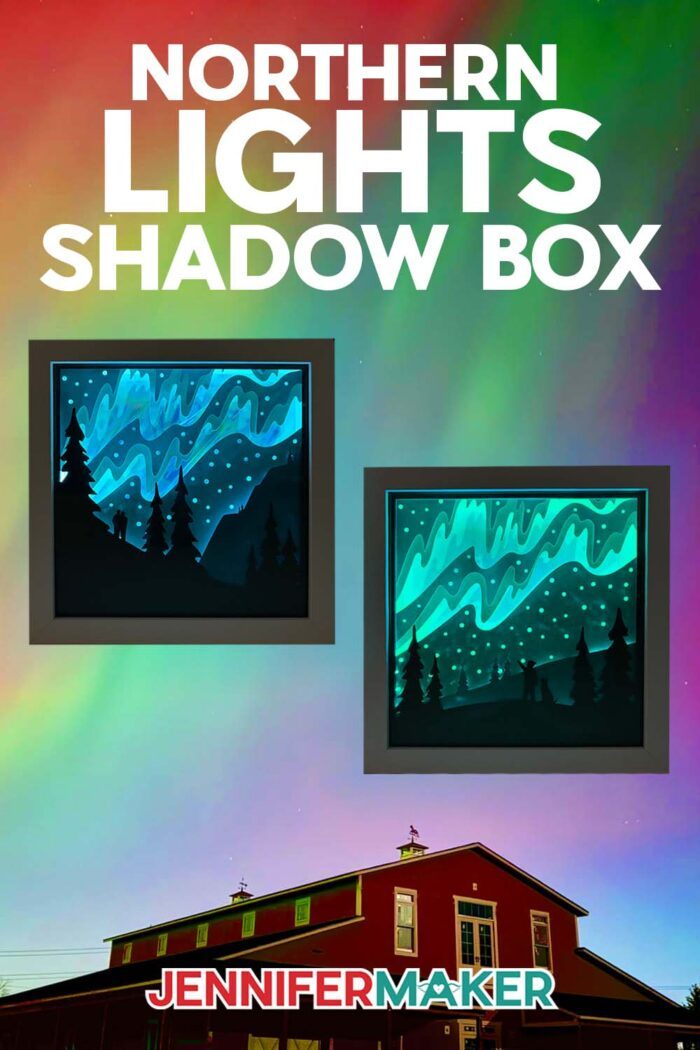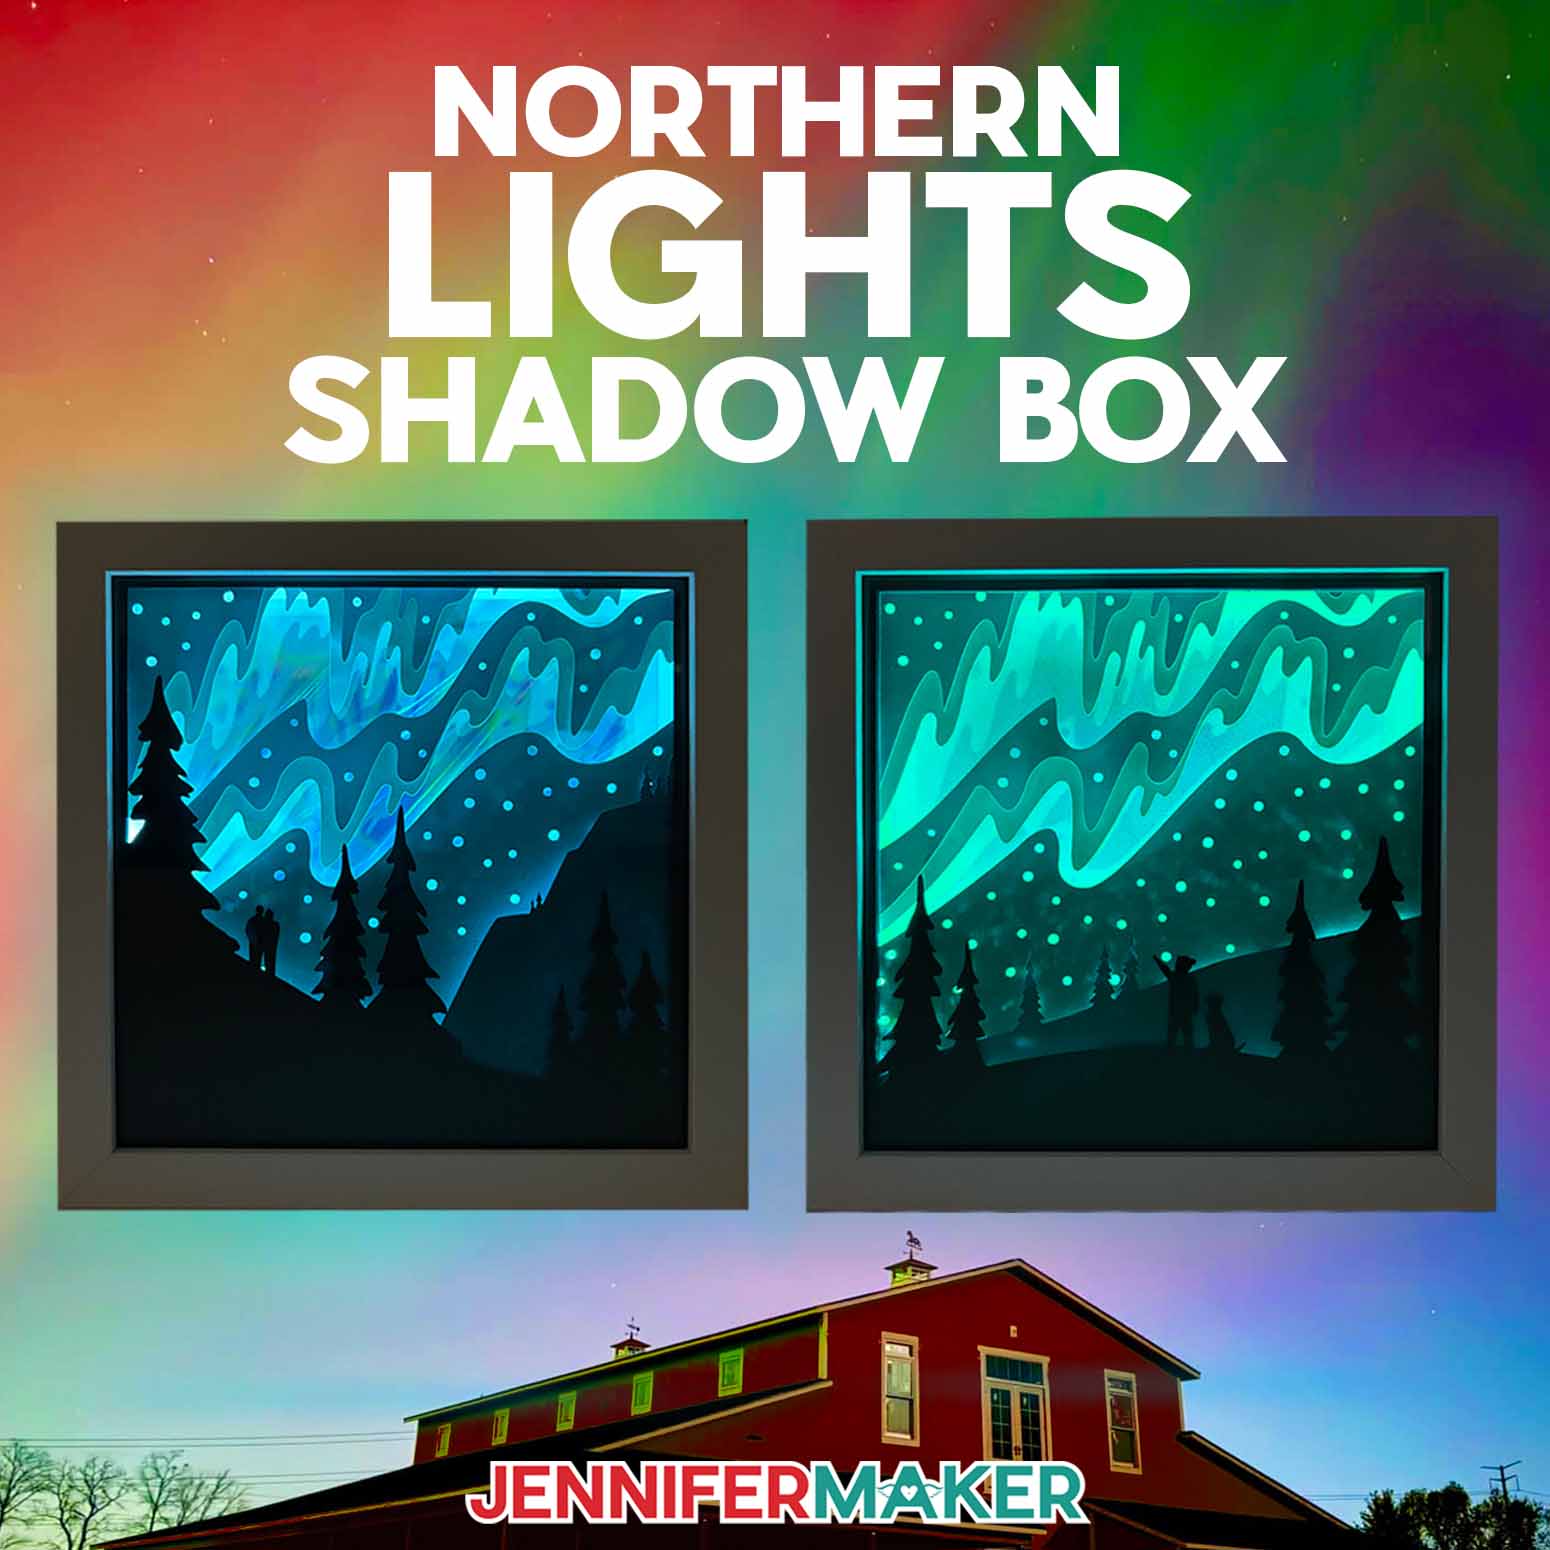
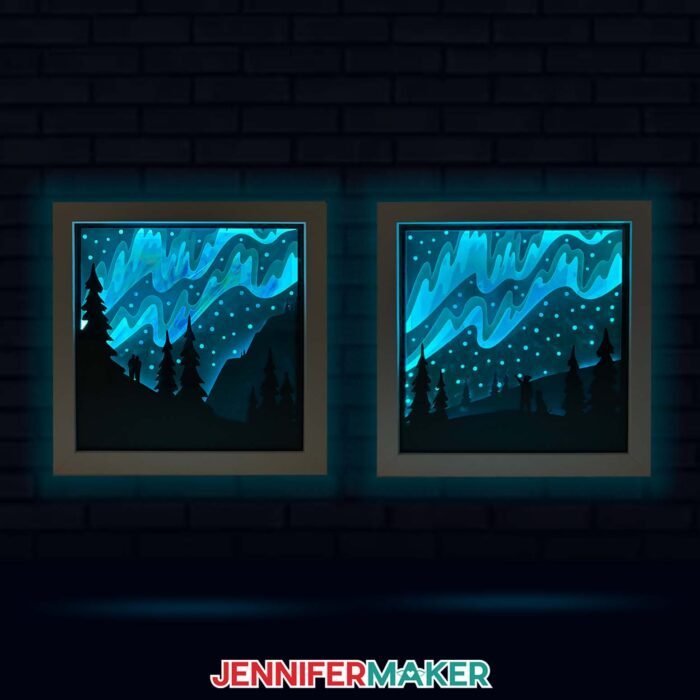
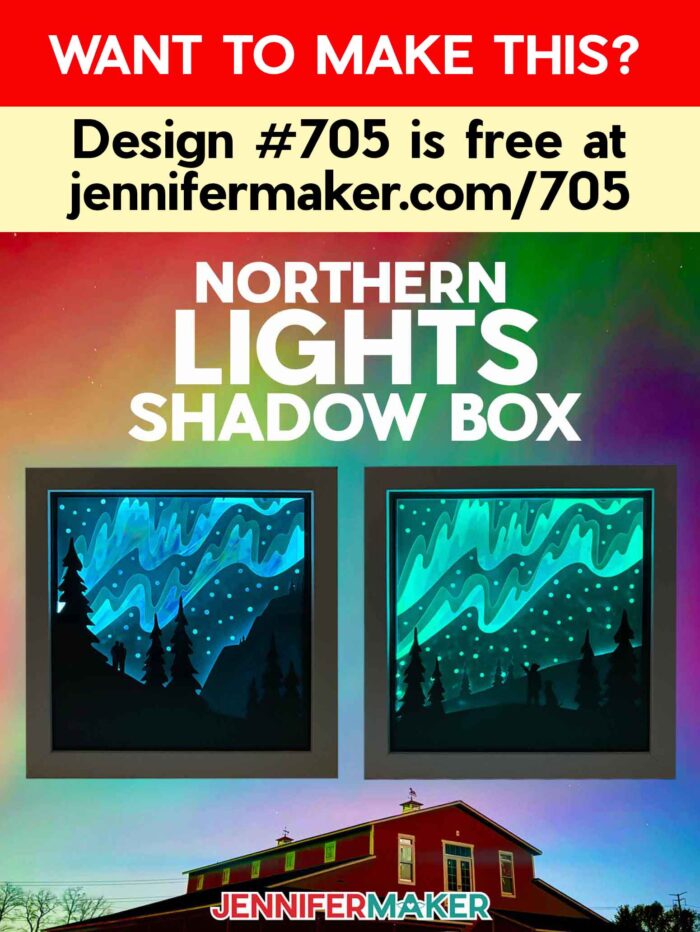
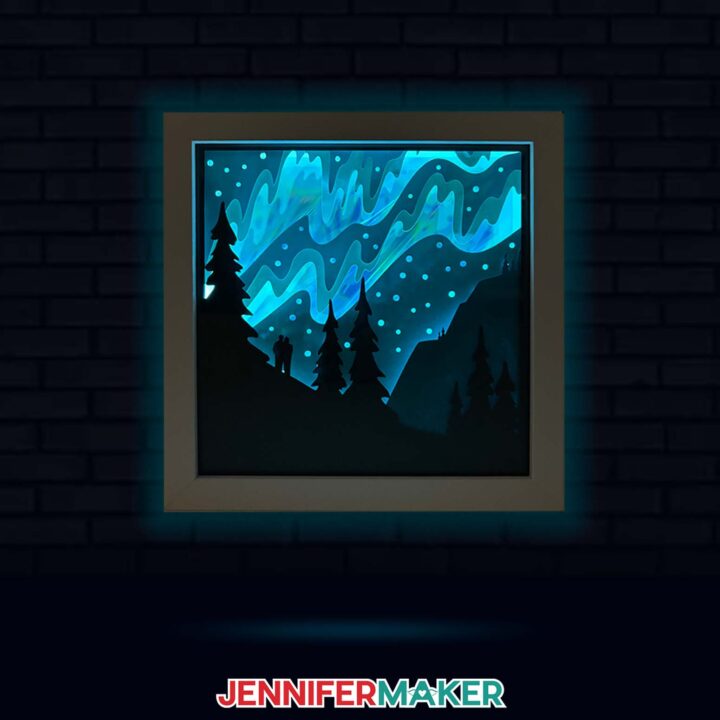
Capture the magic of Aurora Borealis with this Northern Lights Shadow Box!
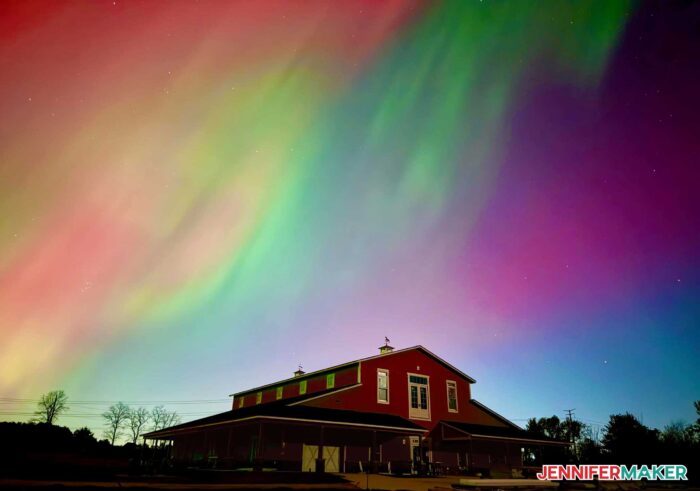
Sometimes, we’re lucky enough to see the northern lights in the United States thanks to some incredibly powerful solar flares! This past October in Michigan, I finally saw them for the first time ever, and we were gifted with multiple periods of stunning blue, green, pink, and violet skies! I even saw Aurora Borealis (another name for the beautiful lights) from Maker Farm, and captured some amazing photos of the sky exploding with color. These dynamic patterns of brilliant lights are the inspiration for my Northern Lights Shadow Box!
Watch the full step-by-step video tutorial on making a Northern Lights shadow box:

Here is the photo I took of the Northern Lights at their peak on the evening of October 10, 2024 at Maker Farm in Dexter, Michigan. I colored our barn from the beige primer to the red paint (so I could hang this photo on my wall), but otherwise, this photo is unedited. The lights were really that spectacular that evening.
I was so inspired, that I decided to make a craft that captured some of the beauty — a shadow box seems like the perfect project!
One of the reasons I love shadow boxes is that they’re perfect for crafters of any crafting level. No matter what number of layers a box has, the assembly process is similar every time. They can be simple with just a few layers, or complex with lots of layers and intricate details. Plus they always make a really gorgeous framed wall decoration or great gift for a friend! I definitely prefer the added dimension of a shadow box to a flat picture frame, especially for this design.
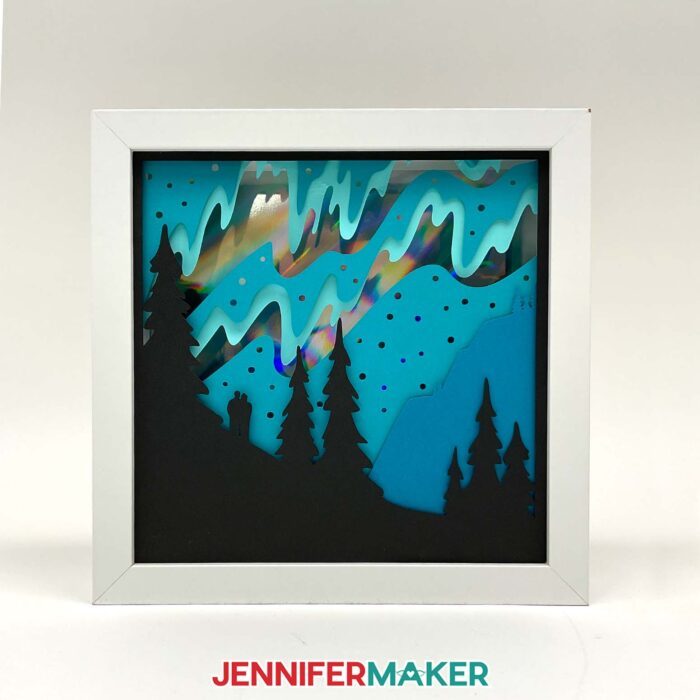
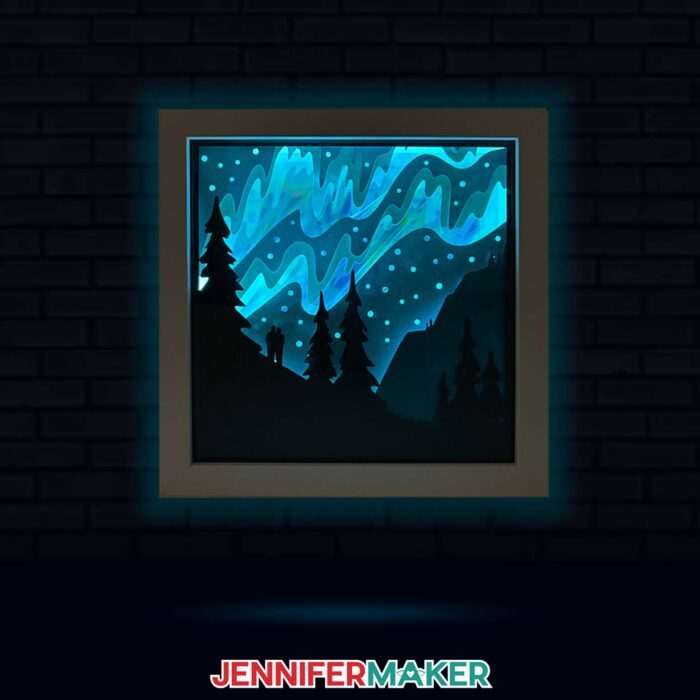
In my tutorial, I show you how to make this northern lights shadow box with just five sheets of cardstock. I use different shades of 65 lb. solid-core teal cardstock for the foreground layers. You can use whichever base color of cardstock you like, and this will determine your final product color. I also show you how to use holographic cardstock to create a reflective backboard for the northern lights effect. Then I demonstrate how to deck out your spacer with adhesive LED lights. The dynamic flickers from the lights help us achieve the aura special effect we’re going for. Finally, I show you how to assemble all these pieces in an 8″ x 8″ shadow box.
How gorgeous does this beautiful northern light display look when it’s all lit up? Pairing holographic cardstock with LED strips gives this shadow box an almost eerie, enchanting glow. But the real trick to capturing the magic of aurora borealis is having layers with lots of cutouts. That gives the light plenty of room to bounce around and fill up the box! Thick foam double-sided tape helps too, by separating the layers so light can pass through.
For the perfect foreground layers, you want to use a cutting machine for this project. I used my Cricut Maker 3 with a Fine-Point Blade and a green StandardGrip machine mat. You can also use an original Maker, the Venture, an Explore machine, or the Joy Xtra. I don’t recommend resizing this to cut on a Joy as the intricate layers won’t cut well. I also recommend a few other handy paper-crafting tools, such as scissors, tweezers, and an XL scraper. You’ll also want an art knife or craft knife and a self-healing cut mat for cutting your holographic backboard.
Would you like to design your own northern lights (or southern lights) foreground scene for your shadow box? I have a design workshop designed to teach you just that in my ADVANCE program. There’s even a set of blank frames and a toolkit to help get you started! Learn more about ADVANCE with JenniferMaker here!
So, are you ready to make your own northern lights shadow box? Check out my step-by-step tutorial to learn how to download my free SVG files, as well as how to prepare, cut, and assemble your box. I’ll even show you some of the photos I captured as inspiration for this project! Let’s get started!

Let me show you how to make a northern lights shadow box! This post contains some affiliate links for your convenience (which means if you make a purchase after clicking a link I will earn a small commission but it won’t cost you a penny more, there is no additional cost)! Read my full disclosure policy.
Materials to Make A Northern Lights Shadow Box
View my Amazon shopping list for the exact items I used!
- One (1) 8″ x 8″ Shadow Box Frame
- One (1) Strand of 3 ft Battery-Powered, Color-Changing LED Strip Lights
- Three (3) Sheets of 8.5″ x 11″ or 12″ x 12″ 65 lb Cardstock (I used three different shades of teal)
- One (1) Sheet of 8.5″ x 11″ Holographic Cardstock
- One (1) Sheet of 8.5″ x 11″ 65 lb Black Cardstock
- Three (3) AA Batteries (for LED strip lights)
- A way to cut your cardstock: I’m using the Cricut Maker 3, but you can use a Maker series machine, an Explore series machine, the Venture, or the Joy Xtra for this project!
- StandardGrip Machine Mat
- Brayer
- Spatula
- Weeding Tool (for popping out small cutouts from intricate areas)
- XL Scraper
- Scissors
- Tweezers
- 0.25″ Double-Sided Adhesive Foam Tape
- 3/8″ Medium Zots Glue Dots (optional for adhering the holographic cardstock to the shadow box backer) – OR –
- Craft Glue, like Bearly Art Precision Glue (optional for adhering the holographic cardstock to the shadow box backer)
- Craft Knife (to cut a notch in the corner of your shadow box frame) – AND –
- Self-Healing Cutting Mat – AND –
- Metal Safety Ruler
- Measuring Tape (optional, to measure the size of your shadow box frame)
- Isopropyl Alcohol (optional, to clean your shadow box glass) – AND –
- Lint-Free Cloth
How to Make a Northern Lights Shadow Box!
Northern Lights Shadow Box
Capture the magic of the Aurora Borealis with this Northern Lights Shadow Box!
Materials
- One (1) 8" x 8" Shadow Box Frame
- One (1) Strand of 3 ft Battery-Powered, Color-Changing LED Strip Lights
- Three (3) Sheets of 8.5" x 11" or 12" x 12" 65 lb Cardstock (I used three different shades of teal)
- One (1) Sheet of 8.5" x 11" Holographic Cardstock
- One (1) Sheet of 8.5" x 11" 65 lb Black Cardstock
- Three (3) AA Batteries (for LED strip lights)
- Design #705 (My free SVG/PDF/DXF design files are available in my free resource library - get the password by filling out the form at the bottom of this page)
Tools
- A way to cut your cardstock - I’m using the Cricut Maker 3, but you can also use the original Maker, the Explore Series machines, the Venture, or the Joy Xtra
- Cricut Green StandardGrip Machine Mat 12″ x 12″
- Brayer
- Spatula
- Weeding Tool
- XL Scraper
- Scissors
- Tweezers
- 0.25" Double-Sided Adhesive Foam Tape
- 3/8" Medium Zots Glue Dots (optional for adhering the holographic cardstock to the shadow box backer) -OR-
- Craft Glue like Bearly Art Precision Glue (optional for adhering the holographic cardstock to the shadow box backer)
- Craft Knife (to cut a notch in the corner of your shadow box frame) -AND-
- Self-Healing Cutting Mat -AND-
- Metal Safety Ruler
- Measuring Tape (optional, to measure the size of your shadow box frame)
- Isopropyl Alcohol (optional, to clean your shadow box glass) -AND-
- Lint-Free Cloth
Instructions
STEP 1: GET MY FREE NORTHERN LIGHTS SHADOW BOX DESIGN
First, download my Northern Lights Shadow Box files from my free library – look for Design #705. Alternatively, you can use the Save This Project form near the top of this post and the design link will be emailed to you.
In the folder, you’ll find SVG and DXF versions of my design to cut on a cutting machine. There is also a PDF version you can print and cut by hand.
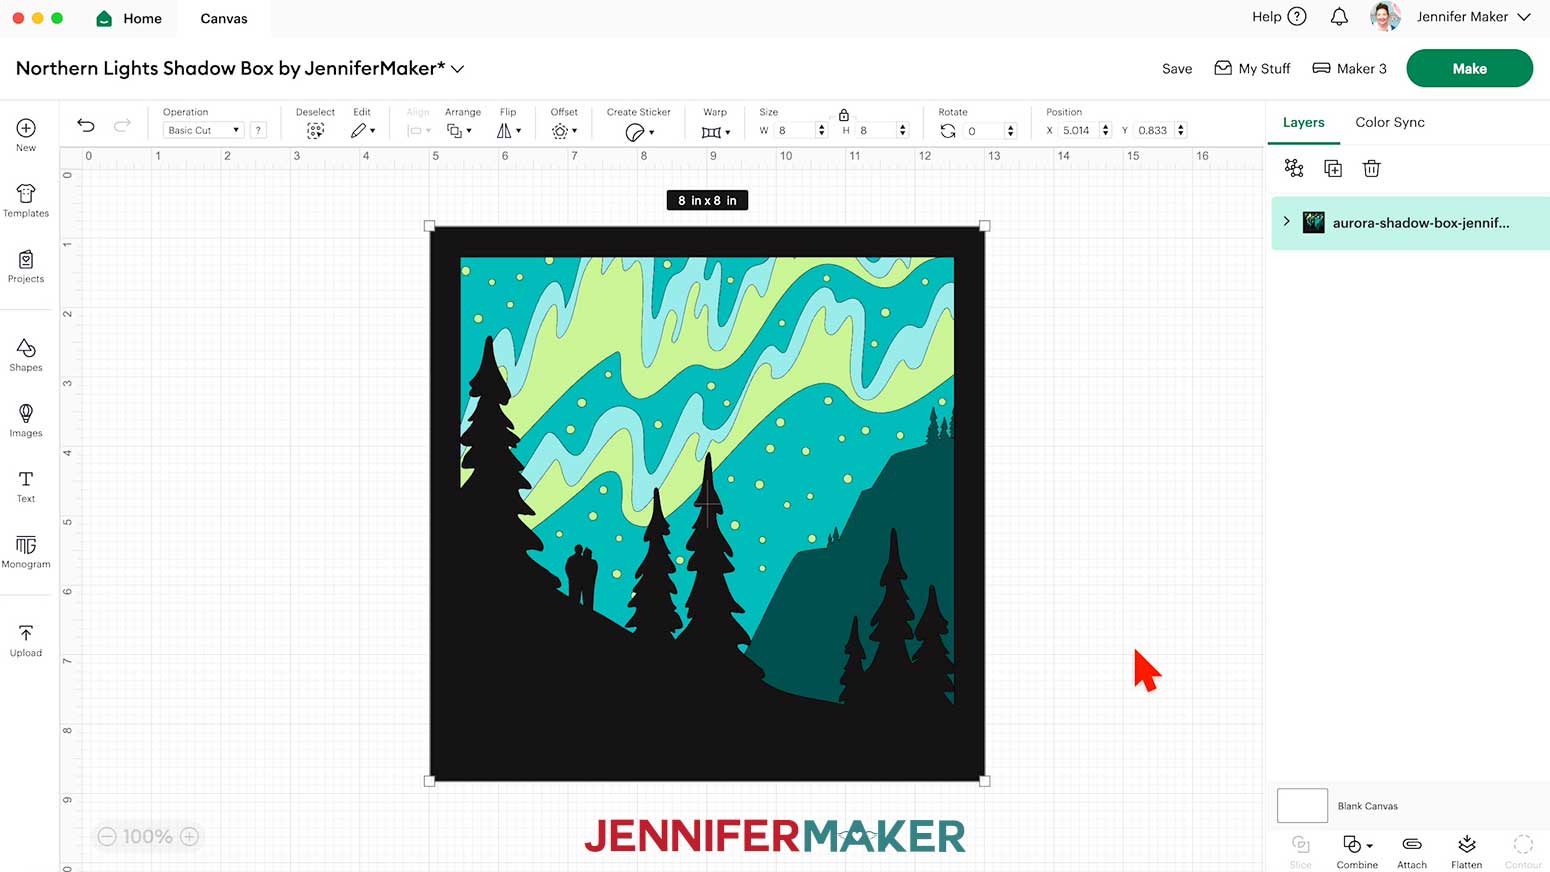
Upload the SVG file to Design Space to get started.
TIP: If you’re not sure how to upload, go to jennifermaker.com/svgs to learn how to unzip and upload SVG files.
STEP 2: PREPARE AND CUT YOUR NORTHERN LIGHTS DESIGN
CRICUT DESIGN SPACE
- In Cricut Design Space, open a blank Canvas. NOTE: If you’re new to using Cricut Design Space, go to cricutkickoff.com for my introductory tutorial on Design Space basics.
- Click “Upload” and then “Upload Image.”
- Click “Browse.”
- Select the SVG file.
- Click “Open,” and then “Continue.”
- Click “Upload” to add the design to your Canvas.
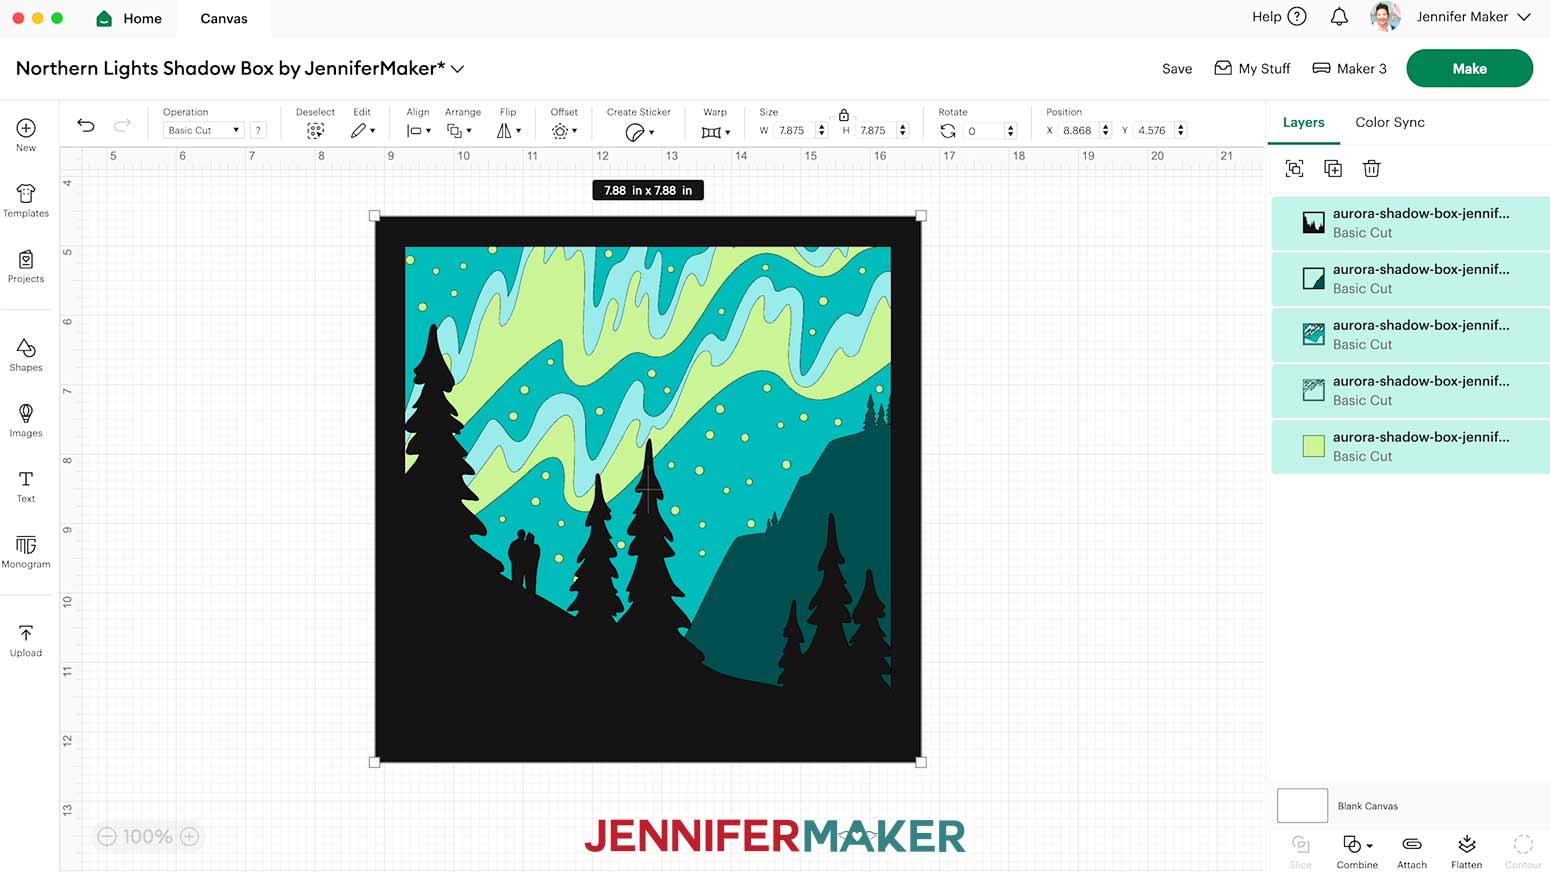
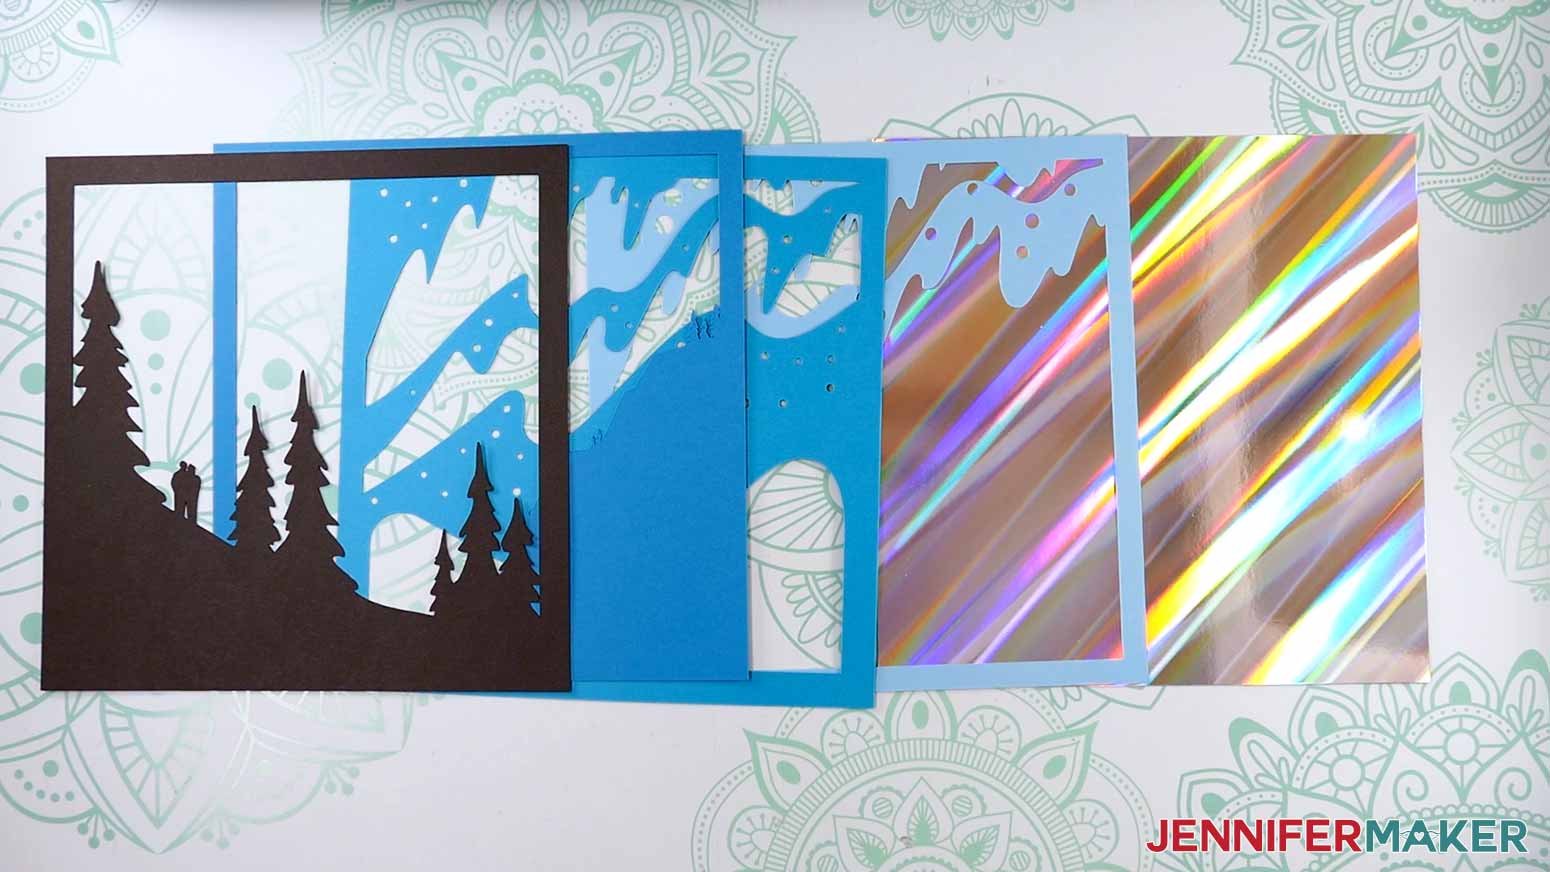
NOTE: There are five layers stacked on your Canvas, four with designs cut out for your regular cardstock layers, and one solid cut shape for your holographic cardstock layer.

- Click “Save” and give your project a name.
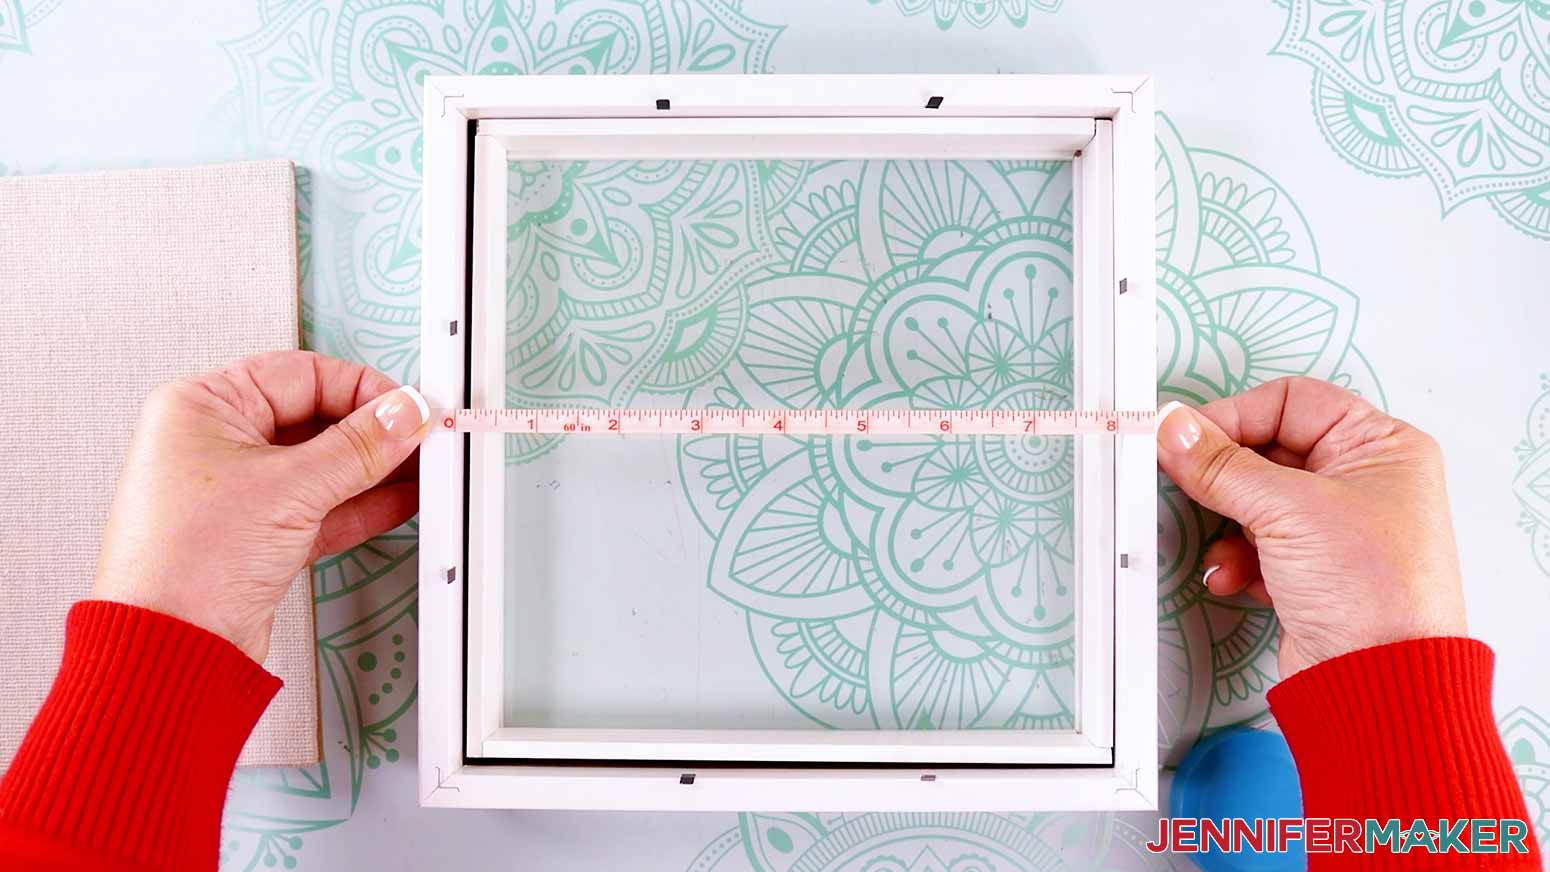
- Your project is designed to fit the 8” x 8” shadow box in the materials list, but most shadow box display areas are smaller than the advertised dimensions. So use a tape measure or ruler to measure the inside of your shadow box.
- If you need to resize the design to fit, select all of the layers and make sure the “Lock” icon is closed to maintain the design’s proportions.
- Enter the height you measured minus ⅛” in the “Height (H)” field, and the “Width (W)” will automatically adjust to match it.
NOTE: Sizing your layers slightly smaller than your shadow box’s measurements ensures that they will fit inside the box after they’re assembled.
NOTE: I don’t recommend resizing for a smaller shadow box as some of the pieces are very intricate and won’t cut well at a smaller size.
- And now your layers are ready to cut!
CUTTING
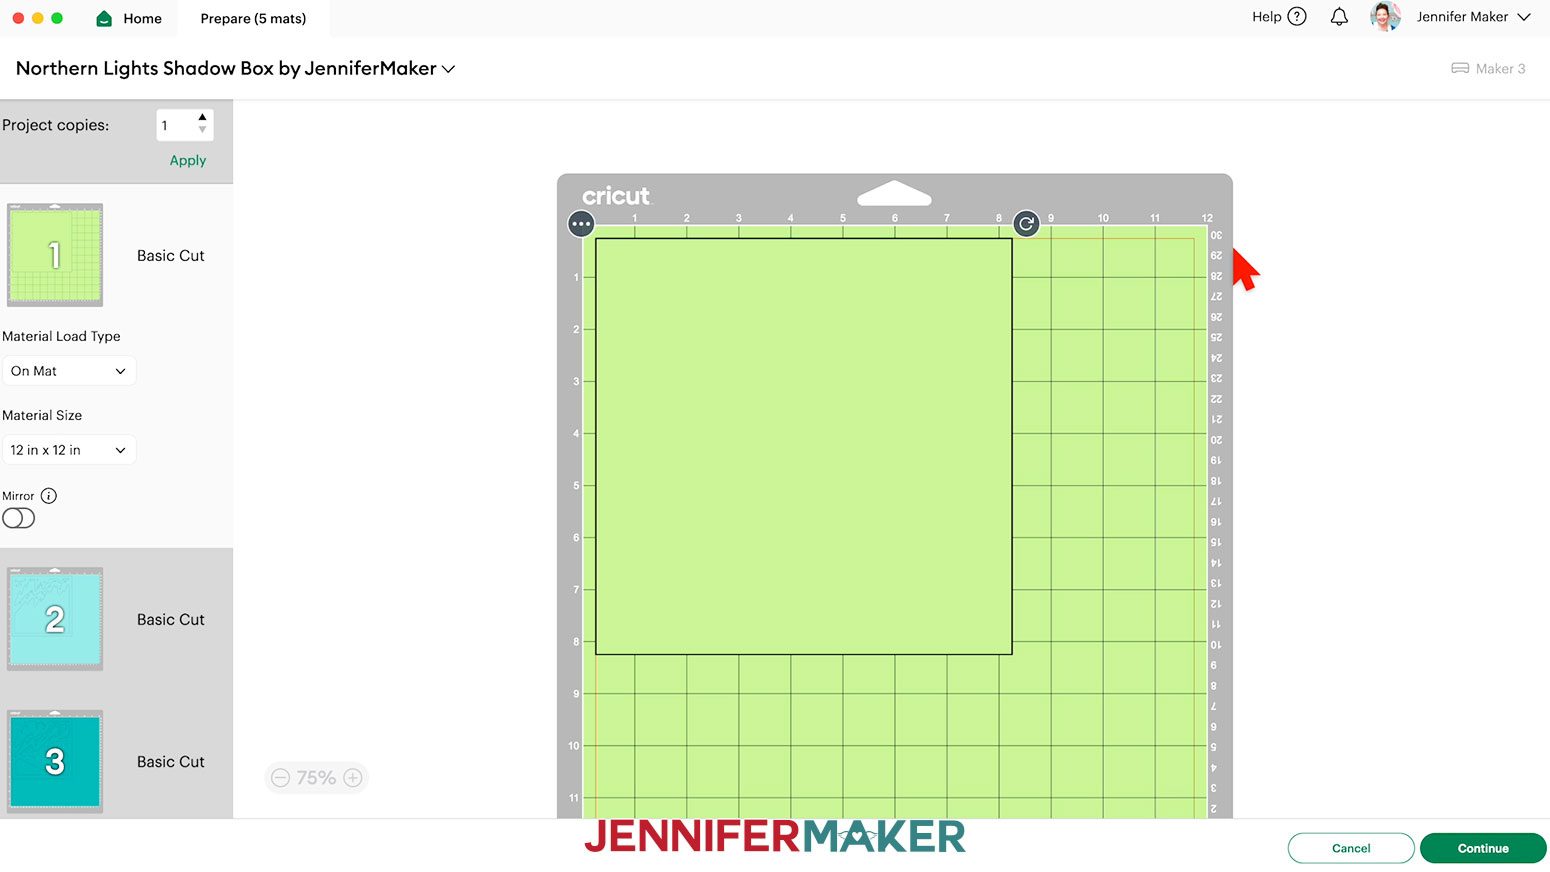
- Make sure the correct machine is selected in the top right.
- Click “Make.”
- On the Prepare screen, make sure the correct Material Size is selected for your mats.
NOTE: I’ll keep the “12 in x 12 in” size for all my mats. The holographic cardstock is 8.5” x 11”, but leaving its mat at the 12” x 12” size won’t cause any issues.
- Select the first mat so it loads first on the next screen and click “Continue.”
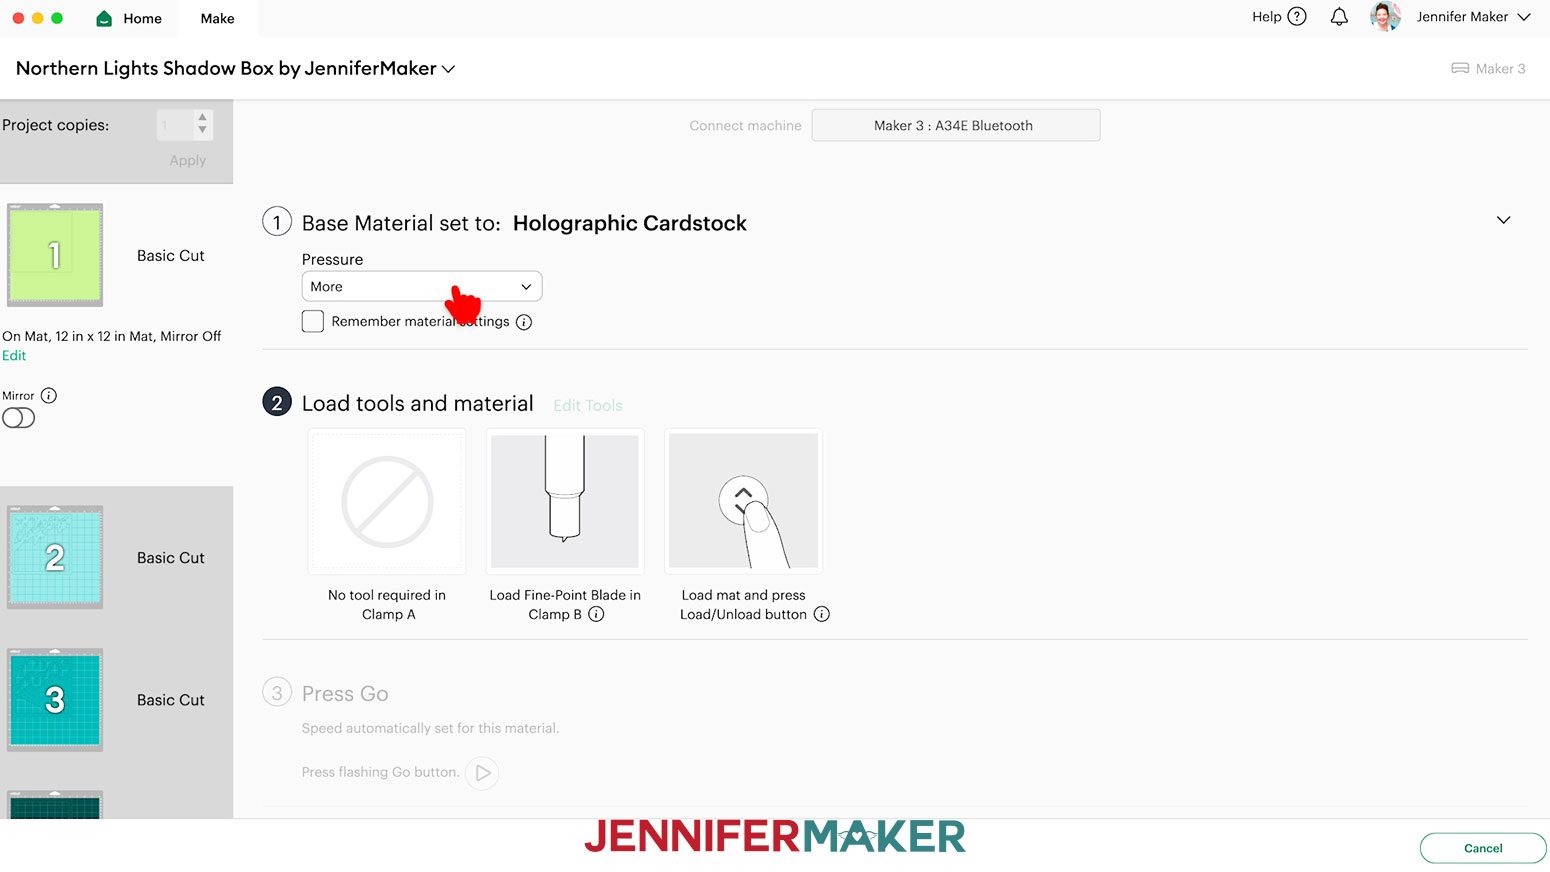
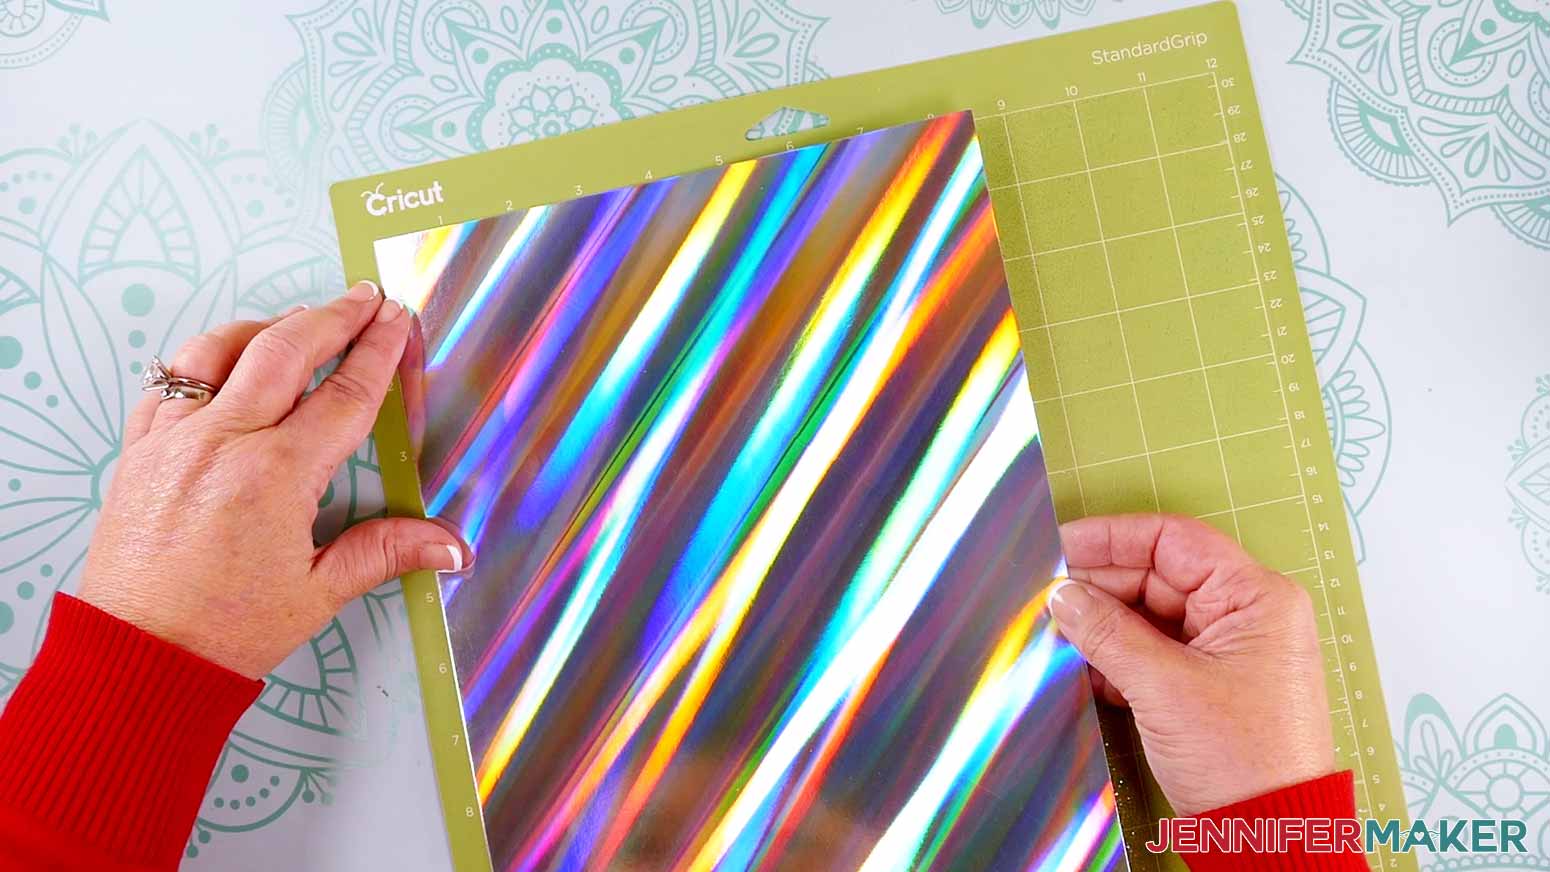
- On the Make screen, set the Base Material for your first mat. Mine is the holographic cardstock. For my holographic cardstock mat, I’m using the “Holographic Cardstock” material setting with “More” pressure.
NOTE: If you don’t see “Holographic Cardstock” in your materials list, click on “Browse All Materials.” Enter “holographic” in the search box, select the correct option from the results list, and click “Done.”
TIP: Changing the Pressure to “More” results in a cleaner cut.
- Place your holographic cardstock shiny side up on a green StandardGrip machine mat.
- Use a brayer to make sure it’s fully adhered.
- Check that your Premium Fine-Point Blade is clean and in the clamp.
- Press the flashing “Load/Unload” button to load the prepared mat into your Cricut.
- Press the flashing middle button to begin cutting.
- When it has finished cutting, don’t unload the mat right away. Gently lift a corner of the material to make sure the cuts went all the way through. If not, press the middle button again to make a second pass of cuts in the same spots. TIP: If you have any issues with your cuts, go to jennifermaker.com/cleaner-cuts.
- When the cuts are complete, unload the mat, flip it over onto your work surface, and roll it back to release the cardstock.
- When you get to a regular cardstock mat, change your material setting to “Medium Cardstock - 80 lb (216 gsm)” and the Pressure to “More.” NOTE: If any of the intricate areas are causing issues, the “Cardstock (for intricate cuts)” setting with "Default" Pressure works well, too. NOTE: After you set the material for a mat color, you can check the box next to “Remember Material Settings” to save time between mats.
- Place your regular cardstock face up on a green StandardGrip machine mat.
- Then repeat Steps 7-12 to cut and release your regular cardstock.
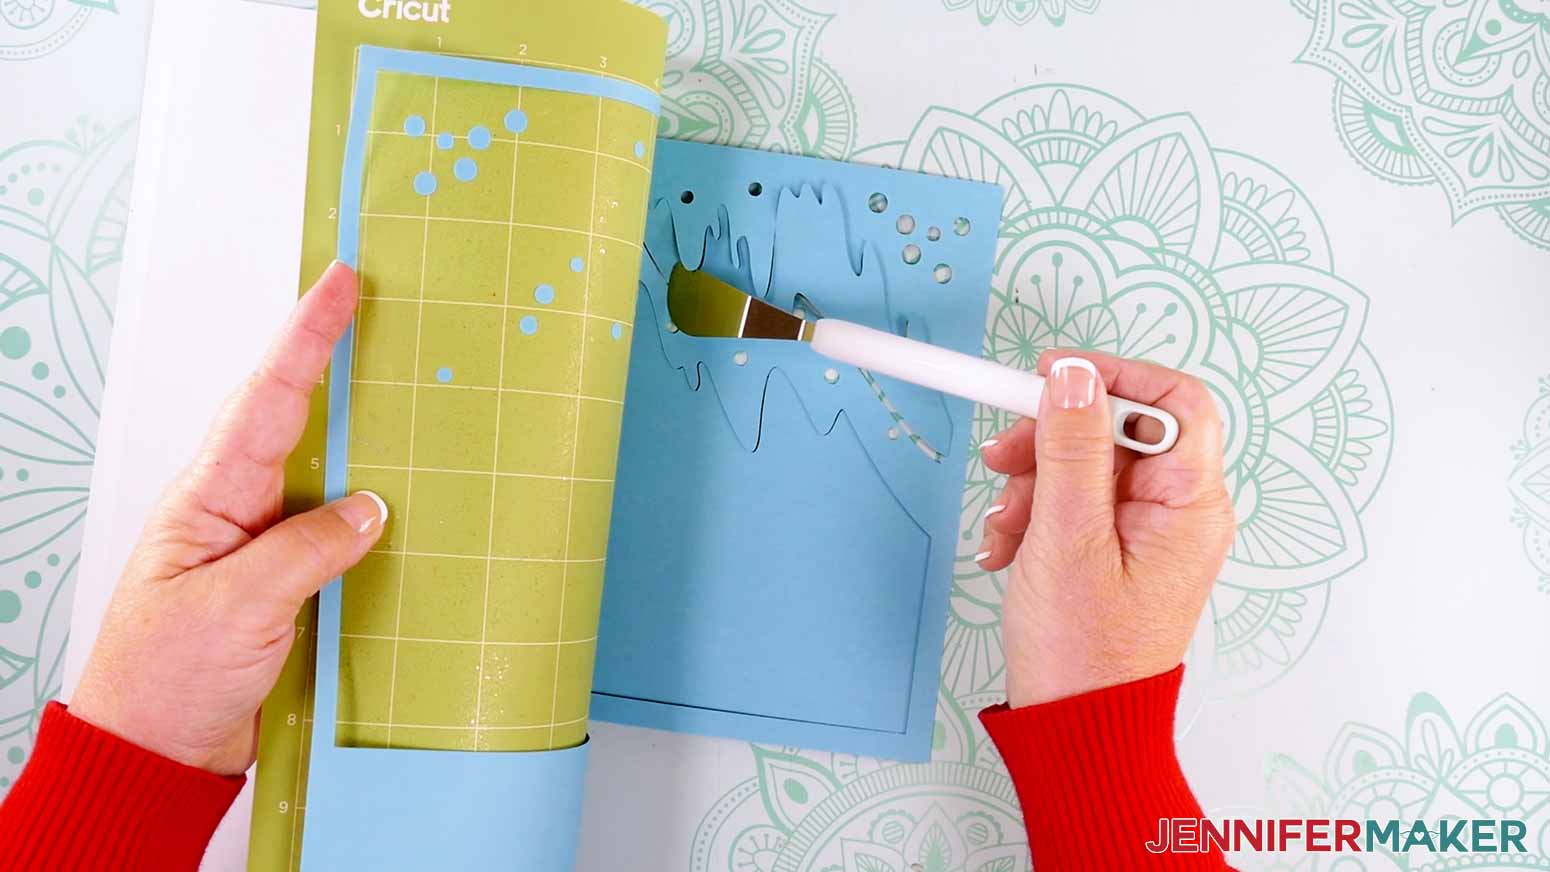
TIP: Use the spatula to help lift delicate parts, and your weeding tool to poke out small bits of cardstock that are still attached to your cut pieces.
- Use a scraper tool to remove the small bits of cardstock left on your mat after you remove the cut pieces.
- Lay out all of your layers face up.
TIP: Refer to the Design Space screen if you’re not sure about some pieces’ orientation.
STEP 3: ASSEMBLE YOUR NORTHERN LIGHTS SHADOW BOX
LAYER YOUR SHADOW BOX’S FRONT PIECES
- Stack your regular cardstock layers face up in the order they’ll fit in the frame. Set aside the holographic cardstock layer for now.
- Grab your shadow box frame and place it face down on your work surface. Remove the backing and inner spacer piece, then set them aside.
- Use isopropyl alcohol and a lint-free cloth to clean both sides of the box’s glass.
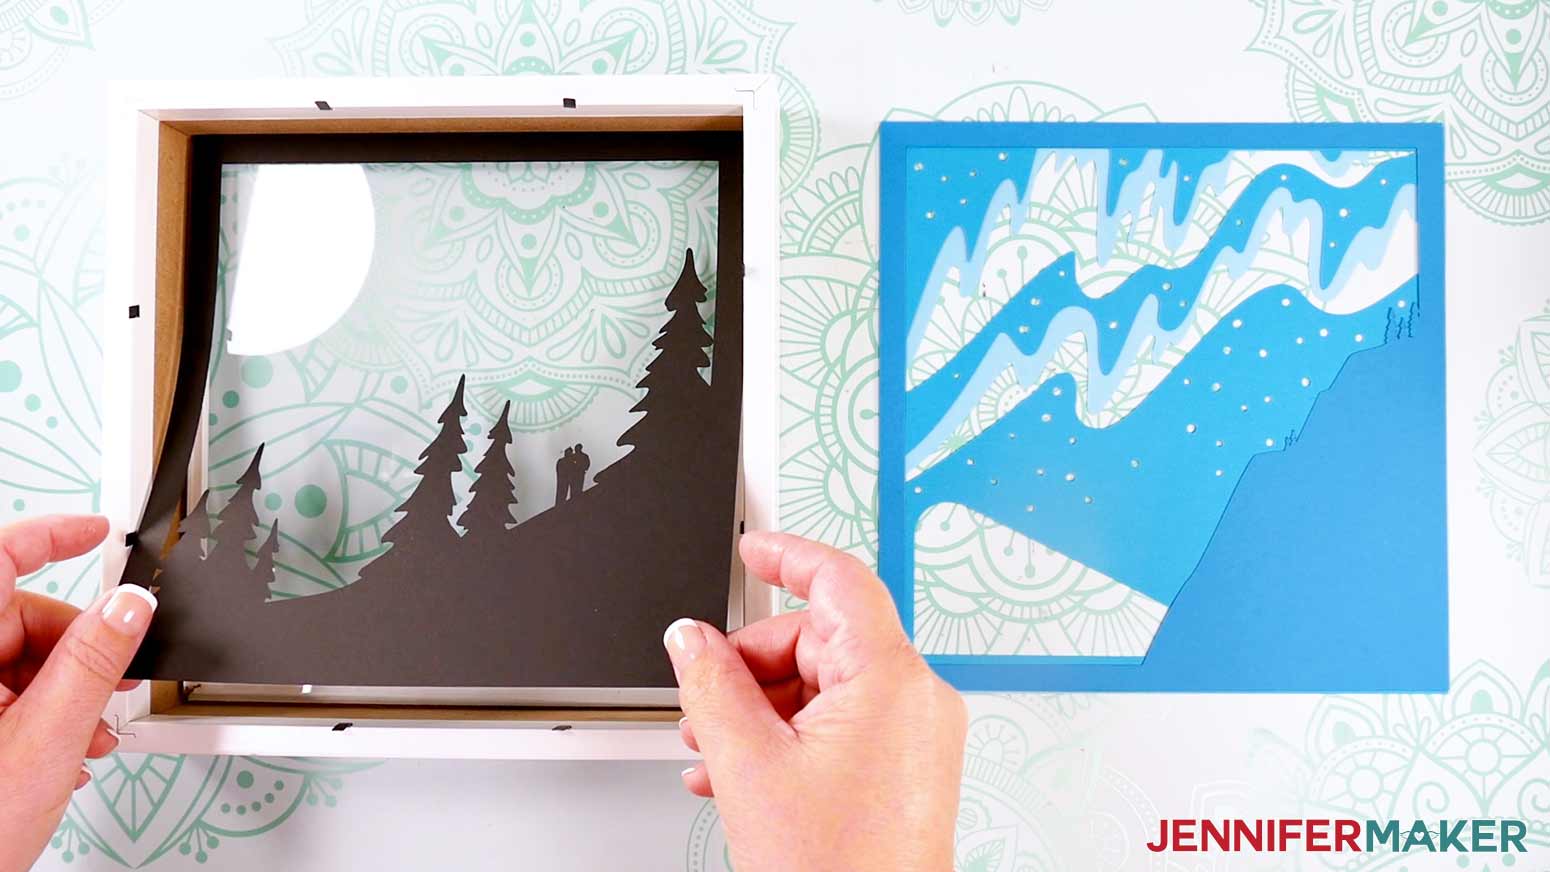
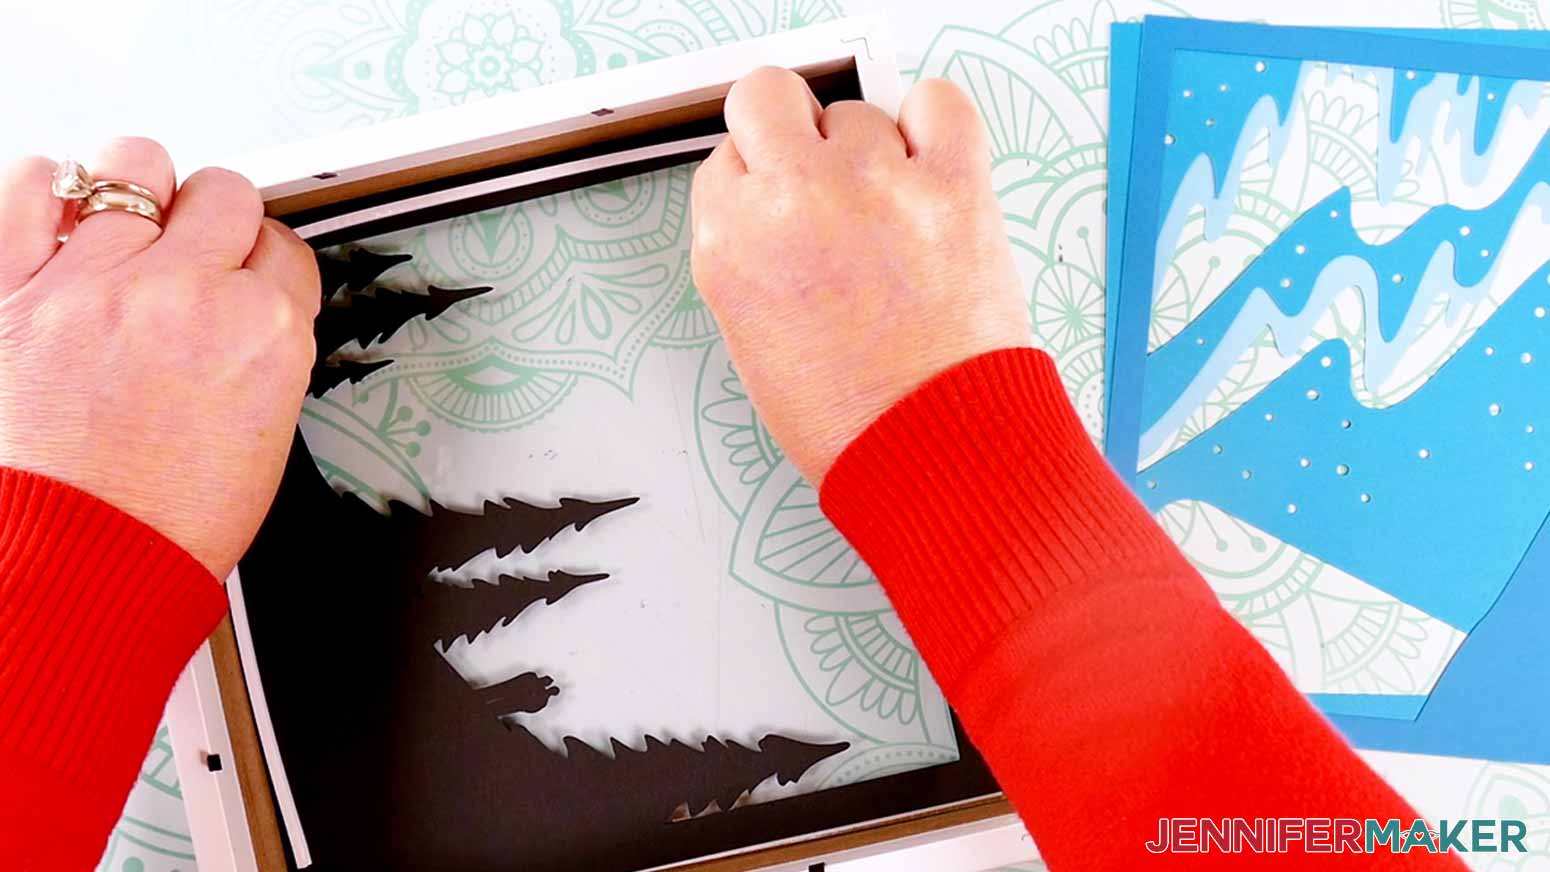
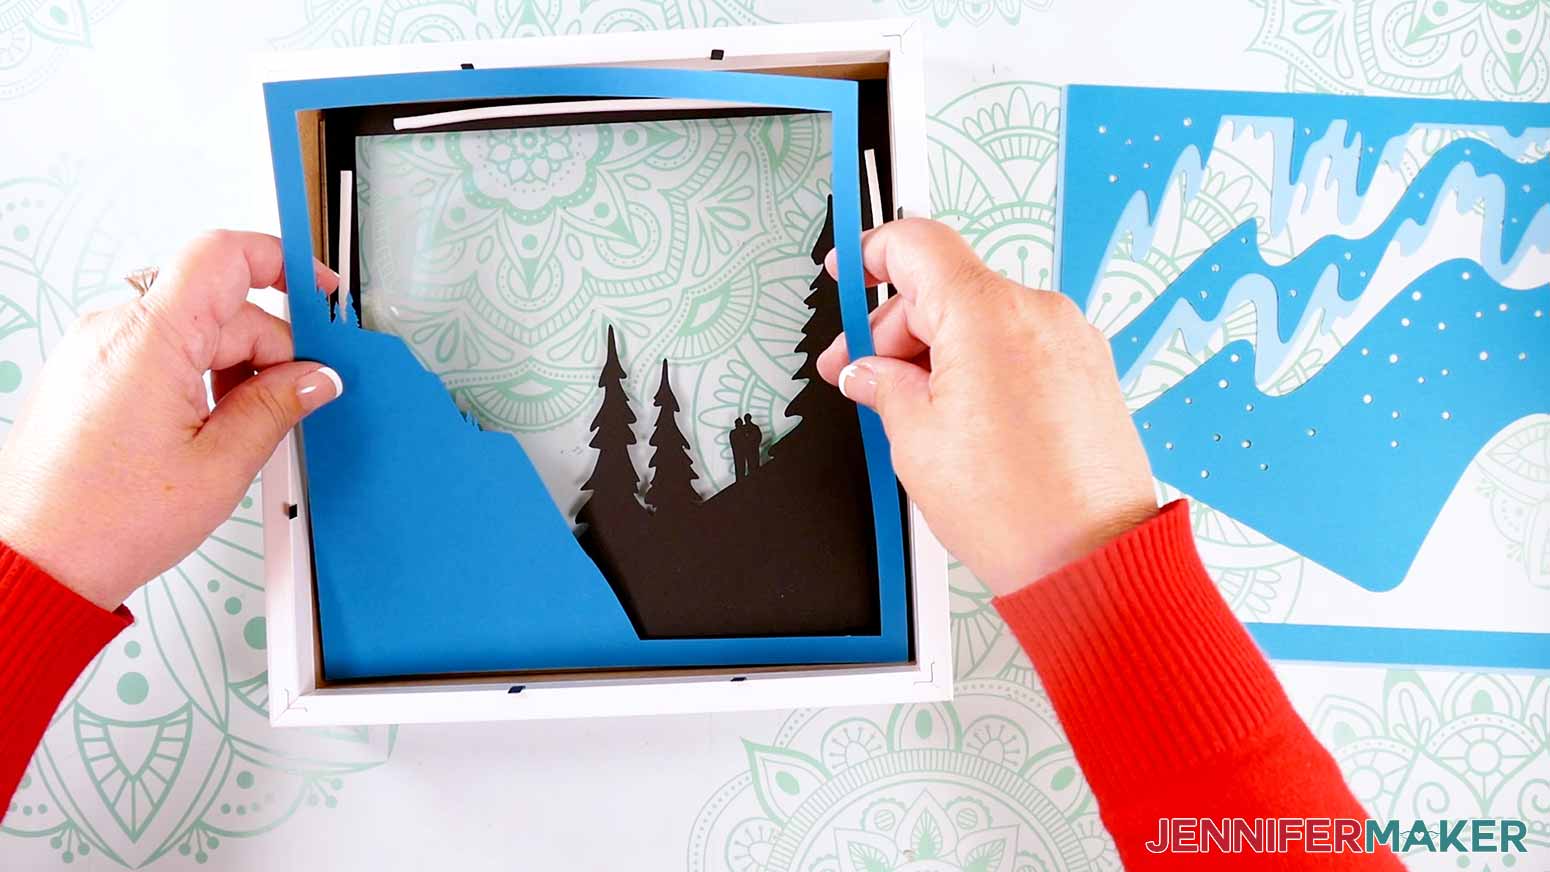
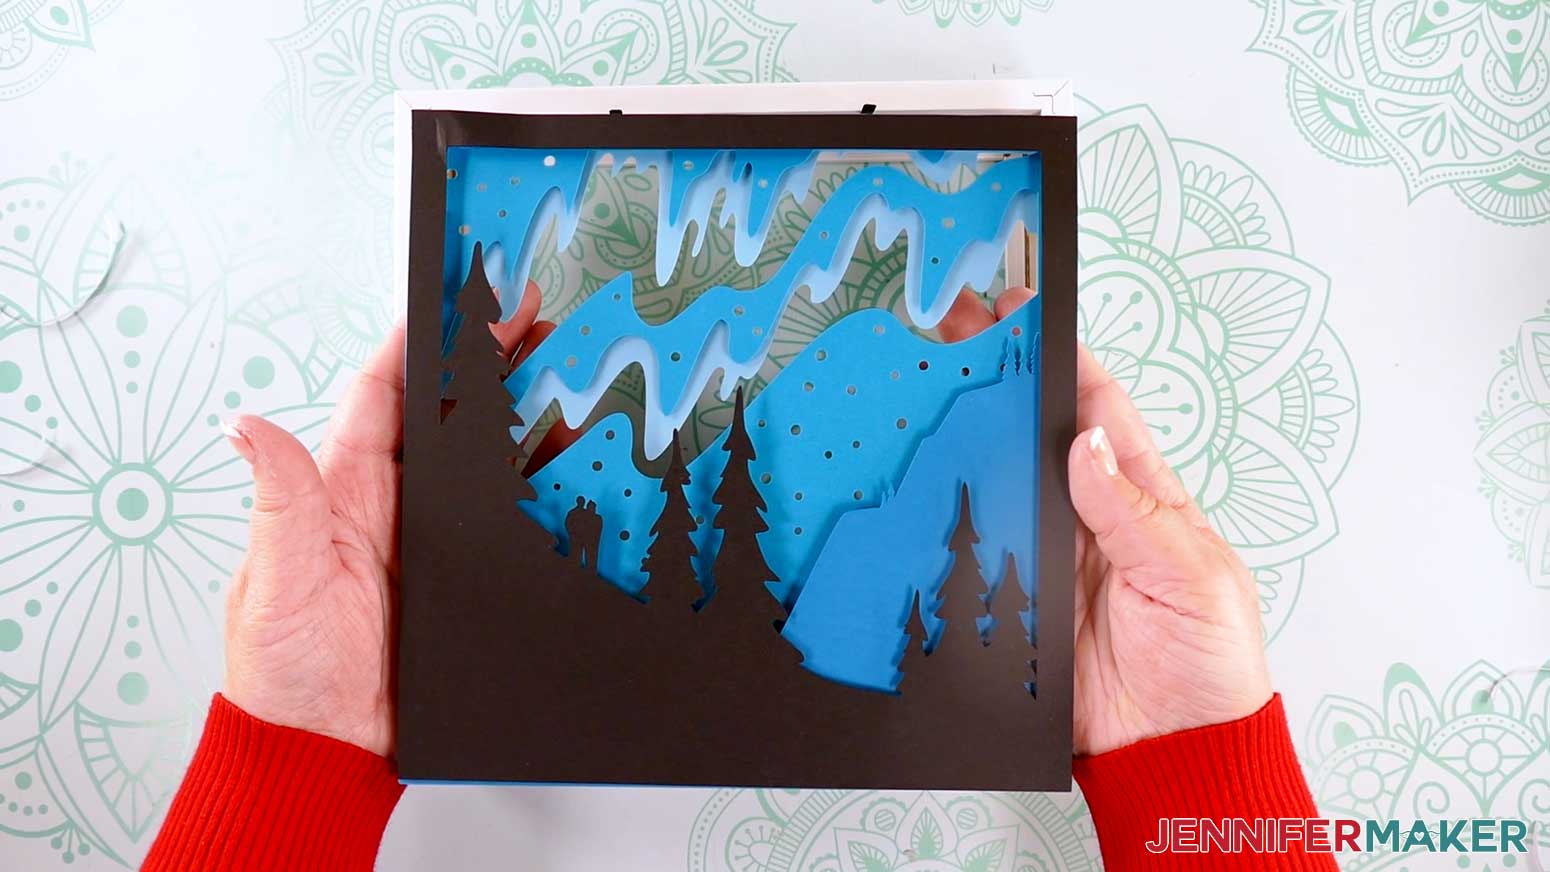
- Take Layer 1, flip it over, and place it face down inside the shadow box frame.
- Place Layer 2 face down on top of Layer 1 and take note of any areas that do not overlap, such as the tree tops. Remove Layer 2 from the shadow box.
- Use scissors to cut and place foam tape strips of your desired length on the back of Layer 1. Make sure the strips are evenly spaced around the edge and across the back of the paper. Avoid getting tape in cutout areas or areas where the cardstock doesn’t overlap as noted in Step 5.
- Remove the backing from each piece of foam tape on Layer 1’s top half.
- Gently lower Layer 2’s bottom half face down into the shadow box, directly above Layer 1.
NOTE: Use the bottom corners of the shadow box to help with alignment.
- When Layer 2’s bottom half is lined up with Layer 1’s, gently lower the top half onto the uncovered tape strips.
- Remove both layers from your shadow box to check that they’re aligned, and then press the pieces together to adhere them at the top.
- Place Layer 1 face down on your work surface, and lift the bottom half of Layer 2.
- Peel the backing off Layer 1’s remaining pieces of tape, and then press Layer 2 into place on top.
- Place the attached layers face down into the shadow box.
- Repeat Steps 5-13 to add Layers 3 and 4 to your shadow box, placing your foam tape in the same position on the back of each layer to make sure the papers are adequately spaced and supported.
TIP: Use small strips to avoid covering the star holes with tape so more light will shine through when your project is finished!
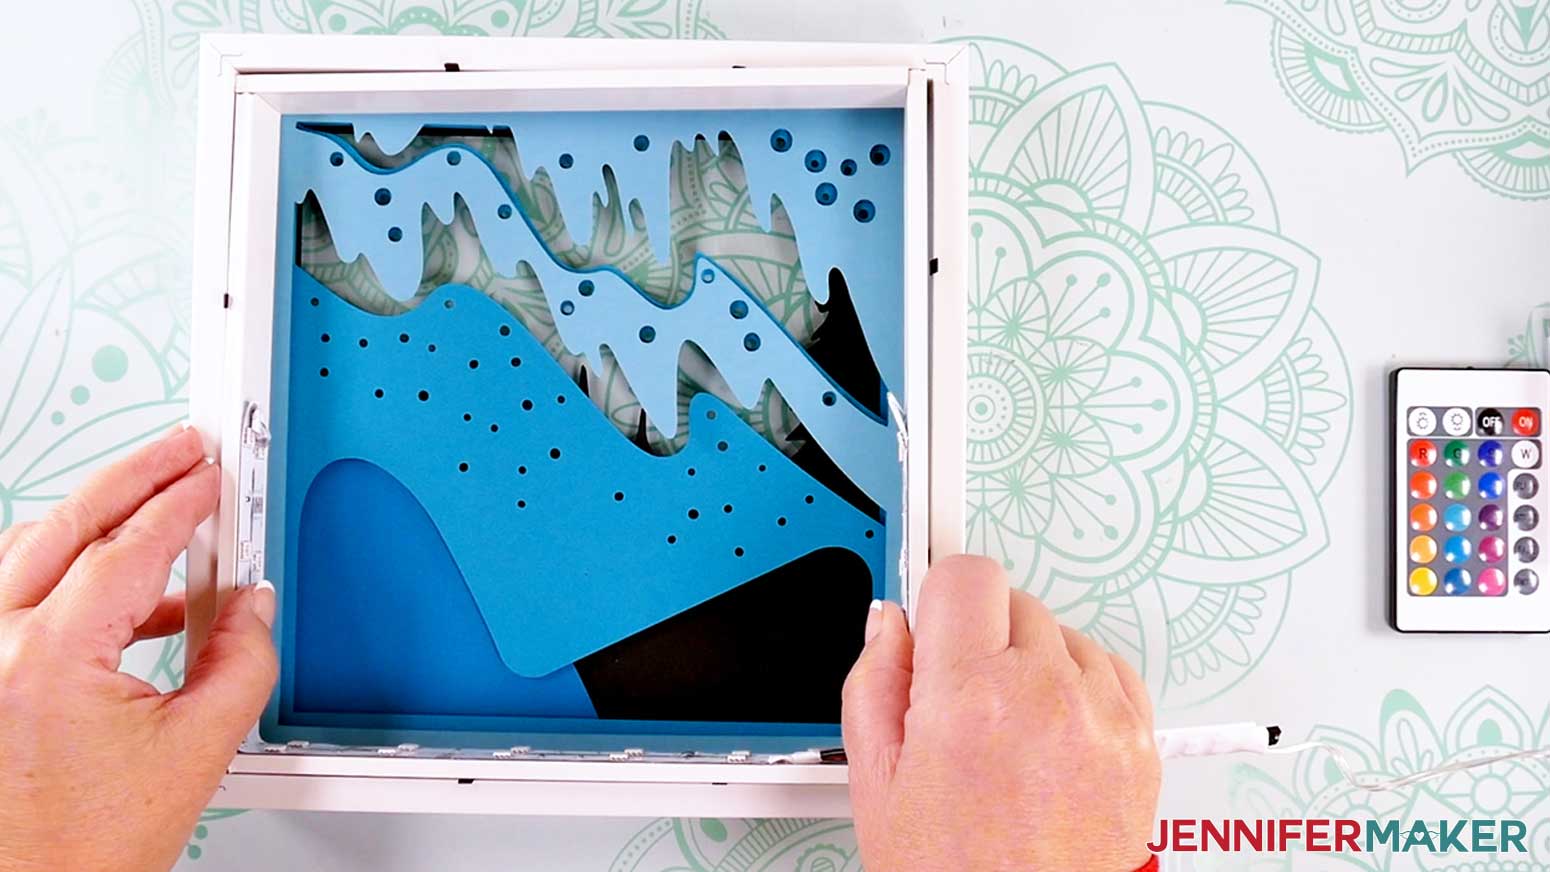
- Carefully flip over your shadow box layers to see the four scene layers assembled from the front and check for any visible tape. Then lay the shadow box and layers face down on your work surface again.
ADD LED LIGHTS TO YOUR SHADOW BOX’S SPACER
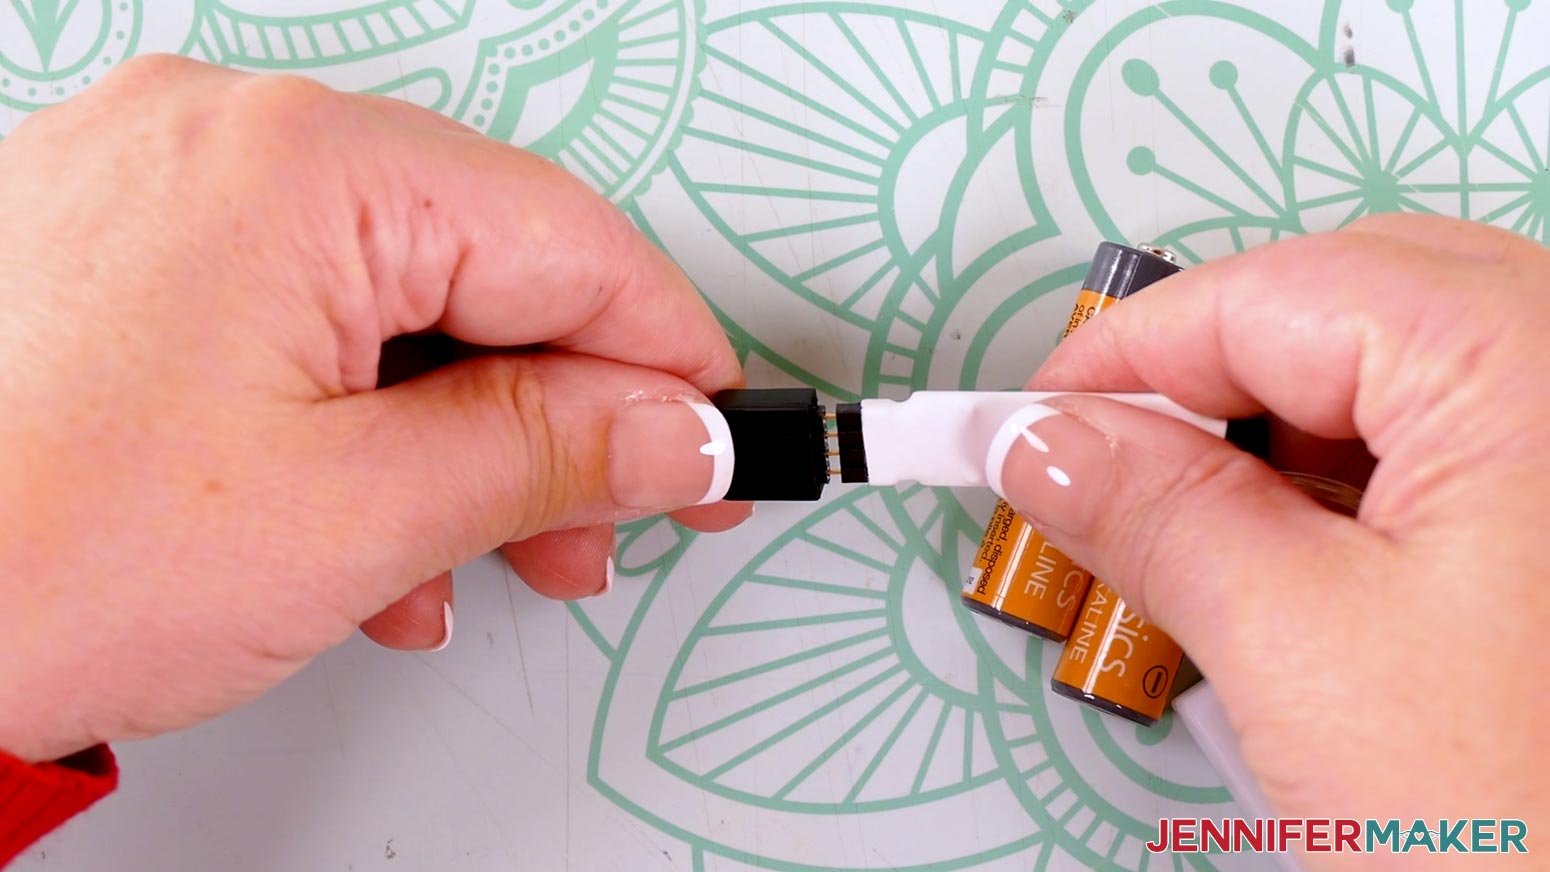
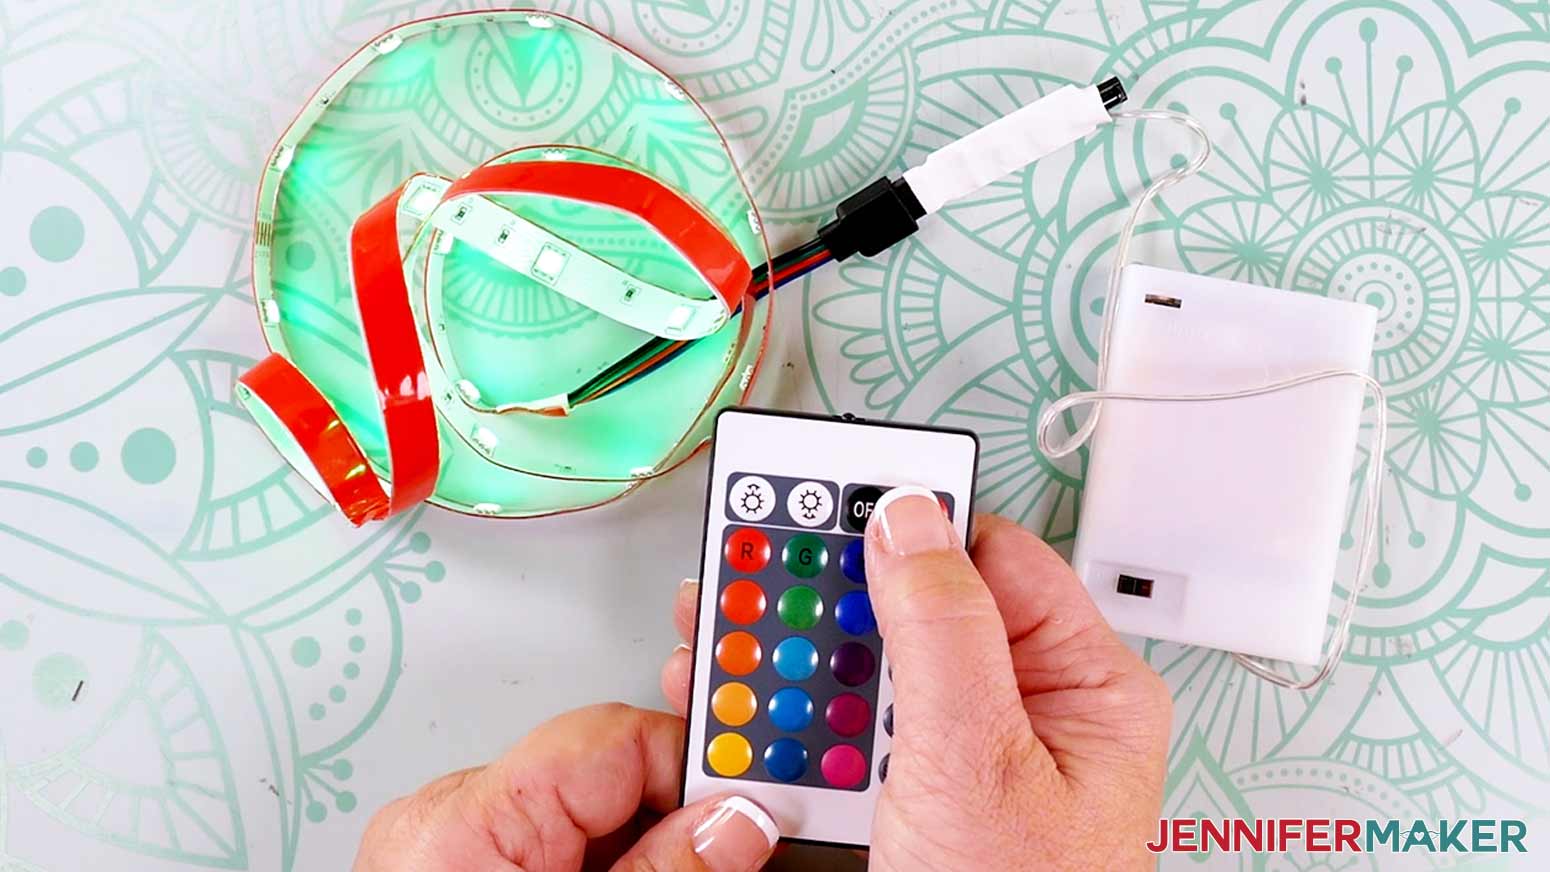
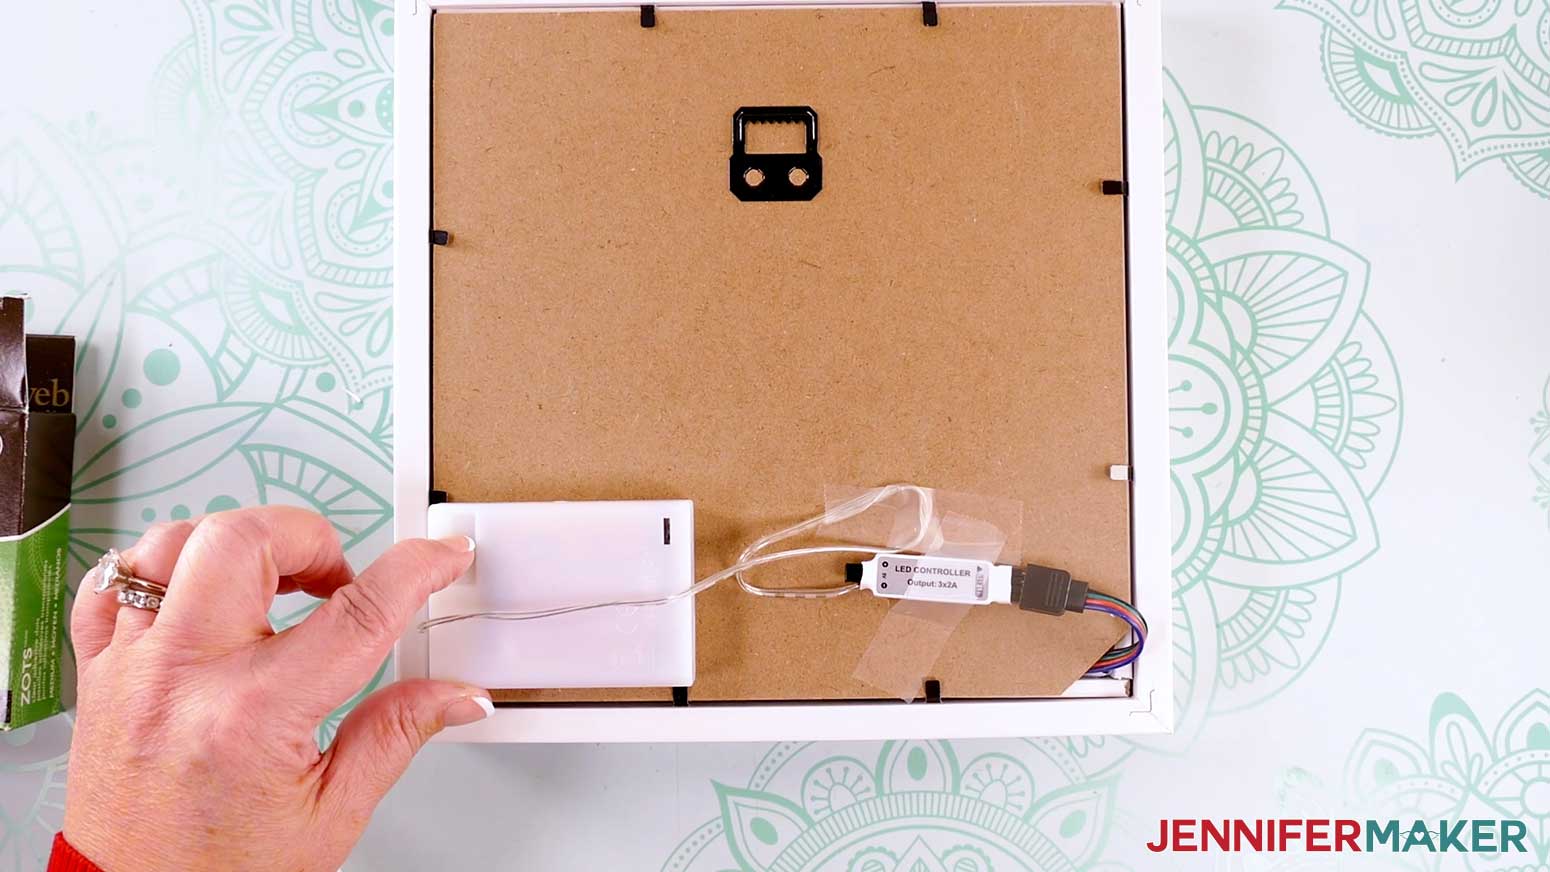
- Remove the LED light strip, battery pack, and remote from their packaging.
- Take the light strip off its roll if it has one, then connect its pronged end to the battery pack.
- Slide the cover off the battery pack and slot in three AA batteries. Then replace the case and flip the switch to the “ON” position.
- Press the “ON” button on the remote to test that your lights work. Then press the “OFF” button while you attach the lights.
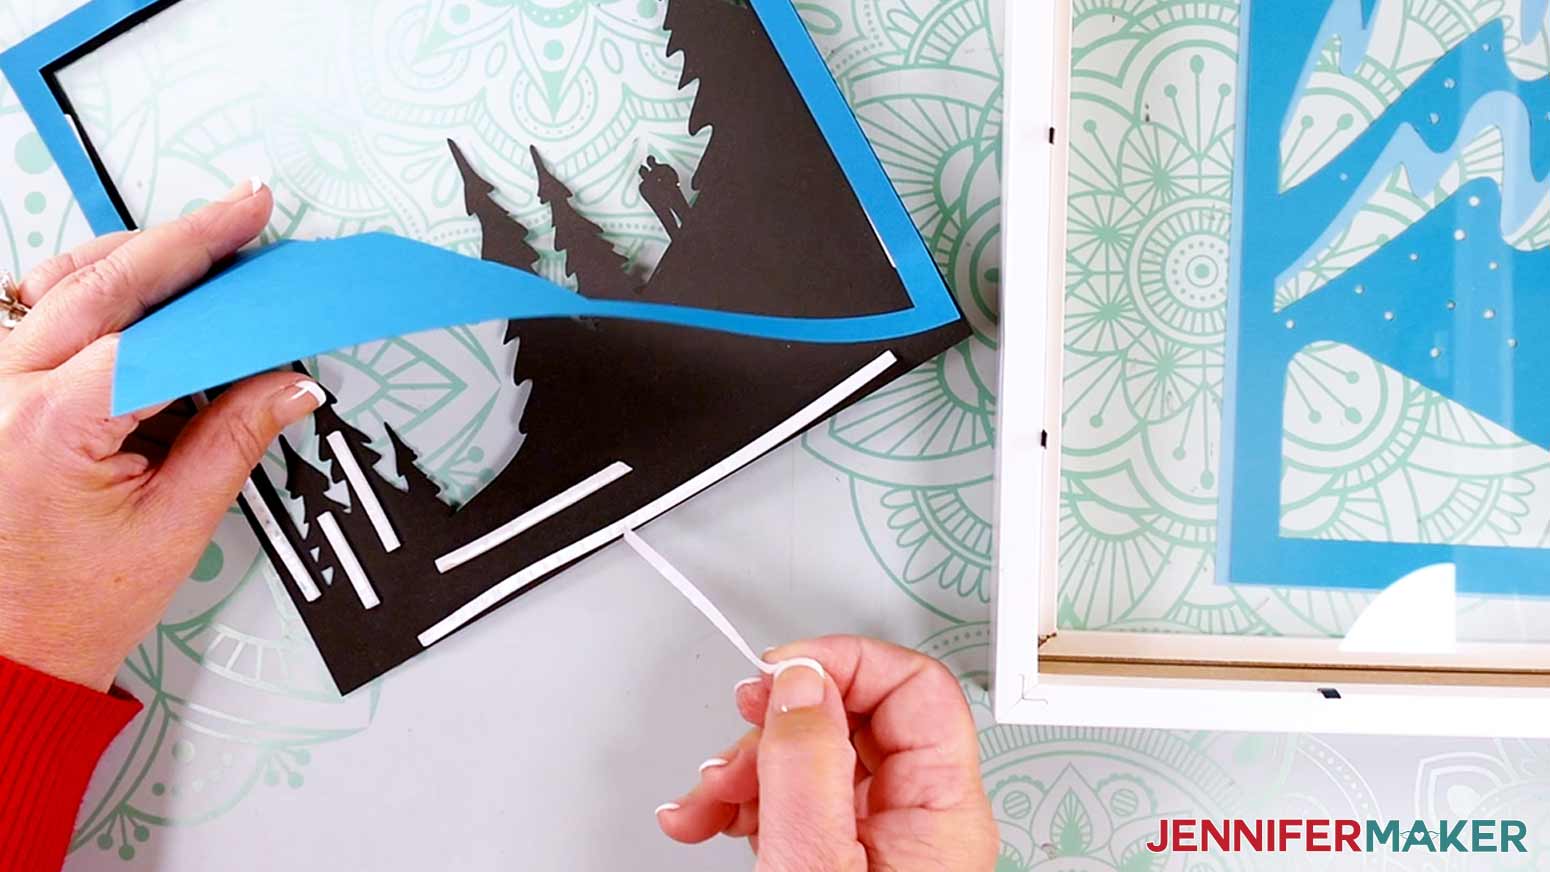
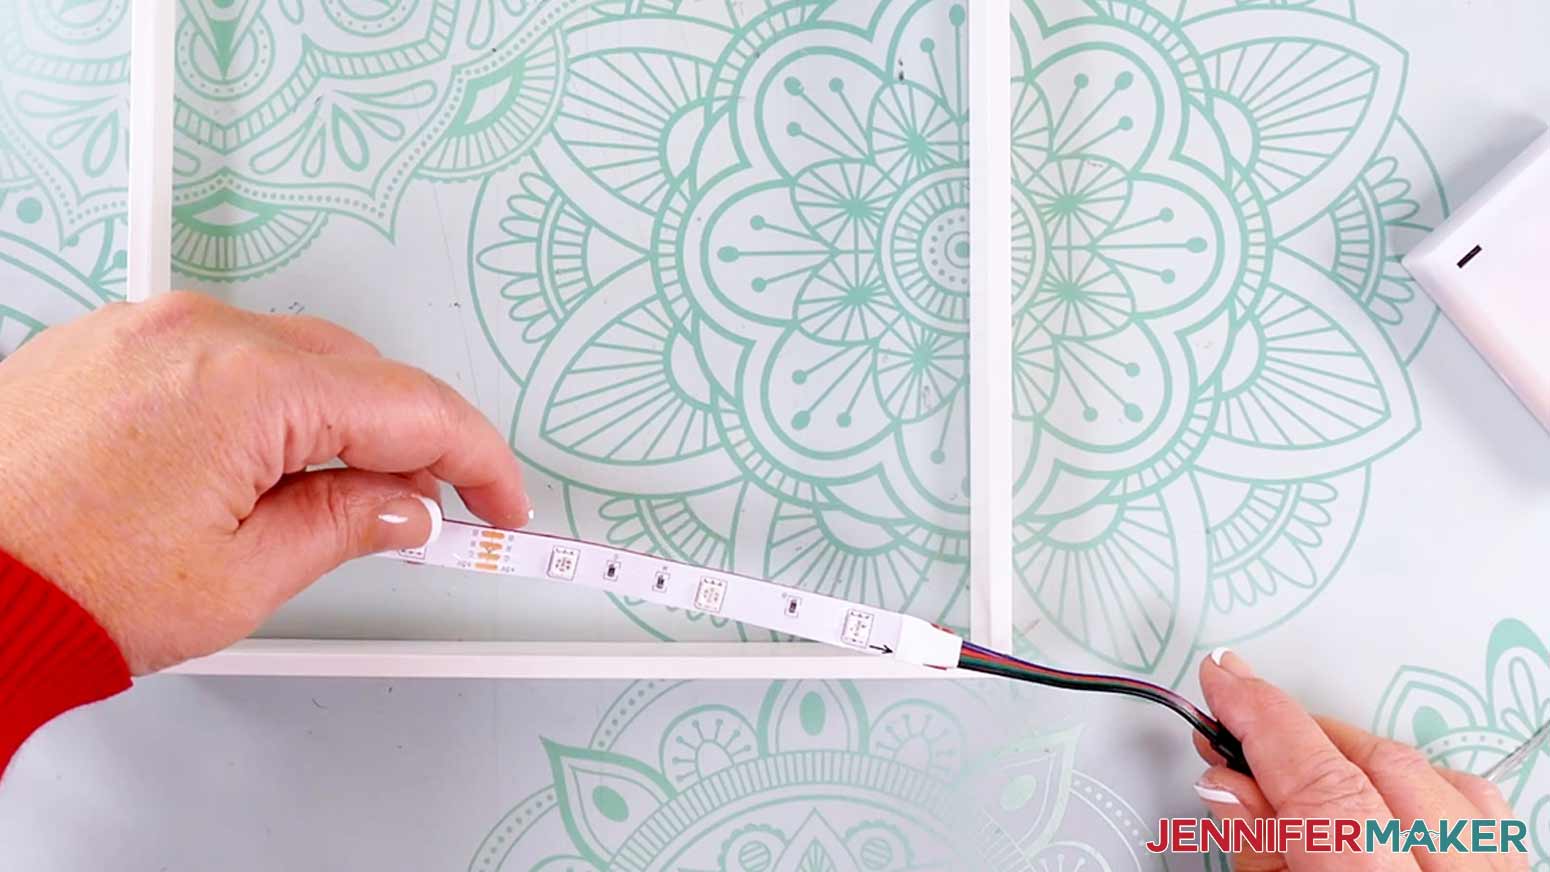
- Grab the shadow box’s inner spacer piece. NOTE: We want to concentrate the lights in half of the spacer, so we’ll place them in a specific way.
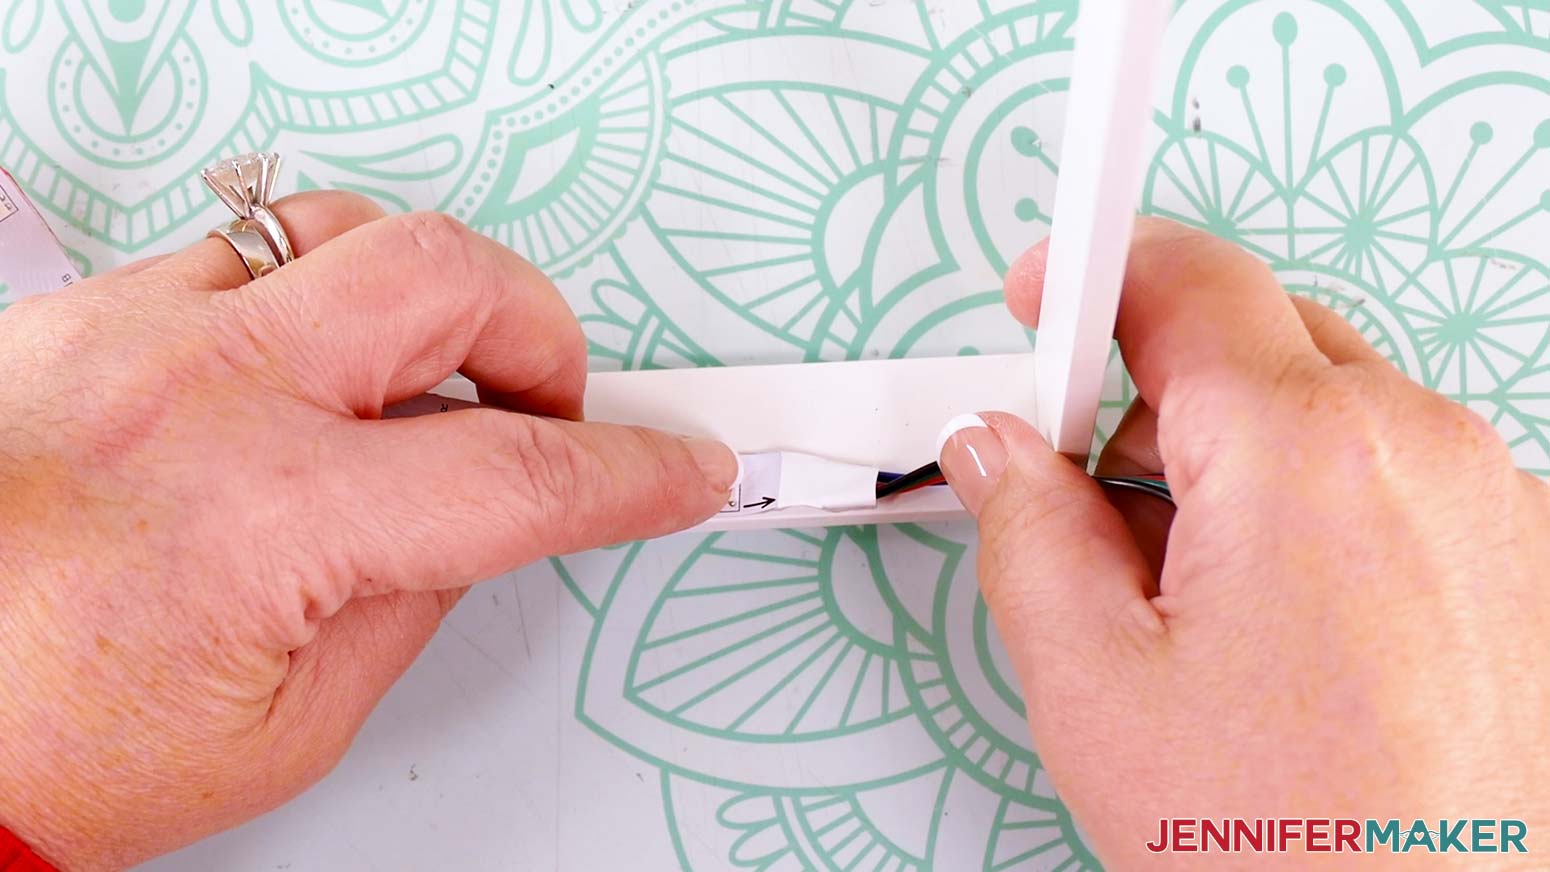
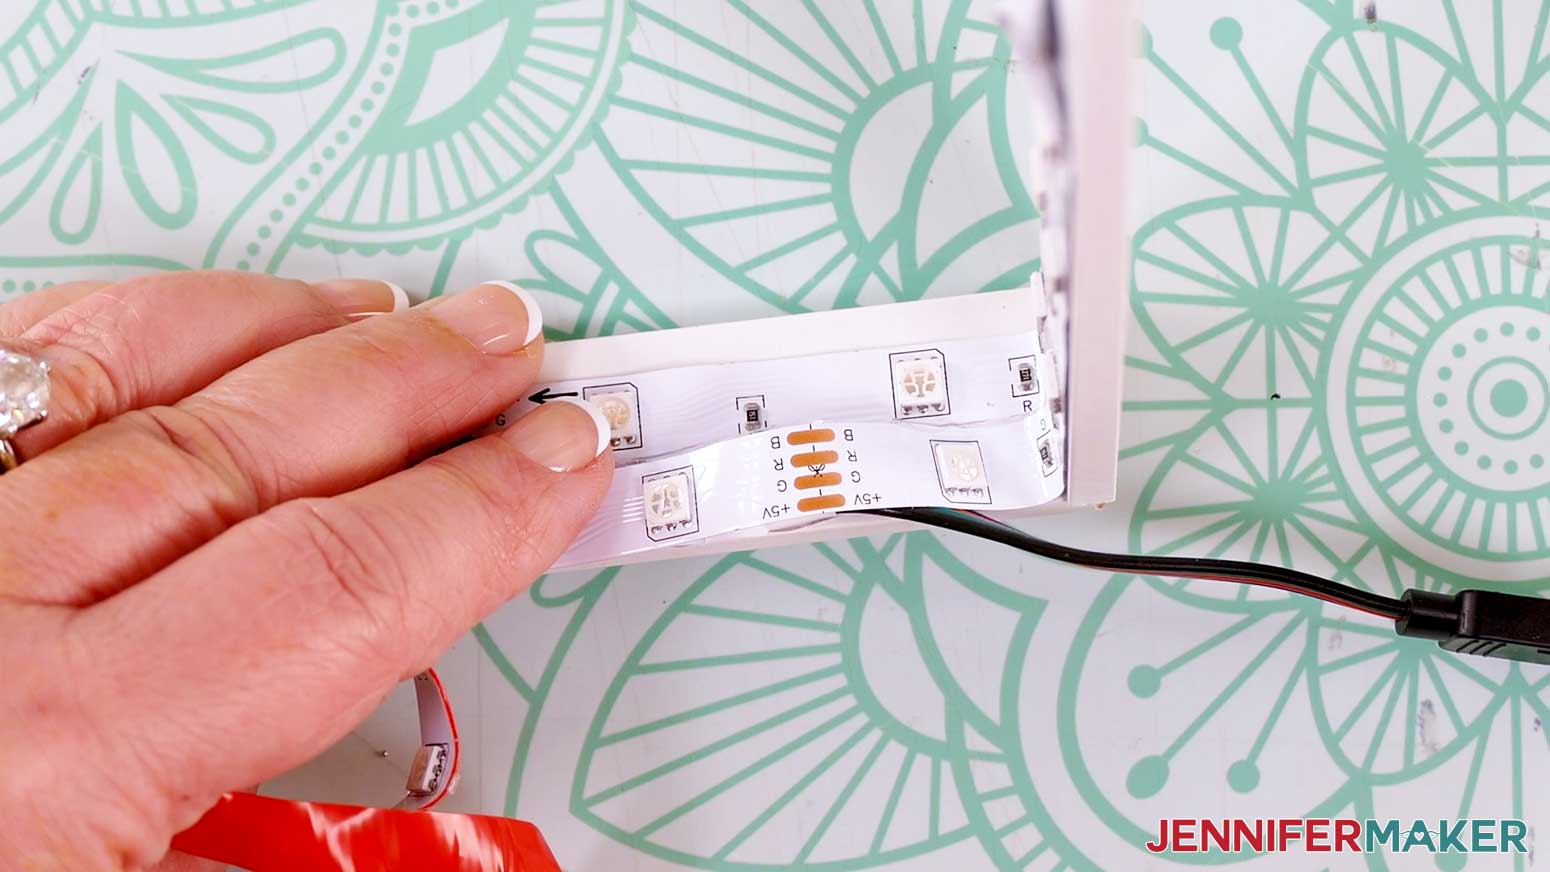
- Position the light strip so the end attached to the battery pack sticks out of one of the spacer’s corners.
- Peel back about an inch of the adhesive backer from the start of the light strip and adhere the strip inside the spacer, flush with the edge of the side facing you.
TIP: Position the beginning of the lights about an inch from the corner of the spacer so the attached cables don’t bunch up.
TIP: Use a weeding tool to help remove the adhesive backer if you’re having trouble with it
- Working in small sections, continue removing the backing from the light strip’s adhesive and pressing the strip flush along the spacer’s edge.
- Press the strip in at the first corner tightly so the light strip stays adhered to the spacer, then continue up the side.
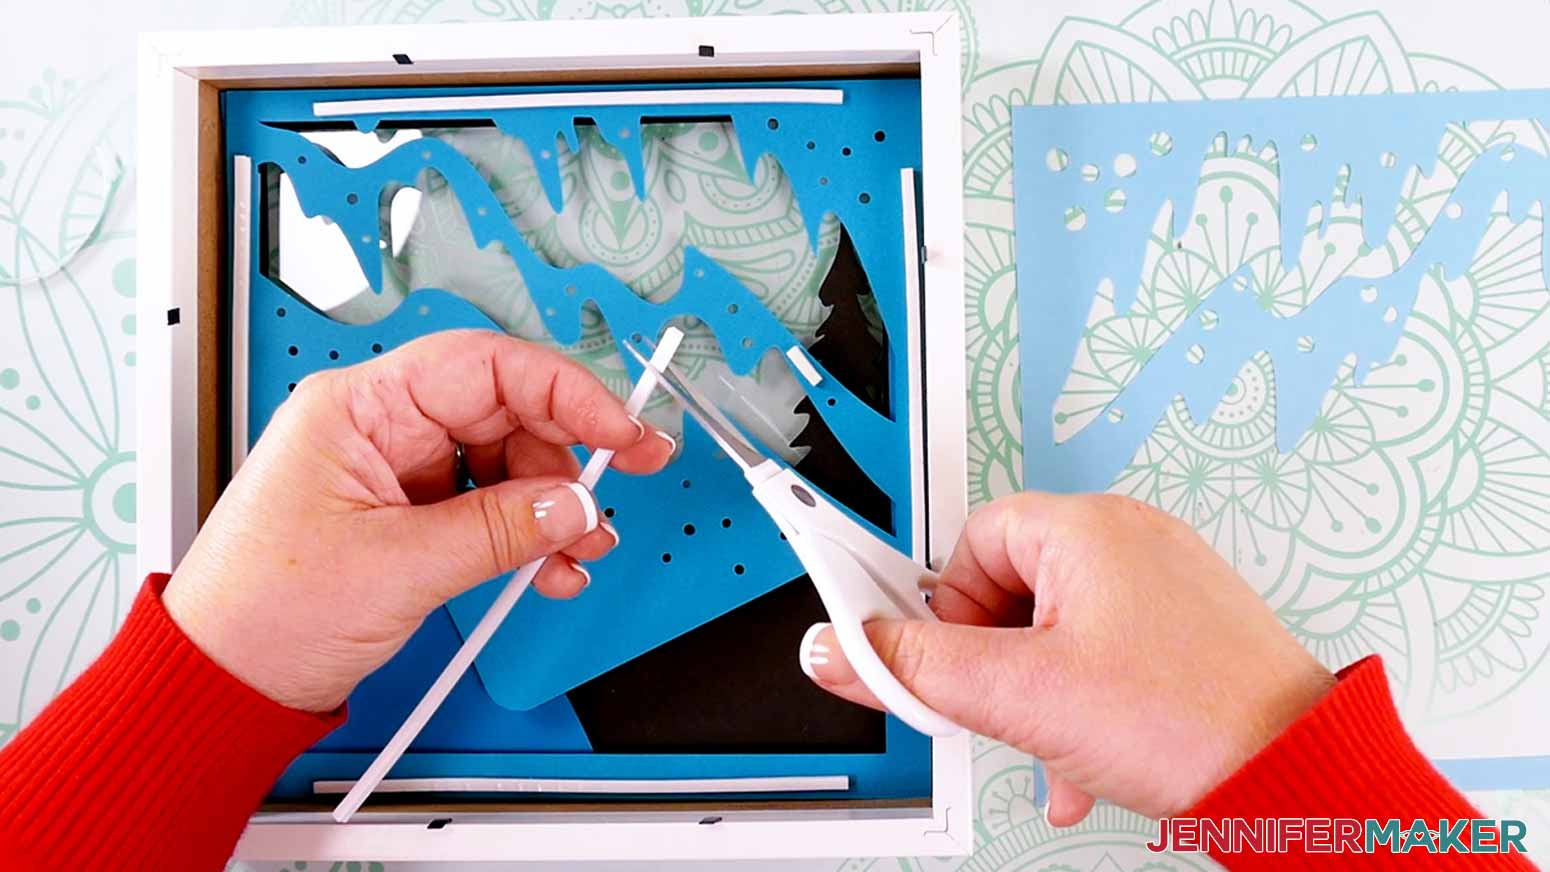
- When you reach the halfway point of the spacer’s second side, loop the light strip so it faces back towards its starting position.
TIP: Use your ruler or measuring tape to find the side’s halfway point. For an 8” x 8” shadow box, your halfway point will be at 4”.
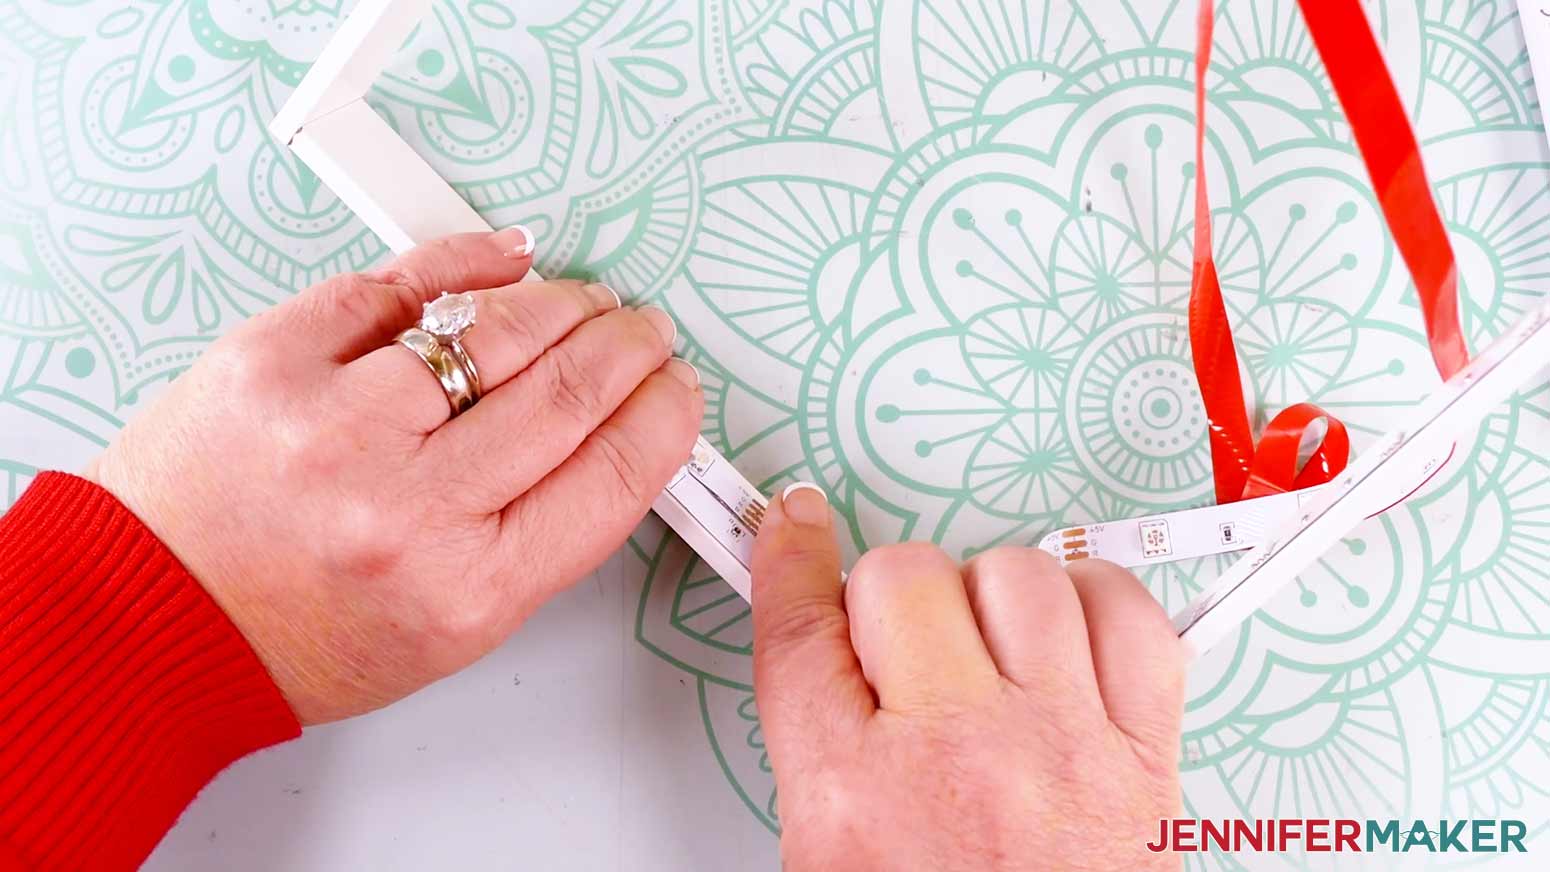
- Then resume adhering the strip to the other side of the spacer’s inner edge, adding a second row of lights right beside the first.
- Continue to remove the adhesive backing and attach the light strip to the spacer until you reach the halfway point opposite your first loop.
- Repeat Steps 10-11 to loop the light strip again, and adhere the strip to the spacer until you’re back at your starting corner.
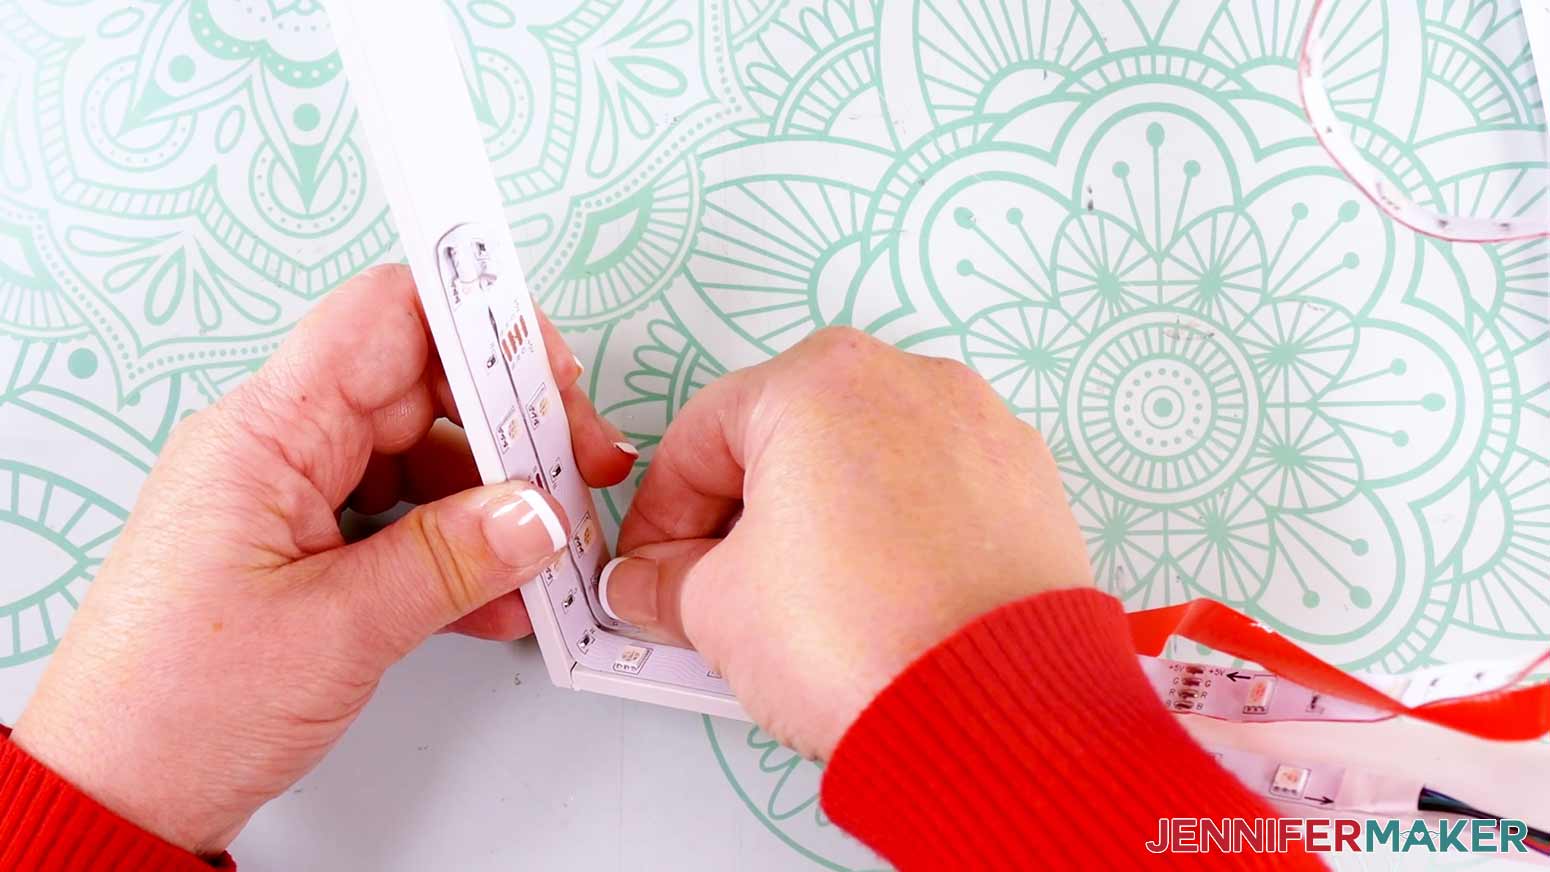
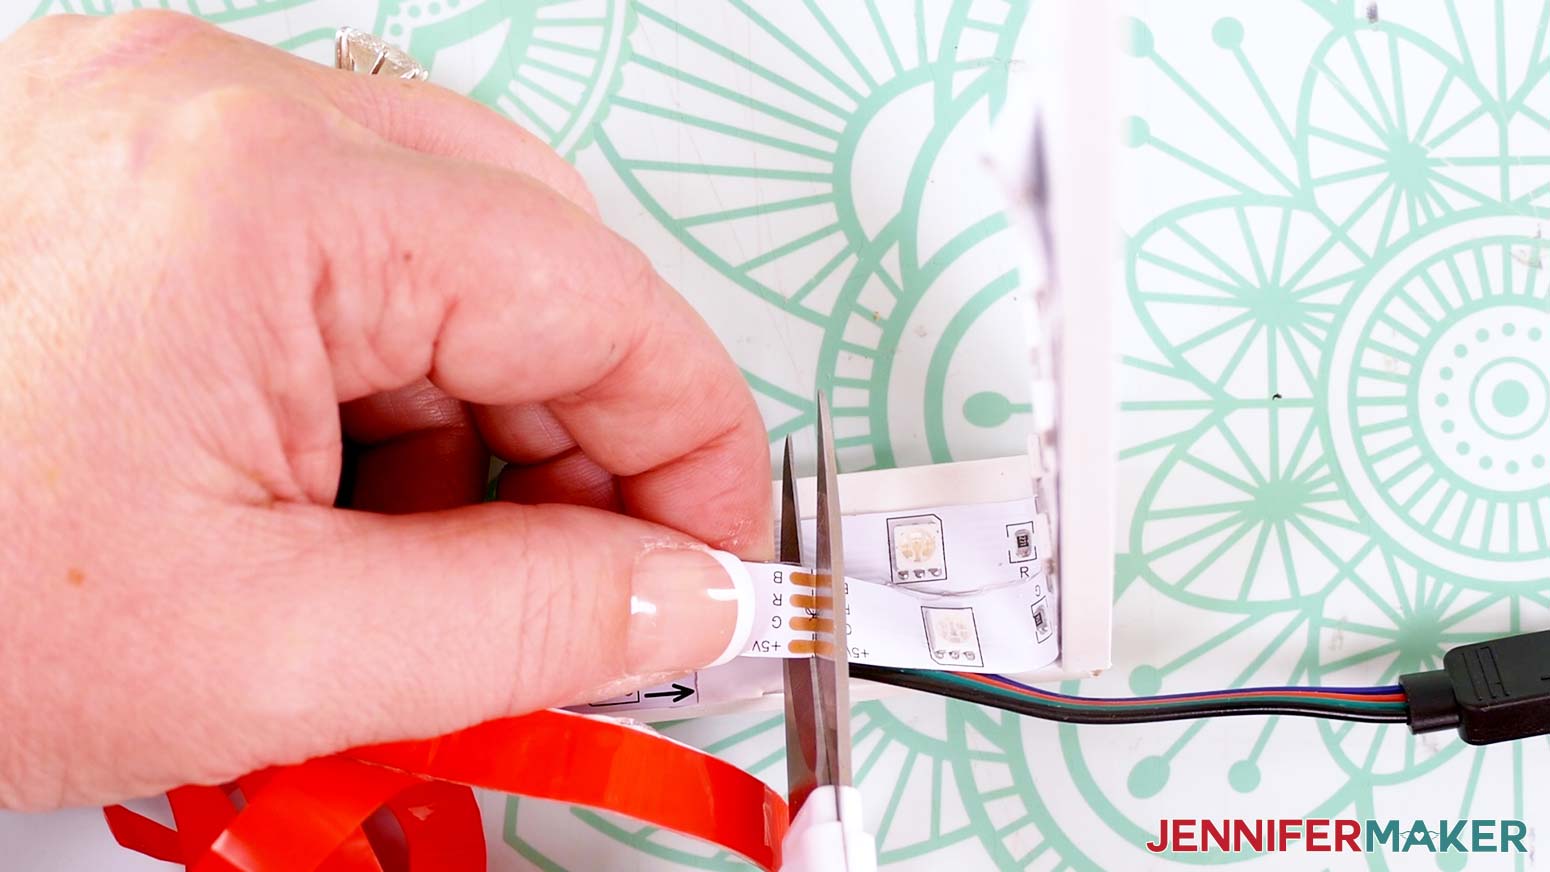
- On the excess part of your light strip, find a cut line marked with a pair of scissors. Peel off the backing just past the cut line, then use your scissors to trim the strip on that line.
NOTE: It’s okay if the light strip overlaps itself a little bit, but you don’t want a lot of excess.
- Adhere the rest of the strip to the spacer, then work the end around the cables, overlapping a small part of the lights if needed.
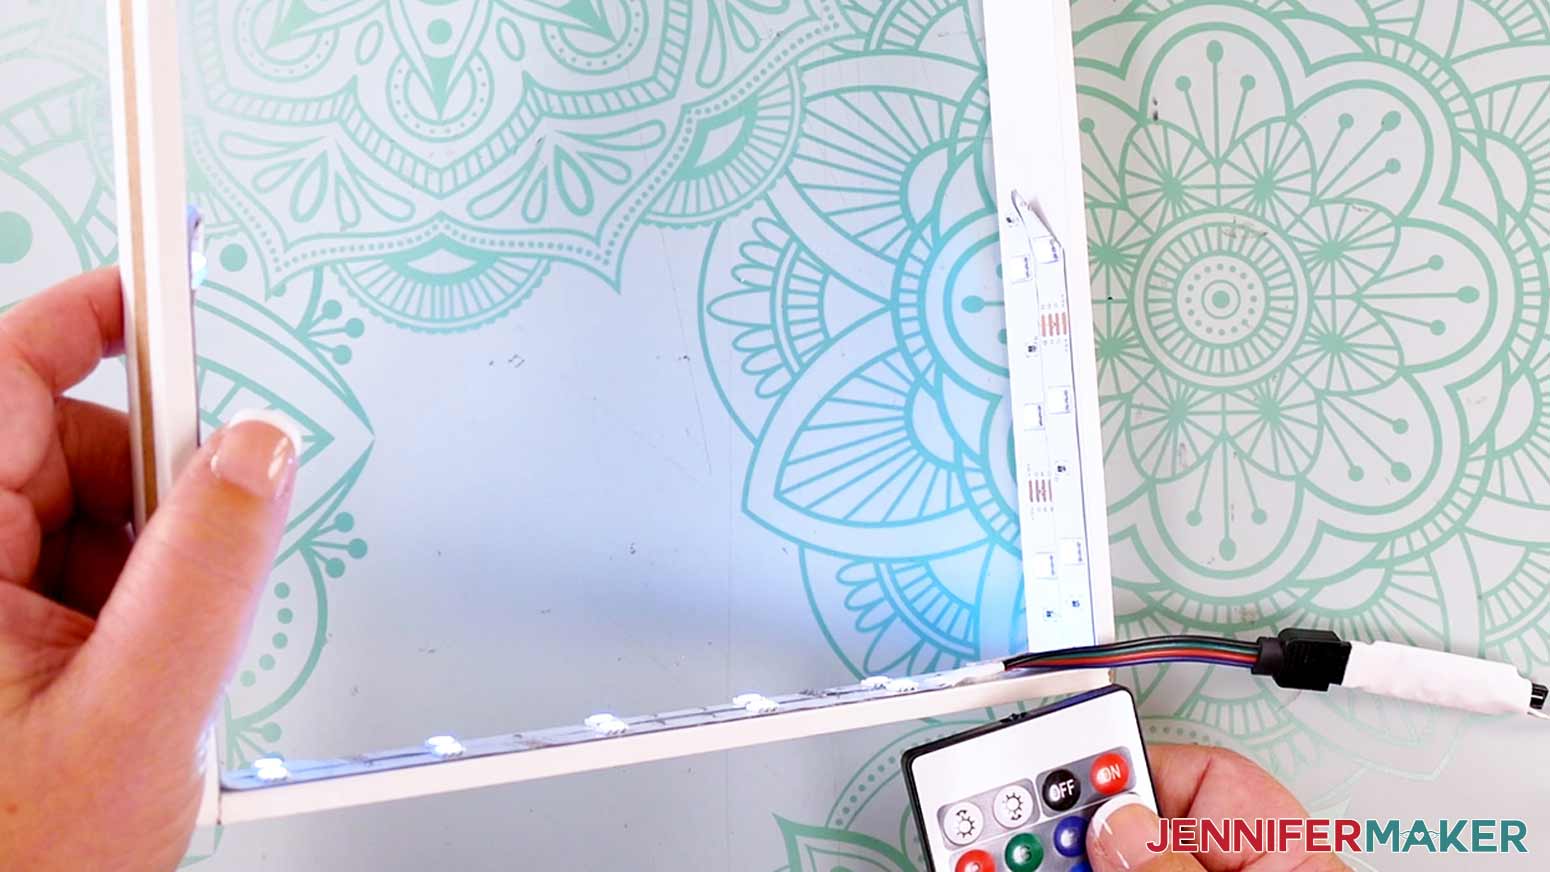
- Test that the lights still work, and then your spacer is complete!
- With the lights off, place your spacer on top of Layer 4 in the shadow box, keeping the cords in a bottom corner, coming out of the back of the box.
 TIP: Use a weeding tool to help remove the adhesive backer if you’re having trouble with it
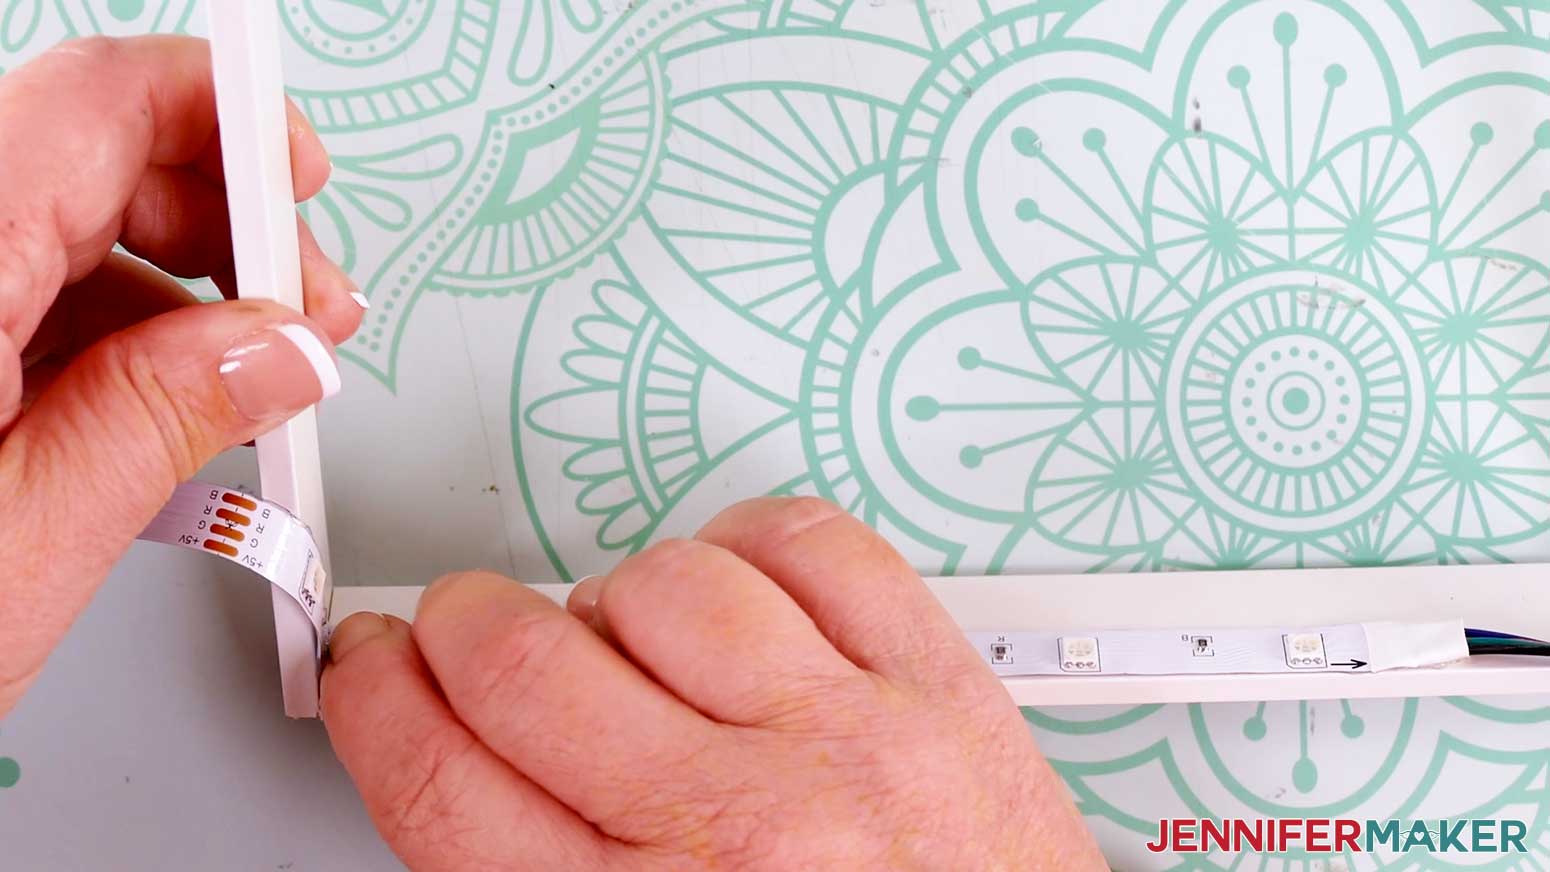

ASSEMBLE YOUR HOLOGRAPHIC BACKING BOARD
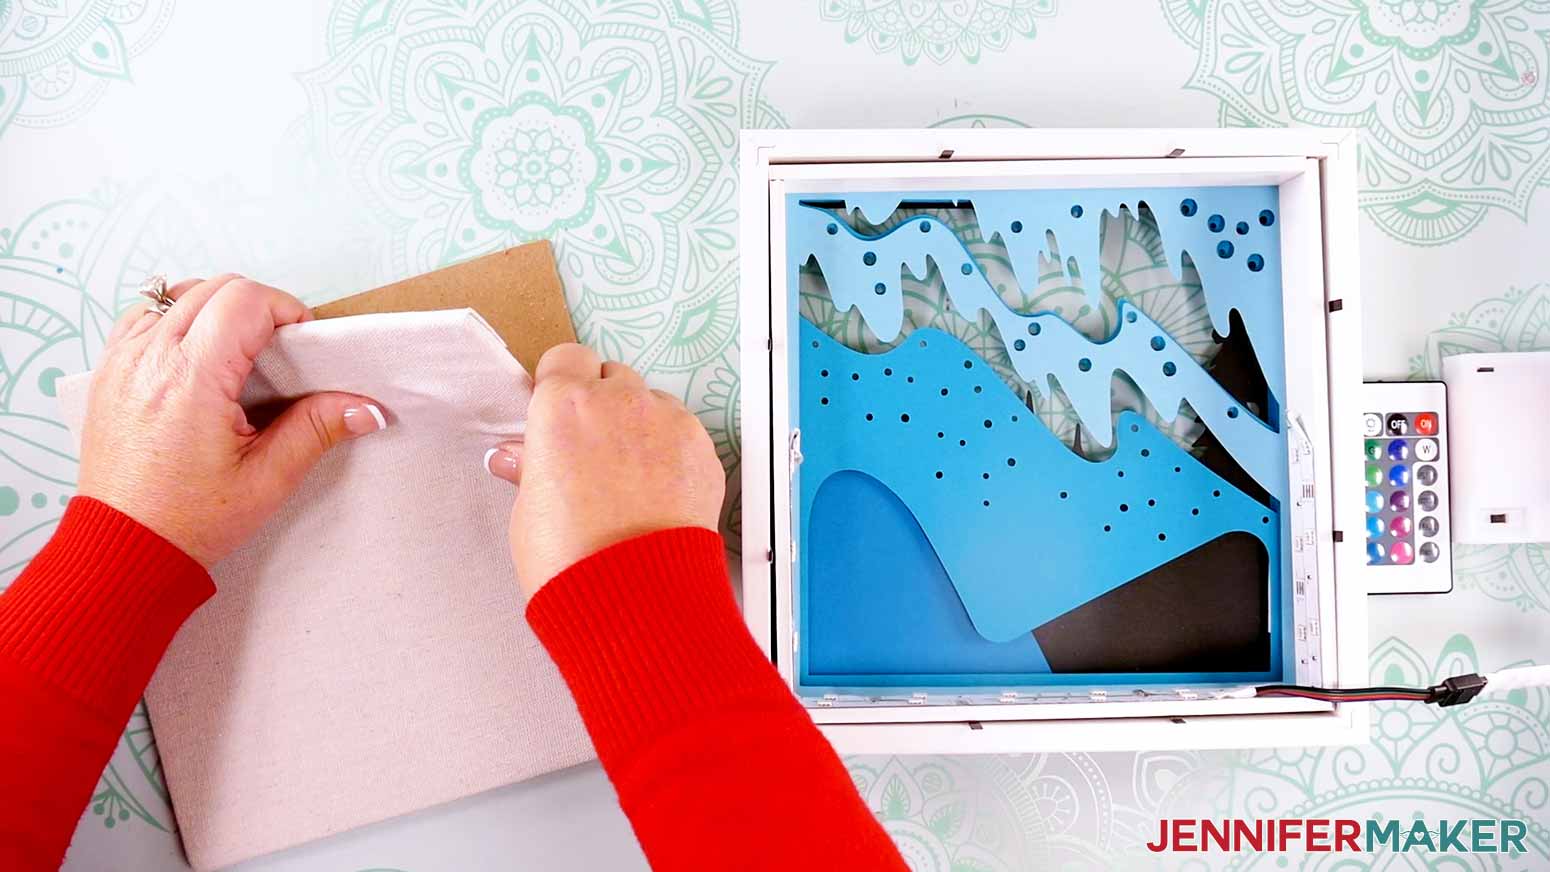
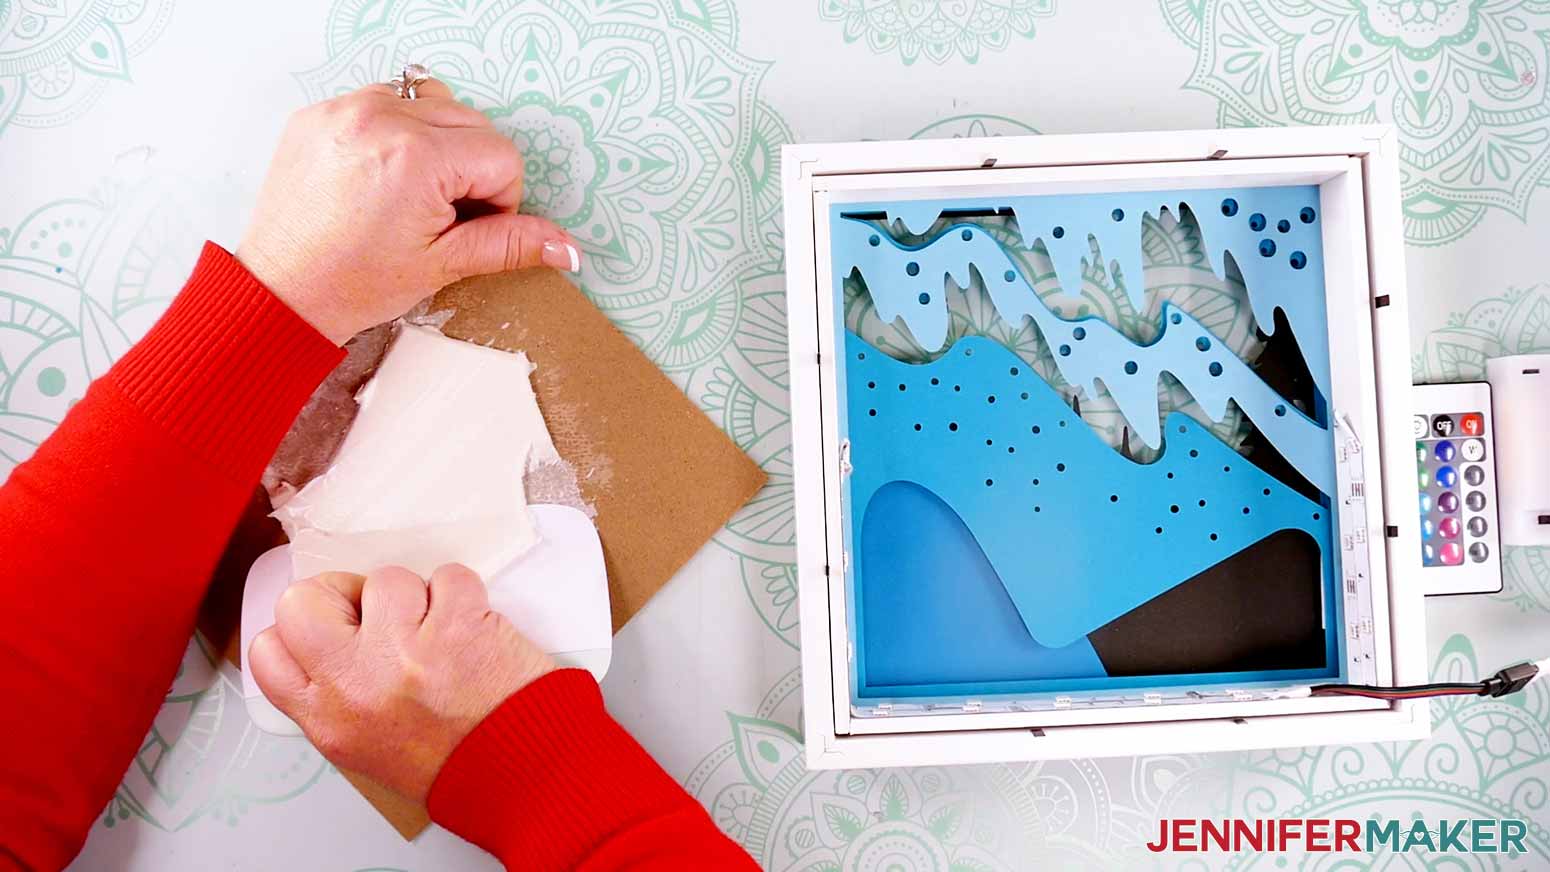
- Take your shadow box’s backing board and carefully peel away its padding so your layers aren’t too thick to close the box.
- Use your XL Scraper tool to remove any foam still attached to the board.
NOTE: It’s OK if some residue remains on the backing board. It just needs to be smooth enough to adhere a sheet of cardstock to it.
- Place the backing board inside the shadow box with the hanging hardware at the top. Take note of the corner where the light strip’s cords are located.
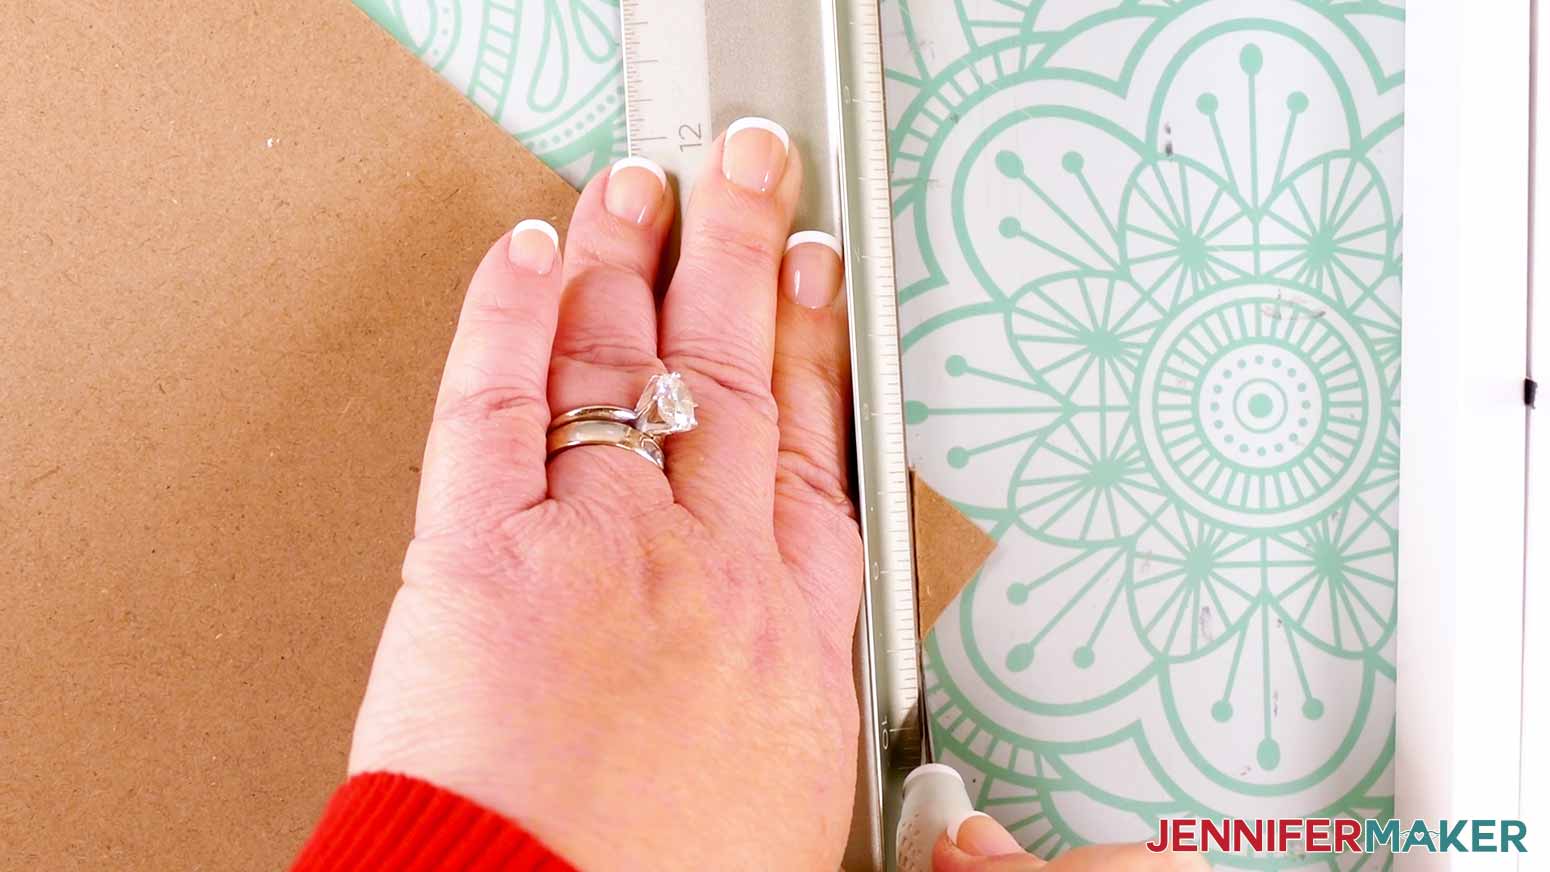
- Move the backing board to a self-healing cutting mat.
- Place your safety ruler diagonally across the backing board about a quarter to a half inch away from the corner you need to remove to make space for the cords.
- Keep the safety ruler in place with your fingers on the protected side, and carefully use your craft knife to cut along the ruler to remove the backing board’s corner.
TIP: Make multiple cut passes all the way across the corner with a comfortable amount of pressure to safely cut through the cardboard. No need to cut it all in one go!
- Once your cut has gone all the way through, replace the safety cap on your craft knife.
- Place the backing board on your shadow box’s spacer to test if the light strip’s cords fit through the notch you made. NOTE: If needed, repeat Steps 5-7 to cut another small section off the backing board’s corner to make it bigger.
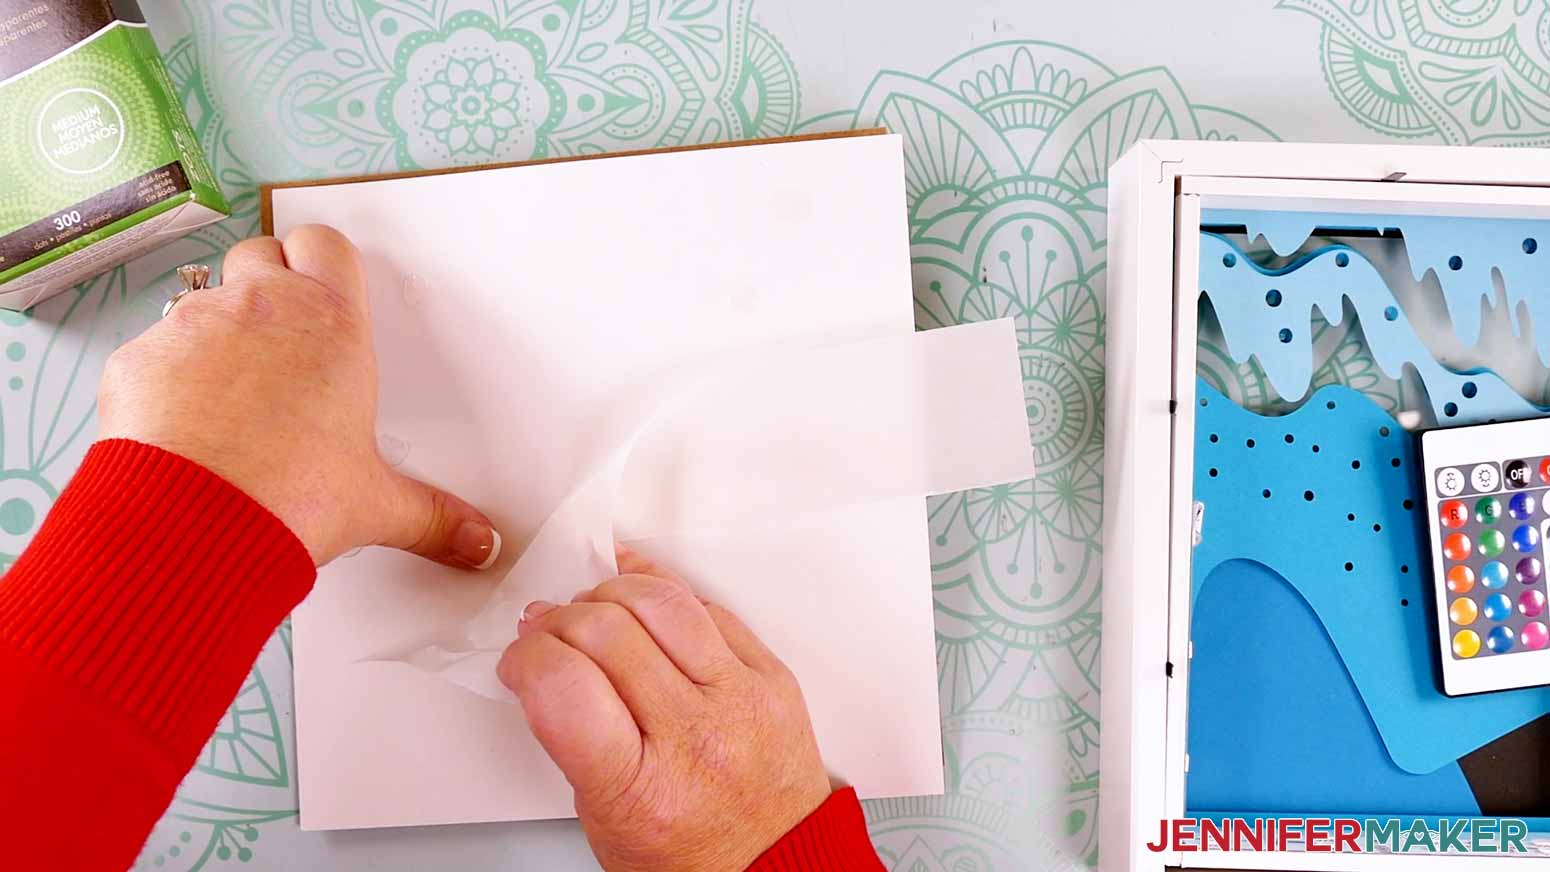
- Lay the backing board with the hanging hardware side down on your work surface, and your holographic cardstock layer with the shiny side down.
- Apply glue dots or craft glue around the edges of the cardstock, then add a few in the middle, as well.
- Center the holographic cardstock shiny side up on the shadow box’s backing board, making sure the outer edges align.
- Press down and smooth to adhere the cardstock in place.
- Use scissors to trim away the excess cardstock at the cut corner of the backing board.
- Place the backing board onto the shadow box’s spacer, shiny side down, with the hanging hardware at the top.
- Push the metal side tabs down to secure the cardstock layers, light-up spacer, and holographic backing in place.
- Flip your project over so you can see your assembled design.
 NOTE: It’s OK if some residue remains on the backing board. It just needs to be smooth enough to adhere a sheet of cardstock to it.
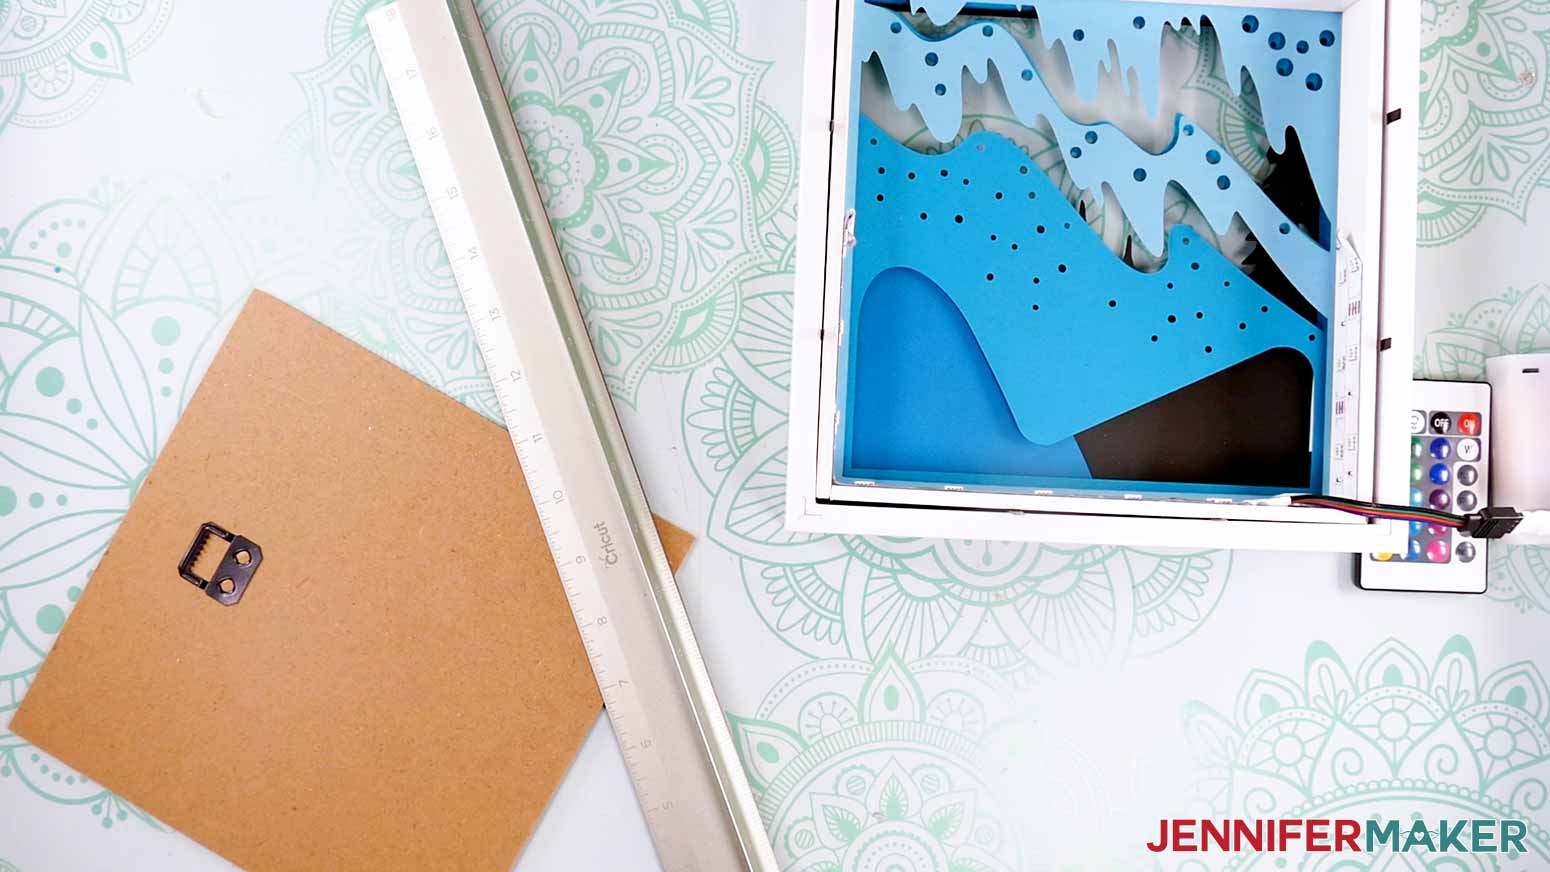


STEP 4: SHOW IT OFF
Turn on the LED lights, and you now have a gorgeous Northern Lights Shadow Box with colorful, glowing lights!

Once you have decided where to place your shadow box, you can hide the battery pack behind the box, or use glue dots to attach the battery pack to the back or side of the box. Just make sure to leave the door and switch accessible!
Notes
Finished Size:
Design Layers: 8"W x 8"H
In Shadow Box: Approximately 9"W x 9"H x 1.75"D
Answers to Your Questions About Making a Northern Lights Shadow Box
Q: I want to customize my northern lights shadow box with other elements. How do I do that?
A: You can learn how to create a custom northern lights shadow box with your OWN scene in a special design workshop in my ADVANCE program. Learn more about ADVANCE here!
Q: Help! My Cricut Design Space screen looks different than yours!
A: If you’re using the latest version of Cricut Design Space, your screen may have slight variations than the screen you see on the video tutorial. Good news: All of the same functions are there, they may just be in different spots or have new icons. Pause the video if you need, or follow along with the written tutorial. If you get stuck, ask for expert support in our Facebook group. Our group has become not just a help center, but also a vibrant community of real people and crafters! Plus, you can catch the latest news on JenniferMaker tutorials and more.
Q: Where can I find the supplies and tools to make a northern lights shadow box?
A: My northern lights shadow box SVG files can be made with simple supplies you may already have in your crafting stash. I like to shop on Amazon for their free shipping and quick delivery time with my Amazon Prime membership (just make sure to look for sellers with 5-star reviews, carefully review product information, and check out the product preview). You can also find most, if not all of the supplies and tools at your local craft store, sometimes even at a cheaper regular price sale price, so be sure to check for current sales as you continue shopping for supplies.
Q: Can I make and sell these northern lights shadow box designs?
A: I love supporting creative entrepreneurs! If you want to use my designs and projects for commercial use, please familiarize yourself with my important licensing information before selling your crafts.
I do not permit sale of my digital items, but you can sell the creative goods you make with them — as long as you follow my licensing requirements. That means you cannot sell the northern lights shadow box SVG files, but you can sell cards that you made with the files within the guidelines linked above.
Q: How do I know if my design is the right size?
A: Not sure if your design is uploading at the correct size or aspect ratio? If you are using Cricut Design Space Beta for Desktop, try switching to the Live version as this has worked in our testing. Here are the dimensions you should see for each design on your Canvas:
-
aurora-shadow-box-jennifermaker-SVG: 8” x 8”
If you need help resizing your design, open my Resizing Guide in a new window.
Q: Do I have to use a full page of cardstock for each layer?
A: Cardstock sheets come in several different sizes. The most popular are 12″ x 12″ sheets and 8.5″ x 11″ sheets. The layers for this project are all sized at 8″ x 8″, so they’ll cut from either of these sizes. Unfortunately, they’re too large for more than one to fit on a page. However, you can always save your scraps for other cardstock projects.
Q: Can I decrease quantity of star holes in the layers? My Cricut has trouble cutting them.
A: Try cutting your cardstock using the “Cardstock for Intricate Cut” material setting.
Q: Are the northern lights and the southern lights the same?
A: Yes and no. They are the same atmospheric phenomenon, but where they are located differs. The northern lights appear in the Northern Hemisphere over the Arctic Circle, and can be seen in countries such as the United States, Canada, and the northern areas of the United Kingdom like Scotland. On the other hand, the southern lights appear in the Southern Hemisphere over Antarctica, and can be seen in Australia, New Zealand, South Georgia & South American countries such as the Falkland Islands. They’re not usually visible in the southern regions of South Africa, though it is possible.
Q: Do you have other shadow box designs I can make?
A: Whether you’re celebrating a birthday, a graduation, the holiday season, or another event, I’ve got the perfect shadow box design for you! Check out these free shadow box designs:
- Tutorial with step-by-step directions: Photo Gallery Shadow Box
- More Designs: Heart-Shaped, LED Photo, Pumpkin, Paper Flower, Gnome, Flower Beard Gnome, Hot Chocolate, Layered Cardinal, Light-Up Stars
- Backlit Shadow Boxes: Flowers & Butterflies, Snowflake & Poinsettia, Sunflower & Pumpkin
Get my free SVG/DXF/PDF files to make a northern lights shadow box!
(If you do not see the signup form above, click here.)
I love seeing what you make with my designs and how you use them! Please share a photo of your northern lights shadow box in our Facebook group or tag me on social media with #jennifermaker.
Love,

Want to remember this? Save this Northern Lights Shadow Box tutorial to your favorite Pinterest Board!