

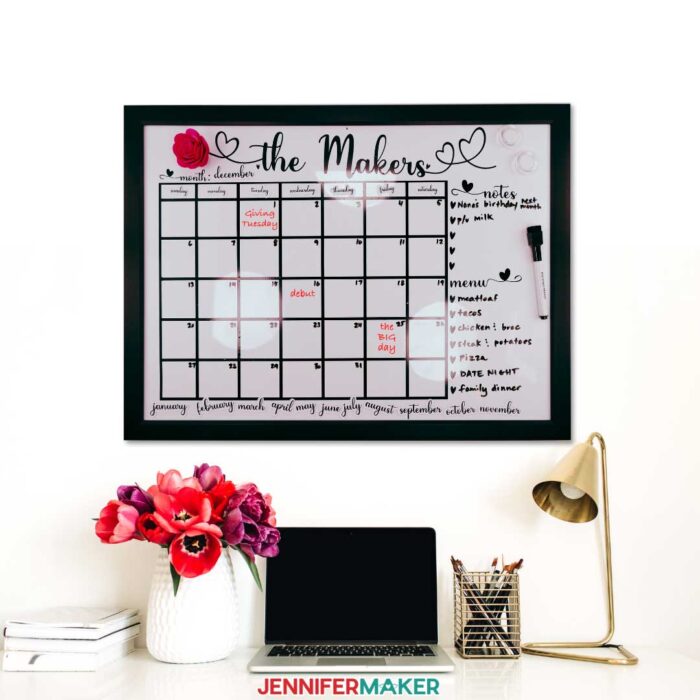
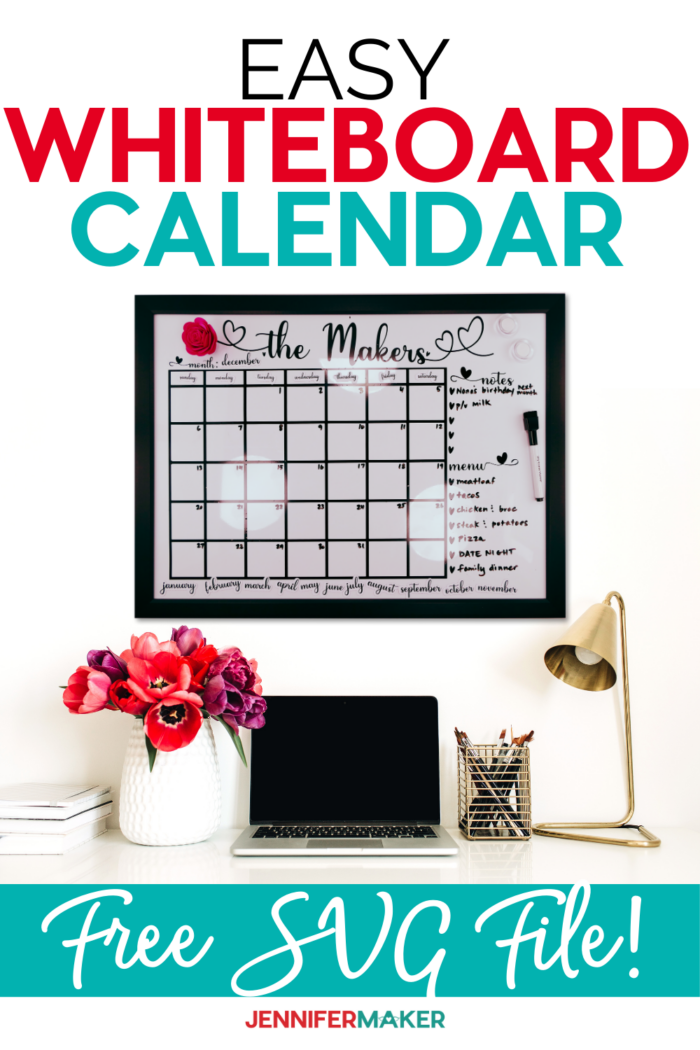
Let me show you how to make a personalized whiteboard calendar with interchangeable print & cut day and month magnets to help you stay organized!
A new year is coming, and that means it’s time to get our schedules in order. This can be tricky when you have a family, but one of the best ways to coordinate schedules is with a family whiteboard as the center piece of your command center. With appointments, meetings, and different happenings, it’s SO helpful to have one spot that everyone can check so we know what everyone else has planned. So for Day 16 of The Great Maker 25-Day Gift-Away Challenge, I am showing you how to make a DIY Whiteboard Calendar that you can use to help keep your family organized!
See exactly how to make a personalized whiteboard calendar in my tutorial video (or keep scrolling if you prefer a printable step-by-step photo tutorial):

 What is The Great Maker 25-Day Gift-Away? This is an annual tradition here at JenniferMaker! Every day for the first 25 days of December we gift you with a brand new project, design, tutorial, and video. On top of that, we host a giveaway with 25 prizes. Some of the amazing prizes are Cricut cutting machines, sewing machines, gift cards, and beautiful print editions of our popular Cricut Coach Playbook. You can even earn bonus entries for sharing photos of the daily projects! Click here to learn more about The Great Maker 25-Day Gift-Away!
Supplies for this project include the obvious — a magnetic framed dry erase white board. I am using a seventeen inch by twenty three inch whiteboard I got from Amazon — the links to everything I’m using are below.
To create the calendar on the whiteboard, you want permanent adhesive vinyl — one roll of black will do nicely. Standard grip transfer tape will also be necessary to get the vinyl onto your white board.
To make the calendar perpetual, we’ll create magnets from printable magnet sheets. These are really cool! Then we can move everything around as needed.
To print the magnets, you’ll want an inkjet printer. I’m using the HP Envy 7155, but most inkjet printers will do a great job here.
And, of course, we need a way to cut the vinyl, and I’m using the Cricut Explore cutting machine to do that. Other things you need are the green standard grip mat to cut your vinyl on, a brayer to adhere your vinyl to the mat, a weeding tool to remove excess vinyl, and a scraper tool to stick your vinyl really well to your whiteboard.
Now you just need the pattern for the calendar and magnets!
So let me show you where to find the designs, and then I’ll show you how to personalize, cut, and create your whiteboard! This post contains some affiliate links for your convenience (which means if you make a purchase after clicking a link I will earn a small commission but it won’t cost you a penny more)! Read my full disclosure policy.
Materials to Make a DIY Whiteboard Calendar
View my Amazon shopping list with the exact items we used to make this project!
- Magnetic Framed Dry Erase White Board (I used a 17″ x 23″ whiteboard) -or- transparent plexiglass (it won’t be magnetic, but it may match your decor!)
- Printable Magnetic Sheets
- Permanent Vinyl (I used one roll of black)
- Transfer Tape (Standard Grip)
- Color inkjet printer
- Brayer
- Measuring Tape
- Cricut StandardGrip Cutting Mat (I used a 12″ x 12″ and 12″ x 24″)
- Weeding Tool
- Scraper
- (Optional) Magnets (some come with the whiteboard if you get the same one I did)
- (Optional) Hey Lover font
- Inkjet Printer
- A way to cut your vinyl (I used a Cricut Maker series cutting machine but this can also be cut on a Cricut Explore series or the Cricut Venture)
- Design #267 – My free SVG design files (available in my free resource library—get the password by filling out the form at the bottom of this page)
How to Make a Personalized Whiteboard Calendar with Magnets
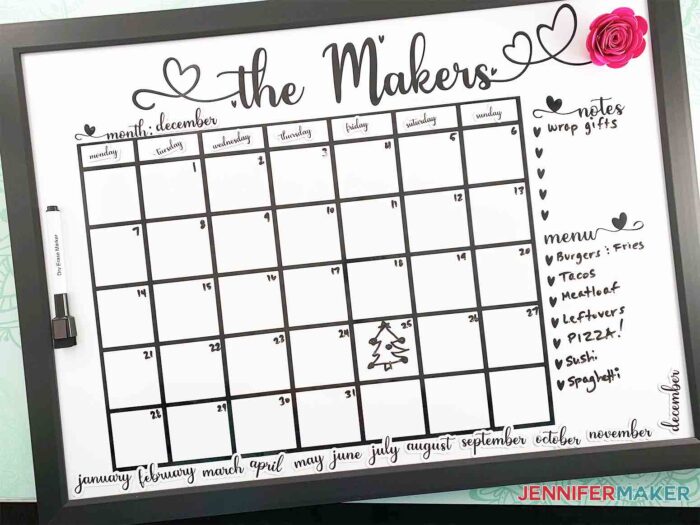
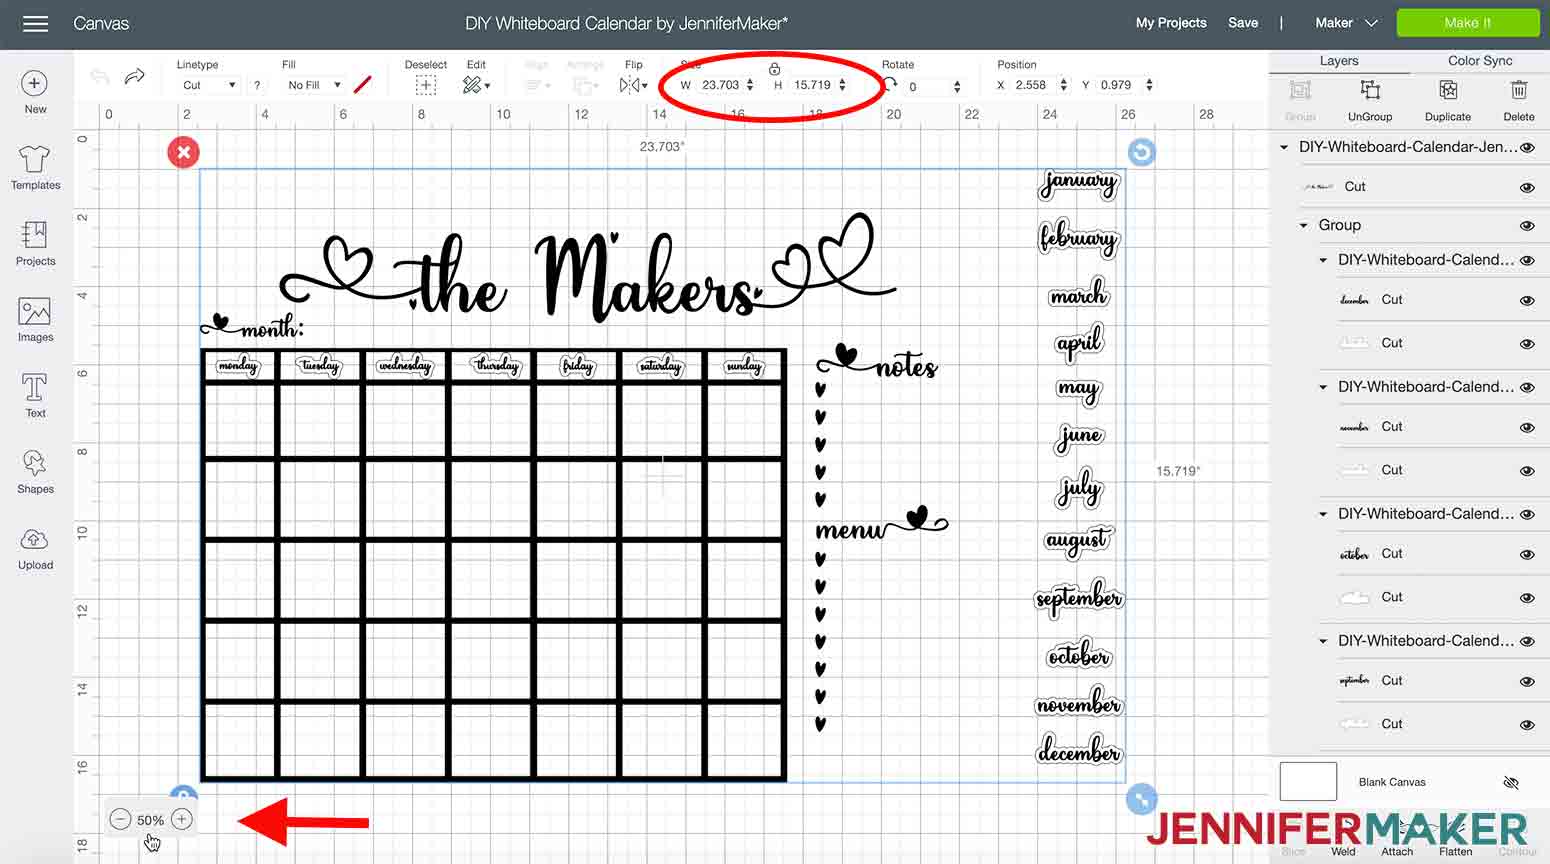
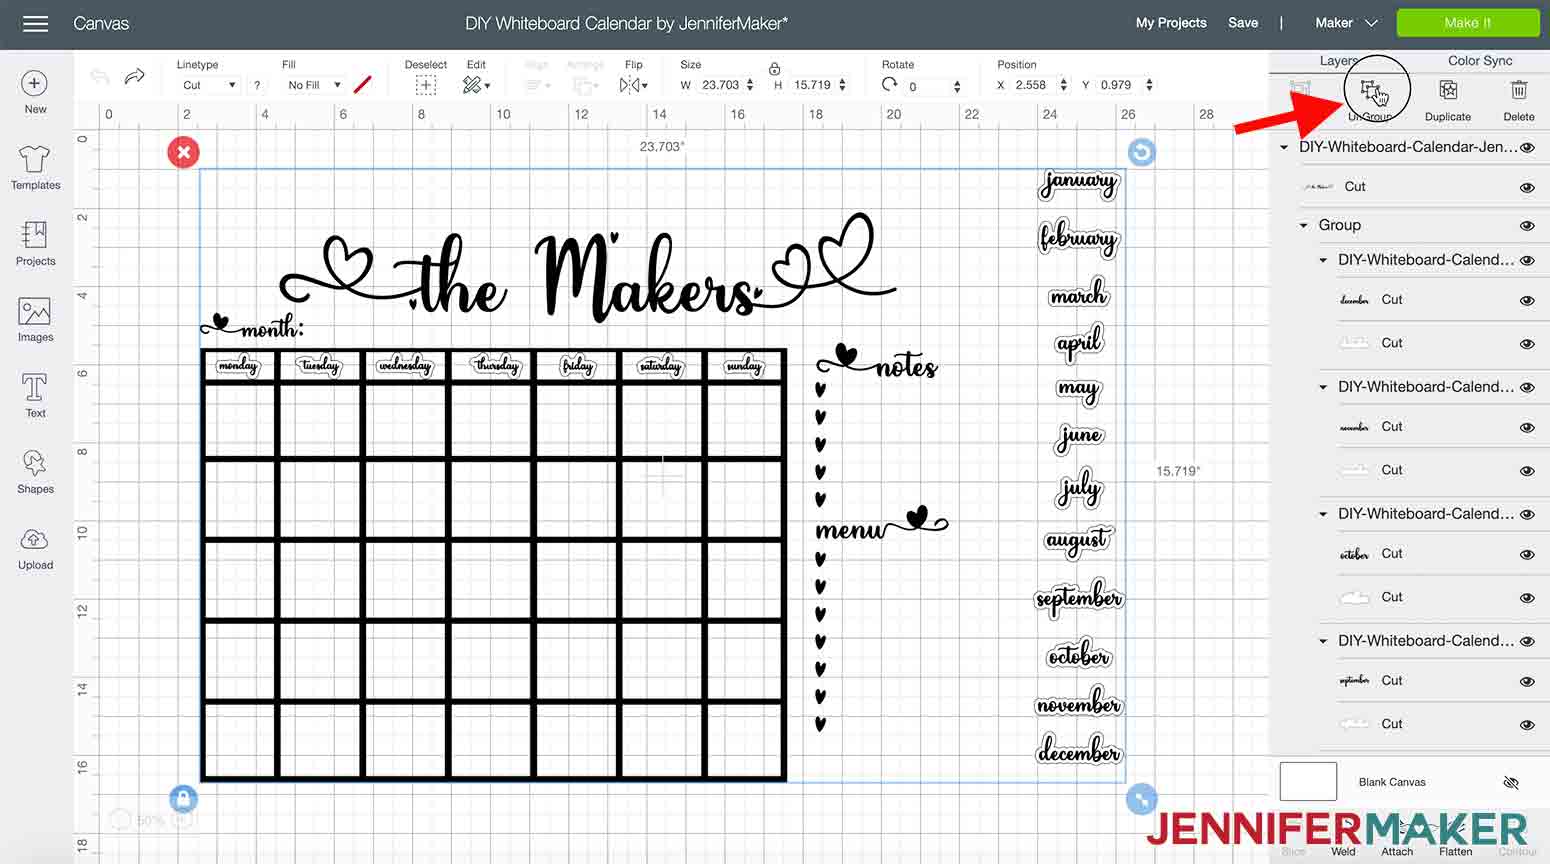
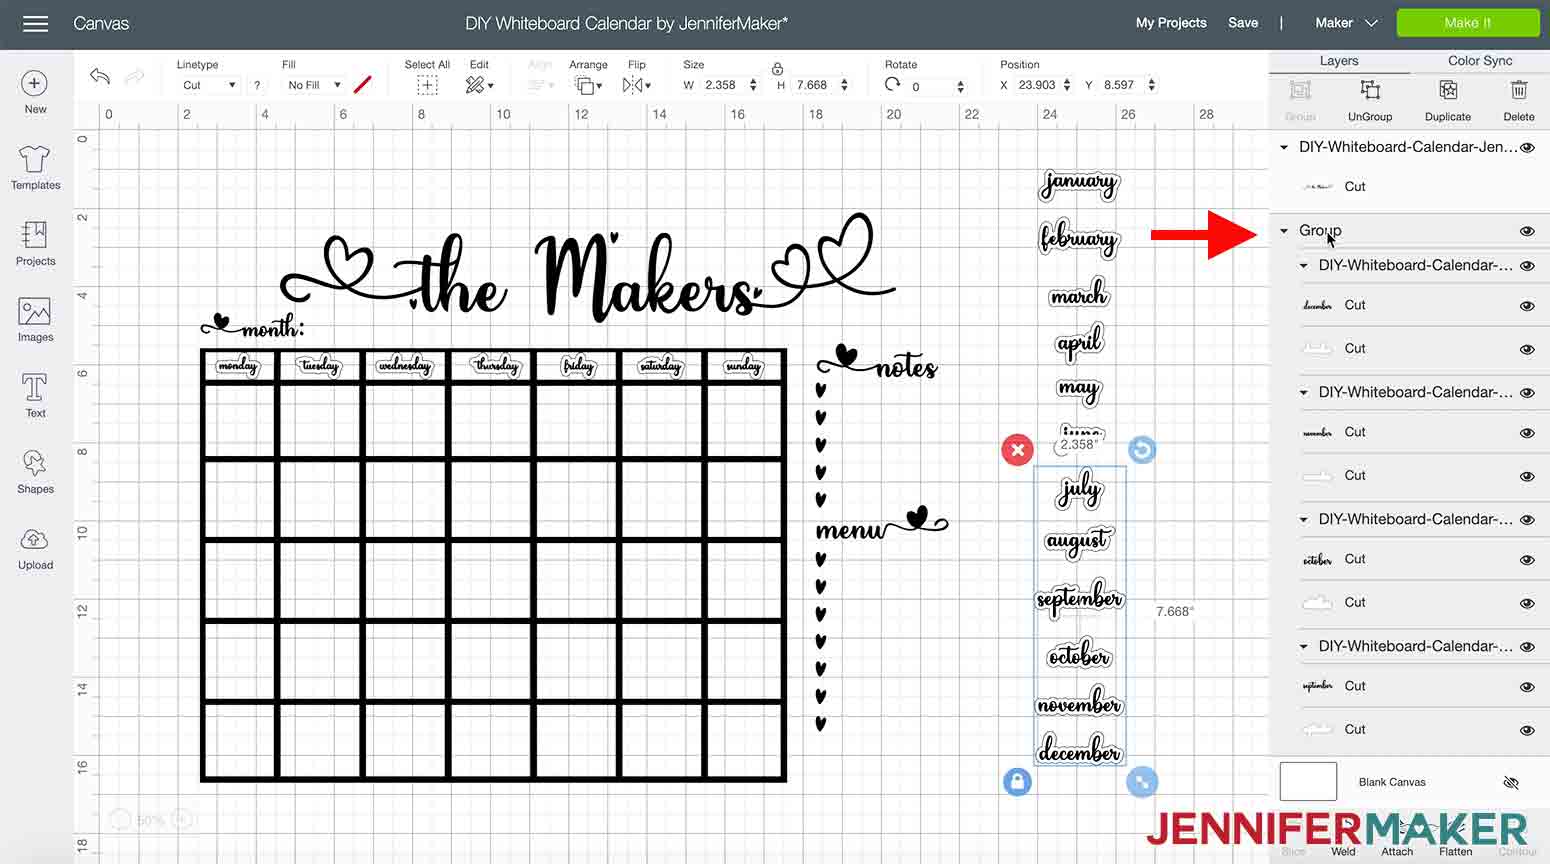
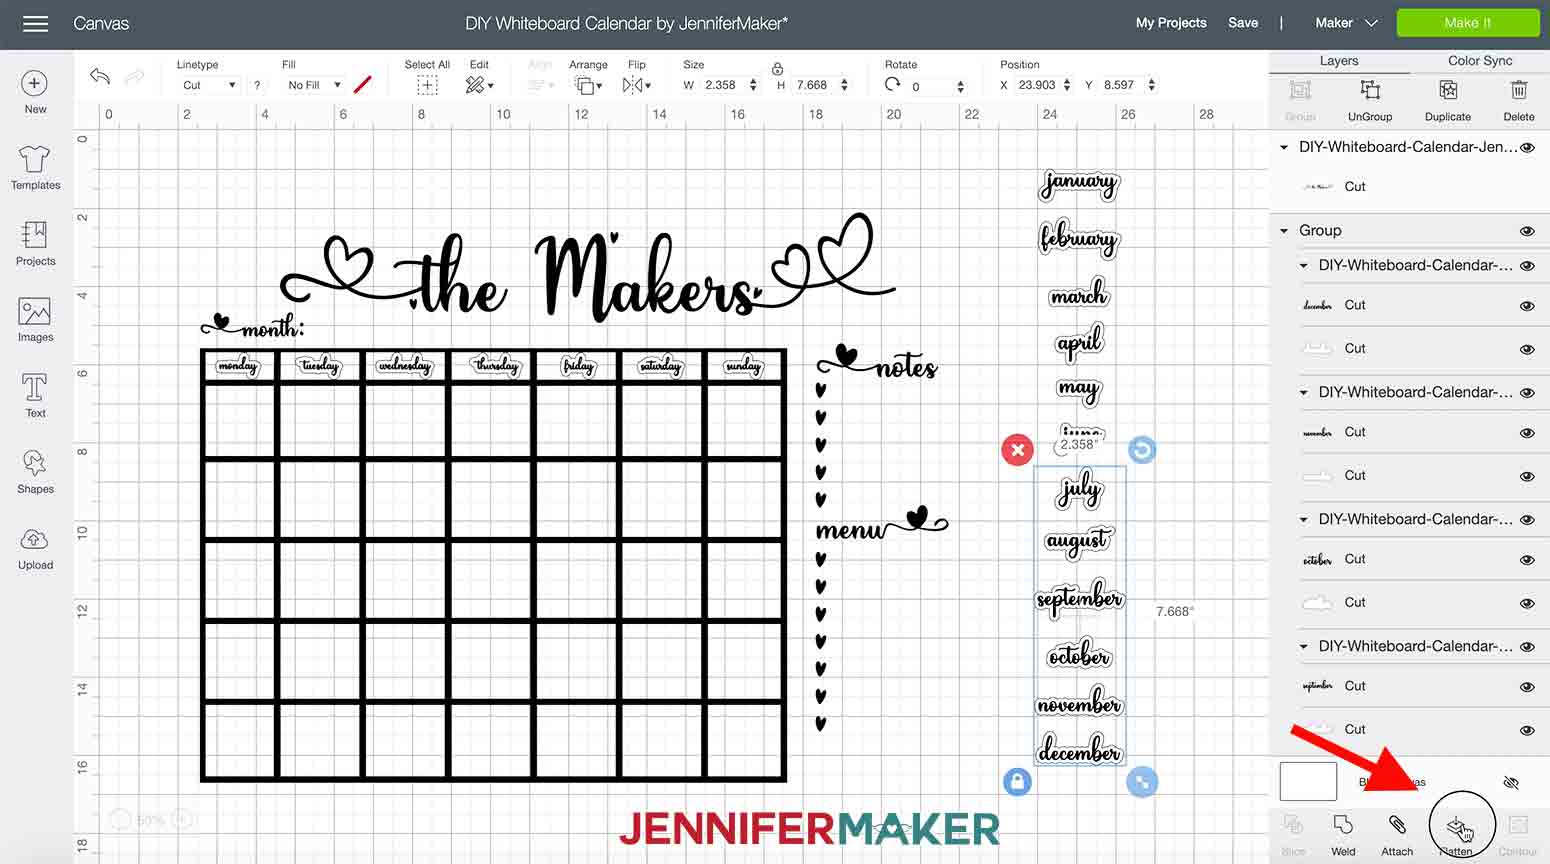
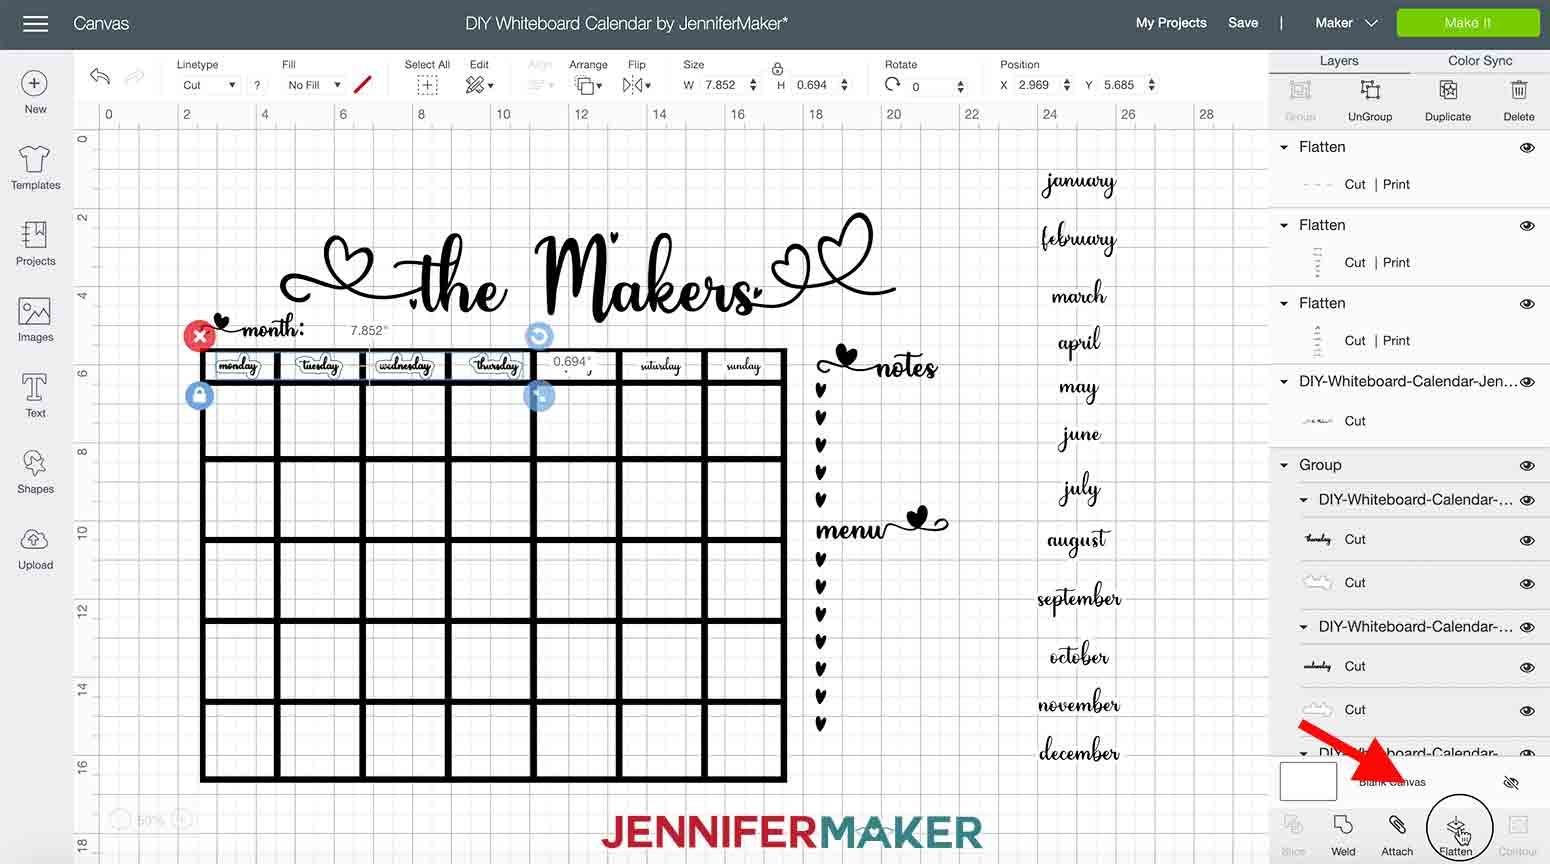
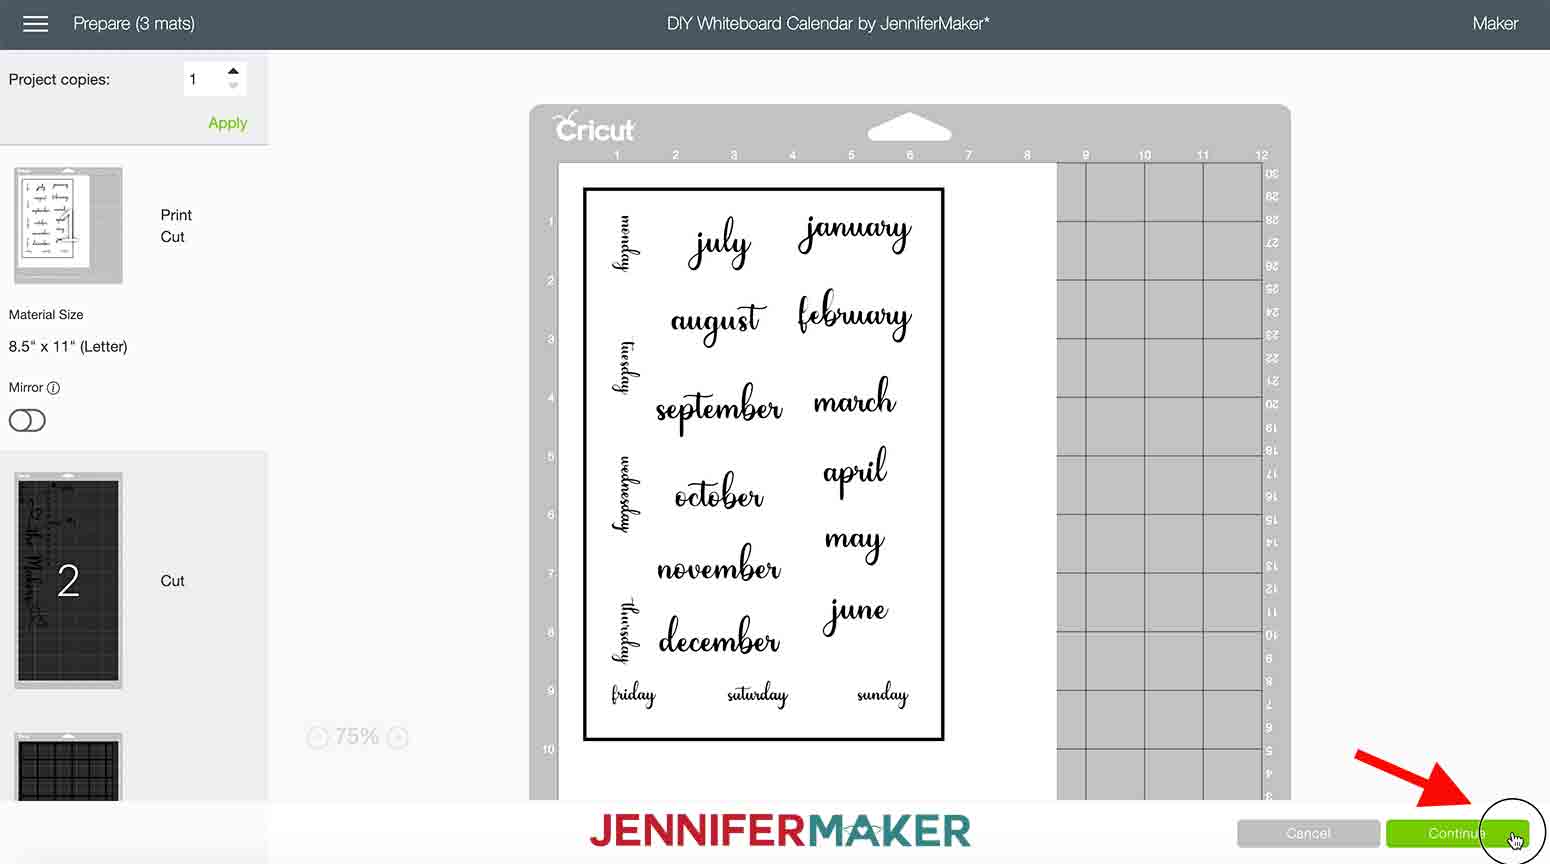
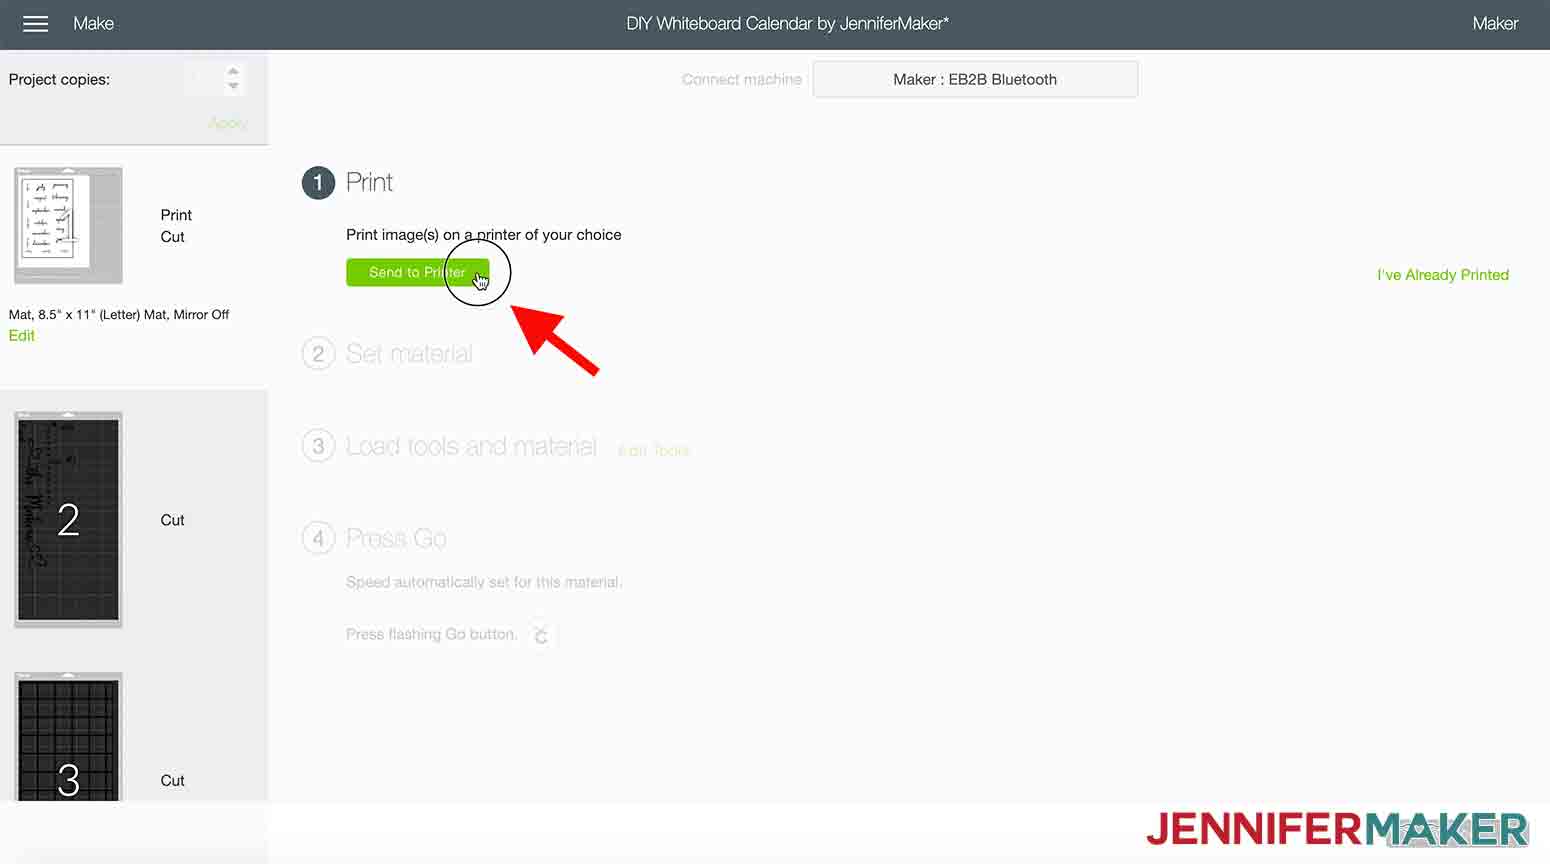
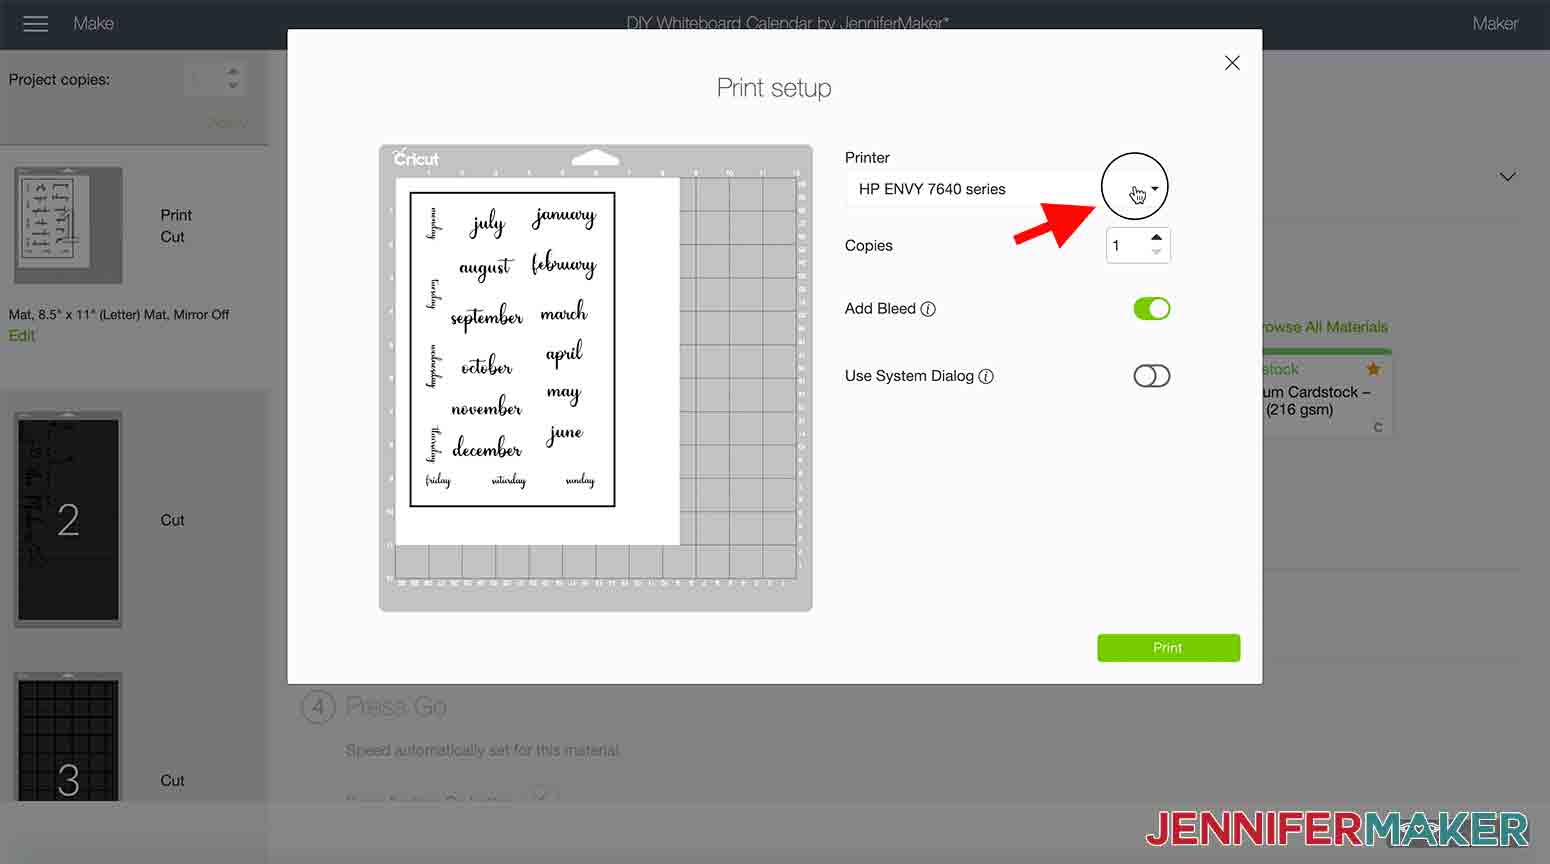
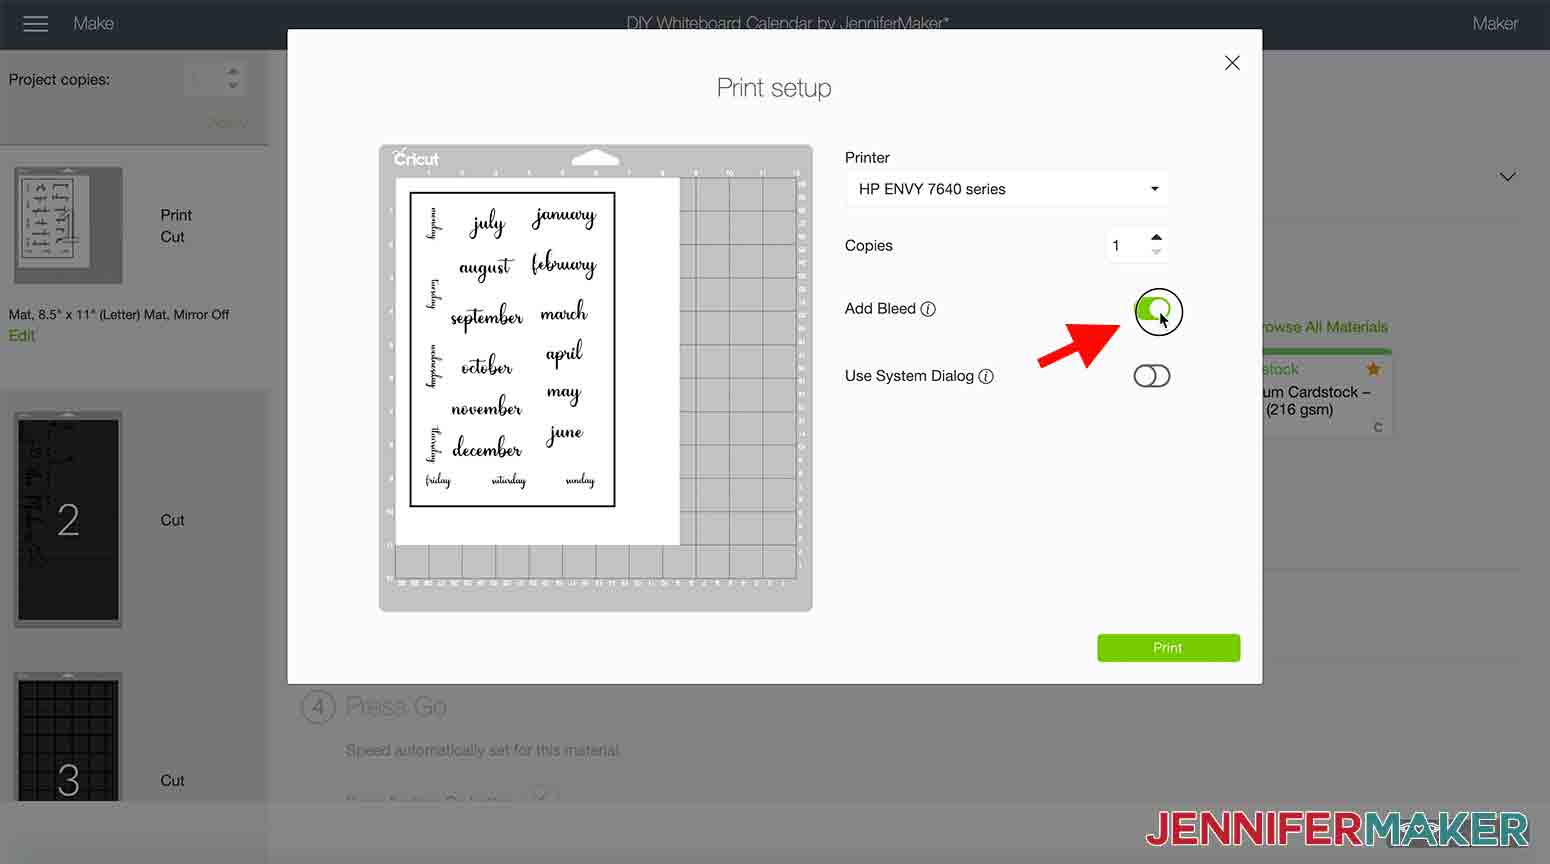
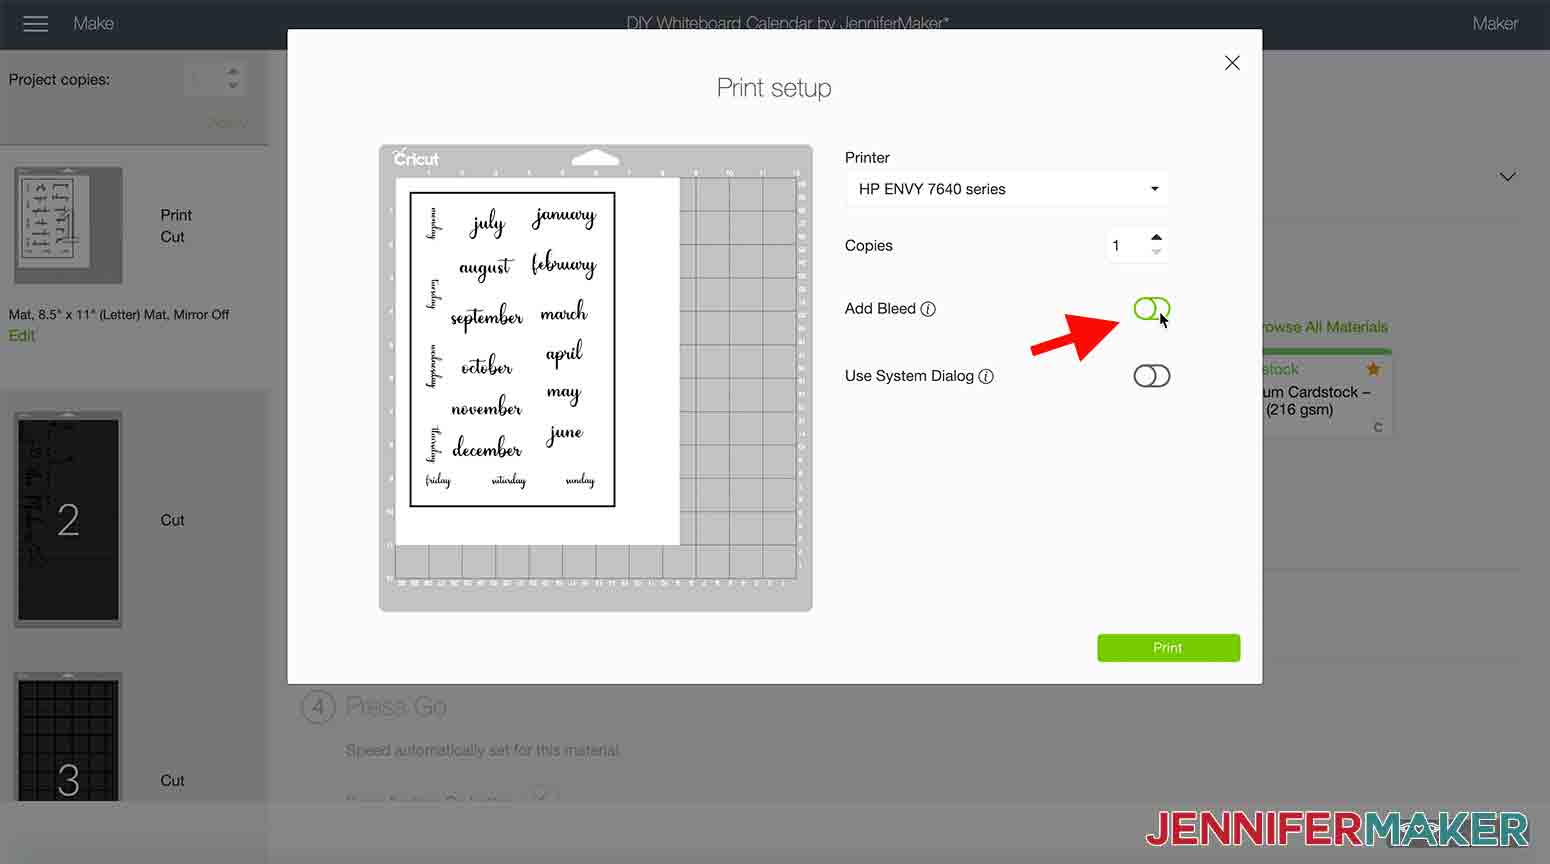
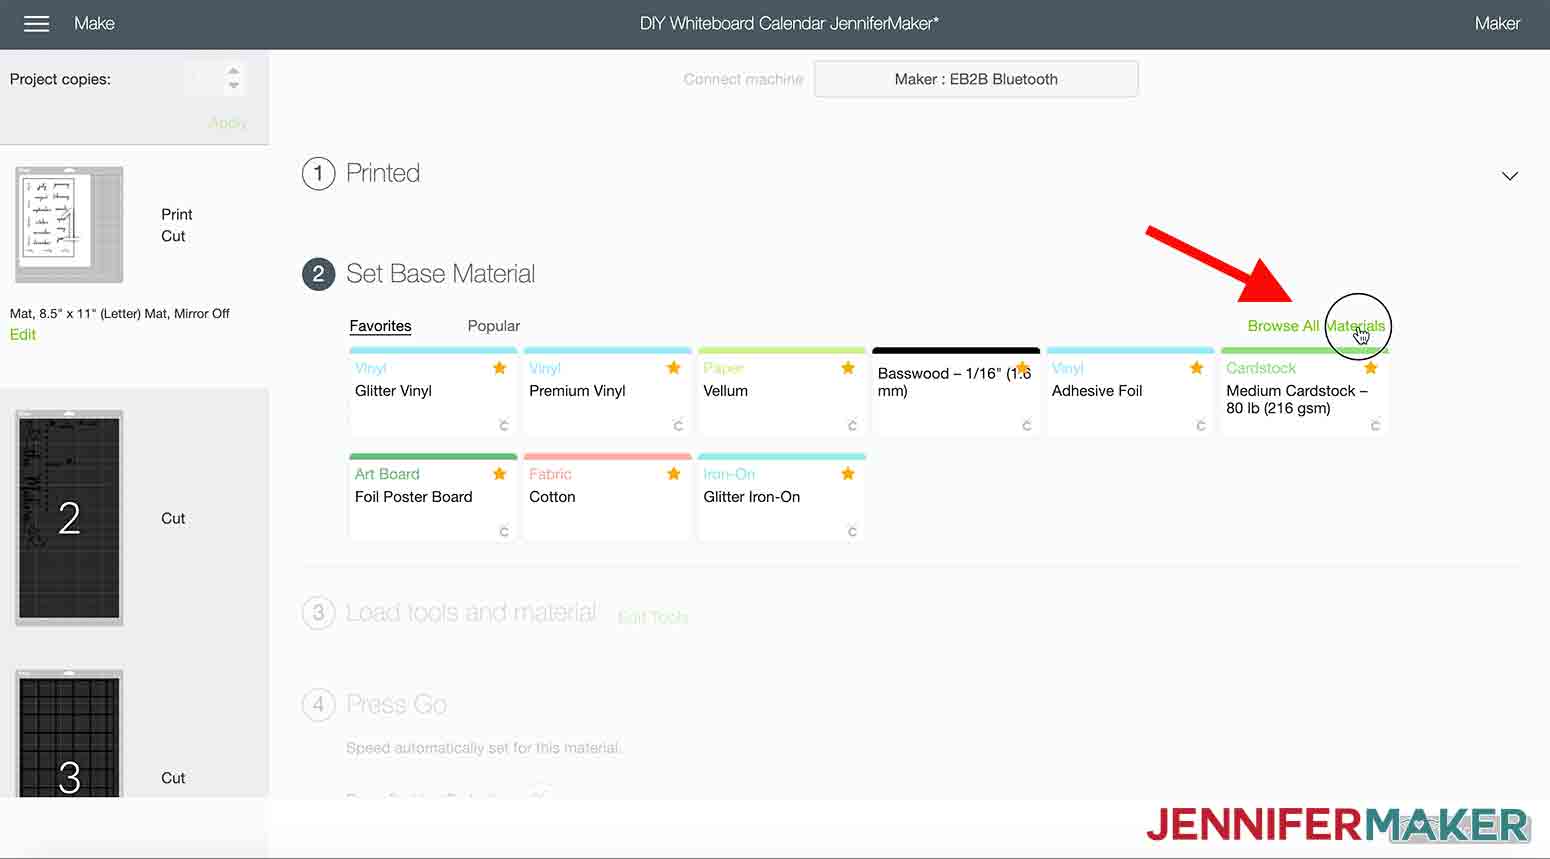
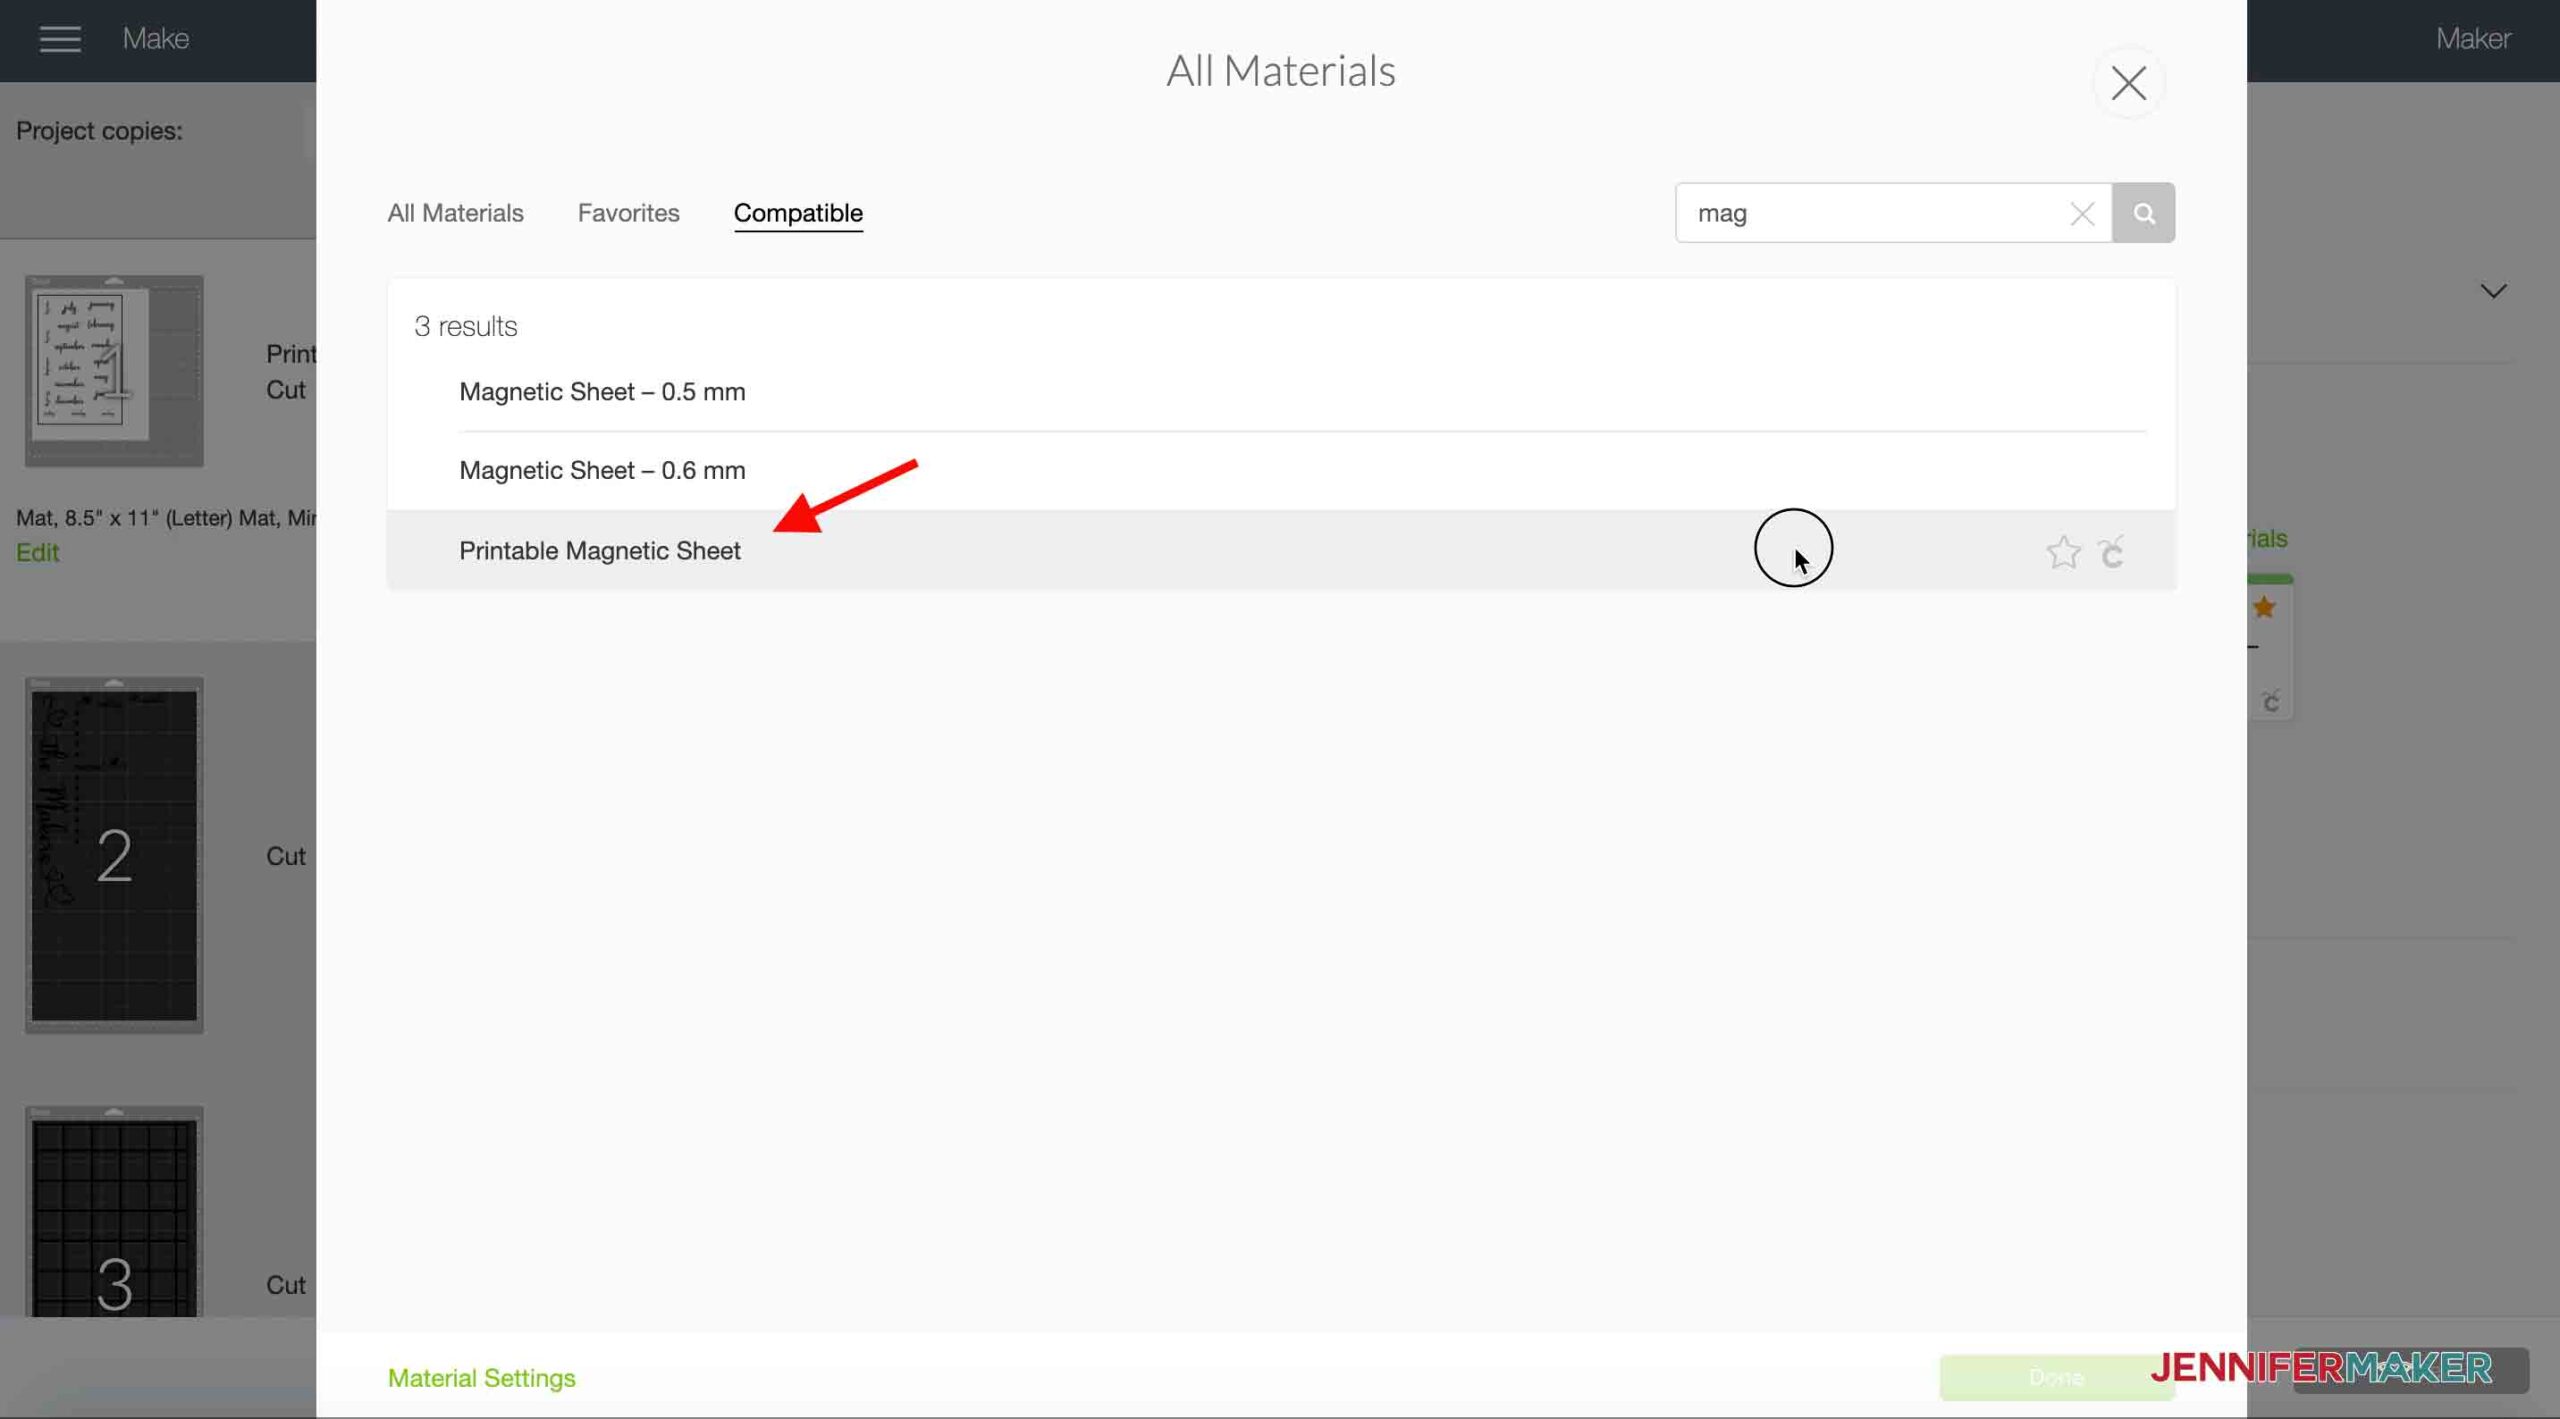
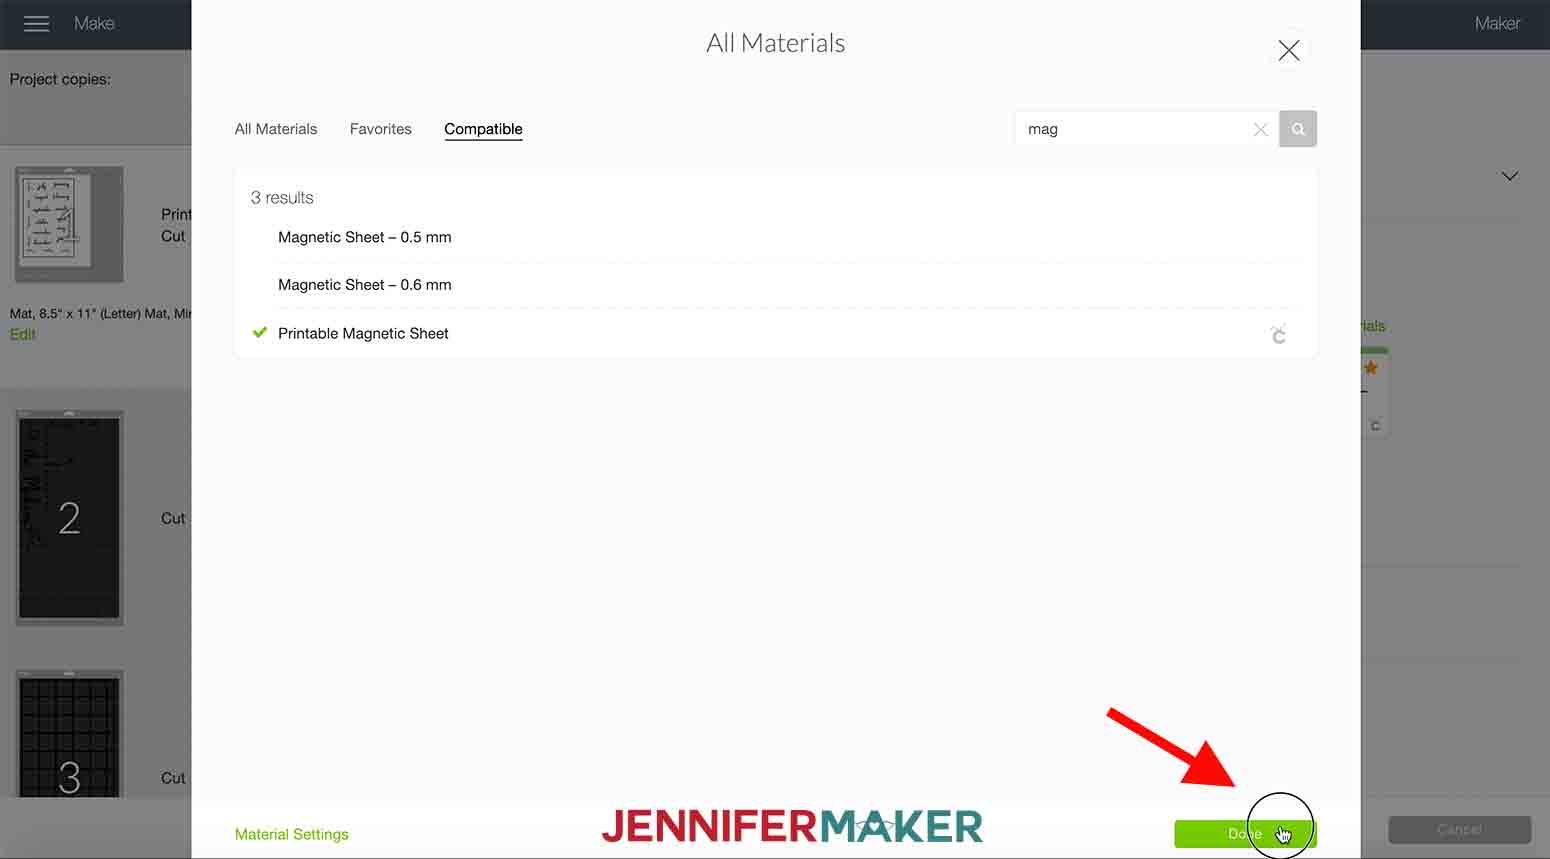
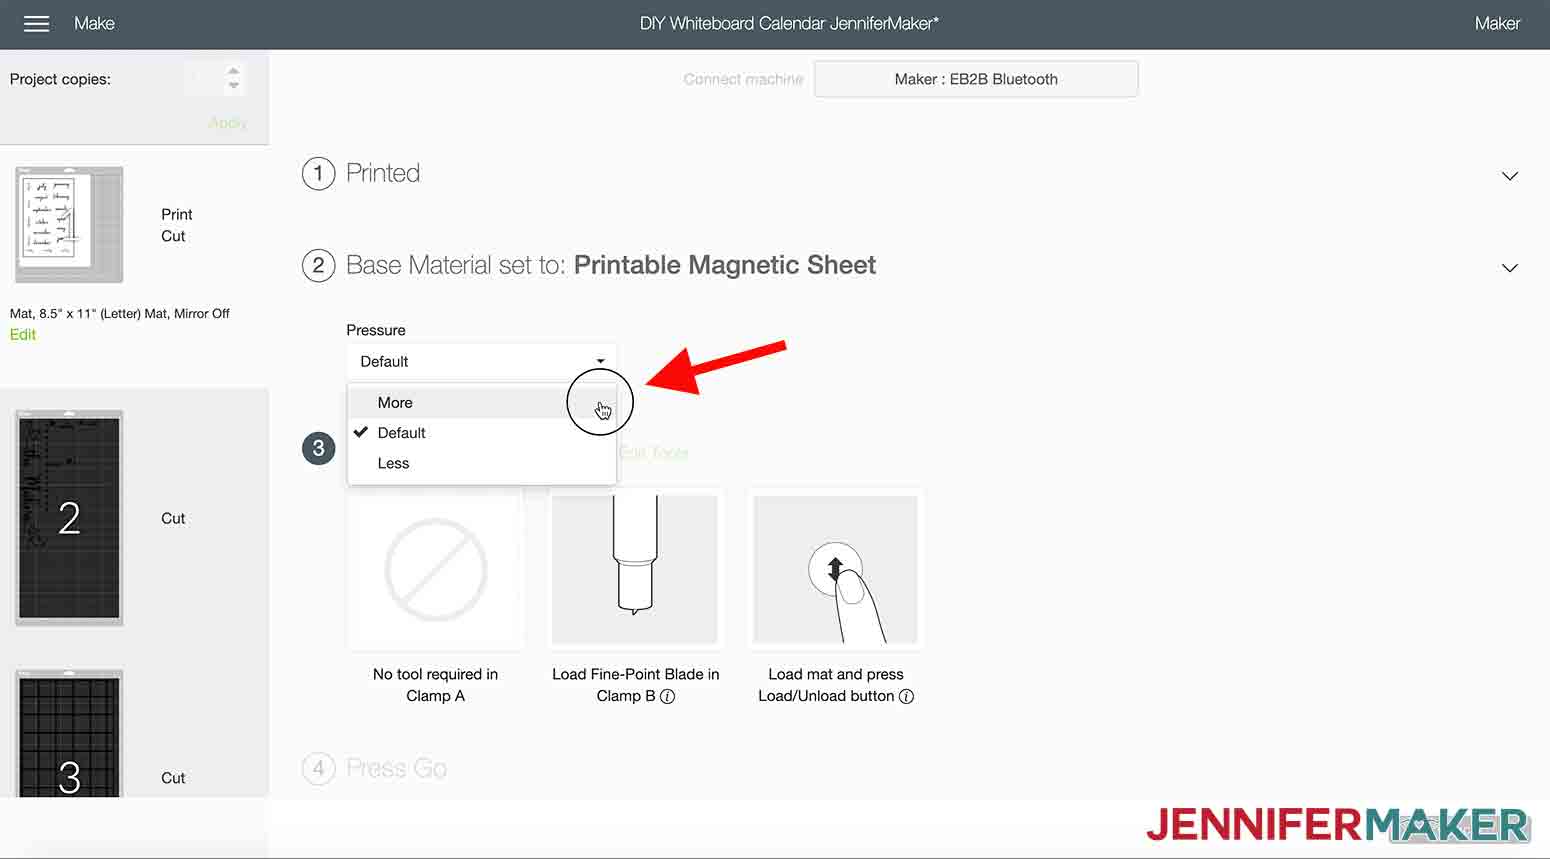
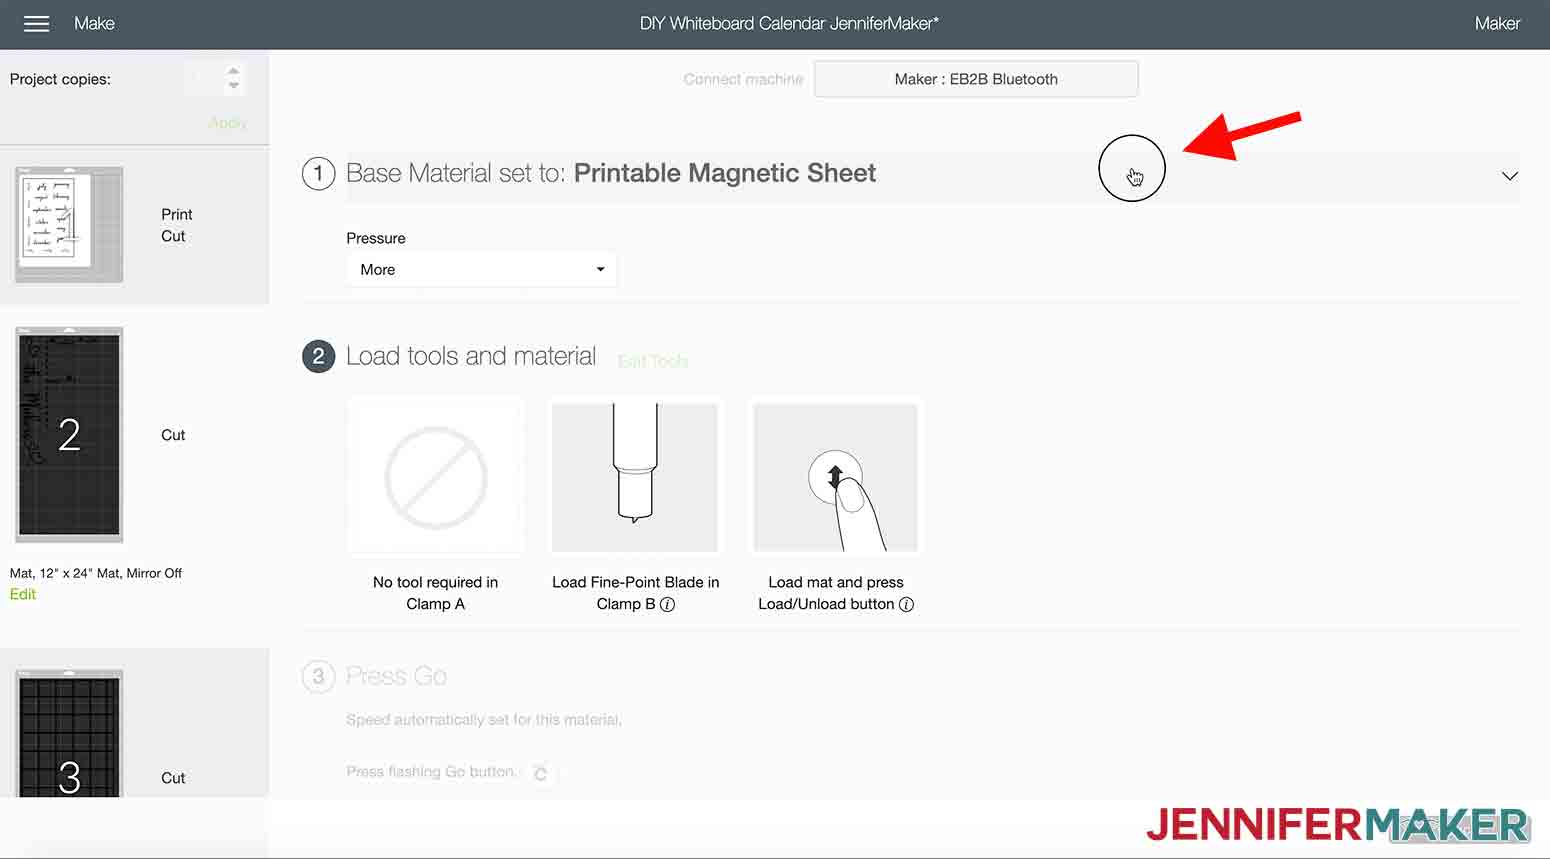
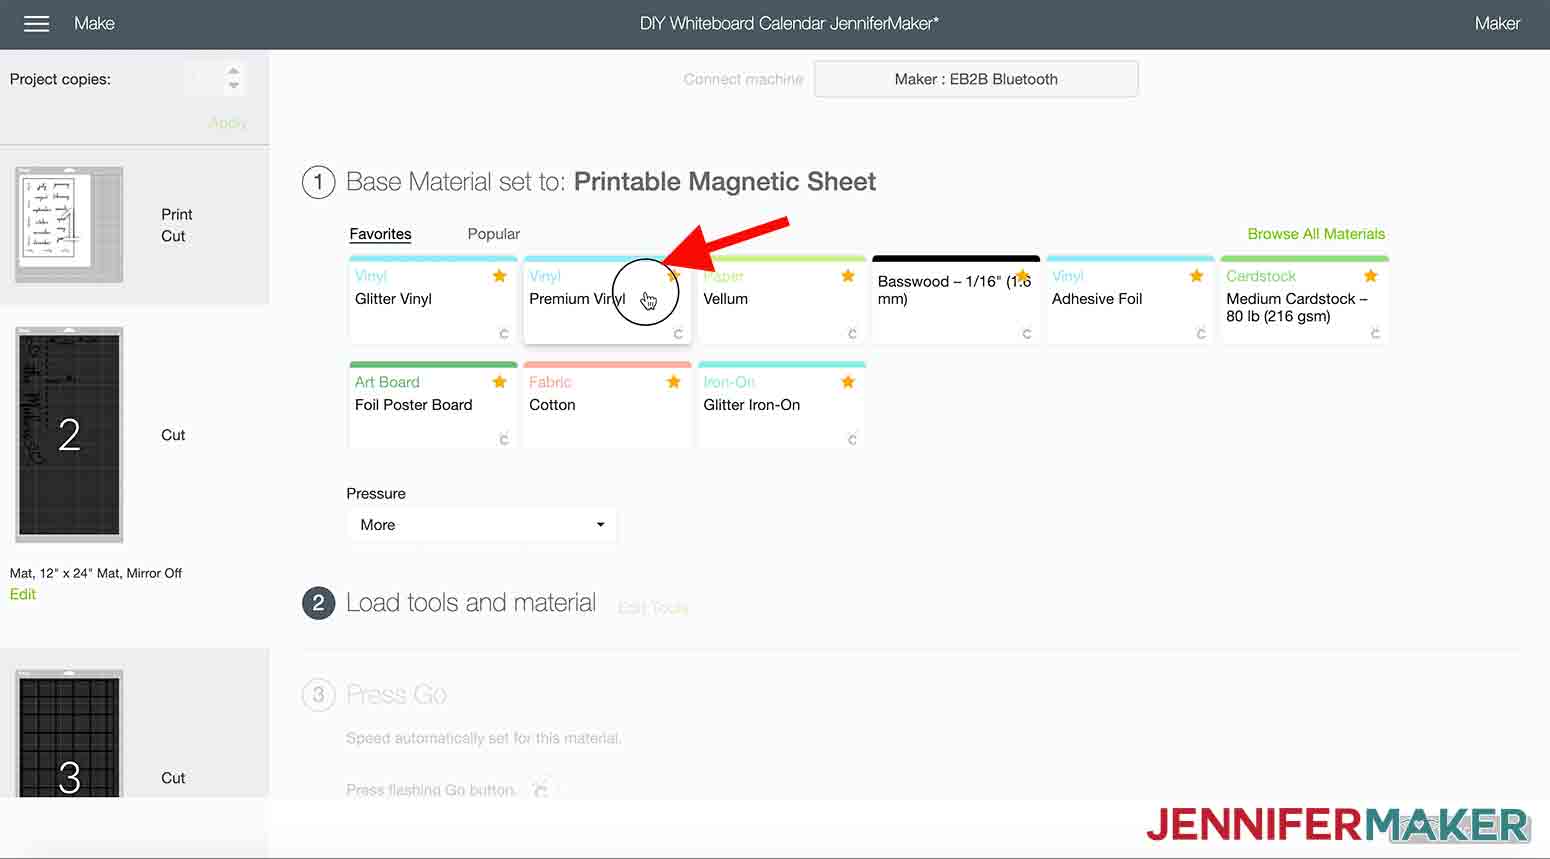
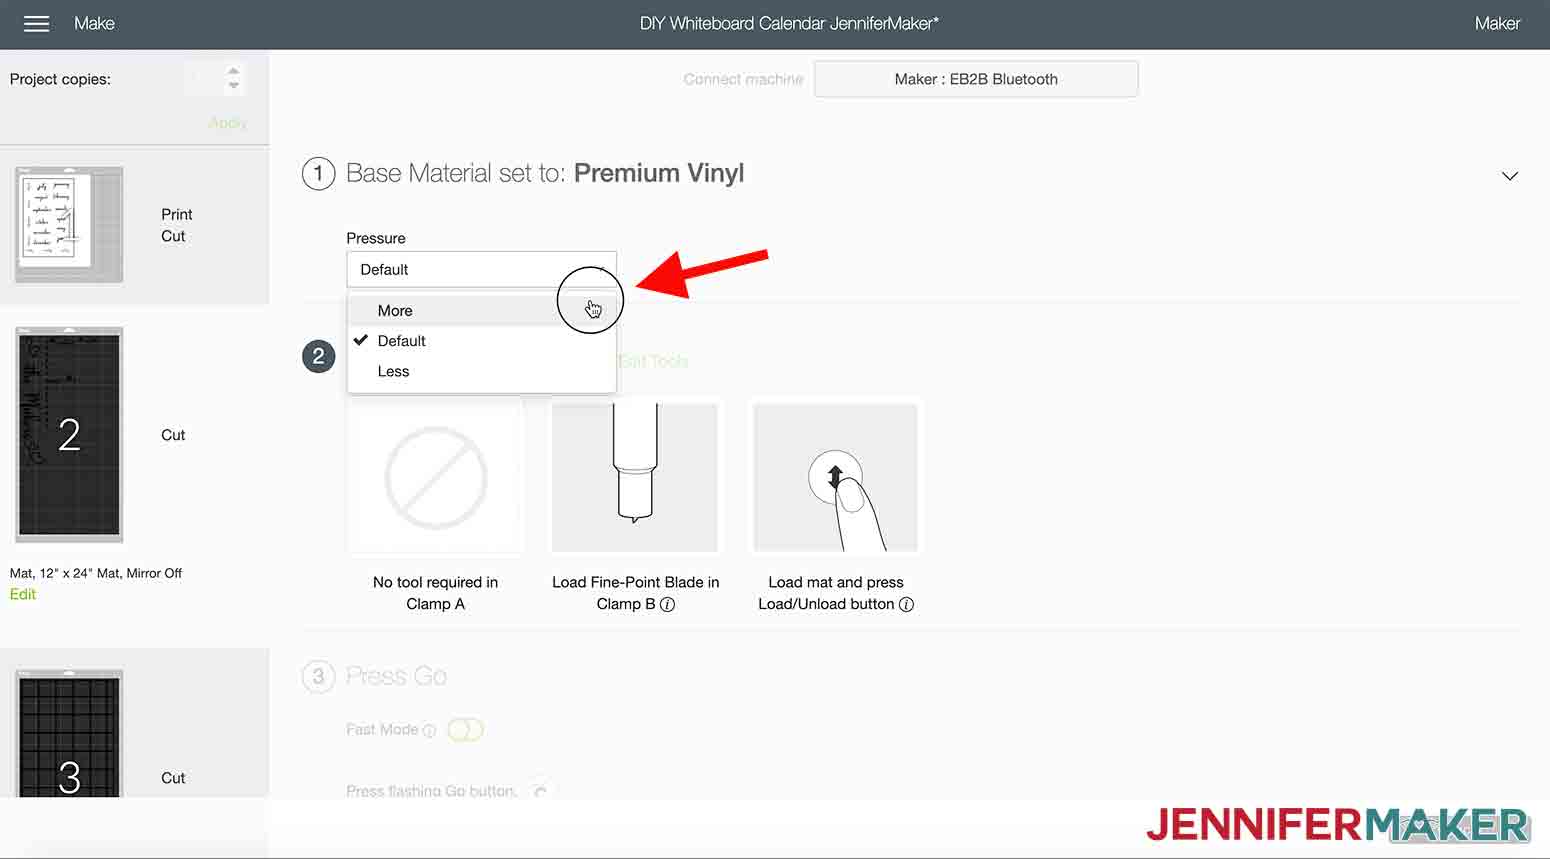
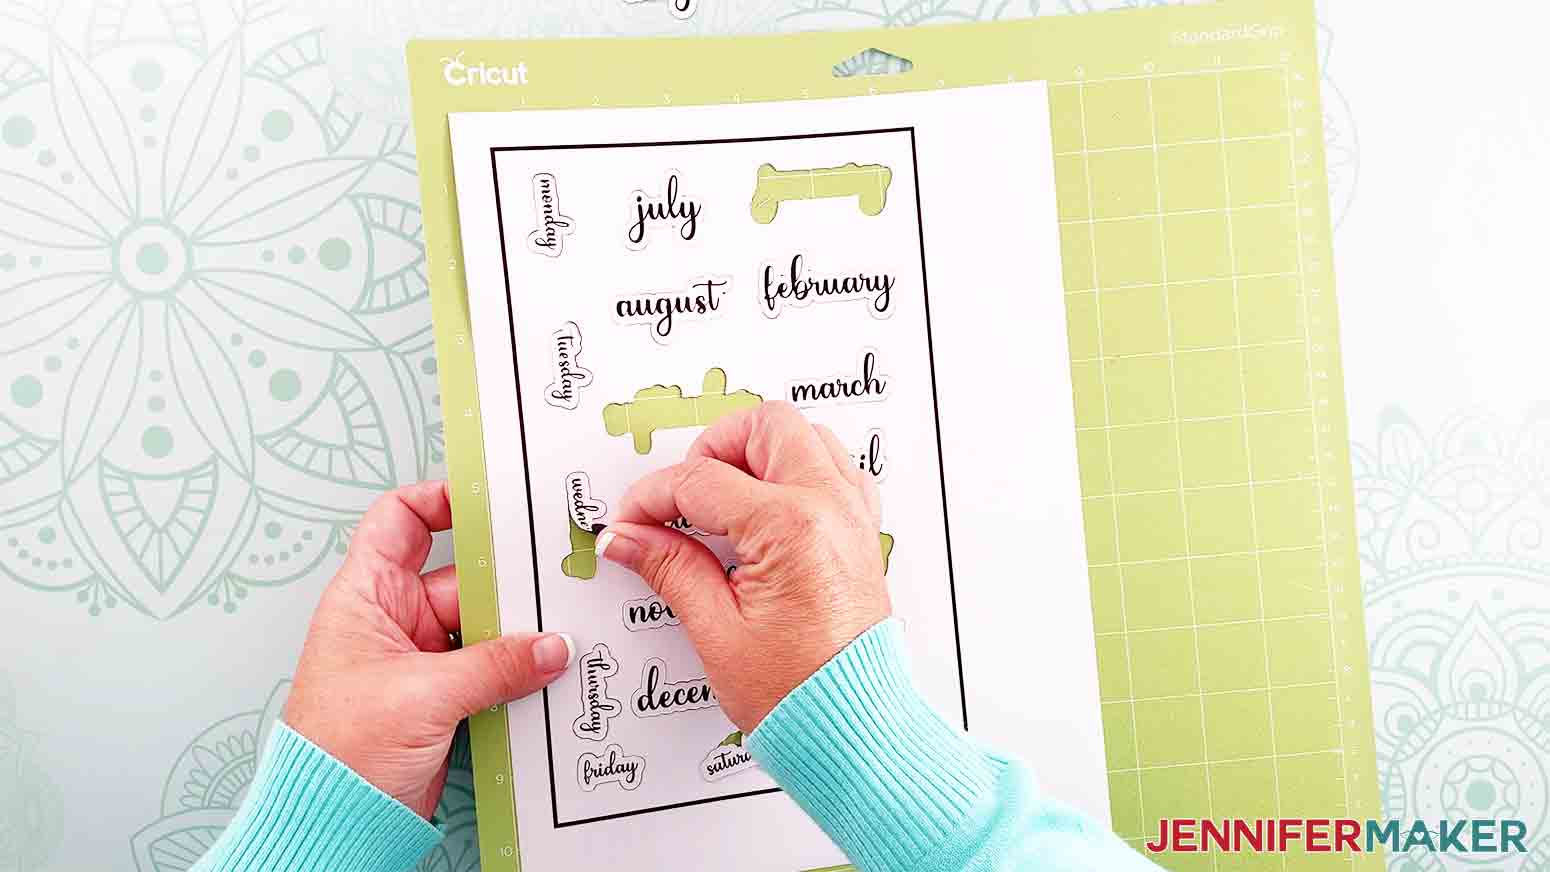
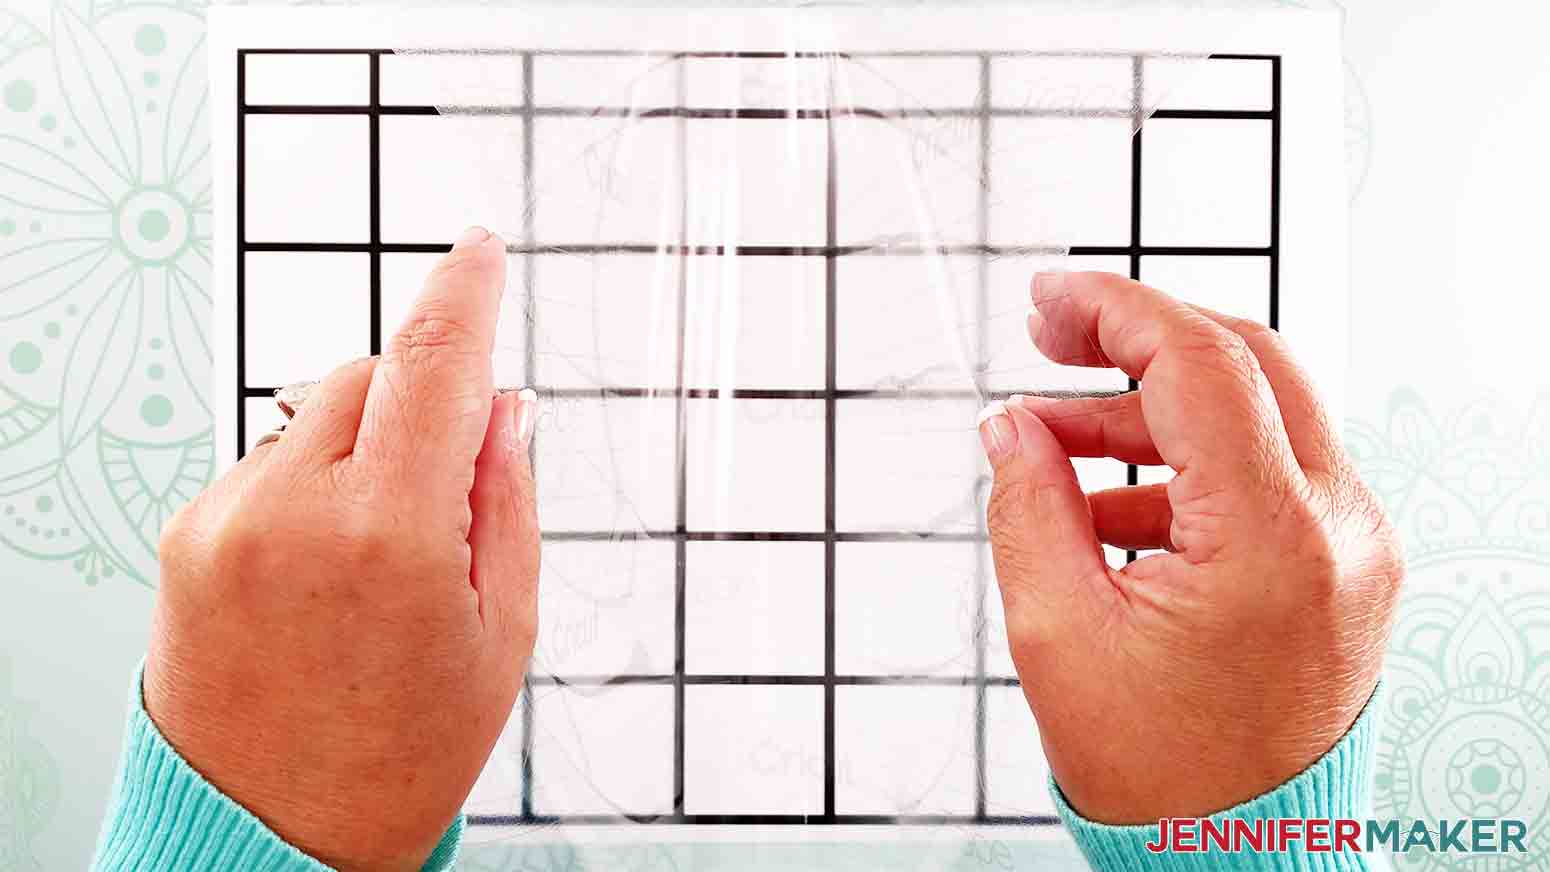
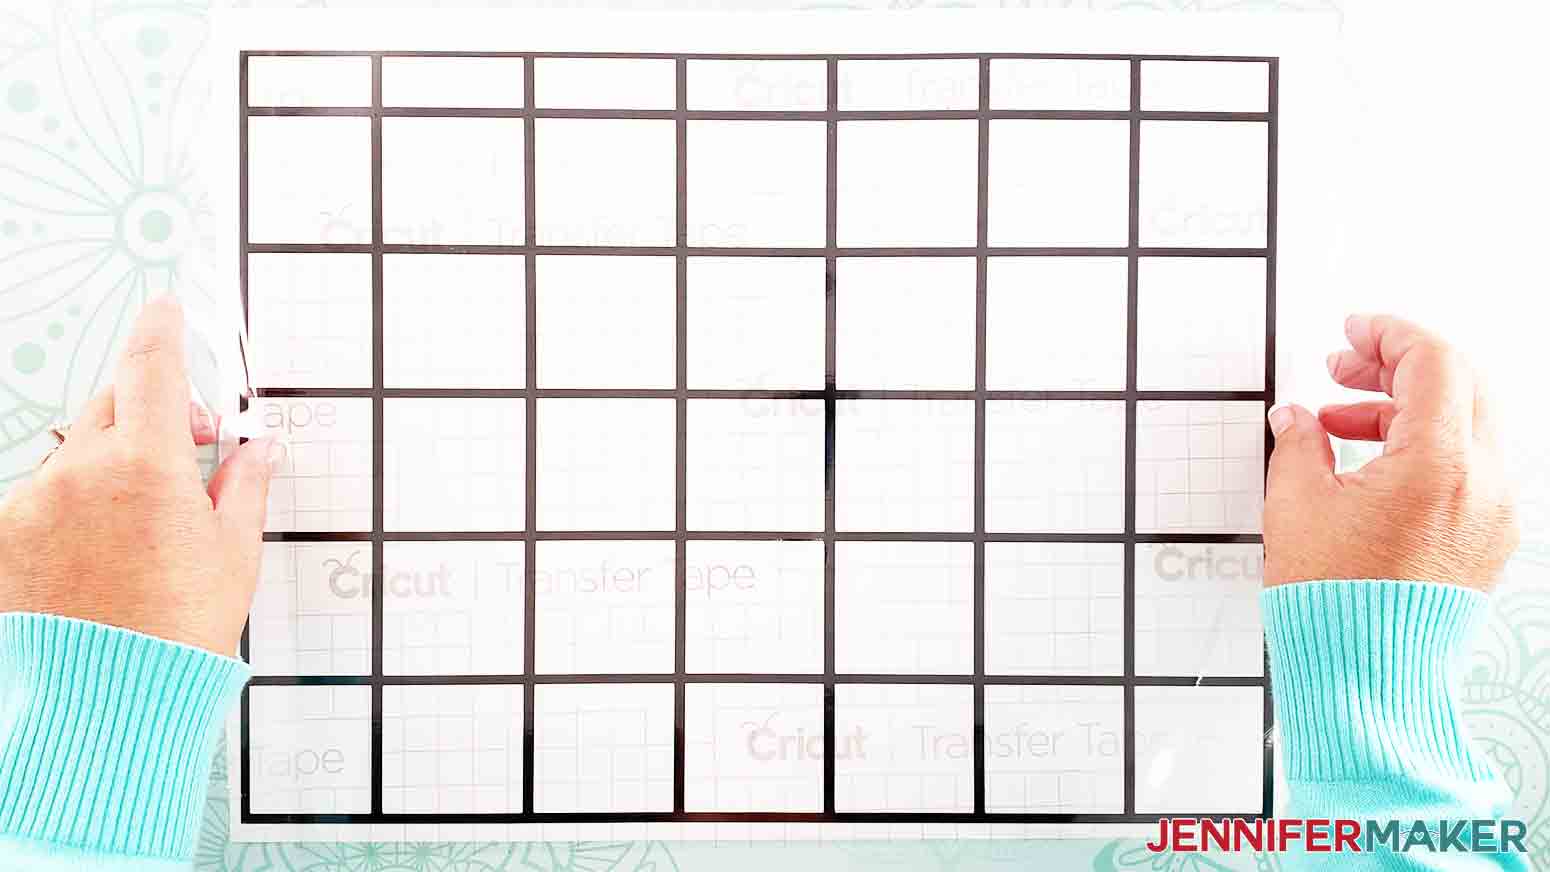
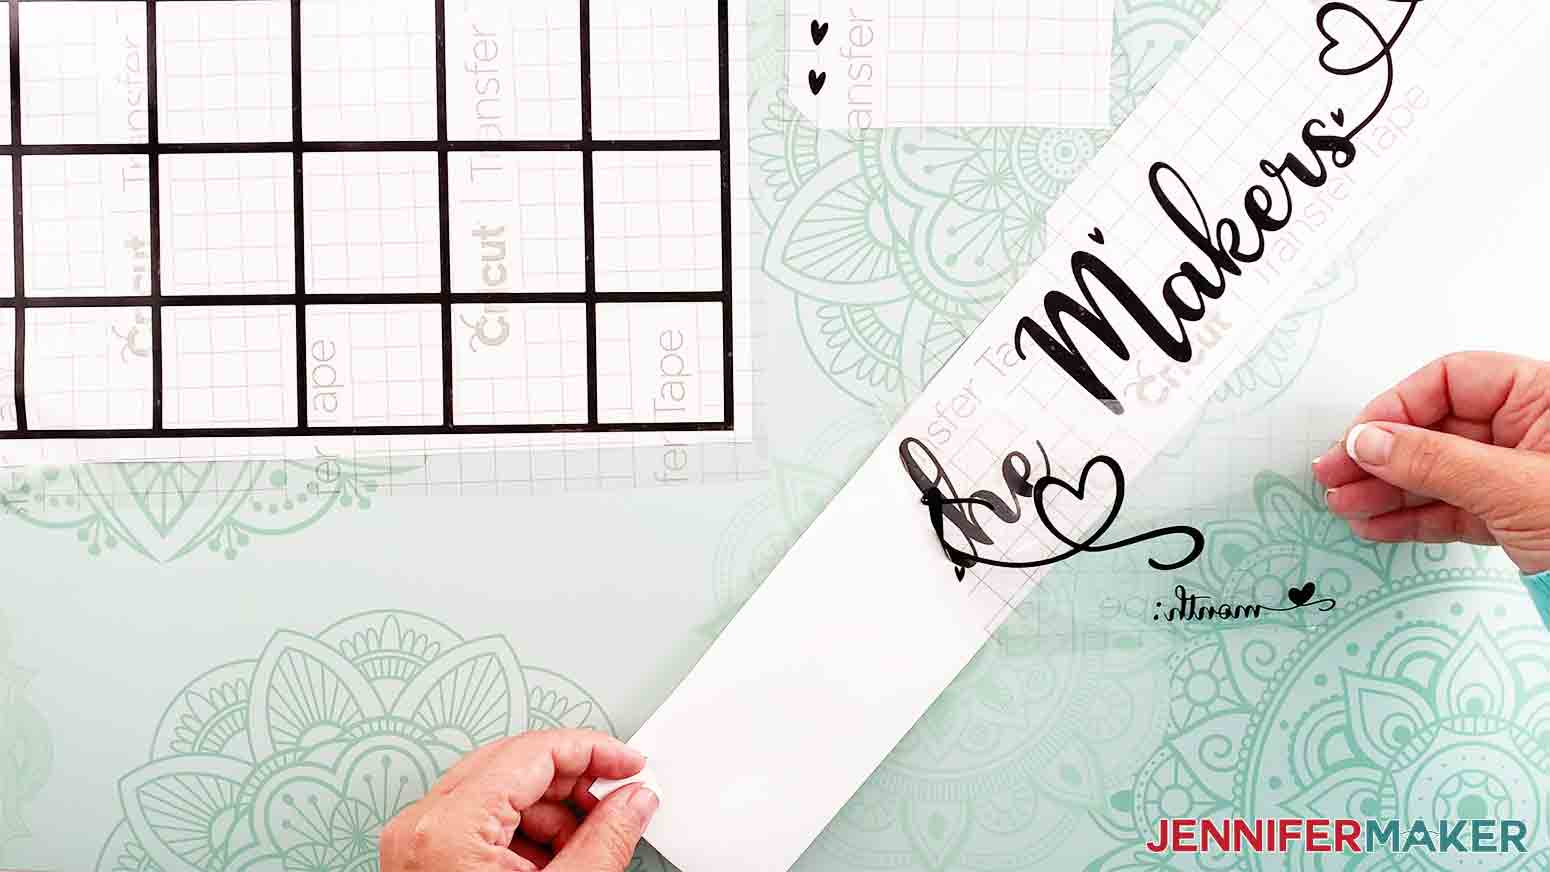
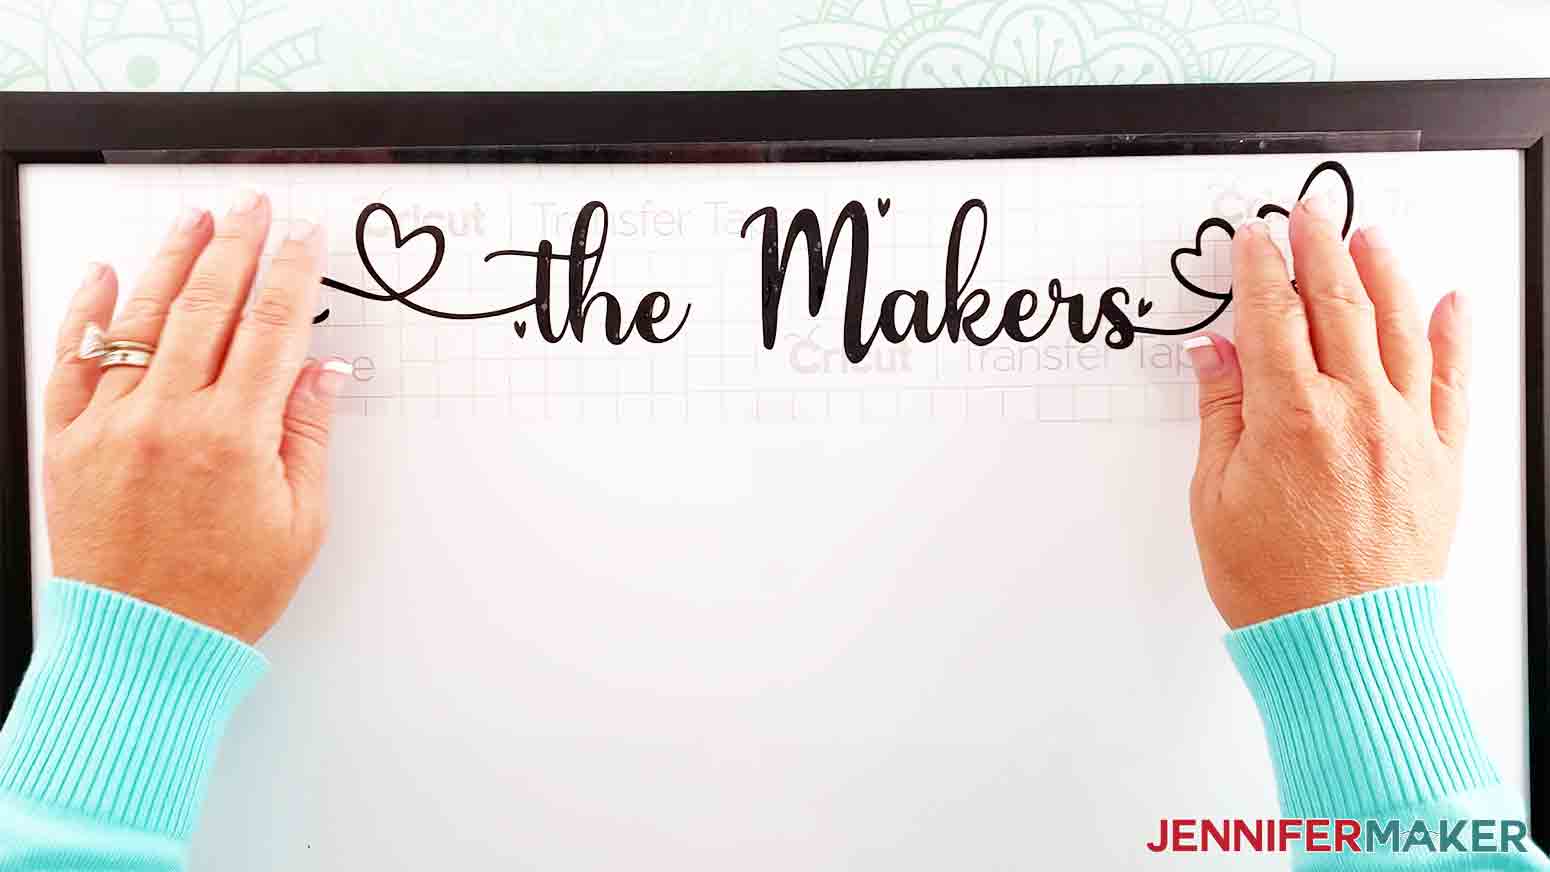
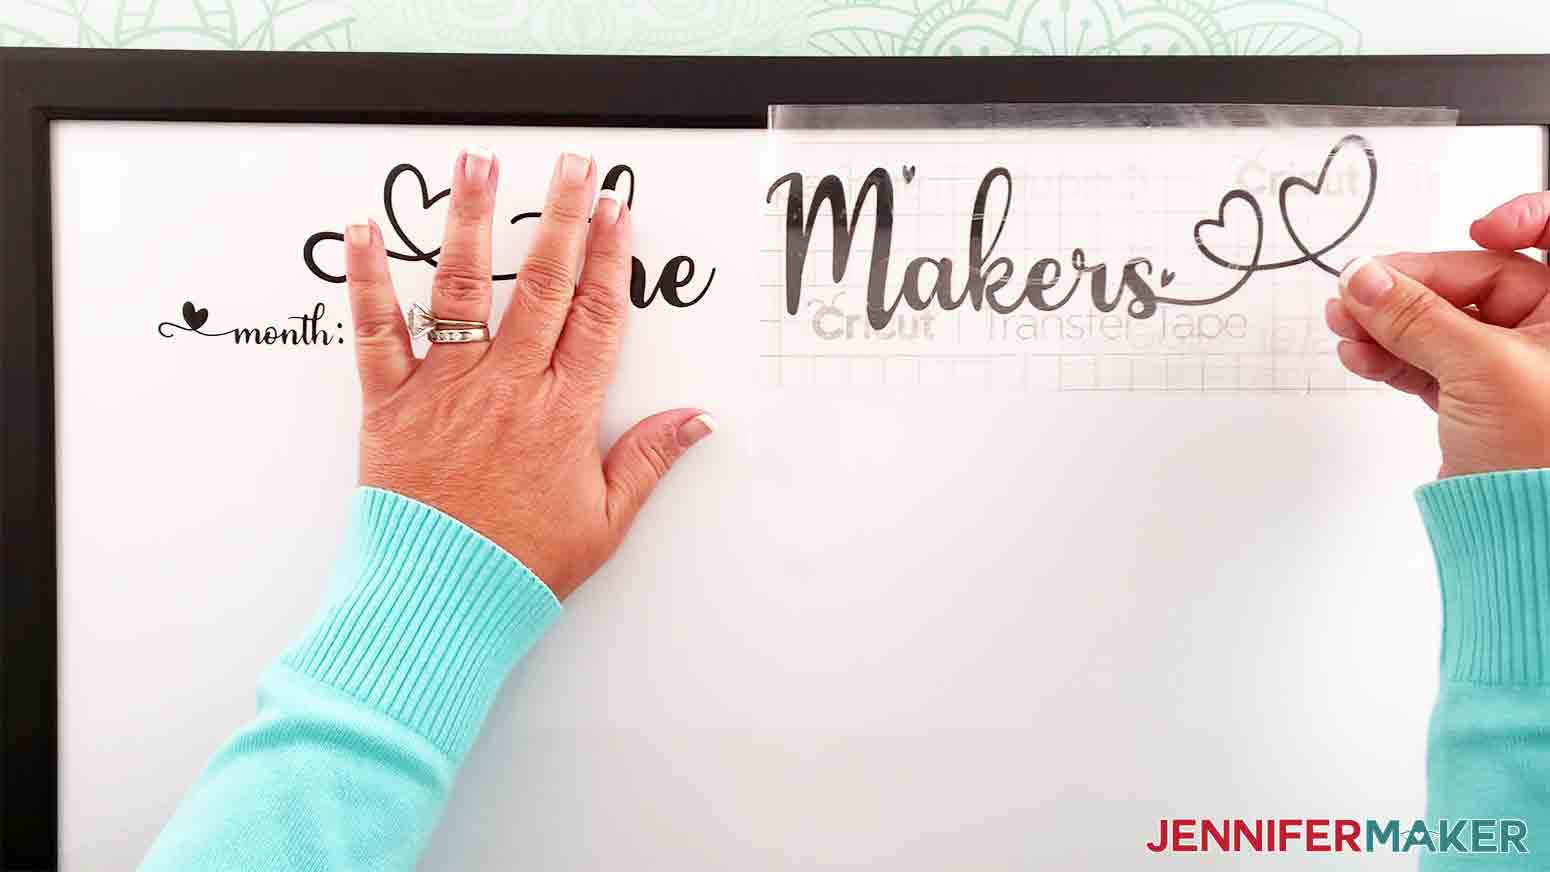
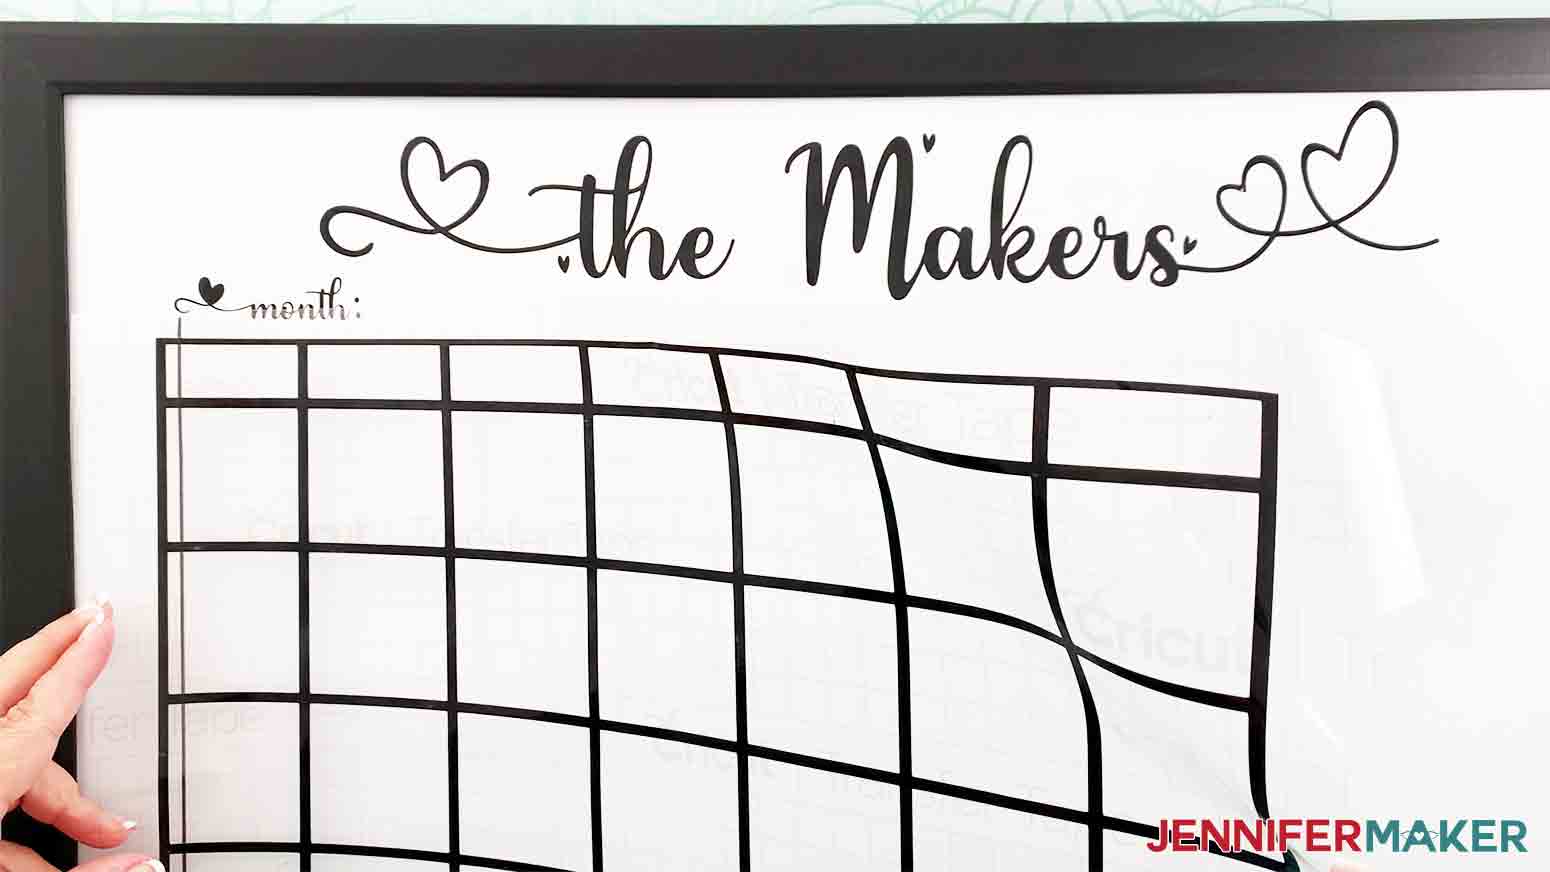
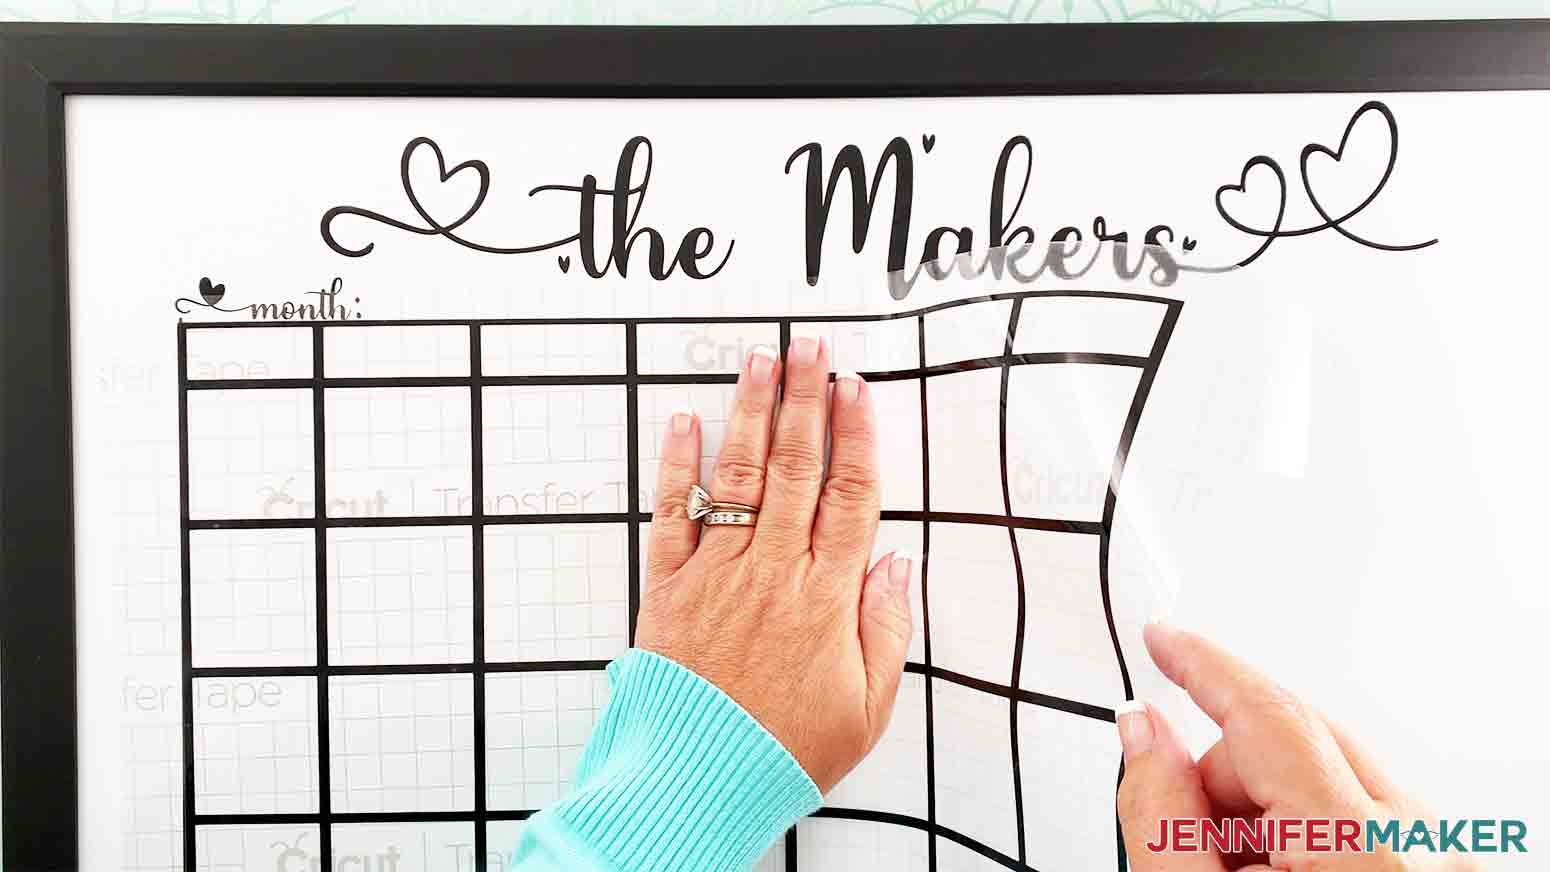
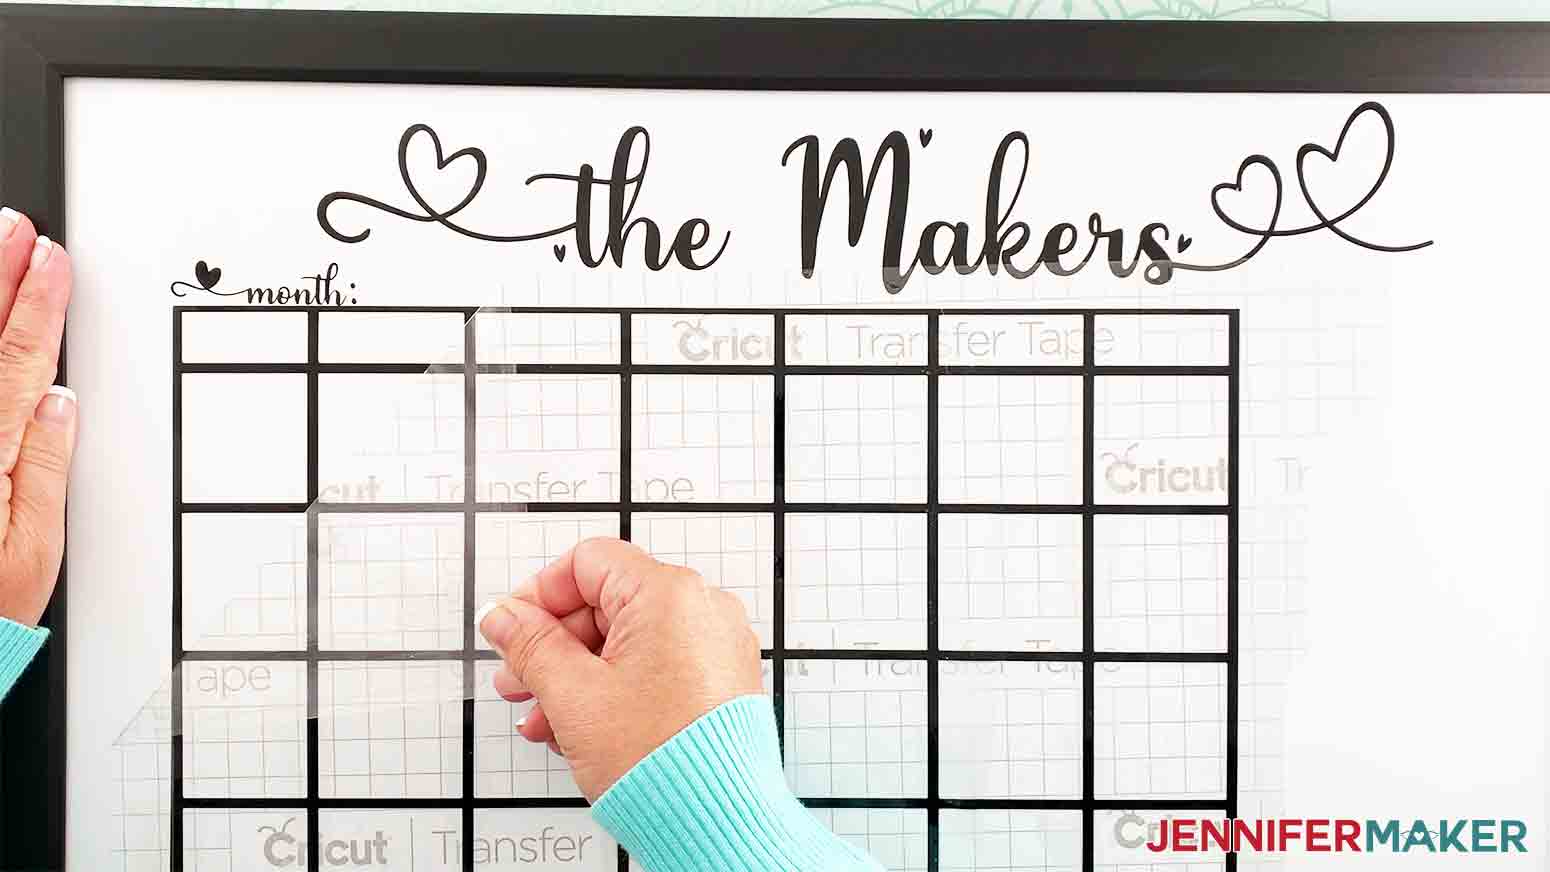
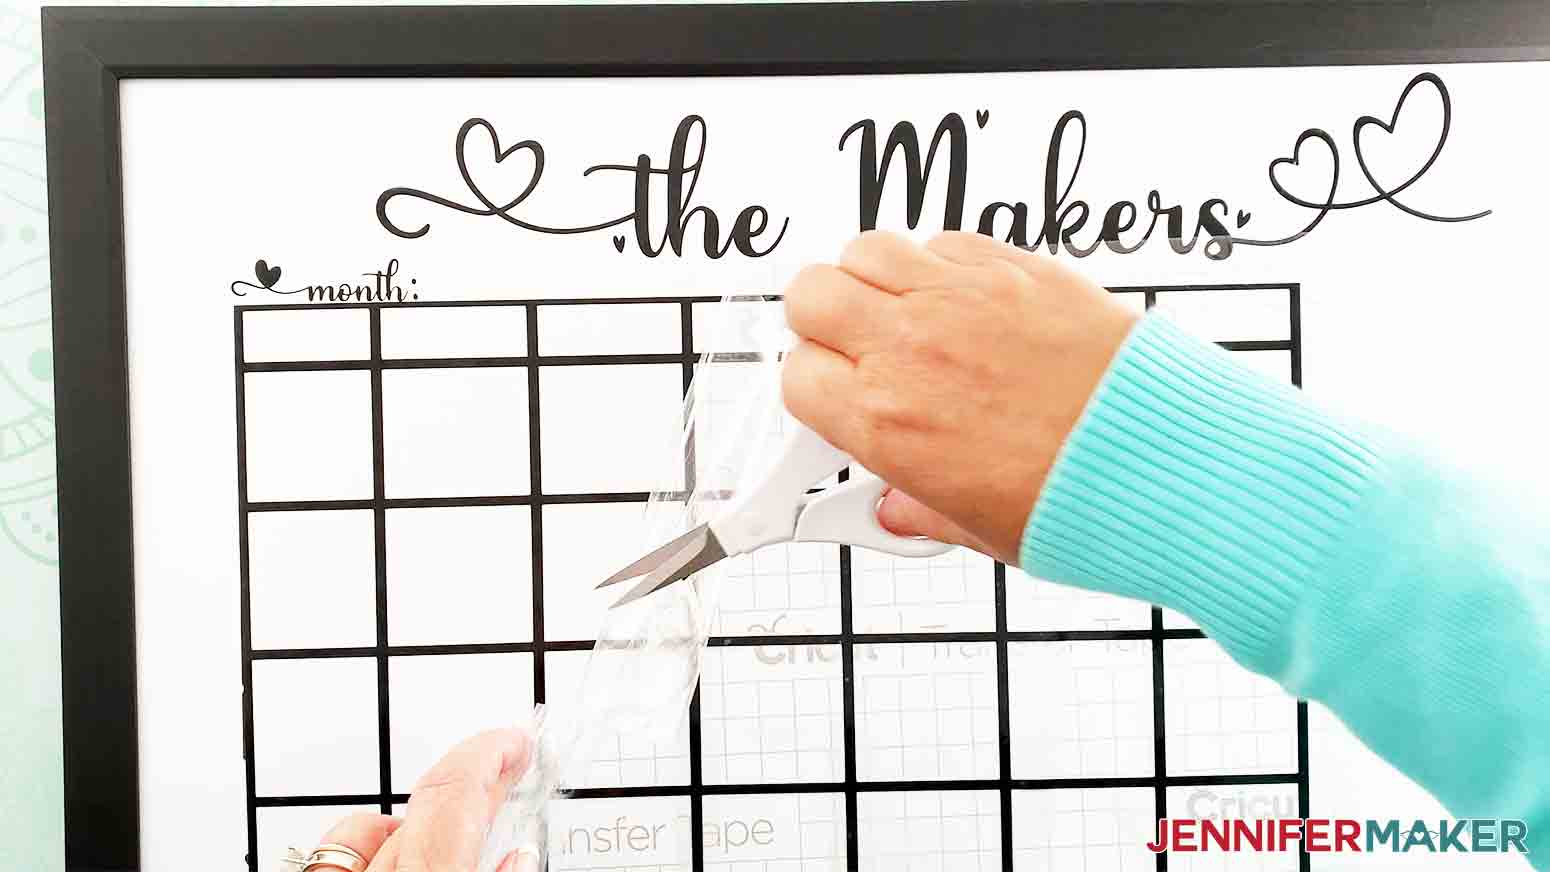
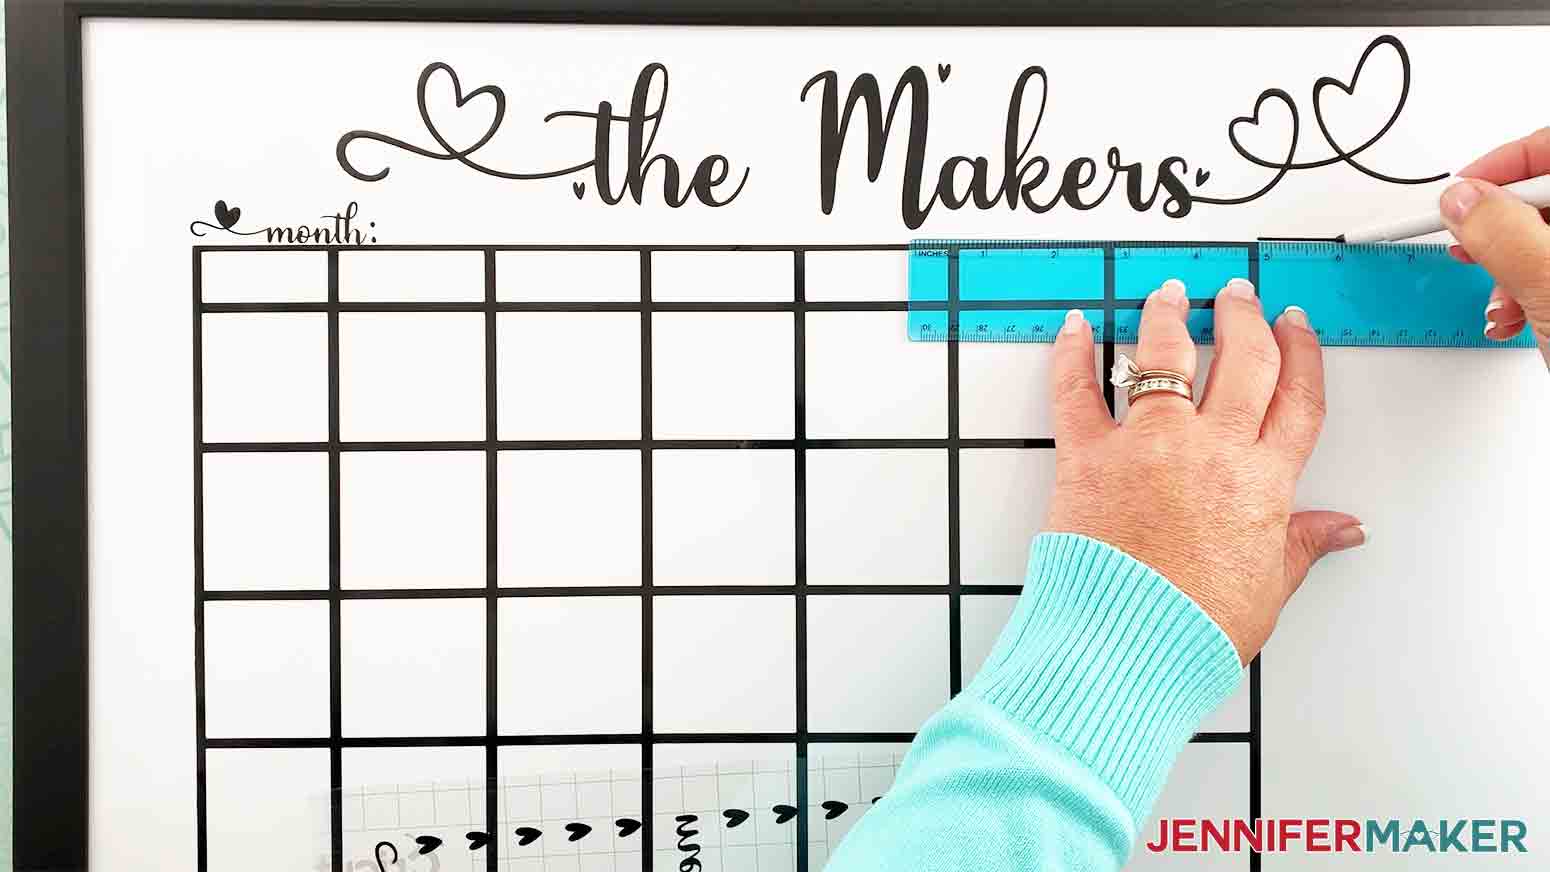
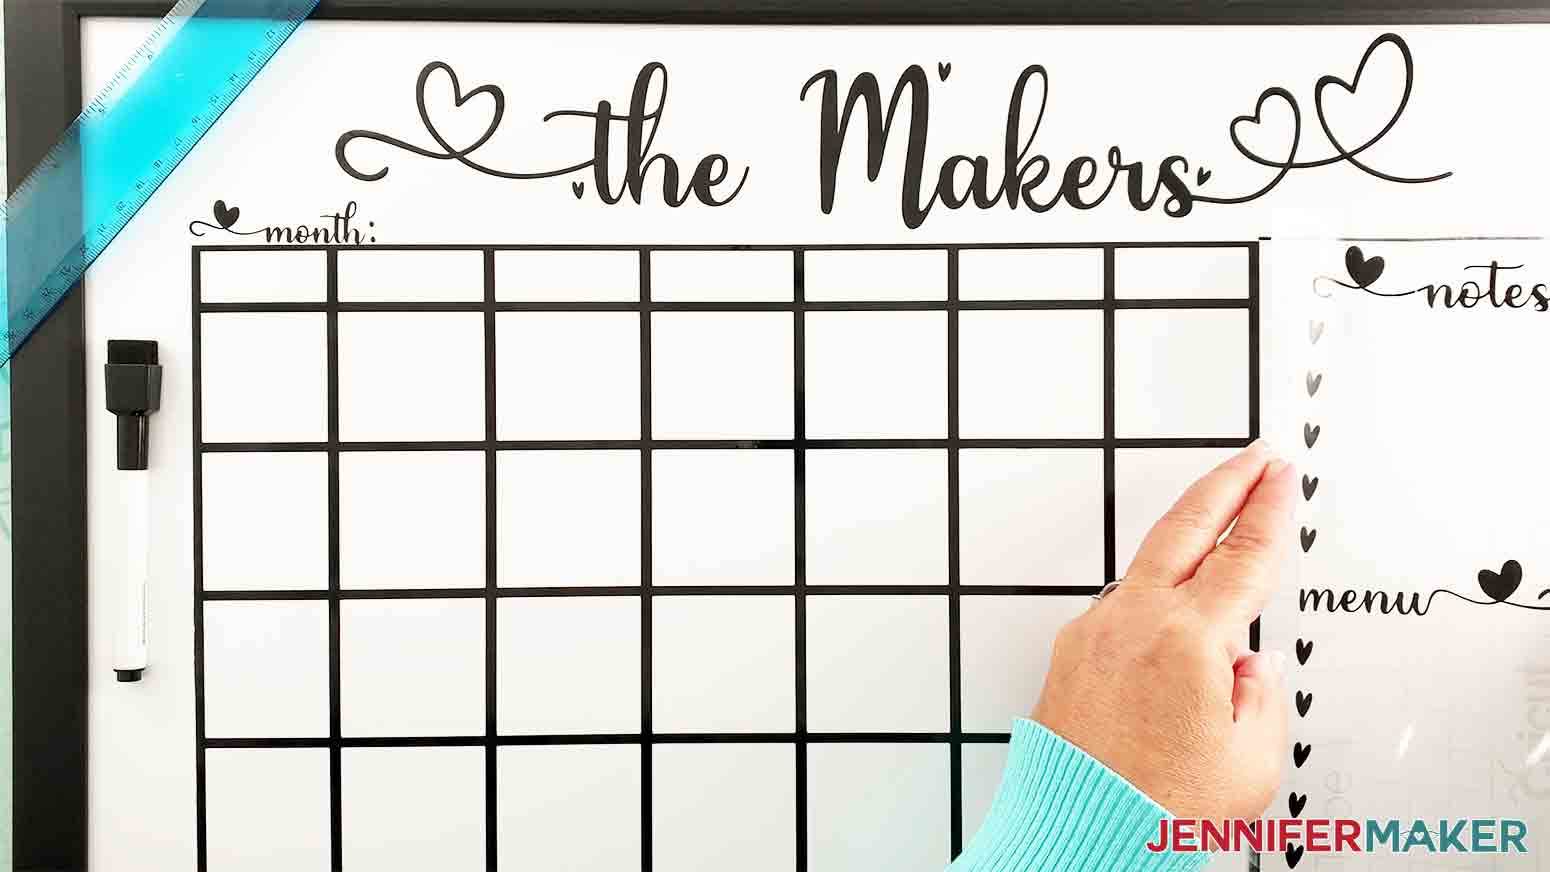
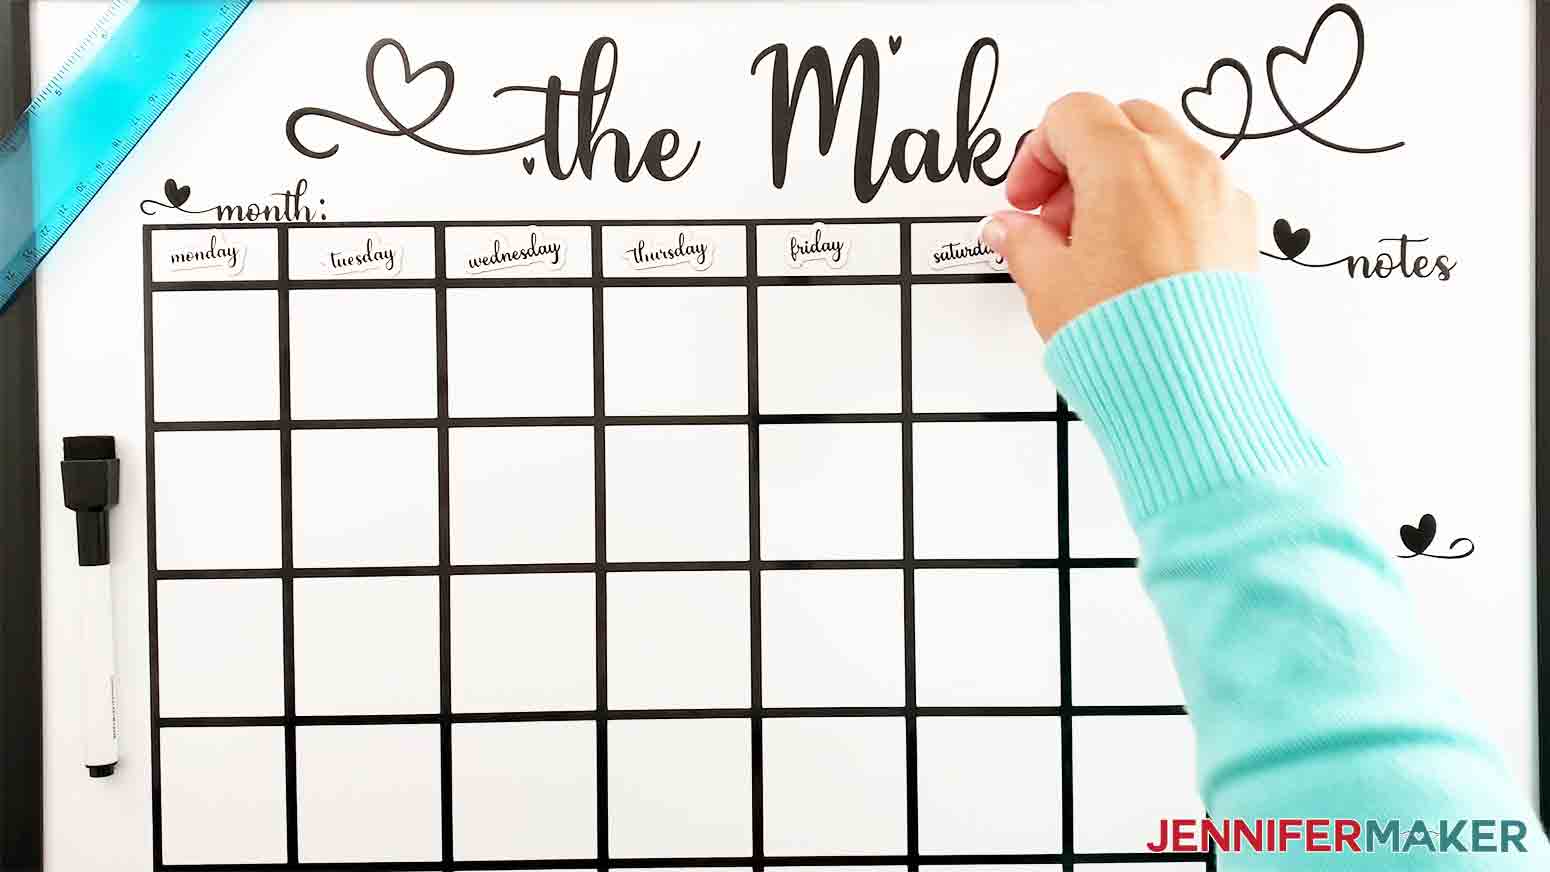
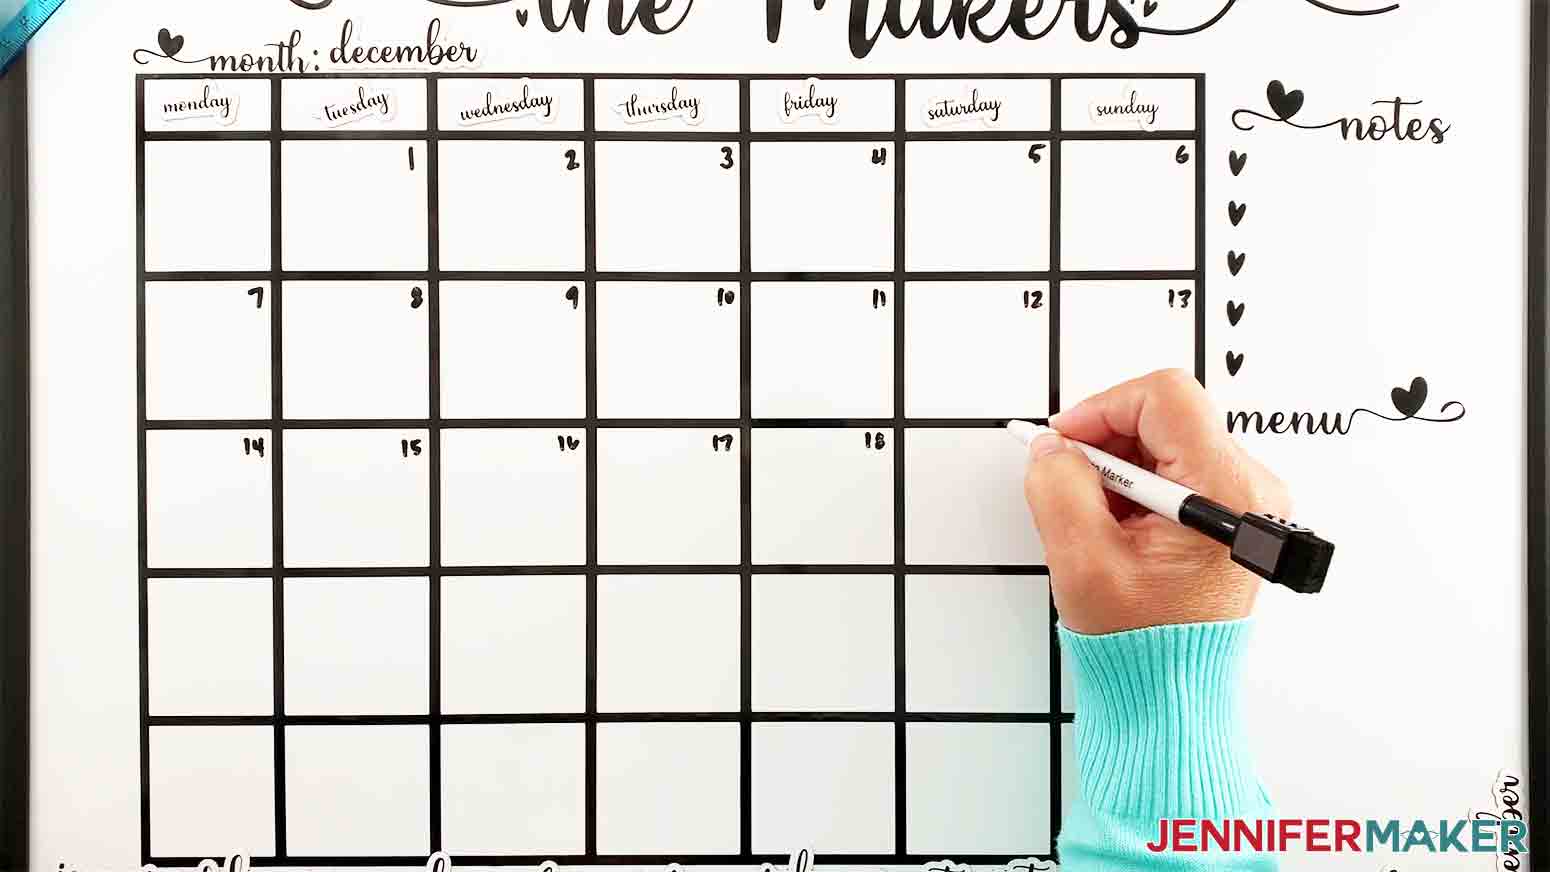
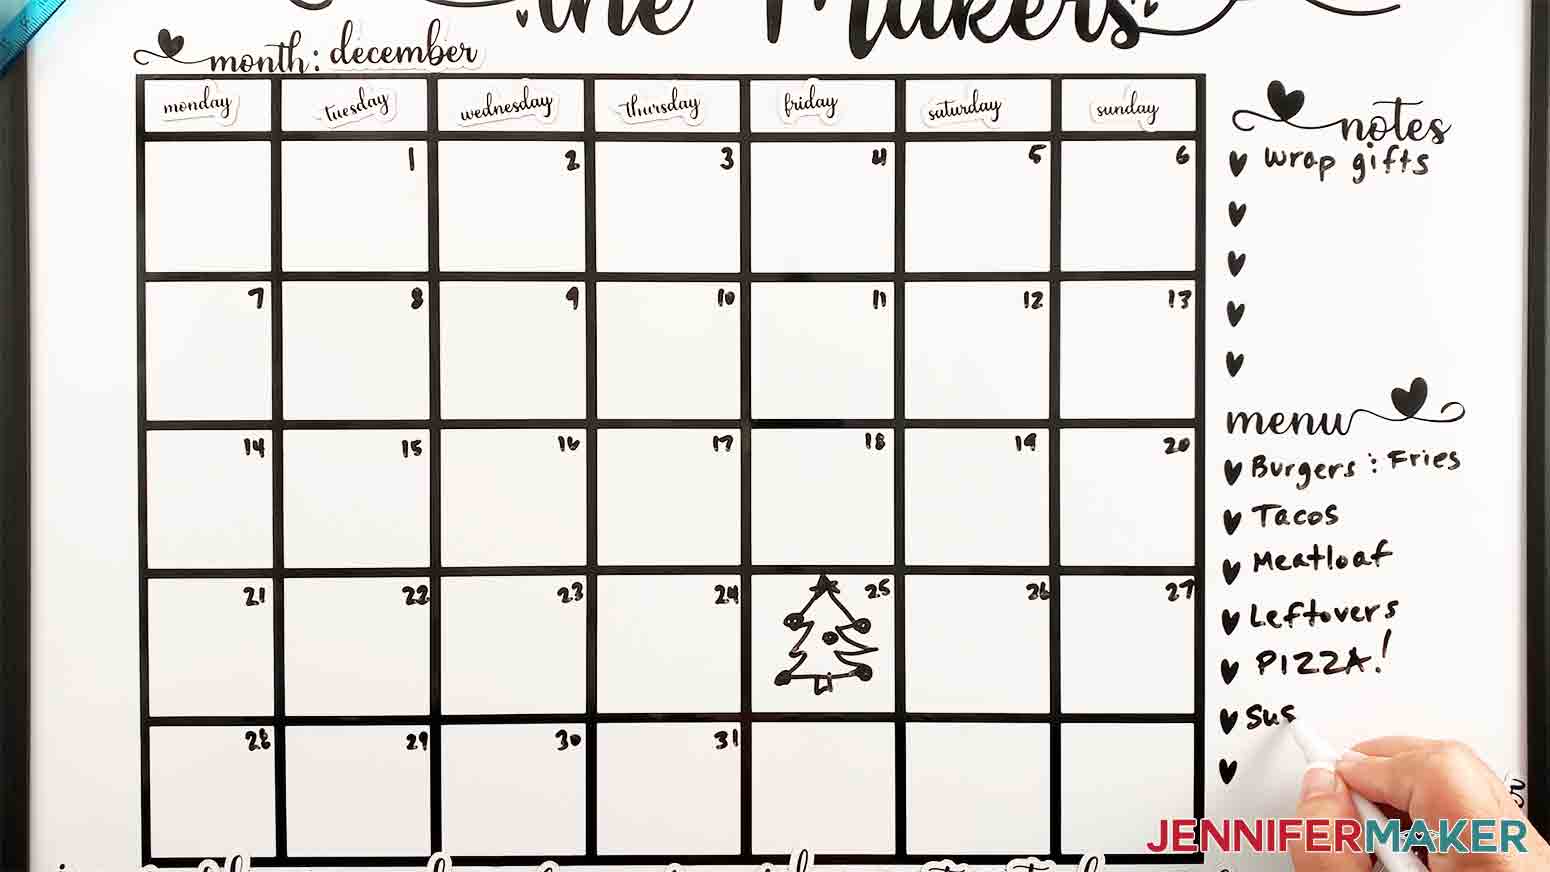
A step-by-step tutorial on how to make a DIY Whiteboard Calendar with interchangeable print & cut day and month magnets. Make one for your family and give one as a gift! Upload my DIY Whiteboard Calendar SVG files into Cricut Design Space. If you're not sure how to upload an SVG file to Cricut Design Space, watch this helpful video training series I made. If you're on an iPhone or iPad, here's how to download and upload SVG files to the Cricut Design Space app. Here's what the DIY Whiteboard Calendar SVG will look like in Design Space. Before you do anything, click on the design on your screen to select it. You should see a blue box around it. Now, zoom out to 50% to see the entire design on the screen and check the dimensions at the top, they should match mine. Once uploaded into Design Space you will first select "UnGroup" in the layers panel on the right. Once ungrouped you can customize the DIY Whiteboard Calendar by adding your last name or whatever you like in place of "The Makers". I used the "Hey Lover" font from FontBundles.net for this project. You can purchase and download that or use any font you like for the 'topper'. If you're not sure how to upload a font to Cricut Design Space, watch this helpful video I made that shows you how. To add a different name, simply select the layer on the right that says "The Makers" and hit delete. Then add your own in its place. In order to print all of the days and months on the same magnetic sheet (which you want to do) I broke them up into four separate groups during the design process. These will now need to be grouped together in Design Space. This is really easy! Click on the first "Group" you see on the right. This will highlight (grey out) everything underneath as you see here. Then click "Flatten". TIP: If "Flatten" is greyed out at the bottom of your screen and you have more than one Cricut Machine you may not have switched machines before hitting "Make It"...I know because this happened to me :). It's an easy fix! There's a dropdown menu up at the top right of the screen just to the left of the "Make It" button. Click on that and switch to the Maker or Explore and you are all set! And "Flatten". Now, click "Make It" in the upper right-hand side of the screen. Then click "OK" at the top since we will use a larger mat (12x24) to cut the vinyl. Now click "Continue" (notice all the days and months are on one mat so they will all print out on one magnetic sheet). Load one 8.5" x 11" printable magnetic sheet into your printer feeder tray. Here's what they look like: Make sure to follow your printer directions to print on the correct side. And click "Send to Printer". Next is the "Print Setup" page. First, make sure you choose your printer from the top dropdown box. Next click the toggle next to "Add Bleed" to turn it off... You should hear your printer fire up and print now. TIP: Before you remove the printable magnetic sheet from the printer make sure to give it time to dry so the ink doesn't smudge. This won't take long, it's just a good idea so you don't have to do it over. Once it's dry, place the magnetic sheet on a StandardGrip Mat as shown on the screen above to cut. Once the magnetic sheet prints, you will see this screen. Click on "Browse All Materials". In the search bar type "mag" and select "Printable Magnetic Sheet" and click "Done". And I always choose "More" under Pressure for my cuts. Then load your mat with the magnetic sheet into your machine by pressing the blinking up/down arrow, then click the "C" button when it starts blinking. When the cut is complete, carefully remove your "day and month magnets" from the mat. Now onto the vinyl cuts. On the left notice mat two is now in queue. Click on the arrow on the upper right to reveal the materials list so you can change materials. Select Premium Vinyl. Again choose "More" pressure in the dropdown box. The first piece of vinyl should measure at least 7.5" x 18.5" (this is why we need the 12" x24" mat). Once you place the vinyl on the mat, use the Cricut Brayer to smooth out all the bubbles. Now load the mat into your machine by pressing the blinking up/down button. Once loaded, hit the "C" button to cut. Once the cut is done, unload the mat and peel off the vinyl. Now apply your second piece of vinyl to the large StandardGrip Mat. This piece needs to measure at least 12" x 16". Make sure to use the brayer again to smooth out the bubbles before loading the mat. Once the cut is done, remove the mat and peel off the vinyl. Here's what all your cut pieces should look like: The print and cut magnet pieces should pop out very easily. Now weed everything and apply transfer paper. You will see that I like to bend my transfer tape with both sides up into a "taco" shape and then apply it to the vinyl from the center out. Now carefully peel back the transfer tape from the top part of the design. Make sure it is centered and slowly apply it to the top of the DIY Whiteboard Calendar. Now peel off the transfer tape being careful not to pull up the vinyl...take your time. Next, use the dry erase marker and ruler to draw a line along the left side. This will help you line up the calendar portion of the design. Align the left side of the calendar on the line... Carefully place the vinyl on the DIY Whiteboard and slowly press it in place from left to right using your hand to smooth it down along the way. Now peel back the transfer tape. Again, take your time to avoid pulling up any of the vinyl. TIP: After pulling up the left side of the transfer tape use scissors to cut it in half lengthwise and peel back the top half first, then the bottom half. It's easier to keep everything where it should be when you do it this way. Now mark the spot on the right where you will place the notes and menu portion of the design. Press that in place and peel off the transfer tape. Now put all of your magnets in place. I started my week on Monday, but you can choose Sunday if you like. That's the best part, you can set up your DIY Whiteboard Calendar however you like! Use the dry erase marker to add the dates, notes, and menu and you're all set! You can even glue one of my paper flowers onto a magnet and use that to add a pop of color! If you don't know how to make paper flowers, check out my blog for super simple step-by-step instructions and videos. These also make great gifts! "Hey Lover" from Fontbundles.net Thanks to the JenniferMaker Design Fairy Team, specifically Design Fairy Debbie, for helping me design this fun DIY Whiteboard Calendar. 
DIY Whiteboard Calendar
Materials
Tools
Instructions
STEP 1: GET MY FREE DESIGN FILES
STEP 2: CUT THE DESIGN
 We will do this three more times to cover all of the days and months. So click on the next "Group" in the panel and you will see it will highlight everything underneath.
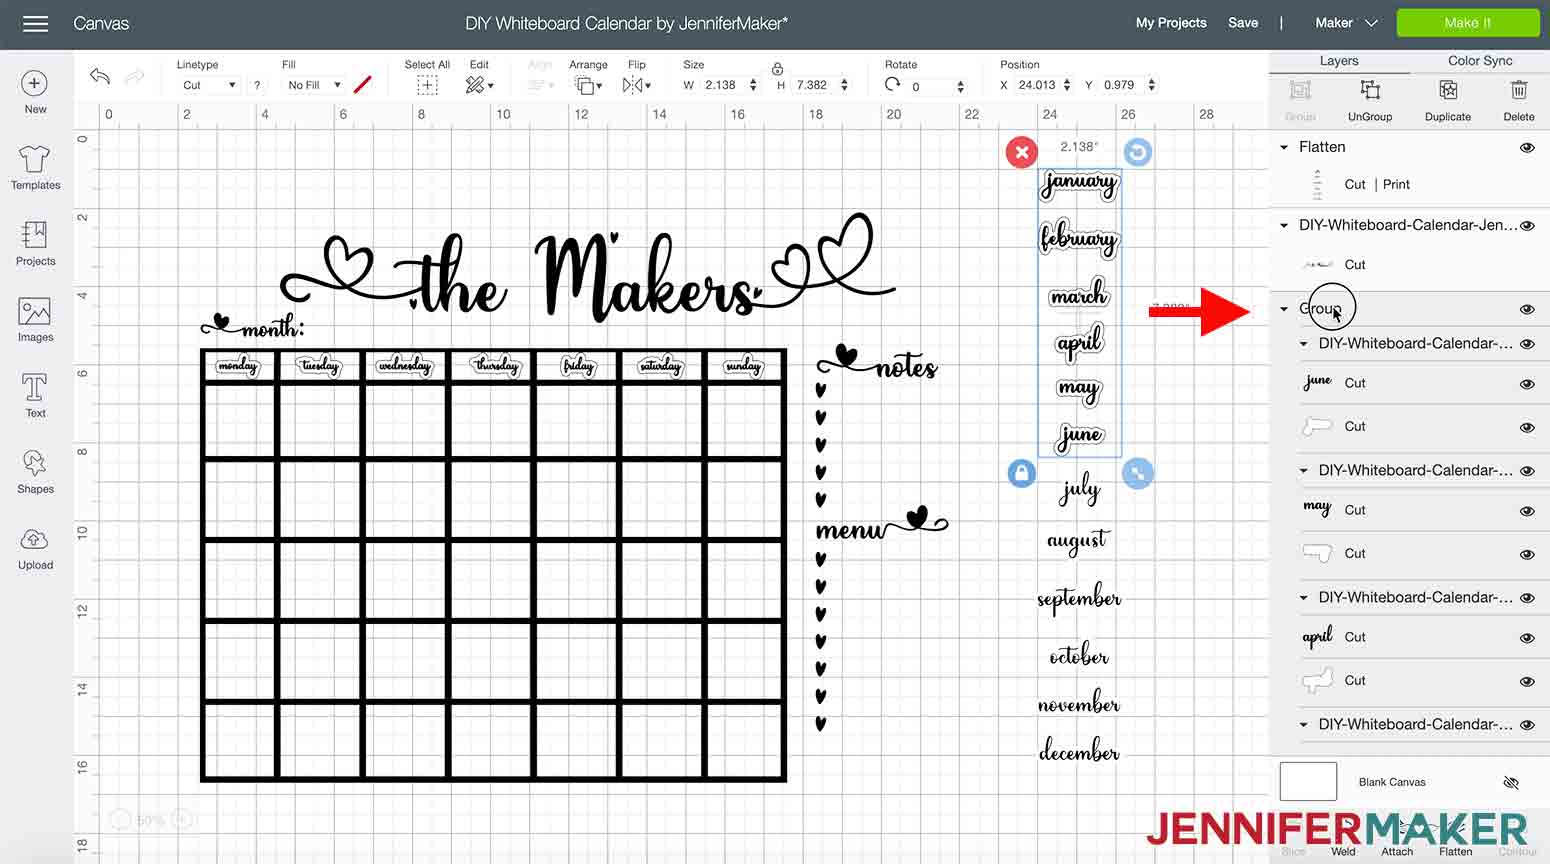 and click "Flatten".
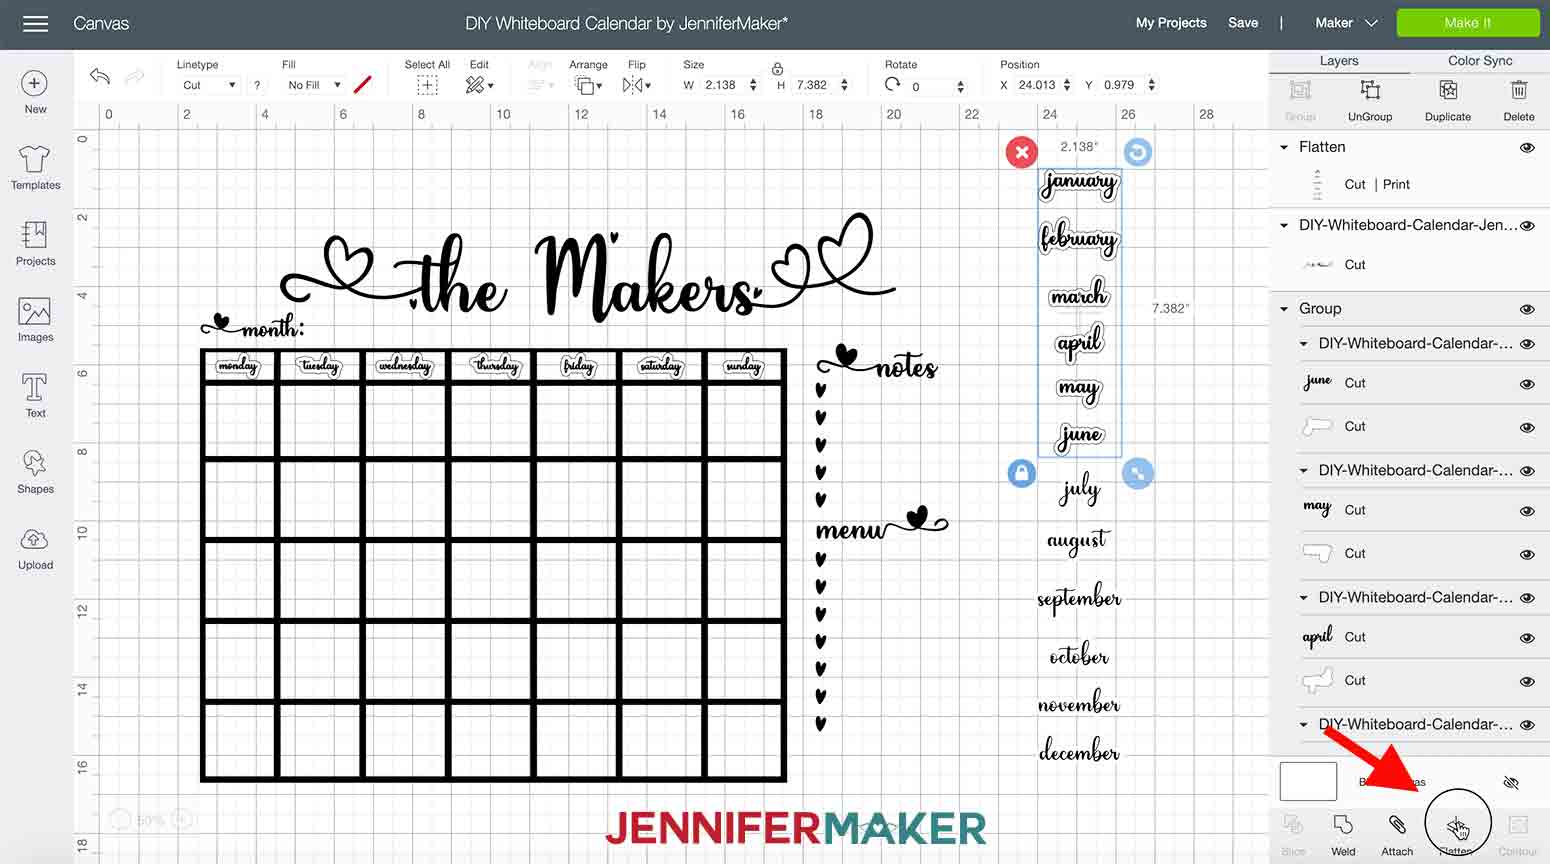 Then select the next "Group"...
 And "Flatten" again.
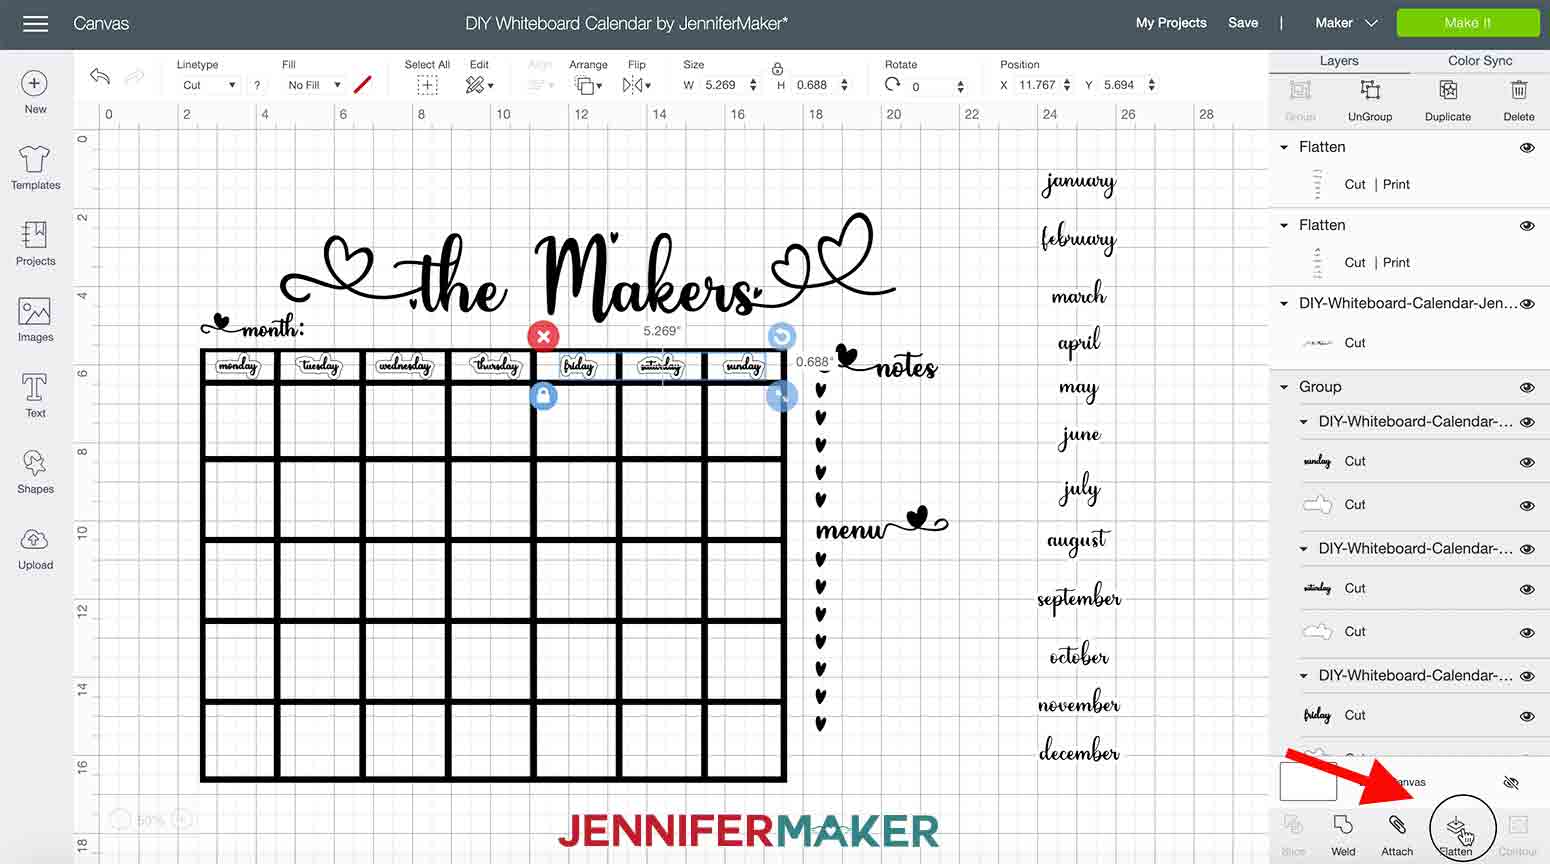 And one more time, select "Group"
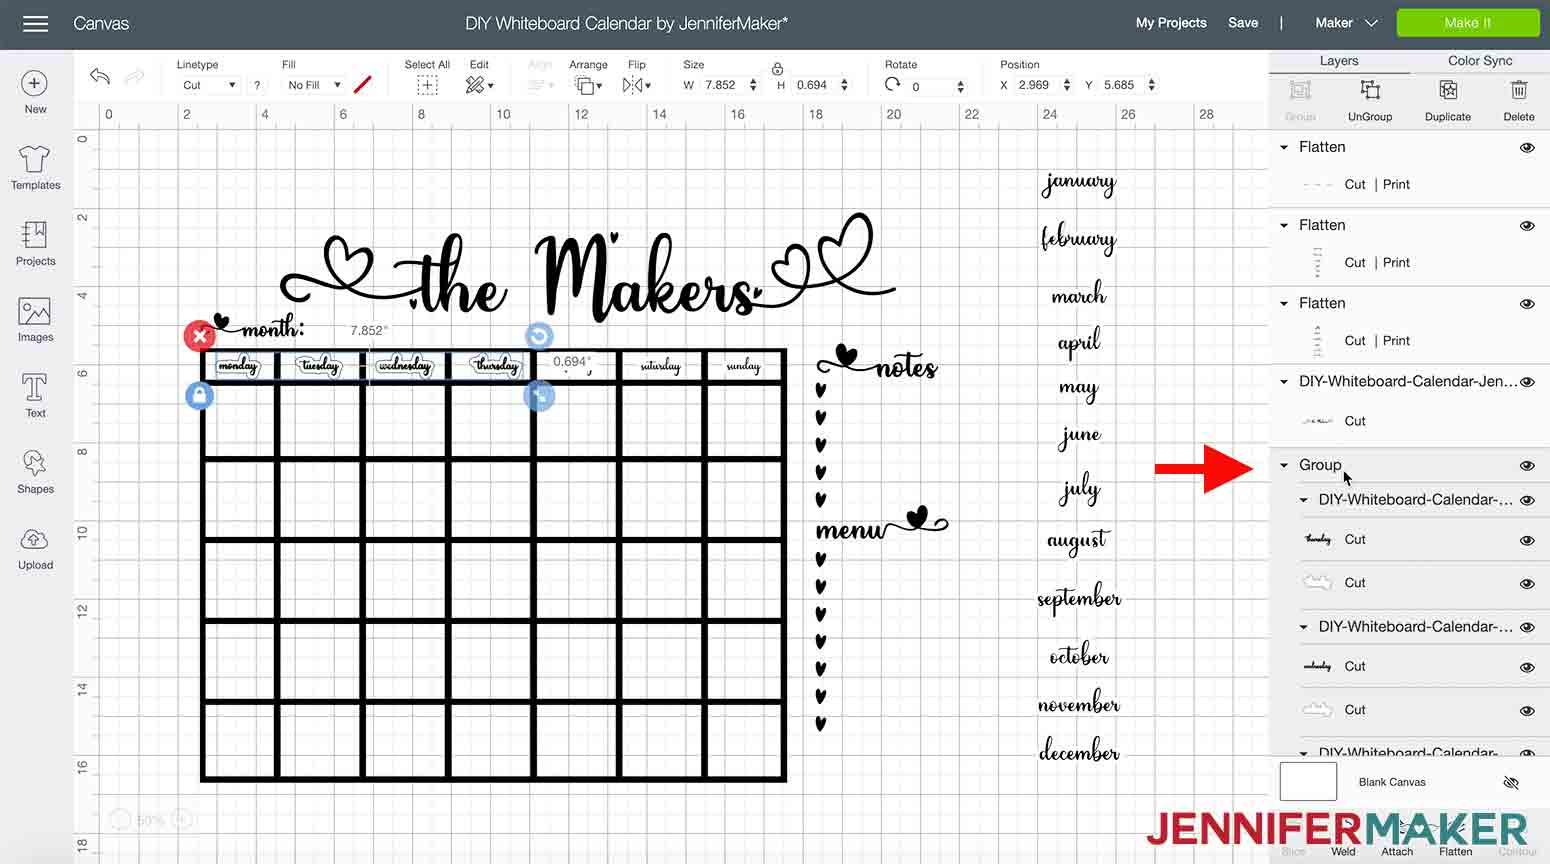


 ...and click "Print".
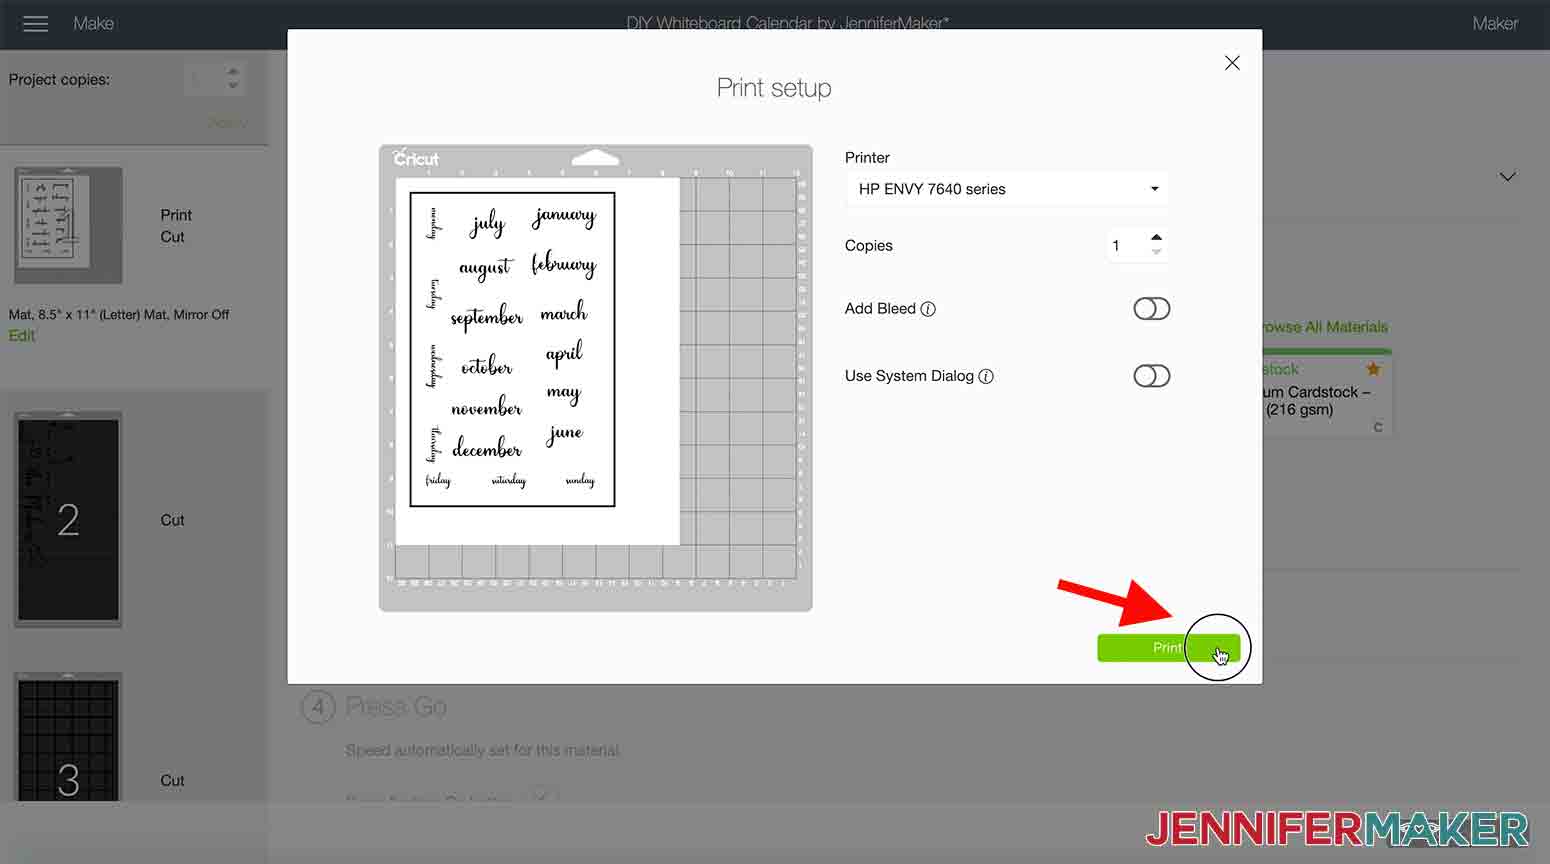


 Then use the scraper to smooth out any bubbles.
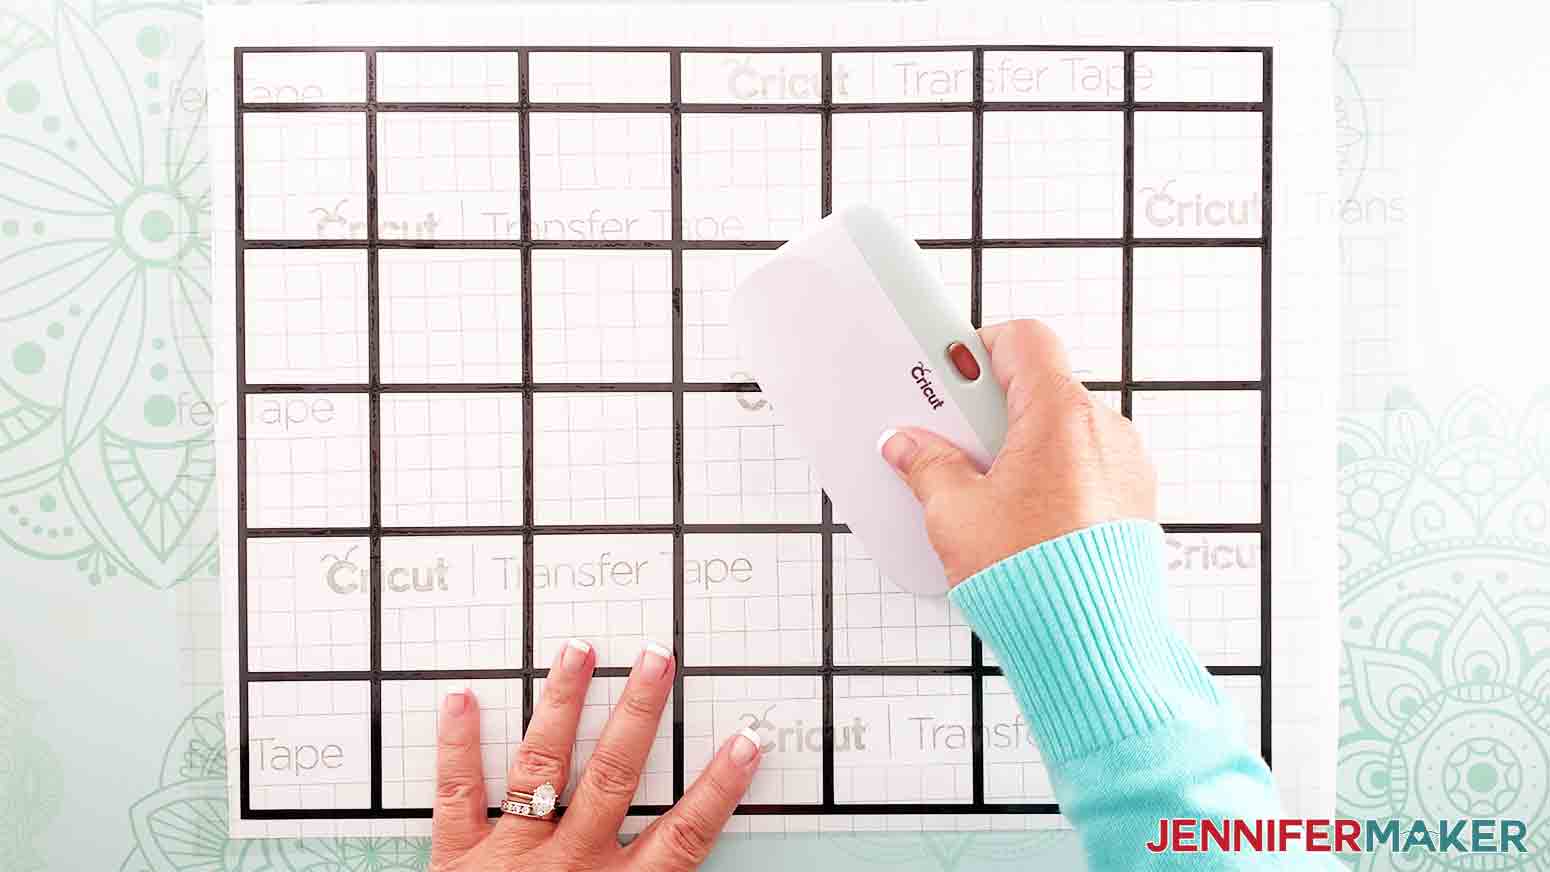
STEP 3: PUT IT ALL TOGETHER
First, grab a measuring tape and mark the top center of your DIY Whiteboard. My whiteboard measured 17" x 23". The inside measurement across the top was 21", so I used the dry erase marker to mark the center at 10.5".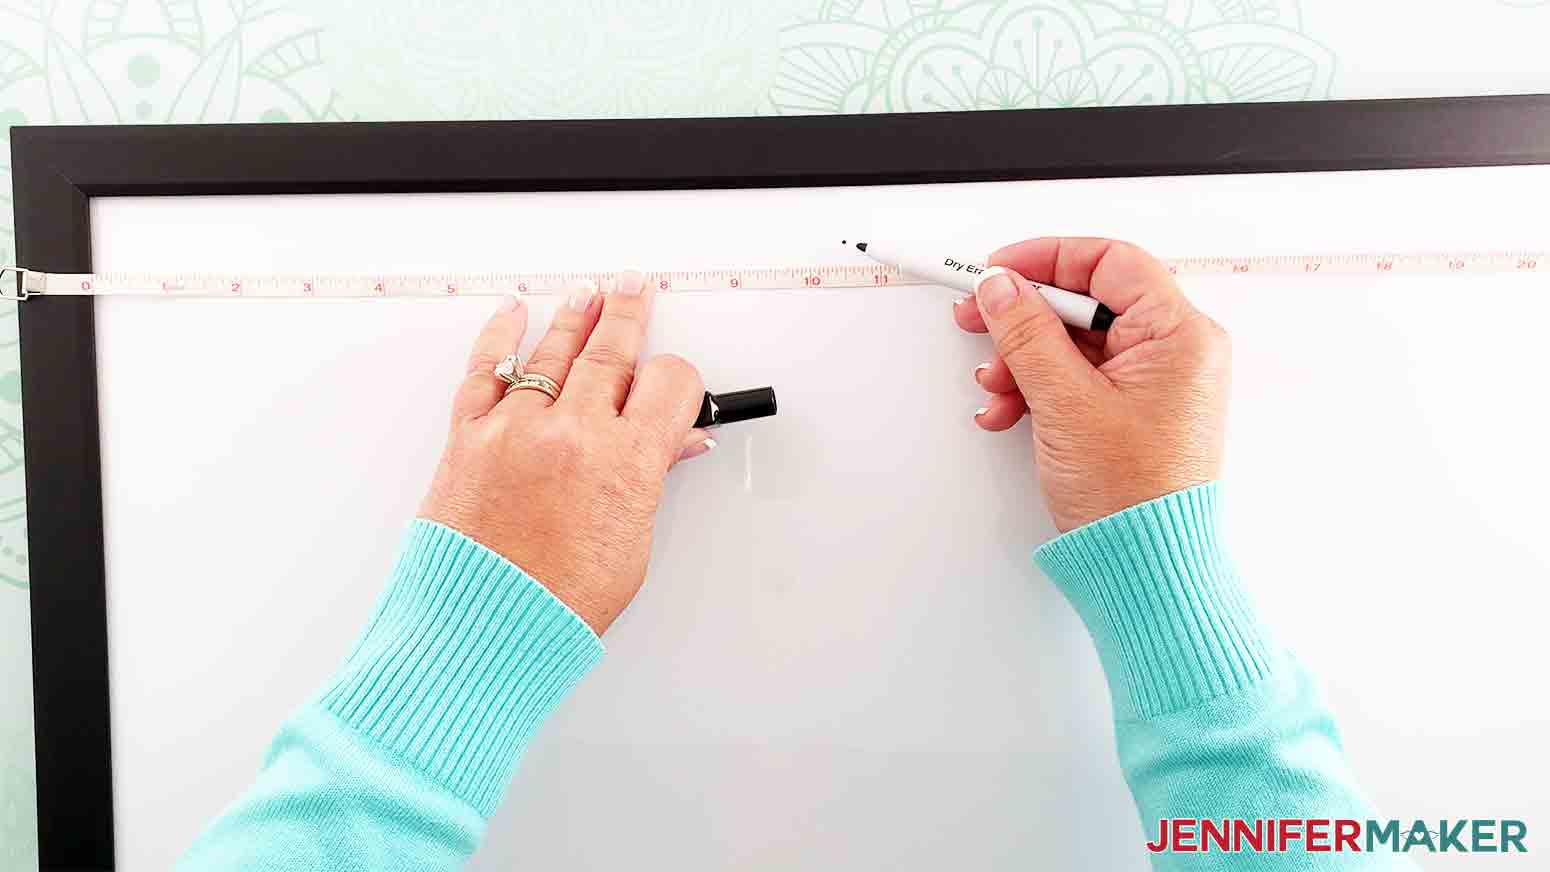

STEP 4: SHOW IT OFF
So fun, right? This DIY Whiteboard Calendar is great for keeping the family up to date and organized.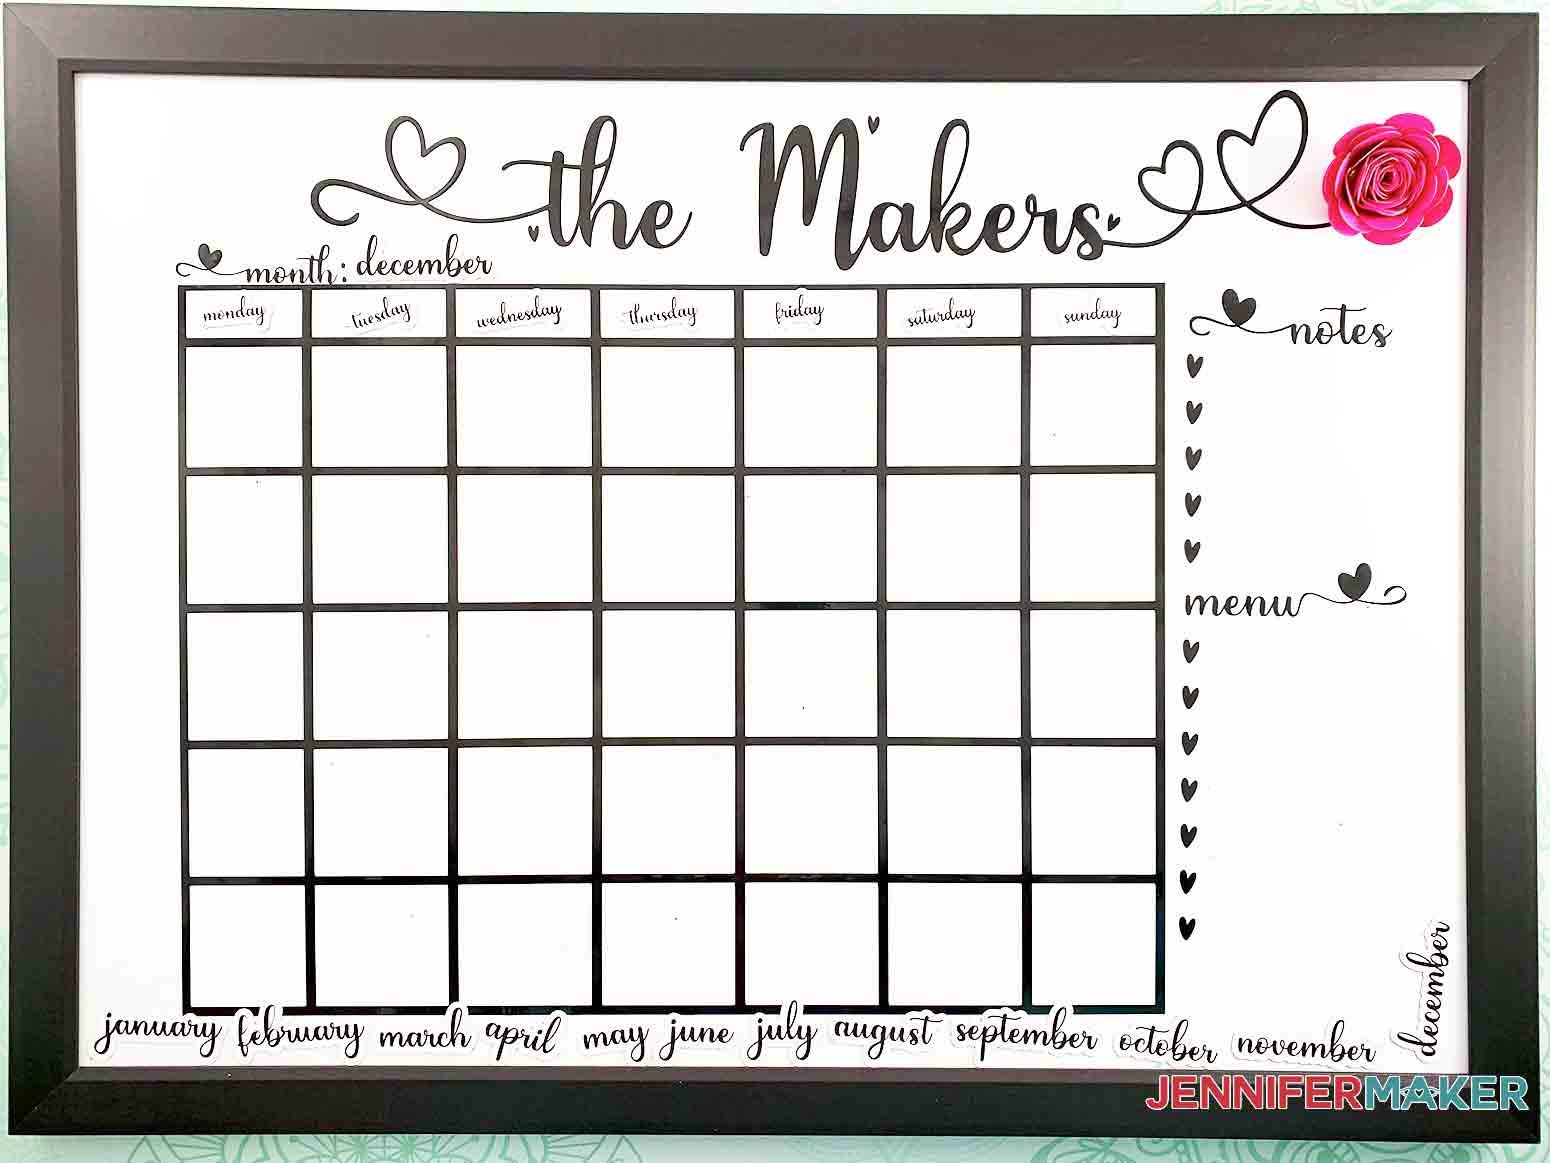


Notes
FONTS USED IN THIS DESIGN:
ACKNOWLEDGMENTS:
Answers to Your Questions About DIY Whiteboard Calendar
Q: Will alcohol damage the whiteboard?
Alcohol can damage the whiteboard and I would not use it on the whiteboard!
Q: Should the whiteboard be at room temperature?
I recommend all products be at room temperature before using your products.
Q: Can I add pictures to the vinyl?
Absolutely! You use print then cut to make designs up to 9.25” x 6.75” ! We have a tutorial for just that in our Easy Print and Cut Stickers blog post.
Q: Do you have to seal the magnets?
No, you don’t, but if they will be handled a lot or if they might get wet, you can seal them for an extra precaution.
Q: What blade do you use for magnet sheets?
You can use the fine point blade that came with your Cricut!
Get my free SVG files to make a DIY Whiteboard Calendar
I’d love to see your personalized whiteboard calendars and how you arranged them! Please share a photo in our Facebook group or tag me on social media with #jennifermaker.
See all of the projects, tutorials, and free designs in The Great Maker 25-Day Gift-Away Challenge!
Love,

Want to remember this? Save this DIY Whiteboard Calendar tutorial to your favorite Pinterest Board!


Wow!
Thanks, Cindy!
can you explain how you made the white outline around the text on the month and day magnets?
Hi MB! I just flattened them to a shape. You can see that here: https://jennifermaker.com/easy-print-and-cut-stickers/
Hi – in the top section, it says watch the etched glass tutorial instead of whiteboard. The link is correct – it takes you to the whiteboard video
Thank you very much, I have fixed it now!
Thank you so much, Andrea! We are correcting that!
Would it be possible to attach the calendar image to the back of a picture frame and then use the picture frame as a dry erase board? Would the image need to be a mirror image then?
Absolutely! Yes, you would have to mirror the image!
Thank you so much!!!
Thank you so much for the whiteboard calendar! i needed a gift for a very special family in my life and this was perfect. i have to tell you something – my Air Explore 2 quit cutting on right side and bottom and Cricut said they would replace it weeks ago…but nothing yet so i ‘fingered’ out a way to cut with it…if i put my finger on housing and press lightly while it is cutting it works…but without pressure it won’t cut all sides…so i sat and pressed on housing to get this project done in time for Christmas!!! How’s that for determination? Wish i could win one of your free machines but until i get replacement i will do simple projects. Thanks for all the fun ideas you share with us. Rena Jacobsen
well i think this project wasn’t meant to be for me. first Cricut quit working properly, thought i found a work around for that. just finished it and words won’t stick….looked and i purchased a non magnetic whiteboard!!!! any suggestions. i have name and grids already on whiteboard….
Hi Rena! You could do some print then cut designs and just stick them on your calendar with tape!
Just love this project – I found it via your command center tutorial on Beautiful Home/Beautiful Life. You mentioned more than once the link to the full command center and all the links to the products and files you used (jennifermaker.com/diy-command-center), but when I type it in, it takes me to your other command center using shutters instead. I tried typing it into the search box, but the same thing happens. Where do I find the page with your beautiful command center?!
Hi Debbie! Here is the link for the command center featured on Beautiful Home, Beautiful Life: https://jennifermaker.com/diy-family-command-center-ideas/