
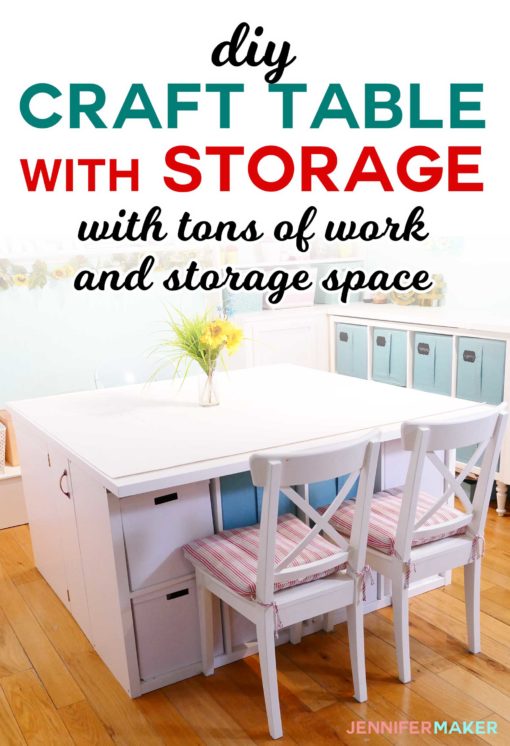
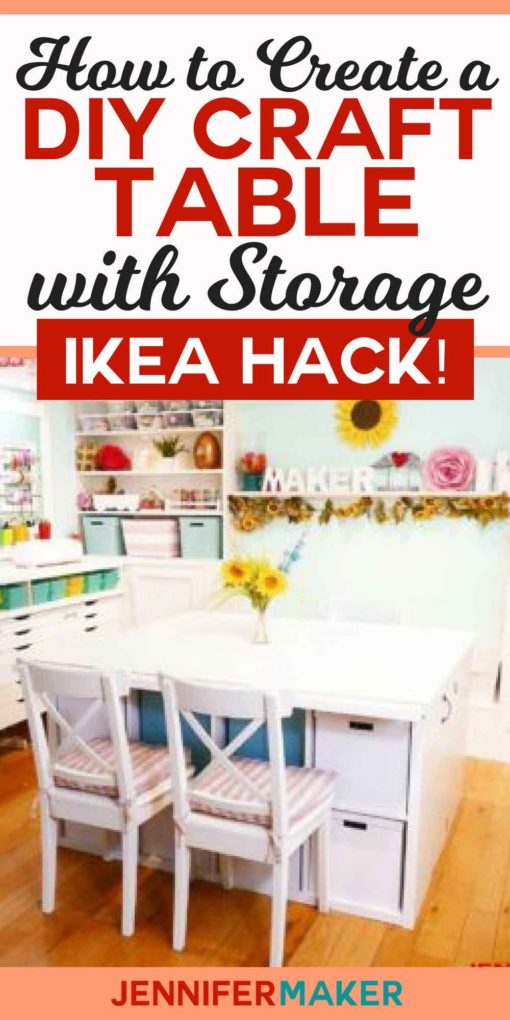
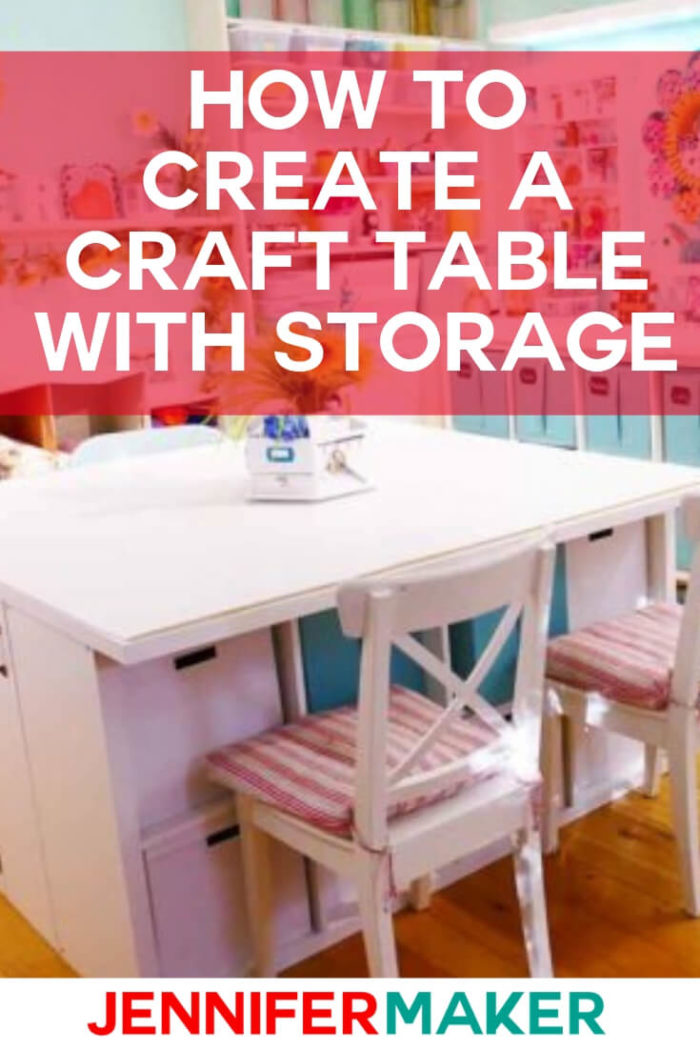
Need a bigger craft table with lots of storage? Check out this easy-to-make DIY craft table with storage!
Have big craft room dreams and a tiny budget? Yeah, me too! I’ve been drooling over those picture-perfect craft rooms with a gigantic craft tables. So when I began planning my ultimate craft room, I knew I needed an amazing craft table WITH storage. But what’s a girl to do when she doesn’t want to spend a ton of money? She either buys an affordable craft table or she hacks together the perfect DIY craft table with storage using IKEA storage units.
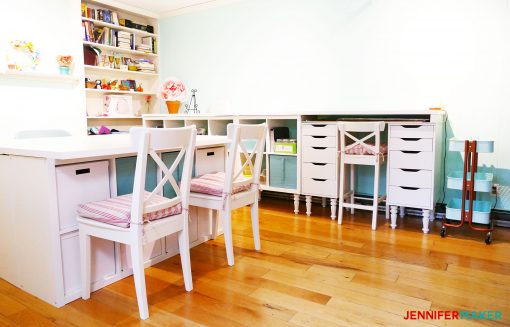
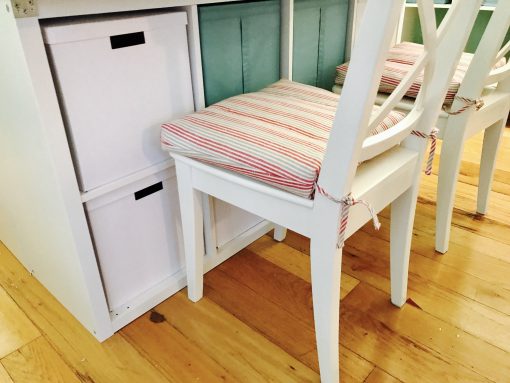
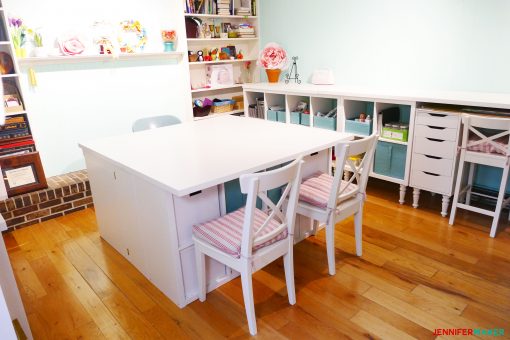
I needed a large craft table at a normal table height (I dislike stools) with lots of storage, very sturdy, and with a white, easy-to-clean surface. My solution was to buy several different IKEA storage solutions and “hack” them together to create the craft room table of my dreams. I now have TONS of storage in my table with both drawers and shelves, a hidden place for my trash can (it’s behind a little door on the side), some pull out “wings” on either side of my work area for storing things while I’m working, another hidden place for storing large items, and a “guest” side where my family and friends can sit with me (room for two chairs). The work surface is very large — 5′ x 5′, which is 25 square feet. I am overjoyed.

I designed the craft table primarily for my own work, but the overhang on the end provides room to pull up two chairs so people can join me. Sometimes I sit on the far end, but sometimes it’s easier just to pull up a chair on the closer end.
Here are some photos of my craft table in my in-progress craft room:

The best part? The components for this amazing craft table with storage were under $300.
Important Note: In 2021, IKEA discontinued the Linnmon line of tabletops I used to make this table in 2017. The replacement tabletop is called Lagkapten, but unfortunately it isn’t exactly the same size. So your table can’t be made exactly as mine. But you can get it close with Lagkapten and end up with a table that is 5″ x 4″ rather than 5′ x 5′ which is still pretty awesome! If this is a problem, use the Skarsta tabletops that are wider than what I used (31.5″ reather than 29 1/2″).
In 2024, IKEA discontinued the Haggeby doors, but you can substitute with 15″ x 30″ Veddinge doors, but do note that this door width may change based on what tabletop you go with.
And I can show you how to make this table step-by-step so you can recreate it for your own craft room. This post contains some affiliate links for your convenience (which means if you make a purchase after clicking a link I will earn a small commission but it won’t cost you a penny more)! Read my full disclosure policy.
Materials for the DIY Craft Table with Storage (IKEA Hack)
- Two (2) Alex drawers from IKEA
- One (1) Kallax shelving unit from IKEA
- Two (2) Lagkapten tabletops (59″x23″) or Skarsta tabletops (63×31 1/2″) from IKEA
- Four (4) Veddinge (15″x30″) doors from IKEA
- Two (2) copper handles from Amazon
- Eight (8) L-brackets (also known as corner braces)
- Eight (8) rectangular straight brackets (braces)
- Four 2″ narrow mortise door hinges
- Two magnetic door catches
Note: Here are the other things shown in the photos with the craft table
How to Make a DIY Craft Table with Storage
First, you’ll need to get everything from IKEA. I’ve created a handy printable sheet with the item numbers of each component—you’ll find it in my resource library (get the password to the library by filling out the form at the bottom of this post).
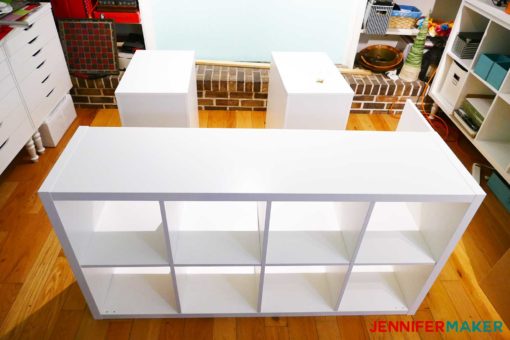
Next, assemble the two Alex drawers and the Kallax shelving unit following IKEA’s directions. Set them into position like the photo below. The Kallax shelves face outward, as do the two drawers. (Ignore the mess — the craft room was very much in progress when we made the table.)
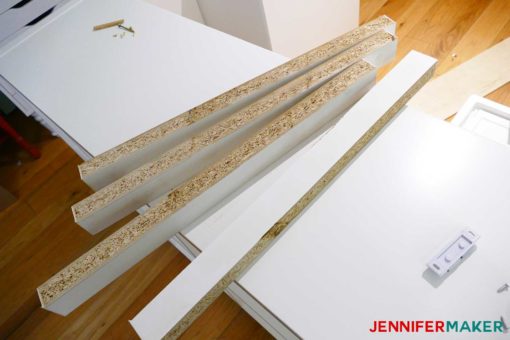
Now, take two of the Haggeby doors and cut 2 5/8″ off each long end to create four 2 5/8″ high by 23″ long strips. (Note: This may differ if you’ve using the shorter or longer tabletop replacements referenced earlier, or measure twice and cut once!) These are your spacers, used between the Alex drawers and tabletops as the Alex drawers are a little shorter than the Kallax shelves. The advantage to cutting up these Haggeby doors rather than just using scrap wood is that the finish will be identical to the rest of the desk without any need for painting or sealing, so they blend in perfectly.
Attach the spacers to the tops of your Alex drawers using brackets — the diagram below show you where they go.
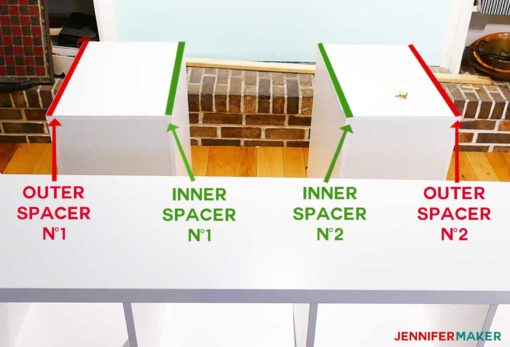
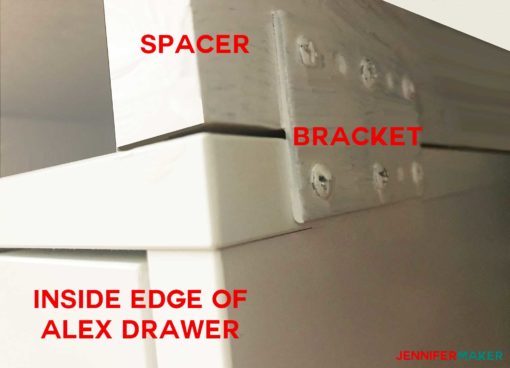
The inner spacers can simply attach right to drawers with flat brackets, but you’ll want to use L-brackets to attach the outer spacers to the tops of the Alex drawers. In the photo below, you can see where we’ve attached an inner spacer to the edge of the drawer with a flat bracket. We later painted the bracket white so it wouldn’t be noticeable when looking at the table, but this not really necessary.
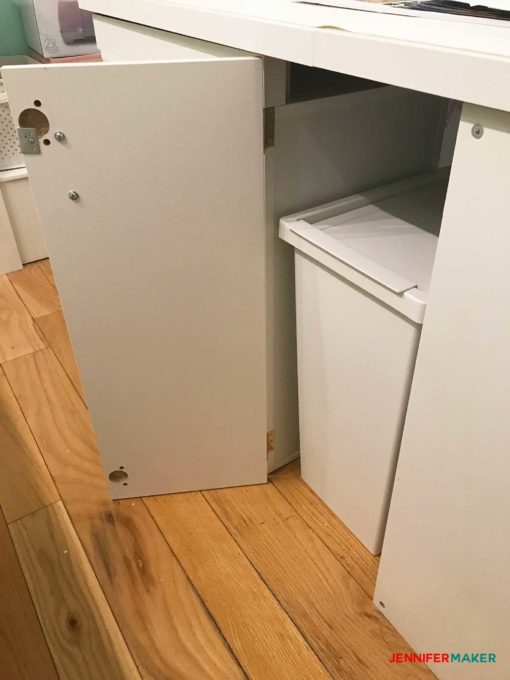
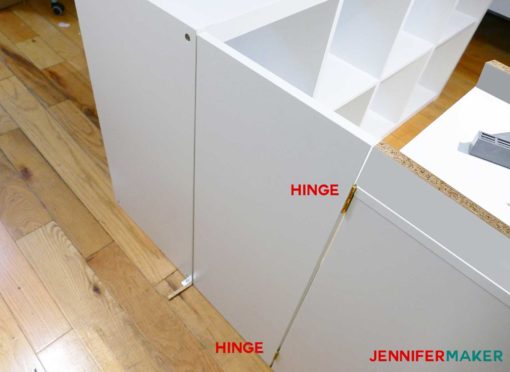
Next, attach the other two Heggeby doors to the open area between your Alex drawers and Kallax shelves. You’ll want to use two hinges and a magnetic door catch, as well as attach a door handle. These doors will perfectly bridge and cover the gap between the Alex drawers and Kallax shelves, and provide accessible storage for whatever you want. I put my trash cans behind these doors. When both doors are on, this entire collection of shelves/drawers/doors becomes your base unit.
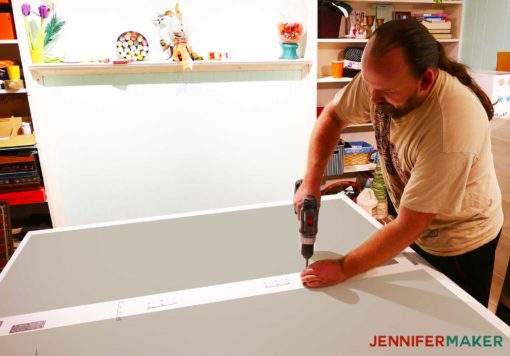
Now, place your tabletops FACE DOWN on top of your Kallax shelves and drawers. You want to attach the two tabletops together using brackets on the under side of the tabletops (which is what you’ll see when you put the tabletops face down). The under side of the tabletops look different than the top sides (see the photo below). Here’s Greg screwing in the brackets for the craft table with storage.
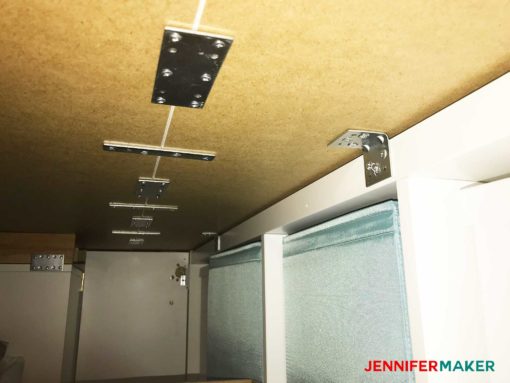
Carefully flip your attached tabletops over and position them on top of your base unit. Attach the tabletop to both the Kallax shelves AND the Alex drawers using L-brackets on the underside of the table. (You’ll need to crawl in and underneath the table to attach the brackets.) Here’s what the underside of my craft table looks like.
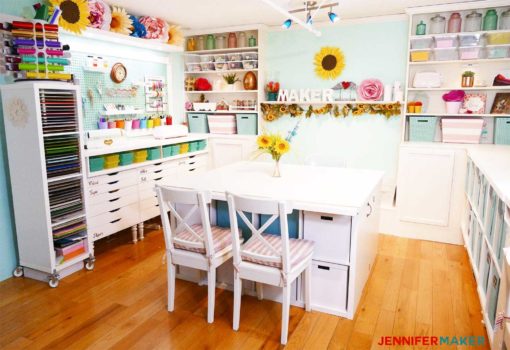
And here is the finished table in my craft room as it looks today:
After my table was all assembled, I covered the top with a simple piece of white vinyl I bought from the fabric store. This protected the top free from scratches and gouges, and it’s easy to replace the white vinyl if it gets stained.
If you make my DIY craft table with storage, please share a photo of your table! You can send it to [email protected] or tag me on social media with #jennifermaker.
Love,

Want to remember this? Save this Craft Table with Storage Tutorial to your favorite Pinterest board!
This DIY craft table with storage will solve all (or at least many) of your crafting and storage needs at once!


This came out great, and your idea of covering the top with white vinyl that can be replaced is really genius!
I would need a hard surface on the top so I would have to buy a cutting mat that would cover it. I love what you have done and am working on planning mine now.
Thank you for sharing!
You, your craft table and your craft room are adorable!
You are incredible I am in process of purchasing material can’t wait.
How fun, Sherri!
Hi Jennifer – so excited to have found this project as it is exactly what I need for my quilting space. I do have a question which is could you put this table on locking casters or would that require additional propping up of the table? Thanks in advance for your attention to this question.
You probably could put this on locking caster wheels. I haven’t tried that, but you could definitely try it and see if it works!
Hi Jennifer,
I don’t have enough space with what i already have in my craft room to build the 5 sq ft table. However, couldn’t I do a smaller one, like the 48 inch? That would help out a lot because i definitely don’t have that much space now with my current craft table , although it does have decent storage space. Thank you for everything you do here and hopefully in the near future i will be able to live my dream of event decorating. I really only want to create and do the decor, nothing else.
Yvette, yes, you can definitely take this idea and use it for different size furniture.
The inside storage area would be a great place to store craft totes….there just is never a good place for those and they take up so much space!
I love the idea of having the doors between the kallax and the alex drawers. That’s a perfect solution to the gaps and an excellent hiding place for wastebaskets – and mummies when the need arises!
Mummies, zombies, the possibilities are endless, Christine! LOL Glad you loved it! 🙂
I absolutely love the design, the extra hidden storage under the tabletop, the 5 x 5 work space, the cubbies and drawers, and the cost! Thank you so very much for sharing all of your ideas, but especially for this “hack” because it gives me something to look forward to creating for my little spare bedroom office. Thank you again!
I’m so happy to hear that this helped! Thank you!
Love your craft room Jennifer,I will be working on mine this coming summer.
That’s fantastic, it’ll feel wonderful when it’s done!
Sorry for question #2 but can you tell me what number I should look for in your library for the IKEA sheet with reference numbers on it for the table supplies. I looked through everything and can’t locate it. Thank you so much!
Hi Therese! You can find everything I used for this table in the materials list towards the top of the blog post.
I would love to know how to make or what the storage/shelving is on the right side along your wall?
Hi Lesley! This blog post might help answer your questions! https://jennifermaker.com/craft-room-tour-organization-storage-projects/
Hi Ms Maker what type of craft mat do you have on your lovely craft desk
Monique
Hi Monique!
I use Cricut’s Decorative Self-Healing Mat. The mat color is mint.
Hi Jennifer, I plan to make this cute little craft station. Could you share more info on the vinyl you used to cover the top? I can’t seem to find any. Also I tried to find the plans in the library and had no luck. Point me in the right direction? Thank you!
Hi Skyla! The top is covered with just brown butcher paper and there are no step-by-step plans in the library, the blog post covers all of that for you.