
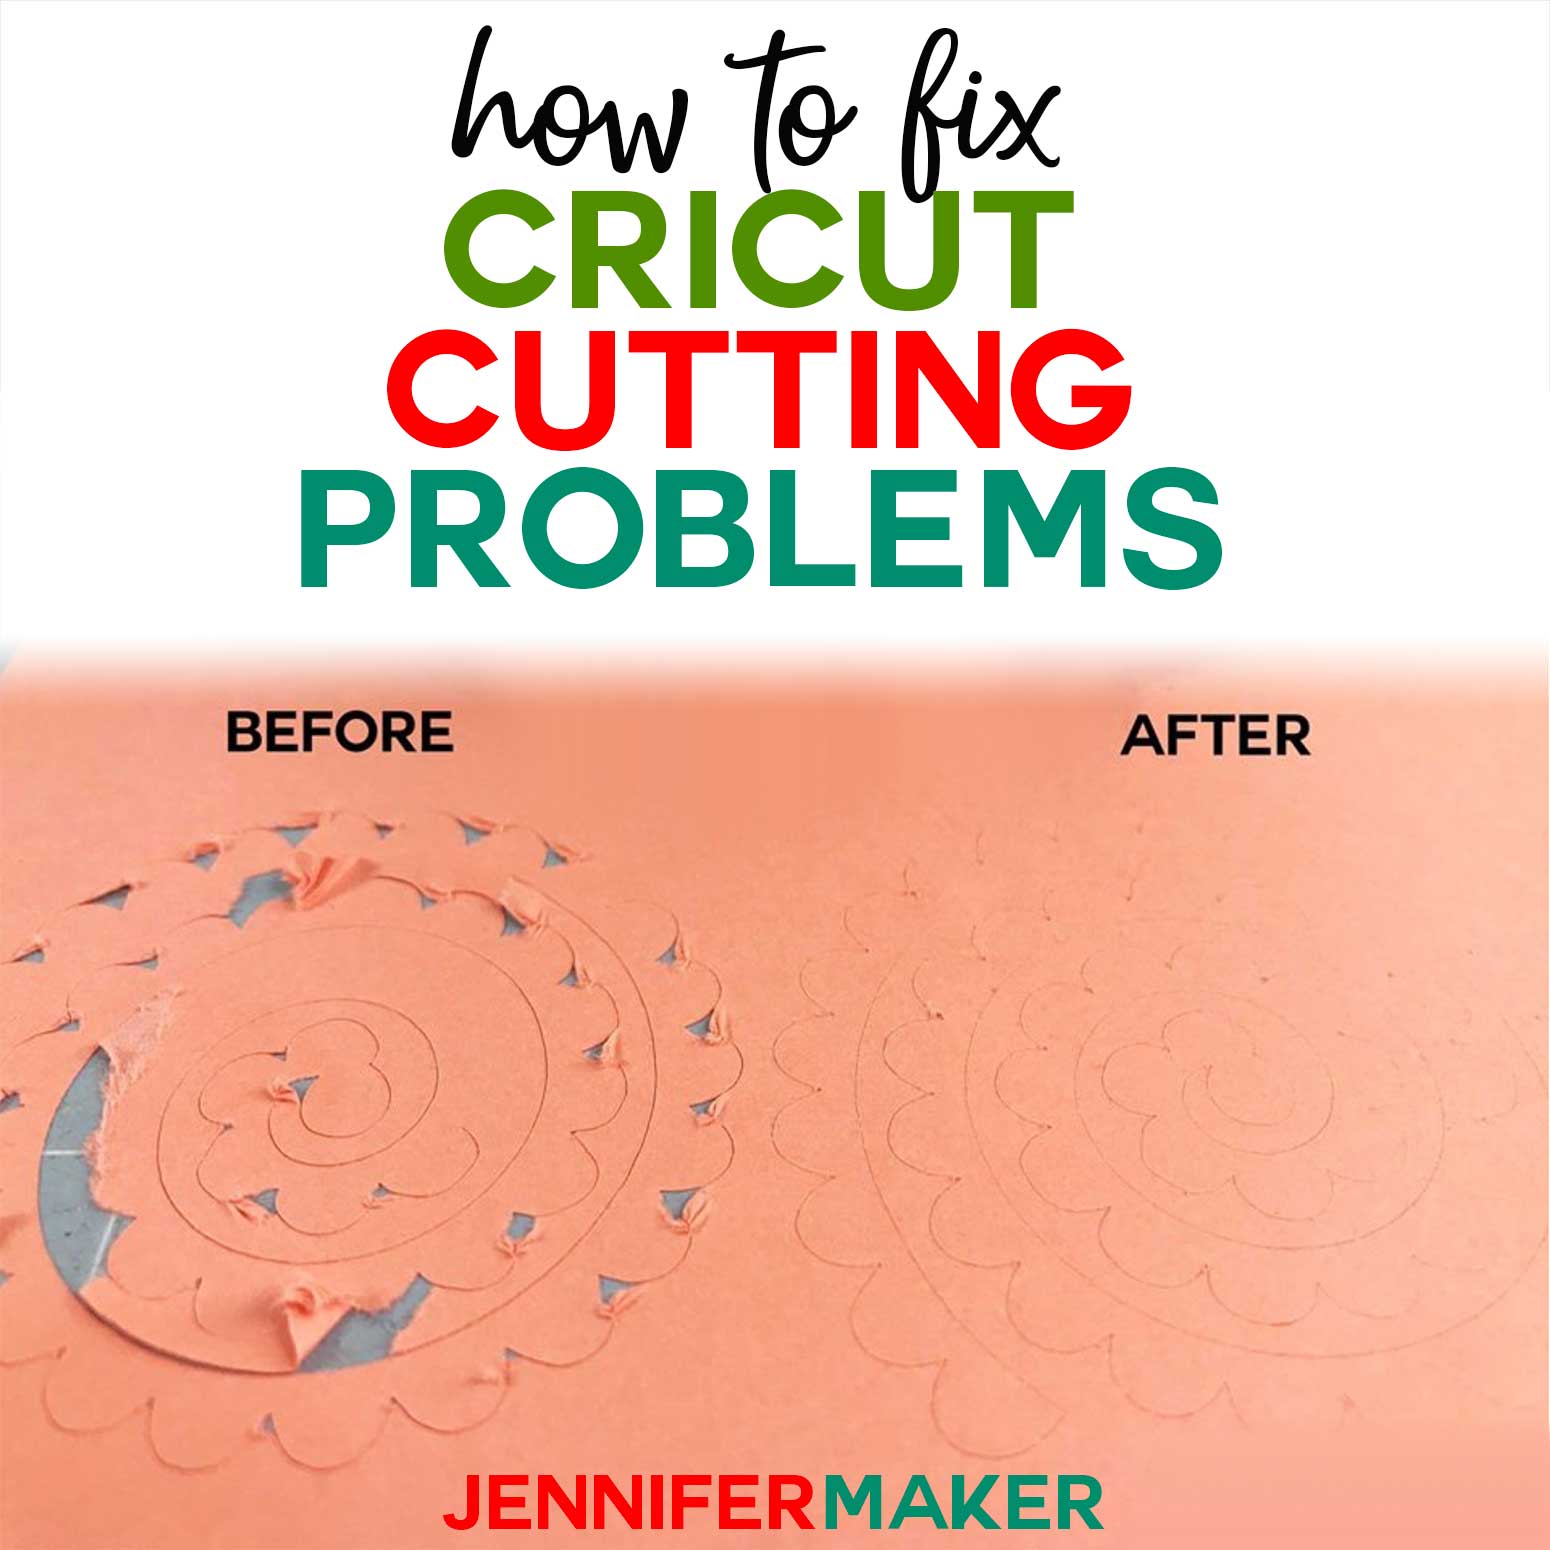
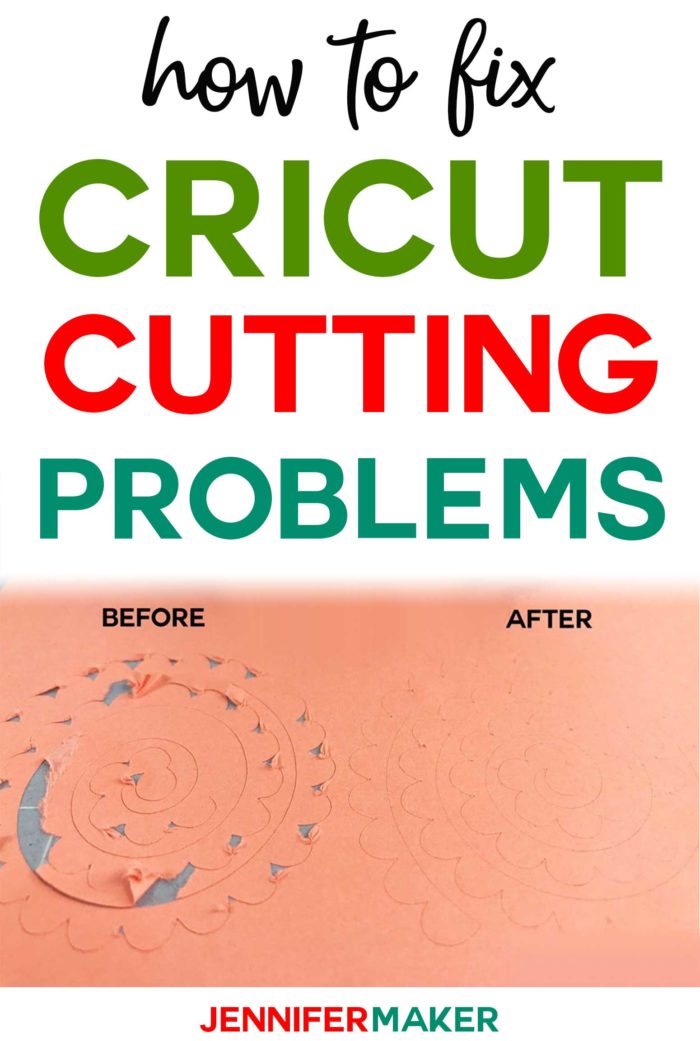
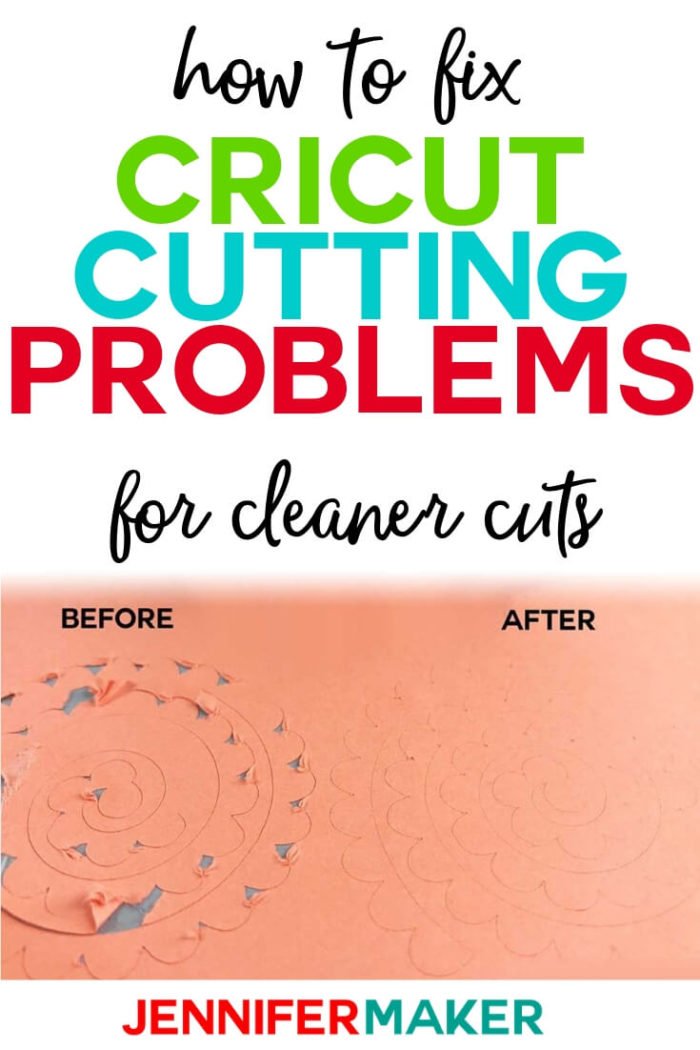
Learn how to get the cleanest cuts possible on your Cricut with these helpful troubleshooting tips!
The Cricut cutting machine is an amazing invention. It lets us create SO many beautiful things! But sometimes, the cuts aren’t as clean as we’d like, and it’s not always obvious WHY or what we should do to fix it. So today I’m going to go over the five things you need to pay attention to when cutting on your Cricut cutting machine. With this, you can fix nearly any Cricut cutting problem and create those beautiful, clean cuts!
The five things to pay attention to are your MAT, BLADE, MATERIAL, SETTING, and DESIGN. And that’s the exact order I go in when I’m troubleshooting a cutting problem, too.
Cricut Cutting Problem Solution #1: Use a Sticky Mat
Your Cricut machine mat needs to be pretty sticky in order to get clean cuts. So if your cuts aren’t clean, the first thing you should do is change your mat. I usually switch to a new (or newer) mat and it solves my problem right away. If you don’t have a new mat, you can try washing your old mat with dishwashing soap and allowing it to air dry to get it stickier. But I’ll be honest — it might still not be sticky enough. A sticky mat can make all the difference. And, in fact, I prefer the green mats over the blue mats. I rarely use the purple StrongGrip mats, however, unless I’m cutting some really thick material. Green mats are my friend!
Learn More About Mats: Cricut Cutting Mats: Get Sticky For Success
Cricut Cutting Problem Solution #2: Use a Clean, Sharp Blade
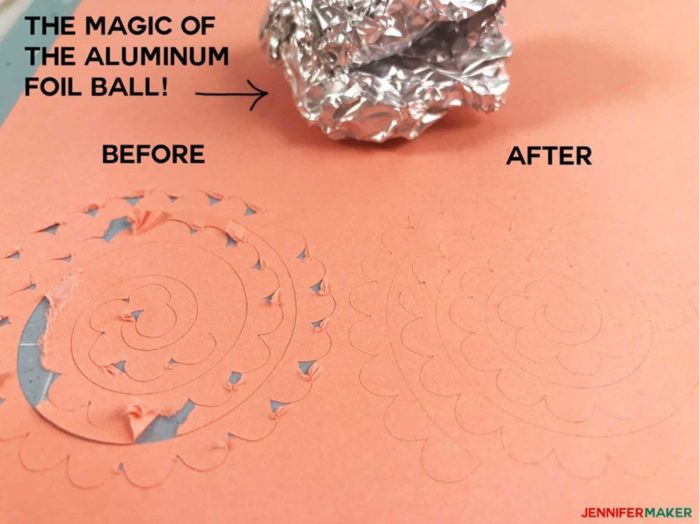
You need to make sure your Cricut blade is clean and sharp. I do this by taking a sheet of aluminum foil and balling it up like this. Then I remove the blade from its housing, depress the plunger, and stick it in and out of the aluminum ball carefully over and over — maybe 50 times. This cleans any debris from the blade, like bits of paper or vinyl that might be stuck to the blade. (Note that this does not sharpen it, only cleans it.) This technique works for the Fine-Point and Deep-Point Blades. This technique works GREAT for me and I haven’t had to buy a new blade in over a year. I always do this to my blades when I’m about to cut something with really intricate cuts.
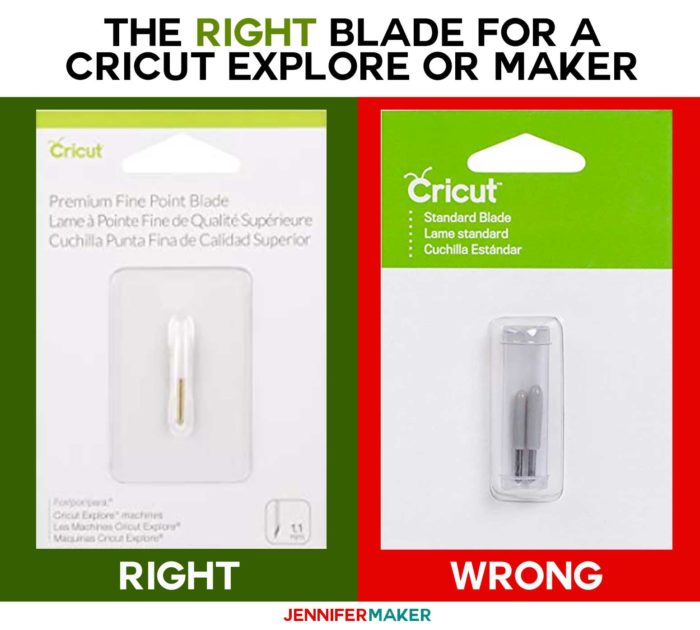
If your problem is not that your blade isn’t cutting all the way through but rather that it’s cutting TOO MUCH, it may be that you’re using the wrong blade. Check your packaging — you need to use the Premium Fine-Point (German Carbide) blade with your Cricut machine. The Premium Fine-Point Blades can be identified out of their packaging by the color of the caps, either WHITE or RED. Do not use the gray cap blades — they are made for older Cricut machines.
Learn More About Blades: Cricut Blades: Tips and Tricks for Cleaner Cutting
Cricut Cutting Problem Solution #3: Use Quality Materials
Your material can make a big difference in how it cuts, too. For example, not all paper is created equal. If the fibers are weaker or shorter in the paper, which you usually find in lower quality paper, you’ll get more tearing. So if your paper doesn’t seem to be cutting well even after using a sticky mat and a clean blade, the paper itself could be the culprit. There have been many times when I’ve had an issue and then changed to a new paper only to have everything work perfectly. Cricut paper is high quality, so is Recollections. So before you give up on that project, try a new paper!
Tip: If you use textured paper, put your paper textured side UP on your mat for the best cuts!
Learn more about paper: 16 Best Paper Types for Amazing Crafts
Cricut Cutting Problem Solution #4: Check Your Settings
It’s really important that you’ve got the right settings for your material. In Cricut Design Space, you change the Base Material Setting after clicking “Make” and selecting your material’s size. Click “Browse All Materials” and choose the material you want to cut. Design Space will automatically adjust the cut and pressure settings for that material. And if that still doesn’t seem to help, try increasing the pressure of your cut. This is why I almost always select “More” pressure for my cuts — it seems to always help me get those clean cuts.
Tip: Sometimes when everything else seems right it can help to turn your custom settings to “Washi Tape” — this seems to work best on intricate cuts on vinyl.
Cricut Cutting Problem Solution #5: Check Your Design
Not all designs are going to cut cleanly. The smaller and more detailed and intricate they are, the harder it’s going to be to cut them. Sometimes, they are just too small. So you can try making them larger if that is an option. If that doesn’t work or is not an option, you can try setting your Base Material Setting to “Intricate Cuts” if you’re cutting cardstock. Or try the “Washi Tape” setting if you’re cutting vinyl. Neither of these are guaranteed to work, but it’s worth a try. In the end, some designs may just be too tiny or detailed to be cut without issues. This doesn’t mean all is lost, however — you may still be able to cut it and just clean it up with scissors or a knife later.
These are all the tips I use each time I go to cut something, and I nearly always have clean cuts on all of my Cricut cutting machines because of it. It does require a certain mindset — you have to go into a project knowing you might need to tinker with it a bit to get it to cut properly. Testing can help a LOT. The key is not to give up. Be persistent and try new things. It really always works for me!
Answers to Your Questions About Cricut Cutting Problems and Solutions
Q: How do I know if my Cricut needs a new blade?
A: Cricut blades are very well made and last a long time. I use the Premium Fine Point blade most often and mine still make perfect cuts for intricate designs since I follow the tips in this post, especially checking the pressure setting and cleaning the blade. However, if you have tried all my tips including trying a different design, resizing, using new material or a stickier cutting mat, and you’re still having cut issues, try a new blade. If the new blade helps, it’s possible the previous one was damaged or not seated in the blade housing correctly.
Q: How do I calibrate my Cricut?
A: You will need an inkjet printer, printer paper, a LightGrip Machine Mat, and Cricut Design Space to create a calibration sheet and calibrate your machine. Open Design Space and click the top right menu to access “Settings.” Select “Machines” then “Machine Calibration,” and choose your machine type. Choose the calibration for your tool or project type (Rotary Blade, Knife Blade, or Print Then Cut), then follow the screen prompts to complete the calibration process.
Q: When should I calibrate my Cricut?
A: The first time you use your knife blade or rotary blade, Cricut Design Space will walk you through the steps to calibrate your Cricut for the tool. Cricut suggests calibrating your machine each time you swap to the rotary blade. If you have trouble with either of these blades or with a Print Then Cut project, it’s time to calibrate your machine.
Q: How often should you calibrate your Cricut?
A: Cricut suggests calibrating your Cricut each time you swap to the rotary blade. I also recommend you calibrate your Cricut before beginning a new Print then Cut project.
Q: Why is my Print Then Cut off?
A: Print Then Cut is a complex process, so it requires practice to get the best cut accuracy. There are a few common causes of problems:
- Calibration is a common issue for Print Then Cut projects. Calibrate your machine for Print Then Cut before trying anything else.
- Reflective or patterned design elements can confuse the machine’s cut sensor, so you may want to add them afterward, if possible.
- Your machine may have too much or too little light for the sensor to read the registration marks or cut sensor marks — the black marks that print around your images. Remove direct overhead lights or turn on a light off to the side to create more even illumination.
- The sensor may be dirty. You can VERY carefully sweep debris or dust off of the sensor with a clean, dry paintbrush.
- Some types of printable paper are too thick for a Print Then Cut image project. You may have to experiment with different brands to get the best results, especially for sticker sheet products.
Q: Why is my Cricut cutting slow?
A: Sometimes, the Bluetooth connection between your computer and Cricut machine is not very strong, which can slow down your work. Connecting them with an USB cable is an easy way to see if the speed increases. You can also check if you need to update firmware for your machine in the account menu, which often helps.
Q: Do Cricut machines need updating?
A: According to Cricut, firmware is already installed into your Cricut. Occasional updates will become available when Cricut adds features or does updates to improve the performance of your machine. When a firmware update becomes necessary to the function of your machine, Cricut Design Space will give you an alert. To learn more about updating the firmware on your Cricut, visit the Updating Cricut Machine Firmware page on Cricut’s website.
If you need more help with your Cricut cutting problems, please visit my amazing Cricut Facebook group so we can all help you out!
Love,

Want to remember this? Save the Cricut Cutting Problems & Solutions Tutorial to Your Favorite DIY Pinterest Board!


I just wanted to say thank you, I’ve watched your how to make flowers a couple of times now and love it. At first I thought i’m never going to make those. To high tech for me, but now I’m going to give it a try. Thank you for giving me the confidence to try. This weekend I’m going in, flowers watch out.
Thank you for your tip! I will be using it for sure .
You’re welcome, Kathy!
Great tips! I have had a Cricut of one type or another for years and I still get frustrated on occasion when something doesn’t cut correctly.
Jennifer, having been frustrated with some cutting a while back, I appreciate these tips and I have to add one more out of desperation, I have used contour and eliminated a few teeny-tiny cuts which allowed me to cut what I needed and to be honest, no one noticed the missing cuts
Thanks for the tip about the types of blades and the aluminum foil. I changed my blade only to find out I had purchased the wrong type. Luckily, your foil trick worked perfectly and I was able to save my old blade. Let the cutting continue!
hi jeniffer! is it possible to reach you.. i have been having troubles with my cricut. i’ve been turning the webs upside down. im going cray cray. my cricut seem to like skipping letters… like if it’sLOVE.. would only cut VE. i don’t know what to do. huhuhu
If you’re having issues with the way your Cricut is operating, I suggest contacting Cricut Member Care. I recommend the Chat option when it’s available otherwise,
you can call during open hours or email them at any time. Cricut Member Care is very helpful!
im using design space version 5.10.18 on my cricut maker, when i click make it, then it popping saying could not complete purchase. and cant do the cutting. do you have any idea what to do? i already emailed cricut member care but no response, tried to call, cant get through. not sure who to ask now. i got lots of projects to be done, cant finished if this problem persist. help me jennifer. 😭
I’d suggest taking a look at each font or image you have in your project to find out which item you’re using that is requiring a purchase. You don’t have to pay to use Design Space; however, you do have to pay for some of the fonts or images.
Thank you.
I aligned my design on design space according to the placement on the vinyl. I wanted the machine to cut one piece of vinyl on the 1 inch line and another piece on the 6 inch line. I pinky promise the vinyl was lined up exactly but when I cut it, it cut 1 centimeter higher than I indicated for BOTH cuts. Are you able to help me figure out why?
If your Cricut is not cutting where it is set up on your mat preview screen then you will want to contact Cricut Member Care Team for troubleshooting suggestions. https://help.cricut.com/hc/en-us/articles/360020316674-Cricut-Contact-Information
Everyone says to do a test cut but never just how to do it. Like where to place it on your mat or what size it should be but my biggest concern is if I’m doing a layered cut that has some intricacies should I use the least intricate or the most?
Love your tutorials and that you can answer a question without making one feel like a complete fool. Keep up the wonderful work!!
Hi Teresa! When doing a test cut you just take a circle and size it down to 1″ and cut on various settings till you get the one that works for your machine.