
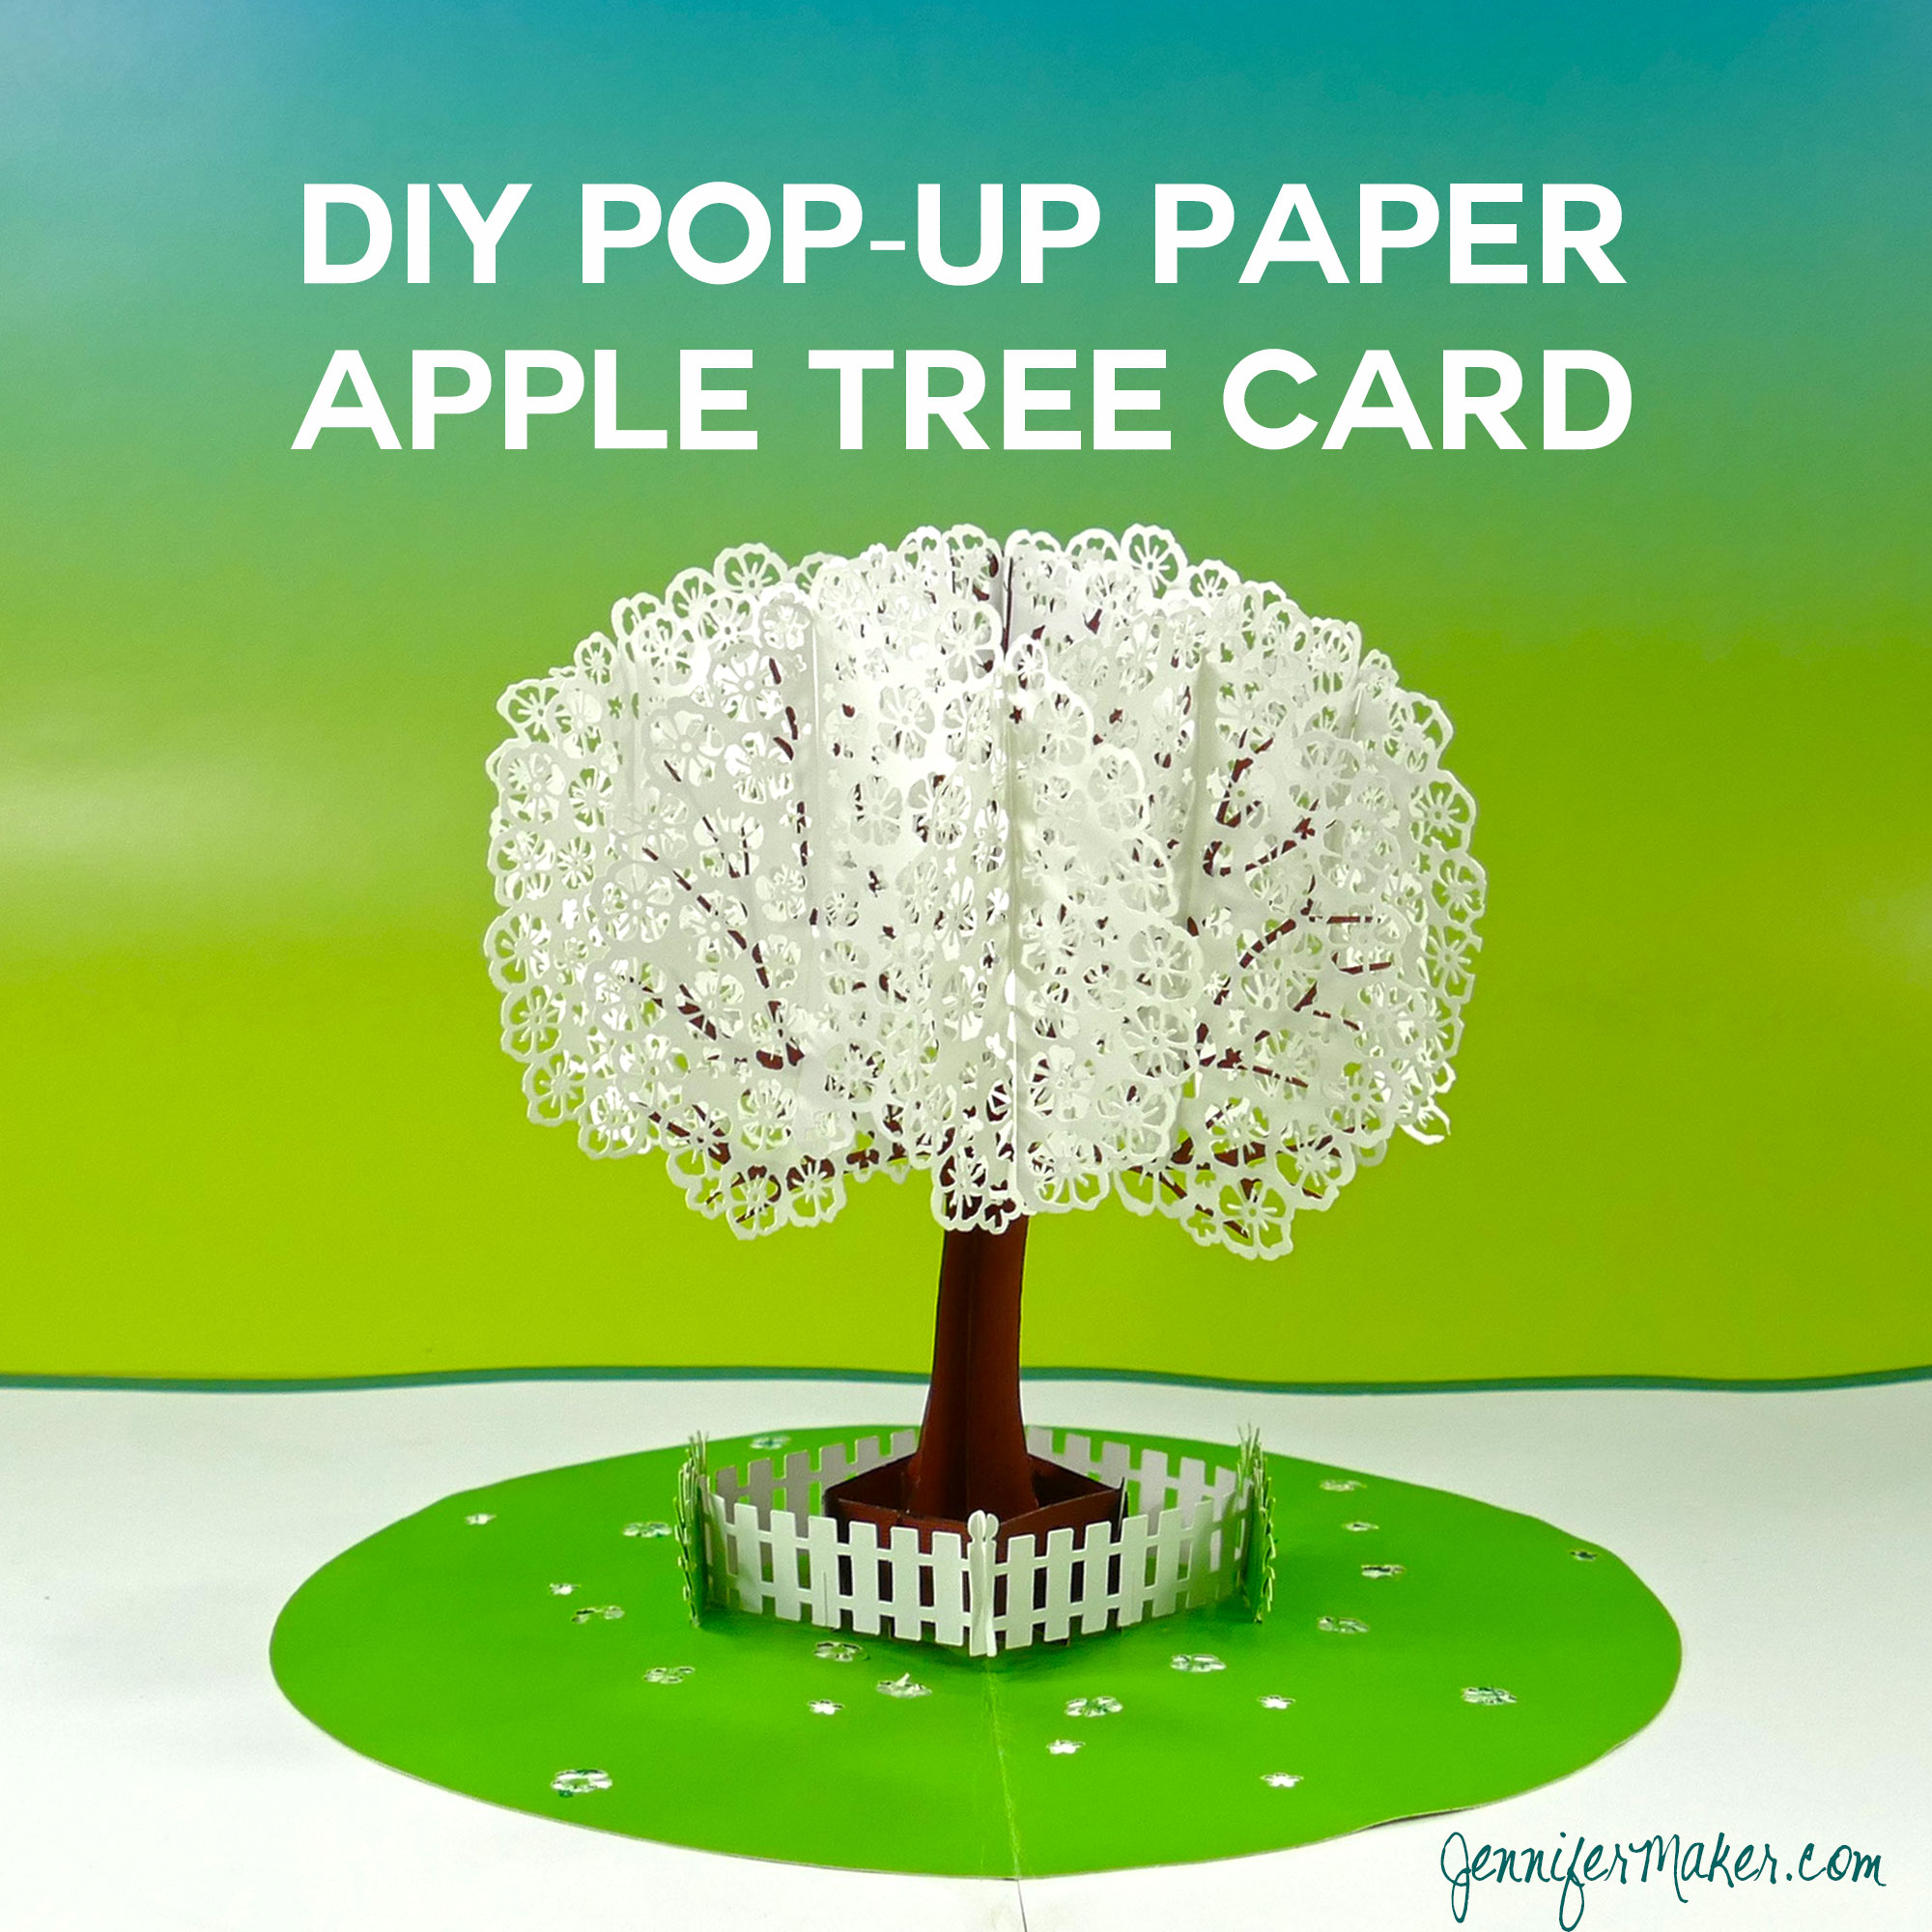
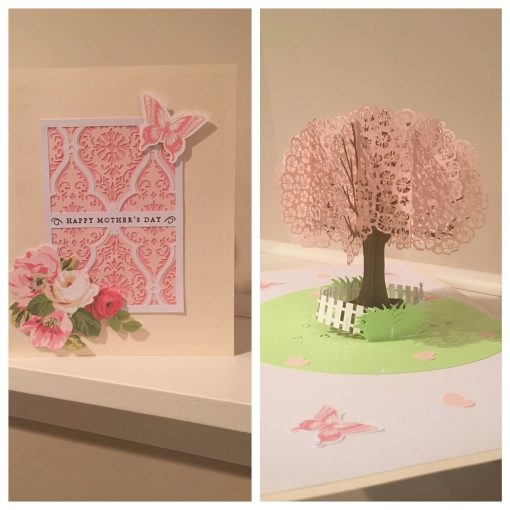
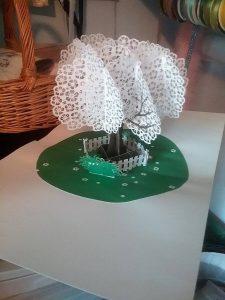
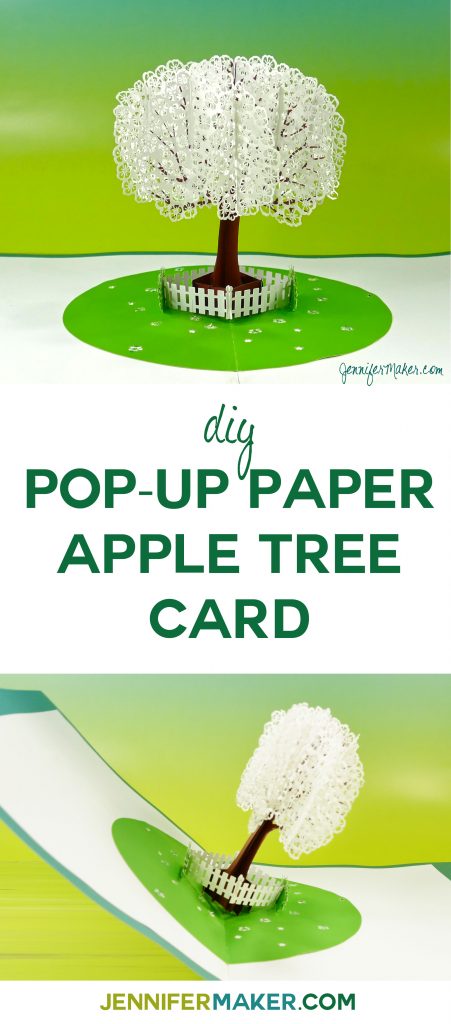
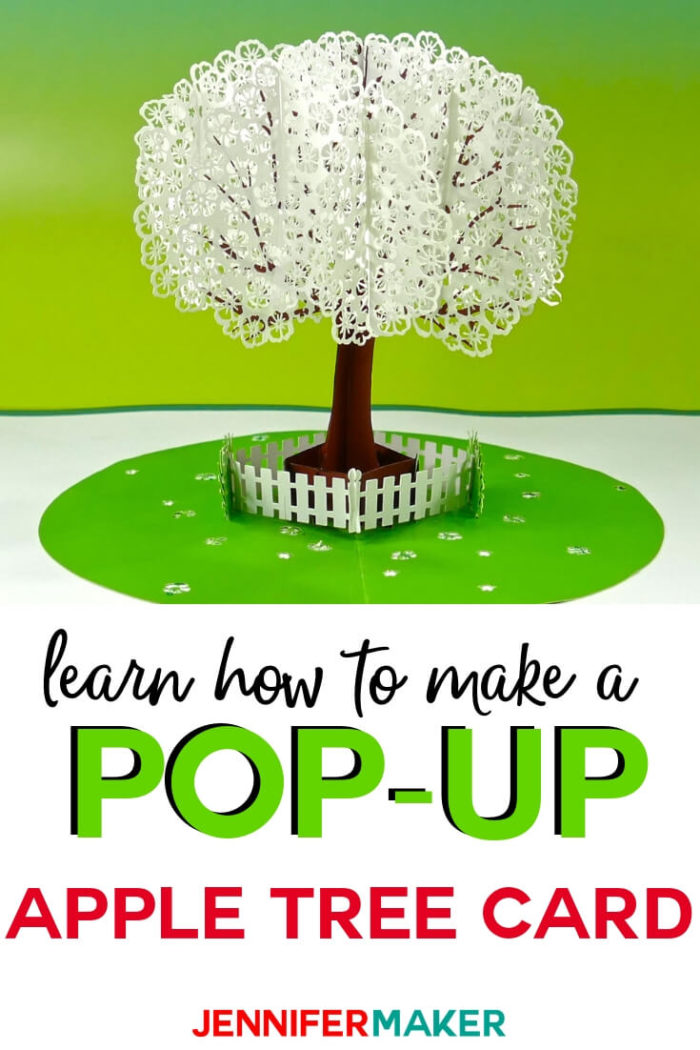
Two days ago while browsing Facebook, I saw a photo of a pop-up cherry tree card. I fell in love with it and set out to learn how to make it. (There’s an entire story to this—scroll down a bit to read it, or just skip it to get to the tutorial.) I am a little amazed to say I have figured it out and have made a gorgeous pop-up apple tree card. I picked the apple tree because I can see one from my desk all day, and the apple blossom is the official flower of my state, Michigan. The apple tree folds flat, but when you open the card it springs to life. It is SO cool! And I’m going to show you how you can make one, too!

Here’s a video of my apple tree pop-up card in action:
My Sliceform Pop Up Design Story
Have you ever amazed yourself by doing something you didn’t know you could do? That’s what happened when I made this. I was fascinated by the idea of the pop-up tree, and thought, “Hey, I want to make something like this, too!” But I’ve never made a pop up before. So I looked around for a tutorial or a video… or something. I found some simple pop-up tutorials, but nothing like this. So I stared at the photo, imagined the pieces in my head, moving them around until they fell into place… and suddenly, I KNEW.
I opened up Adobe Illustrator and began to draw. First the trunk and leaves, then the extra leaves, and finally the base. I uploaded the files to Cricut an hour later and tried to put it together. Here’s the amazing thing … everything fit without any errors. It all just slid right into place. I’m still not sure how I managed that, except to say I’ve been designing a lot of different things lately. You can see the first tree I made below in all green.
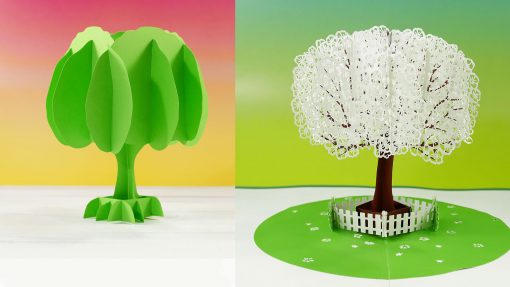
Once I had a basic sliceform design down, I made it pretty by adding in blossoms, the fence, and the base. I designed everything on my own, from top to bottom. The blossom shapes were modeled after real apple blossoms from the tree in my yard. So while it may have a resemblance to various commercially-designed pop-up cards, it is 100% my own design. And I am happy to share it with you!
If you’re curious about sliceform, it is a technique developed by Olaus Henrici, a London mathematician at the end of the nineteenth and early twentieth centuries. It is a fascinating way of creating 3D paper sculptures, and I plan to explore it further.
Pop-Up Apple Tree Card Materials

Some of the links below are Amazon affiliate links for your convenience. Read my full disclosure policy.
- Good quality cardstock*—four sheets of white 65 lb. 8.5″ x 11″ cardstock, 1 sheet of brown 65 lb. 12″ x 12″ cardstock, 1 sheet of green 65 lb. 12″ x 12″ cardstock, and 2 sheets of 12″ x 12″ cardstock in any color (for the card cover)
- Glue (I used Aleene’s “Tacky” Glue Pen)
- Tape
- Design #27 – Cut files (available free in my resource library—get the password to the library by filling out the form at the bottom of this post)
- A cutting machine (I used a Cricut Explore series machine but you can use a Maker series, Explore series, or a Venture)
* Note on Cardstock Quality: These are intricate cuts, so a better cardstock will produce better results. All the card stock I used was 65 lb.

How to Make a Pop-Up Apple Tree Card: Step by Step
I made a video of the entire pop-up tree card assembly process—I recommend you watch it to see how it all comes together.
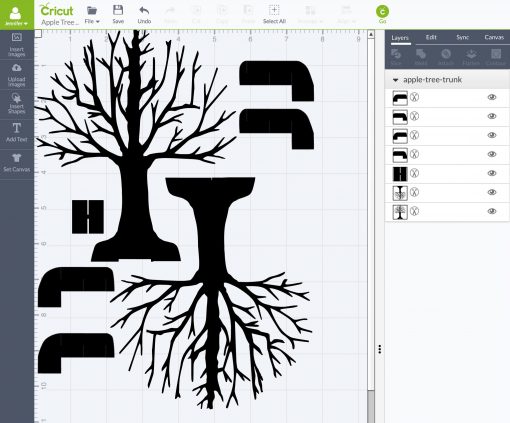
First, cut out all your cardstock using my free cut files (Design #27). To do this on a Cricut, download the SVG cut files from my resource library, go to Cricut Design Space, and upload each file.
IMPORTANT: Be sure to click Select All and Attach on each file before you cut it to keep it all in the proper places.
And make sure your cutting mat is clean and sticky enough—a mat that isn’t sticky enough will cause the flowers to cut out poorly. Please note that it will take a couple of hours to cut out these intricate files on a Cricut.
Be aware that Cricut Design Space will not show some of the details on the canvas, but they will still cut. The reason for this is that the outlines of the shapes are on the higher layer than the details to force the outline to cut out last. I do this on purpose, because if the outlines were to cut first, your paper may slip on the mat when cutting the details. If this is what you see in Cricut Design Space, this is RIGHT:
Having problems loading or cutting the files? You may just not have enough system memory—there are a lot of intricate cuts in my files. To help with this, I’ve uploaded two new sets of files — one has all the elements individually, and the other simplifies the elements (removes the blossoms). You’ll find both of these alternate sets of files in my resource library. The simplified files are also appropriate for those of you who are cutting it out by hand.
Note: Even with a sticky mat, sharp blade, and good cardstock, you can expect to spend some time weeding the blossom petals out.
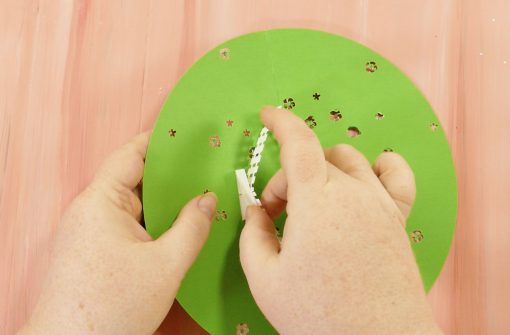
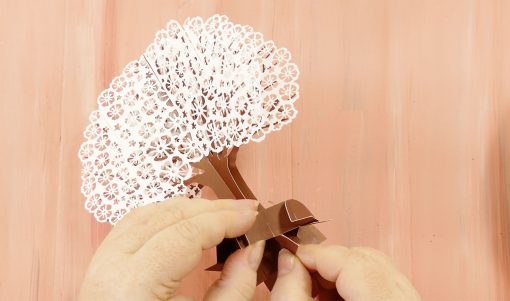
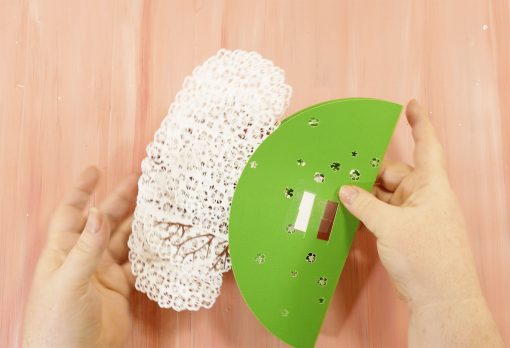
Now it’s time to assemble your tree. Start with the tree trunk piece that has a slot at the top and glue the foliage that is separated into two halves onto the branches. When gluing, be careful to avoid gluing over the slot and note that no branches should be peeking out from the foliage. Tip: Put glue on the branches and attach the foliage to it rather than the other way around. Set aside to dry.
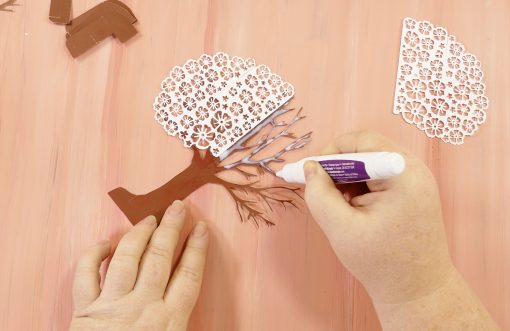
Next, glue the foliage onto the other tree trunk piece. There is no slot at the top of this tree piece, so you don’t have to worry about matching anything up—just be sure to use the largest foliage piece. The outline of this trunk/foliage set should match the outline of the trunk/foliage set you did in the previous step. Set aside to dry.
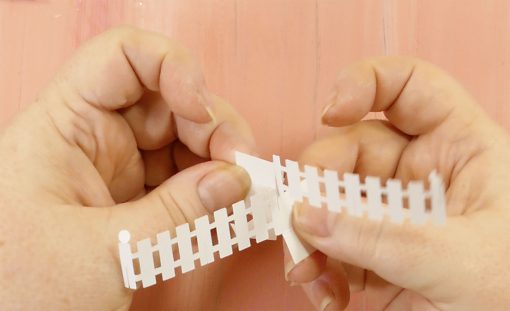
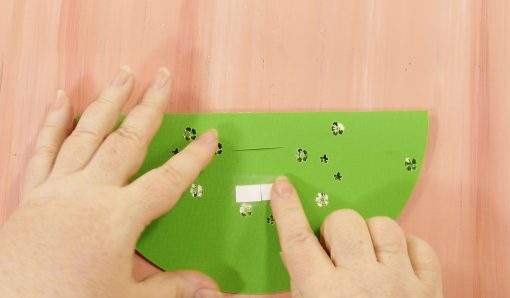
Assemble the fence. This is a little tricky because it’s easy to slot the fence pieces in the wrong way. Here is a diagram showing which way the pieces go together.
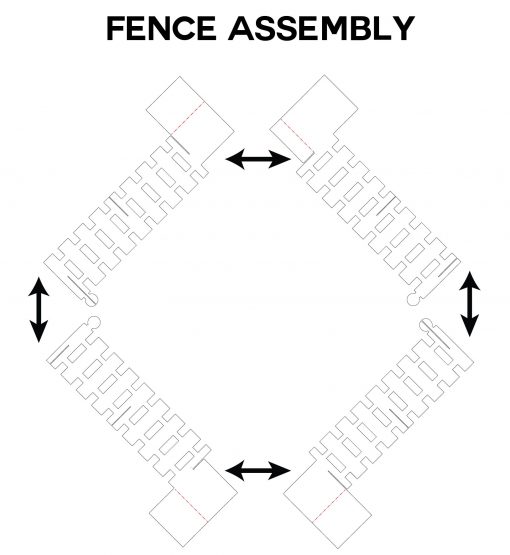
Once the fence is assembled, fold the tabs up so they are even with the bottom of the fences and pointing away from the fence assembly. The fold lines are indicated by red dashed lines in the diagram above.

Now slide each set of fence tabs into the outer slots on the card base, then tape down from the underside.
If you’d like to cover the white fence ends, glue the grass pieces to the inner and outer sides of the white rectangles on either end of the fence. The corner pieces go inside, while the pieces with one straight edge go on the outside.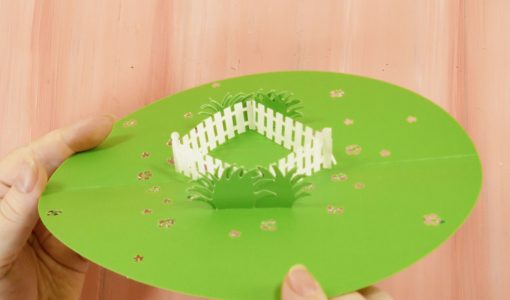
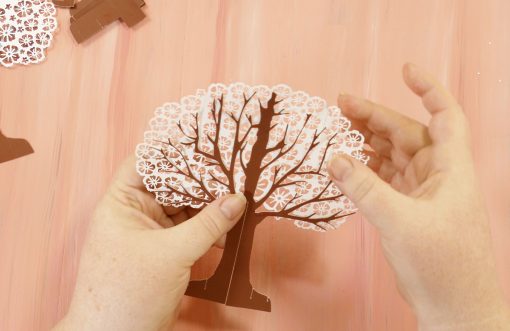
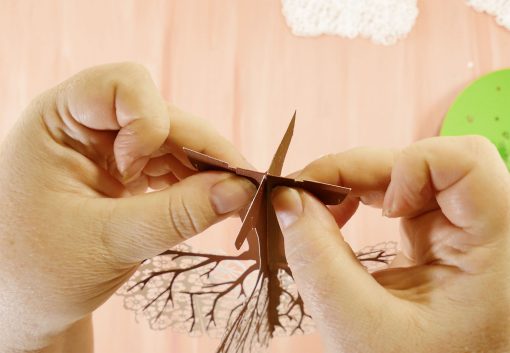
Now let’s assemble our tree. Start by slotting one tree trunk onto the other (the trunk with the upper slot slides over the trunk with the lower slot). Stand it up to make sure it is stable.
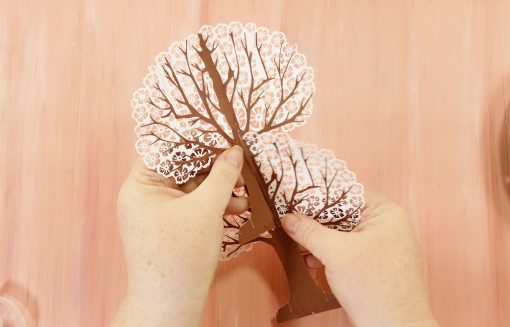
To keep the trunk pieces stable, we’ll attach the small H-shaped bridge piece. First, carefully fold it in half, then glue the tabs (not the thin connection piece), and place over the bottom end of the tree trunk with the lower slot. Notches are cut into both trunks that will allow this bridge to fit snugly over and in the trunk pieces. When done, stand it up to make sure it is still stable.
Now assemble the trunk support pieces, which go together similar to the fence pieces. Here is a diagram of how the trunk support pieces get slotted together.
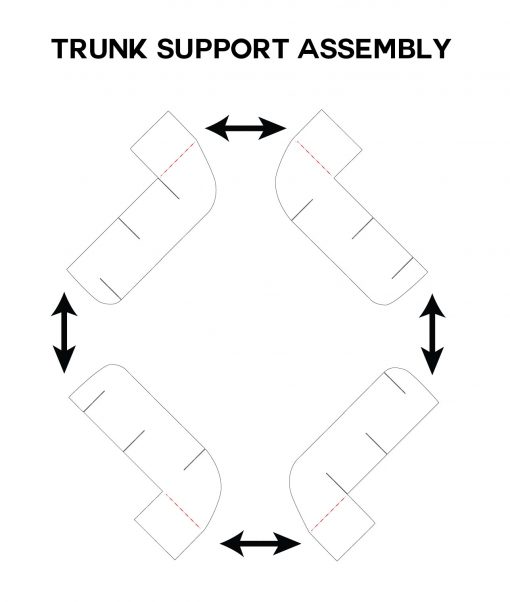
Once the trunk support is assembled, fold the tabs up so the bottom of the tab is even with the bottom of the support. The fold lines are indicated by red dashed lines in the diagram above.
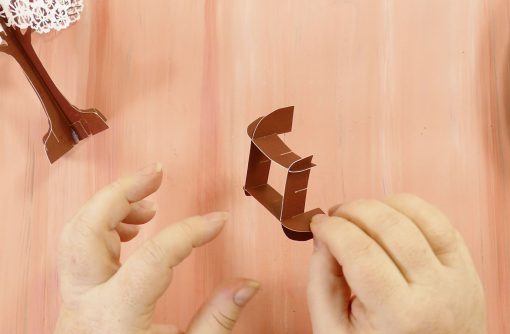
Put the trunk support on the bottom of the tree trunk by inserting the folded tree into the support from the top, then slotting the tree into the support from the bottom.
Slide the trunk support bases into the inner slots on the card base and tape down from the underside.
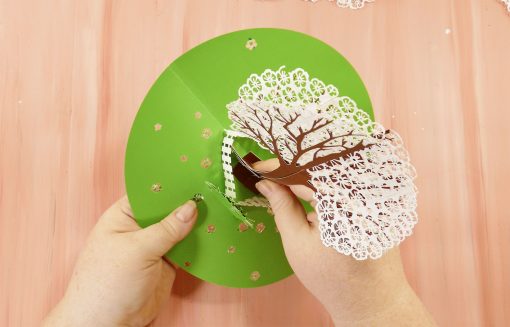
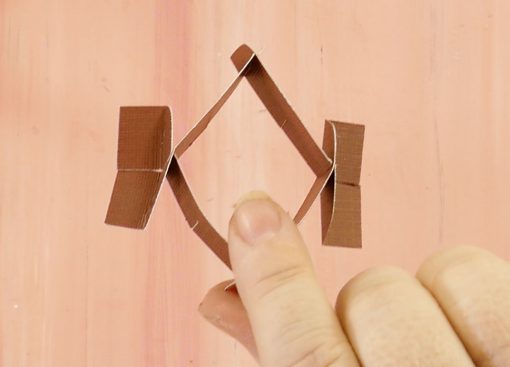
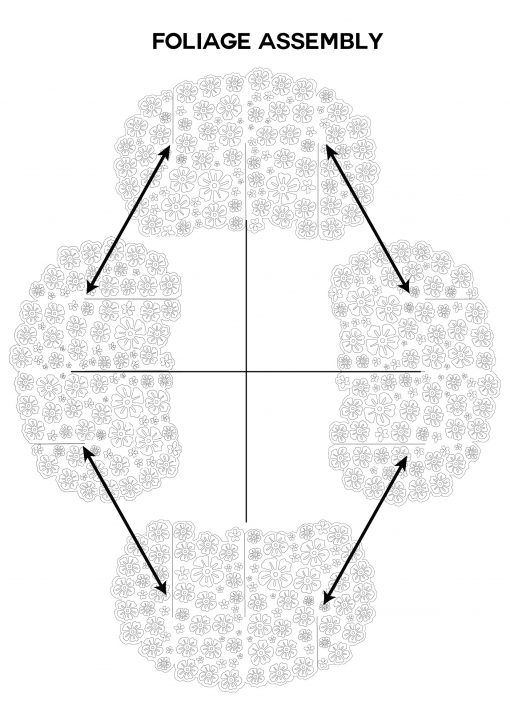
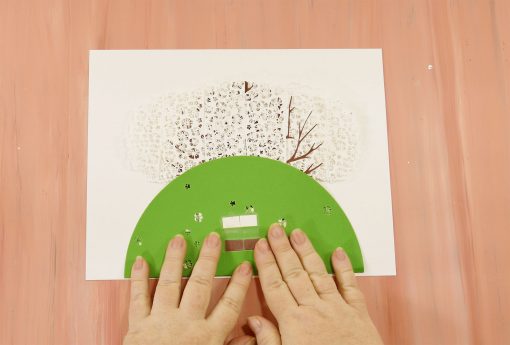
Stand the assembled tree up (put heavy objects on the base if necessary to keep it stable). Now slide in the foliage slices as shown in the diagram below.
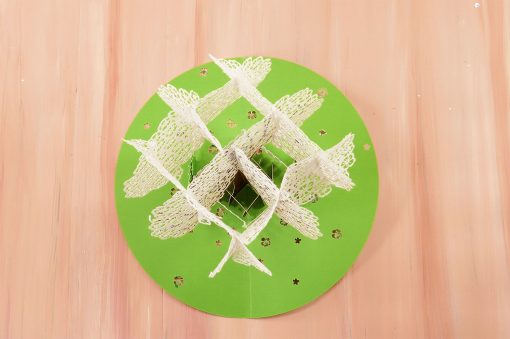
Now test the opening and closing of your base to make sure your pop-up is working as intended. Make any adjustments necessary now before you move on to the next step.
Glue the two pieces of white 8.5″ x 11″ cardstock to the underside of either half of your base to form the card.
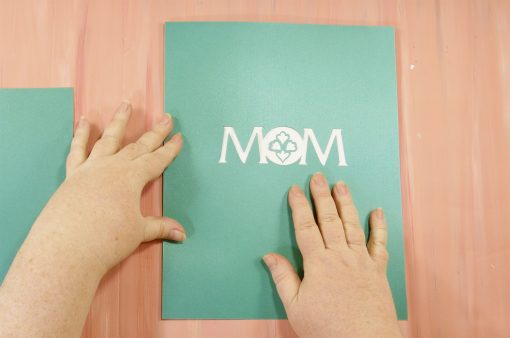
Finally, add the two pieces of 9.5″ x 12″ cardstock to the outer sides of the card for a more decorative look. I used a Cricut Acess image to cut “MOM” into the cover of my card stock before applying it.
And that’s how you make a sliceform apple tree pop-up card! The cutting is really the most time-consuming part of this project—assembly is about 30 minutes tops. If all that seems like too much time to you, it may be better to buy a laser-cut and pre-assembled version from one of the commercially available pop-up card stores, such as LovePop.com. It won’t look the same, but they have their own fun designs.
Fill out this form to get the password with the free SVG files:
Get my free SVG cut files for the pop-up apple tree card

Subscribe (free!) to get access to my resource library with all my free cut files, printables, and patterns! Once subscribed, I will send you a newsletter with details about my new free files each week.
If you make one of these, please do email me and tell me — I love to see your creations! And, as always, let me know if you have any questions.
To inspire you to try this, here is a photo of a gorgeous pop-up cherry tree made from these files by a reader, Mary Ann Penn:
Here is a photo from another reader, Elizabeth Nessmith, who had a little fun with her apple blossoms during assembly!

Love,

Like this tutorial? Please share it with your friends and pin this post to your favorite craft board!


What is the finished size of your card.
The finished card is 12″ high by 9.5″ wide. So it’s pretty large for a card. You could go smaller if you reduced all the files by the same amount, though it may be hard to make all those cuts even smaller on the Cricut. I am not sure.
if we are not using the circit would it be possible to make it smaller?
Yes, I believe so. 🙂
Thank you so much for this set of cut files. This was exactly what I was looking for. I started looking for a Christmas tree and found your site. Thanks again.
Happy to help!
OMG! I always wanted to make one of these since I first saw the love pop cards. You are amazing!!! Thanks for sharing.
Yay! I hope you make one. Please let me know if you have any questions. 🙂
Awesome! Now I need to try one…
Thanks! Please do. Your web site looks like fun!
Brilliant article thank you
Thanks, Karen. 🙂
Thanks for the beautiful card! This is awesome. I also appreciated the info on the Cricut import. Couldn’t figure out why the detail didn’t show! Happy crafting!
You’re welcome, Kathy! Please let me know if you make it. 🙂
I was able to cut out the base and the trunk. I can’t get the leaves to cut. I can add the image but when I go to cut all the little cutouts are on a separate page. I tried attaching them but DS3 keeps freezing. I have tried Firefox and Chrome. I also tried Design Space and it says the image is too large. I have cleared my cache and restarted browser,, etc. and still no go. Any suggestions! I am so close!
Hello, Kathy! Yes, this morning I uploaded the individual elements in a ZIP file — I recommend you try uploading those, as they will be smaller. Look in my resource library for the “Pop-Up Apple Tree Card SVG Files (Individual Elements)” file and try uploading the individual things you need one at a time. Let me know if this works for you please!
I will give that a try! Thanks!
I am having the same problem. The leaves are not on the tree tops. They are on a separate page when I hit GO
Hello, Bee! As I mentioned in the tutorial, you need to click Select All and then click Attach before you click Go. Please try that and let me know if you have any issues. 🙂
I ignored the “website is not responding” pop ups. Everytime I did click on it, what I was waiting for popped up! I also made the page with the 4 white…..blossoms pieces into two separate cuts. Those 2 things helped me A LOT. FYI: I spent a week trying to nail this one!
I have downloaded the template. When I upload it, do I need to do any resizing? I watched your you tube video and it didn’t state the size of the images. So excited to try this project – thank you so much for sharing!1
Hello, Heather! No need for resizing — it’s all at the proper size. The finished card is 12″ high x 9.5″ wide.
Thank you, thank you, thank you!!!
You’re welcome, Janet!
Do you have a tutorial of how to make the front of the card?
Hello, Sarah! No, I do not — the design on the front is just something I found in Cricut Access in Design Space. It did not make it. Sorry!
Beautiful. I am cutting now. I had to go with the single images to get it to cut. Just checking- do I cut 2 of each pattern for the blossoms or 3 of each? I keep looking at the pictures and I am unclear? Thank-you.
Hello, Therese! If you are cutting the blossoms individually, you need four of each.
clarification….. there are 6 total. 1 is a bit bigger, 1 is in 2 pieces, an 4 are a bit smaller.
Thank-you. I have cut out and am starting to assemble but… I do not have the piece of foliage separated in 2 halfs. I can see this piece in the file for the pop up card with all the files in one but it is not included in the individuals file which I had to use to get my machine to cut. Am I missing something or am I to cut a piece in half?
It looks like I neglected to put that file into that zip file — so sorry! (There are now so many versions it’s getting hard for me to keep track of.) I uploaded a new “individuals” zip file with that missing file included (it’s called “apple-tree-branches2-individual-jennifermaker.svg”).
I thought it was me, lol. Glad to see it wasn’t! Thank you for getting that file uploaded so quickly. I have every other piece cut, and I’m already in love!
Hi Jennifer, Thank you again for this file. I am still learning the cricut, when I cut the tree flowers it is ripping my paper. Is there a way to slow down the blade to be more delicate or am I doing something wrong? I’ve tried recollections card stock and sharpening the blade. Thanks
Hello, Shawna! It sounds like your mat isn’t sticky enough. Use your stickiest mat, make sure it is clean, and try again. I used a nearly-new StandardGrip mat. It makes all the difference.
Hello, I love this card but I am having the hardest time cutting it out with the cricut. It cuts half of the image and then spits it out. Is there anyway to get the parts and pieces individually instead of together? I think the images are to complex and the cricut just gives up. Or any other tips to get it to cut?
Also if the small pieces can be attached before loading it in to design space that might work better as well. Thanks so much!!
If you use the “less-nodes” version of the files, they are all pre-attached. Have you tried that version yet? I made it specifically for folks with issues like yours. 🙂
Hello, Jolene! Are you using the original files, the less-nodes files, or the individual files? Also, are you leaving your Design Space window open the whole time it is cutting and not moving to another application or web site? Thanks!
OH MY GOSH! If only I would have read your very clear instructions a week ago!! lol!! Ugh I am mad at myself haha! Thank you SOOOO much! My cricut is humming along cutting out this awesome card right now. 🙂 Thanks again, you are wonderful!
Yes!!!!! It’s taken me a week of non stop fiddeling, but it’s MADE!!! I WIN!!! It’s beautiful! BUT I doubt I’ll ever ake another one, so the next step is where and how t display it in my craft room……already have ideas…….
THANK YOU!!!!!!!
Hooray! You did it! Do I get to see a photo of it? I’d love to. 🙂
I do have one. would you like me to upload it here? if so how. I have a funny one ( that only someone who has had trouble with is going to chuckle at) too.)
I’d love to see your photos! Send them to [email protected]
Help, it looks like my sizes for the leaves are wrong. can I have the exact size for the leaves and the tree trunk.
thank you
Lena
Hello, Lena! All the files will upload at the right size, so you could just re-add it. If that is not an option, I can give you the dimensions, but I need to know which of the four ZIP files you downloaded (original, individual, less nodes, or simple). Thanks!
I seem to be having the same problem. The two larger leaves seem to be larger than the four identical ones. I downloaded the nodes version. Can you give the dimensions of the cut leaves that are glued to the trunk first?
Okay, let me take a closer look at the less-nodes version to see if there is a size mismatch.
Ok, the larger leaves should indeed be larger than the four identical ones. This is necessary to achieve the rounded look of the tree branches. I measured the cut leaves that are glued to the trunk and they are 4.705 in. wide by 3.1256 in. high. The side leaves (four identical) should be 4.2537 in. wide by 2.7547 in. high. (These are the dimensions of the objects in Illustrator. It turns out the dimensions are different once imported into Design Space.)
Ok thanks for the measurements….mine printed about 6.5 inches wide
Hmm, something is weird here. In Illustrator, where I designed it, the branches are 4.7 in. wide. When the file is uploaded to either DS2 or DS3, it is ENLARGED to about 6.5 in. I just checked my finished tree and those branches are 6.5 in wide, too. I didn’t measure what cut out vs. what I designed because everything fit together fine. I don’t know why Design Space is enlarging it — I’ve not encountered this before. It’s possible it has something to do with the complexity of the file. Anyway, the files I uploaded are the ones I used and they are working fine. So it’s probably best to ignore the measurements and just cut it out. It does all fit together. 🙂
I have the same problem…though I figured it out after I assembled it. My 2 half pieces and the other branch “flowers” were both sized to fit the tree. Unfortunately, the 4 extra foliage, though all are the same size, are a bit bigger than the others, so they skew the tree and won’t fold. I could try to recut those 4 pieces, but the weeding about killed me. I’m using a once used cricut standard Mat, with cricut card stock and a new blade, but most flowers cut 85% around, forcing me the hand cut the remaining. Any suggestions?
Hi there! If Design Space is giving you problems with processing the design, you might try looking at the other download options I have for this that aren’t as detailed. This is a very memory intensive design for a lot of computers.
Thank you SO much again.
I made this card the tree and sent it to my mother-in-law and when she got it it fell apart and wouldn’t even stand up what weight card stock do you use for each piece. Very disappointed I would like to make another one.
Oh, I’m so sorry to hear that! Was it opening and closing okay when you made it, before you sent it? I used Core-dinations Solid Core Cardstock. I don’t know what weight it is. Did you include the bridge piece under the trunk? Or did you change the size?
I did use the bridge and did every thing by following instructions I am just wondering if I need to use heaver or double up the trunk of the tree and lighter card stock for the leaves
How heavy was the cardstock you used for the trunk? The leaves do need to be fairly lightweight — thats why I have so many cut-outs in my design. If the leaves are too heavy, it won’t want to stand up on its own. I had one reader make the leaves without the blossoms, and it wanted to fall over because it was too heavy.
What weight of paper did you use for each cutout it would sure help I want to make another one it was fun making it.
I used Core’dinations 65 lb. card stock for the trunk and foliage.
Thank You I will try that
Ya I guess I will try it again with lighter and heaver paper I guess it is a learning curve
So I am wondering if the files are sized correctly right out of the folder? I am doing the less nodes one. Or is there a size I should resize too? Because the bigger foliage seems to be much to big for the small foliage? And the tree trunk seems to be the same?
That’s a good question, Rena. After I made this project, I discovered that some of my design sizes were being changed simply by the act of opening and reserving the files. I didn’t know this at the time I made this project. I just looked at the less nodes version, and I see that the large foliage was too large. So I resized it and reuploaded it to the library. So sorry! I’m glad you noticed. I am keeping an eye on this now that I know it can be an issue.
Great project, thanks so much for sharing on craft schooling Sunday!
This is so cool – seems pretty complex but your instructions are great! Thanks for sharing your ideas at the Pleasures of the NW’s DIY party!
Thank you, Helen! And thank you for hosting the party! 🙂
That is so pretty! 🙂
Thank you, Joy! I enjoyed your blog post about that gorgeous Castle House. Would love to live there!
This is really amazing! A lot of work went into it. Thanks for sharing it with SYC.. I’m sure it’s not intentional, but I’m not seeing a link back to the party.
Jann
Thank you, Jann! And yes, the missing link back to your party was unintentional — I have added it! Thank you for hosting the party!
You make the coolest things! Thanks for sharing at The Blogger’s Pit Stop! Roseann from http://www.thisautoimmunelife.com
So pretty and lacy! Thank you for sharing at Ravenwould.
Oh, wow. i wish I had the patience for making pop up cards. This is really neat. Thanks for sharing at the Inspiration Spotlight Pinned & sharing.
No puedo descargar los files : (
Por qué no? ¿Qué sucede cuando intenta descargar desde mi Resource Library – https://jennifermaker.com/resource-library ? ¿Está usted en un escritorio o un dispositivo móvil? No se puede descargar en un dispositivo móvil.
I too am from Michigan. This will be a must make for me.
Oh my gosh that is awesome. Thank you for sharing
you are amazing!
You are amazing Jennifer! Thanks for sharing all your neat ideas with us!! You bless us all!:)
Trying to attempt a cool pop up for my school project and this is going to be super fun!
I have been admiring those beautiful pop cards for months! I’m so surprised and thrilled to see one in your Resource Library. I’m going to have to change my blade before I give it a try, but it’s definitely going on my “at least try” list.
Thank you so much for sharing such a fabulous creation. I hope you do explore this type of design. Would absolutely LOVE to see more of them.
OMG your work is seriously amazing!!! Thank you so much for sharing so much that you do! It is inspiring!!!! 🙂
Thank you, Kristine!
How I want to take you’r class but it will have to wait as I am traveling for the next 2 months.
I am very creative but have a difficult time with technology, at 76 is that not surprising! I do have a couple of Cricut machines and would love to make use of them with my designs.
I will be in touch when I return to the US to check on your next class schedule. In the mean time thanks for sharing.
Pauline.
Hi Jennifer, I started working on your pop-up apple tree card at the King County Library MakerSpace in Bellevue, WA. My first attempt of the flowers resulted in shredded flowers. I think because the paper available wasn’t the same quality as your recommendation. Second attempt mostly worked. I found a better paper and changed the blade. There was a bit of paper separation at the edges in a couple spots. The gals at Michael’s insisted that all cardstock is the same. Uhh…maybe I’m a paper snob, but I’m pretty sure there are quality differences amongst various cardstock. There are differences with painting and drawing papers.
Tried to track down the Core’dinations paper locally, no luck. I’ll have to order some instead.
I’m interested in your design process using Adobe Illustrator. I’d like to make my own SVGs to score/print/cut in Cricut Creative Studio.
Thank you for sharing and posting regularly to your blog.
I just AW THIS INCREDIBLE CARD AND COULD NOT BELIEVE MY EYES, I DO NOT OWN A CRICUT BUT TRULY ENJOYED JUST SEEING THIS CARD. JENNIFER YOU ARE ONE TALENTED LADY. I WILL BE FOLLOWING YOUR POSTS FROM NOW ON AS YOU HAVE INSPIRED ME WITH SOME OF YOUR OTHER WORKS OF ART. ooopsey, caps were on. Sorry. Keep em coming. you are the very best out there. Thank you so very much for all you do.
I am speechless. This card is awesome, beautiful, sweet and incredible. Thank you so much for sharing. You’ve just made my day 🙂
Hi Jeniffer, it is so beautiful!!! I for sure want to make it. Love your tutorials on You tube, learned a lot of it. Please don’t pay attention to my language, I’m Dutch.
thank you for sharing this awesome file. I just saw the tutorial and hope I can make the tree soon.
This is brilliant!
I can’t wait to try!
Thank you so much for all these wonderful blog entries and SVG’s and tutorials and EVERYTHING!!
I really cannot wait to try this tree
I just wanted tom thank you so much I have made this card and a few others as well I have looked though a lot of sites and I just could not follow them but your site is the best again Thank you…
Oh, Linda, thank you so much! And THIS is not an easy project to make! Glad you hung in there!! 🙂