
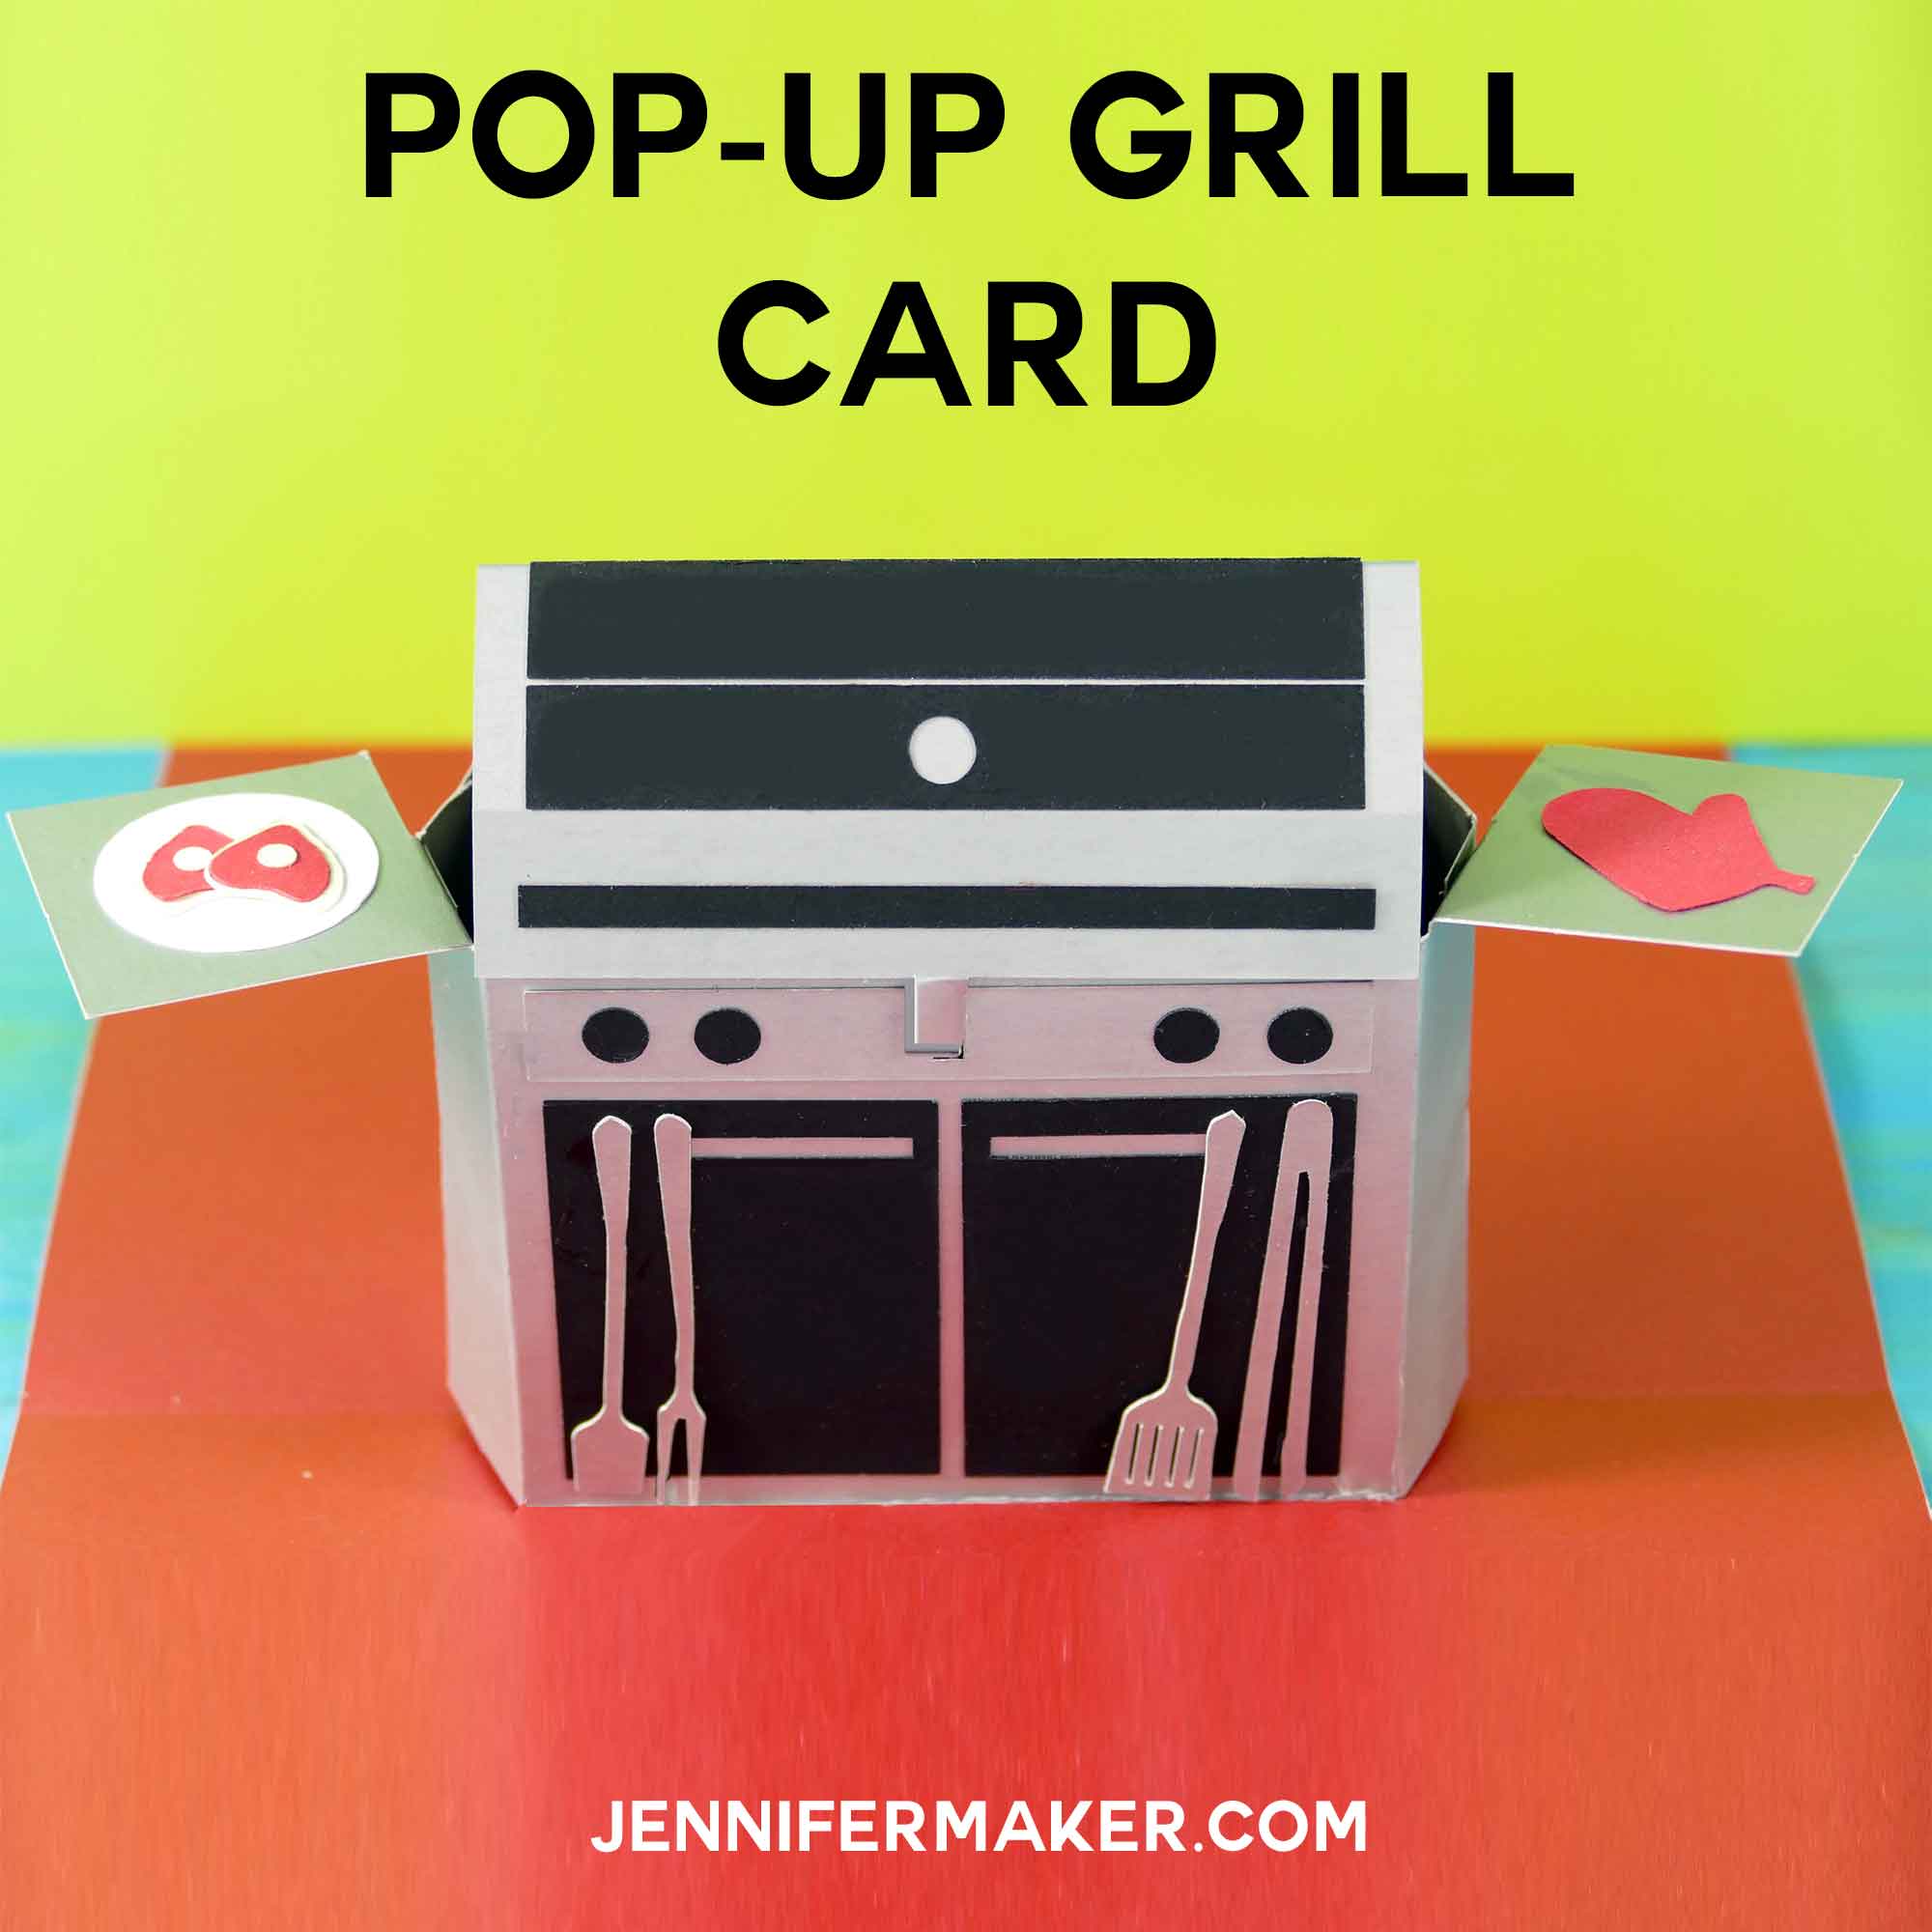
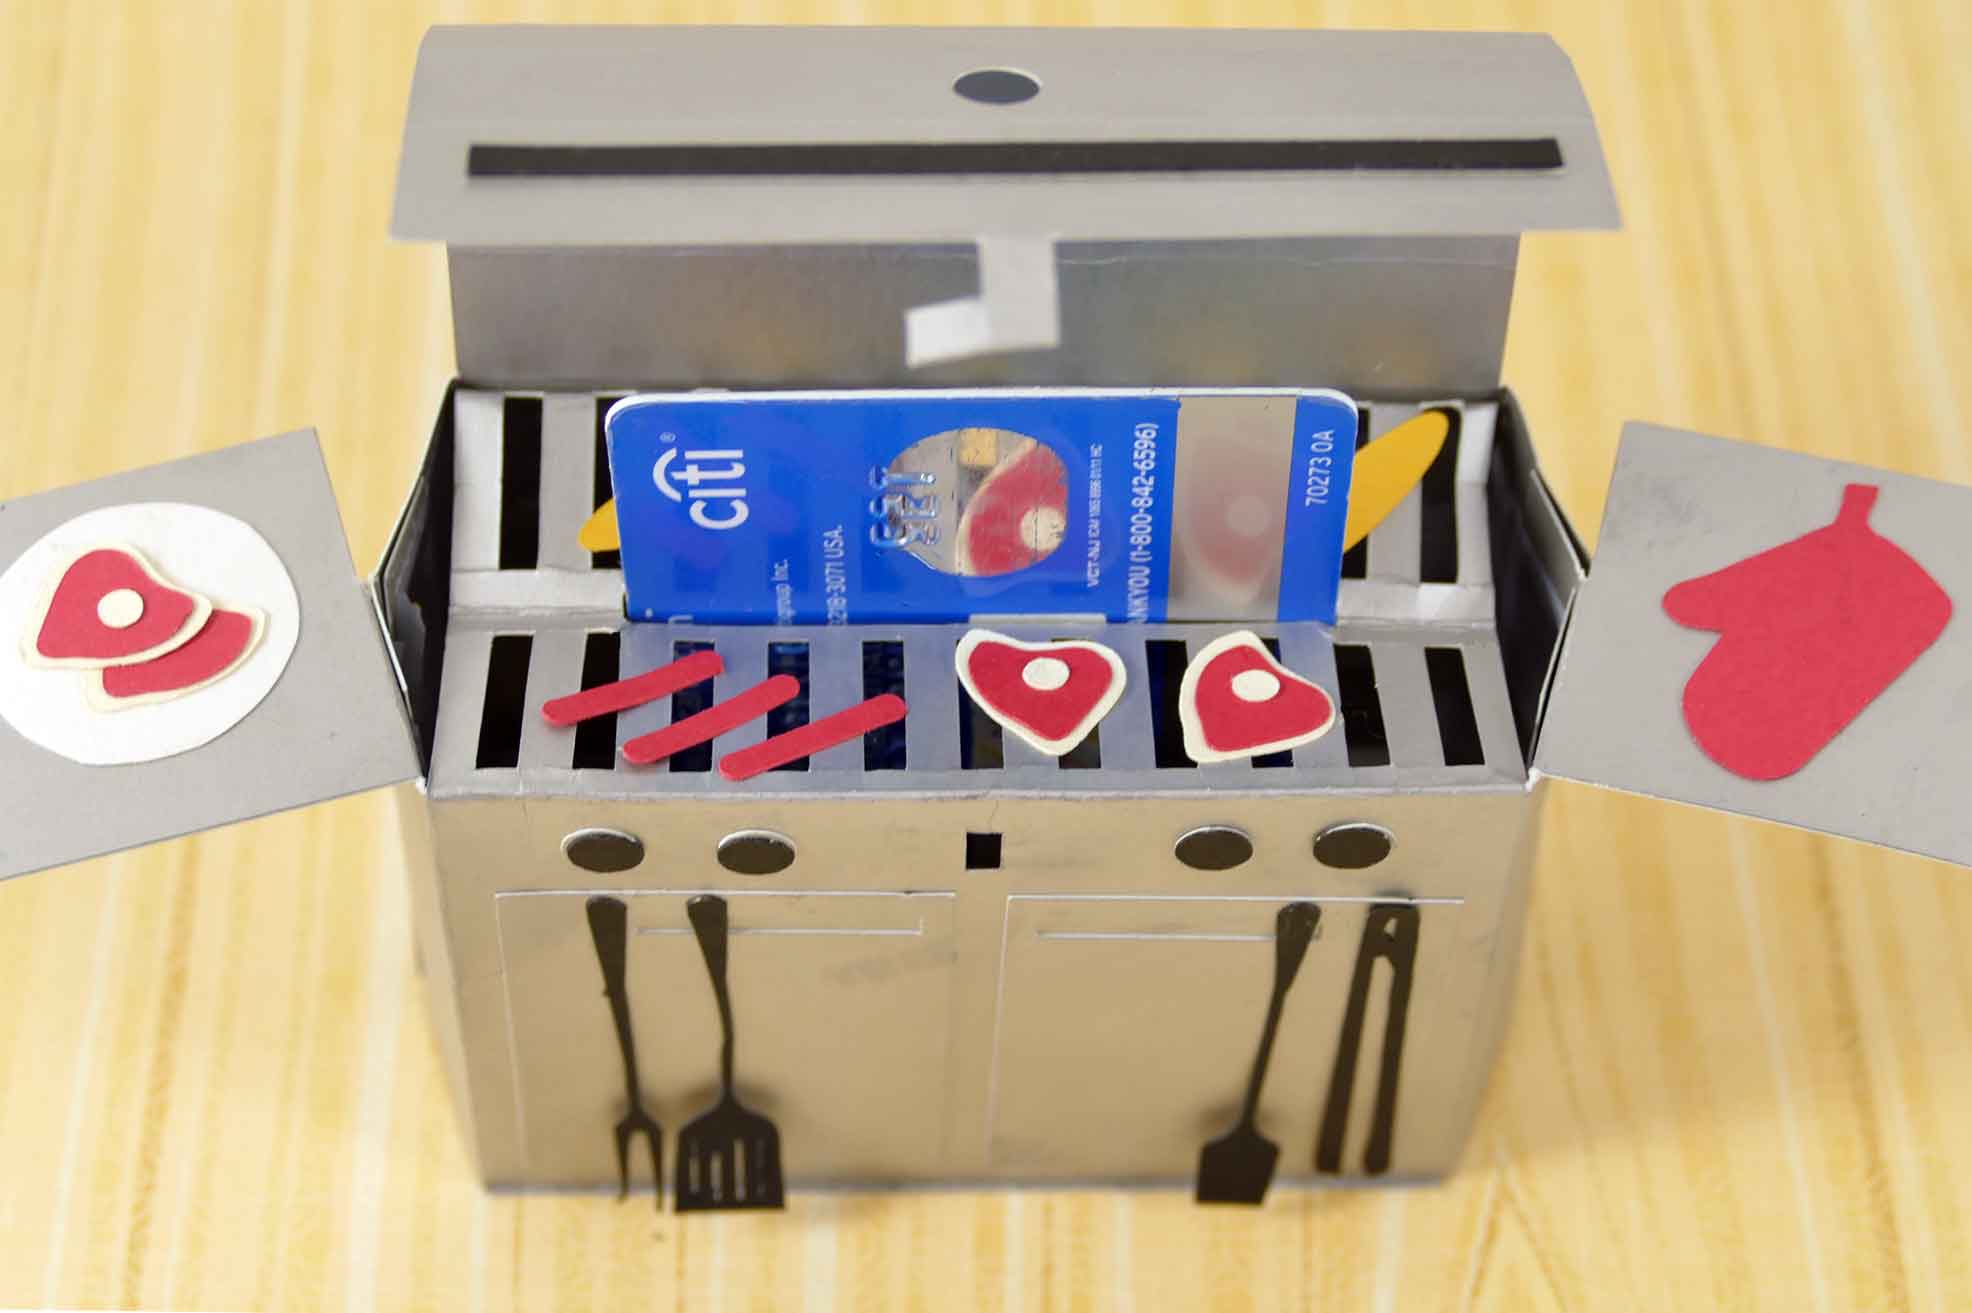
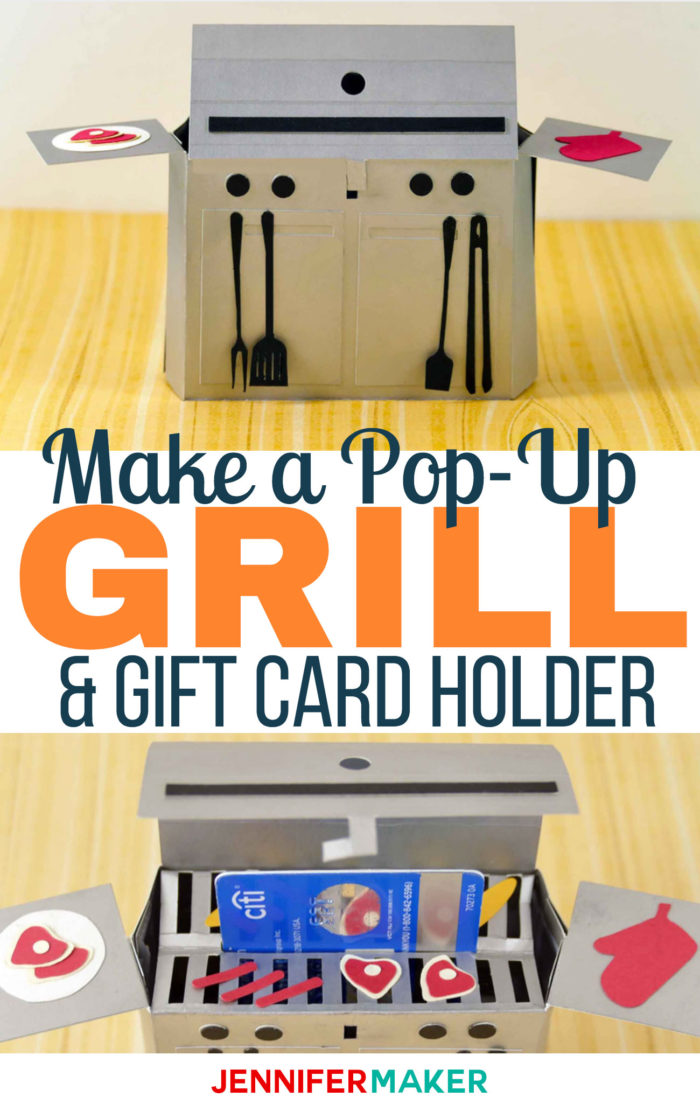
Father’s Day is fast approaching and it’s time to make something fun for the guys! So I’ve designed a pop-up grill card that is perfect for dads and summer cook-outs. And the best part? You can put a gift card right inside the grill (just like my coffee cup gift card holder). Just flip open the grill hood and pull out the gift card. Isn’t that fun? You can use this for a summer party or cookout, too — just leave the gift card out. And it all folds flat so you can slip it into a 5″ x 7″ envelope and even mail it.
Let me show you how easy it is to make this Pop-Up Grill Card! This post contains some affiliate links for your convenience (which means if you make a purchase after clicking a link I will earn a small commission but it won’t cost you a penny more)! Read my full disclosure policy.
Materials to Make A Pop-Up Grill Card
- Metallic cardstock 12″ x 12″
- Regular 65 lb. cardstock 8.5′ x 11″
- Tacky glue
- Spray adhesive
- A way to cut your paper (I used the Cricut Maker cutting machine but they can also be cut on a Cricut Explore or Cricut Joy)
- Design #33 – My free SVG design files (available in my free resource library—get the password by filling out the form at the bottom of this page)
How to Make a Pop-Up Grill Card and Gift Card Holder
Step 1: Get My Free Grill Card SVG File
My free Grill card and Gift Card Holder SVG cut file is Design #33, and it has two separate files, the grill base file and the grill file which contains all the other pieces of the card.
Get the free pop-up grill card and gift card holder design from my free resource library (get the password to the library in the form at the bottom of this post).
Step 2: Prepare Your Pop-Up Grill Card Design File for Cutting
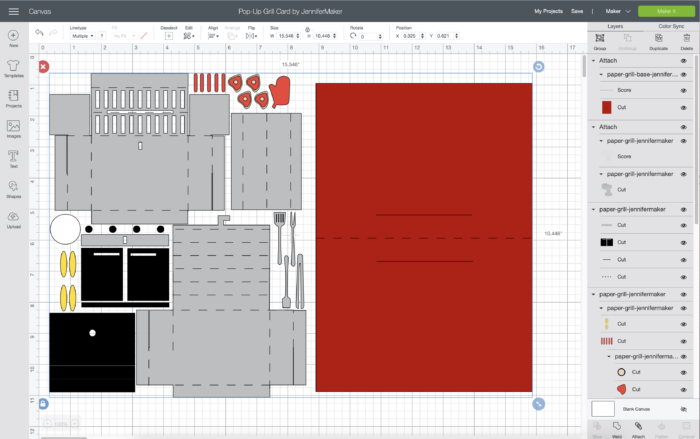
Here is what the pop-up grill card SVG cut file will look like when you upload it to Cricut Design Space:
Tip: If you’re not sure how to upload an SVG cut file to Cricut Design Space, watch this helpful video training series I made. If you’re on an iPhone or iPad, here’s how to download and upload SVG files to the Cricut Design Space app.
Note that I have included score lines as the first layer in both the grill file and the base file, so you need to change that layer from Cut to Score after uploading it to Design Space, and then attach the first two layers together to ensure the score lines appear in the correct places. Everything else is on its own layer so you can change colors or show/hide as much as you like.
Need help with the scoring lines? Check out my tutorial on Cricut Scoring, Grouping, and Attaching!
Step 3: Cut Out Your Pop-Up Grill Card Design
If you use metallic cardstock like me, you may find it hard to cut. I had to create a Custom Material with a setting of 330 and a 3x cut.
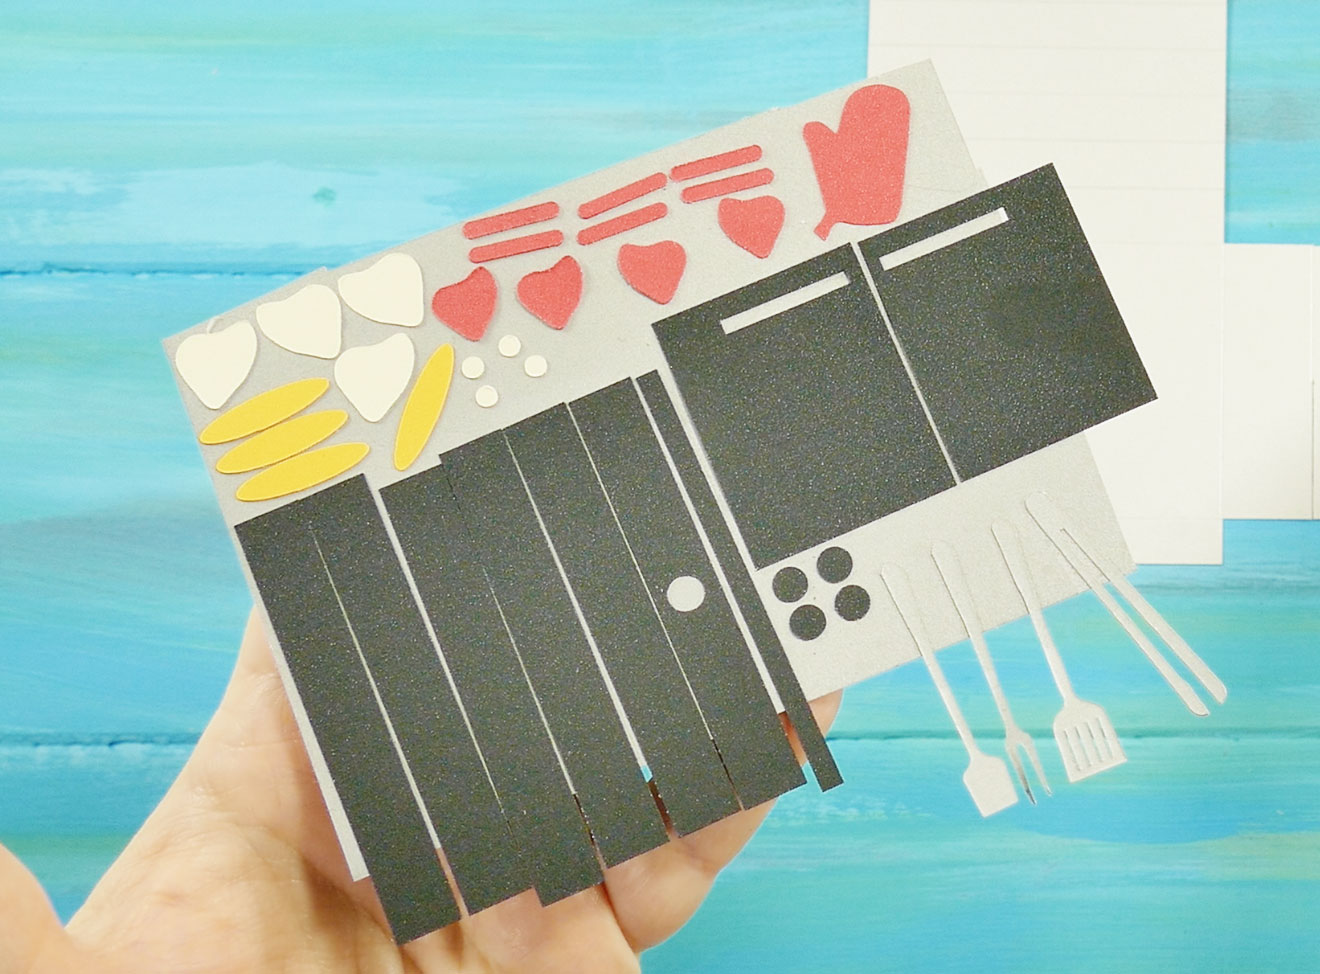
Step 4: Spray Your Small Pieces with Adhesive
Once your pieces are cut out, begin by spraying the backs of all the small pieces with adhesive (doors, knobs, utensils, hood rectangles, food, plate, etc.) I recommend you put them on a small piece of card stock, spray them in your overspray box, then lift out the entire piece of card stock with your sprayed pieces — so much easier that way!
At this point, I recommend you watch my assembly video from start to finish — it’s really a lot easier to watch me put it together, I think! But I do explain each step below for those who do not like videos, of course.
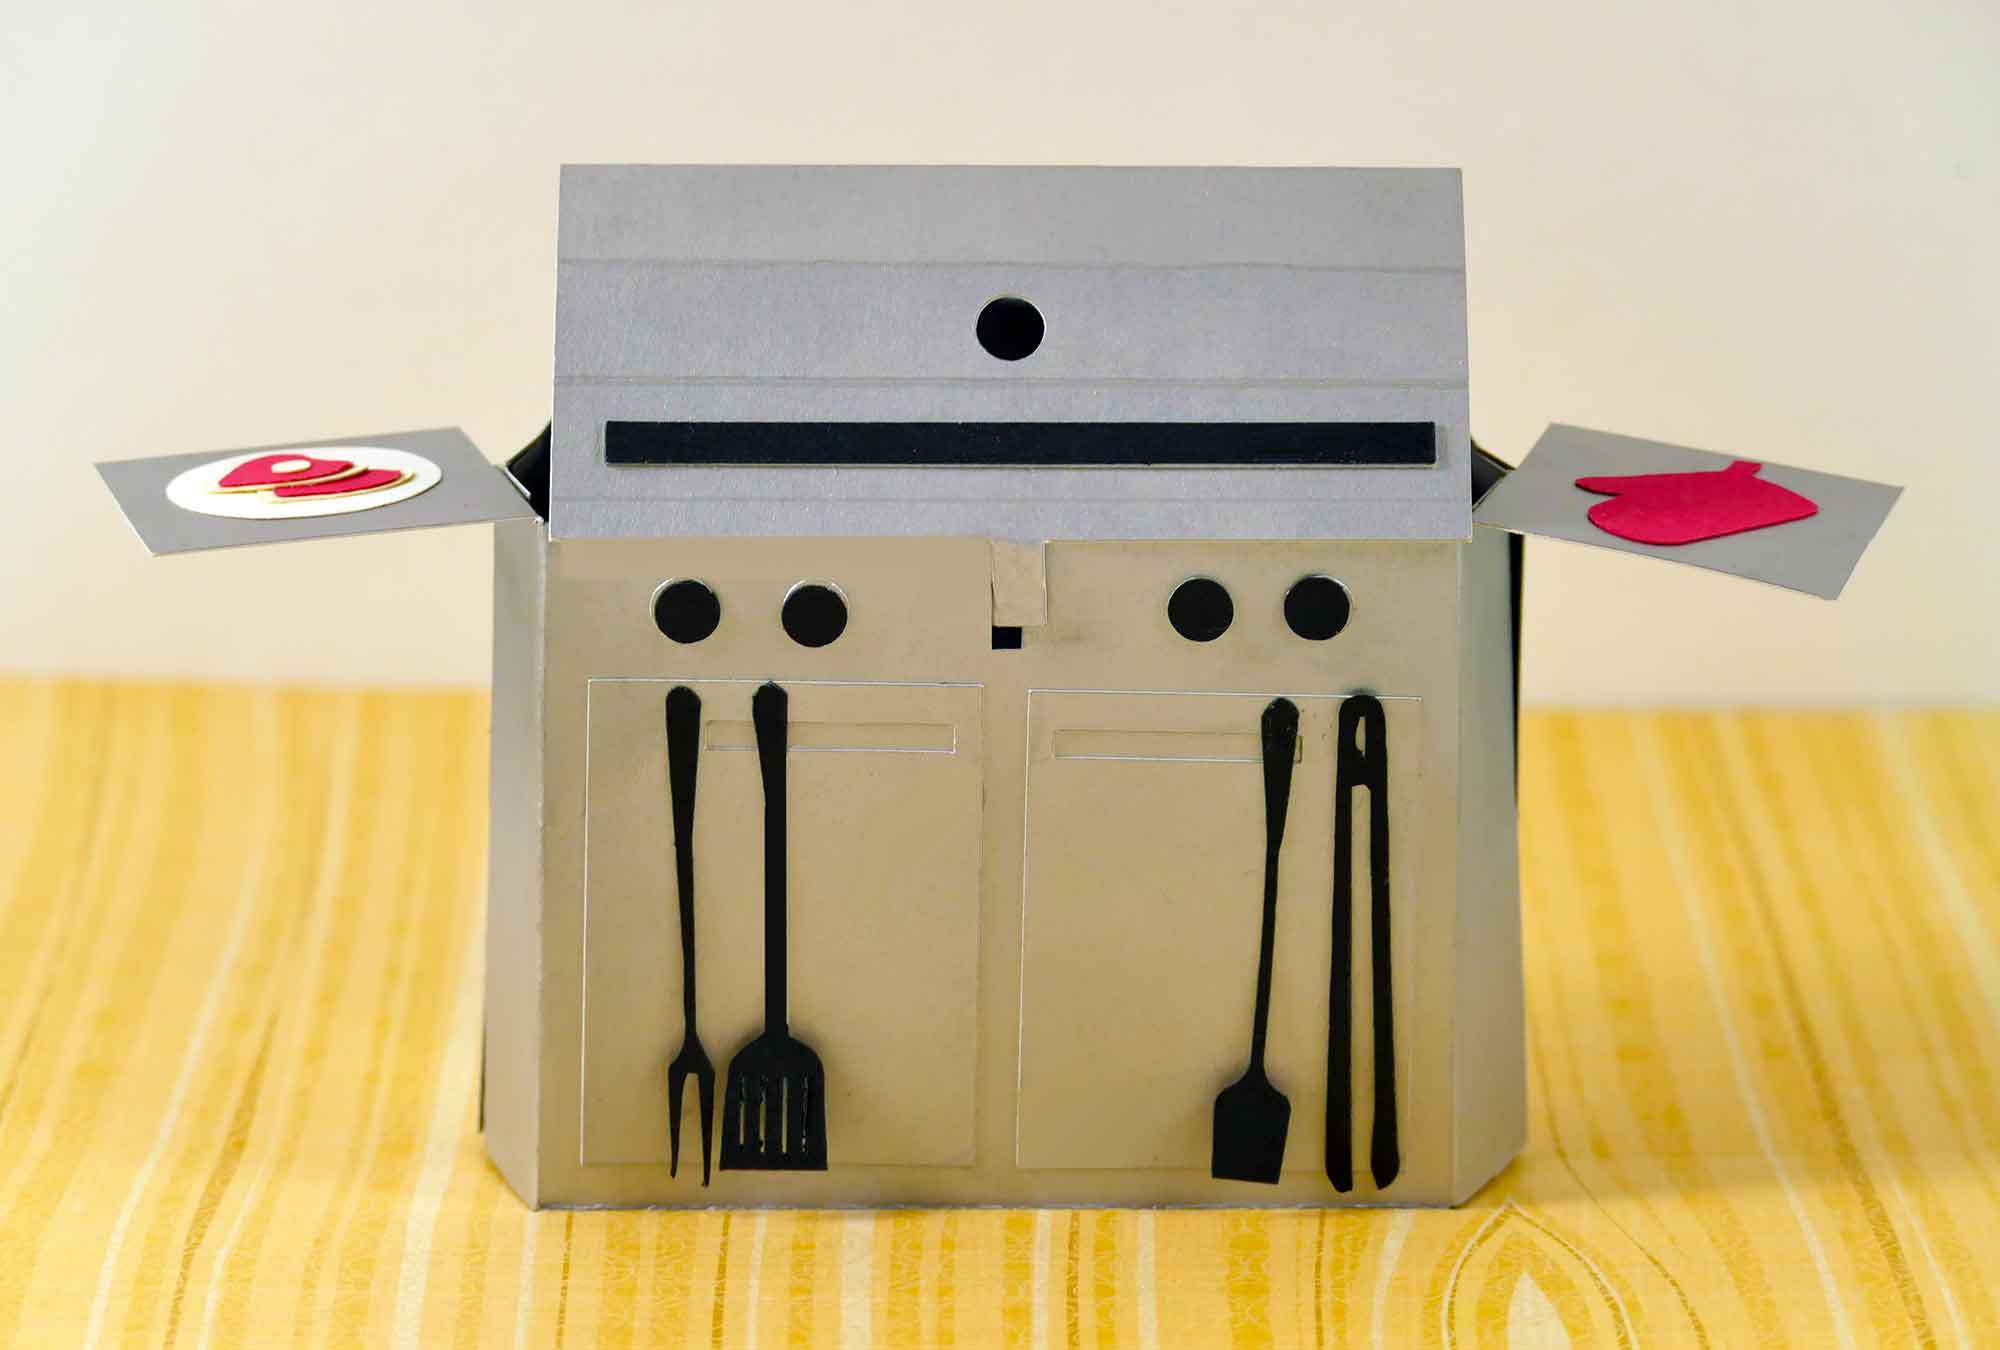
Step 5: Decorate the Front of Your Grill
Identify the front piece of your grill — that’s the part with the grill-like grate in it (see photo below). Turn the piece over so your score lines are on the underside, as shown below.
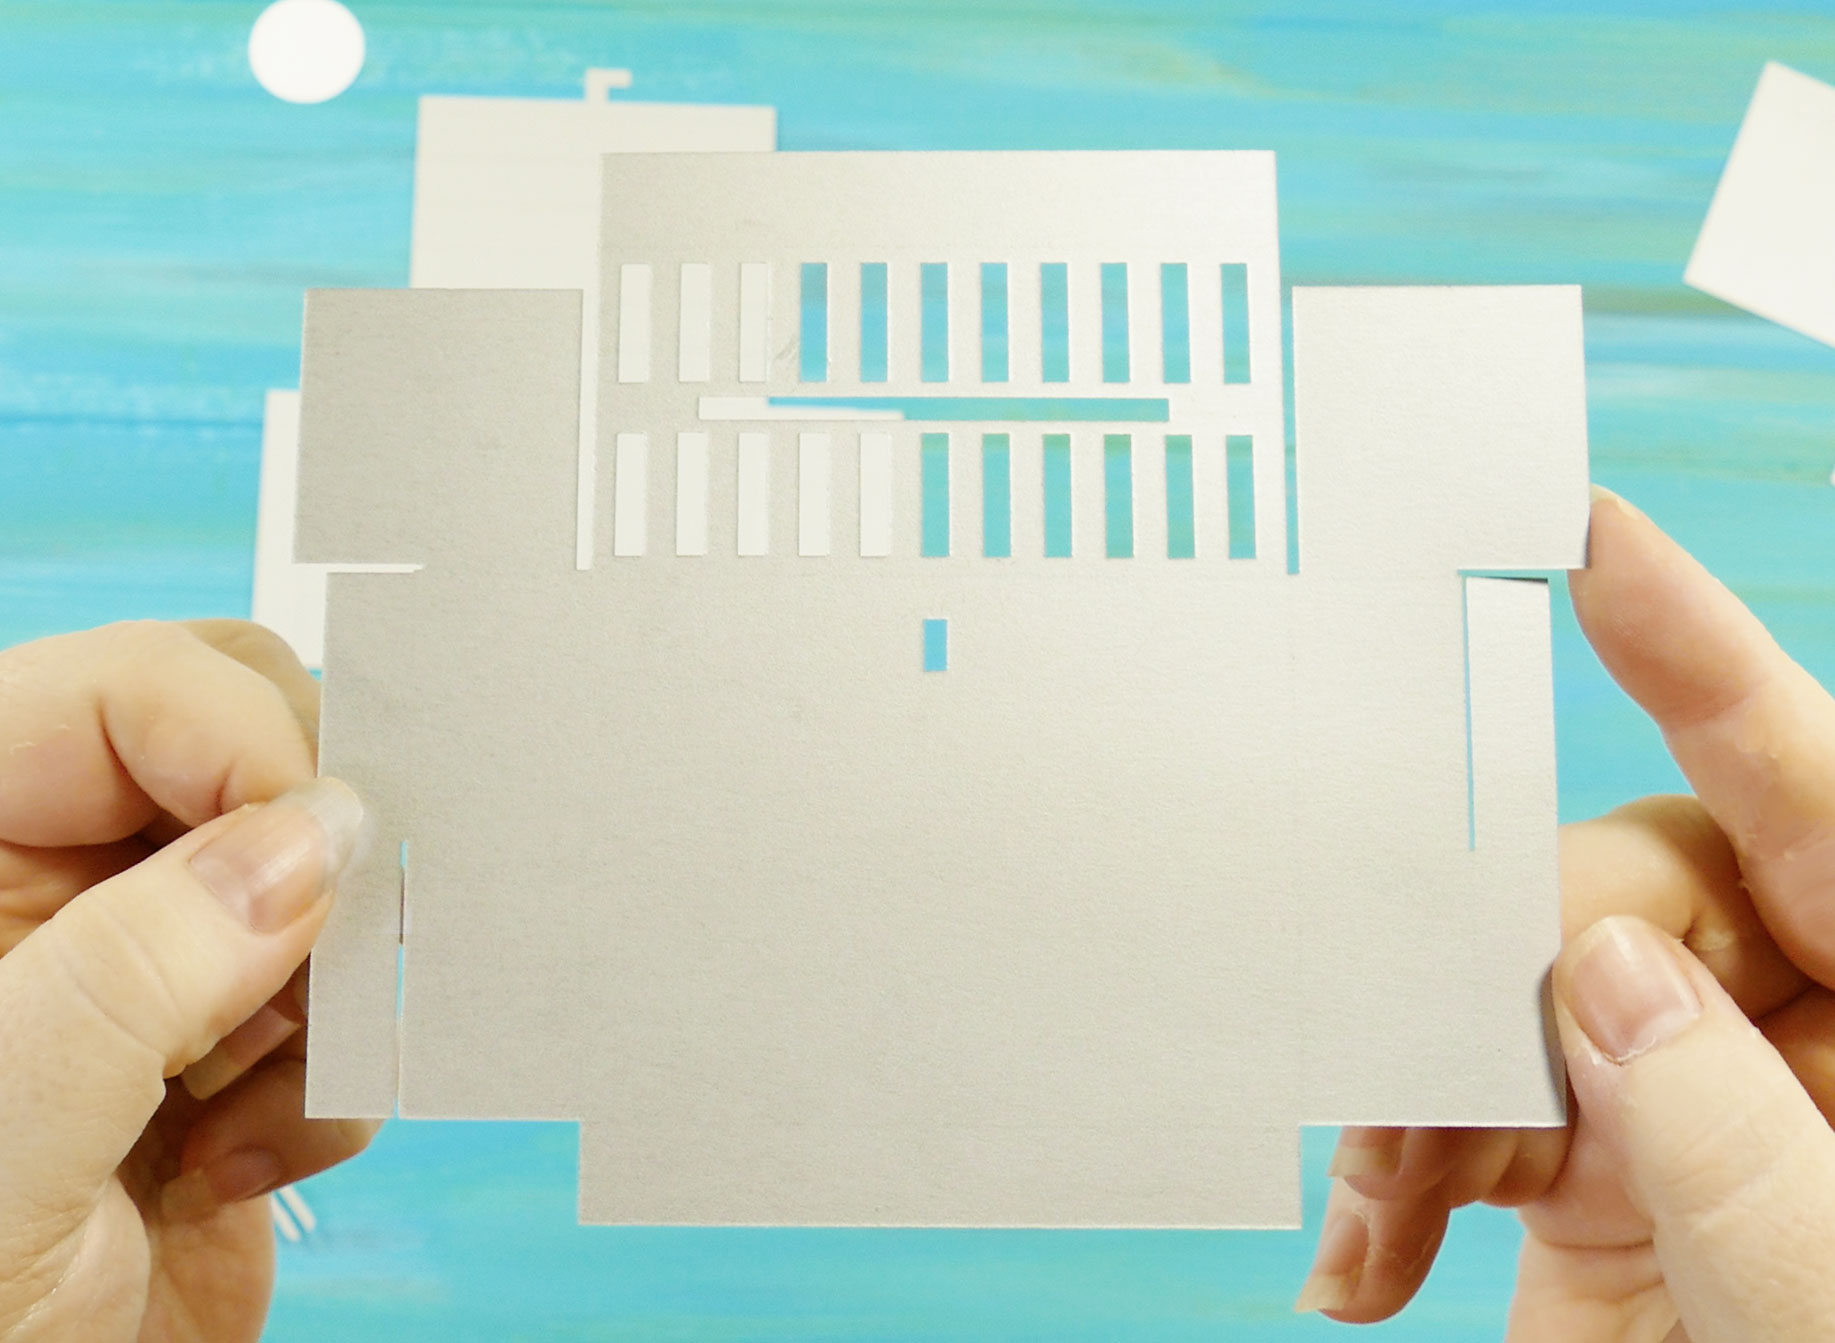
Now decorate the front of your grill in any way you like. Note that if you put anything on the little side tables of the grill, they need to go on the reverse side so they are visible when folded down.
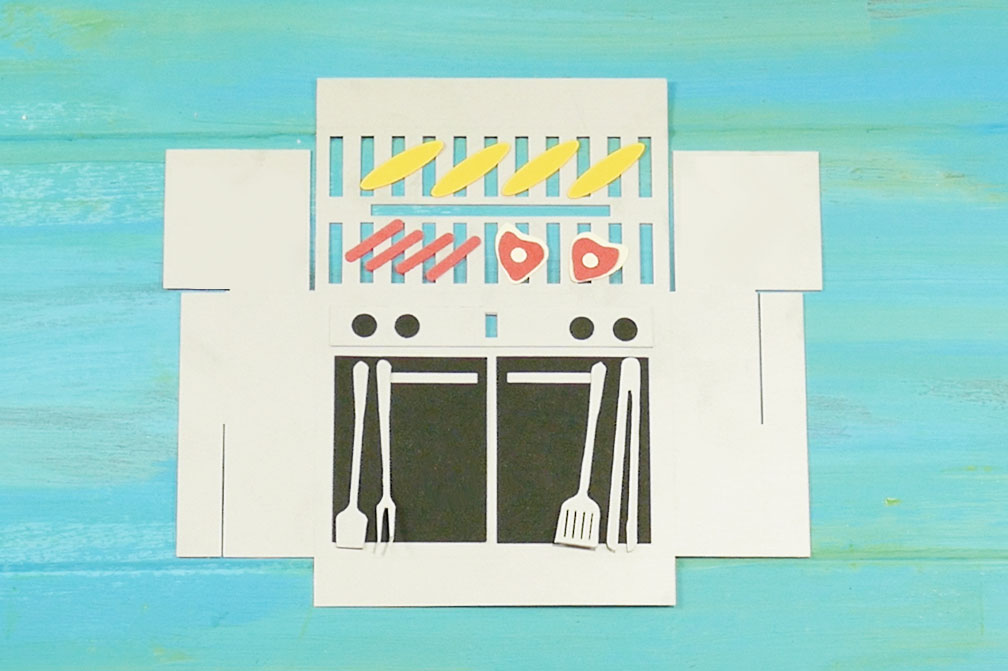
Step 6: Decorate the Back of your Grill
Now take the back piece of your grill and, again, turn it so the score lines are on the underside.
Decorate the hood with the rectangle pieces if you want.
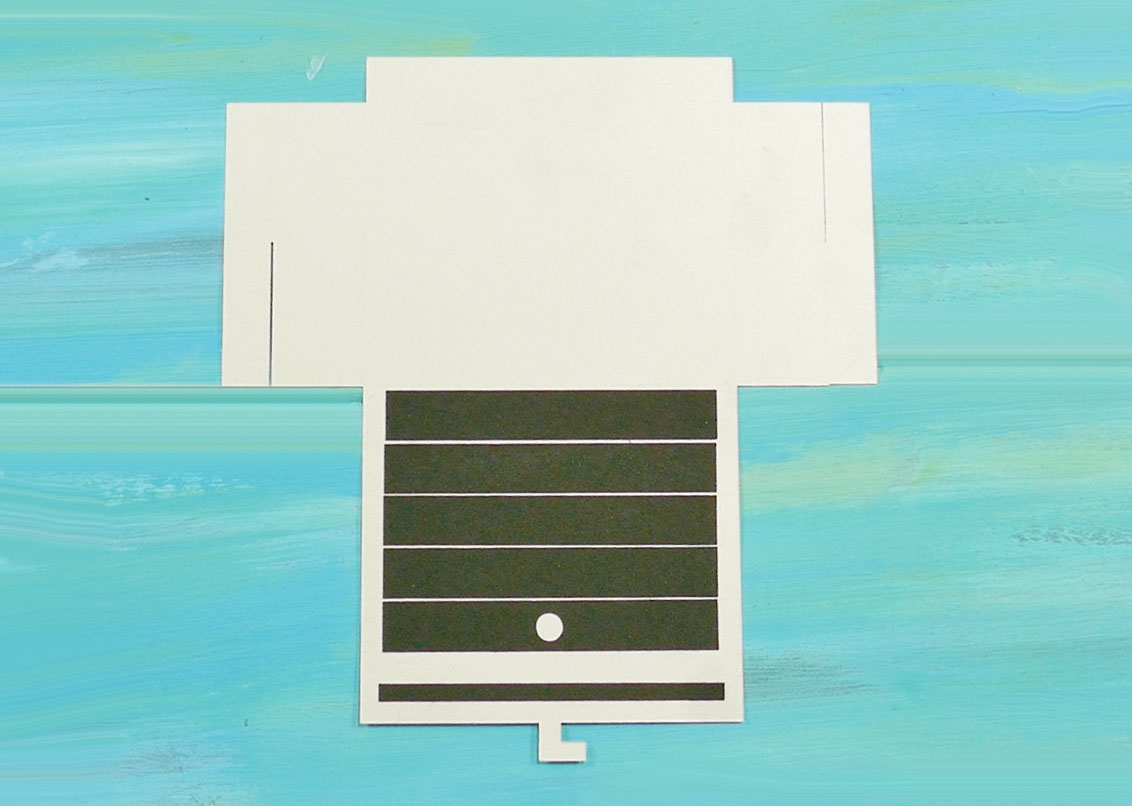
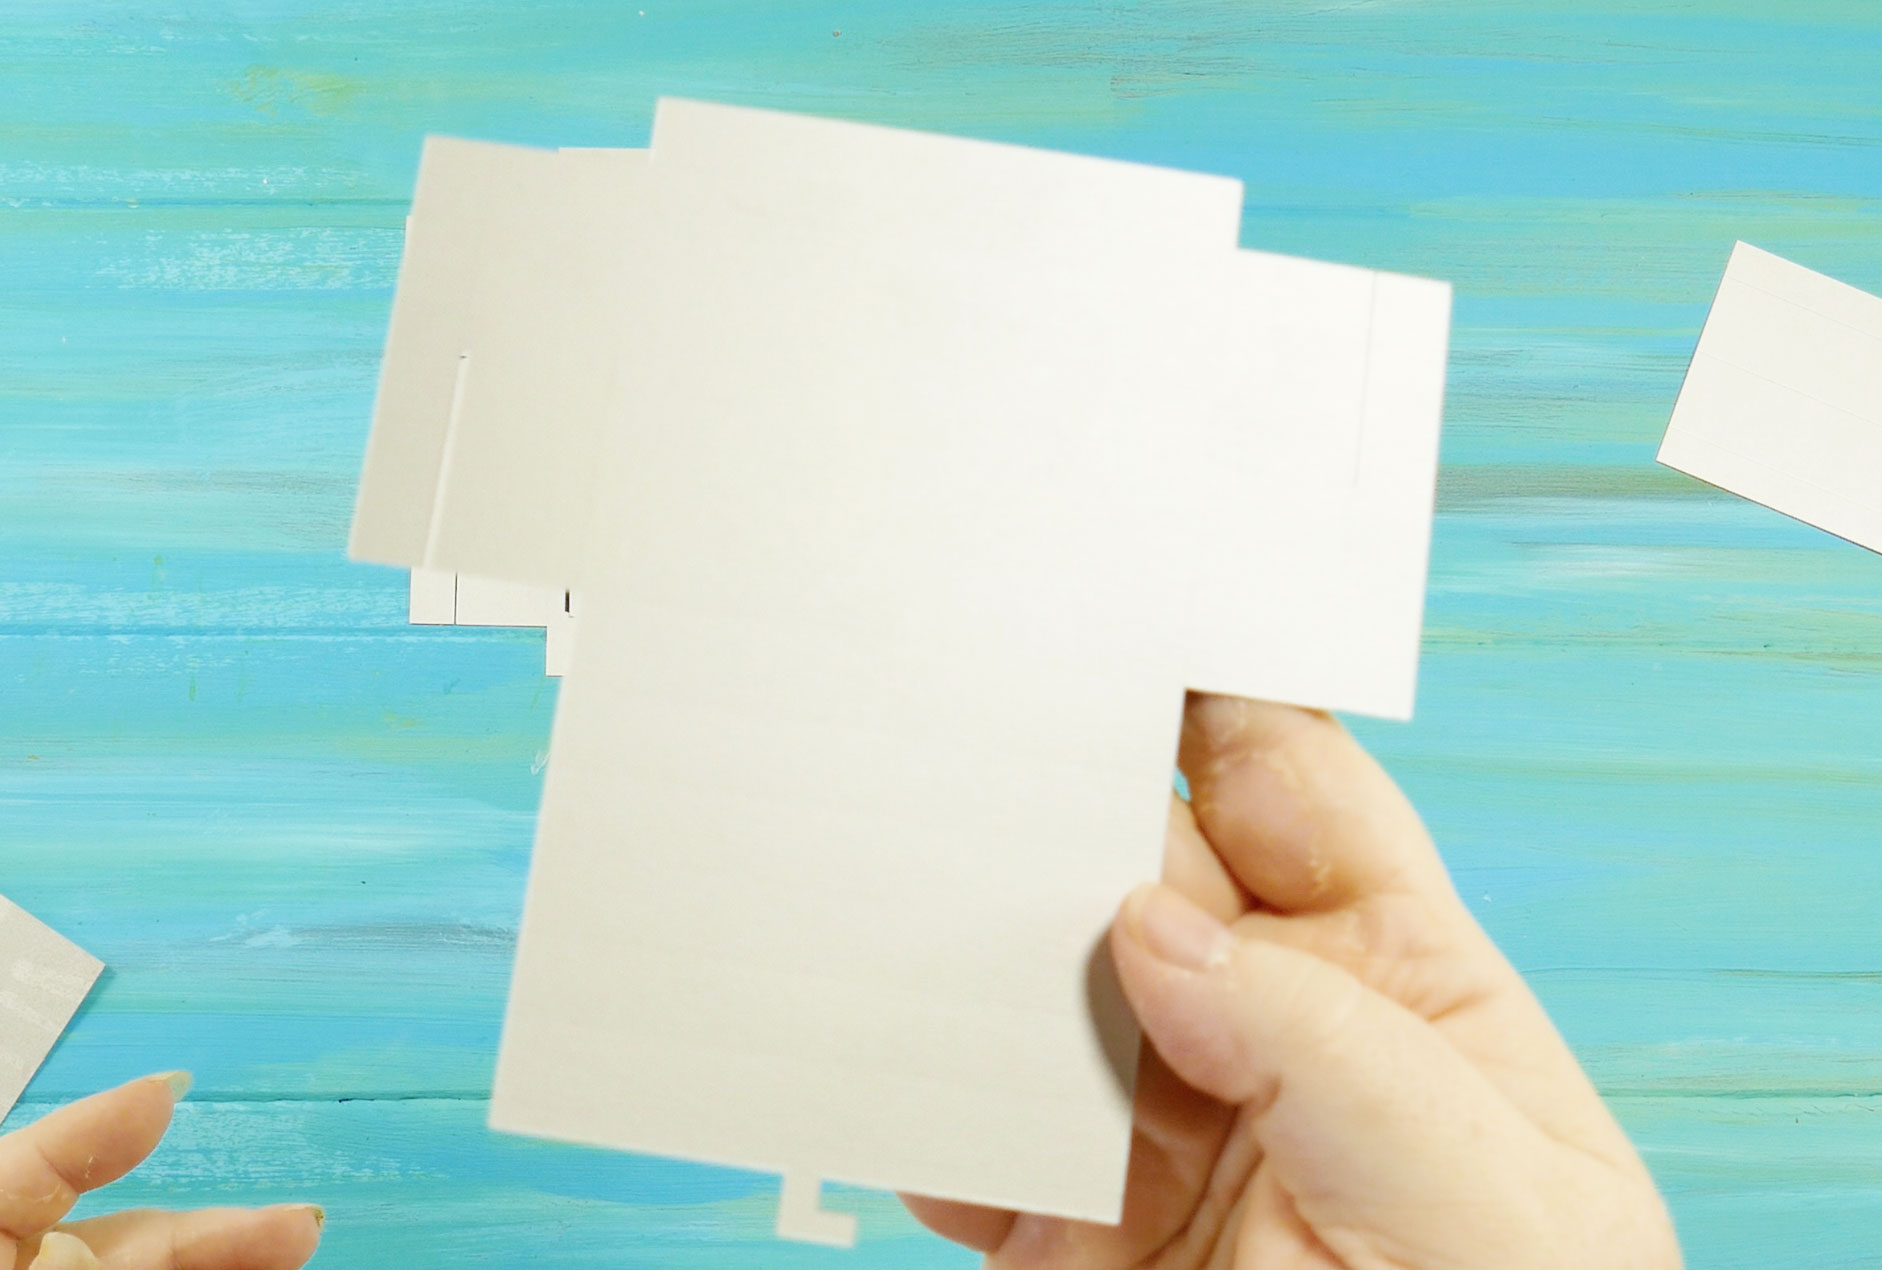
Step 7: Fold Score Lines
Once your decorations are on, begin folding your grill pieces (front and back) along the score lines. Everything gets folded IN except the tab at the bottom, which gets folded OUT. The hood gets folded so it is a sort of curved shape. See my photo below for reference.
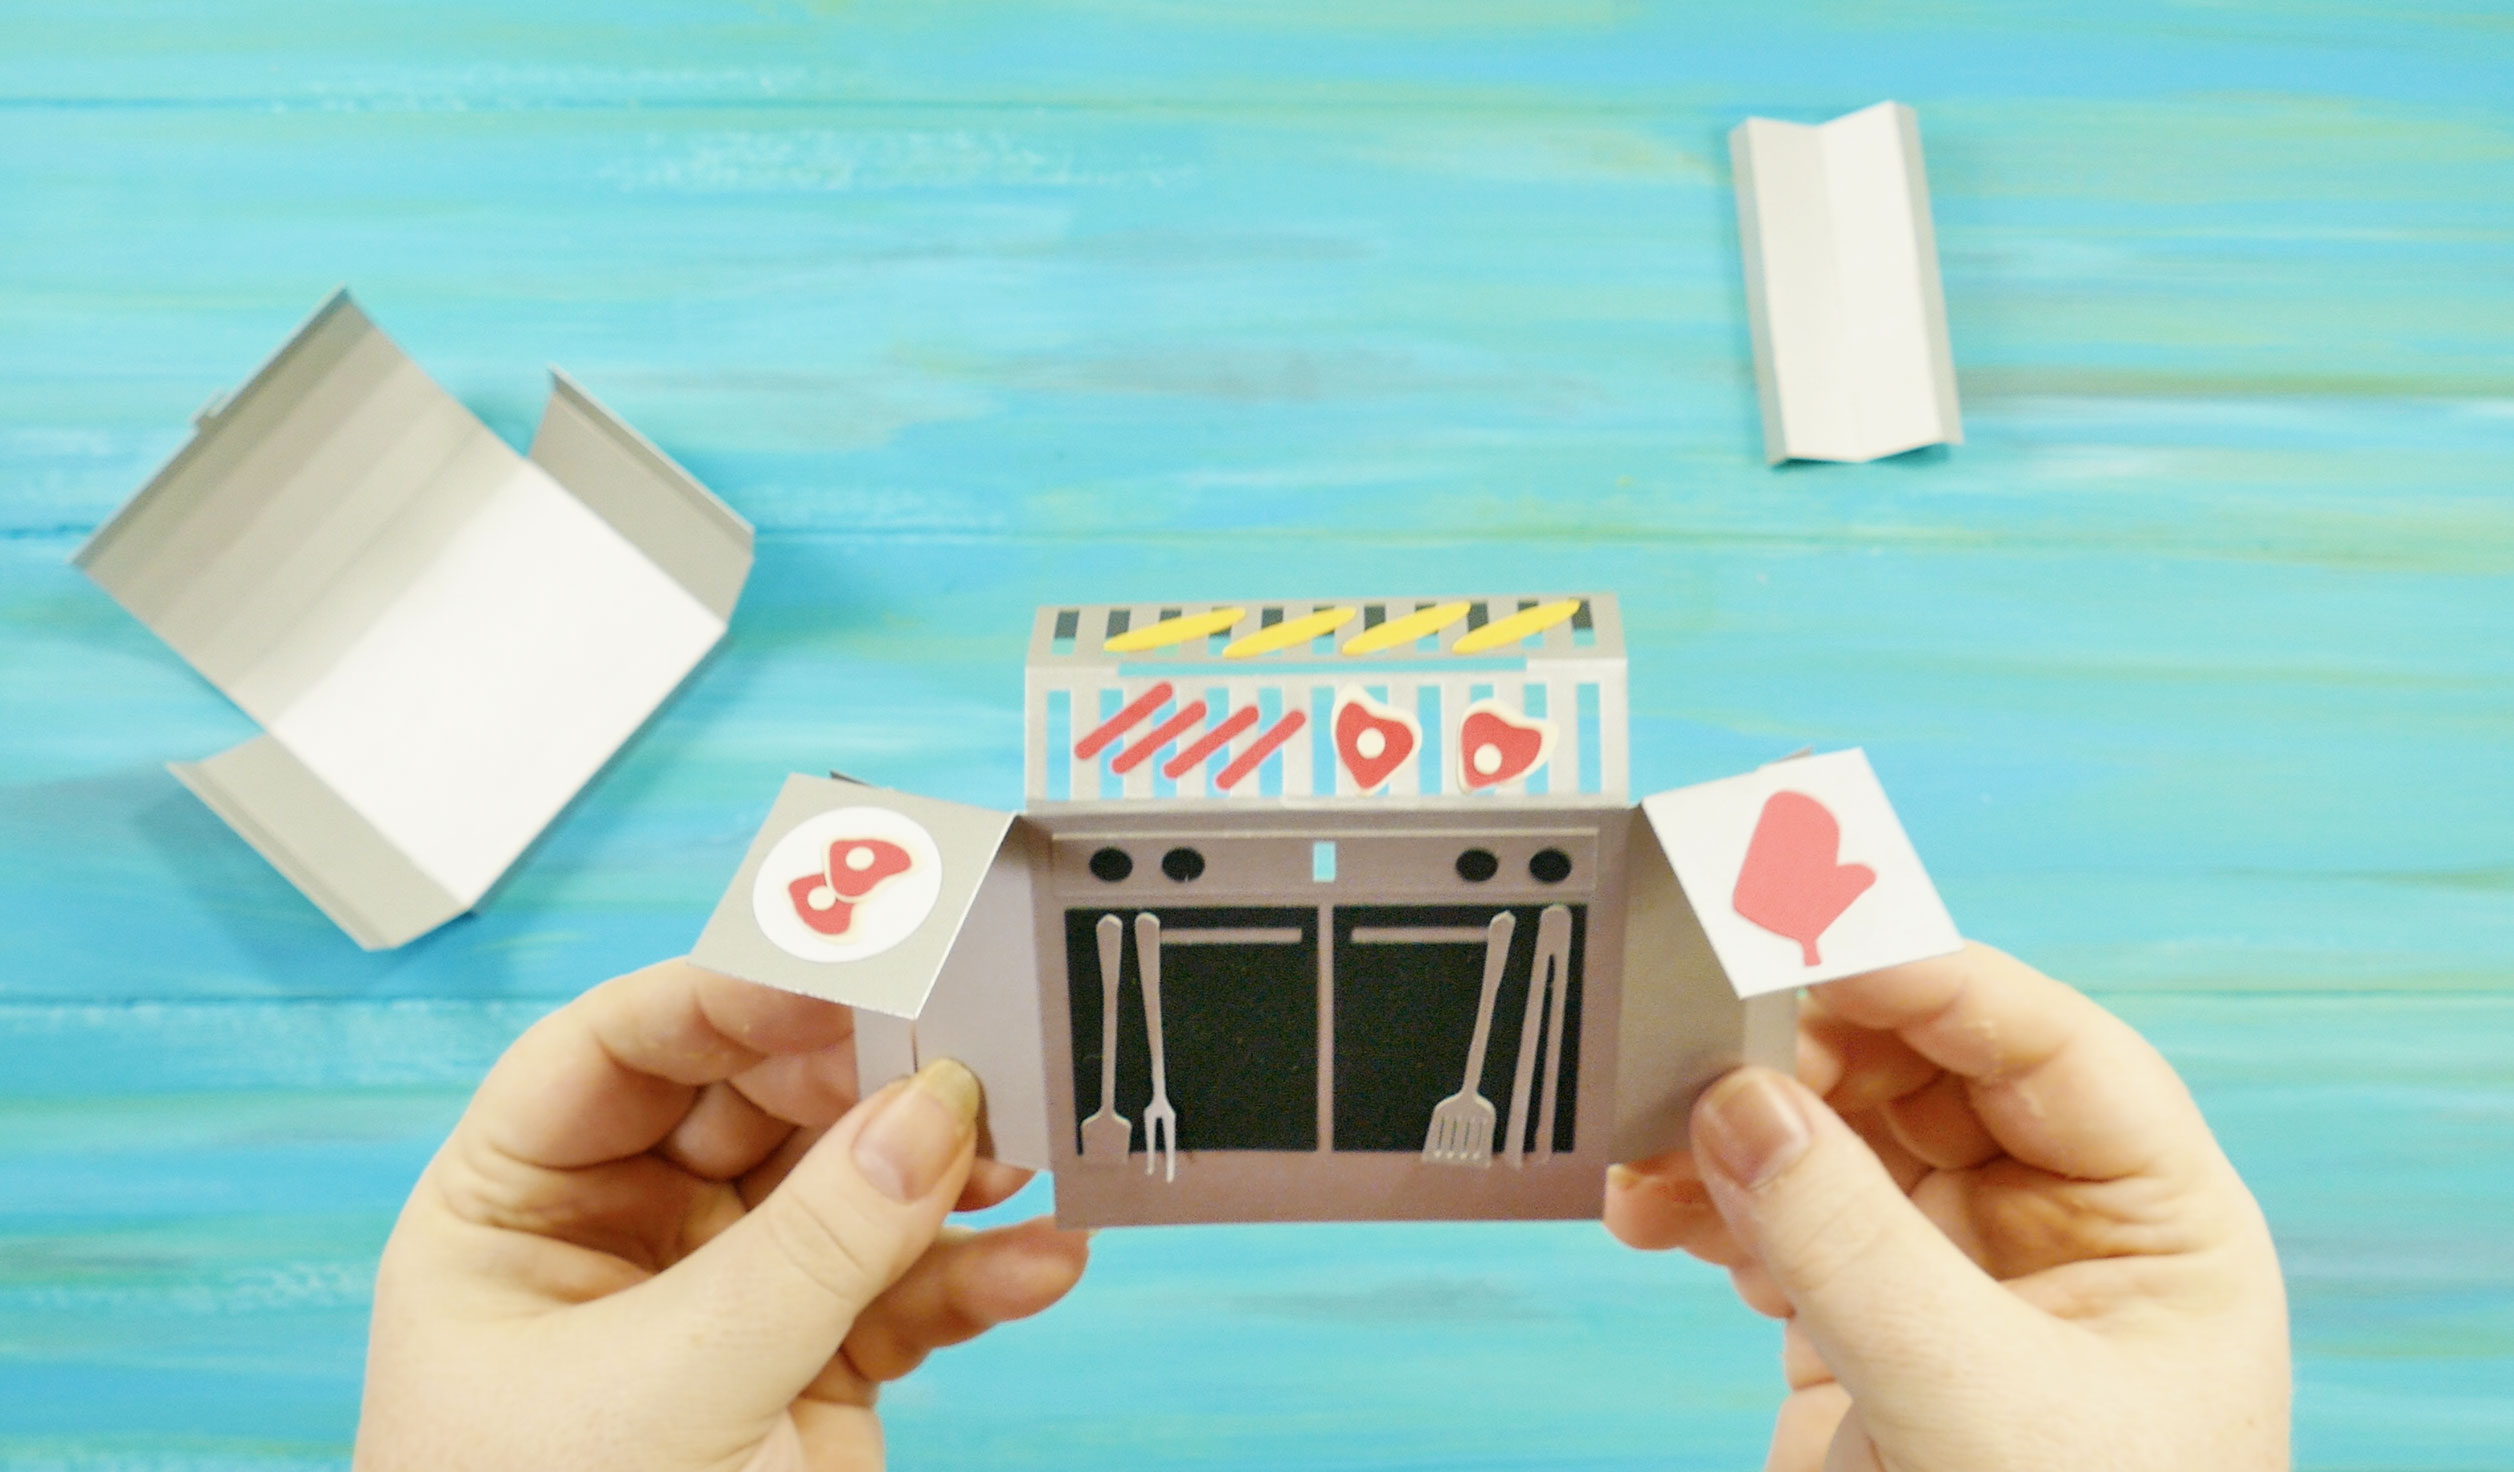
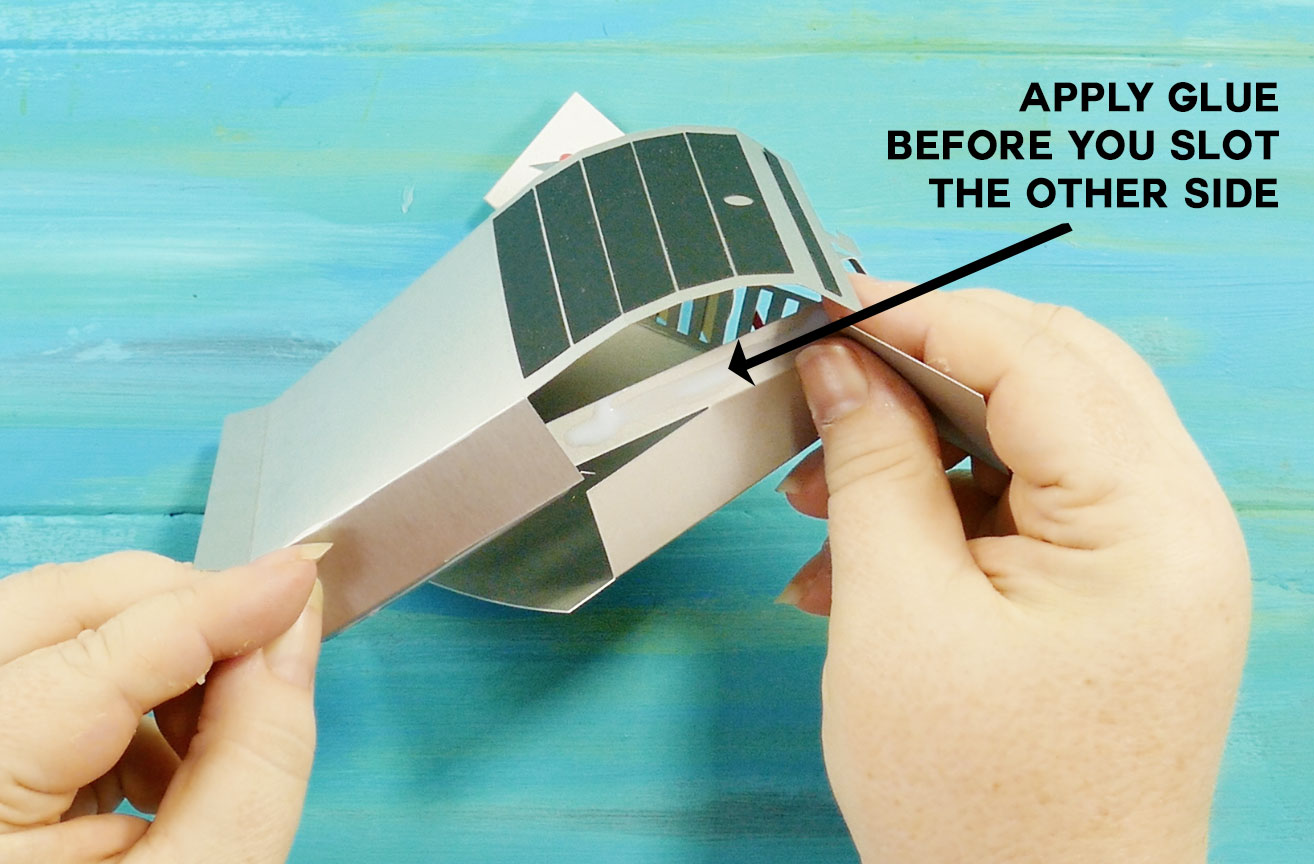
Step 8: Attach Grill Pieces Together
Slot the front and back pieces together so that the extra flaps are on the INSIDE of the grill, as shown below. Turn it over and apply glue to the underside of those flaps. Allow to dry before moving on to the next step.

To attach the other side, put glue on the underside of the flaps on the other side of the grill BEFORE you slot them together. With the glue on the flaps, carefully slot them and then press and hold. Again, allow to dry before moving on. I recommend you let it dry flat, as that way you know everything folds flat without buckling.
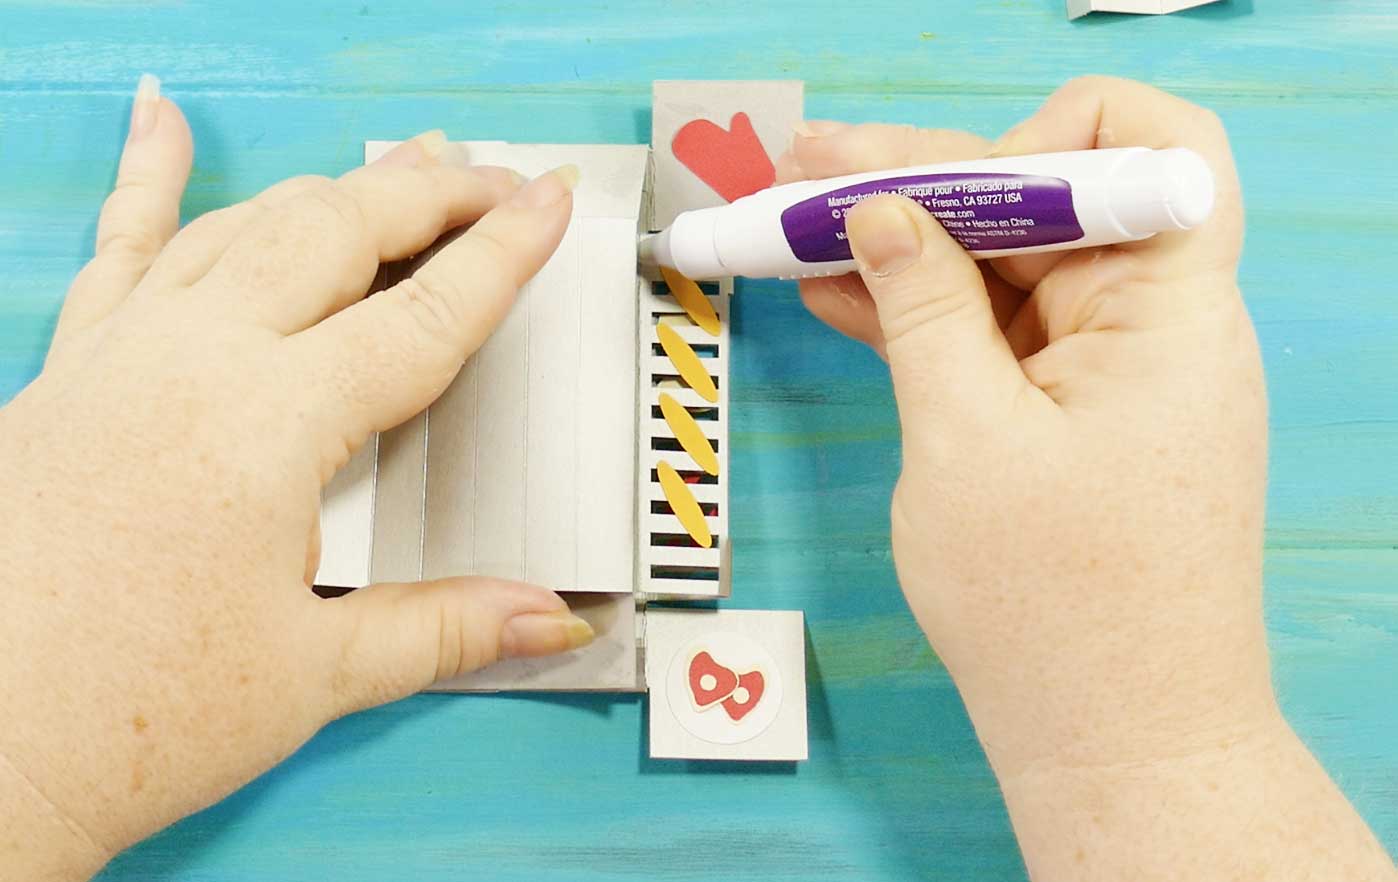
Step 9: Glue the Grate to Your Grill
The easiest way to do this is to fold the grill flat, allow the grate to fold in half upward, put glue on the flap of the grate, then position it so it’s being covered by the back of the grill. Allow it to dry flat.
Once everything is dry, open up your grill and stand it up. You can close the hood now and practice opening and closing it.

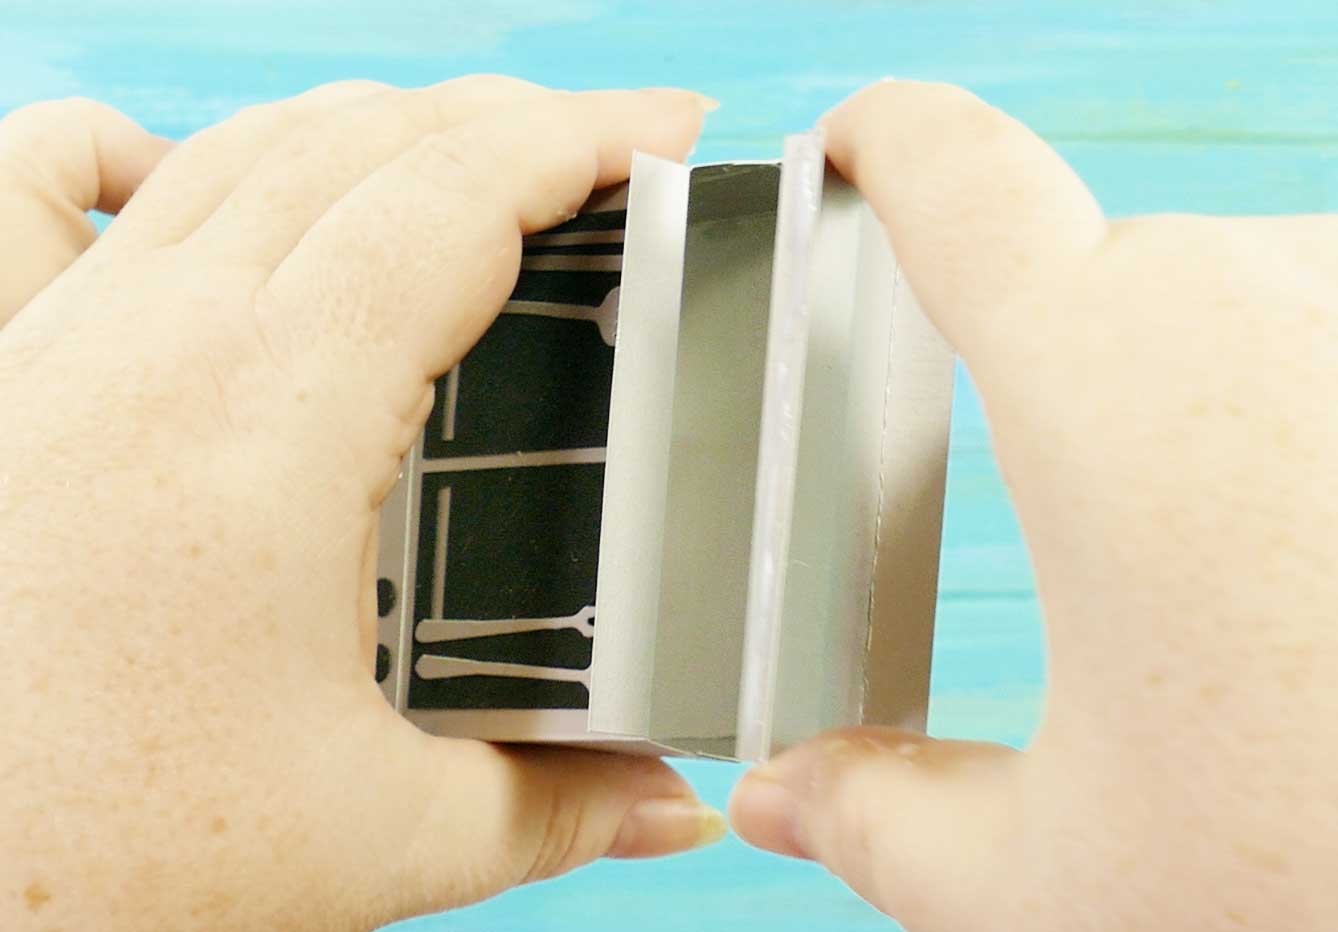
Step 10: Assemble Gift Card Holder (optional)
If you want to use the grill to hold a gift card, you’ll want to attach the bottom tray to keep the card from slipping out when it is folded flat. The tray gets folded into a W shape — just glue the sides of the W and slide it into the bottom, being careful to put it in just far enough so no part of the tray is extending past the bottom of the grill.
Step 11: Attach to Card Base (optional)
If you want to put the grill into a card (for a pop-up card), just slide the tabs on either side of it into the slots in the base card. Glue or tape from underneath.

Step 12: Decorate the Front of the Card
You can now attach whatever sort of outer card you want — in my example, I simply glued a plain piece of black card stock around it. I’m sure you could get creative here and make a great card front! I wasn’t sure what to do, so I haven’t done that yet on my card.
And that’s all there is to the pop-up grill! Here’s an alternate version with more stainless steel!
I’d love to see your Pop-Up Grill Cards. Please share a photo in our Facebook group or tag me on social media with #jennifermaker.
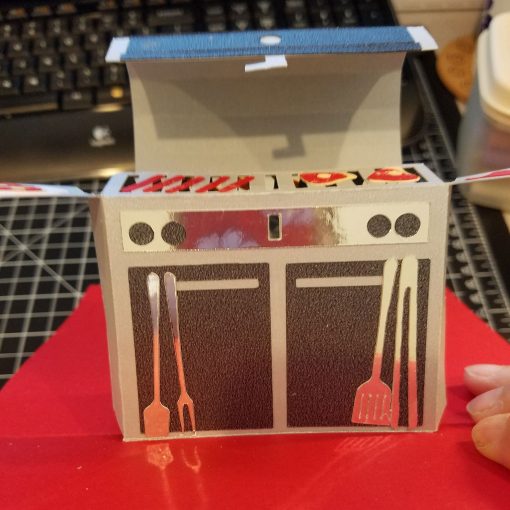
Here is a pop-up grill card made by reader Lois Windsor — isn’t it great?
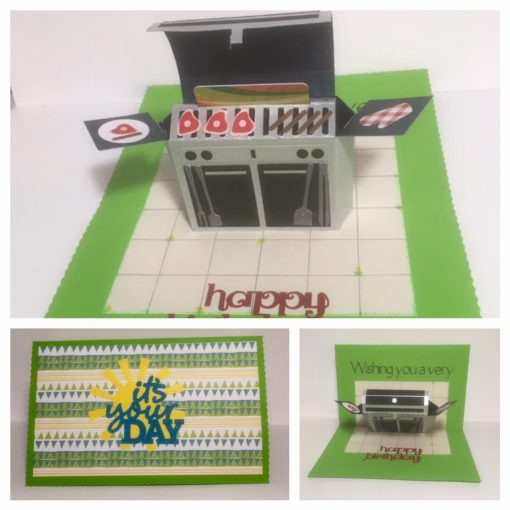
Here’s another version of the pop-up grill card made by reader Janine Rudnick!
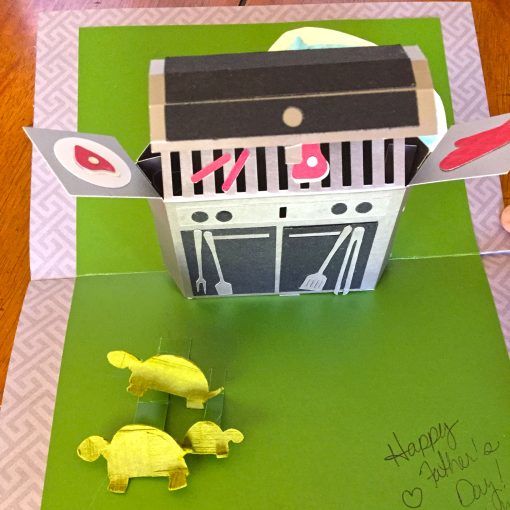
This one is made by reader Cheryl Gould — I love how shiny it is!
Get the free SVG files here by filling out the form here:
Get my free SVG cut files for the Pop-Up Grill Card

Subscribe (free!) to get access to my resource library with all my free cut files, printables, and patterns! Once subscribed, I will send you a newsletter with details about my new free files each week.
Love,

Want to remember this? Save the Pop-Up Grill Card Tutorial to Your Favorite DIY Pinterest Board!

More Free Card SVG Cut Files


love love love this! only question; I changed the black to print on 8.5×11 and I didn’t get any score lines on any of the pages. Is this because I changed the size, or are the score lines MIA?
Good morning, Michelle! I still see the score line layer in the files. When you upload the file to Design Space and place it on your canvas, what is the very first layer you see?
I can *see* the score lines in blue, but all the layers are cuts. I think I just figured it out though; that first layer is all the score lines and I just needed to change it to score instead of cut. That should fix it for the next one!
Love this
OMG! Love this and LOVED making it! Thanks soon much for the file and the tutorial!!! Very clear and helpful.
Thank you, April! SO happy to hear you enjoyed making it. 🙂
What great timing! Mr. SuzerSpace just got a new grill for Memorial Day, and I don’t really see why you can’t get a gift first and THEN get the cute card, right?
Hi Jen I cut out all the pieces, but there are no score lines anywhere. What am I missing? Thanks! MP
The score lines are there — I double-checked the file on the site. I had one person contact me to say she didn’t see them either, and it turns out the layers loaded in a different order than mine or others. Go through the layers and look for the round white circle with a red line through it in each file — that is your score line. Change it from Cut to Score, then be sure to attach it to the layer the score lines need to appear on.
cant see where / how to download pop up grill card
All of our free design files are available in our Resource Library. You can sign up to receive the free password via email at https://jennifermaker.com/library/.
how do i download the svg file? i joined but dont see now to do it
Hi Marie! Check out this blog post for downloading and uploading a file to Design Space: https://jennifermaker.com/how-to-upload-images-to-cricut-design-space/
Hi Jennifer! I’m new to this and have really enjoyed “getting to know you” through your site, videos and instruction book! When I went to do the downloaded svg file there was a Mat 8 in a royal blue colour. I don’t understand what it’s for? In reading the above I’m now thinking it was for the score lines but it is labeled as basic cut. I’ve already popped out all the pieces and am hoping I can maybe do the scoring manually as I also couldn’t find it like the others above. I see the score lines on the canvas but when I go to make it scoring doesn’t show up. Only basic cut. Wish me luck!
Hi Jayne, yes, for that file you have to manually change those layers from cut to score and attach them to their corresponding layers. Here is a blog post that will help! https://jennifermaker.com/cricut-scoring-tools-tips/
Hi Jennifer, I am Sabina from the Netherlands :). I want to cut this lovely grill card on my Cricut Joy. But….. how do I get the cut file to fit my mat? The file is about 20cm wide and my mat is just 11cm. Can you please help? Thank you!
There are easy ways to resize SVG’s, Sabina, but for this particular card, it wouldn’t work on the Joy. The pieces would become way too small to work with, and you wouldn’t be able to insert a gift card. You could always download the pdf version of the file, and cut it out by hand, though! 😊