

Learn how to make a 3D Christmas tree advent calendar!
One fun family tradition we do every year in the Maker home is a Christmas advent calendar. With their daily surprises, they’re definitely a holiday favorite! I love to make and display them once December 1st comes around, and it’s so much fun to open a new surprise every day leading up to Christmas! This year, I gave my popular Christmas tree advent calendar design — whch I originally introduced in 2017 — a sturdier structure … and a special upgrade!
Watch the full step-by-step video tutorial on making a Christmas tree advent calendar:

I just adore these cute countdowns! Last year, I made a Christmas advent calendar village from cardstock and set it aglow with LED fairy lights. Not only do they make an adorable piece of holiday decor, they’re a great way to build fun anticipation all the way up to Christmas Eve — and then Christmas Day!
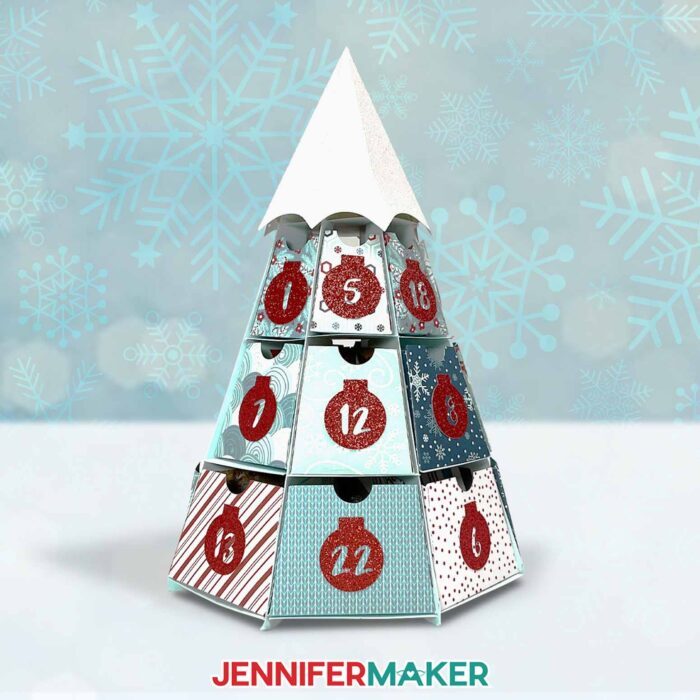
My Christmas tree advent calendar is my favorite advent calendar yet!

The drawers are different sizes, so you can stash lots of different treats inside. They’re the perfect size for candy, small gifts, a note of gratitude, or even a mini ornament. There are 24 drawers in the calendar, with space at the tippy top of the tree for a special 25th surprise! What a fun way to get excited about the holidays, with a treat every day!

This year, I decided to revamp an old design from a few years back. My earlier Christmas tree advent calendar design had one flaw: Sometimes the drawers wouldn’t stay shut with items inside. For this update, we’ll hold the drawers closed with magnets! I’ll even show you how to cut the magnets to the perfect sizes with a Cricut cutting machine. This design can be cut on a Cricut Maker 3, a Cricut Maker, a Cricut Explore series machine, or a Cricut Venture. It’s a bit too big to cut on a Cricut Joy or Joy Xtra.
The first thing I’ll show you how to do is prepare the file in Cricut Design Space. I’ll demonstrate with the score version of the file which uses a scoring tool to create the foldable creases, but you can also use the “no score” version which uses dashed cut lines to create the foldable lines.

I used full color cardstock in different patterns for my festive advent countdown calendar. I even used glitter cardstock for a sparkly touch on the countdown numbers. I recommend using double-sided cardstock so the insides of the drawers are colorful, too.
You’ll need the basic Cricut paper crafting tools, too — like a green StandardGrip machine mat, a brayer, and a craft spatula. A weeding tool can be useful in poking out bits of cardstock left behind on your cut pieces, too. I recommend also having a scraper tool, because it can do double duty! Use it to push any cardstock left behind off the mat, and press it into your score lines to help get nice, even folds on the cut pieces.
After we cut the materials, I’ll show you how to put everything together, We’ll build the drawers, then put together the structure of the tree. You’ll need some good quality craft glue to help hold things together. Each drawer will then have a magnet attached, and I’ll show you exactly how to make the magnets match up on the drawer and inside the tree. The tree topper is the finishing touch!

I’ve got detailed instructions for assembling the Christmas tree advent calendar in my tutorial below, and you can follow along with the video to see how I made mine. Once the Christmas tree advent calendar is fully assembled, simply place a small treat or gift into each of the 24 drawers, then under the topper!
To keep the calendar as close to its original condition as possible for next year’s holiday fun, store it in a plastic storage bag inside of a sturdy box. Plastic storage totes are a good option! Keep it protected and away from humidity so it doesn’t get crushed or soft from moisture. With careful storage, this can become a heirloom piece of holiday cheer that your family can enjoy for years!
If you have any unused product or treats, you can use them to fill candy holders for additional little gifts.
Bonus tip: You can use magnets to update my Halloween countdown calendar the same way! Click here for my free Halloween countdown files and tutorial, which use similar steps. You can also cut this design from different colors and patterns of cardstock to make a Valentine countdown, a Happy Easter countdown, or as a countdown to another special day, holiday, or event. Experiment with different colors, textures, and patterns, like shiny gold or silver foil cardstock, shimmer cardstock, and more!

If any parts of your Christmas tree advent calendar wear out or become torn over time, you can always cut and assemble replacement pieces with my free file!
I hope you’ll make a Christmas tree advent calendar of your own! They’re are perfect for kids of all ages — not to mention adults, too. What magical surprises will you fill your calendar with?
Let me show you how to make a Christmas tree advent calendar! This post contains some affiliate links for your convenience (which means if you make a purchase after clicking a link I will earn a small commission but it won’t cost you a penny more, there is no additional cost)! Read my full disclosure policy.
Materials to Make A Christmas Tree Advent Calendar
View my Amazon shopping list for the exact items I used!
- Ten (10) Sheets of 12″ x 12″ 65 lb. Patterned Cardstock (alternative #1, alternative #2)
- Six (6) Sheets 12″ x 12″ 65 lb. Light Blue Cardstock (alternative)
- One (1) Sheet of 12″ x 12″ Red Glitter Cardstock
- One (1) Sheet of 12″ x 12″ White Glitter Cardstock
- Three (3) Sheets of 4″ x 6″ Adhesive Magnets
- A way to cut your materials – I’m using the Cricut Maker 3 but you could also use the Cricut Maker, a Cricut Explore Series machine, or a Cricut Venture
- Cricut StandardGrip Machine Mat 12” x 12”
- Scoring Stylus (optional for files with score lines) -OR-
- Single Scoring Wheel (optional for files with score lines)
- Brayer
- Spatula
- Scraper
- Weeding Tool (for popping out small pieces from intricate areas)
- XL Scraper Tool
- Craft Glue (I used Bearly Art Precision Craft Glue)

How to Make a Christmas Tree Advent Calendar!

Christmas Tree Advent Calendar
Learn how to make a Christmas Tree Advent Calendar with fun magnetic drawers!
Materials
- Ten (10) Sheets of 12" x 12" 65 lb. Pattern Cardstock -OR-
- Ten (10) Sheets of 12" x 12" 65 lb. Pattern Cardstock
- Six (6) Sheets of 12" x 12" 65 lb. Light Blue Cardstock
- One (1) Sheet of 12" x 12" Red Glitter Cardstock
- One (1) Sheet of 12" x 12" White Glitter Cardstock
- Three (3) Sheets of 4” x 6” Adhesive Magnets
- Design #659 (My free SVG/PDF/DXF design files are available in my free resource library - get the password by filling out the form at the bottom of this page)
Tools
- A way to cut your materials - I’m using the Cricut Maker 3, but you can also use the Maker, Explore series machines, or even the Cricut Venture
- Cricut Green StandardGrip Machine Mat 12" x 12"
- Brayer
- Spatula
- Scraper -OR-
- Large scraper
- Weeding Tool
- Craft Glue (I used Bearly Art Precision Glue)
- Scoring Stylus (optional for files with score lines) -OR-
- Single Scoring Wheel (optional for files with score lines)
Instructions
STEP 1: GET MY CHRISTMAS TREE ADVENT CALENDAR DESIGNS
First, download my Christmas Tree Advent Calendar files from my free library – look for Design #659.
Alternatively, you can use the Save This Project form near the top of this post and the design link will be emailed to you.
In the SVG folder, you’ll find “score” and “no-score” versions of my design to cut on a cutting machine. There is also a DXF folder with cut files, and a PDF folder with versions you can print and cut by hand.
Upload the SVG file you need to Design Space to get started. I’ll demonstrate with the “score” design because it creates a smoother result.
TIP: If you’re not sure how to upload, go to jennifermaker.com/svgs to learn how to unzip and upload SVG files.
STEP 2: PREPARE AND CUT YOUR CALENDAR DESIGN
CRICUT DESIGN SPACE
- In Cricut Design Space, open a blank Canvas.
- Click “Upload” and then “Upload Image.”
- Click “Browse.”
- Select the SVG file of your choice.
NOTE: I’ll pick the “score” version. - Click “Open,” and then “Continue.”
- Click “Upload” to add the design to your Canvas.
NOTE: If your project uploads differently than is shown on this page (with the layers stacked on top of each other vs spread out), this is intentional to make sure your design does not change sizes on you. If you prefer to use the unstacked version of the design files, upload one of the files in the "Unstacked" folder and then make sure your layers match these dimensions:
- tree-advent-no-score-jennifermaker-SVG: 46.143″ x 48.451″
- tree-advent-score-jennifermaker-SVG: 46.126″ x 48.432″
The eight triangle-shaped pieces will be the tree’s vertical support walls, the four octagons will be the horizontal base pieces the drawers will sit on, the green fan-shaped piece is the Christmas tree topper, and the twenty-five ornaments are the number tabs for the drawers.
There are also sixteen small squares, sixteen medium squares, and sixteen large squares for the magnet cutouts.
The remaining pieces will be the drawers: eight small boxes, eight medium boxes, and eight large boxes, for a total of 24 drawers.

- Click “Save” and give your project a name.
- Ungroup the design and spread the pieces out.
- In the Layers Panel, click the arrow next to the first group to expand the top-left vertical support piece. It has two layers: the score lines and the cardstock shape.
- Select the top layer (the score lines) and click the “Operation” drop-down menu to change it to “Score” to make the crease lines where your shapes will be folded.
- Hold your Shift key and click the two layers for the vertical support piece in the Layers Panel.
- Click “Attach” to keep these operations together.
- Repeat Steps 9-12 to expand, change the top layer operation to “Score,” and Attach the two layers for the remaining vertical support pieces.
- Use Steps 9-12 to prepare the tree topper and the twenty-four drawer pieces the same way.
- Your project is ready to cut!


CUTTING
- Make sure the correct machine is selected in the top right.
- Click “Make.”
- On the Prepare screen, make sure the correct Material Size is selected for your materials.
NOTE: The magnet pieces will be cut from material that is 4” x 6”, so be sure to change the Material Size setting to match this for your gray mat.
TIP: If you want to combine mats to save time and materials, follow the instructions in my Easter Egg Lantern tutorial. - Select the first mat again and click “Continue.”
- On the Make screen, set the Base Material for your first mat. Mine is the magnetic sheet, so I used the “Magnetic Sheet - 0.5 mm” setting with “Default” Pressure.
NOTE: After you set the material for a mat color, you can check the box next to “Remember Material Settings” to save time between mats. - Place your first mat’s material on a green StandardGrip machine mat. Mine is the adhesive magnet sheet, which should have the carrier sheet touching the mat.
- Use a brayer to make sure it’s fully adhered.
- Check that your Premium Fine-Point Blade is clean and in the clamp.
- Press the flashing “Load/Unload” button to load the prepared mat into your Cricut.
- Press the flashing “Go” button to begin cutting.
- When the cuts finish, don’t unload the mat right away. Gently lift a corner of the material to make sure the cuts went all the way through. If not, press the “Go” button again to make a second pass of cuts in the same spots.
- When it has finished cutting, unload the mat, flip it over onto your work surface, and roll it back to release the magnets.
- Cut the rest of the magnet mats the same way.
- For your cardstock mats, set the material to the “Medium Cardstock - 80 lb (216 gsm)” setting with “More” Pressure for the base pieces and drawers.
- Place your regular cardstock face up on a green StandardGrip machine mat and use a brayer to make sure it’s fully adhered.
TIP: Put your holiday patterned paper with your chosen pattern FACE DOWN—this way your paper will get scored on the back, making it easier to fold in the proper way with your chosen pattern face out. - When you get to a mat with score lines, follow the screen prompts to select and add the tool you chose as needed. I used the Scoring Stylus, but you can also use the Scoring Wheel.
TIP: If you click the “Remember Material Settings” box after changing the tool from the Scoring Wheel to the Scoring Stylus, it will remember your tool selections, as well. Even so, always check that your material and tool settings are correct between mats.
NOTE: If you’re using the no-score version, you won’t see the scoring tool prompts. - Press the flashing “Load/Unload” button to load the prepared mat into your Cricut.
- Press the flashing “Go” button to begin cutting.
- When it has finished cutting, check the cuts and make a second pass if needed by pressing the "Go" button again.
- When the cuts are complete, unload the mat, flip it over onto your work surface, and roll it back to release the cardstock.
TIP: Use the spatula to help lift delicate parts, and your weeding tool to poke out small bits of cardstock that may have been left behind. If you have any issues with your cuts, go to jennifermaker.com/cleaner-cuts. - Use a scraper tool to remove the small bits left on your mat after you remove the cut pieces.
- For the glitter cardstock, set your material to the “Glitter Cardstock” setting with “More” Pressure for the tree topper and number ornaments.
- Place the material face up on a green StandardGrip machine mat and brayer it down well.
- Use the same steps to cut and unload your glitter pieces.
- Lay out all of the pieces face up. You should have eight vertical support walls, four octagonal horizontal supports, eight small box pieces, eight medium box pieces, eight large box pieces, the tree top piece, twenty-five ornament numbers, sixteen small magnets, sixteen medium magnets, and sixteen large magnets. All cardstock pieces but the horizontal supports and ornaments will require folding.
NOTE: Refer to the Design Space screen if you’re not sure about some pieces’ orientation.


STEP 3: ASSEMBLE YOUR CHRISTMAS TREE ADVENT CALENDAR
CHRISTMAS TREE SIDES AND BASE ASSEMBLY
- Begin by folding the eight vertical supports in half along the crease line.
NOTE: You'll want to line up the four slots along the sides as best as you can.
TIP: Placing the edge of a large scraper along the crease line can help with this. - With the support piece face down, add a thin line of craft glue to one long edge, then fold along the seam and press the edges in place.
TIP: The precision tip on a bottle of Bearly Art glue works really well! - Glue and fold the rest of the support pieces the same way and let them dry.
- Set the two largest base octagons face up.
- Hold a support piece, pointing up with the bottom slit aligned with one on the bottom octagon, then slide them together.
TIP: Make sure everything is slid in all the way. - Slide the next octagon into the support piece’s next slot the same way.
- Add the rest of the support pieces to the other slots on the two octagons.
- Take the next octagon and gently match its slots with the next slots on the support pieces.
- Add the smallest octagon the same way to complete the frame.


DRAWER ASSEMBLY
- There are three sizes of drawers and eight of each. All are assembled the same way.
- Place a drawer piece face down and fold the three tabs up along the crease lines.
- Fold up each of the three sides of the drawer.
- Then, glue the tabs to the sides and pinch them in place to set.
TIP: I found it easiest to glue the front two tabs, then glue the back tab. - Use Steps 2-4 to assemble all of the drawers and let them dry.
- One at a time, attach an ornament piece to the front of each drawer with craft glue.
NOTE: You will have twenty-five numbers but only twenty-four drawers. The 25th ornament goes in the very top space, under the tree topper (perhaps for a special surprise!).
TIP: You can add the ornaments in order or mix them up depending on your preference. - Pair up the magnet pieces by size. You should have eight sets for each size of magnets.
TIP: If the magnets seem to repel or do not want to go on straight, turn one magnet 180° so the two magnets line up when stuck together. - Next, peel the backing off one magnet in a small set.
TIP: Use a weeding tool if the backing doesn’t come off easily. - Apply the sticky side to the bottom of a small drawer. Press the magnet in place to make sure it adheres well.
- Then peel the backing off the other side of the magnet pair, realigning the magnets if necessary.
- Push the drawer into position on the top shelf of the Christmas Tree Advent Calendar without letting the bottom touch until it’s in place. Then use your thumb to press up from the underside of the shelf the drawer is resting on, while pressing down lightly from the top of the drawer with your forefinger. This magnet will allow your drawers to stay in place even when they are not full.
- Continue affixing the magnets and positioning the remaining drawers in place, working from top to bottom to make sure you can apply pressure from the underside of each shelf easily. Keep going until every drawer is in place and your tree is full!


TREE TOPPER ASSEMBLY
- To assemble the tree top, place it face down, then fold along all the crease lines so it starts to curl into a cone shape.
- Add glue to the tab where it will touch the other side of the topper.
- Bring the other side over to cover the tab and hold it in place to set.
- The assembled tree topper rests on top of your tree -- no need to secure it into place. Plus, it’s the secret hiding spot of day 25’s gift. Just lift off the top to see the gift!


STEP 4: SHOW IT OFF
Your Christmas Tree Advent Calendar is finished! Place your Advent items in the boxes (don’t forget to lift the tree topper to place a gift on the very top shelf!) and enjoy sharing a gift every day of the holidays!

Notes
Assembled Size: 8.5" W x 13" H x 8.5" D
Typeface: Tingler Script / Free Alternative: Timberly
Answers to Your Questions About How to Make a Christmas Advent Calendar
Q: Where is the file with the gold star numbers? How do I design my own custom Christmas tree advent calendar?
A: You can learn how to design your own customized number tabs and typeface for your Christmas tree advent calendar in my ADVANCE program. Learn more about ADVANCE here!

Q: Are you going to do Merry Maker Mingle again this year?
A: Yes! Merry Maker Mingle is my annual event for the holidays! Each day in December leading to Christmas, I present you with a brand new and free “gift” — a project to craft, make, or do. You can make these projects on a machine or by hand if you don’t have one. Our Merry Maker Mingle projects will come with a fun video with yours truly, a step-by-step printable photo tutorial, and a free pattern/SVG cut file. Stay tuned to sign up for daily updates and prizes!
Q: What are Christmas advent calendars?
A: An Advent calendar is a calendar, typically with little drawers, pouches, or compartments, used to count the days of Advent in anticipation of Christmas. Each spot holds a treat or a small present that is opened by the owner every day from December 1st to 25th!
Q: Can I cut the base out of Kraft Board or a heavier material?
A: The assembly slits were designed to fit cardstock, so using much thicker material will make the pieces not fit together correctly.
Q: Do you open 1 or 24 first on an advent calendar?
A: Historically, the 1 is opened first, but lots of people start at 24. It’s personal preference and family tradition, so there’s no wrong way.
Q: How many days are in an advent calendar?
A: My advent calendars are always 25 days. I know some cultures and families prefer to have 24 days. If you fall into the 24 camp, just ignore the 25th spot under the top of the tree.
Q: Can I cut these Christmas tree advent calendar SVG pieces on a Cricut Joy Xtra or original Cricut Joy?
A: The files in this project are a bit too large to be cut on a Cricut Joy or Joy Xtra.
Q: Do I have to use a Cricut to cut my Christmas tree advent calendar SVG pieces?
A: No! You can make a calendar from paper or card stock that works with your equipment, or even just with scissors. We always include several versions of each free file in the free download ZIP file. If you have a Silhouette Cameo, which uses Silhouette Studio, you can use the DXF file in Silhouette Basic Edition. If you have upgraded to Silhouette Designer Edition, Designer Edition Plus, or Business, you can use the SVG format with your Silhouette machine to cut each intricate design. If you don’t have a cutting machine, you can print and then cut out my digital download PDF files, too! The ZIP archive in my resource library includes these file types and more!
Q: Help! My Cricut Design Space screen looks different than yours!
A: If you’re using the latest version of Cricut Design Space, your screen may have slight variations than the screen you see on the video tutorial. Good news: All of the same functions are there, they may just be in different spots or have new icons. Pause the video if you need, or follow along with the written tutorial. If you get stuck, ask for expert support in our Facebook group. Our group has become not just a help center, but also a vibrant community of real people and crafters! Plus, you can catch the latest news on JenniferMaker tutorials and more.
Q: Where can I find the supplies and tools to make an advent calendar?
A: My Christmas tree advent calendar SVG files can be made with simple supplies you may already have in your crafting stash, which I’ve linked above. I like to shop on Amazon for their high quality products and free shipping within the United States with my Amazon Prime membership (just make sure to look for sellers with 5-star reviews). Depending on the availability of your item, you might get a delivery date within a few days of the purchase date — especially if you explore the additional shipping options. Alternatively, you can likely also find most, if not all of the supplies and tools at your local craft store.
Q: Do I have to use the magnets?
A: You don’t have to, especially if you’re using lighter weight gifts inside the tree like stickers or notes. However, I cannot guarantee that the drawers will stay closed. That’s why I added magnets!
Q: Do you have any other advent calendar projects I can make?
A: Advent calendars come in all shapes and sizes. There are wall hanging advent calendars, tabletop calendars, and even ones that can take up your whole fireplace mantel! Check out my other advent calendar projects:
- Felt Christmas Tree Advent Calendar
- Easy Advent Calendar Village
- Gingerbread Village Countdown
- Arabesque Tile Ornament Tree Countdown Calendar
- Christmas Day Countdown Sign
- Christmas Town Countdown Calendar
Q: Can I make and sell these Christmas tree advent calendar designs?
A: I love supporting creative entrepreneurs! If you want to use my designs and projects for commercial use, please familiarize yourself with my important licensing information before selling your crafts.
I do not permit sale of my digital items, but you can sell the creative goods you make with them — as long as you follow my licensing requirements. That means you cannot sell the stacked calendar SVG files, but you can sell stacked calendars that you made with the files on platforms like Etsy. Whether you use the Etsy app or the browser version, you’ll find a global marketplace filled with thousands small businesses, and interested buyers can find thousands of made-to-order items. I love to see creative crafting businesses thrive with the help of my designs and inspiration!
Q: I’m new to paper crafting. Can you help me learn more about it?
A: Want to learn all there is to know about paper crafting? Check out my ultimate guide to paper crafting with your Cricut, my Cricut Coach Playbook. It’s full of tips, tricks, and techniques, for all kinds of Cricut crafts. The best part is you can apply these tips to thousands of projects — not just mandalas or shadow boxes, but tons of special goods!
Q: What fonts did you use in the project?
A: I used a paid typeface called Tingler Script but a free alternative is Timberly
Q: How do I know if my design uploaded at the correct size?
A: You can make sure your dimensions match mine after uploading your files:
- tree-advent-stacked-no-score-jennifermaker-SVG: 11.49″ x 11.49″
- tree-advent-stacked-score-jennifermaker-SVG: 11.49″ x 11.49″
There are also “unstacked” files in these dimensions:
-
tree-advent-no-score-jennifermaker-SVG: 46.143″ x 48.451″
-
tree-advent-score-jennifermaker-SVG: 46.126″ x 48.432″
If your projects are not coming in at the right size, try uninstalling and re-installing Cricut Design Space. If you need help resizing your design, please see our Resizing Guide.
Get my free SVG/DXF/PDF files to make a Christmas tree Advent Calendar!
(If you do not see the signup form above, click here.)
I love seeing what you make with my designs and how you use them! Please share a photo of your Christmas tree advent calendar in our Facebook group or tag me on social media with #jennifermaker.
Love,

Want to remember this? Save this Christmas Tree Advent Calendar Tutorial to your favorite Pinterest Board!


![DIY Cake Toppers with Custom Names and Sentiments Cut on a Cricut ] Free SVG Cut File #cricut #cakedecorating #birthday](https://jennifermaker.com/wp-content/uploads/diy-cake-toppers-custom-f.jpg)