Learn how easy it is to make a gorgeous sublimation T-shirt with beautiful, long-lasting results!
Do you want to make t-shirts with any design you want on them? This sublimation T-shirt tutorial is the best way to get started! While I love layered heat transfer vinyl shirts, sometimes I want a different look and feel. Especially with full-color watercolor designs being so popular. Getting beautiful results is really easy once you’ve learned my sublimation shirt basics. There are a few details to get right, but I’ve done lots of experimenting for you. So you can learn from my experiments (and mistakes!) to make your own beautiful shirt with sublimation transfers.
Watch my full video on How to Make a Sublimation T-Shirt:
Print sublimation on t-shirts is such a fascinating process! And it’s really not as intimidating as it may sound. Basically, special sublimation dyes and papers are activated with heat. The inks become a vapor and dyes the surface in just a few seconds. And since the printed designs become part of the shirt’s fibers, you can’t feel them! That is extra helpful if you or a loved one have sensory issues.

Even better, you can transfer any design your printer can create! So you can use high quality PNG files and similar designs with gradients. That is a HUGE upgrade from layering HTV vinyl or even patterned Infusible Ink. I’m sharing some beautiful watercolor designs with blended, vibrant colors so you can see just how much detail you can get with sublimation.
A sublimation t-shirt takes some special materials and equipment, but once you’re all set up, the process is so fast and easy. If you’re new to sublimation, be sure to check out my Sublimation for Beginners tutorial!
Of course, we need a shirt! I recommend that you start with a white Cricut polyester t-shirt for your beginner sublimation project. I tested many different shirts for this project (with varying degrees of success- watch the video to see them!) and found that the most important part of a sublimation t-shirt is the polyester content. If you want to test your process before using a shirt, you can sublimate on a piece of polyester fabric with the same material content.
And yes, you will need a sublimation printer and a way to control it. I’m using my Epson EcoTank ET-4760, but you can find information on several printers in my Best Sublimation Printer to Buy in 2022 post. I find sublimation printing easiest from my desktop computer using Google Docs (really!). Then, you’ll need compatible ink and paper. I used Hippo Ink and 8.5″ x 11″ A-SUB paper. You can learn the best materials for your needs in my Sublimation for Beginners Ultimate Guide.
And like I mentioned earlier, sublimation requires heat. Lots of it!
You can use an EasyPress, traditional heat press machines, or a Cricut Autopress, which is my favorite. You usually cannot use a household iron because sublimation ink activates at 350°F (175°C) and irons don’t get hot enough.
I like the Autopress the best because I don’t have to worry about pressure or opening it when it’s done. I can multitask! You can learn more about the Cricut Autopress at my full review.
Once you have your shirt, printer, paper, and ink selected, there really aren’t many things you need to make a sublimation t-shirt. But they’re very important for safety and perfect results!
Sublimation ink gets so hot that it turns to vapor during its processing, and this vapor can transfer to nearby surfaces. I’ll show you how to use white butcher paper and white cardstock to avoid unwanted ink transfer on your shirt and press. Heat resistant tape will also help keep the design in place to avoid blurry images.
And just like the ink vapor can get on paper, it can get on you! Good ventilation is important any time you use sublimation. Have your windows open and a fan going to help the fumes dissipate quickly. And don’t breathe in very close to the project while it’s still warm.
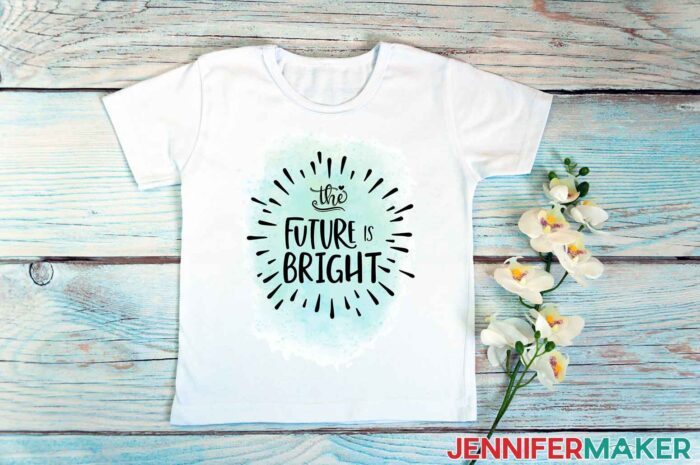
I can’t wait to see what you make with these designs and all your new sublimation skills! With all the possibilities for creativity, I know your crafting future is indeed bright!
Sublimation Startup
Need a little extra help understanding how to get started with sublimation? Join Sublimation Startup for a logical, step-by-step guide to getting setup for success with sublimation! You can ask questions and feel confident that you’ll get help! The Sublimation Startup mini-course is also great for those who enjoy learning from Jennifer Maker’s easy-to-understand, calm, and clear method of teaching. This is a no-fluff, no-mess, no-distraction workshop … it’s like sitting down with Jennifer in her craft room to learn directly from her! We work in logical steps to build your understanding and confidence with sublimation, and then provide support to keep helping you as you continue on your journey! Register now!
Ready to make a sublimation t-shirt using my free designs and step-by-step tutorial? You’re going to love it! This post contains some affiliate links for your convenience (which means if you make a purchase after clicking a link I will earn a small commission but it won’t cost you a penny more)! Read my full disclosure policy.
Materials to Make a Sublimation T-Shirt
View my Amazon shopping list with the exact items we used to make this project!
- Sublimation Shirt with at least 65% polyester – I used an adult large Cricut T-Shirt Blank,
- Sublimation Paper – I used 8.5″ x 11″ A-SUB Sublimation Paper
- Sublimation Printer and ink – I used my Epson EcoTank ET-4760 converted to sublimation printing with Hiipoo sublimation ink
- Heat Press large enough for your design – I used the Cricut Autopress, but you could also use the Cricut EasyPress 12″ X 10″
- Protective Paper – I used white cardstock and white uncoated butcher paper
- Heat Resistant Tape, Lint Roller, and Scissors
- Laptop or Desktop running Windows or Mac
- Free Google account – to use Google Docs (free) for printing your sublimation design
- (Optional) Your ICC Printer Profiles for better color (here are the Hiipoo printer profiles)
- Design #394 – My free sublimation t-shirt design files (available in my free resource library – get the password by filling out the form at the bottom of this post)

How to Make a Sublimation T-Shirt
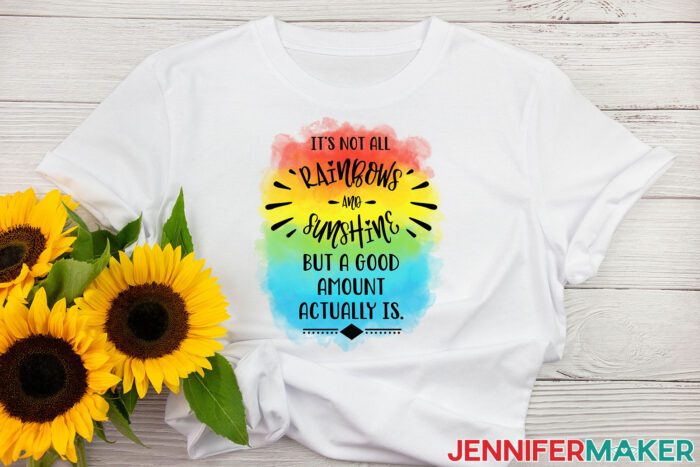
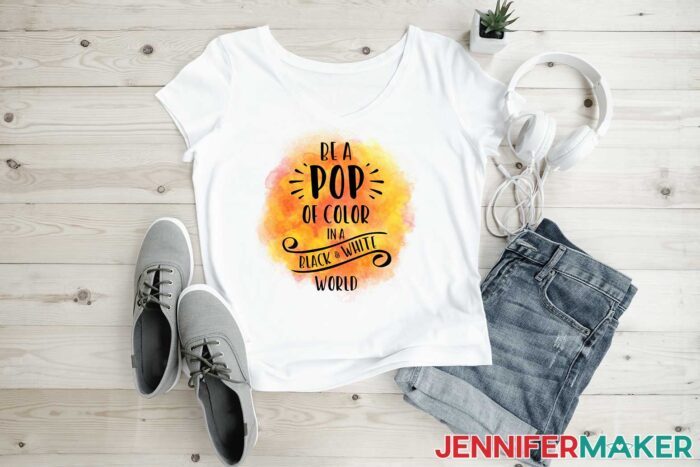
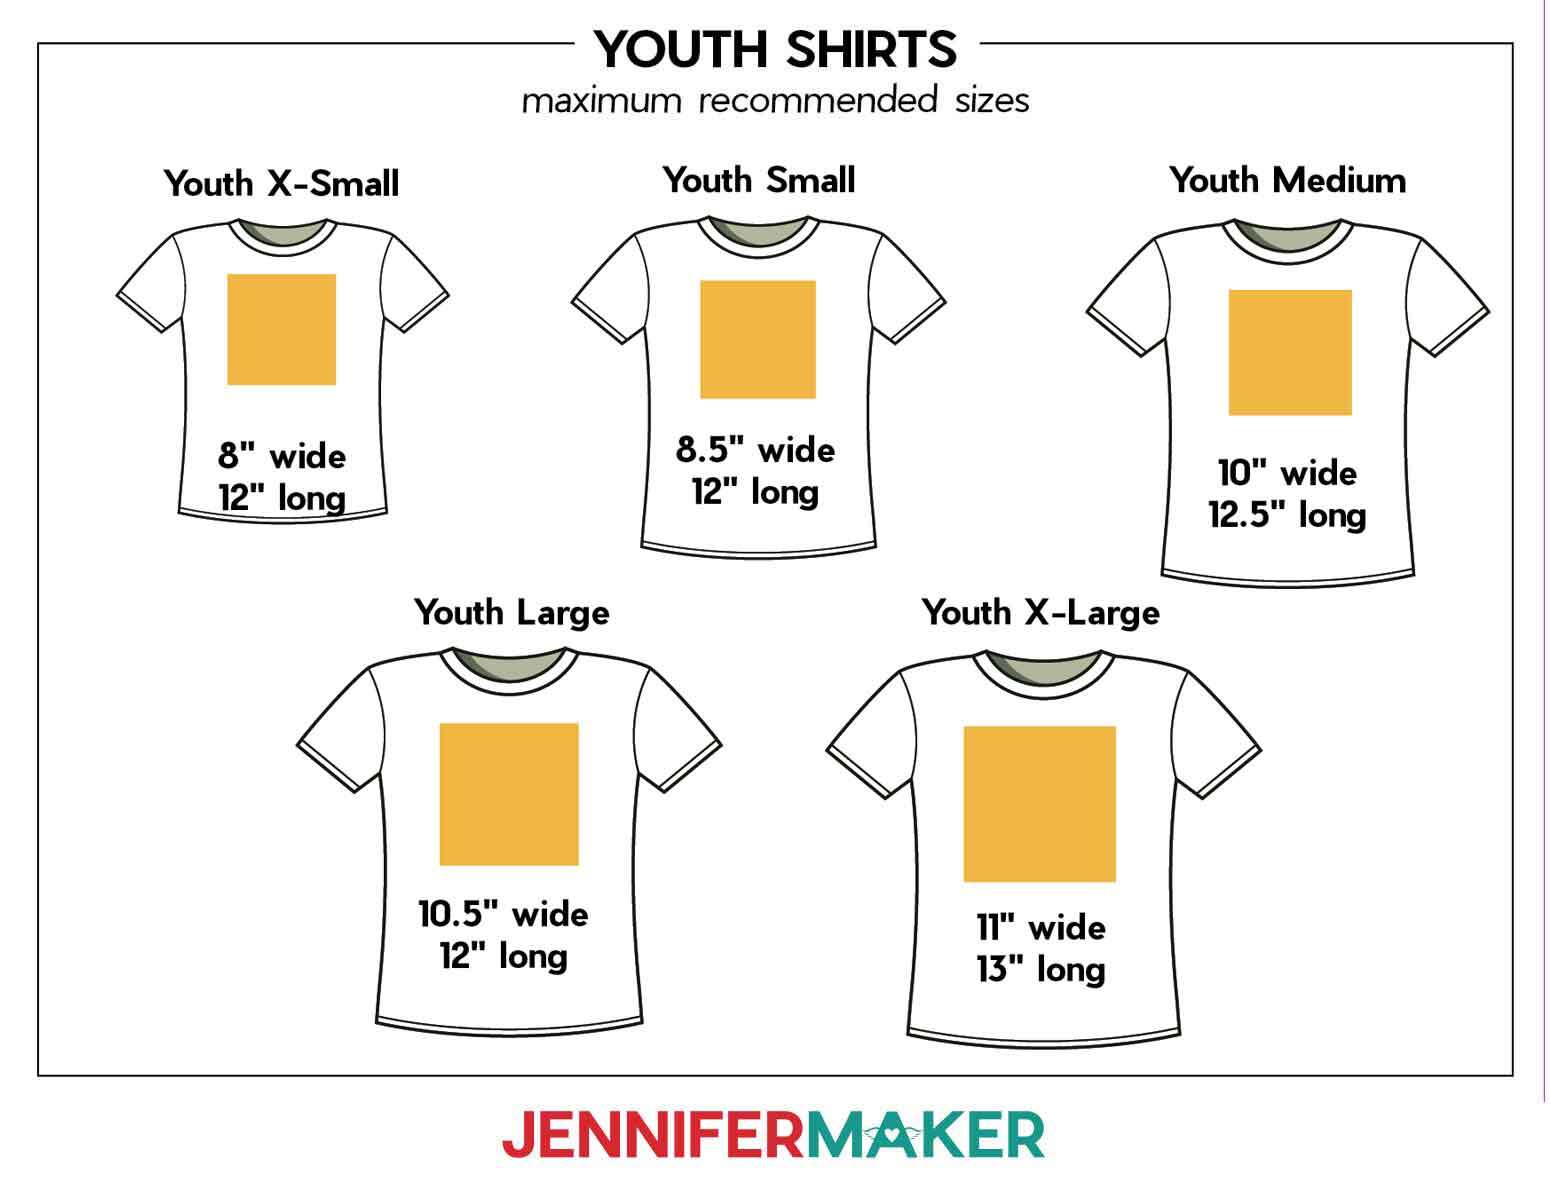
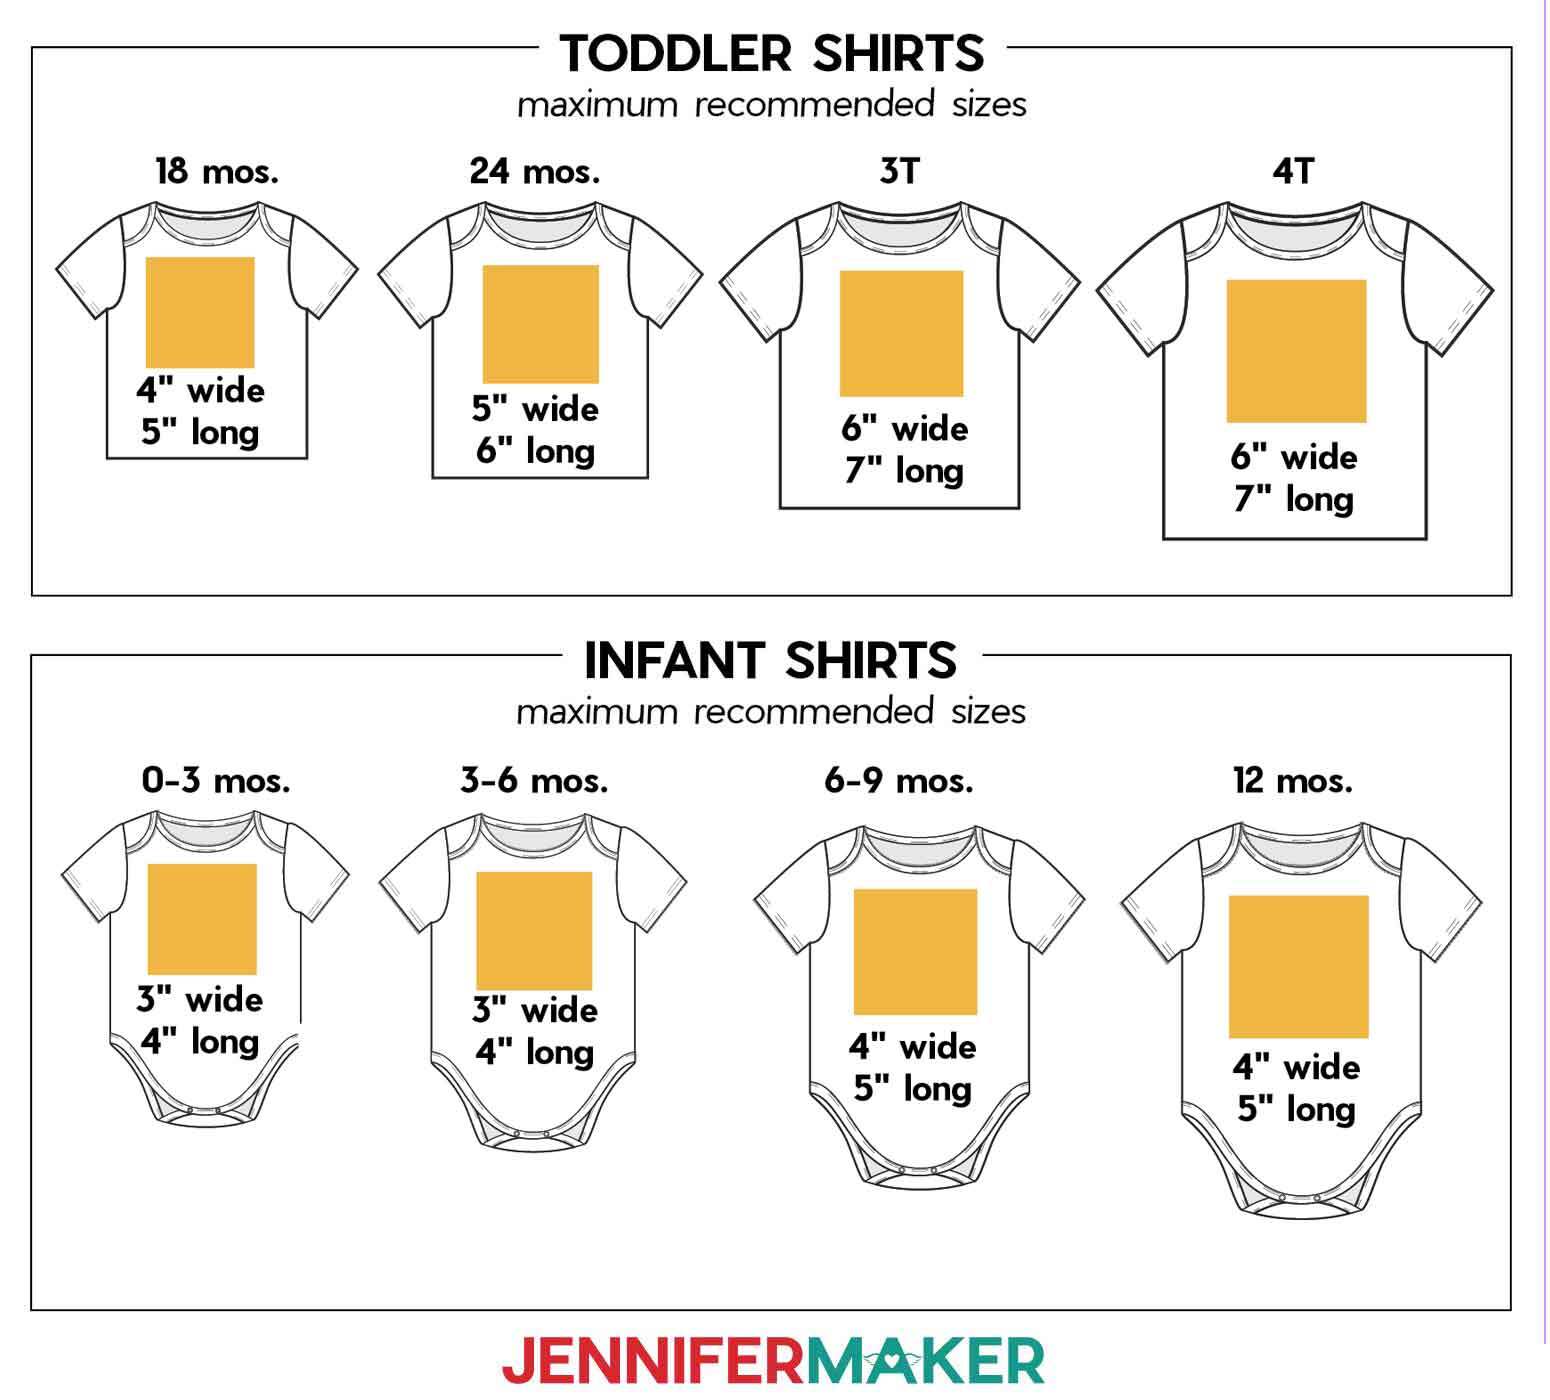
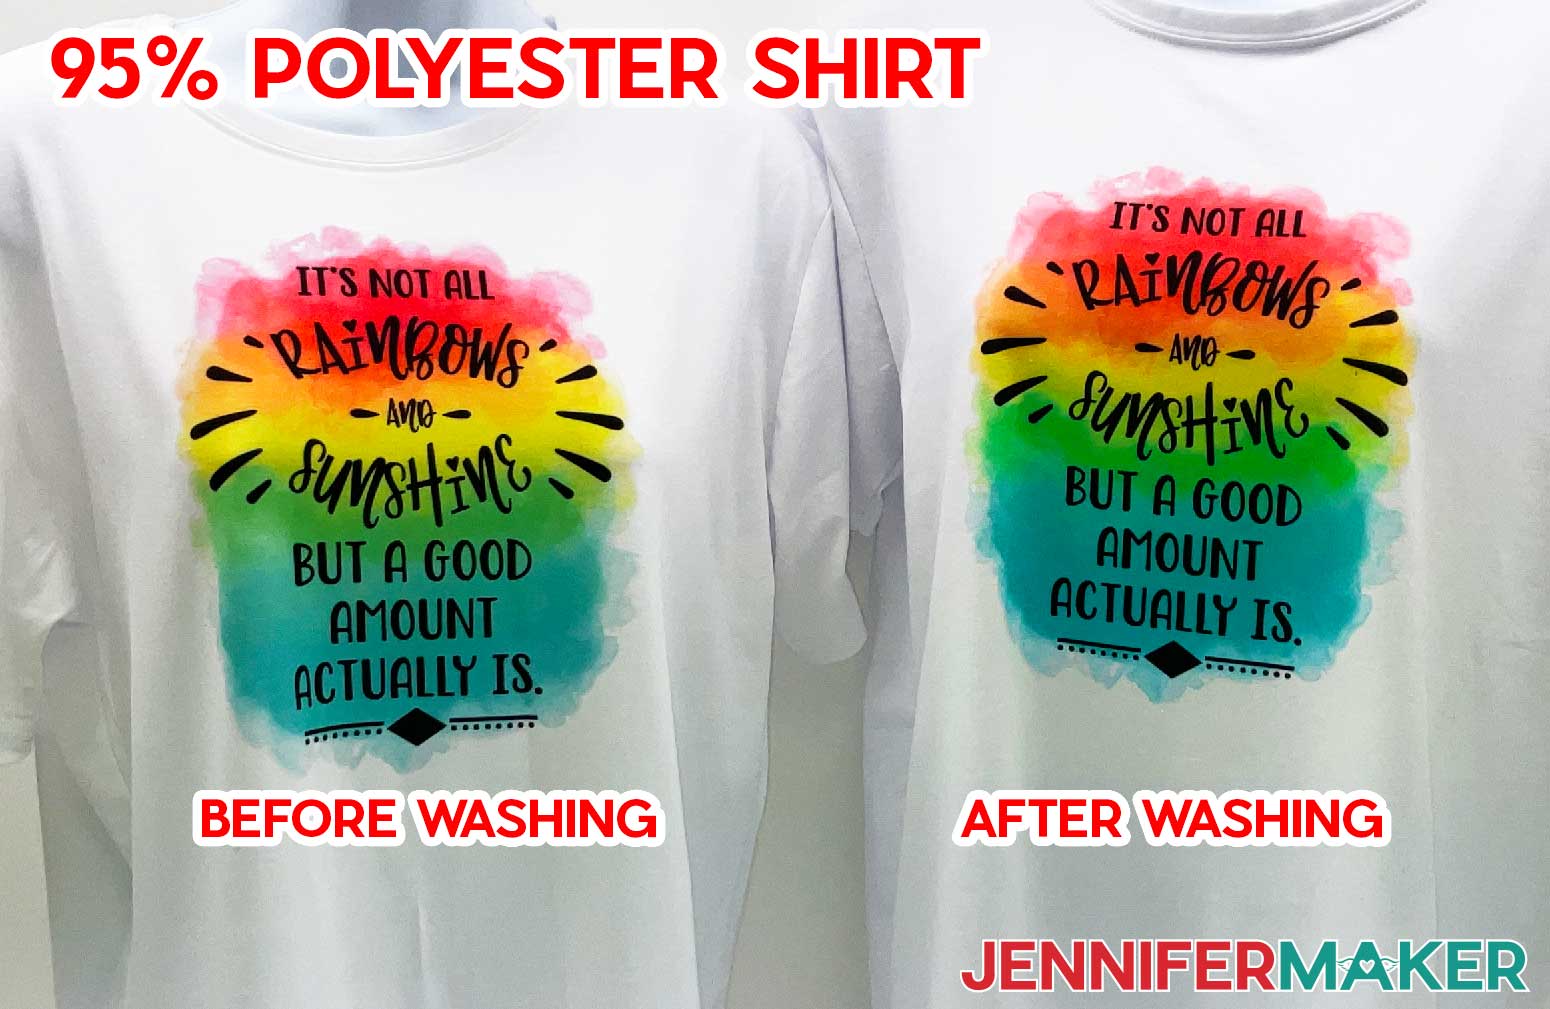
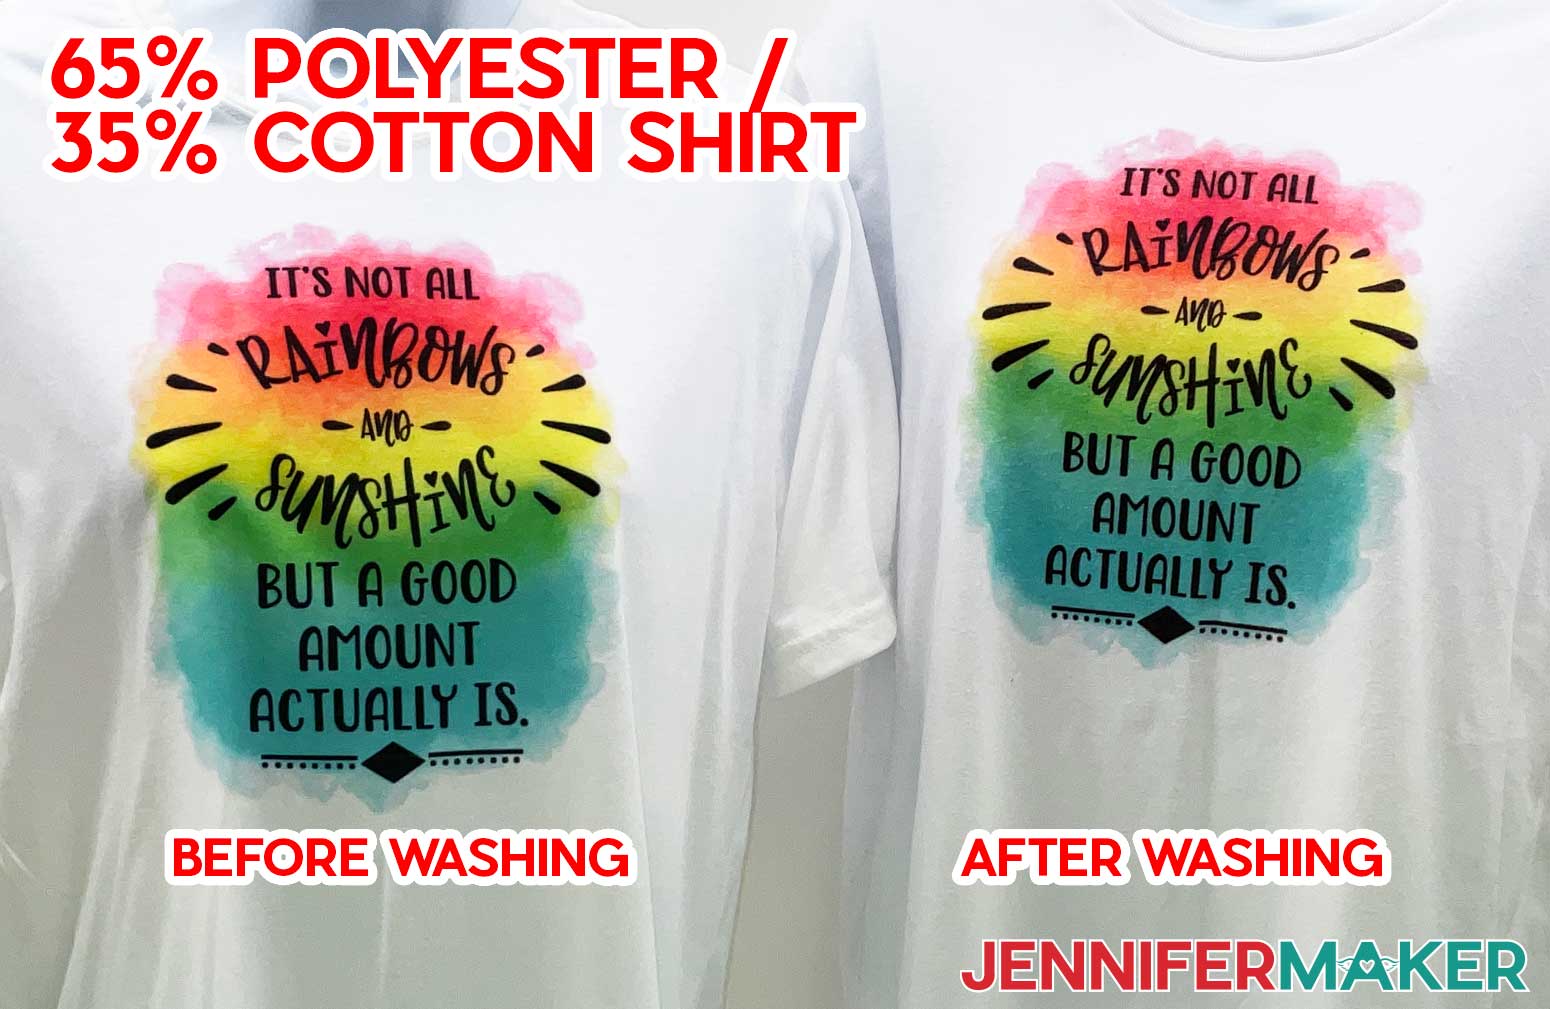
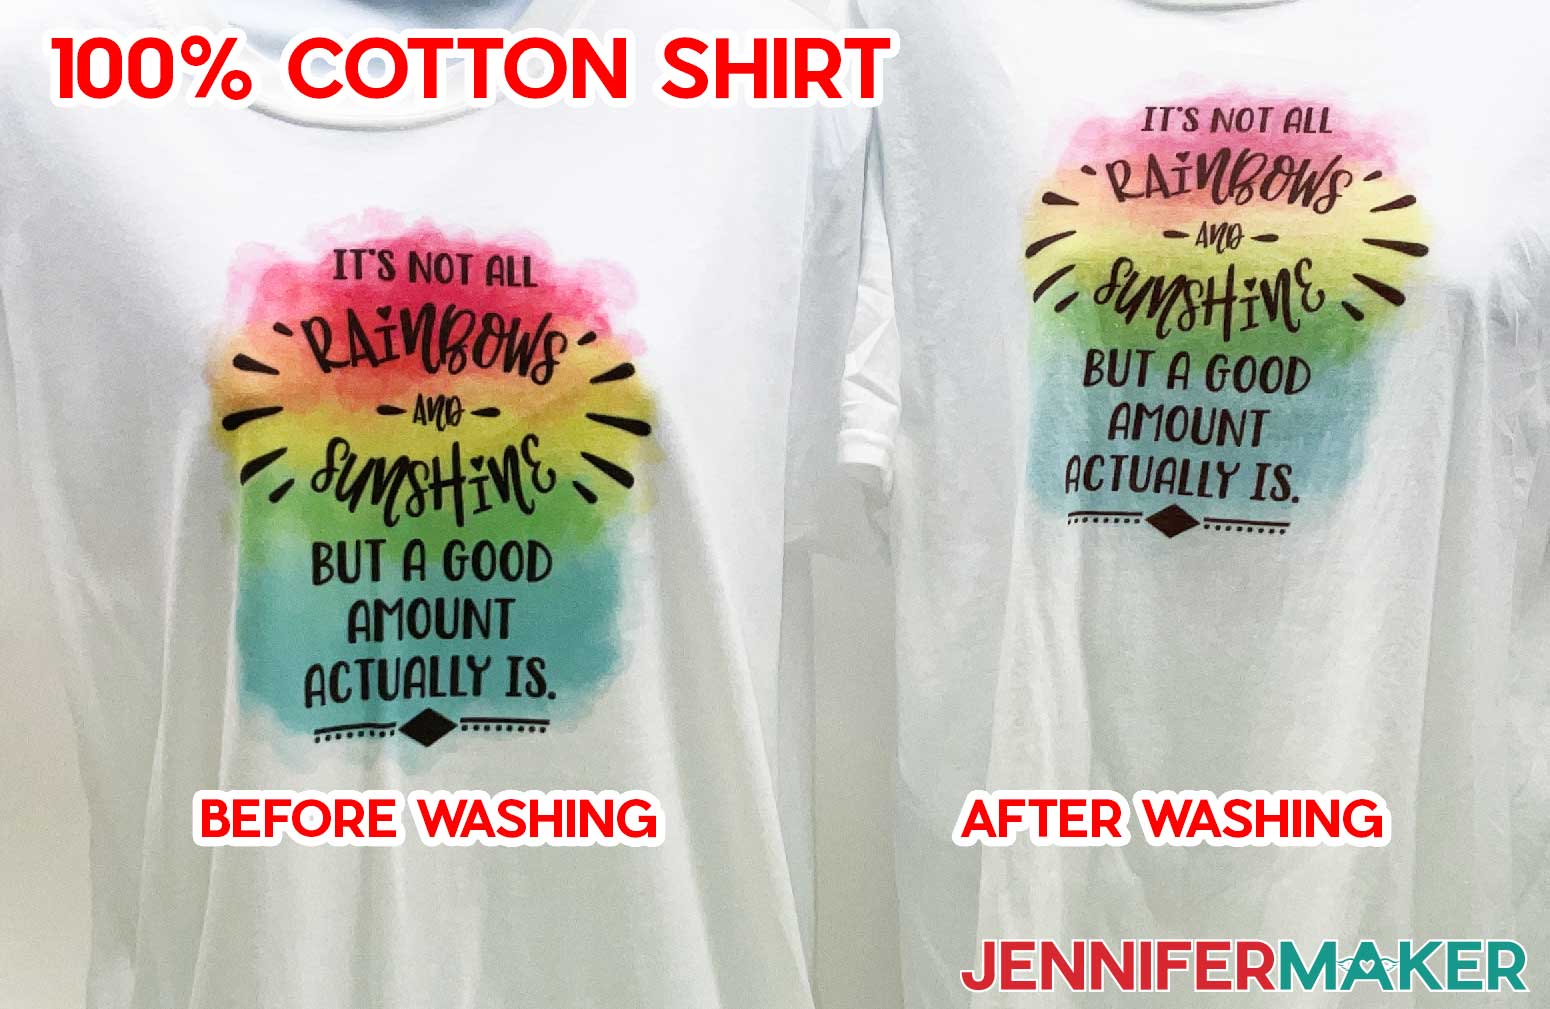
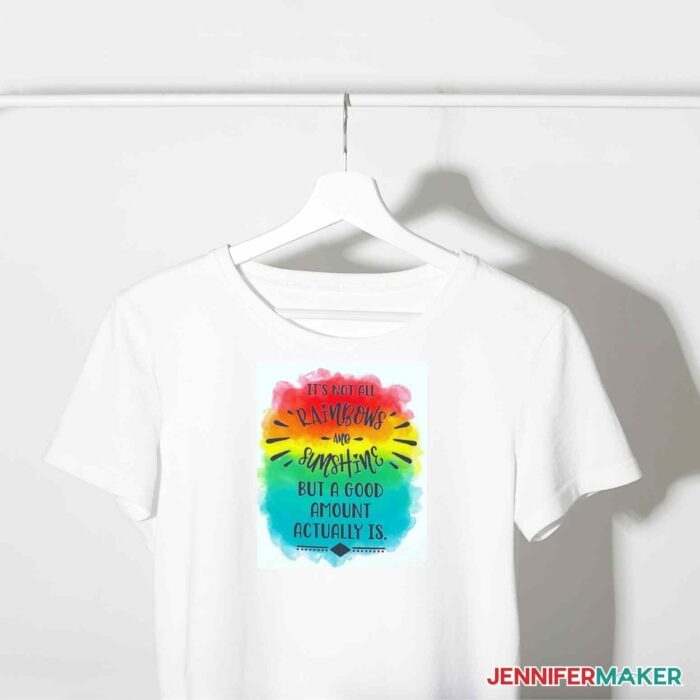
Learn how to make a beautiful sublimation T-shirt with easy techniques for flawless application! You can use any of my Sublimation T-Shirt design files from my resource library, Design #394. The four designs I’ve included have positive sayings with beautiful watercolor backgrounds. I've also included the background designs without words if you'd like to add your own. Today, I’m going to make the rainbows and sunshine design, but you can use these steps for any of the designs. We'll print the design on a good-quality sublimation paper for the best results. I’m using A-SUB paper in my Epson EcoTank with Hiipoo ink. You can use another combination, of course. You can use image editing software to prepare your design, but I'll show you my favorite way: Google Docs. Go to Google Docs in the Google Chrome web browser on your computer. You can also download and open the Google Docs app on a phone or tablet, BUT be aware that you won't be able to install or access any printer profiles from a mobile device. We need to resize the design to fit our shirt. For an adult large, we can make the design up to 10.5" wide or 12" tall. But remember to stick to your paper size! I’m using letter size paper, so I won’t go taller than 11.5". TIP: If you're using a different size shirt, here are the recommended design dimensions for several common styles: Maximum Recommended Design Sizes for Adult Shirts Adult Small: 10" wide by 12" long Adult Medium: 10" wide by 12" long Adult Large: 10.5" wide by 12.5" long Adult Extra Large: 11" wide by 13" long Adult 2X: 12" wide by 14" long Adult 3X: 13" wide by 15" long Adult 4X: 14" wide by 16" long Maximum Recommended Design Sizes for Youth Shirts Youth Extra Small: 8" wide by 12" long Youth Small: 8.5" wide by 12" long Youth Medium: 10" wide by 12.5" long Youth Large: 10.5" wide by 12" long Youth Extra Large: 11" wide by 13" long Maximum Recommended Design Sizes for Toddler Shirts 18 Months: 4" wide by 5" long 24 Months: 5" wide by 6" long 3T: 6" wide by 7" long 4T: 6" wide by 7" long Maximum Recommended Design Sizes for Infant Shirts 0-3 Months: 3" wide by 4" long 3-6 Months: 3" wide by 4" long 6-9 Months: 4" wide by 5" long 12 Months: 4" wide by 5" long Now, you can click and drag the image anywhere on your page. I recommend putting your design in the center of your page, as that ensures it won't get cut off at the edges and you have plenty of space to feather the sides for a clean press. I’ll show you that trick when we get to the pressing stage! We’ll add a vertical crease to help center the design. With the right care, your shirt will last a long time! Here are a few tips for keeping it look its best: Here are the results of my wash tests! The main takeaway was that the higher the polyester content, the brighter the designs stayed after washing. As an Amazon Associate and member of other affiliate programs, I earn from qualifying purchases.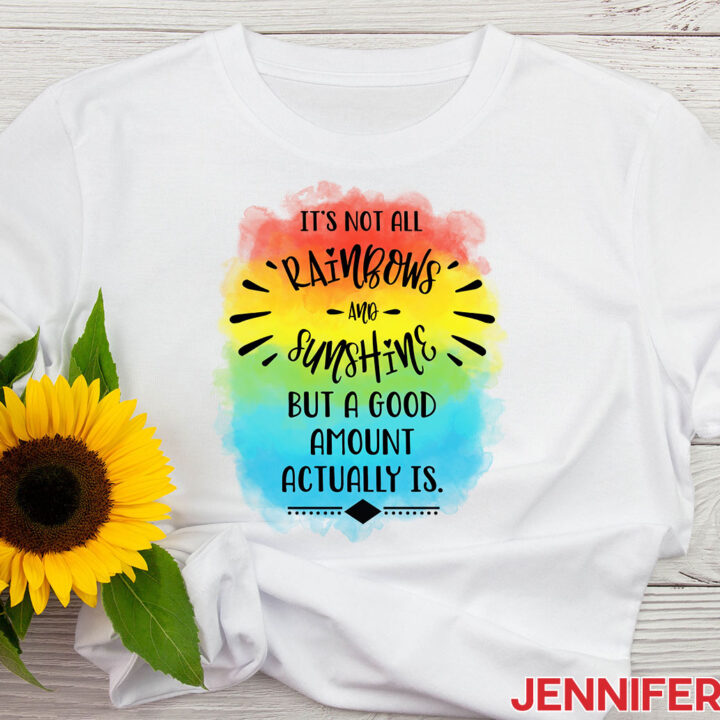
Beginner Sublimation T-Shirt
Materials
Tools
Instructions
STEP 1: GET OR PREPARE A SUBLIMATION DESIGN
To begin, click on "Blank" to open a new document.
In the top File menu, select "Page Setup." Change your margins to 0 and change your Paper Size to match your sublimation paper size. I’ll use letter size, 8.5" x 11". Click OK.
Now click on the Insert menu at the top and select "Image." Then, select "Upload from Computer." Locate the sublimation design you want to use in the folder you downloaded from my library. I’ll use the Rainbows design. Then click "Open." The image will appear and fill your page!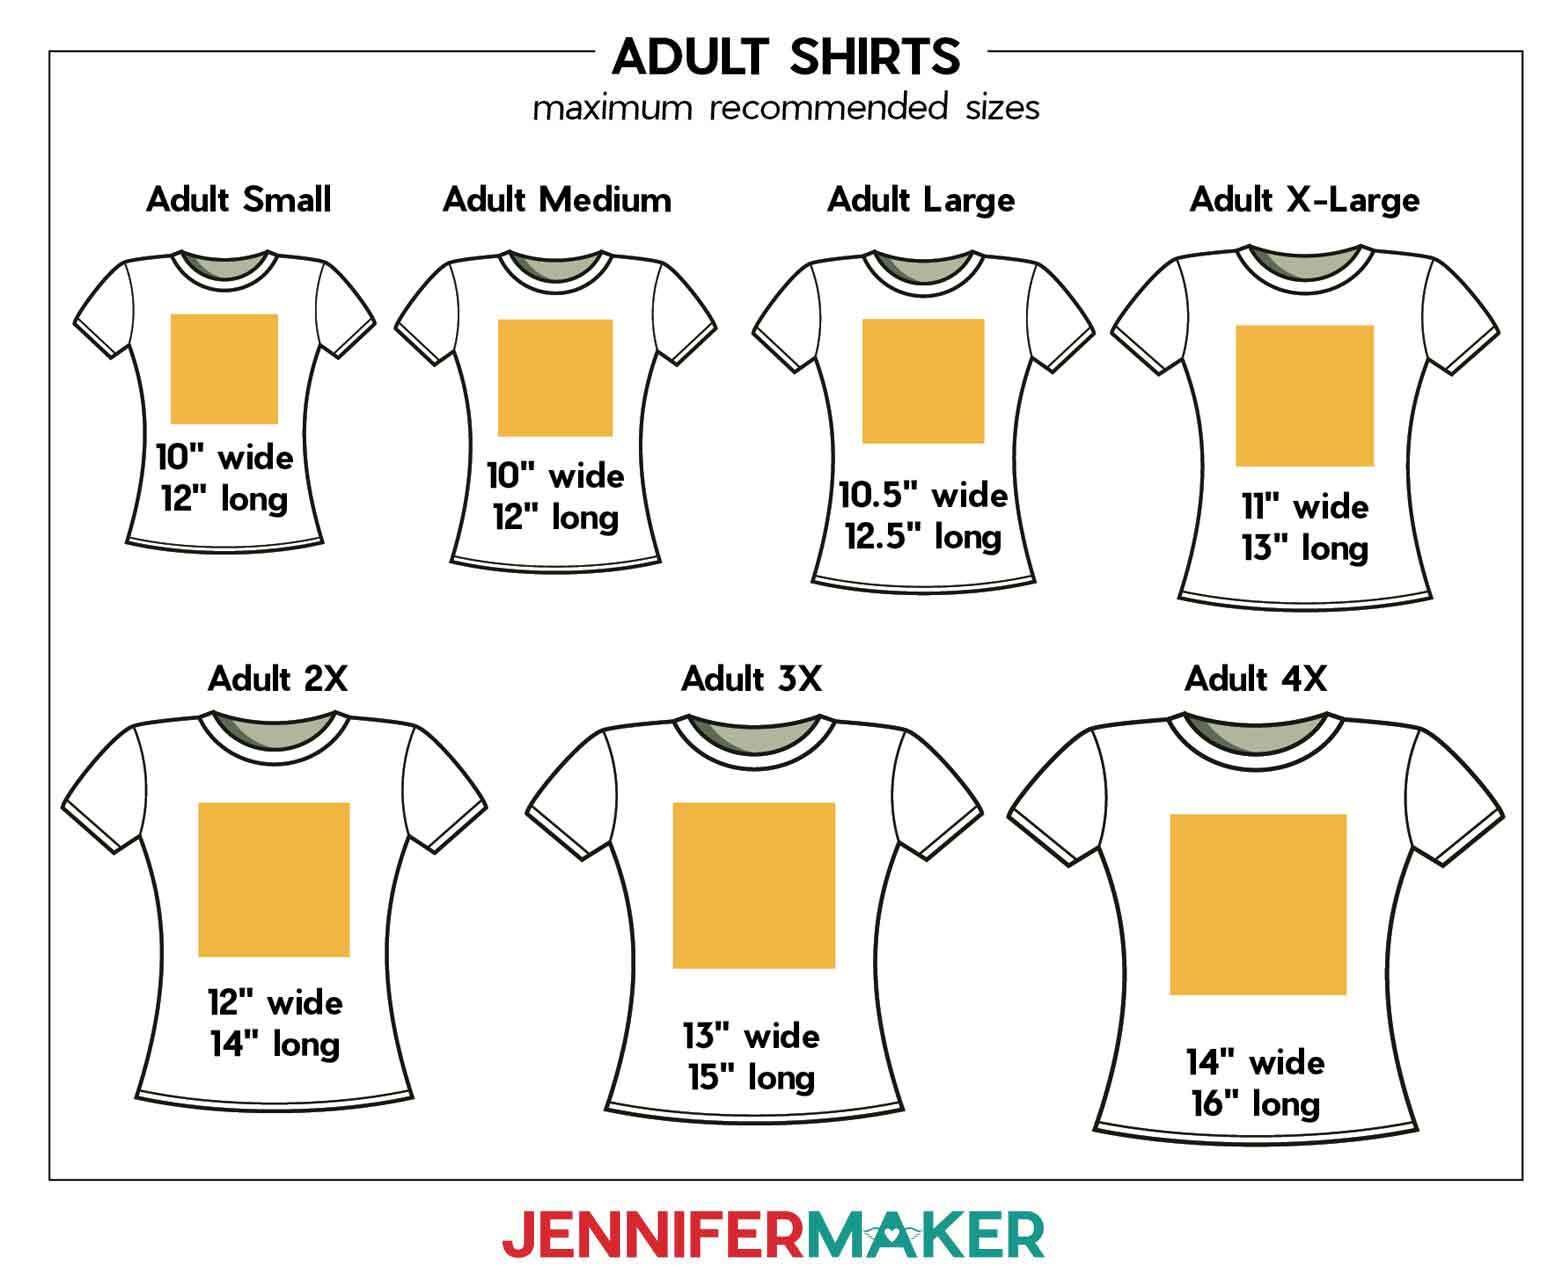
To resize the design, select the image, then click and drag a corner until it fits the page. Or, you can right-click the image, select "Image Options," then "size and rotation," and change the size in the fields. 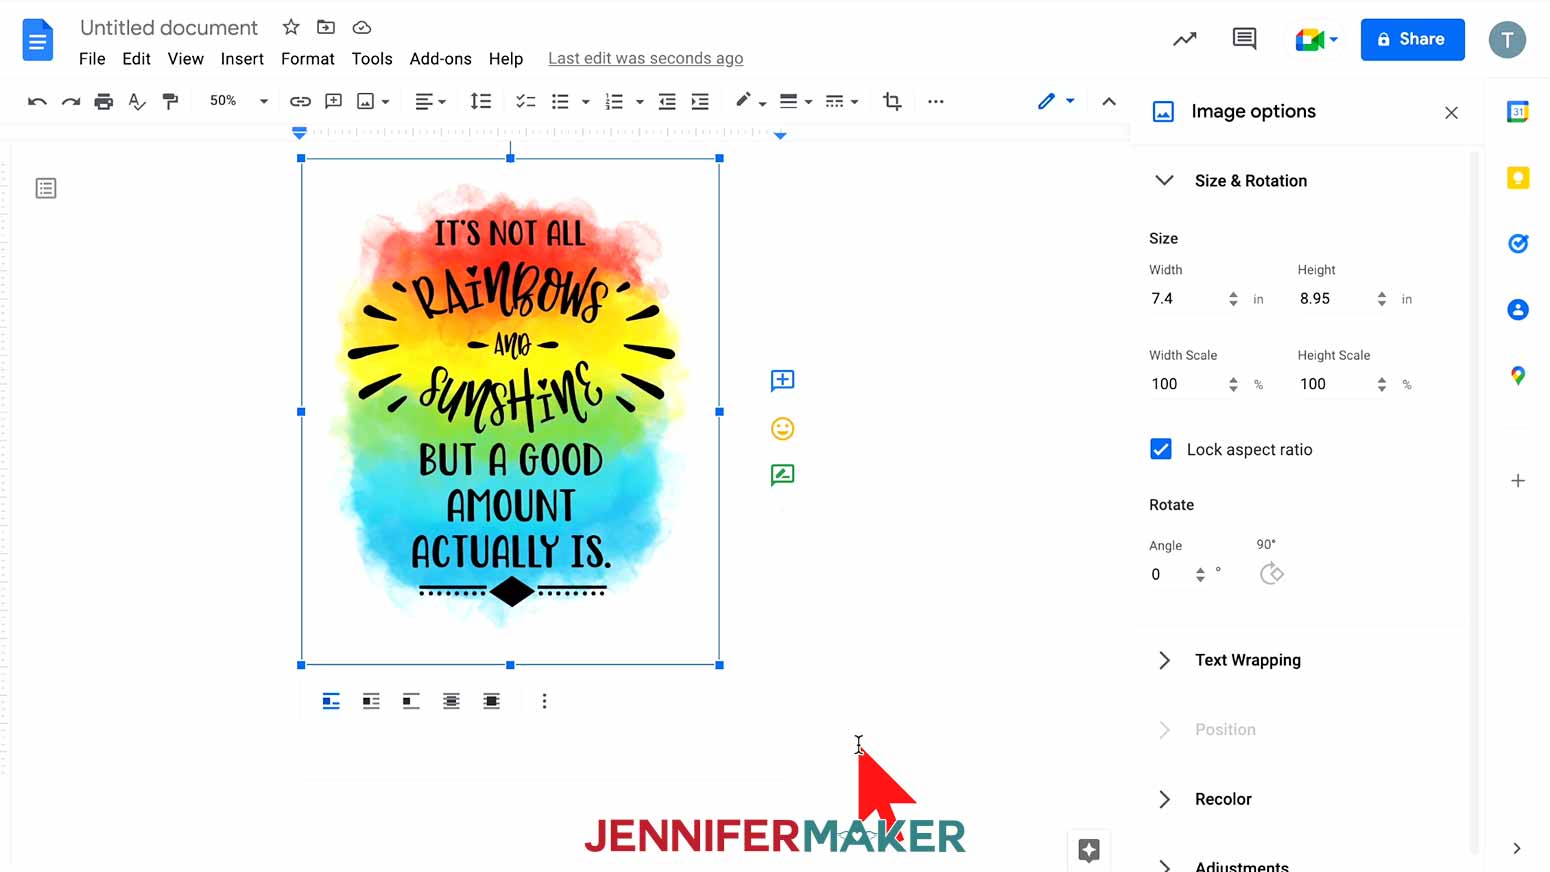
Next, let’s make sure the design will print in the right spot. To reposition the image, select it and then click on "Wrap text" from the menu that appears below. You might have to hover your cursor at the bottom of the image to bring up the menu.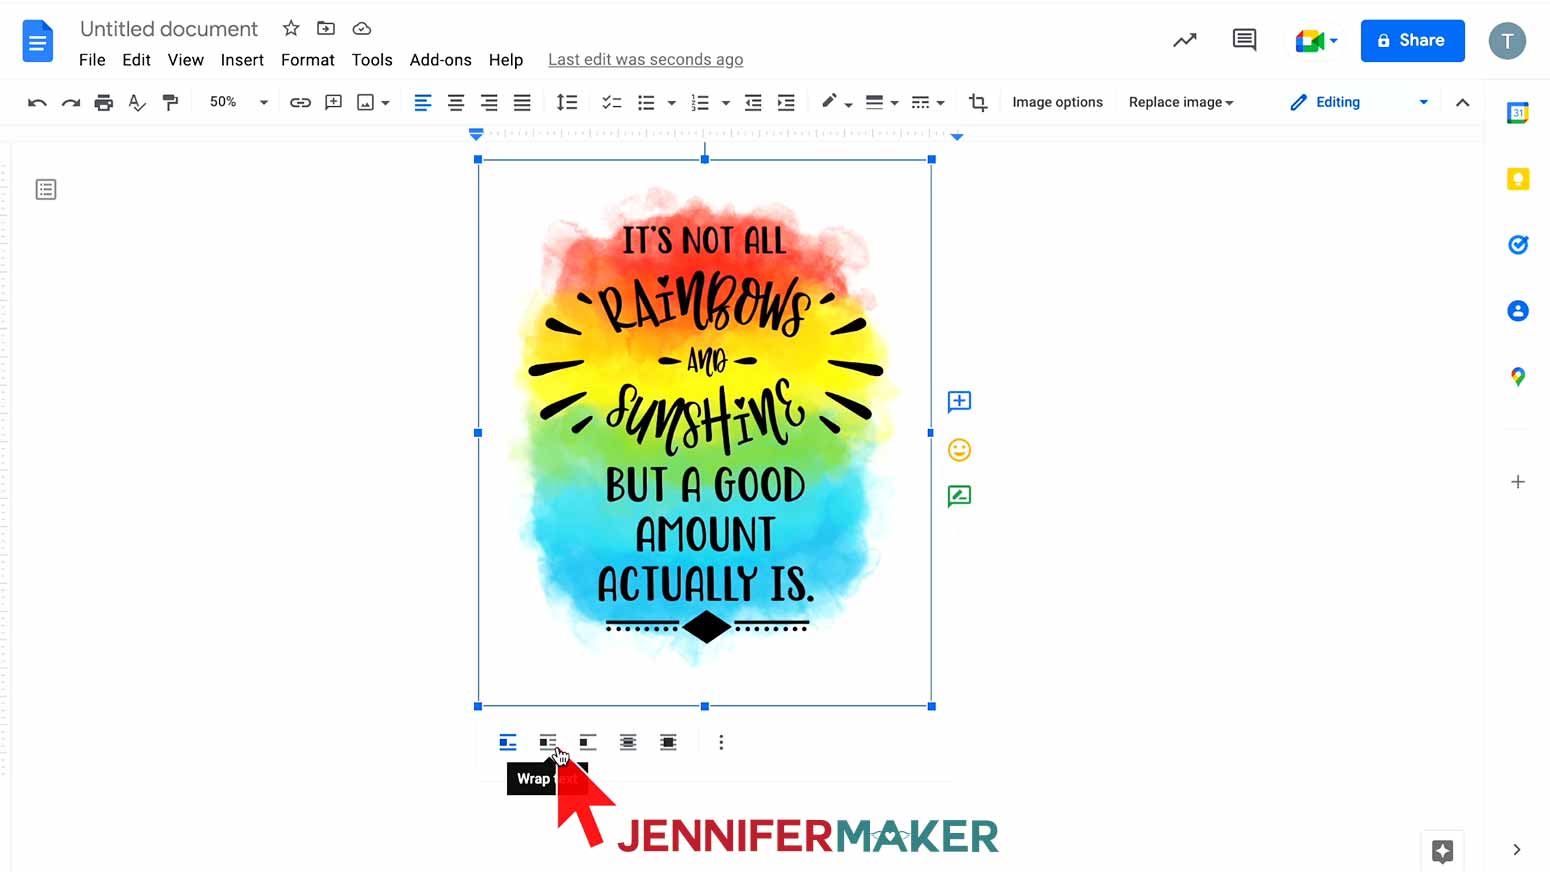
Once you’re happy with the design, give it a name by clicking where you see “Untitled” in the top left field. Another great thing about Google Docs is the auto-saving feature!
Before printing, make sure your paper is loaded correctly. Check your printer manual and paper packaging for help identifying the right side to print on and how to load it. If you’re using A-SUB paper in an Eco Tank like me, place the paper facedown with the words “A-SUB” visible so that the design will print on the bright white side of the sublimation paper.
The printing settings and steps depend on the type of printer you're using. While printer settings vary, the main things we have to watch for are paper type and print quality.
Epson Print Method
If you have an Epson, go to the File menu and choose "Print."
Select your printer under "Destination." Then, click the arrow beside "More Settings" and click "Print Using System Dialog."
Make sure your sublimation printer is selected under "Printer." Then, under "Layout" click "Flip horizontally" to mirror your image. Most sublimation projects need to be mirrored, so remember that step!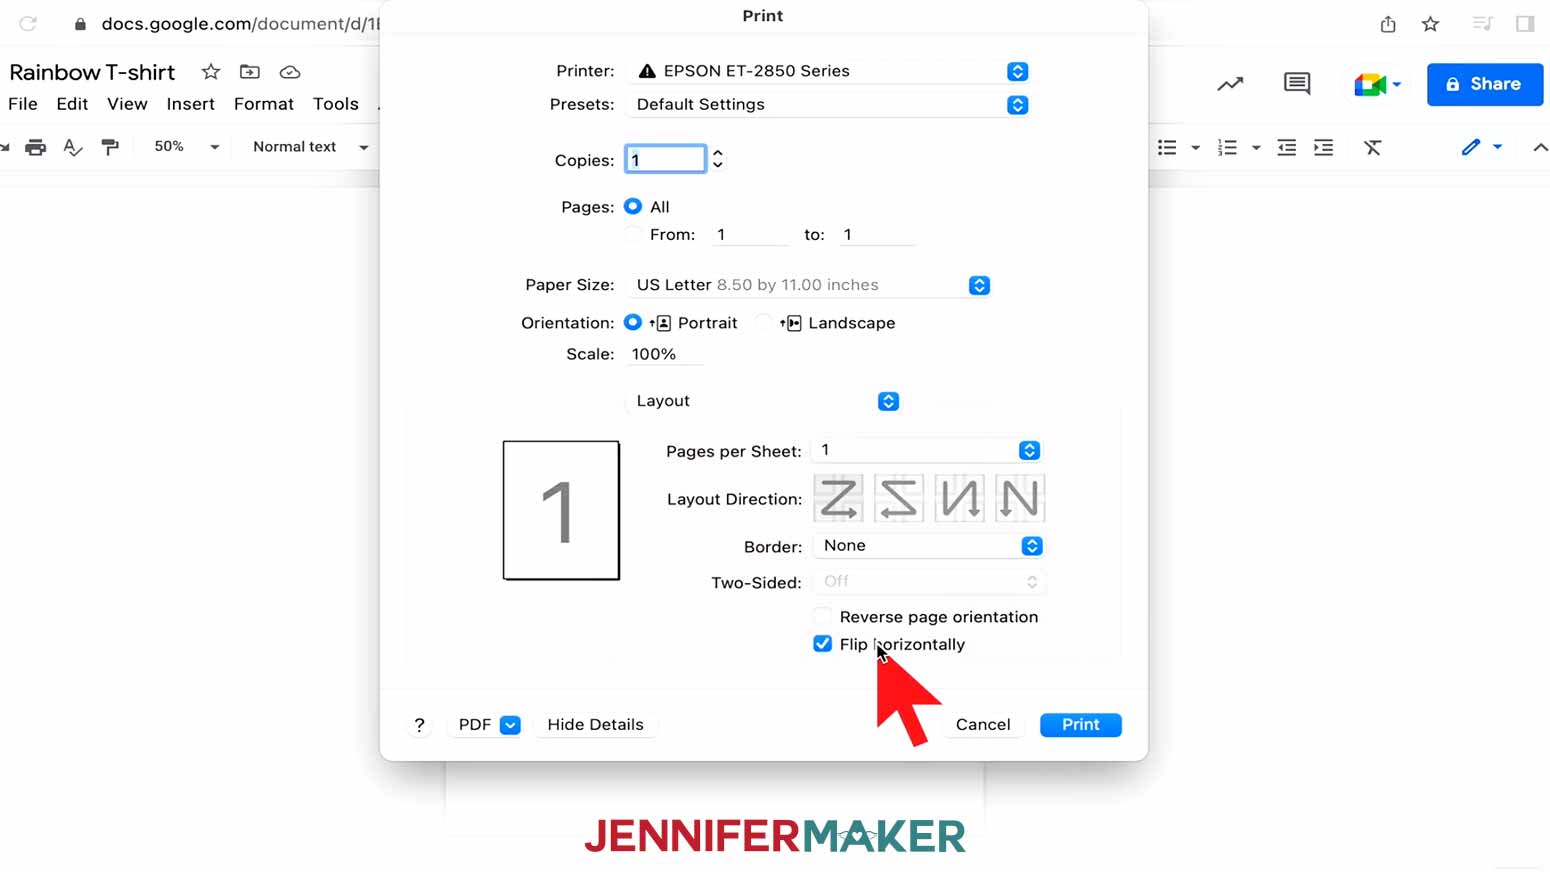
Choose "Print Settings" and change your media type to "Premium Presentation Paper Matte" and Print Quality to "High Quality."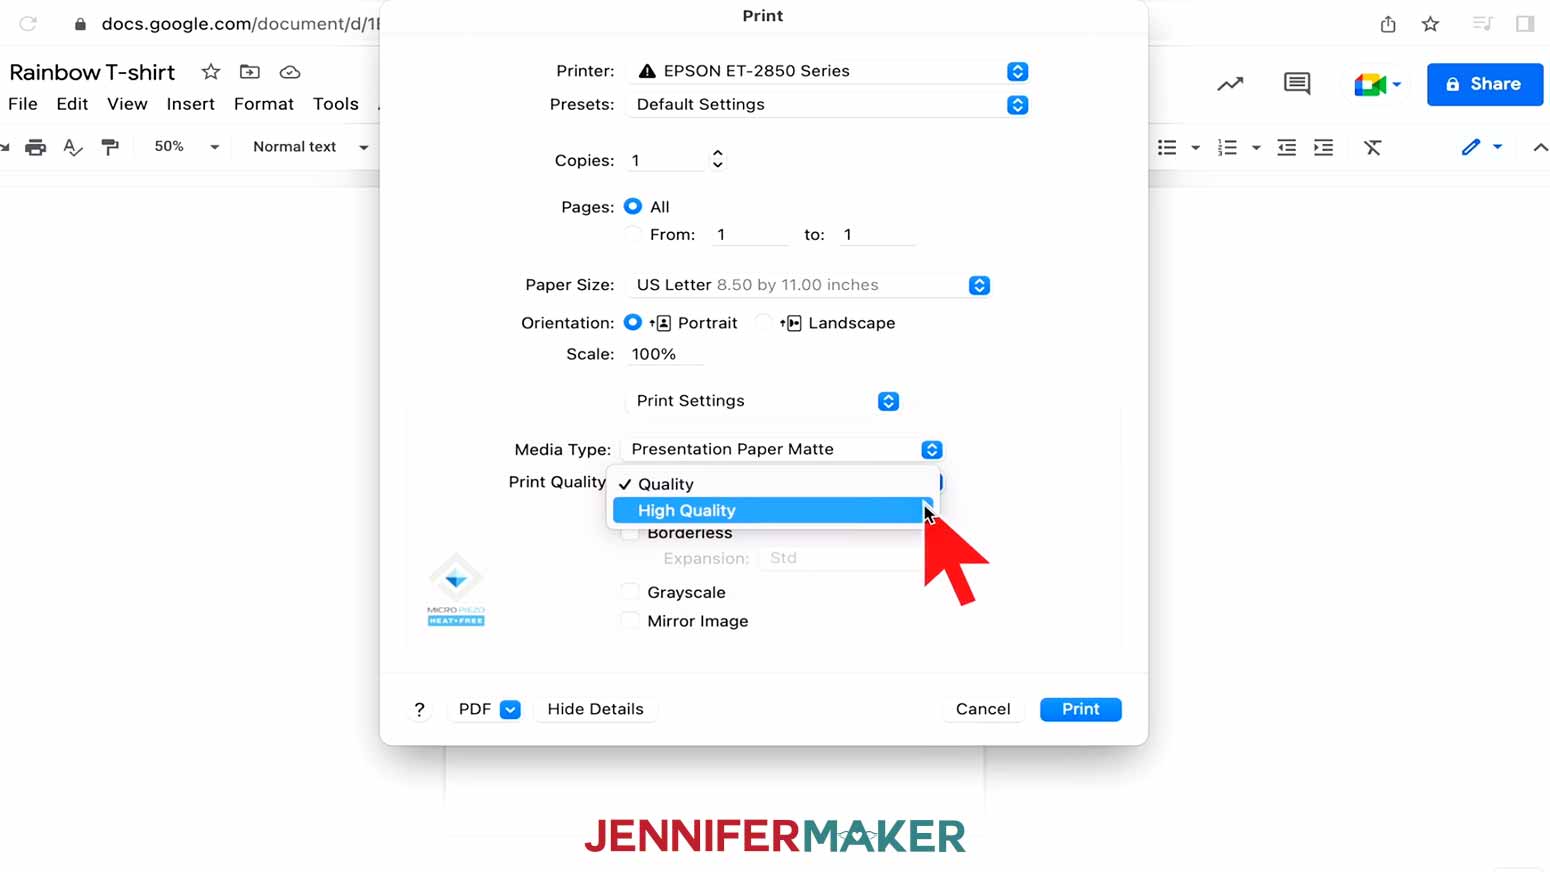
We already mirrored the image, so don’t click that. And don’t use high speed!
If you’ve installed an ICC printer profile for better colors, which I covered in my sublimation printer setup sublimation printer setup sublimation printer setup videos, you can select that here as well. Select "Color Matching" and choose your printer profile. If you’re on a Mac as I am, choose "Color Sync," click on the menu, select "Other Profiles," and select your printer profile from the list.
Once you’ve correctly adjusted your settings for your printer, click on "Presets" and choose "Save Current Settings as a Preset" and then you can choose that from now on!
Sawgrass Print Method
To print on a Sawgrass, go to the File menu, choose "Print," and select your printer under "Destination." Then, click the arrow beside "More Settings" and click "Print Using System Dialog."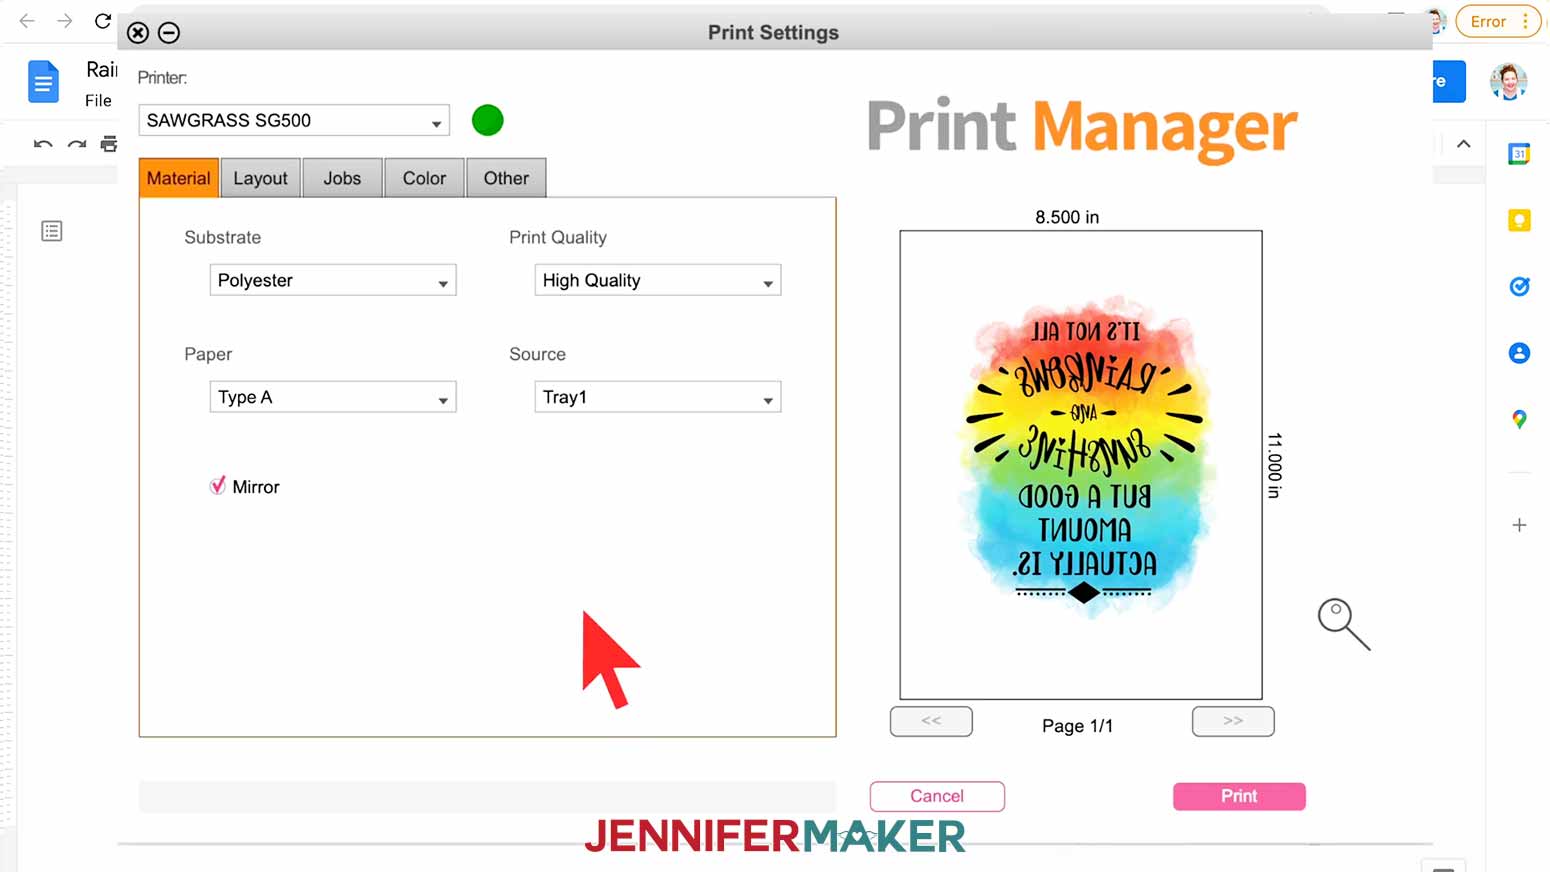
This is where the steps change. Select the PDF menu in the lower left corner and choose "Sawgrass Print Manager." If you’re having an issue finding this, look for your Print Options and select "Sawgrass Print Manager" as your printer. This is the only way to access the helpful ICC printer profiles that Sawgrass provides.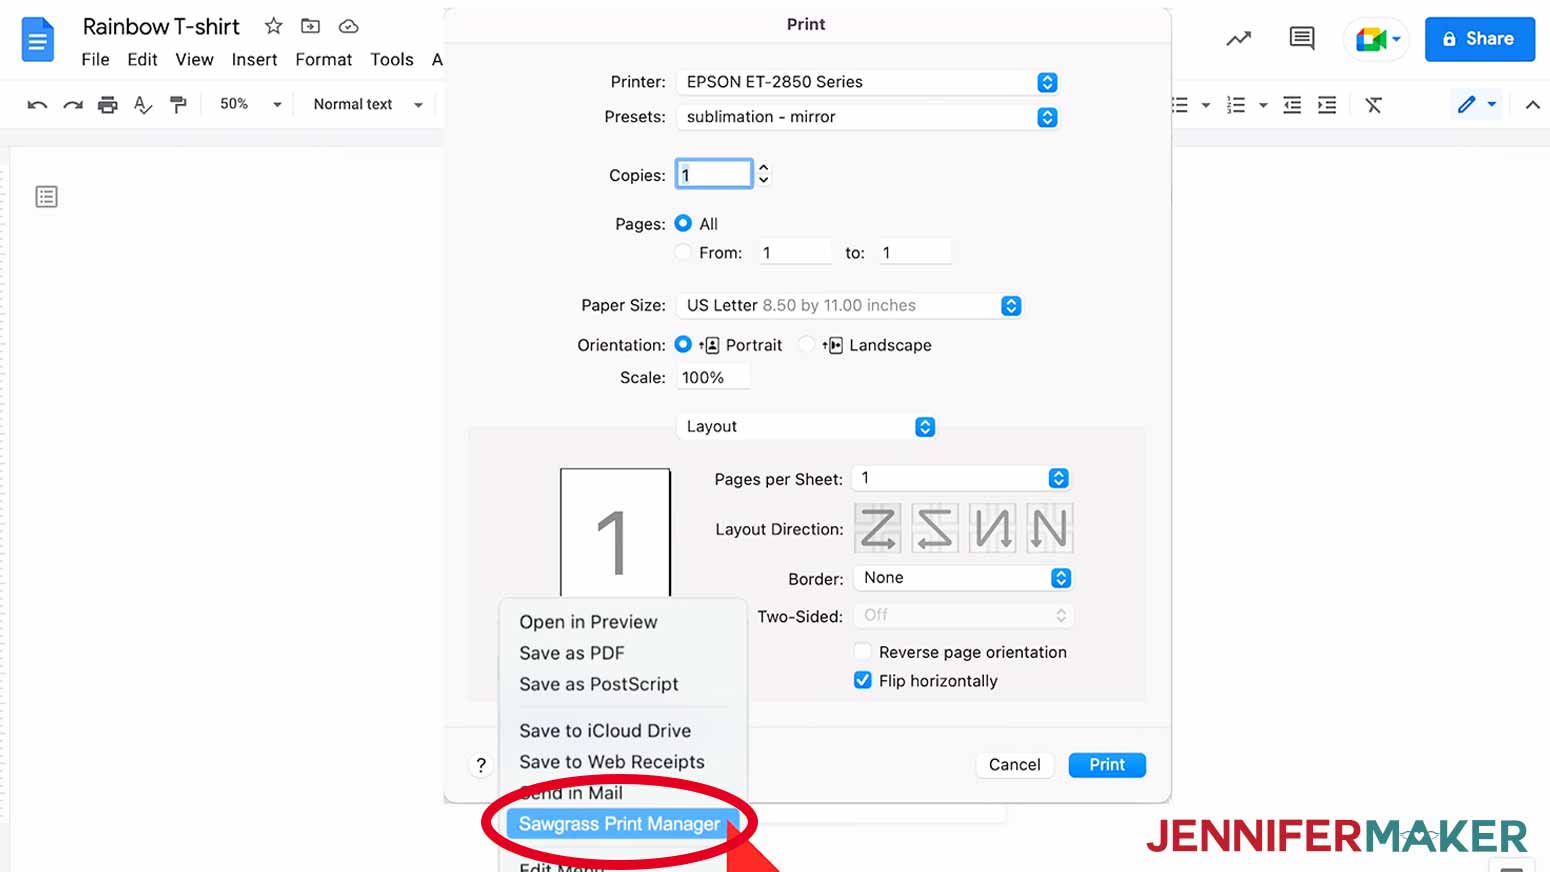
Your window might look different, but choose your settings that match your shirt. For mine, I’ll set the substrate – that means what we’re sublimating on to – to “Polyester” and paper to “Type A”. Again, I recommend High Quality over High Speed! Sawgrass automatically knows we want to mirror the design, so don’t uncheck that box by accident.
Then, look at the preview to the right and make sure your design looks correct. If not, hit "Cancel" and make any adjustments you need until you’re happy.
Finally, click the pink Print button and watch the magic happen!STEP 2: PREPARE YOUR PRINT AND SHIRT FOR SUBLIMATION
Here's how my design looked printed on the Epson. The colors don't look like they did on the screen, but that will happen when we press it.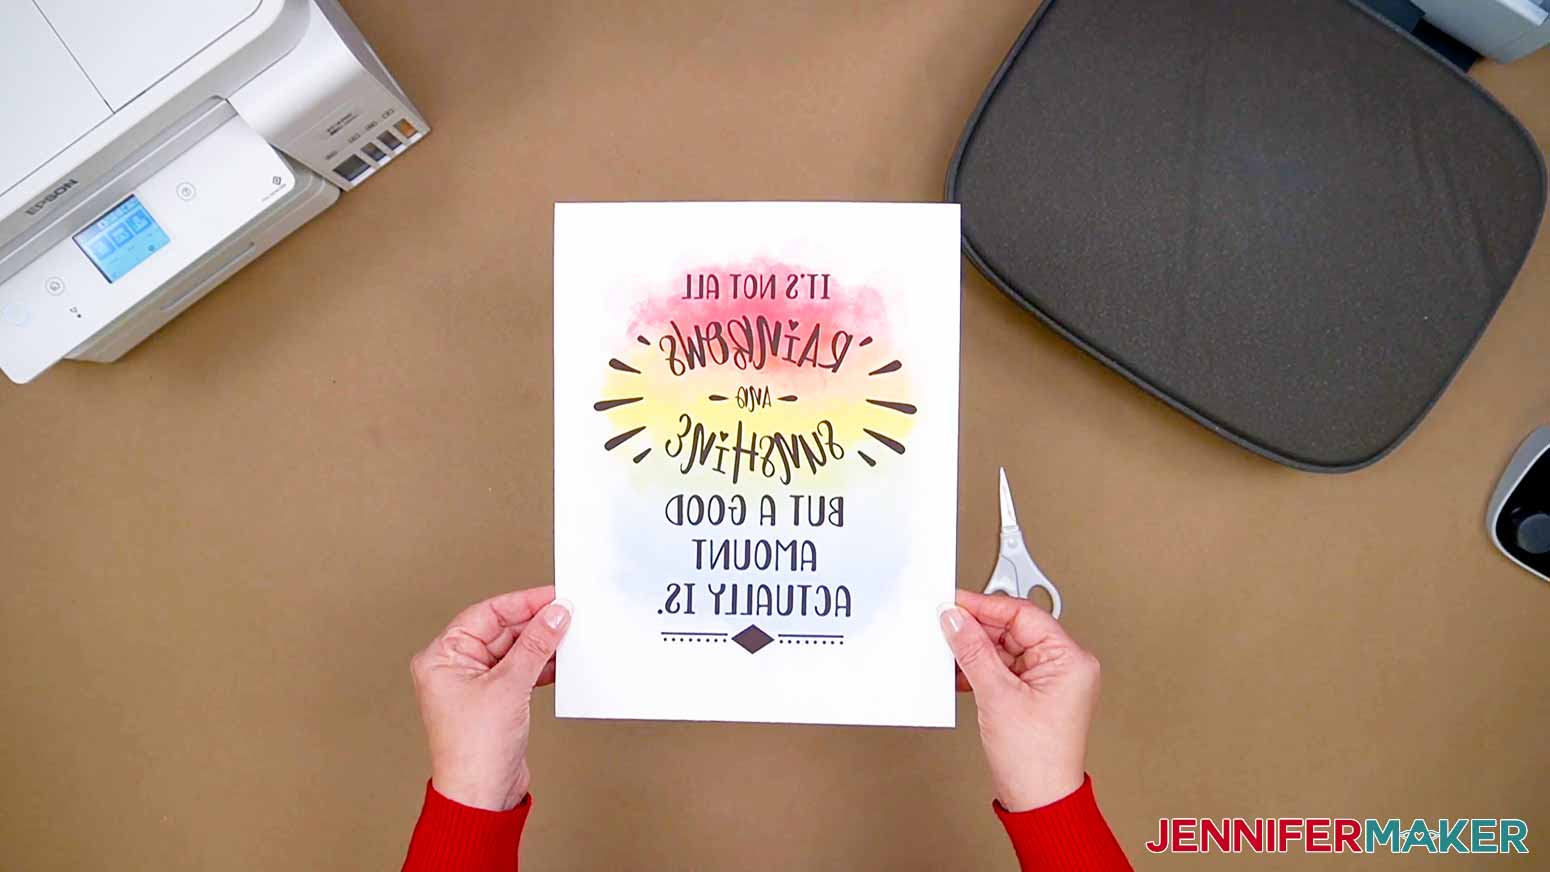
Trim the paper close to the design to avoid the lines at the edges transferring to your fabric. You can also gently tear the edges to smooth out the transition. Tearing also prevents any lines of sublimation ink that might have snuck onto the edge of your paper undetected.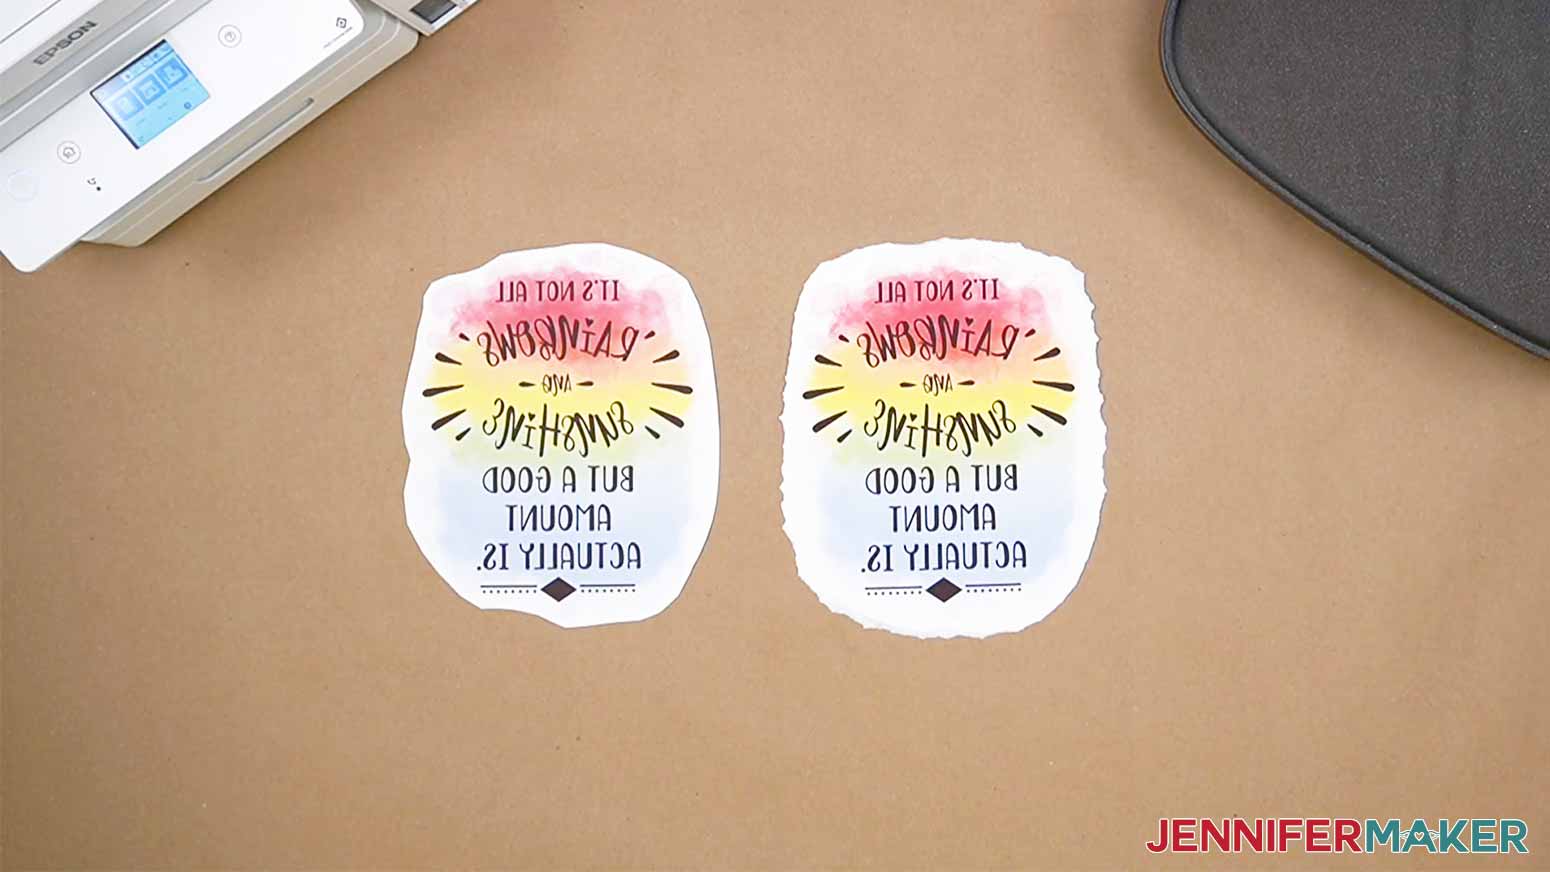
Now, set your heat press to a temperature between 385°F and 400°F which is 196°C to 204°C, to warm up. I’m using the Cricut AutoPress, and I find shirts work best at 400°F and with a time of 60 seconds.
You can also use a traditional heat press or a Cricut EasyPress! Do not use a household iron, however, as it will not get hot enough.
Since sublimation produces fumes, open your windows and turn on a fan to craft safely.
I'll show you how to press a design using a white 95% polyester shirt from Cricut. For this project, don’t use anything less than a 65% polyester shirt, or your ink will be faded and eventually mostly disappear in the wash.
You don't have to prewash your shirt if you don’t want to – my rule is I’ll pre-wash it if it’s for me or a family member, and I don’t pre-wash if I’m going to gift or sell it. Lint roll the shirt to remove any dust or hair, which can cause strange dots and marks to sublimate onto the surface.
Fold your shirt in half vertically and press it for 10 seconds along the crease. When you open it up, you have a center line! This also serves as the pre-heat, removing moisture and ensuring a good transfer. Pre-heating is important for a beautiful sublimation result!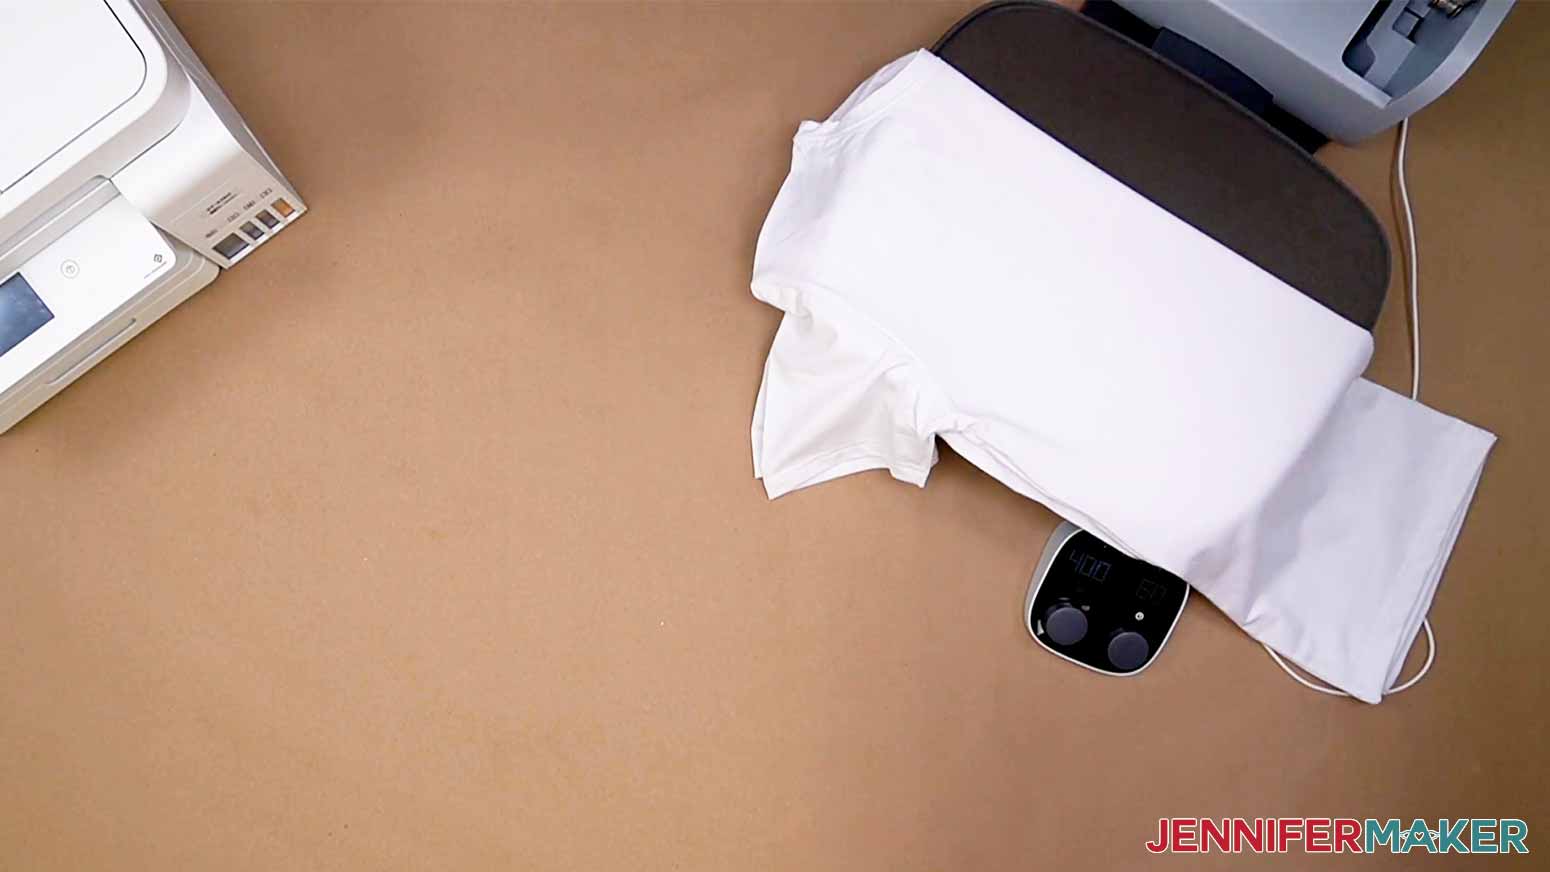
Unfold your shirt and lay it face up on the pressing area. Slide a piece of white cardstock inside the shirt under where your design will be. This will protect the back layer of your shirt and the pressing mat from any sublimation ink that may bleed through. 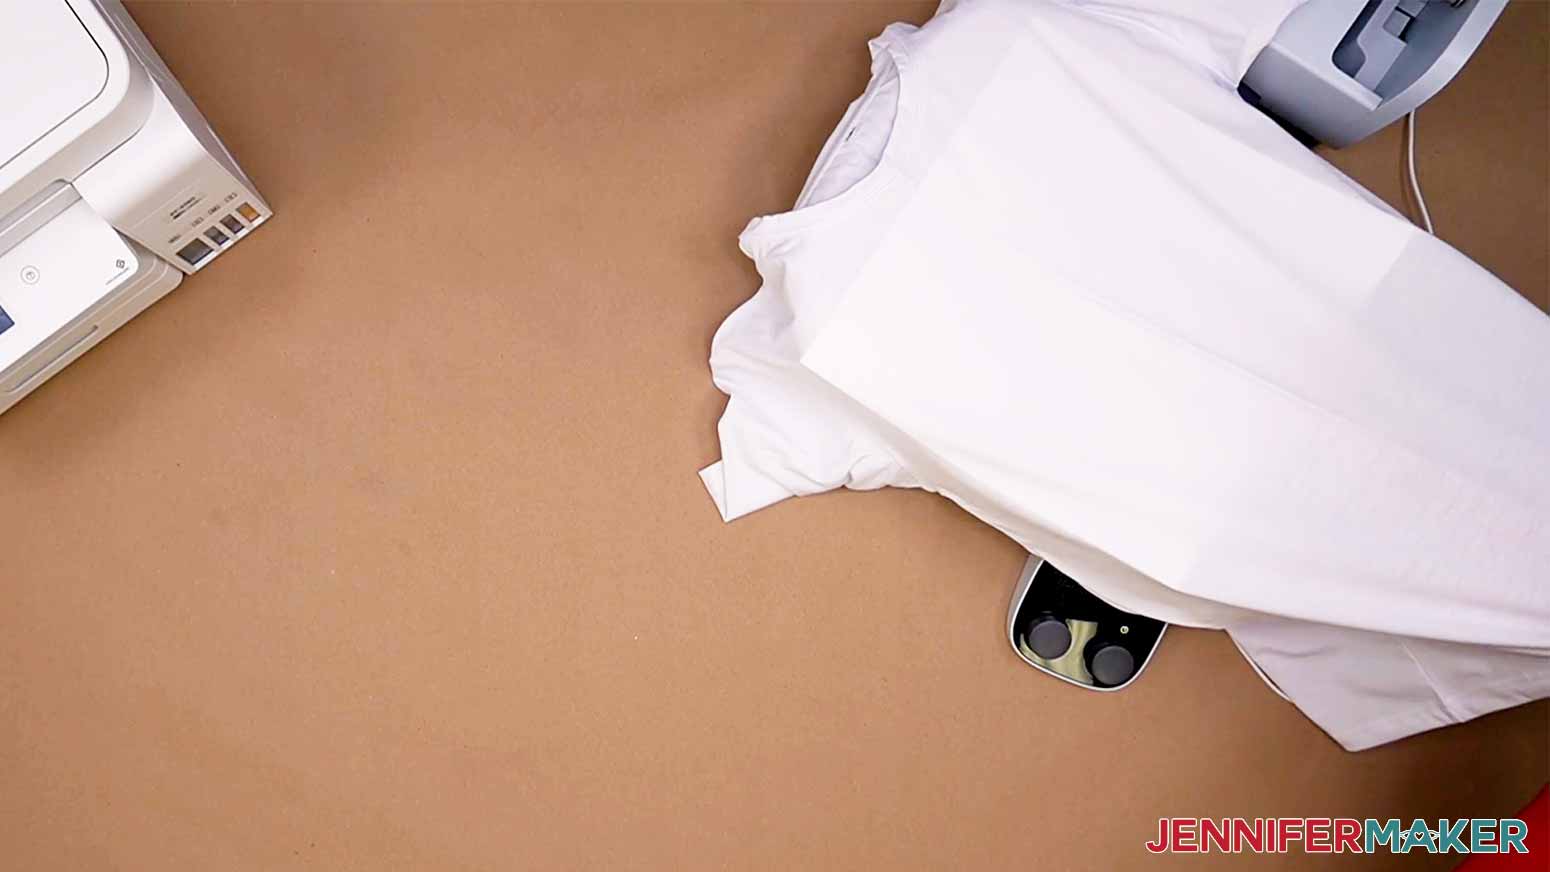
Gently fold your printed design the same way as the shirt, and crease it at the top and bottom of the paper. Don’t fold through any of the printed image!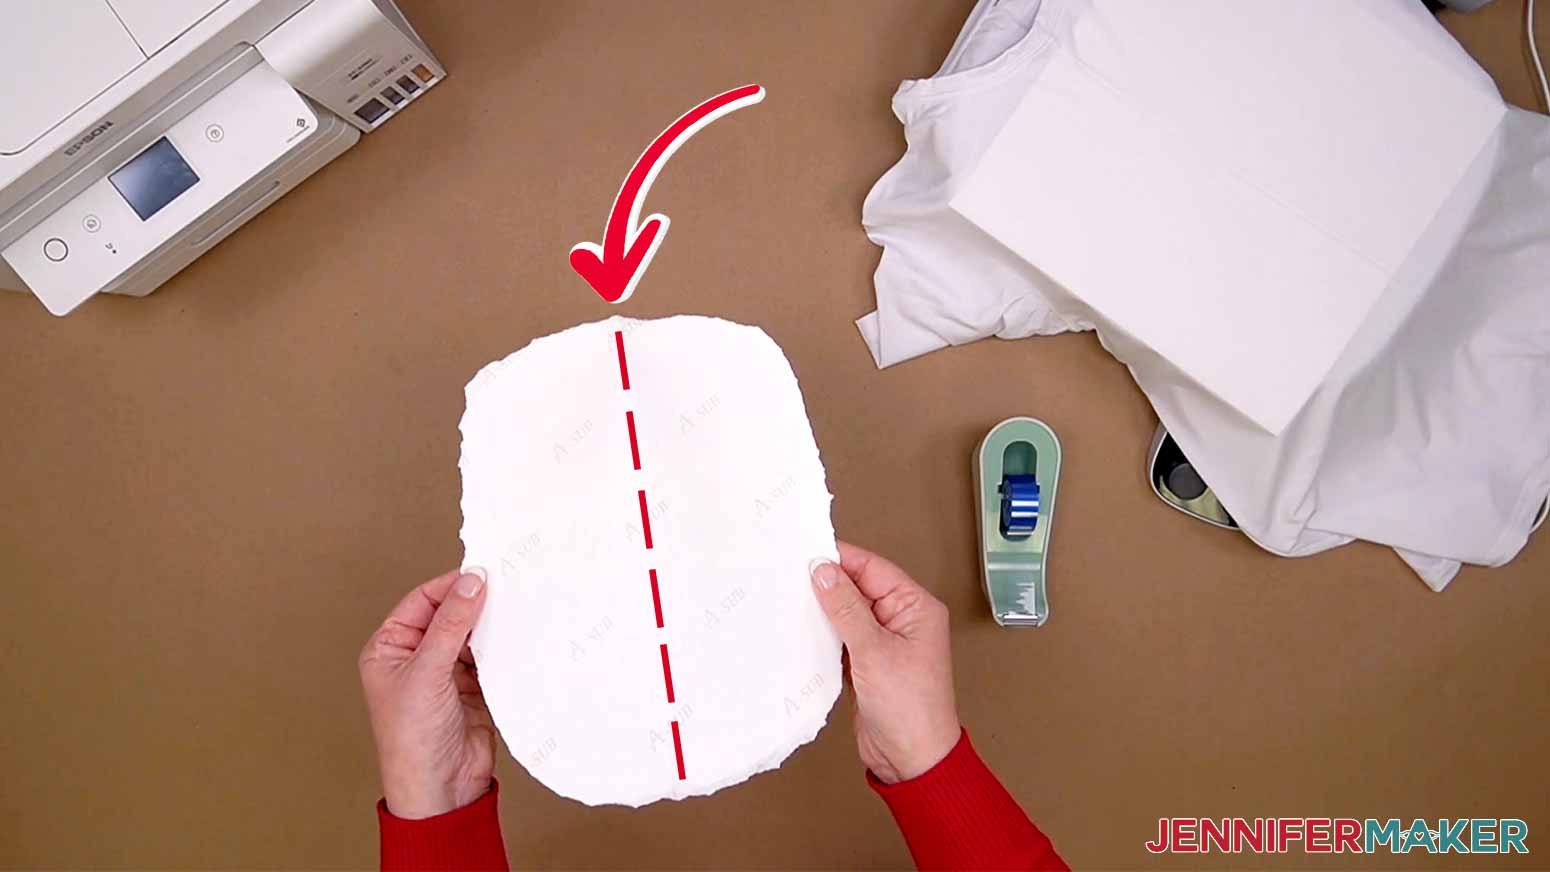
Since I’m making a crew t-shirt, the top of the design should start about 2" below the collar.
For a v-neck shirt, the top of the design should start about 1" below the collar.
Lightly place the design ink-side down on the pre-heated shirt, lining up the creases.
Secure the design with heat resistant tape on all four edges to keep it in place and prevent ghosting or fuzzy images. Do not skip over this step!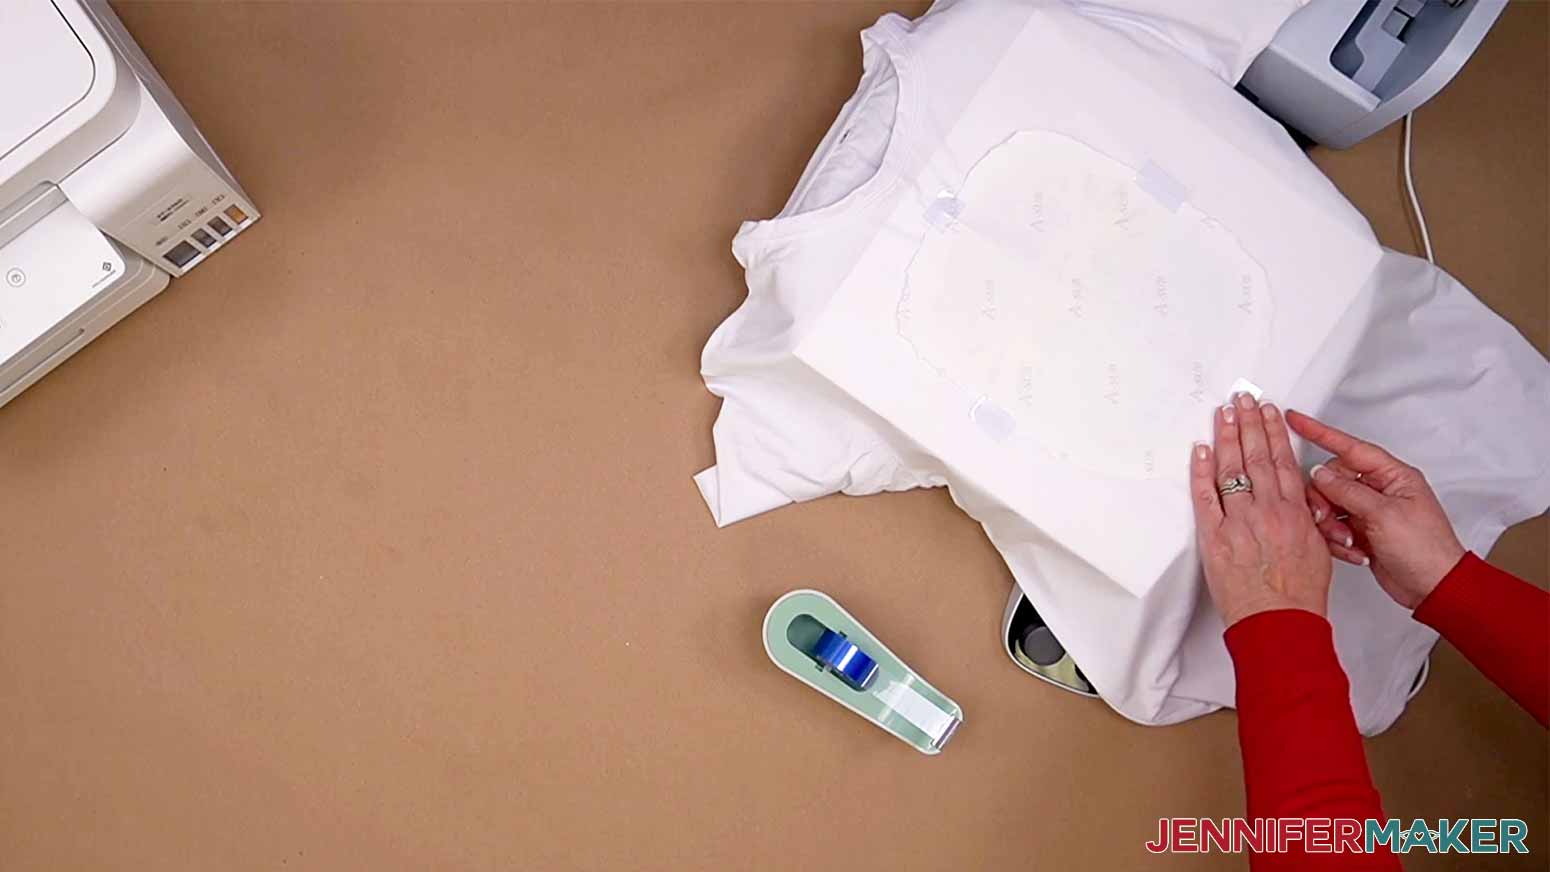
Place a piece of white uncoated butcher paper larger than your heat plate on top of the t-shirt. Do not use parchment paper, wax paper, freezer paper, or teflon paper as these will trap moisture and can produce fuzzy transfers. I also recommend you avoid colored butcher papers, as sometimes they are dyed and the color can transfer to your shirt.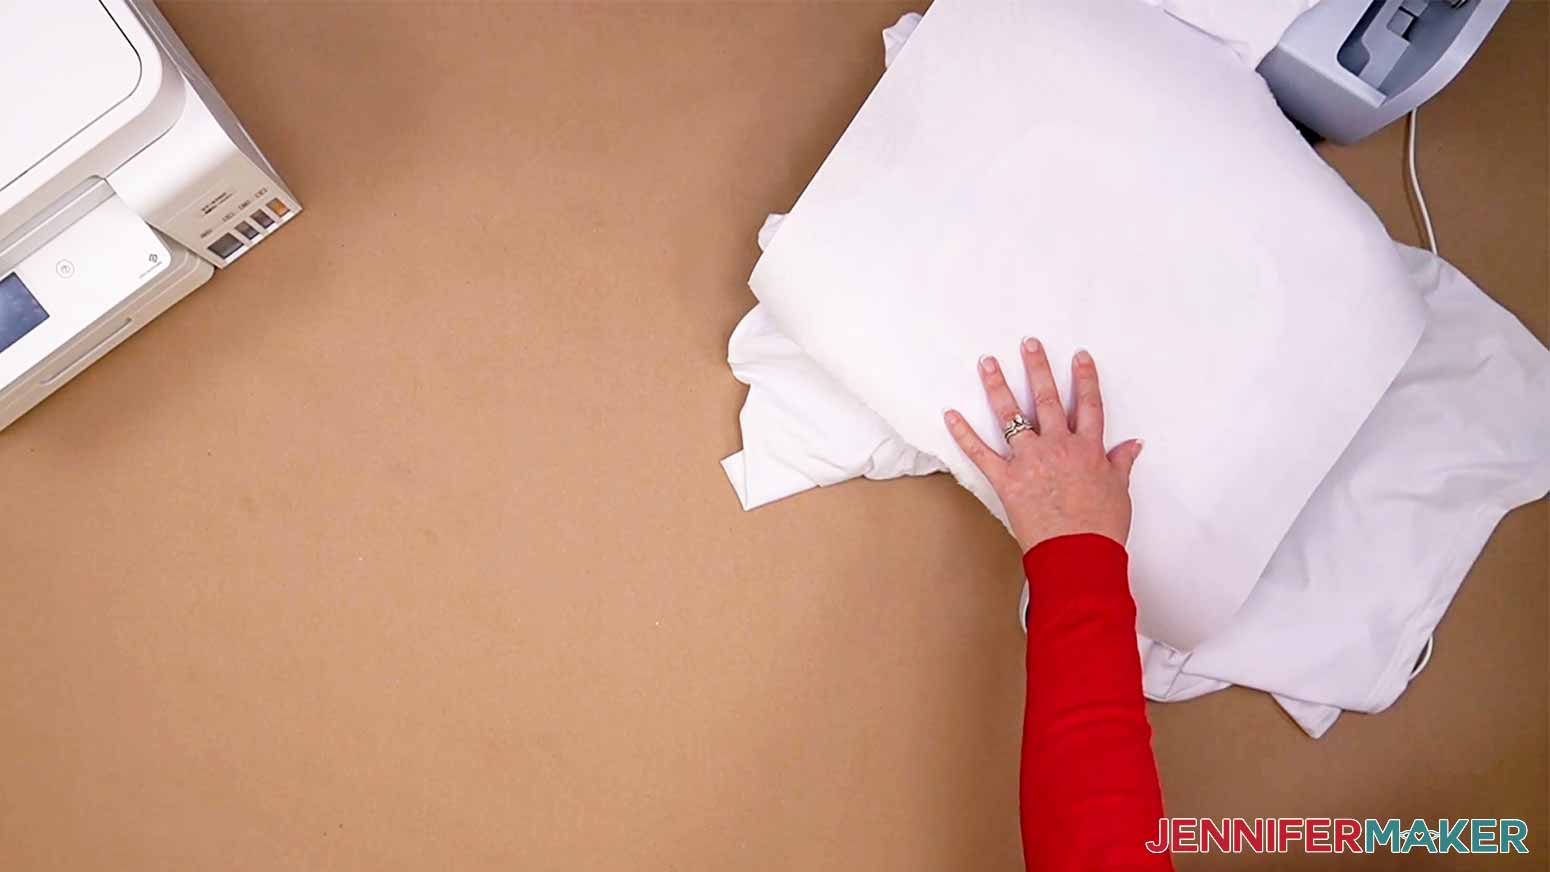
STEP 3: PRESS YOUR SUBLIMATION PRINT
Once your heat source reaches the right temperature, you’re ready to go!
If you’re using the Cricut Autopress as I am, the pressure is set for you automatically. If you’re using an EasyPress, you want light pressure, so press lightly with one hand. If you’re using a traditional heat press, you want light to medium pressure, about 40 PSI.
To avoid ghosting, press down as straight as possible and don't move the heat source.
Press your shirt for 45 to 60 seconds. If you’re not sure which to do, start with forty five seconds. Some experimentation is normal if you’re using a different shirt or press. If your transfer looks dull or washed out, that means you should press for longer. If your transfer has a brown or yellow hue, you pressed it too long.
If you’re using the Autopress, it will automatically open when its done. If you’re using the EasyPress, lift it up straight from your shirt. The pressing area and materials will still be hot, so be careful. You can remove the butcher paper but leave the t-shirt in place to cool down. The sublimation process is still taking place for 10-15 seconds, so moving the t-shirt immediately could make the image blurry.
When you are confident that your shirt has cooled down, remove the tape and paper. Step back and enjoy your gorgeous, full color sublimated t-shirt!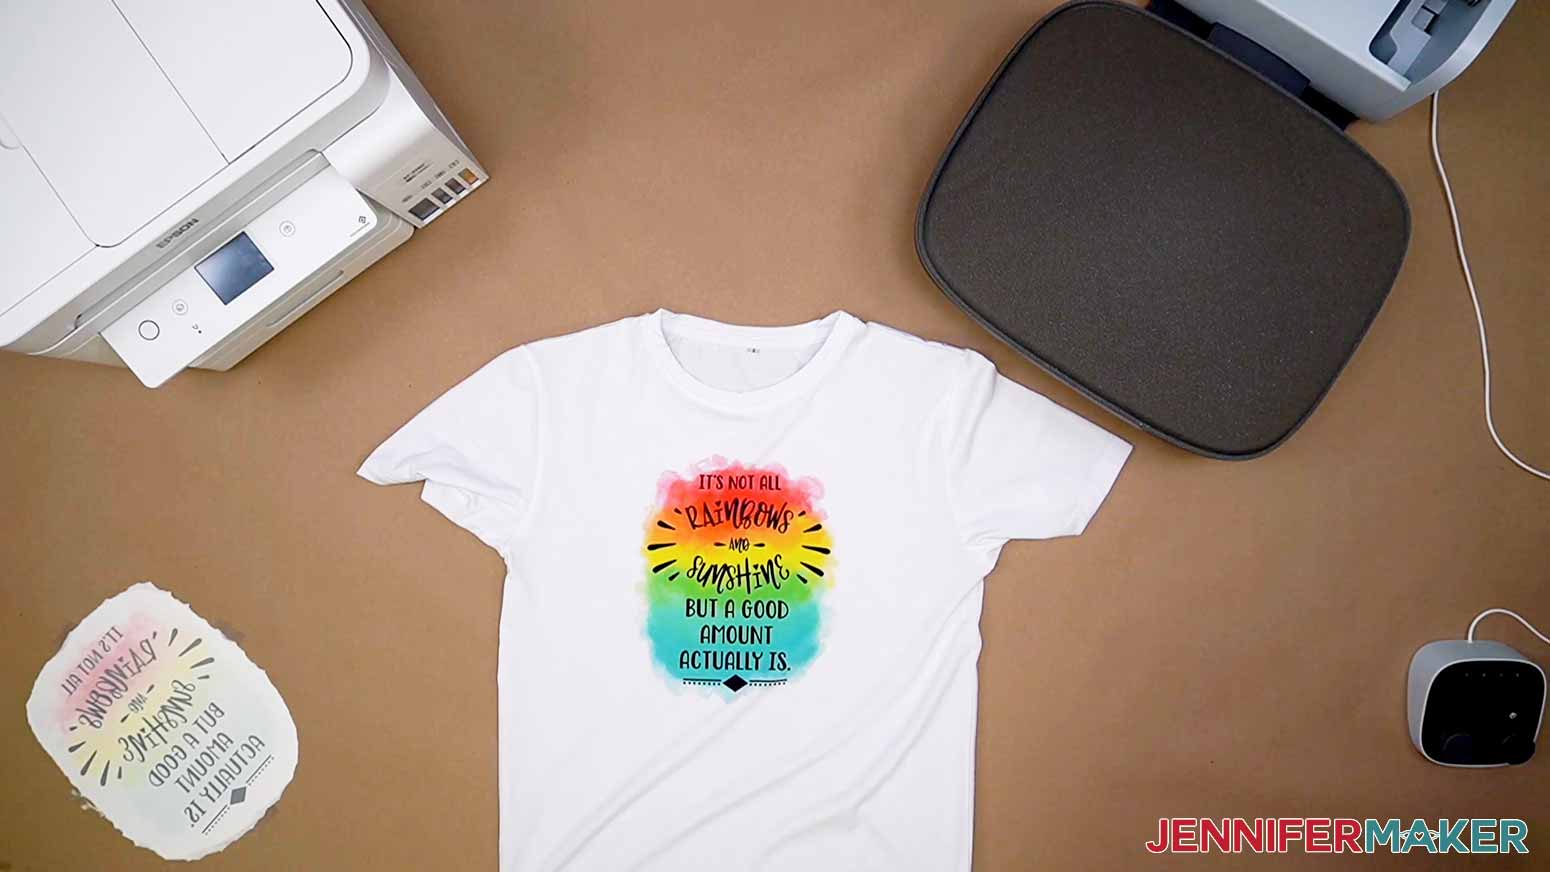
STEP 4: SHOW IT OFF!
Recommended Products
I also have a group just for sublimation crafting where you can get help and tips from other crafters who love to sublimate, too! Come join us at jennifermaker.com/sublimationgroup to ask questions, share ideas, and get inspired!!
Questions About How to Make a Sublimation T-shirt:
Q. What is a sublimation T-shirt?
A sublimation T-shirt is made by heating dye sublimation ink to a gaseous state, which soaks into the fabric of the shirt, then cools back down into a solid state to create a permanent design.
Q. Can you sublimate on any T-shirt?
Technically yes, but you’ll get the best results easiest with white polyester T-shirts, like ones from Cricut. You can use a poly blend shirt, but the design may not be vibrant, especially after washing. And you can sublimate on dark shirts if you use darker ink or add a light colored substrate to it first, like white glitter vinyl. Remember that different types or shirts might use different temperatures or pressing times, so always check!
Q. Can I sublimate on a 100% cotton t-shirt?
Again, technically yes, but you might not like the result. And as a person who prefers the feel of cotton, I understand why you’d want to! Unfortunately, I found that sublimating on a cotton shirt produced less vibrant designs that loss their color more quickly in the wash. Eventually, the color will virtually all wash out. So I do not recommend you waste your ink and efforts on a 100% cotton T-shirt. Watch for my upcoming tutorial that shows alternate ways to sublimate onto 100% cotton T-shirts.
Q. What shirt material is best for sublimation?
By far, the best shirts for print sublimation are polyester shirts or poly blends with at least 65% polyester.
Q. How many washes does sublimation last?
There are many variables, but if you use a mostly polyester shirt and follow my tips, your sublimation T-shirt should last as many wash cycles as the shirt itself!
Q. Is sublimation better than vinyl?
It all depends on your preferences and goals! Dye sublimation is fast, flexible, and permanent, but it requires some extra equipment that heat transfer vinyl doesn’t.
Q. Do sublimation shirts fade?
Even the best sublimation T-shirts will eventually fade, just like clothing you’d buy at a store, even ones made with screen printing. But since the dye soaks into the fibers, sublimation images will last much, much longer than HTV decorations.
Q. Can I use a sublimation printer for regular prints, too?
No, a sublimation printer (whether purpose-built or converted) only prints in sublimation ink. And you cannot really switch a converted printer back to being an inkjet printer without a LOT of effort and wasted ink.
Q: What kind of paper do I use?
While some people will use just regular laser paper, I really recommend you use special sublimation paper for the best and most vibrant results and ink transfer. I used A-SUB paper during my tests.
Q: What kind of ink do I use?
You must use special sublimation ink to do a sublimation shirt. I used Hiipoo Ink for these tests
Q: How do I test my sublimation prints for vibrancy and color?
Use my free subliflower design to see how your colors look! It’s Design #385 in my resource library!
Q: What else can I put my sublimation prints on?
In addition to polyester garments, anything with a high polyester count or a special sublimation coating will work. I’ve had SO MUCH fun learning to sublimate with you! Here are just a few of the items I’ve sublimated and some tips I’ve learned along the way:
- White Polyester T-Shirts and Colored Polyester/Cotton Shirts — look for blank shirts with a polyester count of at least 65% or higher
- Satin ribbons – Print dimensions: .8″ wide
- Sublimation coasters, white polyester and rubber, – Print dimensions: 4″ circle
- Mason jar tumblers, 17 oz. white stainless steel – Print dimensions: 3.4″ tall by 17.8″ wide
- Glitter sublimation tumblers, 20 oz. insulated stainless steel skinny – Print dimensions: 8.07″ tall by x 8.89″ wide
- Mousepads – Print dimensions: 7.9″ tall by 9.6″ wide
- Keychains, squares, hearts, circles, rectangles
- Kitchen towels – Print dimensions: 15″ tall by 26″ wide
- Flour sack towels – Print dimensions: 28″ tall by 28″ wide
- License plate blanks – Print dimensions 6″ tall by 12″ wide
- Sequin pillow covers – Print dimensions 18″ tall by 18″ wide – sunflower
- Polyester door mats – Print dimensions 29.5″ tall by 17″ wide
- Throw Blankets – Print dimensions 7.9″ tall by 9.8″ wide (for each blank spot on the 40″ x 60″ blanket)
- Jigsaw Puzzles – Print dimensions 7.5″ tall by 9.8 inches wide
- Glitter iron-on vinyl (to transfer onto cotton or dark substrates like black shirts)
Get my Sublimation T-Shirt designs (and many more) for free!
(If you do not see the signup form above, click here.)

I can’t wait to see your sublimation T-Shirts! Watch for more sublimation tutorials and please ask any questions you have in our Facebook group >or tag me on social media with #jennifermaker.
Love,

Want to remember this? Save the How to Make a Sublimation T-Shirt tutorial to your favorite Pinterest Board.