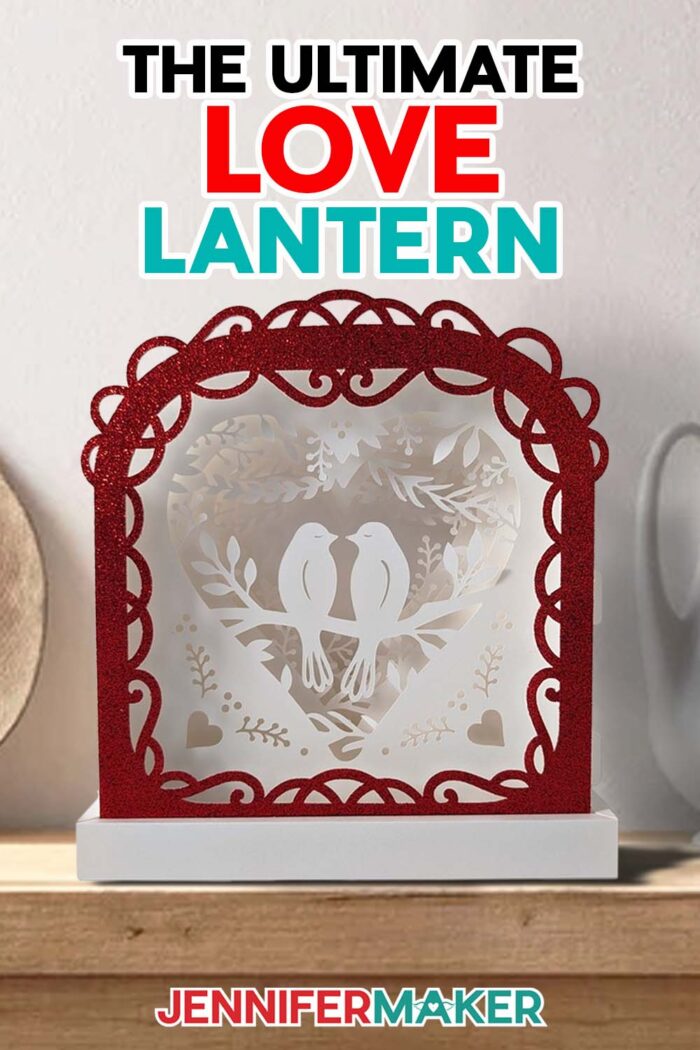
Learn how to make a beautiful love paper lantern for Valentine’s Day using just a few layers of cardstock, fairy lights, and some adhesive!
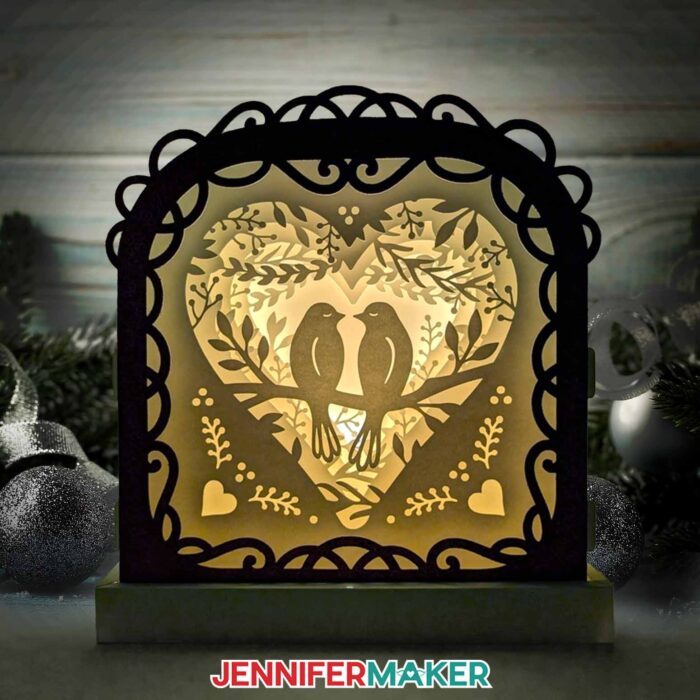
Beautiful lighting is so important for setting the mood, especially when it comes to romance! My 3d Love Paper Lantern is the perfect way to add some ambience to your Valentine’s Day celebration. Whether you’re having an intimate dinner with your sweetheart or just spending time with your favorite friends and family, this lantern is sure to light up the room with love! And if you need even more clever accent lighting, be sure to check out my heart-shaped hanging paper lanterns, or take a peek at my paper animal lantern designs!
Watch the full step-by-step video tutorial on making a love paper lantern:

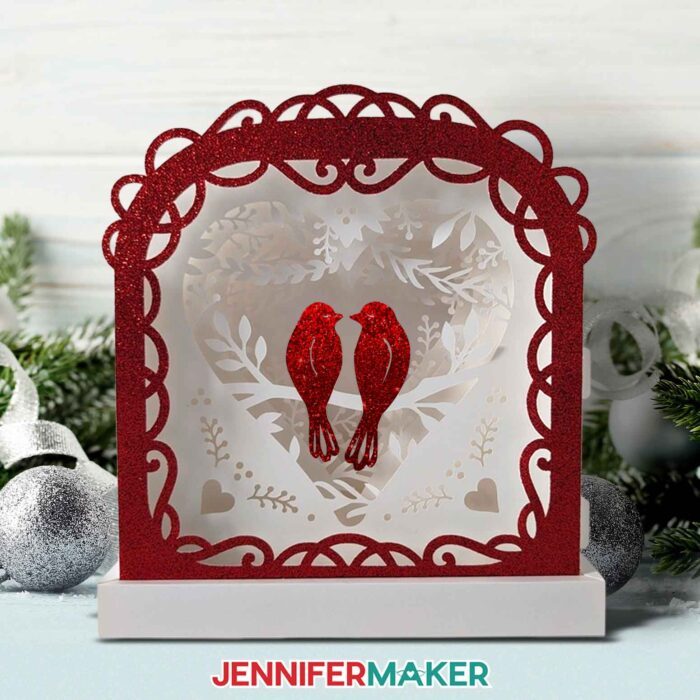
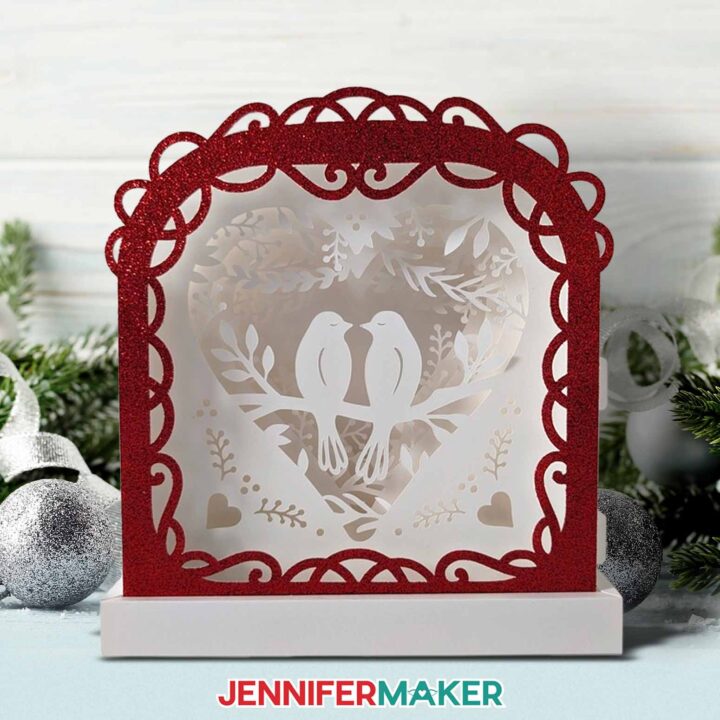
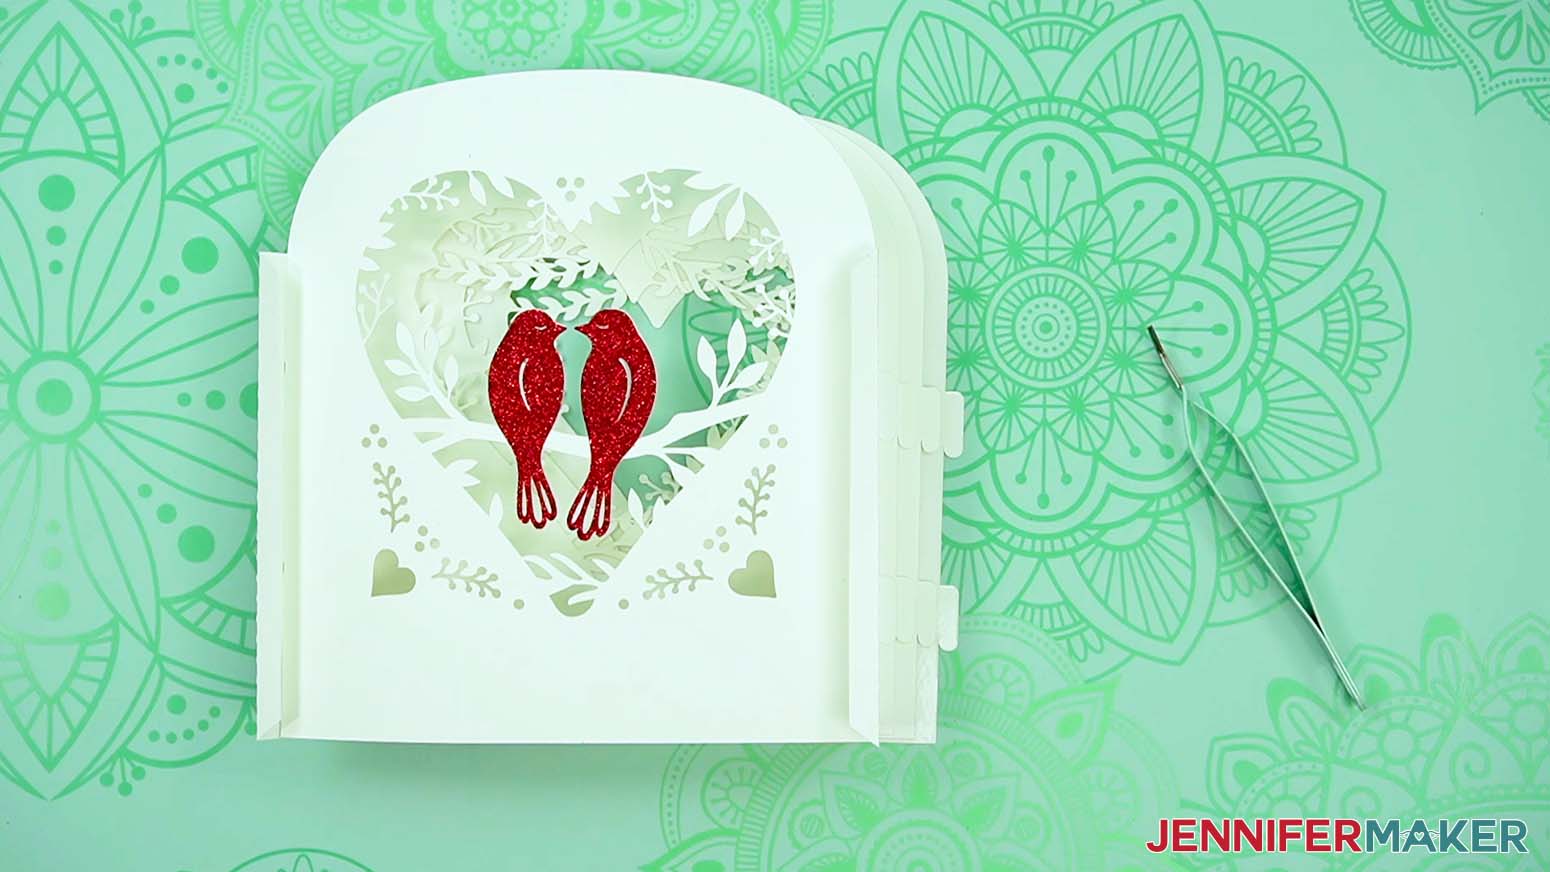
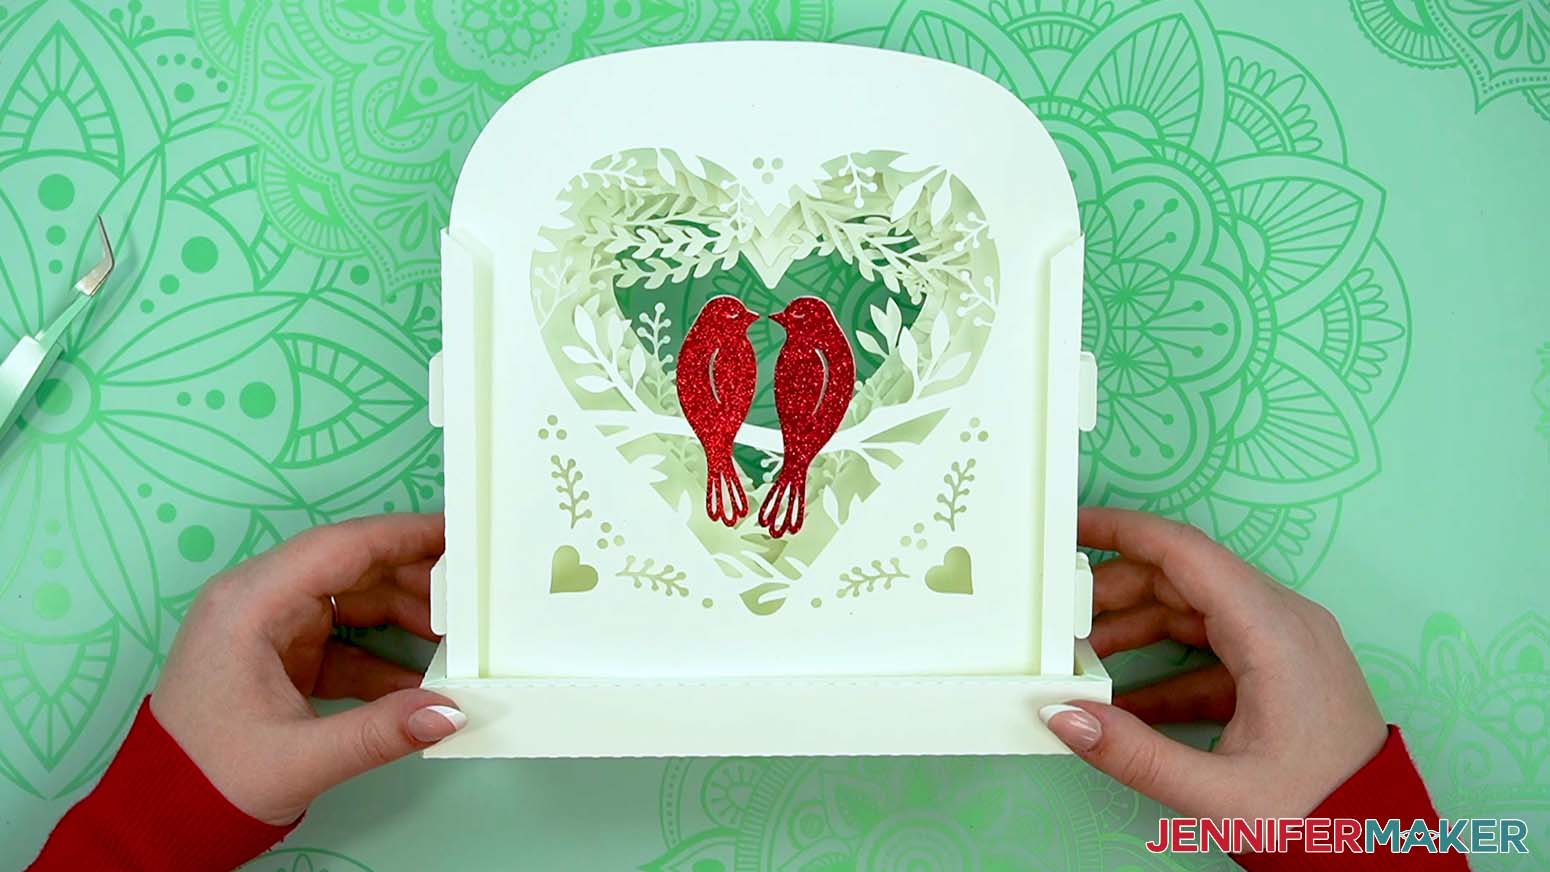
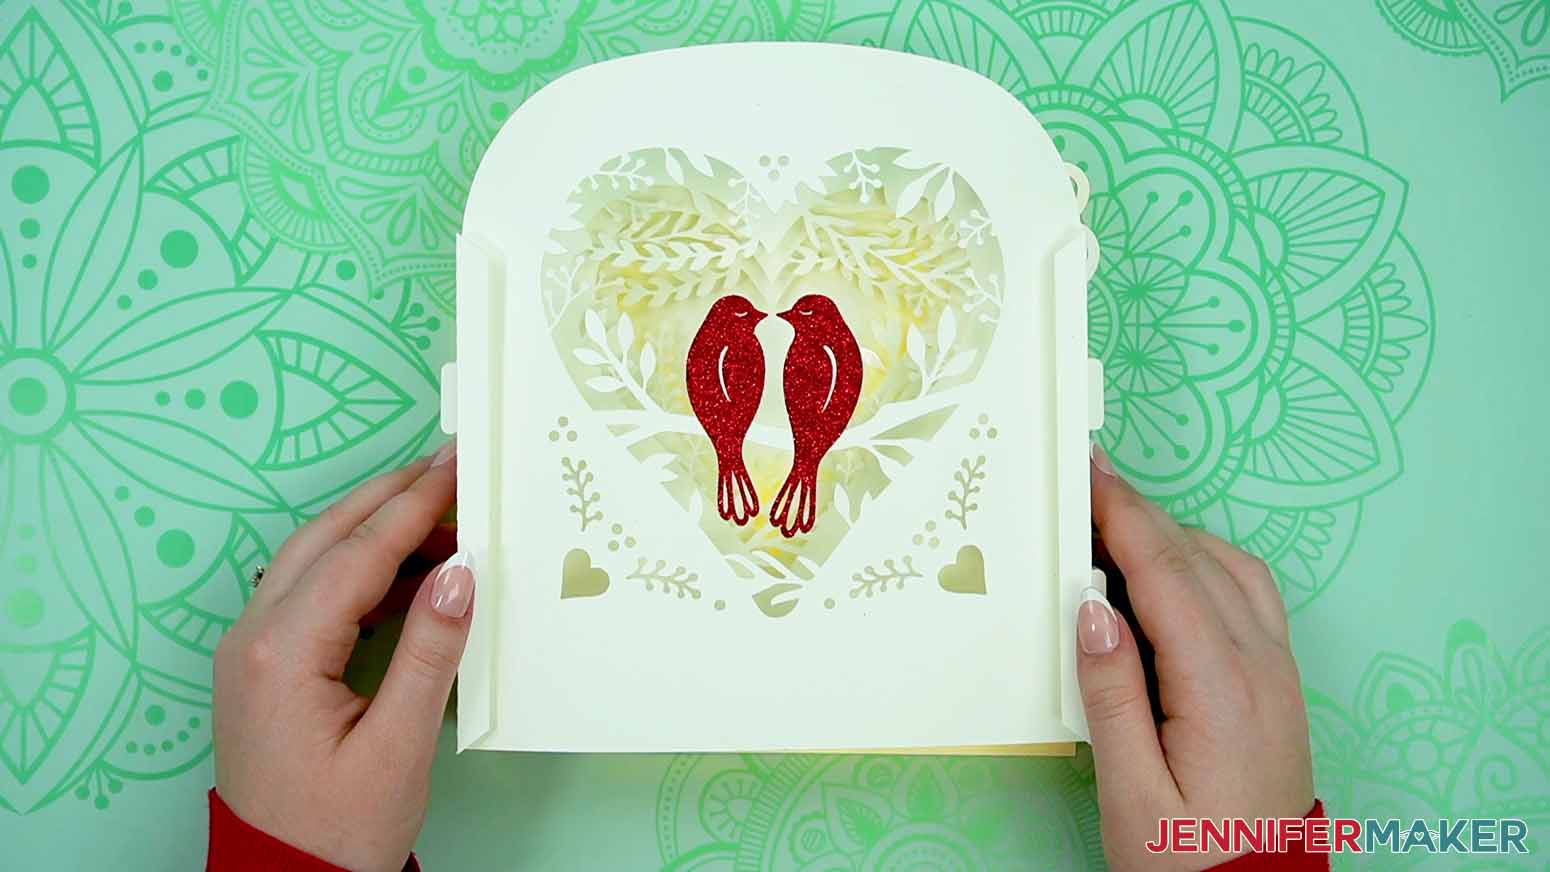
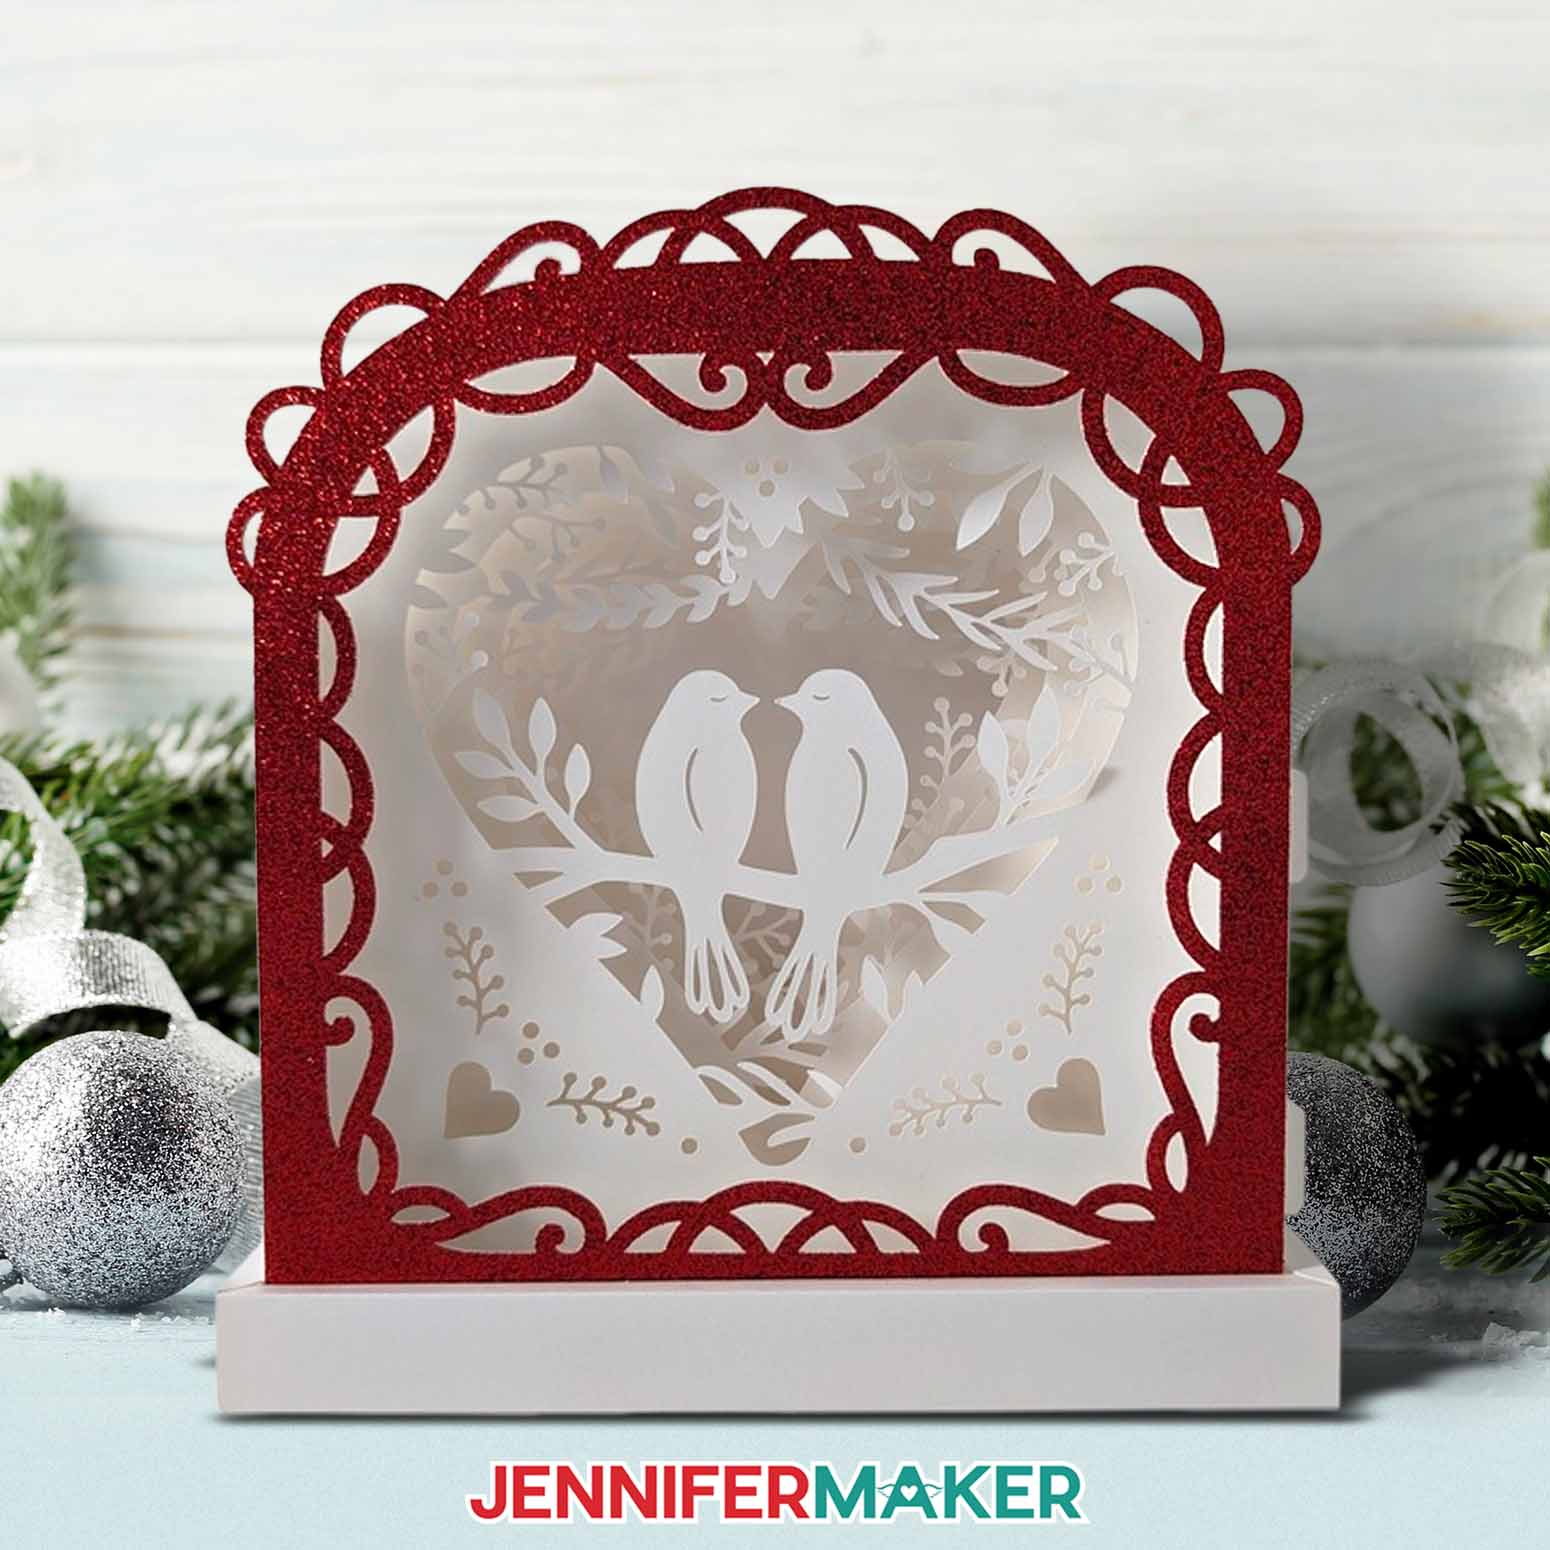
Paper lanterns are one of my favorite crafts to make. There are so many ways that you can get creative with them. Plus, the way they softly illuminate their surroundings makes them naturally romantic. I just had to design one with a valentine theme to spread some warm, fuzzy feelings! Can’t you just feel the connection between the two lovebirds perched in the center? This lantern is perfect for gifting to a loved one, and it makes an elegant centerpiece. You can even display it all year long, not just for Valentine’s Day!
For this project, I wanted to create a lantern with a shadow box feel, but without the need for a frame. So, the pieces to this beautiful paper lantern are designed to slot into one another, providing support and creating a 3D framework for the intricate layers inside! I also added a sturdy cardstock base to keep my lantern standing tall. Yes, this love lantern is crafted entirely from paper and some simple adhesives! And of course, this wouldn’t be a lantern without a lighting element, so I found a great way for it to give off a nice, warm glow. I’m so excited to share my tips and tricks for great lighting with you!
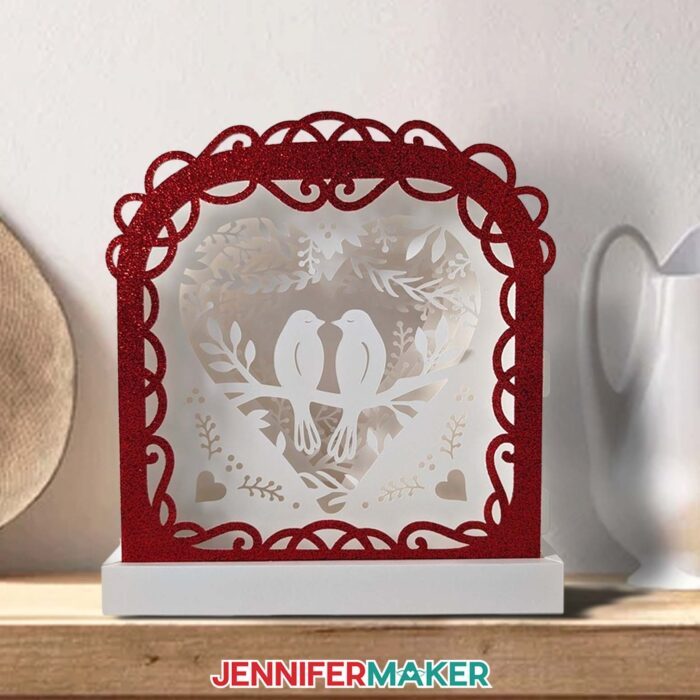
To make my love paper lantern, you’re going to need some cardstock! I recommend using high quality 65 pound white cardstock. That way your layers won’t be too flimsy too stand, and also not to thick to fold. Plus, white cardstock will let the light inside shine through multiple layers. I used red glitter cardstock to give the frame some extra sparkle. You can even cut the optional bird silhouettes from glitter cardstock, too! I think that really makes them stand out.
The cardstock layers for this lantern have some very intricate areas, but I’ll walk you through preparing and cutting the layers in my video tutorial. I’ll share the cut settings that worked best for me, and I’ll even teach you my trick for reinforcing intricate cuts using adhesive vinyl! Using vinyl for intricate cuts really is a game changer, and it will save you a lot of frustration and wasted material. I’ll also show you how to create creases in your cardstock using dashed cut lines instead of score lines so you don’t need a separate tool (but my files do contain a score version in case you prefer to use a scoring wheel or stylus to create your crease lines).
Once the pieces are cut, I’ll show you how to assemble the lantern’s base. We’ll glue the pieces together so they hold fast, so make sure you have quality craft glue (like my favorite Bearly Art glue) handy. Then I’ll show you how to slot together all your layers so you have a pretty scene for your lovebirds! Finally, I’ll teach you the best way to light up your lantern using pretty LED fairy lights! There are some components to the lights that you don’t want to be visible, so I’ll show you how and where to hide them for a polished look.
I used my Cricut Maker 3 to cut my pieces, but you can also use the original Maker, an Explore series machine, the Cricut Venture, or even the Cricut Joy Xtra. I don’t recommend resizing the layers to fit on a Joy–the designs are too intricate for the smaller size. You’ll also need a green StandardGrip machine mat and the Cricut Fine-Point blade, as well as a few standard paper-crafting tools. A brayer will help keep your cardstock in place during cutting, while a spatula and an XL scraper will help remove the cardstock from the mat after cutting. A weeding tool will also be helpful for removing any little pieces of cardstock that remain attached to your cut pieces.
If you’d like make this design truly yours, I can teach you how to customize your layers to make a scene that is personal to you and your loved one! My workshop and toolkit for this project are part of my ADVANCE with JenniferMaker program, which gives you access to a library full of helpful resources! To find out more about how you can customize your project and level up your crafting skills, check out the Advance program here!
My love paper lantern is sure to impress friends, family, and especially valentines! So if you’re searching for a craft that will really make a statement, this one is sure to do the trick! And the best part of all, is that your Cricut does all the hard work, so you can totally make this lantern whether you’re a paper crafting beginner or a seasoned veteran. Happy Valentine’s Day, and happy crafting!
Let me show you how to make a love paper lantern! This post contains some affiliate links for your convenience (which means if you make a purchase after clicking a link I will earn a small commission but it won’t cost you a penny more, there is no additional cost)! Read my full disclosure policy.
Materials to Make A Love Paper Lantern
View my Amazon shopping list for the exact items I used!
- Six or Seven (6-7) Sheets of 12″ x 12″ 65 lb. White Cardstock -OR-
- Seven or Eight (7-8) Sheets of 8.5″ x 11″ 65 lb. White Cardstock
- One (1) Sheet of 8.5″ x 11″ or 12″ x 12″ Glitter Cardstock (optional for the front frame and bird accents)
- One (1) Strand of LED Fairy Lights
- OPTIONAL: Clear or Frosted Permanent Vinyl (for applying to your cardstock to get clean intricate cuts)
- A way to cut your cardstock – I’m using the Cricut Maker 3, but you can also use a Cricut Maker series, a Cricut Explore series machine, the Cricut Venture, or even the Cricut Joy Xtra.
- Cricut Green StandardGrip Machine Mat 12″ x 12″
- Scoring Stylus (optional for files with score lines) -OR-
- Single Scoring Wheel (optional for files with score lines)
- Craft Glue (I used Bearly Art Precision Glue)
- Small 3/16″ Zots Glue Dots (for attaching the fairy lights)
- Brayer
- Spatula
- Weeding Tool (for popping out small pieces from intricate areas)
- Scraper
- Tweezers (optional)
- Scissors (optional to cut the vinyl)
How to Make a Love Paper Lantern!
Love Paper Lantern
Learn how to make a beautiful love paper lantern for Valentine’s Day using just a few layers of cardstock, fairy lights, and some adhesive.
Materials
- Six or Seven (6-7) Sheets of 12" x 12" 65 lb. White Cardstock -OR-
- Seven or Eight (7-8) Sheets of 8.5" x 11" 65 lb. White Cardstock
- One (1) Sheet of 8.5" x 11" or 12" x 12" Glitter Cardstock (optional for the front frame and bird accents)
- One (1) Strand of LED Fairy Lights
- OPTIONAL: Clear or Frosted Permanent Vinyl (for applying to your cardstock to get clean intricate cuts)
- Design #722 (My free SVG/PDF/DXF design files are available in my free resource library - get the password by filling out the form at the bottom of this page)
Tools
- A way to cut your cardstock - I’m using the Cricut Maker 3, but you can also use the Cricut Maker, a Cricut Explore Series machine, the Cricut Venture, or even the Cricut Joy Xtra.
- Cricut Green StandardGrip Machine Mat 12" x 12"
- Scoring Stylus (optional for files with score lines) -OR-
- Single Scoring Wheel (optional for files with score lines)
- Craft Glue (I used Bearly Art Precision Glue)
- Small 3/16" Zots Glue Dots (for attaching the fairy lights)
- Brayer
- Spatula
- Weeding Tool (for popping out small pieces from intricate areas)
- Scraper
- Tweezers (optional)
- Scissors (optional to cut the vinyl)
Instructions
STEP 1: GET MY FREE LOVE PAPER LANTERN DESIGNS
First, download my Northern Lights Shadow Box files from my free library – look for Design #722. Alternatively, you can use the Save This Project form near the top of this post and the design link will be emailed to you.
TIP: If you’re not sure how to upload, go to jennifermaker.com/svgs to learn how to unzip and upload SVG files.
Inside the template folder, you’ll see two versions of the design -- one with score lines that you can make using a scoring tool, and one with dashed cut lines that only needs the Fine-Point Blade. The scored version has “score" in the file name, and the dashed cut line version has "noscore" in the file name.
For this tutorial, I’ll show you how to make the version with dashed cut lines. If you’d like to make the version with score lines using a scoring wheel or stylus, you can refer to my tutorial to learn how to adjust the files. All Score layers in the file have a red color swatch, no fill color in the Layers Panel, and are grouped with their corresponding Cut layers.
STEP 2: PREPARE YOUR LOVE PAPER LANTERN DESIGN
1. Open Cricut Design Space and click “New Project.”
2. Click “Upload” and then “Upload Image.”
3. Click “Browse.”
4. Select the SVG file you want. I’ll use “love-paper-lantern-noscore-jennifermaker-SVG.”
5. On the Prepare to Upload screen, it will say “Cut Image” with the design preview.
6. Click “Upload.”
7. Find your design in Recent Uploads and add it to the Canvas.
8. Click the minus (-) sign to zoom out to see the entire design with the layers at the top and pieces for the base and frame at the bottom.
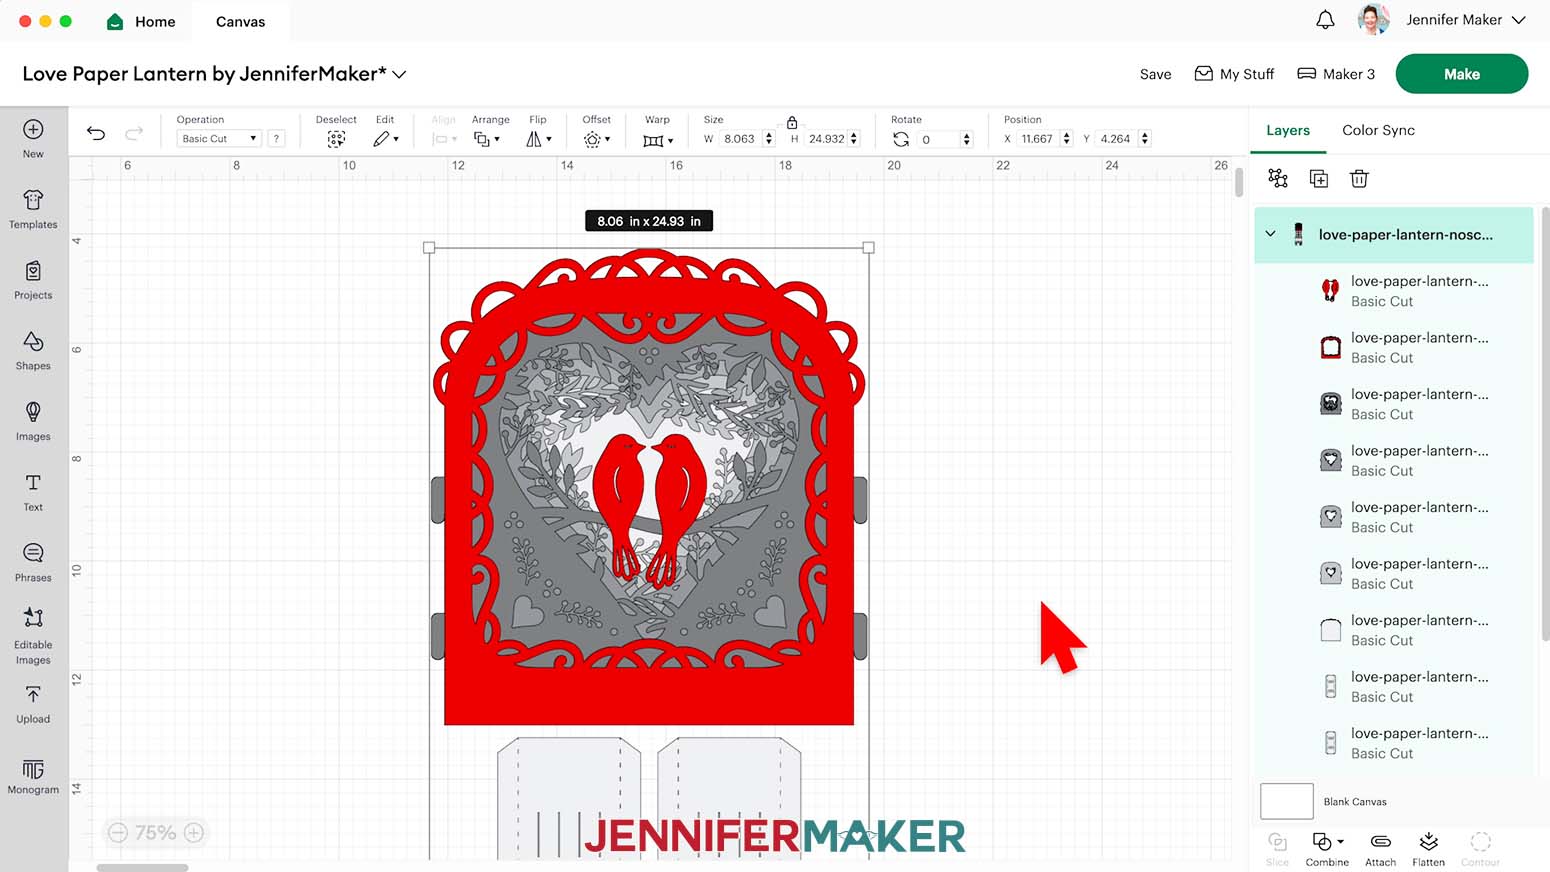
NOTE: I’ve used different shades of gray to make the layers easier to see, but you can use whatever color cardstock you’d like. If you’re adding lights, make sure your cardstock is light enough that light can shine through it.
NOTE: Since the design is so intricate, I don’t recommend reducing the size of the file.
9. You don’t need to do anything to prepare the “noscore” file, so your lantern design is ready to cut!
10. Make sure the correct machine is selected in the top right.
11. Click “Make.”
12. If prompted, click "On Mat," choose your mat size, and click “Confirm.”
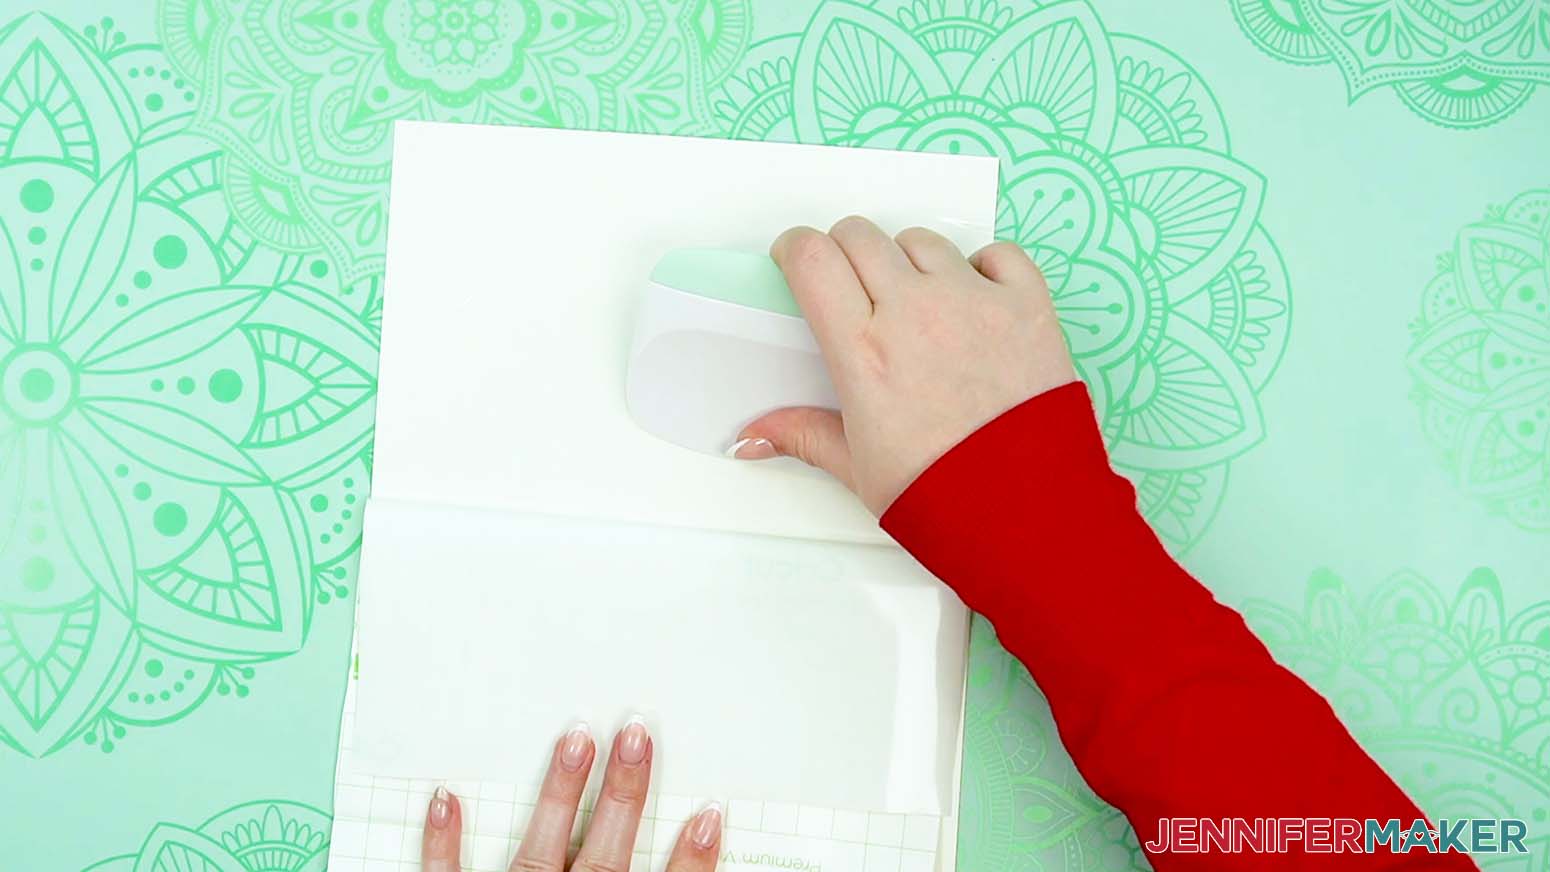
STEP 3: APPLY VINYL TO THE BACK OF YOUR CARDSTOCK
If you’re using the same color setup as me in Design Space, mats 3, 4, 5, and 6 are very intricate. Reinforcing the cardstock for those layers with clear or frosted permanent adhesive vinyl helps get cleaner cuts.
1. Cut pieces of vinyl about 8.5” x 9”, or a little bigger than your design’s layers.
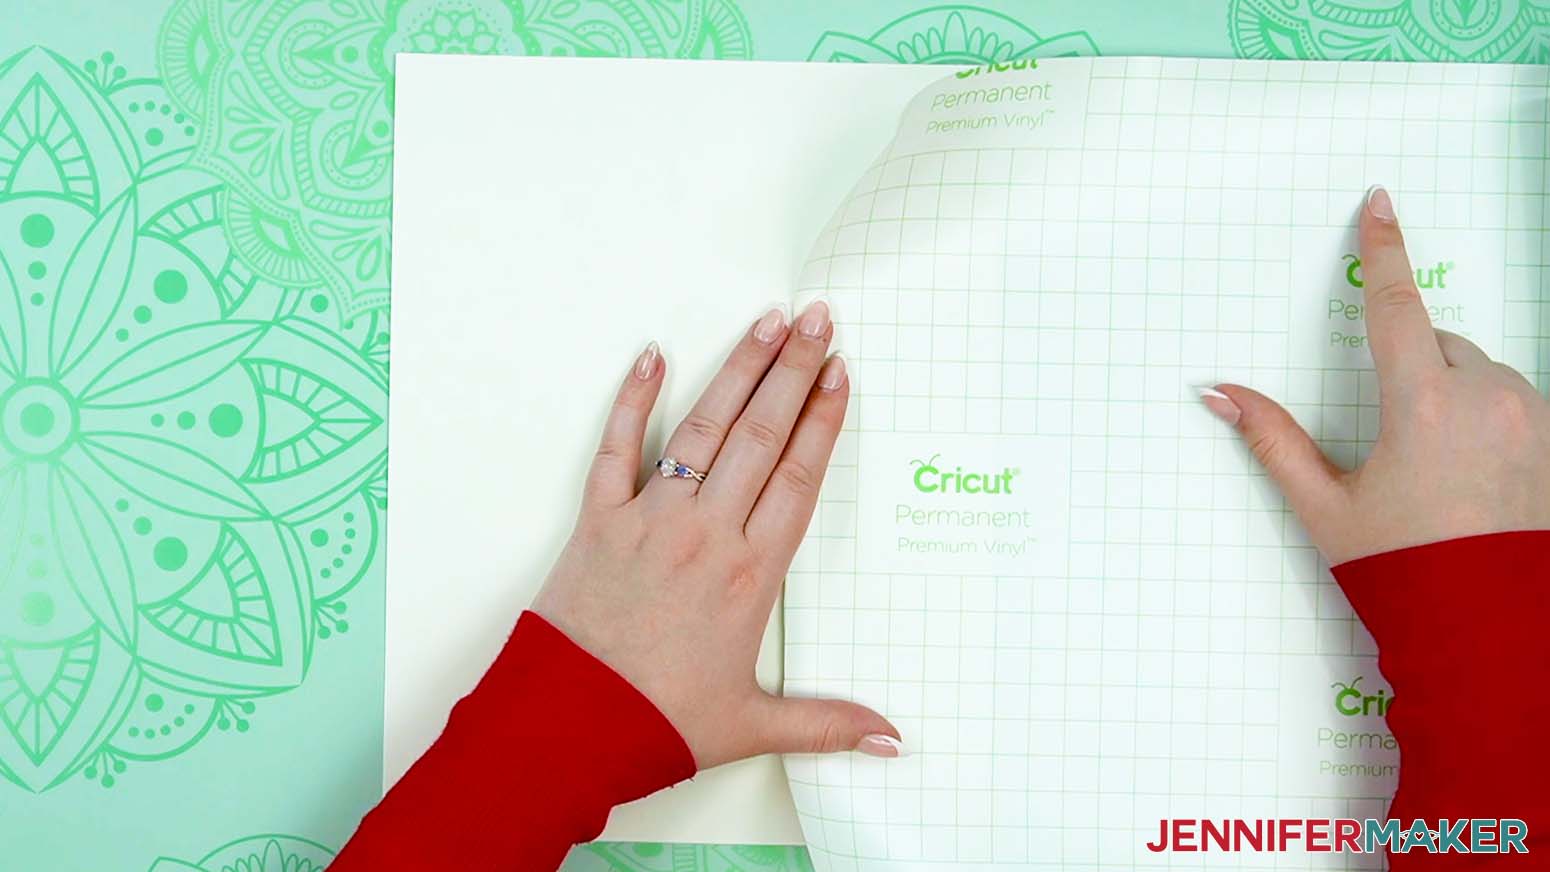
TIP: Use the grid on the vinyl’s back to help get straight cuts.
TIP: If the cut vinyl keeps curling, flatten it out under a stack of books for an hour or so.
2. Take one sheet of vinyl and one 8.5” x 11” sheet of 65 lb. cardstock.
3. Place the cardstock face down.
4. Peel back about an inch of the vinyl’s backing from one end.
5. Fold it down, using the grid lines as your guide.
6. Line up the edges, then apply the vinyl’s exposed end to one edge of the cardstock.
TIP: Don’t let it stick until you’re sure of the placement!
7. Use the XL scraper to adhere the vinyl.
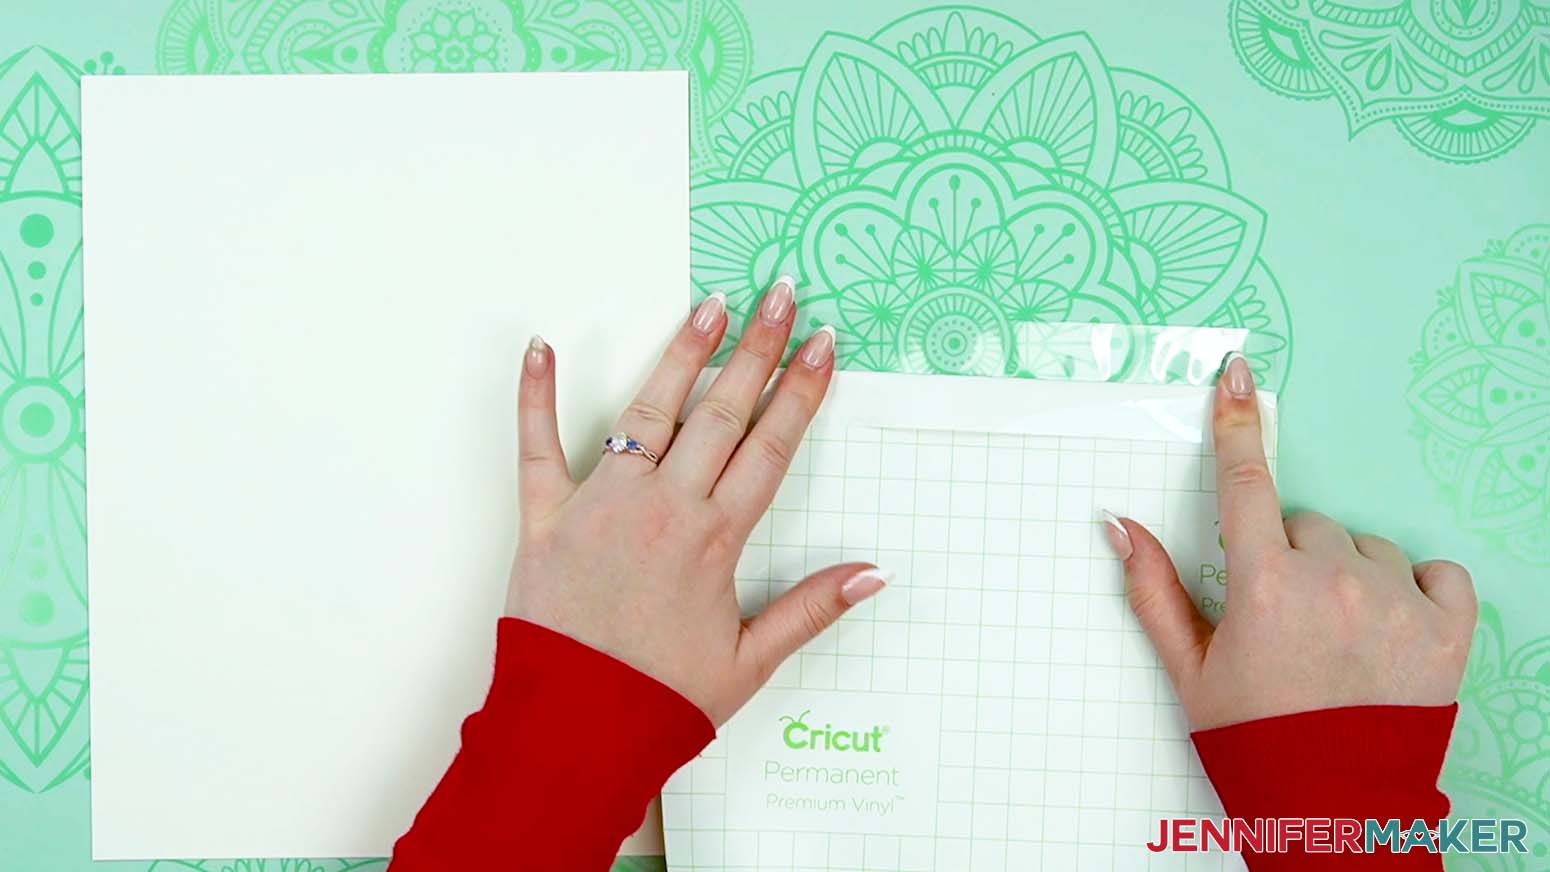
8. Reach one hand under the vinyl sheet, between it and the cardstock. Pull a small section of the vinyl’s backing away from the edge you just secured.
9. With your other hand, use the scraper to press the vinyl down onto the cardstock in small sections.
10. Peel the backing off from underneath as you go.
TIP: Work slowly and smooth out any wrinkles before peeling off more backing.
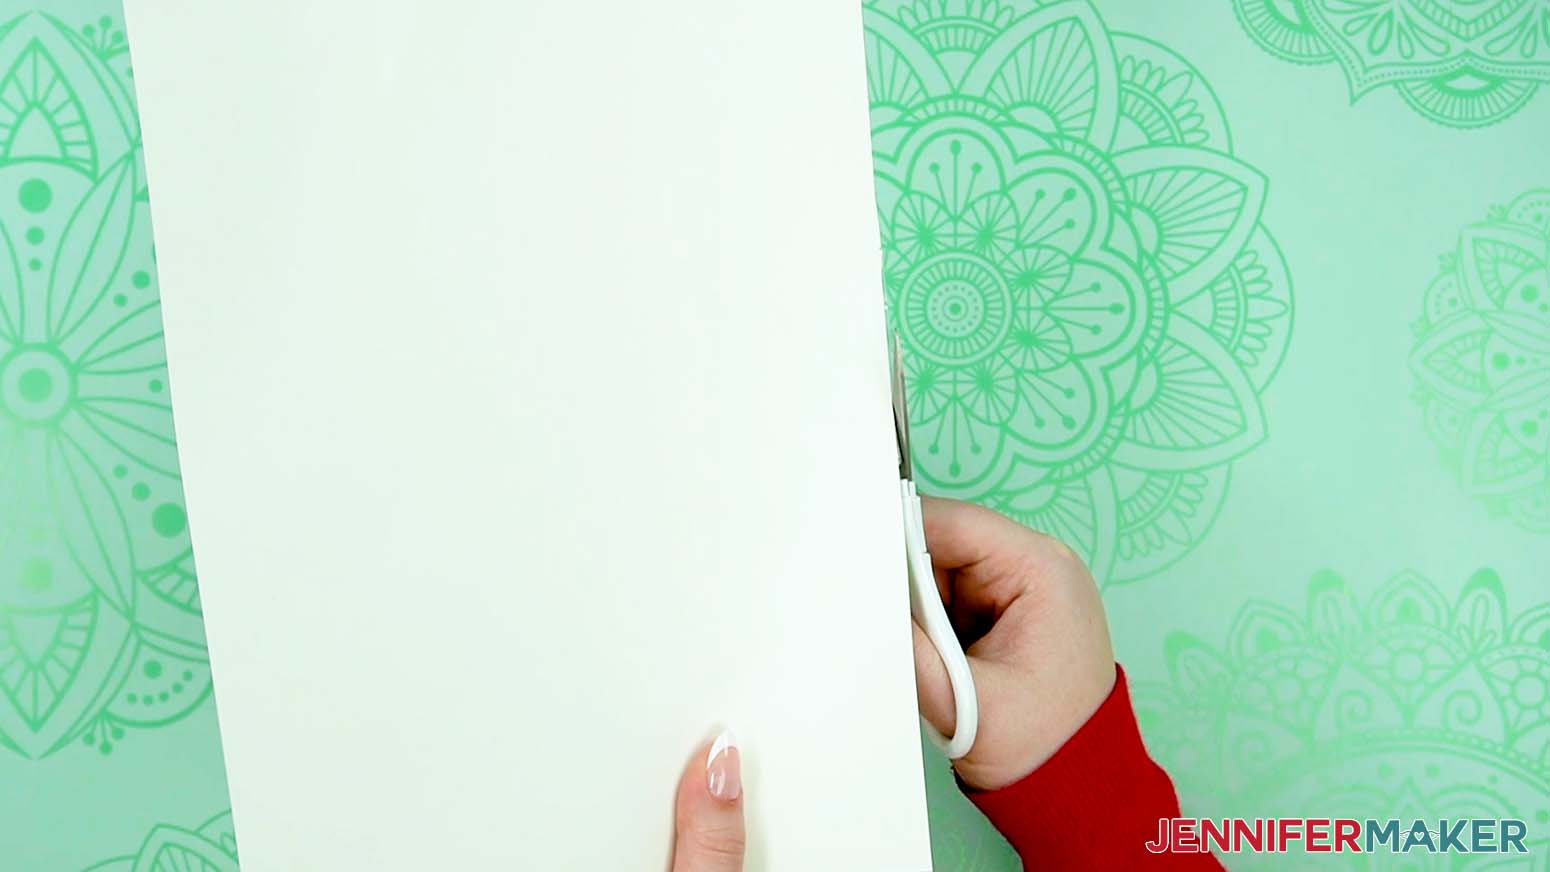
11. When you’re finished, cut off any excess vinyl from around the cardstock’s edges.
STEP 4: CUT YOUR LOVE PAPER LANTERN LAYERS
1. On the Design Space Prepare Screen, you should have 7 mats.
2. Change the Material Size for each mat to match your paper choices. I’m using 8.5” x 11” white cardstock for everything other than the red mat.
3. Select the first mat again and click “Continue.”
4. On the Make Screen, check if your first mat needs plain or vinyl-backed cardstock.
NOTE: I used the “Medium Cardstock - 80 lb (216 gsm)” setting with “More” Pressure for both, but remember that all machines are different and you may need to adjust your settings.
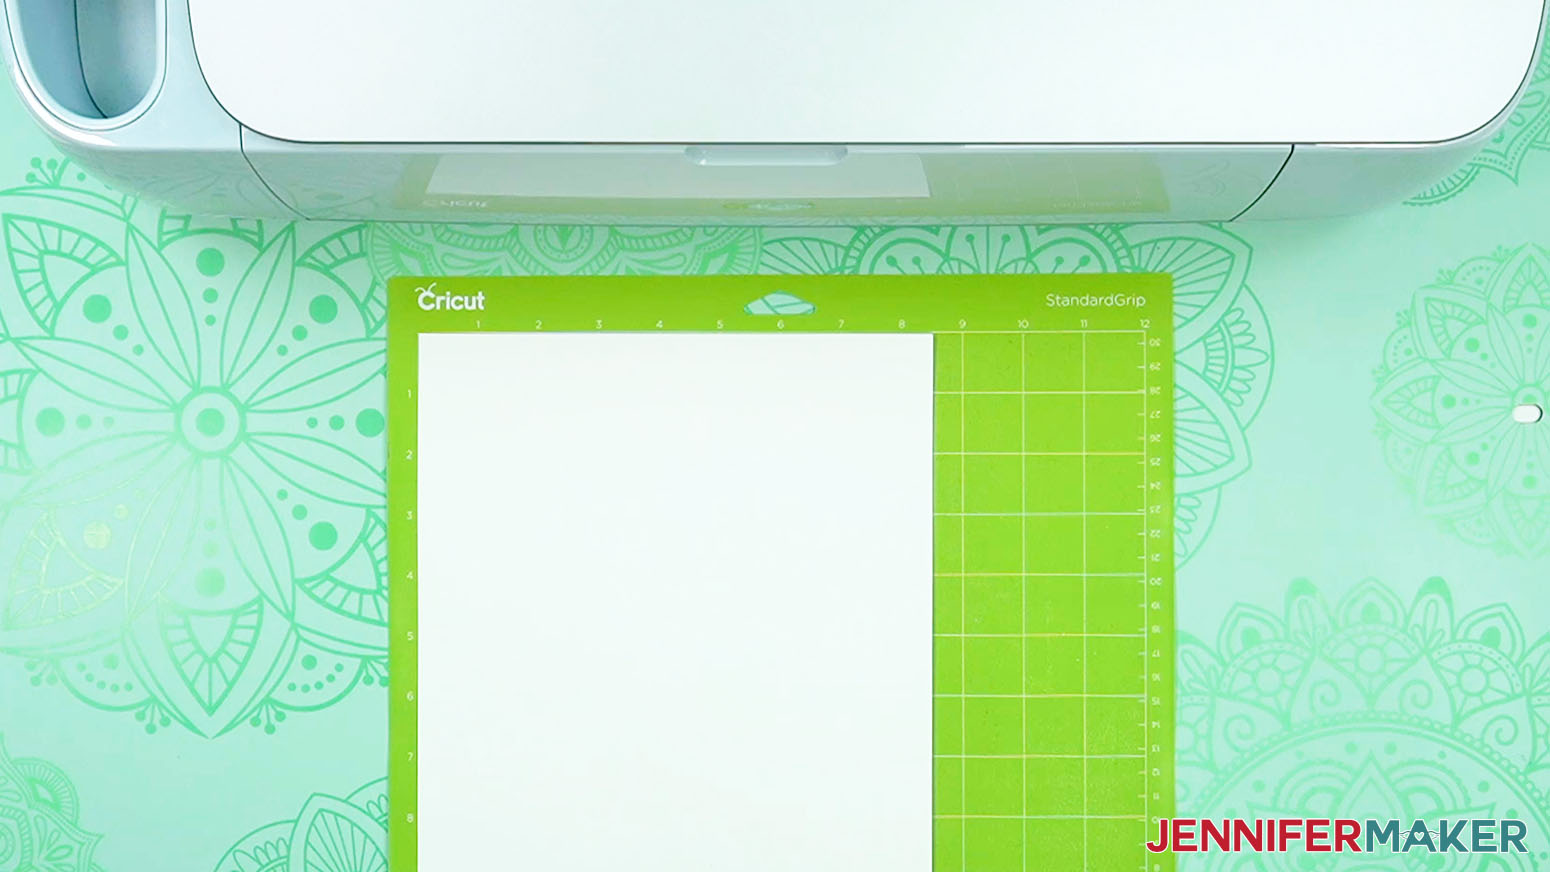
5. For a plain cardstock mat, put the piece face up on a green StandardGrip machine mat.
6. Use a brayer to make sure it's fully adhered.
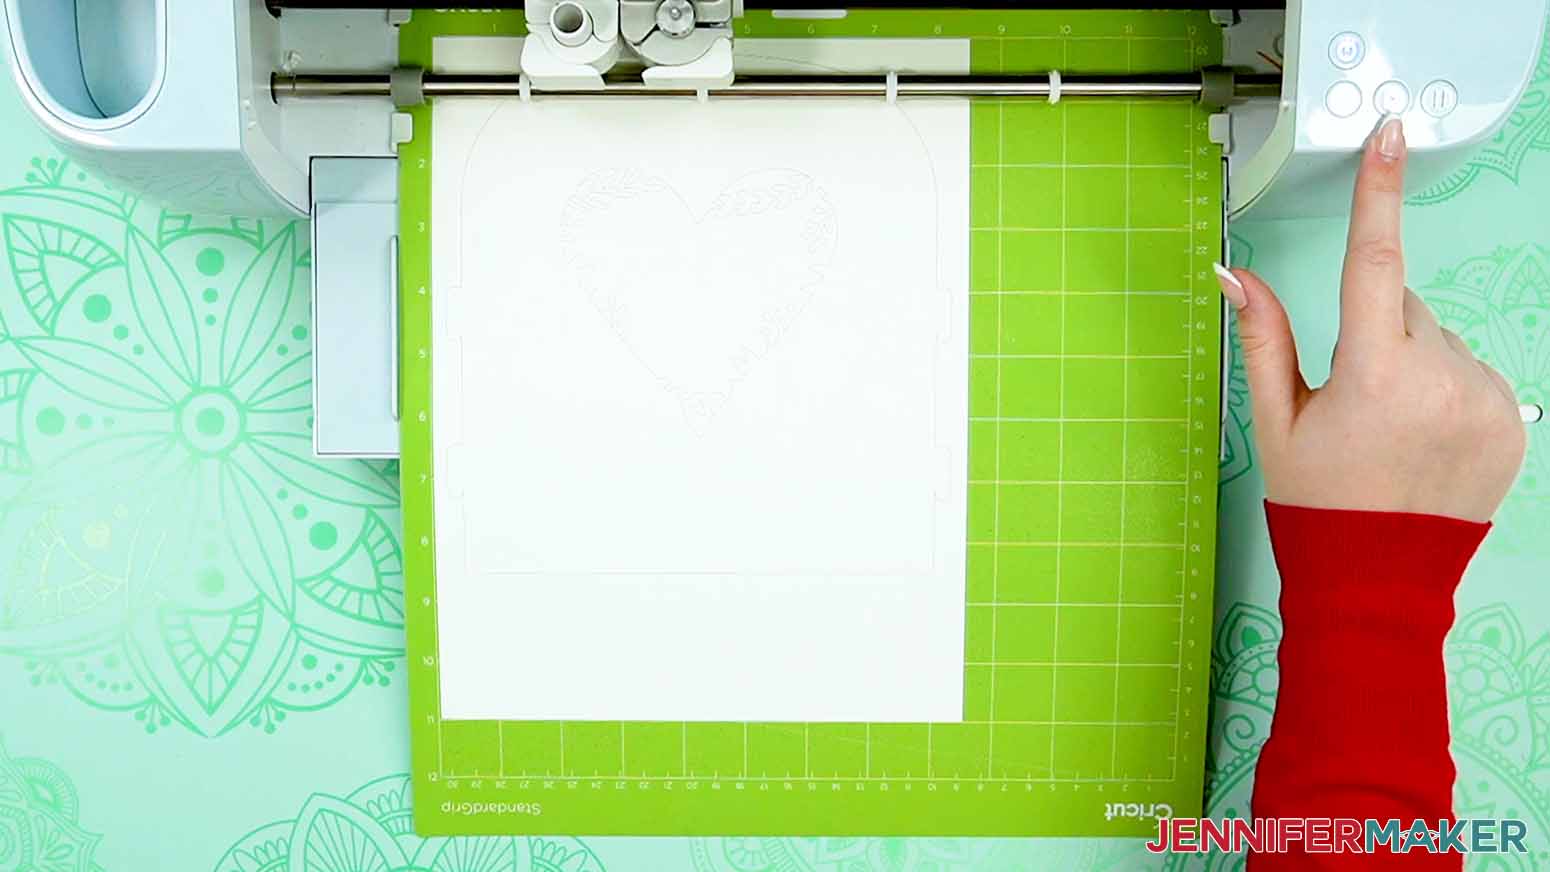
7. Check that your Fine-Point Blade is clean and in the clamp.
8. Press the flashing “Load/Unload” button to load the prepared mat into your Cricut.
9. Press the flashing “Go” button to begin cutting.
10. When it has finished cutting, unload the mat, flip it over onto your work surface, and roll it back to release the cardstock.
11. When an intricate layer comes up, clean your blade.
12. Place the prepared sheet vinyl side down on your green StandardGrip machine mat.
13. Position any wrinkles in the vinyl outside of where the design will cut.
14. Adhere it with a brayer, then load and begin cutting the mat.
15. Before unloading your mat, check to make sure the pieces cut all the way through.
16. If they didn’t, press the "Go" button to cut them again in the same spot.
17. When the cuts are complete, unload the mat, flip it over, and roll it back to release the reinforced cardstock.
18. You can slide your spatula gently under intricate pieces to remove them, but the vinyl on the back will help prevent them from tearing.
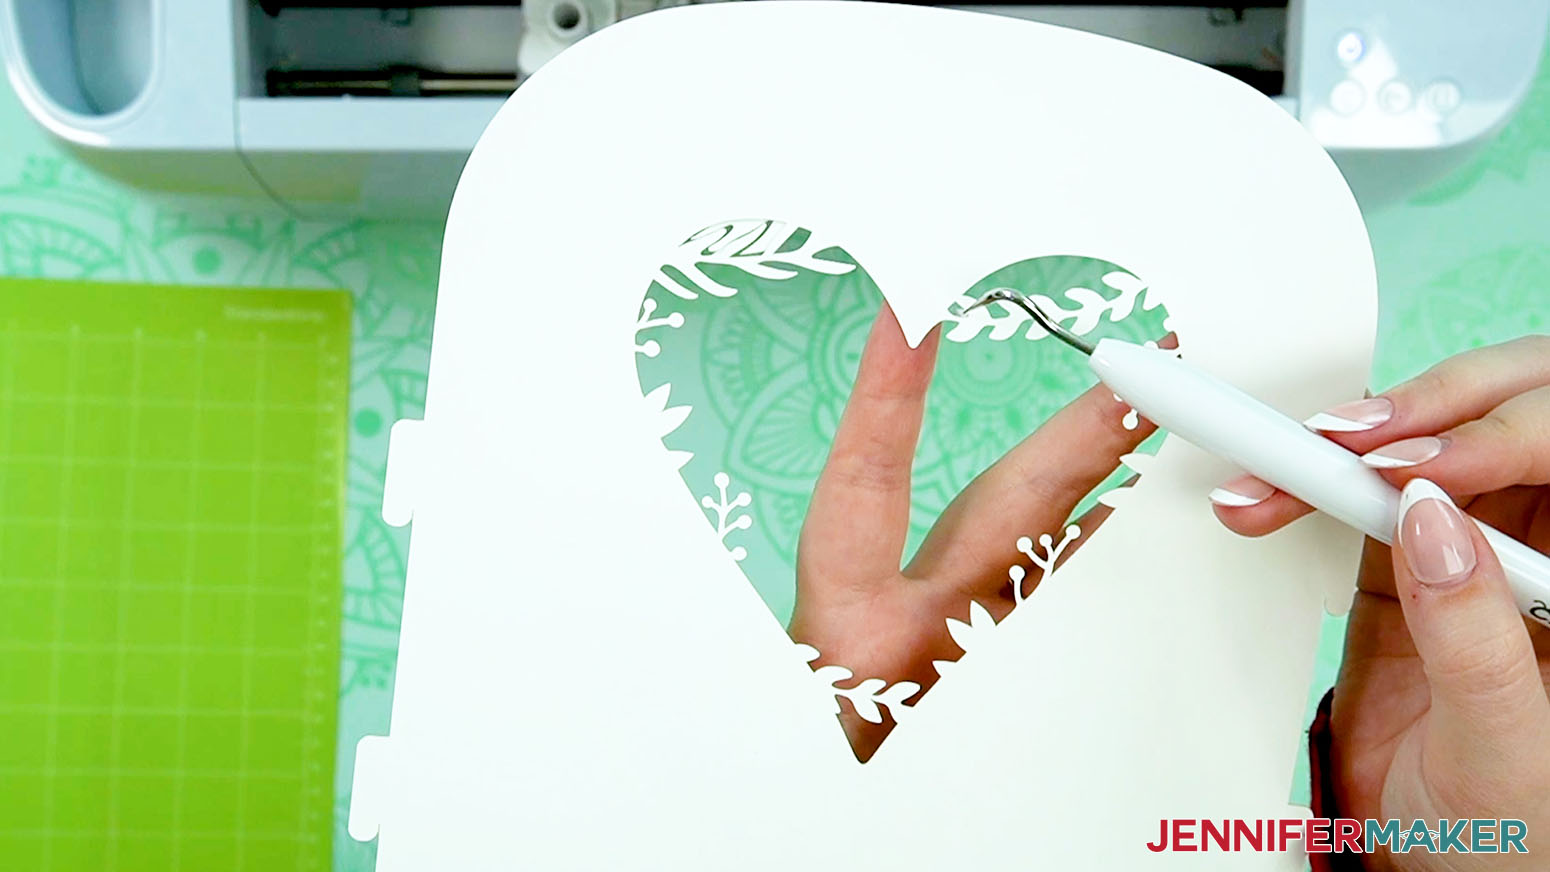
19. After removing your cut layers from the mat, you may need to peel away the excess materials around the cut area and use a weeding tool to poke out the inner pieces, as the vinyl will make the pieces “stick” in place.
20. Cut the rest of the reinforced cardstock mats the same way.
21. For the red mat, search for and select the “Glitter Cardstock” setting if you’re using glitter cardstock like me.
22. Select “More” for the Pressure.
23. Place your glitter cardstock face up on a green StandardGrip machine mat and use the same steps to load, cut, and remove the pieces.
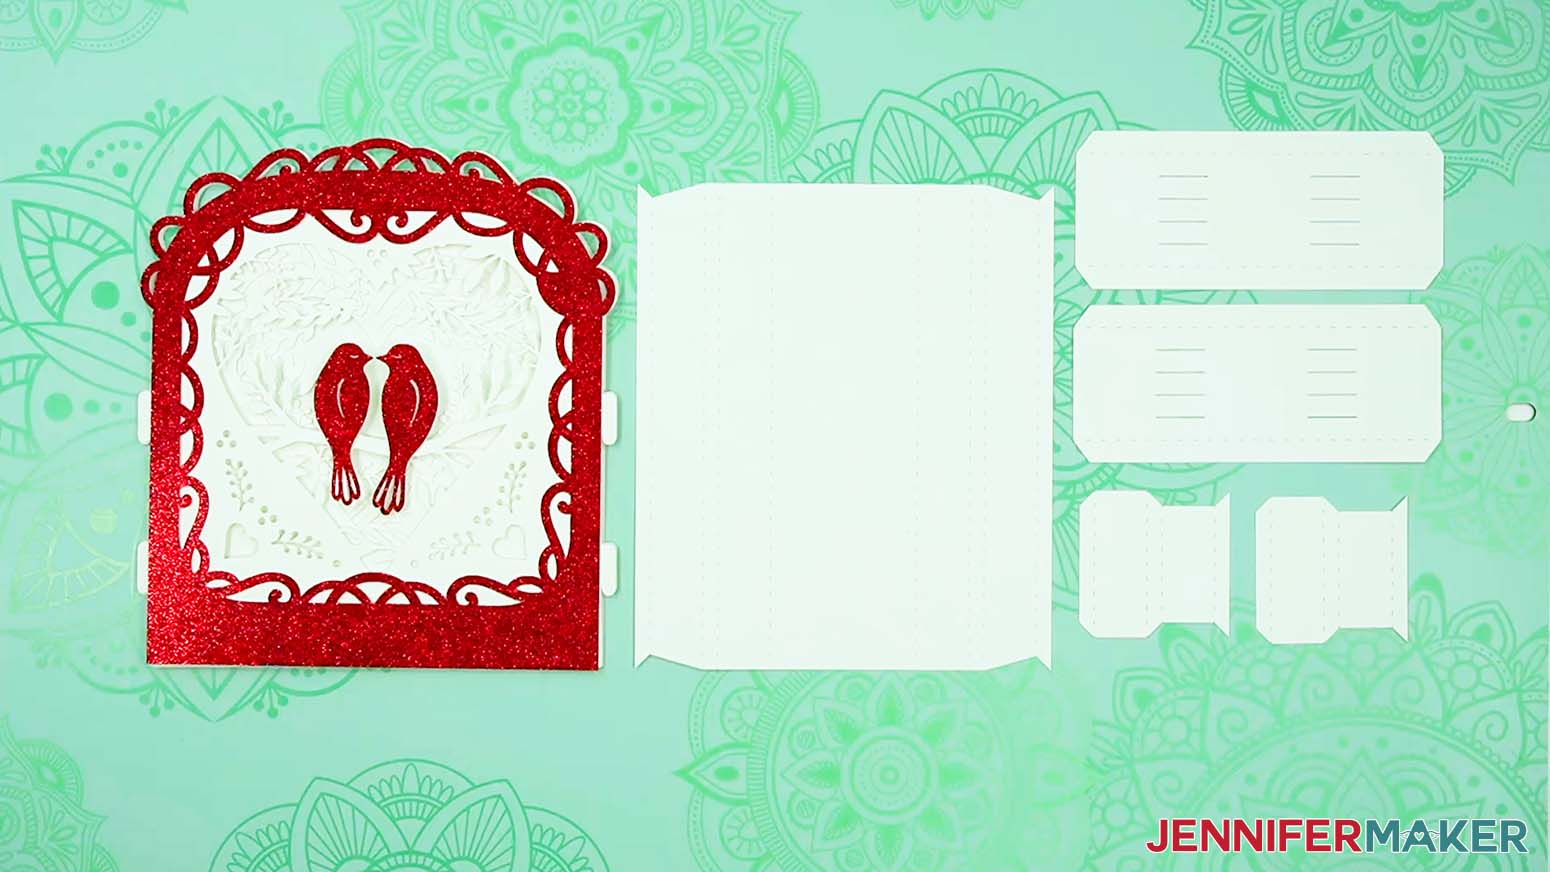
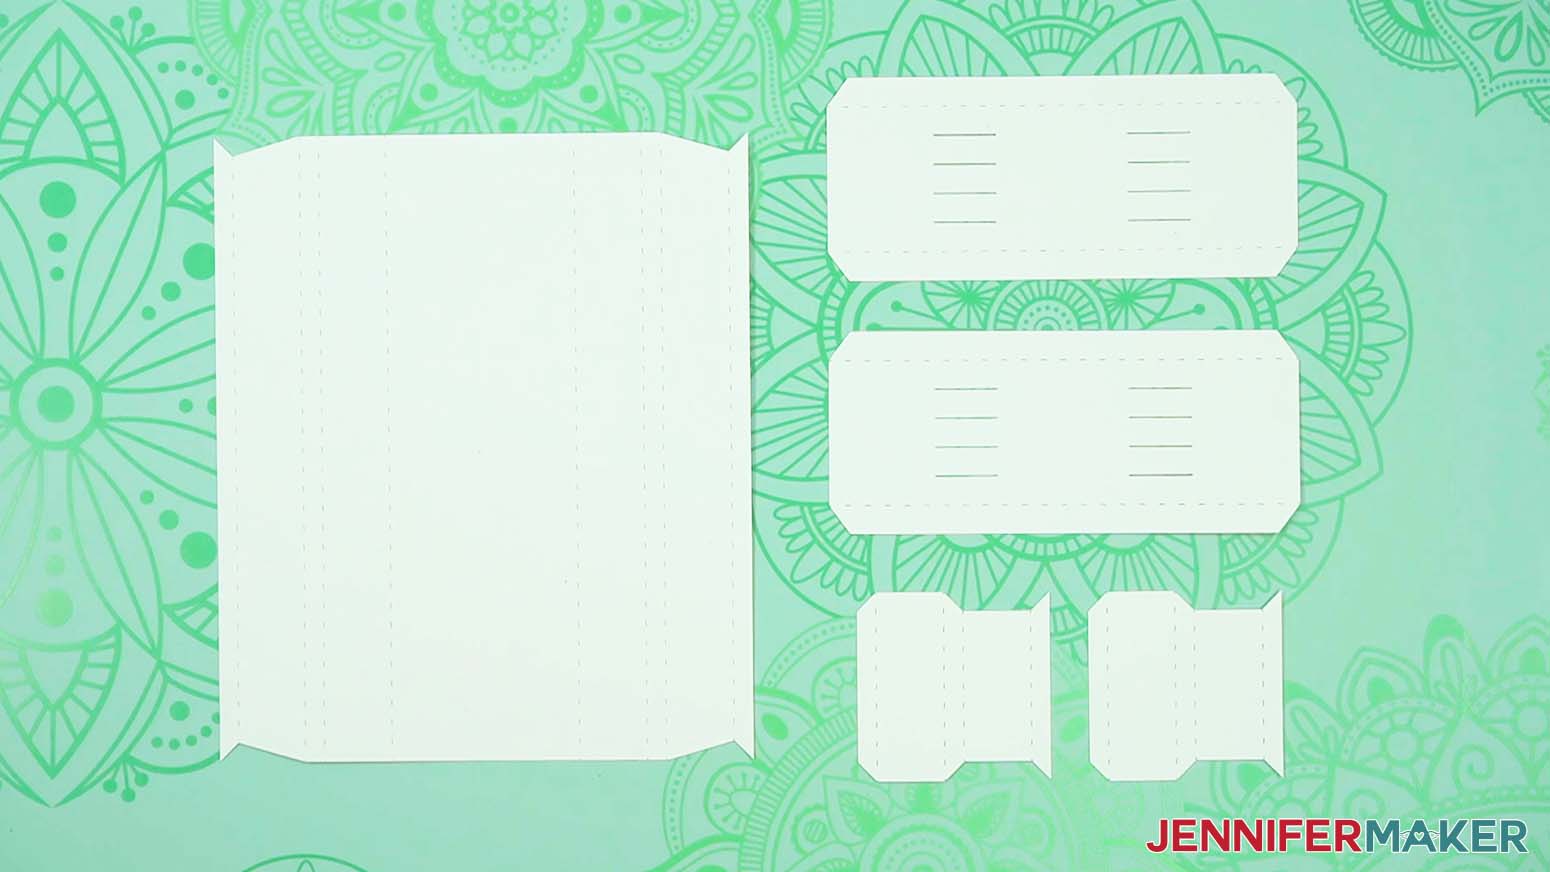
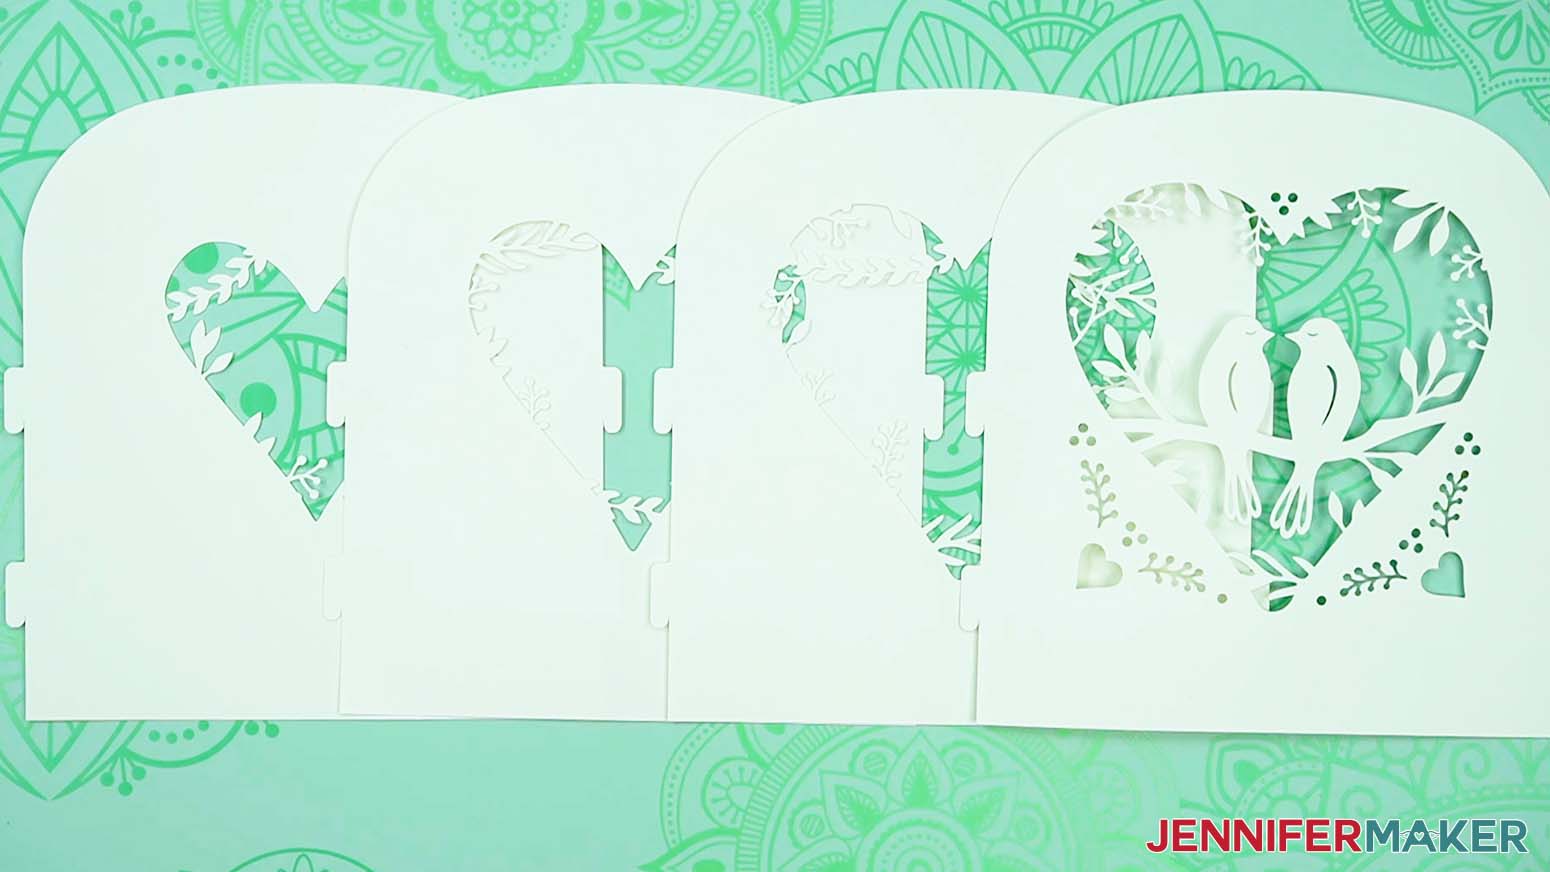
24. Here are what all my cut pieces look like.
STEP 5: ASSEMBLE YOUR LANTERN BASE AND LAYERS
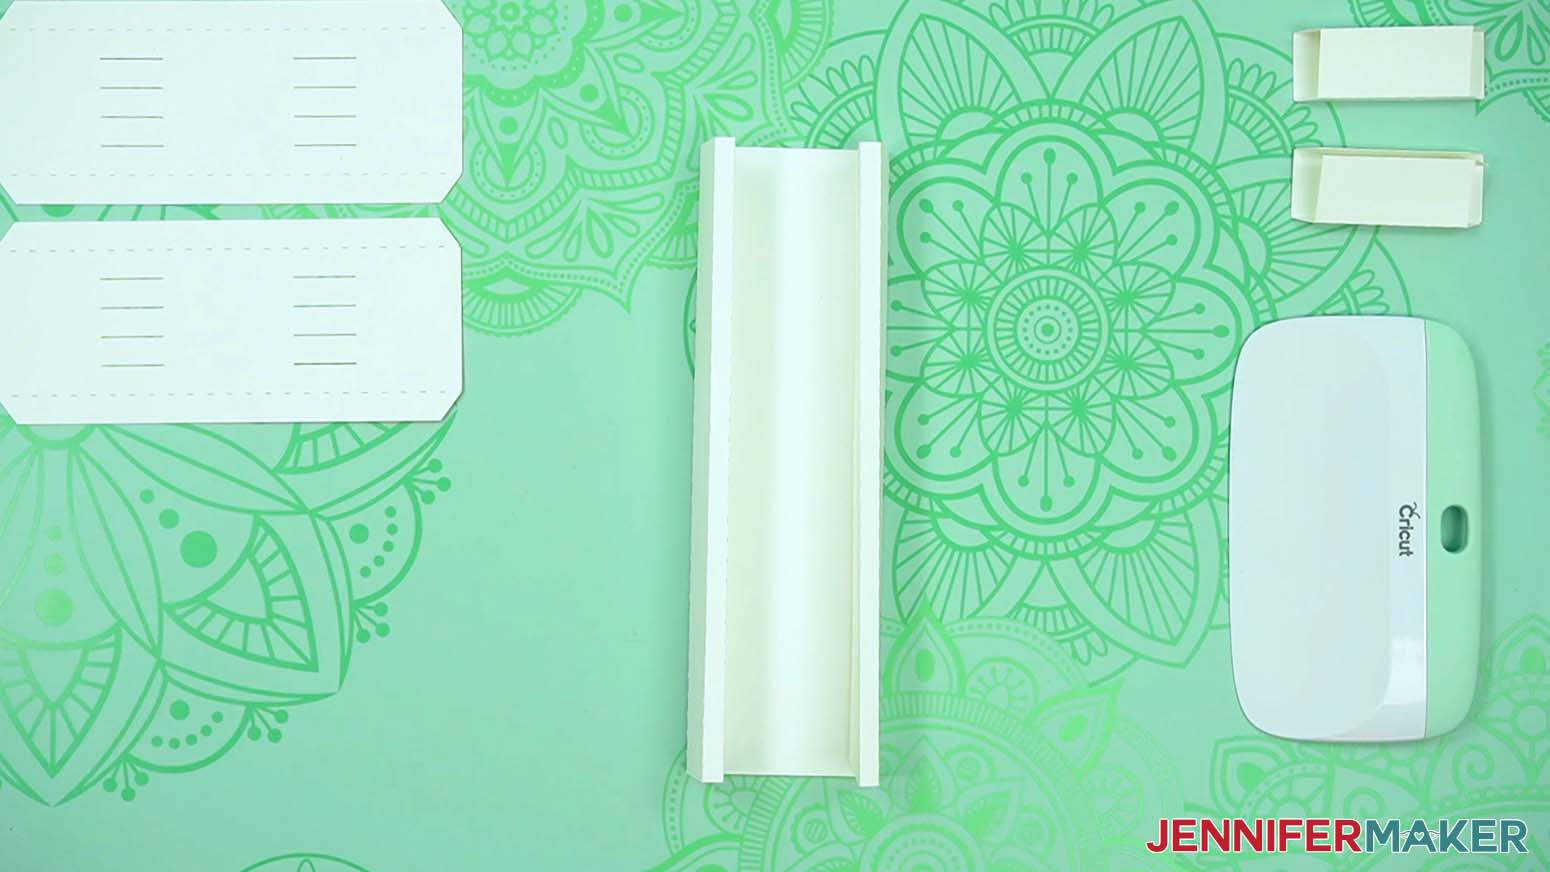
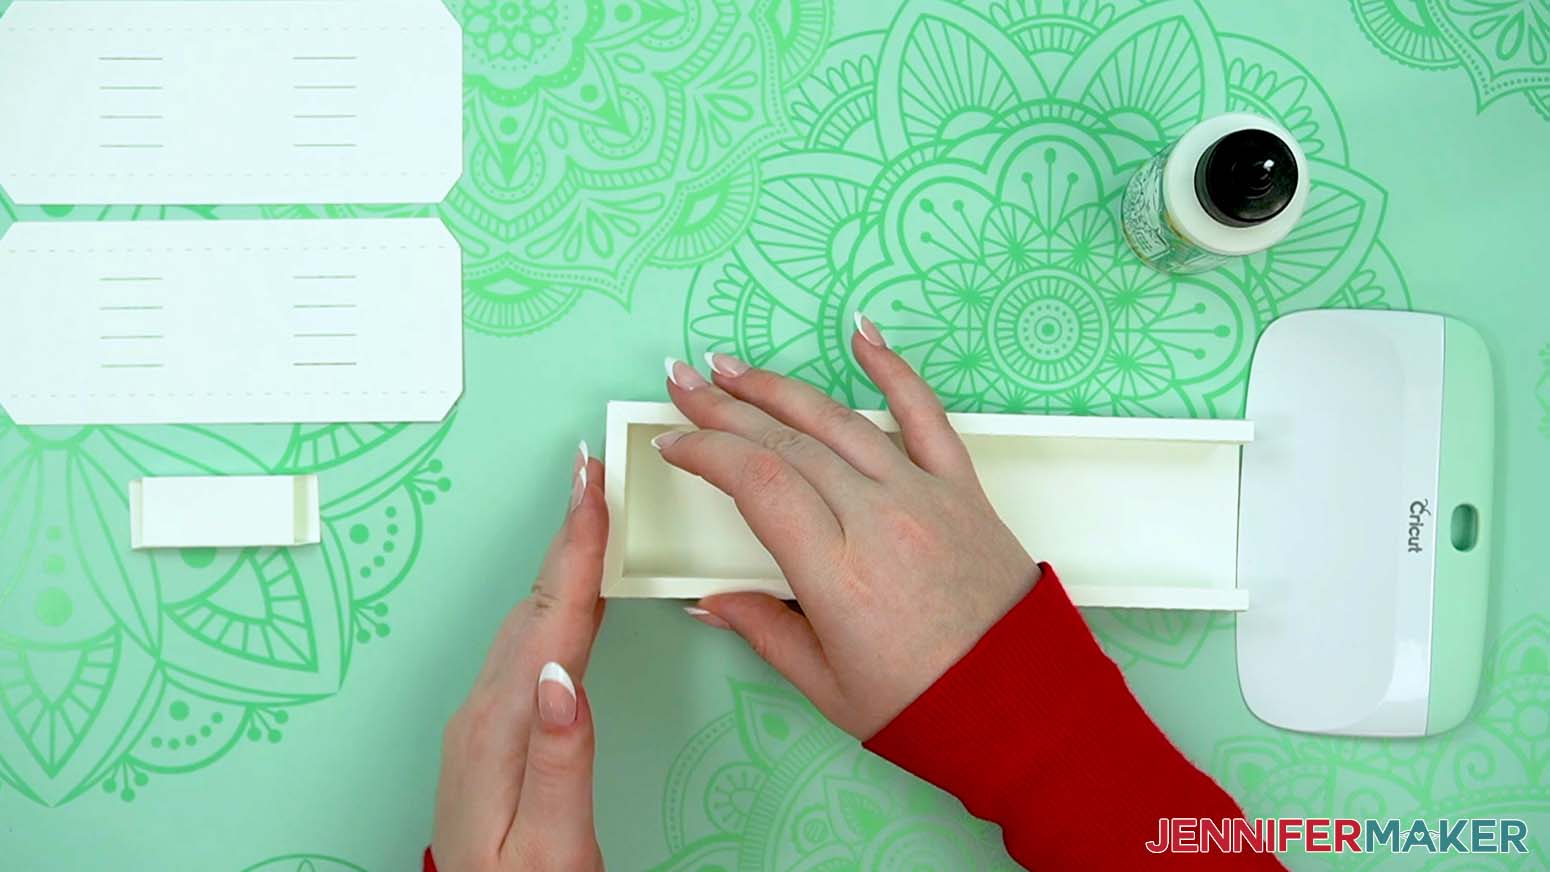
1. Grab the three pieces for the base.
2. Place a small side piece on your work surface with the pointed edge to the right.
3. Align your scraper along the first dashed cut or score line on the right and fold the small section up.
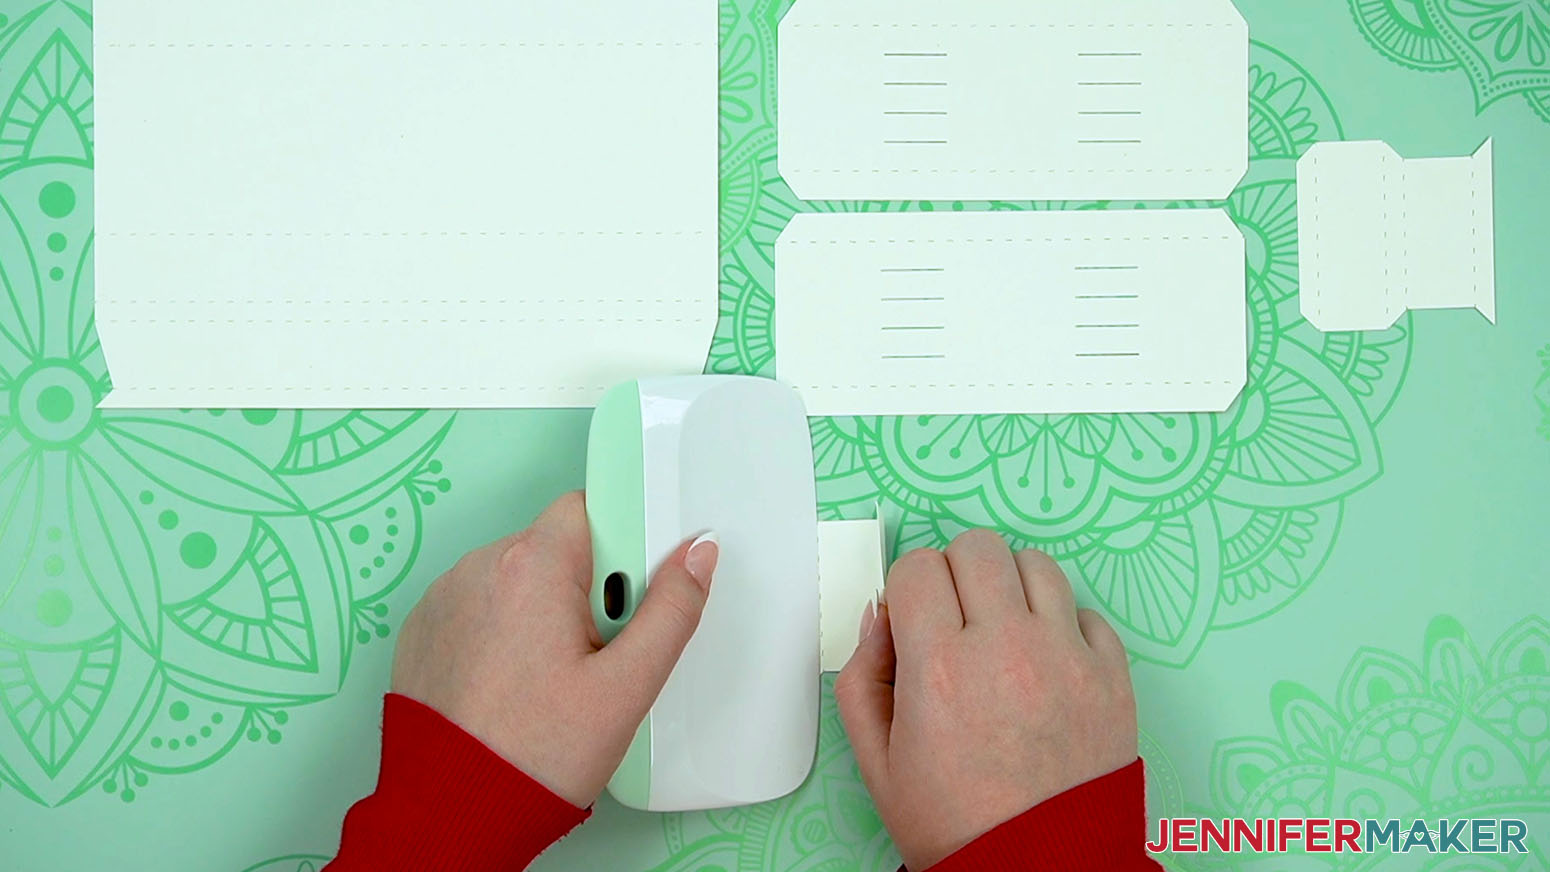
4. Keep moving to the left, supporting and folding the other creases the same way so they start curling into a tube.
5. Run your scraper along the folds to sharpen them.
6. Use Steps 2-5 to prepare the other side piece the same way.
7. Place the large base on your work surface so the creases run vertically.
8. One side at a time, fold along the dashed or scored lines from the outside in.
9. Support the sections with your scraper to start the creases, then use your scraper to sharpen the creases.
NOTE: They should all fold the same way so the creased sections start rolling in toward each other.
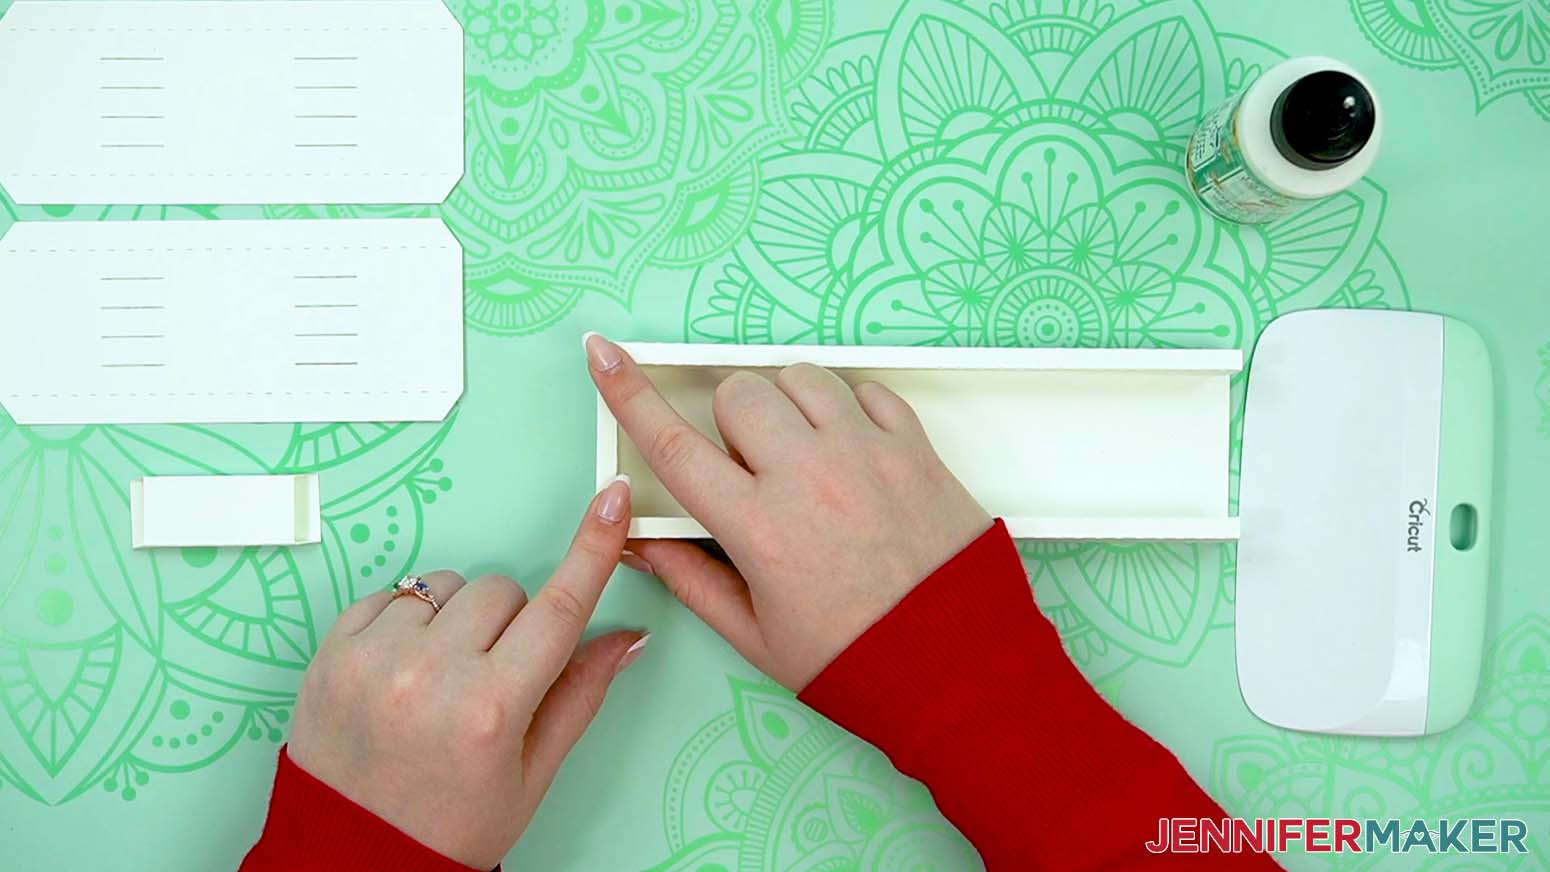
10. Starting on one side of the base, add glue to the back of the long tab at the outside edge.
11. Roll it toward the middle and align it on the base.
NOTE: Make sure the edges are flush and the tab touches the side wall.
12. Gently put your fingers in the sides to press the ends of the tab in place.
13. Press down along the top edge so the glue bonds well to the base.
TIP: It’s harder to tell if the tab is secure further in, but you can poke your tweezers or the narrow end of your spatula in from each end to carefully adhere the tab.
14. Hold the wall and tab in place for about 30 seconds so the glue is completely set.
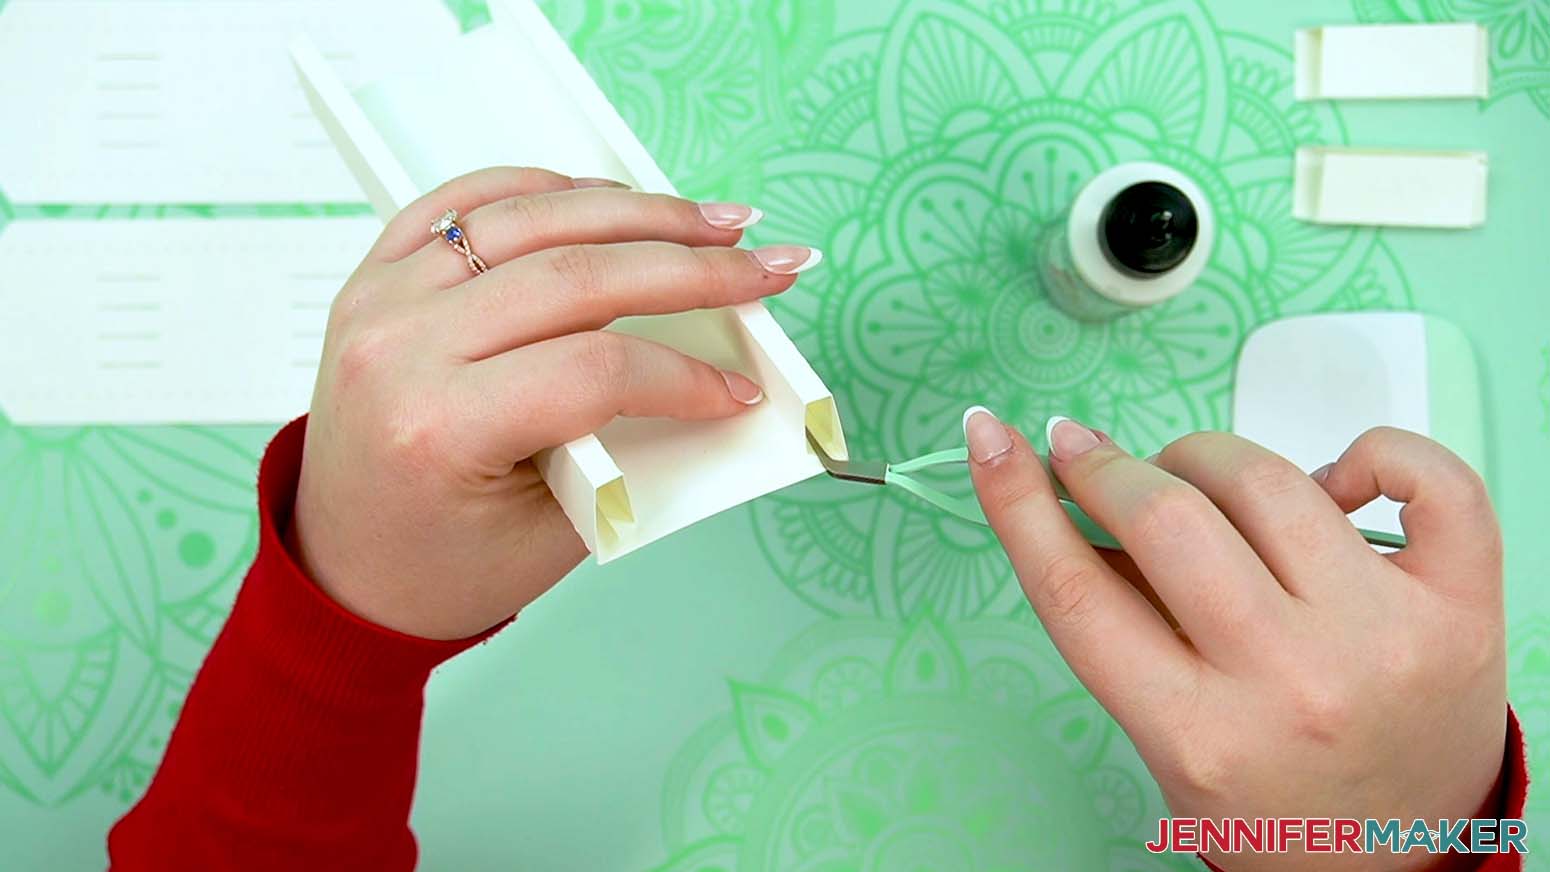
15. Use Steps 10-14 to create and secure the other long wall.
16. Roll one of the small side pieces up and glue its bottom tabs together to make a rectangular tube for one short wall.
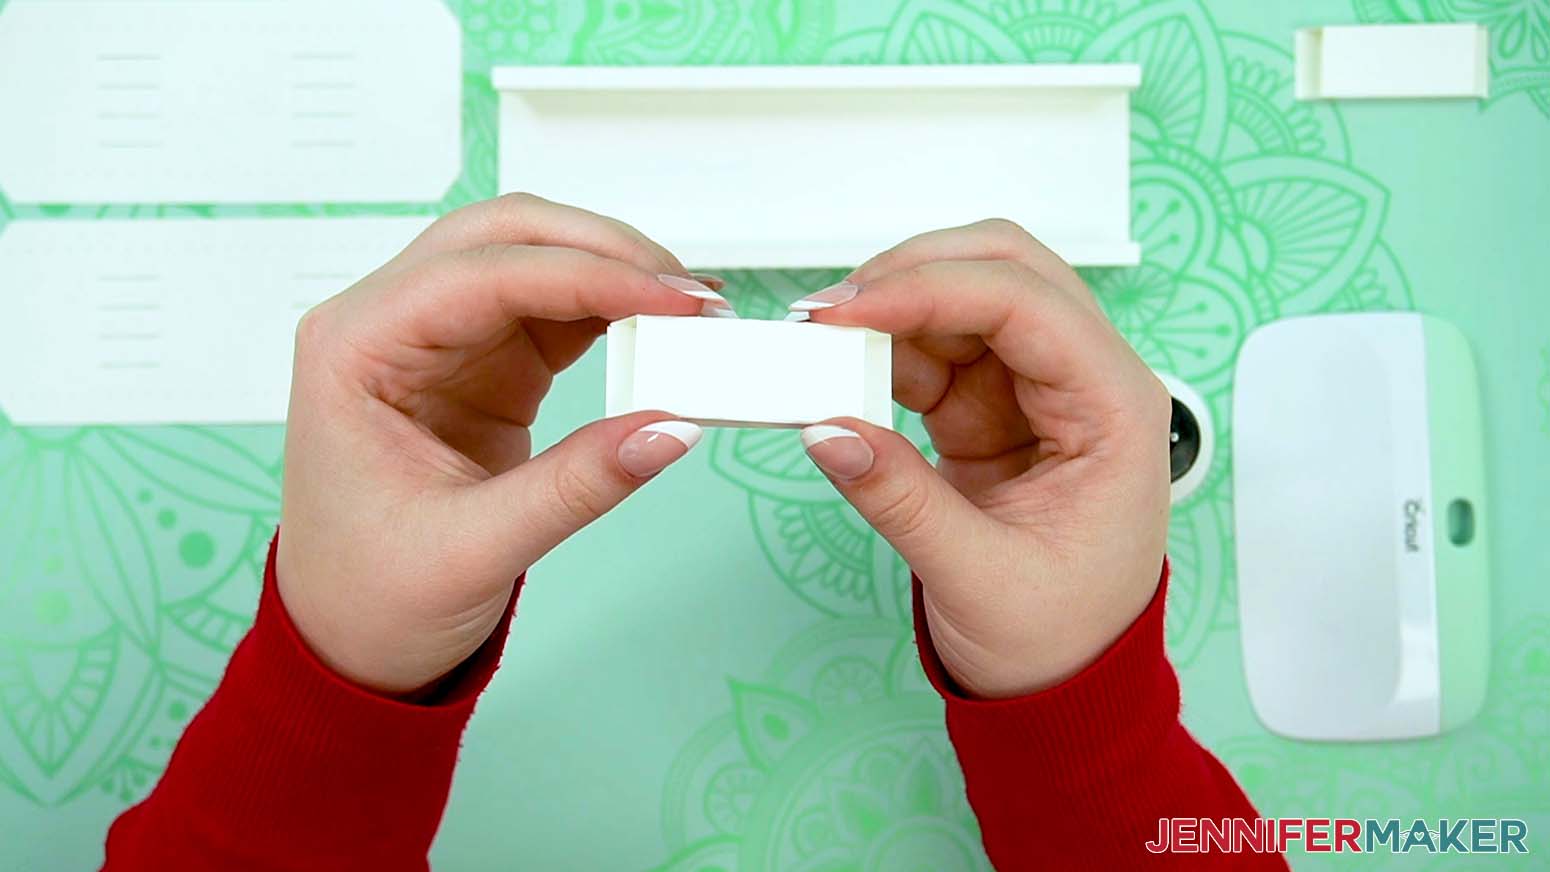
17. Repeat with the other small side piece to make the second short wall.
NOTE: Each small side piece will attach to the base with its glued seam at the bottom and the angles pointing in.
18. Put some glue on the bottom of a small side piece.
TIP: The inner corners of the long sides will go inside the small pieces, so you might need to move them out of the way just a little.
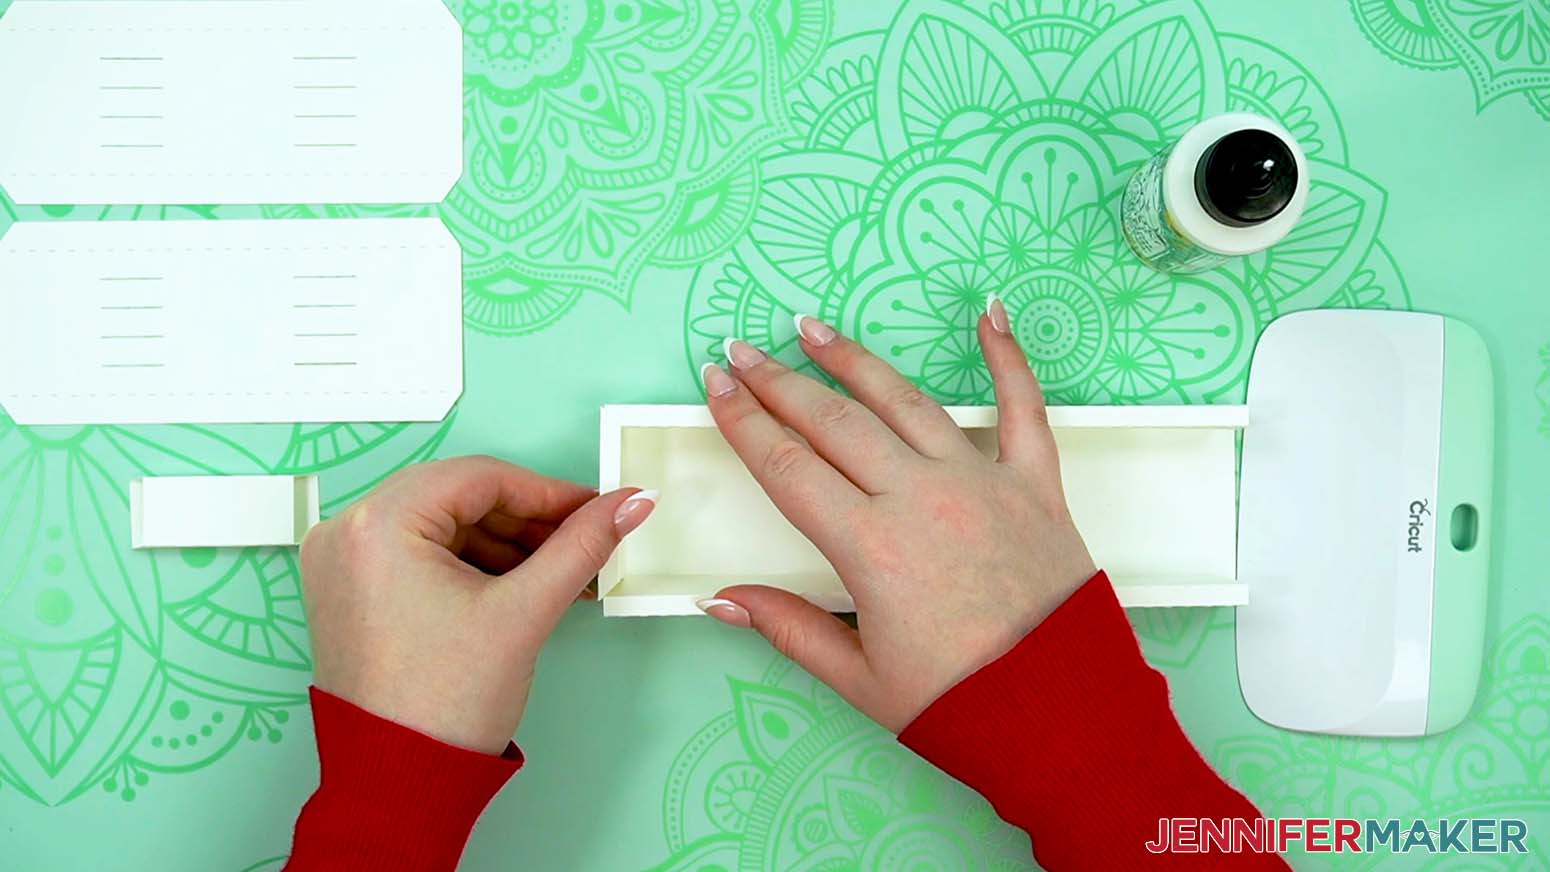
19. Press a small side in place so the outer joints are flush.
20. Once the bottom is dry, pull the small side piece back a bit and add dots of glue to the top of the long sides where they overlap.
21. Push the small wall back in place and press down on the glued areas until they dry.
22. Use Steps 18-21 for the second short side piece to complete the base!
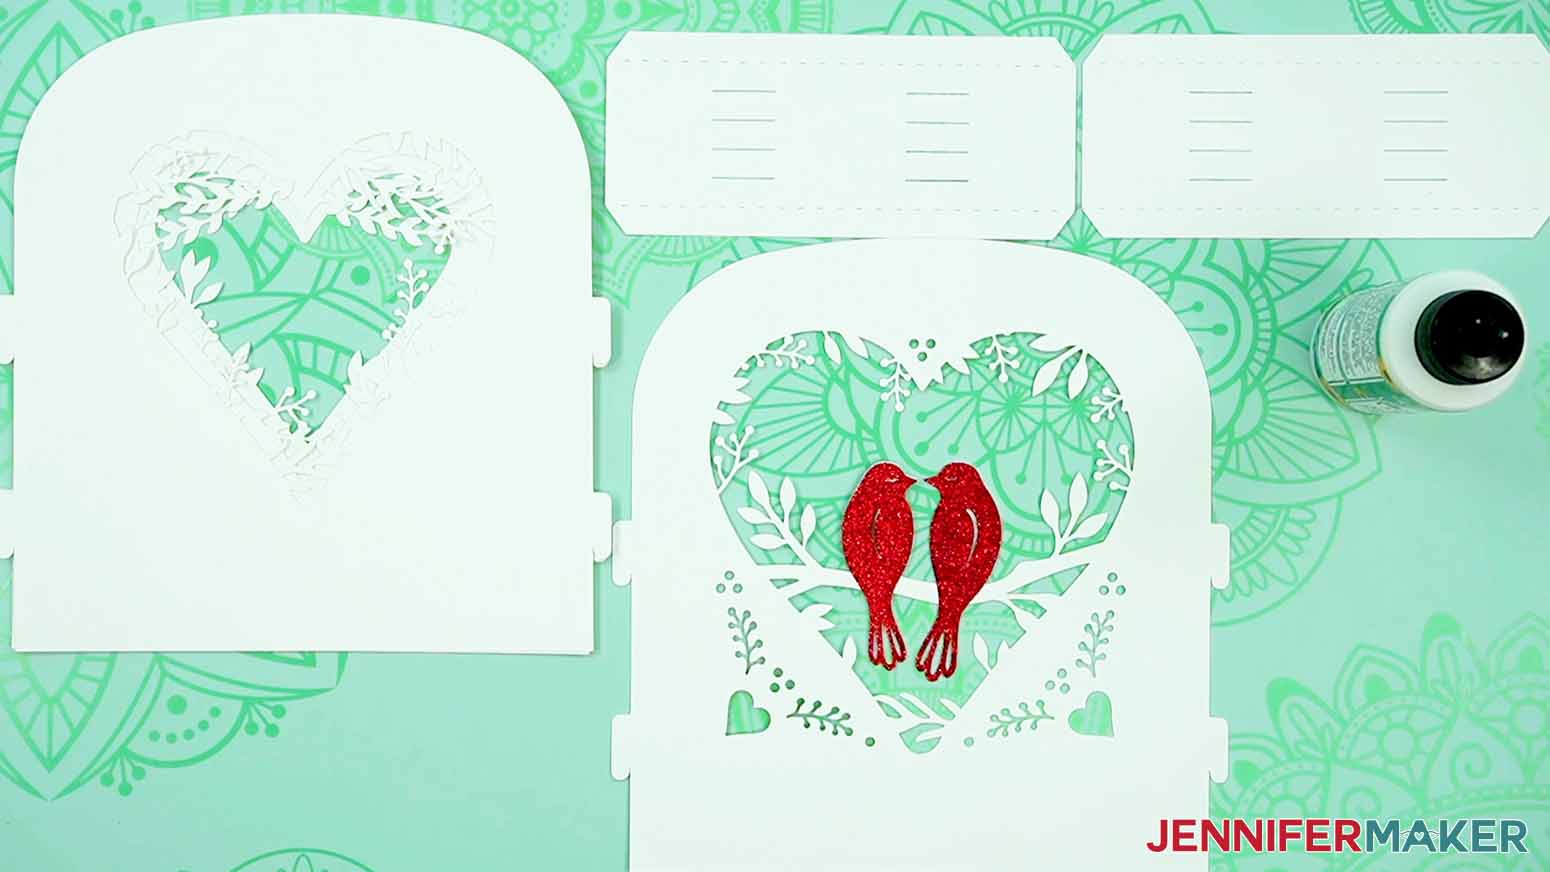
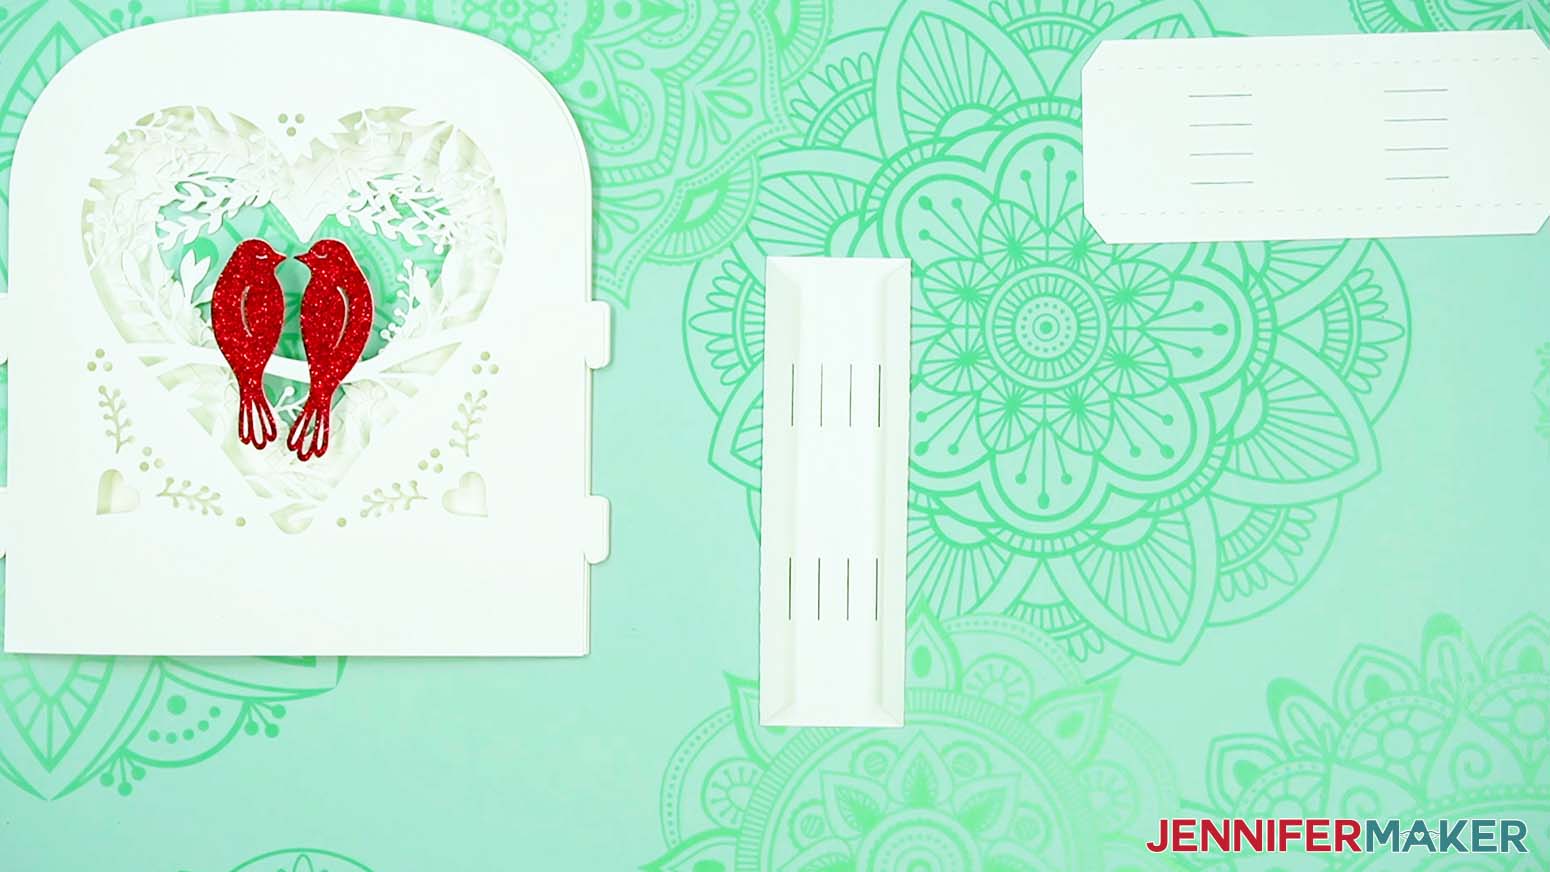
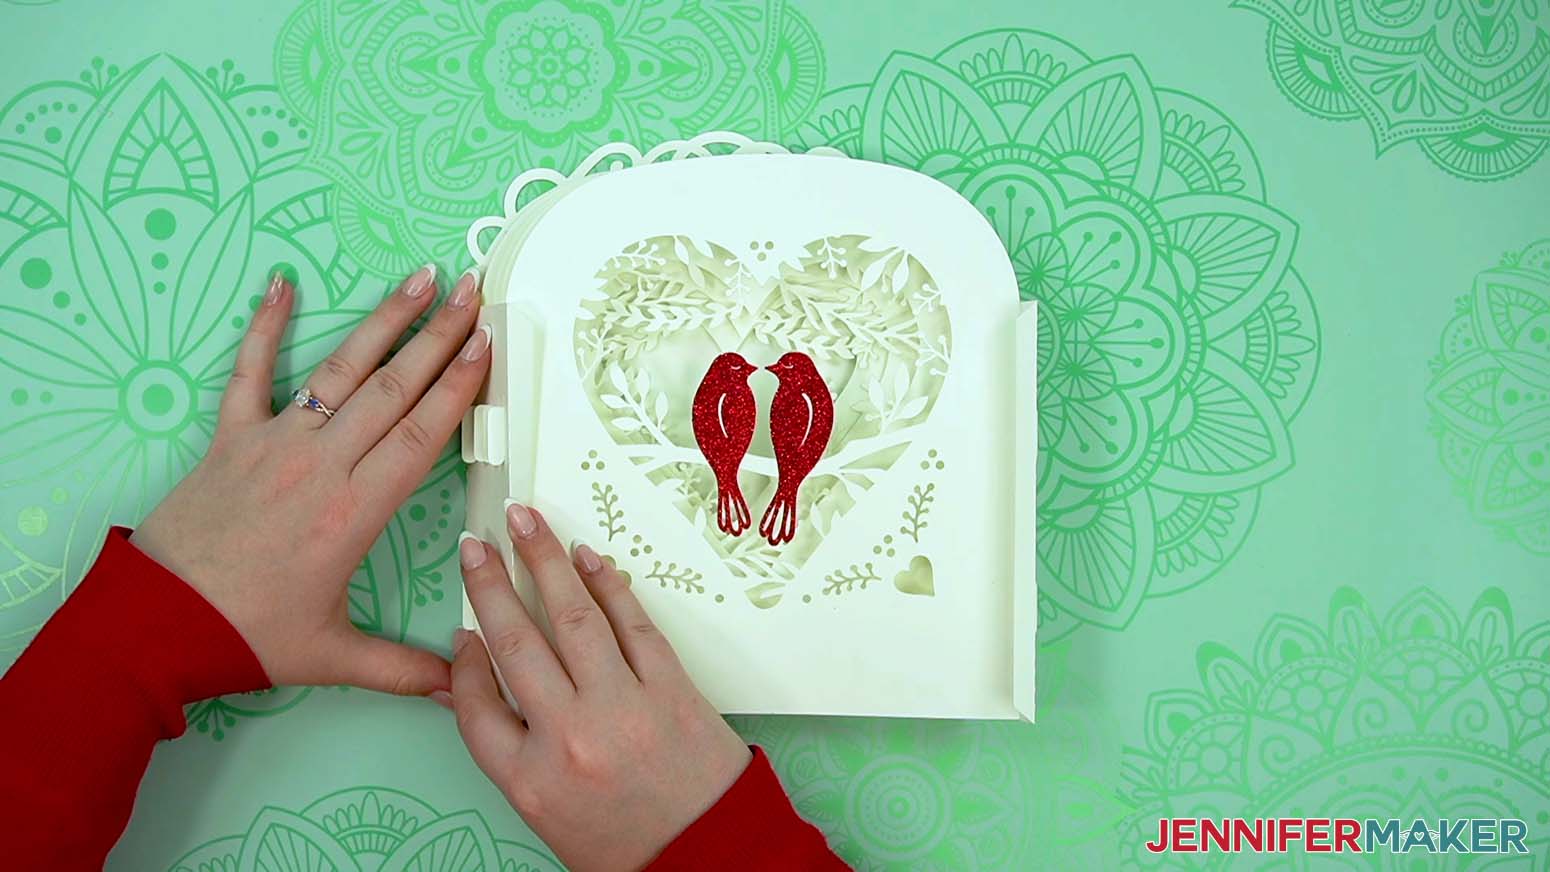
23. Now, lay out the side frames and inner layers.
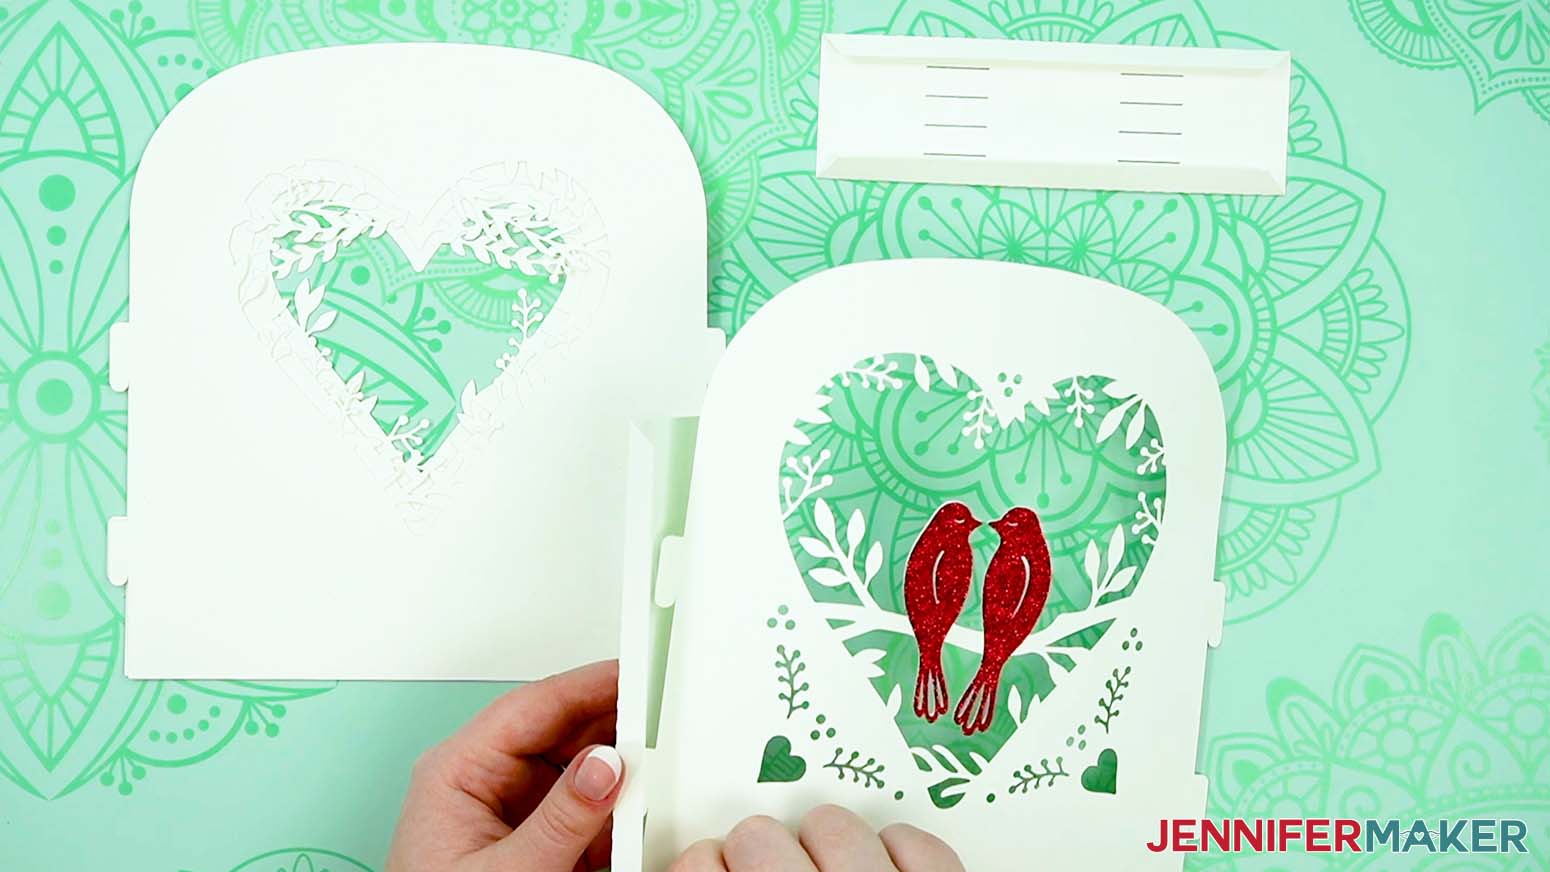
NOTE: If you’re adding color to the birds like me, put a little glue on each glitter bird shape’s back, avoiding the cutouts. Then secure them to the matching silhouettes on the front of Layer 1.
24. Take a side frame piece and use your scraper to help fold and crease the long tabs. Both tabs should face the same way and be perpendicular to the frame piece.
25. Then repeat on the other side frame piece.
TIP: They’re exactly the same no matter which direction they’re facing, so don’t worry about mixing them up!
26. Make sure your layers are correctly oriented with Layer 1 - the one with the birds - on top. The heart gets smaller the further you go back.
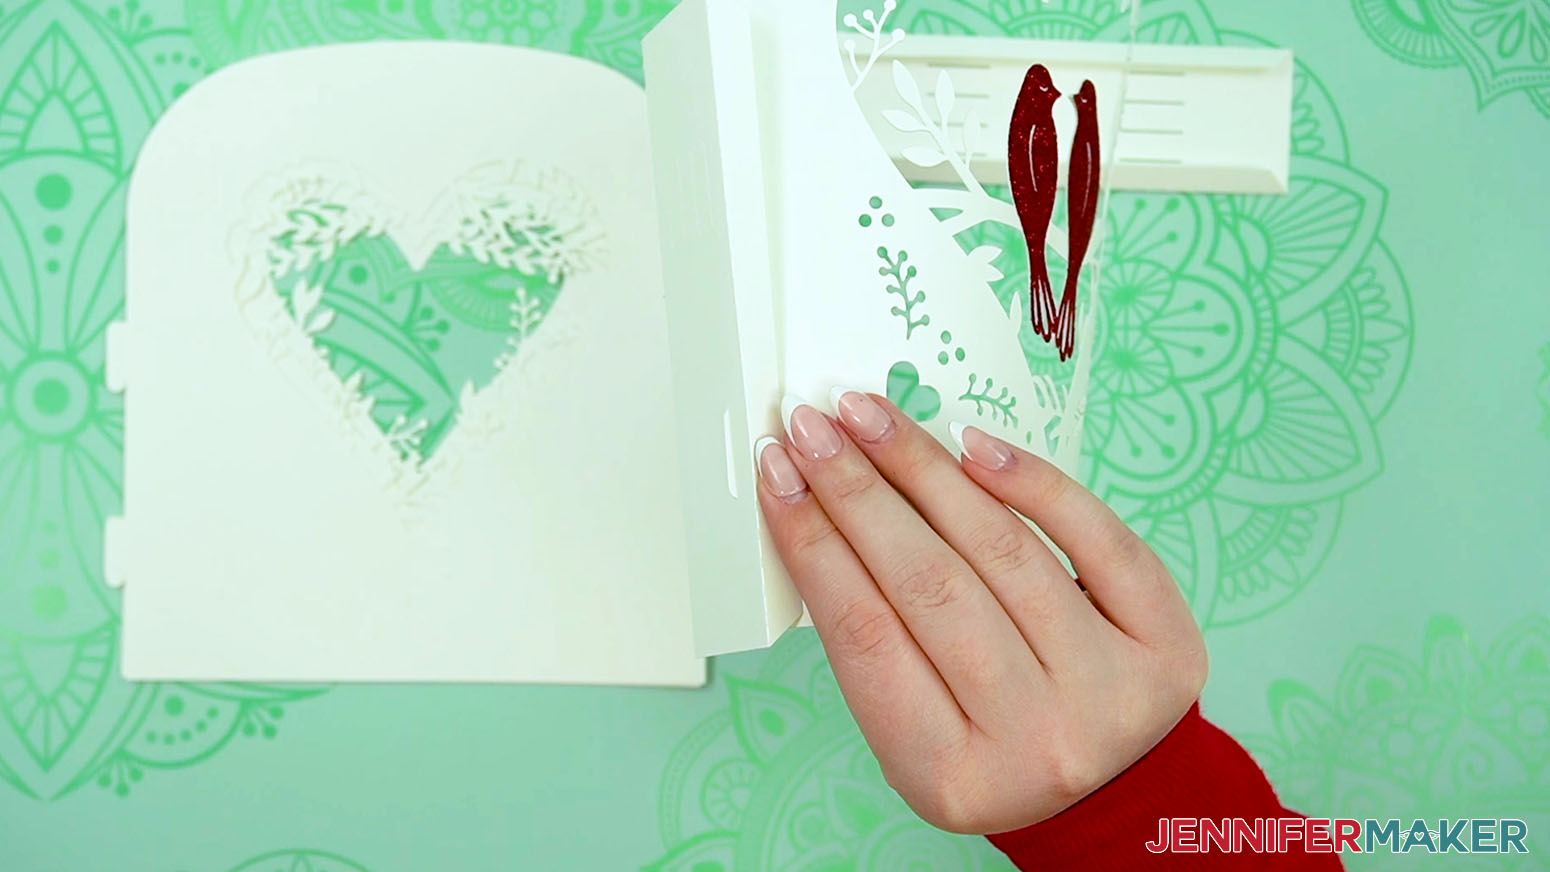
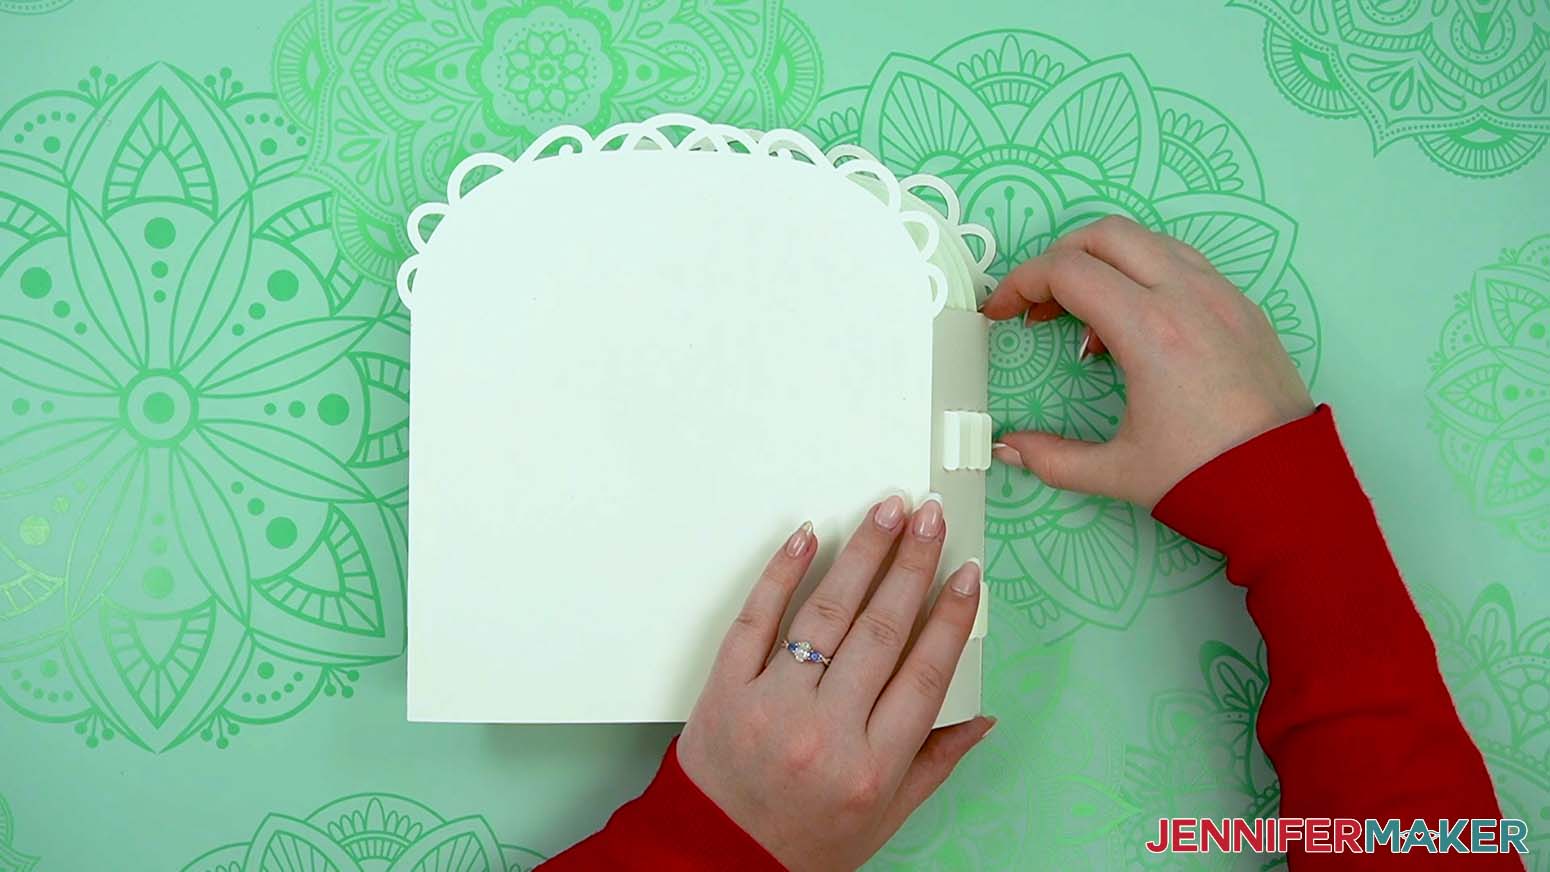
27. It’s easier to assemble one side at a time, so grab a frame side piece and Layer 1. Make sure the folded tabs on the frame face toward the layer.
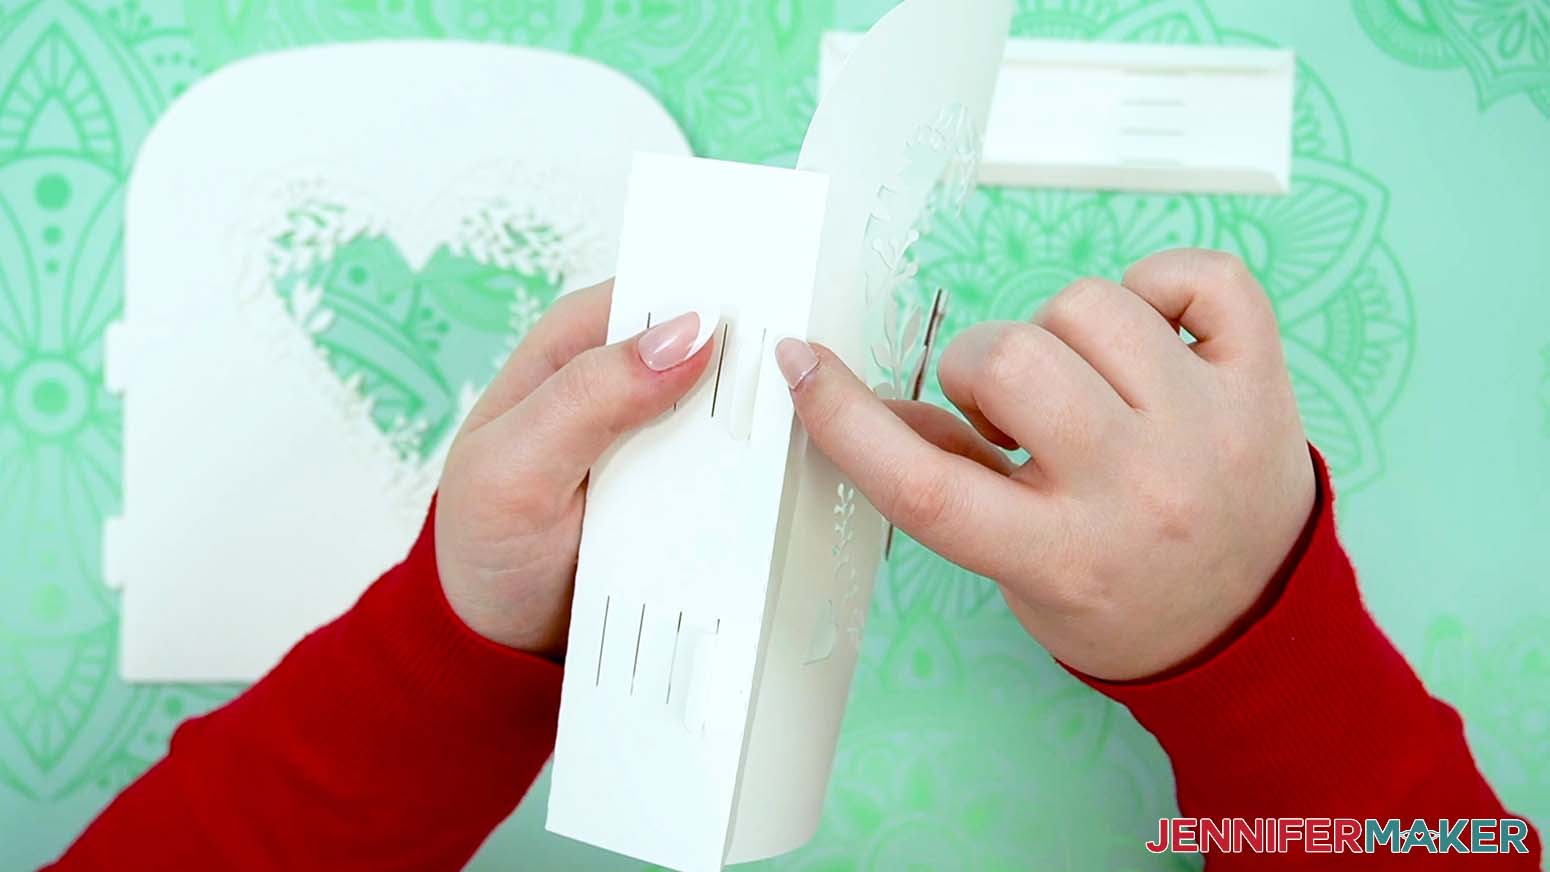
28. Each layer has two small tabs on the side that match the slits on the frame pieces. Gently put the first layer’s bottom tab into the lower slot on the frame.
29. Then put the top tab into the upper slot.
TIP: They’re a tight fit to make the lantern sturdy, so tweezers can help pull the tabs through.
30. Once both tabs are through, gently pull them down to lock them into place.
TIP: You can tell they’re locked when the bottom of the layer is flush with the bottom of the frame.
31. Carefully let the first layer fall out of the way so you can see the next set of slots.
32. Add Layer 2 to the next set of slots using Steps 28-30.
TIP: It can help to reach through the heart to maneuver the tabs. Just be very careful that you don’t bend or rip the delicate elements. The vinyl reinforcement helps here!
33. Add the third and fourth layers in order using Steps 28-30.
34. Take the other side frame piece and make sure the folded tabs face the lantern layers.
35. Starting with Layer 1, use the same process as before to put the tabs through the correct slots and lock them in place.
NOTE: The second side takes some patience and gentle maneuvering, so take your time to avoid damaging the tabs and delicate design elements.
36. Once the last layer is in place, you can see how it looks so far in the base!
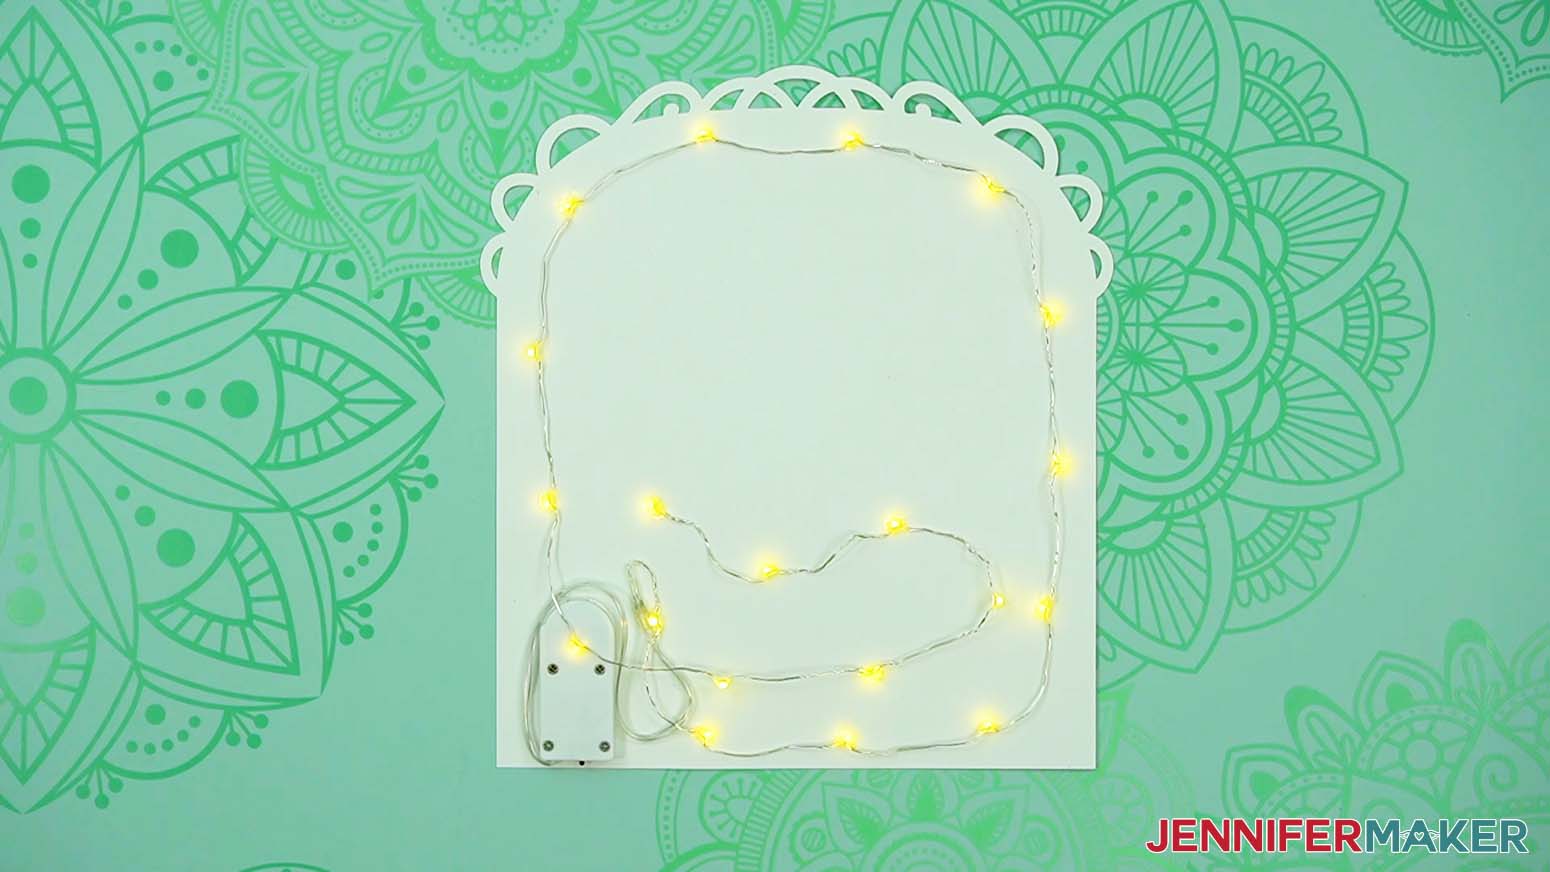
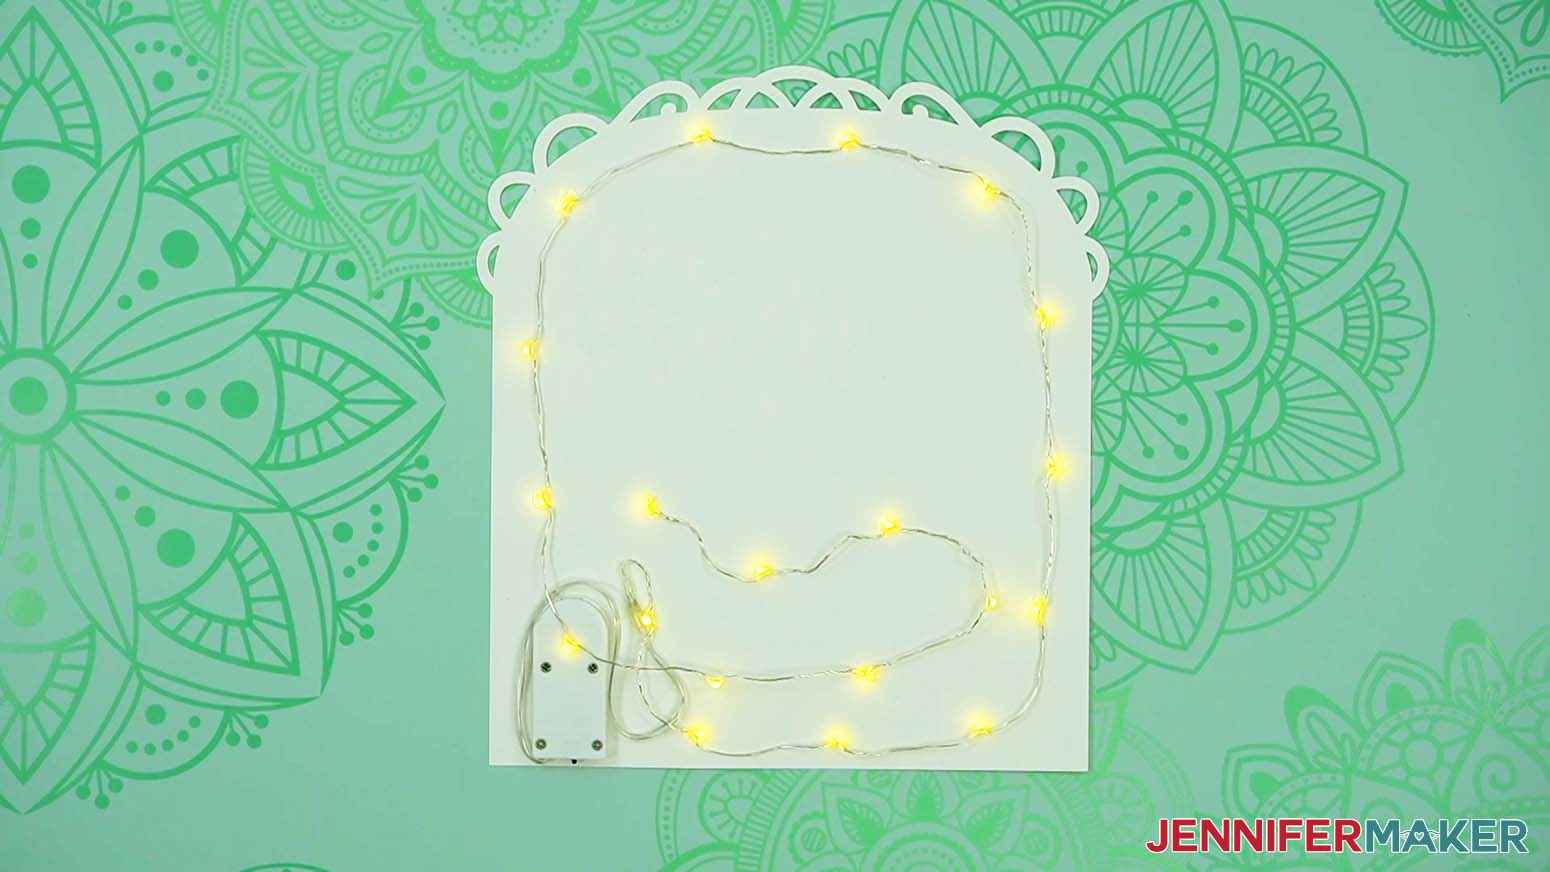
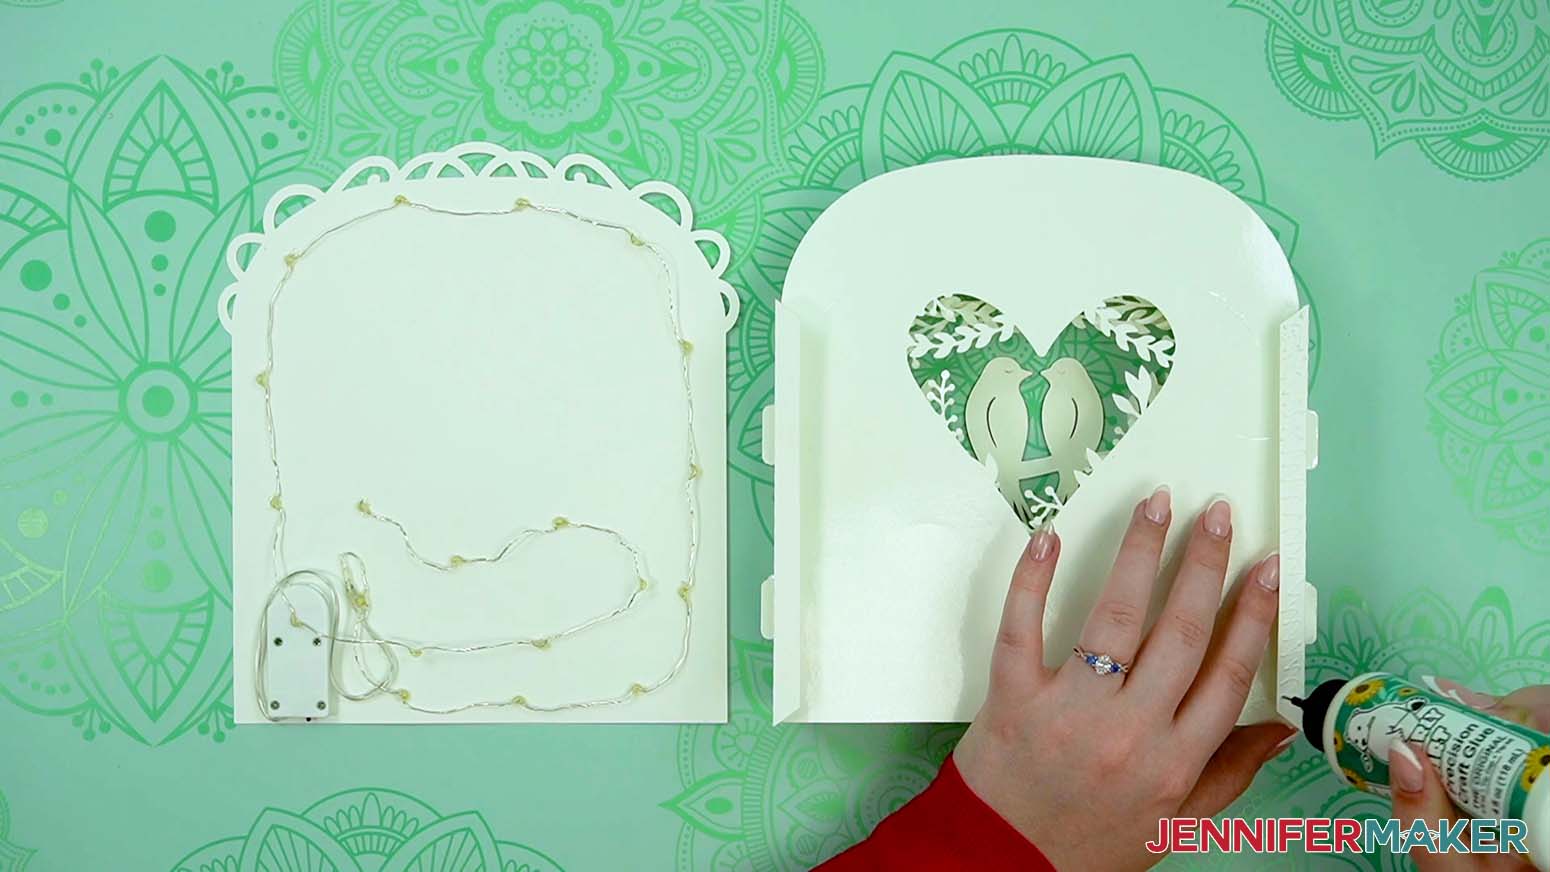
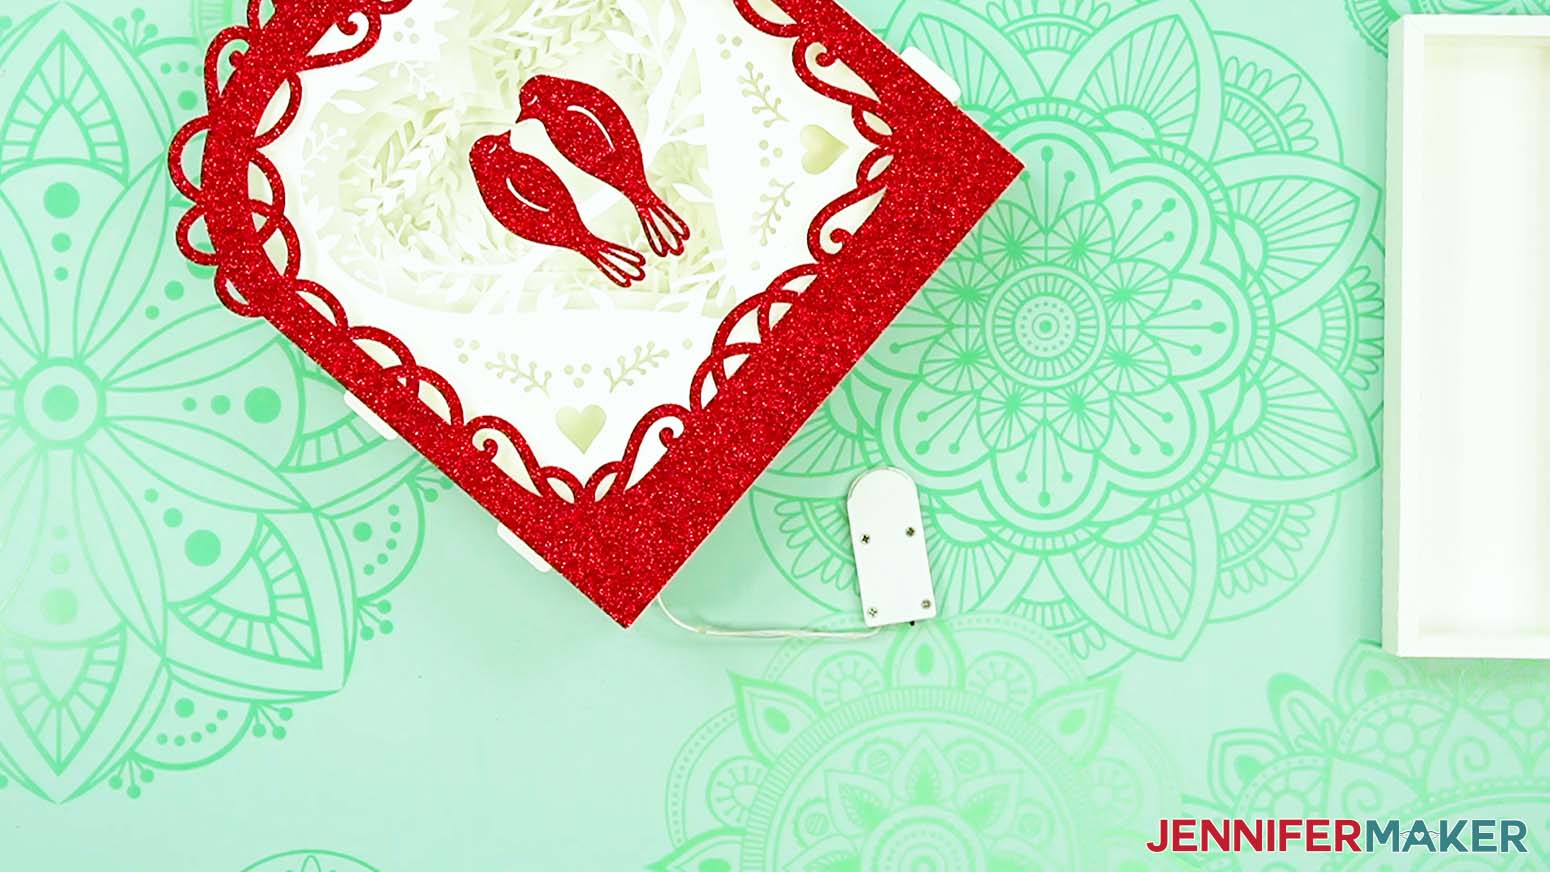
STEP 6: ADD THE LIGHTS TO THE BACK LAYER
1. Grab your fairy lights and the back layer (the one without any cutouts in the center).
2. Unwind the fairy lights and make sure they work.
TIP: Some kinds have a little battery protector tab you might have to remove.
3. It’s important that the switch is accessible, and that you can change the batteries, so add glue dots to the side of the battery pack without screws.
TIP: The easiest way to manage the super sticky glue dots is to rip a section of backing paper off with a dot, then use the paper to press the adhesive in place, and peel the paper away.
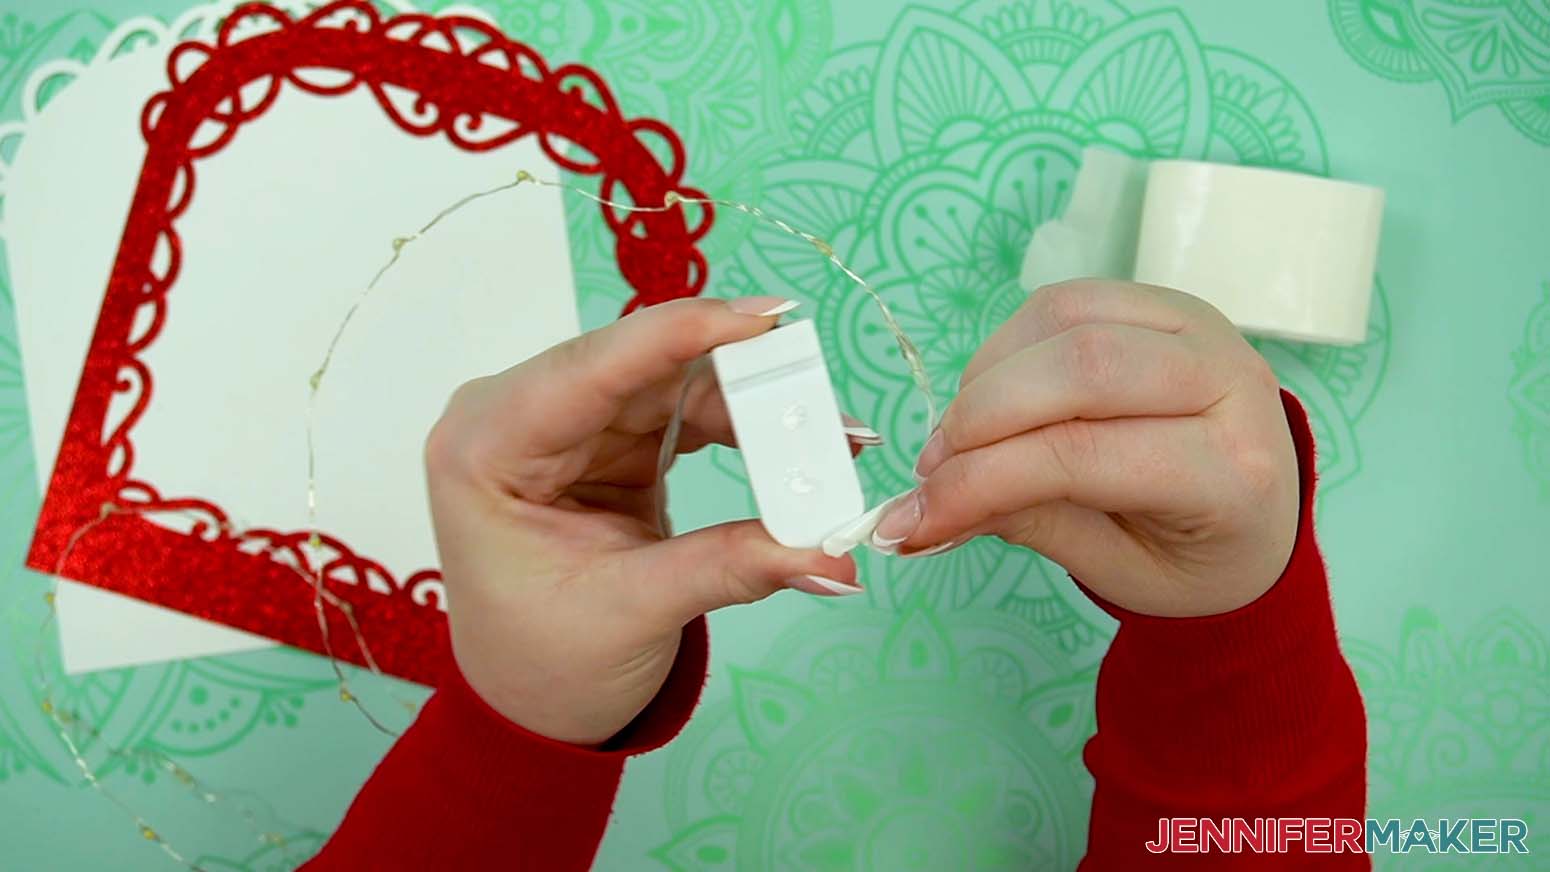
4. Then adhere the battery pack to the inside of the cardstock piece, about half an inch in from the left side, so the frame’s tab can be attached there later. Make sure the switch is right at the bottom edge so you can turn the lights on and off.
5. Use a few glue dots to secure the wire without lights right by the battery pack, but don’t adhere anything to the pack.
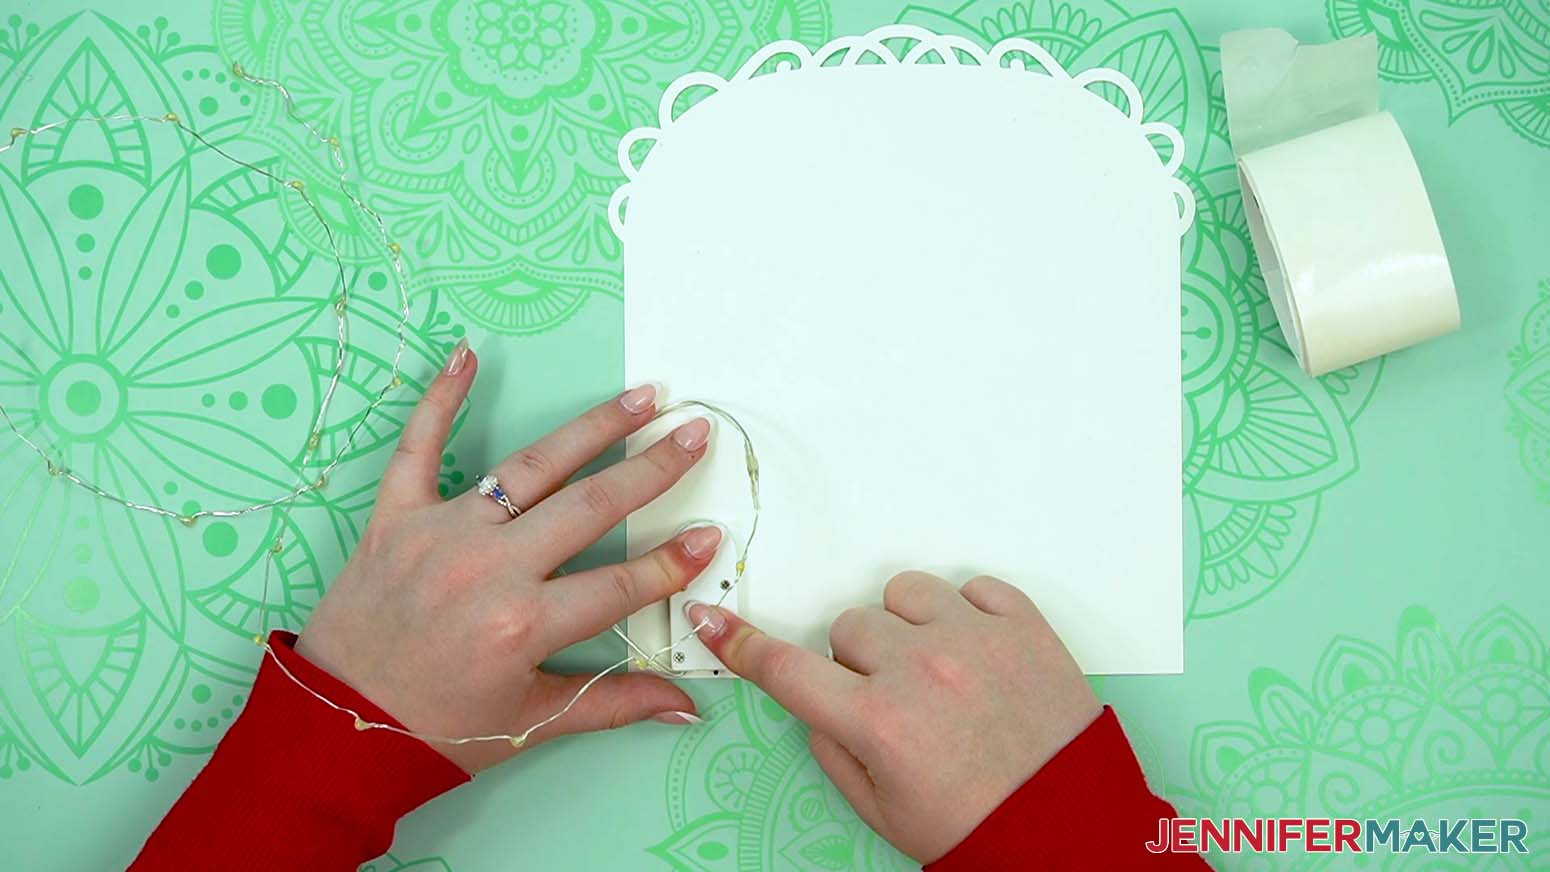
6. The thin wire is difficult to adhere the glue dots to, so stick one dot to the first light, then press it in place right near the coiled section.
7. Attach the lights across the bottom and up the right side of the cardstock back, adhering every other light. Remember, leave the ½” along the right side clear to add the frame’s tab later!
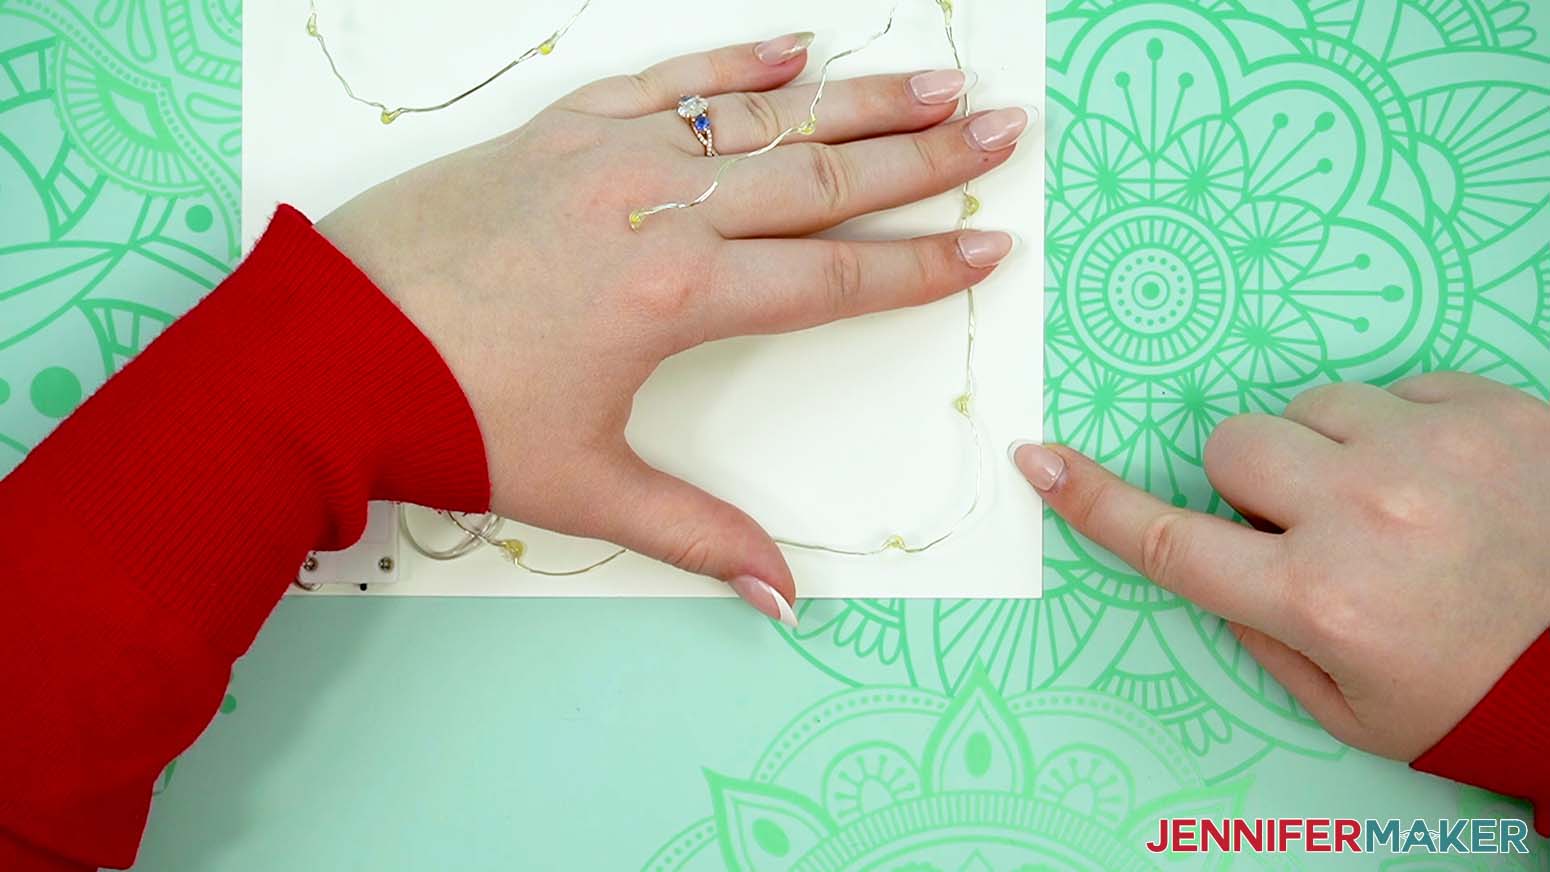
NOTE: We want to light up the sides, top, and bottom of the panel without interfering with the final assembly, so the ½” on either side where the frames will get glued must remain clear. Also, keeping the lights away from the middle will create a softer glow.
8. Keep adding lights along the top, staying about the same distance from the upper edge.
9. Continue down the left side.
10. When you get to the battery pack, try to feed a light or two over it so there isn’t a dark spot, but don’t adhere them to the plastic. That way, they won’t interfere with changing the batteries.
NOTE: Make sure the lights and wire don’t stick up too much.

11. Use the rest of the lights to weave back and forth across the bottom section of the cardstock.
12. You don’t want any of the lights or wire to be visible through the heart cutouts, so hold the rest of the assembled lantern in place against the back piece and look down at everything to check the placement.
13. If anything doesn’t look right, adjust it.
14. If any lights or wire sections stick up, try to tack them down with more glue dots because there’s only about ⅜” clearance before the next layer.
15. Turn on your lights one more time to make sure everything looks good!
STEP 7: FINISH THE LOVE PAPER LANTERN ASSEMBLY
1. Add glue to the back of the lantern’s side frame tab that won’t be near the battery pack.
2. Place the back in position, making sure the edges align and the lights stay in place.
TIP: You can flatten the layers and press against the glued areas to make sure they adhere well.
3. Then, hold up the back piece and add glue to the other side’s tab.
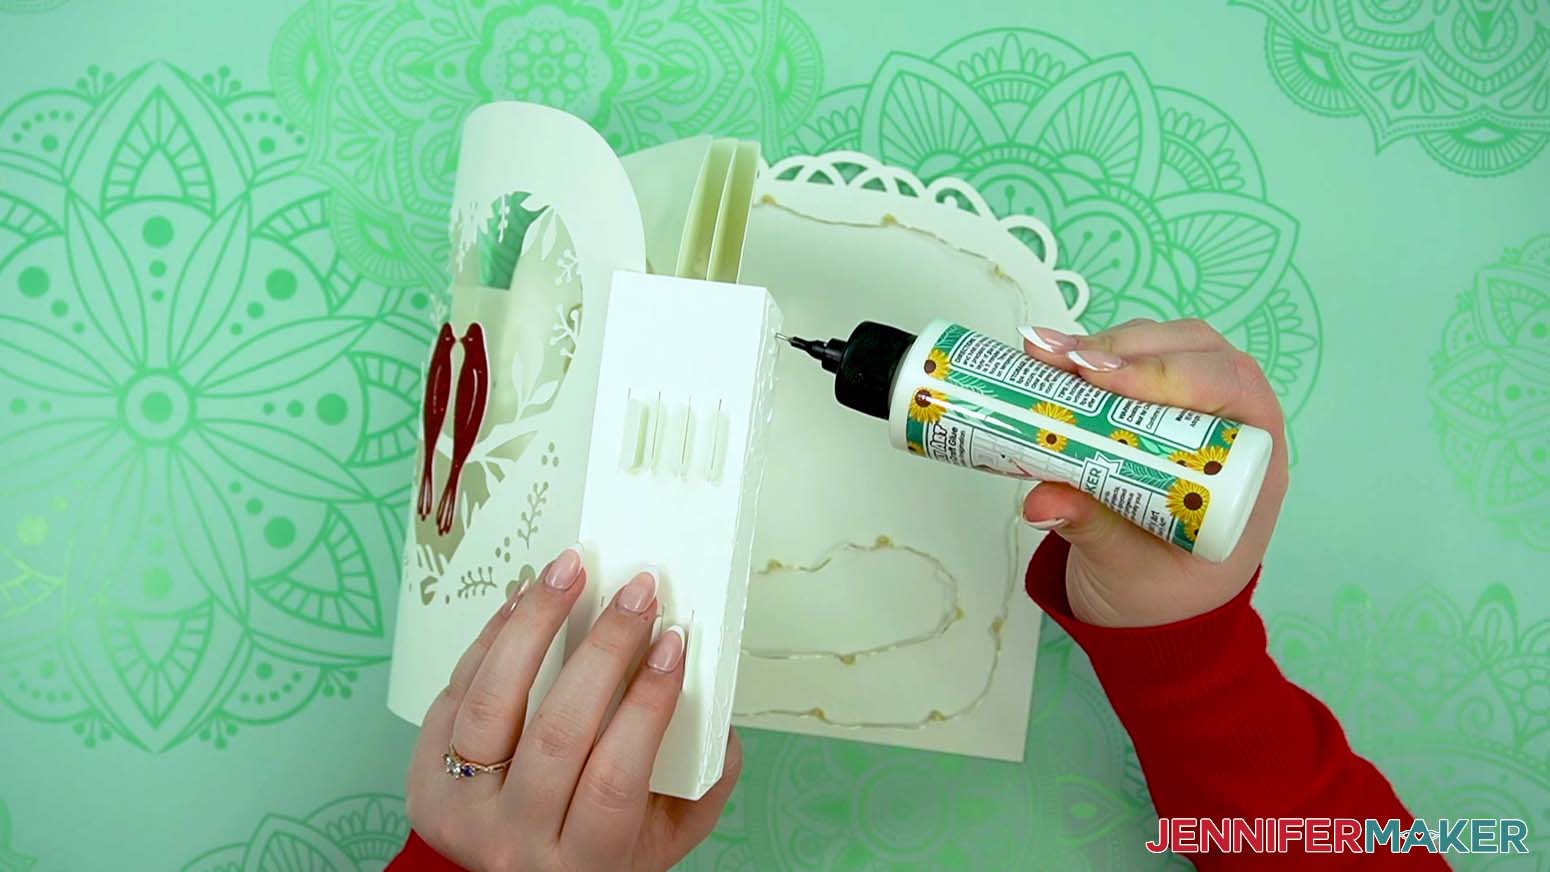
4. Lower the back piece down and make sure the edges line up without disturbing the lights or battery pack.
TIP: You can’t really flatten this side as well, so sneak your fingers in from the sides to help press the tab in place while the glue dries.
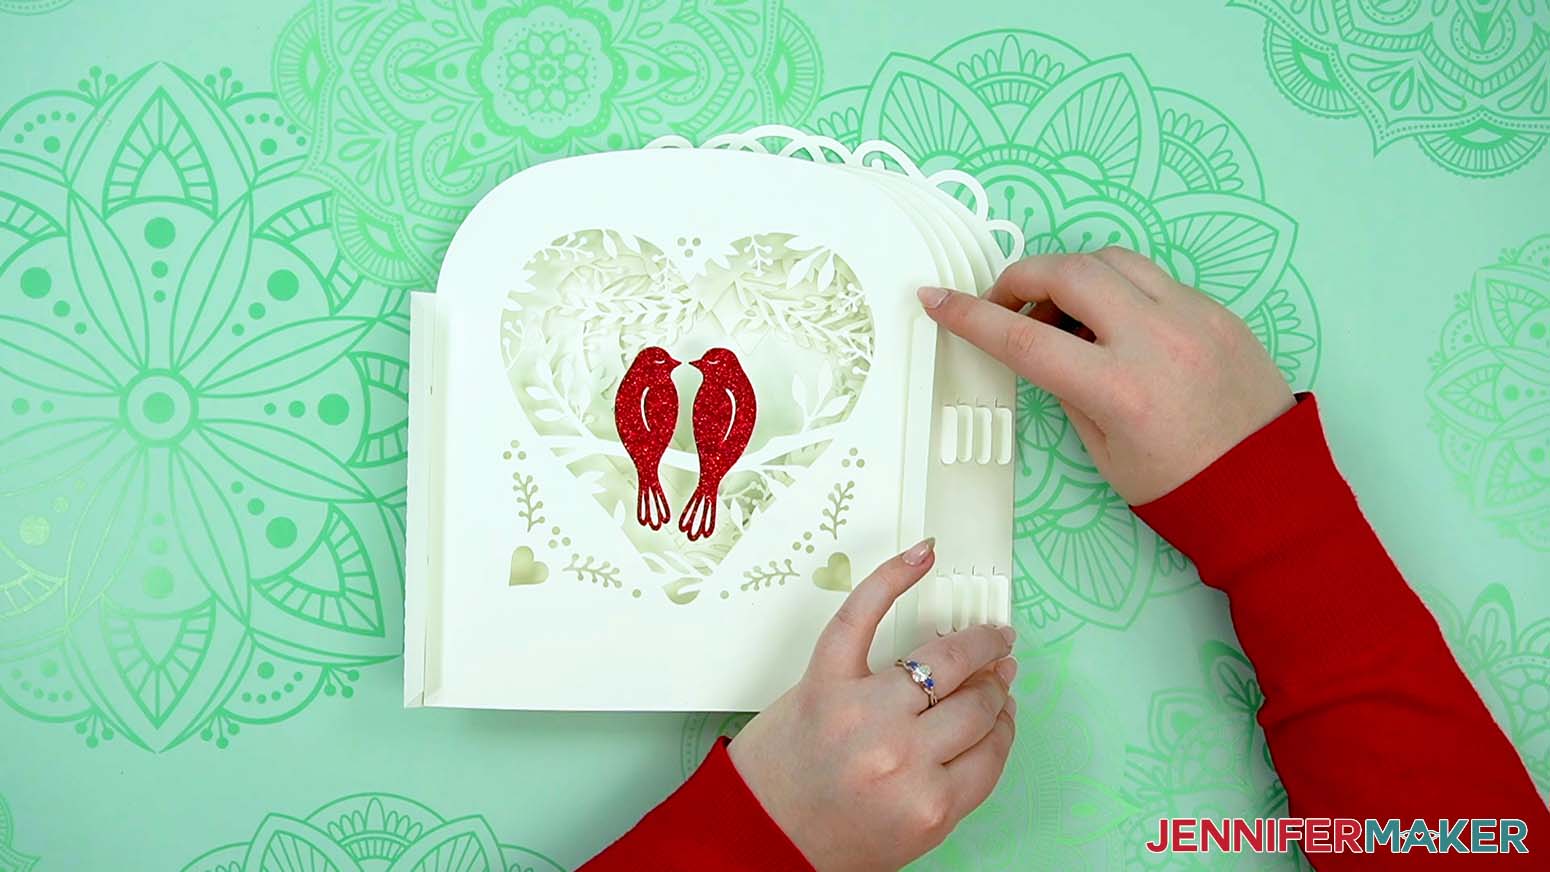
5. Once the back is completely dry, flip the lantern over and glue the front frame piece to the side tabs using the same process.
TIP: Remember, make sure the edges line up!
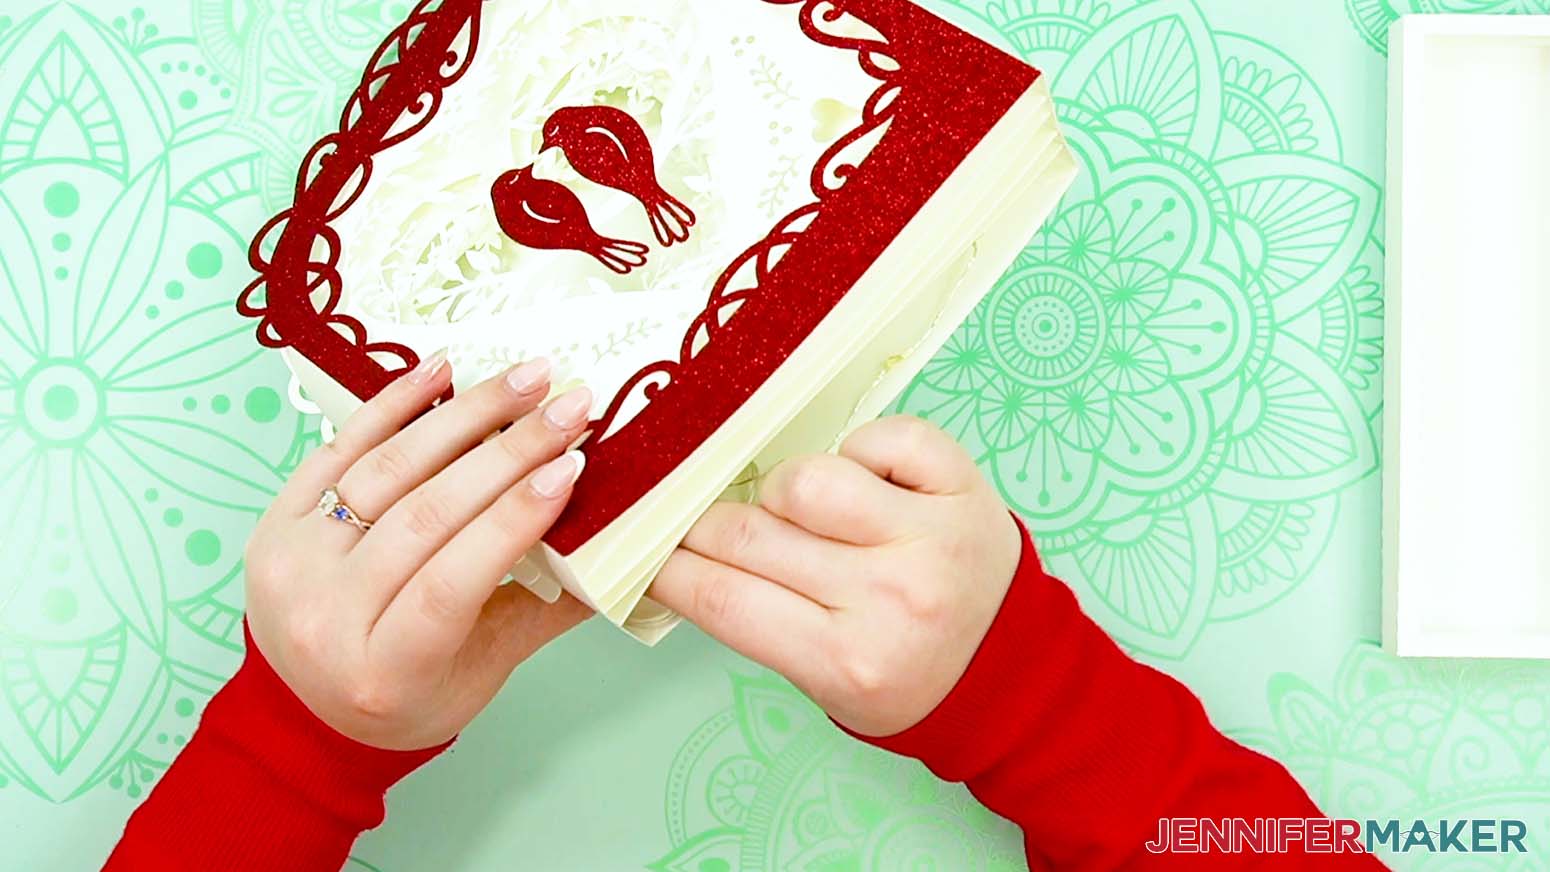
6. Slide the assembled layers into the base and your lantern is complete!
STEP 8: SHOW IT OFF!
Your 3D love paper lantern is complete and ready for display!
To turn on the lights, take the lantern out of the base and flip the switch at the bottom. Then replace the lantern in its base. If you need to replace the batteries, take the lantern out of the base and gently lift the back layer. Then carefully pry up the battery pack.
Once you’ve replaced the batteries, sneak the pack back in place and gently press down to re-adhere the glue dots.
Notes
Finished Size: 8" W x 8.75" H x 2.5" D
Answers to Your Questions About Making a Love Paper Lantern
Q: I want a different design. How do I design my own custom love paper lantern?
A: You can learn how to design your own customized scene in my ADVANCE program. Learn more about ADVANCE here!
Q: Help! My Cricut Design Space screen looks different from yours!
A: If you’re using the latest version of Cricut Design Space, your screen may have slight variations than the screen you see on the video tutorial. Good news: All of the same functions are there, they may just be in different spots or have new icons. Pause the video if you need, or follow along with the written tutorial. If you get stuck, ask for expert support in our Facebook group. Our group has become not just a help center, but also a vibrant community of real people and crafters! Plus, you can catch the latest news on JenniferMaker video tutorials and more.
Q: What do you put in the bottom of lanterns?
A: For these lanterns (and any other paper lantern craft project), all you need to place in the bottom is a strand of LED fairy lights or an LED tea light. Never use real candles in paper lanterns!
Q: How do I display lanterns in my house?
A: There are endless ways to display these lanterns (or your own designs) in your house. Decorate your fireplace mantel, an end table, use some for a cute table centerpiece, or use them to decorate your outdoor space. Just be sure to bring them inside at night, and during humid, windy, or rainy weather.
Q: What do you light paper lanterns with? Can you put tea lights in paper lanterns?
A: If it’s a battery powered LED light, absolutely! They’re the only kind of light safe to use with paper and cardstock. NEVER use real fire or candles in paper crafts!
Q: Do I have to use a Cricut to cut my lantern pieces?
A: No! You can choose how to make a lantern from paper that works with your equipment, or even just with scissors. We always include several versions of each free file in the free download ZIP file. If you have a Silhouette Cameo, which uses Silhouette Studio, you can use the DXF file in Silhouette Basic Edition. If you have upgraded to Silhouette Designer Edition, Designer Edition Plus, or Business, you can use the SVG format with your Silhouette machine to cut each intricate design. If you don’t have a cutting machine, you can print and then cut out my digital download PDF files, too! The ZIP archive in my resource library includes these file types and more!
Q: Where can I find the supplies and tools to make a love paper lantern?
A: My love paper lantern can be made with simple supplies you may already have in your crafting stash. I like to shop on Amazon for their free shipping with my Amazon Prime membership (just make sure to look for sellers with 5-star reviews). You can also find most, if not all of the supplies and tools at your local craft store.
Q: Can I make and sell these love paper lantern designs?
A: I love supporting creative entrepreneurs! If you want to use my designs and projects for commercial use, please familiarize yourself with my important licensing information before selling your crafts.
I do not permit sale of my digital items, but you can sell the creative goods you make with them — as long as you follow my licensing requirements. That means you cannot sell the love paper lantern SVG files, but you can sell assembled lanterns that you made with the files within the guidelines linked above.
Q: Do you have other crafts like this one I can make?
A: I love making paper lanterns! Get inspired by these other lanterns in my free resource library:
- Hanging Fall Paper Lantern
- 3D Pumpkin Lanterns
- More Pumpkin Lanterns
- 3D Paper Christmas Tree Lantern
- 3D Easter Egg Lantern
Q: I’m new to paper crafting. Can you help me learn more about it?
A: Want to learn all there is to know about paper crafting? Check out my ultimate guide to paper crafting with your Cricut, my Cricut Coach Playbook. It’s full of tips, tricks, and techniques, for all kinds of Cricut crafts. The best part is you can apply these tips to thousands of projects — not just mandalas or shadow boxes, but tons of new ideas, too!
Check out my free videos and tutorials to learn useful and popular crafting techniques, and take advantage of my unlimited downloads of SVG and PNG design files to create your own incredible crafts!
Get my free SVG/DXF/PDF files to make a love paper lantern!
(If you do not see the signup form above, click here.)
I love seeing what you make with my designs and how you use them! Please share a photo of your farm shadow box with floating pieces in our Facebook group or tag me on social media with #jennifermaker.
Love,

Want to remember this? Save this love paper lantern tutorial to your favorite Pinterest Board!