Learn how to make hygge-inspired 3D layered paper craft home decor!
Layered paper shadow box projects are always super popular and fun to make! I’ve seen many of you make beautiful versions of our sea animal mandalas and layered heart designs. This time, I wanted to create a wall decoration idea using letters. I just love how it combines two words that mean a lot to me, “Home,” “Love,” and “Kind” along with beautiful, intricate designs in some of my favorite colors. And I’ve made four versions of this paper craft home decor project, so you can make one or all of them! I’ll show you how to cut and assemble them fast and easy!
Watch the full step-by-step paper craft home decor assembly video below:

These shadow box designs are inspired by my love of “hygge” (pronounced “hyoo-guh”). If you don’t know, hygge is a Danish word that evokes feelings of coziness and togetherness. In essence hygge means creating a warm, comfortable atmosphere and enjoying the good things in life with good people. I mean, is there anything better?
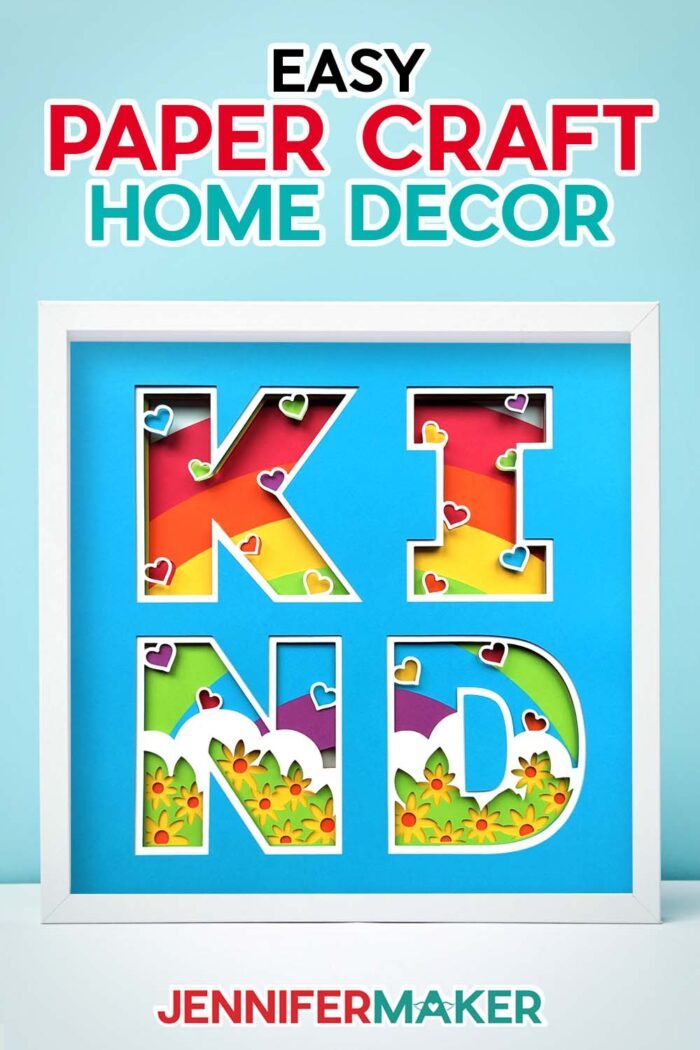
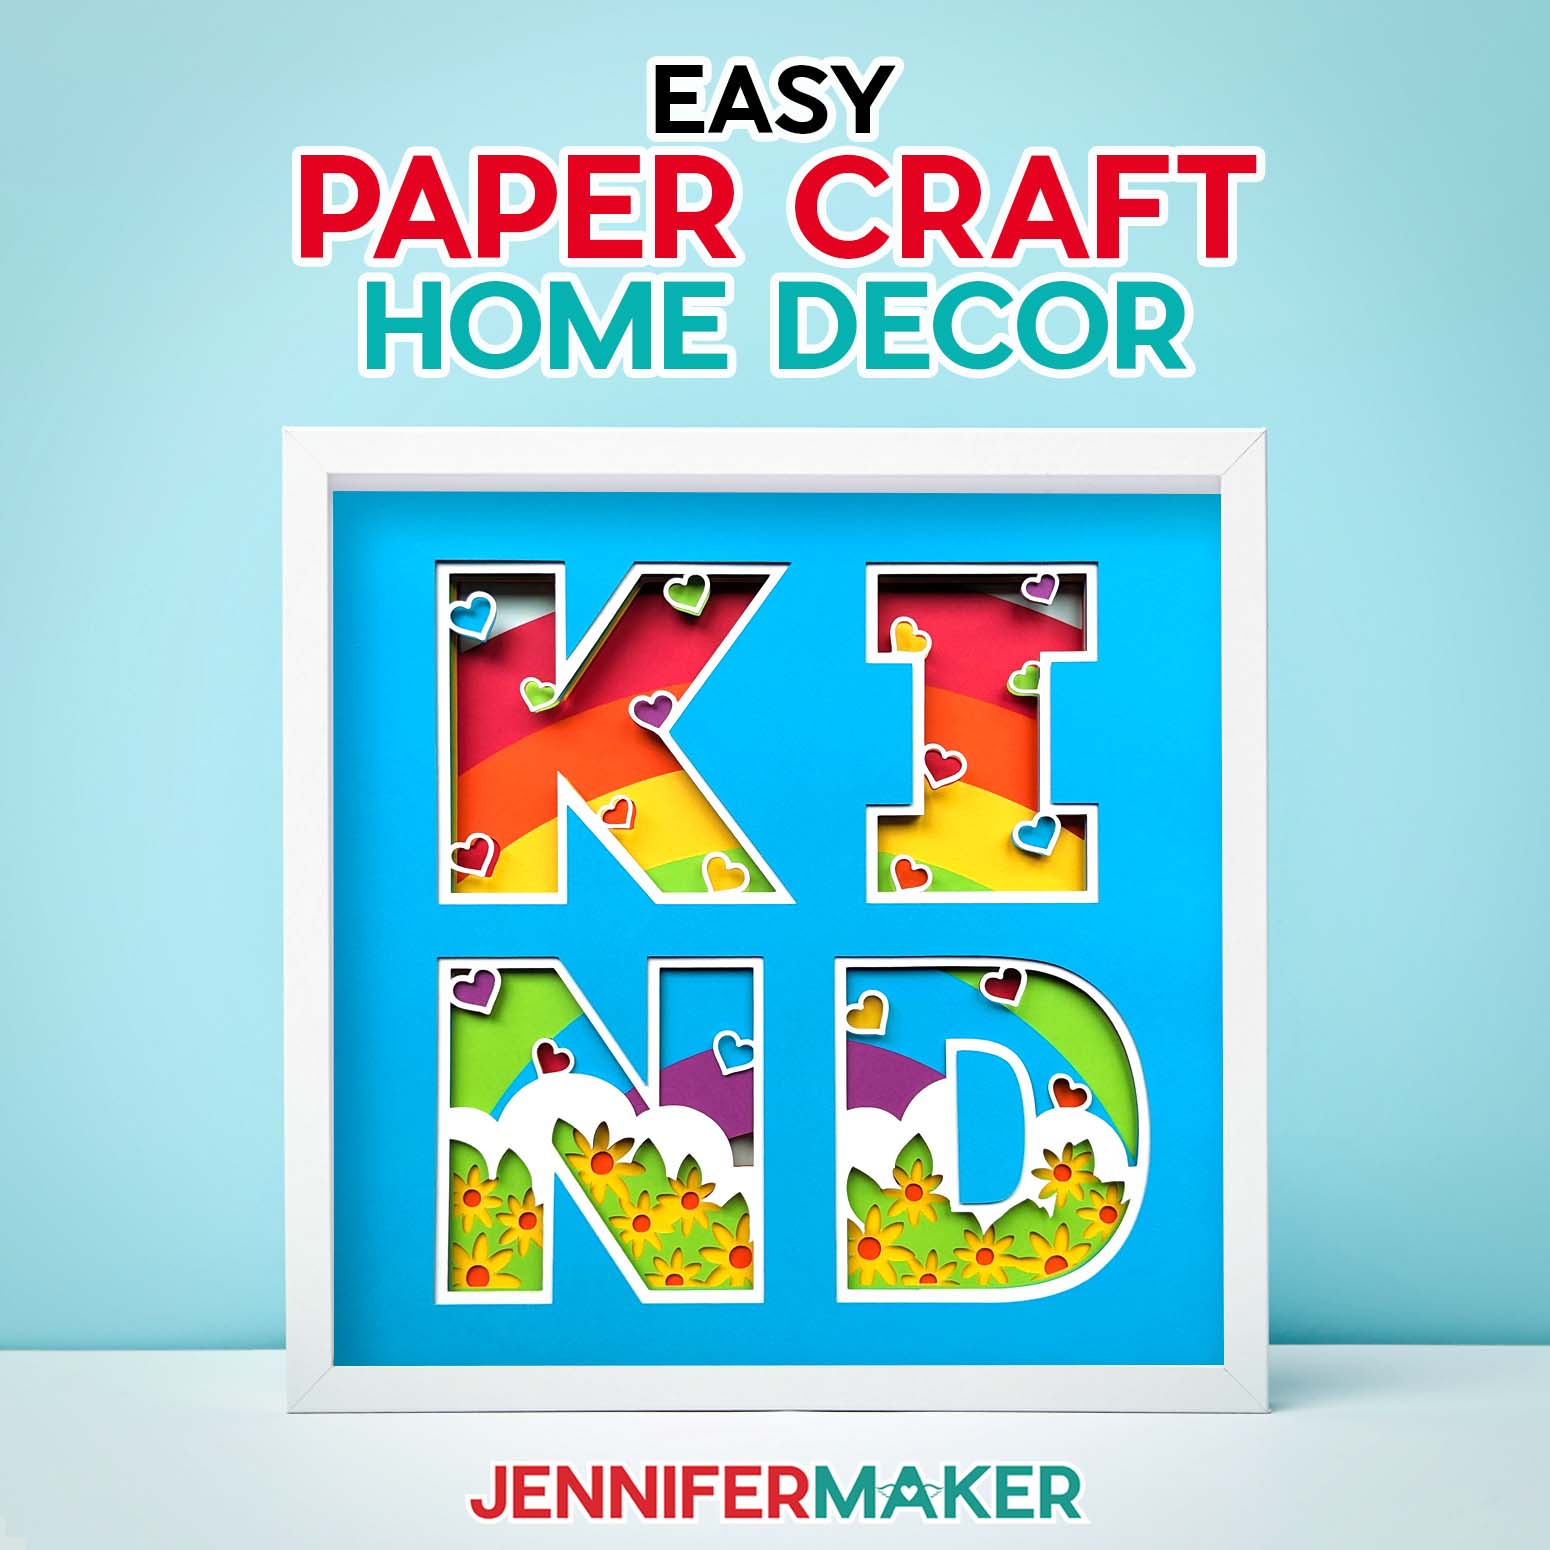
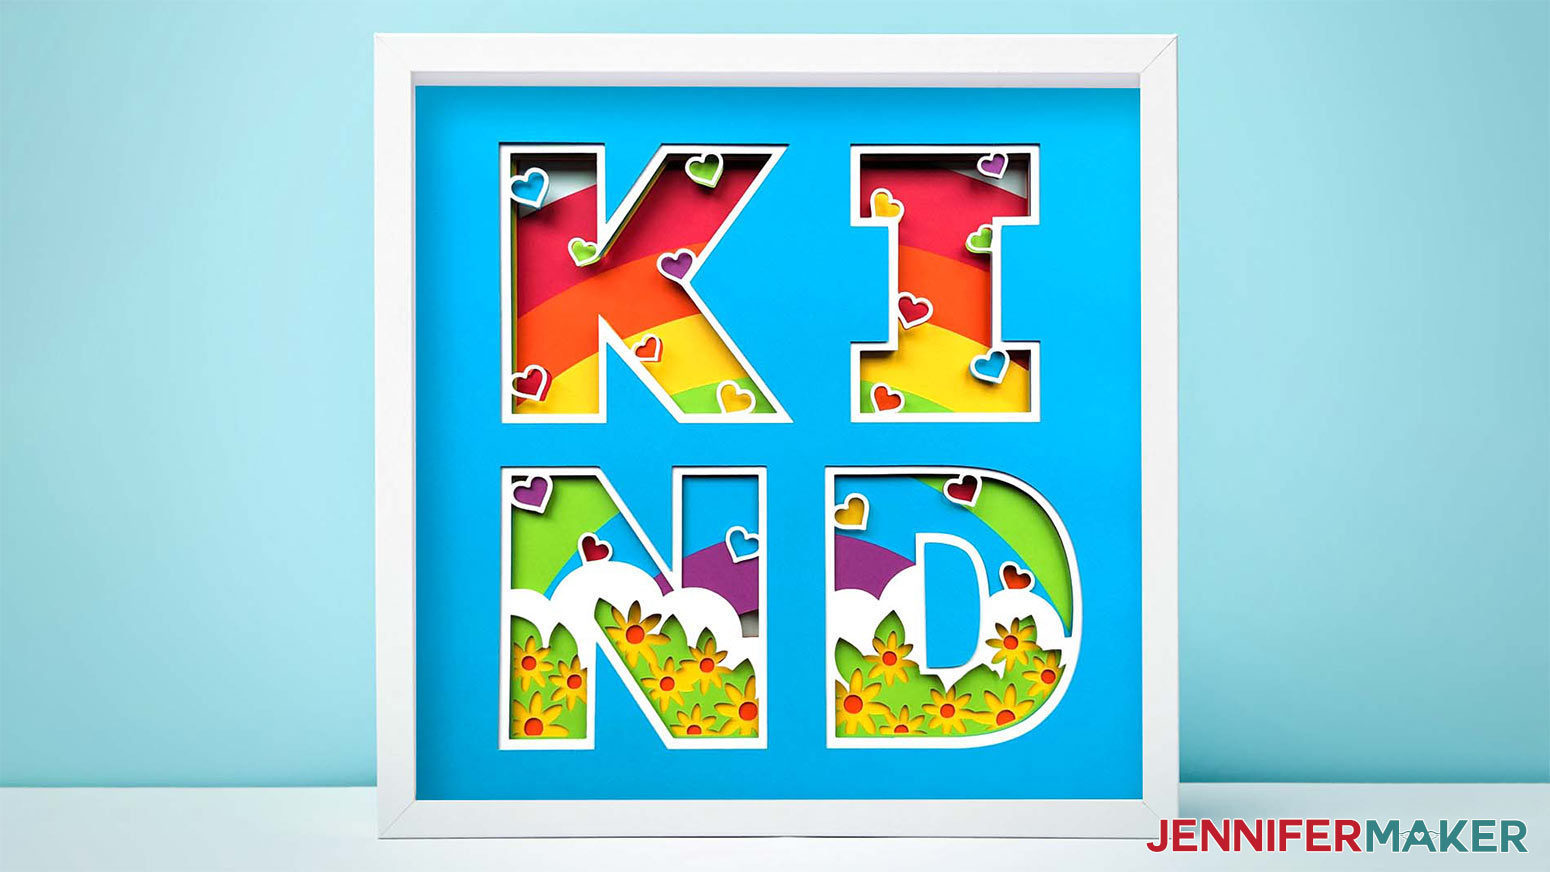
My KIND rainbow design is one I wish we all had hanging on a wall. Kindness is so important to show to others (and ourselves!), and seeing it every day is a great way to remember!
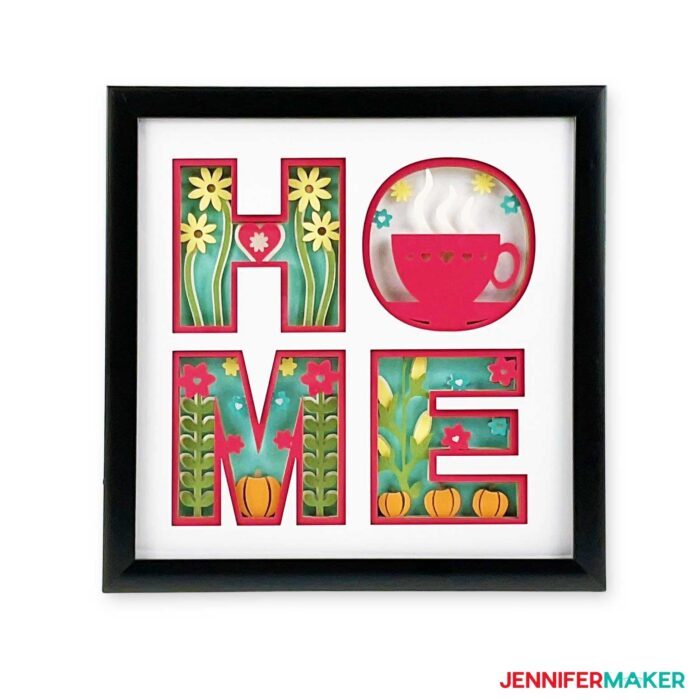
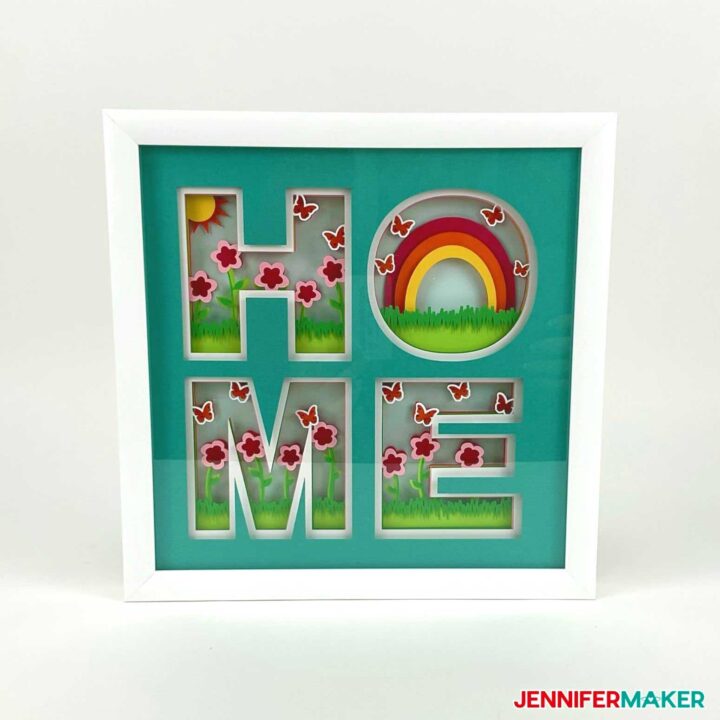
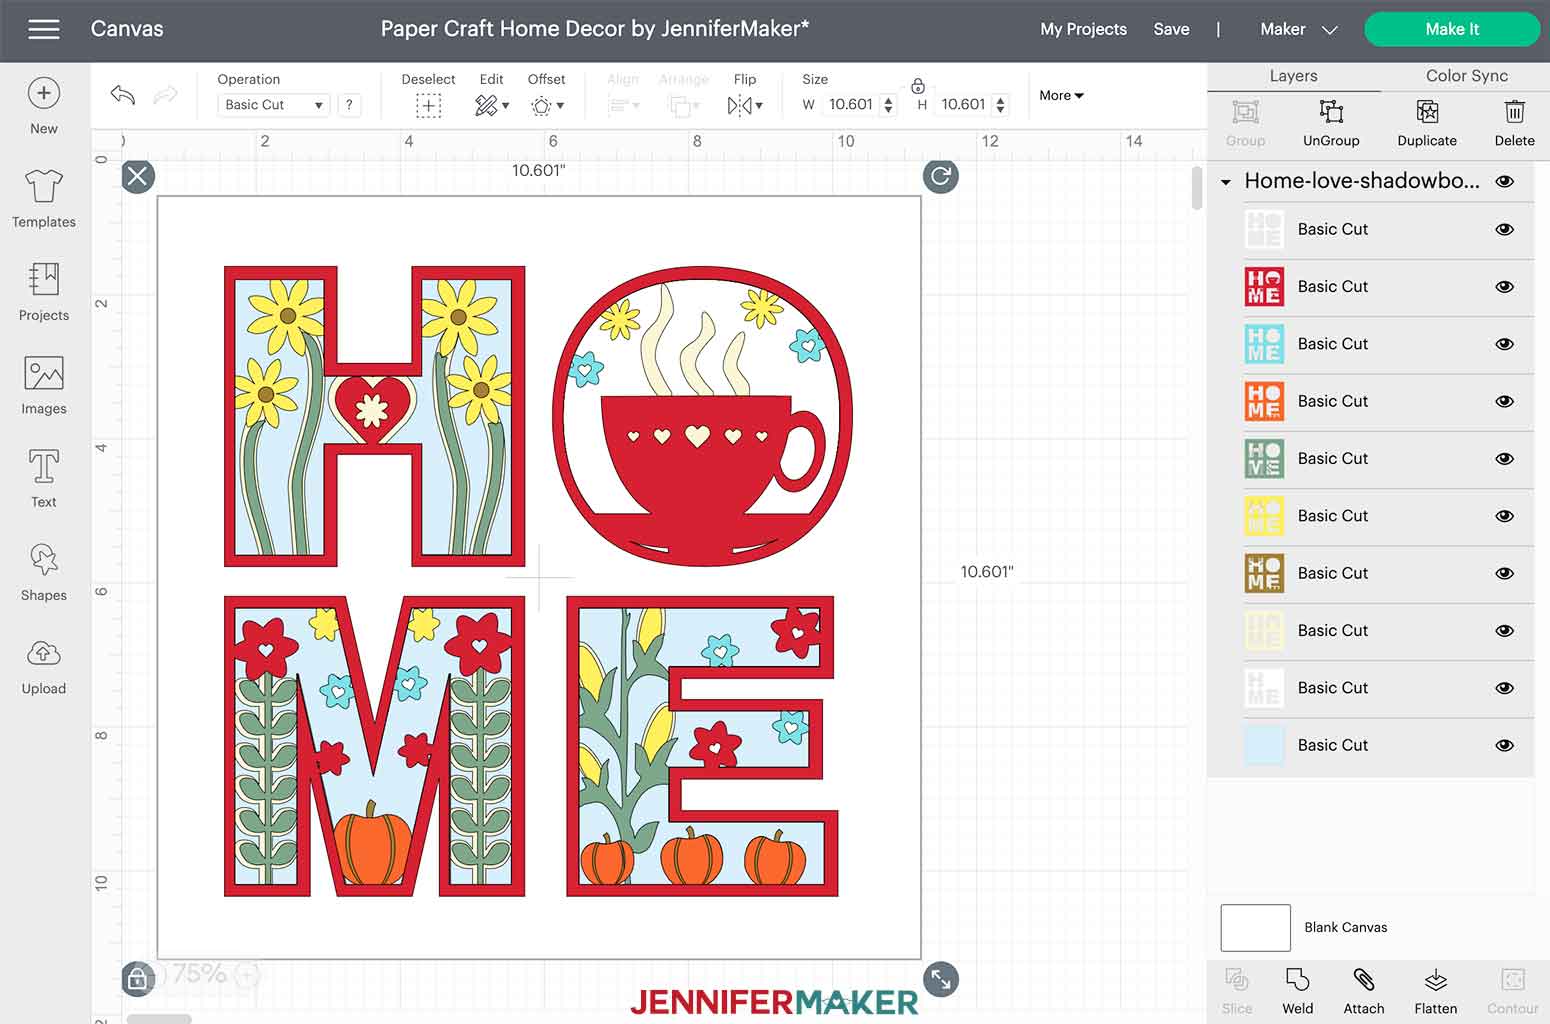
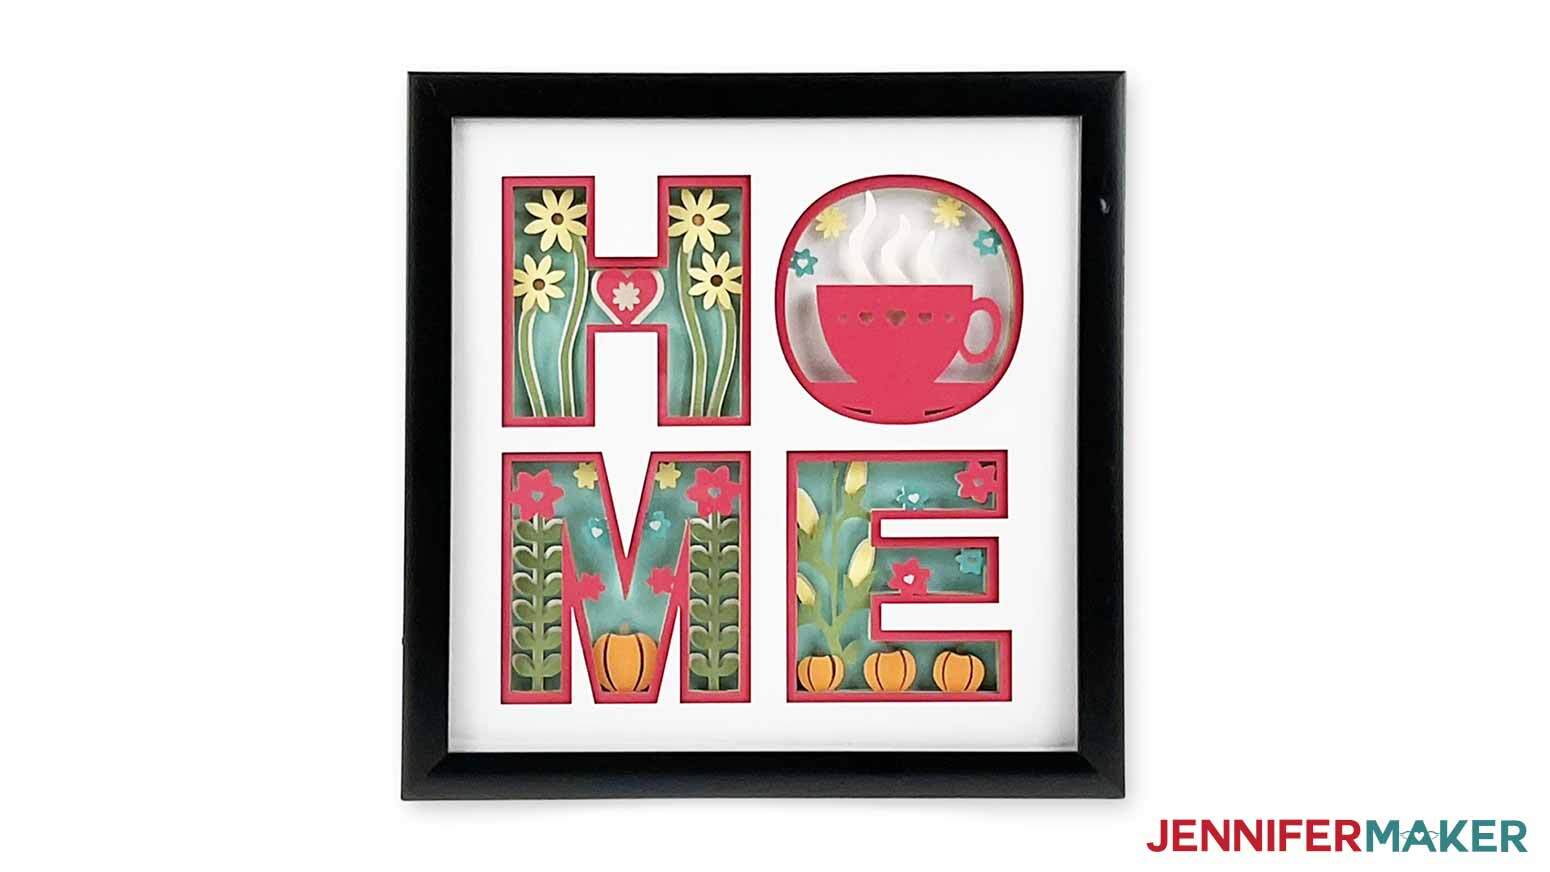
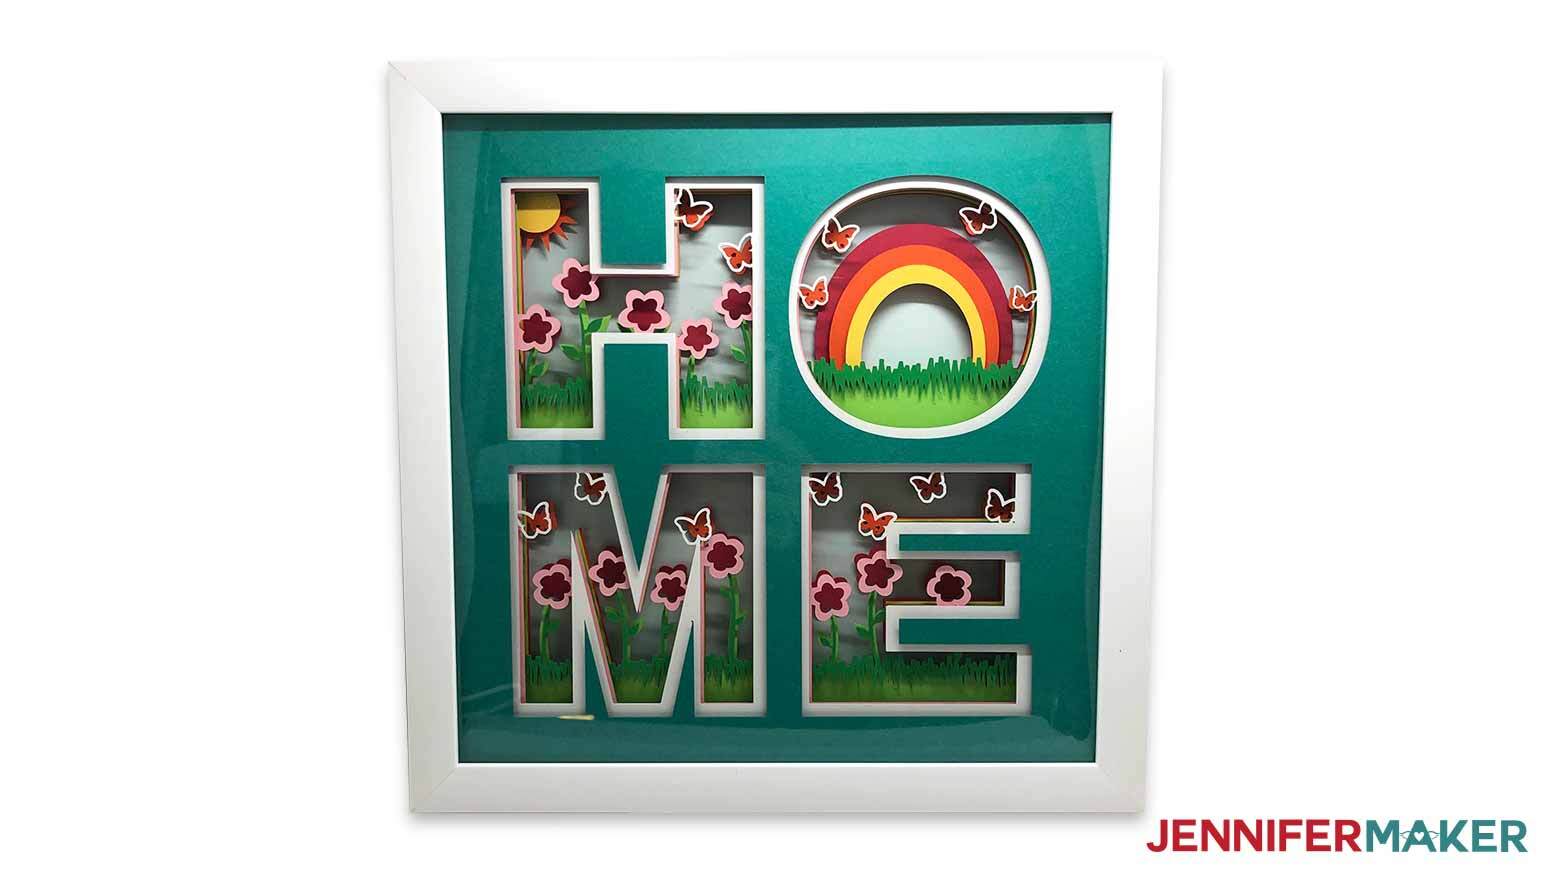
I’ve included spring and fall versions of the HOME design so you can do home decor makeovers for different seasons. That’s one of my favorite things about simple paper crafts!
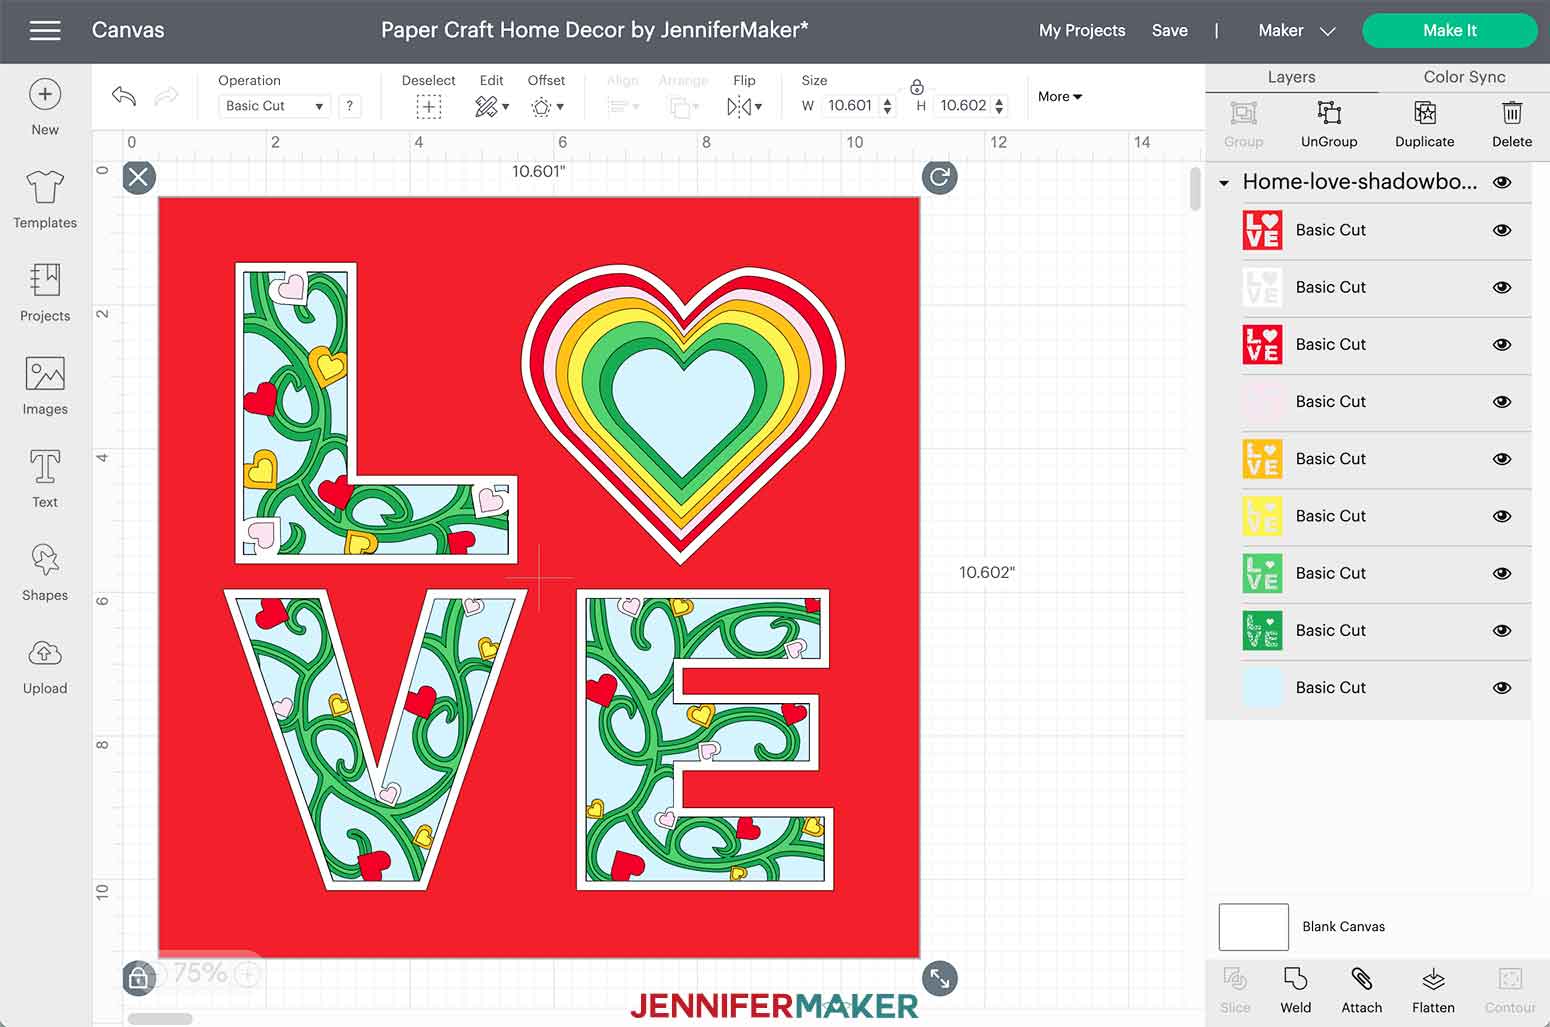
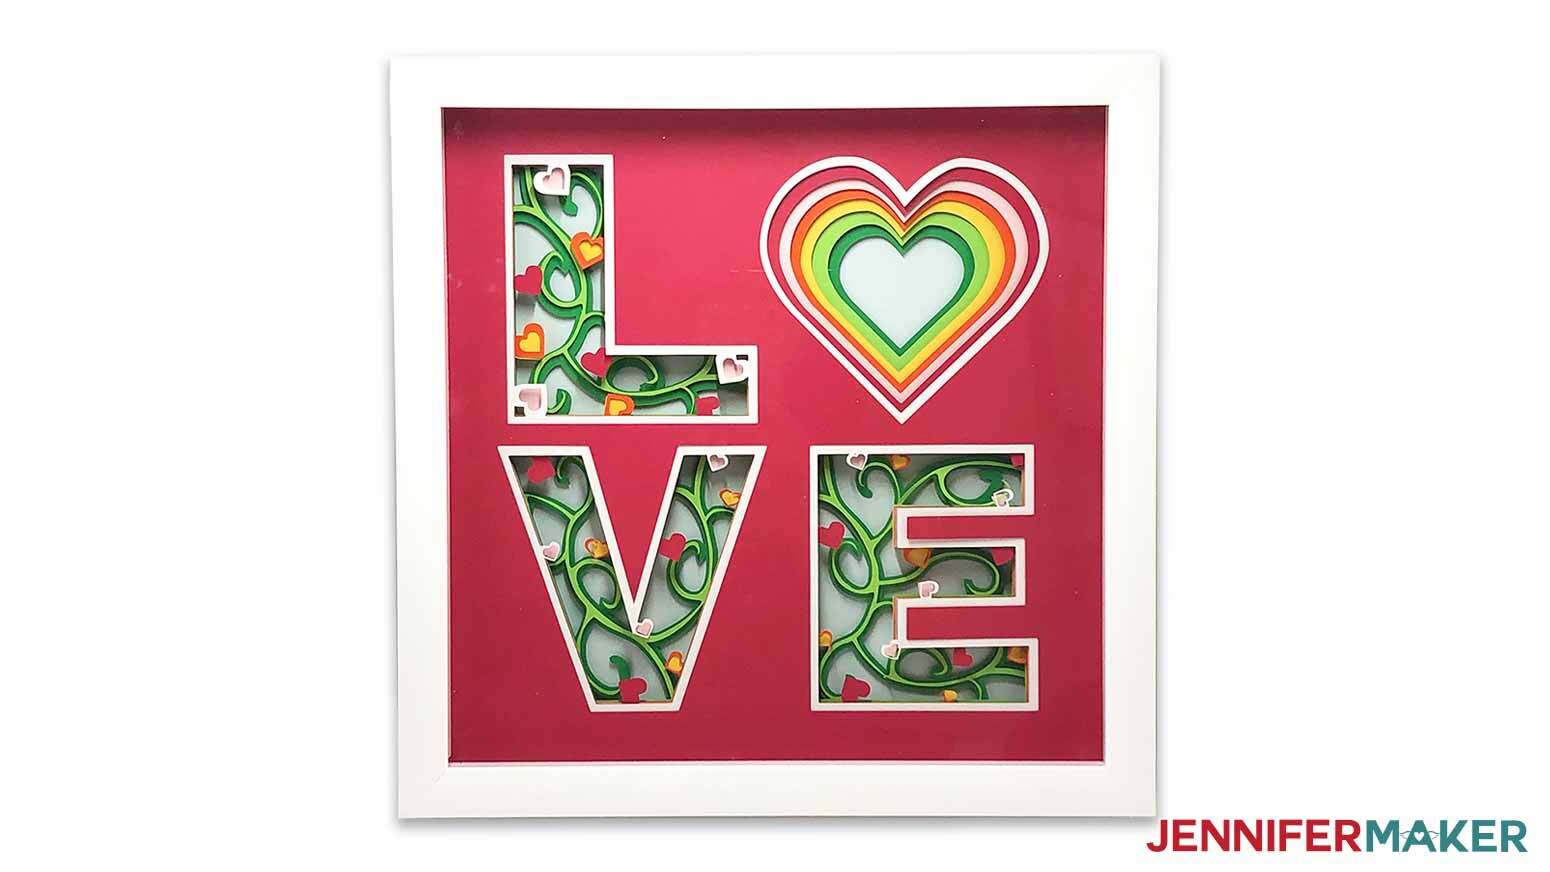
And the LOVE design is perfect for anywhere you want to celebrate with its bright colors and happy details. It would look perfect in a craft room, I think!

Even though these shadow box designs might look complicated, I’ve done all the hard work for you and the cutting machine will do the rest! Wait until you see how fun and easy this is to put together!
To make this paper craft home decor, you need about 9-10 sheets of good, quality cardstock. I suggest a solid core 65 lb. or 80 lb. cardstock — this is especially important when you are cutting intricate designs like this. Quality matters in paper crafting and good materials are a simple way to save time and money in the long run.

We will also use some foam adhesive tape to attach the layers and a 12 by 12 inch shadowbox… and that’s it for materials! Easy peasy wall art!
You can cut your cardstock with a craft knife, but it’ll be much easier and faster to cut it with a cutting machine like a Cricut. And if you do use a Cricut machine as I am, you’ll also want to use your fine-point blade, a blue LightGrip or green StandardGrip machine mat, a scraper tool, a brayer, and a weeding tool. I cut my examples on a full size Cricut Maker, but the designs can be shrunk to cut on a Cricut Joy! If you use a shadow box with glass, remember to wipe down the glass with rubbing alcohol and a lint-free cloth to make it shine!
Let me show you how easy it is to make this pretty paper craft home decor with my free SVGs and simple materials! This post contains some affiliate links for your convenience (which means if you make a purchase after clicking a link I will earn a small commission but it won’t cost you a penny more)! Read my full disclosure policy.
Materials to Make a Paper Craft Home Decor with Layered Paper
View my Amazon shopping list with the exact items we used to make this project
- 9 or 10 Sheets of 12″ x 12″ 65-80 lb. cardstock in different colors – number of sheets depends on which design you make
- 12″ x 12″ Shadow Box – helps you put the layers in the right place, too!
- Double-sided 3D adhesive foam squares or circles (you can also use 3D Zots or adhesive foam tape)
- Cricut Blue LightGrip Machine Mat, 12″ x 12″ -OR-
- Cricut Green StandardGrip Machine Mat, 12″ x 12″ – an older green mat can stick about the same as a fresh blue one!
- Scraper
- Brayer
- Weeding Tool
- Isopropyl Alcohol and a lint-free cloth (or shop cloths!) to clean the frame
- A method to cut your cardstock – I used the amazing Cricut Maker series machine but you can also use the Cricut Explore series, a Cricut Joy series, or a Cricut Venture
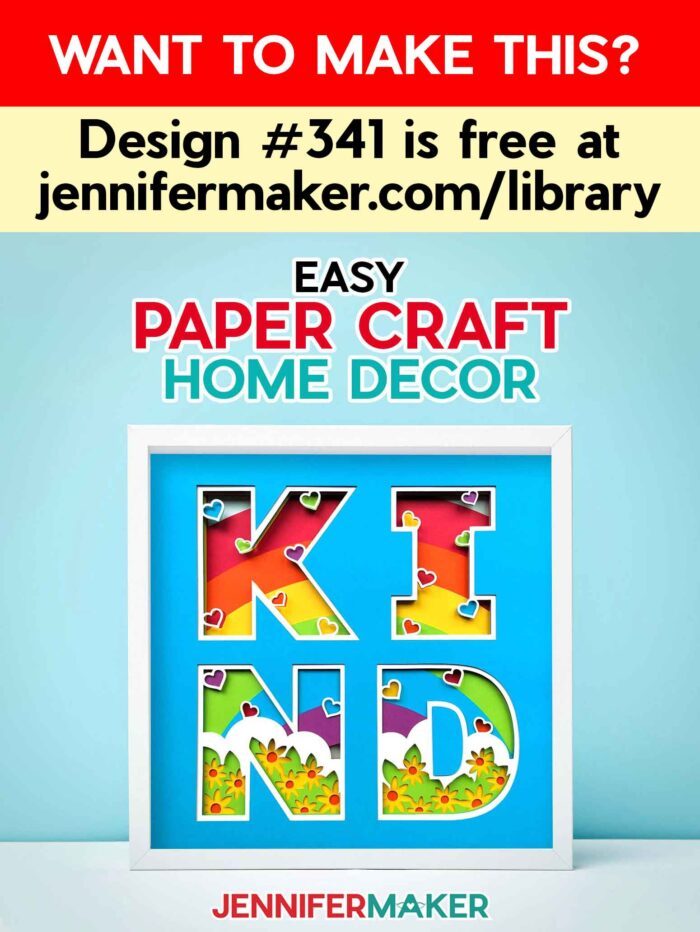
- Design #341 – My free paper craft home decor SVG/PDF/DXF design files are available in my free resource library – get the password by filling out the form at the bottom of this page
How to Make Your Own Beautiful Paper Craft Home Decor
Paper Craft Home Decor
Make a colorful, layered paper design to add to your home decor!
Materials
Tools
- A method to cut your cardstock — I used the amazing Cricut Maker but you can also use the Cricut Maker 3, an Explore series machine, or a Joy after resizing
- Cricut Blue LightGrip Machine Mat, 12" x 12" -OR-
- Cricut Green StandardGrip Machine Mat, 12" x 12"
- Cricut XL Scraper
- Cricut Weeding Tool
- Brayer
- Isopropyl Alcohol
- Lint-Free Cloth
Instructions
STEP 1: GET MY FREE PAPER CRAFT HOME DECOR DESIGN FILES
First, download my free Paper Craft Home Decor SVG/DXF/PDF files, Design #341, from my free resource library. There are four different designs – two "HOME," one "LOVE," and one "KIND." These pieces of art fit in a 12” x 12” shadow box and are perfect for decorating your home!
You can cut these layered designs by hand with the printable PDF, or cut them on a cutting machine with the SVG cut files. Let me show you how to cut these on a Cricut cutting machine.
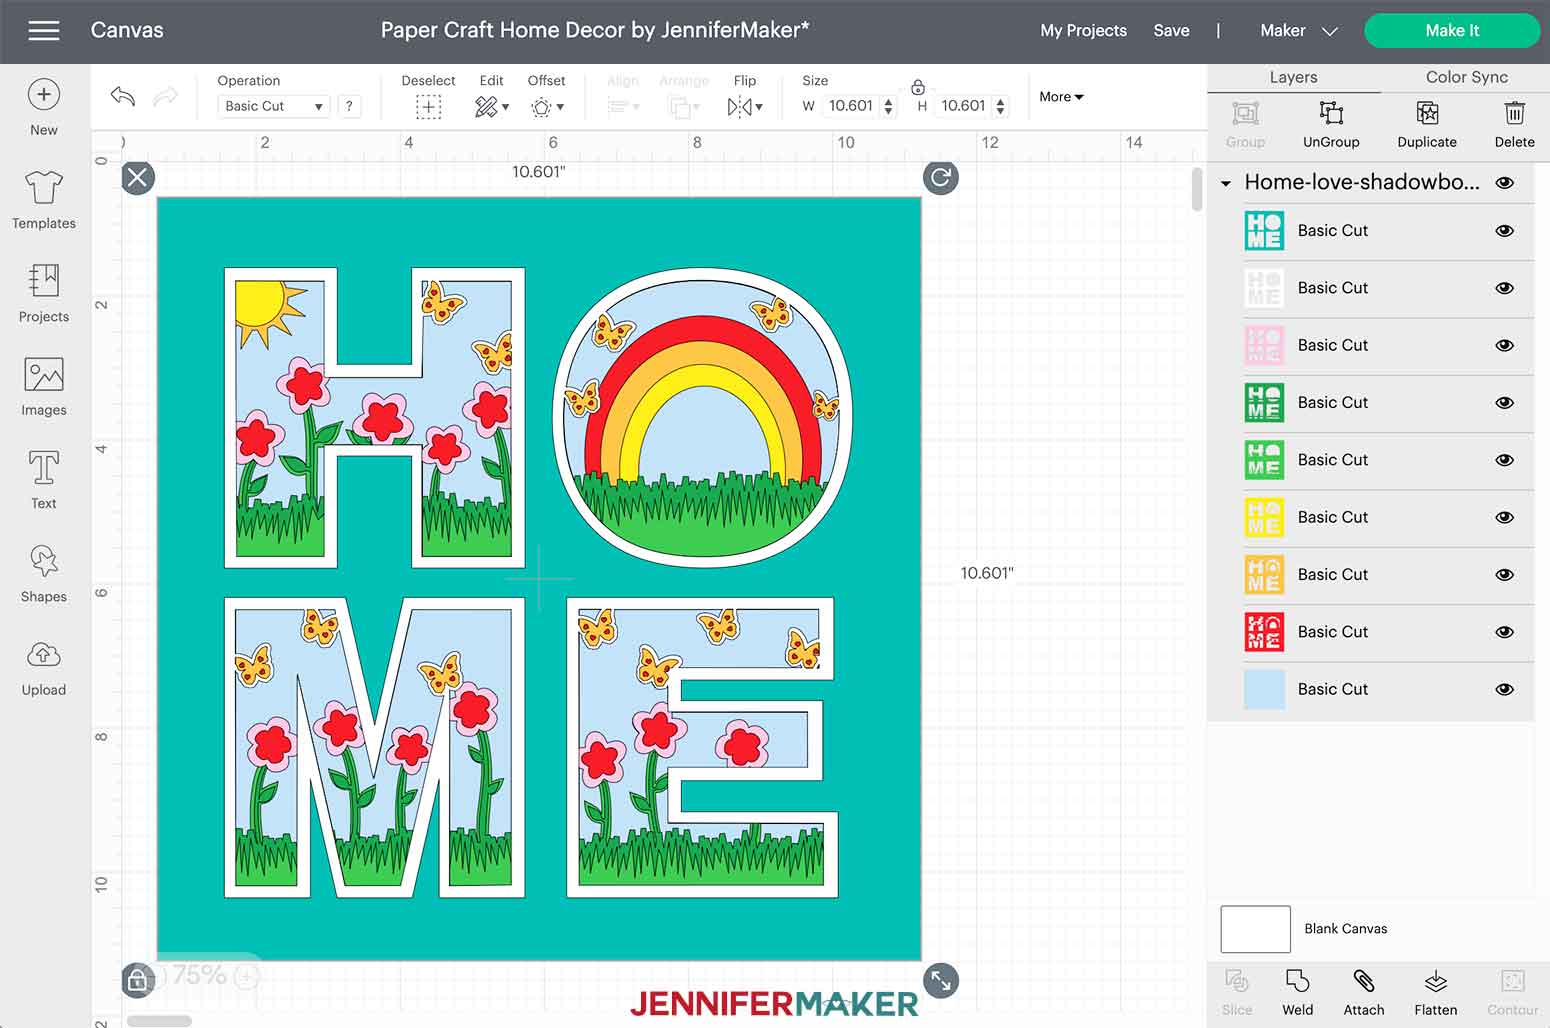
First, upload the SVG cut file of your choice to your design software. If you're not sure how to upload an SVG cut file to Cricut Design Space, watch this helpful video SVGs Made Simple training series I made.
If you're on an iPhone or iPad, here's how to download and upload SVG files to the Cricut Design Space app.
This is what the Paper Craft Home Decor SVG cut files look like in Design Space when you import them to Cricut Design Space.
The Home designs have 10 layers. The Love and Kind designs have 9 layers.

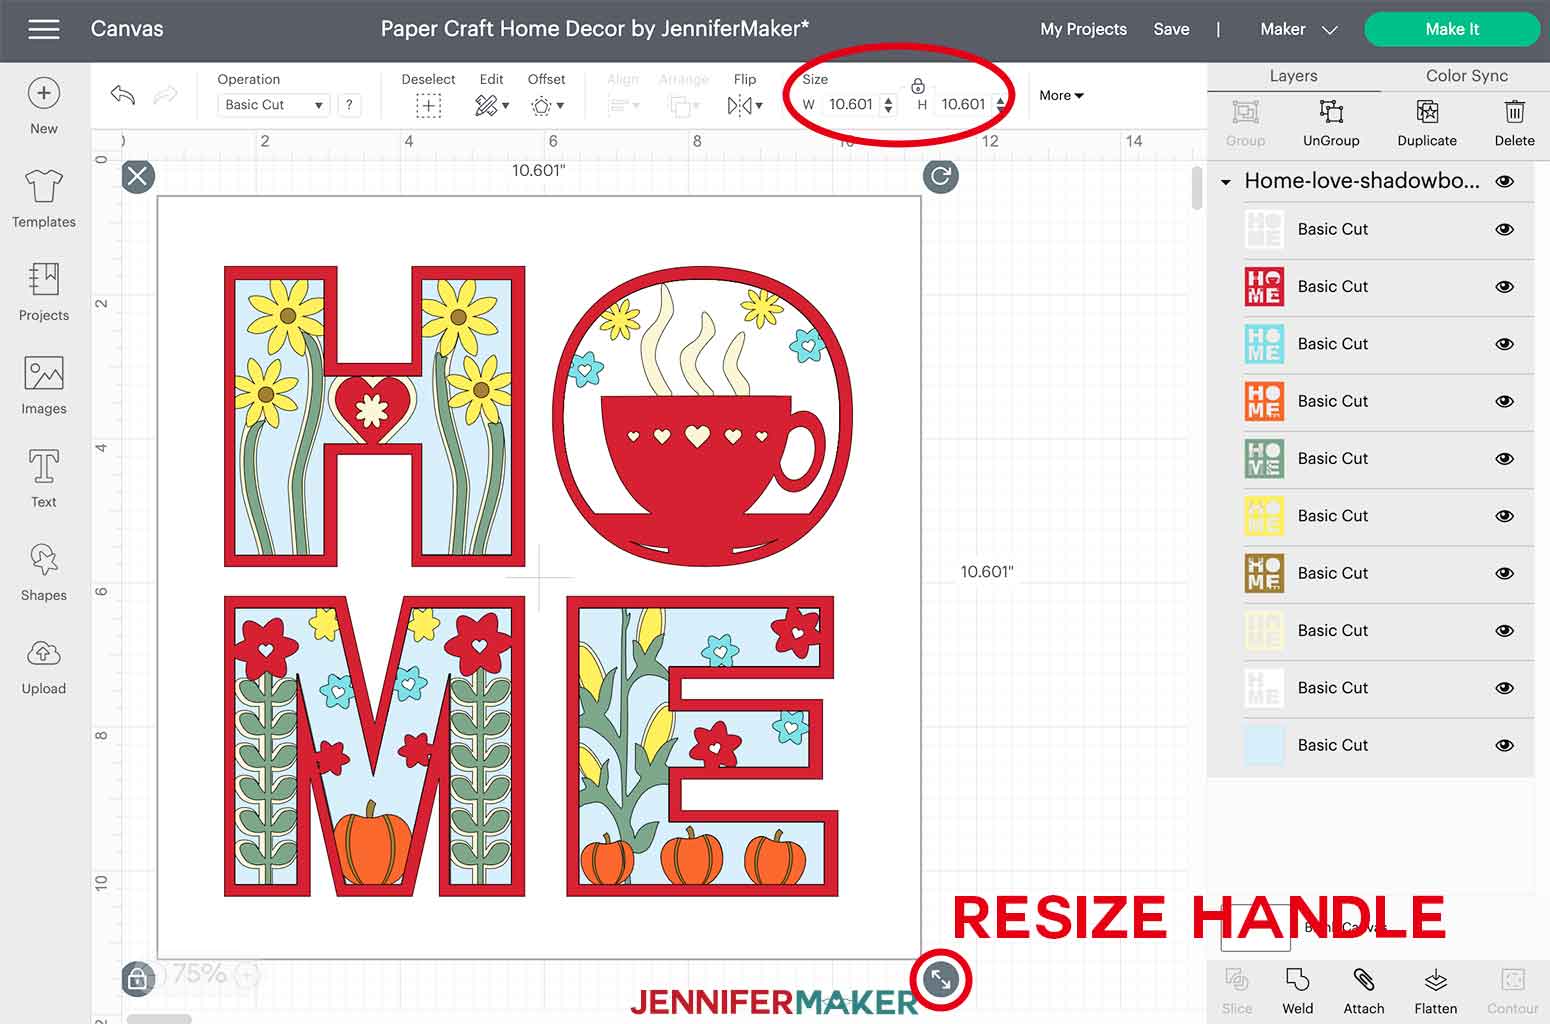
All four designs are sized to fit perfectly in these 12" x 12" shadow boxes. If you are using a different shadow box, make sure to measure the inside of the display area to ensure your design shows as intended.
TIP: To change the size, click on the design on the canvas and then click and drag the arrows on the bottom right side until everything is the size you want. You can also change the measurements in the size fields at the top of the canvas. In order to maintain the correct proportions, make sure the padlock remains locked, otherwise the image will become distorted.
STEP 2: CUT THE LAYERED HOME OR LOVE DESIGNS
Once your size is set, click "Make It" in the upper right corner.
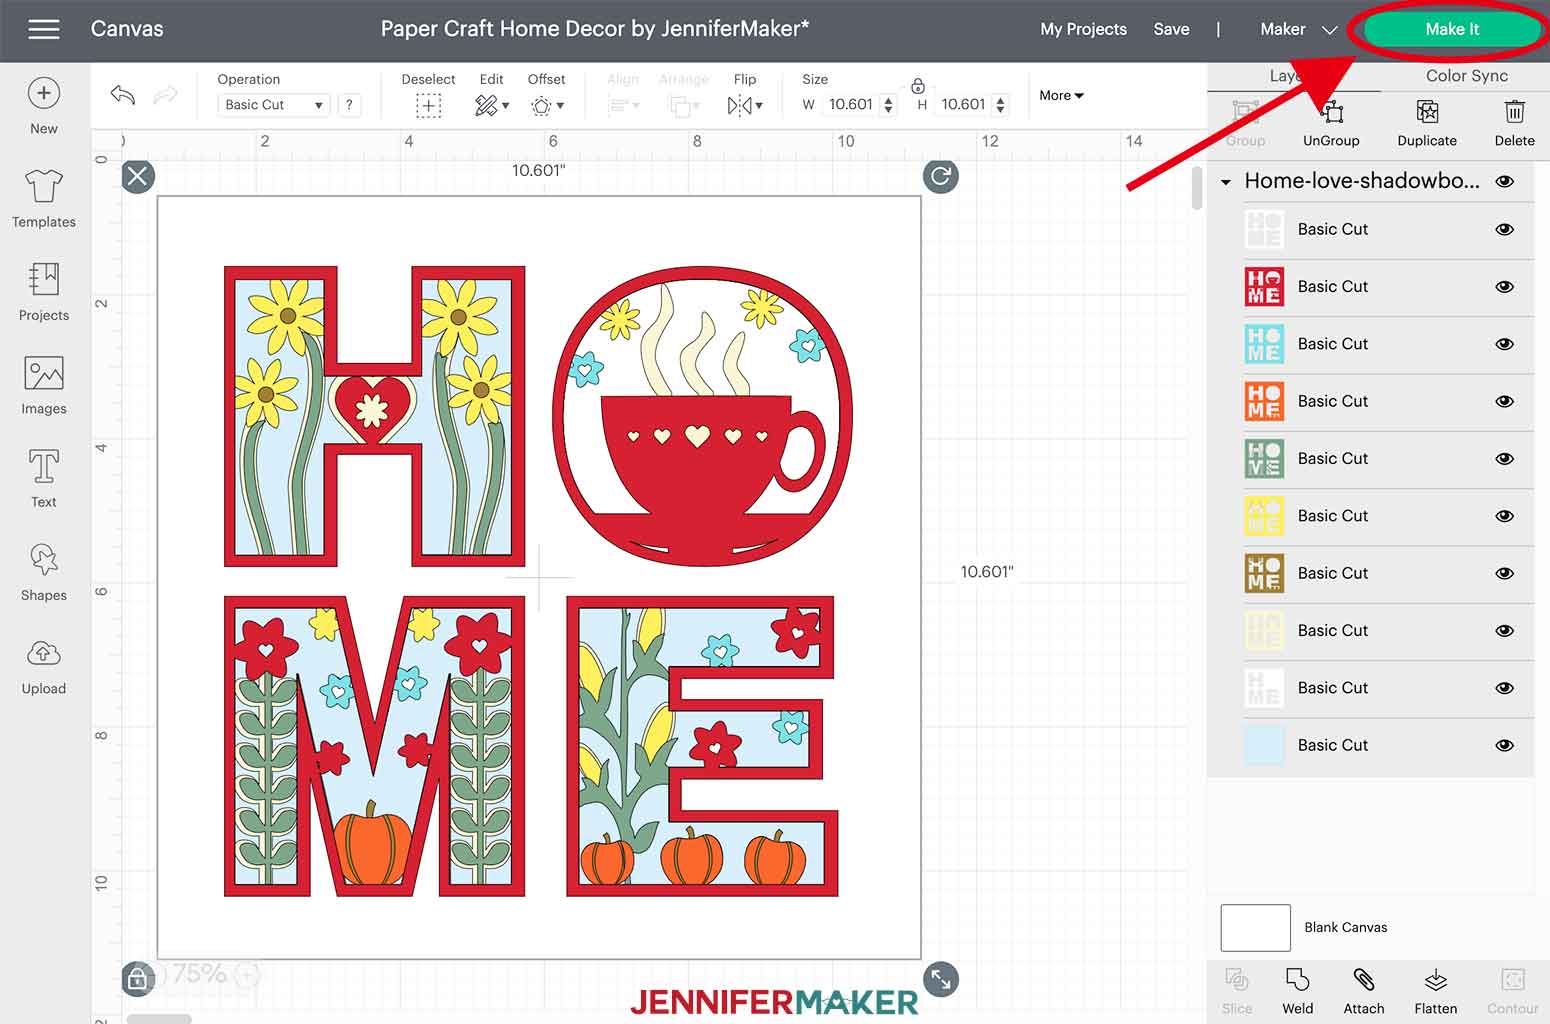
There is nothing to change on the Prepare screen but Cricut Design Space will display the color order in which the cuts will happen. This can be helpful so you know how to organize your cardstock to prepare for cutting.
I set my material setting to Medium Cardstock with "More" pressure for a clean cut.
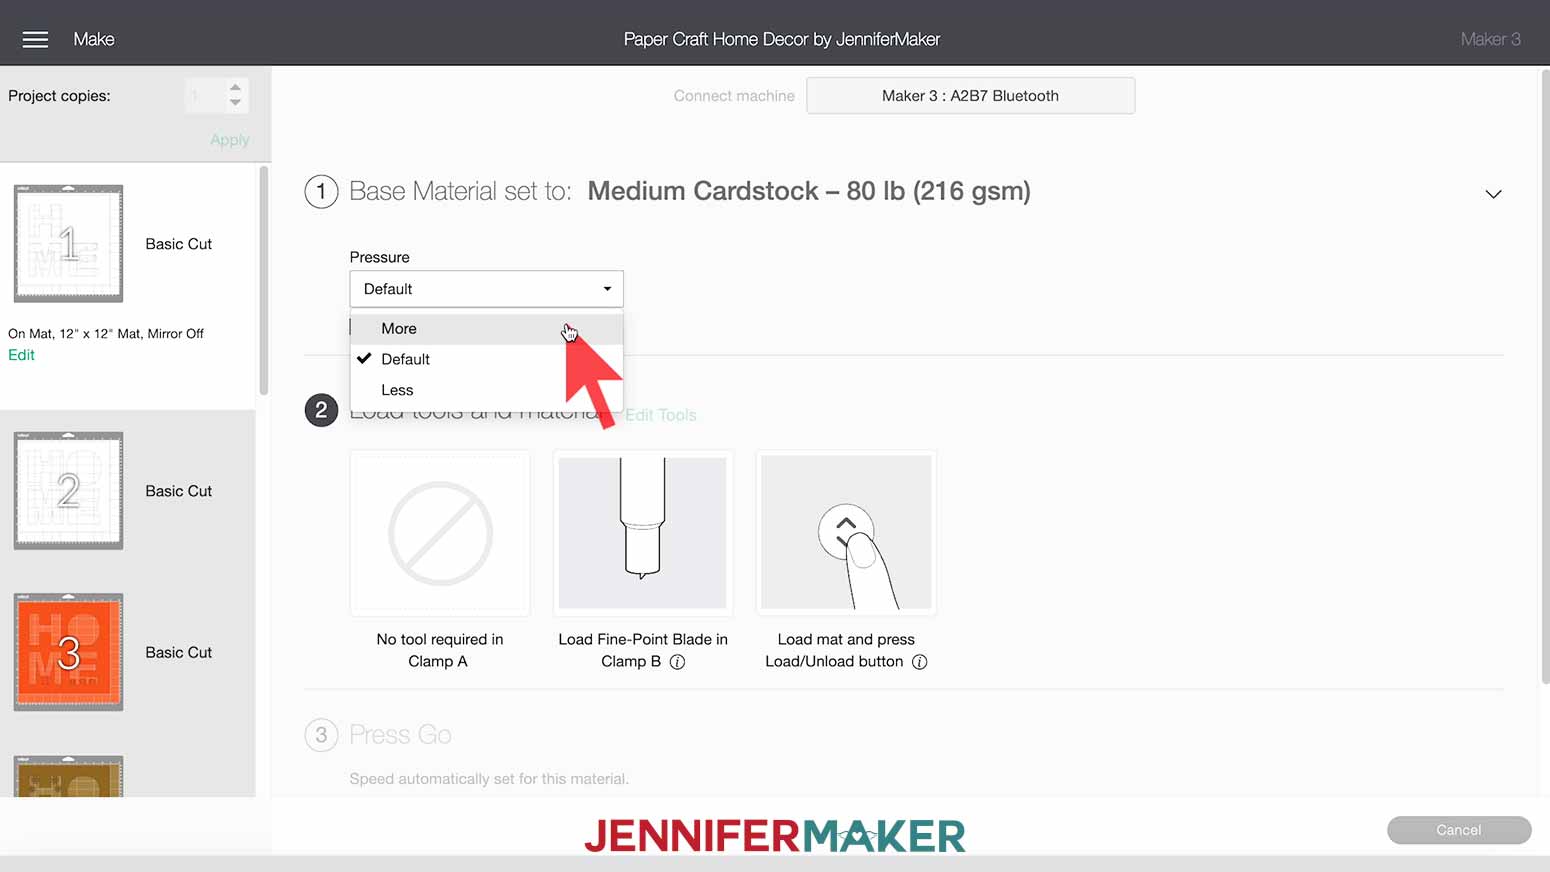
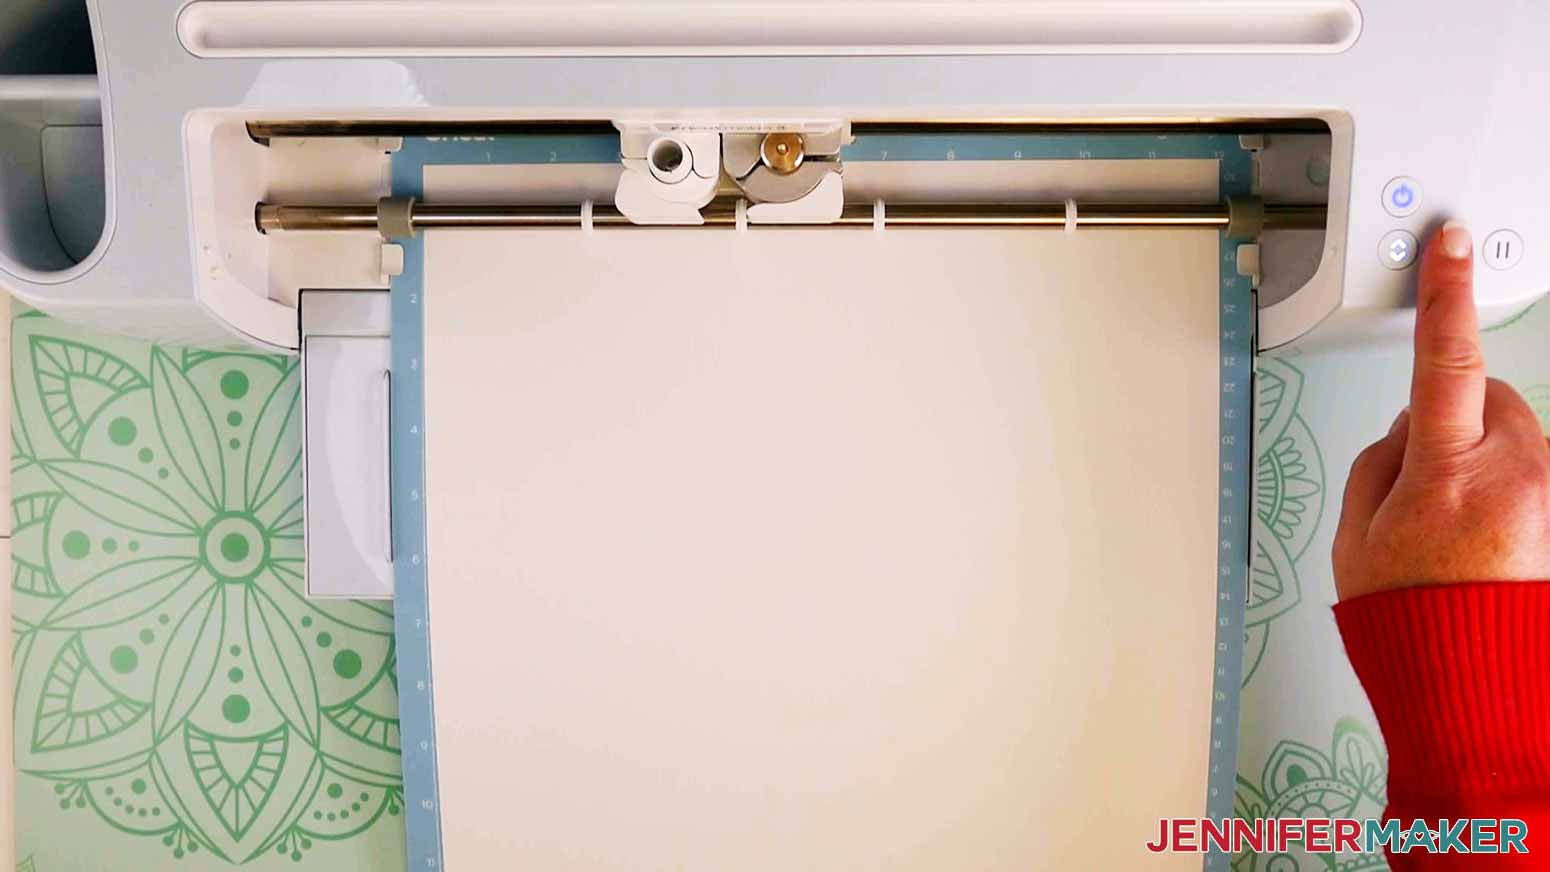
Place your first mat's cardstock face up on a clean blue LightGrip machine mat and use a brayer to make sure it's fully adhered. Make sure the Fine-Point Blade is loaded in Clamp B, then load your mat into your machine and press the Go button.
TIP: If you have any issues cutting, check out my Cutting Problems Guide. It contains all the tips I use to get clean cuts consistently.
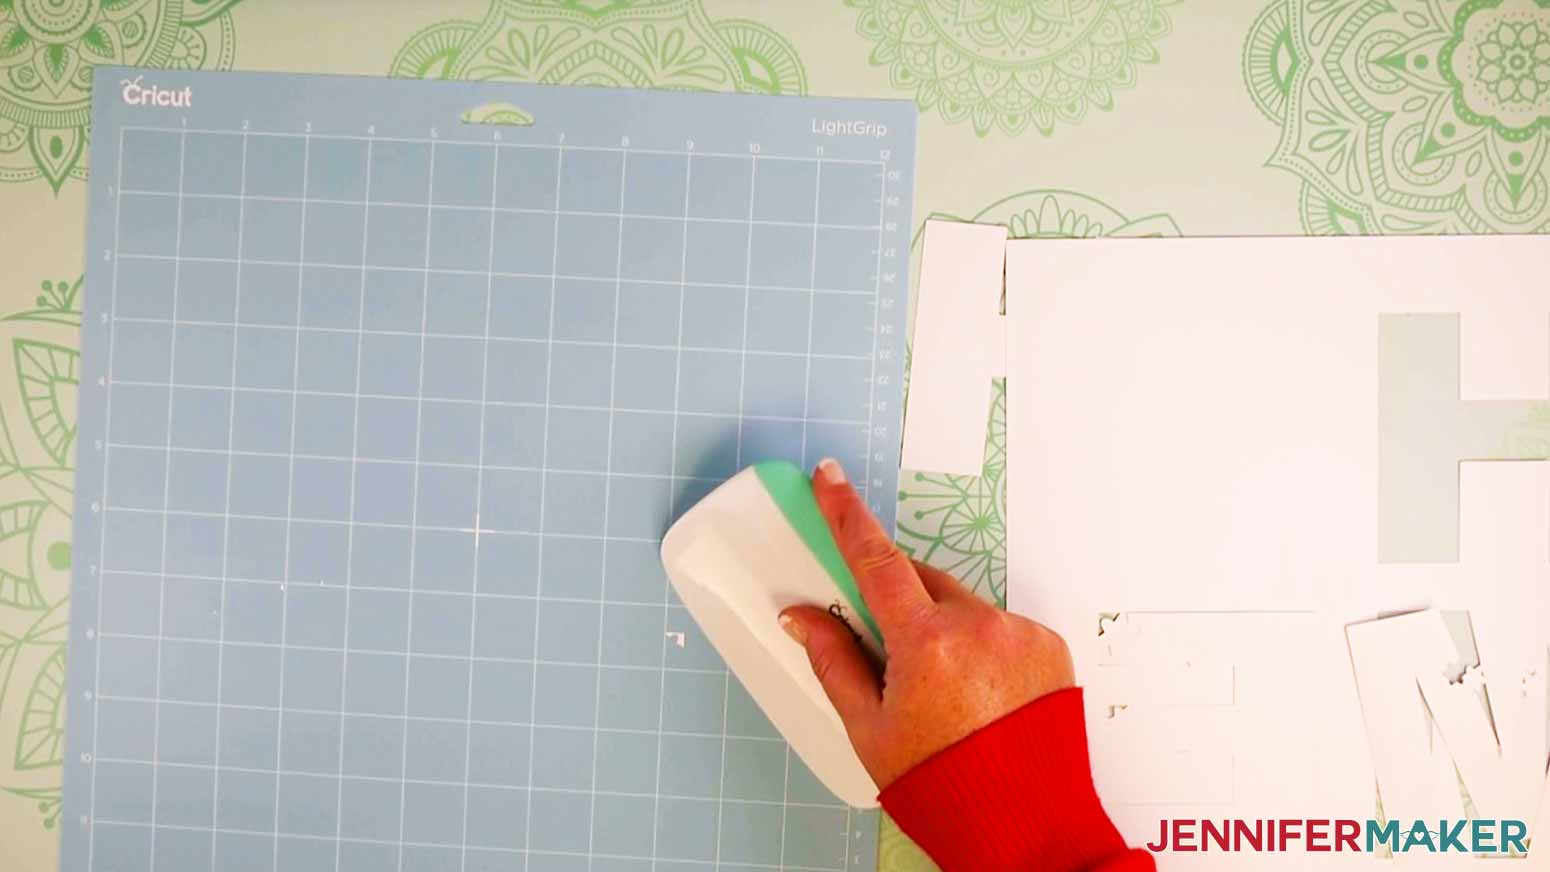
When your Cricut is done cutting the first layer, unload the mat and flip it over. Gently peel the mat away from the cardstock. (Take a look at this tip if you're having issues with your cardstock curling or ripping).
TIP: As you cut your layers, each design will leave behind cut-out pieces on your mat. I carefully peeled them off using my fingers and also used my Cricut XL Scraper tool to easily remove those pieces from the mat.
You will be prompted to load your second mat. Repeat the steps above until all of your layers are cut.
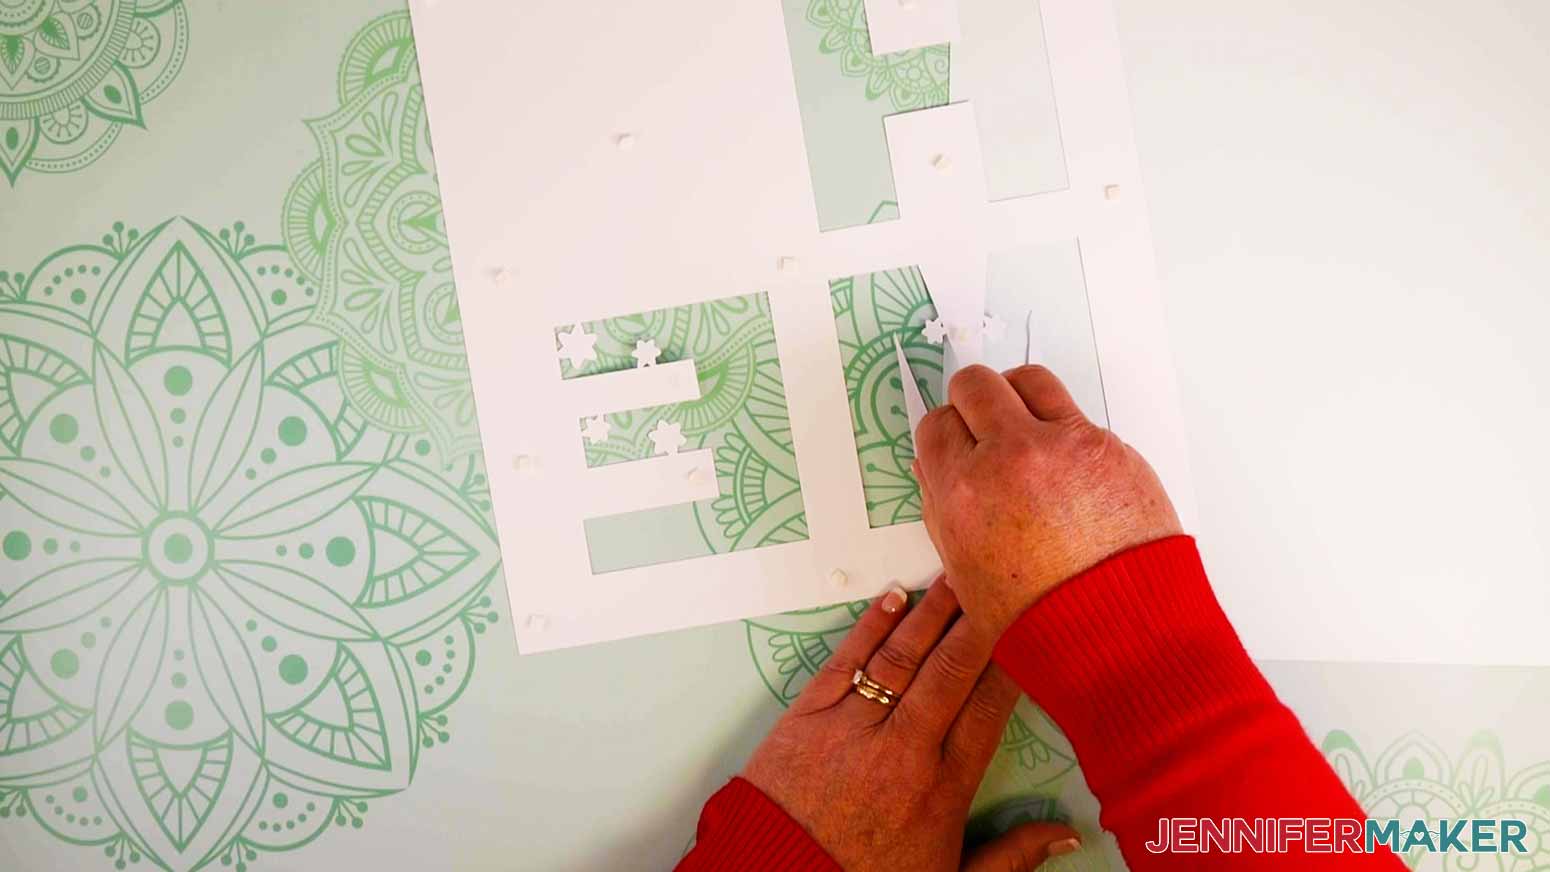
TIP: As you remove each layer of cardstock from the mat you may find that some pieces didn’t cut all the way through, if that happens I find it helpful to use the weeding tool to pop those pieces out.
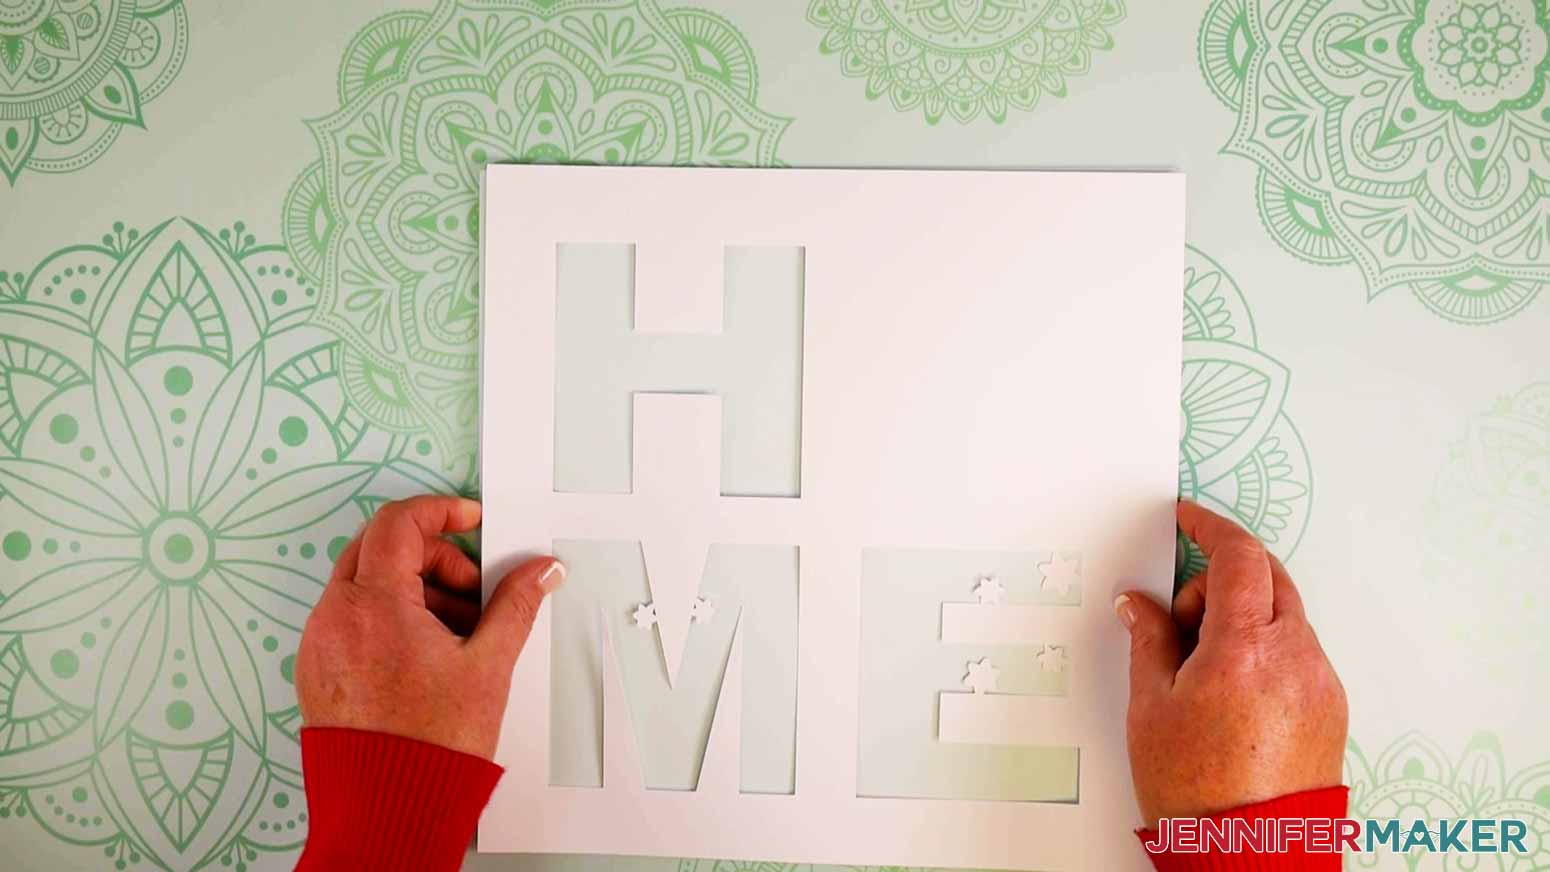
STEP 3: ASSEMBLE YOUR PAPER CRAFT HOME DECOR
Once you have your pieces cut, I recommend you refer back to your canvas to review the order of layers. It will be helpful to organize your cut cardstock in the correct order to help you stay organized during assembly. Apply double-sided foam adhesive squares to the backside of all the layers. We will work from the bottom layer up to the top.
Center and place your second-to-last layer on your bottom blue layer.
TIP: As you place each layer on top of each other, lay them down lightly so you can adjust your placement if needed, then press to the underlying layer.
Now take the next bottommost layer and add the foam adhesive to the back.
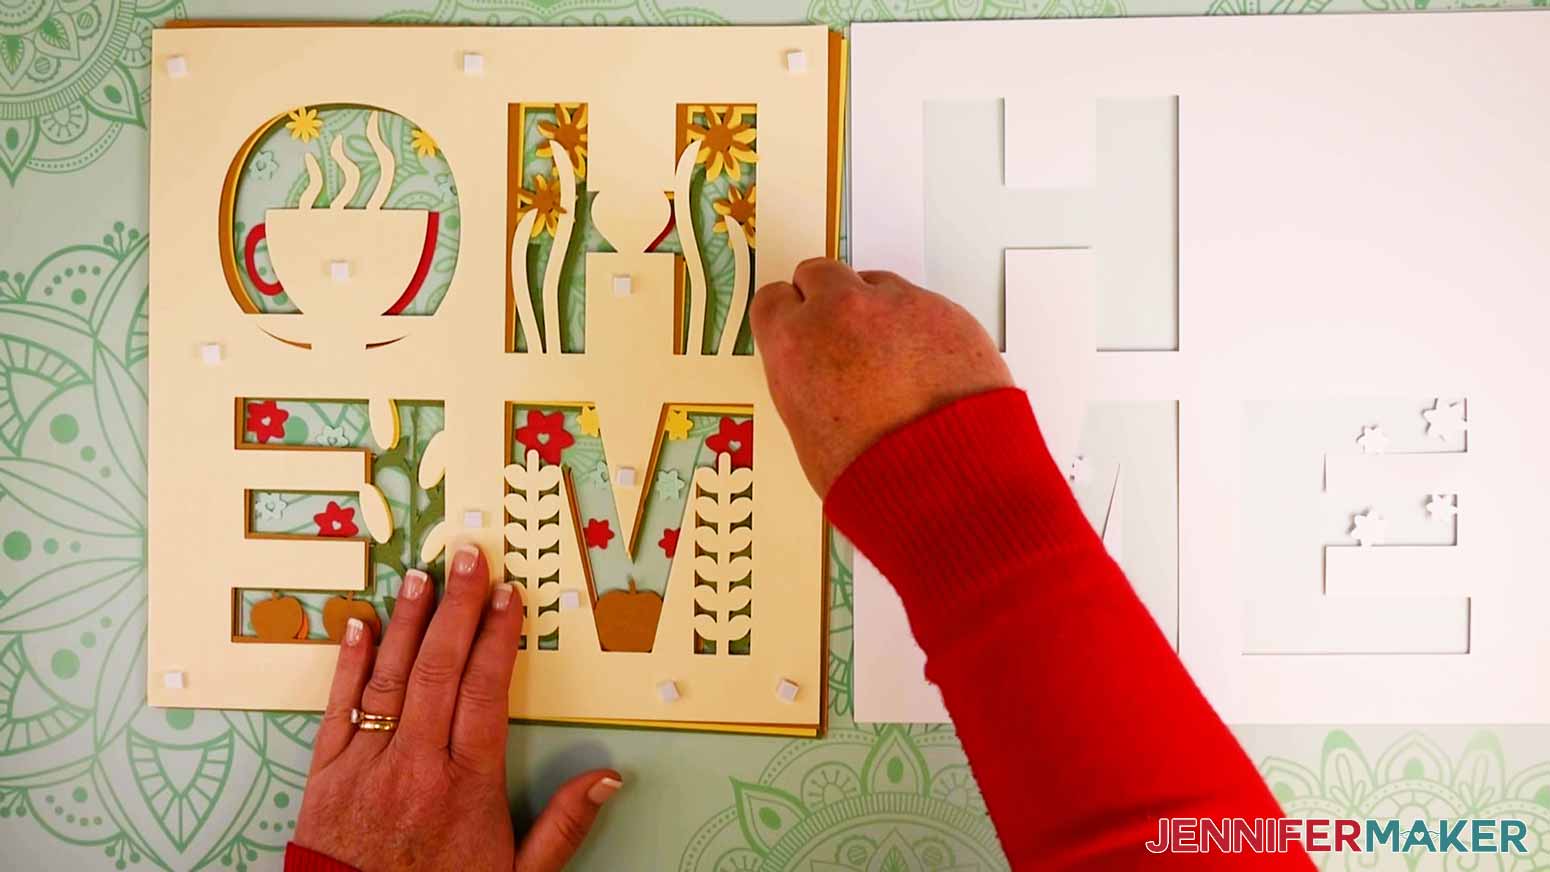
Gently place it on the second-to-last layer.
Continue the process by applying foam adhesive squares to the back of the next bottommost layer and then placing it on the below layer.

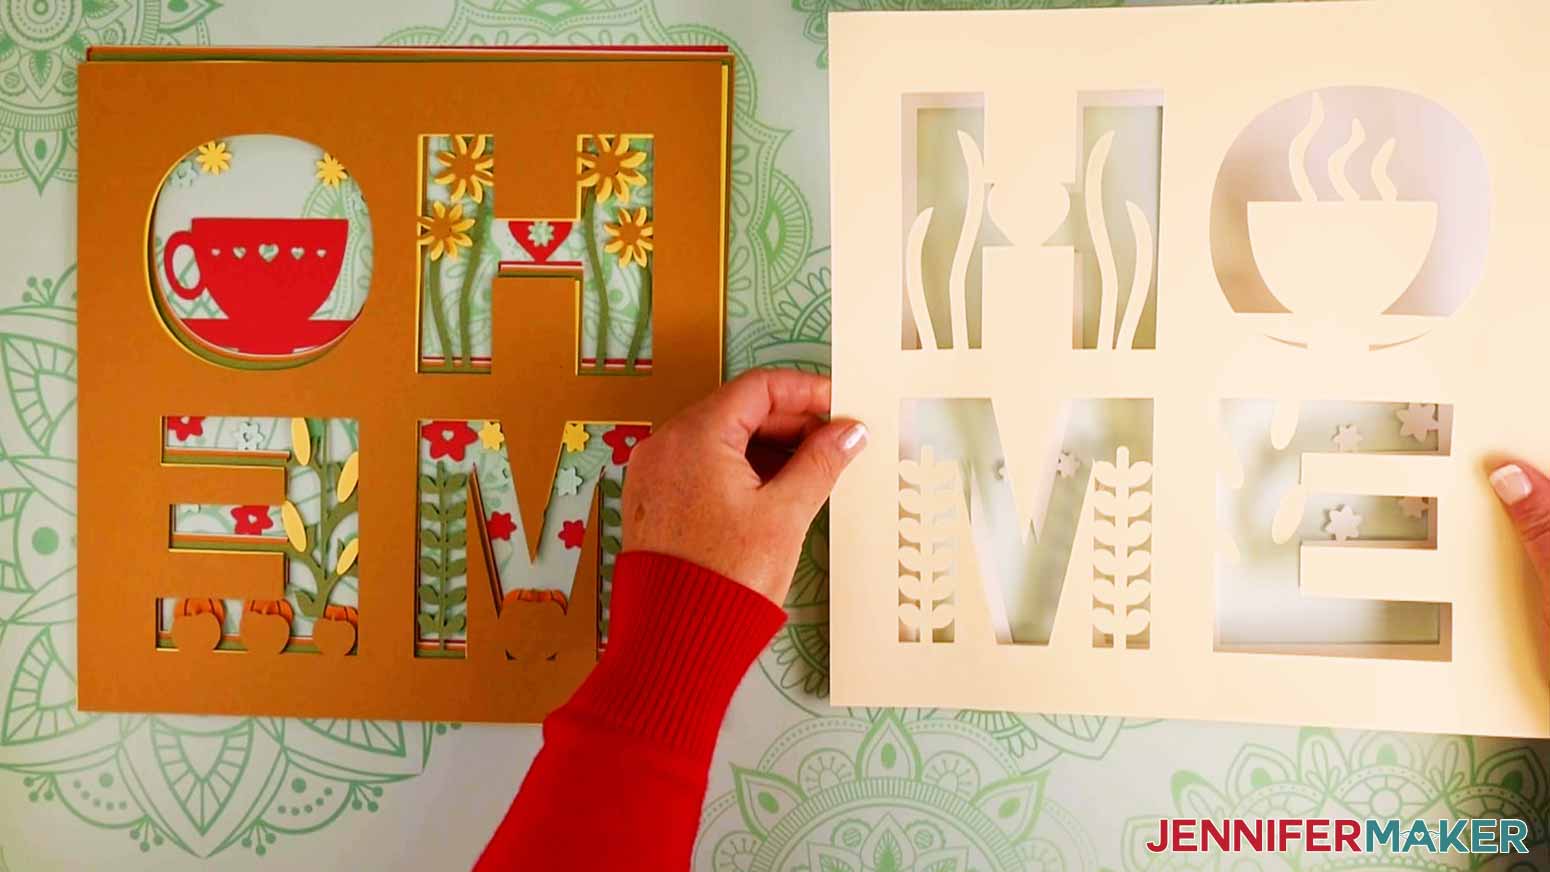
The process is the same as you work your way to the top. Once your top layer is applied, it is time to frame your beautiful artwork!
STEP 4: ASSEMBLING THE SHADOW BOX
First, let’s get our shadow box ready. I always like to clean the glass with a lint-free cloth and isopropyl alcohol. I clean both the inside and out, so I’m sure my design will look its very best once I give it a home.
Next, turn over your design and apply adhesive foam to the back of your layered design.
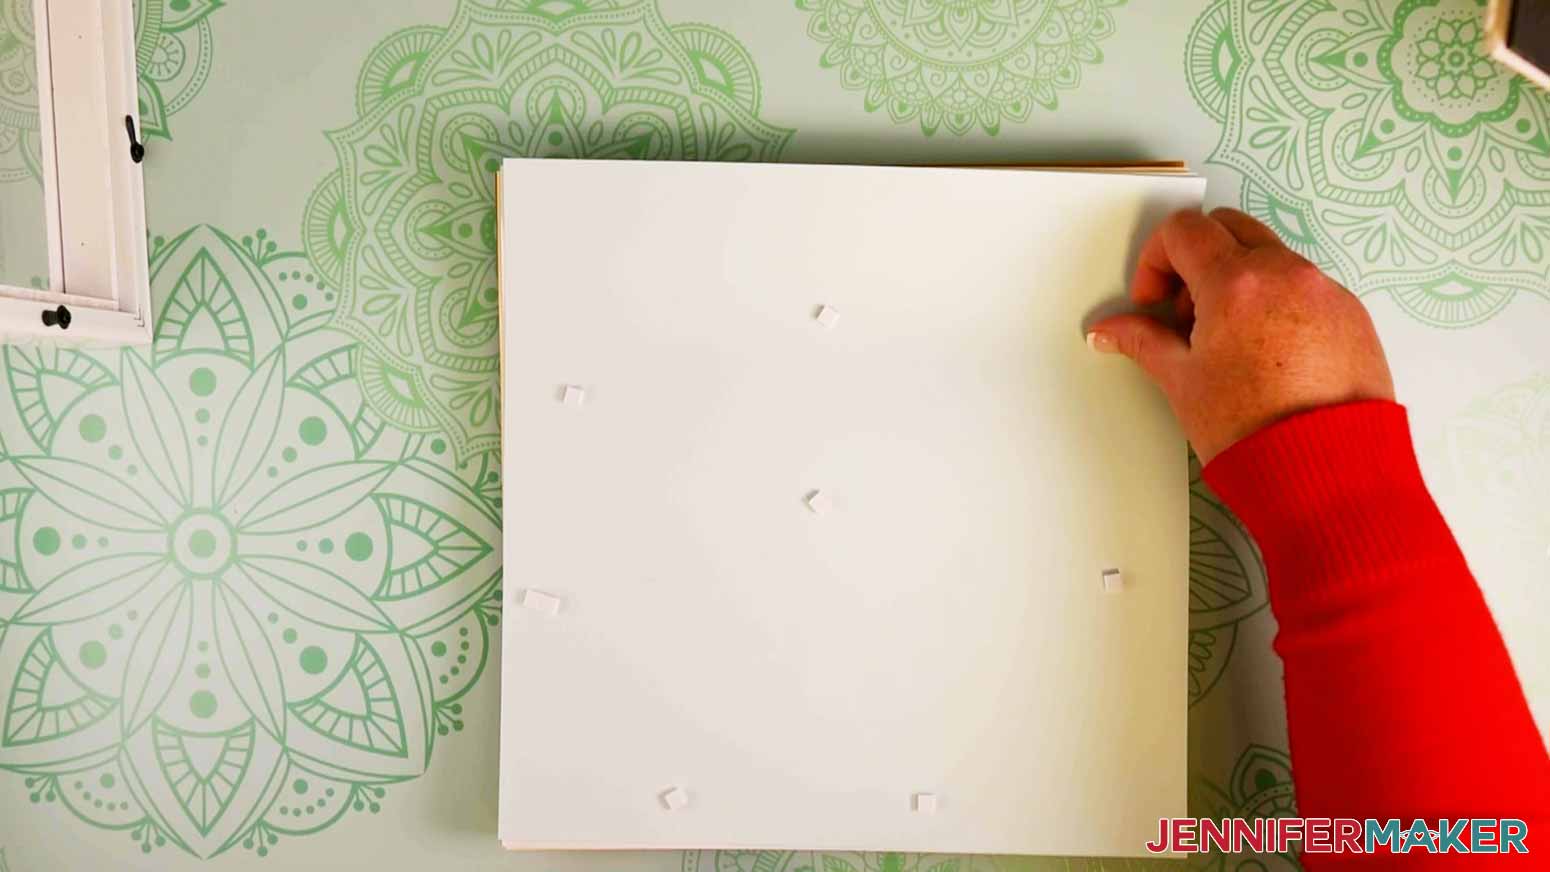
Press your design onto the the back board piece of your shadow box.
NOTE: You can use hot glue instead of foam tape for this part if you’re worried about it staying put.
Assemble the frame and close the tabs on the back.
STEP 5: SHOW IT OFF
This is what my Paper Craft Home Decor HOME signs look like when finished!
This is what my Paper Craft Home Decor LOVE sign looks like when finished!
This is what my Paper Craft Home Decor KIND sign looks like when finished!
Recommended Products
As an Amazon Associate and member of other affiliate programs, I earn from qualifying purchases.

Answers to Your Questions About How to Make Paper Craft Home Decor
Q: What kind of paper do I use?
A: You can really use any 65 lb-80 lb. or higher cardstock to make layered paper craft home decor — it’s your choice what color and texture you want to use. If you want to use the exact same materials I used, check the materials list above. I do recommend high-quality, soild-core cardstock because it cuts easily and won’t show white edges!
Q: How do I keep my layers stuck together?
A: I used double-sided foam adhesive squares applied to the underside of each layer, which gave the layered paper an interesting look with depth and shadow. But you could also use adhesive foam circles or 3D Zots to achieve a similar effect. And you can also just keep the layered flat against one another by using tacky glue like Bearly Art Precision Craft Glue or spray adhesive instead. There are no rules, just what you prefer!
Q: Can I cut these paper layers on a Cricut Joy?
A: While you could resize this project down to fit on a Cricut Joy, I think the detail might be difficult to cut out cleanly. But feel free to give it a try! (Update: I can confirm that this can be resized and cut on a Cricut Joy as one of my wonderful crafters reported a successful cut!!)
Q: My cardstock keeps ripping on the intricate cuts. What can I do?
A: Be sure you’re using a clean and sticky machine mat, good quality cardstock, and a clean blade. See my Cricut Cutting Problems post for all the tips I use to get clean cuts every time.
Q: What decorations can you make out of paper?
A: There are so many easy paper crafts out there and I have some great ideas for you! Depending on your goals and supplies, check out my tutorials on making card stock paper flowers, party decor for holidays and special occasions, and canvas wall art!
Q: What can I make out of paper at home?
A: With a Cricut, you don’t need excellent fine motor skills and a high skill level to make a cute paper craft. Try my free tutorials for a paper flower craft with crepe paper, giant paper butterflies, a moving handmade card, and many more in my free library!
Q: What are some DIY crafts for home decor?
A: In addition to wall hangings, you can add a personal touch to your living space or home office in many ways! Try adding some tissue paper flowers to a boring wall, drape paper garlands on the living room mantle, or branch out into vinyl projects for even more beautiful crafts!
Get my free SVG/PDF/DXF files to create beautiful Paper Craft Home Decor!
I love seeing what you make with my designs and how you use them! Please share a photo of your layered paper craft home decor in our Facebook group or tag me on social media with #jennifermaker.
Love,

Want to remember this? Save this Paper Craft Home Decor Tutorial to your favorite Pinterest Board!