
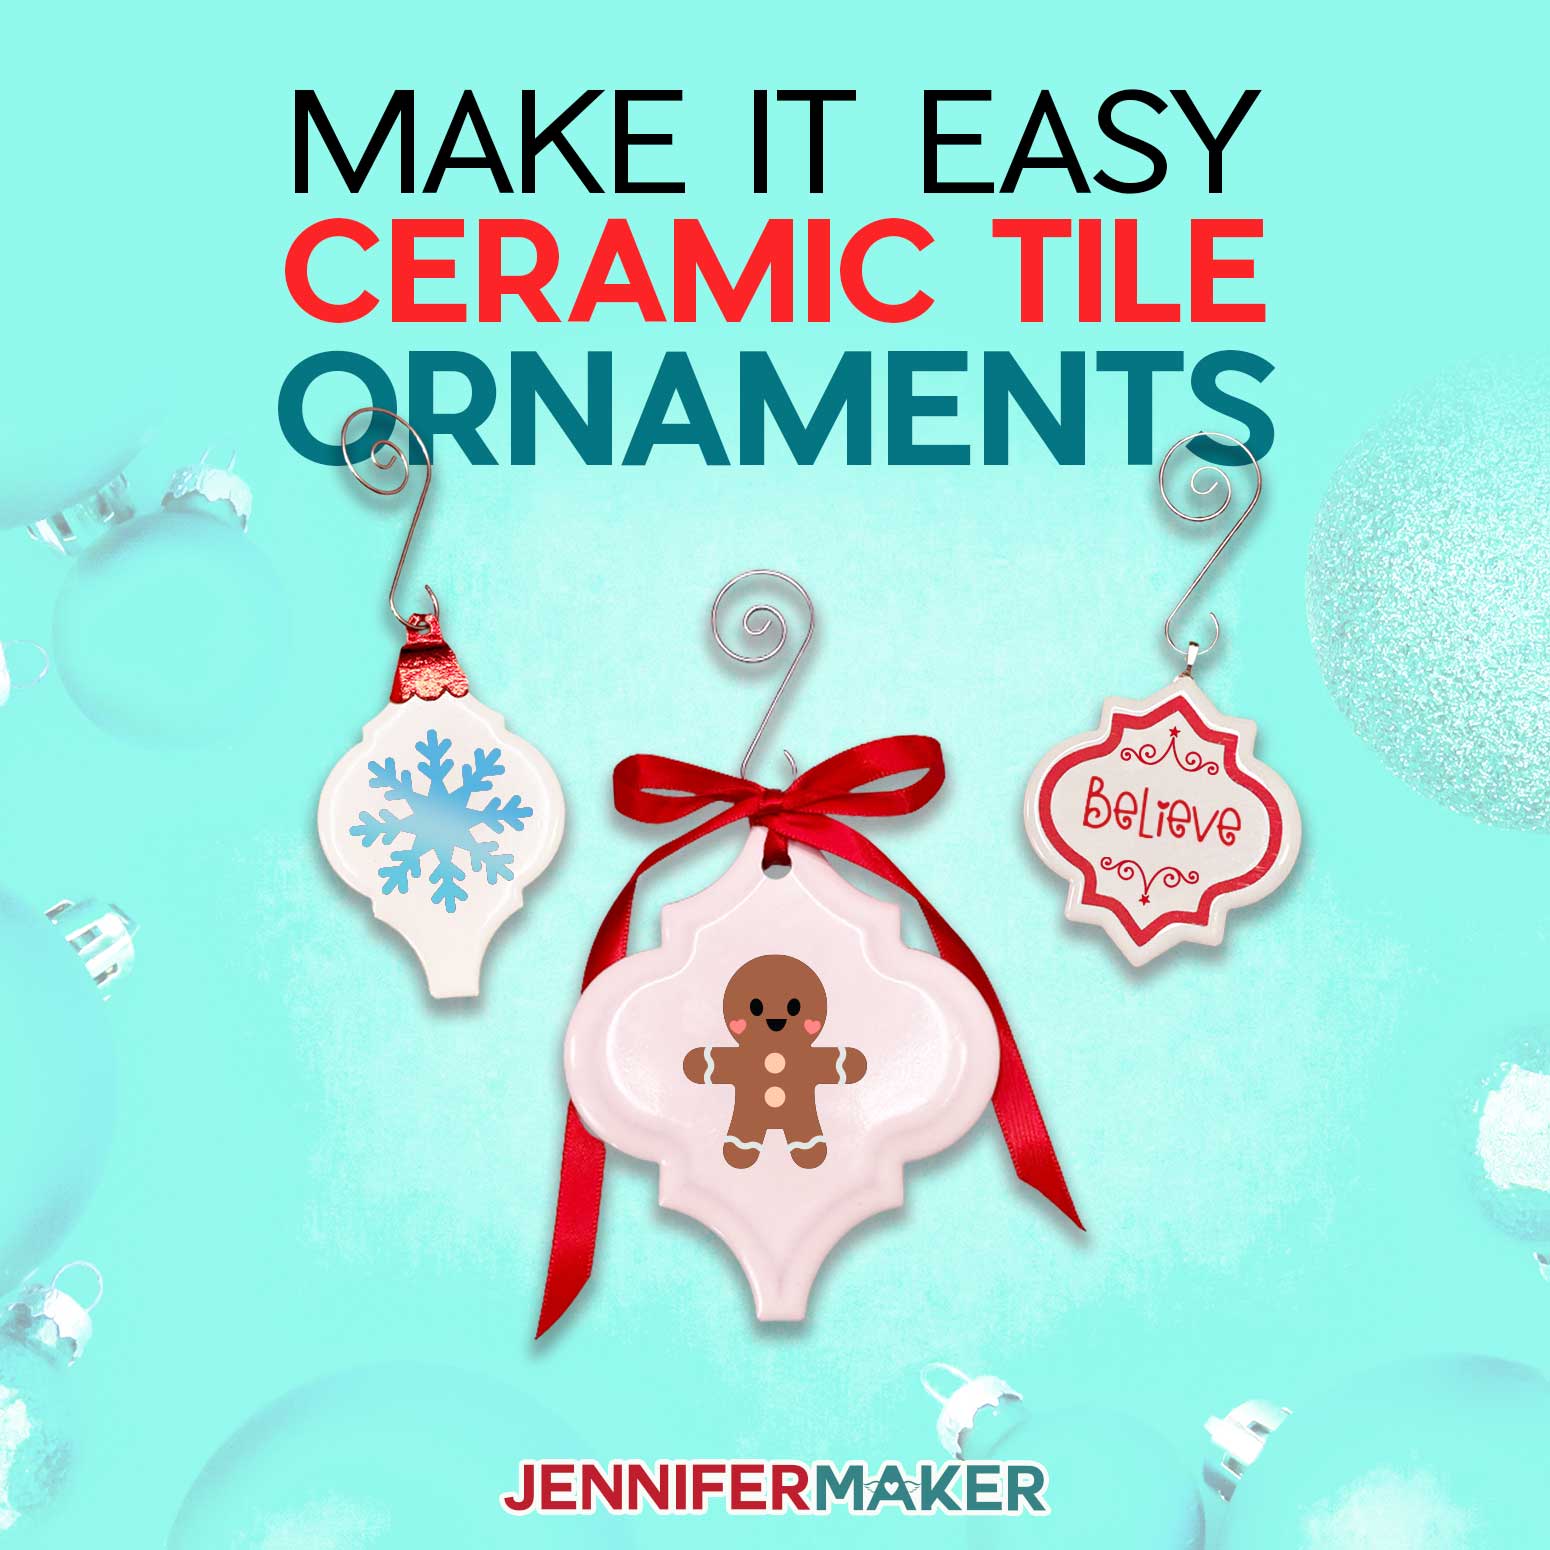
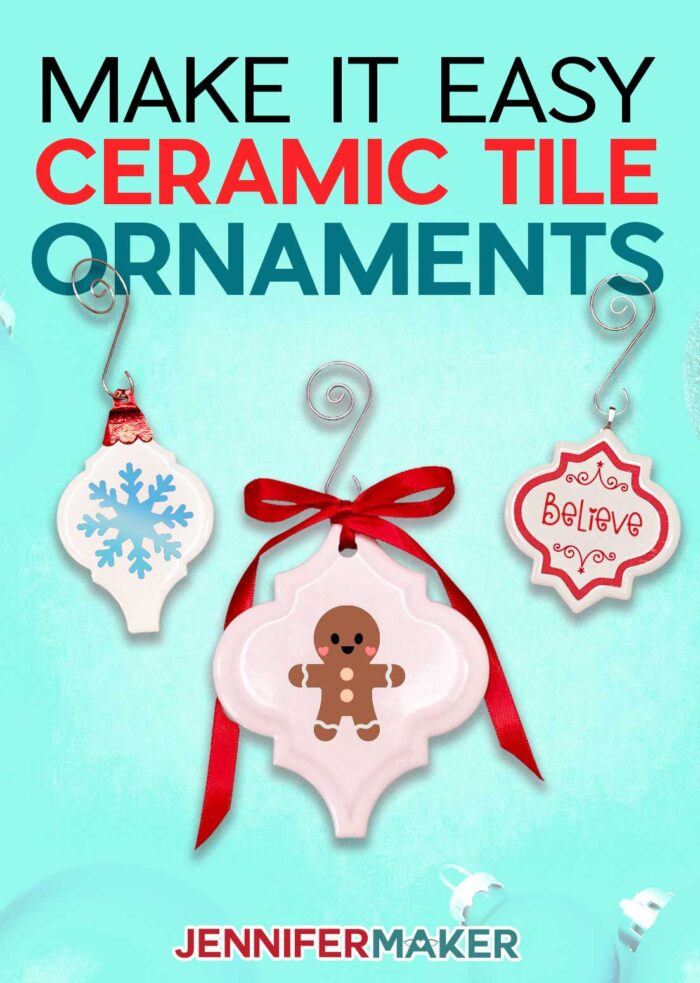
Learn how to turn inexpensive ceramic tiles into make fun and personalized ornaments, complete with decorations and hangers!
In the crafting world, the holidays come early! It may only be November, but many are already planning and making their Christmas ornaments. Last year around this time we were all about the glitter ornaments. This year the big holiday trend is simple ceramic tile ornaments personalized with vinyl, paint, and alcohol ink. The beauty of these ornaments is the tile itself — you can buy the arabesque lantern-shaped tiles inexpensively from your local home improvement store. Then it’s just up to you and your imagination to turn that into a special keepsake … a personalized tile ornament!
Watch a quick video that shows you how to turn a tile into a ceramic ornament:

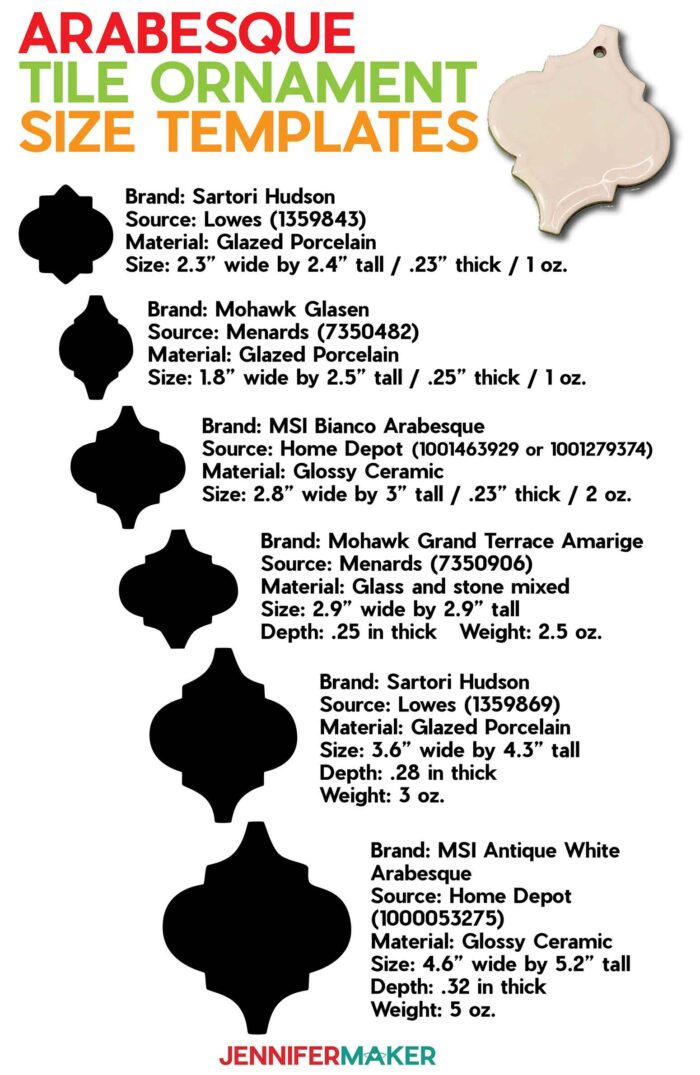
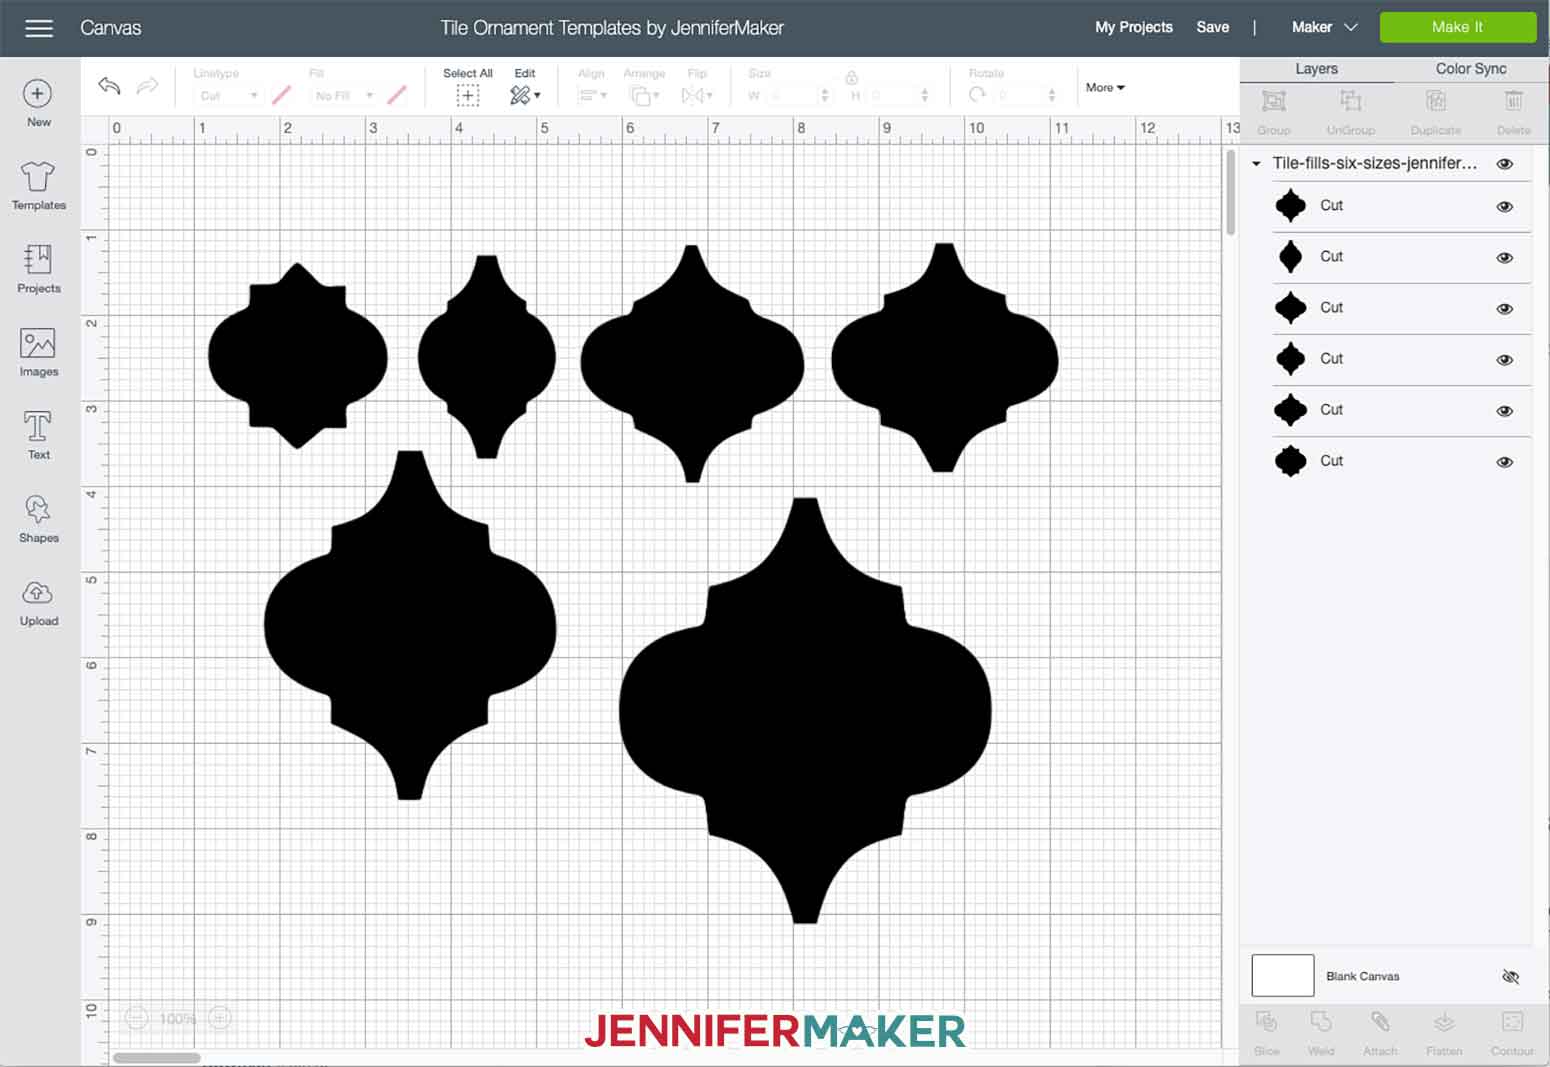
To help you make these personalized tile ornaments, I went to every home improvement store in my town (Lowes, Home Depot, and Menards) to get every arabesque, lantern-shaped tile I could find. I wound up with six different sizes and shapes of arabesque porcelain, ceramic, or glass tile that I thought you might like to use. Here is a list and link to each of these ceramic tiles:
Personalized Tile Ornament Sizes:
- 2.4″ tall from Lowes
- 2.5″ tall from Menards
- 3″ tall from Home Depot
- 2.9″ tall from Menards
- 4.3″ tall from Lowes
- 5.2″ tall from Home Depot
Let me show you how easy it is to make your own DIY personalized tile ornaments! This post contains some affiliate links for your convenience (which means if you make a purchase after clicking a link I will earn a small commission but it won’t cost you a penny more)! Read my full disclosure policy.
Personalized Tile Ornament Surface Treatment Ideas:
Tile ornaments can be left as is because the fired tile has a glossy appearance, or you can cover the surface as you wish. Here are three ways you can decorate your ceramic tile surface:
- Spray paint
- Acrylic paint
- Alcohol ink
I did a spray paint test of the tile ornaments to check coverage, durability, and scratch-resistance. Each tile was cleaned with alcohol prior to spray painting with a light coat outside.
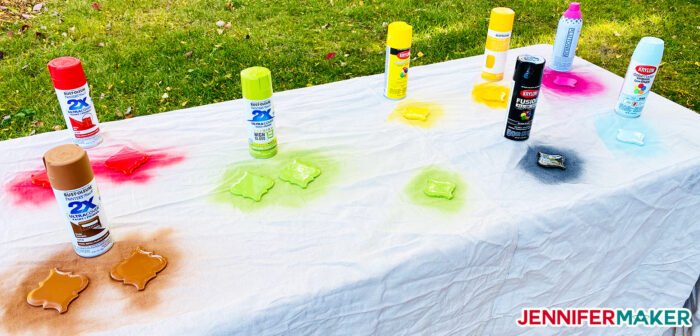
Here are my tile ornament spray paint results (I used one coat of paint ONLY—I do not recommend double coats because it can cause the paint to bubble or warp):
- Krylon ColorMaxx Paint + Primer: Good coverage (light yellow)
- Rust-Oleum Designer Series High Gloss: Coverage was good, but it bubbled badly (gold) – AVOID
- Plutoneum: Good coverage (pink)
- Rust-Oleum Painter’s Touch 2X Ultra Cover: Excellent coverage (light green) – RECOMMEND
- Krylon Fusion All-in-One Paint + Primer: Excellent coverage (black) – RECOMMEND
- Krylon CoverMaster Paint + Primer: OK coverage (light blue)
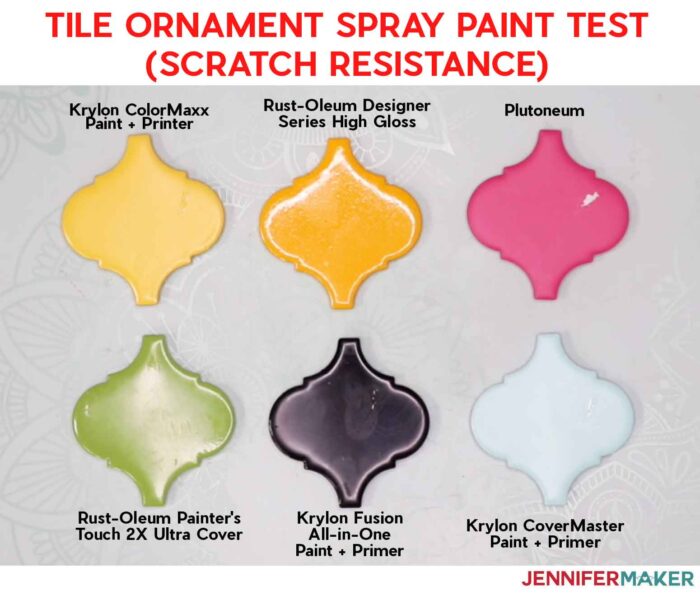
In order to test scratch resistance, I waited 48 hours for the coat of spray paint to cure and then tried scratching the surface of all six painted tiles with a paper clip — all six held up fine. So they will tolerate a little scratching.
When I tried scratching the surface with the rough underside of the tiles, however, all six FAILED and scratched the tile surface. And when I pressed harder, I was able to actually remove paint from every painted tile. Thus, it is imperative that you cover the backs of your ornaments with something to avoid scratching other tiles.
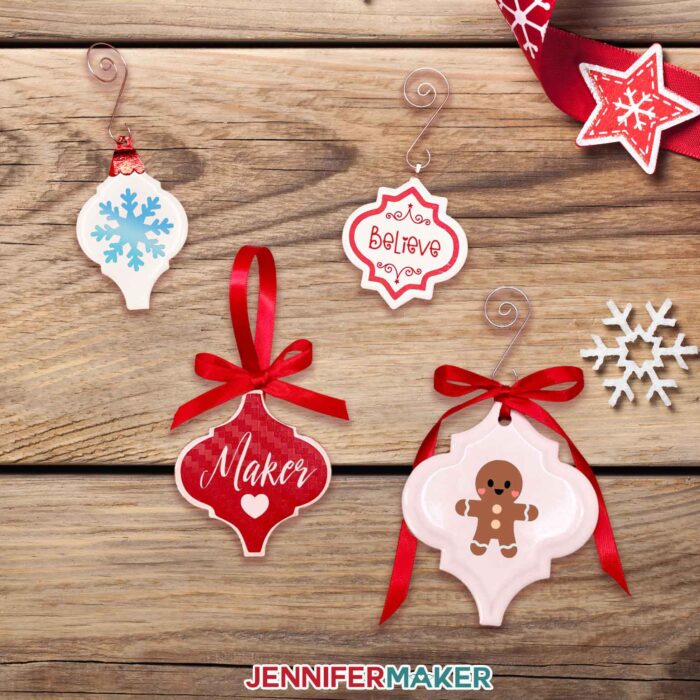
Tile Ornament Decoration ideas:
- Holiday words and names, such as “Believe” and “Hope” (paint and vinyl) — I have 25 of these free in my library for you!
- Cute little holiday images — I have dozens of these free in my library for you!
- Santa belly (paint and vinyl)
- Grinch face (paint and vinyl)
- Gnome head (paint and vinyl, maybe some fabric)
- Monograms and names (vinyl)
- Geometric designs (vinyl)
- Favorite team/school/band/show etc. (vinyl)
- Stencils (vinyl and paint)
- Photographs and multi-colored images (waterslides)
- Engraving (on Glowforge)
- Stickers
- Stamps
Tile Ornament Hanging Ideas:
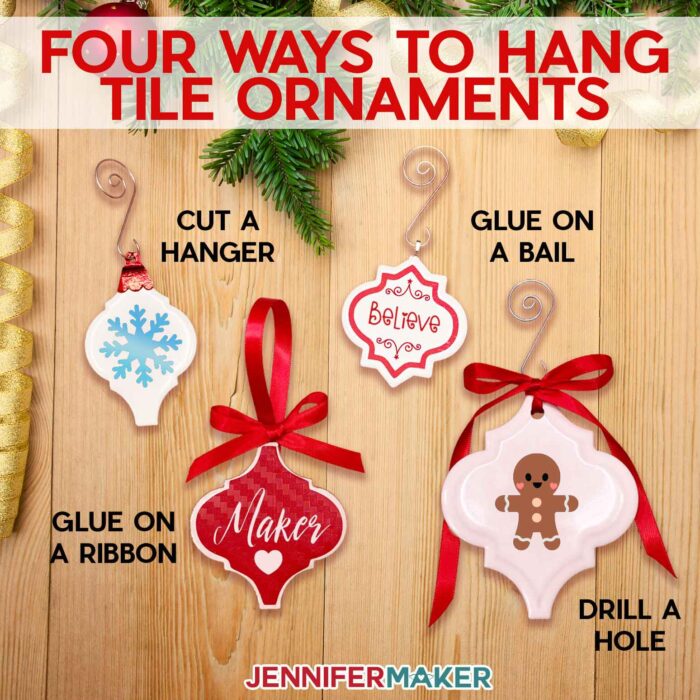
- Glue a Kraft board hanger around the top of your ornament — this is my favorite way!
- Hot glue a ribbon or string to the top back of your ornament
- Attach a jewelry bail to the top back of your ornament
- Drill a hole near the top of your ornament with a masonry bit
If you wish to drill a hole in your tile ornament, here are some tips on how to do it:
- Use a 1/4″ carbide-tipped masonry bit
- Put a board underneath when you drill – we used a piece of 1/2″ plywood
- Put a nail in the board to keep the tile from turning so you can keep both hands on the drill
- Use making tape to keep the bit on the tile for drilling
- The larger bits seem to do a better job and don’t heat up as quickly. They also seem to last longer before the bit got worn down.
- You need to go slow and use light pressure — just enough so you can see it removing material and hear it scraping. Slow and steady wins the race.
- Periodically, clear material out of the hole — flip it over and dump it out to clear it.
- Cool the bit by occasionally dipping the bit in a cup of water once every 30 seconds.
- The thickness of the ornament makes a difference — the thicker it is, the longer it will take.
- If the hole is too close to the edge of the material, it can break the tile.
- If the pressure is too much, it can break the tile. About 2/3rds of the way through drilling is when it is most likely to fail, so be especially careful when you get to this point.
- Be sure to use the drill setting, not the hammer setting (if your drill even has that).
- Most of these tiles have some sort of backing, which seems to be a little stronger than the tile itself. It’s harder to get through that and easy to put more pressure at that point, which can cause the issues.
- We averaged 3-5 tiles from a bit before it wore out. The bits were about $2.50 each.
Now, that’s a LOT of information, I know! But I wanted you to have a more complete picture of all the options.
So how do you choose what to use and where do you begin? I recommend for your first tile ornament you start with a simple unpainted tile, a word or image in permanent vinyl, and a simple Kraft board back with a built-in hole for hanging. I’ve provided all of these for you to use free in this tutorial.
Materials to Make Easy Personalized Tile Ornaments
See my complete Amazon shopping list for the items needed to make this project!
- 1 lantern-shaped arabesque porcelain, ceramic, or stone “mosaic” tile (you can get them in a variety of sizes at Lowes, Home Depot, Menards, and Amazon)
- 4″ x 4″ of permanent adhesive vinyl (for personalization), such as Cricut Premium Vinyl (avoid removable vinyl, which can be hard to transfer)
- Kraft board (to cut ornament hangers and backings)
- Isopropyl alcohol (to clean your tile before applying anything to it) and a lint-free cloth
- Weeding tool
- Transfer tape (use Standard Grip, unless you have glitter vinyl)
- Tacky glue or E6000 (clear)
- Wire ornament hanger
- A way to cut your vinyl and Kraft board (I used the Cricut Maker cutting machine but these can also be cut on a Cricut Explore or Cricut Joy)
- (Optional) Something to paint the tiles, such as Krylon Fusion spray paint, acrylic paint, or alcohol inks
- (Optional) A 1/4″ carbide-tipped masonry bit and some masking tape (if you want to drill holes for hanging)
- (Optional) Jewelry bail or D-ring hanger
- (Optional) Ribbon or cord (for hanging)
- (Optional) Something to glue things onto your ornament, such as E-6000, Gorilla Glue Super Glue, or hot glue
- (Optional) Something to cover the backs of the tiles, such as Kraft board, cardstock, felt, duct tape, paint, grout, plaster of paris, or Mod Podge
- (Optional) Decorations like Mini Santa Hats or Mini Knit Hats
- Design #251 – My free tile ornament templates and SVG/DXF/PDF design files (available in my free resource library—get the password by filling out the form at the bottom of this page)
How to Make Personalized Tile Ornaments
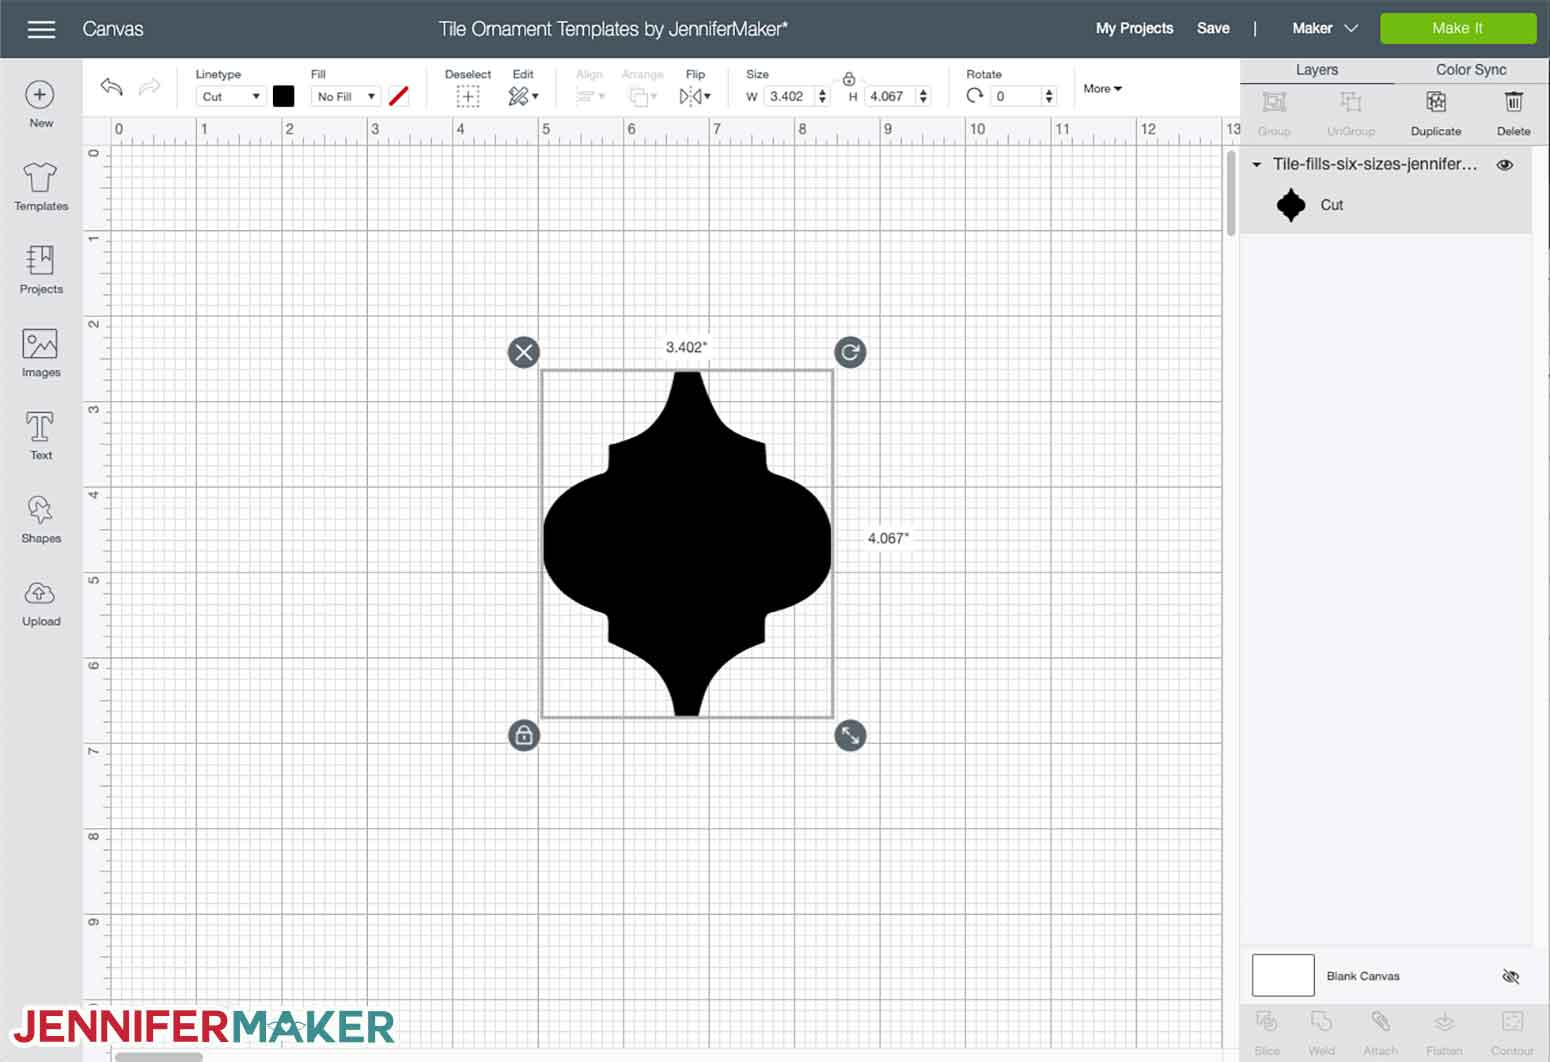
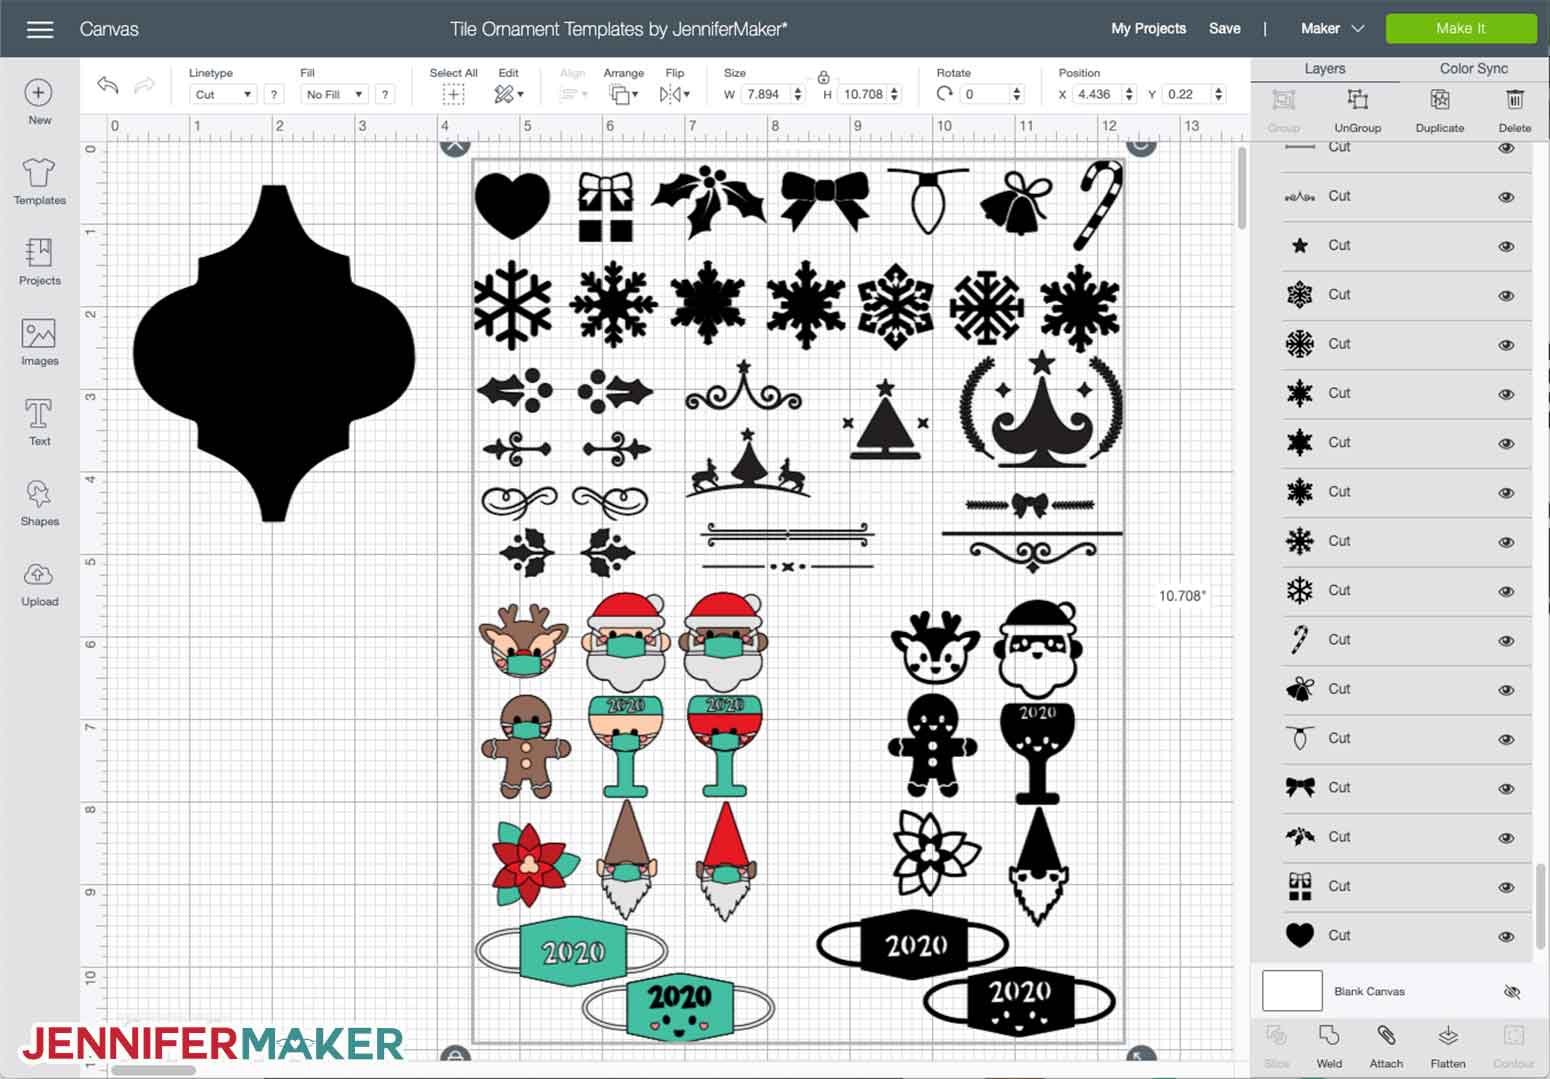
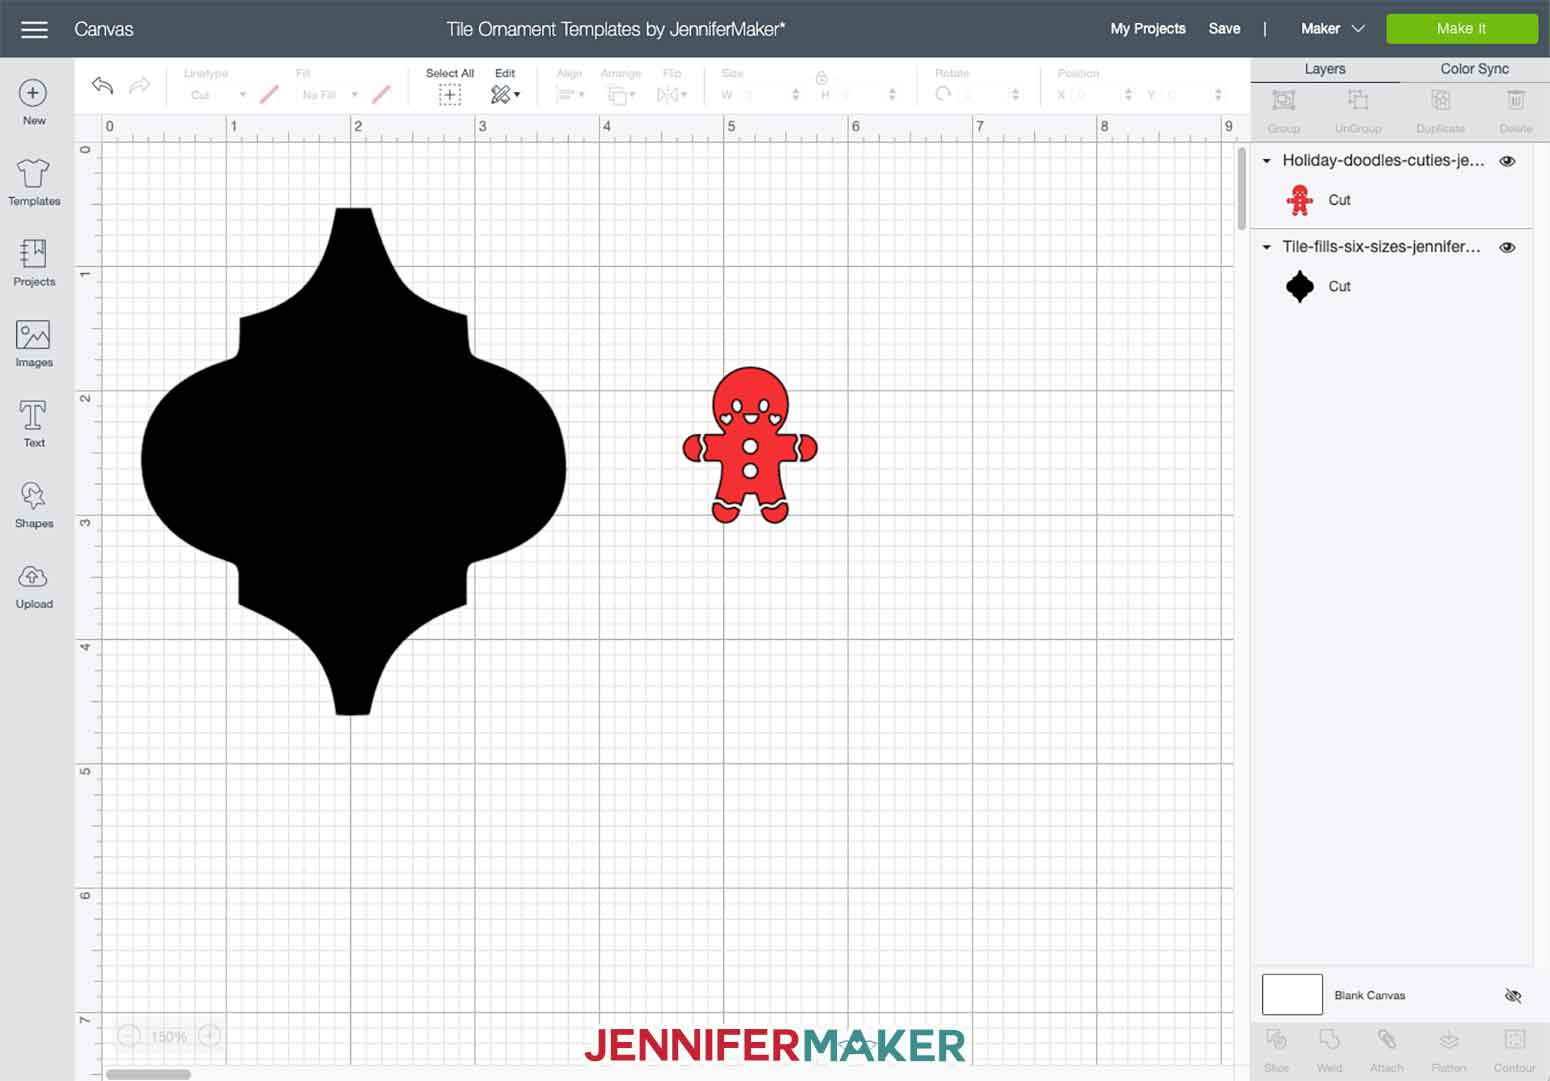
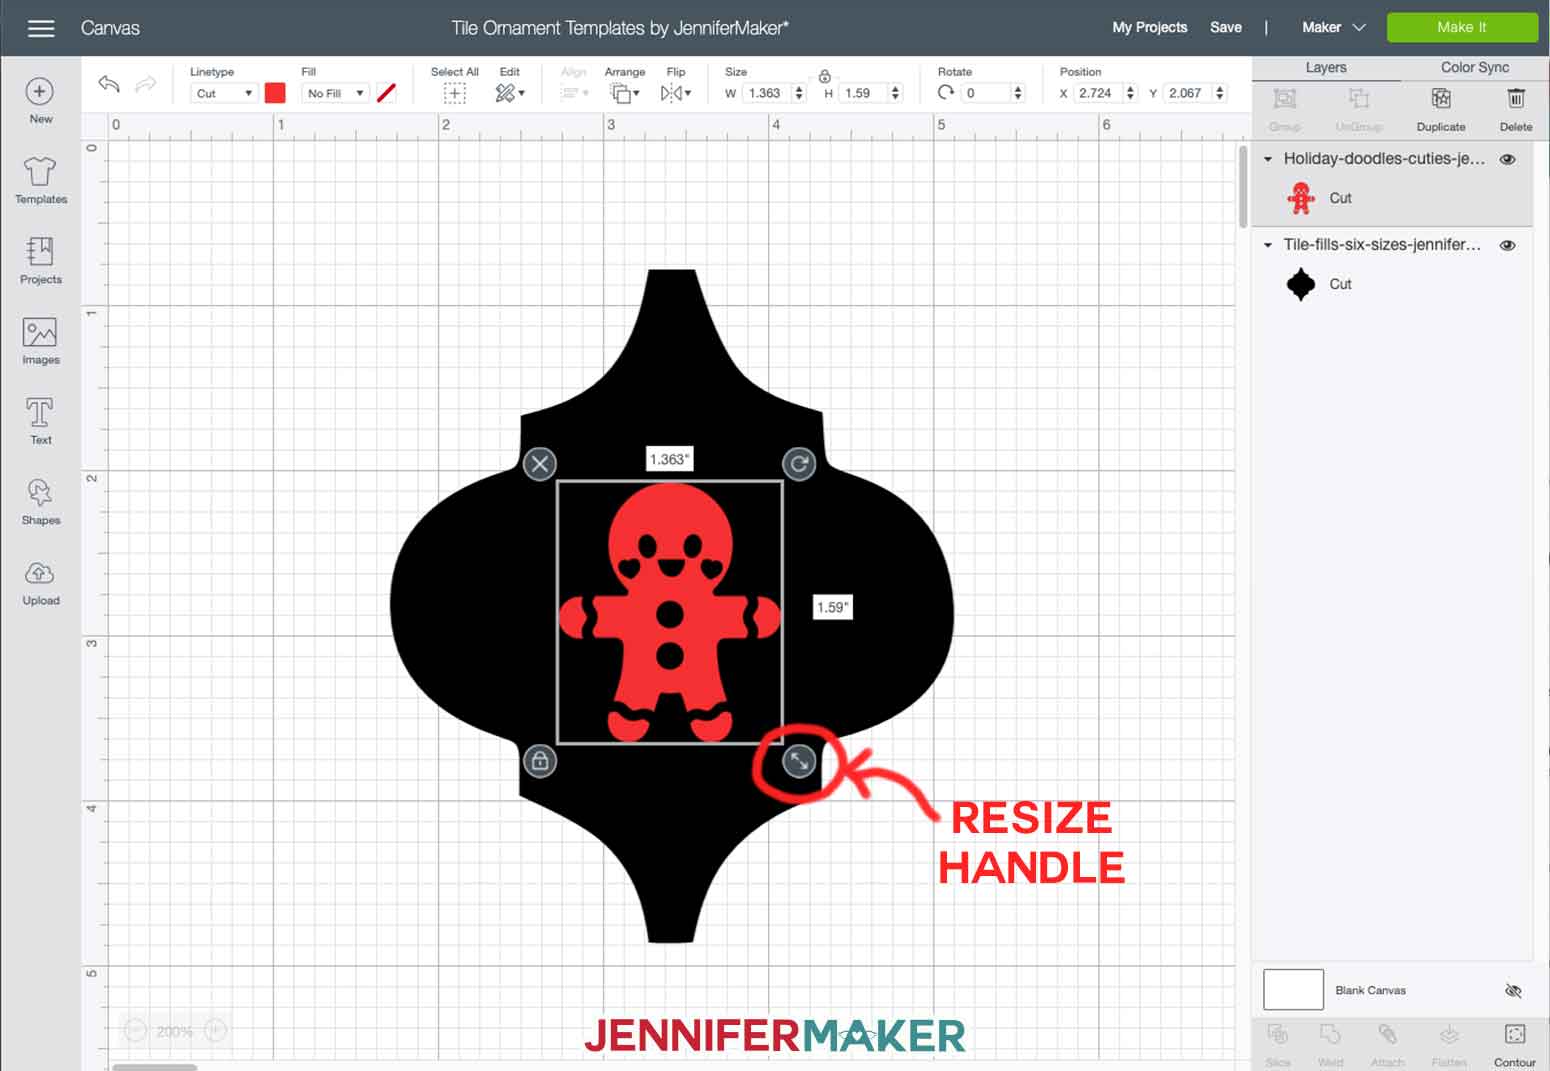
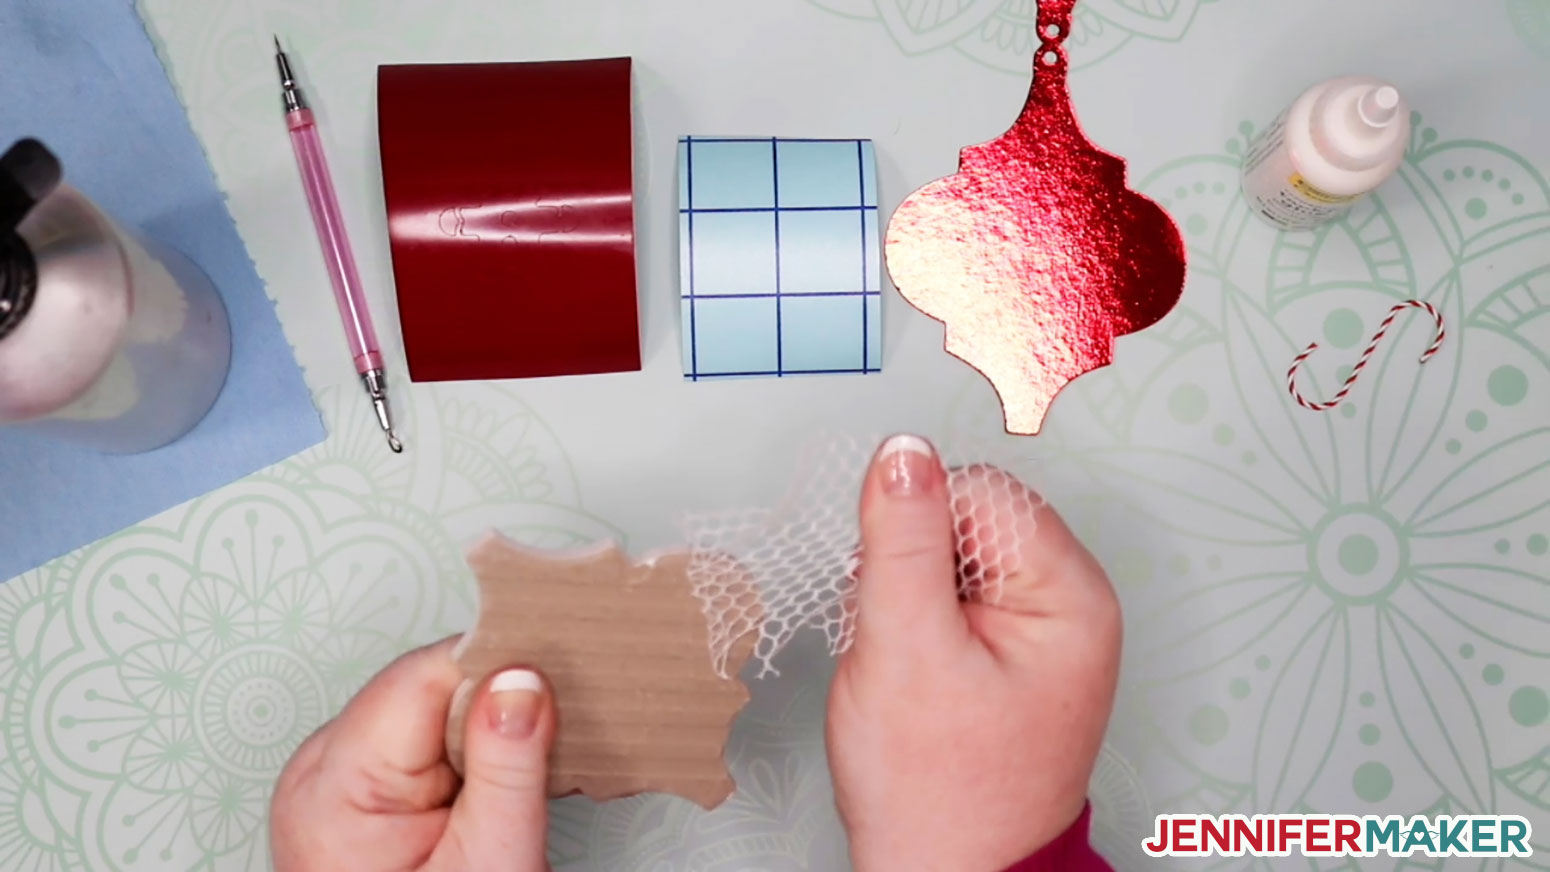
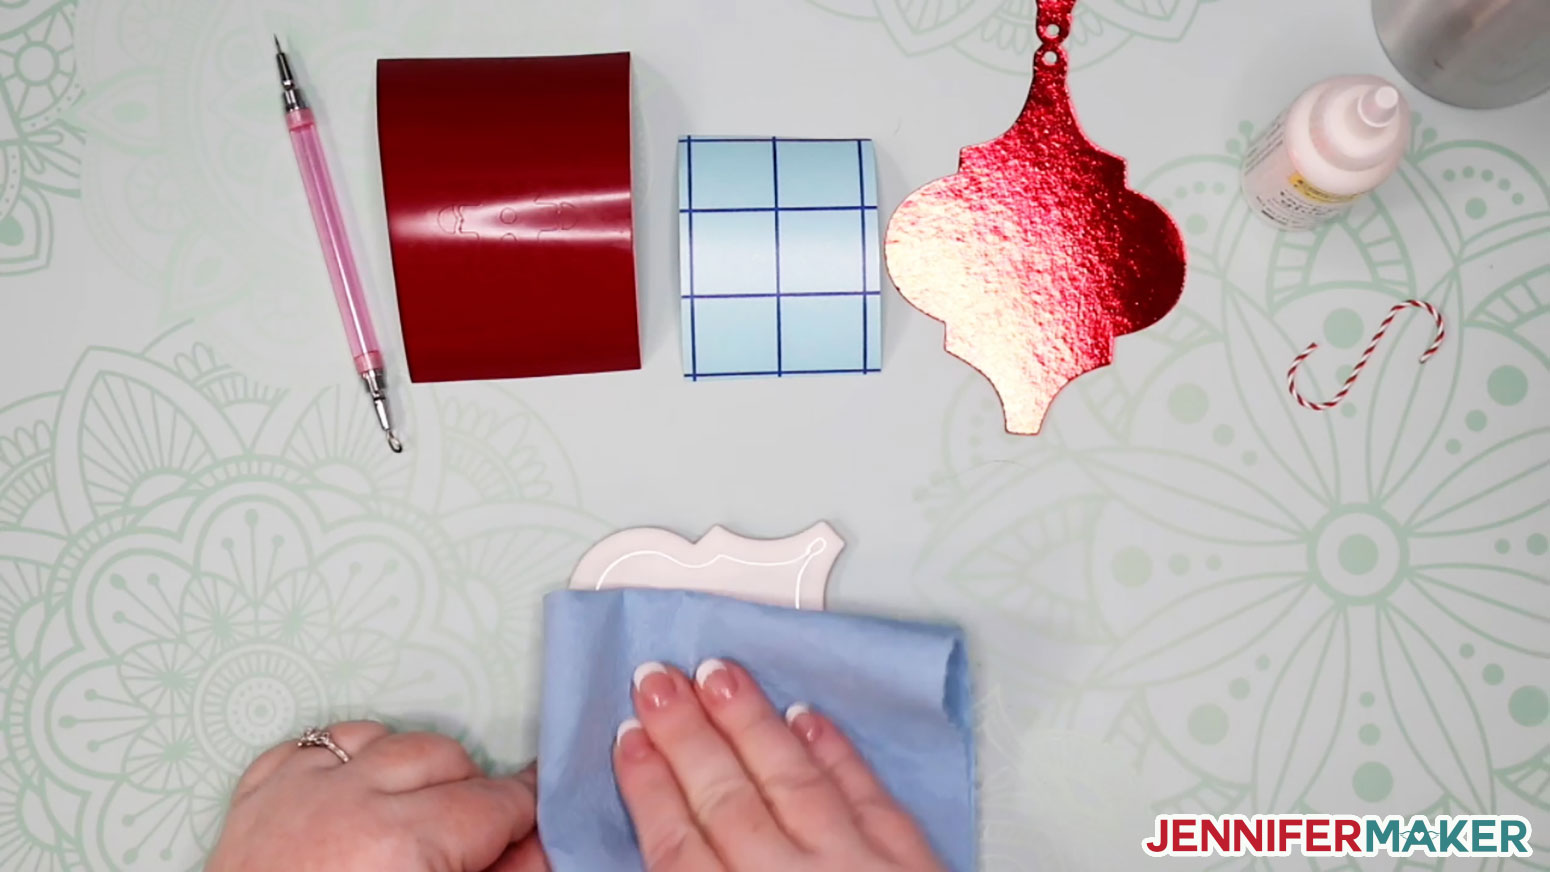
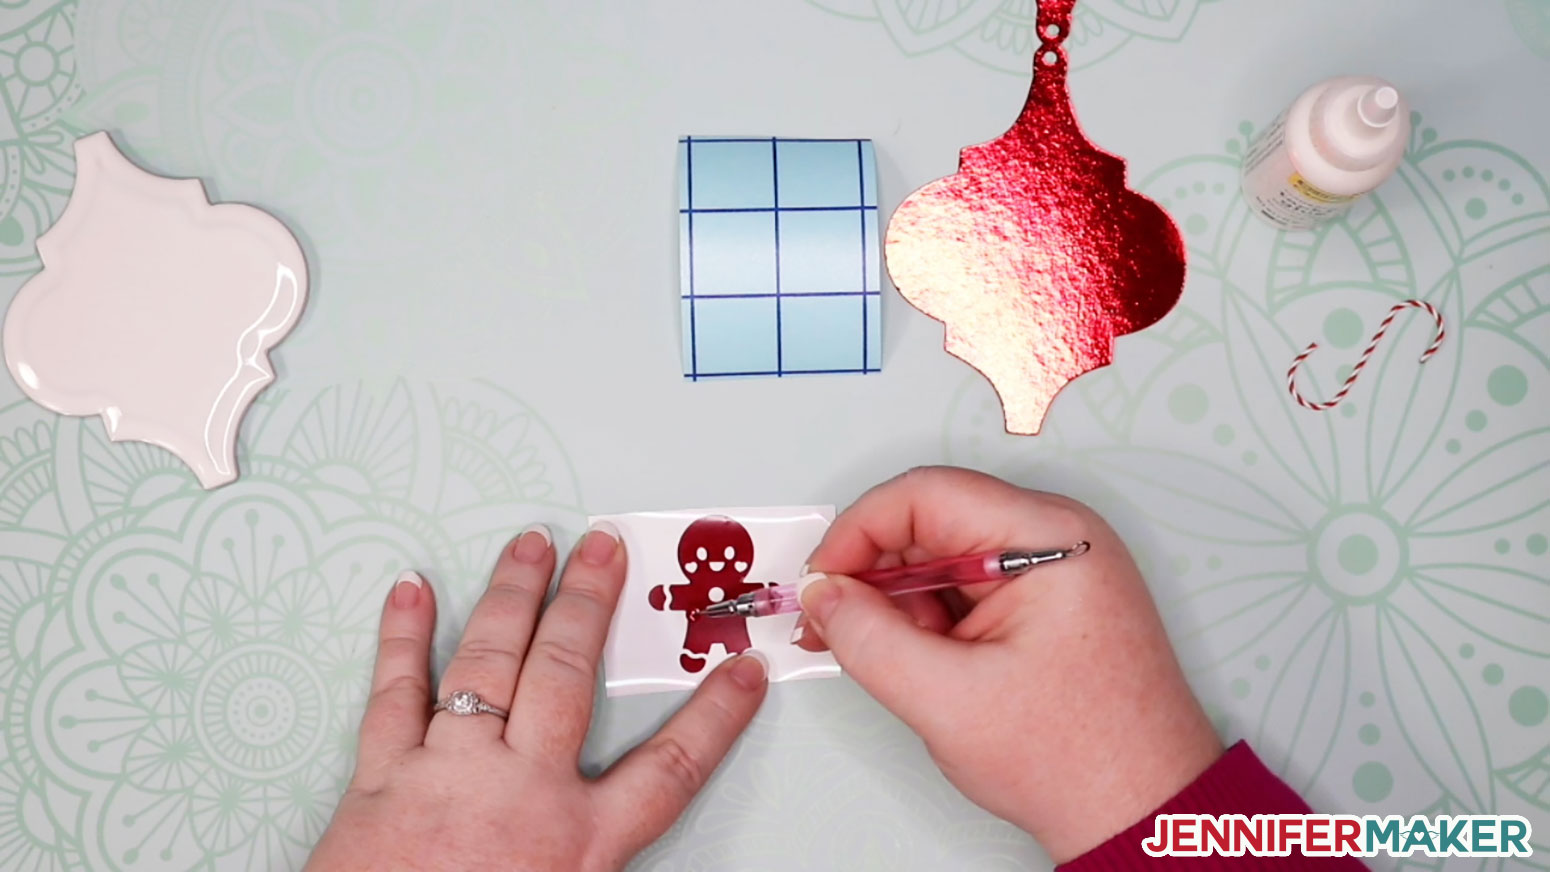
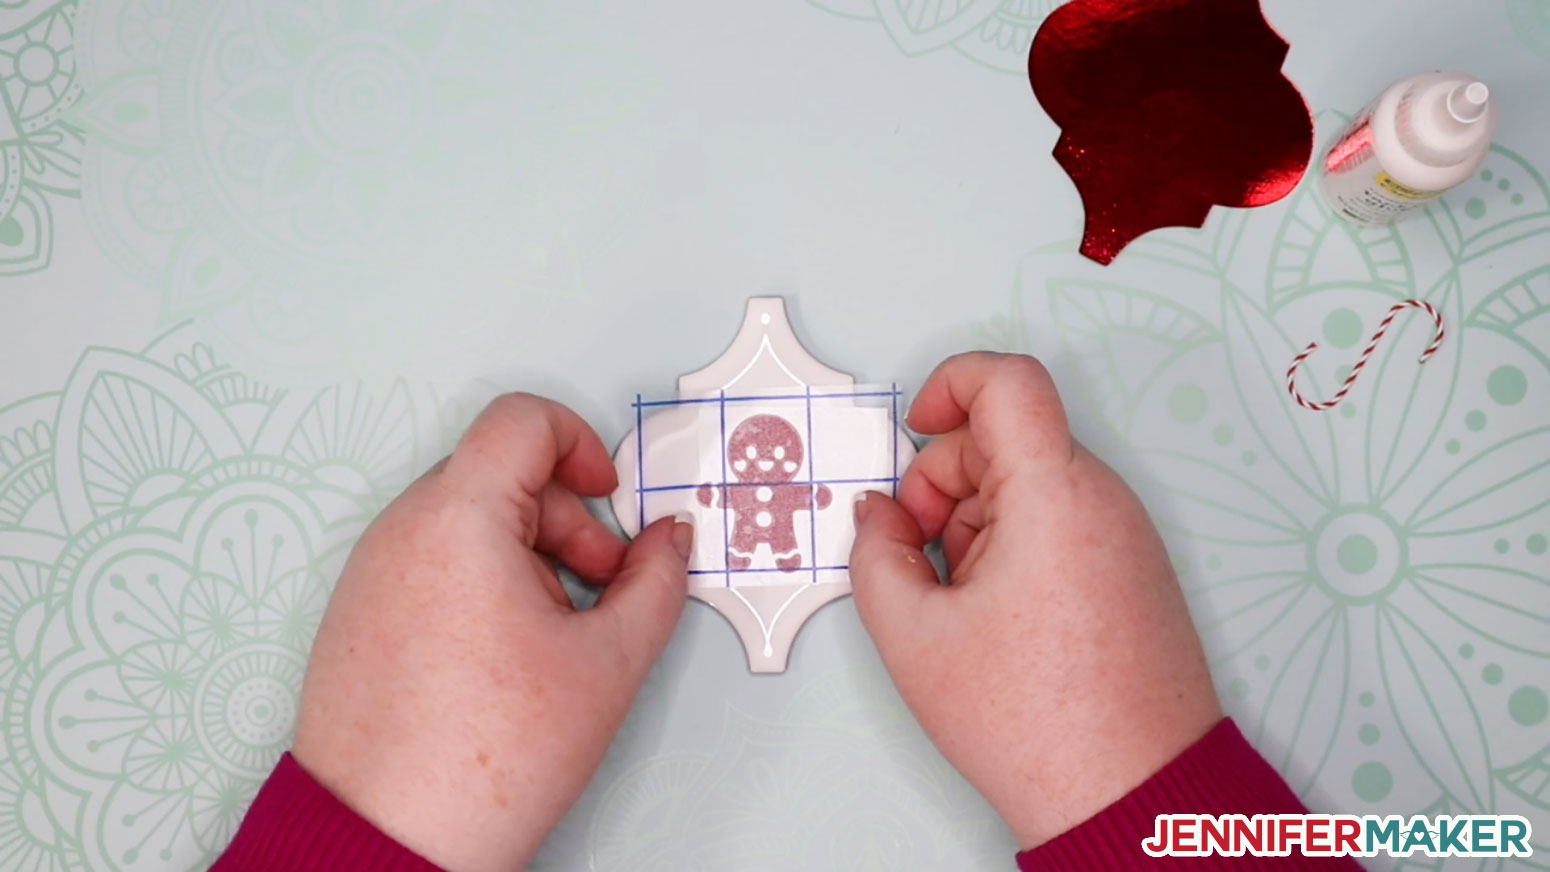
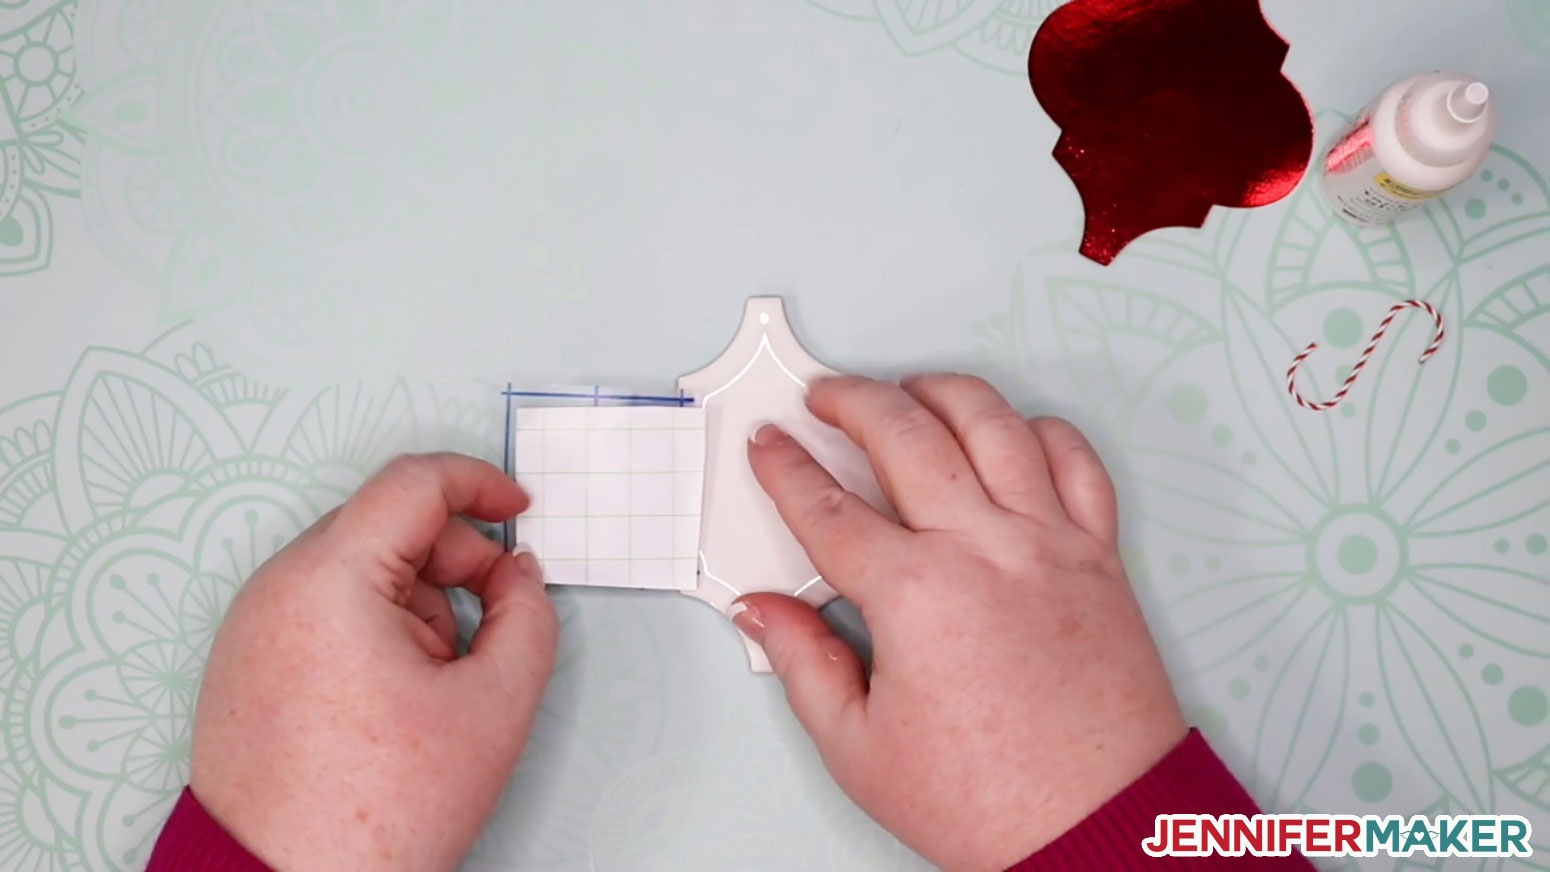
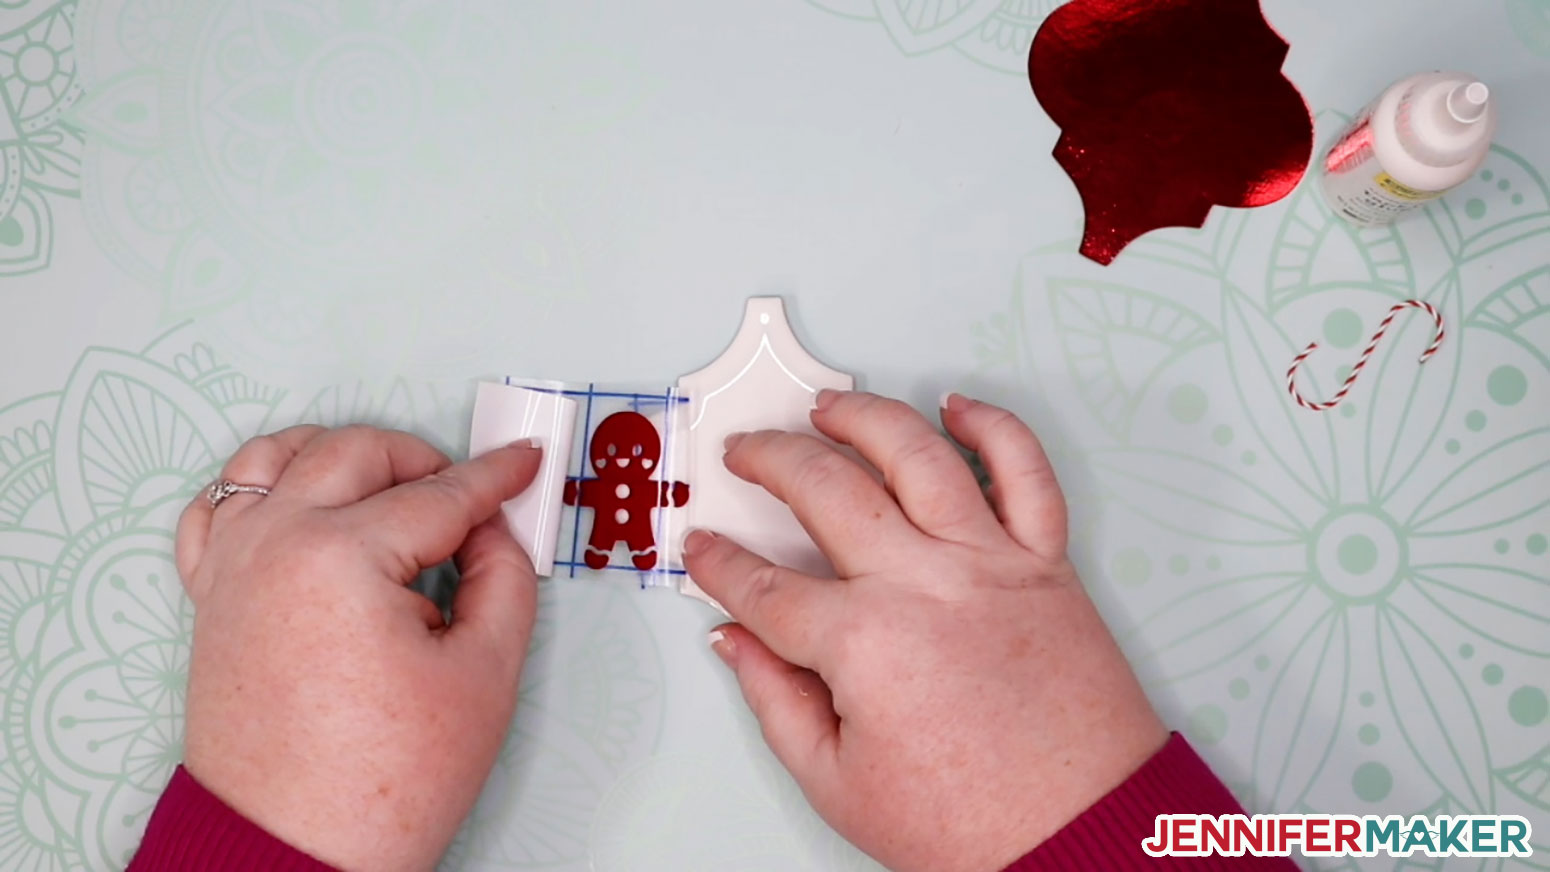
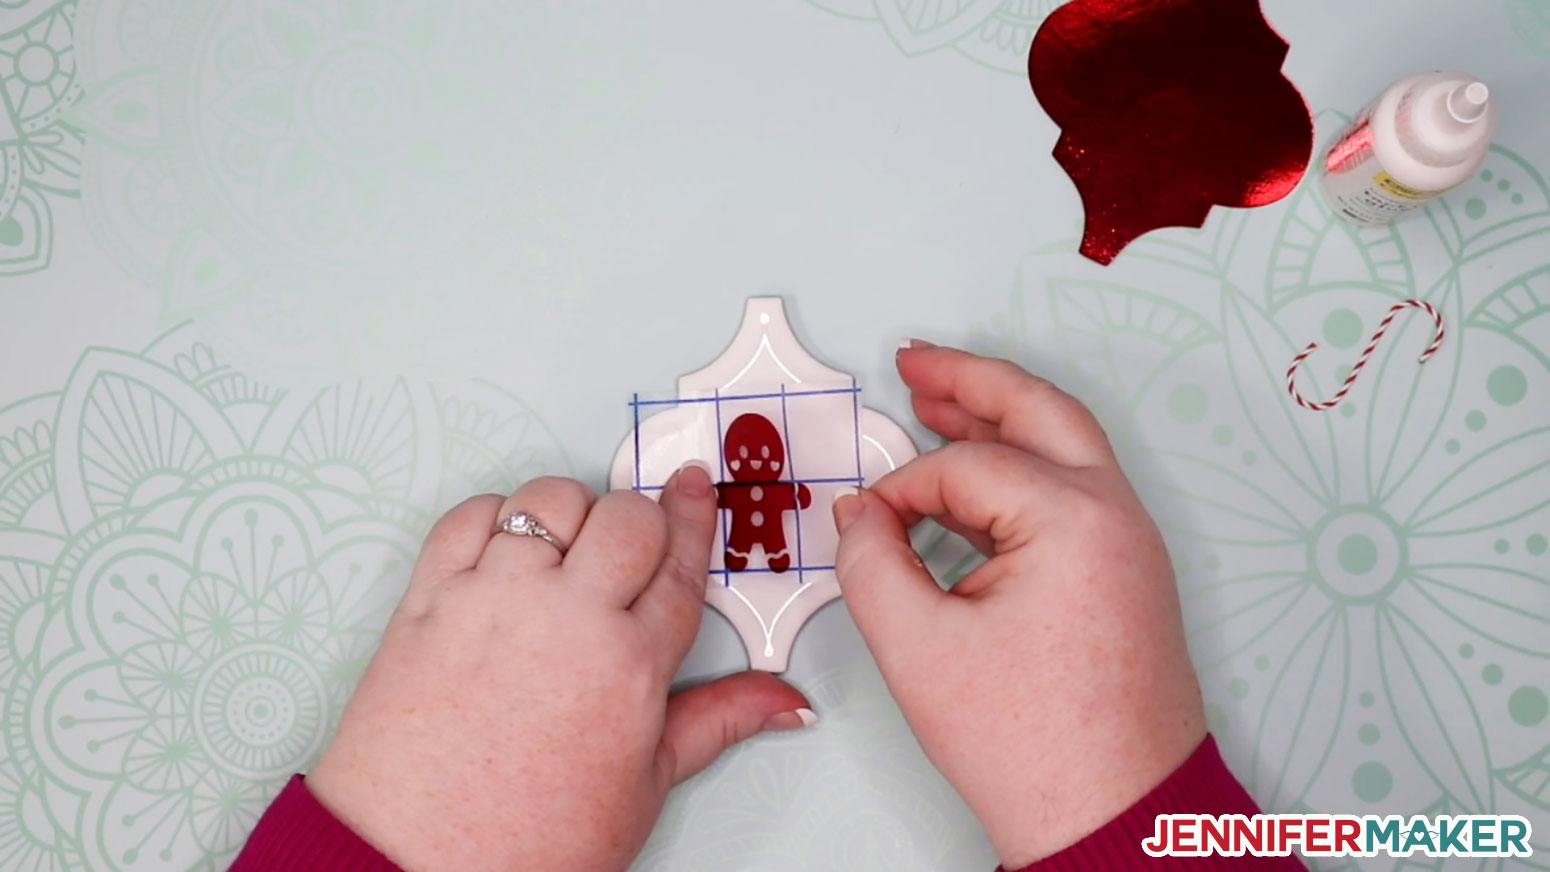
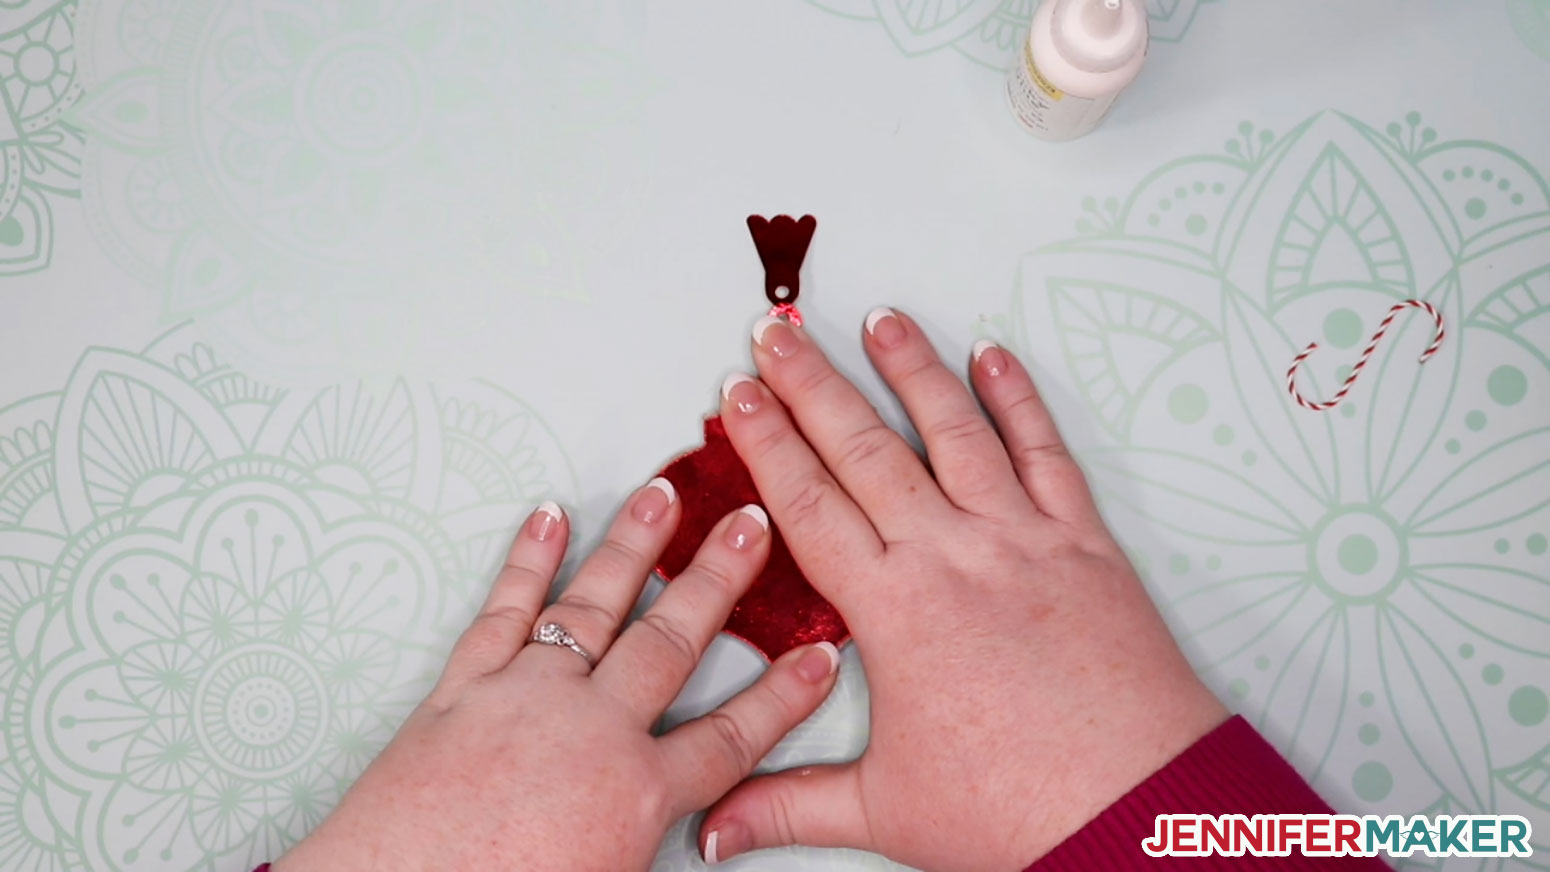
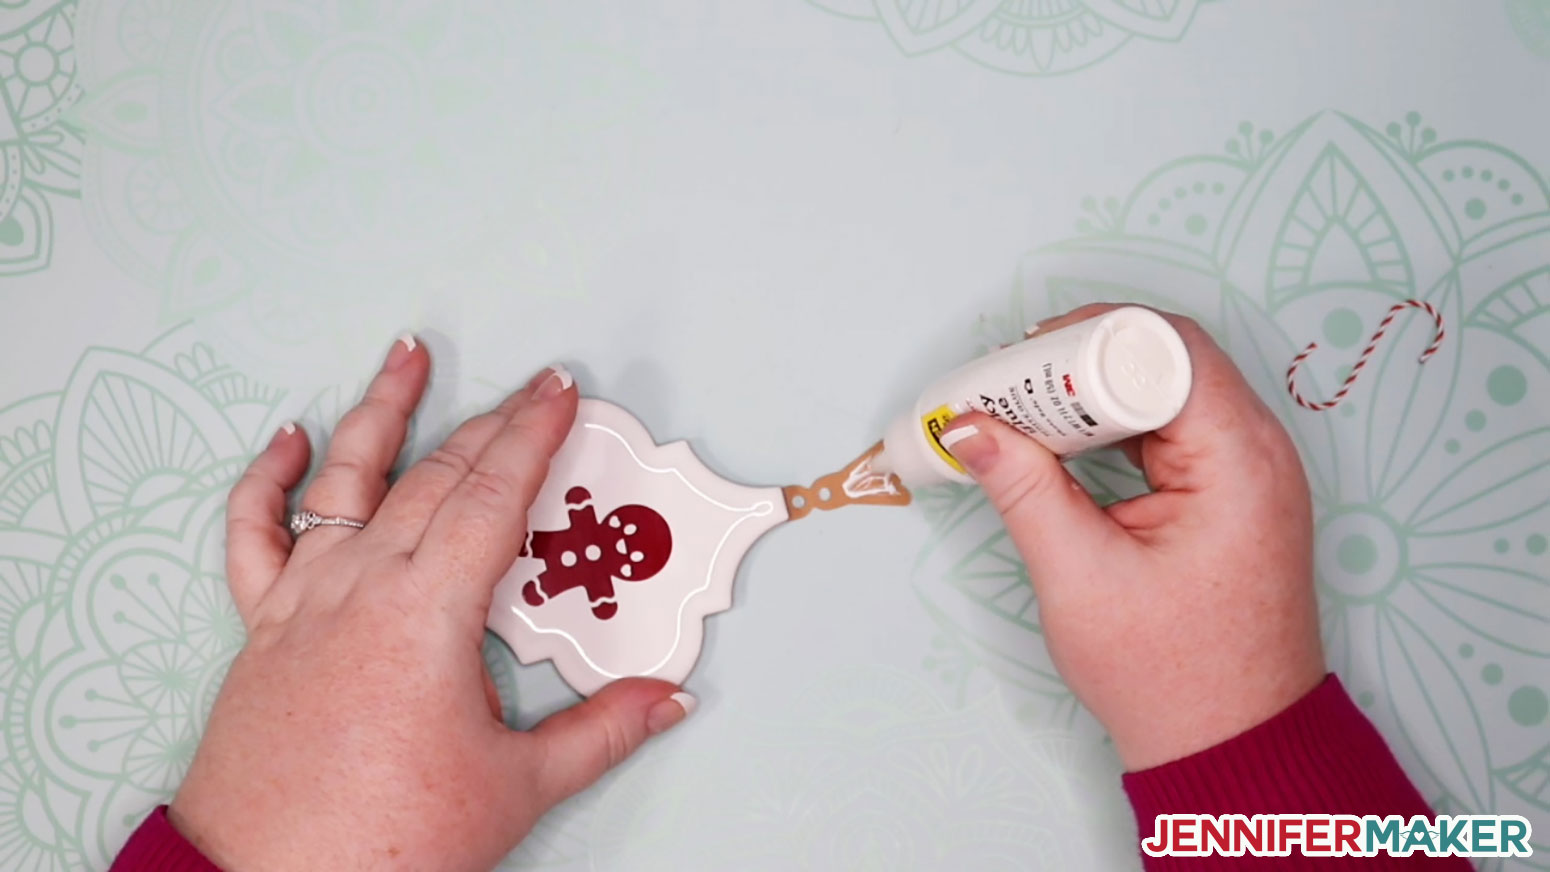
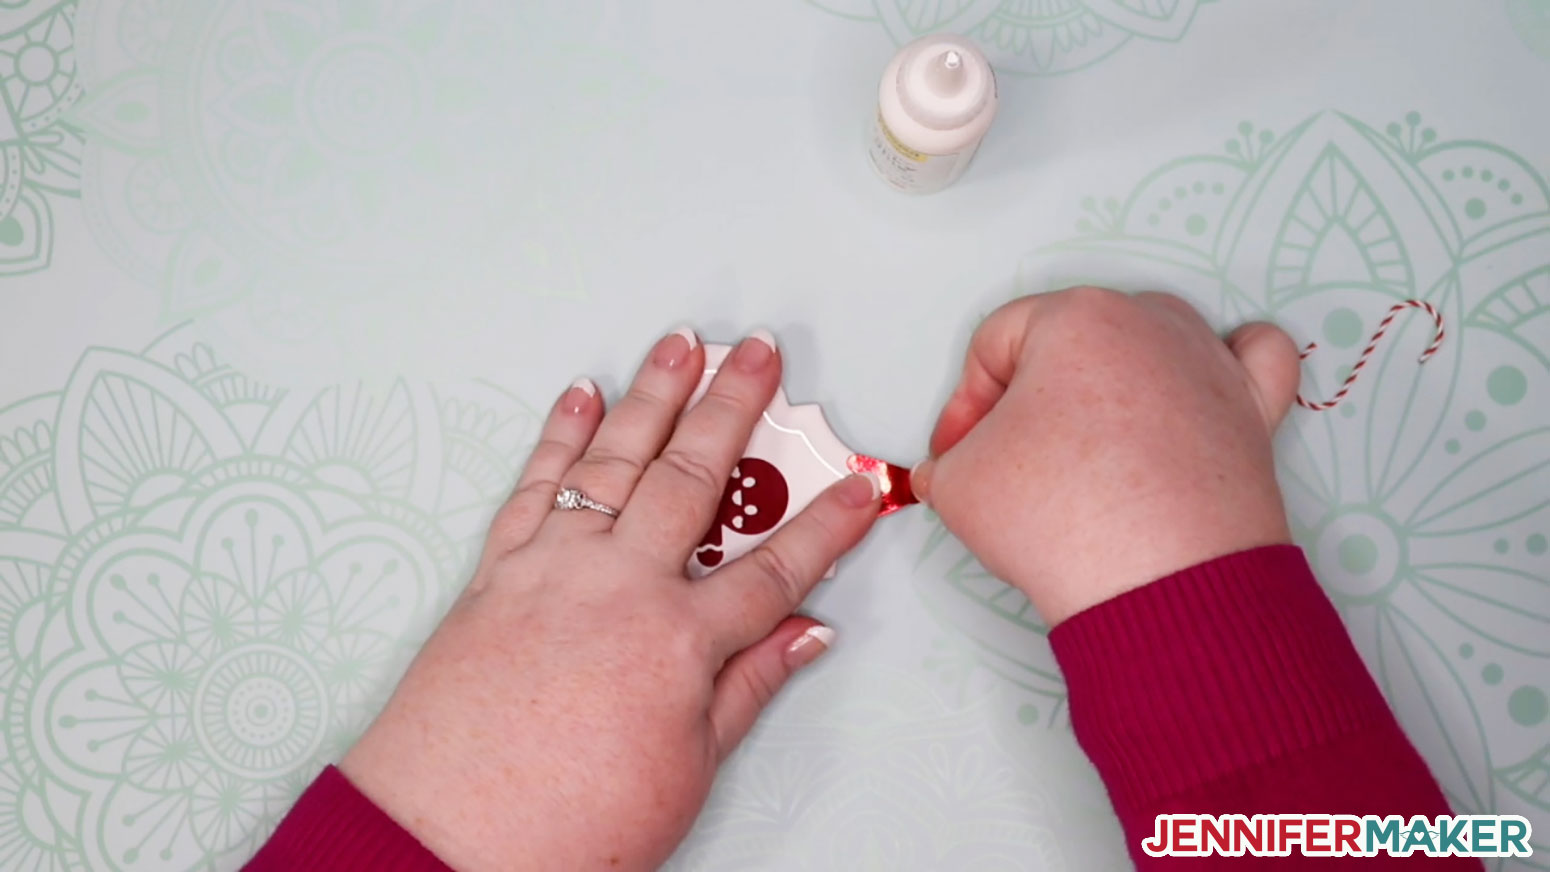
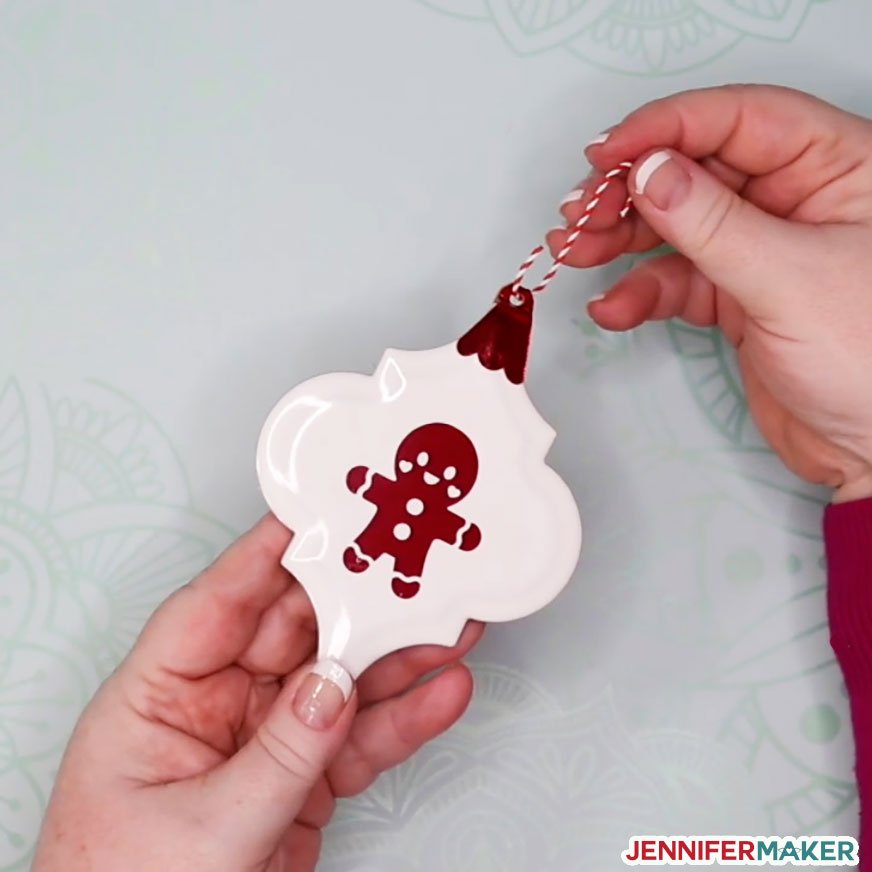
Learn how easy it is to make simple tile ornaments with easy hangers. You can get my free tile ornament templates and designs from my free resource library (get the password to the library in the form at the bottom of this page. There are over 20 files in that archive, everything from borders and fills to simple designs to backings for your ornaments, and all for the six differently sized tiles. I recommend you begin by uploading the tile-ornament-templates SVG to Cricut Design Space and then identify which of the six templates fits your ornament based on my chart here. Here's what the six templates look like in Cricut Design Space: Tip: If you are not sure how to upload an SVG cut file to the Cricut Design Space, watch this helpful video training series I made. Here is the chart again so you can identify which ceramic tile you have — if in doubt, measure your tile and compare. Keep in mind that these templates are sized just a hair smaller than the actual tiles because most of the tiles are rounded at the edges which means their surface area is slightly smaller. Once you've identified your tile template, delete or hide the others so only it remains. You will use this as a guide to create your design and ensure it fits on your tile. The template shown below is the Lowes Sartori Hudson tile. On the off chance your tile ornament is not included in my templates, you can resize one of my templates similar in shape to your tile. Now upload a design to Cricut Design Space. This can be a purchased design or one of my free ones. Here is my holiday-doodles-cuties file uploaded to Design Space. Choose the design(s) you want to put on your ornament and hide/delete the rest. Now position the design on the ornament template, resizing with the resize handle in the lower right corner as necessary until it looks good to you. Be careful not to resize the tile ornament template. If you want to personalize your tile ornament with a name or date, this is the perfect time to do it. Once all of your elements are in place, select the designs (not the template) and click Attach to keep them all together and in place. I'm going to keep this tutorial very simple and stick to just one design, the gingerbread man. You can now hide your template (click the eye icon in the panel on the right) and click Make It to cut it out. Once your design is created, it's time to cut it out. To keep this tutorial simple, we're just going to cut our design from one layer of permanent vinyl. Place your vinyl on a Cricut Standard Grip cutting mat (green) paper side down (pretty side up) on the mat. Select Premium Vinyl as your material setting and cut. If you have any issues cutting fine details from your vinyl. check out my cutting tips here. Remove any webbed or paper backing from your ceramic tile ornament. You should be able to just pull it off, but if not, soak it in some hot water with dish soap for a few minutes first. Wipe down the shiny side of your tile ornament with rubbing alcohol and a lint-free cloth. This will help your vinyl decal adhere better. Avoid touching the surface of your ceramic time once you've wiped it down. Weed the vinyl decal to remove all of the parts you do not want to appear on your ornament — start by pulling off the big parts you don't want, then use a weeding tool to remove the smaller parts. Put a piece of transfer tape over your weeding design and press well with your fingers or (better yet) a scraper. Keep the backing on the vinyl for now. Do not remove the backing from your ornament's vinyl decal yet. Carefully position your decal on the front of your ornament without removing the backing. Now adhere just one side of your transfer tape to the ornament with the decal in position (if necessary, cut away enough of the backing to expose the sticky side of the transfer tape). Once the decal is in position (centered the way you want), press the sticky side of your transfer tape to your ornament. Now flip the decal over (keeping the transfer tape stuck on one side). Remove the paper backing. Carefully flip the decal back over onto your ornament, smoothing as you go from the side that is stuck to the ornament first. Adhere the vinyl to your ornament really well by rubbing the transfer tape side — you'll get the best results with a scraping tool. Gently remove the transfer tape, making sure small bits stay stuck to the ornament. Upload my "tile-ornament-back" file, select the correct backing for your ornament, and cut it out from Kraft board or an equally heavy cardstock. I used red foil Kraft board. Once cut, pre-fold the end of the ornament backing so the holes match up. Using tacky glue, apply a light amount of glue to the backing of the Kraft board. Position on the backing on the underside of your tile ornament and press into place until the glue sets. Flip the tile over and apply glue to the top of the backing, like this: Fold the top over onto itself and the top of your ceramic tile — hold in place until the glue sets. Insert a wire hanger and put it on your tree! Tacky glue works fine to keep the Kraft board on the tile ornament, but feel free to use E6000 if you prefer. I do not recommend hot glue as it's just too thick. Note that if you like the font I used for the Holiday Words in the design file, it is called Christmas Kisses and you can get it here. As an Amazon Associate and member of other affiliate programs, I earn from qualifying purchases.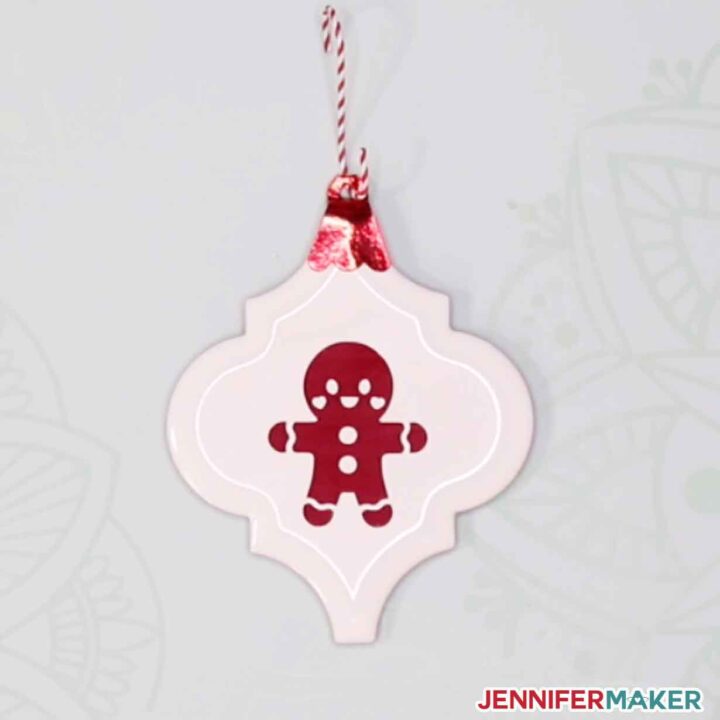
DIY Personalized Tile Ornament (Beginner Version)
Materials
Tools
Instructions
STEP 1: GET THE TILE ORNAMENT TEMPLATES AND DESIGNS

STEP 2: CUT THE TILE ORNAMENT DESIGN
STEP 3: APPLY THE DECAL TO THE ORNAMENT
![]()
![]()
STEP 4: APPLY THE ORNAMENT BACKING AND HANGER


Notes
Recommended Products


Answers to Your Questions About Making Personalized Tile Ornaments
Q: How do I get the tiles off the mesh backing?
A: Just peel the tiles right off. All varieties of the tiles I got came right off the backing with a little effort. If you have issues, soak them in hot water and a little Dawn dish soap.
Q: How do I paint the tiles without having the paint come off when I put on vinyl?
A: Be sure to let the paint dry 48 hours and use a less-sticky transfer tape, such as this transfer tape, masking tape, or painter’s tape.
Q: How do I get the vinyl lined up straight on my tile ornament?
A: Get out a ruler and pencil, measure the center point on each side of the tile, then pencil in a light line between the two. Do the same thing for the top and bottom, drawing a line light in between the two center points. Now you have a cross-hair on your ornament to help you line up your vinyl. Once you’ve applied your vinyl, lightly erase the line. Voila!
If that seems like too much work, opt for an ornament that doesn’t have a design that goes right to the edge. The more border you have between your vinyl and the edge of your ornament, the easier it is going to be to apply and the better it is going to look.
Q: Aren’t the tile ornaments a little heavy for a tree?
A: The tiles don’t feel any heavier than any other ornament I’ve put on my tree. I weighed each tile and they range in weight from 1 oz. to 5 oz.
Get my free SVG files to make your own personalized tile ornaments
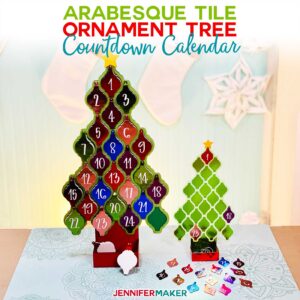
Tile Ornament Tree Countdown Calendar for Christmas!
I’d love to see your personalized tile ornaments. Please share a photo in our Facebook group or tag me on social media with #jennifermaker. And definitely check out my tile ornament tree project if you’d like to make a countdown like mine!
Love,

Want to remember this? Save this DIY personalized tile ornament tutorial to your favorite Pinterest Board!


Jennifer I keep clicking on links for the tile ornaments and the ornament tree and it keeps bringing me back to this page. What am I doing wrong? I’ve never had a problem following the links to other items in the past.
We just checked them, Debbie, and the links are ok. Try deleting the copies you have and try downloading them again! 🙂
Jennifer I was looking for the ceramic tile svgs and couldn’t find them it keeps taking me to the christmas tree countdown. Help
Hi Sharon! Happy to help with this! Just a little trick I have started doing in all of my blog posts is supplying you with the design file number from my library in the materials list of the blog post above. Just locate the materials list (yellow box, outlined in red) and you will see what number this design is in my library. It is just that easy!
Thank you for the templates and all the legwork! I’m excited to give this a try.
Thank you for your kind words! I’m so happy you’re enjoying these templates!
I absolutely LOVE this idea and can’t wait to try it out! Are there any other glues that would work well with the ceramic tiles, besides Scotch tacky glue? I have Art Glitter Glue, Alenes Tacky glue and Fabrictac. Any suggestions? I would hate to use a glue that doesn’t hold up and ends up falling off the tree and breaking😔 Thanks for sharing your wonderful ideas!
Hi Elisa! I would give your Art Glitter Glue a try or Aleene’s Tack Glue.
Glazed tile, whether porcelain, ceramic or glass, essentially has a glass surface. Paint will not stick well unless you prepare the surface by making it rough (use a pumice stick or similar coarse material that is used to clean the ring in toilets), and perhaps using a primer. Even then, paint is not as hard\durable as the ceramic glaze was originally. Like making a window cling, vinyl will stick to the surface, and is more durable than paint, but it too is subject to scratching off. Maybe a finish coat of Krylon would help to protect the artwork. Is there such a thing as unglazed or greenware Arabesque tile? It might be worth considering to make make your own clay tiles, using a commercial tile as the template, and use a white or colored clay that you bake in the oven.
Hi Pam! Great considerations! I do not know of an unglazed or greenware tile that is available.
I know that Cricut has the Infusible Ink Coaster Blank Ceramics, but could I use one of the ceramic tiles you’ve shown to put Infusible Ink on? Or does it have to be Cricut brand?
You can, just remember that your results may vary slightly!
Help! Can’t find your holiday-doodles-cuties file. Point me in a direction! Thanks, Robin
Hi! It is file #250 and this is another way to access! Instead of extracting, like you would normally do, double-click on the “tile-ornament-tree-jennifermaker” file. Then double-click the “File Designs” file, and you will find the “holiday-doodles-cuties-jennifermaker” SVG file!
I want to put a a hole in my ceramic tile…. How do you do this?
Hi Crystal! You would need to use a masonry bit on your drill to do this. I do mention this at the top of the blog post.
Jennifer!!! I love love love your website and sweet sweet personality that shines through!!
This is such a sweet idea that I would love to do with my girls and think I definitely will!! Thanks for sharing your talent and skills with the world :). You’re the best!!
So glad you enjoyed the project, Hadlee!
Trying to find how to make the tile ornaments and obtain the template
Hi, Karen! Just log into my free resource library and look for design file #251.
how do you do the border for the tiles?
Hi Karen! You can find lots of different borders in Design Space.
I downloaded the arabesque tile templates, but when I try to drag it to upload in design space it says it must be a file and won’t let me upload it. What am I doing wrong? I did extract before trying to upload
Hi Annabeth! Make sure you have extracted the initial download and that you are uploading the SVG file.
I signed up for the email newsletter and got the password, but I can not find the template svg in your library files. Can you please help?
Absolutely! In my library every template has been given a number and this template is #251. I hope this helps!
i downloaded the files and tried to upload the svg tile backs but when I drop the files to upload then as usual, the program doesn’t go past the upload page. Other SVG files upload no problem…
Hi Jennifer! Make sure you have extracted the download and you are uploading the SVG file type. If that is all good, try restarting Design Space.
These are so cute. Thanks for sharing.
You’re welcome!
Thank you for this! I love the templates and I have used them to make the ornaments, but I was wondering about the hangers. I ordered the Jewelry Bails for hangers. what Adhesive do you recommend to attach the bail to the tile?
Two options I recommend in the tutorial to try is Tacky Glue or Gorilla Glue! I can’t wait to hear how your ornaments turn out!
This was the best and most informative site I’ve found on how to make these ornaments. Thank you so much for taking the time to lay this out for us.
Thank you for your kind words, I’m so glad my tutorials are helpful!
hi Jennifer, I am new to the cricut and want to download your tile ornaments. I can’t figure out to do it. Please help.
Hi, I’m glad you are here! Starting with my Love Your Cricut Mini Course will be very helpful for you!
Is it possible to use HTV on the tiles after they are painted?
Thank you! This is the best tutorial & video I’ve found!!! Thank you for sharing 😊
Do you have a link for the backing that had the hook part that folds down?
What a sweet idea and i would like to do with my girls and think that i will definitely. Thank you very much for sharing your advice and skills with the world.
Thanks
So glad you loved it!
What a sweet idea and i would like to do with my girls and think that i will definitely. Thank you very much for sharing your advice and skills with the world.
ornaments
You are very welcome, Anna!
Hi do you happen to have SVG gift box, for the Arabesque Tile Ornament (Satori from Lowes) could not find library
We have a selection of gift boxes to choose from, Josie! Just go to our free resource library, and search for “gift box” for a great selection! You can resize anything you like so the Sartori Hudson arabesque will fit! 🙂