Learn how to make detailed side edge cards with Cricut!
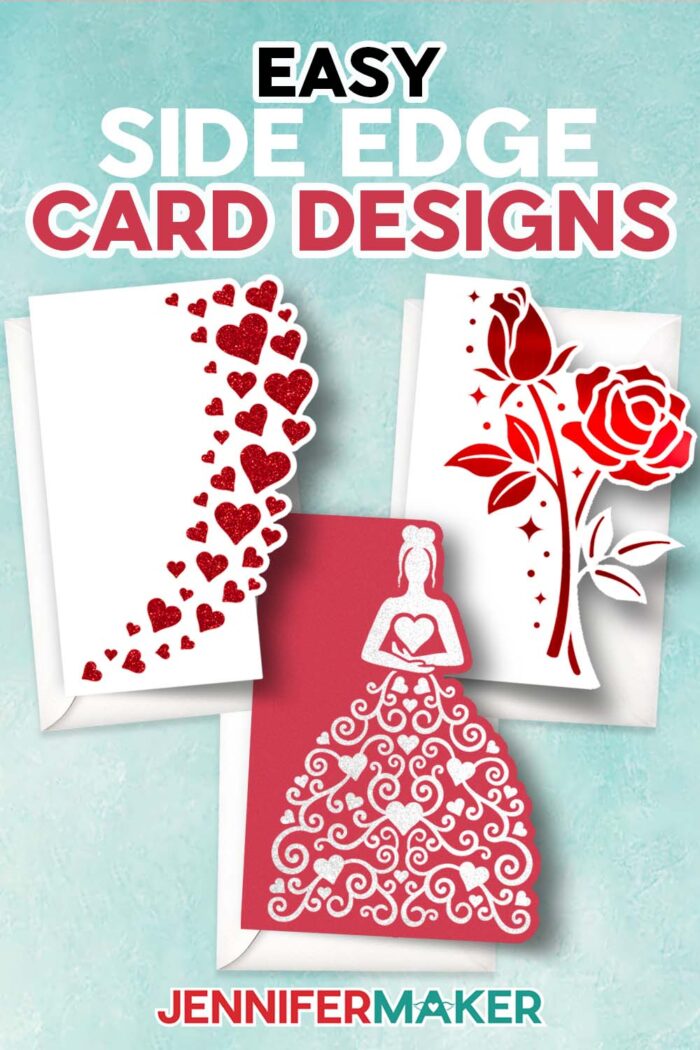
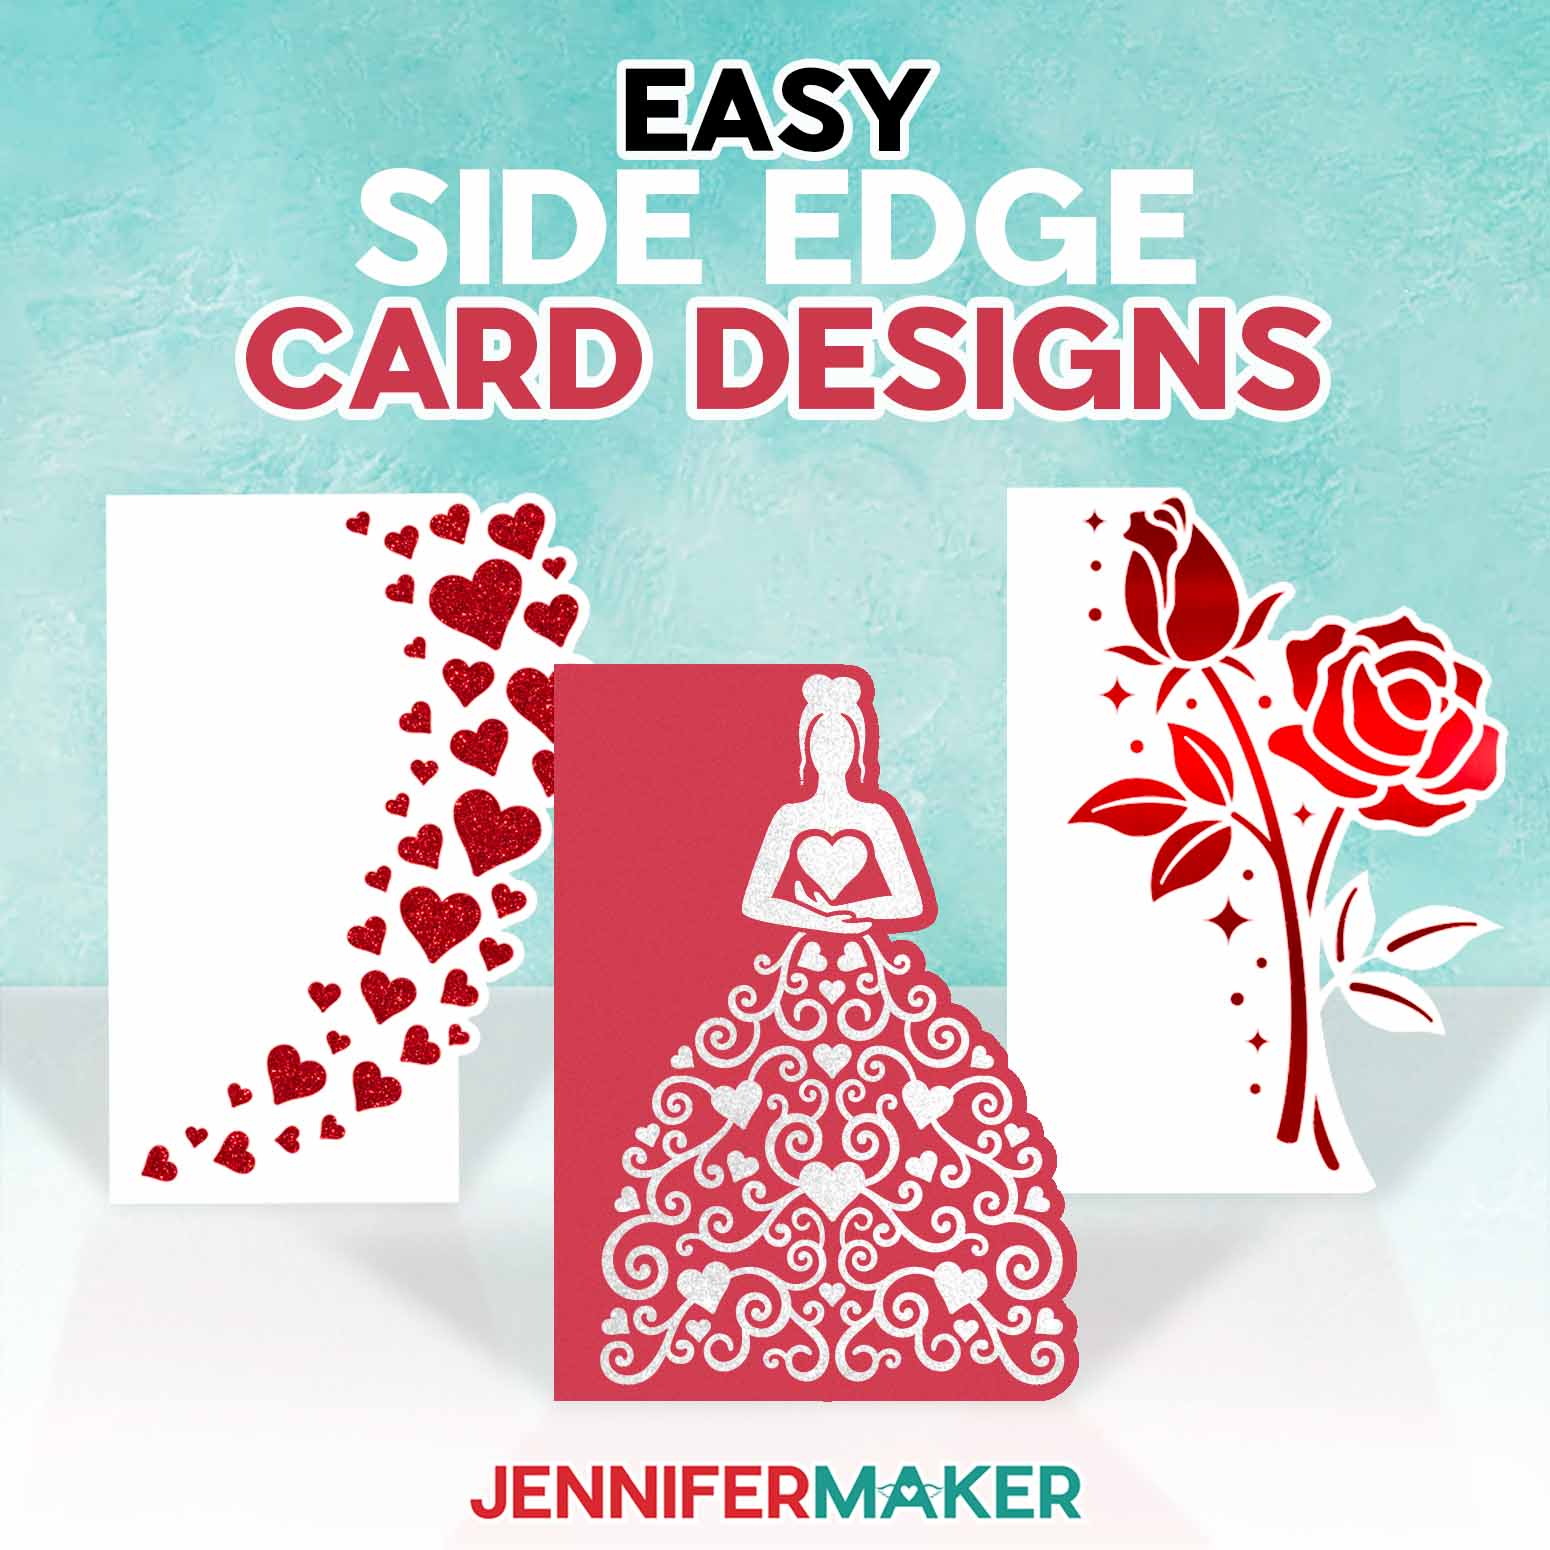
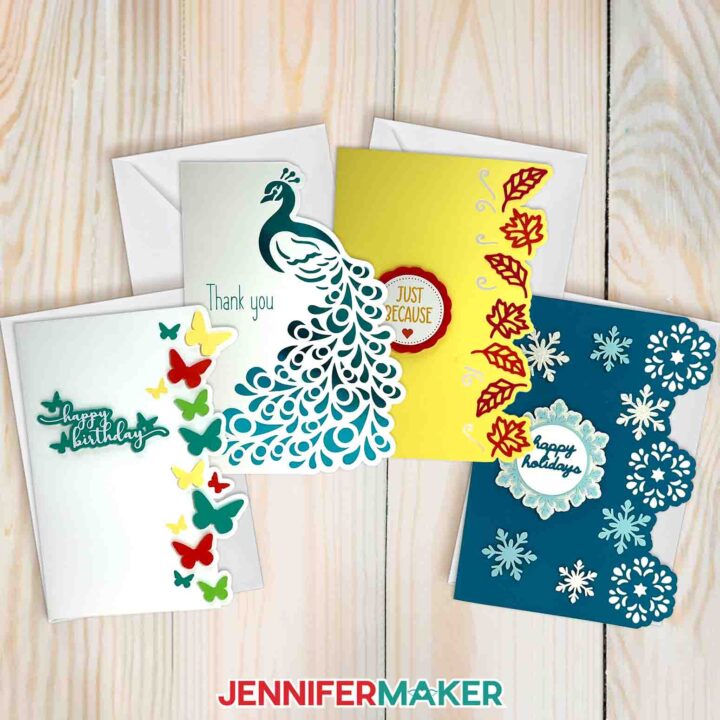
Have you seen gorgeous side edge cards online or at the store and want to make your own? You absolutely can! I love seeing all your homemade cards using my first set of side edge card designs (with leaves, butterflies, snowflakes, and that popular peacock!) so I made a new set for you! These homemade card SVGs are ready-to-go using my cutting tutorial. Or, use them for inspiration to make your own side edge cards with Cricut Design Space following the design instructions!

If you haven’t come across side edge cards before, they’re special designs that have a shaped edge for added interest. Using layered paper can also make them even more special and professional-looking. And while they look complex, it’s easy to make side edge cards with Cricut because the machine does most of the work for you!

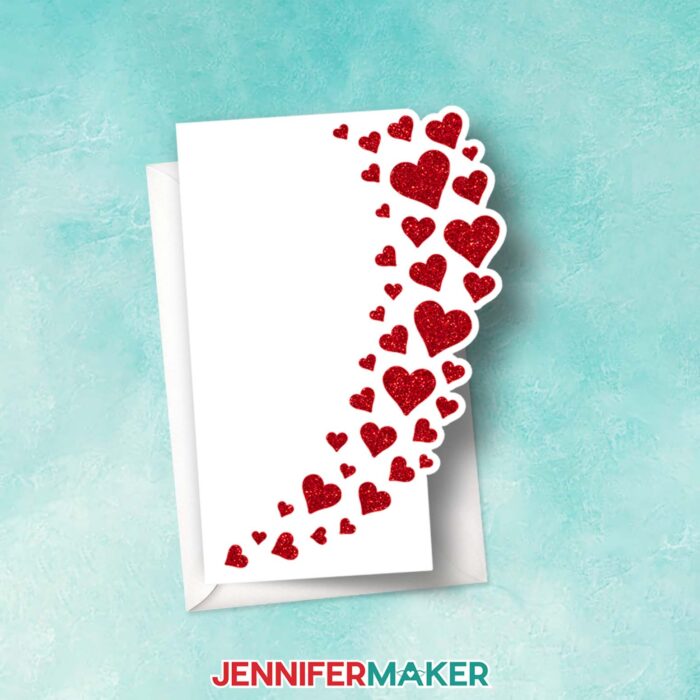
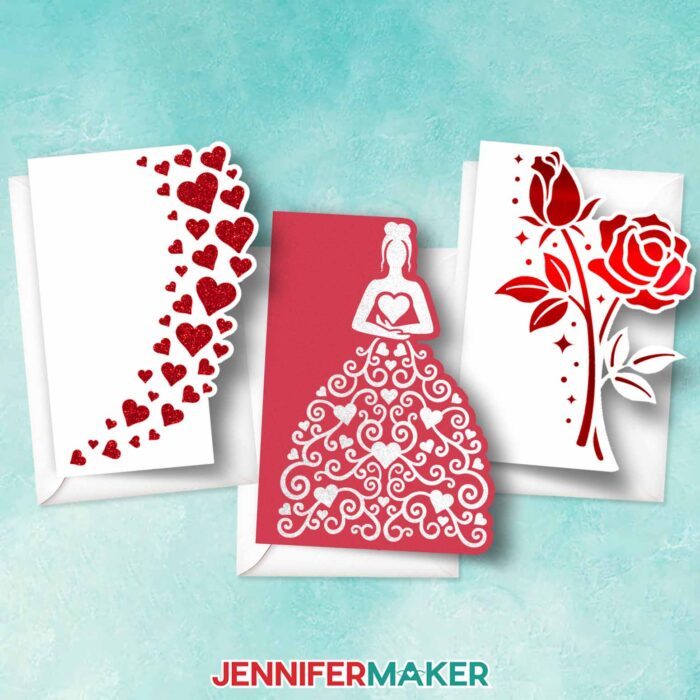
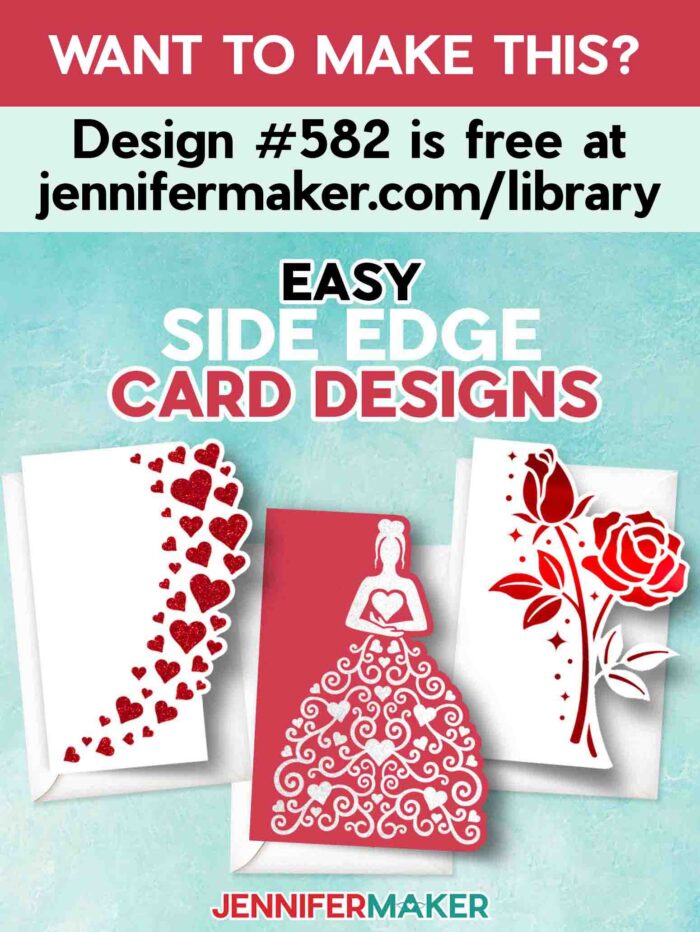
The new collection has a sweeping hearts design with a nice open area. You can use different colors or add a message to the front of the card to use this design for a loved one of any age.
Then there’s a more dramatic rose side edge card perfect for an anniversary or special occasion.

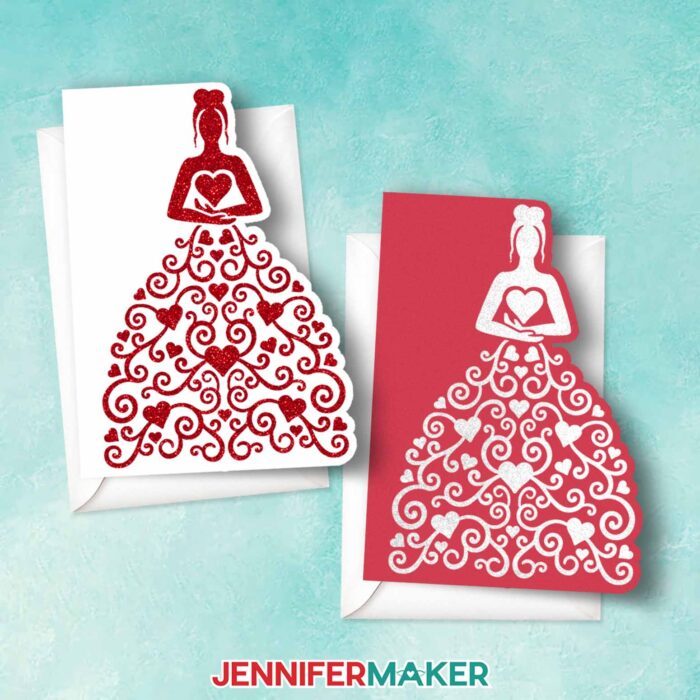
And last but certainly not least, a gorgeous card with a person wearing a dress made of hearts! She was inspired by an early wall art design of a woman whose dress is made of flowers!
The cutting and assembly steps for each card are very similar, so just pick your design and follow along with my video tutorial or the written step-by-step guide below. I prepared my side edge cards with Cricut Design Space, but you can use other software for another cutting machine.
I’ll show you how to make no-score versions of the cards using dashed cut lines instead of a score line, but if you’d like to use the score version to create a fold line, you can use an optional Scoring Stylus or Single Scoring Wheel. Again. If you need help setting your score lines, see my Scoring Tools and Tips post.
And if you want to make custom side edge cards with Cricut, the tutorial covers picking a shape, using Offset layers, Slice, and Weld to shape the edge of your card, and even how to make sure your card layers match using Duplicate and Flip. You’ll learn a lot while making your own designs!
I’m using the Cricut Maker 3, but you can also use the Cricut Maker, a Cricut Explore Series machine, the Cricut Venture, or even the Cricut Joy Xtra for this project (or another machine that uses cut files).
My materials list below has perfect paper recommendations, but remember that high-quality cardstock usually cuts better than bargain brands. Save yourself time and money by getting the best results on the first try!
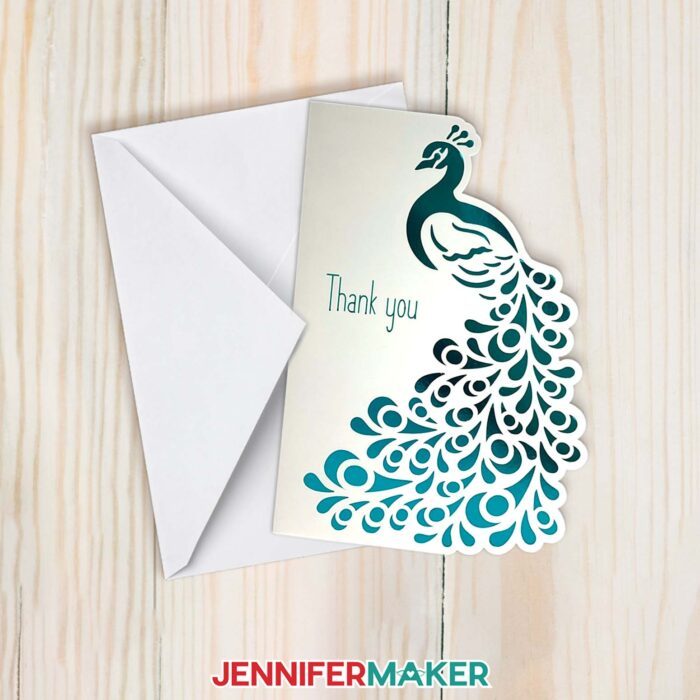
Plus, you can use my tutorial on how to write on a card layer with Cricut to add a special message with perfect penmanship. Remember, the peacock file is in my earlier side edge cards with Cricut collection, so download them, too!
To send your own side edge card through the mail, you can even make a DIY envelope! Just follow my easy Envelope tutorial. If you didn’t resize your own card, the A7 size envelope fits great.
Let me show you how easy it is to make side edge cards with Cricut! This post contains some affiliate links for your convenience (which means if you make a purchase after clicking a link I will earn a small commission but it won’t cost you a penny more)! Read my full disclosure policy.
Materials to Make Side Edge Cards with Cricut
View my Amazon shopping list with the exact items we used on the original project
- One (1) Sheet of 8.5″ x 11″ or 12″ x 12″ 65 lb. Colored Cardstock -OR-
- One (1) Sheet of 8.5″ x 11″ or 12″ x 12″ 65 lb. White Cardstock
- One (1) Sheet of 8.5″ x 11″ or 12″ x 12″ Glitter Cardstock (optional for liner) -OR-
- One (1) Sheet of 8.5″ x 11″ or 12″ x 12″ Metallic Cardstock (optional for liner)
- A way to cut your cardstock: I’m using the Cricut Maker 3 but you can also use the Maker, Explore series, Venture and Joy Xtra for this project!
- Scoring Stylus (optional for files with score lines) -OR- Single Scoring Wheel (optional for files with score lines)
- StandardGrip Machine Mat 12″ x 12″
- Brayer
- Scraper
- Weeding Tool
- Tweezers (optional)
- Craft Glue – I used Bearly Art Precision Glue
- Design #582 (My free SVG/PDF/DXF design files are available in my free resource library – get the password by filling out the form at the bottom of this page)
How to Make Your Own Side Edge Cards With Cricut
Side Edge Cards
Learn how to make fun side edge cards with some cardstock, glue, and foam adhesive.
Materials
- Several Sheets of 8.5" x 11" or 12" x 12" 65 lb. Cardstock (various colors)
- One (1) Sheet of 8.5" x 11" or 12" x 12" 65 lb. White Cardstock
- One (1) Sheet of 8.5" x 11" or 12" x 12" White Glitter Cardstock (optional for snowflakes)
- One (1) Sheet of 8.5" x 11" or 12" x 12" Blue Metallic Cardstock (optional for peacock card liner)
- One (1) 3” x 2” Piece of Permanent Vinyl (optional for sentiment)
- One (1) 3” x 2” Piece of StandardGrip Transfer Tape (optional for sentiment)
- Gel Pens (optional for sentiment)
- Design #564 (My free SVG/PDF/DXF design files are available in my free resource library - get the password by filling out the form at the bottom of this page)
Tools
- A way to cut your materials - I’m using the Cricut Maker 3, but you can also use the Cricut Maker, a Cricut Explore Series machine, the Cricut Venture, or even the Cricut Joy Xtra.
- Cricut Green StandardGrip Machine Mat 12" x 12"
- Scoring Stylus (optional for files with score lines) -OR-
- Single Scoring Wheel (optional for files with score lines)
- Craft Glue (I used Bearly Art Precision Glue)
- Adhesive Foam Squares
- Brayer
- Spatula
- Scraper
- Weeding Tool
- Tweezers (optional)
Instructions
STEP 1: GET MY FREE SIDE EDGE CARDS DESIGNS
First, download my Side Edge Cards SVG/PDF/DXF files from my free library -- look for Design #564. Alternatively, you can use the Save This Project form near the top of this post and the design link will be emailed to you.
There are four designs in the folder: butterflies, leaves, a peacock, and snowflakes. There are score and no-score versions of each design.
In this tutorial, I will show you how to prepare and assemble the no-score snowflakes card, but you can also follow these steps to make the other card designs. I’ll also show you how to make your own custom leaves design from scratch in Cricut Design Space. Upload your chosen SVG file to Design Space to get started.
TIP: If you’re not sure how to upload, go to jennifermaker.com/svgs to learn how to unzip and upload SVG files.
PROJECT 1: SNOWFLAKES SIDE EDGE CARD
STEP 2: PREPARE YOUR DESIGN
CRICUT DESIGN SPACE
1. Open Cricut Design Space and click “New Project.”
2. Click “Upload” and then “Upload Image.”
3. Click “Browse.”
4. Select the SVG file.
5. On the Prepare to Upload screen, it will say “Cut image” with the design preview.
6. Click “Upload.”
7. Find your design in Recent Uploads and add it to the Canvas.
8. With the design selected, click the “Ungroup” icon above the Layers Panel.
9. If you’d like to change the color of any elements, click on them and select a new color swatch from the top menu.
TIP: If you’d like to cut the “happy holidays” sentiment out of permanent vinyl instead of cardstock, change it to a new color not used in the design so it will cut on a separate mat.
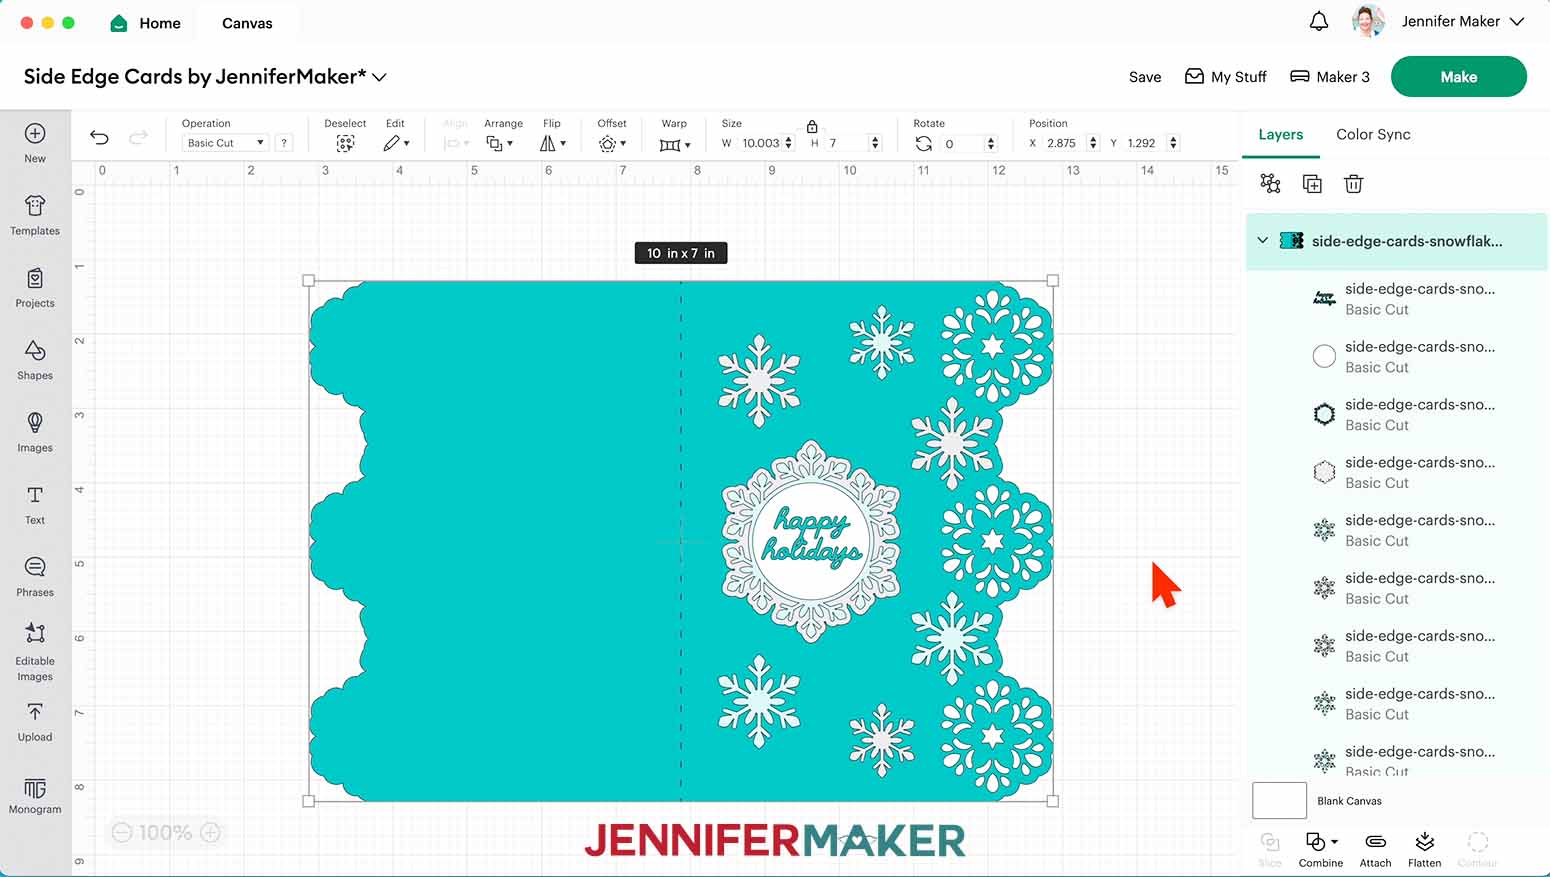
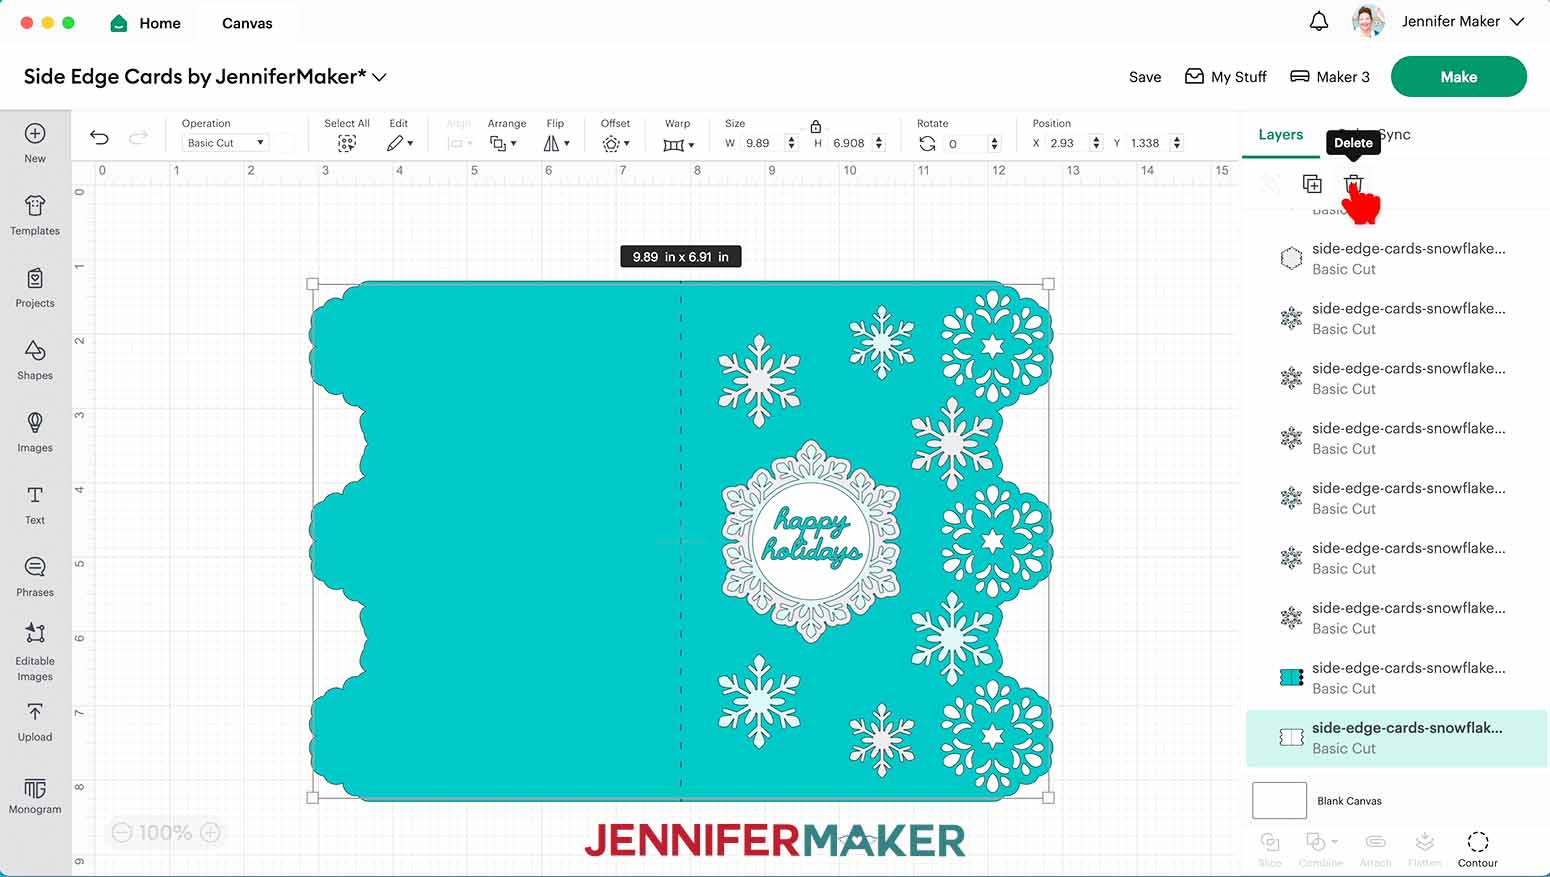
10. The snowflakes design has two layers for the card base - a teal front layer and a white back layer for easier writing on the inside of the card. If you’d like to remove the extra white layer, select it in the Layers Panel and click the “Delete” icon.
11. Your layers are ready to cut!
12. Make sure the correct machine is selected in the top right.
13. Click “Make.”
14. If prompted, click "On Mat," choose your mat size, and click “Confirm.”
15. On the Prepare Screen, you should have four mats for the snowflakes side edge card - 1 white, 1 gray (I used white glitter cardstock for this), 1 dark teal, and 1 light teal.
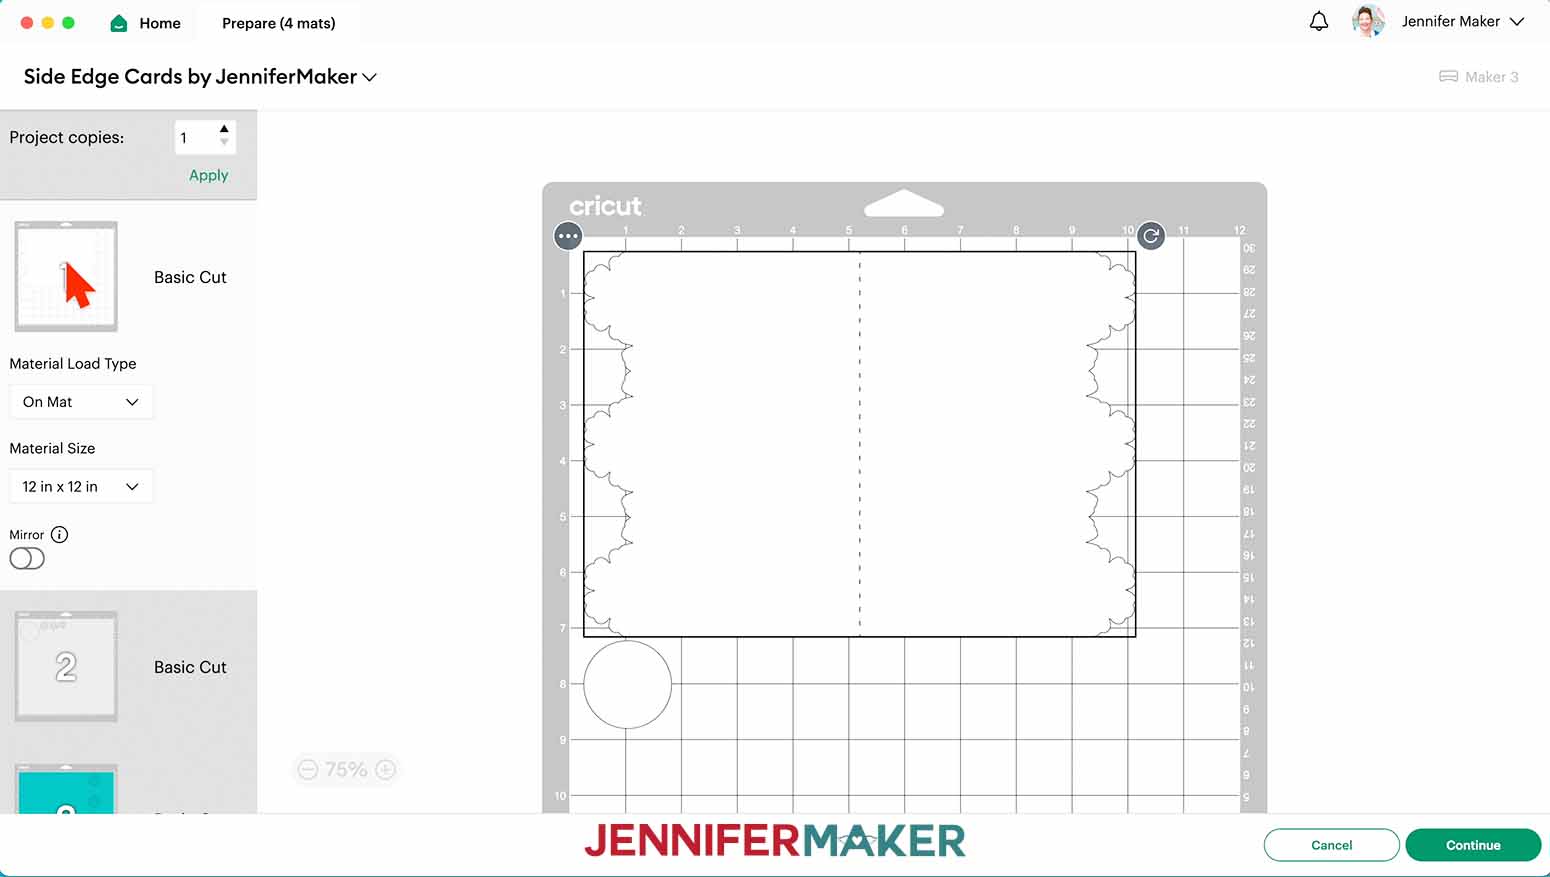
16. If needed, change the Material Size to match each paper you’re using.
17. Select the first mat again and click “Continue.”
CUTTING
1. On the Make Screen, click “Browse All Materials.”
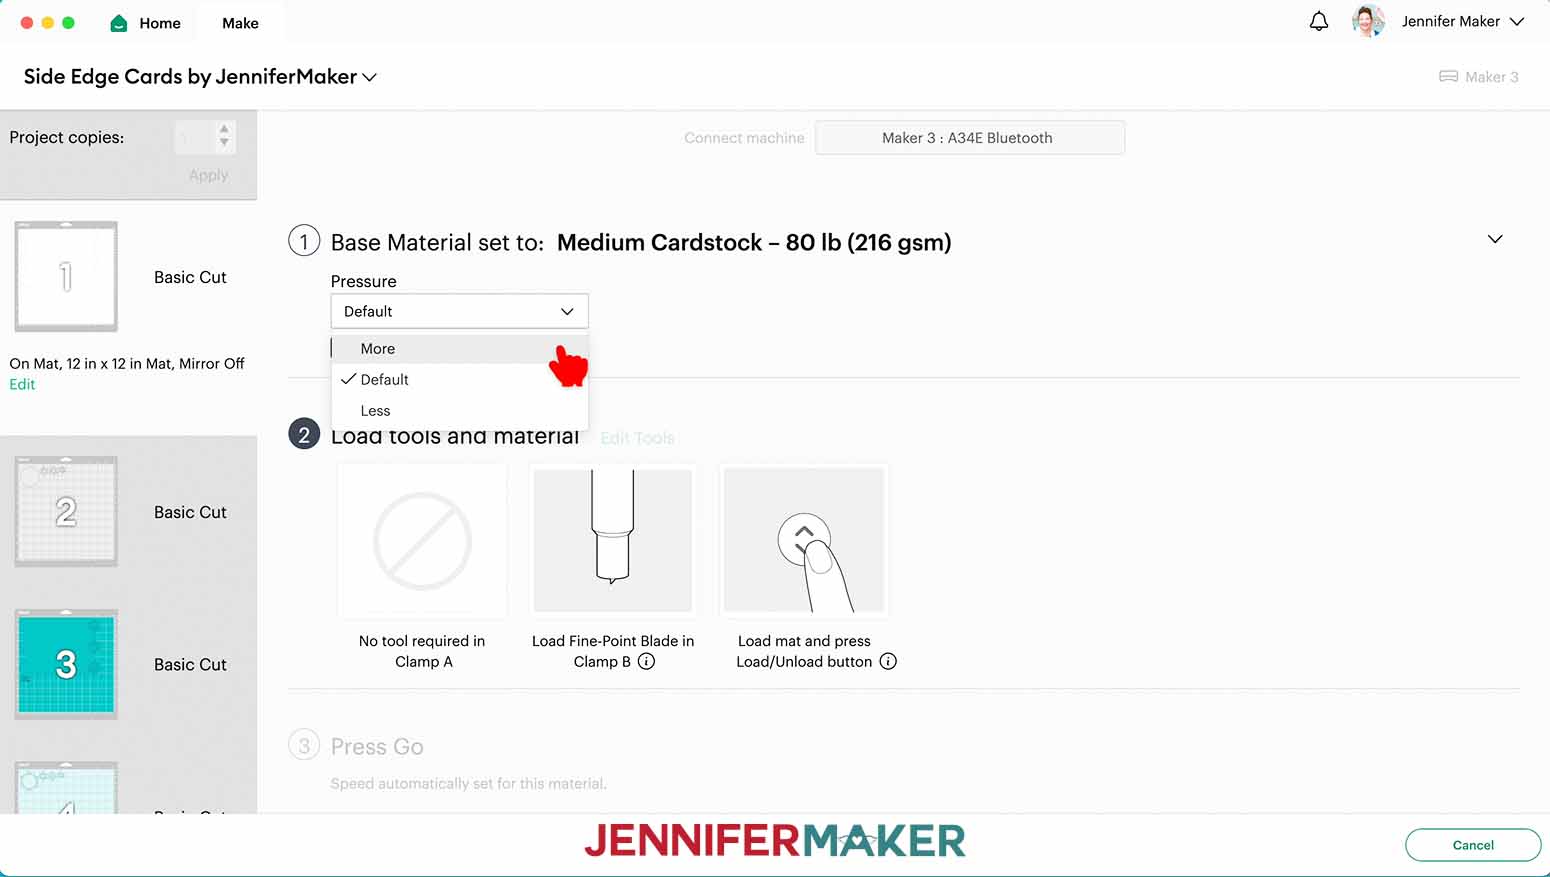
2. Search for and select the settings needed for the materials you’re using. I used 65 lb. cardstock for the white and teal mats and glitter cardstock for the gray mat. You can also use permanent vinyl for the sentiment piece. These are the settings you can use for each material:
- 65 lb. Cardstock - “Medium Cardstock - 80 lb (216 gsm)” Setting with More Pressure
- Glitter Cardstock - “Glitter Cardstock” Setting with More Pressure
- Permanent Vinyl - “Premium Vinyl - Permanent Glossy” Setting with More Pressure

3. Place your paper face up on a StandardGrip machine mat and use a brayer to make sure it’s fully adhered.
TIP: Refer to your Design Space screen to make sure you’re loading the correct color and type of paper for the current mat.
4. Check that your Fine-Point Blade is clean and in the clamp.
5. Press the flashing “Load/Unload” button to load the prepared mat into your Cricut.
6. Press the flashing “Go” button to begin cutting.
7. When it has finished cutting, unload the mat, flip it over onto your work surface, and roll it back to release the paper.
8. Follow steps 2-7 to cut and remove your remaining pieces.
TIP: Be careful when removing intricate pieces like the “happy holidays” sentiment. Use a spatula to carefully remove any intricate parts and a weeding tool to pop out any small pieces. If you have trouble with any of your cuts, check out my Cricut Tips & Tricks for Cleaner Cuts.
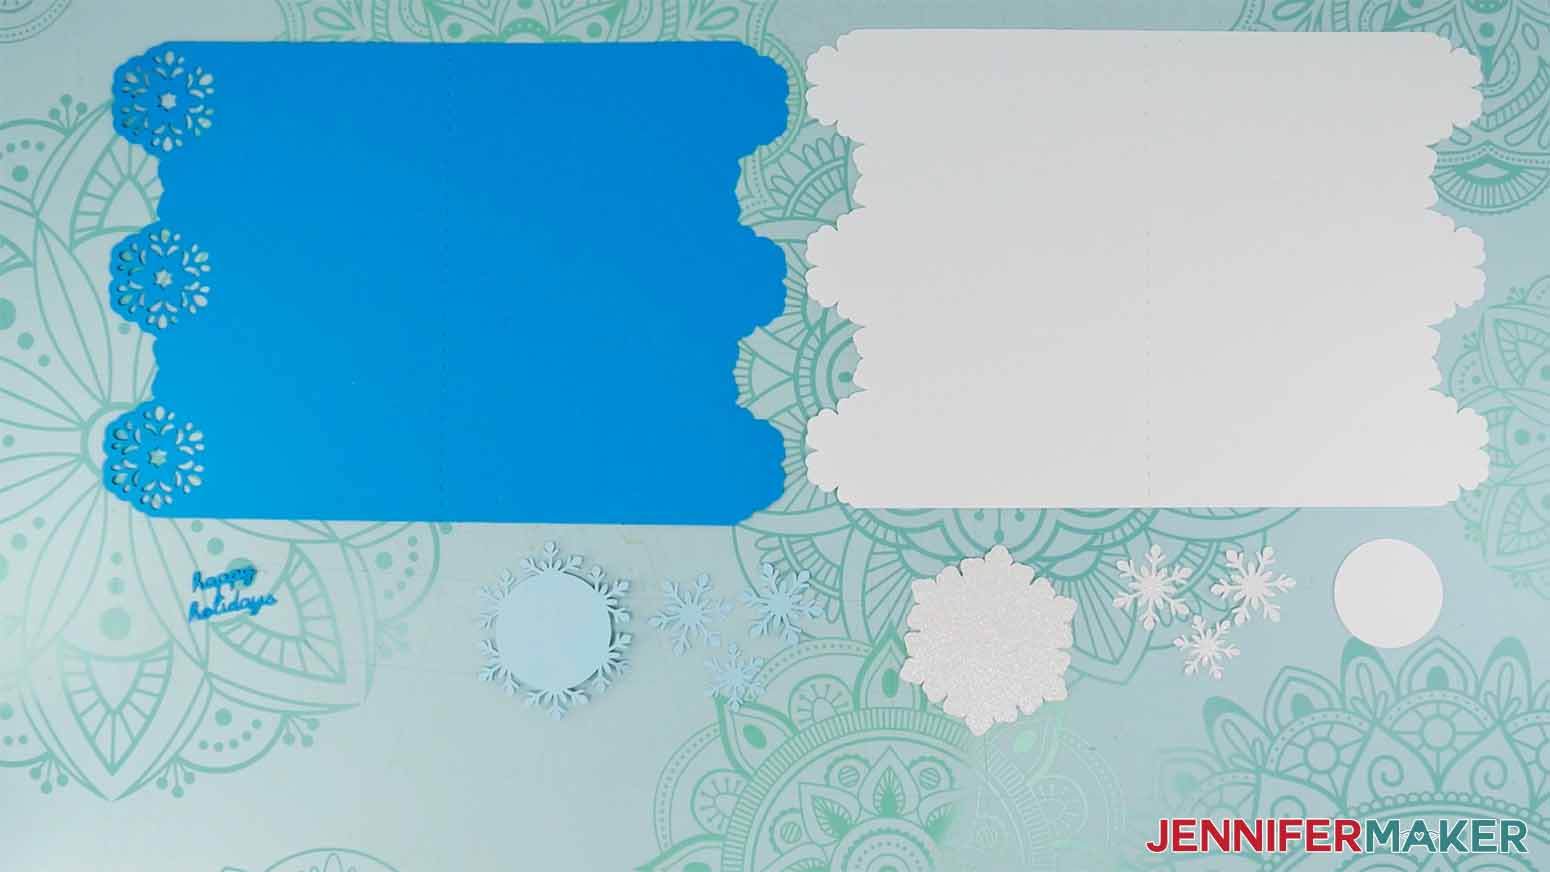
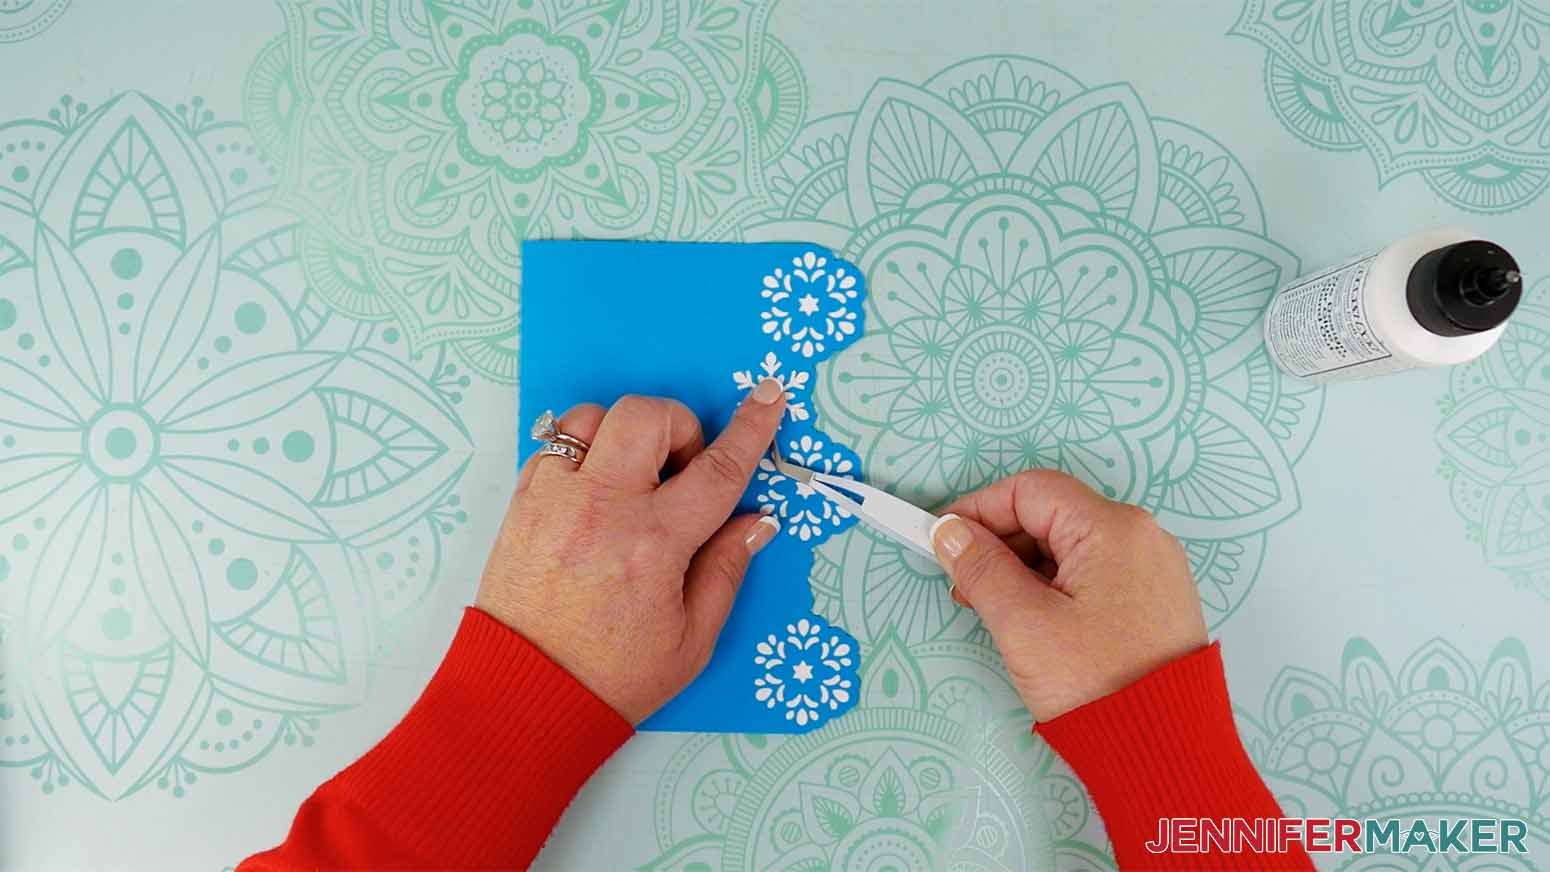
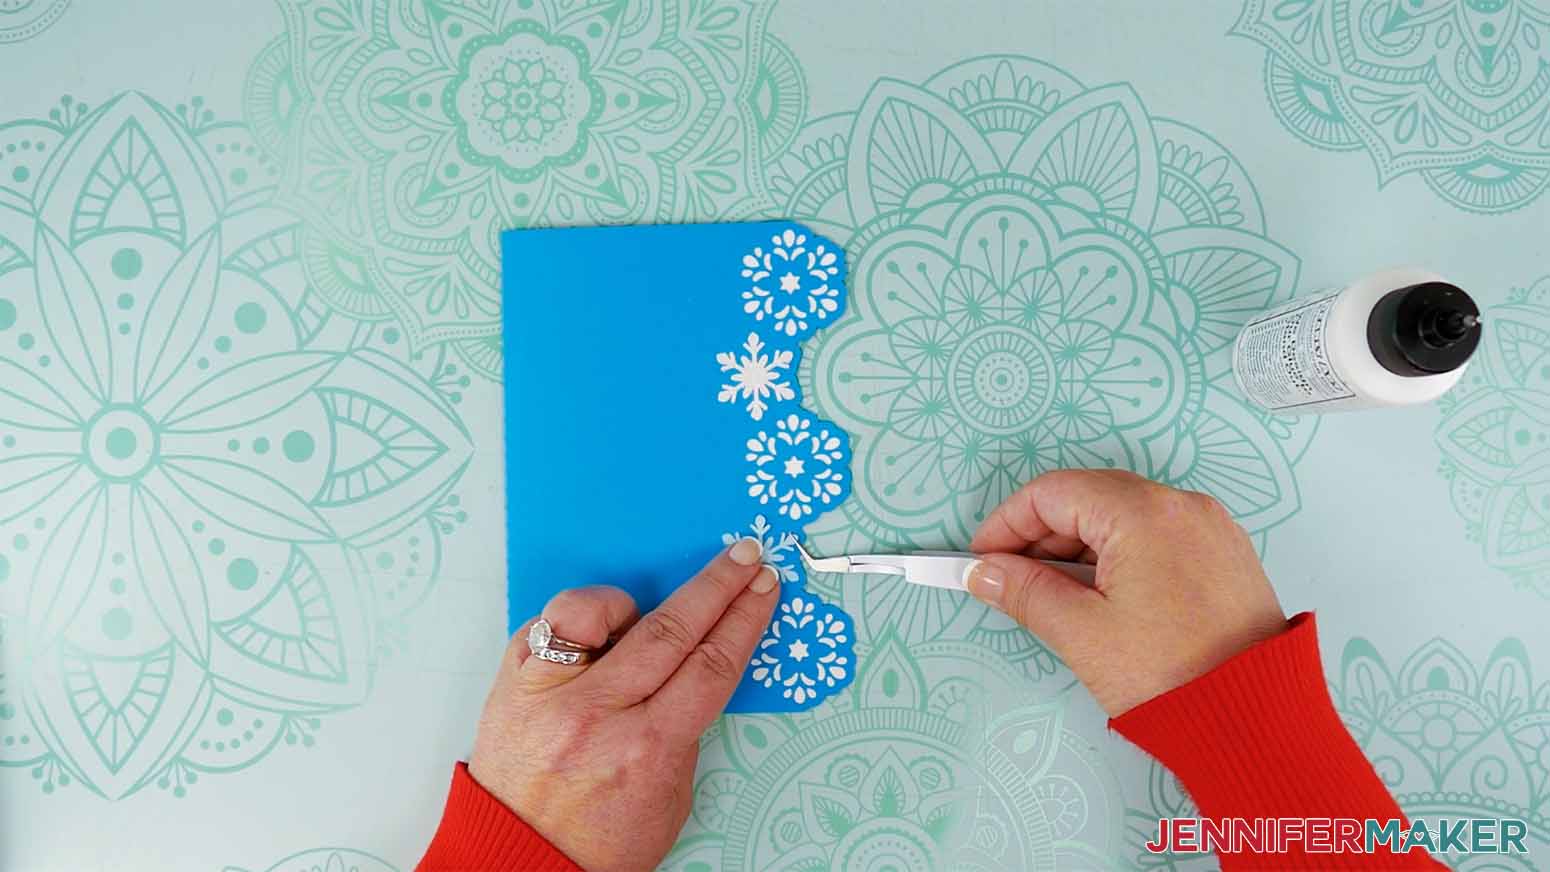
9. Here are what my cut pieces for the snowflakes side edge card look like.
STEP 3: ASSEMBLE YOUR SNOWFLAKES SIDE EDGE CARD
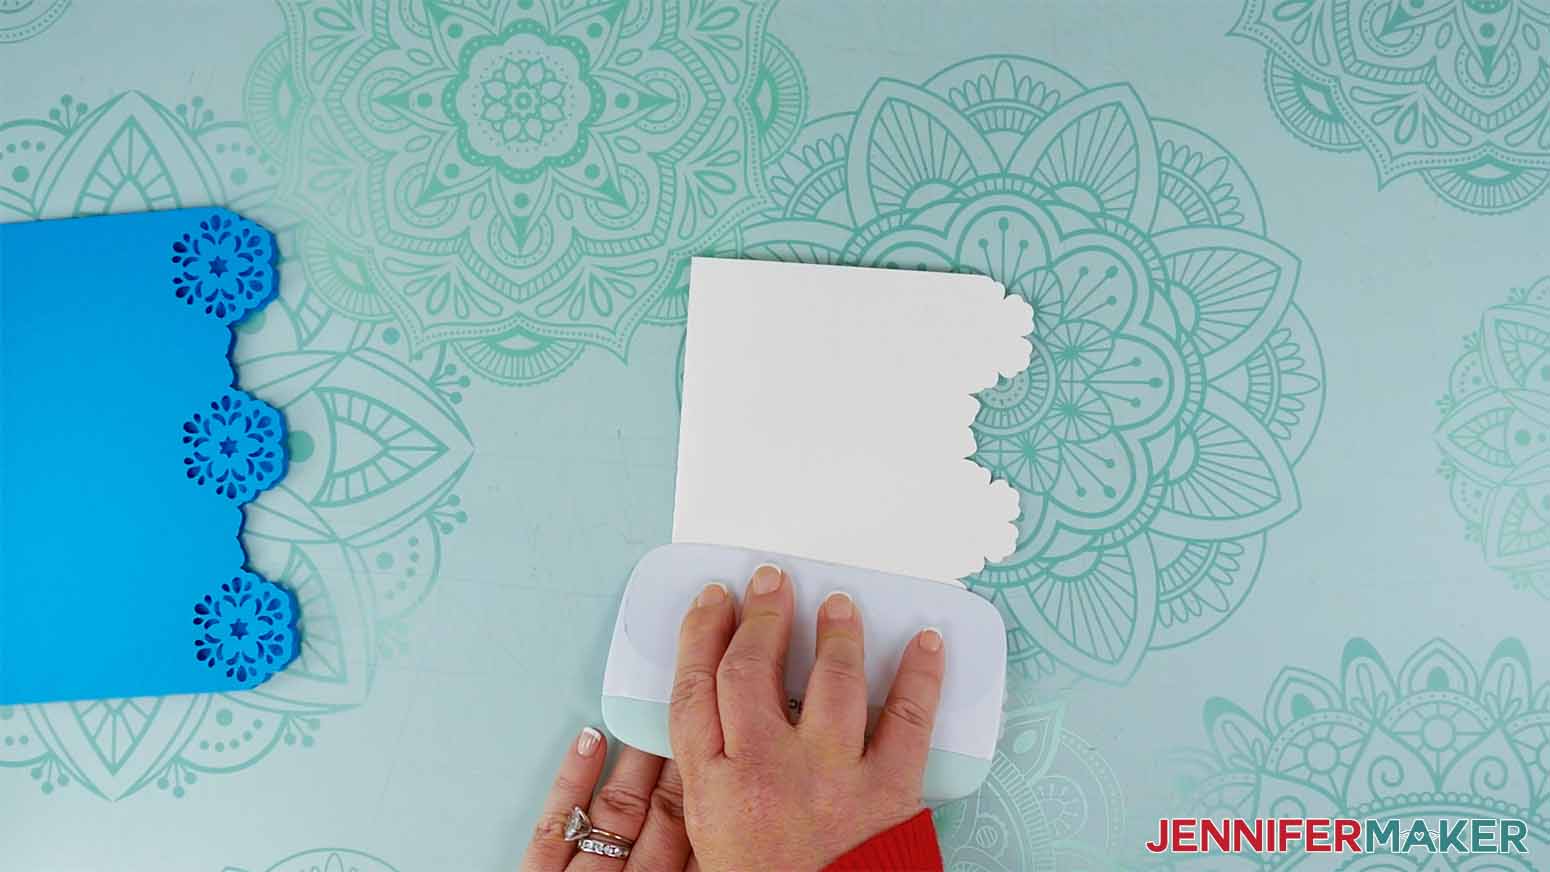
1. Fold the teal and white card base pieces in half along the dashed or scored lines. Make sure the snowflake cutouts on the teal piece are on the front of the card.
TIP: Use a scraper for sharp creases.
2. Place the white liner piece inside the teal card and line up their edges. Fold both pieces closed, making sure the folds are aligned and the liner is nestled snugly into the inside of the card.
NOTE: If you’re not adding the white liner piece, skip to step 8.
3. Place the closed card face down on a flat surface.
4. Without fully opening the card, lift up the white liner from the front side and add glue to the inside of the teal card underneath. Avoid the cutouts but make sure to add glue to the very edges.
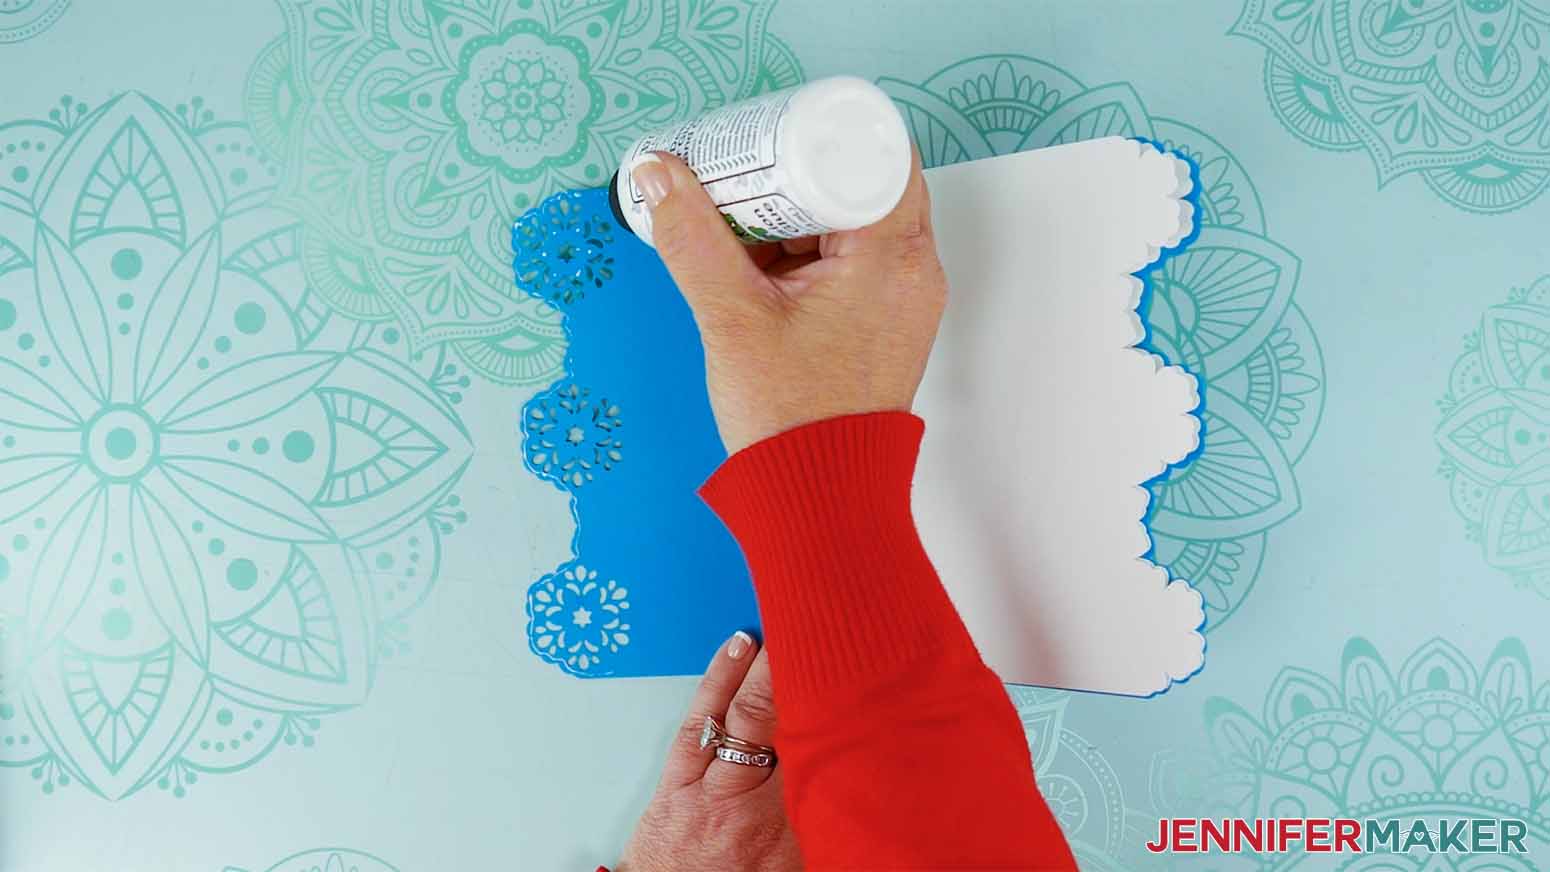
5. Close the card and press down against the glued area. Make sure no white can be seen around the outside edges of the card when viewing it from the outside.
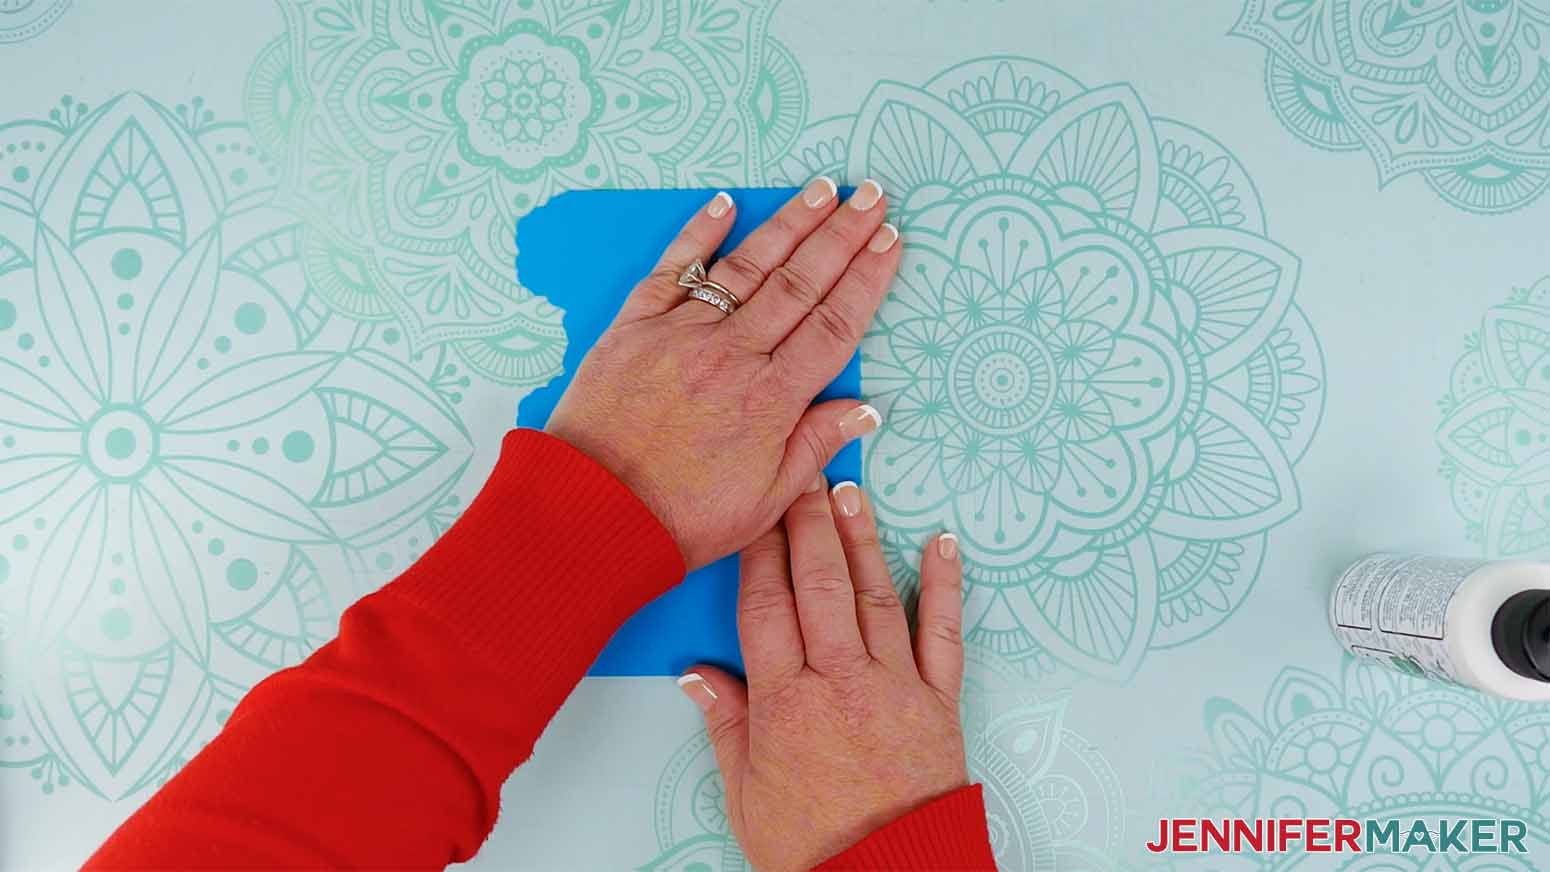
6. Wipe away any excess glue with your finger before it dries.
7. Follow steps 4-6 above to attach the back half of the white liner to the other side of the card. Make sure the card folds nicely and doesn’t bunch up or wrinkle near the fold.
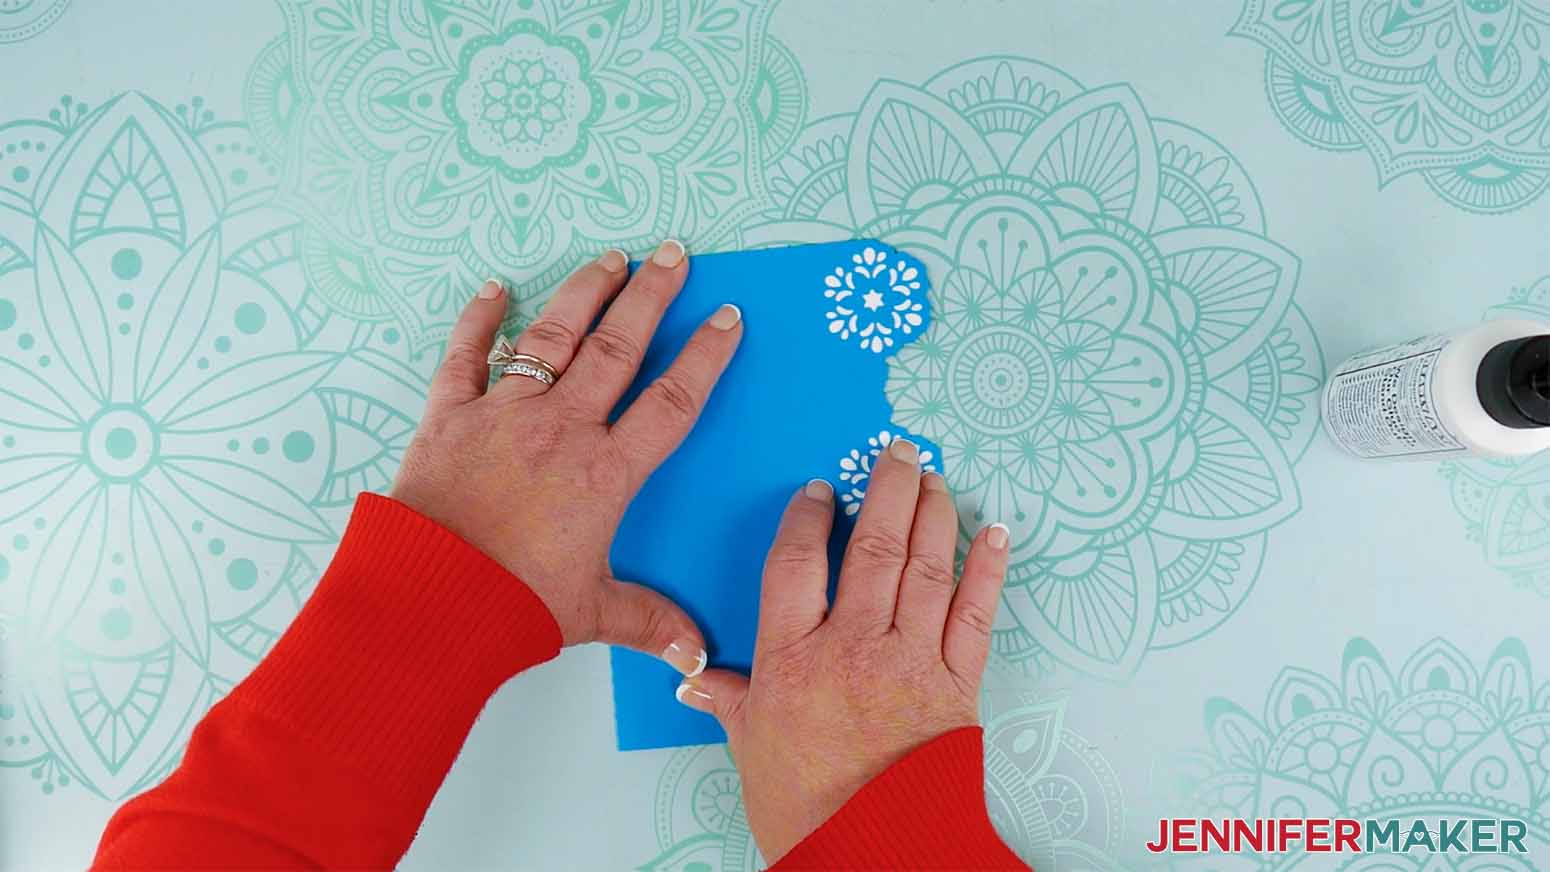
TIP: If any glue seeps out on the inside of the card, make sure to wipe it away quickly so the card doesn’t get glued closed.
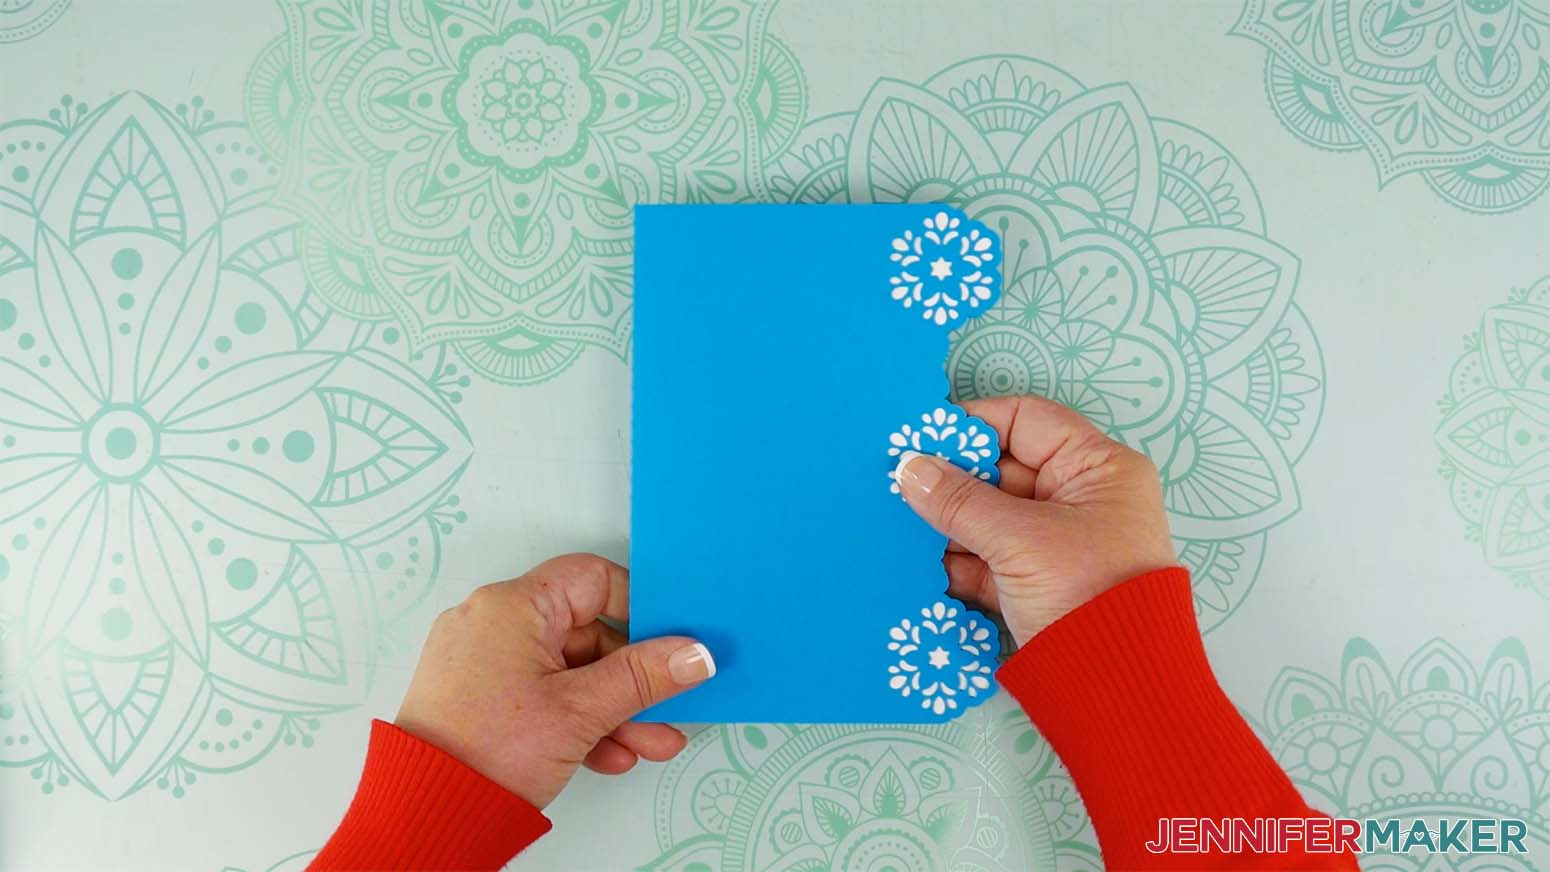
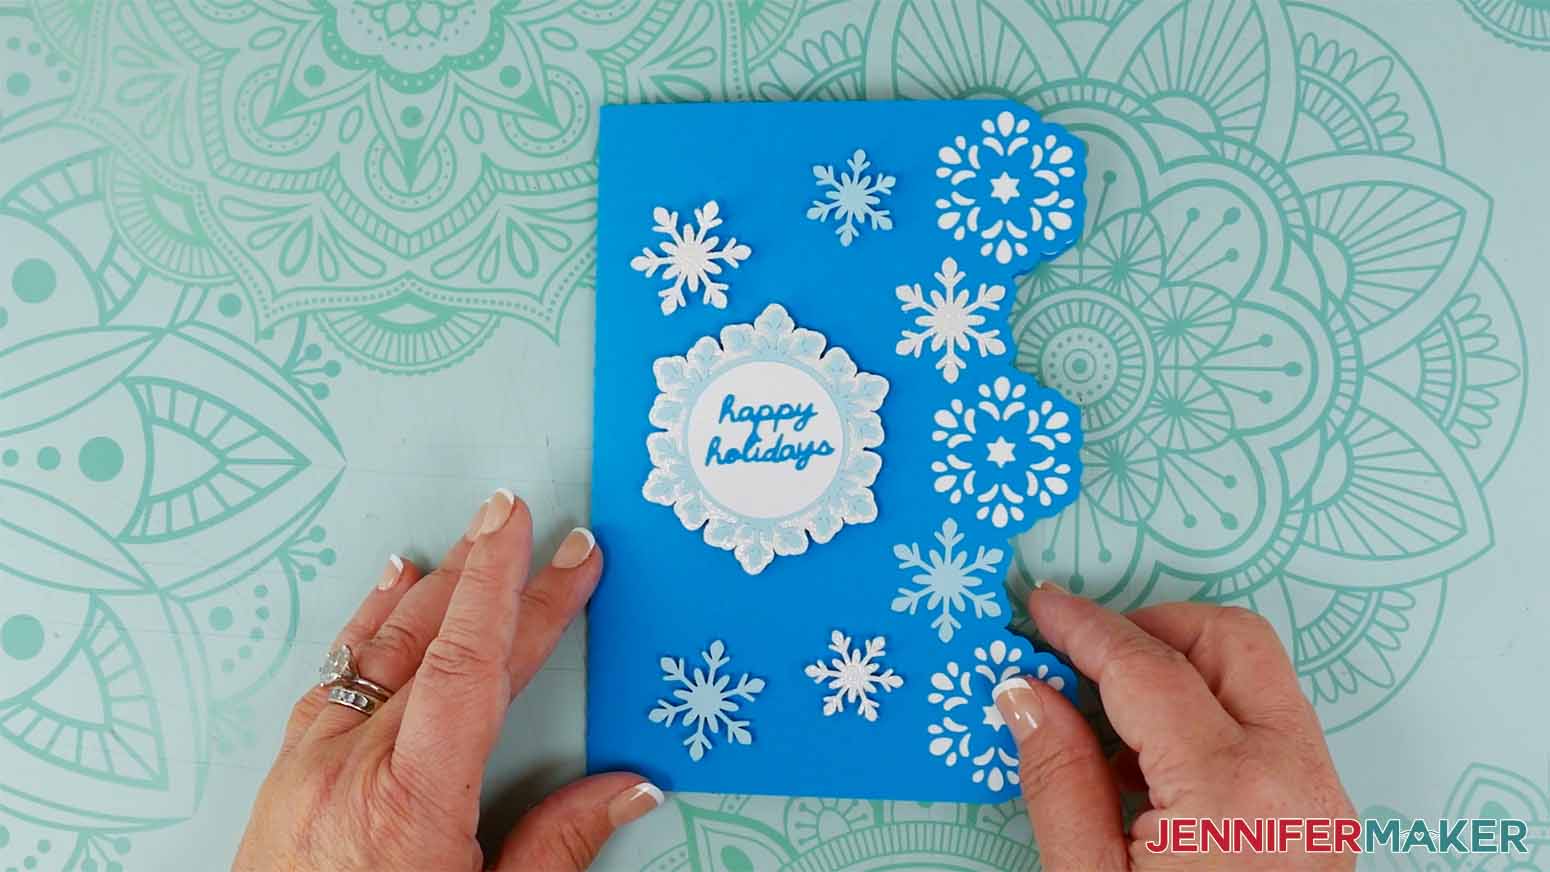
8. Grab two of the larger snowflakes (I used one white glitter and one light teal snowflake).
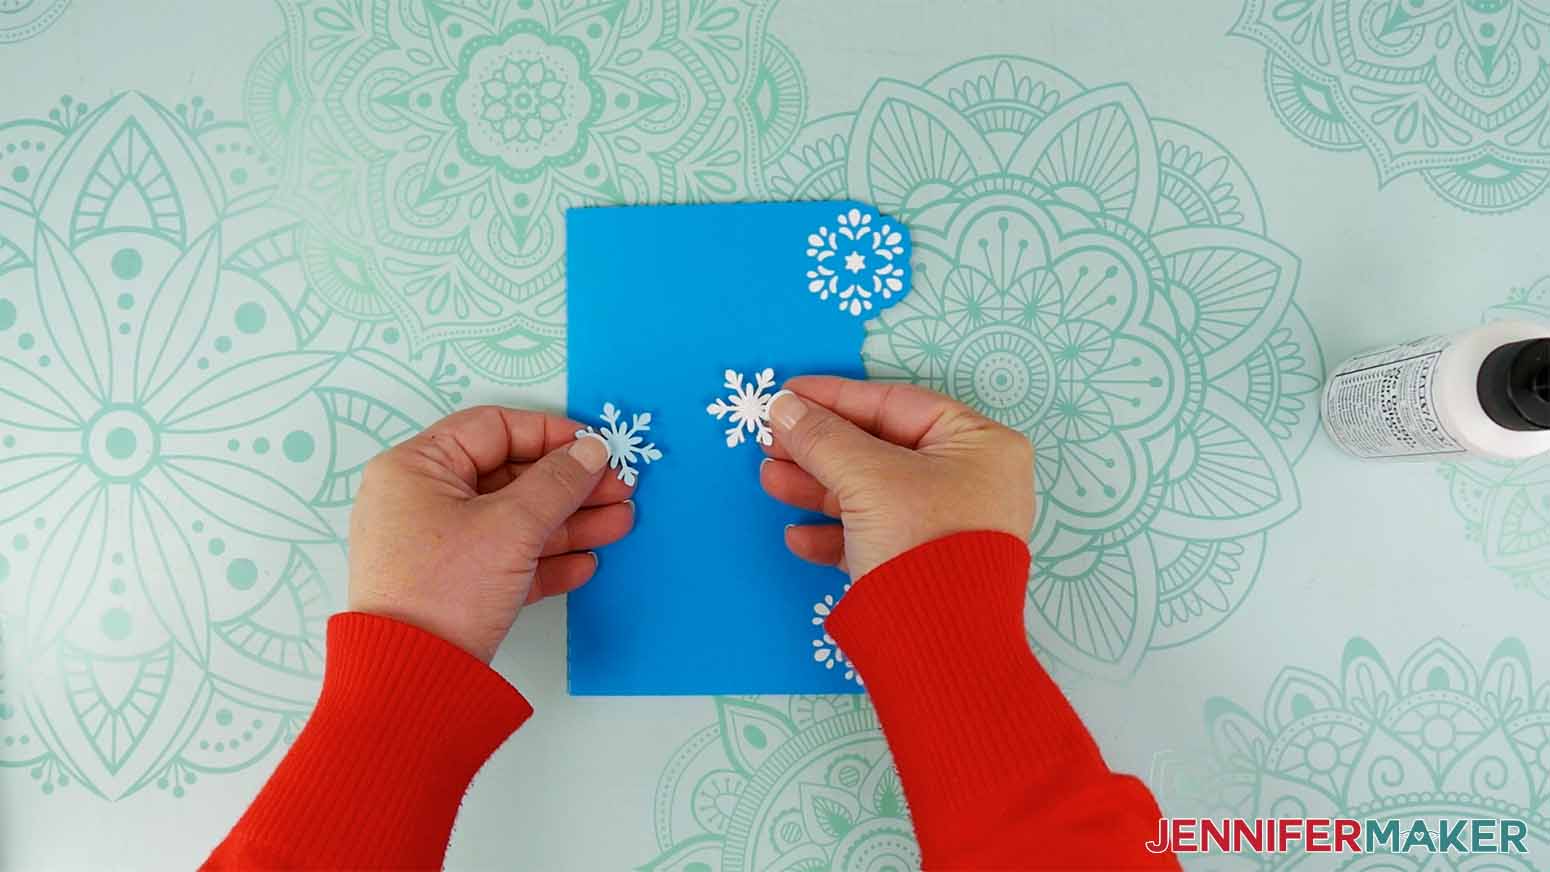
9. Add a small amount of glue to the back side of one.
10. Attach it to the front of the card, along the right edge between the top and middle snowflake cutouts. Align two of the snowflake’s arms with the two offset “bumps” in between the snowflake cutouts.
TIP: Refer to your Design Space Canvas if you need help determining where to place the piece.
11. Repeat steps 9-10 to attach the other larger snowflake between the middle and bottom snowflake cutouts.
12. Grab the pieces for the sentiment - you should have a “happy holidays” piece, a white circle, a light teal circle with snowflake edges, and a white glitter circle with snowflake offset edges.
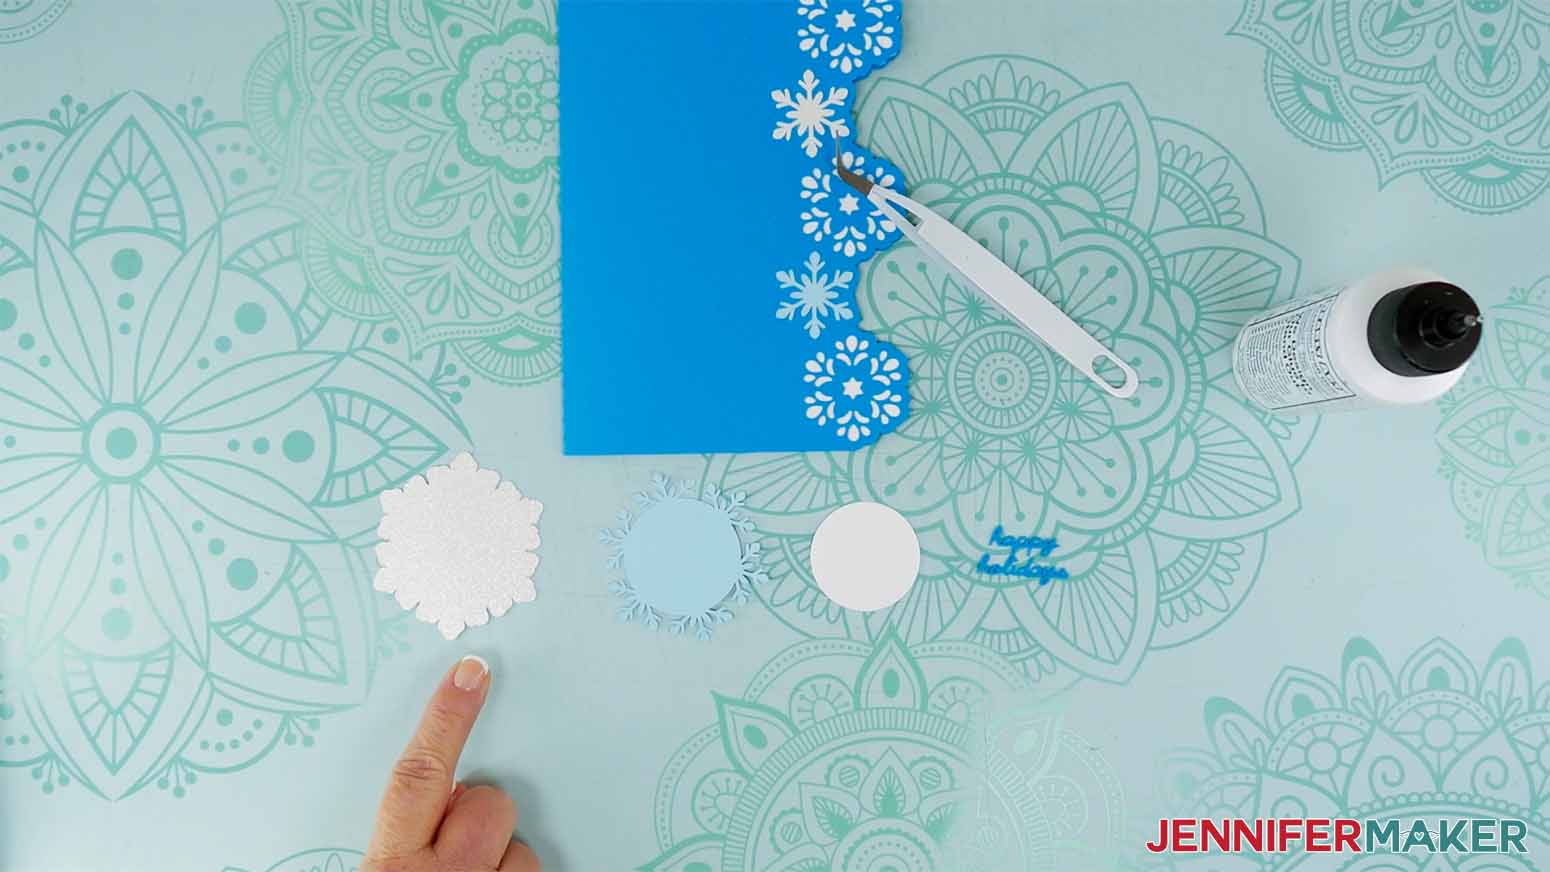
13. Add glue to the back of the light teal snowflake circle and attach it to the front of the white glitter snowflake offset, making sure to center them with each other.
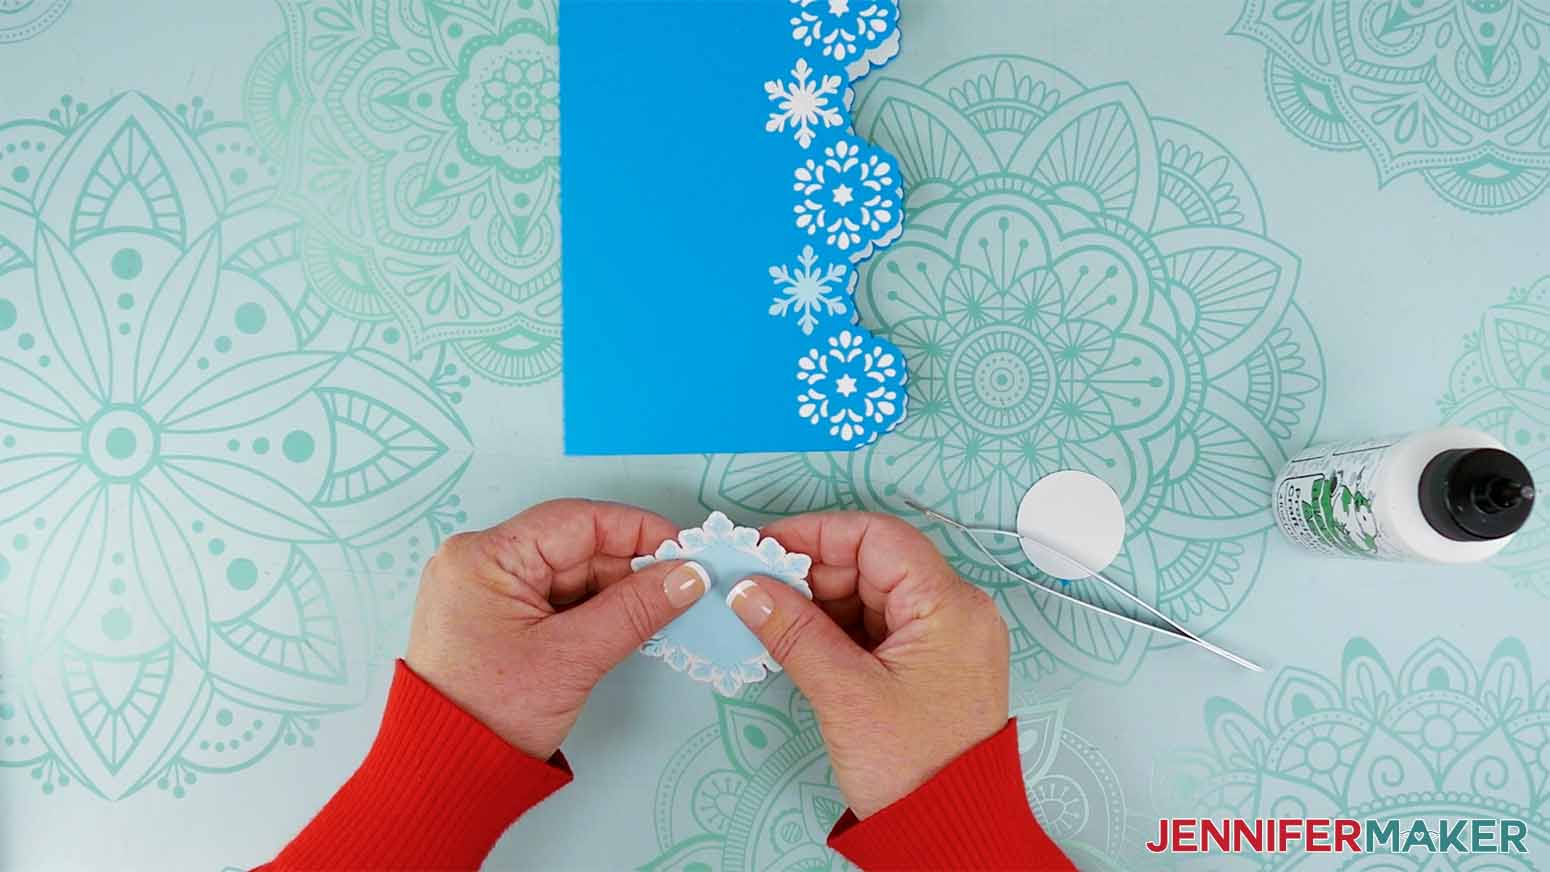
14. Add glue to the back of the white circle and attach it to the center of the light teal layer.
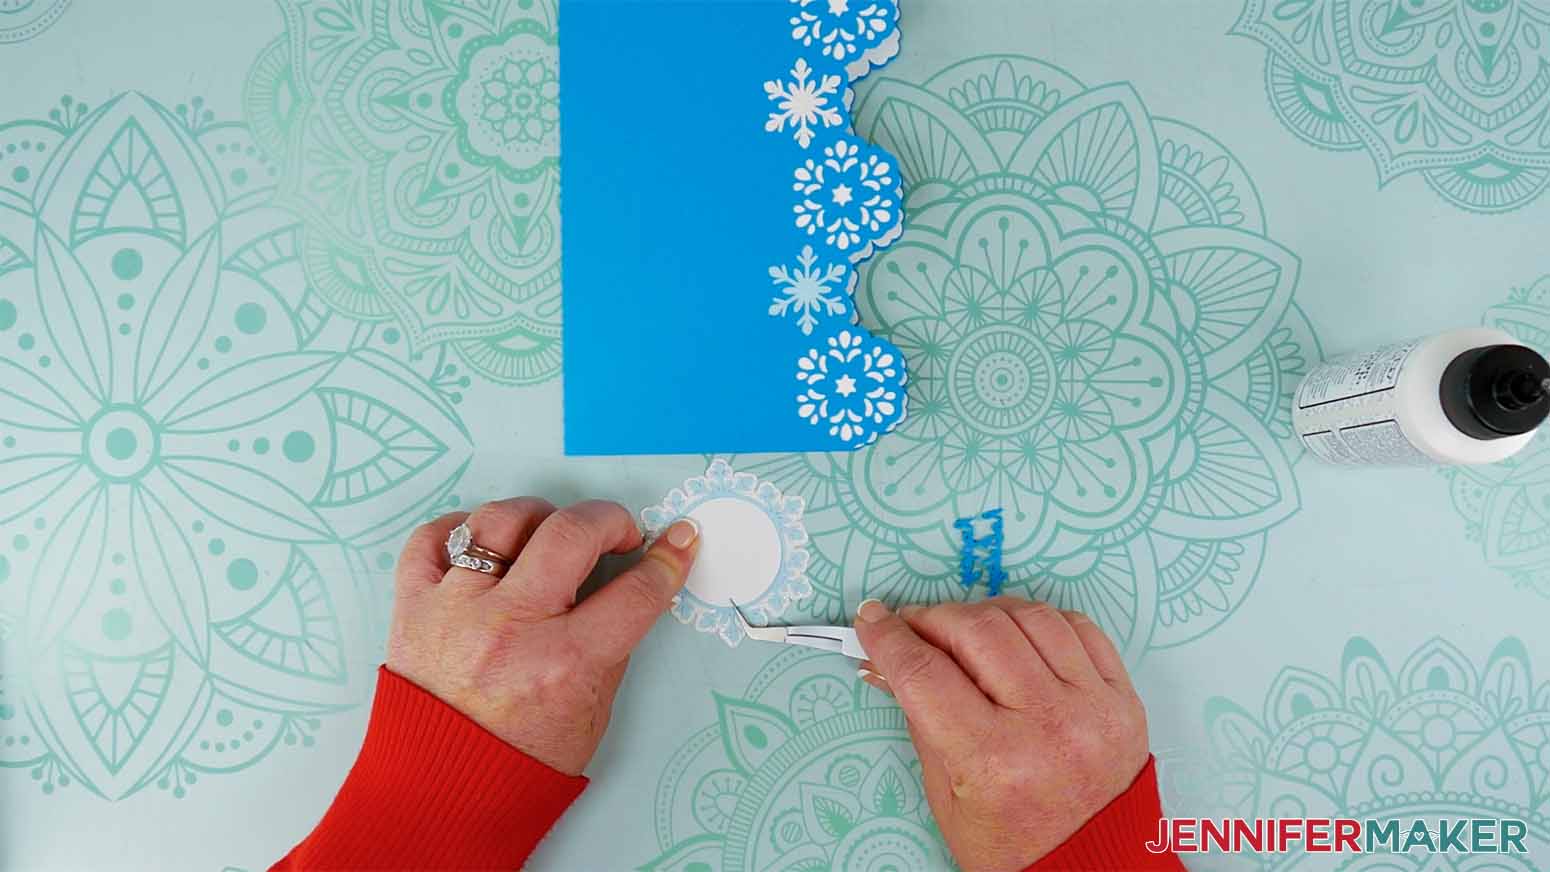
15. Add glue to the back of the “happy holidays” sentiment and attach it to the center of the white circle. Be careful not to rip or bend the delicate letters, and wipe away any excess glue before it dries.
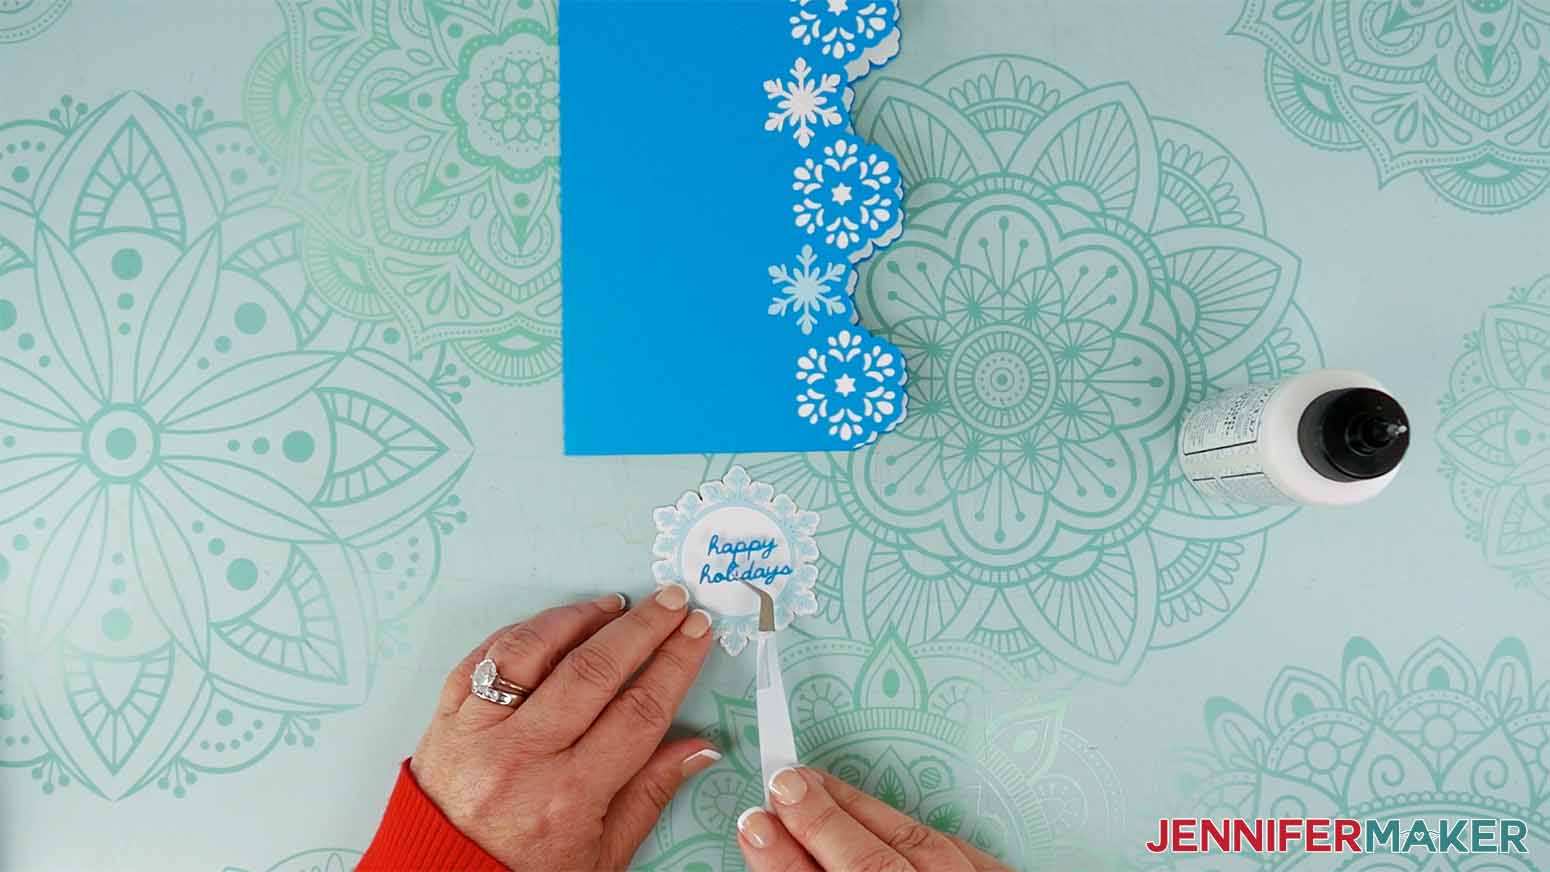
NOTE: If you cut your sentiment from permanent vinyl, weed out the excess pieces of vinyl and then use a piece of StandardGrip transfer tape slightly larger than the sentiment to transfer the words to the white circle.
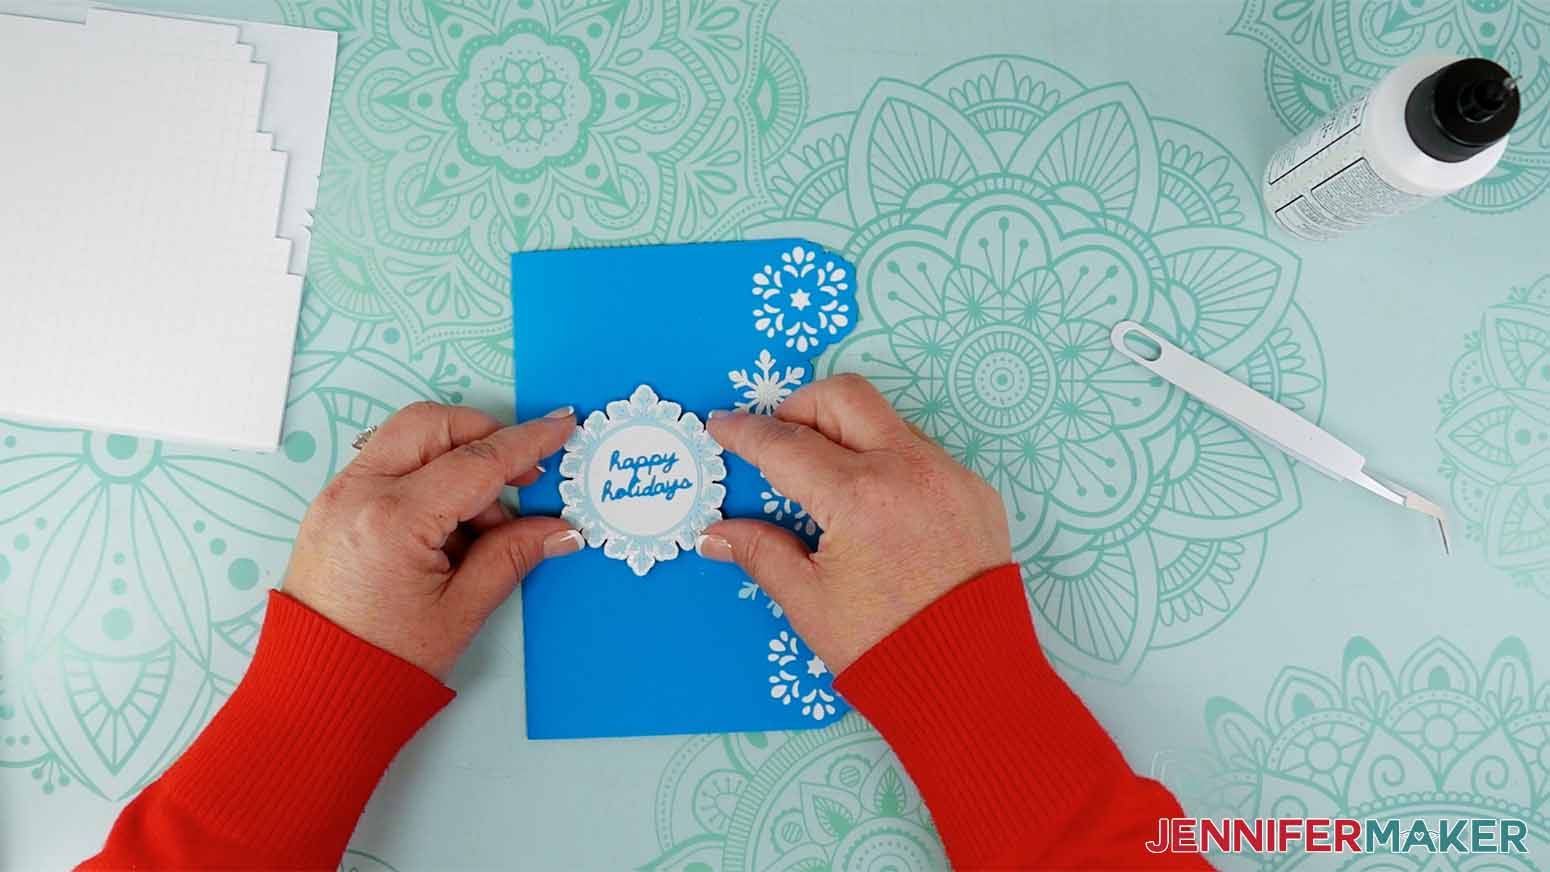
16. Attach four foam adhesive squares to the back of the assembled sentiment piece, spacing them evenly around the outside edge.

17. Place the sentiment on the front of the card, making sure it’s centered from top to bottom, and press down to adhere it.
18. Attach one foam adhesive square to the back of each of the remaining snowflakes, and attach them to the front of the card wherever you’d like.

PROJECT 2: CUSTOMIZED LEAVES SIDE EDGE CARD
STEP 2: PREPARE YOUR CUSTOM DESIGN
CRICUT DESIGN SPACE
1. Open Cricut Design Space and click “New Project.”
2. If you’d like to add elements to your design from an existing SVG, click “Upload” and then “Upload Image.”
3. Click “Browse.”
4. Select the SVG file. I’ll use “side-edge-cards-leaves-no-score-jennifermaker-SVG.”
5. On the Prepare to Upload screen, it will say “Cut image” with the design preview.
6. Click “Upload.”
7. Find your design in Recent Uploads and add it to the Canvas.

NOTE: You can also choose elements to use from Cricut Design Space images. Just click “Browse All Images” and select these filters to find images that will work for your side edge card:
- Free
- Under Operation Type: Cut Only
- Under Layers: Single
8. With the design selected, click the “Ungroup” icon above the Layers Panel.
9. Select and move any elements you’d like to use on your custom card off to the side.
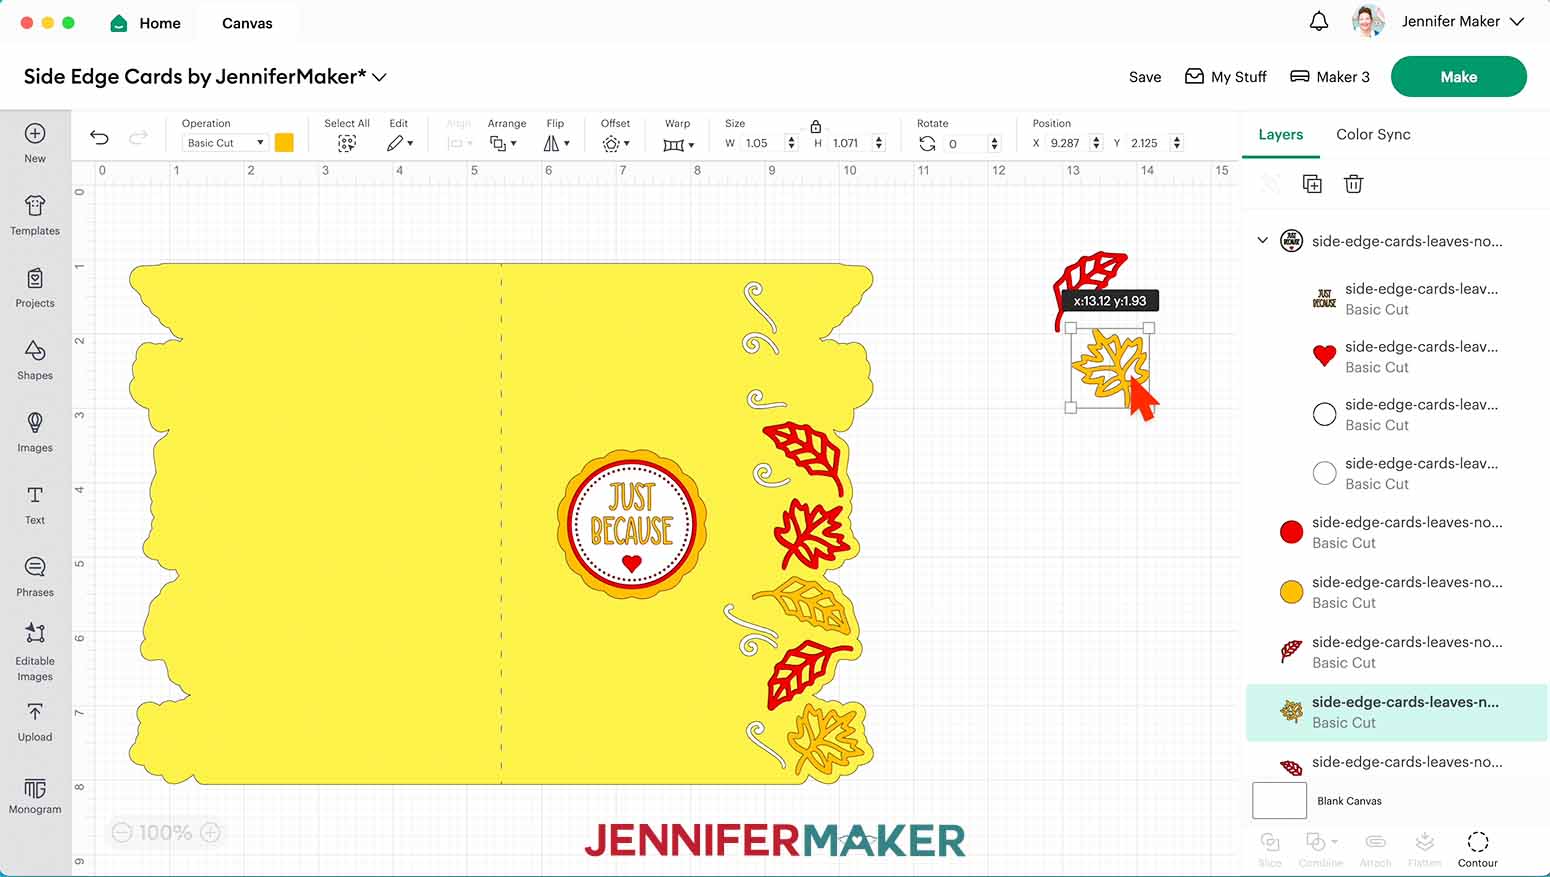
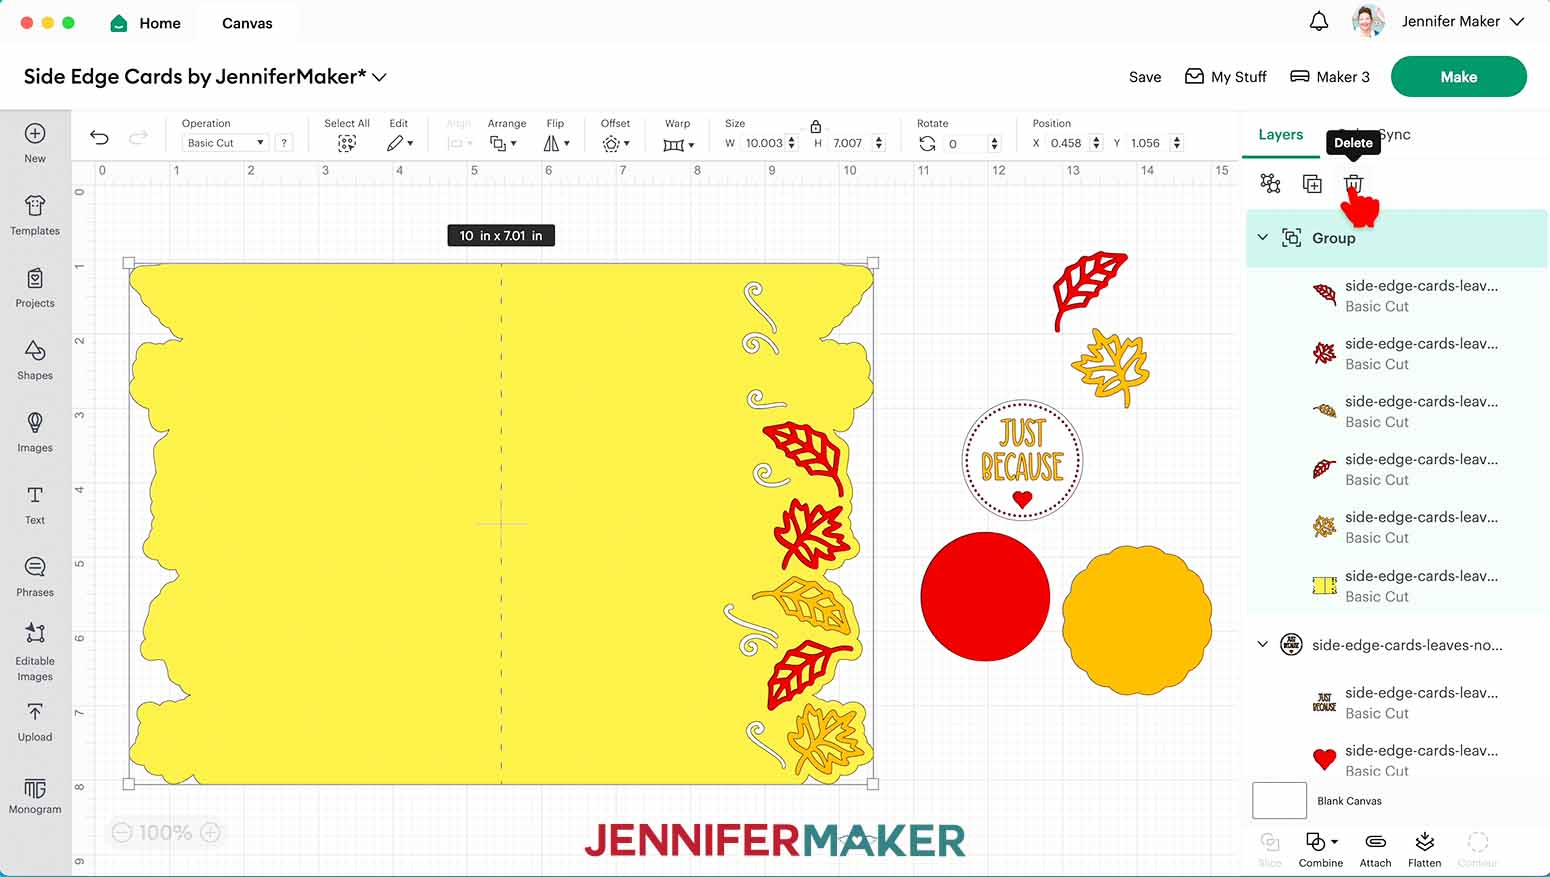
10. Drag a bounding box around the remaining pieces and click the “Group” icon at the top of the Layers Panel.
11. With the group selected, click the eye icon next to the group in the Layers Panel to hide it or the “Delete” icon at the top of the Panel to delete it.
12. Click the “Shapes” menu and select the Square.
13. With the square selected and the lock icon open, type “5” into the width (W) field and “7” into the height (H) field. This is the base piece for the front of our 5” x 7” greeting card.
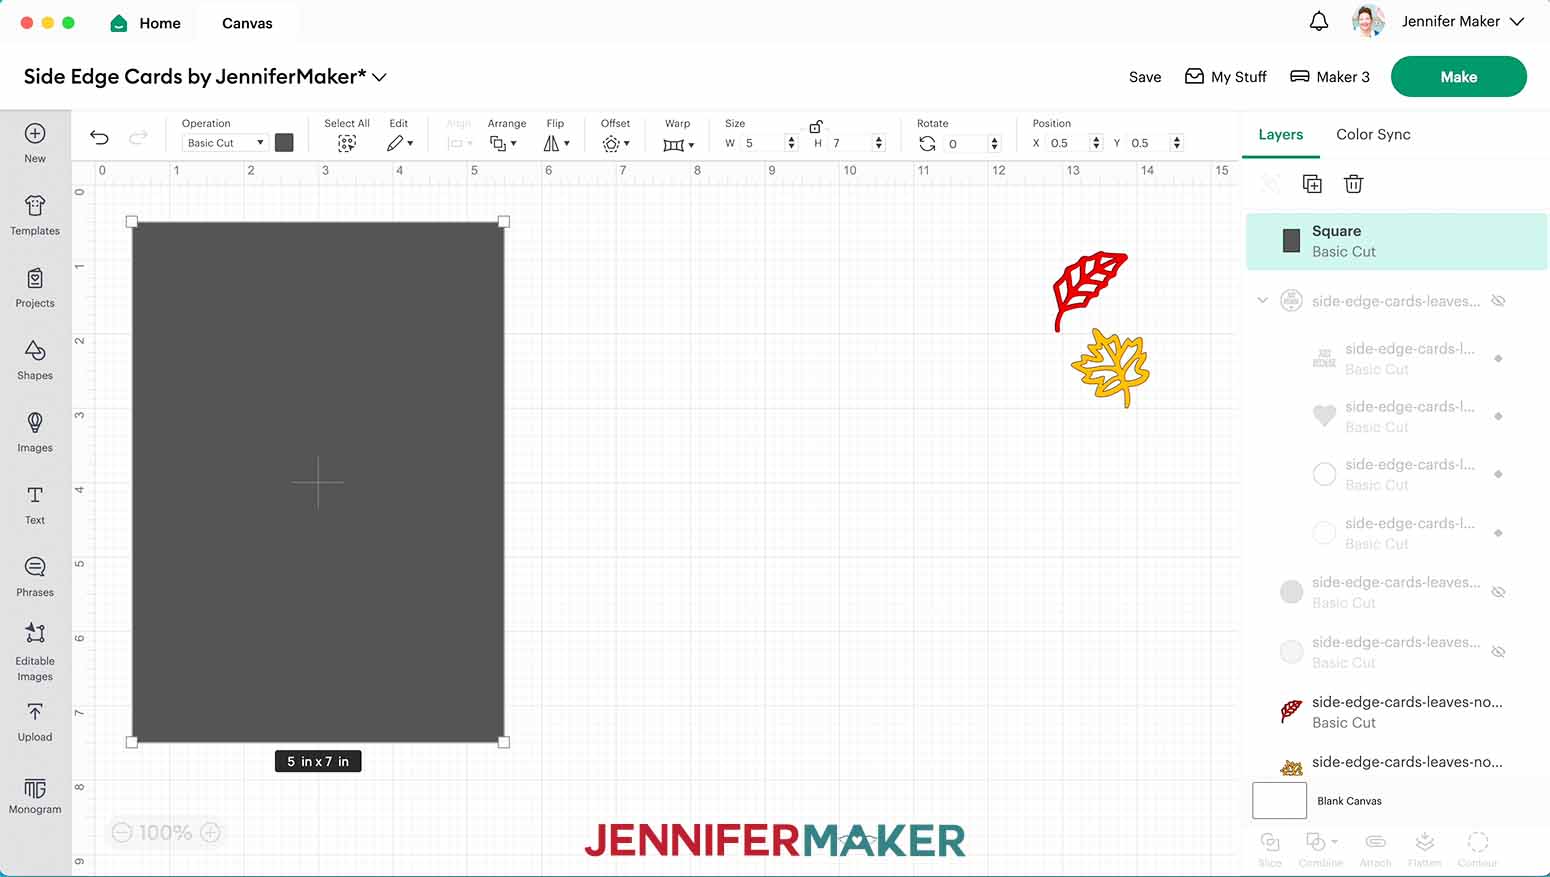
TIP: If you’d like to make a different-sized card, resize your square to match the size you want your folded card to be.
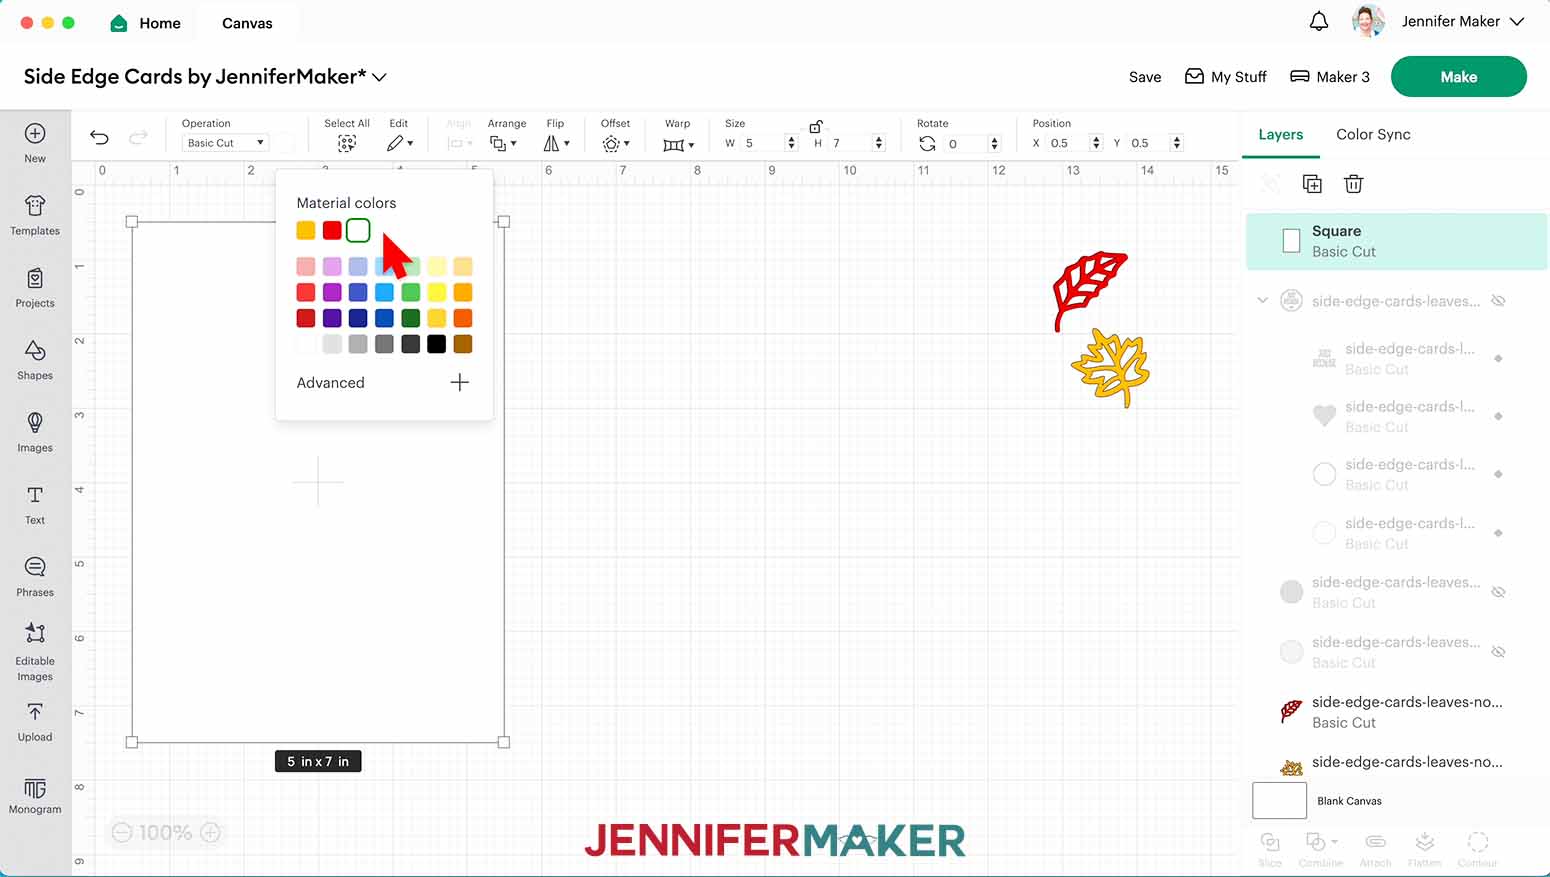
14. Change the color of your resized rectangle to white so it’s easier to work with.
15. With your rectangle selected, click “Arrange” and “Send to Back” so it’s behind your elements.
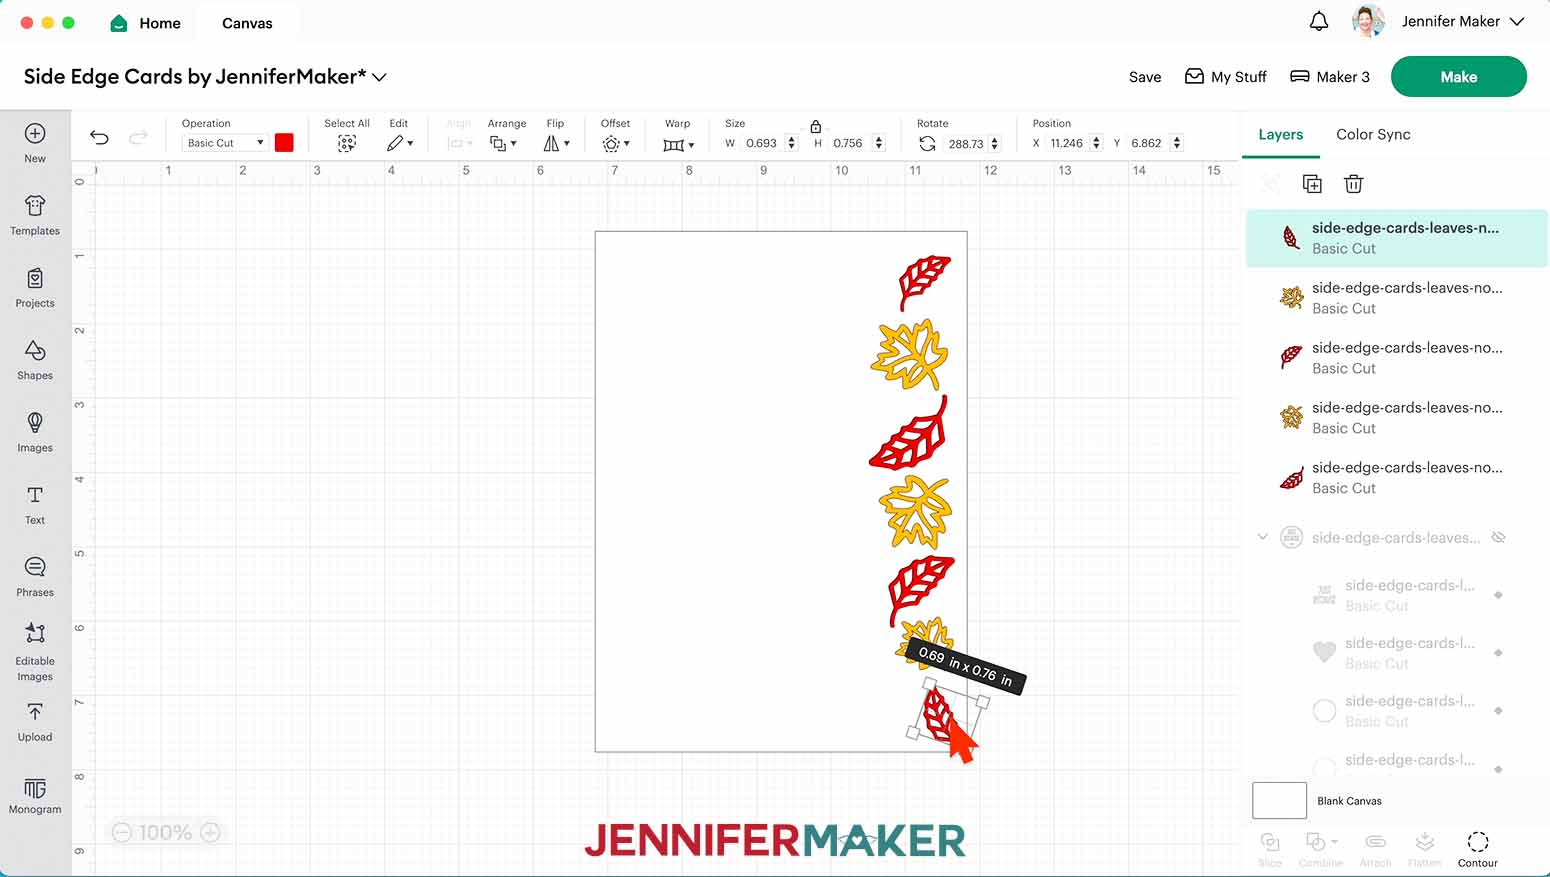
16. Arrange your chosen elements along the right edge of your rectangle, keeping them within the rectangle itself so nothing extends past the top, bottom, or right sides.
NOTE: Duplicate, resize, and rotate your objects as needed until they fit within your rectangle and you’re happy with their placement. Don’t forget to leave some space on the left half of the rectangle for adding a greeting, if you’d like.
TIP: If you’d like to make a landscape card that folds along the top instead of the side, you can arrange your elements along the bottom edge of the card. A landscape card also works well if you’d like to use a single image that is wider than it is tall.
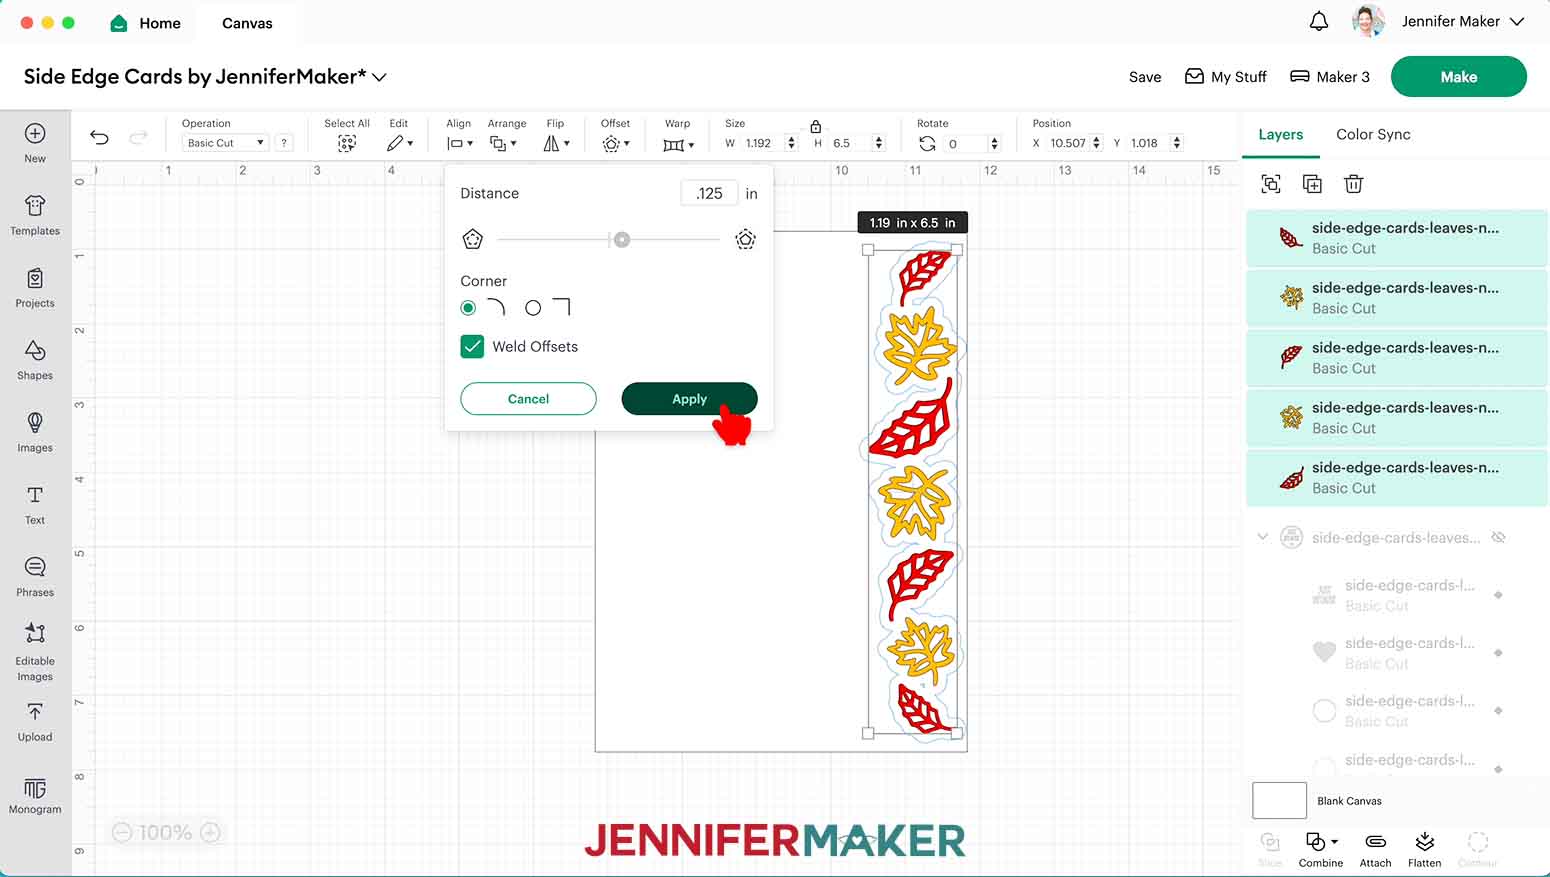
17. Select all of your arranged elements and click “Offset” in the top menu.
18. Move the “Distance” slider back and forth to find a good size for your offset. The offset shapes of each of your elements should slightly overlap each other. I used 0.125” for my offset size.
19. Select your corner style and check the “Weld Offsets” box to make the offset a single shape, then click “Apply.”
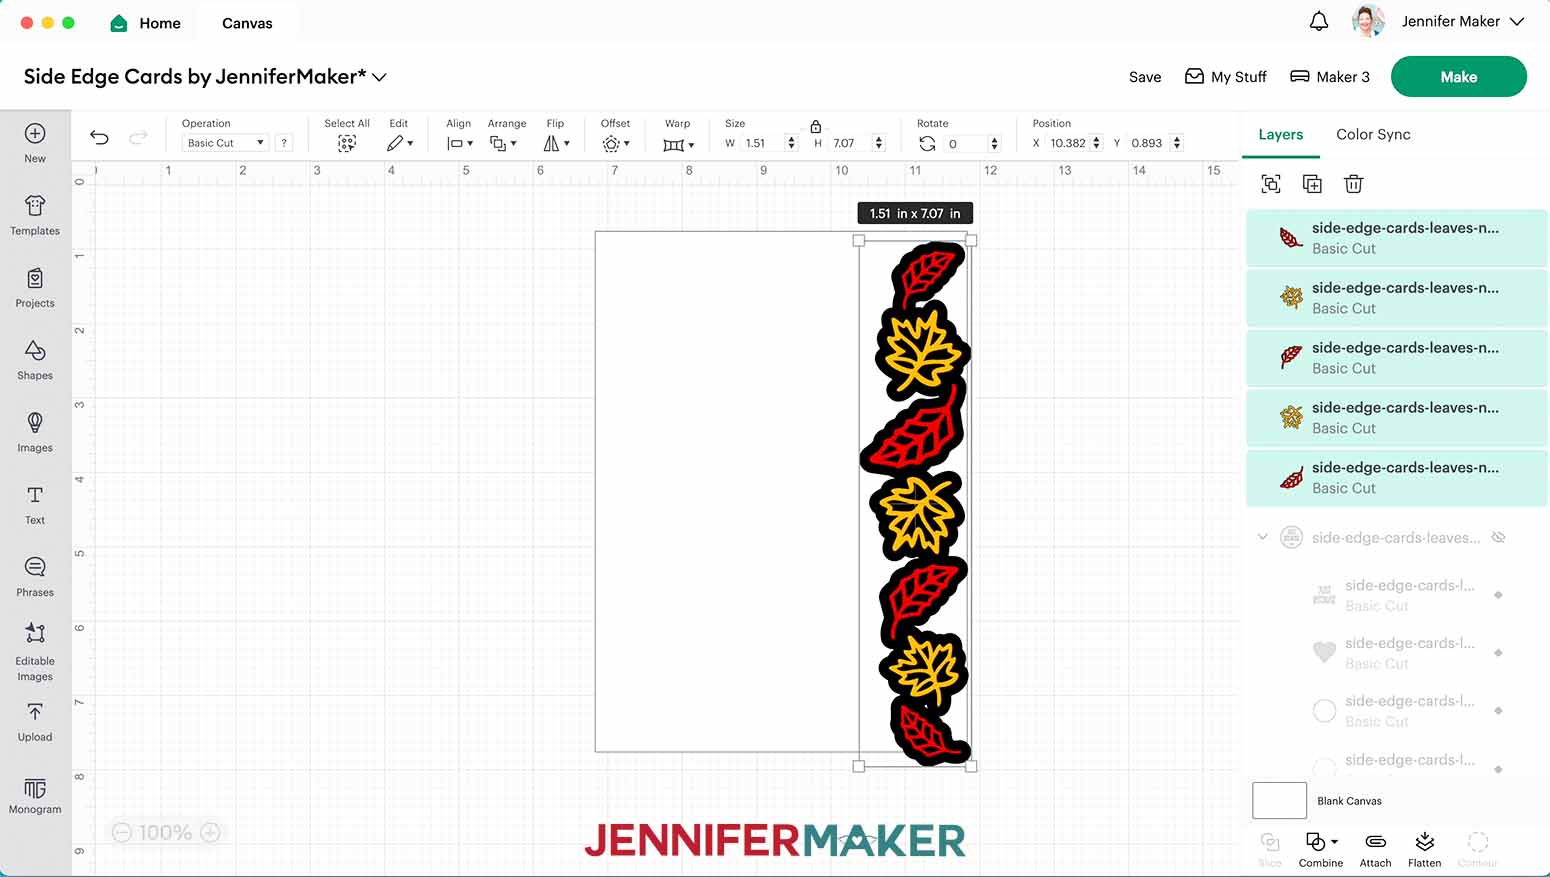
20. Select all of your elements and the offset layer you just created and change their combined height so it’s slightly taller than the height of your card. Make sure the lock icon is closed. I made mine 7.07” tall.
21. With your elements and offset still selected, click the “Group” icon.
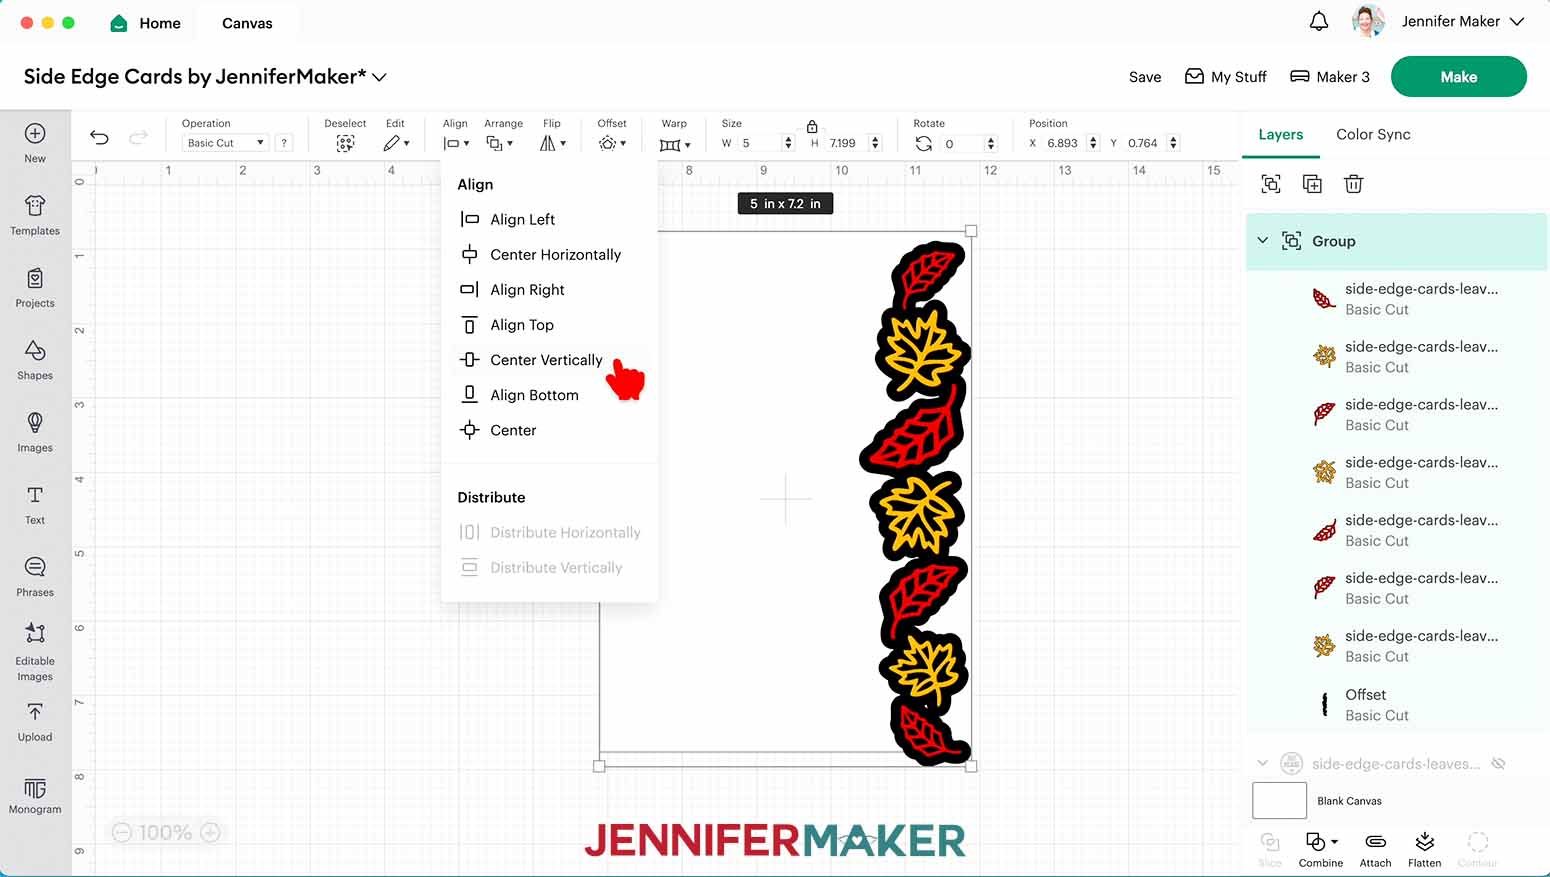
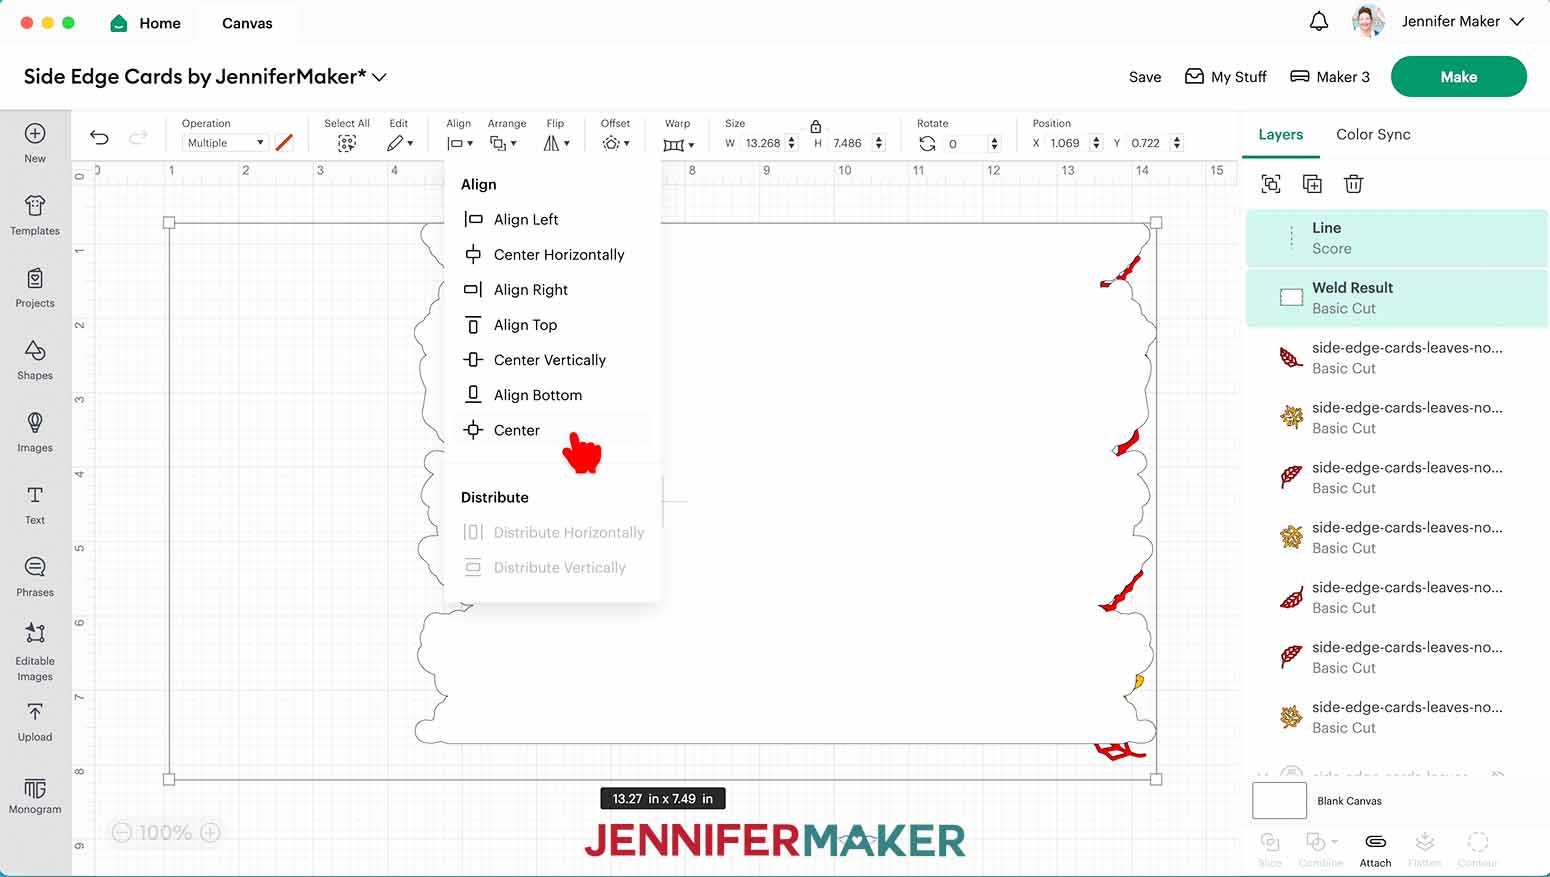
22. Select the group and your card base layer and click “Align” and “Align Right.”
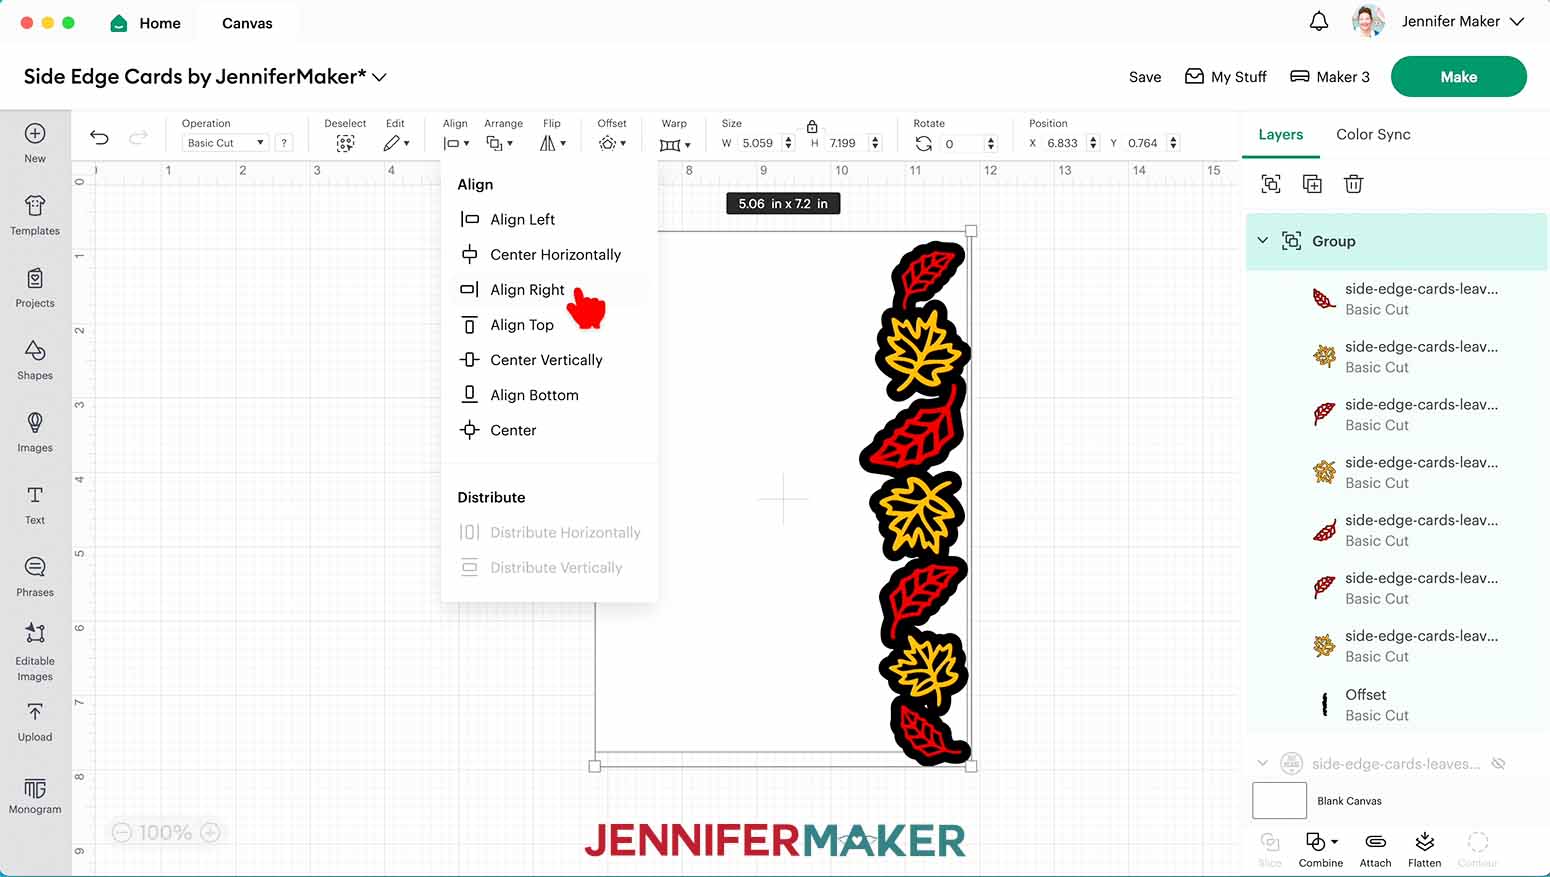
23. Without deselecting anything, click “Align” and “Center Vertically.”
24. Select your shapes and click the “Ungroup” icon.
25. Use the eye icons in the Layers Panel to hide each of your elements, leaving just the card base and offset shape showing on the Canvas.
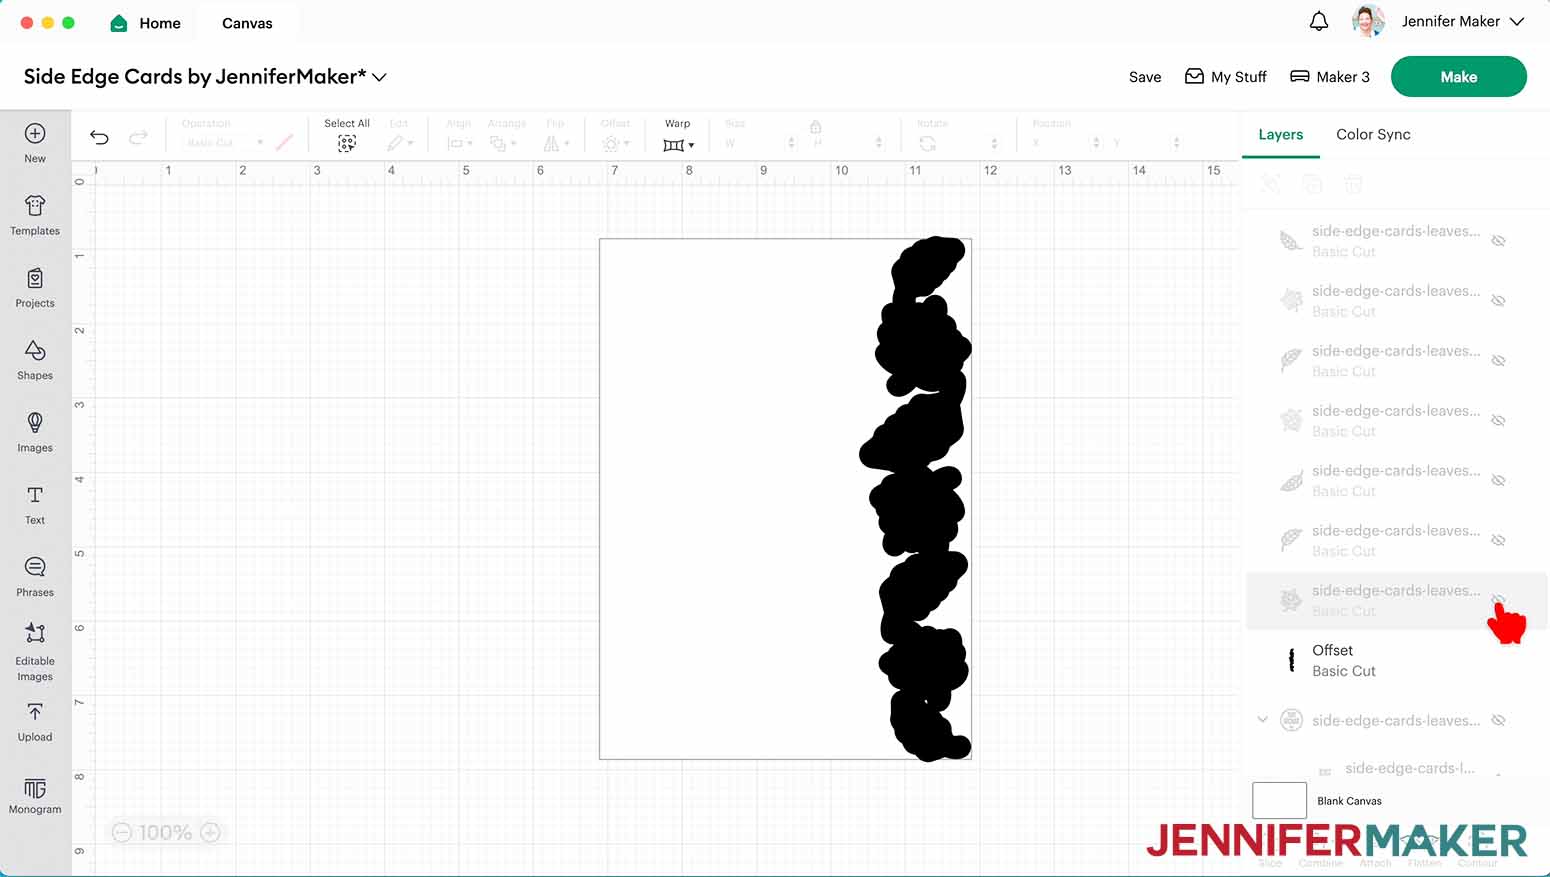
26. Select the offset shape and click the “Contour” icon at the bottom of the Layers Panel.
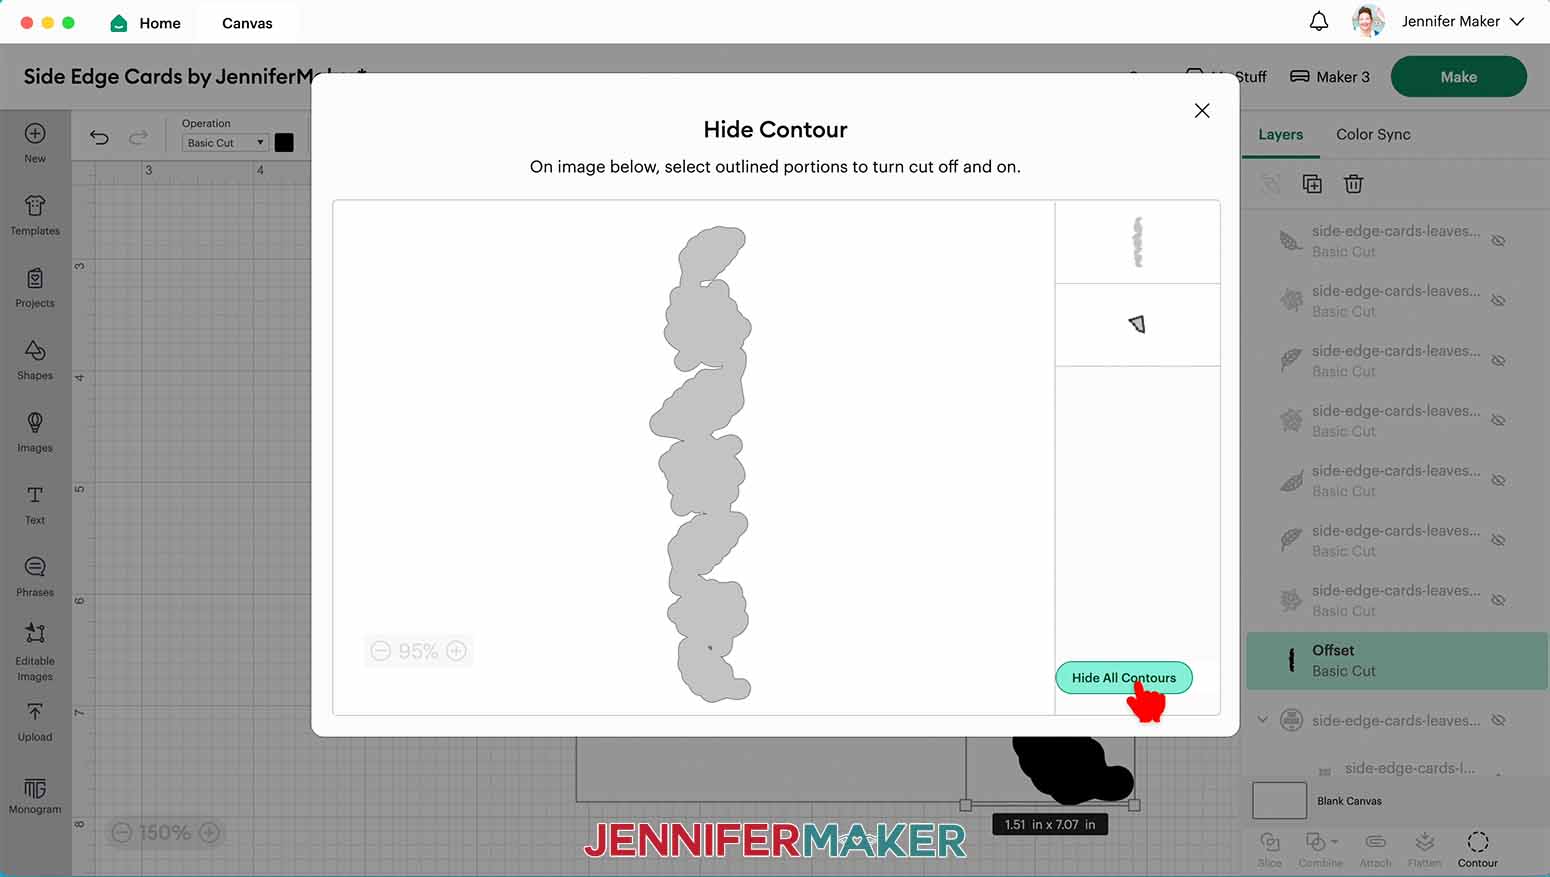
NOTE: If you don’t have any contours to hide, skip to step 28.
27. Click “Hide All Contours” to remove any inner cutouts from the offset shape, then click the “X” to close the “Hide Contour” window.
28. Select the offset shape and the card base layer and click the “Slice” icon at the bottom of the Layers Panel.
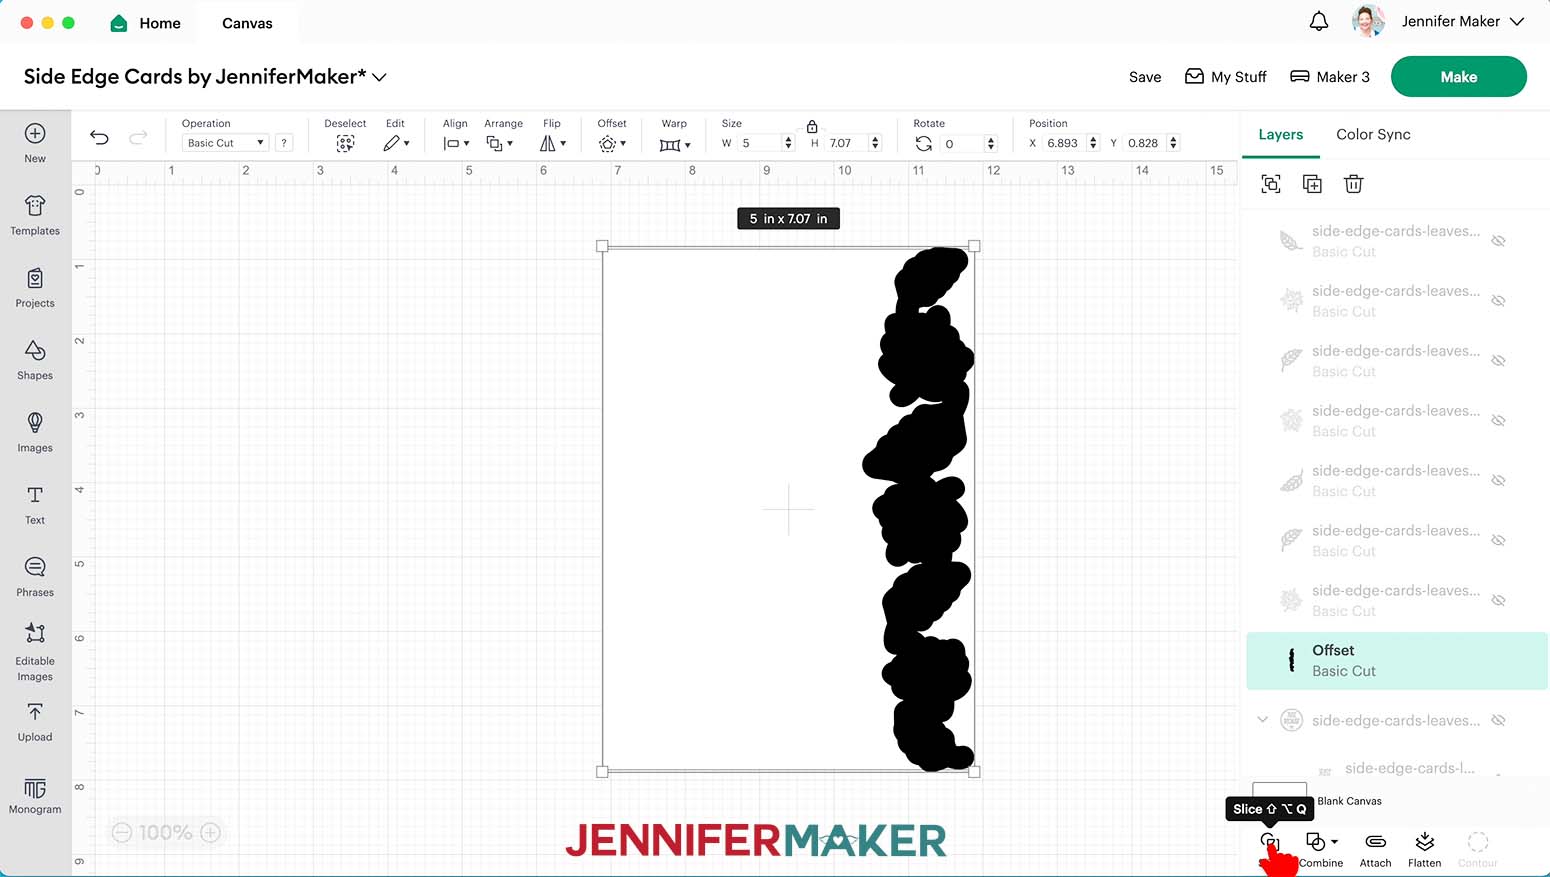
29. Delete any extra pieces and the duplicate offset shape layer, leaving just one offset shape Slice Result layer and one Slice Result layer with the left half of the card attached.
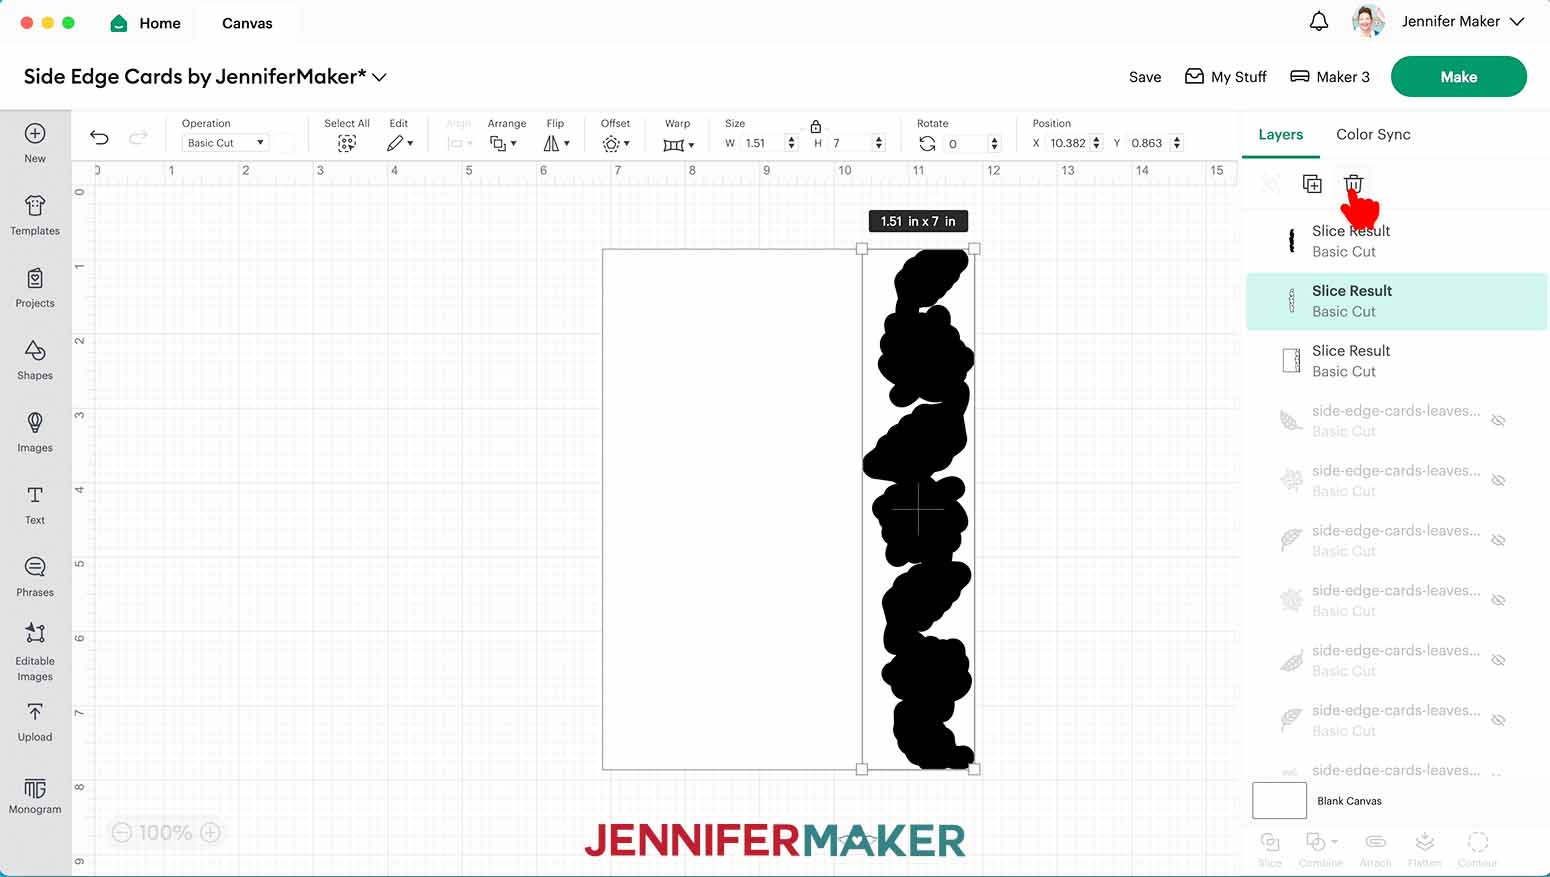
IMPORTANT: Do not move any pieces on the Canvas, or your card may not look right when you weld your remaining pieces together in step 32 below.
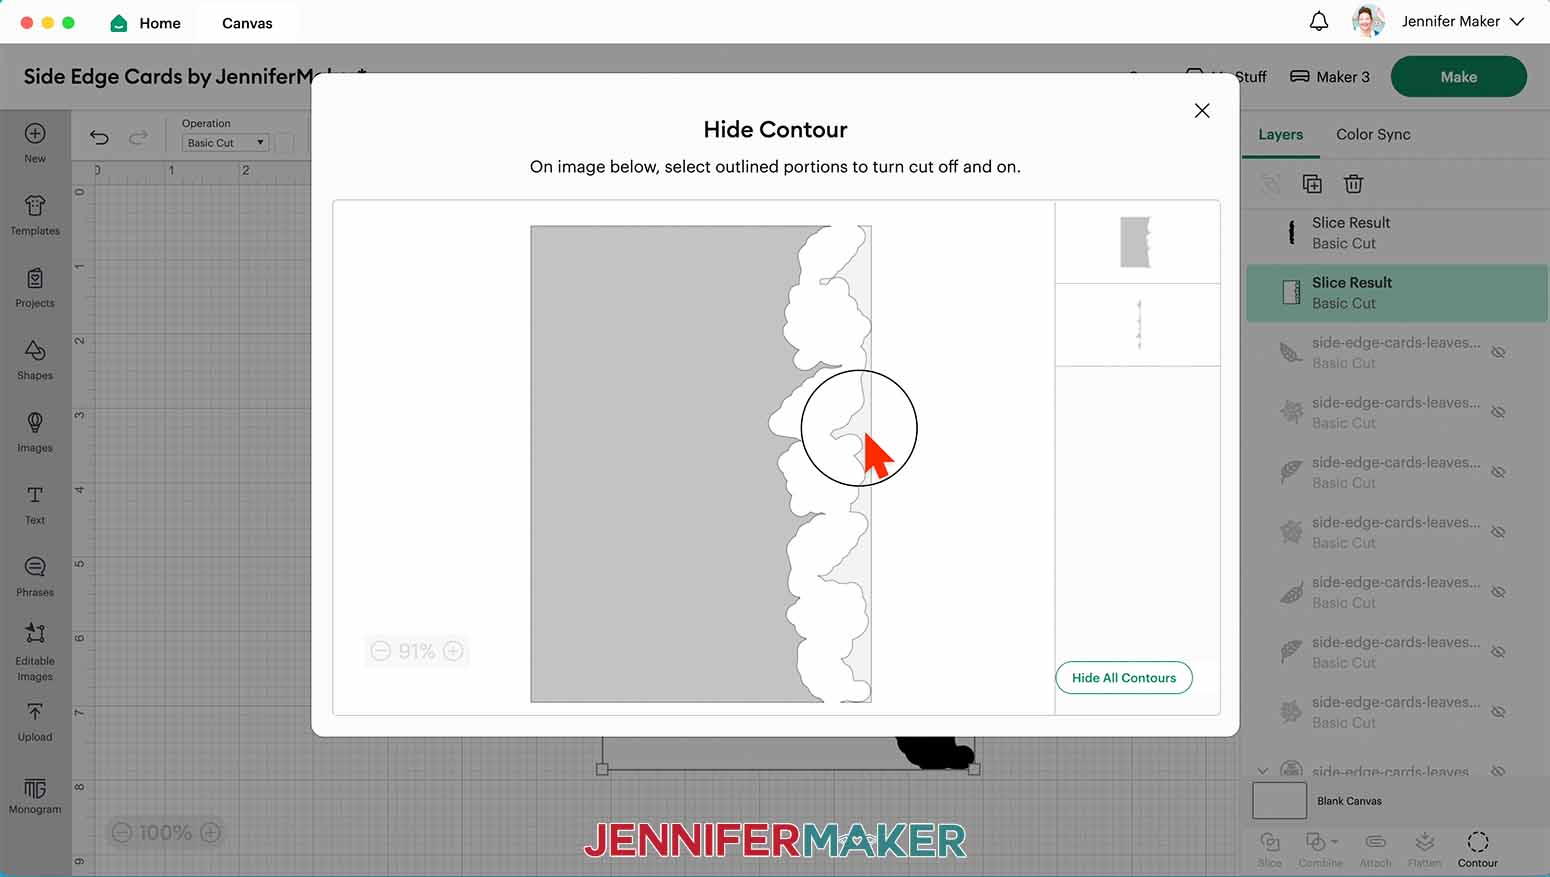
30. Select the layer with the left half of the card and click “Contour.”
31. Click on the pieces to the right of your offset shape to hide them. Click the “X” to close the window when you’re done.
32. Select the offset shape and the left card half layers, then click “Combine” and choose “Weld.” You should be left with a single 5” x 7” shape with a straight edge on the left and a shaped edge on the right.
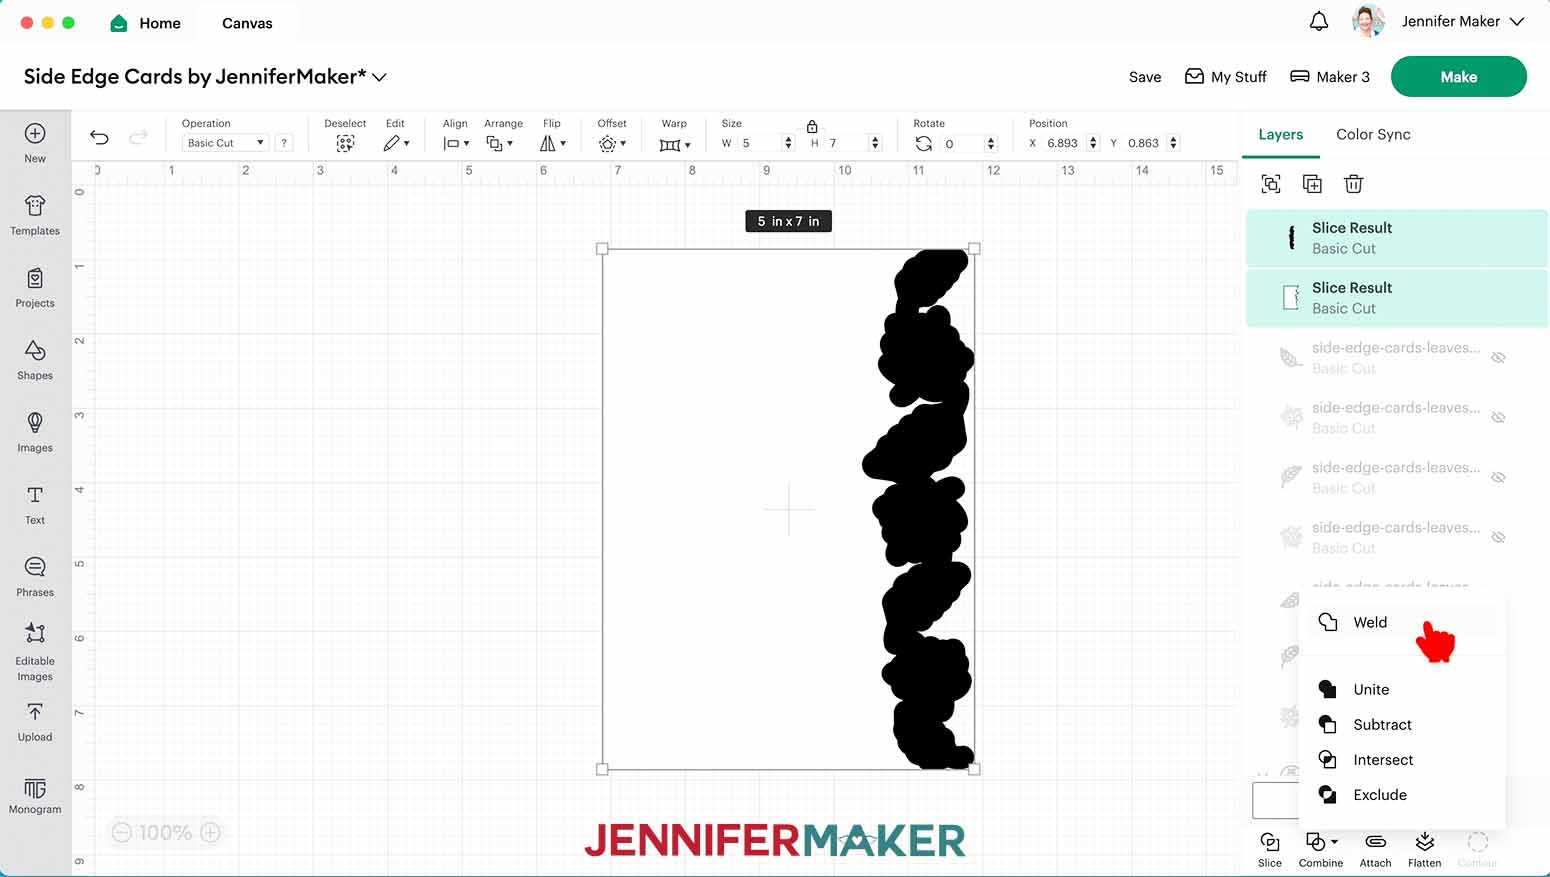
33. Click the shape and click “Arrange” and “Send to Back.”
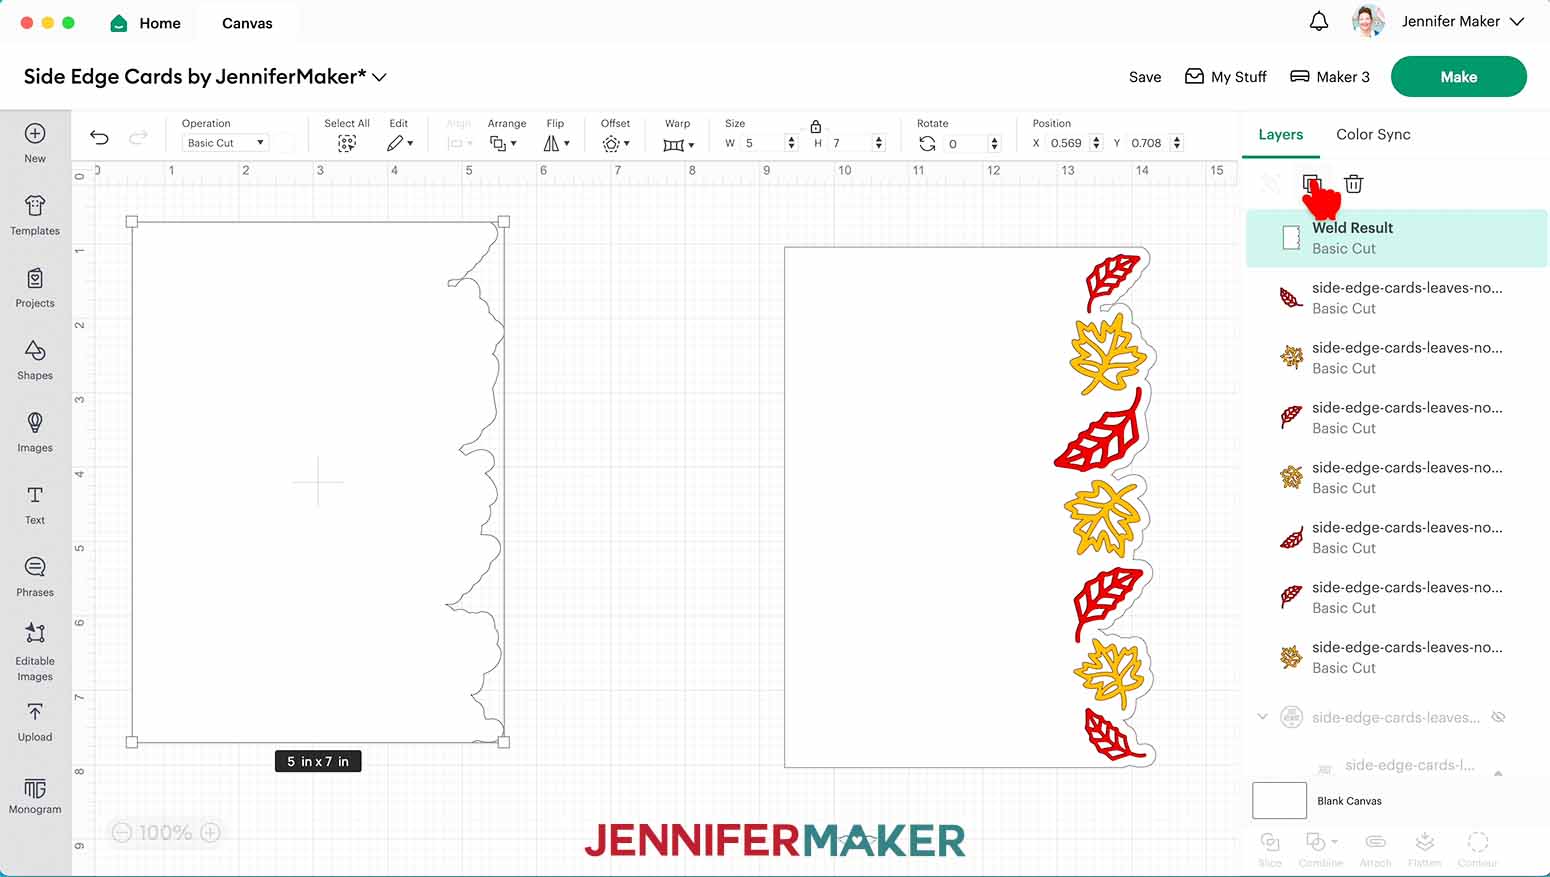
34. Click the eye icons in the Layers Panel to show your card elements.
35. If you’re happy with your card shape, select the card base and click the “Duplicate” icon.
36. Select the duplicated layer and click “Flip” and then “Flip Horizontal.”
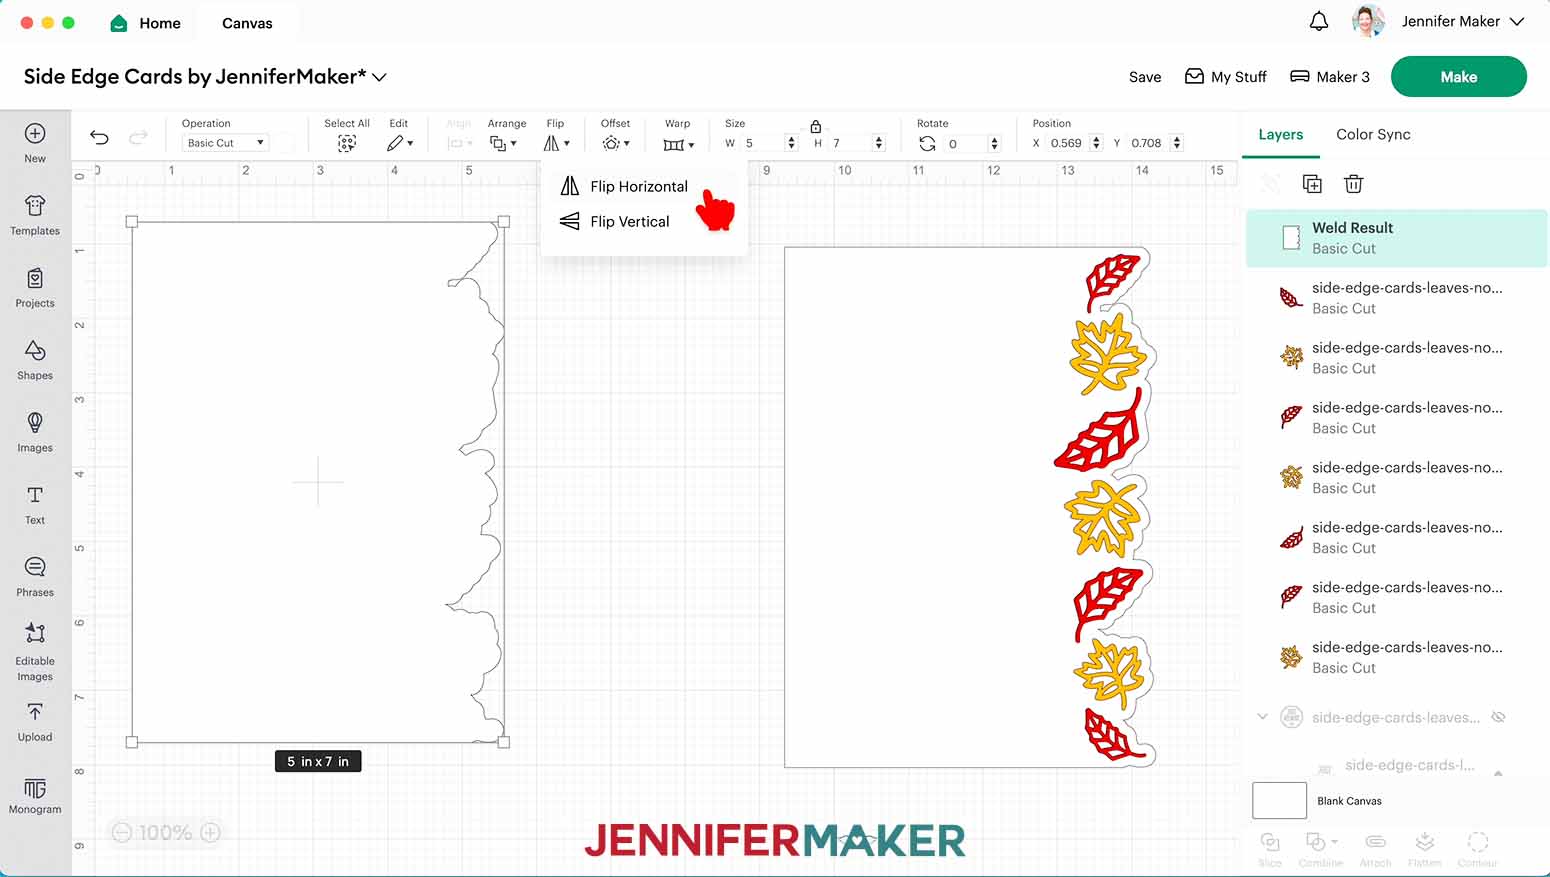
37. Select both card halves and click “Align” and “Align Top.”
38. Hold your shift key and move each card half to the left or right so they slightly overlap each other in the center.
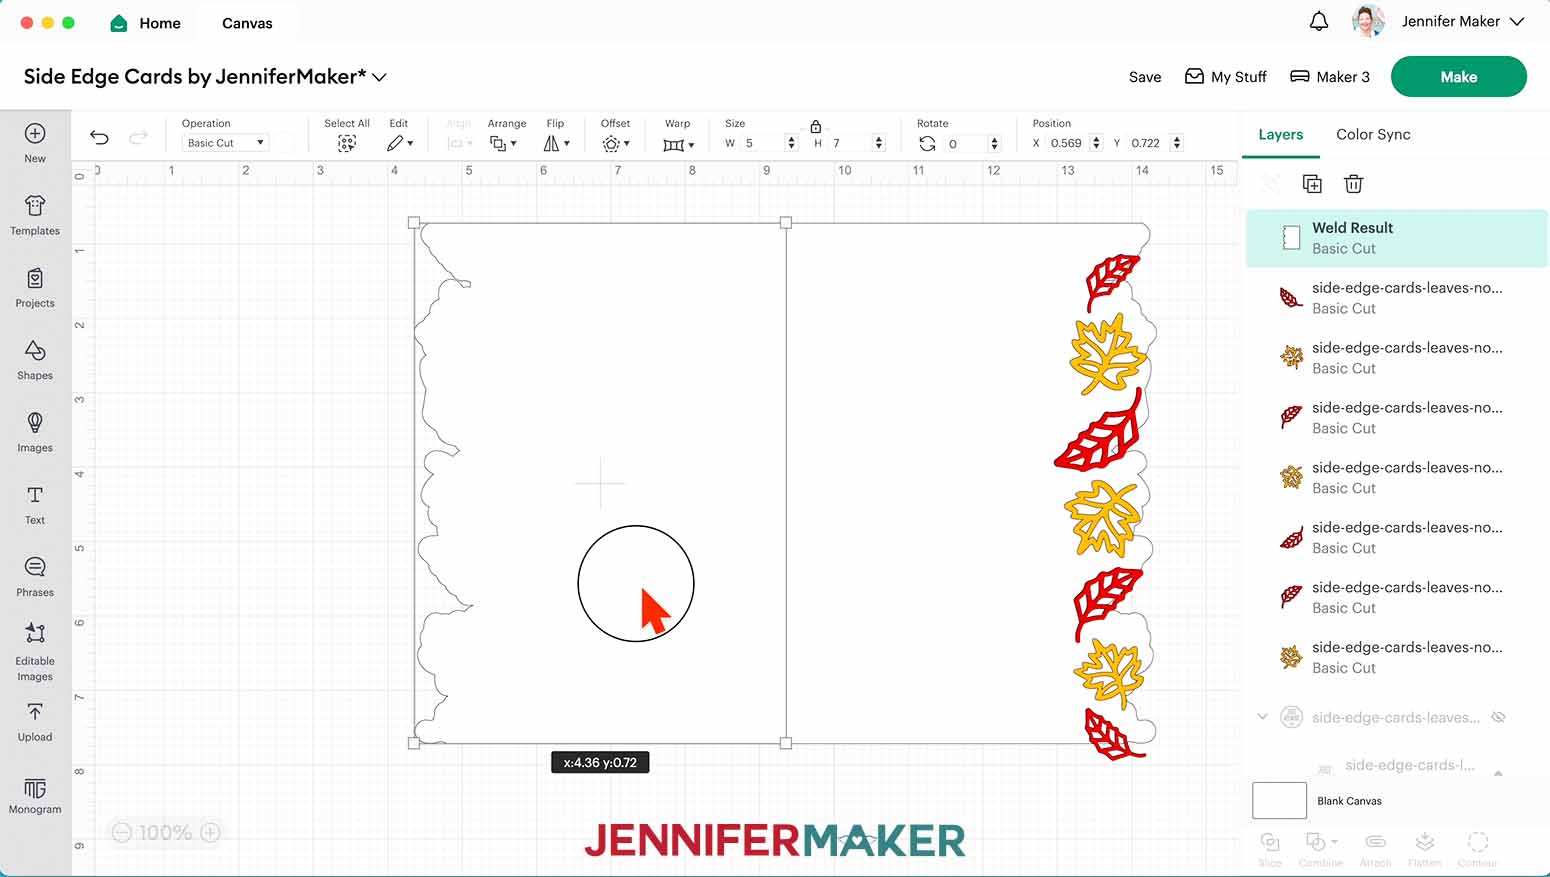
39. Select both card halves. Their combined width should be slightly less than 10”. If the width is more than 10”, move one of the halves so it overlaps the other a bit more.
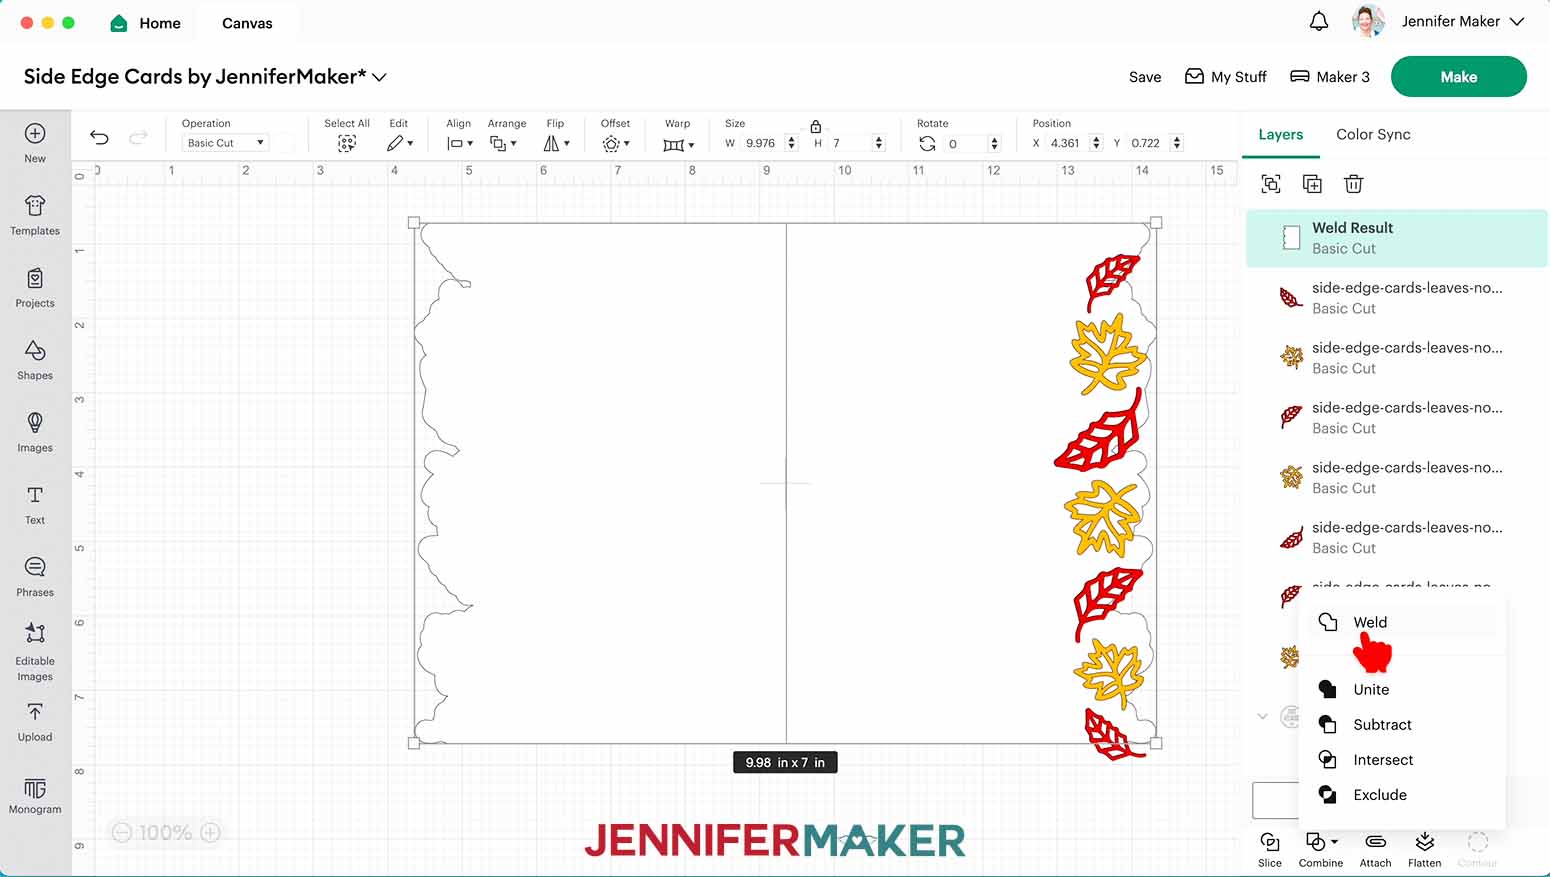
40. With both halves selected, click “Combine” and choose “Weld.”
41. Click the “Shapes” menu and select the Score Line.
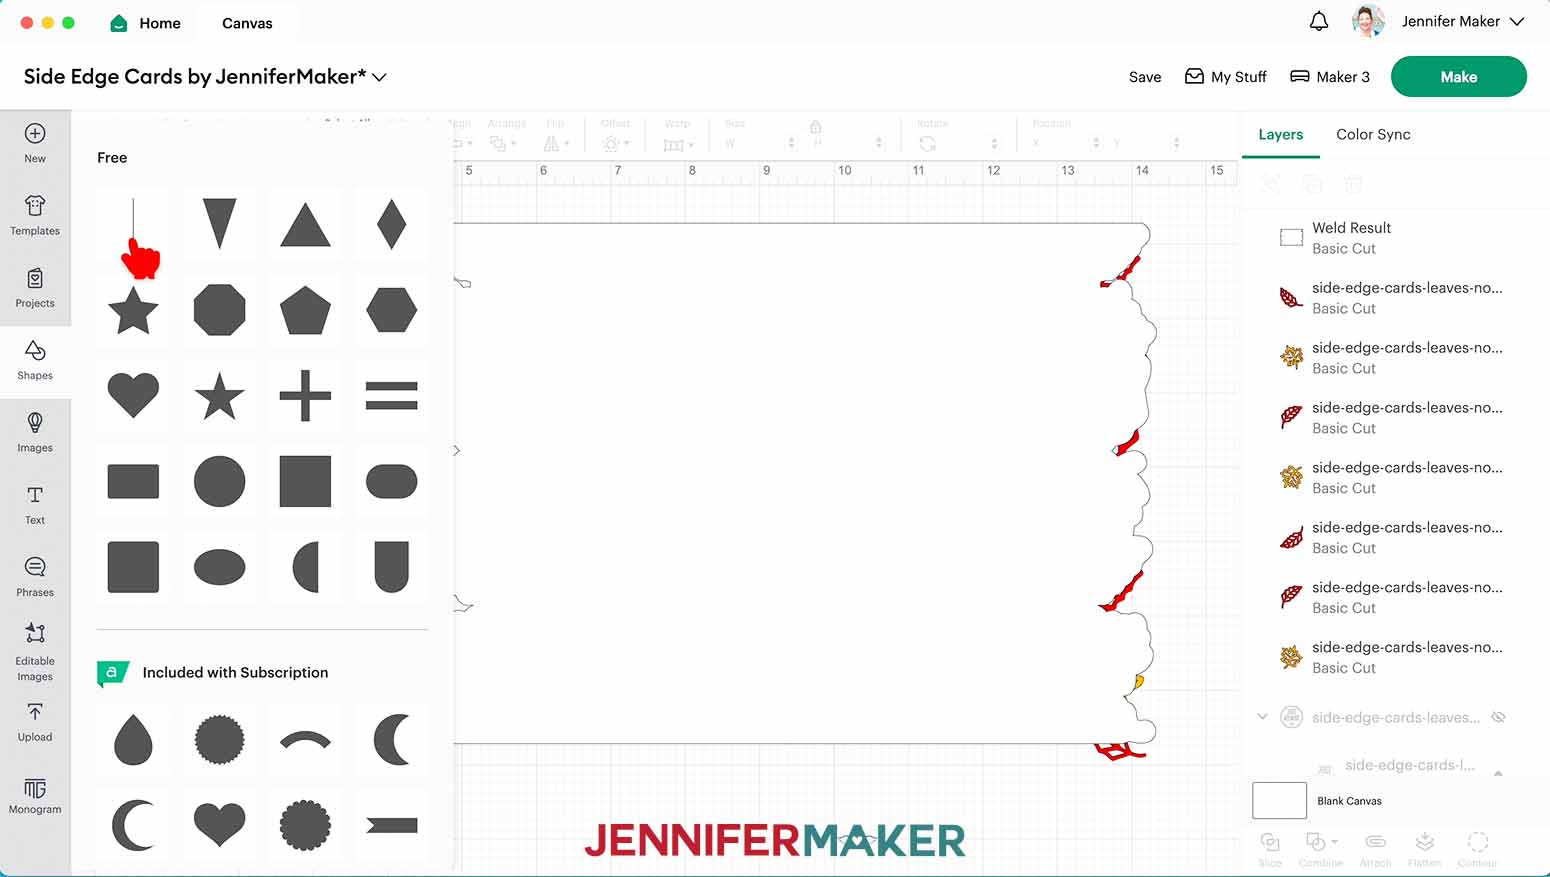
42. With the score line selected, resize it to 7” tall by typing “7” into the height (H) size field.
43. Select the score line and the card base and click “Align” and then “Center.”
44. With both layers still selected, click “Attach” at the bottom of the Layers Panel.
45. Add a sentiment in the open space on the front of the card, if you’d like. I’ll use the “Just Because” sentiment, along with the corresponding red and orange circles, from the leaves SVG file.
TIP: If you’d like to add a custom sentiment that your machine can write in pen, follow the steps in my Birthday Card Pop Up tutorial.
46. The “Just Because” sentiment is meant to be a Print Then Cut piece, so it needs to be flattened before we can cut it. Select the sentiment group and then click “Flatten” at the bottom of the Layers Panel.

47. Select the attached card base and score line and click “Arrange” and “Send to Back.”
48. Move your elements and sentiment into place on the card and make sure you’re happy with everything. Make any adjustments if needed.
49. Follow the “Project 1, Step 2” CRICUT DESIGN SPACE steps 12-17 above.
CUTTING
1. Follow the “Project 1, Step 2” CUTTING steps 1-8 above to cut your customized side edge card pieces.
NOTE: If you added a written sentiment to the front of your card, load your Fine Point Pen when prompted.
TIP: If you added a Print Then Cut sentiment or image, follow the steps in my Stained Glass Cards tutorial to print and cut your respective pieces.
STEP 3: ASSEMBLE YOUR CUSTOM LEAVES SIDE EDGE CARD
1. Fold the card base piece in half along the scored line. If you’re using two-sided cardstock, make sure the pretty or colored side is face out.
TIP: Use a scraper for a sharp crease.
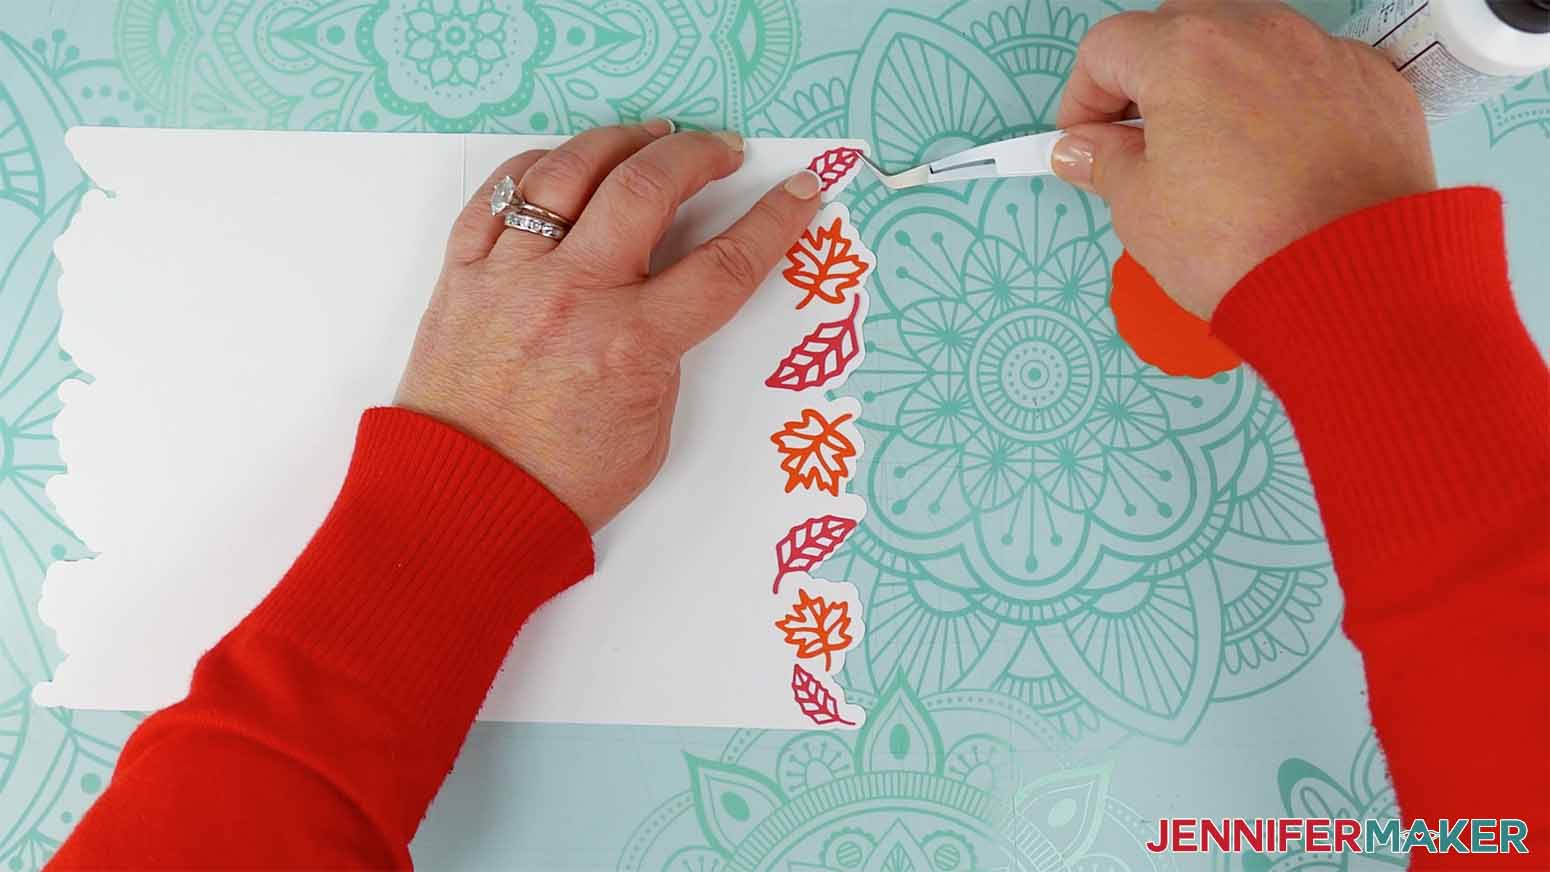
2. Add a few dots of glue to the edges and center on the back side of a leaf piece.
3. Match up the leaf’s edges with its corresponding offset shape on the right edge of the card. After the leaf is correctly positioned, press down to adhere it to the front of the card.
TIP: Refer to your Design Space Canvas if you need help determining where to place each piece.
4. Follow steps 2-3 to attach the rest of the leaves to the card.
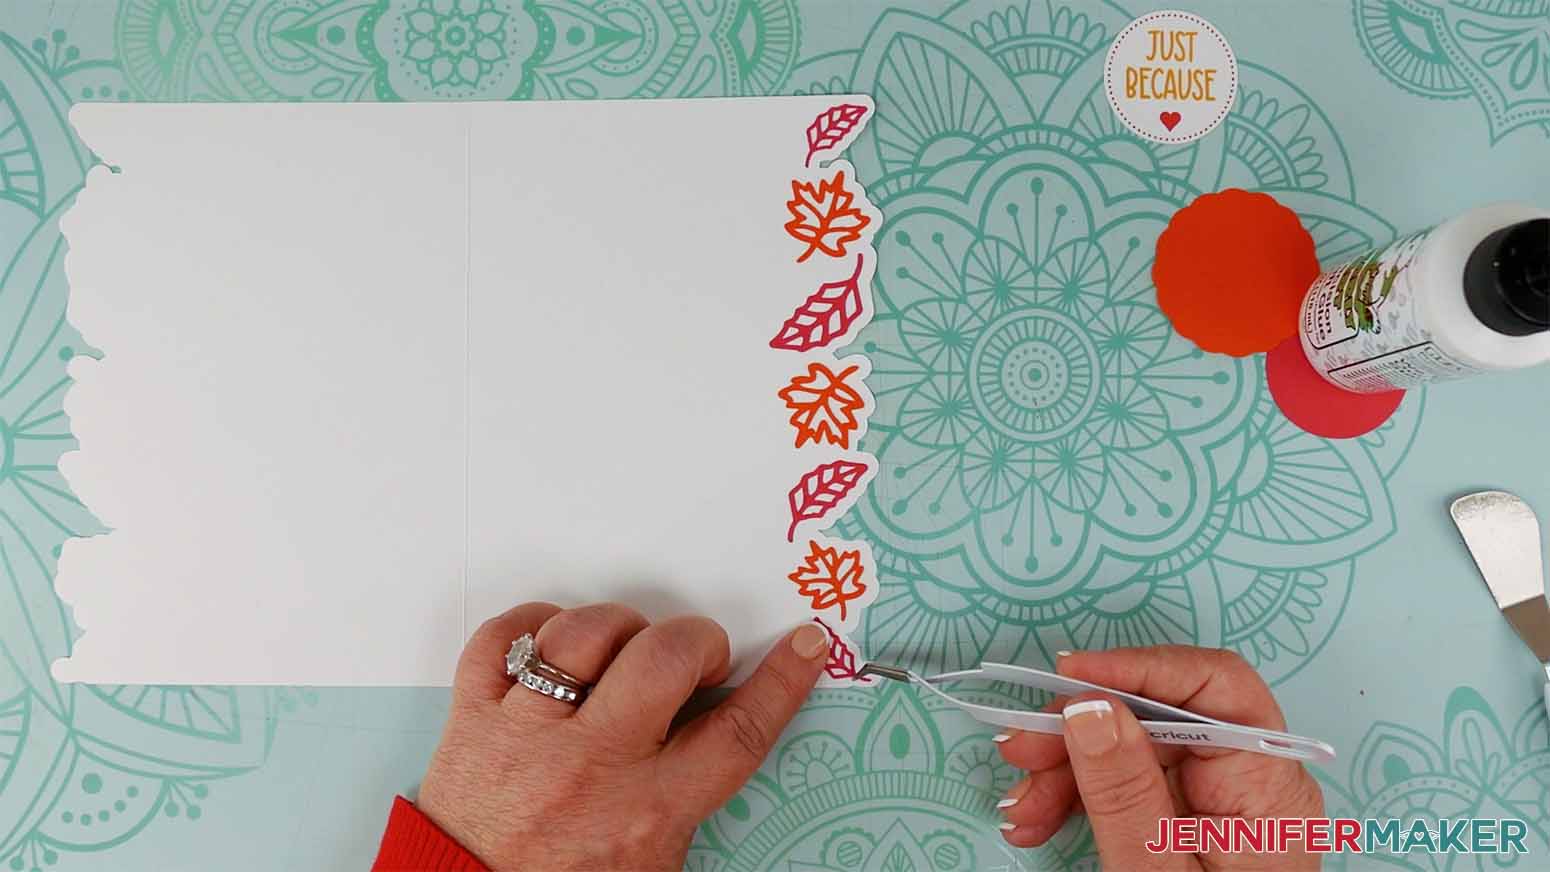
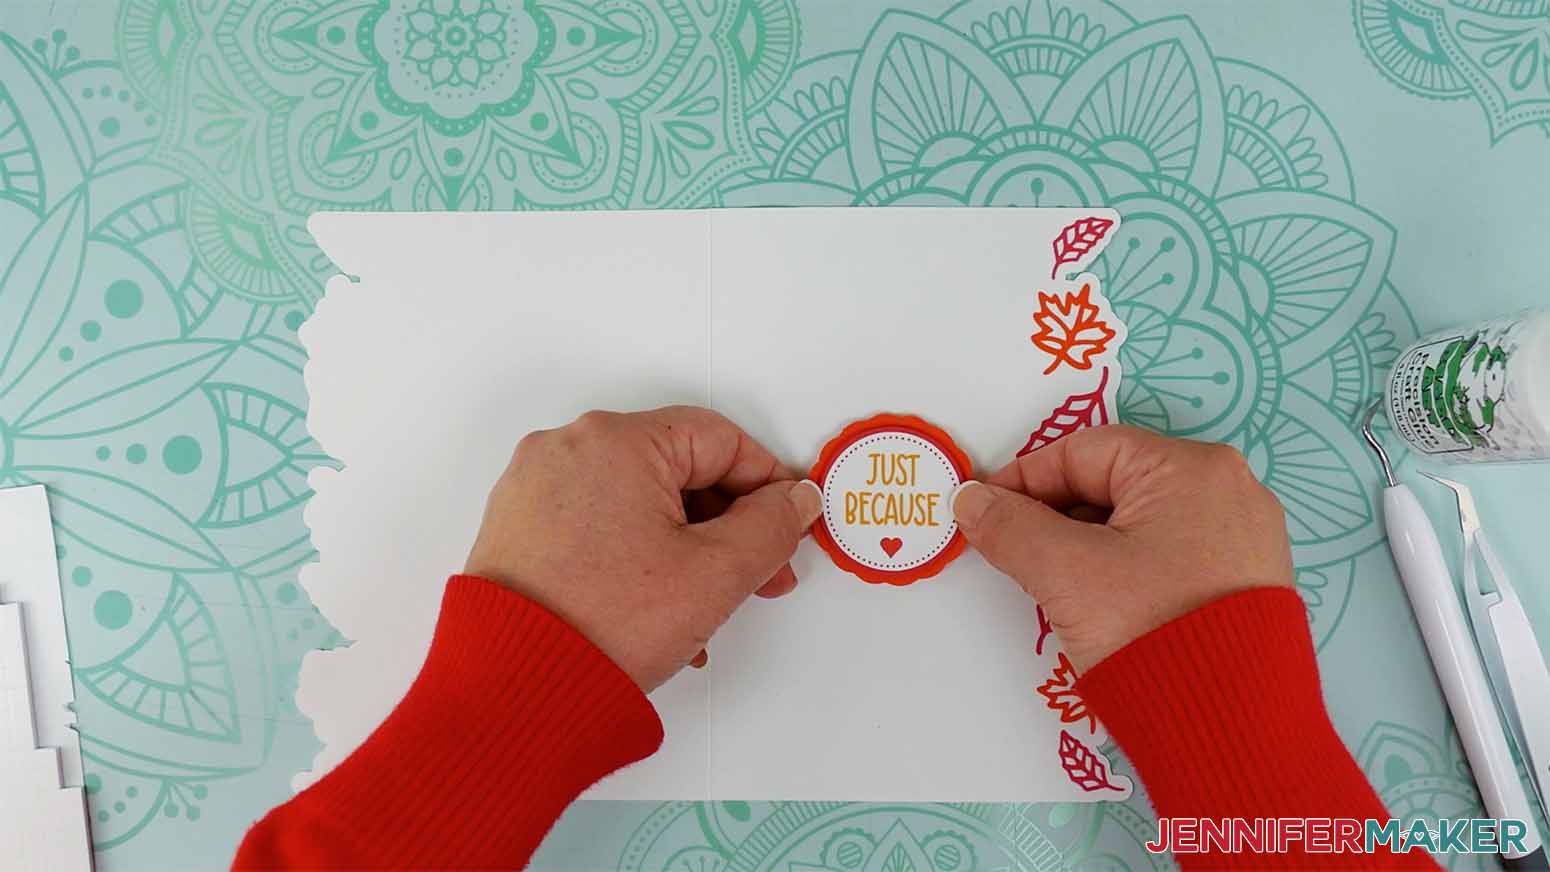
5. To make the Print Then Cut sentiment, first add glue to the back of the printed circle and attach it to the center of the red circle.
6. Attach four foam adhesive squares to the back of the red circle, spacing them evenly around the outside edge.
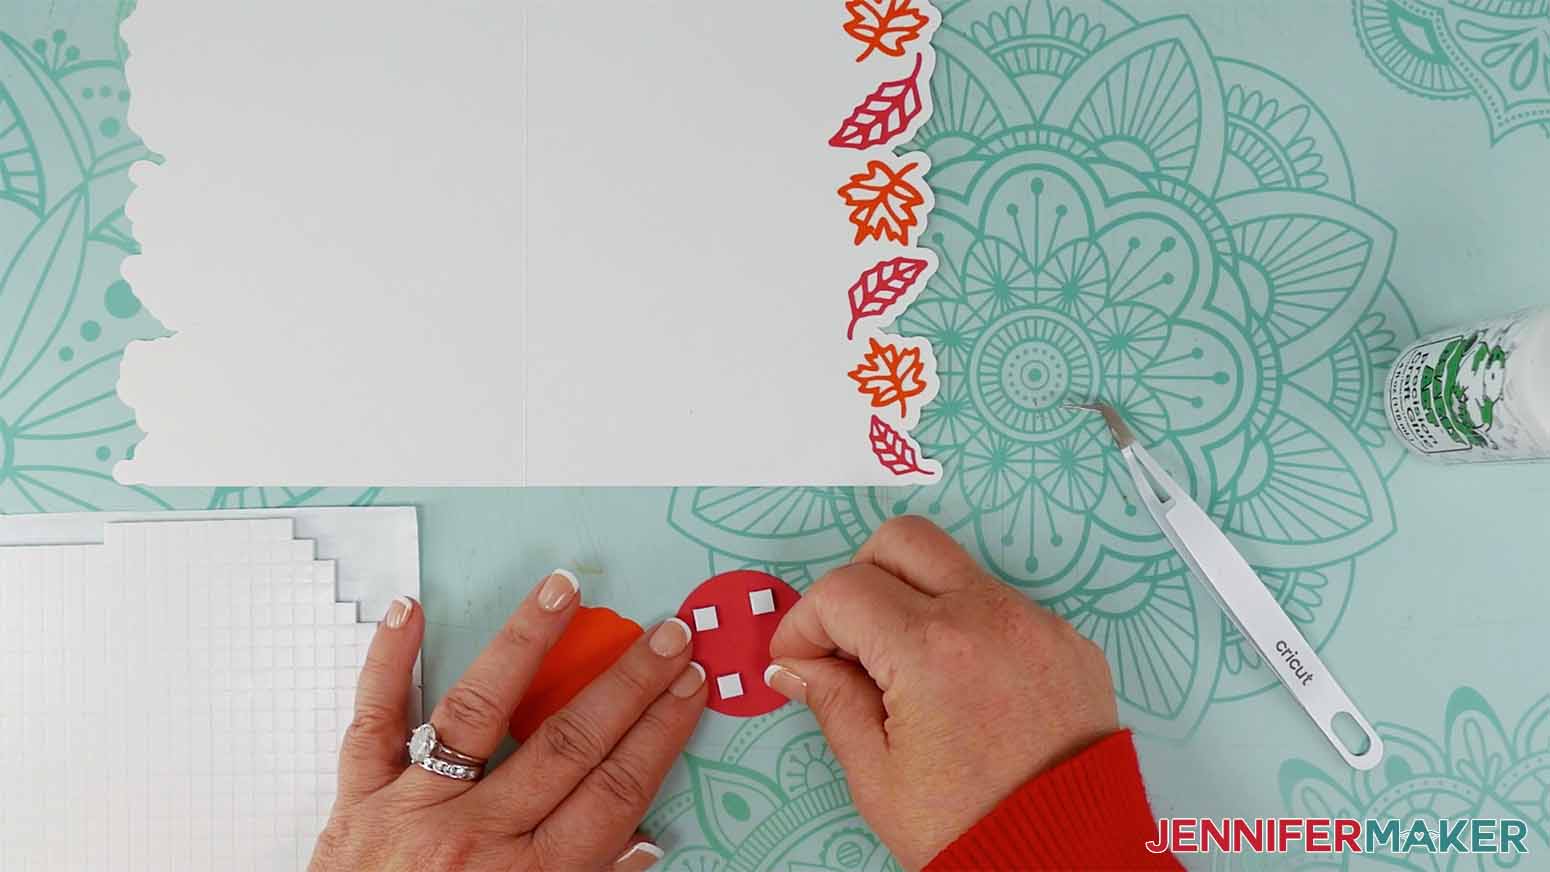
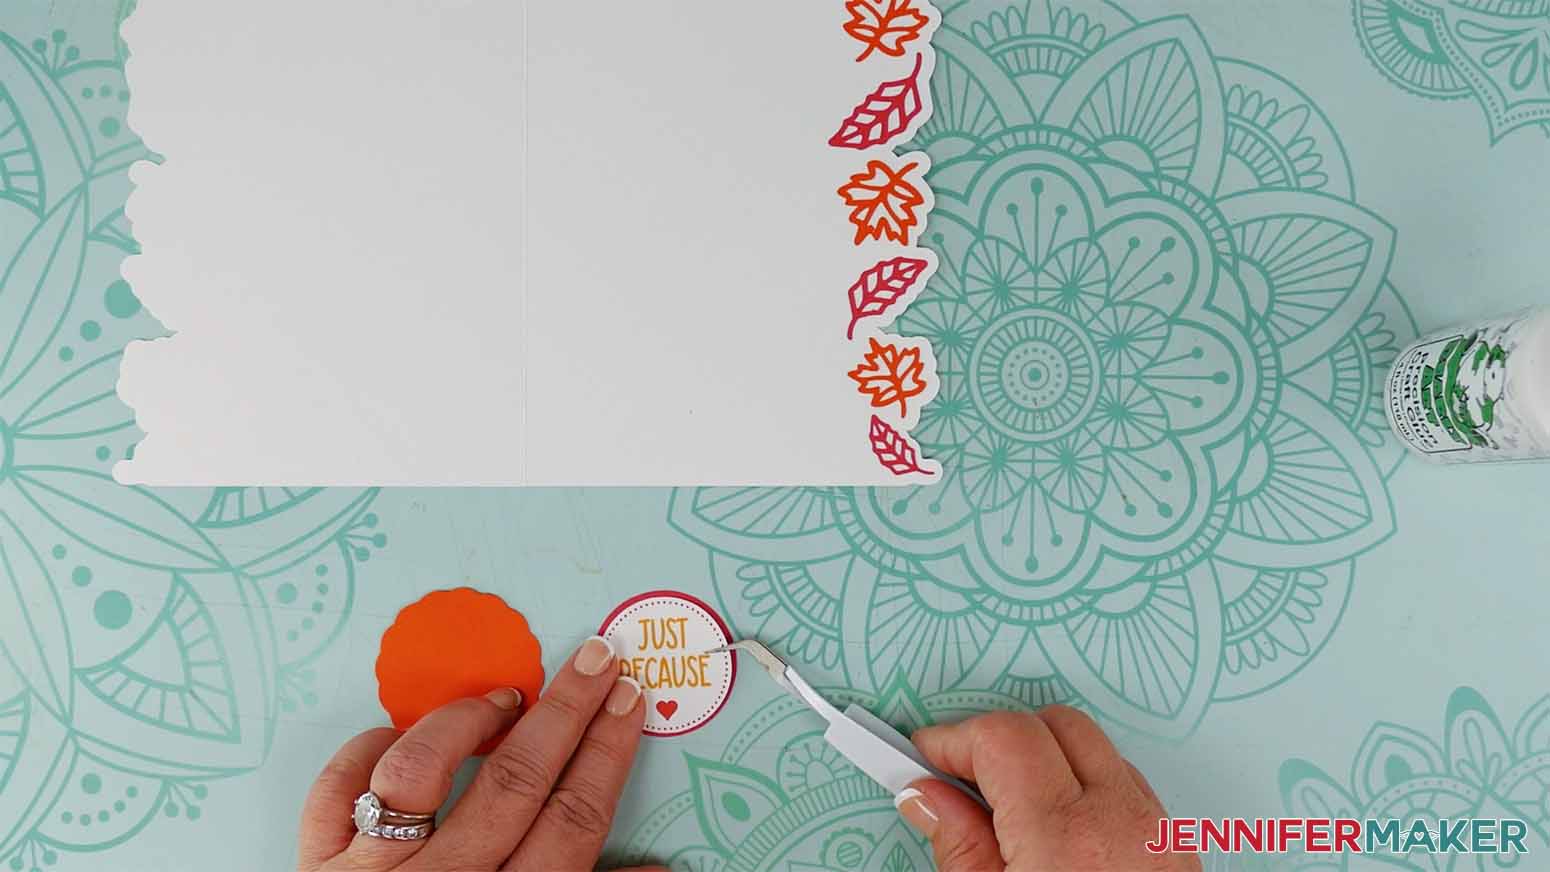
7. Remove the adhesive backings and attach the sentiment pieces to the center of the orange circle. Press down to adhere them.
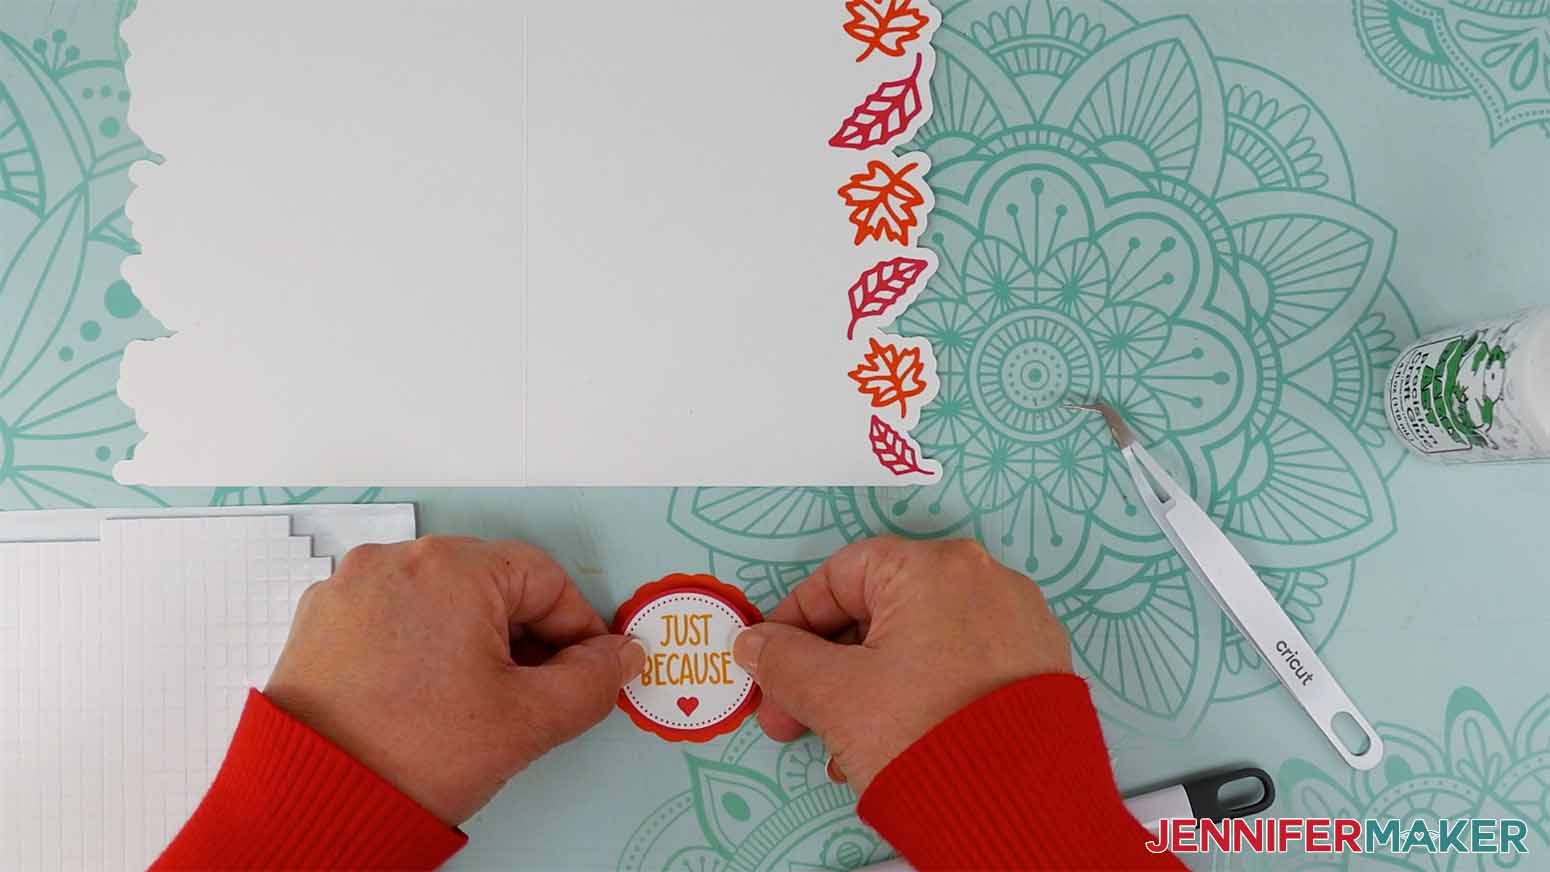
8. Attach four foam adhesive squares to the back of the orange circle and then attach it to the front of the card, centering the completed sentiment from top to bottom.
VARIATION 1: PEACOCK SIDE EDGE CARD
STEP 2: PREPARE YOUR DESIGN
CRICUT DESIGN SPACE
1. Follow the “Project 1, Cricut Design Space” steps 1-9 above.
2. Add a sentiment in the open space on the front of the card, if you’d like. You can follow the steps in my Birthday Card Pop Up tutorial to add a sentiment that your machine can write in pen.
TIP: My font JM Tall works really well for this. Don’t forget to convert your sentiment to Pen and attach it to the card base before cutting!
3. Make sure the correct machine is selected in the top right.
4. Click “Make.”
5. If prompted, click "On Mat," choose your mat size, and click “Confirm.”
6. On the Prepare Screen, you should have two mats for the peacock side edge card - 1 white for the card base and 1 teal for the card liner.
7. If needed, change the Material Size to match each paper you’re using.
8. Select the first mat again and click “Continue.”
CUTTING
1. Follow the “Project 1, Cutting” steps 1-8 above. I cut my white layer on 65 lb. cardstock and my teal layer on metallic foil cardstock using these settings:
- 65 lb. Cardstock - “Medium Cardstock - 80 lb (216 gsm)” Setting with More Pressure
- Metallic Foil Cardstock - “Holographic Cardstock” Setting with More Pressure
NOTE: If you added a written sentiment to the front of your card, load your Fine Point Pen when prompted.
STEP 3: ASSEMBLE YOUR PEACOCK SIDE EDGE CARD
1. Fold the card base piece in half along the dashed or scored line. If you’re using two-sided cardstock, make sure the pretty or colored side is face out.
TIP: Use a scraper for a sharp crease.
2. Open the card and add glue to the left side, avoiding the cutouts and very edges.
TIP: You just need a few dots of glue in between the feather cutouts, on the wing, and on the eye piece.
3. Carefully align the foil liner to the glued area with the foil side facing down so it shows through to the front of the card.
TIP: Make sure the liner piece doesn’t extend past the fold.
4. Flip the card over before the glue dries and wipe away any excess.
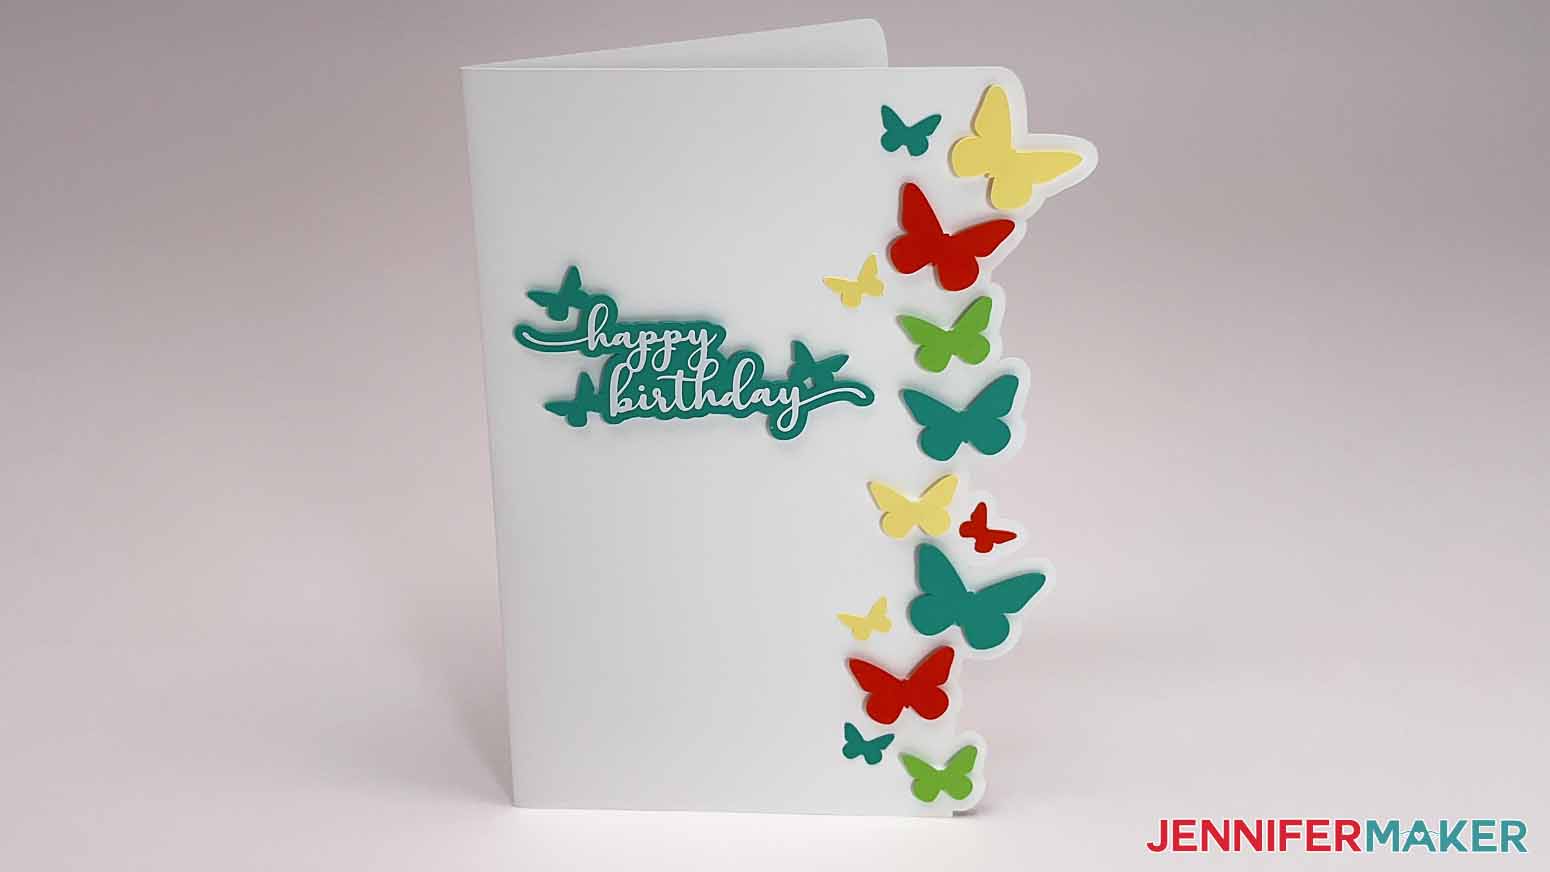
VARIATION 2: BUTTERFLIES SIDE EDGE CARD
STEP 2: PREPARE YOUR DESIGN
CRICUT DESIGN SPACE
1. Follow the “Project 1, Cricut Design Space” steps 1-9 above.
2. Make sure the correct machine is selected in the top right.
3. Click “Make.”
4. If prompted, click "On Mat," choose your mat size, and click “Confirm.”
5. On the Prepare Screen, you should have six mats for the butterflies side edge card - 1 white for the card base, 1 gray for the vinyl sentiment, 1 orange, 1 yellow, 1 green, and 1 teal.
6. If needed, change the Material Size to match each paper you’re using.
7. Select the first mat again and click “Continue.”
CUTTING
1. Follow the “Project 1, Cutting” steps 1-8 above. I cut my white and colored layers on 65 lb. cardstock and my gray layer on white permanent vinyl using these settings:
- 65 lb. Cardstock - “Medium Cardstock - 80 lb (216 gsm)” Setting with More Pressure
- Permanent Vinyl - “Premium Vinyl - Permanent Glossy” Setting with More Pressure
STEP 3: ASSEMBLE YOUR BUTTERFLIES SIDE EDGE CARD
1. Fold the card base piece in half along the dashed or scored line. If you’re using two-sided cardstock, make sure the pretty or colored side is face out.
TIP: Use a scraper for a sharp crease.
2. Weed the vinyl sentiment.
3. Use a piece of StandardGrip transfer tape slightly larger than the sentiment to transfer the words to the teal backer piece.
4. Attach one foam adhesive square to the back of each of the eight largest butterflies.
TIP: You can also use glue to attach these butterflies.
5. Attach each butterfly to the front of the card, aligning its right edge with the corresponding offset shape on the right side of the card.
TIP: Refer to your Design Space Canvas if you need help determining where to place each piece.
6. Add a small amount of glue to the back of the five small butterflies.
7. Attach one to the remaining blank offset area on the front of the card, aligning its right edge to the offset shape.
8. Attach the remaining four butterflies wherever you’d like.
STEP 4: SHOW IT OFF!
Here is what my finished side edge cards look like!


Now you can give them to friends or family members to brighten their day. You can even make a DIY envelope to mail your finished card by following my How to Make an Envelope tutorial.
Notes
Charlotte (butterflies design)
BFC Hello Flower (snowflakes design)
JM Sweet (leaves design)
JM Tall (peacock design)
Finished Size: Each card is 5" x 7" when folded
Answers to Your Questions About Making Side Edge Cards With Cricut
Q: Is it easy to make cards with Cricut?
A: Different cards have different levels of difficulty, but overall — YES! I love making cards with Cricut because it can write a message, add the score line to the middle of the card, and then cut it out perfectly.
Q: Can you sell cards made with Cricut?
A: As long as you’re using original designs with elements and typefaces that are free for commercial use, you can sell cards made with a Cricut machine. Please see information on licenses for my designs.
Q. Are your free SVGs just for personal use or also commercial use?
A: I’m honored that you’d ask! Yes, you can sell completed projects using these designs (with limitations) — please read about licenses here so you know what you can and cannot do. If you use them, please share photos with us!
Q: Can Cricut make pop up cards?
A: Yes! I have several pop up card design files you can try, like a hot air balloon card, a butterfly card with moving wings, and a pop up birthday cake!
Q: How do you use Cricut cutaway cards?
A: Cricut insert cards (often called cutaway cards) are easier to use than you might think. Check out my easy tutorial on how to use a Cricut insert card for all the details!
Q: What supplies do I need to make cards with Cricut?
A: For basic Cricut card making, you’ll need a selection of eye-catching cardstock like I said above, along with the other materials and tools in my materials list for this tutorial. My side edge cards are beautiful, but they’re really simple — just the basics are needed.
Q: Do you have any other easy cards I can make?
A: Yes! Search “card” on my blog or you can browse cards in my resource library. Get the password by filling out the form at the bottom of this post.
Get my free SVG files to create side edge cards with Cricut!
I love seeing what you make with my designs and how you use them! Please share a photo of your side edge cards with Cricut or another method in our Facebook group or tag me on social media with #jennifermaker.
Love,

Want to remember this? Save this Side Edge Cards With Cricut Tutorial to your favorite Pinterest Board!