
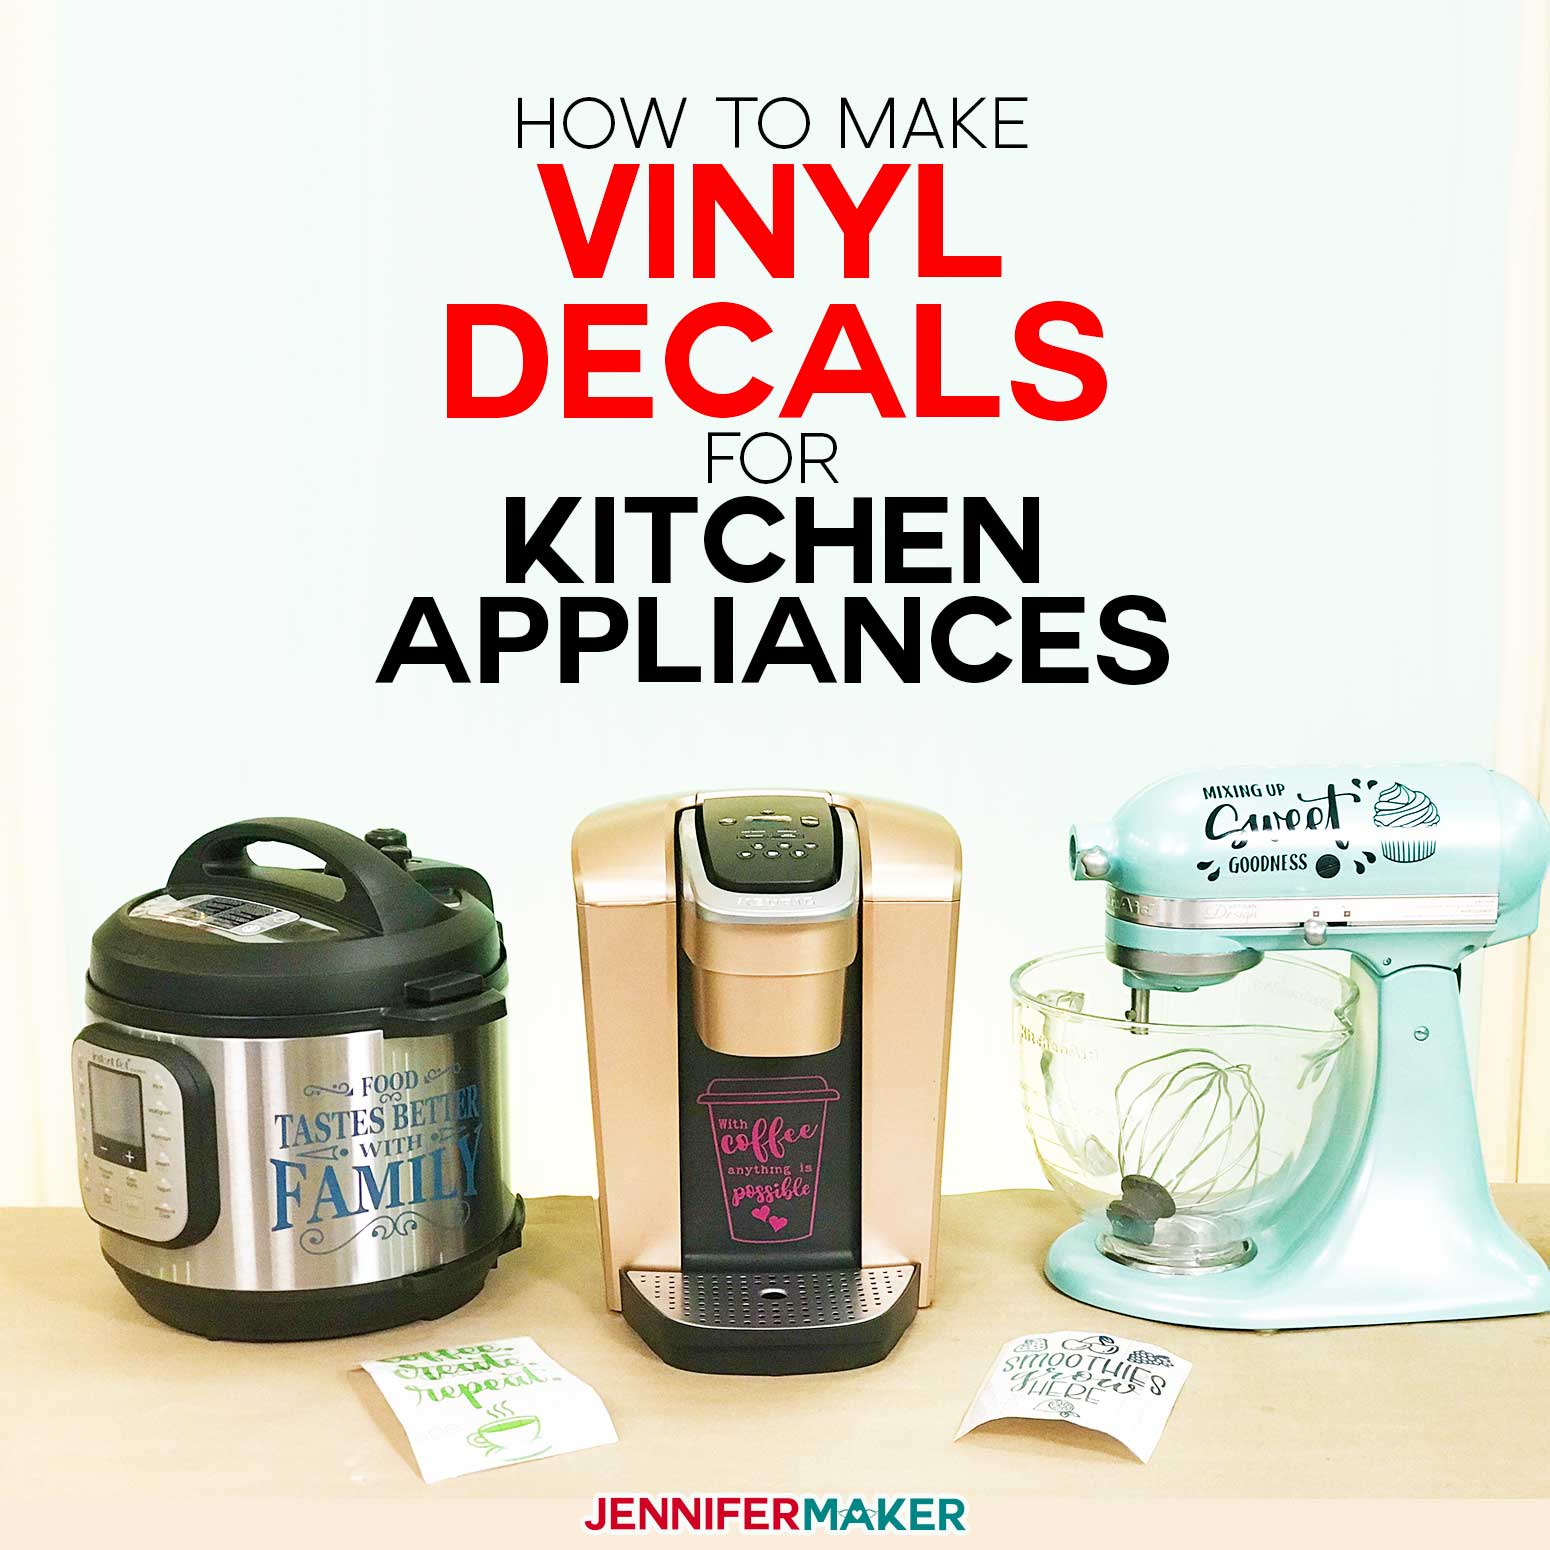
Learn how to make vinyl decals for nearly anything in your home! In this tutorial, we’ll show you how to make and apply vinyl decals to your kitchen appliances, including your Instant Pot, KitchenAid Mixer, Keurig coffee machine, and blender!
You can decorate just about anything with vinyl. I know — I’ve put vinyl on mugs, glasses, your Cricut machine, canvas, ornaments, walls, and so much more! It’s just so easy to do, and I want to be sure you know how to do it, too. And you probably already have something at your place just begging for a little vinyl personalization … your kitchen appliances! They work hard for us, and deserve a little spicing up. You can make custom decals that fit perfectly on your favorite kitchen appliances – they’ll be the talk of the neighborhood! You can put vinyl decals on your Instant Pot, KitchenAid mixer, Keurig, or blender! So today, I am showing you how to make vinyl decals for your kitchen appliances.

See exactly how to make vinyl decals for your kitchen appliances in my tutorial video (or keep scrolling if you prefer a step-by-step photo tutorial):
Aren’t these a fun way to dress up an ordinary appliance? Now, when we talk about making and applying vinyl decals, we mean ADHESIVE vinyl — this is a vinyl with a self adhesive backing. Vinyl like this comes in both permanent and removable variations, and while you might at first think that removable vinyl would be best, it’s not. Removable vinyl is really intended for rough surfaces like walls or other porous or fragile surfaces that could be damaged by the adhesive on a vinyl. But surfaces like metal, glass, and ceramic — which is what you’ll find on things like kitchen appliances — the best option is permanent adhesive vinyl, because it will stick better and you CAN remove it from these hard surfaces later if you really want.
Also, I get a lot of questions about what brand of vinyl works best for vinyl decals like this. I did a test earlier this year with a variety of vinyls, and honestly I just keep coming back to Cricut permanent vinyl. It does a great job, comes in lots of colors and styles, and it’s really easy to get at craft stores. I also like Oracal 651, which I feel is of comparable quality, but I find it harder to get and thus I just don’t use it that much. I wouldn’t recommend any other vinyl, however. You may see store brands, and sometimes at great discounts, but you’re taking a risk with those. Also, it’s important that you use reasonably fresh vinyl, as it does have a shelf life of about 1-2 years. If your vinyl is older than two years and you haven’t yet applied it to something, it’s time to get some new vinyl.
So for this vinyl decal tutorial, I’m using Cricut Premium Vinyl — the permanent stuff. If you’re not sure whether what you have is permanent or not, it says on the label as well as on the carrier sheet, well, it usually says it on the carrier sheet. Removable vinyl is also almost always matte, not glossy … and it just feels less sticky. You can sometimes slide s small piece of it around right on the carrier sheet. That said, you can use removable if you really intend to take it off soon, because it probably won’t last all that long. It’s your choice!
You can use vinyl of different colors or textures, but in my experience some vinyls, such as glitter and foil, is harder to weed, harder to apply, and less likely to stay put, so if you’re a beginner, I’d just avoid that and stick with a basic solid vinyl — it’s the best option for projects like this.
In addition to the vinyl, you need transfer tape, which is an adhesive sheet you put over your decal to transfer it onto your surface. I’m using Cricut transfer tape — and it’s important you use regular transfer tape, not the StrongGrip stuff.
You’ll also want a weeder, a scraper (or one of your old credit cards), a ruler or measuring tape, rubbing alcohol, and lint-free towels or something else that’s lint-free, like a coffee filter.
Of course, you need a way to cut out your vinyl decal — I use and recommend a Cricut cutting machine, and that’s what I’ll be showing you how to use in today’s tutorial!
Last but not least, you need a vinyl decal design! I have eight pre-made with beautiful hand-lettering for you to use, or you can design your own. I made them in the right size for a few popular appliances, so preparation is super easy. So let me show you where to find my free designs on my blog at JenniferMaker.com, then we’ll head over to Cricut Design Space to make our vinyl decals and then I’ll show you how I put the vinyl decals on my InstantPot, KitchenAid Mixer, and Keurig Coffeemaker.
Decorating your appliances with vinyl is fun one of those fun and easy DIY projects that any crafter can do. There are so many possibilities when you have the right materials and tools, and know the right cut settings and techniques!
So let me show you where to get the free pattern on my blog at JenniferMaker.com, then I’ll show you how to make these adorable kitchen appliance decals with vinyl!
Ready to make your own vinyl appliance decals? I’m excited to show you how to make your own vinyl decals! This post contains some affiliate links for your convenience (which means if you make a purchase after clicking a link I will earn a small commission but it won’t cost you a penny more)! Read my full disclosure policy.
Materials to Make Vinyl Decals on Your Cricut
View my Amazon shopping list with the exact items we used to make this project!
- Cricut Premium Vinyl (Permanent) (if you want it to last and be hand washable) or Cricut Removable Vinyl (if you want to remove it soon)
- Cricut Transfer Tape
- A weeding tool
- Scraper tool
- Ruler
- Rubbing alcohol
- Lint-free towels or coffee filters
- Standard Grip Cutting mat (the 12″ x 12″ size)
- A way to cut your vinyl for the decals (I used my amazing Cricut cutting machine!)
- Design #182 – My free SVG design files and template (available in my free resource library—get the password by filling out the form at the bottom of this page)

How to Make Vinyl Decals for Your Kitchen Appliances
Step 1: Measure Your Surface
The first thing you should do is measure the available surface for a vinyl decal with a ruler or measuring tape. You want to know both the height and width of the space available, as well as whether or not there are any dials, bolts, cords, or unusual features that you need to work around. Make a note of the surface space available, as you’ll need it in the next step.
Step 2: Make a Vinyl Decal Design or Use My Free SVG Files
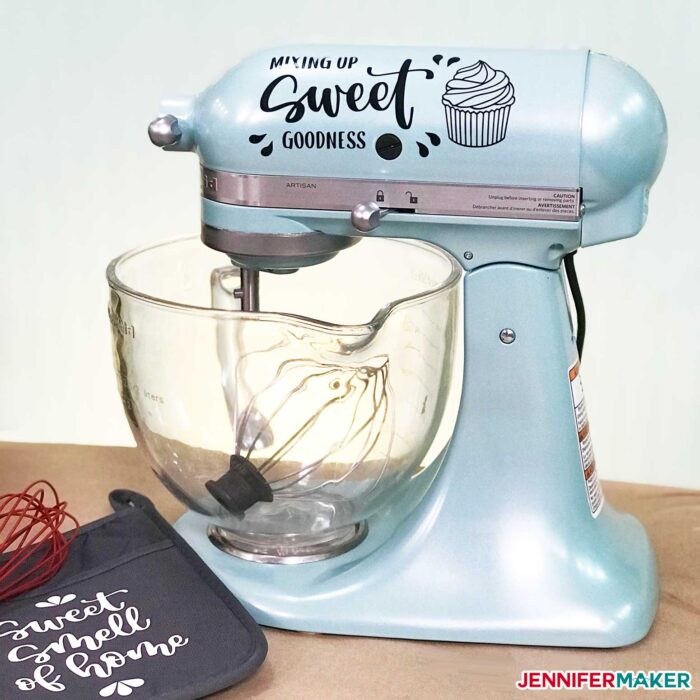
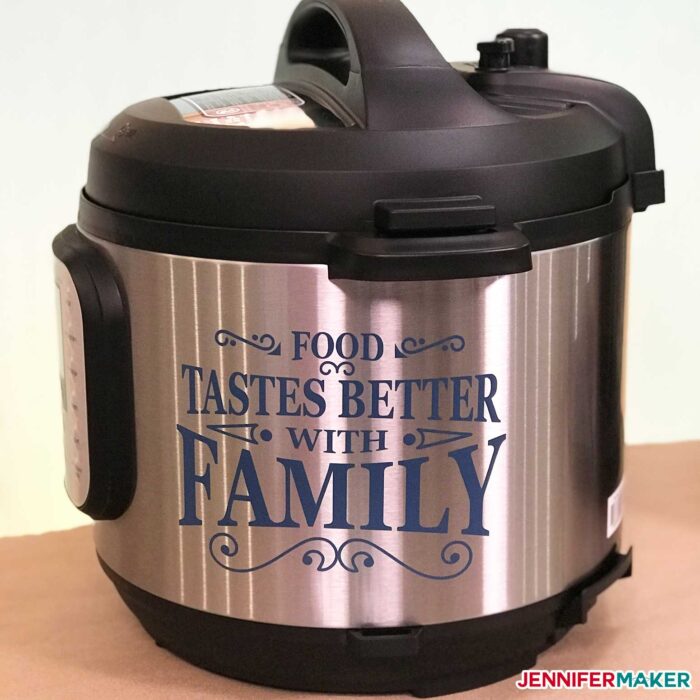
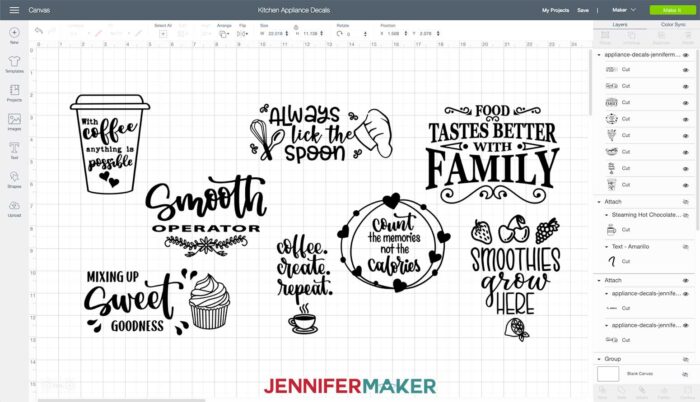
You can make your own vinyl decal designs in Cricut Design Space, or use my free kitchen appliance vinyl decal patterns and SVG cut files (Design #182). My kitchen appliance design file contains eight different designs you can use to decorate your InstantPot or Crockpot, your Keurig coffee pot, your KitchenAid or other stand mixer, or your blender.
Get the free appliance decal designs from my free resource library (get the password to the library in the form at the bottom of this post).
Step 2: Prepare Your Vinyl Decal Design for Cutting
Here is what your file will look like when you upload it to Design Space:
Tip: If you’re not sure how to upload an SVG cut file to Cricut Design Space, watch this helpful video training series I made. If you’re on an iPhone or iPad, here’s how to download and upload SVG files to the Cricut Design Space app.
Once the file is uploaded, decide which of the designs you want to use and hide or delete the rest. To do this, first click Ungroup, then click to delete or hide the layers you do not want to cut.
Resize the designs (if needed) to fit the imprint area of your appliance.
Step 3: Cut Out Your Vinyl Decal Design
Using a green StandardGrip mat, place your adhesive vinyl FACE UP on the cutting mat, make sure you have the fine point blade in your machine, load the mat, and press the flashing button to begin cutting.
Step 4: Weed Your Decal and Apply Transfer Tape
Weed your design carefully, removing all of the excess vinyl. Go slow and be patient. Weeding is a love it or hate it thing, but even if you really dislike it like me, you can still get the job done with some patience and grace. I find that if I keep or return my vinyl to a cutting mat, it’s a lot easier to weed because it lays flat and stays put.
Once your design is weeded, cut a piece of transfer tape the same size as your design. Remove the backing from the transfer tape. Apply the transfer tape to your vinyl decal by holding the transfer tape in the shape of a taco, then putting the bottom of your “taco” onto the middle of your design. Smooth the tape over the decal from the center outward.
With the transfer tape in place, use a scraper tool or other hard and flat-edged item (like a store loyalty card or old credit card) to transfer the vinyl decal design to the transfer tape. It’s important to scrape it well to transfer the vinyl decal.
Step 5: Prepare Your Surface for the Vinyl Decal
It’s a great idea to wipe down the area where you will apply the design with rubbing alcohol and a lint-free towel (or other lint-free thing, such as a coffee filter). Do NOT use window cleaner as this will leave a residue.
Allow your surface to dry fully before moving on to the next step.
Step 6: Apply the Design to Your Appliance
Carefully peel the carrier sheet off the decal. If little bits of it don’t want to transfer to your tape, scrape it again and pay careful attention to those problem areas.
Now place your design on the right place on your item’s surface, being mindful that it is straight and centered. If it isn’t, you can usually peel it up and reposition it so long as you have yet pressed down on the decal.
If you have a hard time getting your decal to go around curved surfaces, like my KitchenAid mixer, you can make small cuts in the transfer tape — this will help the entire design follow the curve and lay flat around various shapes.
Using a scraper tool, scrape the surface of the transfer tape down to transfer the design to your appliance.
Now just pick up a corner of the transfer tape and slowly remove it from your decal.
And that’s it! See how fun that is? This is a simple and easy way to make fun custom vinyl decals for your appliances! Permanent vinyl works on any smooth surface, and is durable enough for outdoor use (like car windows). You can follow these steps to make custom vinyl stickers or a small decal for a water bottle, window decals, wall decals, or even a vinyl car decal or bumper sticker! Design them with your own custom text and SVG designs, then cut them on your Cricut Maker series, Explore series, Venture, or even the Cricut Joy and Joy Xtra! There are so many different options when it comes to vinyl projects!
Get my free easy vinyl decal templates and SVG cut files
I’d love to see your vinyl decals for your appliances, and all the other fun ideas you come up with to use these! If you make one, please share a photo in our Facebook group, email it to me at [email protected], or tag me on social media with #jennifermaker.
Love,

Want to remember this? Save the How to Make Vinyl Decals for Kitchen Appliances Tutorial to your favorite Pinterest board!


I had joined before, my facebook got massed up. Had to rejoin facebook and Jennifer Maker.
Fun project. Bonus word is decal
Awesome! I goofed. I unsubscribed by not paying attention to the right link. Then I resubscribed. Don’t unsubscribe me! I LOVE your blogs!
Just found you yesterday! Might finally be able to plug in my Cricut this weekend, thanks to you!
These are wonderful! Can the words be customized? I would love to put some of these in Spanish.
These aren’t customizable, but you can definitely take the idea and create a design inspired by these.
Thank you for share these great projects!
Can I use a 12 x24” mat if that’s all I have for now?
You sure can!
How do I become a paid member to be able to use your svg files please x
Hi Kim! My files are completely free for you to use! Get a free password here: https://jennifermaker.com/library/
would the vinyl work and be safe on a garage freezer?
Hi Caryn! Any permanent adhesive vinyl should work just fine.
I just got my Cricut Maker setup last weekend, and did some simple paper cuts to get the feel of things. Now, I am wanting to cut some vinyl, but nothing critical. I want to start small, so I watched this video, and want to apply some single layer vinyl to my phone case. I have some text laid out, but I also want some easy flowers to add to it, or maybe a simple Celtic or Presbyterian cross. Do you have anything like that on your library?
I do not at this time but you might check out the Cricut images library for the crosses.
I am looking for a cricut bright pad and can’t find one anywhere. Are they discontinued? Any recommendations for a similar unit. Looking for a good vinyl weeding tool. Thanks!
Hi Caryn! They have become a bit scarce over the last year or so. You can usually find one at Michael’s or even on Amazon.
Hi, I’m about to place an order for Oracal 651 Popular Pack, but I’m not sure what type of Vinyl Transfer Tape, do I order the Cricut Vinyl Transfer Tape, 12×48. I watched you video on your cute mugs.
Oracal 651 is a permanent vinyl (not sure what a “Popular Pack” might contain, though), so regular Cricut Transfer Tape should be just fine, Michelle! 🙂
How do I find a list of your svg files
You can find that by going to our free resource library, Michelle! 🙂