
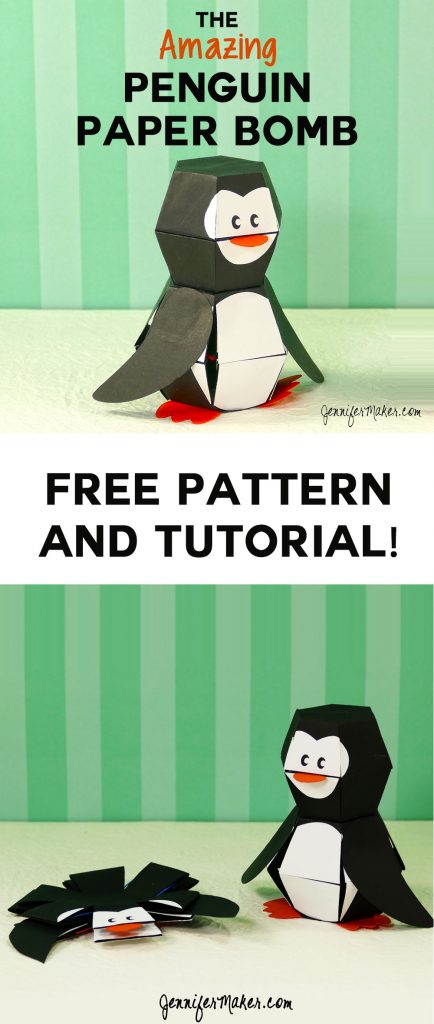
This little pop-up penguin is going to blow your mind! Several times this week on Facebook I was tagged in an article about Kamikara, which is the Japanese word for trick papercrafts. Among these crazy papercrafts was a penguin that popped up when you dropped it on a surface. I was fascinated and set out to learn everything I could. It’s no secret I love to figure out extreme papercrafts, like the pop-up apple tree earlier this year. The talented designer of the penguin and other kamikara, Hakuri Nakamura sells a book in Japan, but his patterns aren’t available online. So after watching many videos and a whole lot of trial and error, I came up with my own design of this penguin paper bomb! It’s not his pattern, but certainly inspired by it.

Here is a quick video that shows the pop-up effect of the penguin:
You’re probably wondering how to make this fascinating little paper toy! If you’ve got three minutes, I can show you how to make one yourself it in little video that gives you a general overview — and you can watch the full-length, normal speed video later in this tutorial!
I want to point out that while this penguin was inspired by Haruki Nakamara’s penguin, it is not the same — so if you’re trying to make his, you may find this tutorial helpful in ways but it does not show you how how to make his penguin. This penguin paper bomb is of my own design (with help from my daughter, Alexa), based on a visual review of videos — I did not have access to his design. I believe it works similarly, but not exactly. Big kudos to Haruki Nakamura for his original design!
Do you think you can make a penguin paper bomb? I think you can! But be forewarned — this will be a challenge. Consider it more of a puzzle to solve than a simple papercraft. You can put it together, sure, but can you make it pop up when you drop it? And will the penguin land on his feet? That is your quest, if you choose to accept it!
This post contains some affiliate links for your convenience (which means if you make a purchase after clicking a link I will earn a small commission but it won’t cost you a penny more)! Read my full disclosure policy.
Penguin Paper Bomb Materials
- 65 lb. 8.5″ x 11″ cardstock (I used two sheets of black, one sheet of white, and one sheet of orange)
- Two rubberbands — one in size 16 (2.5 inches long) and one in size 18 (3 inches long)
- Tacky glue
- Hot glue
- Two dimes (or small weights)
- A 7″ piece of wire, tweezers, or a hooked took, such as a crochet hook
- A way to cut out your paper pieces (THIS is what I use that makes it fast and easy to cut out, but you can also cut it out with scissors)
- Design #41 – The pattern/cut files (available in my free resource library — get the password for free by filling out the form at the bottom of this post)
How to Make a Penguin Paper Bomb
First, cut out all of your paper pieces using my cut files or pattern.
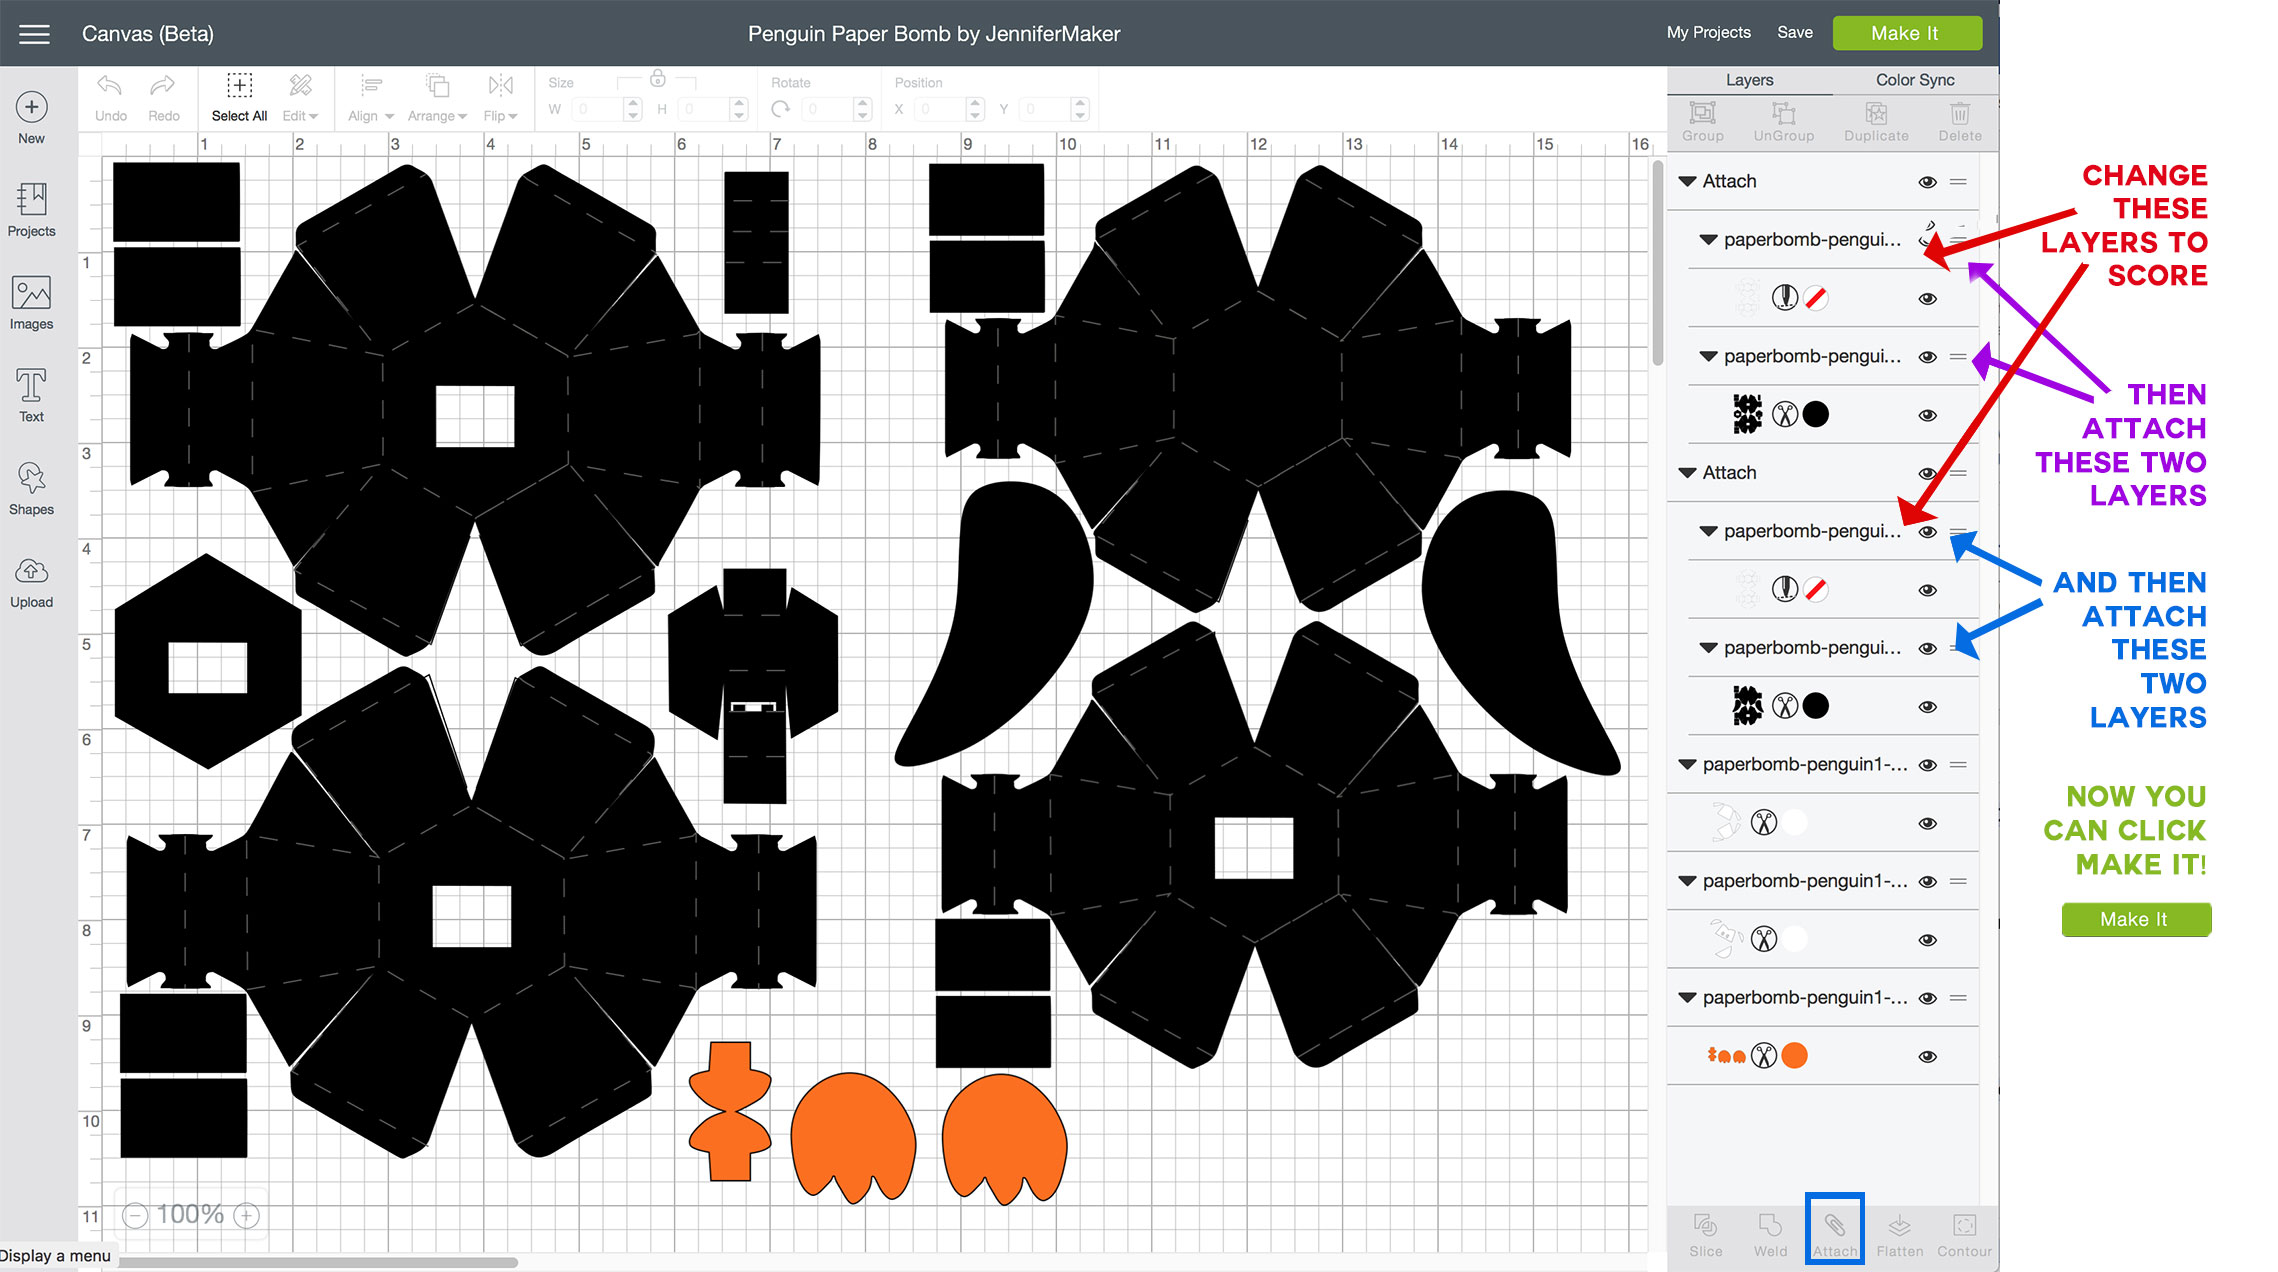
- If you cut with a Cricut, upload the .SVG file to Cricut Design Space, place it on your Canvas, click Ungroup, change the two red layers with score lines to “Score,” then select each red score layer and its corresponding black cut layer and click Attach. You’ll need to attach both sets of red score layers and black cut layers to ensure the score lines appear in the proper places.IMPORTANT NOTE: If you’re not sure how to upload an SVG file to Cricut Design Space, or you’re having issues (such as getting a message that says “unsupported file”), please watch my free training series, The Joy of SVGs. It will help you SO much!

- If you cut with scissors, print out the PDF files onto the appropriately colored cardstock and then cut. I’ve included a pattern for solid color cardstock, as well as a patterned design that you can print onto white cardstock.
Next, watch my full-length assembly video at the link below:
This video will show you things that are hard to explain in this post. But this post has information not available in the video, so be sure to read it, too!
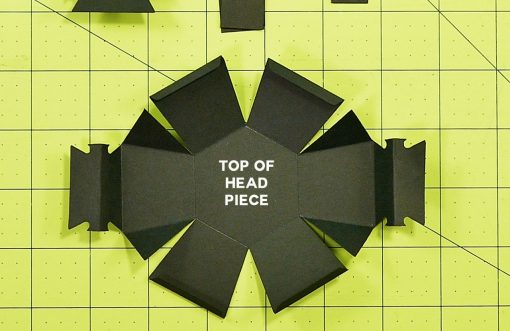
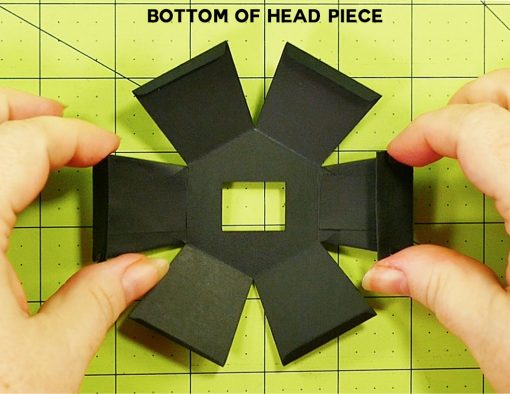
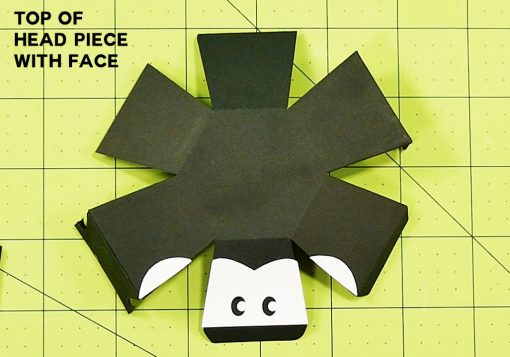
Your first step is to fold the top of the head piece (the smaller roundish piece without a hole in the middle). Fold each side in and each tab in. Crease each to get a good fold. You’ll also need to fold in the triangle pieces. The rubber band holder tabs get folded in then up. Here’s a photo of the top of the head piece folded.
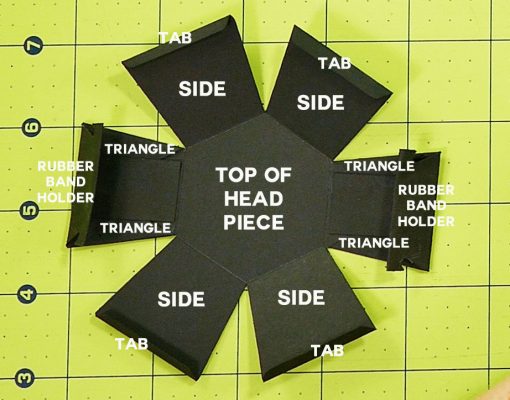
Now glue down the triangles, the rectangular side reinforcements on top of each side with triangles, and the rubber band holders. Here is a photo of the top of the head piece after it is glued.
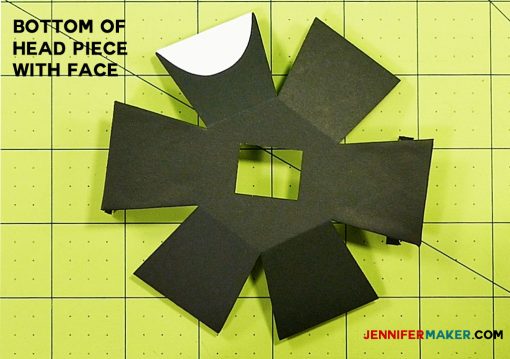
Do the same thing to the bottom of the head piece — fold and glue.
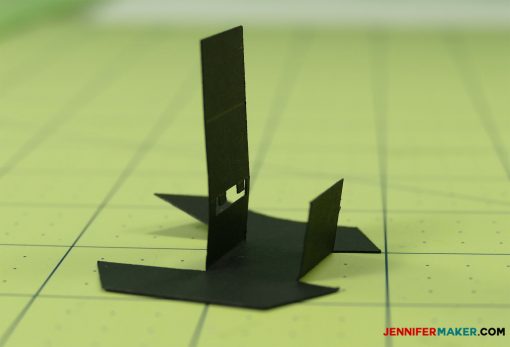
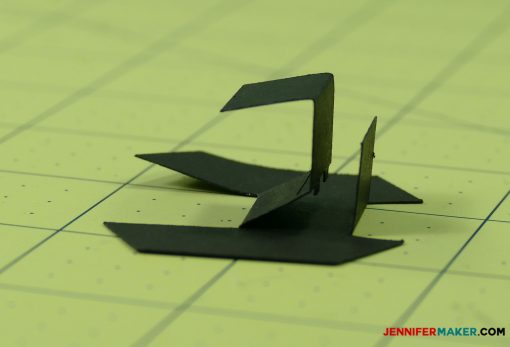
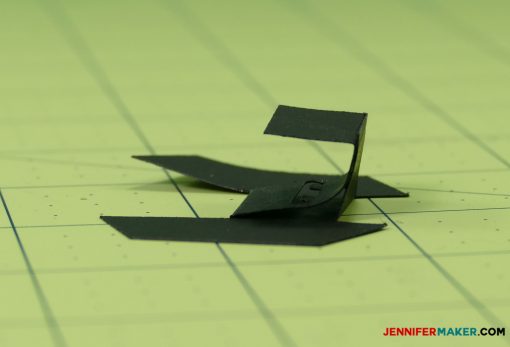
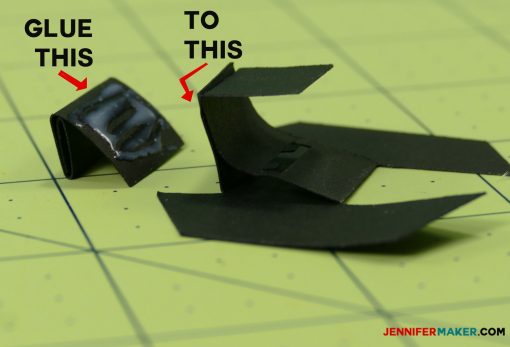
It’s time now to fold the paper spring mechanism, which comes in two parts. The first part, which looks like a rectangle with wings, gets its tabs folded up at the base. The section that is longer gets down again. Here are photos of how it is folded and glued.


Now glue on the white face parts to the top and bottom of the head piece, as shown below. It’s important to pay attention to the orientation of the rubber band holders when you attach the face parts to ensure they are in the right place later.
It’s time to glue these two head pieces together, but first we need to fold the orange bill piece in half, glue it closed, then sandwich it in between the top and bottom of the white face with glue.
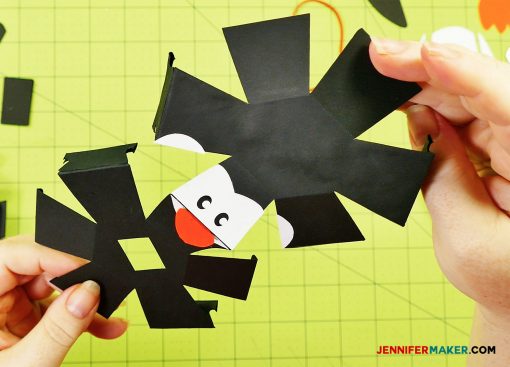
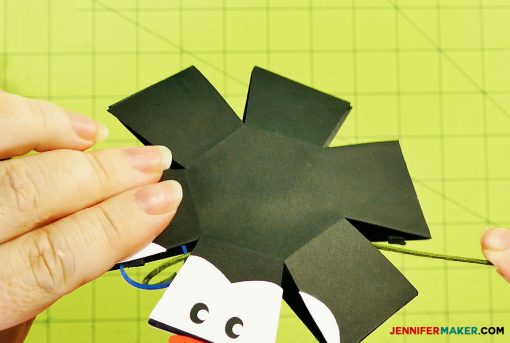
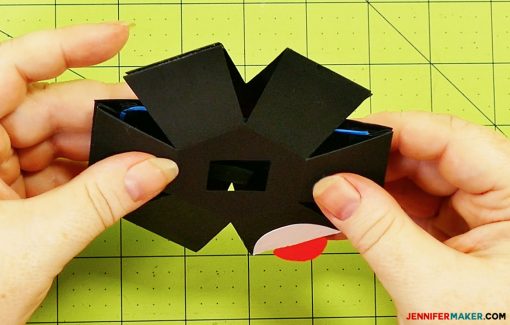
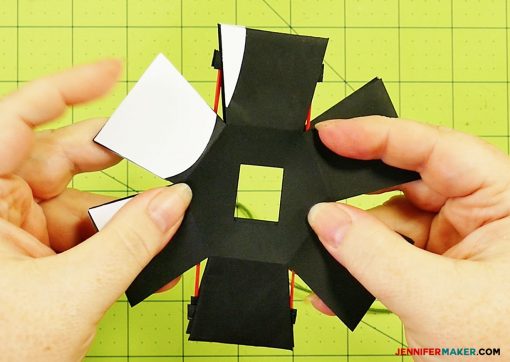
Once the two head pieces are attach at the face, you can fold it closed and glue all of the other tabs and rubber band holders together, like this:
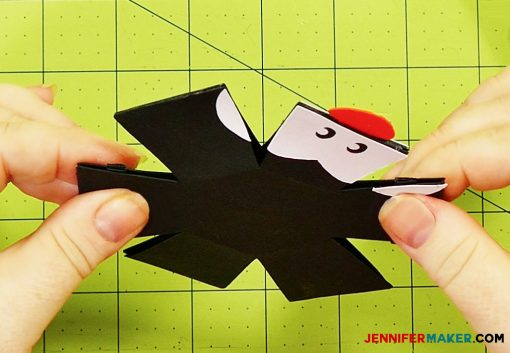
Your head piece should be able to make this shape at this point:
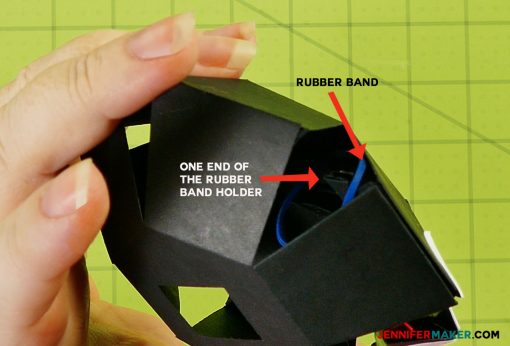
Now let’s make it able to pop up! To do this, take your smaller rubber band (size 16 — about 2.5″ long when folded) and drop it into the head so one end of the rubber band loops around one end of a rubber band loop.
Now reach into the head, grasp the rubber band, and hook it around the other end of the same rubber band holder.
If you have difficulties grasping the rubber band, make yourself a hook out of a piece of wire as I did.

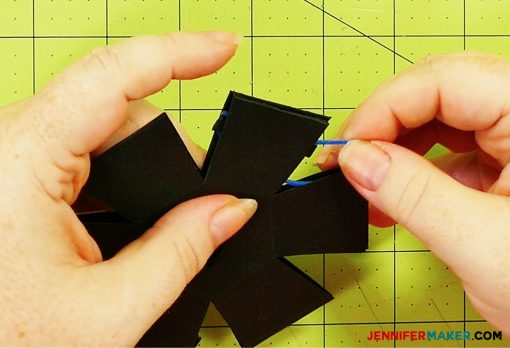
Using that hook, reach into the head from the opposite side of where your rubber band is currently hooked on, grasp the end of the rubber band, and carefully hook it around the rubber band holder directly across from the first one. This is tricky! It took me many tries to get the hang of this.
Lastly, reach inside with your hook from the other side, get the rubber band, and wrap it around the last end of the rubber band holders.
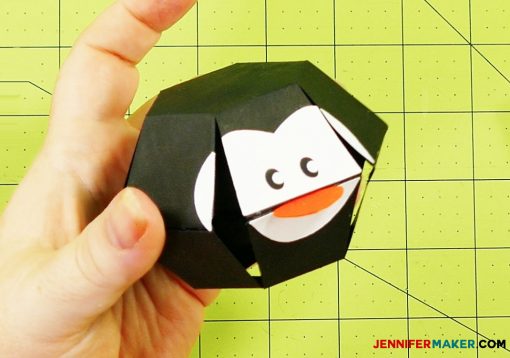
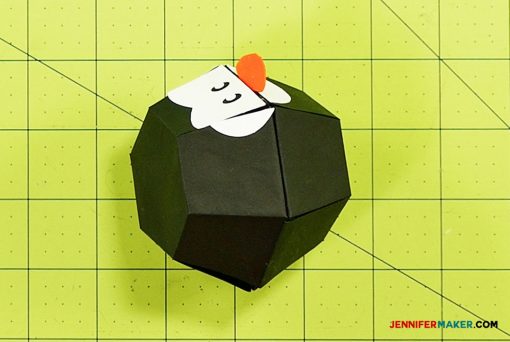
At this point, you should be able to let go and the head will pop into place!
Flatten the head again, turn it over, and make sure the mechanism is sticking out. (You may need to reach in with your hook and pull it out.) Allow the protruding side of the mechanism to catch on the bottom, which will keep it flat.
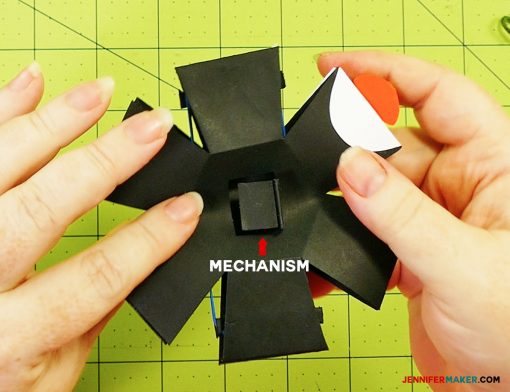
Now drop it on your work surface. mechanism side down. If you did it right, it will pop up! If it doesn’t work, check to make sure nothing is impeding the mechanism from being pushed in when it lands on the work surface.
Next fold the two halves of the penguin’s body.
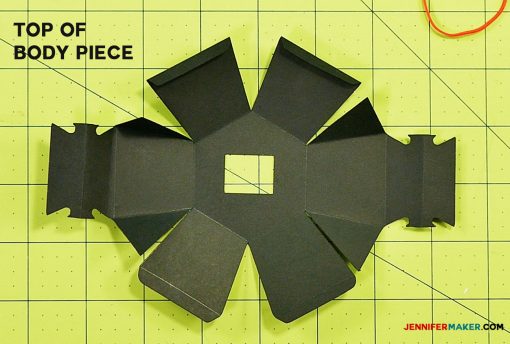
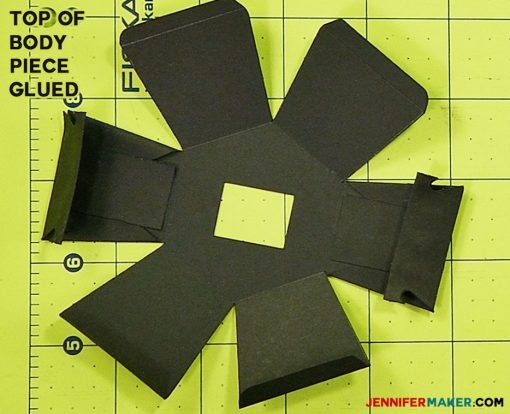
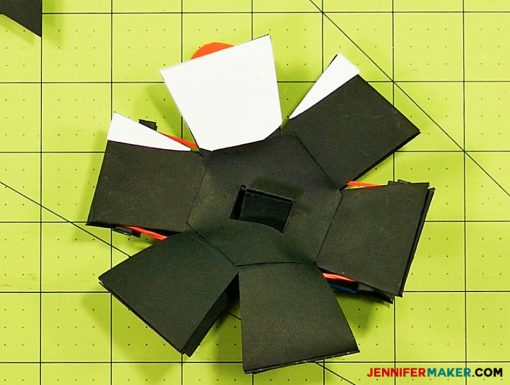
Glue down the triangles, side reinforcement pieces, and rubber band holders, just as you did with the head pieces.
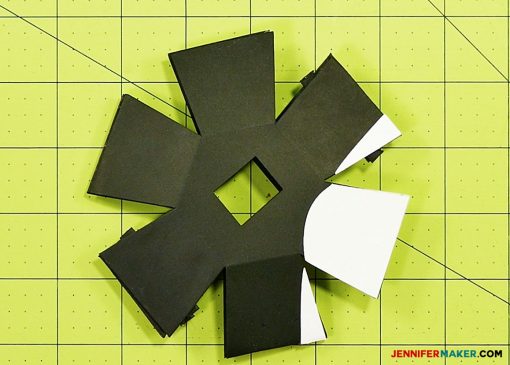
Glue on the white body pieces. Pay careful attention to the arrangement of the black body pieces. Follow the same orientation as in my photos below.
Now insert and hook the size 18 rubberband into the body in the same way you did it for the head.
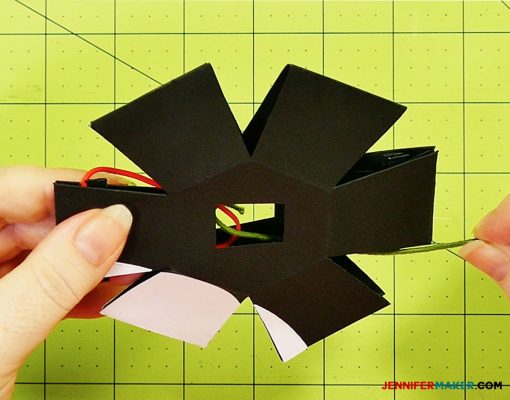
Here is the body with the rubber band in place.
Now you need to glue the head to the body. Line up the rectangles on each one so they match up, then glue. Tip: If your body doesn’t seem to be aligning right, turn it over and try again. When you glue it, center the head on the body as much as possible.
Now glue the reinforcement piece onto the bottom of your penguin paper bomb, being careful it does not impede the mechanism. Check this by flattening it to make sure it all fits properly.
Glue on the orange feet so they stick out on either side of the white part of the body.
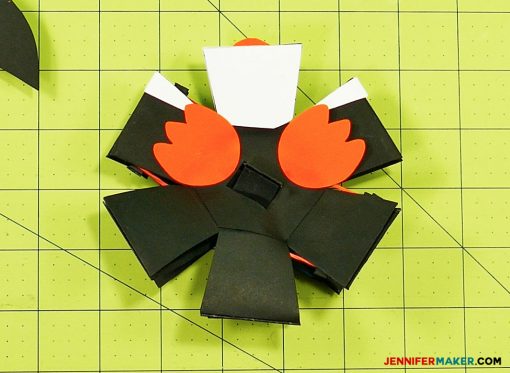
Now stand your penguin up and glue on this wings to either side of his body. I recommend you glue them on so the wings just brush the ground, as this may help him stabilize when he jumps up!
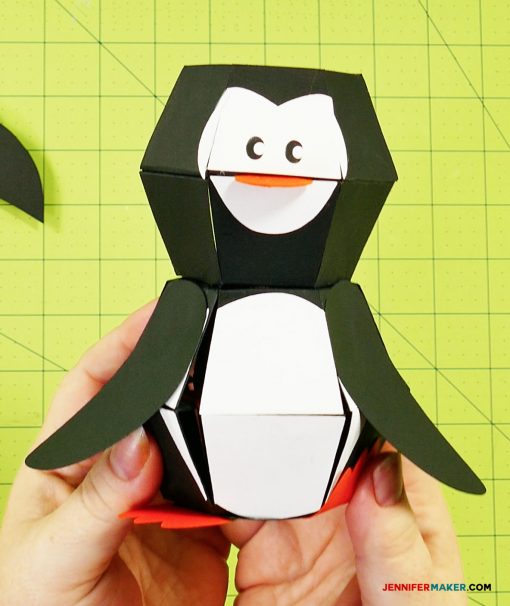
Another way you can stabilize your penguin when he pops up is to put weights on the bottom. I hot glued two dimes onto the bottom and that works pretty well.
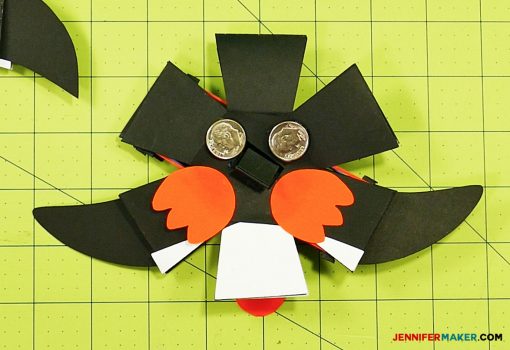
Now it’s time to try out your penguin paper bomb. Flatten him, put the mechanism into place (so the protruding part on the tab overhangs the open rectangle underneath), and drop him onto a surface. If you did it right, the penguin will pop right up! Does it not pop up? Make sure nothing is in the way of the tab. If it looks like something is in the way, feel free to widen the opening so it doesn’t impede the mechanism.
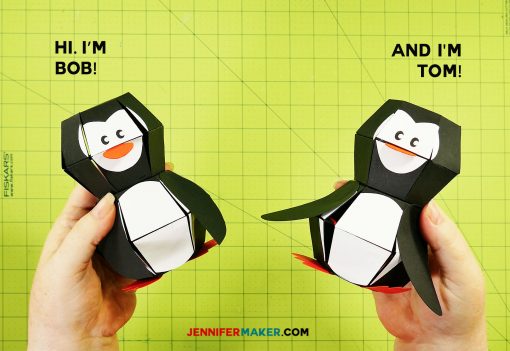
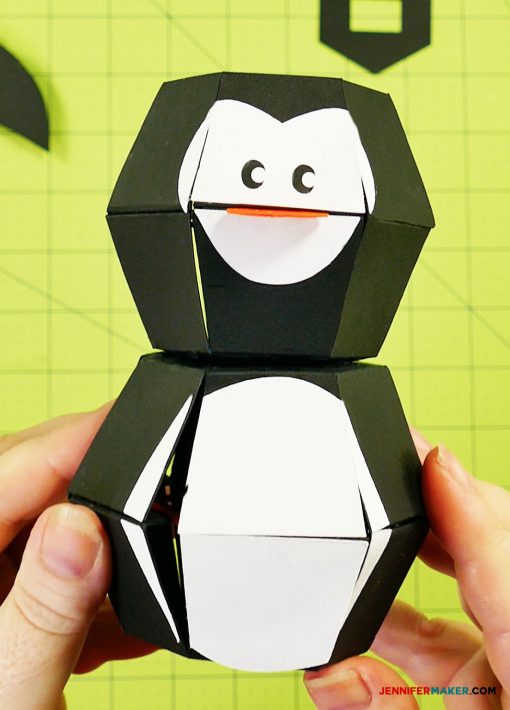
And there we go — you have your very own penguin paper bomb.
Now I have a challenge for you. Make a penguin and give him or her a name. Now take a video of it popping up when you drop it. Put it on Facebook, tag my Facebook page (DIY & Crafts with Jennifer Maker) in it so I see it (like my page first so you can tag it). (No Facebook? Email it to me!) Anyone who does this will get their video and name to my roll of honor on this page. This is a special list honoring everyone who successfully made a penguin that pops up when you drop him! I want to see as many people make penguin paper bombs as possible!
Penguin Paper Bomb Roll of Honor
1. Reader Emma Cogger was the first to show me a video of her working paper bomb!
2. Reader Tonya Brooks made an adorably blingy penguin! She says, “I added some extras to it. This was so much fun and would make cute Christmas cards. I definitely will be making more.”
3. Supporter Amy at amygonnacraft made Mr. Fluffles! She says, “Meet Mr. Fluffles having a great fall, he is fun. My daughter loves making him bounce.”
So are you ready to do this? If so, here’s the files!
Free Cut Files & Pattern for the Penguin Paper Bomb
Get the password for the library with the free penguin paper bomb pattern and SVG/DXF/PDF files here by filling out this form:
If you enjoy paper toys like this, I encourage you to check out the talented designer of the penguin and other kamikara, Hakuri Nakamura and his book. Visit the artist’s YouTube channel to see his other creations and support his work!
If you make a penguin paper bomb, please share a photo or video of it with me by emailing me at [email protected] or tagging me on social media with #jennifermaker.
Love,

Save Penguin Paper Bomb to Your Favorite Pinterest Board!
Check Out This Easier & Faster Paper Bomb:
More Fun Pop-Up Papercraft Tutorials
- Pop-Up Apple Tree Card
- Pop-Up Butterfly Card
- Pop-Up Grill & Gift Card Holder
- Fairy House Card
- Pop-Up Game Controller Card
- Pop-Up Birthday Cake Card
Do you like to do craft projects, too? Share and leave a comment below!


jennifer i only get this page i can dowload eveything else but not the penguin file none of them download please help iam trying everything you said
Beverly, are you going to the resource library at https://jennifermaker.com/resource-library ?
Do I need to subscribe again to get the password? I already receive your updates.
I would like the SVG files for the Pop-Up Penguin, Please and thank you
Hi, Beth! The SVG files are in my Free Resource Library at https://jennifermaker.com/resource-library — get the password to it by filling out the form on this blog post page. 🙂
Jennifer, I went to the library and got the download for the zip..unzipped it and then uploaded it to Design Space. I am not seeing any score lines on the uploaded version. When I ungrouped it, I did have an overlay that could possibly be score markings however everything is cut…there is no scoring tool used. Can you clarify this for me? Thank you! Love your stuff!
I got it, I was confused a bit about the red octagon shapes in the overlay, I thought they needed to be cut but I don’t believe so, I think this needs to be changed from cut to score and if I remember right, you did mention something about this..maybe.
Yes, the red layers are the score layers. If you look at my tutorial, the first step shows a screenshot of those red layers being changed. Here’s a link to that image:
I am deaf and just had watched the video’s where in the captions it didn’t say much about the red layer…I d/l the pattern but had not read this page yet. My apologies, you covered it here.
Good morning, Melody! The red layers need to be changed from cut to score. That can only be done in Cricut Design Space. I am not able to do it before it gets uploaded — I sure wish I could though!!
Where are the videos
Thank you so much for this file
Hello, Sue! The videos are all in the body of the post — if your computer or device did not load the page fully, it’s possible you cannot see them. Here is a direct link to the main video on YouTube: https://www.youtube.com/watch?v=tTBH-pggvH0
That’s cute! Thanks for sharing your ideas at the Pleasures of the NW’s DIY party!
This is so cool! I love everything you create. Thank you for putting so much work into your creations and your sharing of them.
Thank you for the kind words, Mary!
Very cute little guy! I love it! Pinned! Thank you for sharing on Merry Monday! Hope to see ya next week!
Kim
That certainly looks challenging! It is a wonderful craft though… so much fun and surprising to see it pop together. 🙂
Help! DS3 says it’s an “unsupported file type” what am I doing wrong? I love the penguin and would like to make it for my daughter for her birthday..
Hi, Tami! There were some issues with DS3 and uploaded files a few days ago, but I think they’ve been resolved. Have you been able to upload it?
Oh my gosh! How cute is that guy! <3
Thank you, Lexie!
You are truly a paper artist! Thanks for sharing with SYC.
hugs,
Jann
Wow, that is impressive! I’m sure the kids love smashing it. Visiting from Funtastic Friday party.
I am sharing this with a 4th grade teacher who loves penguins- and projects. Thanks for this clever idea. #Pit Stop
Thank you so much, Michele!
This crafty creation is superb. I am little bad in crafts and art work. But want to do a little for my kids sake. Your post will be helpful for me to learn a bit. Your step by step pictures are really a helping hand for me
Thank you, Minakshi!
So cute! Thank you for sharing at Ravenwould.
have tried to sign up for this like 4 times still waiting for the password. What have I done wrong? no library password to get into the files please help
Hi, Stephannie! Sometimes the email goes right to your spam folder. Or if you have gmail, it goes to your Promotions or Updates tab. I will send you an email right now with the password again, in case that helps.
how to find out the password please reply o knows its an old post but am quite interested
Sana, subscribe (free) at https://app.convertkit.com/landing_pages/145985 and the password will be emailed to you.
Hi Jeniffer
I was surfing the original Penguin popup and came across your video and directly landed here. What you have accomplished is fabulous and a test of patience and hard work. I was trying to look for your email regarding a business proposal. Can you please share your email ..so we can discuss in brief.
Look forward to this.
– Thank You
good job. Thank you for sharing.
Hi Jennifer
I love the look of this project but I don’t have Cricut so was looking to print the PDF’s onto black and white card.
However, the PDF’s in your library are for printing just onto white card…?
And how would you print onto black card?! I don’t believe you can get white ink in most common printers!
Please help!
Thanks
You could still print it on black cardstock — you’d just be able to see the cut lines to cut it out. Try it — I think it will work. If not, you’ll need to print it on white paper, cut it out, and use it as a pattern to trace onto your black paper with something that will show up on the black, like a white gel pen or even white chalk.
Hey!
I just found out about your website and it’s amazing!
I love how crafty and artistic your works are!
Thank you for sharing.
Cheers from Brasil!
Thank you, Isa!
Love your penguin and just had to make her. My sister had been taken suddenly into hospital so I made her into a nurse penguin. It have her and both the nurses and doctors many chuckles.
So happy to hear that, Florence!! Do you have a photo of your nurse penguin?
Wow, Thank you for making this amazing paper toy and I will have so much hun with my kids. Please send me the password for downloading the template. Thank you so much!
Hi, Charles! You can get the password by signing up for free at https://app.convertkit.com/landing_pages/235095
My origami specialty is a jumping frog. A popping penguin would surely top that! I’m going to see what cardstock we have around tomorrow (it’s 2:04 a.m. here now, so I don’t want to wake everyone up, although it would be for a worthy cause.)
What a clever person you are….love thepop up penguin …too cute!!
You really have a great site, very, very inspiring. Thanks!
This looks like it will be a great toy to make for my grandchildren. I can hardly wait to give it a try. Thank you for all the incredible details you have put into this post – you have made the process of making these penguin bombs look so easy. thanks for all your hard work
I love this & the pumpkin one. Will you be making a pop up design for Easter or St Paddy’s Day?
That’s a great idea! Would you suggest it for me so I can remember? You can request it here:
Hi Jennifer! Any chance you have any other animals?!? These are awesome!!!
I do not! But that’s a great idea! Would you suggest it for me so I can remember? You can request it from this link!