
Learn how to make beautifully painted wood signs using a vinyl stencil you can cut on your Cricut!
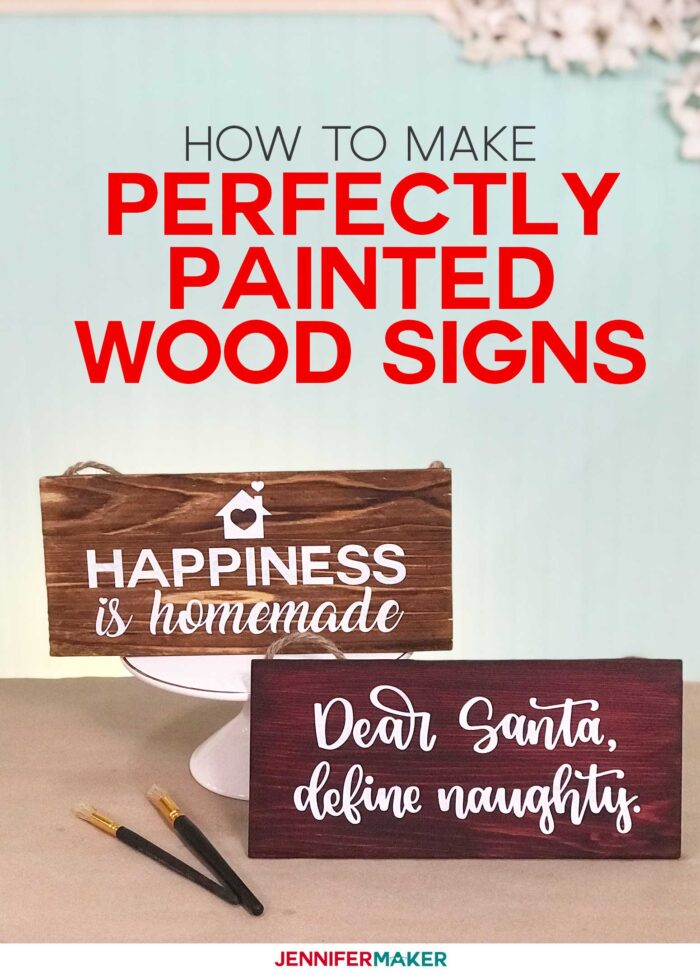
One of the more popular home trends these days are wood signs with names or phrases on them. And they’re really so easy to make and personalize. Last year. I taught you how to apply vinyl to a wood sign and you’ve all made SO many beautiful signs. But there’s another way you can make wood signs — you can paint them to give them a more natural look! Now, the first thing people think when I say “painted wood sign” is hand-painting and all the skill required to do that. But, we’re going to do it a better way — we’re going to use a vinyl stencil we cut out on our Cricut cutting machines so we paint exactly what we want—no more, no less! So today, I am showing you how to make vinyl stencils to paint wood signs perfectly — no painting skill needed.Want to save this project? Enter your email address below and we’ll send the project straight to your inbox.
See exactly how to make this adorable customized wood sign with vinyl stencil in my tutorial video (or keep scrolling if you prefer a step-by-step photo tutorial):
 So for this vinyl stencil technique, you’re going to need some permanent adhesive vinyl in ANY color, matte Mod Podge (don’t use glossy), acrylic paint, and a wood board. I’m using this 12″ x 6″ wood board that came pre-hung with a rope, but you can use any board that has a flat surface. You may also want to sand and stain the wood to prepare your sign in advance, and some sealer to protect your wood sign after you paint it. Other things that will come in useful are stencil brushes, cosmetic sponges, and weeding tools. And your Cricut cutting machine, of course.
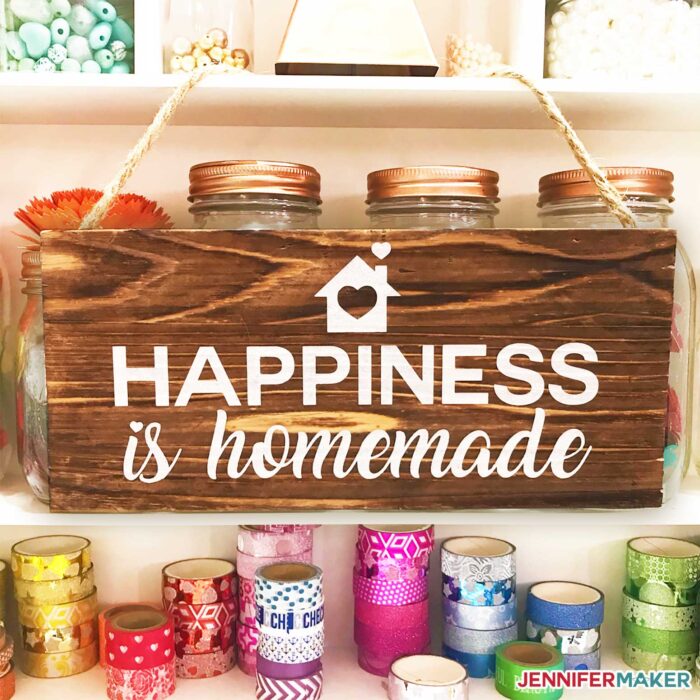
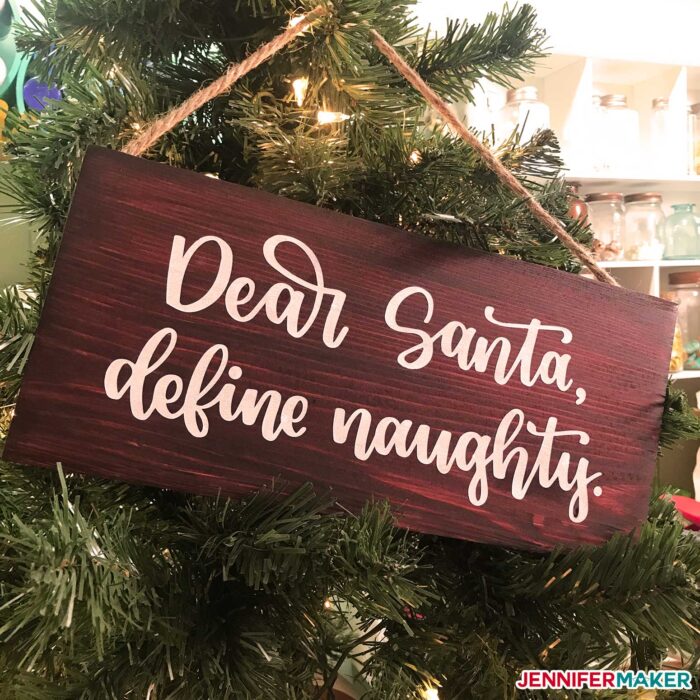 I have prepared three stencil designs to show you how to cut, apply, and paint your stencil, and you’re welcome to use any or all of them for your projects. The designs for both of these the wood sign are free on my blog! So let me show you how to find them and how to put it all together to make your own customized wood sign!
This wood sign is beautiful and fun to make. The trick, though is to let the paint and Mod Podge dry completely before moving on to the next step.
I have prepared three stencil designs to show you how to cut, apply, and paint your stencil, and you’re welcome to use any or all of them for your projects. The designs for both of these the wood sign are free on my blog! So let me show you how to find them and how to put it all together to make your own customized wood sign!
This wood sign is beautiful and fun to make. The trick, though is to let the paint and Mod Podge dry completely before moving on to the next step.
 Ready to customize a fun wood sign with a vinyl stencil? I’m excited to show you how! This post contains some affiliate links for your convenience (which means if you make a purchase after clicking a link I will earn a small commission but it won’t cost you a penny more)! Read my full disclosure policy.
Materials to Make a Customized Wood Sign with a Vinyl Stencil
View my Amazon shopping list with the exact items we used to make this project!
- A wood sign — I used this sign I found on Amazon. Here’s a square sign, too!
- 220 grit sandpaper blocks (I find the blocks easier to use than the paper)
- Wood stain – this is the exact one I used
- Mod Podge – Matte (do NOT use glossy)
- Acrylic paint – you don’t need much paint!
- Stencil brush and/or cosmetic sponges
- Weeding tool/Scraper/Spatula – the Cricut basic tool set is my favorite one to use for projects like this
- Cricut premium vinyl in any color. I used yellow for the Happiness sign and black for the Santa sign
- Cricut transfer tape
- Spray sealer, matte or gloss – I used this specific one
- Painters Tape
- Standard Grip Cutting mat (the 12″ x 12″ size)
- A way to cut your vinyl for the stencil (I used the amazing Cricut Maker cutting machine!)
- Design #180 – My free SVG design files and template (available in my free resource library—get the password by filling out the form at the bottom of this page)
How to Make a Painted Wood Sign to Greet Guests at Your Door or in Your Home!
Step 1: Get My Free Wood Sign SVG File
My free wood sign SVG cut file contains three different designs to make your own wood sign. These designs were all hand lettered. Get the free wood sign designs (Design #180) from my free resource library (get the password to the library in the form at the bottom of this post).Step 2: Prepare Your Stencil Vinyl Design File for Cutting
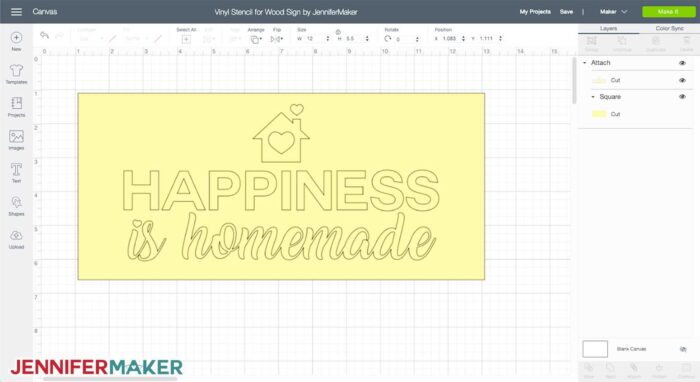
Here is what the customized wood sign SVG cut file will look like when you upload it to Cricut Design Space. Tip: If you’re not sure how to upload an SVG cut file to Cricut Design Space, watch this helpful video training series I made. If you’re on an iPhone or iPad, here’s how to download and upload SVG files to the Cricut Design Space app.
Once the file is uploaded, decide which of the designs you want to use and hide or delete the rest. Resize design (if needed) to fit the imprint area of your sign.
Tip: I like to insert a square and resize it to the same size of my sign then select both the shape and the sign design and click the “Attach” button. This way when I put the vinyl on my wood sign I don’t have to worry about it being centered or worry about the paint getting anywhere other than the letters for the sign.
Tip: If you’re not sure how to upload an SVG cut file to Cricut Design Space, watch this helpful video training series I made. If you’re on an iPhone or iPad, here’s how to download and upload SVG files to the Cricut Design Space app.
Once the file is uploaded, decide which of the designs you want to use and hide or delete the rest. Resize design (if needed) to fit the imprint area of your sign.
Tip: I like to insert a square and resize it to the same size of my sign then select both the shape and the sign design and click the “Attach” button. This way when I put the vinyl on my wood sign I don’t have to worry about it being centered or worry about the paint getting anywhere other than the letters for the sign.
Step 3: Cut Out Your Custom Wood Sign Design
Using a green StandardGrip cutting mat, place your vinyl FACE UP on the cutting mat, select the proper cutting material, and load your fine-point blade into your Cricut machine.Step 4: Weed Your Cut Vinyl Stencil Design
Remove all of the excess vinyl from your stencil BUT REMEMBER, when weeding your stencil you are leaving the negative and taking out the positive. So you remove the parts you want to PAINT. That’s usually your letters and images. Now apply a piece of transfer tape to your weeded vinyl stencil. Tip: Before applying the transfer tape to the vinyl stick it to your clothes to make it less tacky and easier to lift when you go to add the vinyl to your wood sign.Step 5: Apply the Vinyl Stencil to Your Wood Sign
Line up your vinyl on your wood sign and use a scraper tool to apply the vinyl to the wood. Scrape it down really well to adhere it well and form a good seal. When removing the transfer tape be careful not to lift any of the interior parts of the letters.Step 6: Mod Podge Your Vinyl Stencil On Your Wood Sign
Using a paint brush, apply a coat of matte Mod Podge to your sign. This helps prevent the paint from leaking under the vinyl. You do not want your layer of Mod Podge too thin or too thick. When applying your Mod Podge make sure to coat it in all directions. Let this layer dry completely. I let my Mod Podge dry for one hour, but you could let it dry overnight to be on the safe side.Step 7: Paint Your Wood Sign
After your Mod Podge has dried, it is time to being painting. I like to use a stencil paint brush to apply the paint in a pouncing motion, which means to bounce the paint brush up and down rather than brush it side to side. Pouncing is a stenciling technique. To even out the texture, you can dab lightly with a cosmetic sponge. Wait for the paint to dry (I waited two hours, but you would let it sit overnight just to be safe). Feel free to add an additional layer if necessary. It really depends on the look you prefer.Step 8: Remove the Vinyl Stencil
After the paint has dried, slowly and carefully remove your vinyl. Removing the vinyl the opposite direction of the wood grain helps to avoid unwanted paint from lifting. Use a weeding tool to remove the vinyl from the inner part of the letters. There will be times when you lift paint when you remove vinyl from a sign. This is an easy fix depending on how extensive the paint lifted. I like to use a straight pin and dip it into the paint and then patch up the spots that lifted when the vinyl was removed.Step 9: Seal Your Wood Sign
You can optionally add an optional top coat of spray polyurethane to protect your project and give your sign a nice finish. And that is all there is to making a gorgeous wood sign with a vinyl stencil!Answers to Your Questions About Using Vinyl Stencils For Painted Wood Signs
Q: What is the difference between Cricut stencil vinyl and regular vinyl? A: You can use stencil film or adhesive vinyl to make your one-time use stencil. The stencil vinyl is supposed to be easier to reposition as needed, but I’ve honestly had the same success using my tutorial with permanent vinyl and Mod Podge. Try both and use the best stencil material for your own design! Q: Can you use Cricut permanent vinyl as a stencil? A: Yes, I used permanent vinyl on my stencil project because it stays in place a little bit better than removable vinyl. Q: Will stencil vinyl stick to wood? A: Stencil vinyl will stick to a wooden sign and then come off when you’re done. Q: How do I make a reusable stencil with Cricut? A: If you’re making the same project a few times, making your own stencils with craft plastic is a great way to save time. Making exactly the design you want is the best part of crafting! Q: Which Cricut should I use to cut DIY stencils? A: If you use adhesive vinyl to make your custom stencils, you can use any Cricut cutting machine with its fine-point blade. That means you can use the Cricut Explore, Cricut Explore Air, Cricut Explore Air 2, Cricut Maker, Cricut Maker 3, Cricut Venture, Cricut Joy Xtra, or the Cricut Joy. Just make sure your machine’s working area is large enough to cut the entire stencil.Get my free customized wood sign vinyl stencils templates and cut files
I’d love to see your custom wood signs, and all the other fun ideas you come up with to use these! If you make one, please share a photo of your Cricut projects in our Facebook group or tag me on social media with #jennifermaker. Love,
Want to remember this? Save the Vinyl Stencil Wood Sign Tutorial to your favorite Pinterest board!


Hi Jennifer
I loved the wood signs in today’s video tutorial. Thanks for sharing this technique.
Terrific video!
You have opened my eyes on how to make the stencil work best on another surface (not just wood). I would never have thought of using Mod Podge to seal the stencil before applying the paint. I always learn so much from you – thank you!
Can this Mod Podge application work on canvas for stenciling?
Hi Nanette! You can use mod podge on canvas if you like.
New to all this. Is it okay to stain the wood first? I did a stain and waited 24 hrs but my vinyl would not stick for anything at all. Slightly frustrated. TIA
That’s definitely frustrating! Since staining can leave an oily residue, you will want to seal it before using vinyl!
I am looking to do a stencil wood sign but the stencil would be longer then my cut mat how do I do this?
Hi Shaina! A couple of things, first, if you are using a 12″x12″ mat and you happen to have two of them, just apply some painter’s tape to the backside of them to make one 12″x24″ mat. If you have a 12″x24″ mat and your design is still larger than this, I do have a blog post on this, check it out here: https://jennifermaker.com/large-wall-decal-larger-than-mat-cricut/
Wow, that is the best tip! I didn’t know that Cricut would still read the mat! Awesome news! Yeah! That’s a money saving tip that opens doors to new options and I love those tips! Thank you.
You are most welcome!
Thank you for the great tips!!
You’re welcome and thank you!
How do you recommend printing vinyl stencils for a vertical “Welcome” sign that is approximately 4 feet? Just trying to figure out how to make it evenly spaced and not crooked. 🙂 Love your tips and videos!
Hi Heather! I have a blog post that might be helpful! https://jennifermaker.com/vertical-welcome-sign-porch/
Hi Jennifer, I just completed 3 wood signs all resulting in the same issue. I used espresso wood stain and let set overnight. The next day I painted ( in my case ) welcome on the signs in white acrylic paint. After everything was dry I sealed with clear rustoleum indoor outdoor fast drying non yellowing spray. Guess what happened all three times, the white paint yellowed. What am I doing wrong? I see tons of dark wood sings with white wording that is not yellow.🤷🏽♀️😫🥺
Hi Annette! It could be the brand of paint you are using or the wood stain.
My wife and I are making wood signs for Christmas gifts. We have our wood sign that we painted a solid background with milk paint. We cut out our stencil, applied the transfer tape, have positioned the stencil, applied Mod Podge, painted the stencil with acrylic and let the paint dry. Our problem is when we remove the stencil, the paint will sometimes come up also.
I’ve heard some say let the paint dry and others say don’t. Could this be our problem or is there something else?
Hi David! If the steps you listed are correct in the way you did it, you will want to apply mod podge all over your sign and let dry before applying your stencil.
Hi Jennifer. I am using HTV on unfinished wood. I am using the East Press at 300 degrees for 40 seconds, but I cannot get it to stick. I have tried a higher heat and a longer press, but it will not stick. Parts of it do stick, but not all of it. I have redone it about ten times. Suggestions?
IF your wood is very rough, the vinyl will have a hard time sticking to it. You might have to sand it down a bit first!
I cannot figure out how to find the svg files
Once you download the zip file, you need to “extract all” and then you will be able to see the individual files! Good luck, you can do this!
Hi, what are the two script fonts used for these signs? Thank you!
These aren’t a font, these signs were hand lettered!
Thank you for this easy to understand and follow video! I’m ready to try my first wood sign. At the end you sprayed the sign with polycrylic. Could you also brush it on if you don’t have the spray? Thank you!
Yes, you can brush it on too!
Can you resuse the stencil multiple times? If not, is there different/cheaper material to use if I want to make multiple signs with the same saying? Thanks!
Hi there! If you are looking to create re-usable stencils, look into using stencil vinyl or trying acetate sheets.
Jennifer, thank you for the video. I’m new to this. You said in the video to select premium vinyl….is that removeable vinyl or permanent?
Hi Laura! The premium vinyl is considered permanent vinyl from Cricut.
Hi Jennifer – Could you use spray paint to do this project. Love your videos!
Hi Ranae! You could just be careful with how heavy you apply it.
Hello there, I really like some of the fonts you chose on your wood signs and hopefully you can share the name of them with me? The WELCOME sign with black letters is the first one and also the Dear Santa, Define Naughty is the second font I love. I hope you can share them with me. I love all of your turorials….you make it so easy and fun to use the Cricut Maker. Thank you
Hi Karen! The “Welcome” is Times New Roman and the “Dear Santa” one is actual hand lettering from one of my amazing Design Fairies, Caitlin.
Hi Jennifer – I love your videos! If I paint my board (instead of staining the wood), do you still recommend using mod podge to avoid the paint bleeding when I go to do the lettering? Thanks!
Hi Diane!
I do recommend adding the Mod Podge to help prevent the paint from bleeding through the stencil letter area.
Hello, I followed this technique and when I peeled up the stencil the paint peeled up as well in many places. How can I prevent this? My stencil was large letters, I used the mod podge and acrylic paint that you recommended. I will note that I had no bleeding. Thank you
Alison, make sure that your mod podge is MATTE and not GLOSSY. Also, try extending the time you allow your sign to dry.
Thanks for this awesome video. I’m nee to this and just a bit confused about the type of vinyl.
-what’s the difference between permanent vinyl and stencil vinyl? (I thought I would need stencil vinyl for this??)
-Why do you choose permanent vinyl? I am assuming it comes off the wood easily enough when peeling the stencil?
Thanks so much.
Christy, stencil vinyl is re-useable but I have found it more receptive to bleeding of the paint, this is why I chose permanent vinyl.
I have read and seen this video probably 10 times while making the sign. Incredible advice and I chose just to trust you as I didnt quite understand the need for all the steps. It turned out awesome!! Thanks so much.
Audra! So glad it turned out and that you gave it a try!
Thank you so much for putting this up, I have to make seven signs for a friends wedding and on my first go it was a disaster and then I watched your video and they all turned out perfect
Thank you for letting me know that! I’m so happy that it helped and you were able to help your friends have a wonderful wedding! 🙂