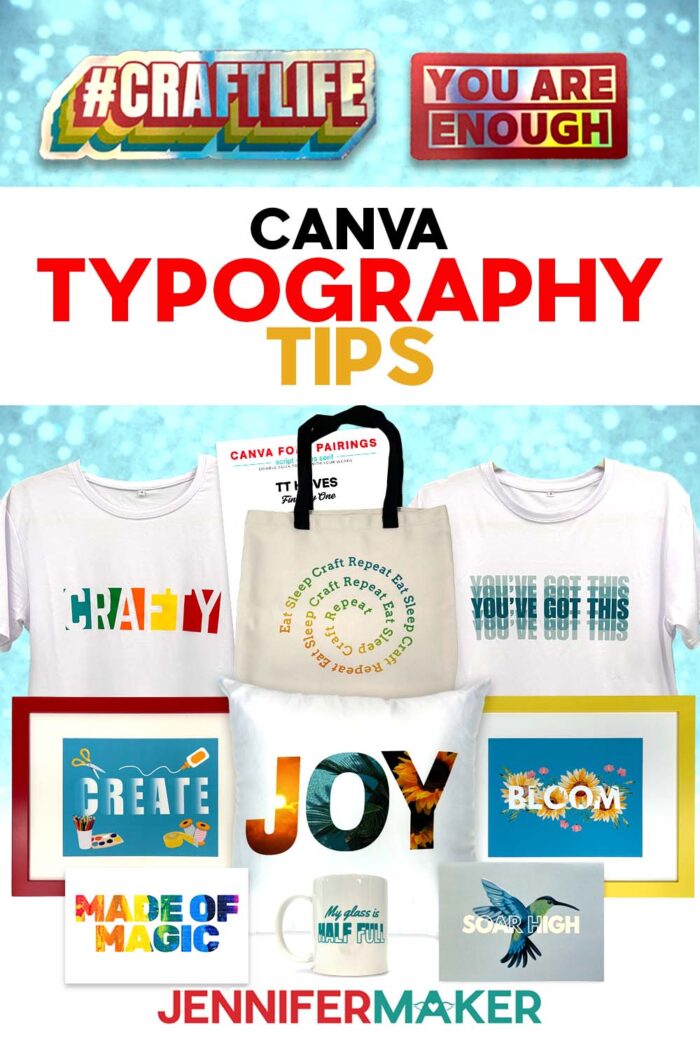
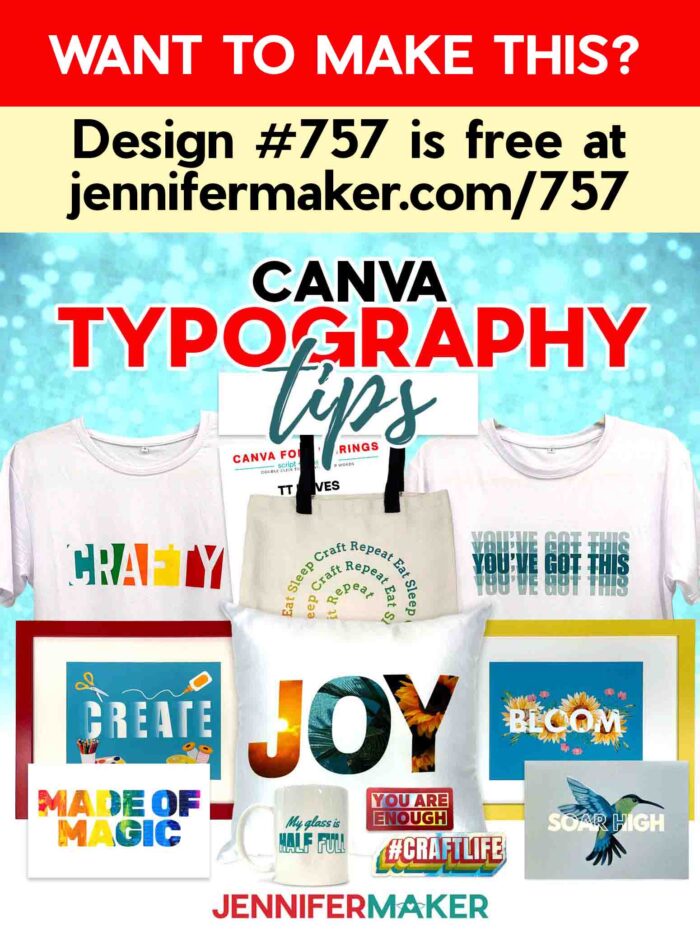
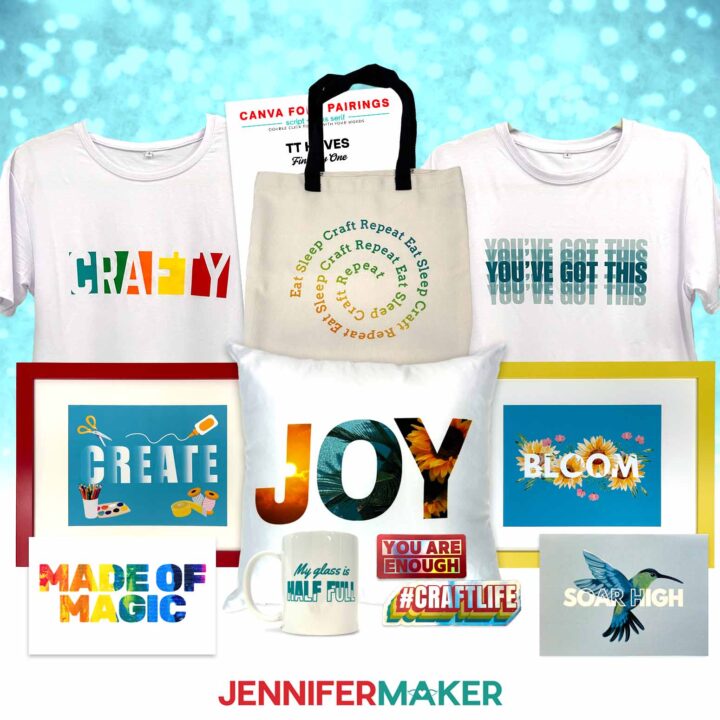
Learn how to use my Canva typography tips to create amazing word art for so many different crafts!
Words are powerful, especially if they look the part! Imagine a shirt that says “Shine Bright” in plain old text. Now, picture it with rainbow-filled letters, bold shadows, and swirly curves that practically dance off the fabric. Same phrase, totally different vibe! That’s the magic of great typography, and with a few simple tricks in Canva, you can turn any word or phrase into eye-catching, professional-looking word art.
See the full step-by-step video tutorial on how to make typography designs in Canva:

Whether you’re crafting stickers, shirts, cards, mugs, or decor, I’ll show you ten easy Canva typography tips that will completely change how your projects look, and how confident you feel designing them. Plus, I made a free printable Canva Typography Reference Guide to help you follow along and keep these creative ideas handy at your computer!
Typography is one of the most underrated design tools in crafting. It’s not just about picking a pretty typeface, it’s about creating a feeling with your words and design. You know that feeling when you see a handmade card with just the right style of type and color? Or when a quote on a mug makes you smile because the letters are as joyful as the message? That’s good typography at work. It helps you tell a stronger story, even with just a word or two. And with Canva, it’s fun and easy to do!
In my video, I guide you through techniques that range from clever to downright magical. You’ll learn how to fill letters with a photo to make sublimation projects shine, layer text and shapes to create amazing vinyl designs, and use Canva’s free tools to turn your words into craftable works of art. I’ll show you how to adjust letter spacing and line height so your text looks just right, and how to pair different typefaces (like mixing a serif font with a playful script font) to create contrast and visual interest in your designs. Not to mention, I’ll clear up the confusion once and for all: What’s the difference between a font and a typeface?
I’ve made sure all of the tools and elements I show you in the video are totally free, because I want everyone to be able to try these without needing a paid account. Whether you’re using a laptop, tablet, or even your phone, Canva makes it so easy to start creating right away. Remember, you don’t need a fancy background in design. Just a bit of curiosity and a little willingness to try something new goes a long way.
These typography tips are especially perfect for crafters who love working with Canva and Cricut together. You can use my tips to create Print Then Cut stickers, cut vinyl decals for mugs and tumblers, and so much more. The text tricks in this tutorial will help your projects look polished and professional.
If you’re anything like me, you probably enjoy having a guide to follow as you create. That’s why I put together a printable Canva Typography Reference Guide you can download from my free library. It includes examples of all ten tips from the video (plus a bonus tip!), and simple step-by-step instructions on how to get each text effect. All you need to do is enter your email at the bottom of this post to access it.
One of my favorite things about this tutorial is that it helps unlock your own creativity. I’ve seen so many crafters start with a simple quote, then end up creating incredible designs just by playing with layout and type effects! If you’re into DIY design projects, this is the perfect place to start. Even if you’re new to Canva, you’ll see how easy it is to go from a blank screen to a professional-looking piece of word art.
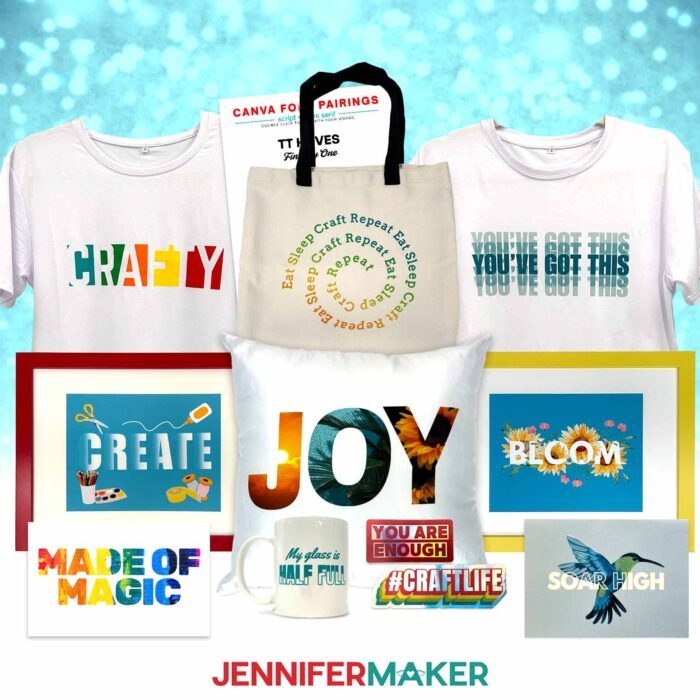
From sublimation projects to Cricut Print Then Cut designs and beyond, my typography tips are tools you’ll use over and over again in your Canva crafting journey. I can’t wait for you to see how fun and easy it is to style your words to match the mood and message of your projects! You might be surprised how quickly your designs go from “that’s cute” to “WOW, did you really make that?!”
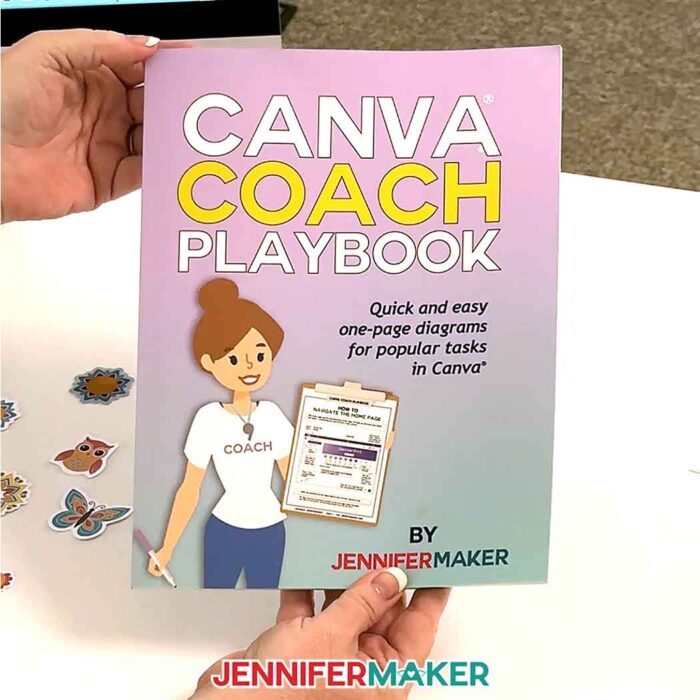
Want to do more with Canva? Check out my Canva Coach Playbook, which includes tons more Canva tips, tricks, and techniques for you to get the most out of your designs!
Want to learn more about typography and experiment with typeface pairings? I have a workshop just for you in my ADVANCE program. Learn more about ADVANCE with JenniferMaker here!
Let me show you how to use my Canva typography tips to create versatile word art designs! This post contains some affiliate links for your convenience (which means if you make a purchase after clicking a link I will earn a small commission but it won’t cost you a penny more, there is no additional cost)! Read my full disclosure policy.
Materials to Make the Projects in My Canva Typography Tips Tutorial
View my Amazon shopping list with the exact items I used.
For iron-on vinyl T-shirts:
- Value Iron-On Vinyl Rainbow Sampler -OR-
- Everyday Iron-On Vinyl Rainbow Sampler
- One (1) White Cotton/Poly T-Shirt
- A way to cut your vinyl – I’m using the Cricut Maker 4, but you can also use a Cricut Maker series machine, a Cricut Explore series machine, the Cricut Venture, or the Cricut Joy Xtra
- Cricut Green StandardGrip Machine Mat 12″ x 12″
- Brayer
- Scraper
- Weeding Tool
- Tweezers
- Lint Roller
- Paper Trimmer -OR-
- Scissors
- Heat Press – I used the Cricut EasyPress -AND-
- Cricut EasyPress Mat
- Tape Measure
- Cricut BrightPad Go (optional to help with weeding)
For adhesive vinyl mugs:
- One (1) 15 oz Cricut Mug (I used the Miami and Ocean colors)
- Value Permanent Vinyl Rainbow Sampler -OR-
- Premium Permanent Vinyl Brights Sampler
- StandardGrip Transfer Tape
- A way to cut your vinyl – I’m using the Cricut Maker 4, but you can also use a Cricut Maker series machine, a Cricut Explore series machine, the Cricut Venture, the Cricut Joy, or the Cricut Joy Xtra
- Tape Measure
- Cricut Green StandardGrip Machine Mat 12″ x 12″
- Brayer
- Scraper
- Weeding Tool
- Tweezers
- Lint Roller
- Paper Trimmer -OR-
- Scissors
- Isopropyl Alcohol -AND-
- Lint-Free Cloth
- Cricut BrightPad Go (optional to help with weeding)
For framed printout:
For Print Then Cut card:
- 8.5″ x 11″ 65 lb. White Cardstock
- 5″ x 7″ A7 Envelopes (optional)
- Color Inkjet Printer
- A way to cut your cardstock – I’m using the Cricut Maker 4, but you can also use a Cricut Maker series machine, a Cricut Explore series machine, the Cricut Venture, or the Cricut Joy Xtra
For Print Then Cut stickers:
- 8.5″ x 11″ Holographic Sticker Paper
- Color Inkjet Printer
- A way to cut your stickers – I’m using the Cricut Maker 4, but you can also use a Cricut Maker series machine, a Cricut Explore series machine, the Cricut Venture, or the Cricut Joy Xtra
For sublimation tote bag or pillowcase:
- One (1) Cricut Sublimation Tote Bag
- One (1) White Polyester Pillowcase -AND-
- One (1) Matching Pillow Insert
- Sublimation Printer – I used a converted Epson EcoTank ET-2800 Inkjet Printer -AND-
- Sublimation Ink
- 8.5″ x 11″ Sublimation Paper
- White Uncoated Butcher Paper
- 12″ x 12″ White Cardstock
- Heat-Resistant Tape
- Tape Measure
For all projects:
How to Make Typography Projects with Canva!
Canva Typography Tips
Level up your designs with Canva Typography Tips!
Materials
- Value Iron-On Vinyl Rainbow Sampler (for T-Shirt) -OR-
- Everyday Iron-On Vinyl Rainbow Sampler (for T-Shirt)
- One (1) White Cotton/Poly T-Shirt (for use with HTV) -OR-
- One (1) White Polyester T-Shirt (for sublimation)
- Value Permanent Vinyl Rainbow Sampler (for Mug) -OR-
- Premium Permanent Vinyl Brights Sampler (for Mug)
- StandardGrip Transfer Tape
- One (1) 15 oz Cricut Mug (Miami Color) -OR-
- One (1) 15 oz Cricut Mug (Ocean Color)
- 8.5” x 11” Matte Photo Paper (for Framed Printout)
- 8.5" x 11" 65 lb. White Cardstock (for Print Then Cut Card)
- 5” x 7” A7 Envelopes (Optional for Print Then Cut Card)
- One (1) Polyester Pillowcase -AND-
- One (1) Matching Pillow Insert (for Sublimation Pillow)
- 8.5" x 11" Holographic Sticker Paper (for Print Then Cut Stickers)
- One (1) Cricut Sublimation Tote Bag
- 8.5" x 11" Sublimation Paper -AND-
- White Uncoated Butcher Paper -AND-
- 12" x 12" White Cardstock (for sublimation)
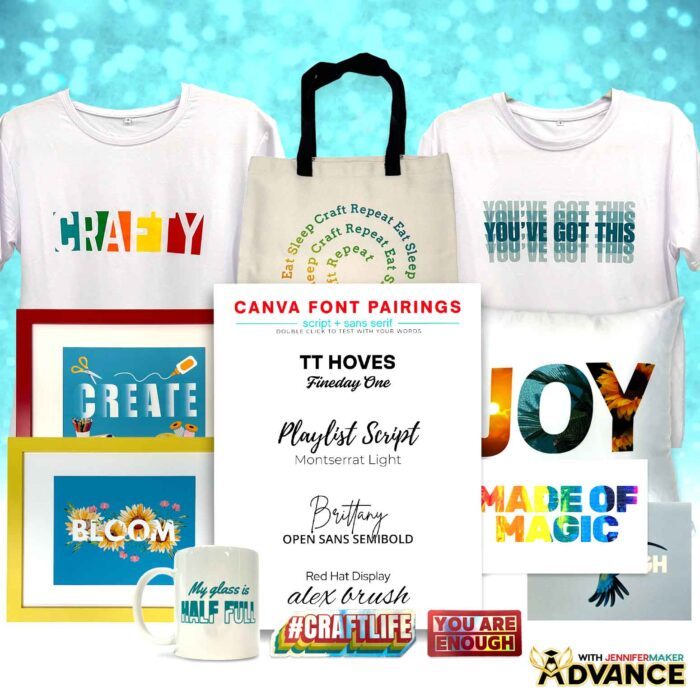
- Design #757 (My free PDF Reference Guide is available in my free resource library - get the password by filling out the form at the bottom of this page)
Tools
- Free Canva account
- A way to cut your vinyl or cardstock - I’m using the Cricut Maker 4, but you can also use a Cricut Maker Series machine, a Cricut Explore Series machine, the Cricut Venture, or the Cricut Joy Xtra
- Color Inkjet Printer -OR-
- Sublimation Printer - I used a converted Epson EcoTank ET-2800 Inkjet Printer -AND-
- Sublimation Ink
- Heat Press - I used the Cricut EasyPress -AND-
- Cricut EasyPress Mat
- Cricut Green StandardGrip Machine Mat 12" x 12"
- Brayer
- Scraper
- Weeding Tool
- Tweezers
- Lint Roller (for shirt, pillowcase, and/or tote bag)
- Isopropyl Alcohol -AND-
- Lint-Free Cloth (for cleaning mugs)
- Paper Trimmer -OR-
- Scissors
- Heat Resistant Tape
- Tape Measure
- Fan for Ventilation (for sublimation)
- Cricut BrightPad Go (optional to help with weeding)
Instructions
NOTE: I used 11" x 8.5" canvases for each of these examples, but you can use other sizes for your projects.
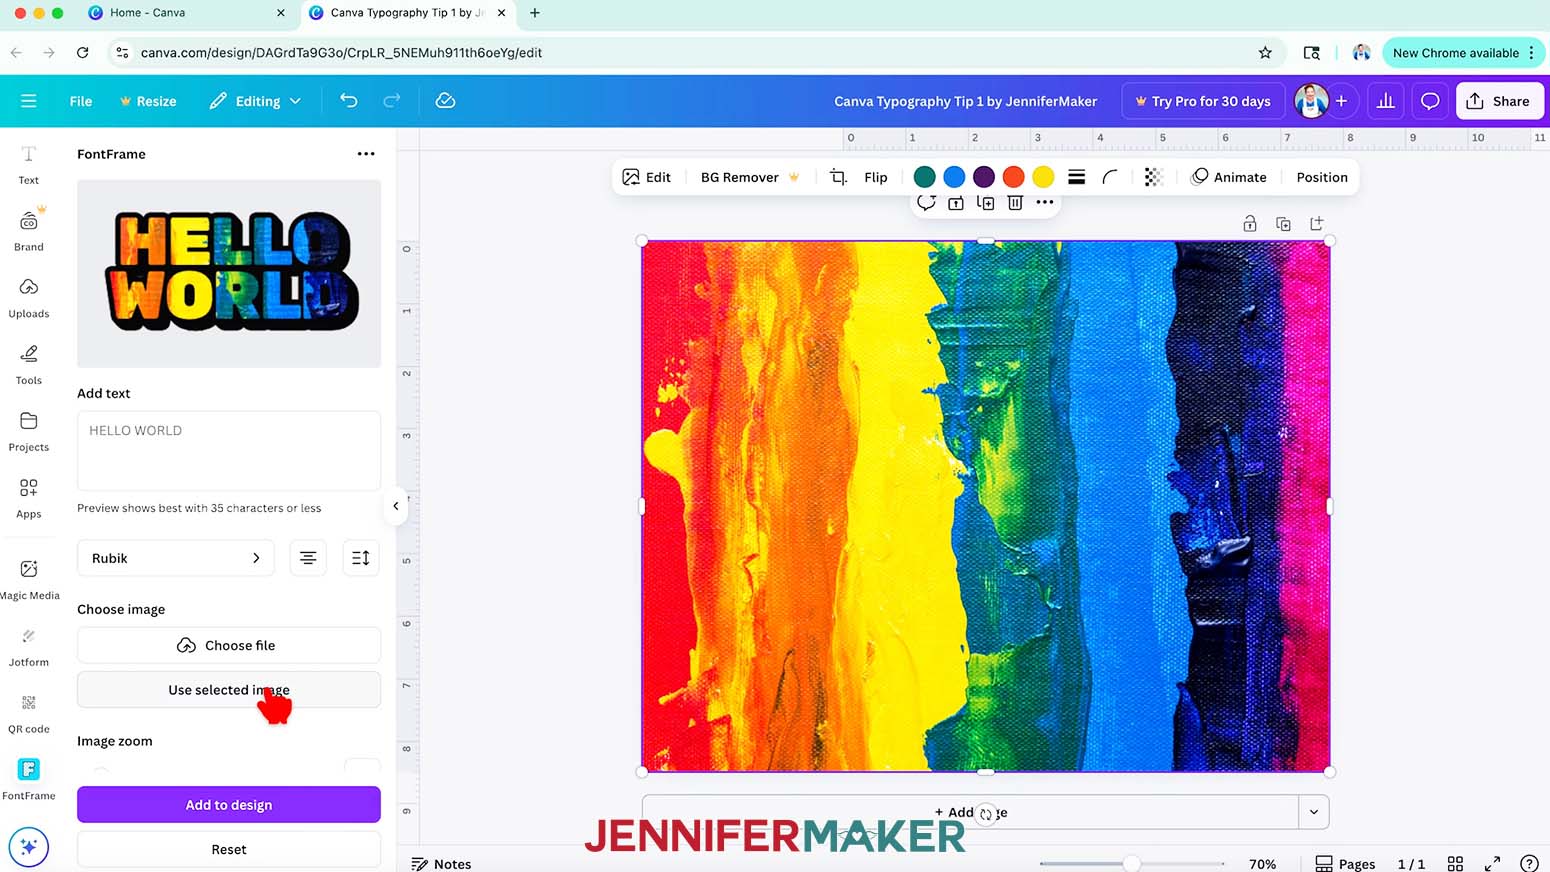
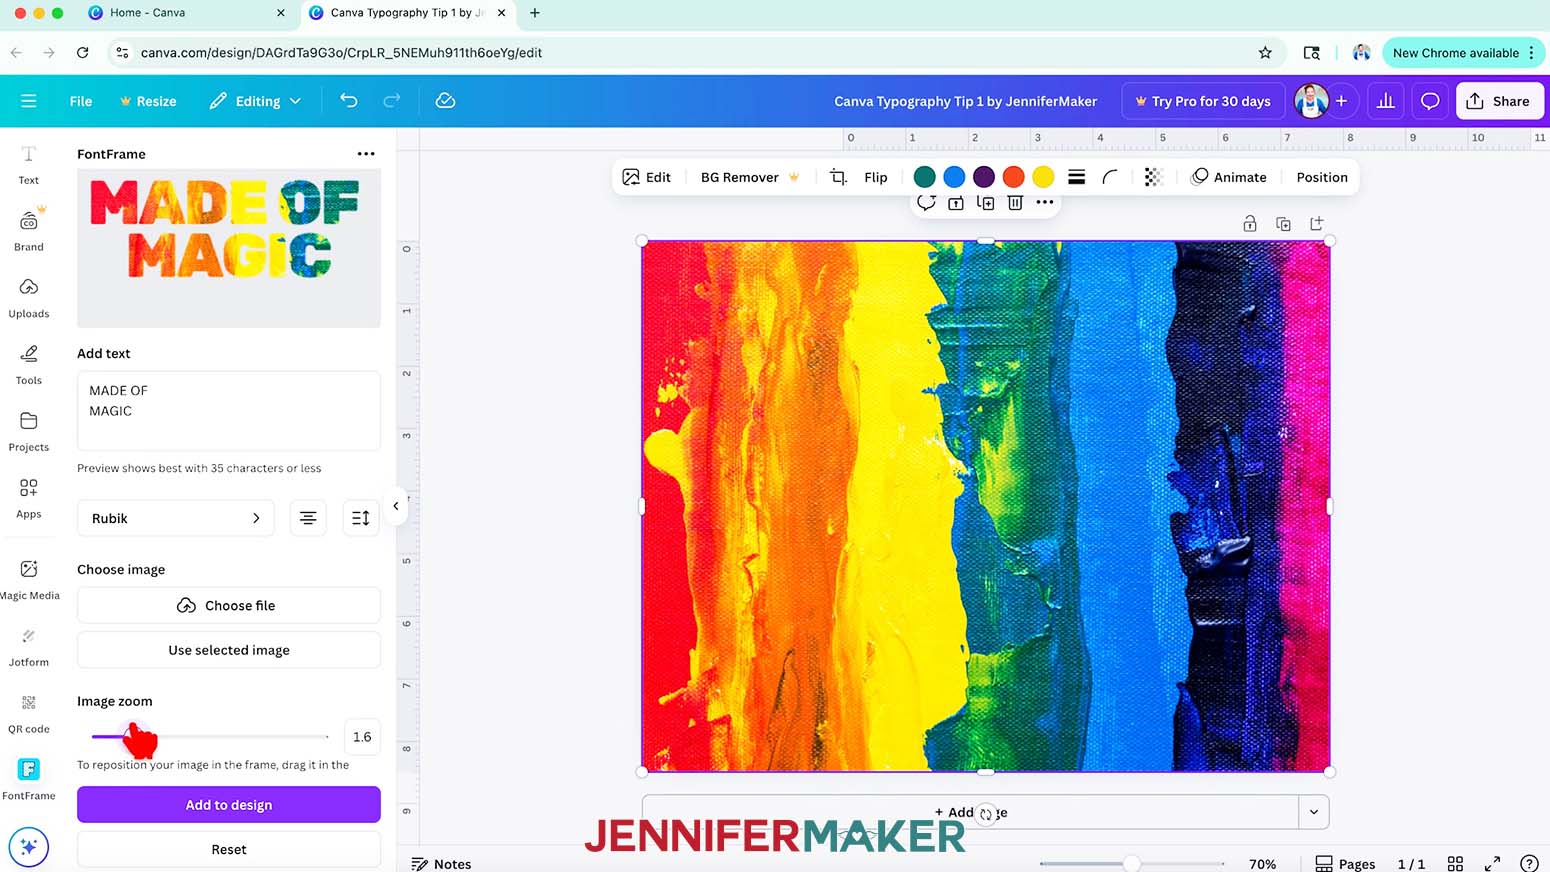
CANVA TYPOGRAPHY TIP 1: FILL WORDS WITH A PHOTO
- Add a "Graphic" or "Photo" Element with pattern or texture to your Canvas.
NOTE: I used an abstract rainbow painting. - Select the Element on the Canvas, then go to "Apps" and search for "FontFrame."
- Click “Use selected image” so the preview will reflect the graphic on your Canvas.

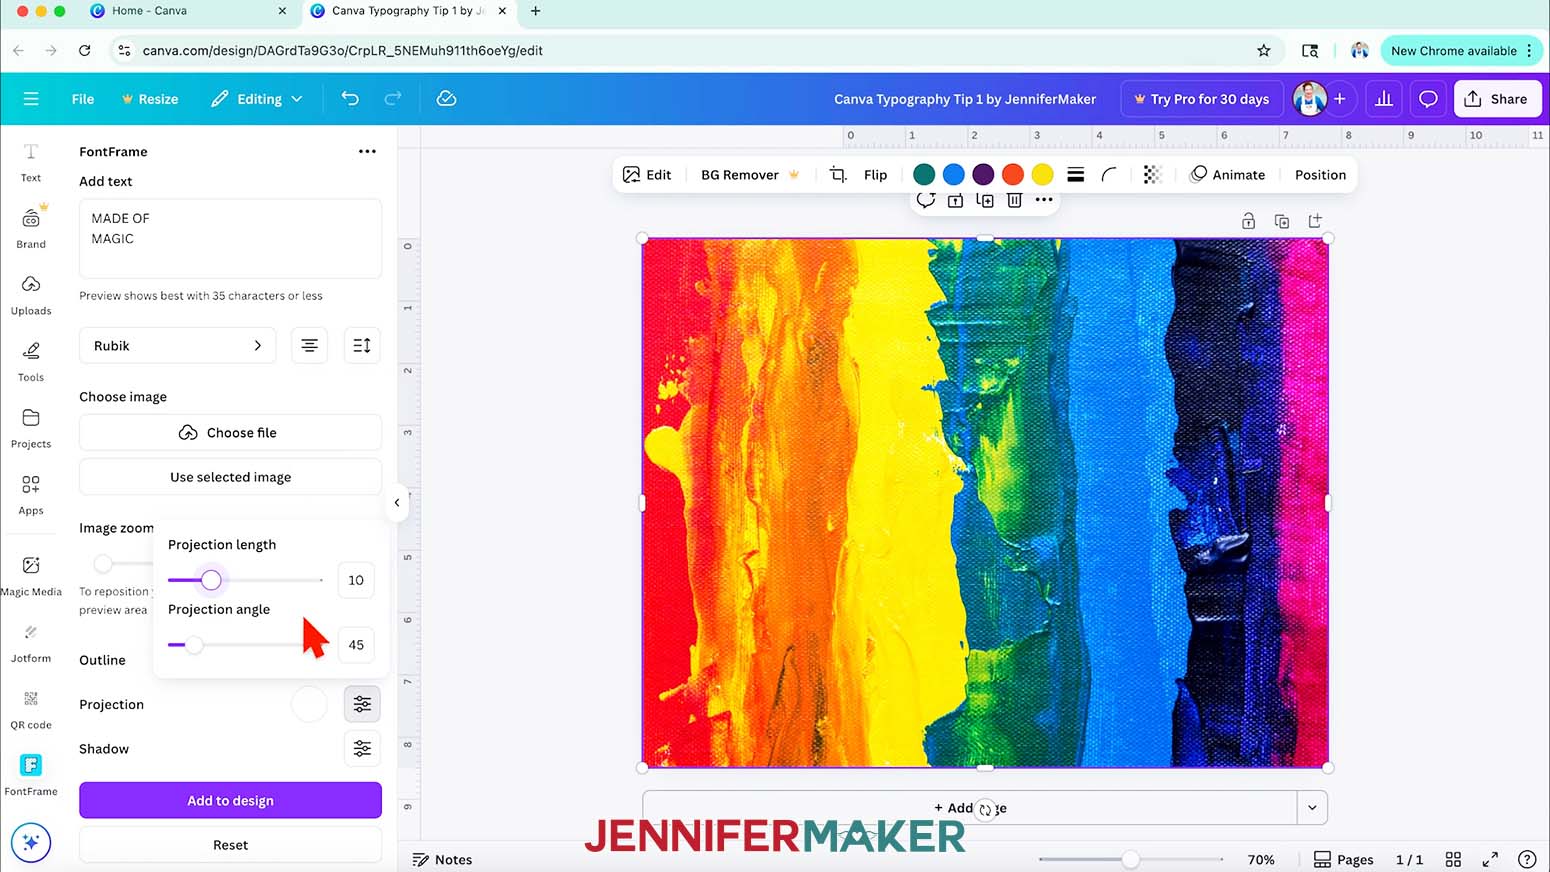
TIP: Or, if you have your own image in mind, click “Choose file” to use your own file. - Type the word you want to use in the "Add text" box under the preview.
- Adjust the look by typing on multiple lines, changing the alignment and spacing, or trying another typeface.
NOTE: I used the "Rubik" typeface in all capital letters to make large spaces for the image to show through. - You can change or even turn off the "Outline" or the "Projection," or play with "Shadows."
- You can also use the "Image zoom" slider to change how the photo or graphic looks inside your text.
- Check to make sure everything looks correct, because you can't edit the result once you add the design to the Canvas.
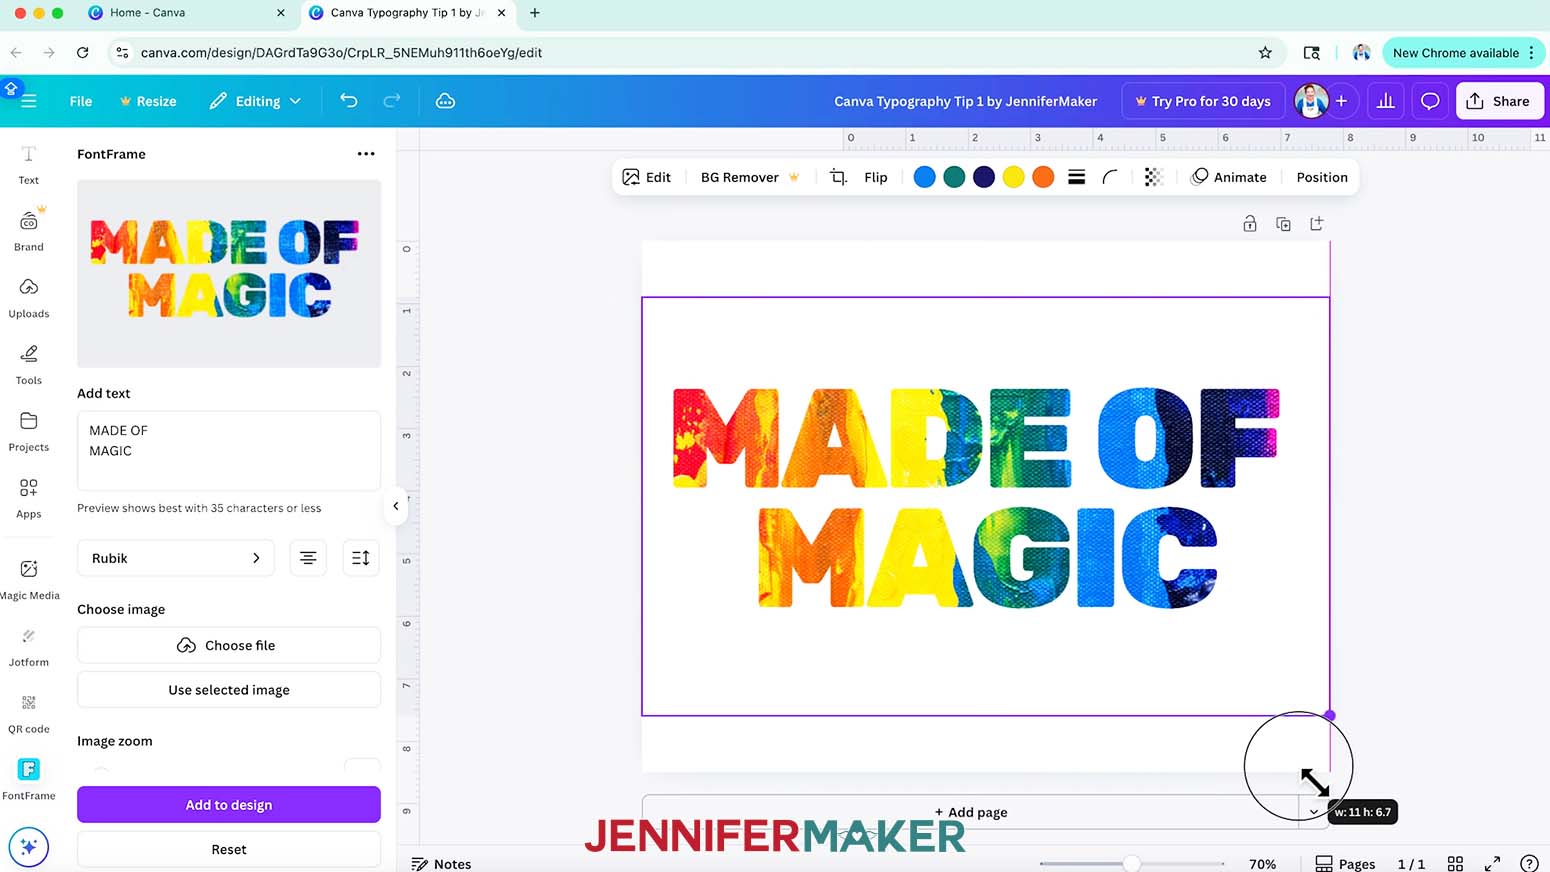
- When you’re done, click “Add to design” to move it to your Canvas.
- Delete the original image.
- Then, you can resize the design on your Canvas using the corner handles.
- I printed my design on a card using my Canva Card Tutorial!
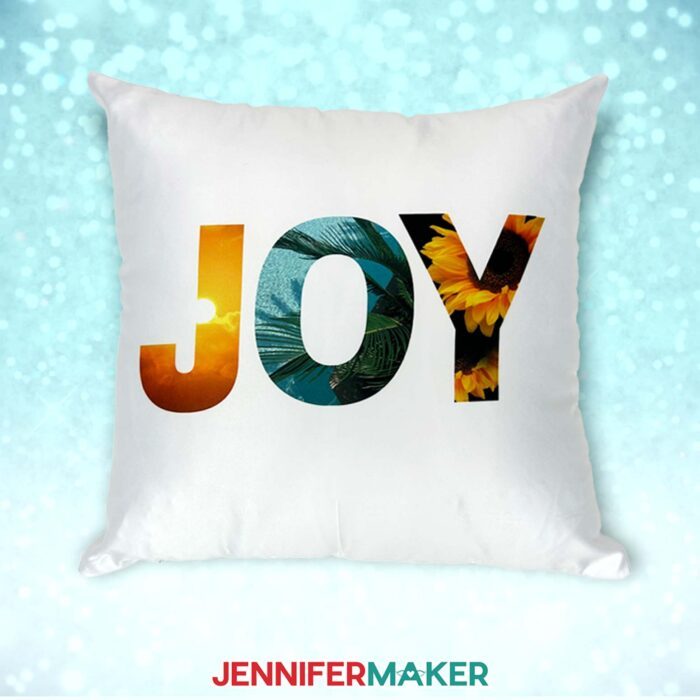
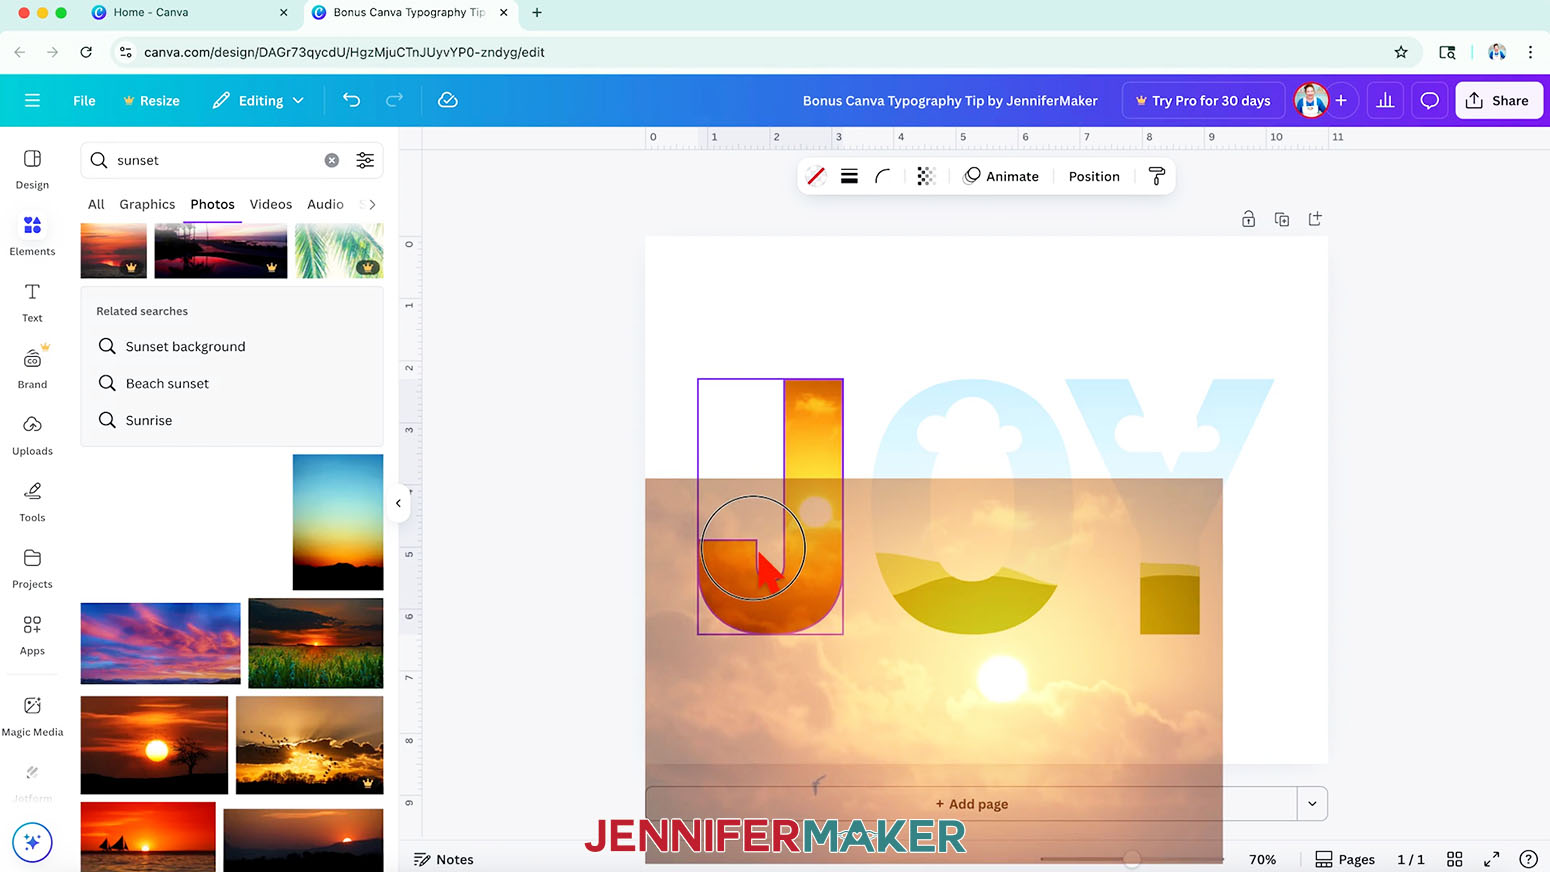
BONUS: FILL LETTERS WITH DIFFERENT PHOTOS
- To use a different graphic or photo in each letter, first search for "letter frames" under "Element."
- Under "Frames," pick the first letter you want to add it to the Canvas.
NOTE: I picked a blocky capital "J" to begin spelling "JOY."
TIP: The illustrated landscape in Frames means we can add an image to fill the space. - Find a "Graphic" or "Photo" Element for the first letter, and drag it into the first letter frame to fill it.
NOTE: I searched for "sunset" photos.
TIP: Hold the image near the inner top left corner of a frame and it will automatically fill the space. - Then double-click to make adjustments to the image's size and placement as needed.
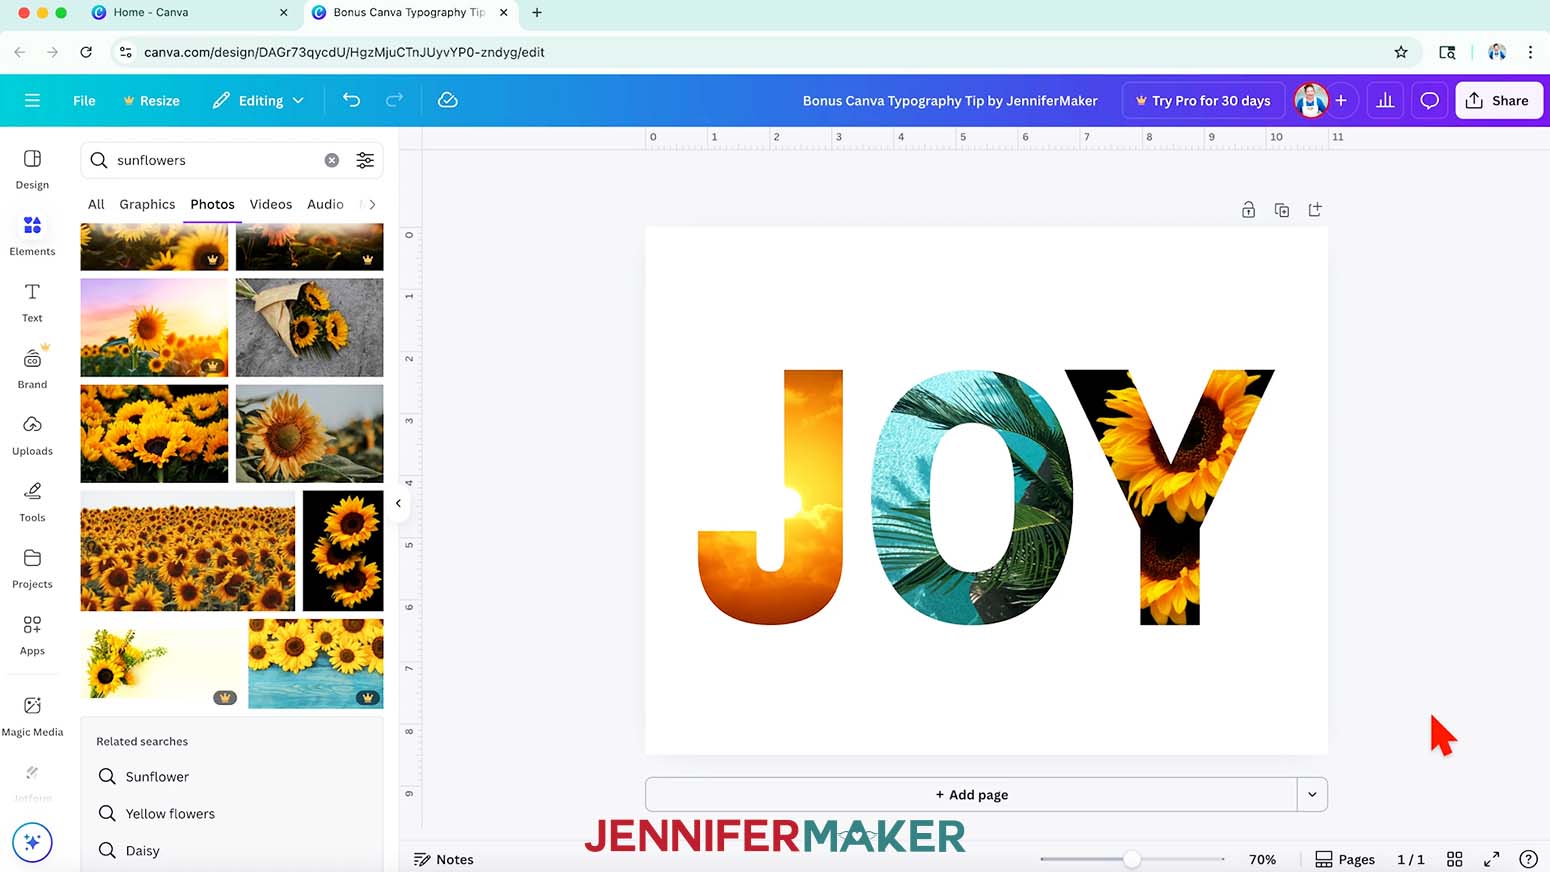
- Repeat steps 1-4 to fill the other letter frames with different images.
NOTE: I added an ocean photo to the "O" and a sunflowers photo to the "Y." - I sublimated this design on a pillow using my Sublimation Pillow Tutorial!
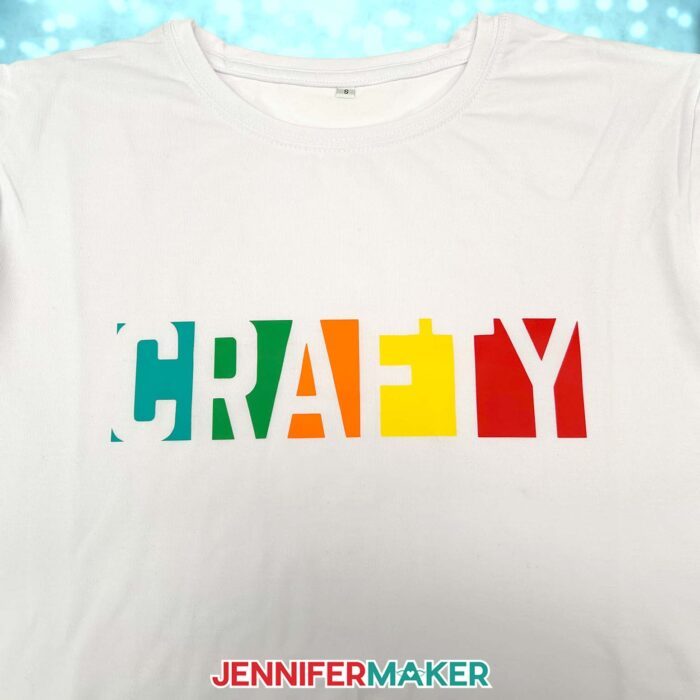
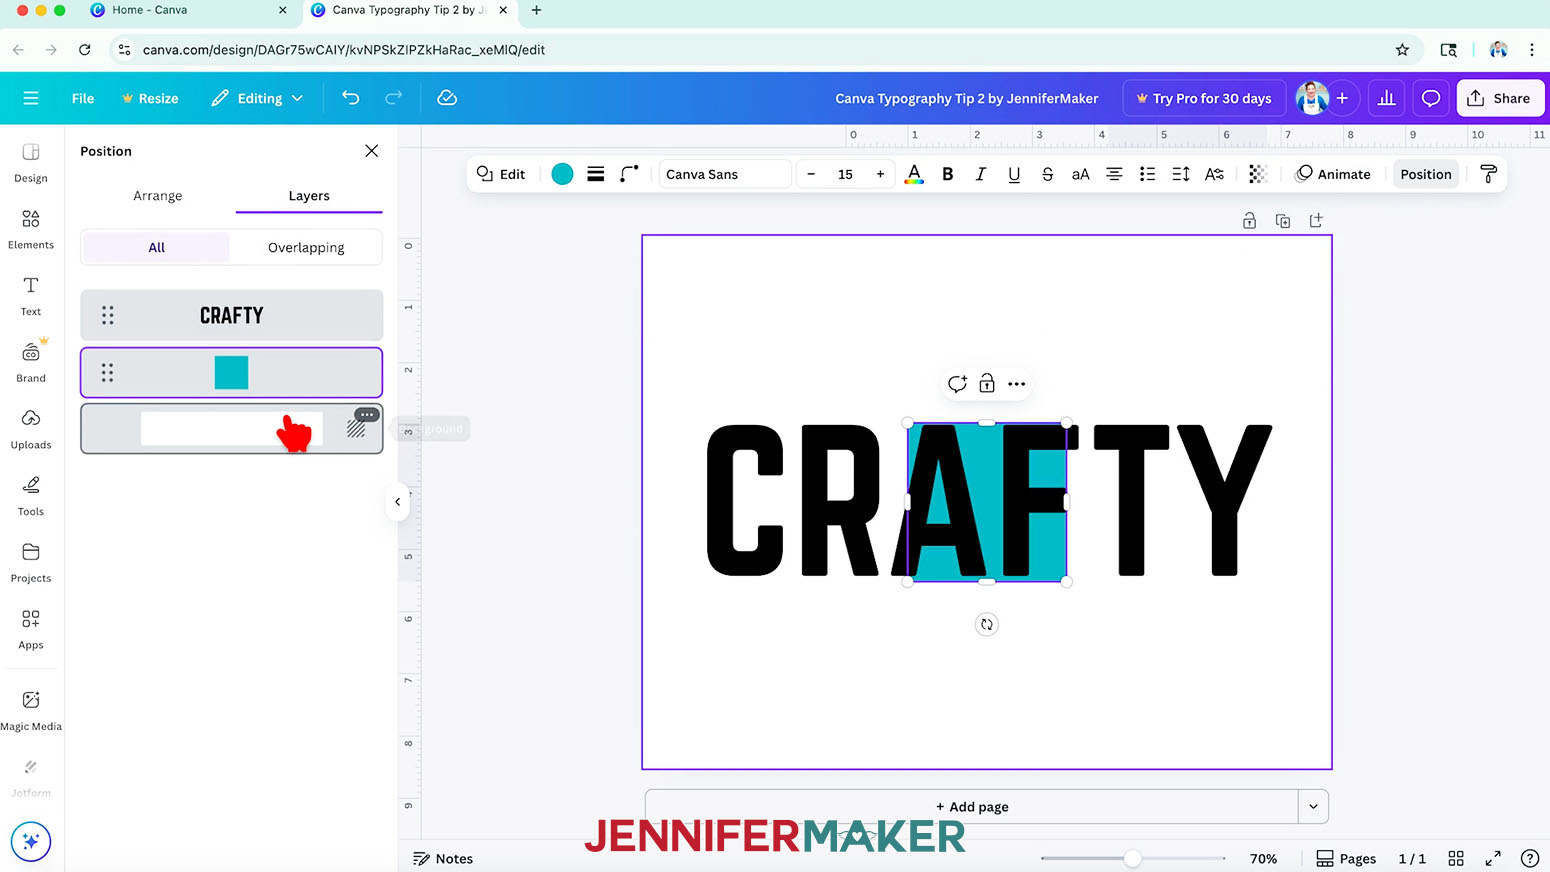
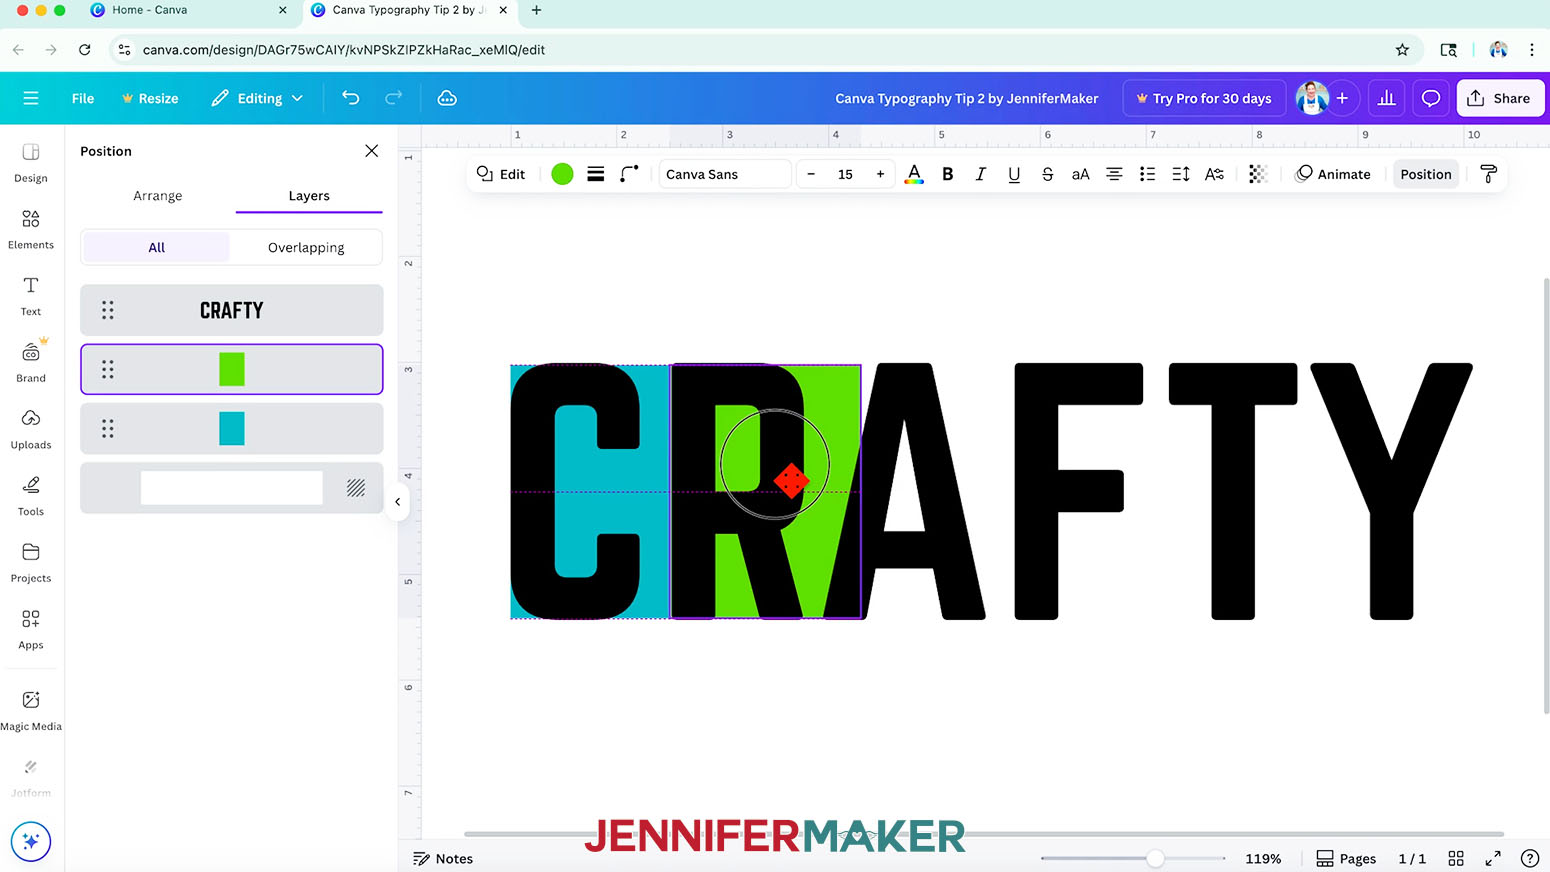
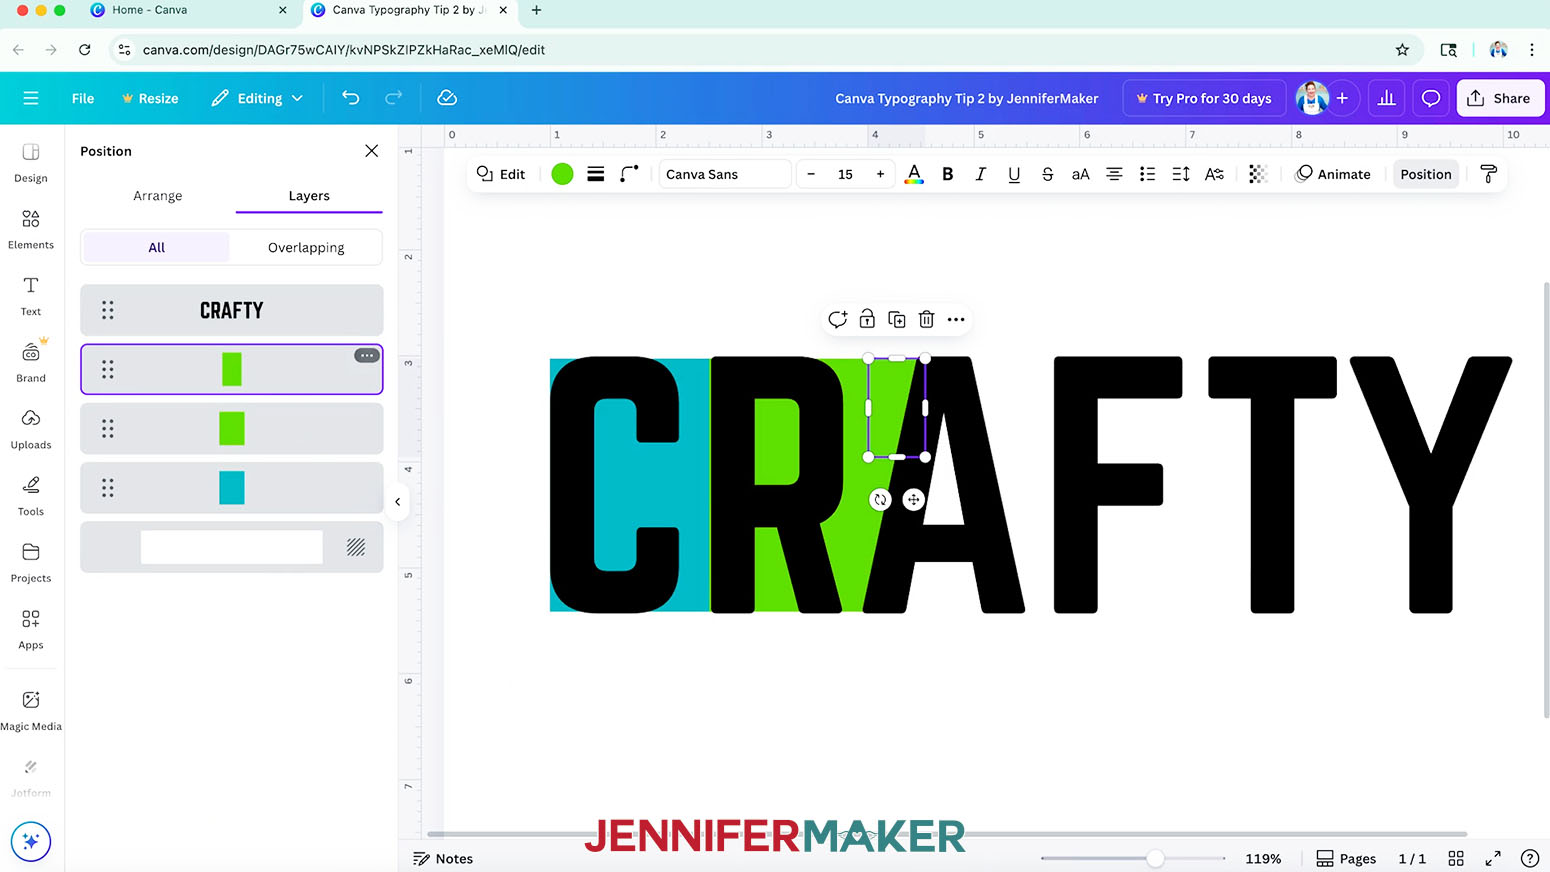
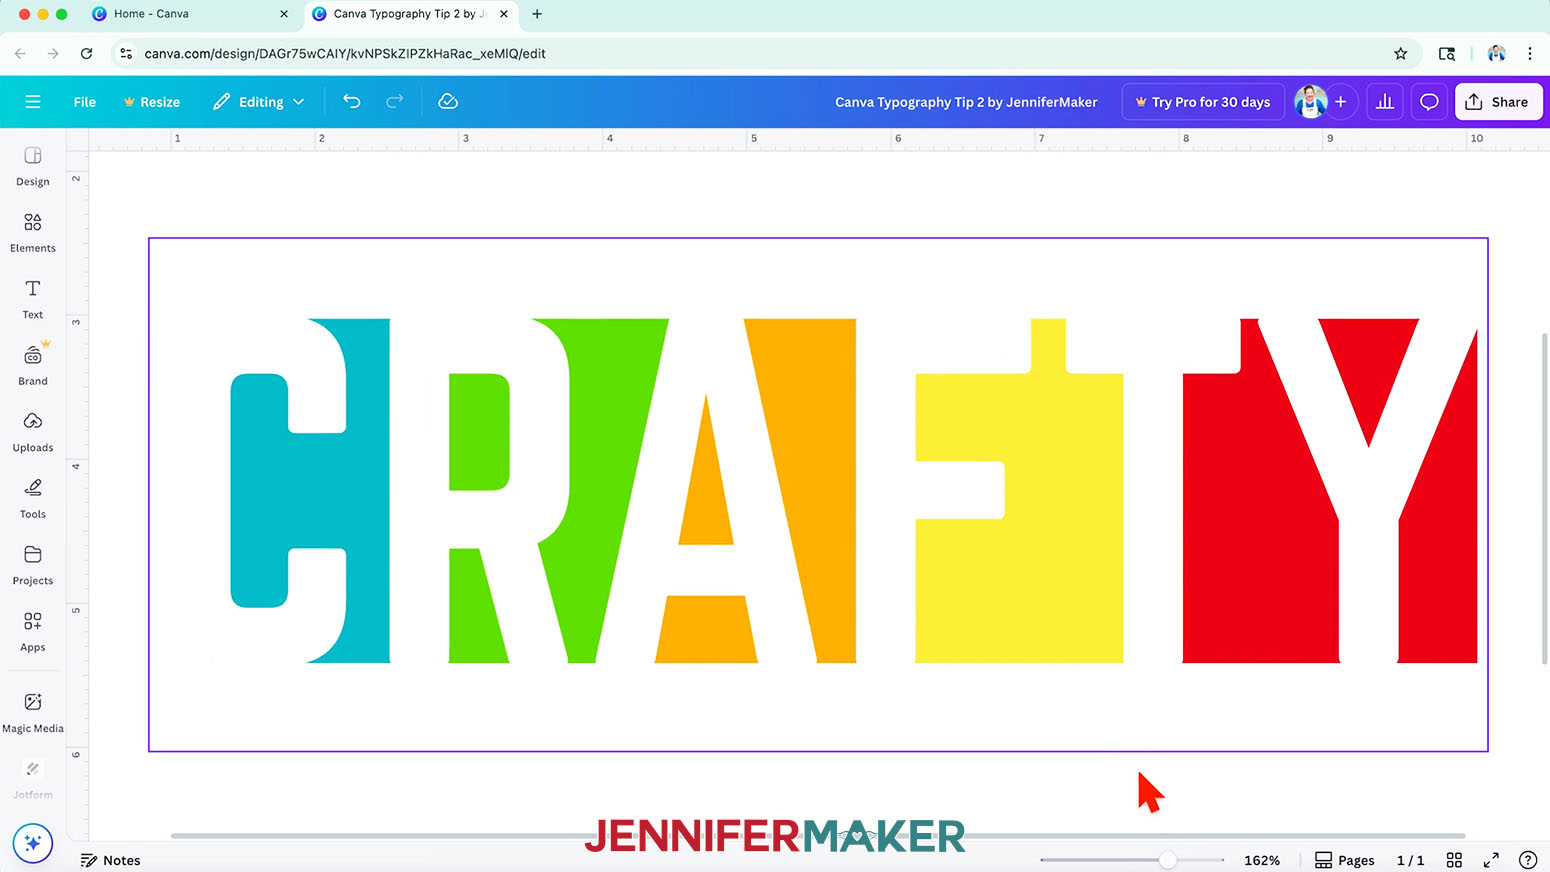
CANVA TYPOGRAPHY TIP 2: MULTICOLOR TEXT WITH NEGATIVE SPACE
- Add a text box and type your message.
TIP: I prefer using all capital letters for more consistent letter height. - Then, select a bold, chunky typeface,
NOTE: I used the Canva typeface "Norwester." - Resize the text as needed.
- Under "Elements," add a Square from the "Shapes" menu and change its color to the first color you want in your design.
- Open the "Position" panel and, under the "Layers" tab, drag the square underneath the text layer so it's behind the text on the Canvas.
- Resize the square to be just a tiny bit smaller than the first letter on the left, top, and bottom edges.
- On the right side, make the square connect to the next letter, but it shouldn’t be visible inside the letter.
- Duplicate the square, change its color, and move it behind the text.
- Adjust the square to fill the space in between the next two letters.
- You might need to make a duplicate square or squares to fill small spots with the same color. Just take your time to fill all the spaces with color.
TIP: Make sure the large main shapes are the same height for a consistent look across all the letters. - Keep adding, arranging, and adjusting squares of color to fill the space between the rest of the letters.
TIP: I like to keep some color before and after the word to make the letters easier to read. - Change the text to white to see the negative space result.
- Check for any lines of color you don’t want and adjust them as needed.
TIP: If some letters and color boxes aren't layering correctly, go to "Position" and try adjusting them in the "Layers" panel to hide and reveal different sections. - I made an iron-on vinyl shirt with this design using my Easy Iron-On Vinyl Shirt Tutorial!
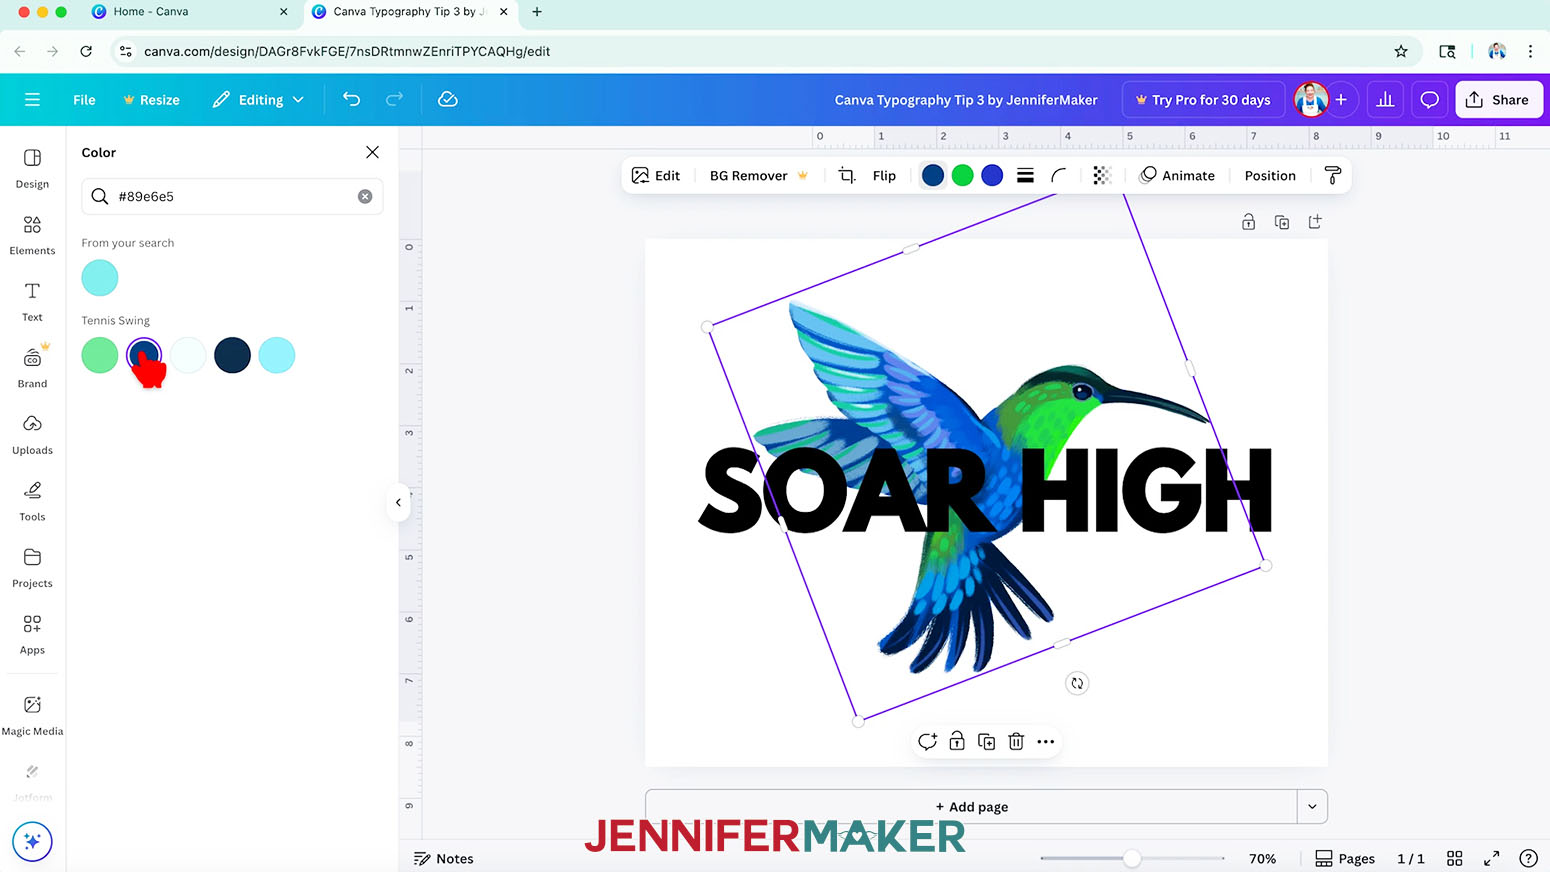
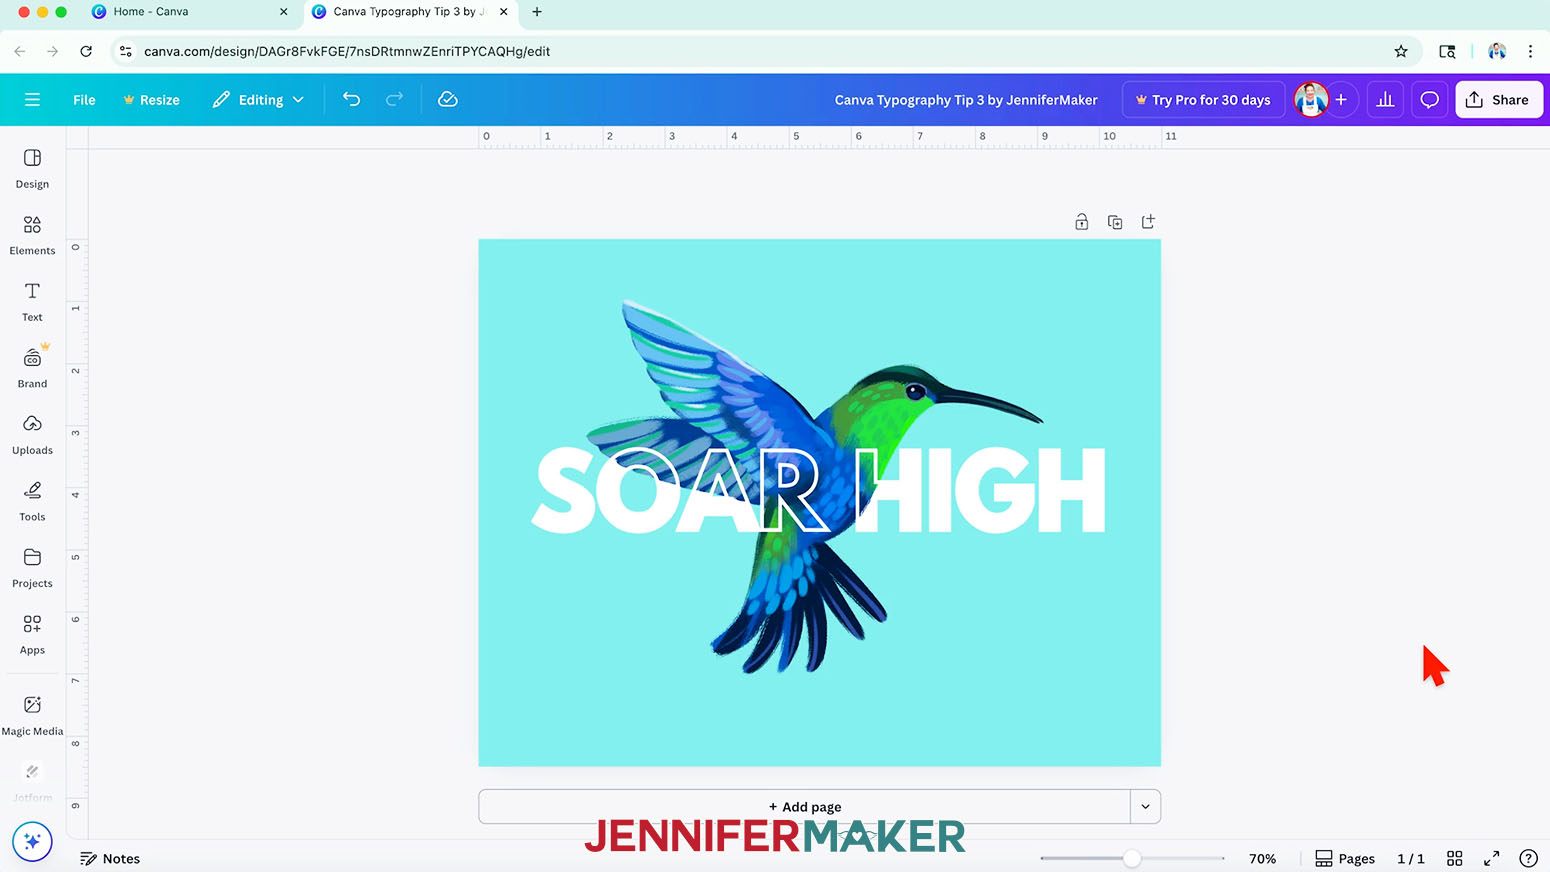
CANVA TYPOGRAPHY TIP 3: HOLLOW TEXT IMAGES
- Add a word or phrase to your canvas in a bold typeface.
NOTE: I used the "League Spartan" Canva typeface. - Duplicate the text and stack the layers so they perfectly align.
- Click “Position” in the top bar and use the "Layers" panel to select the top text layer.
- Then click "Effects" in the top bar and pick "Hollow."
NOTE: The change won’t be noticeable yet. - Now, search for an image with a transparent background under "Elements."
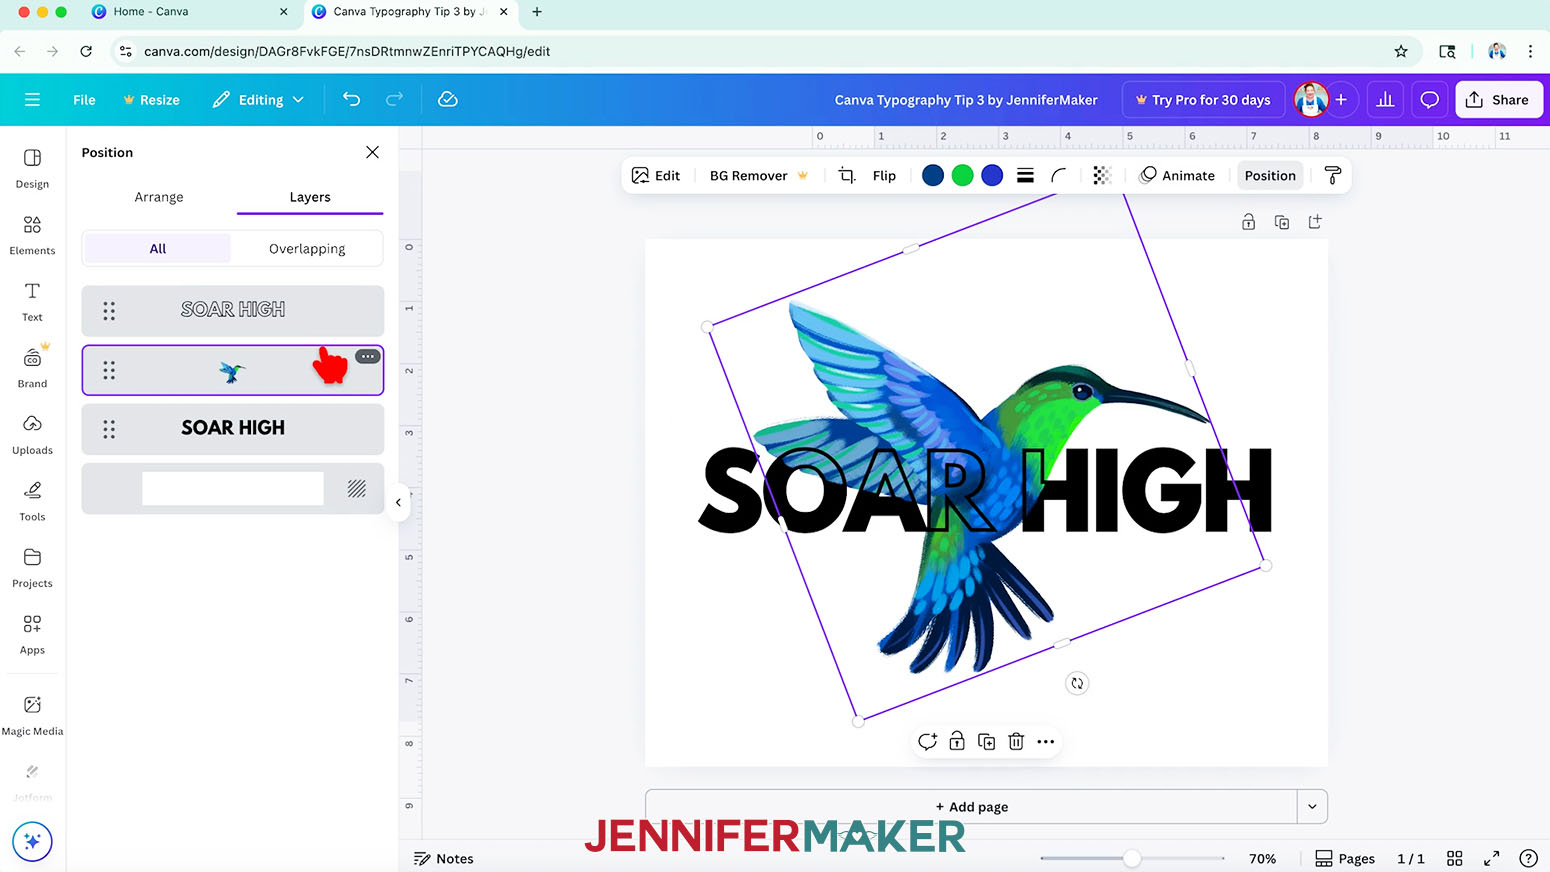
NOTE: I'll use a hummingbird graphic. - In the "Layers" panel, move the image behind all your text, and adjust the composition.
- You can change the colors in your image if you see color swatches in the top menu when the image is selected.
- For the magic reveal, use the "Layers" panel to move the graphic between the two text layers!
- Pick a new background color using the color wheel at the top.
- Finally, change your text color to make it stand out.
- I printed my design on a card using my Canva Card Tutorial!

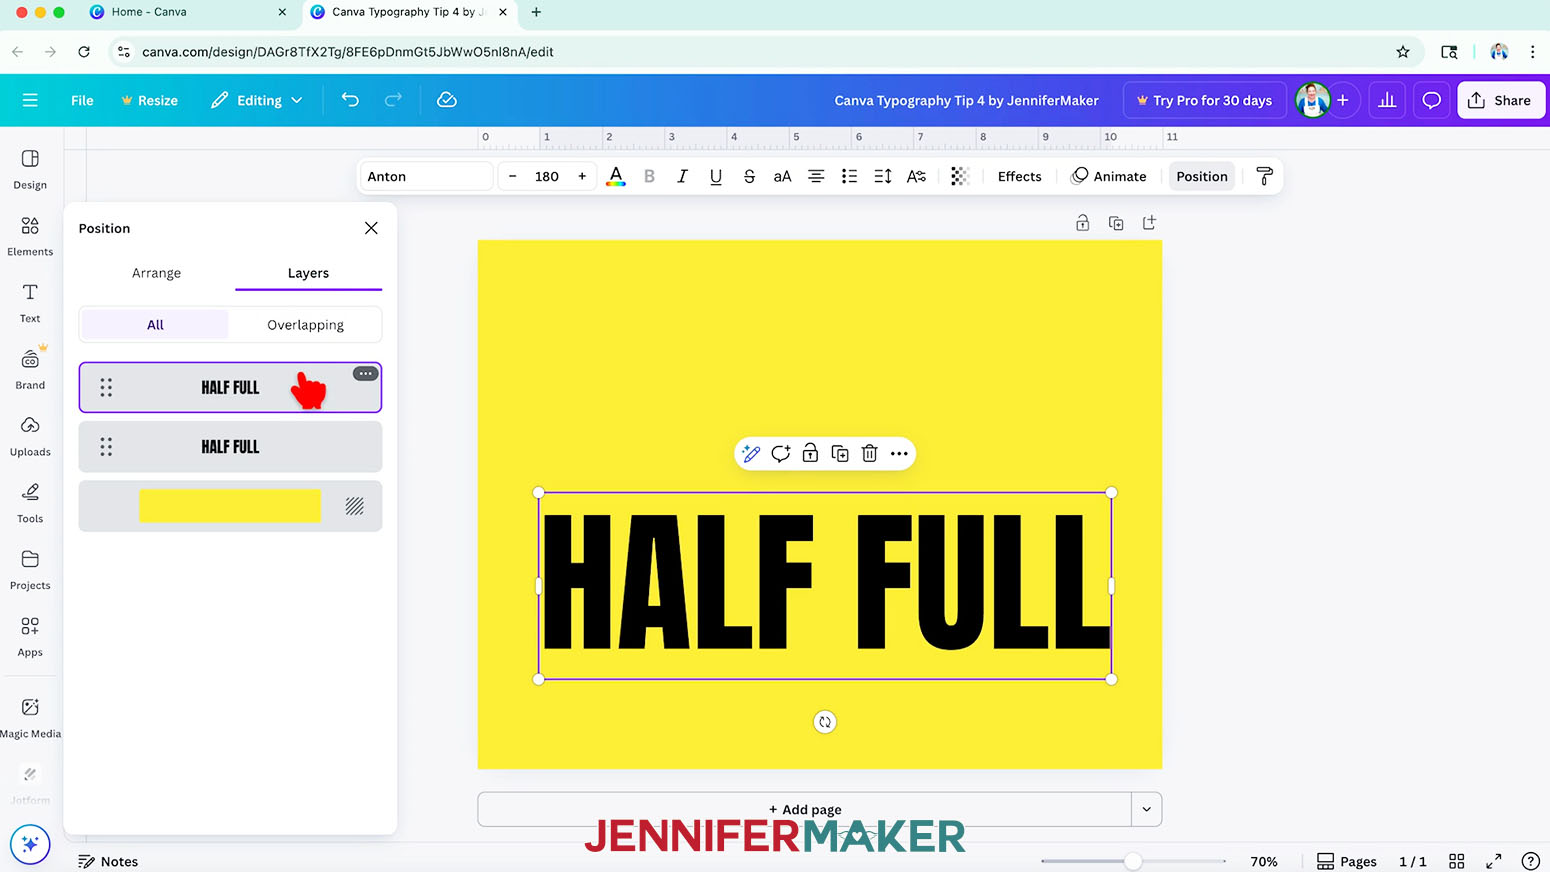
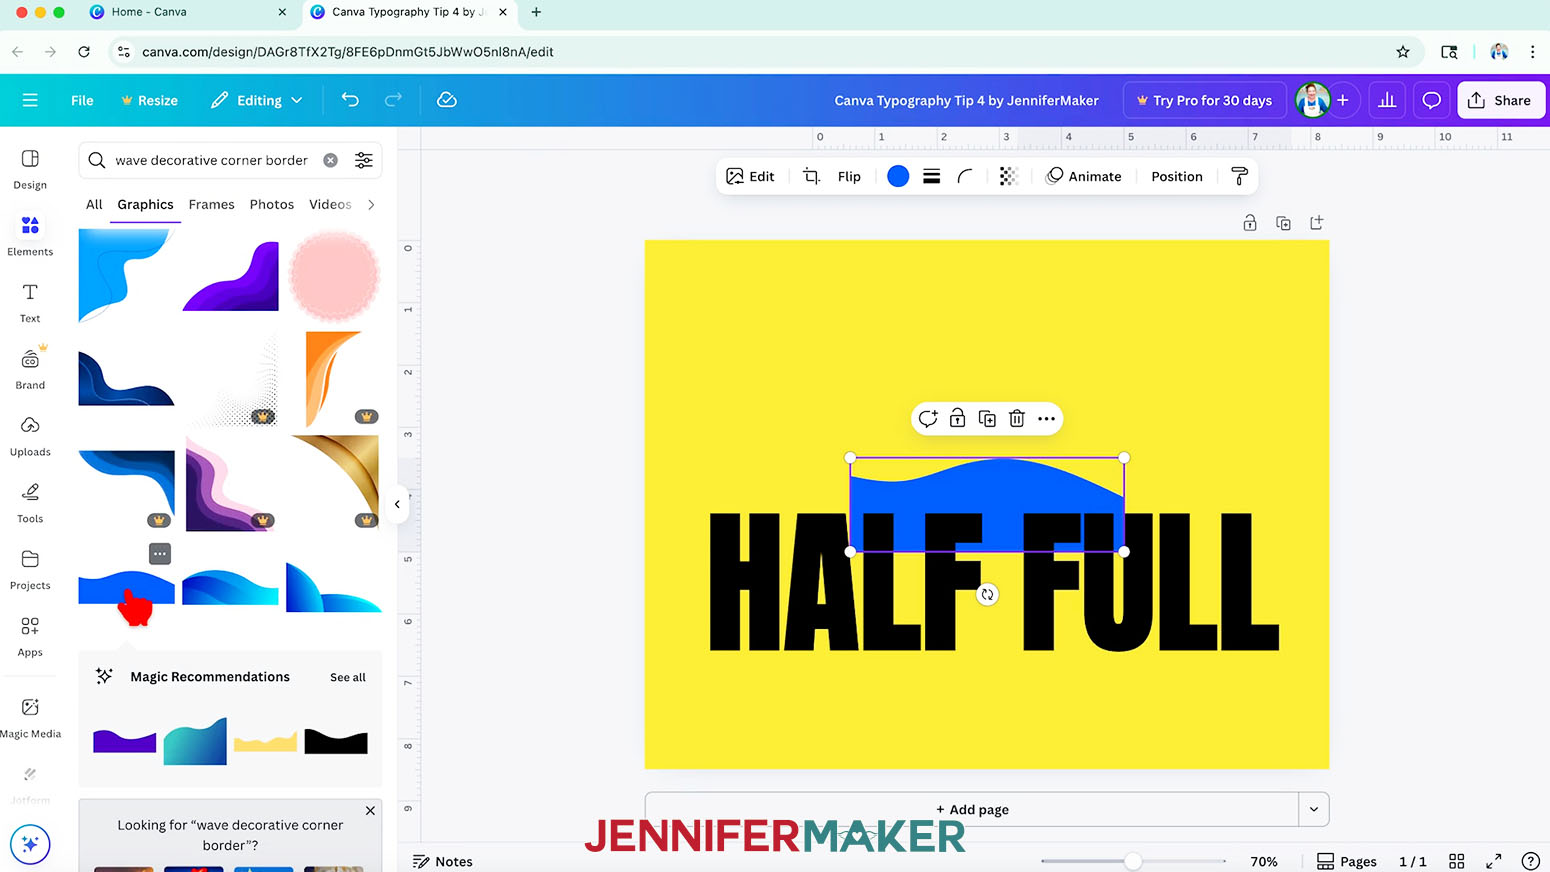
CANVA TYPOGRAPHY TIP 4: HALF-FILLED WORD
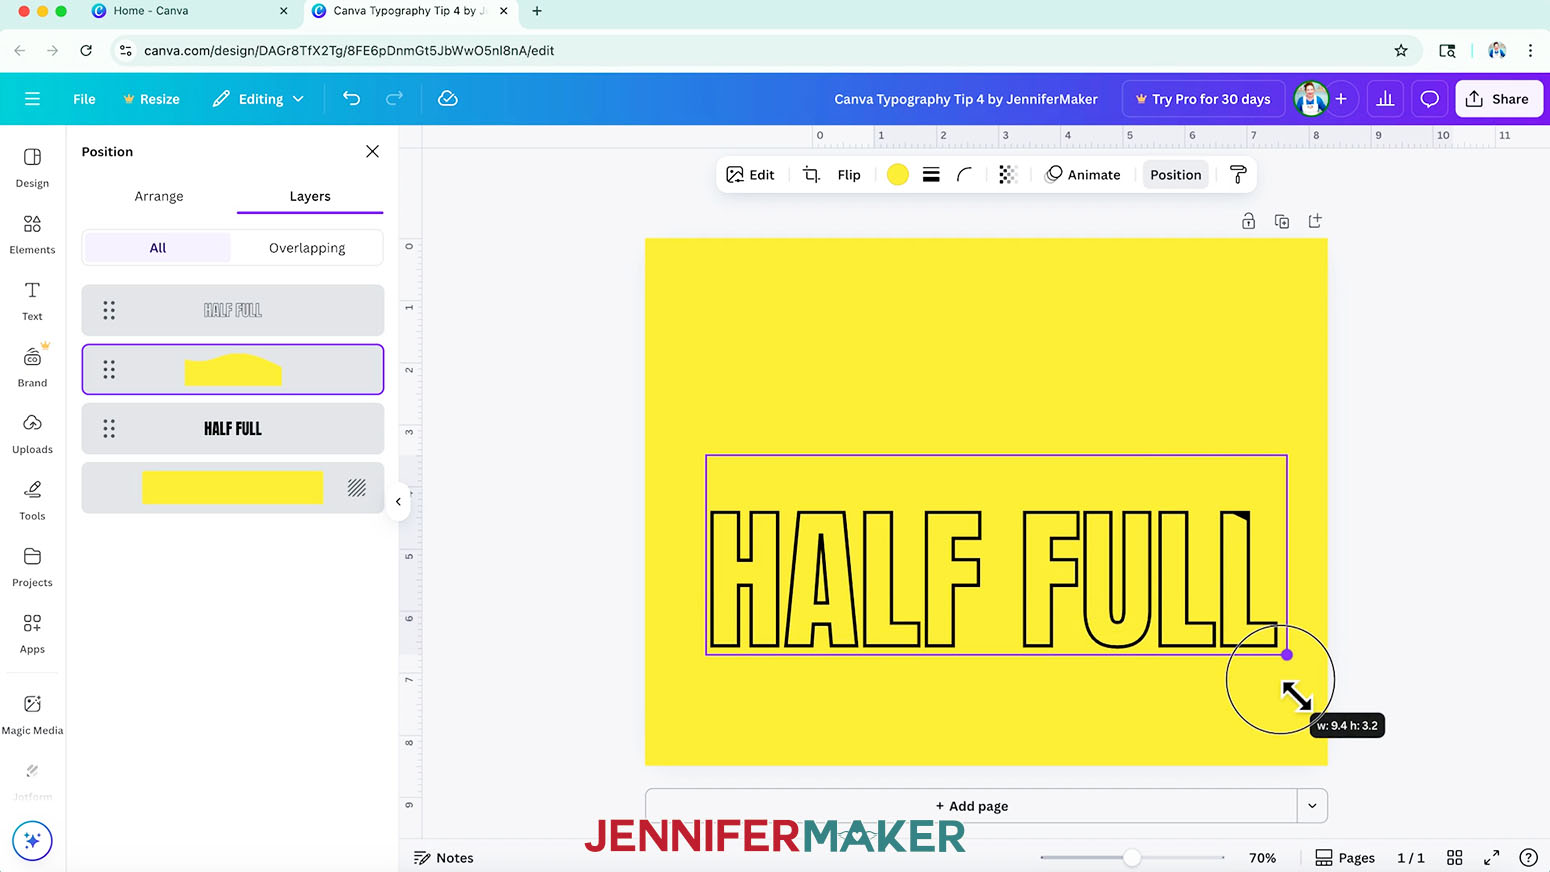
- For a twist on Tip 3, stack your text and use the "Hollow" Effect following steps 1-4 above.
NOTE: I used the "Anton" Canva typeface for this design. - For this tip, search for a "Graphic" under "Elements" that will add a fun detail across the text, like a wave.
- Change it to the same color as the background.
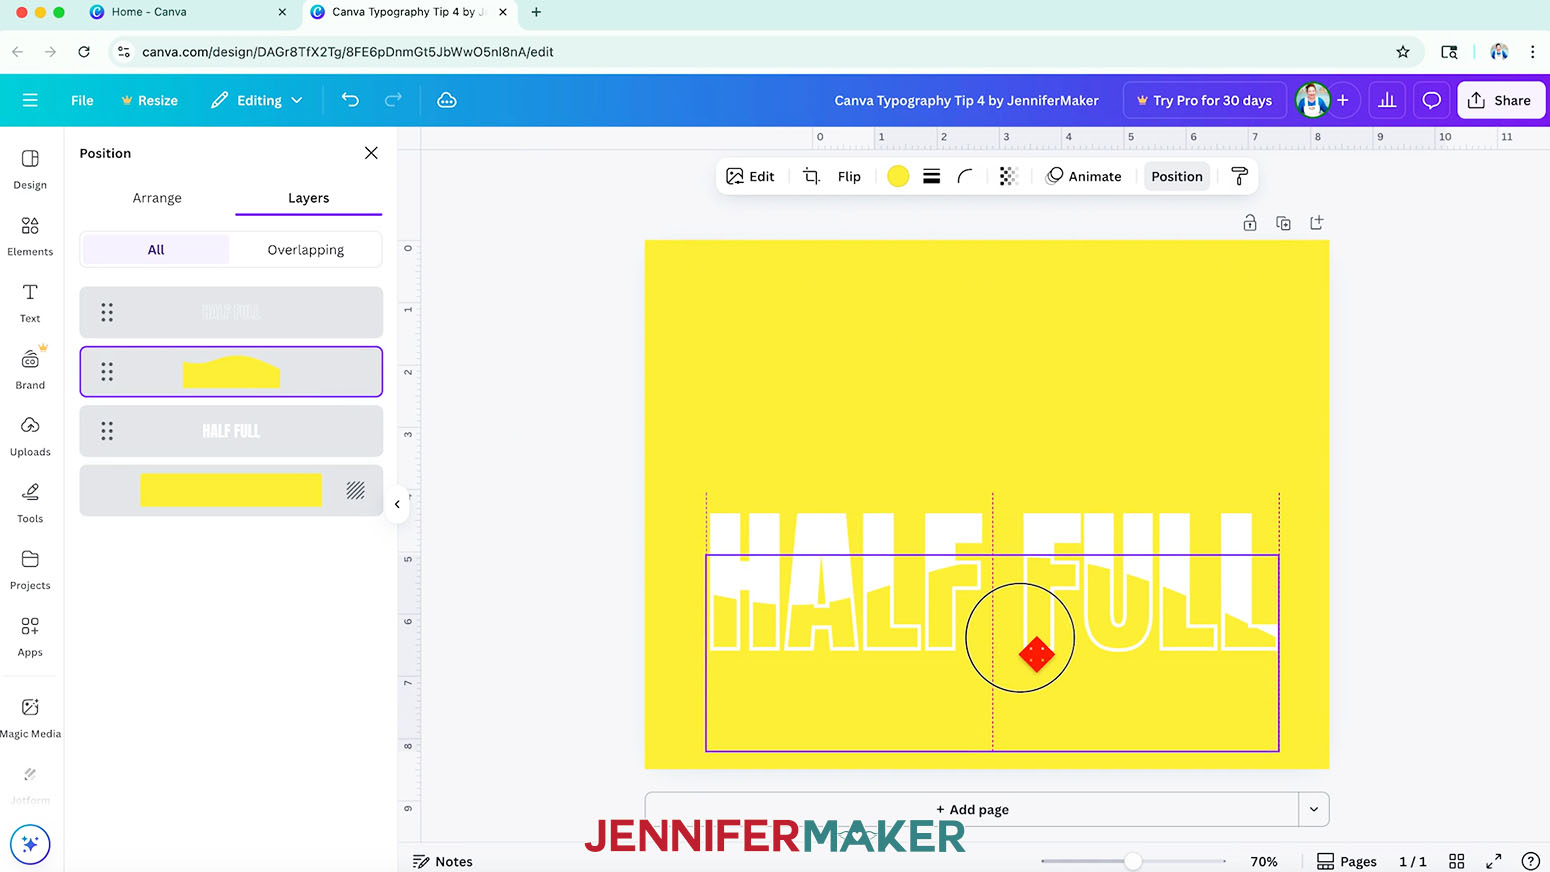
- Position the Graphic between the two text layers, then resize it to fill the letters completely.
- Now, you can change the text layers to another color if you like, and adjust the graphic’s positioning to really show well within the word or phrase.
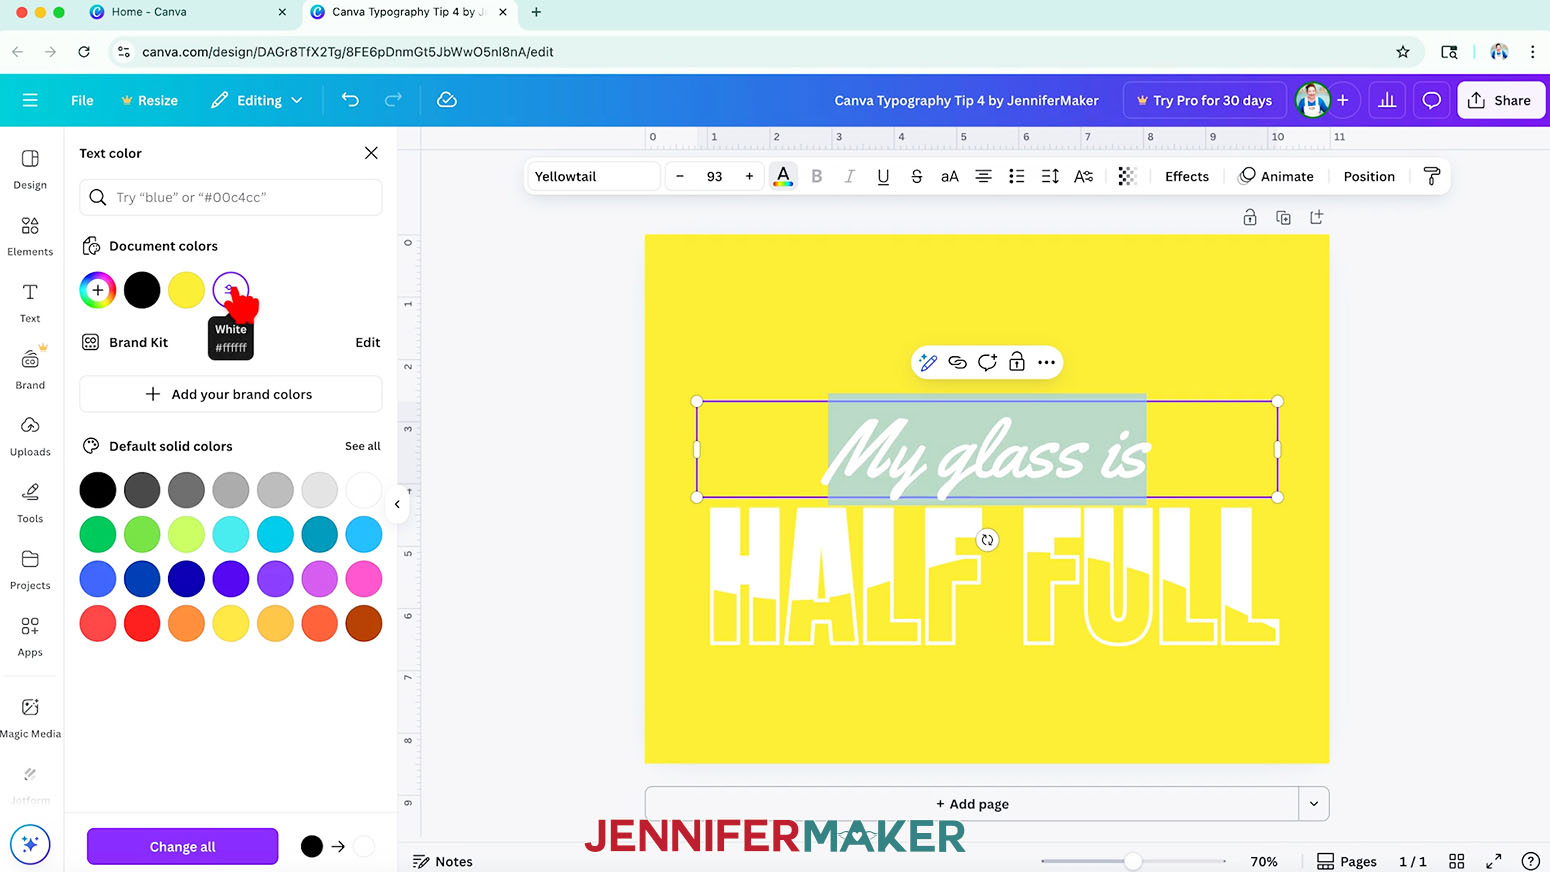
- For interest, add another line of text in a contrasting typeface, like
NOTE: I used the Canva script typeface "Yellowtail." - I used this design for a custom adhesive vinyl mug using the directions in my Vinyl vs Iron-On Tutorial!
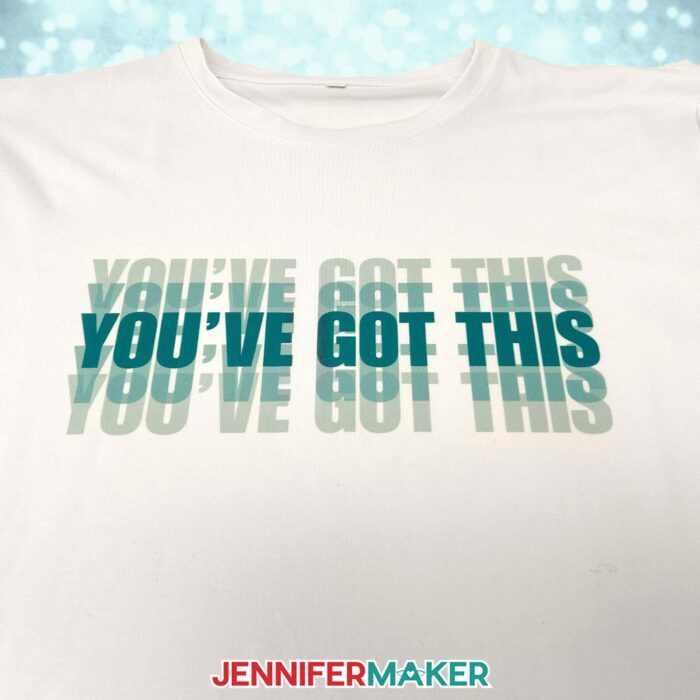
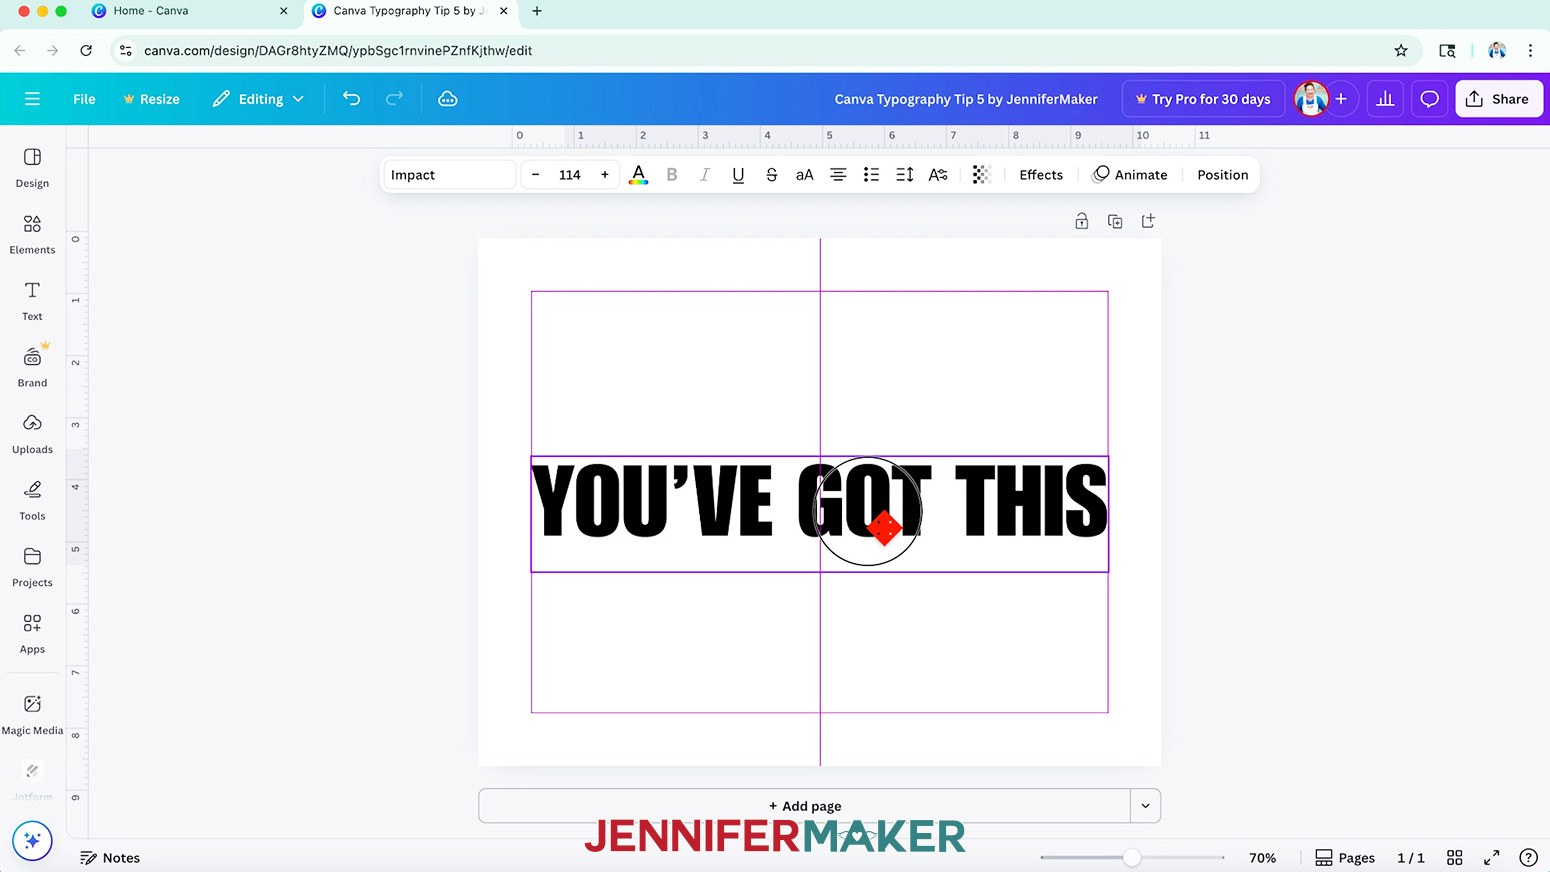
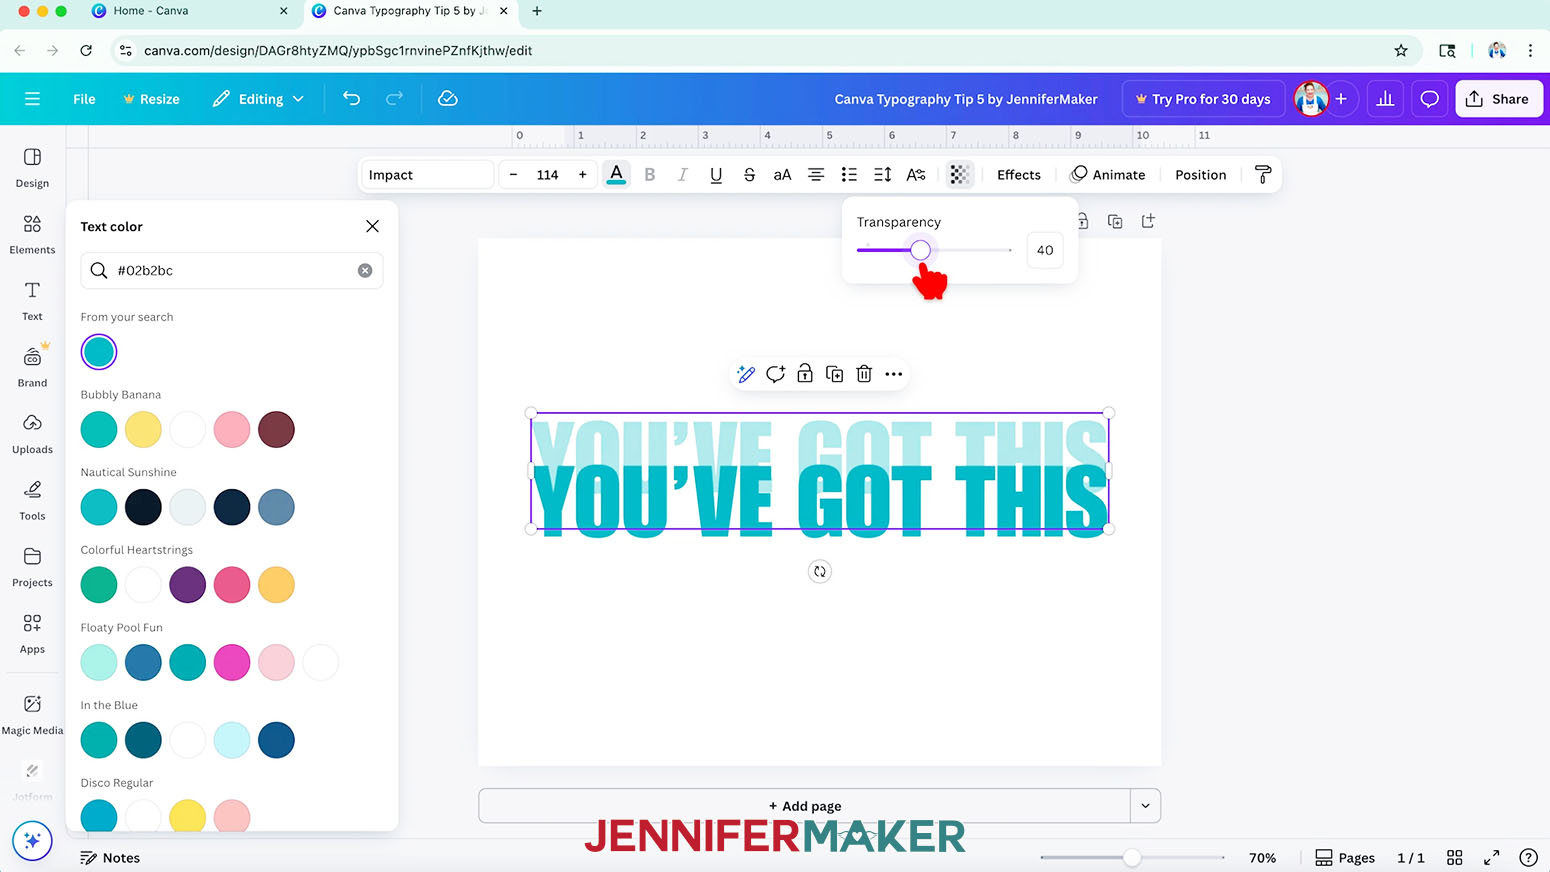
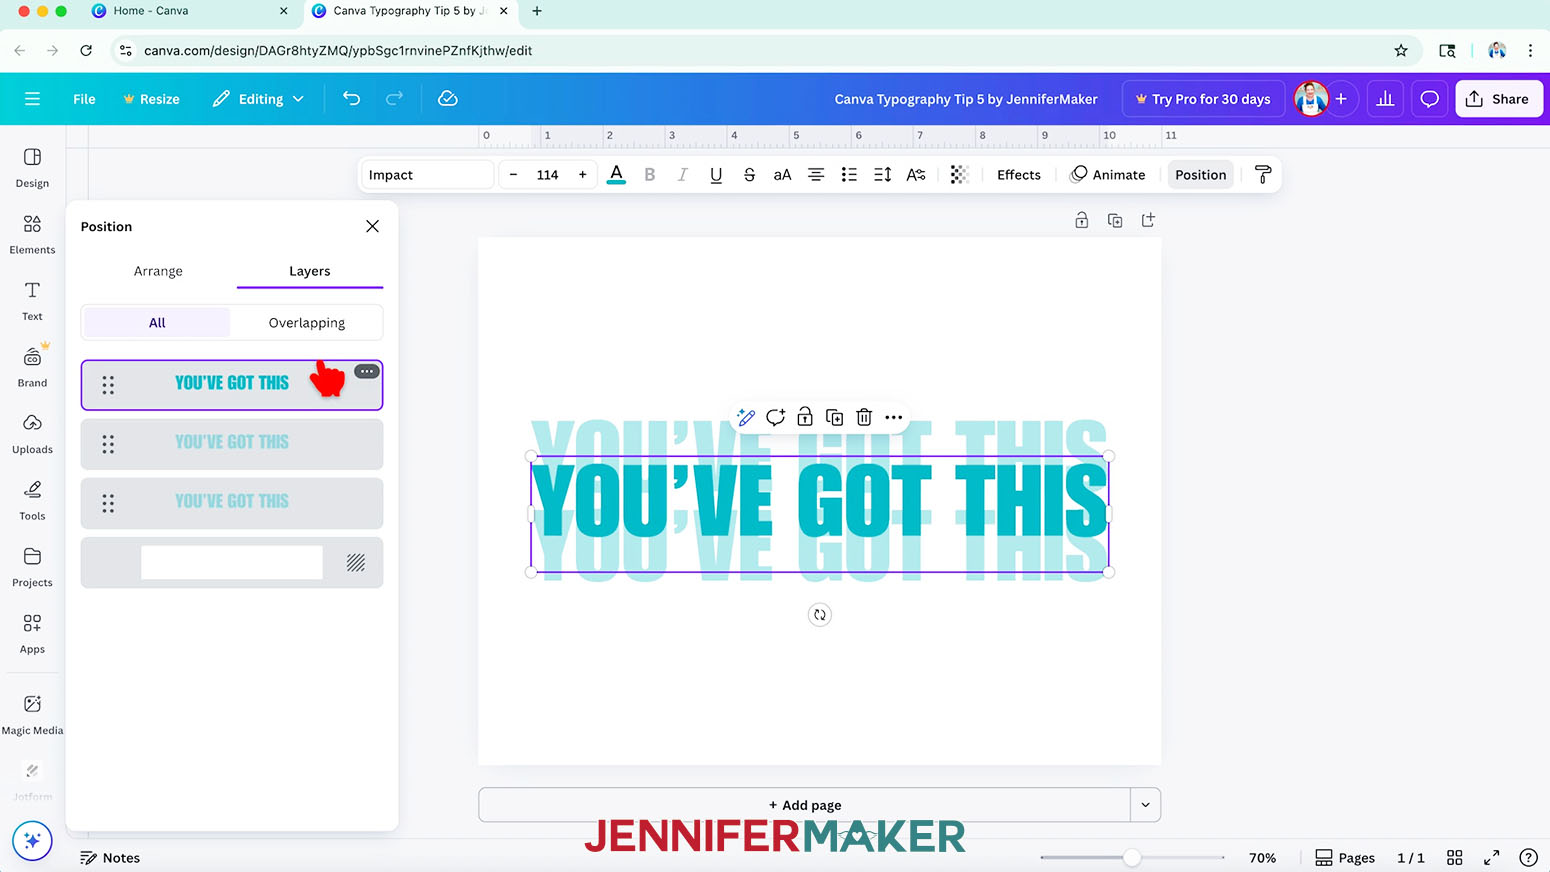
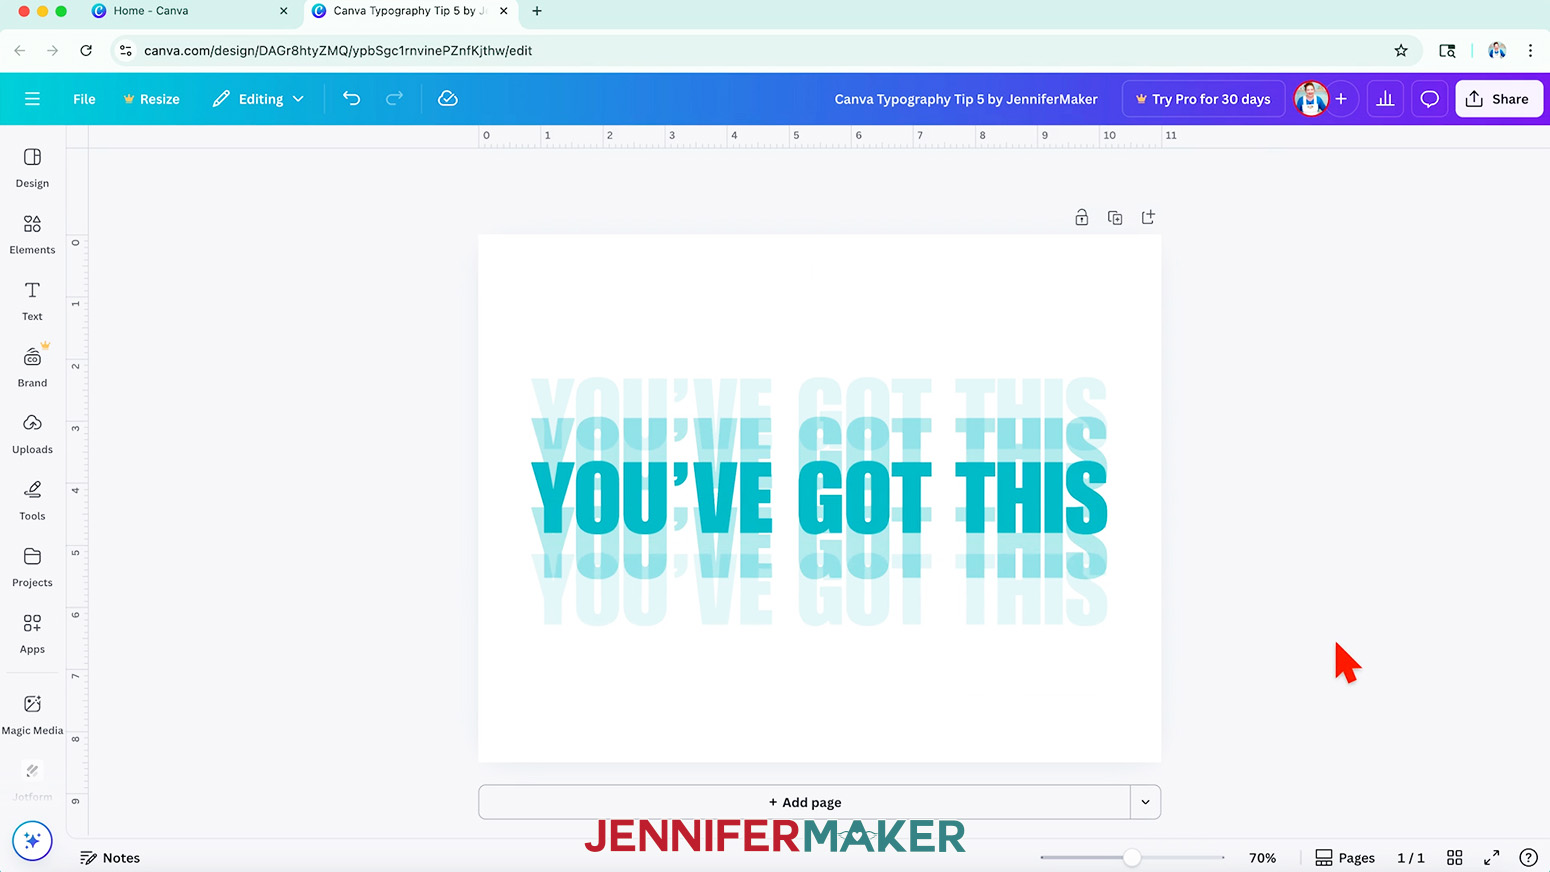
CANVA TYPOGRAPHY TIP 5: DUPLICATED SHADOWS
- Add a line of text in a simple, bold font that’s easy to read.
NOTE: I used the Canva typeface "Impact." - Change the text to a fun color that stands out from the background.
- Duplicate the text, and place the second text box slightly above the first one.
- Find the "Transparency" settings in the top bar and decrease the transparency to about 40% using the slider.
- Then, duplicate the lighter text and move it slightly below the main text box.
- Click "Position" and then use the "Layers" panel to drag the original text box on top of the other two.
- Add another set of duplicated text boxes above and below the current ones, but set their transparency to half of the first set -- about 20% -- to make them fade into each other.
- I made a sublimation shirt with this design using my Sublimation T-Shirts for Beginners Tutorial!
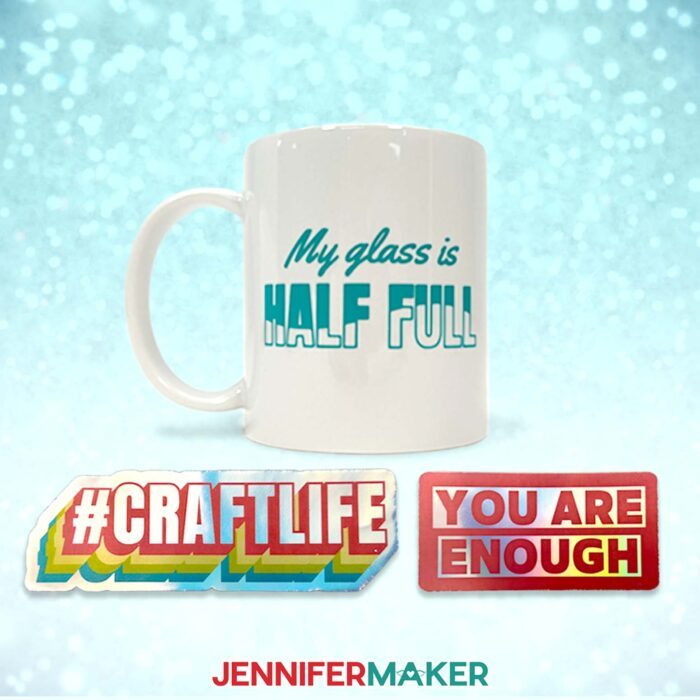
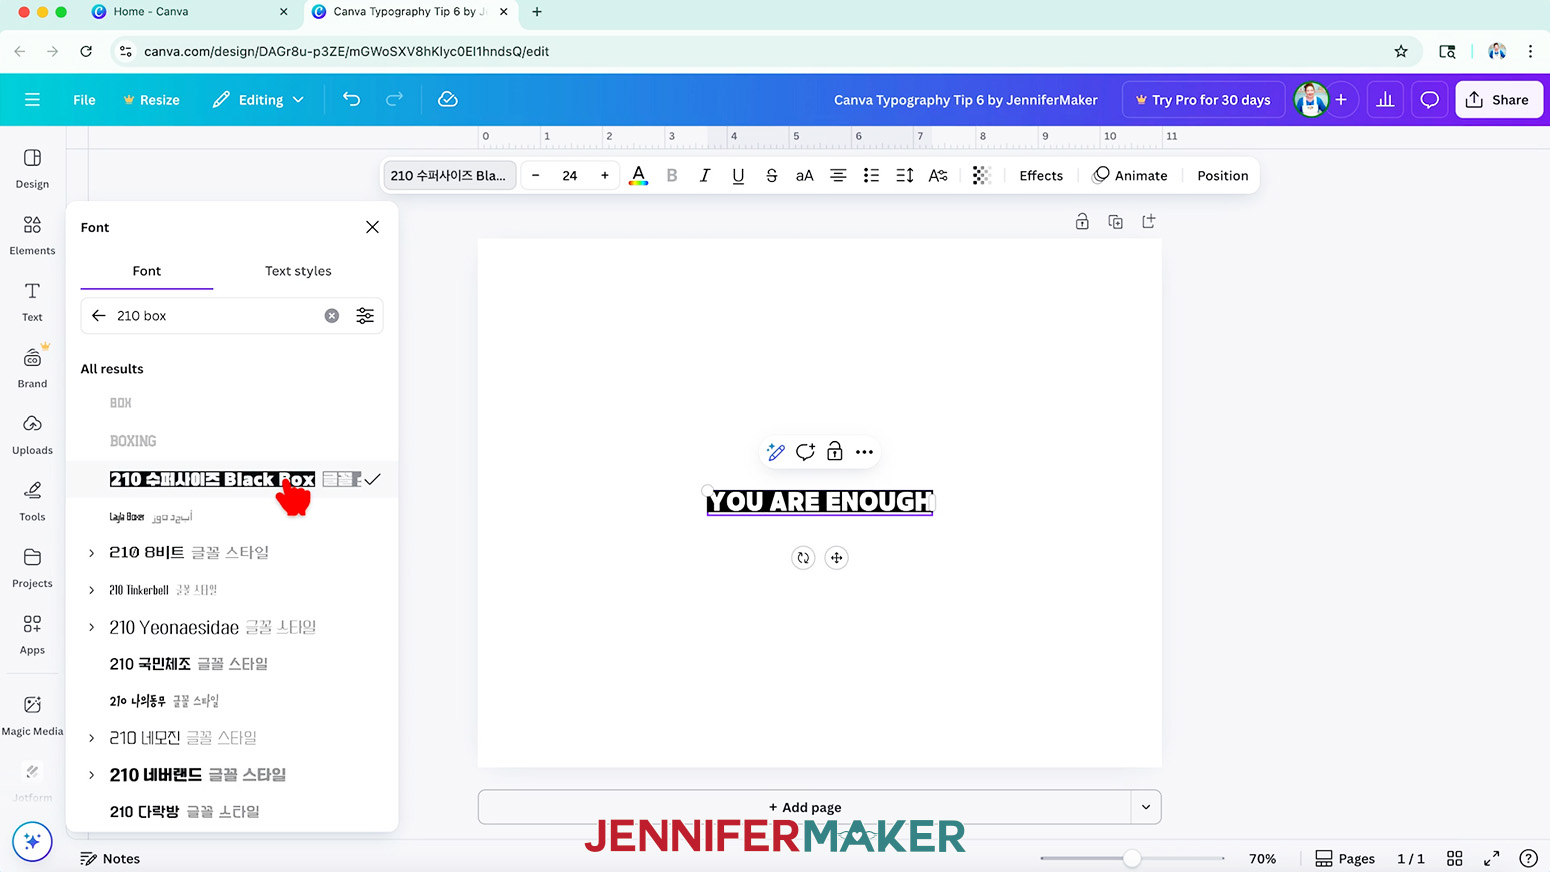
CANVA TYPOGRAPHY TIP 6: GLOWING CUTOUT TEXT
- Add a text box and type your chosen word or phrase.
- Search the "Font" menu for "210 Box." Choosing the "Black Box" option will add a box behind your text.
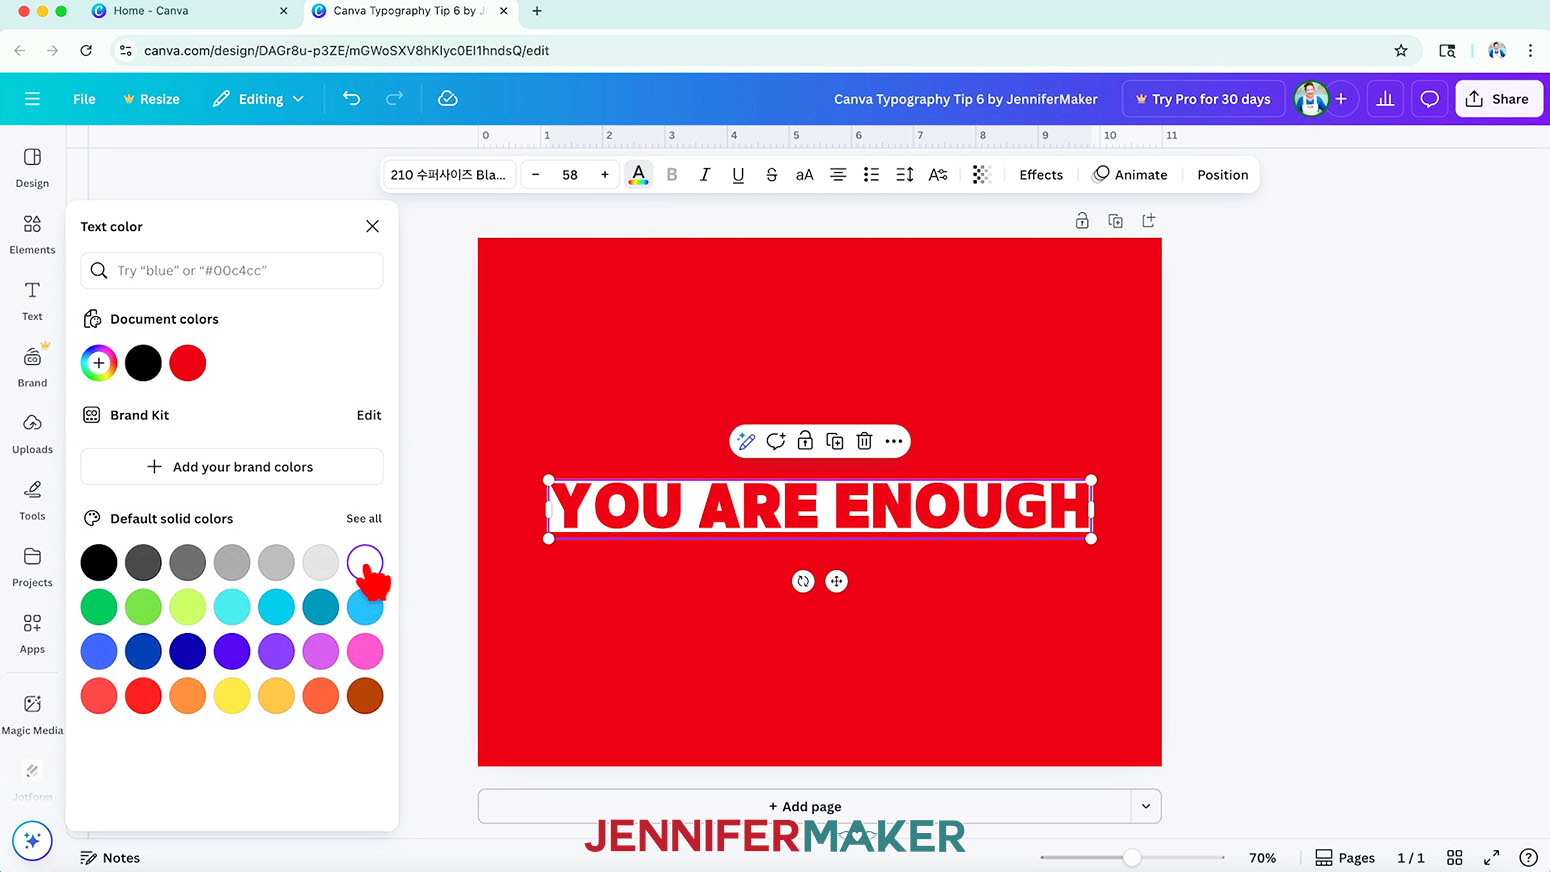
- Change the canvas and text to contrasting colors so you can see that the letters are actually cutouts!
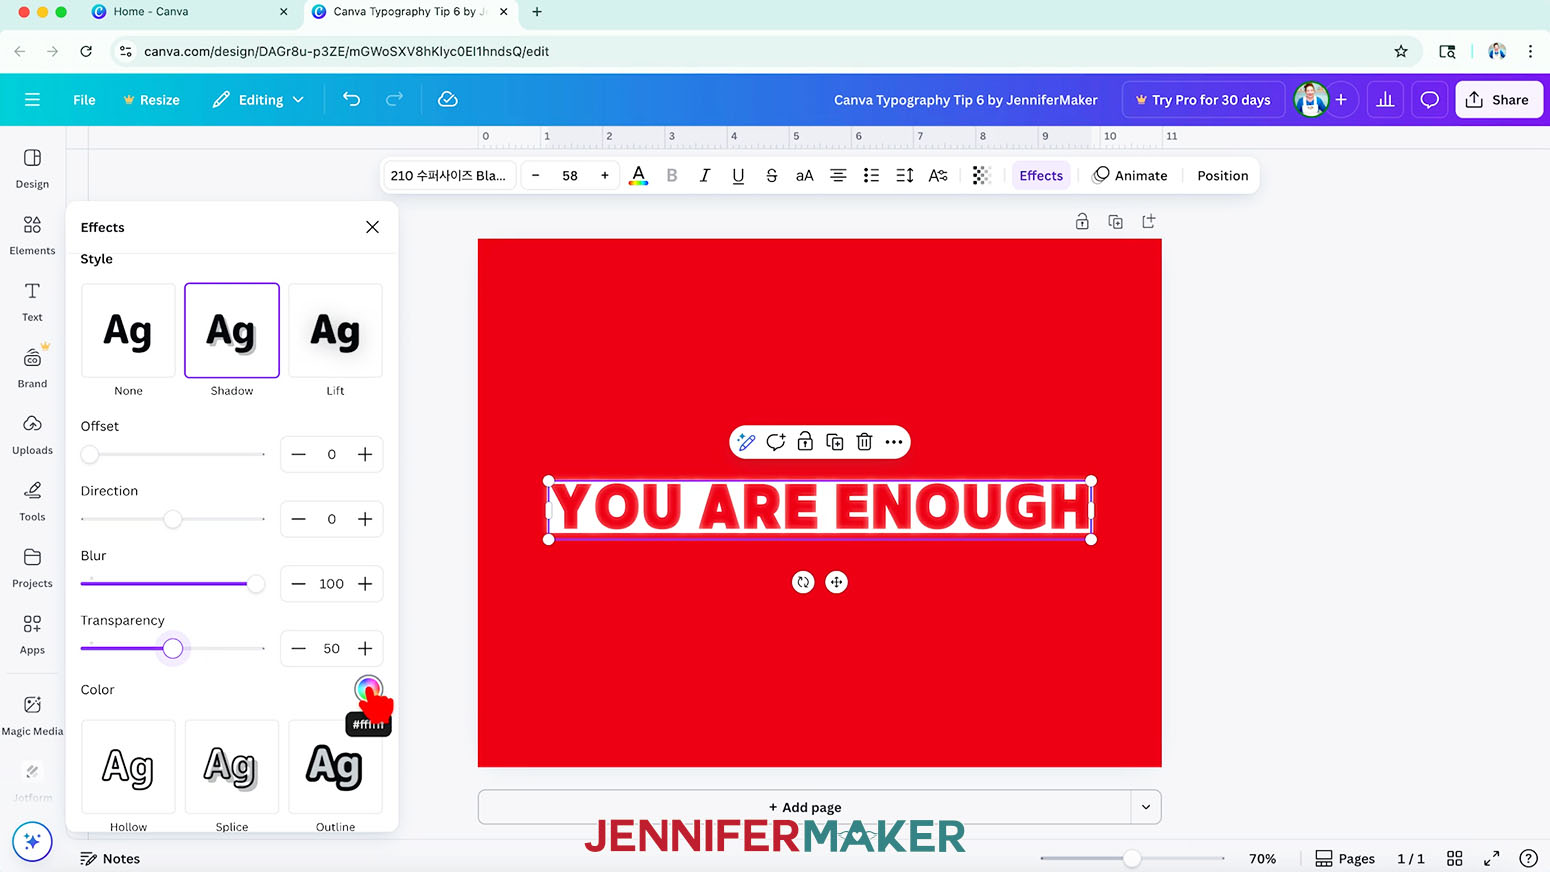
- Click "Effects" in the top bar and pick "Shadow."
- Set the "Offset" and "Direction" to "0" so the shadow will stay within the box.
- Set "Blur" to "100" to make the shadow stretch inside the letter cutouts more.
- Set "Transparency" to about "50" to make the shadow less harsh and more glowy.
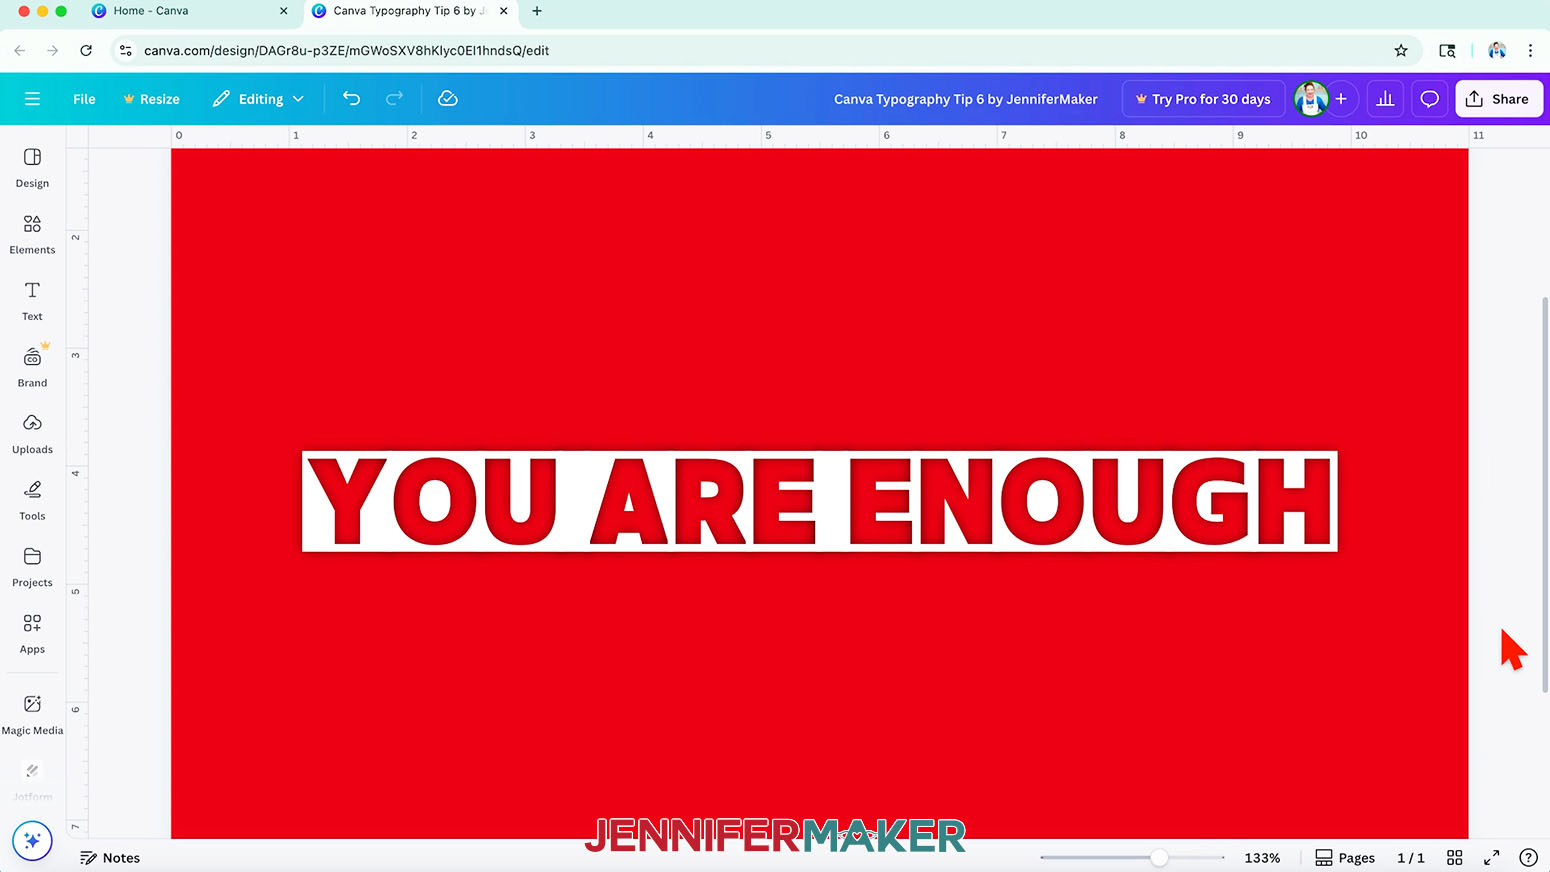
- Set the shadow's color to black, and now the letters have an inner glow!
- I made a sticker with this design using my Canva Stickers Tutorial!
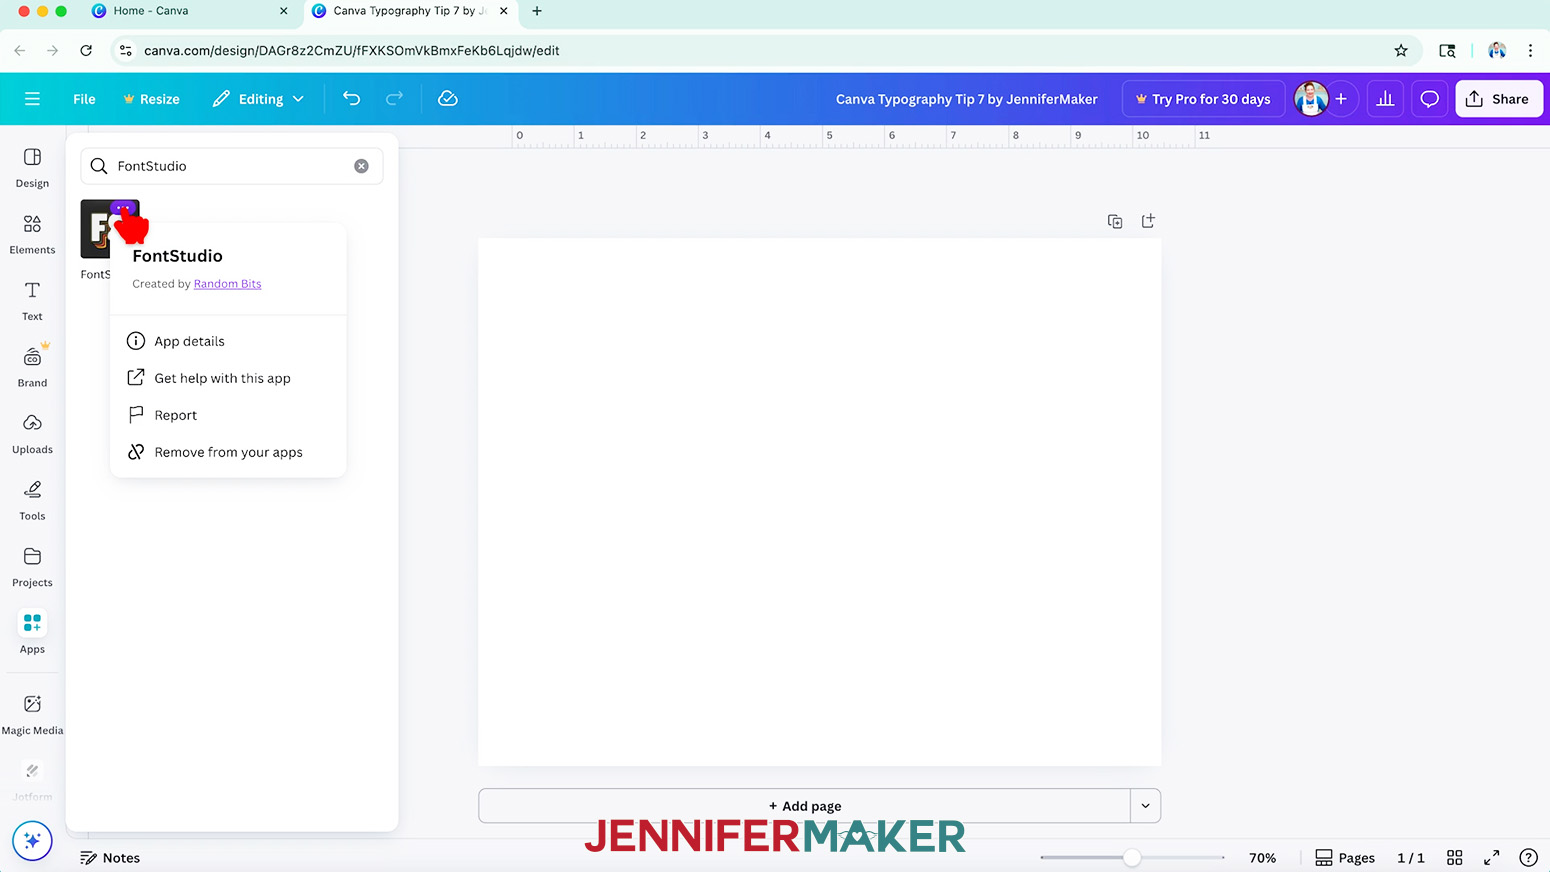
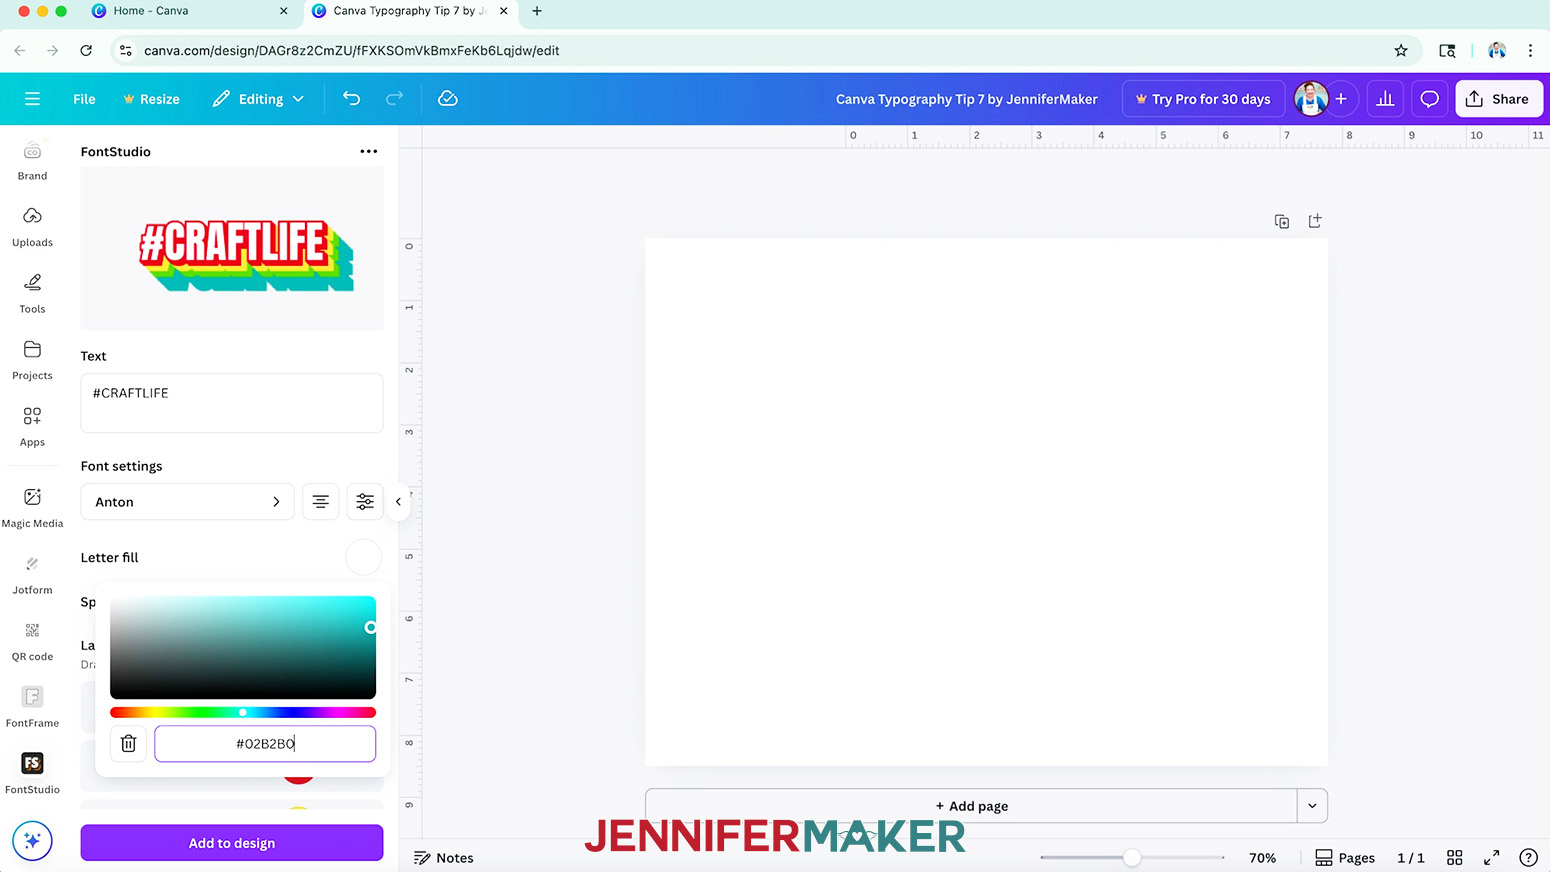
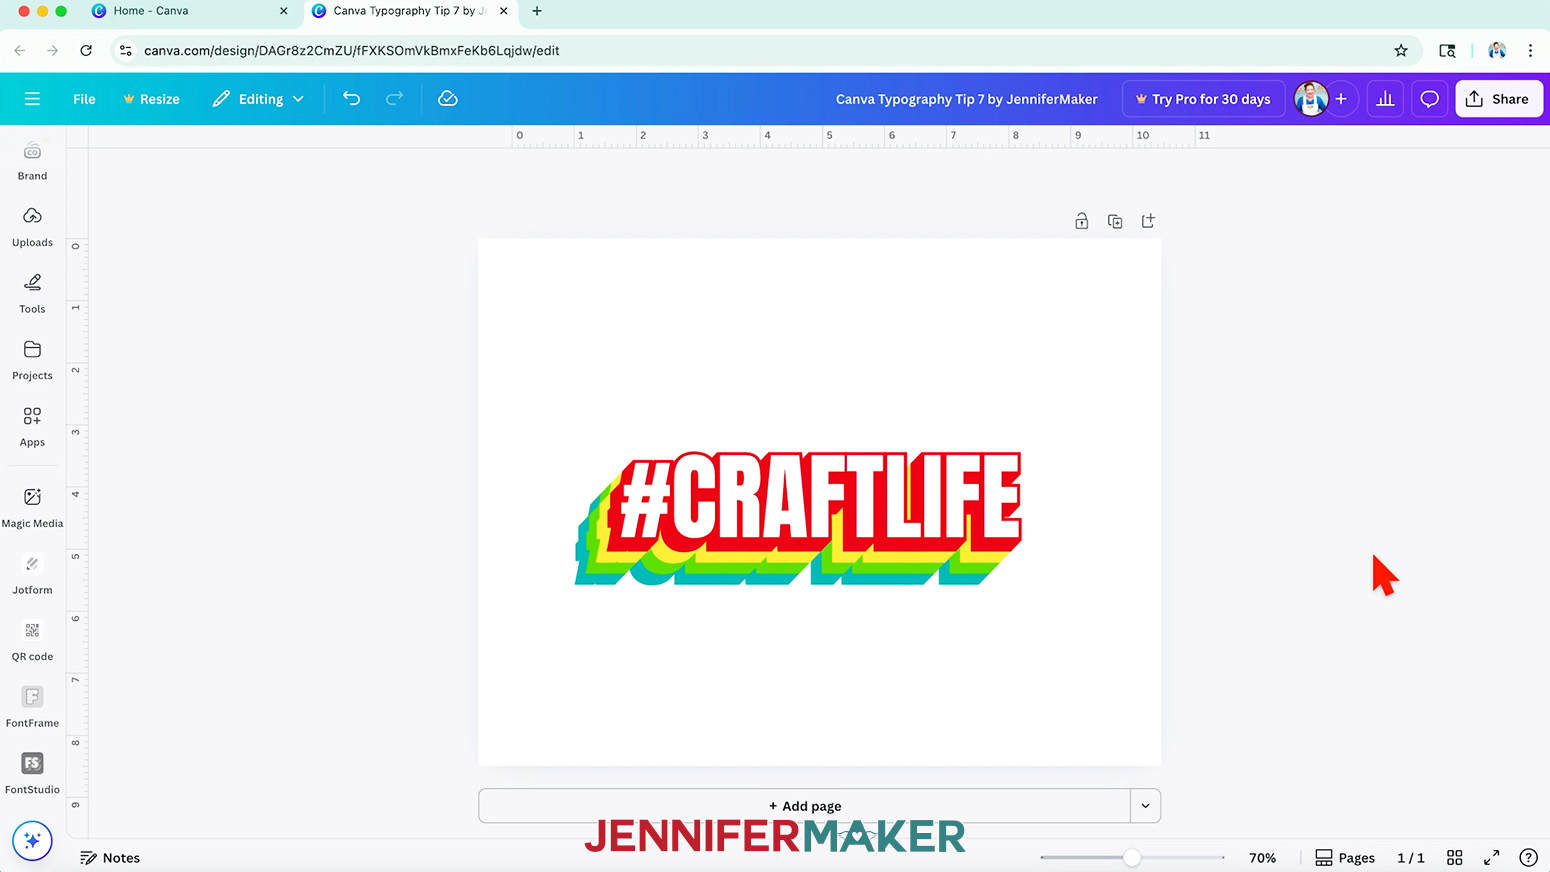
CANVA TYPOGRAPHY TIP 7: EXTRUDED SHADOWS
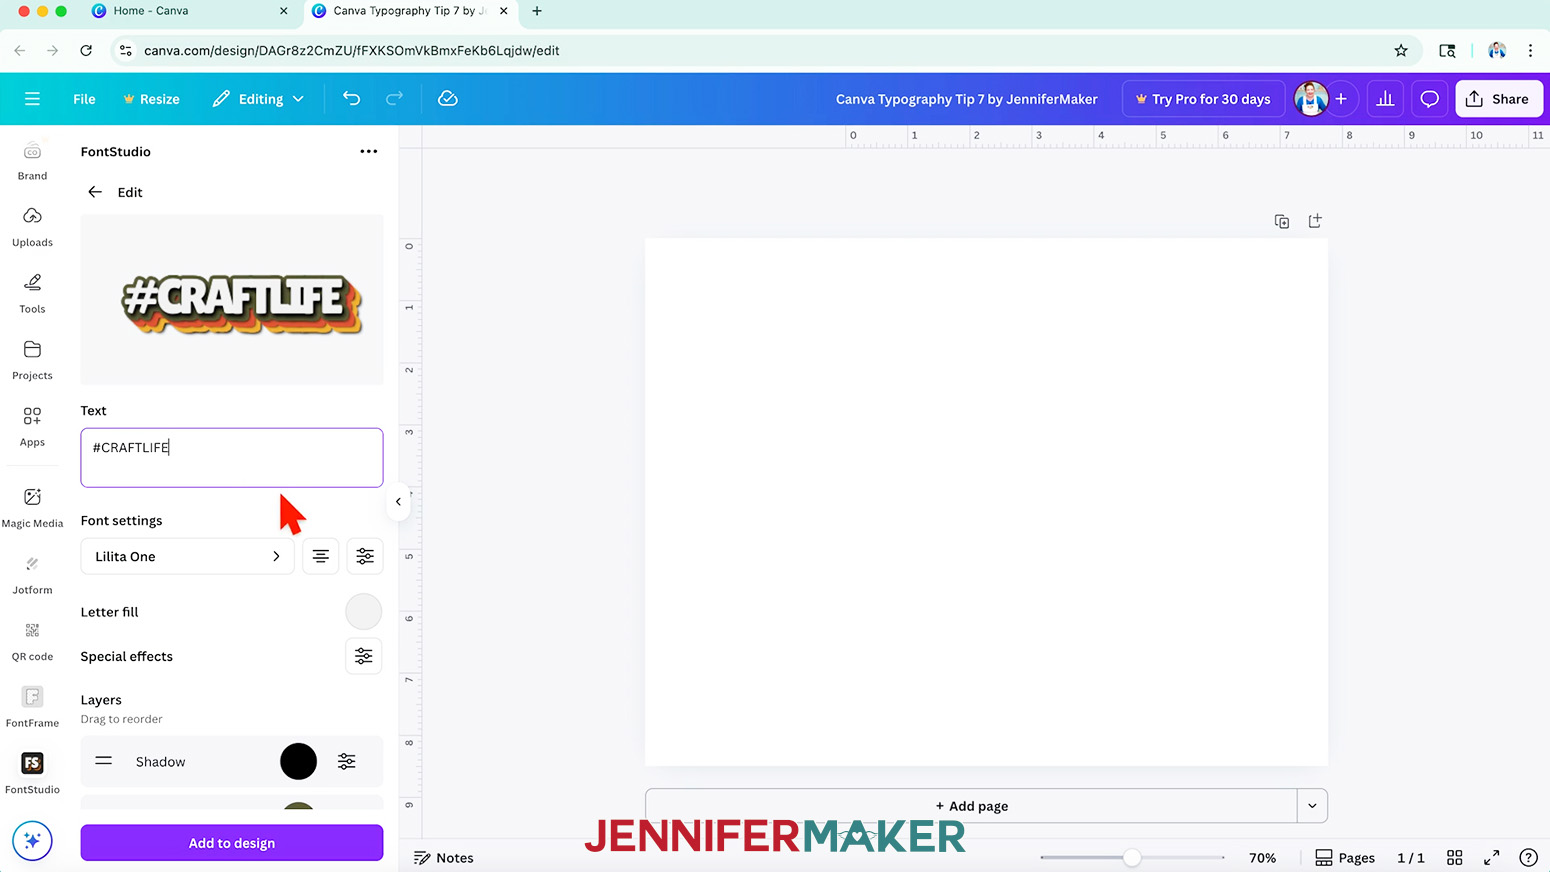
- There are many free Canva apps that can help you design with text, like "FontStudio."
- Of the free options in "FontStudio," I like "Classic" the most since it creates extruded shadows to look like layered colors below the text.
- To use the "Classic" option in the FontStudio app, first type your text in the app's "Text" field. Then you can adjust the settings to create many different looks.
NOTE: I typed "#CRAFTLIFE" in the Canva typeface "Lilita One" since this style works best with capitalized, blocky letters.
TIP: Adjusting the settings once a design is added to the Canvas isn’t always possible, so take your time to make sure the design is just the way you want it before you add it to the Canvas. - You can even add a gradient or image to your text under the "Letter fill" option, but I’ll stick with white.
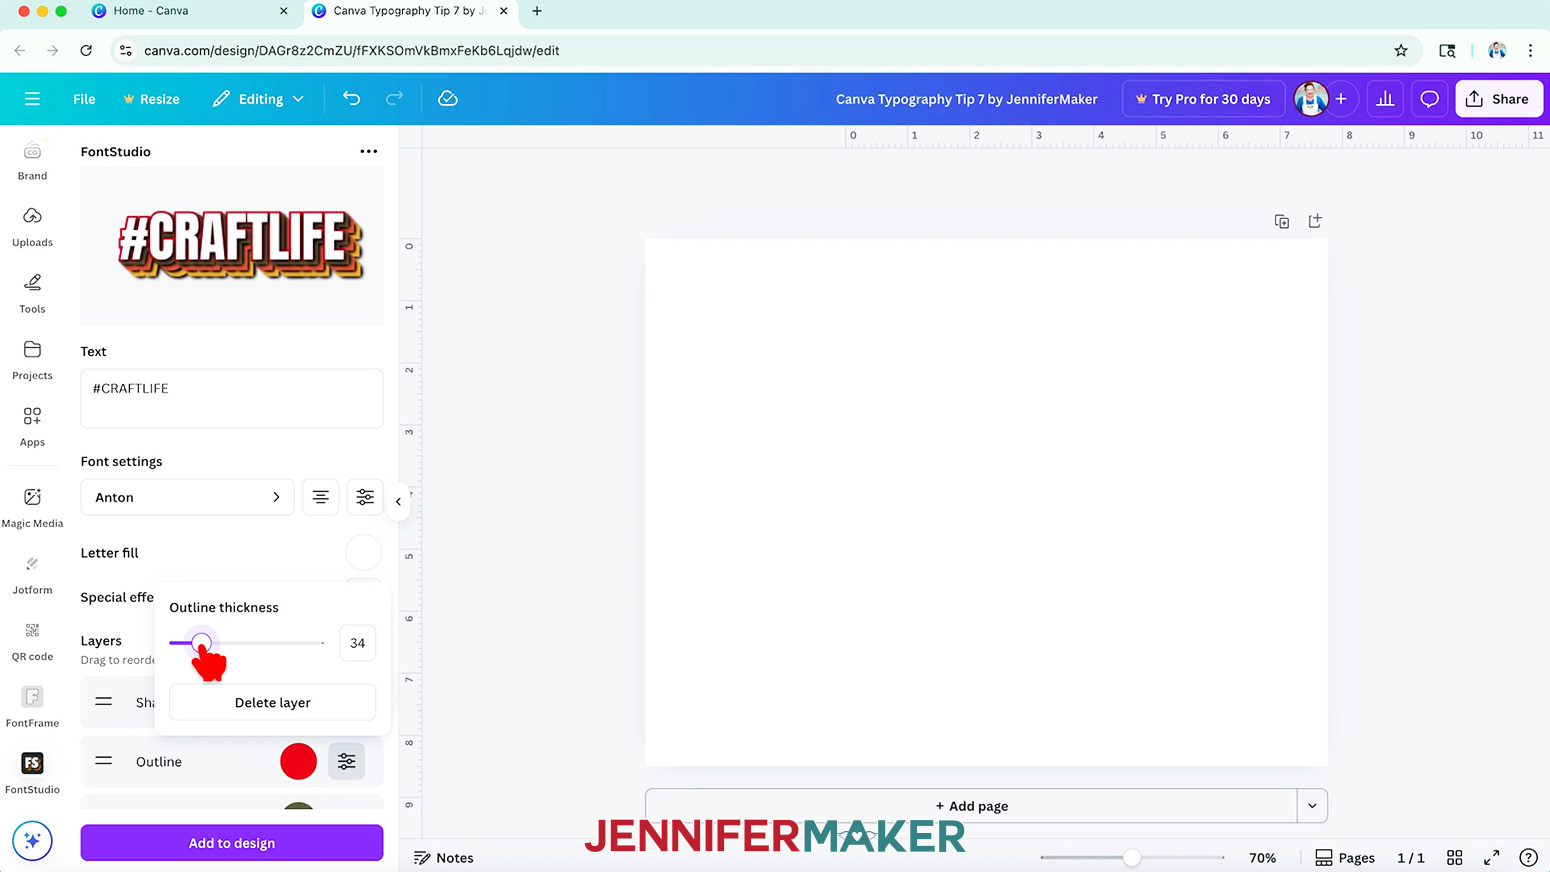
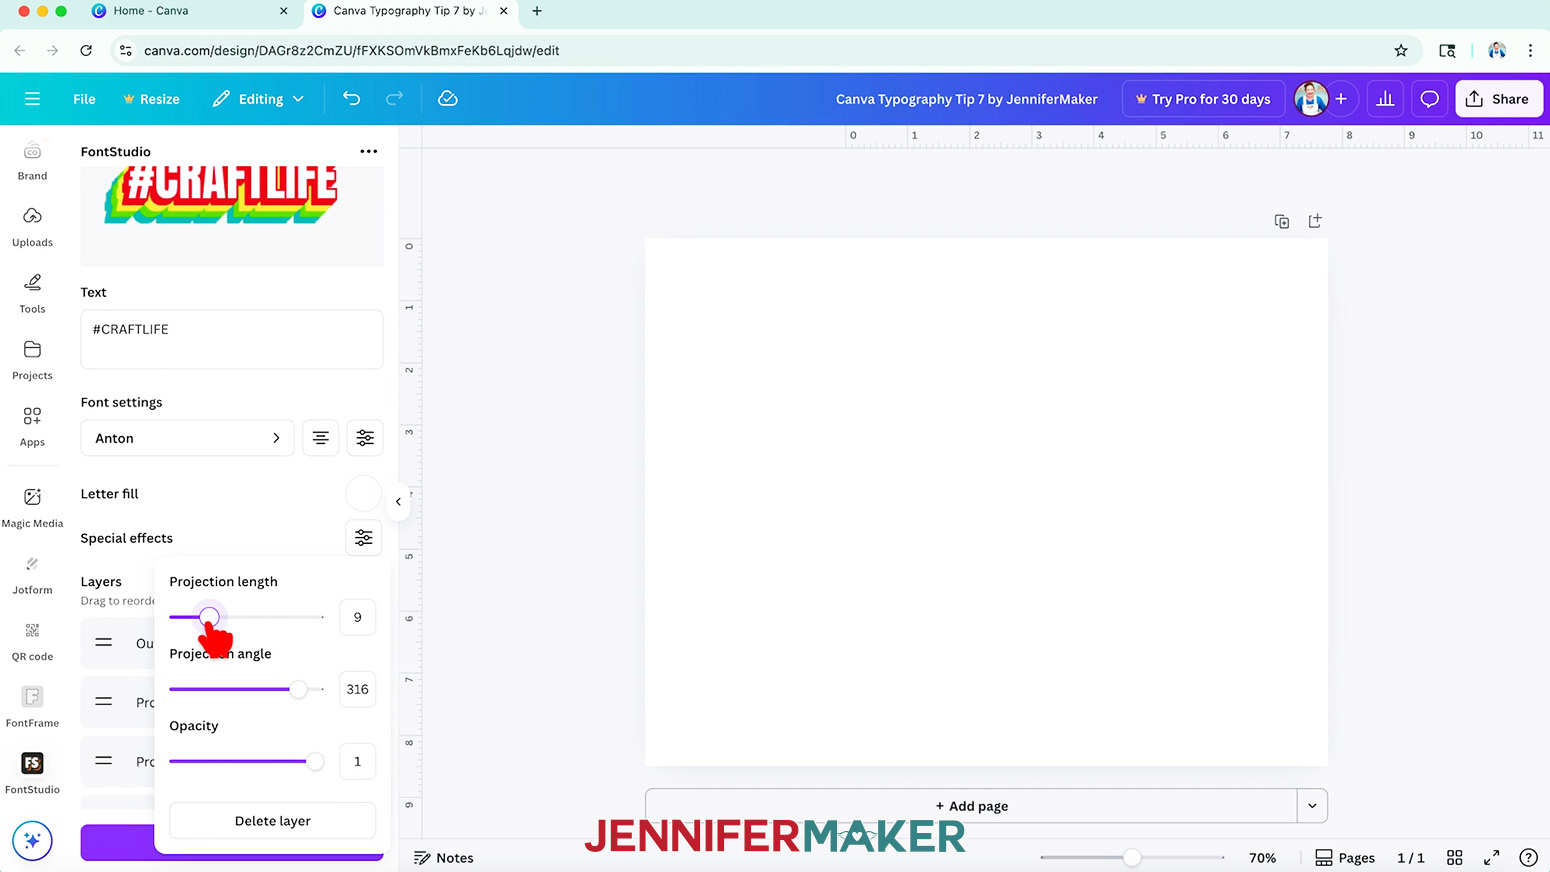
- Then, you can play with the extruded areas. There are three layer types:
° the "Outline" around the main text
° "Projections" of colors
° and "Shadows" under each "Projection"
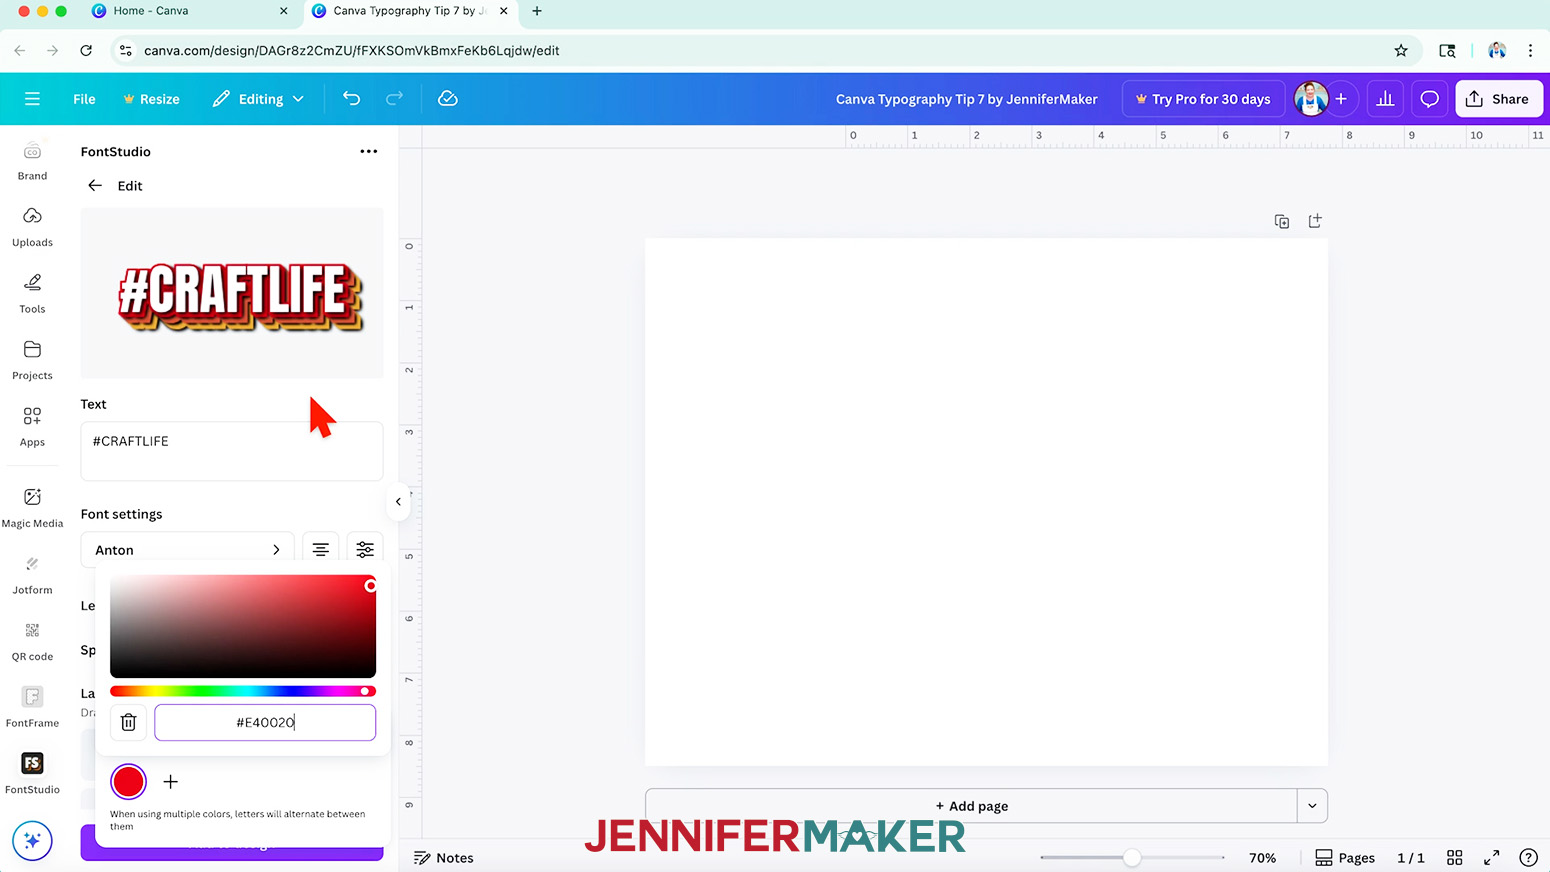
TIP: Each piece has a color swatch, but you can only use the color picker to select a new color.
NOTE: I set the "Outline" to red, then used the settings icon to make it thinner. - To make the first projection's color match the outline, copy and paste the color's Hex code, which tells Canva the precise color to use.
- If you don't like the shadows, you can delete them.
- Continue adjusting the layers as you like.
NOTE: I changed the next projections' colors to some of my favorites by typing in their Hex codes. - You can add as many layers as you want, so I added another "Projection" and made it teal.
- Check your preview, and decide if you want to make any changes.
NOTE: I made the "Projection length" a little longer and changed their angle to the bottom left corner.
TIP: Remember to apply the same settings to all the matching layers to make your design look more consistent. - When everything looks correct, click "Add to design," and then you can resize it using the corner handles to fit your project.
- I made a sticker with this design using my Canva Stickers Tutorial!

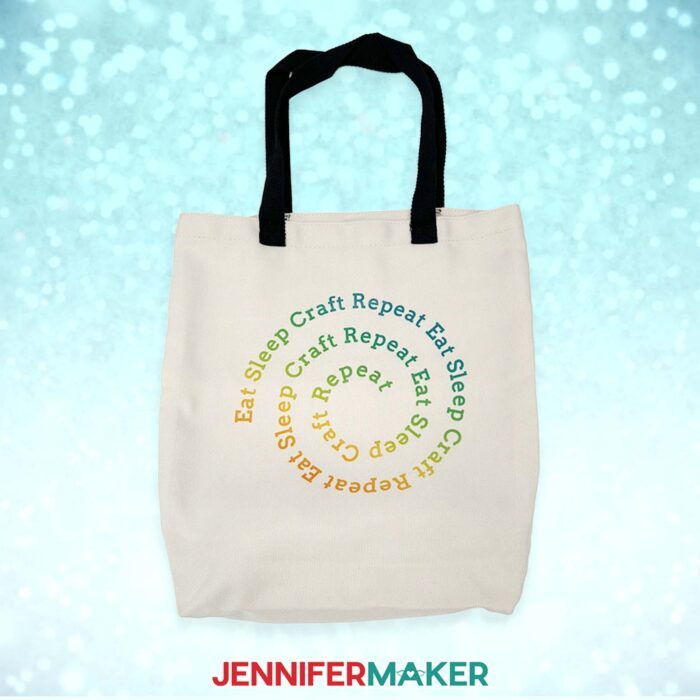
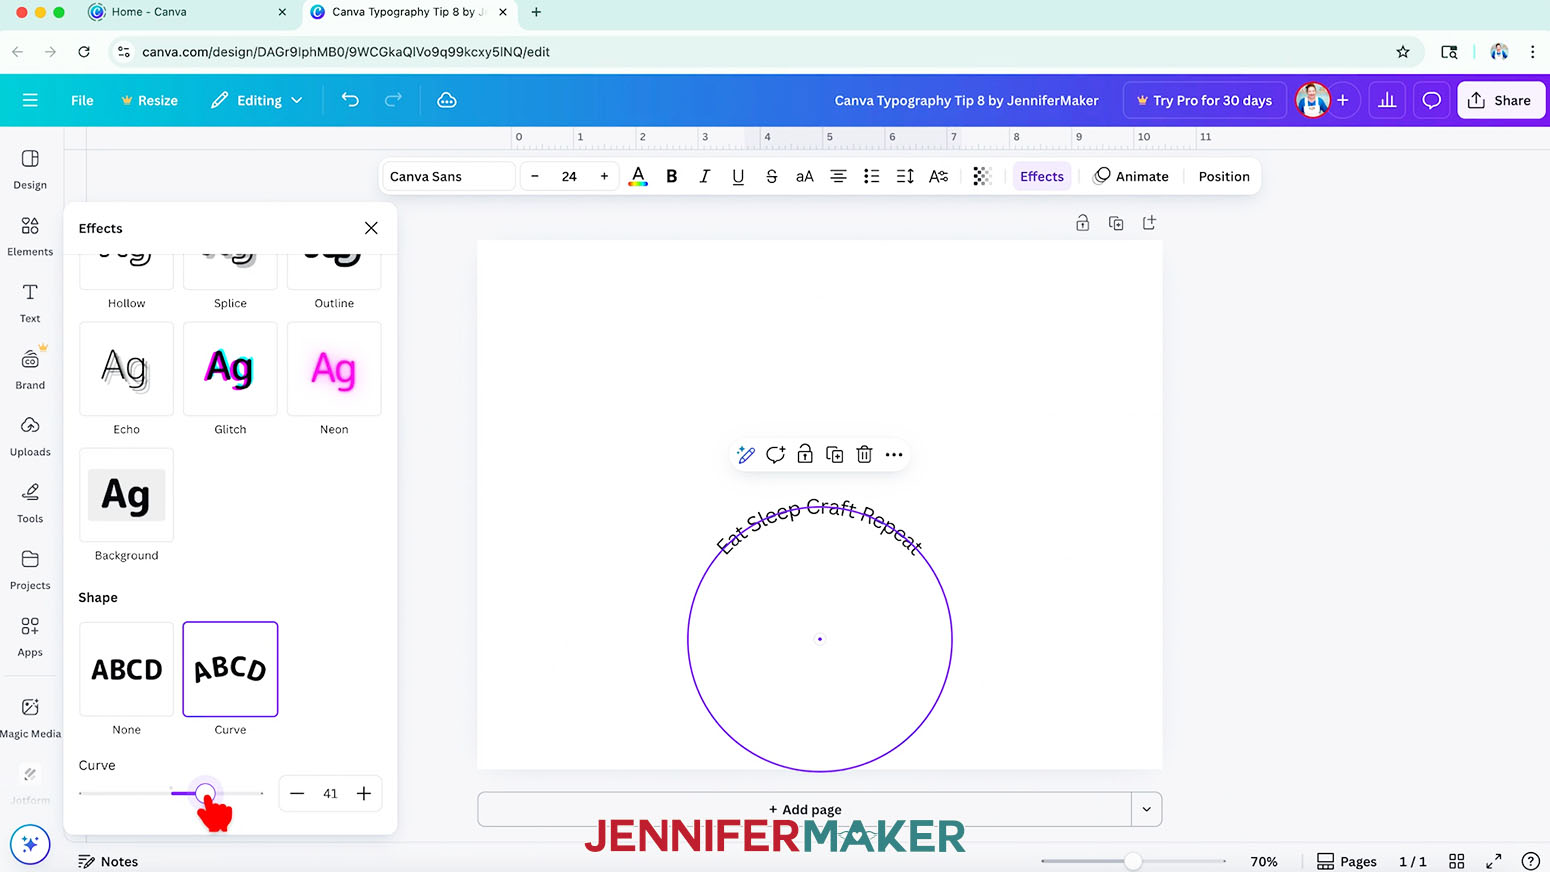
CANVA TYPOGRAPHY TIP 8: SHAPED TEXT
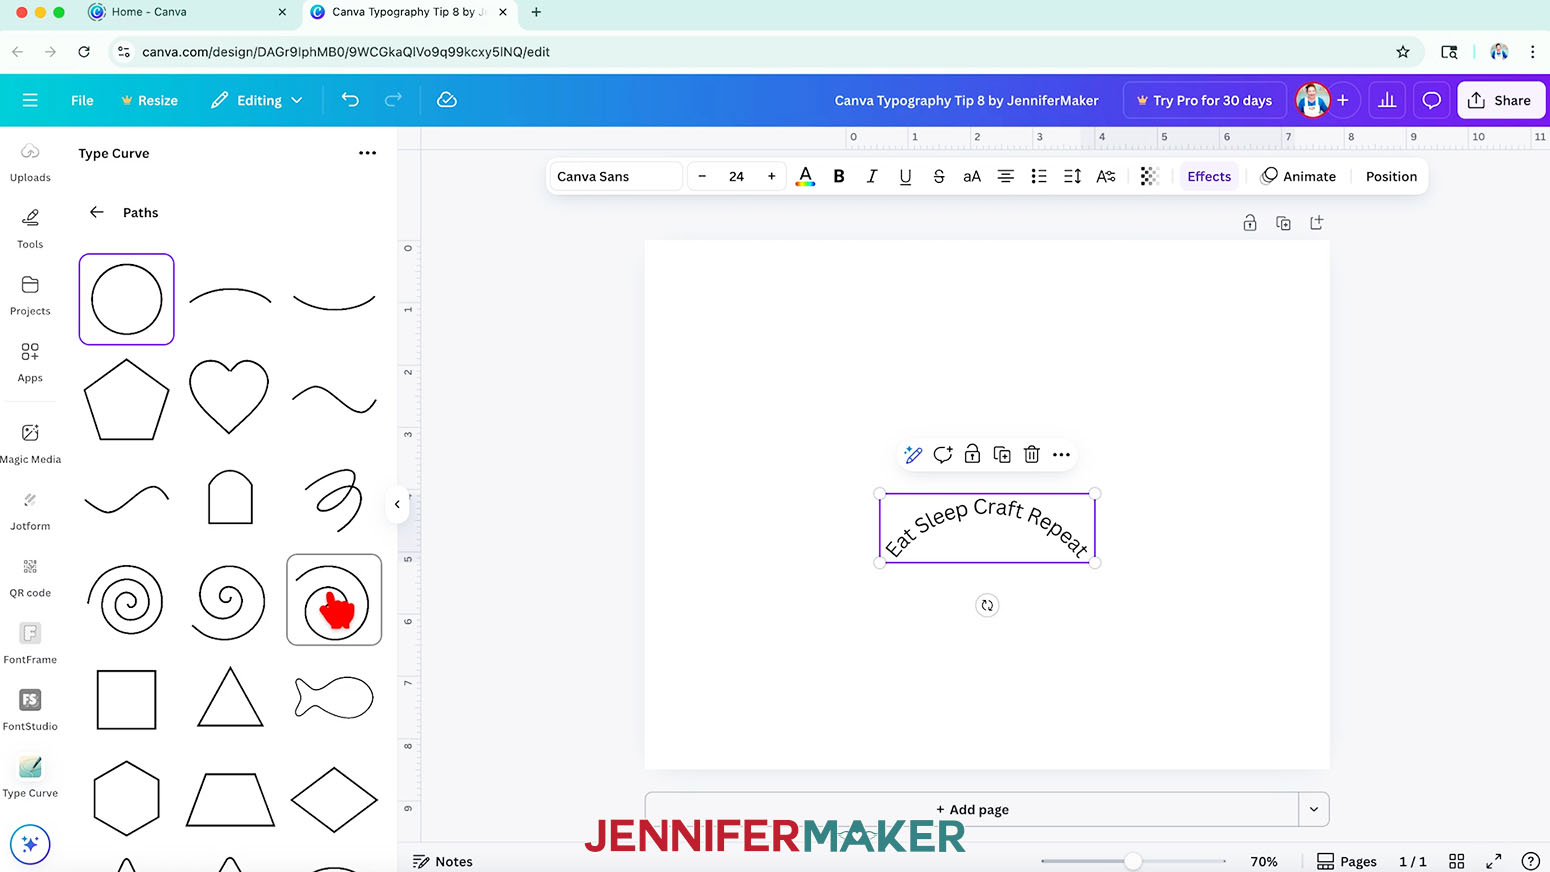
- Click on "Apps" and then search for one called "Type Curve."
NOTE: If you want to keep it simple and curve your text around a circle shape, just click on "Effects" in the top bar and choose "Curve" under "Shape." - In the Type Curve app, click "See all" next to "Paths."
- Pick the path shape you want from the options.
NOTE: I chose one of the spirals. - Type the text you want into the "Text" window.
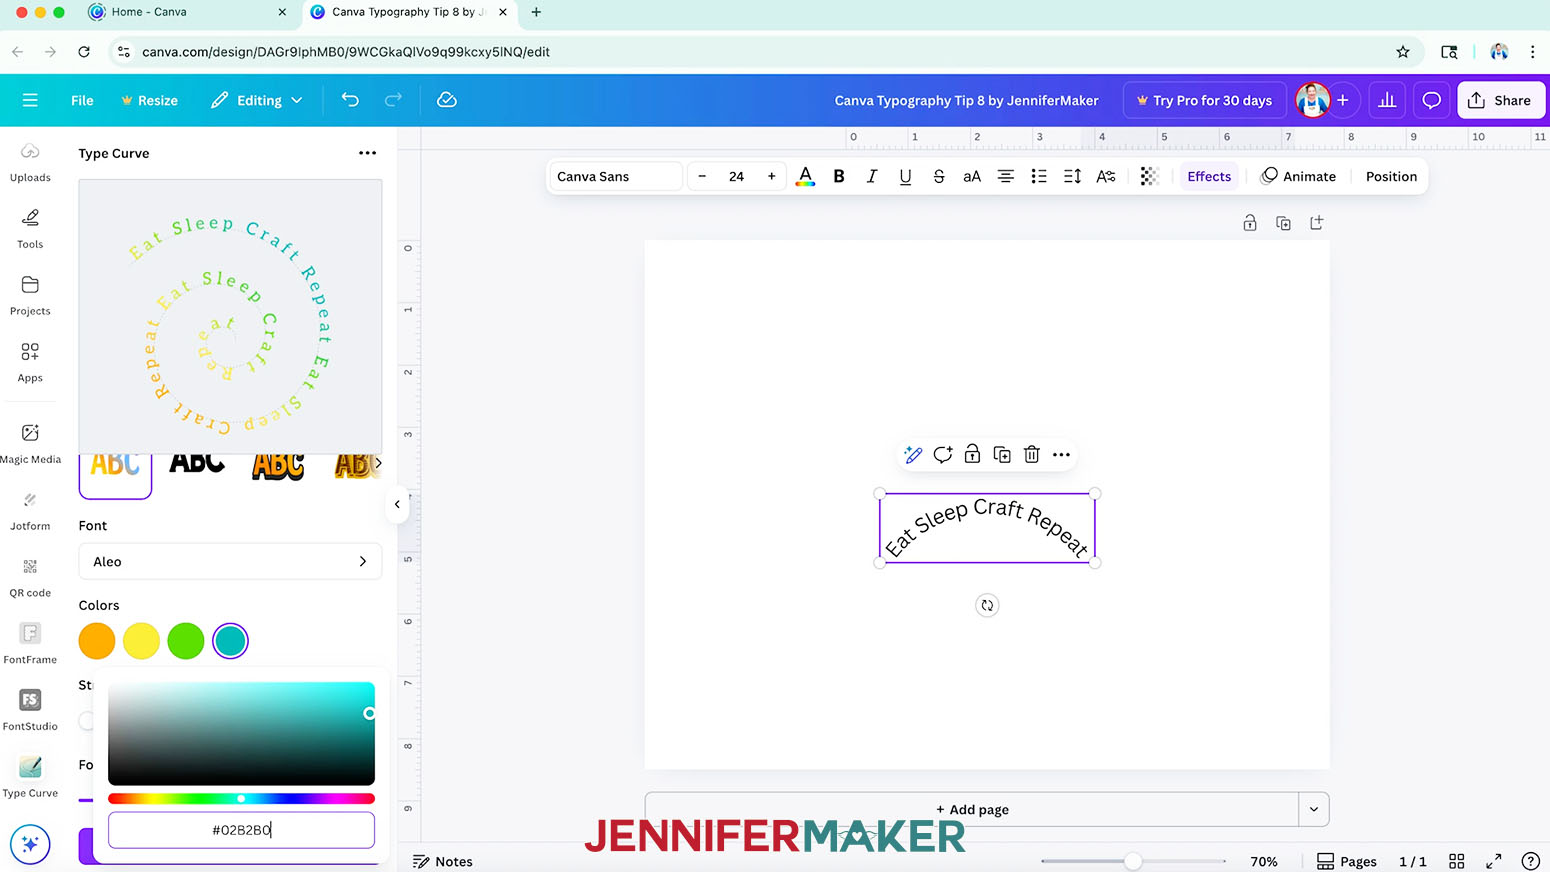
NOTE: I typed "Eat Sleep Craft Repeat" several times. - Then, you can adjust the typeface and play with different styles.
NOTE: I used the Canva typeface "Aleo." - If you pick the gradient Style, you can change the colors, but they'll be positioned in the same spots as previewed in the example, so plan your color order first.
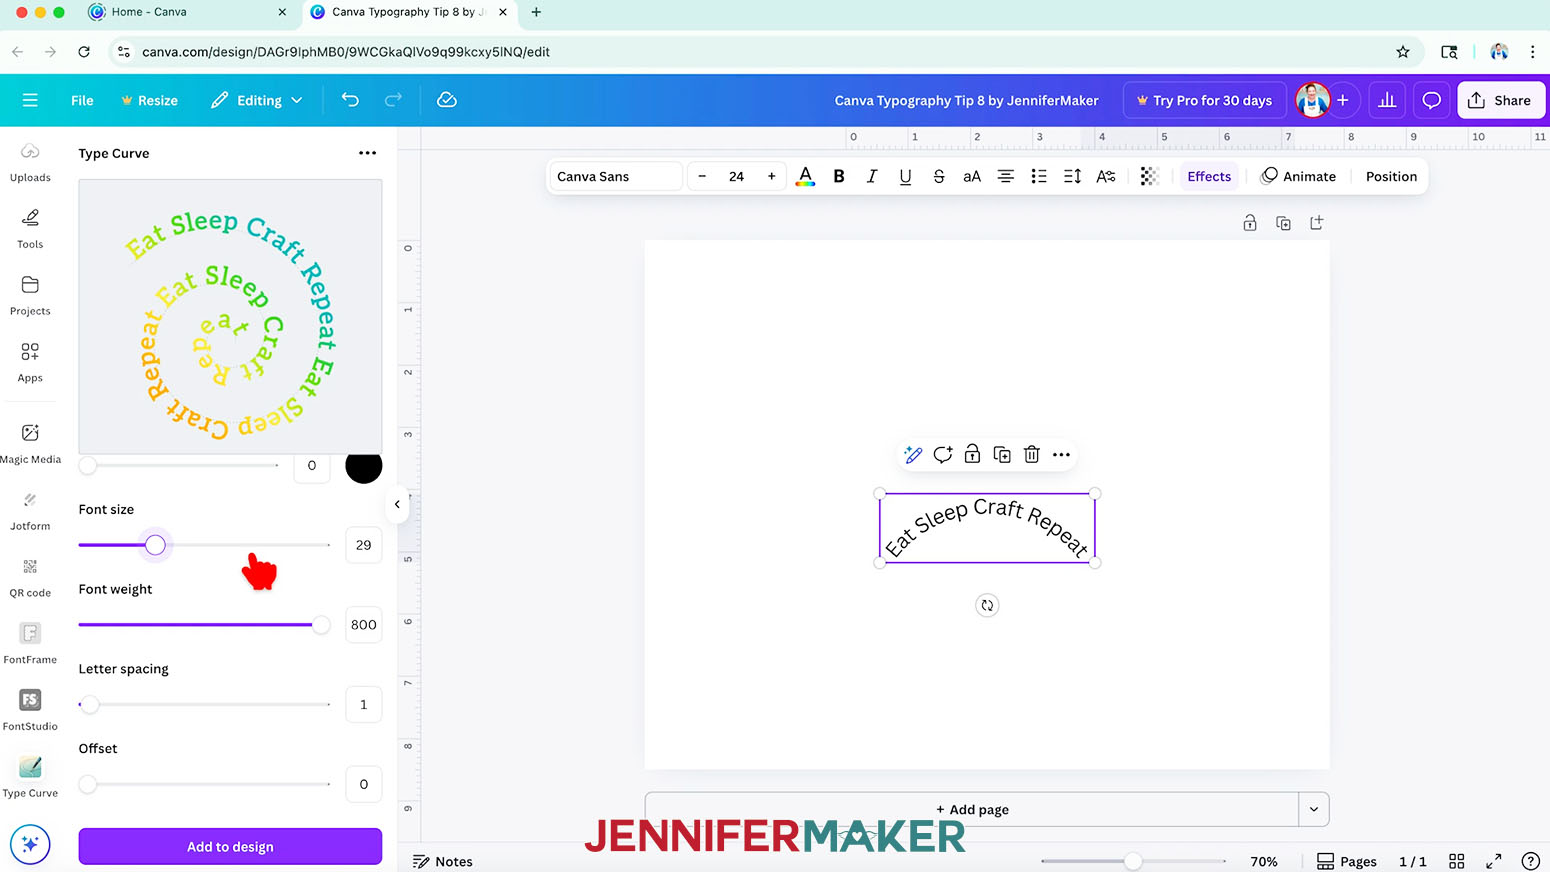
- Adjust the "Font size," "Font weight," and "Letter spacing" settings, but keep an eye on the design preview at the top of the window to make sure your words look the way you want!
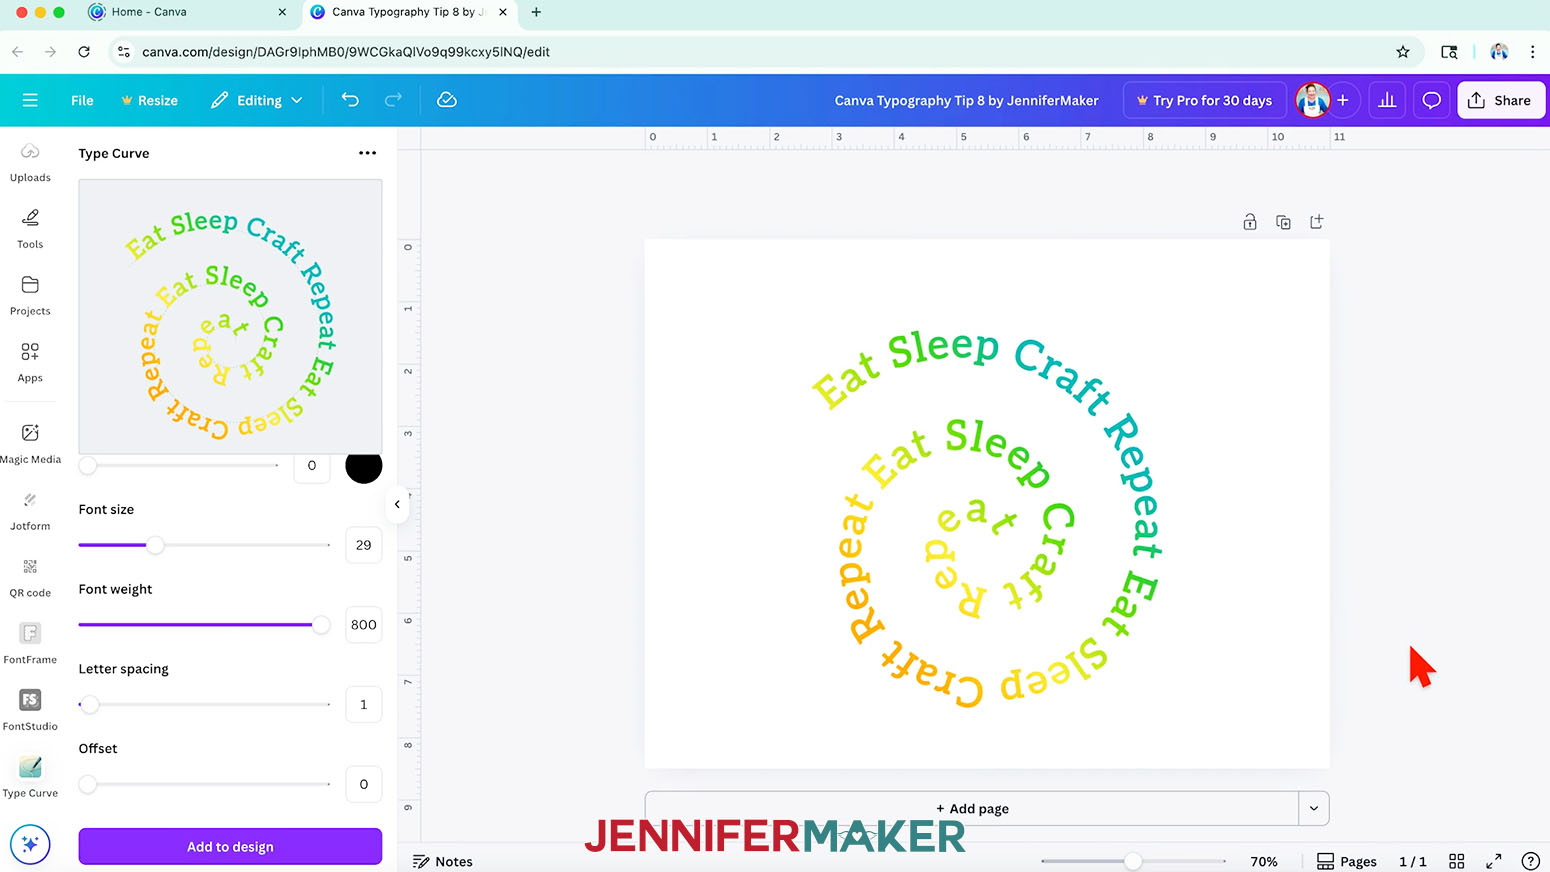
- When you’re happy with the results, click "Add to design" to send the design to your Canvas.
- I sublimated a tote bag with this design!
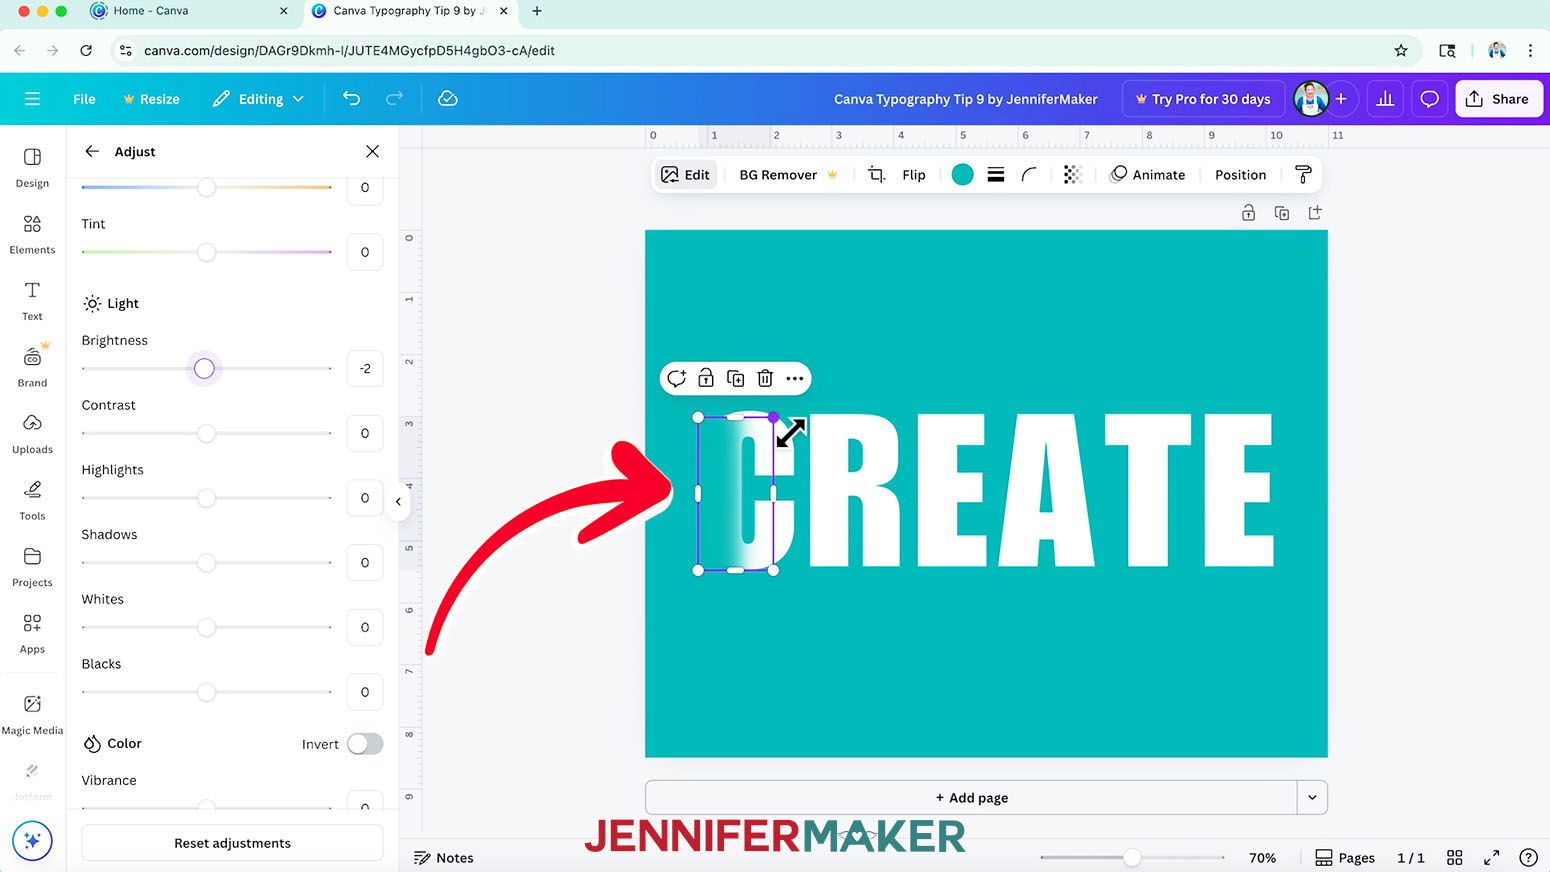
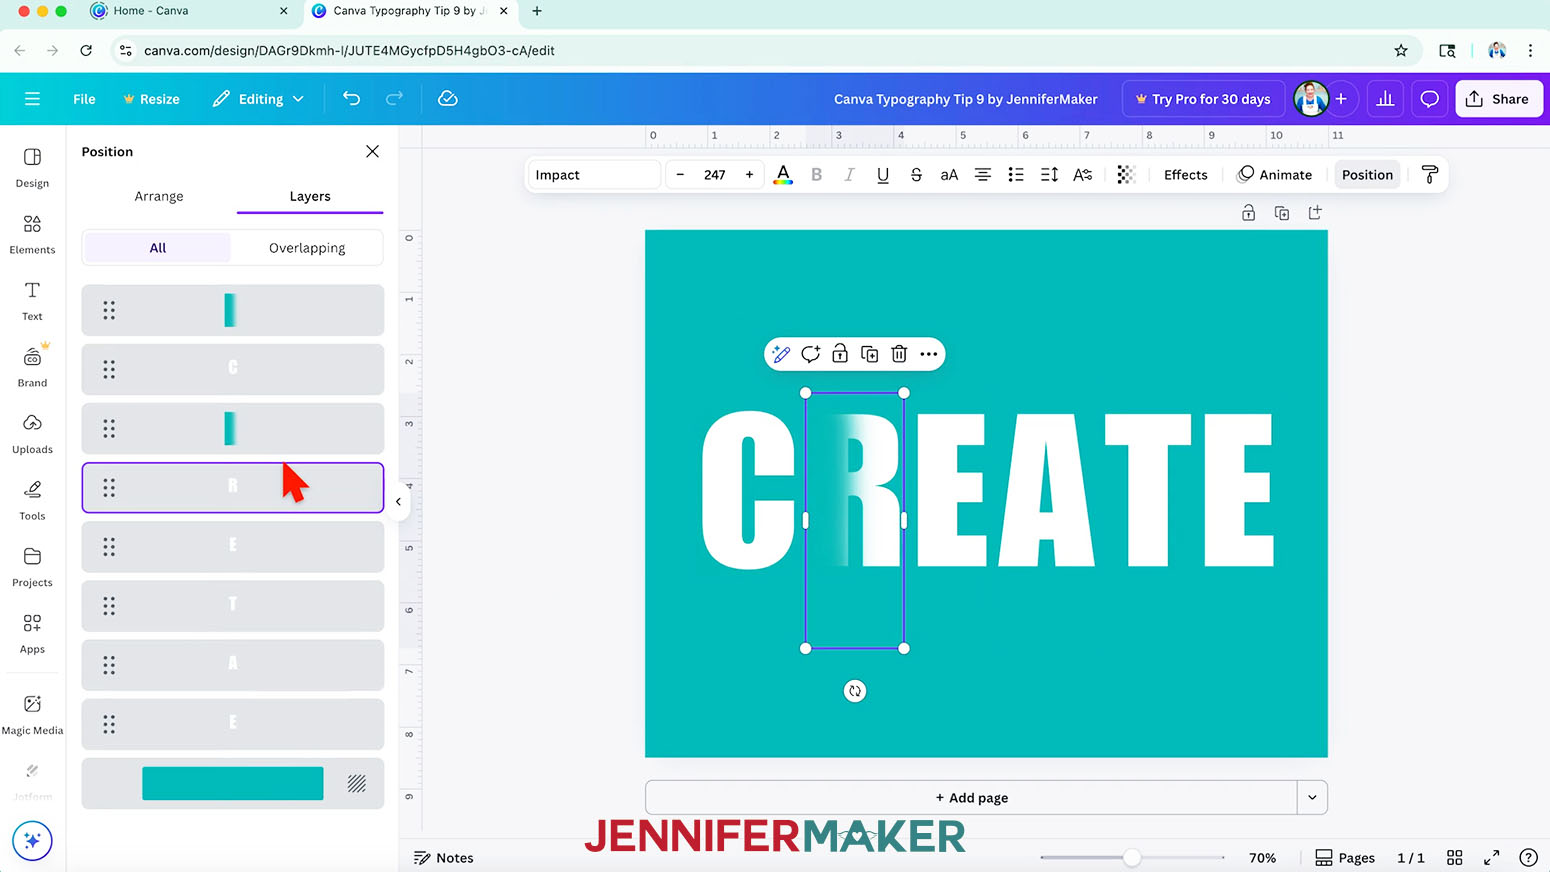
CANVA TYPOGRAPHY TIP 9: SHADOW LETTERS
- This tip works best with blocky letters created separately, so add a text box, type the first letter of your word, and pick a bold typeface.
NOTE: I started with "C" using the Canva typeface "Impact." - Duplicate the text box and type the next letter of your word. Repeat this until you have the whole word.
- Position the letters in order on your Canvas so they're aligned and have space in between them.
- Change your background color by clicking the rainbow color wheel in the top bar.
- Change the text to a contrasting color.
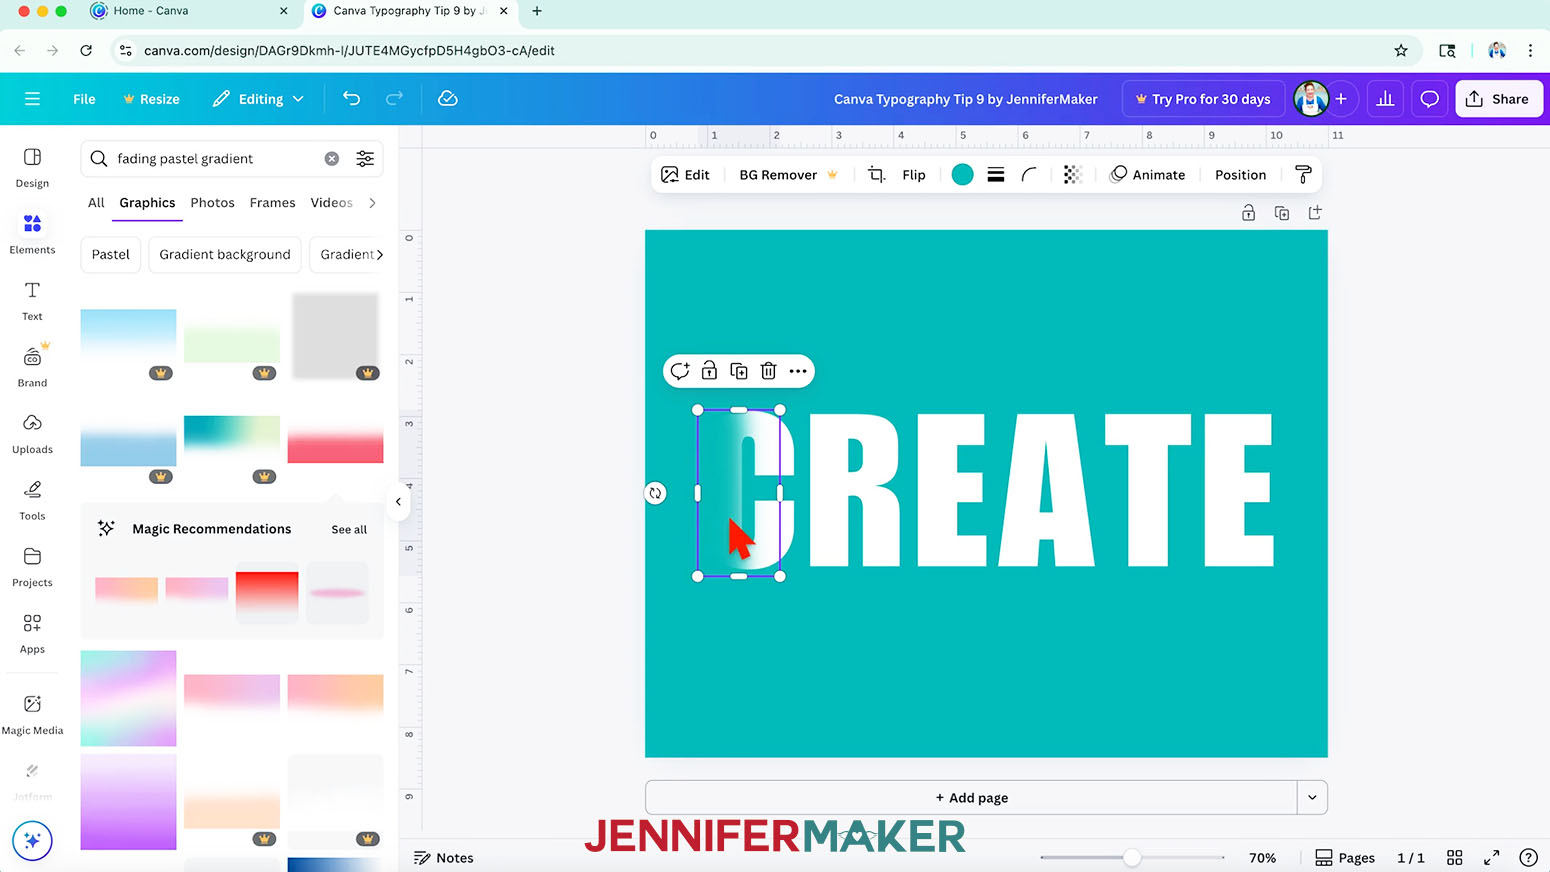
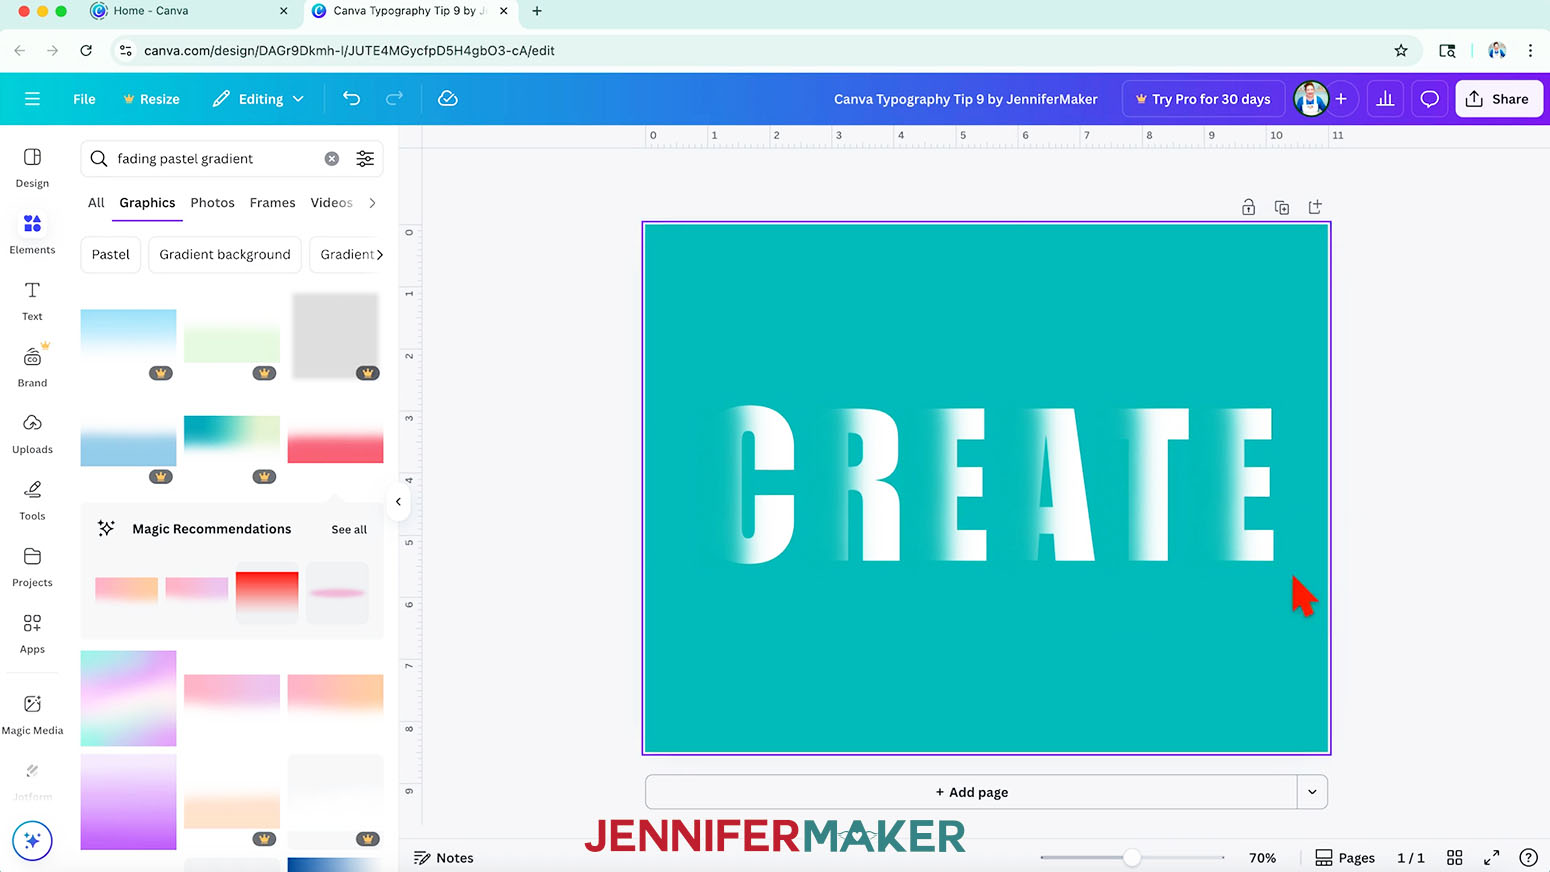
- We can use a "Graphic" Element to blend the letters into the background, so search for one that goes from dark to transparent.
TIP: Searching for terms like "fading" and "gradient" gave me some good options. - Change the graphic's color to match the background.
- Move the graphic to cover an edge of the text.
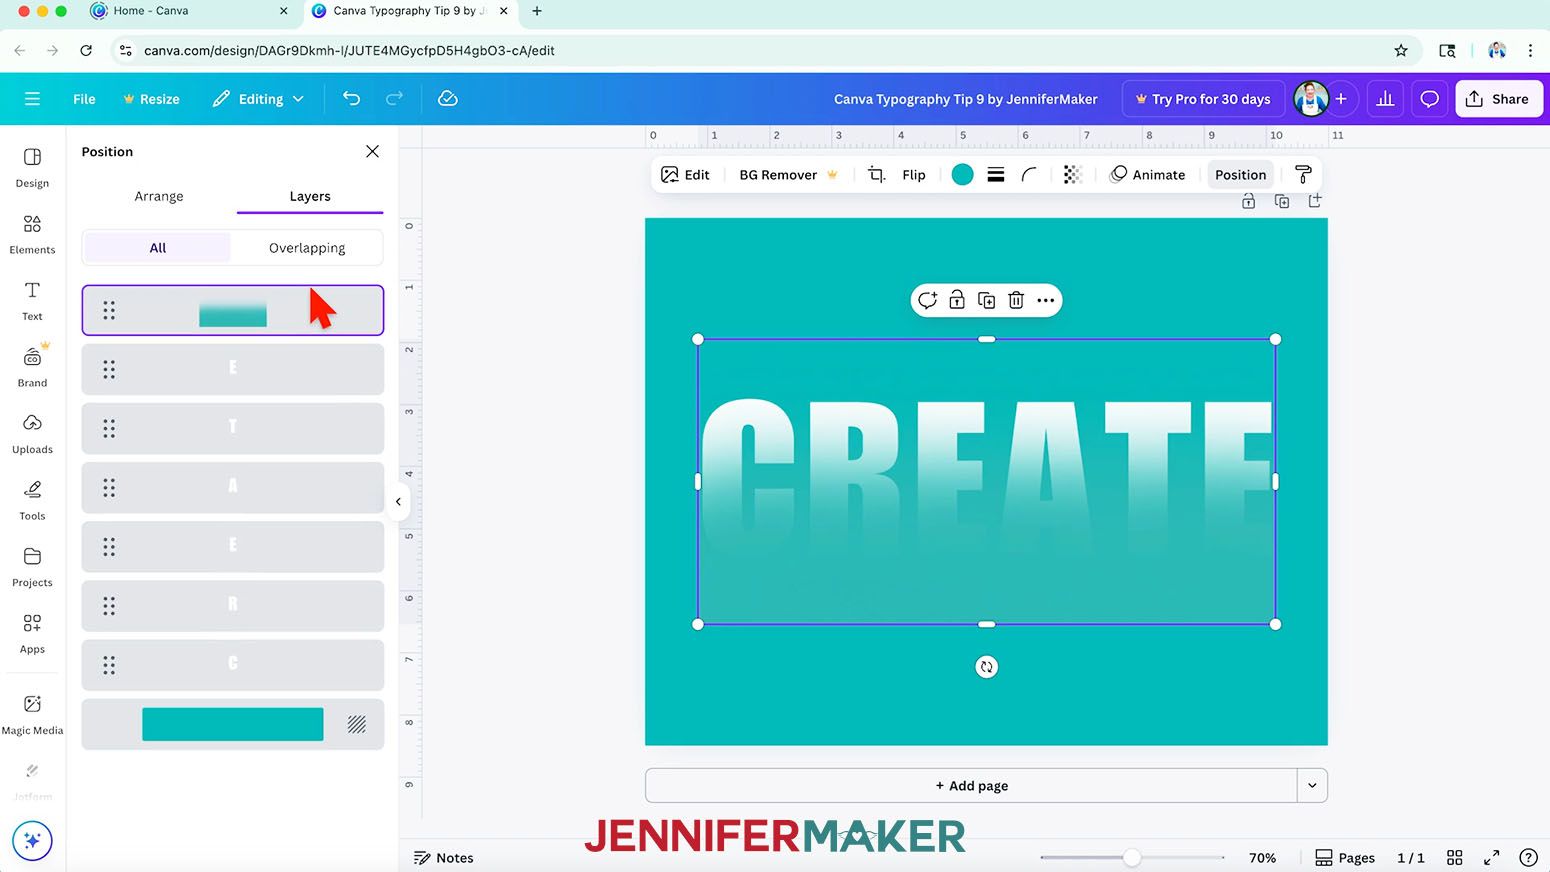
- Click "Position" in the top bar and then use the "Layers" panel to move the graphic to the front, on top of the text.
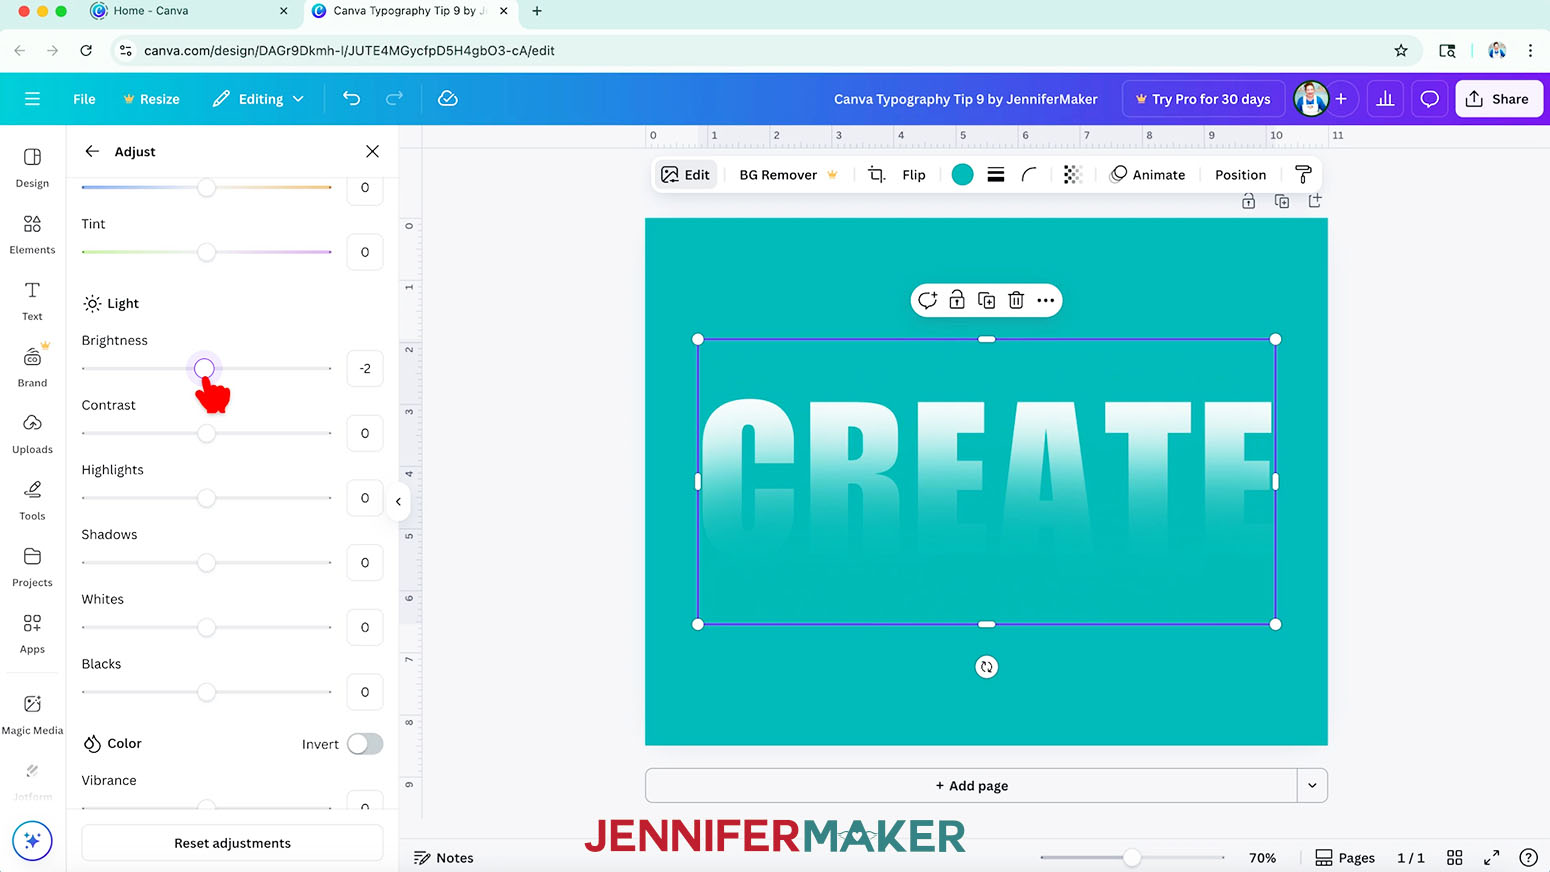
- Depending on the graphic you chose, you might be able to see its outline, even if its color matches the background. Editing will help, so click on "Edit" in the top bar and then click "Adjust." Adjust the sliders as needed -- be creative and patient to find the settings that help it blend best.
NOTE: Adjusting the graphic's "Saturation" and "Brightness" worked best for me. - You can position the gradient graphic so it's casting a shadow on the whole word, or you can apply the same look to each letter using copies of the graphic. First, rotate the graphic so its dark edge is on the left and its transparent edge is on the right. Resize and position it so it just covers the left half of the first letter.
- Duplicate the graphic and align it with the first one, then drag it over so it just covers the left half of the second letter.
- Repeat step 12 until every letter is covered by a shadow.
- If the letters and shadows overlap incorrectly, use the "Layers" panel to arrange the letters so they read from top to bottom in the panel, and then alternate the shadow graphic layers in between them, with the first one on top and the last one at the bottom.
- Stick with it, and you’ll have a really fun result!
- I printed and framed this design and printed it on a card using my Canva Card Tutorial!

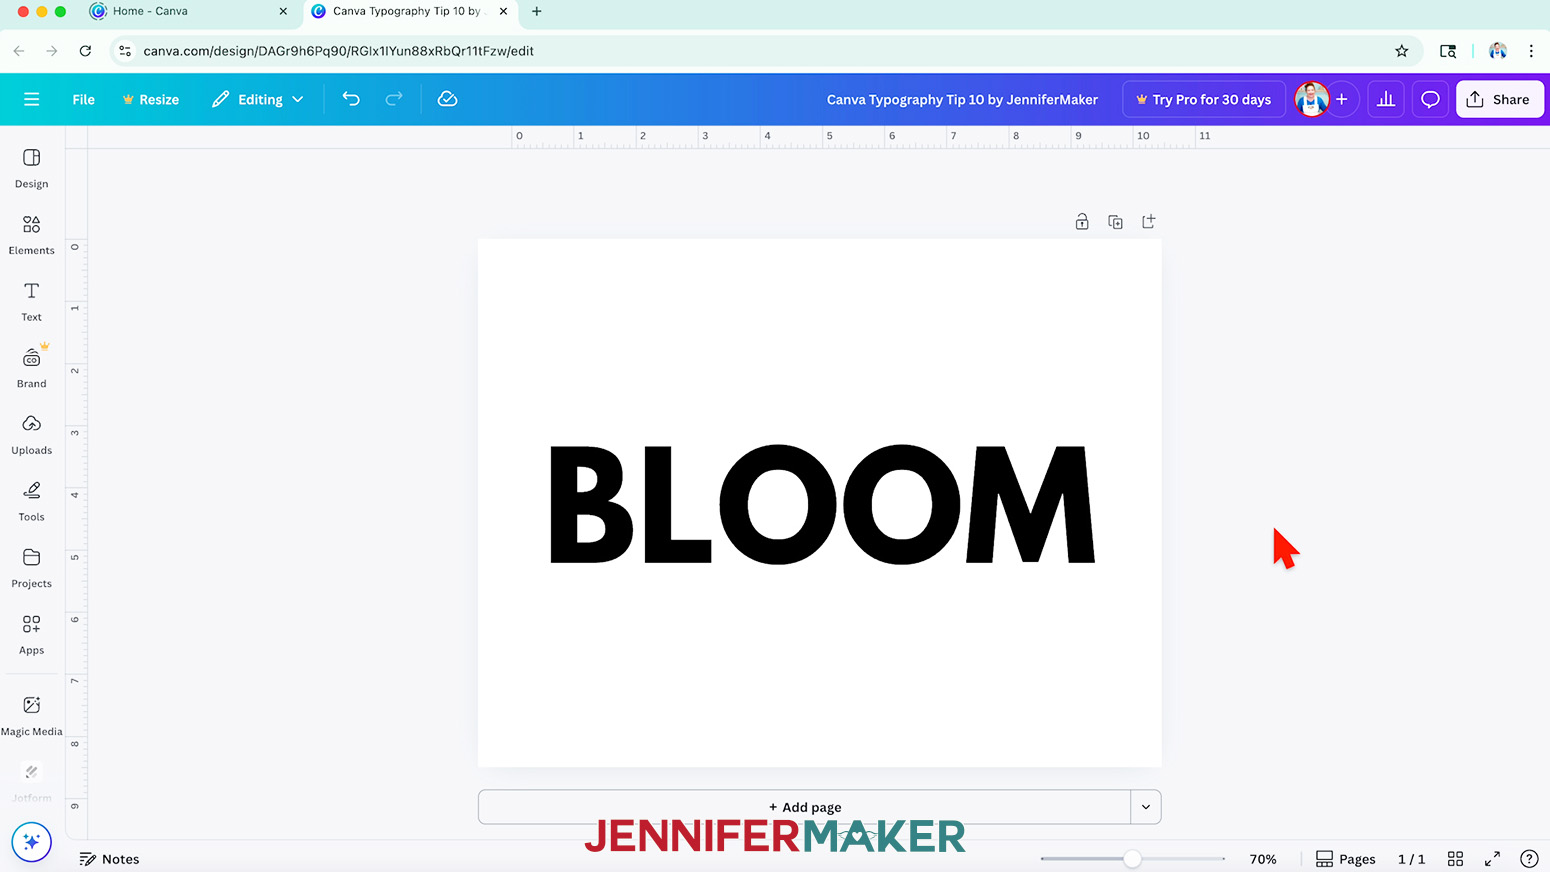
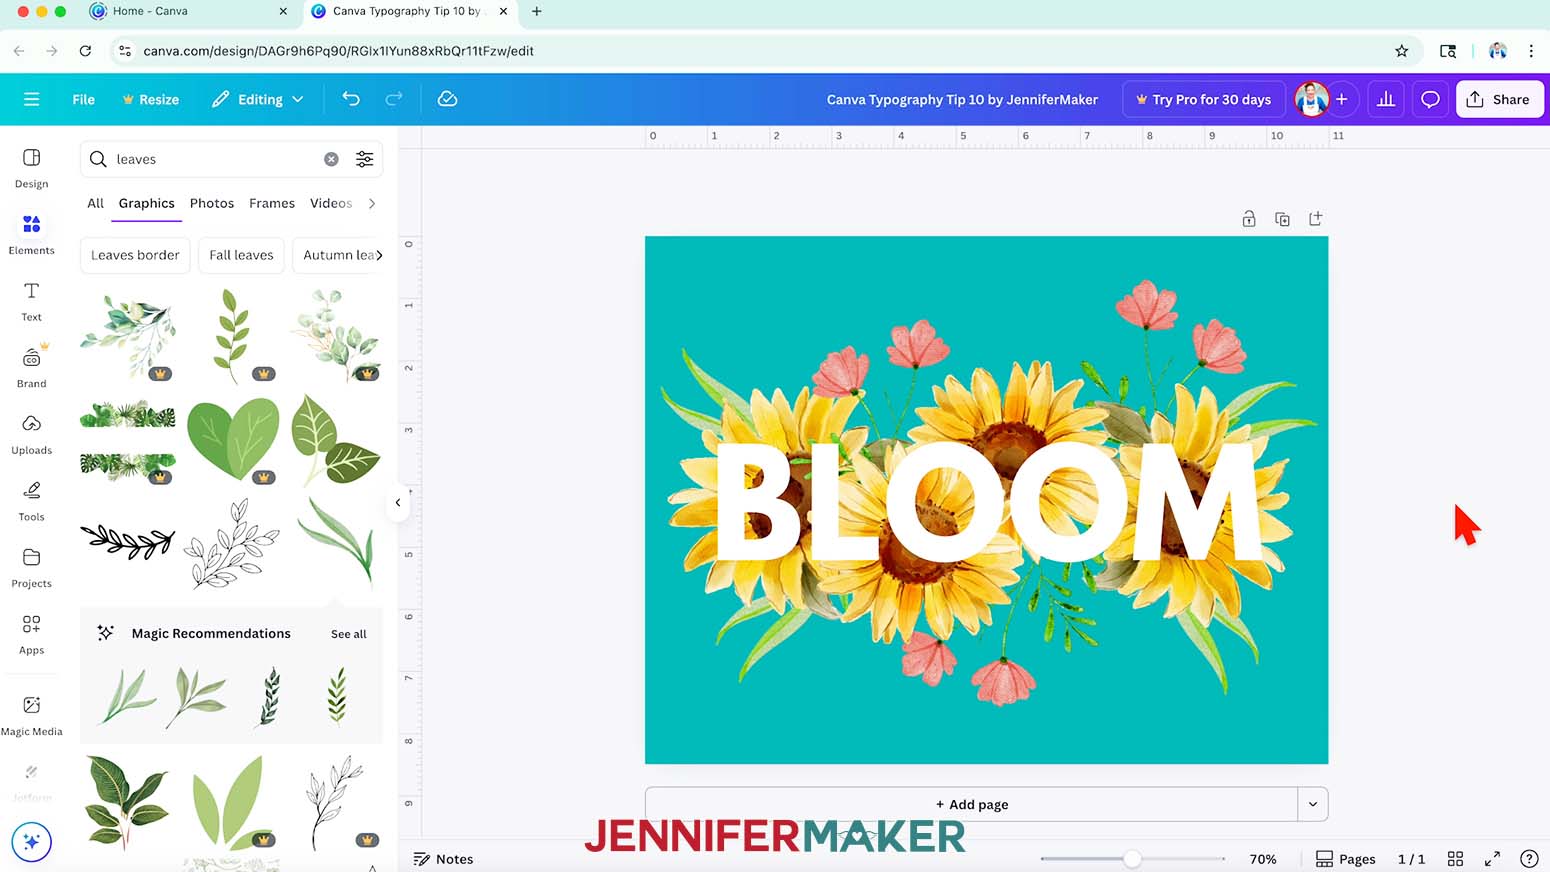
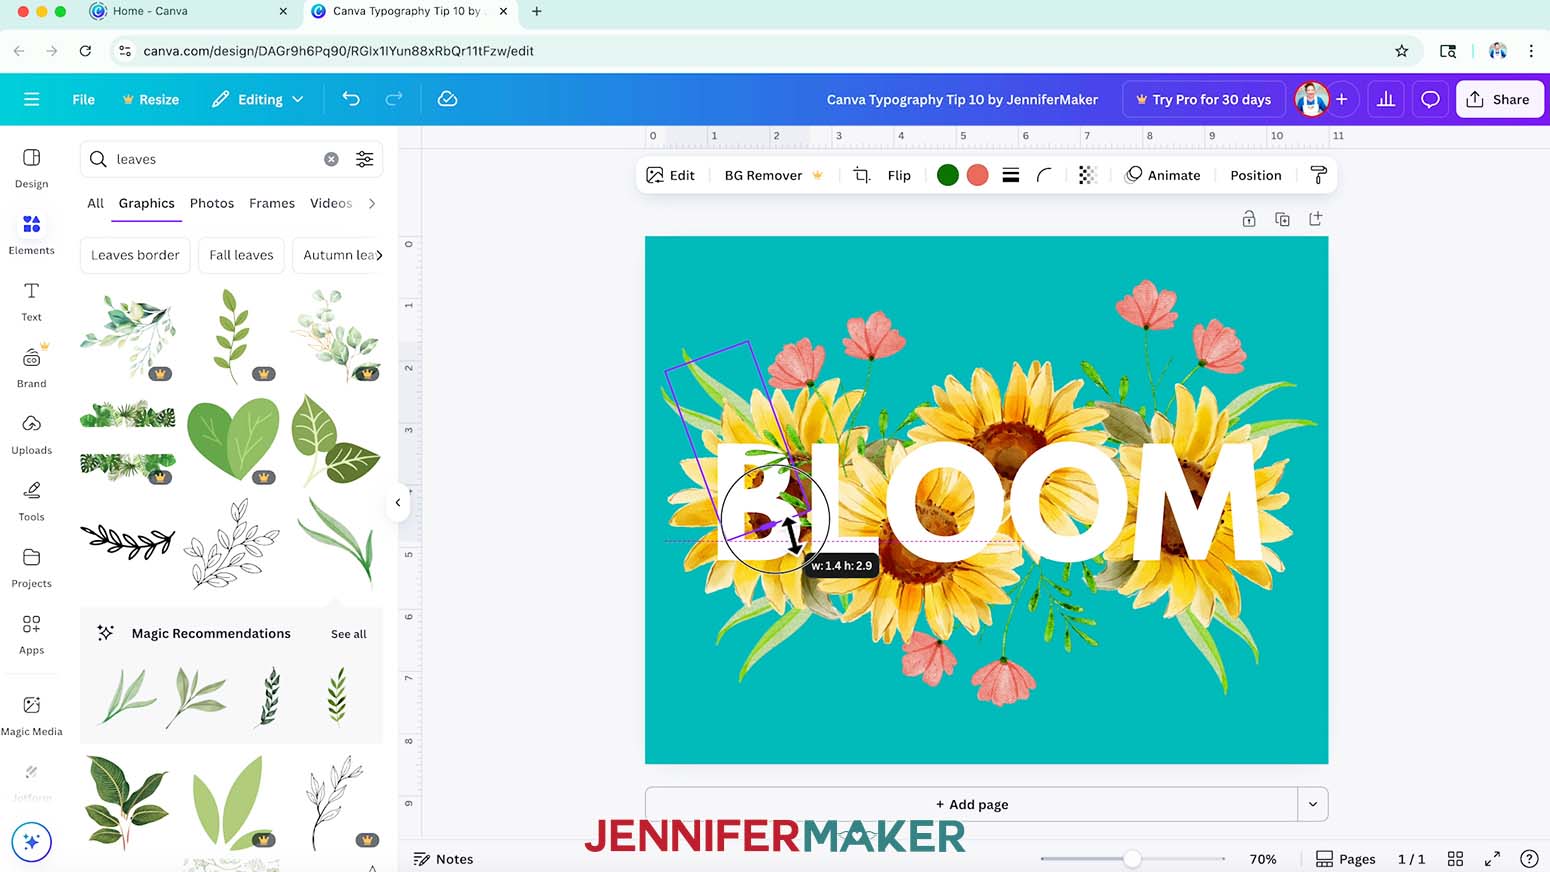
CANVA TYPOGRAPHY TIP 10: 3D LAYERED TYPOGRAPHY
- This style is totally up to you, but I found it easiest to use a simple word in capital letters using a blocky typeface. First, add a text box, type your word, and pick your typeface.
NOTE: I typed the word "BLOOM" in the Canva typeface "League Spartan."
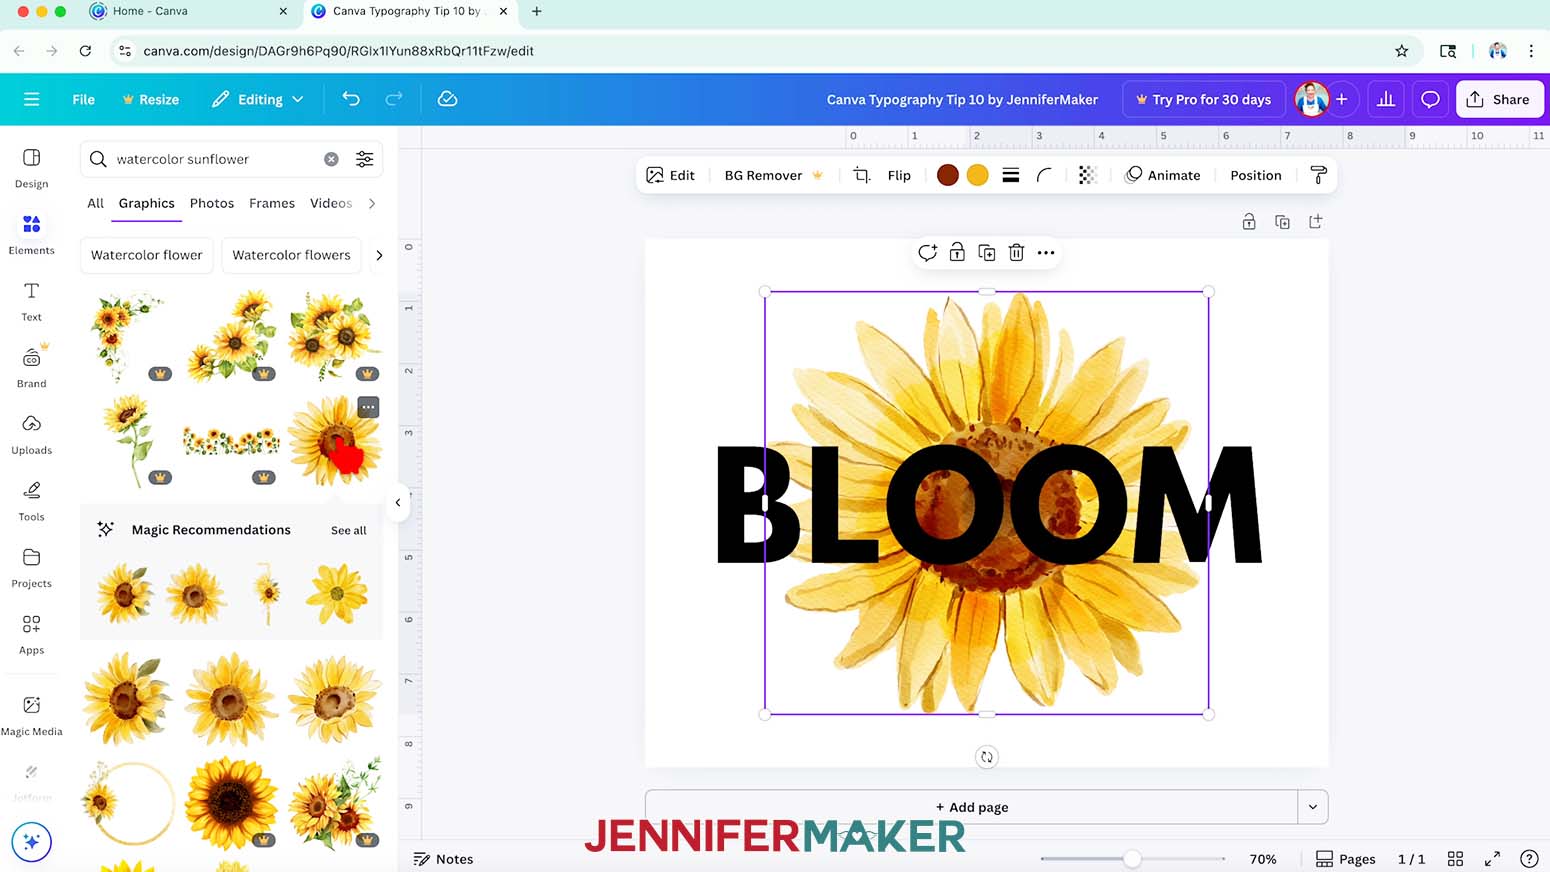
TIP: Try to pick a word that will fit the graphics you want to use. And using letters with interesting spaces between them and counters (holes like those in Os) makes this more fun. - Find and add some of your favorite free Canva graphics that have pieces you'll be able to weave among the letters.
NOTE: I found several watercolor-style sunflowers and flower stems, because I can make the petals and leaves weave within the letters. - Duplicate, resize, and flip the elements to create your rough composition behind the letters.
TIP: To flip an element, select it, click "Flip" in the top bar, then choose either "Flip horizontal" or "Flip vertical." - Change the background to a color that goes with the elements by clicking the rainbow color wheel in the top bar.
- Change the text to a contrasting color so you can tell everything apart.
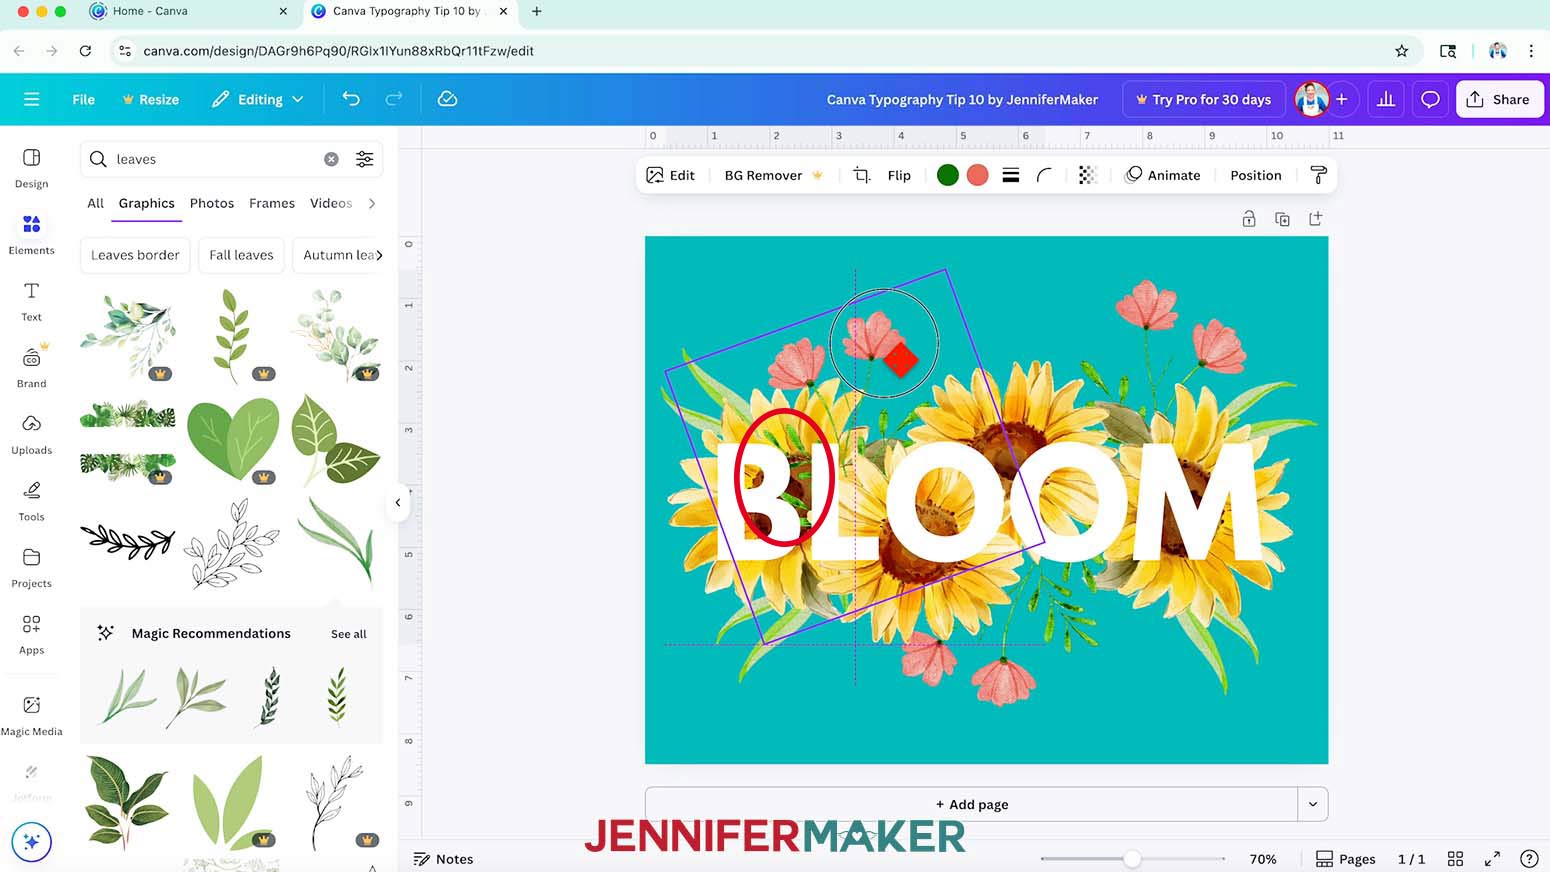
- Then, look for spots where parts of your elements can interact with the text, like the leaves that could peek over the "B" in my design.
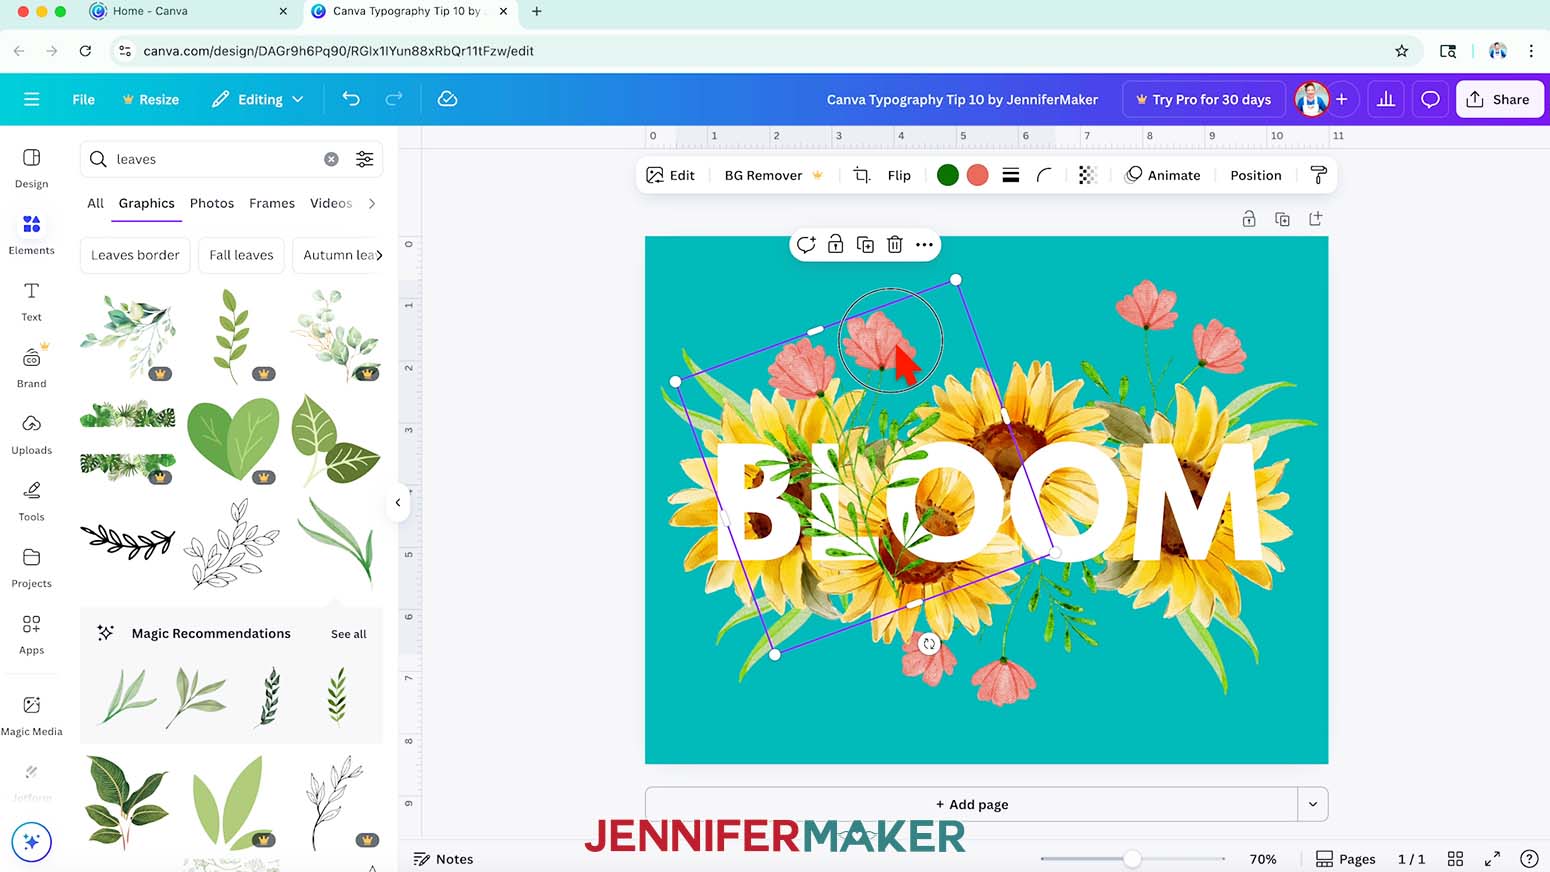
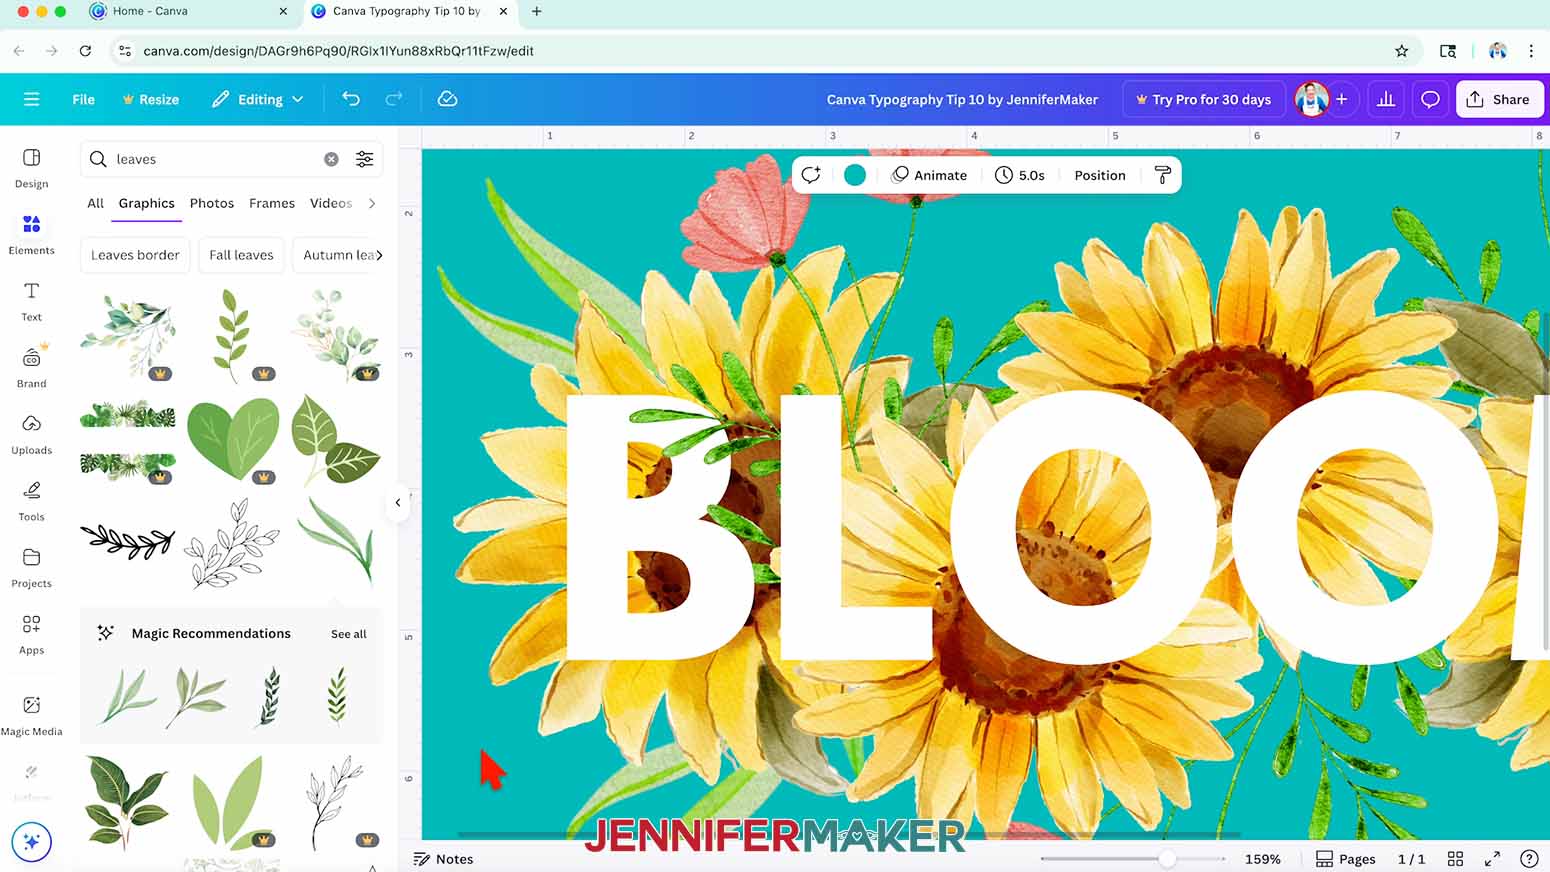
- Duplicate the element, and make sure the copy is on top of everything using the "Layers" panel.
- Then, place the duplicate right on top of the original.
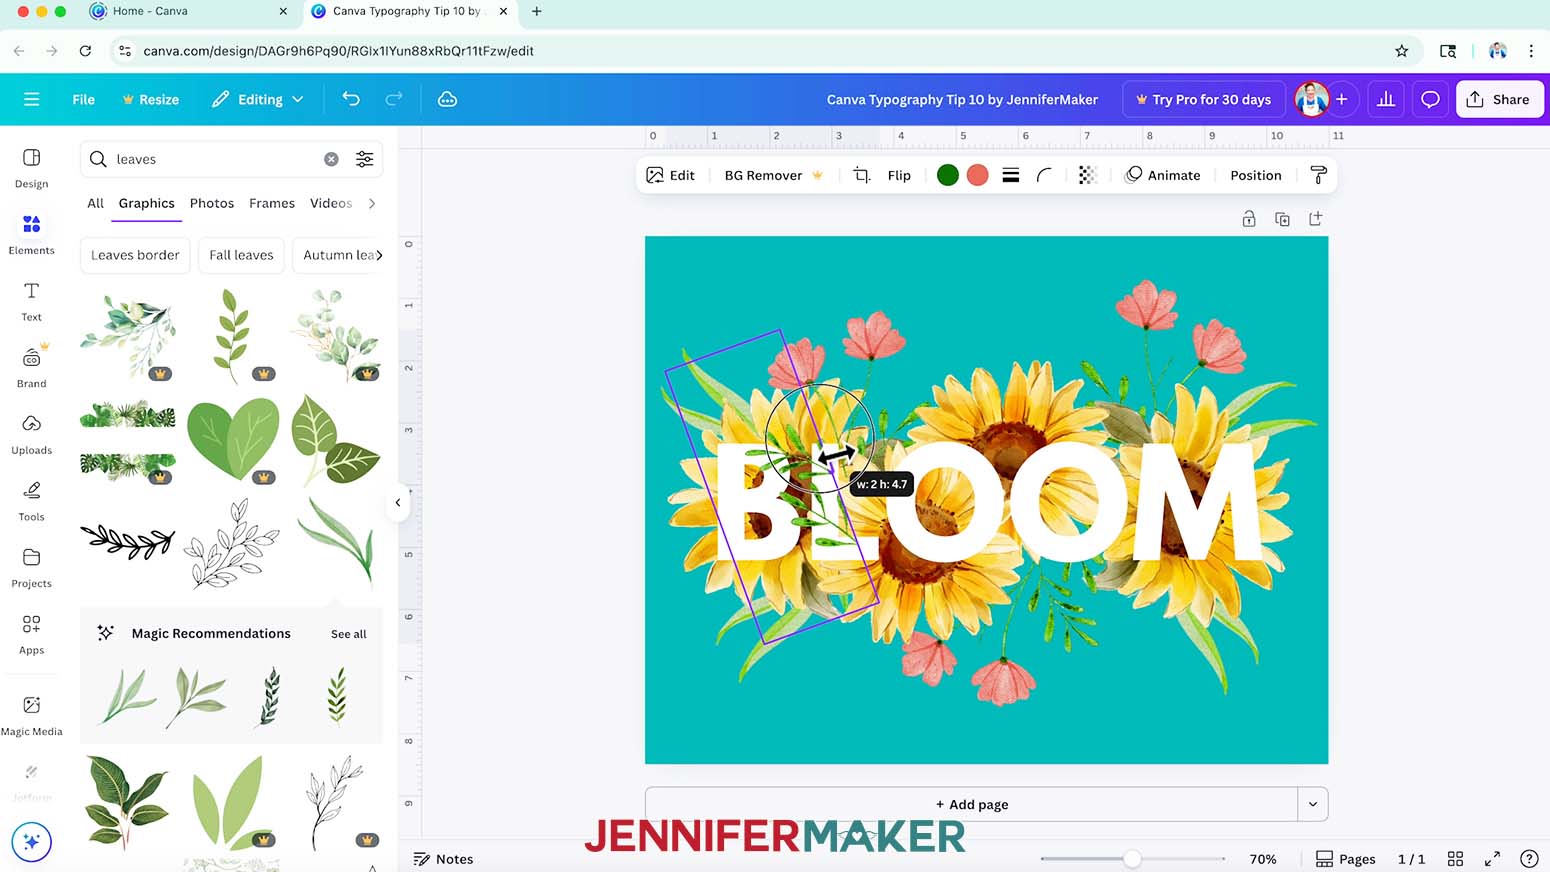
TIP: This has to be exact, so use any guidelines that pop up to help with positioning. - Now, use the "Crop" icon in the top bar to remove the element's sections you don’t want, like the leaf sections that will be behind the letter "L."
TIP: You might need to crop it from different sides to get the right look.
NOTE: Don’t be afraid to adjust your composition, just make sure the duplicated elements are still lined up with the originals! There isn’t an app or shortcut to create this look, but it’s so much fun to play with! - Repeat steps 6-9 to create a 3D layered effect for the rest of your word.
- With some creativity and patience, you can create a really engaging design with tons of depth and interest!
- I printed and framed my finished design!
Answers to Your Questions About My Canva Typography Tips
Q: I want to learn more about typography, as well as font and typeface pairings. How do I do that?
A: You can learn more about typography and experiment with font and typeface pairings in my ADVANCE program. Learn more about ADVANCE here!
Q: Can you show me how to make Canva text look good?
A: Absolutely! Great-looking text in Canva starts with choosing the right fonts for your message and balancing size, spacing, and color. You can elevate a simple word design by layering its elements, adding effects, or even filling it with a photo. Don’t be afraid to explore Canva’s free fonts. There are so many stylish options beyond the basics. The right design tricks can make your text pop beautifully without needing advanced skills.
Q: Can I use Canva to make stickers to sell?
A: As long as you’re combining Canva elements to create a new design, Canva’s licensing agreement is very generous when it comes to selling the items you create using the software. That means you can use both free and pro Canva elements in your designs, then make items to sell in your own shop! To see the most up to date rules, always check the Canva licensing page.
Q: Can you teach me how to use fonts effectively in Canva?
A: Yes, this video is a good place to start, but I have more font-focused tutorials coming up! Using fonts and typefaces effectively is about more than just picking pretty styles. It’s about choosing different fonts or typefaces that work well together and support your project’s tone. For example, pairing a modern sans serif with a soft script font can create contrast and visual interest. Use consistent hierarchy with headings and body text, and adjust spacing and alignment for balance. Typography is a design superpower once you know how to use it!
Q: Will you teach me how to make typography in Canva?
A: This video will help! Typography is all about styling your text to match the emotion or message of your design. I’ll show you how to mix fonts, add visual depth with shadows or outlines, and space everything out just right. Soon, you’ll learn when to use a serif like Times New Roman versus when to go bold or modern. With just a few tricks, your words can become powerful design elements!
Q: Can you show me how to perfectly align text in Canva?
A: Canva makes it super easy to align text perfectly. Use the position tools to center, align left or right, or evenly space multiple elements. Guide lines and snap-to-grid features help make sure your text is balanced and neat. This is especially helpful when working with multiple text boxes or layering words over graphics. With just a few clicks, everything can look polished and professional.
Q: How do you add a shadow effect to text in Canva?
A: To add a shadow, select your text, click on “Effects” in the toolbar, then choose “Shadow.” From there, you can adjust blur, direction, offset, and transparency to get the look you want. It’s a great way to give flat text some dimension and make it stand out!
Q: Can I make curved text in Canva?
A: Yes, you can! Select your text, click “Effects,” and choose “Curve.” You can adjust the curve’s radius to arc your text upward, downward, or even into a circle. Curved text is perfect for round logos, badges, or just adding a playful twist to a quote. It pairs well with bold or decorative fonts and works great in both simple and layered designs. It’s one of the most popular Canva text editing features for a reason!
Q: What does adjusting transparency in Canva do?
A: Adjusting transparency controls how see-through something is, like text or elements. You can use it to layer words subtly over photos, create soft background text, or even simulate dimension with overlapping letters. Try lowering transparency on repeated words or accent text for a neat, layered look.
Get my free Canva Typography Reference Guide PDF file!
(If you do not see the signup form above, click here.)
I love seeing what you make with my tutorials and how you customize them! Please share a photo of your Canva typography project in our Canva Creators Facebook group or tag me on social media with #jennifermaker.
Love,

Want to remember this? Save this Canva Typography Tips tutorial to your favorite Pinterest Board!