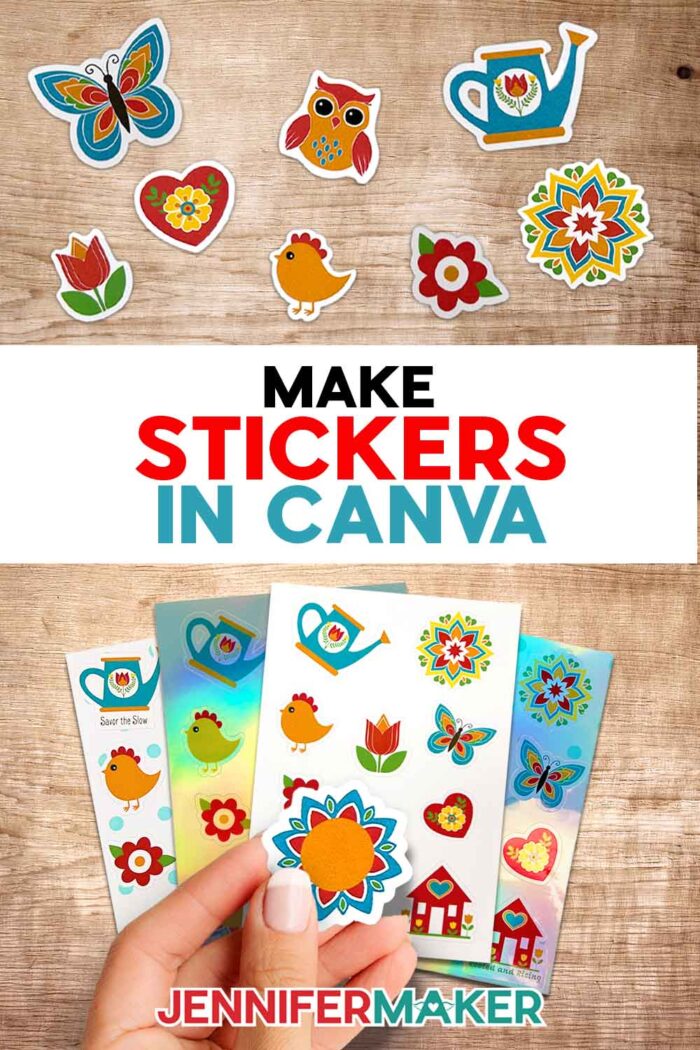
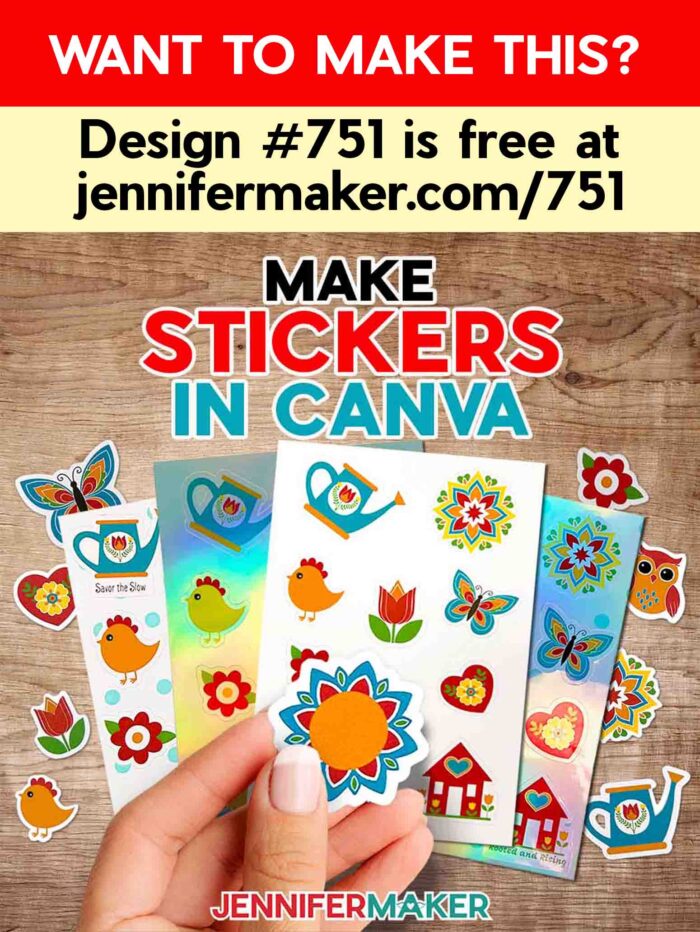
Learn how to make stickers in Canva and cut them with your Cricut!
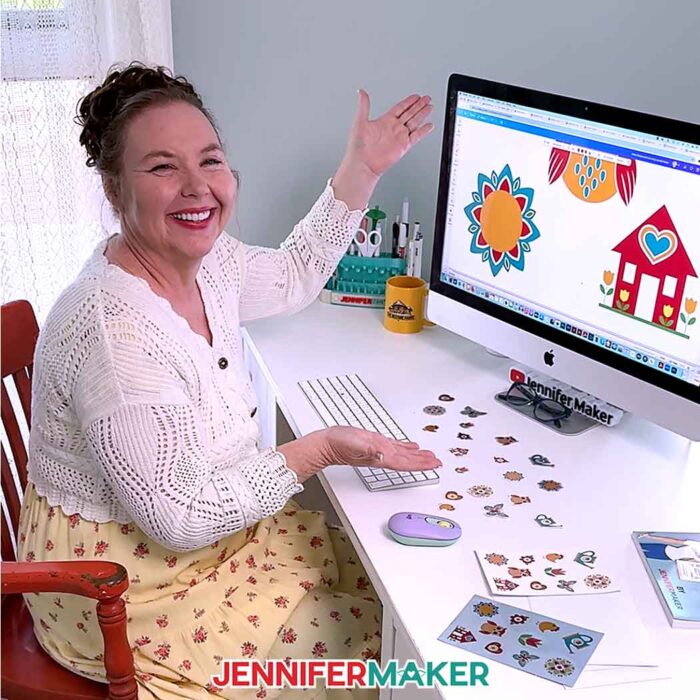
Of all the things a Cricut can do, the Print Then Cut feature may be my favorite. Especially for making stickers! I’ve made LOTS of stickers over the years, and I’m always looking for ways to improve my sticker crafting. Now, I’ve found an even cooler way to level up my sticker game: I learned how to make stickers in Canva! In just a few minutes, you can create an entire set of amazing custom stickers using free Canva tools, print them with a regular inkjet printer, then cut them using your Cricut. And to make it even easier, I designed ten free summer sticker designs for you to customize in Canva, so you can jump right in!
See the full step-by-step video tutorial on how to make stickers in Canva:

If you’ve ever found yourself endlessly scrolling through online shops or standing in front of the sticker display at your local craft store, trying to find just the right ones with the perfect words or style, I totally get it. That was me too. I’d think, “These are close… but not quite what I need.” That’s when it hit me. Why not just design and make my own? And thanks to Canva, it’s not only possible, it’s actually super fun! It’s also so rewarding to take total control over your designs, whether you’re customizing planners, decorating envelopes, or sticking them to tumblers and other surfaces.
All you need to get started is a free Canva account, a Cricut cutting machine, and some sticker paper. That’s it! And I promise, you do not need to be a professional designer to do this. We’ll walk through the whole process together, starting with choosing or uploading your sticker images in Canva. My free designs are a great place to begin, and include happy, colorful PNG images that are perfect for Print Then Cut projects. Want a sheet full of mini stickers? Easy! Prefer large single stickers for laptops or water bottles? You’ve got it!
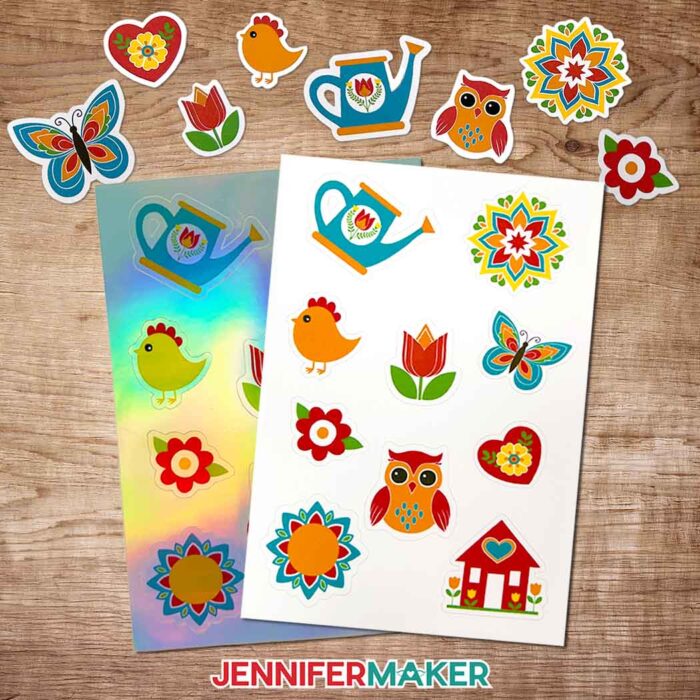
Once you’ve picked your favorite images, we’ll create a custom sticker sheet in Canva. I recommend 6″ x 9″ since that size works beautifully with Cricut’s Print Then Cut feature.
And here’s where the real fun begins … designing your sticker sheet! You can add stickers in different designs and sizes, drag them around, rotate them, change colors, and even add custom text or fun elements from Canva’s built-in library. This is a great way to explore Canva’s tools and make your sticker sheet truly one-of-a-kind. And if you love that classic sticker look with a white outline, there’s a super easy way to do that with Canva’s outline shadow effect. I’ll show you how in the video tutorial!
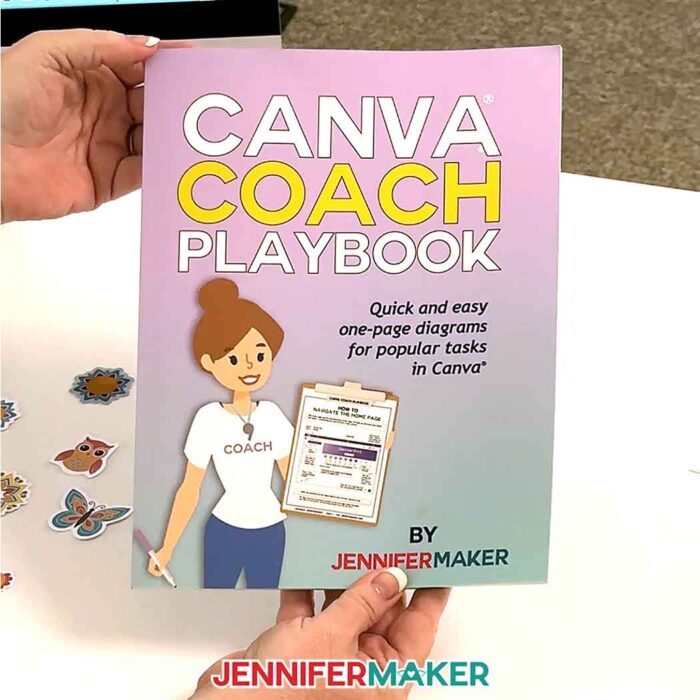
Want to do more with Canva? Check out my Canva Coach Playbook, which includes tons more Canva tips, tricks, and techniques for you to get the most out of your designs!
Once your sticker sheet is ready, I’ll show how to download it as a PNG and upload it to Cricut Design Space for printing and cutting. Backgrounds can be tricky for Print Then Cut projects, but whether you’re using the manual or automatic tool, it only takes a moment to get your designs ready to turn into stickers. With Canva Pro, you can export your design with a transparent background, which is super handy in Cricut Design Space. But if you’re using the free version, no worries! I’ll show you how to remove the background manually in just a few clicks. With or without Cricut Access!
After that, we print! Be sure to use high quality printer settings for the most professional-looking results. I love using “Premium Photo Paper” settings for a smooth, vibrant finish. Once printed, let your sticker sheet dry completely before sticking it to your Cricut mat. Be sure to use a brayer to smooth it down for perfect cutting, too! Whether you want a kiss cut, where the stickers peel off the backing, or a die cut, where the stickers are cut all the way out, Cricut can handle both. I’ll share which settings to use for both methods. Then you can just load your mat, press the button, and let your Cricut do the work!

Another thing I love about this process is how customizable it is. You can make a whole sheet of different designs, or print one large sticker at a time. I still remember the first sticker I made! It was simple, but it felt like magic. And now, using Canva, I can create anything I imagine, whenever I need it, without spending hours searching for just the right thing in a store.

So if you’ve been thinking about making your own stickers, or you’ve felt overwhelmed by the idea of designing something from scratch, let me encourage you. This is totally doable, even for beginners! It’s fun, it’s rewarding, and it opens up a whole new world of crafting possibilities!
Would you like to make a sticker sheet with a custom background in Canva? I have a workshop just for you in my ADVANCE program. Plus, I’ll even share my special trick for die-cutting and kiss-cutting at the same time so your Cricut cuts your sheet down to size, too! Learn more about ADVANCE with JenniferMaker here!
Let me show you how to make stickers in Canva and cut them on your Cricut! This post contains some affiliate links for your convenience (which means if you make a purchase after clicking a link I will earn a small commission but it won’t cost you a penny more, there is no additional cost)! Read my full disclosure policy.
Materials to Print Then Cut Your Canva Stickers
View my Amazon shopping list with the exact items I used.
- One (1) Sheet of 8.5” x 11” Printable Sticker Paper -OR-
- One (1) Sheet of 8.5” x 11” Holographic Sticker Paper
- Copy Paper (optional for protecting your printed stickers while securing with brayer)
- A way to cut your sticker paper – I’m using the Cricut Maker 4, but you can also use any Maker series machine, a Cricut Explore series machine, the Cricut Venture, or the Cricut Joy Xtra
- Inkjet Printer
- Cricut Green StandardGrip Machine Mat 12” x 12”
- Brayer
- Paper Trimmer
How to Make Stickers in Canva!

Make Stickers in Canva
Learn how to make stickers in Canva and Print Then Cut them in Cricut Design Space!
Materials
- One (1) Sheet of 8.5” x 11” Cricut Printable Sticker Paper -OR-
- One (1) Sheet of 8.5” x 11” Holographic Sticker Paper
- Copy Paper (optional for protecting your printed stickers while securing with brayer)
- Design #751 (My free SVG/PNG/PDF design files are available in my free resource library - get the password by filling out the form at the bottom of this page)
Tools
Instructions
STEP 1: GET MY FREE SUMMER STICKERS DESIGNS
First, download my Make Stickers in Canva files from my free library – look for Design #751. Alternatively, you can use the Save This Project form near the top of this post and the design link will be emailed to you.
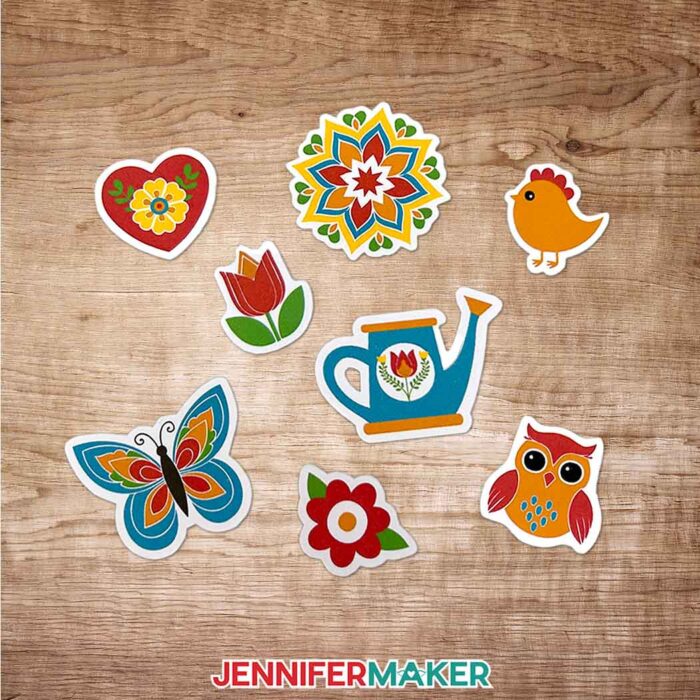
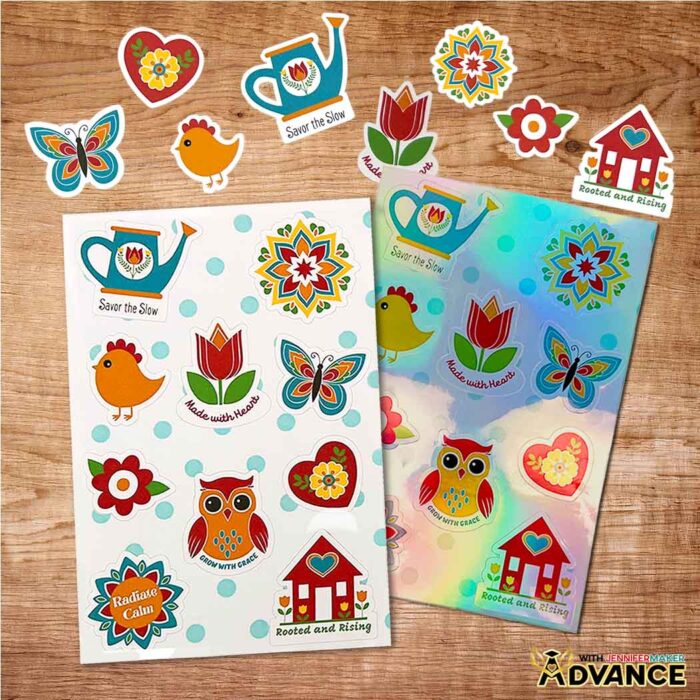
In the SVG and PNG folders, you’ll find a Sticker Starter Pack with ten summer-themed sticker designs you can use to create stickers in Canva. These images were created with the help of an AI generator and adjusted using image editing software.
There is also a PDF folder with versions you can print and cut by hand.
TIP: If you’re not sure how to upload, go to jennifermaker.com/svgs to learn how to unzip and upload SVG files.
STEP 2: DESIGN YOUR STICKER SHEET IN CANVA
- To get started, open your computer’s browser and go to jennifermaker.com/canva.
NOTE: If you’re new to Canva, check out my Canva for Beginners tutorial. - Then, either sign in to your account or follow the prompts on the screen to sign up for a free account.
NOTE: Canva does offer paid subscriptions with more tools and elements, but I’ll show you how to do everything with the free account. - On the Canva Home screen, click the “Create a design” button.
TIP: Depending on your view, the button may just say “Create.”
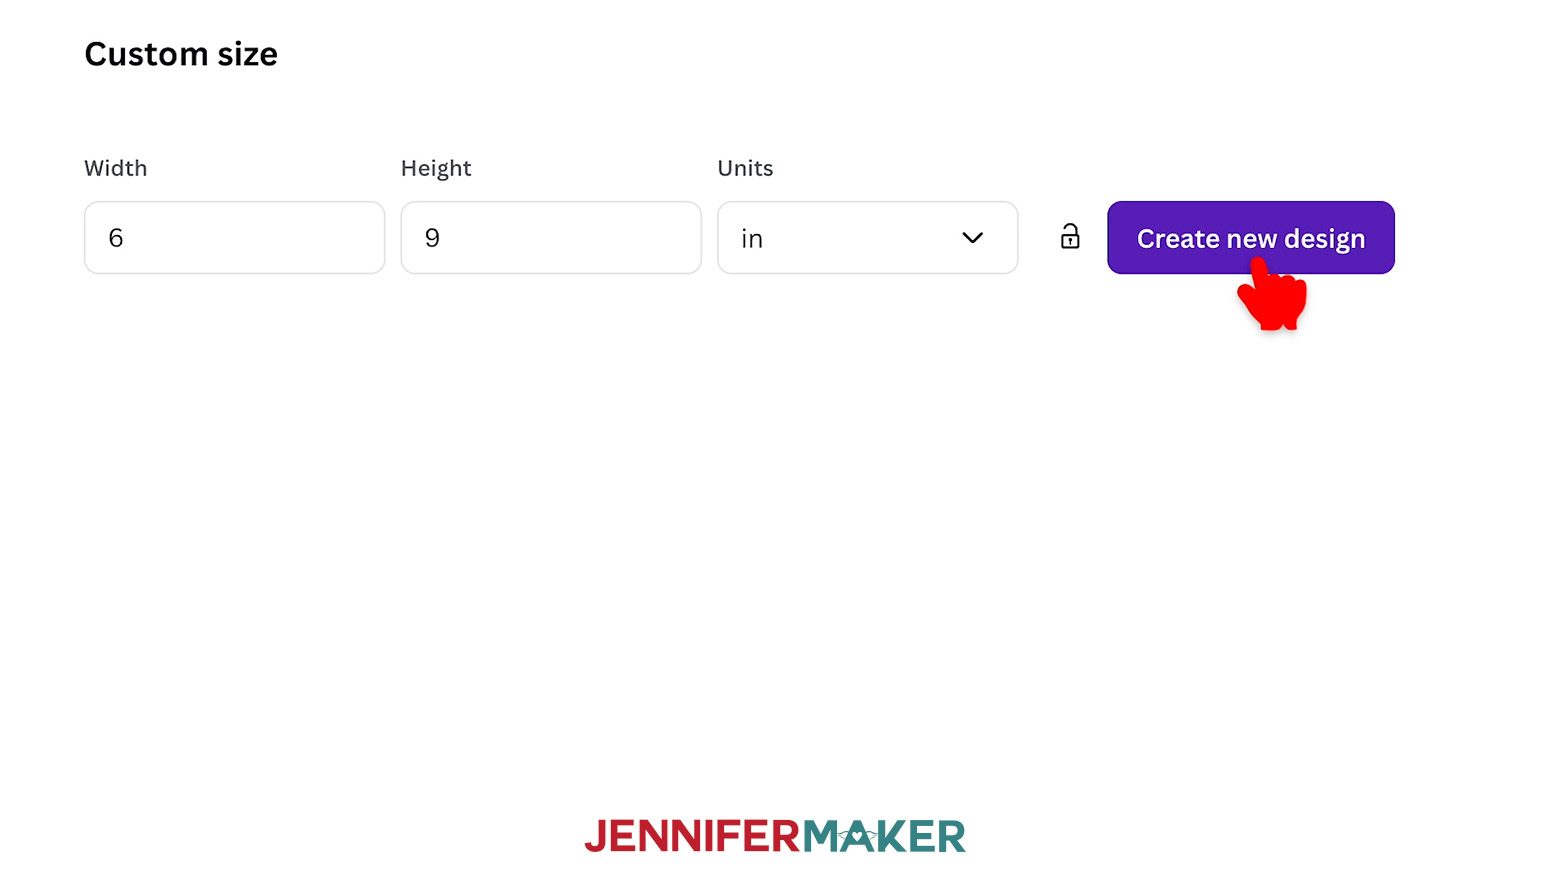
- Click “Custom size” to set the dimensions of your canvas.
- In the “Units” box, click the dropdown menu and select “in” for inches.
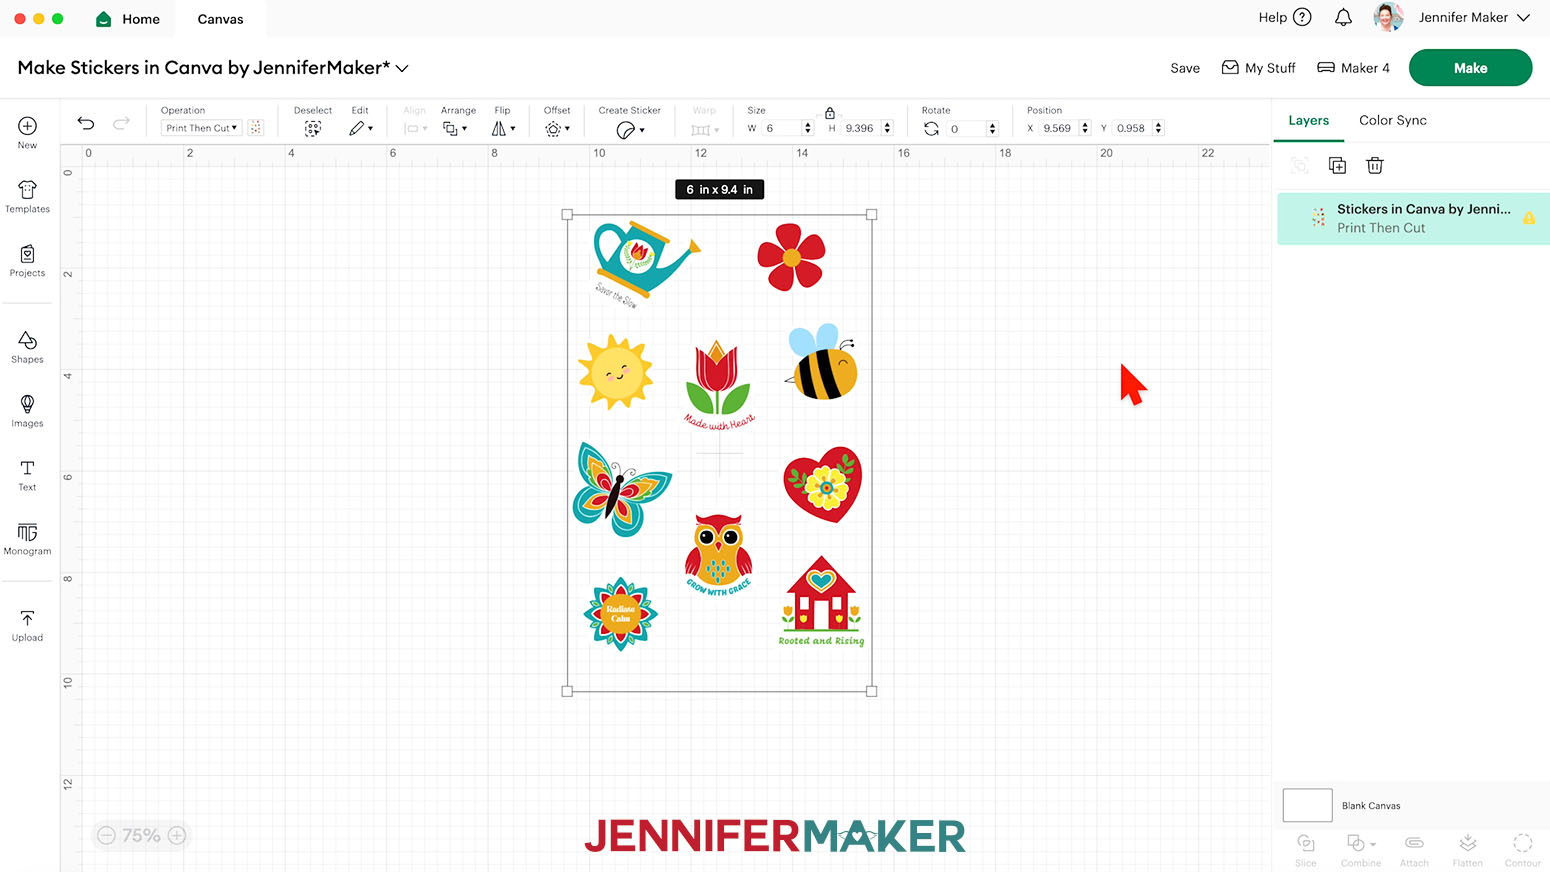
- Enter “6” in the “Width” field and “9” in the “Height” field so your stickers fit the Print Then Cut area of an 8.5” x 11” sheet of sticker paper.
NOTE: This size is compatible with Cricut Design Space’s Print Then Cut feature. If you are using another method, please check the requirements. - Click “Create new design.”
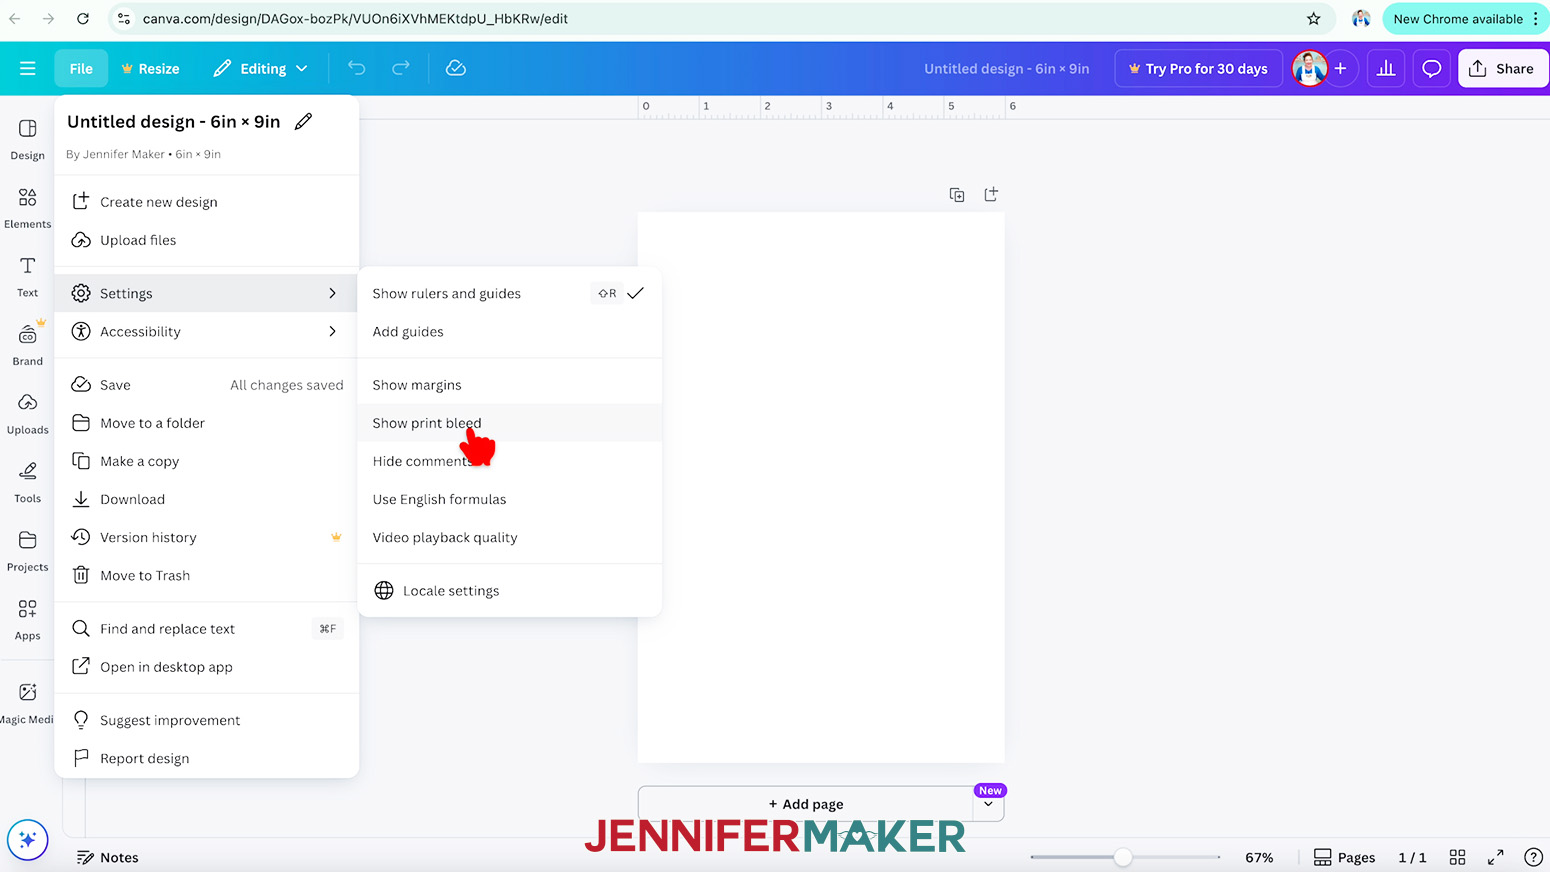
- Click on “File,” hover over “Settings,” and select “Show print bleed” to add guidelines for the print area to your canvas.
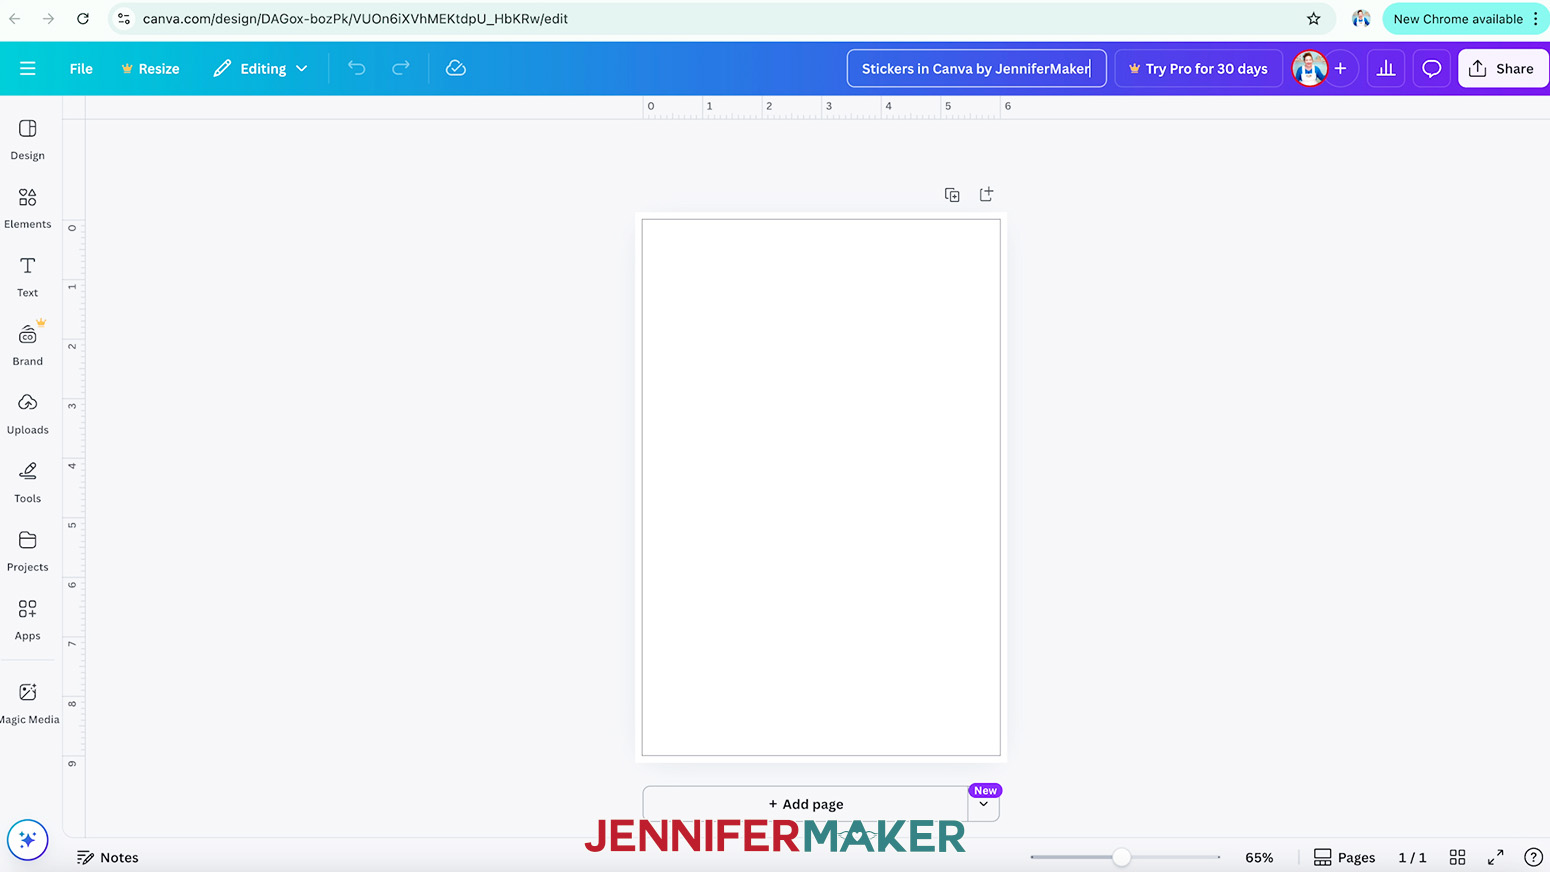
TIP: Keep your design elements inside the inner black outline to ensure they don’t get cut off when downloading your file. - With the new canvas ready, click the filename field at the top and replace the current name with your own.
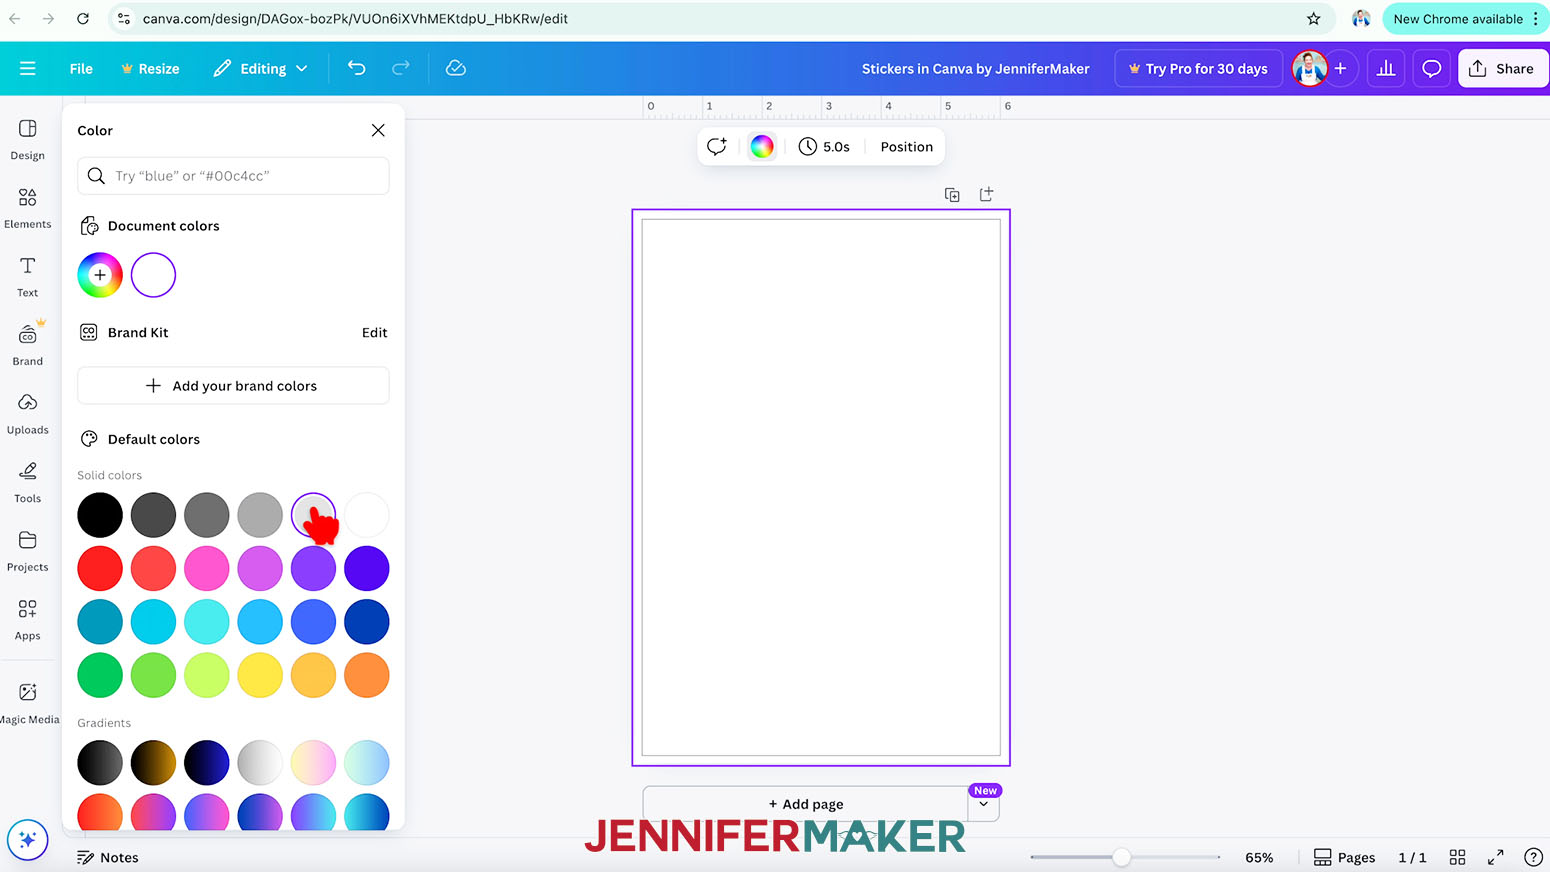
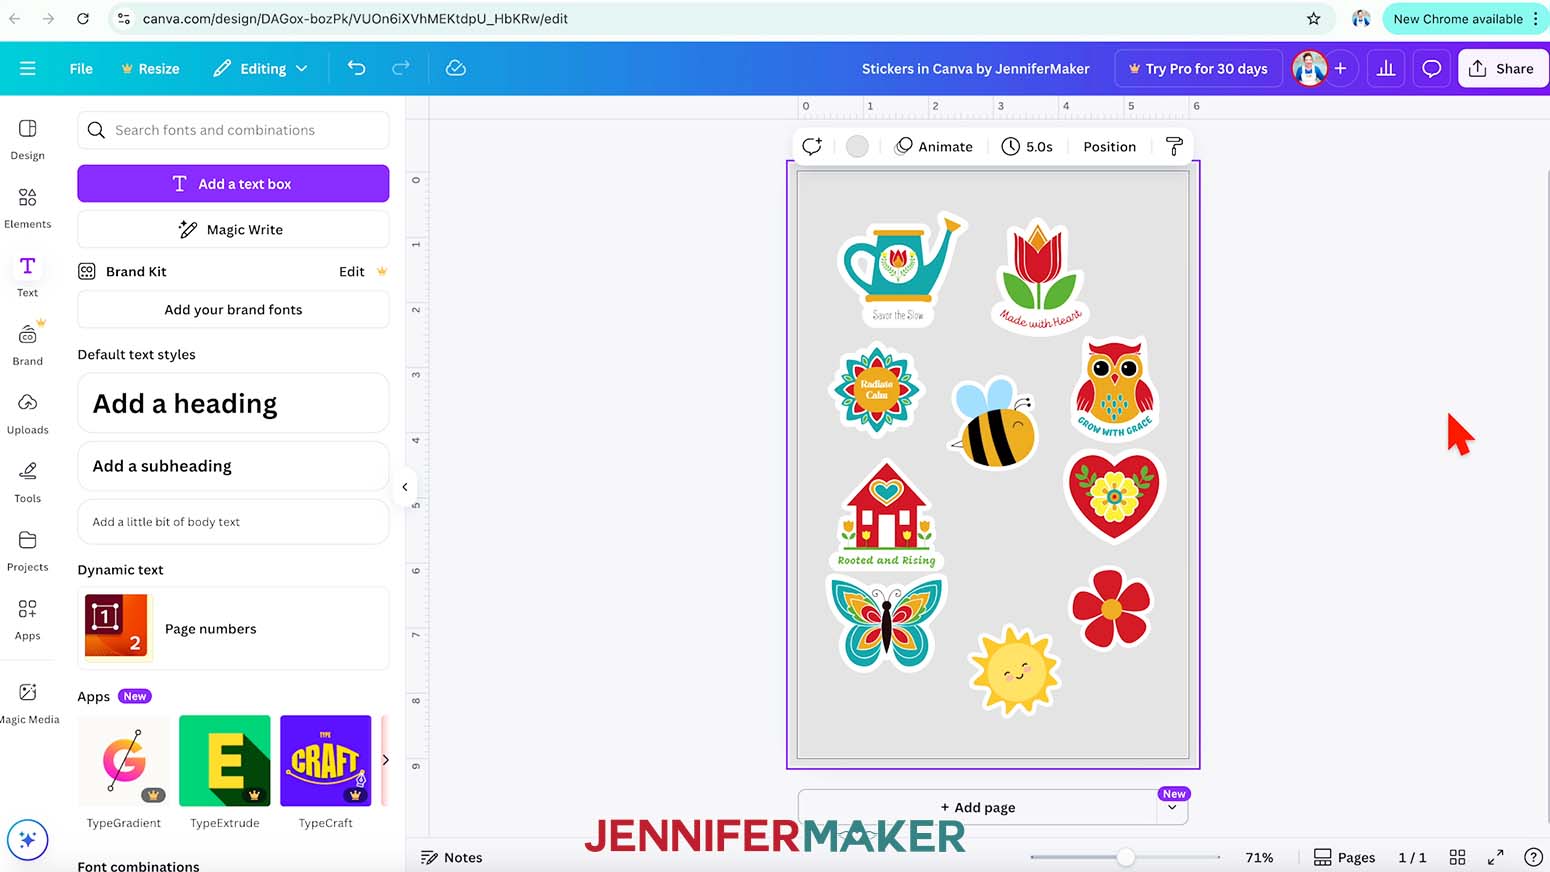
NOTE: I’ll name mine “Stickers in Canva by JenniferMaker.” - To change the background color and make the stickers easier to see, select the canvas and click the rainbow swatch in the bar above it.
- Then choose a light color in the “Color” panel that opens.
NOTE: I’ll choose “Light gray.” - To add a sticker design to your sheet, click on “Uploads” in the side panel, then “Upload files.”
- Select the sticker PNG you want to upload and click “Open.”
NOTE: I’ll select the “watering-can” PNG file. - In the Uploads Panel, click the sticker PNG to add it to your canvas.
- If you like, use the corner handles to Resize the sticker.
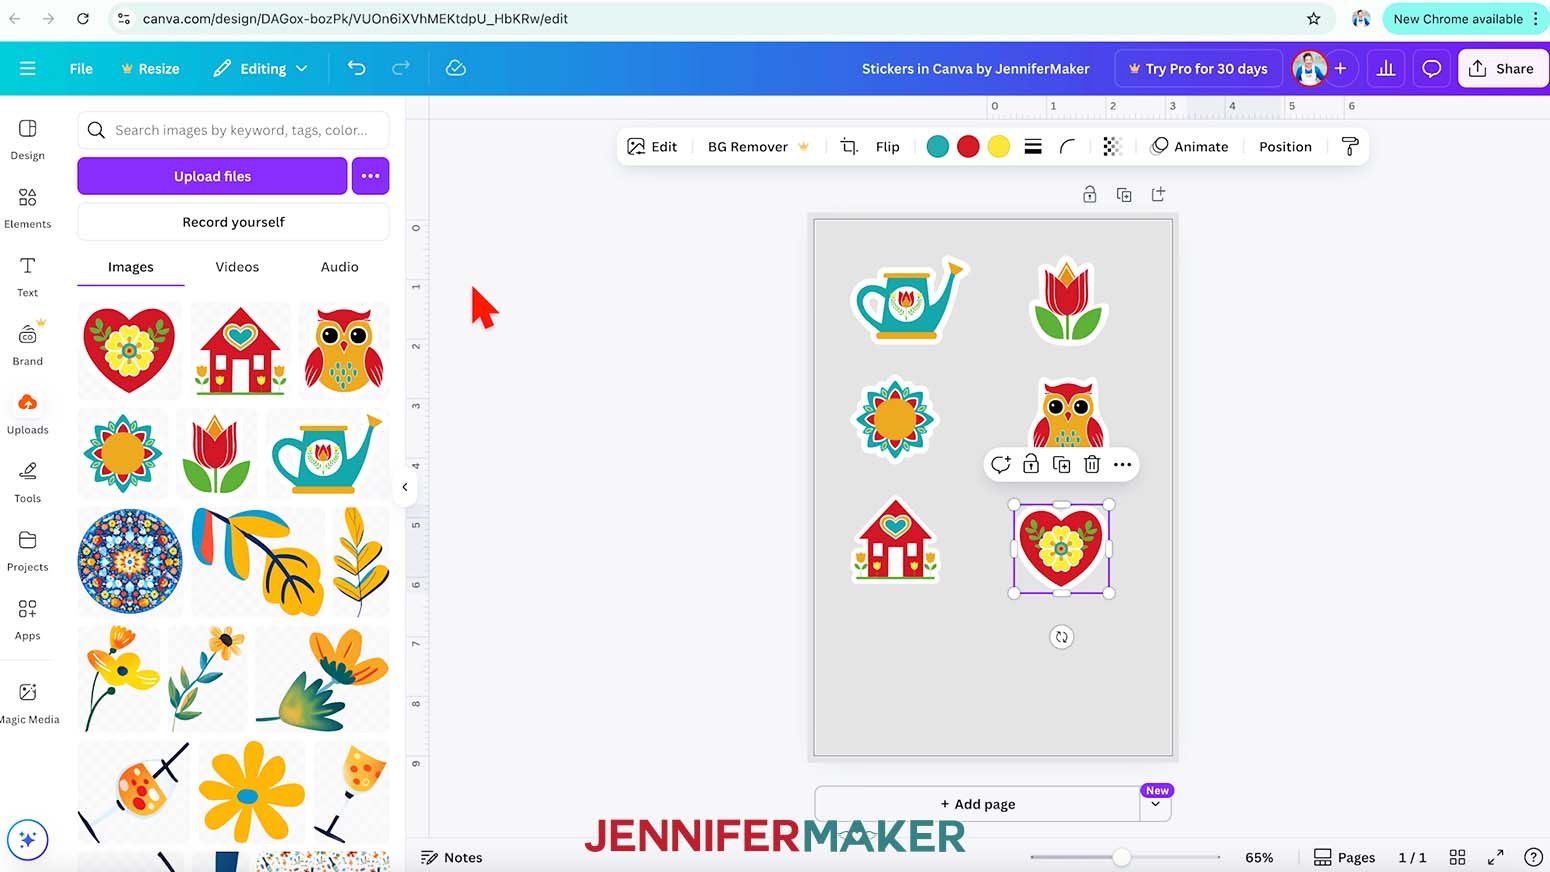
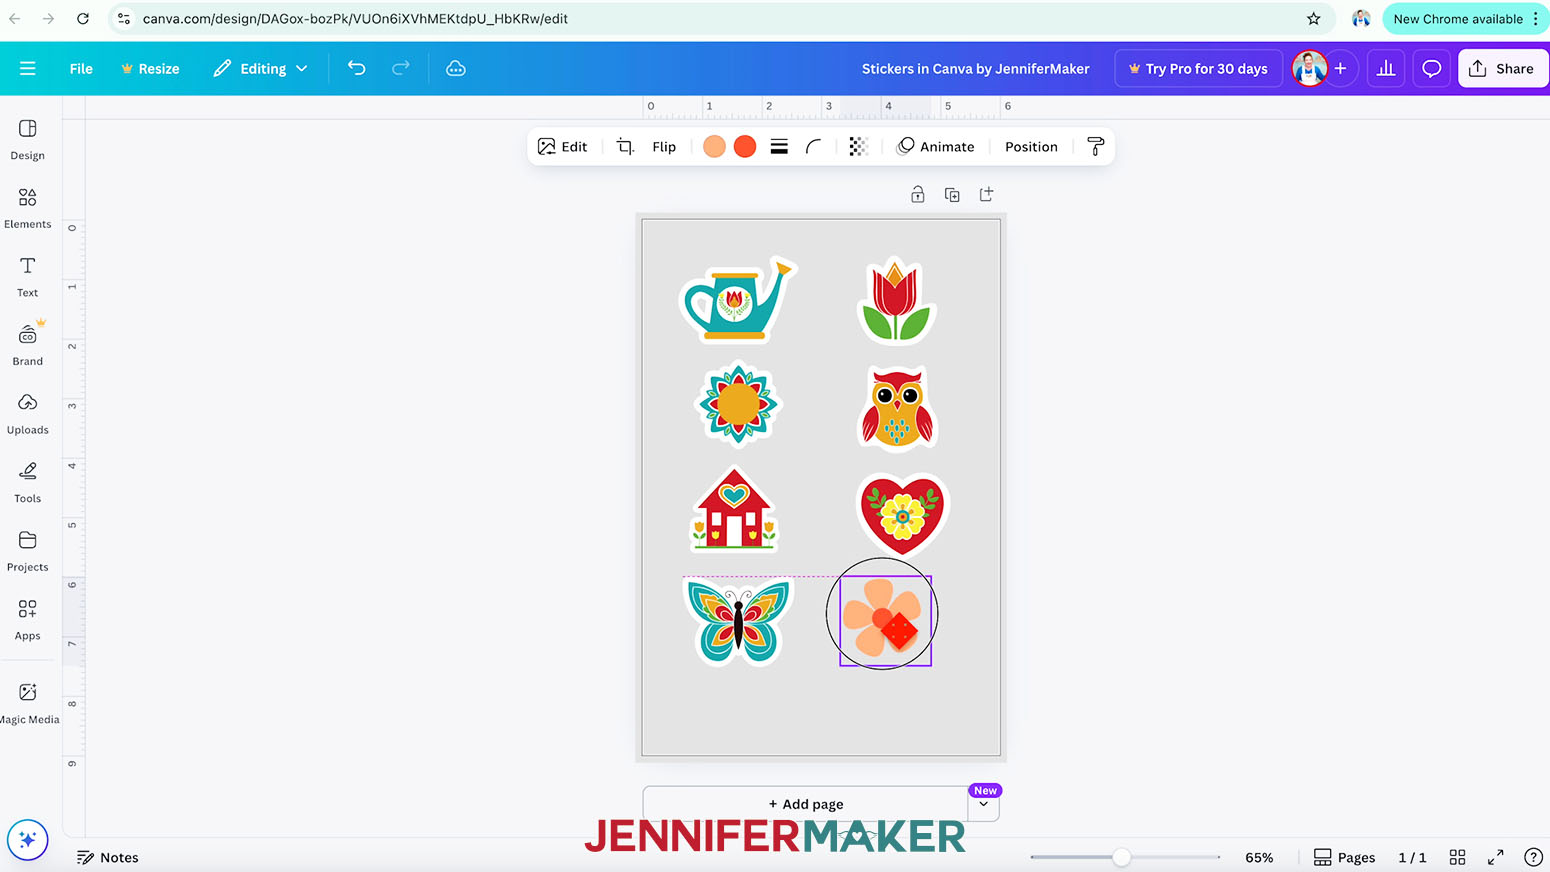
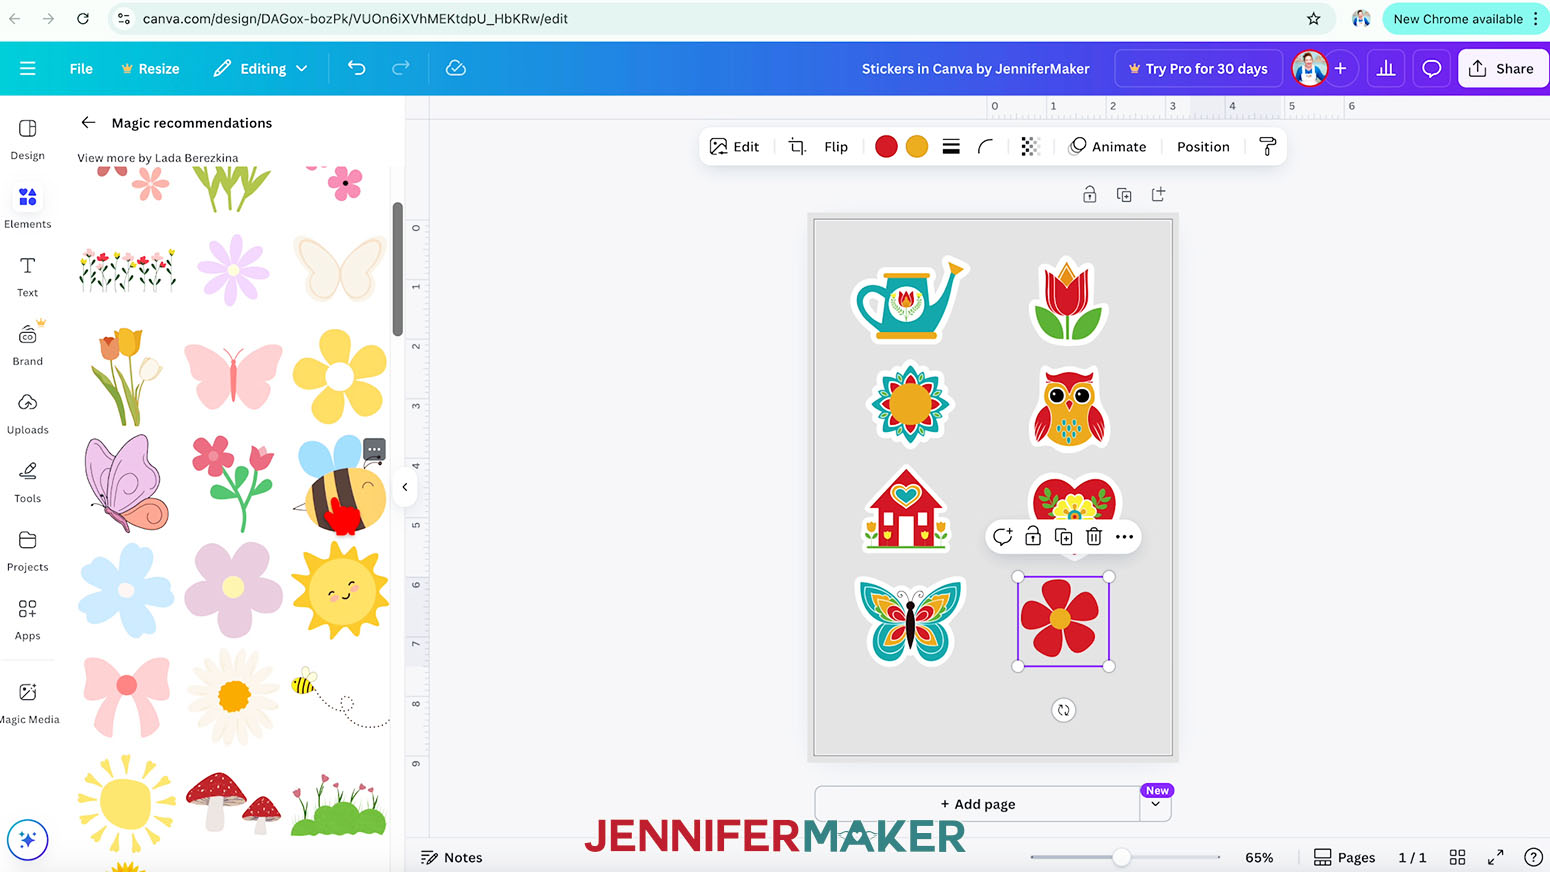
NOTE: I’ll resize mine to about 1.5” high. - Repeat Steps 12-15 to add additional sticker designs to your sheet, moving each one to an empty spot on the canvas as you go.
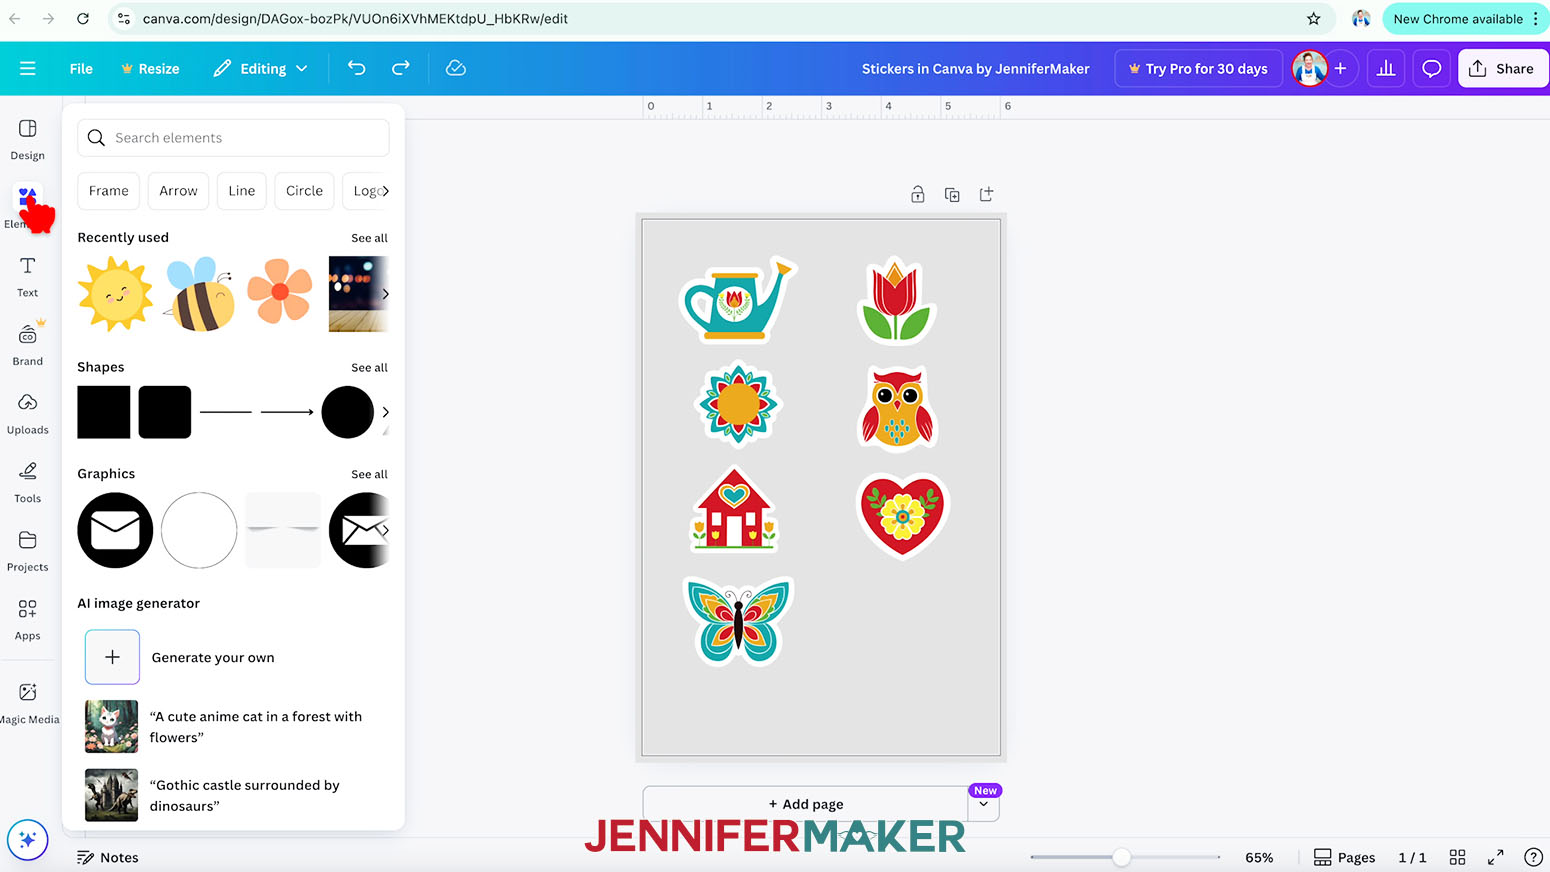
NOTE: I’ll add my “tulip,” “sun-mandala,” “owl,” “house,” “heart,” and “butterfly” PNG designs. - You can also add graphics from Canva’s library to create more stickers! Click on “Elements” to browse Canva’s image collection.
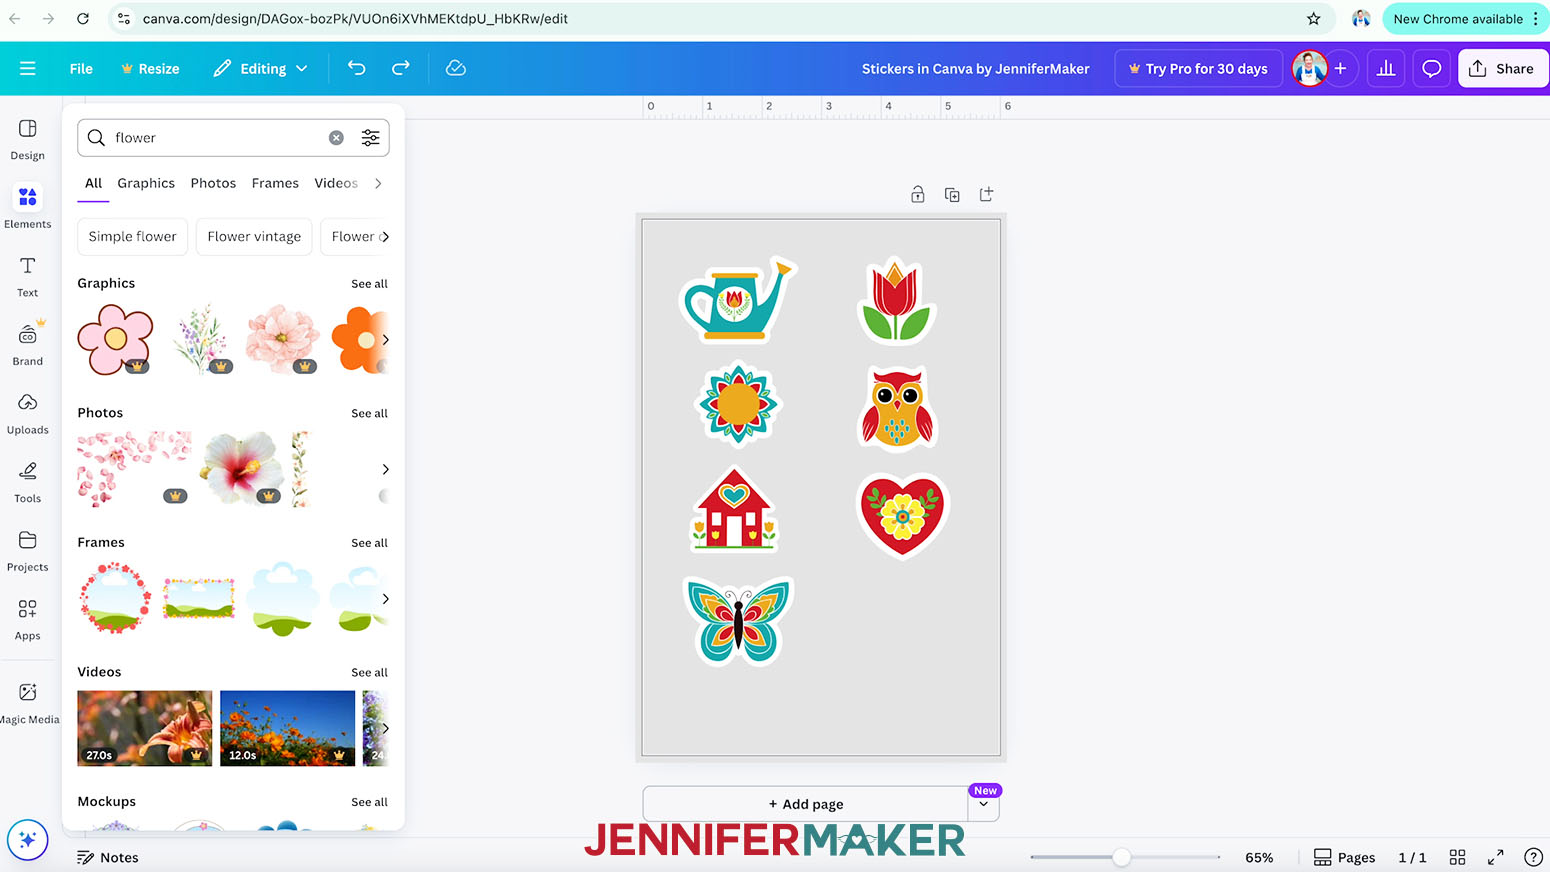
NOTE: Items with a crown are Canva Pro items. You’ll need to purchase them individually or sign up for a paid membership to download images using these elements. - To find an image that fits a specific design you have in mind, type a related phrase in the “Search” bar.
NOTE: I’ll type in “flower.” - Click “See all” to expand a section to see more available options in that category.
NOTE: I’ll expand the “Graphics” section. - When you find an image you like, click it to add it to your canvas, then resize and position it as desired.
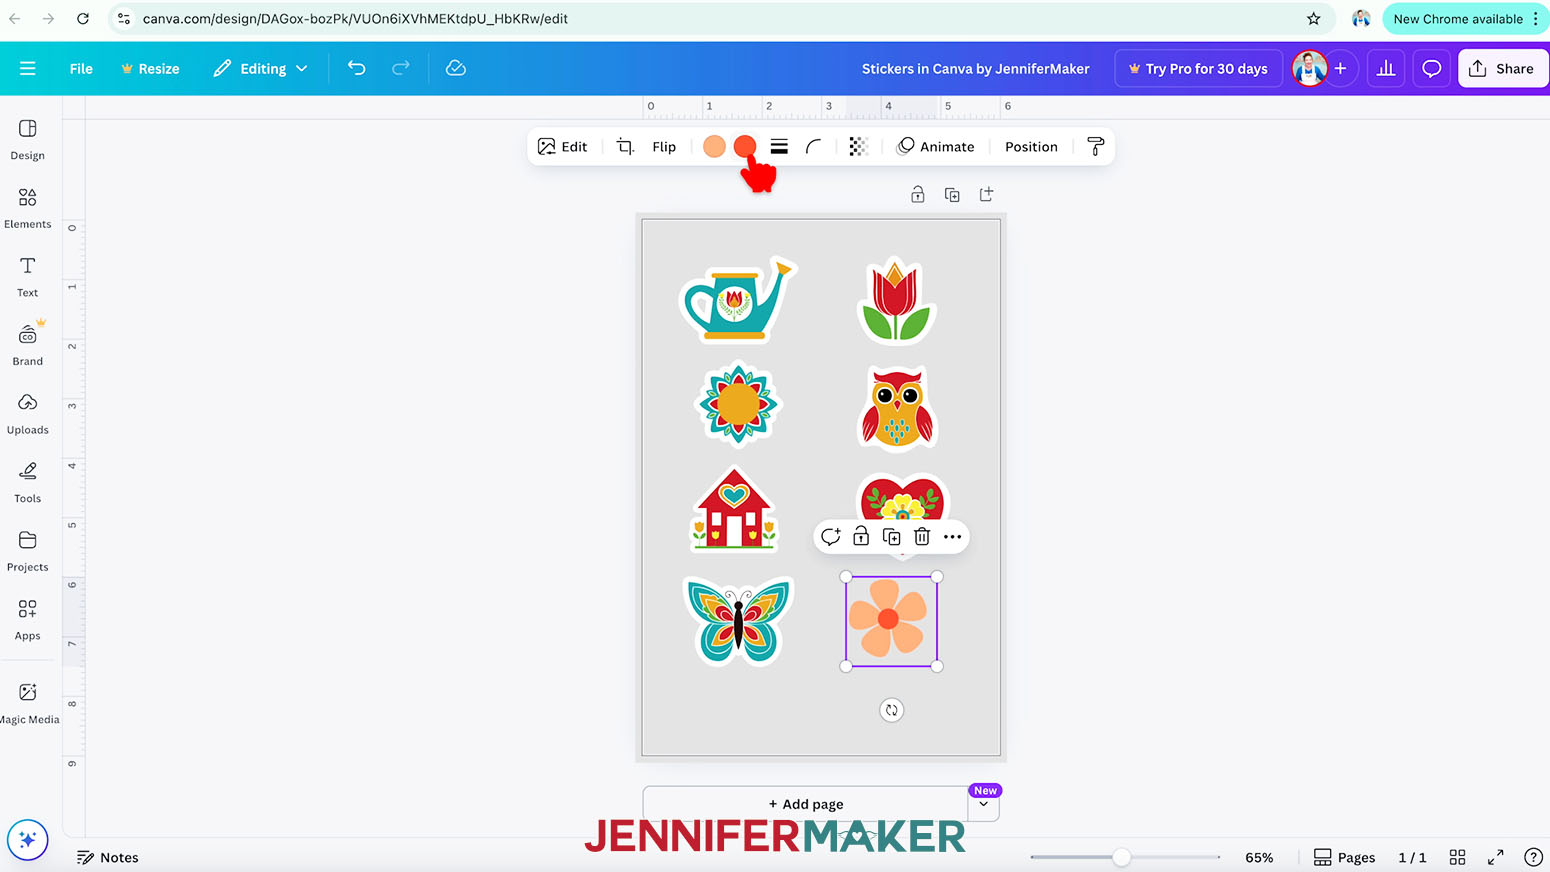
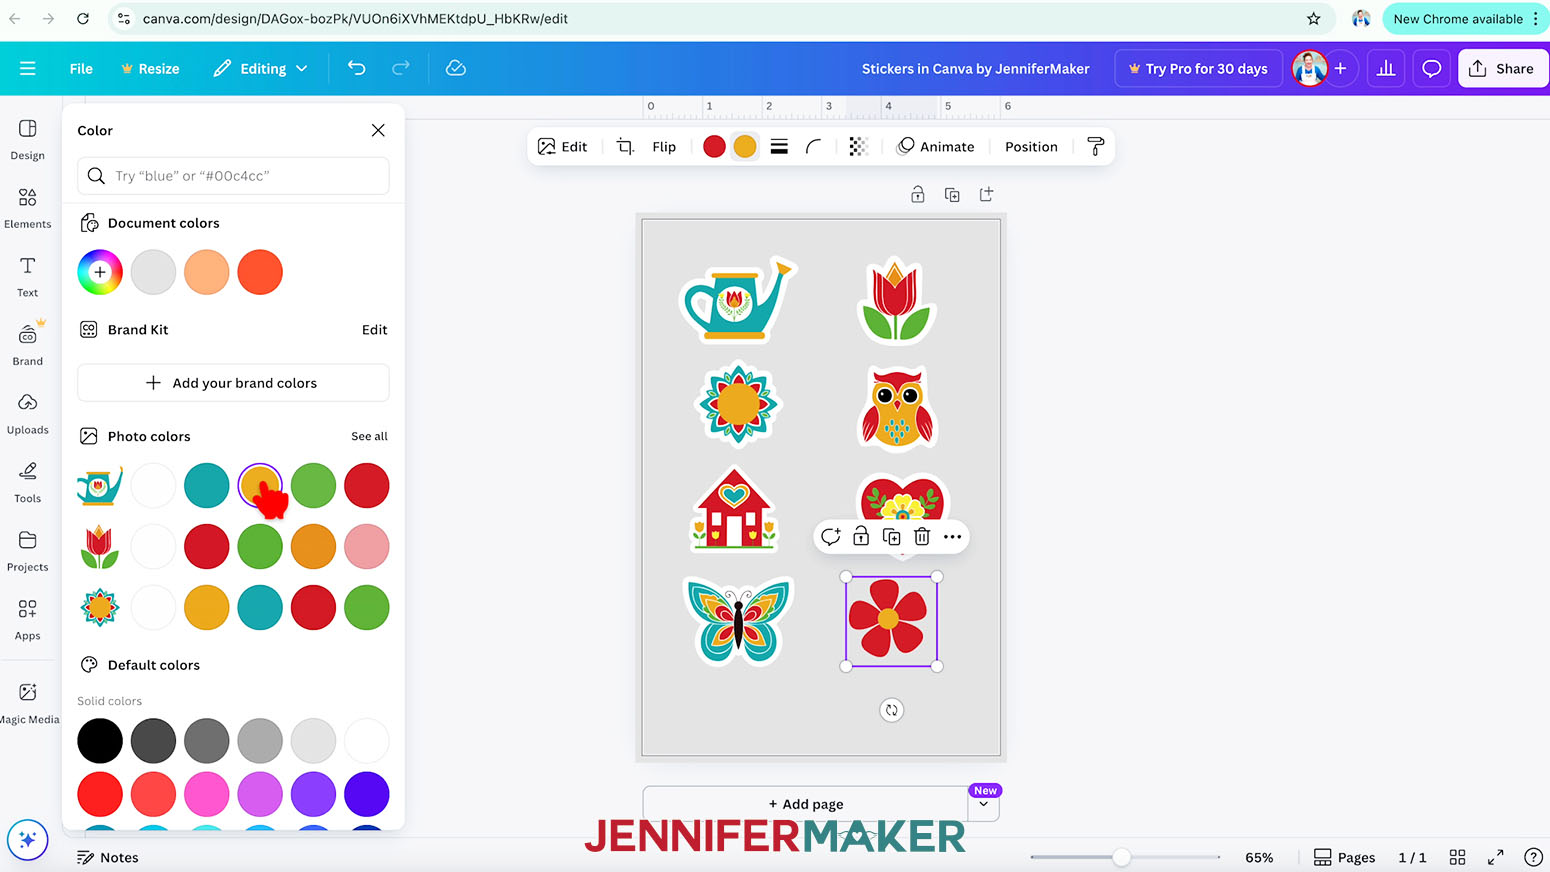
NOTE: I’ll add a simple flower. - To change an element’s colors, select it and make sure there are color swatches at the top, which indicate you can adjust them.
NOTE: If color swatches do not appear, you won’t be able to change the element’s individual colors. My PNG sticker files and most of my SVG sticker files have color swatches available so you can adjust them however you like! - Click the swatch that matches the image’s color that you’d like to change, and select a new option in the Color Panel that appears. The new color will take the place of the original in your image.
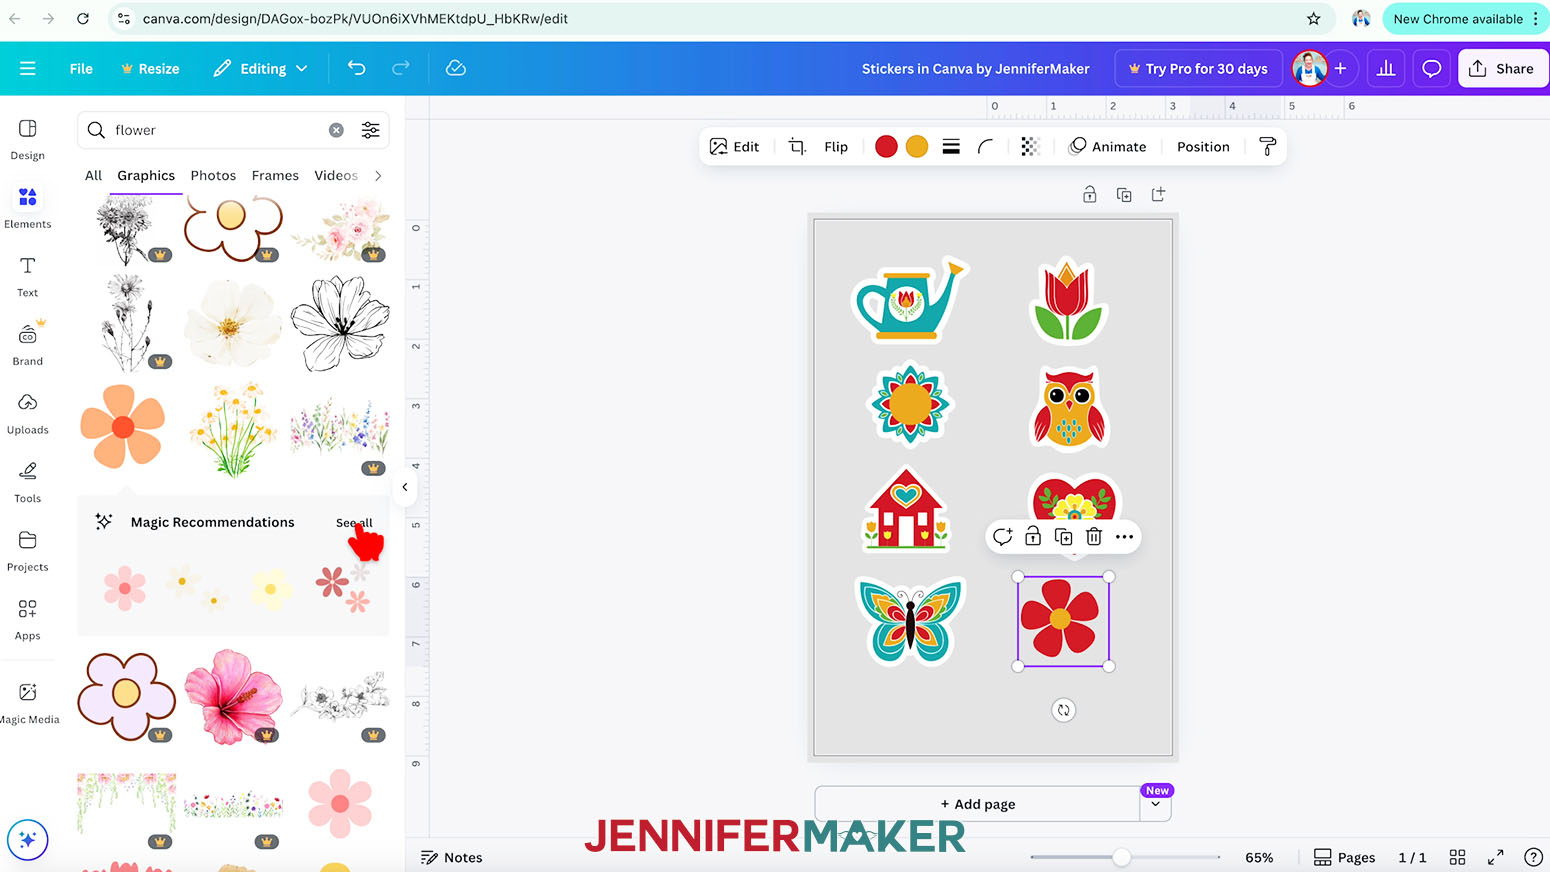
NOTE: I’ll change the Canva flower’s colors to orange and red to match my uploaded designs. - Once you add a Canva graphic, you can easily add similar images to fit your theme and style! Click on “Elements” and then click “See all” to expand the new “Magic Recommendations” section and browse through the options.
- Add, resize, and position any related elements you like!
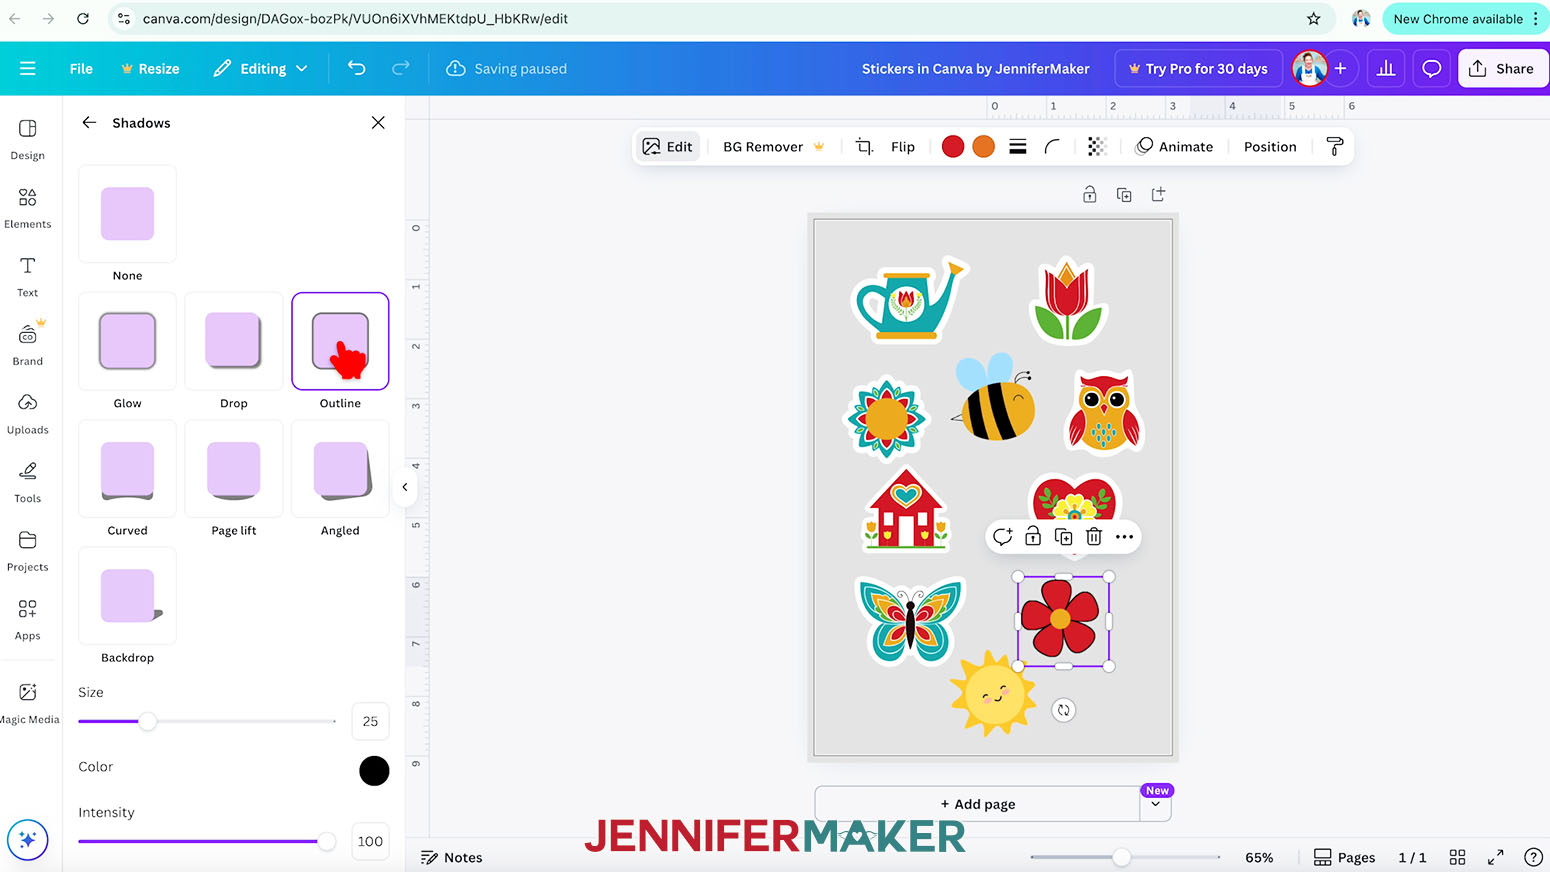
NOTE: I’ll add a happy sun and a smiling bee graphic. - To add a white border around a Canva graphic, select it and click the “Edit” button in the top toolbar.
NOTE: I’ll add a border around the Canva flower sticker. - Click on “Shadows” under “Effects,” and choose the “Outline” effect.
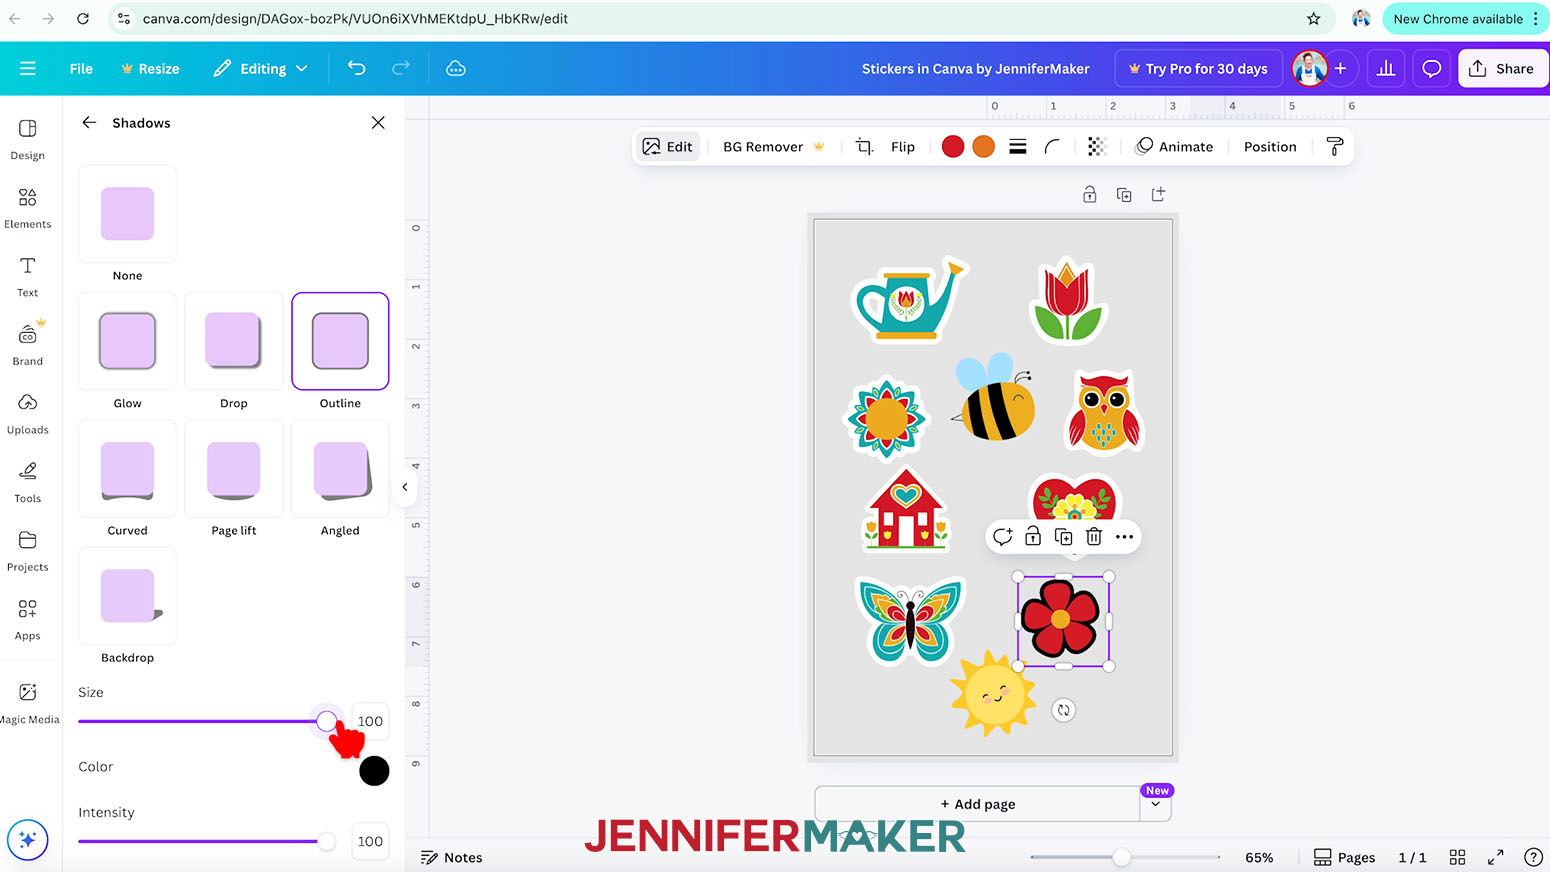
- Adjust the slider under “Size” to choose the thickness of the border. The image itself will shrink slightly to keep its dimensions the same with the added border.
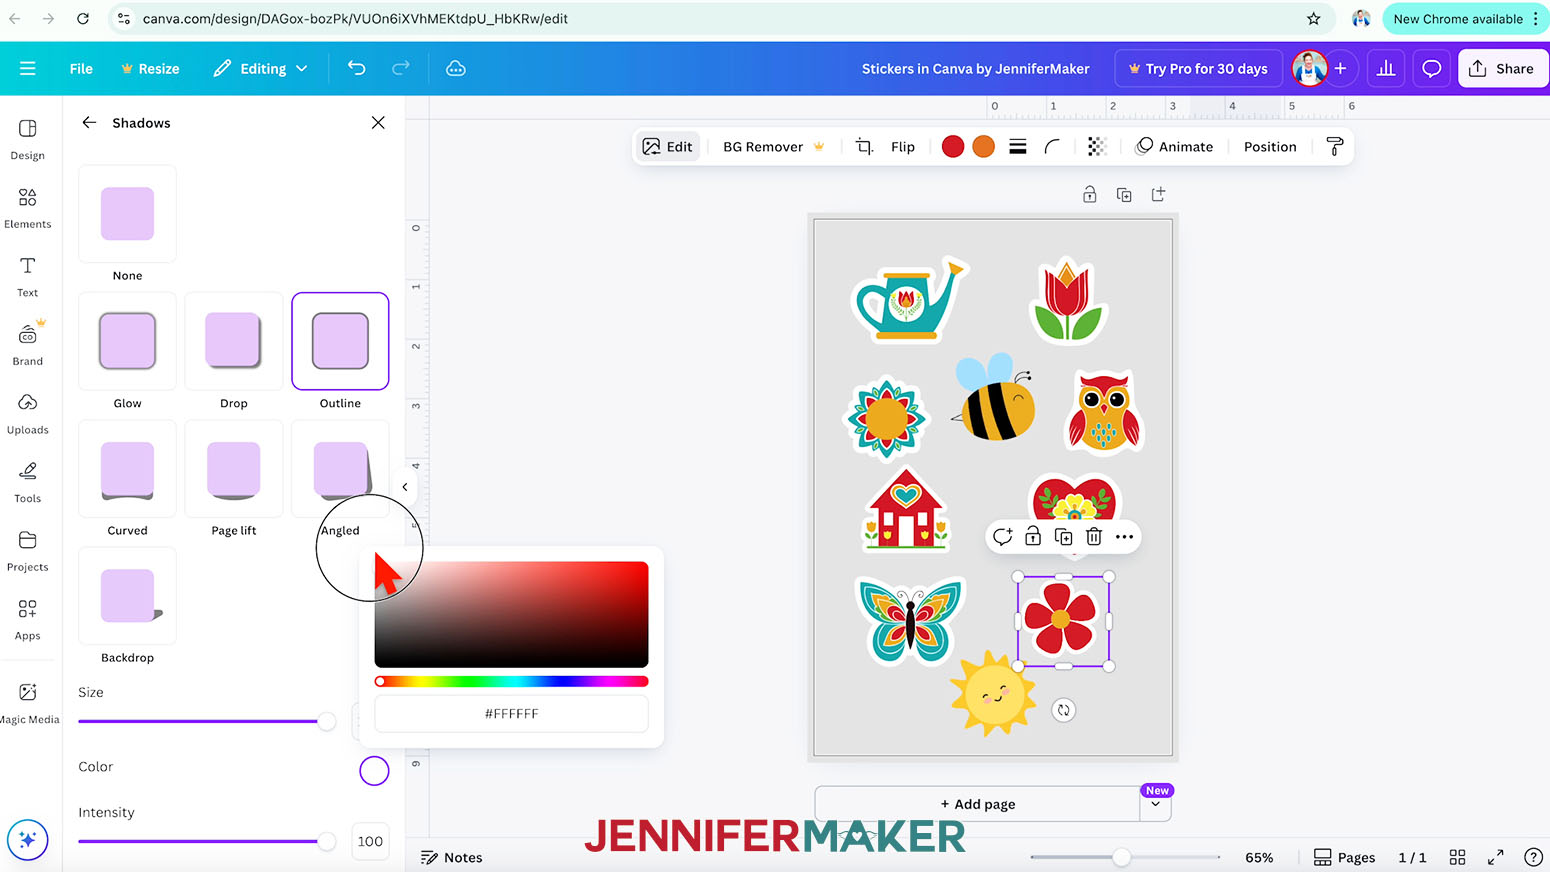
NOTE: I’ll set mine to 100. - Then click the color swatch to set the border’s color.
NOTE: I’ll choose white to match my uploaded stickers. - Repeat Steps 25-28 to add borders around any other stickers as needed.
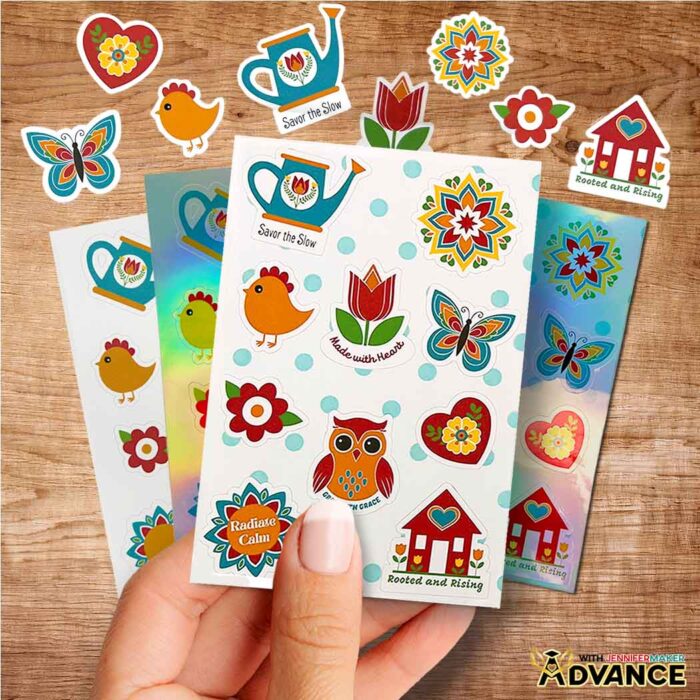
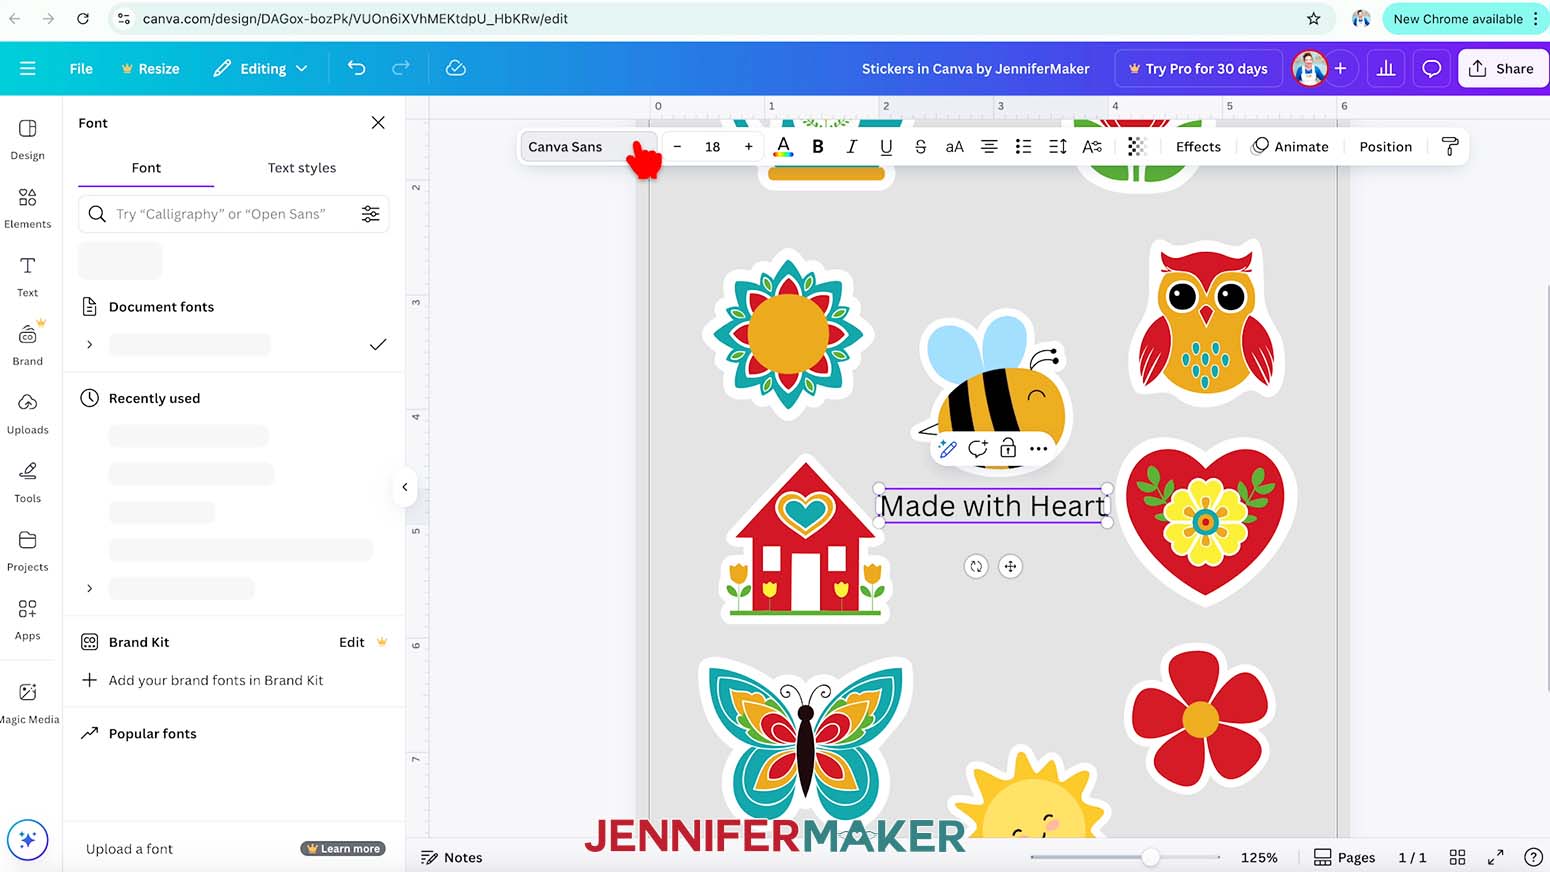
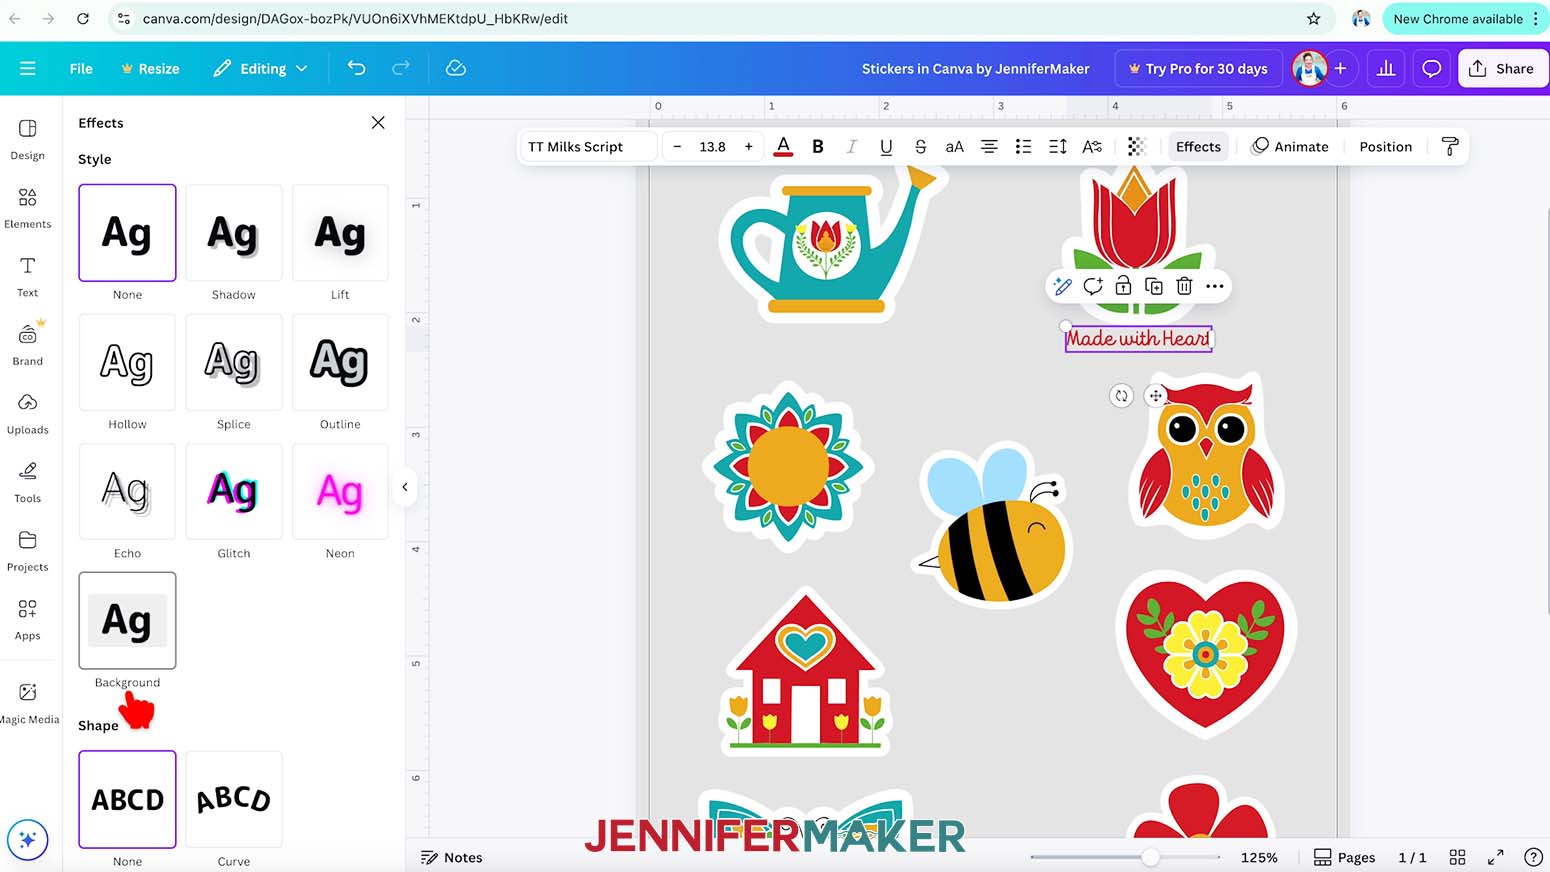
- To add some text to a sticker, click the “Text” icon in the side panel, then click “Add a text box.”
- Type your desired text in the box.
NOTE: I’ll type in “Made with Heart.” - To change your text’s typeface, keep the text box selected and click the font name field to open the Font menu in the side panel.
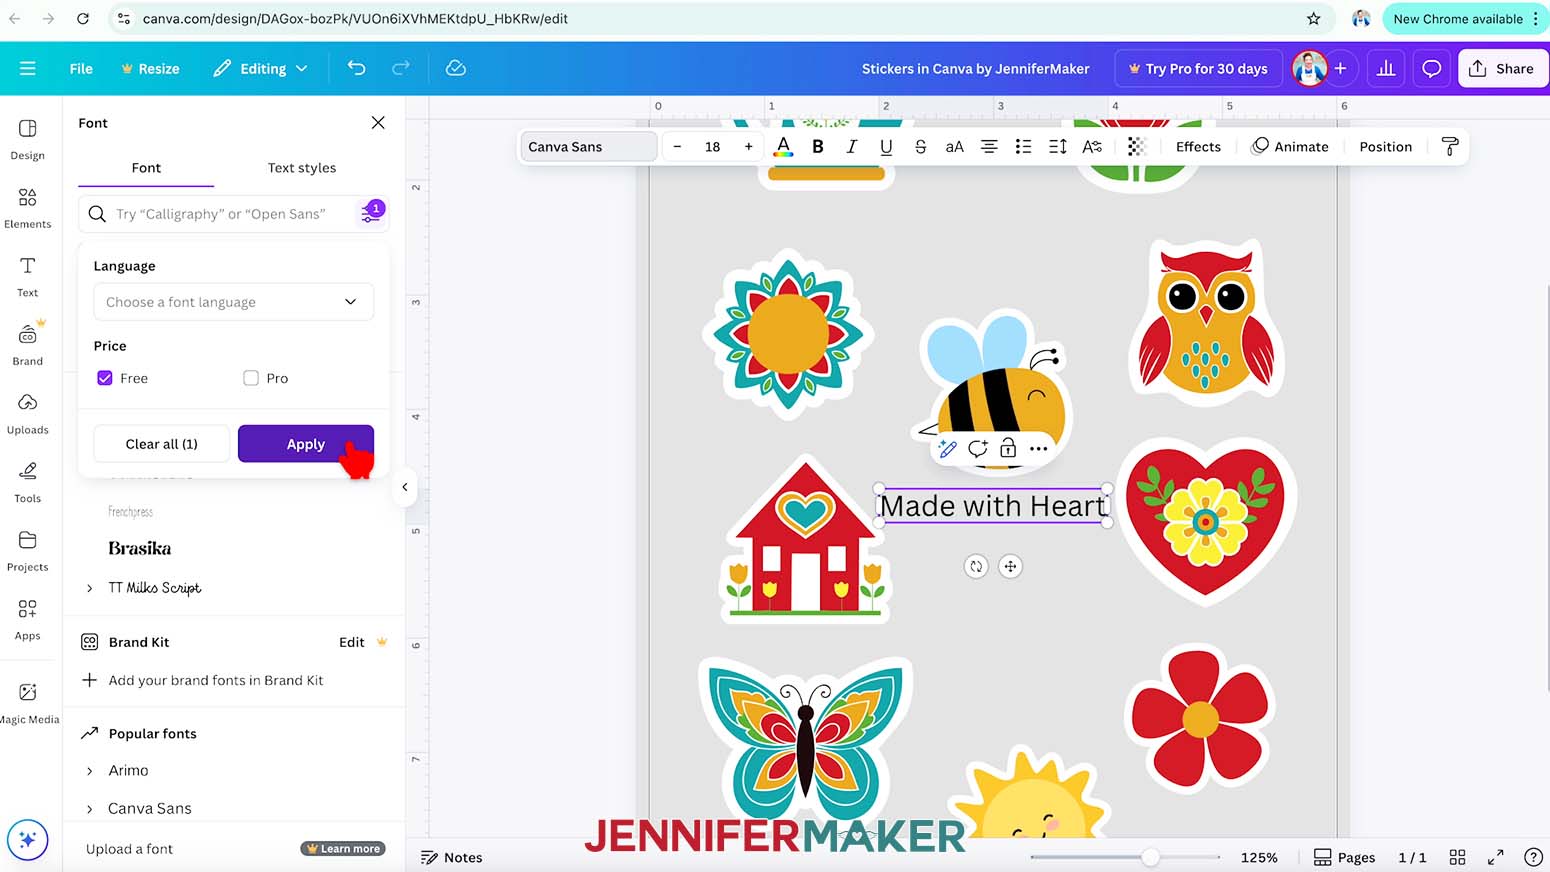
NOTE: It probably says “Canva Sans.” - Click on the icon with three horizontal lines and small circles to open the “Filter” menu. Then check the box next to “Free,” and click “Apply” to show only typefaces you can use without a paid account.
- Click a typeface you like from the list to apply it to your text.
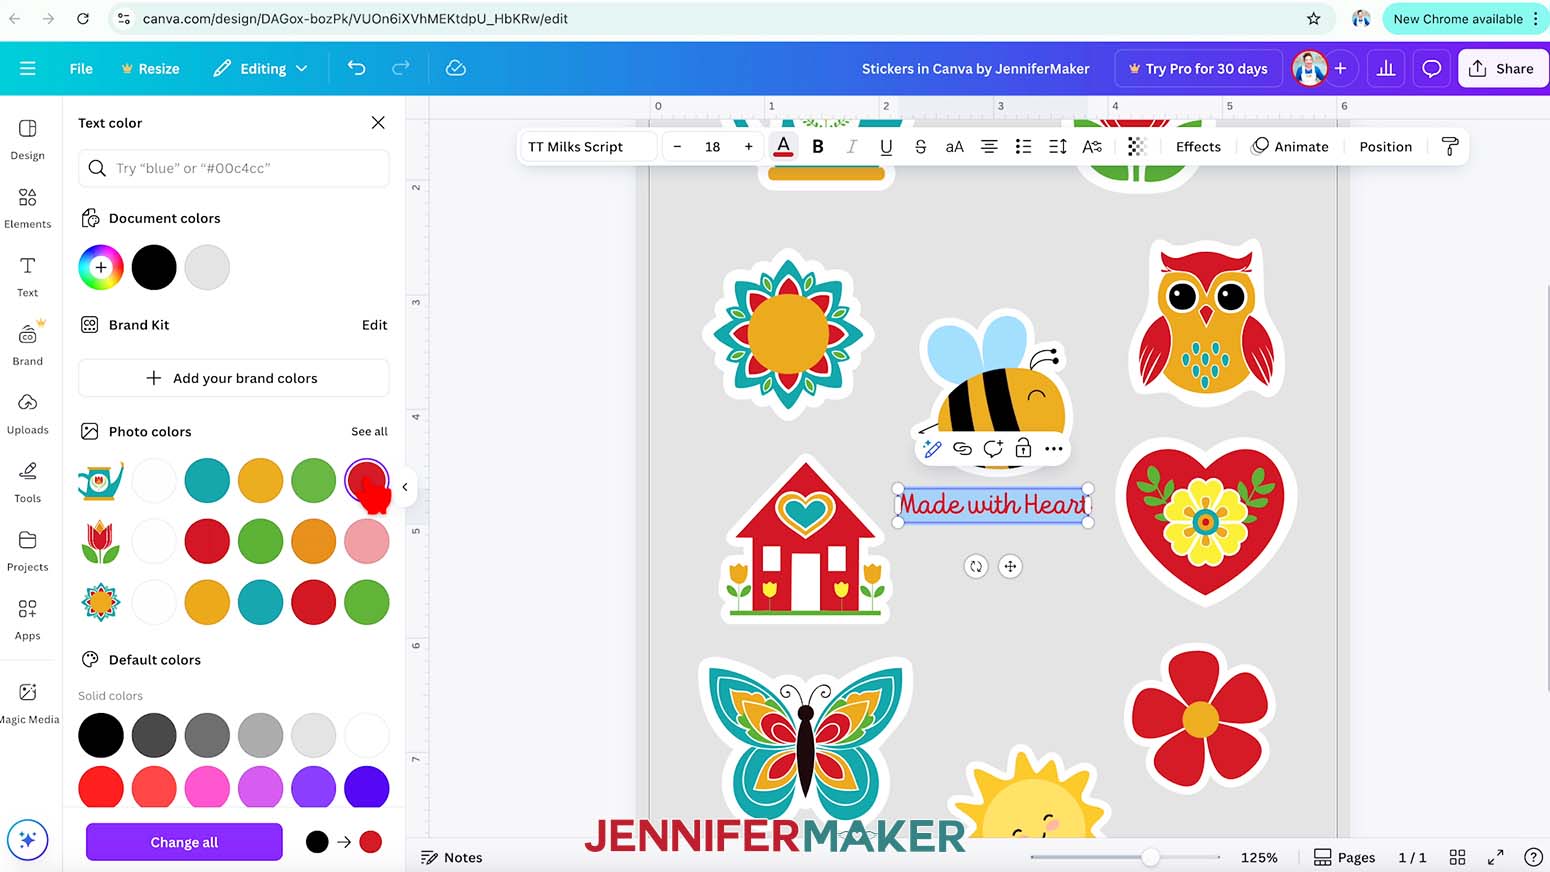
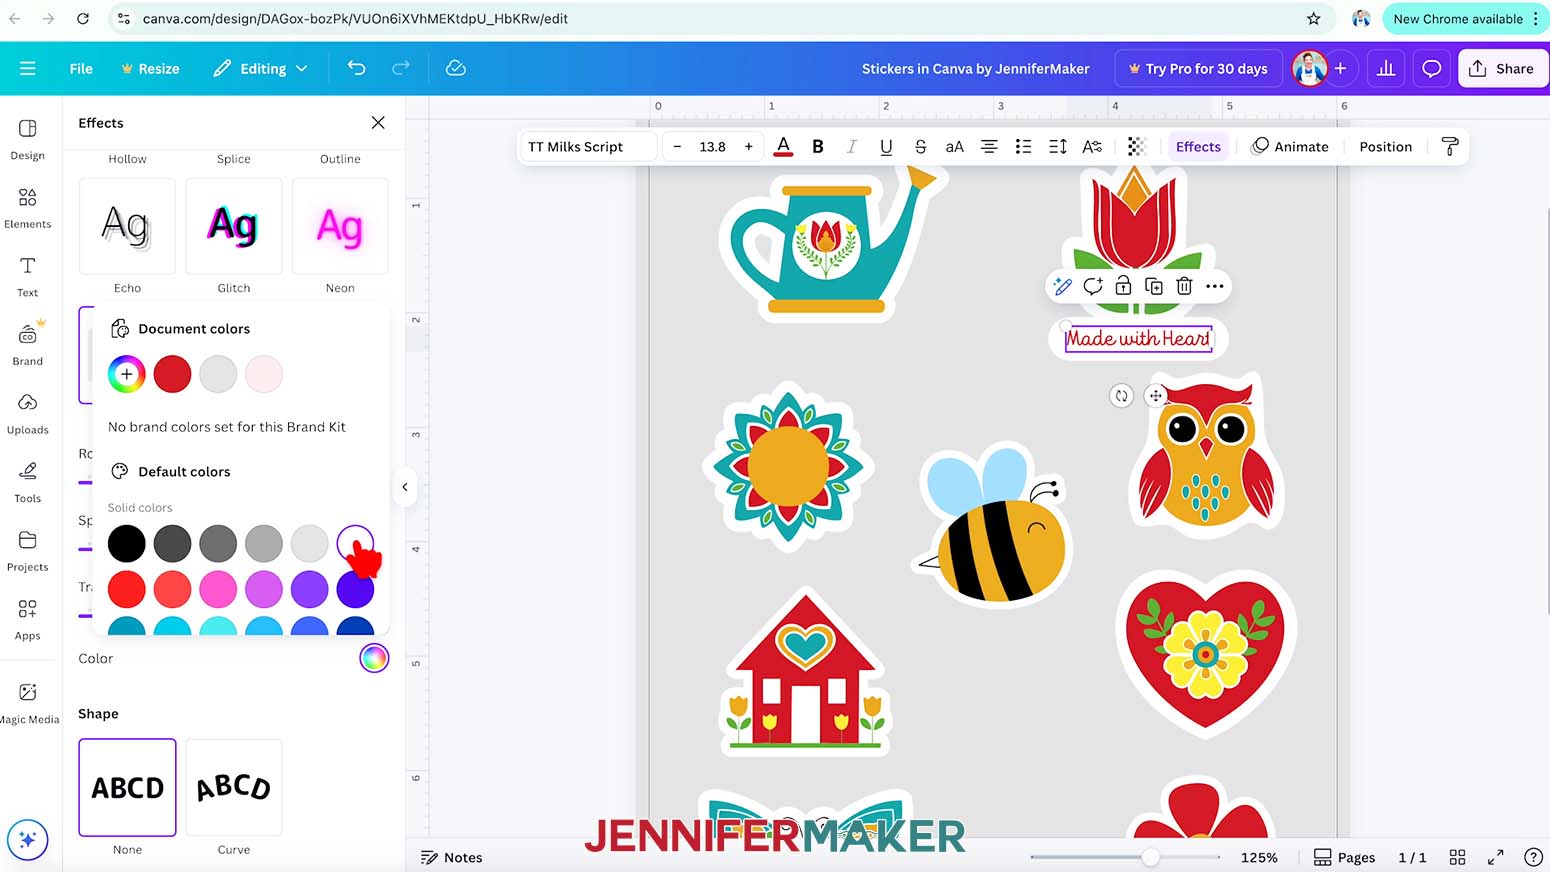
NOTE: I’ll choose “TT Milks Script.” - To change the color of your text, click the toolbar button with the letter “A” above a color box and choose a new option.
NOTE: I’ll make mine red. - Use the corner Resize handles to make your text larger or smaller as needed, and the side handles to change the text’s position inside the box.
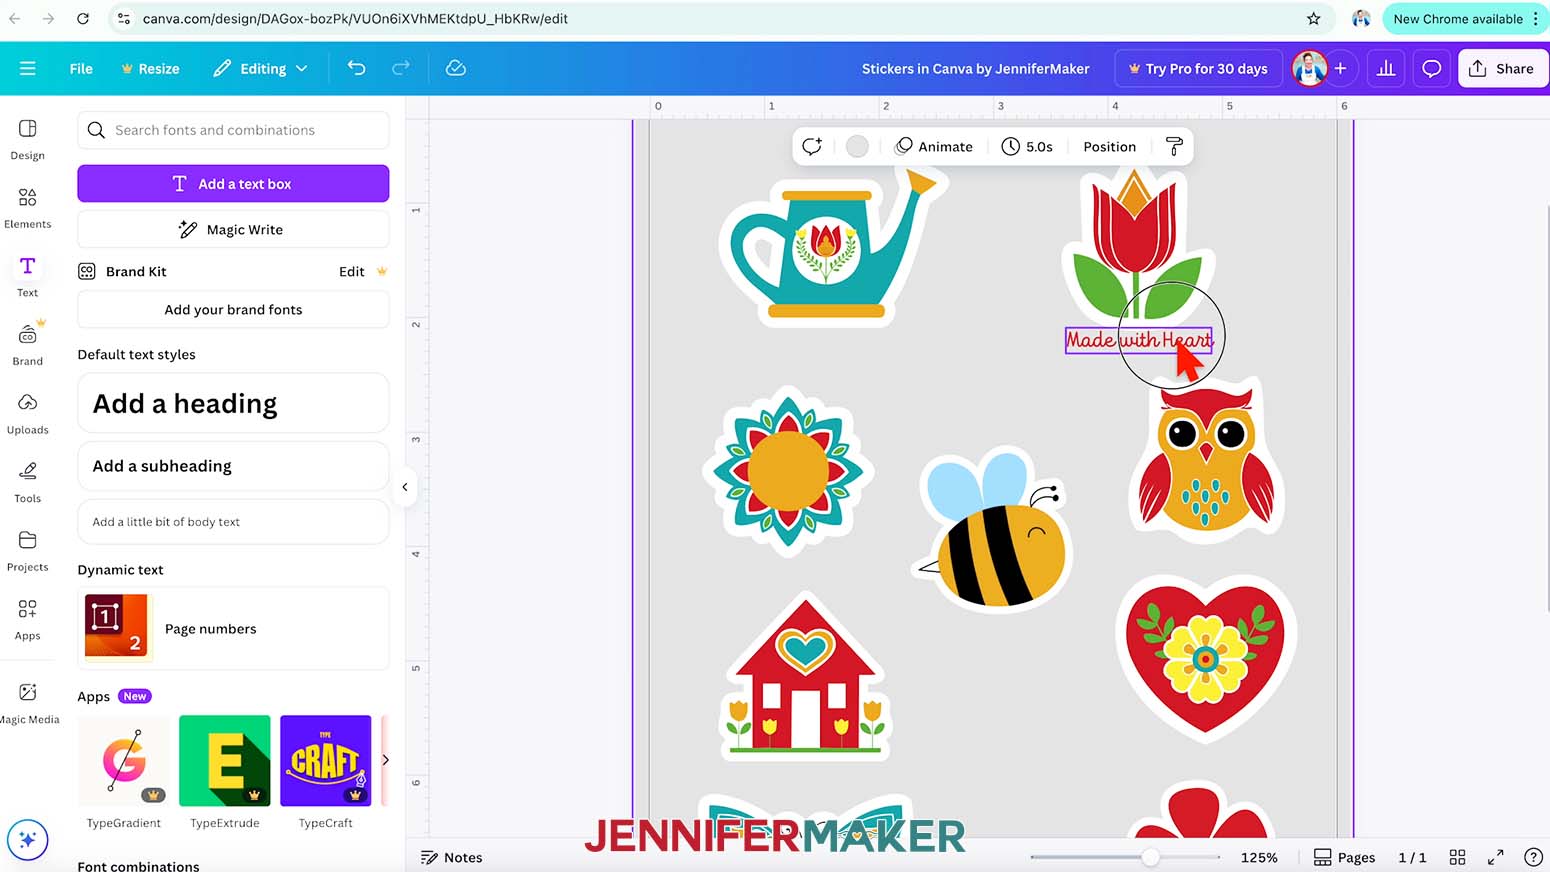
- Click and drag the text box to move it into your desired position.
TIP: Use the pink guidelines to help with alignment.
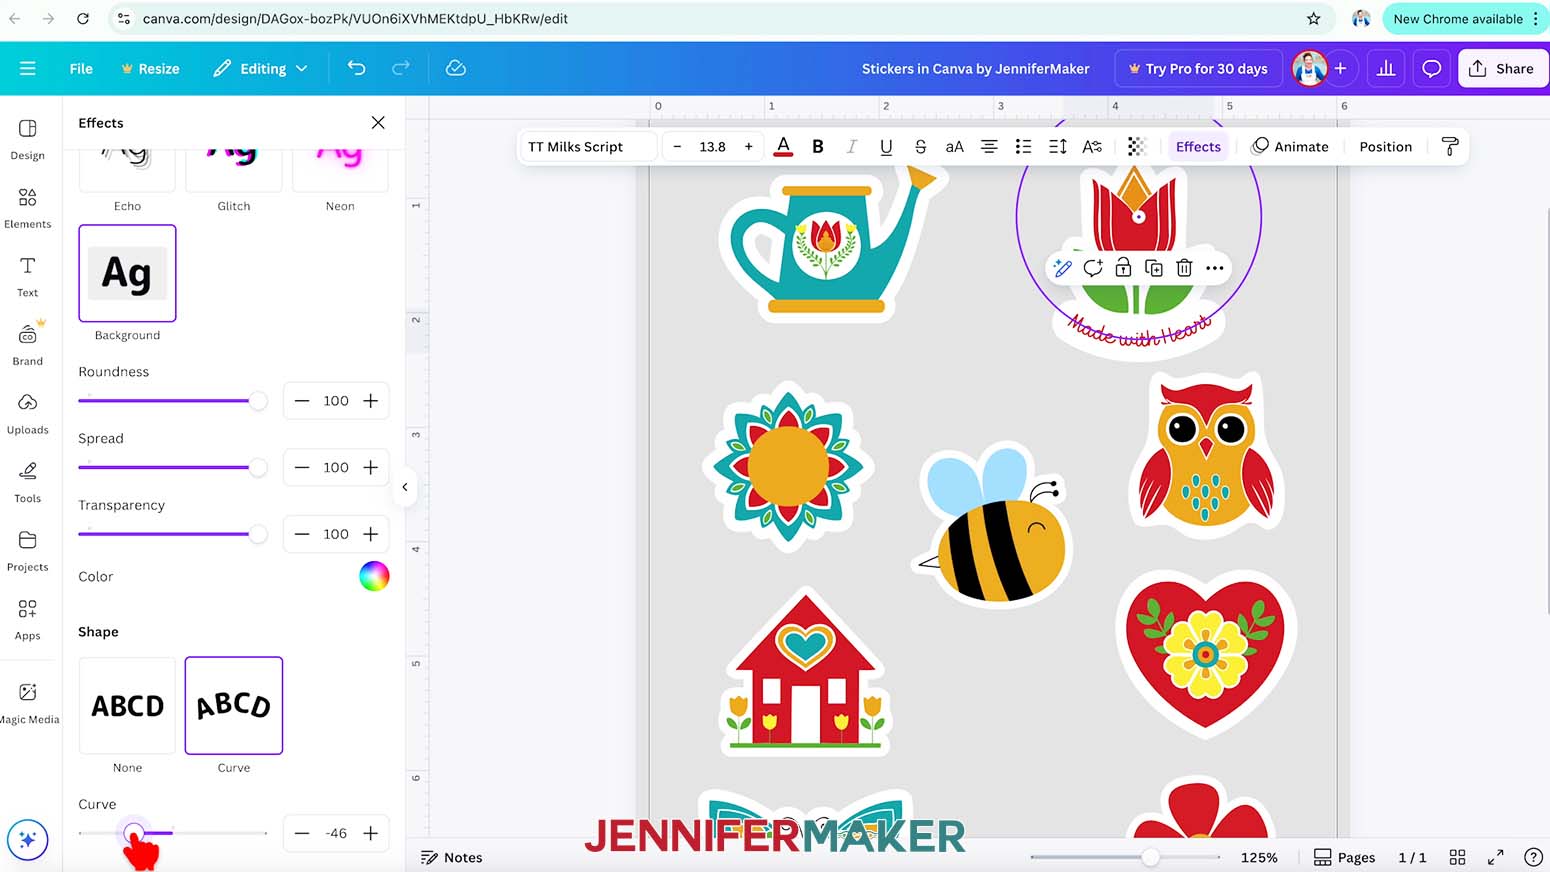
NOTE: I’ll center my text under the tulip. Make sure your text is close to your sticker so that they will both be connected in the next steps. - To connect the text to the sticker, you’ll need to create a solid background behind the text. First, select the text, then click the “Effects” button in the Text Toolbar.
- Under “Style,” choose “Background.”
- Adjust the “Roundness” slider to change the shape of the background’s corners. Lower values are more square, while higher values are more rounded.
NOTE: I’ll set the Roundness to 100. - Adjust the “Spread” slider to change the size of the background relative to the size of the text. A higher value spreads the background outside the text, while lower values shrink the background closer to the text.
NOTE: I’ll set the Spread to 100. - Click the color swatch to set the background color.
NOTE: I’ll pick white to match the offset around my sticker. - If you’d like to add a curve to your text, choose “Curve” under “Shape” in the Effects menu.
- Move the slider to the left or right to adjust the curve of your text.
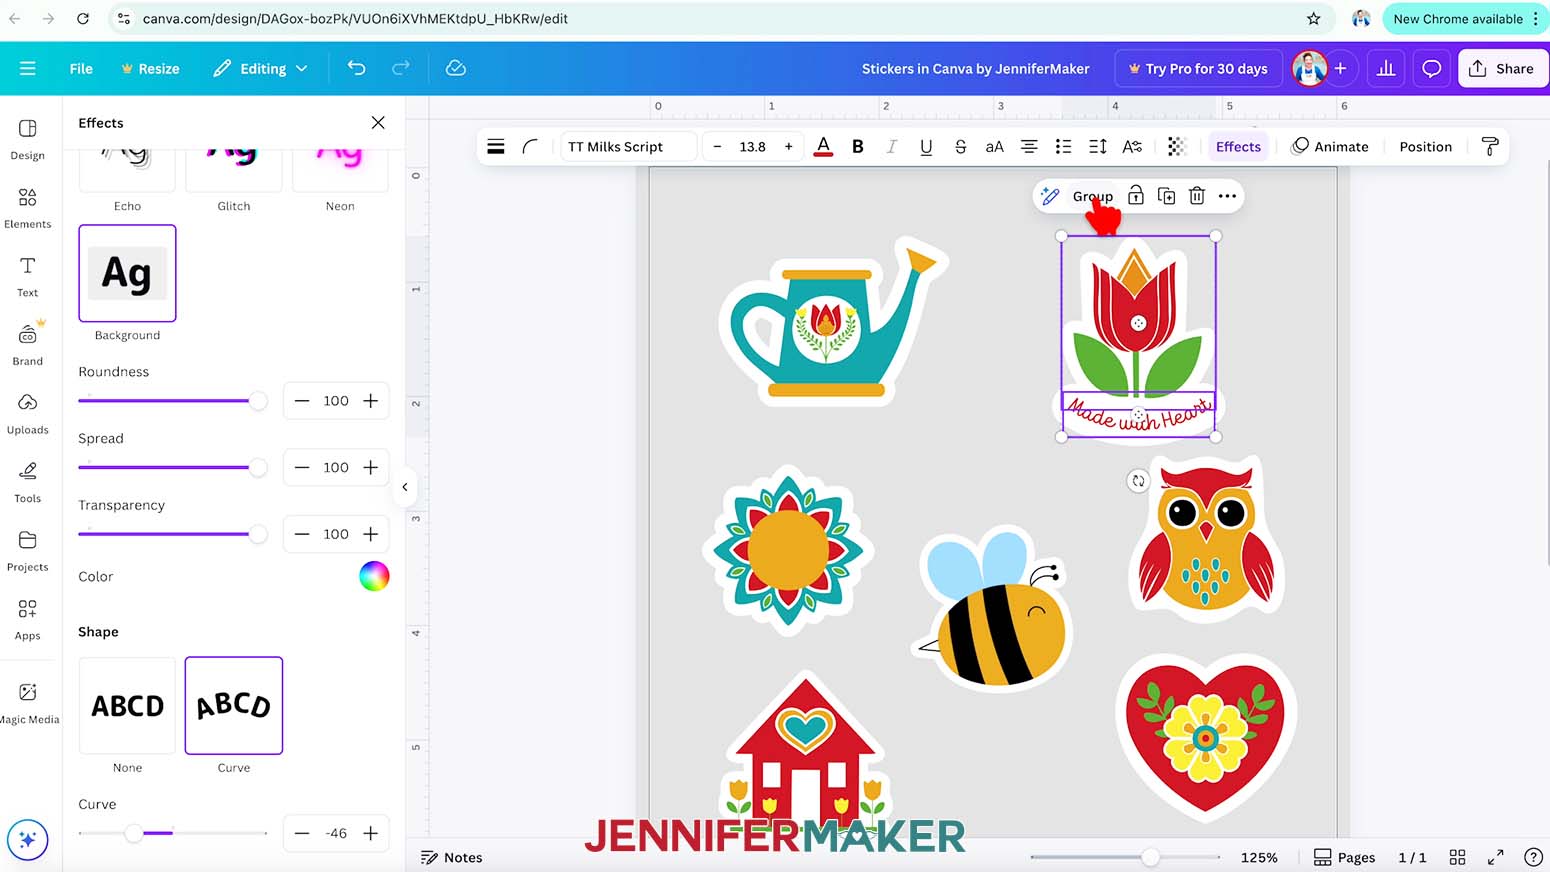
NOTE: I’ll set mine to -46 so the ends curve upward around my sticker. - When you’re finished adding text, select your sticker, then hold down the “Shift” key on your keyboard and select your text box.
- Click the “Group” button on the bar above your selections to keep them together.
- Repeat Steps 30-46 to add text to any other stickers you’d like.
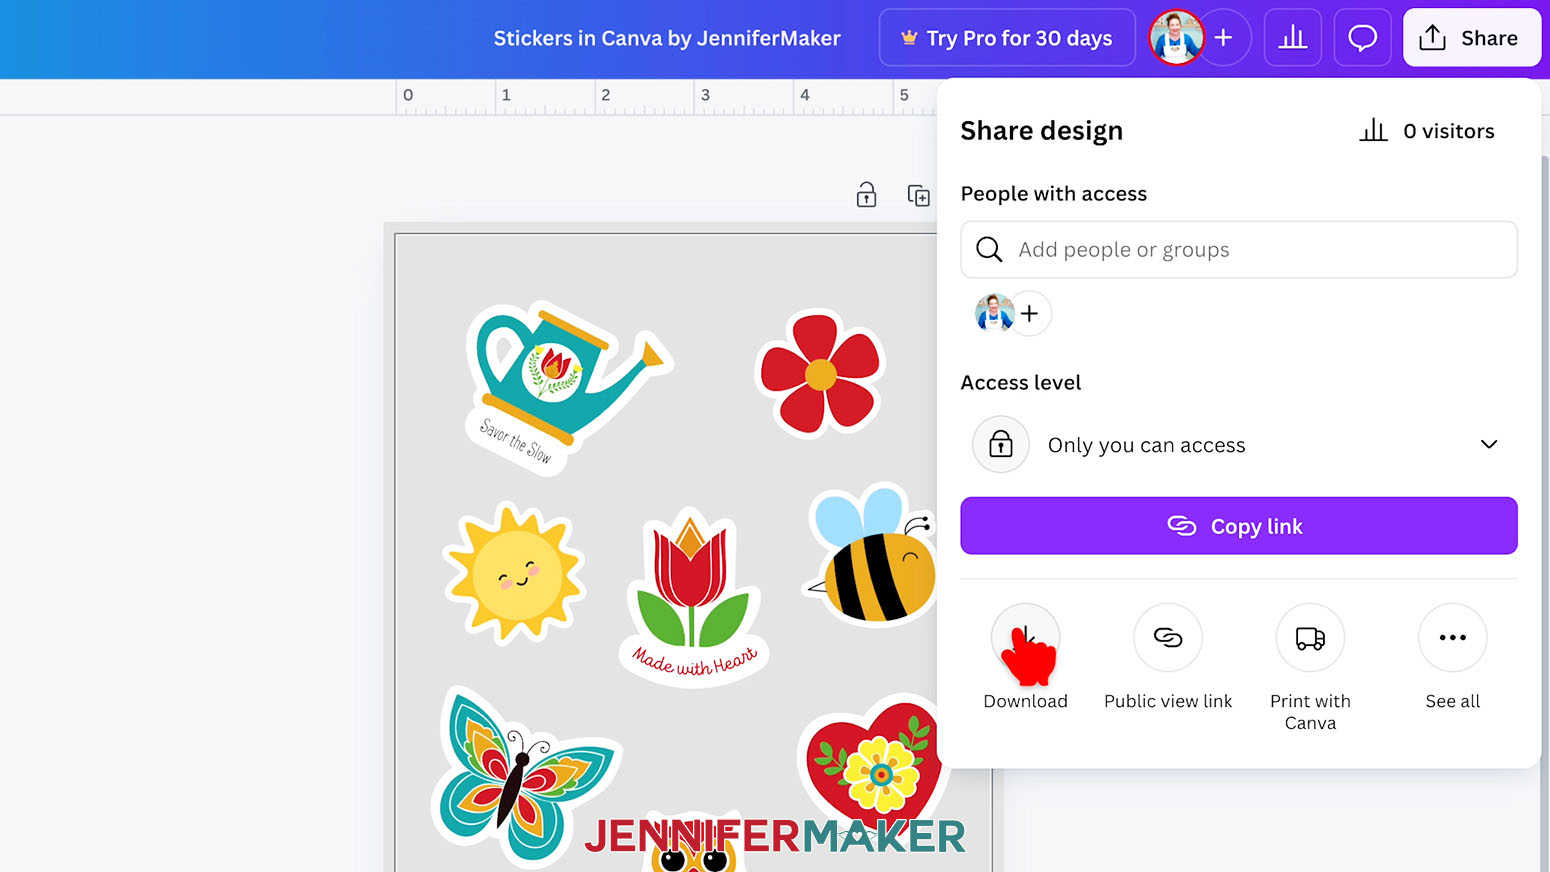
NOTE: I’ll add “Savor the Slow” to my watering can, “Grow with Grace” to my owl, “Radiate Calm” to my sun mandala, and “Rooted and Rising” to my house. - To use your finished sticker sheet design, click “Share” in the top menu.
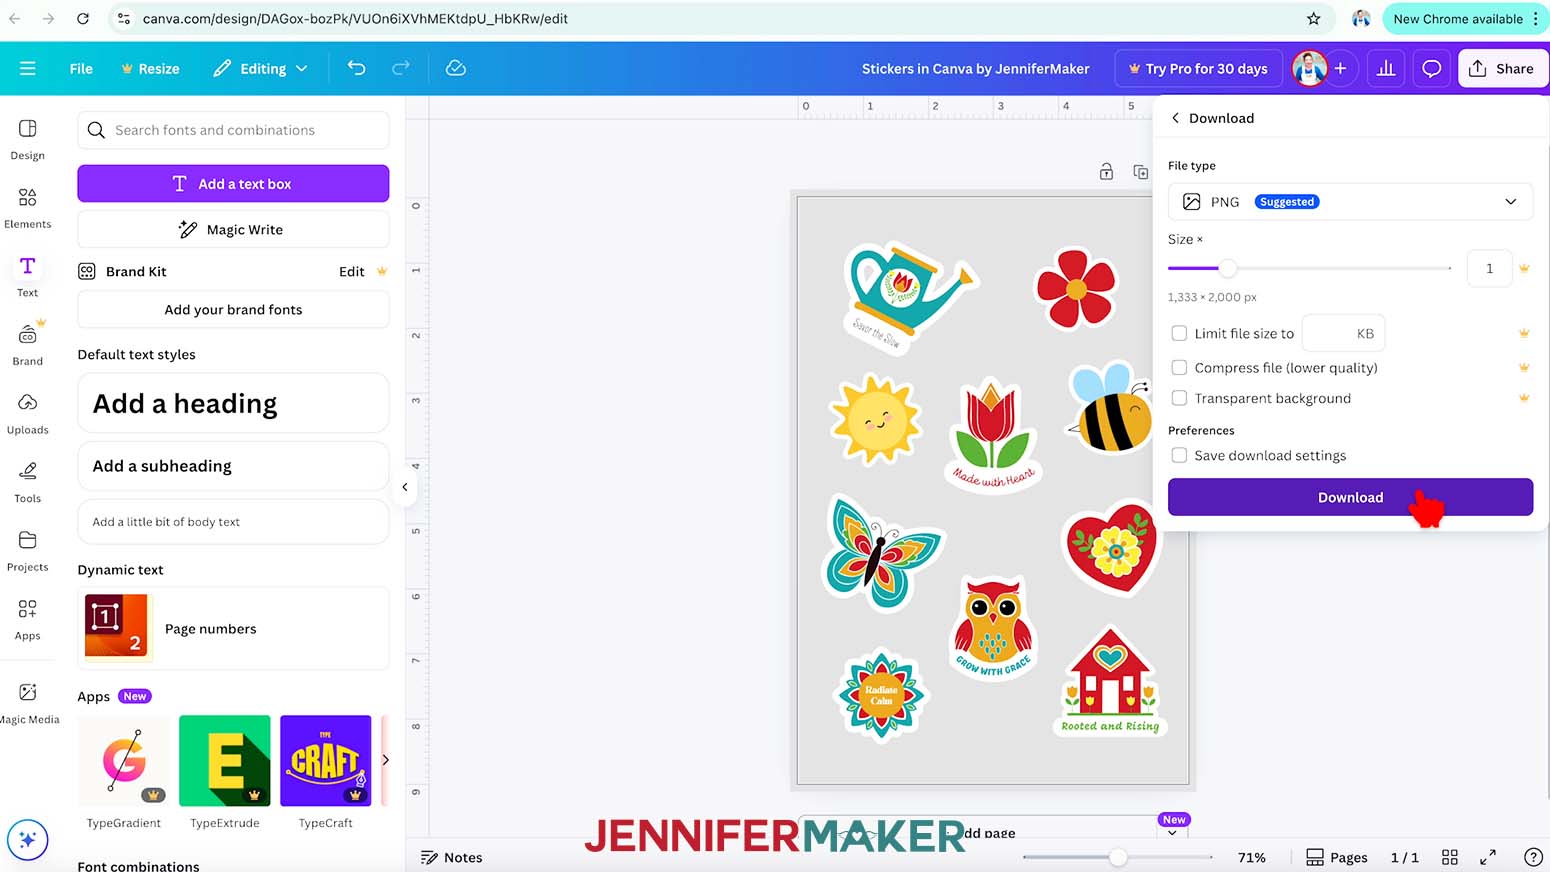
NOTE: Keeping the gray background will help differentiate the stickers’ white borders from the background when we upload the file to Cricut Design Space in the next step, but we won’t print it with that color. - Select “Download.”
- Since we’ll use Cricut Design Space to print the stickers, make sure the file type is set to PNG, then click “Download” to save the image to your computer.
NOTE: If you have a Canva Pro account, you can check the box beside “Transparent Background” and skip the steps to remove the background from your stickers when uploading your file in Cricut Design Space. - Your sticker sheet design is ready to upload to Cricut Design Space!


STEP 3: PREPARE YOUR STICKER SHEET IN CRICUT DESIGN SPACE
- In Cricut Design Space, open a blank Canvas.
NOTE: If you’re new to using Cricut Design Space, go to cricutkickoff.com for my introductory tutorial on Design Space basics. - Click “Upload” and then “Upload Image.”
- Click “Browse.”
- Select your sticker sheet PNG file.
- Click “Open,” and then “Continue.”
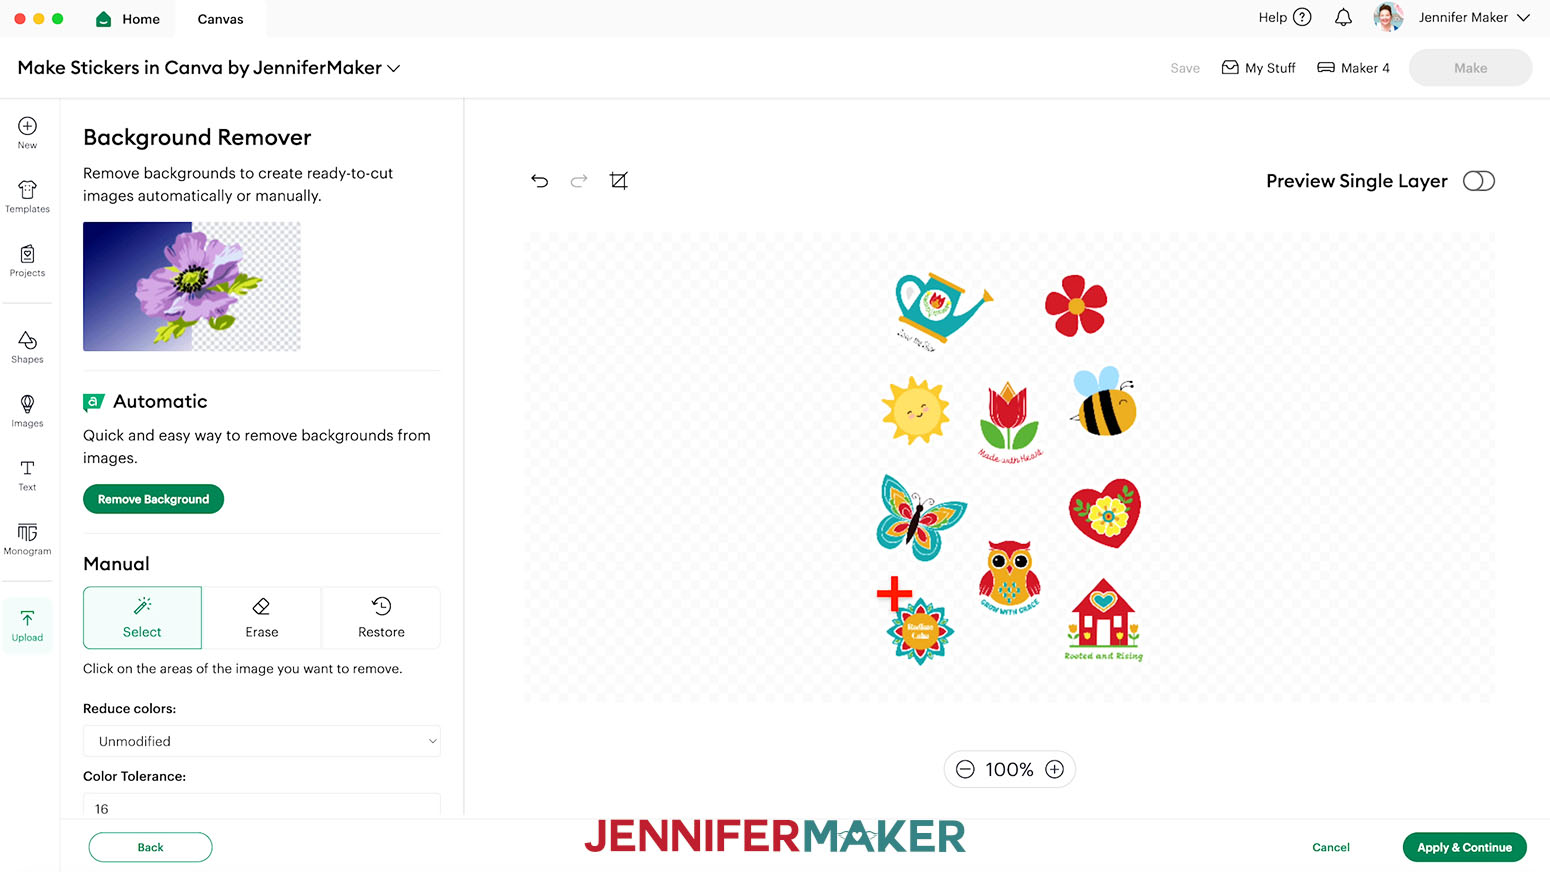
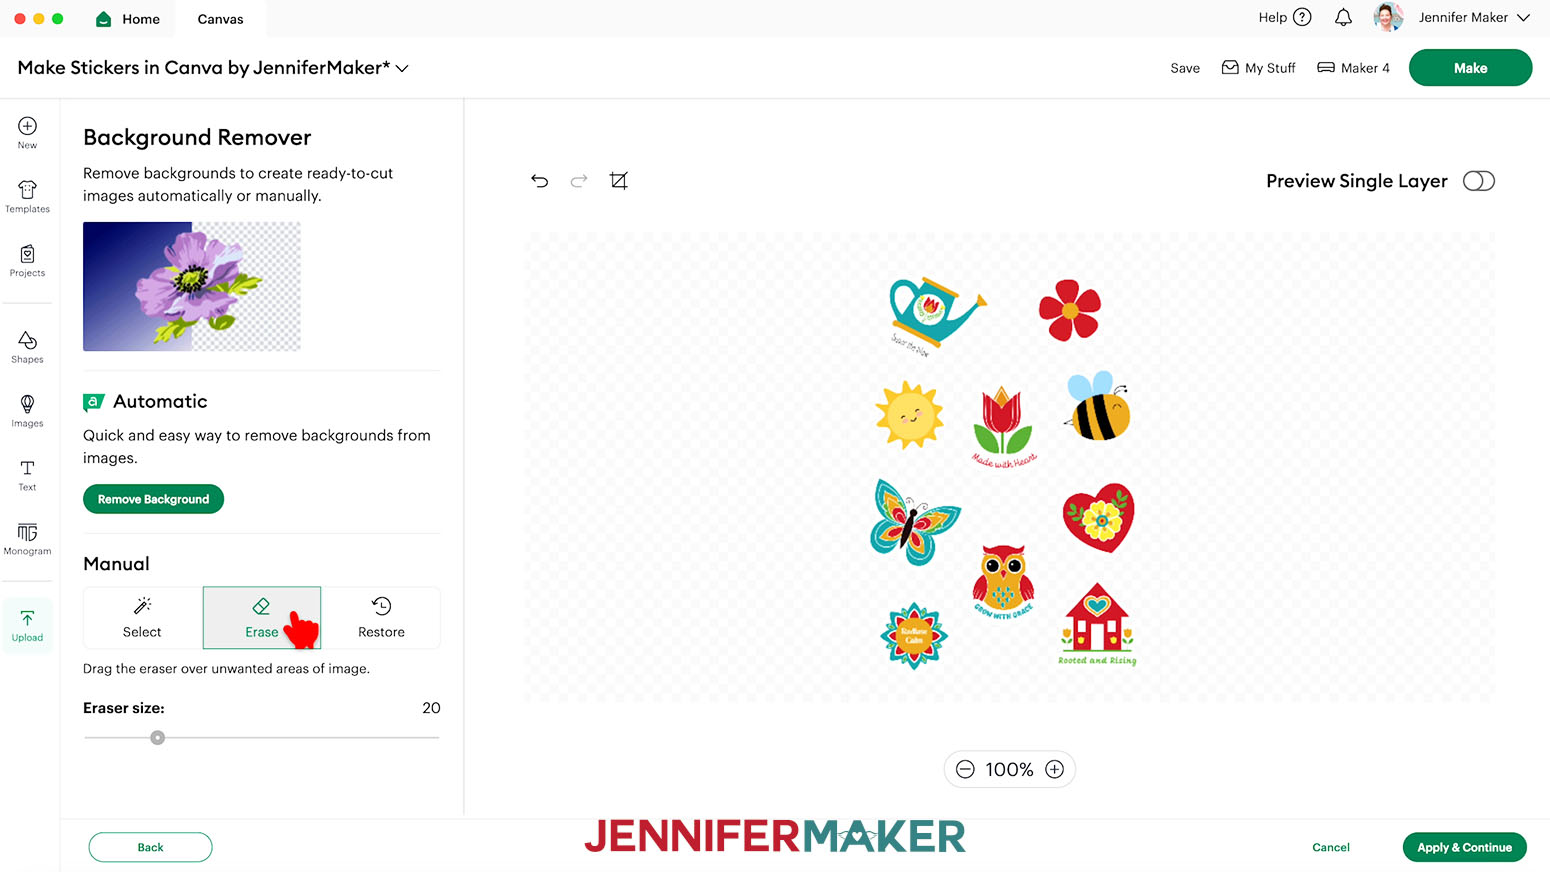
- On the “Background Remover” screen, you can use the Automatic remover if you have Cricut Access. If you have a free account, make sure the “Select” tool is selected under the “Manual” section, and click anywhere on the background of your sticker sheet to remove the gray background. This will enable us to cut around each sticker individually.
- If there are gray background areas inside any of the stickers, click those as well to remove the background.
TIP: Zoom in using the “Plus (+)” sign to see better.
NOTE: I’ll remove the background inside the handle of my watering can. - Next, click “Preview Single Layer” to see the basic cut shape for each sticker.
- If any areas of the background are still present, select the “Erase” tool under “Manual.”
- Click and drag over the remaining gray background areas to remove them.
TIP: If you accidentally remove an area you want to keep, select the “Restore” brush, then click and drag over the areas you want to bring back. - When you’re finished removing the background, click “Apply & Continue.”
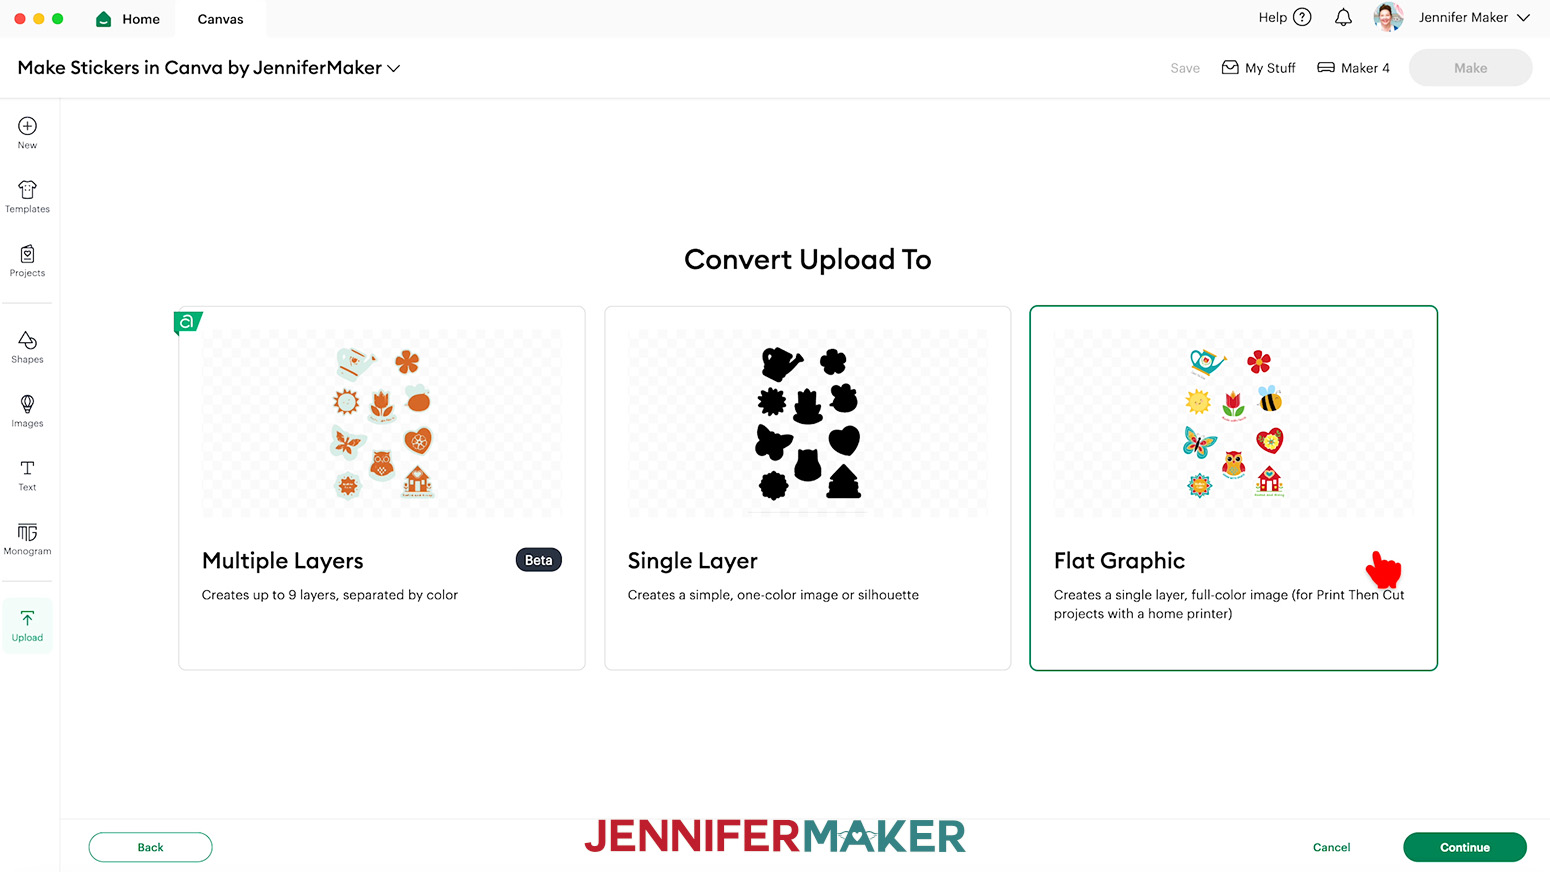
- On the “Convert Upload To” screen, click “Flat Graphic” and then “Continue.”
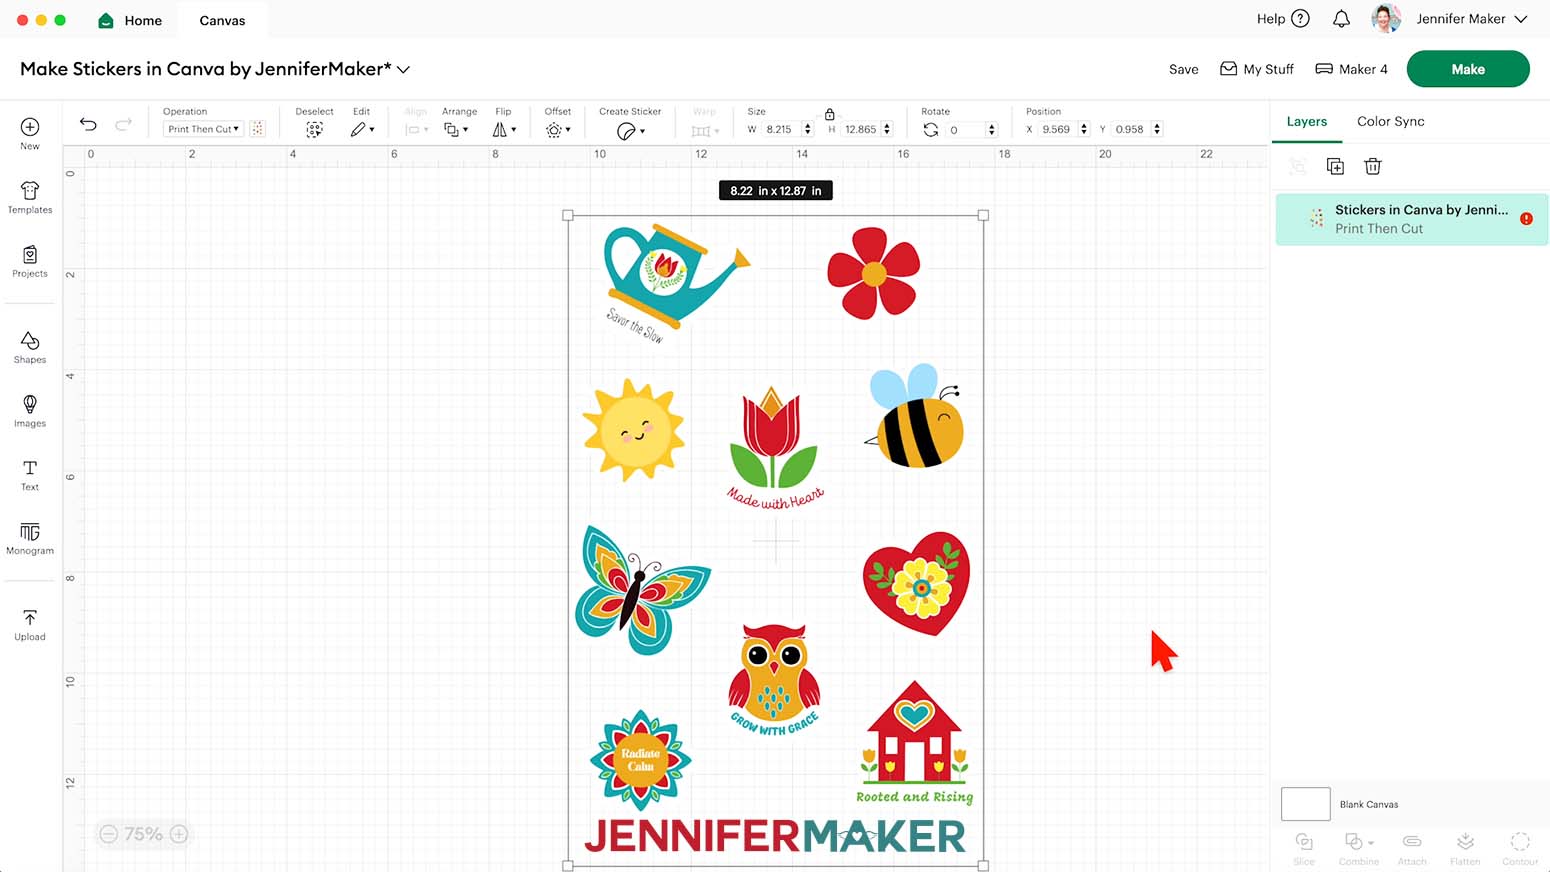
- Click “Upload” to add the design to your Canvas.
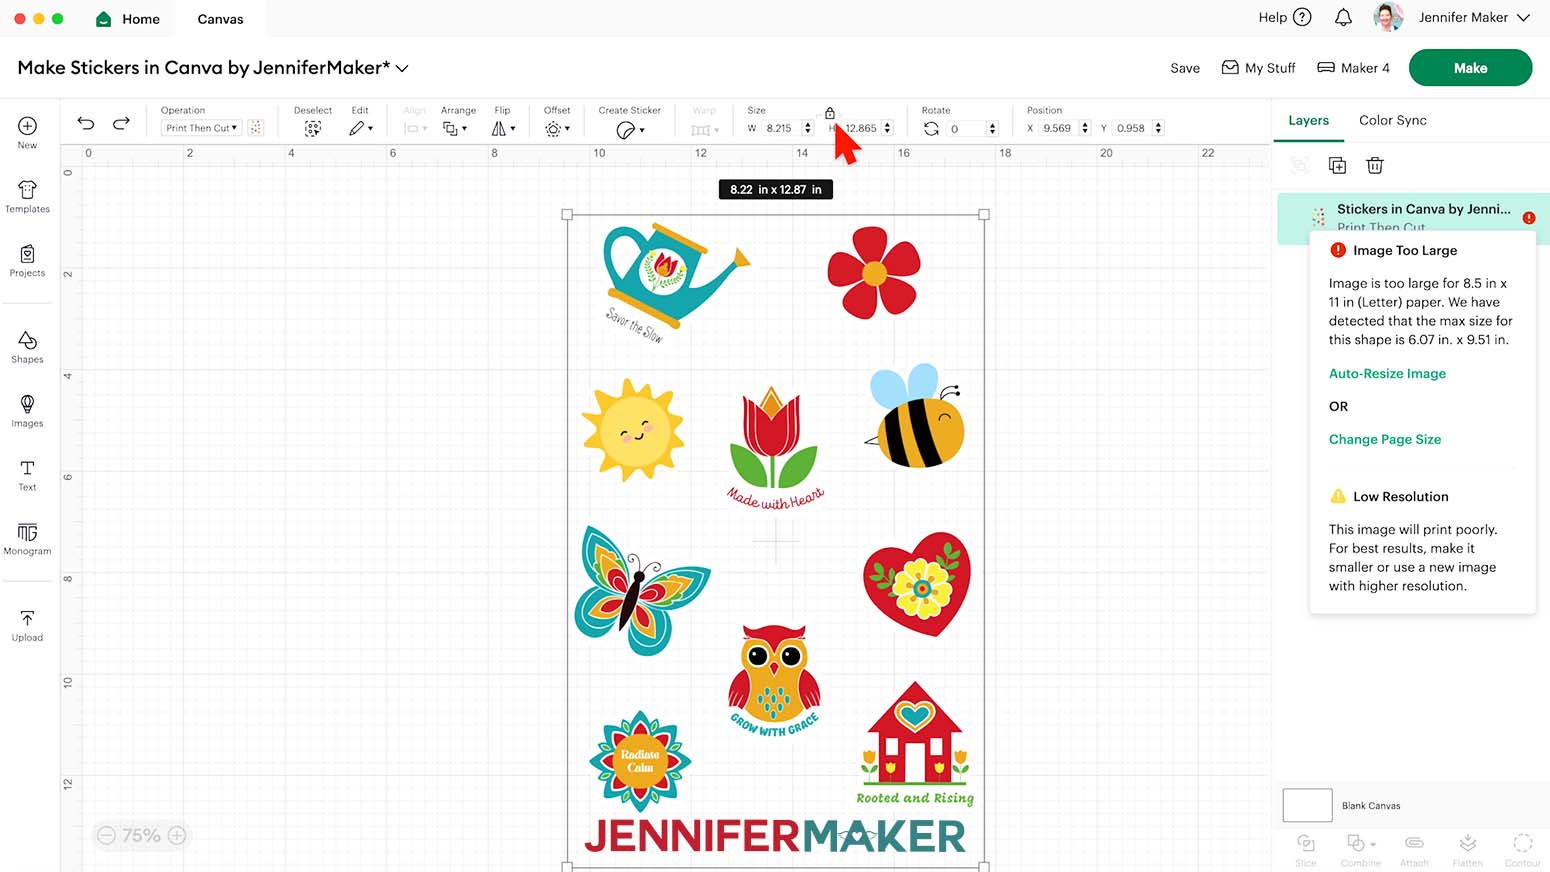
NOTE: The image will load in too large for Print Then Cut, and you’ll see a red warning icon in the Layers Panel, but it’s OK. We will fix this later. - Click the “Minus (-)” icon in the lower left corner to zoom out and see everything on your Canvas.
- Select the image on your Canvas.
- With the “Lock” icon closed to maintain proportions, enter “6” in the “Width (W)” field. The “Height (H)” will automatically adjust.
NOTE: After resizing your sticker sheet, you may see a yellow “low resolution” warning in the Layers Panel. Not to worry–your stickers will still print just fine! - Click “Save” and give your project a name.
- Your project is ready to Print Then Cut!

STEP 4: PRINT THEN CUT YOUR STICKER SHEET
- Make sure the correct machine is selected in the top right.
- Click “Make.”
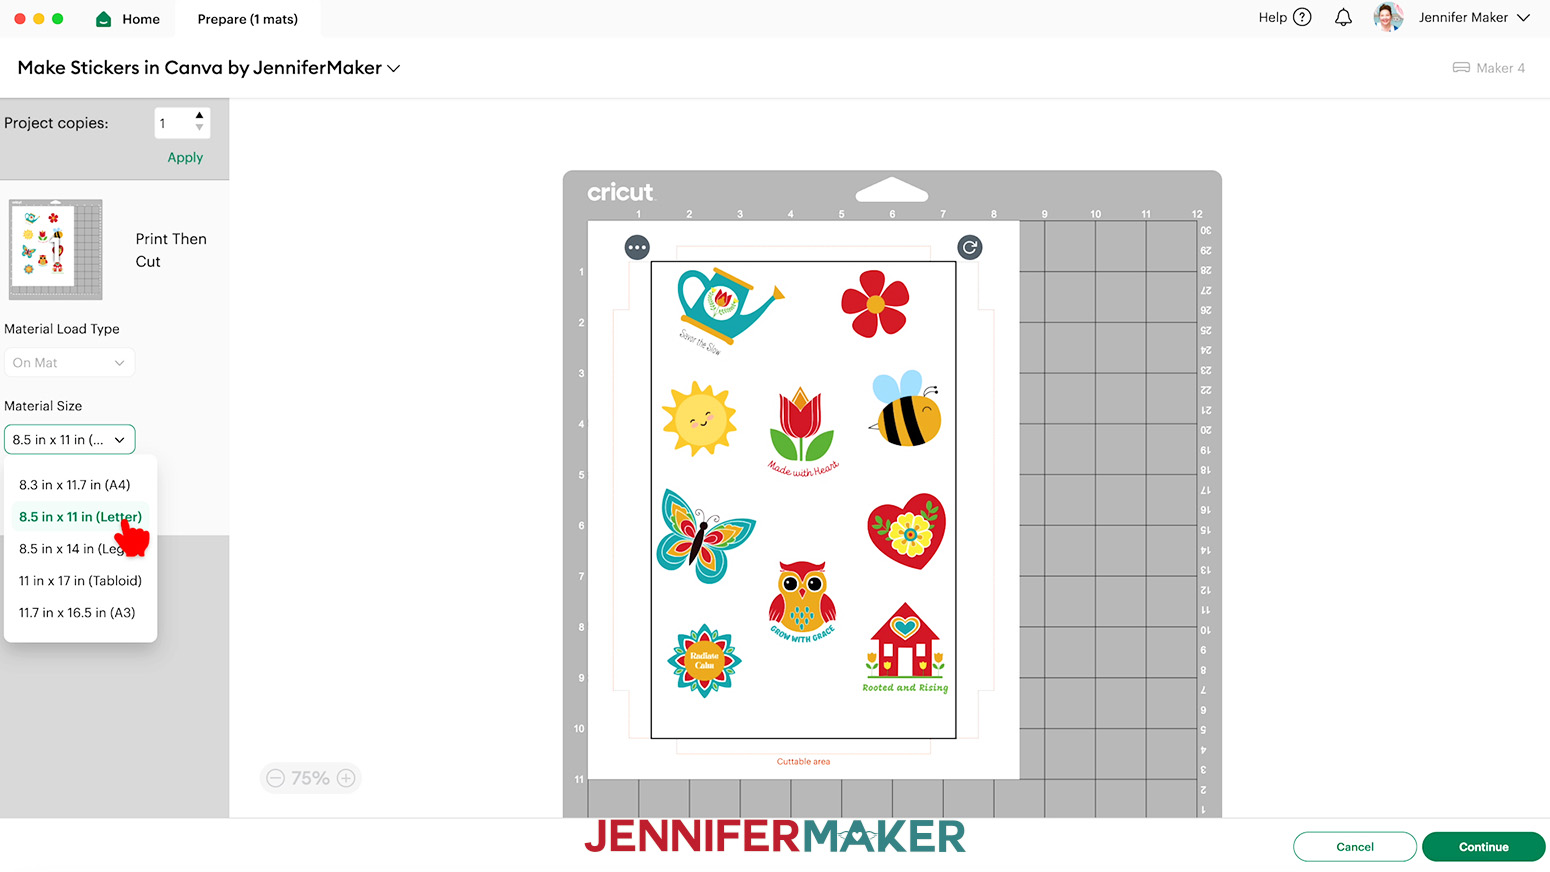
- On the Prepare screen, make sure the correct Material Size is selected for your mats and materials.
NOTE: I’ll use “8.5 in x 11 in” for my Print Then Cut mat to match my printable sticker paper. - Click “Continue.”
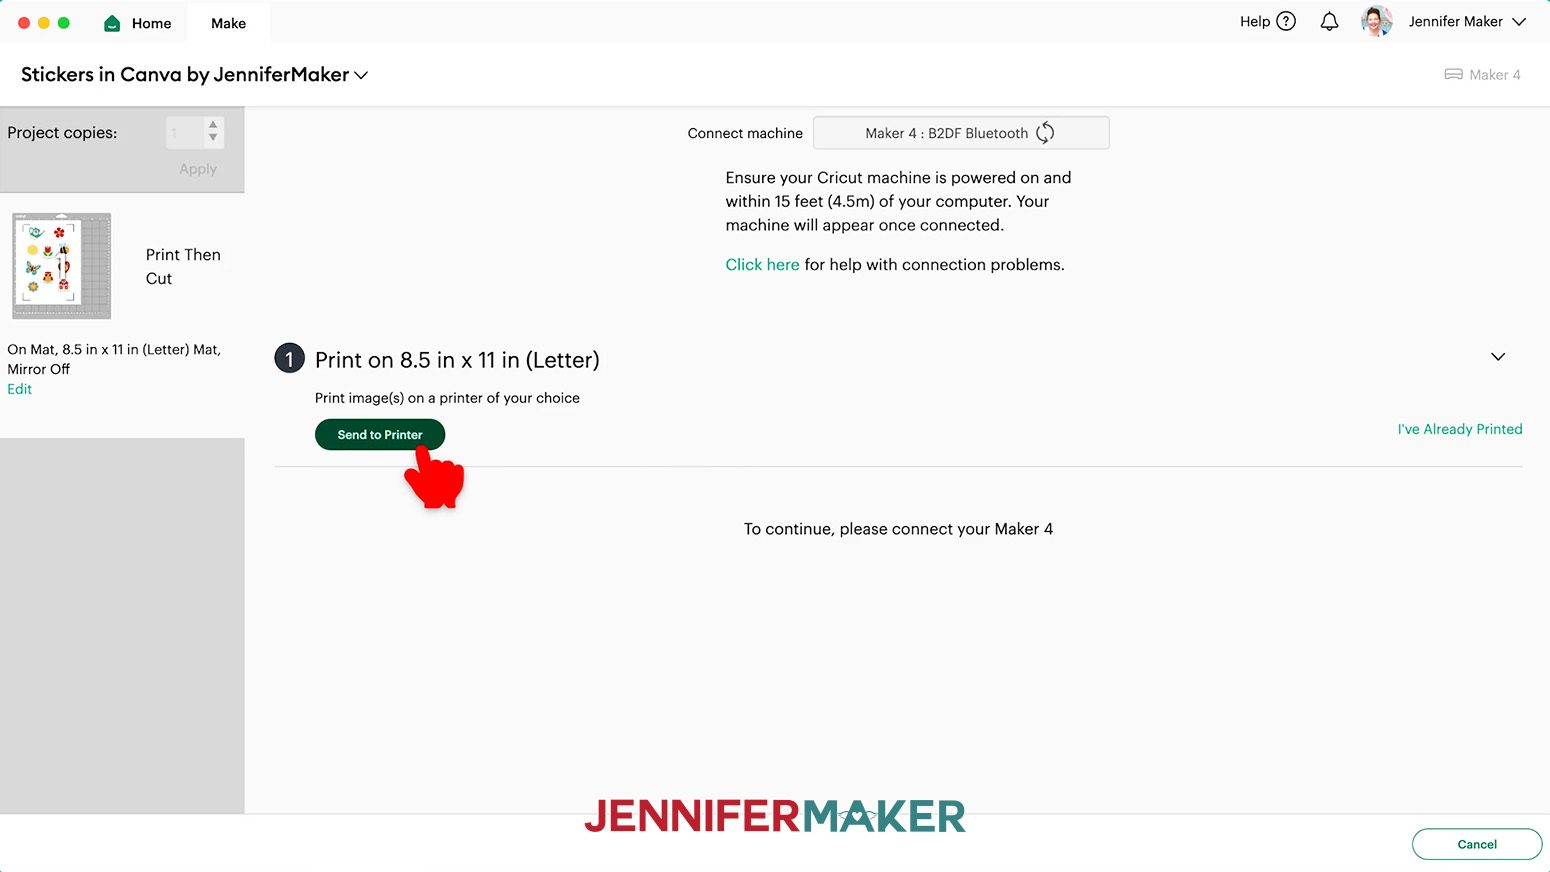
- On the Make Screen, click “Send to Printer.”
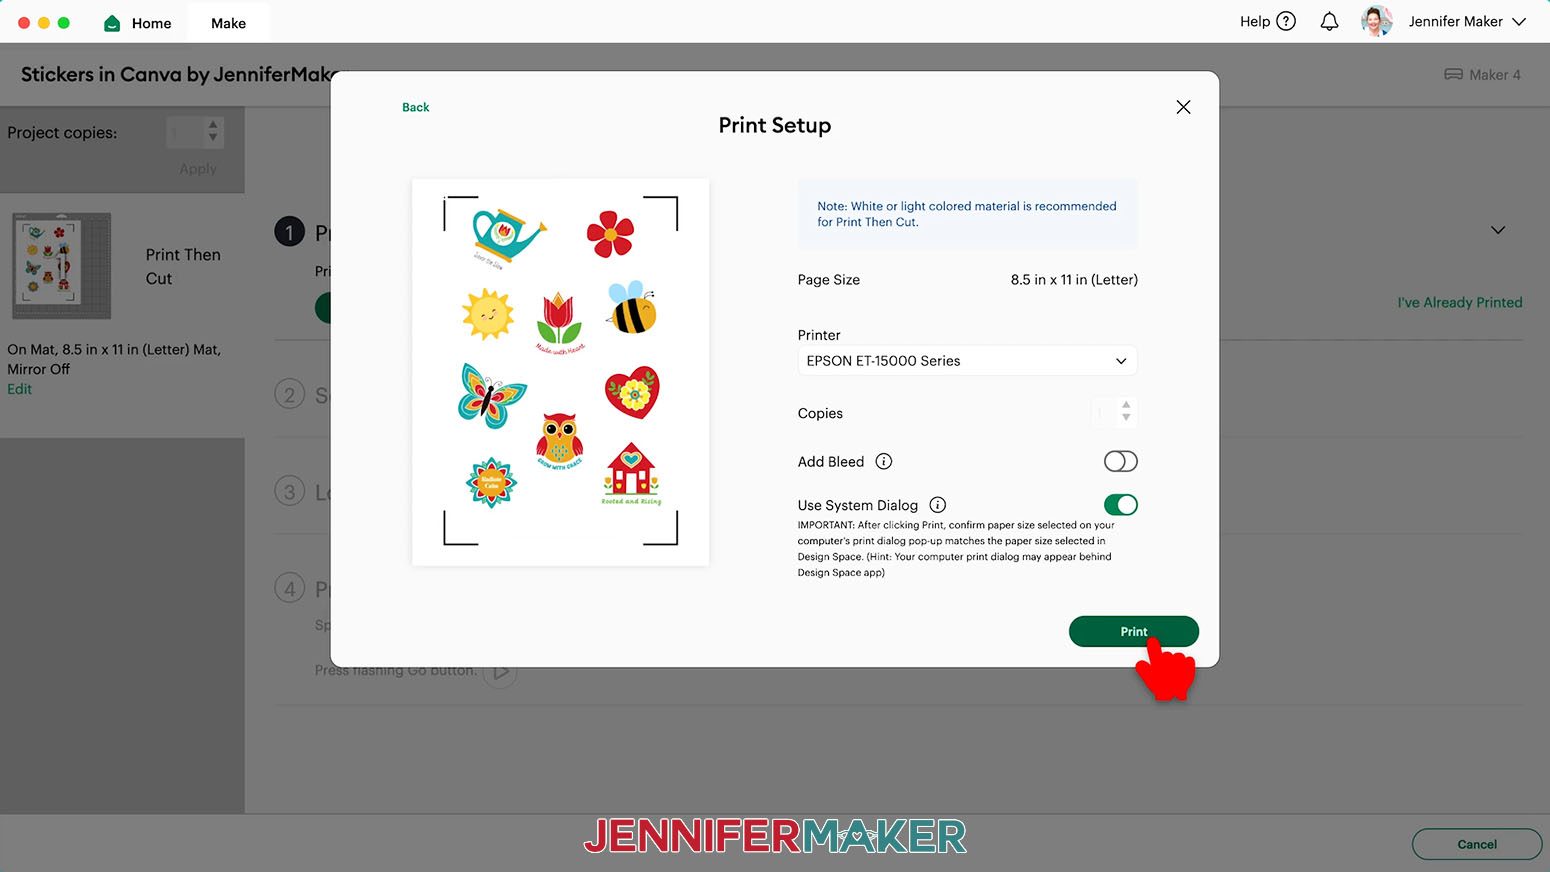
NOTE: If Design Space prompts you to calibrate, go ahead and follow the on-screen instructions to complete the process. If you need help, check out “STEP 3” of my How to Use Fill Patterns tutorial for a complete walkthrough. - In the “Print Setup” window, select the correct printer, keep “Add Bleed” toggled off (since we already added a white offset around the stickers) and toggle ON “Use System Dialog.”
- Click “Print.”
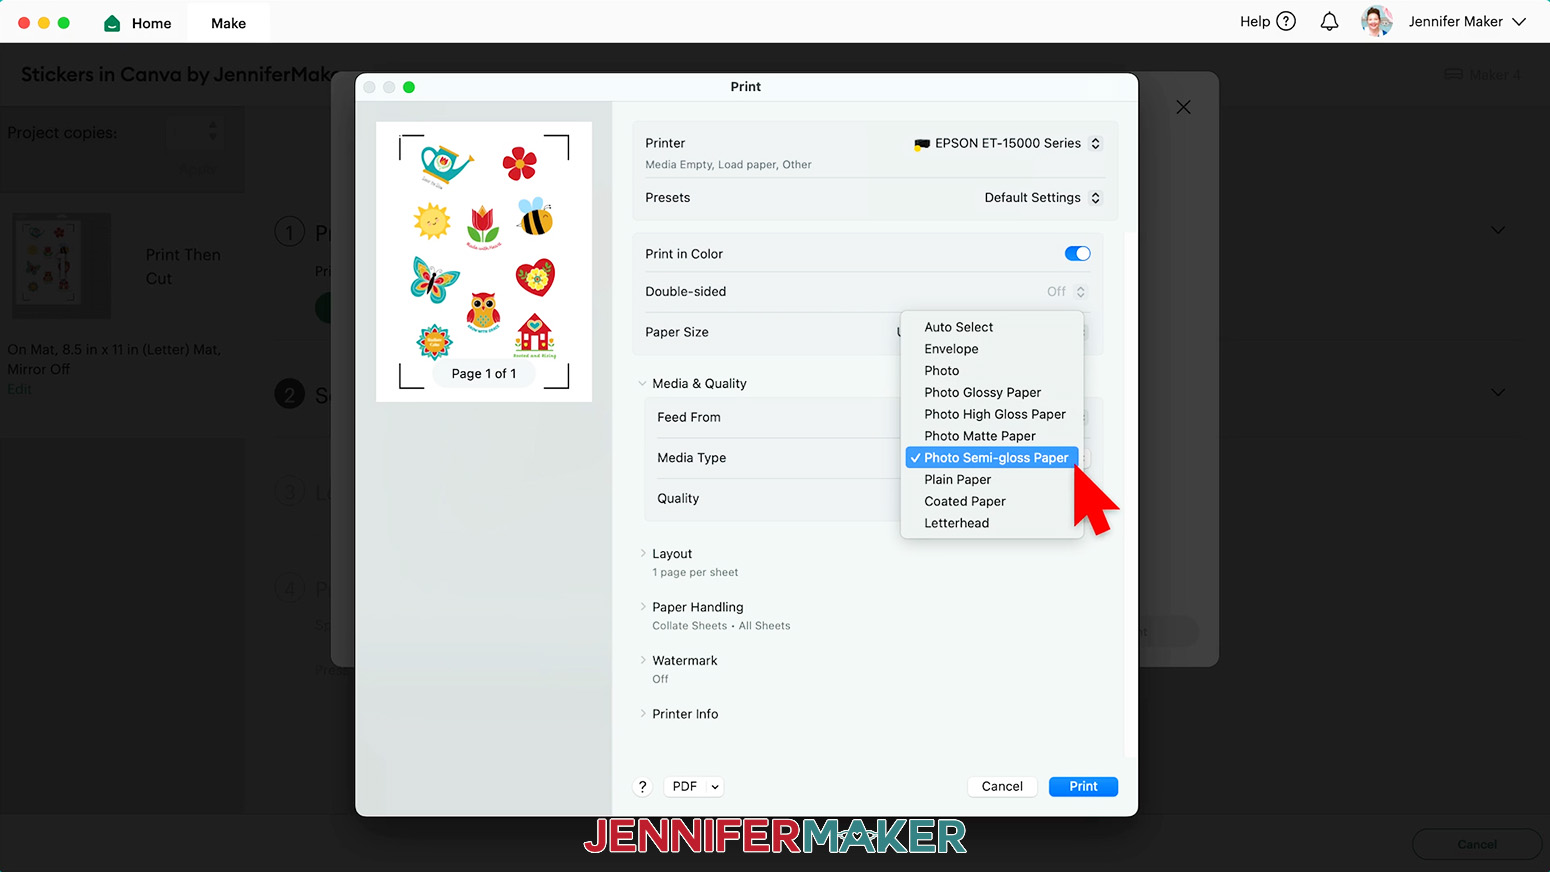
NOTE: Your System Dialog window might be behind the Cricut Design Space window, so minimize it if you don’t see the settings. - In the System Dialog Box, make sure the correct printer is selected.
If you’re using Cricut Printable Sticker Paper, change the Media Type to “Premium Photo Paper Semi-Gloss” and the Quality to “Best,” or whichever settings are closest.
If you’re using Holographic Sticker Paper, change the Media Type to “Ultra Premium Photo Paper Glossy” and the Quality to “Best,” or whichever settings are closest.
NOTE: Not all printer settings will be the same, but you can use my choices as guidelines. - Load the sticker paper into your printer according to the directions on the package.
- Click “Print” to send the Print Then Cut design to your printer.
- Let the print dry before handling it to avoid smudges.
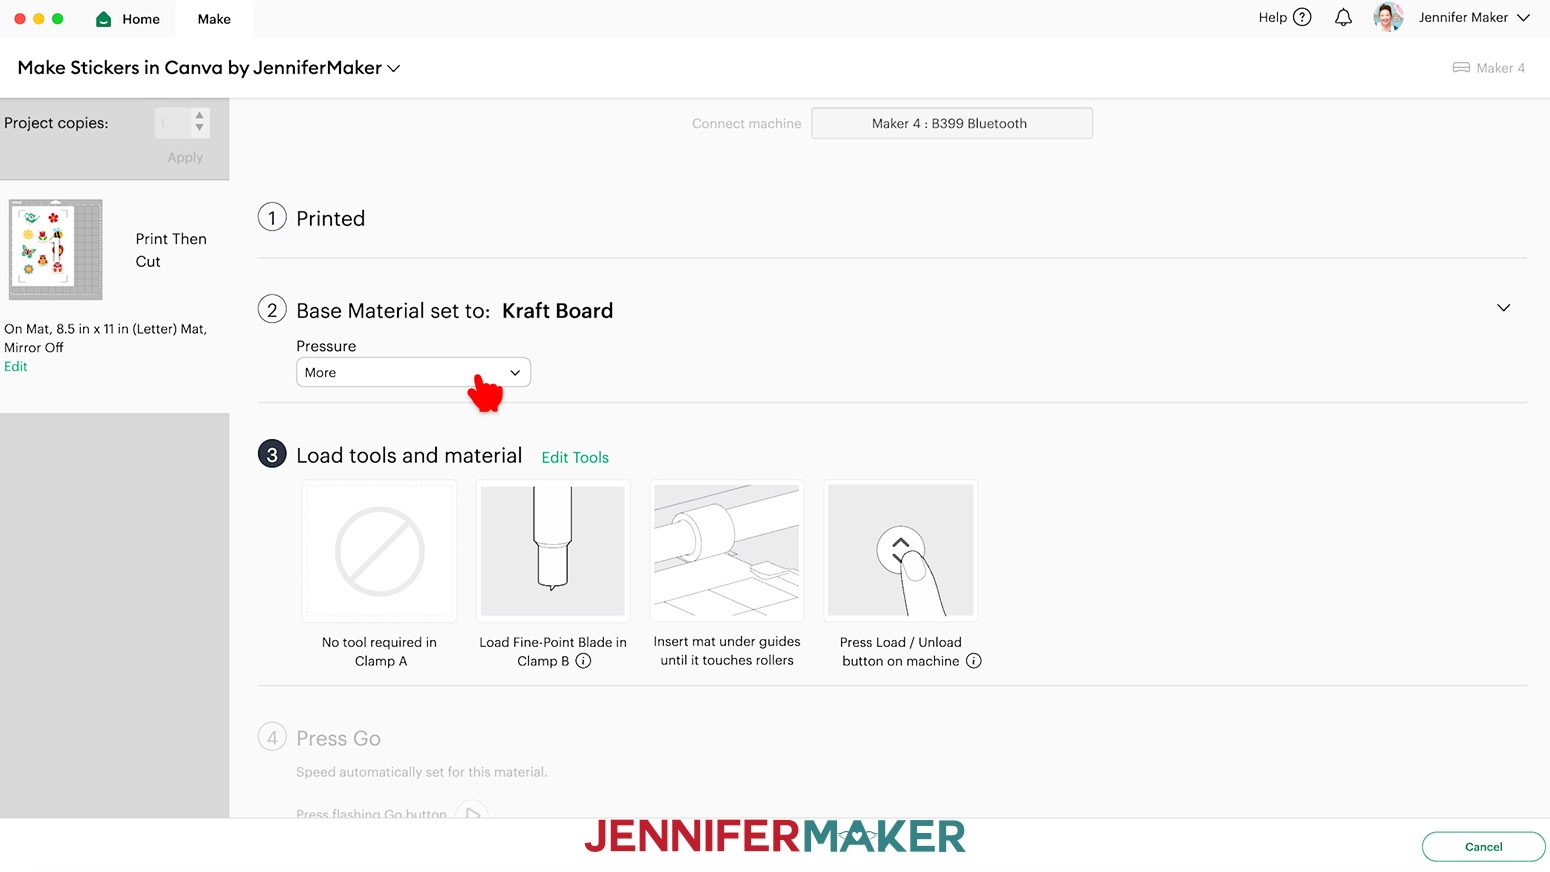
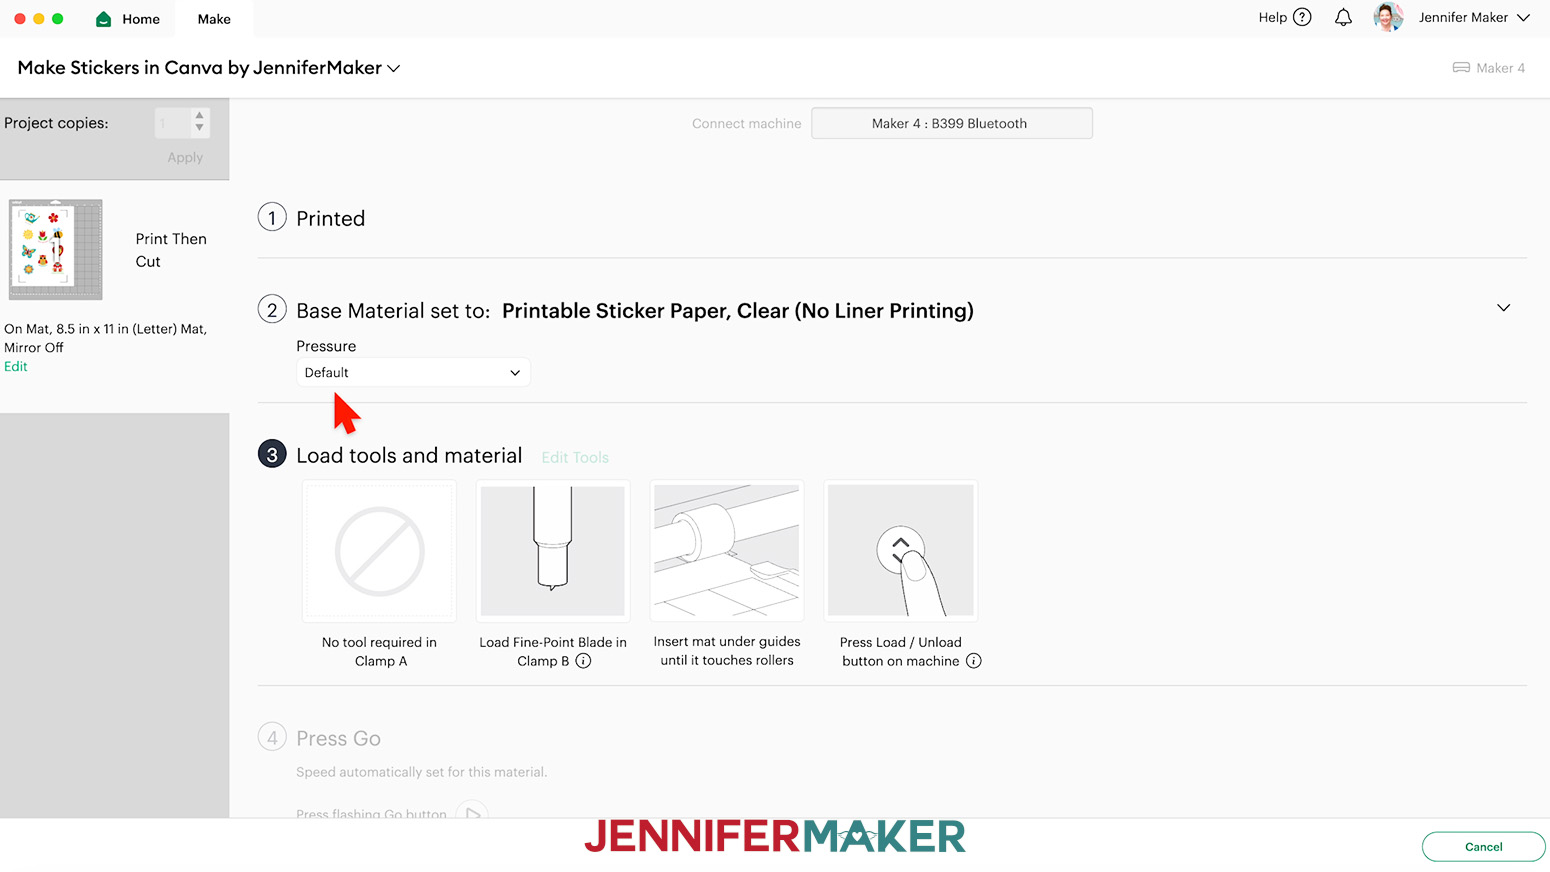
- Back on Cricut Design Space’s Make Screen, set the Base Material for your mat.
To die cut (cut all the way through for individual stickers) your stickers, use the “Kraft Board” setting with “More” Pressure for both plain sticker paper and holographic sticker paper.
To kiss cut (cut through just the top layer of sticker paper for an attached sheet of stickers) your stickers, use the “Printable Sticker Paper, Clear (No Liner Printing)” setting with “Default” pressure for both plain sticker paper and holographic sticker paper.
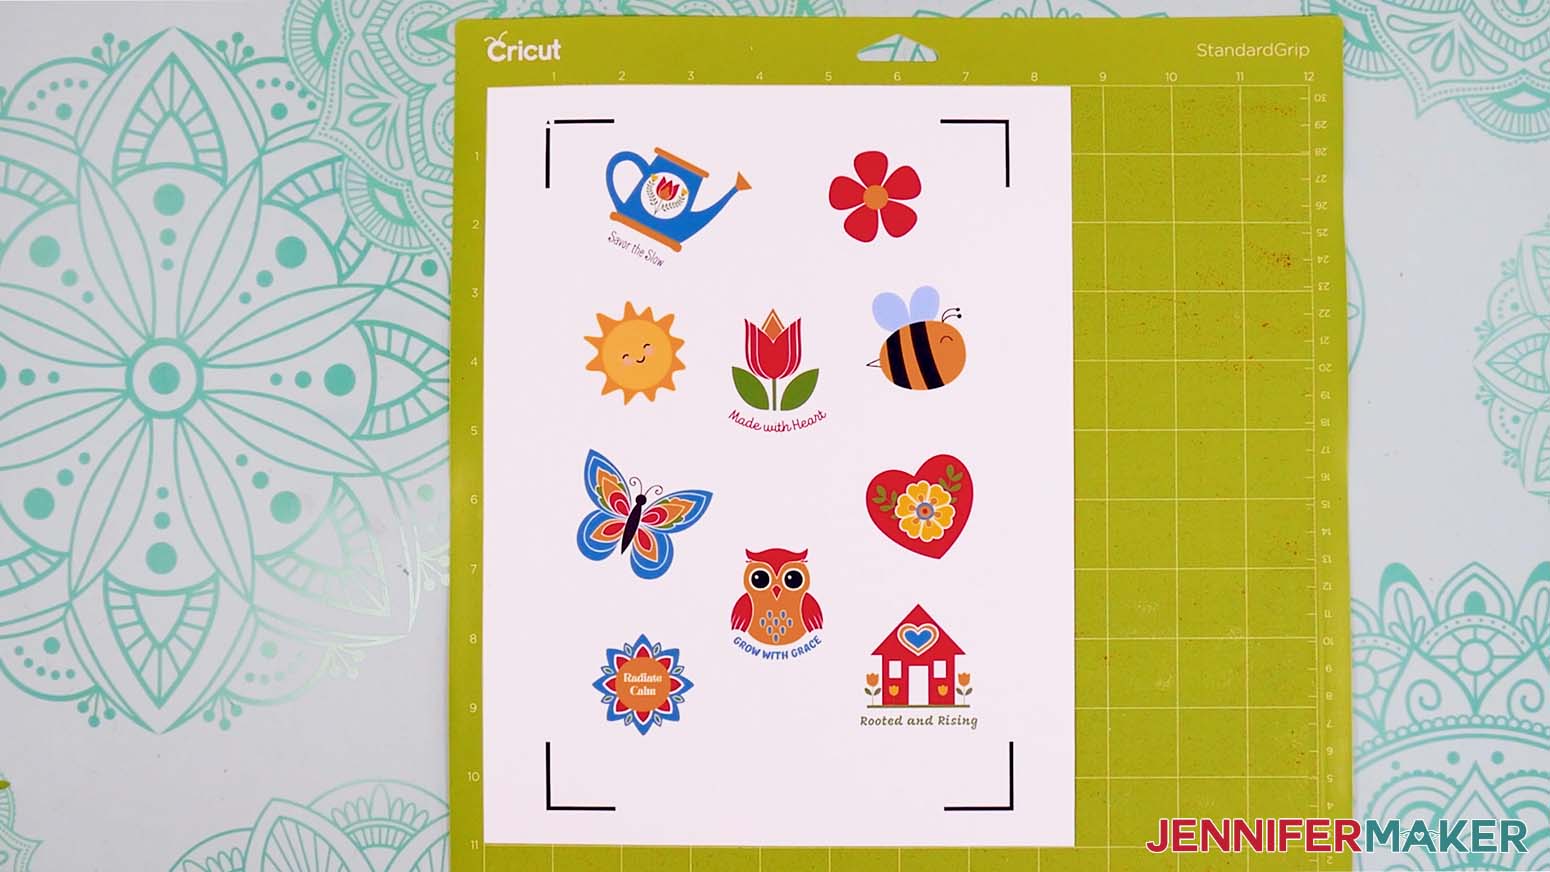
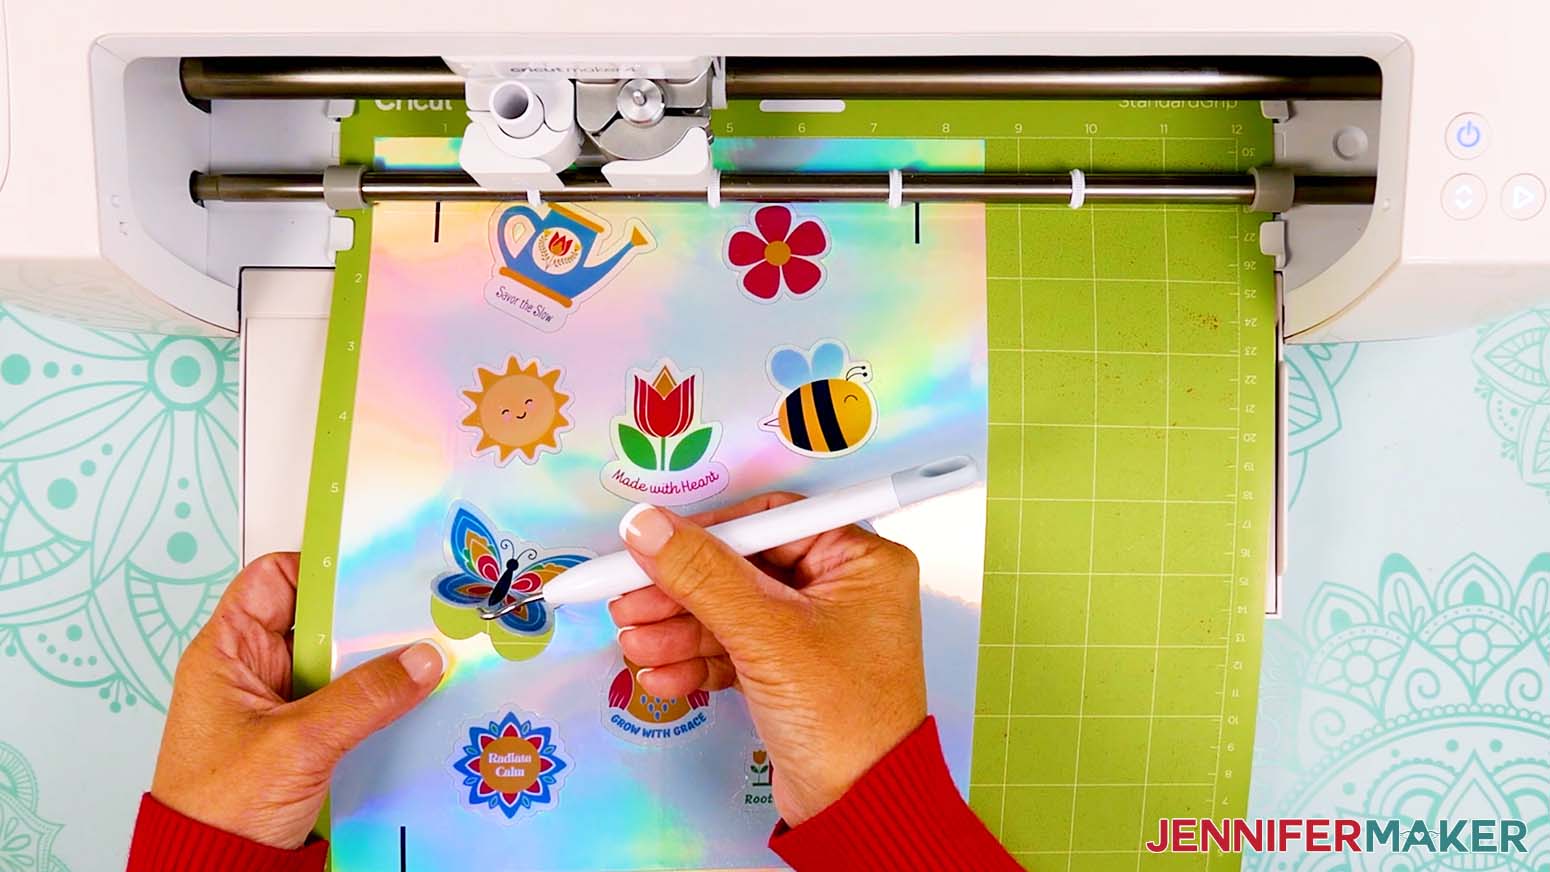
NOTE: If you don’t see the material in your materials list, click on “Browse All Materials.” Then type in the material’s name in the search bar and select the correct setting from the results. - Place your printed sticker sheet face up on a green StandardGrip machine mat so it matches the screen preview.
- Place a clean sheet of copy paper on top of the print and use a brayer to make sure the print is fully adhered. Remove the copy paper.
- Check that your Premium Fine-Point Blade is clean and in the clamp.
- Press the flashing “Load/Unload” button to load the prepared mat into your Cricut so it matches the screen preview.
- Press the flashing middle button to begin cutting.
- When it has finished cutting, don’t unload the mat right away. Gently lift a corner of the material to make sure the cuts went all the way through. If not, press the middle button again to make a second pass of cuts in the same spots.
NOTE: “Kiss cut” stickers should only cut through the top layer of sticker paper, not the backing sheet.
TIP: If you have any issues with your cuts, go to jennifermaker.com/cleaner-cuts. - When the cuts are complete, unload the mat, flip it over onto your work surface, and roll it back to release the sticker paper.
- Use a spatula to help remove any die cut stickers that won’t come off the mat.
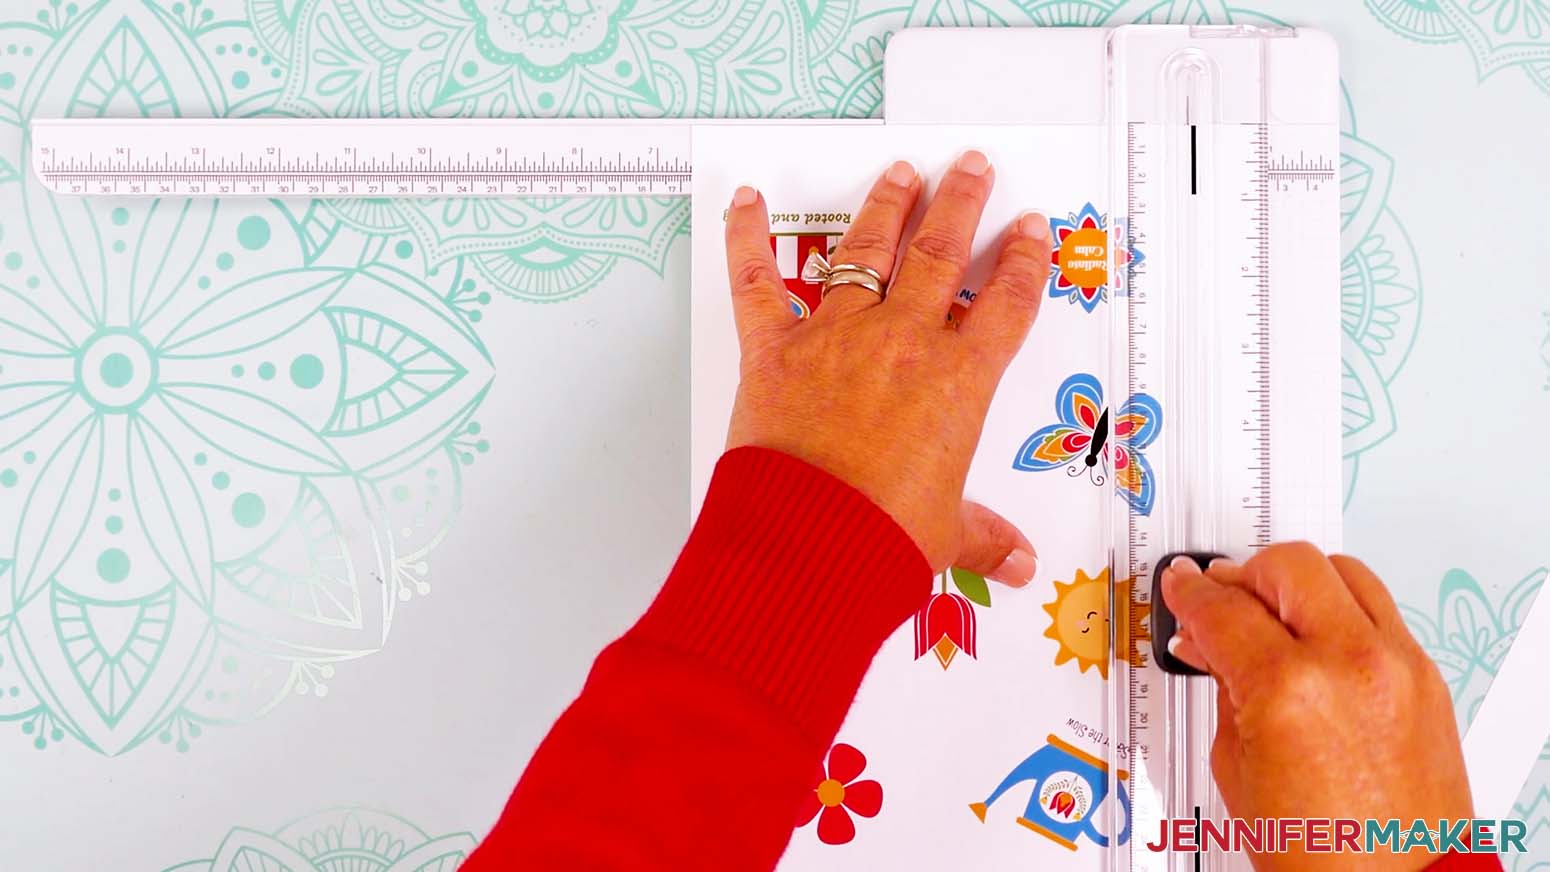
- If you kiss cut your stickers, use a paper trimmer to cut away the excess sticker paper and any registration marks on all four sides of your sticker sheet.
- Your Canva sticker sheet is complete!

STEP 5: SHOW IT OFF
You now have your own set of stickers made in Canva!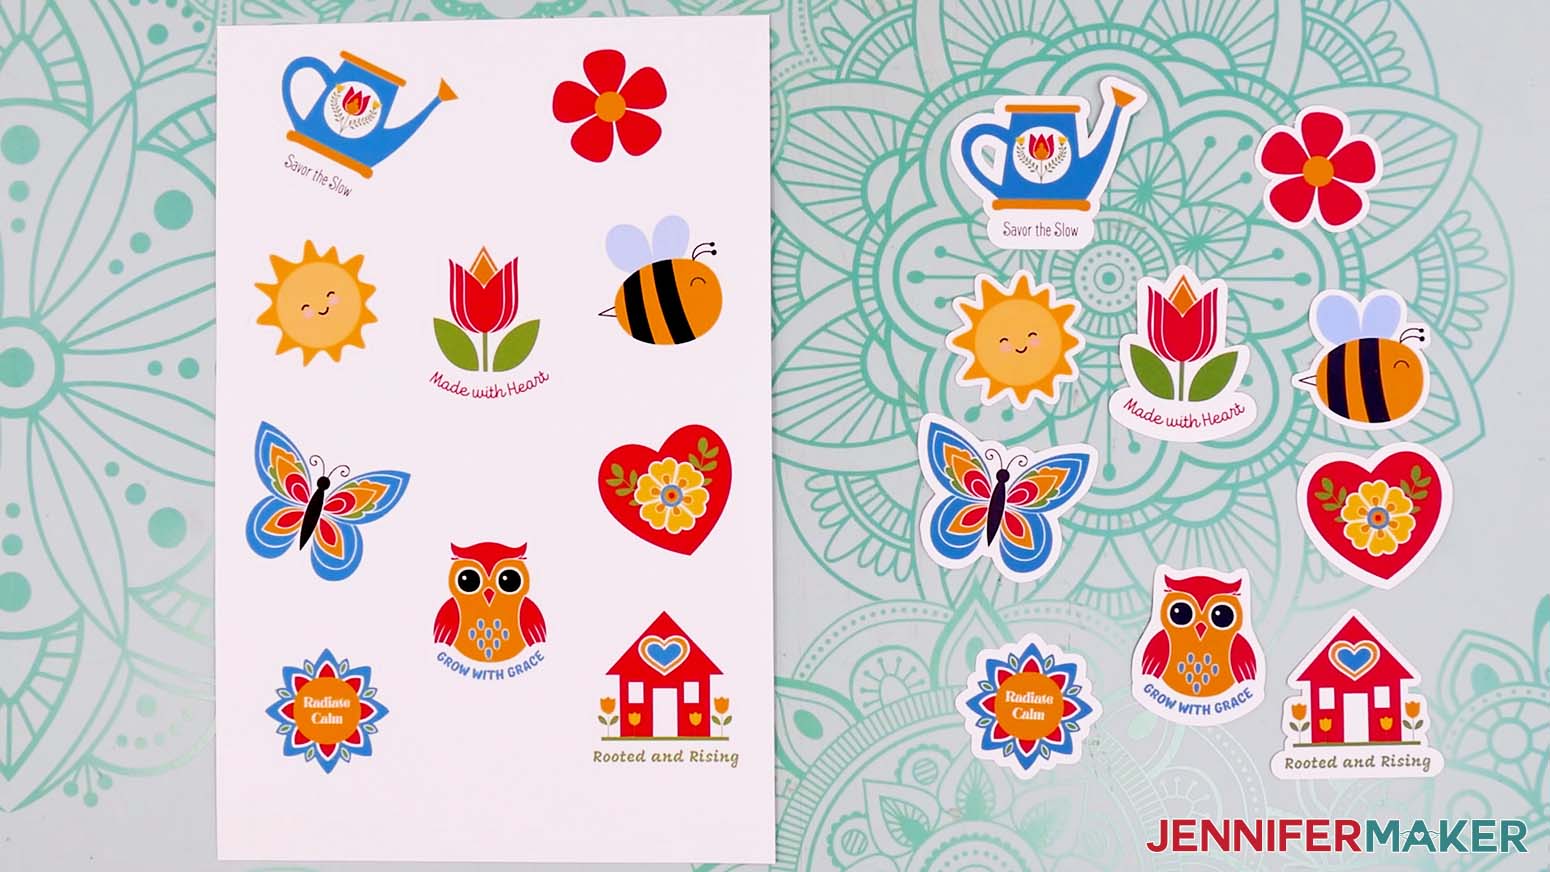
Notes
Finished Sizes
Full Sheet: 6” x 9”
Individual Sticker: Approximately 1.5”
Free Canva Fonts Used
“Radiate Calm” - Brasika
“Savor the Slow” - Frenchpress
“Made with Heart” - TT Milks Script
“Grow with Grace” - TT Masters
“Rooted and Rising” - Mogra
Answers to Your Questions About Creating Stickers in Canva and Cutting Them with a Cricut
Q: I want to design a sticker sheet with a fun background. How do I do that?
A: You can learn how to design a custom sticker sheet background in Canva in my ADVANCE program. Learn more about ADVANCE here!
Q: Can I make stickers with Canva?
A: I can show you how to create stickers using both SVGs and PNGs in Canva! Just follow the video tutorial or read through the written tutorial above to learn how to design your stickers easily with a free Canva account. I’ll even show you how to use Print Then Cut in Cricut Design Space to cut out your stickers, too!
Q: Can I use Canva to make stickers to sell?
A: As long as you’re combining elements to create a new sticker, Canva’s licensing agreement is very generous when it comes to selling the items you create using the software. That means you can use both free and pro Canva elements in your designs, then make stickers to sell in your own shop! To see the most up to date rules, always check the Canva licensing page.
Q: Can I sell the stickers I make using your designs?
A: If you want to use my Summer Sticker Starter Pack for commercial use, please familiarize yourself with my important licensing information before selling your crafts. In general, you can sell the physical items you make using my designs, but digital products such as my templates and design files themselves can NOT be sold.
Q: How do I create a sticker out of a photo?
A: Canva makes it super easy to create custom stickers out of any photo. Just make sure you have the rights to use the image before you upload! For that classic sticker feel, you just need to add a border around it, which I show you exactly how to do in my video tutorial!
Q: Why is my Cricut cutting my stickers in the wrong place?
A: If your Cricut isn’t quite cutting around your sticker the way you want it to, you might need to calibrate your machine for Print Then Cut to make sure everything is lined up correctly. You can find out more about Print Then Cut calibration in my Seamless Patterns with Cricut Design Space tutorial.
Q: What’s the difference between a “kiss-cut” sticker and a “die-cut” sticker?
A: When it comes to stickers, “kiss-cut” refers to cutting only the top layer of the sticker paper, leaving the backing intact. Think of your standard sticker sheet. The cuts go around the stickers so you can peel them off the sheet, making kiss cutting the perfect way to carry around a collection of fun stickers! “Die-cut” stickers, on the other hand, are cut all the way through the sticker material, so you have an individual sticker that matches the shape of your design. A die-cut sticker is the perfect sticker to share with friends!
Q: What kind of sticker paper can I use for my stickers?
A: You can use any kind of printable sticker paper that’s compatible with your printer to make your stickers. Matte white sticker paper is the most popular, but you can also find holographic and glossy sticker paper, too!
Get my free Summer Sticker Starter Pack PNG and SVG files!
(If you do not see the signup form above, click here.)
I love seeing what you make with my tutorials and how you customize them! Please share a photo of your stickers in our Facebook group or tag me on social media with #jennifermaker.
Love,

Want to remember this? Save this How to Make Stickers in Canva tutorial to your favorite Pinterest Board!