
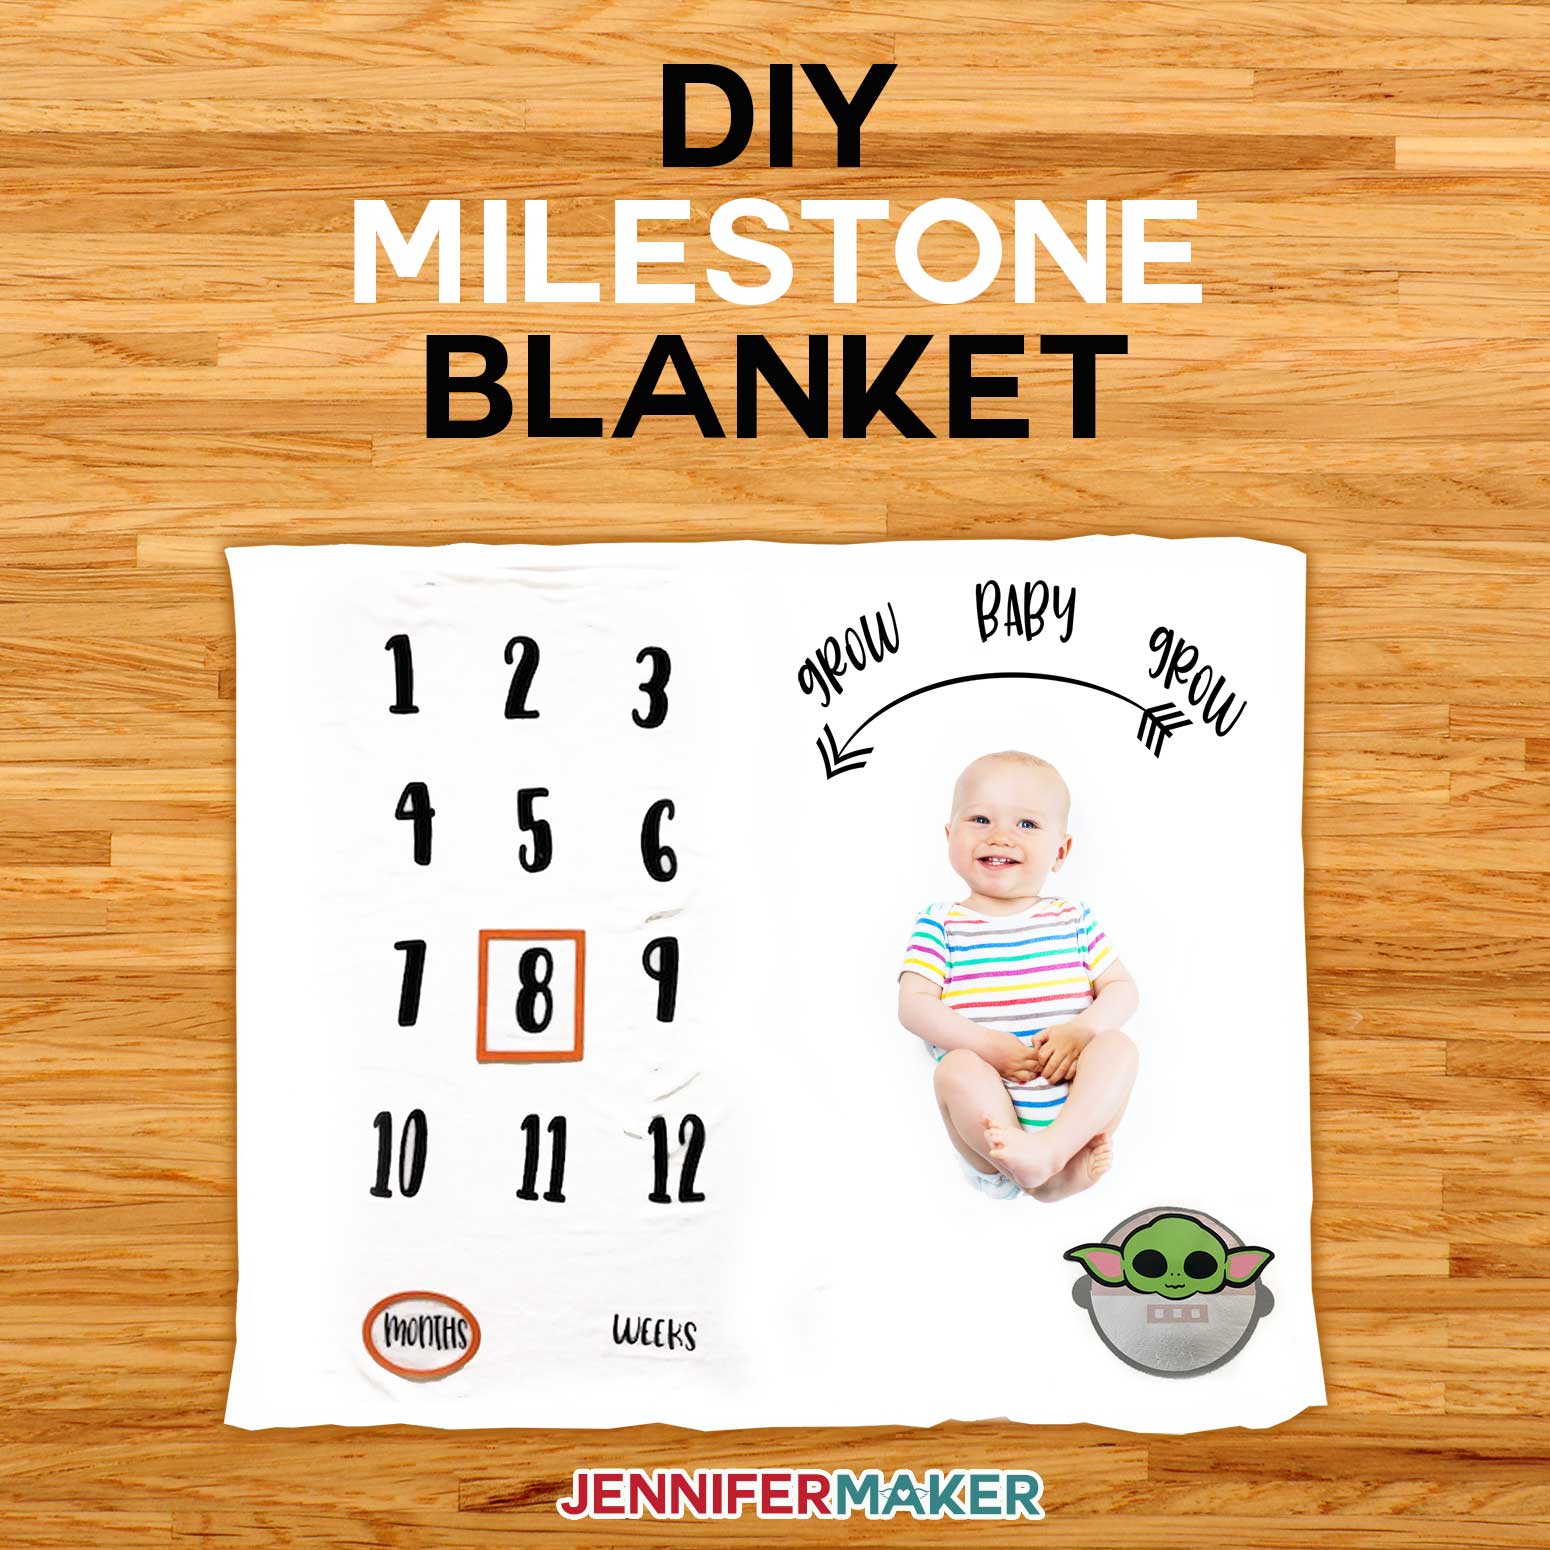
Learn how to make a DIY milestone blanket for your baby with iron-on vinyl! I show you how to easily layer iron-on vinyl for fun designs, too!
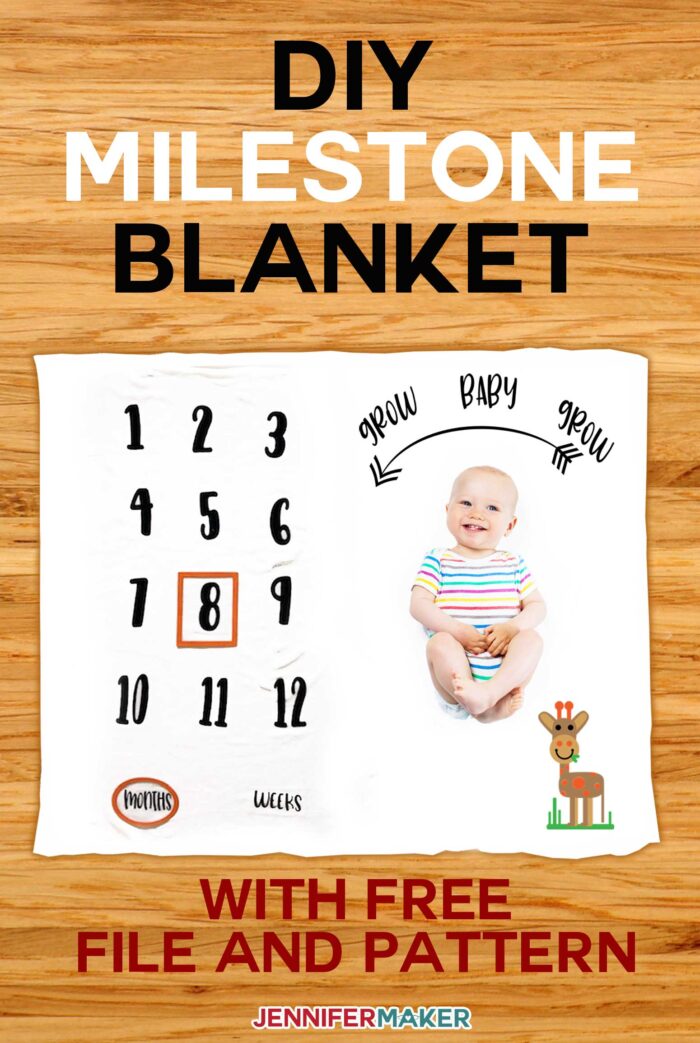
With the advent of social media, many new moms enjoy sharing photos of their growing babies each month. I totally missed out on this as my daughter was born five years before I joined Facebook. But I think it’s a really FUN idea. And a milestone blanket is one of the easiest ways to do it! The idea is you have a blanket with the numbers 1-12 on it, and then you just lay it on the floor, put your baby on it, mark the number of weeks or months in some way, and snap a photo! You can buy milestone blankets, of course, but why not make it yourself just the way you want? So for Day 7 of The Great Maker 25-Day Gift-Away Challenge, I am showing you how to make a DIY milestone blanket for your baby!
See exactly how to layer iron-on vinyl to make a DIY milestone blanket in my tutorial video (or keep scrolling if you prefer a step-by-step photo tutorial):
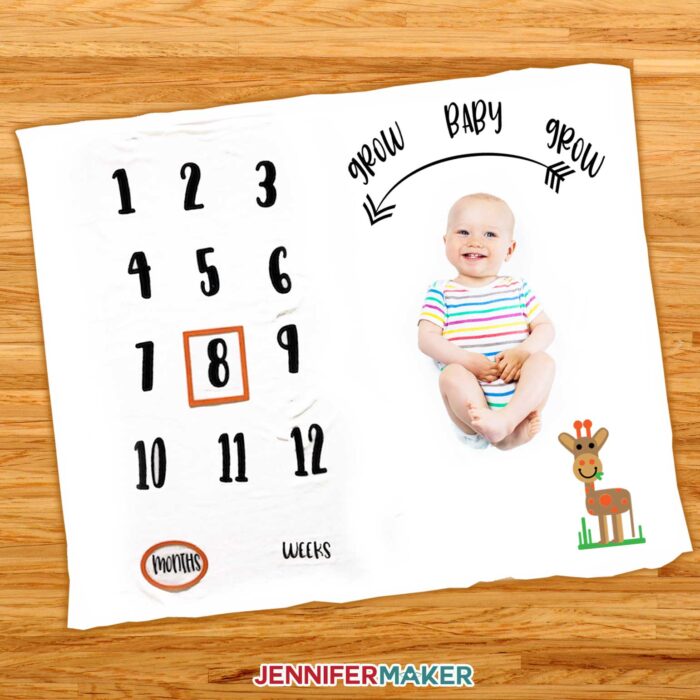
Today I’m going to show you how to make a simple milestone blanket, and all you need is a blanket and some iron-on vinyl. And since we’re working with iron-on vinyl, I’m also going to show you how to layer it so you can make cute decorations on your blanket. Like an adorable Baby Yoda, or a super cute giraffe, both of which were made with layered iron on vinyl. A lot of people tell me they’re confused about layering iron on vinyl, but it’s really pretty easy, and I’ll show you how.

For this tutorial, I’m using several different kinds of vinyl — for the numbers and letters, we’re using a soft flocked vinyl that feels a little like fabric. And for the layered iron-on decorations, I’m using regular Cricut everyday iron on, which is your basic iron-on vinyl that works on pretty much everything for the giraffe, and Cricut SportFlex iron on vinyl which is great for stretch fabrics like this fleece polyester blanket — I used this for the Baby Yoda. You can really layer almost any vinyl — the only things you can’t do is put other vinyl on top of glitter iron on, foil iron on, holographic iron on, patterned iron on, or printable iron on. If you want to use those, they should be your top layer only. And you can totally layer SportFlex iron on, which we’ll be doing today, but if you do this you should ONLY use SportFlex in your layers and no other iron-on vinyl because SportFlex stretches and the others don’t.
There are a few important things to remember when layering vinyl.
1. If you have more than two layers, you’ll want to reduce your press time by at least half, otherwise, you risk overheating and overpressing the bottom layers.
2. You must always use a cover sheet of some kind when you iron on additional layers, such as a Teflon sheet or a sheet of parchment paper (that’s what I use).
3. Whenever possible, trim your layer’s carrier sheets so that you can do multiple colors at once — it cuts down on time and reduces the likelihood you’ll get little lines where your carrier sheets were.
4. If you’re having any issues getting layers lined up just right, you can use the star alignment tip, which just means you can add stars to each layer in the same spot and use them as a way to align your layers each time … but the stars don’t have to end up on your finished project, and I’ll show you how that works!
Other than vinyl and a blanket, you’ll want a way to cut your iron-on vinyl — I’m using my Cricut — and a way to press the iron-on vinyl — I’m using the Cricut EasyPress 2 in the BIG size. You’ll also want a weeding tool to prepare the vinyl, a pressing mat, your cover sheet, maybe some heat-resistant tape to keep things in place, and a yardstick to measure things. And if you’d like to make a way to indicate the numbers for the photos, I’m using Cricut veneer, glue, and a little acrylic paint to make frames!
I think that’s it … oh, you need a design! I have the giraffe milestone blanket design you can freely use over on my blog! I can’t give you the file for the Baby Yoda, as that is Disney’s property, but I CAN show you how to use a licensed Star Wars image over on Cricut Design Space for it!
So let me first show you how I prepared and layered this cute Baby Yoda with SportFlex iron-on vinyl, and then I’ll show you how to iron on the rest of the numbers and letters over a big surface … without going nuts! This post contains some affiliate links for your convenience (which means if you make a purchase after clicking a link I will earn a small commission but it won’t cost you a penny more)! Read my full disclosure policy.
Materials for the DIY Milestone Blanket with Layered Iron-On Vinyl
View my Amazon shopping list with the exact items we used to make this project!
- 50 x 60 blanket of choice. (I used a soft polyester fleece blanket)
- Cricut Iron-on Vinyl (use Everyday Iron-On Vinyl if your blanket is made of cotton, or SportFlex Iron-On Vinyl if your blanket is made from polyester — I experimented with both in this tutorial)
- Two yards of Siser Stripflock Heat Transfer Vinyl
- Freezer paper (for the star alignment technique)
- Cricut Heat Resistant Tape (optional)
- Cricut EasyPress
- Teflon sheet or parchment paper
- Cricut EasyPress Mat
- Yardstick to align numbers (optional)
- Cricut Natural Wood Veneer (1 package) for the frames.
- Tacky Glue
- Acrylic Paint
- Cricut StandardGrip Mat
- Cricut Weeding Tool
- Brayer (optional)
- Painter’s Tape (optional)
- A way to cut your vinyl (I used the amazing Cricut cutting machine!)
- Font used: Acres Font from Font Bundles
- Font used: Big Mad Font from Font Bundles
- Design #172 – My milestone baby blanket pattern/file (available in my free resource library—get the password by filling out the form at the bottom of this page)
- Baby Yoda design in Cricut Design Space

How to Make a Milestone Baby Blanket and Layer Iron-On Vinyl
Step 1: Get the blanket pattern.
Get the free Milestone Baby Blanket design (Design #172) and the link to the Baby Yoda design in Cricut Design Space from my free resource library (get the password to the library in the form at the bottom of this post).
Watch our video to see Step 1 in detail.
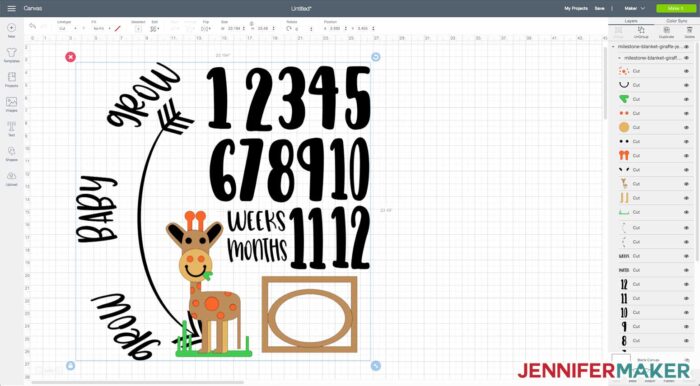
Step 2: Cut Out Your Iron-On Vinyl
You’ll find it much easier to cut this project on a cutting machine, like a Cricut. To do that, you’ll first upload the SVG design file you downloaded in step 1 to Cricut Design Space. Here’s what my SVG file looks like uploaded to Cricut Design Space:
If you’re not sure how to upload an SVG cut file to Cricut Design Space, watch this helpful video training series I made. If you’re on an iPhone or iPad, here’s how to download and upload SVG files to the Cricut Design Space app.
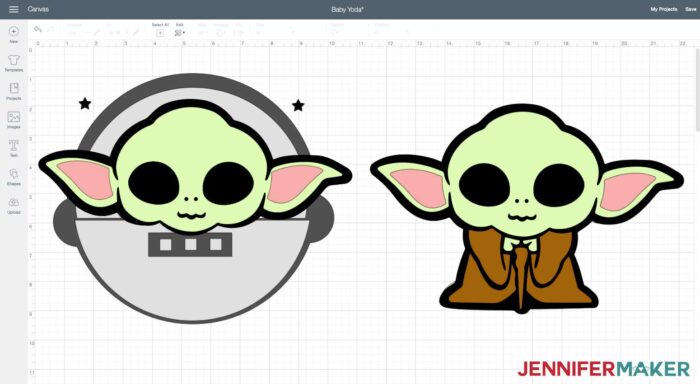
If you prefer a Baby Yoda (Boda) over the giraffe, I made one from a licensed Star Wars image from Cricut Design Space. Note that this image is NOT free — it’s currently $1.99 in Cricut Design Space. But it is SO worth it and it’s right and proper to pay Disney for the usage of their licensed trademark. Please also note that Disney controls this image and it’s possible that it may one day be licensed for use in Cricut Design Space (this happens, and it’s one of the reasons I don’t typically use images from there). But if you buy it, you should keep access to it. Here’s what that looks like in Cricut Design Space (there are two versions — one with Baby Yoda in the hover carriage, and one without):
For this project, you’ll be using two different kinds of iron on vinyl. Use the StripFlock HTV for all the numbers, the words Months, Weeks, Grow Baby Grow and the Arrow. For the design, Cricut SportFlex is the best choice if your blanket is super stretchy, otherwise use Cricut Everyday Iron on. Use either all SportFlex or all Everyday iron on for your design.
Tip: You can add alignment stars to your design — watch how I do that in my video with the baby Yoda.
Remember to mirror your designs before cutting!
Note: When you cut your iron-on vinyl, be sure to cut it shiny side down. Cricut SportFlex can be a little hard to determine which side is shiniest — if you have a problem, put the side with more bubbles up. The StripFlock Heat Transfer Vinyl is best cut on the Glitter Iron on setting.
Watch our video to see Step 2 in detail.
Step 3: Layer Your Iron On for Your Design
First, if you are using a Cricut EasyPress, refer to the Cricut EasyPress Interactive Quick Reference Guide which will tell you how to prep your material and EasyPress, how to apply and how to care for the finished product. This takes the guesswork out of the process. You can view the guide at jennifermaker.com/easypress.
Pre-heat your blanket with your Cricut EasyPress for about 10-15 seconds.
Tip: If you use the star alignment method for layering your design (see my video for a demonstration), cut small pieces of FREEZER paper (not wax paper, not parchment paper) and put them shiny side down under your stars. Keep the freezer paper in place until all layers are pressed, then remove.
I recommend you press each layer at 305 degrees for 15 seconds. Be sure your use a cover sheet (Teflon sheet or parchment paper) on top of your design every time you press to prevent scorching the exposed vinyl layers already ironed on.
Remove each carrier sheet with it is still warm (not hot, not cold).
If you make the baby Yoda design, press each layer in this order:
1. Dark gray circle shape
2. Light gray semi-circles
3. Green Baby Yoda head
4. Pink Baby Yoda ears
5. Black Baby Yoda outline
If you do the giraffe design, press each layer in the following order:
1. Grass
2. Giraffe body
3. Giraffe snout
4. Giraffe legs, antlers and mouth
5. Giraffe spots
6. Giraffe ears, grass and nose
7. Giraffe eyes (white)
8. Giraffe eyes (black)
Watch our video to see Step 3 in detail.
Step 4: Position and Iron On Your Numbers and Letters
Cut the frames from Cricut veneer wood (yes, you can do this on either a Cricut Explore or Cricut Maker) using a deep cut blade. You’ll cut two layers for each frame.
Glue the layers of each frame together. I recommend you put them under a heavy object to dry as the material is wood and will curl a bit as it absorbs the moisture of the glue.
Once glue is dry, paint the frames desired color and again put under something heavy when dry to keep the material from curling. Once completely dry the frames will not curl.
Watch our video to see Step 4 in detail.
Get my free template and cut files for the DIY Milestone Baby Blanket and Cute Giraffe
I’d love to see your DIY milestone baby blankets (and cute babies or grandbabies! Please share a photo in our Facebook group or tag me on social media with #jennifermaker.
Love,

Want to remember this? Save the DIY Milestone Baby Blanket Tutorial to your favorite Pinterest board!


You are amazing, the blanket is amazing, your method of teaching is amazing. Thank you so much.
Awe, thank you for your sweet words, Charlotte!