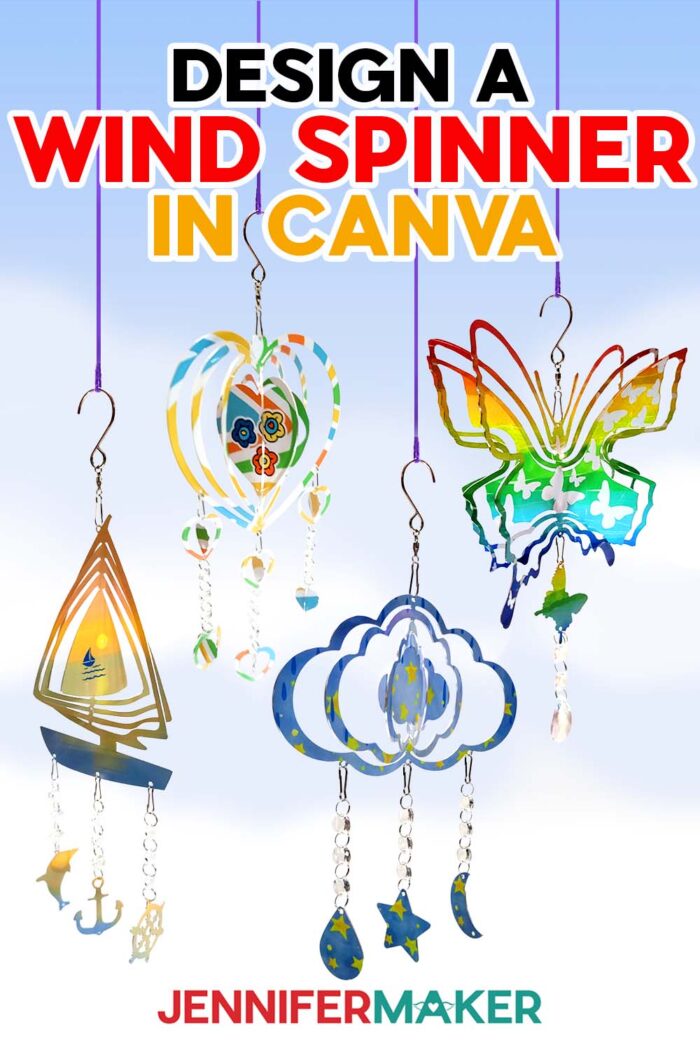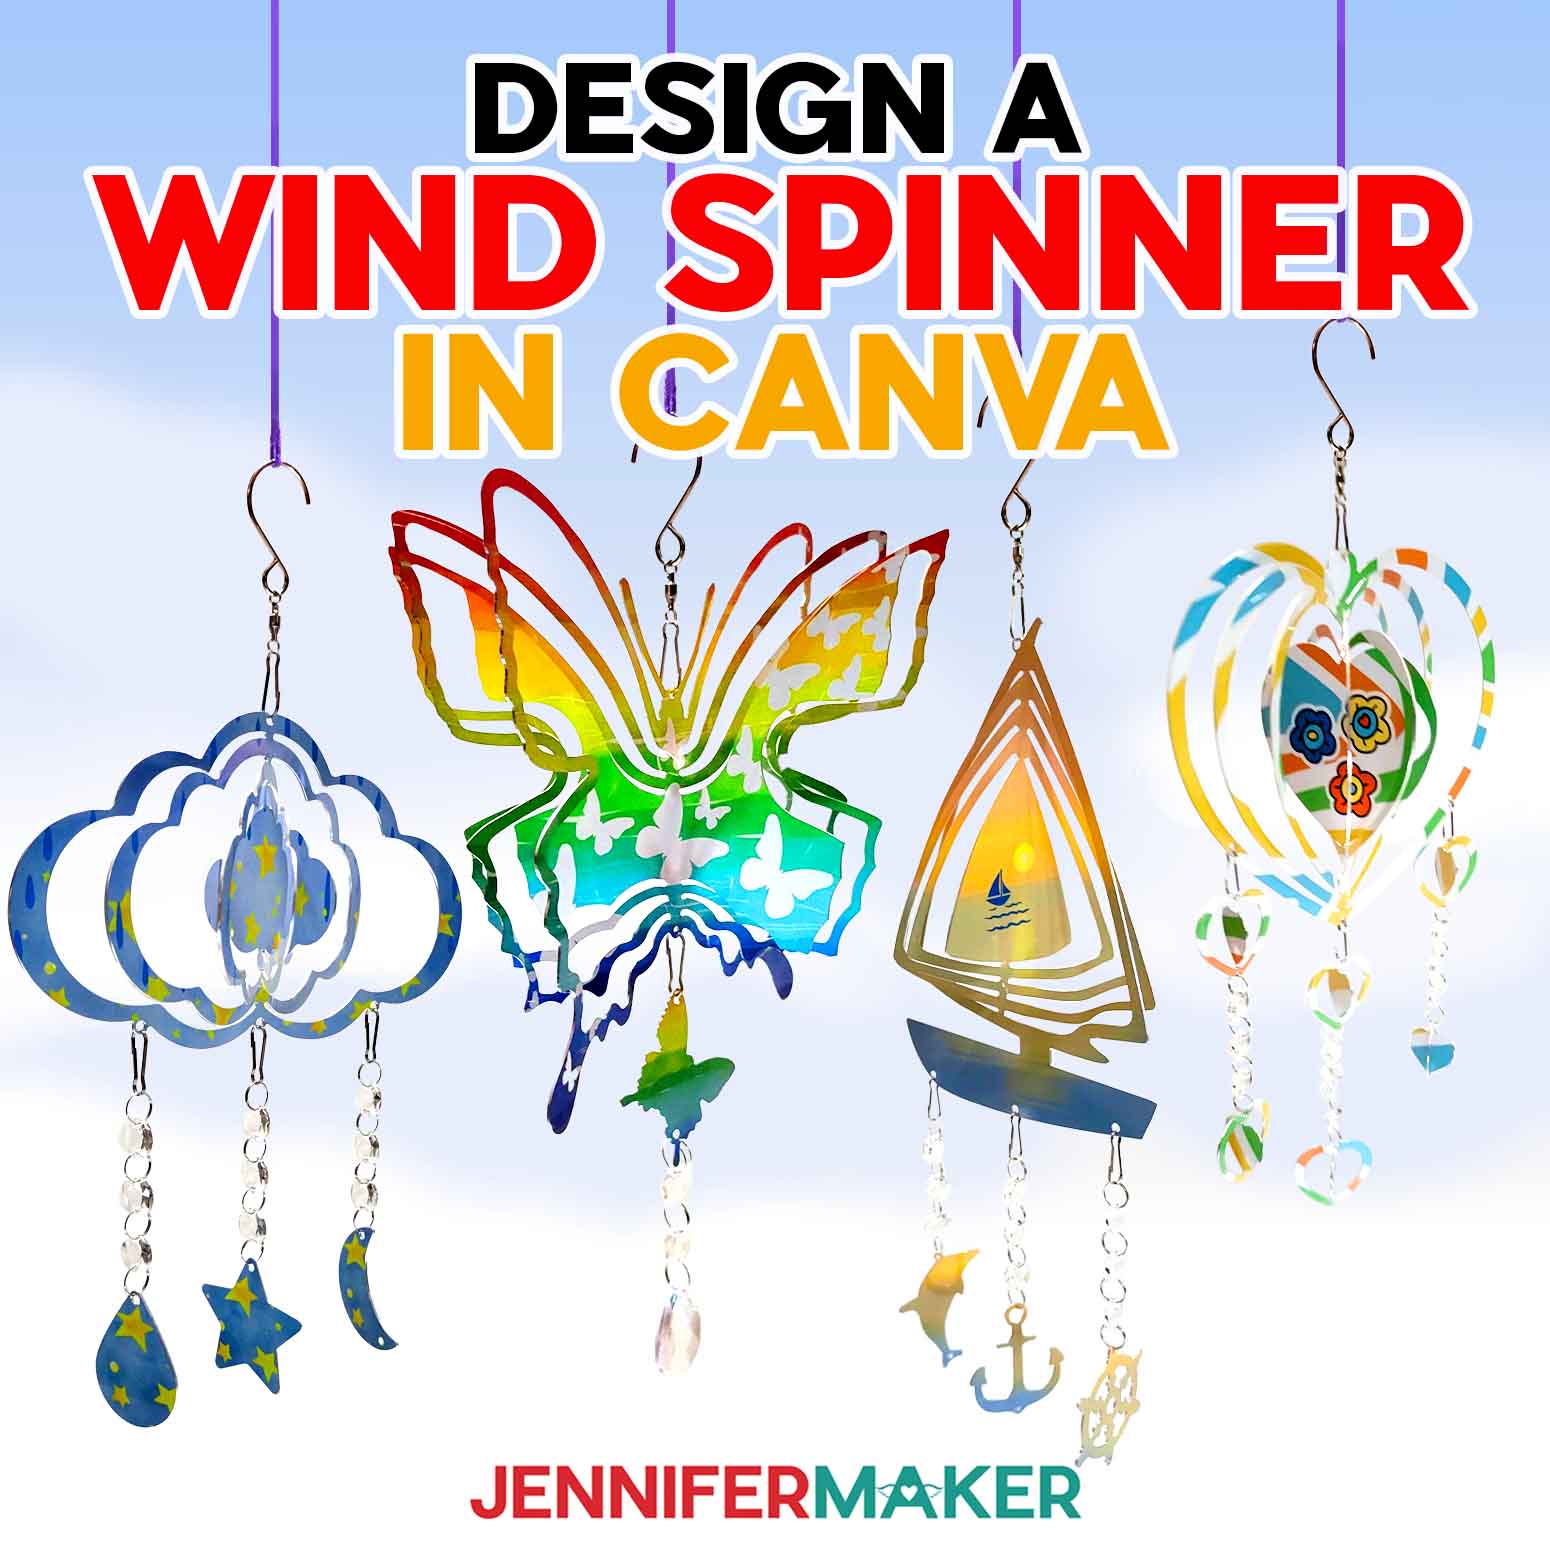
Learn how to design a wind spinner in Canva with easy templates for shaped wind spinners!
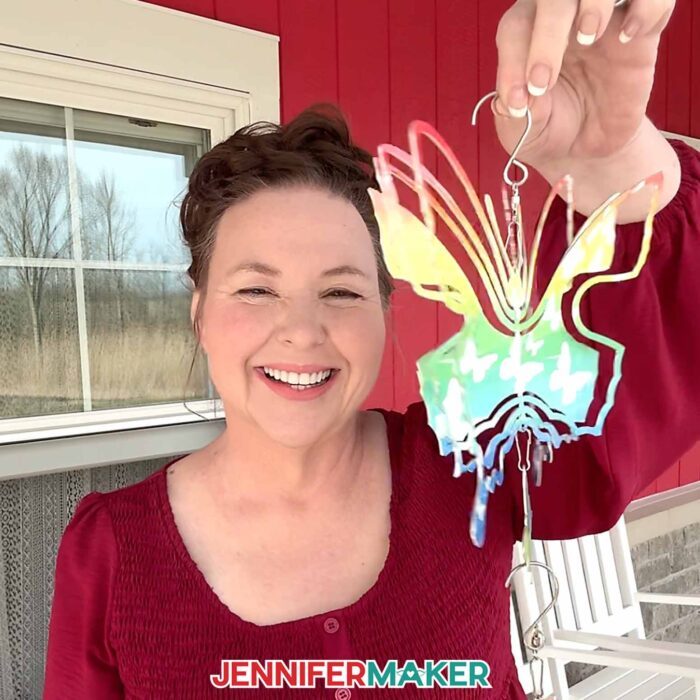
Here in Michigan, we’re no strangers to the wind, especially during the springtime when I like to break out my favorite outdoor decorations! Garden flags look so beautiful fluttering in the breeze, and I just can’t get enough wind spinners! I’ve sublimated so many of them, but they’ve always been the traditional rounded shape that everyone knows and loves. This time, I’ve found some unique wind spinner shapes–but creating designs for irregular shapes is a whole new process! Once I figured out how to do it, I knew I had to share it with you. So let’s dive into Canva today and learn how to design and sublimate these super fun Shaped Wind Spinners!
Watch the full step-by-step tutorial on how to design a wind spinner in Canva:

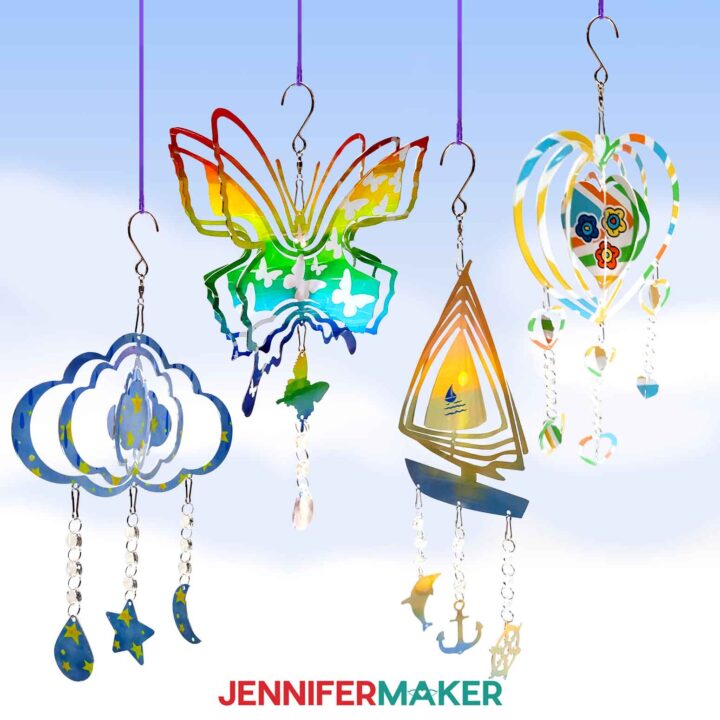
I’m so excited that I stumbled across these sublimation wind spinners! Not only do they have fun shapes, but they also come with small dangle attachments that you can also sublimate. Some of them can even have rings you can fan out, just like the main shapes! Chains of glass crystal accents catch the sunlight and connect the dangles to the larger pieces, making them prettier than ever! Even on days when the wind is low, they’re just as mesmerizing.
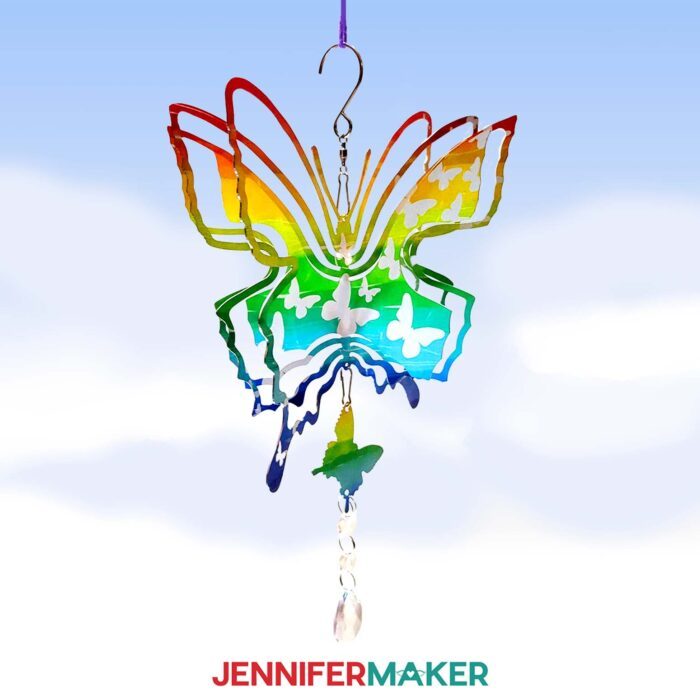
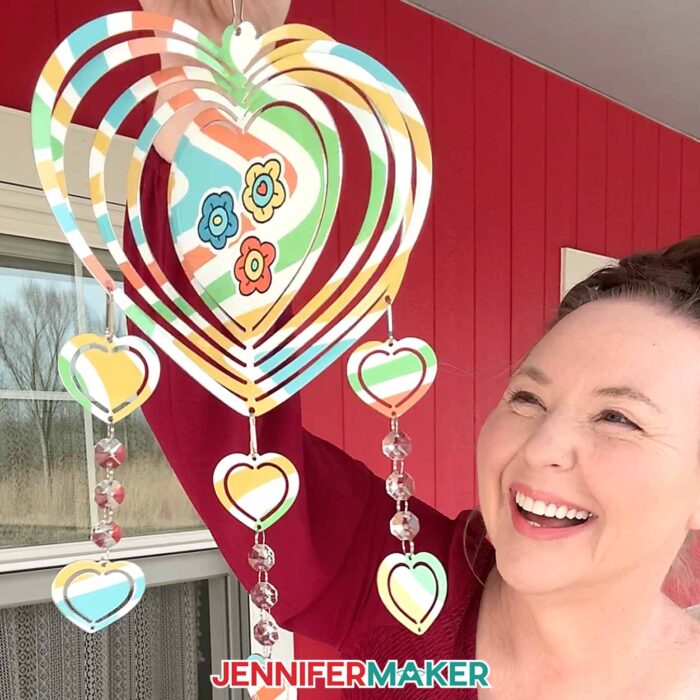
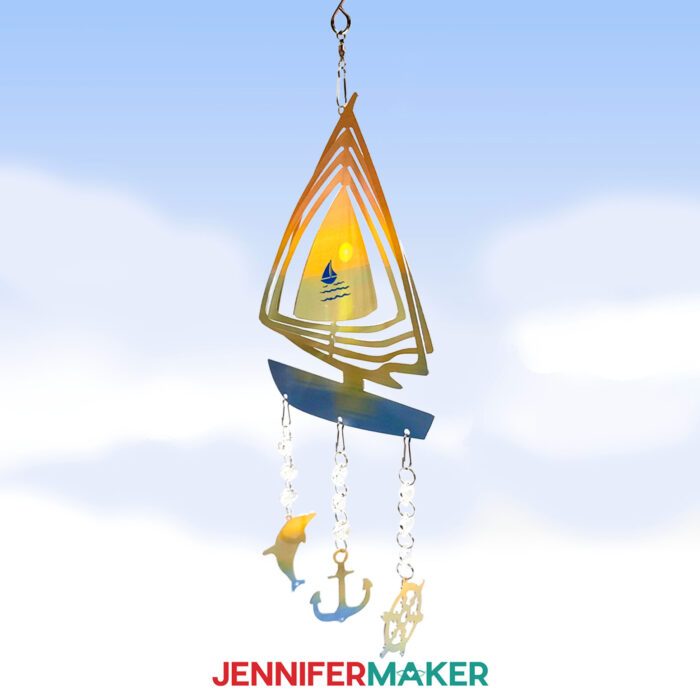
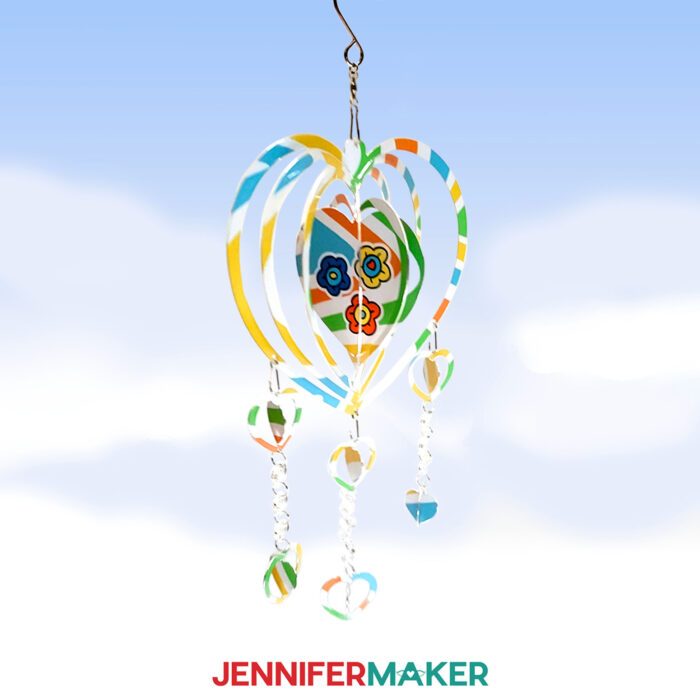
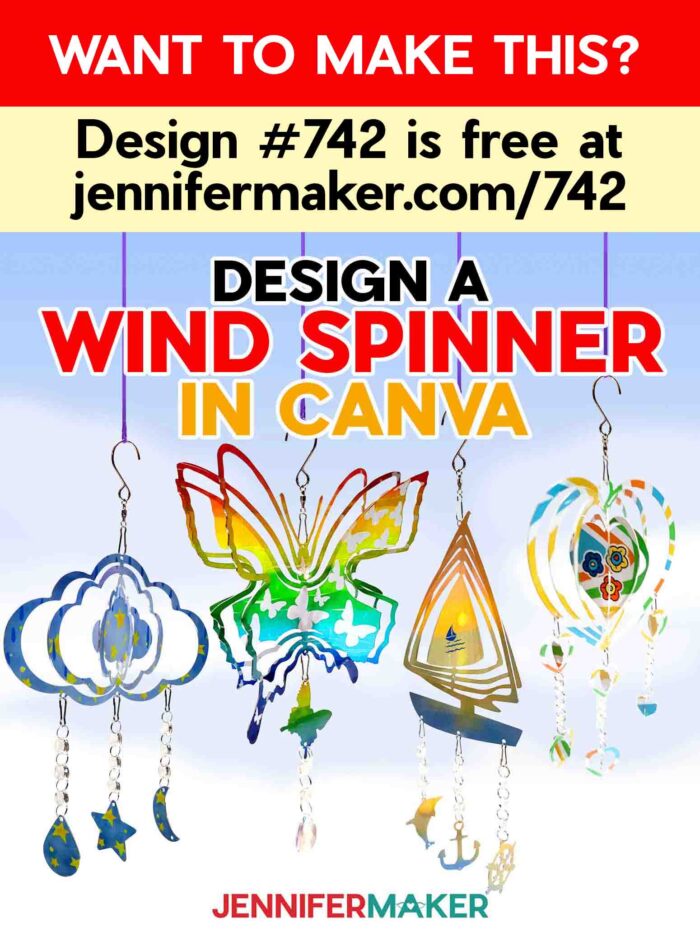
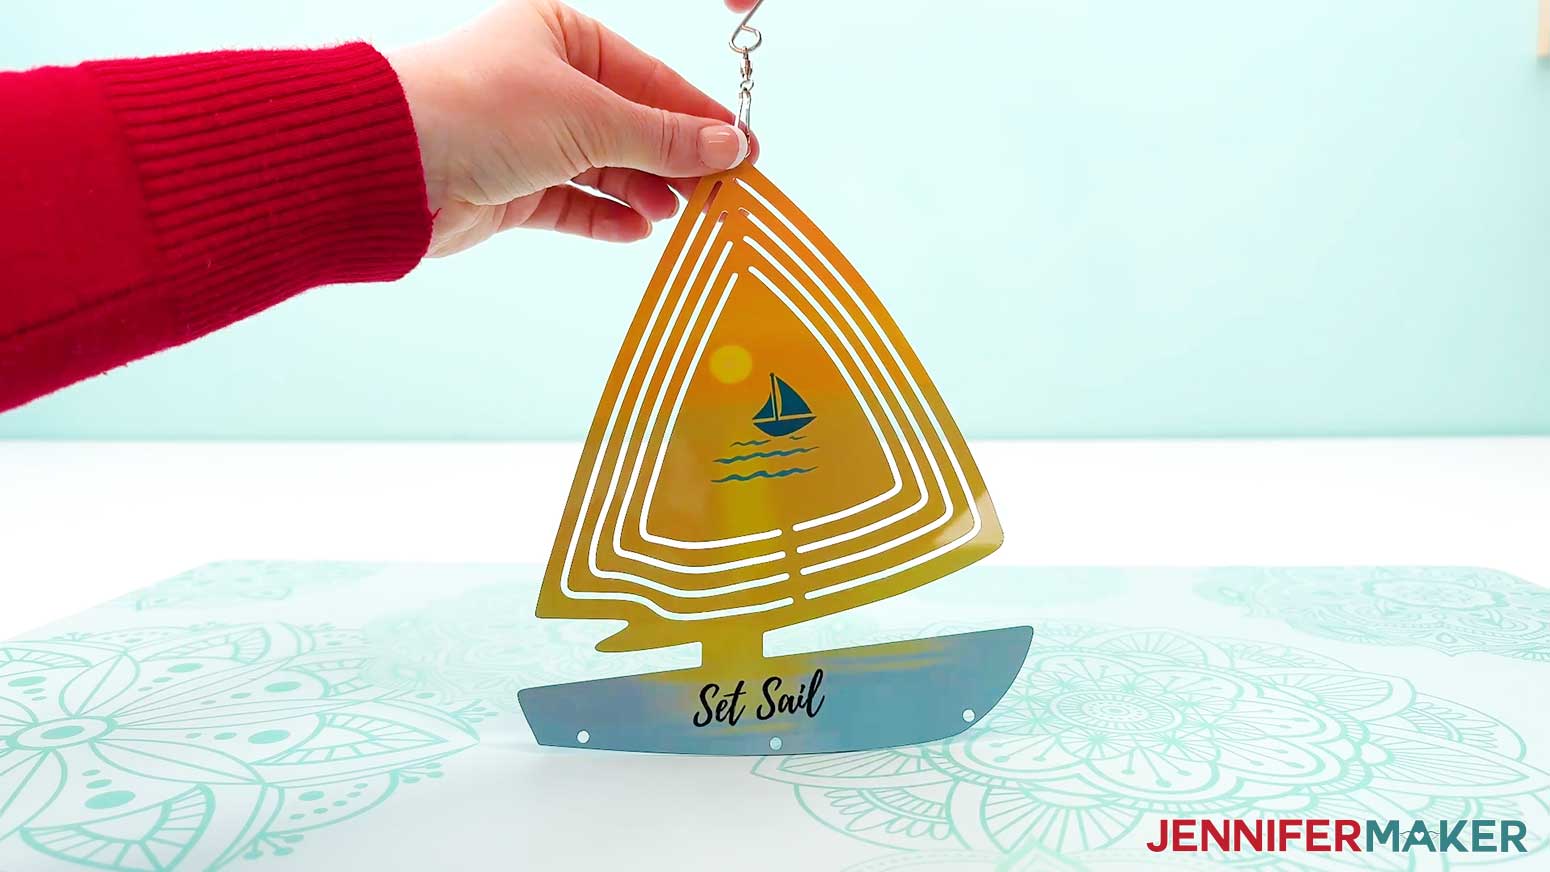
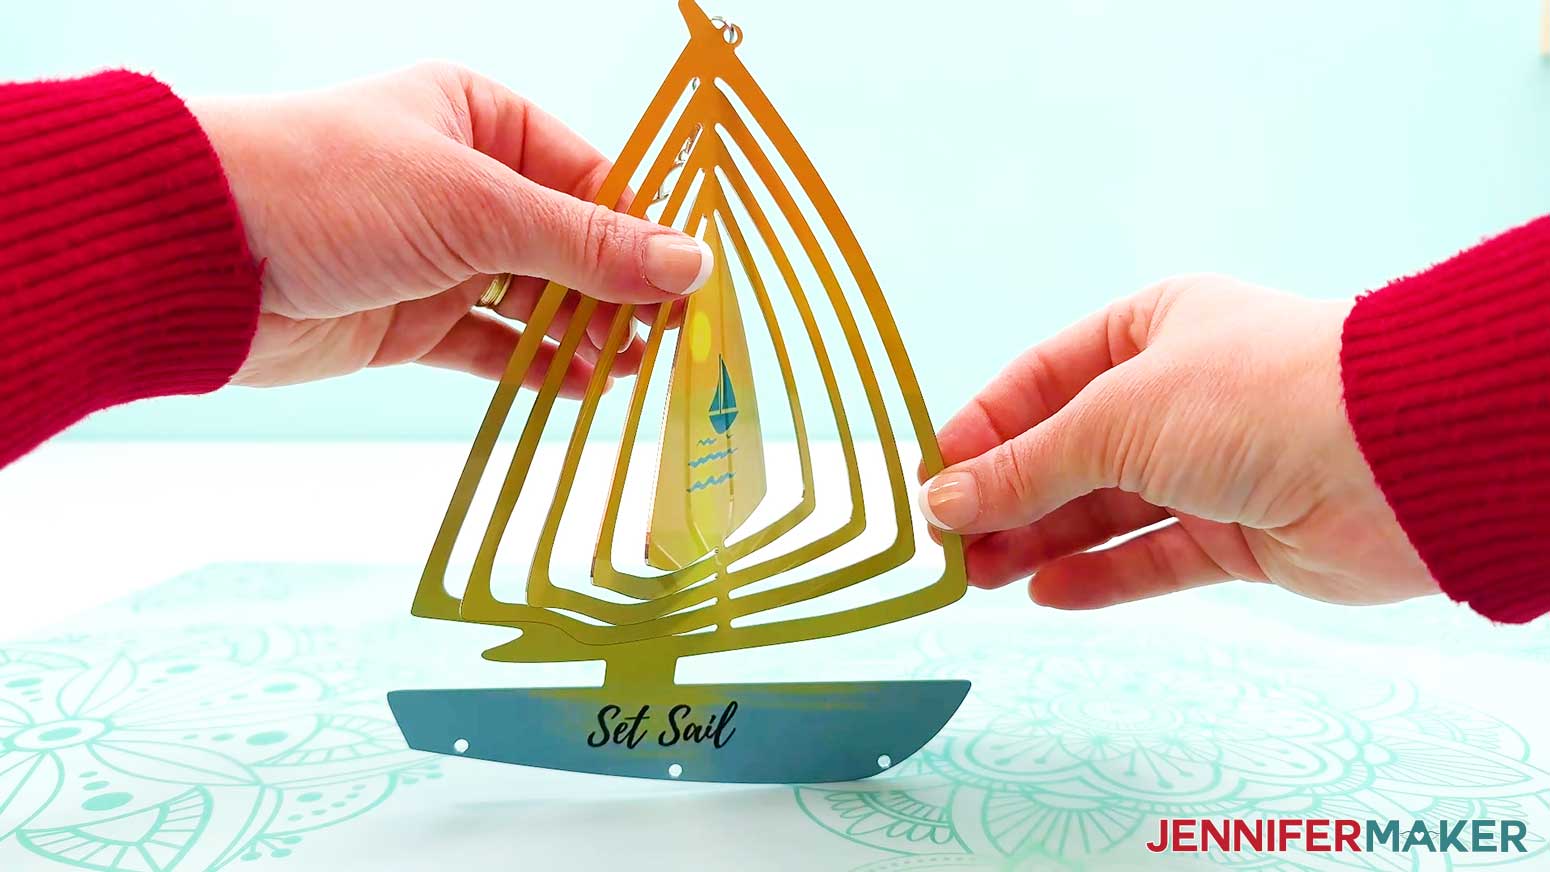
For this project, I picked some of my favorite shapes and created four designs that remind me of the peaceful outdoors: a serene sailboat drifting into the sunset, carefree butterflies dancing across a rainbow, a raincloud with moons and stars, and colorful flowers on a swirly heart background. I made all of these designs using free elements in Canva, and I’m excited to show you how you can do that too! My video tutorial will walk you through all the steps you need to create an amazing sublimation image without having to purchase any special software!
Cricut Design Space is great for simple tasks and certain Print Then Cut projects, but when designing high quality images for sublimation on larger items, I need something a little bit more powerful. Canva is my go-to software when I need more detail and control over my design. It’s a free graphic design platform that can be used right from your computer’s web browser, your tablet, or your smartphone! Everything is drag-and-drop, so it’s simple to use. It’s also incredibly powerful! And best of all, it’s free! If you’re new to Canva and want to get a feel for it before diving into design, my Canva Coach Playbook explains how use its most common tools and features.
I’ve provided free PNG outlines for each wind spinner’s shape so your design is the perfect shape and size in Canva. I like to start by adding a background from Canva’s free library. They have tons of gorgeous, high-quality images to choose from. You can even use their search feature to narrow down the list if you already have an idea in mind! If you’re an Advance with JenniferMaker member, you have access to even more background images and design elements from my personal collection in your member library! Click here to learn more about the Advance program!
After you pick your background, you can use Canva’s color correction features to make sure your image is bright and bold so it will sublimate beautifully. I’ll show you how to add filters to change a photo’s overall affects, and how to change the transparency of a solid shape to change the color of just part of an image. I’ll also teach you how to add, crop, resize, and position elements to add interesting foreground details to your wind spinner designs.
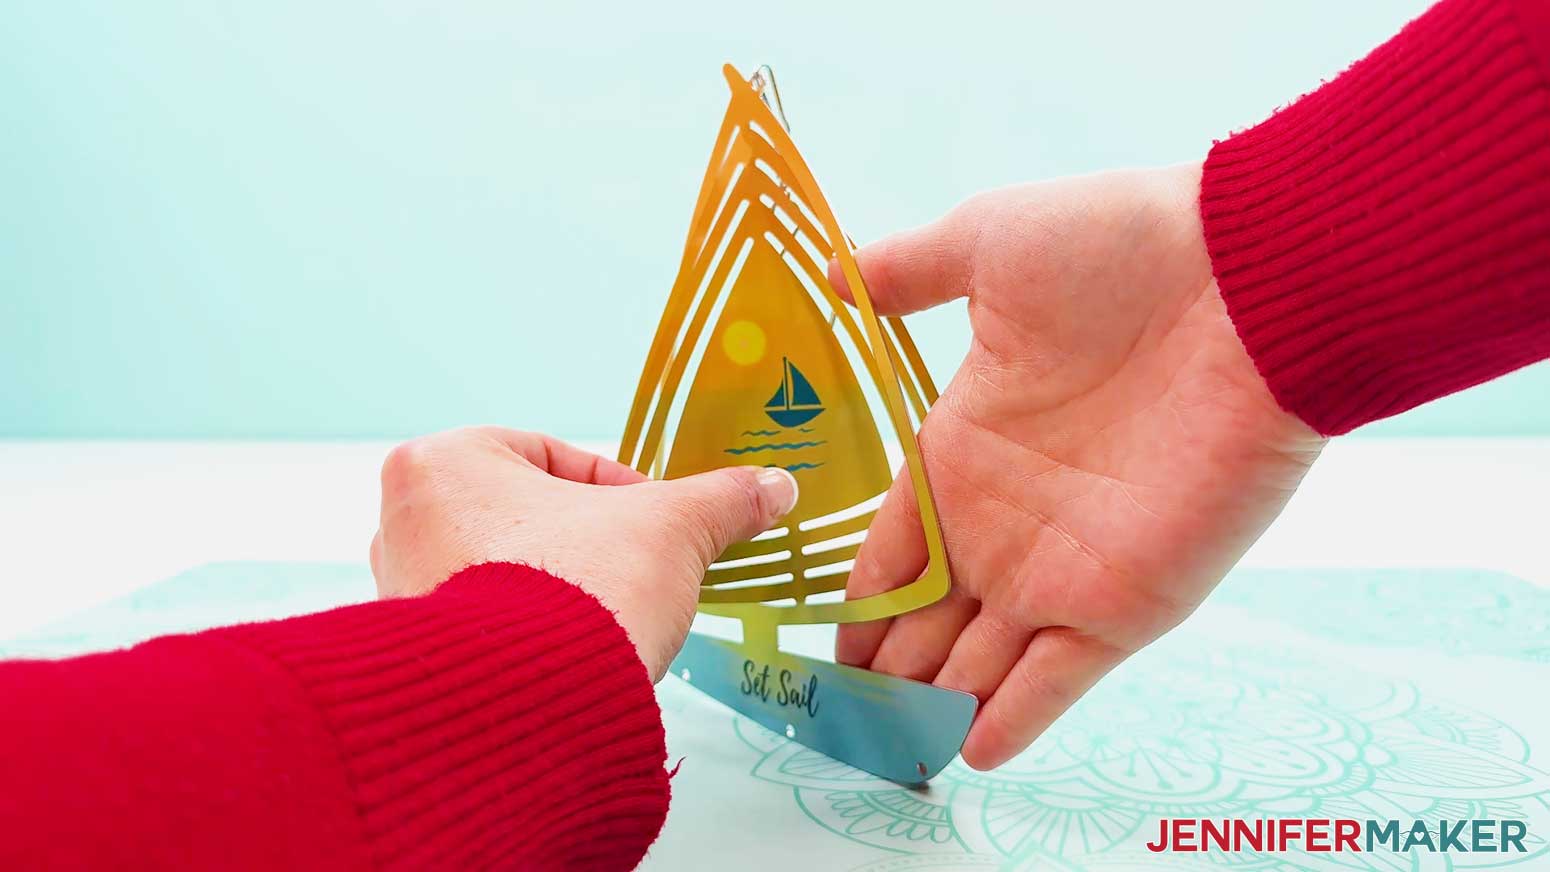
Background and foreground elements are the most important parts of your design, but I have a few more tricks to show you that are unique to sublimating on two sides of an asymmetrical shape like our sailboat blank. I tried a few different methods before finding the easiest way to flip images to make sure the designs flow seamlessly. It took some trial and error, but I nailed down the process so I could demonstrate it for you–and save you the headache! Be sure to watch the tutorial to see how that works!
Once your designs are ready to go, I’ll show you how to upload them to Google Docs for printing. I like using Google Docs for sublimation printing instead of Cricut’s Print Then Cut feature because it allows you to use more of the page. You can easily resize and position the designs, too, so your image will be large enough to cover your blanks. There are different layout and sizing settings for each of the spinners, but I cover all of that detailed information to save you time and resources.
Then you can print your sublimation transfers using a sublimation printer with sublimation ink. I use a converted Epson EcoTank with Hiipoo sublimation ink, and my prints always come out great! Good-quality sublimation paper is also important, and A-SUB sublimation transfer paper is one of the most consistent. A-SUB has both letter-size and legal-size paper available, so even the larger shapes and all their dangles can print on a single page. My supply list below has links to everything you need.

I’ll also show you the time and temperature settings that gave me the best sublimation results for the blanks I used. If you use a different brand or material for your blanks, or if you’re just curious to learn more about sublimation, check out my Sublimation Cookbook. It’s packed with loads of information to help you achieve great results consistently, whether you’re just starting out or a seasoned sublimation pro!
And don’t forget to prepare your wind spinner blank for sublimation! These to-dos may seem minor, but skipping them can greatly impact sublimation success. So be sure to check both sides of your blank for protective film and remove it if you find it. You want your ink to press directly onto your blank’s surface. Also be sure to clean both sides with alcohol and a lint-free cloth. Dust and debris can prevent ink from transferring to the blank wind spinner correctly. Use a lint roller to pick up any dust and debris that might transfer to the blank during handling, as well. And don’t forget to craft with caution by opening a window, setting up a fan, and wear heat-resistant gloves when handling the sides of the spinner so you don’t burn yourself!
The easiest way to keep your printed sublimation design in place when pressing is to use heat-resistant tape to secure the sides of the wind spinner to the paper. I like to cut the prints for the larger wind spinners separate from the dangle prints so I don’t have to press everything at once. That way it all fits under my heat source, and I can apply even pressure to the entire blank. Even pressure is essential to prevent ghosting and blurred edges, so even if all your spinner’s blanks will fit under your heat press, sublimating one at a time is the way to go! I’d only recommend pressing them all at once if you’re using a Cricut Autopress.
There are different styles of heat press that will work for this project, but I’ve found using a handheld press like my 10″ x 12″ Cricut EasyPress 2 gets the job done well. Even the largest blank (the sailboat) fits under the 9″ x 9″ EasyPress, so that’s another option that will work well. Smaller heat presses can also work, but you need to take extra care to make sure the design is completely pressed with consistent pressure. I don’t recommend using a household iron for sublimation projects–they’re not consistent in reaching the high temperature necessary for sublimation.
I also tested the viral “cold quench” hack I’ve seen all over social media lately. That’s when you take a freshly pressed blank and plunge it into cold water bath to “lock in” the colors, resulting in a more vibrant image. Since my shaped wind spinner blanks are made from aluminum, I knew there was a possibility that they might warp when changing temperatures so drastically, so I actually tested two variables at once! You can see the results of my rapid cooling test in my video, too.
With your design pressed, there are only a few finishing touches necessary! Fanning out the wind spinner’s rings might seem intimidating, but I promise it’s easier than it looks! Then you can attach the dangles and it’s ready to hang outside for all to see! I’m positive that everyone’s going to be so impressed by your shaped wind spinner, especially when you tell them you designed it yourself in Canva!
So, want to learn how to design a wind spinner in Canva and heat press your shaped sublimation blank? Let me show you how fun and easy it is! This post contains some affiliate links for your convenience (which means if you make a purchase after clicking a link I will earn a small commission but it won’t cost you a penny more)! Read my full disclosure policy.
Materials to Sublimate a Shaped Wind Spinner
View my Amazon shopping list with the exact items I used.
- Two (2) Sheets of 8.5” x 11” A-Sub Sublimation Paper 125g (butterfly and cloud designs) -OR-
- Two (2) Sheets of 8.5” x 14” A-Sub Sublimation Paper 125g (boat and heart designs)
- Heart Shaped Wind Spinner -OR-
- Boat Shaped Wind Spinner -OR-
- Butterfly Shaped Wind Spinner -OR-
- Cloud Shaped Wind Spinner (may be unavailable)
- White Uncoated Butcher Paper
- Two (2) Sheets of 12″ x 12″ White Cardstock
- Sublimation Printer – I used a converted Epson EcoTank ET-2800 Inkjet Printer
- Sublimation Ink
- Scissors -OR-
- Paper Trimmer
- Heat Press – I used the 12” x 10” Cricut EasyPress 2
- Cricut EasyPress Mat
- Fan for Ventilation
- Heat-Resistant Gloves
- Heat-Resistant Tape
- Measuring Tape
- Lint Roller
- Lint Free Cloth -AND-
- Isopropyl Alcohol
- Optional: UV-Resistant Clear Coat Sealant
- Design #742 (My free PNG design files are available in my free library – get the password by filling out the form at the bottom of this page)
How to Sublimate Shaped Wind Spinners
Shaped Wind Spinners
Learn how to design a shaped wind spinner in Canva!
Materials
- Two (2) Sheets of 8.5” x 11” A-Sub Sublimation Paper 125g (butterfly and cloud designs) - OR -
- Two (2) Sheets of 8.5” x 14” A-Sub Sublimation Paper 125g (boat and heart designs)
- Heart Shaped Wind Spinner - OR -
- Boat Shaped Wind Spinner - OR -
- Butterfly Shaped Wind Spinner - OR -
- Cloud Shaped Wind Spinner
- White Uncoated Butcher Paper
- Two (2) Sheets of 12" x 12" White Cardstock
- Design #742 (My free PNG/PDF design files are available in my free resource library - get the password by filling out the form at the bottom of this page)
Tools
- Sublimation Printer - I used a converted Epson EcoTank ET-2800 Inkjet Printer
- Sublimation Ink
- Scissors - OR -
- Paper Trimmer
- Heat Press - I used the 12” x 10” Cricut EasyPress 2
- Cricut EasyPress Mat
- Fan for Ventilation
- Heat-Resistant Gloves
- Heat-Resistant Tape
- Measuring Tape
- Lint Roller
- Lint Free Cloth - AND -
- Isopropyl Alcohol
- Optional: UV-Resistant Clear Coat Sealant
Instructions
STEP 1: GET MY FREE SHAPED WIND SPINNER DESIGNS
First, download my Wind Spinner designs from my free library – look for Design #742. Alternatively, you can use the Save This Project form near the top of this post and the design link will be emailed to you.
In the PNG folder, you’ll find outline versions for each shape to create your shaped wind spinner designs in Canva.
There is also a PDF file with patterns you can print and cut by hand.
TIP: If you’re not sure how to download zip files and upload designs, go to jennifermaker.com/svgs. The steps are similar for PNGs and Google Docs.
STEP 2: DESIGN YOUR SHAPED WIND SPINNER USING CANVA
- In your computer’s browser, go to jennifermaker.com/canva.
NOTE: If you’re new to Canva, check out my Canva for Beginners tutorial. - Then, either sign in to your account or follow the prompts on the screen to sign up for a free account.
NOTE: Canva does offer paid subscriptions with more tools and elements, but I’ll show you how to do everything with the free account. - Click the “Create a design” button.
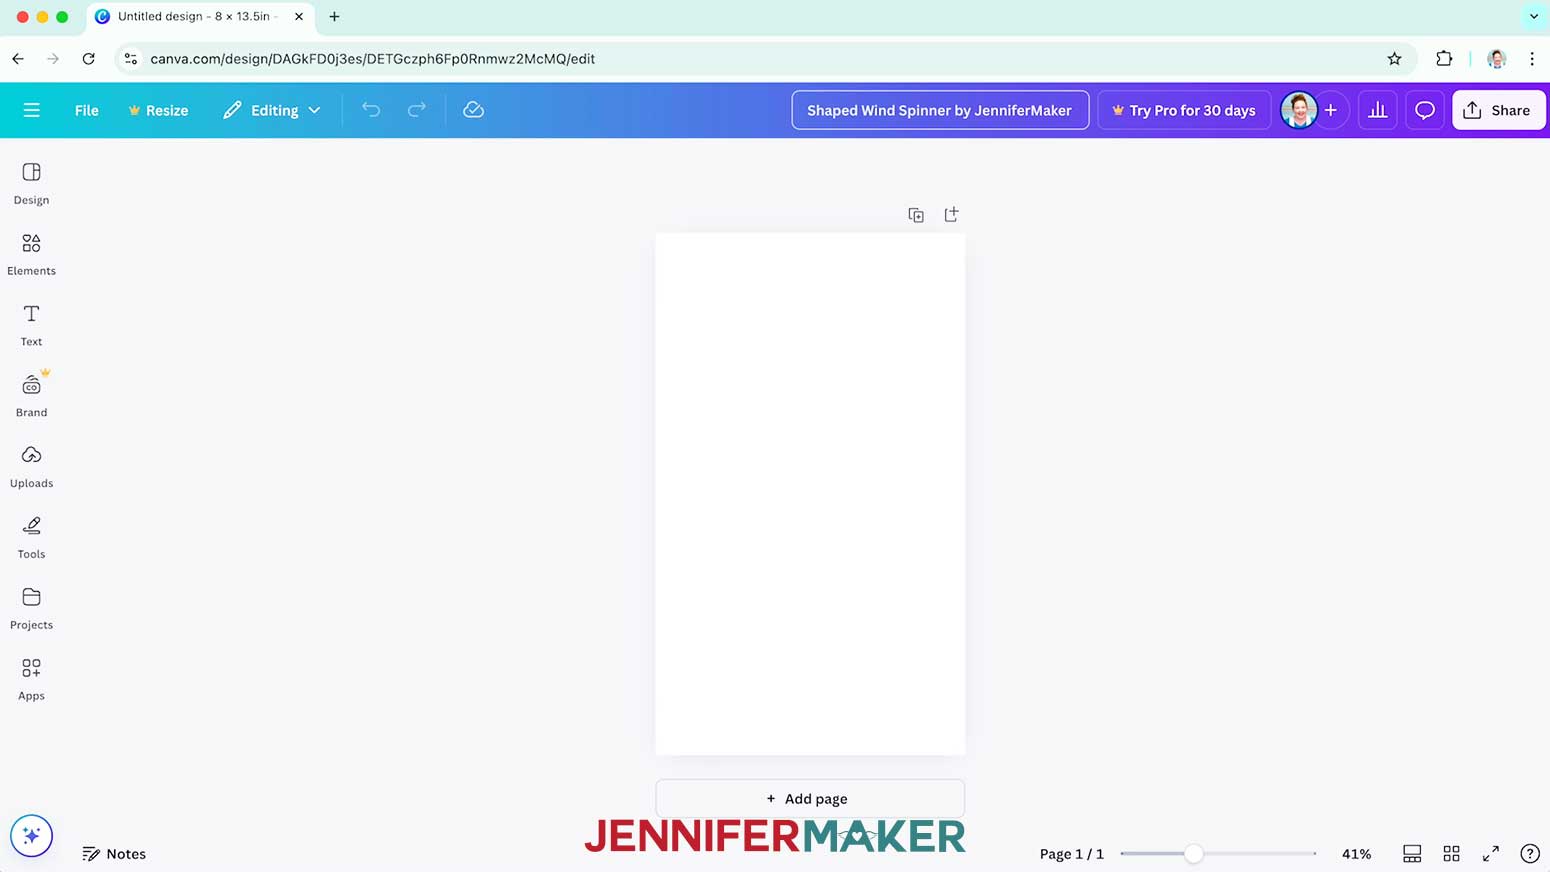
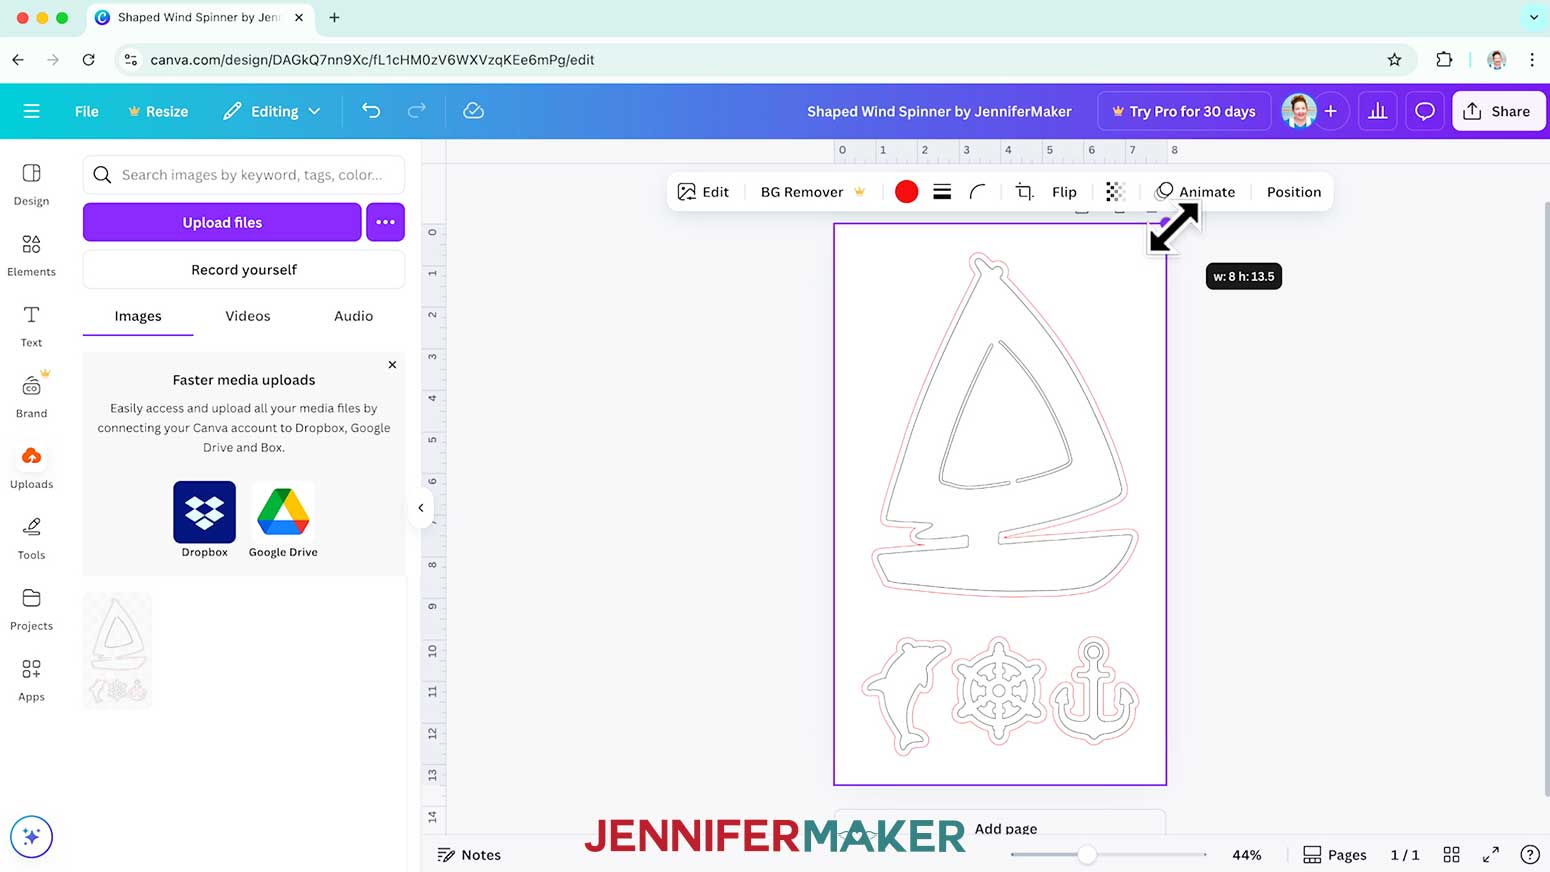
- Click “Custom size” to set the dimensions of your canvas.
- In the “Units” box, click the dropdown menu and select “in” for inches.
- Enter the dimensions that match your wind spinner’s shape in the “Width” and “Height” fields:
Boat - 8” W x 13.5” H
Butterfly - 10.5” W x 8” H
Cloud - 10.5” W x 8” H
Heart - 13.5” W x 8” H
NOTE: The Butterfly and Cloud designs are sized to print out on 8.5” x 11” (letter-size) paper, while the Boat and Heart designs are sized to print out on 8.5” x 14” (legal-size) paper.
NOTE: I’ll demonstrate with the Boat design.
TIP: If you are using a different wind spinner shape, measure the main piece’s widest and tallest spots, add 0.25” to each, and that is the canvas size you will create. You can use the same technique to make canvases to cover any dangles. - Then click “Create new design.”
- Once the new canvas loads, click the filename field at the top and replace the current name with your own.
NOTE: I’ll change mine to “Shaped Wind Spinner by JenniferMaker.”
- To add the guide lines PNG for your wind spinner, click on “Uploads” in the side panel, then “Upload files.”
- Select the guide lines PNG you want to upload and click “Open.”
- In the Uploads Panel, click the “guide” PNG to add it to the canvas.
- Next, remove your wind spinner blanks from the packaging. Set aside any hangers or decorative pieces.
- Lay your wind spinner’s main blank flat on your work surface.
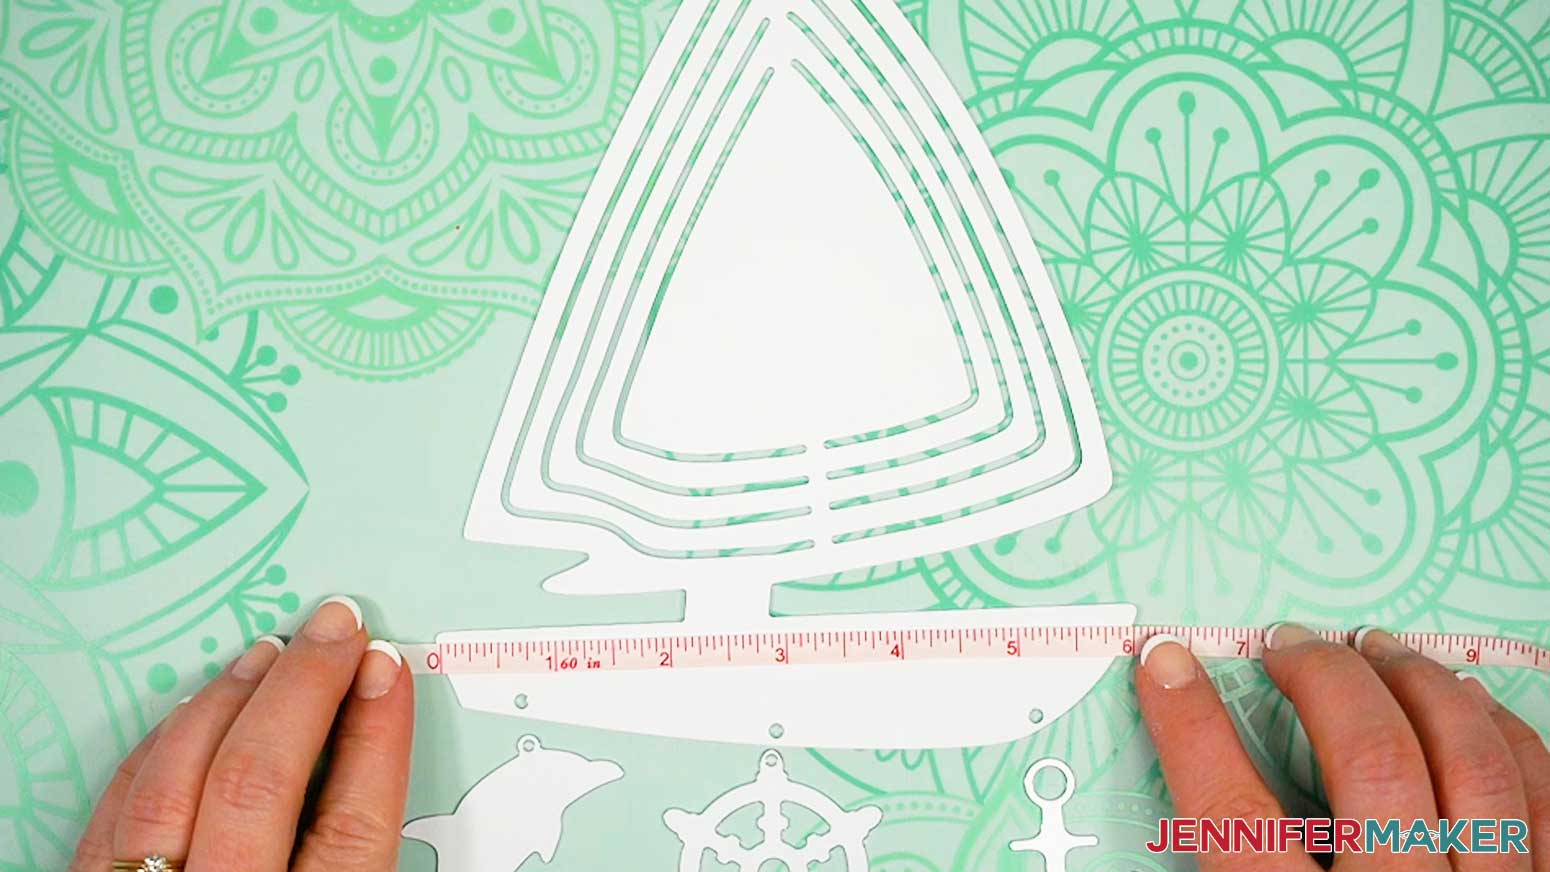
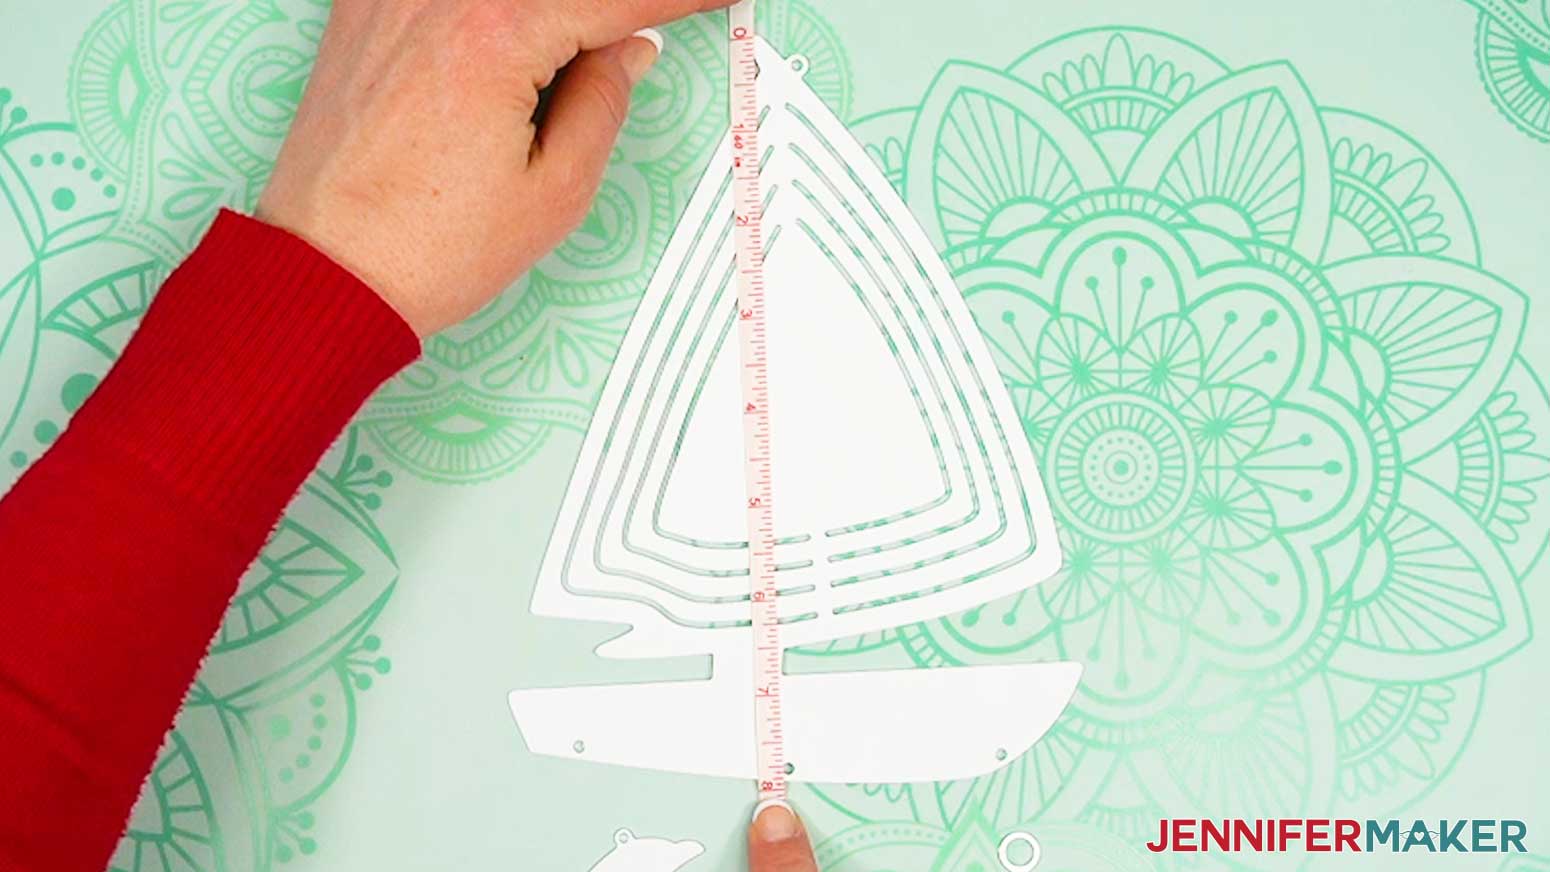
NOTE: Use caution to not bend the wind spinner until you’re ready to shape it at the very end after sublimating. - With a ruler, measure the width from left edge to right edge at the blank’s widest part.
- Now measure your blank from top to bottom at the blank’s highest part.
- Verify that your main shape’s dimensions match mine.
NOTE: Measurements for each wind spinner and dangle can be found in the Notes section at the bottom of this tutorial. - Repeat Steps 12-15 for each of the dangle blanks.
- If your wind spinner’s measurements match mine within a quarter of an inch, drag the outline image’s corners to the edges of the canvas.
- If your spinner is a different size, make sure your rulers and guides are visible by clicking “File,” going down to “Settings,” and selecting “Show rulers and guides.”
- Then click the ruler to the left of the canvas and drag your cursor to the right until the number in the purple box on the top ruler is a quarter of an inch larger than your spinner’s width dimension. This will create a purple guide line on your canvas.
- Then click and drag from the top ruler until the number on the left is a quarter of an inch larger than your wind spinner’s height.
- Adjust the outline image’s corners until the shape fits inside the guide lines you made.
- Then drag the guide lines off your canvas to delete them.
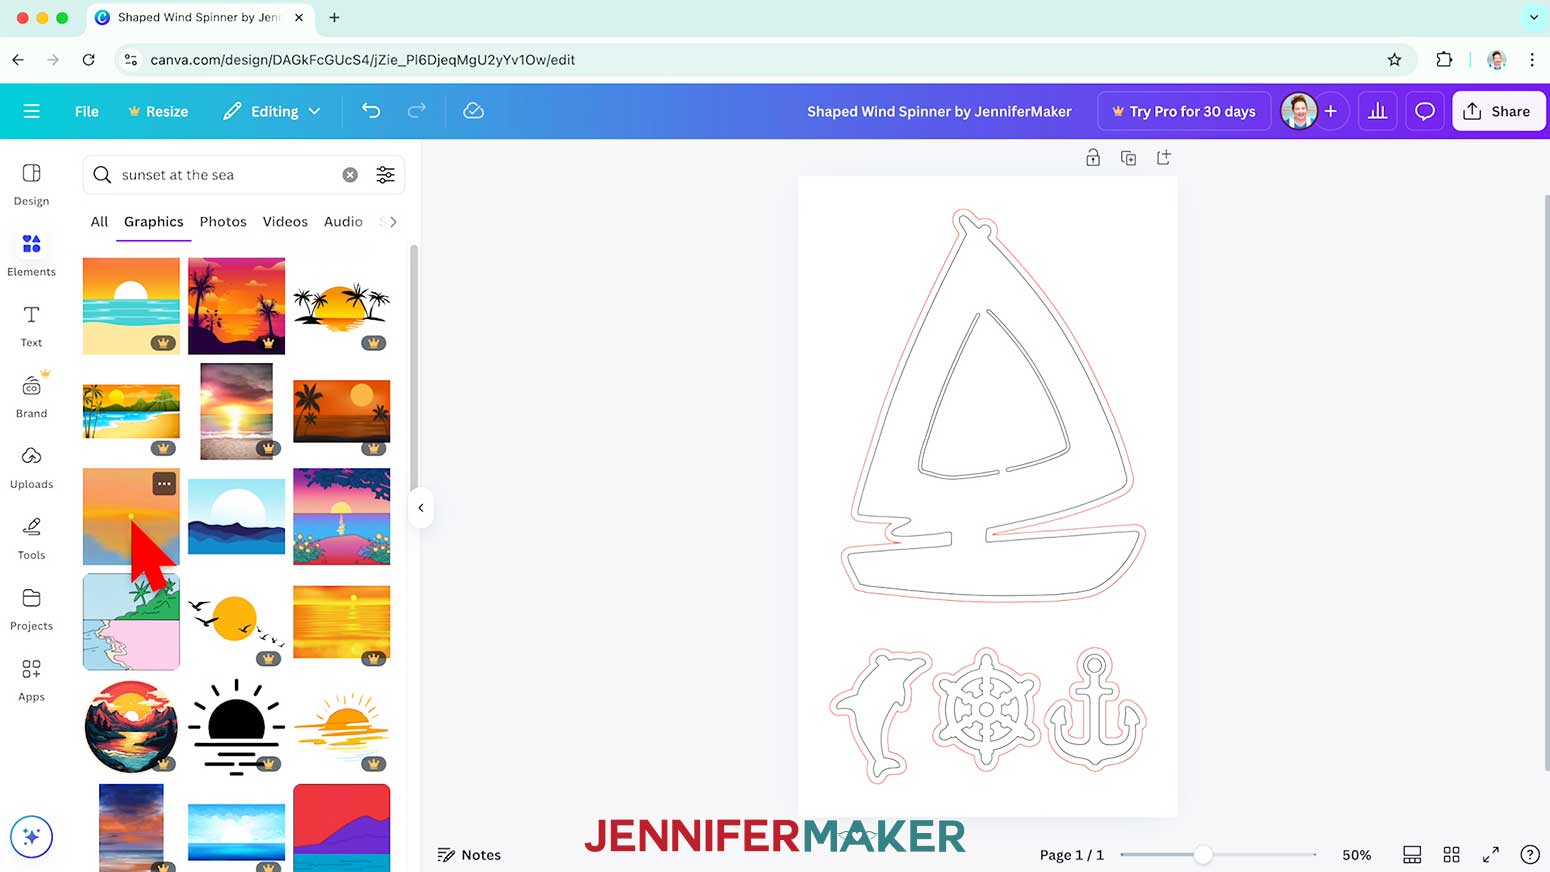
- Next, click on “Elements” to browse Canva’s image collection for a background for your design.
NOTE: Items with a crown are Canva Pro items. You’ll need to purchase them individually or sign up for a paid membership to download images using these elements. - Or, to find an image that fits a specific design you have in mind, type a related phrase in the “Search” bar.
- When you find an image you like, click it to add it to your canvas.
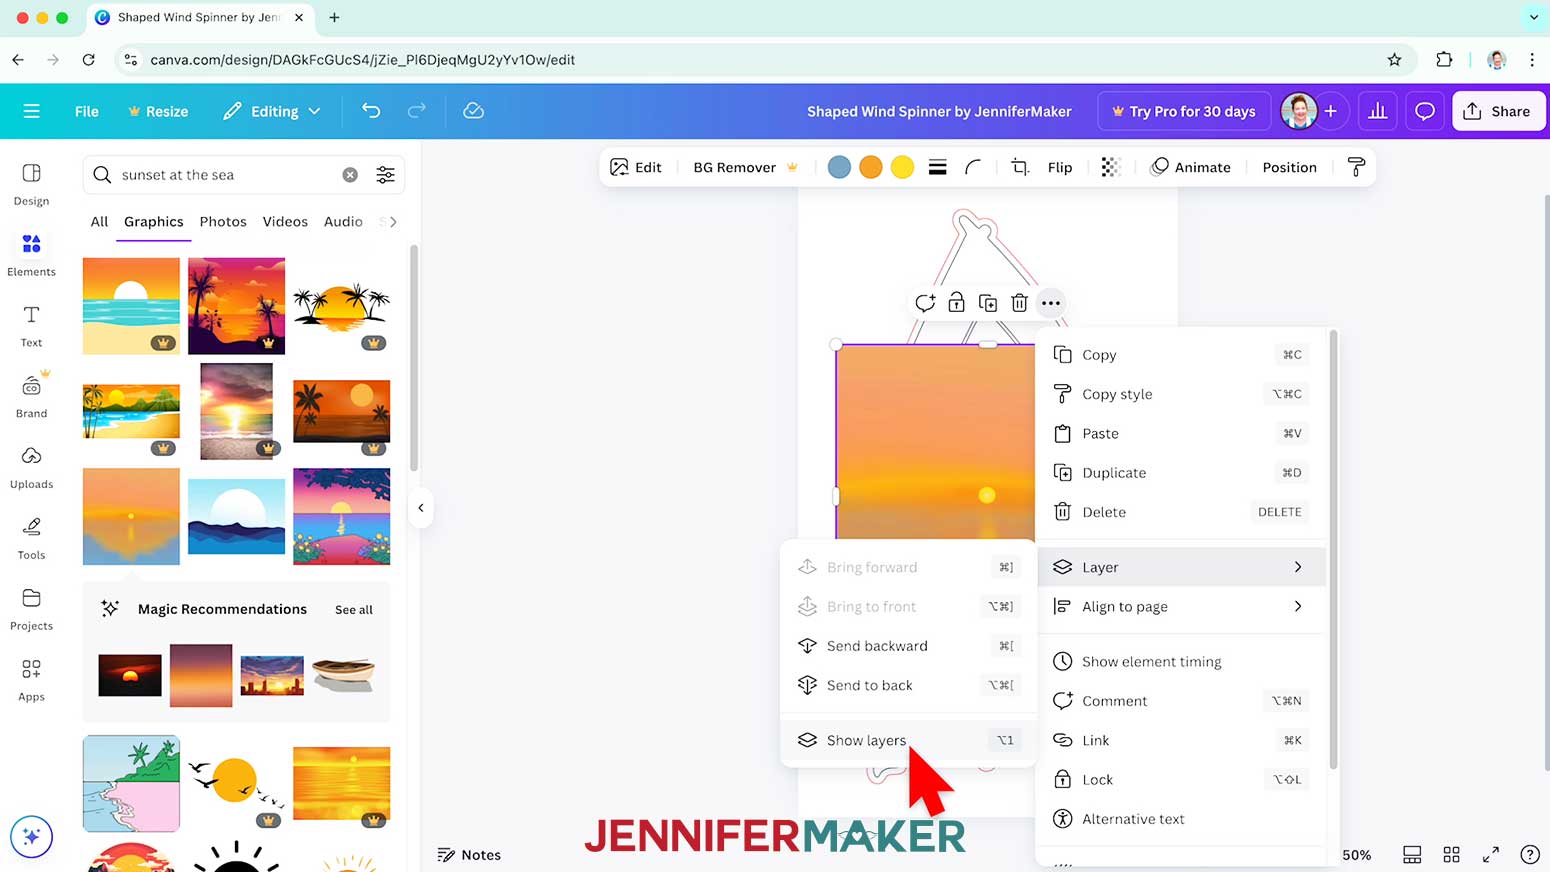
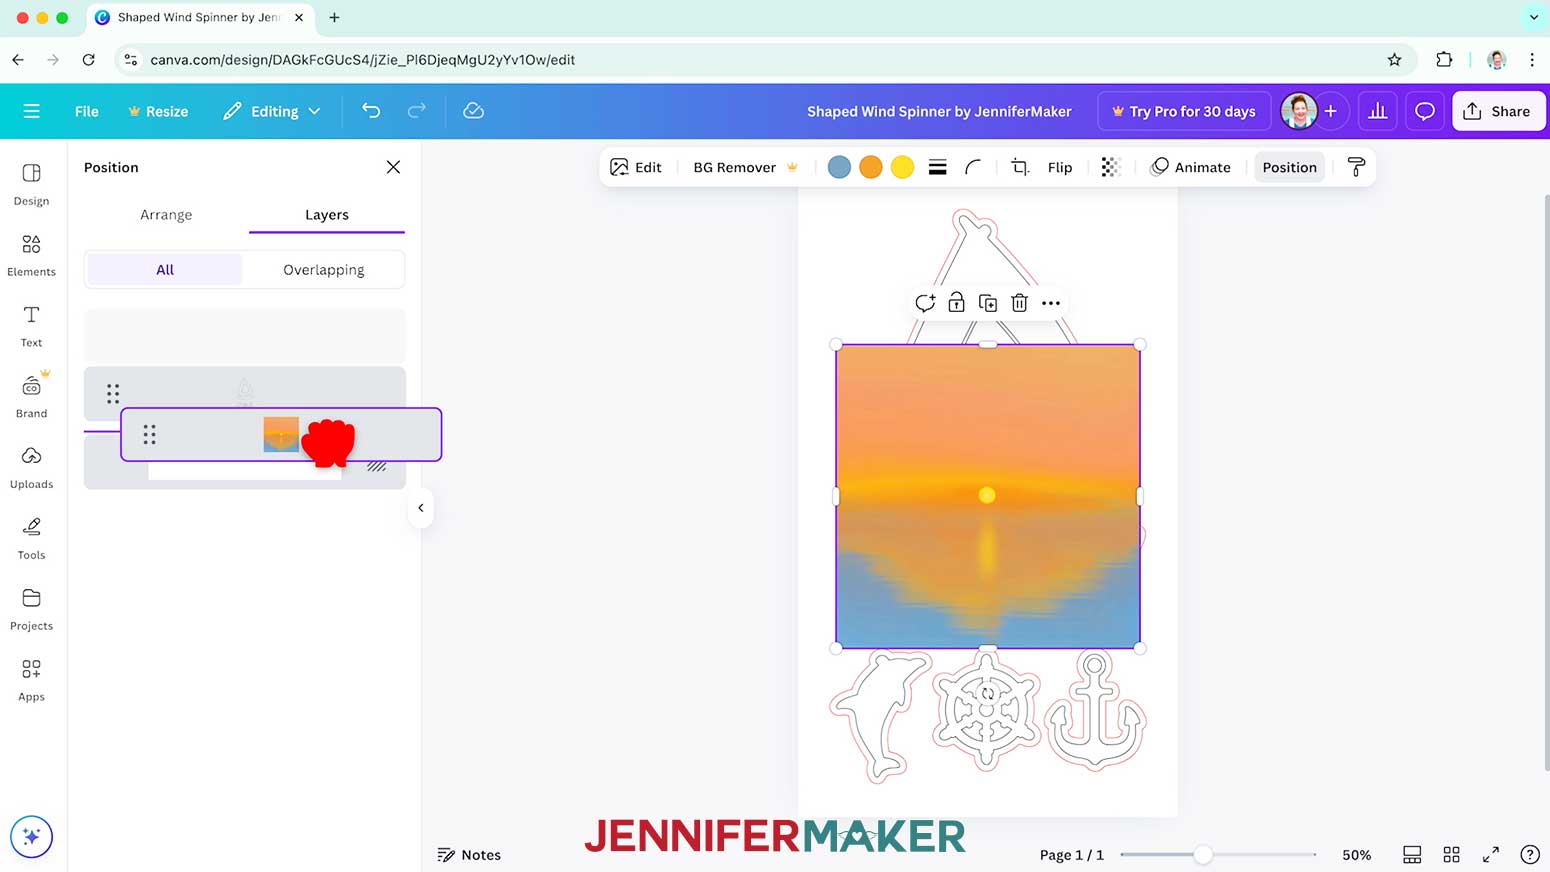
NOTE: I’ll add an image of a sunset on the sea. - Select the background image on your canvas, click the button with three dots in the toolbar above it, hover over “Layer” and then click “Show layers” to open the Layers Tab on the Position Panel.
- Drag the layer with your background image below your guide layer so you can see your wind spinner’s shapes on top of the background.
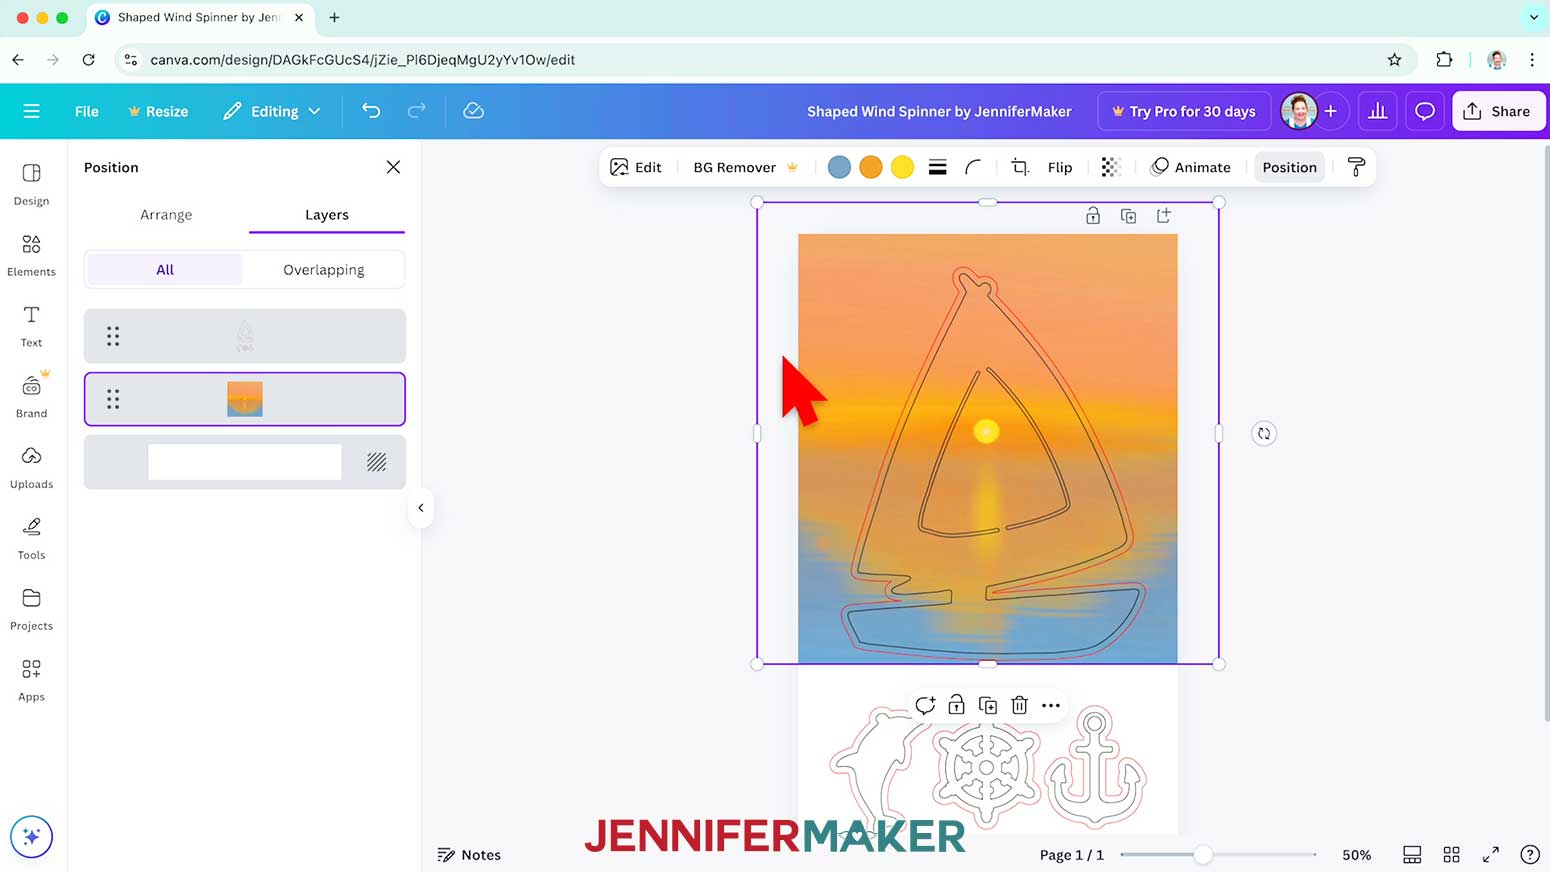
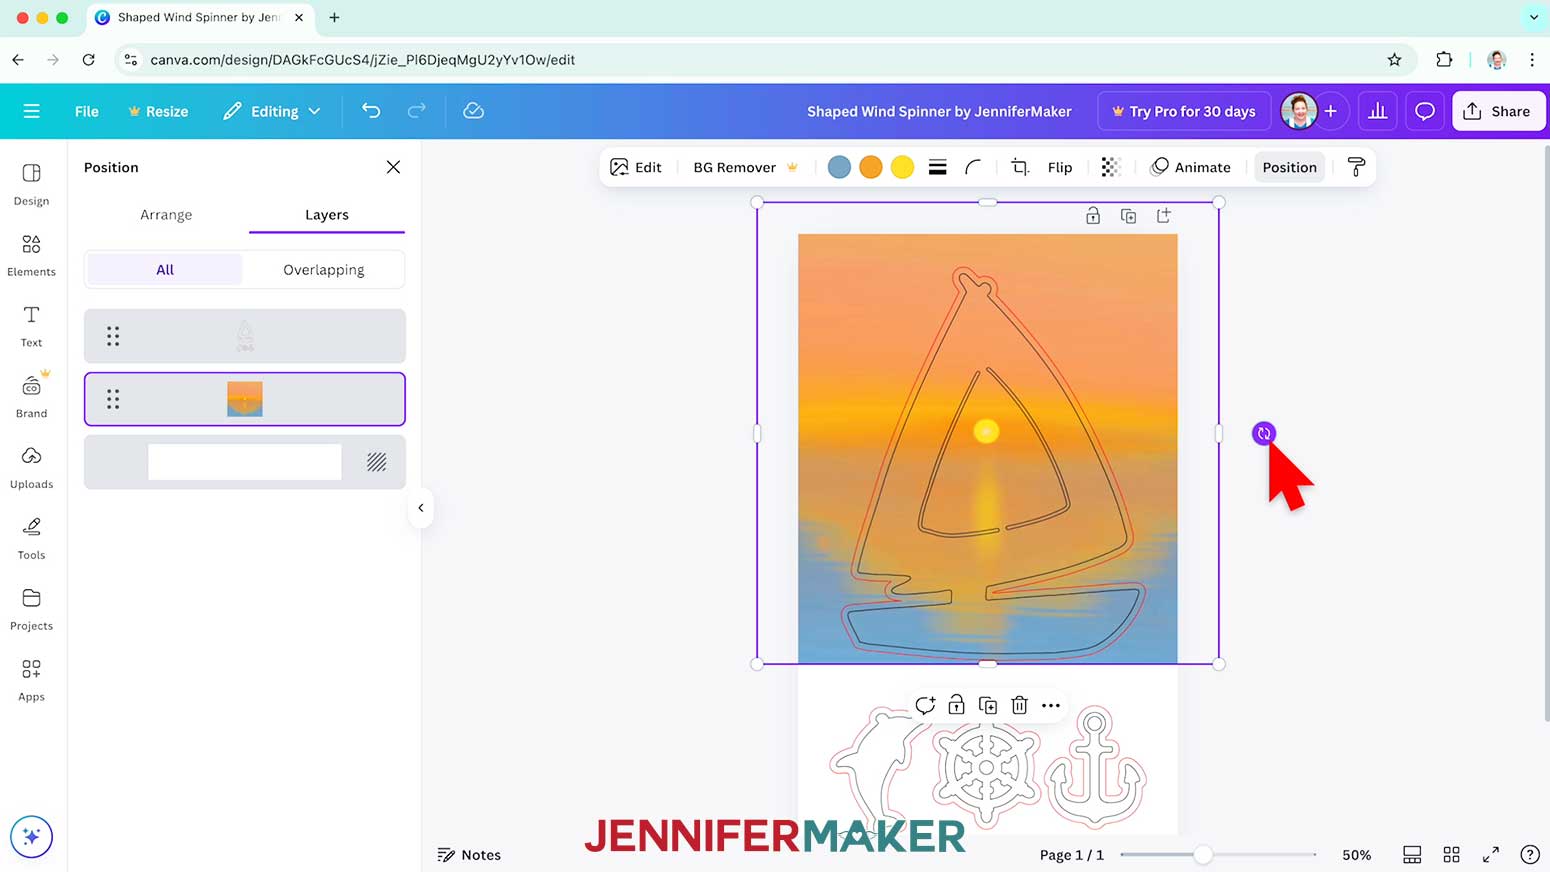
- Select the background image on your canvas and use the corner handles to resize it so it’s large enough to fill the area inside the main shape’s guide lines entirely.
NOTE: The guide frames are slightly larger than the wind spinner to provide a buffer zone around it for full coverage. - If you like, drag the curved arrows outside the image’s border to rotate the image.
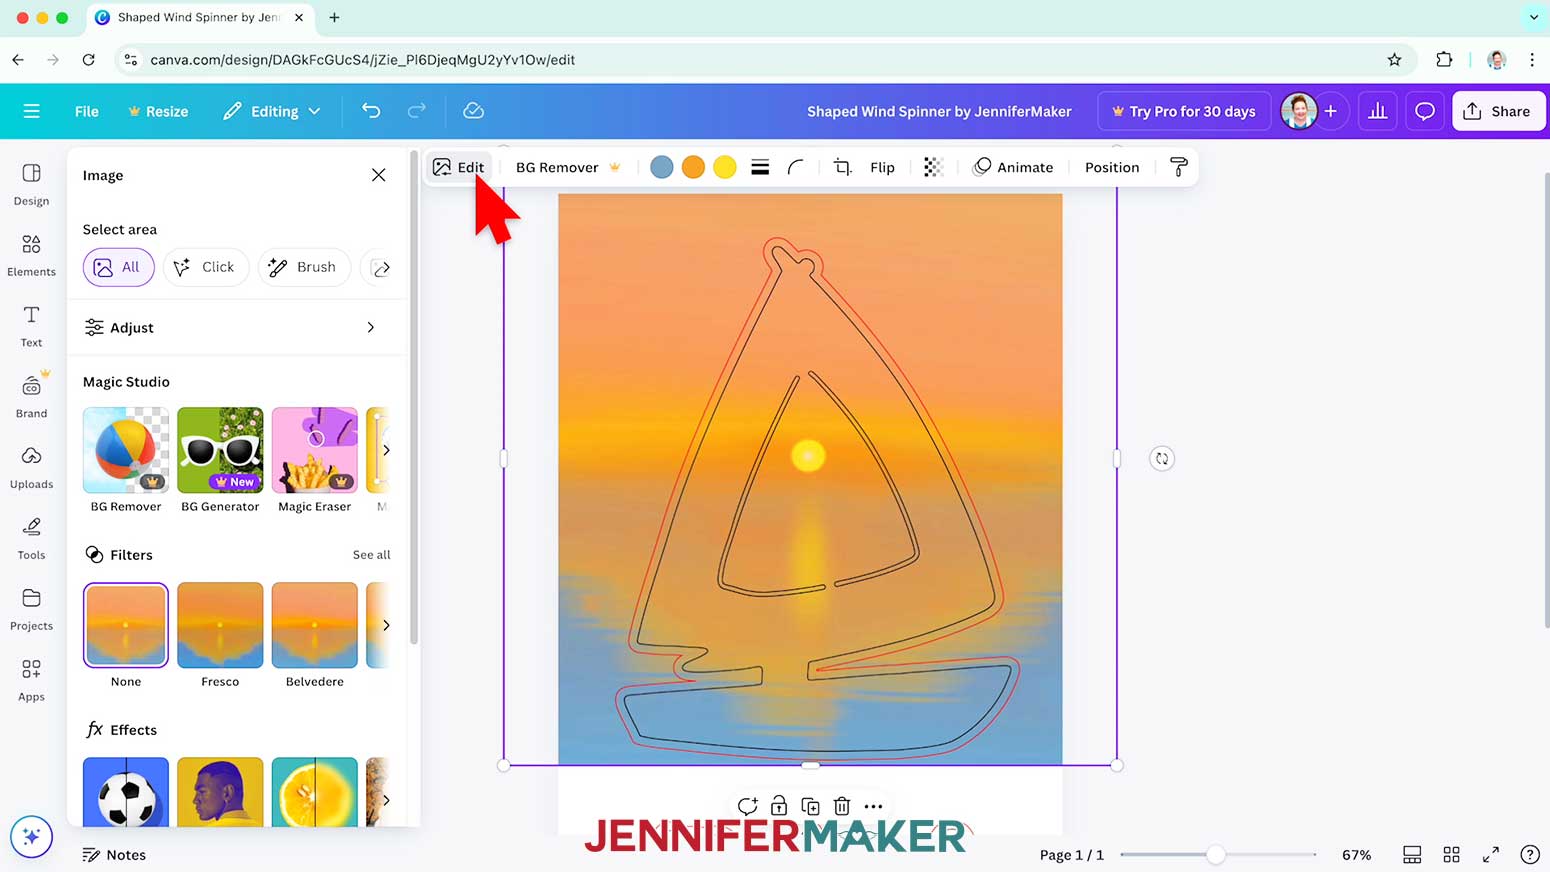
- If your background image’s colors are too dark, you can apply a filter to brighten them up. First, select the image on your canvas and click “Edit.”
- Then find the “Filters” section and click “See all” to open all available filter options.
- Click a filter to apply it to your image.
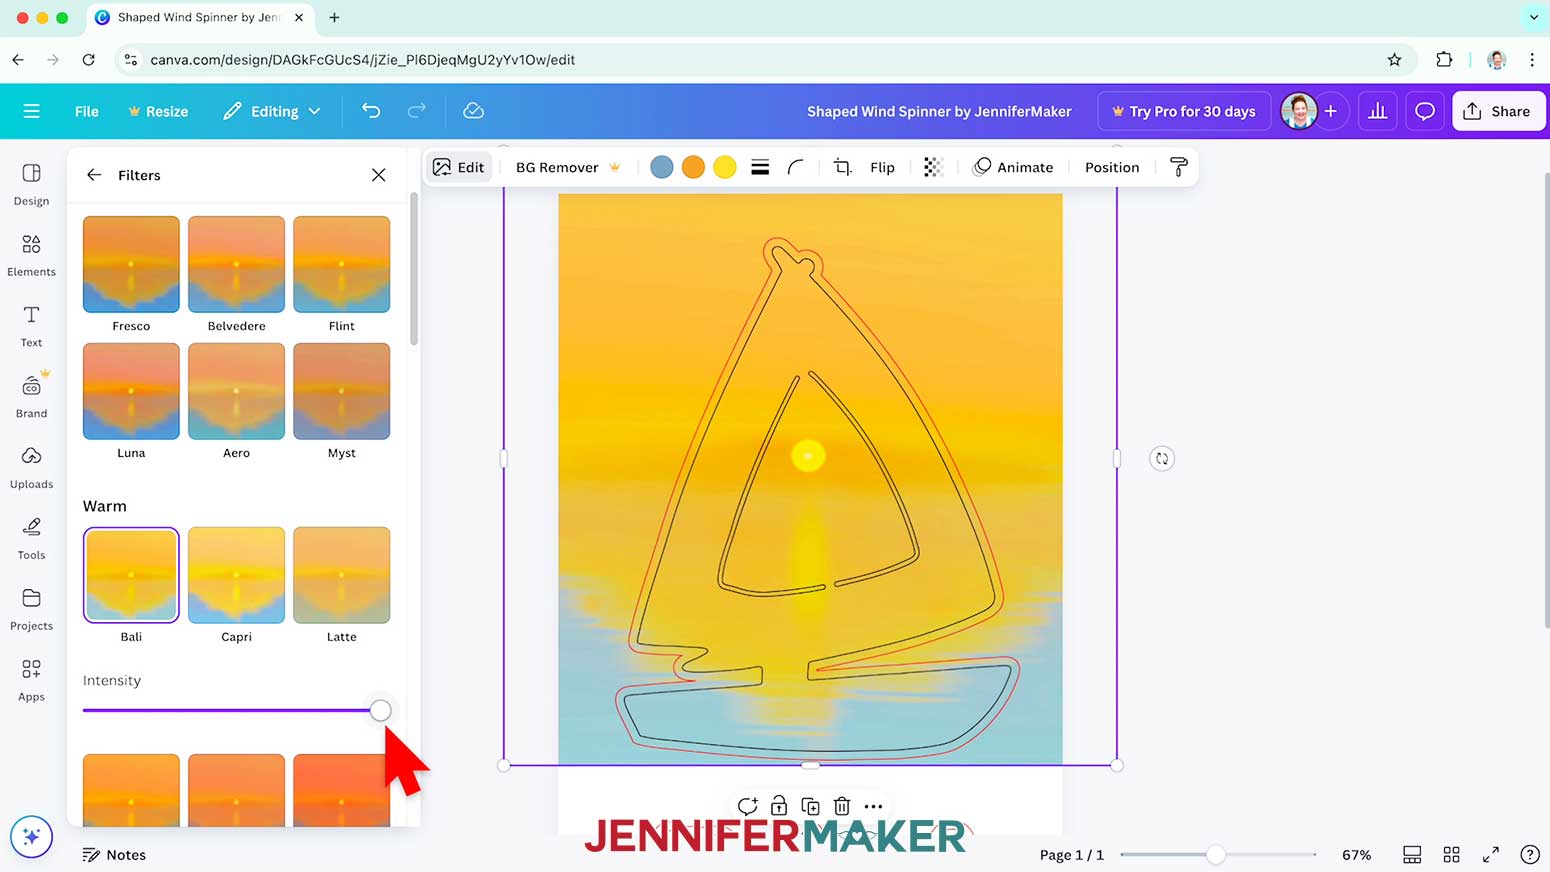
NOTE: I’ll use the “Bali” filter to apply a warm tone to brighten up my background image. - Use the “Intensity” slider to adjust how much the filter affects your image.
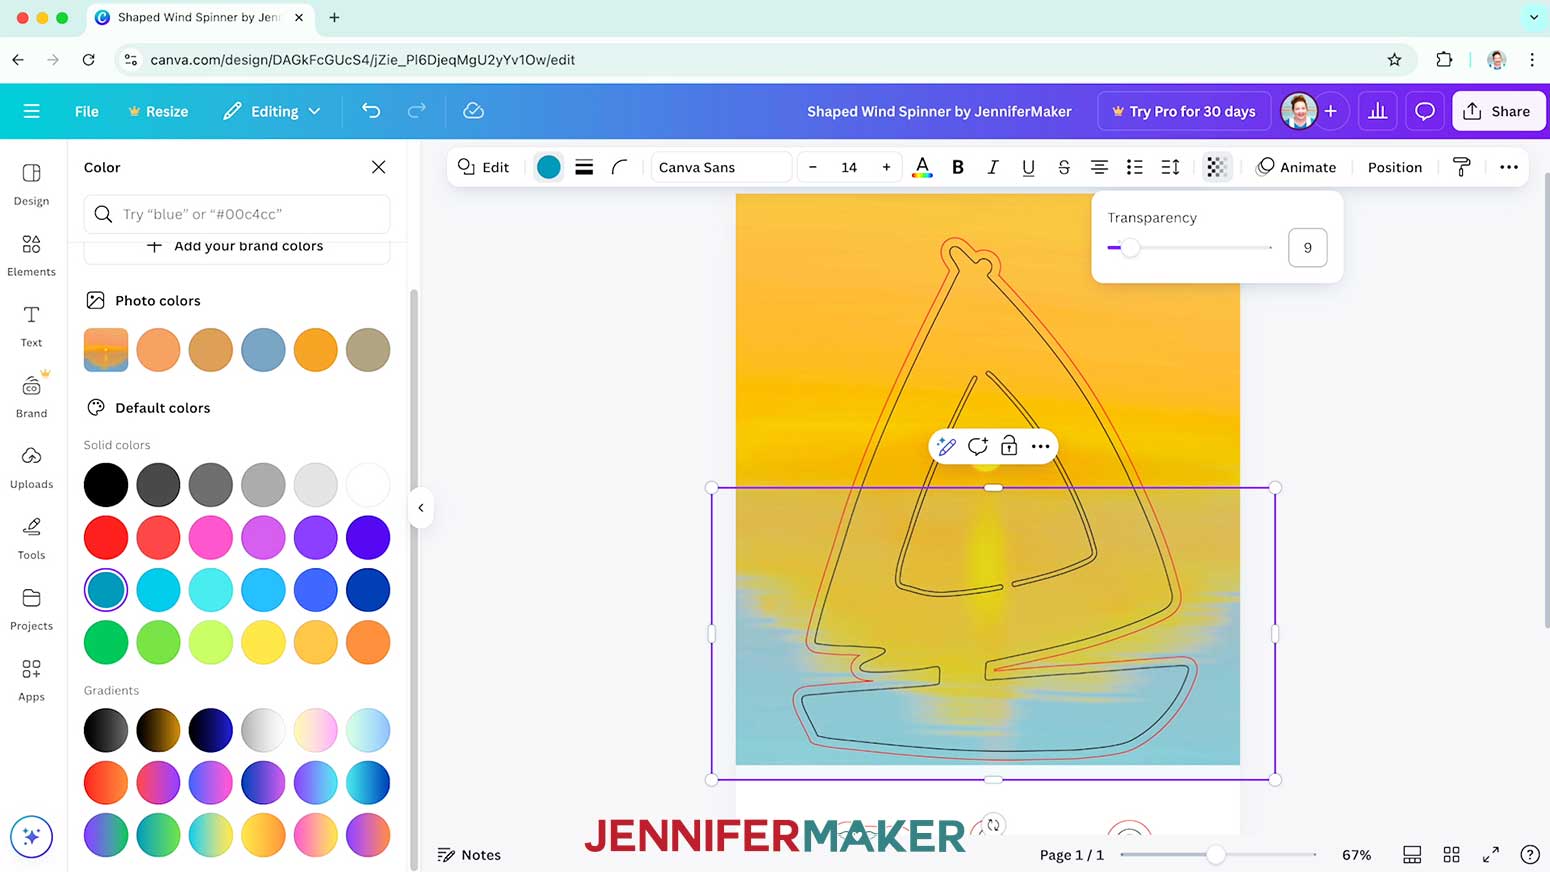
NOTE: I’ll keep the intensity all the way up for mine. - You can also create a color effect for only part of an image by adding an overlay with reduced transparency.
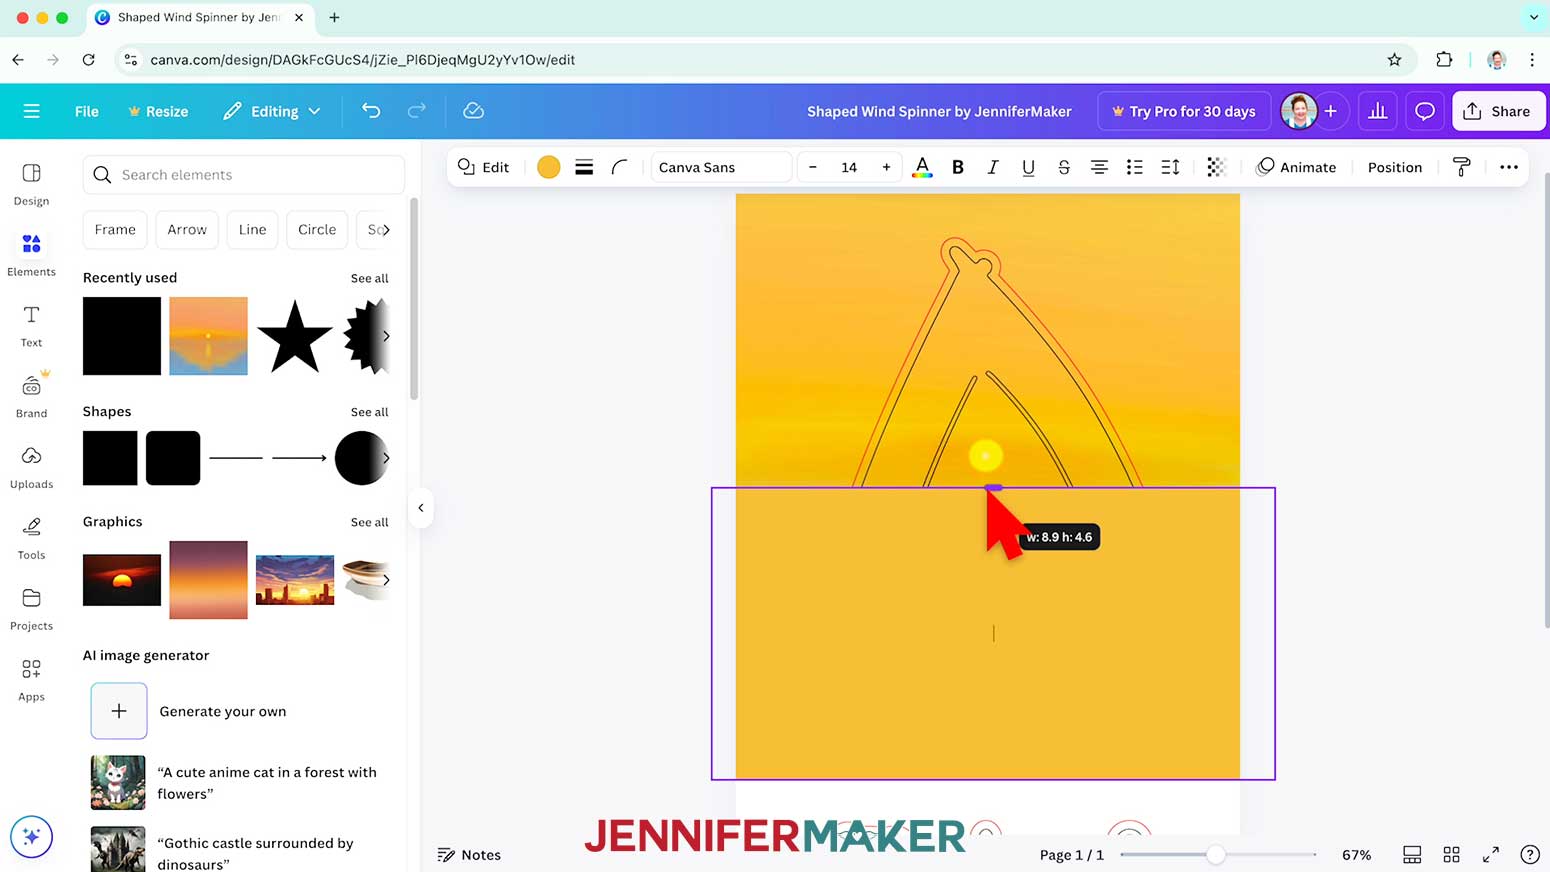
NOTE: I want to darken just the bottom part of my image to create a more defined horizon. - To do so, click on “Elements” and click a free shape under the “Shapes” section to add it to your canvas.
NOTE: I’ll add a free square. - Adjust the image’s size, rotation, and position to cover the area you want to change.
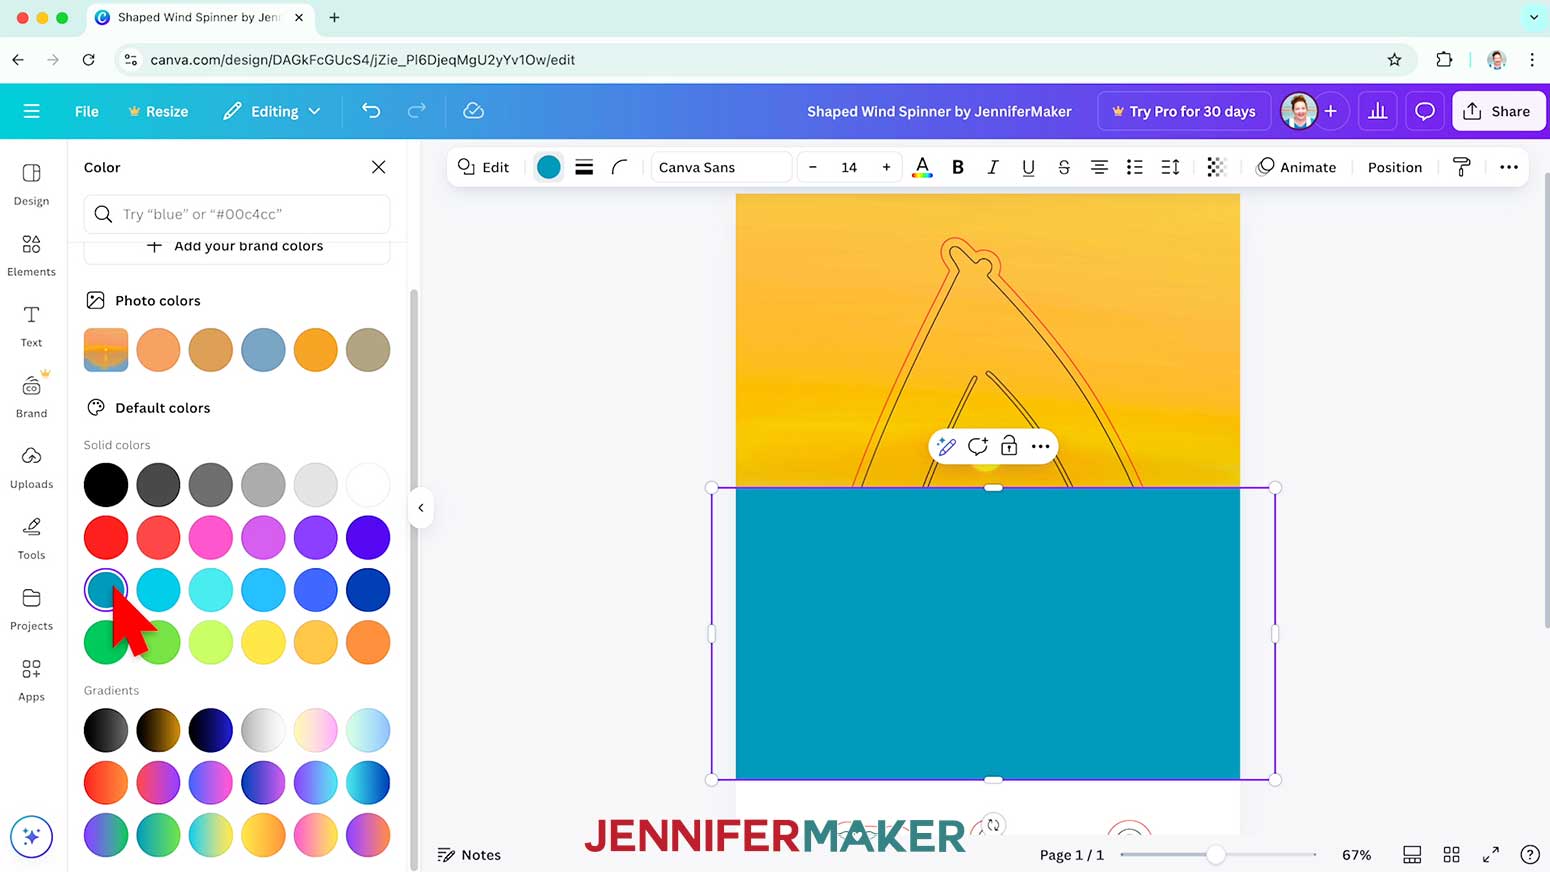
NOTE: I’ll make my square big enough to cover the bottom part of my image, with the top where I want the horizon line to be. - Then click the color swatch in the toolbar above the image to choose a color for your overlay.
NOTE: I’ll choose a dark turquoise to blend with the blue at the bottom of the image. - Click the button that looks like a fading checkerboard to open the Transparency menu, and adjust the slider or type a number in the field to make the shape more see-through.
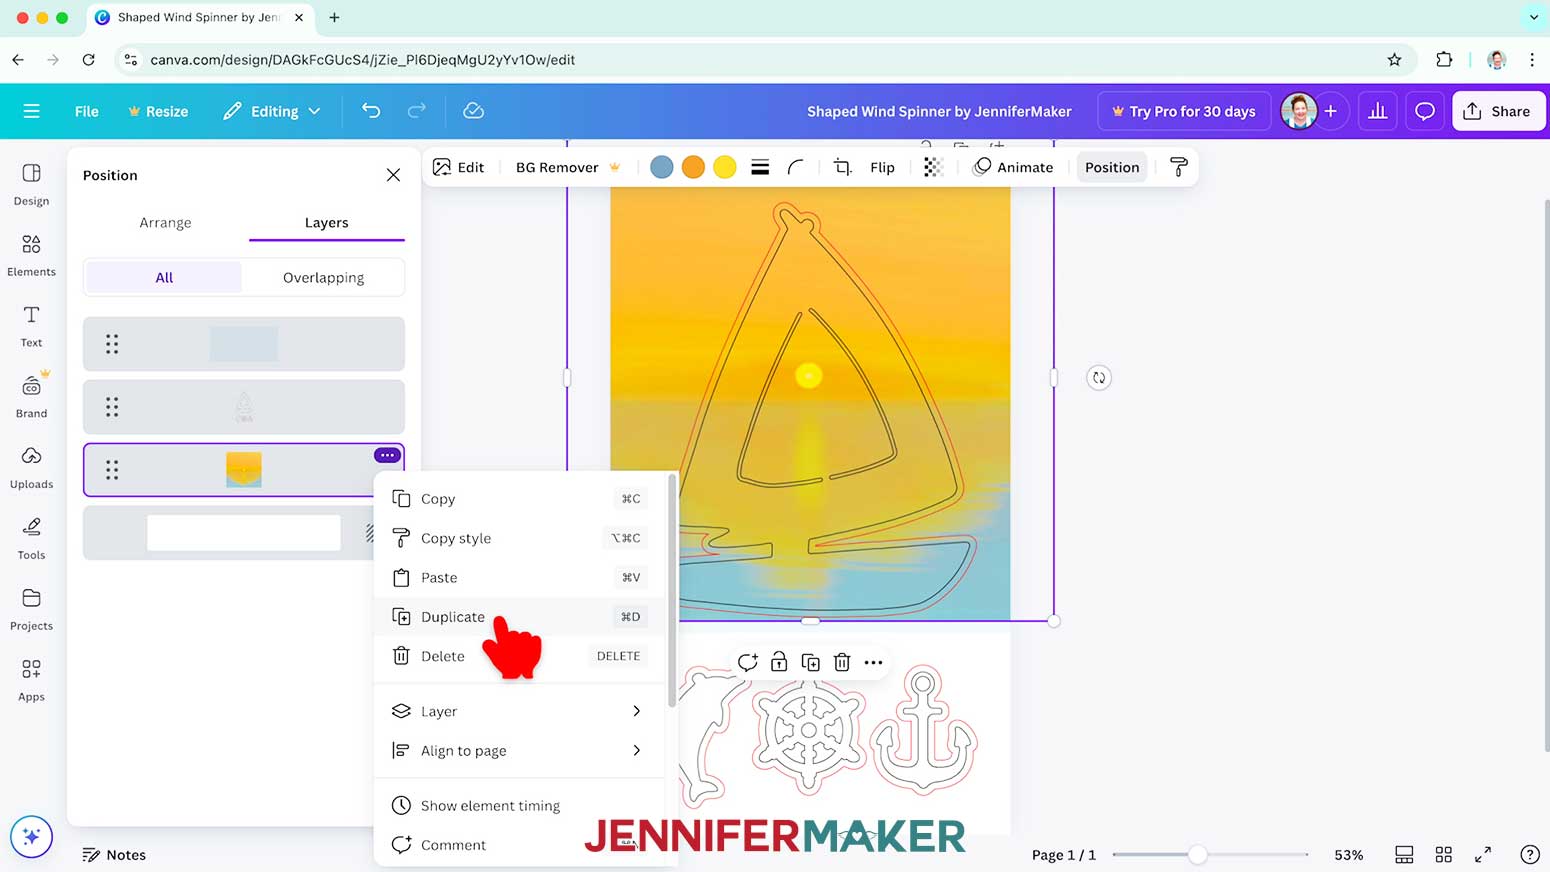
NOTE: I’ll change the value to 9 for a light transparency. - When you’re satisfied with your main shape background, select the background image, click the button with three dots, and select “Duplicate” to create a copy of it for your first dangle shape.
- In the Layers Tab, drag the copy below the guide layer.
- Then resize, rotate, and position the copy so the area you want for your design is inside the dangle shape.
- Repeat Steps 39-41 for any other dangle shapes.
TIP: Your backgrounds don’t have to be identical for all the shapes, so feel free to get creative! - Make sure all of the background images for your dangles are visible behind the guide frames. If any are overlapping, rearrange the layers in the Layers Tab as needed to see everything.
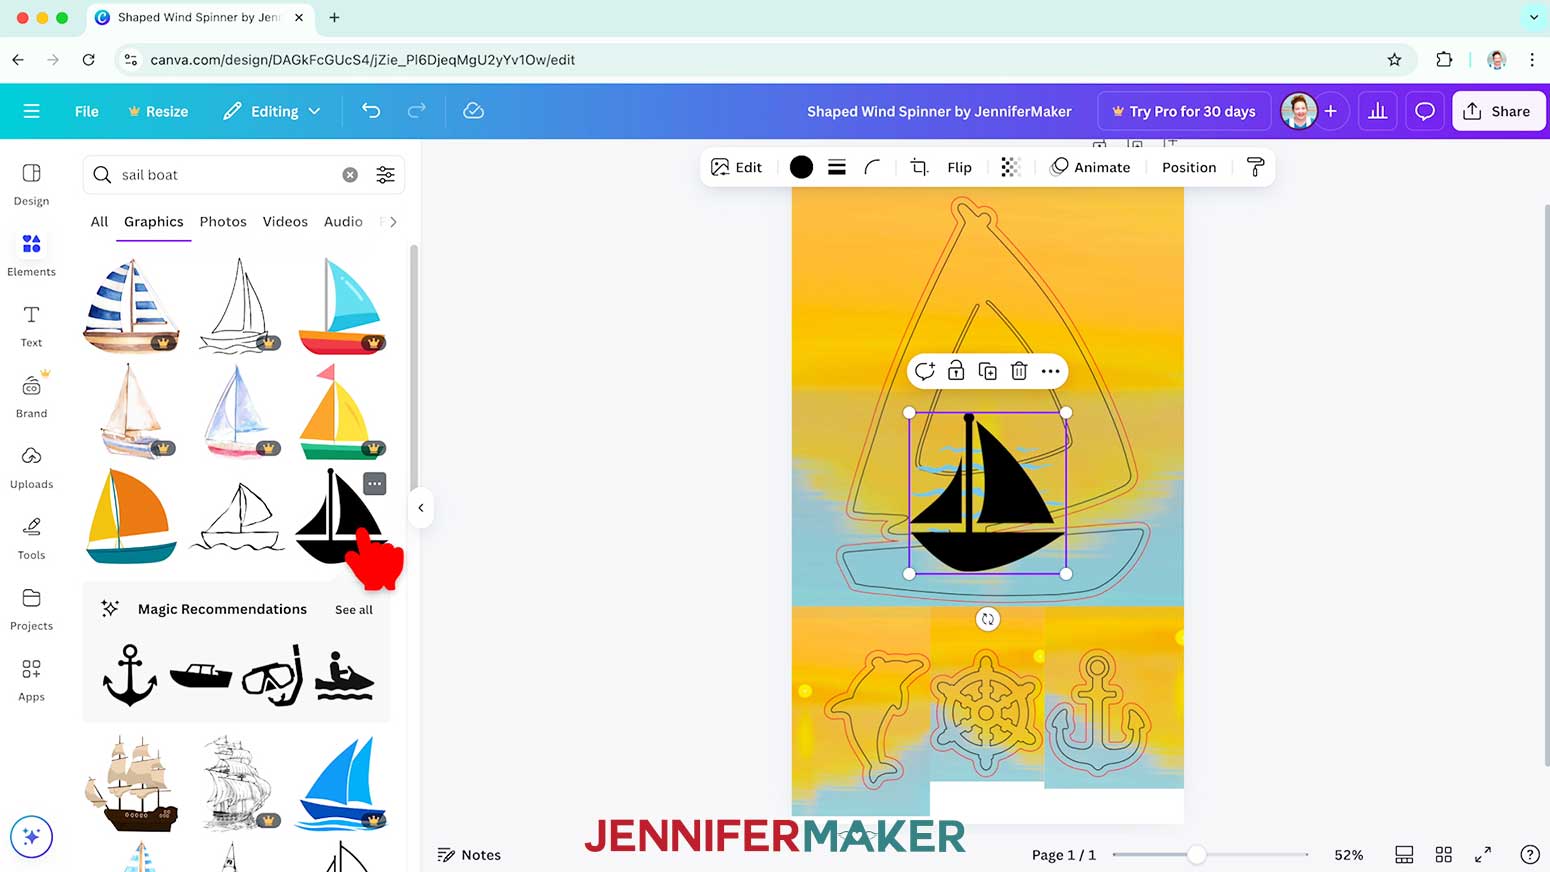
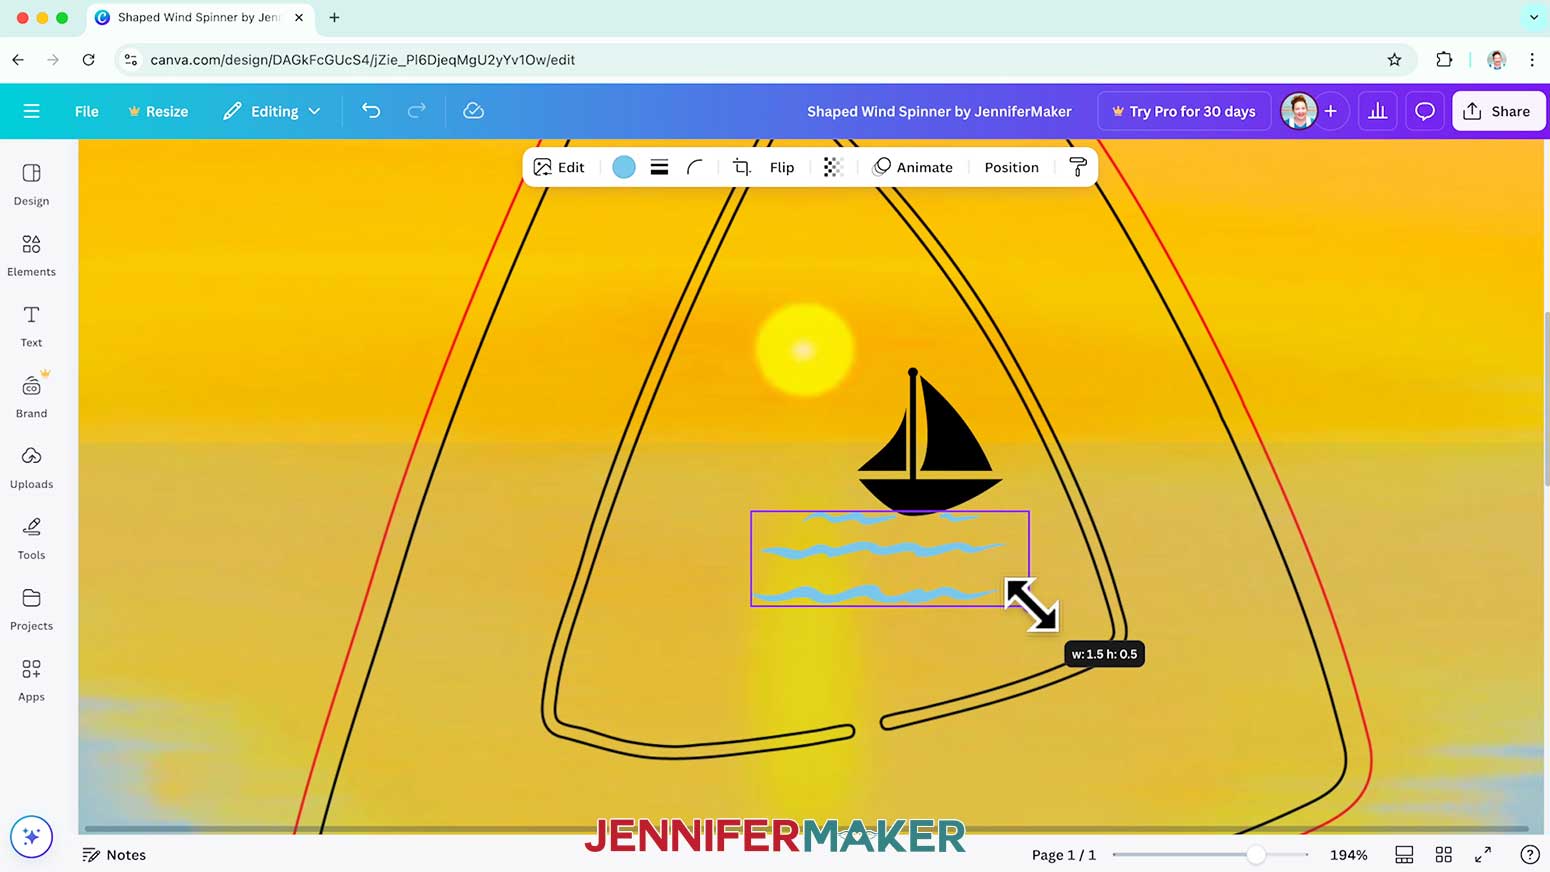
- Next, browse or search the “Elements” panel to find one or more foreground images for your main shape’s design, and click to add them to your canvas.
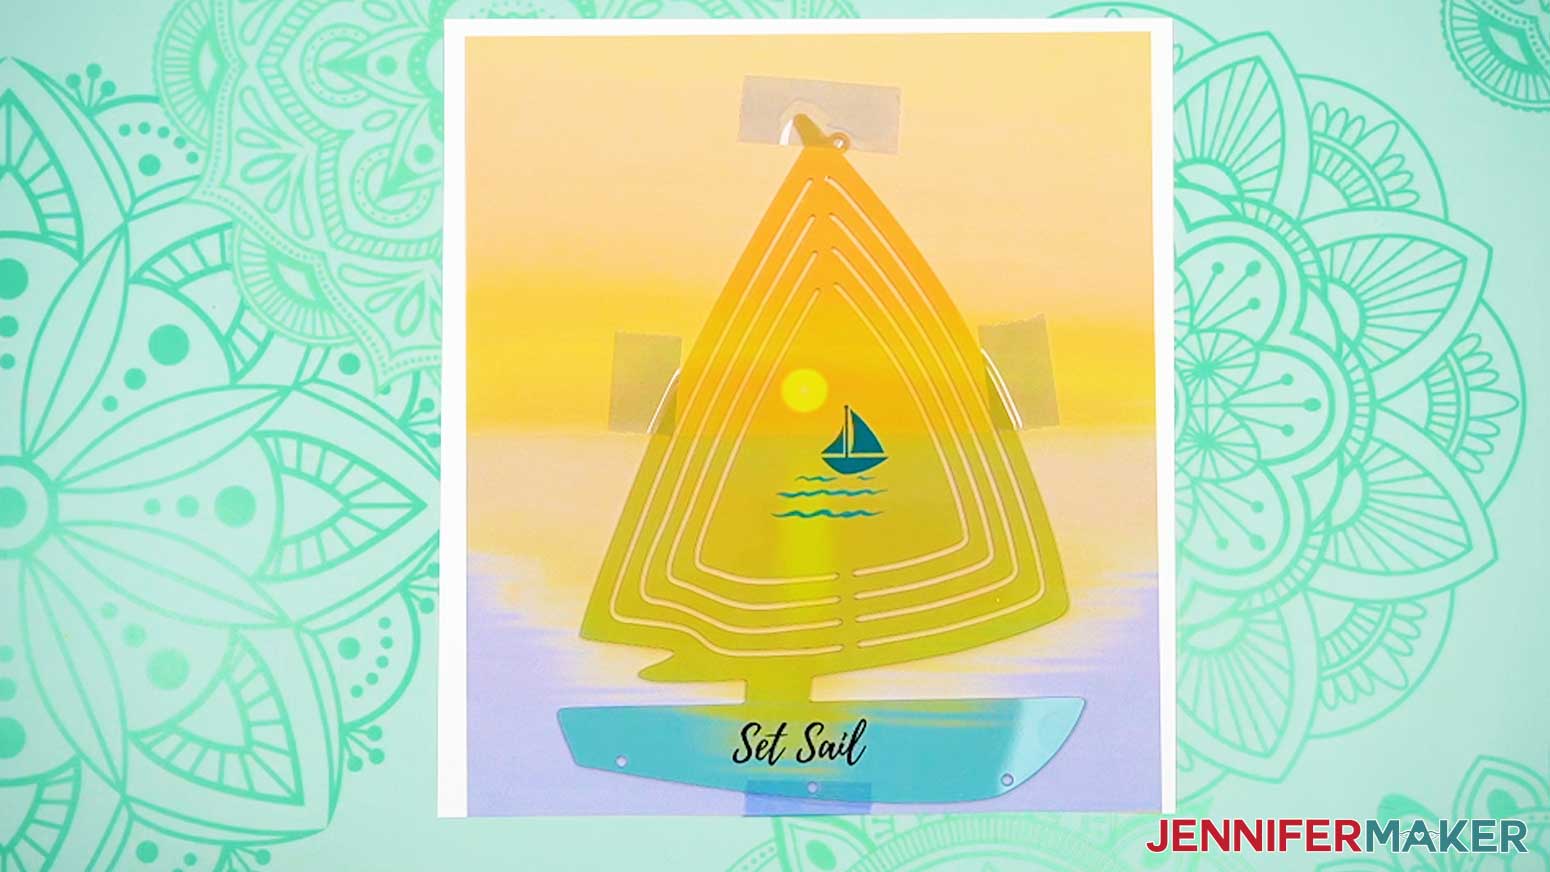
NOTE: I’ll add some waves on the water, as well as a sailboat. - Resize and position the foreground elements as needed to fit in the center of your main shape.
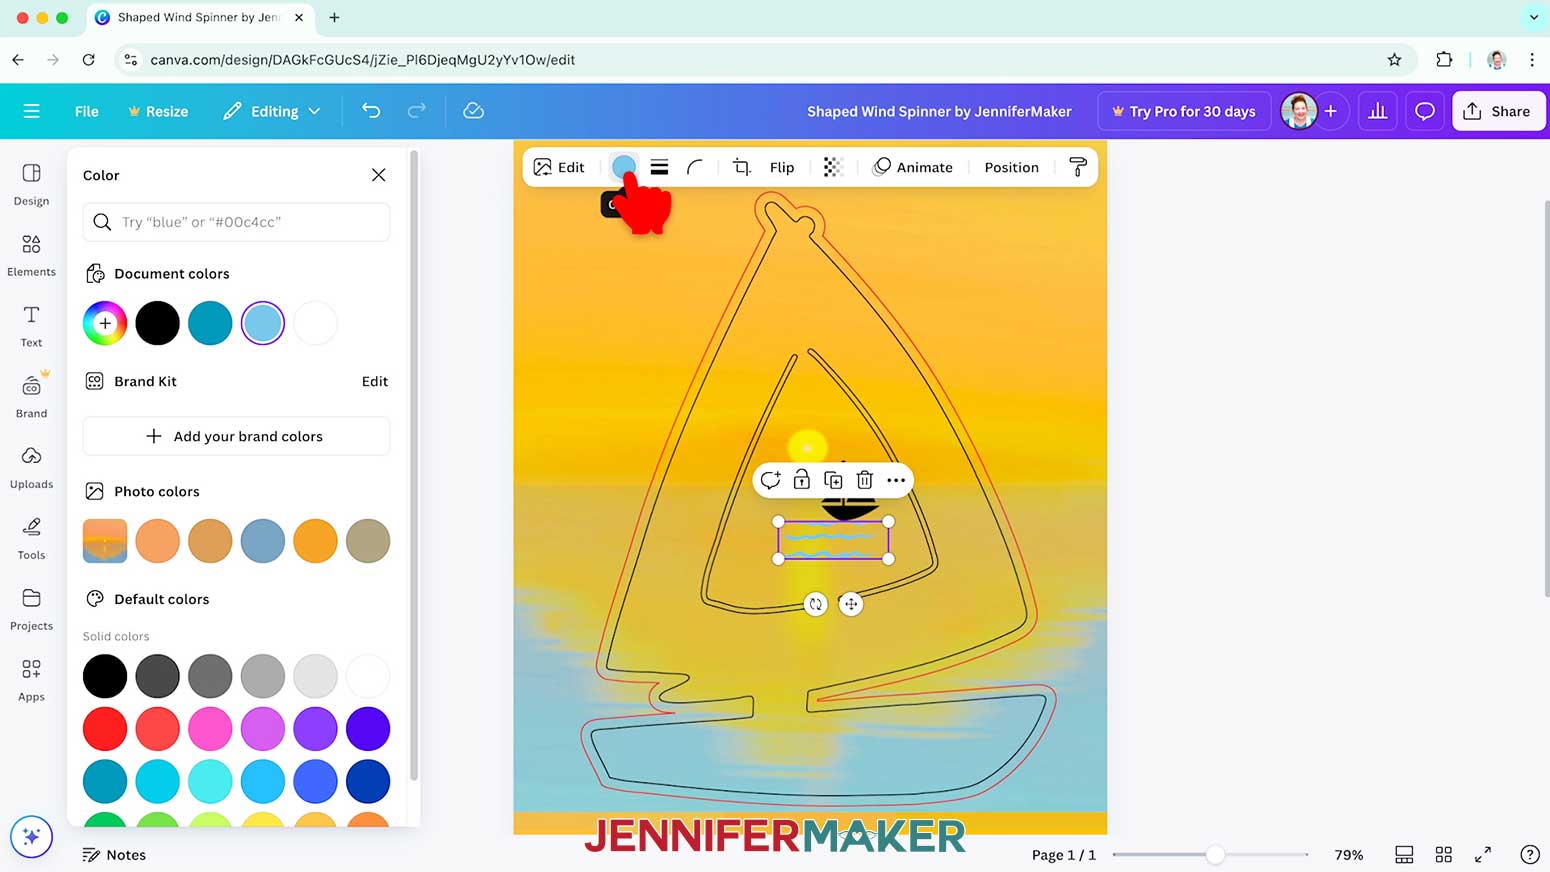
- To change an element’s colors, select it on your canvas and one or more color swatches will appear in the toolbar above it.
- Click the swatch you’d like to change, and select a new option in the Color Panel that appears. The new color will take the place of the original in your image.
NOTE: I’ll make my waves and my boat both dark turquoise. - Repeat Steps 44-47 to add additional elements to your dangle shapes, if you like.
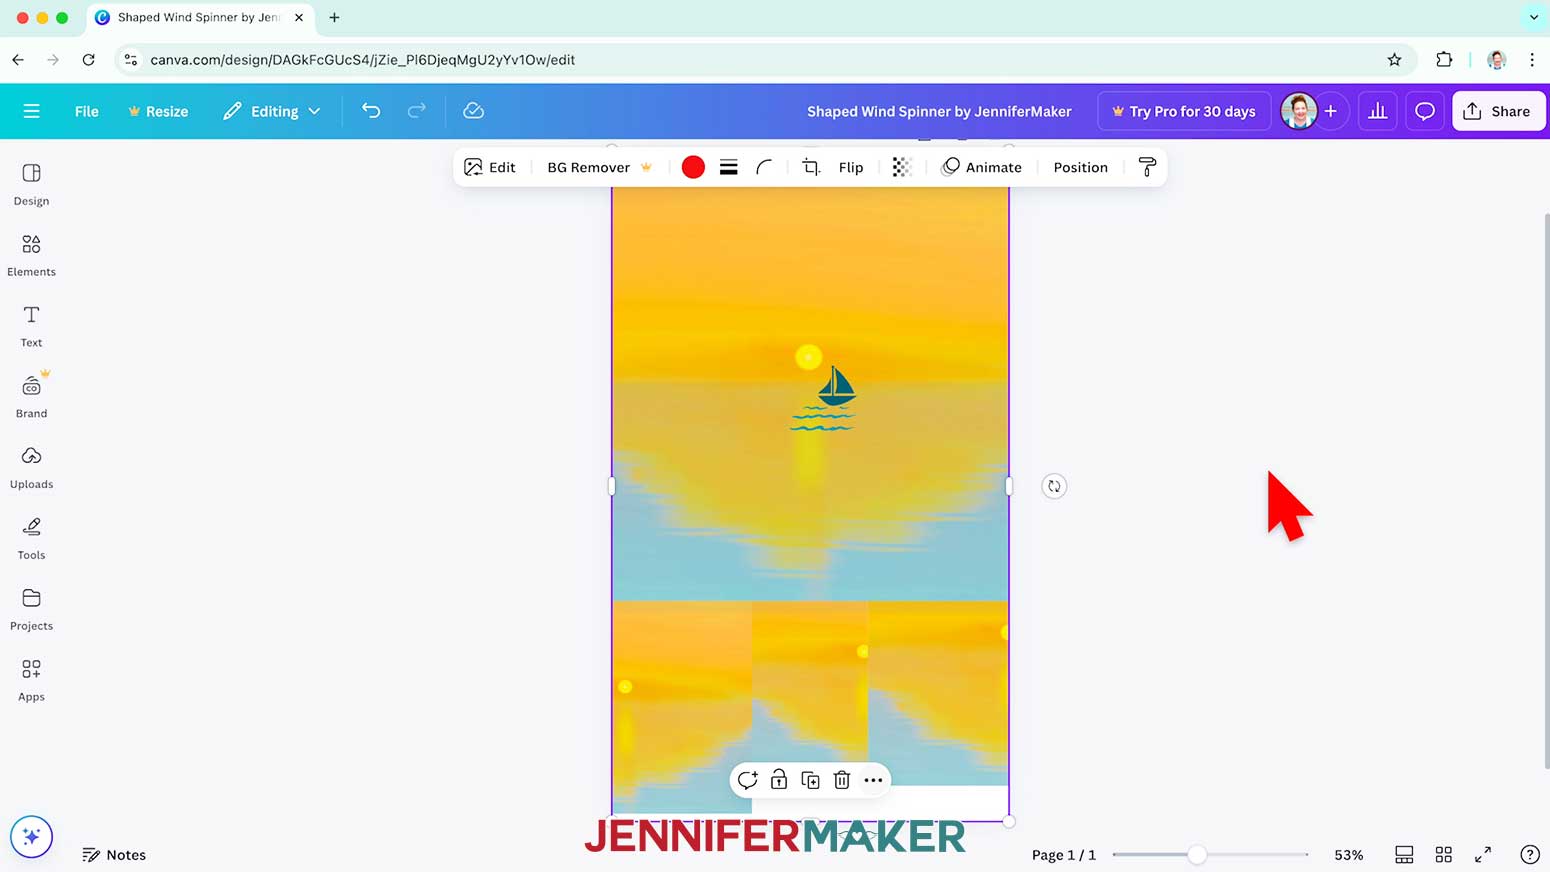
- When you’re satisfied with your design, open the Layers Tab in the “Position” panel and drag the guide lines layer to the bottom.
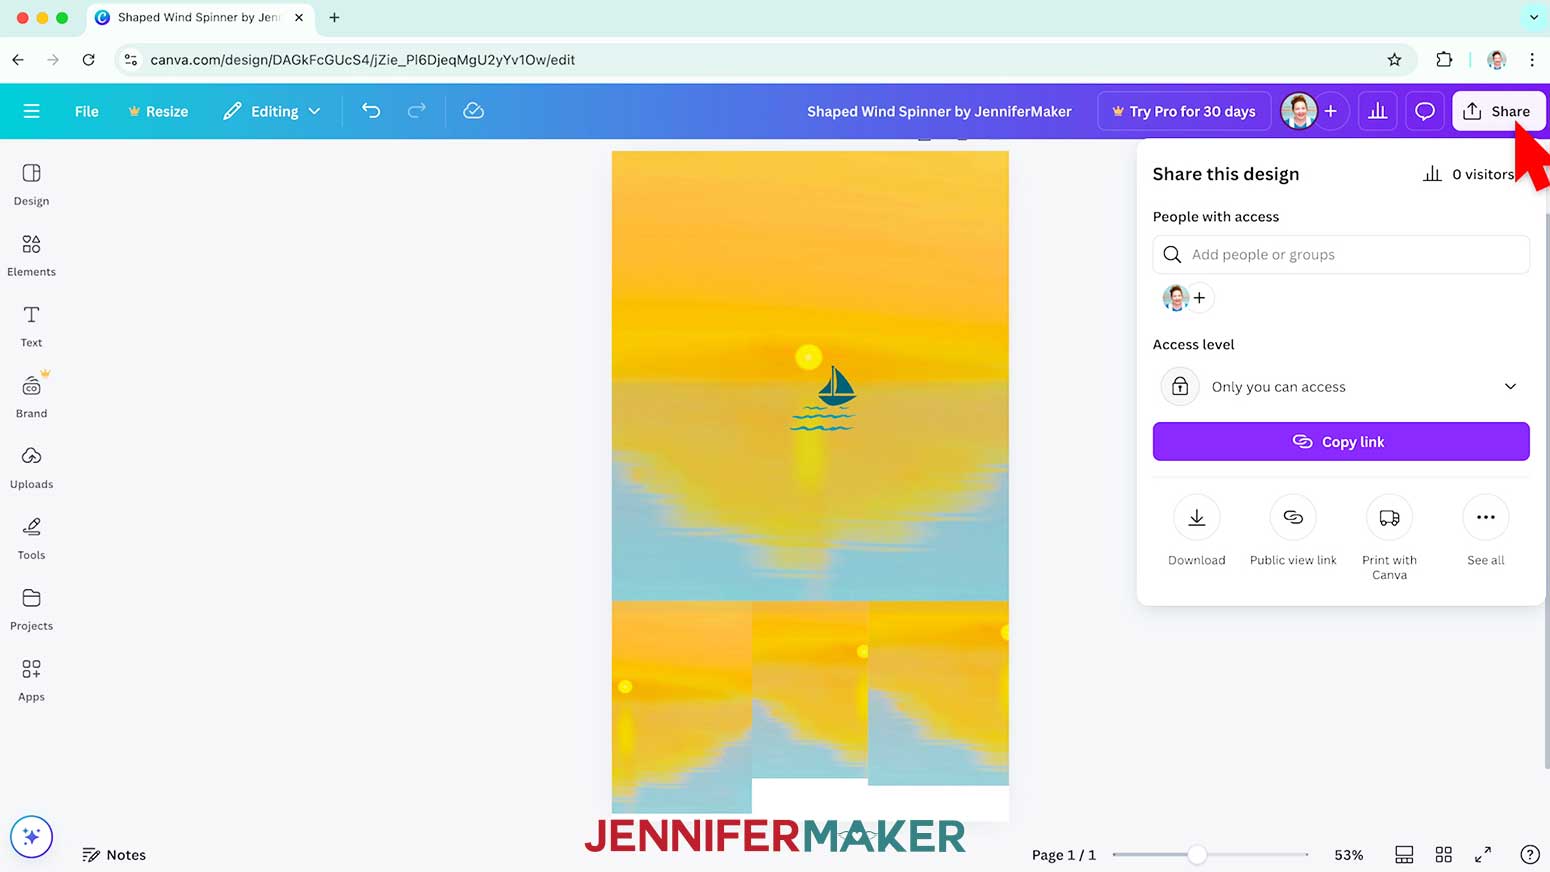
- To use the design, click “Share” in the top menu.
- Select “Download.”
- Since we’ll print the design, make sure the file type is set to PNG, then click “Download” to save the image to your computer.
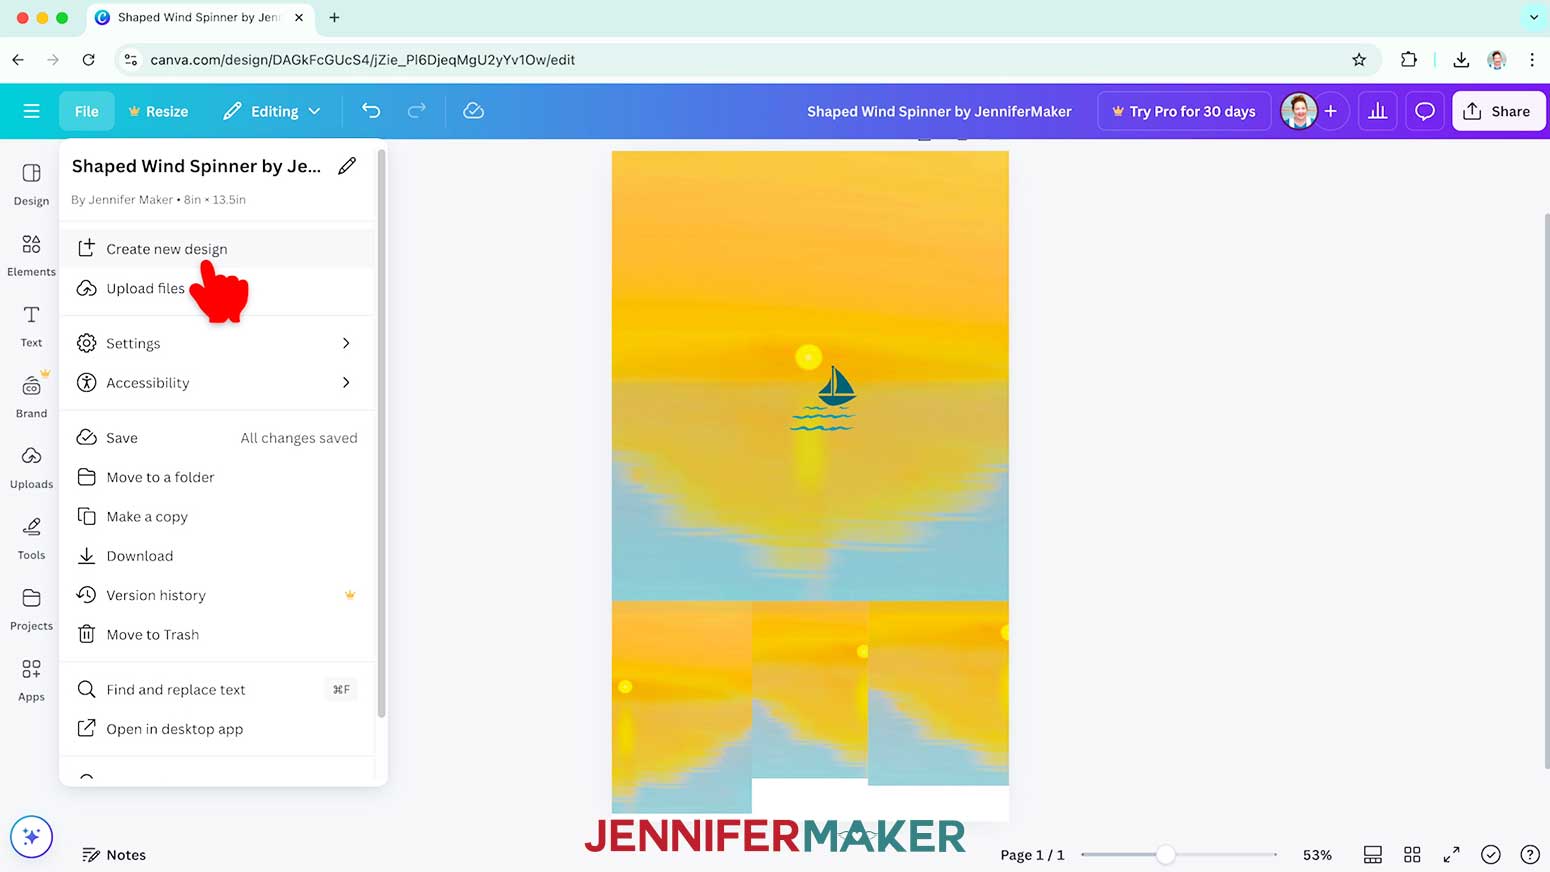
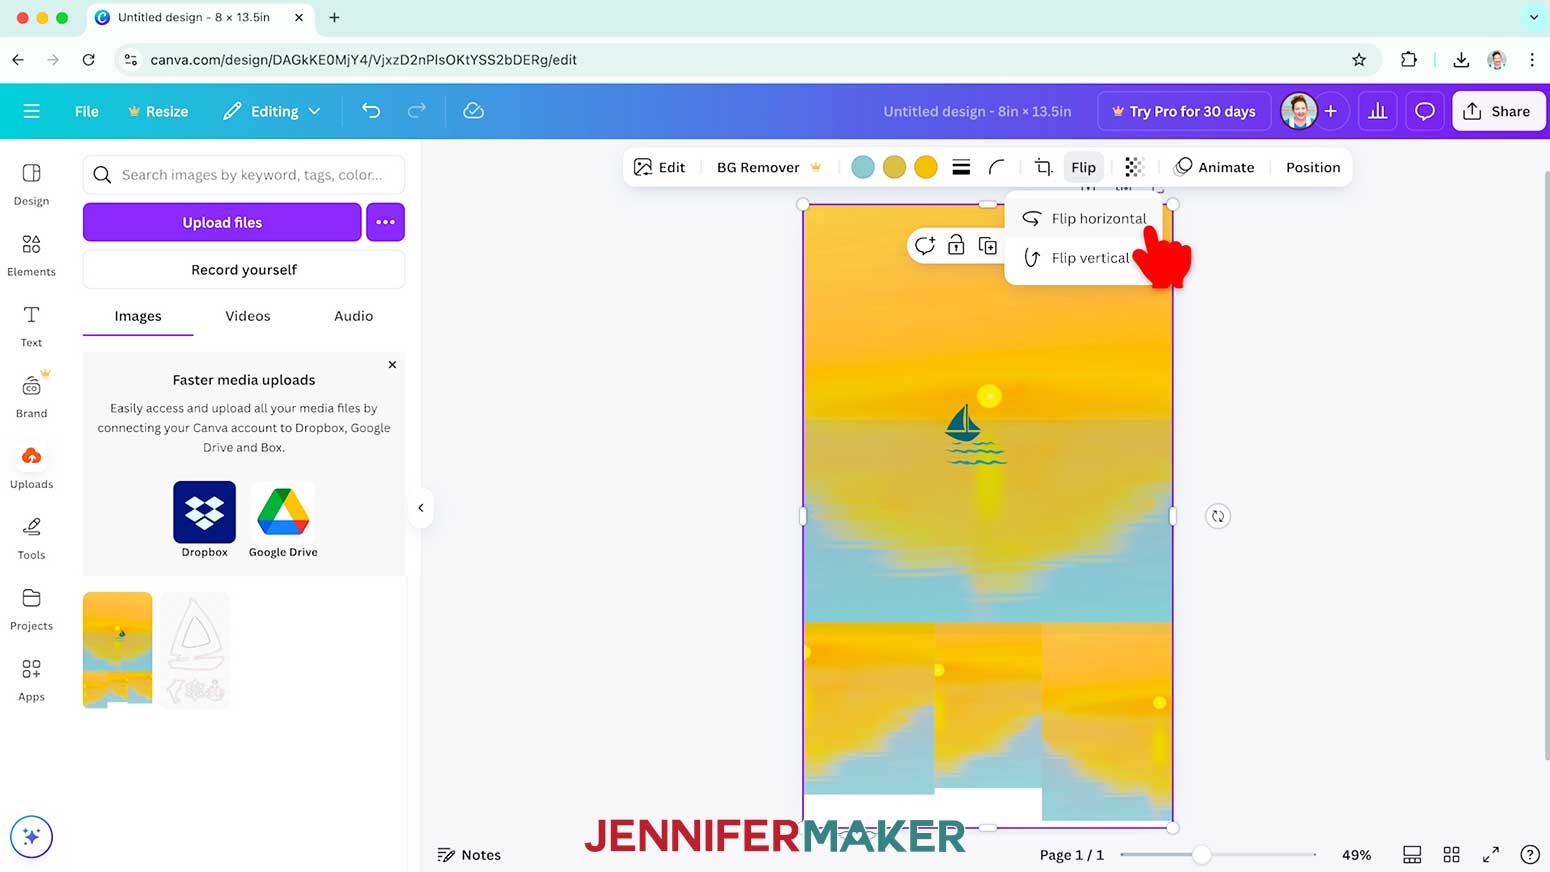
- If your wind spinner’s main shape or any of its dangles are asymmetrical, you’ll need a reverse copy of your design for the other side. So click on “File” at the top of your Canva workspace, and then select “Create new design.”
NOTE: If your wind spinner’s main shape and dangles are all symmetrical, like the heart design, you can skip Steps 43-48. - Repeat Steps 4-7 to set up your canvas for your wind spinner the same way.
- Upload the design you just created to Canva, and click it to add it to your canvas.
- Drag the corner Resize handles outward until the image stretches to the edges of the canvas.
- Then click “Flip” and “Flip horizontal” to create a reverse copy of the design.
- Repeat Steps 50-53 to save and download your wind spinner’s second side.
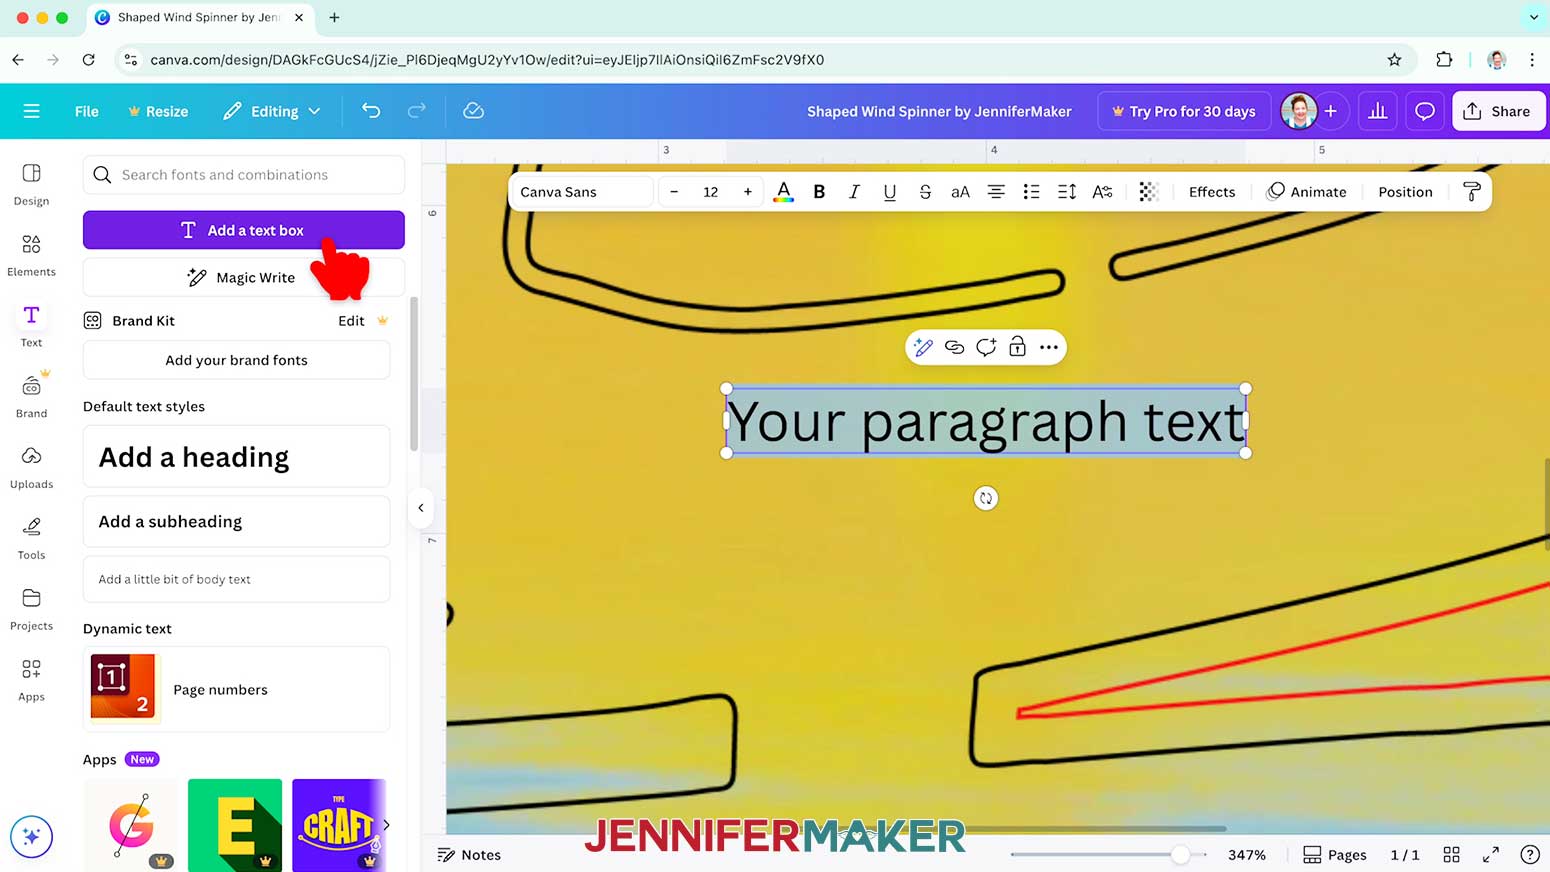
NOTE: I’ll name mine “Shaped Wind Spinner Side 2 by JenniferMaker.” - If you’d like to add text to your design, I recommend only adding text to the first side. To do that, Repeat Steps 4-7 to set up your canvas, then upload your first side’s design to Canva (if you haven’t already).
- To add some text, click the Text icon in the side panel, then click “Add a text box.”
- Type your desired text in the box, then click outside the box to apply it.
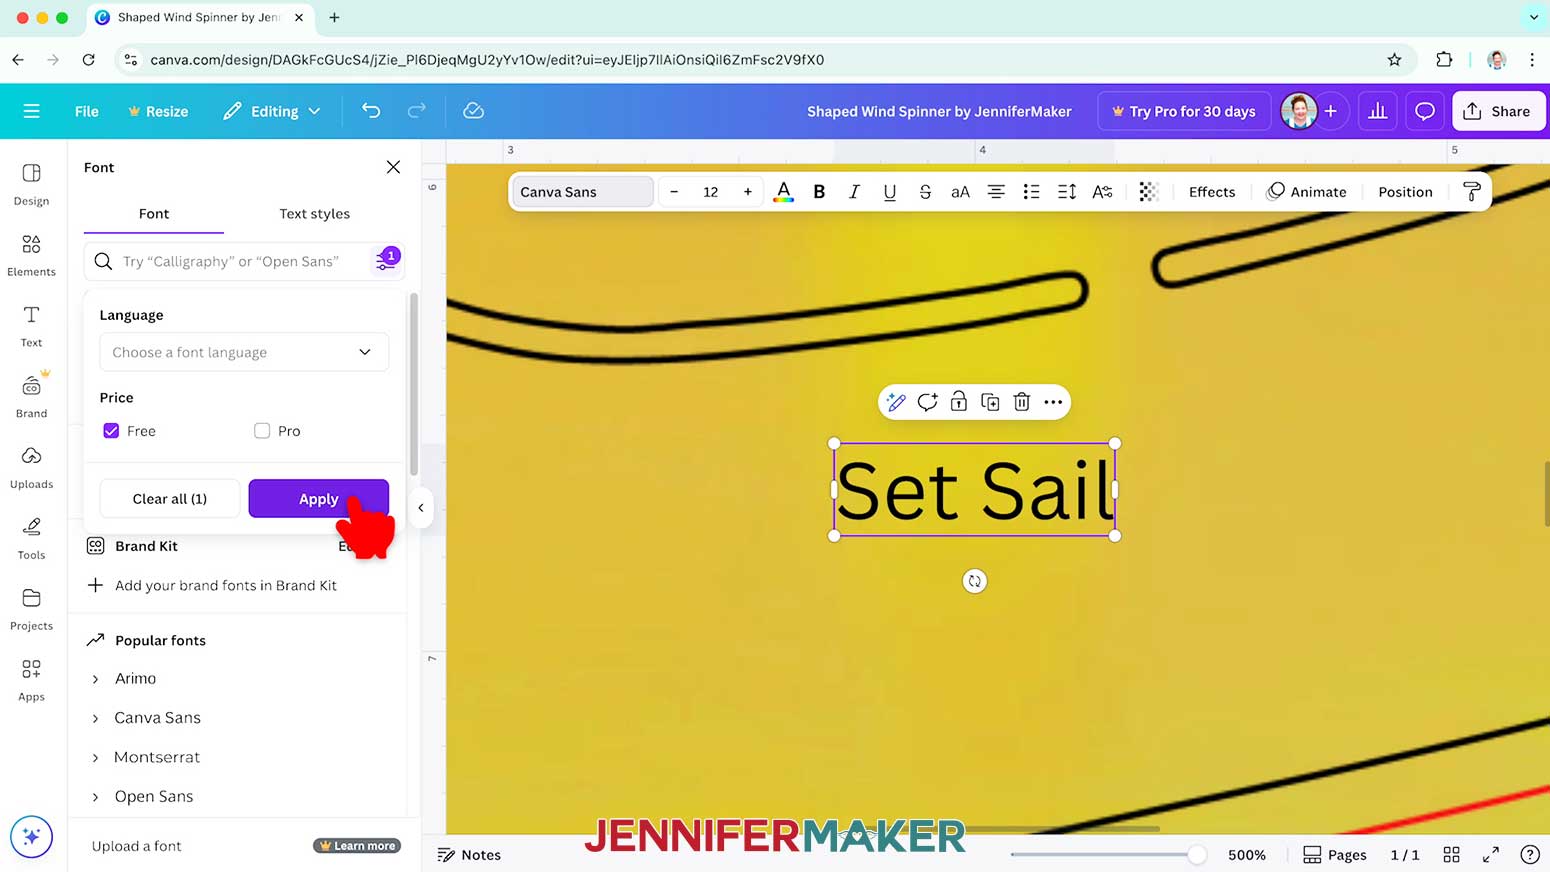
NOTE: I’ll type in “Set Sail.” - To change your text’s typeface, click the field that says “Canva Sans” to open the Font menu in the side panel.
- Click on the icon with three horizontal lines and small circles to open the “Filter” menu, check the box next to “Free,” and click “Apply” to show only fonts you can use without a paid account.
- Click a typeface you like from the list to apply it to your text.
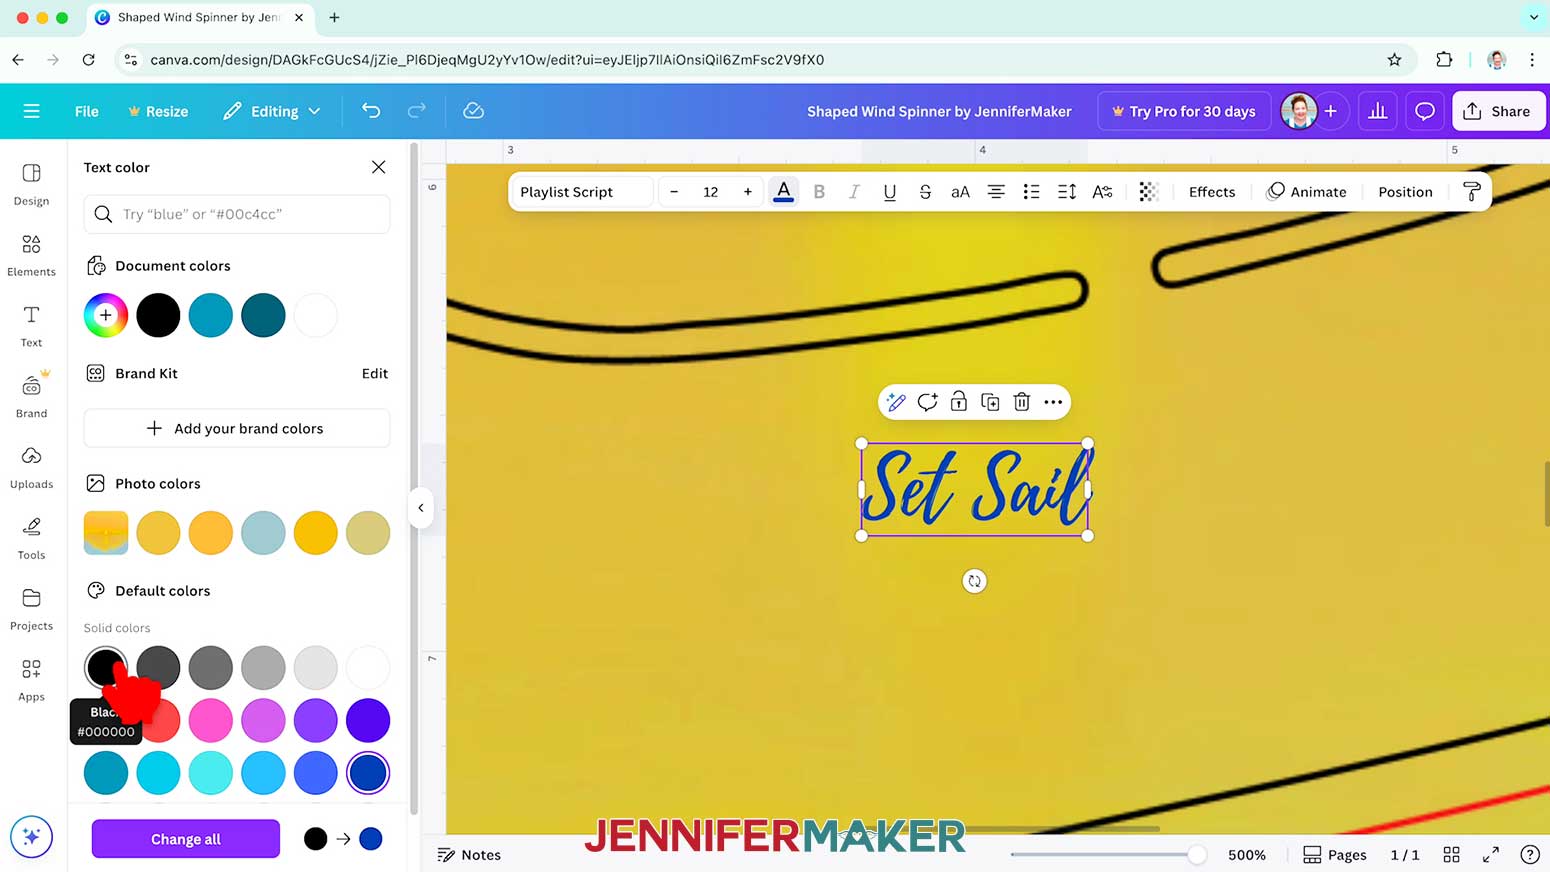
NOTE: I’ll choose “Playlist Script.” - To change the color of your text, click the toolbar button with the letter “A” above a color box and choose a new option.
- Click and drag the text box to move it into your desired position.
- Then use the Resize handles to make your text larger or smaller as needed.
- When you’re satisfied with the design, Repeat Steps 50-53 to save and download your wind spinner with text.
- Your designs are ready to print!


STEP 3: PRINT YOUR DESIGN IN GOOGLE DOCS
- Open Google Docs in the Google Chrome web browser on your computer.
NOTE: You will need a free Google account to use the free Google Docs software.
TIP: You can also download and open the Google Docs app, but you won’t be able to install or access any printer profiles from a mobile device, and you’ll also have limited access to features, so I do not recommend it on a mobile device. - Click “Blank document” at the top left to open a new document.
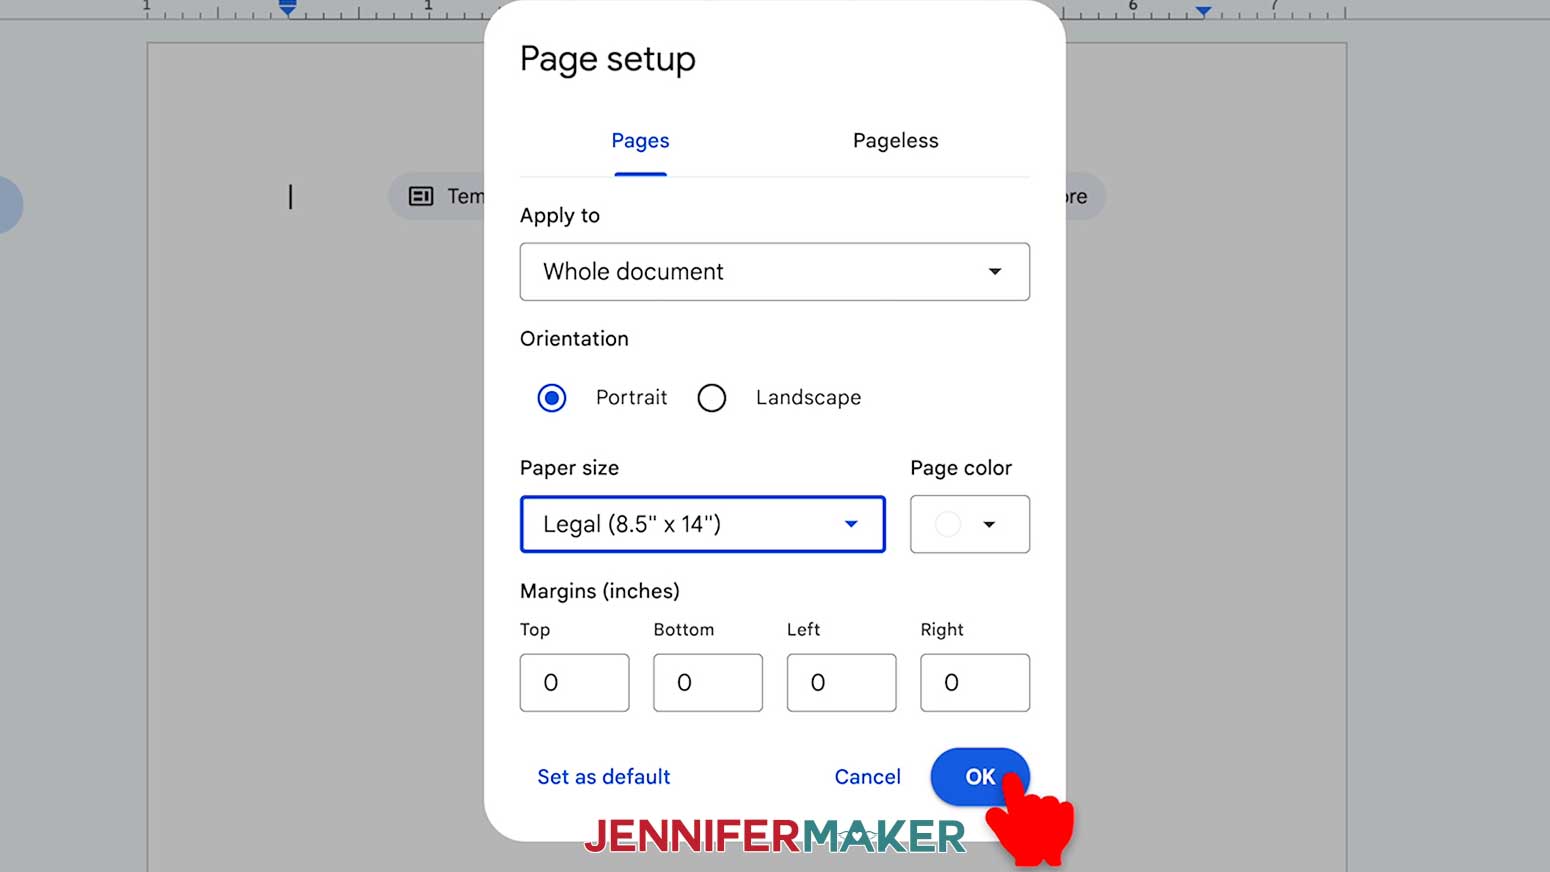
- Go to the File menu and select “Page setup.”
- Make sure the box next to “Portrait” is checked for the boat design, or “Landscape” for the others.
- Change your margins to “0” to use more of the page.
- Then set your paper size to legal-size for the boat and heart, or letter-size for the butterfly and cloud.
NOTE: I’ll set mine to 8.5” x 14” or legal-size. - Click “OK” to apply the settings.
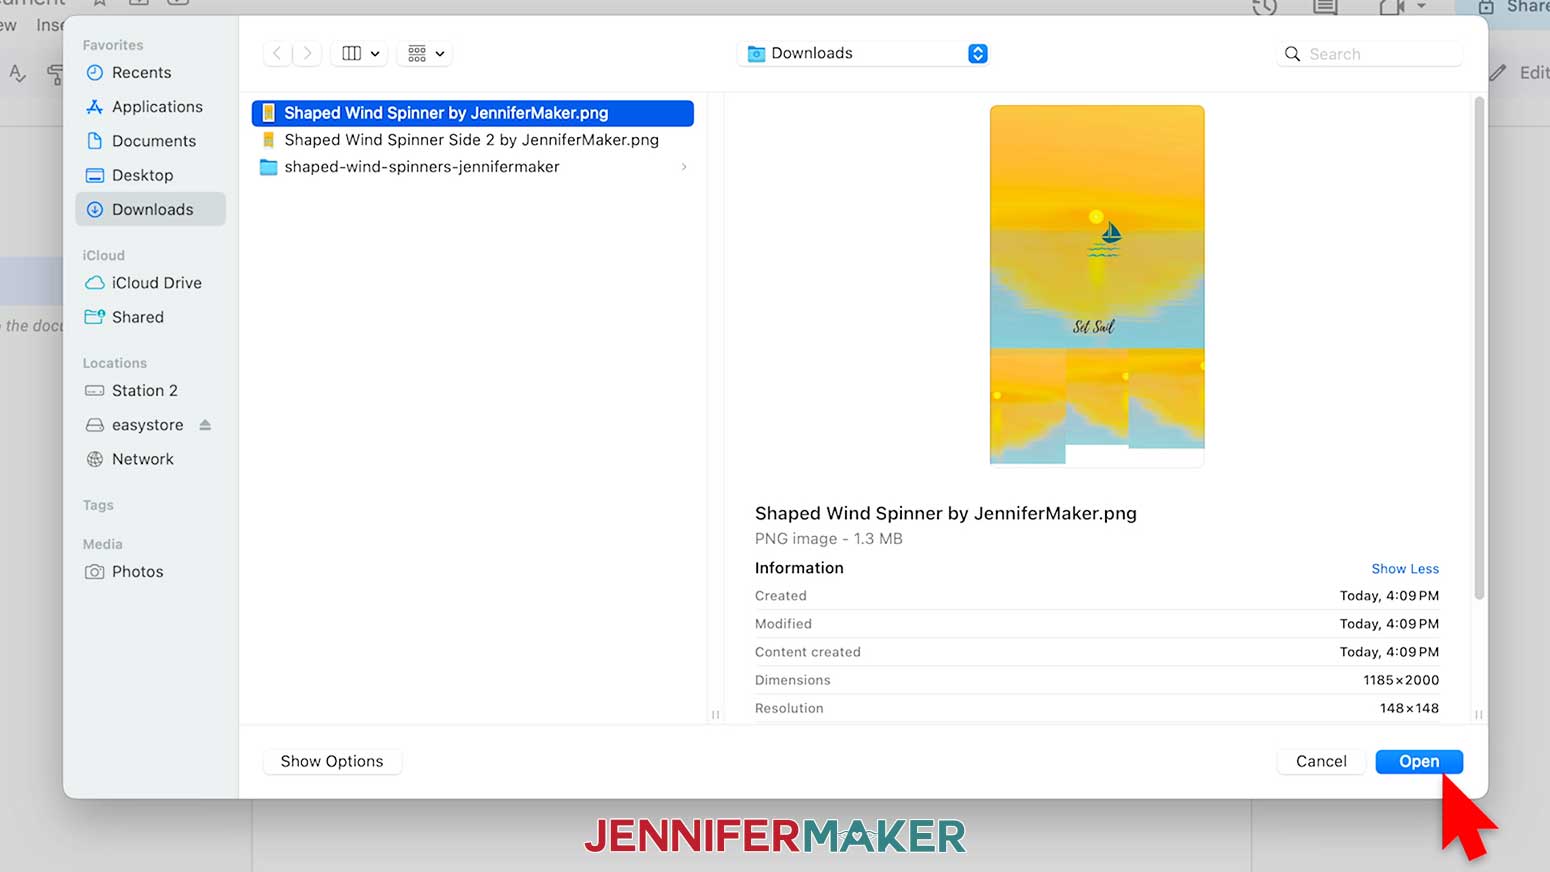
- Go to the Insert menu, select “Image,” and select “Upload from Computer.”
- Select the PNG file with your shaped wind spinner’s first side design.
TIP: You’ll most likely find it in your Downloads folder. - Click “Open.”
- Click the area that says “Untitled document” at the top and type a name for the file.
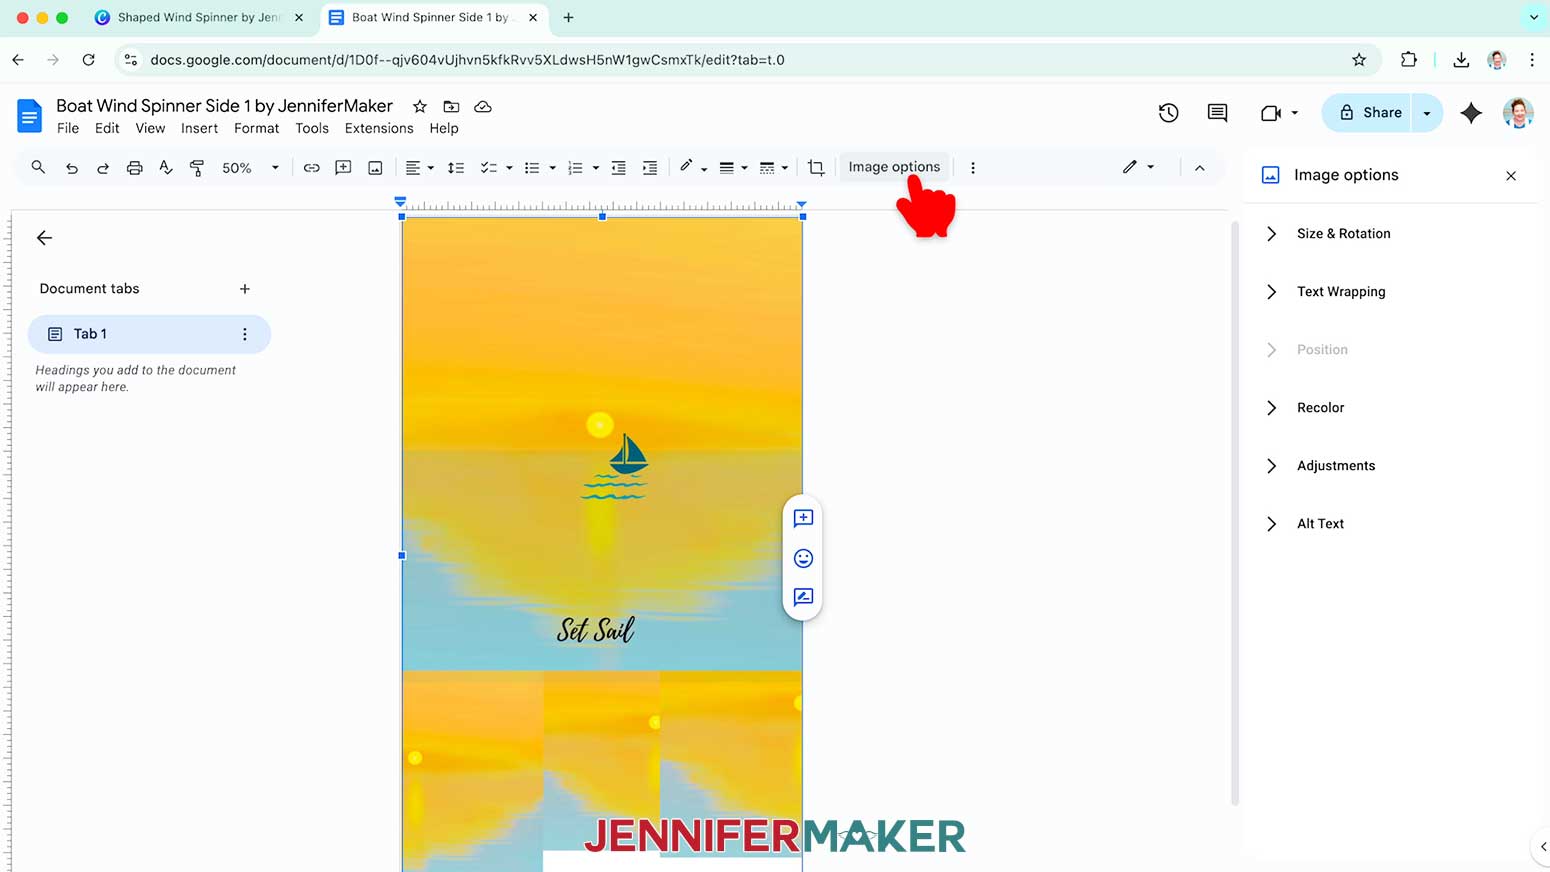
- Click “Image Options” at the top of the canvas.
NOTE: You can also open the menu by going to “Format,” “Image,” and “Image Options.” - Select “Size & Rotation.”
- Keep the “Lock aspect ratio” box checked to maintain the design’s proportions.
- Change the “Width” field to match your spinner shape (the same width you used when setting the image size in Canva).
- The “Height” field will automatically adjust proportionately.
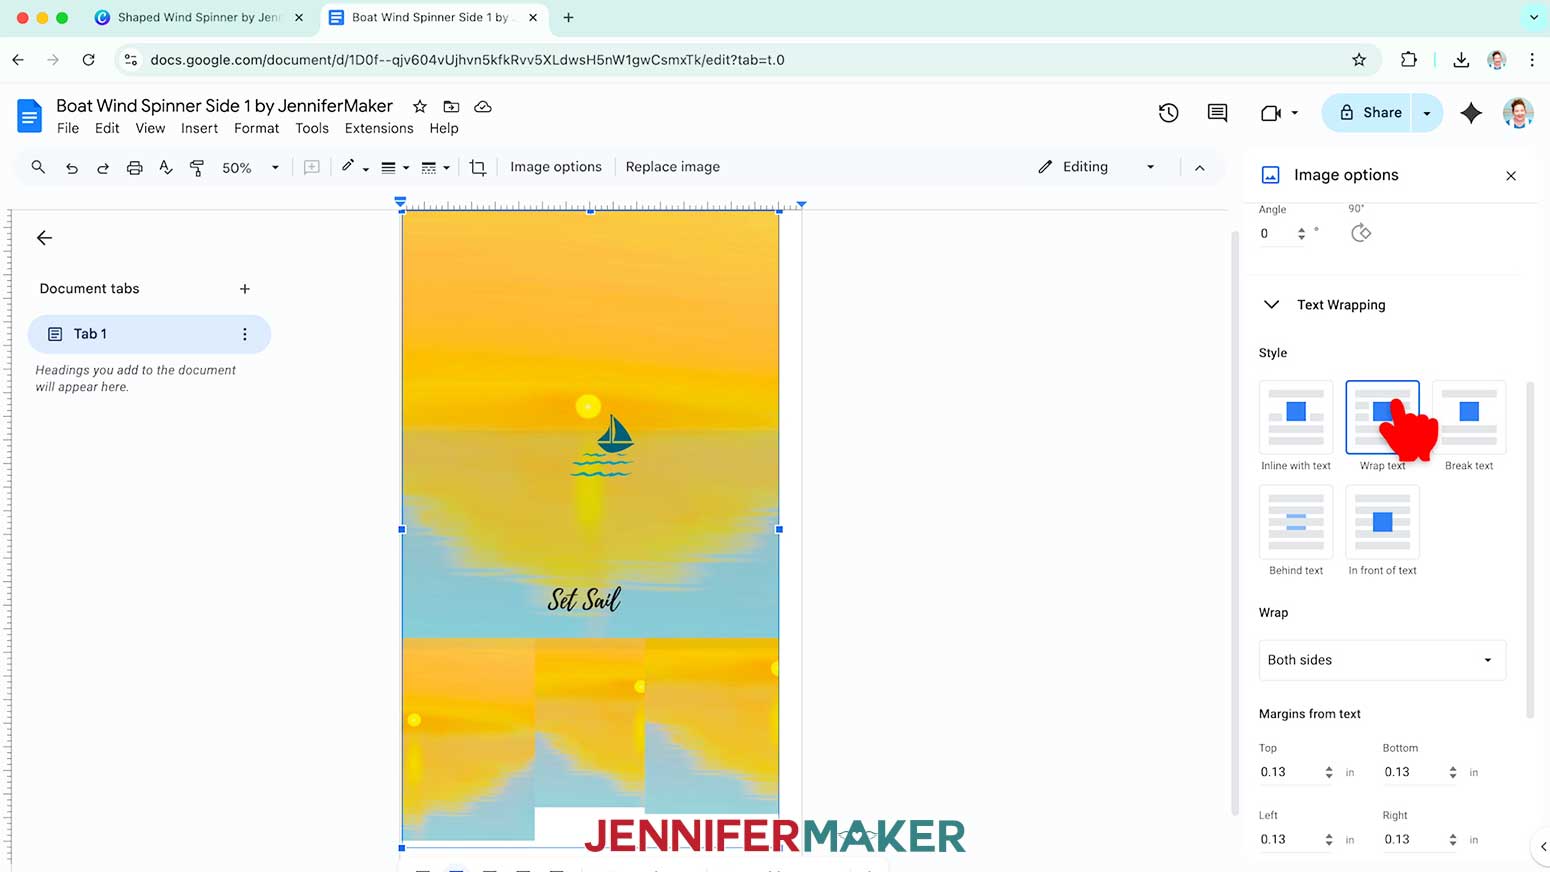
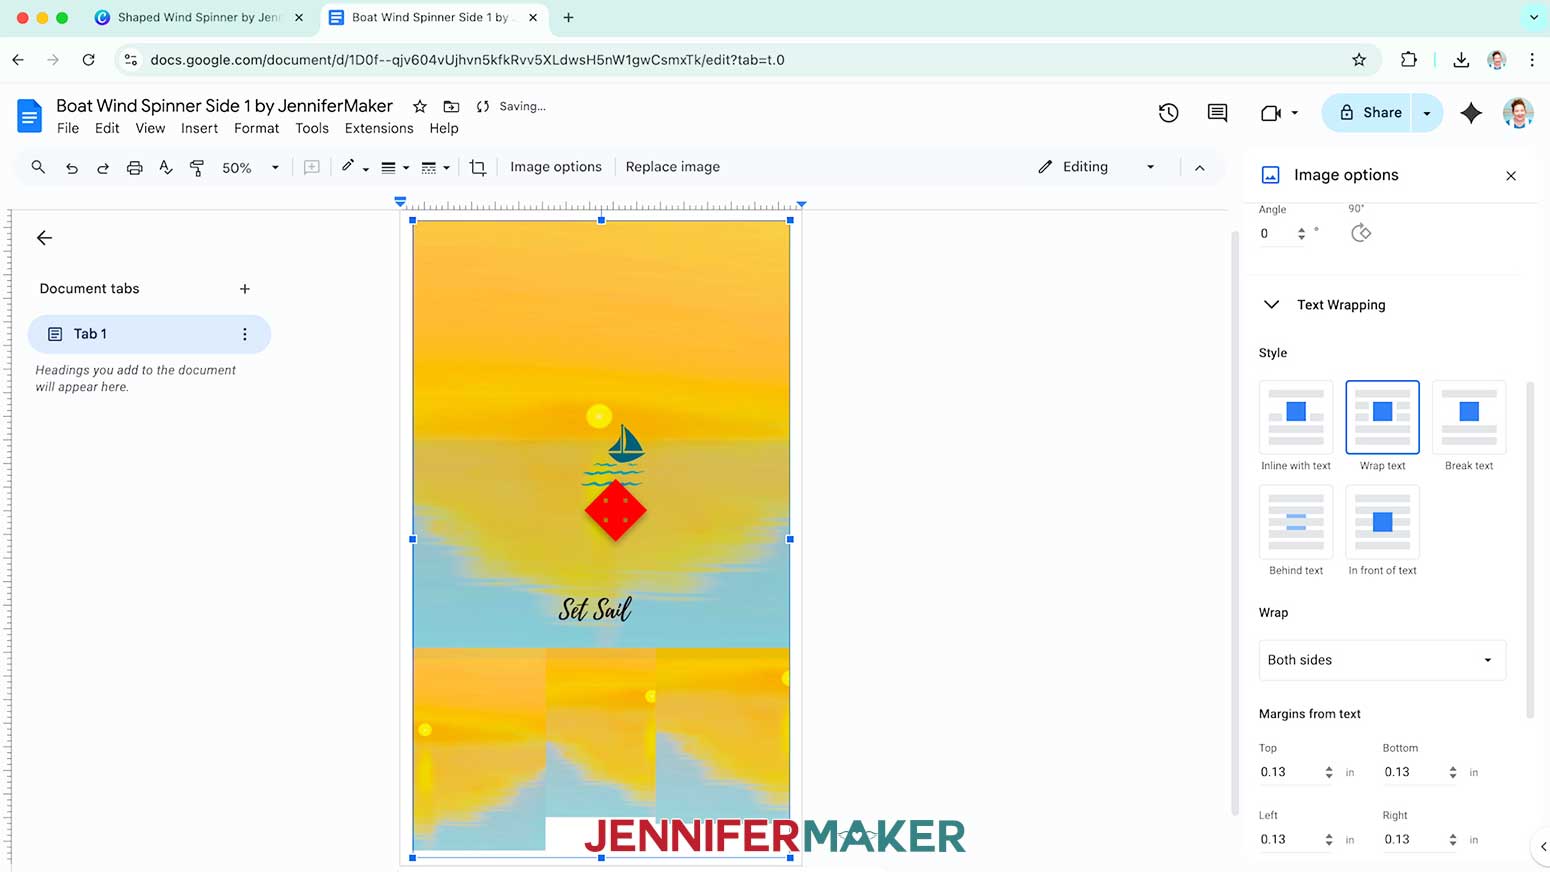
- Click the image and select the “Wrap text” icon from the menu that appears below it.
NOTE: This setting lets you move the design anywhere on the page. - Click and drag the image to the center of your page, as that ensures it won’t get cut off at the edges.
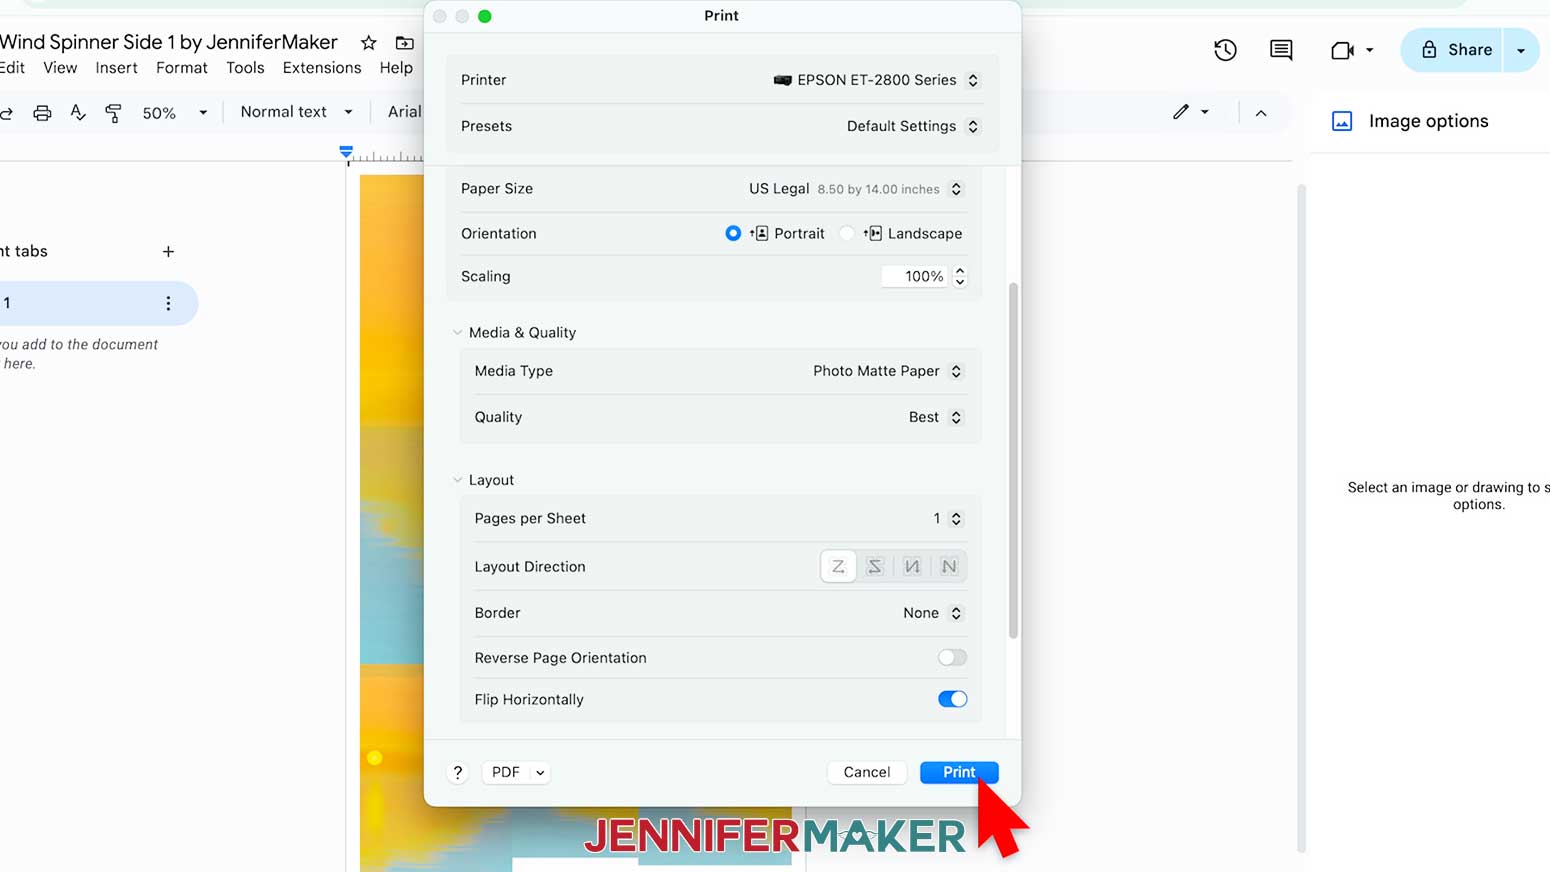
- Go to the File menu and choose “Print.”
- Select your sublimation printer under “Destination.”
- Click the arrow beside “More Settings” to select “Print Using System Dialog.”
- Your print menu may look different - just make sure the sublimation printer is selected, that you “flip horizontally,” to mirror the image and select the highest quality matte paper setting.
NOTE: If your wind spinner’s shape is symmetrical, you can set the number of copies here to “2” and skip Step 26. - Load a sheet of sublimation paper correctly into your sublimation printer.
NOTE: Check the packaging for information on how to load the paper. - Click “Print.”
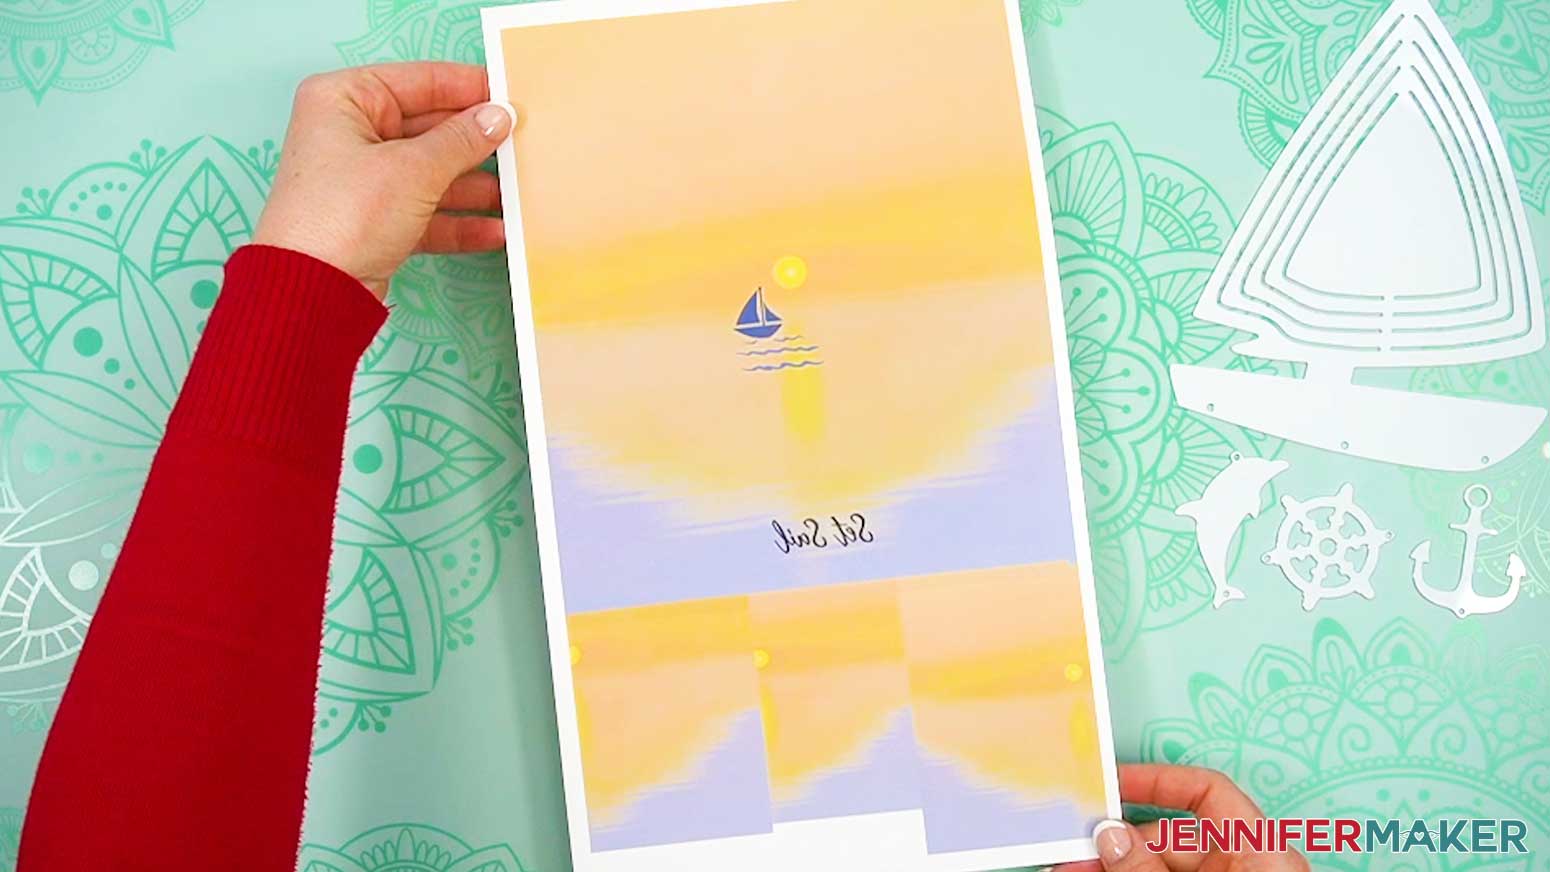
- Allow the print to dry before handling it, as the ink can smear.
NOTE: The printed design will appear lighter before pressing. - Repeat these steps to print your wind spinner’s second side.
- Your images are ready to press!


STEP 4: SUBLIMATE YOUR SHAPED WIND SPINNER
IMPORTANT: As with all sublimation projects, open a window and turn on a fan to improve your ventilation before beginning.
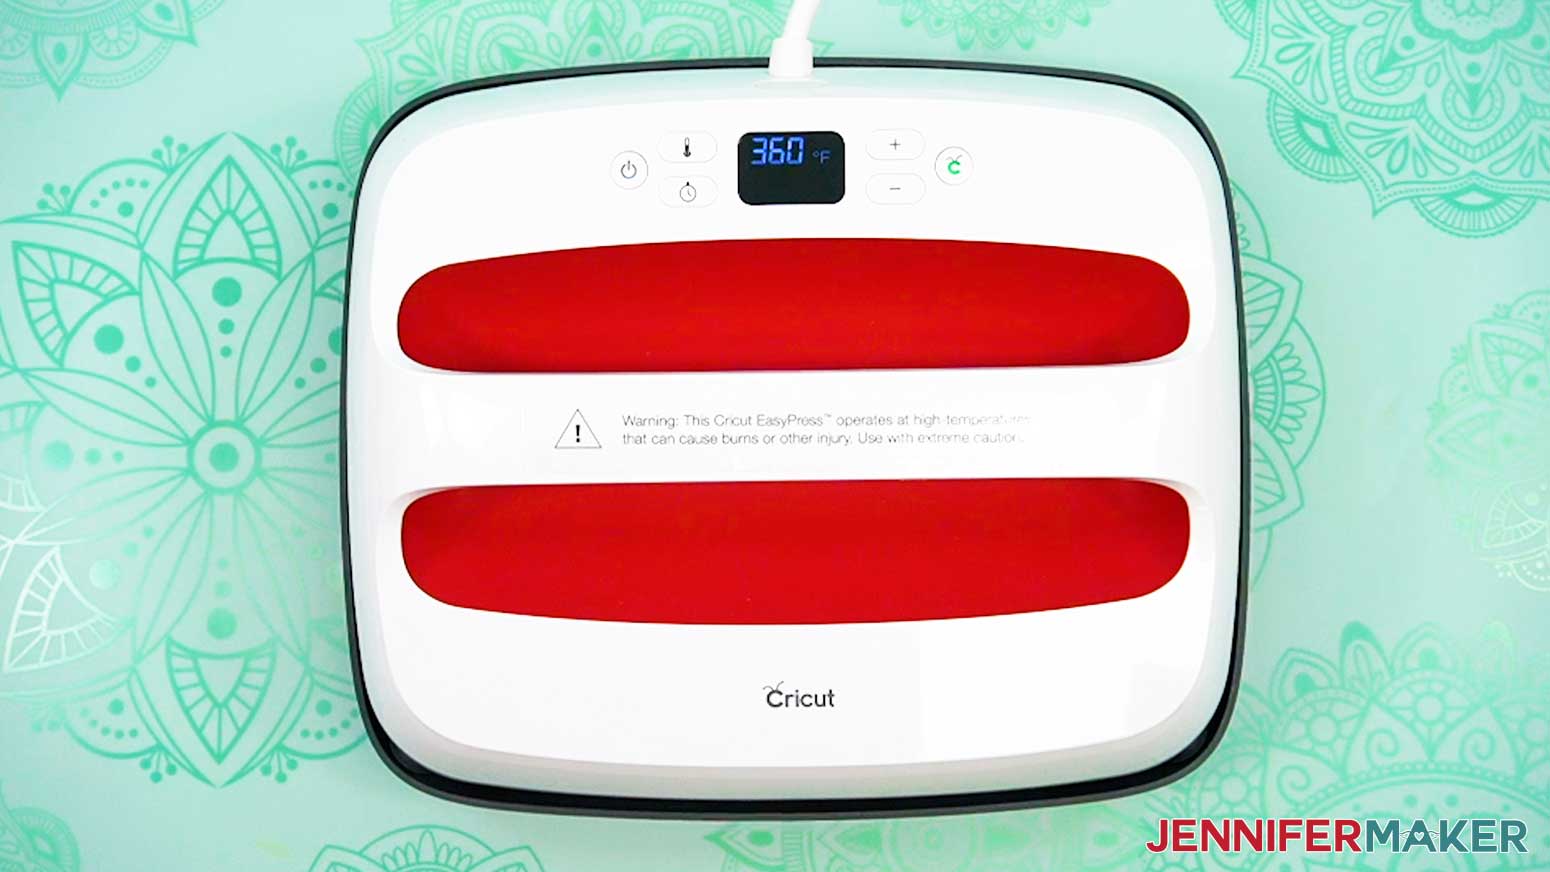
- Set the temperature of your EasyPress to 360℉ (192℃), and set the timer for 120 seconds.
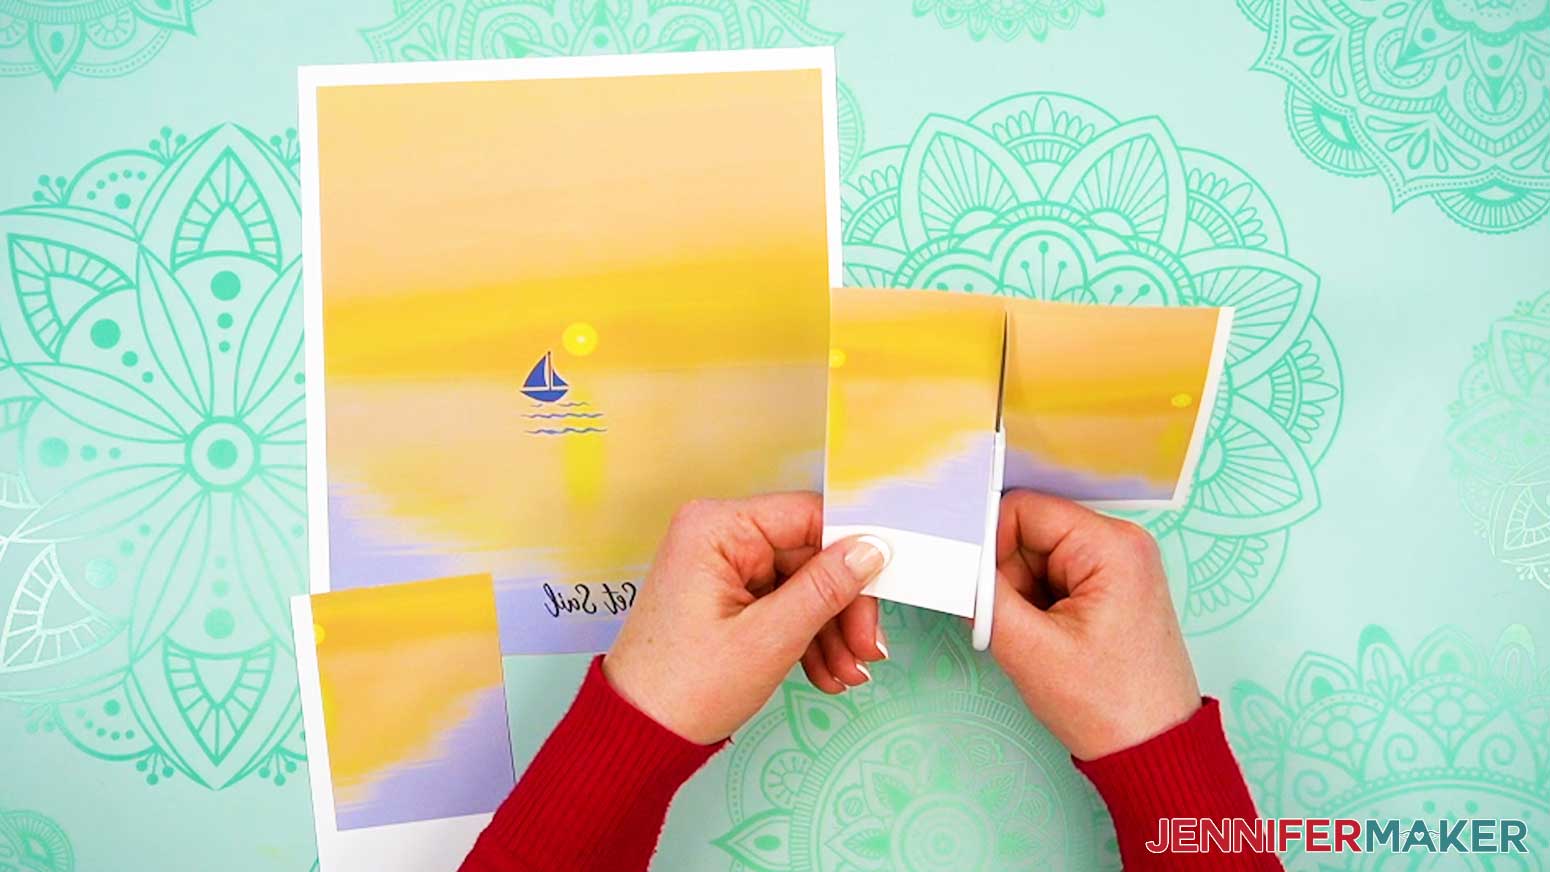
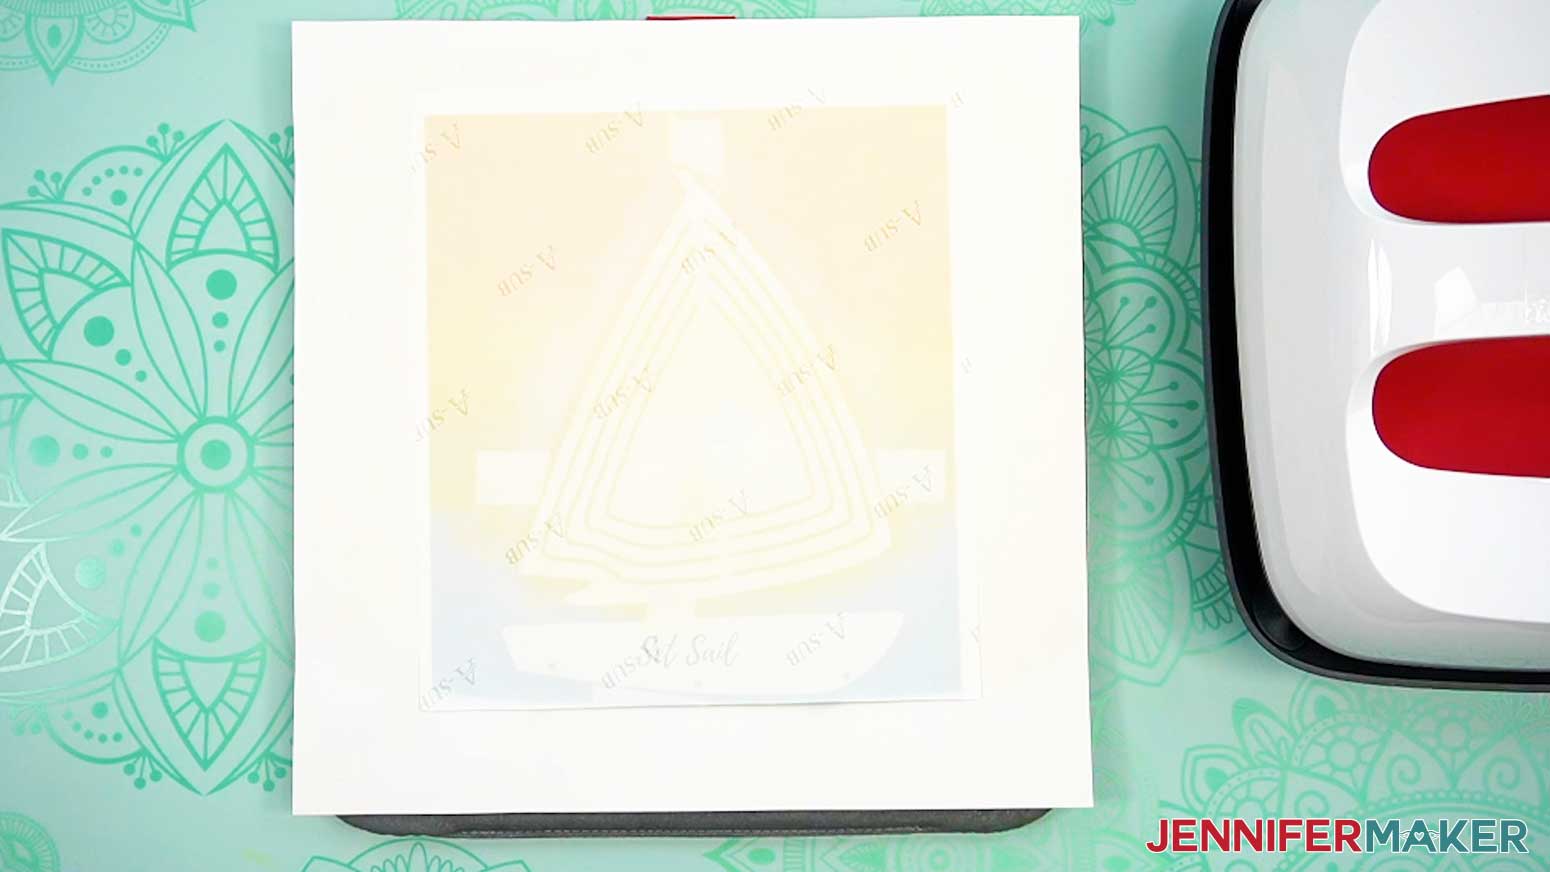
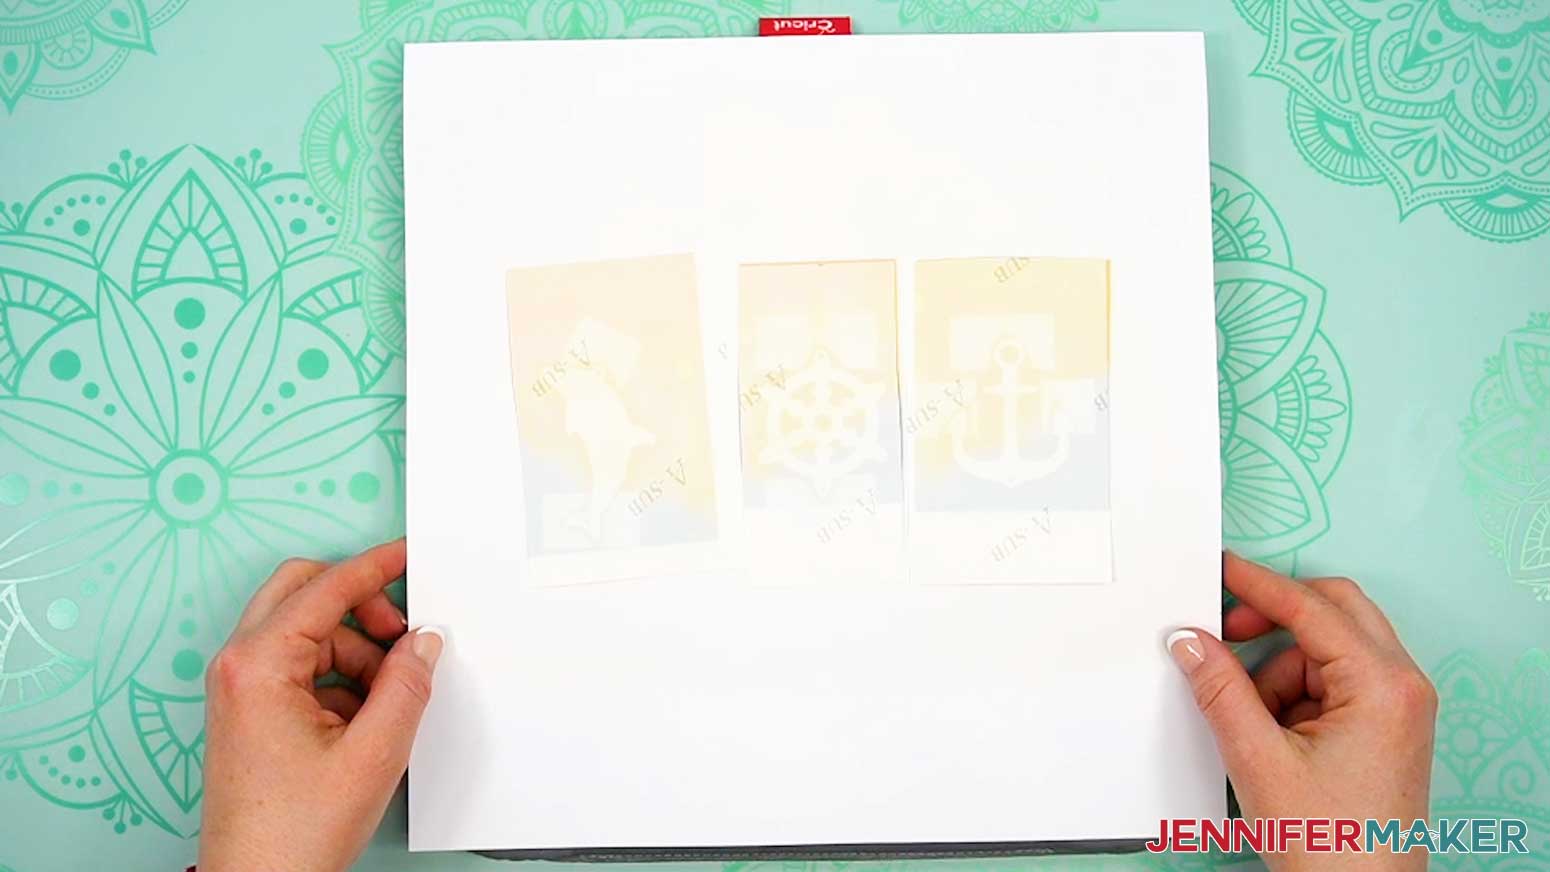
TIP: I followed the time and temperature settings for wind spinners in my Sublimation Cookbook. Inside, you can find the settings for tons of other sublimation projects, too! - Use scissors or a paper trimmer to cut your first side’s print to separate each shape’s design into its own piece.
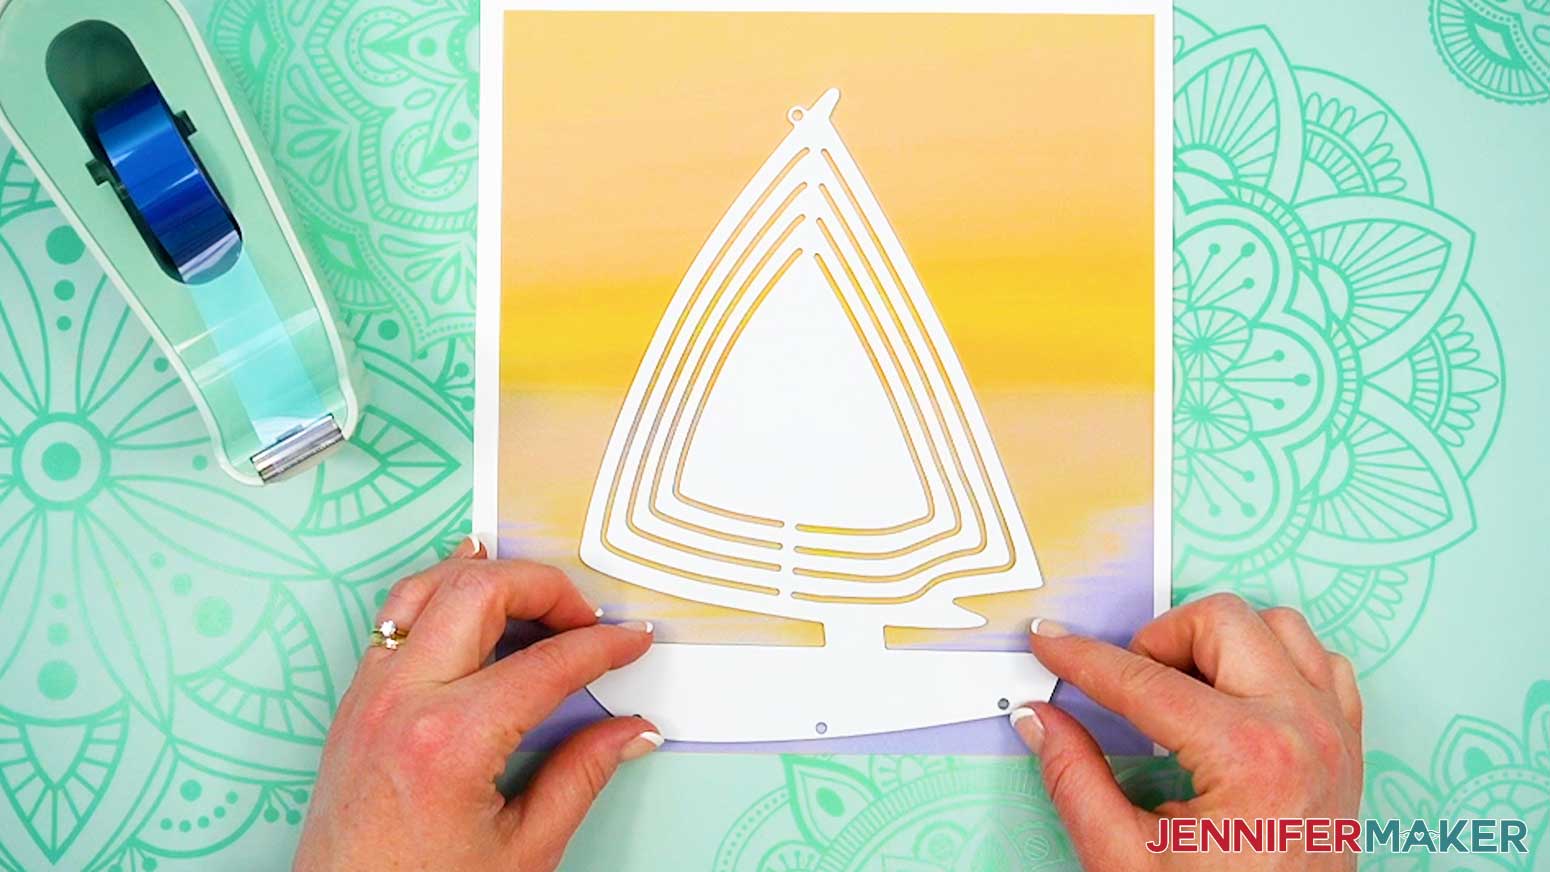
- Place the main shape’s printed design face up on your work surface.
TIP: If your wind spinner blanks came with a protective film, be sure to remove it from both sides of the blank before sublimating. You can use tweezers or a weeding tool to carefully lift the film if it’s really stuck. - Use alcohol and a lint-free cloth to clean both sides of the main shape’s blank.
NOTE: Don't forget to lint roll the second side after the first is pressed, as more debris can be introduced while pressing the first side. - Place the main wind spinner blank on its print so it covers the area of the design you want to transfer.
- Thinking of the blank like a compass, use heat-resistant tape to secure each piece to the paper at North, South, West, and East so the wind spinner pieces can’t shift.
- Place your pressing mat on your work surface.
- Place a piece of white cardstock onto your mat to protect it from any ink that may escape during the sublimation process.
TIP: Your cardstock should be clean and free of any ink or other marks that could transfer to your blank during the sublimation process. - Carefully flip the blank over onto the cardstock so the print is face down.
- Place a fresh piece of white uncoated butcher paper on your blanks to completely cover it.
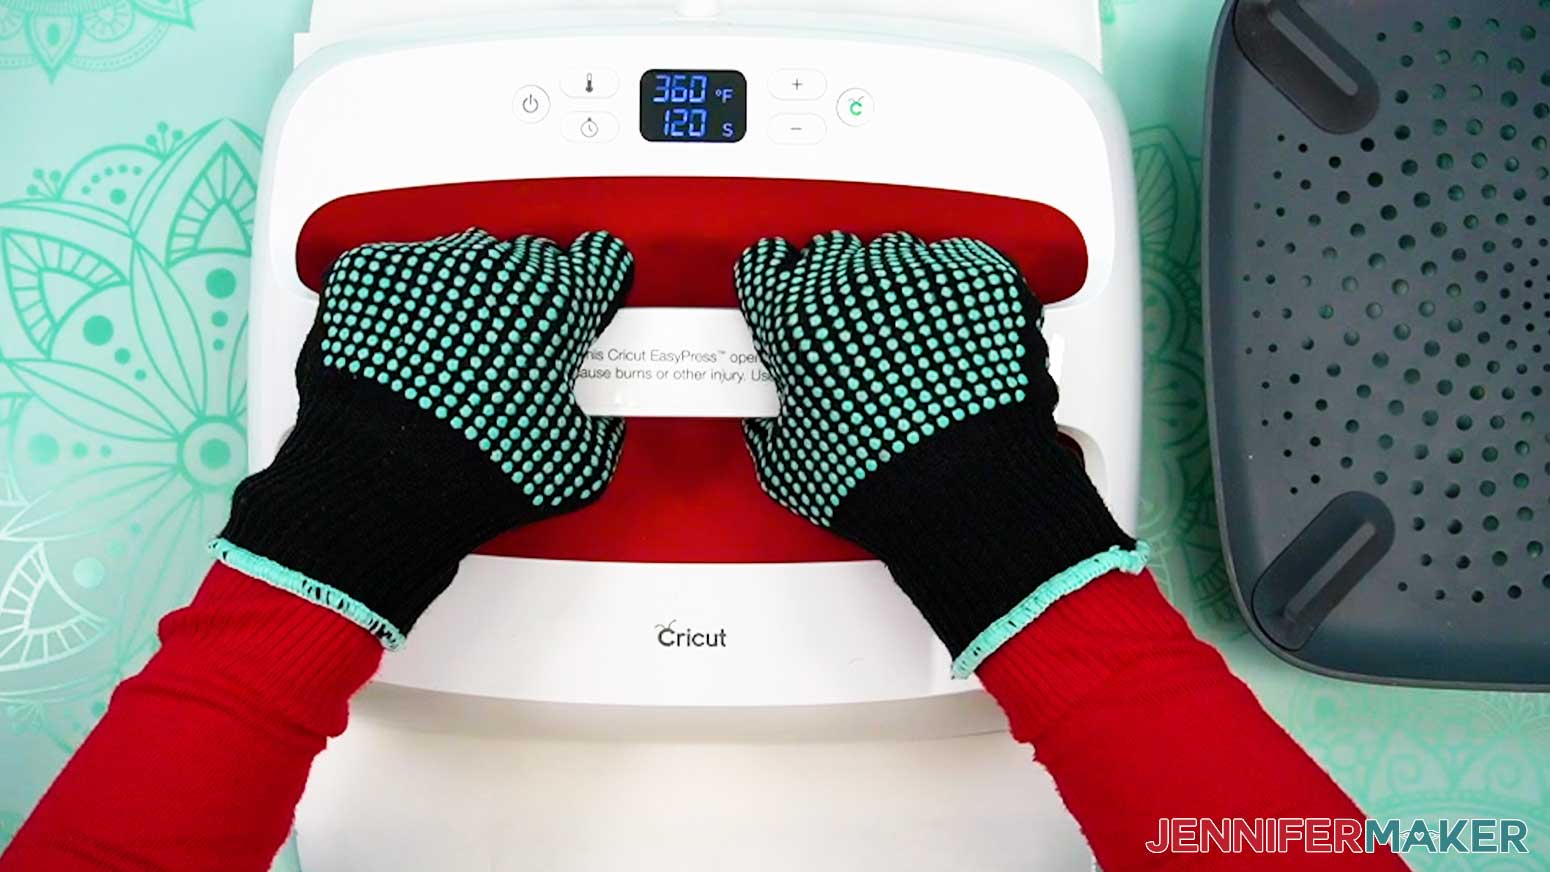
- Make sure the temperature of your EasyPress is at 360℉ (192℃), and the timer is set for 120 seconds.
- Cover the entire area of your wind spinner with the EasyPress and hold it in place to prevent it from slipping around on the blank’s slick surface. Press with medium pressure for 120 seconds.
TIP: Keep pressure even on both sides of the press for best results. - When the time is up, lift the EasyPress straight up to avoid ghosting.
NOTE: Always remember to place your press back on the base after using. - Let the project cool for about a minute.
- The metal blank will still be a little hot, so put on your heat-resistant gloves and then remove the butcher paper.
- Once the blank is cool enough, remove the tape and design, then let it cool completely.
- To press the second side, follow the same steps, making sure you position the spinner blank so the designs will match.
- Repeat these steps to sublimate each of your dangles.
TIP: You can press multiple dangle blanks at once–just be sure to apply pressure evenly!


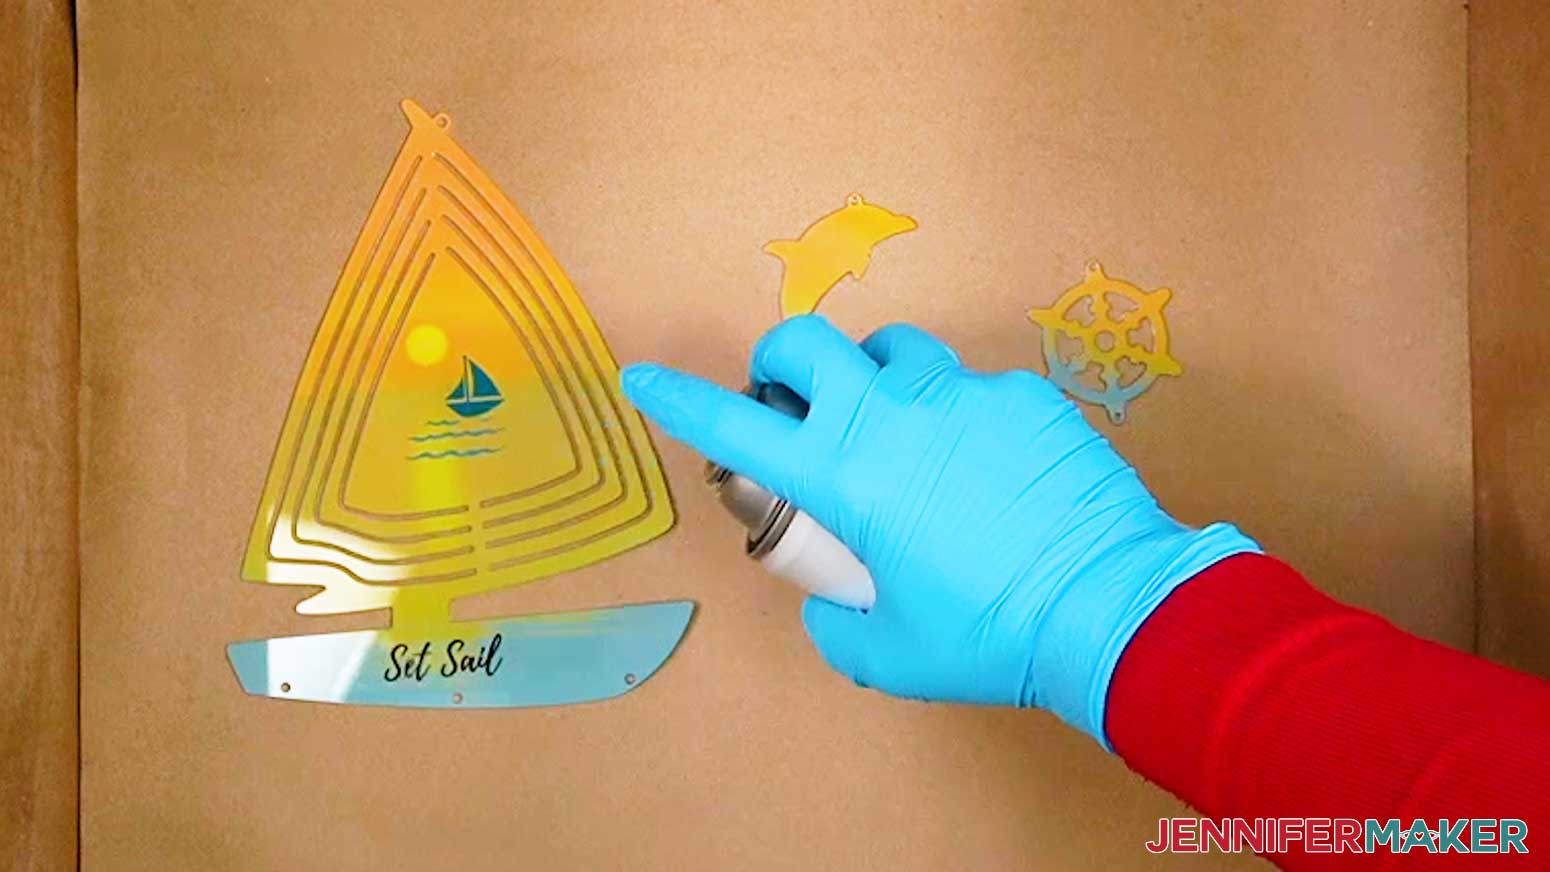
OPTIONAL: PROTECT YOUR SPINNER WITH UV SPRAY SEALANT
- If your shaped wind spinner will be hung in a sunny spot, and place a cardboard box big enough to fit the wind spinner and its dangles on the ground outside.
NOTE: The cardboard box can protect the spinners from debris, and also protect your grass or patio from sealant. - Place the shaped wind spinner and dangles inside the box.
- Spray a light coat of sealant onto all of the pieces.
- Let them dry for at least 10 minutes.
- Once they’re totally dry, flip all the pieces over.
- Spray a light coat of sealant onto the other side.
- Let them dry for at least 10 minutes.
- Remove the wind spinner pieces and discard the box.
STEP 5: BEND YOUR SHAPED WIND SPINNER
- Hold the wind spinner with the hanger at the top and the bottom resting on the work surface.
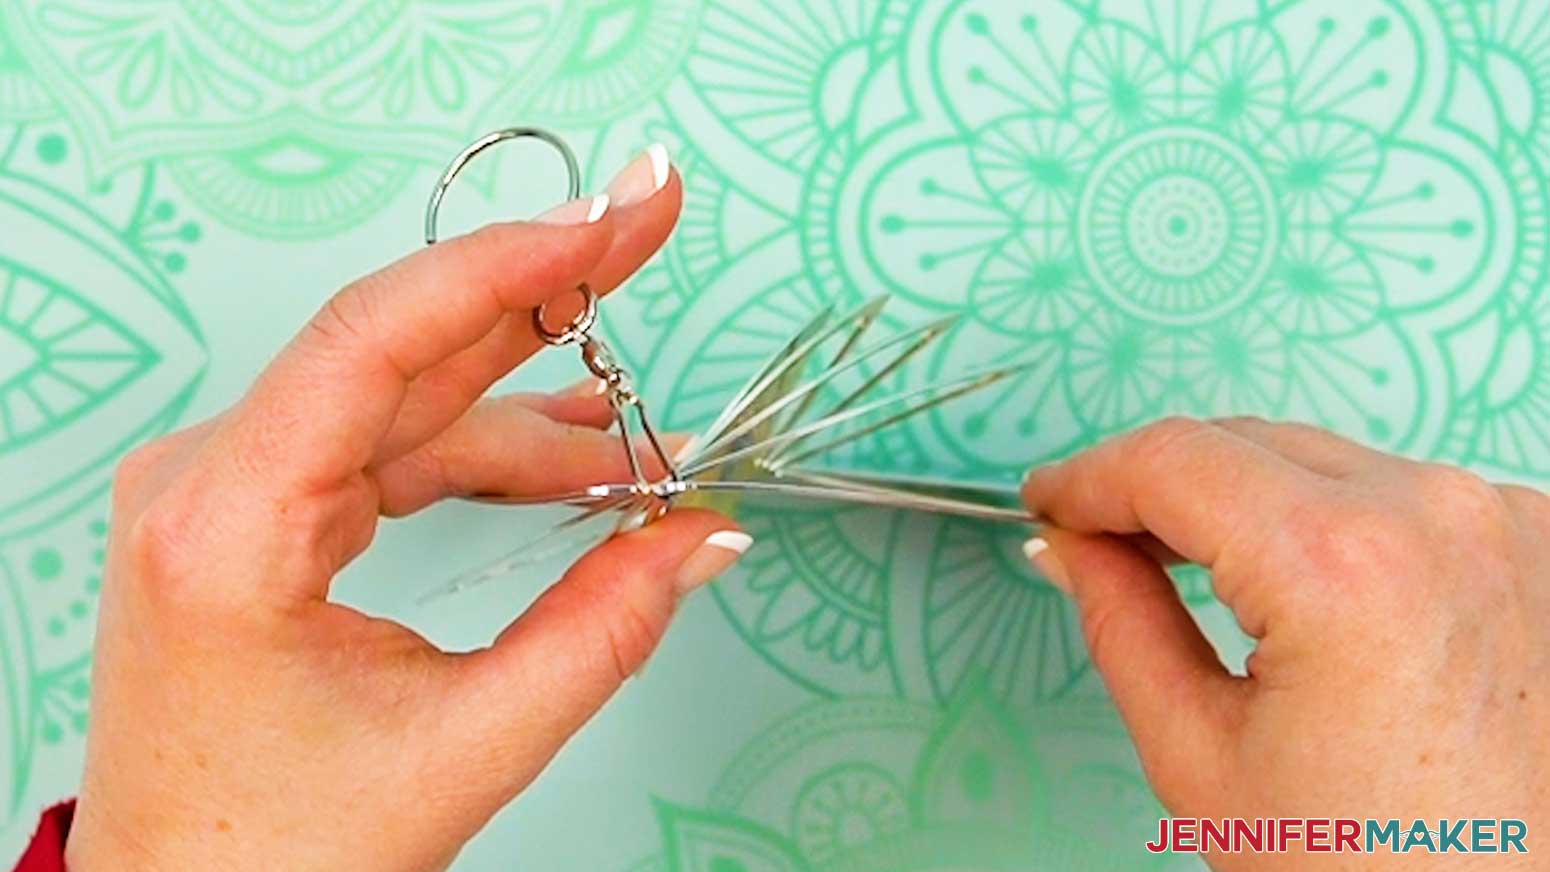
NOTE: You don’t need to put on gloves or protect your hands because the edges aren’t as sharp as they look. Still, be careful. - Starting with the side of your dominant hand, bend the outermost ring about 90° toward you.
- Move to the next smaller ring on that side and bend it toward yourself but not quite as much as the first one.
- Continue moving in toward the spinner’s middle, evenly spacing the rings out by bending them.
- Then, flip the wind spinner over so the flat section is on your dominant hand side and repeat the process for those rings.
- When you’re done, look straight down on the spinner from the top and gently adjust any rings that aren’t even.
- Repeat these steps if any of your wind spinner’s dangles have rings to position.
- Connect the dangles and crystal chain pieces to the main shape using the provided hooks and rings.
STEP 6: SHOW IT OFF
You now have a gorgeous shaped wind spinner with dangles to hang in a breezy area!
Notes
Print Sizes:
Boat - 8” W x 13.5” H
Butterfly - 10.5” W x 8” H
Cloud - 10.5” W x 8” H
Heart - 13.5” W x 8” H
Spinner Sizes:
Boat Top: 6" x 8"
Dolphin: 2.5" x 2.5"
Anchor: 1.875" x 2.25"
Wheel: 2" x 2.25"
Cloud Top: 7.875" x 4.5"
Moon: 1.25" x 2"
Star: 2.125" x 2"
Raindrop: 1.5" x 2"
Heart Top: 7.875" x 7.25"
Heart Dangle: 1.75" x 1.625"
Butterfly Top: 7.75" x 7.125"
Butterfly Dangle: 2.5" x 2.5"
Fonts Used:
Playlist Script (Free Canva Font)
Answers to Your Questions About How to Design a Wind Spinner in Canva
Q: Is there an easier way to create a custom design for my shaped wind spinner in Canva?
A: You can learn how to design your own custom shaped wind spinner using Canva Frames in my ADVANCE program. Learn more about ADVANCE here!
Q: How do I find images for my custom shaped wind spinner?
A: You can use any of the images included in the project files, or find more in our library! You can also use your own photos and designs, images created through AI generators, graphics from Canva or other online sources, or stock photos for your custom shaped wind spinner.
Q: How long do you press an aluminum wind spinner?
A: Just follow the tutorial with my free files to learn what times and temperatures work when learning how to sublimate on aluminum wind spinners! I walk you through each step of making a shaped wind spinner of your own, including how to design a wind spinner in Canva. It’s so much fun!
Q: Can you use sublimation paper twice?
A: Though it may look like there’s ink left on your sublimation transfer after pressing, there’s not actually enough to create another press. You can try, but your second attempt will probably look super faded and not the way you expect.
Q: Why doesn’t my design look right when I press the second side?
A: If you’re using an asymmetrical blank, there are a few extra steps you need to take so the design flows well on both sides, especially if you add text to your design. All the flipping and mirroring can get confusing, so be sure to watch the tutorial and pay special attention to those parts of the video so you don’t waste your valuable ink, paper, and time.
Q: Can a Cricut do sublimation printing?
A: While a Cricut cutting machine can be useful in some sublimation projects, it does not sublimate or print sublimation ink. However, you can use a Cricut and Infusible Ink pens to draw designs onto paper which can be sublimated, or use a Cricut to cut SVG designs out of Infusible Ink transfer sheets. If you want to learn how to sublimate on shaped wind spinners, you’ll need a sublimation printer, a heat press, and other tools and materials you can find above in my materials list.
Q: Can I make and sell sublimated shaped wind spinners?
A: If you want to use my designs and projects for commercial use, please familiarize yourself with my important licensing information before selling your crafts.
Get my free PNG files to learn how to design a wind spinner in Canva!
(If you do not see the signup form above, click here.)
I love seeing your sublimated projects, and how you display them! Once you’ve learned how to design a wind spinner in Canva and heat press it onto a shaped blank, inspire others and share a photo of your sublimated wind spinner in our Facebook group or tag me on social media with #jennifermaker.
Love,

Want to remember this? Save this How To Design a Wind Spinner in Canva Tutorial to your favorite Pinterest Board!