
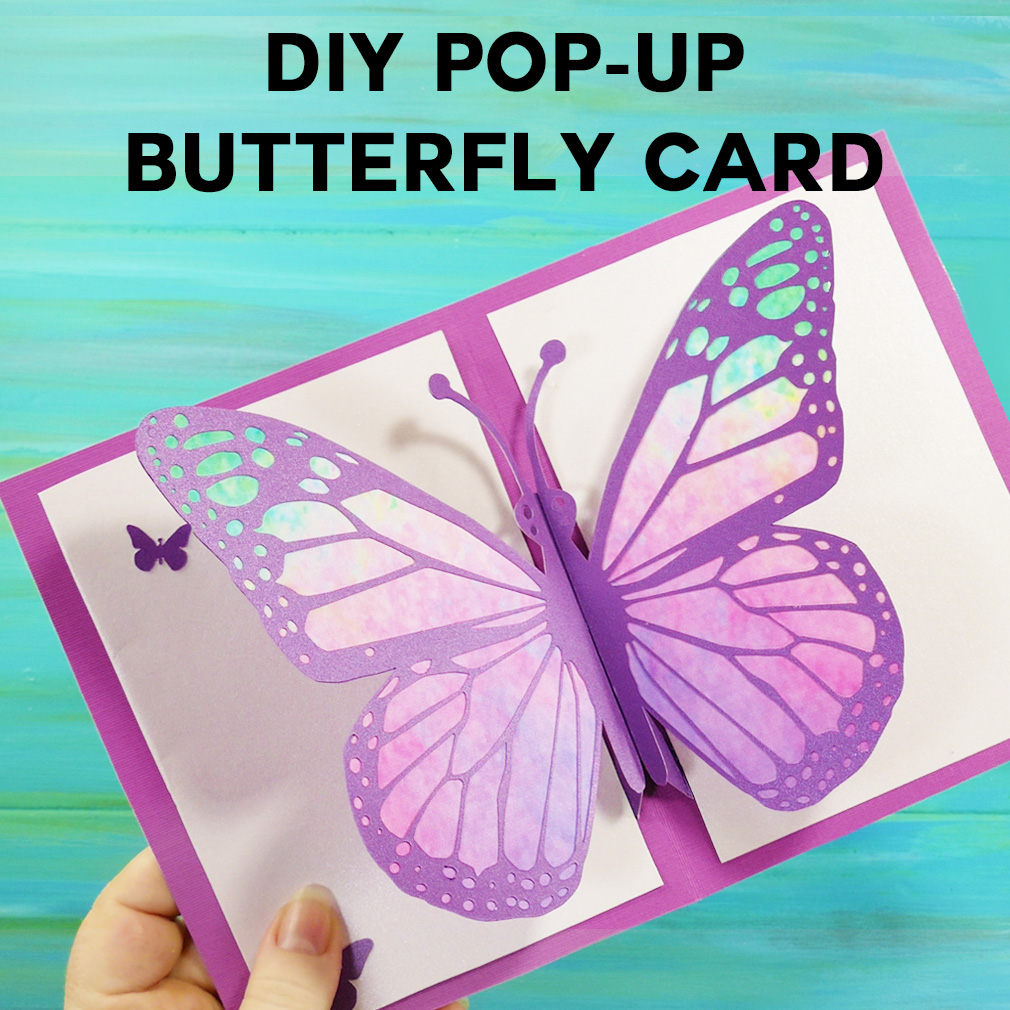
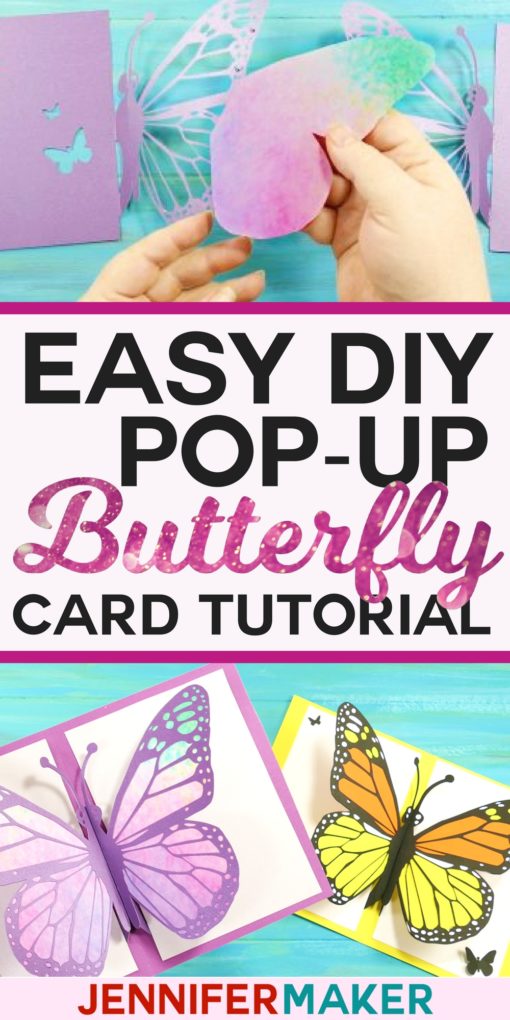
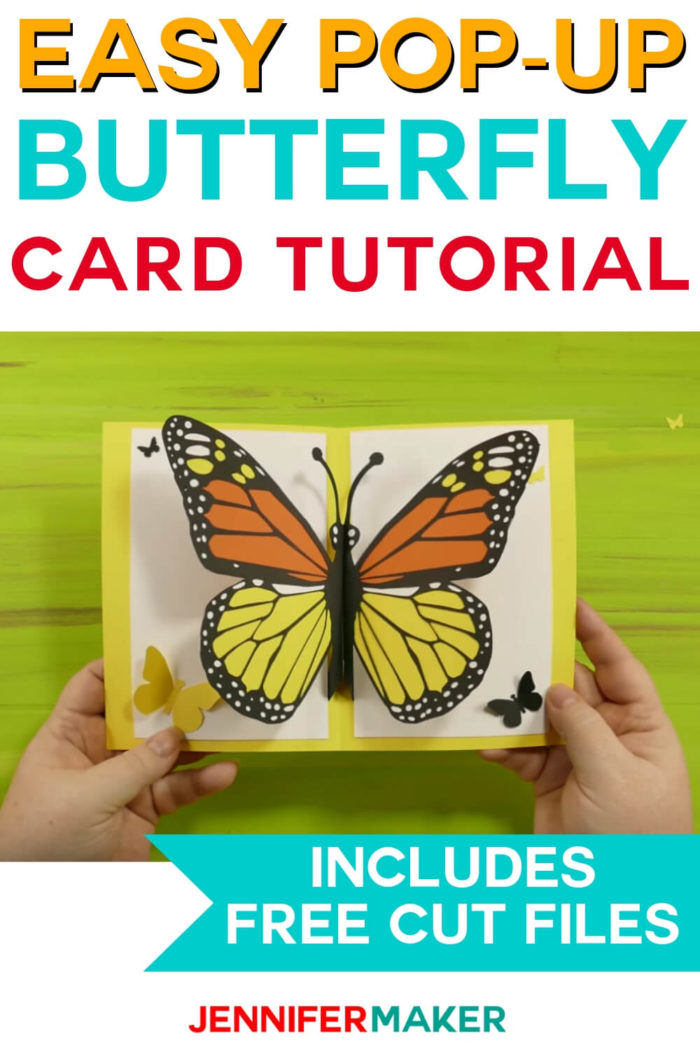
Ah, the sun is shining this morning and I’ve already seen the first few butterflies! And I’m so excited to share my new pop-up card design with you! I created this card for all those who are eager to try a pop-up card but are a little intimidated by the glorious apple tree pop-up card I posted earlier. My pop-up butterfly card is much faster to cut and simpler to assemble than my tree.
Want to save this project? Enter your email below and we’ll send the project straight to your inbox.
Here’s the assembly video if you want to see how it all goes together.

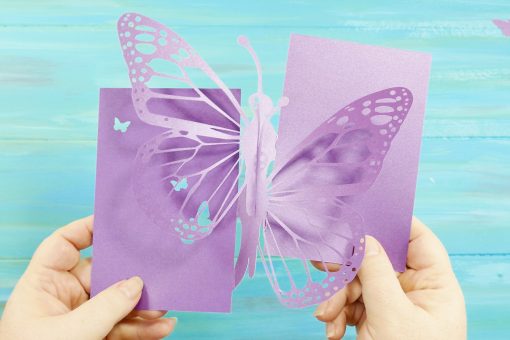
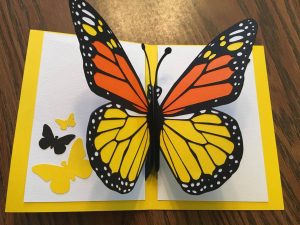
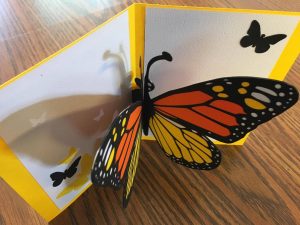
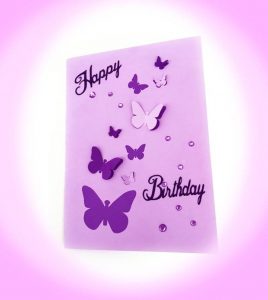
This pop-up card is perfect for Mother’s Day, summer birthdays, and all butterfly lovers. The thing I love about this butterfly card is how the wings flutter gently when there’s any movement, whether that’s just opening the card, holding it in your hands, or from a little breeze. Here’s a video of the butterfly card’s wings in action:
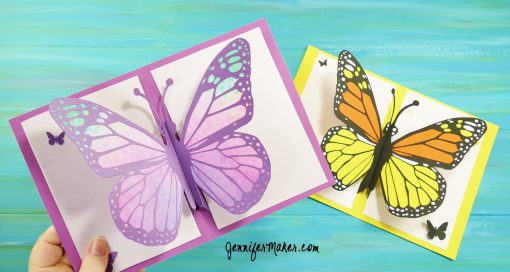
My butterfly card packs a big effect without being difficult to cut or put together. This card is also sized small (just under 5″ x 7″) so it’s easy to gift and send in the mail. Plus, if butterflies are your thing, I drew my butterfly design from a real Monarch butterfly for realistic wings!
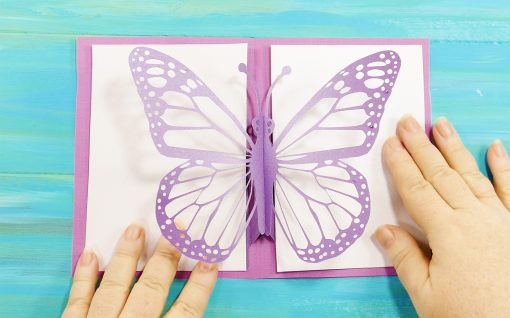
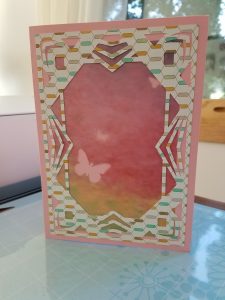
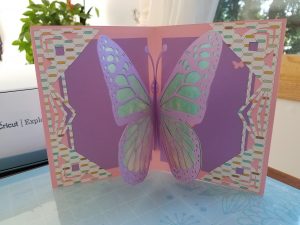
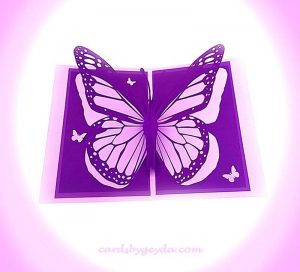
My pop-up butterfly card can actually be assembled in three different ways—as a simple “flutterby ” (without wing color), a fantasy rainbow butterfly (with one-piece wing color), or as a traditional Monarch butterfly (with pieced wing color). I’ve made a video which shows all three versions, as well as assembly instructions for each one. The Monarch butterfly with the pieced wing color is the most complicated (and even that’s really easy).
This post contains some affiliate links for your convenience (which means if you make a purchase after clicking a link I will earn a small commission but it won’t cost you a penny more)! Read my full disclosure policy.
DIY Pop-Up Butterfly Card Materials
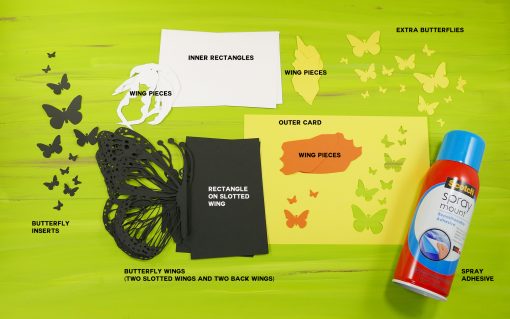
For all versions, you’ll need the following materials.
- 65 lb. cardstock in complementary/contrasting colors (1-3 sheets for the wings, 1 sheet for the outside of the card, and 1 sheet for the inside of the card)
- Spray adhesive (I used 3M Spray Mount)
- A way to cut your cardstock (I used the amazing Cricut cutting machine!)
- StandardGrip Mat
- Design #29 – My free SVG design files (available in my free resource library—get the password by filling out the form at the bottom of this page)
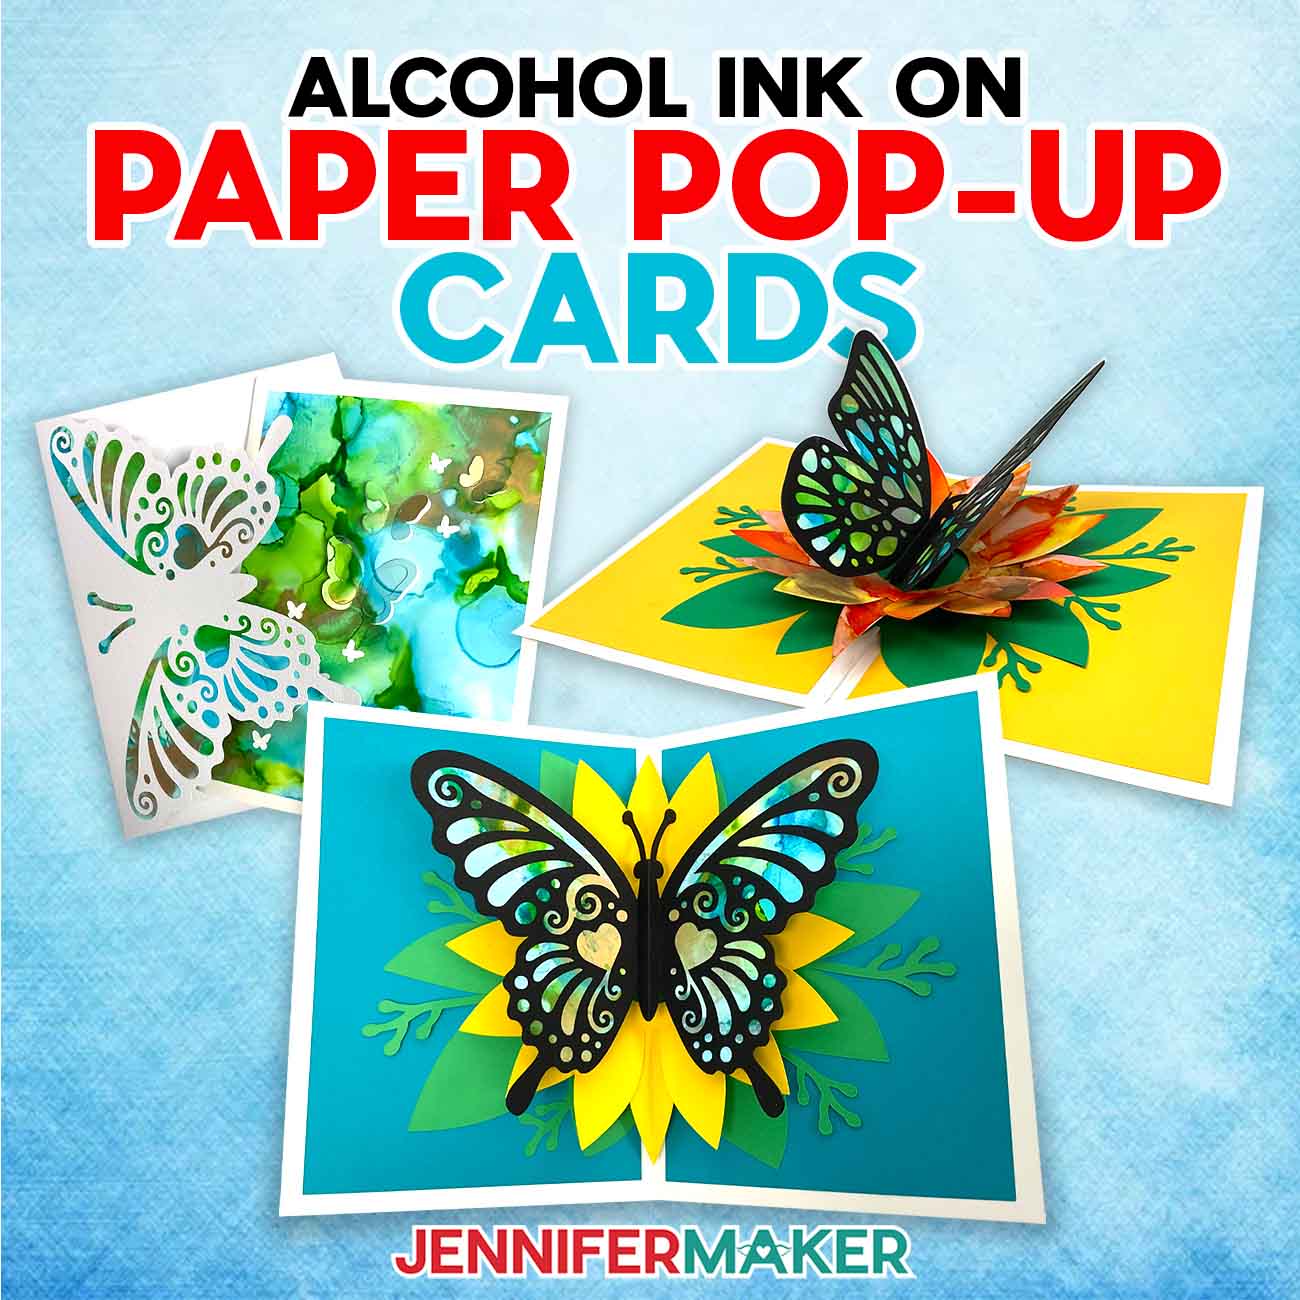
For the fantasy rainbow butterfly, I used one of Melody Lane’s digital papers for the wing color. Specifically, I used the Grace 3 design. I printed Grace 3 out on regular paper (both sides), then cut out the solid wing piece on it. Here’s what it looks like:
For the Monarch butterfly, I used black (3 sheets), yellow (1 sheet), orange (1 sheet), and white (1 sheet)—all of which were Core’dinations cardstock. The wing pieces were cut using the file named with those specific colors.
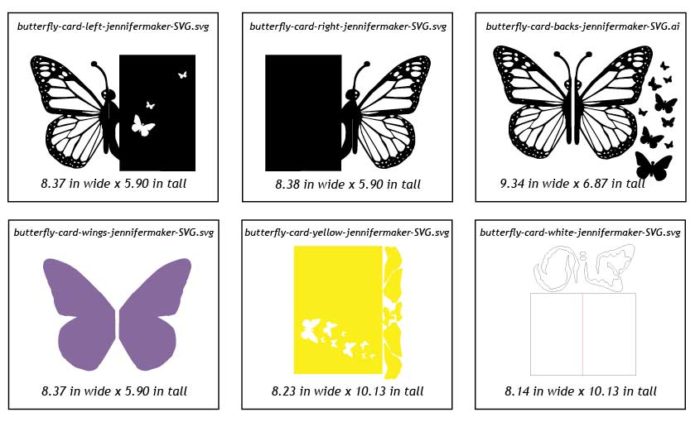
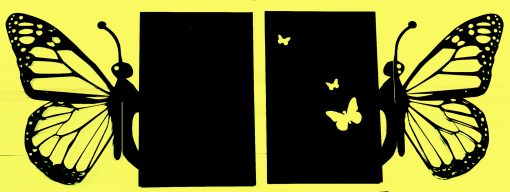
There are nine files for this project in Design #29, as follows:
- butterfly-card-jennifermaker-SVG – this may be the only one you need, as all parts are in it albeit stacked on top of each other (best for Cricut owners!)
- butterfly-card-backs – cut 1 on black card stock (or purple card stock for rainbow butterfly)
- butterfly-card-left – cut 1 on black card stock (or purple card stock for rainbow butterfly)
- butterfly-card-right – cut 1 on black card stock (or purple card stock for rainbow butterfly)
- butterfly-card-orange cut 1 on orange card stock (for monarch butterfly only)
- butterfly-card-yellow – cut 1 on yellow card stock (or dark purple card stock for rainbow butterfly)
- butterfly-card-white – cut 1 on white card stock (or light purple card stock for rainbow butterfly)
- butterfly-card-wings – cut 1 on double-sided colorful paper (for rainbow butterfly only)
Attention Cricut Design Space Users: If you upload the SVG file and it appears too small (the black rectangles next to the butterflies should be 5.9” tall), use the file in the “stacked” folder to retain the proper sizing.
If you have any issues with sizing, here is a chart that shows the size of each set of elements for this card:
Time to Make: 1 hour
Skill Level: Beginner-Intermediate
Finished Size: 5” x 7” folded card
How to Make the Pop-Up Butterfly Card
First, cut out your cardstock for the version you wish to make (review my video linked above to see all three versions). If you use a Cricut, I recommend you cut on a clean StandardGrip mat on the cardstock setting.
IMPORTANT NOTE: If you’re not sure how to upload an SVG file to Cricut Design Space, or you’re having issues (such as getting a message that says “unsupported file”), please watch my free training series, SVGs Made Simple. It will help you SO much!
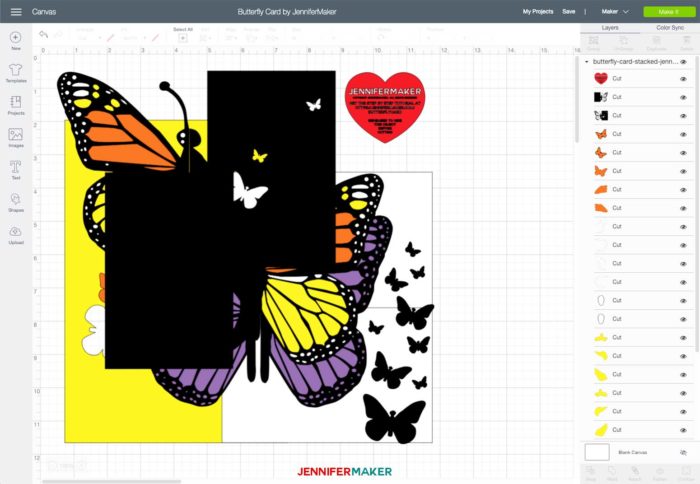
Here is what the pop-up butterfly card design looks like after you’ve uploaded it to Cricut Design Space. Don’t worry about how it looks here — all the layers are in there. Note: There is no ungrouping, attaching or scoring necessary in this design. Just click that green Make It button and you’re good to go!
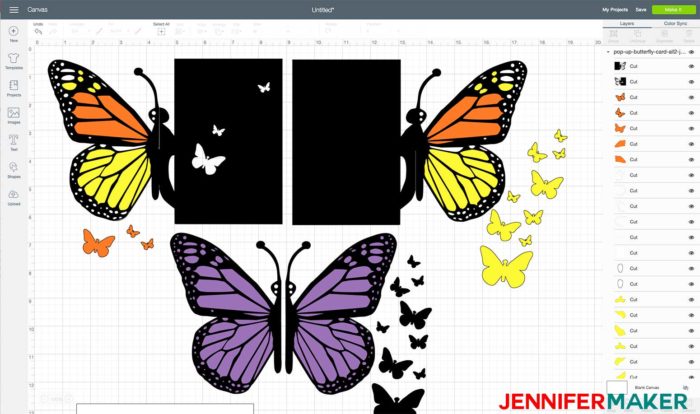
You can ungroup all elements and organize them for better visibility, if you wish. Here’s how I would recommend you organize them on your canvas. (Note: I used to distribute my file this way, but a feature update to Cricut Design Space now prevents this.)
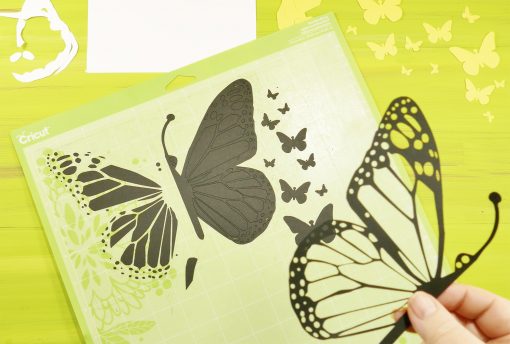
Here’s what some of the butterfly pieces look like after you cut them on your Cricut. Note: If you’re having issues cutting the intricate butterfly pieces, please check out my Cricut Cutting Problems (& Solutions) for ways to improve your cuts!
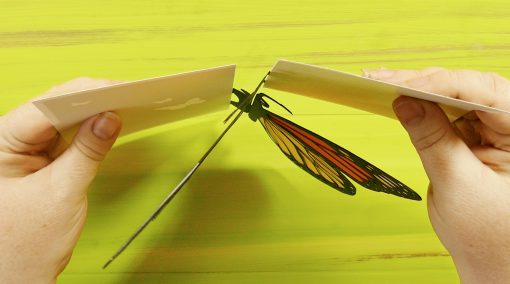
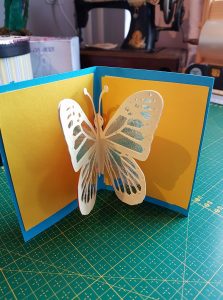
If you are assembling the simple version, just slot the two halves of the butterfly together and wrap the outer card around them. Use spray adhesive to stick the rectangle sections of the slotted butterflies to the outer card being careful not to get any adhesive on the wings.
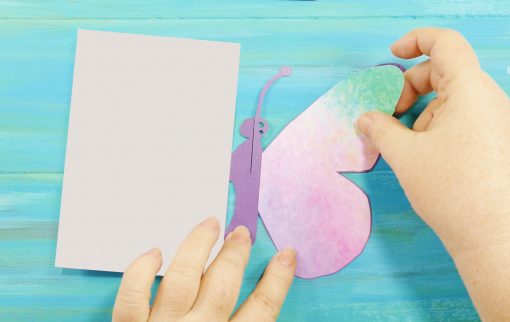
If you are assembling either the fantasy butterfly or the Monarch butterfly, your first step is to put adhesive on the backs of the slotted butterfly wings. Set them down as shown below and spray them well, then wait about 30 seconds before the next step.
Place the inner rectangles on the rectangle sections of the slotted butterfly wings, being careful to center them top-to-bottom and not overlap on the body of the butterfly.

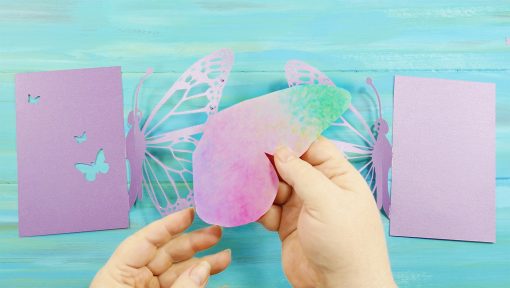
Now place the wing color piece(s) on the slotted butterfly wing. If you’re going for the fantasy rainbow version, you’re using one full wing insert piece.
The Monarch butterfly uses six pieces, which all fit together like a puzzle. As you place the pieces on, check to make sure you’re covering all open areas. Press down well once in position. Repeat for the other wing.
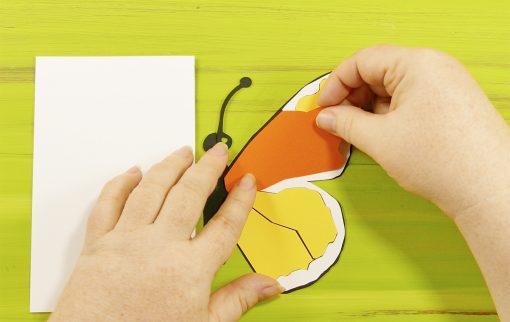
Once the wing color is in place, spray the back wing pieces with adhesive and place over the colored wing. Be sure to line up the back wing so it matches your wing assembly perfectly, then press into place.
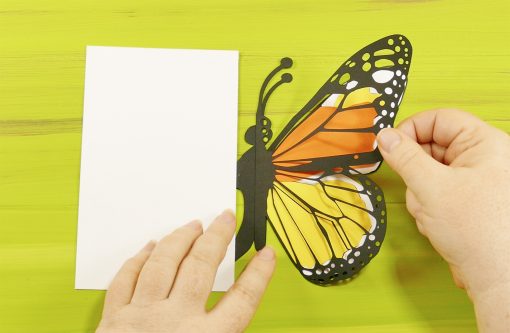
Fold the assembled wings where the body meets the rectangle.
Slot the wings together (one slides into the other from top to bottom).
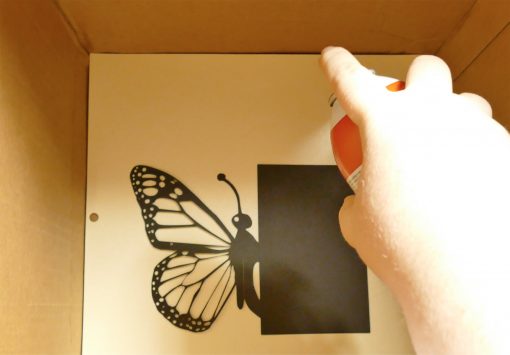
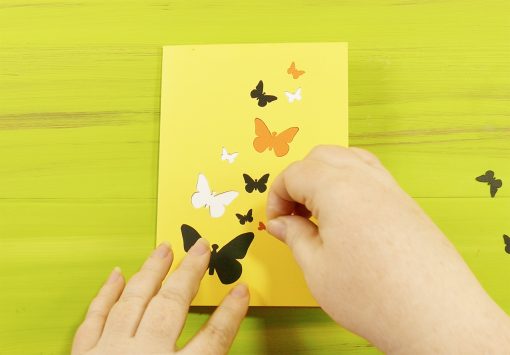
Now it’s time to attach the outer card. First, you’ll want to fold the butterfly and put the small black butterfly cut-outs back into position (these will protect the inner cardstock when we spray adhesive in the next step).
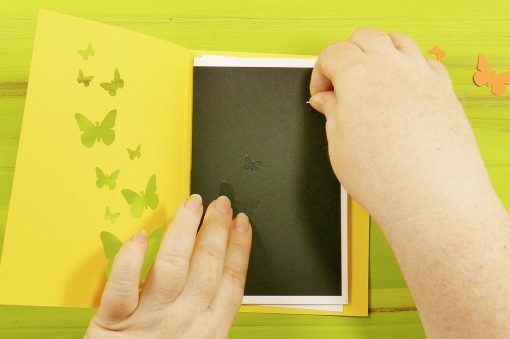
Protect the wings with some scrap paper (in the photo below, I’m using blue scrap paper so it’s easier for you to see) and spray both the front and back of the folded butterfly assembly.
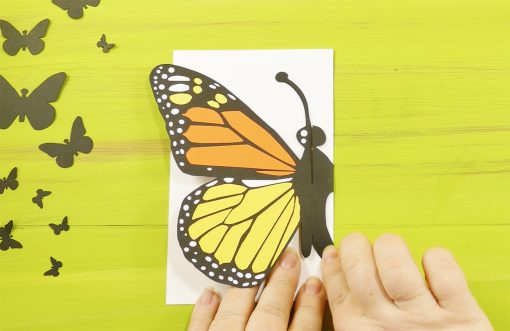
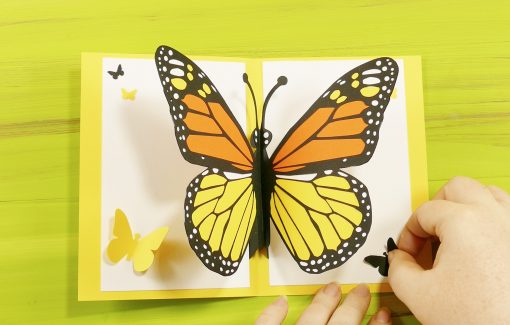
Remove the black butterfly inserts to reveal the white butterflies again, then line up the outer card with the butterfly assembly so the butterflies all line up.
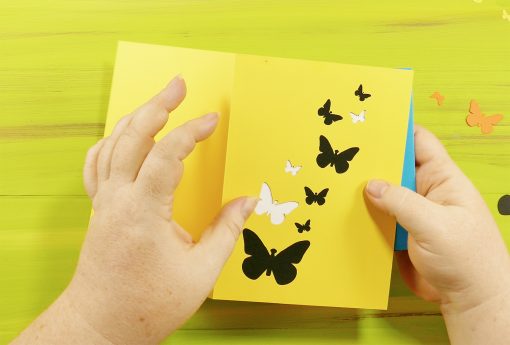
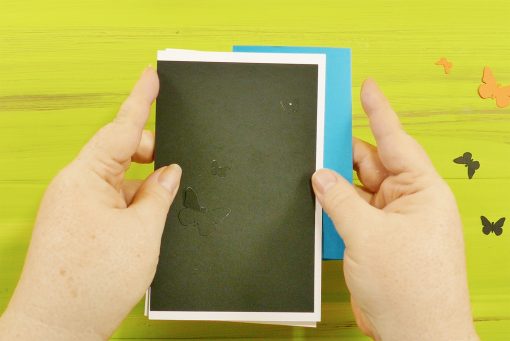
Put black and orange butterfly inserts into the empty spaces on the front of the card to cover the adhesive underneath.
Feel free to put any extra butterfly inserts you have on the insert of the card. You can even fold the wings up a bit for a three-dimensional effect.
Voila! You’re done!
Your butterfly card will fit in a standard 5″x7″ envelope.
I love seeing your butterfly cards—here are several shared with me by my readers:
Here is a butterfly card by reader Annamarie Spinoso, who claims to be a Cricut “newbie.” Looks beautiful, doesn’t it?
Reader Dana Mahan made this lovely Monarch butterfly card:
This butterfly card is by reader Becky Salewski — I love her paper choices!
Here is another reader’s card — this one is a traditional Monarch butterfly — made by Bonita Clark:

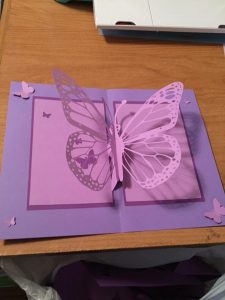
Look at this pretty lavender butterfly by Misty Morgan!
And I love this butterfly card with translucent wings by Monique van Corstanje:
As always, let me know if you have any questions by posting over in our awesome Cricut Crafters Facebook group. And if you make a butterfly card, please let me know or tag it with #jennifermaker — I will include a photo of it here on my blog with your permission!
If you like pop-up cards, you may also like my easy heart rainbow pop-up card!
Love,

P.S. Here is the form to fill out to get the password to the library with the SVG/DXF files for this project:
Get my free cut files for the pop-up butterfly card

Subscribe (free!) to get access to my resource library with all my free cut files, printables, and patterns! Once subscribed, I will send you a newsletter with details about my new free files each week.
Want to remember this tutorial? Please share it with your friends and pin this post to your favorite craft board on Pinterest!

I love your designs and files, I am also in the Ann Arbor area.
What a great place to live.
Thank you so much, Kathy! Ann Arbor is indeed a wonderful place to live — and it’s sunny today!!
Beautiful, thanks for sharing
Thank you, Debbie!
Hi Jennifer.
I downloaded the butterfly card and went to cut it out. the right side has a line going through from the body across the wings and so it slices through the wings.is there a way I can get the correct file? thank you.
Hello, Jill! Re-download the file — there was a bug in DS3 that was causing that line, but I found a workaround and uploaded a new set of files to my library. 🙂
Hello Jennifer.
Thank you. Now it seems i can’t get into the library to download the file as there doesn’t seem to be anywhere to enter the password.
Hello, Jill — just click Libraries > Free Resource Library (it’s a link). Here’s the direct link to it: https://jennifermaker.com/resource-library
Thank you Jennifer. i am looking forward to making the butterfly card.
I love all your work and thank you for your generosity. I am having some trouble downloading this file because I cannot get into the resource library even though I enter the password it just sends me right back to enter the password and I have downloaded some of the files before so I don’t know why this is happening to me. I even tried it on two different laptops and still could not get in. What could I be doing wrong?
My apologies — I made changes to the page earlier today and the links did not update correctly. I have fixed it now. Can you please try again? Here is the direct link to the free resource library: https://jennifermaker.com/resource-library
Thank you so much, it works now!
OMG I love this card. Thank you so much.
Thank you, Victoria!
Are the dimensions for this card already pre-set to make a 5 x 7 inch card or do I need to edit the size? When I downloaded the file, everything looks so small.
The dimensions are all set to make a card that is just a hair under 5″ x 7″ so it will fit into a 5″ x 7″ envelope. 🙂
Hi Jennifer when I made my butterfly card it came out 5″ X 3 1/2″ can you please tell me what I did wrong.
Hi Marilyn. If you are working on an iPad, make sure to resize the design to 11.5″x11.5″ and that should help.
I have tried to download this butterfly file and I keep getting error 404. Is this file no longer available?
I am get the samething Cindy is and I got the password please what going on Jennifer?
Hello, Kari! So sorry about that — I believe it is all fixed now. Please go back to the resource library at https://jennifermaker.com/resource-library and try to re-download it. I tested it and it’s working again. 🙂
Hello, Cindy! I made a change to that file this morning and it must not have saved properly. And my power has been out for several hours, so I missed all the emails about it! But I just fixed it and it looks like its working again. Can you return to the library, attempt to download it again, and let me know if it works this time? Thank you so much!
Hi Jennifer, I am very happy I found your blog and I love your cards! Thank you for providing them. I have a question. When I downloaded the butterfly card, it loaded into DS as only about 3″. Should it download to the correct size or do I have to resize all the parts myself? I am probably downloading incorrectly. Thanks for your guidance.
Terri
Hello, Terri! Which element was only 3″. If it is the butterfly wing, that should be about 5.75″ tall. I just checked and, sure enough, it’s uploading at the wrong size. I opened and re-saved the file, then uploaded a new set of files to the library. These are uploading correctly. So please re-download the butterfly files and use the “pop-up-buttefly-card-all-jennifermaker.svg” file. Thank you for alerting me to this!
Jennifer. The butterfly pop up cards when finished and folded should the measurements be 5×7 or 3 1/2x 4 3/4?
The card should be just a hair under 5″ x 7″ when folded. Are you having an issue with sizing? I found a problem with the sizing in DS3 and re-uploaded a new file, I think it was yesterday.
I have the password and go to get the Butterfly file and all that comes up is a hunch of jibberish letters, is there a different way to get it. I love it ouldmlike to try and make it. Thank You
Does it come up as a “Chrome” file when you unzip it, by chance?
Hi Jennifer,
Beautiful card. I downloaded the files yesterday and cut in DS3. It still cuts the card size approximately 31/2″ x 41/2″. I am able to group all and resize to 5×7, but thought you should know. Thank-you.
Thank you so much for all your creativity! I made this card for both my mother and mother-in-law for Mother’s Day. I then took the butterfly and made a mobile for my MiL. I just gave it to her this weekend, and she LOVES it! (As does my FiL.) Thanks again!
So happy to hear that, Susan! Thank you for letting me know the card was well received. And your mobile is AWESOME! Thank you for sharing that photo with me! 🙂
These are gorgeous. I’m going to make one for a birthday party. Will you share how to make an envelope to go with it?
I plan to post a series of envelope templates in the near future. Stay tuned. 🙂
Thank you God for naps!!! I’m with my grandkids right now and having cricut withdrawls! Fortunately he naps a little, so I get some time to troll. My gonna make it list keeps getting longer, but this one is at the top of the list!! I’m gonna make several to have on hand. SO MANY IDEAS floating around in my brain for this one………
I’ve noticed that you’re keeping a list! I hope you get lots of time to make things when you get back to your Cricut. 🙂
What a gorgeous card! Love how it pops out at ya! Thank you for sharing on Merry Monday! Hope to see ya next week! Sharing on Twitter!
Kim
Thank you so much, Kim! Much apppreciated. 🙂
These cards look amazing and your instructions are really clear. Im not sure my attempt would end up looking quite as professional and neat as yours though!
These are so pretty! Great tutorial! Thanks for sharing at The Blogger’s Pit Stop! Roseann from http://www.thisautoimmunelife.com
Thank you, Roseann!
Wow, this is amazingly detailed! Thanks for sharing it with SYC.
hugs,
Jann
What a pretty card! Love the detail.
Thank you!
That is gorgeous! It looks very realistic. Hopefully I can find some time to make it soon!
This is a lovely card and looks so effective! Gonna try this with my kids. #frugalmommas
Thank you so much!
So pretty! Thank you for sharing at Ravenwould.
Can this be resized to smaller dimensions. I am mailing many cards to an individual to be distributed and the larger the cards the more the postage. Just asking…
It is a beautiful card and looks like one even I can make. Will attempt right away!
Yes, just resize it the version that has all the layers in Cricut Design Space. If you go too small, the details might get hard to cut out, but you’d have to experiment to find out. 🙂
Just found your site – WOW. Love your butterfly card and cannot wait to try it. Thank you so much.
Thank you so much, Charlotte! Happy to have you here. 🙂
Wow! Thank you so very much for this most Beautiful butterfly card tutorial! You do an amazing job explaining the steps! I haven’t actually made one yet but will in the near future. I totally love love love butterflies! They have a special meaning to me since my previous husband passed away. They hold the meaning of New Life to me. I really feel Blessed to have found your site. Thanks again so very very much!
God Bless you and your family!
You are very good teacher. Merci beaucoup!
Beautiful. Where can I get the large butterfly die cut?
It’s not a die cut, it’s an SVG file. You can download the SVG file from my resource library. Directions are in the tutorial. 🙂
Super easy! I am using a friend’s Cricut Maker (saving to get my own!) and this is the first papercraft, and first pop-up card ever, that I’ve made. I did the traditional Monarch for my first one; it turned out so well I’ve cut out two more, in untraditional colors, to play with! I didn’t have spray adhesive and so used a glue stick. Can’t wait to try some of your other projects. Your designs are amazing!
Wonderful! So glad to hear this, Robbin!
THANK YOU FOR THIS! So easy to follow… will buy your instructional book just because I want to support you!
Very inspirational! Thank you for sharing!
How super thoughtful! I’m sure your loved ones enjoy getting such creative, handmade cards like this in the mail. I love the purple butterfly one, but the monarch is super cute also. <3 Love it!
I am a beginner to my cricut and you are such a great teacher! I don’t know why you don’t have a million followers! I love butterflies and I am confident I can do this! Love your designs!!
can’t thank you enough for this insightful and encouraging blog! I am new to this and attempted to make this beautiful card. I can’t wait to send it to someone special!!
thanks for the tutorial. I have made a couple of mugs and now I am working on thankyou cards for my daughters wedding. love love love the information and your videos
Wow!! Thank you!! What an amazing card! I can’t wait to try it. 🙂
signed up got three passwords and still cannot access your butterfly files
Hi Janice, all of my free designs are available for download at my Resource Library https://jennifermaker.com/resource-library/. Also, a member of my team just sent you an email with more detailed instructions to download the card. If you are still can’t locate the file, please do reach out to our Communications Heroes at [email protected]. They’ll be happy to assist!
Jennifer, I just made the monarch butterfly card. Never thought I could make anything so cool! Your directions were great and the video helped too! I would send a picture but I am not sure how to upload that and I do not have facebook, but wanted to say thanks for the cool card and directions!
Jennifer I just love this butterfly card. Thank you for sharing…
Thank you, Luz! I’m so glad to hear you are enjoying it!
Thank you Jennifer ,, one of the beautiful and creative crafts, thank you for sharing it with us 🙂
Thank you Jennifer for your pop-up-butterfly ideas. I don’t have a cricut. What other butterfly pattern can you offer to get a similar effect? Appreciate your help.
Hi Audrey! If you don’t have a Cricut machine that is okay! I provide you with the PDF file for almost all of my projects. Just look for the PDF to print out the design to cut by hand!
I love your designs!! You have helped me so much and I am learning how to do so many new things!! Thank you!!
Wonderful, Shirlyn!
Bravo, it’s lovely!
Thank you, Deb!
Having trouble with the butterfly card. It keeps making a small size . What am I doing wrong? So frustrated!
Hi Cathy! If you are using an iOS device, please resize it to 11.5″x11.5″ and you should be good to go!
Hi 🙂
I have a Cricut Joy, can I make this butterfly card?
Kind Regards,
Sabina from the Netherlands
Hi Sabina! The Joy is restricted to 4.5″ wide, but give it a try! You never know till you try! You will just have to size it down to fit your machine.
Thanks for the design! After I downloaded the SVG and uploaded it to Design Space, I had to resize each element according to the sizes you give in the instructions. However, you don’t give a size for the orange page. What is the proper size I should enter? The size it uploaded as is much too small. Thank you!
The easiest way to resize this file, Mary, is to use the “stacked” version of the SVG. Then all of your elements will size properly and in the proper proportions to each other! 🙂
Hey Jennifer, I have a question, I love all your designs can most of them be made with a cricut joy or the bigger machines. I made some of the butterfly cutouts and love them. But I love all of them. Thank you for helping me out on learning . Tammy B
It depends on the design, Tammy! Some projects can’t be made on a Joy because of their size, or because of the material they require. But we try to design as many of our projects as possible so that Joy owners won’t feel left out! Thank you for crafting with us!! 🙂
Awesome, thanks for sharing