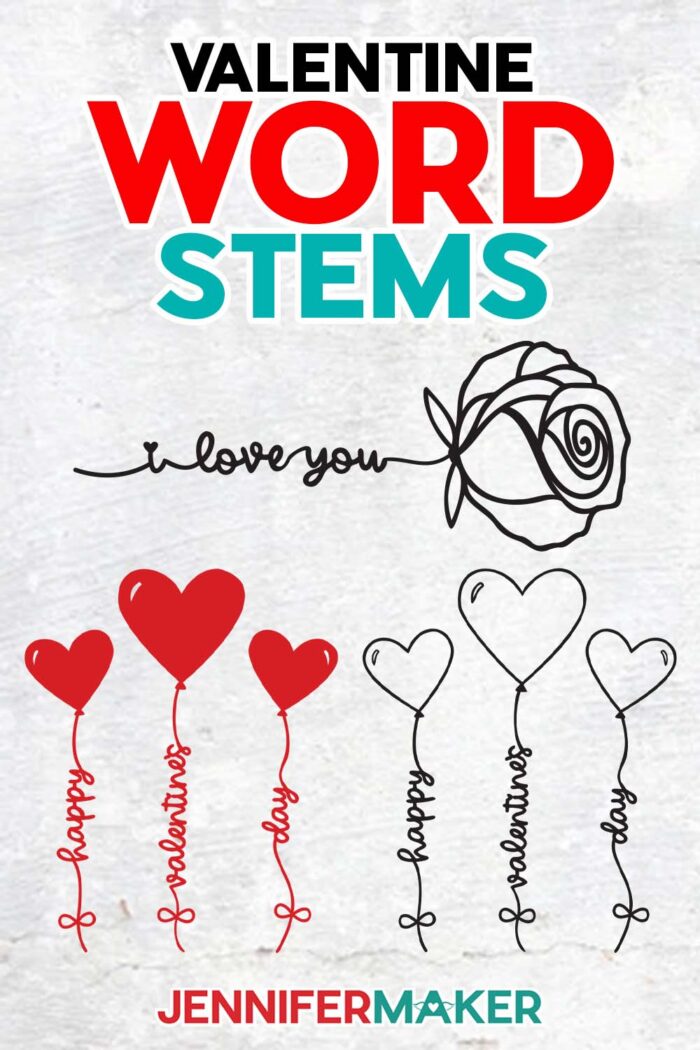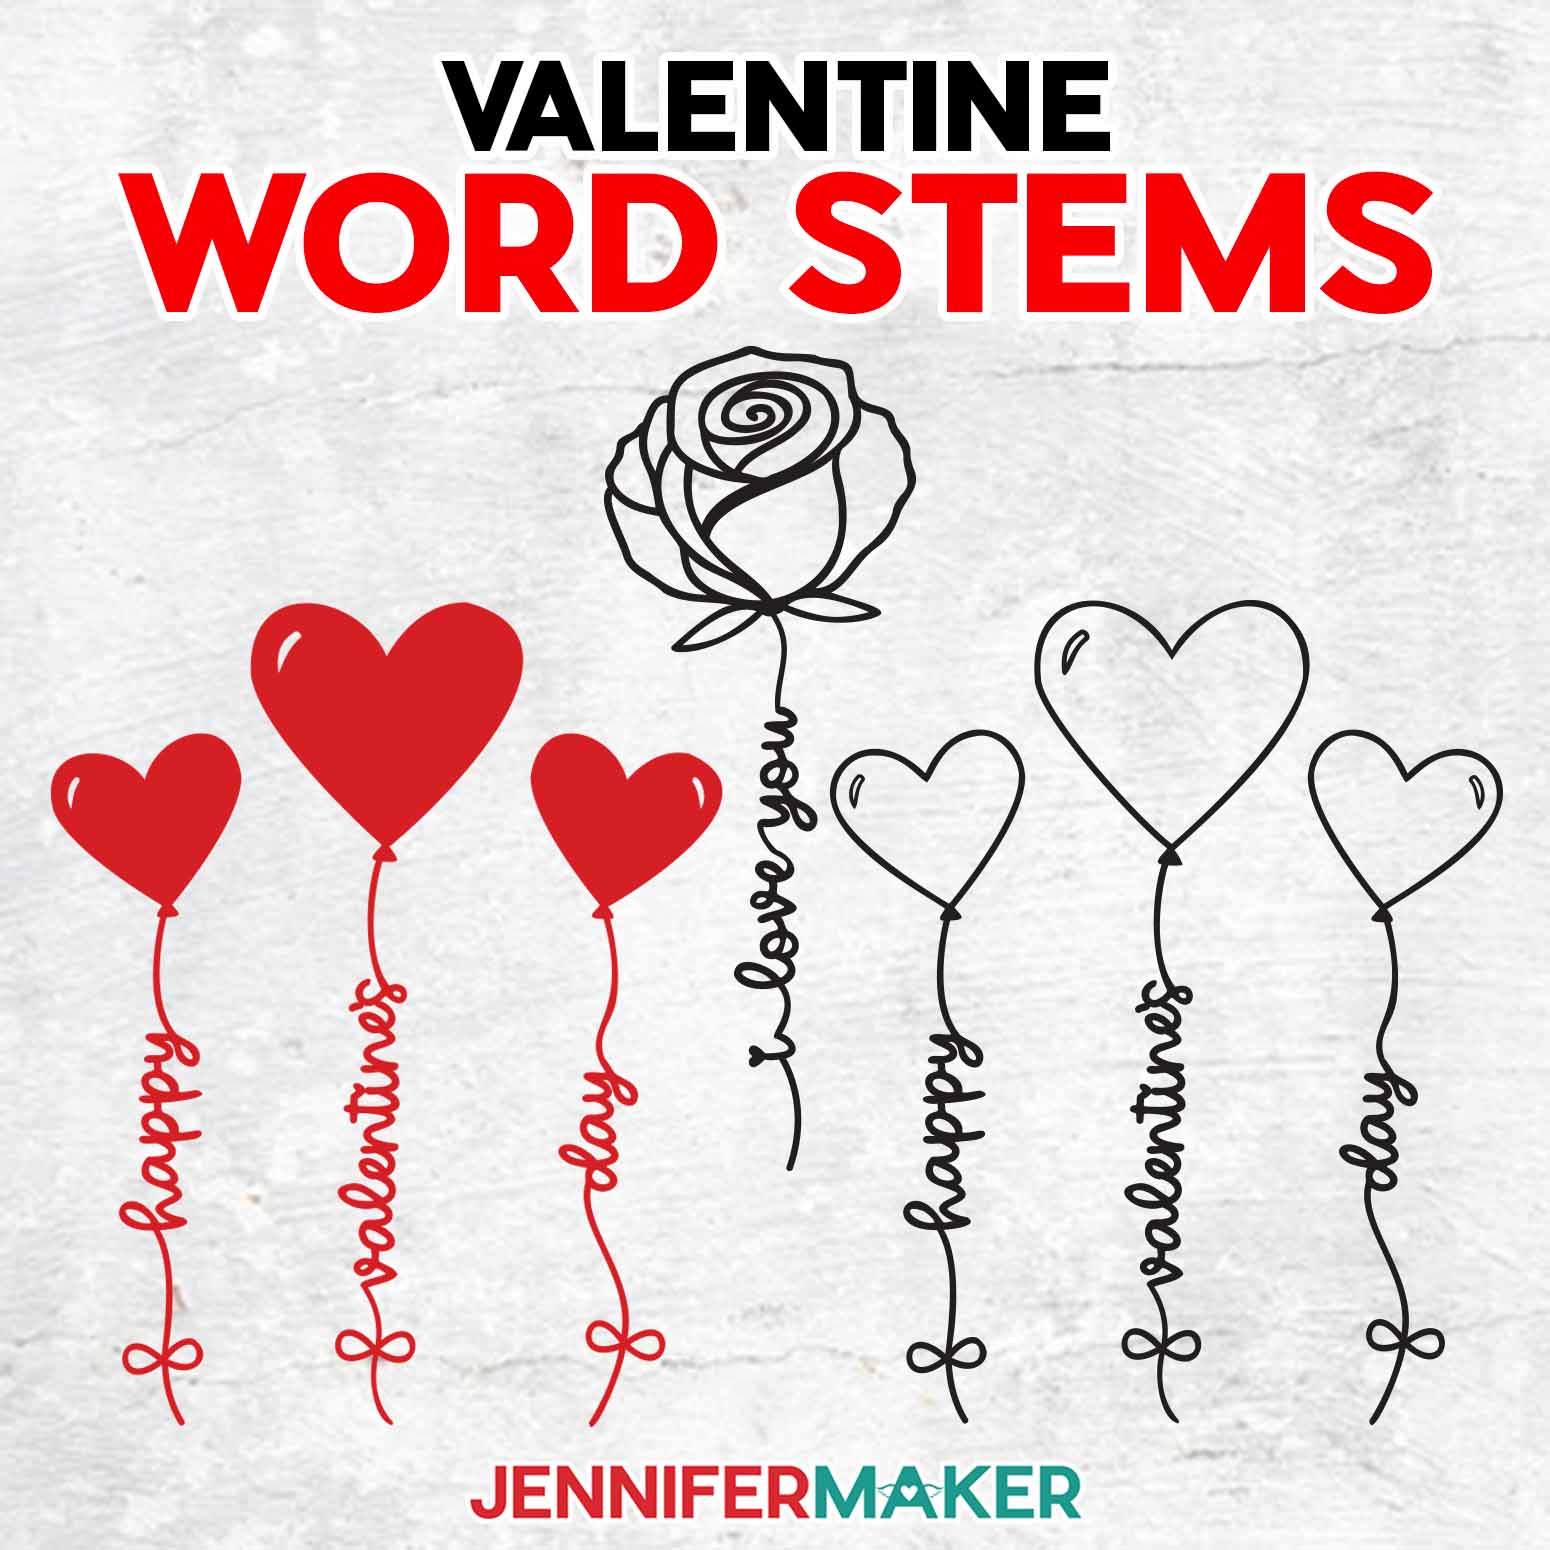
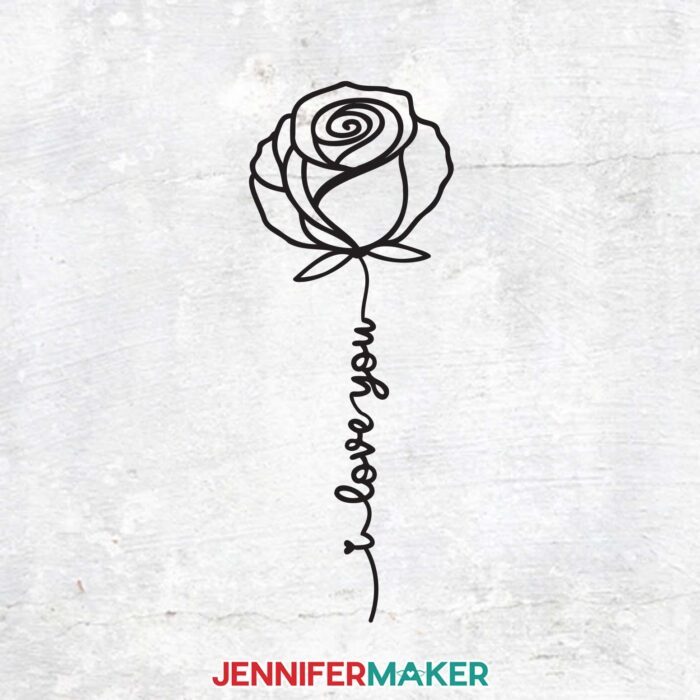
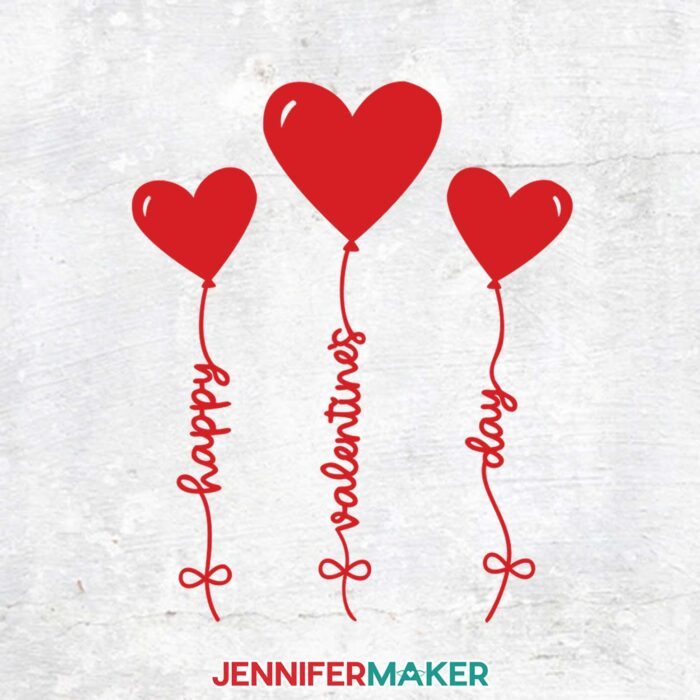
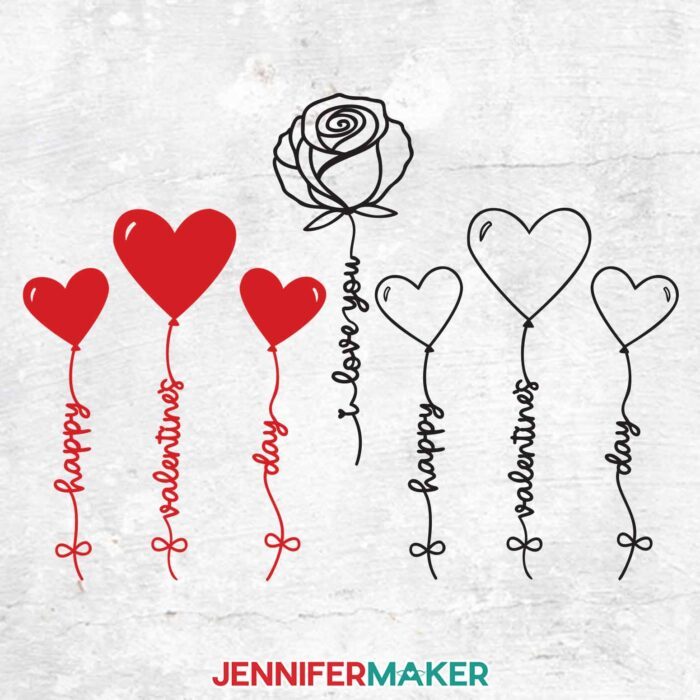
Learn how to make vinyl love phrase flowers!
Watch the full step-by-step tutorial to make a sign or similar project with the designs:

Materials to Make Love Phrase Flowers
View my Amazon shopping list with the exact items I used.
- One (1) Wooden Chalkboard Sign
- White Permanent Vinyl
- Cricut StandardGrip Transfer Tape
- A way to cut your vinyl – I’m using the Cricut Maker 3, but you can also use the Cricut Maker, a Cricut Explore Series machine, or the Cricut Venture
- Cricut Green StandardGrip Machine Mat 12″ x 24″
- Brayer
- Weeding Tool
- Scissors
- Scraper
- Paper Trimmer
- Ruler
- Pencil
- Cricut Bright Pad (Optional)
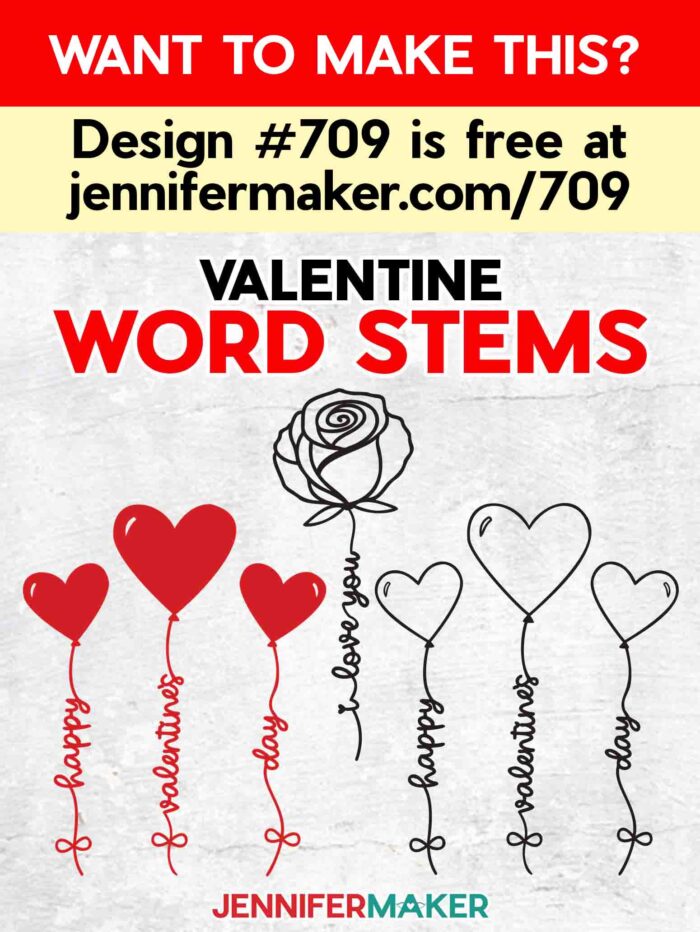
- Design #709 (My free SVG/DXF/PDF design files are available in my free resource library – get the password by filling out the form at the bottom of this page)
How to Make Love Phrase Flowers with Vinyl
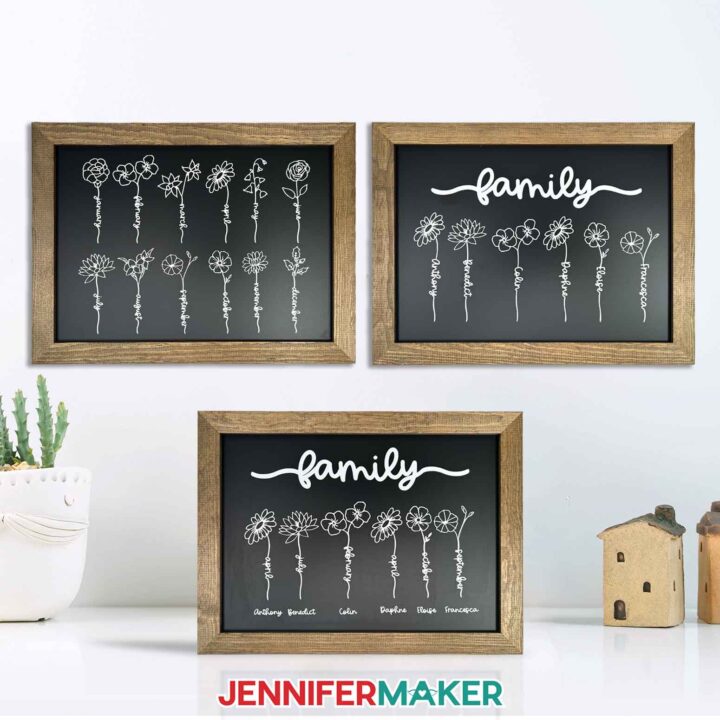
Birth Month Flower Word Sign
Learn how to make flower word vinyl decals on a chalkboard sign!
Materials
Tools
- A way to cut your vinyl - I’m using the Cricut Maker 3, but you can also use the Cricut Maker, a Cricut Explore Series machine, or the Cricut Venture
- Cricut Green StandardGrip Machine Mat 12" x 24" -OR-
- Cricut Green StandardGrip Machine Mat 12" x 12" (for a smaller sign)
- Brayer
- Weeding Tool
- Scissors
- Scraper
- Paper Trimmer
- Ruler or Tape Measure
- Pencil
- Cricut BrightPad (Optional to help with weeding)
Instructions
STEP 1: GET MY FREE FLOWER WORD VINYL DESIGNS
First, download my Flower Word Vinyl Design files from my free library – look for Design #638. Alternatively, you can use the Save This Project form near the top of this post and the design link will be emailed to you.
In the main folder, you’ll find an SVG file with my vinyl flower designs to cut on a cutting machine. There is also a DXF version with cut files, and a PDF version you can print and cut by hand.
Upload the SVG file to Design Space to get started.
TIP: If you’re not sure how to upload, go to jennifermaker.com/svgs to learn how to unzip and upload SVG files.
STEP 2: PREPARE AND CUT YOUR FLOWER WORD DESIGN
CRICUT DESIGN SPACE
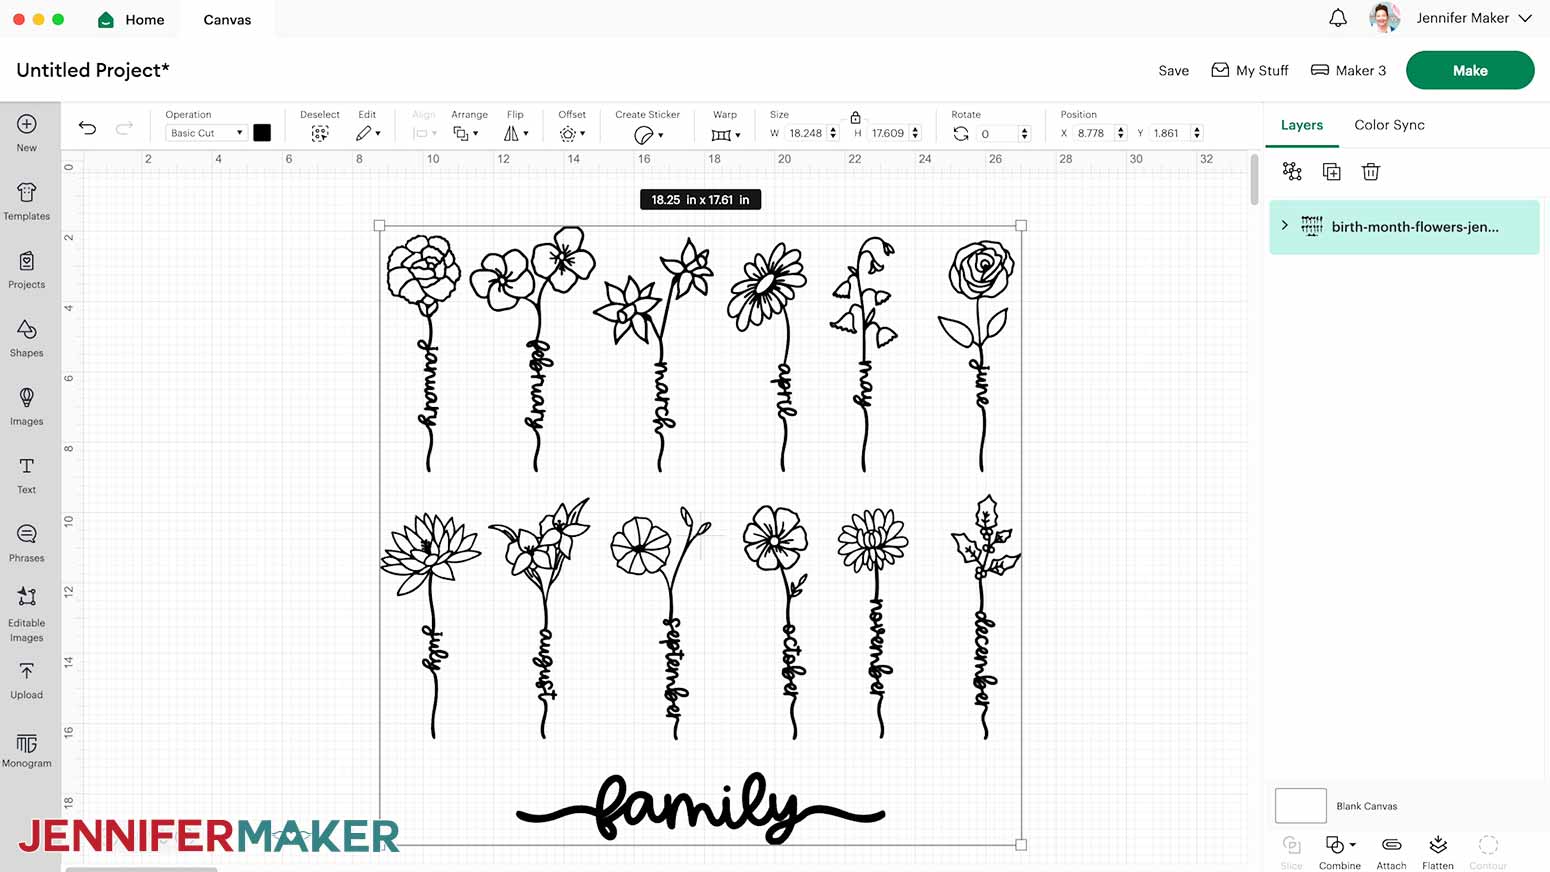
- Open Cricut Design Space and click “New Project” and then “Blank Canvas” in the pop-up window.
- Click “Upload” and then “Upload Image.”
- Click “Browse.”
- Select the “birth month flowers” SVG file and click “Open.”
- Click “Continue.”
- Click “Upload” to add the design to your Canvas.
- Click the “Minus (-)” icon in the lower left corner to zoom out and see everything on your canvas.
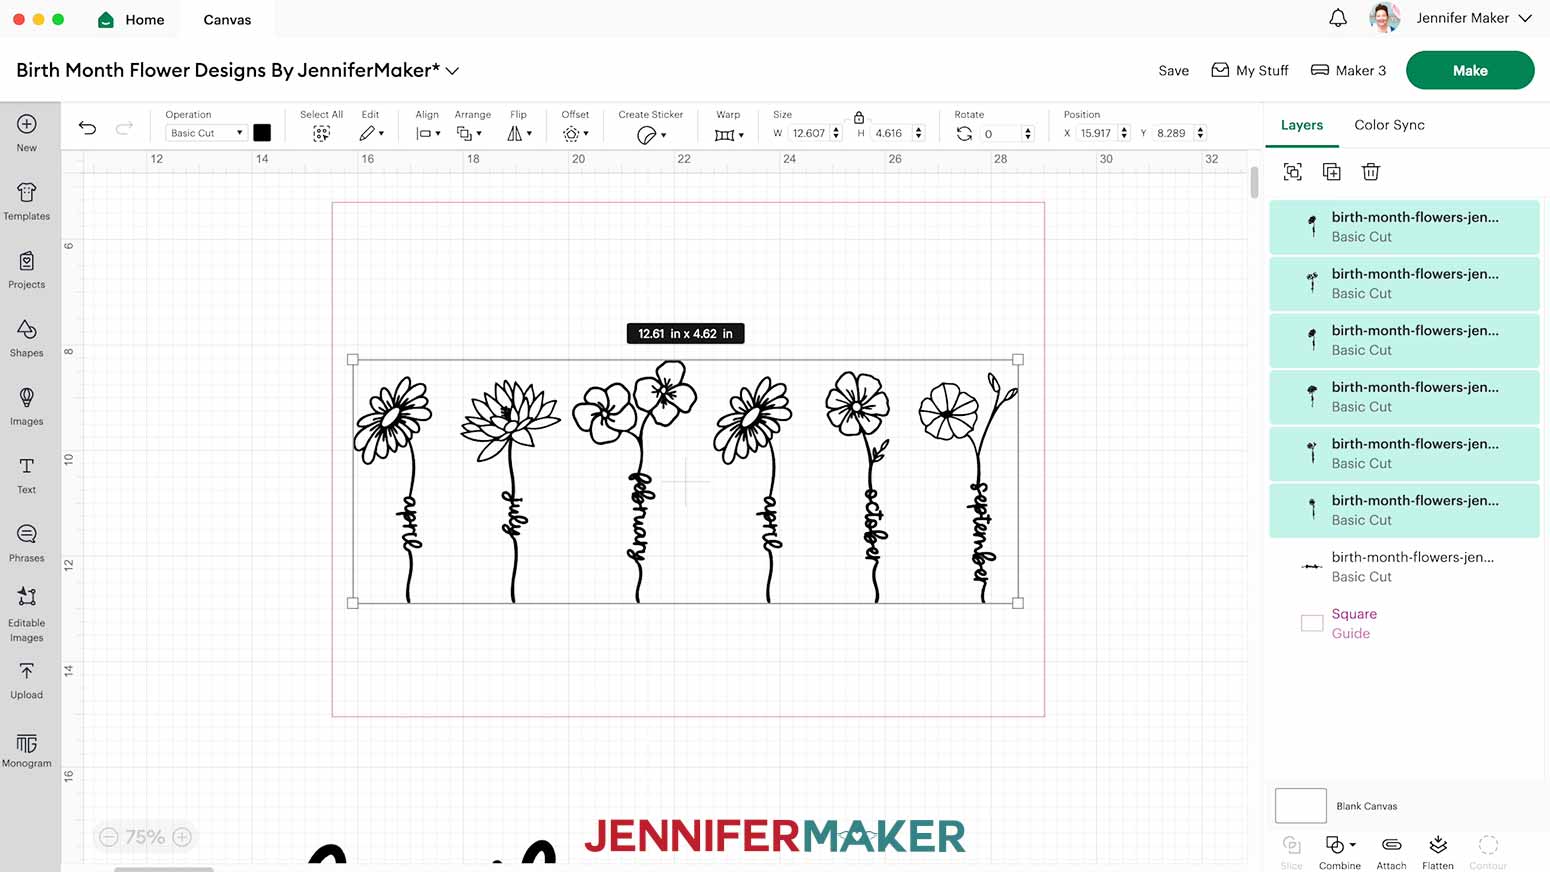
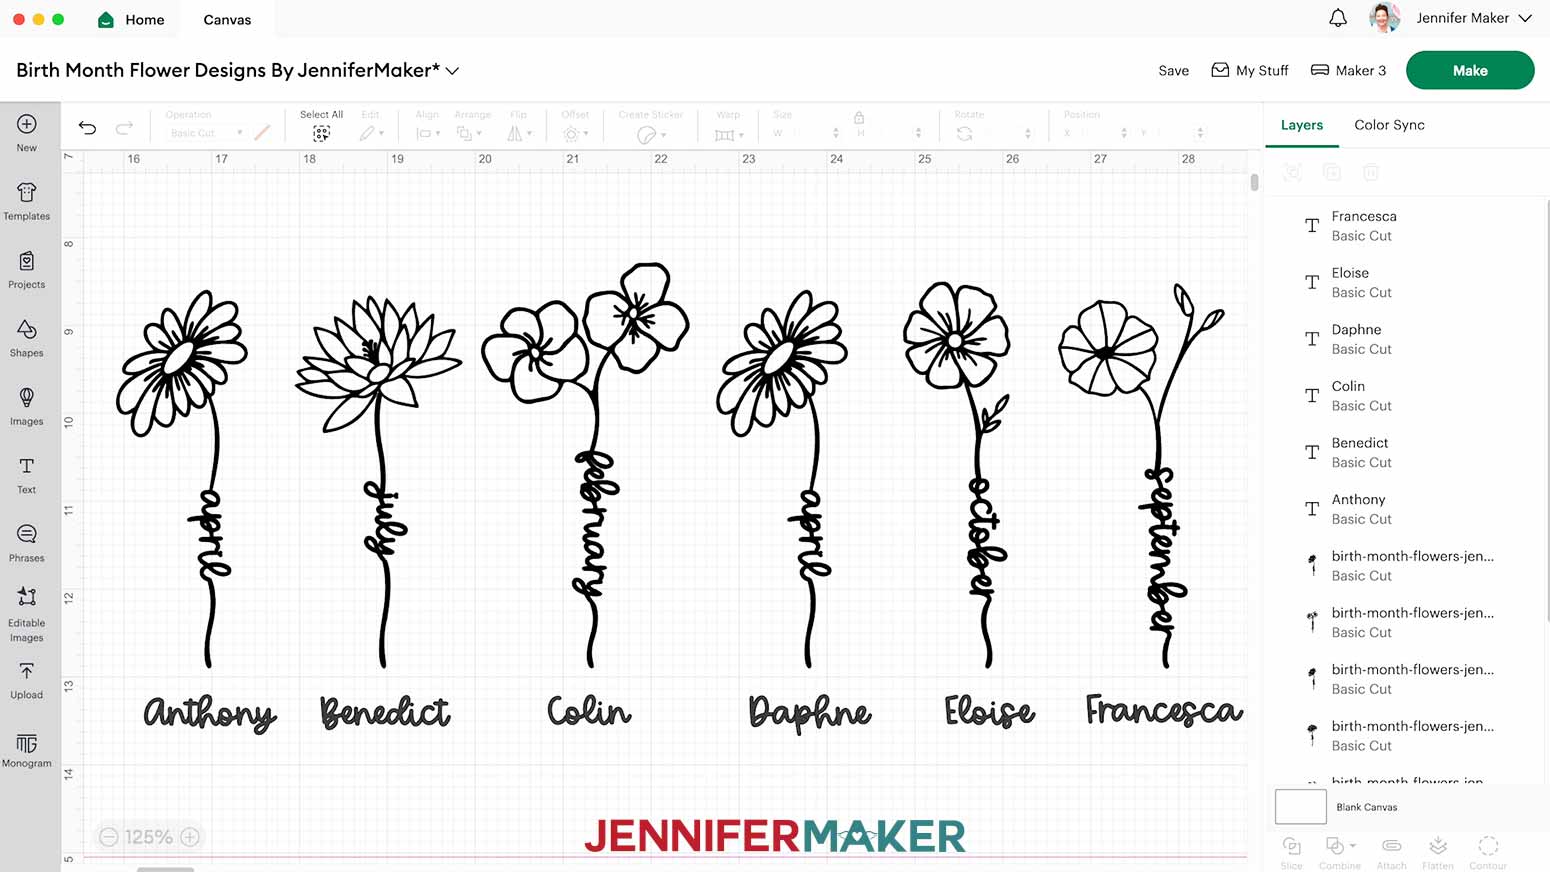
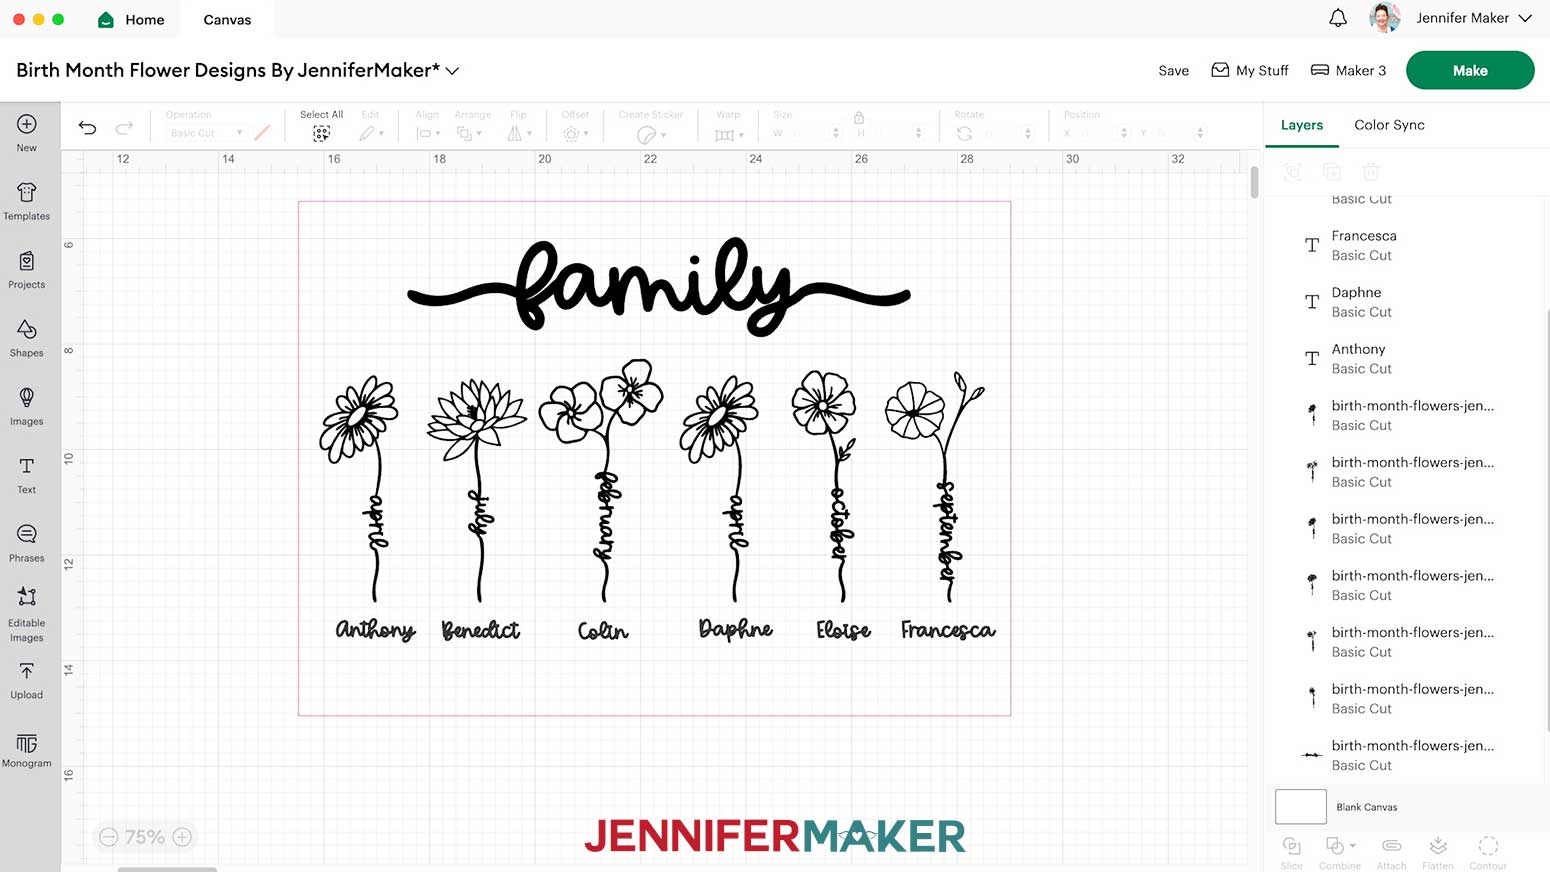
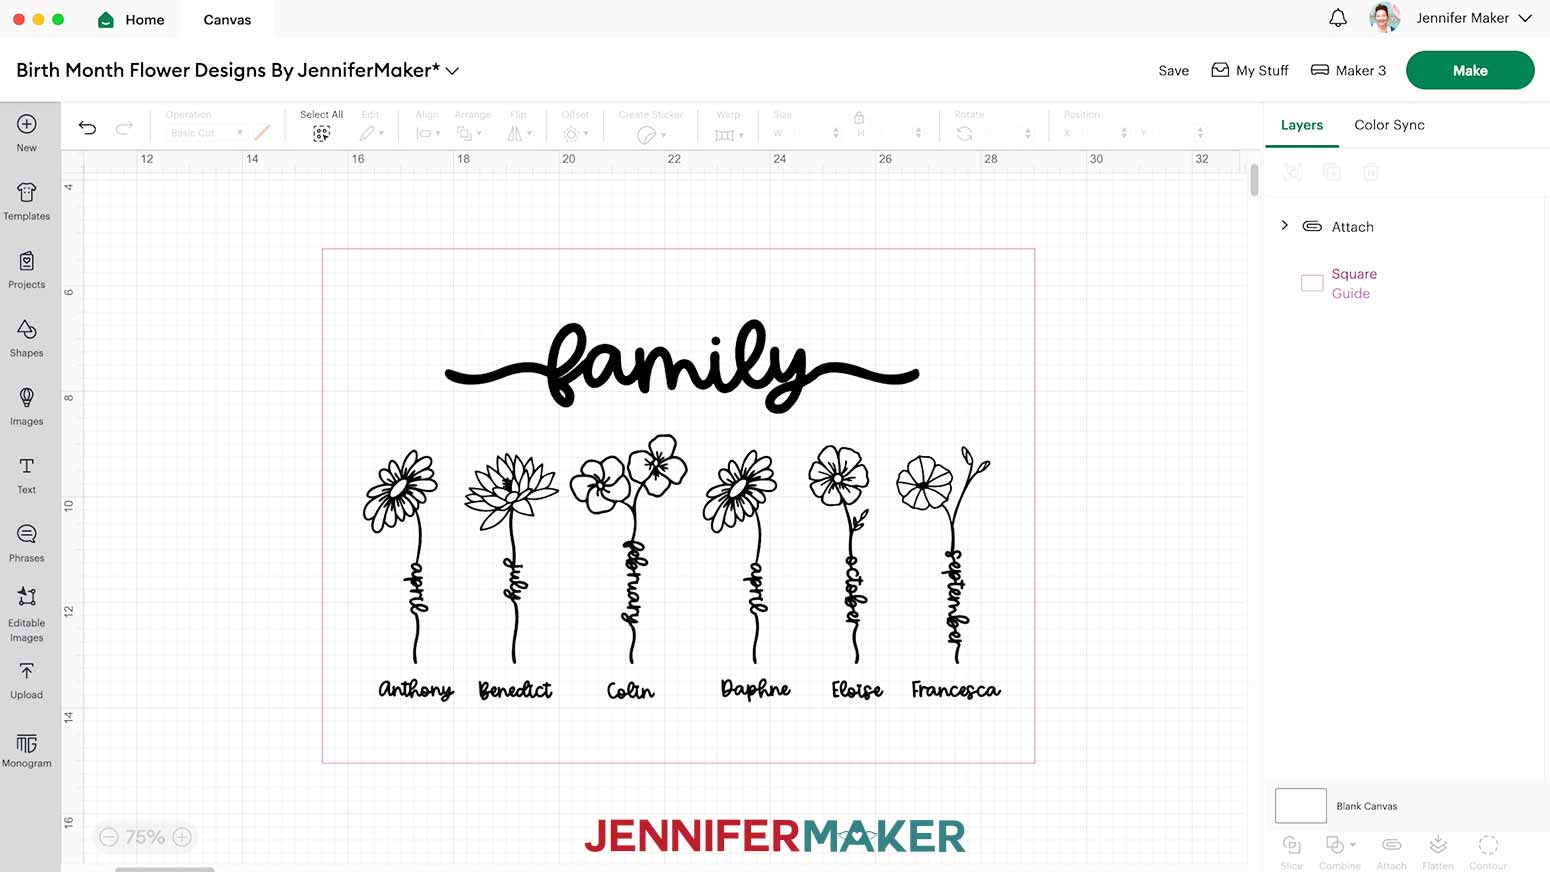
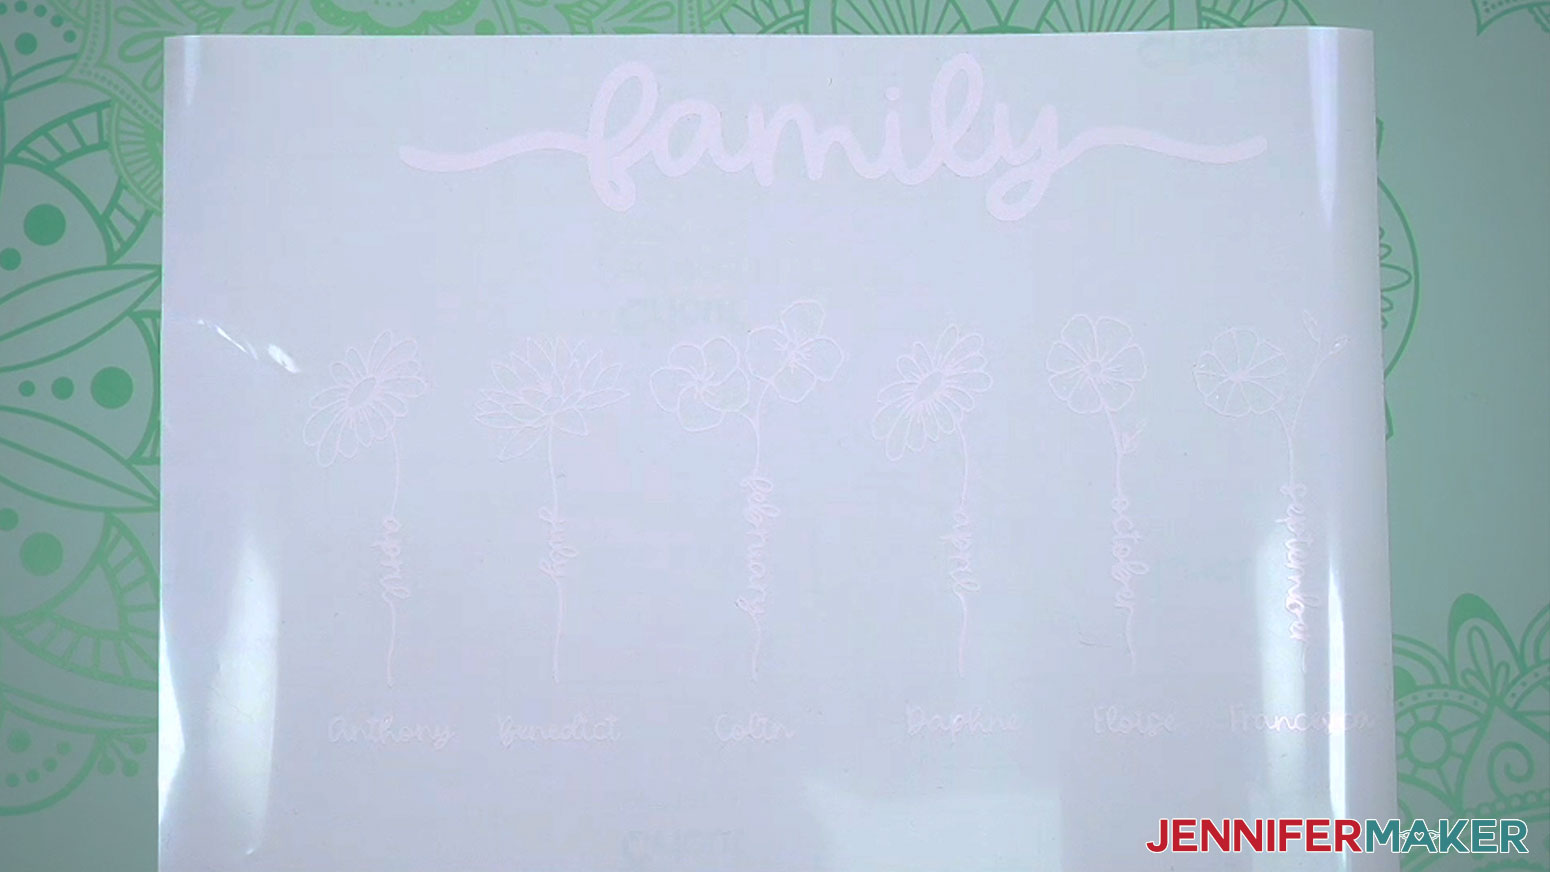
NOTE: There are twelve flowers on your Canvas, each one containing the month of the year it is associated with written in the stem. There is also a sentiment that says “family.”
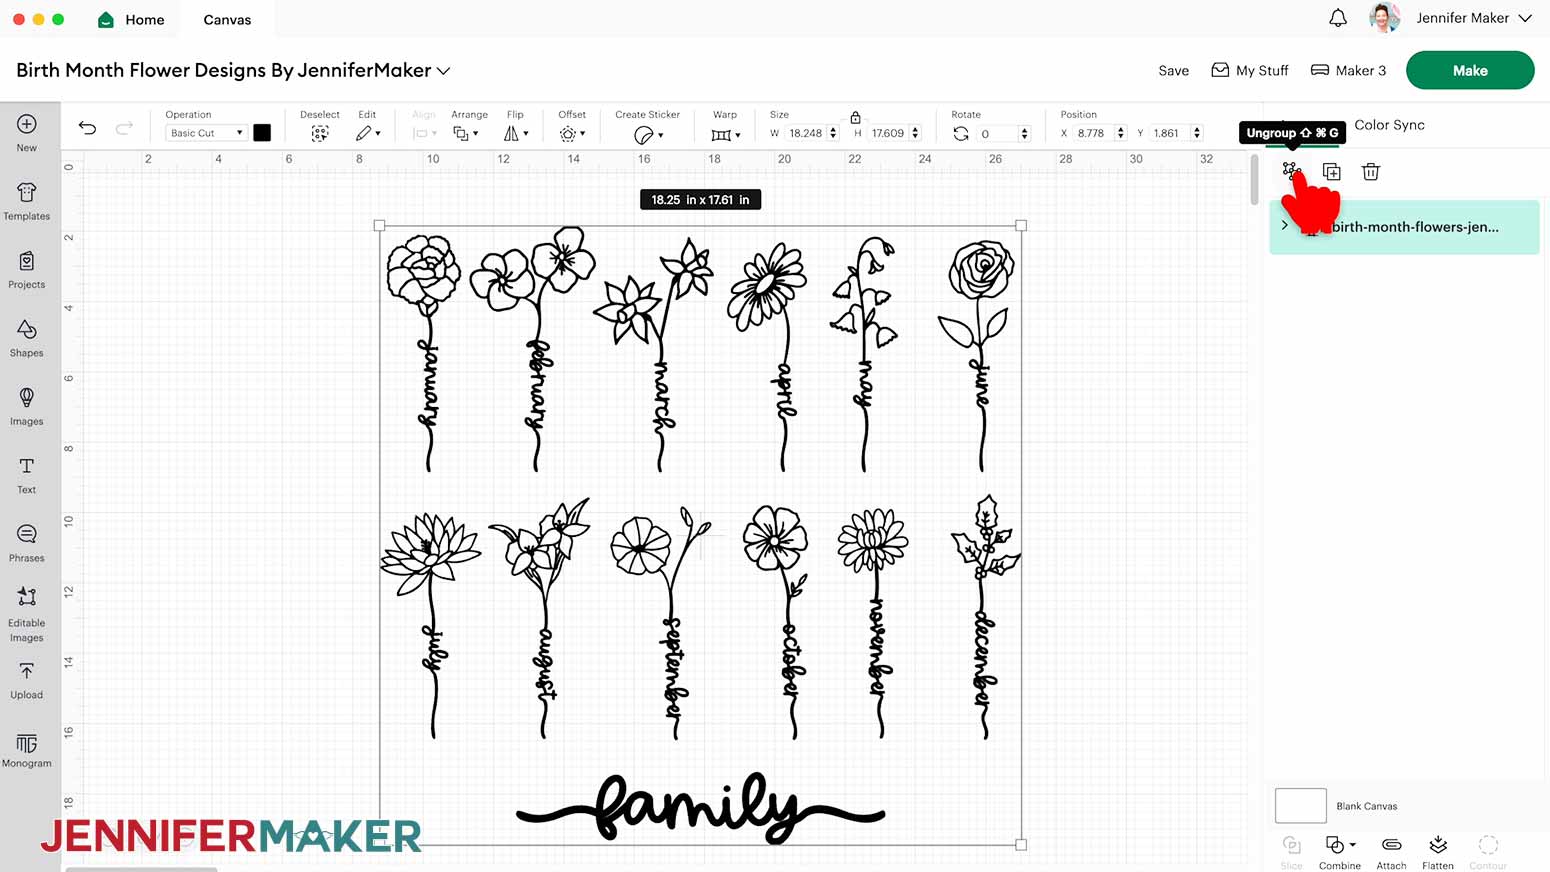
- Click “Save” and give your project a name.
- Ungroup the design.
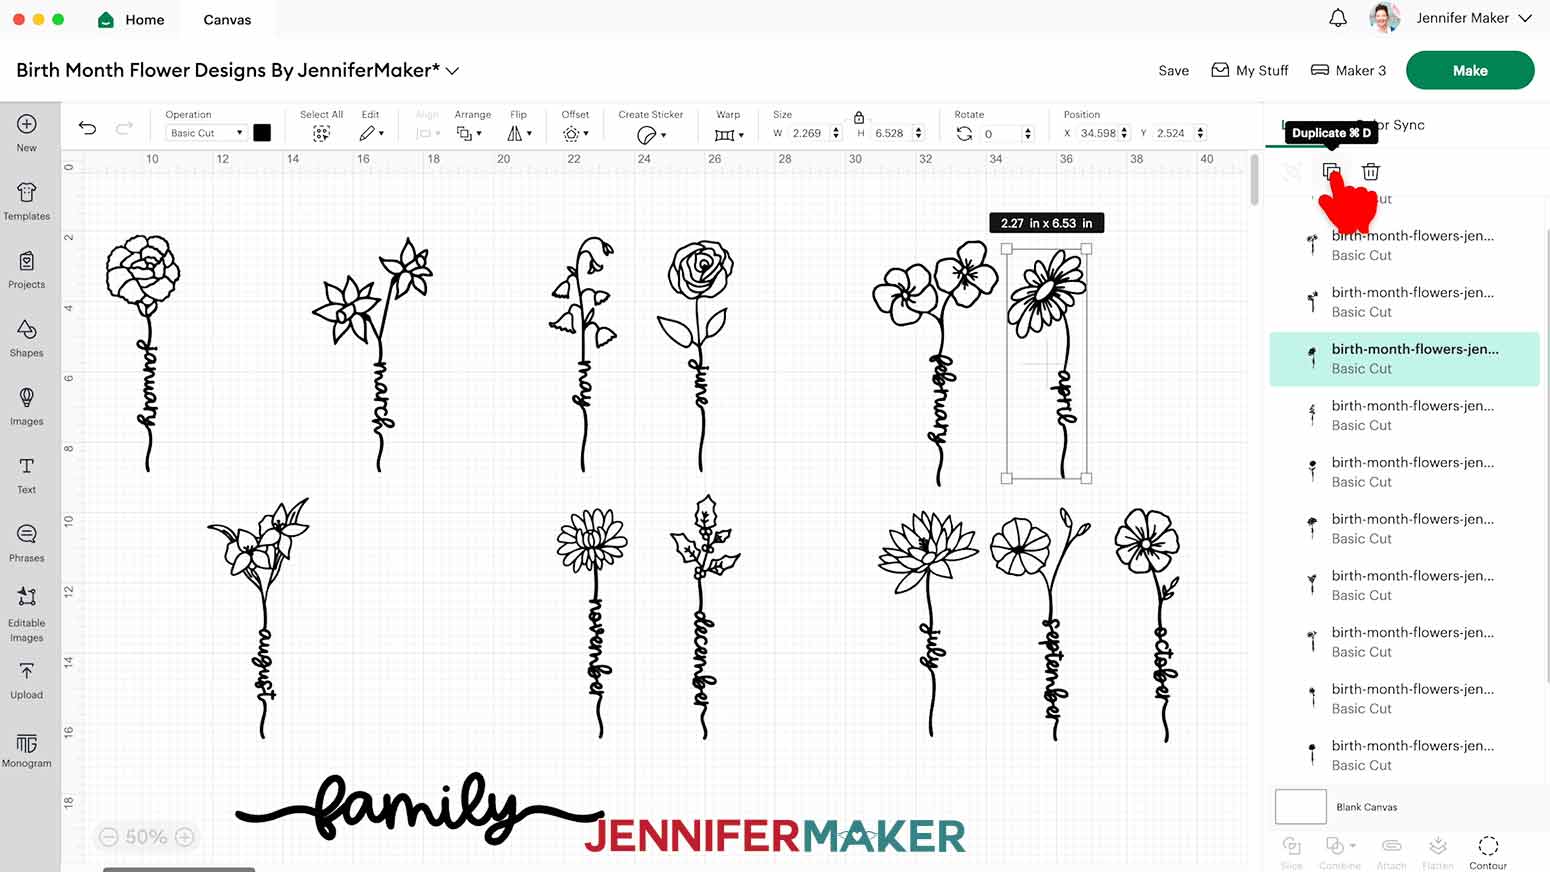
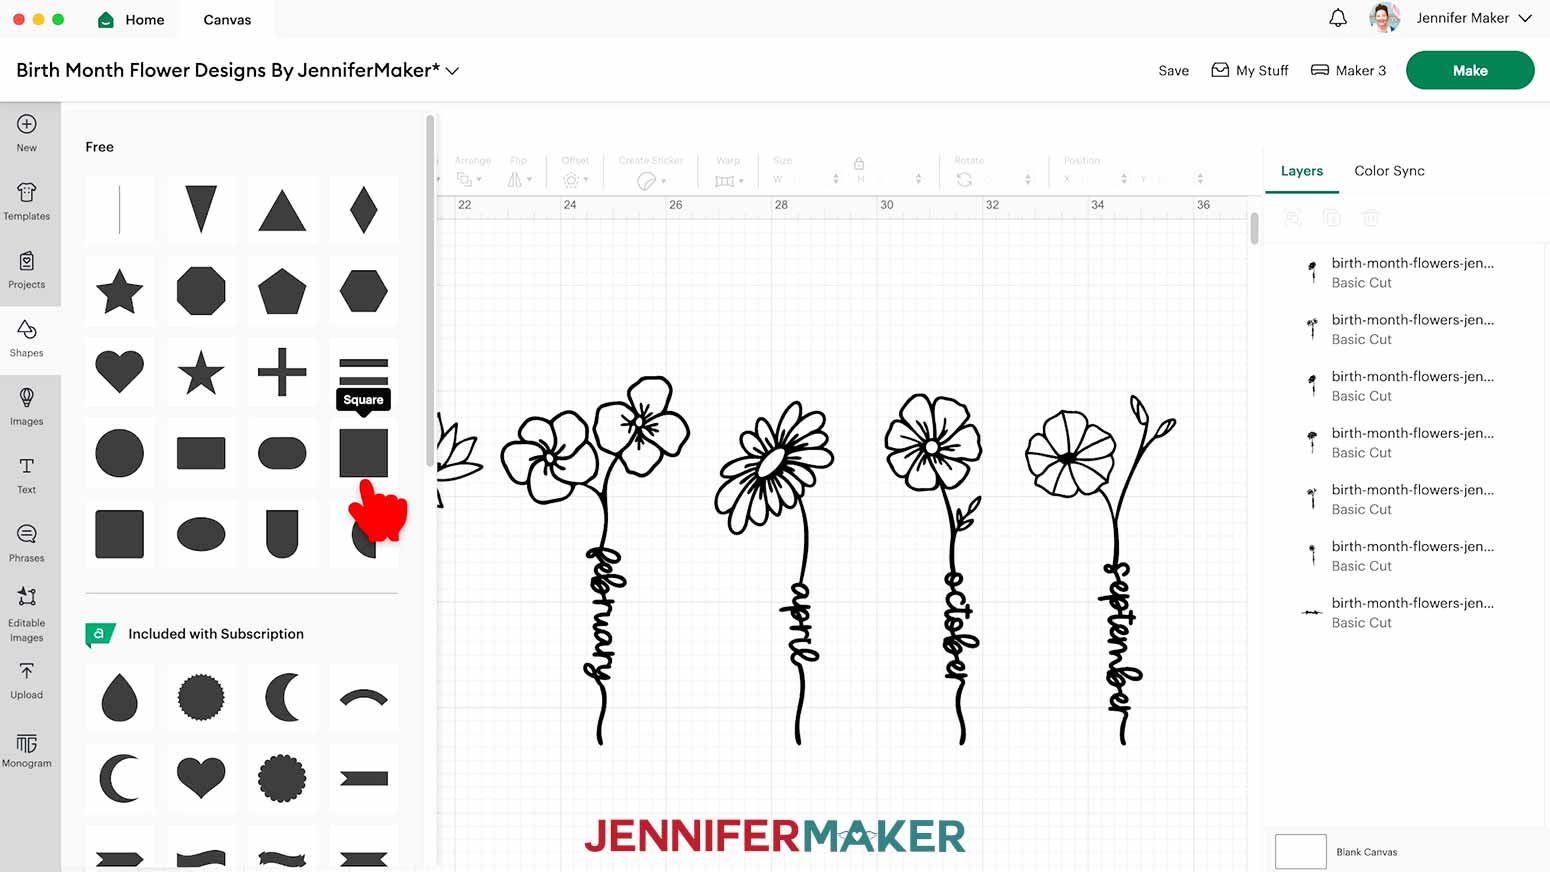
- Click and drag the flowers you want to use off to the side.
NOTE: I’ll keep February, April, July, September, and October. - To create a copy of a flower, select it and click on the “Duplicate” icon.
NOTE: I’ll duplicate the April flower since I need two for my design. - Drag a bounding box around the flowers you don’t want to use and click the “Trash” icon to delete them.
- Arrange the flowers left to right in the order you want.
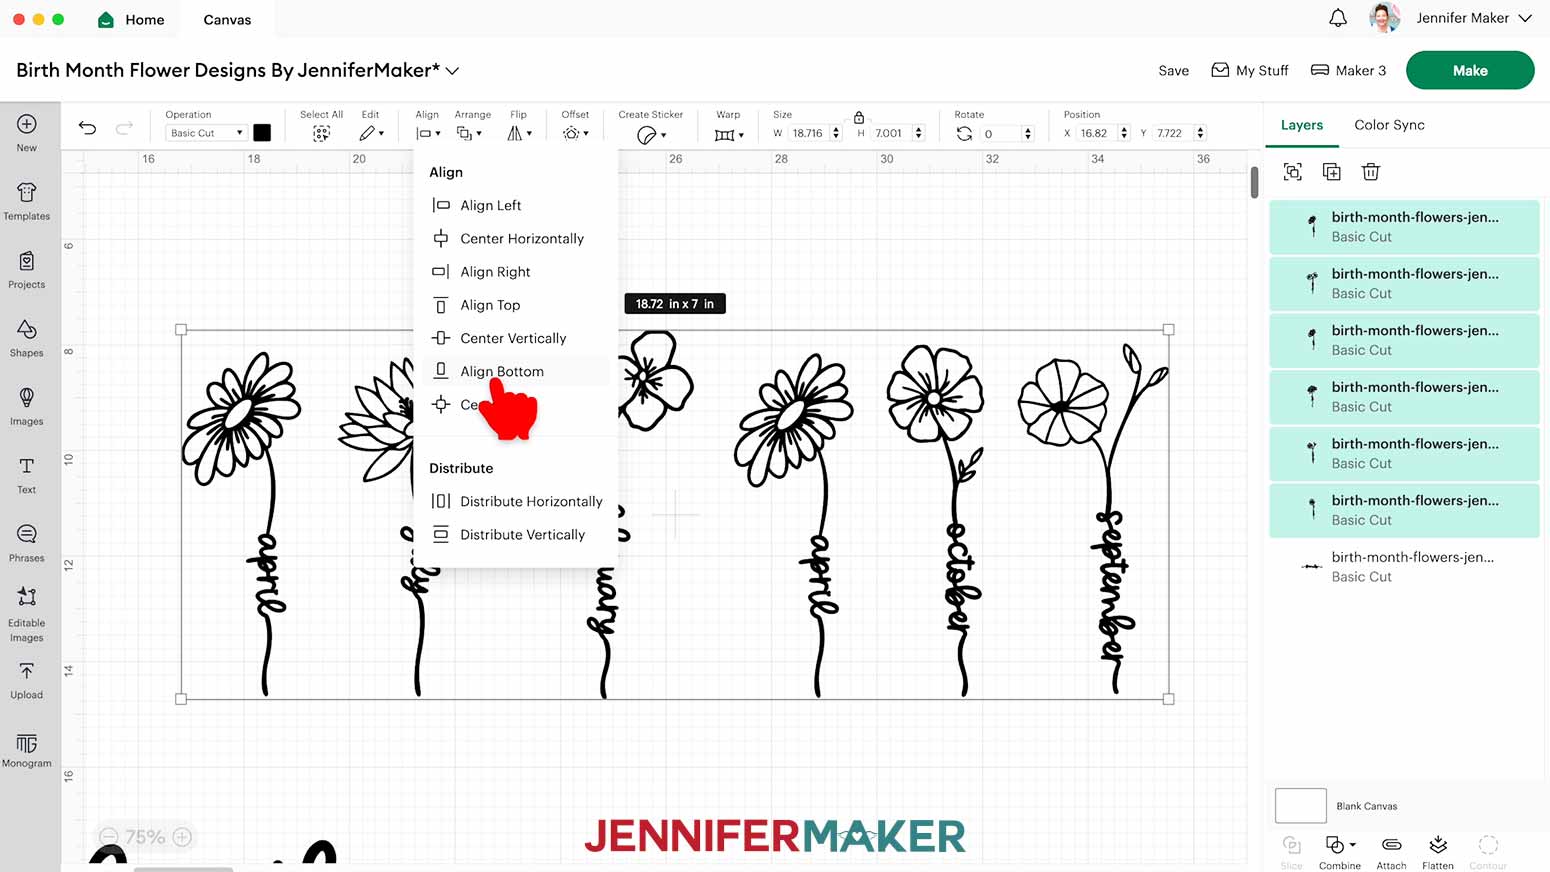
NOTE: I’ll follow this order: April, July, February, April, October, September. - Drag a bounding box around the flowers, click “Align,” and then select “Align Bottom” so their stems are aligned on the same base line.
- Adjust the spacing between each of the flowers using the left and right arrow keys.
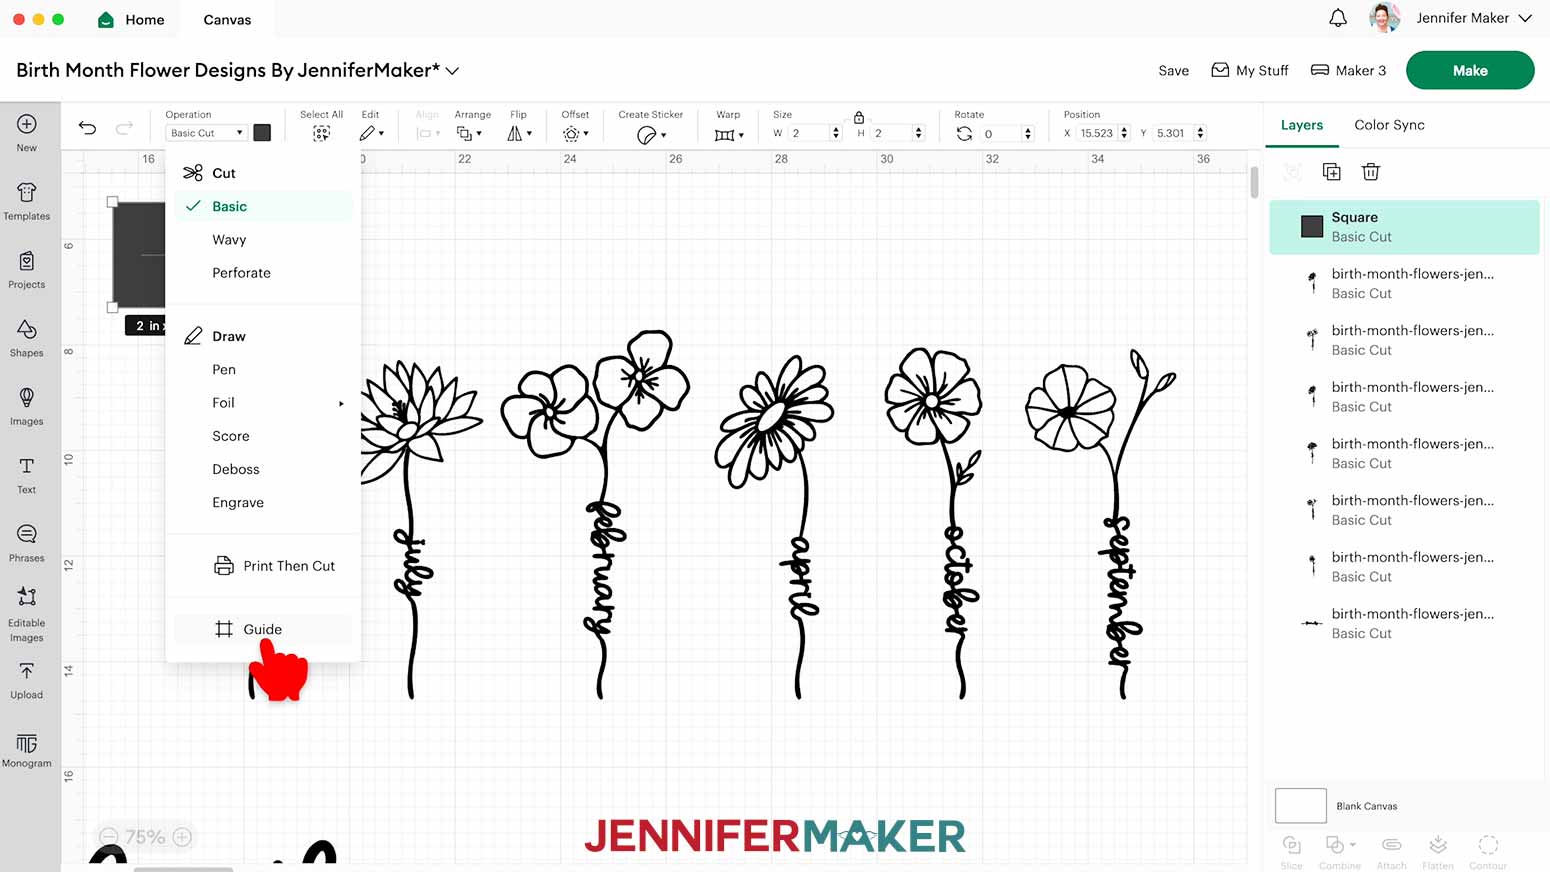
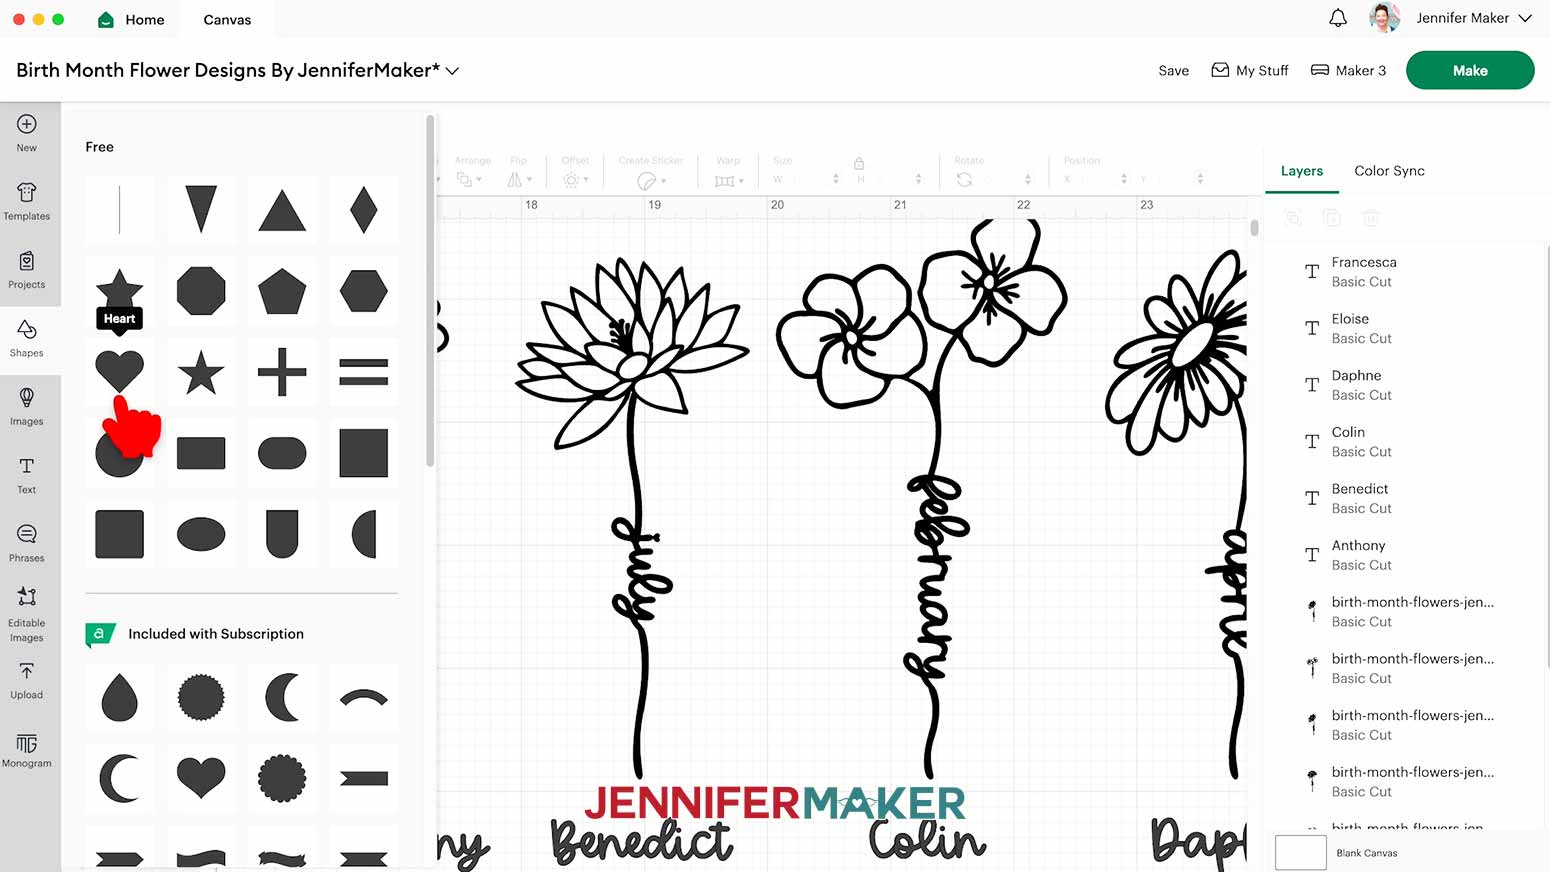
NOTE: You can also use the up and down arrows in the “X” field of the Position menu to move the flowers left and right. - Click on “Shapes” to add a free Square to your Canvas.
- Select the square and click the “Operation” menu, then click “Guide” to change the square to a Guide layer.
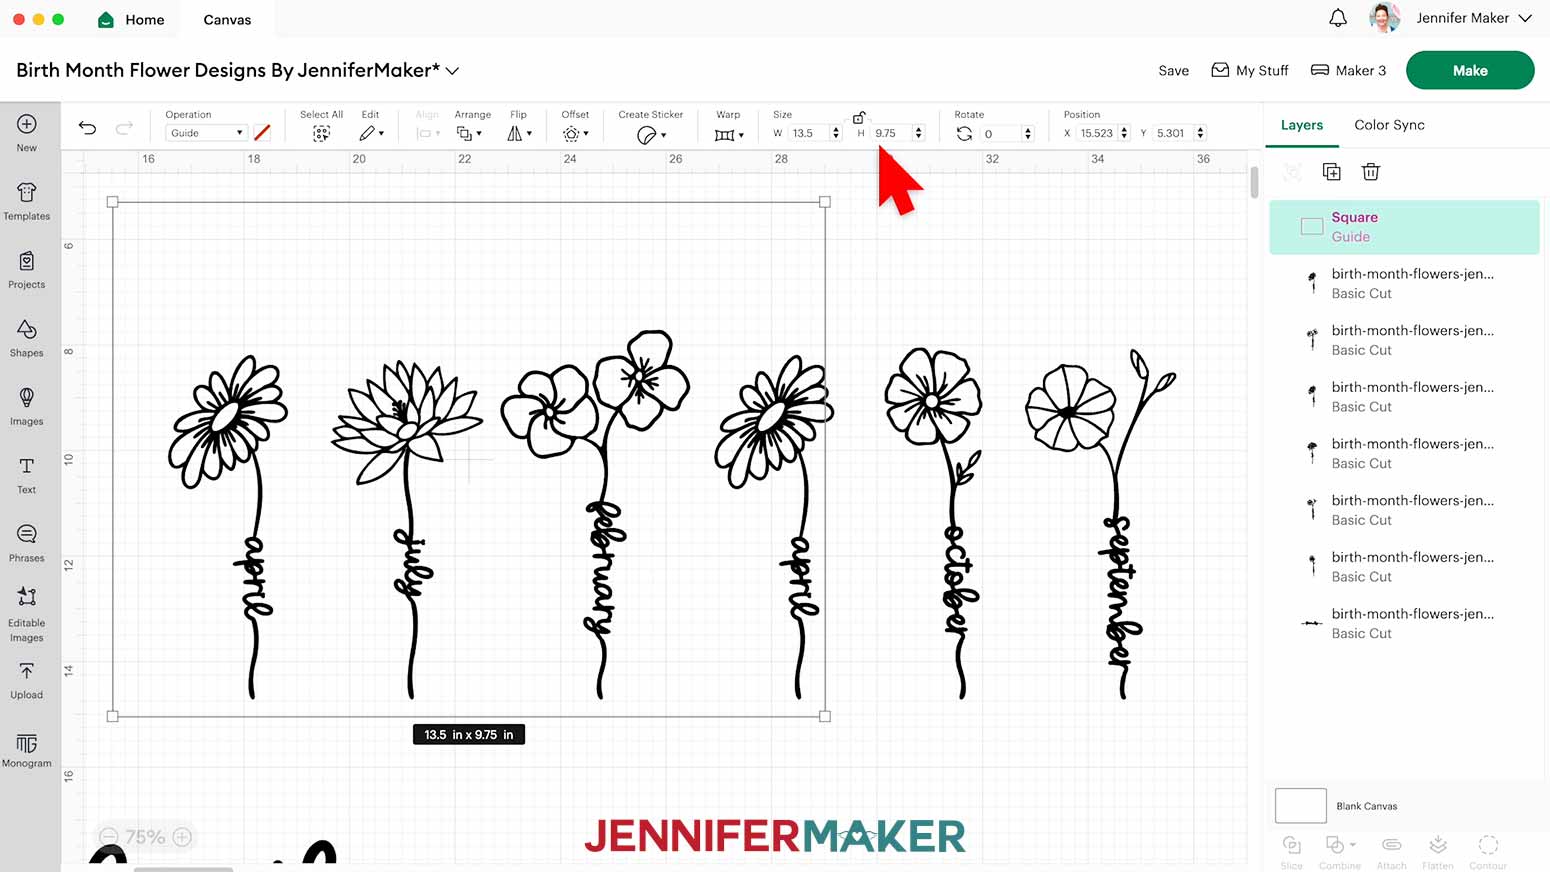
NOTE: The Guide layer is for planning your layout, and will not cut with your final design. - With the “Lock” icon open, type “13.5” into the “W (width)” box and “9.75” into the “H (height)” box to match the dimensions inside your chalkboard sign’s frame.
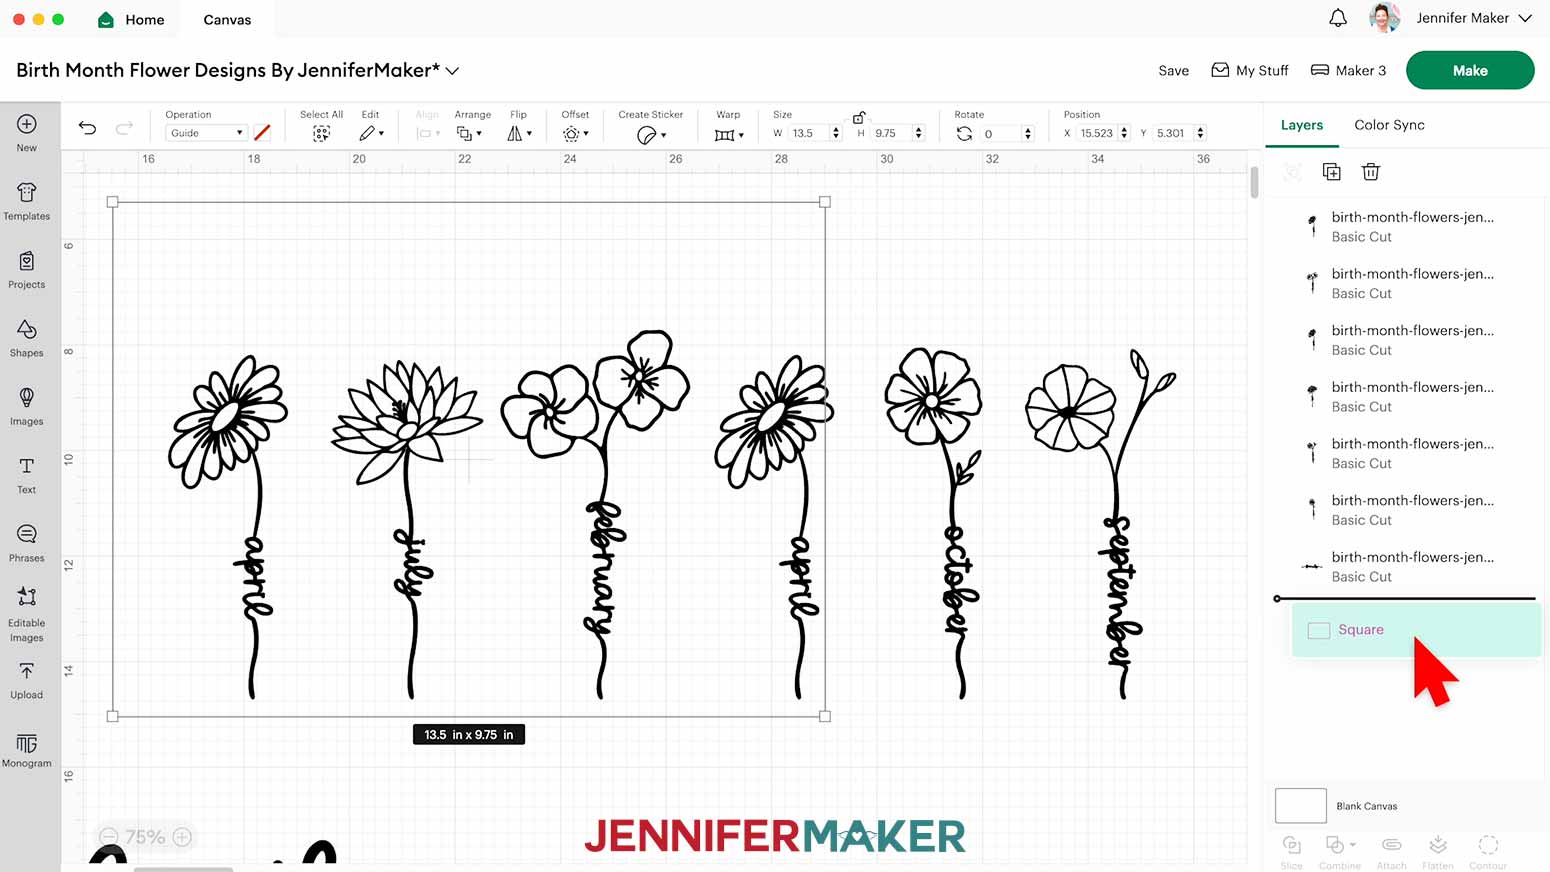
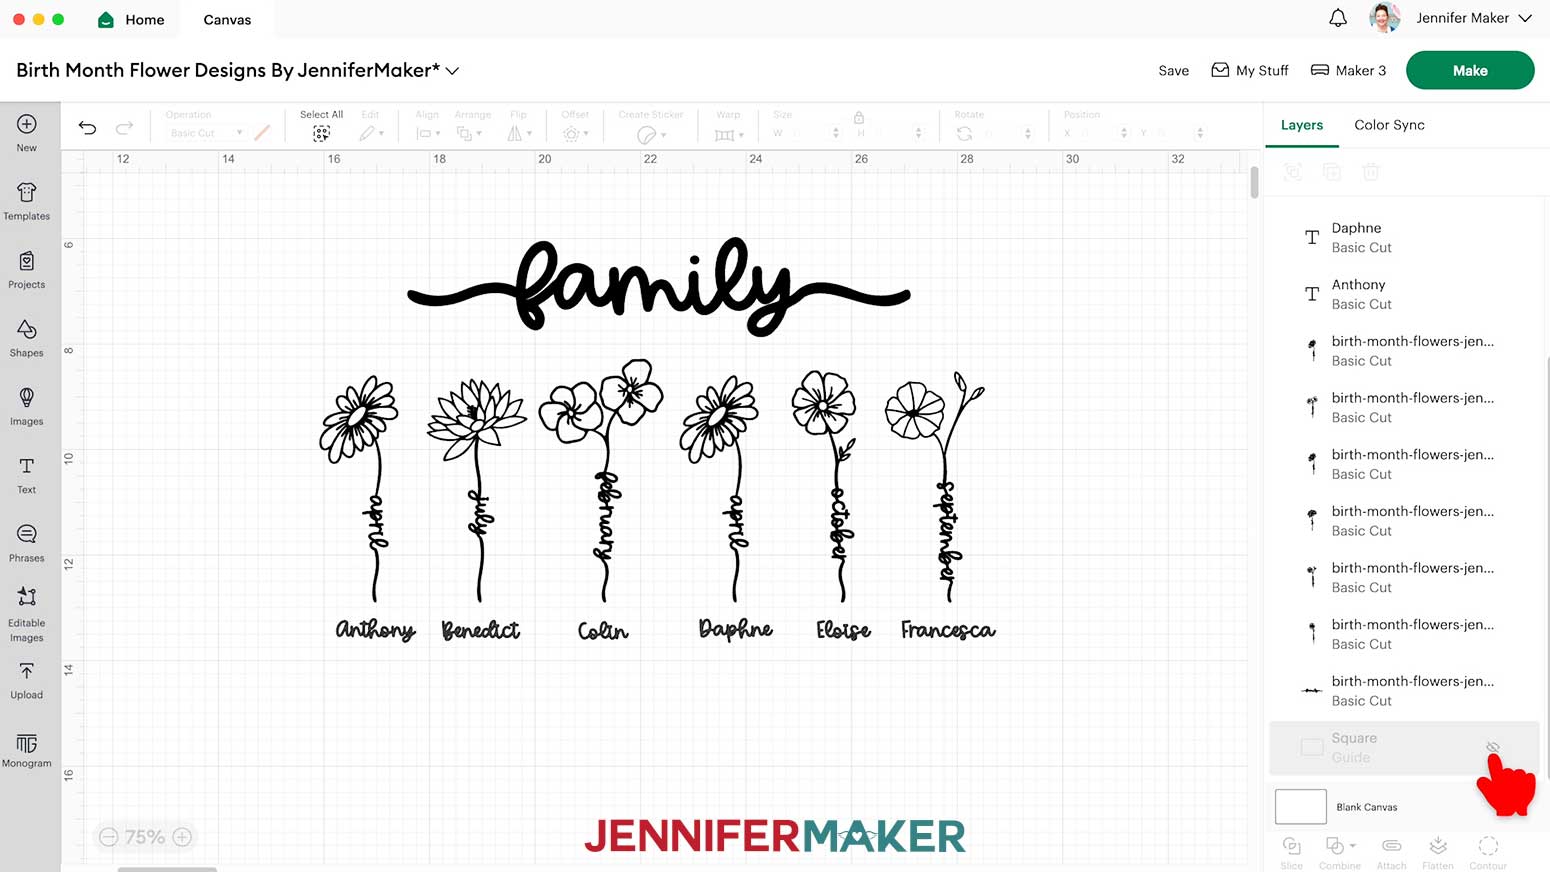
NOTE: If you use a different sign, remember to measure it as its dimensions might not be the same as mine. - In the Layers Panel, click and drag the “Guide” layer to the bottom so you don’t accidentally select it when clicking other pieces.
- Hold the Shift key and click each of the flowers to select them, then move them to the center of the Guide.
- To resize the flowers so they fit inside the Guide, keep the “Lock” icon closed to prevent the stem’s text from warping, then click and drag a corner of the flowers’ bounding box.
TIP: Leave an equal margin on the left and right sides to help with centering later. - Use the “Plus (+)” icon to zoom back in and make it easier to see text on the Canvas.
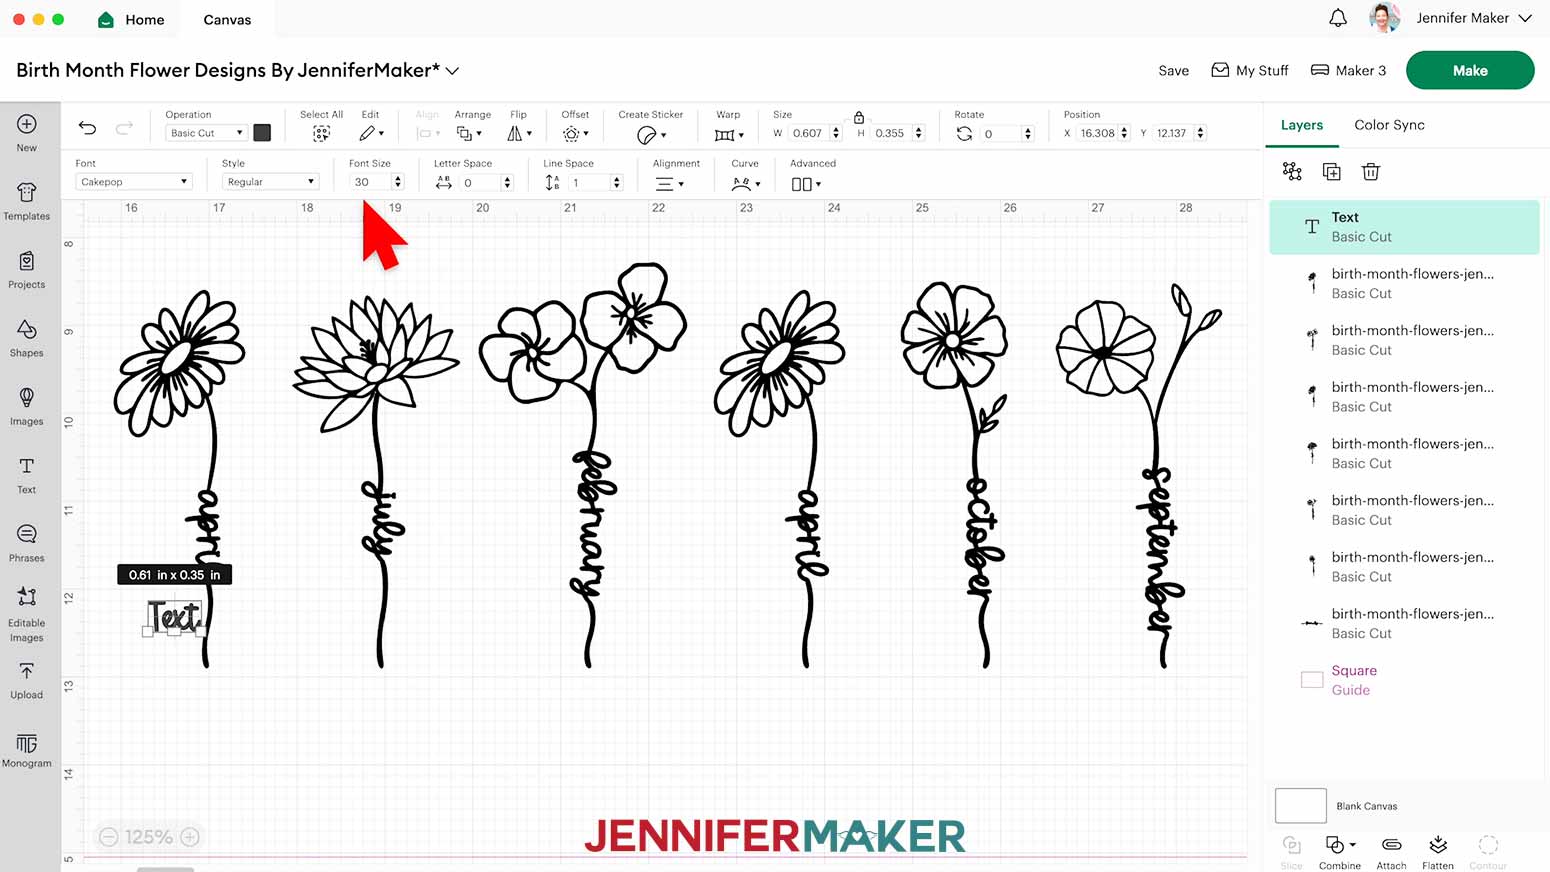
- Click on the “Text” icon to add a Text Box to your Canvas.
- Click the drop-down field under “Font” to choose a new typeface for your name. I’ll use the downloaded font “Cakepop,” which I can find by clicking on the “System” tab and typing it in the search box.
NOTE: If you want to make a similar design, you can purchase this font at FontBundles using my affiliate link. - Use the up and down arrows in the “Font Size” menu to adjust the text size to fit your design. I’ll set mine to size 30.
- Type in the name of a family member to go under your first flower.
NOTE: I’ll type in “Anthony.” - Drag the name and center it under the flower’s stem the best you can.
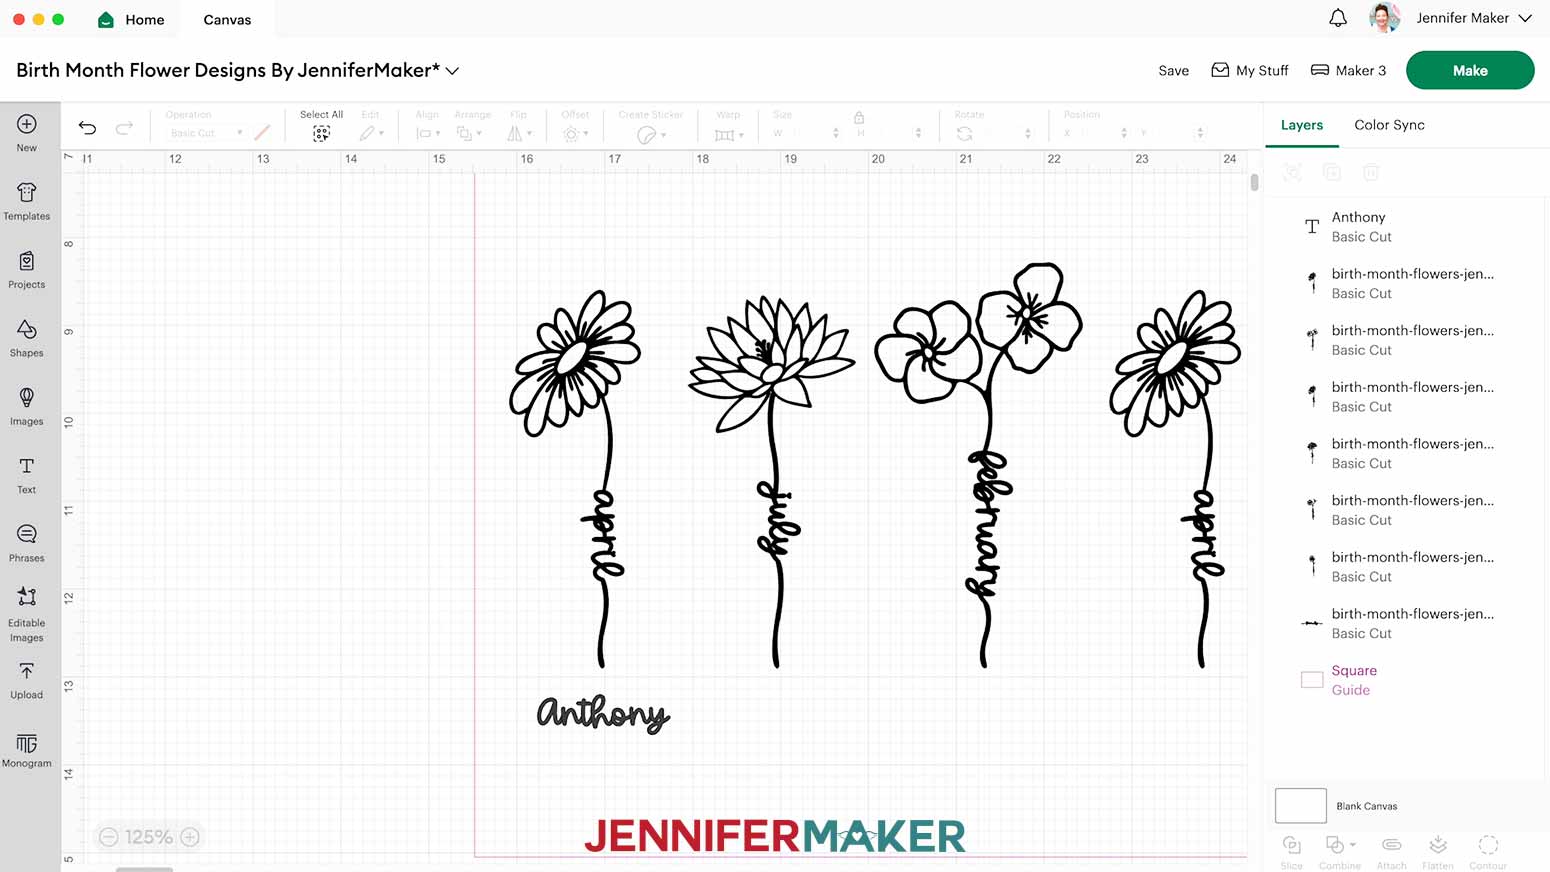
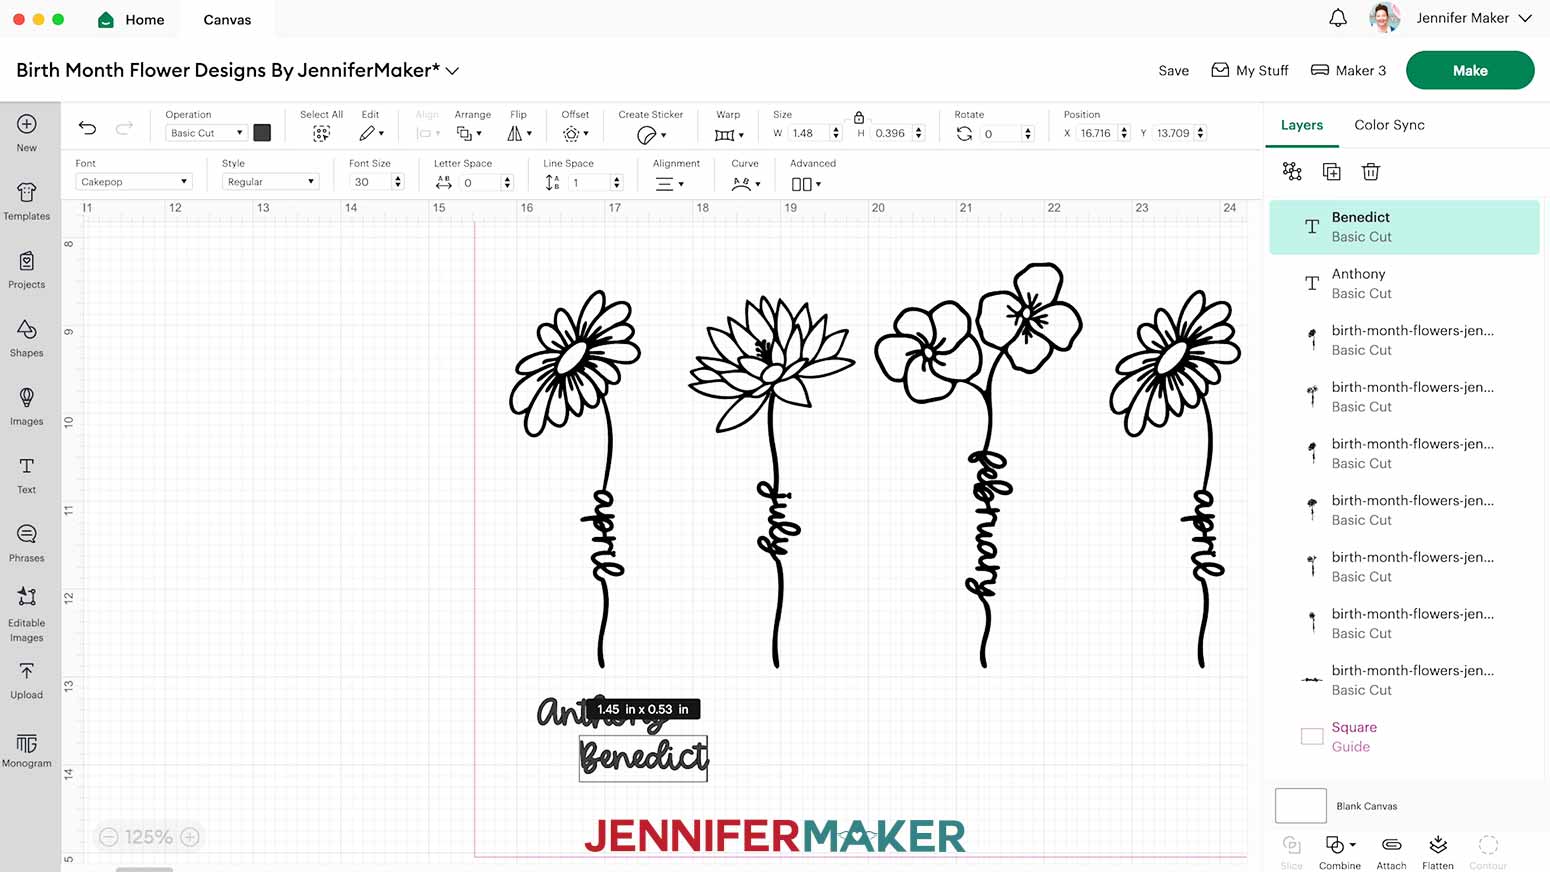
NOTE: I’ll center “Anthony” under my first “April” flower. - Make sure the name is selected and click the “Duplicate” icon to make another copy.
- Double click the new Text Box and type in your next name, then drag and position it under the second flower.
NOTE: I’ll type in “Benedict” and position it under the “July” flower. - Duplicate, edit, and position the Text Boxes for your remaining names and flowers.
NOTE: I’ll add “Colin,” “Daphne,” “Eloise,” and “Francesca.” - If you have any letters with dots over them like I do, those dots are very easy to lose once the vinyl has been cut. To prevent that, click on the “Shapes” icon and click the free Heart shape to add it to your Canvas.
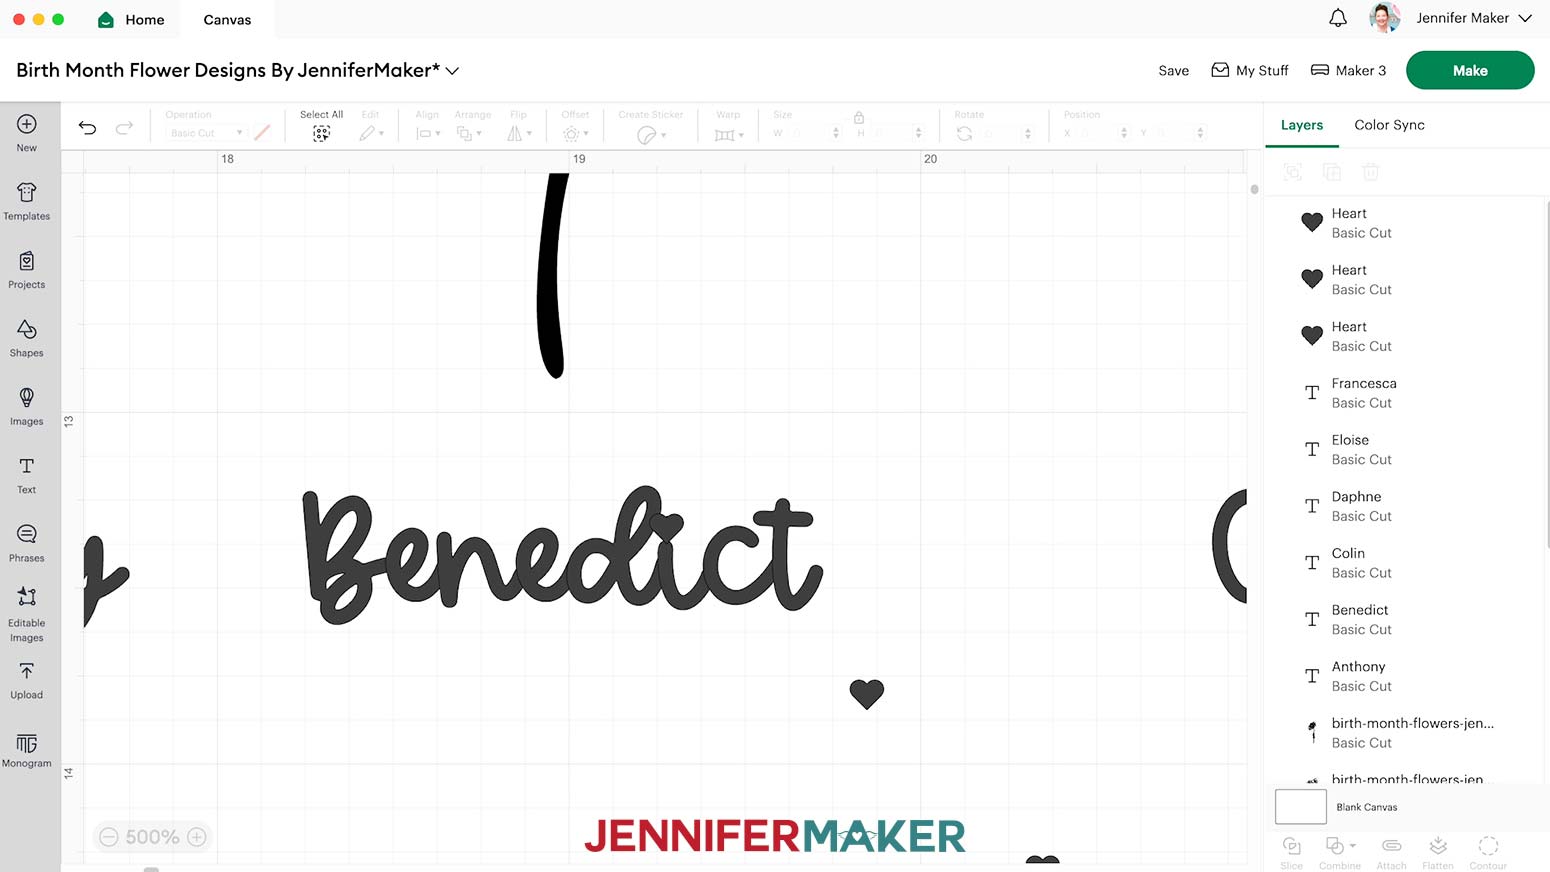
- With the “Lock” icon closed, drag a corner of the heart’s bounding box to resize it so that it’s just larger than one of the dots.
TIP: If you have multiple dots to replace, use the “Duplicate” icon to make as many hearts as you need after getting the size right. This will keep your hearts uniform. - Move the heart so that it covers the dot, and make sure its bottom tip touches the main part of the letter.
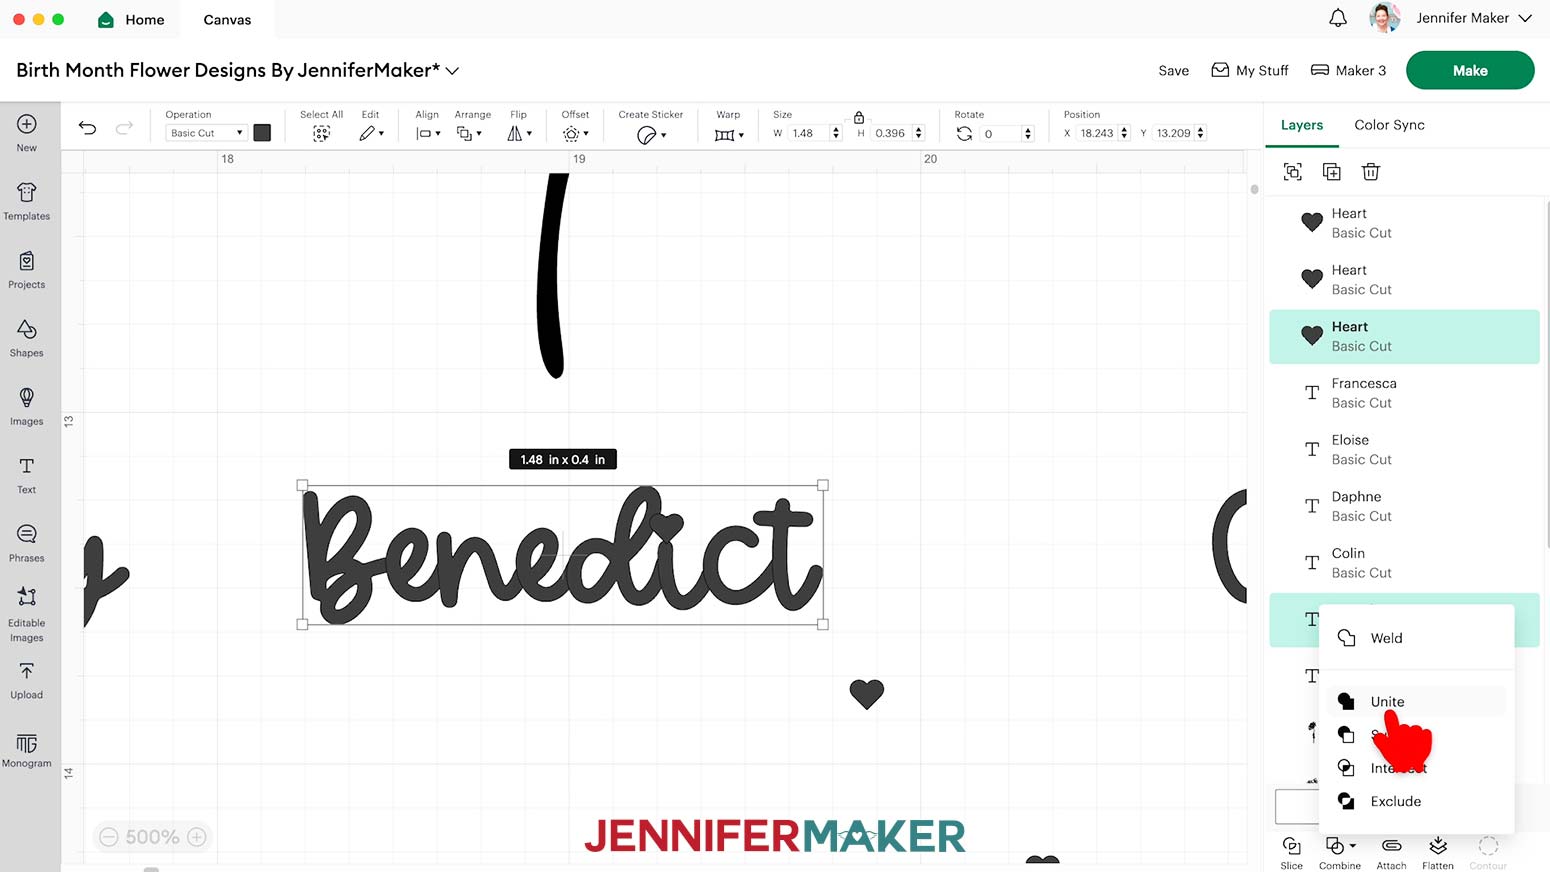
TIP: Use the “Plus (+)” icon to zoom in to make sure the letters are touching. - Hold the Shift key and click both the name and the heart to select them.
- Then click “Combine” and “Unite” to connect the heart to the letter.
- Once your dots are replaced, hold down the Shift key and click each of the names to select them all.
- Click on “Align” and select “Center Vertically” to make sure the names are lined up on the same center line.
- Click and drag the “Family” sentiment above the flowers. Use the handles in the corners to adjust the sizing if you want.
- In the Layers Panel, hover over the Guide layer and click the “Eye” icon to hide it.
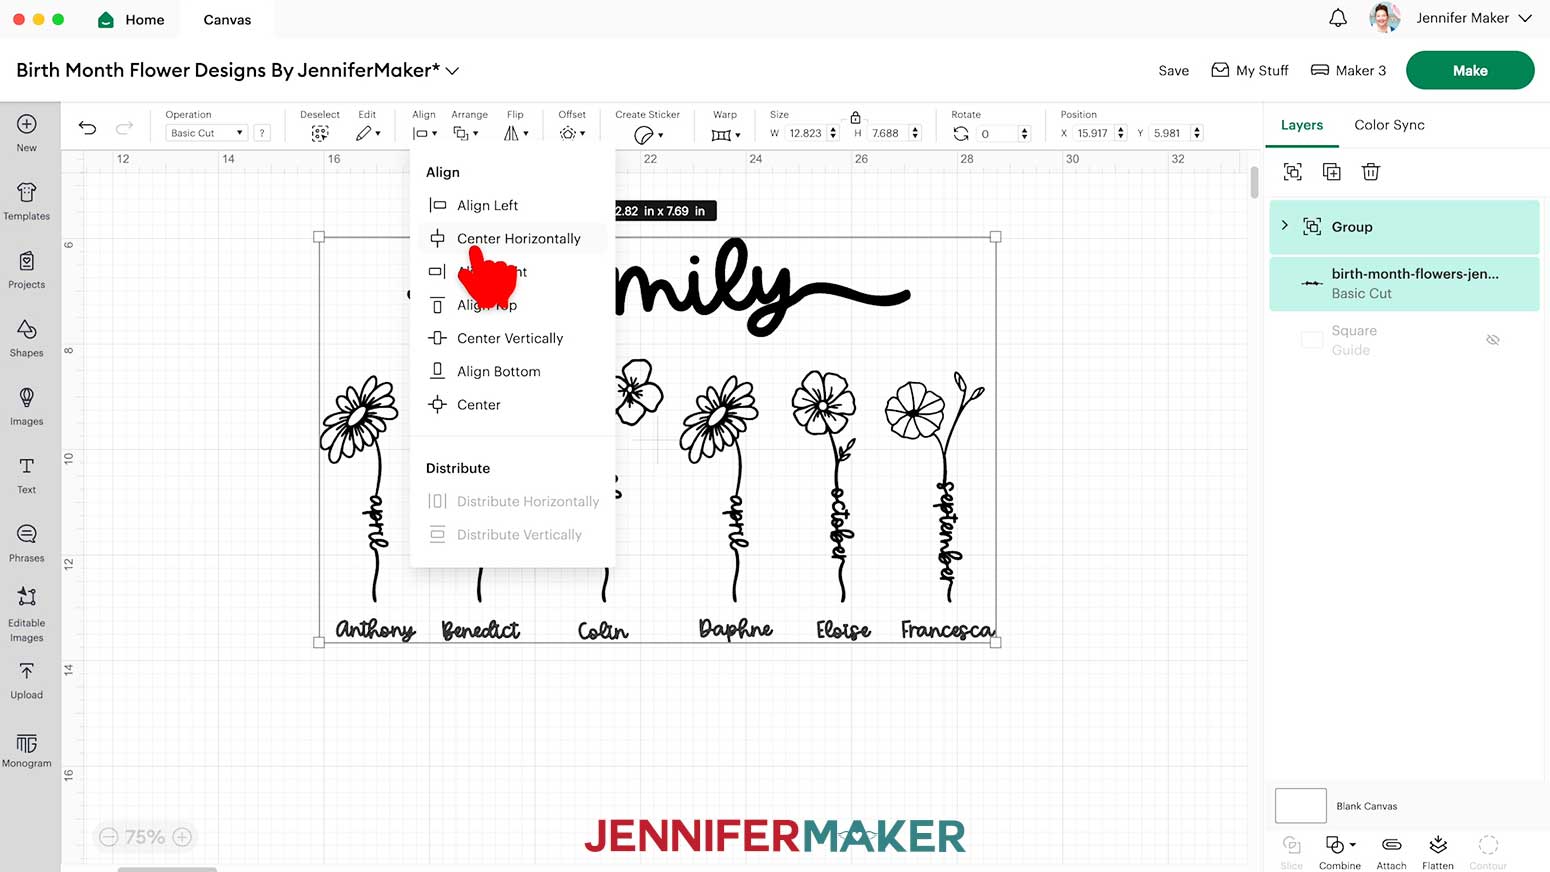
- Drag a bounding box around the flowers and the names to select them all, then click the “Group” icon so you can move them as a single unit.
- Select the flowers and the “family” piece, then click “Align” and “Center Horizontally” to center the word “family” over the flowers.
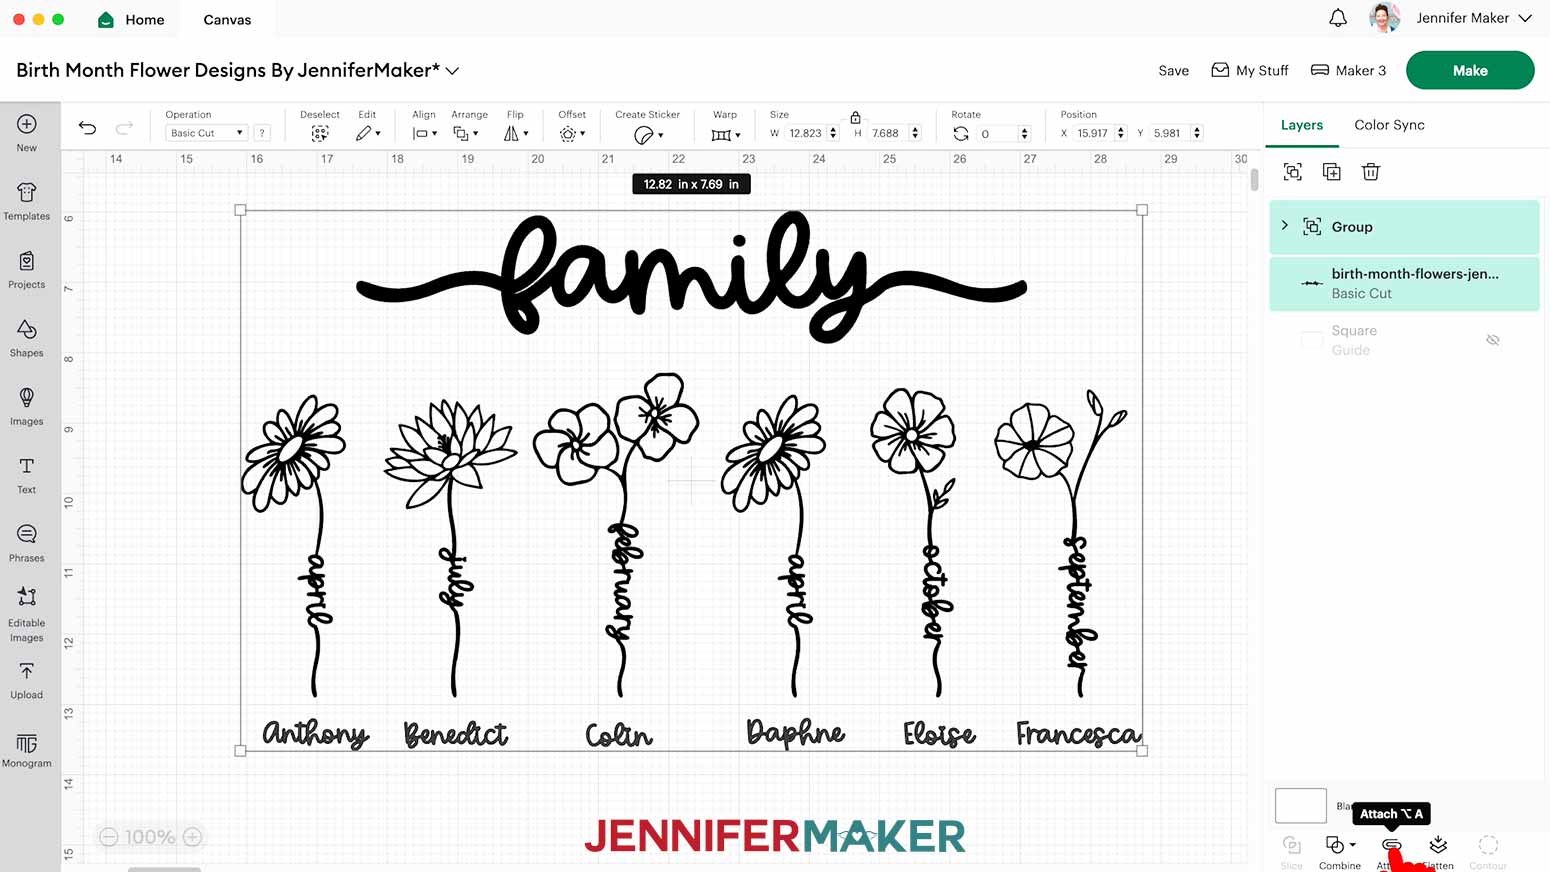
- Select the entire design and click “Attach” to make sure it all cuts together on a single layer.
- Click the Guide layer’s “Eye” icon in the Layers Panel again to unhide it.
- Make any final sizing or positioning adjustments, using the Guide to visualize how your vinyl decal will look when applied to the sign.
- Your project is ready to cut!
CUTTING


- Make sure the correct machine is selected in the top right.
- Click “Make.”
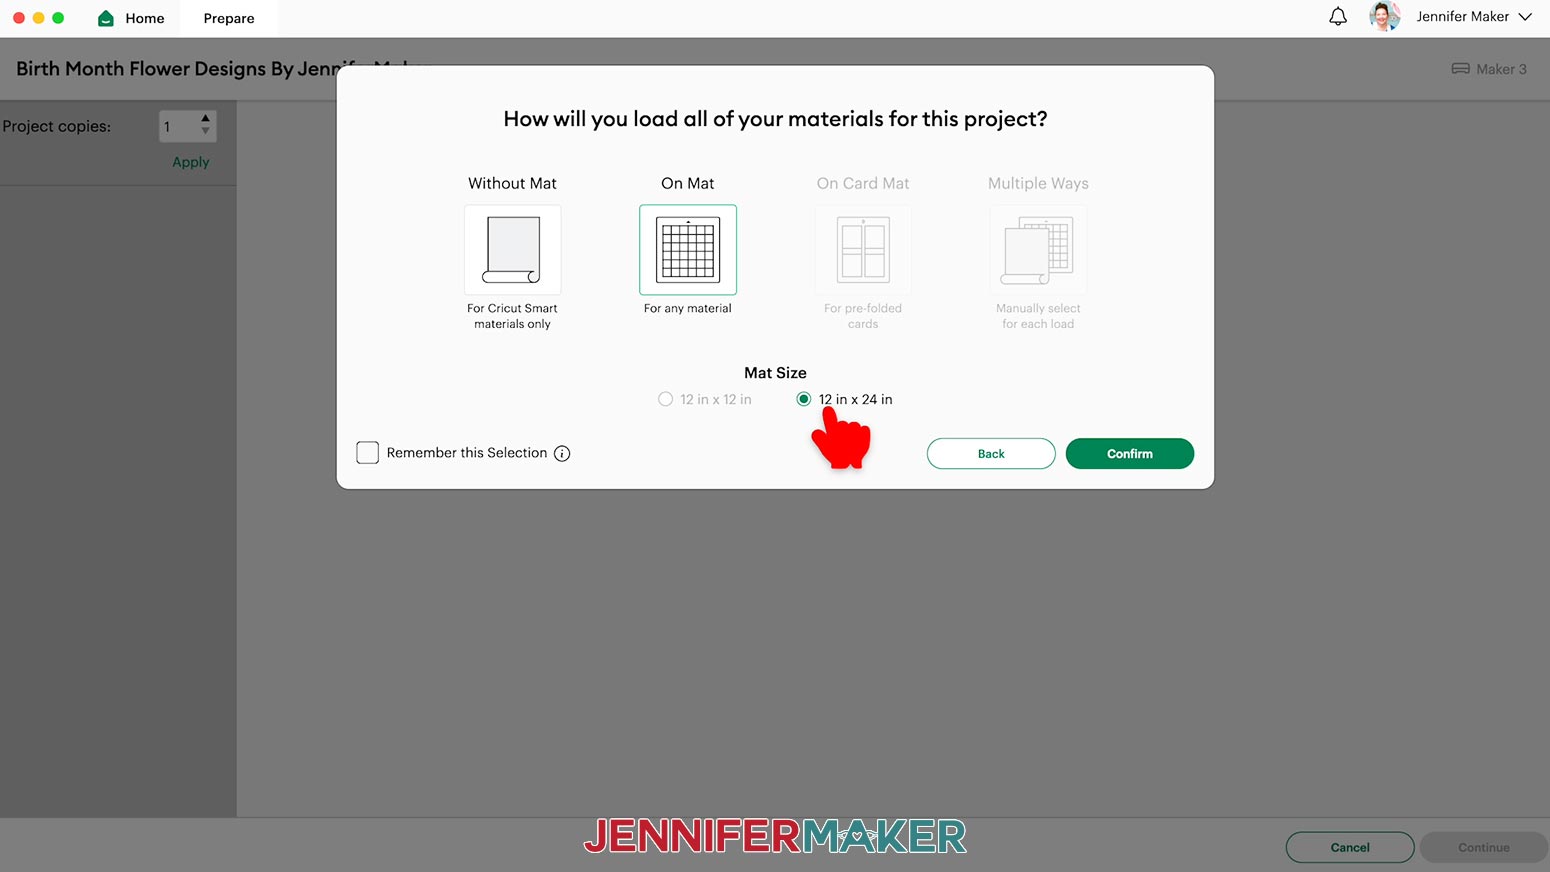
- Click “On Mat” if prompted, and select 12” x 24” for the Mat size.
- On the Prepare screen, make sure the correct Material Size is selected for your mat.
NOTE: I’ll trim my vinyl to fit the design, so I’ll keep the 12” x 24” setting to use the whole mat. - Click “Continue.”
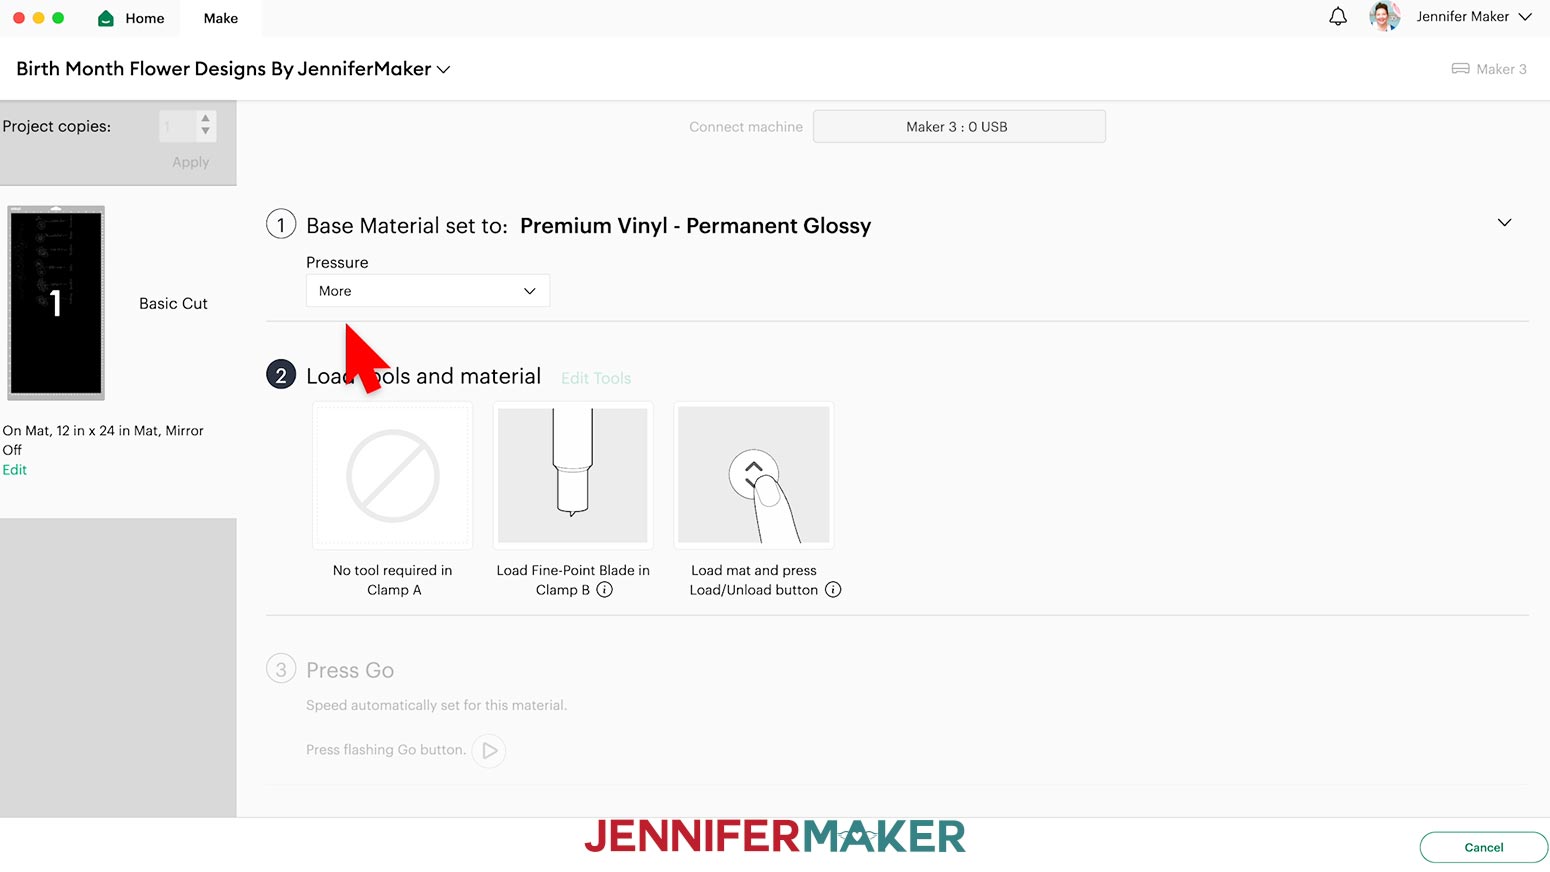
- On the Make screen, set the Base Material for your mat. I used the “Premium Vinyl - Permanent Glossy” setting with “More” pressure.
NOTE: If you don’t see “Premium Vinyl - Permanent Glossy” in your list, click on “Browse All Materials,” type in “Glossy” and select “Premium Vinyl - Permanent Glossy.”
TIP: Changing the Pressure to “More” results in a cleaner cut. - Check the screen to see how large your vinyl piece needs to be to cover the entire decal, plus an inch or so around it.
NOTE: Each grid box is one inch. My piece needs to be about 9” wide and 14” tall to cover the whole design. - Use a Paper Trimmer or scissors to trim your vinyl down to size. I’ll measure and cut my vinyl 14” from the end, for a 12” x 14” piece.
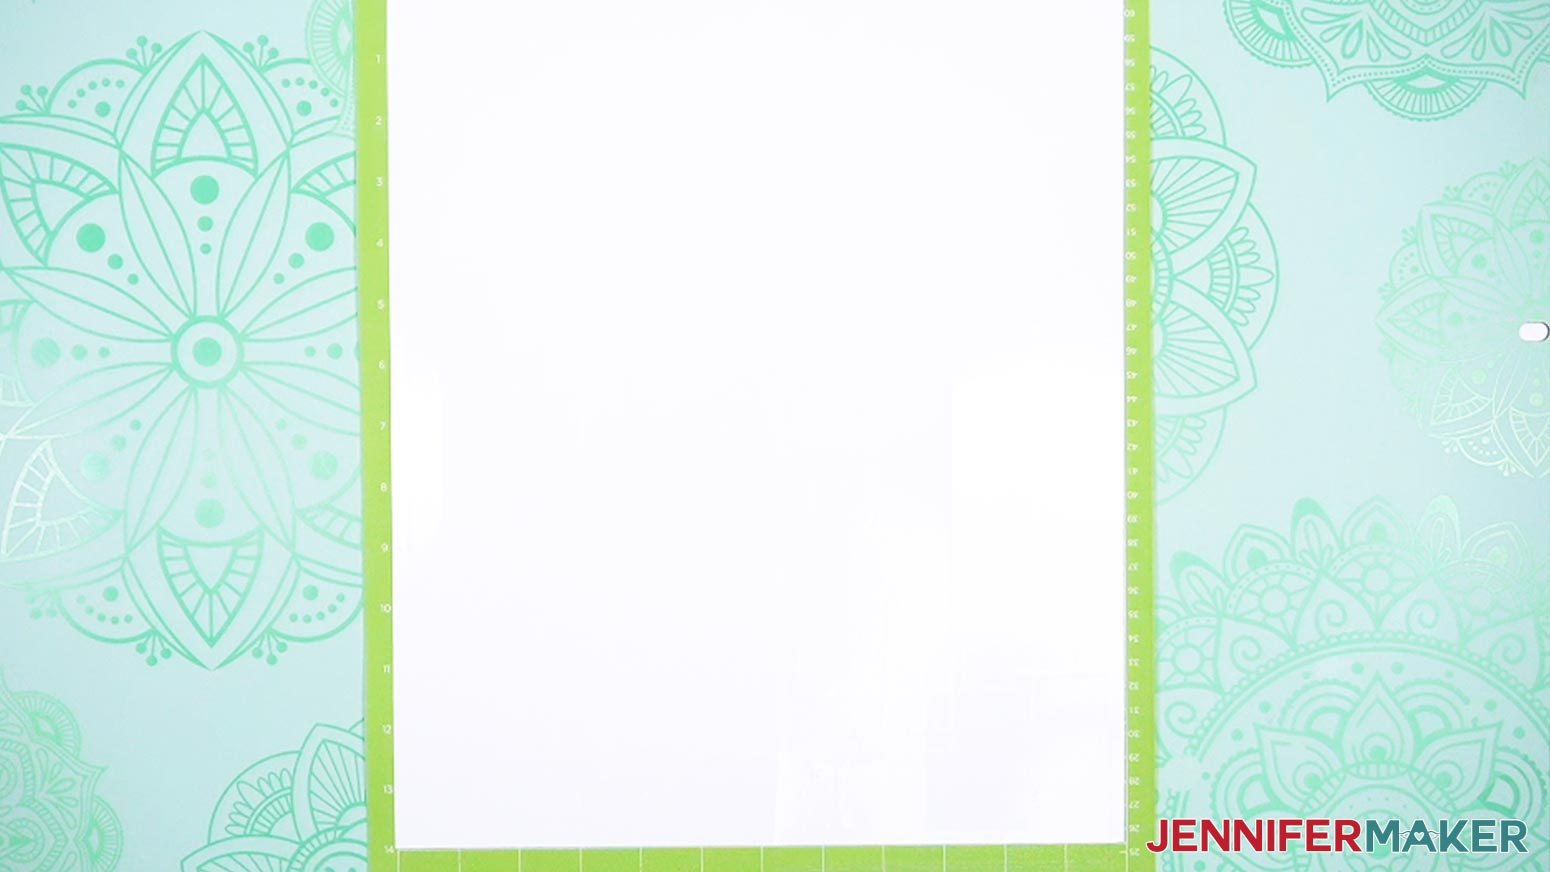
TIP: You can trim your vinyl closer to size and save the smaller pieces for other projects. - Place your vinyl shiny side up on a green StandardGrip machine mat so it covers the design area on your screen.
- Use a brayer to make sure it’s fully adhered.
- Check that your Premium Fine-Point Blade is clean and in the clamp.
- Press the flashing “Load/Unload” button to load the prepared mat into your Cricut.
- Press the flashing “Go” button to begin cutting.
- When it has finished cutting, don’t unload the mat right away. Gently lift a corner of the material to make sure the cuts went all the way through. If not, press the “Go” button again to make a second pass of cuts in the same spots.
NOTE: Cuts should go through the material, but not the carrier sheet. - When the cuts are complete, unload the mat, flip it over onto your work surface, and roll it back to release the vinyl.
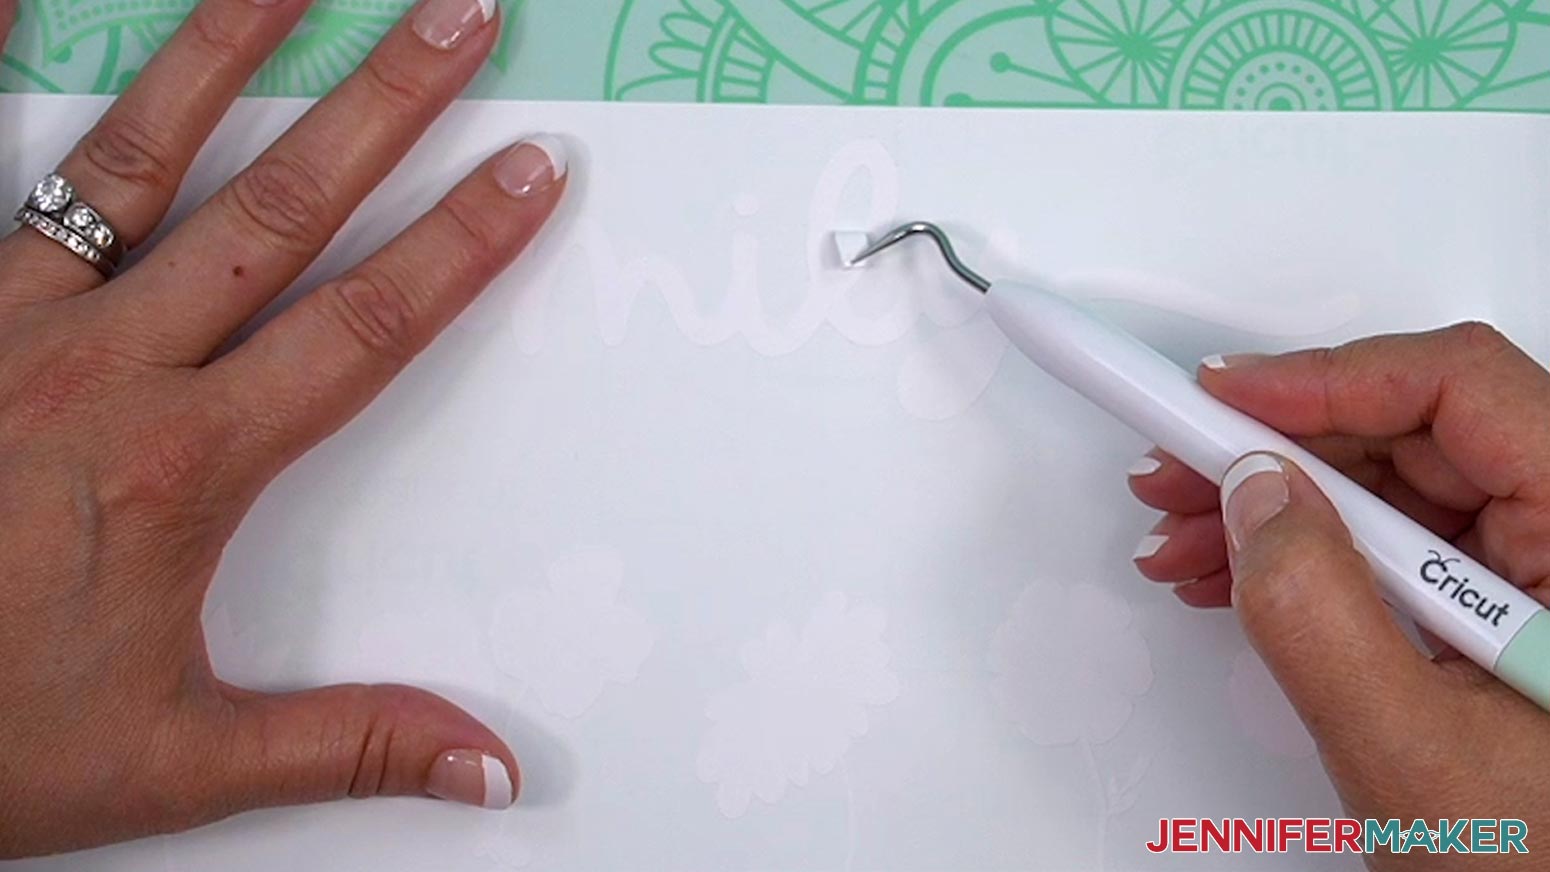
TIP: If you have any issues with your cuts, go to jennifermaker.com/cleaner-cuts. - Use your weeding tool to carefully peel away the extra background vinyl. I like to work from larger to smaller sections during weeding.
TIP: Use a light box like the Cricut BrightPad to illuminate the cuts in the vinyl so they’re easier to see. - Use scissors to cut away large sections of vinyl that have already been lifted to keep the vinyl from re-sticking to your design.
TIP: Make sure you do not pull up any pieces you want to keep! If they come up, gently pat them back in place and try again. Refer back to the Design Space screen if you’re not sure which pieces to remove. - Poke your weeding tool into small sections of the design you want to remove, such as the petals or the insides of letters. Gently lift the tool away from the design.
TIP: It can be easier to weed vinyl, especially small, detailed designs, while it is adhered to the machine mat if you're using a darker color of vinyl and don't need the BrightPad to help see the lines. - Continue to weed until all that is left is the vinyl for your design.

STEP 3: ASSEMBLE YOUR FLOWER WORD CHALKBOARD SIGN
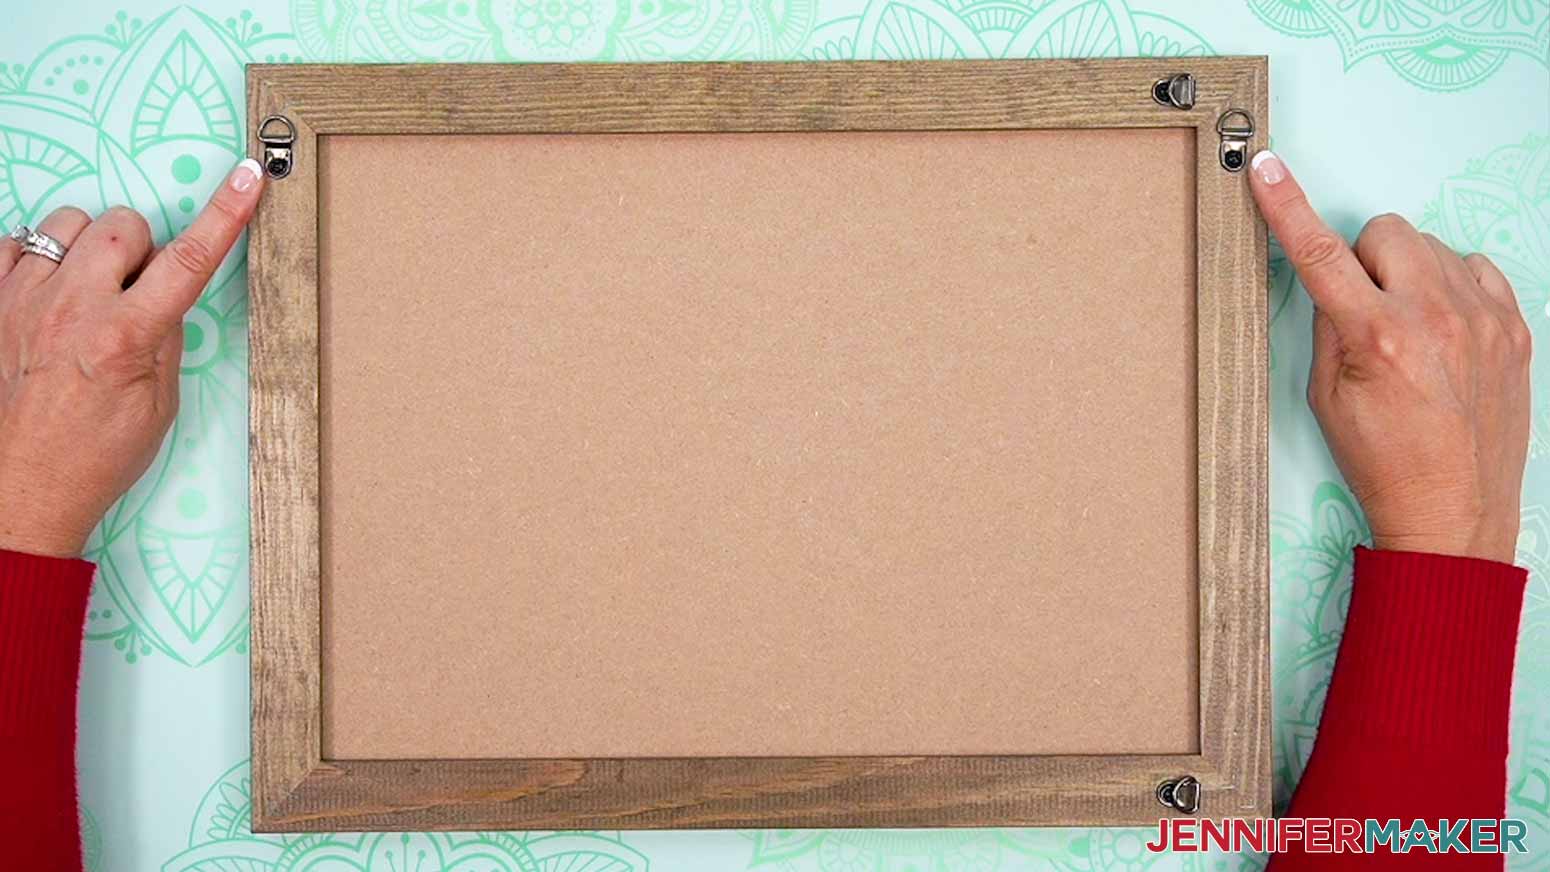
- Check the back of your chalkboard sign to be sure of its orientation. The hanging hardware should be near the top of the frame.
- Lay the sign chalkboard side up on your work surface.
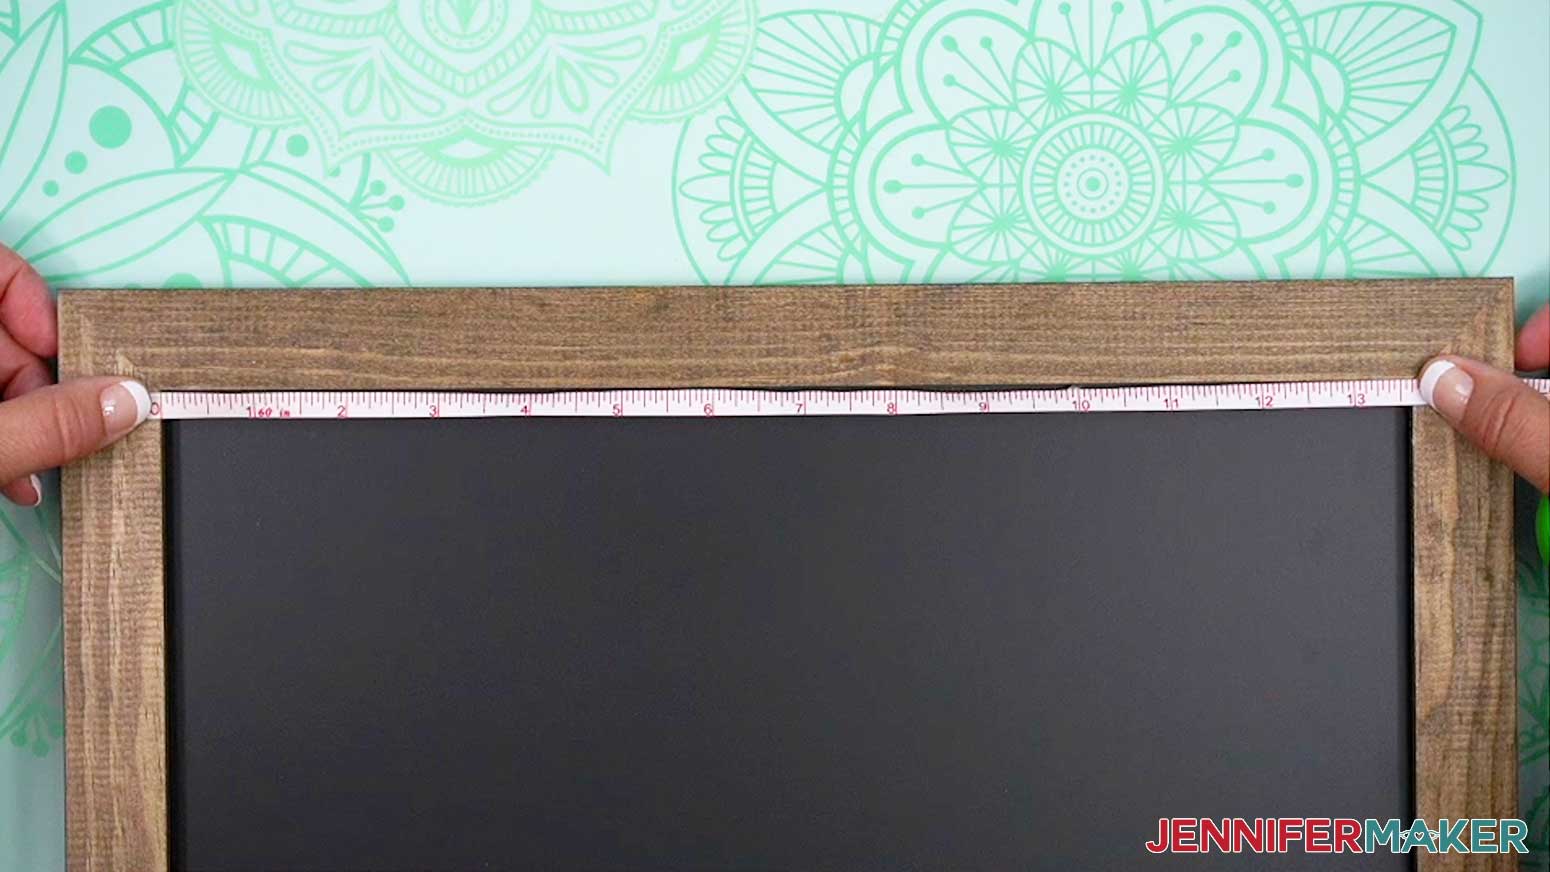
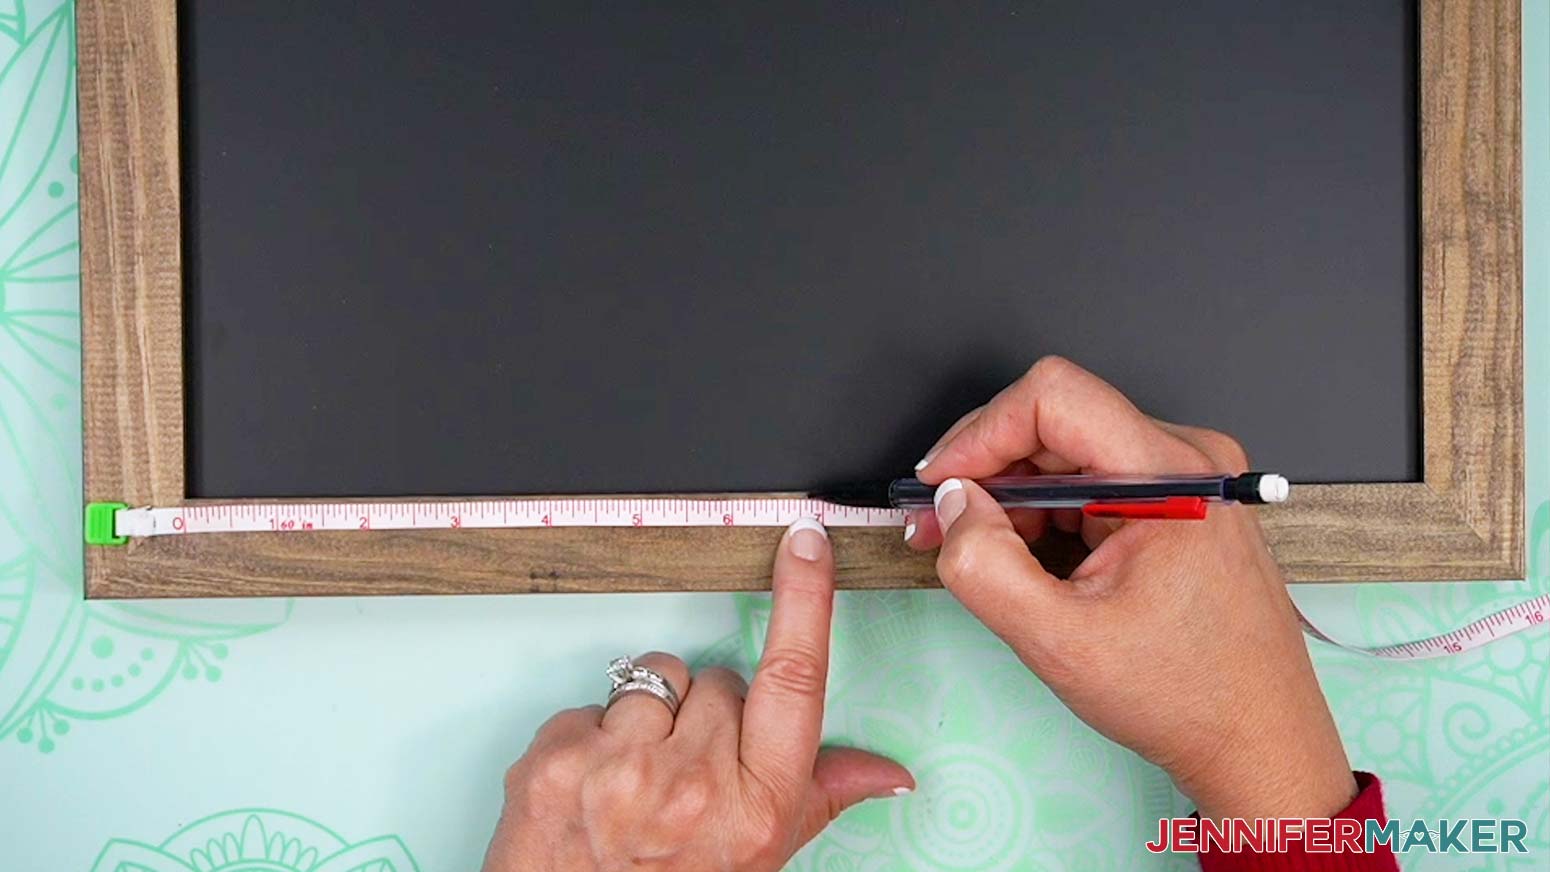
- Measure the length of the inside of your frame from left to right.
- Divide that measurement in two to find the frame’s center point. Mark that point on the top and bottom of your frame with a pencil.
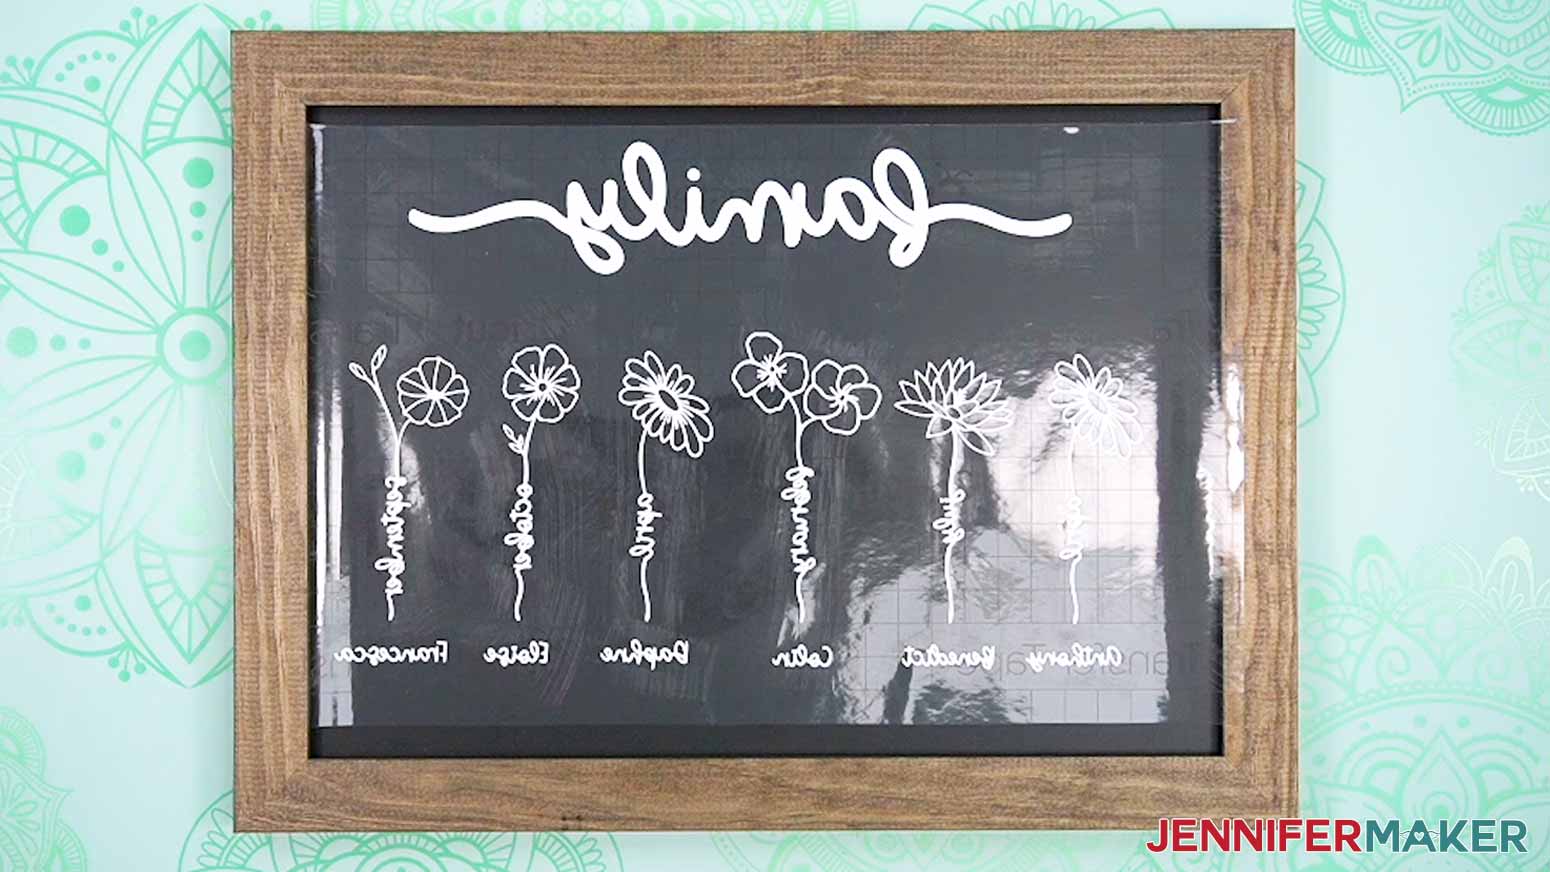
- Lay the vinyl decal face up on your work surface.
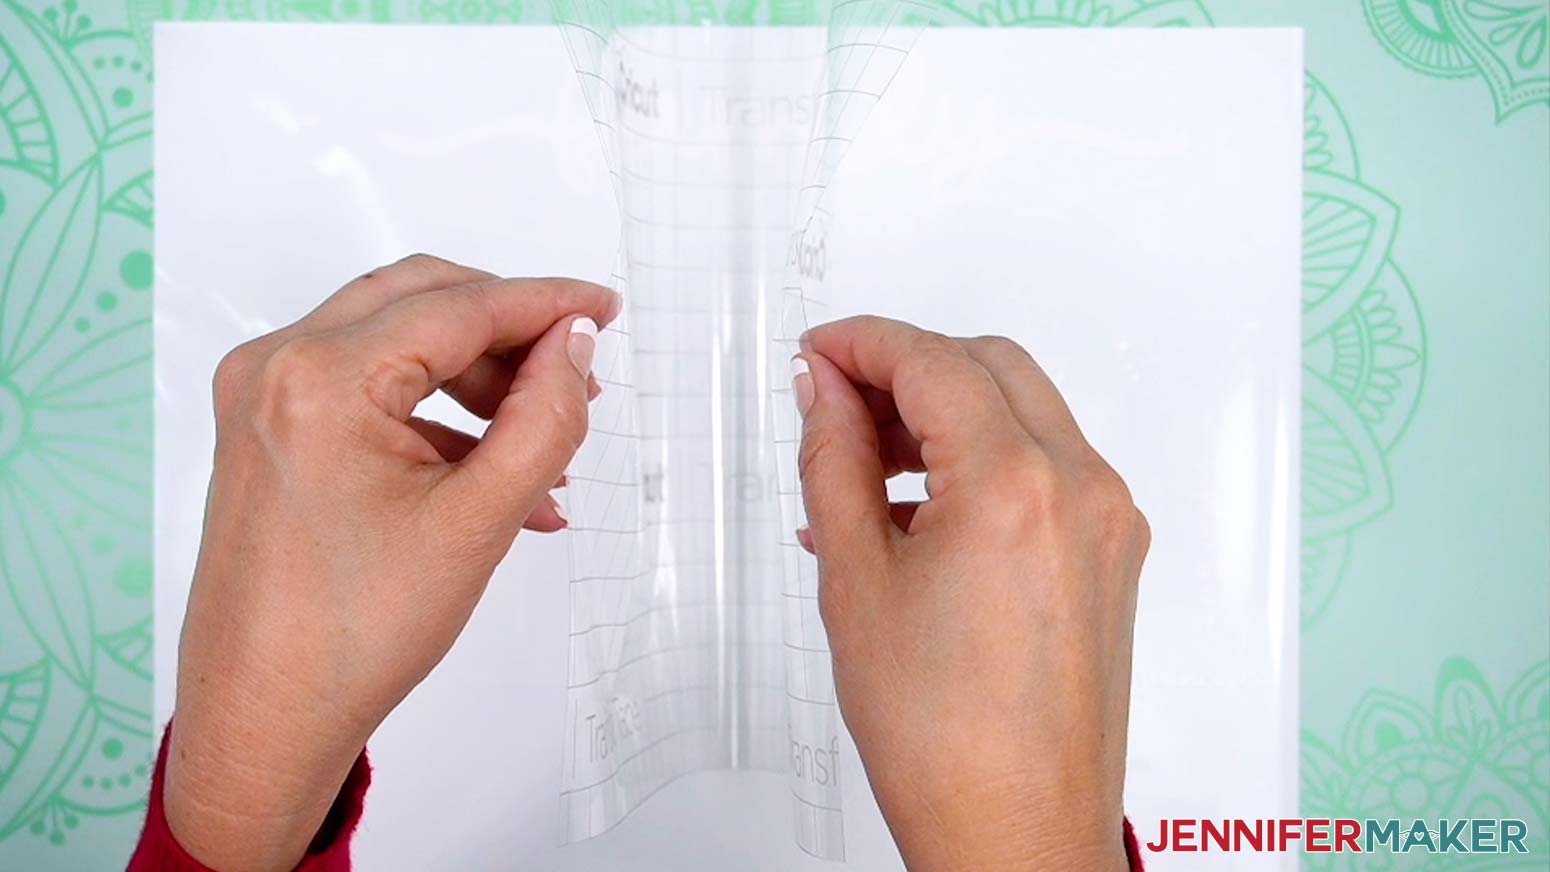
- Cut a piece of StandardGrip transfer tape just larger than the decal.
- Remove the backing from the transfer tape.
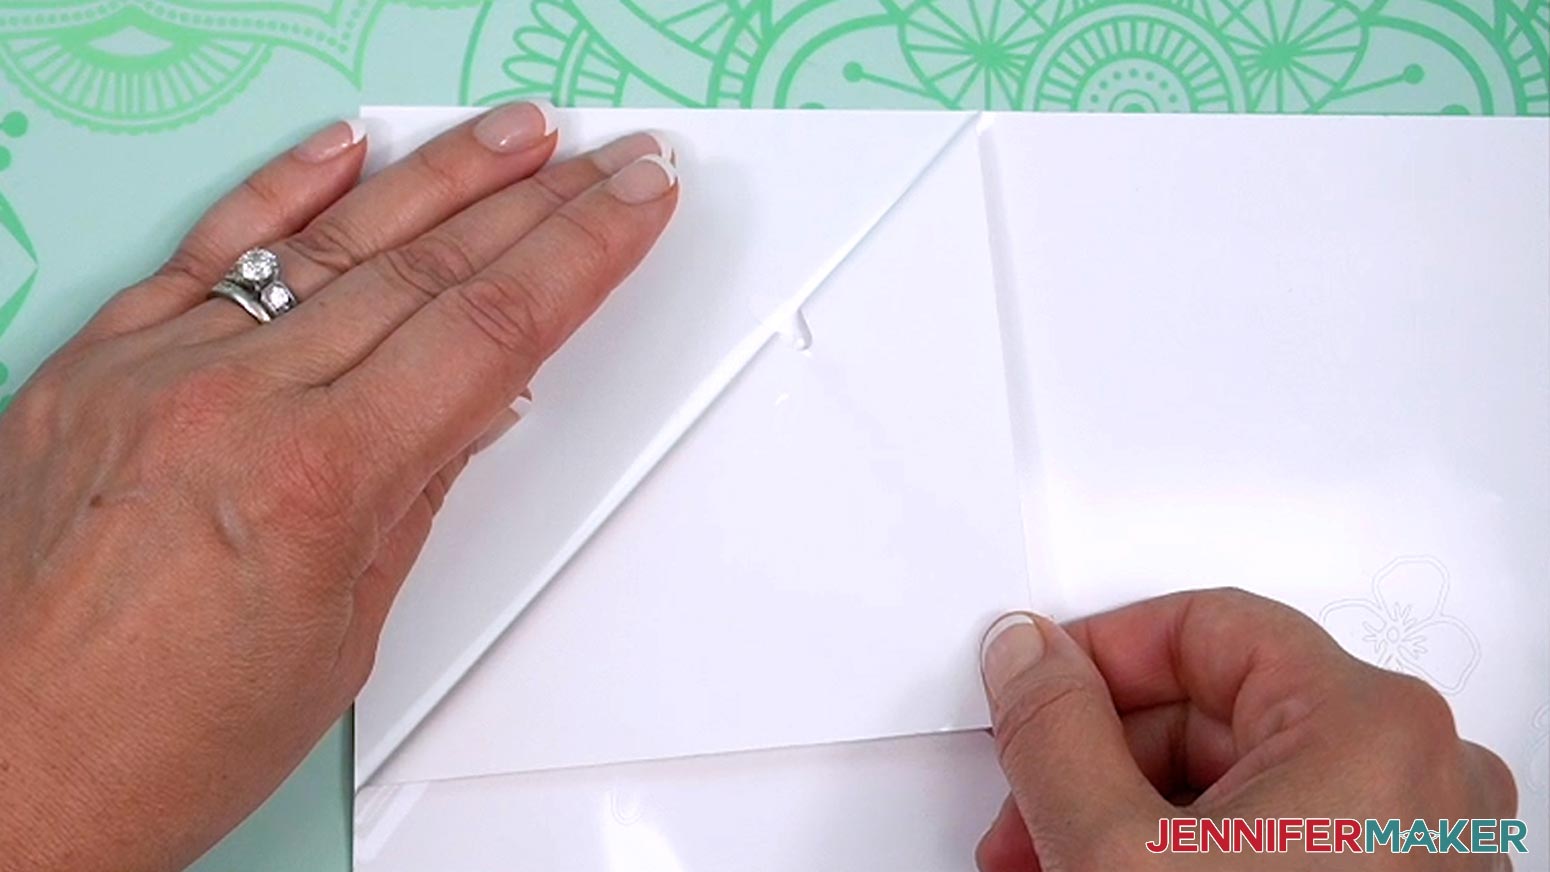
- Hold your transfer tape in the shape of a “taco” sticky side down, then put the bottom of the “taco” onto the middle of your decal.
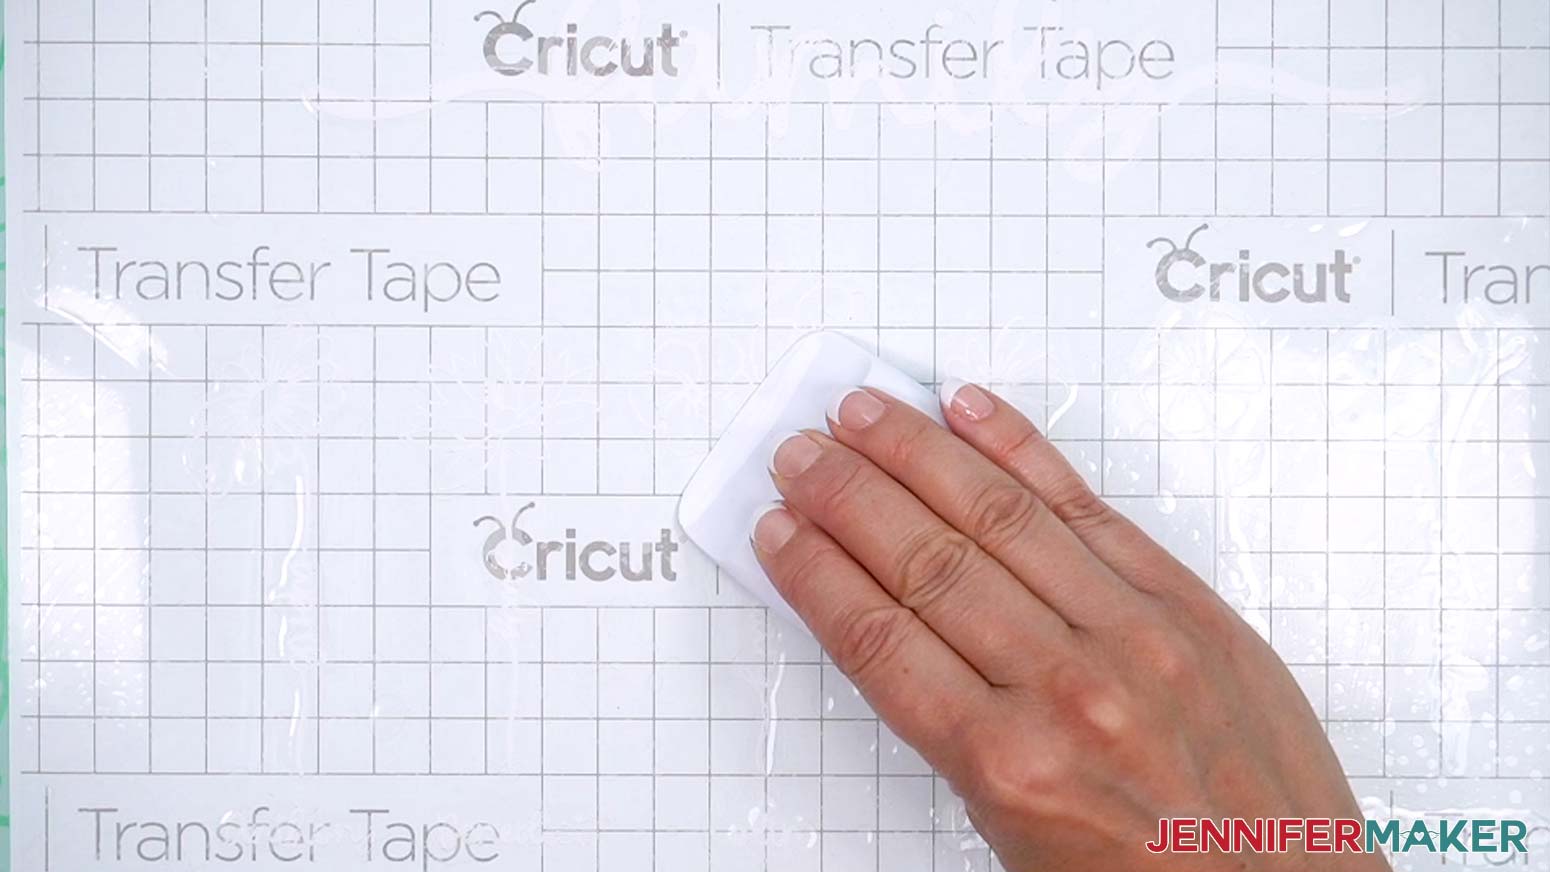
- Smooth the transfer tape over the decal from the center outward and burnish it down using the Scraper Tool.
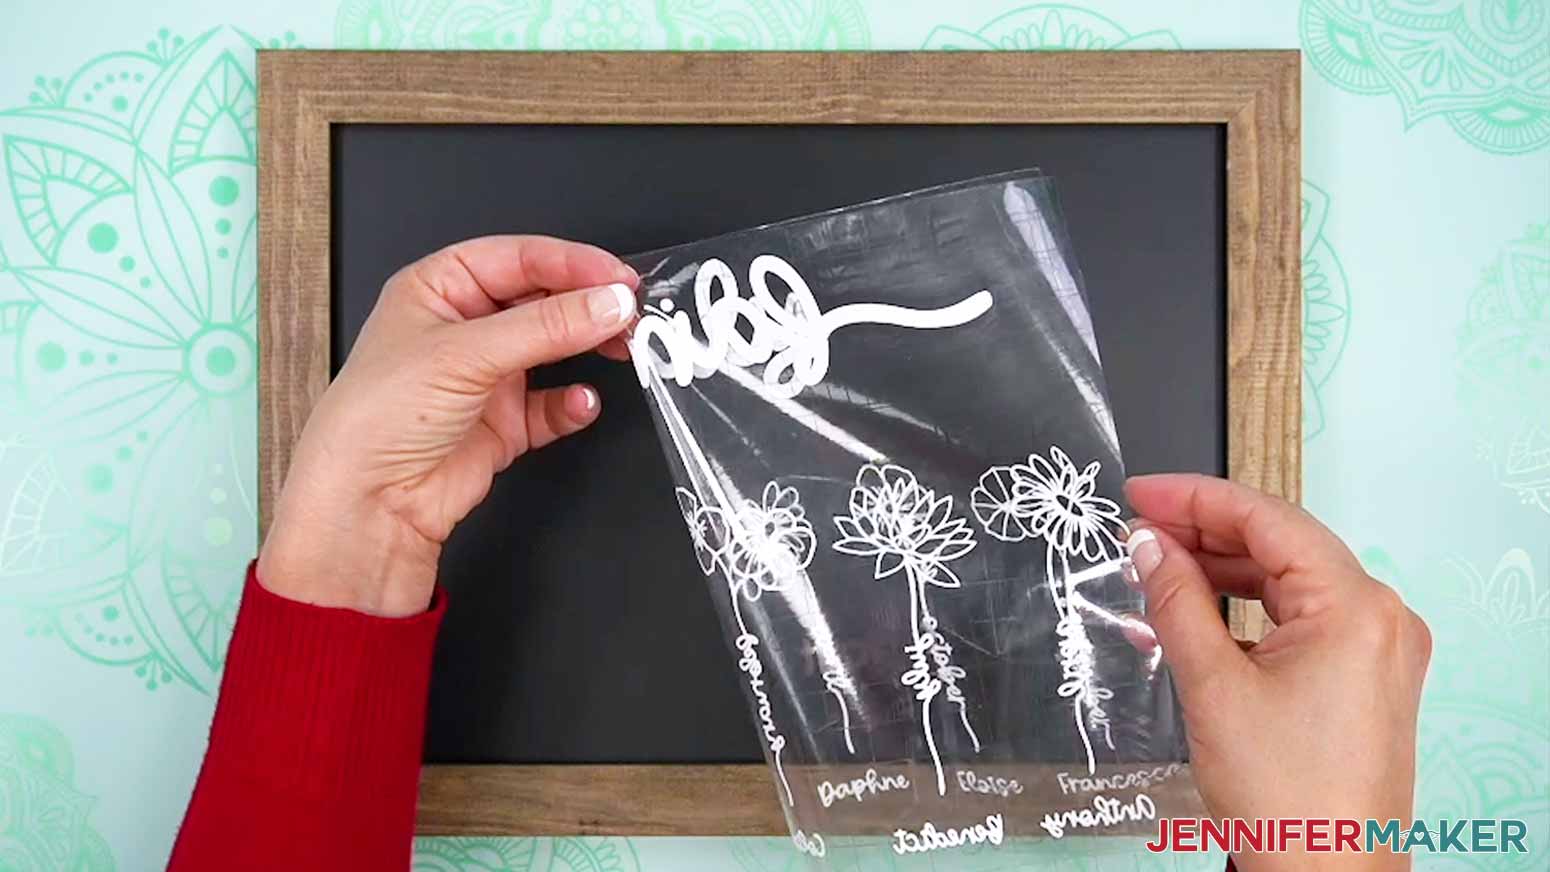
- Flip the design over and gently peel off the backing from the vinyl.
- Lay your vinyl decal sticky side up inside your chalkboard frame to visualize final placement.
- If needed, trim down the transfer tape to make sure the piece fits completely inside the frame without touching any edges.
- Lift the decal and fold it in half, sticky side out, creasing the halfway point of the transfer tape at the top and bottom.
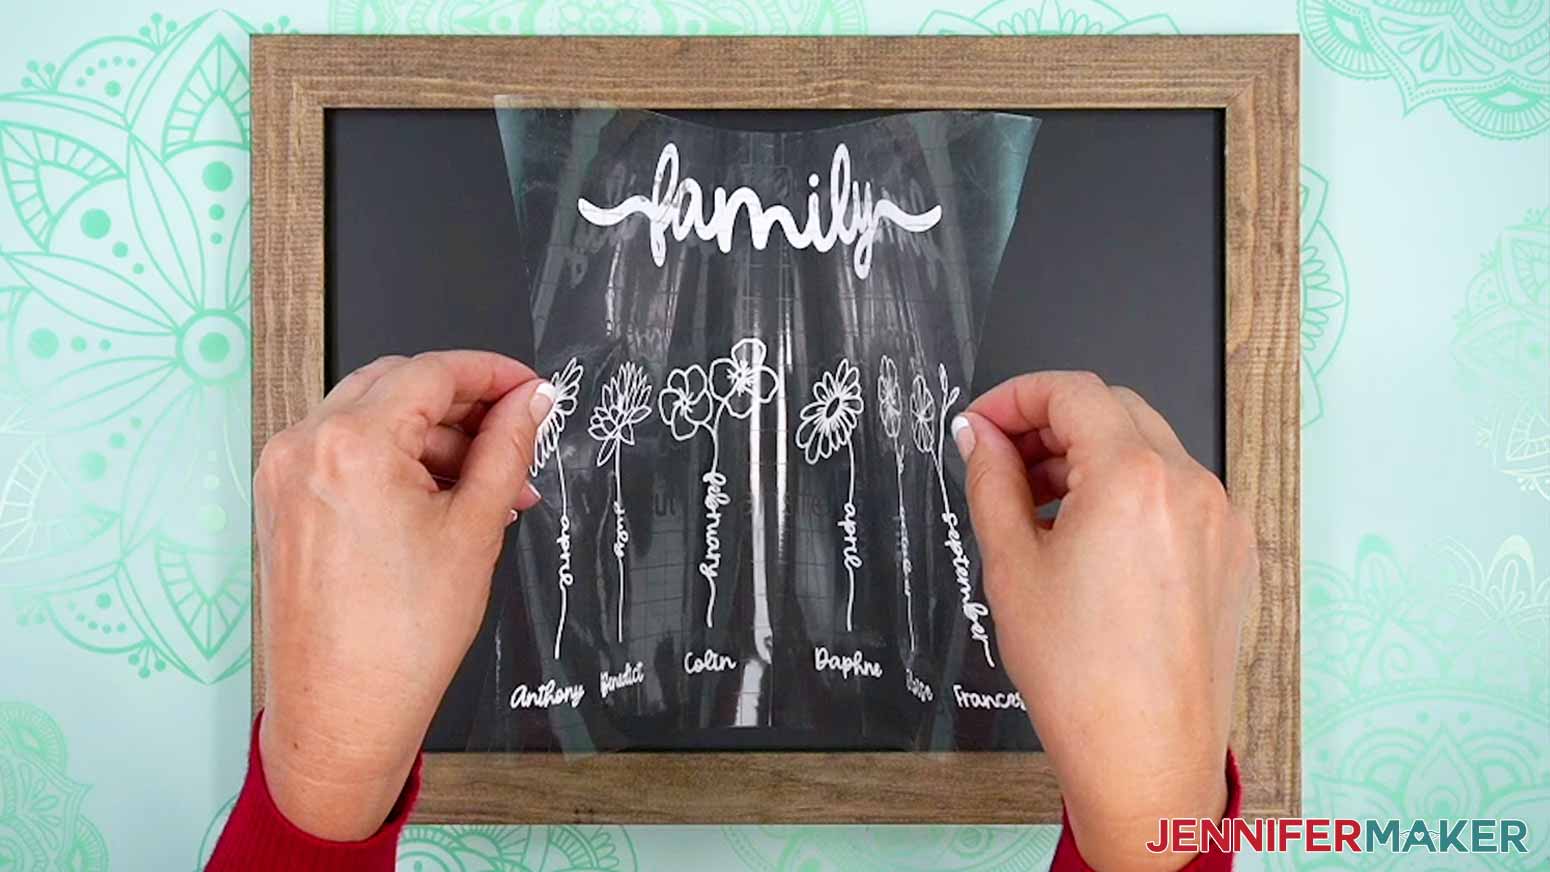
TIP: Make sure not to crease the vinyl! - Holding it in the shape of a “taco” again, align the center creases of the decal with the center marks on your frame.
- Lower your decal onto the chalkboard surface.
- Using your finger, rub from the center of the vinyl outward, tacking the vinyl into place on the chalkboard.
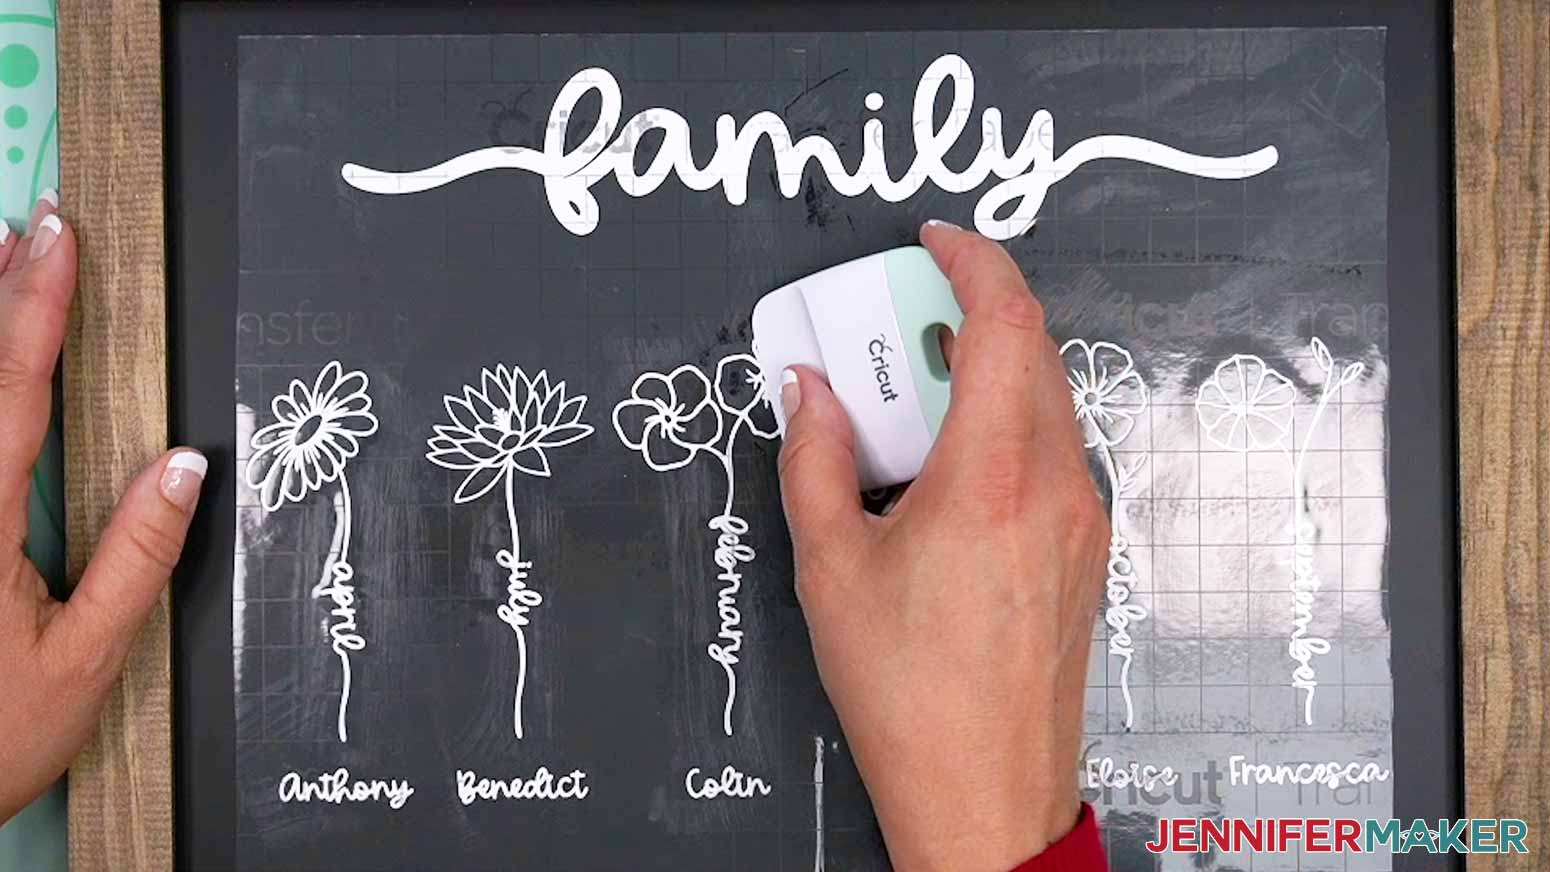
- Take your time and use a scraper to press out as many bubbles as possible.
- Carefully peel away the transfer tape, burnishing down any vinyl that lifts from the surface as you go.
STEP 4: SHOW IT OFF
You now have a beautiful chalkboard sign featuring your family members and their birth flowers. Hang it anywhere in your home!
Answers to Your Questions About Love Phrase Flowers
Q: What are some ways I can customize my love phrase flowers design?
A: Want to learn how to make your own word or name flowers? Check out Advance with JenniferMaker to learn how! They work best with up to 10 letter words. Just remember, that unless you cut them really big, you’ll likely need to be up close reading them. Don’t use words that are too long, or the typeface may be too small to cut or read.
Experiment with other types of vinyl like glitter, shimmer, metallic, and more. You can even use them with heat transfer vinyl (HTV or iron-on vinyl) to create one-of-a-kind T-shirts! You don’t have to be a graphic arts expert to customize your own love phrase flower designs — my workshop makes it easy.
Q: What setting do I use for cutting my vinyl?
A: When cutting the stem of a flower design, I recommend using the “Premium Vinyl – Permanent Glossy” setting with “More” Pressure with the adhesive vinyl linked in my materials list.
Q: Which machine mat do I use to cut my vinyl?
A: I usually use my green Cricut StandardGrip Machine Mat for cutting vinyl. A new blue Cricut LightGrip Mat will also work as long as it’s sticky. I have a great blog post where I discuss Cricut Cutting Mats tips – like which mat to use when and how to keep them sticky!
Q: Help! I can’t see the cut lines to weed my vinyl!
A: The cut lines in adhesive vinyl, especially frosted and white vinyl, can be difficult to see — making weeding them a challenge. A light pad like a Cricut BrightPad can help. No light pad? Try the cinnamon trick! See my Faux Etched Glass tutorial for my best examples on how to use it. By using hacks like these, your weeding woes will be ancient history!
Q: Do you have to use transfer tape with vinyl?
A: You CAN peel and stick your vinyl … but it might not end well. The risk for error is high, and you won’t be able to preserve the spaces or small details the way you would by using transfer tape. Transfer tape really is the best way to apply an adhesive vinyl decal to a surface. And once you know how to use transfer tape, you’ll realize that it’s the easiest way, too. That said, you can use other alternatives like Press N Seal wrap or painter’s tape in lieu of StandardGrip tape — they often work great in a pinch! If you need a stronger tape however, you’ll want to purchase StrongGrip tape.
Q: Why won’t my decal come off the transfer tape?
A: Sometimes transfer tape works so well, that it works a little TOO well. If you’re finding that your vinyl cutouts won’t transfer onto your surface because the tape appears to be too strong, first try burnishing your design onto the surface again. Just be careful, because the stems and details are super delicate, and you may tear the vinyl. Try a few times if needed. If that doesn’t work, your transfer transfer tape may be too strong for your type of vinyl. Either try again with a different, less sticky type of transfer tape, stick it to something soft a few times to make it less sticky, or try using the Press N Seal or painter’s tape methods. When peeling off the transfer material, do so at a 45-degree angle or less for best results.
Q: Do you have to mirror when using transfer tape?
A: A lot of crafters get confused about when they should mirror their vinyl designs. The usual routine with heat transfer vinyl is to mirror your designs, after all. As a general rule, adhesive vinyl doesn’t need to be mirrored — with a few exceptions. Never mirror your adhesive vinyl unless you’re applying it to the back of glass where it will be read from the other side.
Q: Can you suggest other ways to use a love phrase flower design?
A: There are so many ways to use my love phrase flowers designs beyond Valentine’s Day signs. Tying the knot? Give customized word flower gifts to your bridesmaids or flower girl the day of the wedding! Or, use the designs for other crafts like items with heat transfer vinyl, sublimation projects, or size them up and cut them from cardstock! You can use as many designs in your project as you want, whether it’s a single rose, one or two heart balloons, or a whole bouquet of roses. There are truly so many different possibilities to create designs inspired by the enchanting world of flowers!
Q: What font did you use?
A: I used Cakepop in my flower word designs. When searching for fonts online, I recommend using the latest version of Google Chrome, or another up-to-date version of a browser (like Mozilla Firefox) for safe downloading.
Q: Do you have any other flower crafts I can make?
A: I sure do! Check out these floral projects and fill your craft room with the blooming of flowers! Check out my blog for even more:
- Follow this tutorial to learn how to make easy cardstock flowers
- Craft a paper artificial flower bouquet with this tutorial
- Sublimate projects with this gorgeous 3D flower PNG collection
- Create a pop-up paper flower bouquet with this tutorial
- Use this tutorial to create paper flower bouquet wall art
- Make a beautiful flower shadow box with this tutorial
- Follow this tutorial to learn how to put flowers into a balloon
- Create a teddy bear with vinyl or paper flowers in this tutorial
Q: Where can I buy the materials for this project?
A: Check out my list of tools and supplies above, or visit my Amazon shopping list for everything I used. I like to buy most of my craft supplies on Amazon because when I get an idea, I want the materials fast, and the quick shipping makes it super easy for me to craft on my own time. As the largest marketplace in the United States, you’re bound to find what you’re looking for.
Q: How can I display my love phrase flower art piece?
A: In addition to hanging your love phrase flower sign on the wall, you can prop it up against a wall or shelf. Your can even apply the decals to another surface altogether! If you’re hanging your sign or plaque on a wall, find out if it has a cord hanger, sawtooth hanger, or rings to hang it on the back. Be sure to plan accordingly with the right tools and hardware.
Get my free SVG/DXF/PDF files to create your own love phrase flowers!
(If you do not see the signup form above, click here.)
I love seeing what you make with my designs and how you use them! Inspire others and share a photo of your vinyl love phrase flower creations in our Facebook group or tag me on social media with #jennifermaker.
Love,

Want to remember this? Save this Love Phrase Flowers Tutorial to your favorite Pinterest Board!