

Brr, it’s chilly outside! Sweater hats and sweater gloves and sweater scarfs to the rescue! Why sweaters? Anyone who has seen my sweater coats (autumn sweater coat, winter sweater coat, and spring sweater coat) knows how much I love to play with old sweaters. I’ve been collecting sweaters for a while now and I have quite a stash. SO many sweaters. I needed to find a purpose for them. I’ve heard of people making hats and scarfs from old sweaters, but I wondered … could I make a DIY sweater hat, scarf, and gloves all from just one sweater? It took a little trial and error, but I did it… not just once, but four times! Not only is it fun and easy on the wallet, but you can pick just the perfect color and create just the right style to complement your look.
Anatomy of a Sweater Upcycle
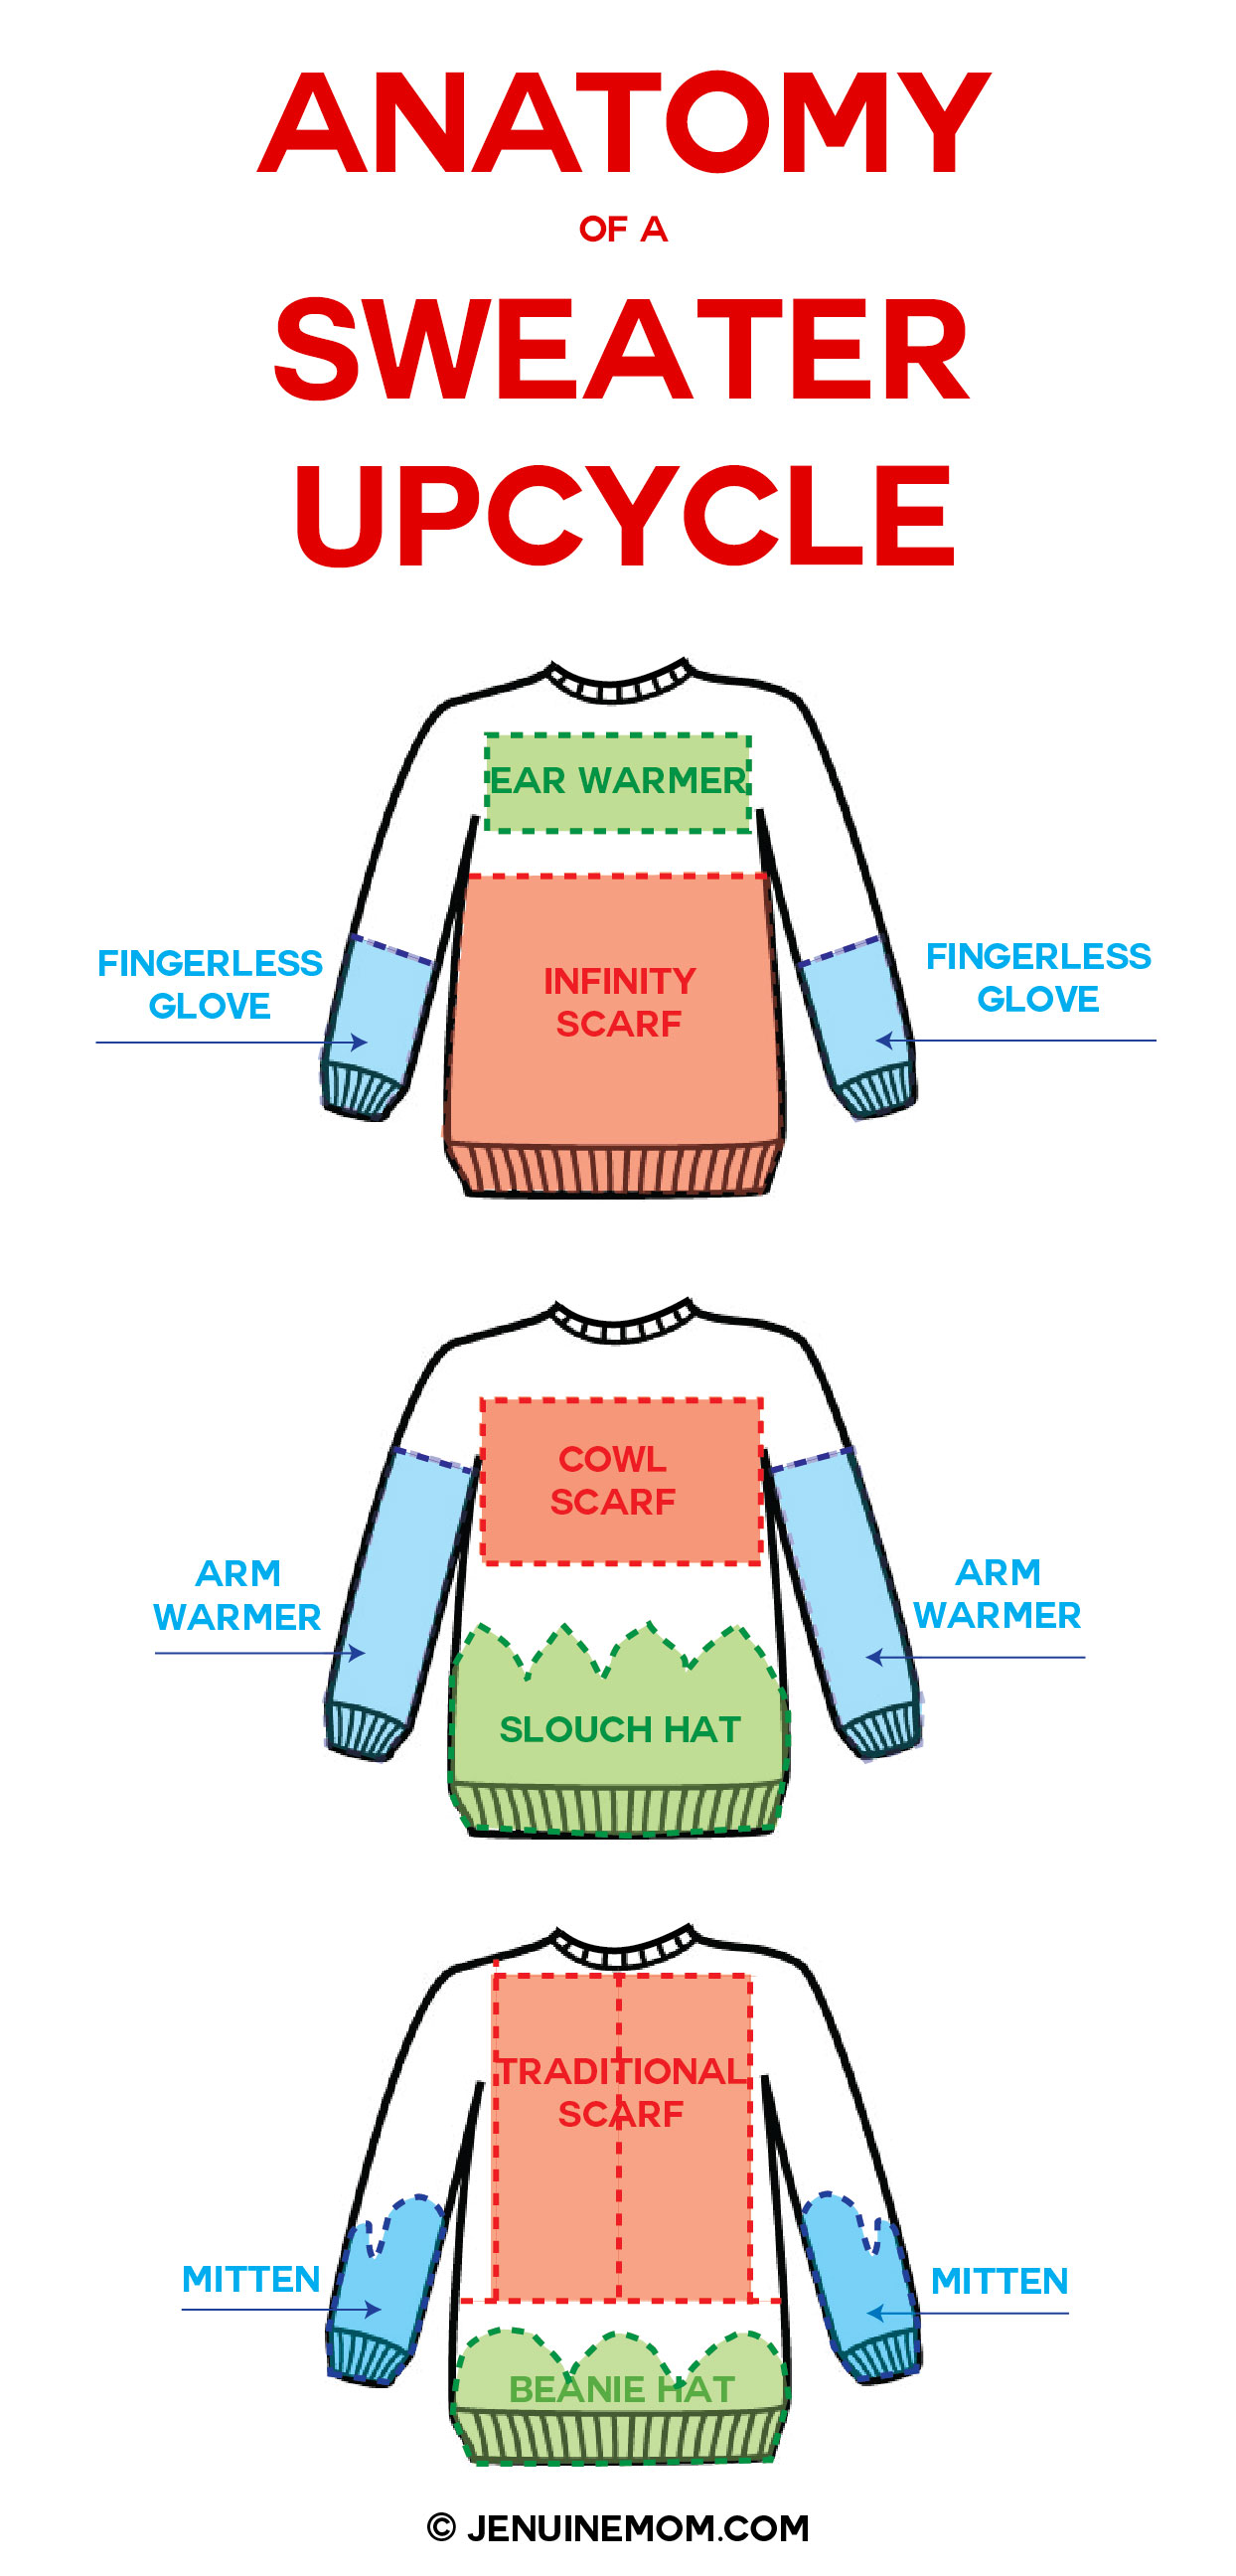
Note: It is also possible to make an infinity scarf from the same section that you make a traditional scarf or cowl scarf, so don’t worry that you can’t have exactly what you want!
Some of the links below are Amazon affiliate links for your convenience. Read my full disclosure policy.
DIY Sweater Hat, Gloves & Scarf Materials
The big thing you need for this project is a sweater! Preferably an old sweater from your closet or from the thrift store. Re-use and recycle, love! The best sweater for this project is a wool sweater that you can felt* in the washing machine. If you can’t find a wool sweater, I recommend a medium-to-tight weave cotton. Avoid loose-weaves and synthetics if at all possible.
If you set out in search of an old sweater, the bigger the better! Check the mens’ section of your local thrift store for big, wool sweaters! The bigger the sweater, the more you have to play with. And if you opt for a wool sweater, it will shrink when you felt it, so you definitely want to go bigger. Still, this is all possible even with smaller sweaters — I managed to make the hat/gloves/scarf combo from a ladies size medium wool sweater.
Be sure to wash and dry your sweaters before using them. If you have a wool sweater, try to felt it by washing in hot, soapy water in your washing machine. Twice. Then dry them for a long time on high heat. You’re cleaning them, yes, but also shrinking and felting them. This makes the wool even stronger and cozier, and reduces the chance of shrinkage in the future.
Beyond the old sweater, you’ll need:
- Scissors
- Sewing machine and/or serger (I used both, but you can get away with one or the other — even hand sewing is possible here, just more time-consuming)
- Thread
- Kraft paper (for an old paper bag) to make patterns
- Pencil
And that’s it! This is really a simple, quick, and fun project.
Note on Sergers: I use and recommend JUKI MO644D Portable Serger![]() if you’re in the market for an awesome serger (it’s usually on sale, too). If you plan to only use a serger, you’ll need one that allows you to rotate the knife away when you make the gloves/mittens.
if you’re in the market for an awesome serger (it’s usually on sale, too). If you plan to only use a serger, you’ll need one that allows you to rotate the knife away when you make the gloves/mittens.
Now watch me as I attempt to squeeze nine different patterns and construction directions into one blog post. Muahahaha! Let’s break it down into hats, then gloves, and finally scarves!
DIY Sweater Hat Step-by-Step Tutorial
You can make at least three different styles of cozy headgear from an old sweater: the trendy slouch hat, the basic beanie hat, and a cute ear warmer. I’m also working on a newsboy style hat, but that’s a bit more complicated and a subject for another post.
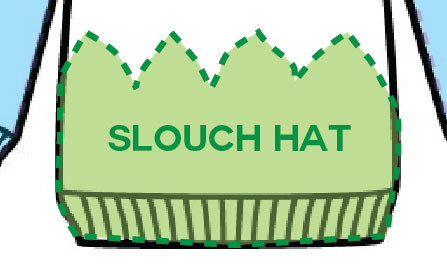
Step 1: Decide which style you want from the Anatomy of a Sweater Upcycle diagram above (look for green sections). I took most of my pictures for the slouch hat, so that’s what you’ll see in this tutorial.
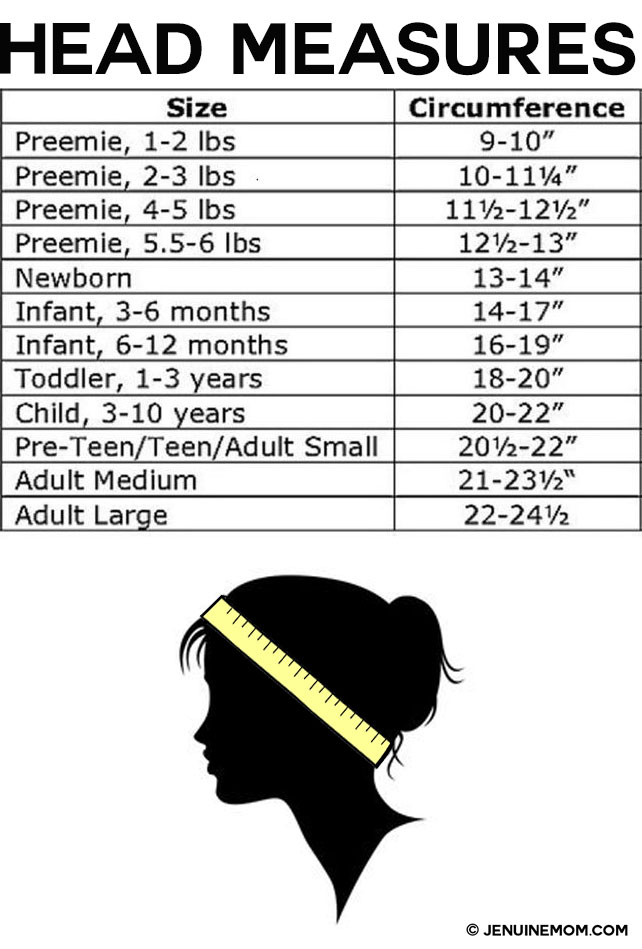
Step 2: Measure the circumference of your head where the edge of your hat will lie, then add 1 inch. For example, I have a 21.5″ inch head and 1″ added to that is 22.5″. This will be your hat “brim” measurement. Tip: If you’re making a gift and you’re not sure what head size to make it to, here is a handy chart:
Step 3: Create your pattern on your paper using the diagram below:
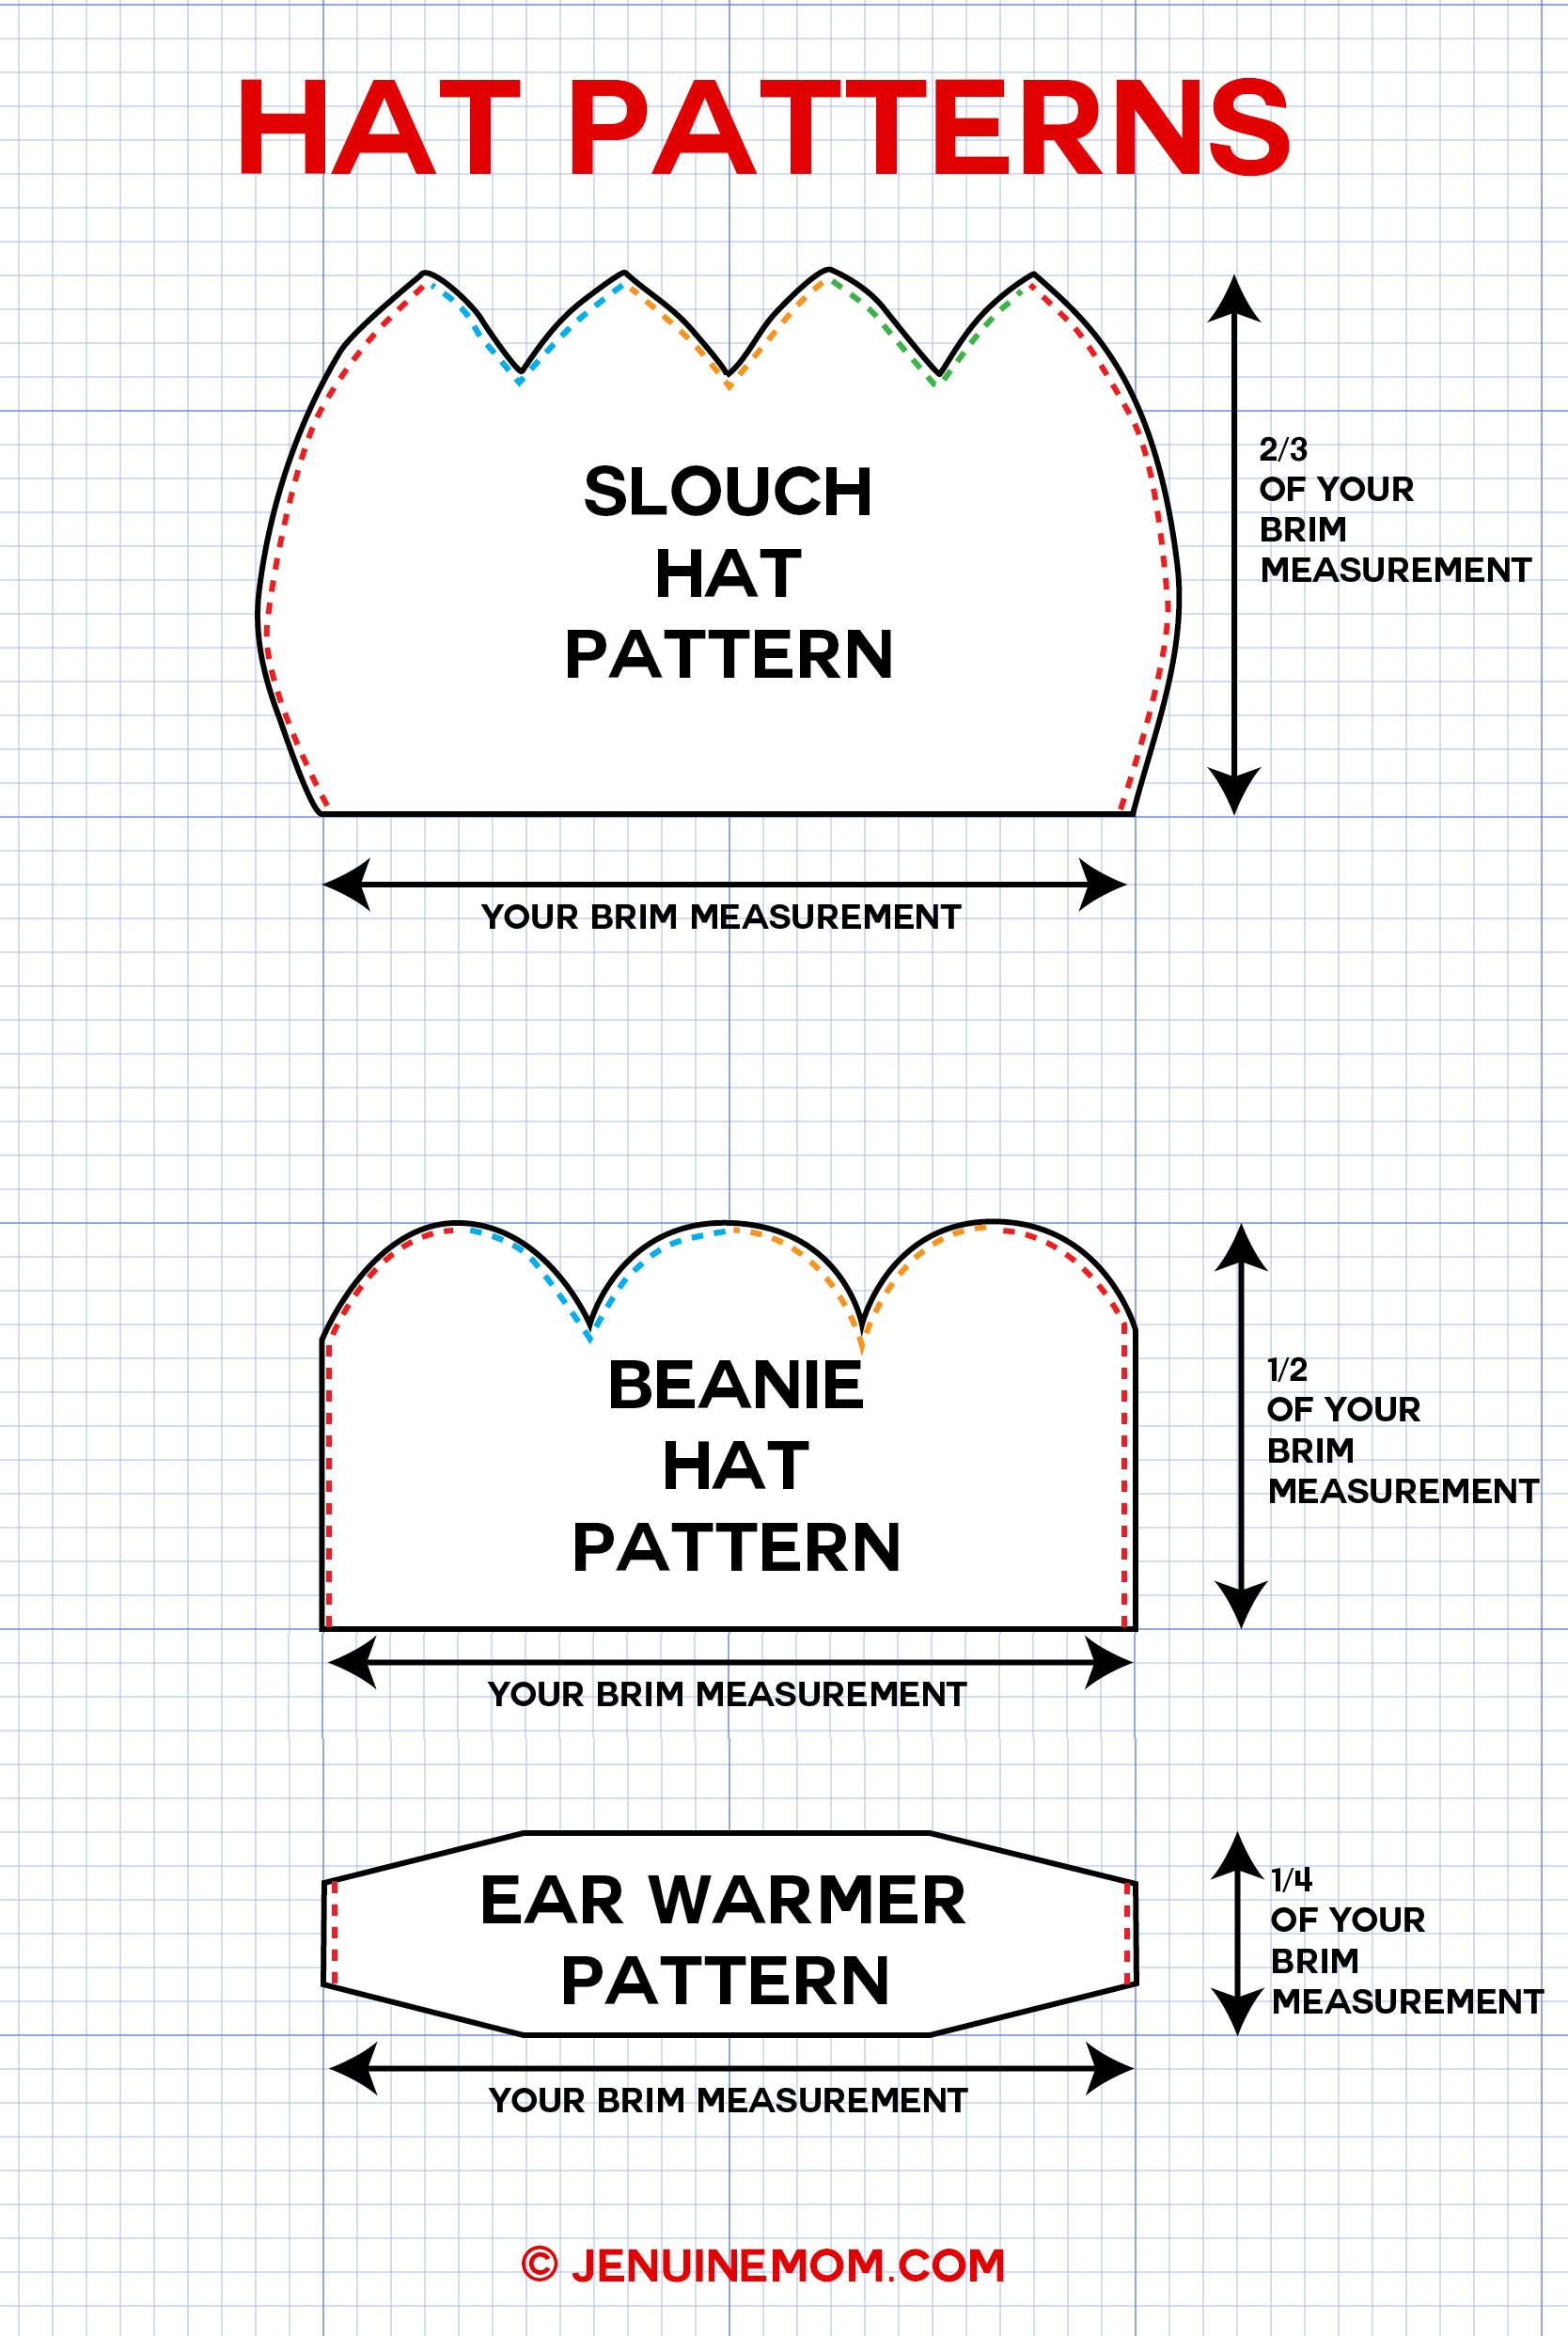
Tip: If you prefer to use a full size pattern, I made a PDF (Design #10) of the full-scale pattern for the slouch hat and put in my Free Resource Library (get the password to the library by becoming a subscriber for free at the very bottom of this post).
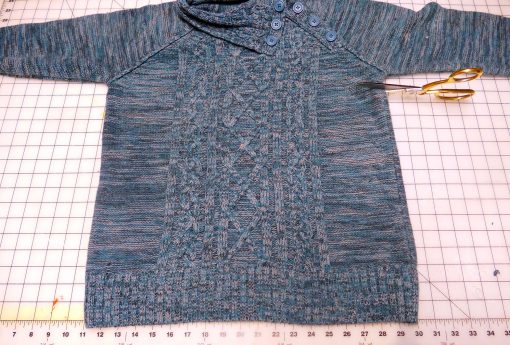
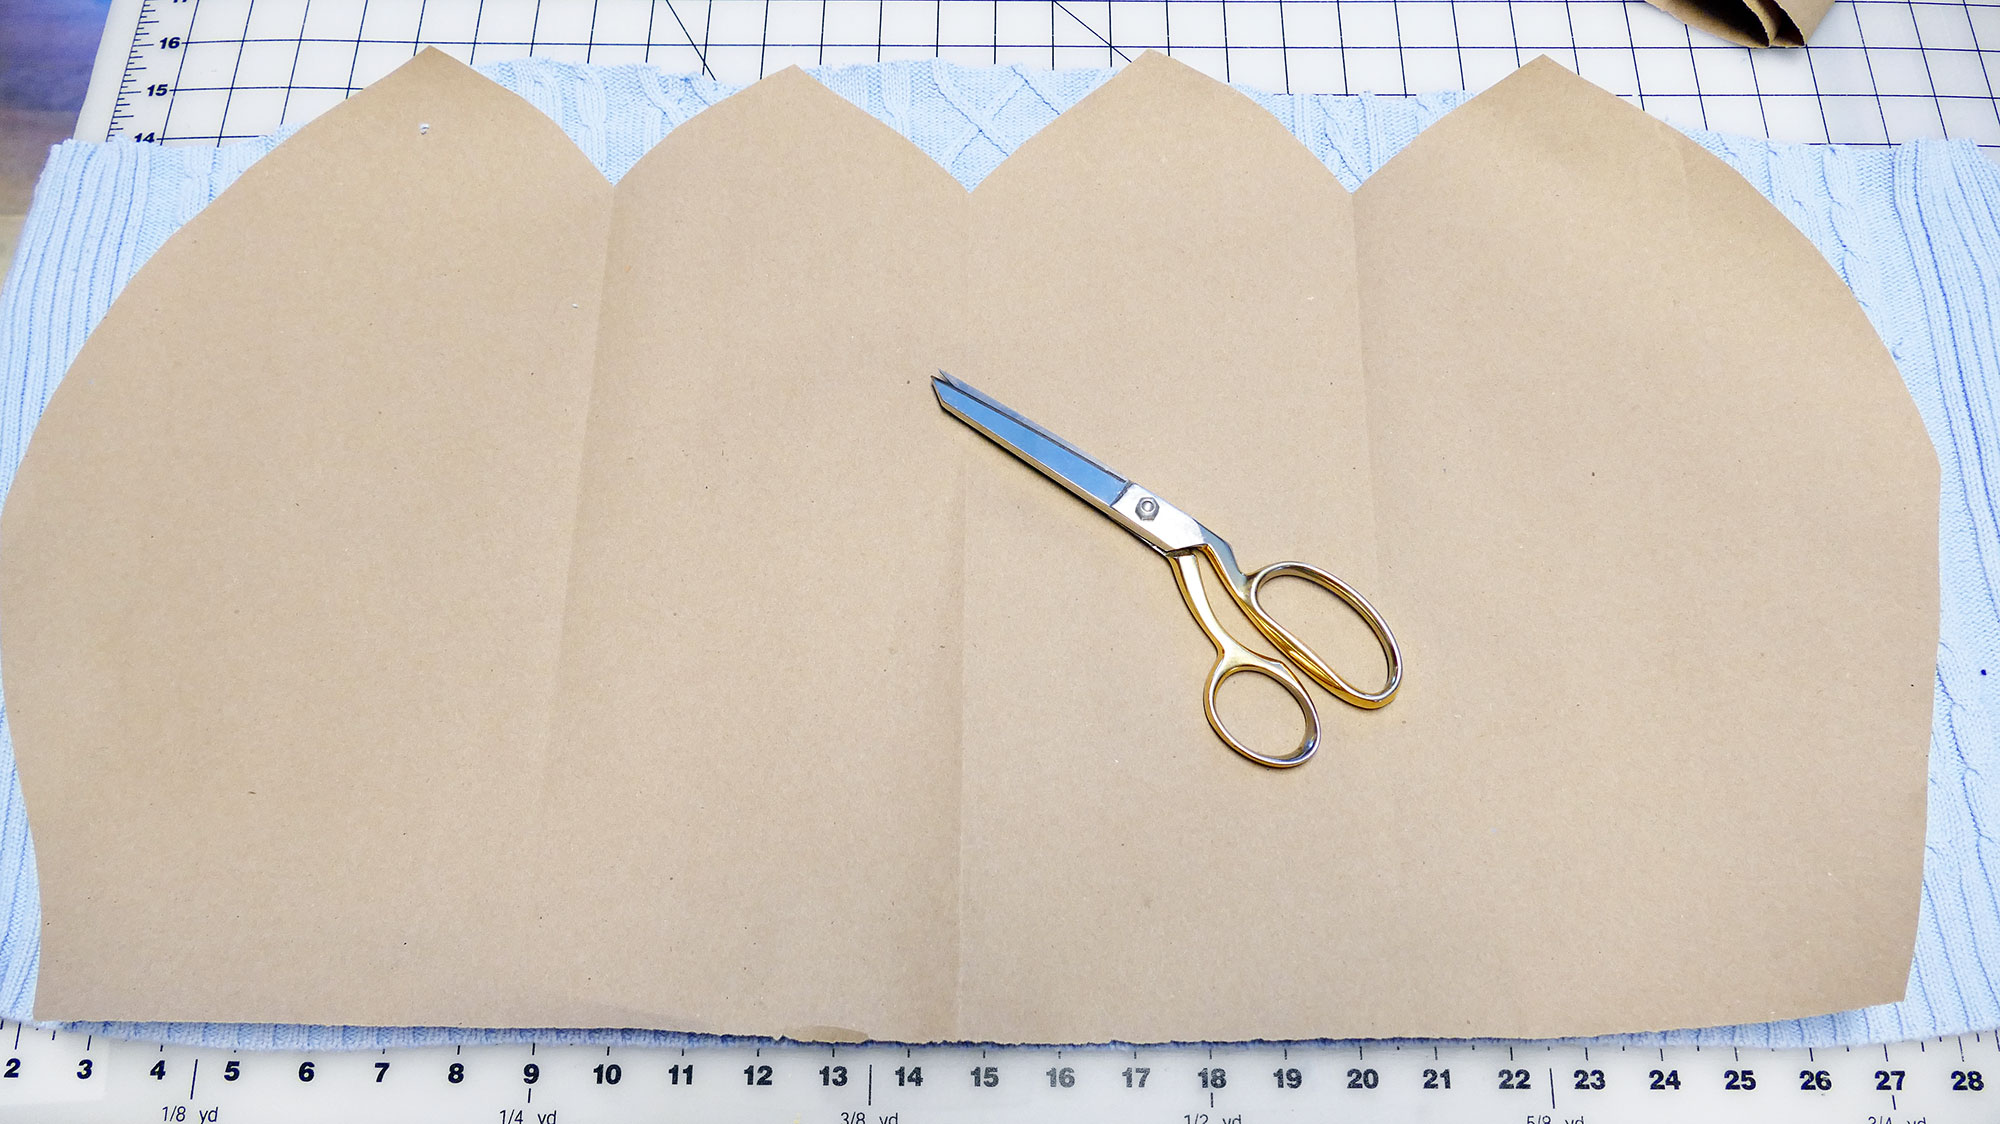
Step 4: Cut your pattern out of your sweater. If you’re making the slouch hat or beanie hat, you should cut the lower part of the section off completely and then make one vertical cut up the back of the sweater so you have a big rectangle. Also, when you cut out the slouch or beanie hat pattern, align the bottom edge of your pattern to the bottom edge of your sweater, as it already has a finished edge. Tip: Align the center of your hat pattern with a pleasing cable pattern you like on your sweater, if one exists. (You can see in the photo below that I’ve aligned the center cable stitch of the sweater with the center of my pattern.)
Step 5 (For Ear Warmer Only): Sew around the entire circumference of your cut piece using a serger, a zig-zag stitch on a sewing machine, or a hemstitch with hand sewing.
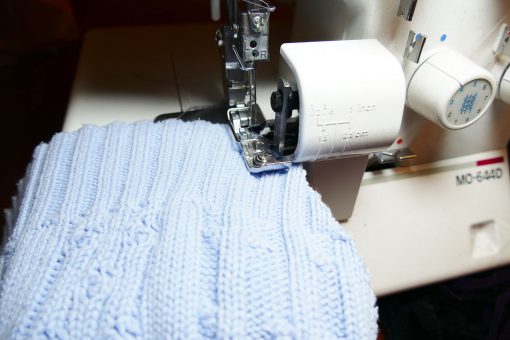
Step 6: Now sew your hat with right sides together. Look at the patterns shown above in step 3 for the sewing sequence. First sew the red stitches together, then the blue, then the orange, and finally the green. (If your pattern doesn’t have those colors, you don’t have to sew them!)
Step 7: Put the hat on and fold the brim to the place that fits and looks the best. Voila! You have a super cute hat!
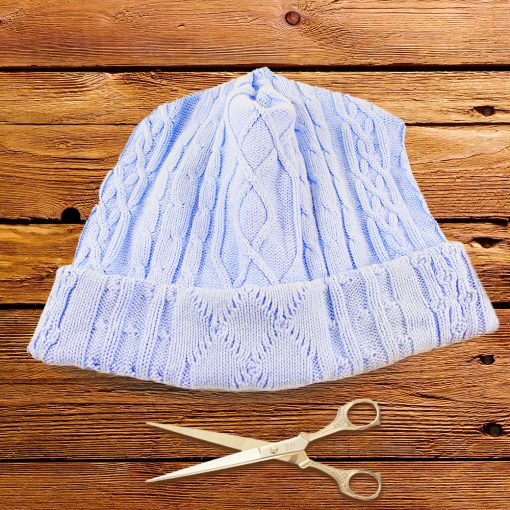
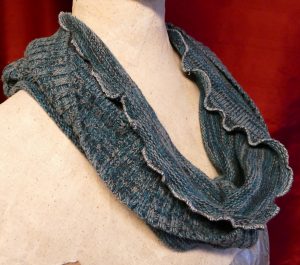
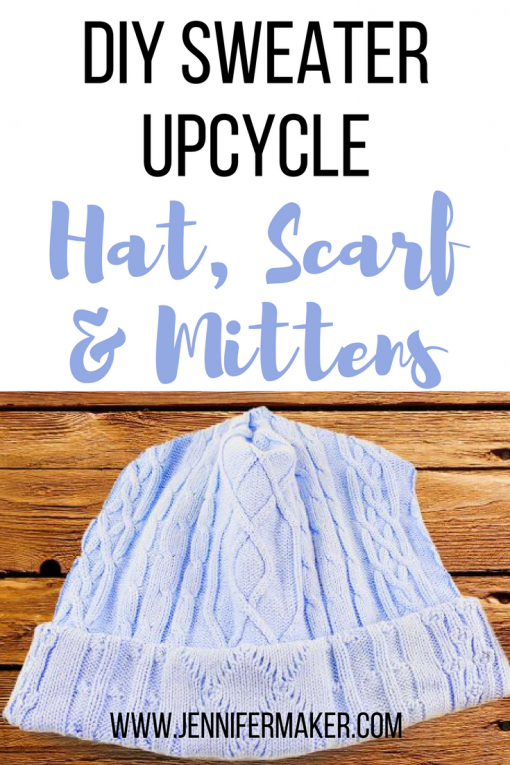
Here’s how it looks being modeled by my niece Natalie, who was the recipient of this light blue slouch hat:

And here are photos of some other hats I made from sweaters:
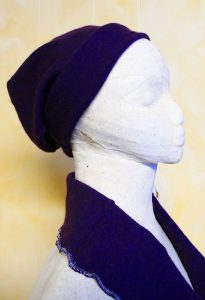
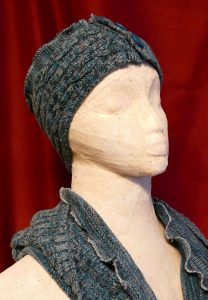
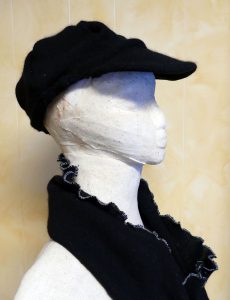
Note: The purple wool is a beanie hat, the turquoise cotton is an ear warmer, and the black wool is a newsboy cap (which I will explain how to make in a future post as it is more involved).
DIY Sweater Gloves/Mittens Step-by-Step Tutorial
Good news—gloves, mittens, and arm warmers and easier than hats!
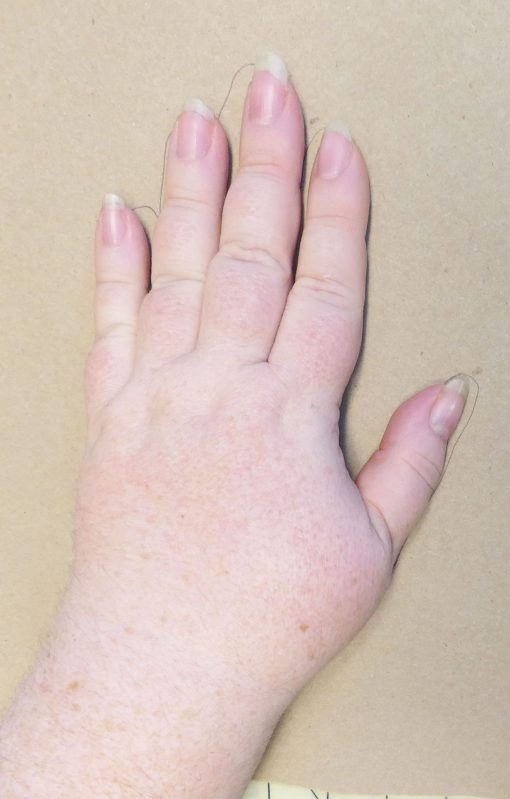
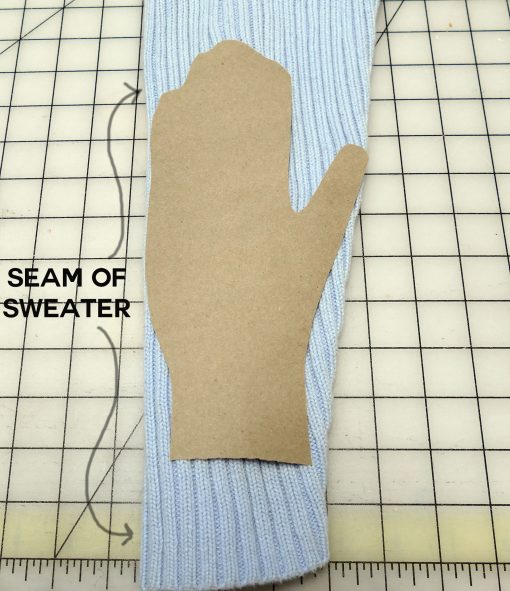
Step 1: Make your pattern by putting your hand on a piece of paper and tracing around it. As you trace, keep your fingers together and your thumb out slightly, like shown in the photo below. Cut out your pattern along the trace lines.
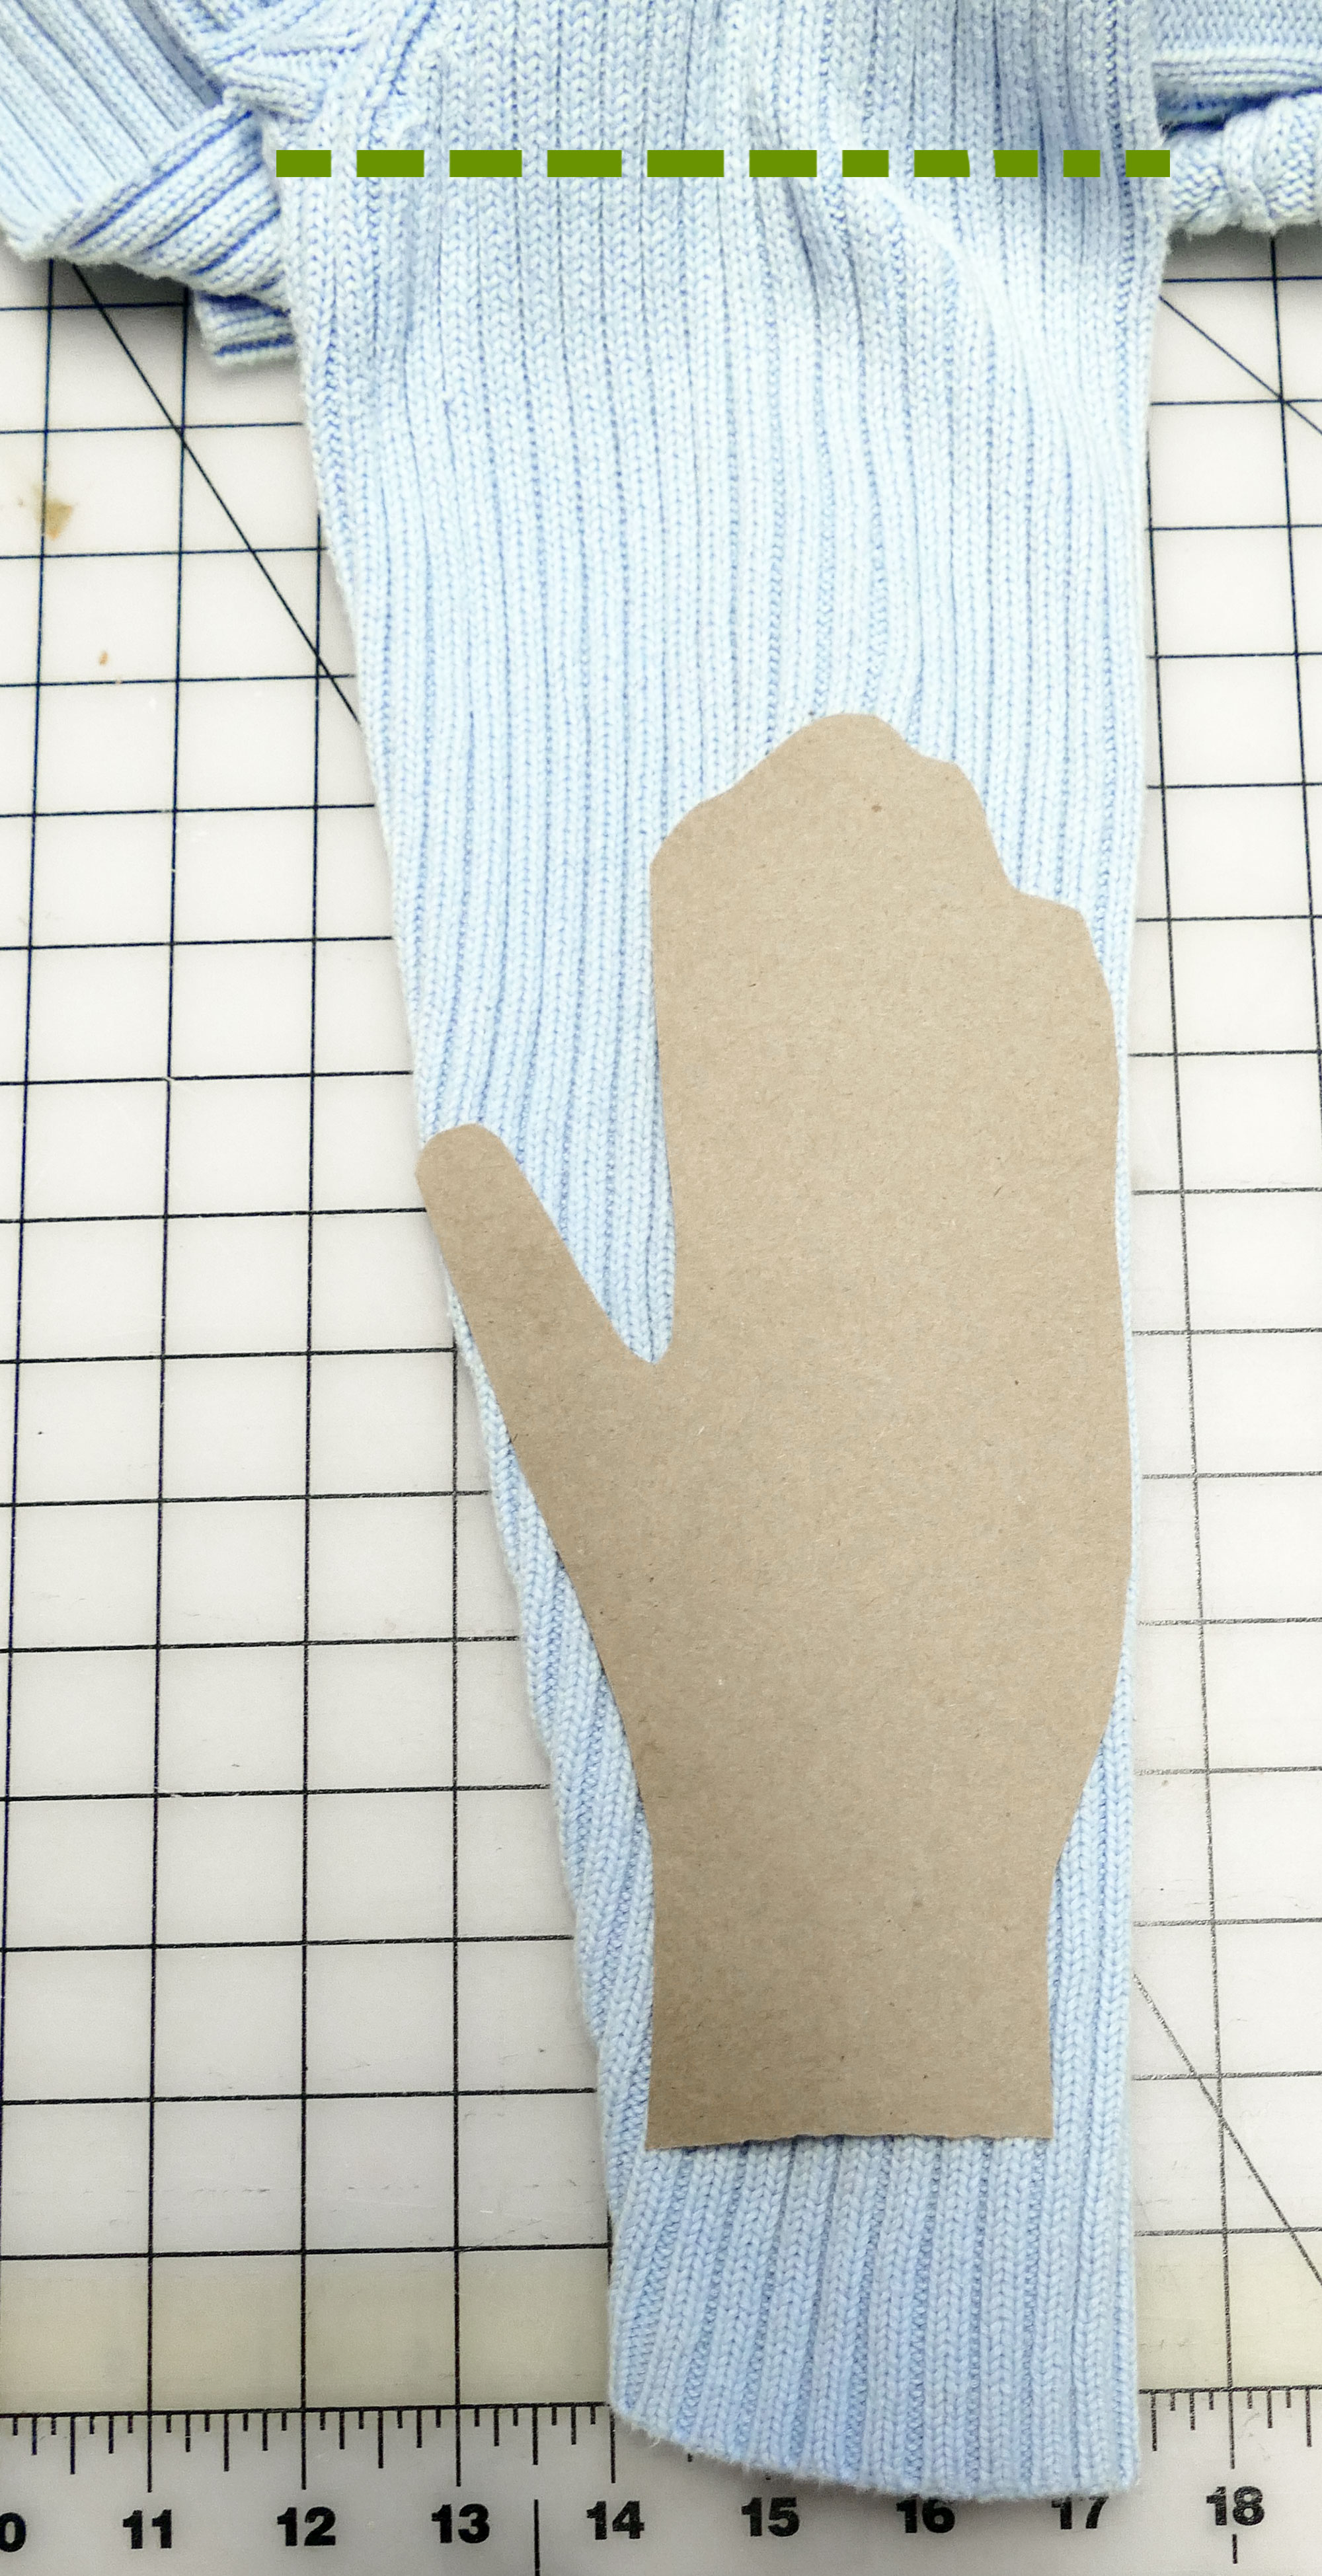
Step 2: Place your hand pattern on the sweater sleeve, with the finger section of the pattern closest to the seam of the sweater sleeve. Place the pattern up high enough on the sleeve so the cuff reaches the point you’d like on your arm. Also consider whether you’ll want to fold the cuff down or not.
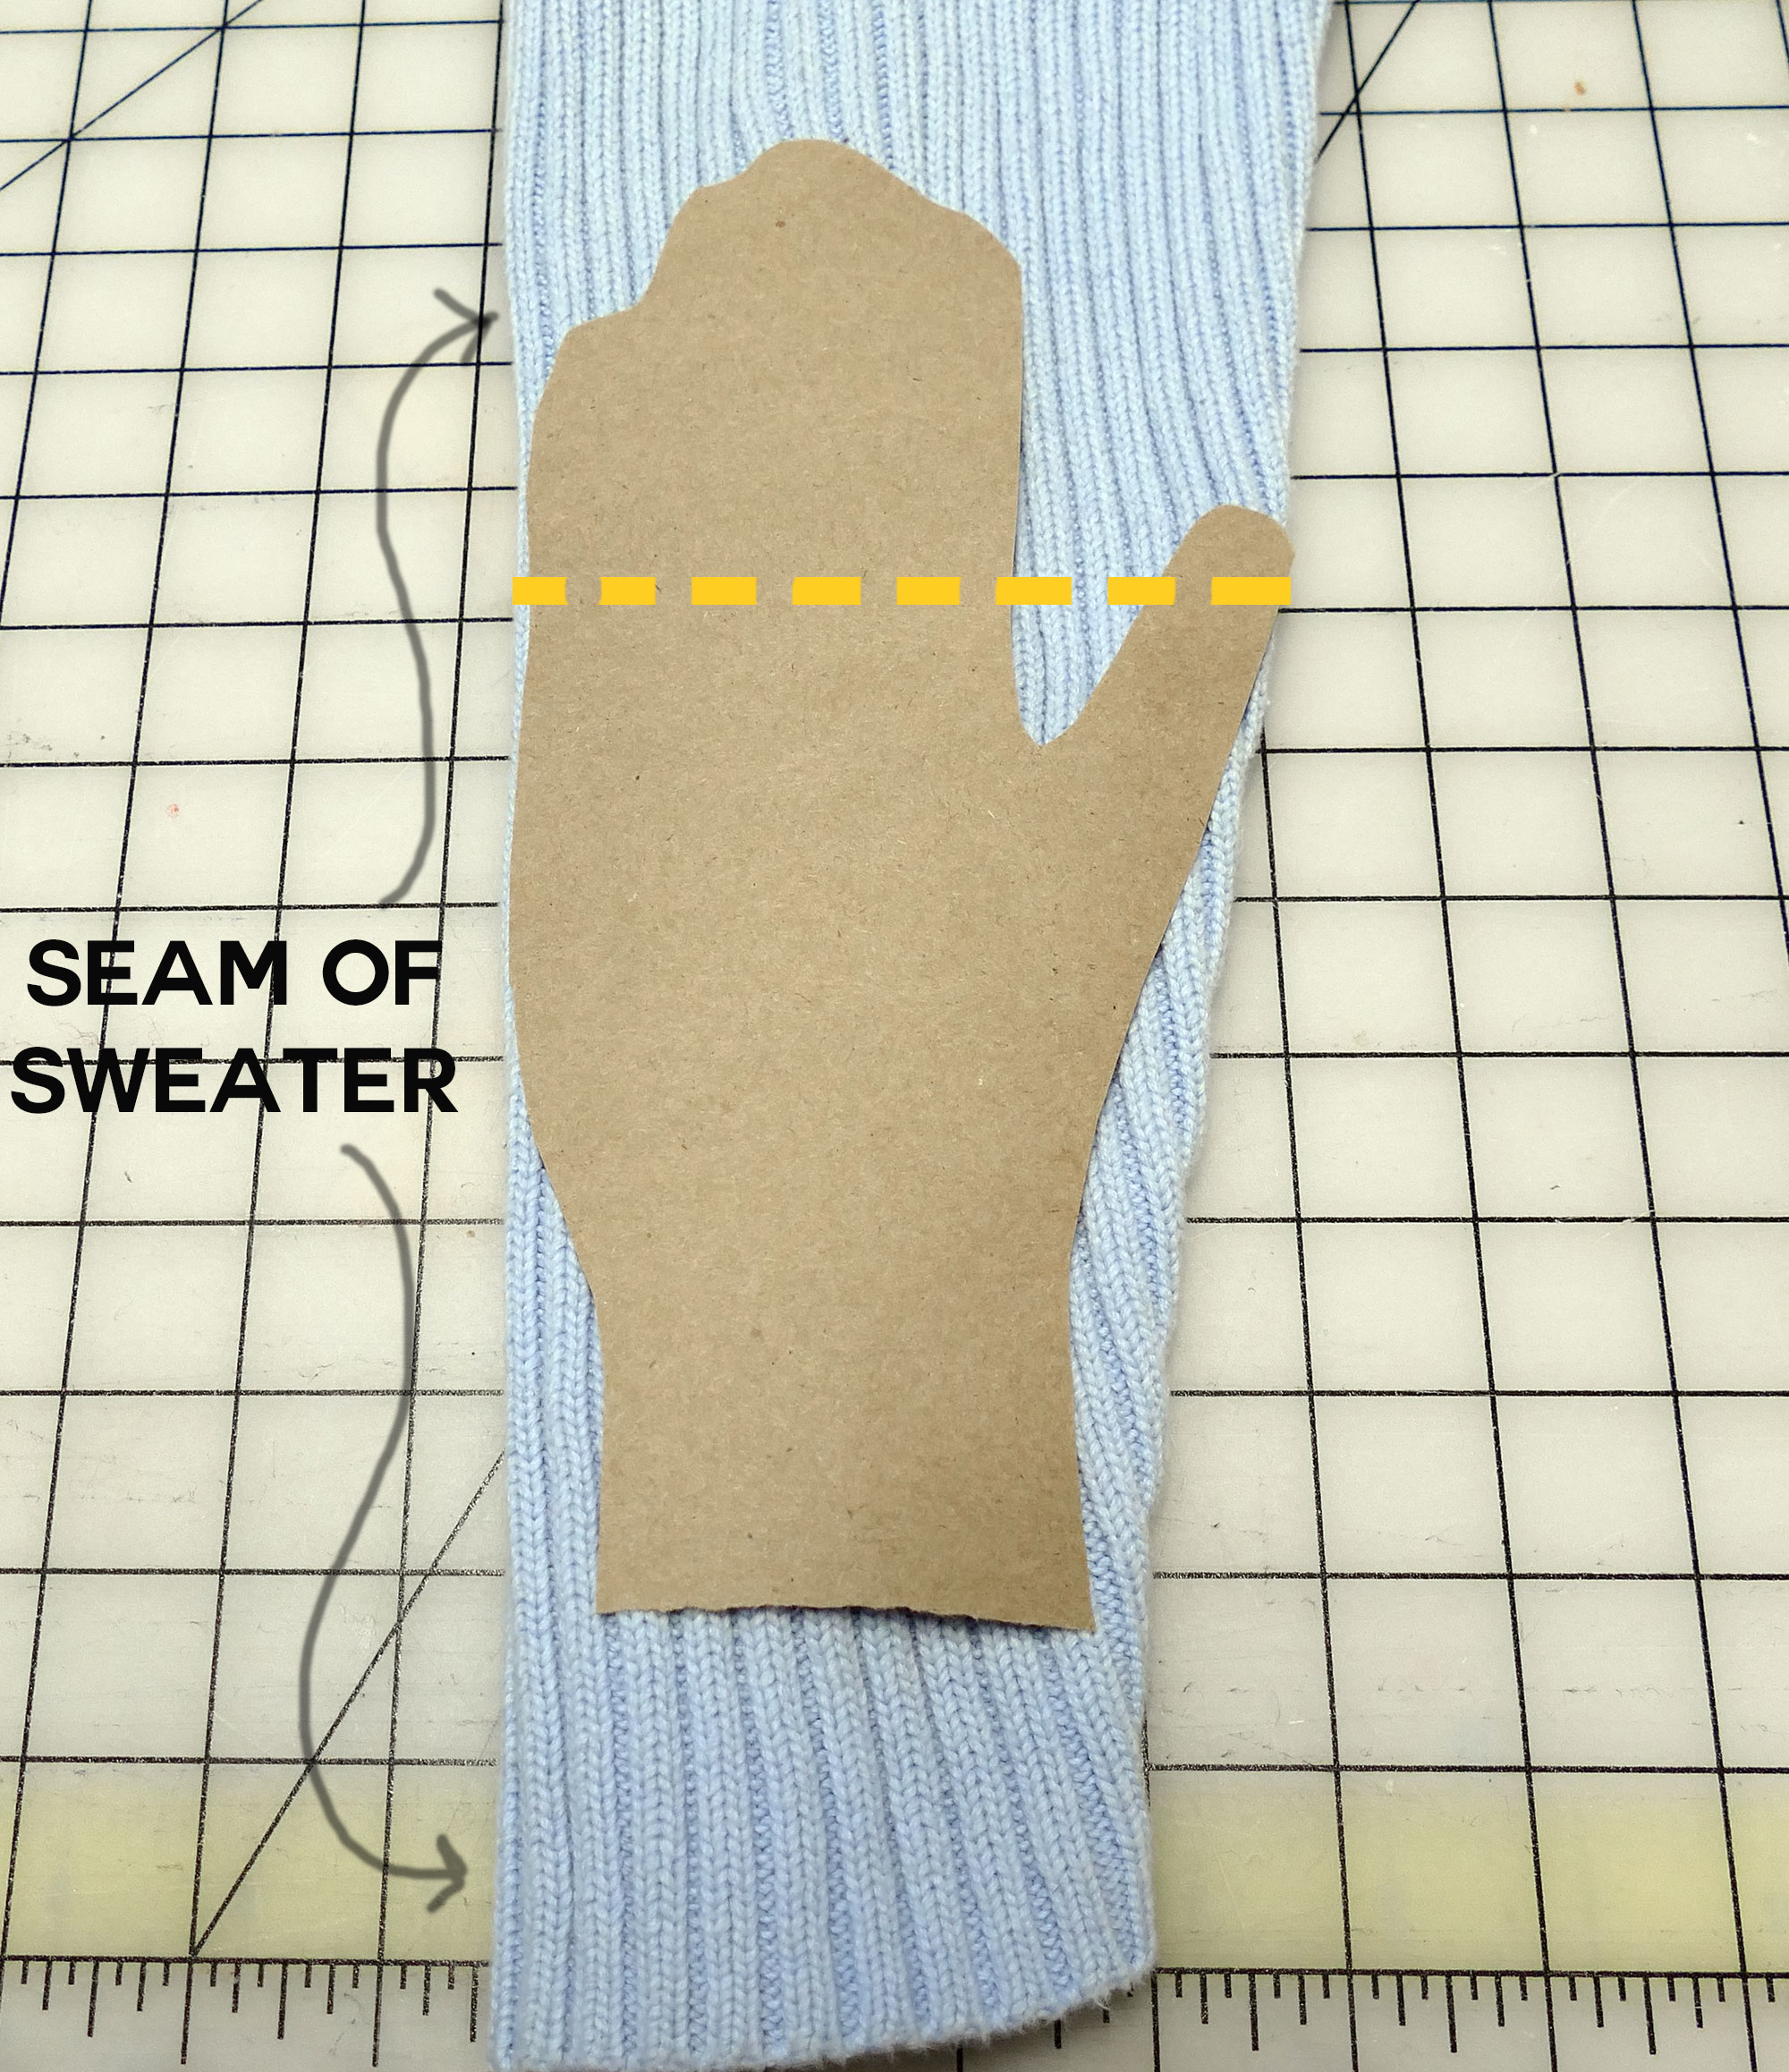
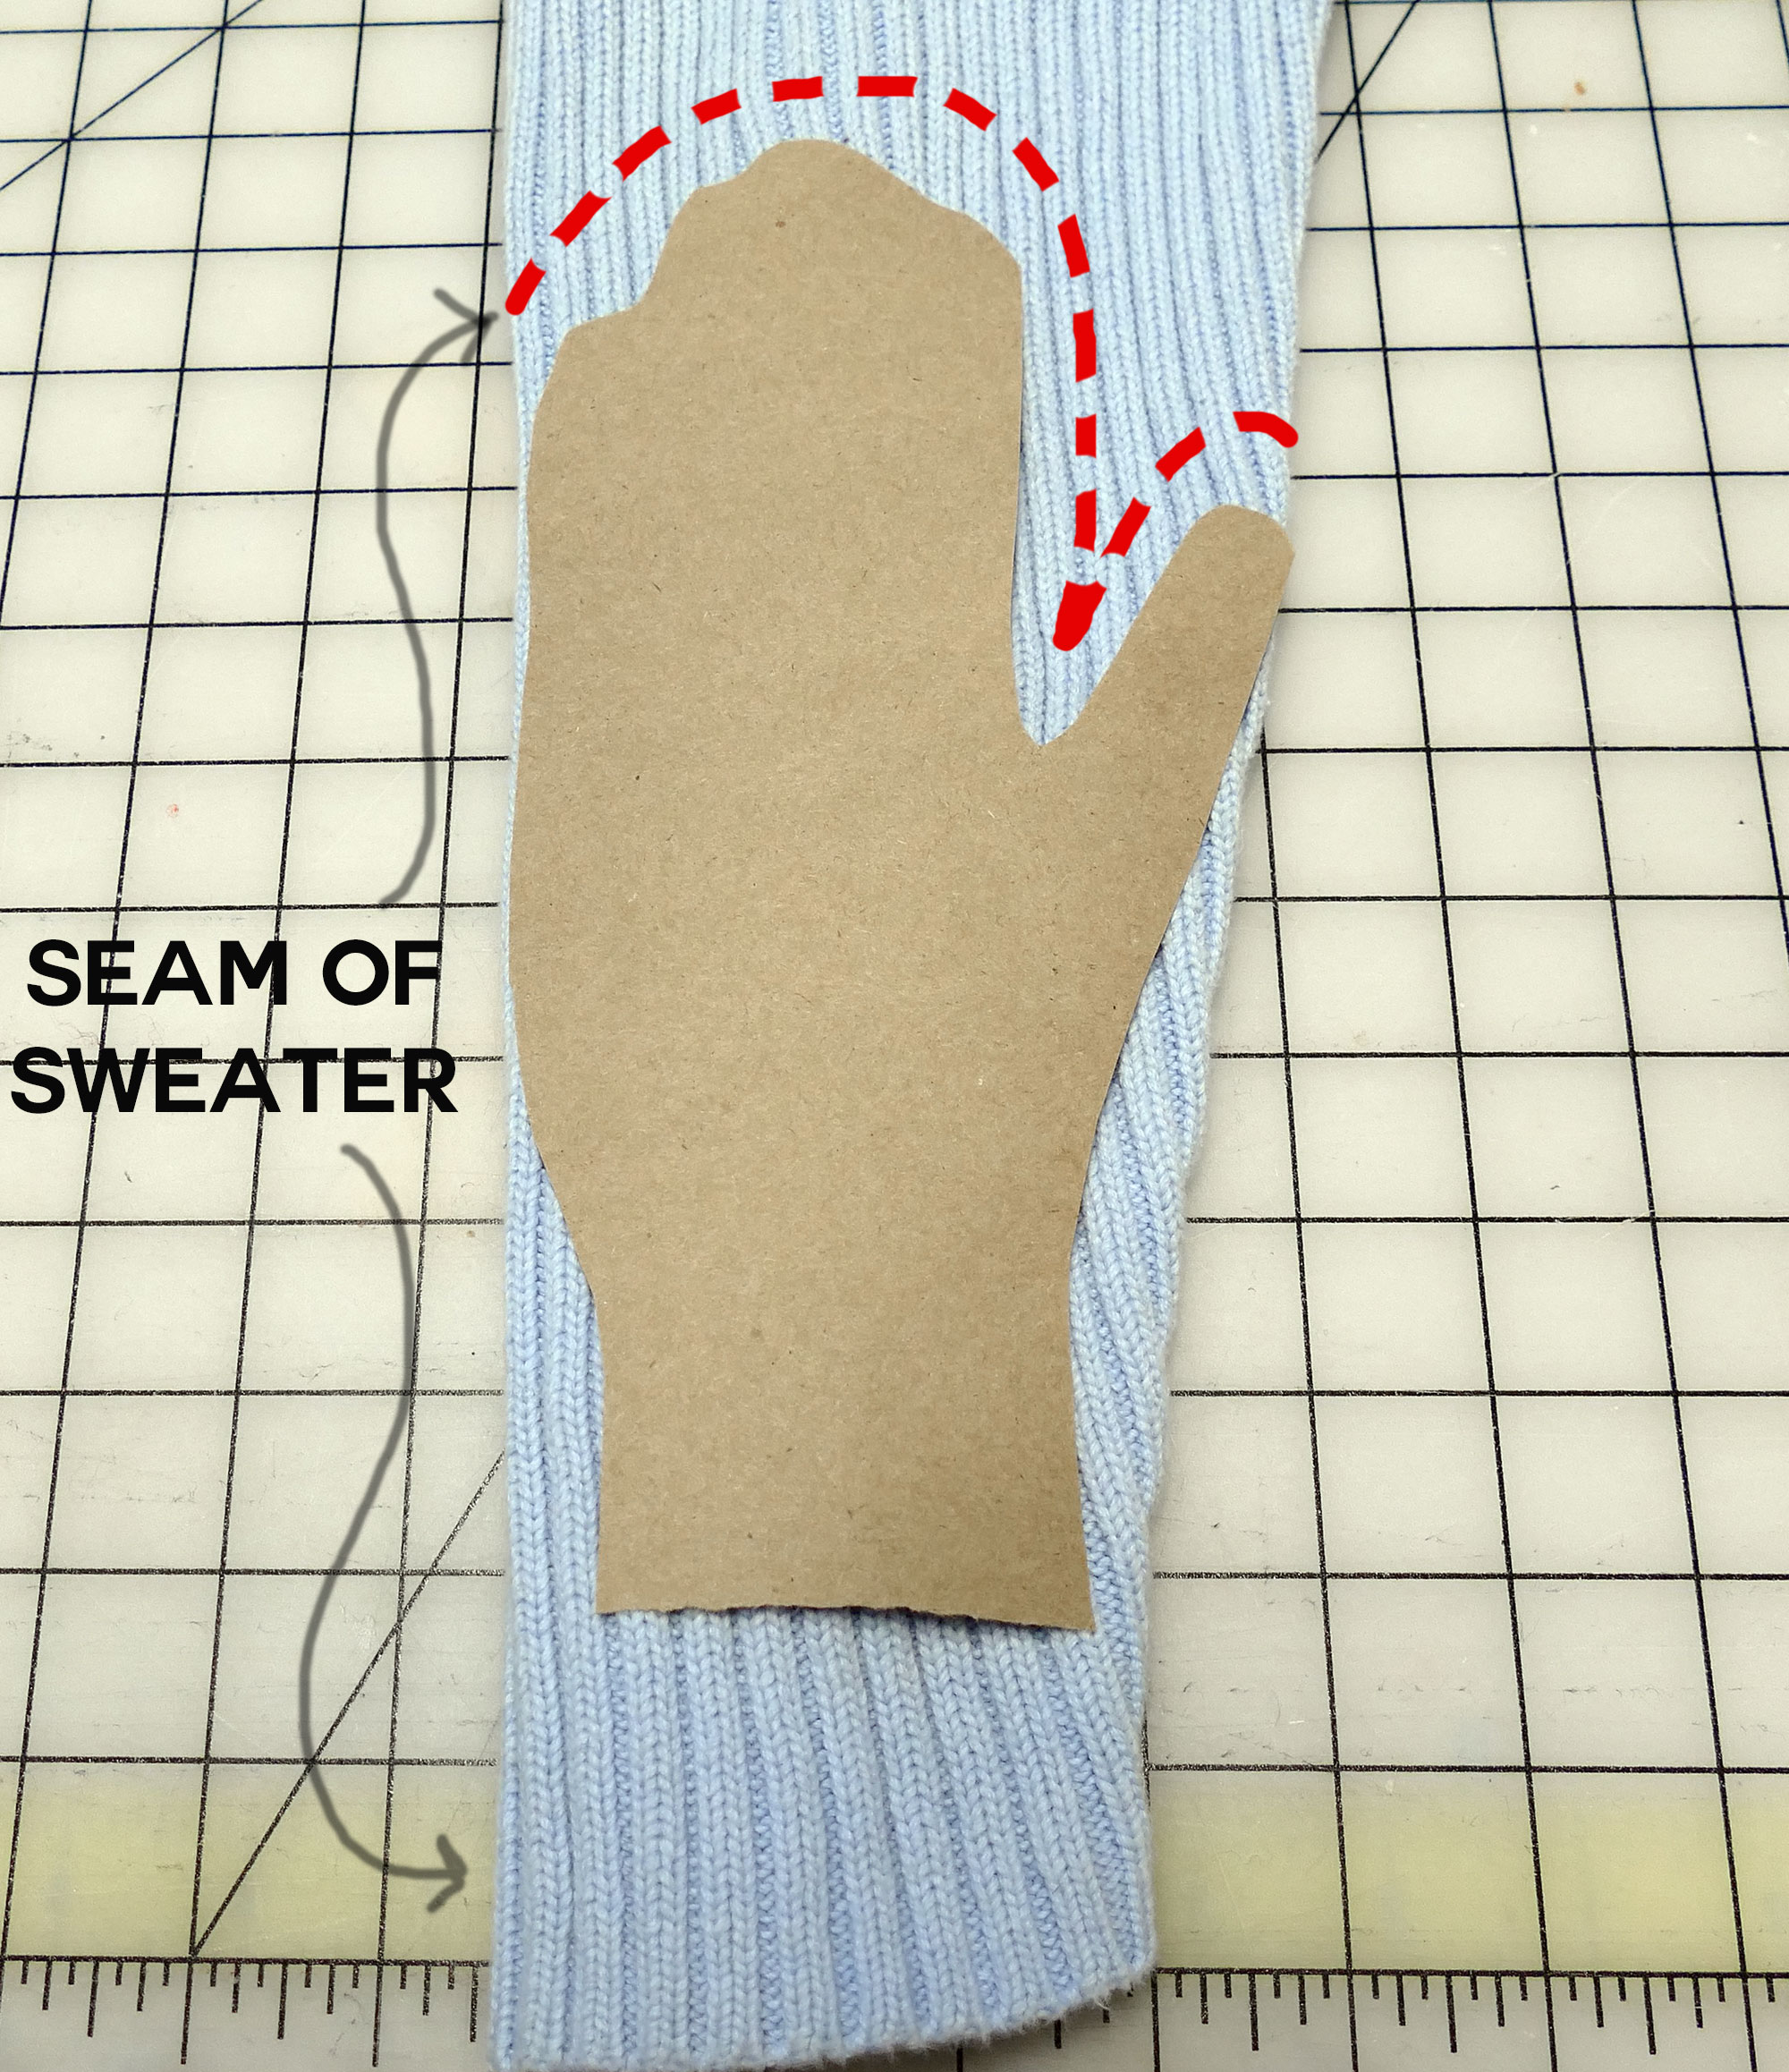
Step 3: Cut your sweater according to what you want. Below are some diagrams so you can see where to cut each type (from right to left: fingerless glove, mitten, and arm warmer). Be careful to only cut along the dotted lines. When done cutting, you will have a tube.
Step 4: If you are making fingerless gloves or arm warmers, sew the entire cut edge with your serger or sewing machine (or hemstitch by hand).
Step 5 (arm warmer): Try on the arm warmer. If it fits snugly, you’re done! If it’s loose, note how much extra sweater you have, take it off, and sew along the edge (the same edge as your sweater seam) to take it in. Remember, sweaters stretch, so tighter is probably better.
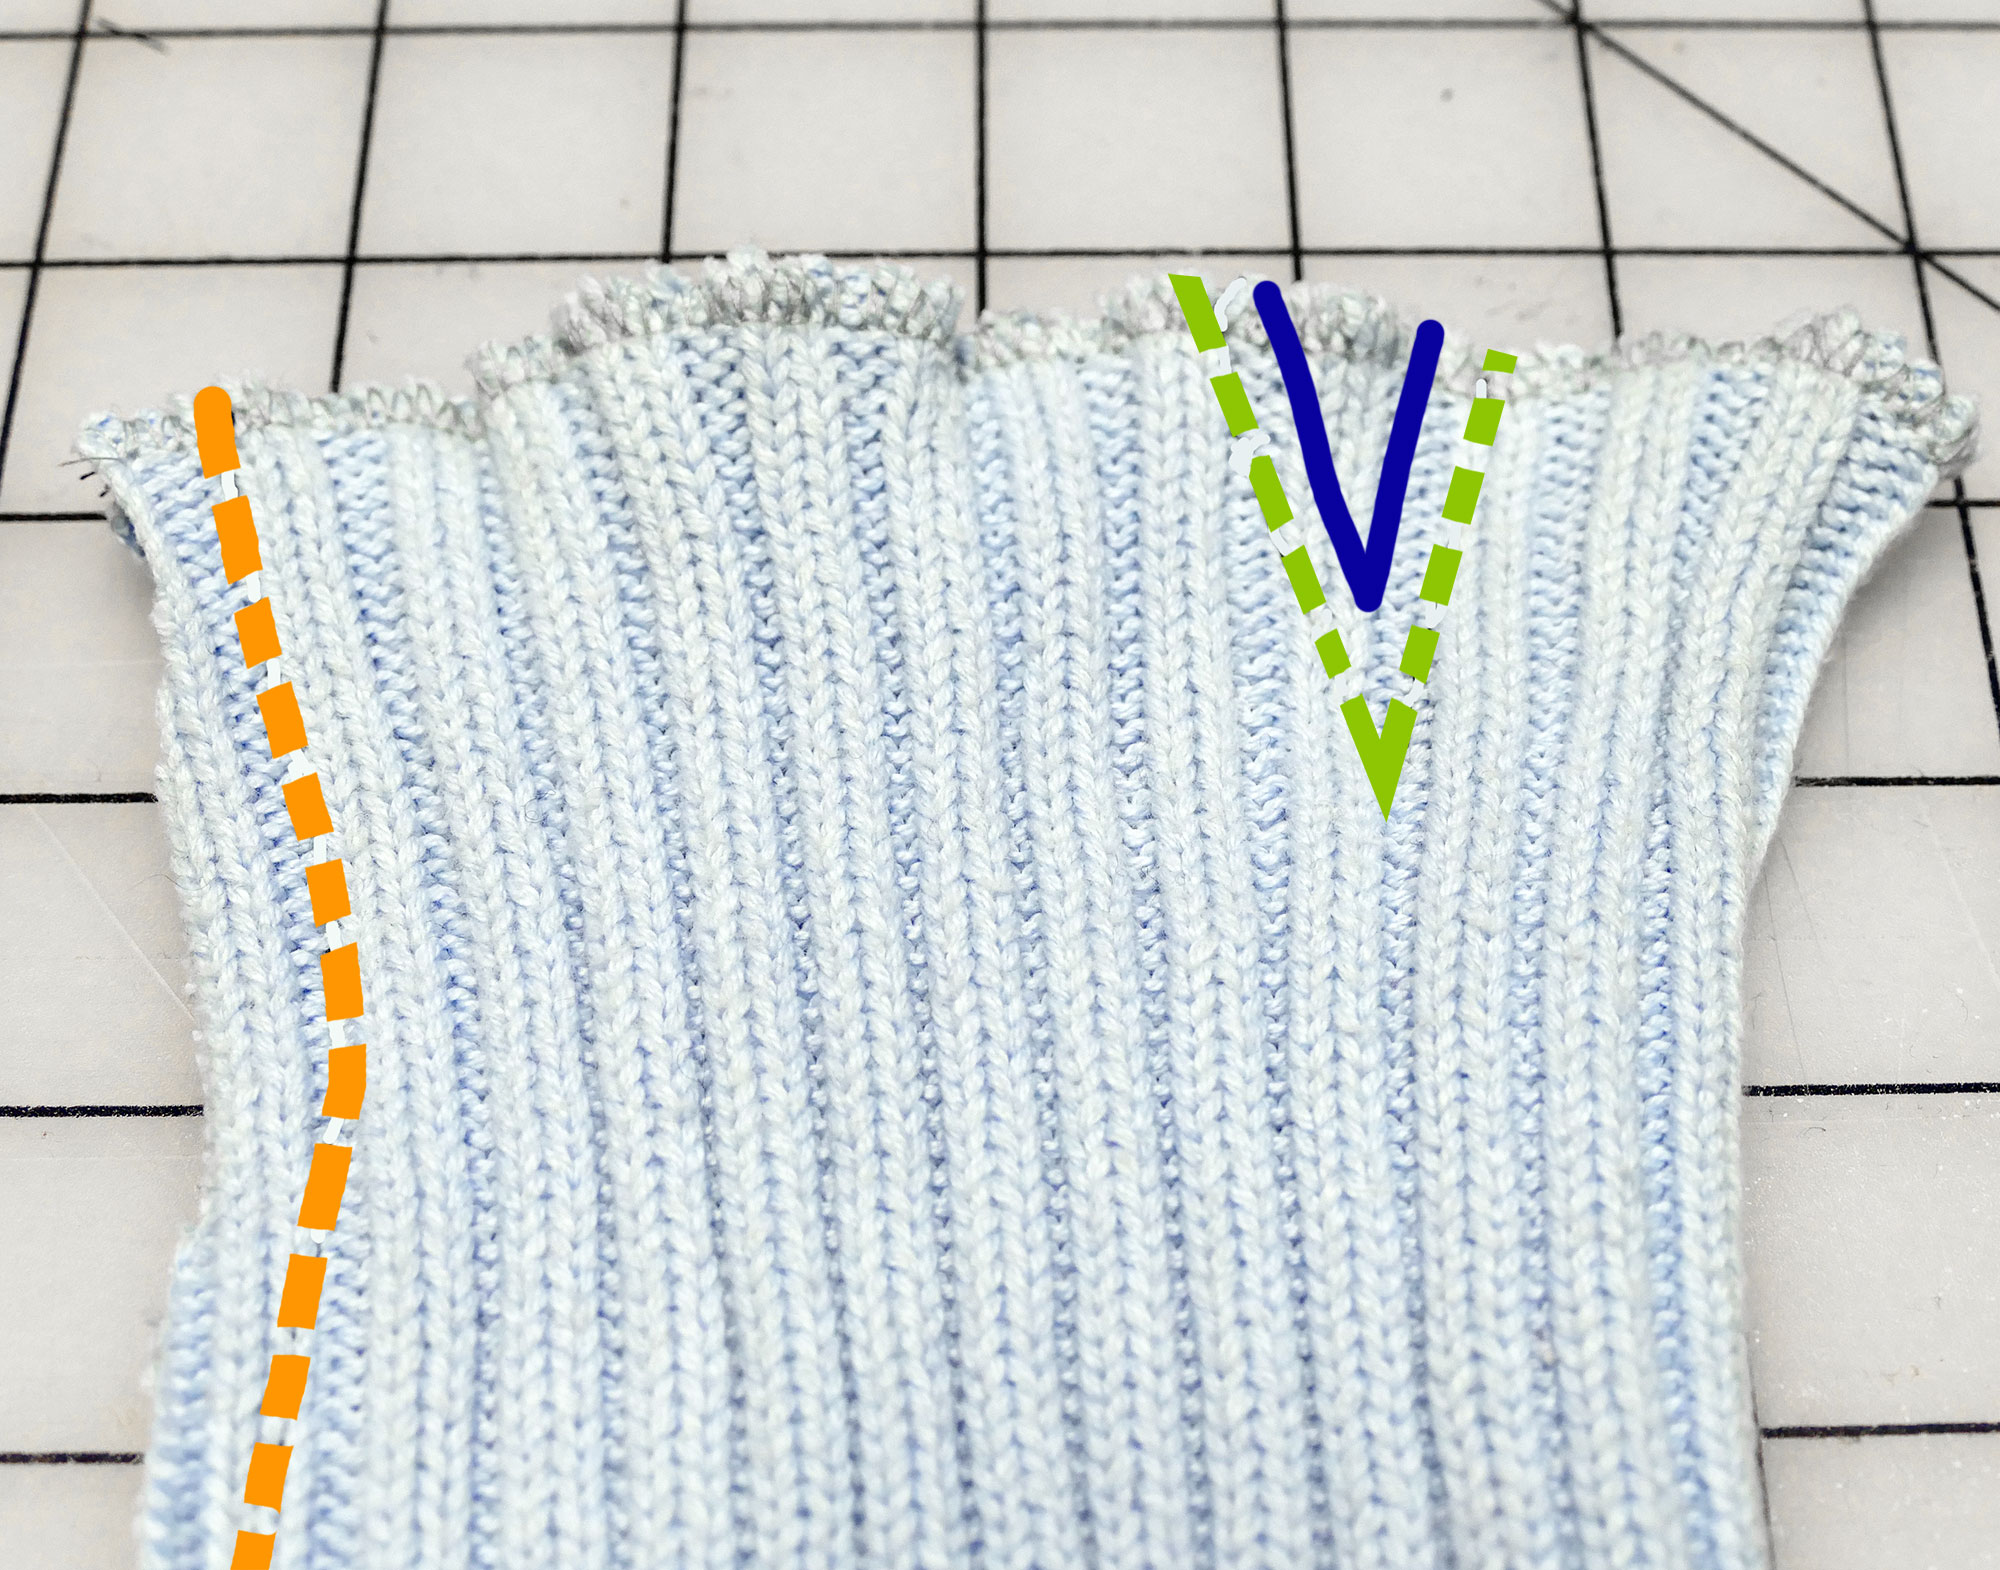
Step 5 (fingerless gloves): Turn your sweater tube (which is what it is at this point) inside out so the seam is showing. Measure in about one inch from the non-seam edge and sew a V shape about 1 1/2″ long, as shown in the photo below (green dotted line). Cut along the blue line. Try it on. If the glove feels a bit loose around your fingers, sew the seam in closer along the orange dotted line. Turn inside out and you’re done! Repeat steps 1-5 again for a pair of gloves.
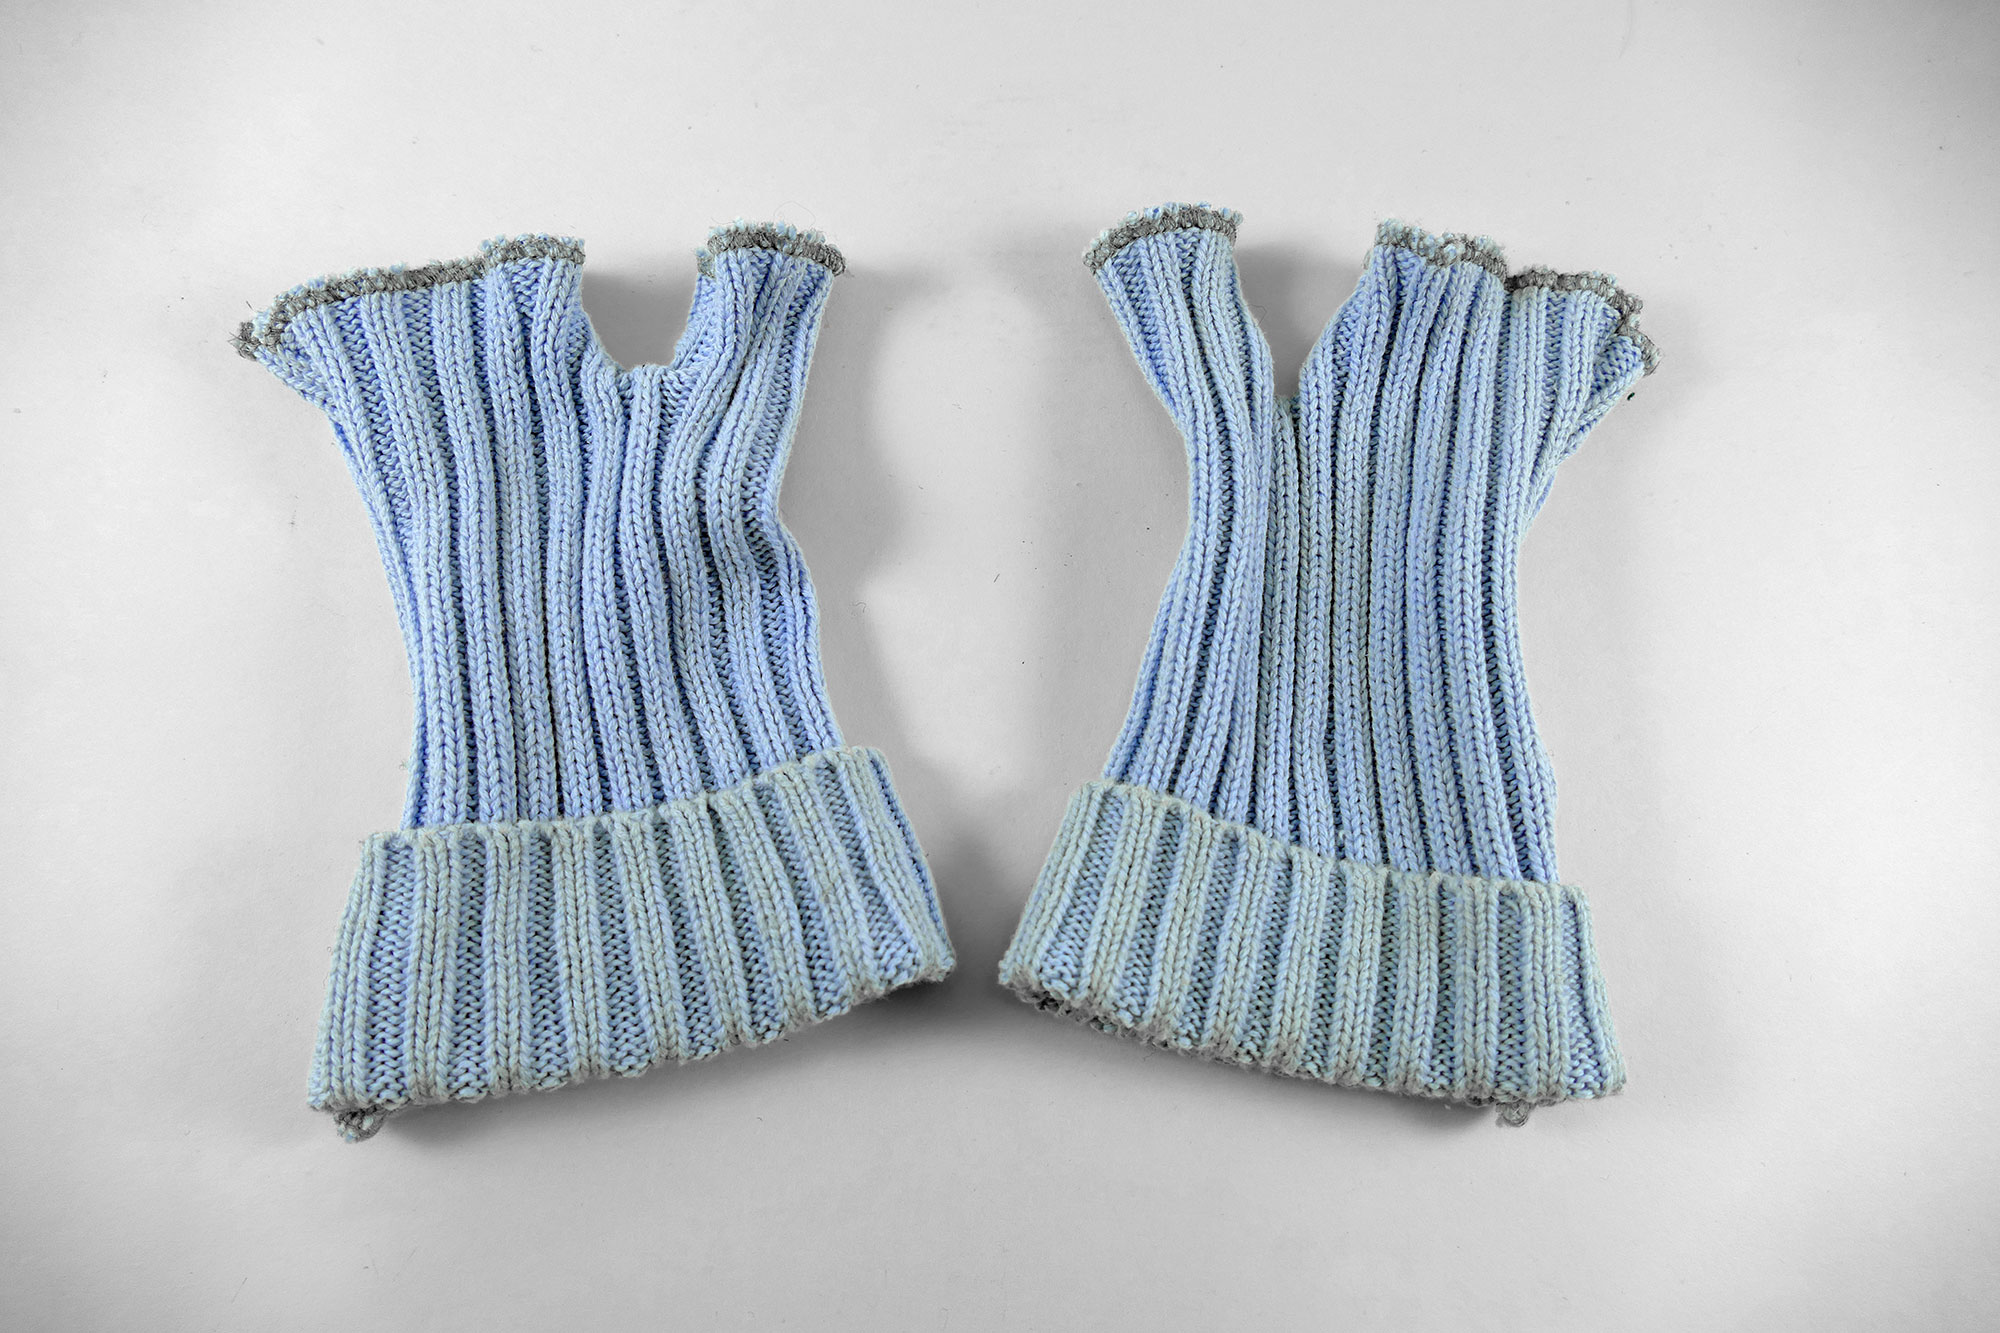
Here is what the fingerless gloves look like:
Step 5 (mittens): Turn your sweater tube inside out. Now simply sew along the cut edge. If you use a serger for this, be sure to swing your knife out of the way, or it will cut into your mitten (been there, done that). Turn right side out and you’re done!
DIY Sweater Scarves Step-by-Step Tutorial
Even better news—sweater scarves are even easier than gloves, mittens, and arm warmers!
Step 1: Layout your sweater and cut out the rectangles shown in the diagram near the top of this post. If you’re making an infinity scarf, do NOT cut along the side seam of the sweater—keep it as a big tube.
Step 2 (Infinity Scarves): Sew along the cut edge with a serger, a zig-zag stitch on sewing machine, or a hemstitch by hand. Fold over or scrunch up as you like. Voila, you’re done with the infinity scarf! Wasn’t that easy?
Step 2 (Traditional Scarves and Cowl Scarves only): If you are making a traditional scarf or cowl scarf, sew all your rectangles together so they form a long strip. You will also want to sew all around the perimeter of your scarf with a serger, a zig-zag stitch on sewing machine, or a hemstitch by hand. Your traditional scarf can be any width and length that pleases you. A cowl scarf will look best if it is about 8″ wide and 30″ long (maybe a little longer if you have a thicker neck or want a looser fit).
Step 3 (Cowl Scarves only): If you are making a cowl scarf, you have two more steps. Fold your scarf in half lengthwise and sew along three edges, turn inside out, and sew closed. Now line the bottom edges of your scarf up at right angles, like shown in the image below. Sew together with thread so it stays in place—you can use buttons as shown here, too. That’s it — you’re done!
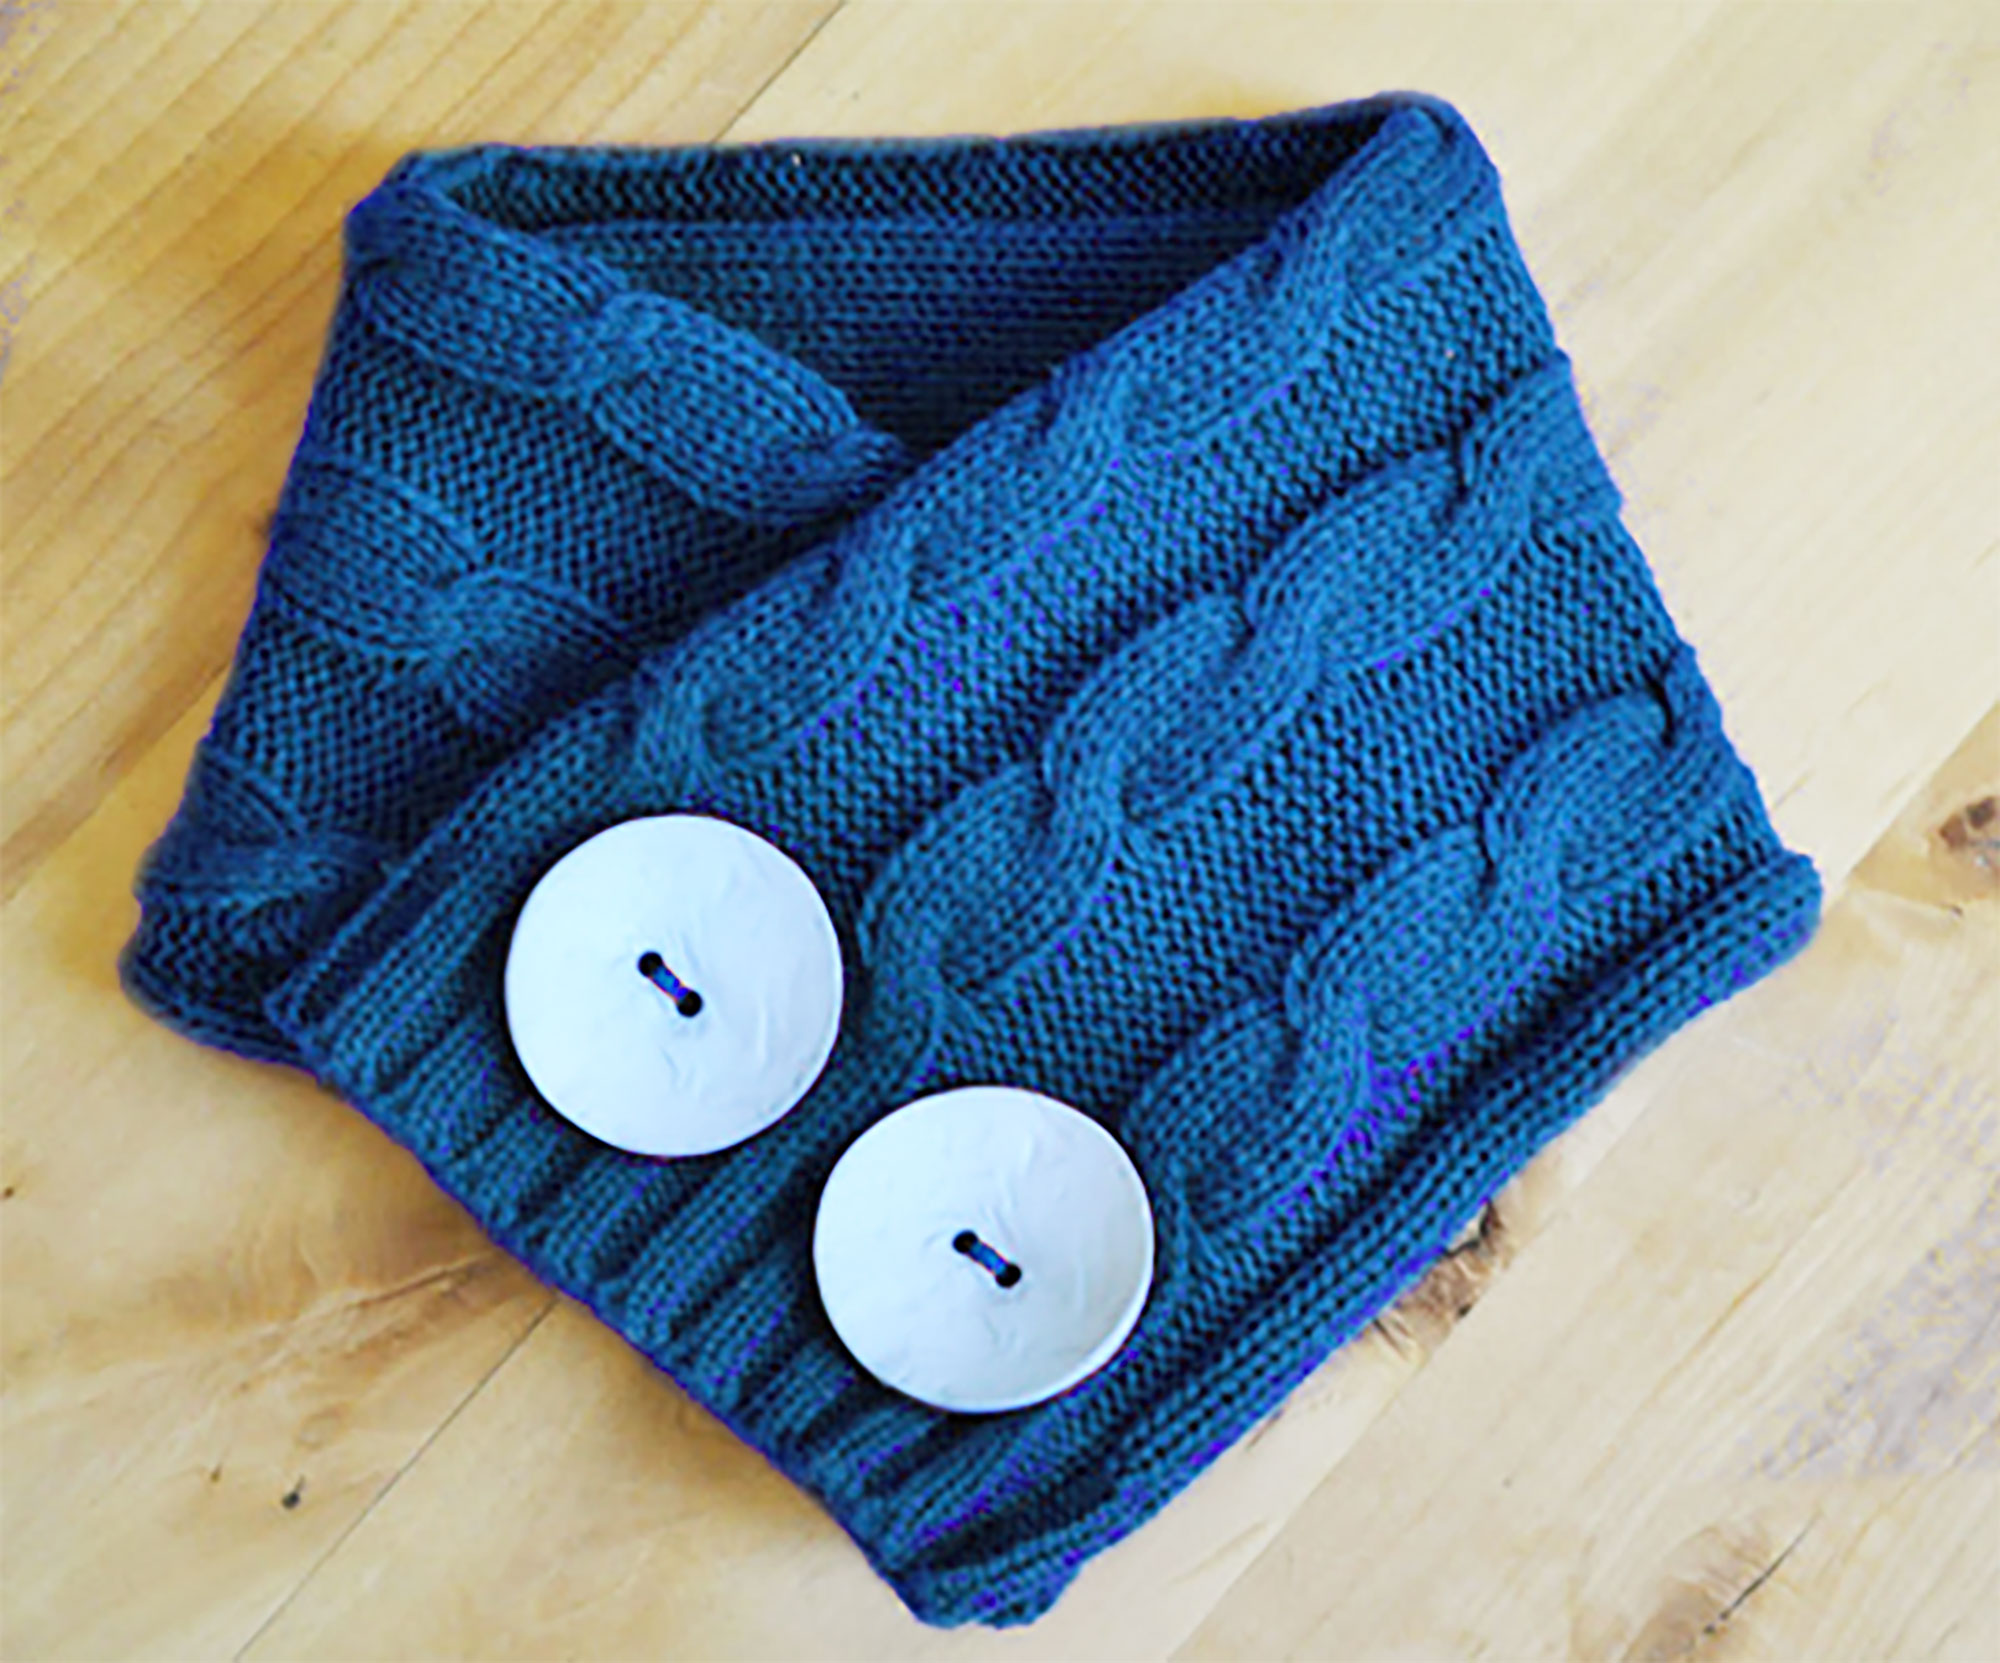
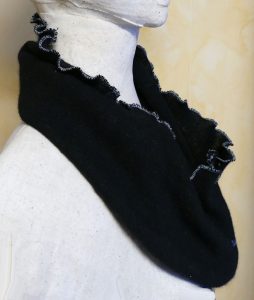
Here are some more of the scarves I made from sweaters:
DIY Sweater Upcycle Notes
Because you washed your sweaters beforehand, you can wash them again to keep them clean and fresh. They shouldn’t shrink anymore than they have!
DIY sweater hats, gloves, and scarves make great gifts. I was able to make all four sets (so 12 items total) in less than a day.
No serger or sewing machine? You can use fabric glue instead — just glue the edges and fold them over a bit for a smooth edge.
If you enjoy playing with sweaters, consider making yourself an entire sweater coat — check out my step-by-step sweater coat tutorial and my sweater pumpkins tutorial!
Love,

P.S. Check out my other fun DIY gift tutorials to help you make wonderful homemade and inexpensive gifts! I currently have tutorials on DIY teacup candles, DIY Sharpie mugs, DIY hand warmers, DIY “gold-dipped” crystal necklace, DIY bath bombs, and a DIY map pillow!
If you enjoyed this tutorial, please pin it to your favorite Pinterest board!


Thank you and keep up the good work you do!
This is awesome! I love the slouchie hat idea! Makes me wish I had an old sweater to do this with!!
I love love love your diagrams!! They are so helpful to visualize where you took the fabric for your end result, and most upcycles don’t have that kind of detail.
Oh, thank you, Lindsey! Much appreciated. 🙂
Saving for my DIY series next Christmas! What great ideas for gifts! Thank you!
This is too cool! I have to admit I am not very crafty but I totally want to try and make these items! They don’t look to hard and I love that you’re being thrifty and eco-friendly by repurposing other things!
I LOVEEE DIYs and you’d totally nailed the DIY work for winter wear 🙂 Amazing work!
Thank you so much, Deb!!
Wow that genius to recycle old sweaters into hats and gloves!!! I’ve seen scarfs before but you can really use all parts of it , great job on explaining how to do it (: thanks for the post!
Thanks, Kit! I’m still thinking of ways to use the shoulder parts, too!
I love your anatomy of a sweater graphics!!! I’ve got a Craft Gossip post scheduled for tomorrow morning that features your tutorial: http://sewing.craftgossip.com/?p=91068 –Anne
Wow, thank you, Anne! I am honored. 😀
This is literally amazing because i was just telling my husband…ok maybe he was telling me that i have too many sweaters. i would love to make my own scarves and hats. You did an awesome job on these, i hope mine come out as good as yours.
You should totally do it! It’s really easy. Have fun and let me know how they turn out!
Wow! How amazing is this? You are so creative and clever turning this one sweater into all these other items. And – love the look of all of them! Stay warm!
Thank you, Karen!!
I have many sweaters I no longer wear. Now I know what to do with them. Thank you .This is perfect for the cold weather we are having.
I love upcycling and this tutorial is so great! I am so going to pin and share it
Thank you for pinning this tutorial, Cynthia!
OMG this is so creative! What an awesome idea! And all the pieces came out so well!
Rachel | The Confused Millennial
Thank you so much, Rachel!!
What neat ways to recycle your sweaters! You really did a good job of breaking down the step-by-step process. Thanks for the post!
Thank you for the kind words, Samantha!
I love that you were able to do this! So creative. I would never think to use a sweater to make all these other accessories, but it is perfect!
You can do so much with old things, especially sweaters. Thanks, Kirsten!
Love this! So great to use previously loved garments and upcycle to new clothing. I’ve seen similar projects before and wondered if the sweater would unravel, guess I need to dig out the serger from the garage.
Right, the serger helps the sweater from unraveling. But if you use a wool sweater and felt it before you use it, it won’t unravel at all. That’s why wool is better when possible!
This is a really cool concept, and one I’d love to get better at. I’ve always had a hard time making things, and being creative but you seem to have it down to a T!! xx Adaleta Avdic
I think this is so cool! The idea of upcycling a sweater is something that I know my daughter would love to do. She started sewing a few years ago and loves making things from patterns.
Happy to hear it, Kerri!!
Wowie, Such an awesome DIY hack to winter clothing. Love these. So will my little girl. These are cool activities for us to try – thanks a ton!
What a great post1 I love how you made something old into something new! This a great tutorial and DIY! Thanks for sharing!
love these items. I have to get some of these made for my next year’s Christmas gifts.
Hi! I was looking for your upcycled sweater coat tutorial. Is it not available any longer?
It’s still available! You’ll find it here: https://jennifermaker.com/my-amazing-autumn-color-dreamcoat-a-journey-to-make-a-katwise-inspired-sweater-coat-for-under-50/
This is such a great idea for all those old sweaters and your items came out so cute! I must try this.
You do a beautiful job and made good use of the sweater pattern. Thank you.