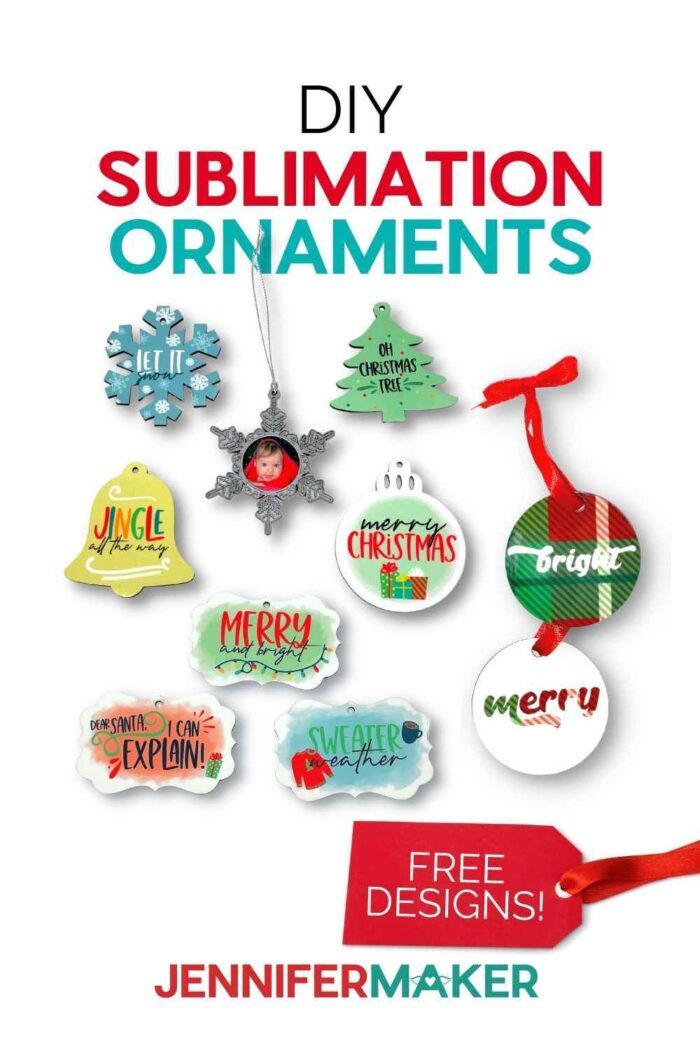
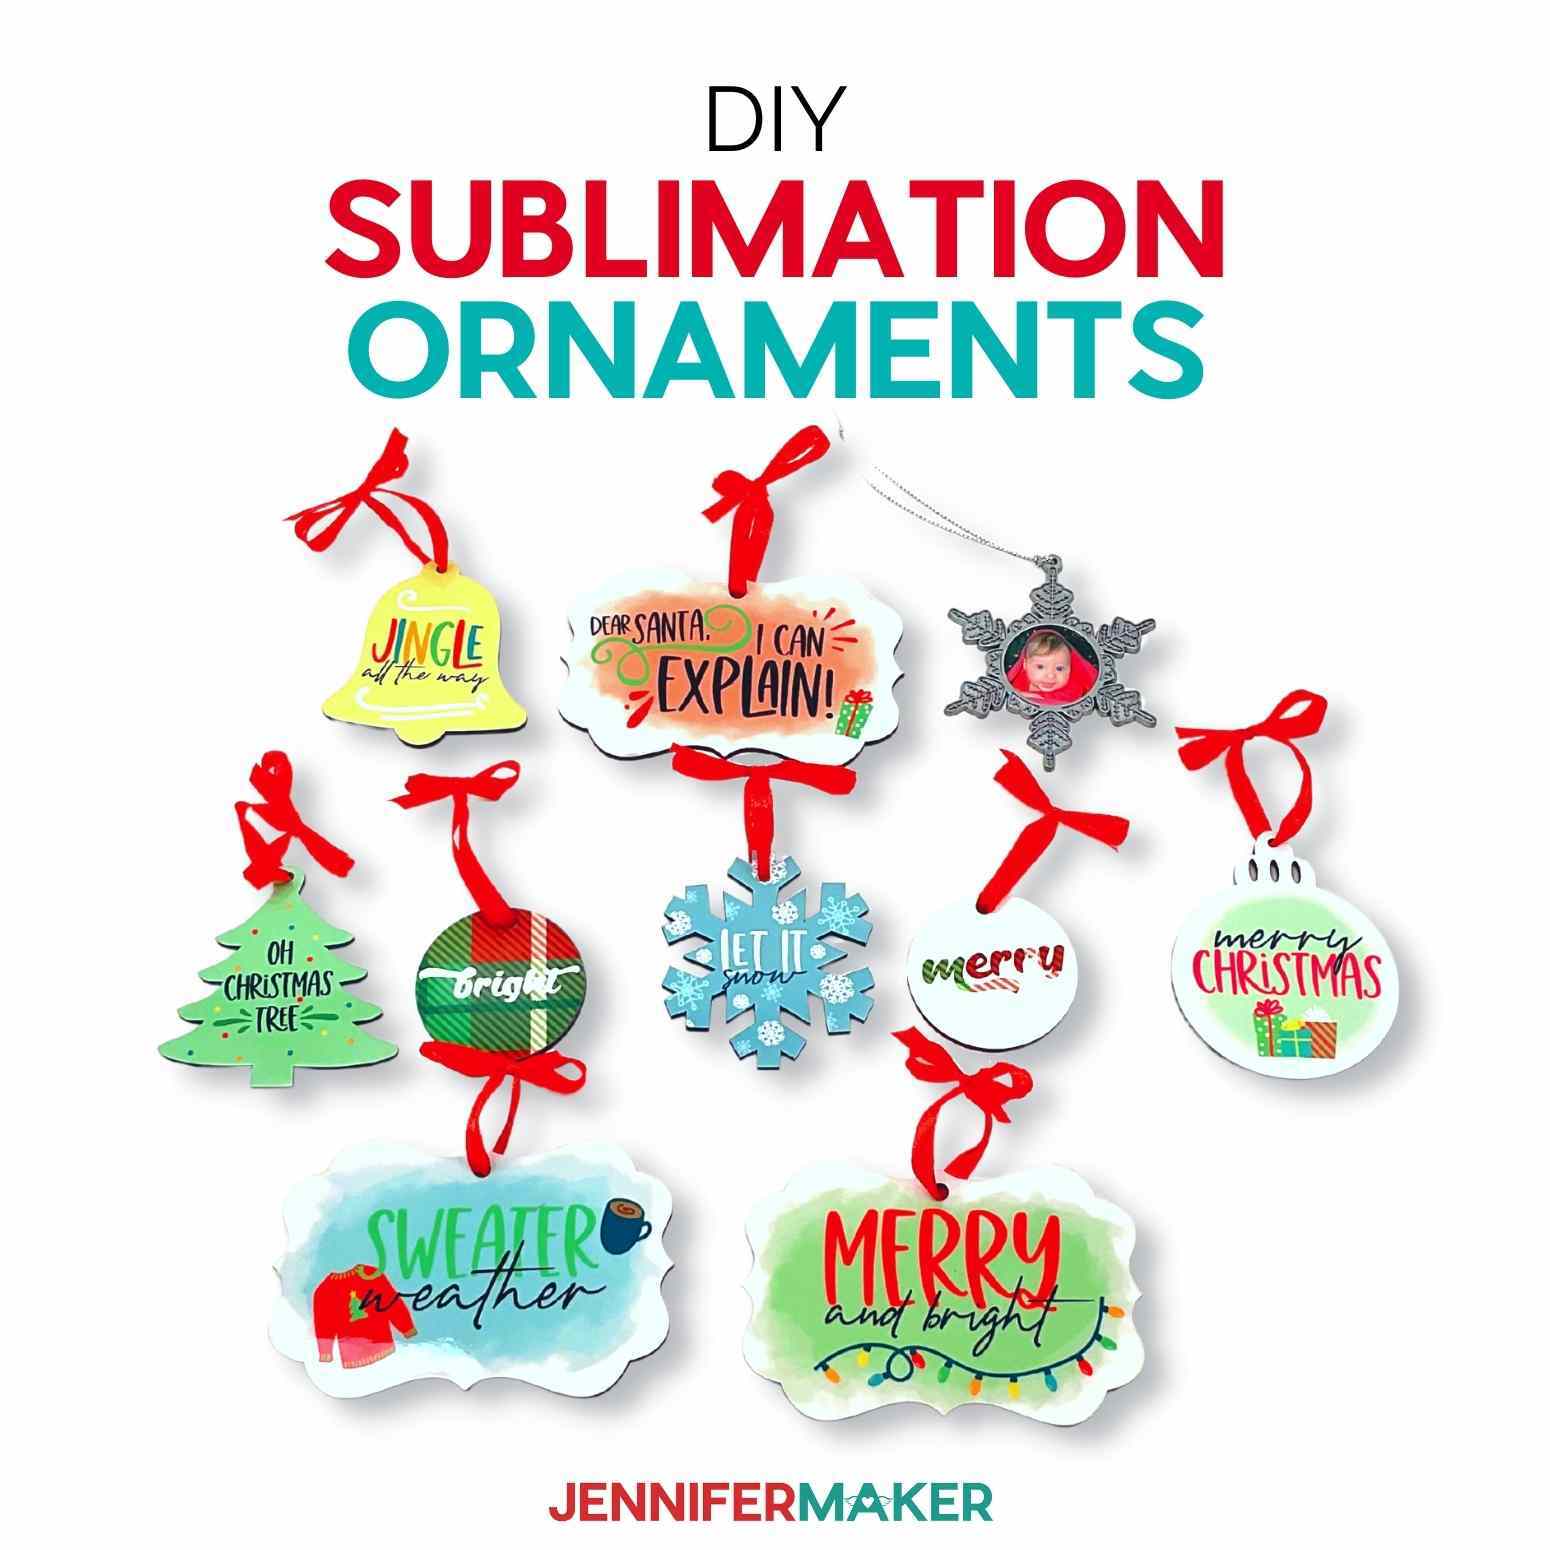
Make your own sublimation ornaments with printed Christmas sublimation designs or Infusible Ink!
Over the past few years I have made a few variations of Christmas ornaments. I’ve made glitter ornaments, wood slice ornaments, infusible ink ornaments, and even some floating ornaments, just to name a few! This is the first time I made DIY sublimation ornaments however, so I’m really excited about this project! Sublimation is a great way to add your own personal touch, and you can sublimate any design onto an ornament, making it unique and special. In this project, I’ll walk you through the steps of sublimating ornaments, from start to finish. By the end, you’ll be an expert at sublimating ornaments!
If you want to make a sublimation ornament with one of my free Christmas sublimation designs, you’ll need special sublimation ornament blanks, which can be ceramic or MDF — but they must have the special sublimation coating on them. You’ll also need a sublimation printer with compatible sublimation ink and paper, and a heat source. I’m going to use my trusty Autopress. You’ll also need a fan for ventilation, a free Google account, and a desktop computer. If you are new to sublimation, I recommend you watch my Sublimation for Beginners tutorial first.

You’ll need pretty much the same things to make the snowflake ornament with a photo. And if you’re making the Infusible Ink versions, you’ll need sublimation-friendly ceramic ornament blanks, the transfer sheets with their butcher paper, a green machine mat, your Cricut, and a Fine Point Blade.
For whichever project you choose, make sure to have extra butcher paper, white cardstock, heat resistant tape, a pressing mat, measuring tape, a lint roller, and scissors ready.
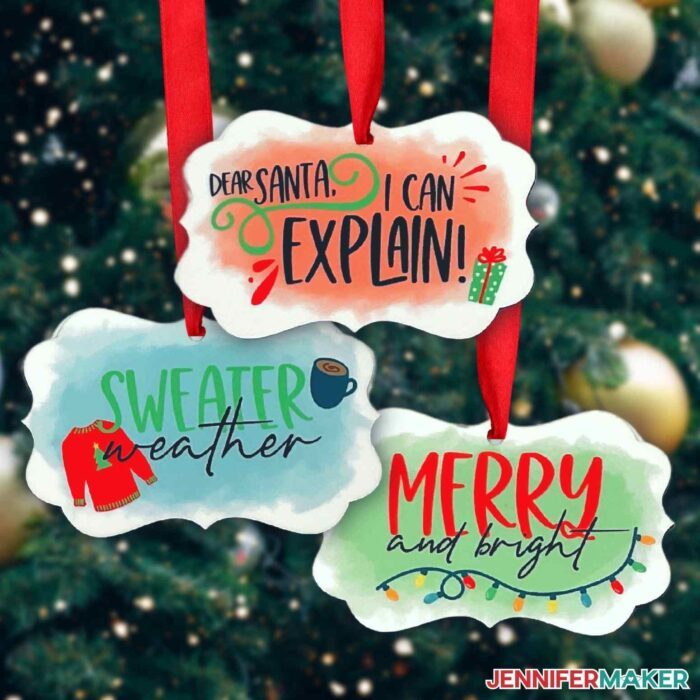
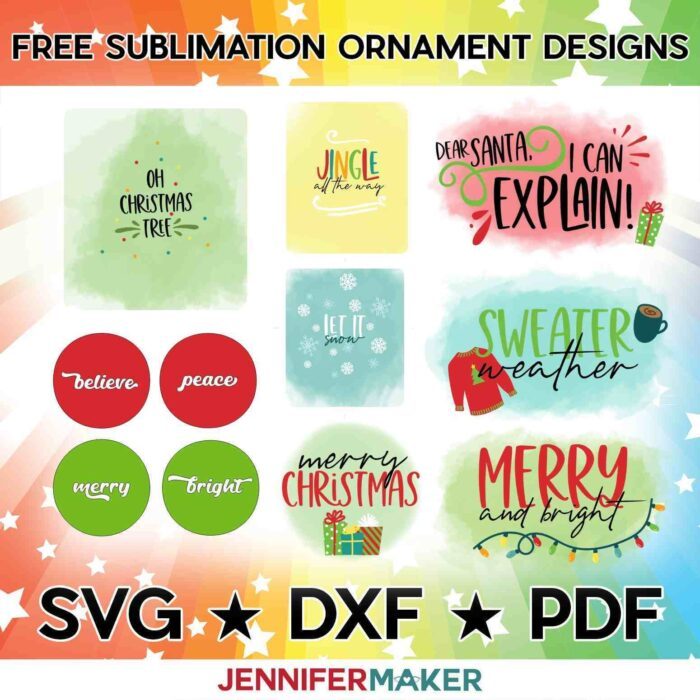
The seven printable sublimation Christmas designs have cute winter and holiday sayings on watercolor backgrounds. The blended, soft colors will look so pretty on the ornaments! Every printable design I am sharing has different shapes and fit nicely on the MDF ornament blanks from my material list.
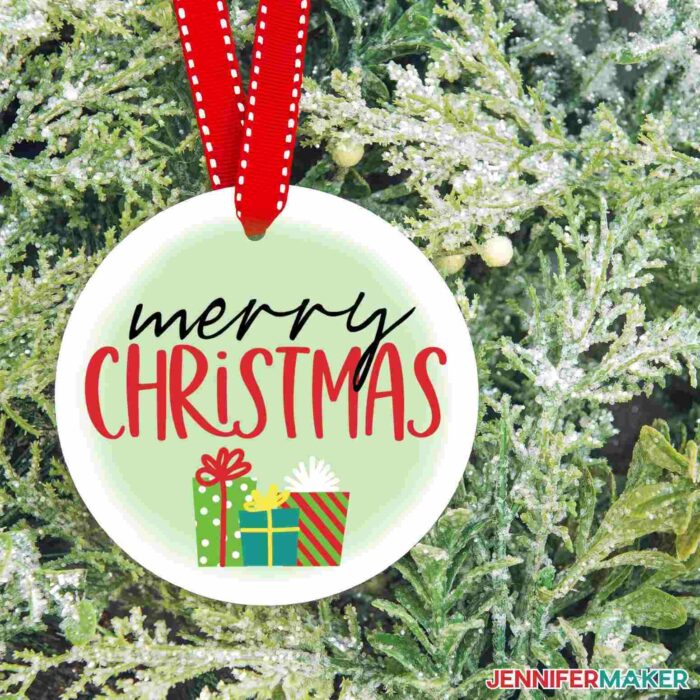
I’ve provided free Christmas sublimation designs for your ornaments — there is a PNG file for each design, as well as an SVG file for the Infusible Ink designs. The printable designs have a transparent background where it makes sense, too! Designs include a Christmas tree, gifts, Christmas lights, sweaters, snowflakes, and fun winter quotes. My digital files are free for you to use and you’re welcome to sell the physical items you create with them!

Here’s a supply list of what you need to make DIY Sublimation Ornaments! This post contains some affiliate links for your convenience (which means if you make a purchase after clicking a link I will earn a small commission but it won’t cost you a penny more)! Read my full disclosure policy.
Materials to Make DIY Sublimation Ornaments
View my Amazon shopping list with the exact items we used to make this project
- Wood Sublimation Ornament Blanks — I used Small and Large double-sided wood MDF blanks
- Metal Snowflake Sublimation Ornament Blanks for photo designs
- Ceramic Sublimation Ornament Blanks
- Sublimation Paper – I used 8.5″ x 11″ A-SUB Sublimation Paper
- Sublimation ink for your printer – I used Hiipoo ink
- Infusible Ink Transfer sheets — you could use Buffalo Plaid or these other holiday-themed transfer sheets — and the butcher paper that comes with them
- Protective Paper – I used 12″ x 12″ 65 lb Cardstock
- White Butcher Paper
- Sublimation Printer – I used my Epson EcoTank ET-4760
- Heat Press – I used the Cricut Autopress
- Laptop or Desktop running Windows or Mac
- Google account – to use Docs for photo editing
- (Optional) Your ICC Printer Profiles here are the Hiipoo printer profiles
- Heat Resistant Tape
- Lint Roller
- Ventilation – I use this fan
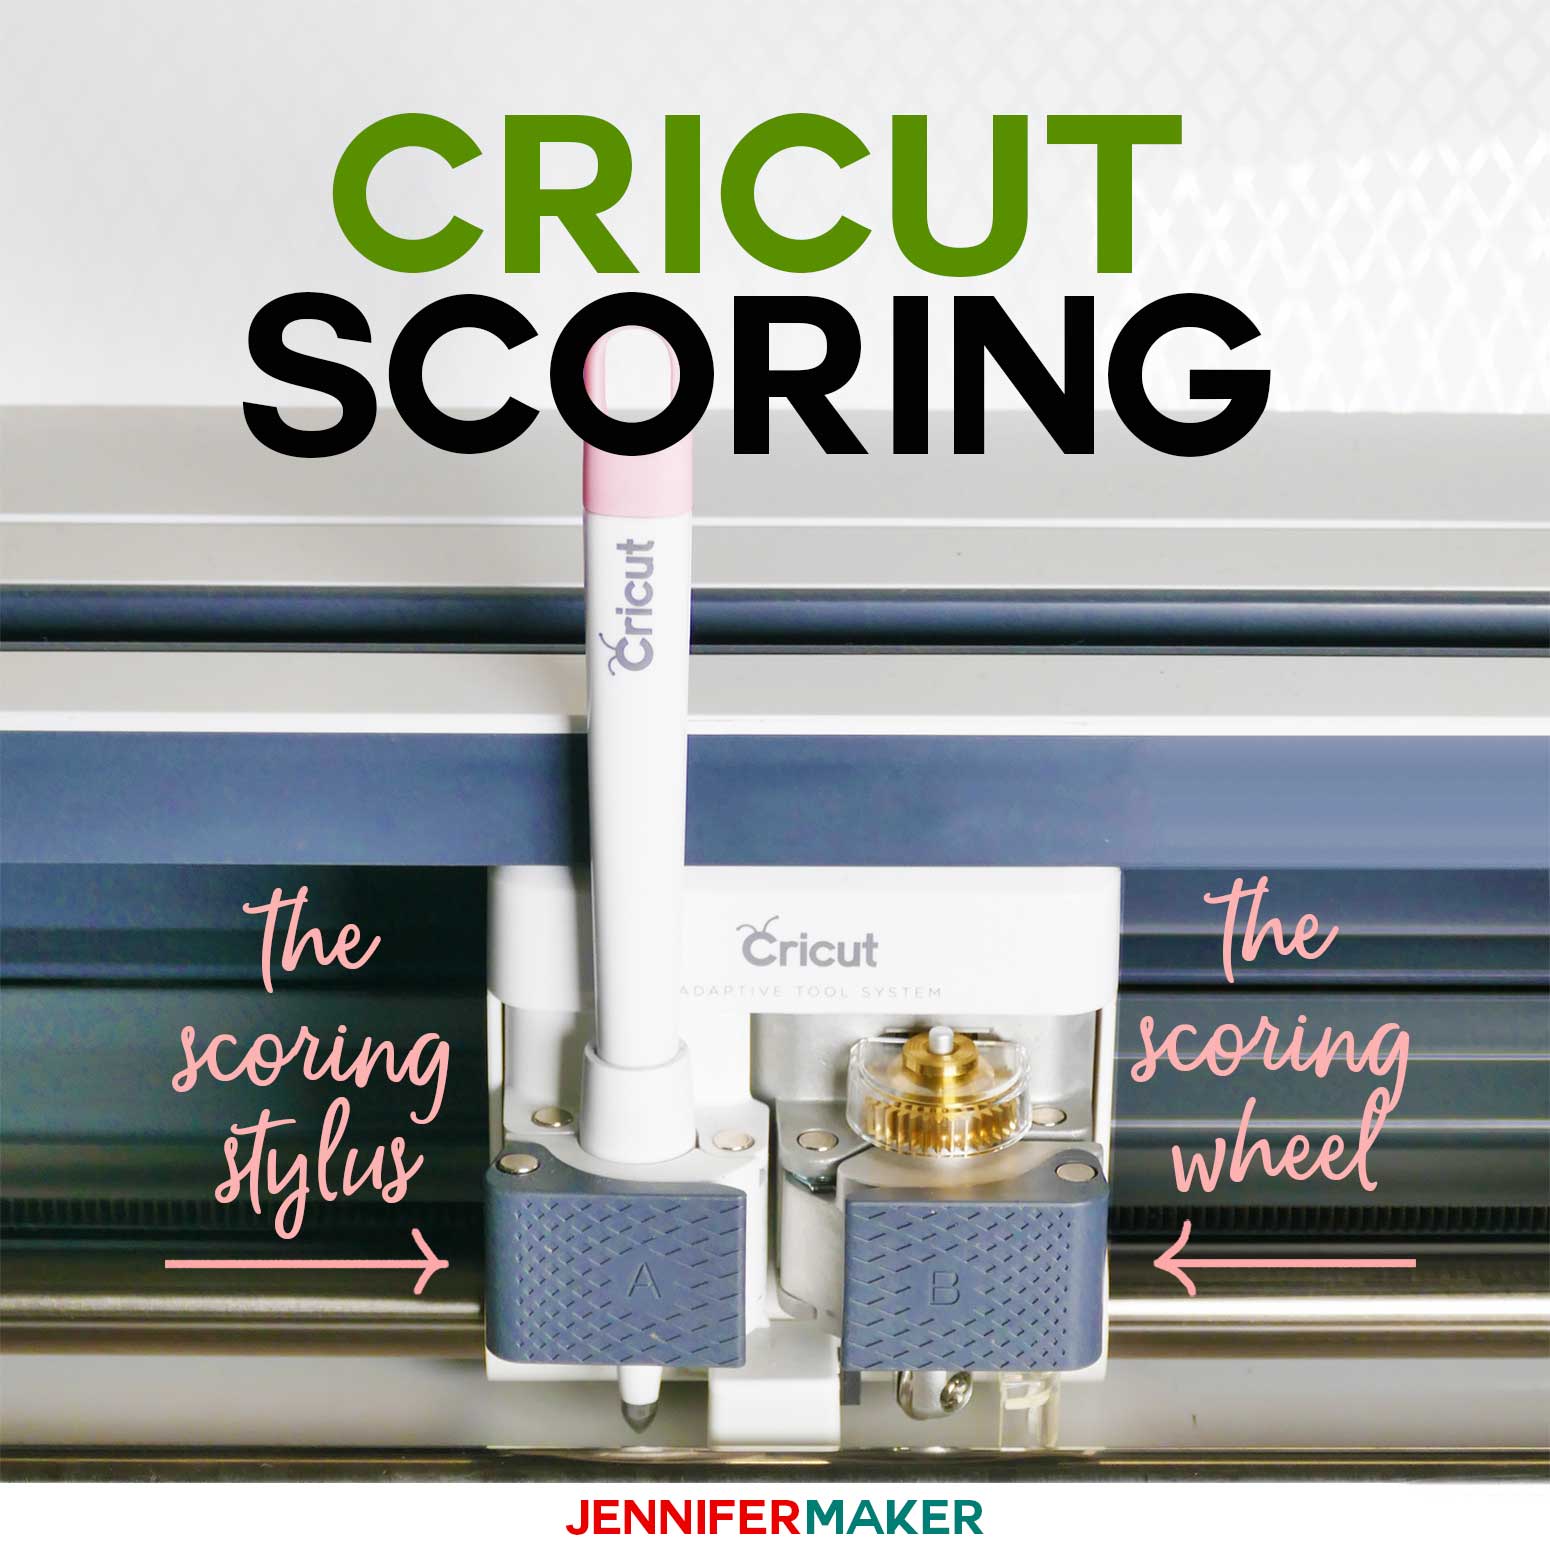
- A way to cut your Infusible Ink — I used a Cricut Maker 3, but you can use any Cricut or even cut by hand.
- Cricut StandardGrip Green Mat, 12″ x 12″
- Scissors
- Weeding Tool – helpful for Infusible Ink
- Design #410 — My free PNG design files and SVG cut files are available in my free resource library (get the password by filling out the form at the bottom of this page)
How to Make Your Own DIY Sublimation Ornaments
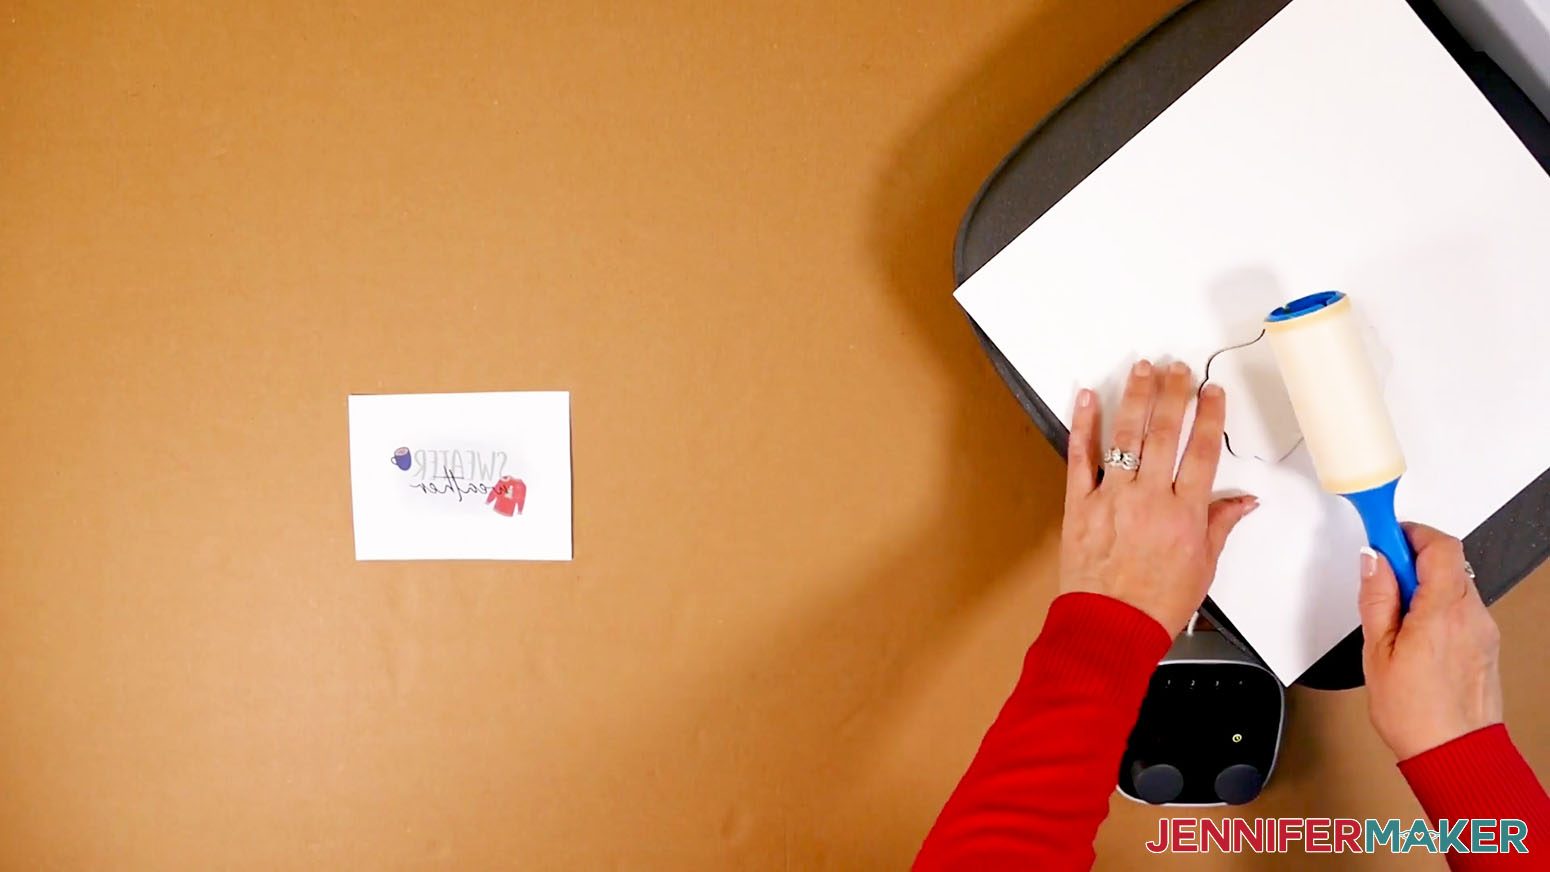
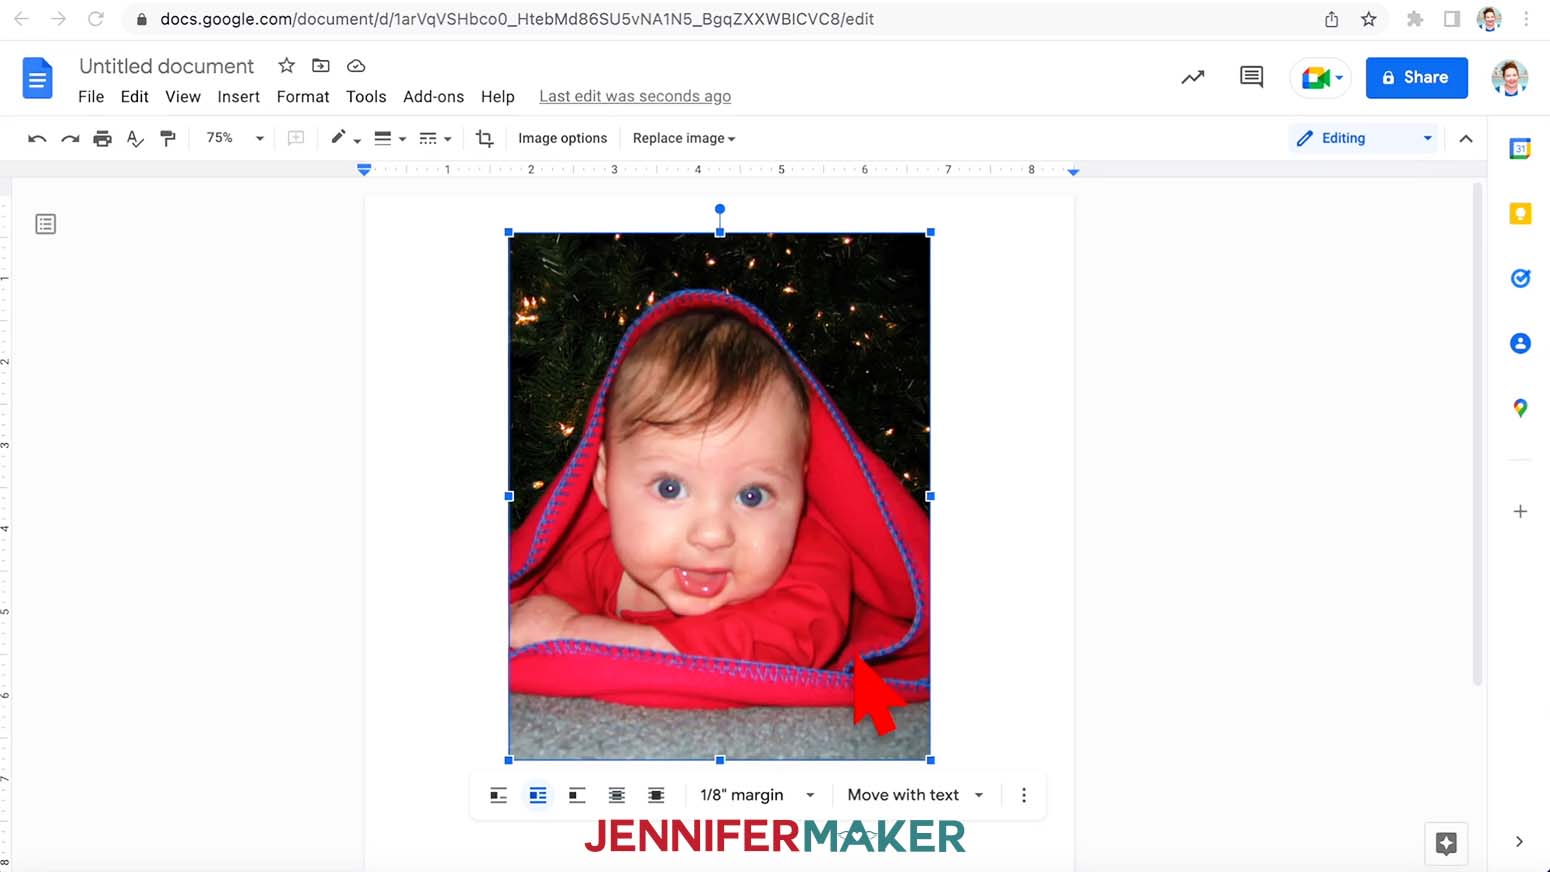
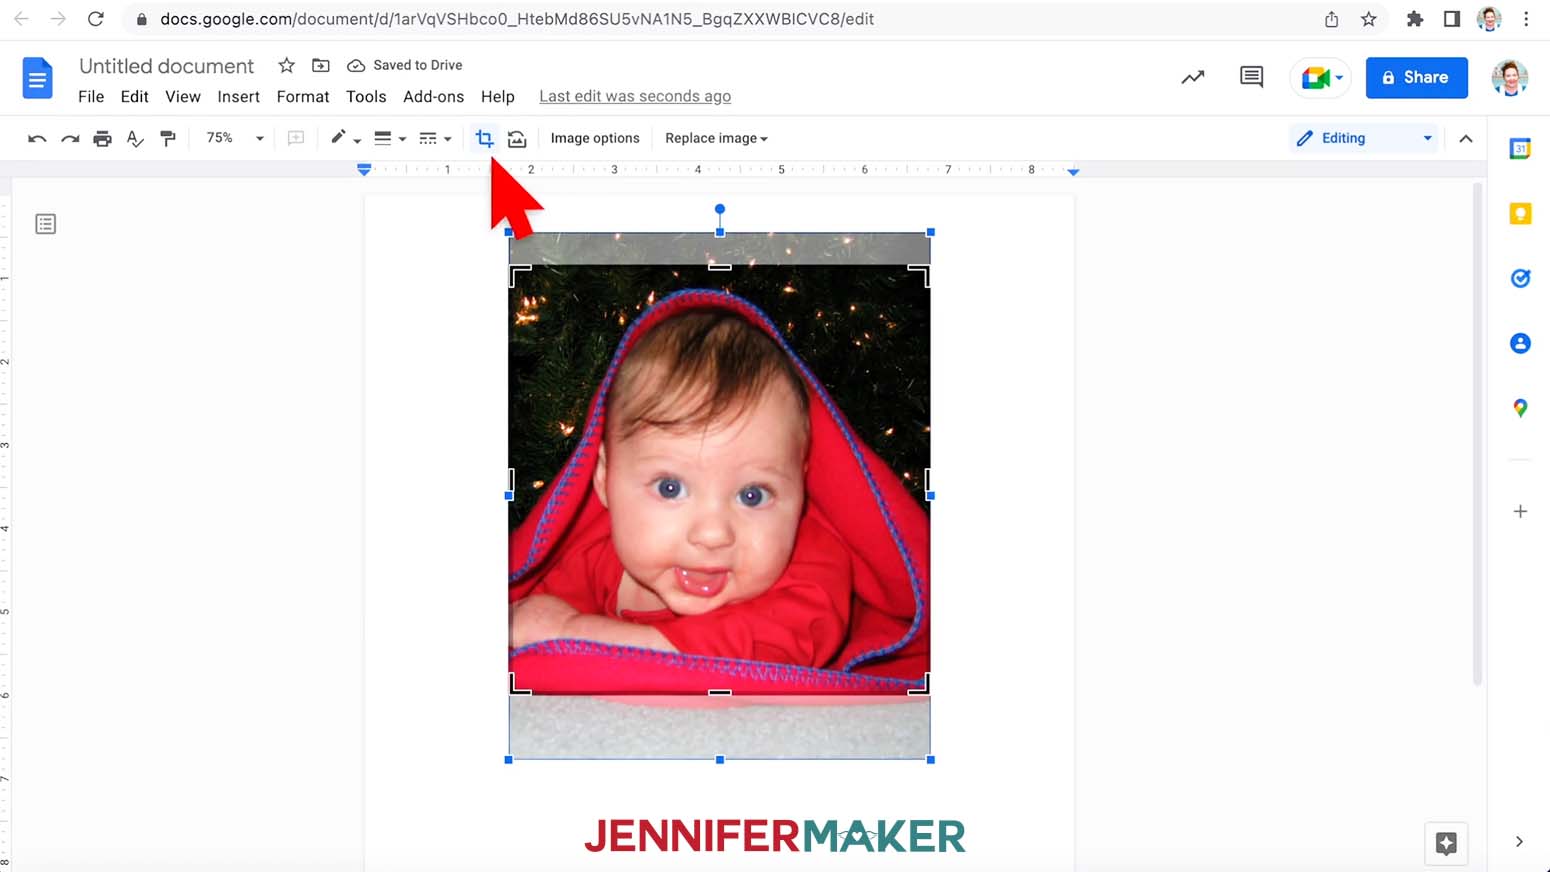
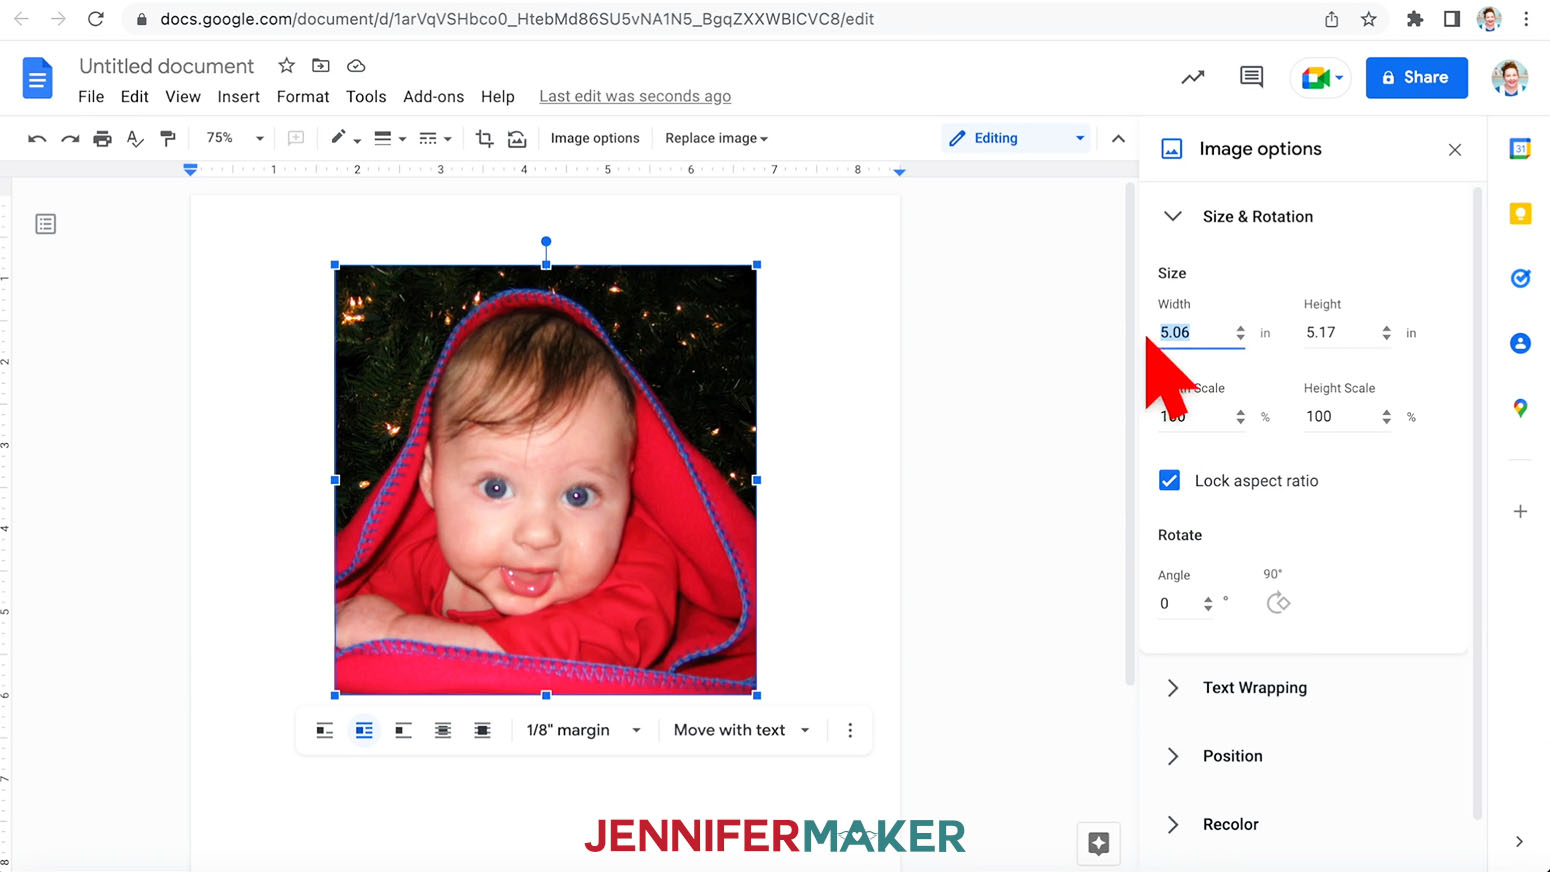
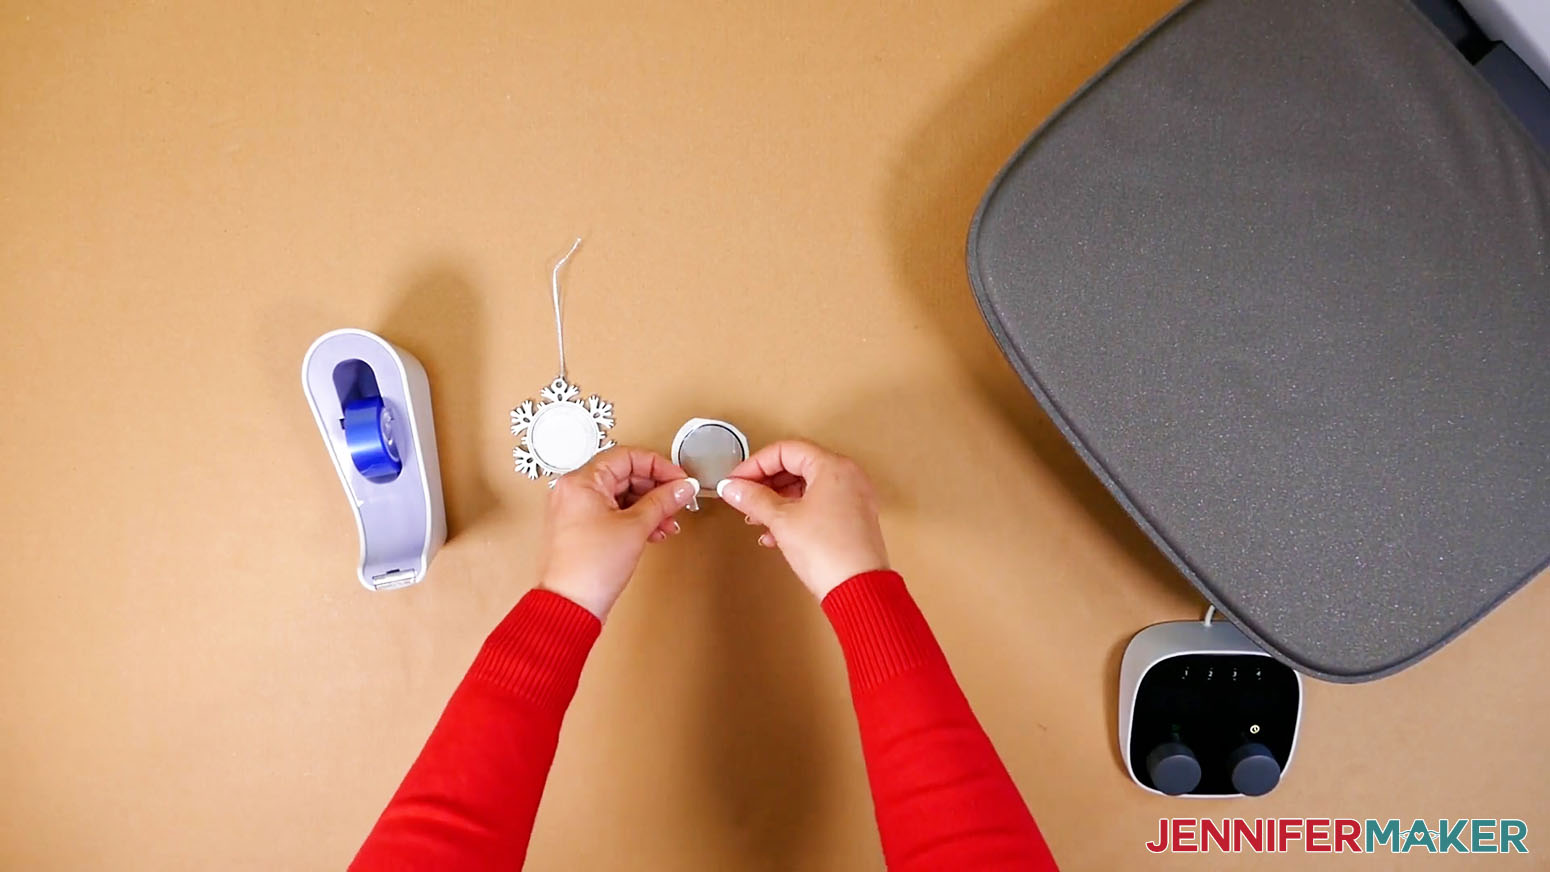
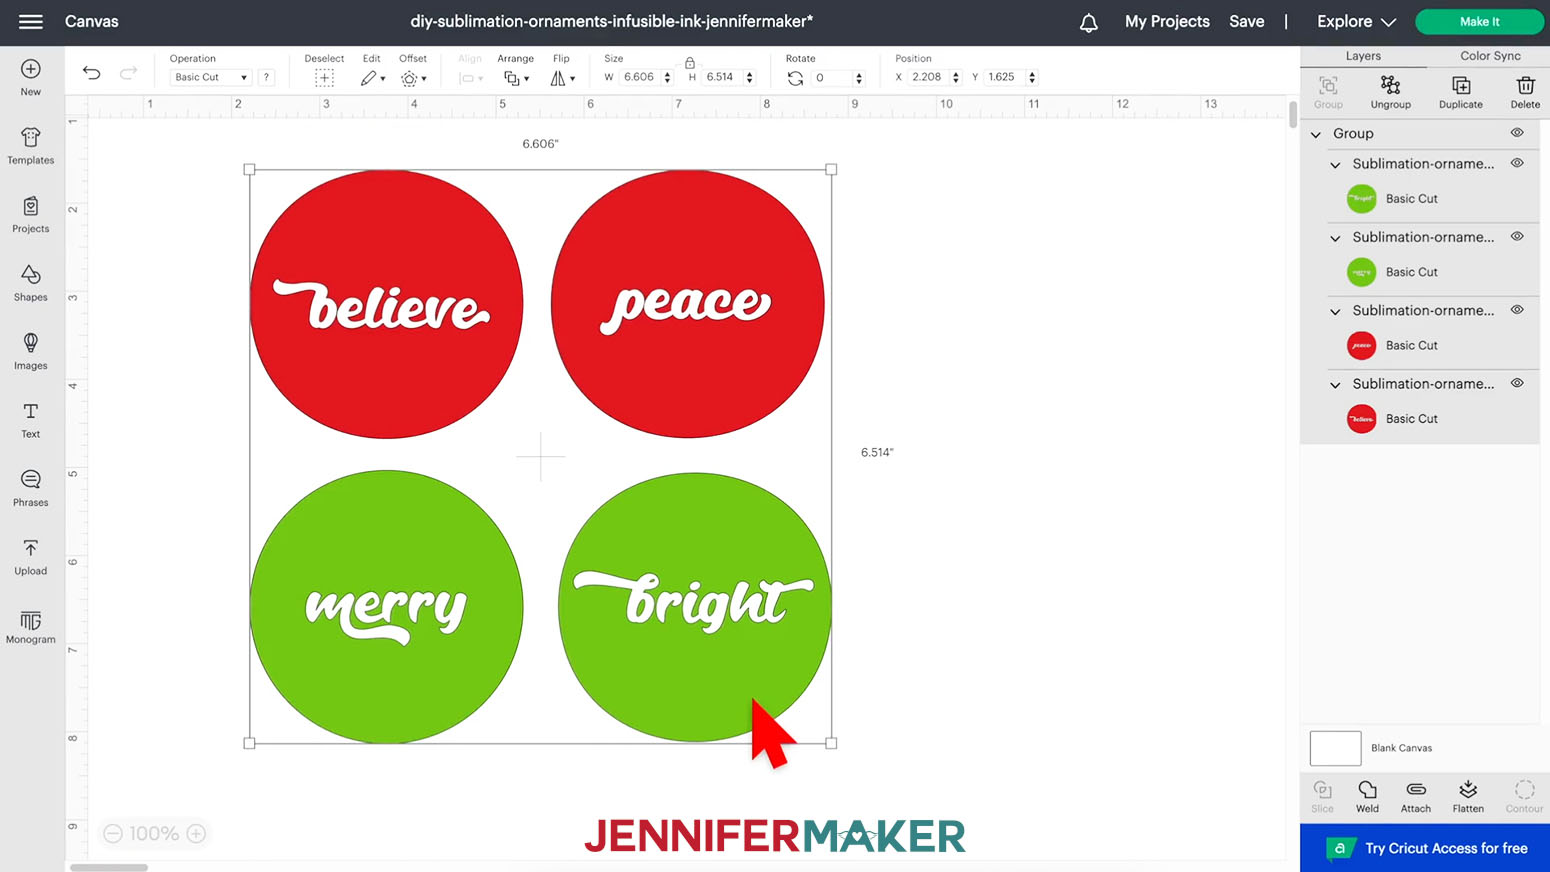
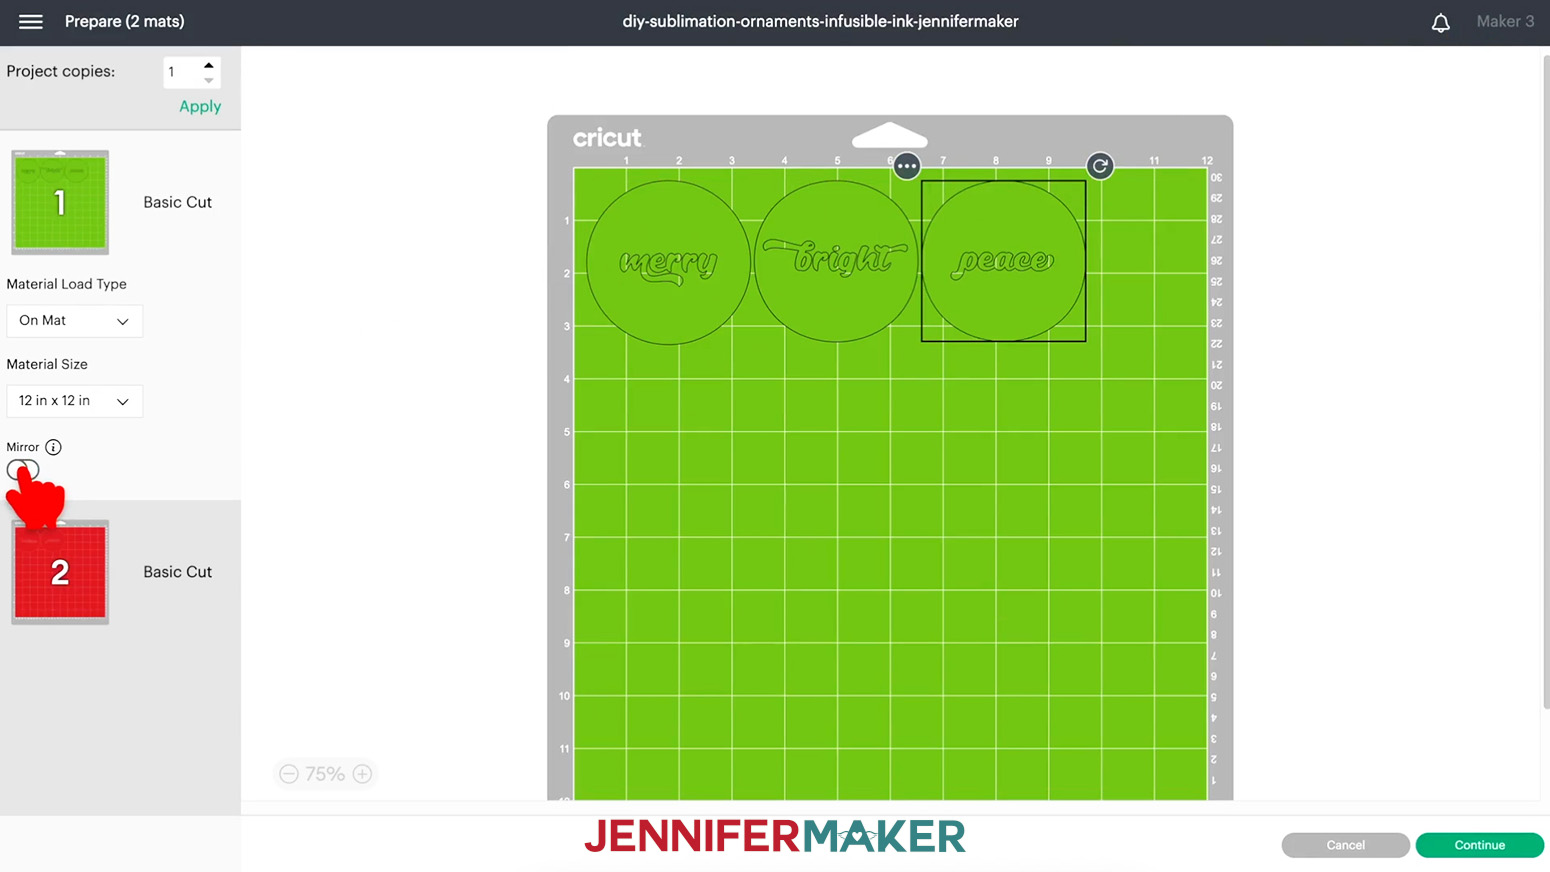
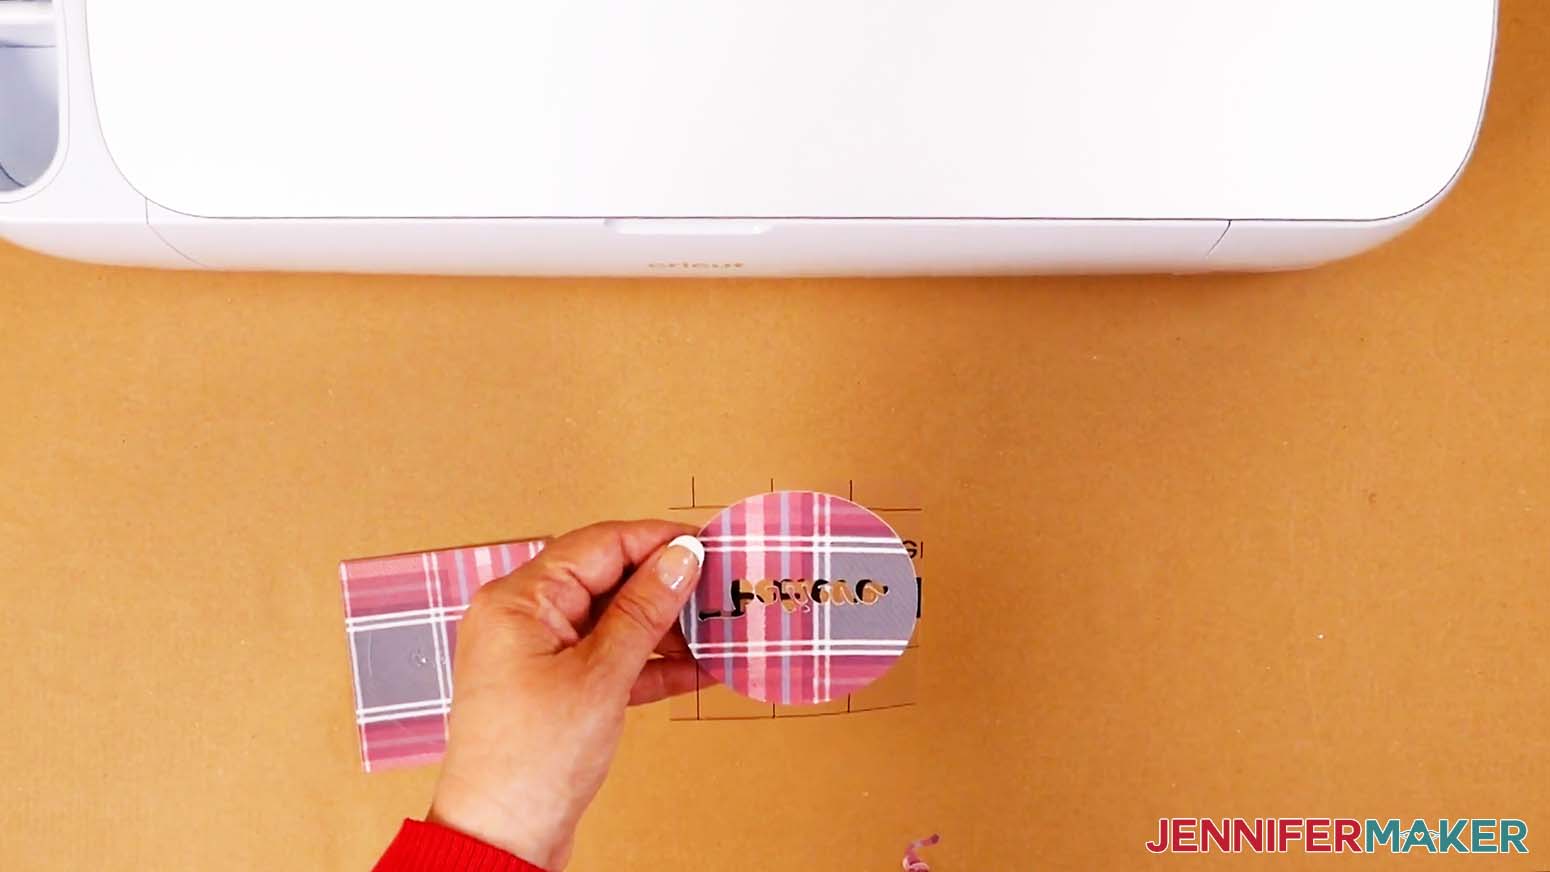
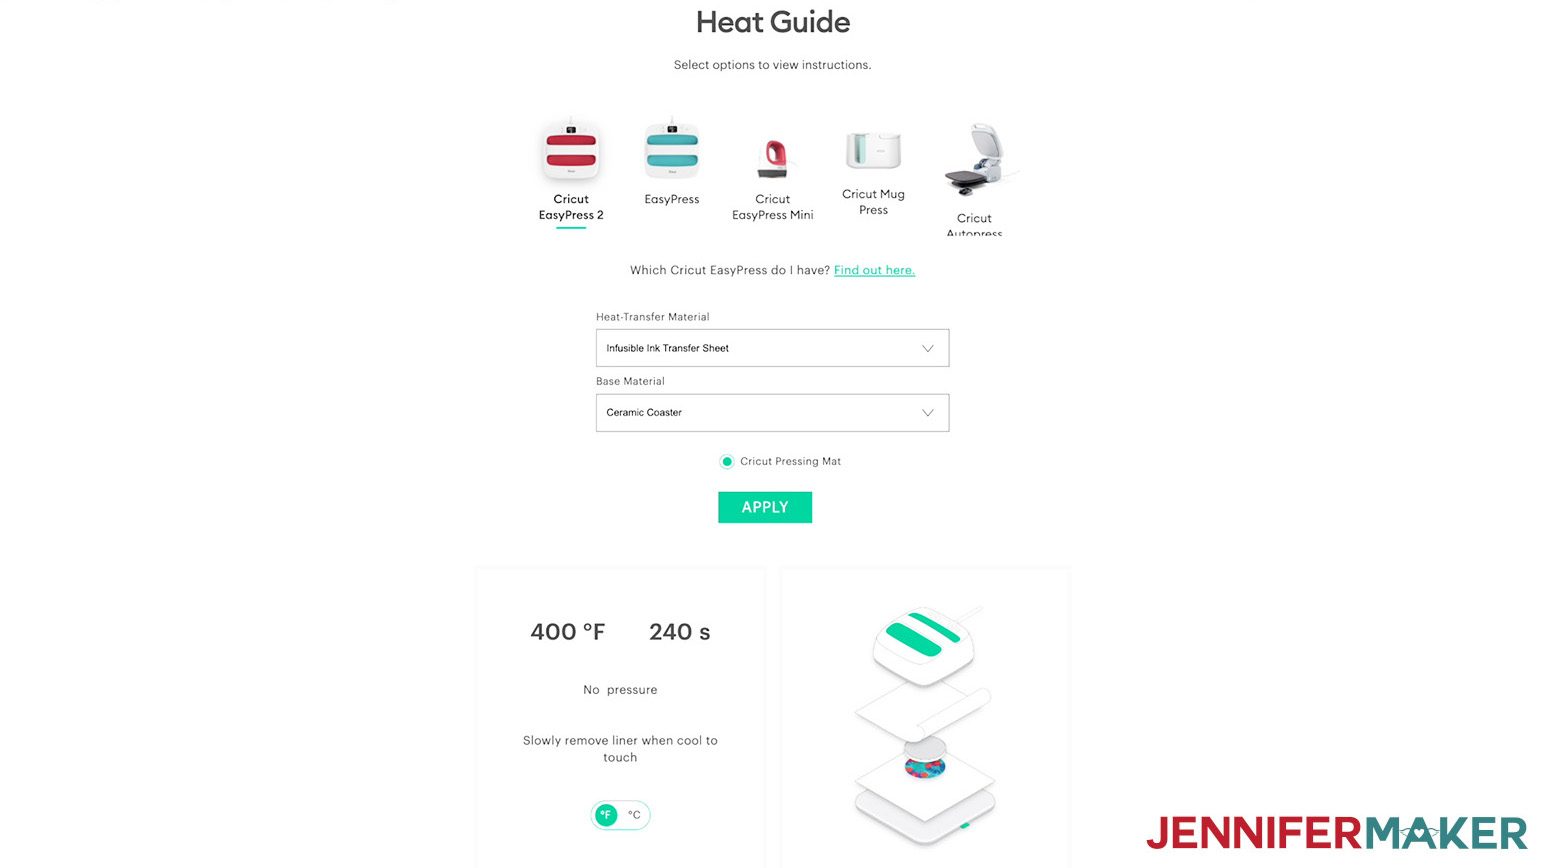
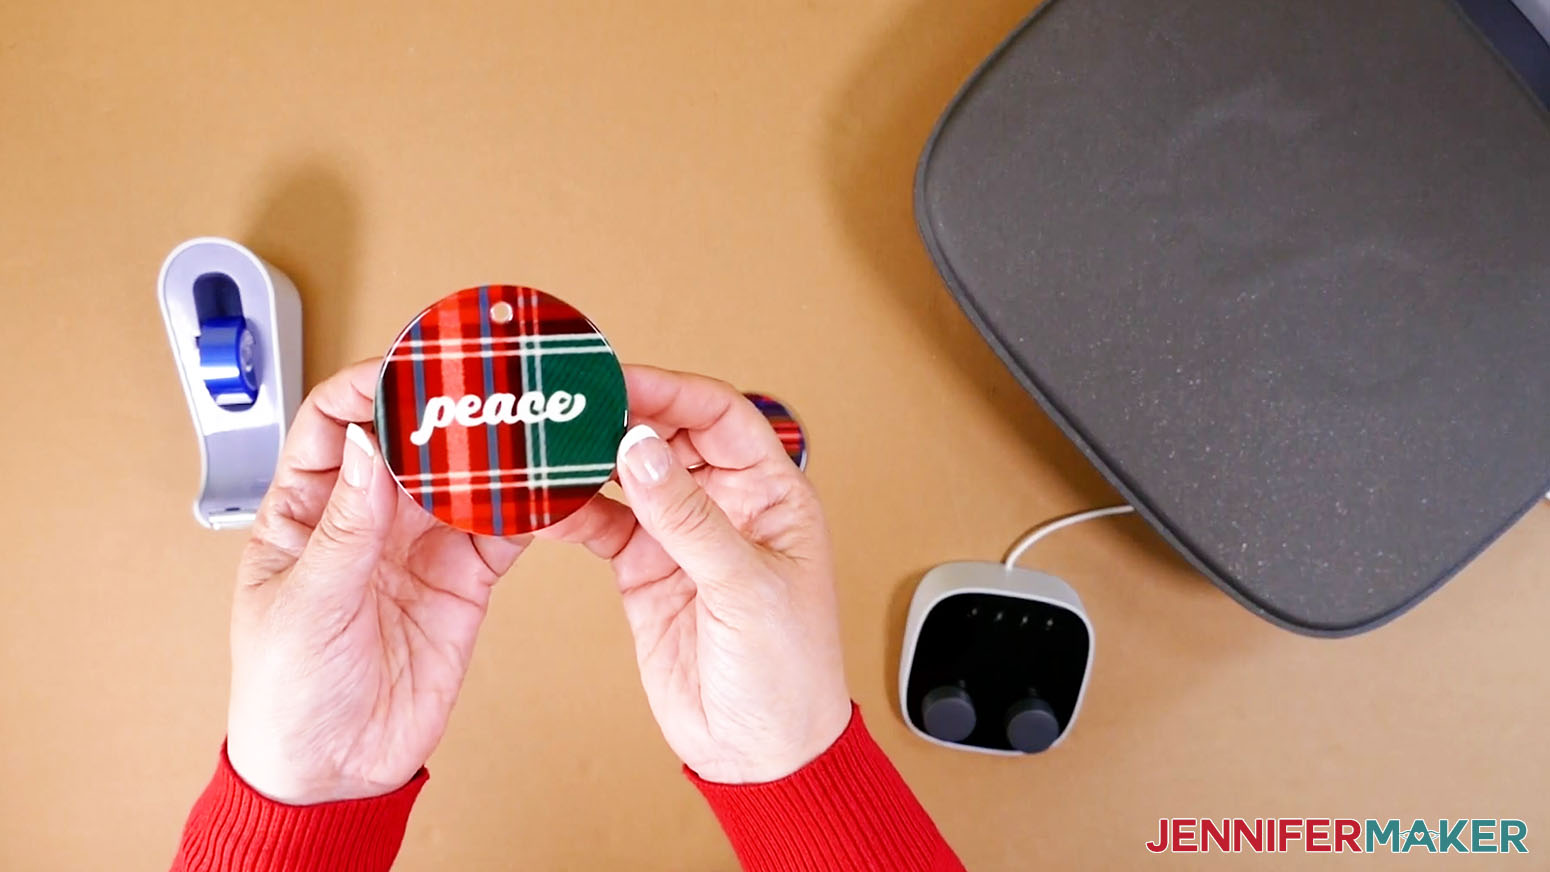
Make your own sublimation ornaments with printed designs or Infusible Ink! First, download my sublimation ornament designs from this page — or search the library for design number 410. I've included a folder of sublimation designs sized for two sizes of ornaments as well as a folder of designs to make with Infusible Ink. Today, I'll show you how to sublimate the Sweater Weather design on a large ornament. You can use the same steps for the other designs, too, or use your own image. Then, I'll show you how to make an Infusible Ink ornament. Once you’ve picked a design, you’ll need to print it on a good quality sublimation paper for the best results. I’m using A-SUB paper in my Epson EcoTank with Hiipoo ink. You can, of course, do this on another sublimation printer with different sublimation ink, too! Make sure you use compatible supplies. The large rectangular ornaments are 4.3" x 2.83" so I need to make the design 5.1" wide. I need to print it a bit larger to account for the orientation marks, but Google Docs makes that easy! If you're using a different ornament, measure the width and height to adjust the files accordingly. Click the image, select "Image Options," then "Size and Rotation." Keep the "Lock aspect ratio" box checked and change the width in the correct field. Now, you can click and drag the image anywhere on your page. I recommend putting your design in the center of your page, as that ensures it won't get cut off at the edges. Once you're more experienced with your printer and sublimation, you can put more designs on a page to save paper. Here are my processes for my Epson Eco Tank and Sawgrass, both of which are popular sublimation printers. There are many variables in sublimation - heat, pressure, ink, substrate, etc. - so you might have to do some experiments to find your perfect combination. Consult your press manual for reference, too, but you can use my settings as general guidelines. Let your heat press warm up to 375°F while you prepare to heat the ornament. I'm using a Cricut Autopress, but you can use an EasyPress, or other heat source that reaches 375°F. Since sublimation produces fumes, open a window or turn on a gentle fan to dissipate any vapors in your working area. Some ornament blanks have a protective clear sheet on them. If yours does, remove it from one or both sides. Then, use a lint roller to remove any debris from the ornament. While the ornament cools a bit, place your printed design on your work surface with the ink facing up. Make sure the design is mirrored and will look right once it's transferred to the ornament. Place your ornament face down on the printed design, using the alignment marks to line up the center. TIP: To make sure your ornament covers most of the design, carefully hold it up to a light to see the alignment better. Lay a piece of white cardstock larger than your design over the press mat to catch any excess ink. Tape the ornament to the image using heat resistant tape. Place your ornament on the cardstock with the taped image on top. Place a piece of white butcher paper on top of the ornament and design. The sublimation process is still active for 10-15 seconds after the heat has been removed. You can remove the butcher paper, but leave the ornament in place to cool. When you are confident that your print has transferred, you may remove the tape and paper. When selecting a photo for small sublimation projects, there are a few things to keep in mind. First, make sure the subject will be recognizable if you make it small enough to fit on the blank. Second, make sure it's high quality enough to look nice printed out. Making a photo ornament in Google Docs follows most of the same steps as working with my PNG design file. I'll show you how to put one on the round ornament in the materials list. They have round inserts that are 1.125" or 1.625" in diameter that we can sublimate on. I'll show you how on the larger one. Follow the same steps to prepare your Google Doc setting and add the photo you want to use. The image will appear on your page, but probably not at the right size or shape. With the image selected, click the icon in the top menu that looks like a square with some extra lines. This will open the Crop tool. Move your cursor to a black rectangle at an edge of the image until it turns into an arrow. Then click and drag that line closer to the subject you want to put on the ornament. Repeat for the other three sides. Click the Crop icon again to commit to the change. Now you'll avoid printing a lot of excess photo! Right-click the image, select Image Options, then Size and Rotation. Make sure the image is just a bit larger than the ornament. If it needs to be smaller, keep the "Lock aspect ratio" box checked and change the width in the correct field. After your image has printed, place it face up on your work surface. You can trim it to be closer to the ornament's disc size, though, to make it easier to manipulate. Remove the protective film from the round insert, then place it face down on the print right over the subject. Add heat resistant tape to the edges to keep it perfectly in place. Cover your pressing area with fresh white cardstock and place the ornament with the image on top. Cover it with fresh butcher paper and press it at 375°F for 60 seconds. While the image cools, peel the white sticker off of the ornament to reveal the adhesive area. Make sure the ornament's hanger is at the top and carefully press the disc in place with the right orientation. If you don't have a sublimation printer, you can make similar ornaments with Infusible Ink using my files in the second download folder. You can download the free SVG cut files from my free resource library, it's Design #410. Then, upload the design collection to Design Space. If you are not sure how to upload an SVG cut file to Cricut Design Space, watch this helpful video training series I made. If you are on an iPad or iPhone, here is how to download and upload SVG files to the Cricut Design Space app. Here is what the Infusible Ink ornament collection looks like on my Canvas. You can zoom out to see all of the designs by clicking on the minus (-) sign on the lower left. With the designs selected, click "UnGroup" so you can work with each ornament independently. If there are ornaments you don't want to make, select them and click "Delete" above the Layers Panel. Or, if there is an ornament you want to make you want to make more of, select it and click "Duplicate." Next, make sure the designs are the right size for your ornaments by clicking each in the Layers Panel to see its dimensions. My ornaments are about 3" so these will fit well. We're ready to cut. Make sure the right machine is selected and then click "Make It." If prompted, select "On Mat" and "12 in x 12 in" then click Continue. On the Prepare screen, click the "Mirror" toggle below all your mats. Then click Continue. Select "Infusible Ink Transfer Sheets" for your material and set the pressure to "More". Make sure your clean Fine-Point Blade is in Clamp B. Then click Continue. Load your mat and press your machine's Go button. Once the mat is finished, unload it, flip it over on your workspace, and gently roll a corner back to release the Infusible Ink. Complete the process for the rest of the mats. NOTE: I recommend you wash and dry your hands immediately before handling Infusible Ink to avoid transferring any oils to the surface. Trim your excess Infusible Ink and then cut the designs apart. To weed Infusible Ink Transfer Sheets, use the “cracking” method. Slightly bend and roll the cut paper until you hear a little cracking sound (which happens as the cuts separate). Don’t worry if your design lifts off the liner a bit. After you “crack” your cut design, just take away the excess paper and you’ll be left with just your design on the liner. Next, prepare your heat press. Use the Cricut Heat app or Cricut Heat Guide to find the right settings for your blank and transfer material. Since I'm using my Autopress and ceramic ornaments, I'll press at 400°F for 200 seconds. Next, we need to position each design over an ornament and secure it with heat resistant tape. Make sure you place the design matte side down on the shiny side of the ornament. This is why we mirrored our designs! Place your Cricut Pressing Mat on the platen and cover it with white cardstock larger than your ornament. Then, place your ornaments on the cardstock, design down. Cover them all with a piece of white butcher paper Heat according to your instructions. When they're done heating, let the ornaments cool down before moving them. Moving them right away could cause ghosting of the image since the sublimation process does not end immediately, After they have cooled, you are free to remove the tape and reveal the sublimated designs. Add ribbon or hooks to hang them! Take care of your ornaments by storing them carefully wrapped in paper towels. Typefaces: Andala, Divine Light Hand and Market Street from FontBundles.net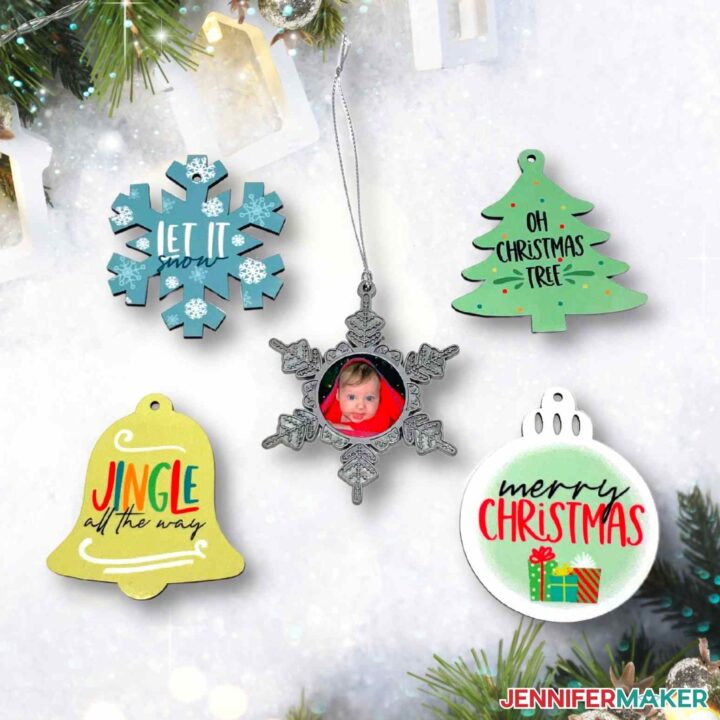
DIY Sublimation Ornaments
Materials
Tools
Instructions
STEP 1: GET OR PREPARE A SUBLIMATION DESIGN
![]()
STEP 2: PREPARE FOR SUBLIMATION
There are lots of ways to print your design but I’ll show you my favorite method: Google Docs!
On your desktop computer, go to Google Docs in the Google Chrome web browser. You can also download and open the Google Docs app on a phone or tablet, BUT be aware that you won't be able to install or access any printer profiles from a mobile device.
If you don’t have a Google account, they’re free and easy to get.
First, click on "Blank" to open a new document.
In the top File menu, select Page Setup. Change your margins to 0. Change your Paper Size to match your sublimation paper size. I’m using letter size. Click OK.
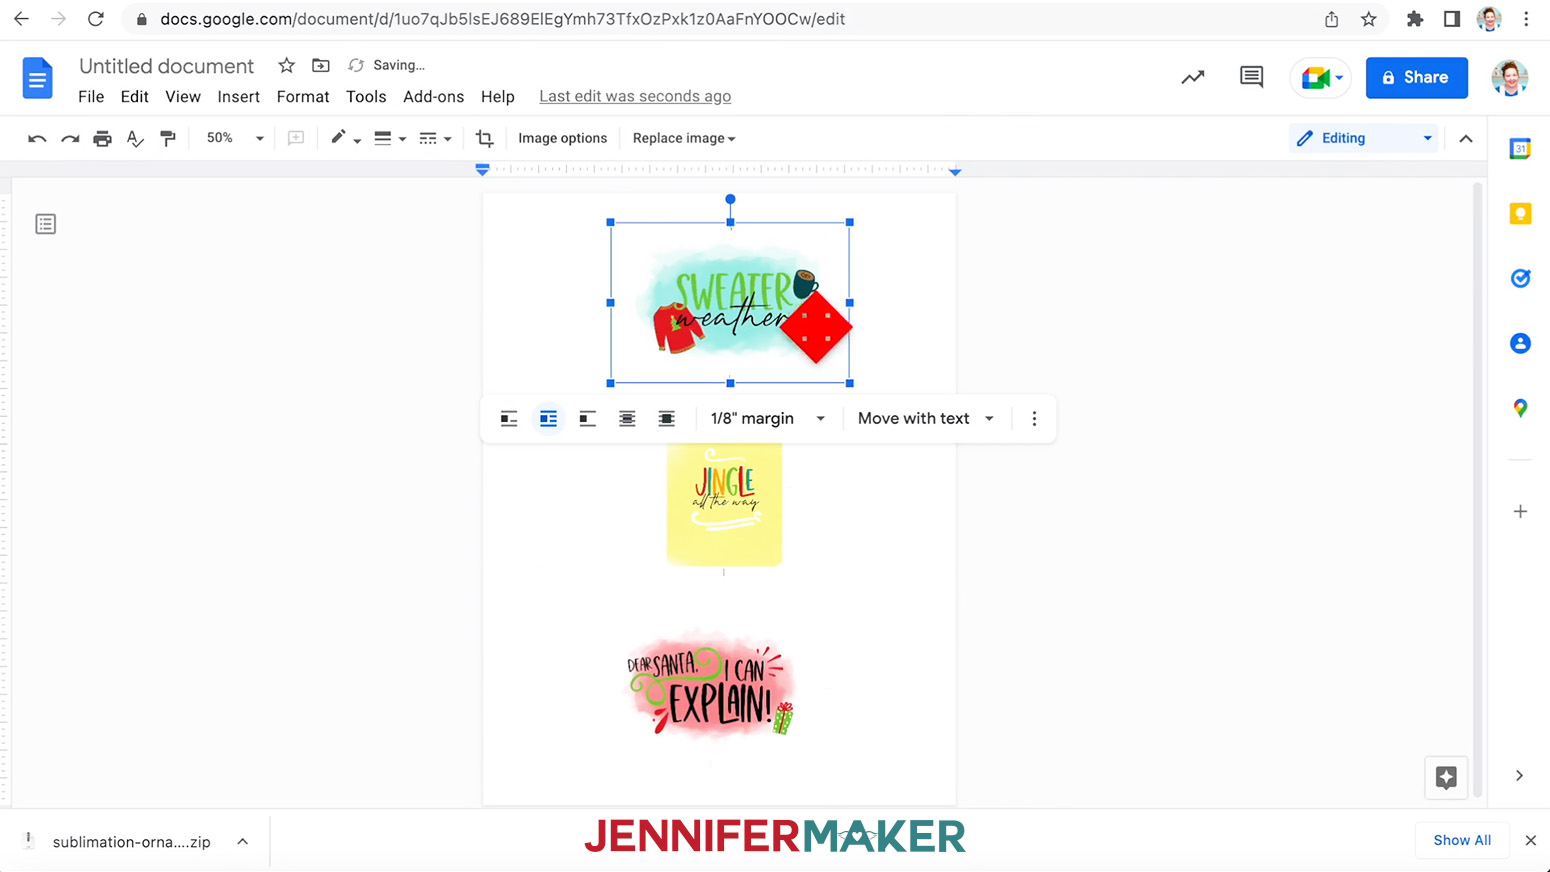
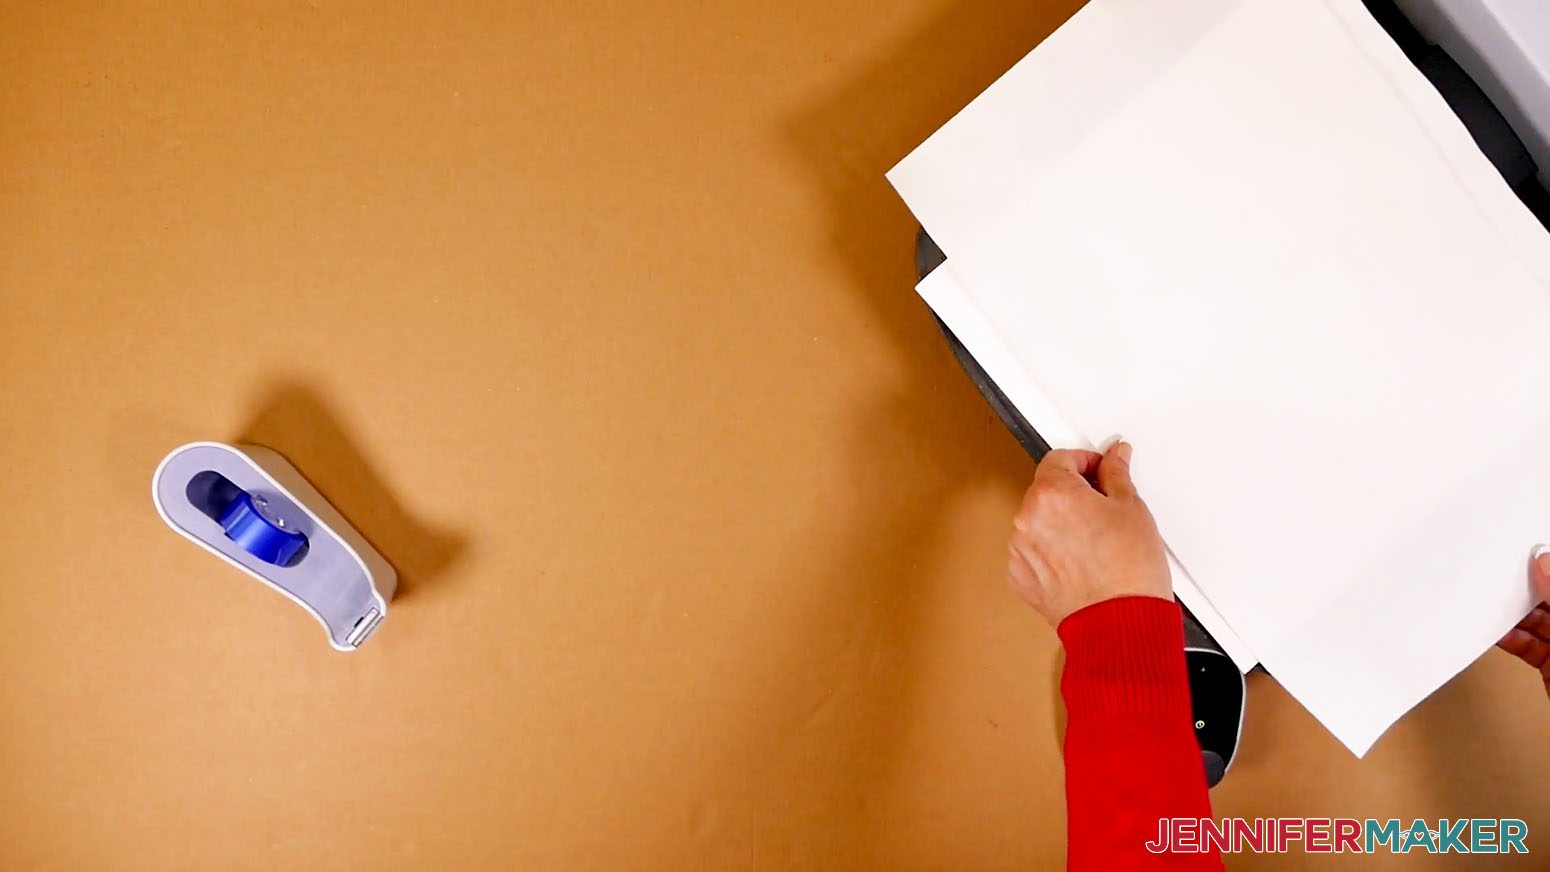
Now click on the Insert menu at the top and select "Image," then select "Upload from Computer." Locate the sublimation design you want to use in the folder you downloaded from my library. I’ll use the "sweater weather" file. Then click "Open." The image will appear on your page!
But, it won’t necessarily come in at the correct dimensions for our ornaments. One of the neat things about sublimation is that you can let the design cover the entire object you're decorating. That's especially helpful for irregularly-shaped items. Measure the shapes as if they're rectangles and we'll adjust the file to fit.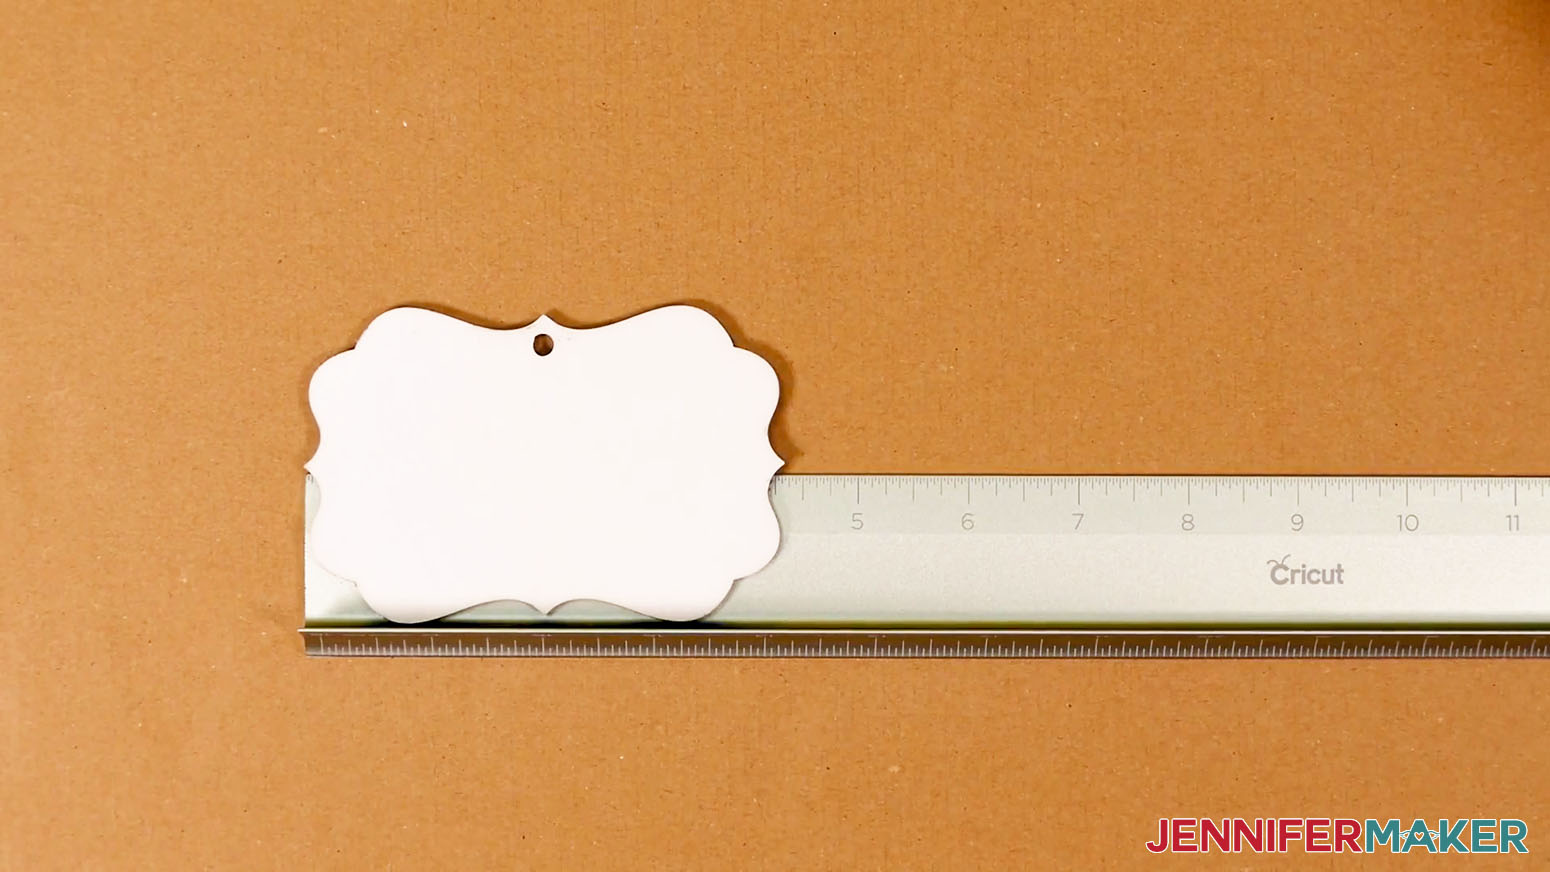

I’ll enter "5.1" for the width to include the orientation lines. The image is automatically resized! The colorful area is just a bit larger than my actual ornament width.
Next, let’s make sure the design will print in the right spot. To reposition the image, select it and then click on "Wrap text" from the menu that appears below. You might have to hover your cursor at the bottom of the image to bring up the menu. 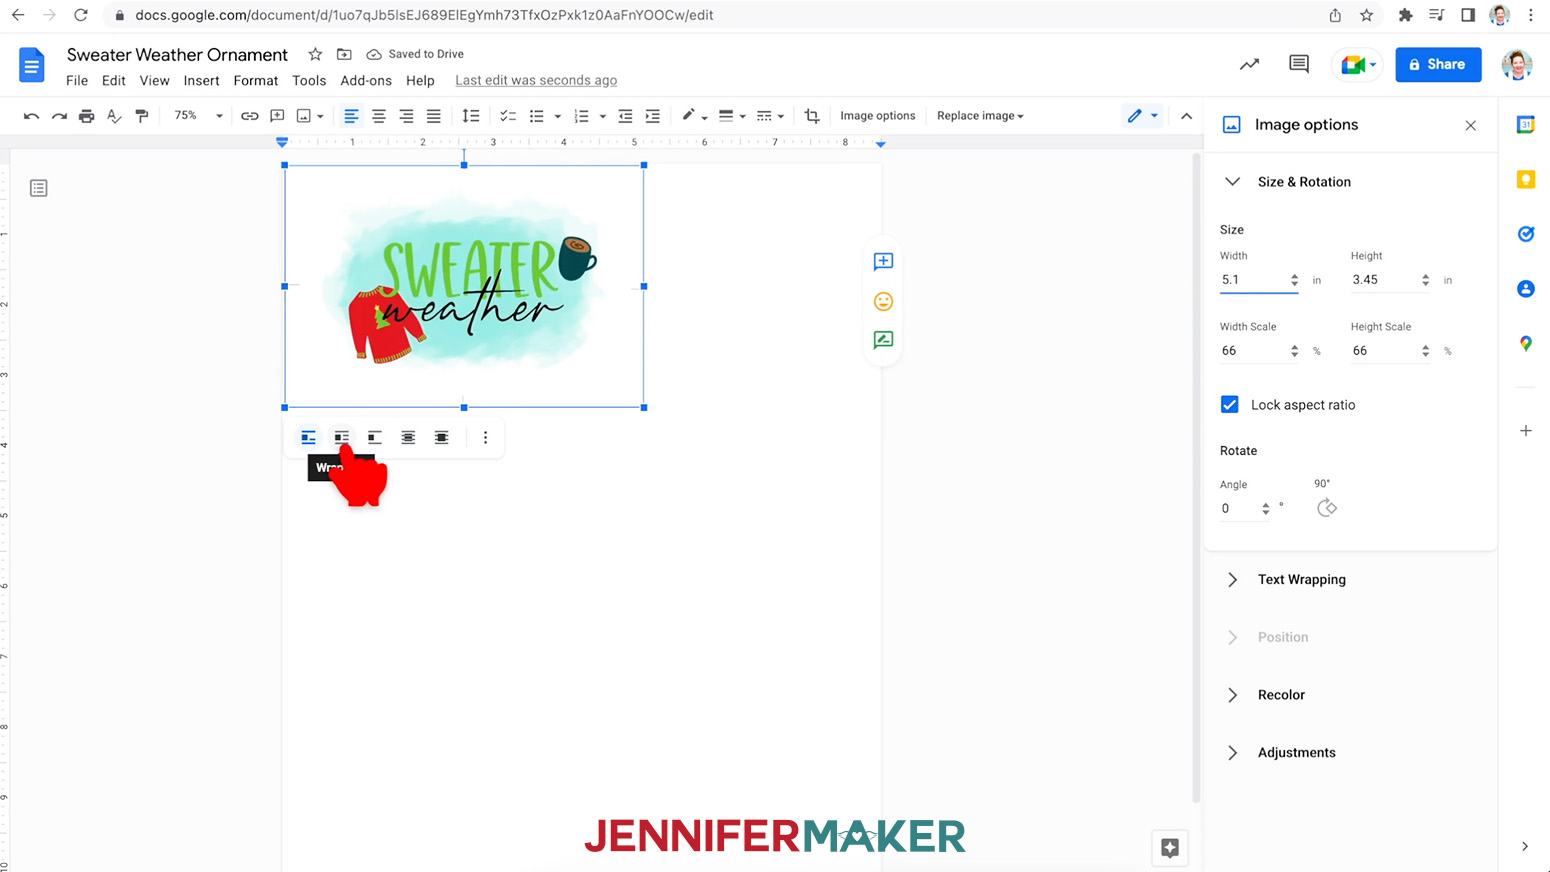
Once you’re happy with the design, give it a name by clicking where you see “Untitled” in the top left field. Another great thing about Google Docs is the auto-saving feature! No more losing your work if you forget to save every few minutes!STEP 3: PRINT YOUR SUBLIMATION DESIGN
Before we print, make sure your paper is loaded correctly. Check your printer manual and paper packaging for help identifying the right side to print on and how to load it. If you’re using A-SUB paper in an Eco Tank like me, place the paper facedown with the words “A-SUB” visible so that the design will print on the bright white side of the sublimation paper.
While printer settings vary, the main things we have to watch for are paper type and print quality. The process is different for each printer so check your manual.
Epson Print Method
If you have an Epson, go to the File menu and choose Print.
Select your printer under "Destination." Then, click the arrow beside "More Settings" and click "Print Using System Dialog."
Make sure your sublimation printer is selected under "Printer". Then, under "Layout" click "Flip horizontally" to mirror your image. Most sublimation projects need to be mirrored, so remember that step!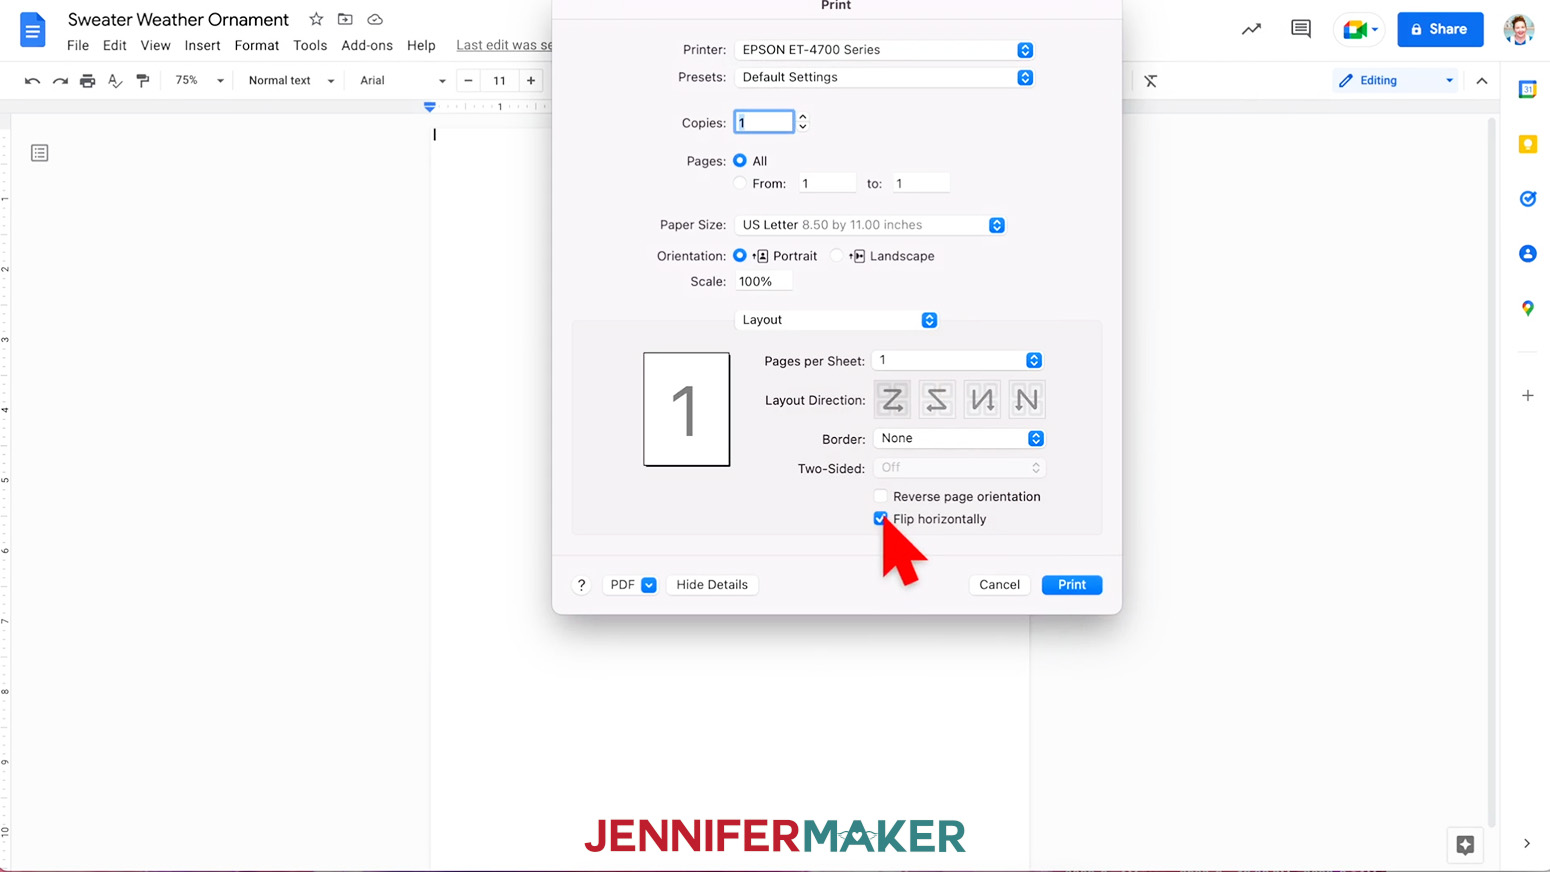
Choose "Print Settings" and change your media type to "Presentation Paper Matte" and Print Quality to "High Quality."
We already mirrored the image, so don’t click that. And don’t use high speed!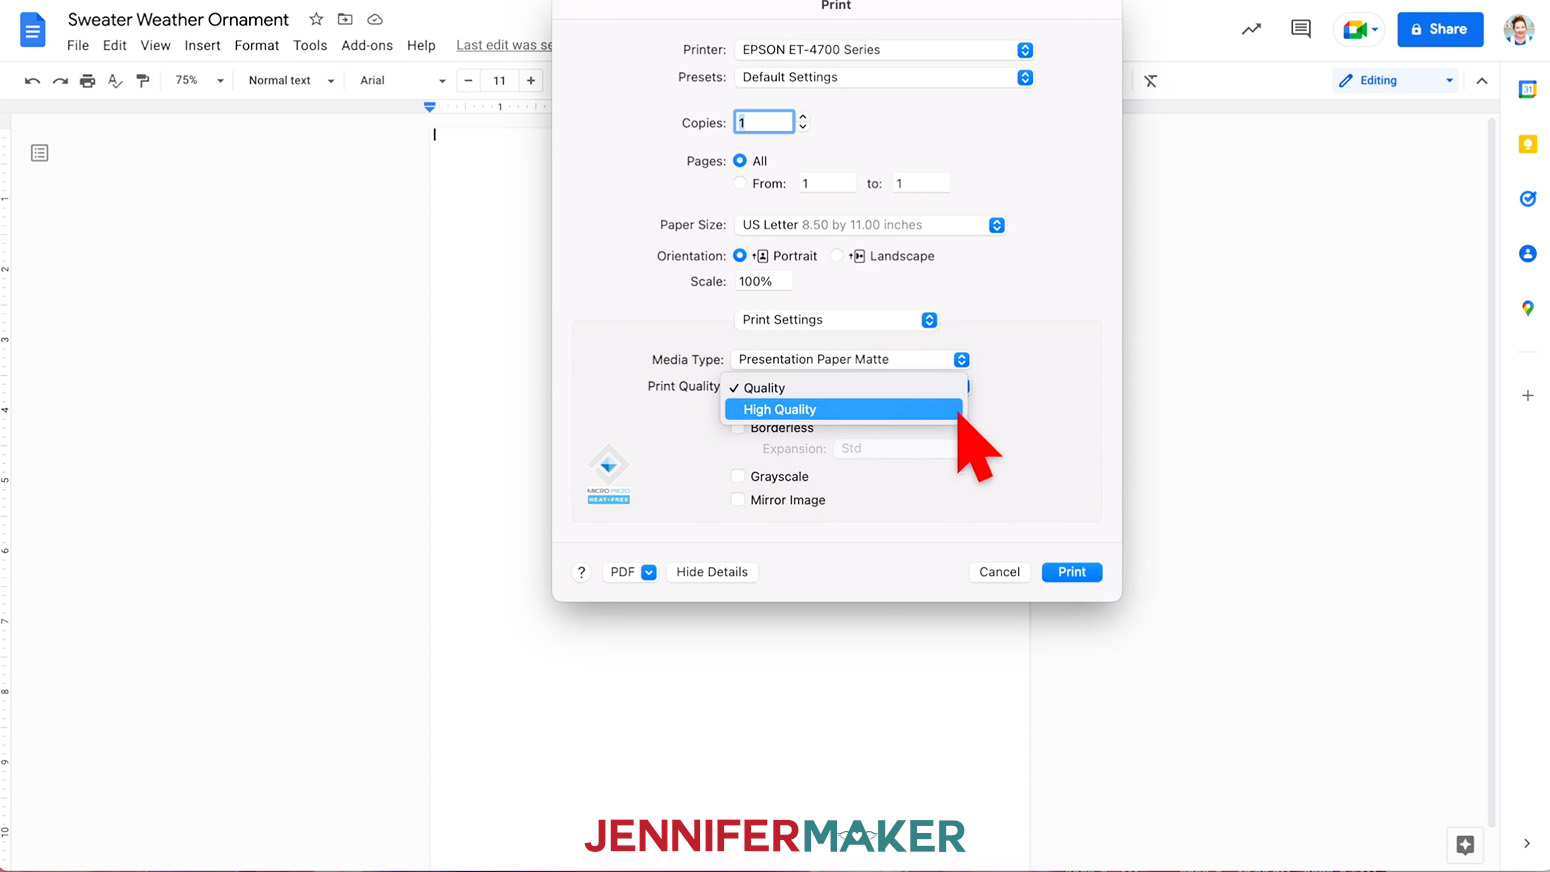
If you’ve installed an ICC printer profile for better colors, which I covered in my sublimation printer setup videos, you can select that here as well. Select "Color Matching" and choose your printer profile. If you’re on a Mac as I am, choose "Color Sync," click on the menu, select "Other Profiles," and select your printer profile from the list.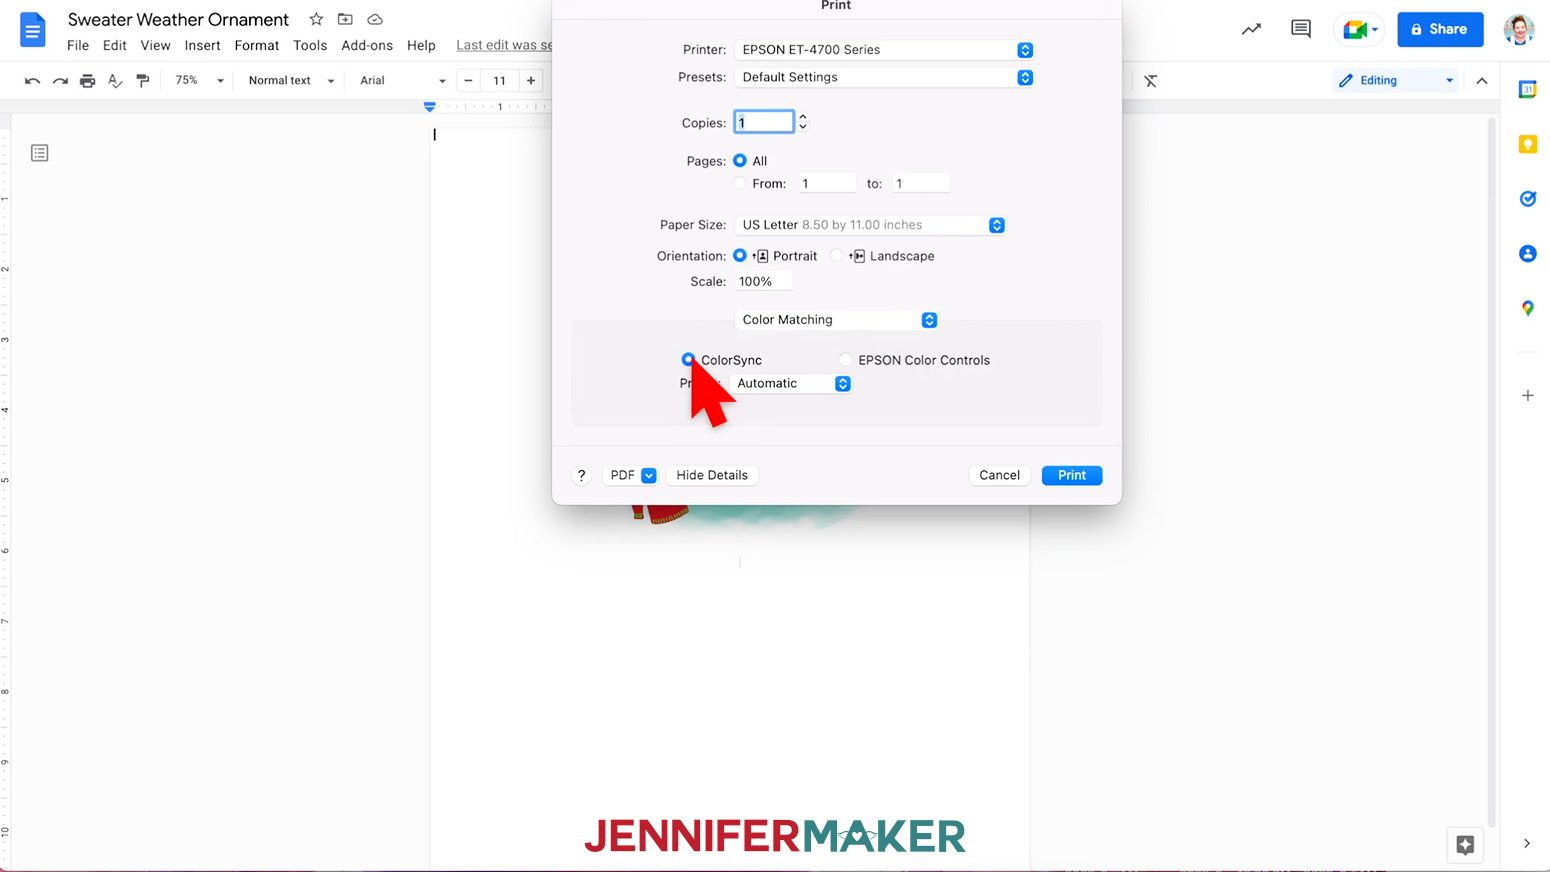
Once you’ve correctly adjusted your settings for your printer, click on "Presets" and choose "Save Current Settings as a Preset" and then you can choose that from now on!
Sawgrass Print Method
To print on a Sawgrass, go to the File menu, choose "Print," and select your printer under Destination. Then, click the arrow beside More Settings and click "Print Using System Dialog."
This is where the steps for the different printers change. Click the PDF menu in the lower left corner and choose Sawgrass Print Manager. If you’re having an issue finding this, look for your Print Options and select Sawgrass Print Manager as your printer. This is the only way to access the helpful ICC printer profiles that Sawgrass provides.
Your window might look different, but choose your settings that match your ornament. For mine, I’ll set the substrate – that means what we’re sublimating on to – to “MDF” and paper to “Type A”. Again, I recommend Quality over Speed! Sawgrass automatically knows we want to mirror the design, so don’t uncheck that box by accident.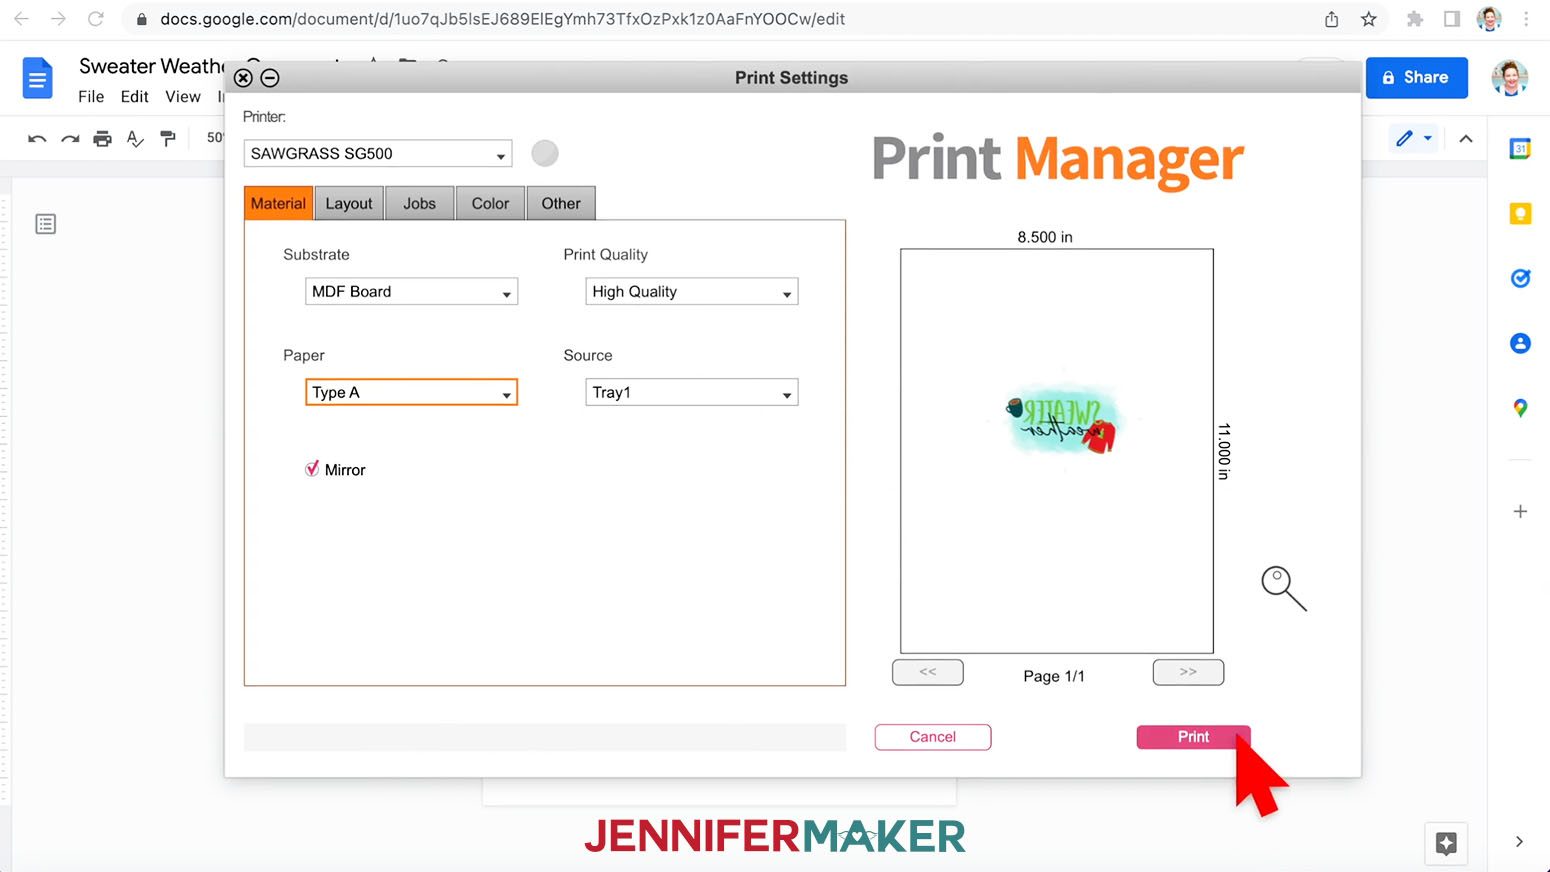
Then, look at the preview to the right and make sure your design looks correct. If not, hit Cancel and make any adjustments you need until you’re happy.
Finally, click the pink Print button and watch the magic happen!STEP 4: PREPARE FOR SUBLIMATION
Once your press reaches the target temperature, place the ornament face up on the pressing area and put a piece of butcher paper on top. Do not use parchment paper, wax paper, freezer paper or teflon paper - these will trap moisture. Preheat the ornament for 10 seconds just in case there is any moisture present.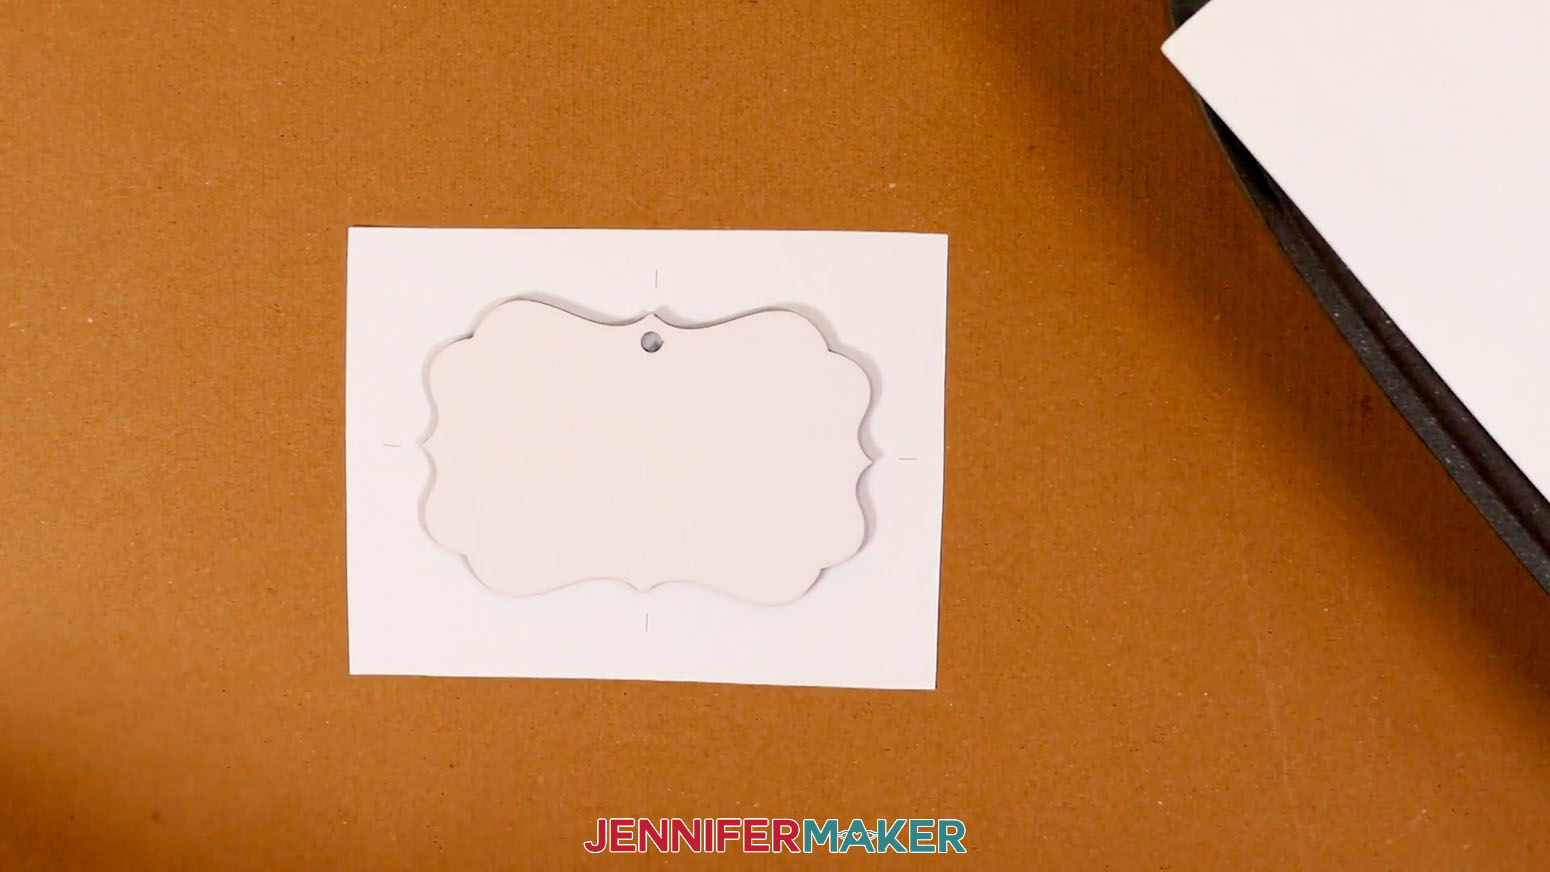
STEP 5: PRESS YOUR SUBLIMATION DESIGN
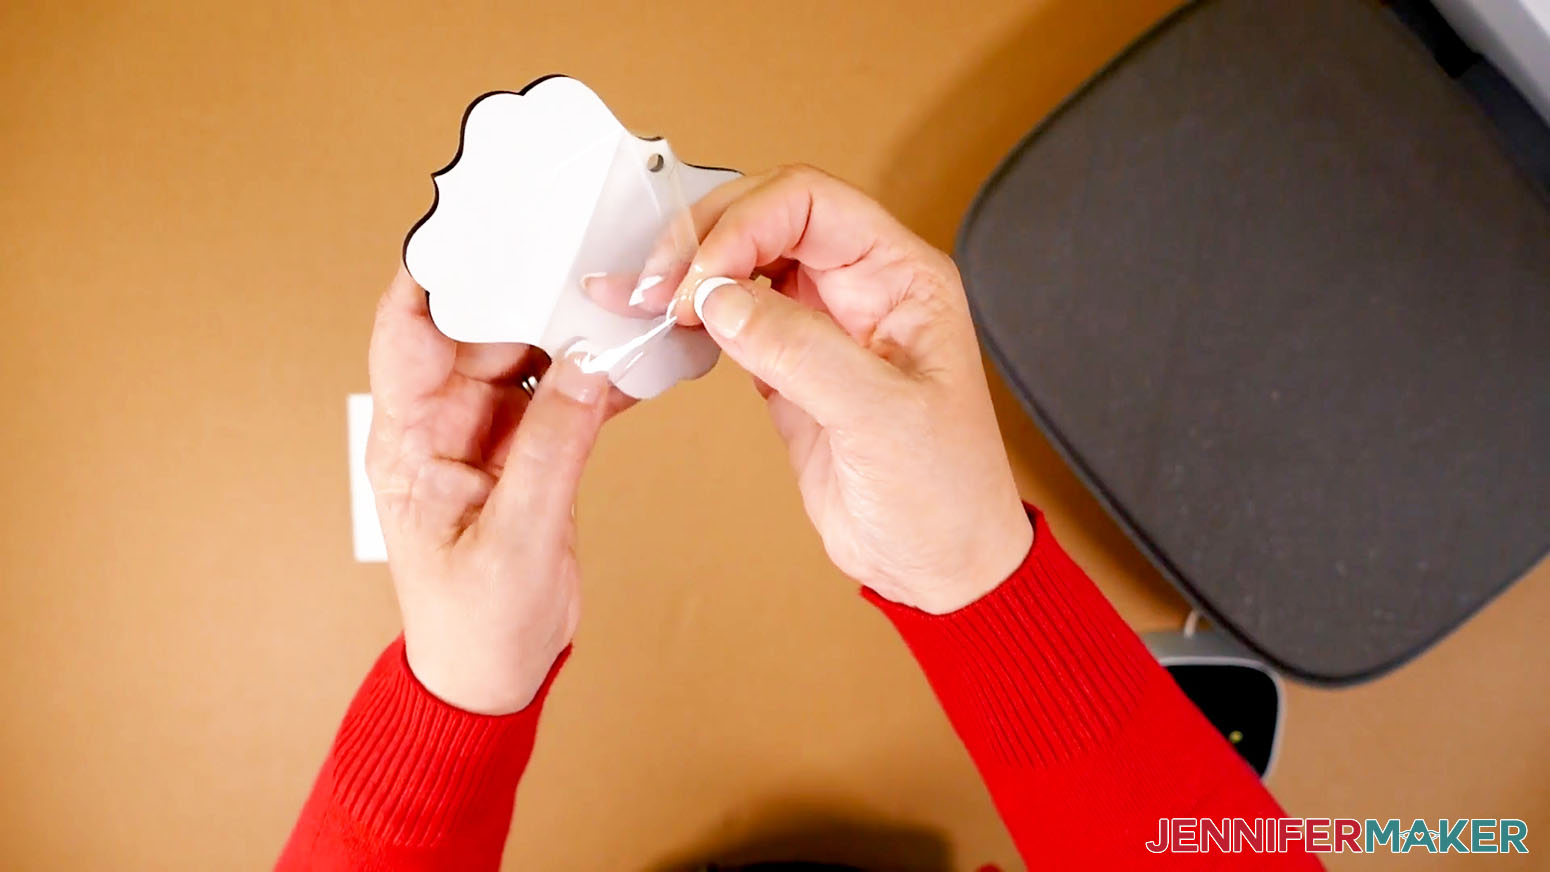
Set the Autopress or your machine's timer for 60 seconds and press the project. The Autopress will open right at 60 seconds. If you’re using a different machine, lift the press straight up to avoid shifting the design and causing blurs.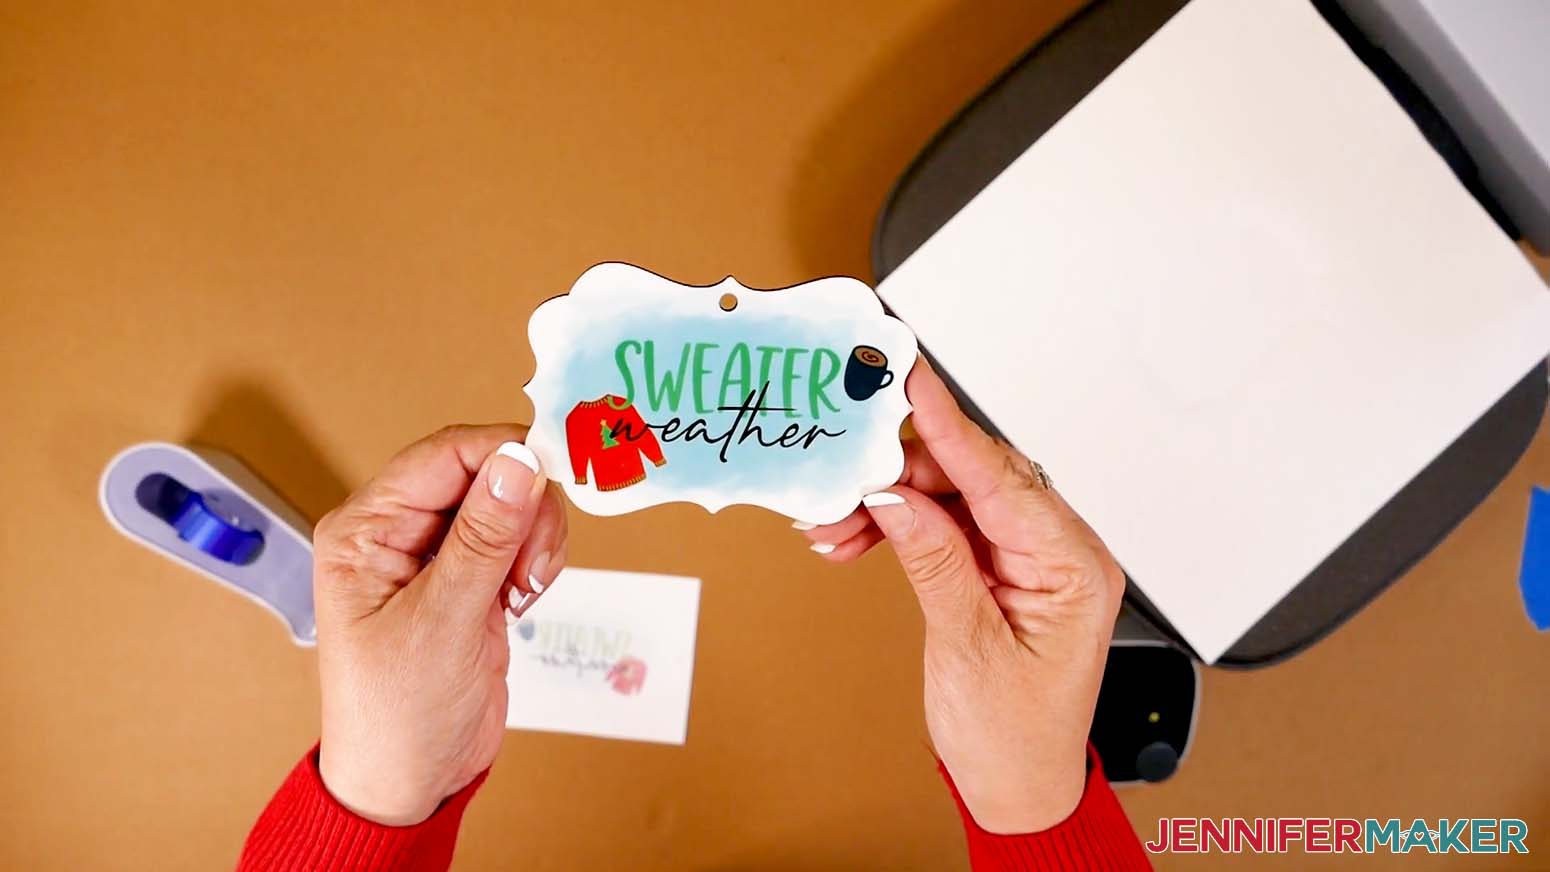
Add a ribbon or hook through the loop and your ornament is ready to display or give as a gift!Variation: Photo Ornament
Since you can use any image you own for sublimation ornaments, you can also decorate one with your own photo or design.
Printed sublimation projects don't have to be the perfect size for the item you're decorating. But you also don't want to print a huge image when you'll only use a few inches for your project.
Follow the earlier directions for your printer.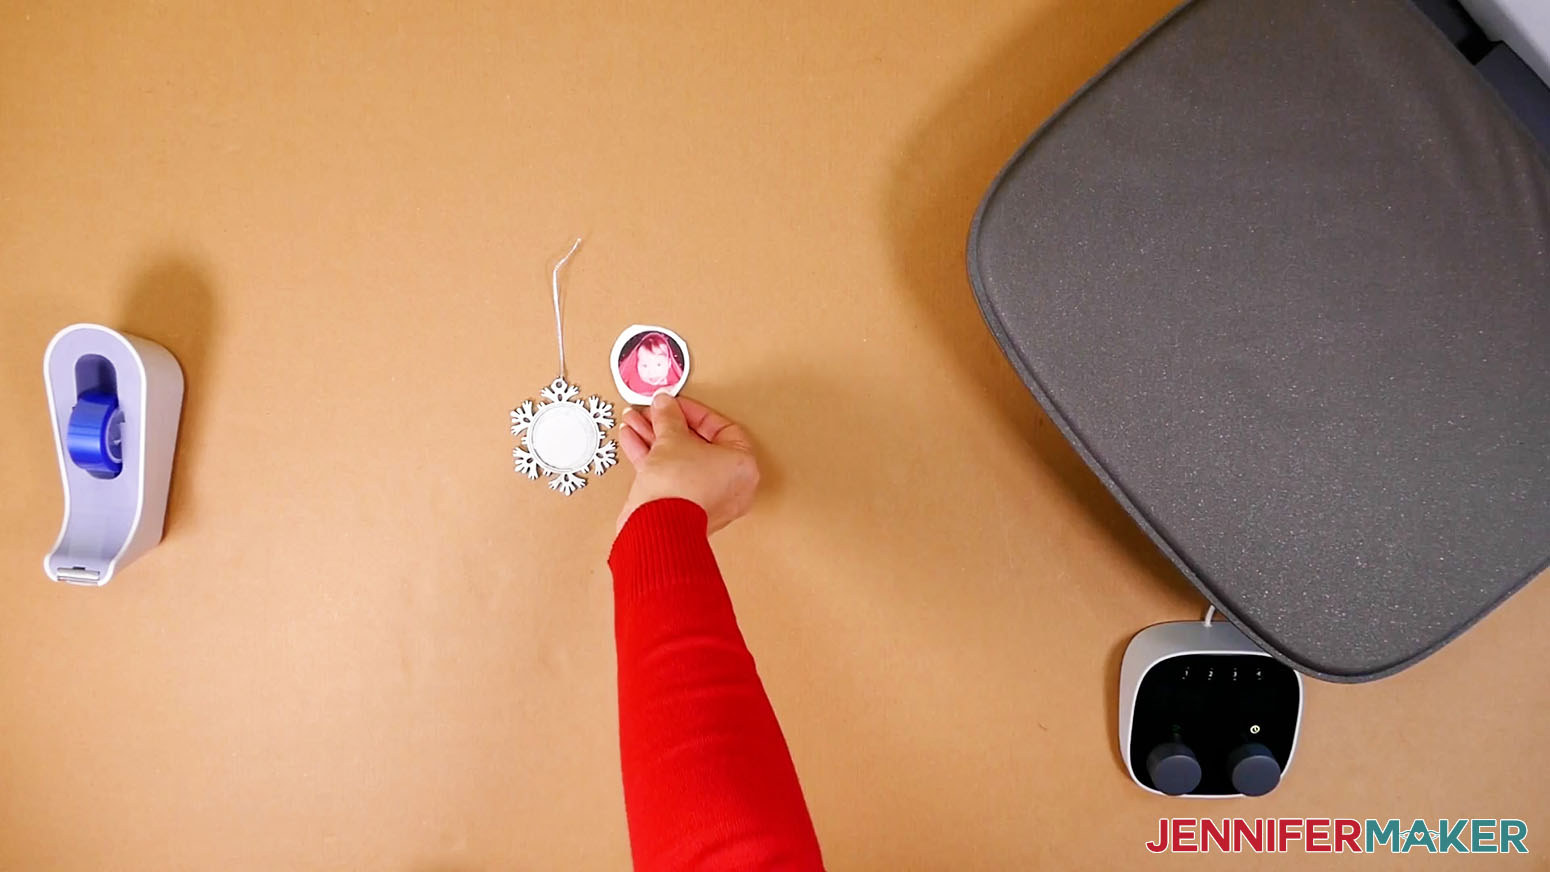
INFUSIBLE INK
Place your first Infusible Ink sheet shiny side down on StandardGrip mat. 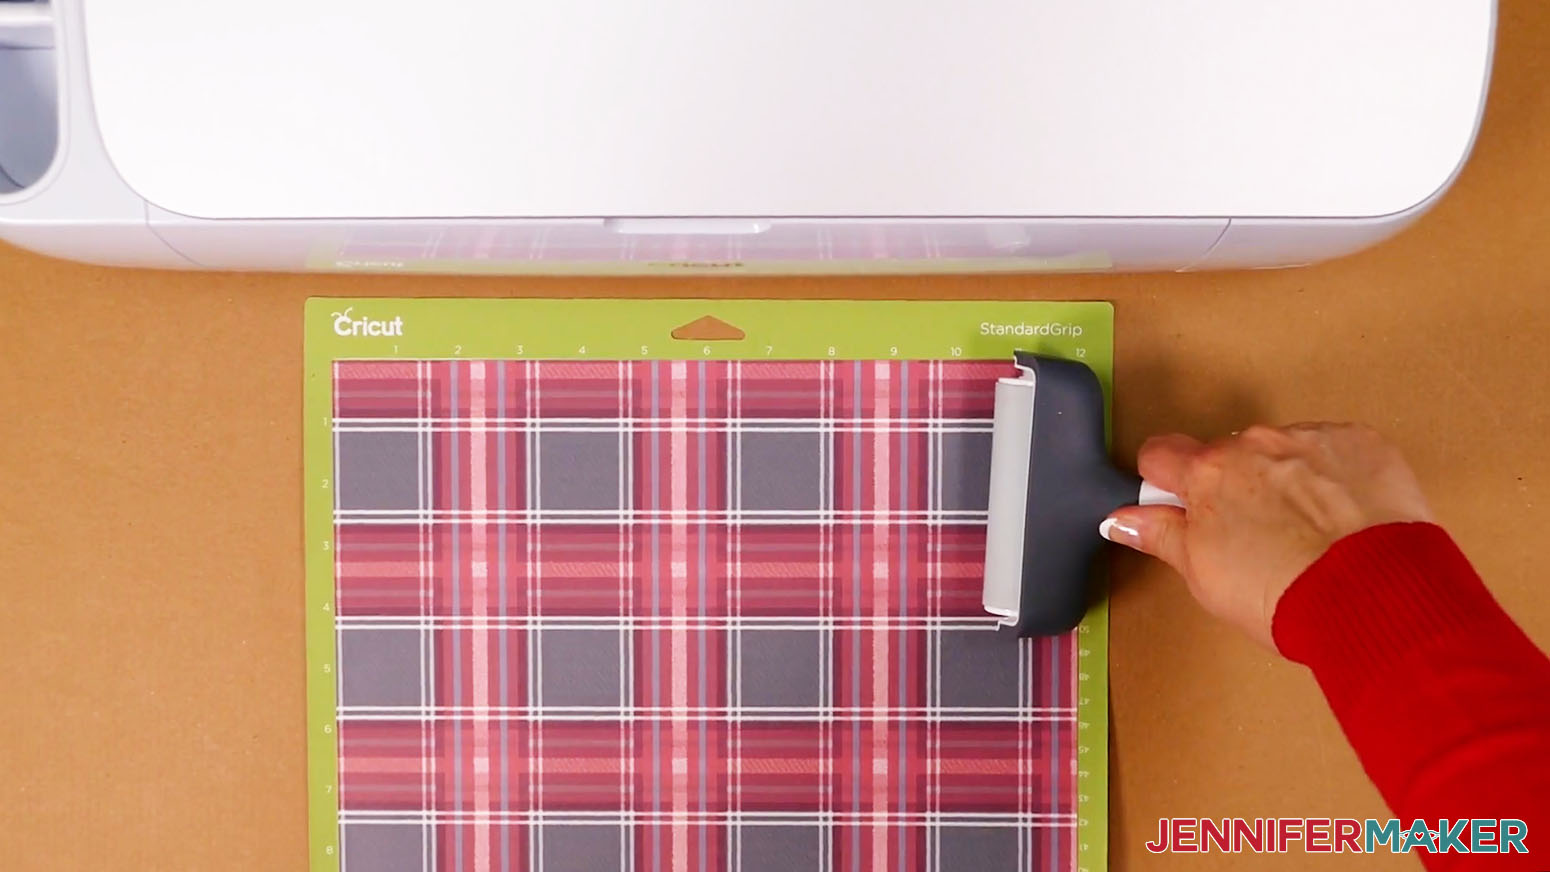
STEP 6: SHOW THEM OFF!
Notes
The detailed step-by-step assembly video on how to create sublimation ornaments debuted during Maker Academy Weekend 2022, held online November 3-6, 2022. Get an on-demand pass to watch all 20+ workshops, each with a printable handbook, transcript, audio files, design files, and support with a VIP pass below:

Add a ribbon or hook through the loop and your ornament is ready to display, give as a gift, or both!

Answers to Your Questions About How to Make DIY Sublimation Ornaments
Q: Where is your tutorial for this project?
This is a special project we made for our free Maker Academy Weekend 2022 event! A complete and detailed step-by-step video premiered during the event November 3-6, 2022 — specifically, this tutorial video was available to watch for free for 24 hours beginning November 6 at 3:00 pm ET! You can get access to the full video, the printable handbook that details how to make this beautiful project if you get a VIP Pass to Maker Academy Weekend 2022, which comes with other perks and bonuses, too!
How does the sublimation process work?
Sublimation uses a special ink from dye-sublimation printers that can then be transferred to another object with a compatible coating. You first print a design with a sublimation printer — which uses special sublimation ink on special transfer paper — then use high temperatures and pressure to transfer the ink permanently to something else that has a coating that can absorb the ink, such as a sublimation ornament blank. After the sublimation cools, which happens quite quickly, the design becomes embedded right in the surface of the object, and won’t crack, peel, rub off, or wash away.
Can I make sublimation ornaments without a printer?
Yes, just use Infusible Ink transfer sheets instead. For the best results, cut out a design out of the transfer sheet with a Cricut cutting machine for fun and unique designs.
Can I use your Christmas sublimation designs in my small business?
Yes, you’re free to sell the physical product you make with these sublimation designs. Like so many of my projects, this one is perfect for small business use and you may use my designs for commercial use.
Can I put your sublimation transfers on other sublimation products?
Yes! Use these designs for tote bags, shirts, and other keepsakes!
What fonts did you use for your sublimation designs?
- Andala / Free alternative: Asterik Font
- Divine Light Hand / Free alternative: Theraphiest
- Market Street / Free alternative: Strawberry Blossom
Free alternatives are for personal use. A commercial license is required if you are selling your projects.
How do I get your Christmas sublimation designs?
Get the free digital download in my zip folder available at the link below.
Get my free PNG files to make these cute Christmas sublimation ornaments!
(If you do not see the signup form above, click here.)
I hope you’ll make these sublimation ornaments this holiday season! I love seeing what you make with my designs and how you use them! Please share a photo of your DIY Sublimation Ornaments in our Facebook group or tag me on social media with #jennifermaker.
Love,

Want to remember this? Save this DIY Sublimation Ornaments Tutorial to your favorite Pinterest Board!