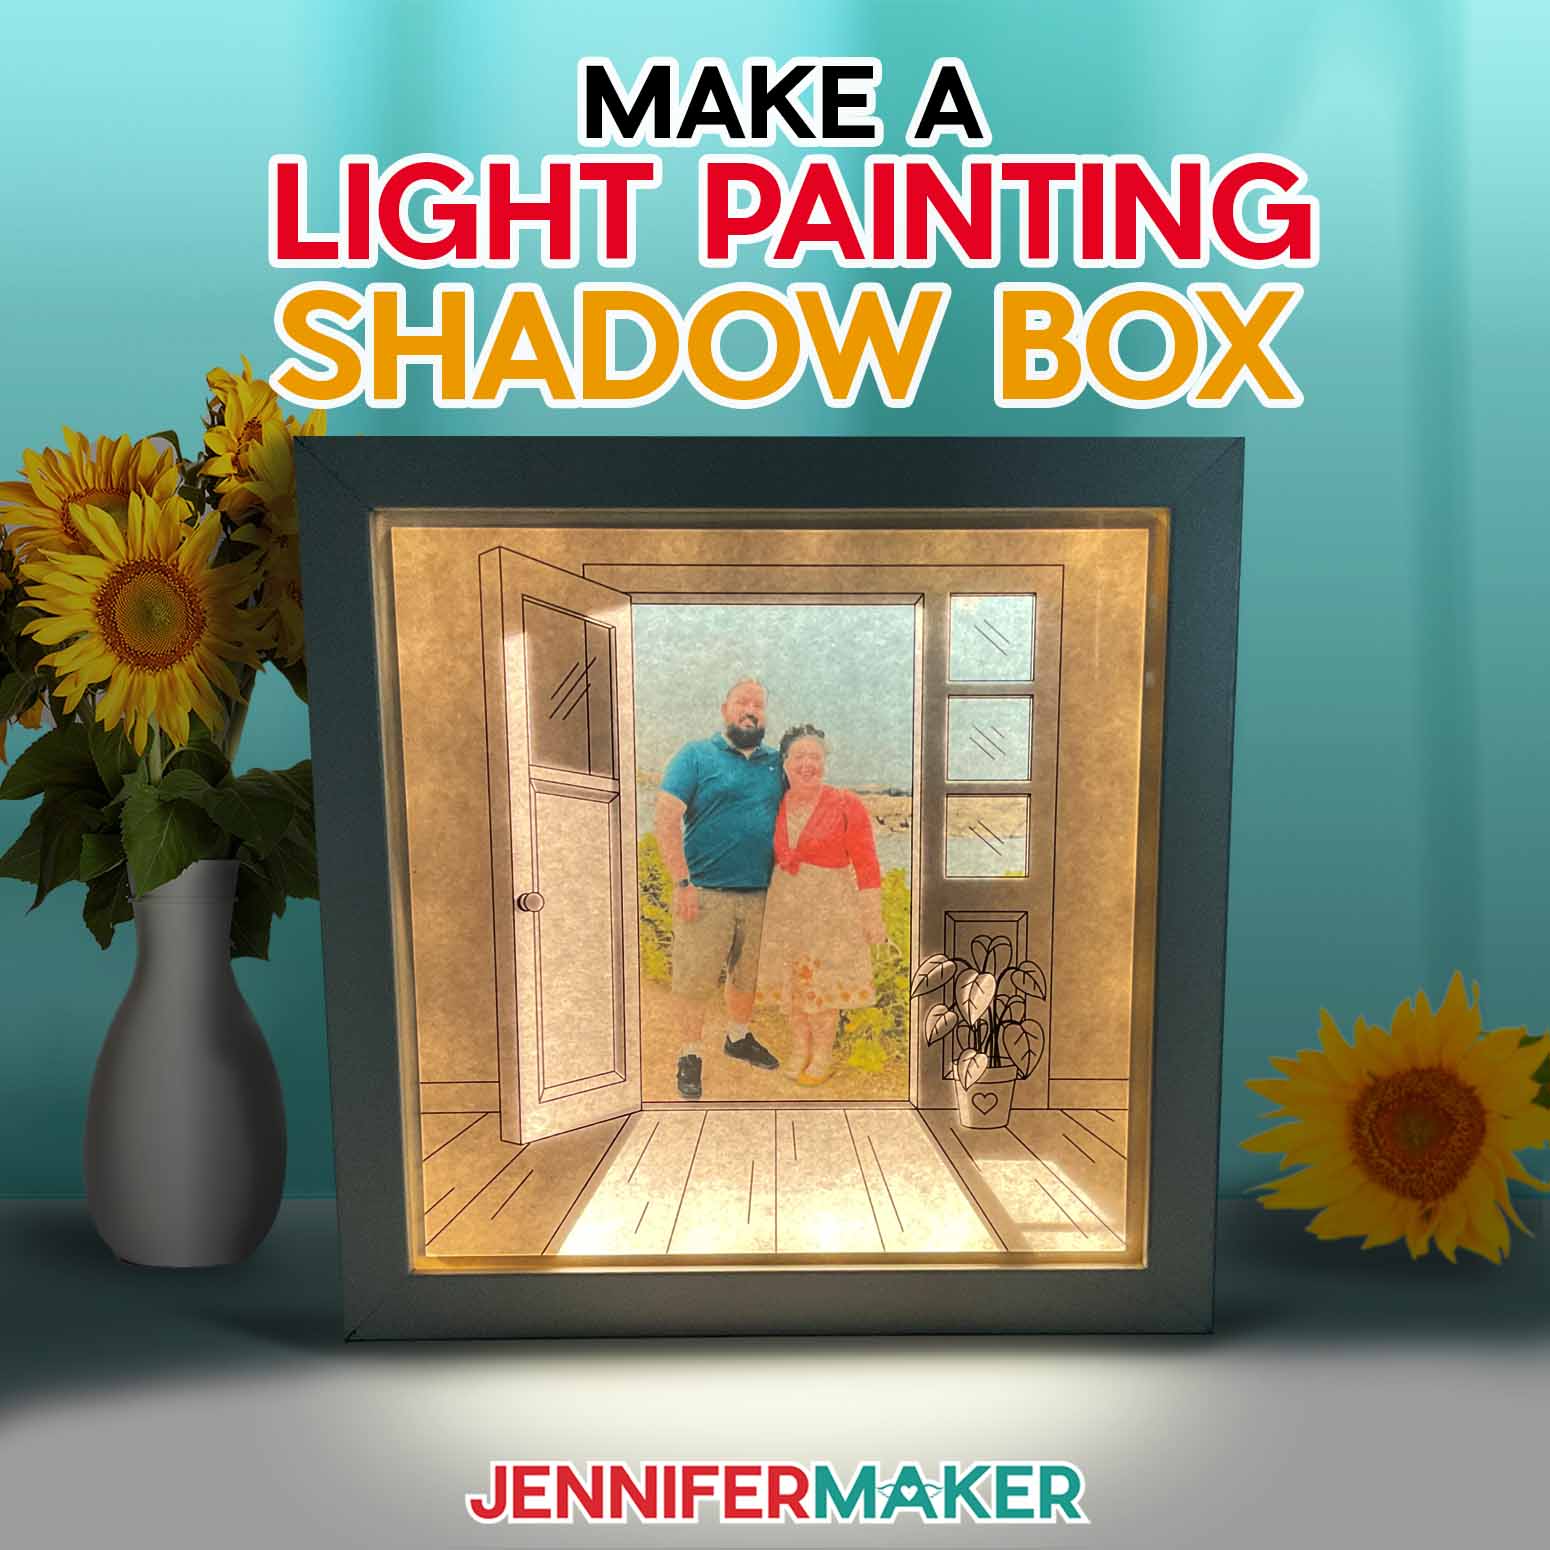
Learn how to make an amazing light painting shadow box!
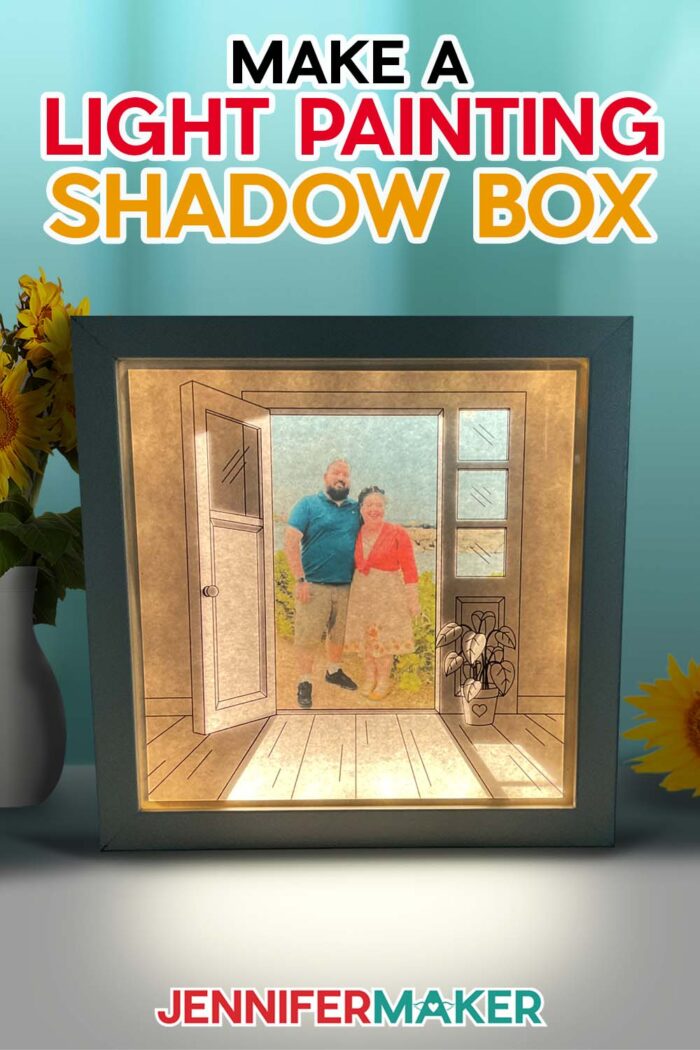
Shadow boxes are one of my favorite crafts. They’re never not beautiful, and using a cutting machine makes it so easy to cut all the layers. Light painting shadow boxes are a fun project that combines layers and light to bring a special photograph to life in a really creative way! When I saw these super cool light-up photo “paintings” online, I just loved how they turned a simple photo into a work of art. Right away, I knew I wanted to create my own! But, how do we make the picture light up?

These are a little different than other shadowbox projects I’ve shared with you, and use a few different materials. One material you’ve most definitely used before, and one may be new to you! But that’s ok, because I’m here to guide you through every step.
I’m always excited to use my crafting tools to their full potential, and for this project we’ll be using the Print then Cut feature on a Cricut, as well as using it to cut our layers.
To make the photo light up in our light painting shadow box, I’ll show you how to print the picture on transparency material, rather than paper or cardstock. This allows the light to shine through and illuminate the image. It is SO cool!
In the download file for this project, you’ll find a JPG folder with a doorway scene drawing layer that you can personalize with your own photo, as well as a sunset scene photo layer that you can personalize with your own custom combination of family silhouettes. I’ve also included an SVG file that includes all the additional layers and pieces needed to complete each design.
First, for the doorway scene, I’ll show you how to tweak your photo in Cricut Design Space to work in the design, then how to use the Print then Cut feature to prepare all the layers to fit together. Then later on for the family silhouettes project, I’ll show you how to customize the design to match your own family, and then we’ll add a sentiment to the frame.
What kind of photo will work for these projects? I’ll show you examples of what to look for when choosing a photo for your shadowbox, and some reference photos that show what kind of pictures do not work well with this project.
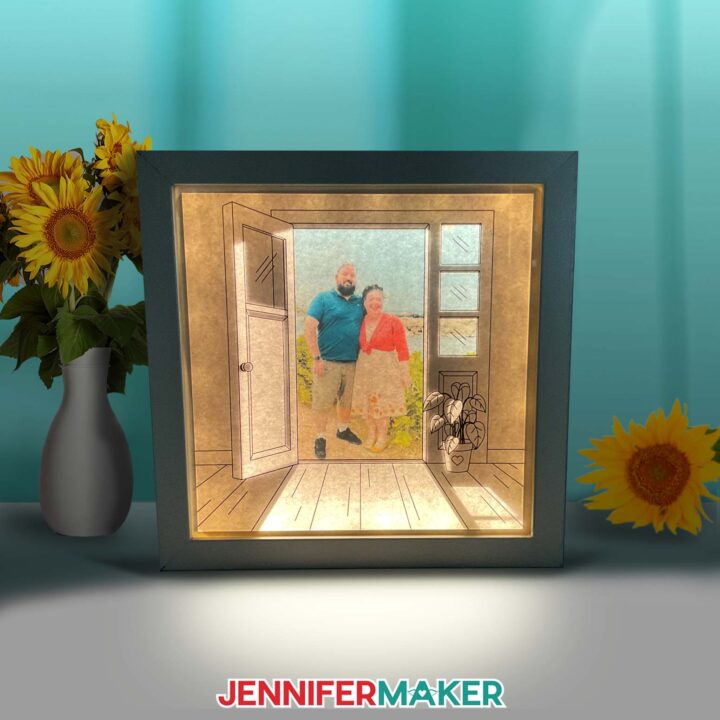
For example, when choosing a photo for the doorway shadowbox, you need to be sure to choose one that’s high quality, with good lighting and clearly featured subjects like the photo I used of Greg and I.
For the silhouette shadow box, you’ll want to choose an image without a lot of contrast or dark tones, as they’ll make the silhouettes hard to see against it. You can use photographic images, pictures of artwork, or digital designs for this layer — it’s totally up to you!
You’ll need a regular color inkjet printer to print certain layers, as well as a Cricut cutting machine with Print then Cut capabilities to cut them. I’ll use a Cricut Maker 3, but you can also use the original Maker, any of the Explore series machines, or the Venture for both projects. The doorway design will work on a Joy Xtra, too, because all of the layers can be cut on 8.5″ x 11″ paper without any modification.

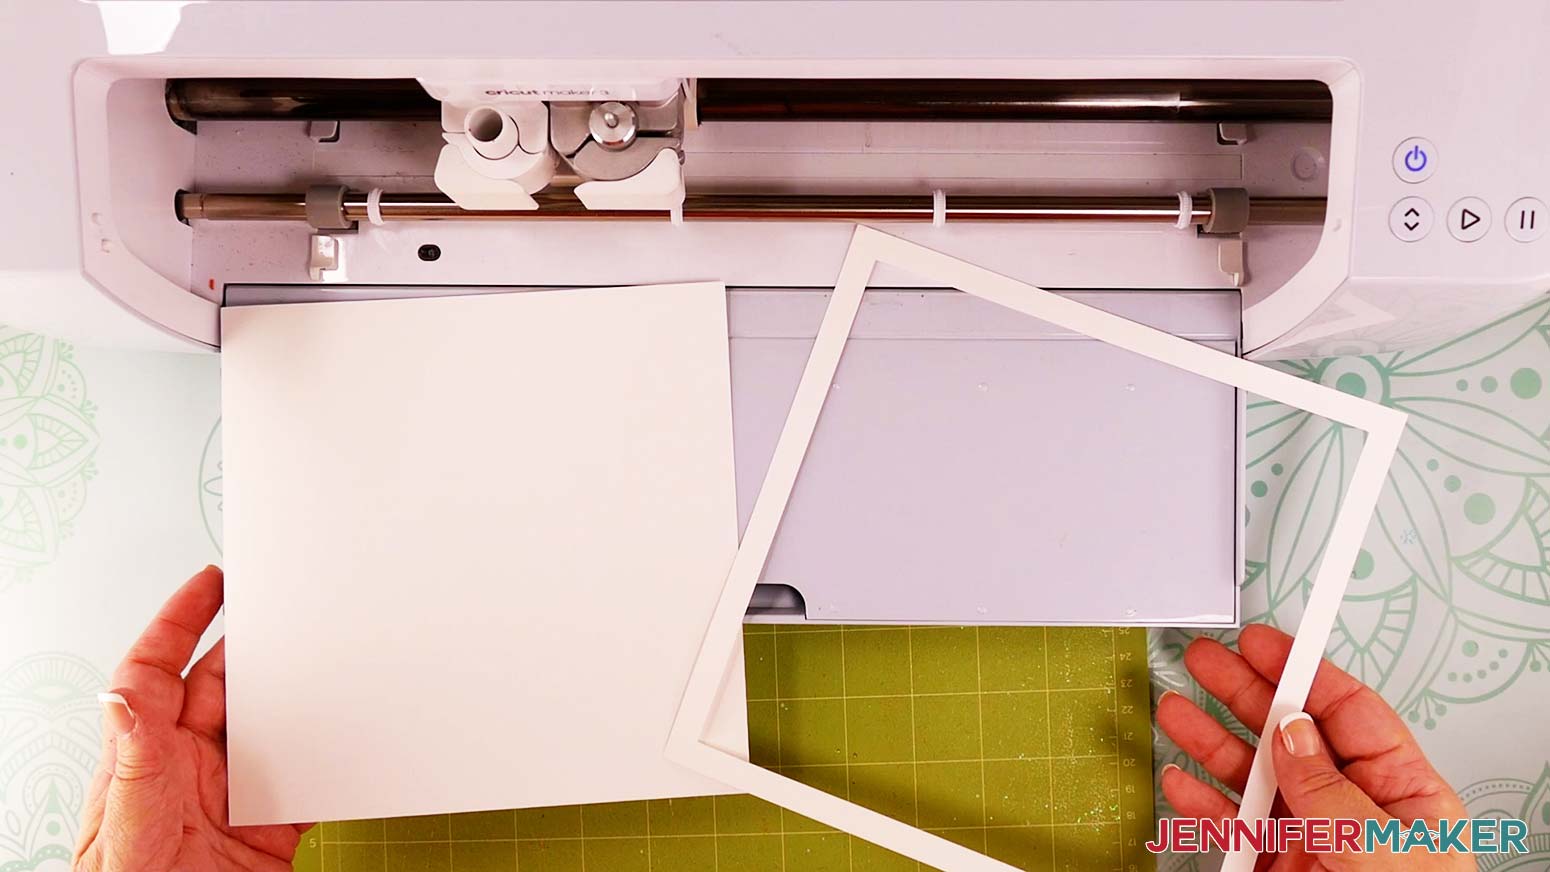
To get started with the doorway shadow box, you’ll need an 8″ x 8″ shadow box frame, regular white copy paper, a transparency sheet, and some white cardstock. For the family silhouette project, you’ll need a 8.5″ x 11″ shadow box frame, regular white copy paper, transparency sheets, and some black cardstock. For both projects, you’ll also need some LED lights, small glue dots, and a few other tools and supplies I have linked in my materials list.
One tool that’s optional but really nice to have is a light box. Using a flat surface that lights up makes aligning and assembling the layers a breeze, and I highly recommend investing in one. They also make weeding certain colors and types of vinyl much easier!
When your shadowbox is finished, display it on a side table, among your family photos, or even on that blank space on your bathroom wall as a cool night light.
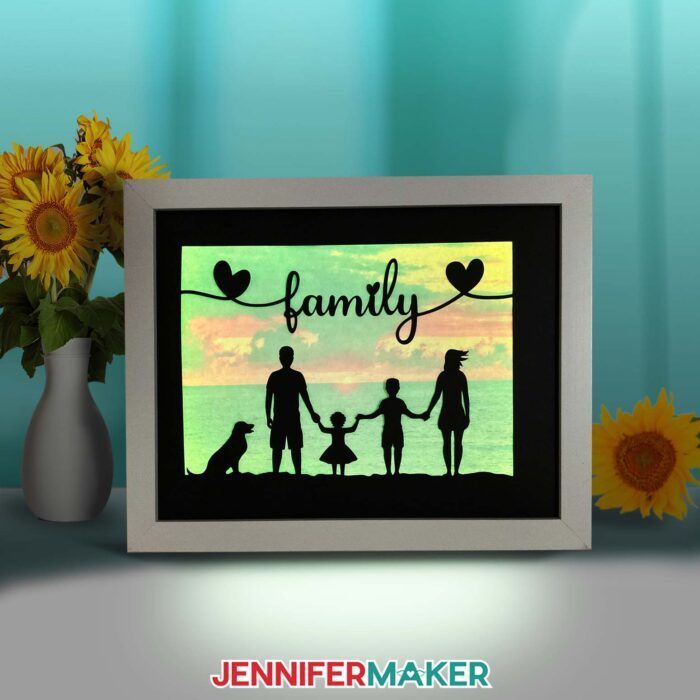
These might be some of my favorite shadow boxes yet! It’s so cool how the artificial light of the LEDs ends up looking like real sunbeams and reflected light in doorway project. In the silhouette box, the cast shadow of the black cardstock looks like a real family backlit from a dazzling sunset. They are too cool, and I can’t wait to make some more of these!
I love taking inspiration from older projects and using it to create something new. And I hope you feel inspired, too, to create your own cool doorway or family silhouette light painting – or any other variation of these ideas! The main thing is to just have fun with it, and to take pride in your unique and beautiful result. I can’t wait to see what you all come up with!
Ready to learn how to make a light painting shadow box? This post contains some affiliate links for your convenience (which means if you make a purchase after clicking a link I will earn a small commission but it won’t cost you a penny more)! Read my full disclosure policy.
Materials And Tools to Make a Light Painting Shadow Box
See my full and complete Amazon shopping list for the exact items used in this project!
- One (1) 8″ x 8″ Shadow Box (for doorway design) -OR- One (1) 8.5″ x 11″ Shadow Box (for silhouettes design)
- One (1) Sheet of 8.5″ x 11″ Transparency Film (for photo layer)
- One (1) Sheet of 8.5″ x 11″ 24 lb. White Copy Paper
- One (1) Sheet of 8.5″ x 11″ or 12″ x 12″ 100-110 lb. White Cardstock for doorway design (I used 8.5″ x 11″ 110 lb. Cardstock) -OR- One (1) Sheet of 12″ x 12″ 65 lb. Black Cardstock for silhouettes design
- One (1) Strand of LED Strip Lights -AND- Three (3) AA Batteries
- Personal Digital Photo JPG or PNG file
- A way to cut your materials – I’m using the Cricut Maker 3, but you can also use the Cricut Maker, a Cricut Explore Series machine, the Cricut Venture, or even the Cricut Joy Xtra for the doorway design.
- Inkjet Printer (I used the HP ENVY Photo)
- Cricut Green StandardGrip Machine Mat 12″ x 12″
- Cricut Blue LightGrip Machine Mat 12″ x 12″
- Brayer
- Spatula
- Scraper
- Weeding Tool (for popping out small pieces from intricate areas)
- Small 3/16″ Zots Glue Dots
- Clear Scotch Tape
- Scissors (to cut LED strip lights to size)
- Craft Knife (to cut a notch in the back of your shadow box) -AND- Self-Healing Mat
- Cricut BrightPad or another flat light source (optional, to help align your layers)
- Ruler or Measuring Tape (optional, to measure your shadow box frame)
- Isopropyl Alcohol (optional, to clean your shadow box glass) -AND- Lint-Free Cloth
- Design #511 – My free SVG/DXF/PDF design files are available in my free resource library – get the password by filling out the form at the bottom of this page
How to Make a Light Painting Shadow Box!
Light Painting Shadow Box
Learn how to make a custom light painting shadow box with a photo that magically appears when the lights are on!
Materials
- One (1) 8" x 8" Shadow Box (for doorway design) -OR-
- One (1) 8.5" x 11" Shadow Box (for silhouettes design)
- One (1) Sheet of 8.5" x 11" Transparency Film (for photo layer)
- One (1) Sheet of 8.5" x 11" 24 lb. White Copy Paper
- One (1) Sheet of 8.5" x 11" or 12" x 12" 100-110 lb. White Cardstock for doorway design (I used this Recollections 8.5" x 11" 110 lb. Cardstock) -OR-
- One (1) Sheet of 12" x 12" 65 lb. Black Cardstock for silhouettes design
- One (1) Strand of LED Strip Lights
- Three (3) AA Batteries (for the LED strip lights)
- Personal Digital Photo JPG or PNG file
- Design #511 (My free SVG/DXF/JPG/PDF design files are available in my free resource library – get the password by filling out the form at the bottom of this page)
Tools
- A way to cut your materials - I’m using the Cricut Maker 3, but you can also use the Cricut Maker, a Cricut Explore Series machine, the Cricut Venture, or even the Cricut Joy Xtra for the doorway design.
- Inkjet Printer (I used the HP ENVY Photo 7155)
- Cricut Green StandardGrip Machine Mat 12" x 12"
- Cricut Blue LightGrip Machine Mat 12" x 12"
- Brayer
- Spatula
- Scraper
- Weeding Tool (for popping out small pieces from intricate areas)
- Small 3/16" Zots Glue Dots
- Clear Scotch Tape
- Scissors (to cut LED strip lights to size)
- Craft Knife (to cut a notch in the back of your shadow box) -AND-
- Self-Healing Mat
- Cricut BrightPad or another flat light source (optional, to help align your layers)
- Ruler or Measuring Tape (optional, to measure your shadow box frame)
- Isopropyl Alcohol (optional, to clean your shadow box glass) -AND-
- Lint-Free Cloth
Instructions
STEP 1: GET MY FREE LIGHT PAINTING SHADOW BOX DESIGNS
First, download my Light Painting Shadow Box designs from my free library -- look for Design #511. Alternatively, you can use the Save This Project form near the top of this post and the design link will be emailed to you.
The folder includes files for a doorway scene that you can personalize with your own photo, and files for a landscape scene that you can personalize with family silhouettes. Each design includes a JPG file for the photo or drawing layer and an SVG file that includes all the additional layers and/or pieces needed to complete the design.
I will show you how to make both of these designs using Cricut Design Space’s Print Then Cut feature. For the family silhouettes design, I will show you how to customize it by adding some of the silhouette pieces and “family” sentiment to the frame in Design Space.
Upload the files you need to Design Space to get started.
TIP: If you’re not sure how to upload, go to jennifermaker.com/svgs to learn how to unzip and upload SVG files.
PROJECT 1: DOORWAY DESIGN WITH PERSONALIZED PHOTO
STEP 2: PREPARE YOUR DESIGN
CRICUT DESIGN SPACE
1. Open Cricut Design Space and click “New Project.”
2. Click “Upload” and then “Upload Image.”
3. Click “Browse.”
4. Select the SVG file titled “light-painting-shadow-box-doorway-layers-jennifermaker-SVG.”
5. On the Prepare to Upload screen, it will say “Cut image” with the design preview.
6. Click “Upload.”
7. Find your design in Recent Uploads and add it to the Canvas.
8. Click “Upload” and then “Upload Image” again.
9. Click “Browse.”
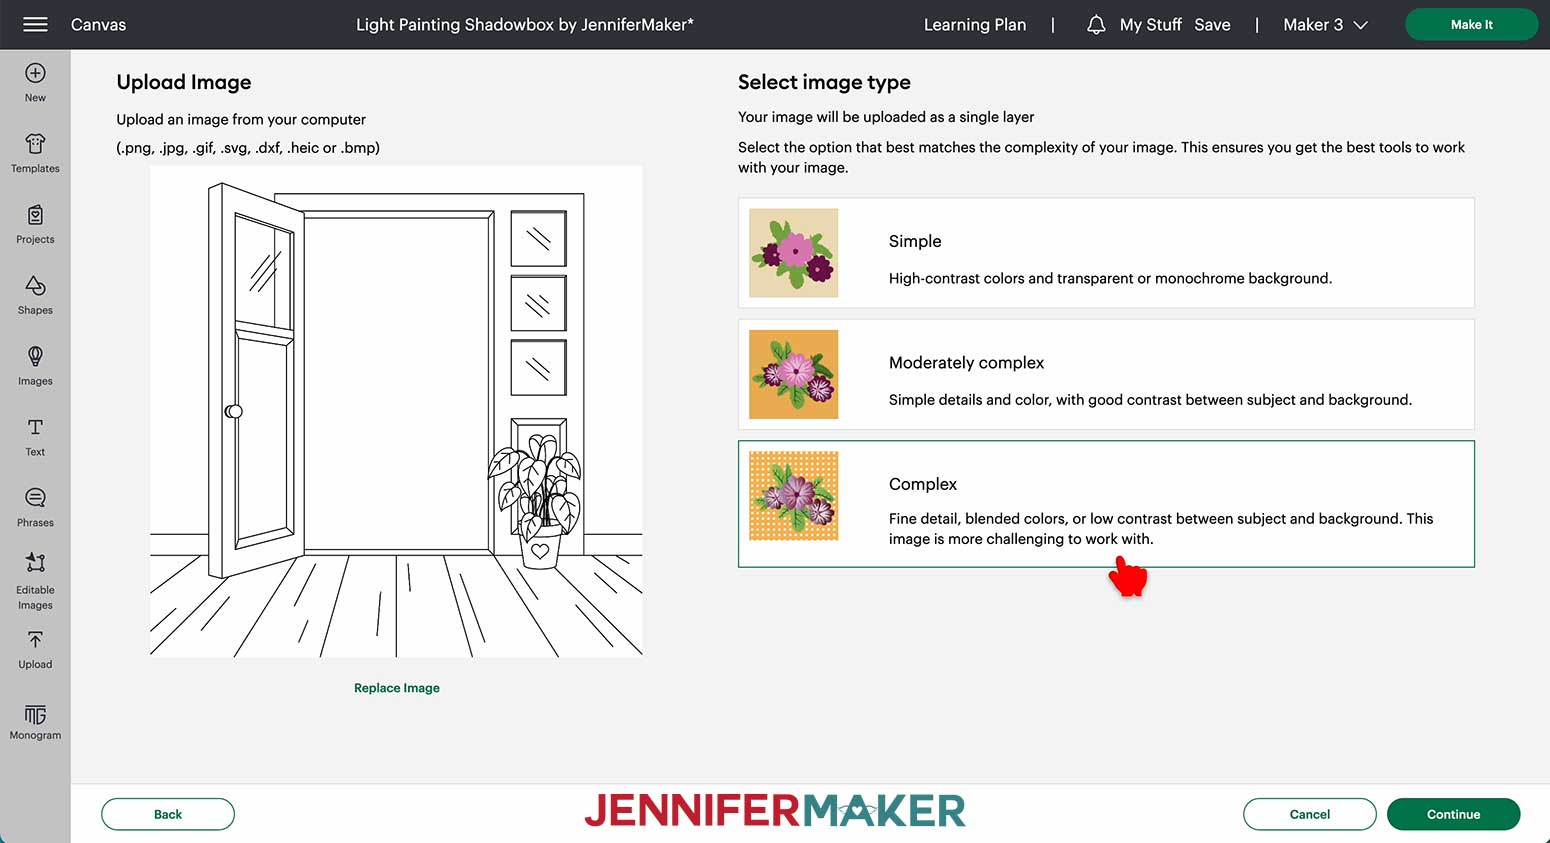
10. Select the JPG file for the drawing layer. It’s titled “light-painting-shadow-box-doorway-drawing-jennifermaker-JPG.”
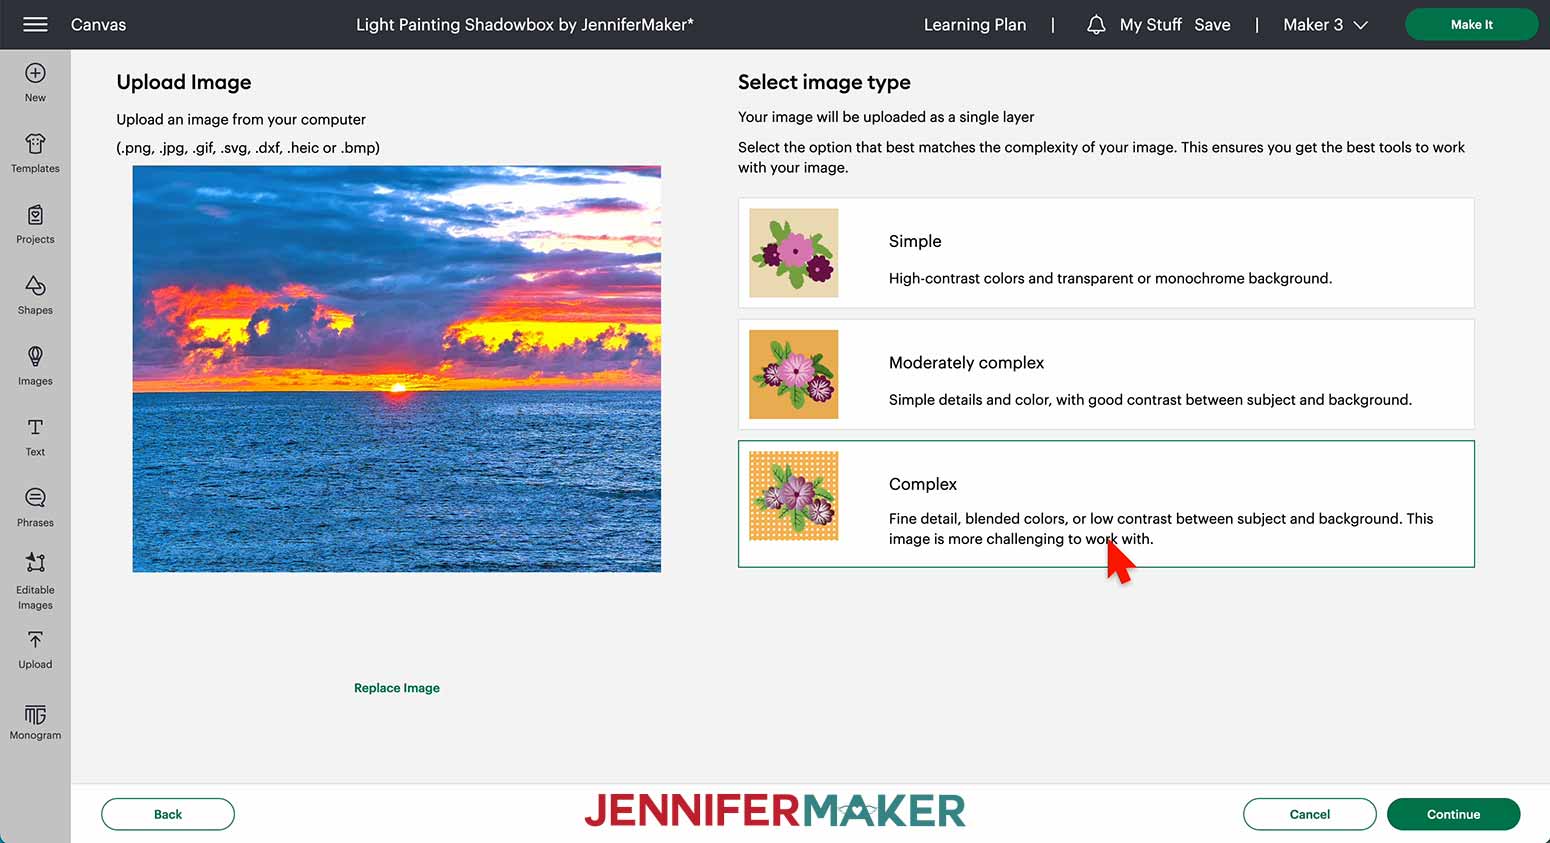
11. On the Upload Image screen, select “Complex” and click “Continue.”
12. On the next screen, click “Apply and Continue.”
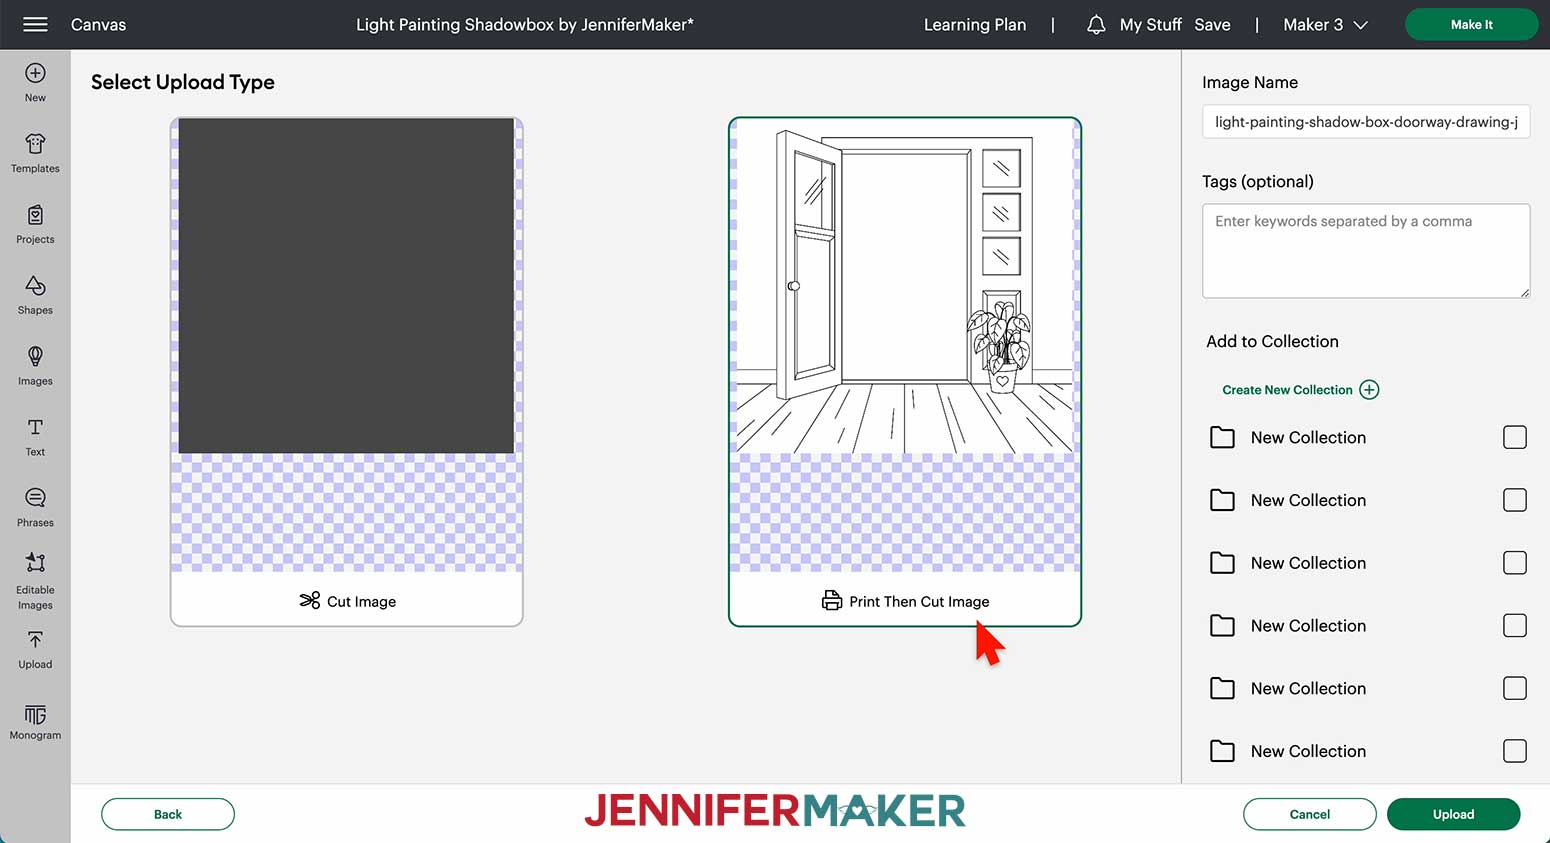
13. On the next screen, select “Print Then Cut Image” and click “Upload.”
14. Find your design in Recent Uploads and add it to the Canvas.
15. To resize it, click the red exclamation point in the Layers Panel.
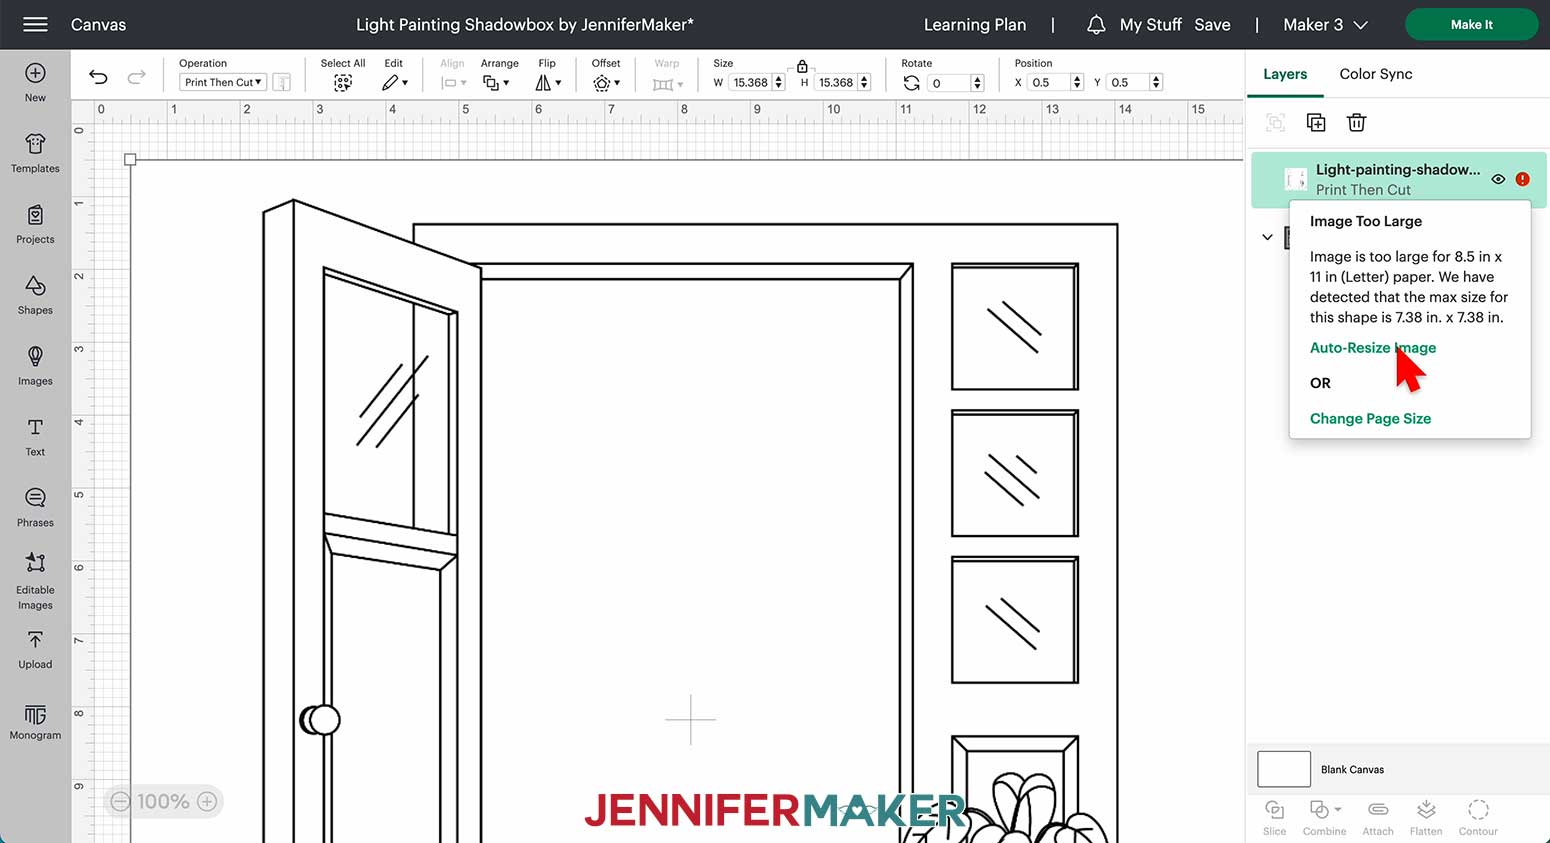
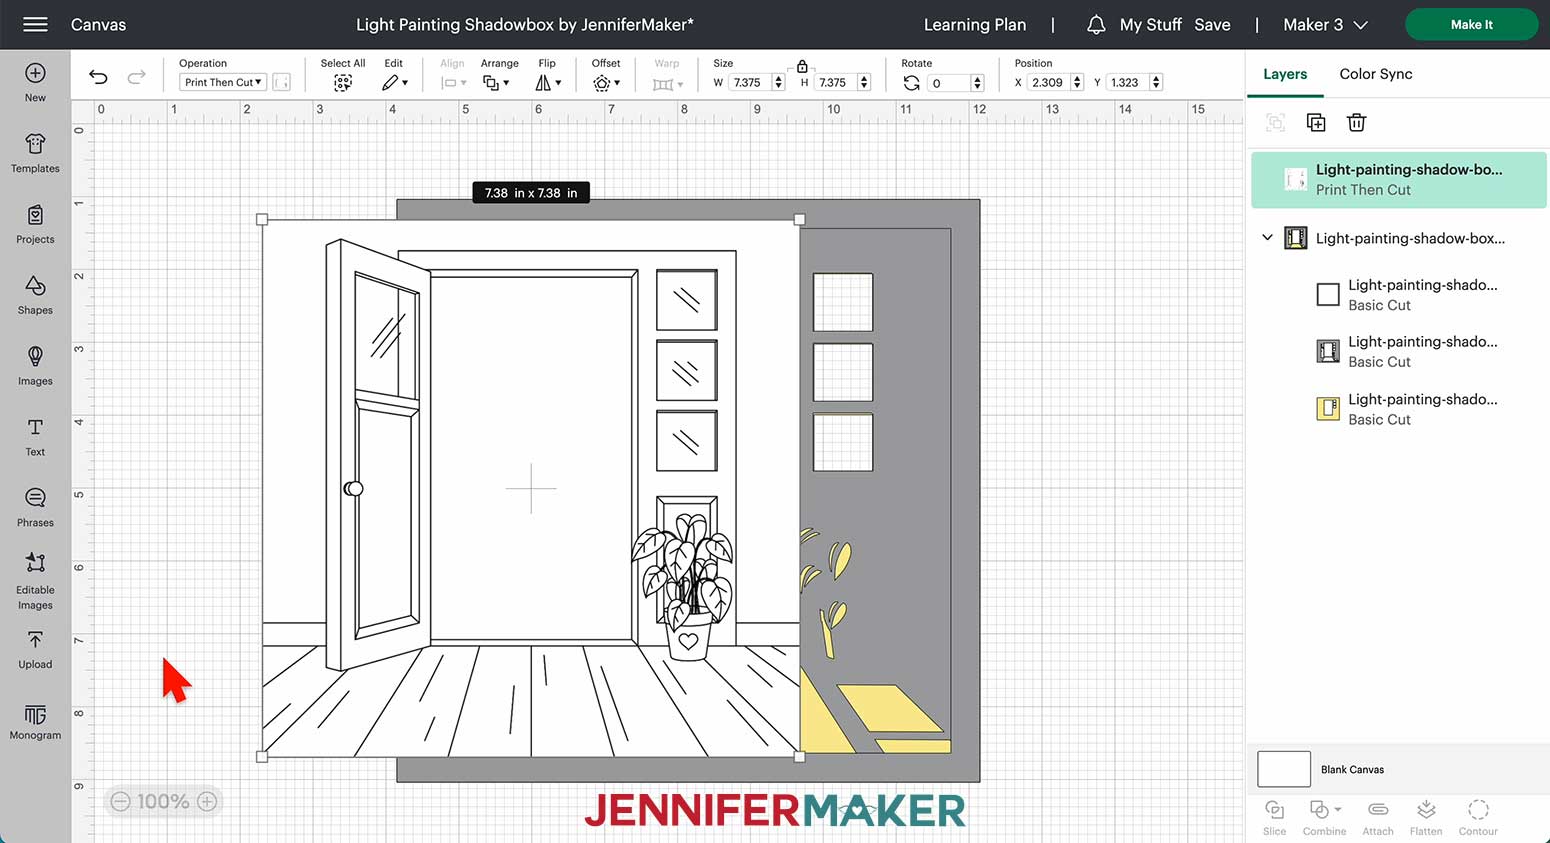
16. Click “Auto-Resize Image” to resize it to 7.38” x 7.38”.
17. Follow steps 8-14 to upload and add your chosen photo to the Canvas.
18. Resize the photo to be 6.75” tall x 9” wide by typing “6.75” into the height (H) field under the Size menu. Keep the lock icon closed to maintain the photo’s proportions.
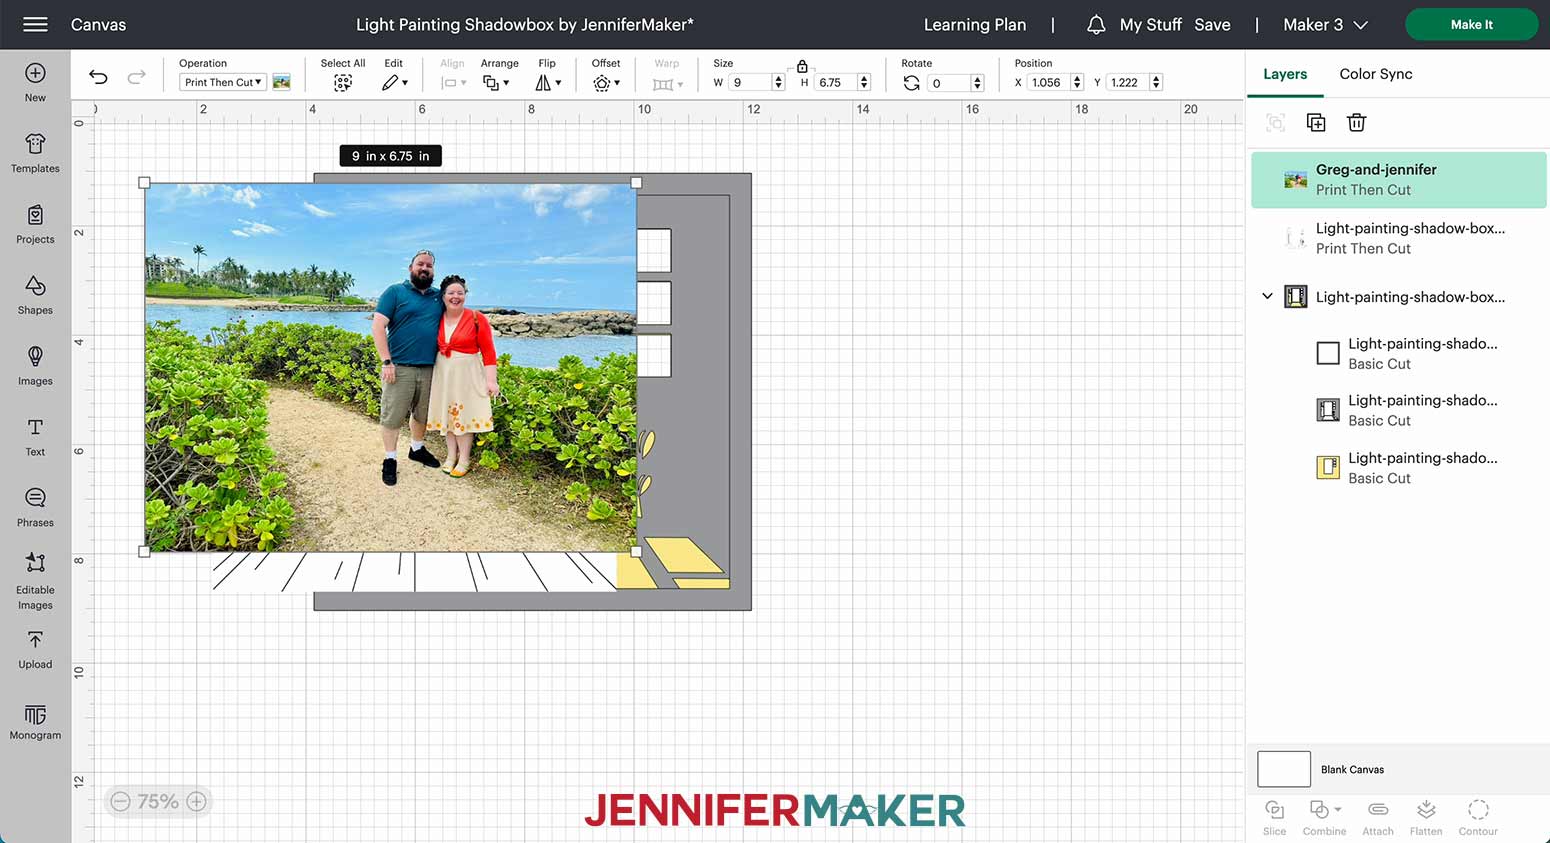
NOTE: These dimensions may vary for other photos. Just make sure the width is at least 4.5” and the height is at least 5.5”.
19. Click the minus (-) sign to zoom out (50% works well).
20. Move the photo and line drawing off to the side on your Canvas.
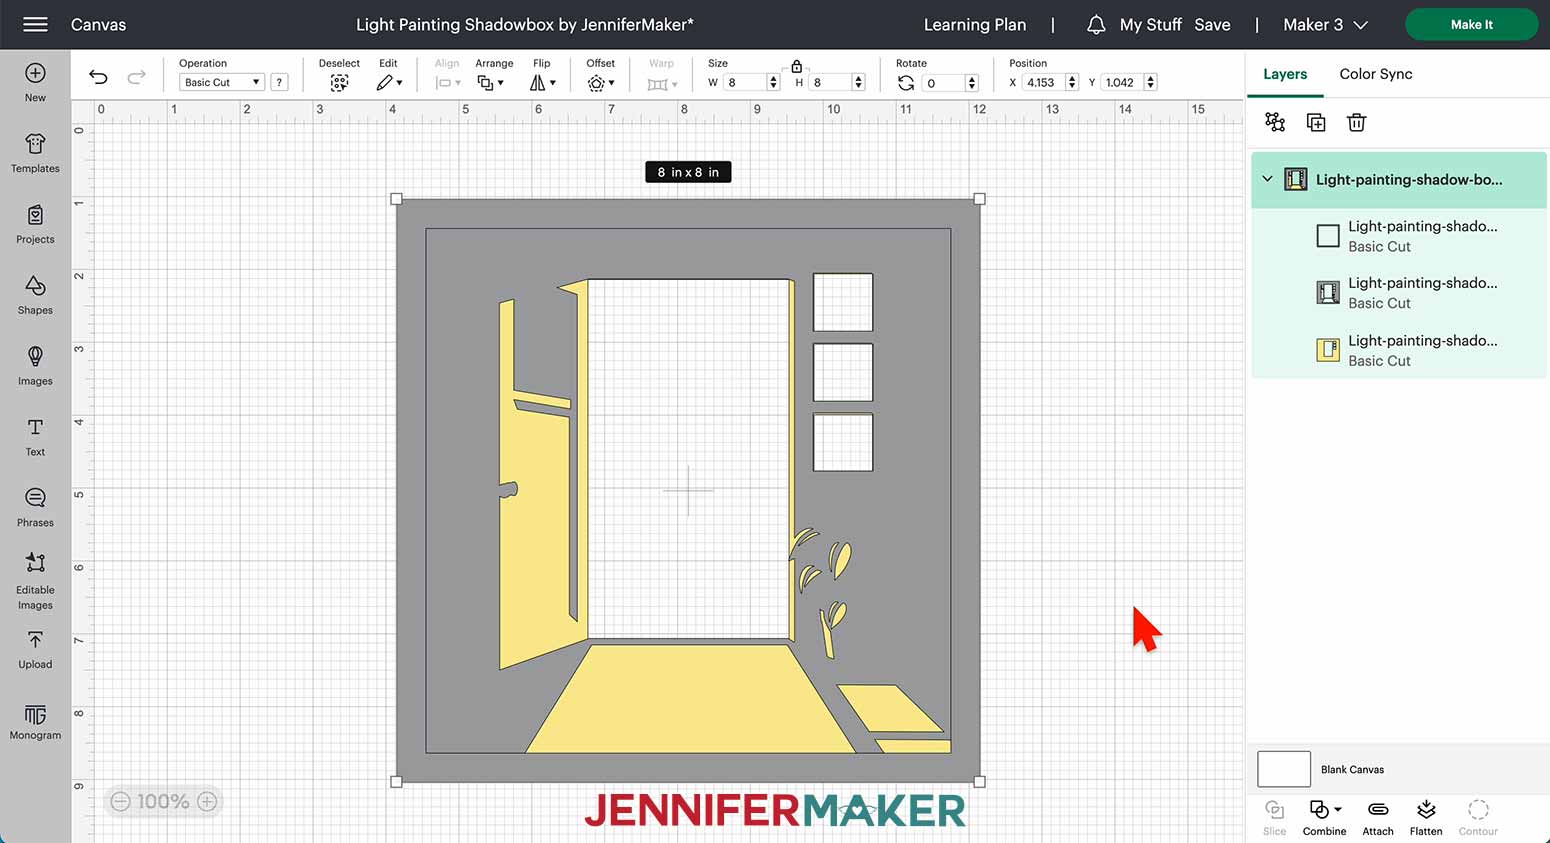
21. Select the gray and yellow SVG layer and ungroup it by clicking the Ungroup icon at the top of the Layers Panel.

22. Move the two gray layers out of the way.
23. Move the photo so it’s on top of the yellow layer.
24. Send the photo behind the yellow layer by clicking “Arrange” and then “Send to Back.”
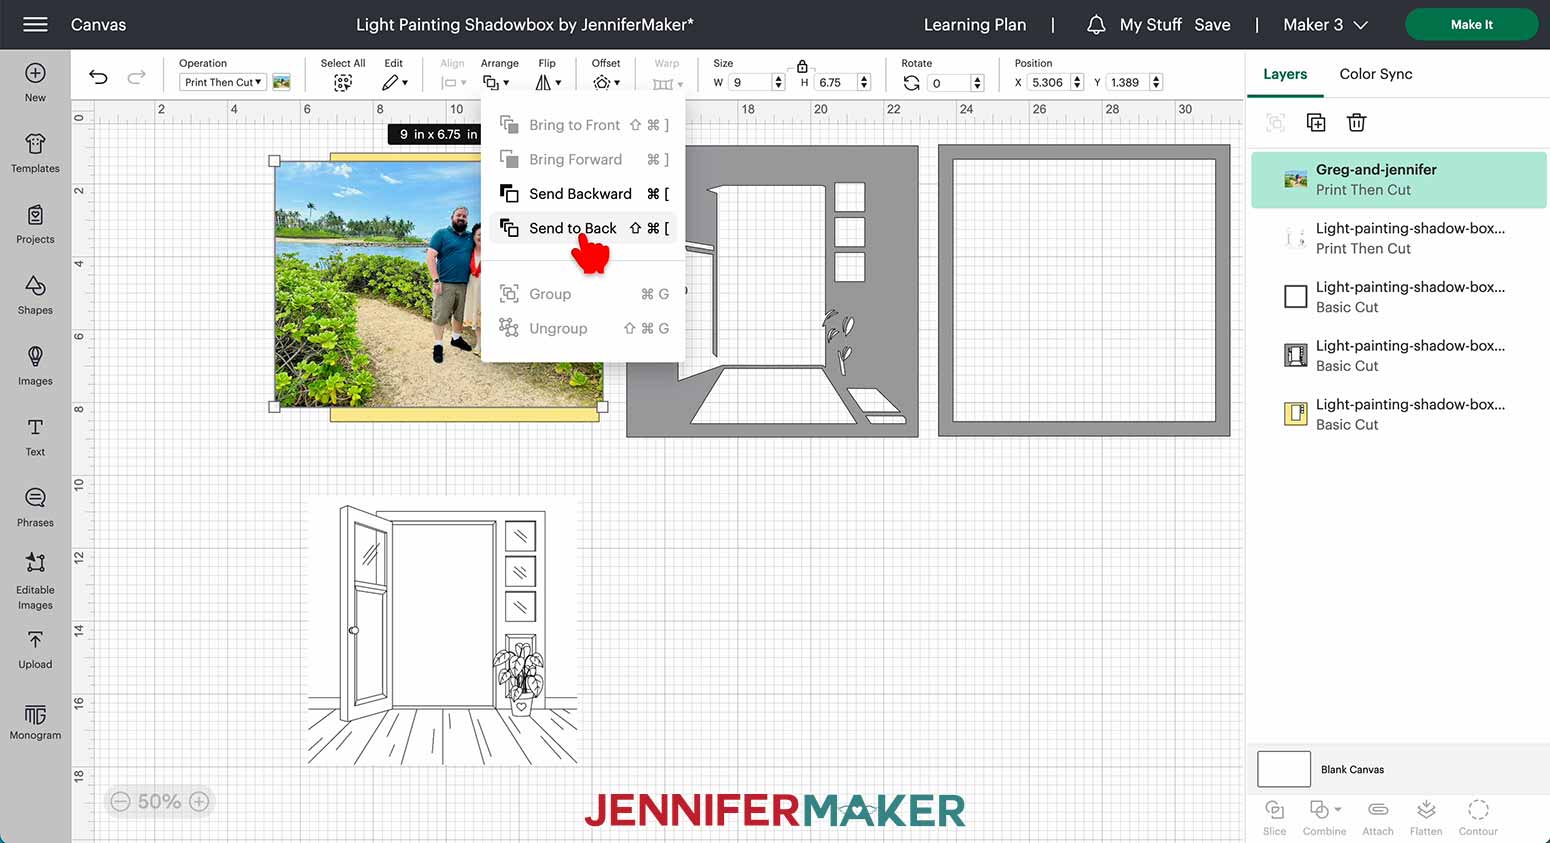
25. Position the photo so the focal point (in this case, me and Greg) can be seen through the doorway cutout.
NOTE: Make sure parts of the photo can also be seen through the window cutouts on the right.
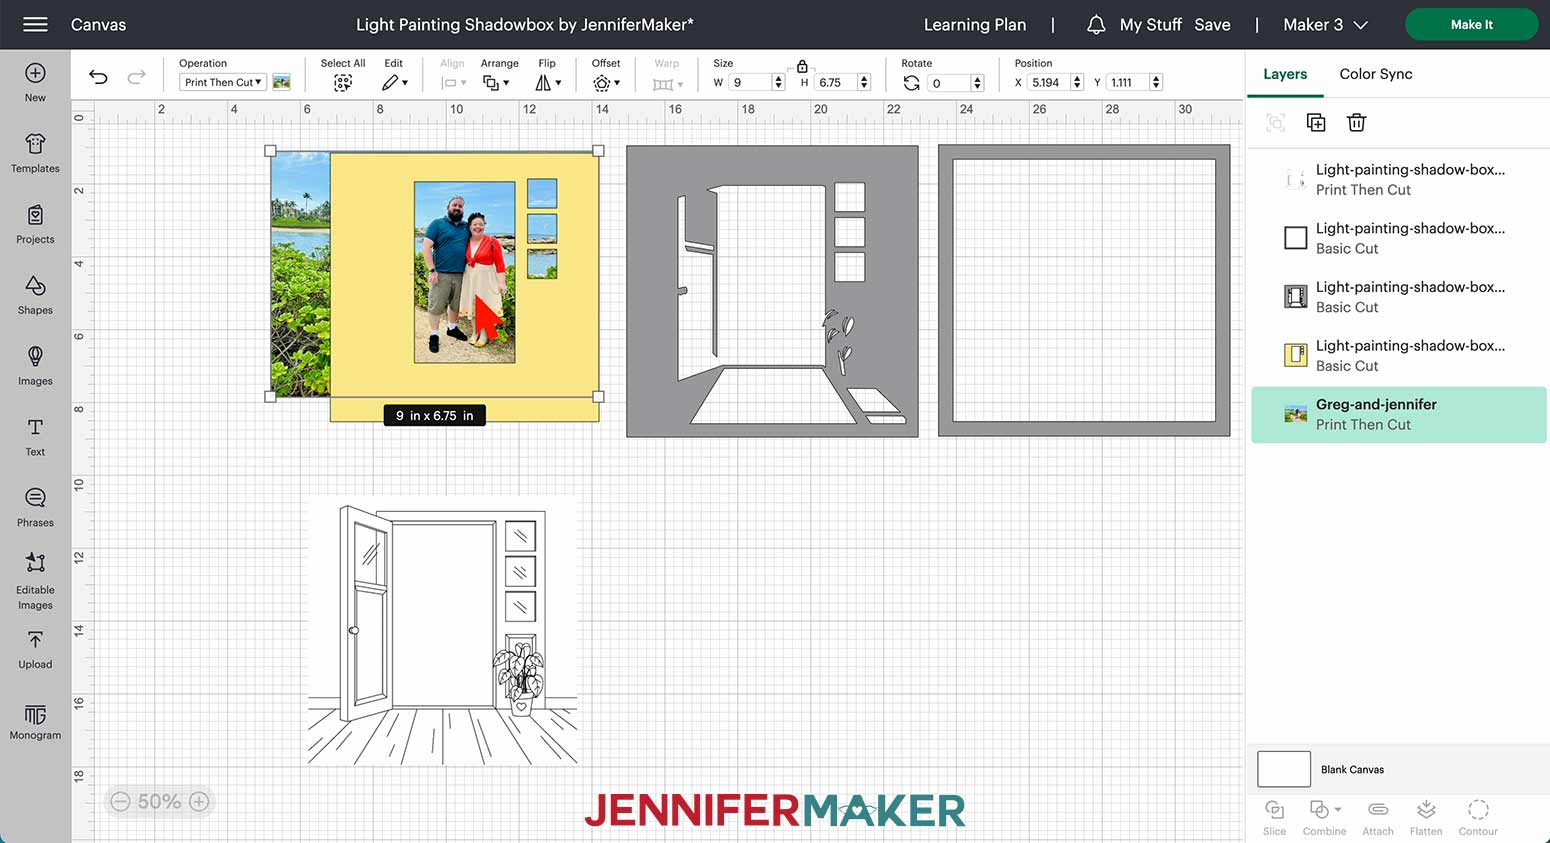
26. Select the yellow layer and click the Duplicate icon to make a copy of it.
27. Move the copy aside.
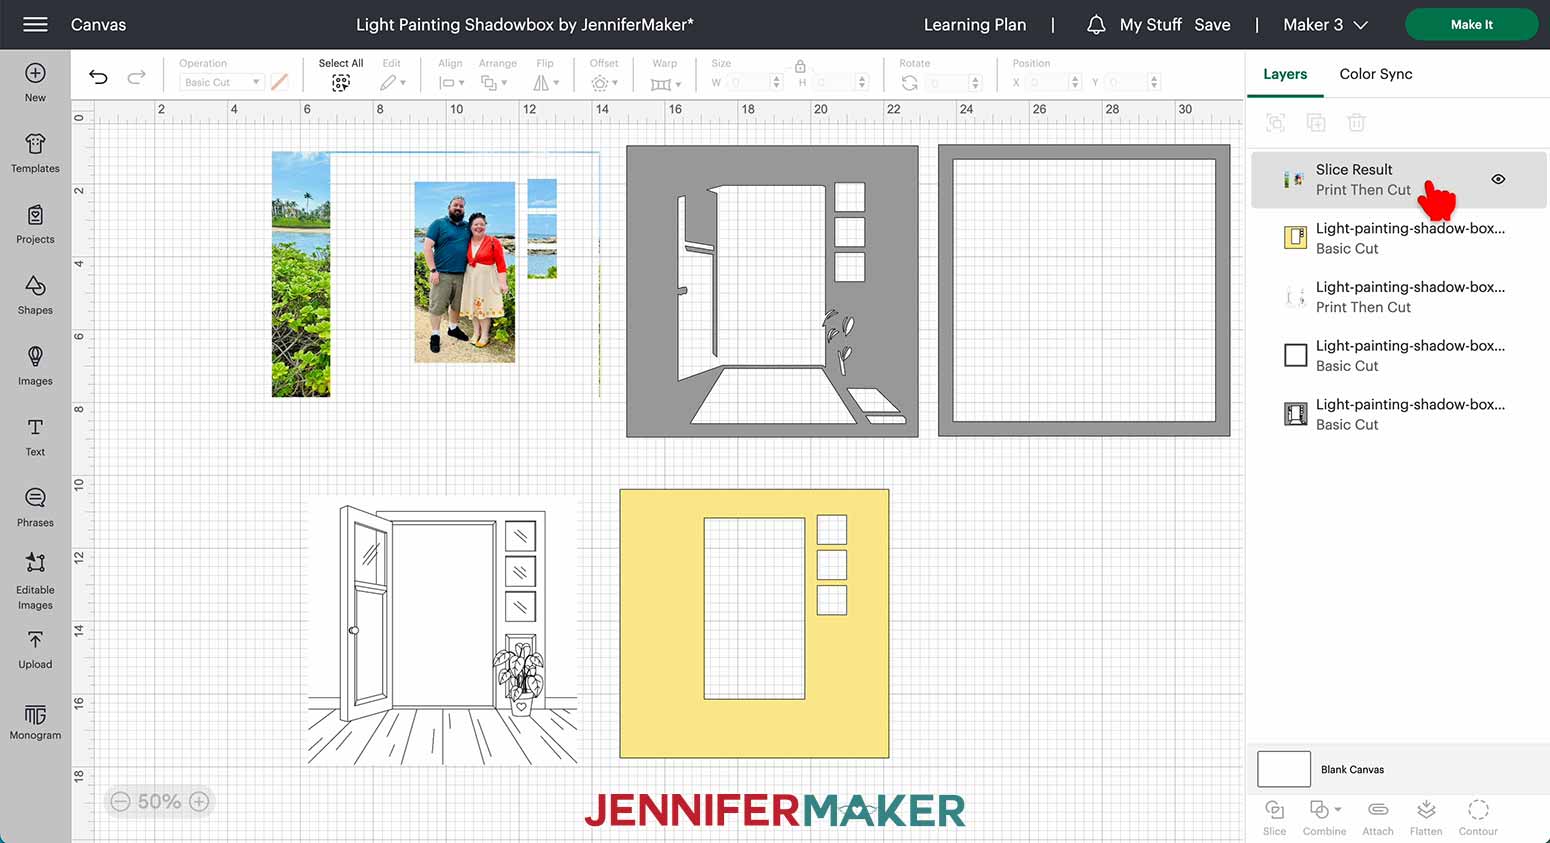
28. Select the photo layer and the original yellow layer and click “Slice.”
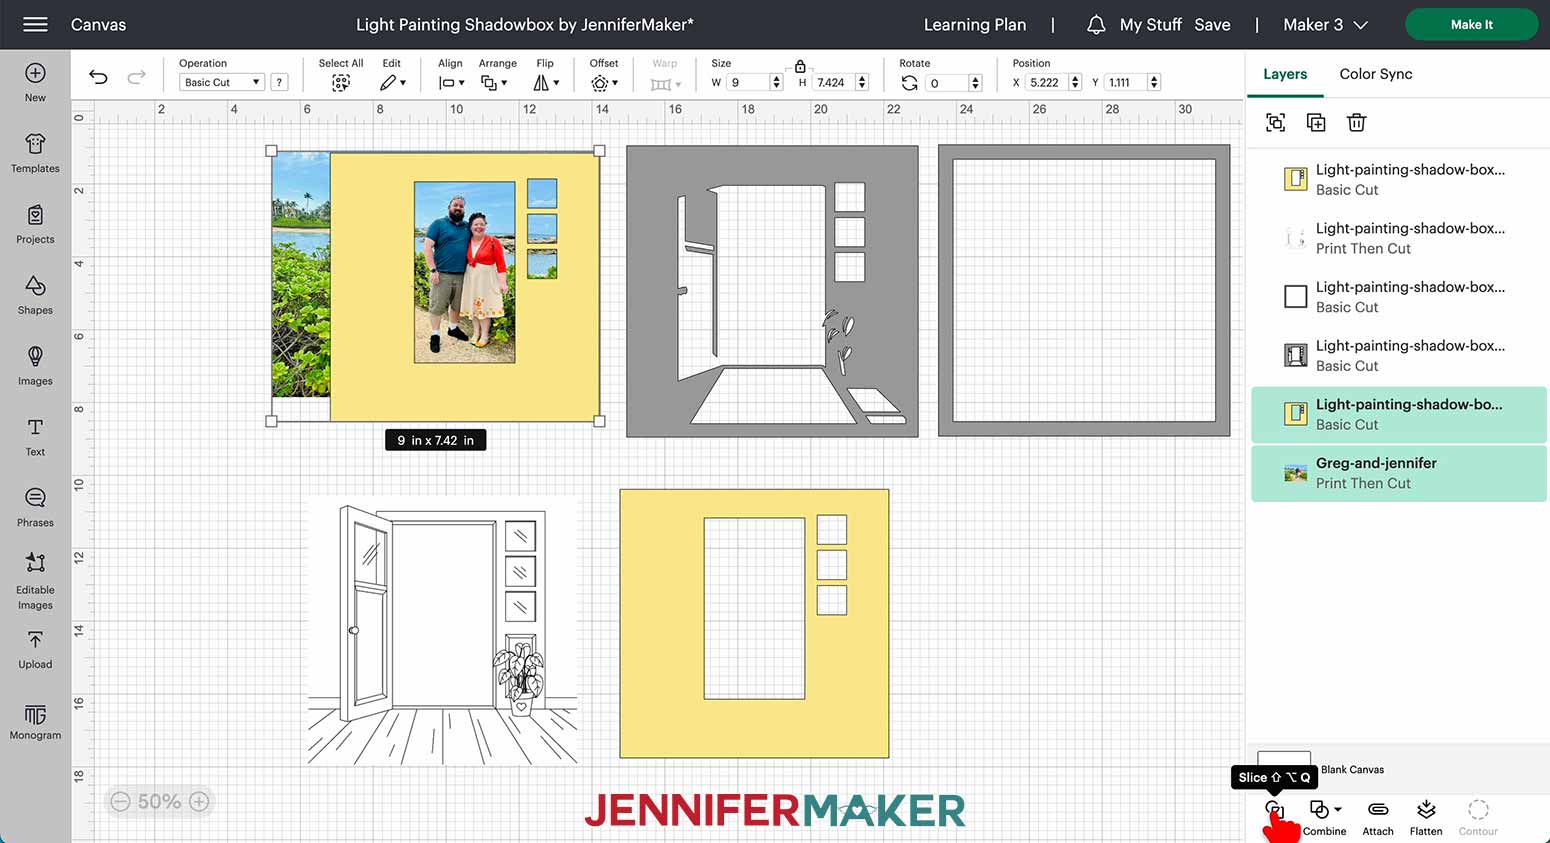
29. Delete the original yellow layer, the extra yellow pieces, and the extra photo pieces. The only layer you need to keep is the one with the photo inside the door and window shapes.
30. If your photo is larger than the yellow layer, you will have some extra pieces that need to be removed.
31. To do this, click the Shapes button on the left and select the Square.
32. Resize the square to cover as much of the extra pieces as you can.

33. Select the resized shape and the photo and click “Slice.”
34. Delete all the layers except for the one with the photo inside the door and window shapes.
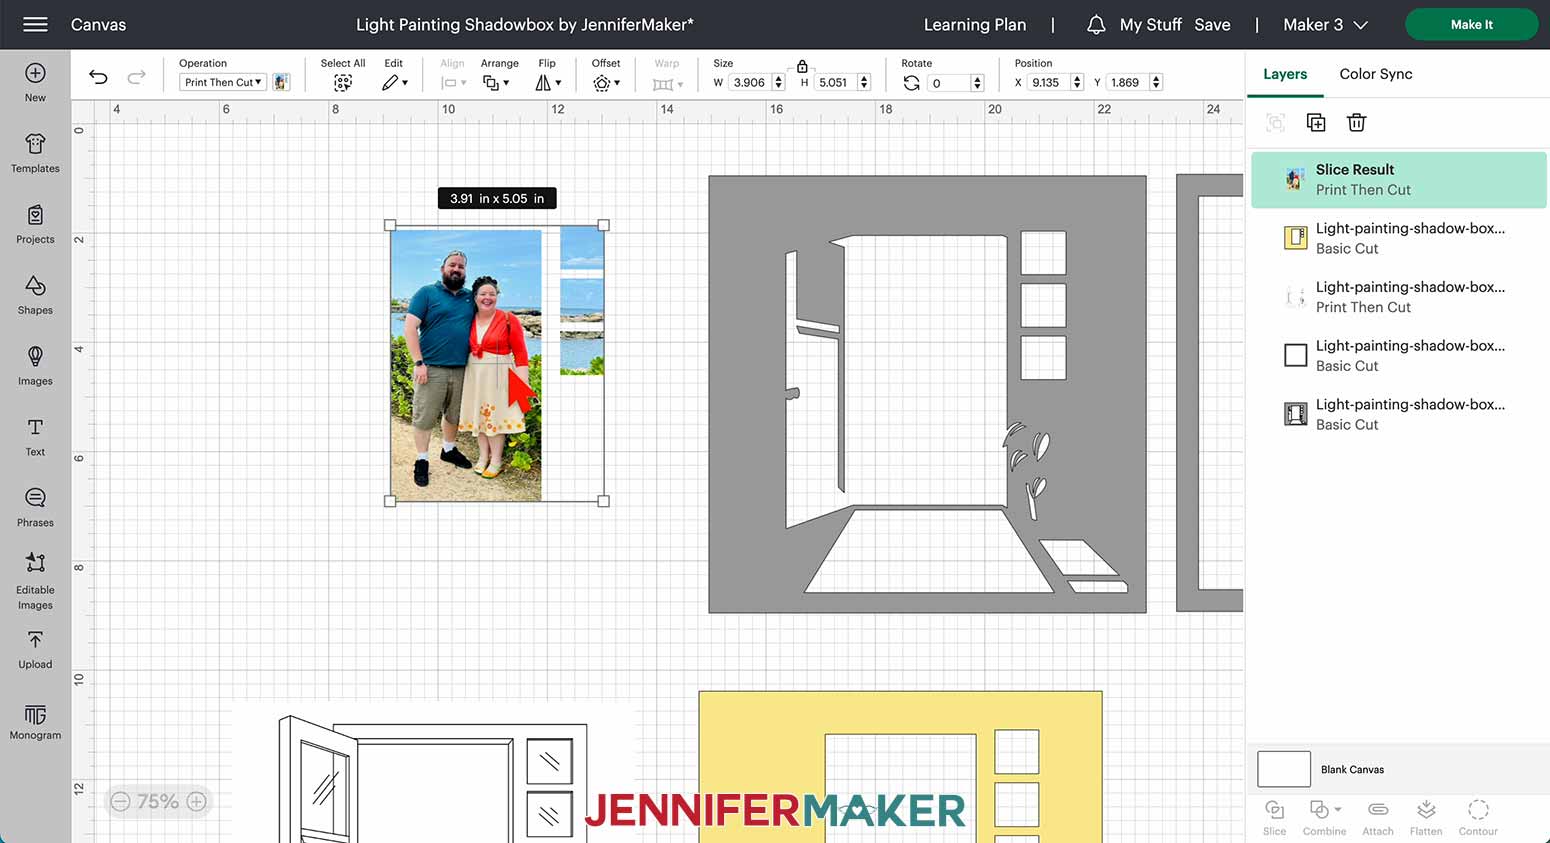
35. If you still have extra photo pieces, follow steps 31-34 to remove them.
36. Your remaining photo layer should be 3.906” wide x 5.051” high.
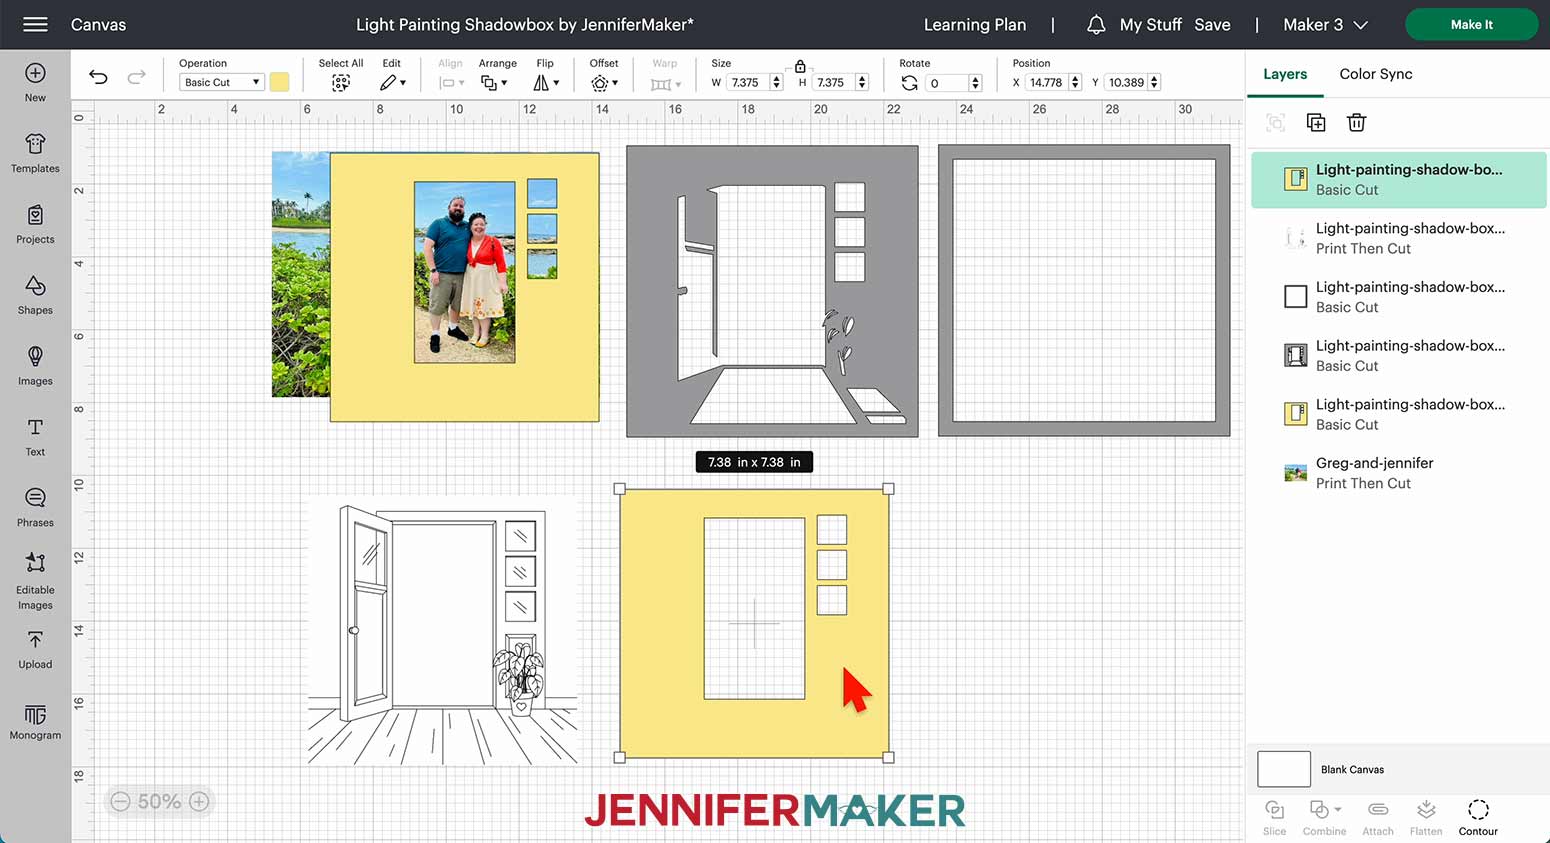
37. Take your duplicate yellow layer and position it over the photo layer so the photo shapes are perfectly aligned within the cutout areas.
TIP: Zoom in if needed for more accurate positioning.
38. Send the yellow layer behind the photo layer by clicking “Arrange” and “Send to Back.”
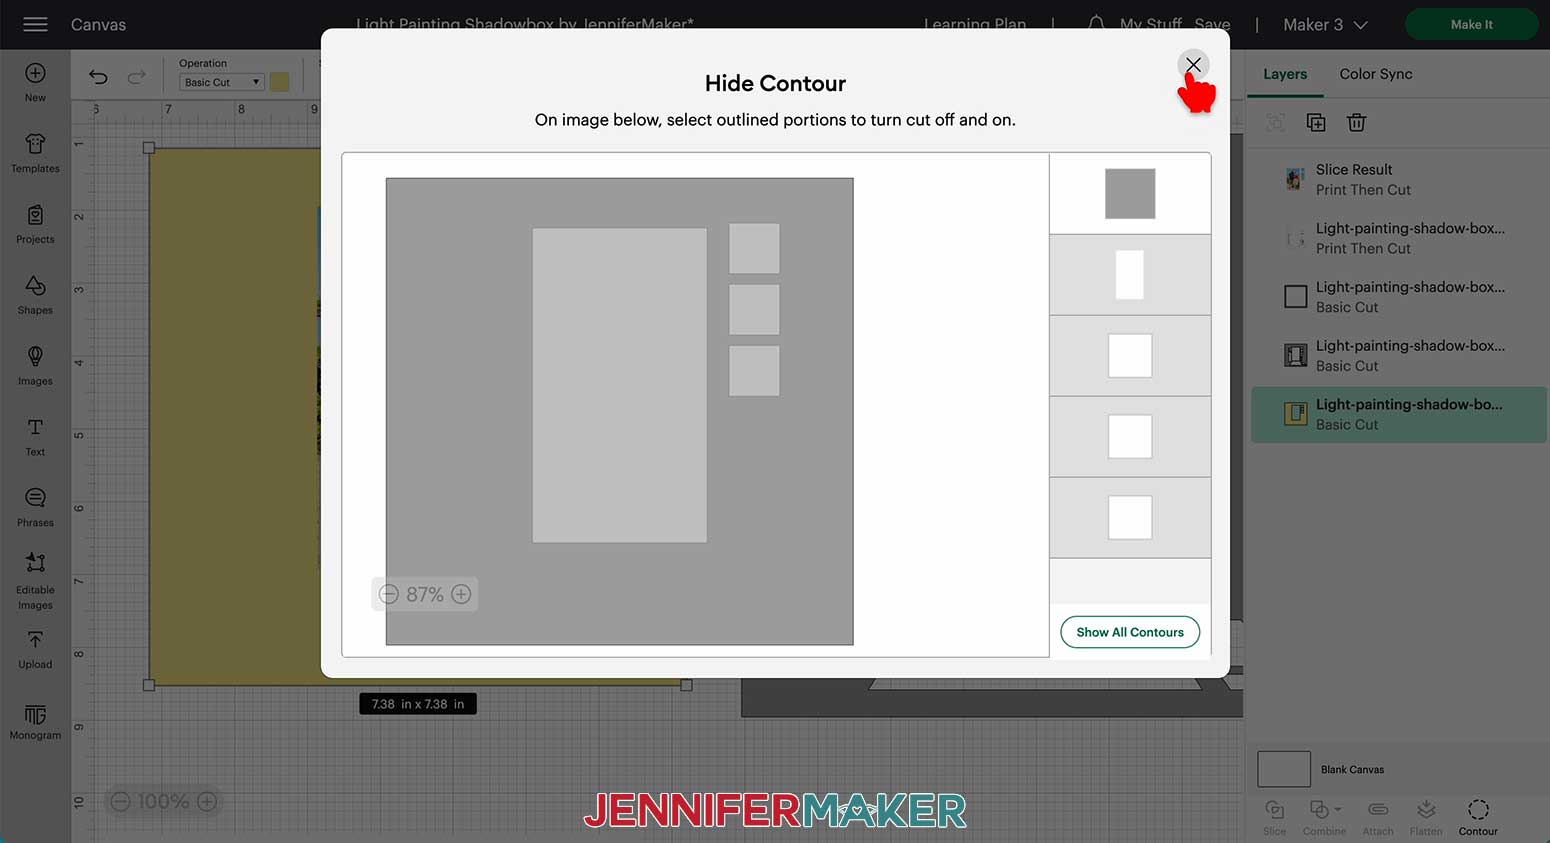
39. With the yellow layer selected, click “Contour.”
40. In the Contour window, click “Hide All Contours” to remove everything but the large yellow square.
41. Click the “X” in the upper right corner to close the Contour window.
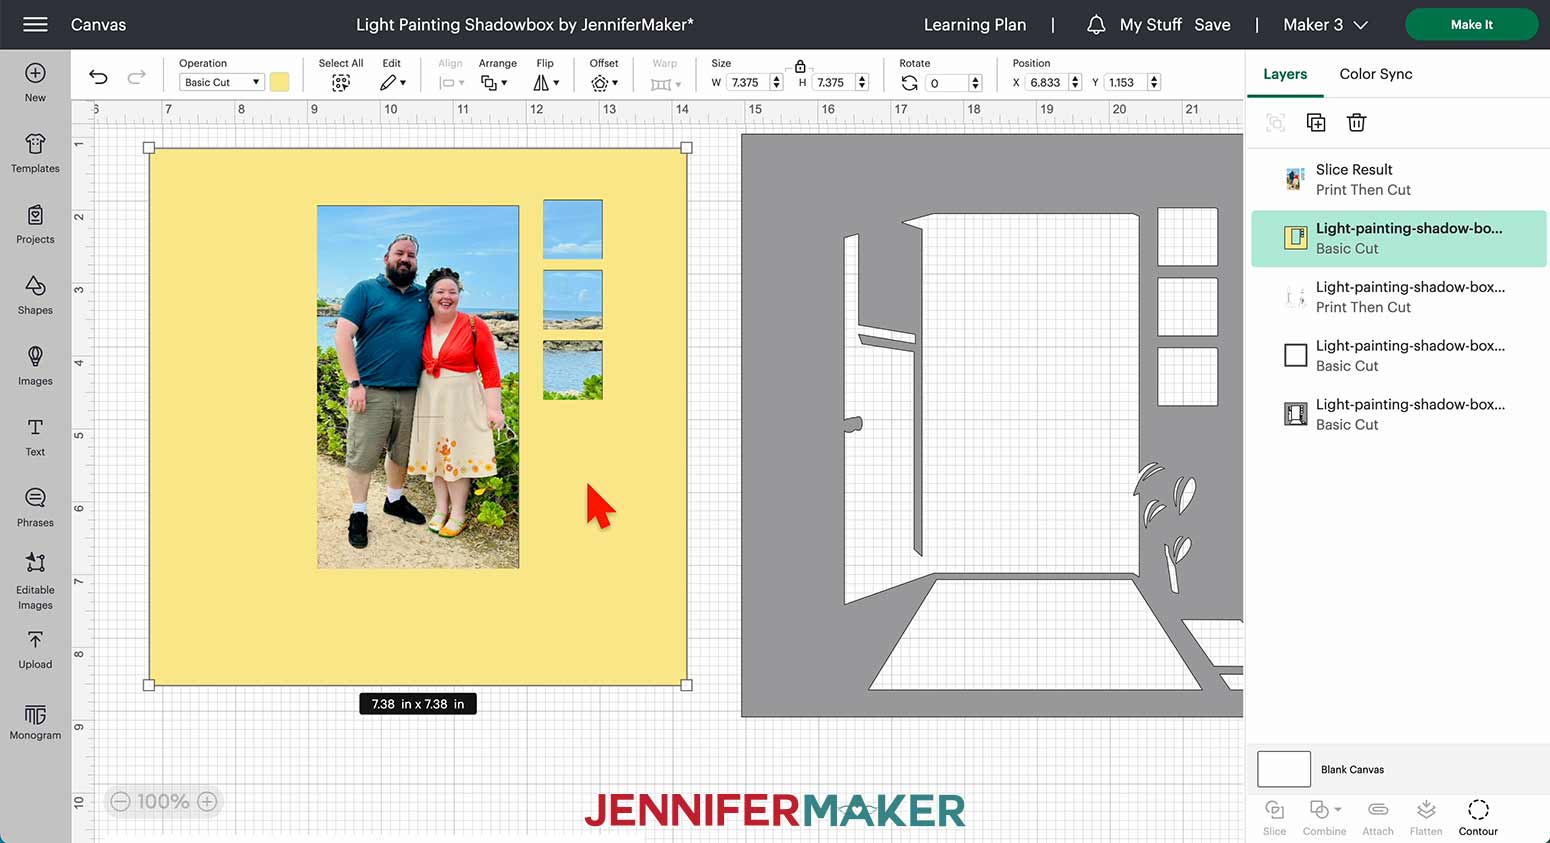
42. With the yellow square selected, click the color swatch in the top menu and choose White.
43. Select the white square and the photo layer and click “Flatten.” You should now have a Print Then Cut layer of a white square with your photo showing only in the doorway and window shapes.
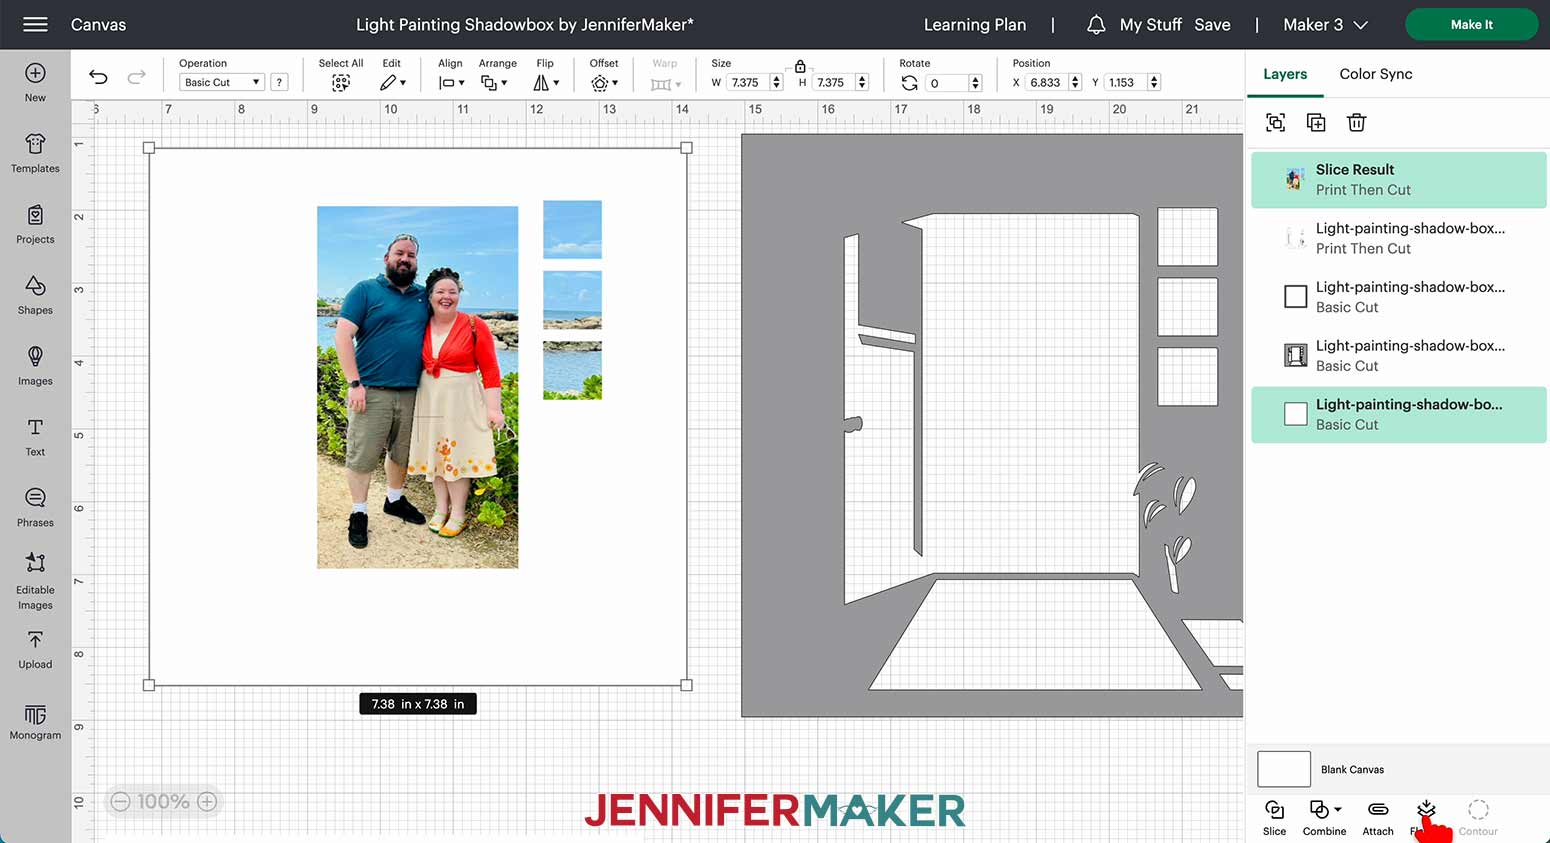
44. Click “Select All” to select all four layers on the Canvas.
45. Center align them by clicking “Align” and then “Center.”

NOTE: You can rearrange your layers if you’d like them to match the order in which we’ll assemble them, but it’s not necessary for cutting.
46. Your layers are now ready to cut! They are sized perfectly for the 8” x 8” shadow box frame in my materials list.
NOTE: I don’t recommend resizing the design, as your Print Then Cut layers are already as large as they can be.
47. Make sure the correct machine is selected in the top right.
48. Click “Make It.”
49. If prompted, click "On Mat," choose your mat size, and click “Confirm.”
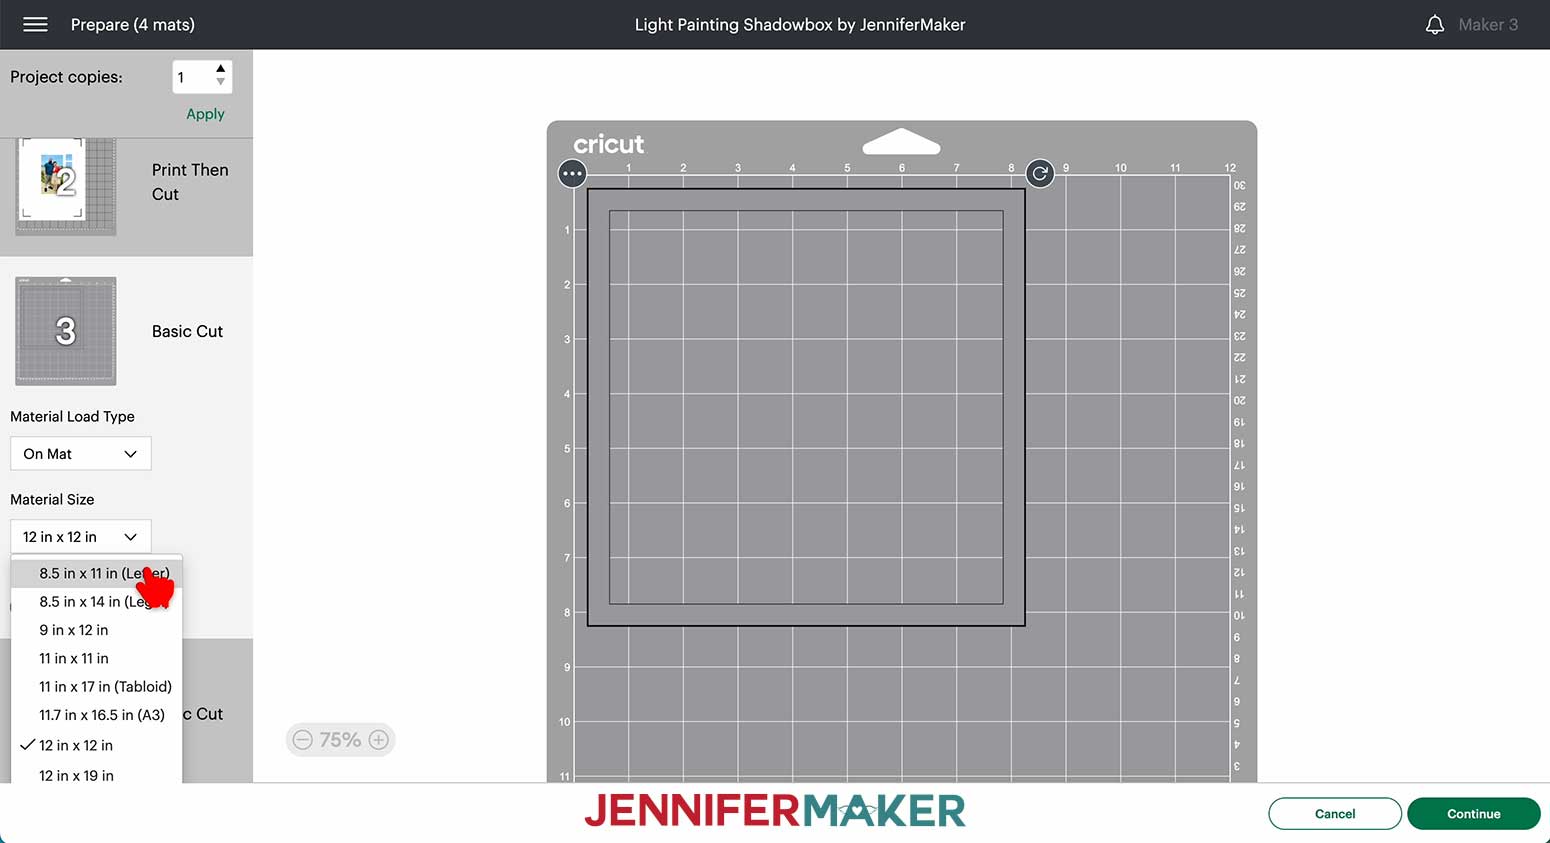
50. On the Prepare Screen, you should have four mats. The first two should be 8.5” x 11” Print Then Cut mats and the second two should be gray Basic Cut mats. Do not mirror any of the mats.
51. Change the Material Size for the gray mats to “8.5 in x 11 in (Letter)” if you’re using the 110 lb. cardstock from my materials list.
52. Select the first mat again and click “Continue.”
PRINTING
1. On the Make Screen, click “Send to Printer.”
2. Select your inkjet printer from the Printer dropdown.
3. Toggle “Add Bleed” on.
4. Toggle “Use System Dialog” on.
5. Click “Print.”
TIP: The print screen for your printer will appear, but it might be hidden behind Design Space. Minimize your Cricut window if needed to see the print settings.
6. For the line drawing layer, set the Paper Type to “Plain” and the Quality to “Best.”
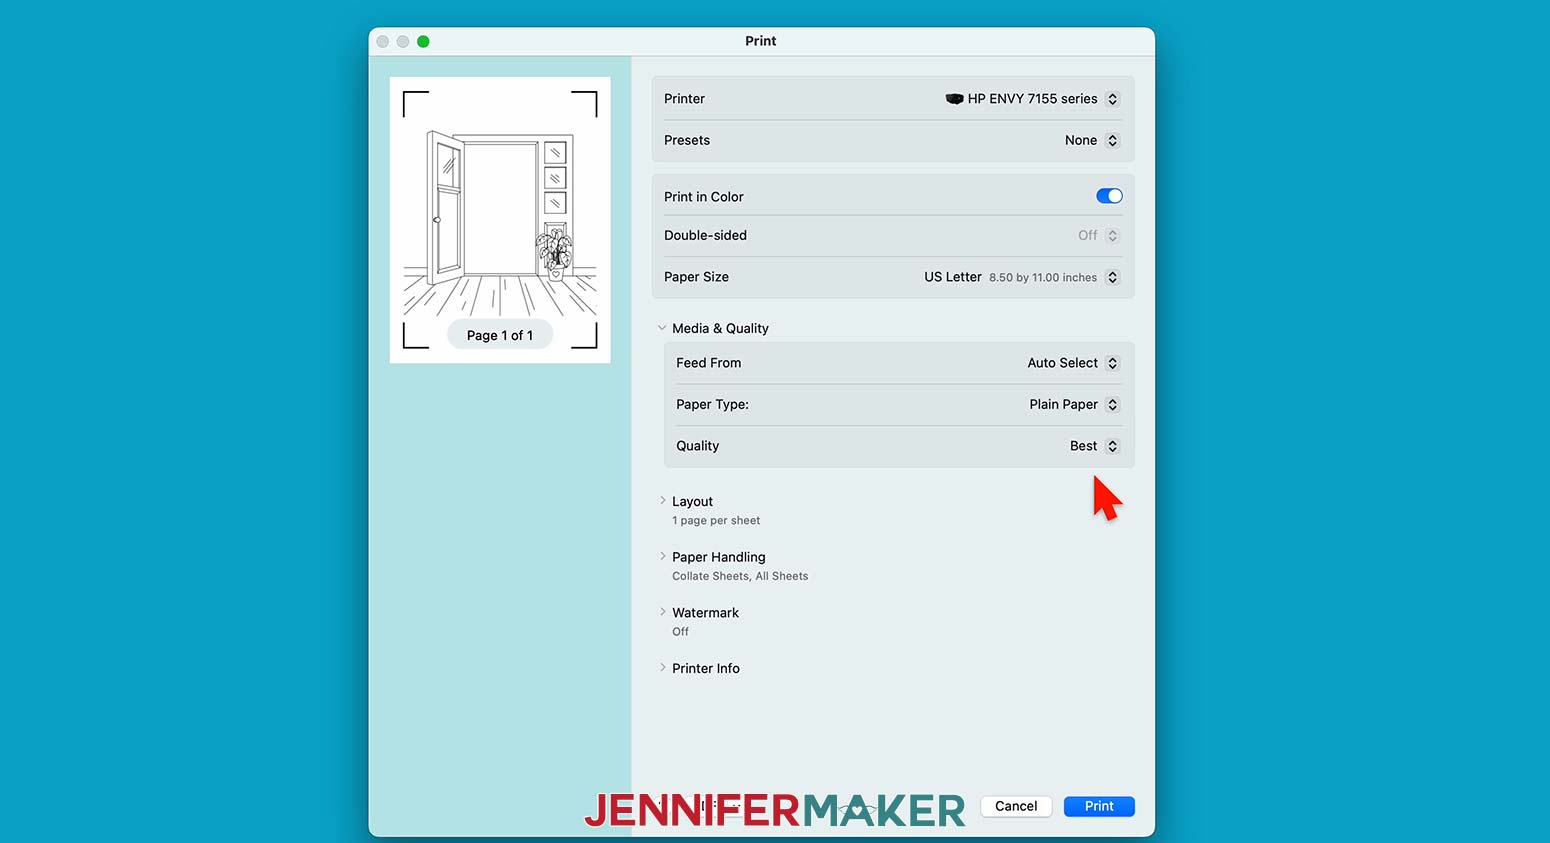
7. Make sure your 8.5” x 11” 24 lb. copy paper is loaded correctly in your printer and click “Print.”
8. For the photo layer, follow steps 1-5 above.
9. Set the Paper Type to “Photo Glossy Paper” and the Quality to “Best.”
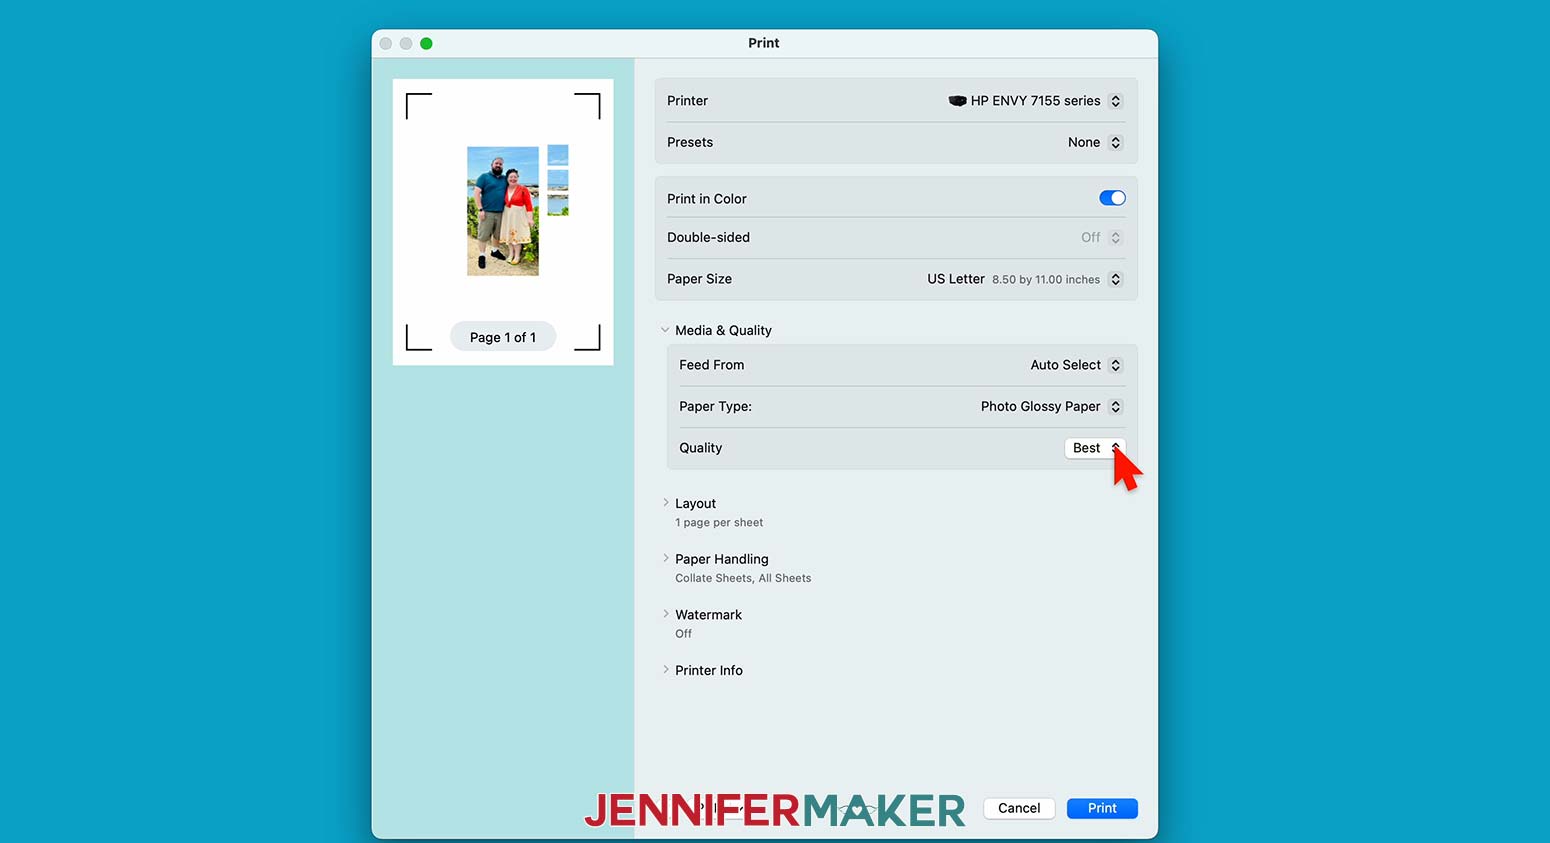
10. Load a few sheets of transparency film in your printer. Make sure the correct side is face up.
NOTE: You may have to remove and discard pieces of tissue paper separating the film sheets in the package.
11. When the transparency sheets are properly loaded, click “Print.”
12. Set both of your prints aside to let the ink fully dry.
CUTTING
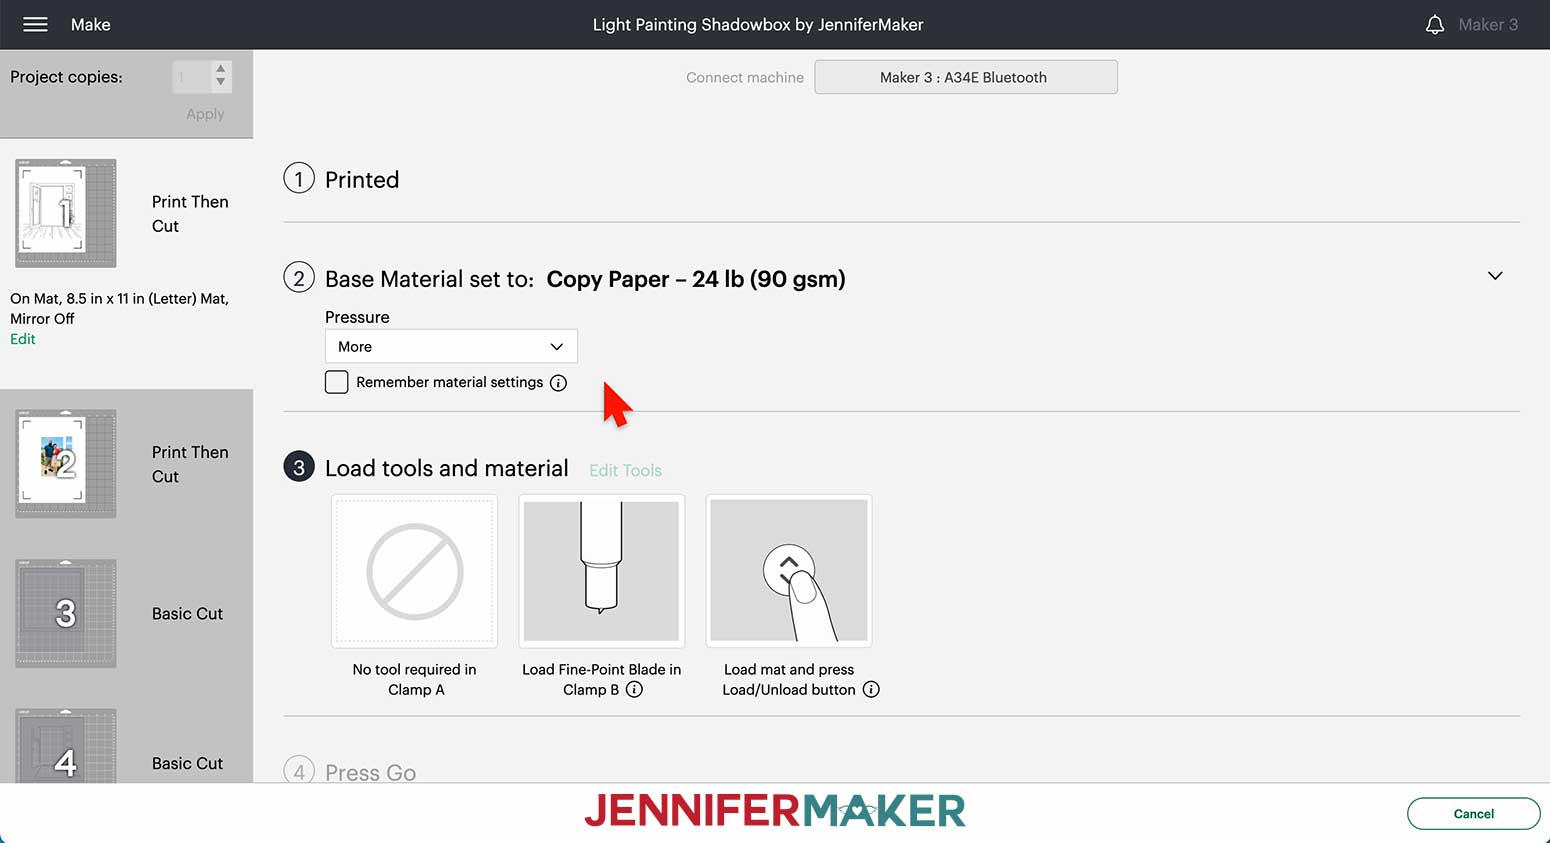
1. On the Make Screen, click on the mat with the line drawing.
2. Click “Browse All Materials.”
3. Search for and select the “Copy Paper – 24 lb (90 gsm)” setting.
4. Change the Pressure to “More” for a cleaner cut.
5. Place your printed sheet face up on a blue LightGrip machine mat and make sure it’s oriented in the same direction as on your screen.
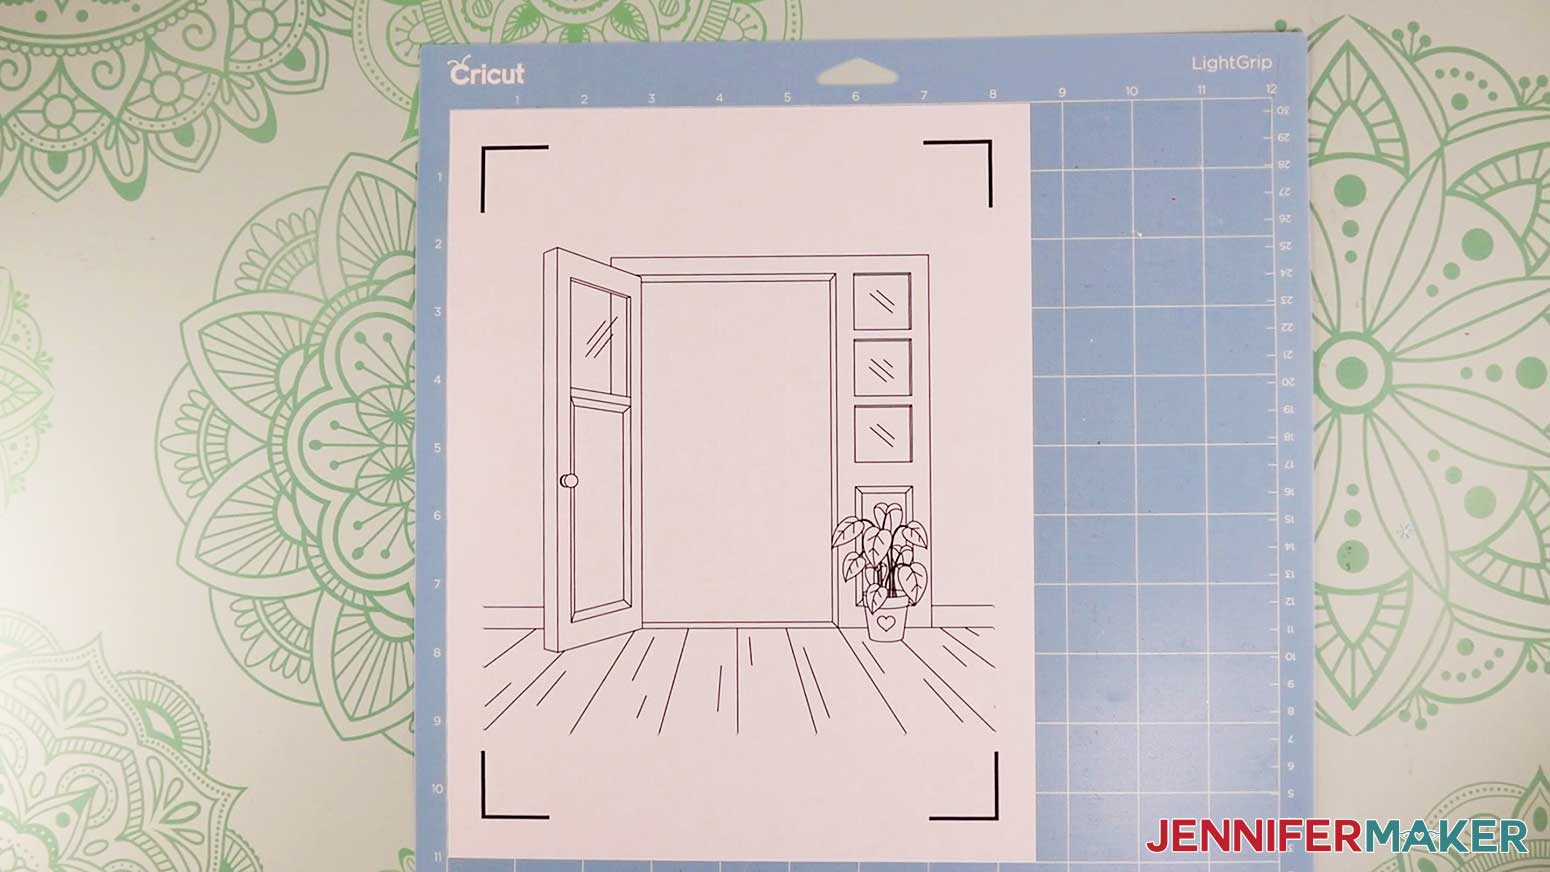
6. Put a piece of clean copy paper on top of the print and use a brayer to secure the print to the mat.
7. Check that your Fine-Point Blade is clean and in the clamp.
8. Press the flashing “Load/Unload” button to load the prepared mat into your Cricut.
9. Press the flashing “Go” button to begin cutting.
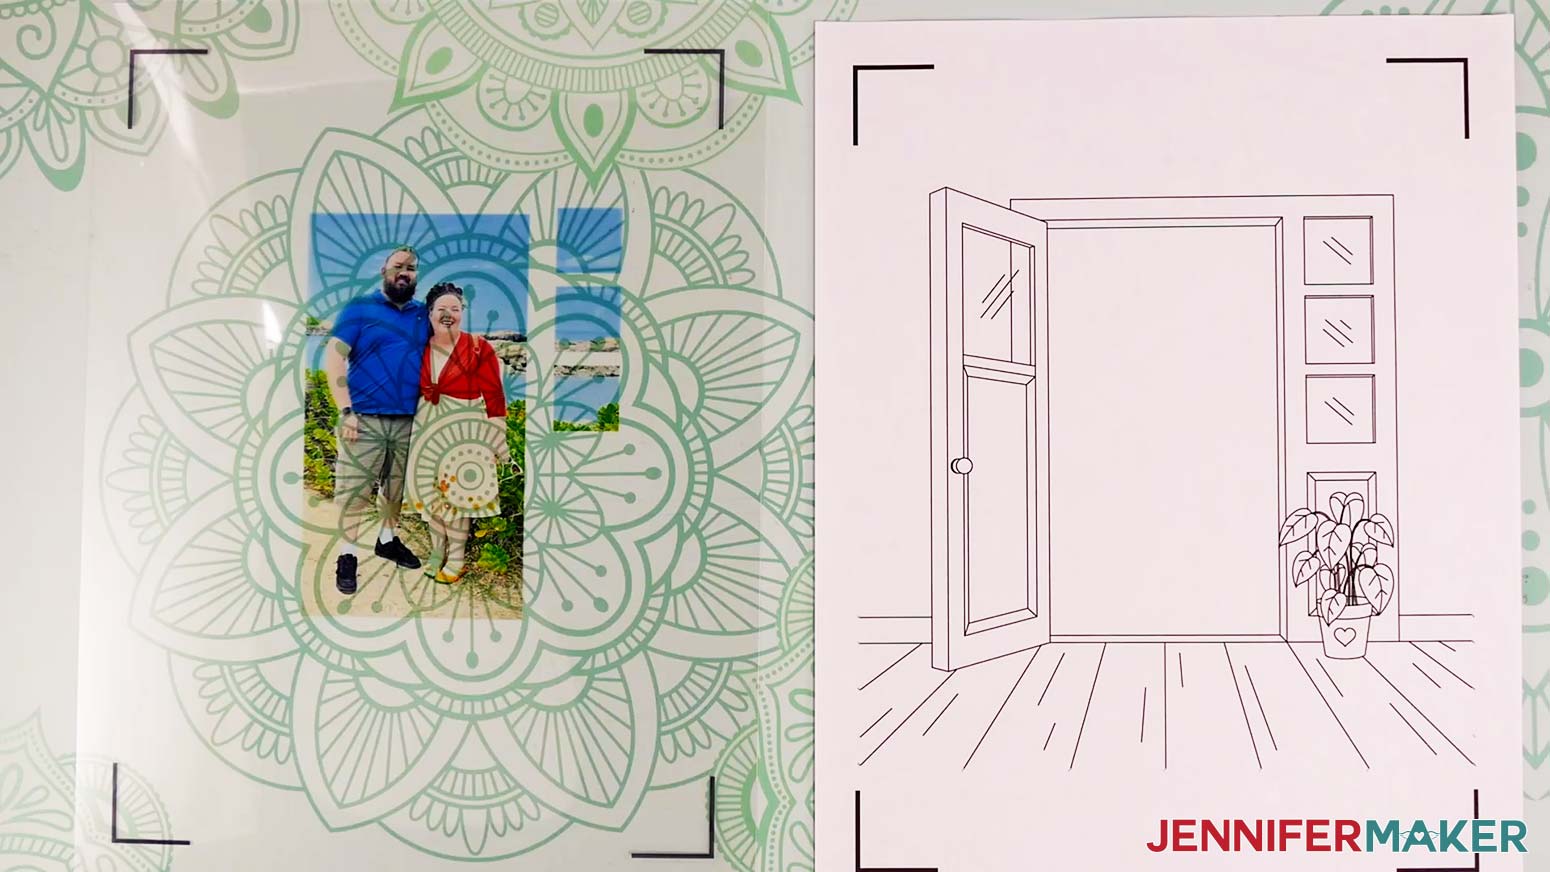
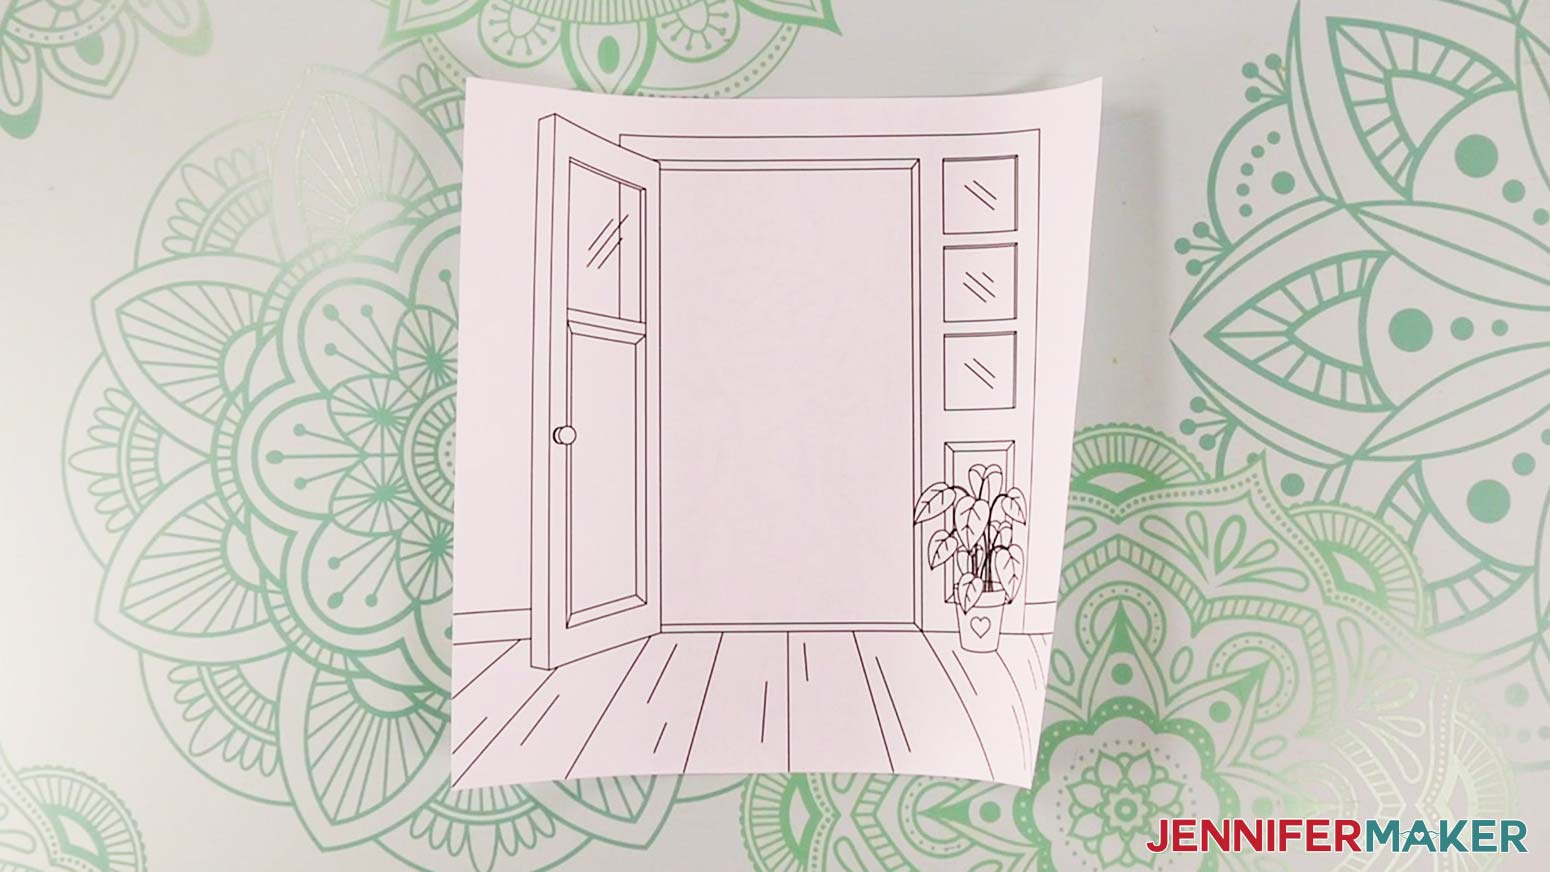
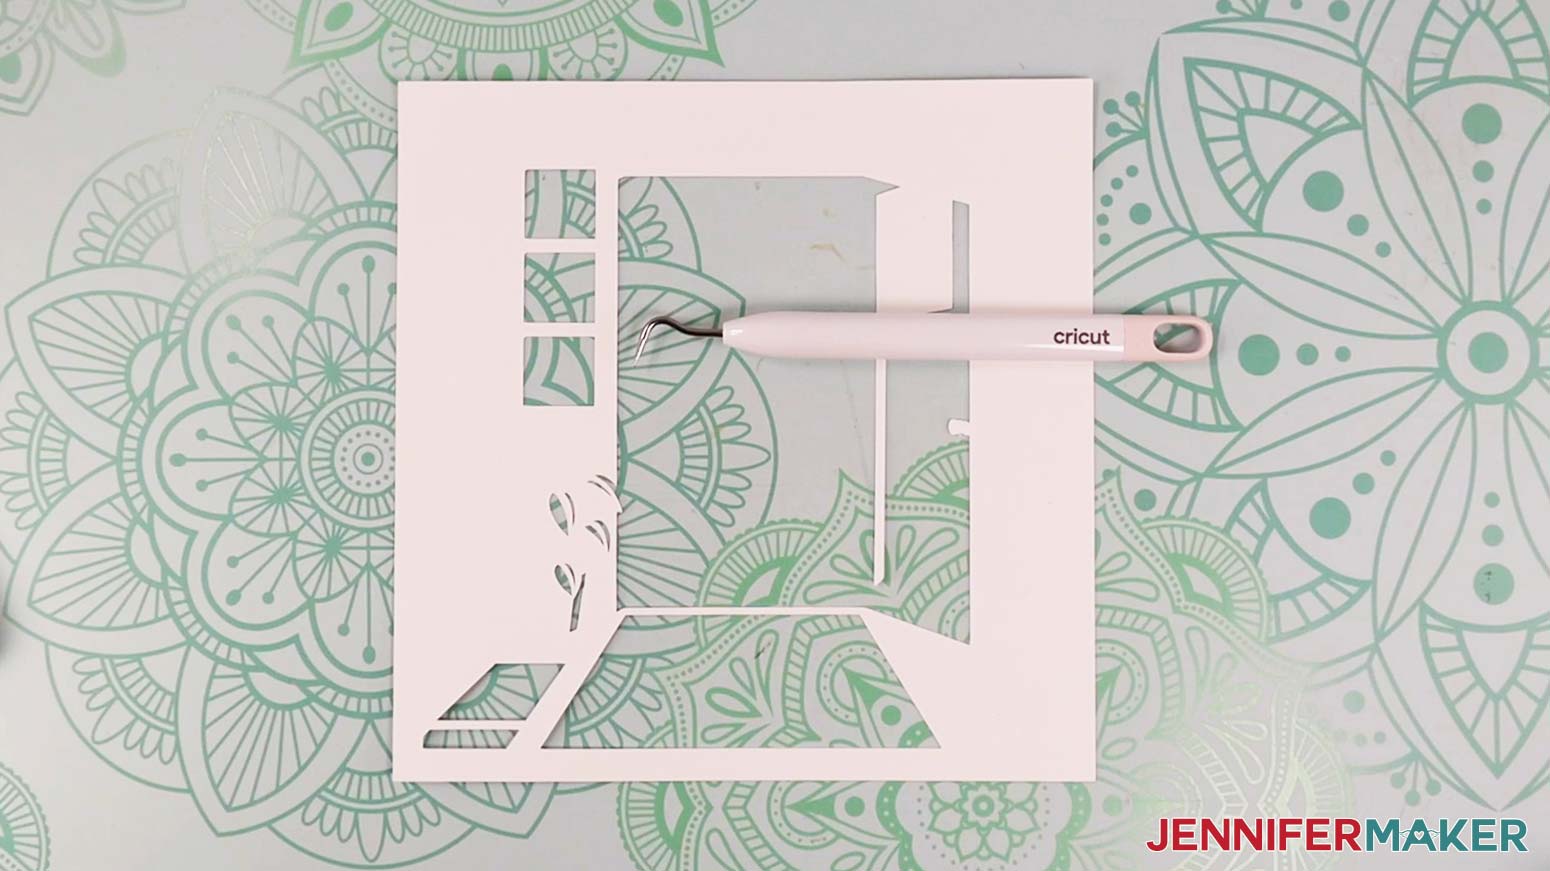
10. When it has finished cutting, unload the mat, flip it over onto your work surface, and roll it back to release the paper. Here is what my cut drawing looks like.
11. On the Make Screen, select the mat with the photo layer.
12. Click “Browse All Materials.”
13. Search for and select the “Transparency” setting.
14. Change the Pressure to “More” for a cleaner cut.

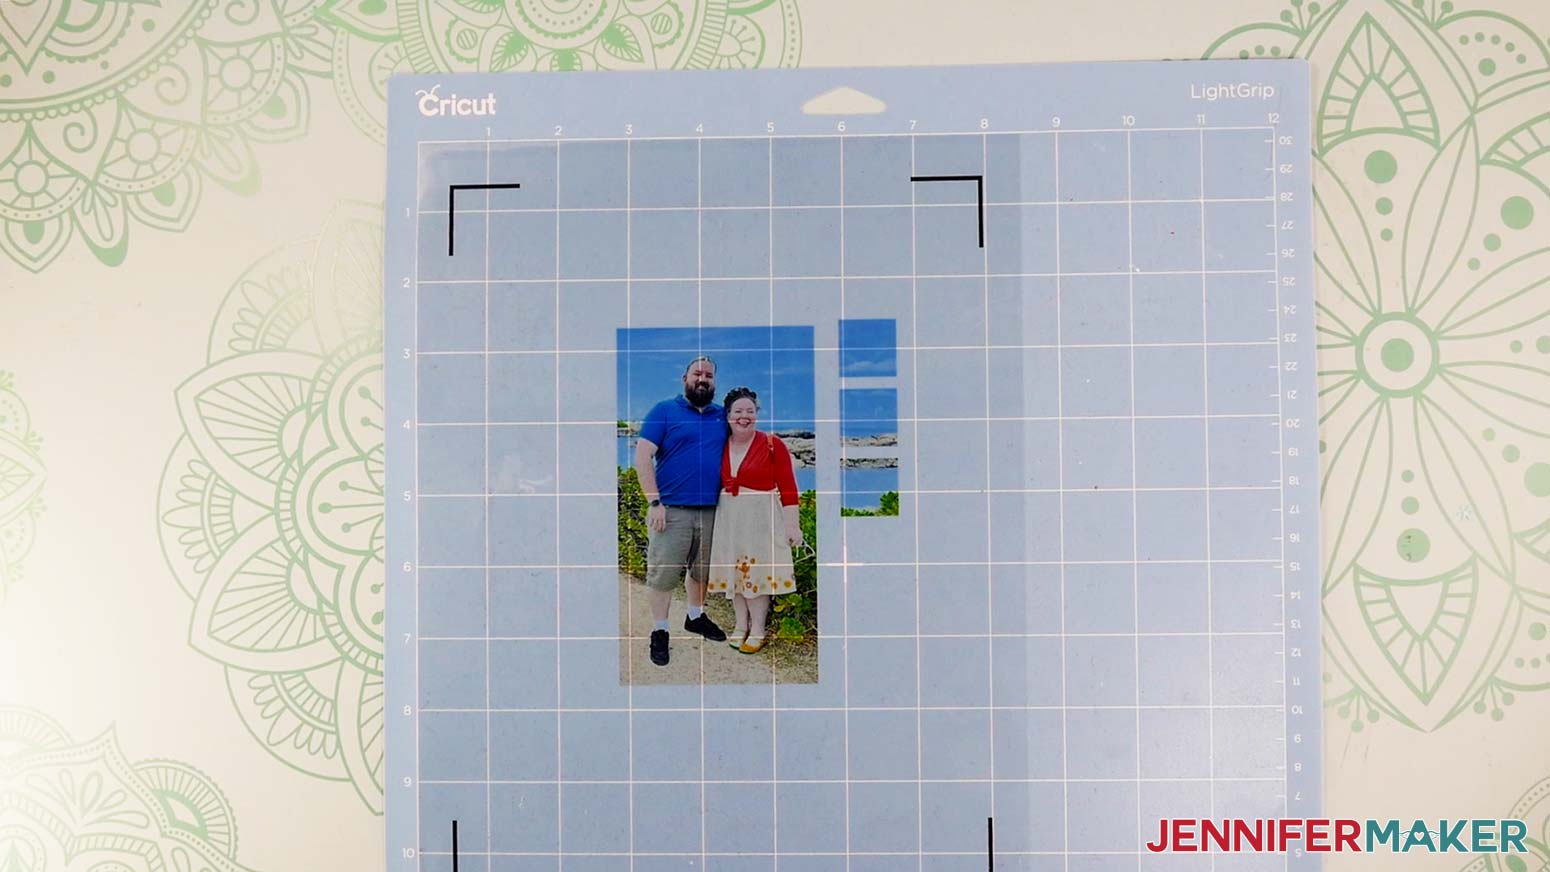
15. Follow steps 5-10 above to cut and remove your photo layer from the mat.
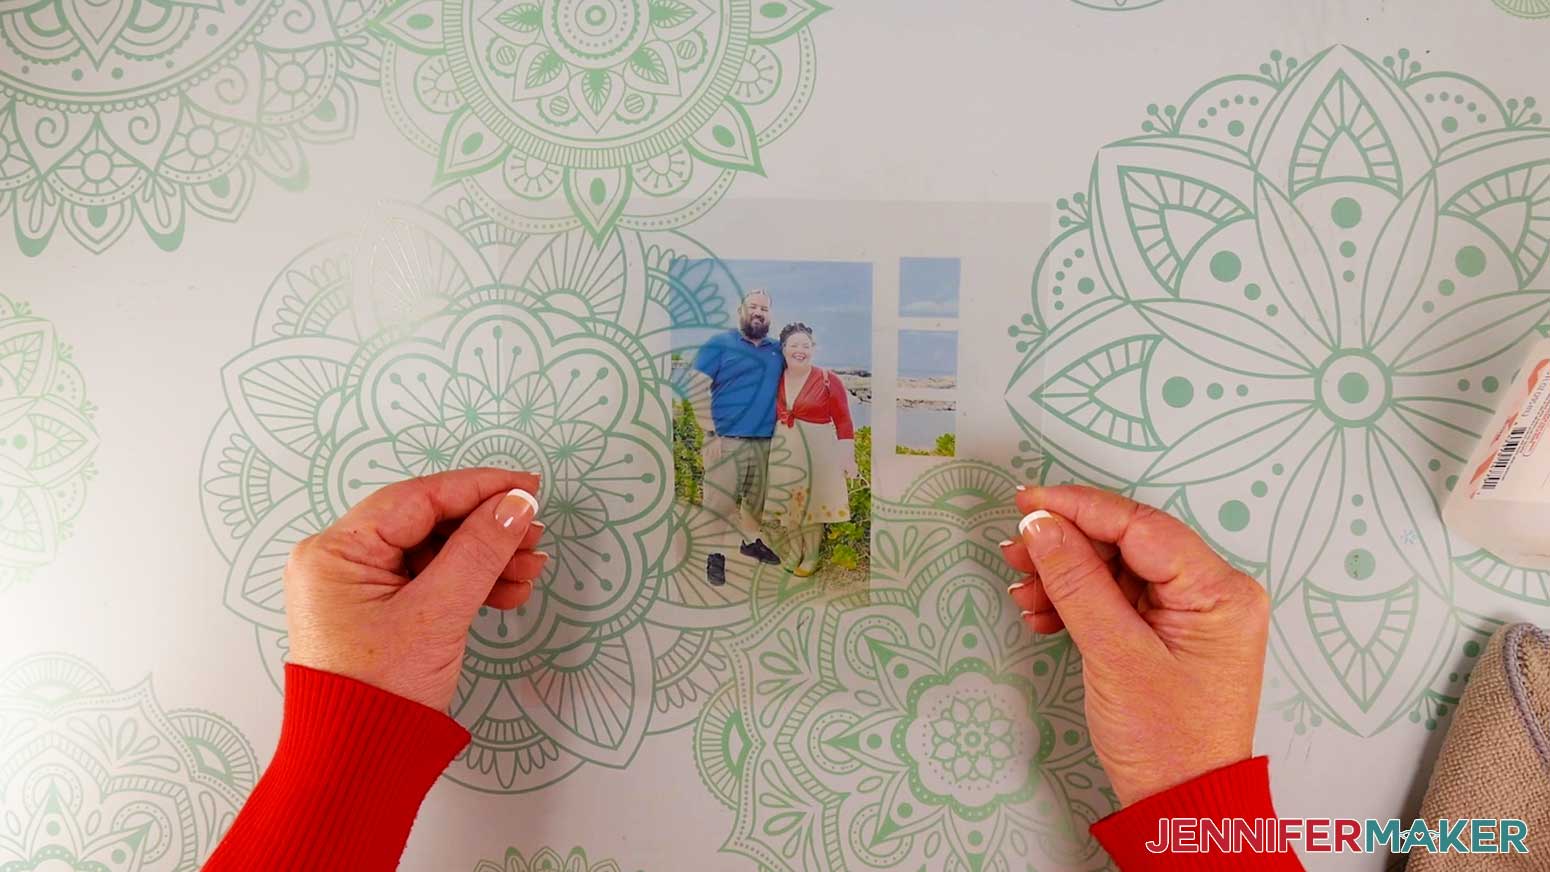
TIP: If any sticky residue from the mat gets on the back of your cut piece, you can clean it off with isopropyl alcohol and a soft cloth. Just don’t wipe the front side or you’ll remove the ink.
16. For the two cardstock pieces, select the “Heavy Cardstock – 100 lb (270 gsm)” setting in Design Space and change the Pressure to “More.”
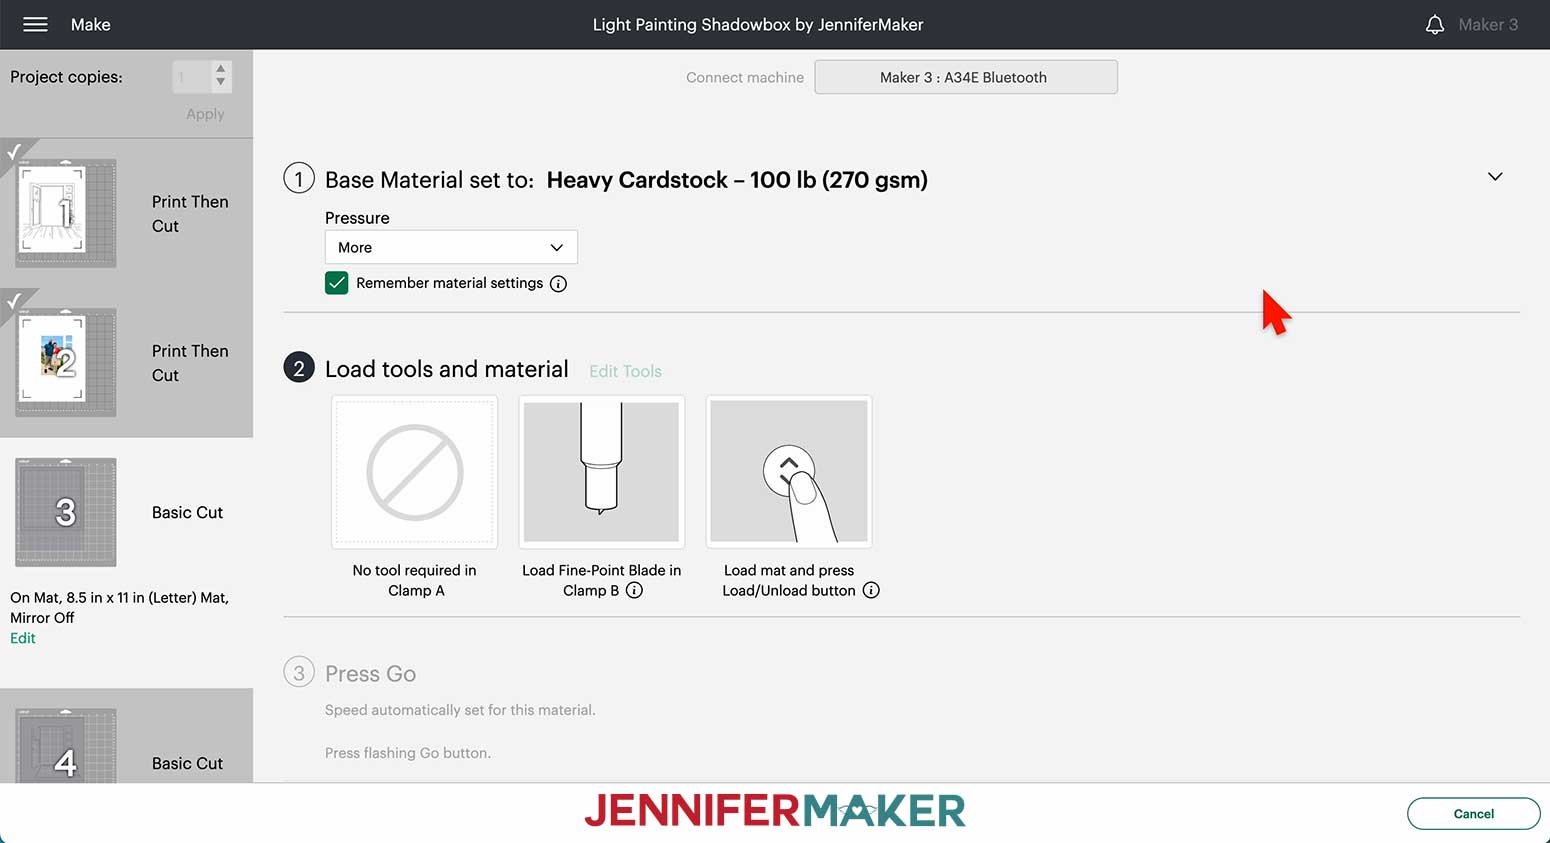
17. Place your first piece of cardstock face up on a green StandardGrip machine mat.
18. Use a brayer to make sure it’s fully adhered.
19. Follow steps 7-10 above to cut and remove your cardstock layers from the mat.
TIP: Use a spatula to carefully remove any intricate parts and a weeding tool to pop out any small pieces.
STEP 3: ASSEMBLE YOUR DOORWAY LIGHT PAINTING SHADOW BOX
ASSEMBLE THE LAYERS
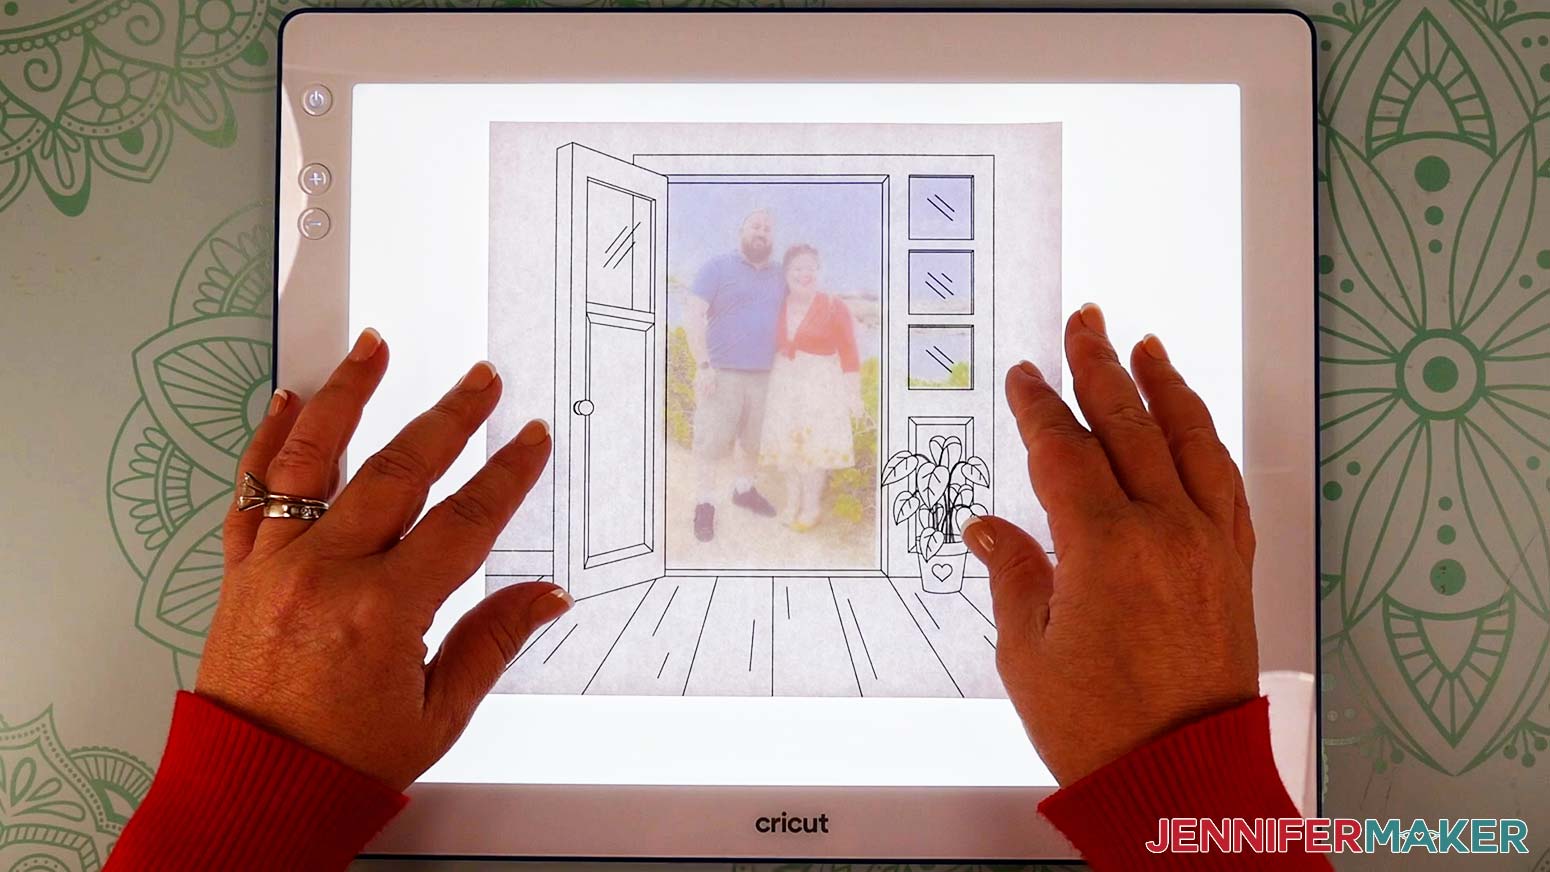
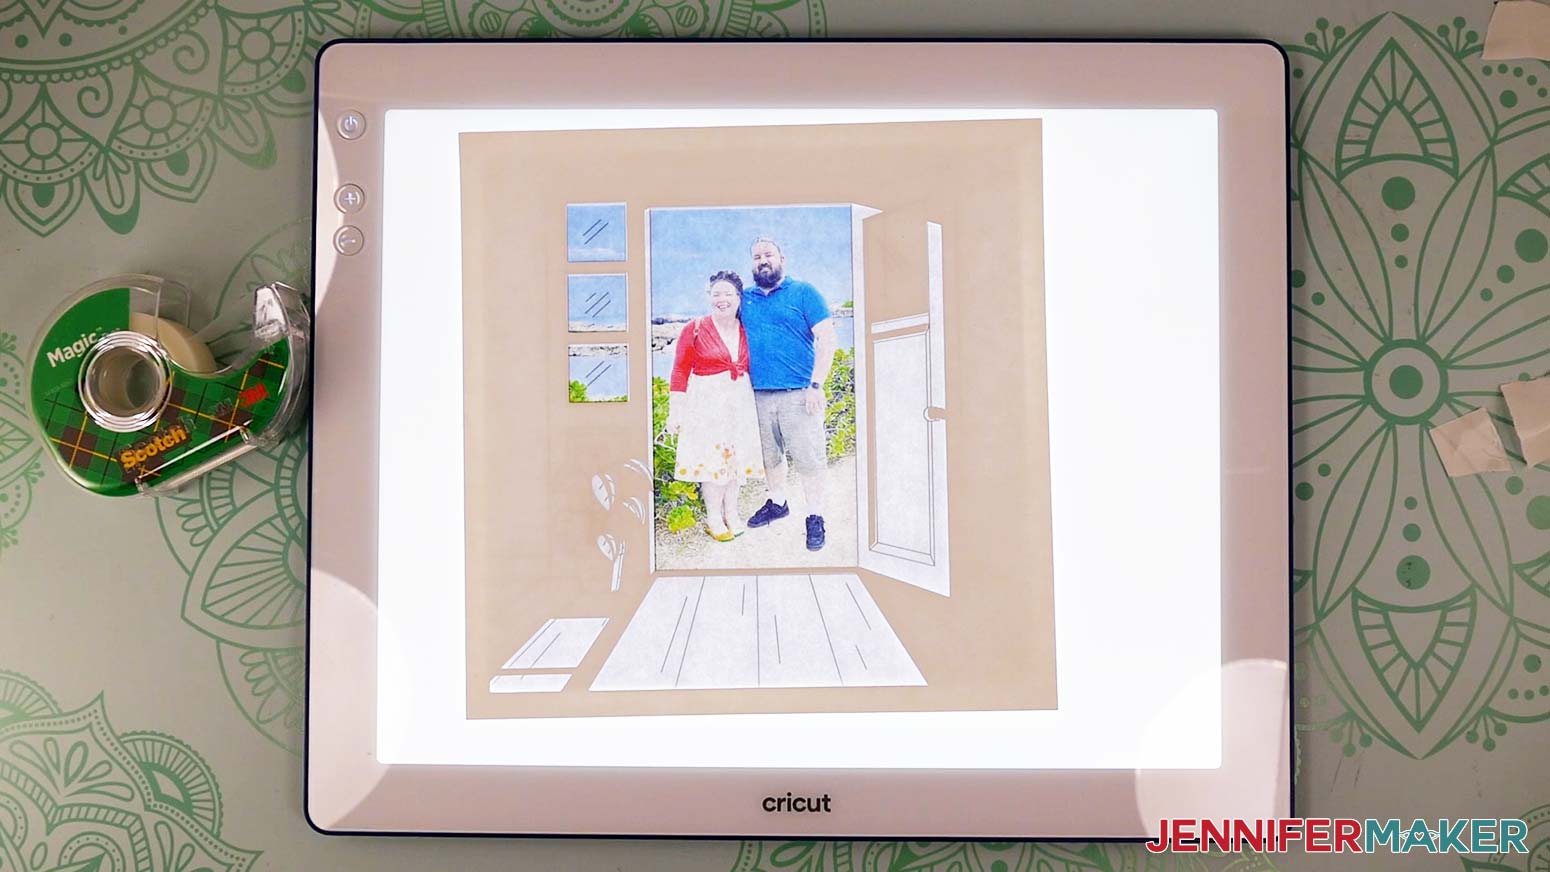
1. Place your photo layer face up on your flat light source (the window shapes should be on the right).
2. Place your line drawing layer face up on top of the photo layer.
3. Turn on your light source and use it to align the photo shapes within the doorway and window areas in the drawing.
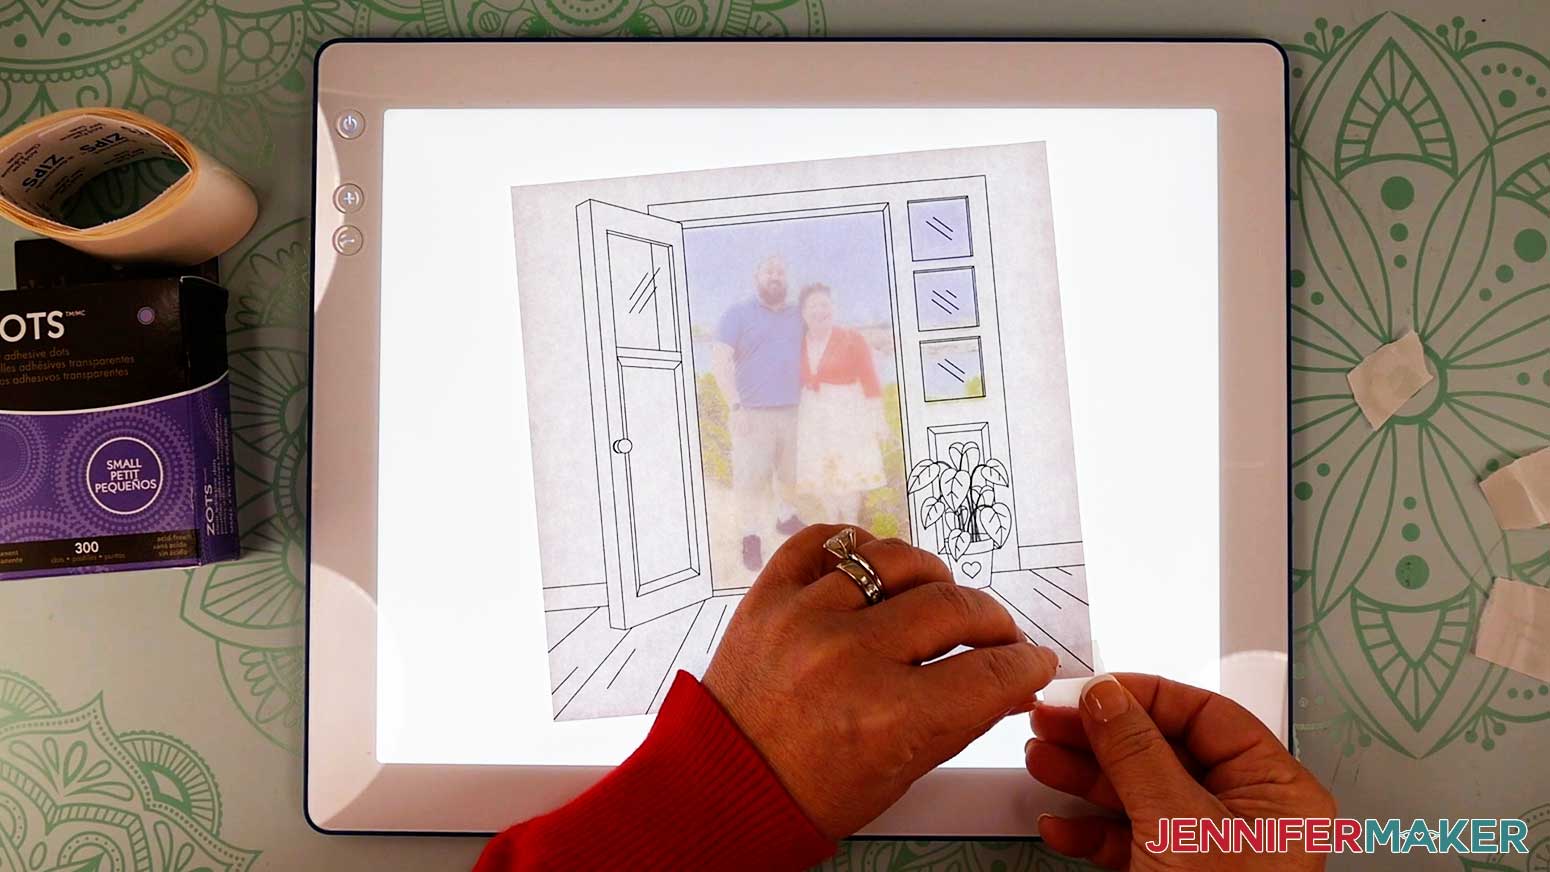
4. Once your two layers are perfectly aligned, attach a few small glue dots to the back of the drawing layer to secure it to the photo layer. I used one dot in each corner.
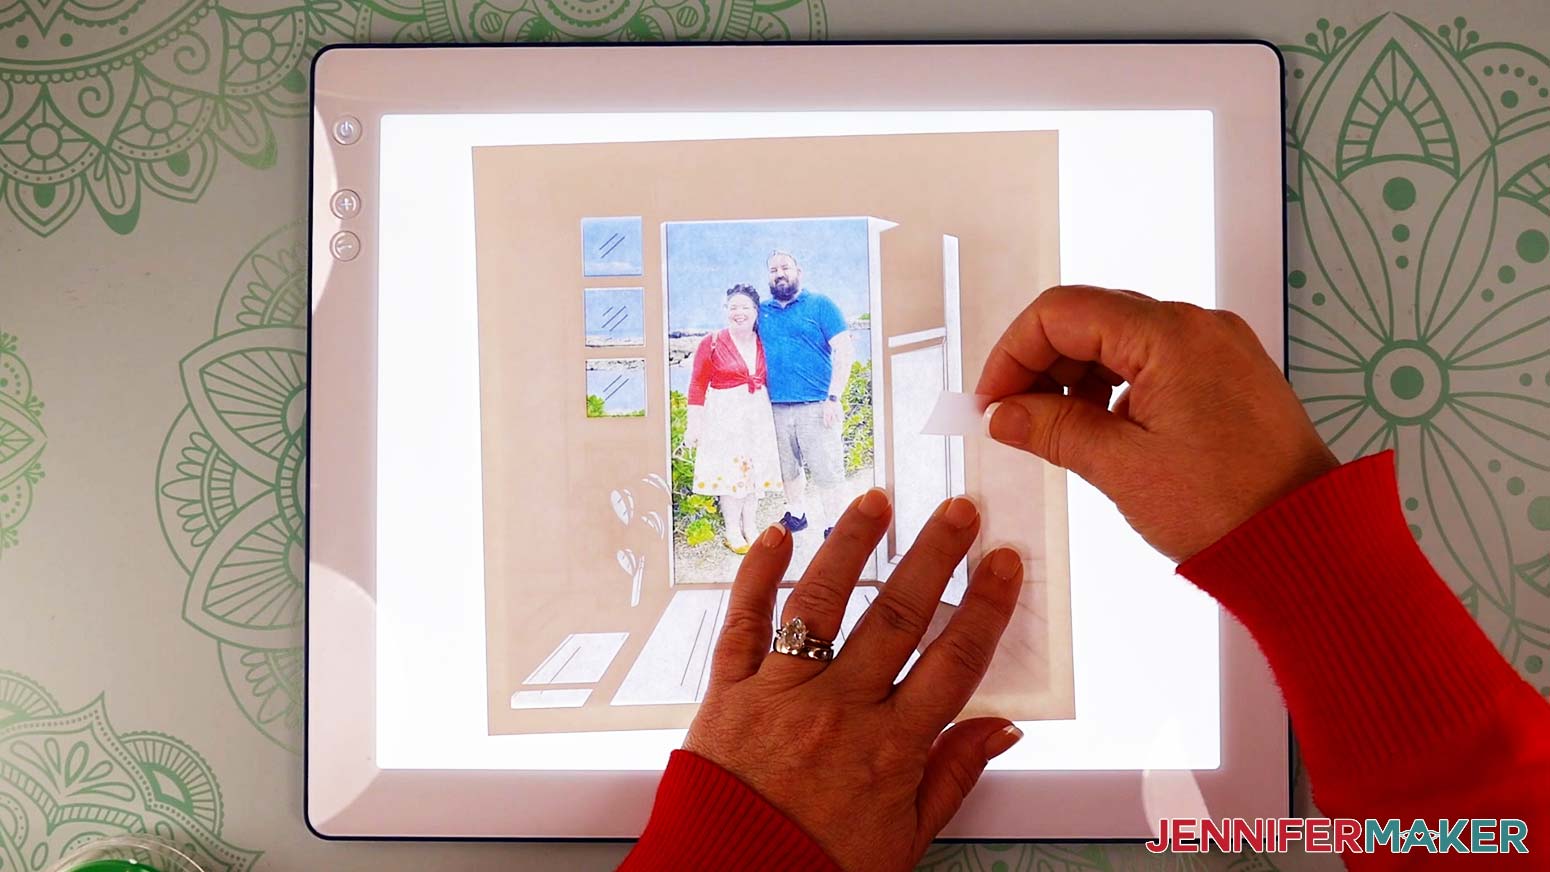
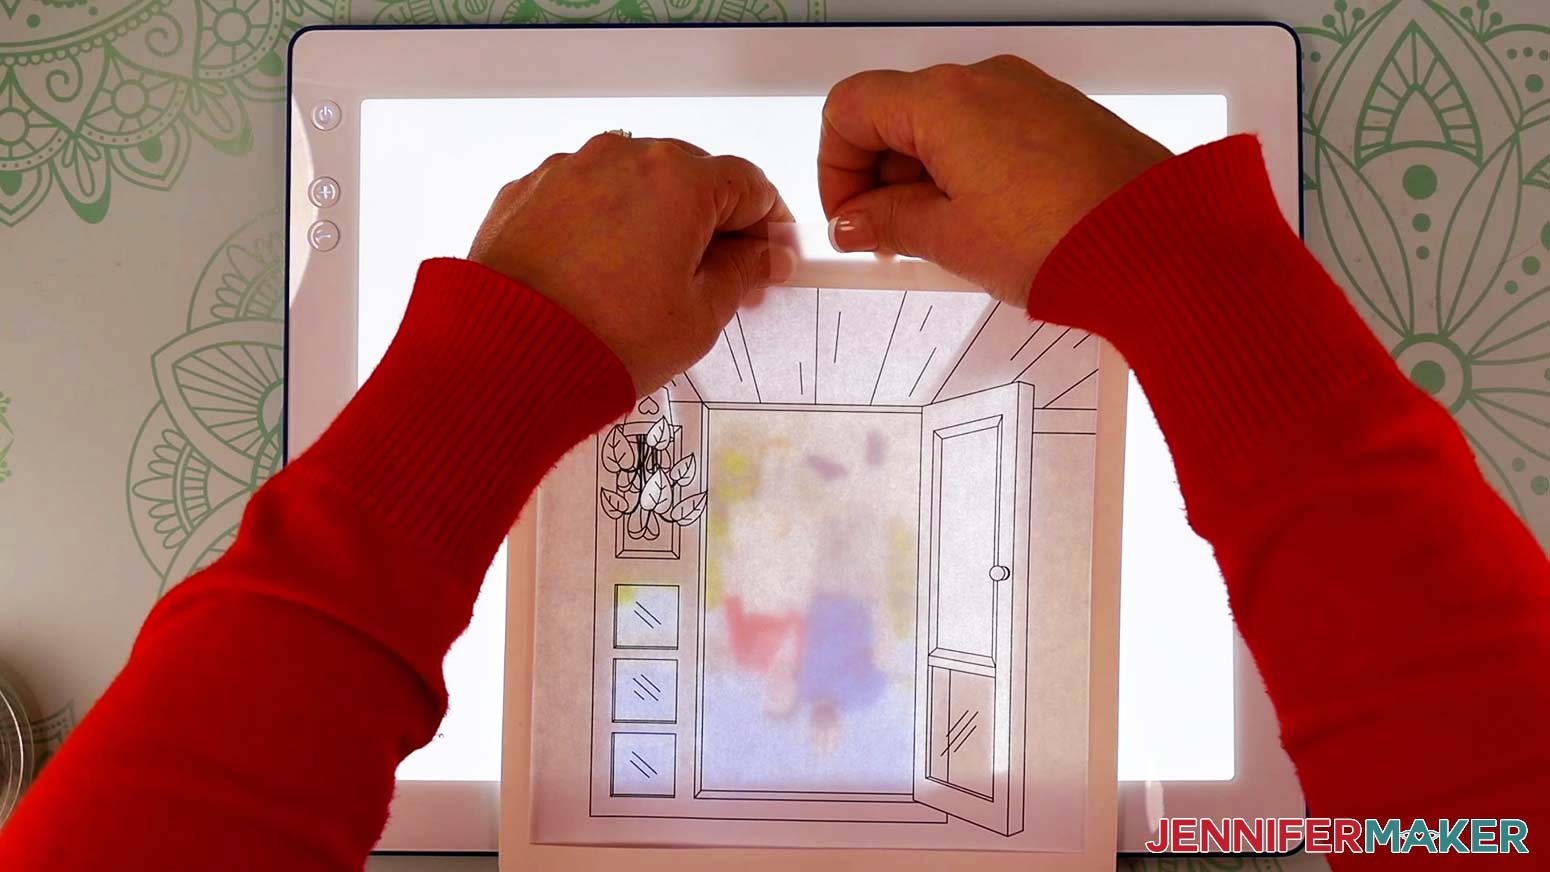
5. After your two layers are attached, flip them over and add the cardstock layer with the cutout areas for the light rays (the window cutouts should be on the left).
6. Use your light source to align the window and doorway cutouts with the photo shapes. Make sure the shadows on the door and plant are aligned with the drawing.
7. Once your cardstock layer is perfectly aligned, secure it to the photo layer with several pieces of clear Scotch tape. Make sure all the intricate areas are secured so everything stays in place right up against the photo.
TIP: Don’t be afraid to use lots of tape. You won’t be able to see it when the lights are on, and it will help create the most realistic light and shadow effect.
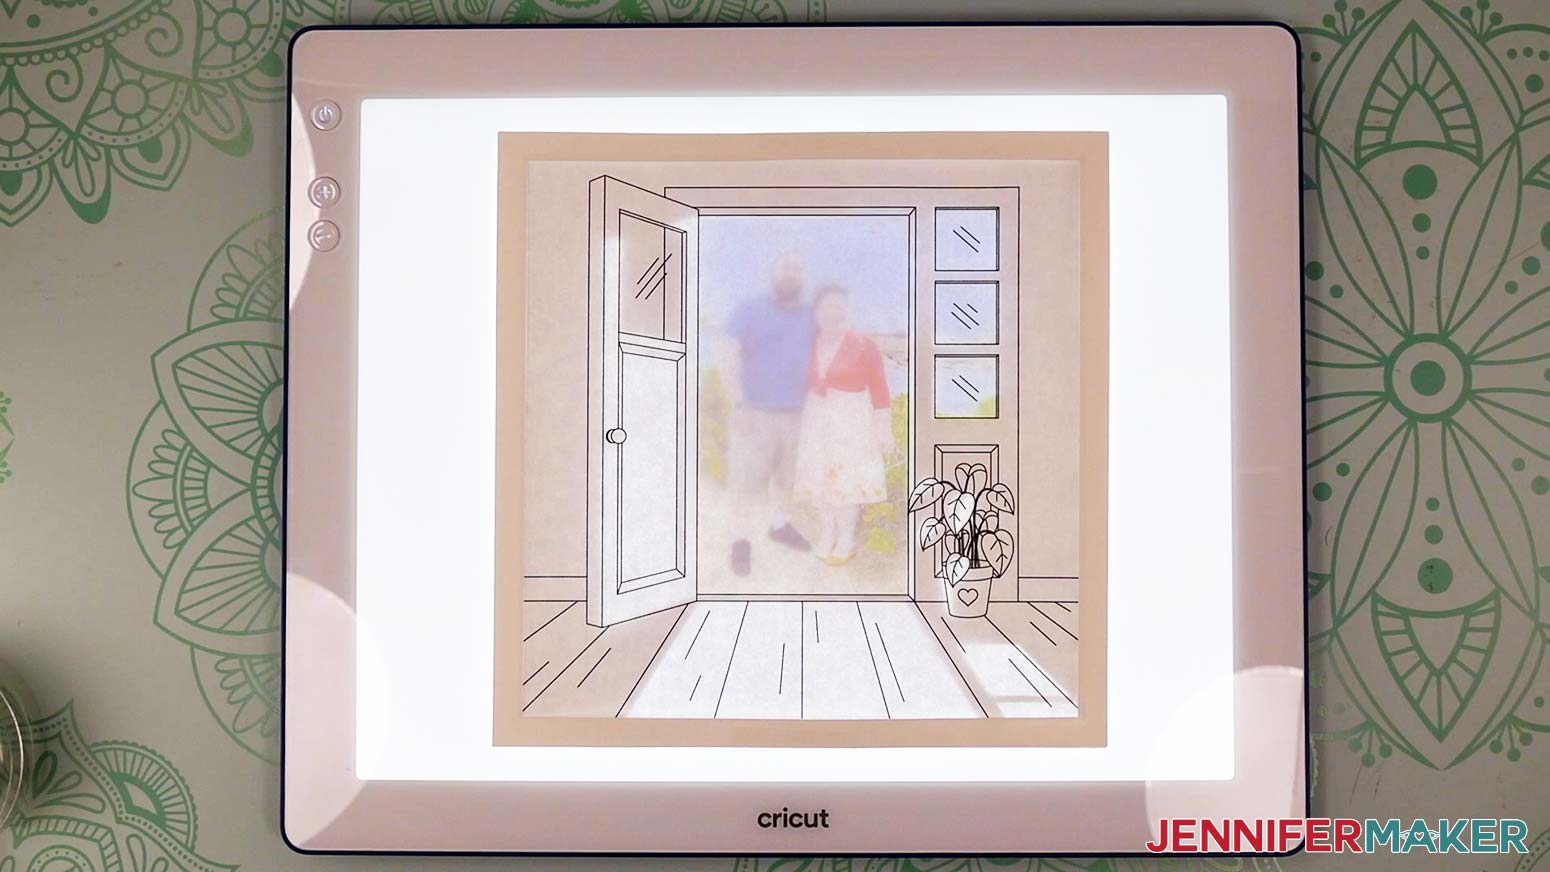
8. After your cardstock layer is attached to the back, flip the stack over and add the cardstock frame on top, aligning the edges.
9. Attach a small piece of Scotch tape at the top of the frame so just the bottom half touches the frame. Fold the tape over tightly and secure the other half to the back of the stack.
10. Follow step 9 to secure the bottom of the frame to the stack as well.
11. Your layers should look similar to mine when you’re finished.
ADD THE LIGHTS
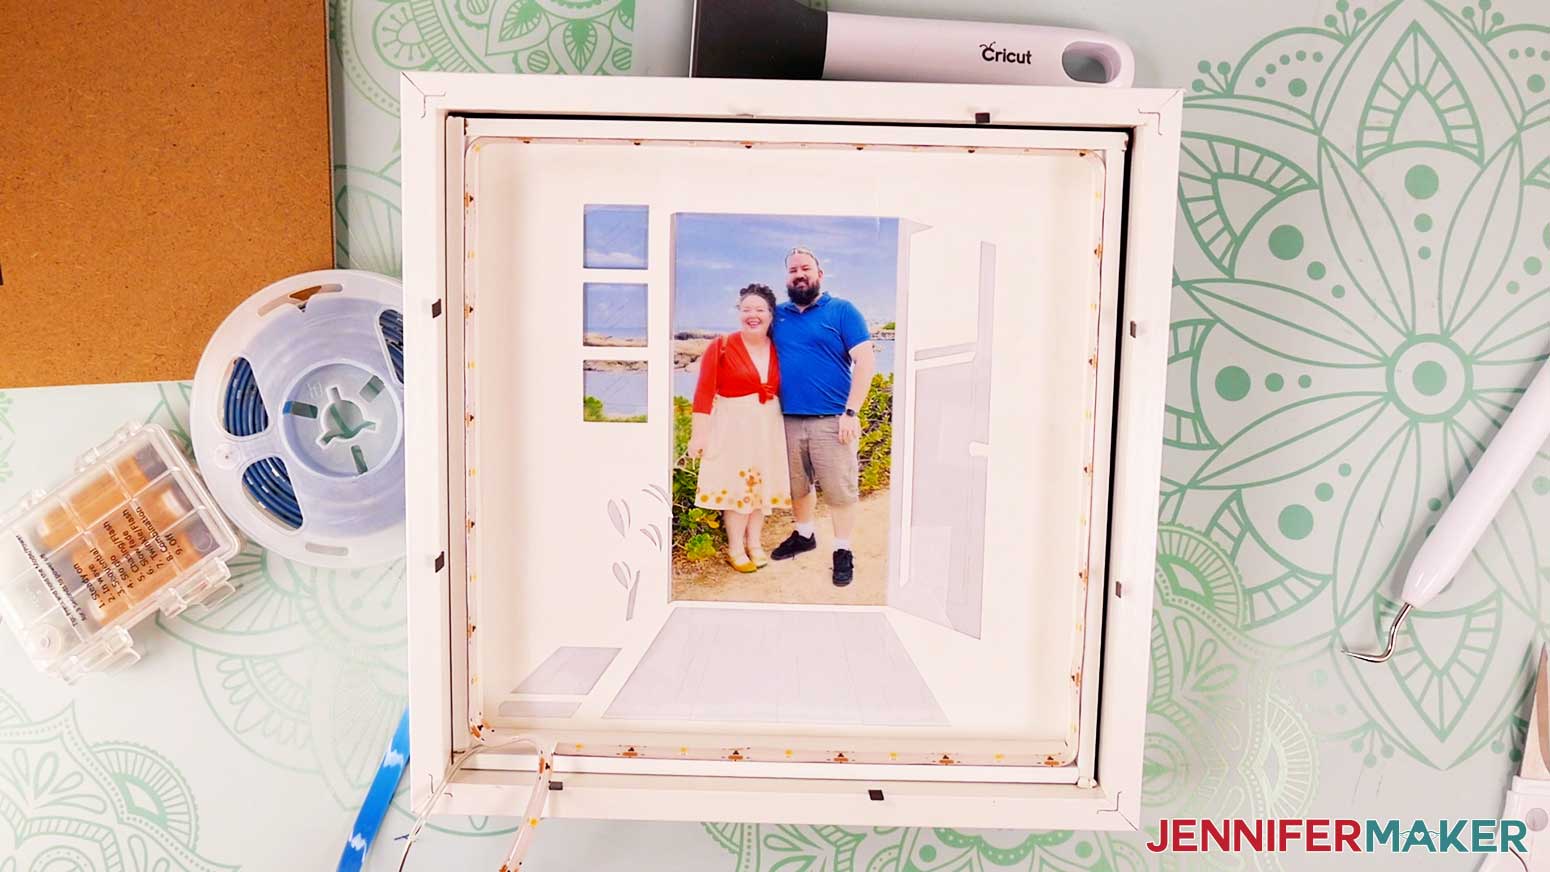
1. Open your shadow box frame and remove the wooden insert. Don’t discard it.
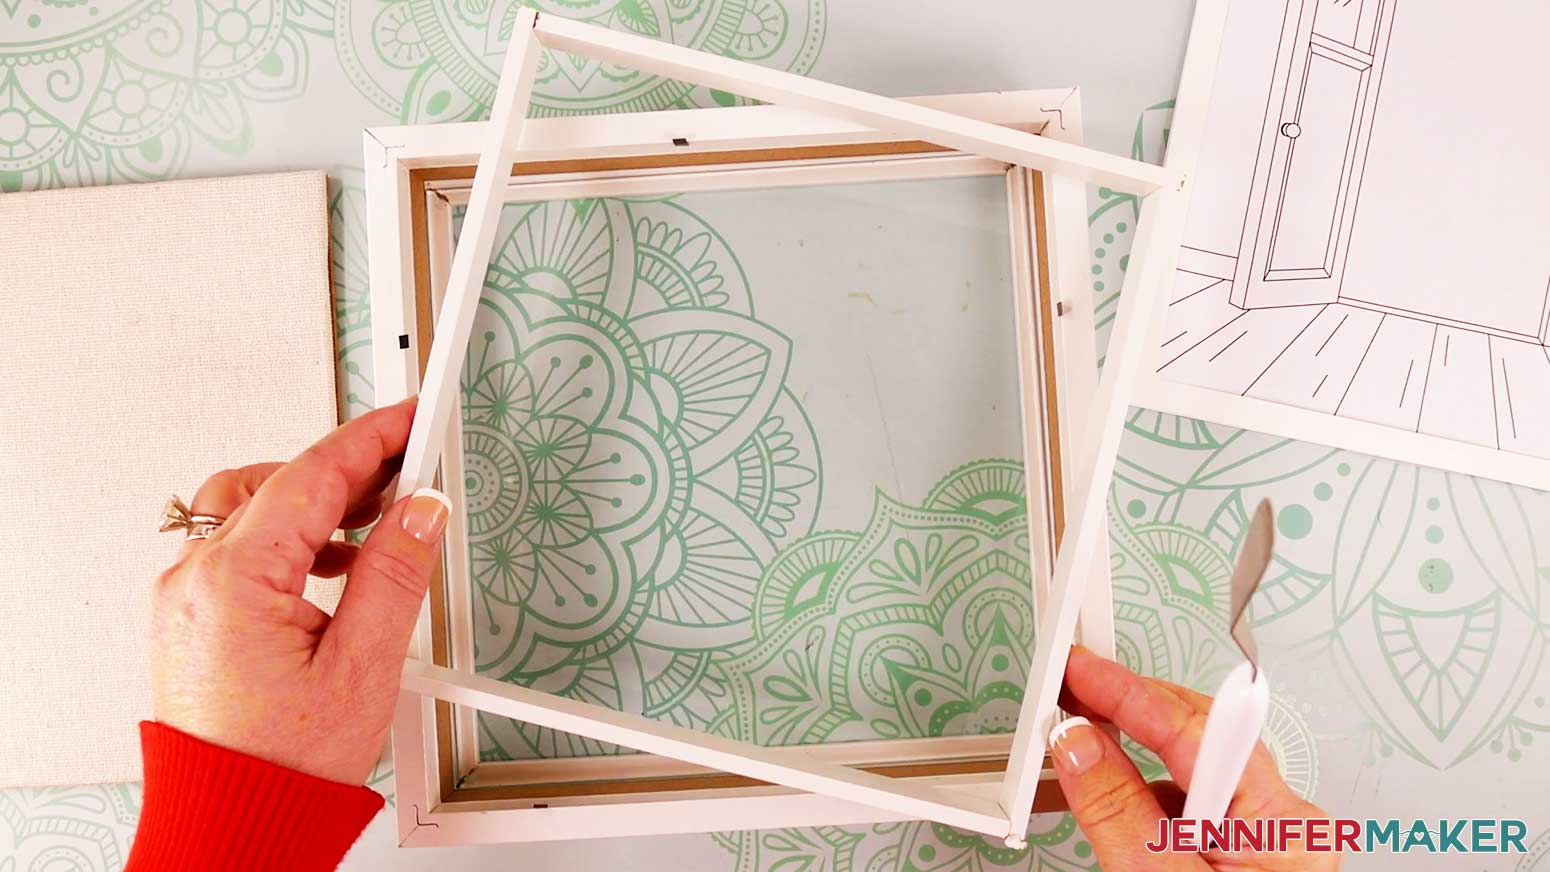
2. Clean the glass with isopropyl alcohol and a lint-free cloth if needed.
3. Place your attached layers face down in the frame. Then put the wooden insert on top of them.
4. Grab your lights and turn them on to make sure they work.
NOTE: If you're using the LED strip lights from my materials list, insert three AA batteries and use the button on the battery pack or the remote to turn them on.
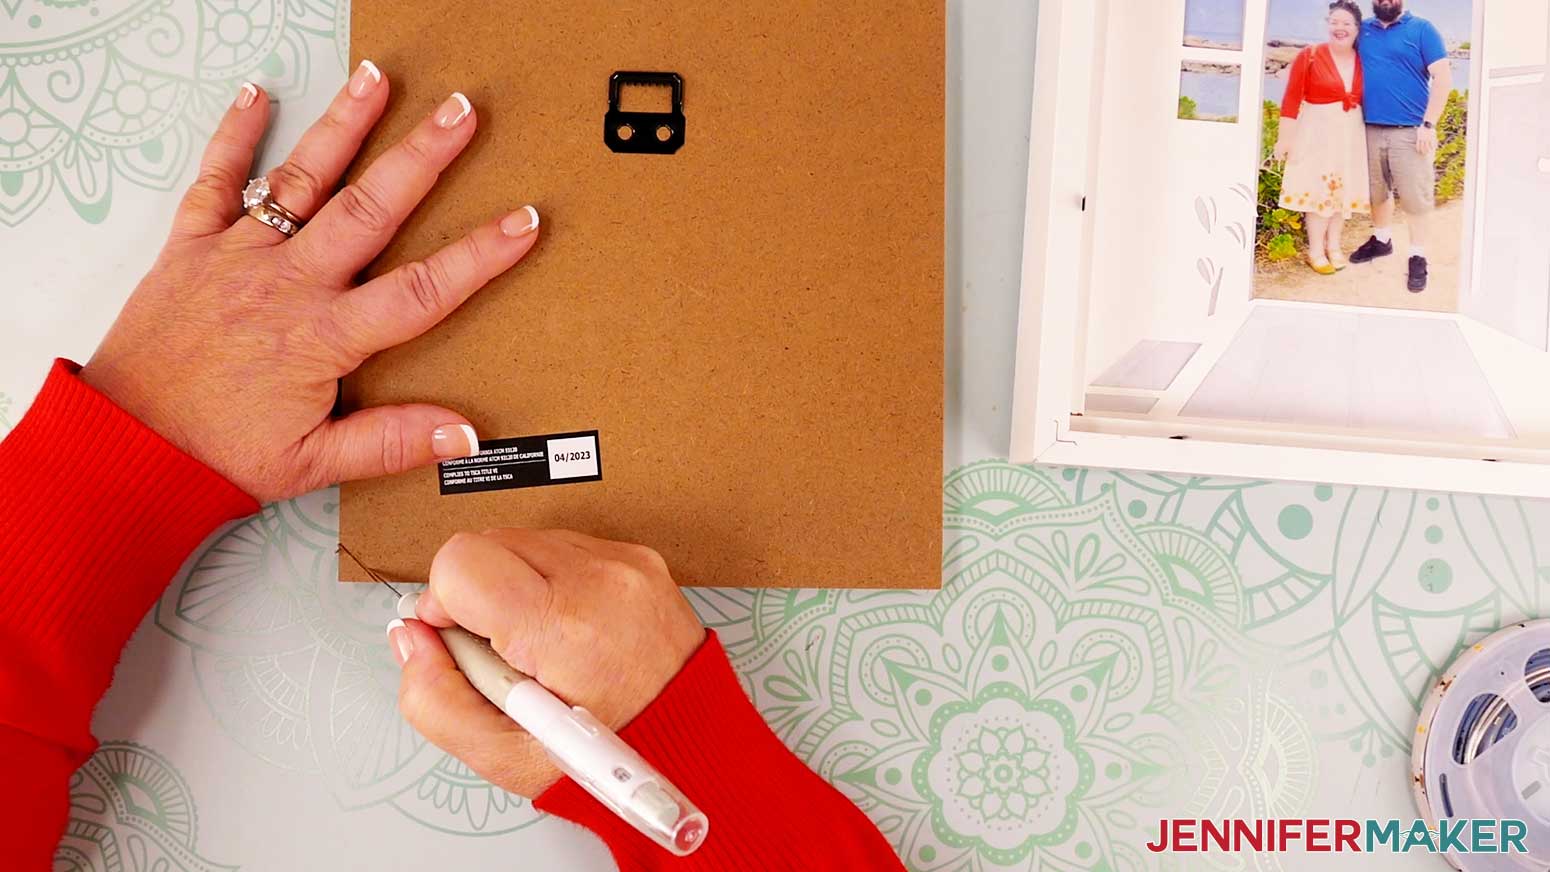
5. Place your frame's backing piece face down (hardware facing up and at the top) on your self-healing mat.
6. Use your craft knife to carefully make a diagonal cut across one of the bottom corners about a half-inch tall. Discard the triangular piece you cut off.
7. Unroll your LED lights so you have a foot or so to work with.
8. Peel off just a bit of the plastic backing at the end of the lights near the battery to reveal the adhesive.
TIP: If you're having trouble getting the backing to release, use your weeding tool to get it started.
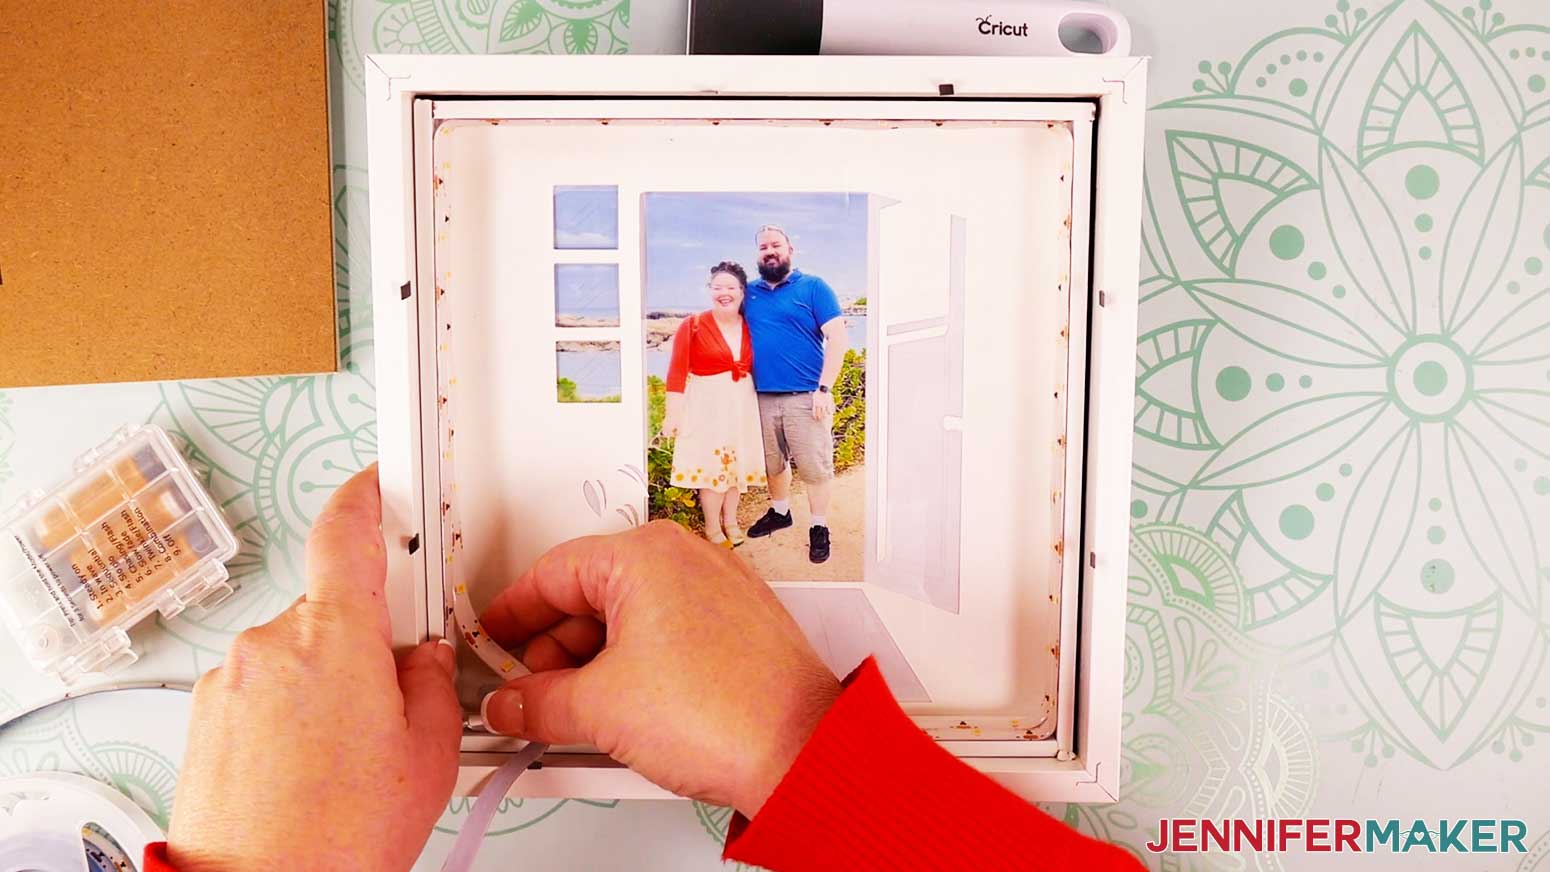
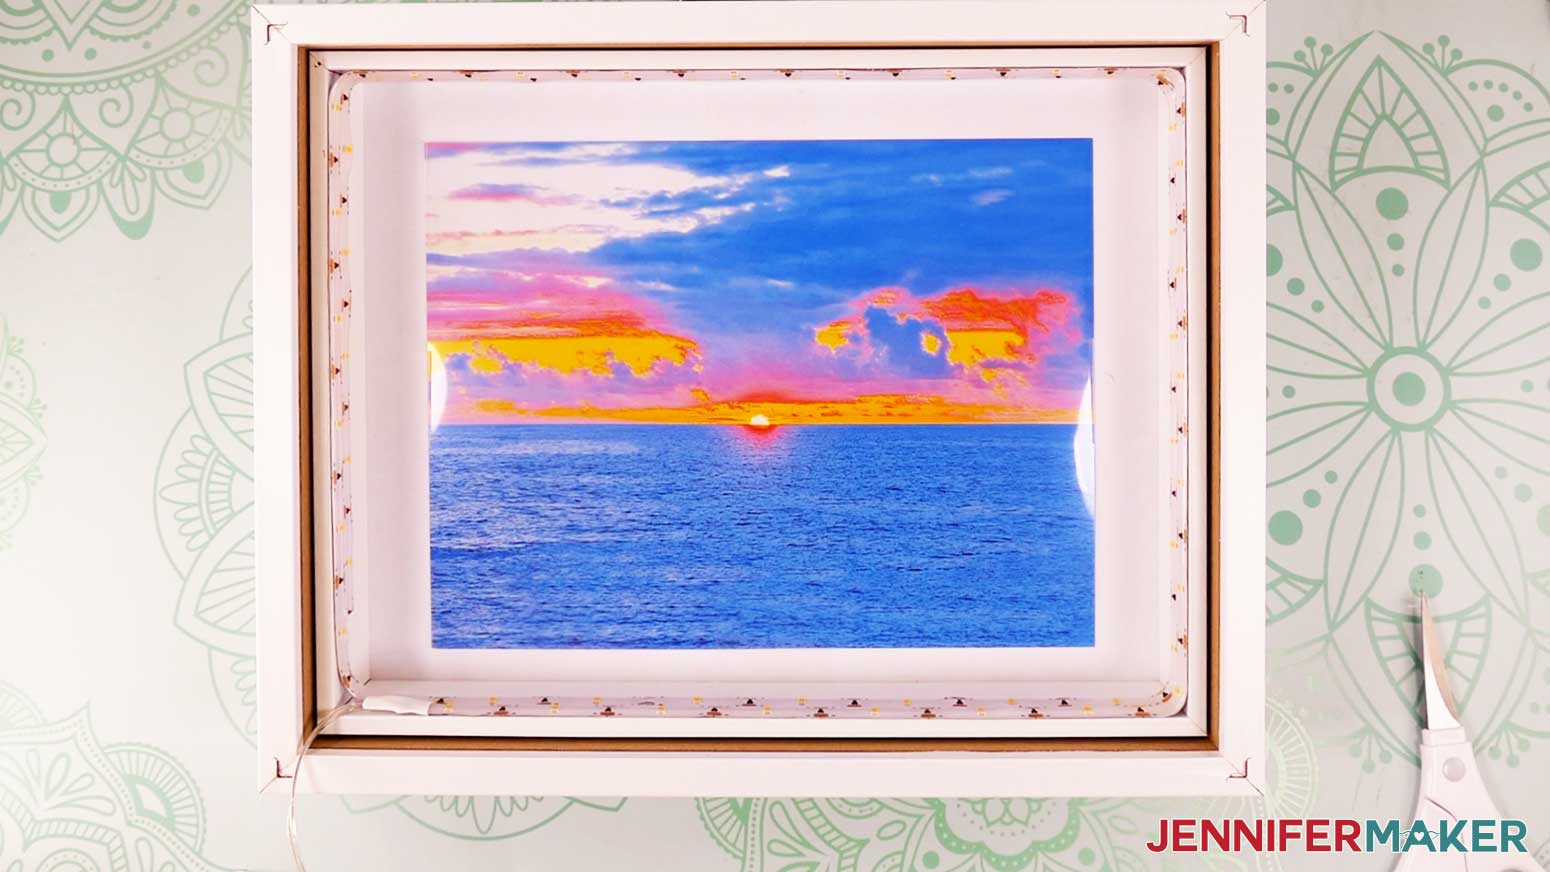
9. Place the shadow box with the layers inside face down. Take your lights and make sure the wire without any lights and the battery pack are both outside the frame.
10. Starting in the same bottom corner as the notch on your backing, attach the exposed adhesive to the inside edge of the wooden insert right along the top.
11. Continue peeling off the backing and attaching the lights evenly around the perimeter of the insert until you reach your starting point. Your lights should look similar to mine.
12. Attach another row of lights directly below your first one. You will have to angle the strip down a bit at the beginning, but you can straighten it out after that.
13. Follow the same process as above until you’ve finished your second row of lights.
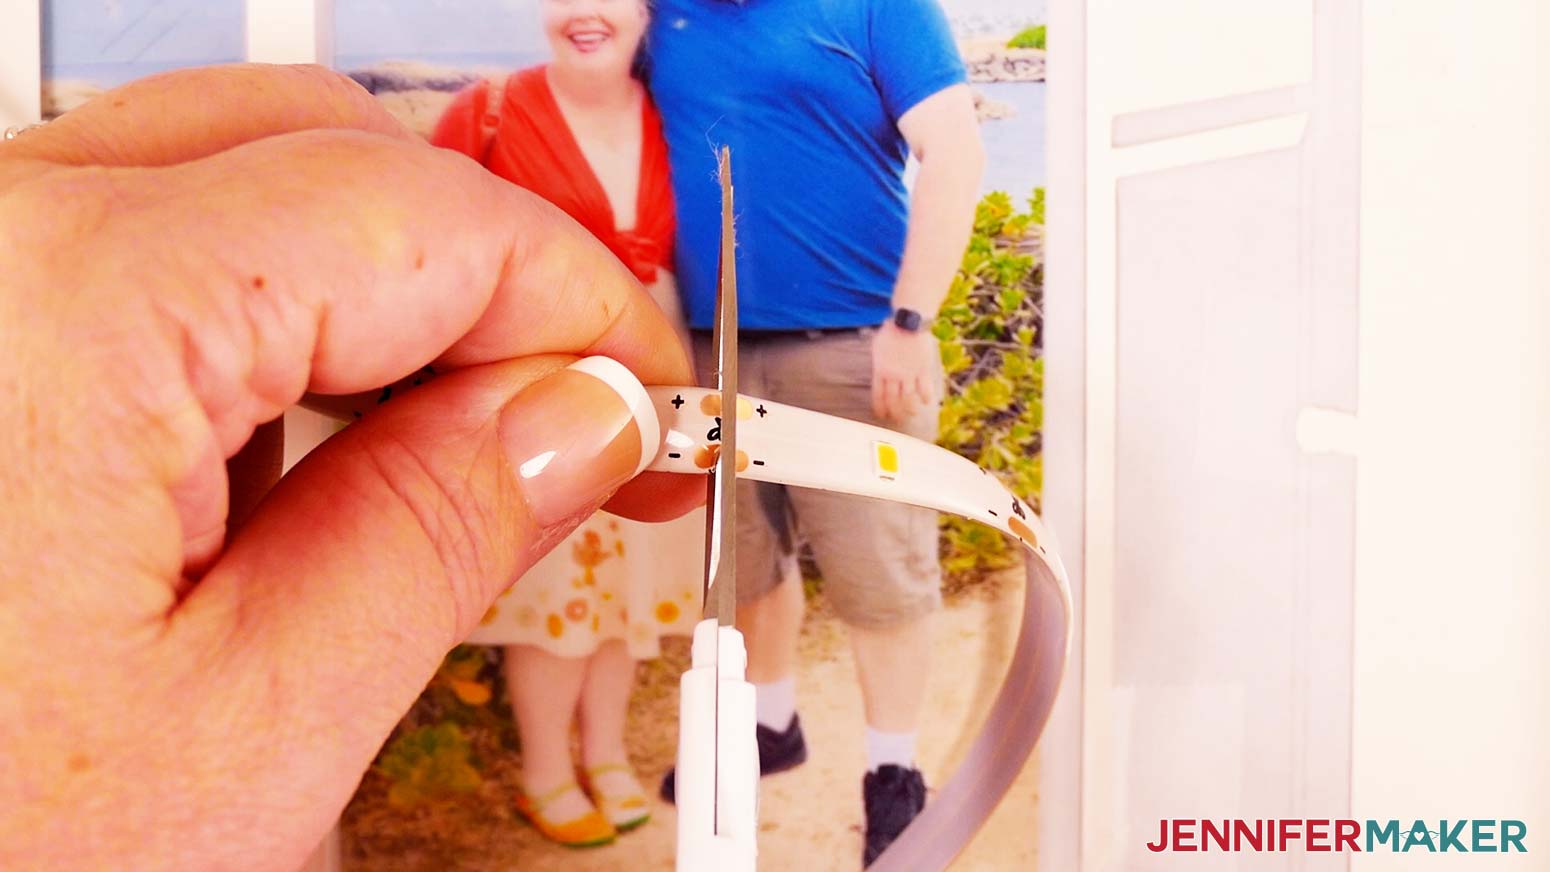
14. Find the closest spot on your light strip where it can be cut. This will be denoted by a small scissors icon with + and - symbols on both sides.
15. Make sure your lights are off and use your scissors to cut the lights in this area.
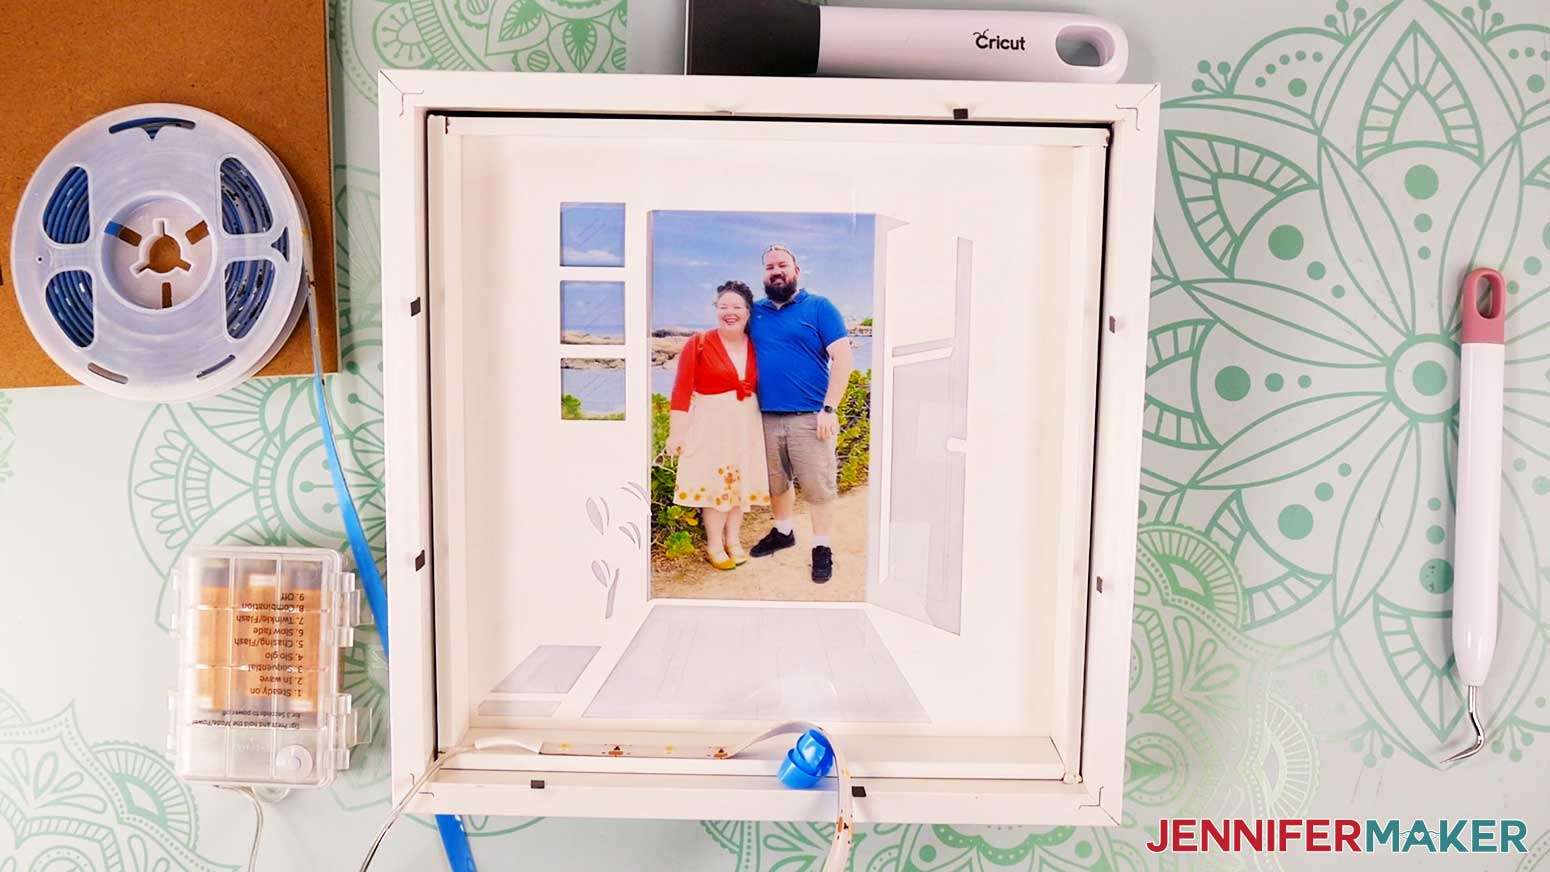
16. Reattach your shadow box's backing and slide the wire through the notch.
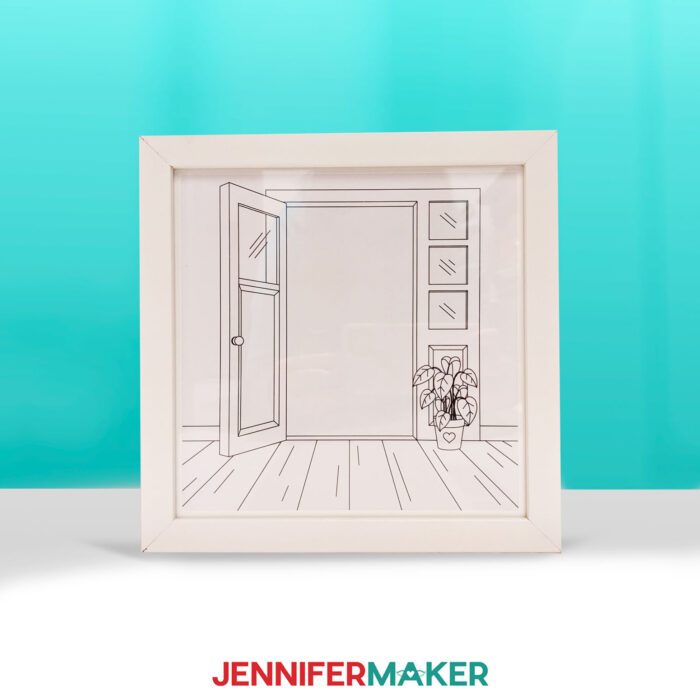
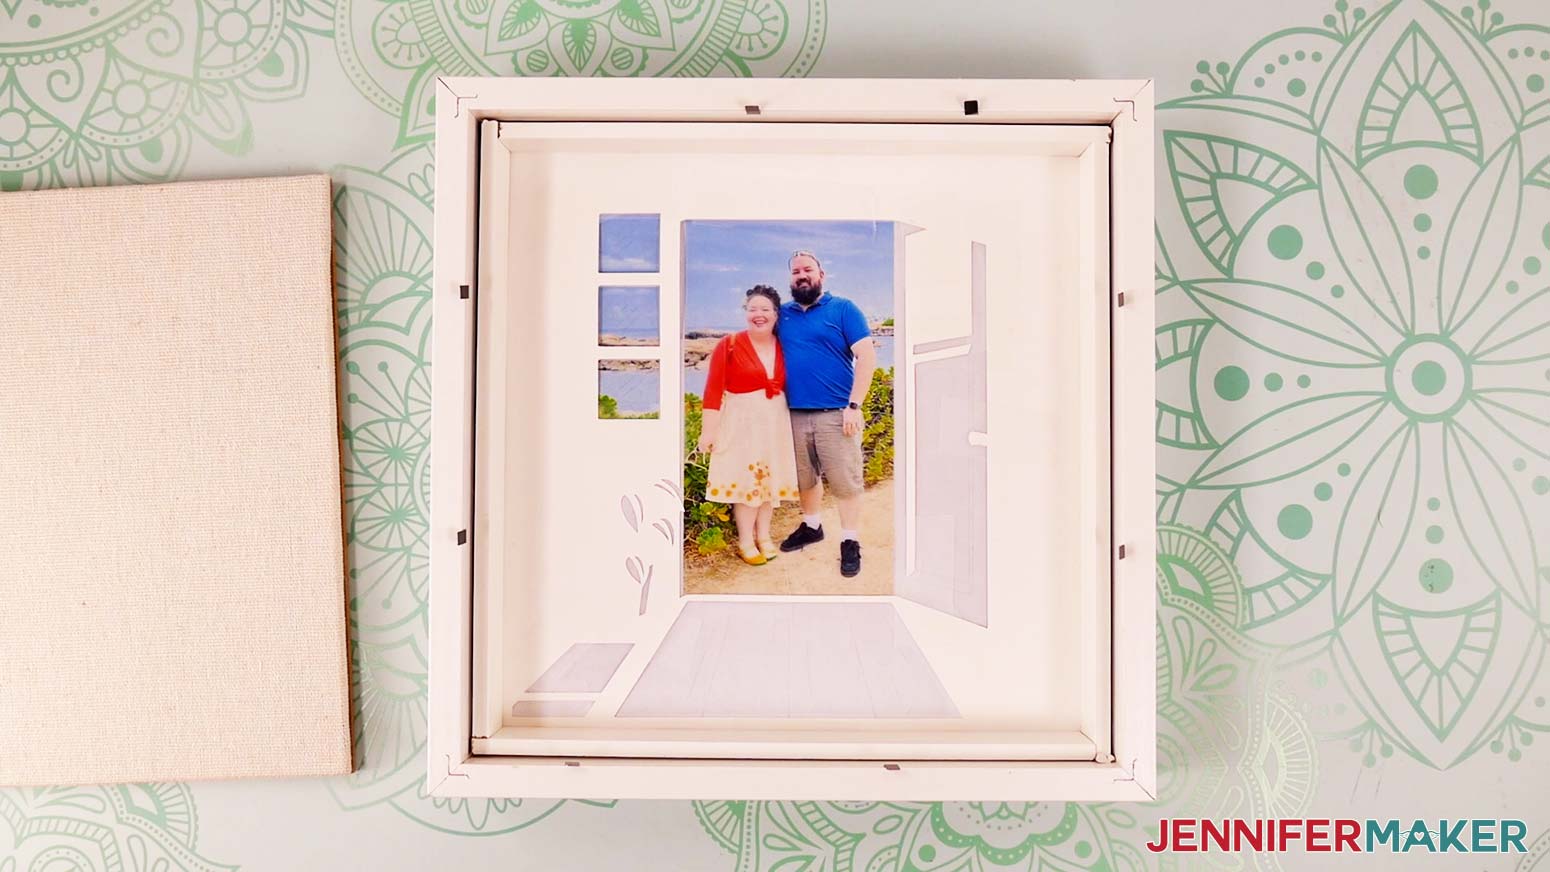
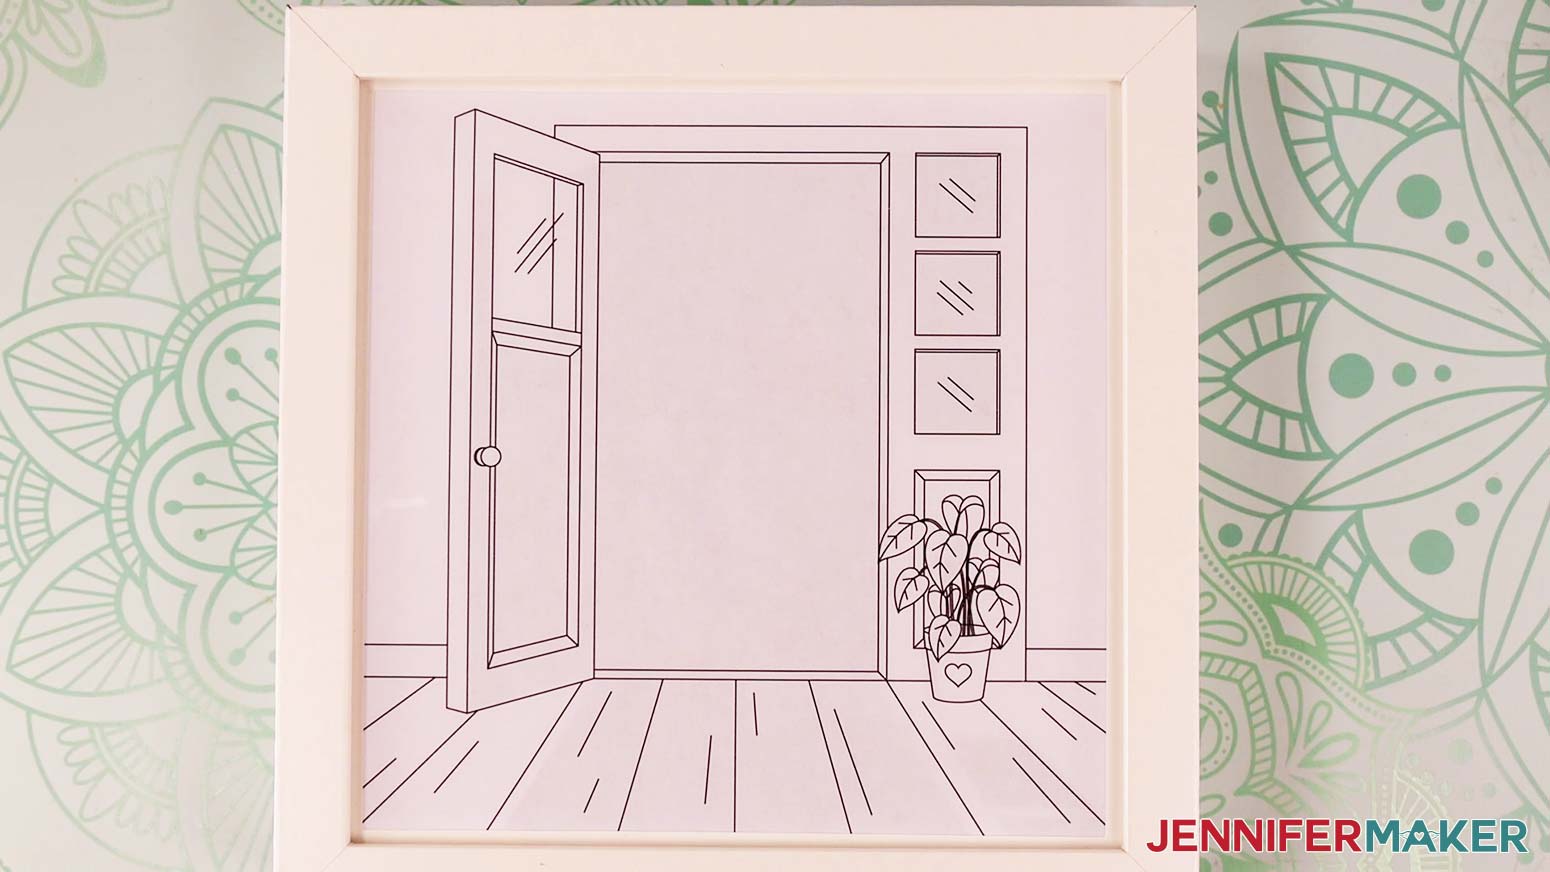
17. This is what my finished doorway light painting shadow box frame looks like with the lights off.
PROJECT 2: FAMILY SILHOUETTES DESIGN WITH SENTIMENT
STEP 2: PREPARE YOUR DESIGN
CRICUT DESIGN SPACE
1. Open Cricut Design Space and click “New Project.”
2. Click “Upload” and then “Upload Image.”
3. Click “Browse.”
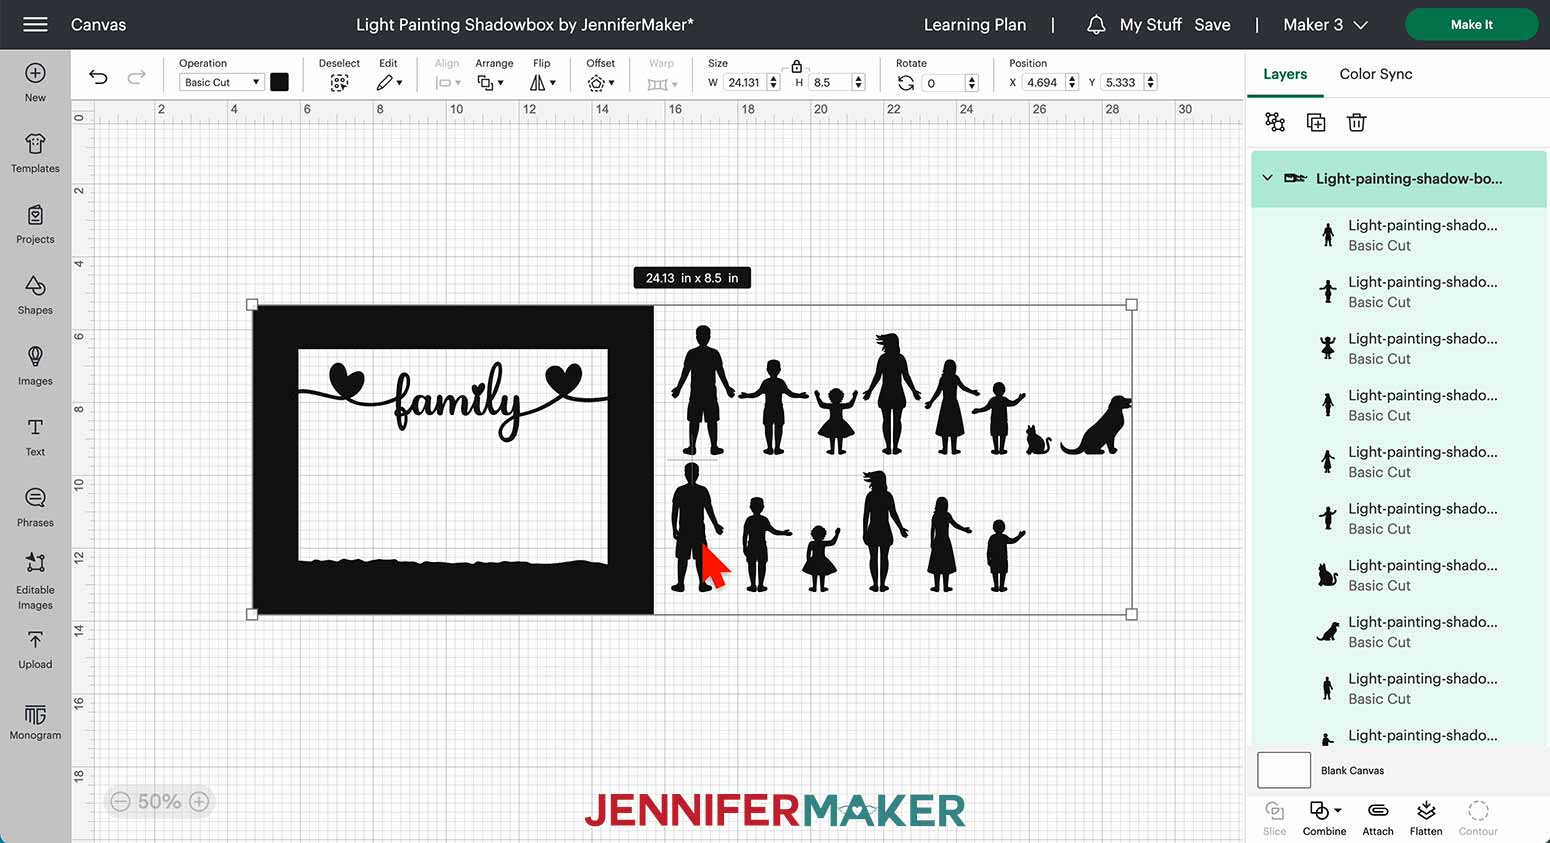
4. Select the SVG file titled “light-painting-shadow-box-silhouettes-layers-jennifermaker-SVG.” This file includes the frame, an optional “family” sentiment, and 14 separate silhouettes that can be used to customize your design.
5. On the Prepare to Upload screen, it will say “Cut image” with the design preview.
6. Click “Upload.”
7. Find your design in Recent Uploads and add it to the Canvas.
8. Click “Upload” and then “Upload Image” again.
9. Click “Browse.”
10. Select the JPG file titled “light-painting-shadow-box-silhouettes-photo-jennifermaker-JPG.”
NOTE: You can upload a different photo for your background if desired. Just make sure it is high resolution and in landscape orientation.
11. On the Upload Image screen, select “Complex” and click “Continue.”
12. On the next screen, click “Apply and Continue.”
13. On the next screen, select “Print Then Cut Image” and click “Upload.”
14. Find your design in Recent Uploads and add it to the Canvas.
15. To resize it, click the red exclamation point in the Layers Panel.
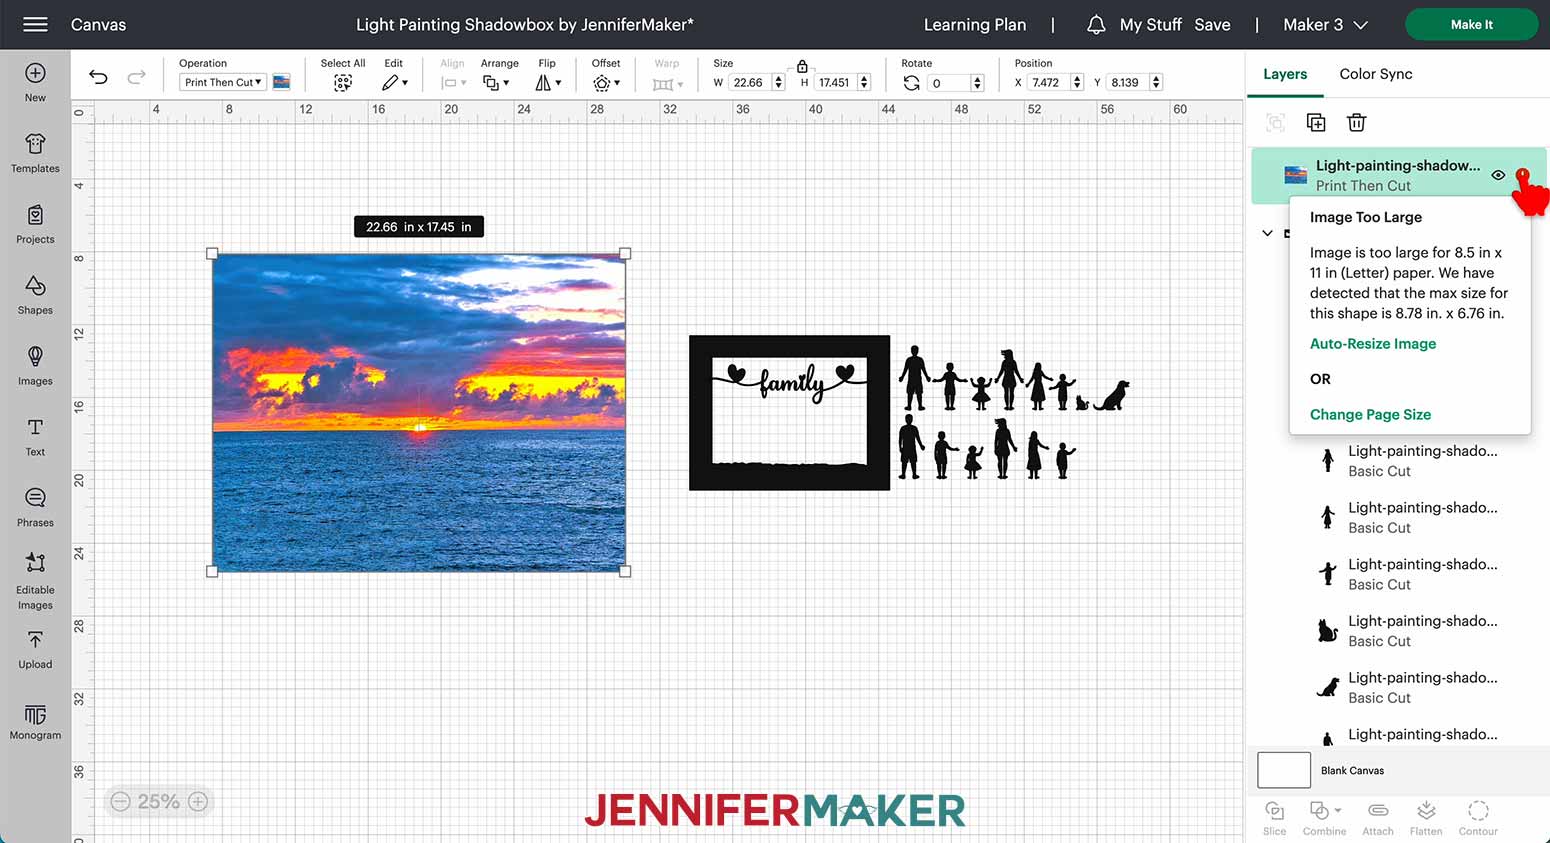
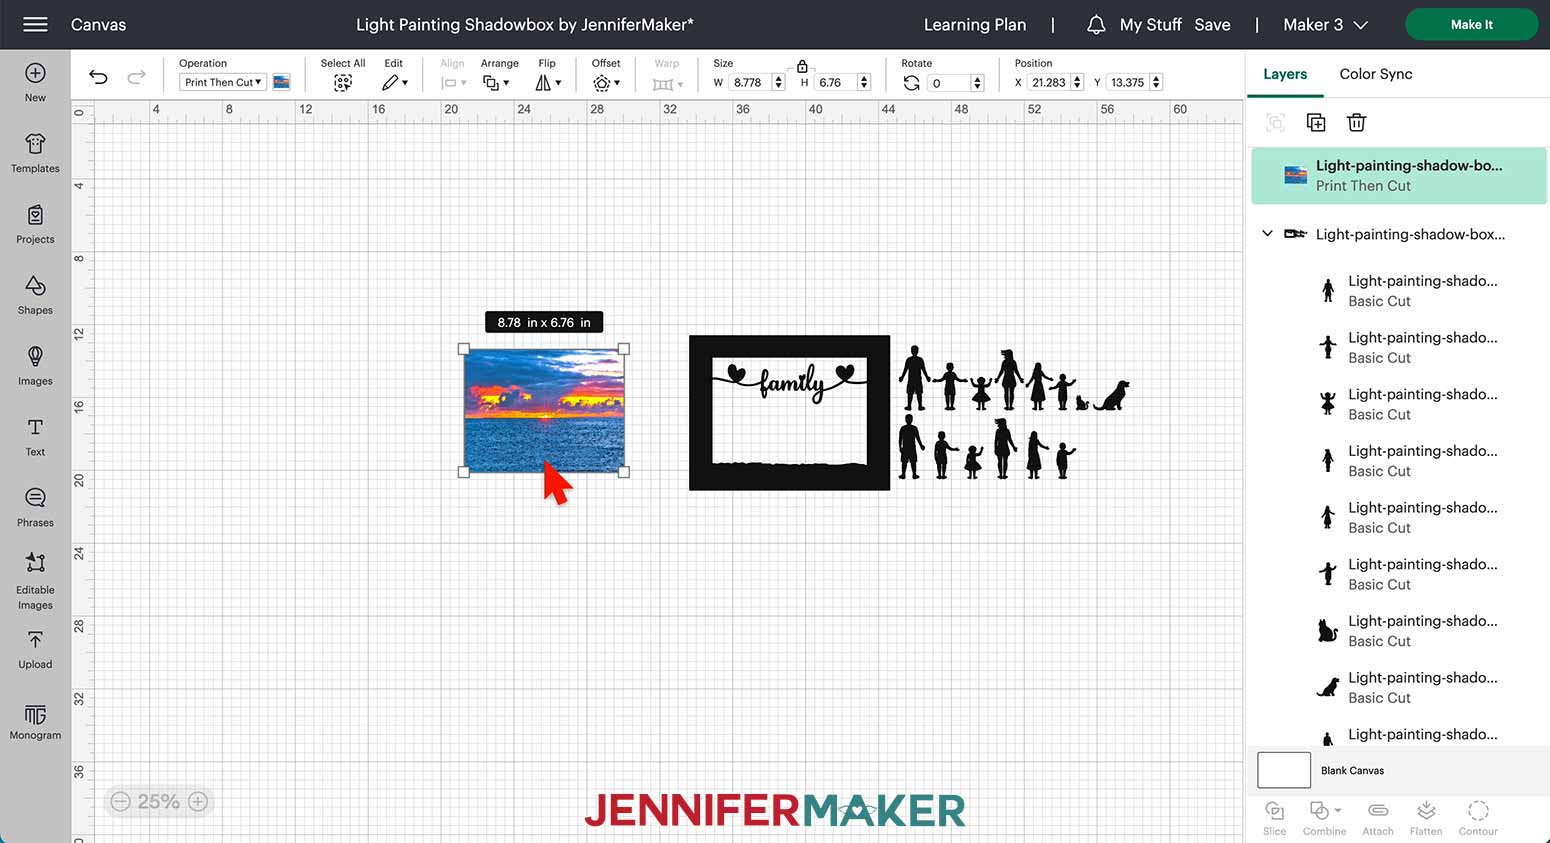
16. Click “Auto-Resize Image” to resize it to 8.78” x 6.76”.
17. Select the layer with the silhouettes and click the Ungroup icon.
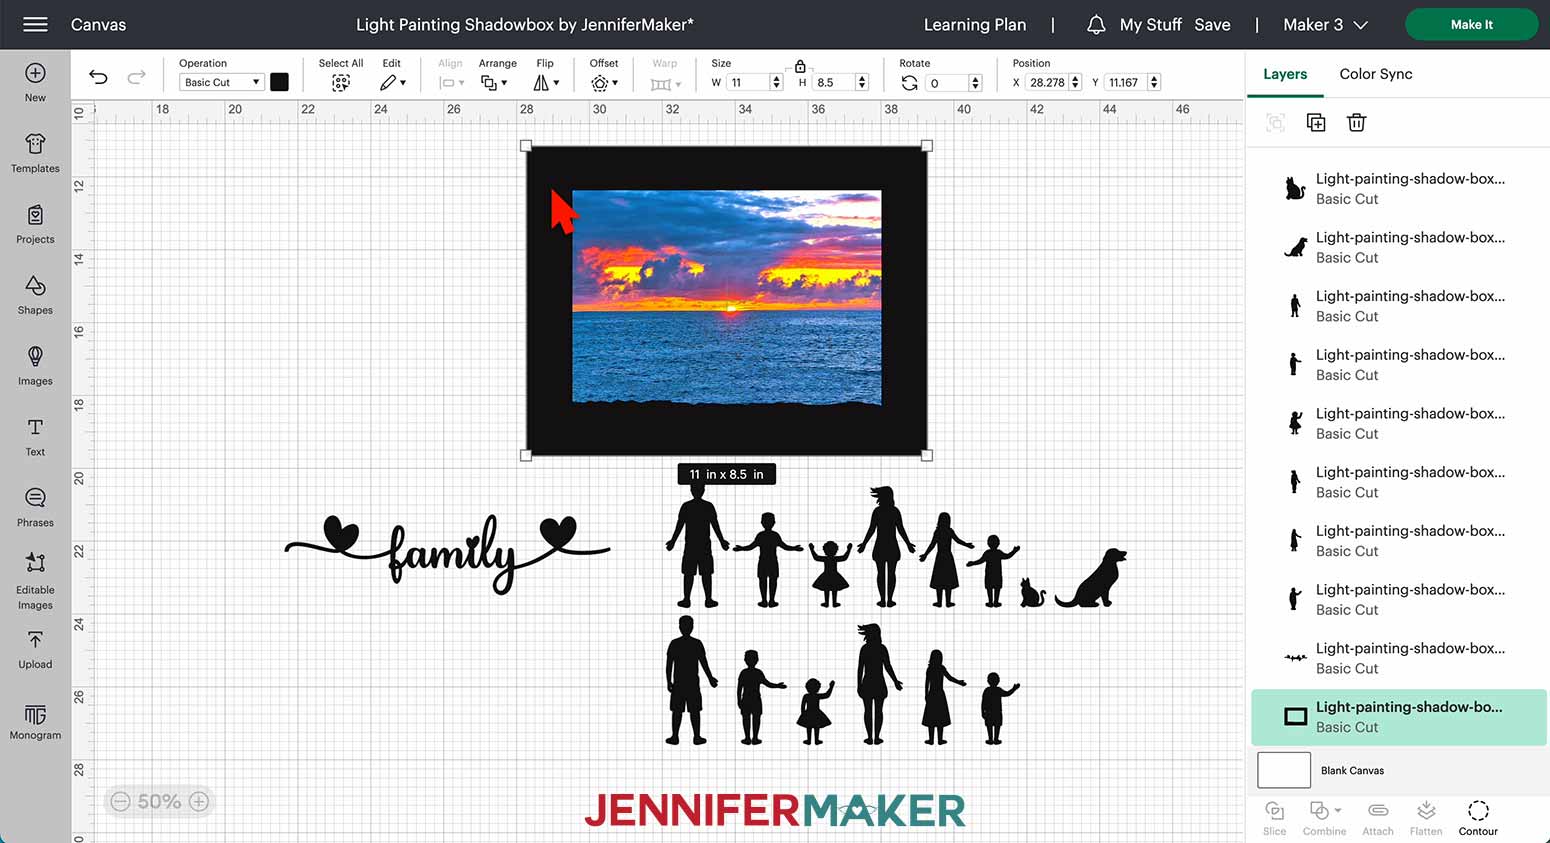
18. Select the photo layer and click “Arrange” and “Send to Back.”
19. Select and move the black frame on top of the photo so all four edges of the photo are covered by the inner border of the frame.
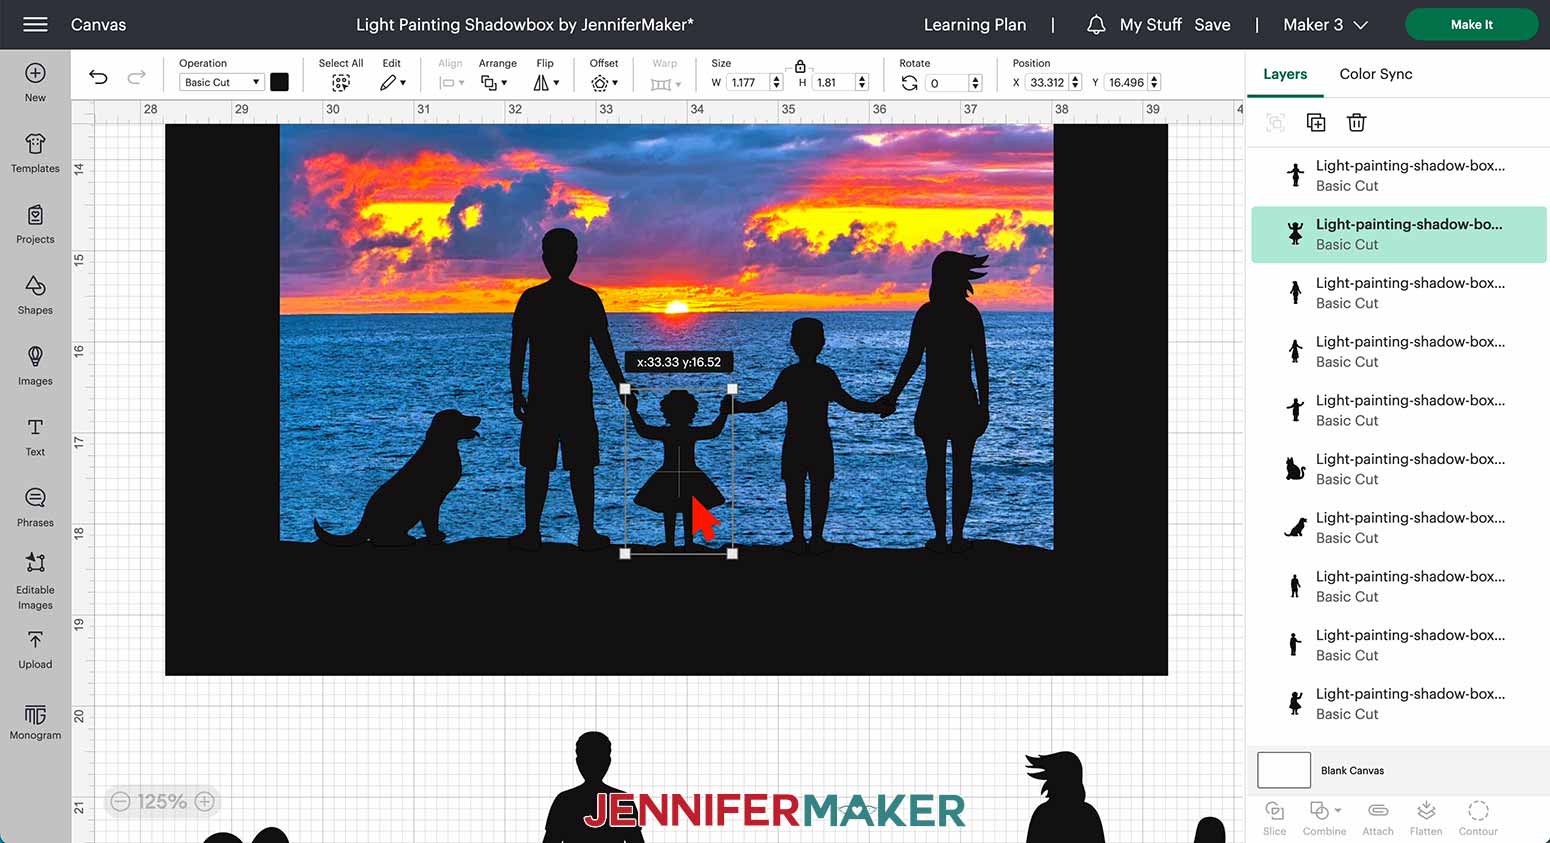
20. Select the silhouettes you’d like to use and move them into the frame.
21. Arrange your chosen silhouettes so their feet touch the ground and their hands overlap (if you’d like them to be holding hands).

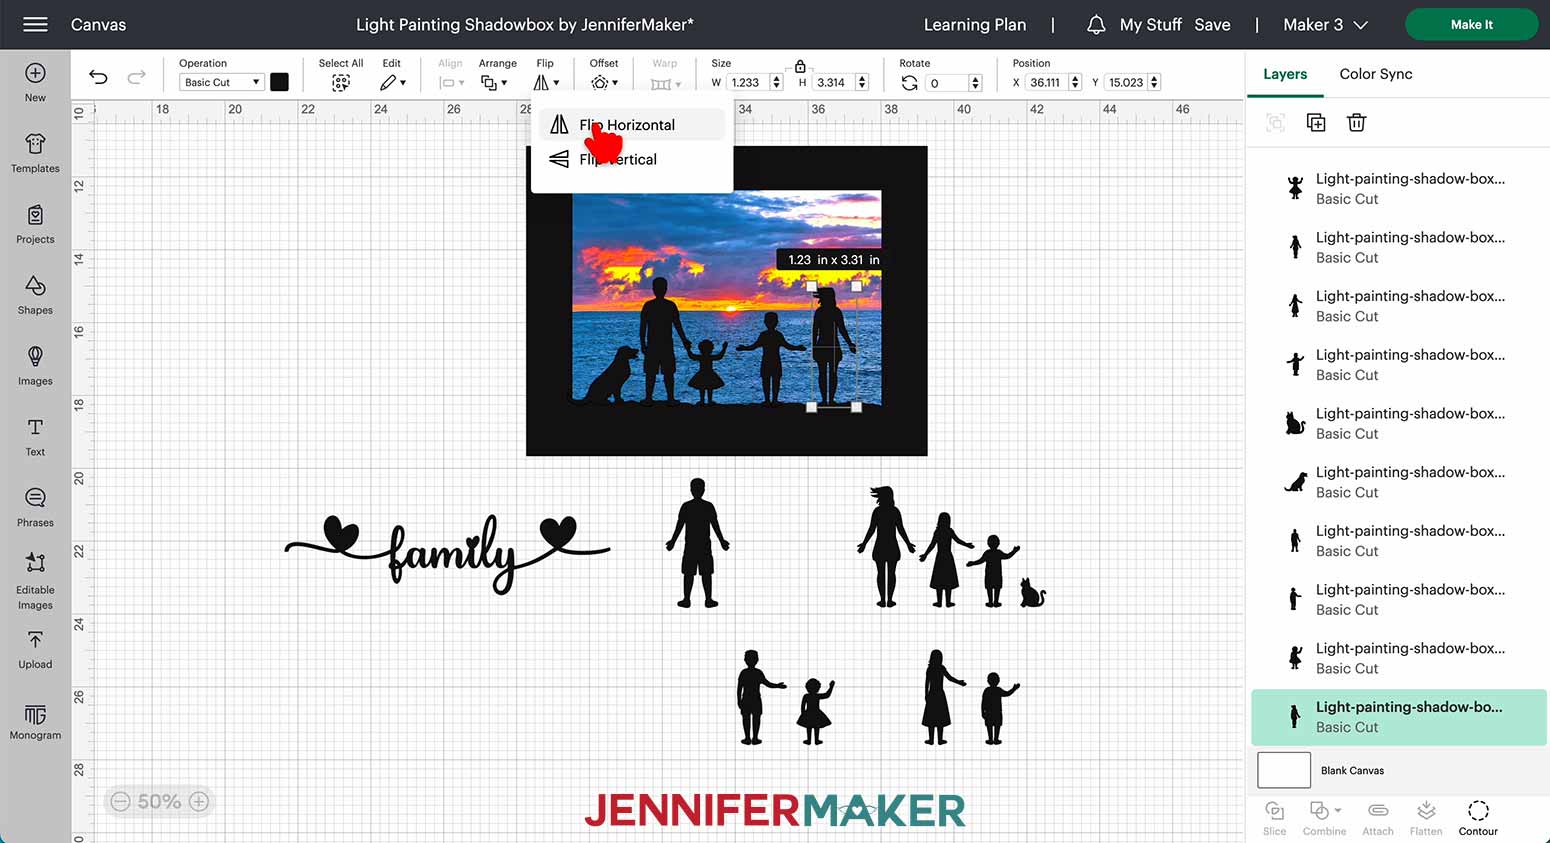
22. If you need to flip the direction a silhouette is facing, select that silhouette, click “Flip” and then choose “Flip Horizontal.”
23. If you need to resize a silhouette, select it, click the corner of the bounding box, and drag to enlarge or reduce the object.

24. Make sure all your silhouettes that are holding hands are aligned correctly and there are no small holes that won’t cut well. Click the plus (+) sign to zoom in and reposition objects if needed.
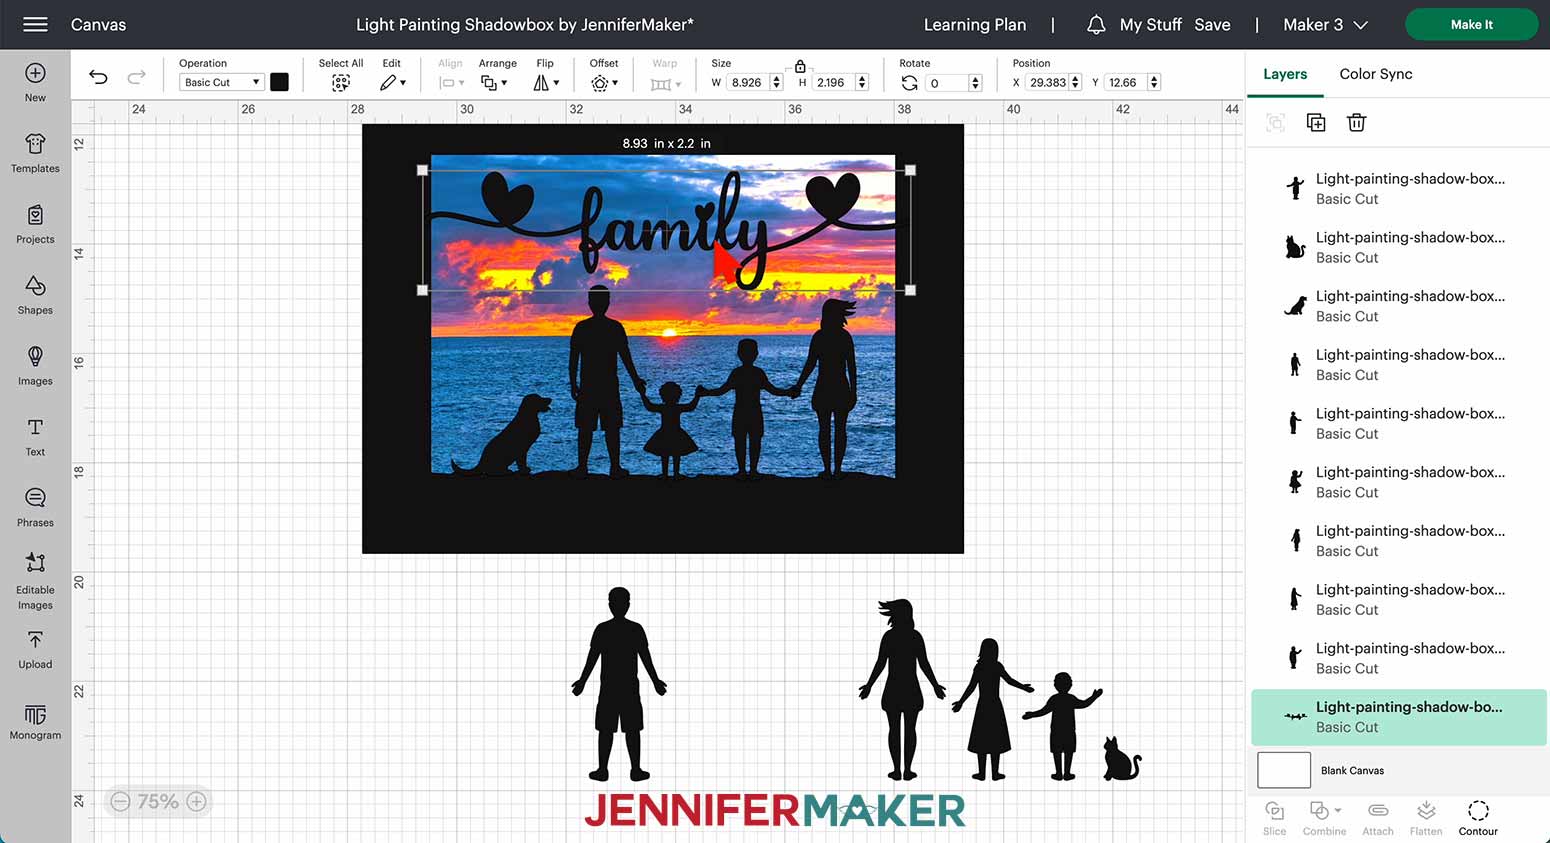
25. If you’d like to add the word “family” above your silhouettes, select that layer and move it to the top center of the frame.
TIP: If you’d like to add your own custom word or phrase, follow the directions in my Layered Cake Toppers tutorial!
26. Click and drag to select the unused silhouettes, then click the Group icon.
27. Hide or delete the grouped layer.
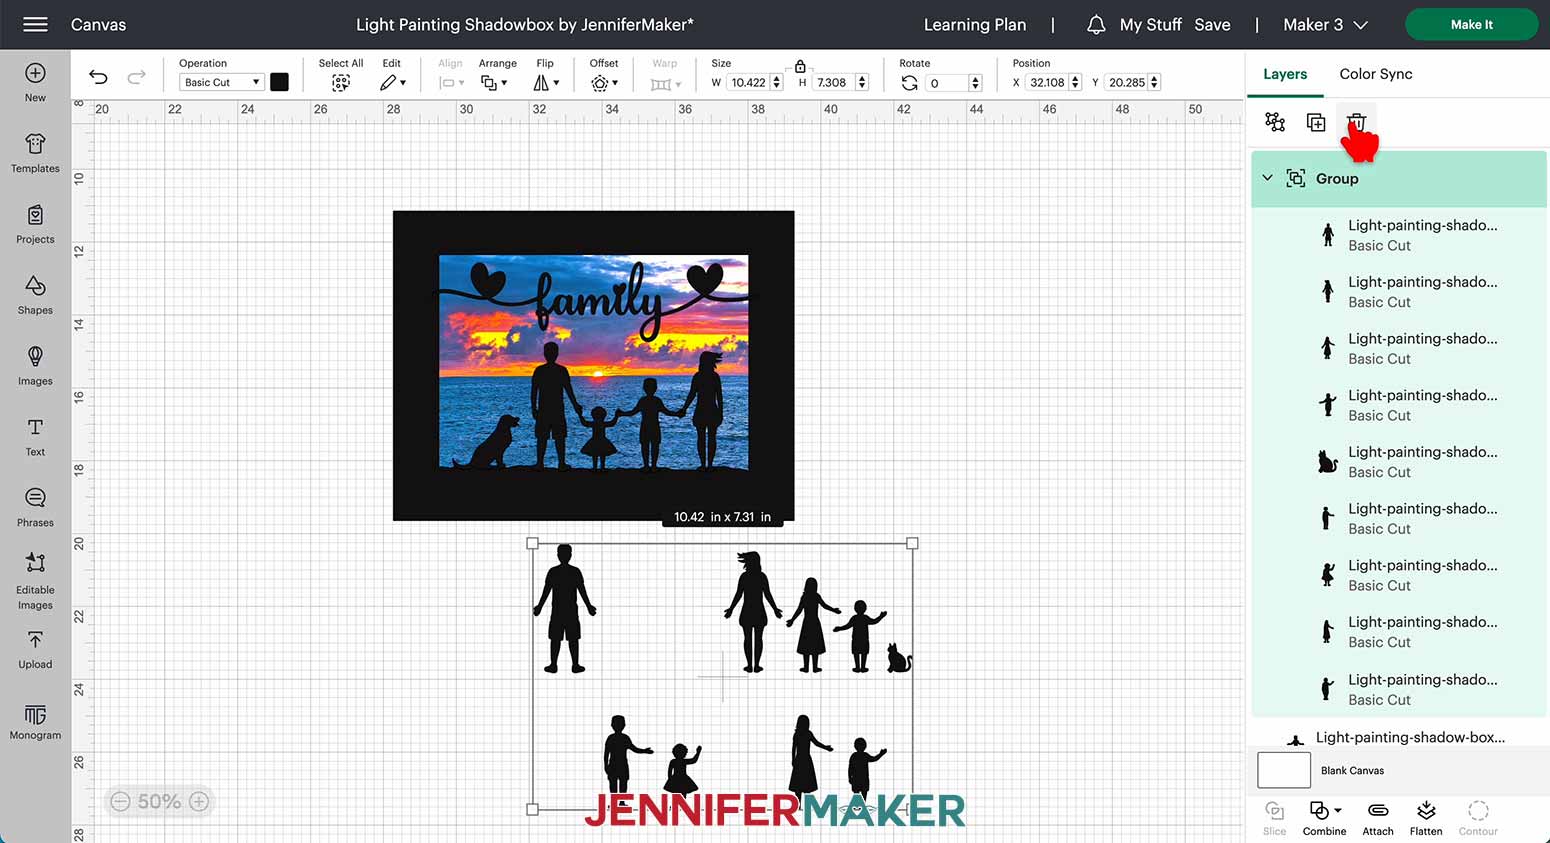
28. Select all your chosen silhouettes, the frame, and the “family” sentiment (if you’re using it), then click “Combine” and choose “Unite.”
NOTE: Make sure you don’t select the photo layer when uniting everything. You can use the Layers Panel to deselect that layer if needed.

29. Your layers are now ready to cut! They are sized perfectly for the 8.5” x 11” shadow box frame in my materials list.
NOTE: I don’t recommend enlarging the design, as your Print Then Cut layer is already as large as it can be.
30. Make sure the correct machine is selected in the top right.
31. Click “Make It.”
32. If prompted, click "On Mat," choose your mat size, and click “Confirm.”
33. On the Prepare Screen, you should have two mats. The first should be an 8.5” x 11” Print Then Cut mat and the second should be a black 12” x 12” Basic Cut mat. Do not mirror either mat.
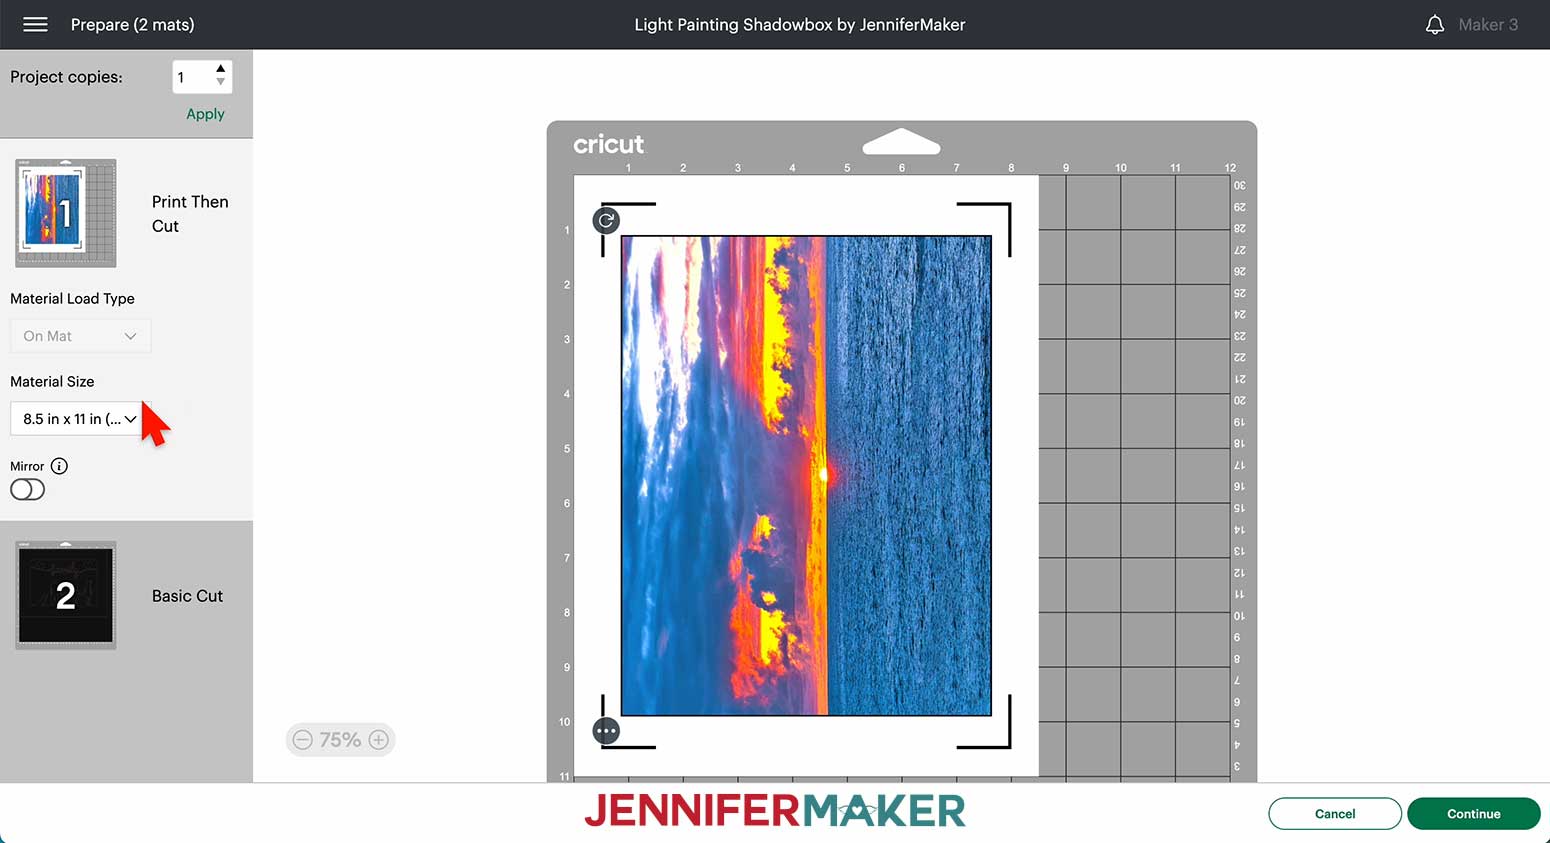
34. Select the first mat and click “Continue.”
PRINTING
1. On the Make Screen, click “Send to Printer.”
2. Follow the “PRINTING” steps in the “PROJECT 1, STEP 2” directions above to print your photo on a sheet of transparency film.
NOTE: Remember to choose “Photo Glossy Paper” for the Paper Type and “Best” for the Quality.
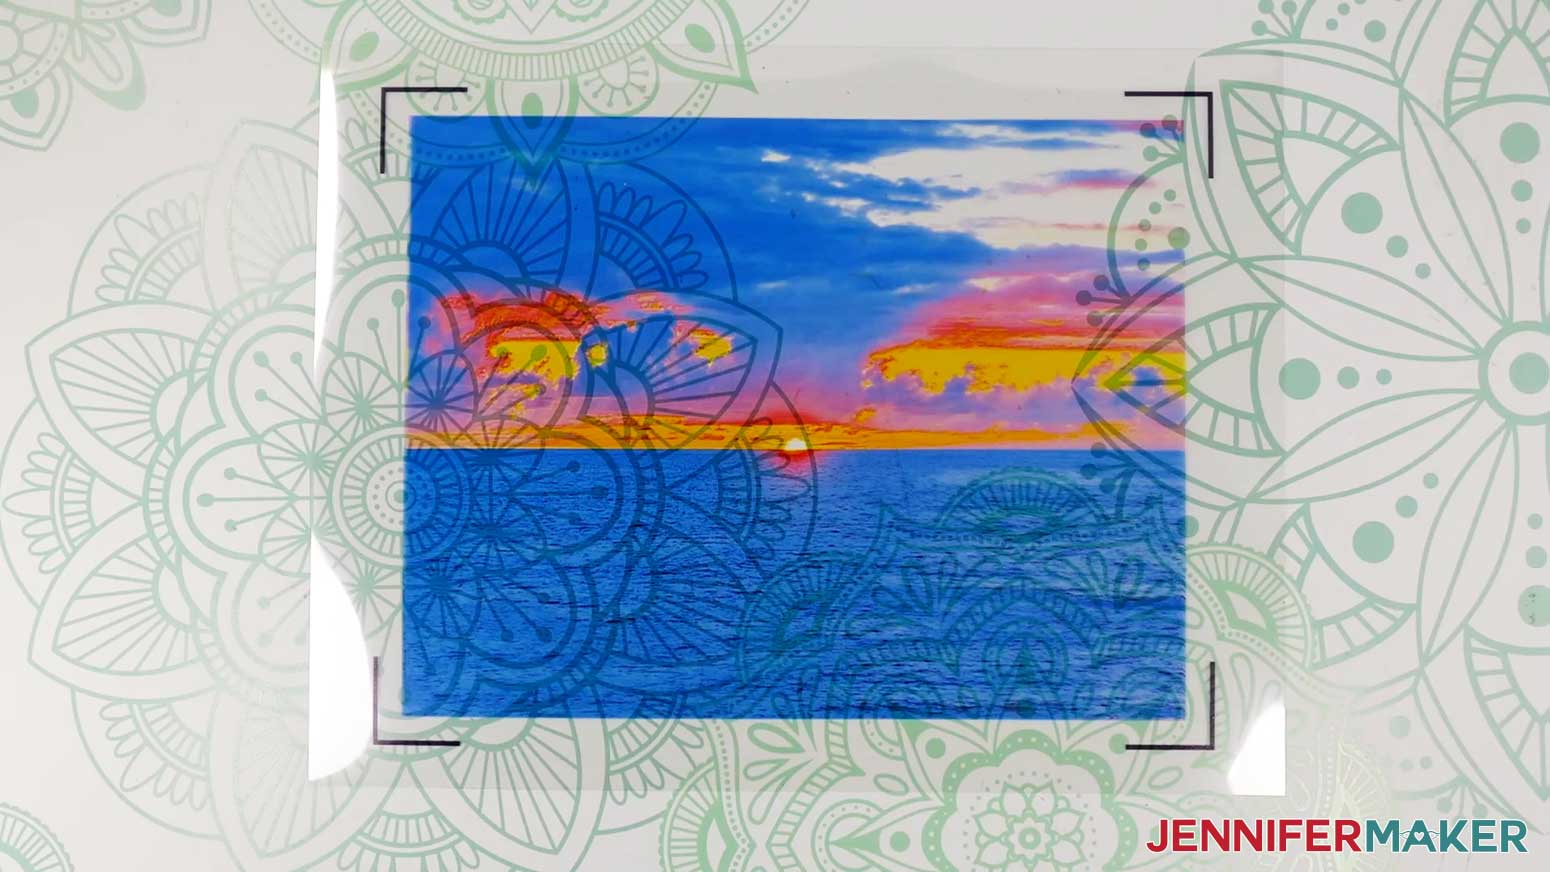
3. Allow your printed sheet to fully dry before placing it on your mat for cutting.
CUTTING
1. On the Make Screen, select the mat with the photo layer.
2. Click “Browse All Materials.”
3. Search for and select the “Transparency” setting.
4. Change the Pressure to “More” for a cleaner cut.
5. Place your printed sheet face up on a blue LightGrip machine mat and make sure it’s oriented in the same direction as on your screen.
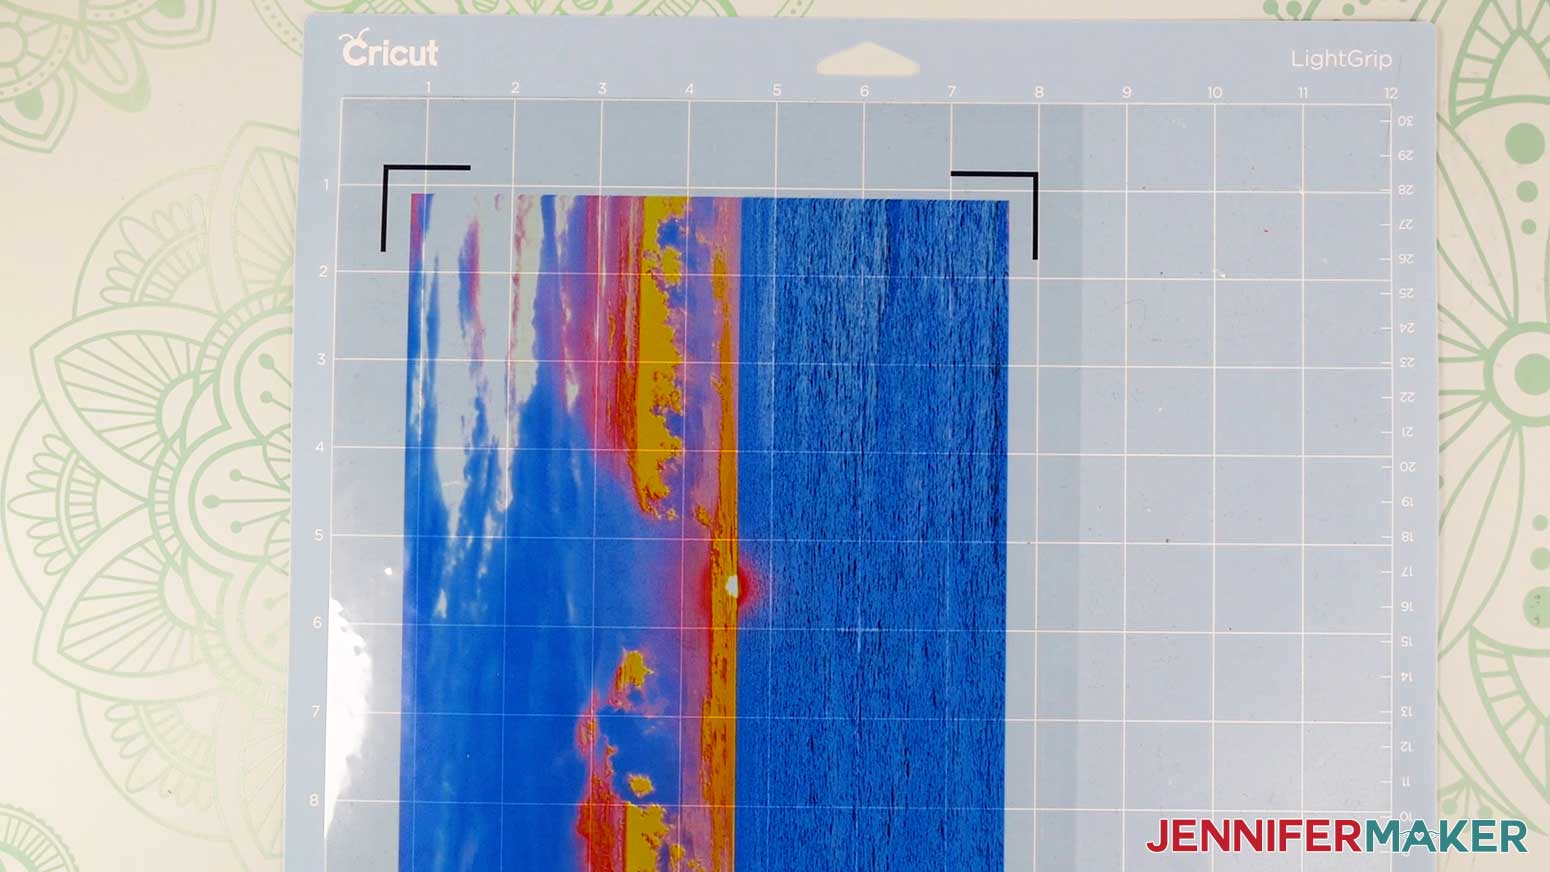
6. Put a piece of clean copy paper on top of the print and use a brayer to secure the print to the mat.
7. Check that your Fine-Point Blade is clean and in the clamp.
8. Press the flashing “Load/Unload” button to load the prepared mat into your Cricut.
9. Press the flashing “Go” button to begin cutting.
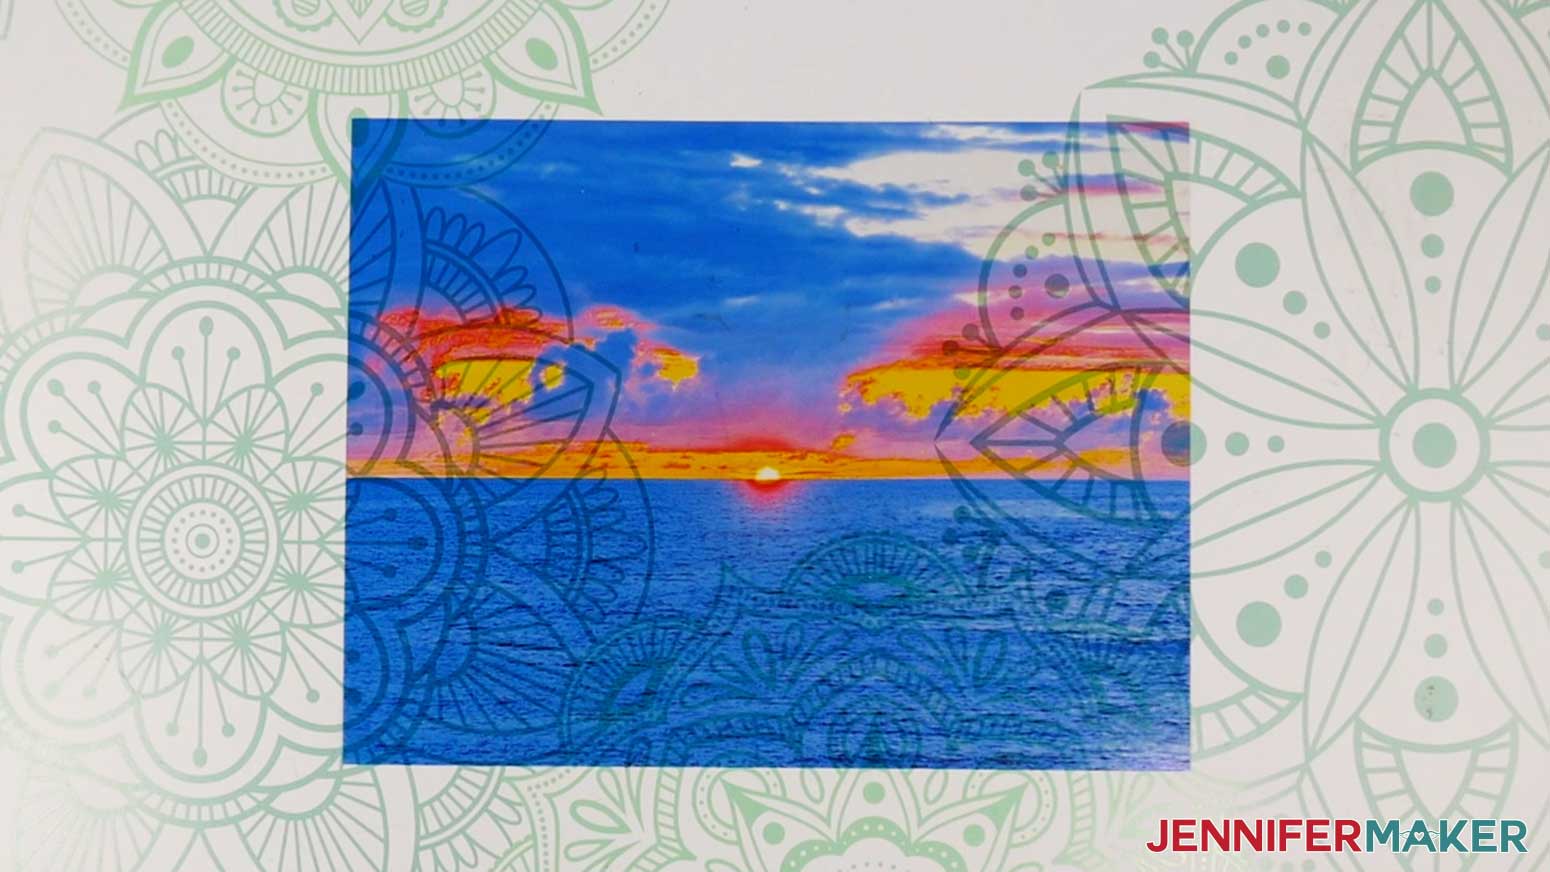
10. When it has finished cutting, unload the mat, flip it over onto your work surface, and roll it back to release the film. Here is what my cut photo looks like.
11. On the Make Screen, select the black mat and click “Browse All Materials.”
12. Search for and select the “Medium Cardstock – 80 lb (216 gsm)” setting.
13. Change the Pressure to “More” for a cleaner cut.
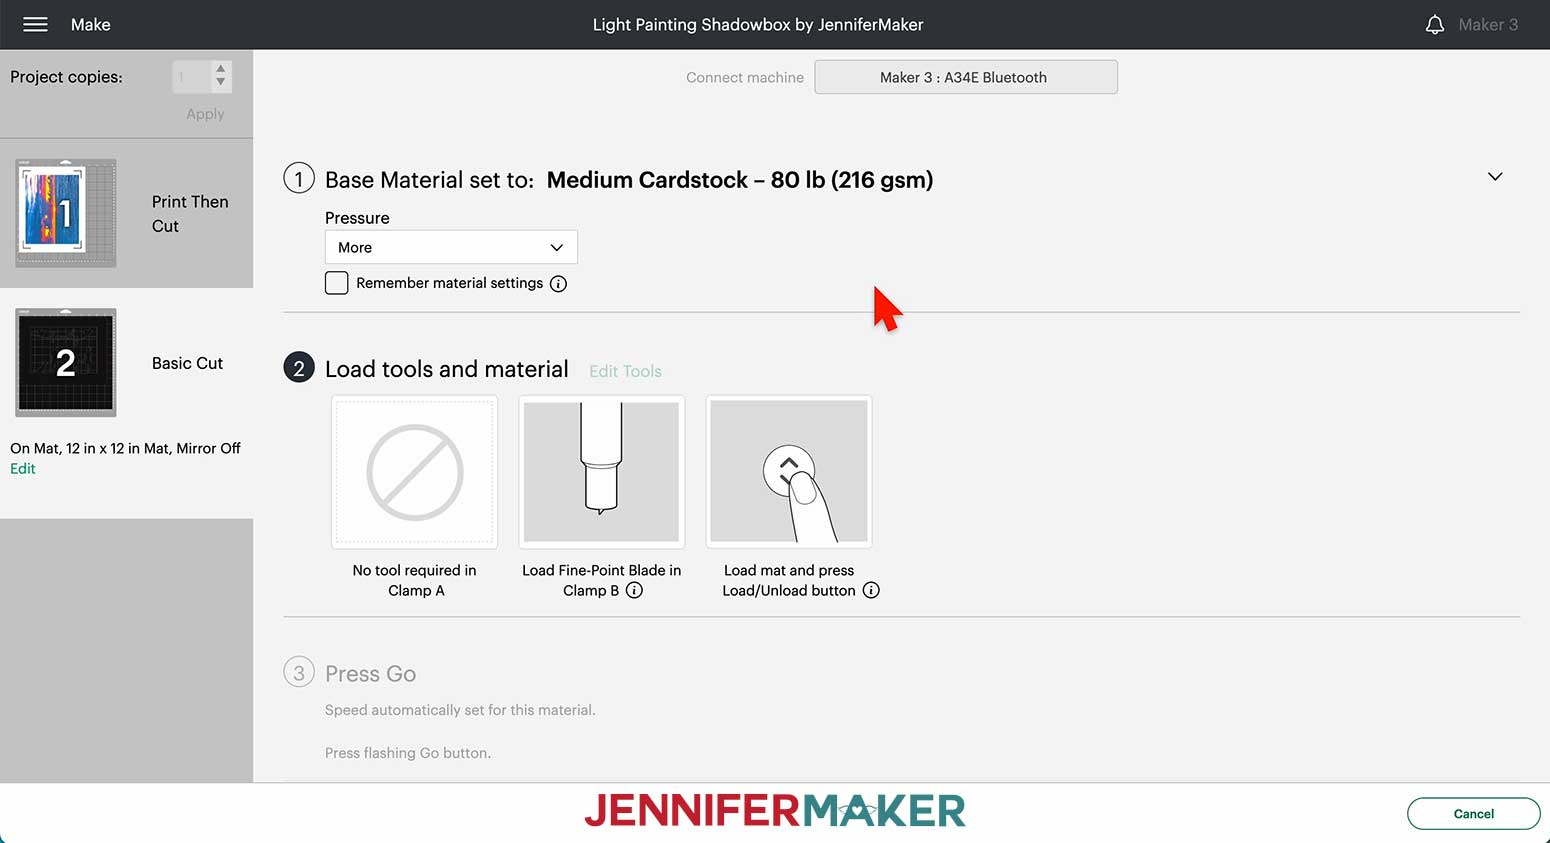
14. Place your black or dark-colored cardstock face up on a green StandardGrip machine mat.
15. Use a brayer to make sure it’s fully adhered.
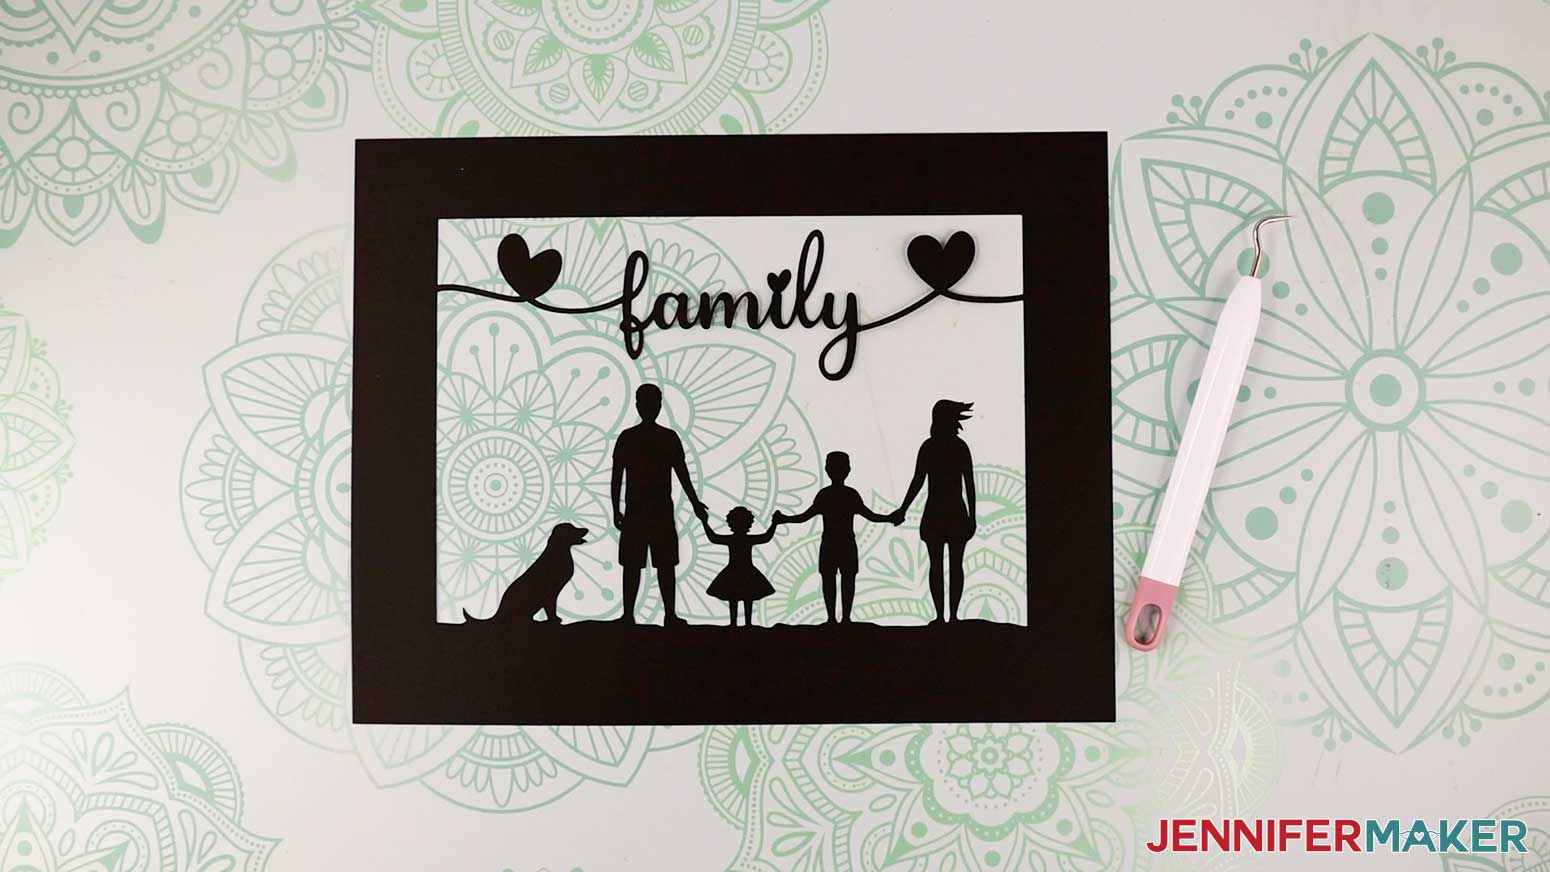
16. Follow steps 7-10 above to cut and remove your cardstock layers from the mat.
TIP: Use a spatula to carefully remove any intricate parts and a weeding tool to pop out any small pieces.
STEP 3: ASSEMBLE YOUR FAMILY SILHOUETTES LIGHT PAINTING SHADOW BOX
ASSEMBLE THE LAYERS
1. Place your cardstock silhouettes layer face down on your flat light source (the word “family” will be backwards).
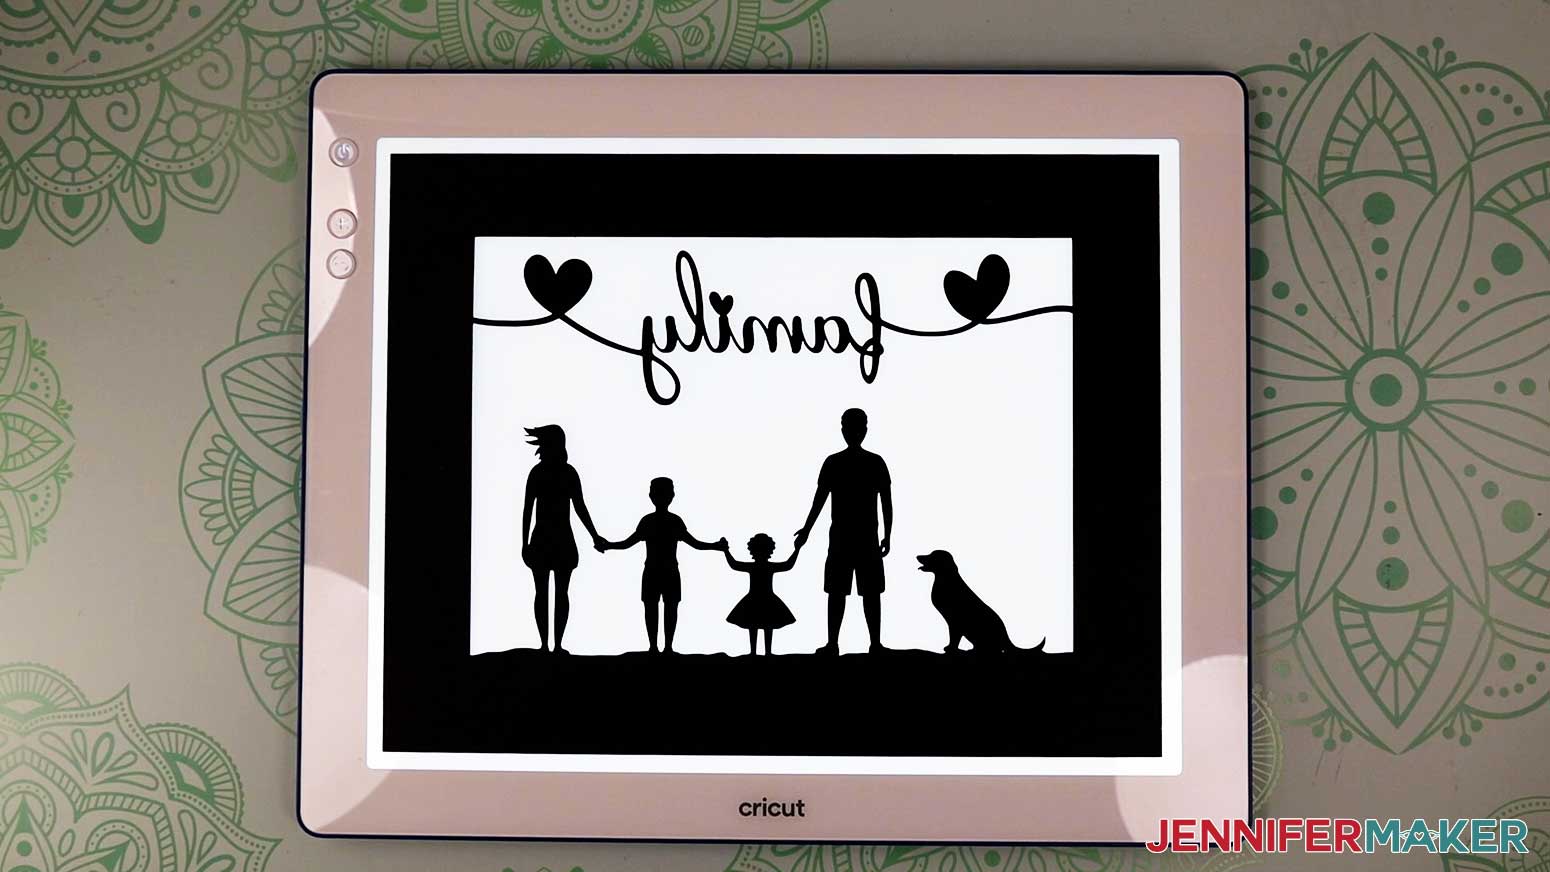
2. Grab a blank piece of 24 lb. 8.5” x 11” copy paper and place it on top of the cardstock layer, aligning the edges.
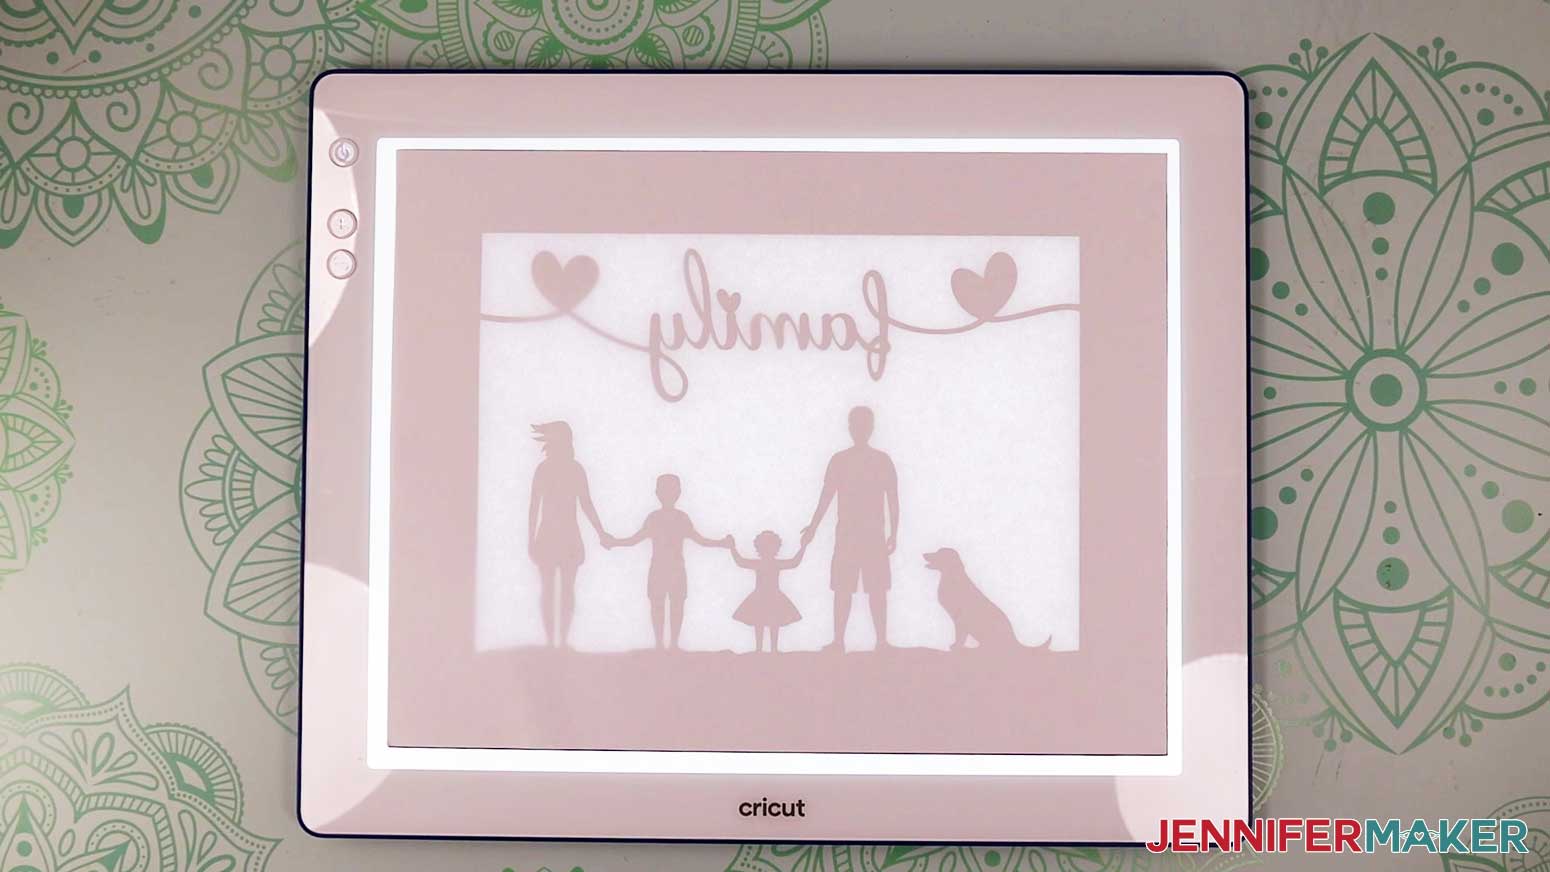
NOTE: We are placing this sheet in front of the printed photo so the image will be hidden until the lights are turned on. I’m using 24 lb. copy paper because it’s thin enough to see light shining through it but not so thin that the photo will be visible when the lights are off.
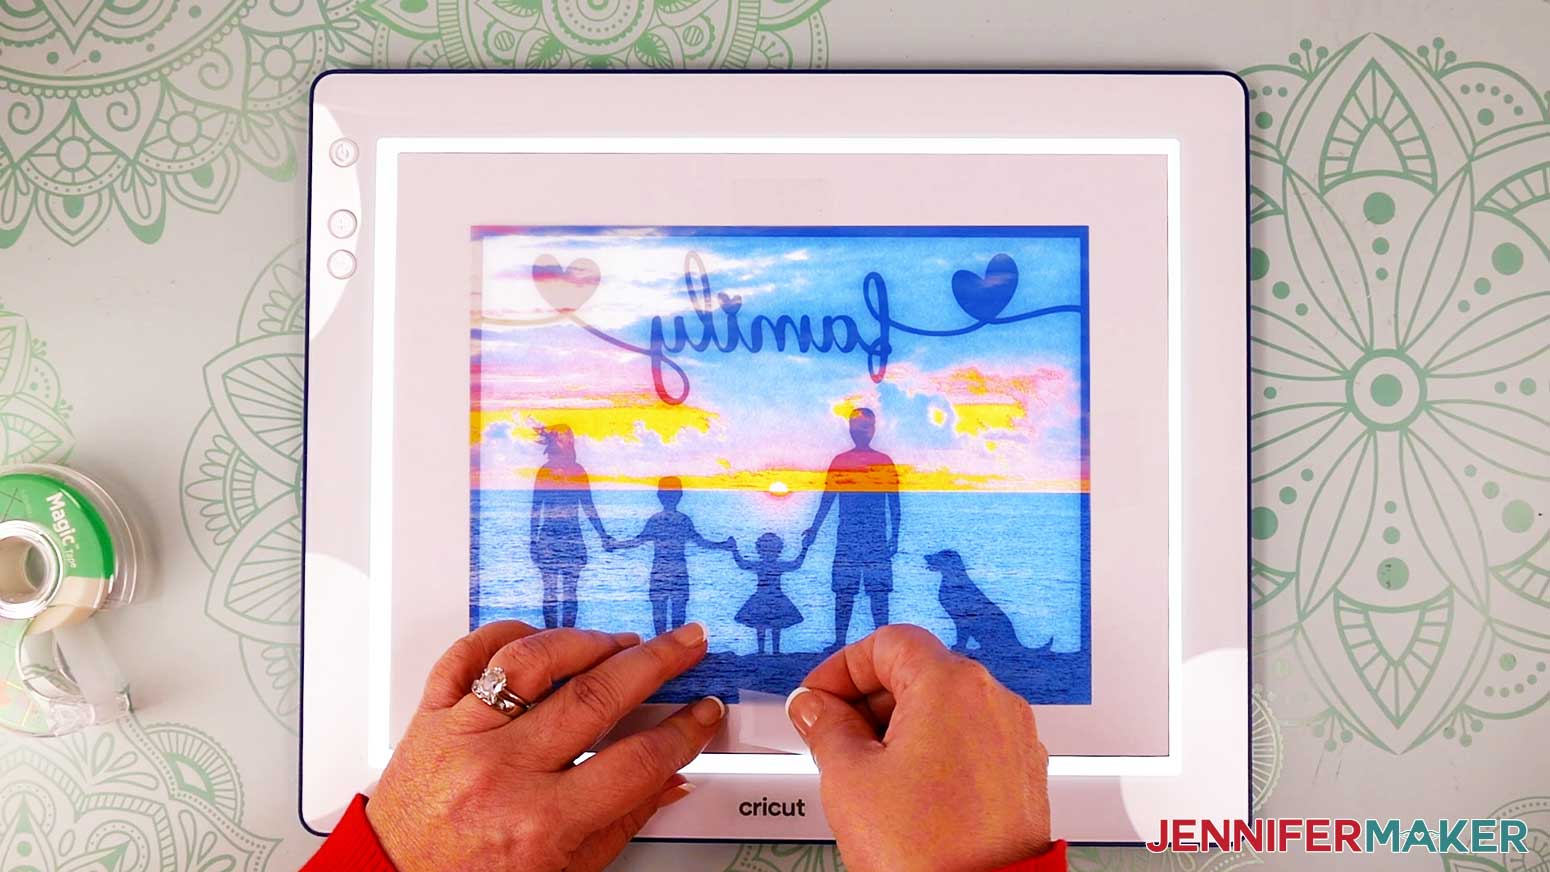
3. Place your photo layer face down on top of the stack.
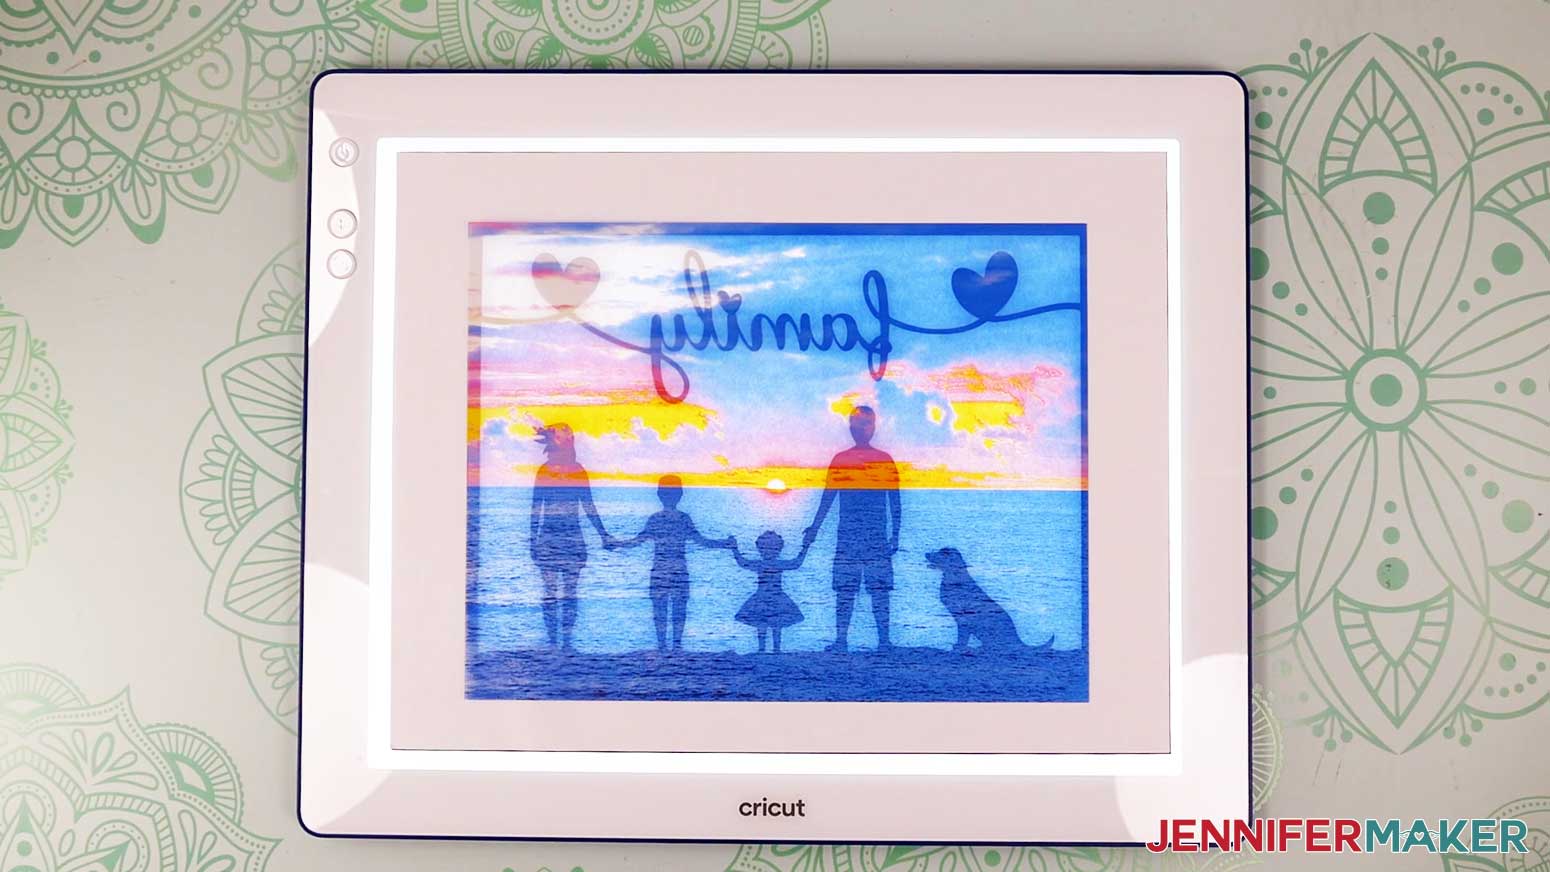
4. Turn on your light source and use it to align the photo within the frame’s opening. Make sure all four edges of the photo overlap the black cardstock frame.
5. Once your photo layer is perfectly aligned, secure it to the copy paper with four pieces of clear Scotch tape – one on each edge.
ADD THE LIGHTS
1. Open your shadow box frame and remove the wooden insert. Don’t discard it.
2. Clean the glass with isopropyl alcohol and a lint-free cloth if needed.
3. Place your cardstock layer face down in the frame (the word “family” will be backwards).
4. Place your attached photo and copy paper layers face down on top of the cardstock.
5. Put the wooden insert on top of all the layers.
6. Follow steps 4-16 in the “ADD THE LIGHTS” section of “PROJECT 1, STEP 3” above to attach your lights inside the frame.
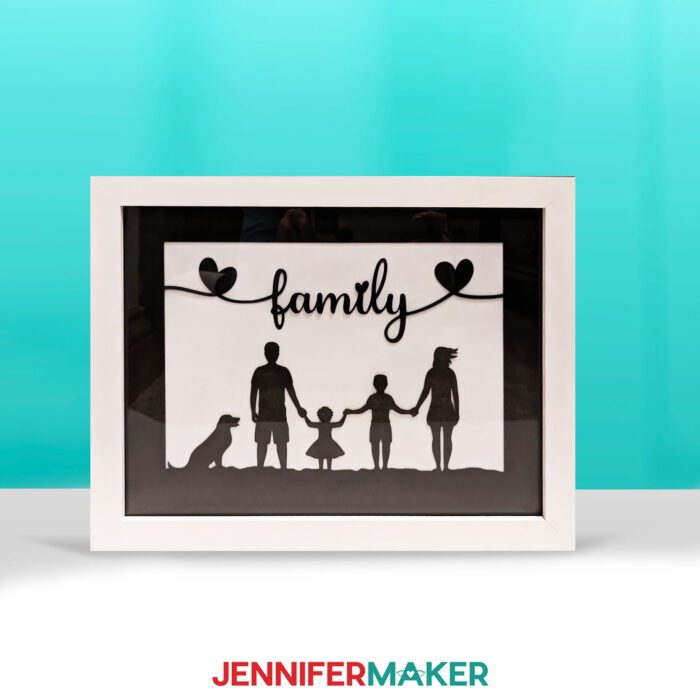
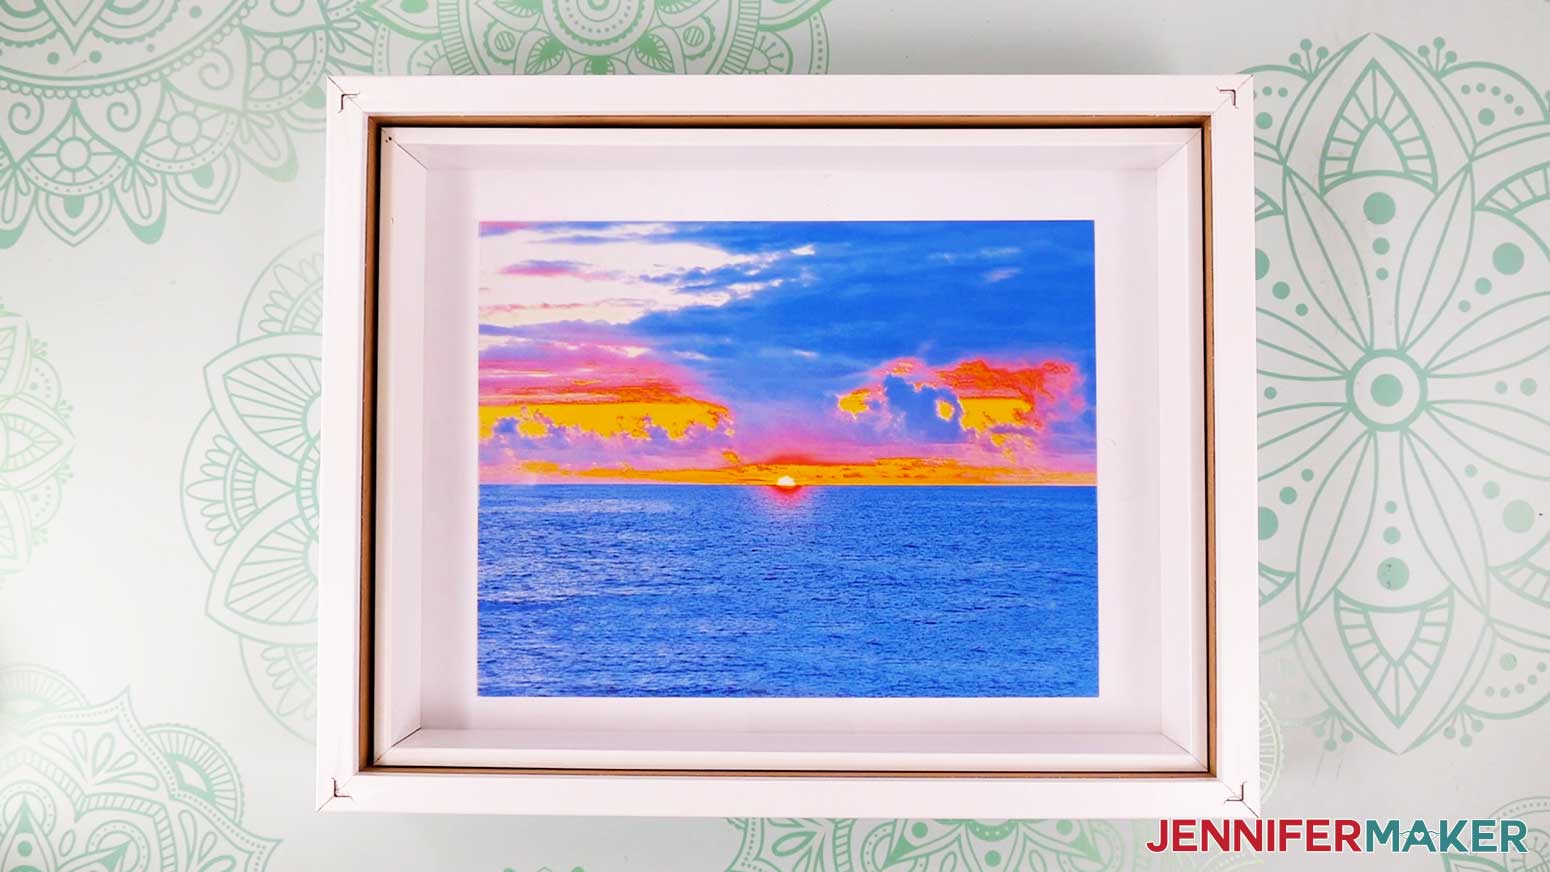
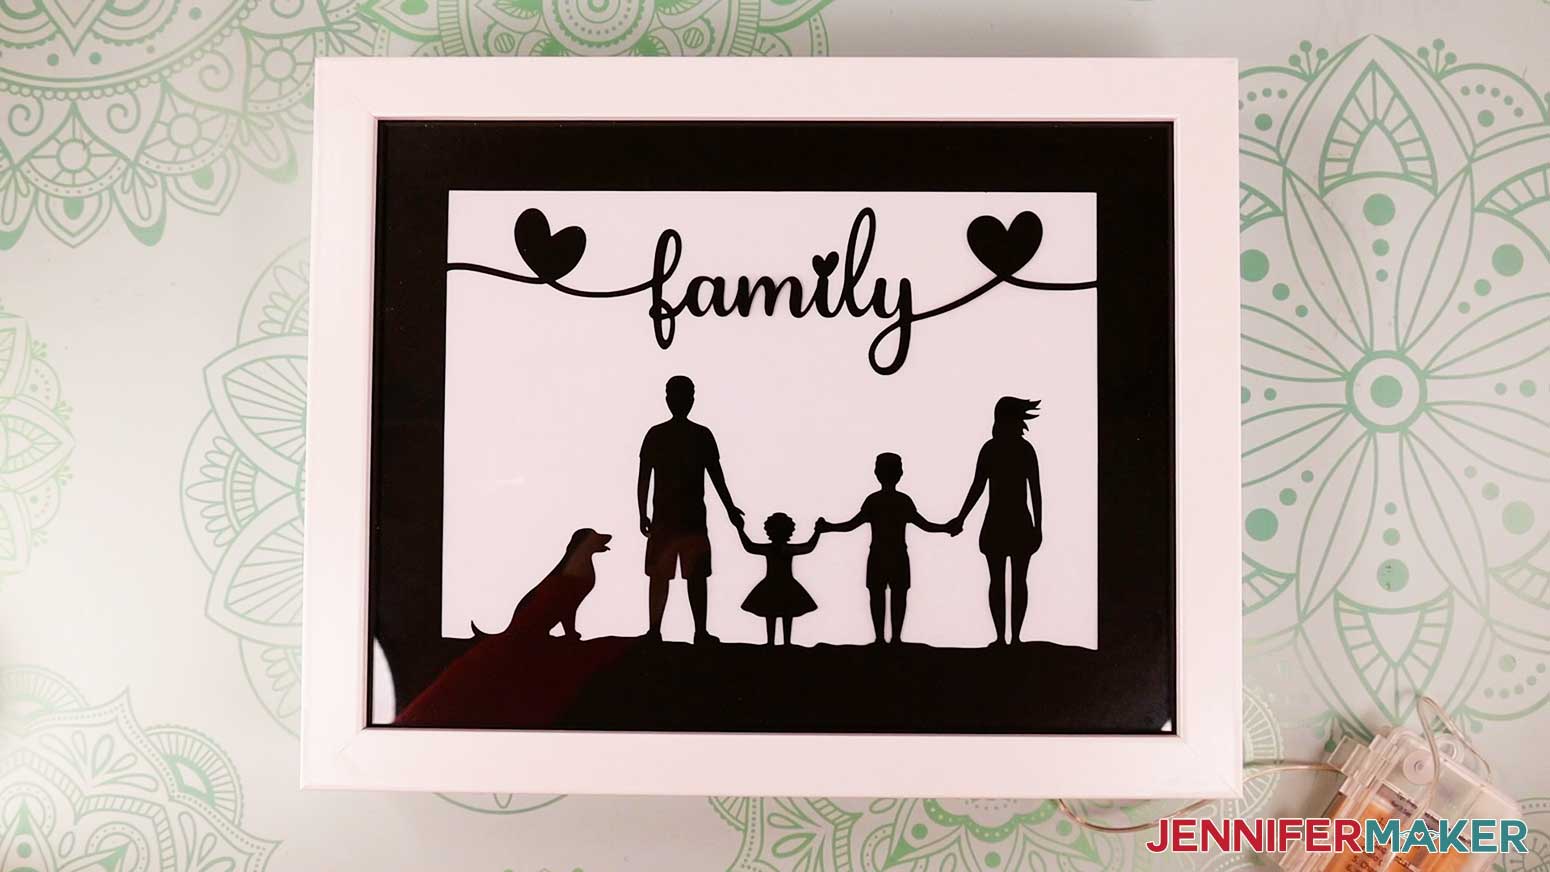
7. This is what my finished family silhouettes light painting shadow box frame looks like with the lights off.
STEP 4: SHOW IT OFF!
Here is what both of my finished Light Painting Shadow Boxes look like all lit up! Aren’t they cool?
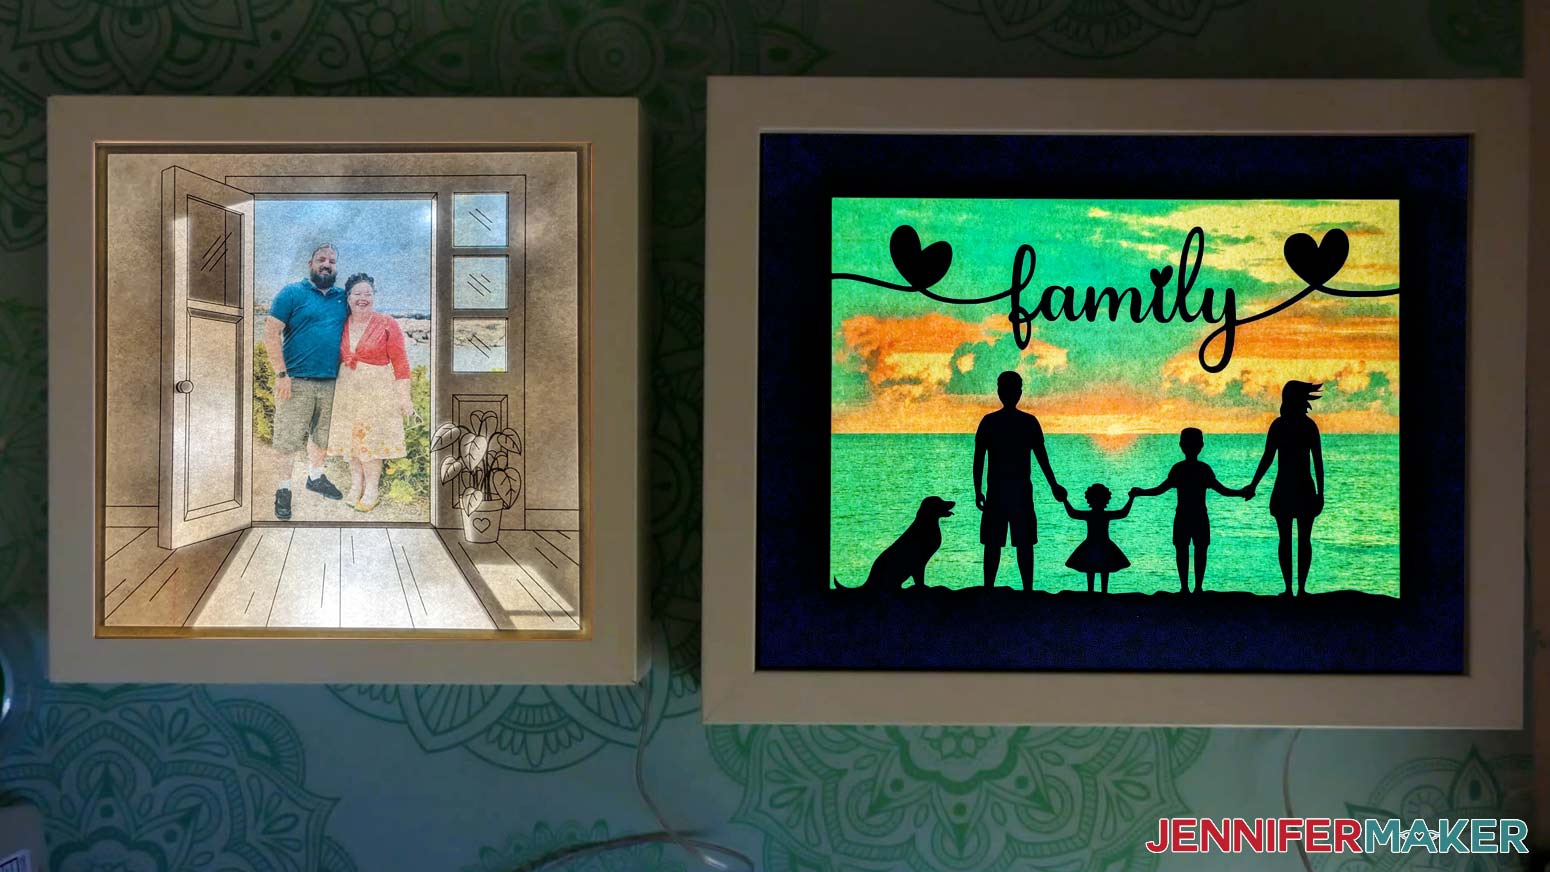
You can hang yours on a wall and secure the battery pack to the top or side with several glue dots, or you can set it on a table or shelf and hide the battery pack behind it.
Notes
Typeface Used: Hey Lover (Silhouettes Design Sentiment)
Finished Sizes:
Doorway Design (in frame): 9" wide x 9" tall x 1.75" deep
Doorway Design Layers: 8" x 8"
Silhouettes Design (in frame): 12" wide x 9.5" tall x 2.375" deep
Silhouettes Design Layers: 11" wide x 8.5" tall
Answers to Your Questions About How to Make a Light Painting Shadow Box
Q: How do you make a lighted shadow box?
A: I explain how to make a lighted shadowbox right here in this tutorial, step by step! You can read the written instructions here in this blog post or watch the video to see how I do it.
Q. How to do I turn a picture into a shadow box?
A. Follow this tutorial if you want to learn how to make a shadow box with an illuminated photo printed on transparency material. I walk you through how to create and customize your own doorway and family silhouette light paintings in this tutorial, but you can also use them for inspiration to create your own photo shadow boxes.
To make a simple keepsake shadow box including a spot for a photo, check out my DIY Shadow Boxes for Collections tutorial.
If you want to turn a photo into a cuttable file you can use in a layered paper craft, shadow box, or many other projects, you’ll need to first convert your image layer to an SVG cut file. This is a much more detailed process than I can describe here, but I cover it in my Cut Above SVG Design Course.
Q. Can you put LED lights in a shadow box?
A: Absolutely! Battery-powered adhesive LED strips are my favorite way to light up a shadow box. I show you how to add them to your shadow box (and my favorite material for making them stick) in this tutorial.
Q: Can you put a painting in a shadow box?
A: Sure! Shadow boxes can be used for all kinds of arts and crafts, including thicker canvases and 3D art. Just make sure you get the right depth shadow box for your painting. Often, you can find used shadow boxes at thrift store or on clearance at your local craft store. Fill them with paintings, layered paper art, keepsakes, mandalas, and anything else you can think of! There’s no wrong way to craft, and as long as you’re having fun you’re going in the right direction.
Q: What do you put between layers in a shadow box? What is the best glue to use in a shadow box?
A: Glue dots and double-sided adhesive foam are my favorite ways to attach and space out layers in a shadow box. I don’t recommend using glue on most shadow boxes because it doesn’t add dimension between the layers like the larger glue dots and foam do.
Q. What kind of printer do I need to print on transparency?
A. A regular inkjet printer works great to print on transparency material — you don’t need any kind of special printer or equipment to print the photo for your light painting shadow box.
Get my free SVG files to make a Light Painting Shadow Box!
I’d love to see YOUR amazing light paintings! Please share a photo in our Facebook group or tag me on social media with #jennifermaker.
Love,

Want to remember this? Save this tutorial on How to Make a Light Painting Shadow Box to your favorite Pinterest Board!