
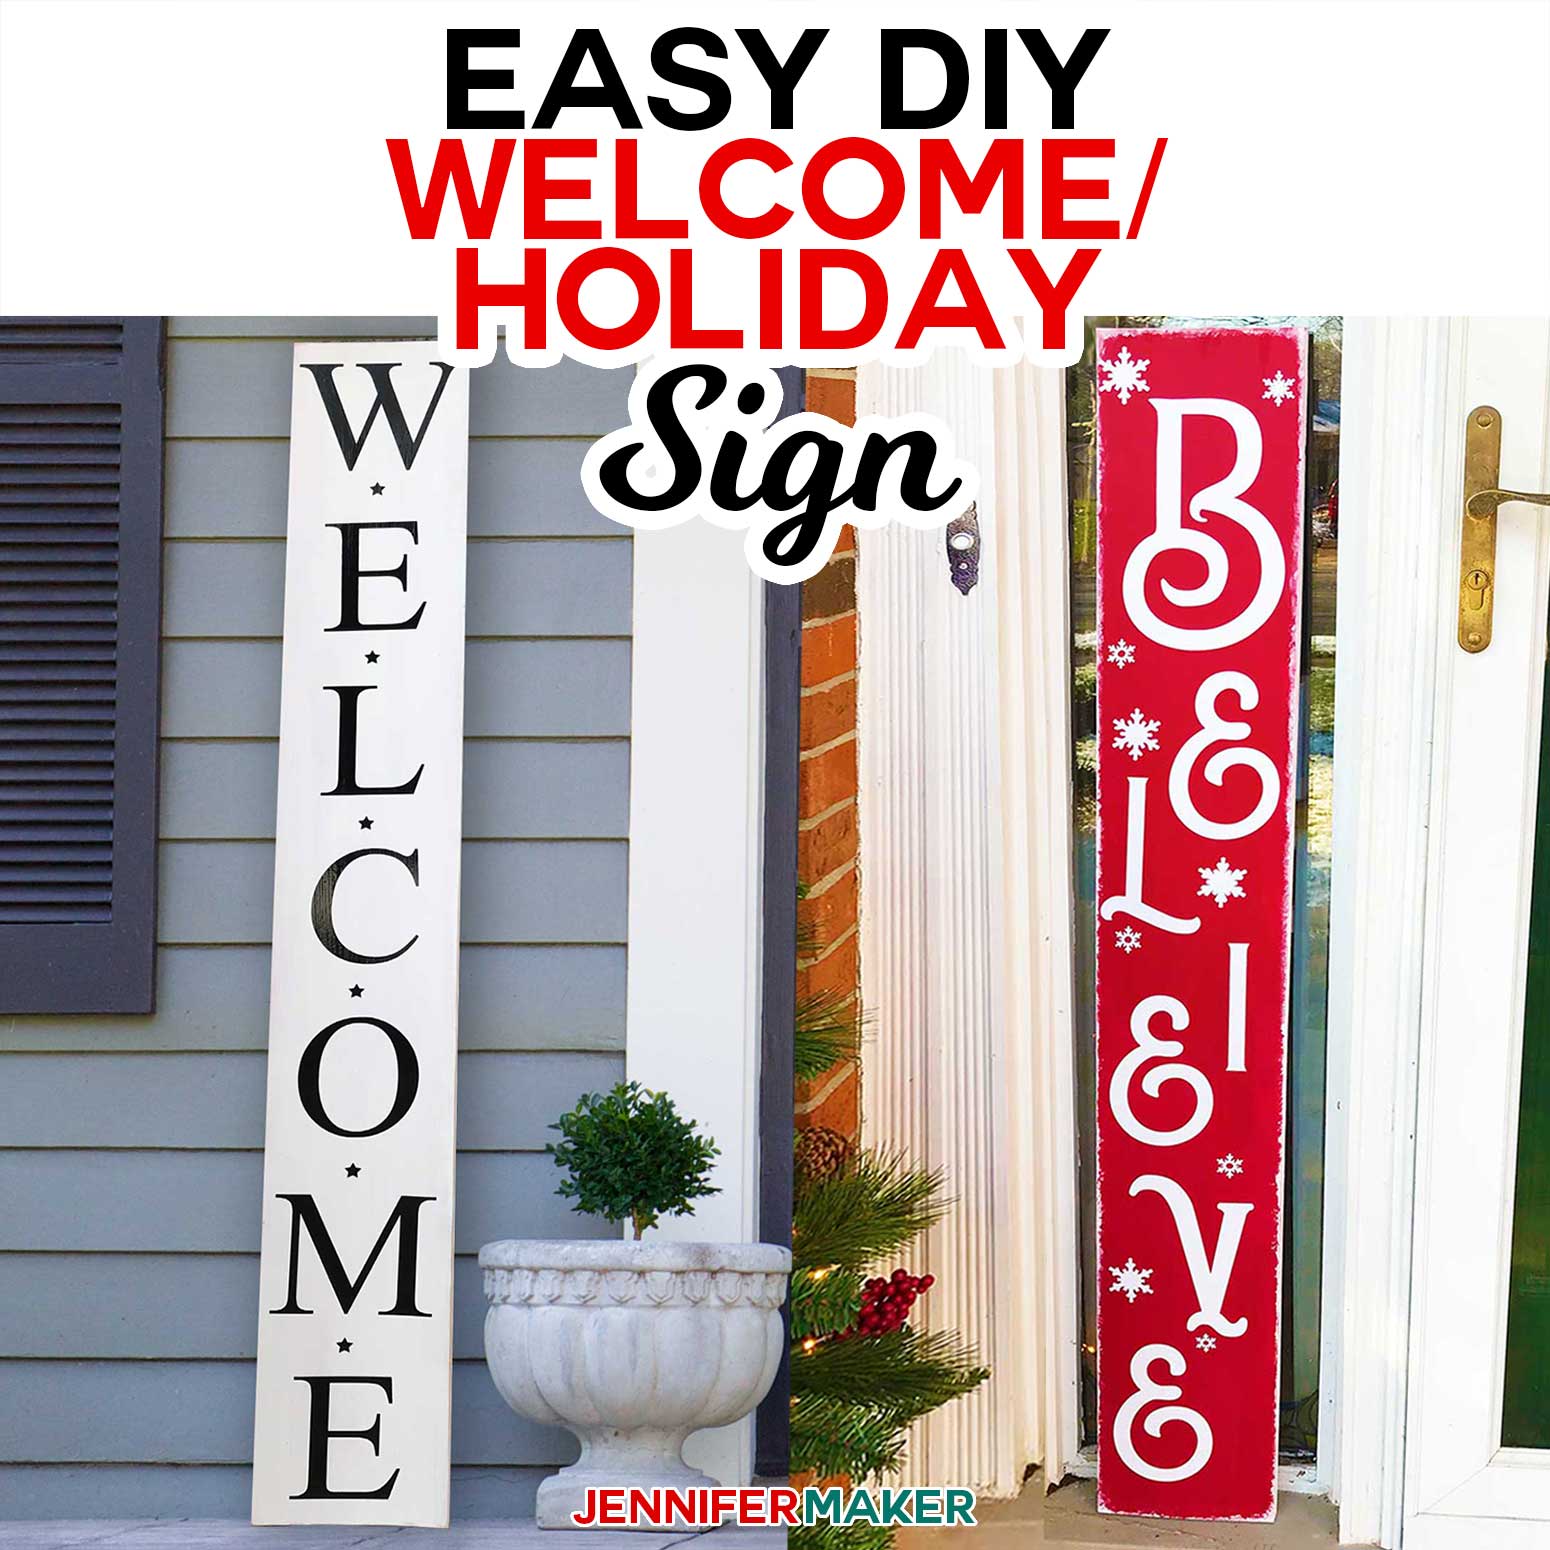
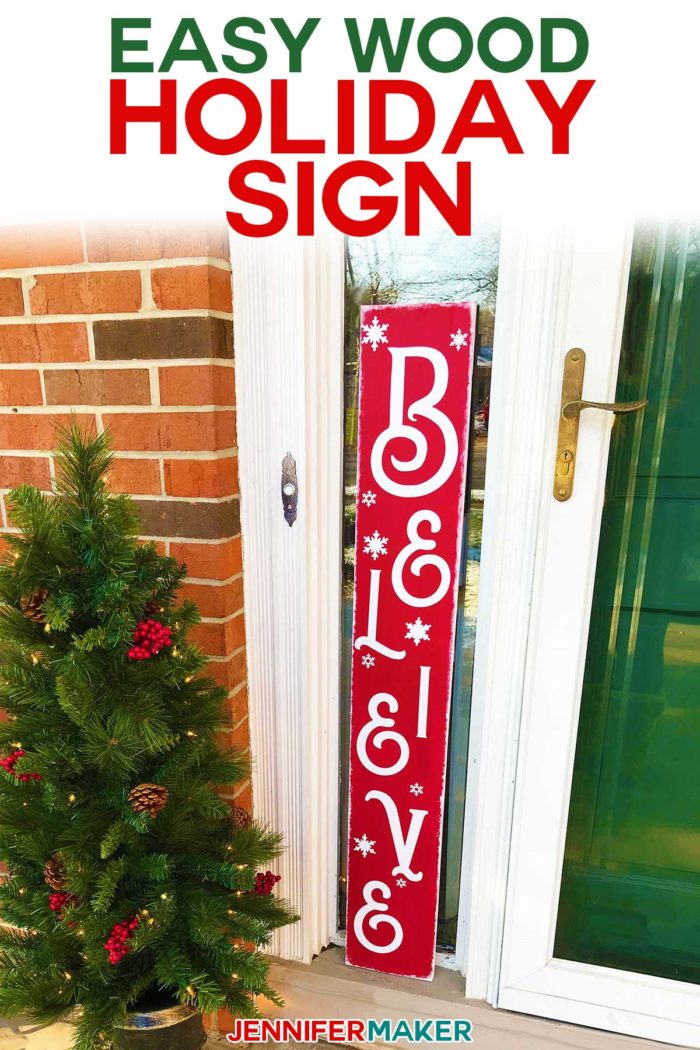
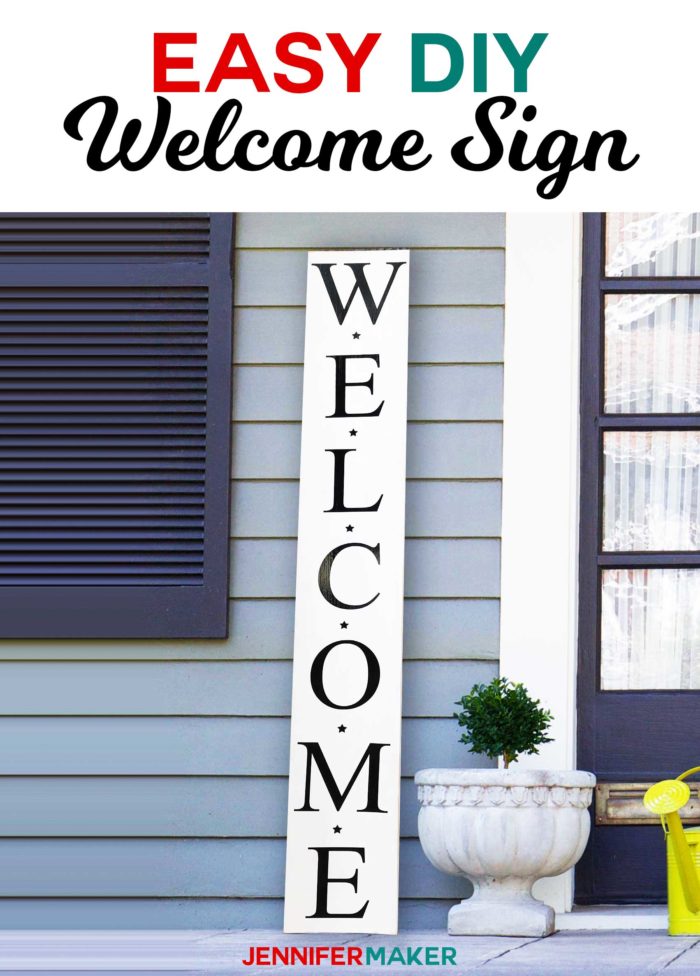
Make an eye-catching vertical welcome sign for your front porch with this easy tutorial!
Let’s spruce up our front porches today! For Day 1 of my Christmas Tree Advent Calendar, we are making a pretty, double-sided vertical welcome sign for your front porch with the words “Welcome” on one side and “Believe” on the other. I picked this project for the first day of the Challenge because it’s a simple project with big impact! And it’s the perfect welcome to our challenge, don’t you think?

Huge thanks to many readers who requested this project (Kat, Mandy, Maira, Rosanne, Kim, Lyn, Sarah, Christine, and Kathy). This vertical welcome sign was the #1 requested project received to date! (Please TELL me about a craft project or technique that you’d like to learn more about, so I can SHOW you how to do it!)
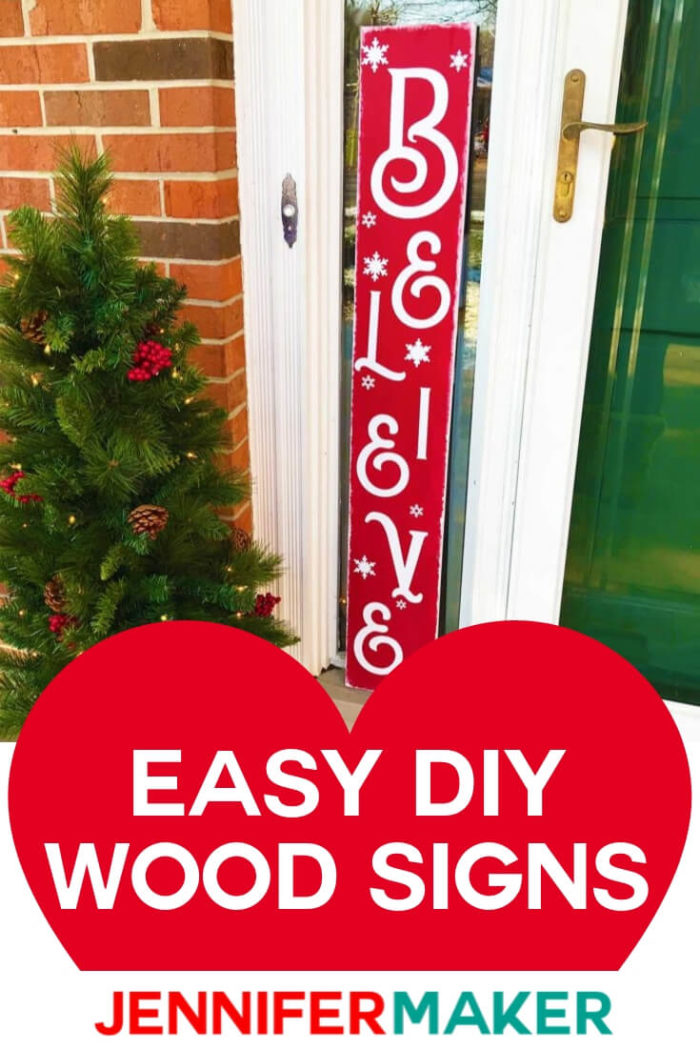
This vertical welcome sign is permanent vinyl on wood. For the Welcome sign, I show you how to make the vertical letters in Design Space and how to cut them out on a regular-size 12″ x 12″ mat so you can line them up perfectly. And for the Believe sign, I’ve created an SVG that all you have to do is upload and cut. I even show you how to paint the board so your vinyl letters adhere best — one side looks a little weathered, the other side looks a little snowy.
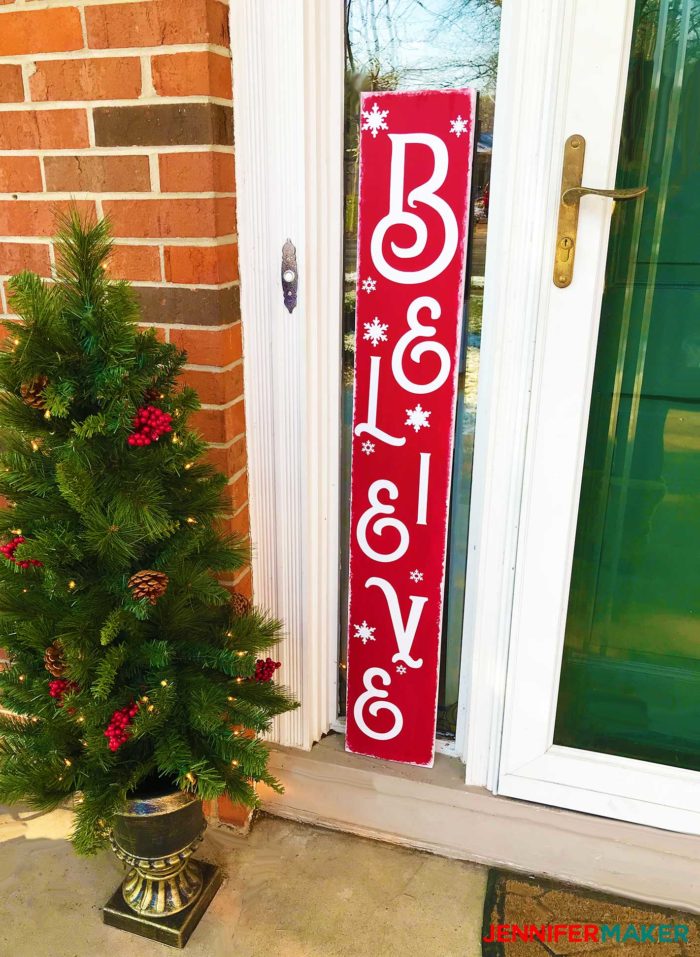
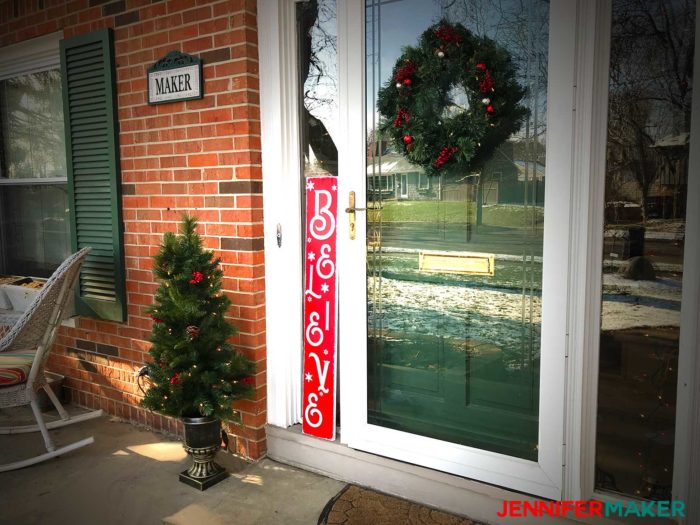
Here’s the holiday side of my vertical welcome sign on my front porch!
I’ve been getting a lot of questions about what font I used for the “Believe” sign. It’s actually a combination of two fonts — Roland Emerald Regular and Black Django Regular — plus I customized the letters a bit. Both are available from FontBundles.net.
Key concepts taught in this tutorial include how to create vertical letters in Cricut Design Space, how to create registration marks, how to create larger-than-mat projects, how to weed vinyl (simple designs), and how to transfer vinyl to material.
See exactly how to make this vertical welcome sign in this tutorial video below:
I’m so excited to show you exactly how to make this fun vertical welcome sign! This post contains some affiliate links for your convenience (which means if you make a purchase after clicking a link I will earn a small commission but it won’t cost you a penny more)! Read my full disclosure policy.
Materials for the Vertical Welcome Sign
- One 8″ x 48″ pine board (I bought this board at Home Depot and had them cut it in half for me for free) -or- a pre-painted board
- Paint (I used white chalk paint and red chalk paint)
- Brushes (paintbrush and sponge brush)
- 220 grit sandpaper
- Polycrylic protective finish (matte) (this is important for getting your vinyl to stick and stay stuck)
- 7 sheets of 12″ x 12″ Permanent outdoor vinyl
- Transfer tape or sheets
- A way to cut your vinyl (I used the amazing Cricut)
- Design #113 – My free SVG/DXF/PDF cut file/pattern (available in my free resource library—get the password at the bottom of this post)
How to Make Your Reversible Vertical Welcome Sign
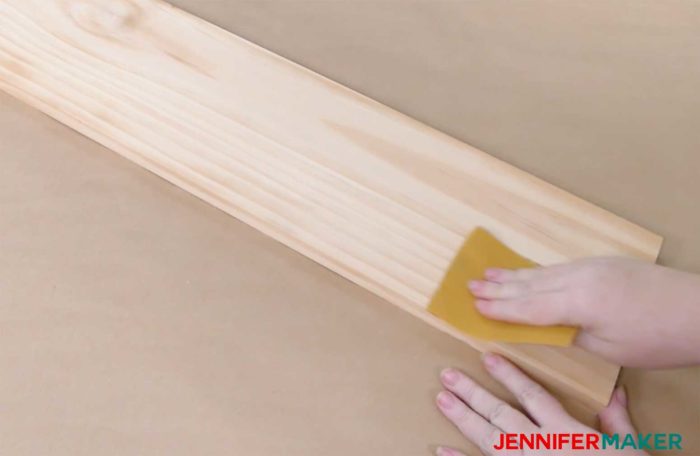
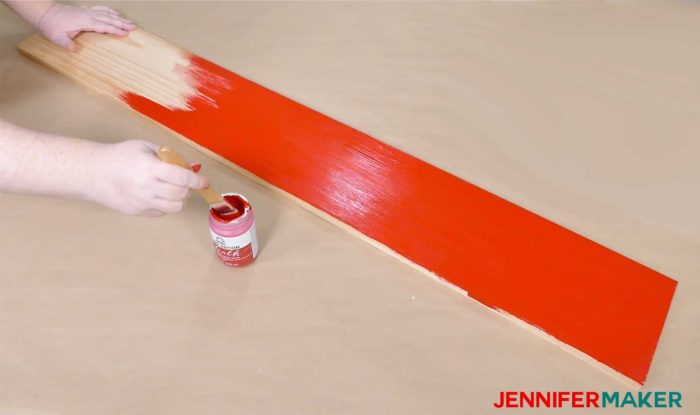
Step 1: Prepare your board
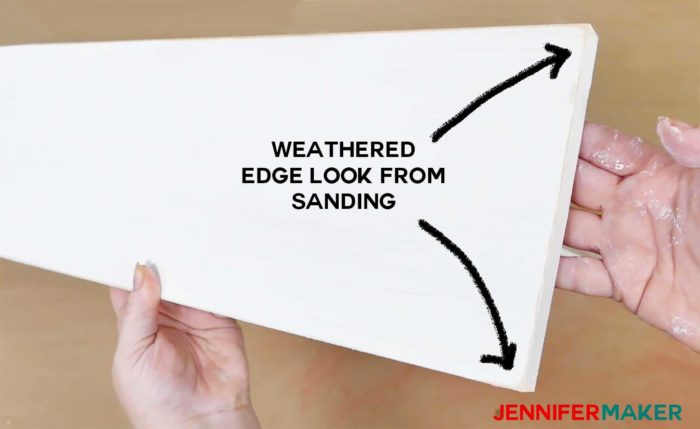
Begin by sanding both sides of your sign board.
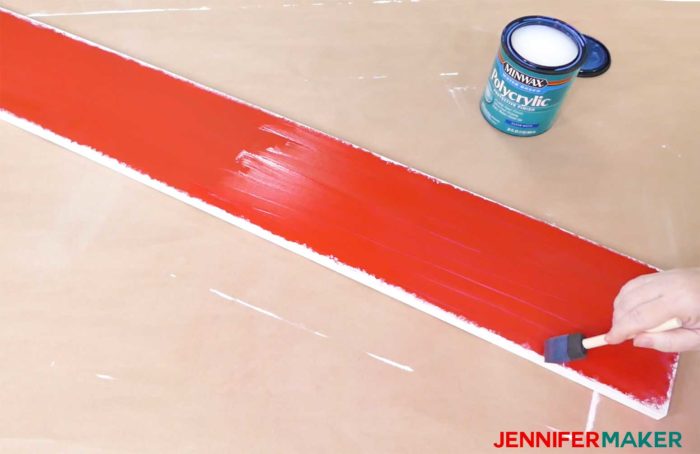
Now paint both sides. I painted one side in whisper white texture chalk paint and the other side in imperial red chalk paint. I used chalk paint because I like the texture and the way you can sand it off to create a weathered look, but you could just use regular acrylic or latex paints.
Tip: If you want a weathered look, sand the edges and/or flat surfaces of your board after about one hour, when the paint isn’t quite dry yet.
Optionally, you can use a dry brush with white paint to create a snowy look around the edges of your board. Just dab the dry brush with a little paint onto the edges in random patterns.
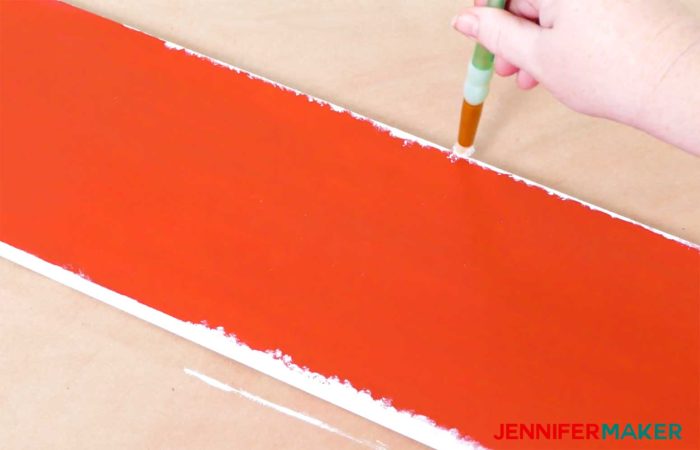
Once the paint is dry (at least 24 hours), sand the surfaces again. You want them super smooth for your vinyl to stick well! Wipe off all the sanding dust when you’re finished.

Now, put a thin coat of Polycrylic finish on both sides. This will ensure your vinyl sticks to your sign board… and stays stuck! You should wait 24 hours for it to dry. (I am impatient and waited 12 hours…. it still turned out great.)
Note: If you bought a pre-painted board, you may not need to prep it at all. If the surface seems at all rough, however, use the Polycrylic finish on it — it’ll make a huge difference and save you lots of headaches.
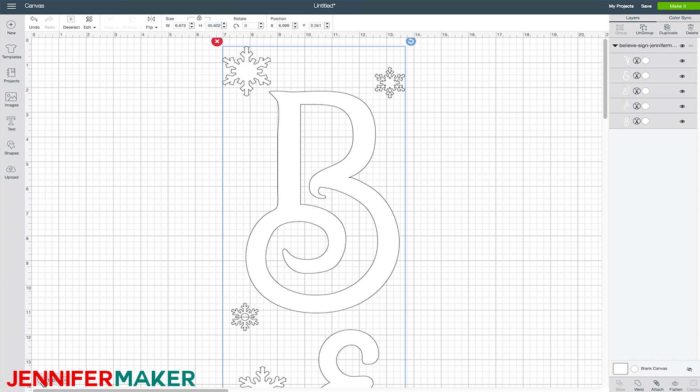
Step 2: Get My Free Believe Wood Sign SVG File or Create Your Own Design
Get my “Believe” vertical sign design (Design #113) from my free resource library (get the password to the library in the form at the bottom of this post).
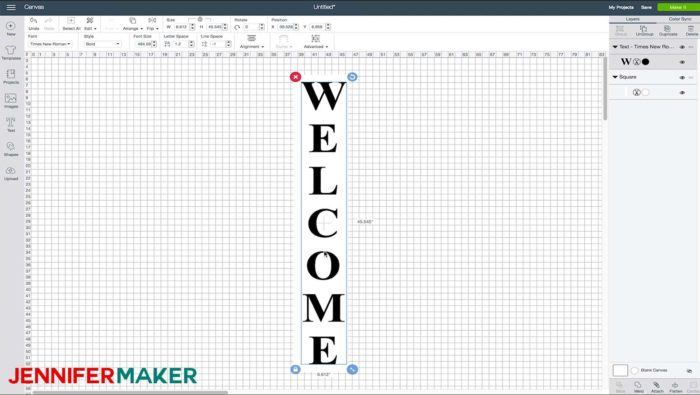
If you’ll be using a Cricut, you can create your own letters in Cricut Design Space. The tutorial video walks you through the entire process of creating vertical letters perfectly aligned to a certain size. But for those of you who prefer text over video, here’s what you do:
How to Align Letters Vertically in Cricut Design Space (for a Vertical Welcome Sign)
- Go to https://design.cricut.com and click New Project
- Click on Shapes and click Square
- With the square selected, click the small lock icon at the top of the screen and enter your board’s width and height.
- Click Text.
- Type your word, one letter at a time, with a return in between each one to move it to the next line. I typed “WELCOME” for my vertical welcome sign.
- With the text select, click Fonts and choose a clear, readable font. I chose Times New Roman. I also recommend all caps for legibility.
- With the text still selected, click Alignment and choose Center . All of your letters will now be centered vertically.
- Click and drag the text over to the rectangle and resize it so it fills most of the space (you need some white space around the outside, so don’t go edge to edge). You can resize by clicking and dragging the double-arrow icon in the lower right corner of the text box.
- To lengthen or elongate the letters, click the arrows in Line Space until you are pleased with how it looks.
- Now go to Advanced and click Ungroup to Letters — this separates each letter onto it’s own layer in Cricut Design Space.
You could stop here and cut out your vinyl, but you’d have to manually place each letter on your board and hope you centered and aligned them correctly. But there’s no need to guess — there’s a better way. Keep reading for my trick on how to perfectly align your vertical letters.
How to Create Registration Marks to Align Vertical Letters
The secret to aligning giant letters or other huge designs like this is to use registration marks. This makes a perfectly vertical welcome sign! So let me show you how to do this in Cricut Design Space:
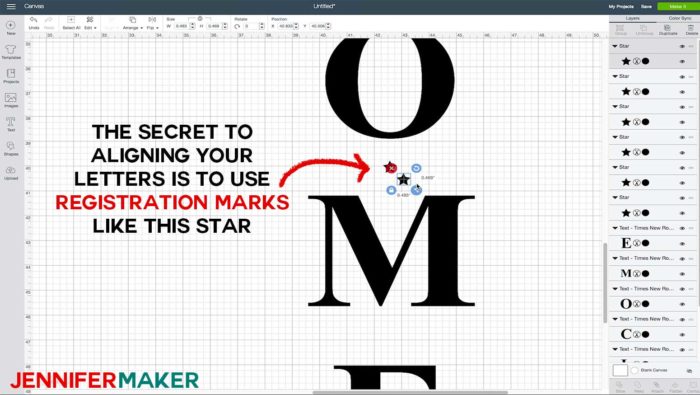
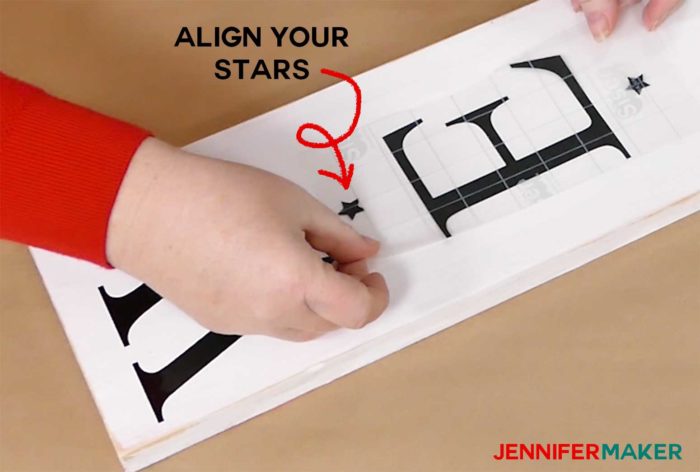
- In your Welcome sign design, click Shapes and select Star.
- Change the color of the star to match the color of your letters (in my case, to black).
- Drag the star over under the first letter and resize it smaller (you can decide what size you want to make it).
- Right-click the star and make duplicate copies, then click and drag them in between each letter of your design.
- Click Select All, then click Align and select Center Horizontally.
- Now make several more stars the same size and color, but drag them off to the side to use later.
- Select the first letter and the first star directly below it, and click Attach.
- Drag one of the stars on the side over on top of the first star, then select that star, the second letter, and the second star, and click attach.
- Repeat this process with the rest of your letters. Your goal is to attach the letter to the stars above and below it (the first and last letter don’t have stars above and below, unless you add them).
- Click Make It and cut our your sets of letters and stars. Now you can align your letters with one another simply by aligning the stars on the cut pieces!
Tip: You can use any shape to make a registration mark — it doesn’t have to be a star. A star just works really well because it has all of those pointy bits to help you line it up with. And you don’t have to keep it in your final design either — use it for alignment, but don’t transfer it to your project.
Note: Your letter and registration mark attachment cannot exceed the size of your material/mat. So nothing bigger than 11.5″ high (for a 12″ x 12″ mat) and nothing bigger than 23″ and 11.5″ wide for a 24″ mat.
Want to see this design in Cricut Design Space: Just go to https://design.cricut.com/#/design/118333355
The “Believe” SVG cut file is available in my resource library, if you want to use that!
Tip: If you’re not sure how to upload an SVG cut file to Cricut Design Space, watch this helpful video training series I made. If you’re on an iPhone or iPad, here’s how to download and upload SVG files to the Cricut Design Space app.
IMPORTANT: If you upload the SVG to Cricut Design Space and it appears smaller than it should, it’s being resized down automatically. You’ll need to resize it back up to fit your wood sign (it was originally around 45 inches tall). See this tutorial on how to resize images in Cricut Design Space.
Step 3: Cut Out Your Vertical Wood Sign Design
It’s time to cut your vinyl! You can cut your permanent outdoor vinyl by hand or with a cutting machine.
Using a Cricut machine, you can cut this on a green StandardGrip cutting mat, place your vinyl FACE UP on the cutting mat, select the proper cutting material, and load your fine-point blade into your Cricut machine.
Step 4: Weed Your Cut Vinyl Design
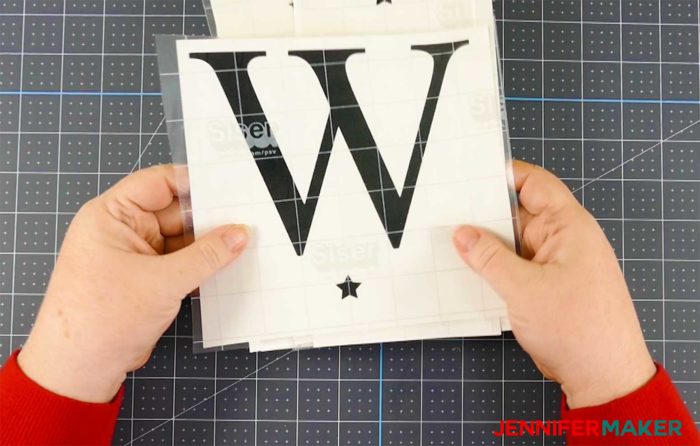
With your vinyl letters all cut, gently remove the excess vinyl from the backing. You may want to use a weeding tool, though I didn’t need to for this simple design.
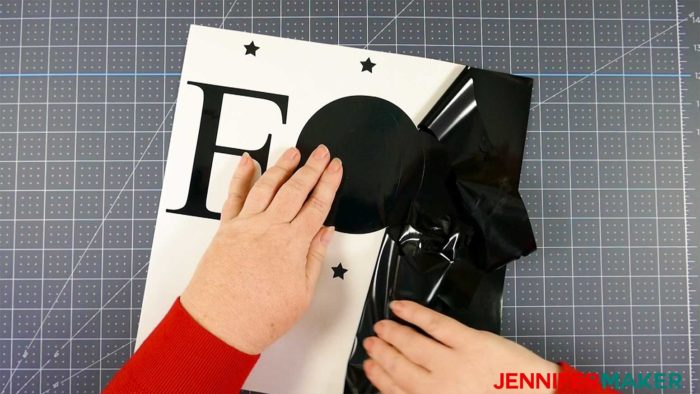
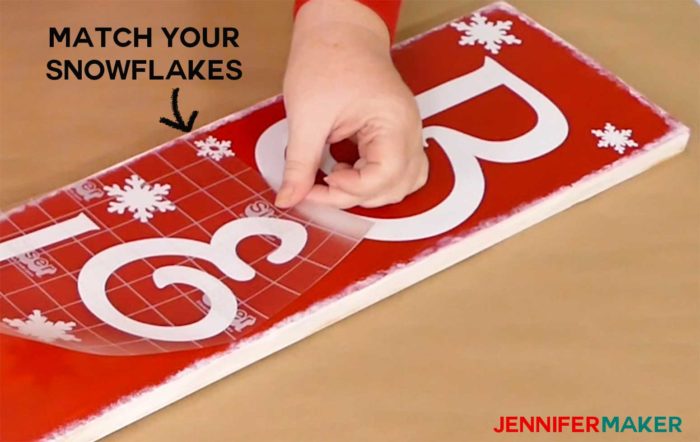
Your vinyl is cut, but now you need to get it onto your board. To do this, first, apply transfer tape or a transfer sheet over the designs. Press and burnish the vinyl to the transfer sheet well!
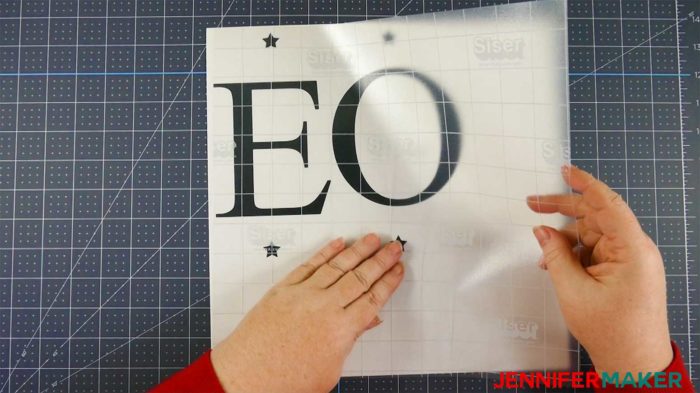
Separate each letter from the others by cutting it with scissors, being mindful to keep the stars with the letters.
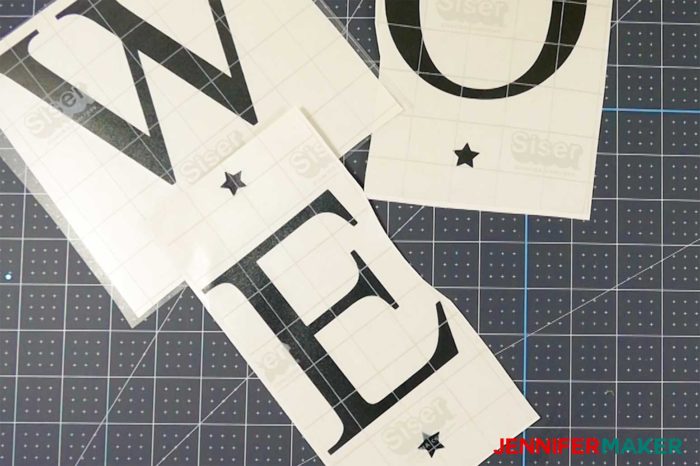
Put your letters in the order they belong so you don’t accidentally apply them in the wrong order.
Step 5: Apply Your Vinyl Letters to Your Vertical Wood Sign
Peel the backing off the first letter and place it on your wood sign board about 1″ down from the top, centered.
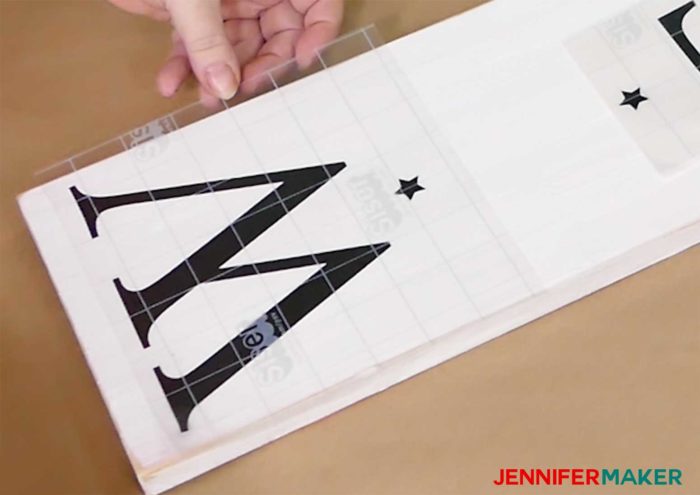
Press the vinyl down well and gently remove the transfer tape from the vinyl.
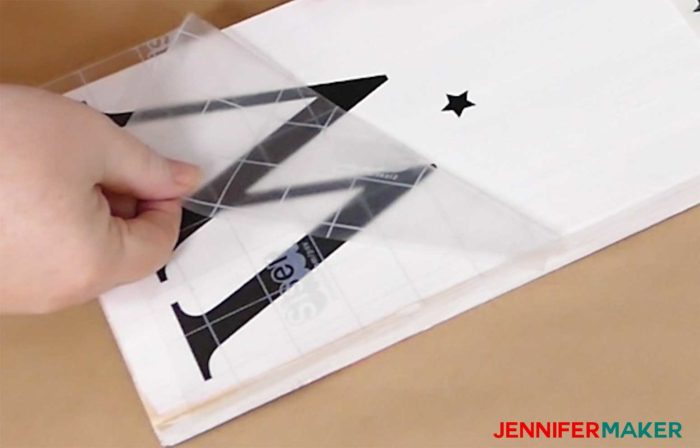
Now, peel the backing off the second letter and align its top star to the bottom star of the letter above. Continue doing this until you have all of the letters in place.
If you’re making the “Believe” holiday sign, you match up the snowflakes instead:
And that’s it! There’s no need to finish the surface of the vertical welcome sign since you already have polycrylic on and you’re using outdoor vinyl, but you can if you really wish.
I put my sign on my front porch already. Doesn’t it look great?
Get my free SVG cut files and patterns for the Welcome and Believe Vertical Signs
If you make one of these awesome vertical wood signs, please share a photo in our Facebook group, or tag me on social media with #makershowandtell.
See all of the projects, tutorials and free designs in The Great Maker Show and Tell Challenge!
Love,

Want to remember this? Save the Easy Vertical Welcome Sign to Your Favorite DIY Pinterest Board!


Beautiful project! Love the red!
Glad you like it, Denise!
Great vinyl tutorial.
Thank you, Laurinda!
I love this… I am having a hard time getting oracle 651 in my area… if I use an indoor vinyl is there anything you would recommend to seal it
I love this! Thank you so much for sharing with us!
Thank you for all the great tutorials. I love seeing everything you make!
Love this & the reversible aspect too….. oh the possibilities! Thank you
Happy to hear you like this sign! And I hope you make one, too!
If being outside did you have to do anything else to make sure it holds up?
I didn’t do anything else and mine has been outside for nearly a year now. You could put a clear spray sealer over it, if you wanted.
I just found you, and you are amazing! I’m new to cricut and was going crazy trying to figure out how to work the thing, until I found you. Oh so happy! Want to make your welcome sign, only if I can figure out how to get your file haha. I’ll figure it out. I just want you to know that you are very much appreciated!!! Thank you so much!
Just made your WELCOME porch sign! So cute and such easy directions! Thanks for the great tutorial. Now,I just need to put a finish on it and it’s ready to go out to the porch! Thanks again!!!
Yay! I’m so happy to hear that, Dana!
HI JENNIFER I’VE BEEN TRYING TO DOWNLOAD THE SVG FOR THE VERTICAL PORCH SIGN
BELIEVE, IT KEEPS SAYING “FILE TOO LARGE” I DON’T KNOW WHAT I”M DOING WRONG. I’VE
TRIED SO MANY DIFFERENT WAYS. CAN U PLEASE TELL ME HOW TO DO IT??
Hi Diane! Once you download it from my library, find it on your computer or device, right-click on it and choose the “Extract All” option. This will create a new folder for you to access during the upload process in Design Space.
Hello! Do you need to put a sealer over this and if so what would you recommend? I’ve had issues with the vinyl curling and peeling off. Any information would be helpful. Thanks!
I do recommend a protective finish (link) to help keep your vinyl stuck to the wood!