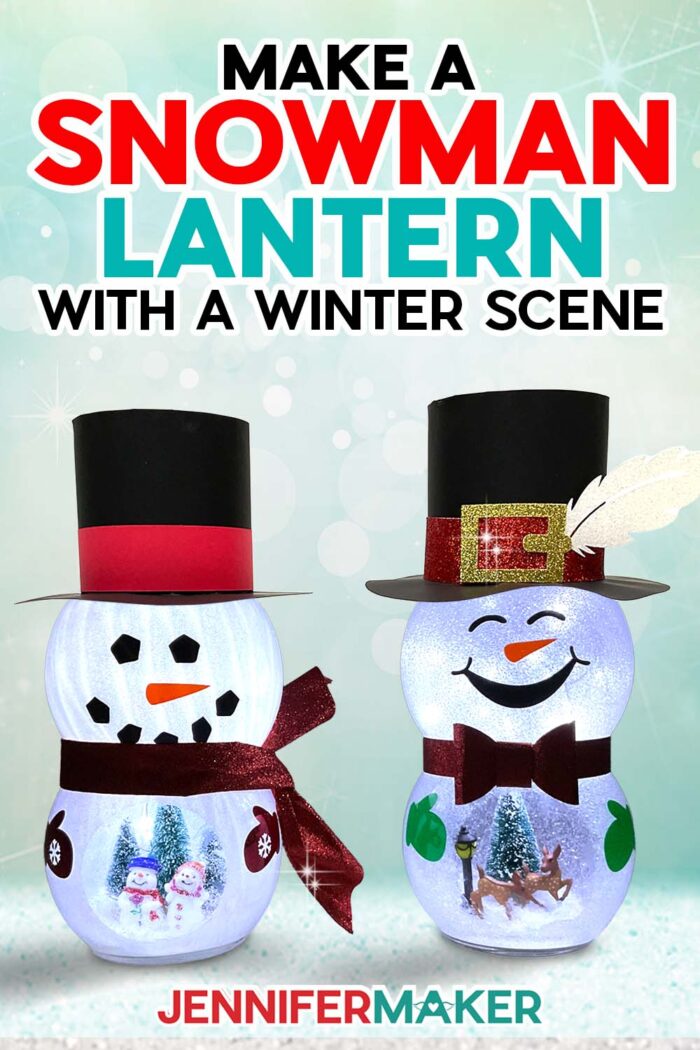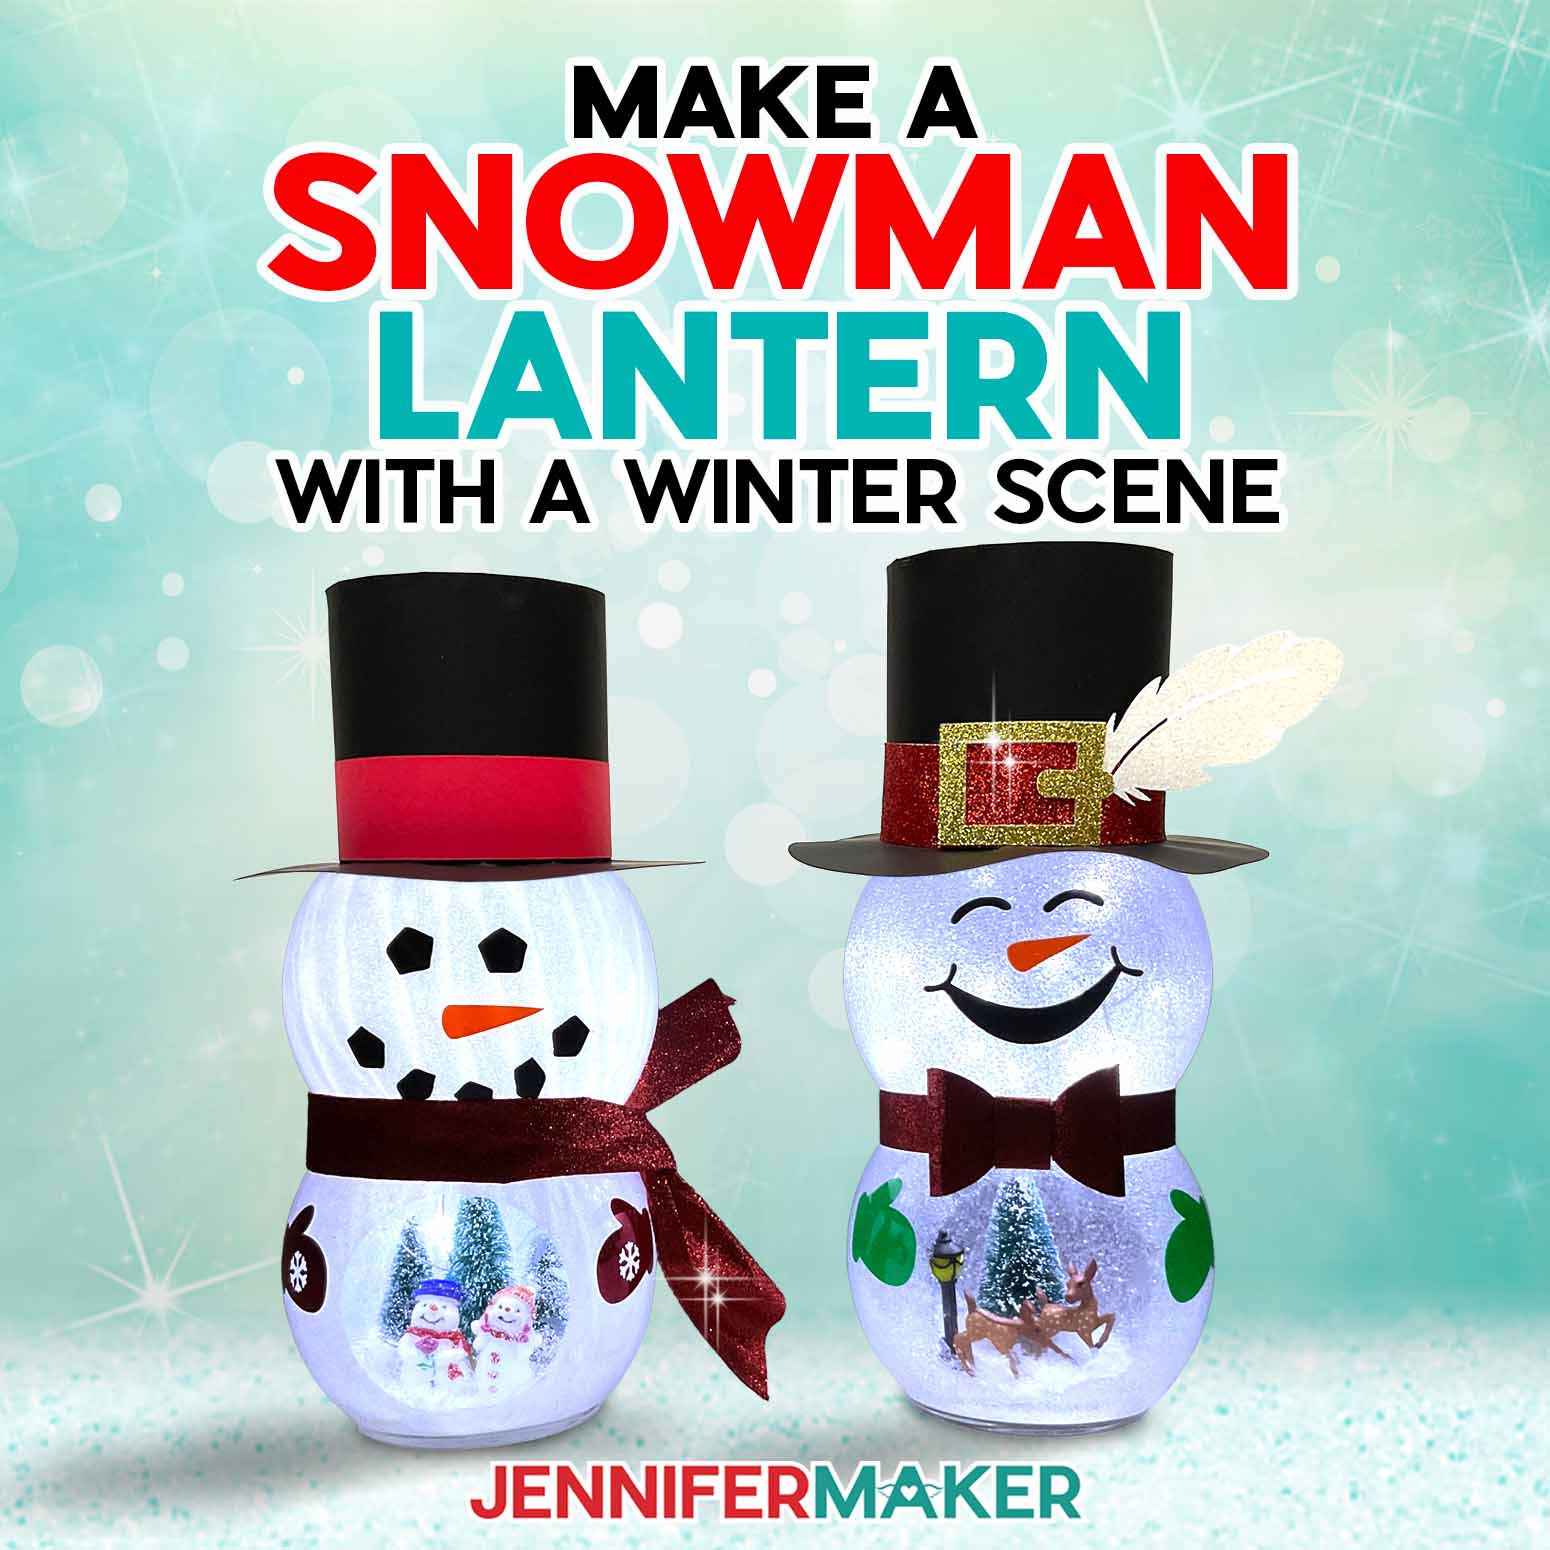
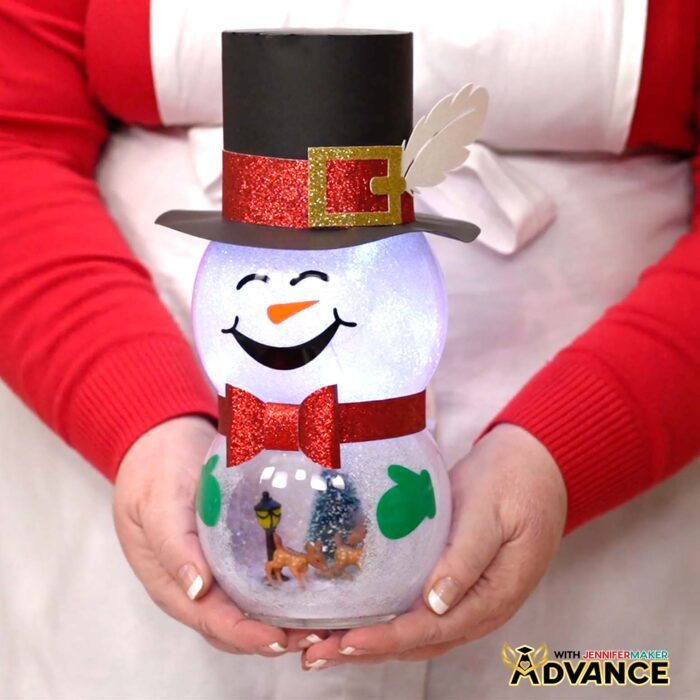
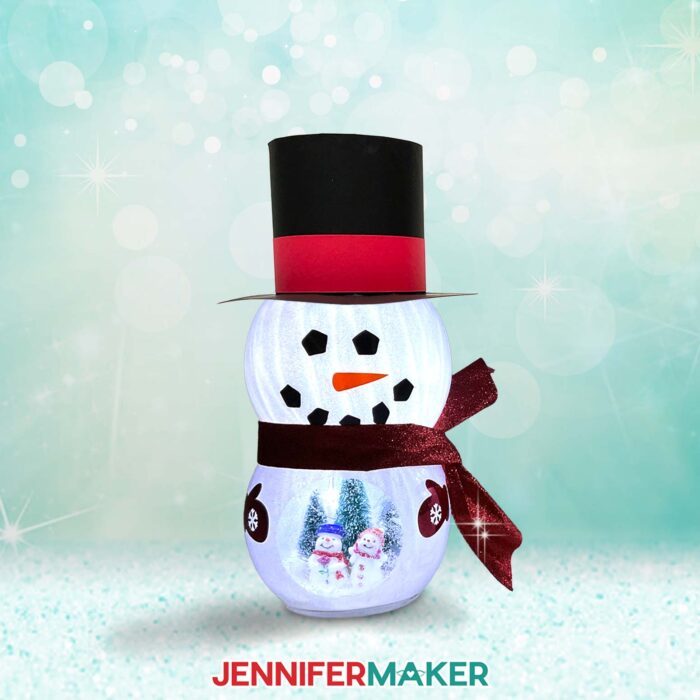
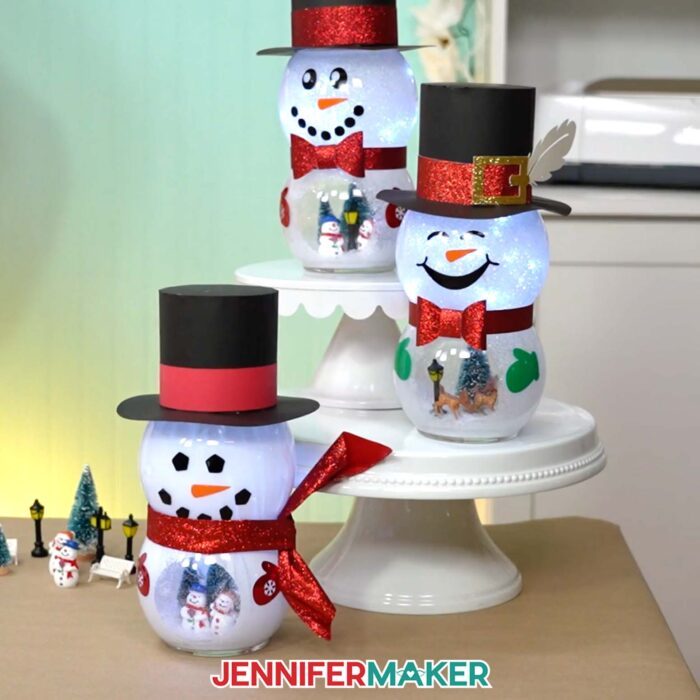
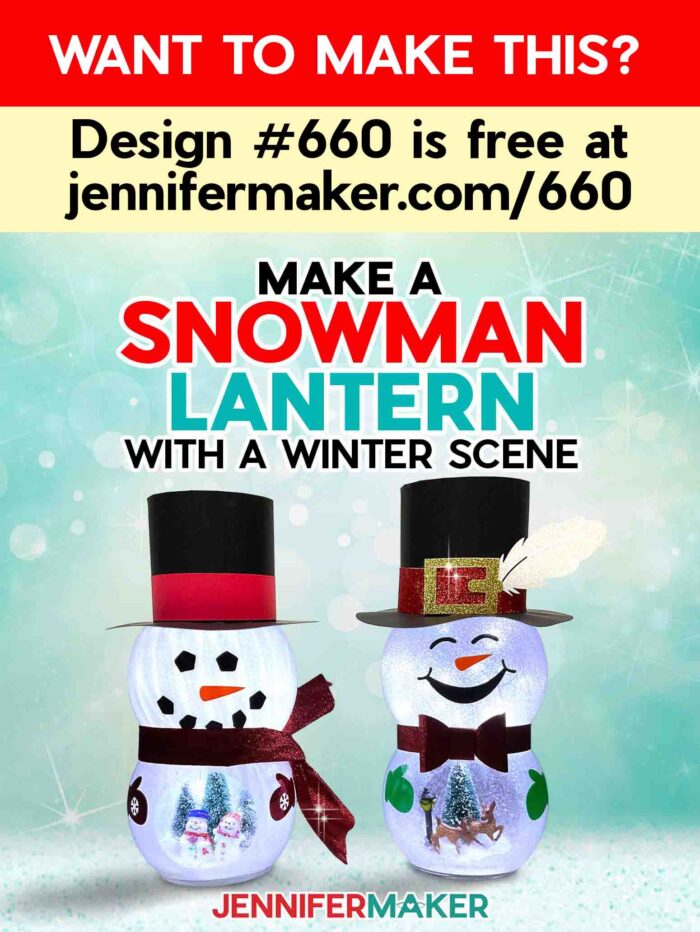
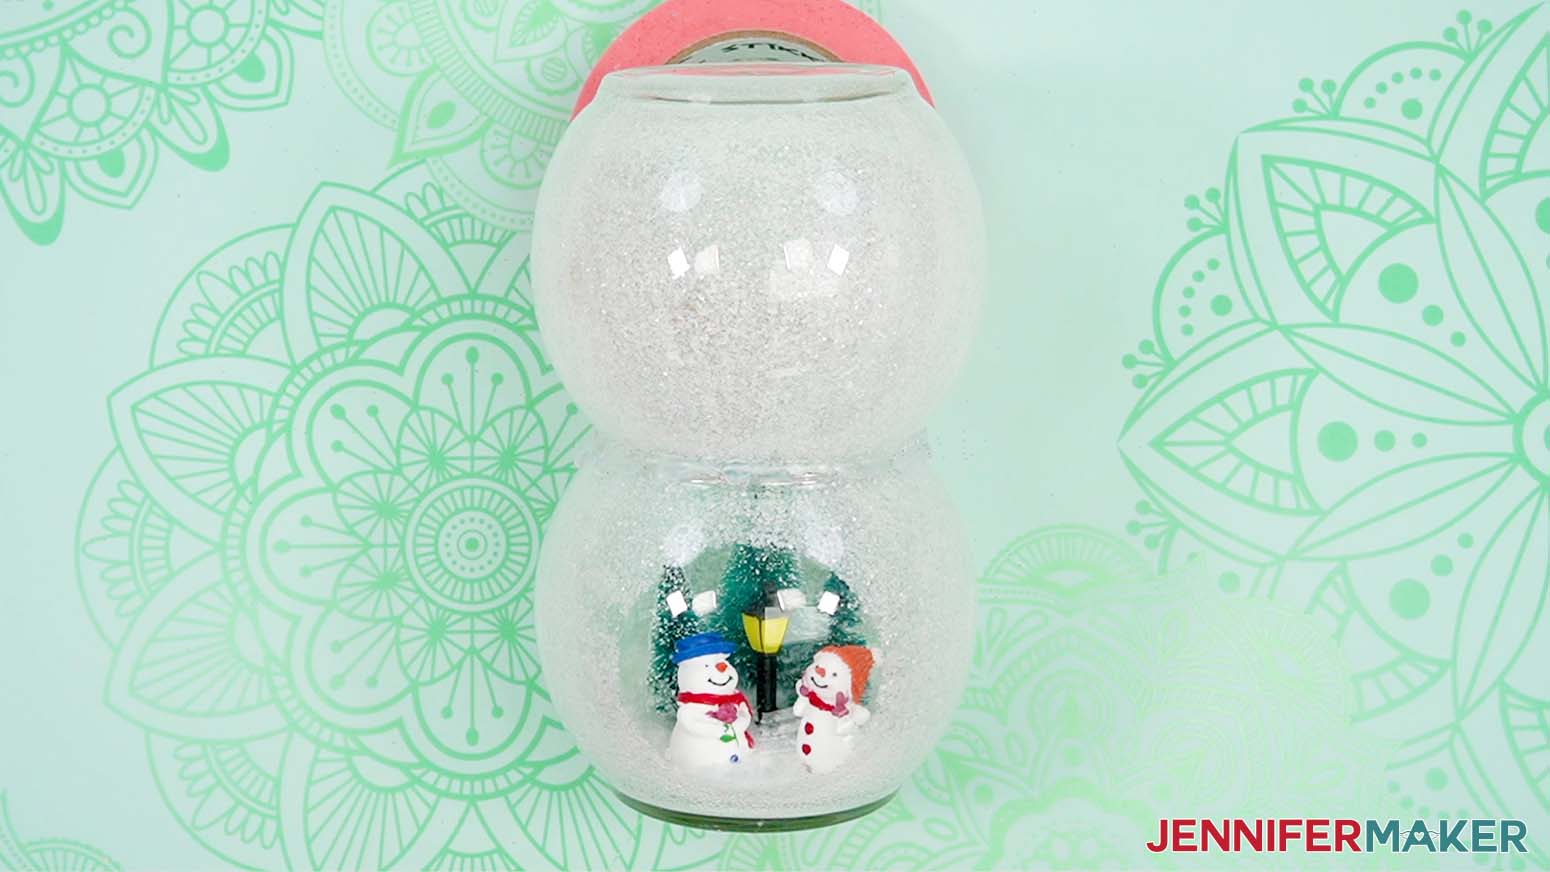
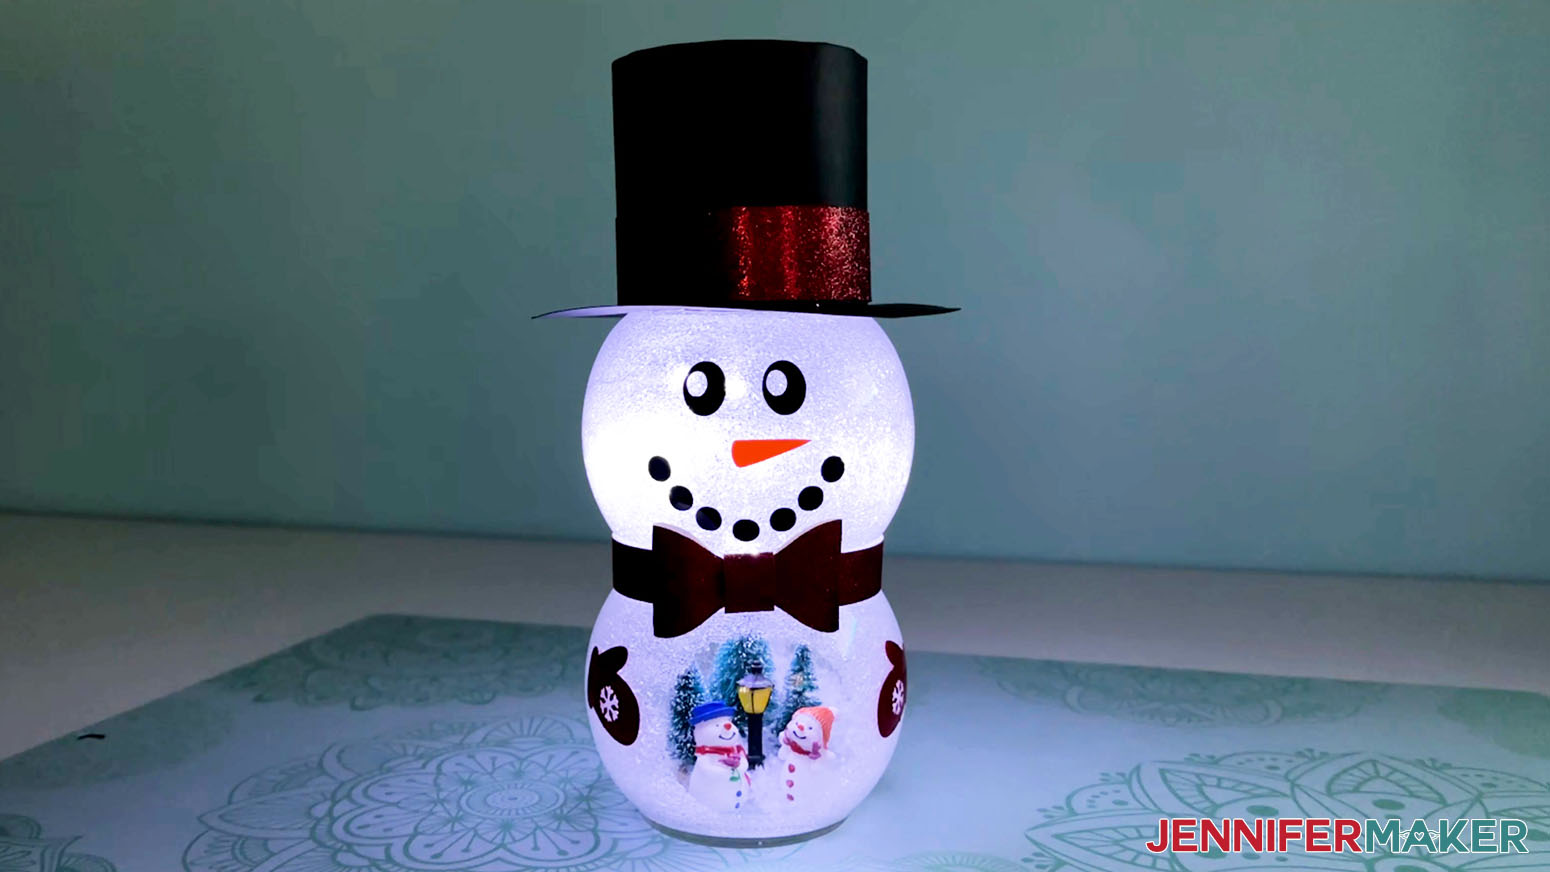
Learn how to make a snowman lantern with a belly scene that lights up!
I just love the winter holidays. Goodies are baking, various Christmas songs are playing, and the holiday lights are gleaming. The Christmas tree is up and decked with family keepsakes and new ornaments I made this year. Let’s make our happy holidays shine even brighter with this winter’s cutest light-up craft: A light-up snowman with a winter scene!
Watch the full step-by-step video tutorial on making a snowman with belly scene:

My original glass globe snowman craft has been such a hit that I adapted it for other holidays and seasons, too! But when I saw one with a snowglobe-like scene in its bottom section, I knew I had to make my own, too.
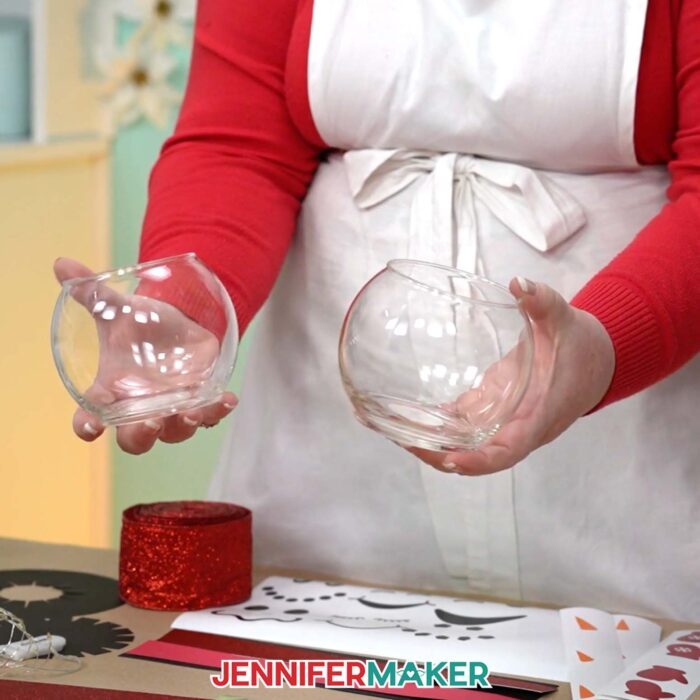
I used two round glass vases from Dollar Tree for the snowman’s body, but my materials list has another option available on Amazon, too. To add the sparkle to the inside of the glass, I used Mod Podge and some chunky white glitter. Be sure to watch the video to see how I got a nice, even coverage of glitter inside the vases, AND how I kept the “window” on his belly clear to show off the scene inside!
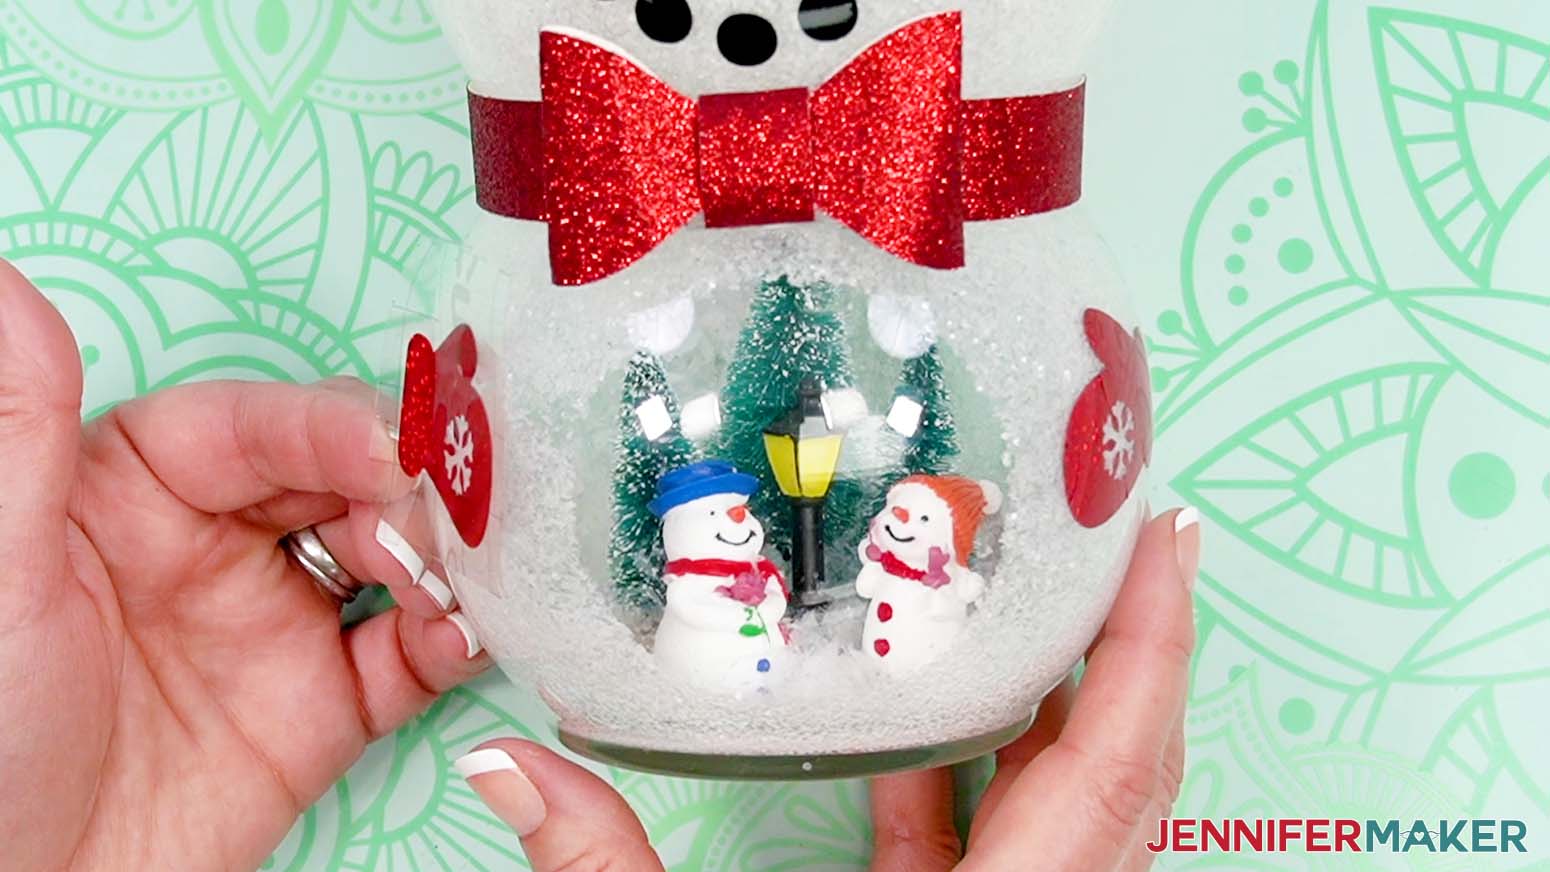
Speaking of the scenes inside — they’re my favorite part! I used a set of adorable holiday figurines that I found on Amazon, but you can use small toys, dollhouse miniatures, or any other tiny objects you can glue to the bottom of the vase. The snowman Christmas figure set I used includes several pieces you can use to customize a winter scene. There are snowmen, reindeer, pine trees, and even a cute lamppost you can arrange inside the snowman’s belly.
Since the figurine set comes with so many pieces, you can make two snowman lanterns for dual winter scenes! The snowmen’s belly scenes are so cute and I love how they come alive with the LED lights.
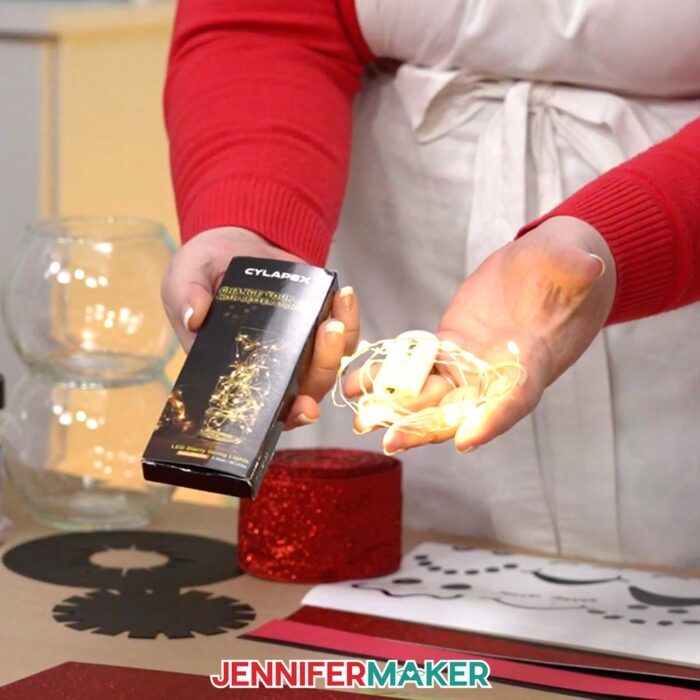
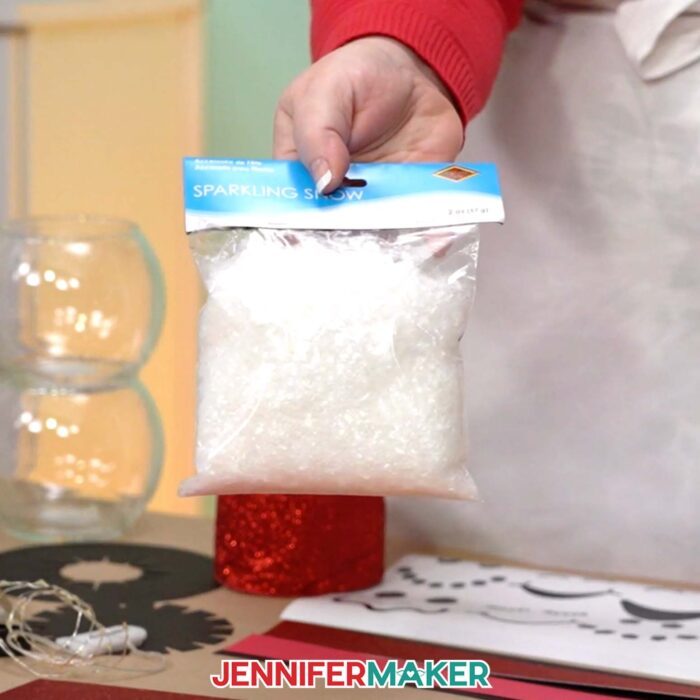
The faux snow we’ll use inside will hide any glue imperfections, and then it’s time to add the lights! Warm white LED fairy lights are my favorite, but you can use any color you want.
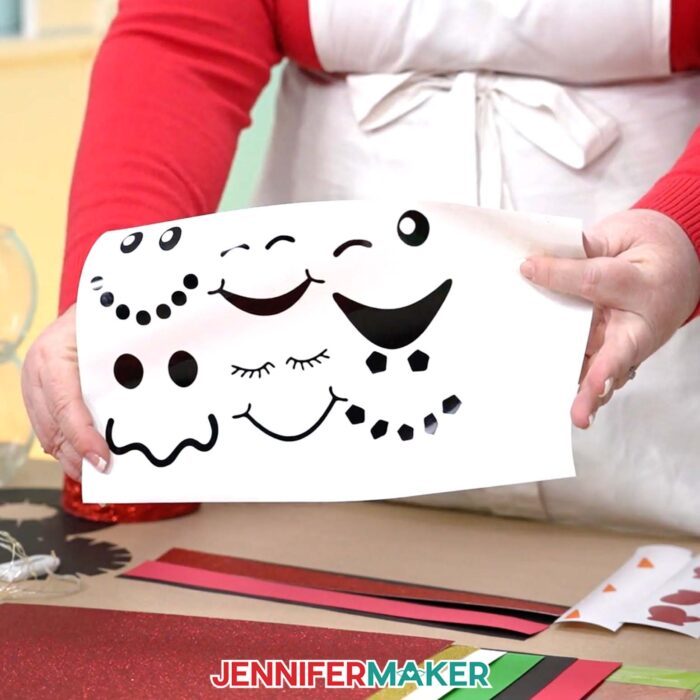
To make the facial features and mittens, you’ll need some permanent adhesive vinyl. Since the pieces are so tiny, I’ll show you a time-saving tip to getting those pieces cut quickly and easily, even if they’re different colors.
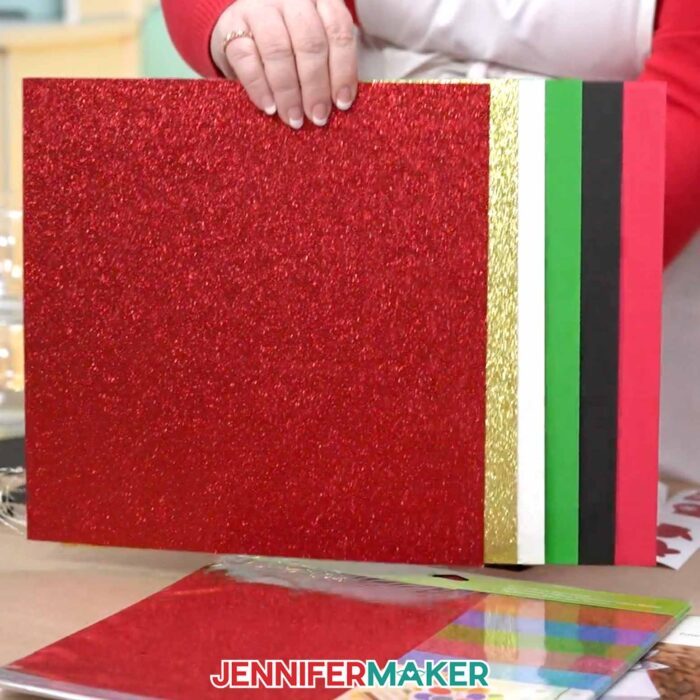
For the hat and bowtie, 65 pound cardstock works best. You can use the colors I did, or personalize your snowman with your own choice of colors, textures, or patterns!
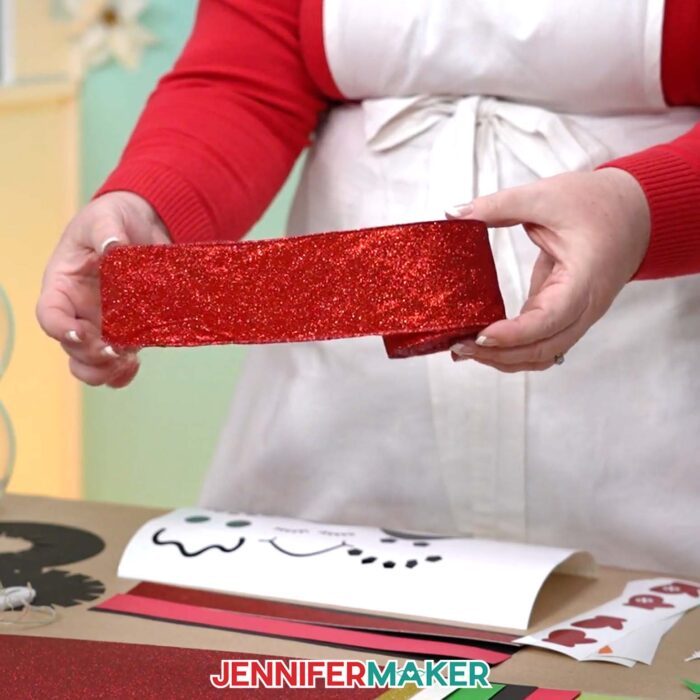
You can also use ribbon to decorate your snowman, instead of a bowtie!
To put everything together, you’ll a few different types of glue, along with some basic crafting tools like scissors, a scraper, and a StandardGrip transfer tape to apply the vinyl details. You’ll also need a roll of painters tape — but not for sticking anything! I’ll show you how to use it in a super handy way in the video.
The complete list of materials and tools you’ll need to make this project are detailed below, along with links where to find them. The full details for preparation and assembly are below in the written tutorial, or you can watch them in the video above!
My snowman lanterns are for indoor use only, and can be dusted or wiped down with a soft cloth if needed. Store them carefully and they should last for many winters to come!
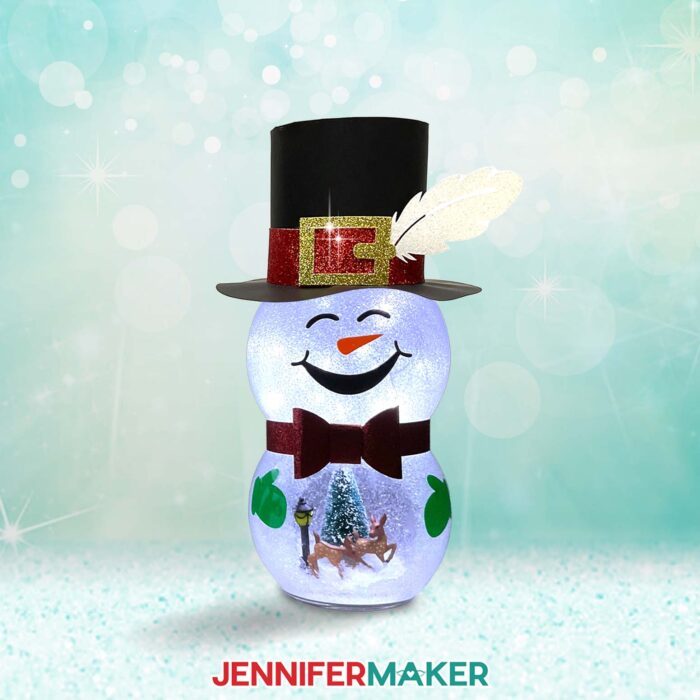
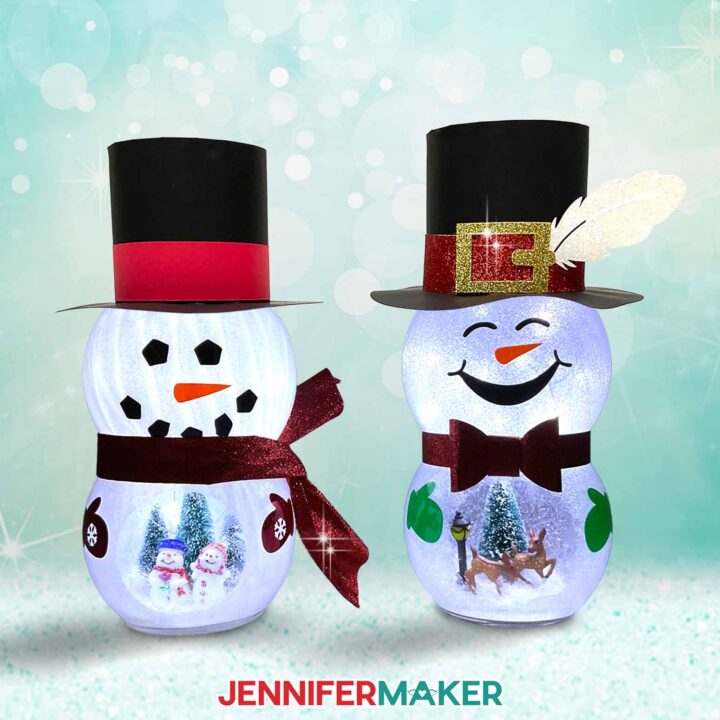
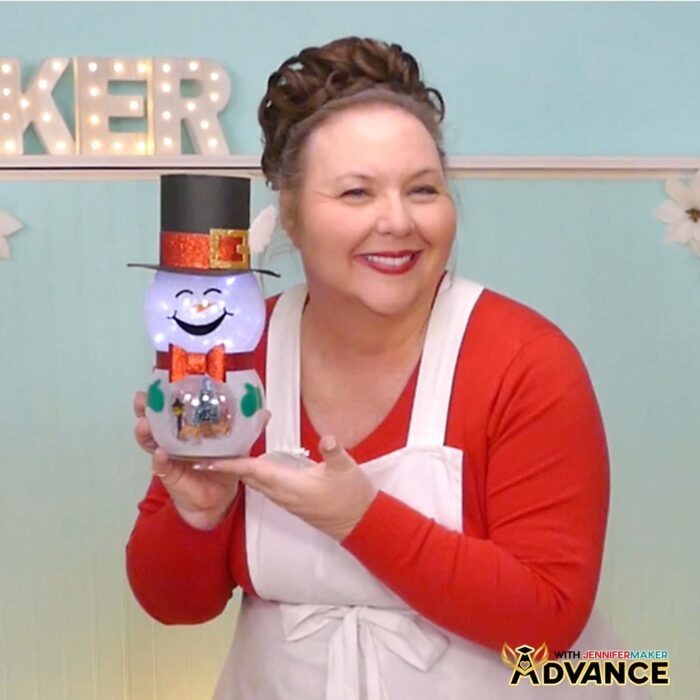
Aren’t these snowpeople the cutest holiday decorations? They make such a beautiful Christmas accent piece! Know someone who can’t get enough of the holidays? A snowman light with a cute scene in its belly makes a great Christmas gift. I love the little statuettes inside, and the tiny details like the snowman’s red scarf and the reindeer’s spots add a magical touch to an iconic scene. I hope you’ll try this craft and make a snowman with an LED-lighted figurine scene of your own!
Let me show you how to make a light-up snowman with belly scene! This post contains some affiliate links for your convenience (which means if you make a purchase after clicking a link I will earn a small commission but it won’t cost you a penny more, there is no additional cost)! Read my full disclosure policy.
Materials to Make a Snowman with Belly Scene
View my Amazon shopping list for the exact items I used!
- Two (2) 5″ Round Glass Vases from Dollar Tree-OR-
- Two (2) 5″ Round Glass Vases from Amazon
- Mod Podge Matte
- Chunky White Glitter
- Removable Vinyl (for view circle)
- Cricut Premium Permanent Vinyl – Black and Orange
- Cricut Holographic Sparkle Vinyl – Red (for mittens)
- Cricut StandardGrip Transfer Tape
- One (1) Sheet of 12″ x 12″ 64 lb. Black Cardstock (for hat)
- One (1) Sheet of 12″ x 12″ Red Glitter Cardstock
- A way to cut your materials – I’m using the Cricut Maker 3, but you can also use the Cricut Maker, a Cricut Explore series machine, or the Cricut Venture
- Cricut Green StandardGrip Machine Mat 12″ x 12″
- Brayer
- Spatula
- Weeding Tool
- Scraper
- Foam Brush
- Isopropyl Alcohol
- Lint-Free Cloth
- Hot Glue Gun & Glue Sticks
- Finger Protectors (optional)
- Bearly Art Precision Craft Glue
- E6000 Craft Adhesive
- Scissors
- Fan (for ventilation)
- Roll of Painter’s Tape (for holding vases in position)
- Cotton Swabs (for cleaning the open area)
- Cricut Trimmer
- Figurine Set
- Sparkling Snow
- One (1) Strand of LED Fairy Lights
- Butcher Paper
- 2.5″ Ribbon
How to Make a Light-Up Snowman with Belly Scene!
Snowman With Belly Scene
Learn how to make a glittered snowman with belly scene!
Materials
- 2 (Two) 5" Round Glass Vases
- Mod Podge Matte
- Chunky White Glitter
- Removable Vinyl (For View Circle)
- Cricut Premium Permanent Vinyl - Black
- Cricut Premium Permanent Vinyl - Orange
- Cricut Holographic Sparkle Vinyl - Red (For Mittens)
- Cricut StandardGrip Transfer Tape
- One (1) Sheet of 12" x 12" 65 lb. Black Cardstock (For Hat)
- One (1) Sheet of 12" x 12" Glitter Cardstock (For Hat Detail)
- Figurine Set
- Sparkling Snow
- One (1) Strand of LED Fairy Lights
- Butcher Paper
- Ribbon
- Design #660 (My free SVG/PDF/DXF design files are available in my free resource library - get the password by filling out the form at the bottom of this page)
Tools
- A way to cut your materials - I’m using the Cricut Maker 3, but you can also use the Cricut Maker, a Cricut Explore Series machine, or the Cricut Venture
- Cricut Green StandardGrip Machine Mat 12" x 12"
- Brayer
- Spatula
- Weeding Tool
- Scraper
- Foam Brush
- Isopropyl Alcohol
- Lint-Free Cloth or Coffee Filter
- Hot Glue Gun & Glue Sticks
- Finger Protectors (Optional)
- Bearly Art Precision Craft Glue
- E6000 Craft Adhesive
- Scissors
- Fan (For Ventilation)
- Roll of Painter’s Tape (for holding the vases in position)
- Cotton Swabs (for cleaning the open area)
- Cricut Trimmer
Instructions
STEP 1: GET MY FREE SNOWMAN WITH BELLY SCENE LANTERN DESIGNS
First, download my Snowman With Belly Scene Lantern designs from my free library – look for Design #660. Alternatively, you can use the Save This Project form near the top of this post and the design link will be emailed to you.
In the folder, you’ll find an SVG file with faces and accessories to cut on a cutting machine. There is also a DXF cut file, and a PDF with versions you can print and cut by hand.
Upload the SVG file you need to Design Space to get started.
TIP: If you’re not sure how to upload, go to jennifermaker.com/svgs to learn how to unzip and upload SVG files.
STEP 2: PREPARE YOUR SNOWMAN WITH BELLY SCENE LANTERN DESIGN
CRICUT DESIGN SPACE
1. Open Cricut Design Space and click “New Project.”
2. Click “Upload” and then “Upload Image.”
3. Click “Browse.”
4. Select the SVG file.
5. On the Prepare to Upload screen, it will say “Cut Image” with the design preview.
6. Click “Upload.”
7. Find your design in Recent Uploads and add it to the Canvas.
NOTE: If your project uploads differently than is shown on this page (with the layers stacked on top of each other vs spread out), this is intentional to make sure your design does not change sizes on you. If you prefer to use the unstacked version of the design files, upload one of the files in the “Unstacked” folder and then make sure your layers match these dimensions:
snowman-belly-jennifermaker-SVG: 20.44" x 12.24"
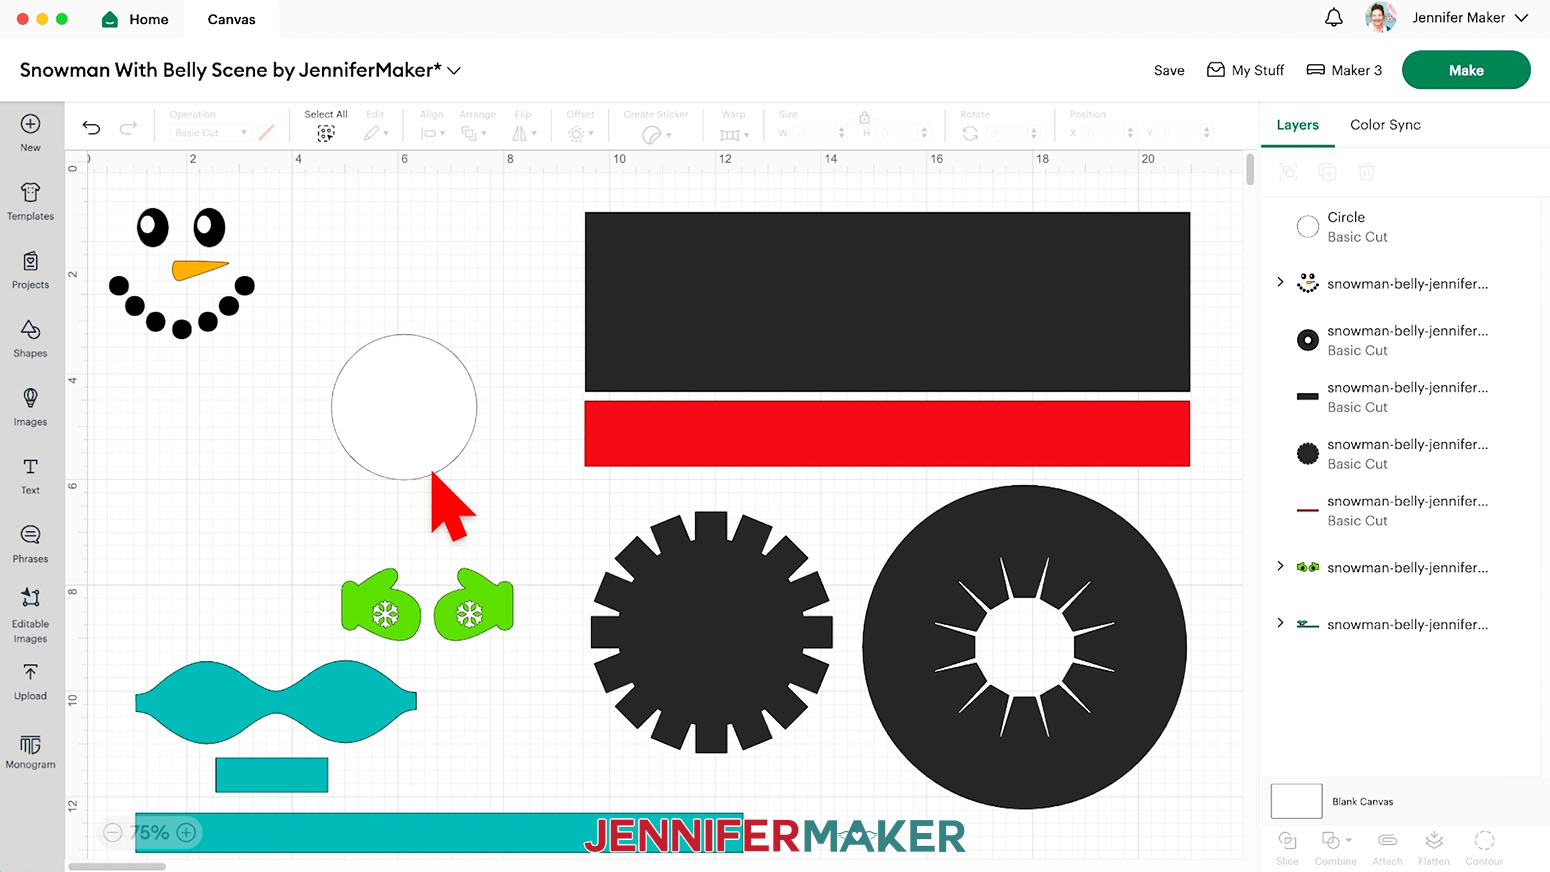
There are six face options and two mitten options to be cut from adhesive vinyl, an optional cardstock bowtie, and then pieces for a cardstock hat.
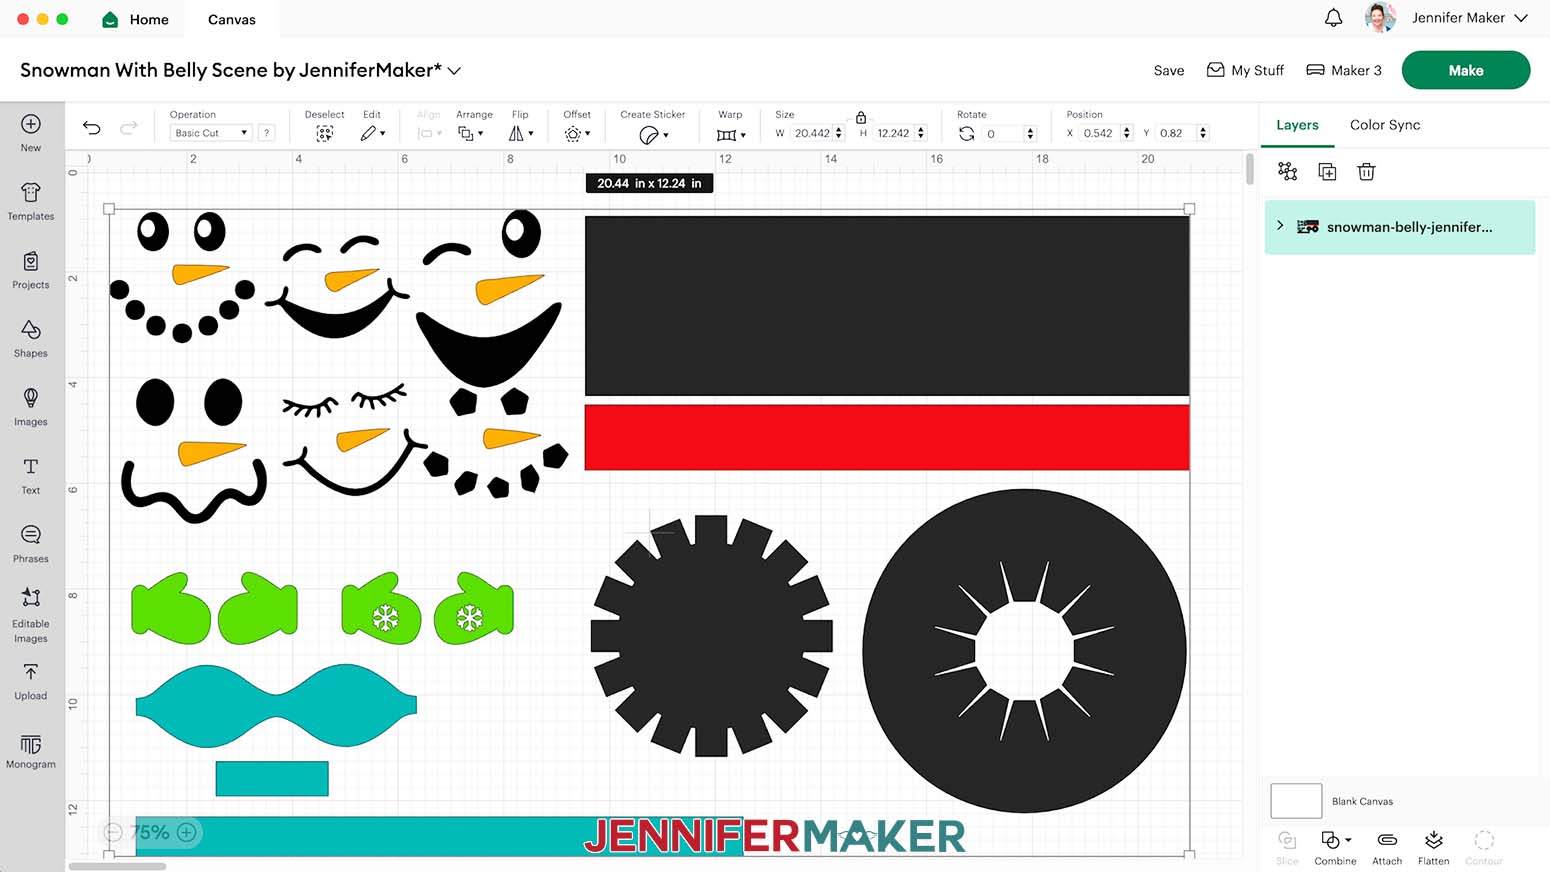
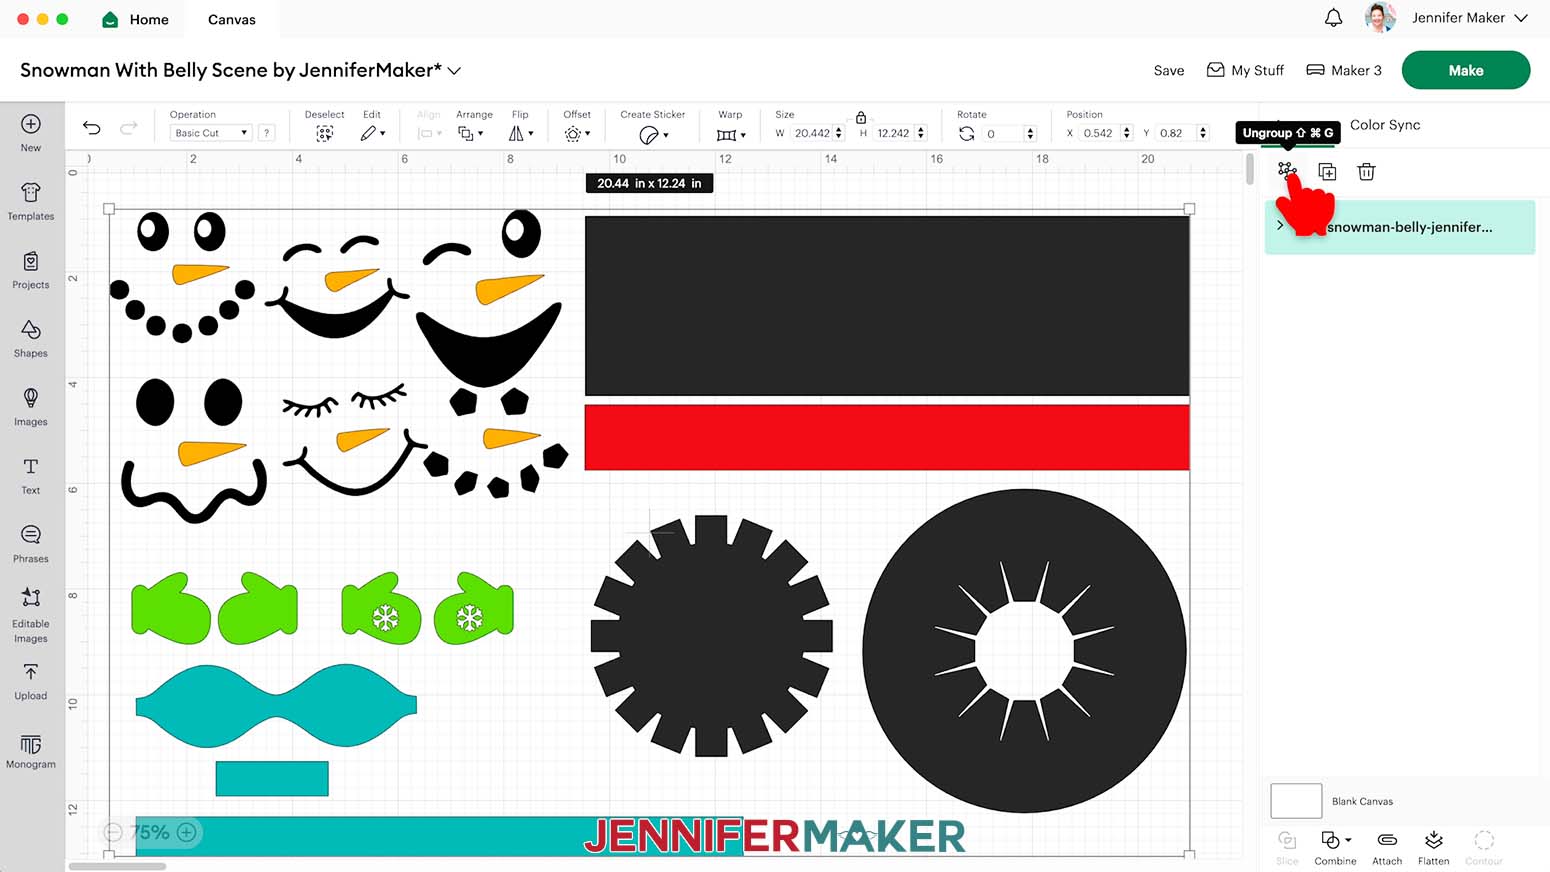
8. Ungroup the design and spread the pieces out.
9. Delete the grouped faces and mitten pair you don’t want to use.

10. If you want to add a belly scene, you can use vinyl to mask off part of the bottom vase. Click the Shapes icon and select the free circle to add it to your Canvas.
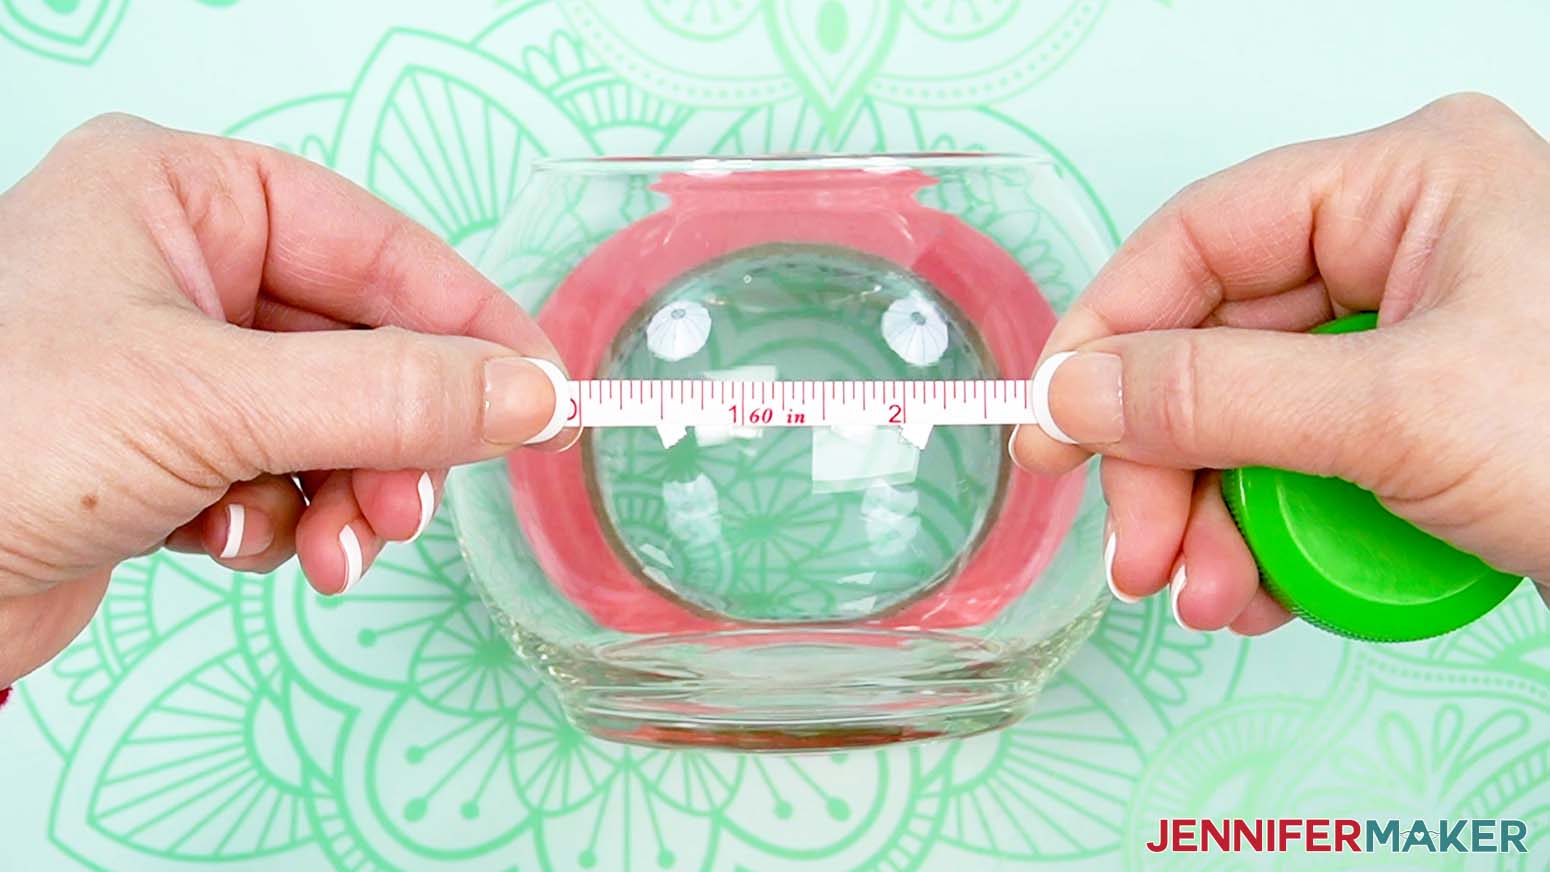
11. With the lock icon closed, adjust the circle to be 2.75” in width. We’ll only use the circle for preparing the bowl, so you can use any color of removable vinyl. I changed mine to white.
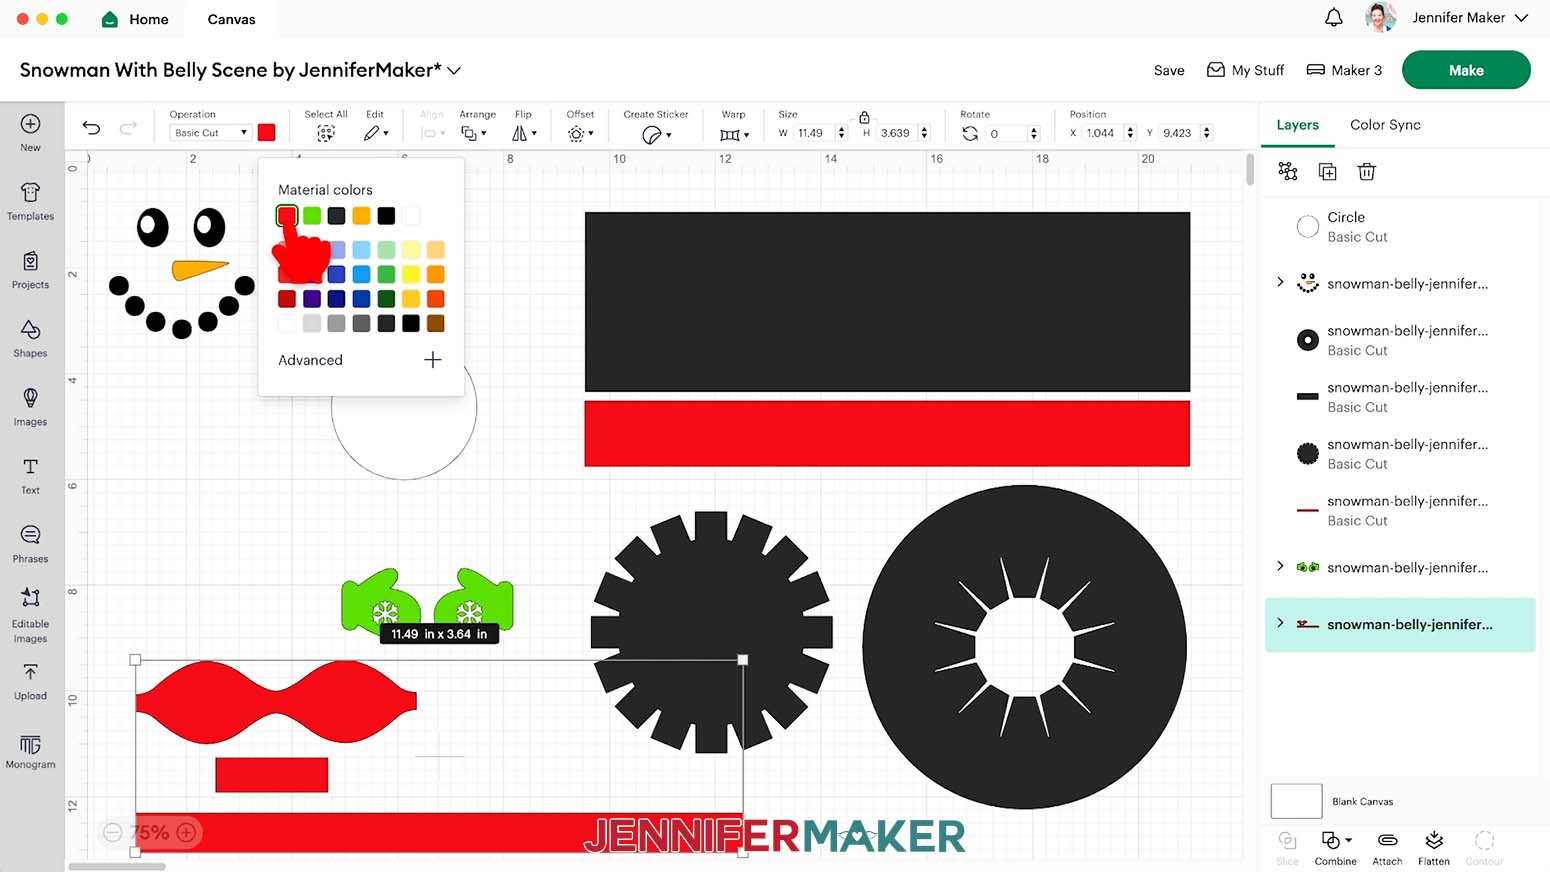
NOTE: If you’re using a different size vase, measure the area you want to leave open and make your circle that size. To check, use a soft tape measure to measure the easily visible section when looking straight at the vase.
12. If you want the bowtie to match the hat detail, select the grouped layers and use the Color Box to select the correct color.
13. Make sure the correct machine is selected in the top right.
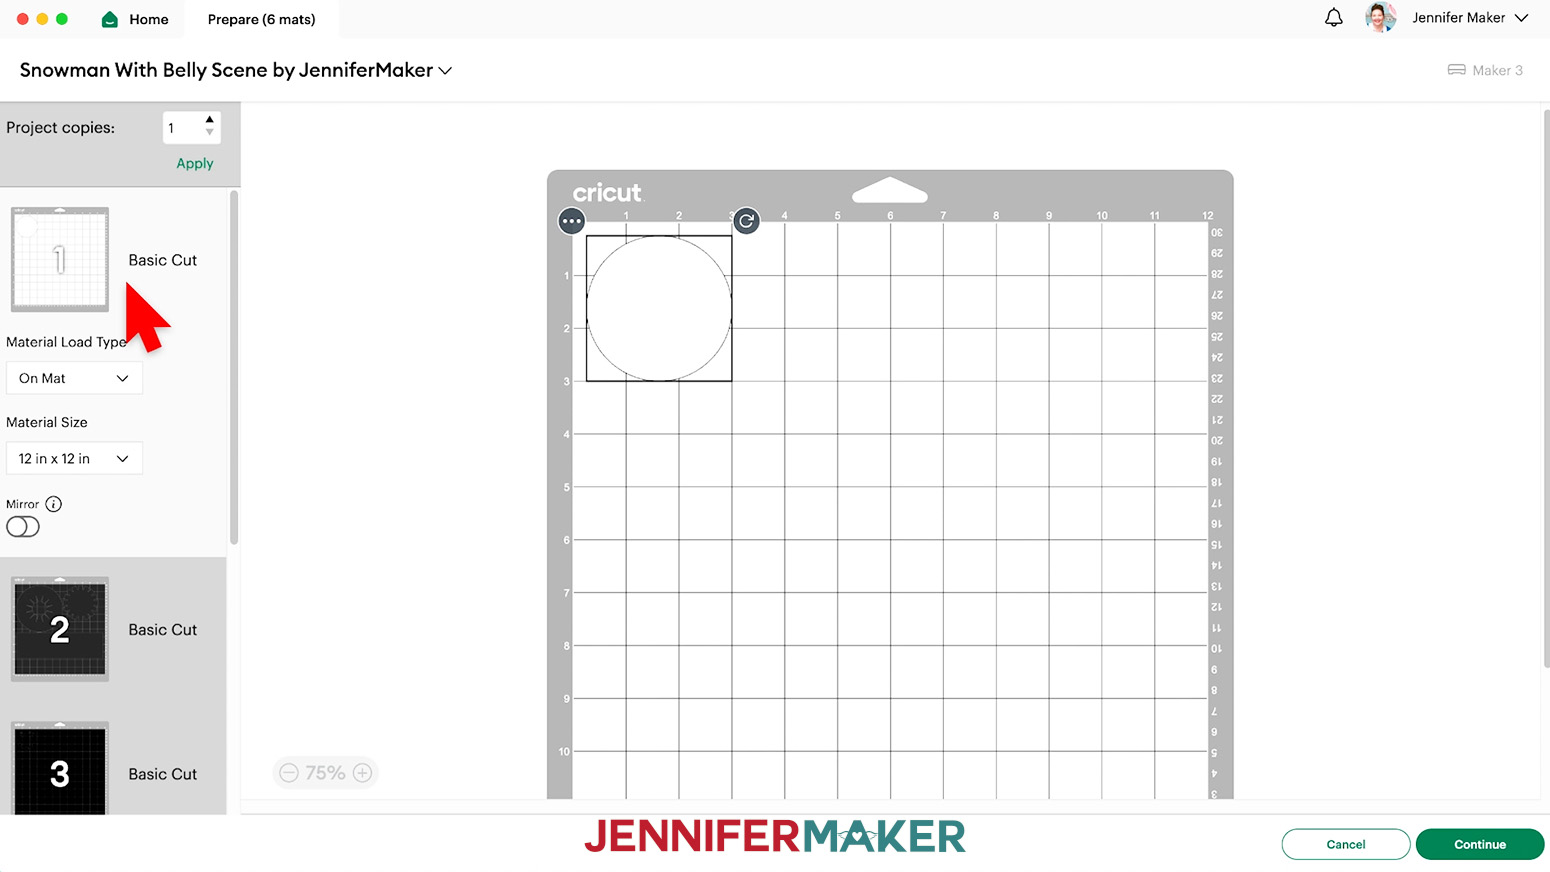
14. Click “Make.”
15. If prompted, click “On Mat,” choose your mat size, and click “Confirm.”
16. On the Prepare screen, make sure the correct Material Size is selected for your materials.

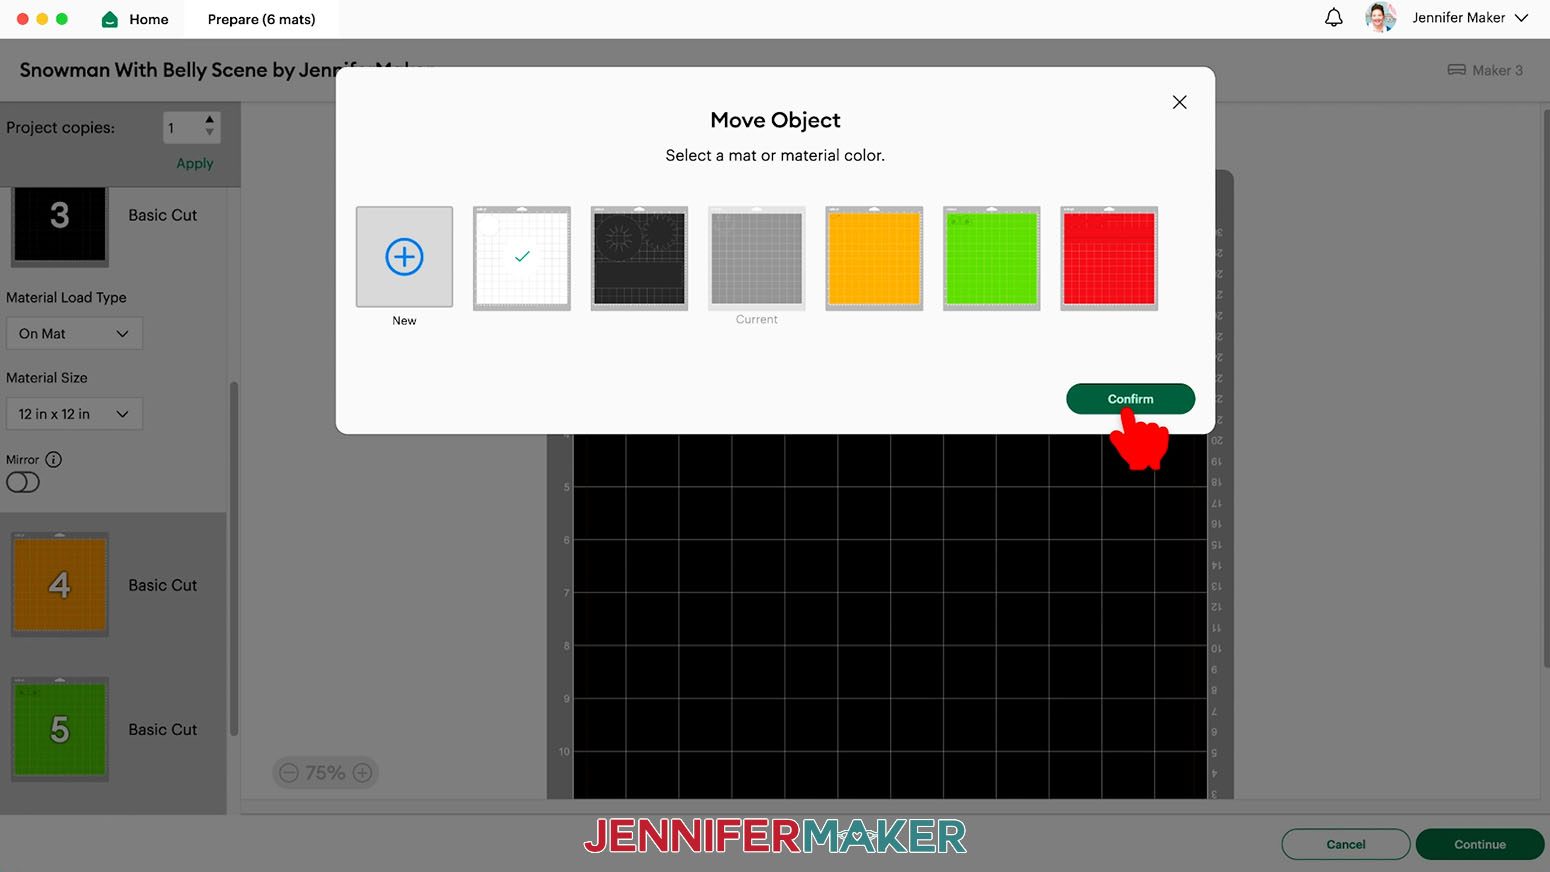
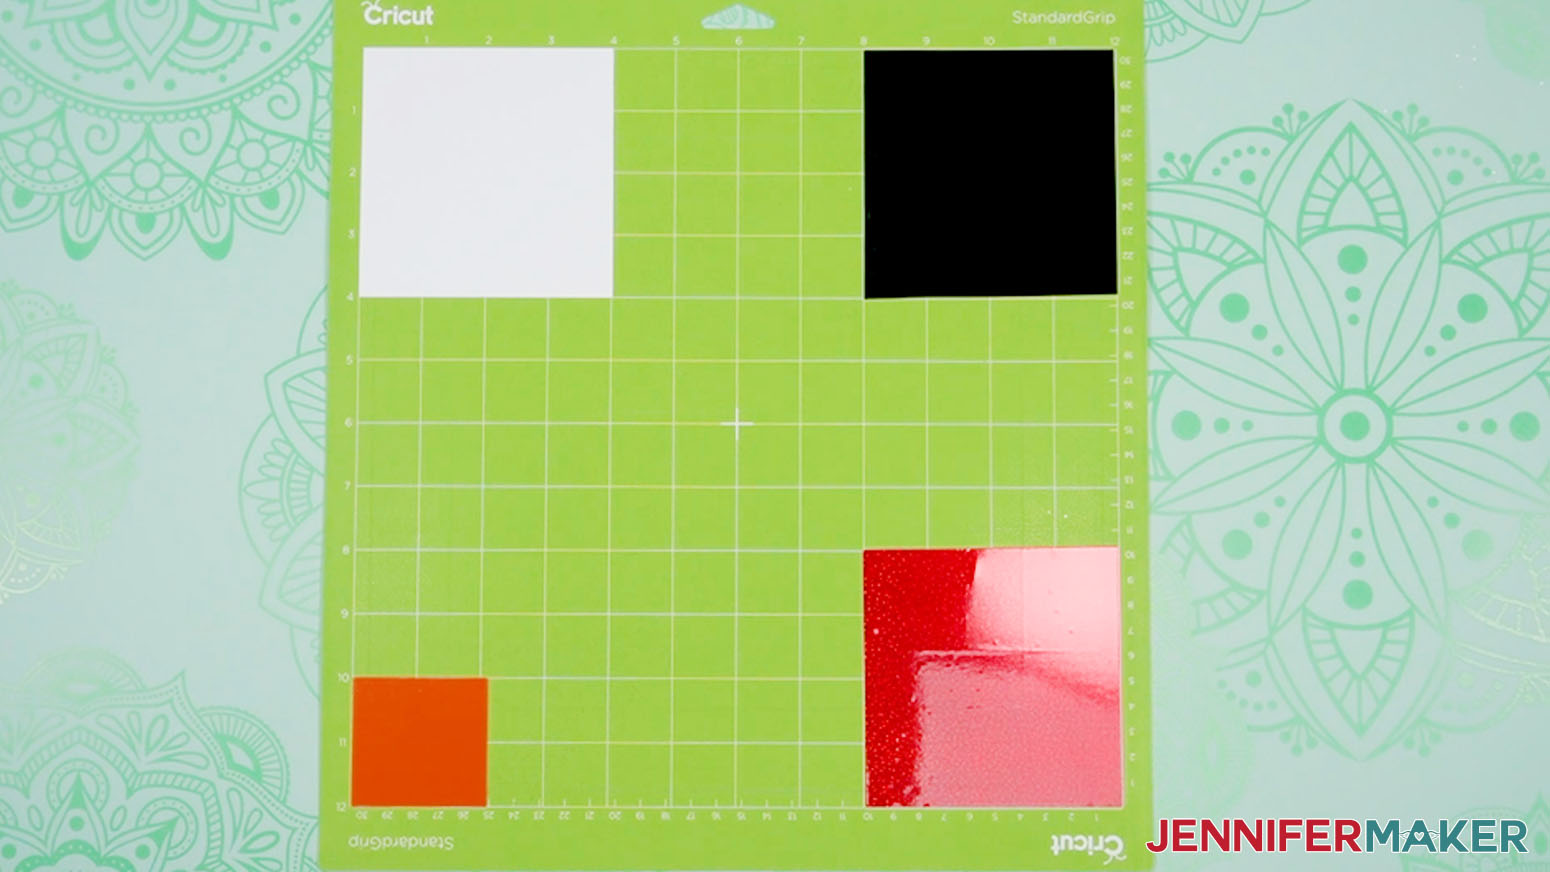
17. You can put the small vinyl pieces on one mat – I’ll use the white one with the circle – to save time with some careful placement.
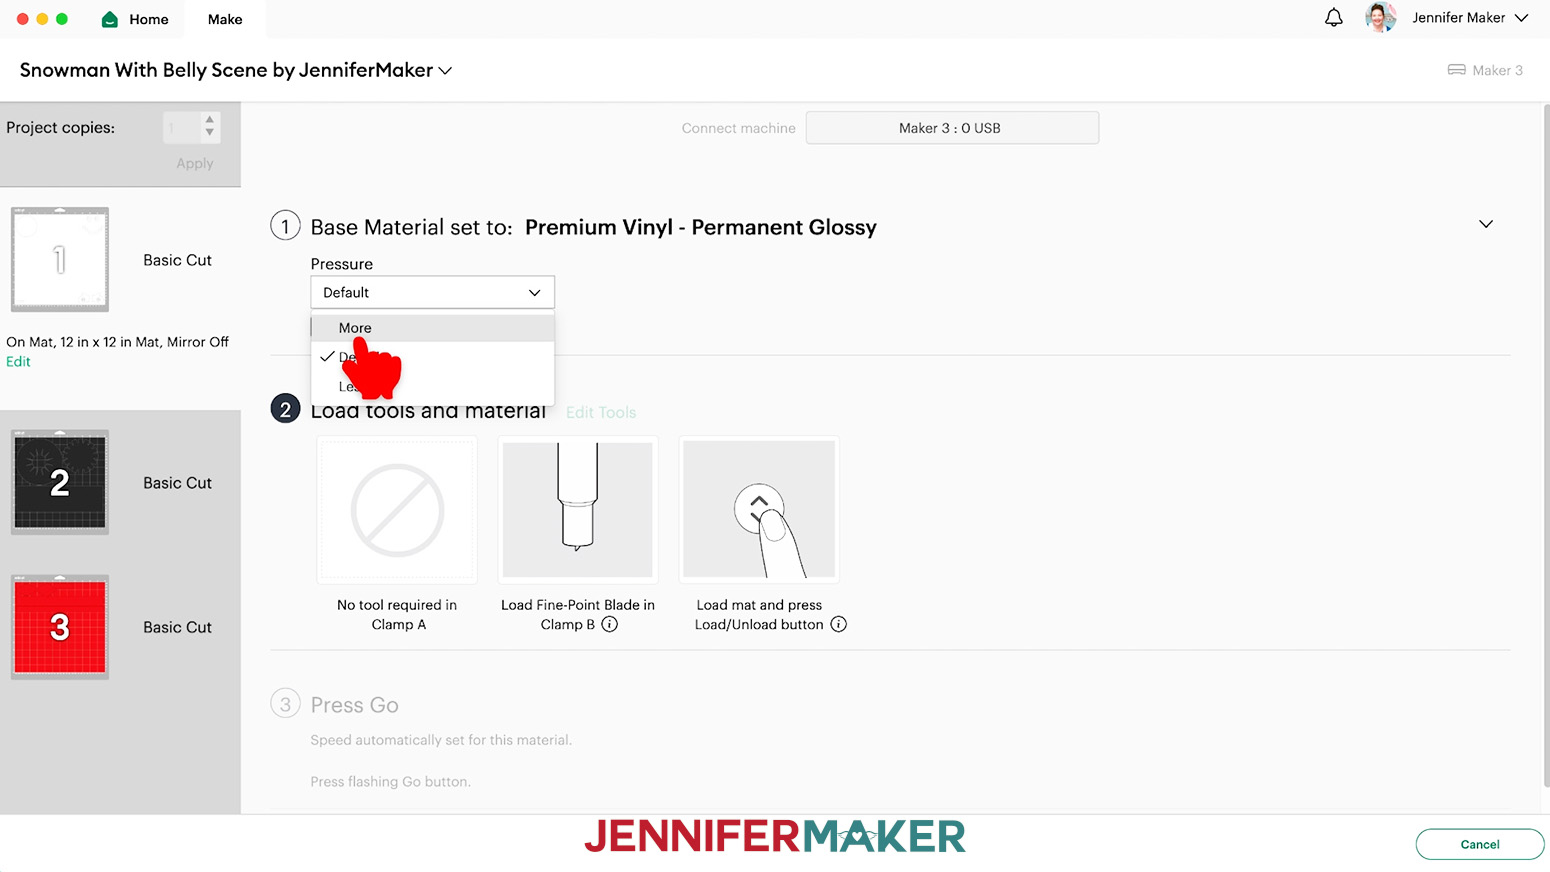
NOTE: The cut settings are slightly different for each kind of adhesive vinyl, but I’ve found that removable, premium glossy, and holographic sparkle Cricut vinyl cut well using the “Premium Vinyl - Permanent Glossy” setting with More Pressure.
18. Go to the black mat and click on the three dots icon in a corner of the face.
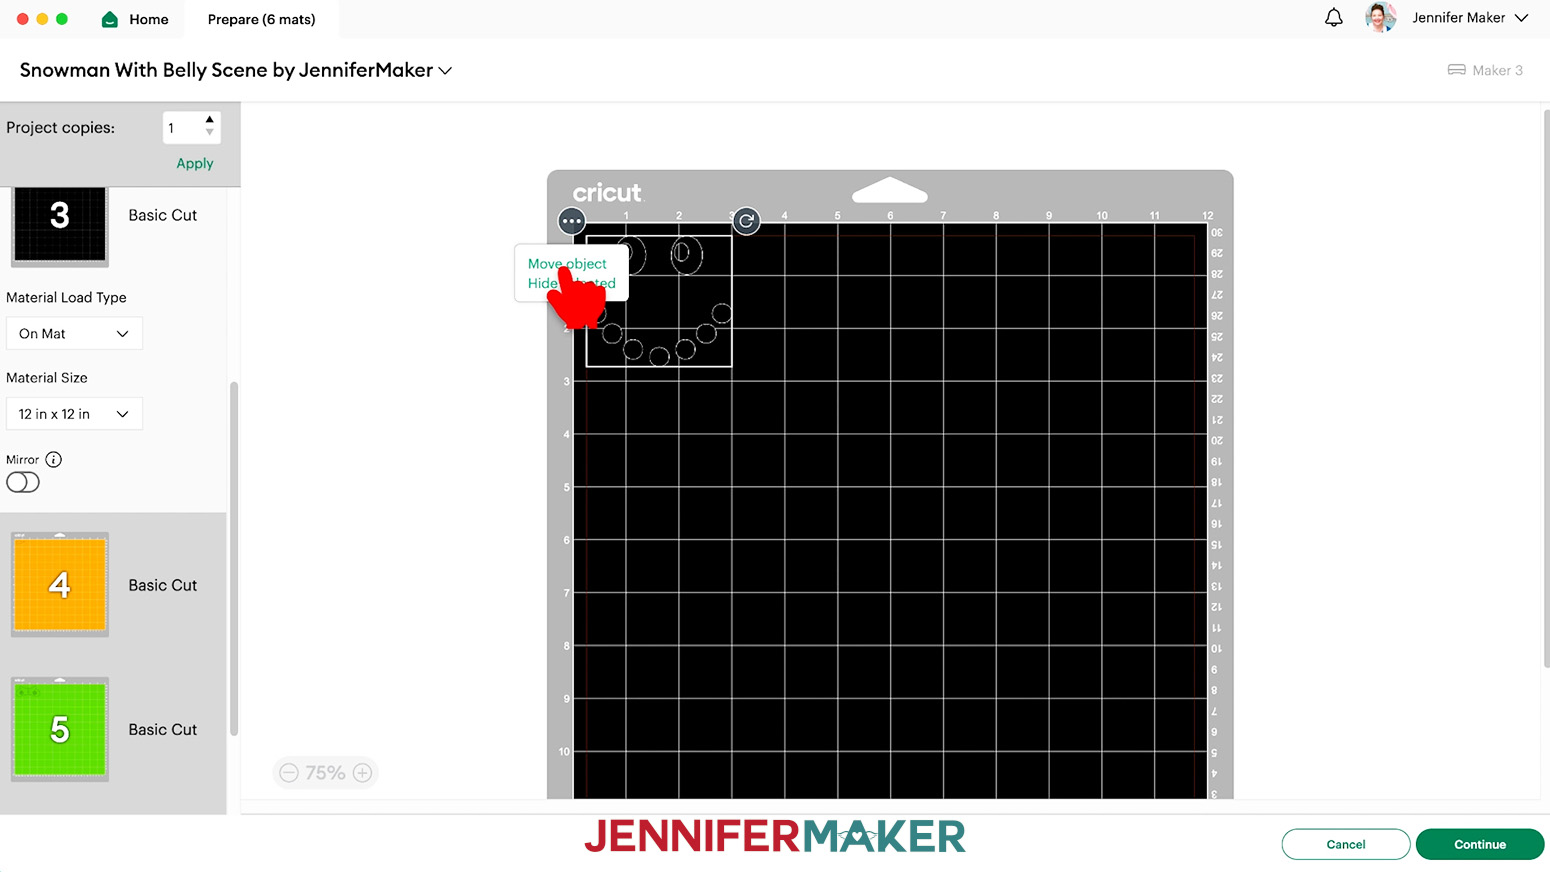
19. Click “Move Object” and select the white mat in the popup.
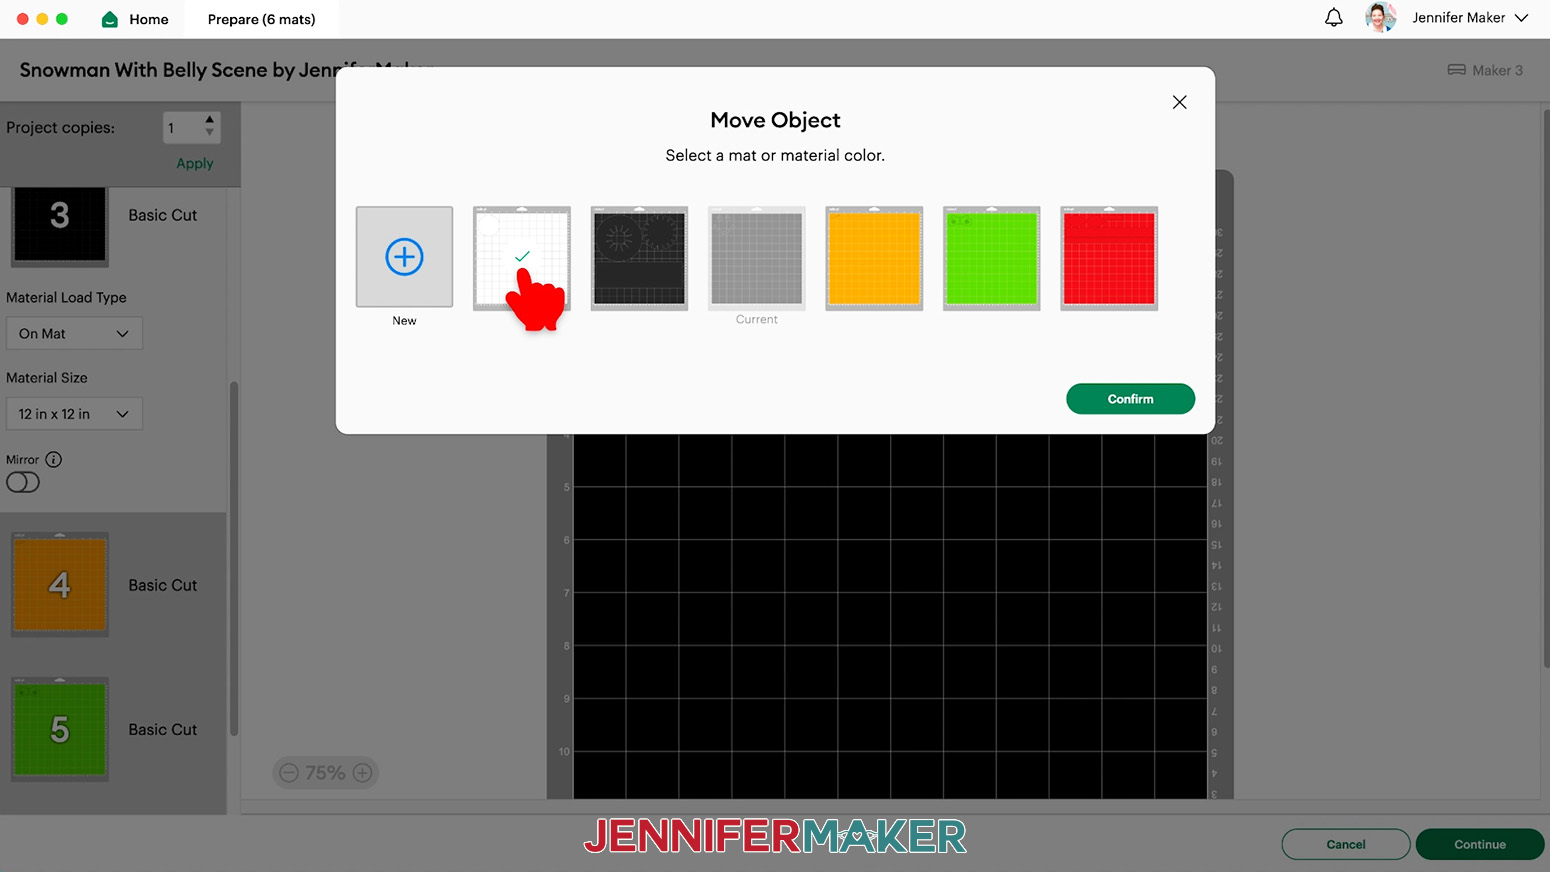
20. Click “Confirm.”
NOTE: The object turned white, but that’s ok.
21. Drag it all the way over to the far right corner so it’s separated from the circle.
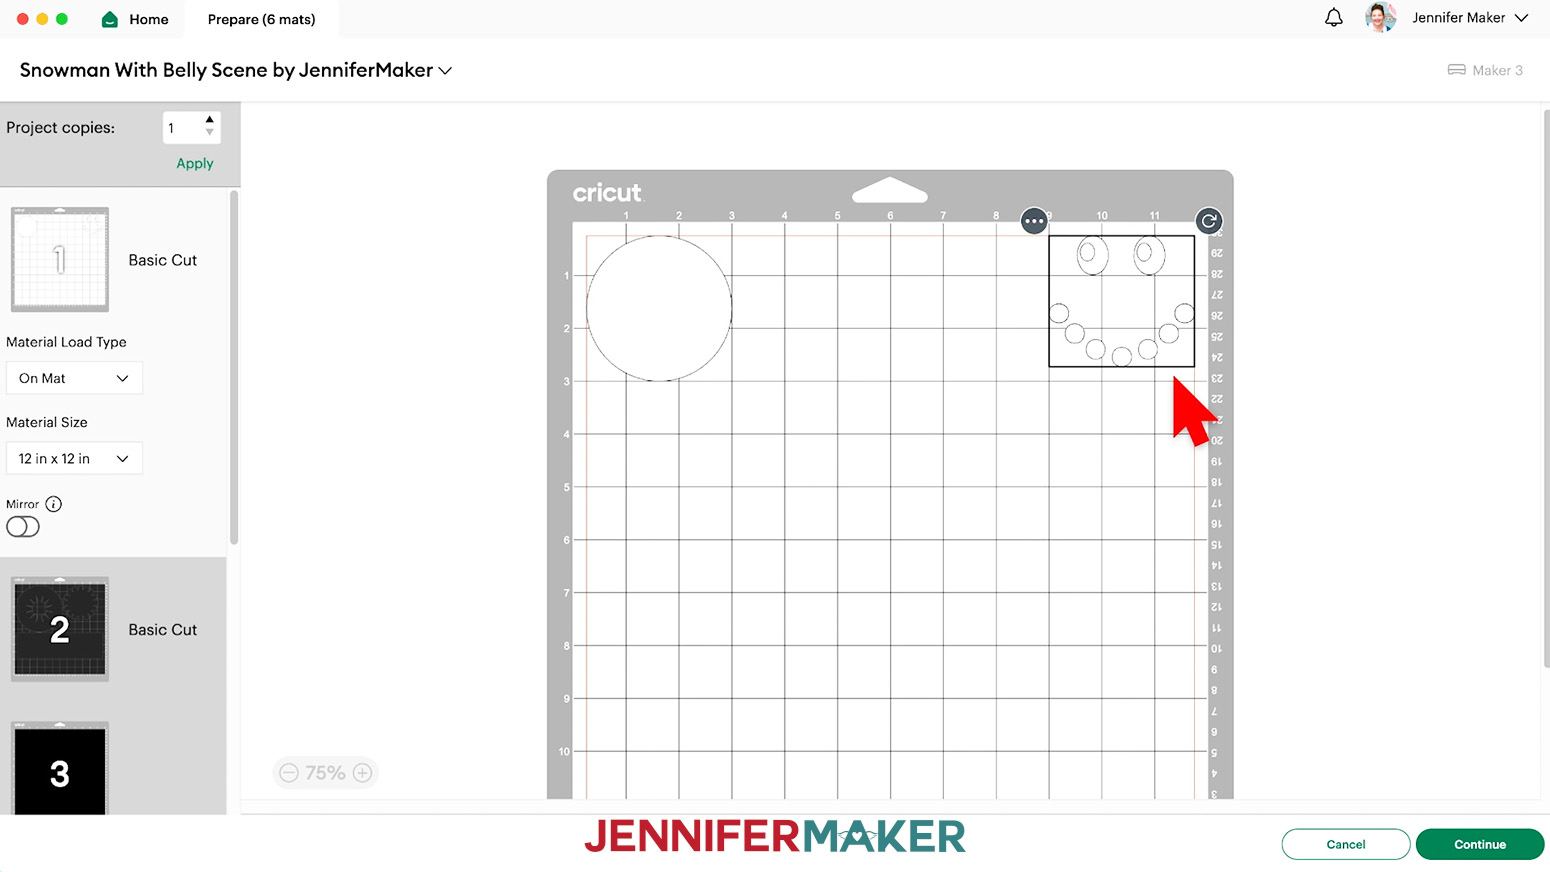
NOTE: The Cricut will cut each shape right where the mat preview shows you. This way, you can cut multiple colors on the same mat.
22. Use Steps 17-20 to move the carrot from the orange mat to the lower left corner of the white mat.

23. Use Steps 17-20 to move the mittens one at a time from the green mat to the lower right corner of the white mat.

24. Note the size you’ll need of each vinyl color to cover its element(s).
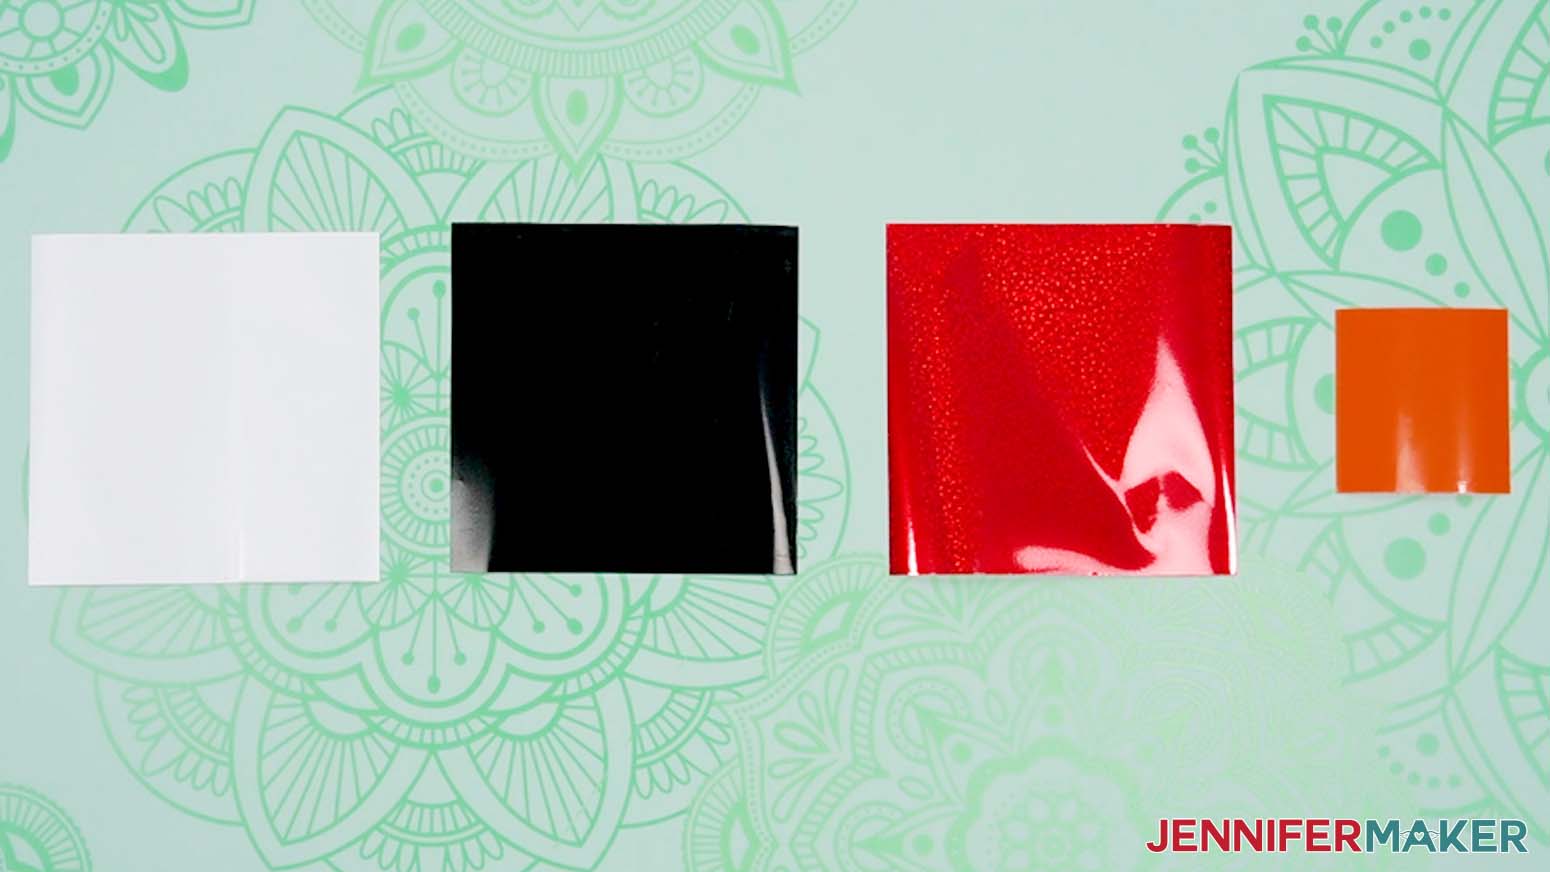
- We’ll put a 4” square of removable vinyl in the top left corner for the circle, a 4” square of black permanent vinyl in the top right, a 2” square of orange permanent vinyl in the lower left, and a 4” square of red holographic sparkle vinyl for the lower right.
25. Select the first mat again and click “Continue.”
CUTTING
1. On the Make screen, set the Material for your combined vinyl mat to “Premium Vinyl - Permanent Glossy.”
NOTE: I tested this setting and it worked for the vinyls I used. All machines behave differently, so it’s a good idea to make a test cut.
2. Change the Pressure to “More” for a cleaner cut.
3. Remove the protective cover from your Green StandardGrip machine mat and set it aside where it won’t get dirty.
4. Use scissors to cut the vinyl shapes needed for your combined mat.
5. Place each piece face up in the correct spot on the mat to match its design element.
6. Use a brayer to adhere each piece very well to the mat.
7. Check that your Premium Fine-Point Blade is clean and in the clamp.
8. Press the flashing “Load/Unload” button to load the prepared mat into your Cricut.
9. Press the flashing “Go” button to begin cutting.
10. When it has finished cutting, unload the mat, flip it over onto your work surface, and roll it back to release the vinyl pieces.
11. Cut away excess vinyl if you used larger pieces.
12. Use your weeding tool to remove the excess vinyl from around your vinyl pieces.
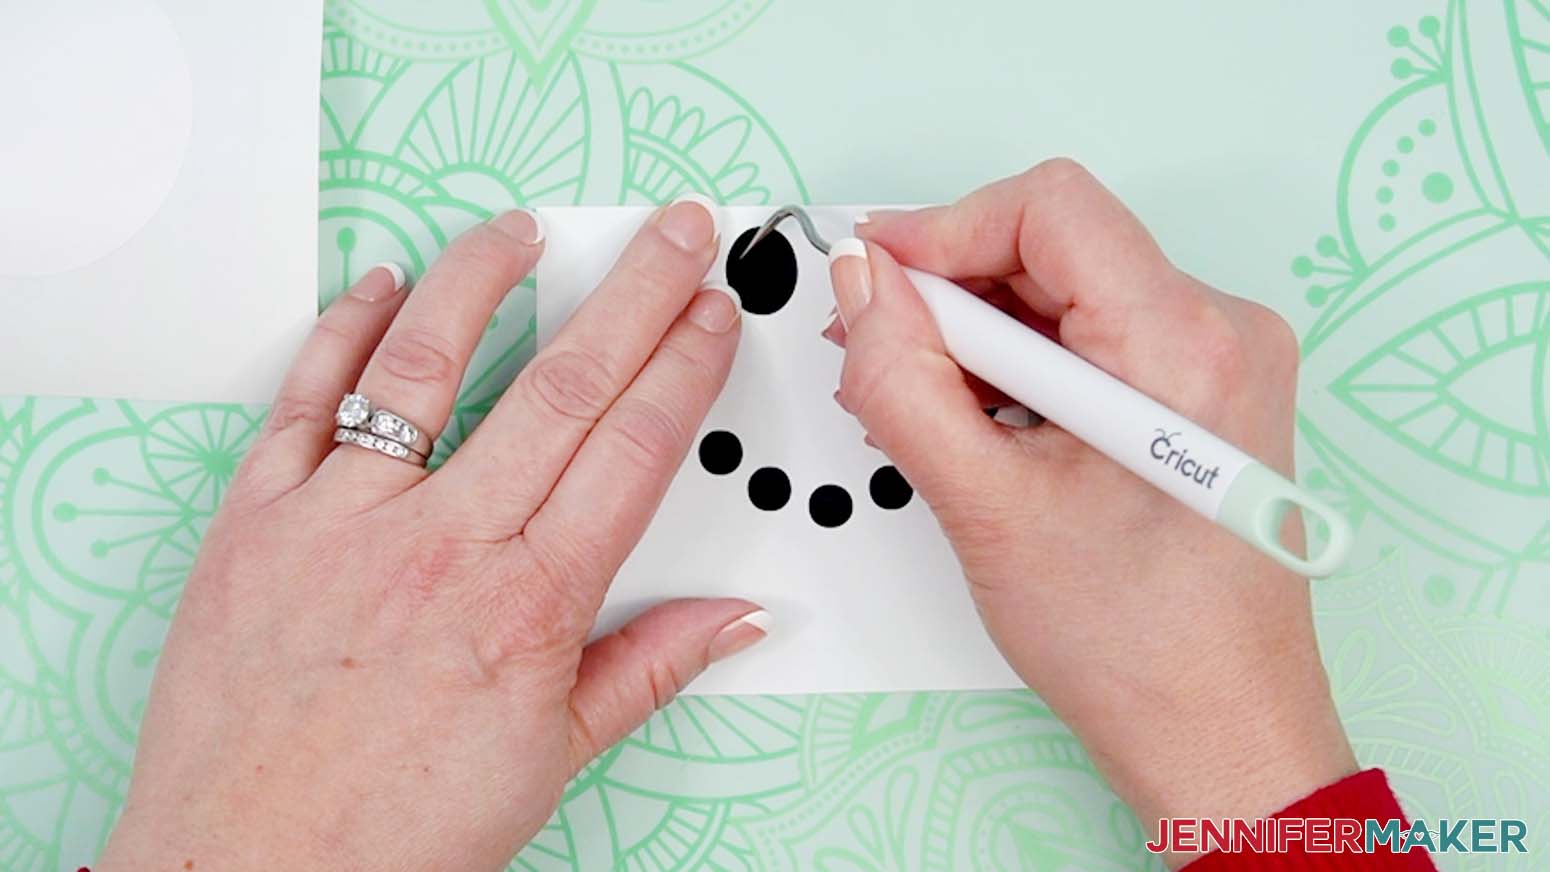
NOTE: Don’t forget to remove the insides of shapes like the eyes!
13. Use the same steps to cut the remaining mats using the following settings and preparation process:
- Cardstock hat: plain cardstock on a green StandardGrip machine mat using “Medium Cardstock - 80 lb (216 gsm)” with More pressure
- Hat detail and bowtie: glitter cardstock pretty side up on a green StandardGrip machine mat using “Glitter Cardstock” with More pressure
STEP 3: PREPARE YOUR GLASS BOWLS
1. Place a piece of butcher paper over your workspace to protect it from the glitter and Mod Podge.
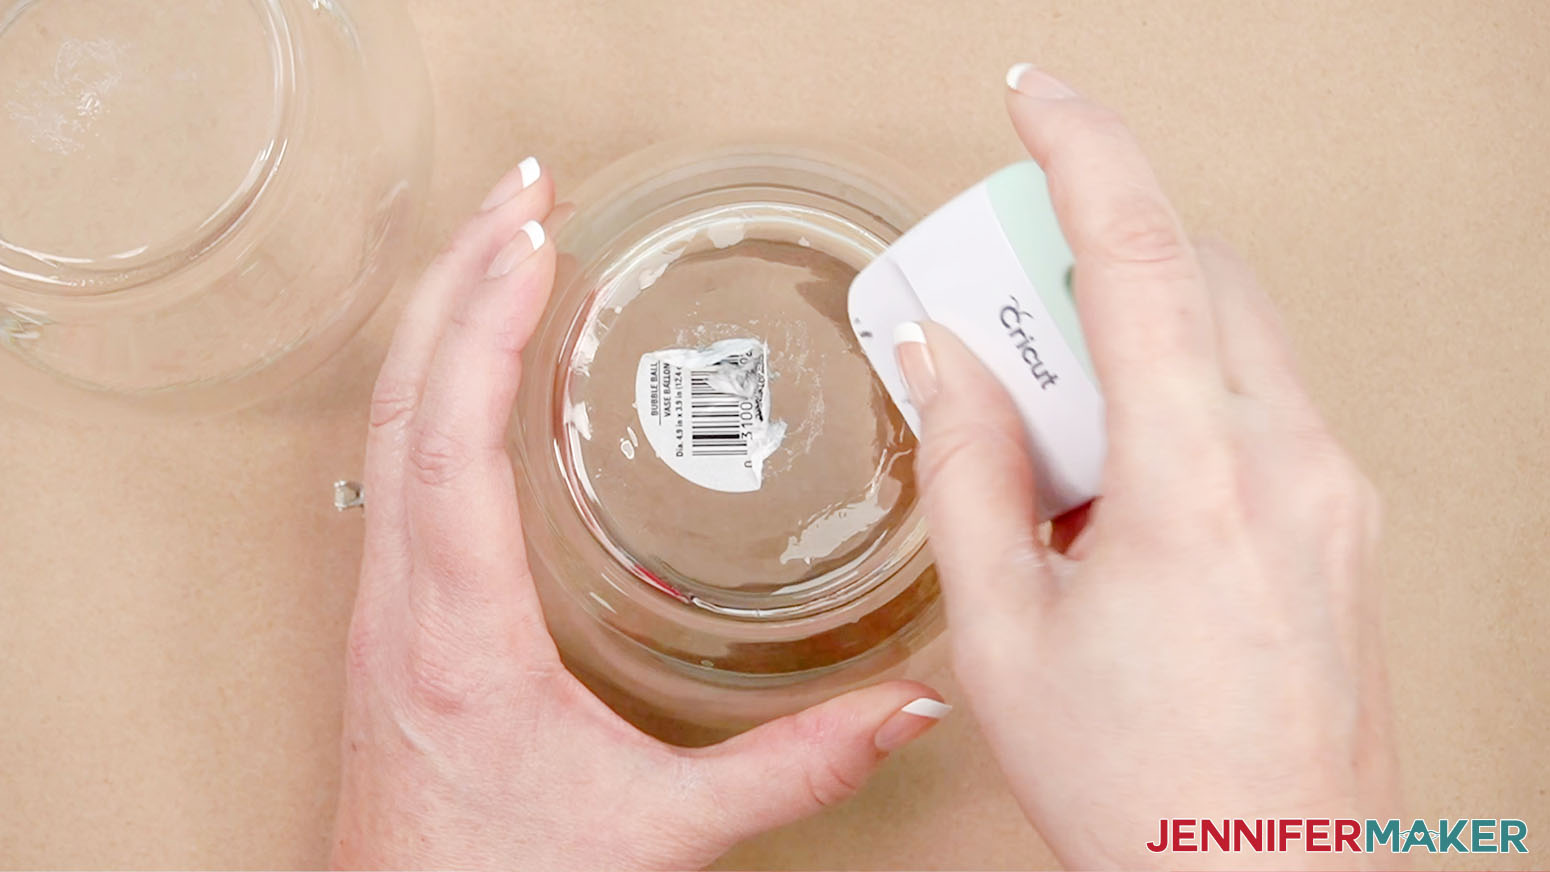
2. Use rubbing alcohol and a lint-free cloth to clean the inside and outside of the bowls and remove any price tag stickers.
TIP: If the sticker is stubborn and on the bottom, place the bowl upside down and add enough rubbing alcohol to completely cover it. Let it sit for a few minutes and then scrape it off with your scraper tool.
3. Place your dry bowls open end up.
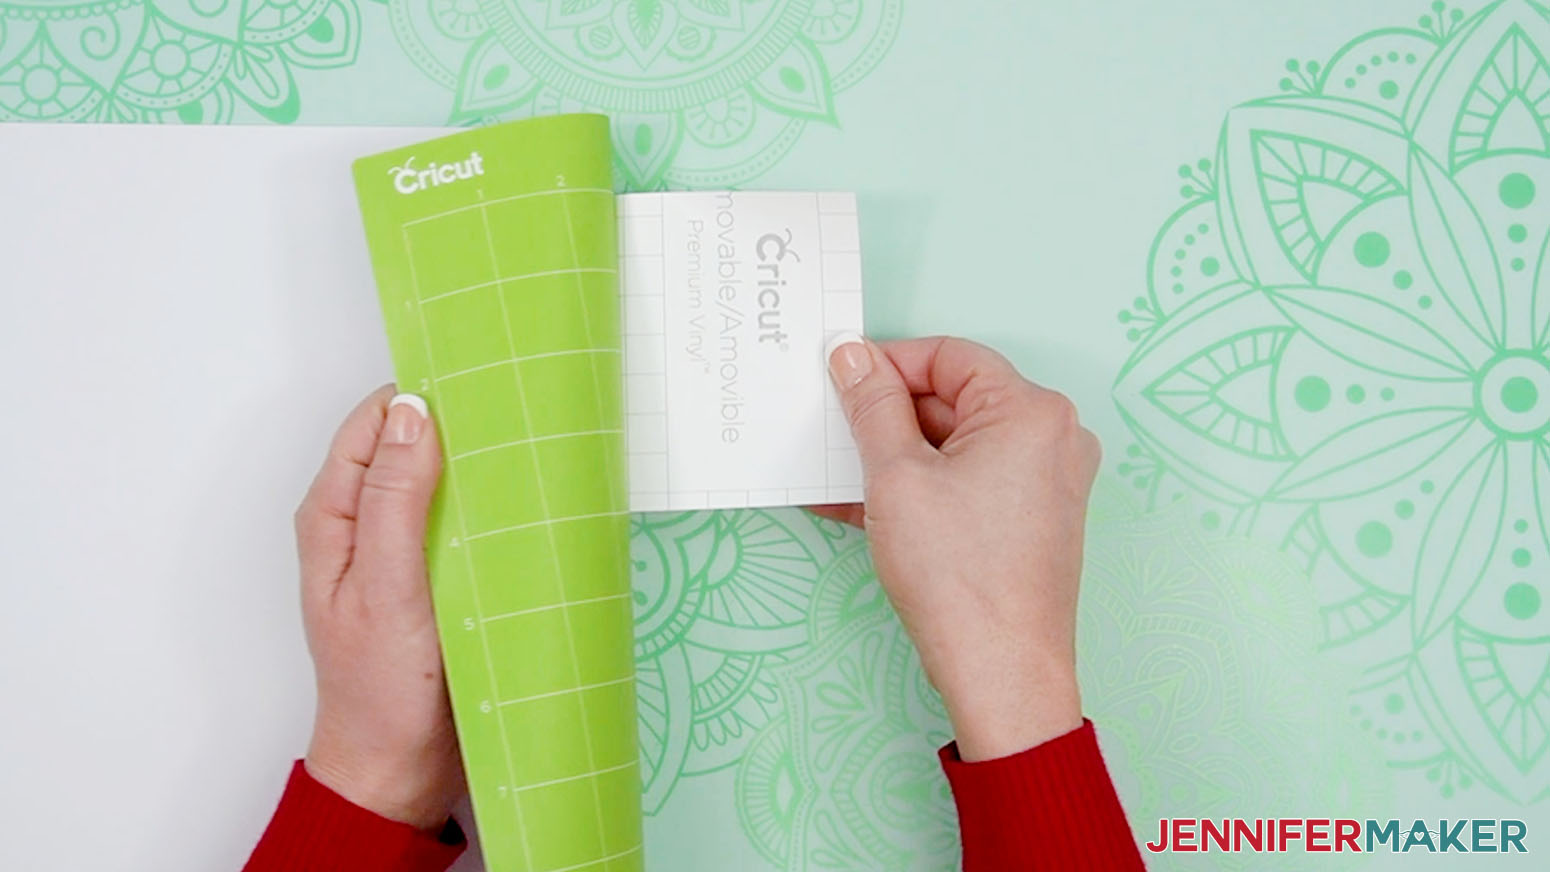
4. Carefully peel the removable vinyl circle off of its carrier sheet like a big sticker.
5. Gently shape the circle like a taco with the sticky side out so it is easier to maneuver in the bowl you’ll use for the bottom.
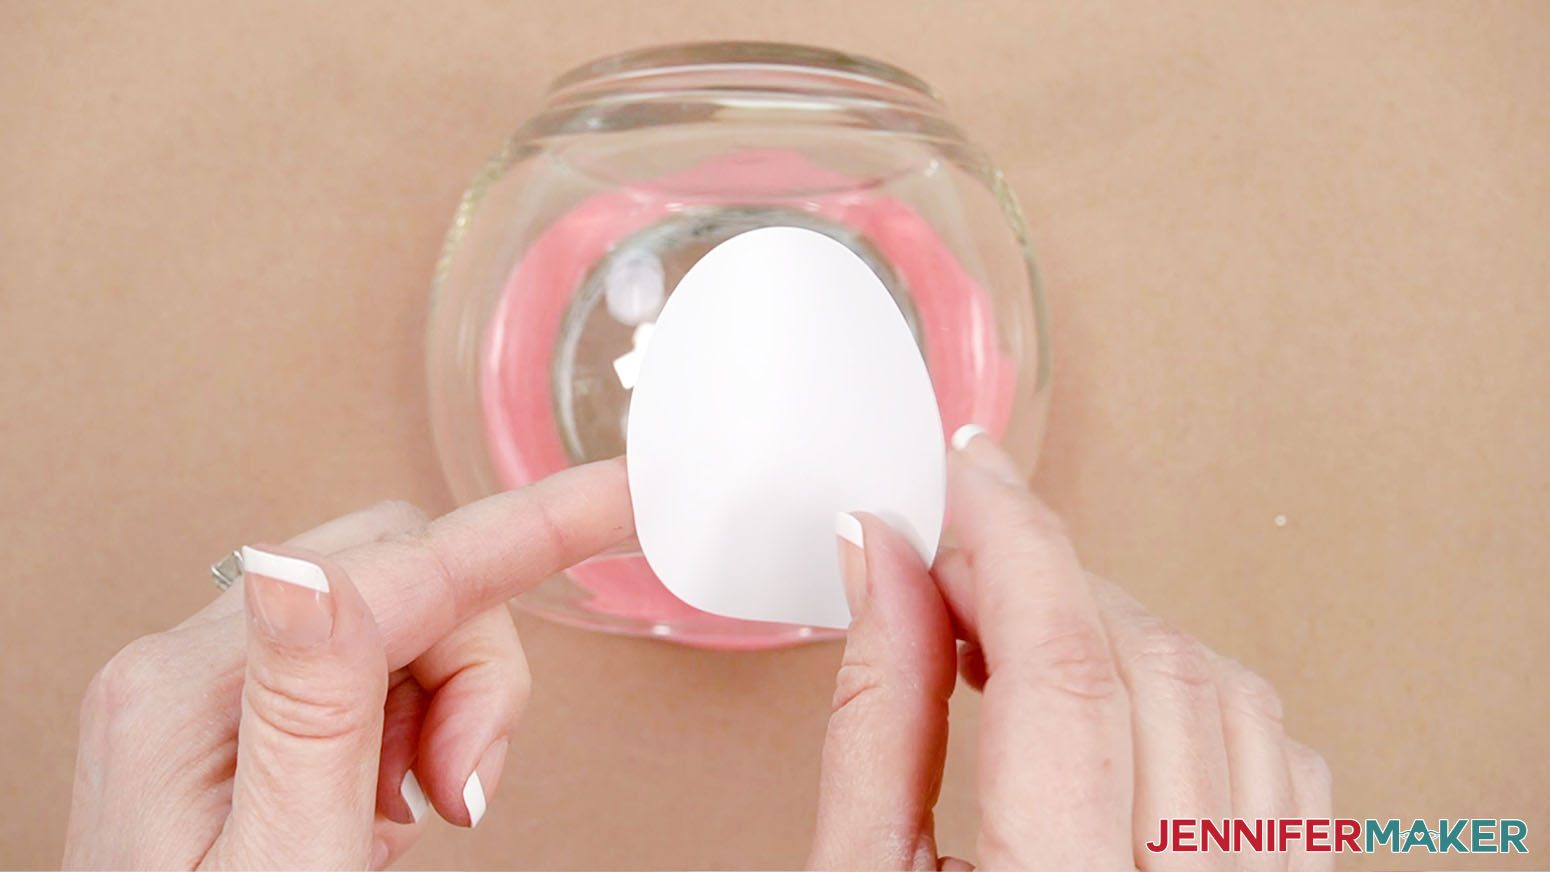
6. Looking at the bowl from the front, lower the circle down inside with the sticky side facing you and the taco shape straight up and down.
7. When the circle’s bottom and top edges look close to where you want them, gently stick it to the inside surface starting right in the middle.
8. Carefully smooth the vinyl out from the middle so it’s smooth against the glass.
9. Press the edges out very well so they are as smooth as possible because that’s the section that will create the opening in our glitter area. If you have a few ripples, a little Mod Podge or glitter might get into the area you’re trying to keep clear, but we can clean up any imperfections later.
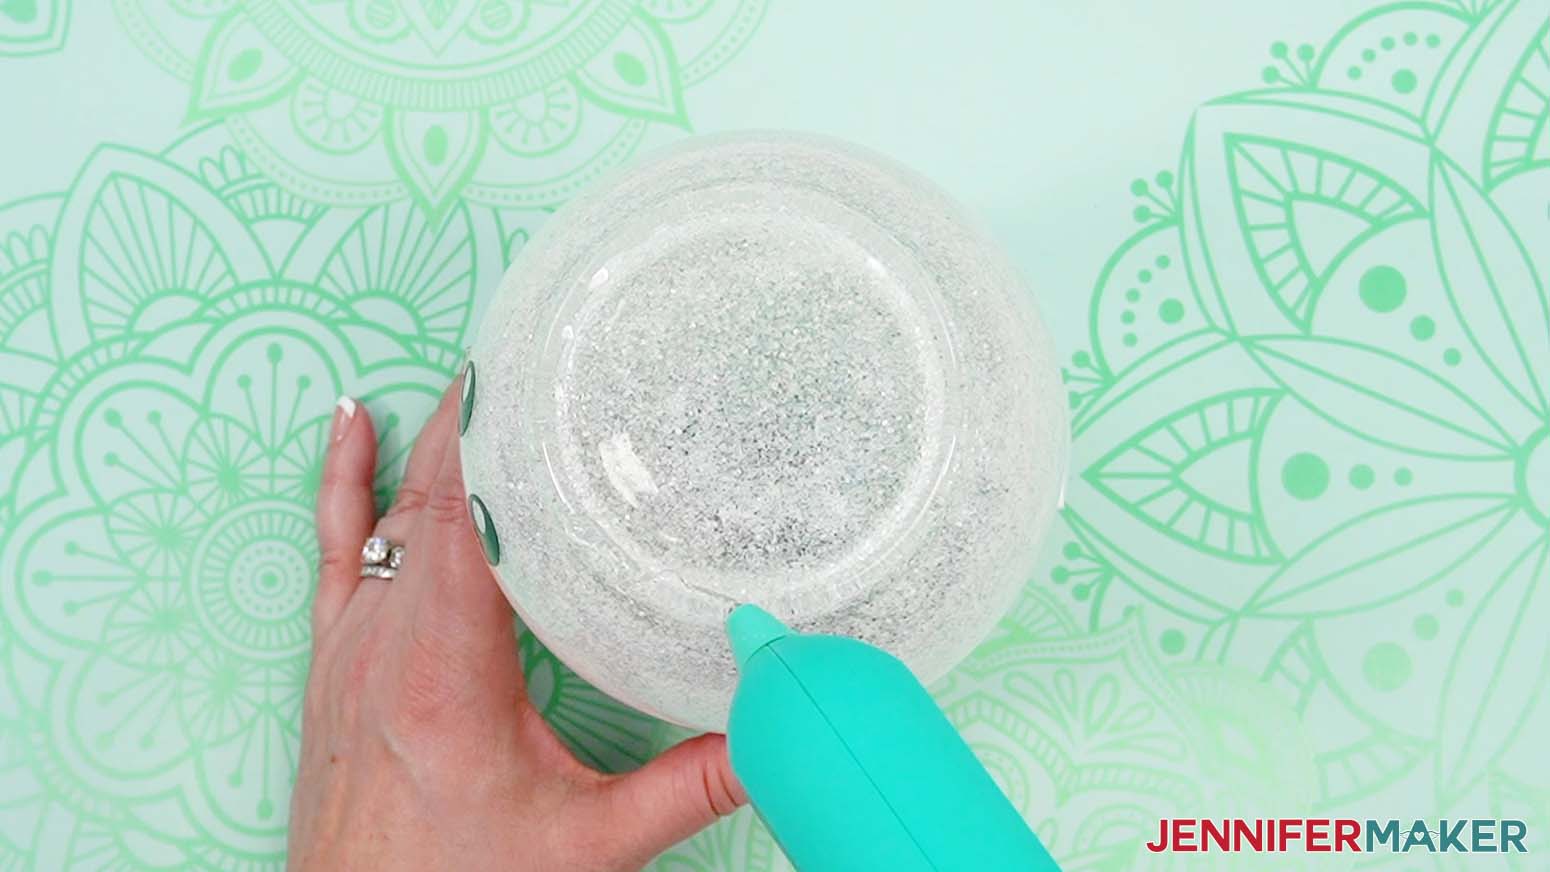
10. Dip your small foam brush into the Mod Podge and spread it evenly inside the glass vase.
TIP: Start by spreading it around the bottom and then apply even strokes to the sides, starting at the bottom and working to the rim.
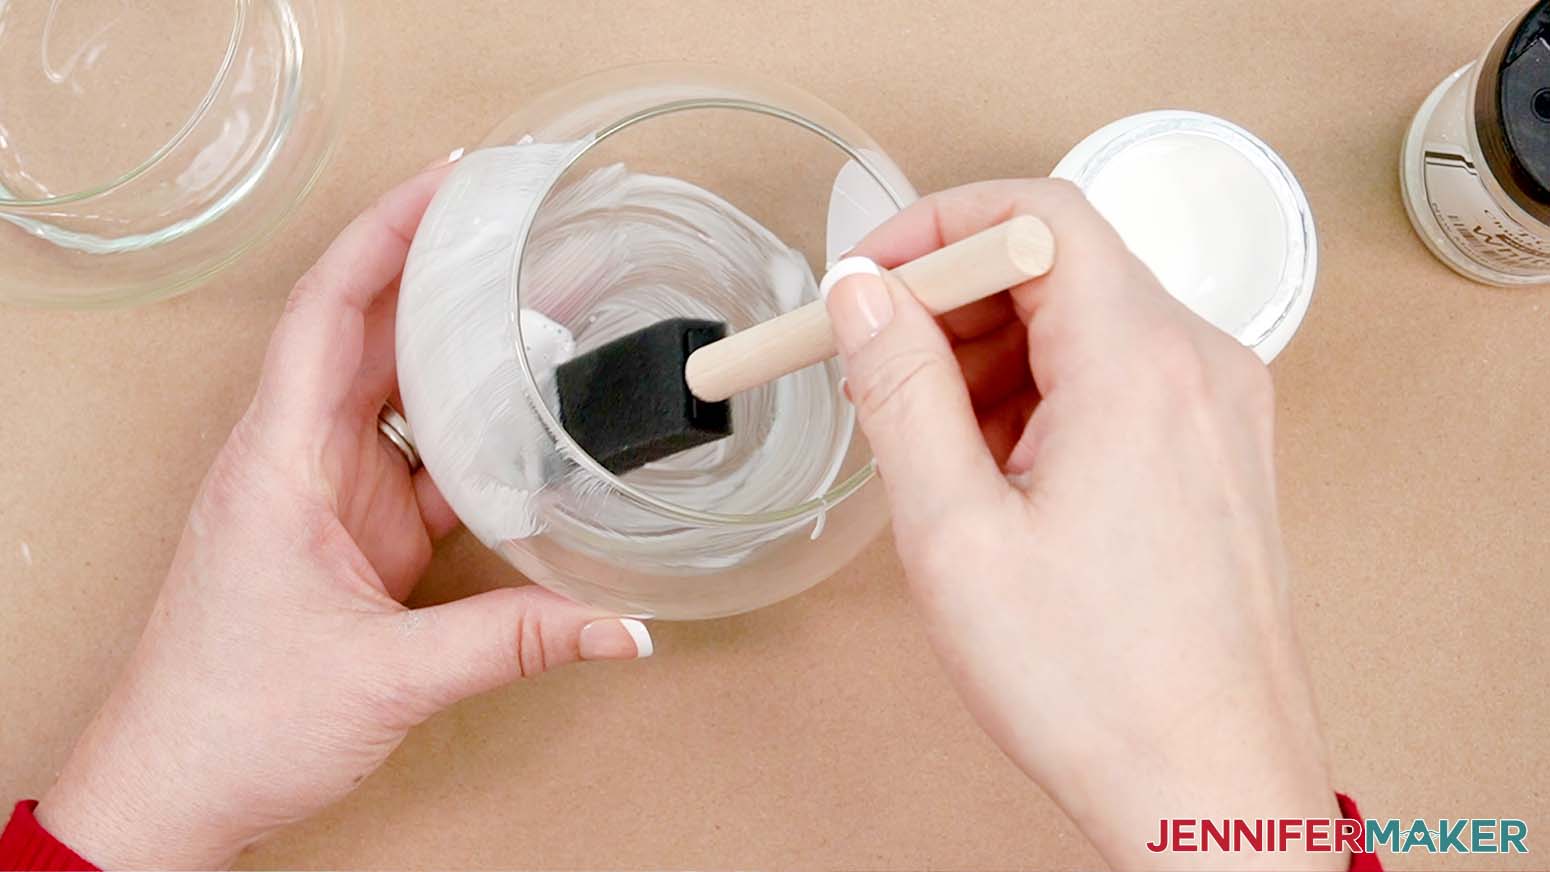
11. When you’re working near the vinyl, spread the Mod Podge from the vinyl out to the glass to keep it from seeping underneath, which is more likely if your brushstrokes go toward the vinyl’s edge instead of away from it.
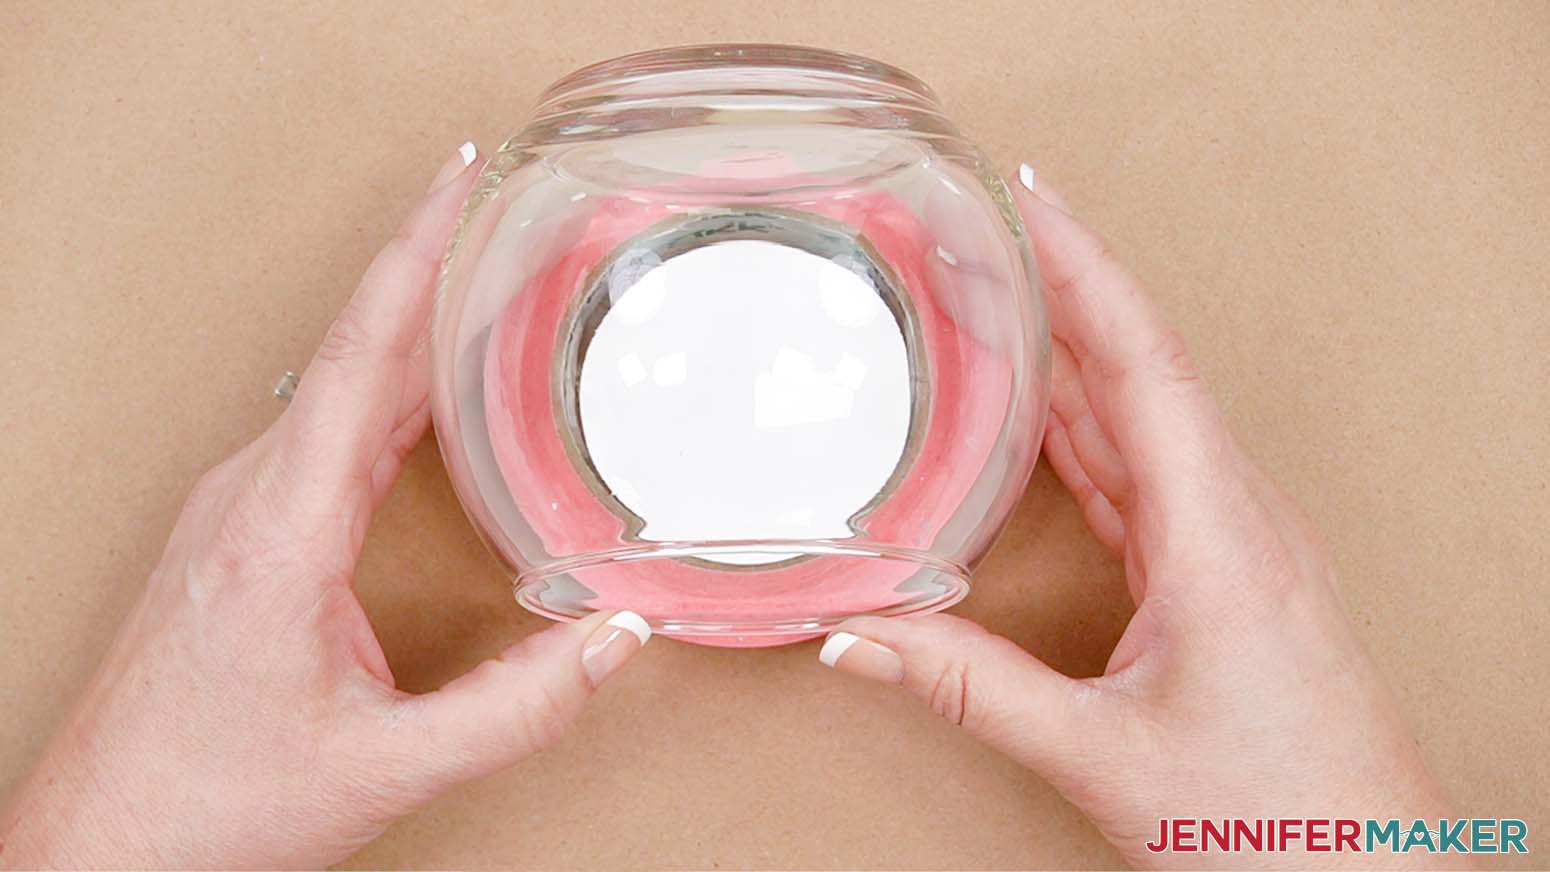
12. When the glass is evenly coated, lightly sprinkle the glitter inside the bowl.
NOTE: I got better coverage using chunky glitter, but you can experiment with different kinds to get the result you want.
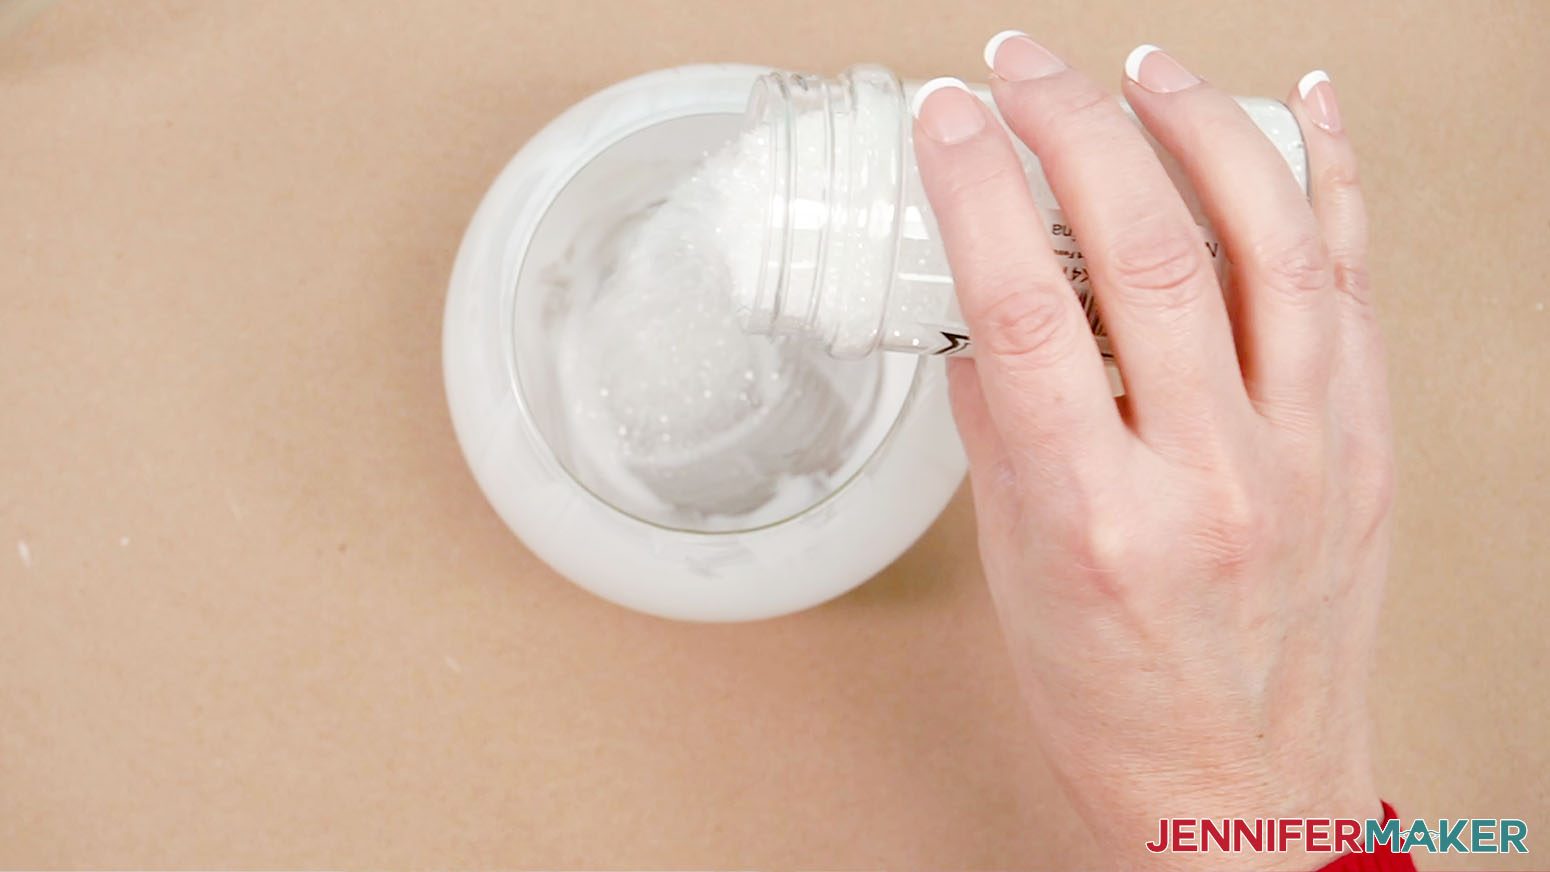
13. Twirl the bowl to spread the glitter so it covers all of the inside Mod Podge.
TIP: Once all the glue is covered, pour the excess glitter back into its container. If any glitter got on to the butcher paper, make it into a funnel to pour it back into the container.
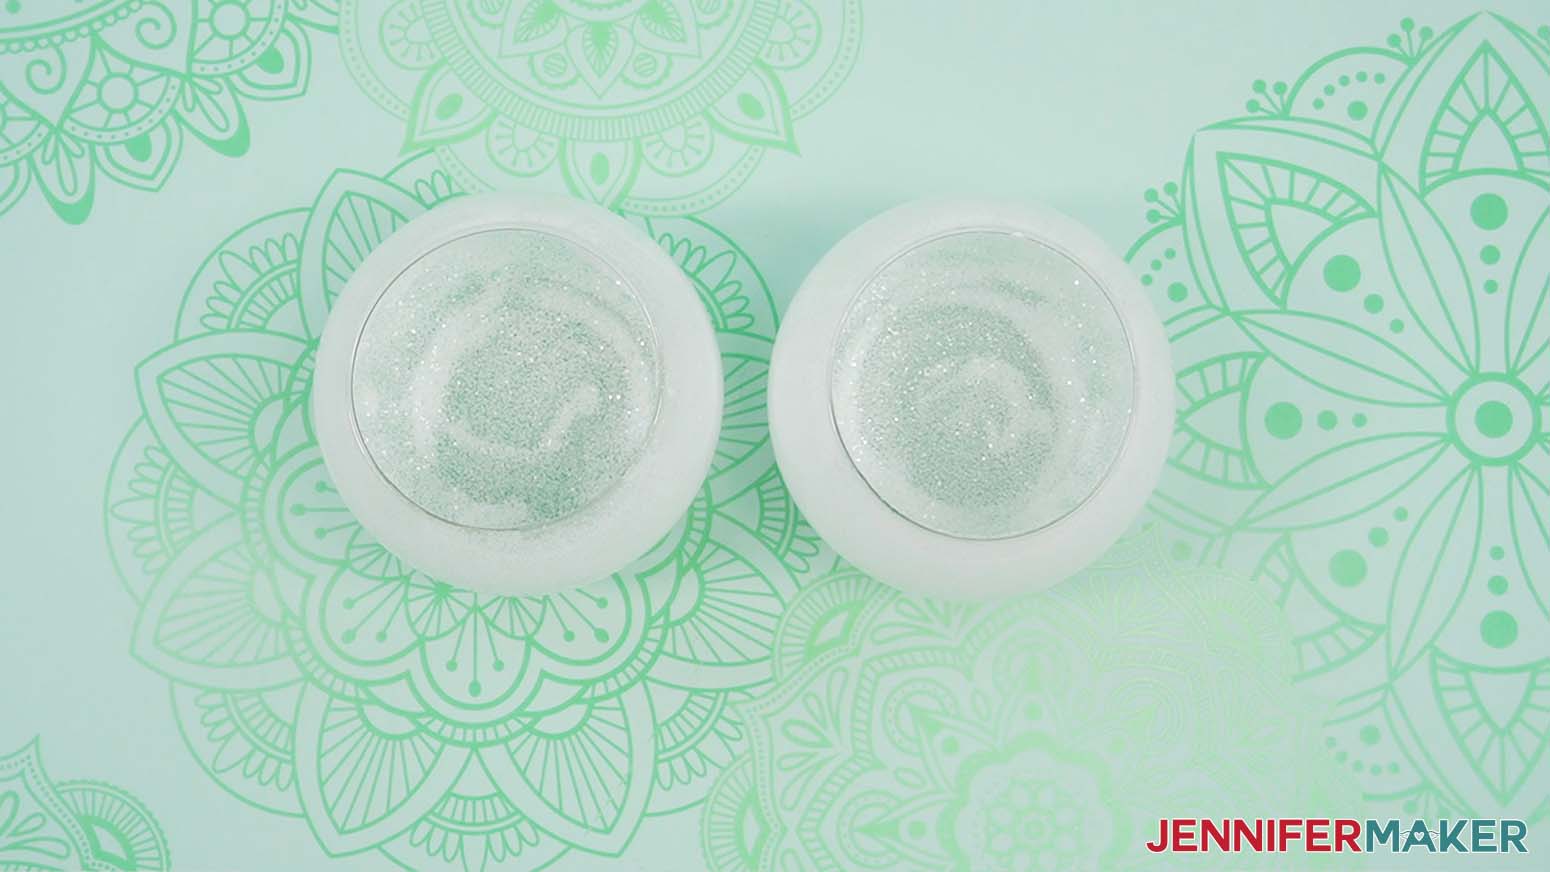
14. Repeat the process - other than the vinyl shape - for the top vase.
15. Set the bowls aside to dry. I let mine dry overnight, but a couple hours is enough.
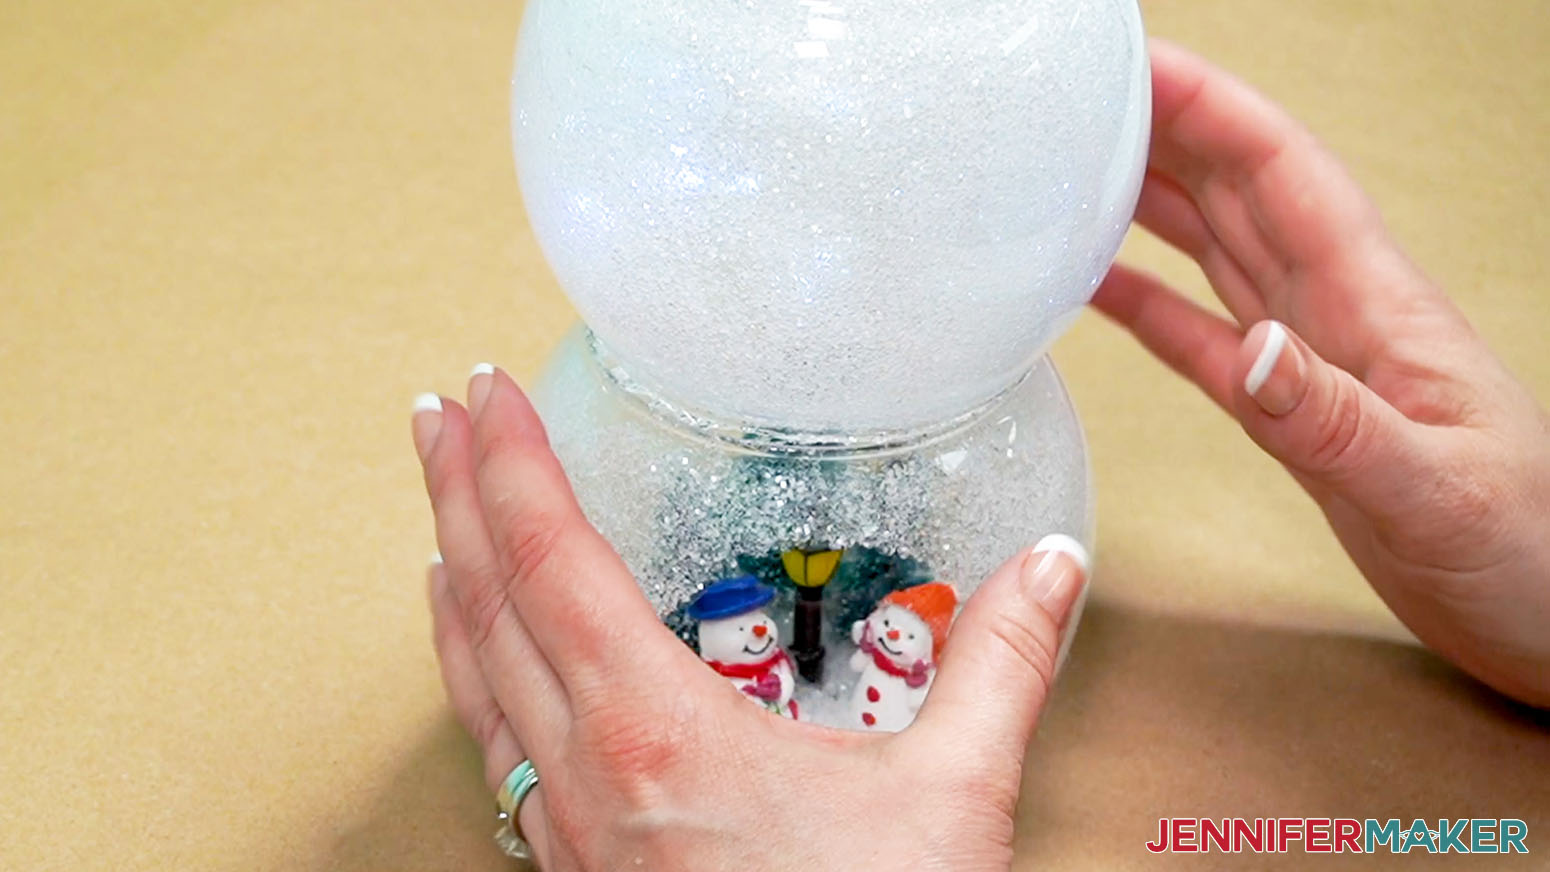
STEP 4: ADD YOUR SNOWMAN BELLY SCENE
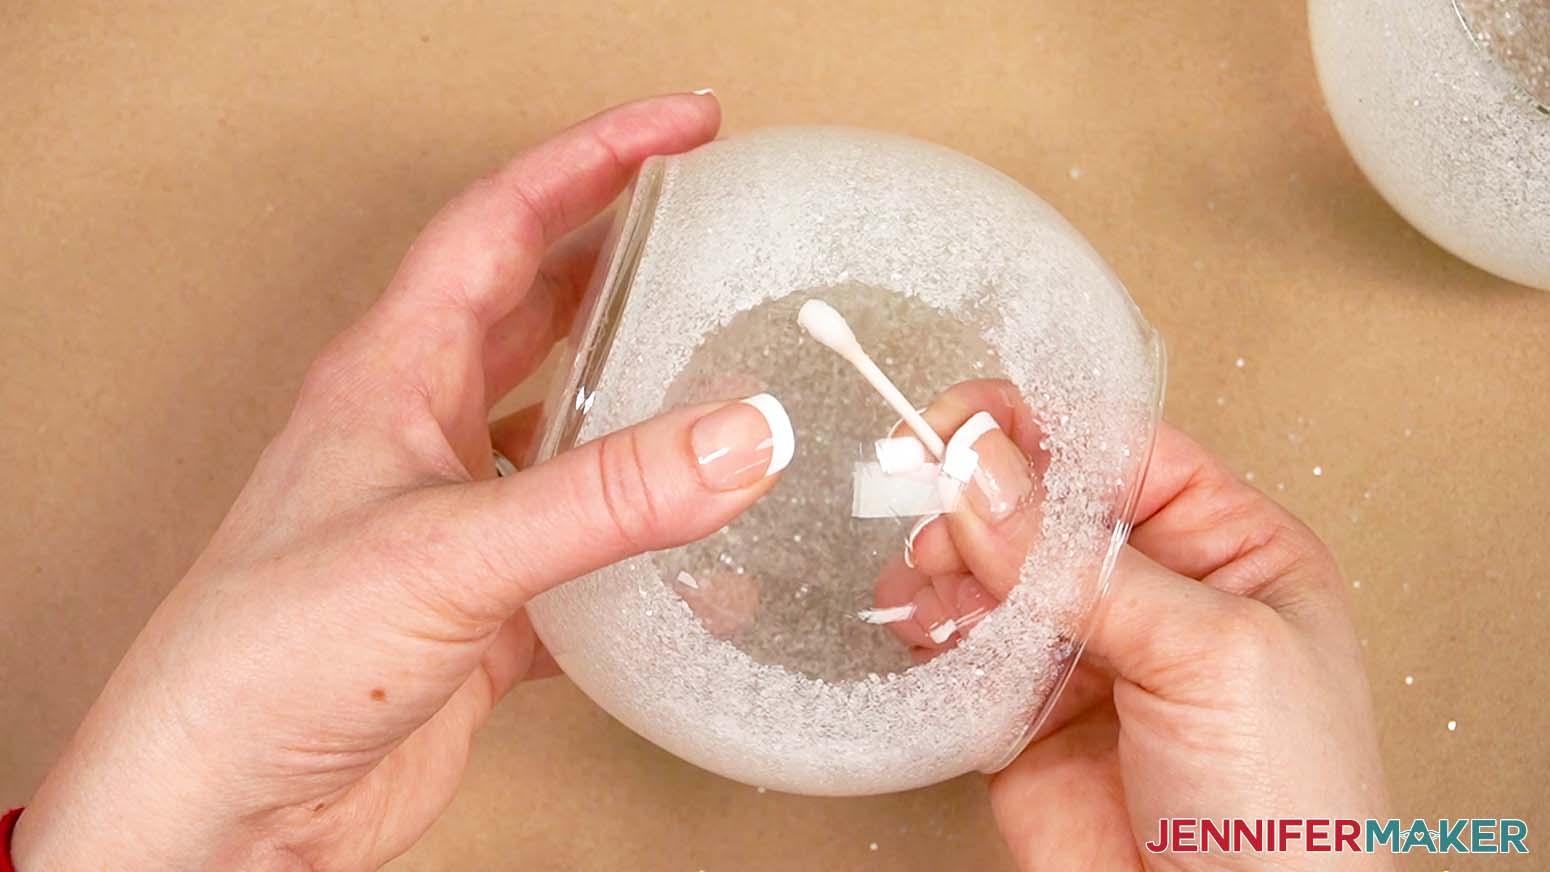
1. Once the Mod Podge is dry, carefully reach inside the bowl and peel away the vinyl mask.
2. If any Mod Podge or glitter is in the clear area, use your lint-free cloth and rubbing alcohol to carefully remove it. You can also use a cotton swab to clean the edge perfectly.
3. Plug in your hot glue gun so it’s heating up.
4. Experiment with your figures to create a scene you like inside the bottom bowl.
TIP: Make sure you look at the scene through the clear area to see how it will look at the end.
5. Use hot glue to attach the figures to the bottom of the bowl.
TIP: You can use plenty of hot glue to really secure the figures because we’ll cover it with sprinkle snow later.
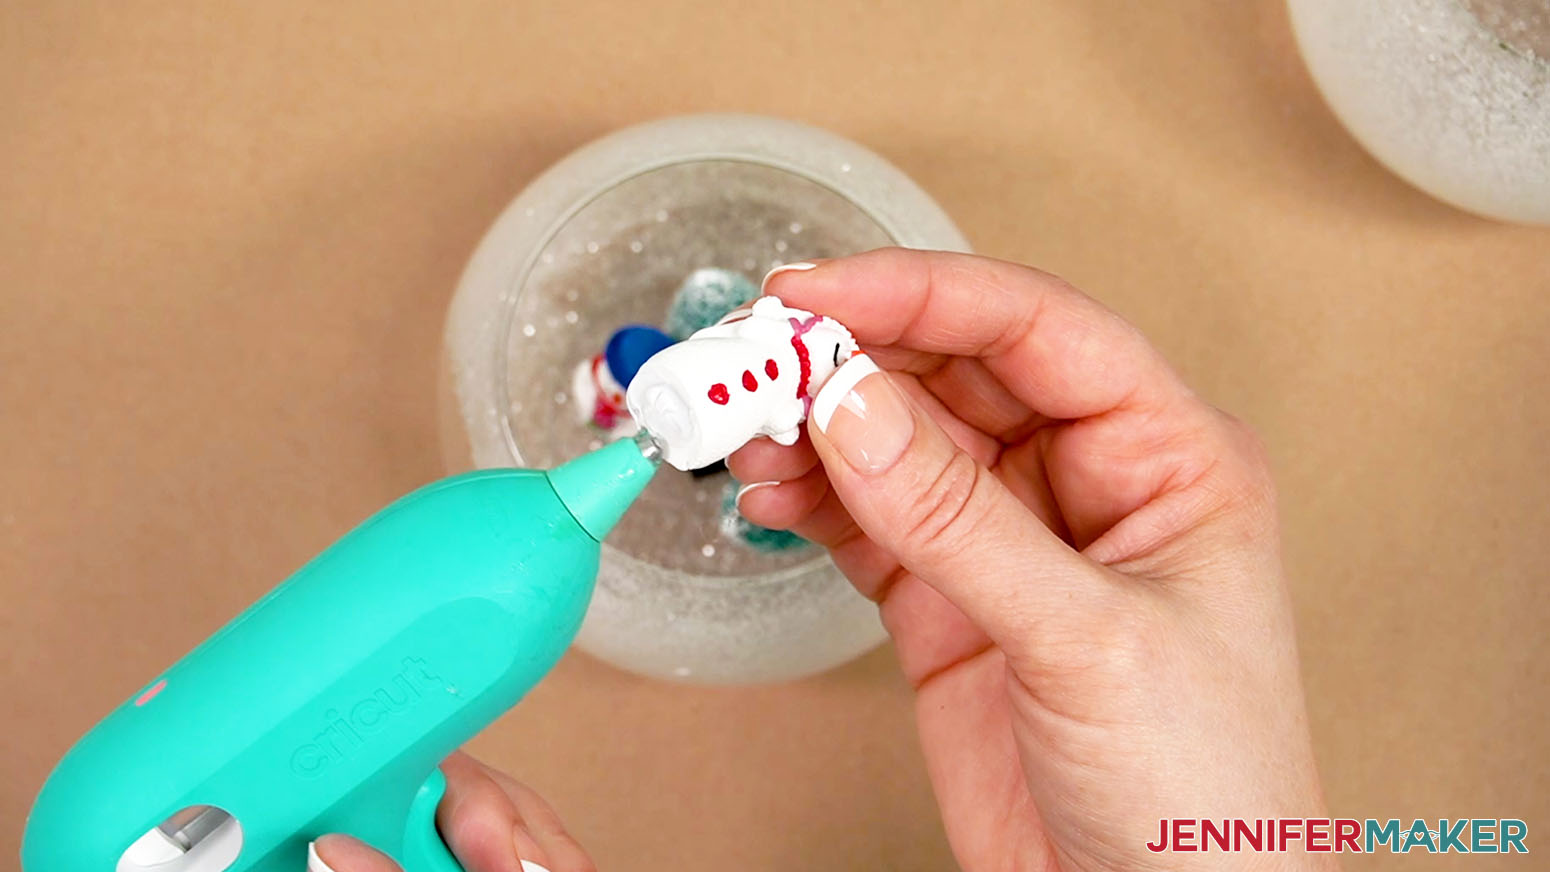
6. Hold each piece in place until the glue sets.
7. Once everything is in place, make sure none of the figures move.
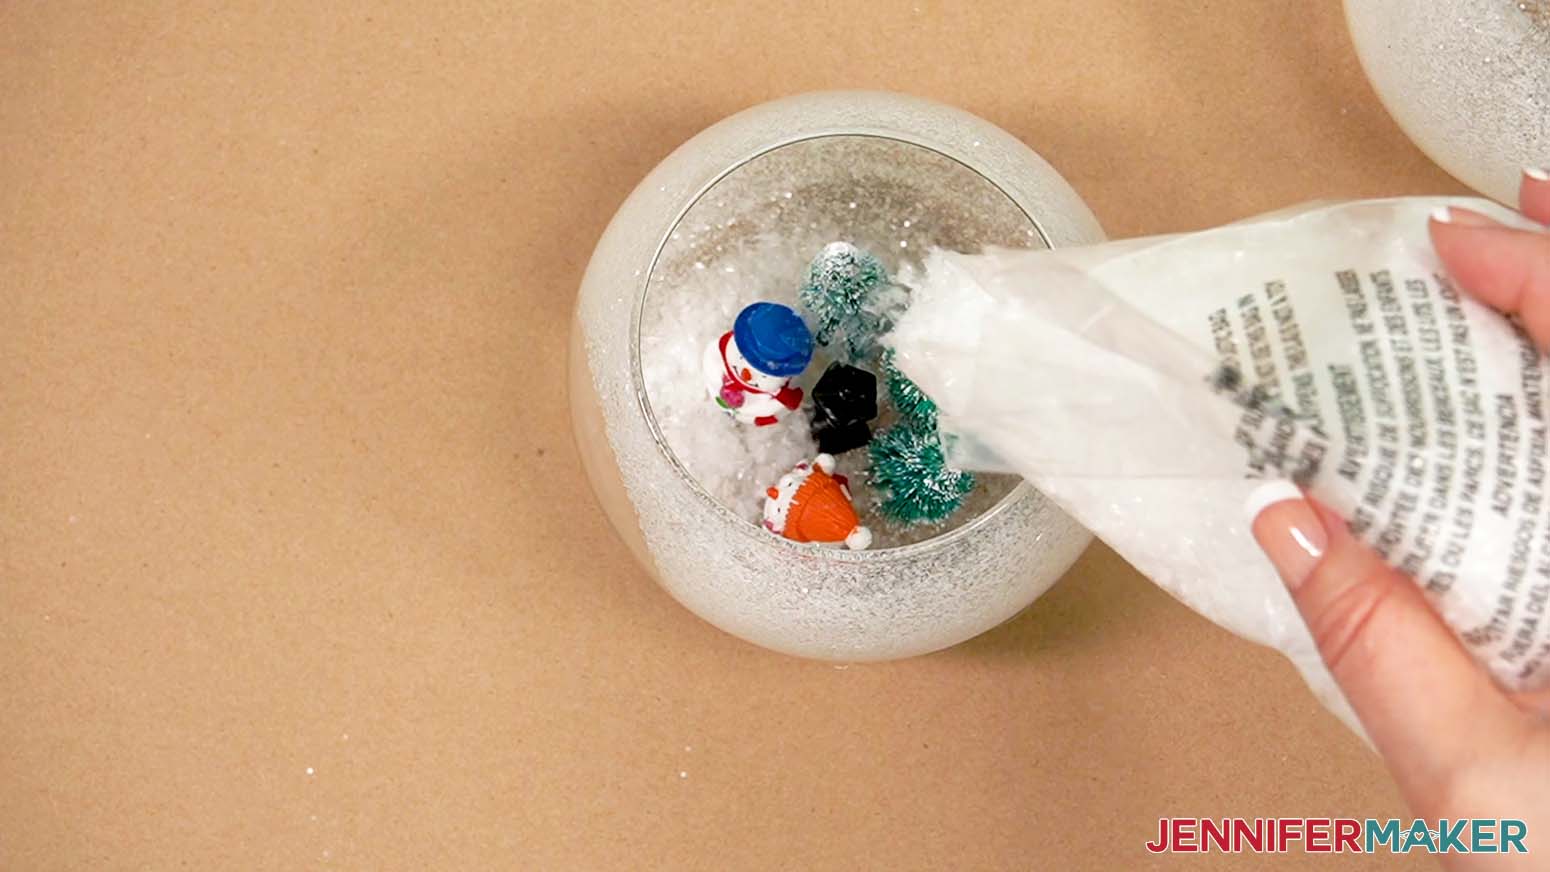
8. Sprinkle in some bagged snow to cover the bowl’s bottom and any excess hot glue.
9. Unravel your LED fairy lights and test them to make sure they power on.
10. Loosely wrap the lights around your hand to create a loop about the same diameter of the bowl’s largest part. Keep the battery pack hanging down a little bit.
TIP: We want the lights to stay in the top bowl so they don’t interfere with the scene in the bottom, so make the loop large enough that it won’t slip down.
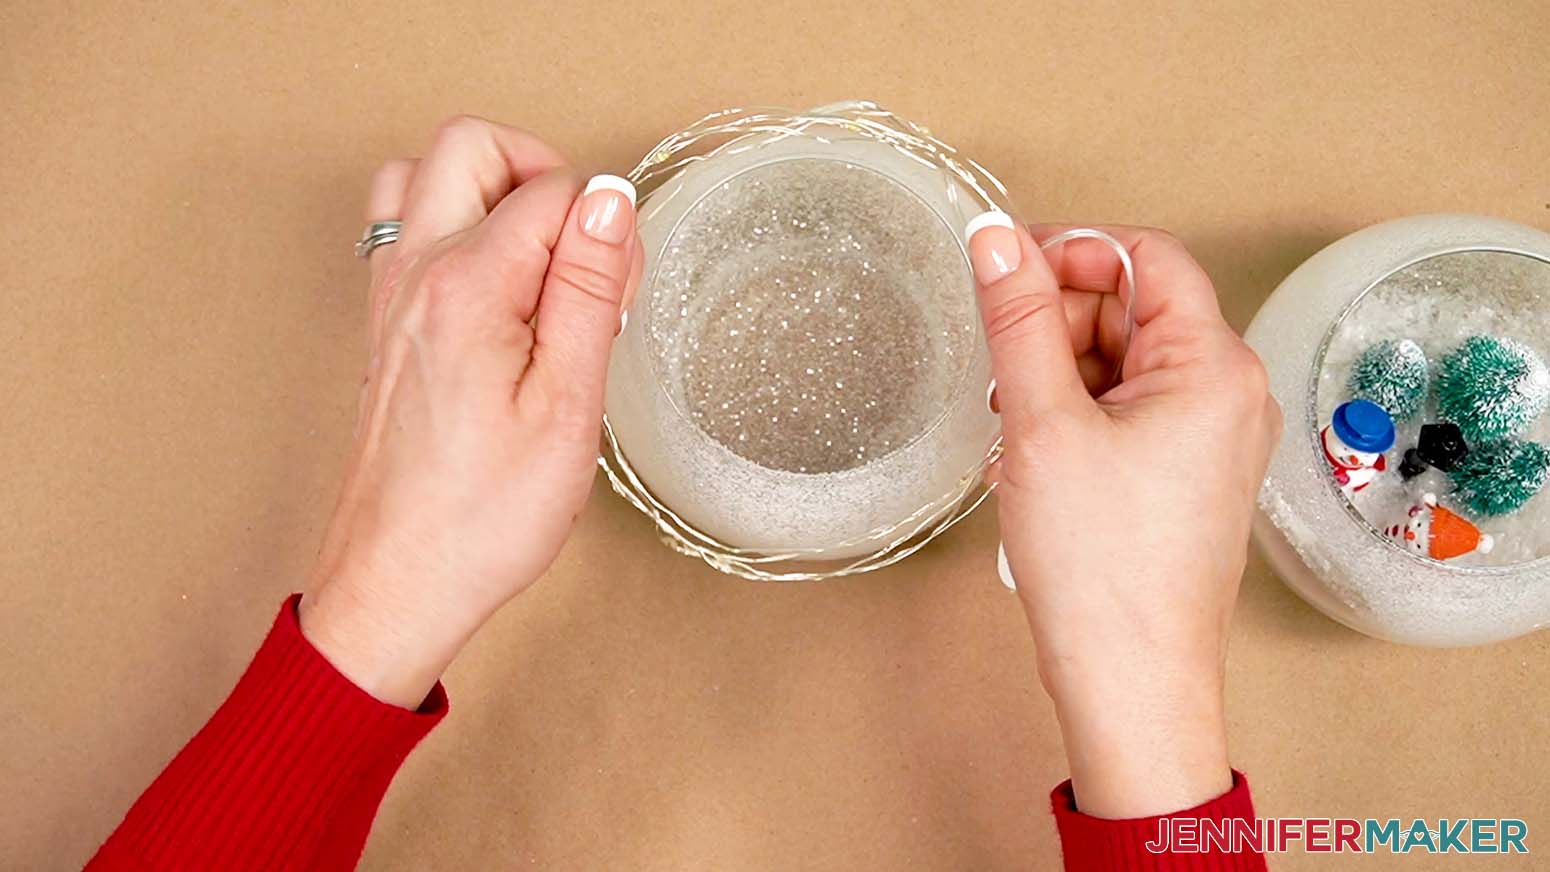
11. Place the fairy lights inside the top glass bowl and leave the battery pack hanging out the back.
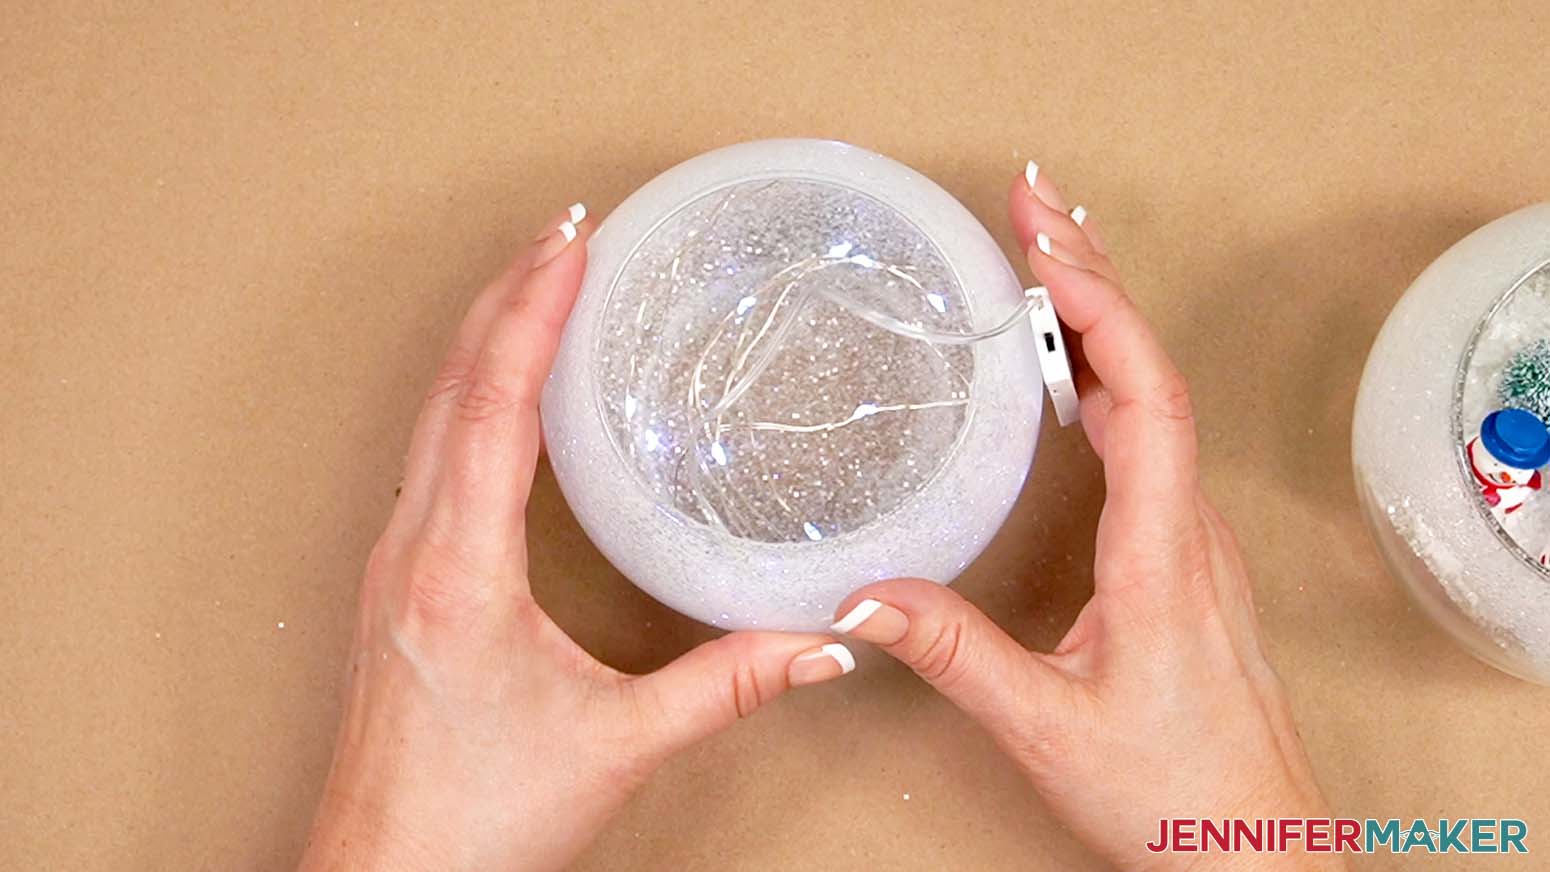
12. Turn on a fan or open a window before opening your E6000 glue.
13. Apply E6000 glue around the rim of the bottom bowl barely on the outer surface.
TIP: Don't worry too much about perfect glue lines because the seam will be covered with the bowtie or scarf.
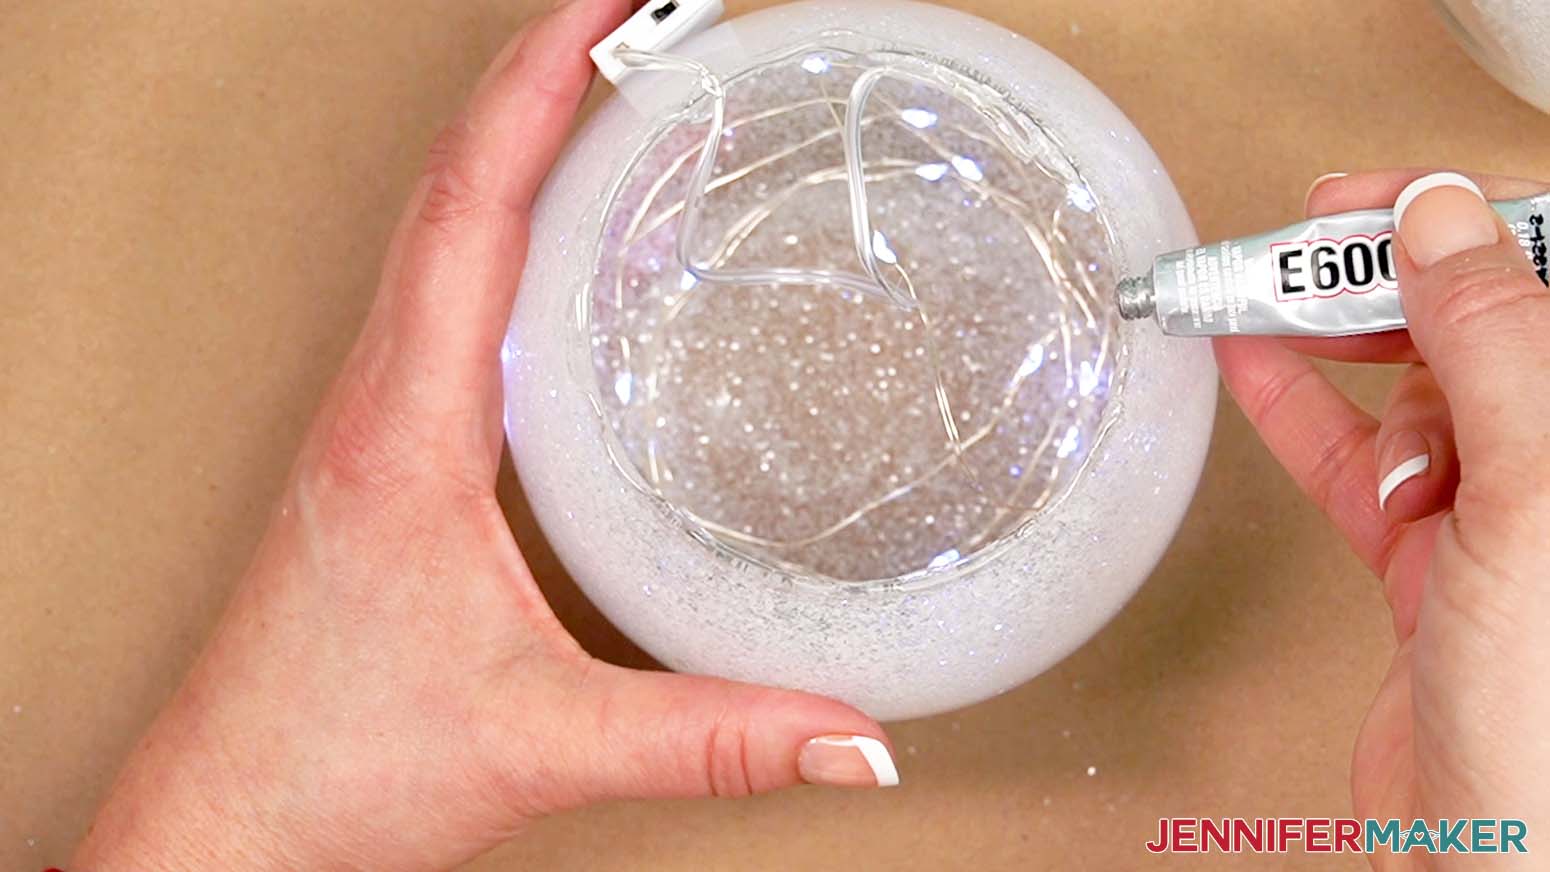
14. Put the cap back on the E6000.
15. Carefully turn the upper bowl over so the lights stay inside and the battery pack hangs out the back.
16. Lower the top bowl onto the bottom one so it touches the E6000 all the way around.
NOTE: Remember to leave the battery pack hanging out the back.
17. The E6000 can take up to 72 hours to dry fully, so hold the vases together and add hot glue around the seam to keep them in position while it cures. Hold them in place for a minute or two while the hot glue cools a bit.
18. Set your glass vases aside to dry for a few minutes.
STEP 5: ASSEMBLE YOUR SNOWMAN WITH BELLY SCENE LANTERN
ASSEMBLE THE HAT
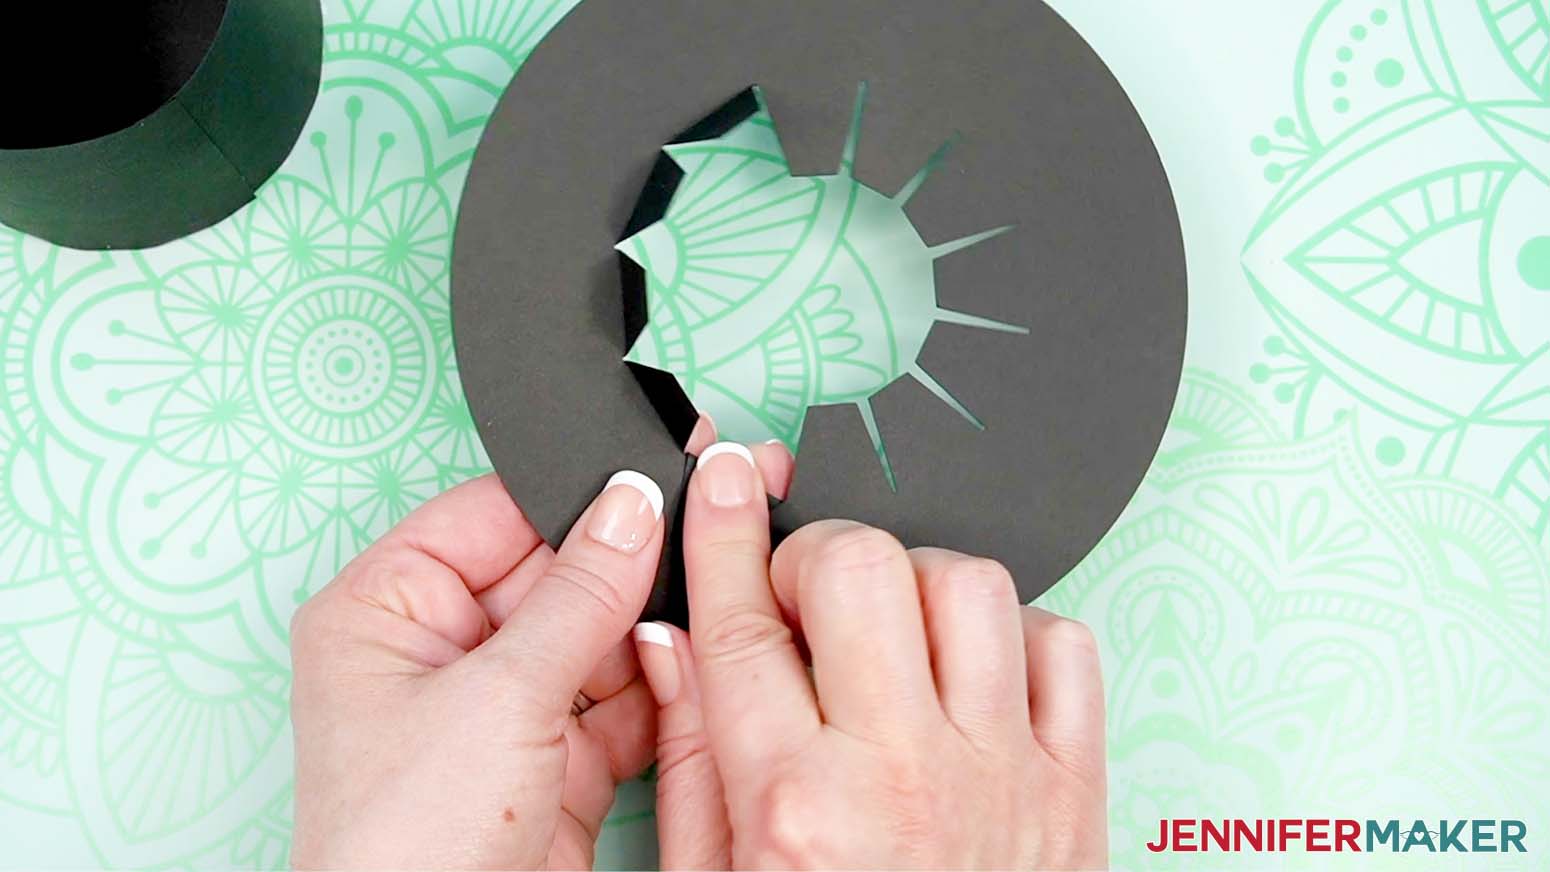
1. Here are the hat pieces.
NOTE: I’ve updated this design from the previous hats, so it goes together easier.
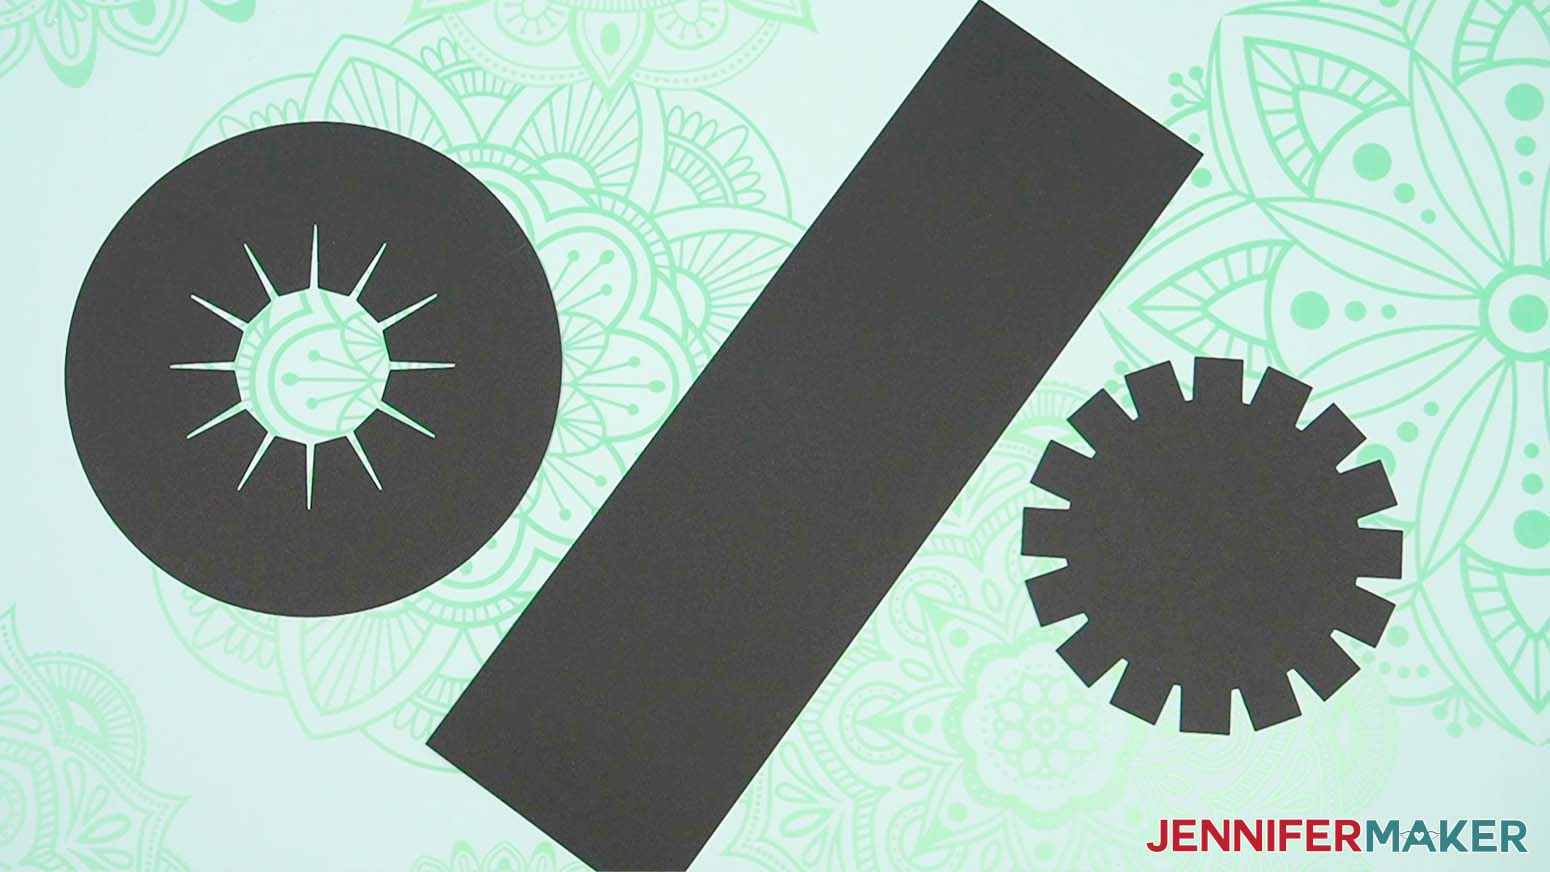
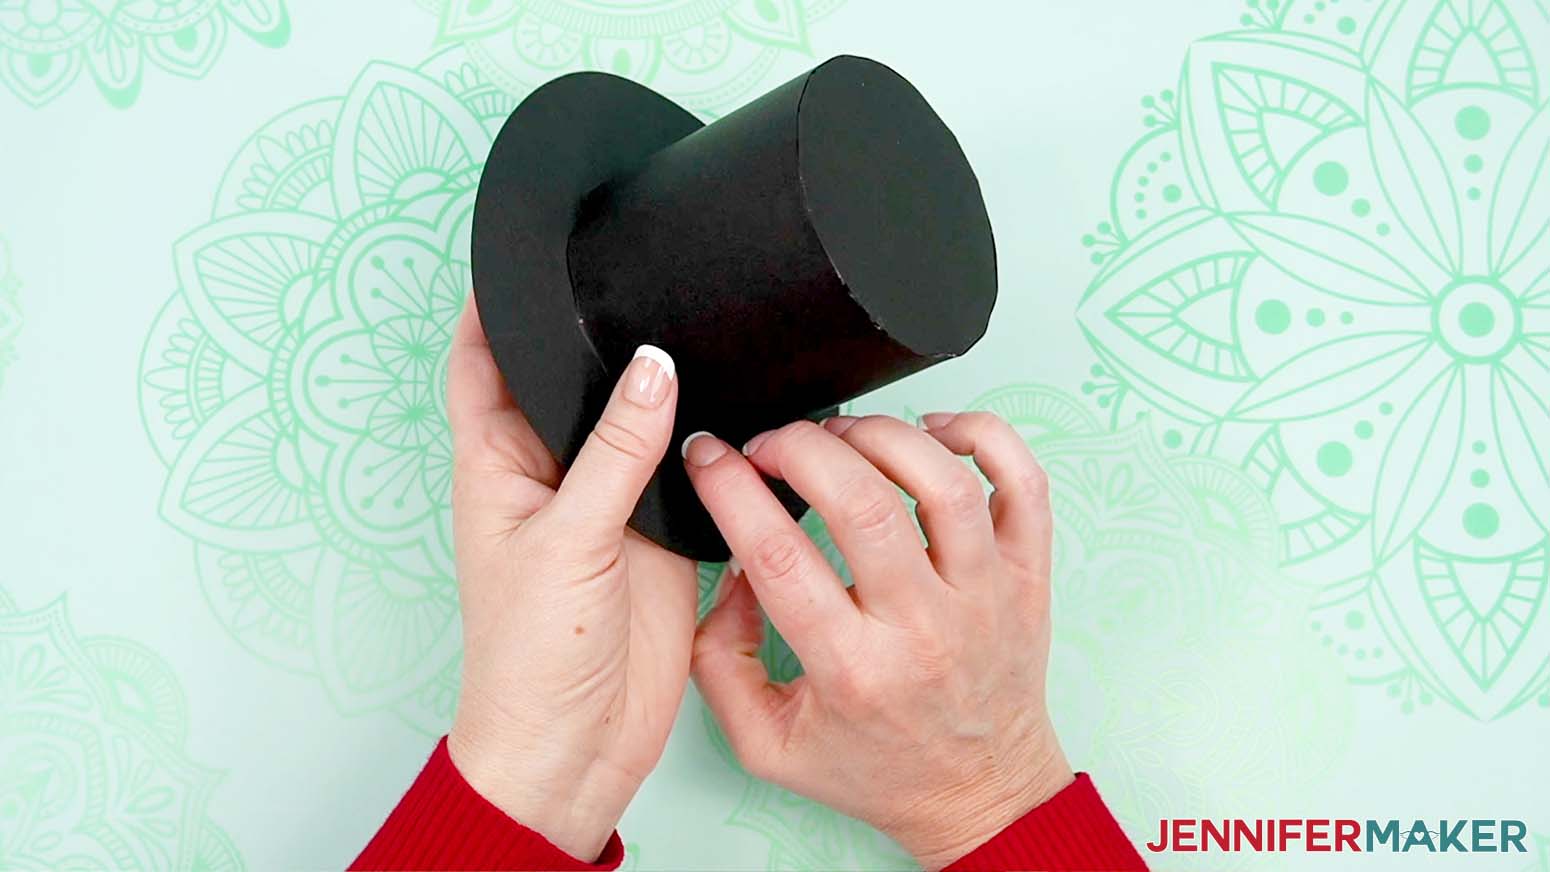
2. The piece with the tabs in the middle is the brim, the rectangle is the side, and the one with tabs on the outside is the top.
3. Place the hat’s top face down and fold the tabs up. The creases should start and end right where the tabs meet the main hat portion.
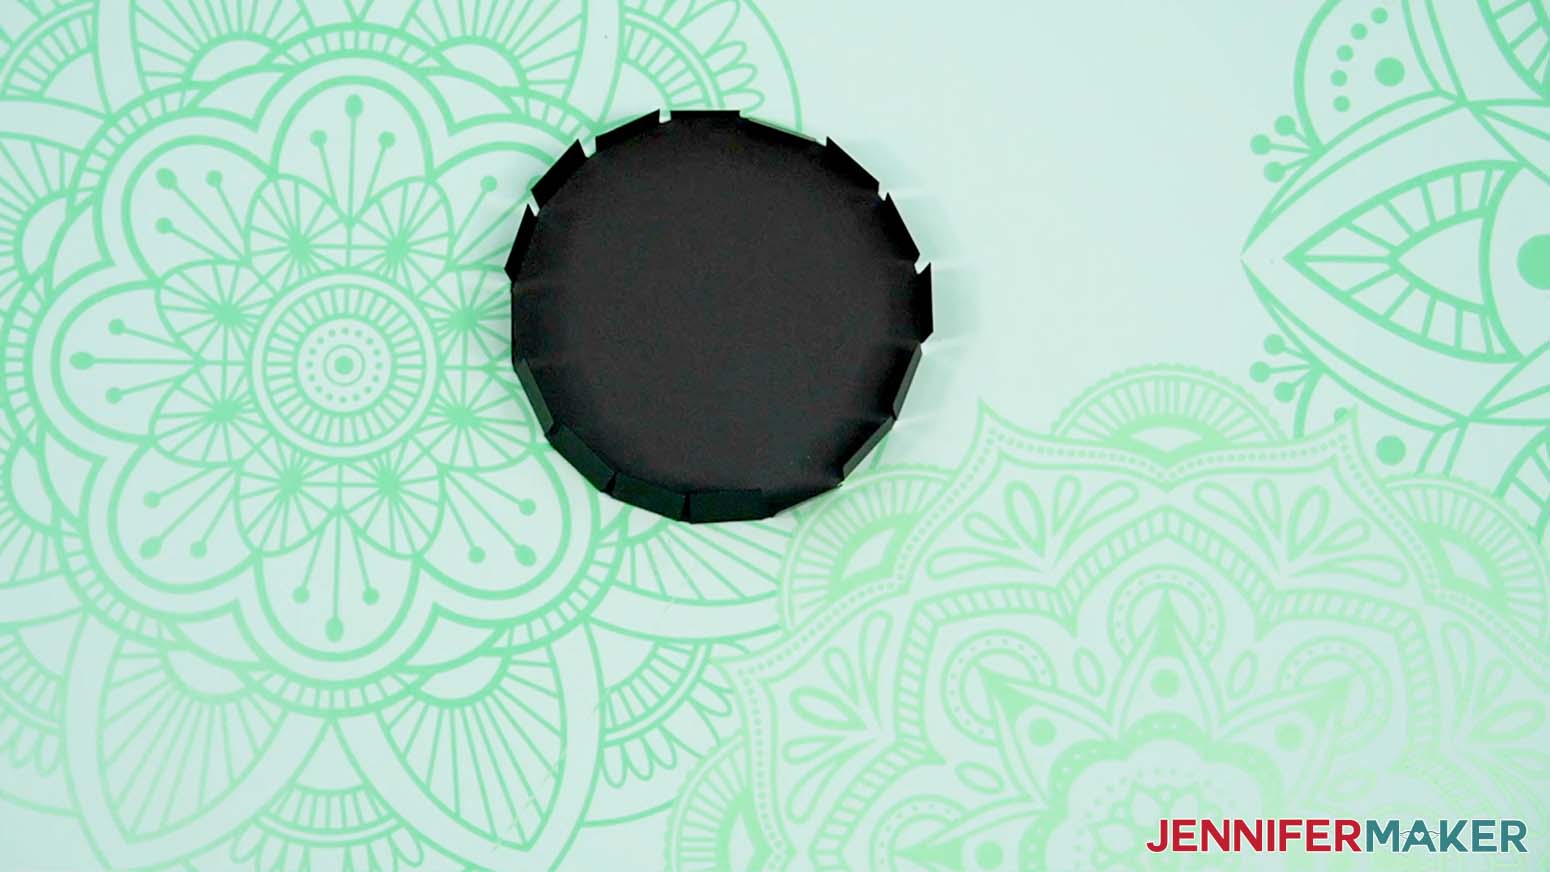
4. Add craft glue to the outside of four tabs in a row.
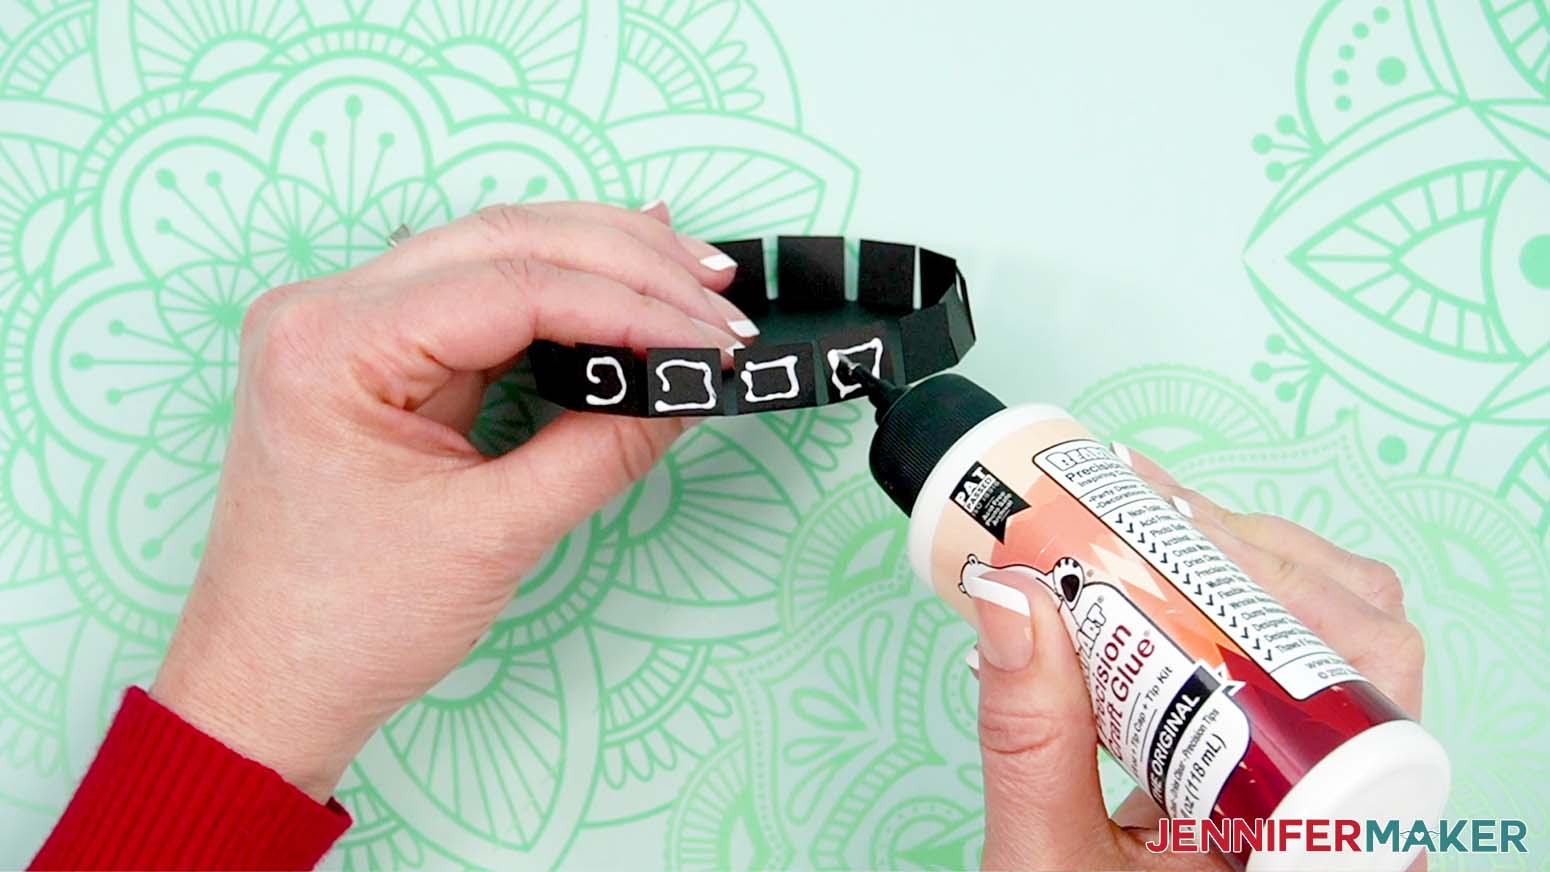
5. With the top face down and the glued tabs facing you, place the side rectangle so a long edge touches the table and the short edge is on the first glued tab.

6. Making sure the rectangle stays parallel to the top’s flat piece so the hat will be straight, press it on to the next few tabs and hold them in place to dry.
7. Once those tabs are dry and secure, add glue to the next four tabs and continue the process. The rectangle will start curving around the hat’s top.
8. When you’re securing the last tab, hold it in place to really dry since this spot will want to open up the most.
9. Use your glue tip to add a little glue under where the side’s short edges overlap, and hold that in place to dry.
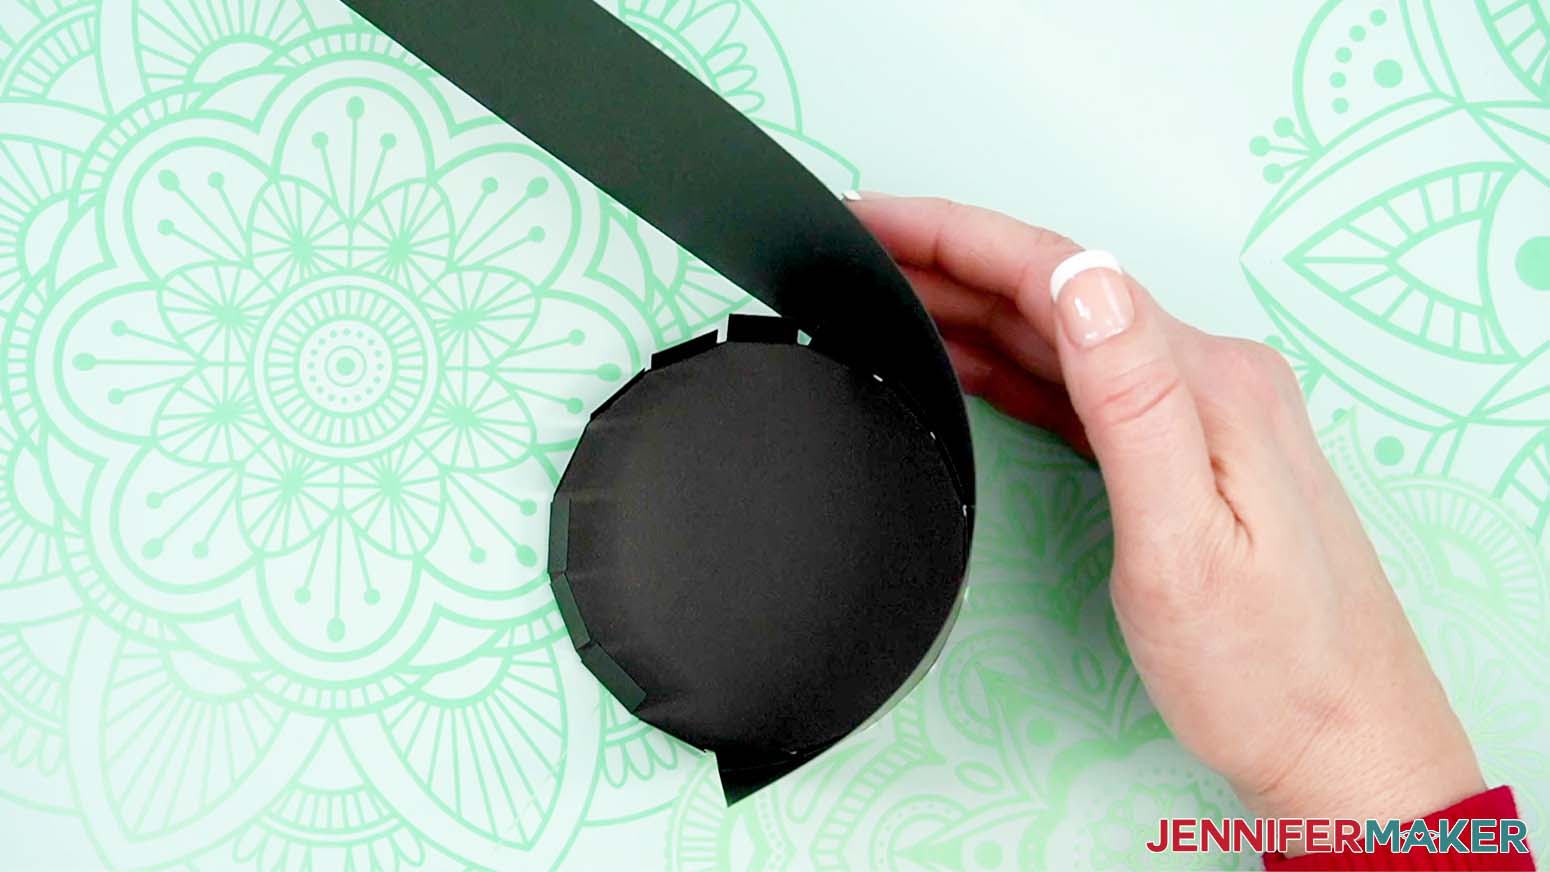
10. Place the brim face up and fold the inner tabs up so they’re perpendicular to the brim’s surface. The creases should start and end right where the tabs meet the main hat portion.
11. Lower the tabs into the hat’s bottom to make sure they’re all folded correctly and will fit inside, flush against the curved sides.
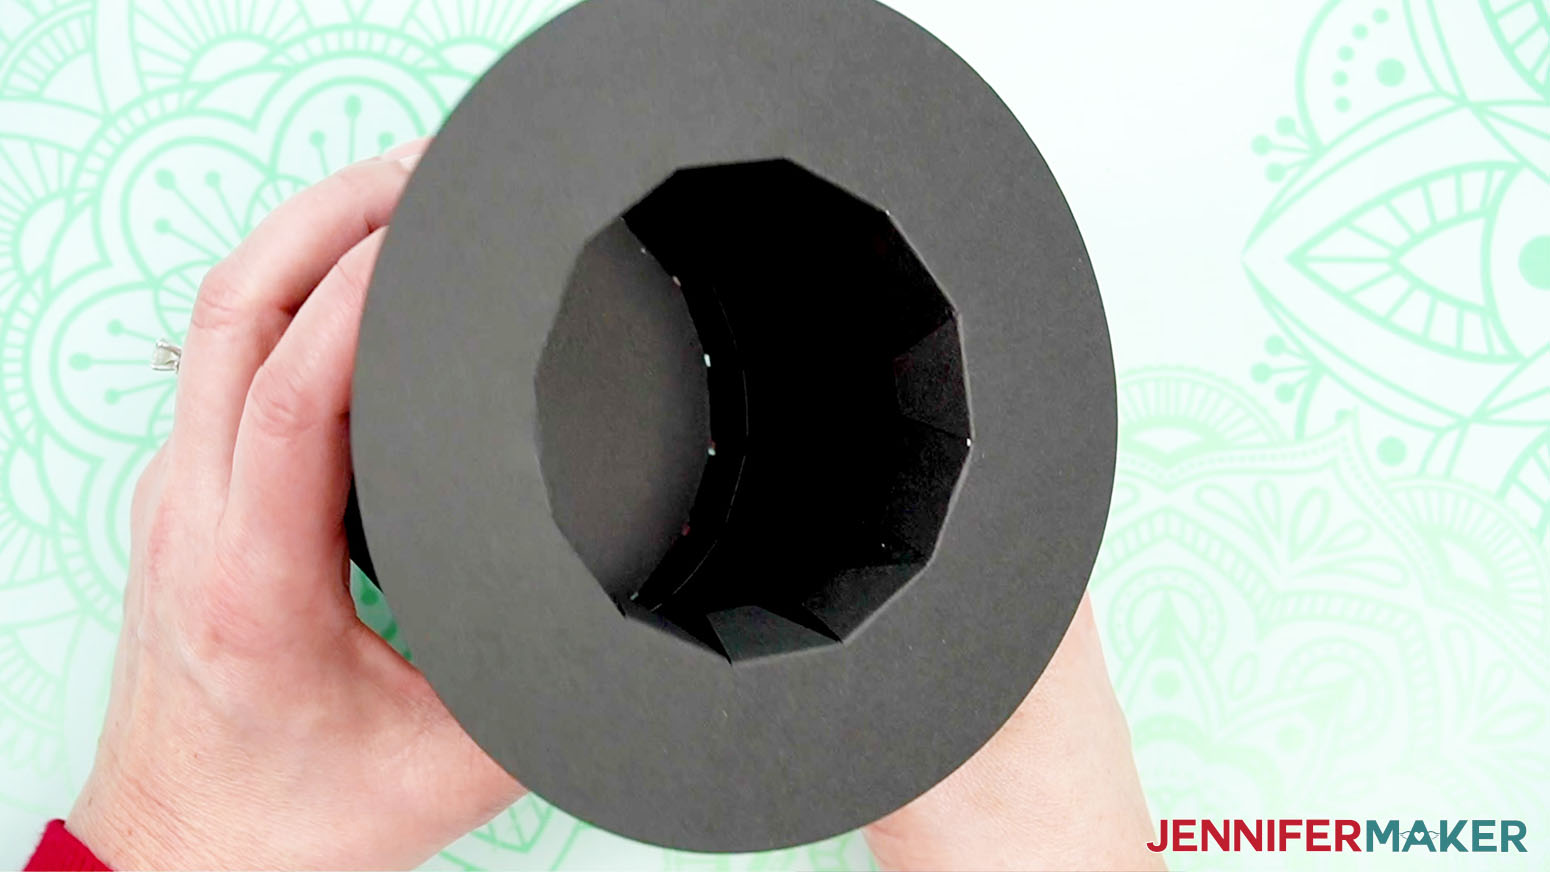
12. If any tabs don’t seem to sit correctly, refold them and try again.
13. Just like the hat’s top, add glue to four brim tabs where they’ll meet the side of the hat.
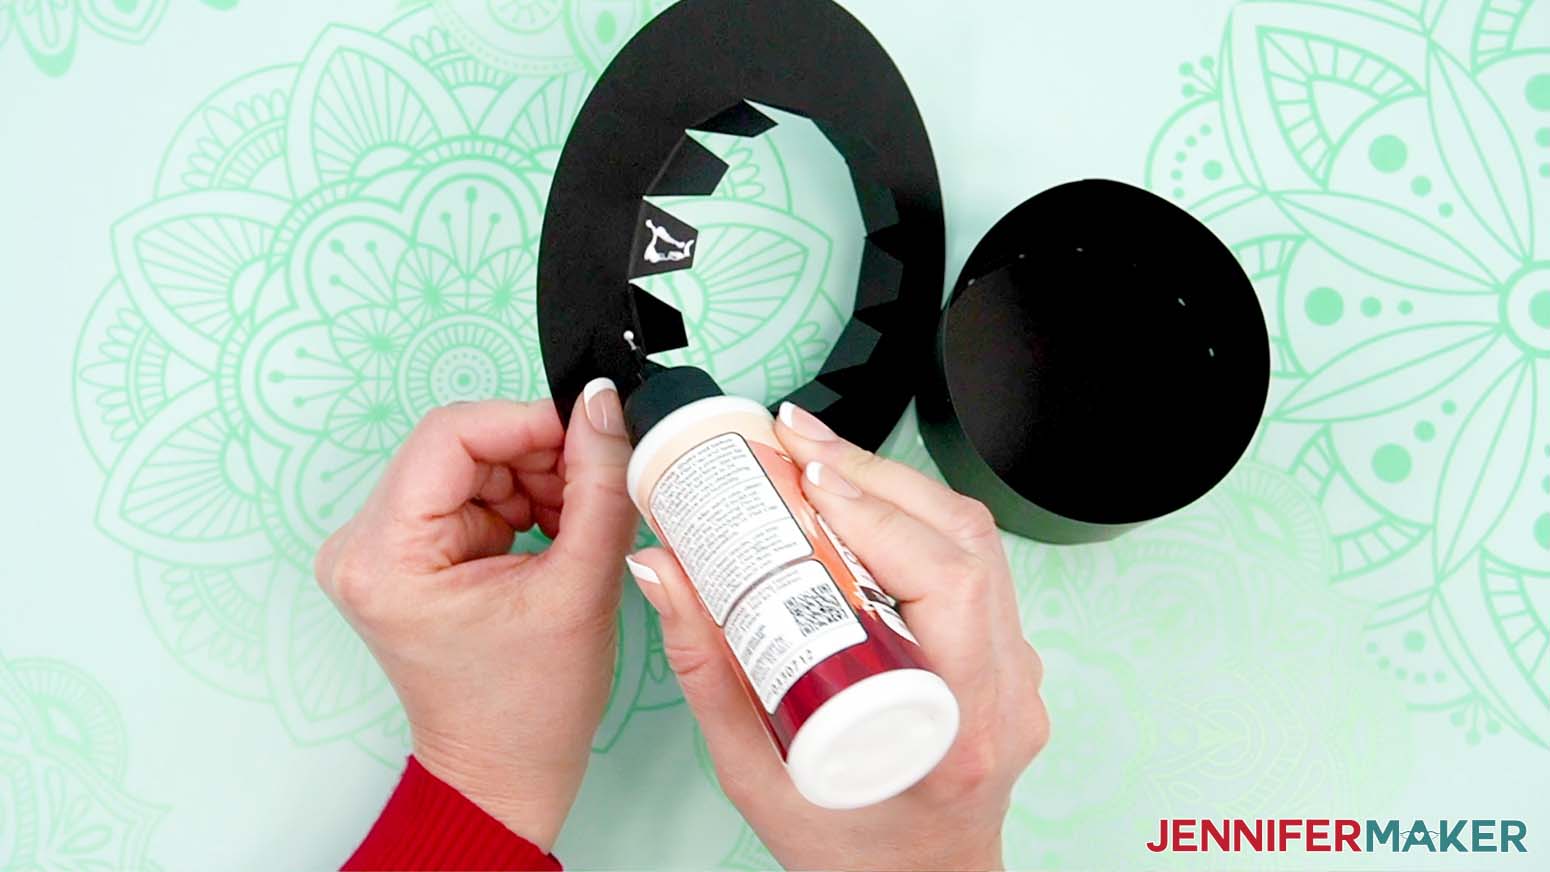
14. Lower the brim’s tabs into the hat so the surface is flush with the curved paper.
15. Hold the first tabs in place to dry against the hat’s side.
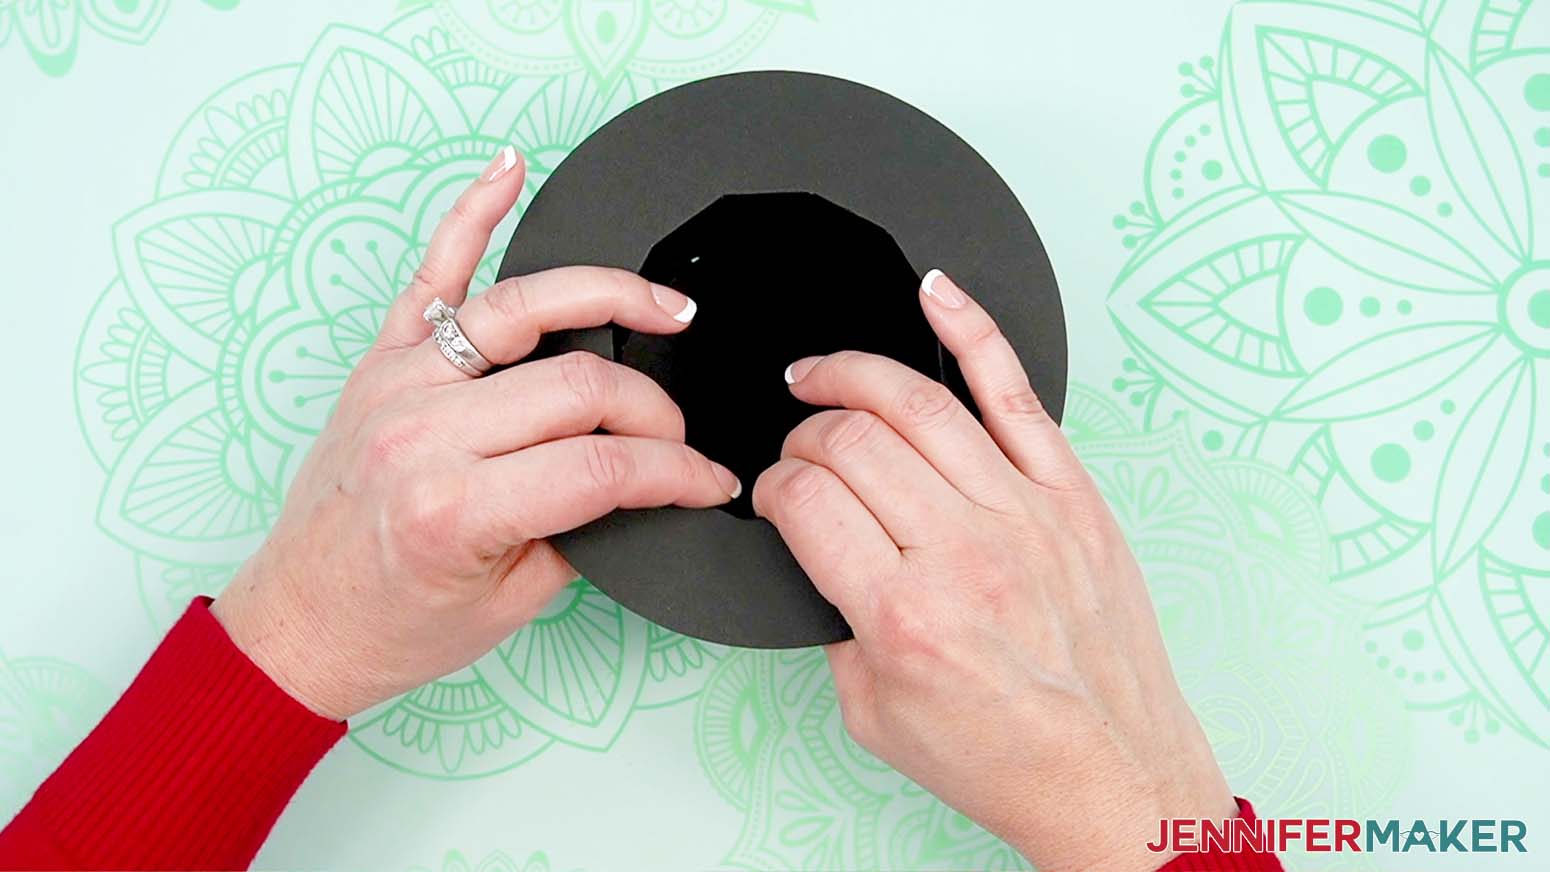
16. Once the brim is secure on those tabs, you can reach inside to pull the next four tabs up and add glue to where they’ll touch the inside of the hat.
17. Press them back into place.
18. Continue lifting, gluing, and adhering the tabs until the entire brim is secure.
19. When everything is glued, you can give the hat some interest by running the brim between your fingers and gently sloping it up and down to give it a slight wave.
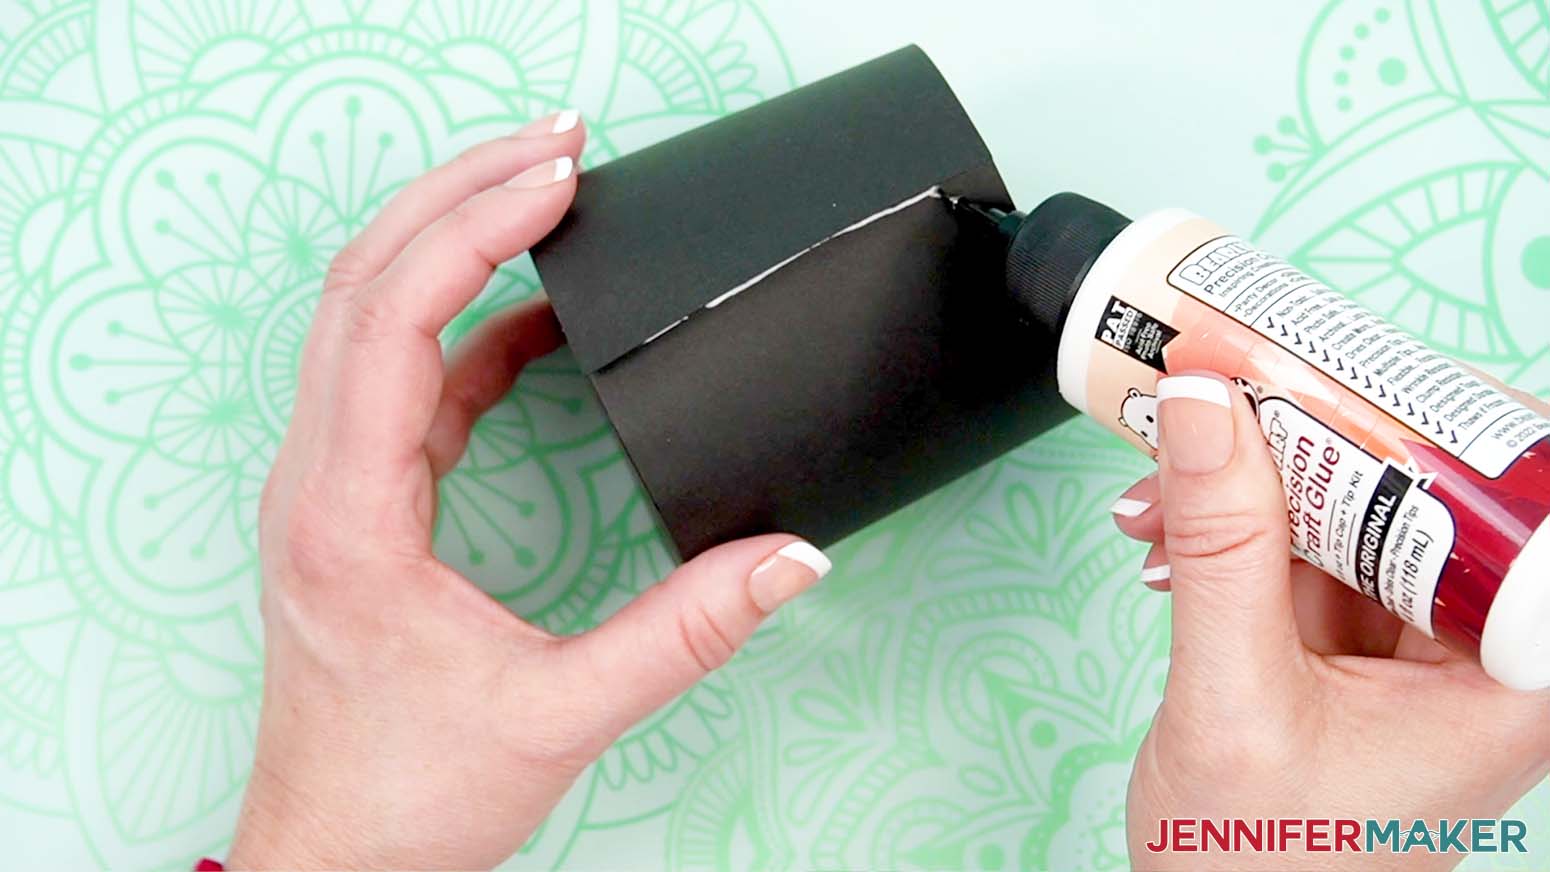
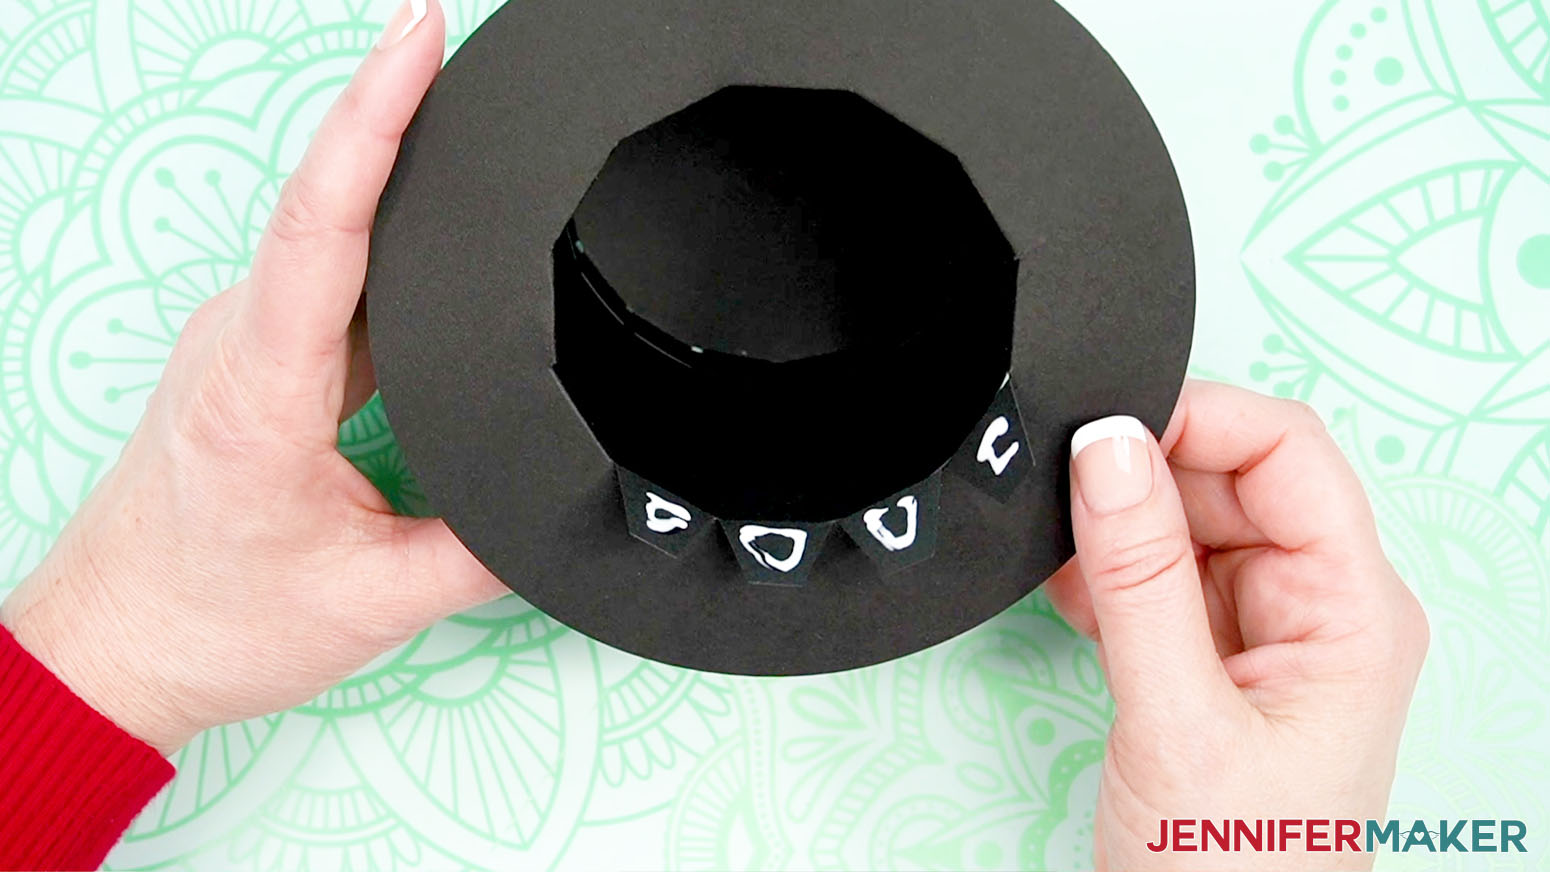
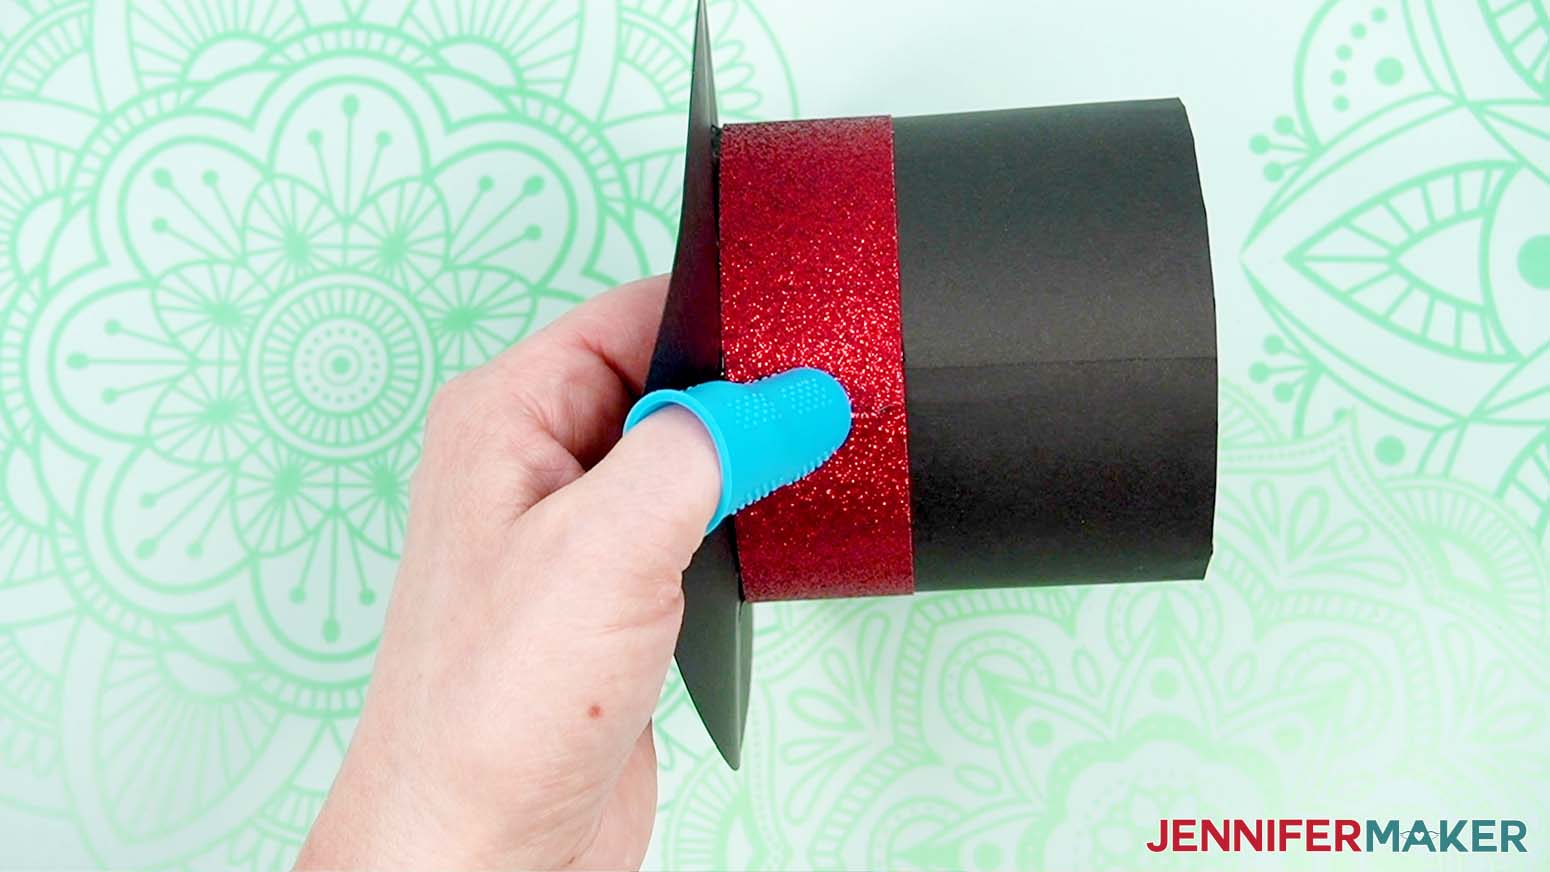
20. Take the hat detail piece and place it on the hat so a short edge matches the seam and the long edge touches the brim.
21. Check how far up it will go on the hat, then add some glue underneath the first inch or so.
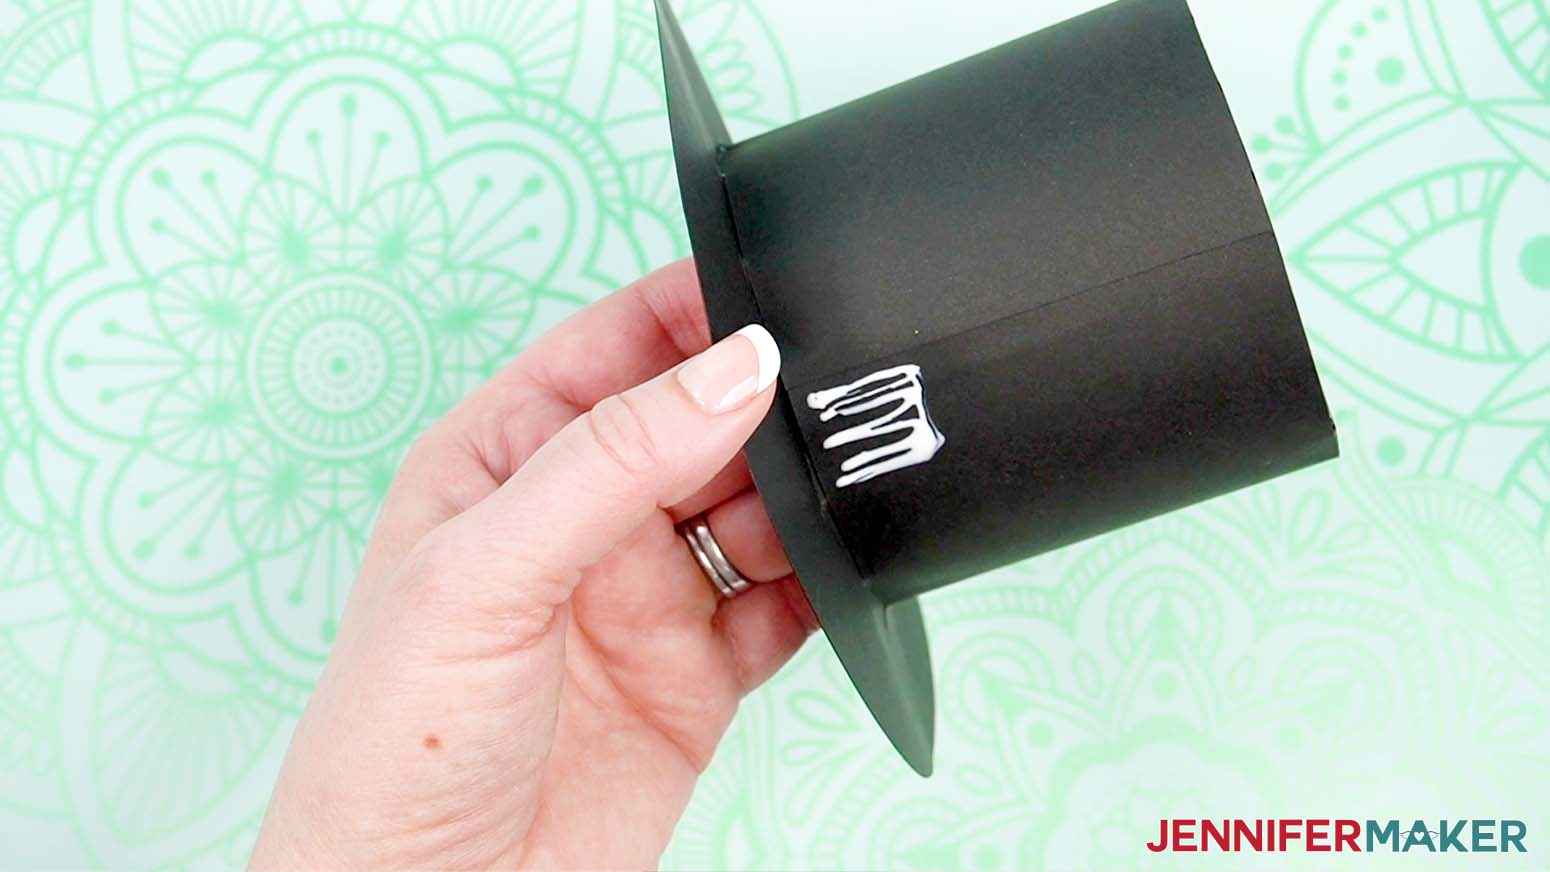
22. Press the short end in place until it’s dry and secure.
23. Gently curve the detail around the hat until the short end is back at the beginning by the seam.
24. Add glue where the detail will overlap at the beginning and hold it in place to set.
TIP: Sometimes craft glue has trouble securing textured paper like glitter, so try hot glue if you have trouble.
25. Let the hat dry completely.
ADD THE SCARF
1. Place the roll of masking tape on your work surface.
2. Gently lower the assembled snowman onto its back so the belly is face up and centered and the top vase is held in place by the tape roll.
TIP: The hot glue should be set enough to hold the vases together even though the E6000 is still curing, just be very gentle moving the snowman.
3. Wrap the ribbon around the snowman's neck to see how long it should be to tie a knot and look like a scarf.
4. Cut the ribbon. I used about 30” but you can always trim it.
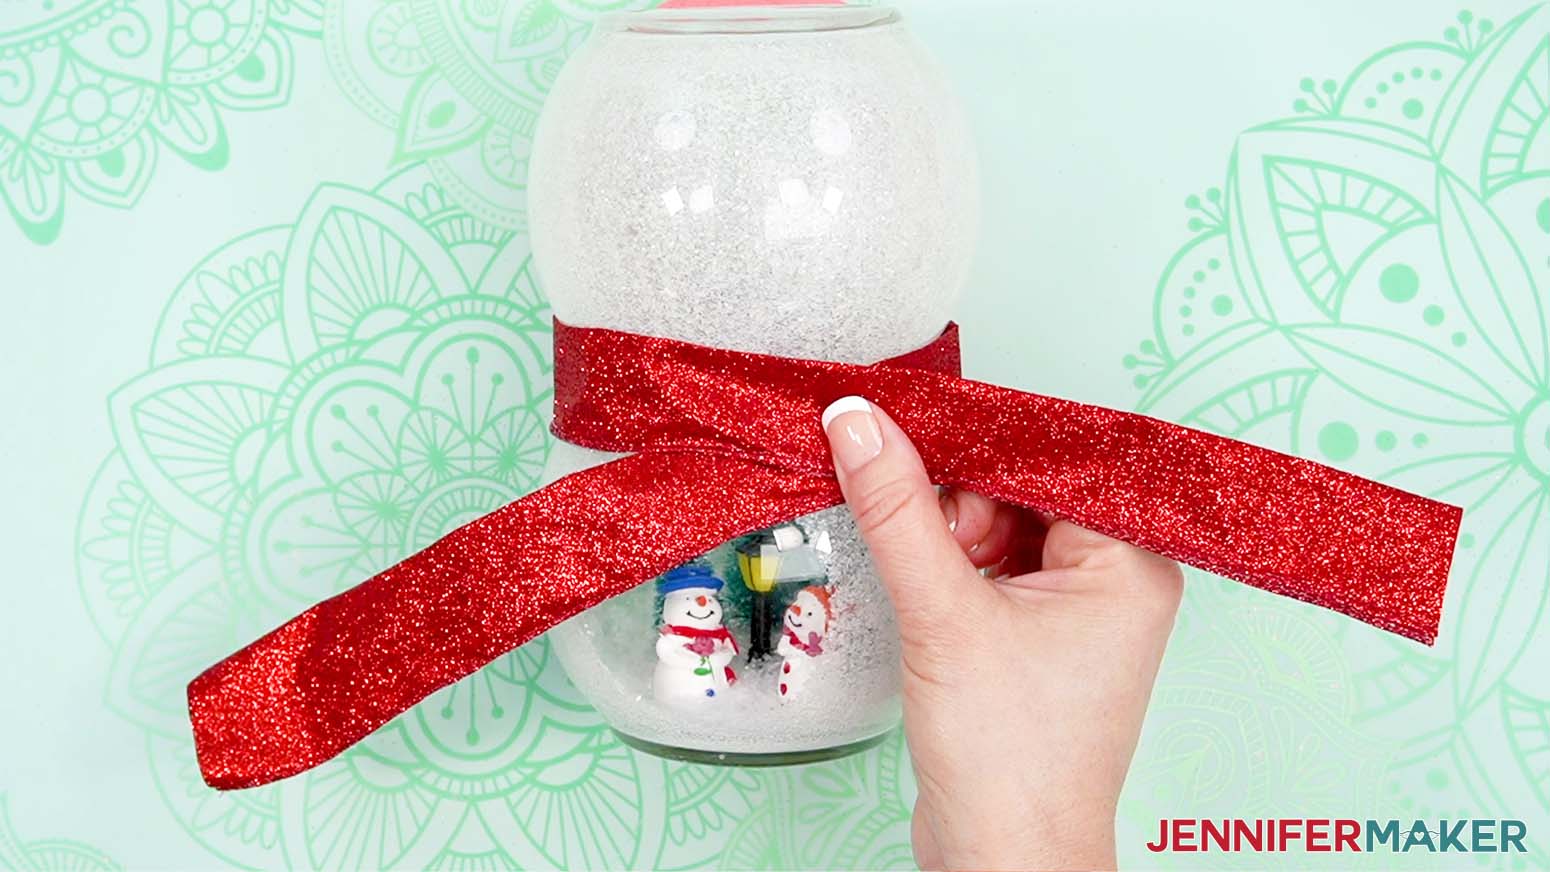
5. Without jostling the vases, carefully tie the ribbon in a knot.
6. Twist the knot to the side, and adjust the tails to look like a scarf.
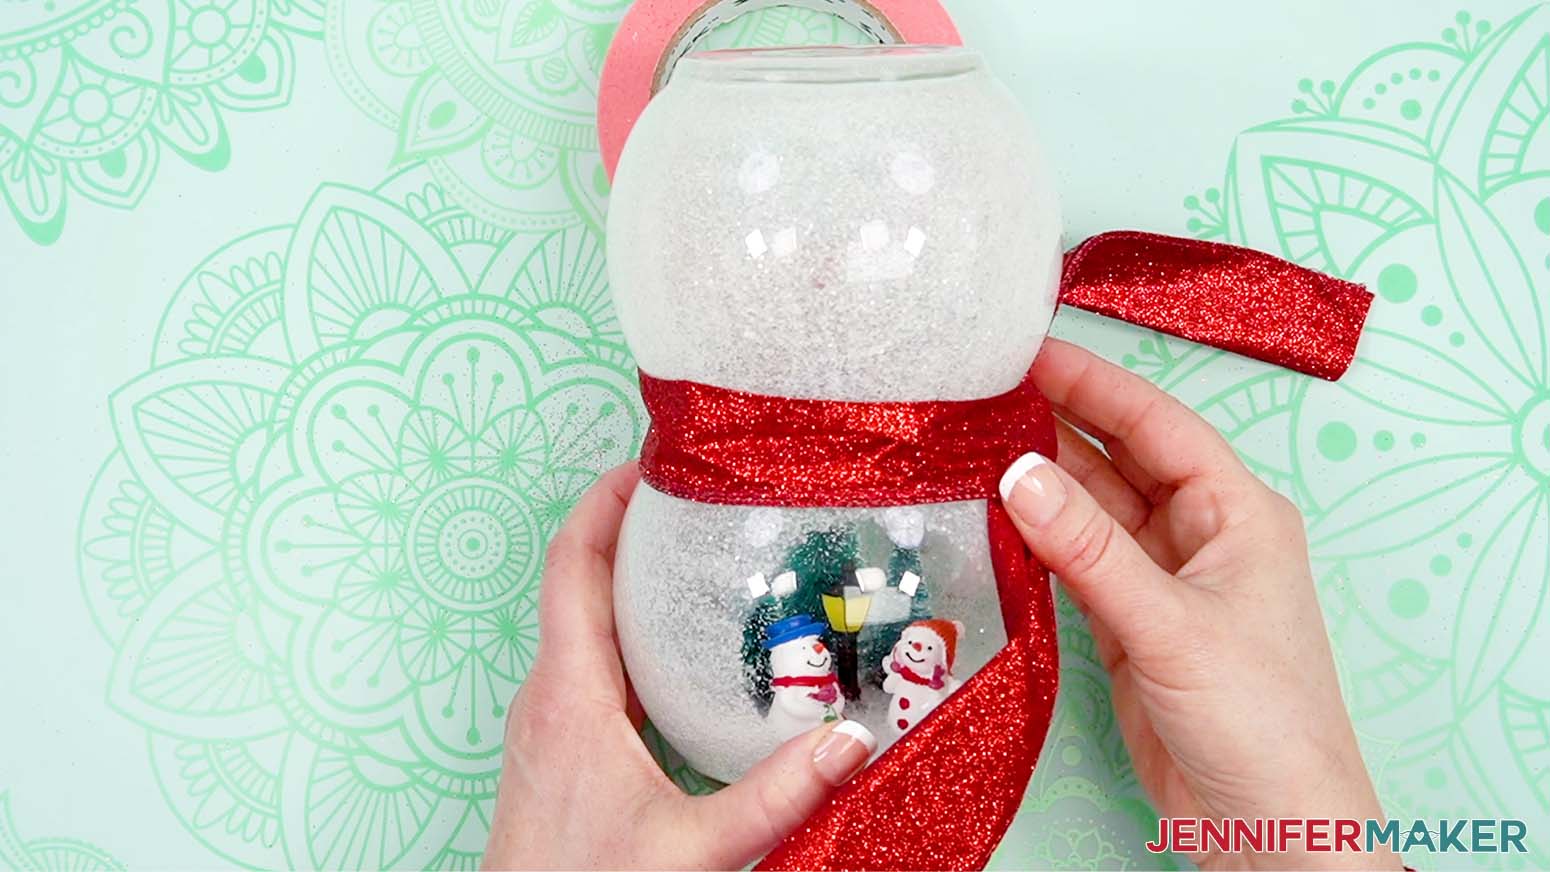
7. Trim any excess ribbon.
OR ADD THE BOW TIE
1. Place the roll of masking tape on your work surface.
2. Gently lower the assembled snowman onto its back so the belly is face up and centered and the top vase is held in place by the tape roll.
3. Put on your finger protectors.
4. Place the bowtie face down and bring one short edge to the middle. Hot glue it in place.
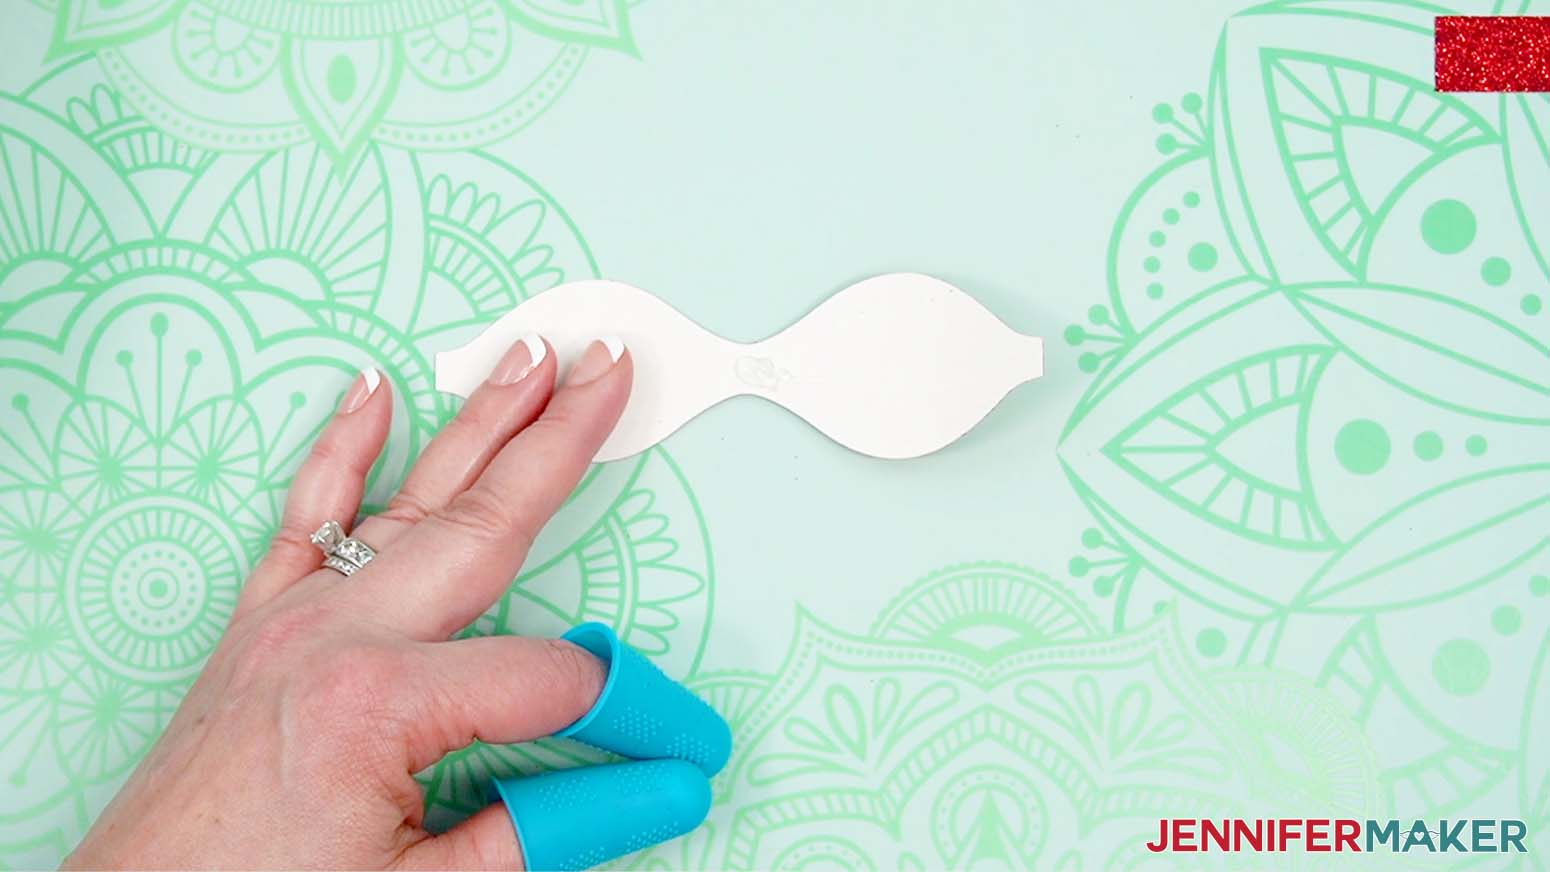
5. Repeat with the other short end.
6. Wrap the small rectangular piece around the bow and glue it in the back.
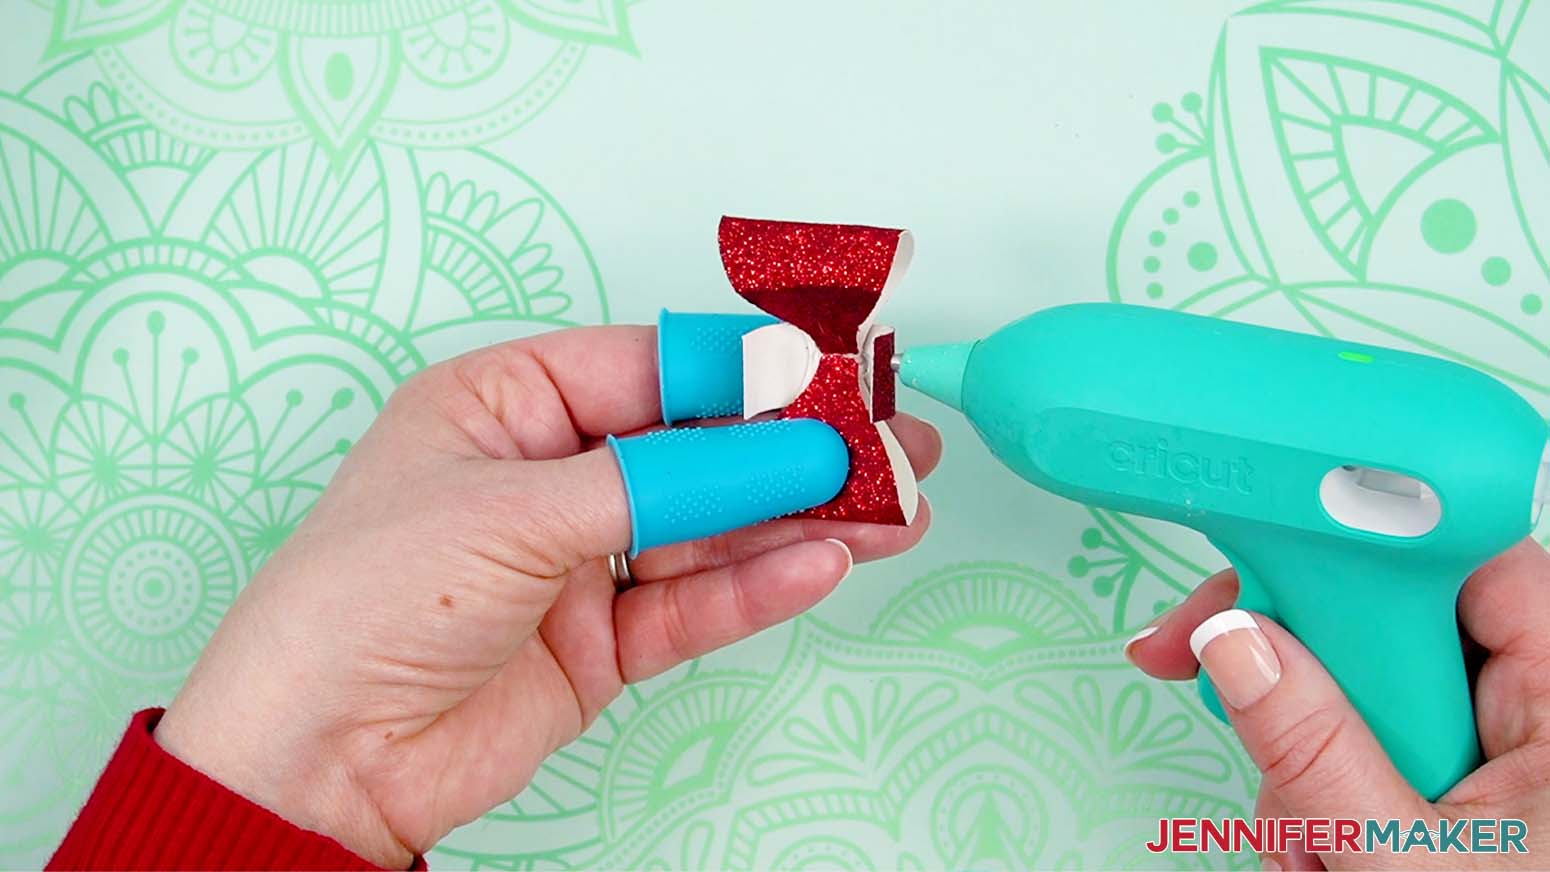
7. Wrap the neck piece around the seam between the vases so the gap is centered in the front. The bowtie will hide it.
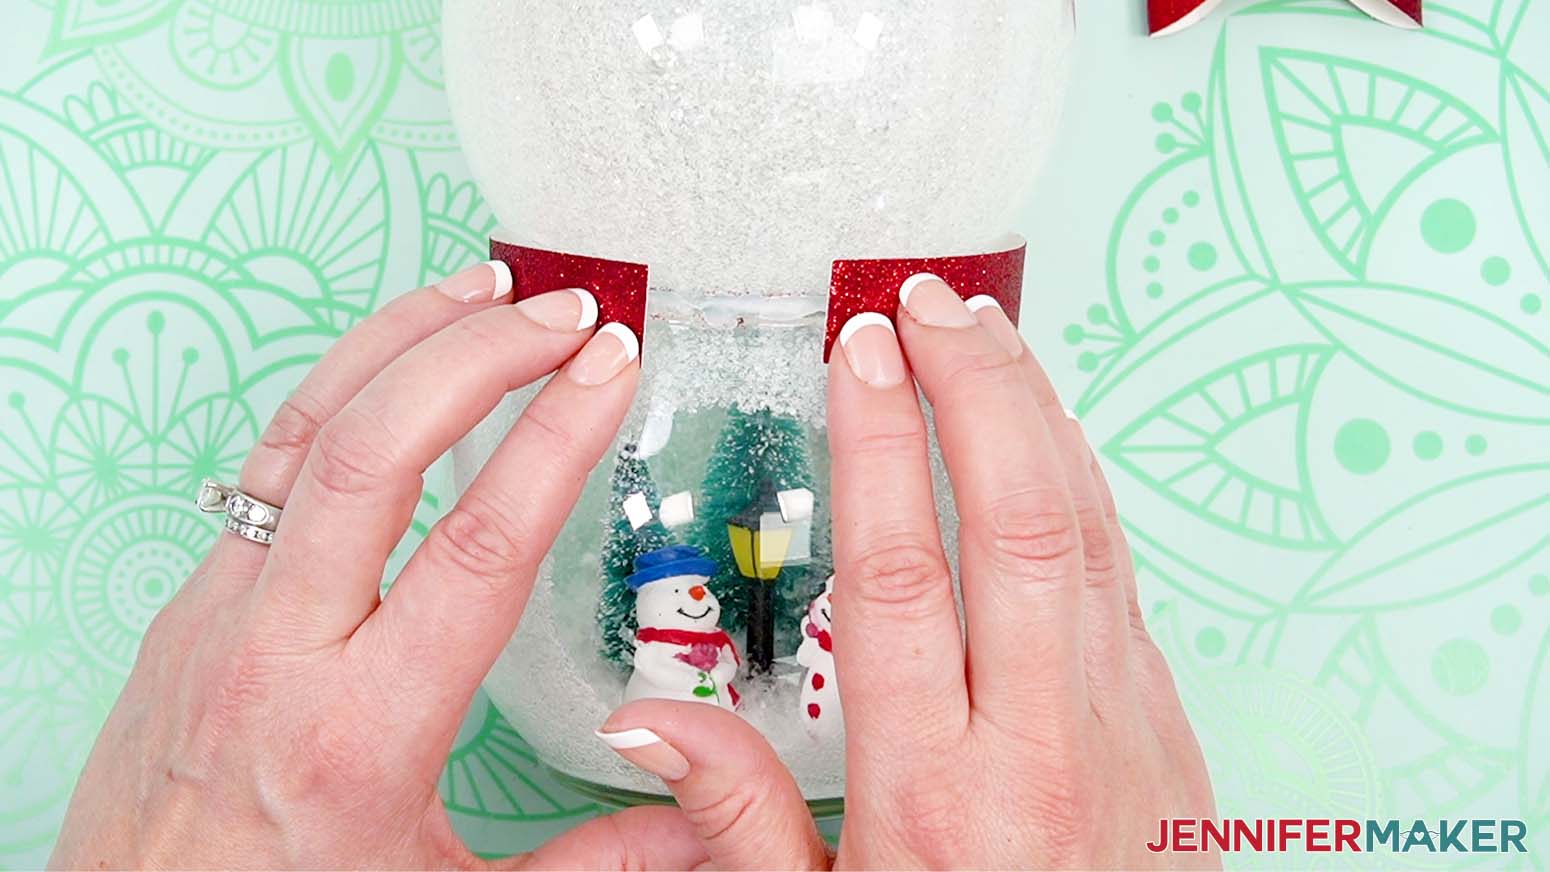
8. Hot glue the ends in place on the vases.
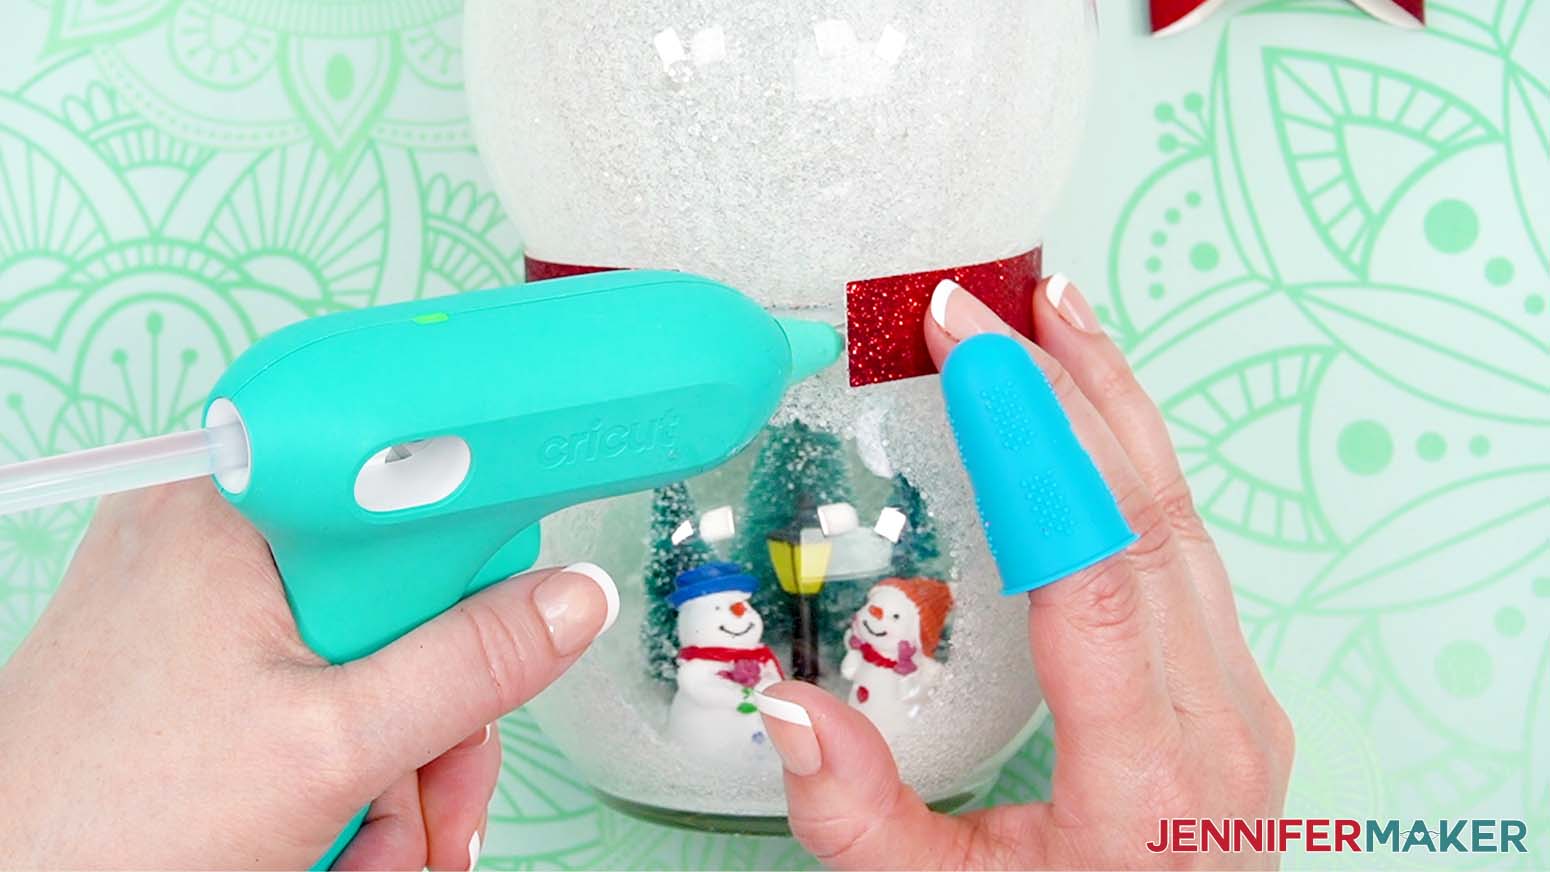
9. Hot glue the bowtie on the band to cover the gap and hold it in place to set.

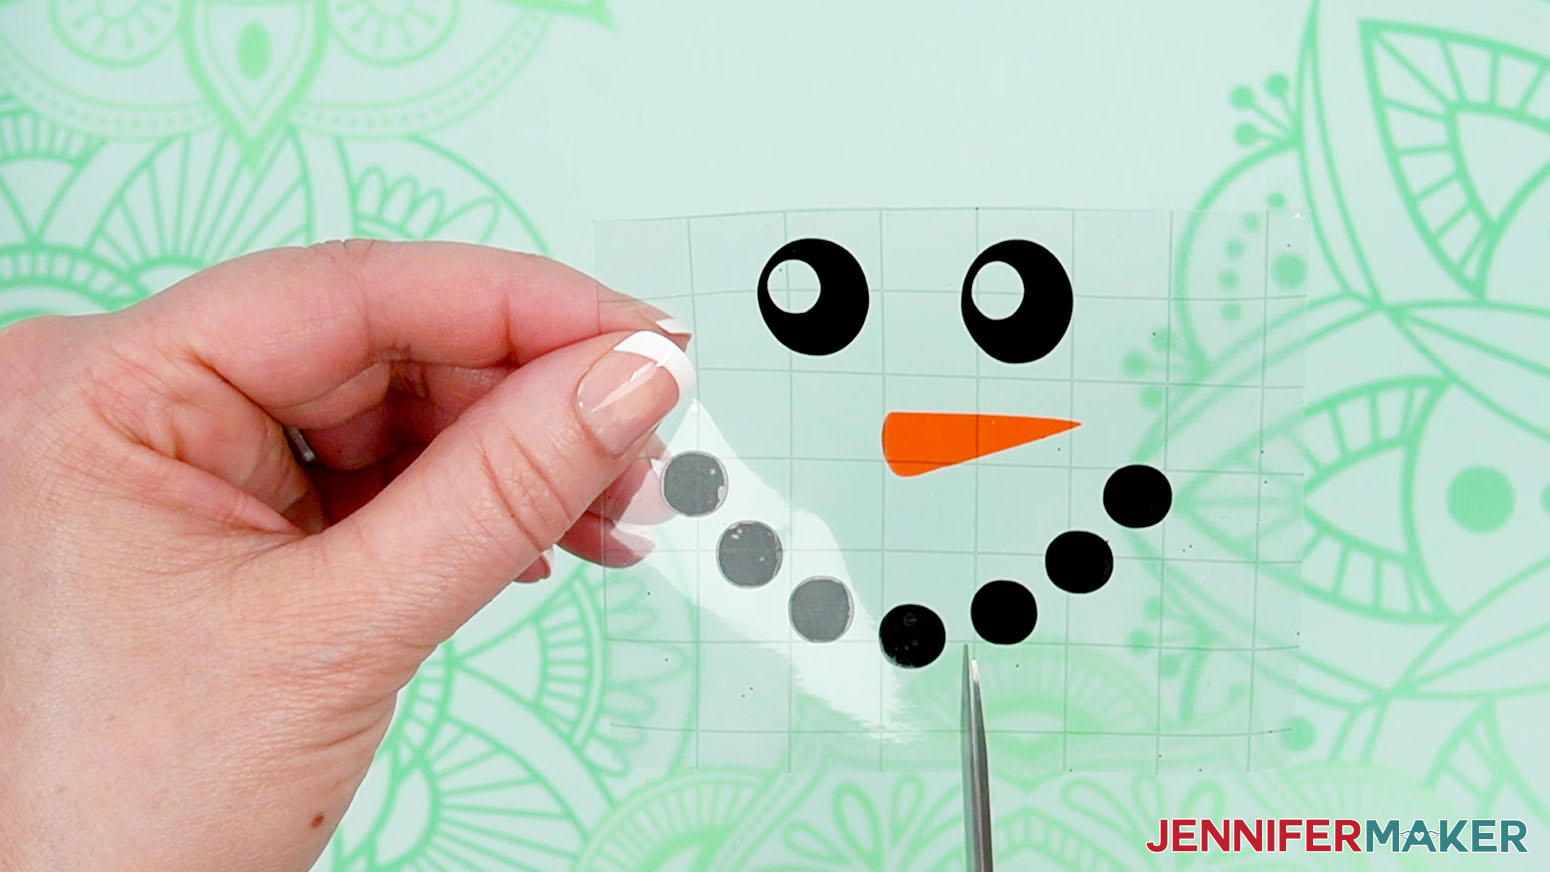
ADD THE VINYL DETAILS
1. Set out your vinyl designs face up.
2. Cut a piece of StandardGrip Transfer Tape slightly larger than the face.

3. Remove the backer from the transfer tape.
4. Curve the transfer tape’s edges up into a taco shape and touch its sticky side down onto the nose on its carrier sheet.
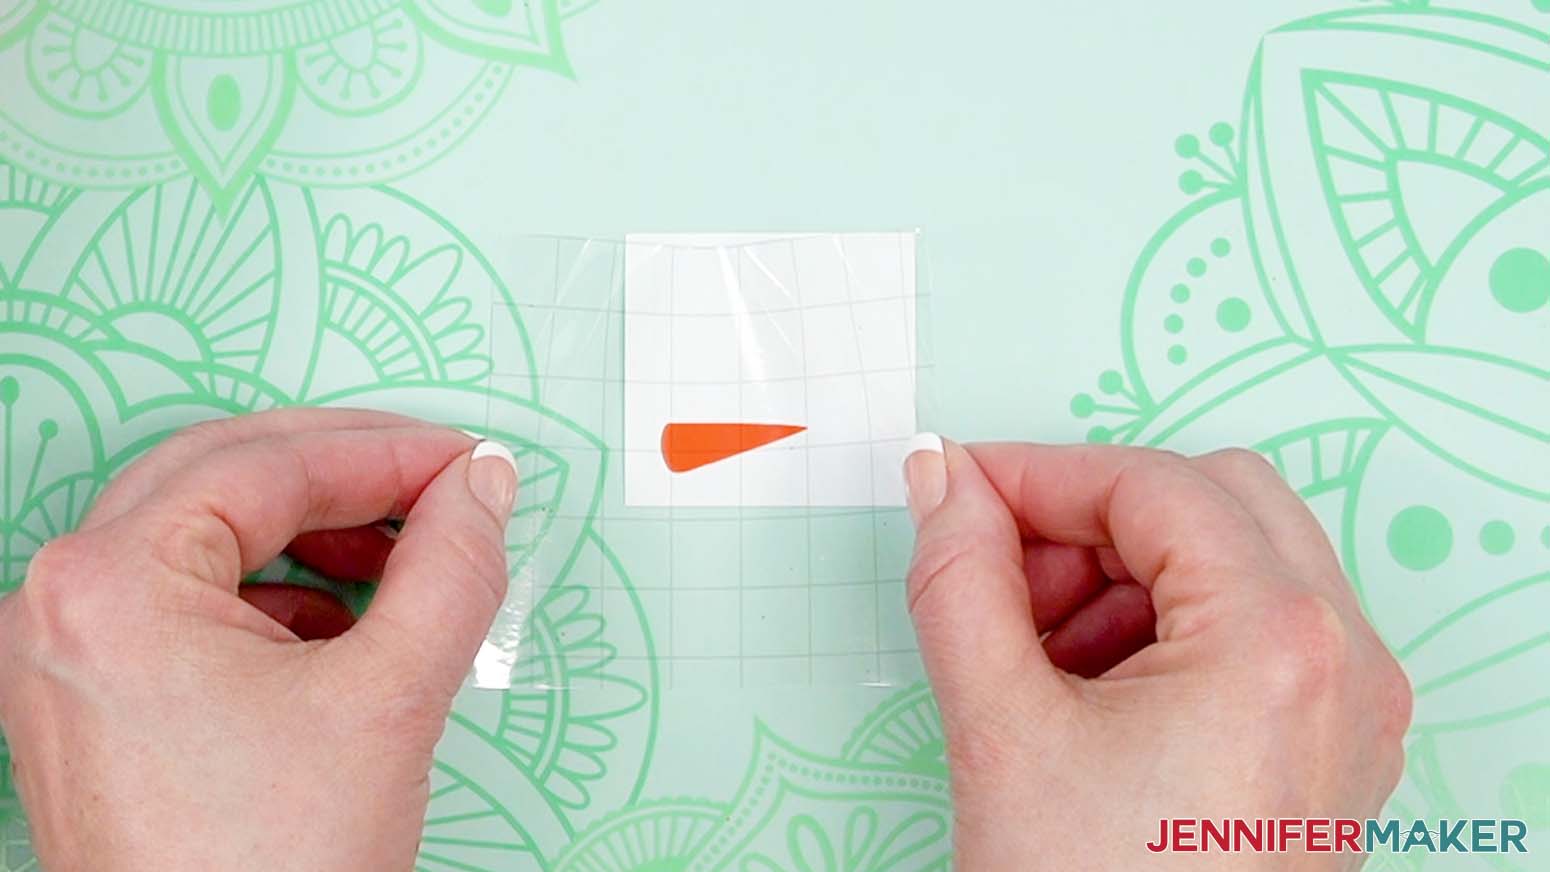
5. Lower the rest of the transfer tape down onto the vinyl, using your fingers to smooth it out from the center outward.
6. Use your scraper to burnish the vinyl onto the transfer tape to help it adhere really well. You can flip it over and burnish from the back, too.
7. Use the transfer tape to peel the nose off of its backing.
8. Follow Steps 4-6 to align the nose over the face design and burnish it so we can apply both colors at once. Leave it on the backing sheet for now.
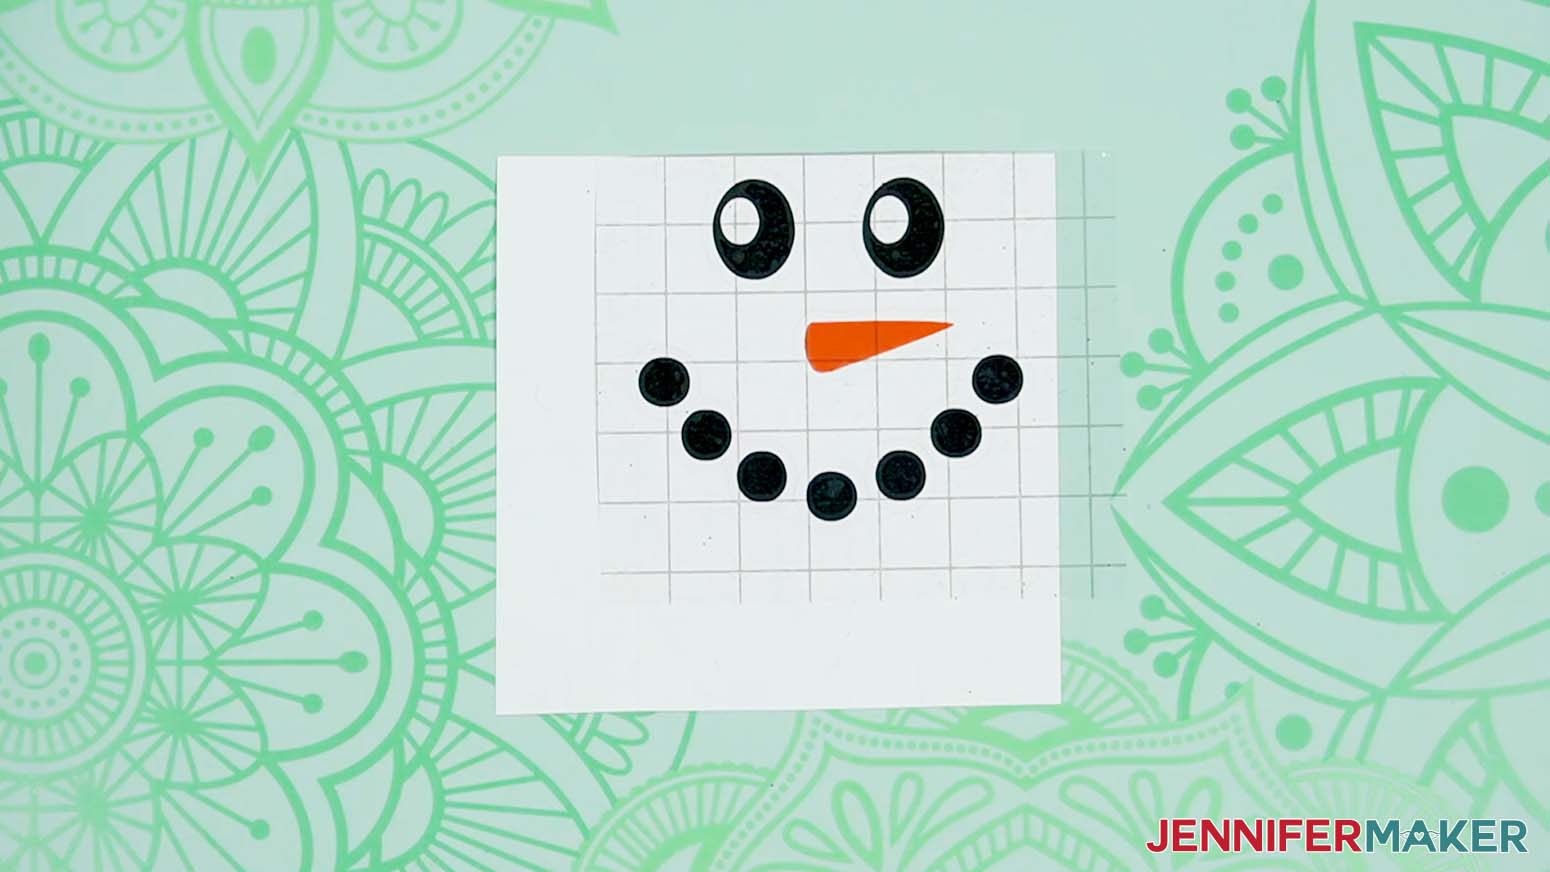
9. You don’t want to place the face too high, so gently place the hat on the top bowl to see how much it covers.
10. Lift the vinyl and transfer tape off of the backing sheet.
11. Make small cuts around the edges of the transfer tape and just slightly in between the vinyl pieces. This will help evenly apply the vinyl to the curve of the vase.
12. Gently fold up the edges of your transfer tape, like a taco so the face’s middle is at the bottom.
13. Using the scarf or bowtie and hat for reference, place the face on to your top glass vase directly above the opening in the glitter.
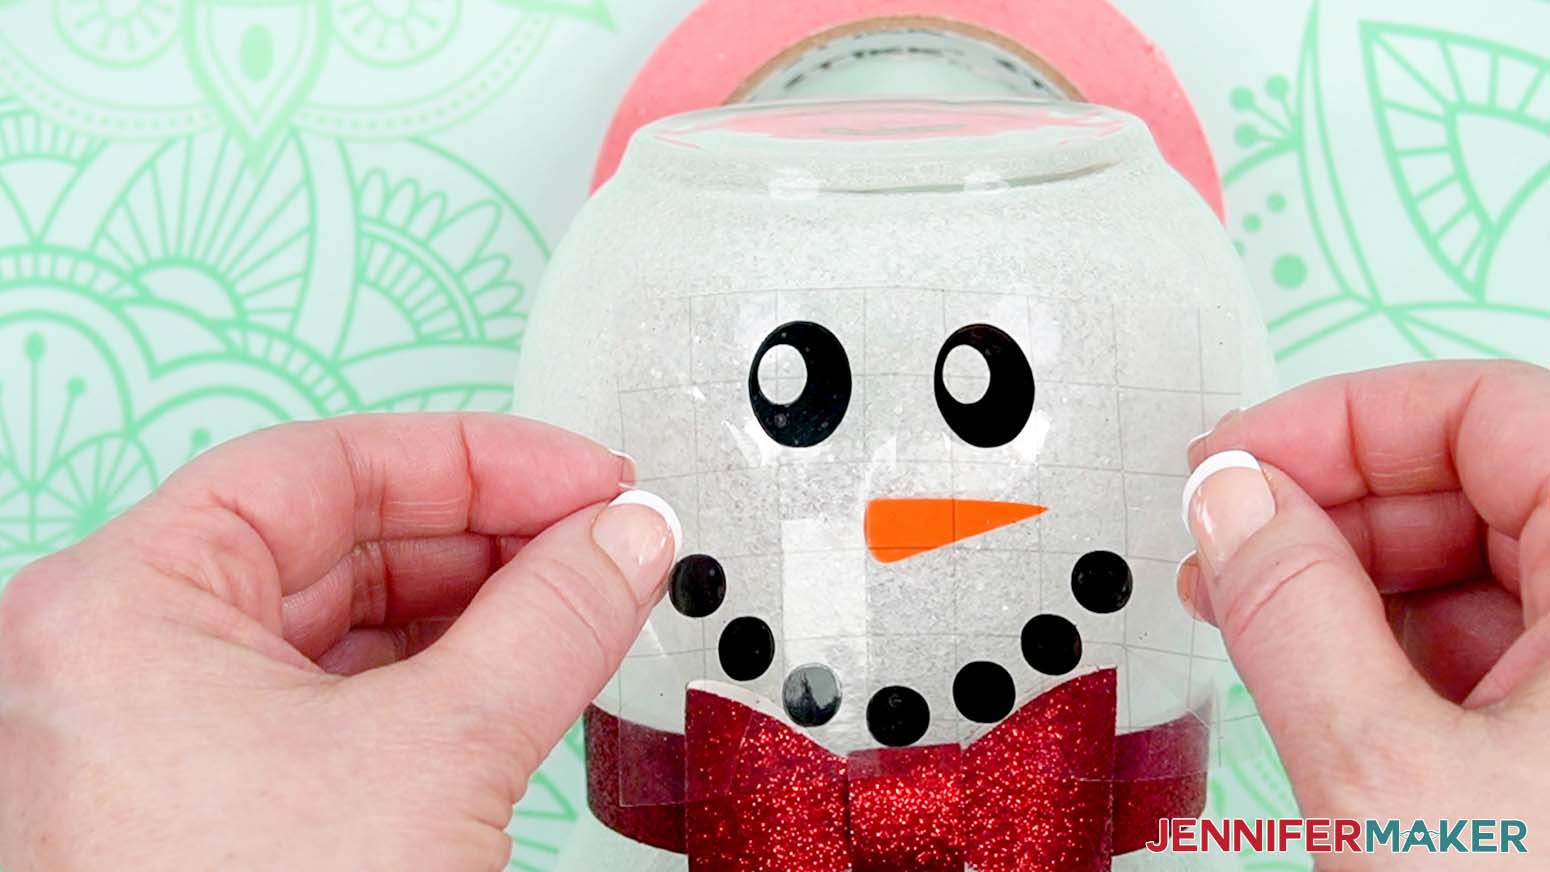
14. Press the vinyl into place on the vase.
NOTE: The cuts in the transfer tape will let the pieces overlap if needed to mold to the curved bowl.
15. Gently burnish the vinyl to the glass with your scraper.
16. Carefully pull away the transfer tape.
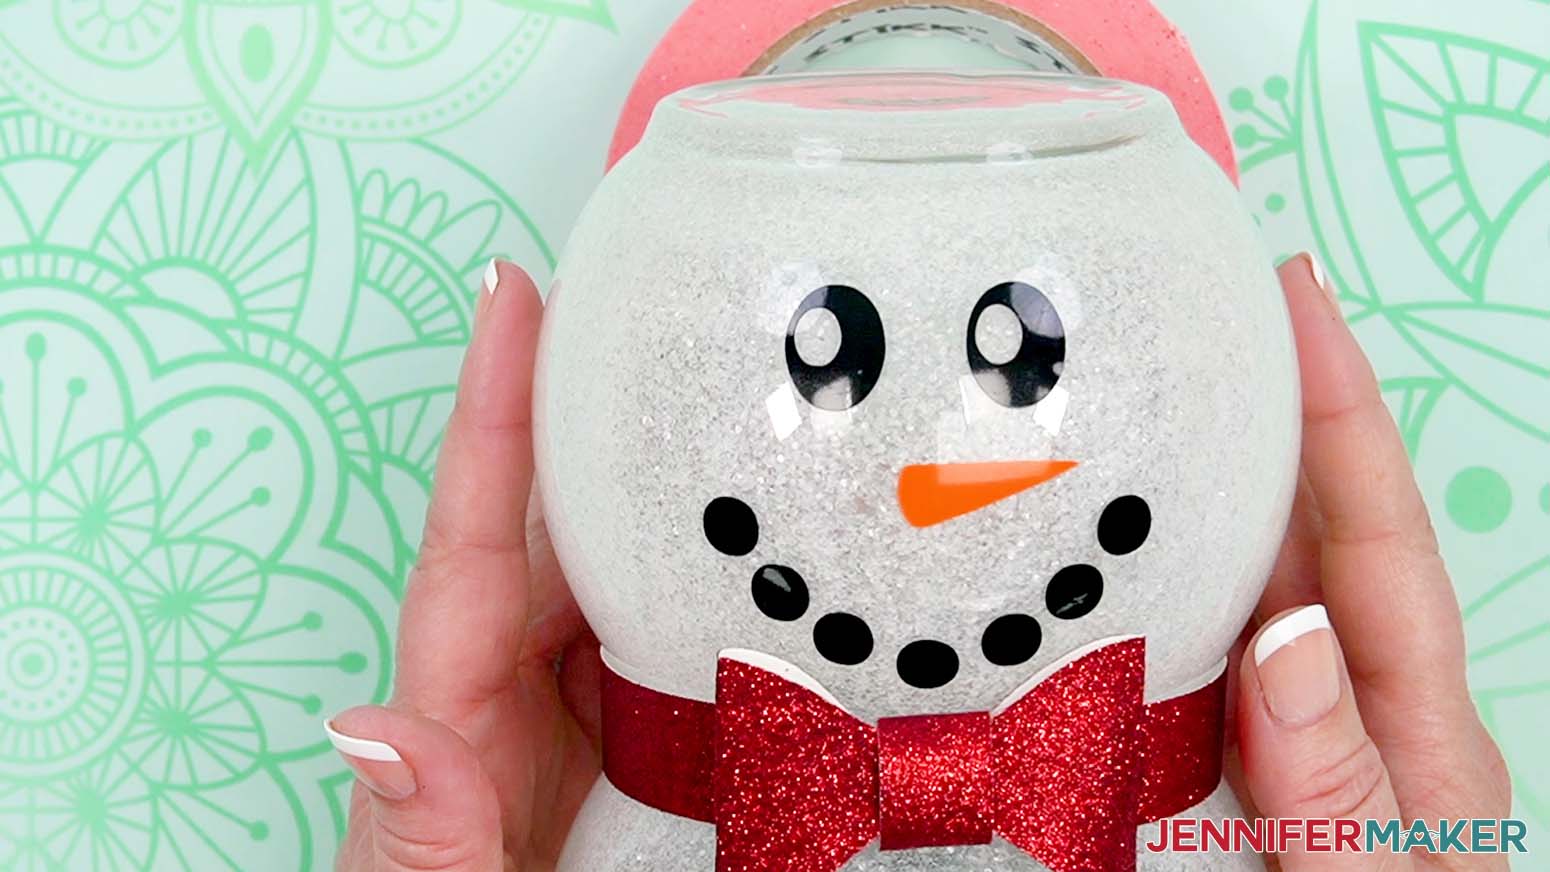
17. Use a fresh piece of transfer tape to add the mittens one at a time on either side of the opening in the glitter.
TIP: Use the first to align the second.
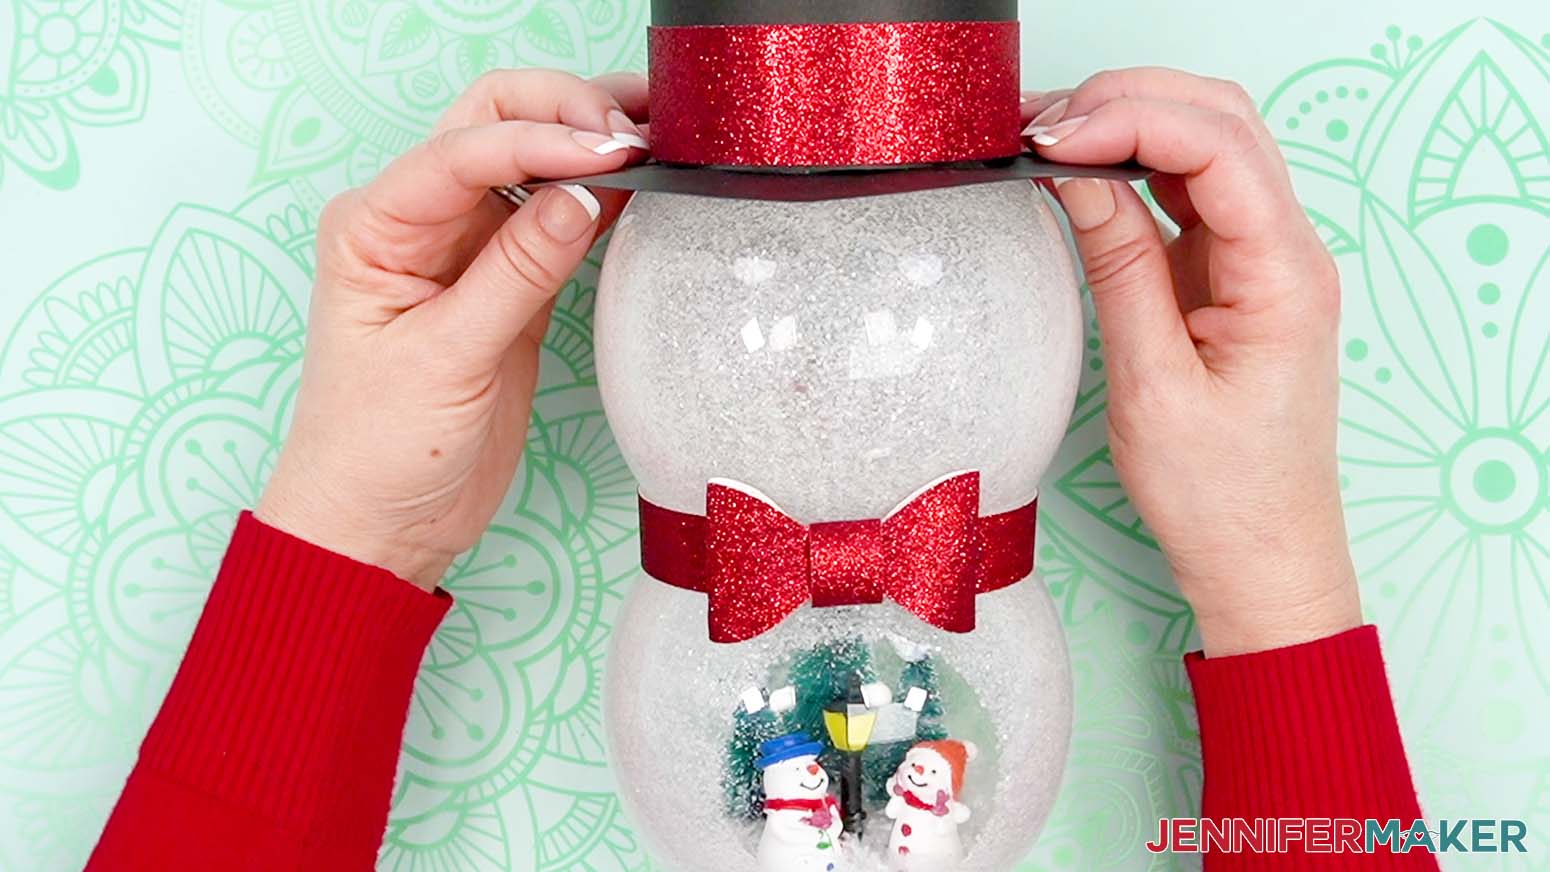
ADD THE HAT
1. Carefully lift the snowman up.
2. Use hot glue to secure the hat to the top vase.
STEP 6: SHOW IT OFF
Here’s the finished Snowman Lantern With Belly Scene!
Notes
Finished Size
13" x 5" x 5"
Answers to Your Questions About How to Make a Snowman Light with a Belly Scene
Q: I want to customize my snowman. How do I accessorize him more?
A: You can customize your snowman’s hat with extra fun accents in my ADVANCE program. Learn more about ADVANCE here!
Q: Can I cut these vinyl and cardstock pieces on a Cricut Joy Xtra or original Cricut Joy?
A: I demonstrate how to cut the pieces on a Cricut Maker 3, but you can cut them on any machine that uses cut files, including the Cricut Maker, an Explore series cutting machine, the Venture, or the Cricut Joy Xtra. Some of the pieces are just a tad too large to cut on an original Cricut Joy.
Q: Do I have to use a Cricut to cut my snowman SVG pieces?
A: No! You can make your snowman’s accessories from cardstock or vinyl that works with your equipment, or even just with scissors. We always include several versions of each free file in the free download ZIP file. If you have a Silhouette Cameo, which uses Silhouette Studio, you can use the DXF file in Silhouette Basic Edition. If you have upgraded to Silhouette Designer Edition, Designer Edition Plus, or Business, you can use the SVG format with your Silhouette machine to cut each intricate design. If you don’t have a cutting machine, you can print and then cut out my digital download PDF files, too! The ZIP archive in my resource library includes these file types and more!
Q: Help! My Cricut Design Space screen looks different than yours!
A: If you’re using the latest version of Cricut Design Space, your screen may have slight variations than the screen you see on the video tutorial. Good news: All of the same functions are there, they may just be in different spots or have new icons. Pause the video if you need, or follow along with the written tutorial. If you get stuck, ask for expert support in our Facebook group. Our group has become not just a help center, but also a vibrant community of real people and crafters! Plus, you can catch the latest news on JenniferMaker tutorials and more.
Q: Where can I find the supplies and tools to make a snowman with belly scene?
A: My snowman with belly scene SVG files can be made with simple supplies you may already have in your crafting stash. The shipping cost of crafts can add up if you purchase from multiple websites, so I like to shop on Amazon for their fast shipping and quick delivery times. My Amazon Prime membership gets me free shipping, too! Just make sure to check the product features so you get the right supplies and tools, and look for sellers with 5-star reviews. You can also find most, if not all of the supplies and tools at your local craft store.
Q: Can I make and sell this snowman with belly scene design?
A: I love supporting creative entrepreneurs! If you want to use my designs and projects for commercial use, please familiarize yourself with my important licensing information before selling your crafts.
I do not permit sale of my digital items, but you can sell the creative goods you make with them — as long as you follow my licensing requirements. That means you cannot sell the snowman lantern SVG files, but you can sell snowman lanterns that you made with the files with restrictions noted at the above link. I love to see creative crafting businesses thrive with the help of my designs and inspiration!
Q: How do I know if my design uploaded at the correct size?
A: You can make sure your dimensions match mine after uploading your files:
- snowman-belly-stacked-jennifermaker-SVG: 11.49″ x 11.707″
There is also an “unstacked” file with these dimensions:
-
snowman-belly-jennifermaker-SVG: 20.442″ x 12.24″
If your projects are not coming in at the right size, try uninstalling and re-installing Cricut Design Space. If you need help resizing your design, please see our Resizing Guide.
Get my free SVG files to make a snowman lantern with a belly scene!
(If you do not see the signup form above, click here.)
I love seeing what you make with my designs and how you use them! Please share a photo of your snowman in our Facebook group or tag me on social media with #jennifermaker.
Love,

Want to remember this? Save this Snowman with Belly Scene Tutorial to your favorite Pinterest Board!