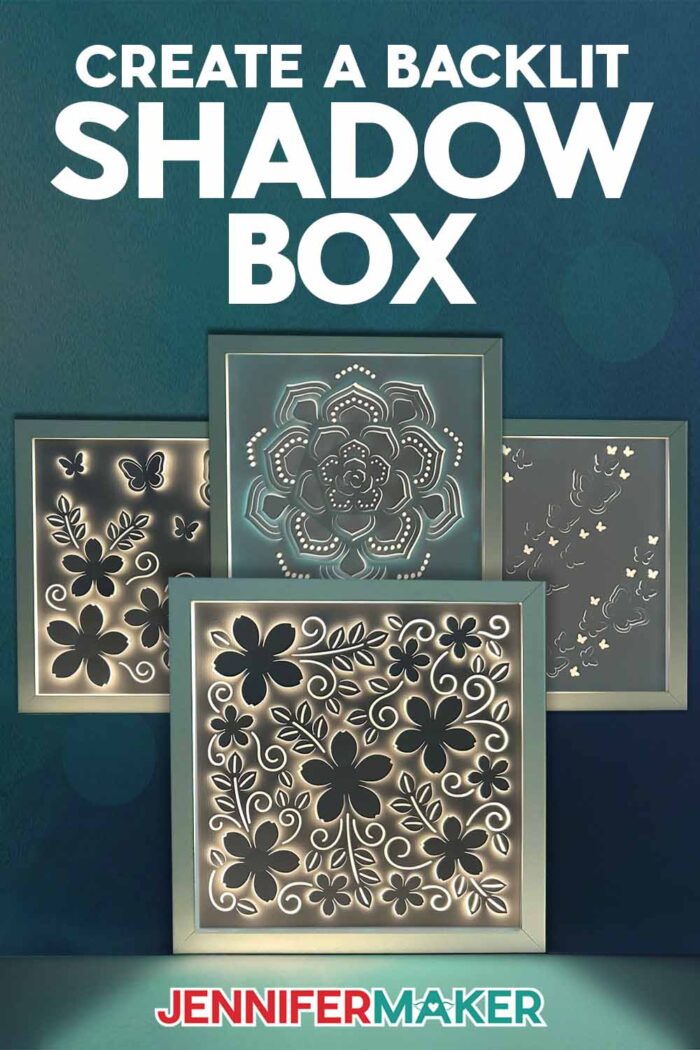
Learn how to create backlit shadow box art that glows!
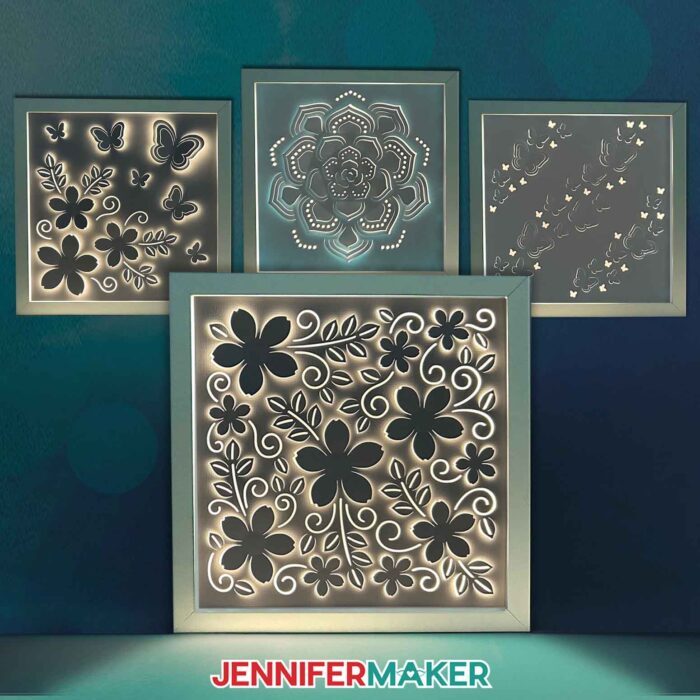
There are so many different ways to make light boxes. Shadow boxes are a wonderful beginner project for new Cricut crafters! And one of my favorite things about crafting is when I find interesting new ways to use regular materials I already have in my craft stash. This time, I’ll teach you how to make an intricate backlit shadow box with a colorful surprise!
Watch the full step-by-step backlit shadow box tutorial:

Ready for something a little different? In this tutorial, I’ll show you how to make a type of lighted shadow box we haven’t made before — one that includes an “ingredient” you wouldn’t normally think of when making light boxes.
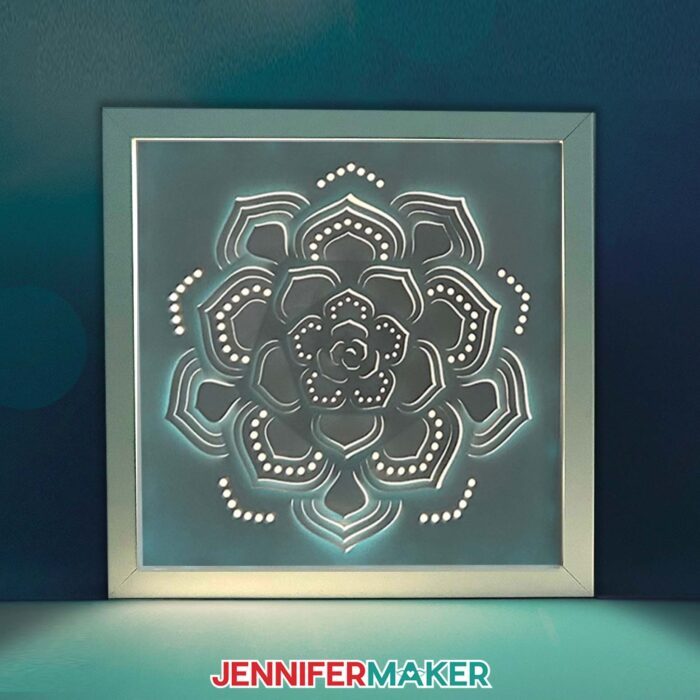
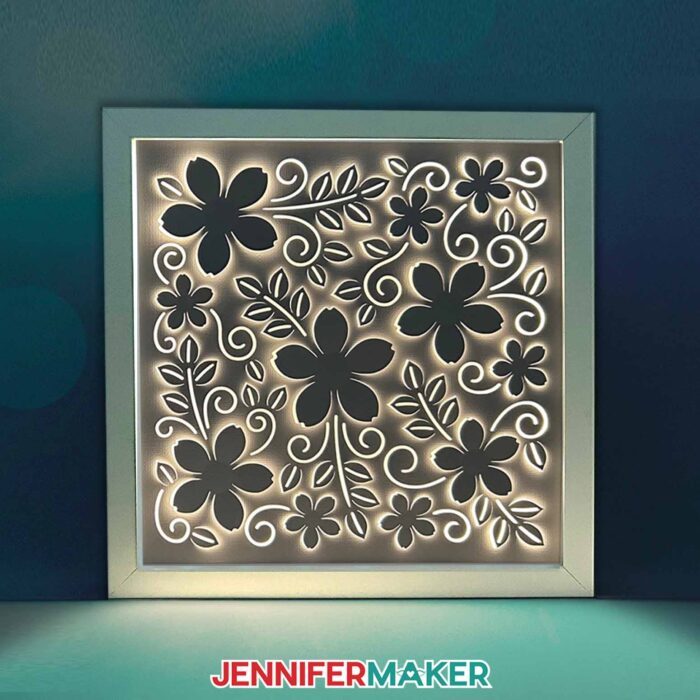
What makes these so lovely is how we bend the cut layers to create brilliant lights and captivating shadows across the shadow box’s three-dimensional surface. I just love how the design shines SO brightly against the darker, more solid parts. But what makes the cardstock more solid, so less light can get through? And where is that hint of color coming from?
Usually shadow boxes have multiple layers. And these technically do, too! You may not see it right away, but there’s another material behind the cardstock: Adhesive vinyl.
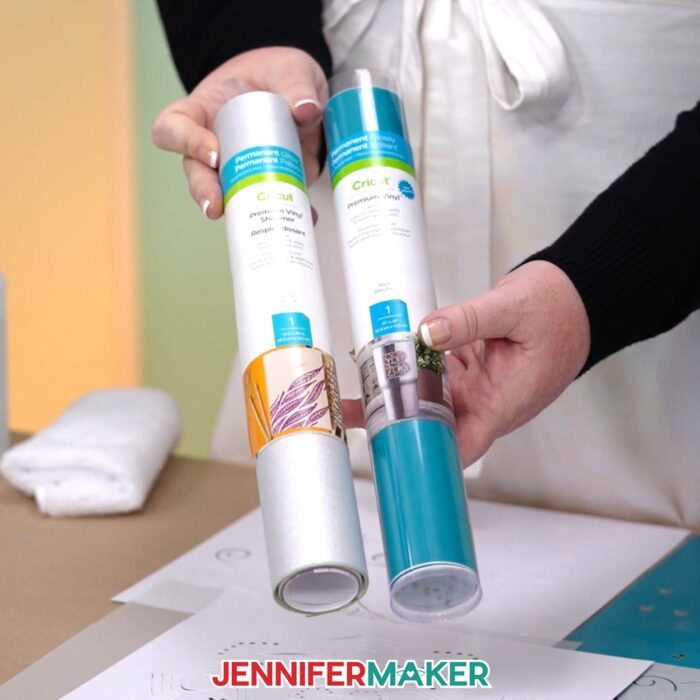
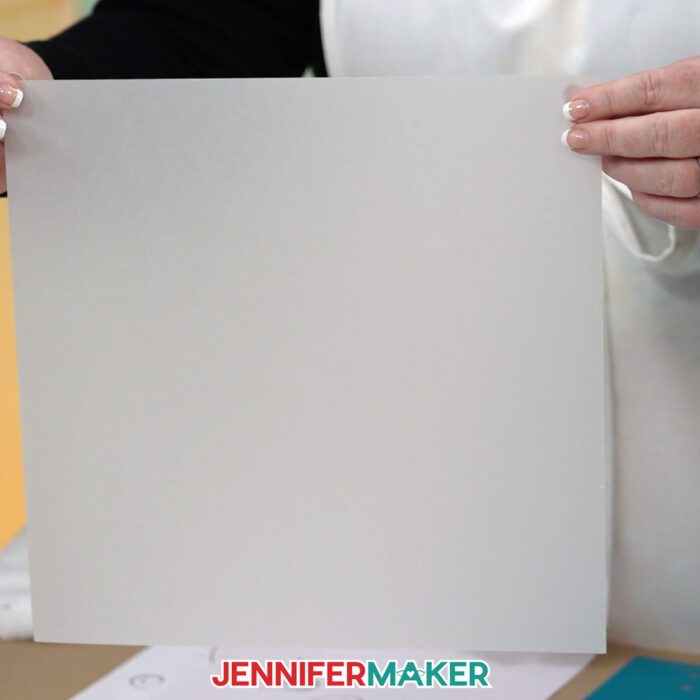
First, you’ll need some 80 pound cardstock. But how do we make sure the cardstock blocks most of the light from getting through — while still being able to be a super intricate cut design? That’s where the vinyl comes in! I’ll show you how to attach permanent adhesive vinyl to the back of the cardstock … before we cut it.
But what color vinyl is the best for this? Check out the video tutorial to learn why I used the color I did … and why silver shimmer vinyl works great, too. No matter which type of vinyl (regular vs. shimmer) you back your cardstock with, the cut settings are the same … but with one small exception. Hint: it’s a sticky one.
There are a few other nifty reasons why we’ll add the vinyl — you can find those out in the video tutorial as well.
Besides the cardstock and vinyl, some vellum can be a neat touch. It’s optional, but it’s a way to soften the glow of the light strip as it beams through the cut areas of the design. They look pretty either way, so no worries if you don’t have it on hand. And as long as you’re careful removing the backing and glass in the shadow box frame, you can put vellum in or take it out later, if you want to try a different look.
I’ll walk you through how to prepare and cut the SVG files in Cricut Design Space using a Cricut Maker 3. You can also use a Maker, an Explore series machine, a Venture, and other cutting machines. I don’t recommend sizing these designs down for the Cricut Joy or Joy Xtra — they’re just too intricate already!

Now, what’s a shadow box without the box? I used 10″ x 10″ shadow box frames, and the designs in my free files are the perfect size to fit them! Like I said, don’t size them down — but feel free to make them bigger if you have a bigger shadow box frame!
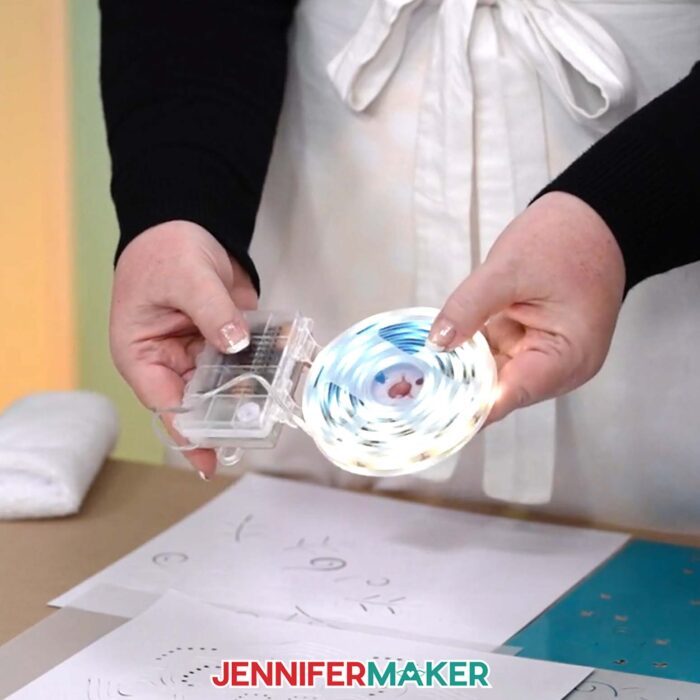
Lastly, I’ll show you how to add an LED light strip to the inside of the frame. Hint: Get light strips with remotes or an easily accessible power source for the easiest on and off. My favorites are linked in my materials list.
I love a good shadow box, and it’s been a lot of fun making these backlit shadow boxes and experimenting with new methods and unconventional materials! Customize shadow boxes with different designs and colors for different environments — anywhere that needs some lovely, glowy ambiance!
Let me show you how to make a backlit shadow box! This post contains some affiliate links for your convenience (which means if you make a purchase after clicking a link I will earn a small commission but it won’t cost you a penny more, there is no additional cost)! Read my full disclosure policy.
Materials to Make a Backlit Shadow Box
View my Amazon shopping list for the exact items I used!
-
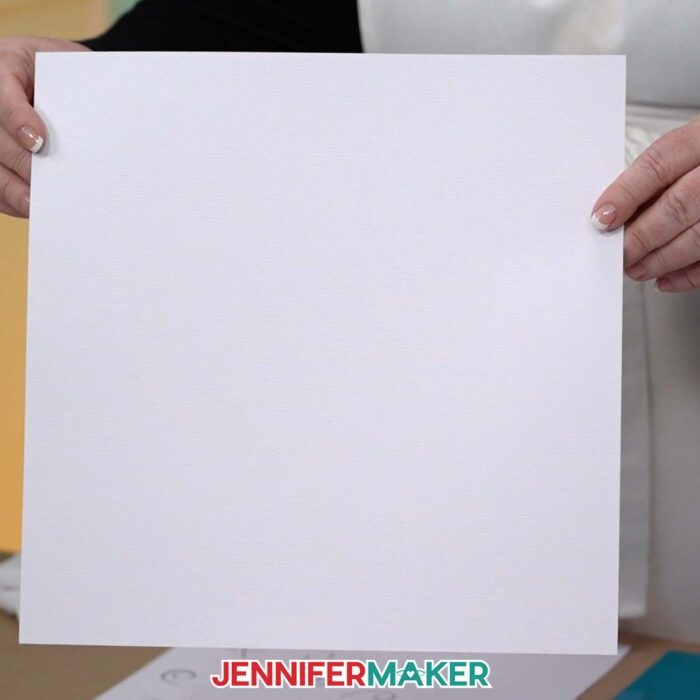
- One (1) Sheet of 12″ x 12″ 80 lb. White Cardstock
- One (1) 12″ x 12″ Piece of Permanent Vinyl (any dark color) -OR-
- One (1) 12″ x 12″ Piece of Permanent Shimmer Vinyl (I used this Cricut Silver)
- One (1) Sheet of 12″ x 12″ White Vellum (optional to diffuse the lights)
- One (1) 10″ x 10″ Shadow Box Frame
- One (1) Strand of LED Strip Lights -AND-
- Three (3) AA Batteries
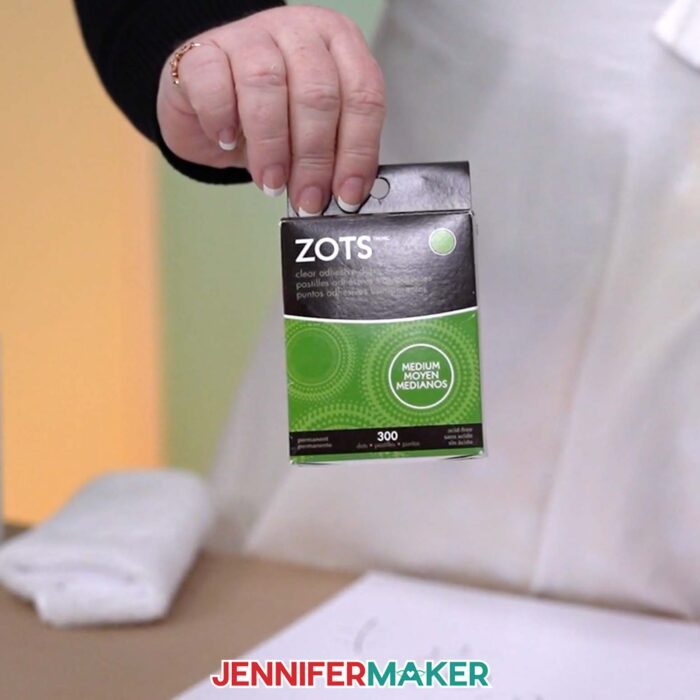
- 3/8″ Medium Zots Glue Dots (optional for adhering the battery pack to the back of the shadow box)
- A way to cut your materials – I’m using the Cricut Maker 3 but you could also use the Cricut Maker, an Explore Series machine, or a Venture.
- Cricut Green StandardGrip Machine Mat 12” x 12”
- Cricut Purple StrongGrip Machine Mat 12″ x 12″ (for designs with shimmer vinyl on back)
- Brayer
- Spatula
- Scraper
- XL Scraper (for applying the vinyl to the cardstock)
- Weeding Tool
- Tweezers
- Scissors
- Craft Knife (to cut a notch in the corner of your shadow box frame) -AND-
- Self-Healing Cutting Mat
- Measuring Tape (optional to measure the size of your shadow box frame)
- Isopropyl Alcohol (optional to clean your shadow box glass) -AND-
- Lint-Free Cloth
How to Make a Backlit Shadow Box!

Backlit Shadow Box
Make a beautiful backlit shadow box with just a frame, some LED lights, and a single sheet of cardstock with vinyl applied to the back.
Materials
- One (1) Sheet of 12" x 12" 80 lb. White Cardstock
- One (1) 12" x 12" Piece of Permanent Vinyl (any dark color - I used this Cricut Aqua) -OR-
- One (1) 12" x 12" Piece of Permanent Shimmer Vinyl (I used this Cricut Silver)
- One (1) Sheet of 12" x 12" White Vellum (optional to diffuse the lights)
- One (1) 10" x 10" Shadow Box Frame
- One (1) Strand of LED Strip Lights -AND-
- Three (3) AA Batteries
- 3/8" Medium Zots Glue Dots (optional for adhering the battery pack to the back of the shadow box)
- Designs #616, 645, or 704 (My free SVG/PDF/DXF design files are available in my free resource library - get the password by filling out the form at the bottom of this page)
Tools
- A way to cut your materials - I’m using the Cricut Maker 3 but you could also use the Cricut Maker, an Explore Series machine, or a Venture.
- Cricut Green StandardGrip Machine Mat 12” x 12”
- Cricut Purple StrongGrip Machine Mat 12" x 12" (for designs with shimmer vinyl on back)
- Brayer
- Spatula
- Scraper
- XL Scraper (for applying the vinyl to the cardstock)
- Weeding Tool
- Tweezers
- Scissors
- Craft Knife (to cut a notch in the corner of your shadow box frame) -AND-
- Self-Healing Cutting Mat
- Measuring Tape (optional to measure the size of your shadow box frame)
- Isopropyl Alcohol (optional to clean your shadow box glass) -AND-
- Lint-Free Cloth
Instructions
STEP 1: GET MY FREE BACKLIT SHADOW BOX DESIGNS
First, download my Backlit Shadow Box designs from my free library – look for Design #616. There are also additional backlit shadow box patterns in designs #645 and #704. Alternatively, you can use the Save This Project form near the top of this post and the design link will be emailed to you.
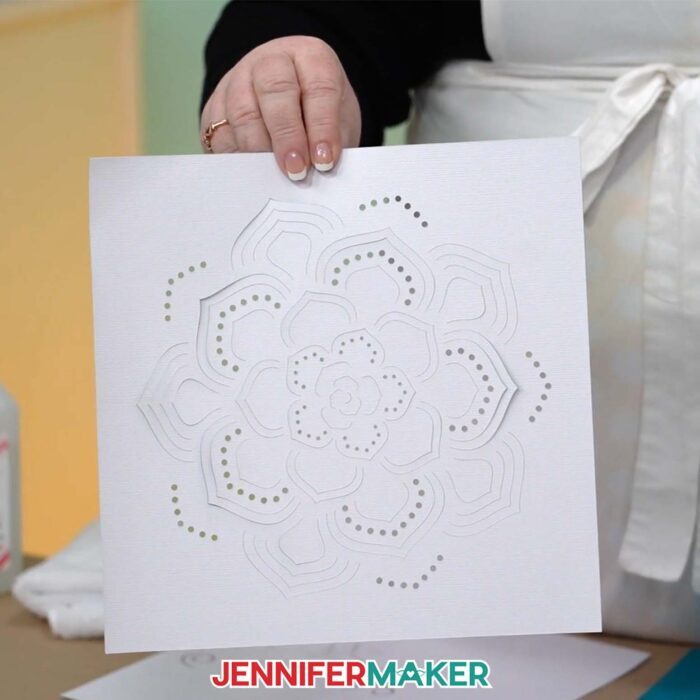
In the SVG folder for design #645, you’ll find three designs sized for a 10” x 10” shadow box: butterflies, flowers, and a succulent.
There is also a DXF folder with cut files, and a PDF folder with versions you can print and cut by hand.
Upload the files you need to Cricut Design Space to get started.
I’ll show you how I prepared and assembled the succulent backlit shadow box design.
TIP: If you’re not sure how to upload, go to jennifermaker.com/svgs to learn how to unzip and upload SVG files.
STEP 2: PREPARE AND CUT YOUR BACKLIT SHADOW BOX DESIGN
CRICUT DESIGN SPACE
- First, open Cricut Design Space and click “New Project.”
- Click “Upload,” then click “Upload Image.”
- Click “Browse” and select the SVG design of your choice.
- Click “Open.”
- Click “Continue” and finally click “Upload” to add the design to your Canvas.
NOTE: I'll demonstrate with the Succulent design.
- Ungroup the design.
- Drag the top layer with the design to the side.
- The white layer with the design will be cut from layered vinyl and cardstock, and the gray solid layer is optional and can be cut from vellum. If you don’t want to use vellum, delete the gray layer.
- Click the “Save” button at the top to give your design a name and save it.
- There’s nothing else to do, so you’re ready to prepare your material and cut!

CUTTING
- Select the correct machine from the top right drop-down menu.
- Click “Make.”
- On the Prepare screen, make sure the correct Base Material Size is selected for your materials.
- Select the first mat and click “Continue.”
- On the Make screen, I used the “Vellum” setting with “Default” Pressure for the vellum, and the “Cardstock (for intricate cuts)” setting with “More” Pressure for the layered cardstock and vinyl.
- If you aren’t cutting vellum, skip to step 13. If you are cutting vellum, place a piece of vellum at least 11” x 11” onto a green StandardGrip machine mat.
- Use a brayer to fully and evenly adhere the material to the mat.
- Check that your Premium Fine-Point Blade is clean and in the clamp.
- Press the flashing “Load/Unload” button to load the prepared mat into your Cricut.
- Press the flashing “Go” button to begin cutting.
- When it has finished cutting, don’t unload the mat right away. Instead, gently lift a corner of the material to make sure it is cut all the way. If not, press the “Go” button again to make the same cuts in the same spots.
- When the cuts are complete, unload the mat, flip it over onto your work surface, and roll it back to release the cut vellum.
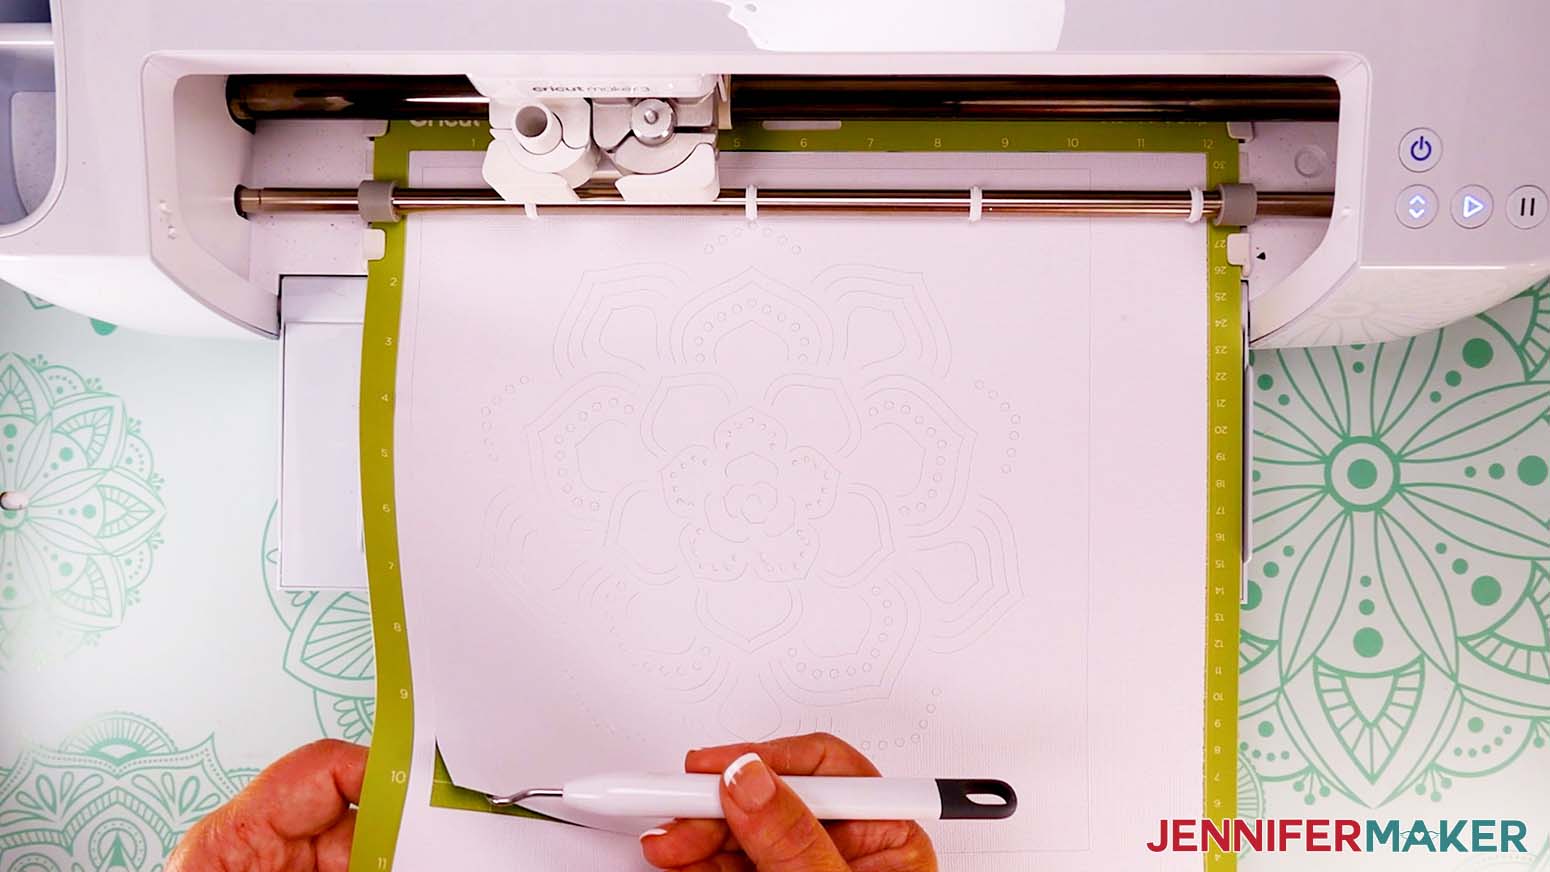
TIP: If you have trouble removing the vellum from a green StandardGrip machine mat, try cutting a new piece on a blue LightGrip mat – or even an older, not-so-sticky StandardGrip one. - Place a 12” x 12” piece of cardstock face down on your work surface.
- Cut a piece of vinyl at least 10.5” x 12”, but no larger than 12” x 12”.
TIP: Use the grid on the back of the vinyl to help with measuring and cutting – each square is ½” x ½”. If the vinyl curls a lot when it’s cut, place it under a heavy book for about an hour to flatten it out. - Starting on the short end of the vinyl, peel off the backing about 1”-1.5”.
- Fold the backing down and crease it to keep it out of the way.
- Turn the vinyl over and align the top and left edges of the vinyl’s sticky side with the top and left edges of the cardstock.
- After it’s lined up, carefully press the vinyl down against the cardstock.
- Grab your XL scraper tool and press along the vinyl that is attached to the cardstock to smooth it out and get rid of any bubbles.
- Reach underneath the vinyl sheet with one hand and peel the backer off little by little, using the scraper with your other hand to press the vinyl onto the cardstock as you go. Go slowly, using the scraper to push any wrinkles or bubbles out before the vinyl is fully pressed onto the cardstock.
- Once the vinyl is completely adhered to the cardstock, flip the sheet over and check if any excess vinyl shows along the sides. Trim it off with scissors if you see any, but be careful not to cut the cardstock.
- Place the vinyl/cardstock combination vinyl-side down onto a green StandardGrip machine mat, making sure the area of cardstock NOT covered by vinyl is either at the bottom or the right side.
NOTE: If you’re using shimmer vinyl, use a brand new, super sticky green StandardGrip machine mat (or a purple StrongGrip machine mat) for best results.
TIP: If there are any areas with bubbles or wrinkles in the vinyl, position them on the bottom or right side as well. - Use a brayer to fully and evenly adhere the material to the mat.
- Check that your Premium Fine-Point Blade is clean and in the clamp.
- Press the flashing “Load/Unload” button to load the prepared mat into your Cricut.
- Press the flashing “Go” button to begin cutting.
- When it has finished cutting, don’t unload the mat right away. Instead, gently lift a corner of the material to make sure it is cut all the way. If not, press the “Go” button again to make the same cuts in the same spots.
TIP: If you have any issues with your cuts, check out my Tips for Cleaner Cuts tutorial. - When the cuts are complete, unload the mat, flip it over onto your work surface, and roll it back to release the design.
TIP: Use a spatula tool to help lift delicate pieces without tearing. - Use a weeding tool to poke out any pieces that remain inside the design.
- Here is what my cut and weeded design looks like.


STEP 3: ASSEMBLE YOUR BACKLIT SHADOW BOX
- Place the design vinyl-side down on your work surface.
- Starting with the outer shapes, fold each cut piece forward at an angle at the base of each “petal.”
- As you move toward the center of a petal, gradually fold the pieces at a larger angle to get a more even-looking light effect when the design is lit.
TIP: Use your small scraper tool to help get a straight crease on your folds. - Follow steps 2-3 to fold the rest of the petal pieces the same way.
TIP: Rotate the design as you go for easier access to the inner pieces. - Grab your shadow box frame. Remove the backing, inner spacer piece, and glass and carefully set them aside.
- With the top of the design pointing away from you, insert the design into the shadow box frame, cardstock side down.
- Carefully set the frame with the design aside.
- Grab the frame’s inner spacer piece and place it on your work surface.
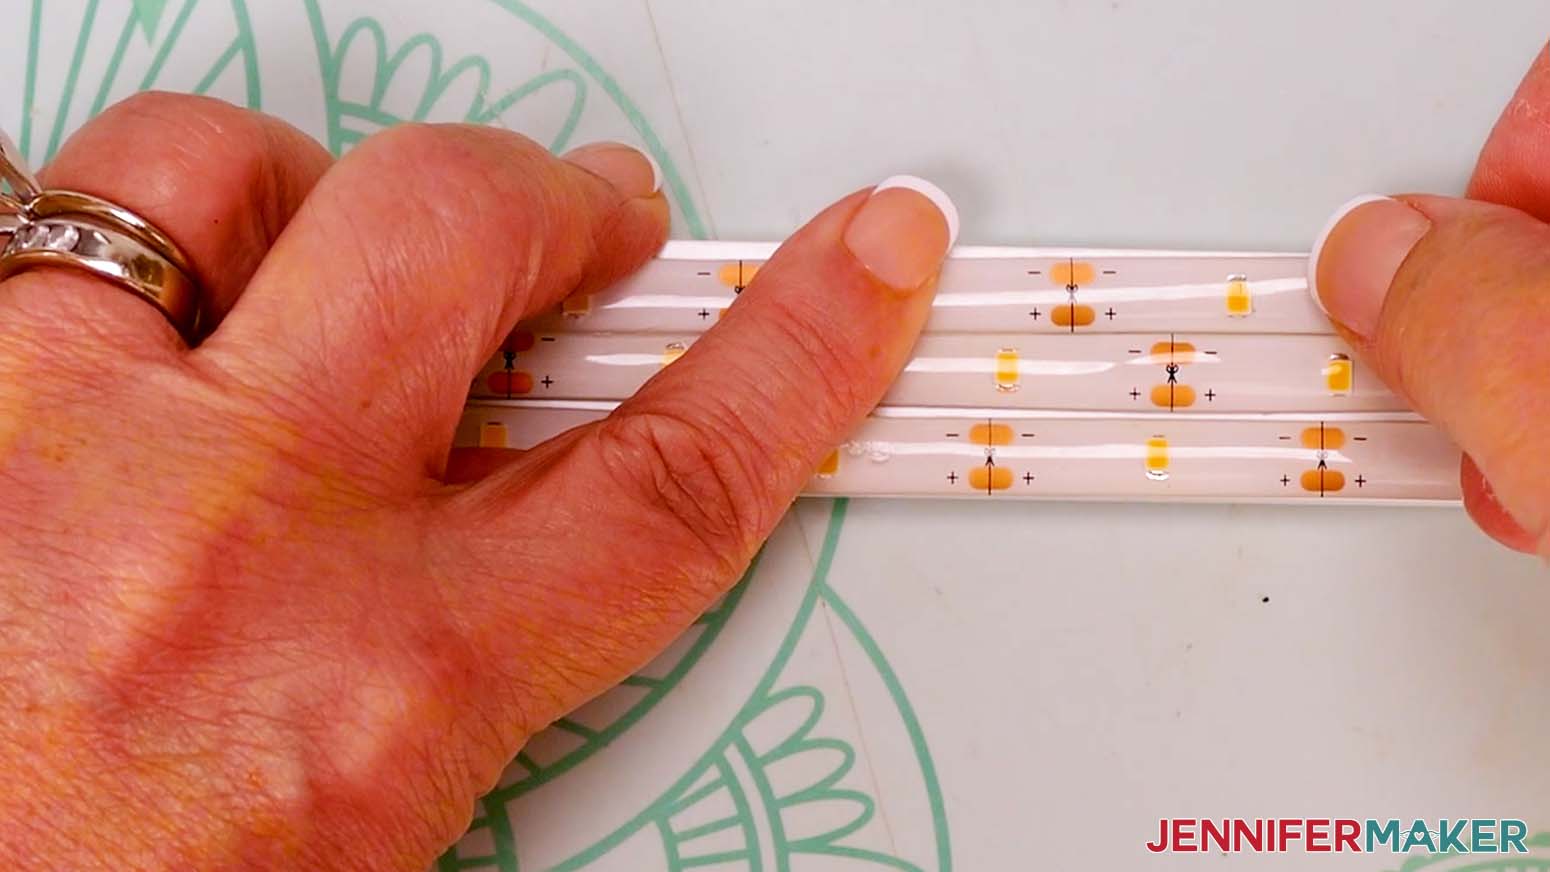
- Grab your LED strip lights and insert the correct batteries into the battery compartment.
- Test the lights to make sure they work.
- Find the end of the strip light that is connected to the battery pack.
- Peel back the adhesive backing a couple of inches, and starting at a bottom corner of the inner frame piece, press the sticky side of the lights onto the frame piece’s very top edge.
TIP: I find the light strip easier to work with if I unroll it all the way before attaching it to the frame’s inner piece. - Continue pressing the light strip along the top edge of the inner frame piece, keeping the strip as straight and flush as possible.
- As you come to each corner of the inner frame piece, press the light strip as squarely as possible into the corner.
- As you come to the place where you started, angle the lights down so you can start another row parallel to the one before.
TIP: Three rows of strip lights fit snugly along the inside of the inner frame piece of my 10” x 10” shadow box, so make sure to press each row up against the previous one to fit them all. - Repeat steps 13-15 until there are three complete rows of lights attached to each inner side of the frame spacer piece.
- When you reach the end of your last row of lights, find the closest spot on the light strip with plus (+), minus (-), and scissors symbols, and cut on that line with scissors.
- Press the loose end of the lights onto the inner frame piece and discard the cut light strip.
- Grab the shadow box frame with the design (cardstock-side down) inside. Place it on your work surface so the top of the design is pointing away from you and the back of the frame is face up so you can see the vinyl.
TIP: Be careful when moving the frame with the folded design inside. The folded cardstock pieces will be unprotected against the work surface, and may bend or tear if handled roughly. - Place your cut piece of vellum inside, on top of the design. If you didn’t cut any vellum, skip this step.
- Carefully pick up the piece of glass and place it inside the box, on top of the vellum.
NOTE: Be very careful not to slide your fingers along the edges or corners of the glass – it’s very sharp. - Place the frame’s spacer piece with the attached lights into the shadow box, on top of the glass. Make sure that the wire leading to the battery pack is on the bottom.
- Set the frame aside.
- Grab the frame’s backer piece and place it on a self-healing cutting mat so the hanger is facing up, at the top.
- Use your Cricut TrueControl Knife or craft knife to cut a small diagonal notch on the same corner as where the wire hangs out on the frame. It will take several passes of the knife to cut through the board. Just be patient and don’t push too hard or the blade may slip.
- Then cut through the padding on the backer piece the same way.
- Grab the shadow box and place it back on your work surface, making sure the top of the design is facing away from you.
- Place most of the lights’ wire into the frame, and leave a few inches (where it’s connected to the battery pack) hanging out the corner of the frame.
- Insert the frame backer piece, with the notch lined up with the wire, and the hanger on the outside at the top, on top of the insert.
- Push the metal prongs down over the backer to hold everything in place.
- You can attach the battery pack to the backer or bottom with glue dots, or leave it detached and set it behind the frame when it’s displayed.
- Flip the frame over and adjust any folded pieces if needed.


STEP 4: SHOW IT OFF
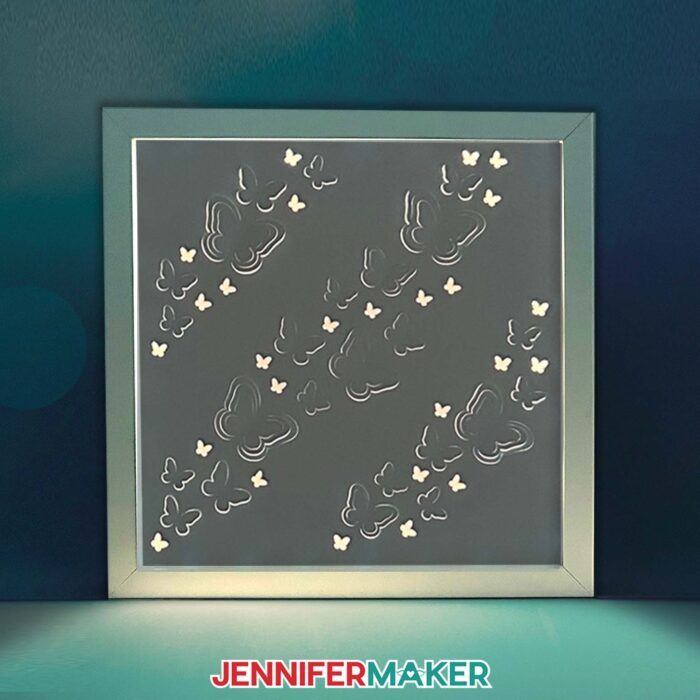
Here is what my finished Backlit Shadow Box looks like.
Use the remote to turn the lights on for a beautiful display!
Notes
Finished size:
Designs: 10" x 10"
In Shadow Box: 11"W x 11"H x 1.75"D
Answers to Your Questions About Making a Backlit Shadow Box
Q: I want a different design. How do I design my own backlit shadow box?
A: You can learn how to design your own backlit shadow box in my ADVANCE program. Learn more about ADVANCE here!
Q: Can you put LED lights in a shadow box?
A: There are different solutions out there, like lighted shadow boxes and photo frames, but they weren’t exactly what I needed for this project — plus, they can be on the expensive side! That’s why I went the DIY route. Using an unlit shadow box frame and adding my own strip lights was a great option, without the additional cost of buying a pre-lit frame. Using a deep shadow box with a larger interior depth, or sized up to a big shadow box frame? Add more lights! You can also experiment with LED lights with a different color for an even more unique look.
Q: What do I need to make a light up shadow box?
A: The materials and tools you’ll need for your shadow light box are listed above, with links where to find them. If you purchase other materials or lights, just be sure to go with an LED lighting option — regular incandescent or fluorescent bulbs shouldn’t be used with paper as it’s a fire hazard. You’ll also need my backlit shadow box SVG files, which can be downloaded above.
Q: What kind of glue do you use on shadow boxes?
A: For shadow boxes, I typically don’t use liquid glue. And in this project, you don’t need any adhesive at all! But, when you have a layered shadow box, what do you put between layers? I use glue dots! They’re much less messy than craft glue or hot glue, plus they add some wonderful dimension and separation of the shadow box layers.
Q: How do you secure lights in a shadow box?
A: The LED strip lights I used in this project have adhesive built right in! Just peel off the protective backing and your lights are super sticky and able to be easily pressed onto the inside of the shadow box frame. It’s easy to make a brilliant LED lighted presentation with these backlit shadow box designs and the right materials!
Q: Can you cut LED strip lights?
A: The LED strip lights in my materials list are meant to be cut to the perfect length that works for you. Just be sure to cut on the lines with the scissors symbol, and discard the unused portion of lights that are not attached to the battery pack.
Q: Can you share what cardstock to use for a shadow box?
A: Different shadowbox projects call for different weights of paper. For this shadow box, I recommend using white 12″ x 12″ 80 pound cardstock. You can look for it at your local craft retail store, or order it through the link in my materials list. You can also mix it up with foil cardstock for metal finishes!
Q: Can light shine through cardstock?
A: Heavier weights of cardstock will block more light. The 80 pound cardstock I used blocks some light, but can still withstand the intricate cuts of the designs in this tutorial. That’s why I added the vinyl — to block more light! Some light still gets through with the vinyl attached, so that’s why I still recommend using the 80 pound over lighter weight cardstock.
Q: Can the design be placed behind the frame’s glass?
A: The cardstock and vinyl design shouldn’t be placed behind the glass, because the glass will squash the raised three-dimensional parts. The design cannot be placed further back in the shadow box to make room for the glass in front, either, because then there wouldn’t be enough room for the lights! To protect the design, simply keep it away from water and gently dust it off from time to time.
Q: How do you make a shadow box for beginners? Do you have any other light-up shadow box projects I can make?
A: Making shadowboxes is fun and easy — perfect for beginners! Check these out:
- Light Painting Shadow Box
- Light-Up Shadow Box Ornaments
- Paper Cut Light Box
- Winter Light-Up Shadow Box
- Heart Shaped Lighted Shadow Box
- Winter Farm Shadow Box
- Lighted Snowflake Shadow Box
Q: Where can I display my paper shadow box?
A: I recommend you display your backlit shadow box in indoor locations away from water or curious little hands! Since the front is not protected by glass, be sure to display it away from anywhere it can get splashed or exposed to a lot of humidity.
Get my free SVG files to create a backlit shadow box!
I love seeing what you make with my designs and how you use them! Please share a photo of your backlit shadow box in our Facebook group or tag me on social media with #jennifermaker.
Love,

Want to remember this? Save this Backlit Shadow Box Tutorial to your favorite Pinterest Board!