
Share the love!
![]()
Well hello there, ADVANCE member! You have special access to these Merry Maker Mingle projects in ADVANCE, including an exclusive design workshop and cheatsheet, just for you. You can also just click here to get your design files for these projects quick and easy!
You are welcome to use the information below, but please keep in mind that this page all refers to the free public versions of our gifts — your design workshops appear in your member area as they are released early for you here.
Get early access to the supply and tool lists for many of our planned projects during the 2025 Merry Maker Mingle.
Please note that these projects may change entirely, may be swapped out, or may have their supplies and tools changed or updated, so please use this as a general guide only. When we feel confident about what we’re making each day, the links below leads to an Amazon shopping list and a preview of the project, supplies, and tools so you can see the items we used to create each project. Note that each project’s list can be printed independently if you find that useful — just click the “Print” button on each list! This post contains some affiliate links for your convenience (which means if you make a purchase after clicking a link I will earn a small commission but it won’t cost you a penny more)! Read my full disclosure policy.
Note: This page is a work in progress, and will remain so as we progress through the event. Please keep checking back for the latest and greatest!
Merry Maker Mingle 2025 is a FREE event — the design files do not expire or go on sale later, and all videos remain free to watch forever, just like all previous years of this event. What is different this year, however, is that we’re offering a new VIP Pass that gives you perks over and above anything we’ve ever offered, specifically you get access to an exclusive companion video with me in my studio (so we can craft, bake, wrap, or just enjoy the holidays together), a printable Merry Maker Mingle Quickstart Guide, a VIP dashboard that gives you easier and faster access to all of the project videos, files, and instructions, and a 50% off coupon good for any JenniferMaker e-book, course, or workshop until December 25th, 2025… plus some other goodies, yet to be announced. You will have the opportunity purchase a VIP Pass after you sign up, but please note that there is NO pressure whatsoever to get a VIP Pass, and you can enjoy the event without it. The VIP Pass is intended for those who want extra goodies and easier access! Our philosophy is to give extra and never take anything away. There is no pressure whatsoever to get a VIP Pass.
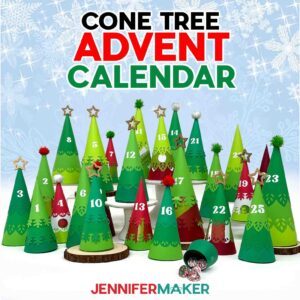
 Day 1: Cone Tree Advent Calendar
Amazon Shopping List
Techniques: How to plan a large project, cutting various cardstocks, creating consistent shapes, and decorating with embellishments.
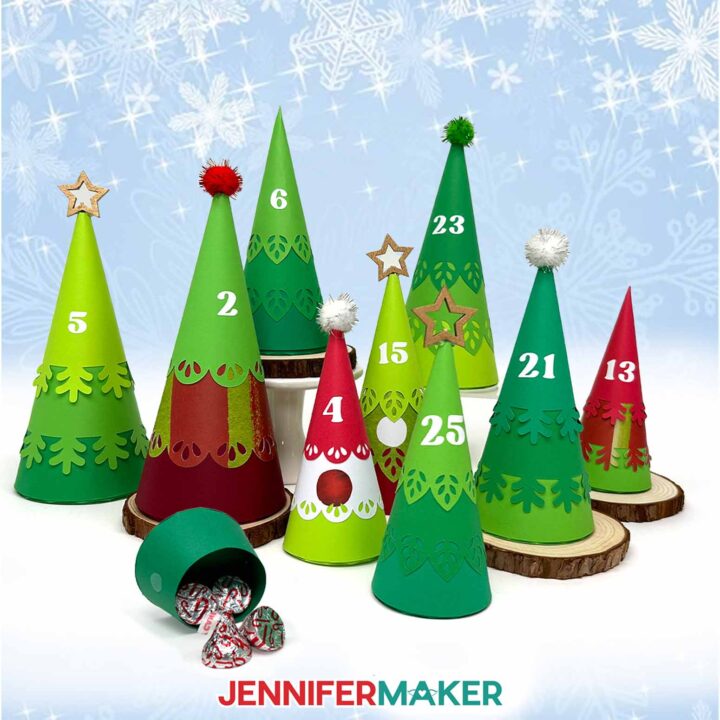
PREVIEW: Minimalist Tree Advent Calendar
Learn how to make a cute and easy minimalist tree advent calendar with cardstock cone trees!
Materials
- About Sixty (60) Sheets of 8.5” x 11” 65 lb. Cardstock (any colors) - I used Recollections Feathered Greens -OR-
- 12" x 12" Green Palette Cardstock
- -AND-
- Recollections 8.5" x 11" 65 lb. Shades of Red Cardstock -OR-
- 12" x 12" Red Palette Cardstock -OR-
- 12" x 12" Cardstock (in various colors)
- -AND-
- Whaline 11.8" x 11.8" Christmas Pattern Cardstock
- Permanent Vinyl (I used White Cricut Value Vinyl)
- StandardGrip Transfer Tape
- Twenty-Five (25) 2cm Pom Poms (optional for tops of trees) -OR-
- Twenty-Five (25) Star Bamboo Picks (optional for tops of trees)
- Fifty (50) Sets of 3/8" Clear Hook and Loop Dots (optional to attach the tree top to the base)
- Design #771 (My free SVG/PDF/DXF design files are available in my free resource library - get the password by filling out the form at the bottom of this page)
Tools
- A way to cut your materials - I’m using the Cricut Maker 4, but you can use any Maker series machine, an Explore series machine, the Venture, the Joy Xtra, or the Joy for the small trees
- Cricut Green StandardGrip Machine Mat 12" x 12"
- Brayer
- Spatula
- Scraper
- Weeding Tool
- Reverse-Action Tweezers -AND-
- Clothes Pins (optional for holding pieces while gluing)
- Scissors
- Craft Glue (I used Bearly Art Precision Glue)
- Hot Glue Gun and Glue Sticks (optional for attaching the pom poms and stars)
- Silicone Finger Protectors (optional for use with hot glue)
- Scoring Stylus (optional for files with score lines) -OR-
- Single Scoring Wheel (optional for files with score lines)
- Wire Cutters (optional for cutting bamboo picks)
- Cricut Pen or Other Cylindrical Object (optional for curving cardstock before gluing) -OR-
- Bone Folder (optional for curving cardstock before gluing)
- Pencil (optional for marking vinyl placement) -AND-
- Measuring Tape or Ruler
Instructions
This project's instructions are now available at https://jennifermaker.com/minimalist-tree-advent-calendar/.
VIP Passholders had early access to this project in the VIP dashboard. Get a VIP Pass here.
ADVANCE members also had early access to this project in the member dashboard along with an exclusive design workshop and cheat sheet!
Notes
Finished Sizes:
Large Tree: Approximately 7.5”H x 3.25”W x 3.25”D
Medium Tree: Approximately 6.5”H x 2.625”W x 2.625”D
Small Tree: Approximately 5.5”H x 2.125”W x 2.125”D
Typeface Used: Margin, Free Alternative: Margin (for personal use only)
Day 2: Gingerbread House Pop-up Card

Amazon Shopping List
Techniques: How to make layered projects align and adhering several cardstock styles including glitter cardstock!
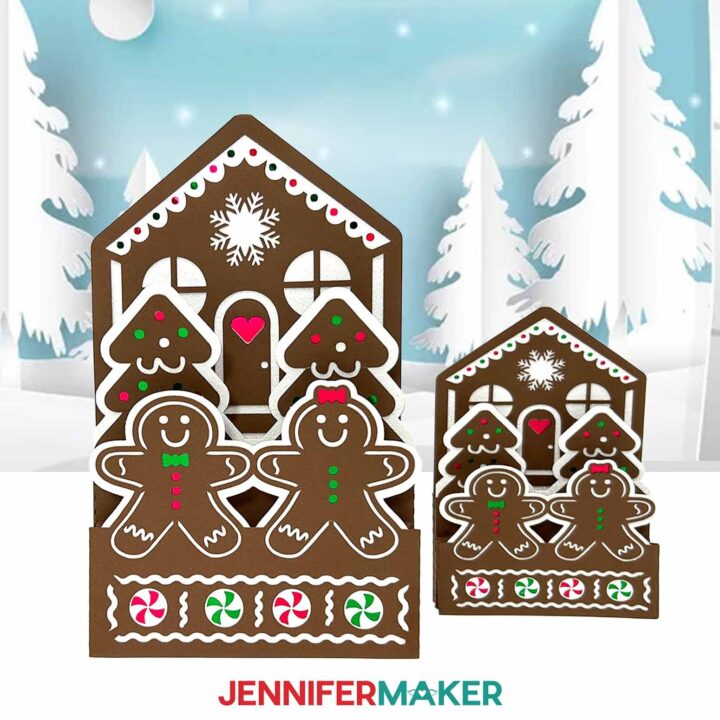
PREVIEW: Gingerbread House Pop-Up Card
Learn how to make a festive gingerbread house pop-up card with colorful cardstock!
Materials
- Two (2) Sheets of 12" x 12" White Glitter Cardstock
- Two (2) Sheets of 12" x 12" 65 lb. Brown Cardstock
- Two (2) Sheets of 12" x 12" Red Foil Cardstock
- Two (2) Sheets of 12" x 12" Green Foil Cardstock
- Design #772 (My free SVG/PDF/DXF design files are available in my free resource library - get the password by filling out the form at the bottom of this page)
Tools
- A way to cut your cardstock (I’m using the Cricut Maker 4, but you can use any Maker series machine, a Cricut Explore Series machine, the Cricut Venture, the Cricut Joy, or the Cricut Joy Xtra)
- Cricut Green StandardGrip Machine Mat 12” x 12”
- Craft Glue (I used Bearly Art Precision Glue)
- Brayer
- Spatula
- Scraper
- Weeding Tool
- Tweezers (optional)
- Scoring Stylus (optional for files with score lines) -OR-
- Single Scoring Wheel (optional for files with score lines)
Instructions
The instructions for this project are now available at https://jennifermaker.com/gingerbread-house-pop-up-card/ !
ADVANCE members had early access to this project in the member dashboard along with an exclusive design workshop and cheat sheet!
Notes
Finished Sizes
Large Card: 5.5" W x 9.2" H x .25" D
Joy Card: 4.2" W x 6.2" H x .25" D
Envelope: 9.75" W x 6.125" H
Font Used:Tingler Print, Free Alternative: Brannboll Stencil
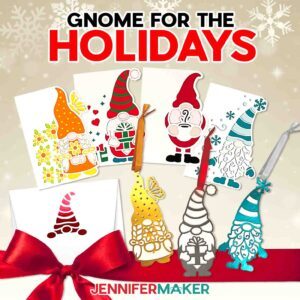
Day 3: Gnome Ornament & Card Gift Set
Amazon Shopping List
Techniques: How to layer papers to make intricate designs more sturdy, and simplifying colors in a design!
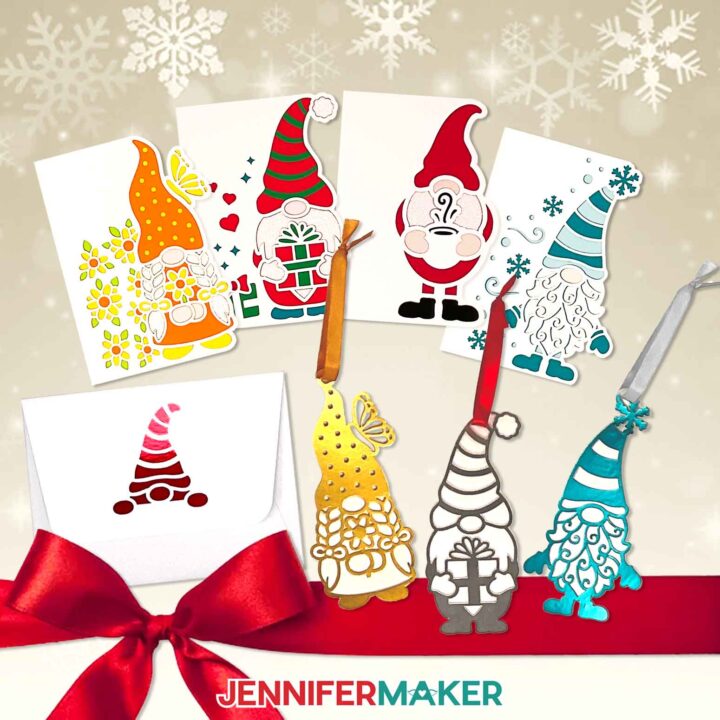
PREVIEW: Gnome Ornament Gift Set
Learn how to make a gnome gift set with an ornament and shaped edge card!
Materials
- One (1) Sheet of 8.5" x 11" or 12" x 12" Metallic Poster Board (for ornament) -OR-
- One (1) Sheet of 8.5" x 11" or 12" x 12" 65 lb. Cardstock (for layered ornament)
- 10" of Ribbon (for ornament)
- One or Two (1-2) Sheets of 8.5" x 11" or 12" x 12" 65 lb. White Cardstock (for side edge card and envelope bases)
- Several Sheets of 8.5" x 11" or 12" x 12" 65 lb. Plain Cardstock (various colors for side edge card liners)
- One (1) Sheet of 8.5" x 11" or 12" x 12" White Glitter Cardstock (optional for side edge card beard liner)
- One (1) Sheet of 8.5" x 11" or 12" x 12" 65 lb. Peach Cardstock (optional for side edge card gnome nose liner)
- One (1) Sheet of 8.5" x 11" or 12" x 12" 65 lb. Metallic Cardstock (optional for envelope liner)
- One (1) Sheet of 12" x 12" 80 lb. White Cardstock (optional for envelope base if you want to make it sturdier)
- Design #711 (My free SVG/PDF/DXF design files are available in my free resource library – get the password by filling out the form at the bottom of this page)
Tools
- A way to cut your materials - I’m using the Cricut Maker 4, but you can also use any Maker series machine, any Explore series machine, the Venture, the Joy, or the Joy Xtra.
- Cricut Green StandardGrip Machine Mat, 12" x 12"
- Scoring Stylus (optional for files with score lines) -OR-
- Single Scoring Wheel (optional for files with score lines)
- Brayer
- Scraper
- Bearly Art Precision Craft Glue
- Scissors
- Weeding Tool (optional for popping out small cutouts from intricate areas)
- Spatula
Instructions
The instructions for this project are now available at https://jennifermaker.com/gnome-gift-set/
ADVANCE members had early access to this project in the member dashboard along with an exclusive design workshop and cheat sheet!
Notes
Finished Sizes:
Side Edge Cards (full size): 5" x 7" when folded
Side Edge Cards (Joy size): 4" x 6" when folded
Ornaments: Approximately 3" x 6"
A7 Envelope (for 5" x 7" cards): 7.25" x 5.25"
A6 Envelope (for 4" x 6" cards): 6.5" x 4.75"
Day 4: Snow Globe Gift Box
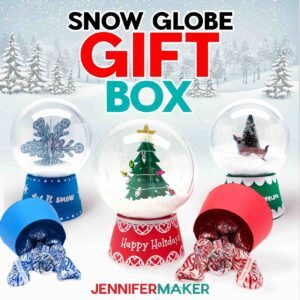 Day 4: Snow Globe Gift Box
Amazon Shopping List
Techniques: How to cut and shape cardstock to hold small items, and decorate inside a round shape to create a snowy scene!
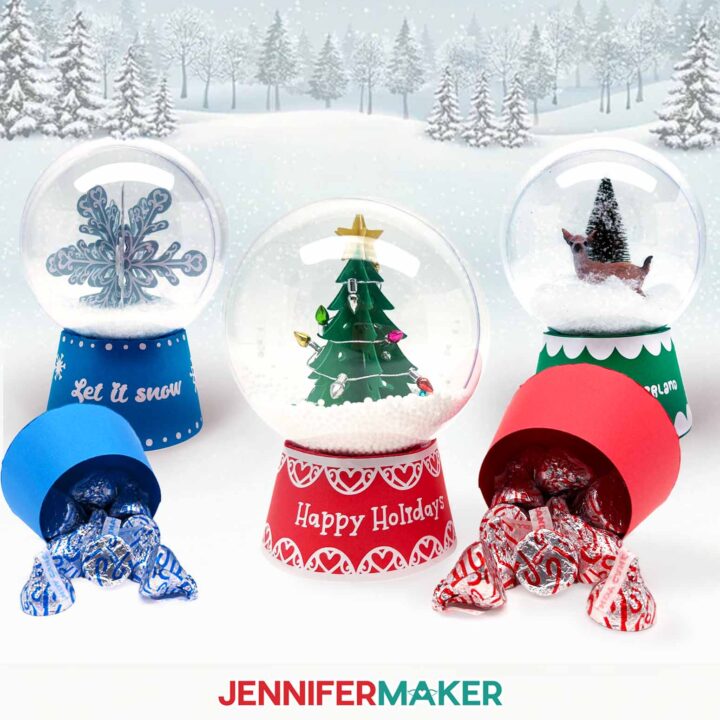
PREVIEW: Snow Globe Gift Box
Learn how to make a DIY Snow Globe Gift Box with a base that can hold small candy or gifts!
Materials
- One (1) 3.94” Clear Fillable Globe Ornament
- Mini Foam Ball Faux Snow -OR-
- Plastic Sparkling Faux Snow
- Two to Four (2-4) Sheets of 8.5" x 11" 65 lb. Cardstock (any colors for gift box base and inner tree decoration)
- One (1) Sheet of 8.5" x 11" 92 lb. Gold Shimmer Cardstock (optional for star on inner tree decoration)
- One (1) Sheet of 8.5" x 11" 92 lb. Light Blue Shimmer Cardstock (for inner snowflake decoration)
- Permanent Vinyl (I used White Cricut Value Vinyl)
- StandardGrip Transfer Tape
- Mini String of Lights (optional to wrap around cardstock or bottle brush tree decorations)
- Mini Bottle Brush Trees (optional to put in globe instead of cardstock decoration)
- Mini Woodland Animal Figures (optional to put in globe instead of cardstock decoration)
- Design #773 (My free SVG/PDF/DXF design files are available in my free resource library - get the password by filling out the form at the bottom of this page)
Tools
- A way to cut your materials - I’m using the Cricut Maker 4, but you can also use any Cricut Maker Series machine, any Cricut Explore Series machine, the Cricut Venture, the Cricut Joy Xtra, or even the Cricut Joy
- Cricut Green StandardGrip Machine Mat 12" x 12"
- Scoring Stylus (optional for files with score lines) -OR-
- Single Scoring Wheel (optional for files with score lines)
- Craft Glue (I used Bearly Art Precision Glue)
- Hot Glue Gun & Glue Sticks
- Small 3/16" Zots Glue Dots
- Brayer
- Spatula
- Scraper
- Weeding Tool
- Tweezers (optional)
- Scissors
- Silicone Finger Protectors (for use with hot glue)
- Painter's Tape (optional for weeding the vinyl designs)
Instructions
The instructions for this project are available at https://jennifermaker.com/snow-globe-gift-box/ !
ADVANCE members had to access the project early in their Member area, along with an exclusive design workshop and cheat sheet! Learn more about Advance here!
Day 5: DIY Cookie Stencils
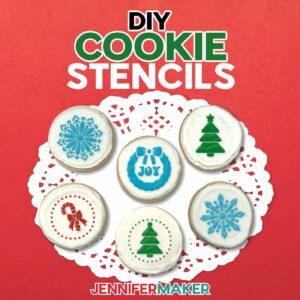 Day 5: DIY Cookie Stencils
Amazon Shopping List
Techniques: How to cut food-safe mylar and use a cookie stencil to add detailed, colorful designs to homemade or store bought cookies!
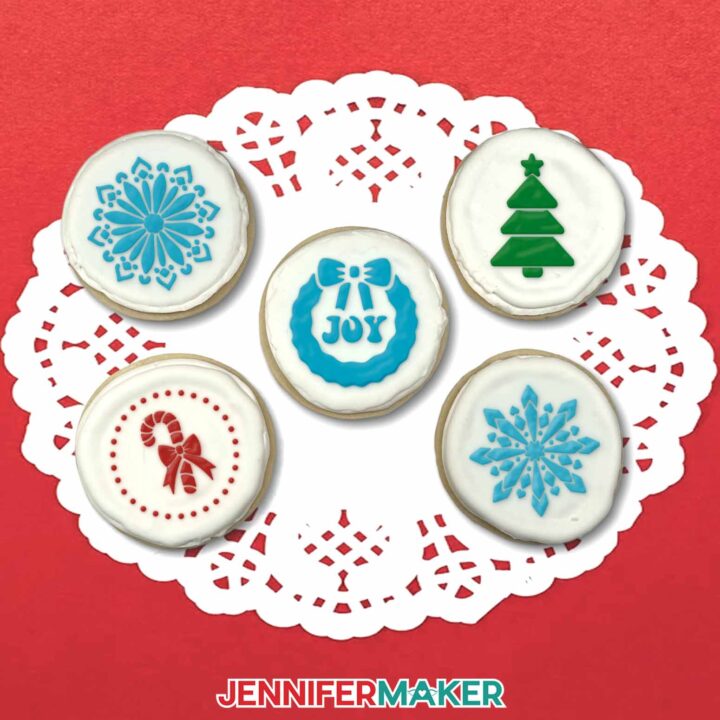
PREVIEW: Cookie Stencils
Learn how to make cookie stencils and decorate cookies with royal icing!
Materials
- One-Two (1-2) 12” x 12” Food-Safe 4 Mil Mylar Blank Stencil Sheets
- Two (2) 16 oz. Packages of Royal Icing Mix
- Twelve (12) Premade 3” Round, Flat-Top Sugar Cookies -OR-
- Twelve (12) Homemade 3” Round, Flat-Top Sugar Cookies
- Quart Storage Plastic Zipper Bags
- Liquid Food Coloring
- Paper Towel
- Design #774 (My free SVG/PDF/DXF design files are available in my free resource library - get the password by filling out the form at the bottom of this page)
Tools
- A way to cut your mylar - I’m using the Cricut Maker 4, but you can use any Cricut Maker Series machine, a Cricut Explore Series machine, the Cricut Venture, or the Cricut Joy Xtra
- Cricut Green StandardGrip Machine Mat 12" x 12"
- 6" x 6" Magnetic Cookie Stencil Holder
- Brayer
- Crafting Spatula
- Crafting Scraper
- Weeding Tool
- Tweezers (Optional)
- Icing Scraper
- Handheld Electric Mixer
- Mixing Bowls
- Silicone Kitchen Spatula
- Rolling Pin (for uniform cookie height if making cookies at home)
- Cookie Sheet
- Tall glass
- Toothpick
- Chip Clips
Instructions
The instructions for this project are now available at https://jennifermaker.com/cookie-stencils
ADVANCE members, you will be able to access the project early in your Member area, along with an exclusive design workshop and cheat sheet!
Notes
Typefaces used: JM GroovyStencil Finished Size: 5.
5” H x 5.5” W
Care Instructions: Rinse in warm water after use, and pat completely dry between paper towels before reusing. Avoid scrubbing, as this may damage the stencil’s surface.
Day 6: 3D Acetate Christmas Ornament
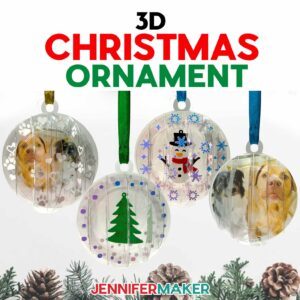 Day 6: 3D Acetate Christmas Ornament
Amazon Shopping List
Techniques: How to cut and assemble clear acetate structures!
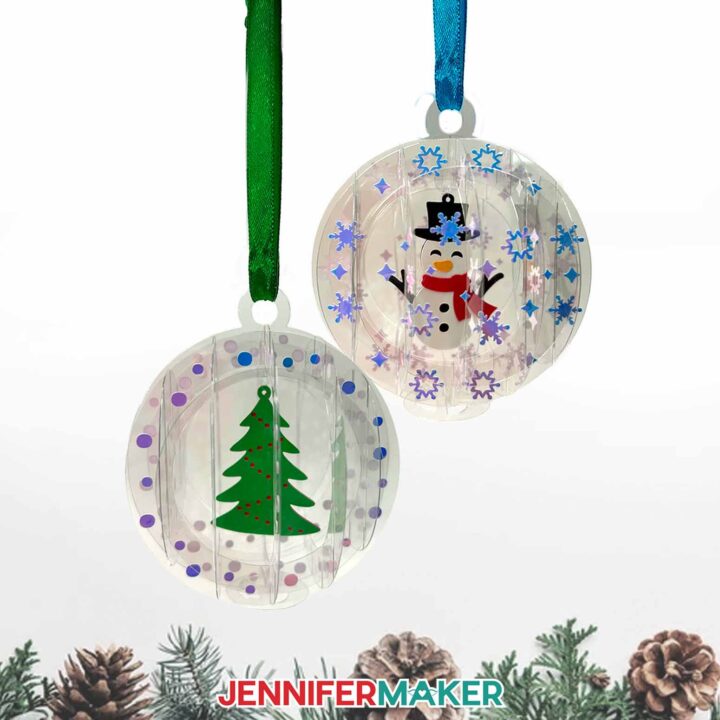
PREVIEW: 3D Christmas Ornament
Learn to make a 3D Christmas Ornament out of acetate with a Cricut!
Materials
- Two to Four (2-4) Sheets of 8.5" x 11" 65 lb. Cardstock
- One (1) Sheet of 12" x 12" Clear Acetate -OR-
- Two (2) Sheets of 8.5" x 11" Colored Acetate
- Permanent Vinyl - I used Cricut Blue Holographic Vinyl
- Cricut StandardGrip Transfer Tape
- 3" to 4" of Clear Nylon Cord (for hanging tree or snowman decoration inside ornament)
- 10" of Ribbon (for hanging ornament)
- Paper Towel (optional for wiping away glue)
- Design #775 (My free SVG/PDF/DXF design files are available in my free resource library - get the password by filling out the form at the bottom of this page)
Tools
- A way to cut your materials - I’m using the Cricut Maker 4, but you can also use a Cricut Maker Series machine, a Cricut Explore Series machine, the Cricut Venture, the Cricut Joy Xtra, or the Cricut Joy.
- Cricut Green StandardGrip Machine Mat 12" x 12"
- Cricut Purple StrongGrip Machine Mat 12" x 12" (optional for acetate)
- Brayer
- Scraper
- Spatula
- Weeding Tool
- Tweezers
- Scissors
- Craft Glue (I used Bearly Art Precision Craft Glue)
- Small 3/16” Zots Glue Dots
- Isopropyl Alcohol -AND-
- Lint-Free Cloth (optional for cleaning fingerprints off of acetate)
- Paper Trimmer (optional for Cricut Joy users)
Instructions
The instructions for this project ware now available at https://jennifermaker.com/3d-christmas-ornament/ !
ADVANCE members had access the project early in their Member area, along with an exclusive design workshop and cheat sheet!
Notes
Finished ornament size: 3.5" x 3.5" Care instructions: Gently wipe the ornament clean with a lint-free cloth as needed.
Day 7: How To Make A Junk Journal
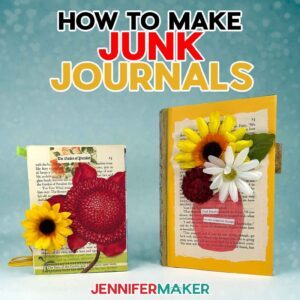 Day 7: How To Make A Junk Journal
Amazon Shopping List
Techniques: How to make junk journals two ways with or without a cutting machine and why they’re such a fun way to use your scraps!
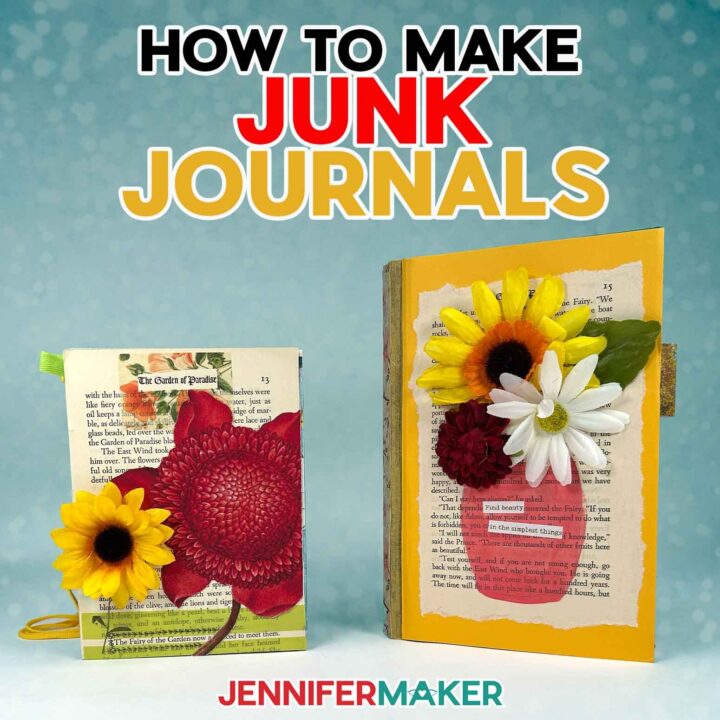
PREVIEW: Make Junk Journals
Learn how to make junk journals in two ways!
Materials
- Three to Six (3-6) Sheets of 8.5” x 11” or 12" x 12" 65 lb. Solid Core White Cardstock
- Canon Double Sided Matte Photo Paper -OR-
- 5.5” x 8.5” Sketch Book with heavy duty pages
- Scotch Wrinkle-Free Glue Sticks
- Scrap Cardstock, Old Magazines, or Books
- Floral Washi Tape
- Washi Stickers
- Pressed Flower Stickers
- Word Stickers
- Washi Tape
- Acrylic Markers
- Black Fineliner Drawing Pens
- Ribbon
- Design #743 (My free SVG/PDF/DXF design files are available in my free resource library - get the password by filling out the form at the bottom of this page)
Tools
- Color Printer - I used my Epson EcoTank ET-4700 Inkjet Printer
- A way to cut your material - I’m using the Cricut Maker 4, but you can also use a Maker, Explore, Venture, Joy, or Joy Xtra.
- Cricut Green StandardGrip Machine Mat 12" x 12"
- Cricut Blue LightGrip Machine Mat 12" x 12" (optional for delicate pieces)
- Scoring Stylus -OR-
- Single Scoring Wheel (optional for files with score lines)
- Brayer
- Scissors
- Scraper
Instructions
The instructions for this project are now available at https://jennifermaker.com/make-junk-journals/
Day 8: Easy DIY Gift Boxes
 Day 8: Easy DIY Gift Boxes
Amazon Shopping List
Techniques: How to make cute, sturdy paper boxes for different uses and combining cardstock with acetate to create windows!
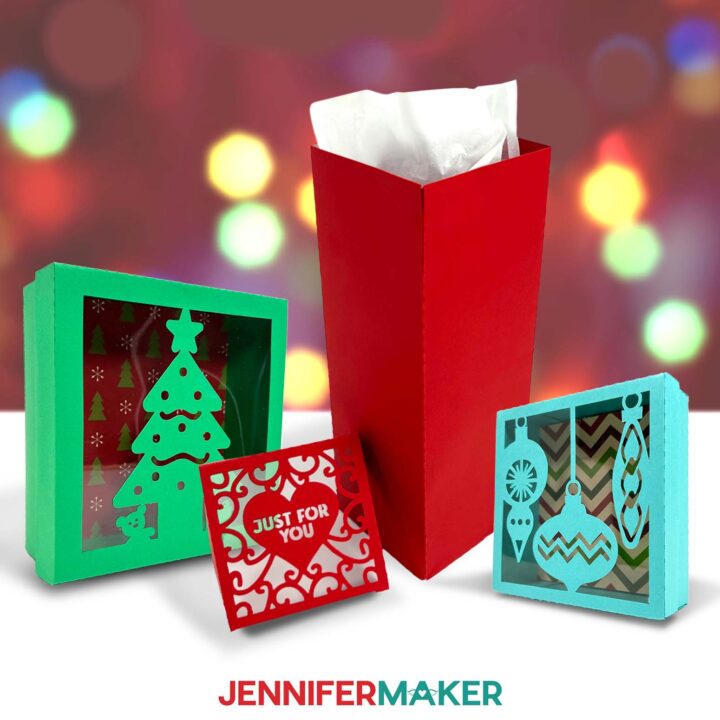
PREVIEW: Easy DIY Gift Boxes
Learn how to make easy DIY gift boxes with acetate windows!
Materials
- Three (3) Sheets of 12" x 12" Teal 65 lb. Cardstock -OR-
- Three (3) Sheets of 12" x 18" Green 65 lb. Cardstock (for the large tree box) -OR-
- Three (3) Sheets of 12" x 12" Red 65 lb. Cardstock
- One (1) Sheet of 12" x 12" Clear Plastic Acetate
- One (1) Sheet of 12" x 12" Brown 30 pt Chipboard
- One (1) Sheet of 11" x 11" Christmas Patterned Paper -OR-
- One (1) Sheet of 12" x 12" Red Metallic Foil Cardstock -OR-
- One (1) Sheet of 12" x 12" White Glitter Cardstock
- Design #776 (My free SVG/PDF/DXF design files are available in my free resource library - get the password by filling out the form at the bottom of this page)
Tools
- A way to cut your materials - I’m using the Cricut Maker 4, but you can use any Cricut Maker Series machine, any Cricut Explore Series machine, the Cricut Venture, or the Cricut Joy Xtra
- Cricut Green StandardGrip Machine Mat 12” x 12”
- Cricut Purple StrongGrip Machine Mat 12” x 12” (for the chipboard)
- Cricut Green StandardGrip Machine Mat 12” x 24” (if making the large tree box)
- Cricut Deep-Point Blade & Housing (for the chipboard)
- Brayer
- Spatula
- Scraper
- Weeding Tool
- Tweezers (optional)
- Craft Glue (I used Bearly Art Precision Glue)
- Scoring Stylus (optional for files with score lines) -OR-
- Single Scoring Wheel (optional for files with score lines)
- Bone Folder (optional)
Instructions
The instructions for this project are now available at https://jennifermaker.com/easy-diy-gift-boxes/ !
ADVANCE members, you are be able to access the project early in your Member area, along with an exclusive design workshop and cheat sheet!
Day 9: Engraving Acrylic Ornaments
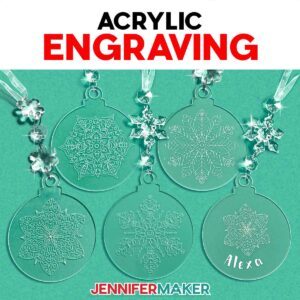 Day 9: Engraving Acrylic Ornaments
Amazon Shopping List
Techniques: How to prepare, position, and engrave acrylic blanks with your Cricut Maker or another machine with engraving capabilities and adding color to make designs pop!
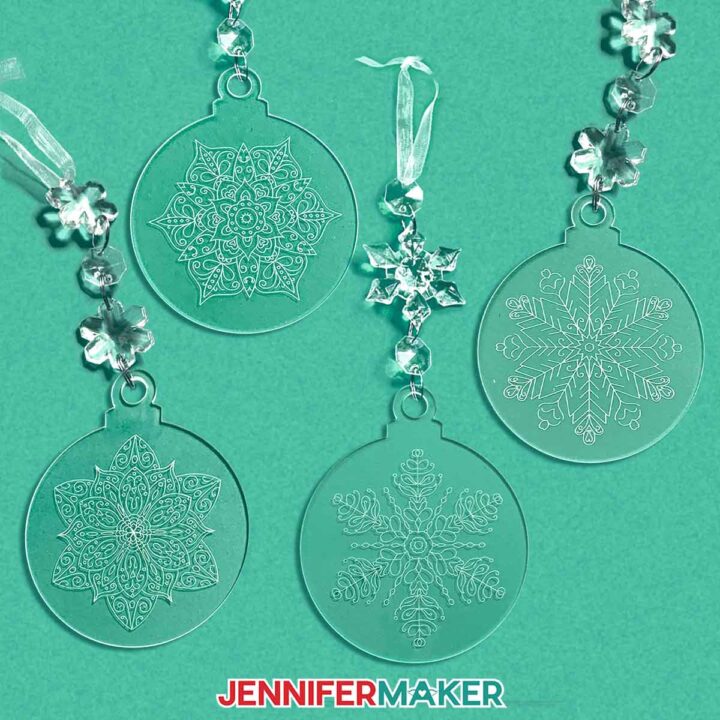
PREVIEW: Acrylic Ornament Engraving
Learn how to make holiday ornaments with acrylic engraving on a Cricut!
Materials
- 3” Round Clear Acrylic Ornaments (2mm thick) -OR-
- 3” Ornament-Shaped Clear Acrylic Ornaments (2mm thick, with decorative charms) -OR-
- 4" Light-Up LED Acrylic Ornaments (optional for a light-up ornament)
- Rub n Buff (optional) and
- Disposable Gloves (optional)
- Paper towels (optional)
- Design #777 (My free SVG/PDF/DXF design files will become available on 12/5/25)
Tools
- A way to engrave your acrylic - I’m using the Cricut Maker 4, but you can also use any of the Maker series machines
- Cricut Purple StrongGrip Machine Mat 12” x 12”
- Cricut Engraving Tip and QuickSwap Housing
- Masking or Painter’s Tape
- Lint-Free Cloth -AND-
- Isopropyl Alcohol (optional, for cleaning the acrylic)
- Alcohol-Free Baby Wipe (optional, for cleaning the machine mat)
- Measuring Tape or Ruler (optional, for measuring your ornament)
Instructions
The instructions for this project are now available at https://jennifermaker.com/acrylic-ornament-engraving/ !
Notes
Finished ornament size: 3” round
Care: Wipe clean with a dry, lint-free cloth. Use isopropyl alcohol for stubborn debris.
Day 10: Making Gifts With Canva
 Day 10: Making Gifts With Canva
Amazon Shopping List
Techniques: How to use Canva’s free tools and shopping features to make custom gifts fast using your own images and designs!
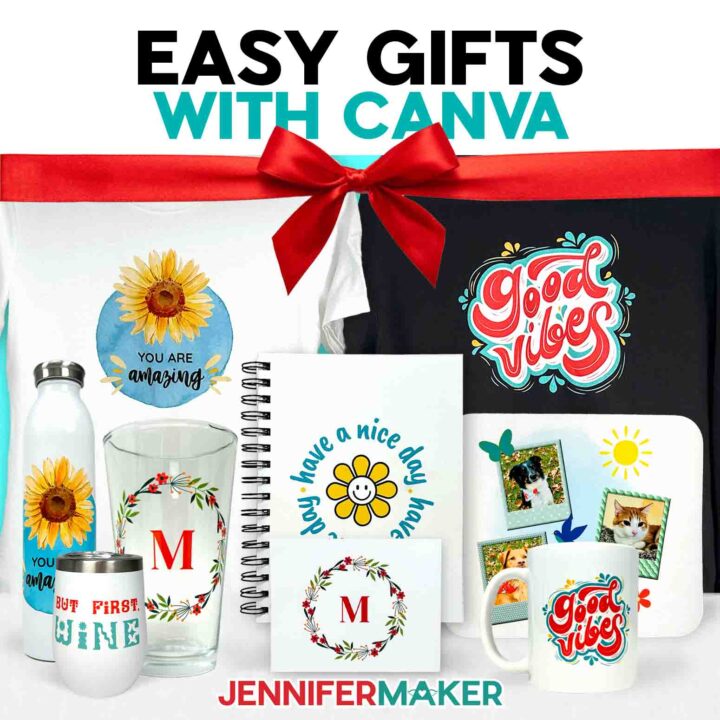
PREVIEW: Canva Gifts
Learn how to make gifts in Canva!
Materials
- #7 Extra Large 14.5” x 19” Poly Bubble Mailers (optional, for shipping)
- #2 Medium 8.5” x 12” Poly Bubble Mailers (optional, for shipping)
- 6” x 6” x 6” Corrugated Cardboard Boxes (optional, for shipping mugs and wine tumblers)
- 12” x 4” x 4” Corrugated Cardboard Boxes (optional, for shipping water bottles)
- 8” x 4” x 4” Corrugated Cardboard Boxes (optional, for shipping pint glasses)
- Shirt Boxes (optional, for T-shirts, tote bags)
- Extra-Large Shirt Boxes (optional, for hoodies)
- Assorted Holiday Gift Boxes with Lids (optional)
- 5” x 7” Envelopes (if you order notecards without envelopes)
- Fineliner Pens (optional, to gift with notebooks)
- Water Bottle Cleaning Tablets (optional, to gift with water bottles)
- Tea Sampler Gift Box (optional, to gift with mugs)
- Cup Lid Cleaning Brush (optional, to gift with wine tumblers)
- Design #778 (My free PNG design files are available in my free resource library - get the password by filling out the form at the bottom of this page)
Tools
Instructions
The instructions for this project are now available at https://jennifermaker.com/canva-gifts/.
ADVANCE members have access the project early in your Member area, along with an exclusive design workshop and cheat sheet!
Notes
Canva Typefaces: Caveat Brush ("Have a Nice Day") Quicksand ("You Are Amazing") Better Together Script ("You Are Amazing") DM Serif Display (monogram)
Day 11: Sublimation Charcuterie Boards
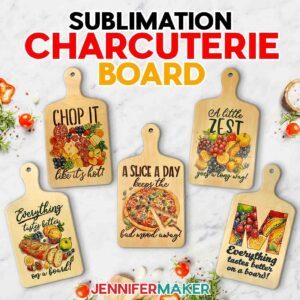 Day 11: Sublimation Charcuterie Boards
Amazon Shopping List
Techniques: How to size designs using Google Docs and sublimate on wood!
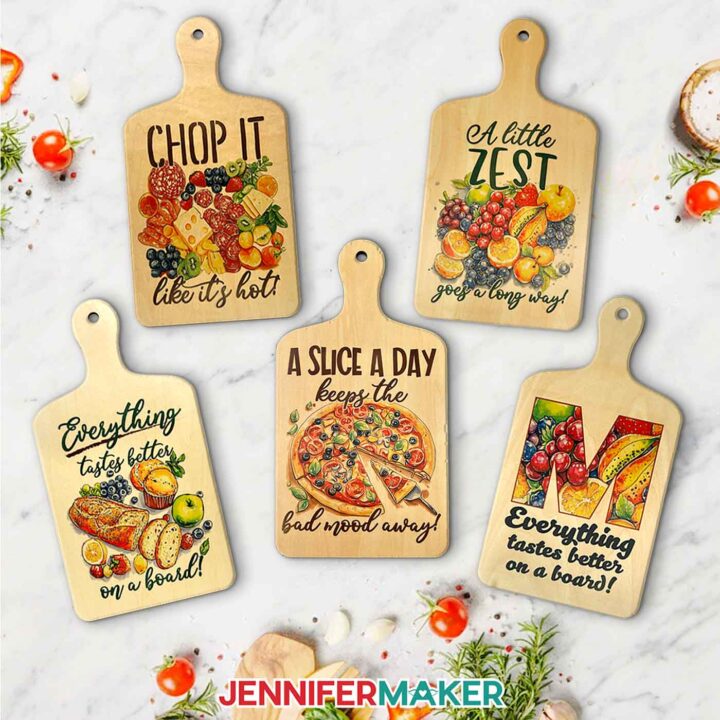
PREVIEW: Sublimation Charcuterie Board
Learn how to make a sublimation charcuterie board!
Materials
- One (1) Plywood Sublimation Cutting Board 11.8" x 6.3" -OR-
- One (1) Plywood Sublimation Cutting Board 9" x 5.5"
- One (1) Sheet of 8.5” x 11” A-Sub Sublimation Paper 125g
- White Uncoated Butcher Paper
- 12" x 12" White Cardstock
- Design #779 (My free PNG design files are available in my free resource library - get the password by filling out the form at the bottom of this page)
Tools
- Sublimation Printer - I used a converted Epson EcoTank ET-2800 Printer
- Sublimation Ink
- Heat Press - I used the 12” x 10” Cricut EasyPress 3
- Cricut EasyPress Mat
- Fan (for ventilation)
- Heat-Resistant Gloves
- Heat-Resistant Tape
- Measuring Tape
- Lint Roller
- Scissors or Paper Trimmer
Instructions
The instructions for this project are now available at https://jennifermaker.com/sublimation-charcuterie-board/.
ADVANCE members can access the project early in your Member area, along with an exclusive design workshop and cheat sheet!
Notes
Print Sizes: Done-For-You Designs: 5.75” W x 7.25” HBlank Sizes:6.3" x 11.8":Sublimation Area Without Handle: 6.25” W x 7.75” HFull Size With Handle: 6.25” W x 11.875” H
5.5" x 9":Sublimation Area Without Handle: 5.5” W x 6.25” HFull Size With Handle: 5.5” W x 9” HFonts Used:
Biosha ScriptFree Alternative: Bonspire Script
Wonderful Display FontFree Alternative: Bestoom
Pantry - Farmhouse StencilFree Alternative: Solid Stencil 2023
Care:To wash, use warm water, mild soap, and a soft cloth. Allow to air dry.
Day 12: Punch Needle for Beginners
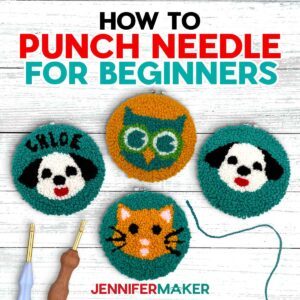 Day 12: Punch Needle for Beginners
Amazon Shopping List
Techniques: How to draw your design with or without a Cricut on your punch needle fabric and tips to make the best loops on detailed and filled-in areas for consistent results!
PREVIEW: How to Punch Needle for Beginners
Learn how to punch needle for beginners with this cute craft featuring adorable animals!
Materials
- One (1) 5.0mm Adjustable Length Punch Needle
- One (1) Extra Long Punch Needle Threader
- One (1) 7.5" Plastic Hoop (for punching)
- One (1) 6" Round Hoop (for display)
- 10" x 10" Monk's Cloth (Natural, Unlined)
- Yarn Variety Pack - Medium Weight #4 Worsted
- OPTIONAL: Gold Yarn - Medium Weight #4 Worsted
- OPTIONAL: Pink Yarn - Medium Weight #4 Worsted
- Design #780 (My free SVG/PDF/DXF design files are available in my free resource library - get the password by filling out the form at the bottom of this page)
Tools
- A way to draw your design on your fabric - I’m using the Cricut Maker 4, but you can use any Cricut Maker Series machine, a Cricut Explore Series machine, or the Cricut Venture
- 12” x 12” Cricut Pink FabricGrip Machine Mat
- 1.0 Cricut Medium Point Marker
- Painter’s Tape
- Ruler or Tape Measure
- Scissors
- Yarn Needle (for finishing the back and cleaning up stitches on the front)
- OPTIONAL: Weeding Tool (for cleaning up stitches on the front)
Instructions
The instructions for this project are now available at https://jennifermaker.com/how-to-punch-needle-for-beginners/.
ADVANCE members, you will be able to access the project early in your Member area, along with an exclusive design workshop and cheat sheet!
Notes
Design Size: 6" x 6"
Finished Size: Displayed in a 6" Embroidery Hoop
Care: Light dusting while on display. If needed, punched fabric can be carefully washed by hand in lukewarm water and laid flat to dry.
Approximate Amount of Yarn Used Per Project:
OWL - 43 yards Golden Yellow - 22 yardsTeal- 14 yardsGreen - 3 yardsWhite - 4 yards
CAT - 42 yardsTeal- 22 yardsRed- 1 yardBlack - 5 yardsPink- 2 yardsOrange - 12 yards
DOG - 44 yardsWhite - 11 yardsBlack - 8 yardsRed- 1 yardTeal- 24 yards
Day 13: Interchangeable Greeting Card Hanger
 Day 13: Interchangeable Greeting Card Hanger
Amazon Shopping List
Techniques: How to paint wood for different finished and apply vinyl on swappable boards!
PREVIEW: Interchangeable Ribbon Greeting Card Hanger
Learn how to make an interchangeable ribbon greeting card hanger for your favorite cards, postcards, and photos!
Materials
- Five (5) 4" x 12" 2mm Wood Panels -OR-
- Five (5) 4” x 12” 3mm Wood Panels
- Twenty (20) Adhesive Magnets -OR-
- Command Strips
- 11" of Jute Twine
- 144" of 5/8" White Ribbon
- Mini White Clothes Pins
- White Permanent Value Vinyl
- Red Permanent Value Vinyl
- Green Permanent Value Vinyl
- Yellow Permanent Value Vinyl -OR-
- Yellow Premium Permanent Vinyl
- Cricut StandardGrip Transfer Tape
- Chalk Paint - White Adirondack
- Chalk Paint - Imperial (Red)
- Chalk Paint - Grotto (Teal)
- Chalk Paint - Java (Brown)
- Matte Mod Podge
- Design #781 (My free SVG/PDF/DXF design files are available in my free resource library - get the password by filling out the form at the bottom of this page)
Tools
- A way to cut your vinyl - I’m using the Cricut Maker 4, but you can use any Cricut Maker Series machine, a Cricut Explore Series machine, the Cricut Venture, the Cricut Joy, or the Cricut Joy Xtra
- Cricut Green StandardGrip Machine Mat 12" x 12”
- Brayer
- Weeding Tool
- Scraper
- Scissors -OR-
- Paper Trimmer
- Measuring Tape
- Pencil
- 1” Foam Paint Brushes
- Hot Glue Gun & Glue Sticks
- Silicone Finger Protectors
- Butcher Paper (to cover work area for painting)
- Baby Wipes (for faux staining)
- Stop Fraying Fabric Glue (optional)
- Lint Roller (to clean the wood panels before painting)
Instructions
The instructions for this project are now available at https://jennifermaker.com/interchangeable-ribbon-greeting-card-hanger/.
ADVANCE members are be able to access the project early in your Member area, along with an exclusive design workshop and cheat sheet!
Notes
Finished size: 12” x 4” Fonts used:Hattie / Free Alternative: MillarisGoldie Rainbow / Free Alternative: Goldie RainbowGirl Talk / Free Alternative: Peanut ButterFarm Dream / Free Alternative: Hello Beautiful AngelAmastery Hand / Free Alternative: FarmhouseAmastery Script / Free Alternative: AmarilloSweetie Almeera / Free Alternative: Sweetie Anabela
Day 14: Pressed Flower Vinyl Bookmarks
 Day 14: Pressed Flower Vinyl Bookmarks
Amazon Shopping List
Techniques: How to compose scenes of layered dried flowers inside clear vinyl, cutting layered vinyl into different shapes, and adding tassel holes to bookmarks!
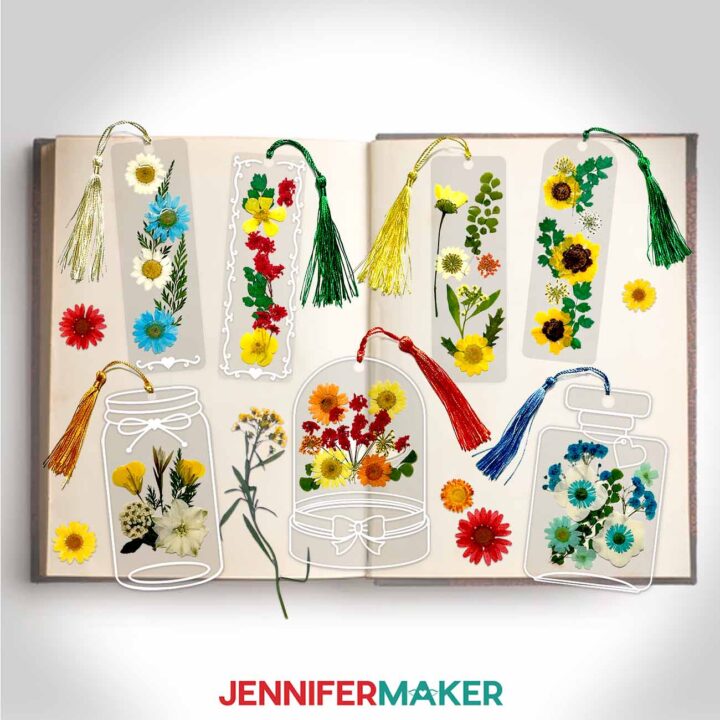
PREVIEW: Pressed Flower Bookmarks
Learn how to create Pressed Flower Bookmarks from lamination pouches, vinyl, and real flowers!
Materials
- One (1) Thermal Laminating Pouch
- Assorted Yellow Dried Pressed Flowers -OR-
- Assorted White Dried Pressed Flowers -OR-
- Assorted Blue Dried Pressed Flowers
- Mini Tassels
- White Cricut Value Permanent Vinyl
- StandardGrip Transfer Tape
- Design #782 (My free SVG/PDF/DXF design files are available in my free resource library - get the password by filling out the form at the bottom of this page)
Tools
- A way to cut your material - I’m using the Cricut Maker 4, but you can also use a Cricut Maker Series machine, a Cricut Explore Series machine, the Cricut Venture, the Cricut Joy Xtra, or the Cricut Joy.
- Cricut Green StandardGrip Machine Mat 12" x 12"
- Laminator
- Scissors
- Scraper
- Spatula
- Weeding Tool
- Tweezers (optional)
- Parchment Paper
- Painter’s Tape
- Heat-Resistant Tape
Instructions
The instructions for this project are now available at https://jennifermaker.com/pressed-flower-bookmarks/.
Notes
Finished bookmark sizes: Circle: 3.94” x 4.72” Cloche: 3.59” x 5.42” Flacon: 3.63” x 5.53” Heart Swirl: 2” x 6” Mason Jar: 2.86” x 5.2” Rectangular: 2” x 6” Rounded: 2” x 6” Swirl: 2” x 6” Care: Gently wipe the bookmark clean with a lint-free cloth as needed.
Day 15: Easy Alcohol Ink Ornaments
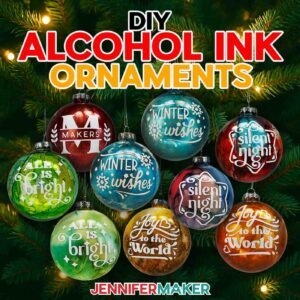 Day 15: Easy Alcohol Ink Ornaments
Amazon Shopping List
Techniques: How to control and mix alcohol ink colors in an orb and use vinyl for contrasting design elements on a rounded surface!
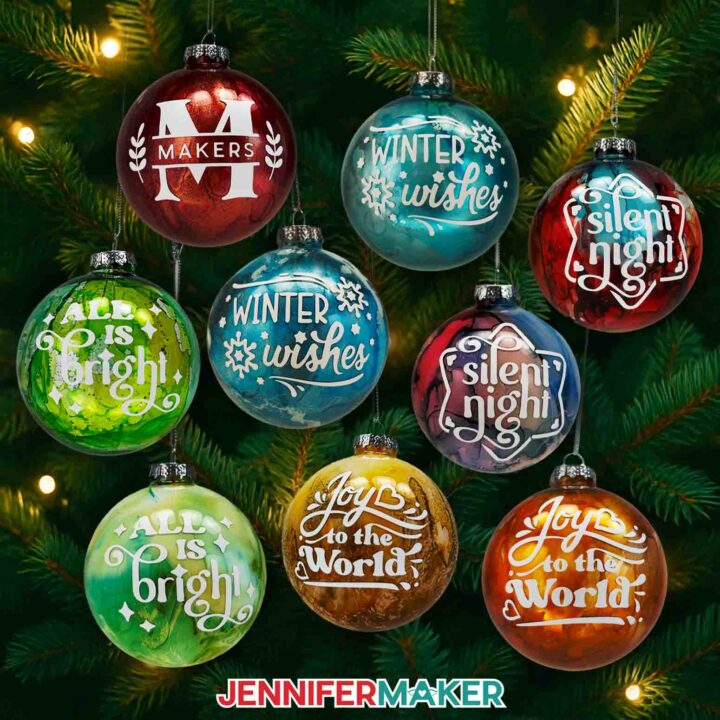
PREVIEW: DIY Alcohol Ink Ornaments
Learn to make one-of-a-kind DIY Alcohol Ink Ornaments with vinyl decals!
Materials
- One (1) 3.15" Clear Ball Ornament
- Alcohol Inks - I used the Tim Holtz Ranger brand Turquoise and Valencia Orange from the “Spring Break” set of colors -AND-
- Tim Holtz Ranger Brand Poppyfield Red Alcohol Ink -AND-
- Tim Holtz Ranger Brand Patina Teal Alcohol Ink -AND-
- Tim Holtz Ranger Brand Botanical Green Alcohol Ink -AND-
- Tim Holtz Ranger Brand Butterscotch Yellow Alcohol Ink -AND-
- Alcohol Ink Metallic Mixatives (optional, I used the Tim Holtz Ranger brand Gold and Silver colors)
- Compressed Air
- White Acrylic Paint with Pump
- Permanent Vinyl - I used White Cricut Value Vinyl
- Cricut StandardGrip Transfer Tape
- Design #783 (My free SVG/PDF/DXF design files are available in my free resource library - get the password by filling out the form at the bottom of this page)
Tools
- A way to cut your vinyl - I’m using the Cricut Maker 4, but you can also use a Cricut Maker Series machine, a Cricut Explore Series machine, the Cricut Venture, the Cricut Joy Xtra, or the Cricut Joy.
- Cricut Green StandardGrip Machine Mat 12" x 12"
- Brayer
- Scissors
- Scraper
- Weeding Tool
- Tweezers
- Pipettes (for dropping ink or water into the ornament)
- Small Paper Cups or Egg Cartons (for holding the ornaments as they dry)
- Isopropyl Alcohol -AND-
- Lint-Free Cloth (for cleaning the ornament)
- Fan (for ventilation)
- Butcher Paper or Newspaper (for protecting work surface when inking)
- Disposable Gloves (for protecting skin when inking)
- Safety Goggles (optional for protecting eyes when inking)
- Apron (optional for protecting clothes when inking)
- Paper Towels (optional for clean up)
- Towel (optional for making the transfer tape less sticky)
Instructions
The instructions for this project are now available at https://jennifermaker.com/diy-alcohol-ink-ornaments/.
Notes
Finished ornament size: 3.15" x 3.15"
Decal dimensions:
“All Is Bright”: 2.56” x 1.88”
“Joy To The World”: 2.32” x 2.09”
“Silent Night”: 2.12” x 2.34”
“Winter Wishes”: 2.58” x 1.87”
Care: Store the ornaments in their original packaging or wrap them with bubble wrap to keep them from breaking. Gently wipe the ornament clean with a lint-free cloth as needed.
Typefaces used:
“All Is Bright”: Margin (free alternative: Margin for personal use only) & Foghe (free alternative: Kaoly)
“Joy To The World”: The Trickster (free alternative: Amertha) & Margin (free alternative: Margin for personal use only)
“Silent Night”: Foghe (free alternative: Kaoly)
“Winter Wishes”: Peachyday (free alternative: JM Sweet) & The Trickster (free alternative: Amertha)
Alcohol ink colors used on set of finished ornaments above:
“All Is Bright”: Patina (teal), Botanical (green), Honeycomb (yellow)
“Joy To The World”: Valencia (orange), Honeycomb (yellow), Gold metallic
“Silent Night”: Turquoise, Poppyfield (red), Valencia (orange)
“Winter Wishes”: Patina (teal), Turquoise, Silver metallic
Day 16: Glowing Village Shadow Box
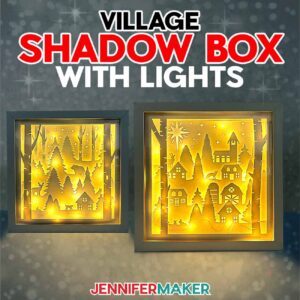 Day 16: Glowing Village Shadow Box
Amazon Shopping List
Techniques: How to strategically light up a shadow box scene!

PREVIEW: Village Shadow Box With Lights
Learn how to make a Village Shadow Box With Lights!
Materials
- 10” x 10” Shadow Box
- Six (6) Sheets of 12” x 12” White 65 lb. Cardstock
- One (1) Sheet of 12” x 12” White Glitter Cardstock
- One (1) Sheet of Copy Paper (optional to protect the white cardstock while using the brayer)
- Two (2) Strands of 7 ft. Long Fairy Lights
- 1/4" Thick Double-Sided Adhesive Foam Tape
- Small 3/16” Clear Zots
- Design #784 (My free SVG/PDF/DXF design files are available in my free resource library - get the password by filling out the form at the bottom of this page)
Tools
- A way to cut your material - I’m using the Cricut Maker 4, but you can also use a Maker series, Cricut Explore Series, or Cricut Venture cutting machine
- Cricut Green StandardGrip Machine Mat 12" x 12”
- Brayer
- Spatula
- Scraper
- Tweezers (optional)
- Craft Knife (optional to cut the shadow box backing) -AND-
- Self-Healing Cutting Mat (optional to cut the shadow box backing) -AND-
- Metal Safety Ruler (optional to cut the shadow box backing)
- Measuring Tape (optional for measuring the inside of the shadow box)
- Isopropyl Alcohol (optional for cleaning the glass on the shadow box) -AND-
- Lint-Free Cloth (optional for cleaning the glass on the shadow box)
- Bearly Art Precision Craft Glue (optional - used to glue cardstock spacer together to make spacers to fill the empty space at the back of the shadow box)
Instructions
The instructions for this project are now available at https://jennifermaker.com/village-shadow-box-with-lights/.
Notes
Finished sizes:
Artwork: 9.5” x 9.5”
Shadow Box: 10” x 10”
Day 17: How To Make Sublimation Shirts
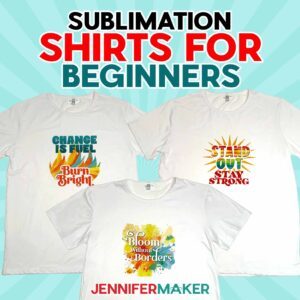 Day 17: How To Make Sublimation Shirts
Amazon Shopping List
Techniques: How to get the most vibrant, consistent results for custom T-shirts using your sublimation printer and free software to control it!
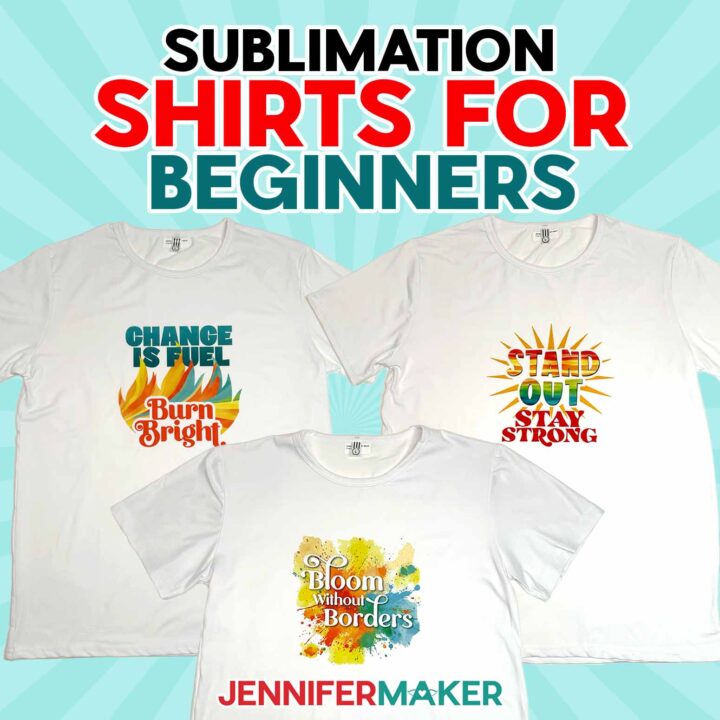
PREVIEW: Sublimation Shirt Ideas
Learn how to create colorful, vibrant tops with these sublimation shirt ideas!
Materials
Tools
- A free Google account
- Sublimation Printer (I used a converted Epson EcoTank ET-2800 Inkjet Printer)
- Sublimation Ink
- Heat Press (I used the 9” x 9” Cricut EasyPress 3)
- Cricut EasyPress Mat
- Heat-Resistant Tape
- Lint Roller
- Fan (for ventilation)
- Scissors -OR-
- Paper Trimmer
- Ruler or Measuring Tape
- T-Shirt Ruler Guide (optional)
Instructions
The instructions for this project are now available at https://jennifermaker.com/sublimation-shirt-ideas/.
ADVANCE members, you will be able to access the project early in your Member area, along with an exclusive design workshop and cheat sheet!
Notes
Print sizes: (Sized for Large unisex T-shirts) "Stay Strong": 8" x 7.81" Other designs: 8" x 8" Typefaces Used: Foghe (free alternative: Londona) Wished Regular (free alternative: Marine Sikona) Wonderful Display Font (free alternative: Bestoom) Quacker (free alternative: Quacker for personal use) VVDS SunshineBridge (free alternative: Chunky Funks) Care instructions: Wait 24 hours before washing. Turn inside out, use cool water and gentle detergent. Line or tumble dry on low.
Day 18: Paper Polaroid Shadow Box
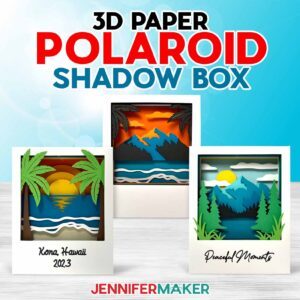 Day 18: Paper Polaroid Shadow Box
Amazon Shopping List
Techniques: How to make intricate paper cuts, crease with or without a scoring tool, and assemble small 3D layered cardstock projects successfully!
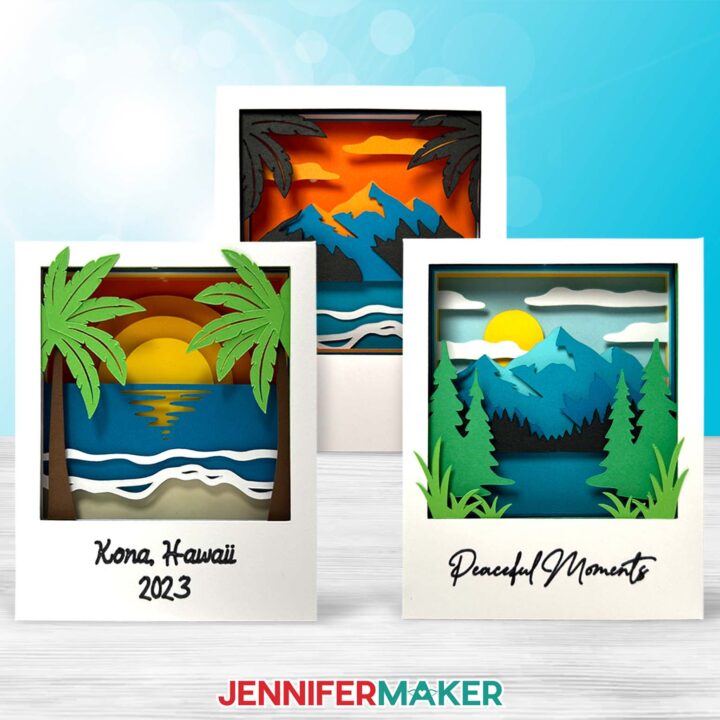
PREVIEW: Polaroid Shadow Box
Learn to create fun vacation-themed layered paper polaroids with just some cardstock and adhesive!
Materials
- Nine (9) Sheets of 8.5" x 11" 65 lb. Cardstock (For the Beach design, I used one sheet of blue, one green, one brown, one cream, one yellow, one light orange, one medium orange, one dark orange, and one white. For the Mountain design, I used one sheet of light green, one dark green, one yellow, one black, and one white.)
- 12" x 12" 65 lb. Teal Palette Cardstock (Optional for the Mountain design - I used four sheets of different shades.)
- Design #729 (My free SVG/PDF/DXF design files are available in my free resource library - get the password by filling out the form at the bottom of this page)
Tools
- A way to cut your cardstock - I’m using the Cricut Joy, but you can also use a Cricut Maker Series machine, a Cricut Explore Series machine, the Cricut Venture, or the Cricut Joy Xtra
- Cricut Joy StandardGrip Machine Mat 4.5” x 6.5” or 4.5" x 12" -OR-
- Cricut StandardGrip Machine Mat 12" x 12"
- Scoring Stylus (optional for files with score lines) -OR-
- Single Scoring Wheel (optional for files with score lines)
- Craft Glue (I used Bearly Art Precision Glue)
- Double-Sided Adhesive Foam Micro Pop Dots
- Paper Trimmer (optional for cutting your cardstock to fit on a Joy mat)
- Brayer
- Spatula
- Scraper
- Weeding Tool (optional for poking out small cutouts)
- Tweezers
- Joy-Sized Cricut Fine Point Pen (optional for writing custom message on front) -OR-
- Cricut Fine Point Pen (optional for writing custom message on front)
Instructions
The instructions for this project are now available a https://jennifermaker.com/3d-paper-polaroid/.
ADVANCE members, you will be able to access the project early in your Member area, along with an exclusive design workshop and cheat sheet!
Notes
Finished Size: 3"W x 3.75"H x 0.7"D
Fonts Used:
JM Cursive (Beach scene)
Baldive (Mountain scene)
Free alternative: Baldive for personal use
Day 19: Photo Basketball
 Day 19: Photo Basketball
Amazon Shopping List
Techniques: How to prepare, print, and apply custom decals to textured, round surfaces smoothly for fun athlete or sports fan gifts!
https://jennifermaker.com/wp-admin/post.php?action=edit&id=962&post=118797&post_type=mv_create&type=diy#
Day 20: 10 Easy Cricut Wrapping Ideas
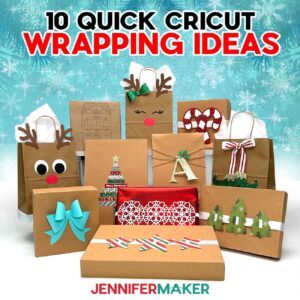 Day 20: 10 Easy Cricut Wrapping Ideas
Amazon Shopping List
Techniques: How to make your gifts stand out with easy flourishes made using a Cricut or other cutting machine for fun customizations!
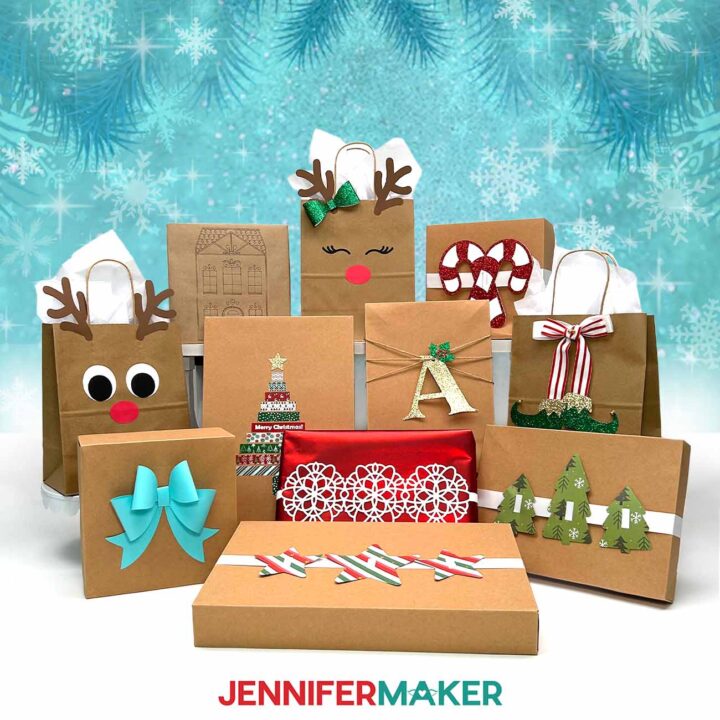
PREVIEW: Cricut Gift Wrapping Ideas
Learn how to make and use quick and easy Cricut Gift Wrapping Ideas to decorate presents!
Materials
- One (1) or more Assorted Gift Boxes
- Wrapping Paper (I used red)
- Brown Paper Bags (for Reindeer Gift Bags, Elf Boots Ribbon)
- One (1) Sheet of 12” x 12” 65 lb. White Cardstock (for Snowflake Box Wrap, Ribbon Sliders, Cutout Gift Tags)
- Three (3) Sheets of 12” x 12” 65 lb. Colored Cardstock (I used brown, white, black, and red for Reindeer Gift Bags)
- One (1) Sheet of 12” x 12” Patterned Cardstock (for Ribbon Sliders)
- One (1) Sheet of 12” x 12” Red Glitter Cardstock (for Ribbon Sliders, Cutout Gift Tags, Holly Letter Gift Tags)
- One (1) Sheet of 12” x 12” Green Glitter Cardstock (for Reindeer Gift Bags, Elf Boots Ribbon, Holly Letter Gift Tags)
- One (1) Sheet of 12” x 12” Gold Glitter Cardstock (for Elf Boots Ribbon, Holly Letter Gift Tags, Washi Tape Gift Decoration)
- One (1) Sheet of 12” x 12” 65 lb. Teal Cardstock (for Cardstock Bow)
- One (1) Sheet of Kraft Cardstock (for Cutout Gift Tags)
- Kraft Paper Roll (for Cricut Pen Wrapping Paper)
- One (1) Sheet of 8.5” x 11” Cricut Sticker Paper (for Print Then Cut Gift Tags)
- 1” Wide White Ribbon (for Ribbon Sliders, Elf Boots Ribbon)
- 1” Wide Striped or Polka Dot Ribbon (for Elf Boots Ribbon)
- ¼” Bells (for Elf Boots Ribbon)
- Twine (for Cutout Gift Tags, Holly Letter Gift Tags)
- Washi Tape with Christmas Pattern (for Washi Tape Tree with Star)
- Clear Tape (to wrap and attach projects to packages)
- Design #787 (My free Cricut gift wrapping design files are available in my free resource library - get the password by filling out the form at the bottom of this page)
Tools
- A way to cut your materials - I’m using the Cricut Maker 4, but you can also use a Cricut Maker Series machine, a Cricut Explore Series machine, the Cricut Venture, the Cricut Joy, or the Cricut Joy Xtra
- Cricut Green StandardGrip Machine Mat 12" x 12" (for all projects but Cricut Pen Wrapping Paper) -OR-
- Cricut Blue LightGrip Machine Mat 12” x 12” (for Cricut Pen Wrapping Paper) -OR-
- Cricut Blue LightGrip Machine Mat 12” x 24” (for Cricut Pen Wrapping Paper)
- Cricut Pen (I used a black 0.4mm Cricut Pen for Cricut Pen Wrapping Paper)
- Inkjet Printer (for Print Then Cut Gift Tags)
- Craft Glue (I used Bearly Art Precision Craft Glue for Ribbon Sliders)
- Hot Glue Gun & Glue Sticks (for Ribbon Sliders) -AND-
- Silicone Finger Protectors (for Ribbon Sliders)
Instructions
The instructions for this project are now available at https://jennifermaker.com/cricut-gift-wrapping-ideas/.
ADVANCE members, you will be also able to access the project early in your member dashboard along with an exclusive design workshop and cheat sheet!
Notes
Fonts: JM Penwriting, Tingler Script (free alternative: Timberly), JM Tall
Assembled sizes:
Cutout Gift Tags: 1.5”W x 2.3”H
Ribbon Sliders: Three Trees 8.3”W x 5”H, Three Stars 12”W x 4.5”H, Candy Canes 6.3”W x 6”H
Fancy Paper Bow: 5.5”W x 5.5”H x 1.5“D
Snowflake Box Wrap: 11.5”W x 4”H
Holly Letter Tags: 6”W x 5.25”H
Cricut Pen Wrapping Paper: 12”W x 24”H
Reindeer Gift Bags: 8”W x 4.75”D x 10”H
Elf Boots Ribbon: Approximately 4.5”W x 6.5”H on ribbon
Washi Tape Tree with Star: Varies, Star 1.2”W x 1.2”H
Print Then Cut Gift Labels: 3”W x 1.5”H
Care: Store your Cricut gift wrapping projects inside of a sturdy box in a cool, dry place.
Day 21: How To Make A Journal With Canva
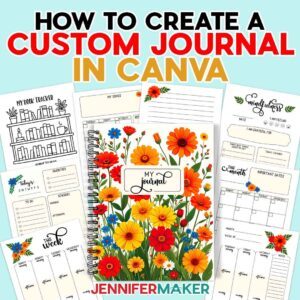 Day 21: How To Make A Journal With Canva
Amazon Shopping List
Techniques: How to design and order a journal using Canva’s easy design and shopping tools!
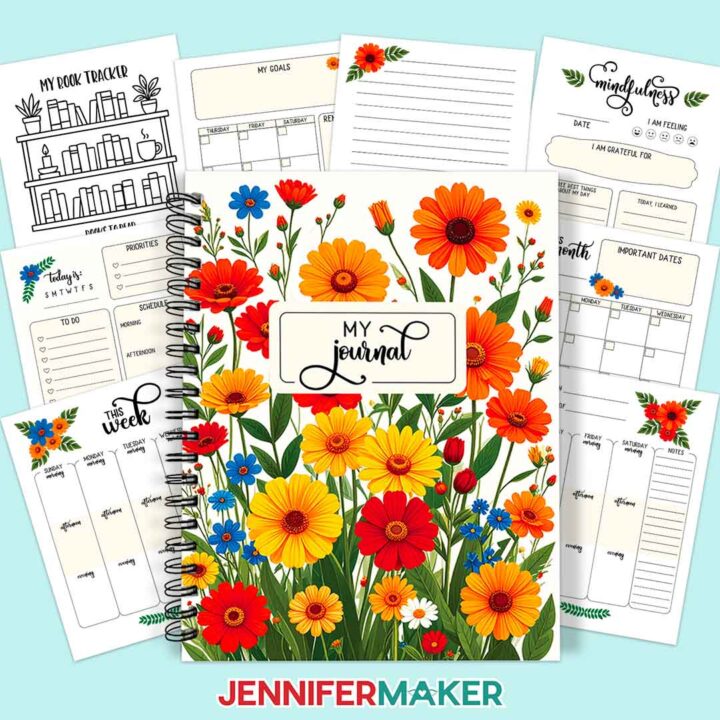
PREVIEW: How To Create A Custom Journal In Canva
Materials
- #2 Medium Poly Bubble Mailers (optional, for mailing the journal)
- Fineliner Pens (optional, for writing in the journal)
- Leather Bookmarks (optional, for keeping your place)
- Journal Stencils (optional)
- Highlighter Pens (optional)
- Washi Tape Set (optional)
- Elastic Band Pen Holder (optional)
- Journaling Prompt Cards (optional)
- Design #789 (My free PNG design files are available in my free resource library - get the password by filling out the form at the bottom of this page)
Tools
Instructions
The instructions for this project are now available at https://jennifermaker.com/how-to-create-a-custom-journal-in-canva/.
Day 22: How To Use Metallic Puff Vinyl
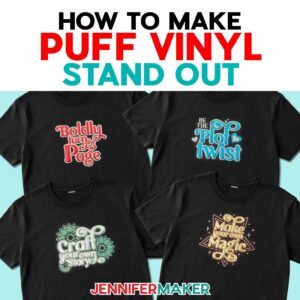 Day 22: How To Use Metallic Puff Vinyl
Amazon Shopping List
Techniques: How to combine and heat press metallic puff vinyl and glitter HTV for the tallest, smoothest puff on T-shirts!
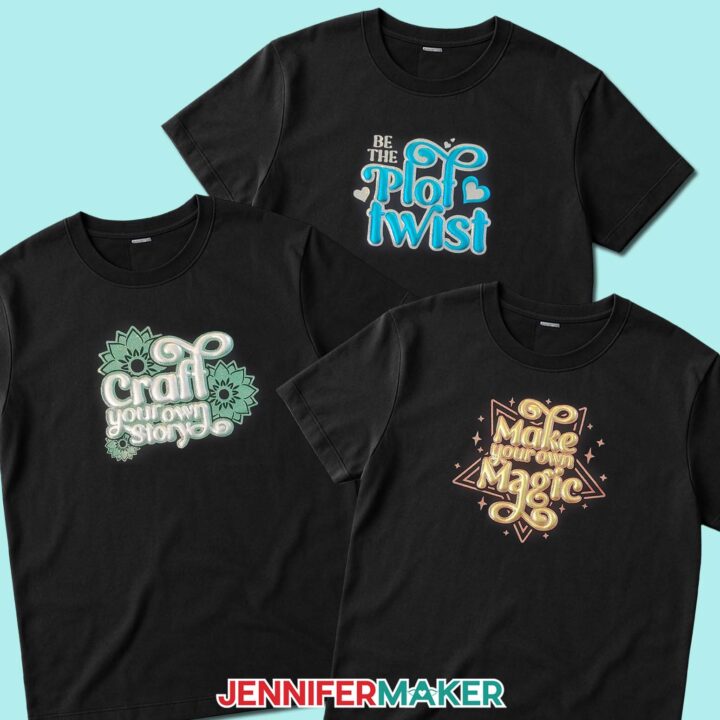
PREVIEW: Puff Vinyl Tutorial
Learn how to make a beautiful T-shirt in this metallic puff vinyl tutorial!
Materials
- Cotton T-Shirt (I used a black shirt) -OR-
- Heavy Cotton T-Shirt
- Aqua Metallic Puff Heat-Transfer Vinyl -OR-
- Gold Foil Puff Heat-Transfer Vinyl -OR-
- Silver Foil Puff Heat-Transfer Vinyl
- Silver Glitter Heat-Transfer Vinyl -OR-
- Red Glitter Heat-Transfer Vinyl -OR-
- Green Glitter Heat-Transfer Vinyl
- Design #790 (My free SVG/PDF/DXF design files are available in my free resource library - get the password by filling out the form at the bottom of this page)
Tools
- A way to cut your vinyl - I’m using the Cricut Maker 4, but you use any Maker series machine, a Cricut Explore Series machine, the Cricut Venture, or the Cricut Joy Xtra
- Cricut Green StandardGrip Mat, 12" x 12"
- Cricut EasyPress 3 - 12" x 10" -OR-
- Cricut Autopress
- Pressing Mat (for pre-heating only)
- Brayer
- Scissors
- Weeding Tool
- 1” Thick Wood Cutting Board - mine is 16" x 11" x 1" but use one that will fit inside the shirt you’re making
- Lint Roller
- Measuring Tape
- Parchment Paper
- My free T-Shirt Ruler Guides
Instructions
The instructions for this project are now available at https://jennifermaker.com/puff-vinyl-tutorial/.
Day 23: Adorable Keepsake Boxes
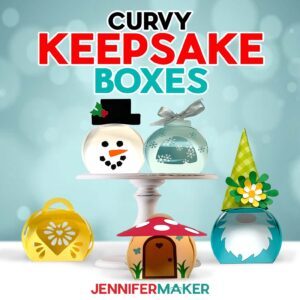 Day 23: Adorable Keepsake Boxes
Amazon Shopping List
Techniques: How to cut and assemble tiny boxes with fun details of all kinds including adding acetate windows and delicate details!
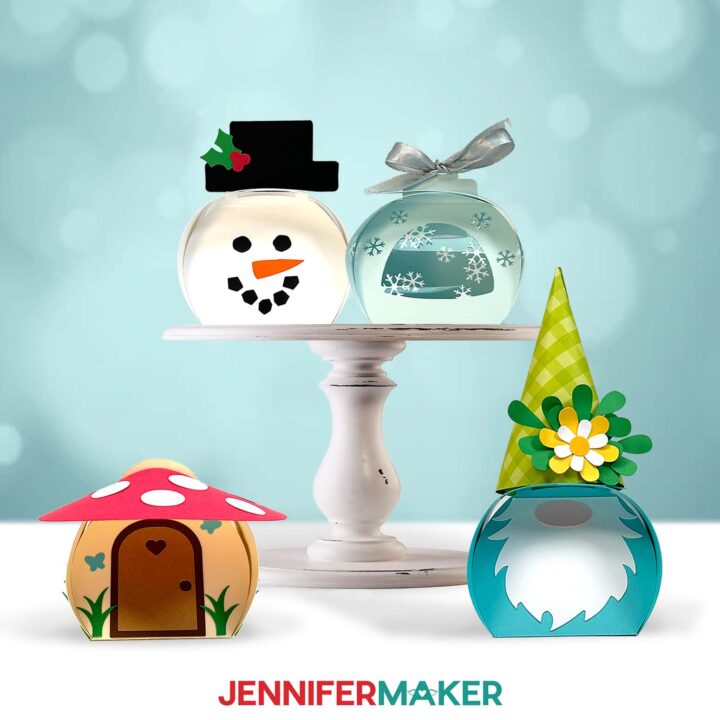
PREVIEW: Curvy Keepsake Boxes
Learn how to make fun and detailed Curvy Keepsake Boxes with paper!
Materials
- One to Ten (1-10) Sheets of 12" x 12" 65 lb. Cardstock in Assorted Colors -AND-
- One (1) Sheet of 12" x 12" 65 lb. Teal Cardstock
- One (1) Sheet of 12" x 12" 65 lb. Patterned Cardstock (optional for the gnome hat)
- One (1) Sheet of 12” x 12” Acetate (optional for snowflake box)
- ⅖” Wide Ribbon (optional for snowflake box)
- Design #791 (My free SVG/PDF/DXF design files are available in my free resource library - get the password by filling out the form at the bottom of this page)
Tools
- A way to cut your material - I’m using the Cricut Maker 4, but you can also use a Maker, Explore, or Venture. You can also use the Joy Xtra with the no-score version of the file.
- Cricut Green StandardGrip Machine Mat 12" x 12”
- Scoring Stylus (optional for files with score lines) -OR-
- Single Scoring Wheel (optional for files with score lines)
- Craft Glue (I used Bearly Art Precision Craft Glue)
- Brayer
- Spatula
- Scraper
- Tweezers (optional for assembling small details)
Instructions
The instructions for this project are now available at https://jennifermaker.com/curvy-keepsake-boxes/.
Notes
Finished box sizes:
Gnome box: 3" W x 6.5" H x 2.5" D
Mushroom House box: 4.5" W x 3" H x 4.5" D
Snowflake box: 3" W x 3" H x 2.5" D
Snowman box: 3" W x 3.75" H x 2.5" D
Day 24: How To Make Waterslide Decals
 Day 24: How To Make Waterslide Decals
Amazon Shopping List
Techniques: How to prepare, print, cut, and apply waterslide decals without bubbles for long-lasting decorations!
PREVIEW: Waterslide Decals For Beginners
Learn how to apply designs to plates and candles with my Waterslide Decals For Beginners tutorial!
Materials
- One (1) 10.5" White Dinner Plate
- On (1) 3” x 6” White Tall Pillar Candle
- One (1) Sheet of Hayes A4 Clear Printable Inkjet Waterslide Decal Paper
- Krylon Crystal Clear Acrylic Coating Spray - Gloss
- Plate Holder (optional to display plate)
- Design #792 (My free PNG/PDF design files are available in my free resource library - get the password by filling out the form at the bottom of this page)
Tools
- Inkjet Printer
- Scissors -OR-
- Paper Trimmer -OR-
- Cricut Cutting Machine - I’m using a Cricut Maker 4, but you can also use a Maker series, Cricut Explore Series, Cricut Venture, or Cricut Joy Xtra cutting machine -AND-
- Cricut Green StandardGrip Machine Mat 12" x 12” (if you’re using a Cricut) -AND-
- Brayer (if you’re using a Cricut) -AND-
- Spatula (if you’re using a Cricut) -AND-
- Large Bowl of Room-Temperature Water (for applying the waterslide decal)
- Paper Towels (for applying the waterslide decal)
- Respirator (with proper fit) -AND-
- Respirator Cartridge
- Safety Goggles (if your respirator doesn’t cover your eyes)
- Disposable Gloves
- Plastic Felt Edge Squeegee (optional for getting bubbles out of the decal)
- Craft-Purposed Toaster Oven with Baking Tray (for curing the decal on the plate – make sure the oven is large enough to fit the plate)
- Oven Mitt (for removing the plate from the oven)
- Cooling Rack (for cooling the plate after heating)
- Measuring Tape
- Isopropyl Alcohol (optional for cleaning your plate or candle) -AND-
- Lint-Free Cloth
- Apron (optional for protecting clothes when using acrylic spray)
Instructions
The instructions for this project are now available at https://jennifermaker.com/waterslide-decals-for-beginners/.
ADVANCE members, you will be able to access the project early in your Member area, along with an exclusive design workshop and cheat sheet!
Notes
Finished sizes: Plate 10.5" round Candle 3" W x 6" H Safety: Plate: Not safe for food. Do not microwave. Candle: Never leave burning candles unattended, and extinguish them before leaving a room or going to bed. Always place candles at least 12” from flammable items like curtains and keep them on a stable, heat-resistant surface. Care: Plate: Hand wash only with soft cloth or sponge and mild dish soap. Do not wash in a dishwasher. Do not microwave. Candle: Wipe clean with a dry or slightly damp soft cloth Typefaces: Sprinkles: Beachwood Sans (free alternative: Caramel) Cake Pop (free alternative: Jolly Dream) Sweet Life: Beachwood Sans (free alternative: Caramel) Timberly Script Cherries: Beachwood Sans (free alternative: Caramel) Timberly Script Shine Bright: Amastery Script (free alternative: Chocolate) Beachwood Sans (free alternative: Caramel) Choose to Shine: Brenson Charlotte (free alternative: Retrovert) Glow Getter: Baby Aletha (free alternative: Hello Honey) Beachwood Sans (free alternative: Caramel)
Day 25: Layered And Stacked Calendar
 Day 25: Layered And Stacked Calendar
Amazon Shopping List
Techniques: How to print and cut consistent designs!

PREVIEW: Stacked Desk Calendar
Learn how to make a stacked desk calendar with a stand!
Materials
- Twelve (12) Sheets of 8.5” x 11” 61 lb. Matte Photo Paper
- One (1) Sheet of 8.5" x 11" 110 lb. Cardstock (for the stand)
- One (1) Sheet of 8.5” x 11” Copy Paper (to protect the printed images from the brayer)
- Design #793 (My free PNG/SVG/PDF/DXF design files are available in my free resource library - get the password by filling out the form at the bottom of this page)
Tools
- A way to cut your materials - I’m using the Cricut Maker 4, but you can also use any Cricut Maker series machine, a Cricut Explore Series machine, the Cricut Venture, or the Cricut Joy Xtra
- Cricut Green StandardGrip Machine Mat 12" x 12"
- A Color Inkjet Printer
- Scoring Stylus (optional for files with score lines) -OR-
- Single Scoring Wheel (optional for files with score lines)
- Brayer
- Spatula
- Bearly Art Glue (for securing the edge of the calendar stand)
Instructions
The instructions for this project are now available at https://jennifermaker.com/stacked-desk-calendar/.
ADVANCE members, you are also able to access this project NOW in your member dashboard along with an exclusive design workshop and cheat sheet!
Notes
Finished Size:4” x 7” per card4” x 7.25” when displayed on the stand
Fonts Used: JM Sweet, JM Cursive