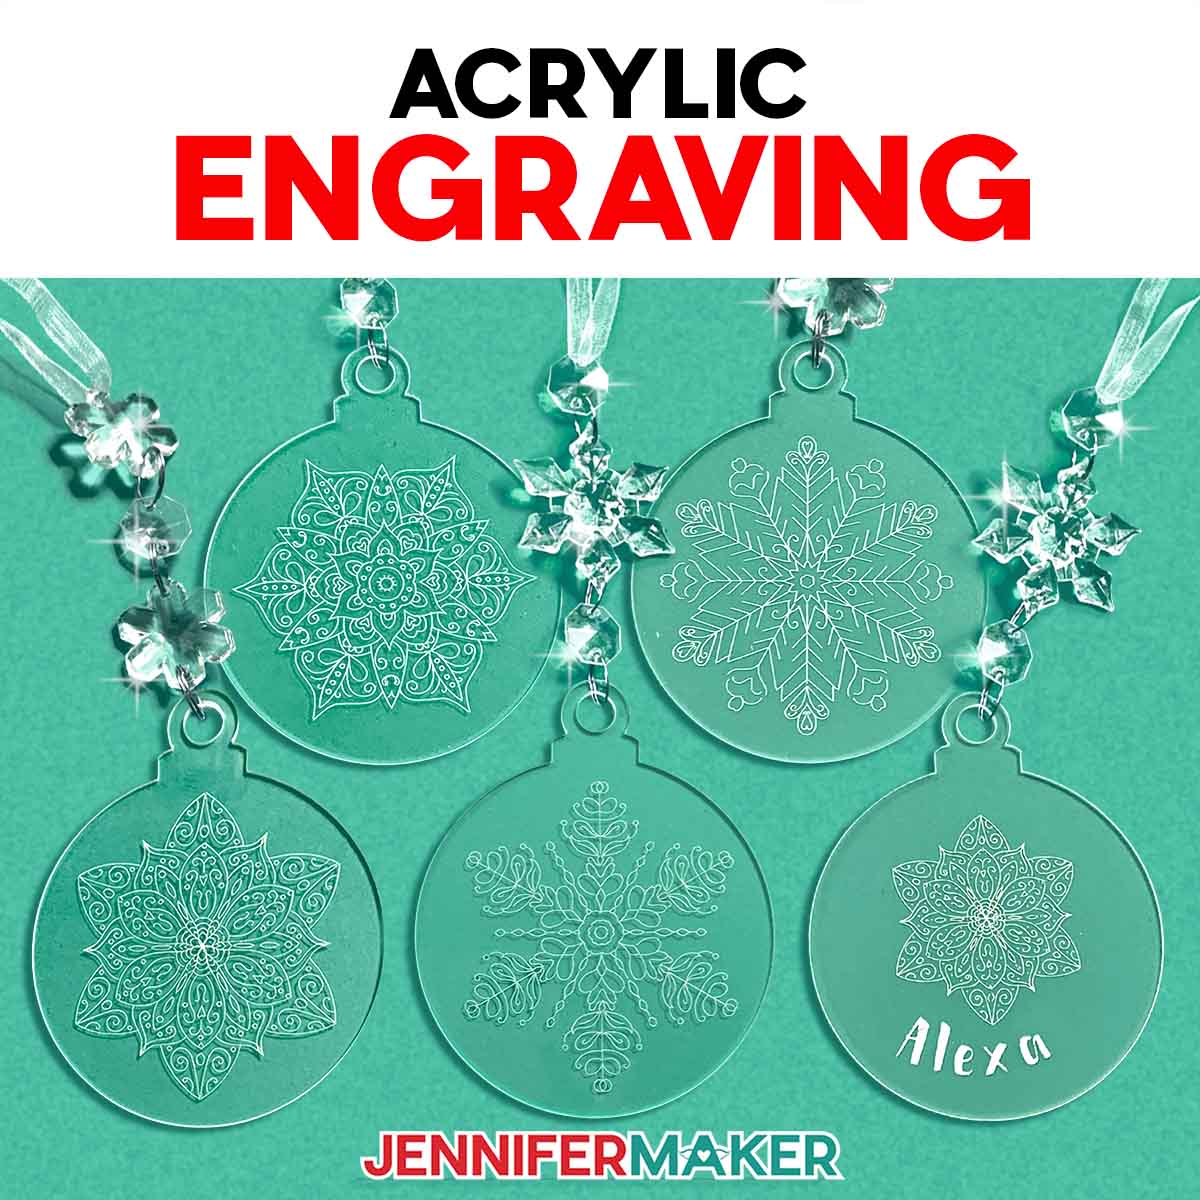
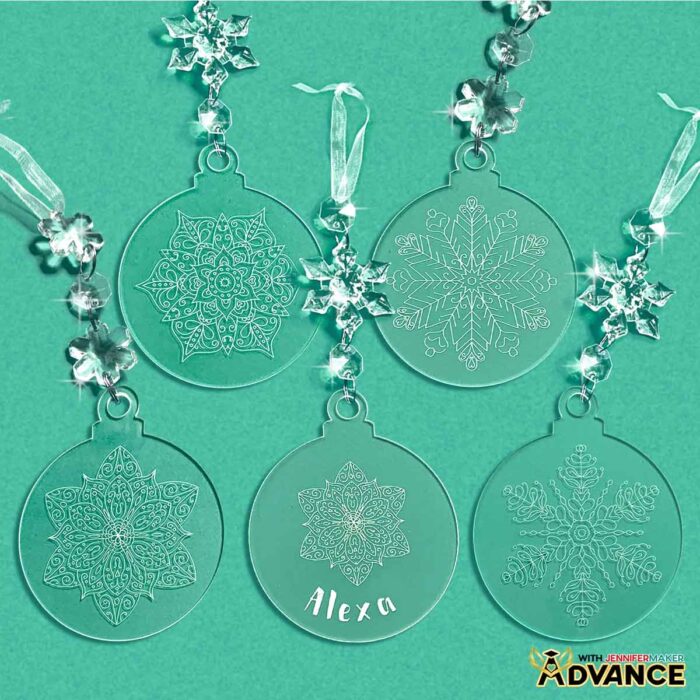
Learn how to do acrylic engraving with your Cricut and create beautiful baubles for your holiday tree!
Would you believe your Cricut Maker can actually engrave? It’s true, this powerful cutting machine isn’t just for paper, vinyl, and fabric. With the right techniques and a small acrylic blank, it can carve out beautiful, professional-looking designs that shimmer and sparkle like glass. Acrylic engraving opens up a whole new world of creative possibilities, and it still amazes me every time I see those fine details appear right before my eyes. There’s something magical about turning a simple, clear acrylic ornament into a one-of-a-kind keepsake that catches the light and tells a story.
See the full step-by-step video tutorial on how to do acrylic engraving with your Cricut:

When you engrave acrylic ornaments, it feels like unlocking a hidden superpower in your crafting room. The Cricut Maker series machines were designed with the strength and precision needed to handle engraving clear acrylic, and they do it beautifully. It’s a popular way to make decorative items that look custom-made, even though all you need is your Maker, an engraving tip, and a little bit of patience. No laser engraving, no complicated setup … just the right techniques and a few simple supplies.

Engraving is only possible with Cricut Maker machines. While some third-party tools claim to work with other models, using them may damage your machine and even void your Cricut warranty, so it’s best to stick with the real tools made for the job.
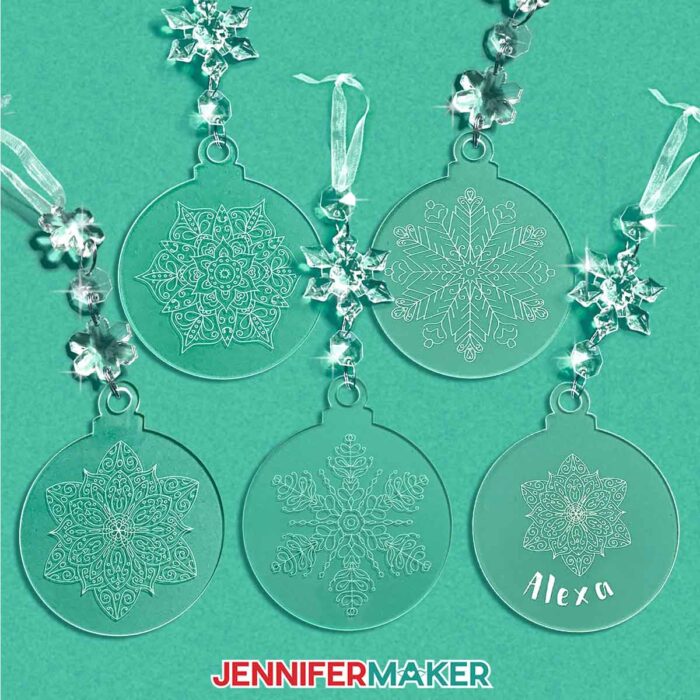
The secret behind this magic is the engraving tip. Unlike a blade that cuts through materials, this tip carves delicate grooves into the acrylic surface, creating light-catching fine details. It’s amazing to watch the engraving process unfold! Tiny flakes of acrylic swirl away as the design takes shape, revealing intricate patterns. For this project, I used small, round acrylic blanks that are about three inches wide and two millimeters thick. The thickness of the acrylic matters more than you might think. If it’s too thick, it can catch on the machine’s roller bar, so always measure before you begin and don’t go taller than 2mm.
Before engraving, I like to prepare my acrylic piece carefully for the best results. Each blank usually comes covered in a protective film. You only want to remove it from one side of the acrylic, leaving the other side covered during engraving. Then, I clean the exposed surface using a little isopropyl alcohol and a soft cloth like a microfiber cloth. That way, nothing will interfere with the tools while you’re engraving. After that, I center the blank on a purple StrongGrip mat, holding it in place with painter’s tape along the edges. It might sound simple, but it’s one of the best ways to keep the blank from slipping mid-engrave.
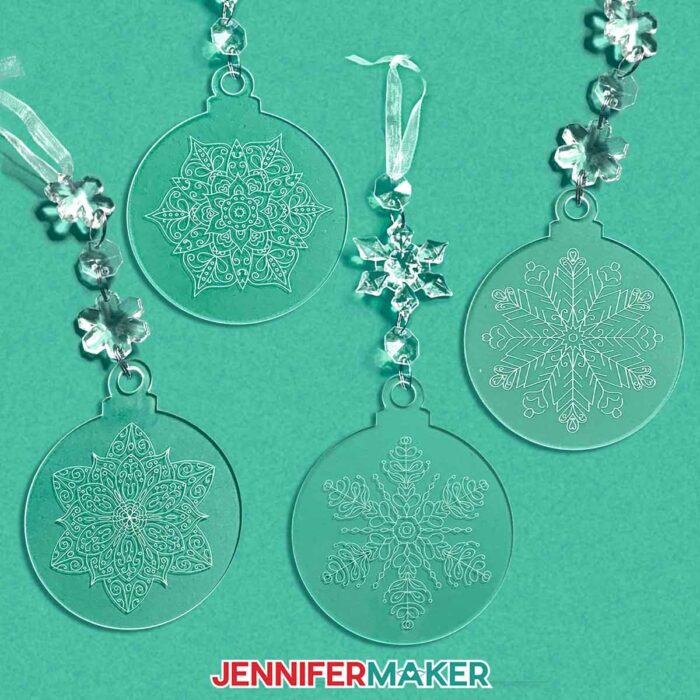
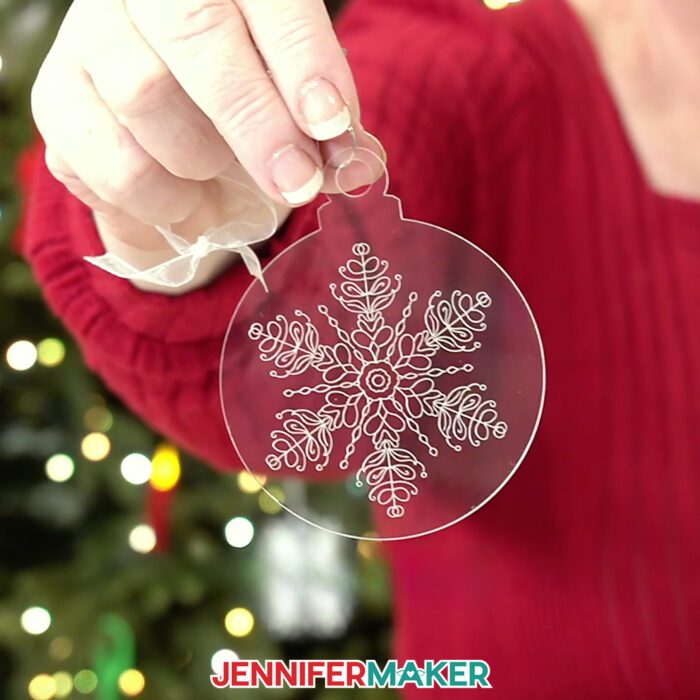
Once your material is ready, the design software does the rest. Upload my detailed designs (download my free snowflakes and mandalas for this project!) or other intricate designs and set the Operation to “Engrave.” A few more steps later, and the Maker handles the rest, tracing each line into the acrylic. If you want the design to be viewed through the smooth side, just mirror it before engraving. That way, you’ll get that reflective finish that looks like it’s glowing beneath the surface. The result is a beautiful engraved design that feels store-bought but has the charm of something handmade.
When the machine finishes, there’s always a bit of dust left behind. Instead of wiping, which can scratch the acrylic surface, I press a piece of painter’s tape down gently over the design and lift it off. This picks up all the tiny shavings without leaving marks. Then I remove the remaining protective film, give it a gentle wipe with a soft cloth, and admire that crystal-clear sparkle. It’s so satisfying to see the finished engraving shine under the lights of the Christmas tree.

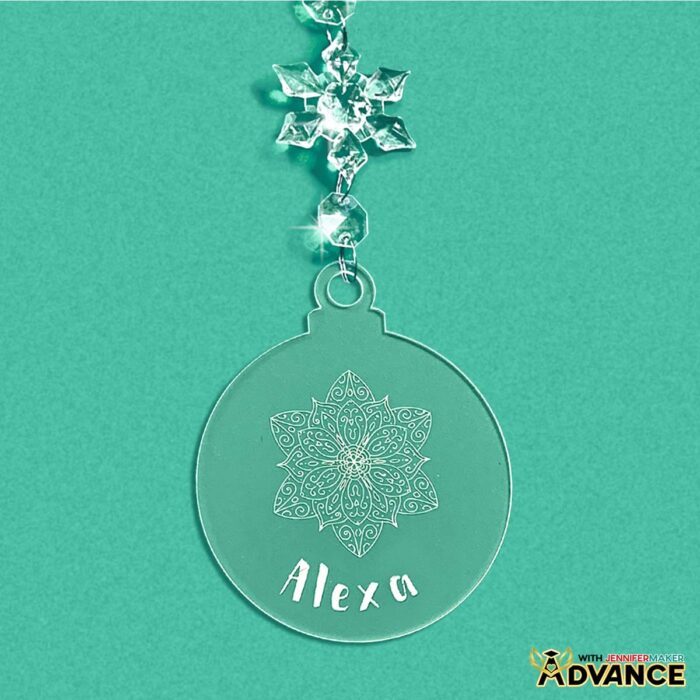
What I love most about engraving with the Cricut Maker is how it gives you so much creative freedom. You can leave the engraved design simple and clear for an elegant look, or you can experiment with different methods to add color and personality. I love using Rub n Buff metallic wax to fill in the engraved areas (you can also use acrylic ink or enamel paint) to highlight the design with shimmer. You can use different colors to match your holiday décor or create a cool contrast between the unengraved sections and the carved lines. The Maker captures every line so precisely that even less detailed patterns look elevated. It’s all about personal preference and how you want your final project to shine. Or, engrave directly on one of the light up blanks in my supply list!
For anyone curious about different materials, engraving isn’t just for acrylic. You can use the Maker to etch designs on aluminum sheets, anodized tags, and even leather. There are so many types of acrylic engraving projects you can explore once you feel confident with the basics.
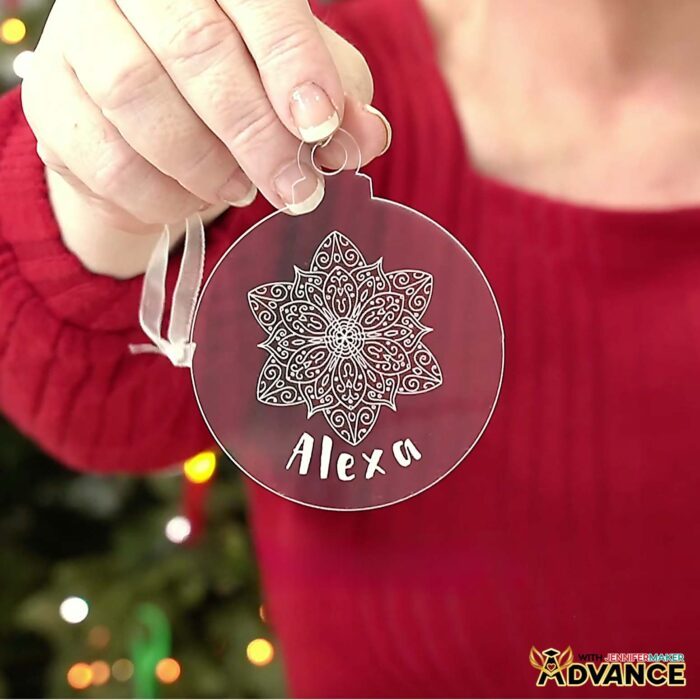
And when you’re ready to level up your engraving game, join me inside ADVANCE with JenniferMaker, where we learn how to turn simple text into bold, filled engraved designs that truly shine! I walk you through the right techniques and different materials to get the best results, plus show you how to add a custom name for that perfect clean finish. It’s the most fun and creative way to make your Cricut Maker projects look professionally engraved, right from your craft room! Learn more about ADVANCE with JenniferMaker here!
I’m constantly amazed at what these machines can do. From paper crafts to engraving, the Cricut Maker proves again and again that creativity and technology make an unbeatable pair. Each project feels like discovering a new superpower. The engraving process may sound advanced, but once you see how simple it is, you’ll wonder why you didn’t try it sooner.
If you want to see exactly how it’s done, my video tutorial walks you through every step, from preparing your acrylic to cleaning and finishing with color. I promise, with just a few tools, a bit of tape, and your Maker, you’ll be creating gorgeous, personalized ornaments in no time. Whether you want to make gifts, keepsakes, or just something to add a handmade sparkle to your home, engraving with a Cricut is one of the best ways to do it.

When I look at my finished ornaments hanging on the tree, I can’t help but smile. It’s proof that even the most advanced crafts are possible at home with the right techniques, a little patience, and a machine that brings your imagination to life. That’s the real joy of crafting: turning everyday materials into something meaningful, beautiful, and uniquely yours.
Let me show you how to do acrylic engraving on ornaments with a Cricut! This post contains some affiliate links for your convenience (which means if you make a purchase after clicking a link I will earn a small commission but it won’t cost you a penny more, there is no additional cost)! Read my full disclosure policy.
Materials to do Acrylic Engraving on Ornaments with a Cricut
View my Amazon shopping list with the exact items I used.
- 3″ Round Clear Acrylic Ornament (2 mm thickness) -OR-
- 3″ Ornament-Shaped Clear Acrylic Ornament with Charms (2 mm thickness) -OR-
- Snap-On Rechargeable Acrylic Ornament LED Light Keychain (optional for lighting up your ornament)
- A way to engrave your acrylic – I’m using the Cricut Maker 4, but you can also use any of the Maker Series machines
- Cricut Engraving Tip & Quickswap Housing
- Cricut Purple StrongGrip Machine Mat 12″ x 12″
- Brayer
- Painter’s Tape
- Tape Measure
- Lint-Free Cloth -AND-
- Isopropyl Alcohol (optional)
- Rub n Buff (optional)
- Disposable Gloves (optional)
- Paper towels (optional)
How to Engrave Acrylic Ornaments with a Cricut!

Acrylic Ornament Engraving
Learn how to make holiday ornaments with acrylic engraving on a Cricut!
Materials
- 3” Round Clear Acrylic Ornaments (2mm thick) -OR-
- 3” Ornament-Shaped Clear Acrylic Ornaments (2mm thick, with decorative charms) -OR-
- 4" Light-Up LED Acrylic Ornaments (optional for a light-up ornament)
- Rub n Buff (optional) and
- Disposable Gloves (optional)
- Paper towels (optional)
- Design #777 (My free SVG/PDF/DXF design files are available in my free resource library - get the password by filling out the form at the bottom of this page)
Tools
- A way to engrave your acrylic - I’m using the Cricut Maker 4, but you can also use any of the Maker series machines or the Cricut Venture
- Cricut Purple StrongGrip Machine Mat 12” x 12”
- Cricut Engraving Tip and QuickSwap Housing
- Masking or Painter’s Tape
- Lint-Free Cloth -AND-
- Isopropyl Alcohol (optional, for cleaning the acrylic)
- Alcohol-Free Baby Wipe (optional, for cleaning the machine mat)
- Measuring Tape or Ruler (optional, for measuring your ornament)
Instructions
STEP 1: GET MY FREE ACRYLIC ENGRAVING DESIGNS
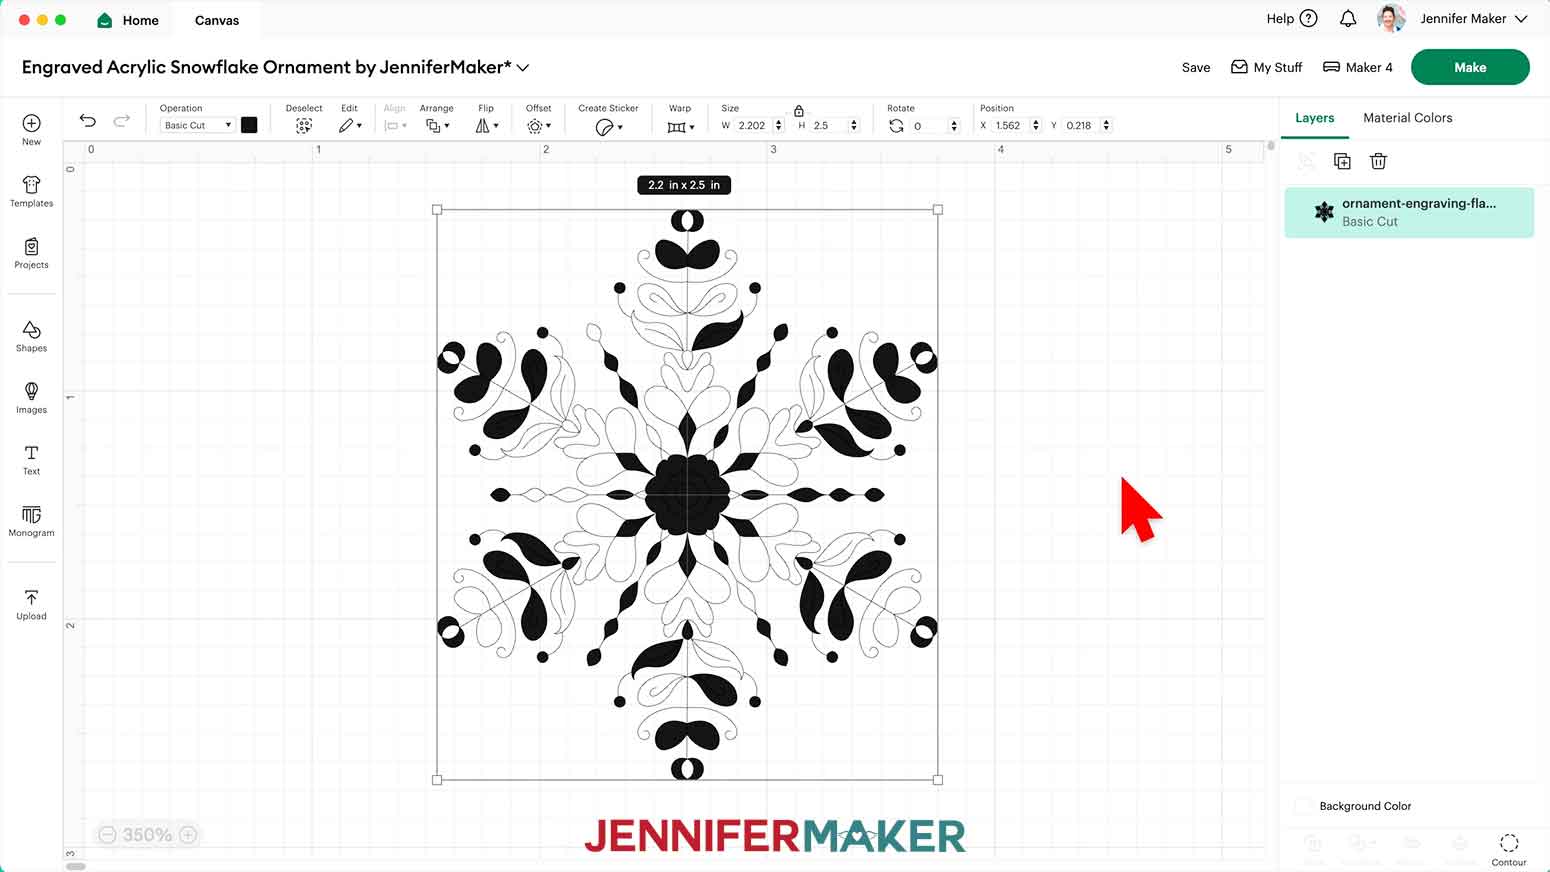
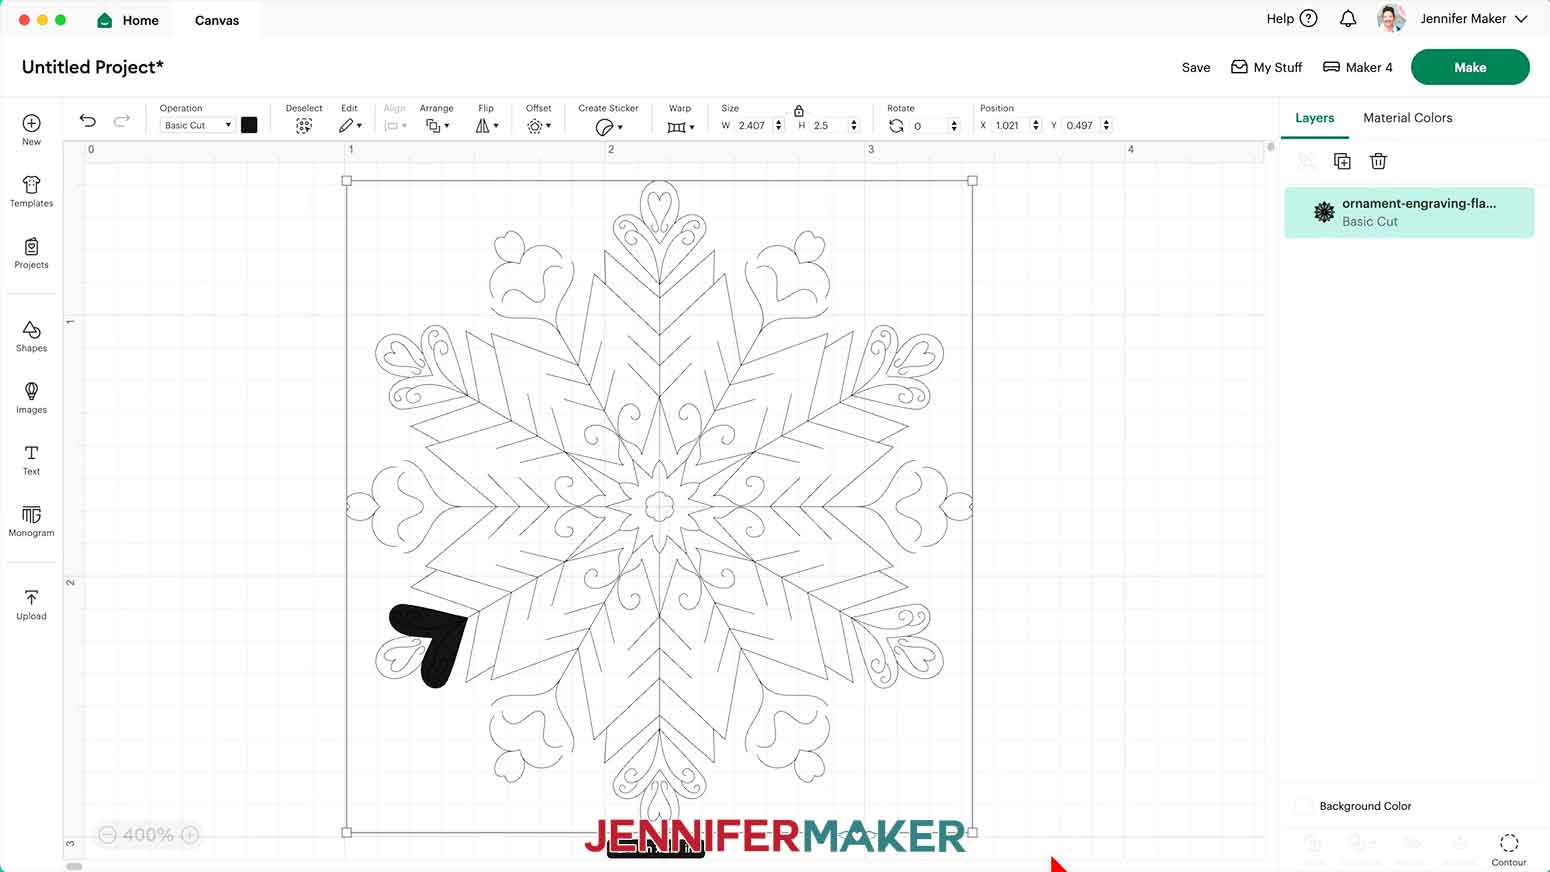
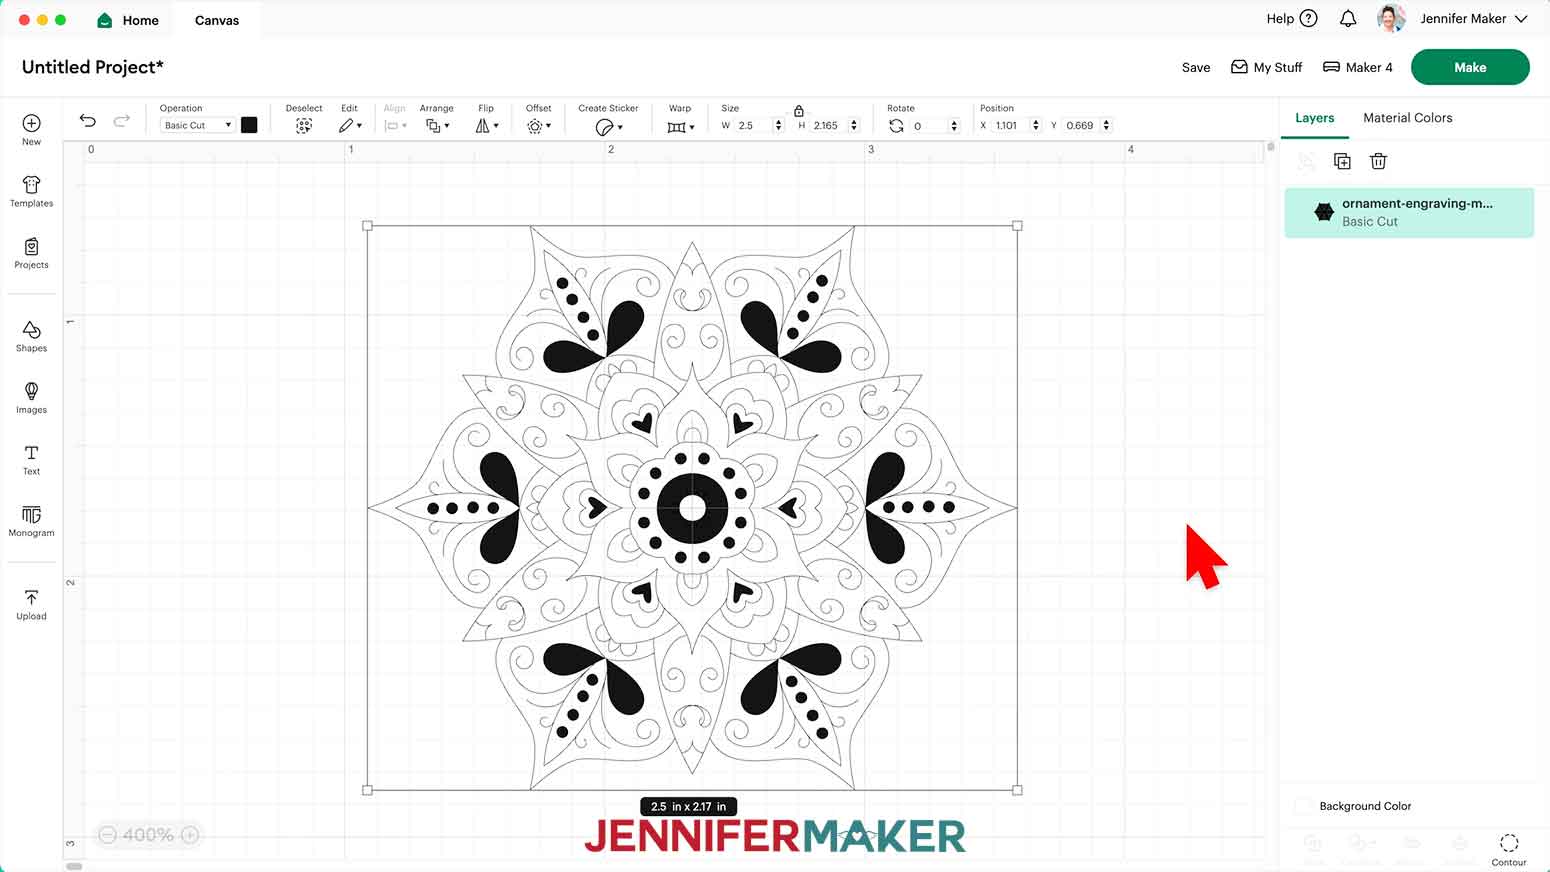
First, download my free acrylic engraving designs from my free library – look for Design #777. Alternatively, you can use the Save This Project form near the top of this post and the design link will be emailed to you.TIP: If you’re not sure how to upload, go to jennifermaker.com/svgs to learn how to unzip and upload SVG files.Inside the SVG folder, you’ll see two snowflake designs and two mandala designs.The DXF folder contains files that can be cut on other cutting machines, and the PDF folder contains designs you can print and cut by hand.For this tutorial, I’ll show you how to engrave the “flake1” SVG design onto an acrylic ornament blank using my Cricut Maker 4, but you can use the same steps to prepare and engrave the other three designs.
STEP 2: PREPARE YOUR ACRYLIC ENGRAVING DESIGN
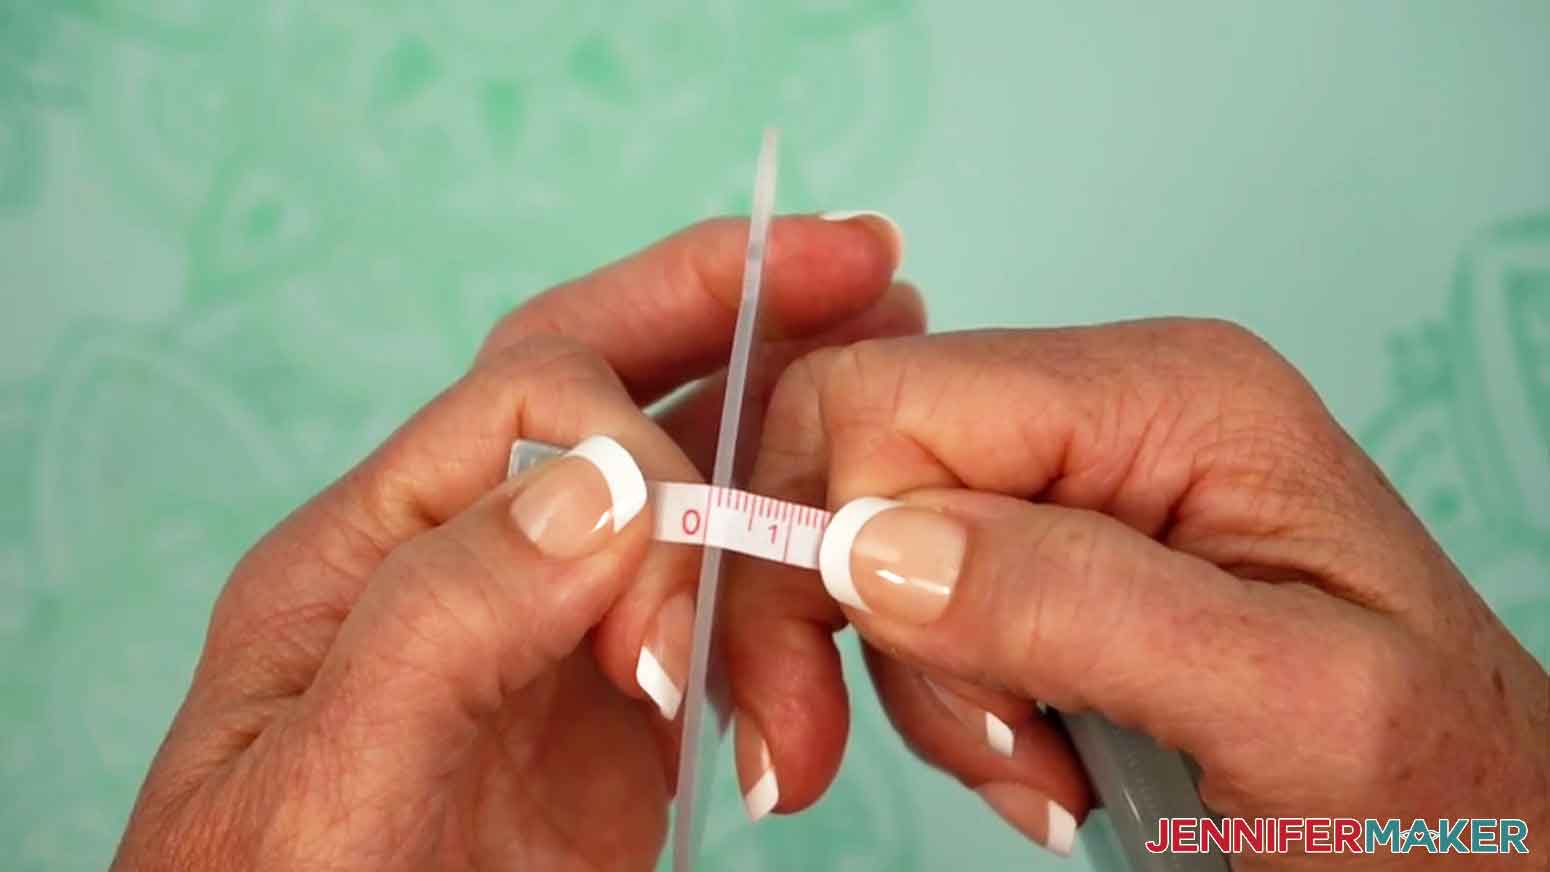
NOTE: Before preparing your design, use a ruler or tape measure to measure the width and height of the widest area on the ornament that's able to be engraved. The ornaments in my materials list are 3” circles. CRICUT DESIGN SPACE
- In Cricut Design Space on a blank Canvas, click “Upload.”
- Click “Upload Image.”
- Click “Browse.”
- Find and select the SVG of your choice. NOTE: I’ll demonstrate with the “flake1” design, but you can use the same steps to prepare and engrave the other three designs.
- Click “Open” and then “Continue.”
- Click “Upload” to add the design to your Canvas.NOTE: The design may not look the way you expect, but it will look correct after preparing it to engrave. This is what the four designs look like on the Design Space Canvas after uploading.

- Click “Save” and give your project a name.
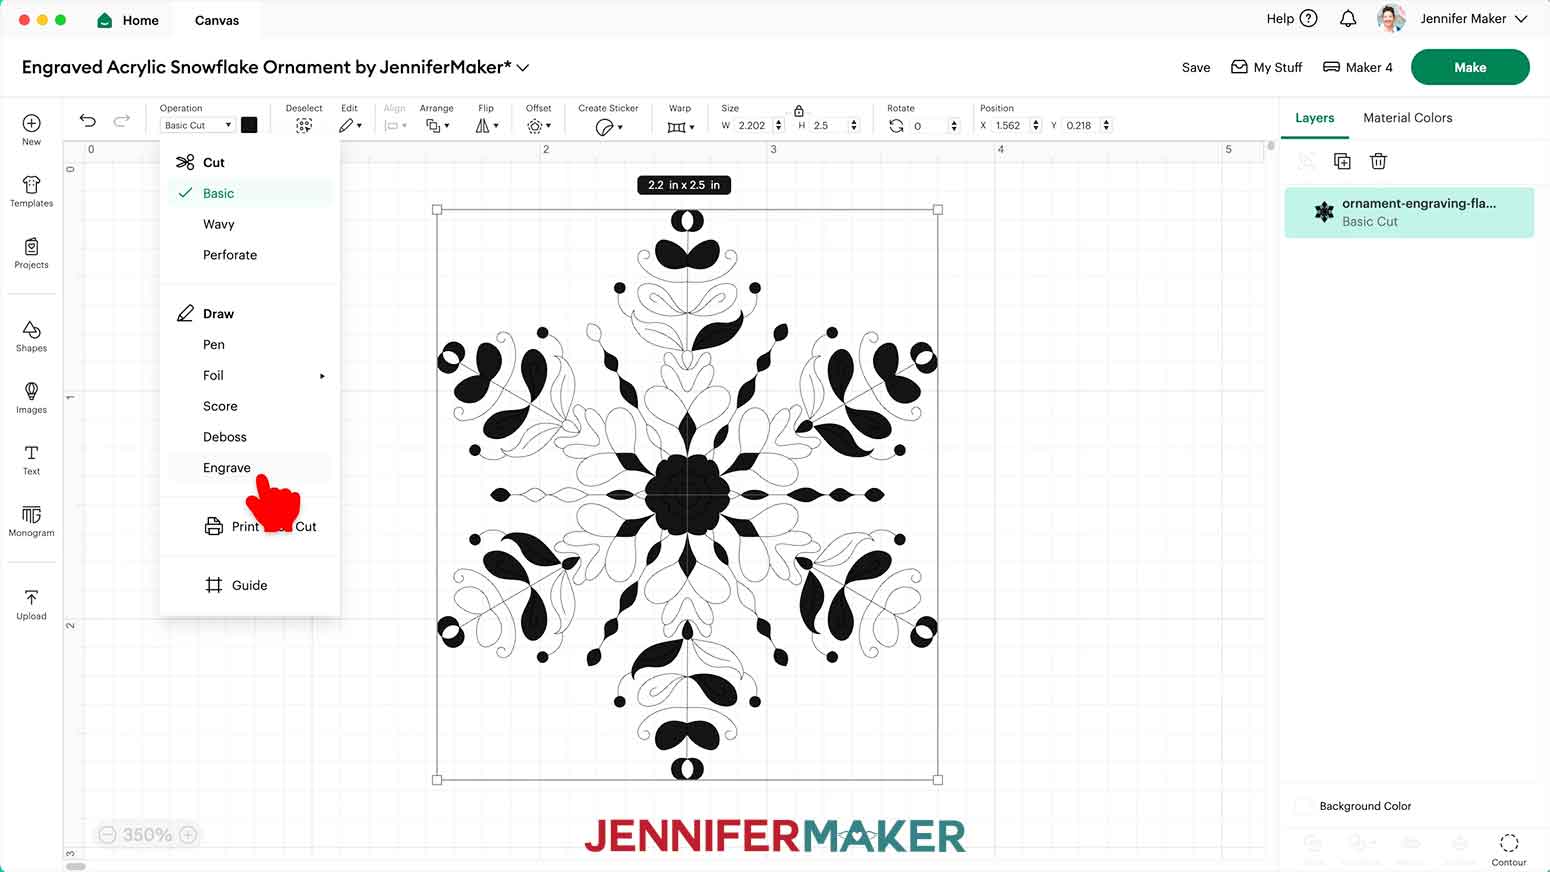
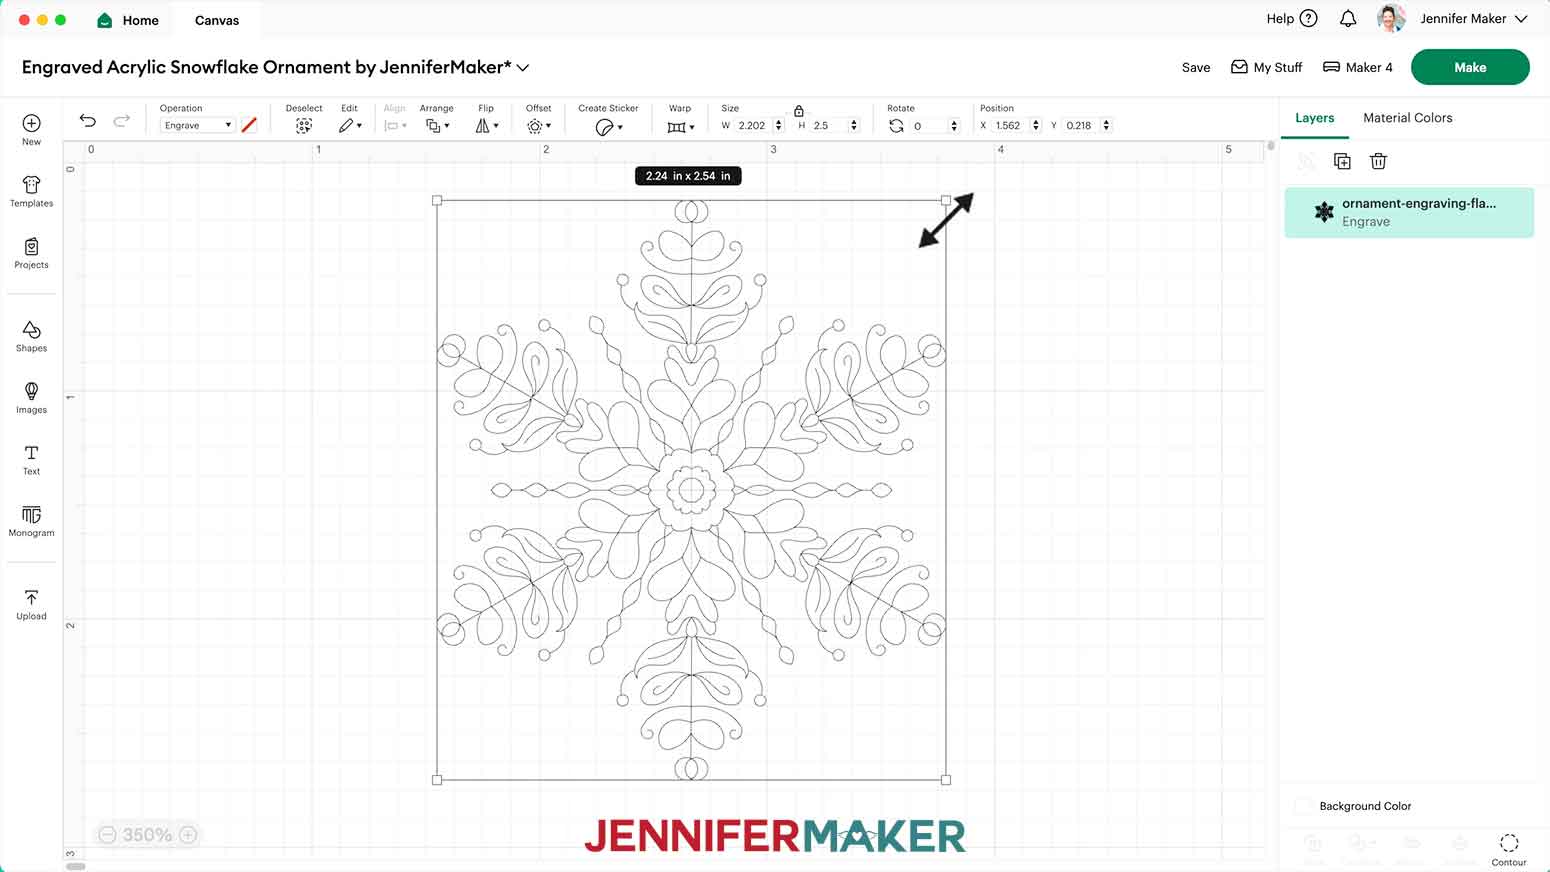
- Select the design and under the “Operation” dropdown in the top menu, select “Engrave.”
- Make sure the lock icon is closed to maintain proportions, then drag the corner handles to resize the design so its longest side is 0.5” smaller than the widest area on the ornament that's able to be engraved. NOTE: This is to leave space for taping the ornament to the machine mat. I left the “flake1” design at 2.2” wide by 2.5” high.
- Your design is ready to engrave!

STEP 3: ENGRAVE YOUR ACRYLIC ORNAMENT
- Select your machine at the top right, then click “Make.”TIP: I recommend connecting your computer to your Cricut directly via USB cable for engraving in case of connection issues.
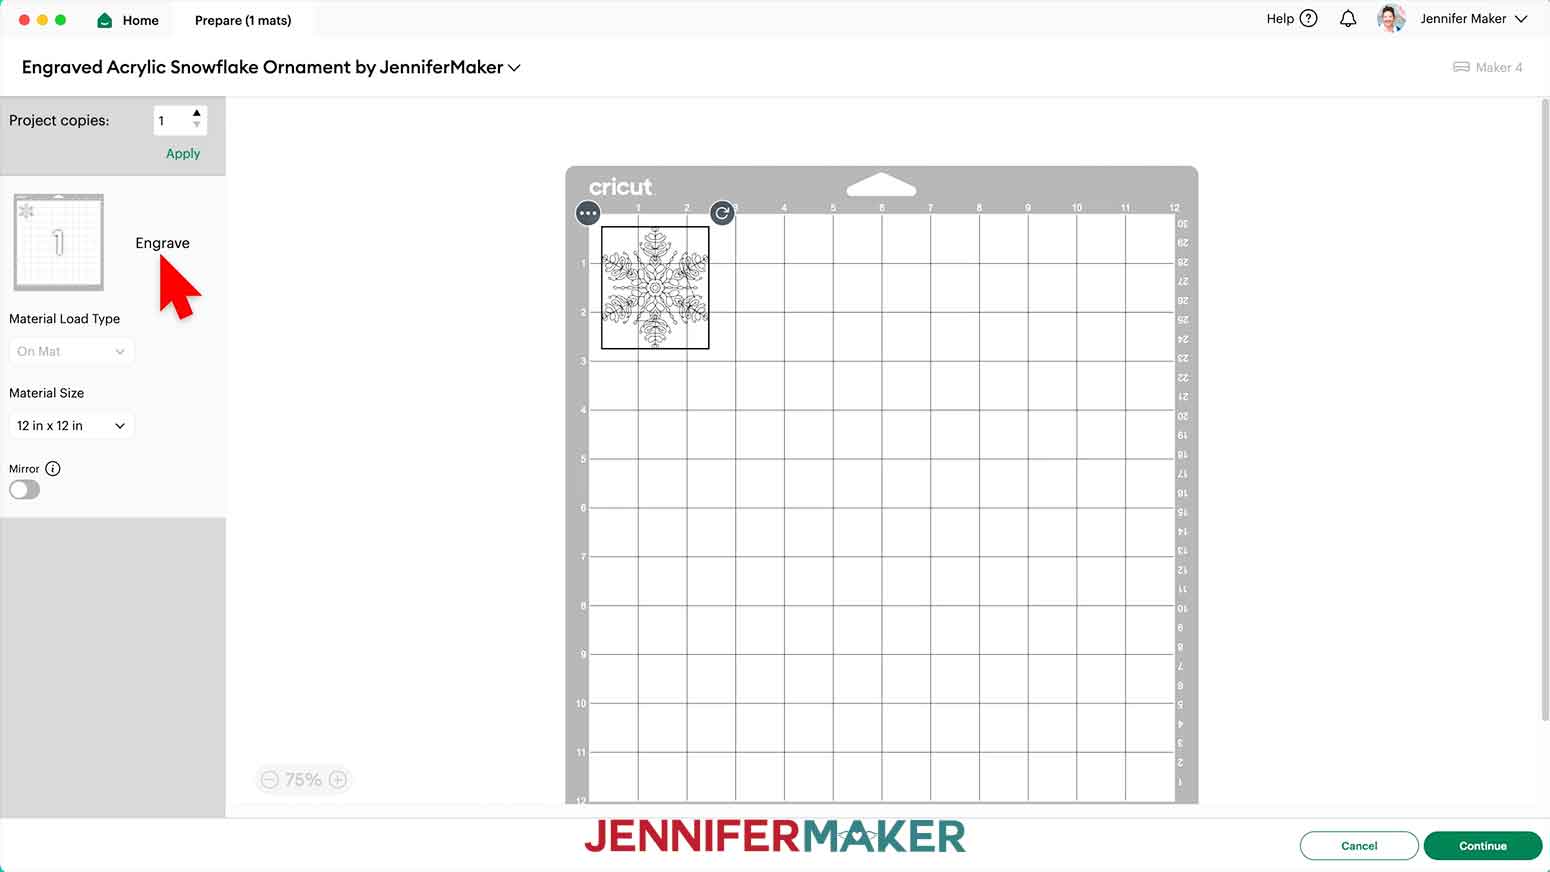
- On the Prepare screen, double-check that it says “Engrave” next to your mat.
- Make sure the Material Size matches the size of your machine mat.
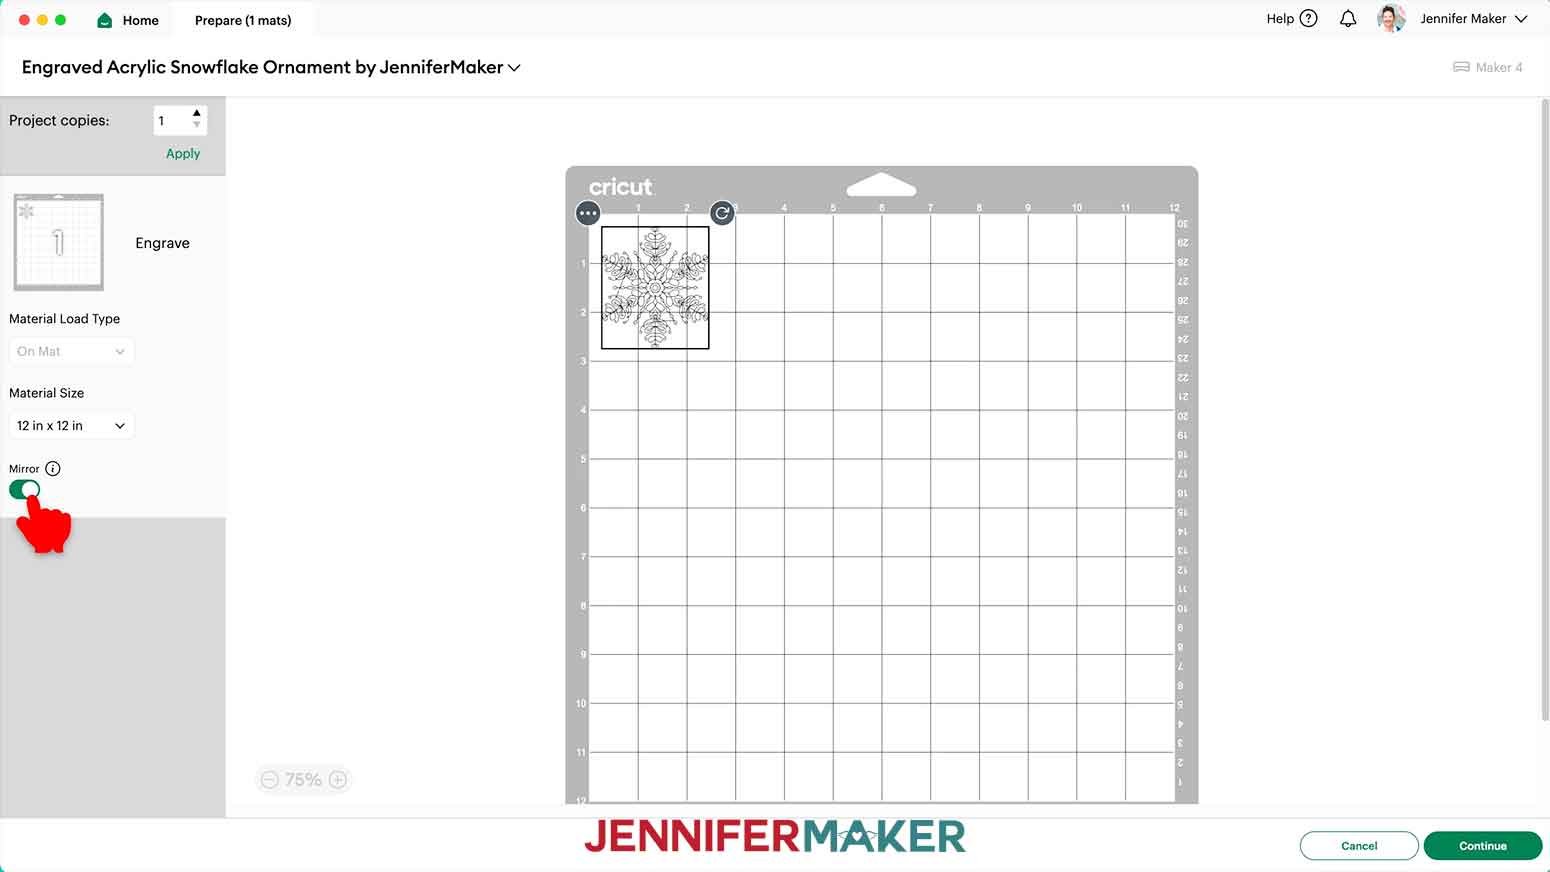
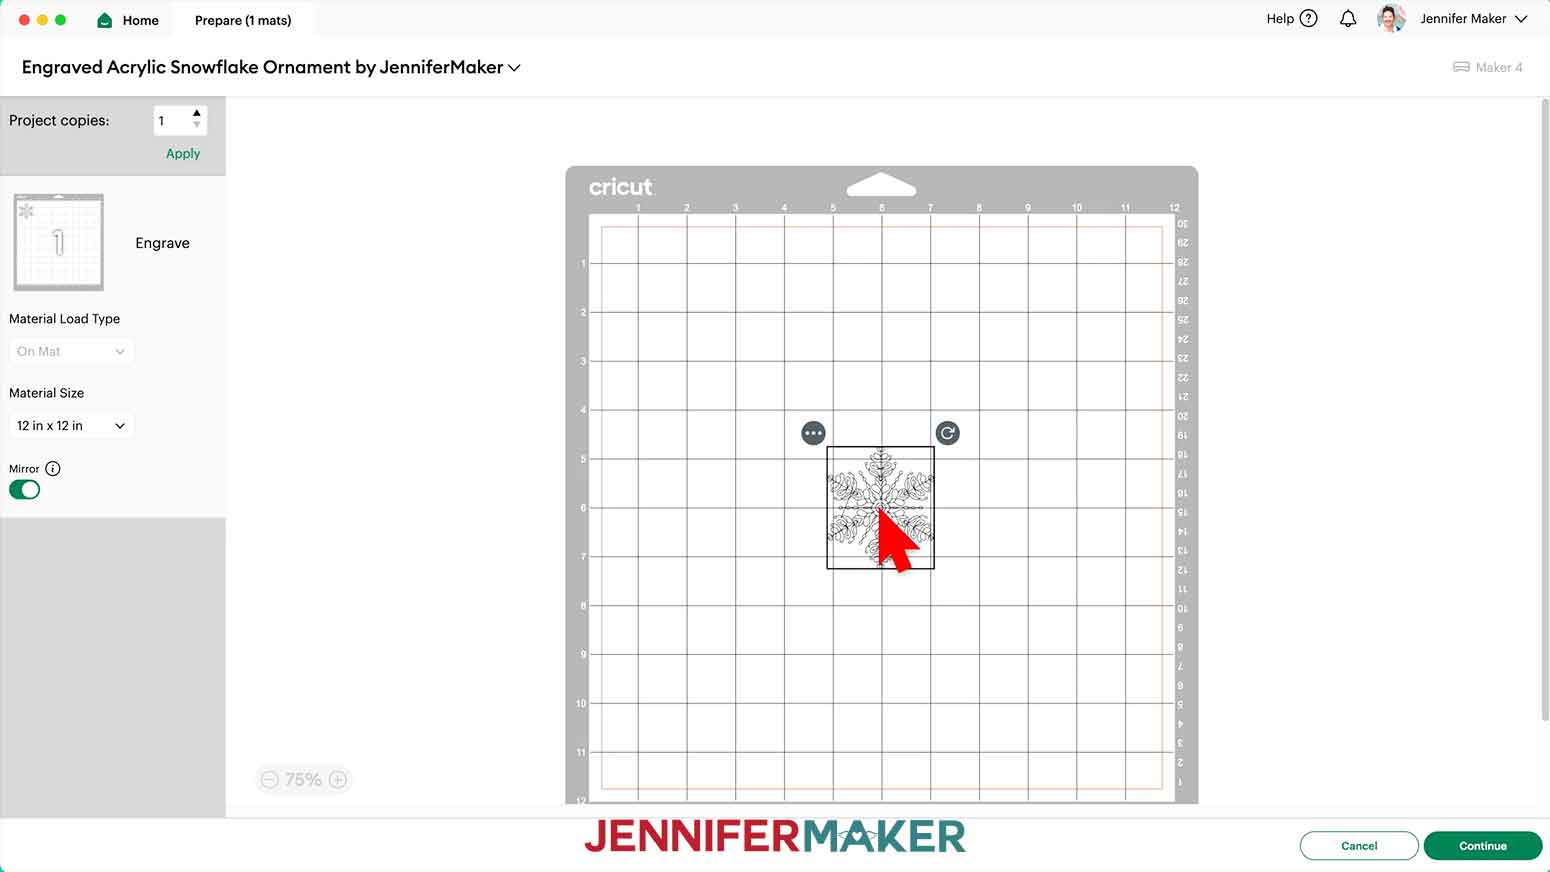
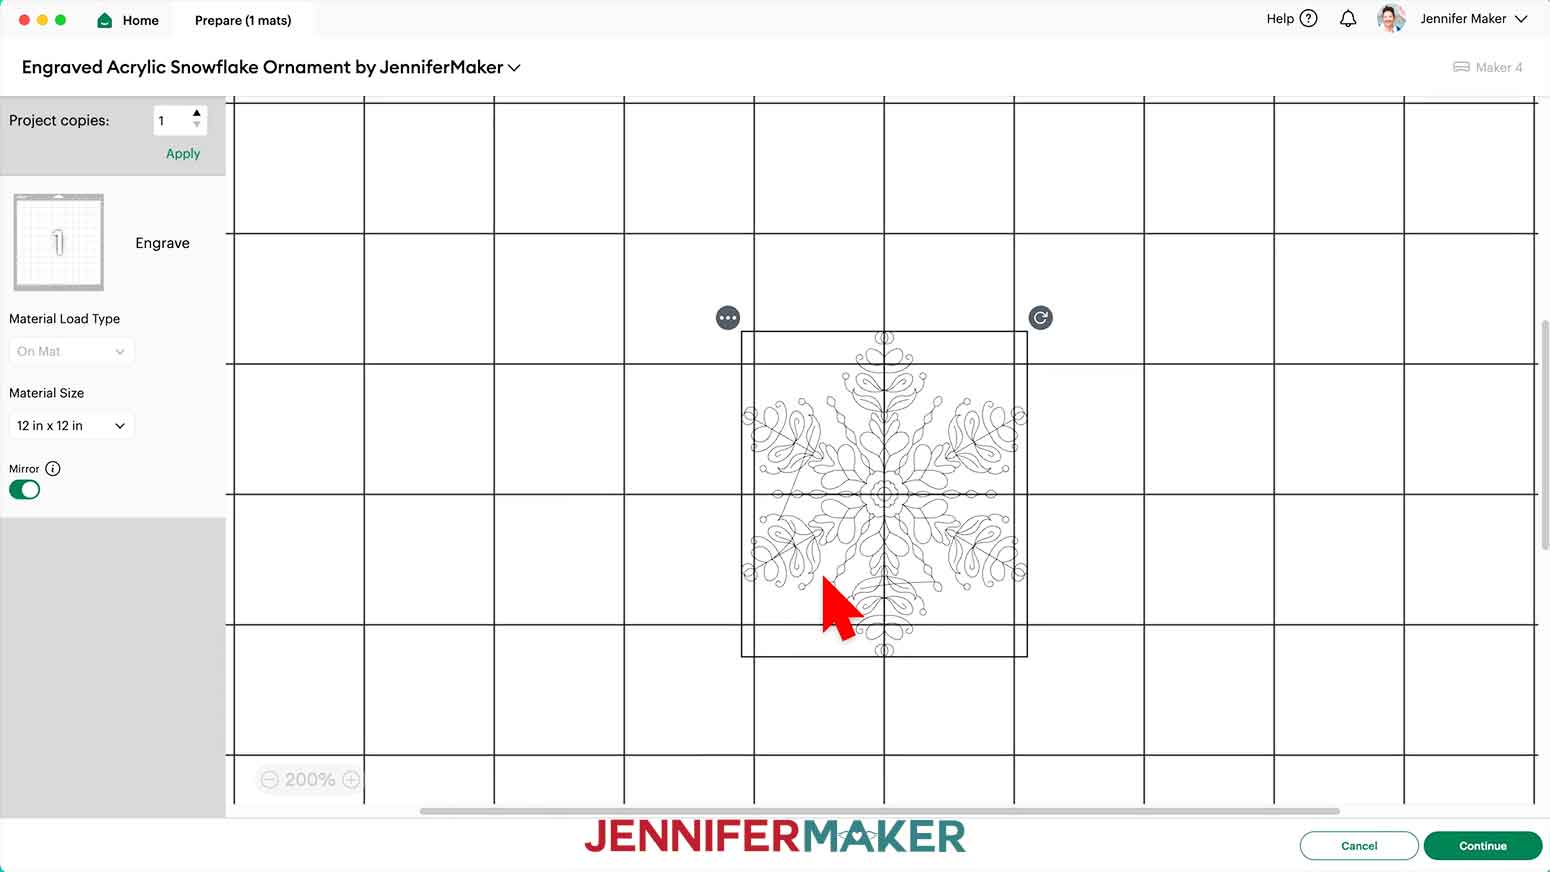
- Since engraving looks best when viewed through the shiny side of an acrylic ornament, be sure “Mirror” is toggled ON.
- Click and drag the engraving design to the center of the mat. TIP: I get the best engraving results when I place the ornament blank in the center of the mat.
- Click the plus (+) icon at the bottom to zoom in, and use the grid to position the very center of the design in the very center of the mat, on the 6” guidelines.
- Click “Continue.”
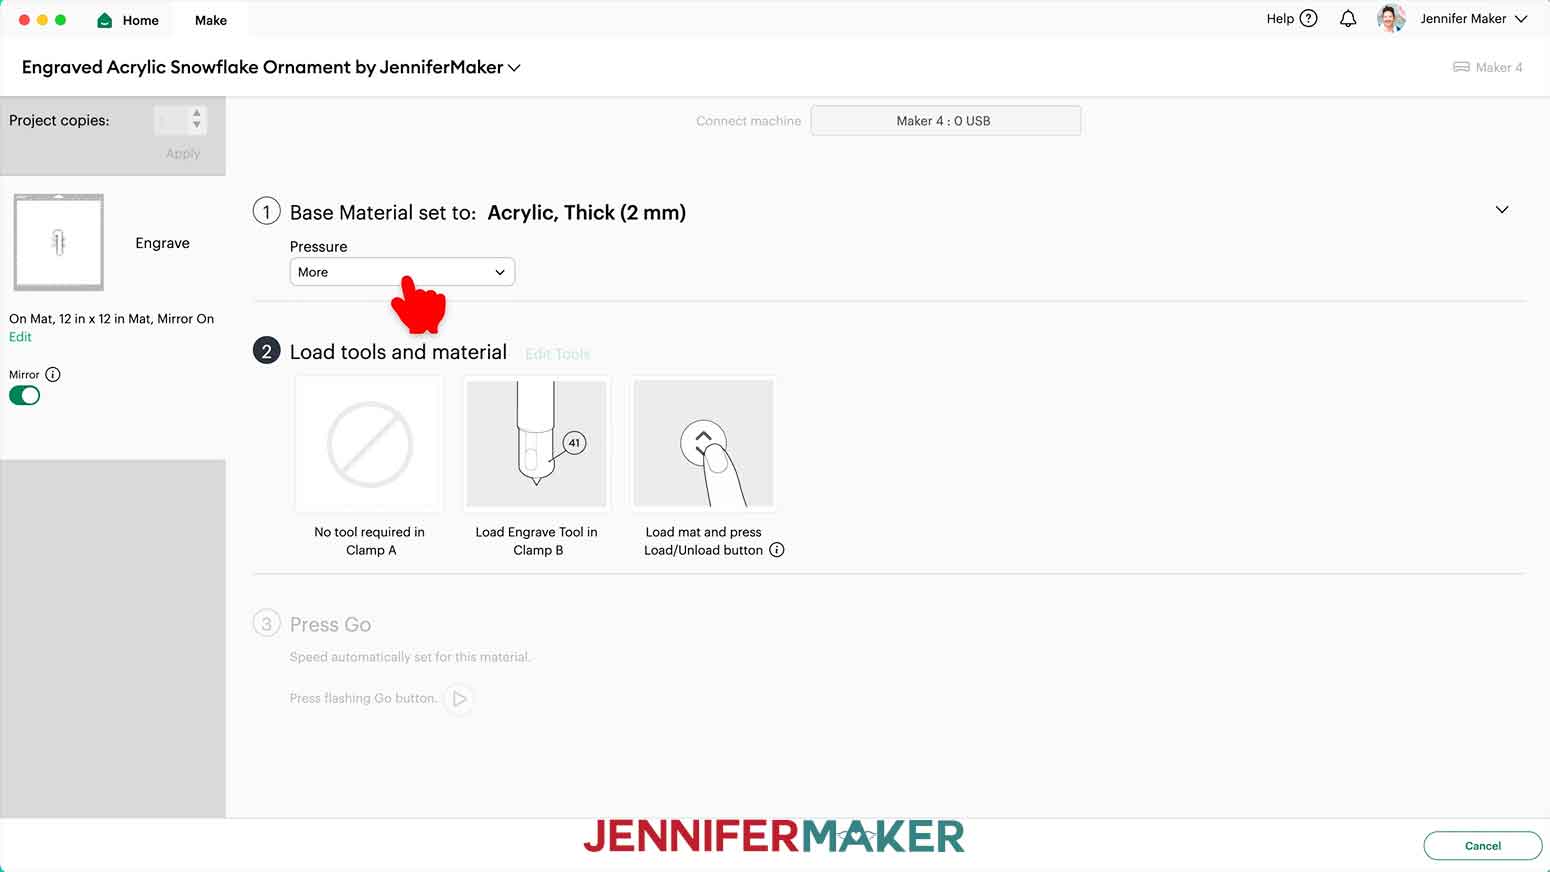
- On the Make screen, click “Browse All Materials” and search for the “Acrylic, Thick (2mm)” setting. Then select “More” Pressure.
- Use a ruler or tape measure to measure the thickness of your acrylic ornament blank, even if the packaging or product listing mentions the size. If the acrylic is thicker than 2 millimeters, it could catch on your Cricut’s roller bar and damage the machine.
- Your ornament blanks may have a protective film on one or both sides. If it has film on one side, skip to step 12. If it has film on both sides, use a weeding tool to carefully remove the protective film from ONE side. Be careful not to scratch the acrylic. NOTE: The film gives the acrylic a matte look and feel, while the acrylic without film looks very shiny and feels smooth. TIP: The acrylic can scratch very easily, so I recommend using the weeding tool to lift the protective film in a less obvious spot, like at the top of the hole where it will be disguised by ribbon or a charm.
- Use a lint-free cloth to clean the side of the ornament without film. For stubborn debris, use a little isopropyl alcohol.
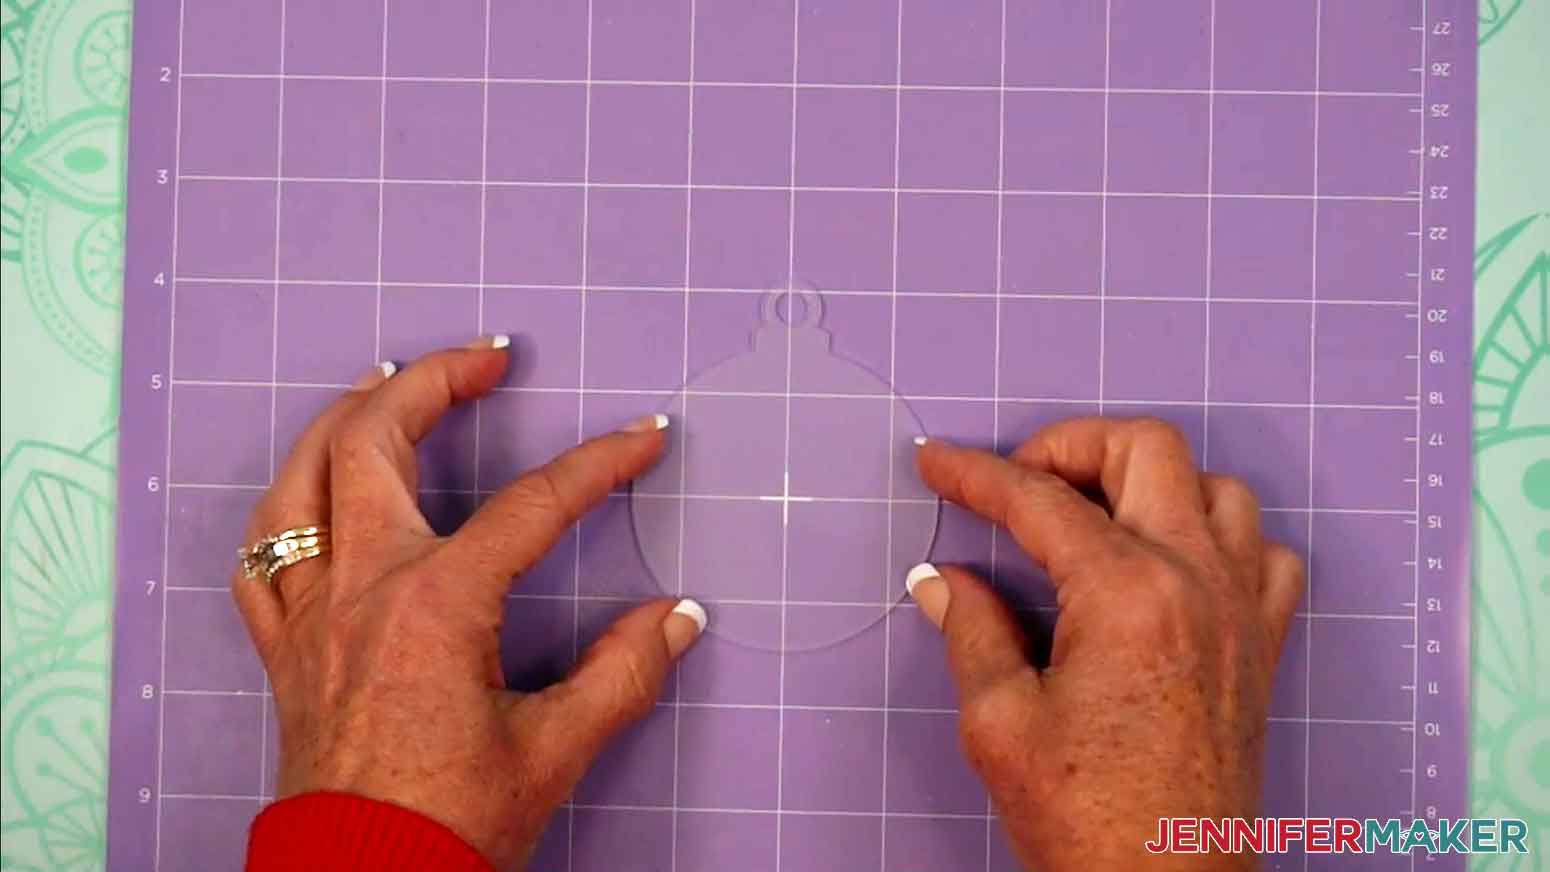
- Place your ornament blank with the film side DOWN on your machine mat to protect it from scratches and sticky residue. Position the round part of the acrylic ornament blank (disregarding the hanging hole) in the very center of a purple StrongGrip machine mat. The ornament should be in the exact position on the mat as the design in Cricut Design Space. TIP: If you’re using the ornaments in my materials list, you should see the gridlines fill the ornament shape with a perfect square when the ornament is positioned correctly in the center of the mat.
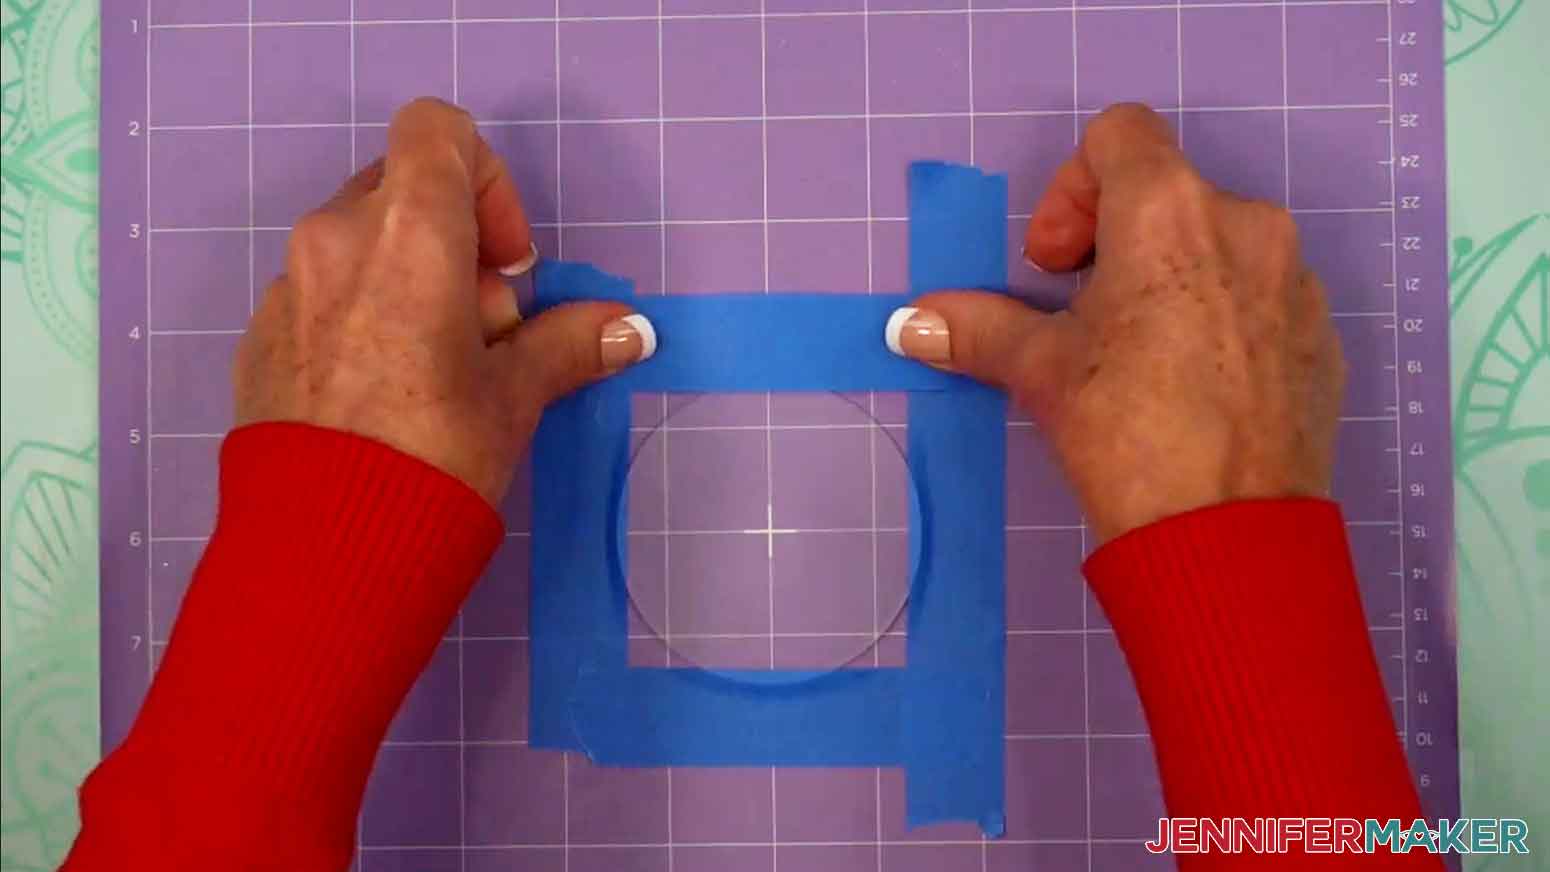
- Apply masking tape or painter’s tape to each side of the ornament to help secure it to the machine mat. The tape should only overlap the acrylic ornament about 0.25” on each side.
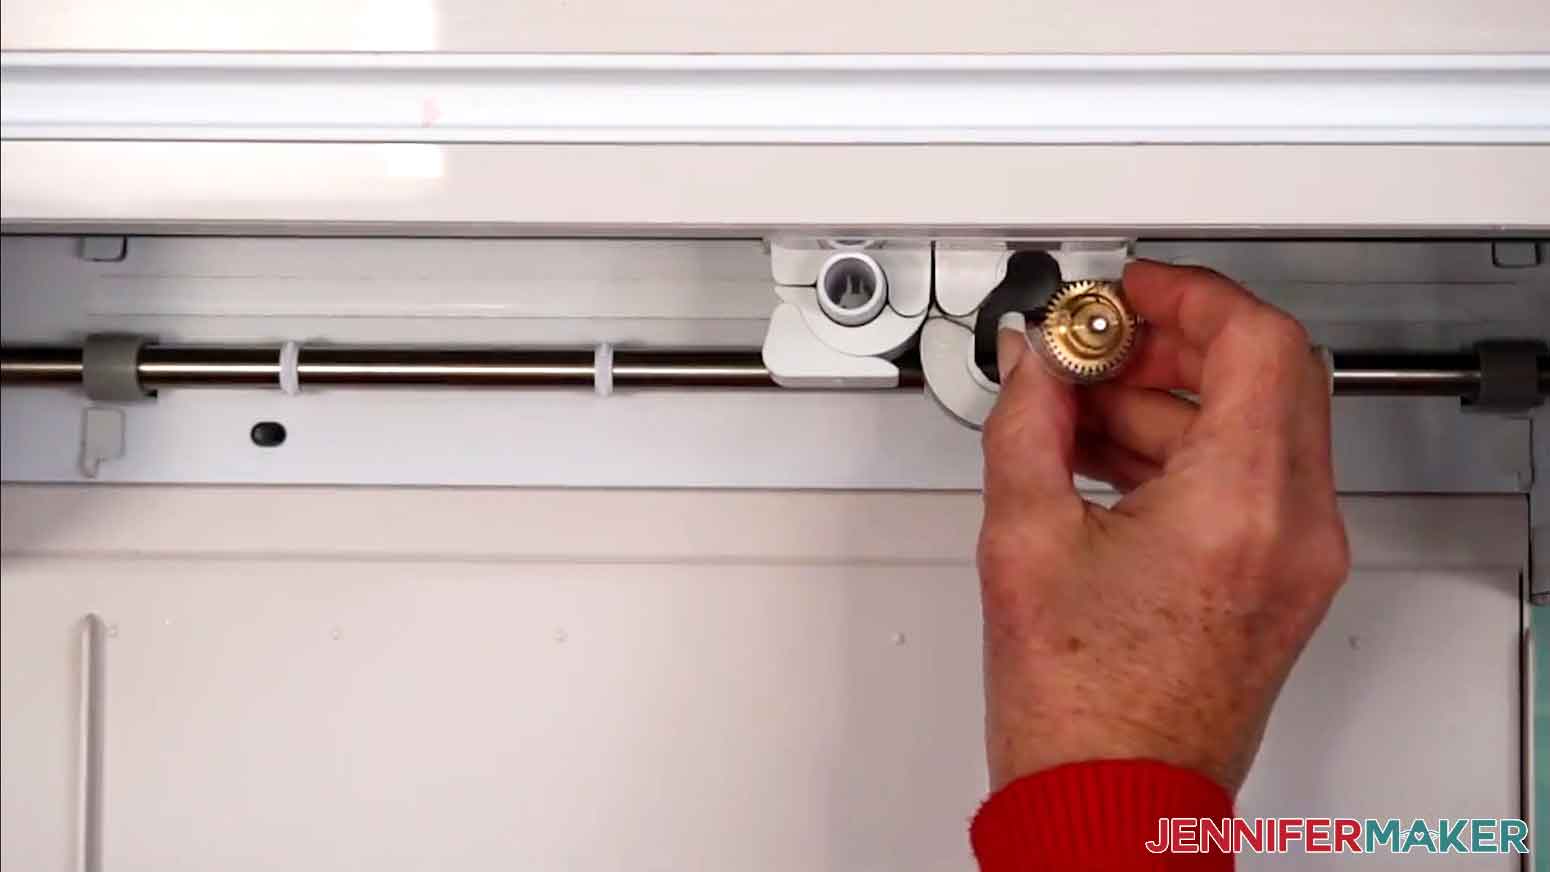
- Load a Cricut Engraving Tip and QuickSwap housing into the correct clamp on your Cricut.NOTE: The Cricut Engraving Tip requires a QuickSwap housing, which is different from Cricut’s blade housings. TIP: To change a tip in the QuickSwap housing, press and hold the plunger to release the current tip and gently remove it. While continuing to press, align the flat sides of the new tip with the housing and slide it in until fully seated. Release the plunger to lock it into place.
- To accommodate the thickness of the acrylic, push the star wheels on your Cricut to the very right of the machine.
- Load your mat into your Cricut so it matches the screen in Cricut Design Space, then press the flashing middle button to begin engraving.NOTE: My Cricut Maker 4 took about 20 minutes to engrave the “flake1” design. I recommend staying near your machine during engraving to watch for any issues, like connectivity.
- Once the ornament is finished engraving, unload the mat and place it on your work surface.
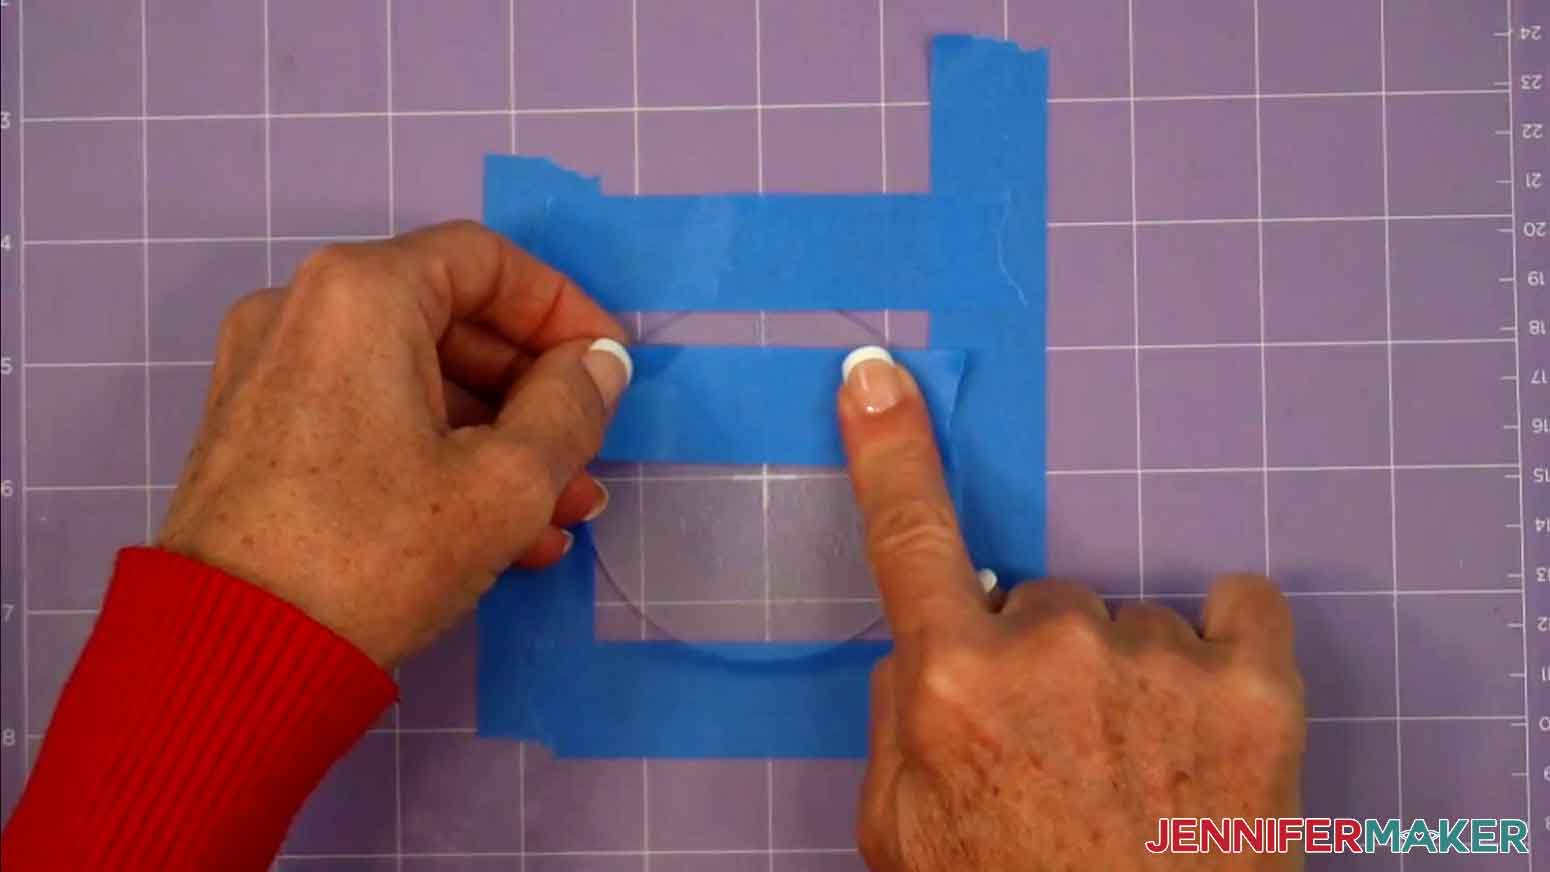
- Stick a fresh piece of masking tape down onto part of the engraved design, smooth it down with your finger, then peel it off to remove acrylic shavings.TIP: I found it easiest to keep the ornament attached to the machine mat while cleaning off the shavings.
- Repeat step 18 with a fresh piece of tape as many times as needed to remove acrylic shavings from the entire engraved area of the ornament.
- Peel off the tape from the ornament and machine mat.
- Pick up the machine mat and peel it away from the ornament.
- If there’s protective film remaining on the back of your ornament, use your weeding tool to remove it. Be careful not to scratch the acrylic.
- Use a lint-free cloth to clean the ornament of machine mat adhesive, smudges, or fingerprints. For stubborn debris, use a little isopropyl alcohol. Avoid cleaning the engraved areas directly to prevent loosening more acrylic shavings.
- String about 6-8” of ribbon through the hole and tie the ends together in a knot for hanging. Trim any excess ribbon at the knot. NOTE: If your ornaments came with charms like mine, string the ribbon through the top charm, then attach the charm(s) to the ornament via the included jump ring.
- Engraving generates dust and particles, so be sure to clean your machine mat, your Cricut, and your work area after engraving. TIP: I like to clean my machine mats with alcohol-free baby wipes or mild dish detergent. Learn more about cleaning your mats in my How To Clean Cricut Mats blog post!
- Clean your Cricut Engraving Tip with isopropyl alcohol and a lint-free cloth between every ornament.
 TIP: To change a tip in the QuickSwap housing, press and hold the plunger to release the current tip and gently remove it. While continuing to press, align the flat sides of the new tip with the housing and slide it in until fully seated. Release the plunger to lock it into place.


STEP 4: SHOW IT OFF!
Here is what my finished engraved acrylic ornament looks like!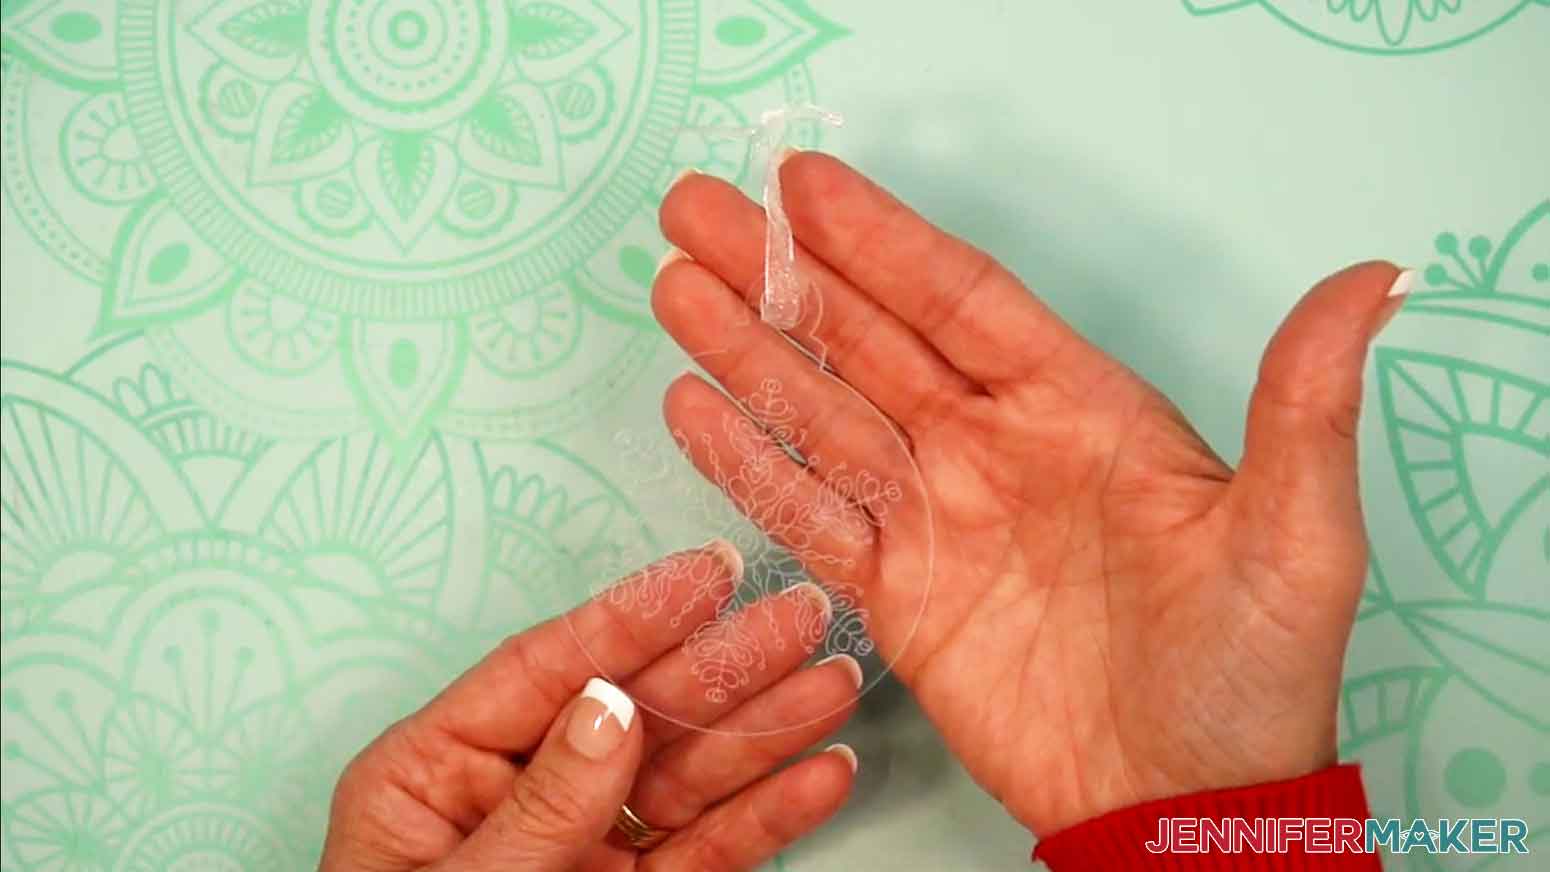
Notes
Finished ornament size: 3” round Care: Wipe clean with a dry, lint-free cloth. Use isopropyl alcohol for stubborn debris.
Answers to Your Questions About Acrylic Engraving with a Cricut
Q: I want to engrave an acrylic ornament with a filled-in name. How do I do that?
A: You can learn how to design a custom engraved acrylic ornament with a filled-in engraved name in my ADVANCE program. Learn more about ADVANCE here!
Q: Can you engrave on a Cricut?
A: Yes! The Cricut Maker line (Maker, Maker 3, and Maker 4) was designed to give home crafters professional-quality results with just the right balance of power and precision. It’s incredible that something small enough to fit on your craft table can produce results like this. Each ornament becomes a tiny masterpiece, a reflection of your creativity, and a lasting piece of your holiday story.
Q: Can I engrave acrylic with any Cricut machine?
A: Engraving is only possible with the Cricut Maker series machines. These are the only models powerful enough to handle engraving and use the special QuickSwap housing required for the engraving tip. The Joy, Joy Xtra, Explore, and Venture machines are not designed for engraving.
Q: Why shouldn’t I use third-party engraving tools?
A: While you might see tools online that claim to let other Cricut machines engrave, using them can void your Cricut warranty and even damage your machine. Cricut tests its own tools for safety and compatibility, so it’s always best to use official tools designed for your specific model.
Q: What kind of acrylic should I use for this project?
A: Use clear acrylic blanks about 3 inches wide (round) and 2 millimeters thick for best results. Always double-check the thickness of the acrylic, since thicker pieces can catch on your machine’s roller bar.
Q: Which side of the acrylic do I engrave on?
A: Always engrave on the side of the acrylic without protective film. Keep the protective film on the opposite side to prevent scratches during the engraving process.
Q: How do I keep the acrylic from slipping while engraving?
A: Secure your blank to a purple StrongGrip mat using painter’s tape or masking tape along the edges. This prevents movement and helps your engraving tip produce clean, even lines.
Q: What’s the best way to clean my engraved ornament?
A: Avoid wiping right after engraving, as dust can scratch the surface. Instead, press a strip of painter’s tape over the engraved design to lift away shavings. Then give it a gentle wipe with a soft cloth or microfiber cloth for a clean finish.
Q: Can you show me how to make acrylic engraving stand out more?
A: To enhance your acrylic engraving, you can color the engraved areas with Rub ’n Buff, acrylic ink, or enamel paint. This creates a pretty contrast between the engraved and non-engraved sections, and you can experiment with different colors to match your personal style.
Q: Can I practice before engraving my final ornament?
A: Absolutely! It’s a great idea to test your settings on a scrap piece of acrylic first. This helps you find the right balance of pressure and placement before working on your final project.
Q: Do I need to mirror my design before engraving?
A: If you want the engraved design to be viewed through the smooth side of the acrylic for a professional reflective finish, mirror the image before engraving. If you plan to color the engraved lines afterward, leave it un-mirrored so you can apply color directly into the grooves.
Get my free Acrylic Engraving SVG files!
(If you do not see the signup form above, click here.)
I love seeing what you make with my tutorials and how you customize them! Please share a photo of your custom engraved acrylic ornament in our Facebook group or tag me on social media with #jennifermaker.
Love,

Want to remember this? Save this How to Do Acrylic Engraving with a Cricut tutorial to your favorite Pinterest Board!