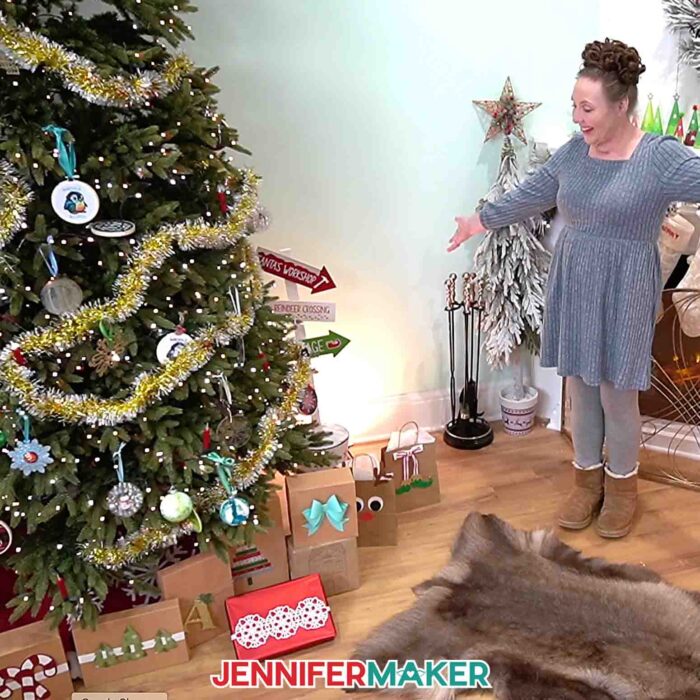
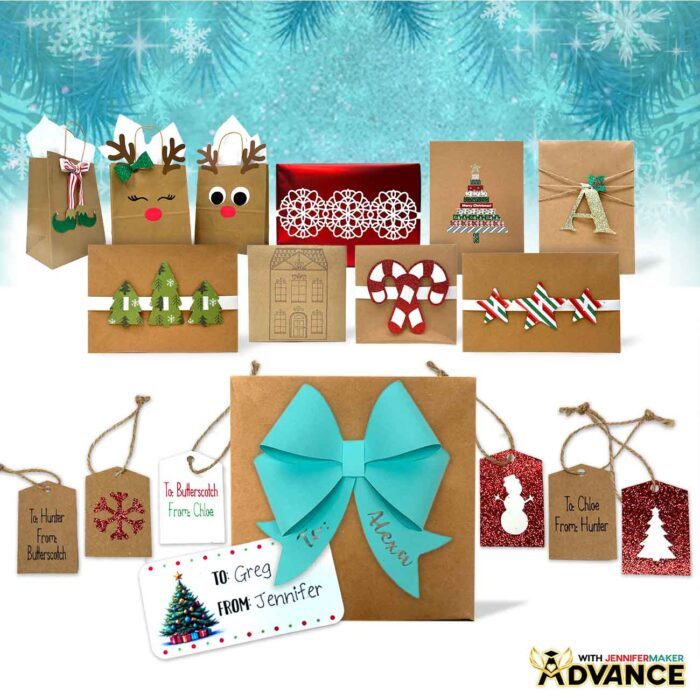
Learn how to make and use quick and easy Cricut Gift Wrapping Ideas to decorate presents!
There was one night a few Decembers ago when I looked around at the pile of unwrapped presents, the crumpled store-bought paper, and those plastic bows that never quite stick. I laughed, and said to myself, “Okay, I can do better than this.” That’s when I poured a cup of cocoa, fired up my Cricut, and let the fun begin. Instead of rushing through boring wrap jobs, I now treat the wrapping like part of the gift itself! And this year, I’ve got my top 10 Cricut gift wrapping ideas to get you started, so you can turn simple paper, cardstock, and ribbon into beautiful, personal wrapping that’ll stand out under the Christmas tree.
See the full step-by-step video tutorial with my 10 easy Cricut gift wrapping ideas:

With a handful of cardstock, some kraft paper, twine, ribbon, a little glue, and a few jingling bells, you can make these ten amazing gift wrapping projects that turn basic boxes and bags into something people will rave about. In the video tutorial that goes with this post, I walk you through everything step-by-step, and you can follow along with the free files so you can make the exact same projects at home. I like to set up my Cricut Maker, Cricut Explore, and even my little Cricut Joy with a variety of materials and let them do the hard work (while I sip cocoa).

So, what Cricut gift wrapping ideas do I have for you? Gift tags are one of the fastest ways to make a present feel special. My Cutout Gift Tags are layered, with glittery fronts glued to simple cardstock backs. A dab of glue in the right places, a bit of twine, and suddenly your Christmas gifts look coordinated and intentional. I love cutting a whole batch on my Cricut machine at once, then assembling them while a movie (usually Elf) plays.
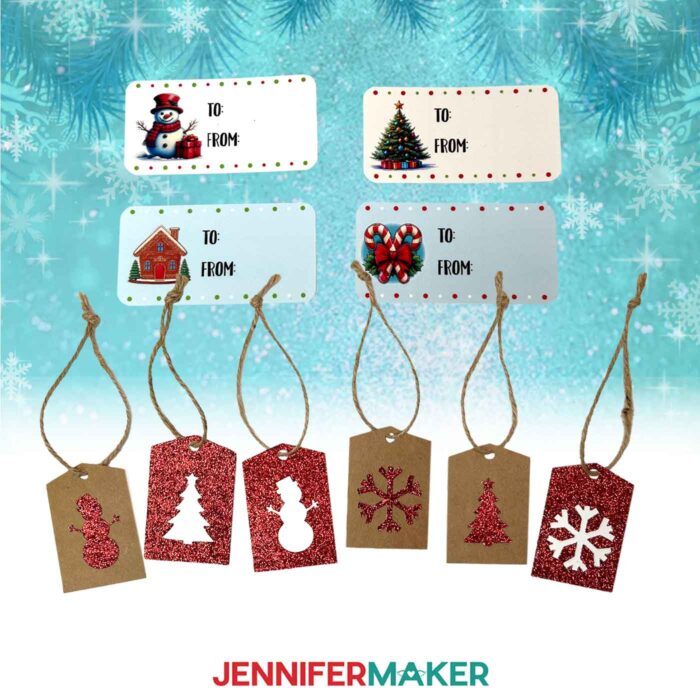
The Print Then Cut Gift Labels look like something you bought in a fancy stationery shop. You print them on sticker paper, let the Cricut read the marks and cut them out, and suddenly you have a sheet of perfectly-cut labels ready to go. They’re fast, they’re polished, and they’re ideal for last-minute wrapping marathons.
If you’ve ever wanted to make your own custom wrapping paper, the Cricut Pen Wrapping Paper project will be your new obsession. You use Cricut pens to draw a design directly onto kraft paper, sized perfectly for the side of a small box. The Cricut machine handles all the drawing, and all you do is tape it onto your box when it’s done. It’s a really fun way to let your machine show off, and a great reason to pull those pens out of the drawer.
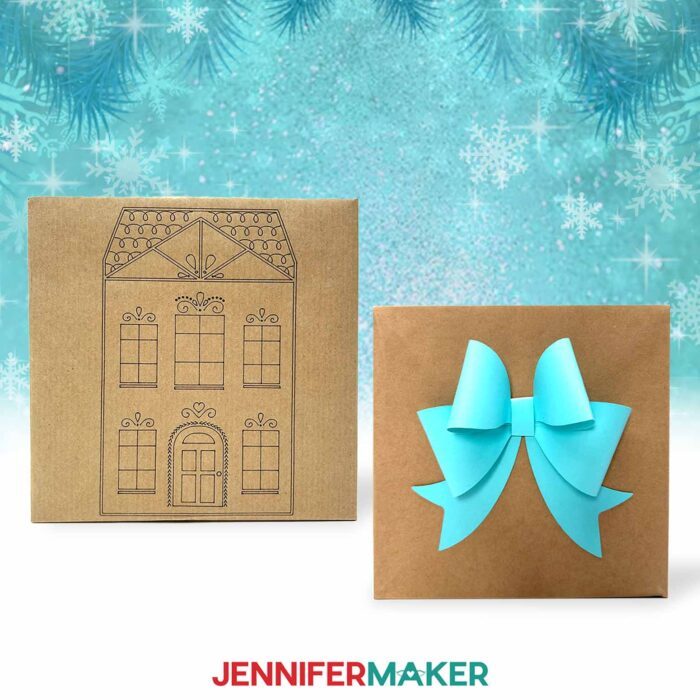
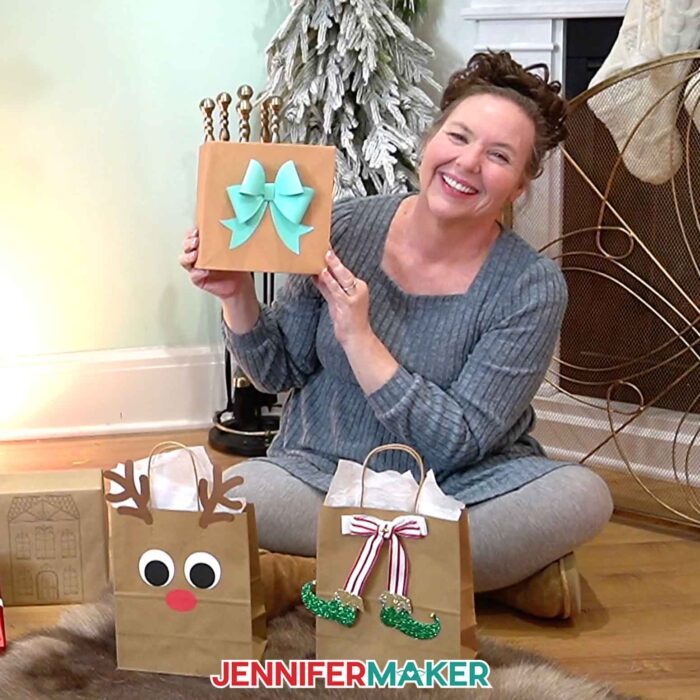
And if you’ve ever tossed overpriced bows into your cart at the last minute, you’ll love my Fancy Paper Bow. Using your Cricut to cut the pieces means you get clean, crisp edges and a bow that assembles easily. It’s one of my favorite ways to dress up plain gift boxes, and because you’re using paper, you can customize the color for any occasion, not just the holidays!
Plain paper bags get an upgrade with the Reindeer Gift Bags idea. A few cutouts for eyes, a nose, and antlers turn a plain brown paper bag into a character straight out of the North Pole. You can even add the included mini bow at the base of an antler if you want them to look extra festive. These are fantastic for stuffing with gift cards or oddly shaped items that never fit in standard boxes.
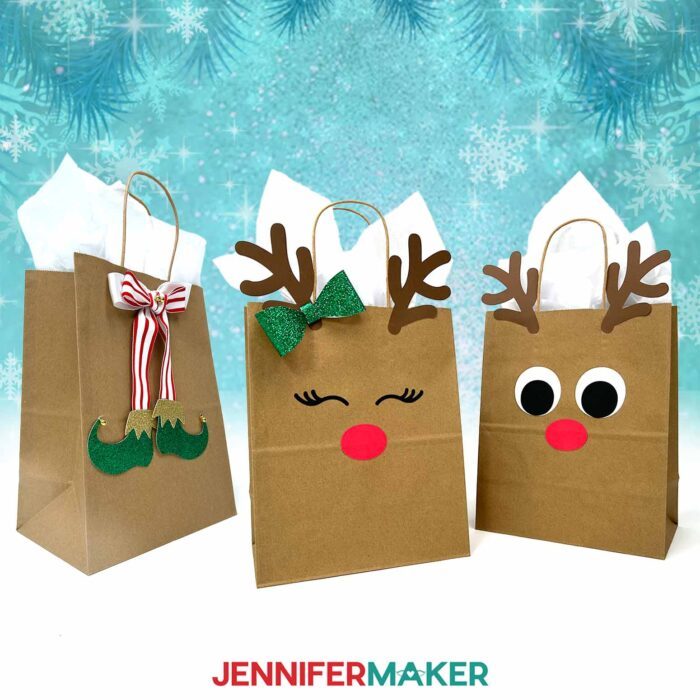
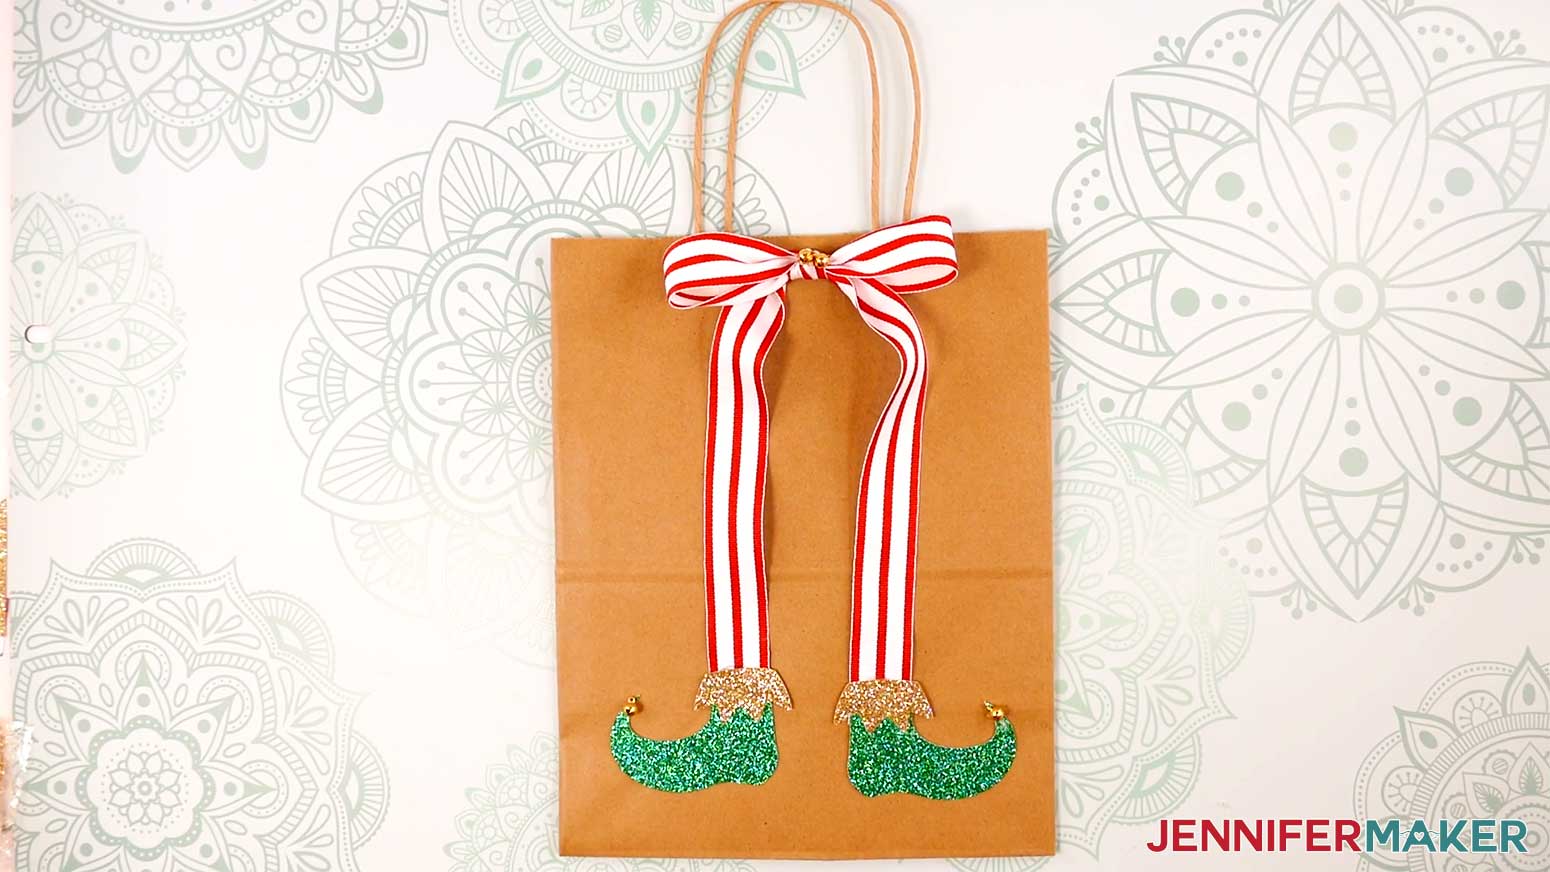
If you love movement and a little jingle, the Elf Boots Ribbon and Ribbon Sliders take your packages to the next level. The Elf Boots Ribbon starts with a bow, and then two tiny boots are glued to the ends of the tails, plus optional bells on the curled toes. It looks like an elf dove head-first into your present!
The Ribbon Sliders slide onto a length of ribbon so you can wrap them around gift boxes without fuss. To adjust the slots to fit your ribbon, watch the tutorial video to see how I did it the easy way.
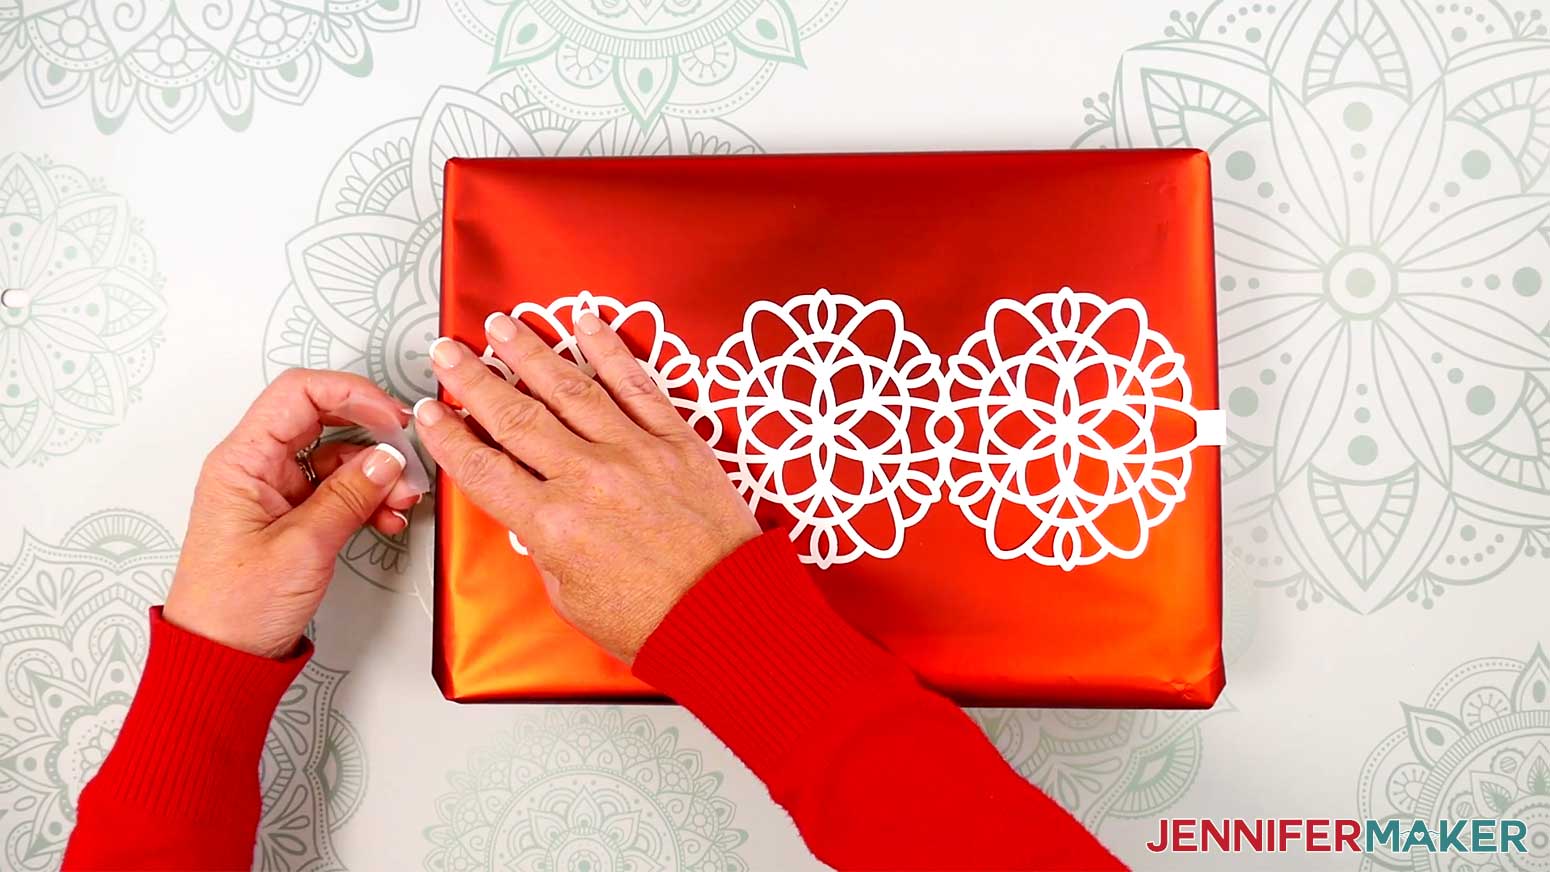
For something really striking, the Snowflake Box Wrap turns your gift box into a showpiece. Long strips connect layered snowflakes into a belt that wraps all the way around your present. If you’re using a Single Scoring Wheel or a Scoring Stylus on your Cricut Maker or Cricut Explore, you can even add score lines to help the band fold neatly around the corners. This is one of those creative gift wrap ideas that looks complicated but is surprisingly easy once the Cricut has done all the cutting.
For a quick and easy project that’s perfect for kids, the Washi Tape Tree with a Star is so satisfying. You use strips of washi tape to build a little tree shape on cardstock, then top it with a glittery star cut on your Cricut. It’s simple, but the mix of patterns and colors makes each one totally unique.
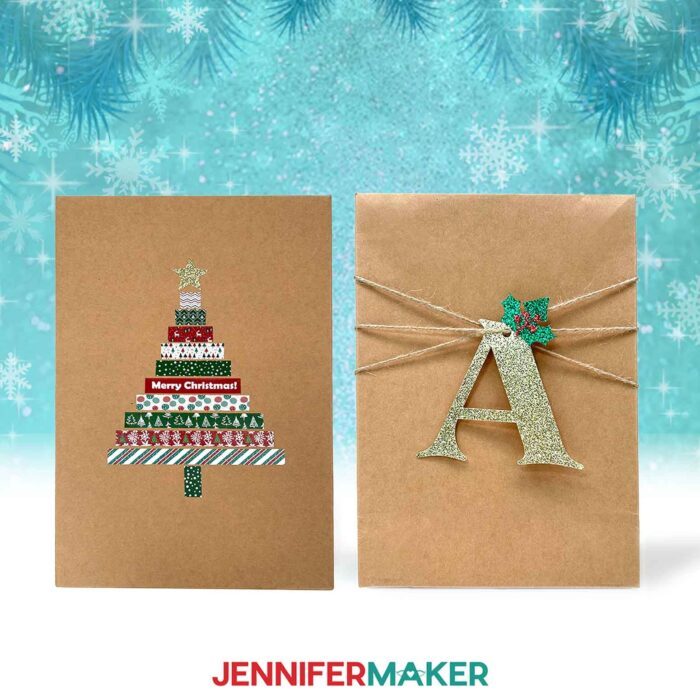
Finally, the Holly Letter Gift Tags are like mini monograms for your favorite people, and I’ll show you how to customize your own. After a few dabs of glue to attach the layers, just thread twine through the hole and wrap it around your gift a few times to anchor everything. It’s such a pretty way to label gifts without writing anything, and leaves the giftee with a pretty paper ornament they can hang on their tree.
All of these projects use simple shapes, a variety of materials you probably already have, and just enough craft glue, hot glue, and tape to hold everything together without stress. In the video tutorial, I show you exactly how to resize the designs, adjust slot sizes, and tweak things for different machines, whether you’re using a Cricut Maker, Cricut Explore, Cricut Joy, Joy Xtra, or even the Venture. You’ll also see how I lay everything out in Design Space, work with score lines, and get the best cuts possible.
Inside the ADVANCE with JenniferMaker tutorial, we’re taking these projects a step further with a special holiday wrapping workshop. I’ll show you how to turn the Fancy Paper Bow into a customized name bow with a cutout layer, how to personalize the Cutout Gift Tags with Cricut writing so they’re already labeled right off the mat, and how to design your own matching Print Then Cut Gift Labels. Every gift under your tree will look like it came from a custom boutique, except it’s made by you! Learn more about ADVANCE with JenniferMaker here!
If you’re ready to move beyond basic store-bought wrap and try some unique ways to dress up your Christmas gifts, these Cricut projects are such a fun place to start. Grab the free files, cue up the tutorial, and spend an afternoon turning plain packages into something that makes people stop and smile before they even peek inside. From my craft room to yours, happy holidays and happy wrapping!
Let me show you how to make Cricut gift wrapping ideas! This post contains some affiliate links for your convenience (which means if you make a purchase after clicking a link I will earn a small commission but it won’t cost you a penny more, there is no additional cost)! Read my full disclosure policy.
Materials to Make All 10 Cricut Gift Wrapping Ideas
View my Amazon shopping list with the exact items I used.
- One (1) or more Assorted Gift Boxes
- Wrapping Paper (I used red)
- Brown Paper Bags (for Reindeer Gift Bags)
- One (1) Sheet of 12″ x 12″ 65 lb. White Cardstock (for Snowflake Box Wrap, Ribbon Sliders, Cutout Gift Tags)
- Three (3) Sheets of 12″ x 12″ 65 lb. Colored Cardstock (I used brown, white, black, and red for Reindeer Gift Bags)
- One (1) Sheet of 12″ x 12″ Patterned Cardstock (for Ribbon Sliders)
- One (1) Sheet of 12″ x 12″ Red Glitter Cardstock (for Ribbon Sliders, Cutout Gift Tags, Holly Letter Gift Tags)
- One (1) Sheet 12″ x 12″ Green Glitter Cardstock (for Reindeer Gift Bags, Elf Boots Ribbon, Holly Letter Gift Tags)
- One (1) Sheet 12″ x 12″ Gold Glitter Cardstock (for Elf Boots Ribbon, Holly Letter Gift Tags, Washi Tape Gift Decoration)
- One (1) Sheet of 12″ x 12″ 65 lb. Teal Cardstock (for Fancy Paper Bow)
- One (1) Sheet of Kraft Cardstock (for Cutout Gift Tags)
- Kraft Paper Roll (for Cricut Pen Wrapping Paper)
- One (1) Sheet of 8.5″ x 11″ Cricut Sticker Paper (for Print Then Cut Gift Tags)
- 1″ Wide White Ribbon (for Ribbon Sliders, Elf Boots Ribbon)
- 1″ Wide Striped or Polka Dot Ribbon (for Elf Boots Ribbon)
- 1/4″ Bells (for Elf Boots Ribbon)
- Twine (for Cutout Gift Tags, Holly Letter Gift Tags)
- Washi Tape with Christmas Pattern (for Washi Tape Tree With Star)
- Clear Tape (to wrap and attach projects to packages)
- A way to cut your materials – I’m using the Cricut Maker 4, but you can also use a Cricut Maker series machine, a Cricut Explore series machine, the Cricut Venture, the Cricut Joy, or the Cricut Joy Xtra
- Cricut Green StandardGrip Machine Mat 12″ x 12″ (for all projects but Cricut Pen Wrapping Paper) -OR-
- Cricut Blue LightGrip Machine Mat 12″ x 12″ (for Cricut Pen Wrapping Paper) -OR-
- Cricut Blue LightGrip Machine Mat 12″ x 24″ (for Cricut Pen Wrapping Paper)
- Cricut Pen (I used a black 0.4mm Cricut Pen for Cricut Pen Wrapping Paper)
- Inkjet Printer (for Print Then Cut Gift Tags)
- Craft Glue (I used Bearly Art Precision Craft Glue for Reindeer Gift Bags, Elf Boots Ribbon, Snowflake Box Wrap, Cutout Gift Tags, Holly Letter Gift Tags, Washi Tape Gift Decoration)
- Hot Glue Gun & Glue Sticks ( for Ribbon Sliders, Fancy Paper Bow, Elf Boots Ribbon) -AND-
- Silicone Finger Protectors (for Ribbon Sliders, Fancy Paper Bow, Elf Boots Ribbon)
- Brayer
- Scraper
- Spatula
- Weeding Tool (optional, to poke out bits of cardstock from intricate cuts)
- Scissors (optional, to cut twine and wrapping paper for gifts)
- Paper Trimmer (optional, to cut kraft paper for Cricut Pen Wrapping Paper)
- Tweezers (optional, to help place or hold small glued areas
How to Make Cricut Gift Wrapping Embellishments!

Cricut Gift Wrapping Ideas
Learn how to make and use quick and easy Cricut Gift Wrapping Ideas to decorate presents!
Materials
- One (1) or more Assorted Gift Boxes
- Wrapping Paper (I used red)
- Brown Paper Bags (for Reindeer Gift Bags, Elf Boots Ribbon)
- One (1) Sheet of 12” x 12” 65 lb. White Cardstock (for Snowflake Box Wrap, Ribbon Sliders, Cutout Gift Tags)
- Three (3) Sheets of 12” x 12” 65 lb. Colored Cardstock (I used brown, white, black, and red for Reindeer Gift Bags)
- One (1) Sheet of 12” x 12” Patterned Cardstock (for Ribbon Sliders)
- One (1) Sheet of 12” x 12” Red Glitter Cardstock (for Ribbon Sliders, Cutout Gift Tags, Holly Letter Gift Tags)
- One (1) Sheet of 12” x 12” Green Glitter Cardstock (for Reindeer Gift Bags, Elf Boots Ribbon, Holly Letter Gift Tags)
- One (1) Sheet of 12” x 12” Gold Glitter Cardstock (for Elf Boots Ribbon, Holly Letter Gift Tags, Washi Tape Gift Decoration)
- One (1) Sheet of 12” x 12” 65 lb. Teal Cardstock (for Cardstock Bow)
- One (1) Sheet of Kraft Cardstock (for Cutout Gift Tags)
- Kraft Paper Roll (for Cricut Pen Wrapping Paper)
- One (1) Sheet of 8.5” x 11” Cricut Sticker Paper (for Print Then Cut Gift Tags)
- 1” Wide White Ribbon (for Ribbon Sliders, Elf Boots Ribbon)
- 1” Wide Striped or Polka Dot Ribbon (for Elf Boots Ribbon)
- ¼” Bells (for Elf Boots Ribbon)
- Twine (for Cutout Gift Tags, Holly Letter Gift Tags)
- Washi Tape with Christmas Pattern (for Washi Tape Tree with Star)
- Clear Tape (to wrap and attach projects to packages)
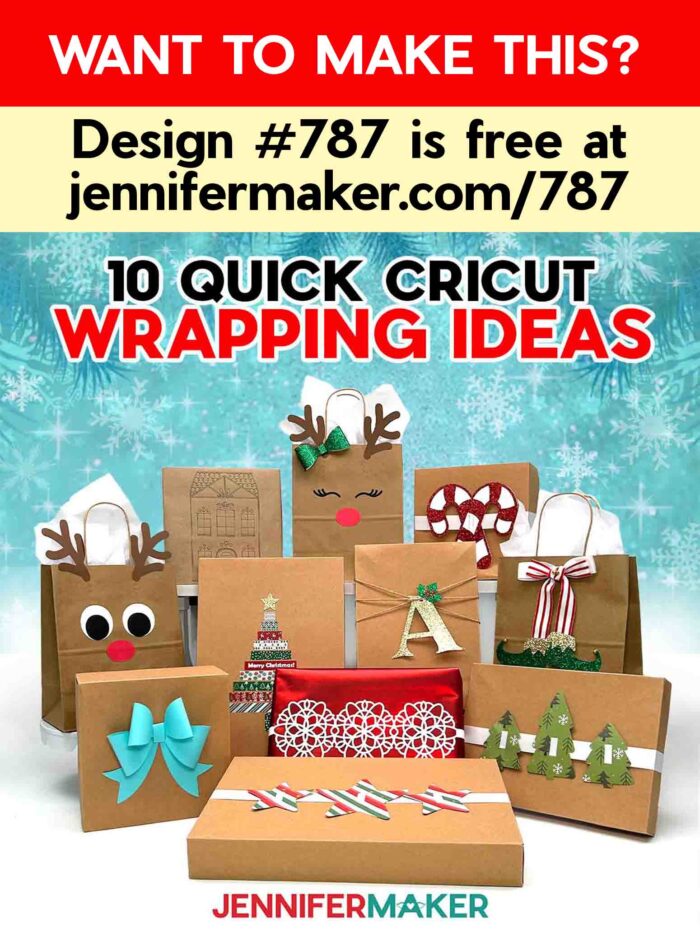
- Design #787 (My free Cricut gift wrapping design files are available in my free resource library - get the password by filling out the form at the bottom of this page)
Tools
- A way to cut your materials - I’m using the Cricut Maker 4, but you can also use a Cricut Maker Series machine, a Cricut Explore Series machine, the Cricut Venture, the Cricut Joy, or the Cricut Joy Xtra
- Cricut Green StandardGrip Machine Mat 12" x 12" (for all projects but Cricut Pen Wrapping Paper) -OR-
- Cricut Blue LightGrip Machine Mat 12” x 12” (for Cricut Pen Wrapping Paper) -OR-
- Cricut Blue LightGrip Machine Mat 12” x 24” (for Cricut Pen Wrapping Paper)
- Cricut Pen (I used a black 0.4mm Cricut Pen for Cricut Pen Wrapping Paper)
- Inkjet Printer (for Print Then Cut Gift Tags)
- Craft Glue (I used Bearly Art Precision Craft Glue for Ribbon Sliders)
- Hot Glue Gun & Glue Sticks (for Ribbon Sliders) -AND-
- Silicone Finger Protectors (for Ribbon Sliders)
- Brayer
- Scraper
- Spatula
- Weeding Tool (optional, to poke out bits of cardstock from intricate cuts)
- Scissors (optional, to cut wrapping paper for gifts)
- Paper Trimmer (optional, to cut kraft paper for Cricut Pen Wrapping Paper)
- Tweezers (optional, to help place or hold small glued areas)
Instructions
STEP 1: GET MY FREE CRICUT GIFT WRAPPING DESIGNS
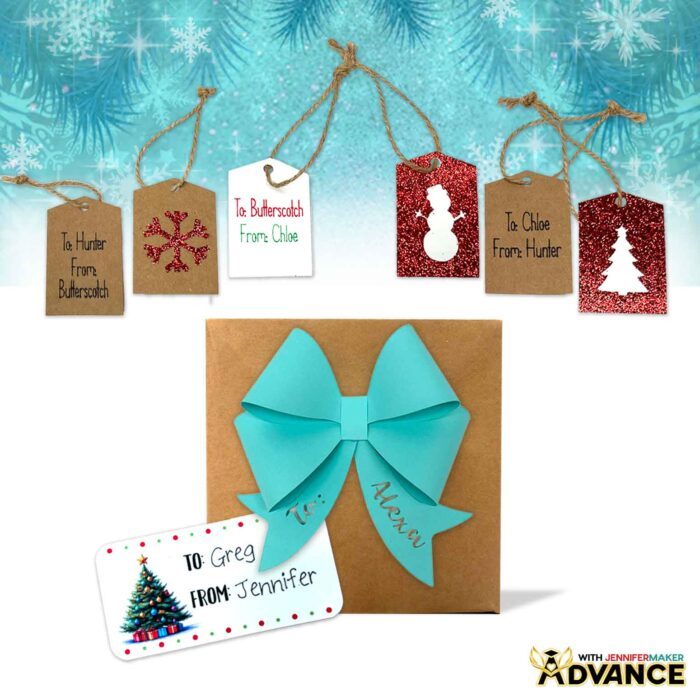
First, download my Cricut gift wrapping designs from my free library – look for Design #787. Alternatively, you can use the Save This Project form near the top of this post and the design link will be emailed to you.In the SVG and PNG folders, you’ll find files for ten Cricut gift wrapping projects:
- Three Cutout Gift Tags (in one file)
- Fancy Paper Bow
- Two Reindeer Gift Bags (in one file)
- Washi Tape Tree with Star (the “star” file can be used as a tree topper!)
- Elf Boots Ribbon
- Three Ribbon Sliders
- Snowflake Box Wrap
- Holly Letter Tags
- Cricut Pen Wrapping Paper (the “house” design file)
- Four Print Then Cut Gift Labels
The Cricut Pen Gift Wrap SVG is sized to be drawn and cut on a Cricut Maker series machine, Cricut Explore series machine, or Cricut Venture. The other ten SVG files can be cut on any Cricut cutting machine.
The Print Then Cut Gift Label PNGs can be made with Cricut Maker series, Explore series, Venture, or Joy Xtra cutting machines. They cannot be made with the Cricut Joy, as it does not have Print Then Cut capabilities. I made the label designs with the help of AI art generation and adjusted them with image editing software.
I will demonstrate each project using my Cricut Maker 4.
The DXF folder contains files that can be cut on other cutting machines, and the PDF folder contains versions of the project you can print and cut by hand.
TIP: If you’re not sure how to download zip files and upload designs, go to jennifermaker.com/svgs.
STEP 2: MAKE CRICUT GIFT WRAPPING IDEAS
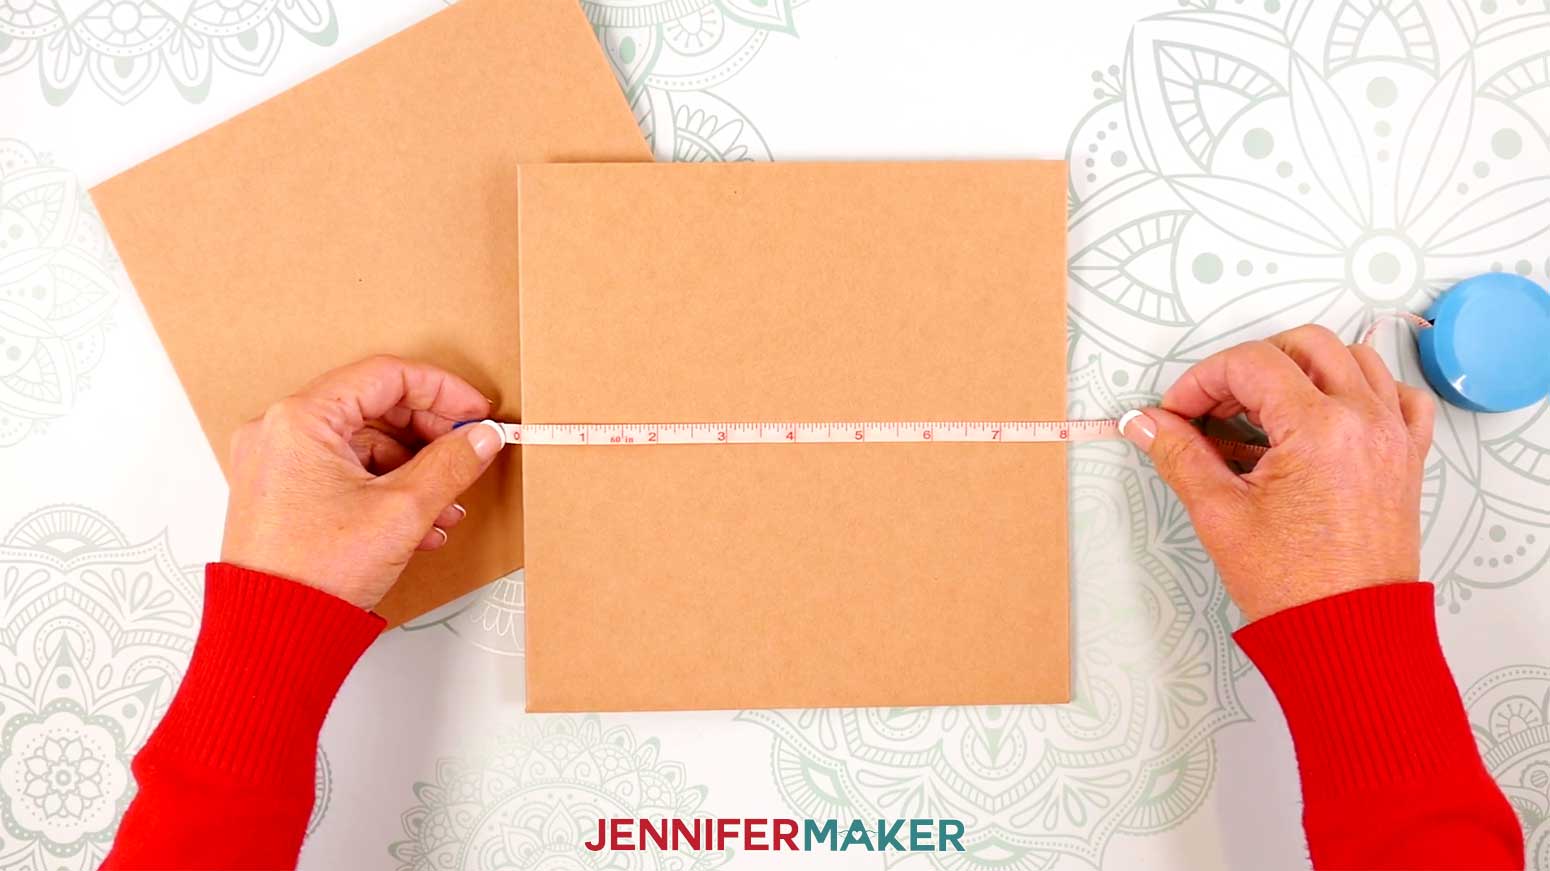
Before you begin, you may want to measure the boxes you’ll be wrapping and decorating. Each design can be resized before cutting.
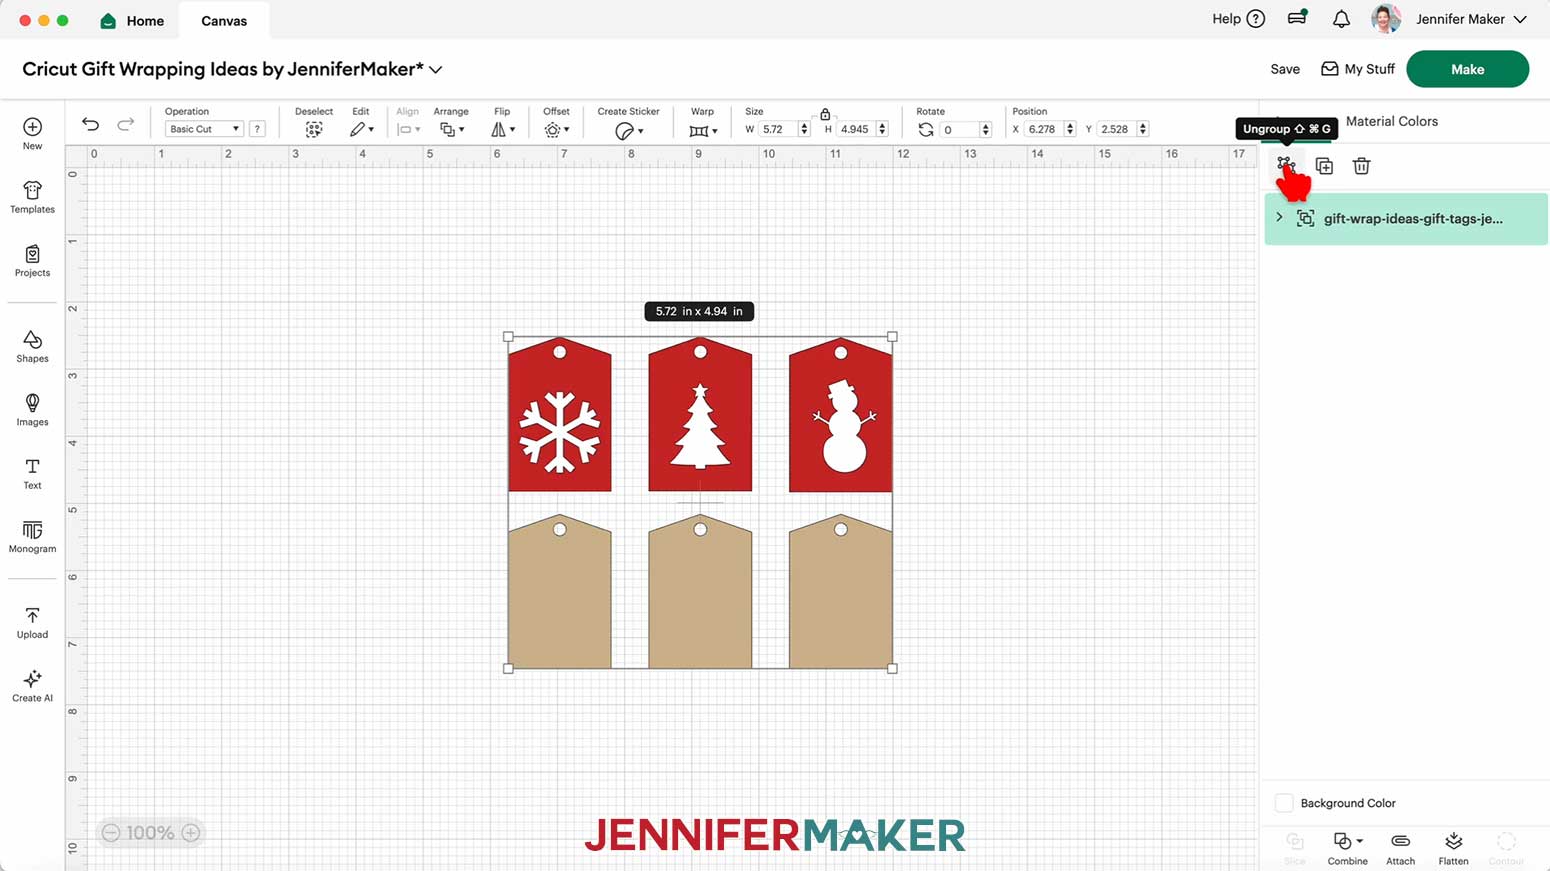
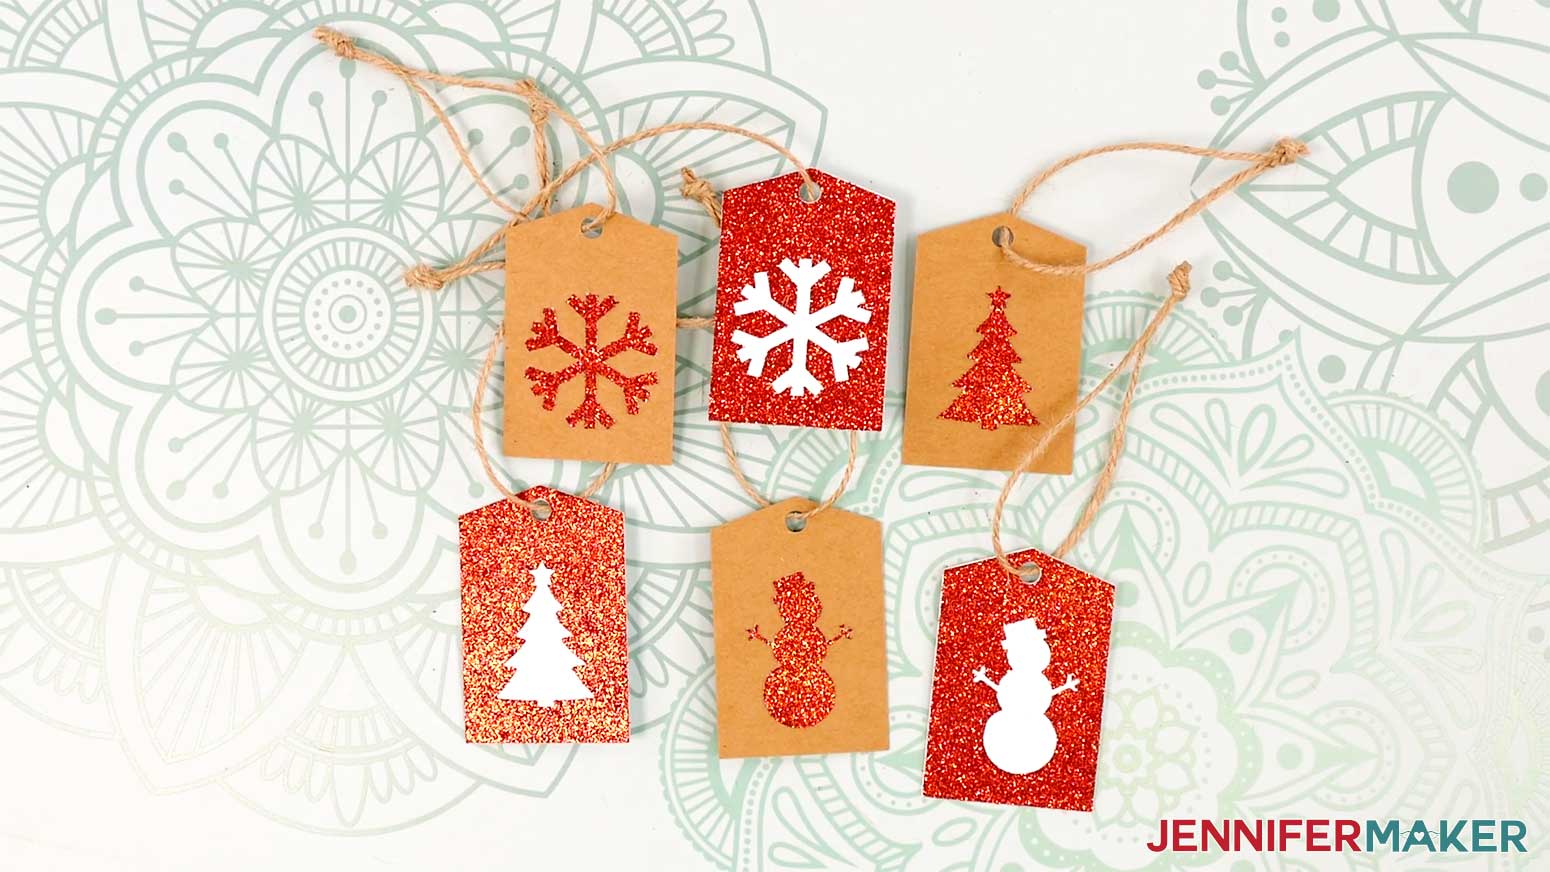
PROJECT 1: CUTOUT GIFT TAGS
CRICUT DESIGN SPACE
1. In Cricut Design Space on a blank Canvas, click “Upload.”
2. Click “Upload Image.”
3. Click “Browse.”
4. Find and select the SVG with “gift-tags” in the name.
5. Click “Open” and then “Continue.”
6. Click “Upload” to add the SVG to your Canvas.
7. Click “Save” and give your project a name.
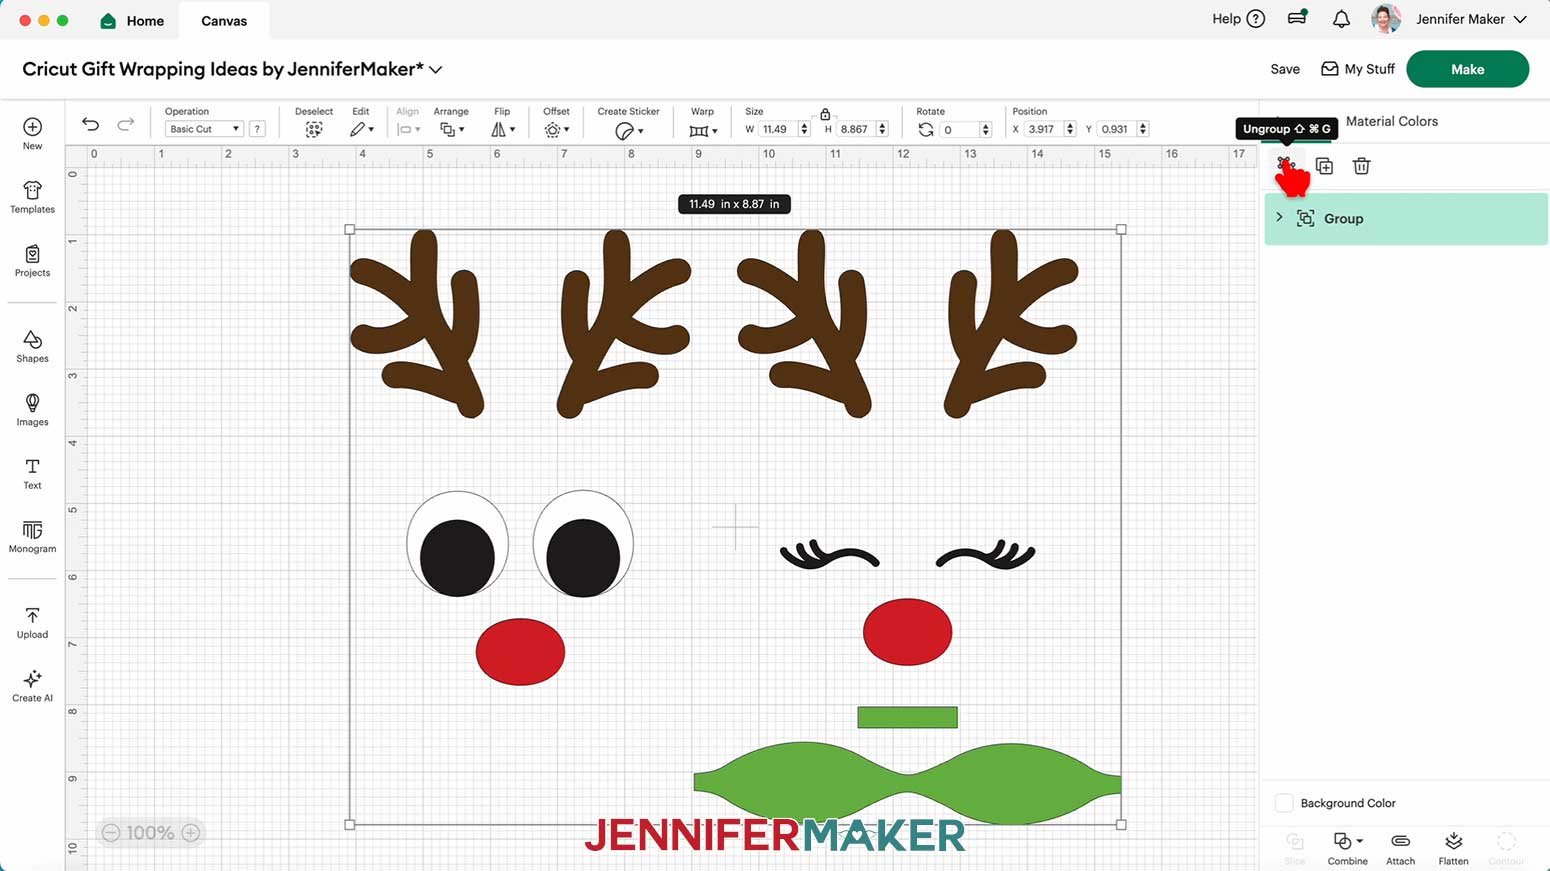
8. “Ungroup” the design.
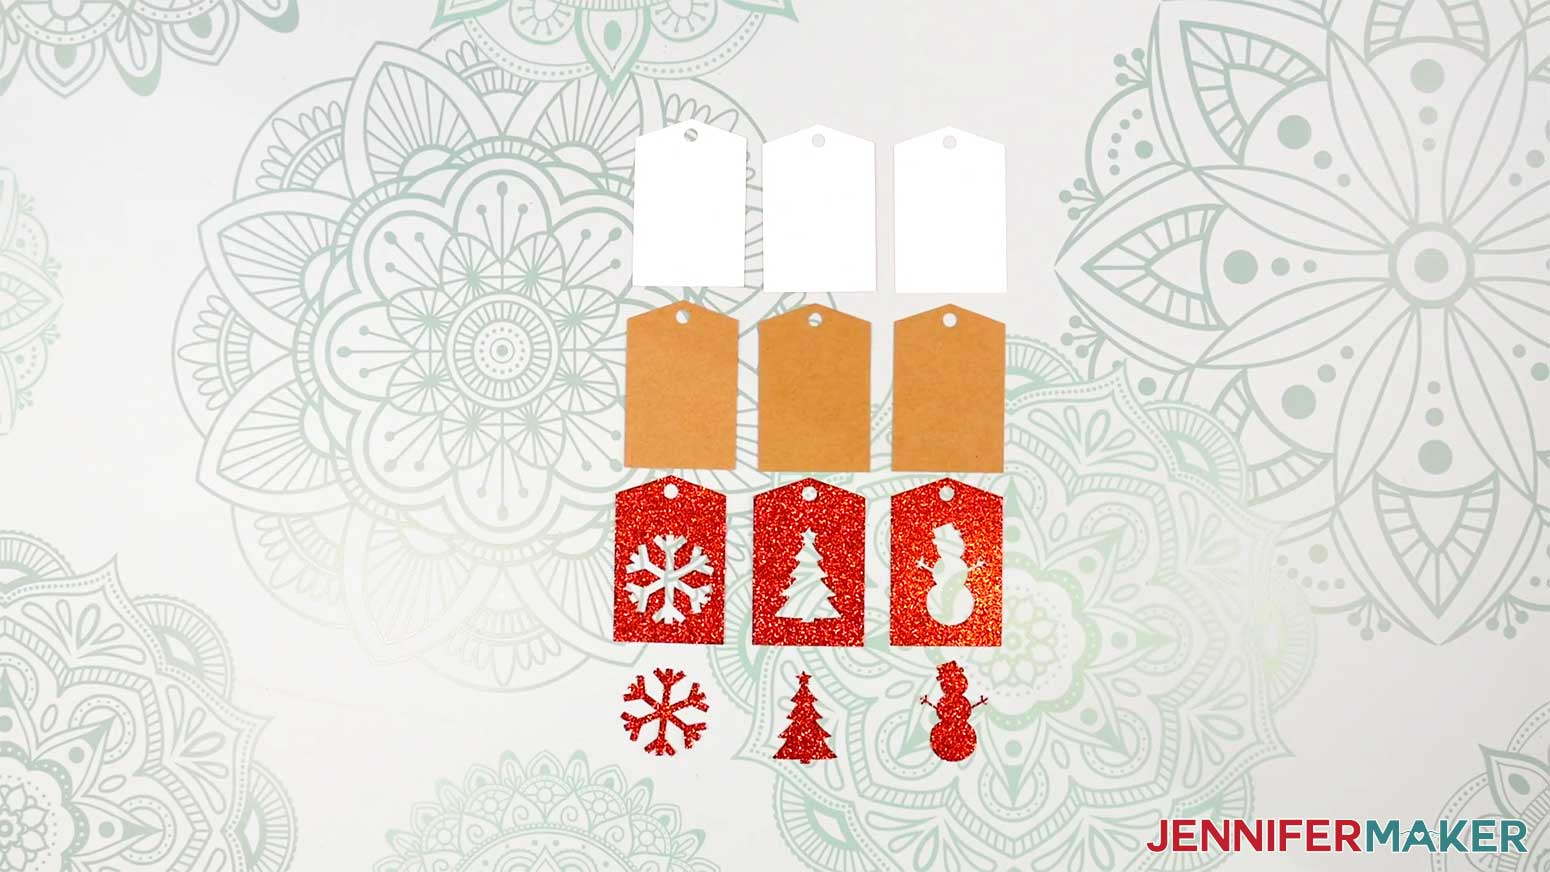
NOTE: There are three cutout tag shapes, and six solid tag shapes. We’ll attach the cutouts from the cutout tags to three of the solid tags, and attach the solid tags to the back of the cutout tags.
9. If you want to use a different color material for the pieces, select the appropriate layer in the Layers Panel and use the Color Box at the top to adjust it.
10 Your gift tags are ready to cut! Make sure the correct machine is selected in the top right, then click “Make.”
11. If prompted, click "On Mat," choose your mat size, and click “Confirm.”
12. On the Prepare screen, make sure the correct Material Size is selected for each of your mats.
13. Select the first mat again and click “Continue.”
CUTTING
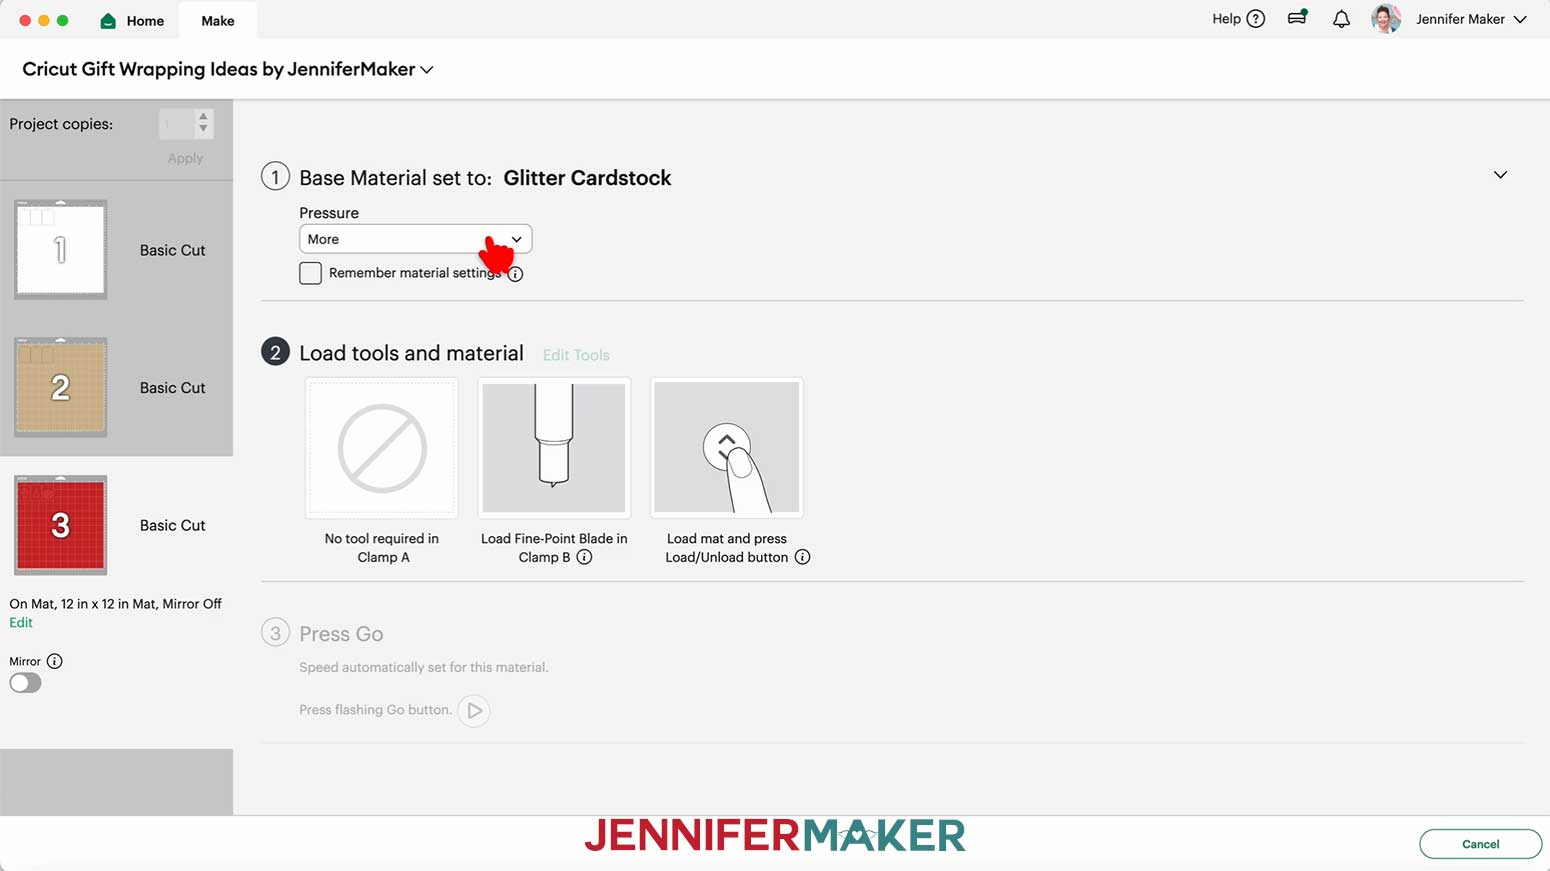
1. On the Make screen, I used the following cut settings:
Kraft cardstock and 65 lb. cardstock: “Medium Cardstock - 80 lb (216 gsm)” setting with “More” Pressure
Glitter cardstock: “Glitter Cardstock” setting with “More” Pressure
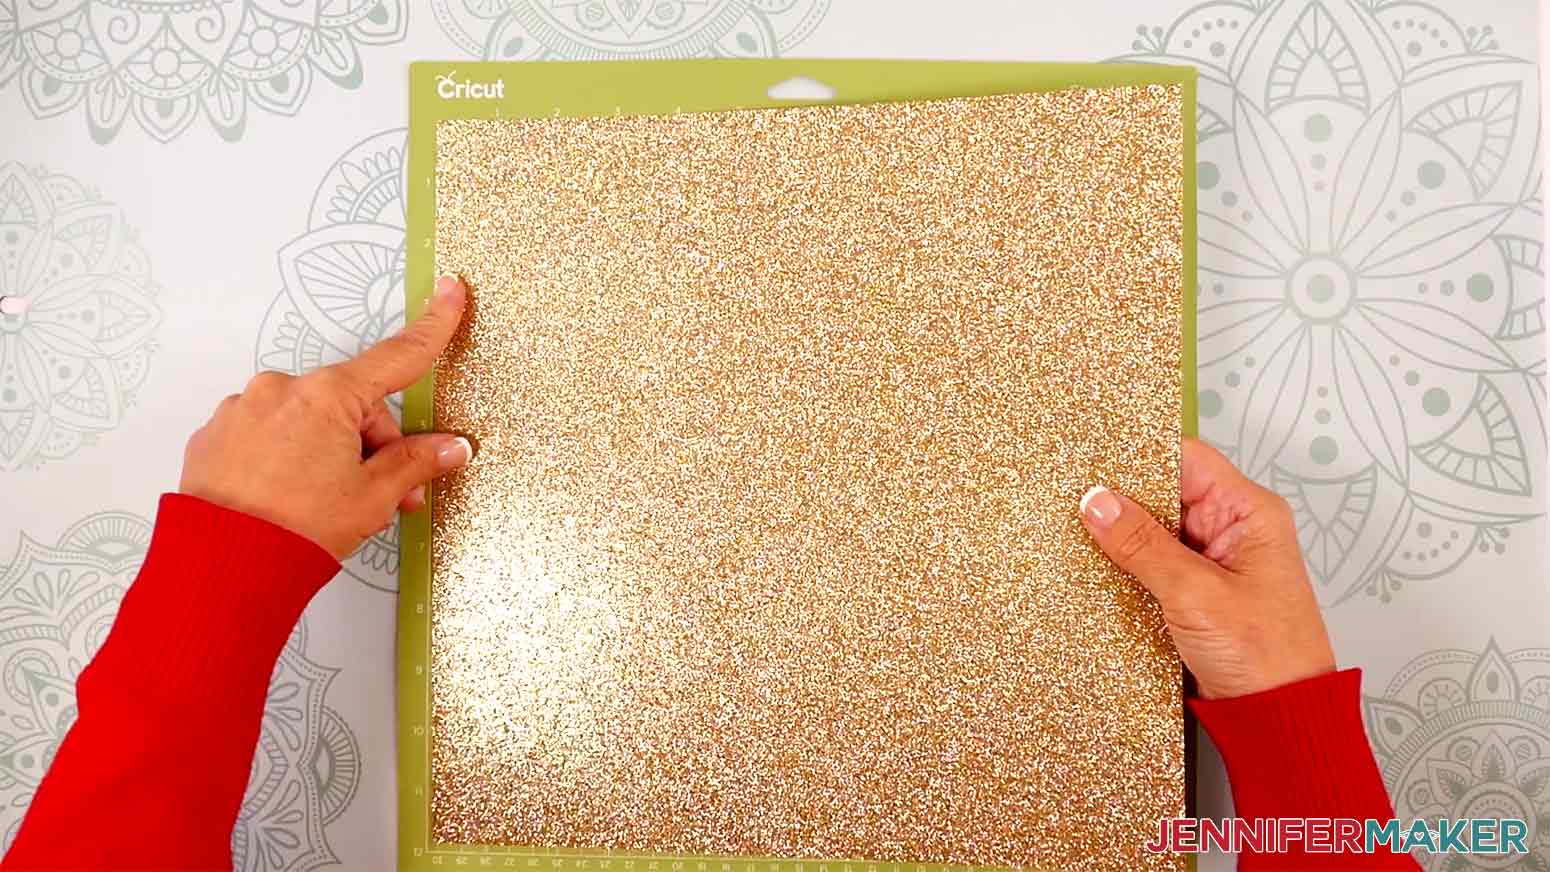
NOTE: I used brown 65 lb. kraft cardstock for the brown solid tags, white 65 lb. cardstock for the white solid tags, and red glitter cardstock for the cutout tags and pieces.
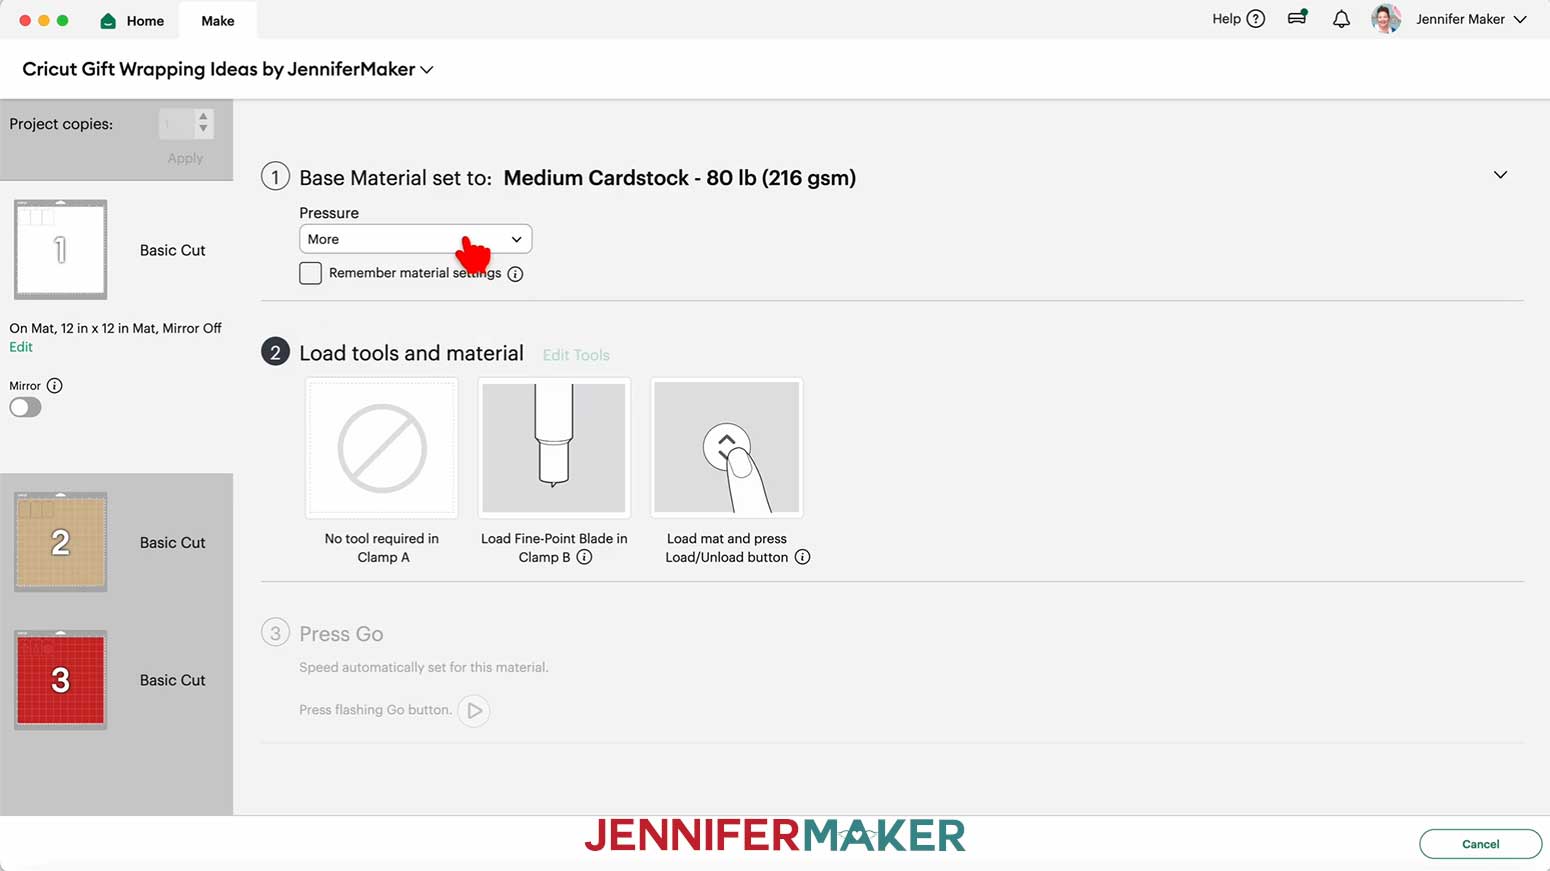
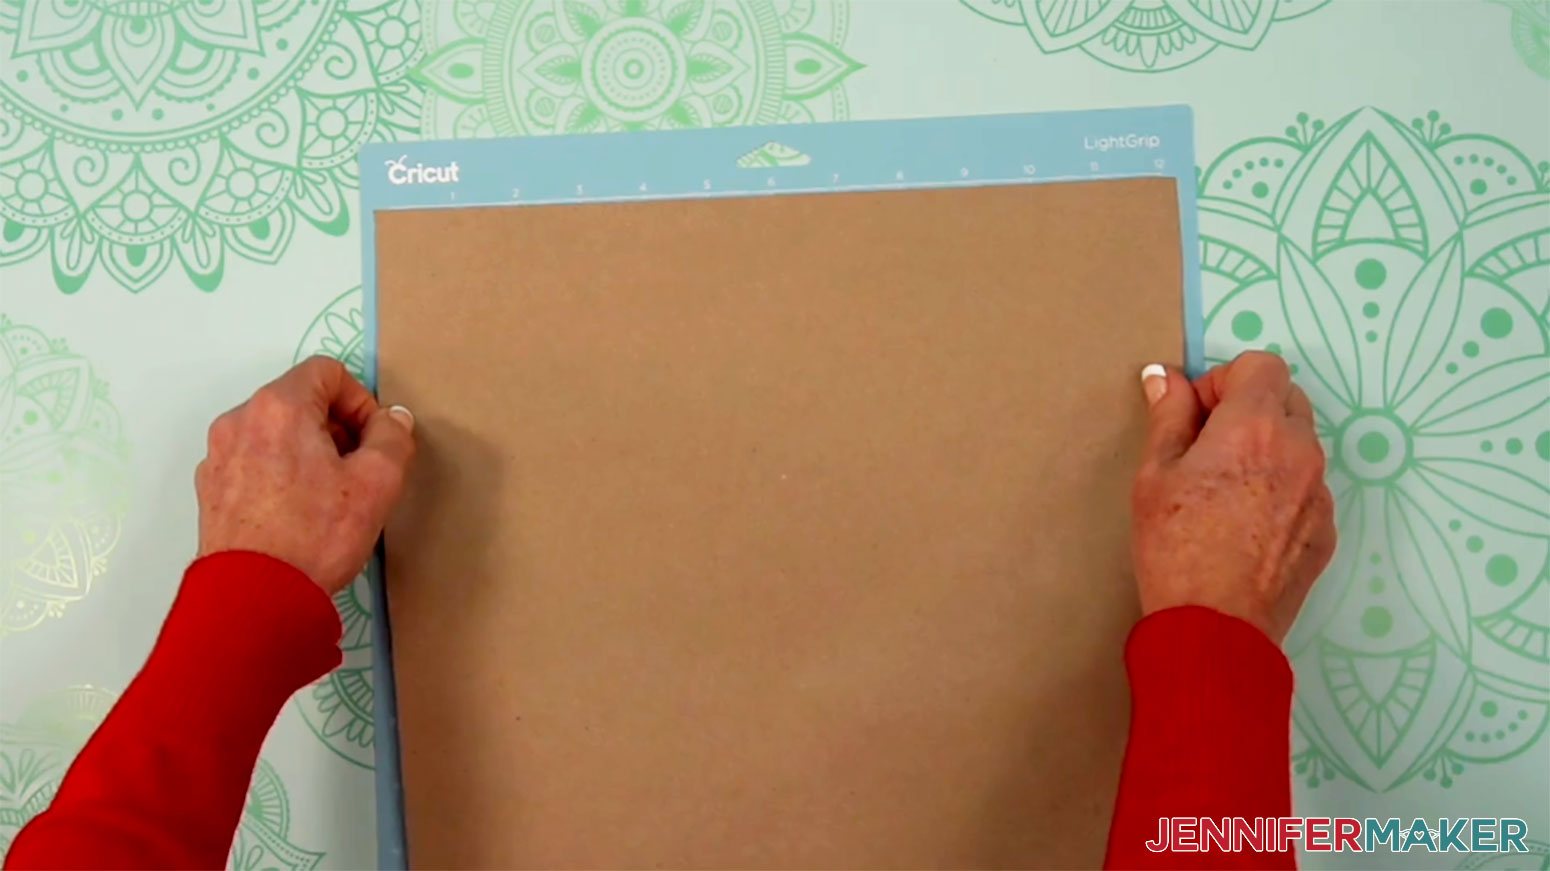
2. Place your first mat’s material pretty-side up onto a green StandardGrip machine mat.
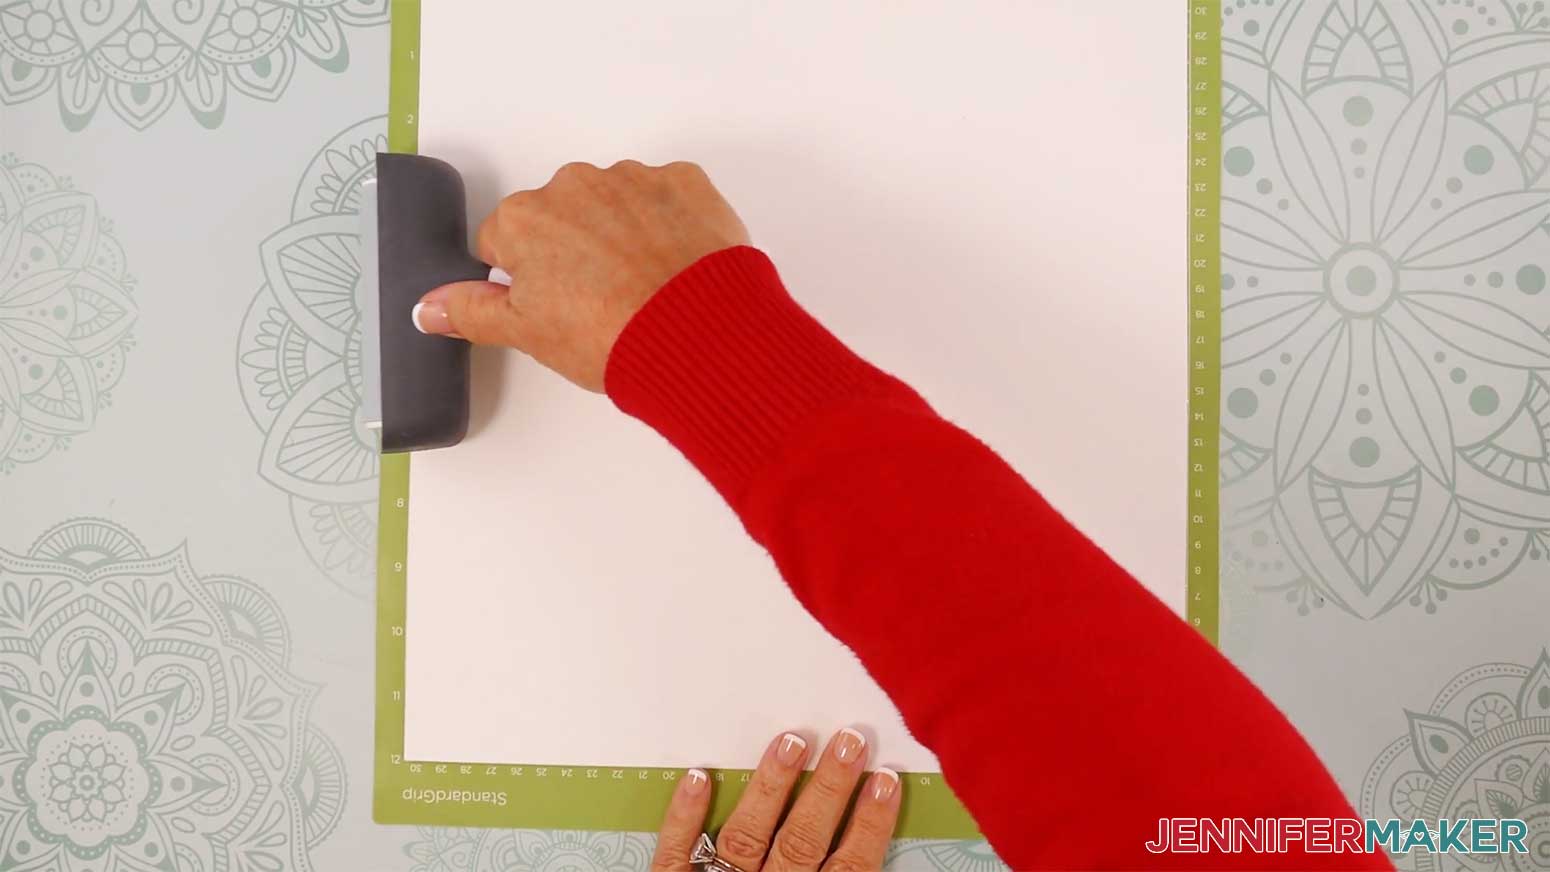
3. Use a brayer to make sure it’s fully adhered.
4. Check that your Fine-Point Blade is clean and in the clamp.
5. Load the mat into your Cricut and press the flashing middle button to begin cutting.
6. Before unloading the mat, use your weeding tool to peel back a corner of the material to make sure the cut went all the way through. If it didn’t, smooth the material back down into place and press the middle button again for another pass.
7. Once the material is cut all the way through, unload the mat, flip it over onto your work surface, and roll it back to release the material. Do NOT throw away the cutout shapes from the glitter cardstock mat!
NOTE: If you have any issues with your cuts, check out my Intricate Cuts tutorial.
8. Place the cut pieces face up on your work surface.
ASSEMBLY
1. Apply craft glue to the back of the glitter cardstock snowflake shape.
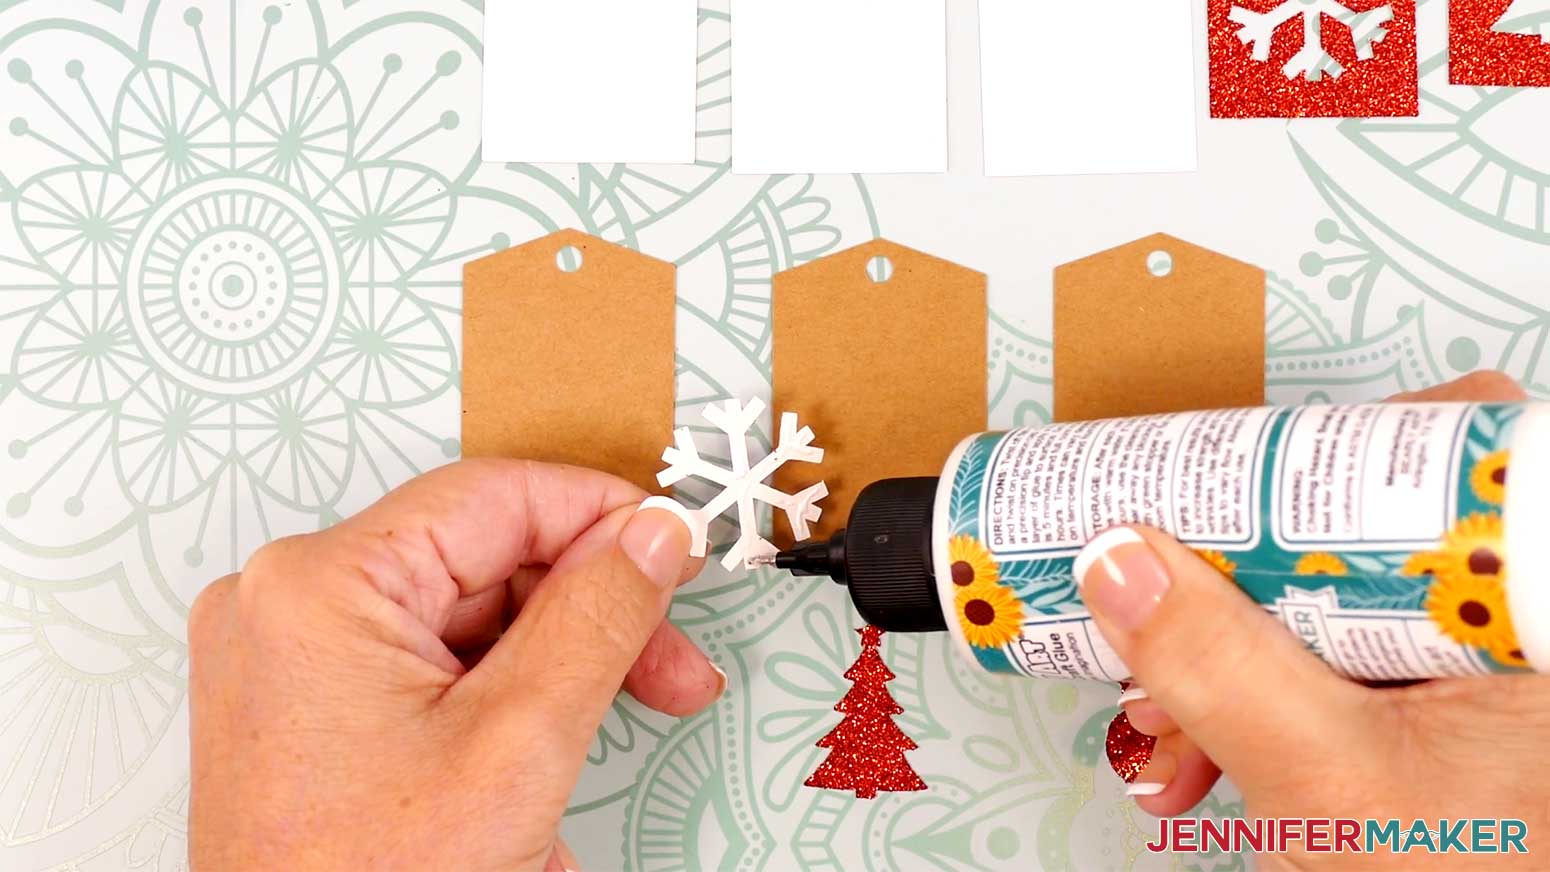
2. Adhere it to the center of a brown kraft cardstock tag, and press the layers together until the glue dries.
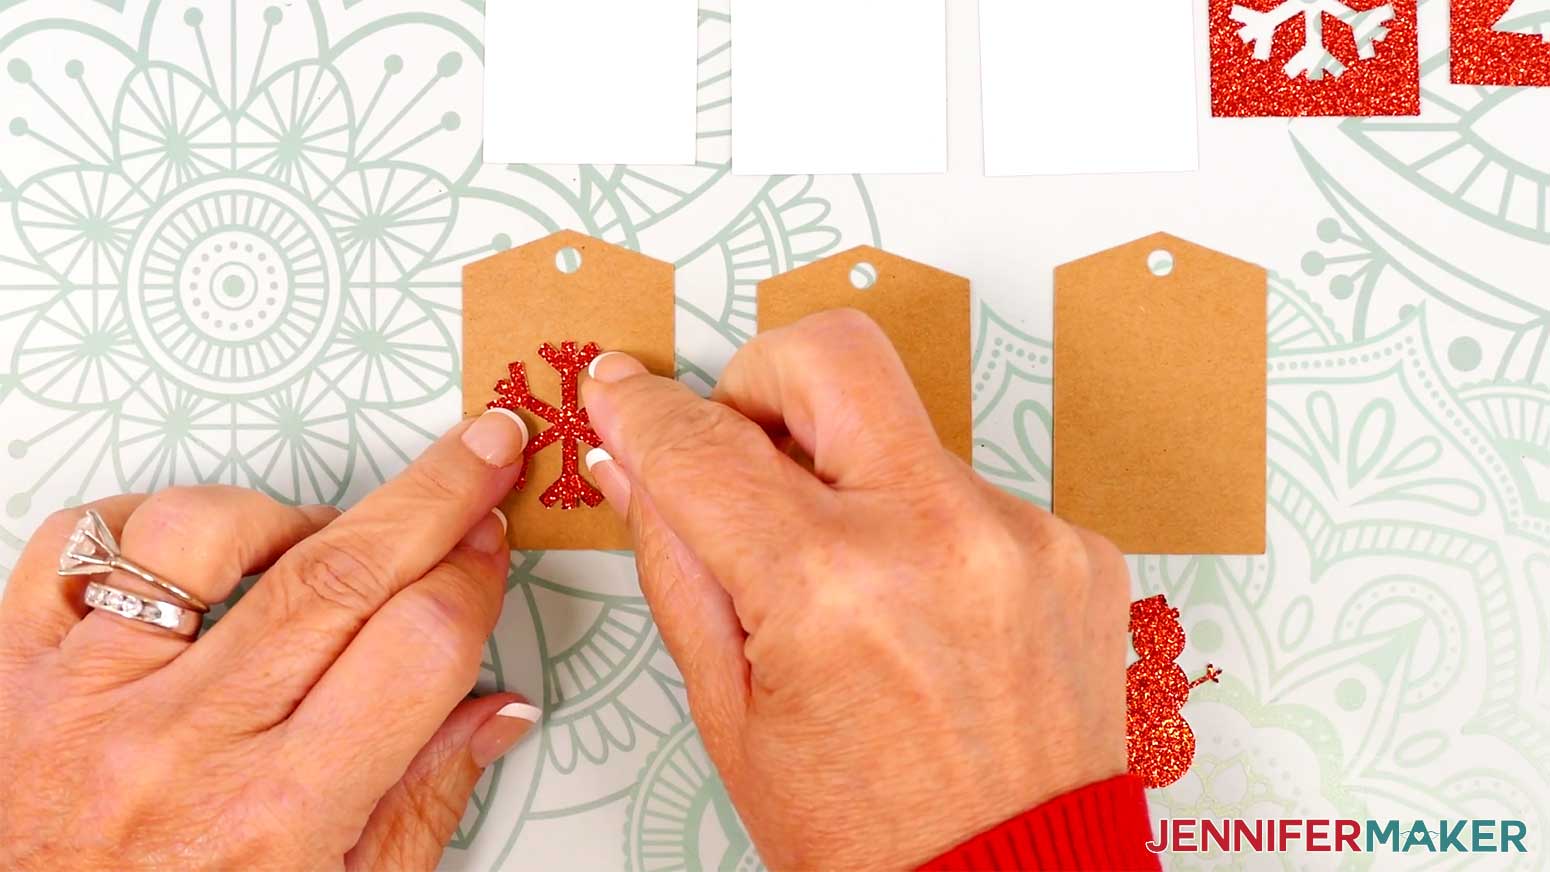
3. Repeat steps 1-2 with the glitter cardstock tree and snowman shapes.
4. Apply craft glue to the back of a glitter tag, avoiding the cutouts and hole.
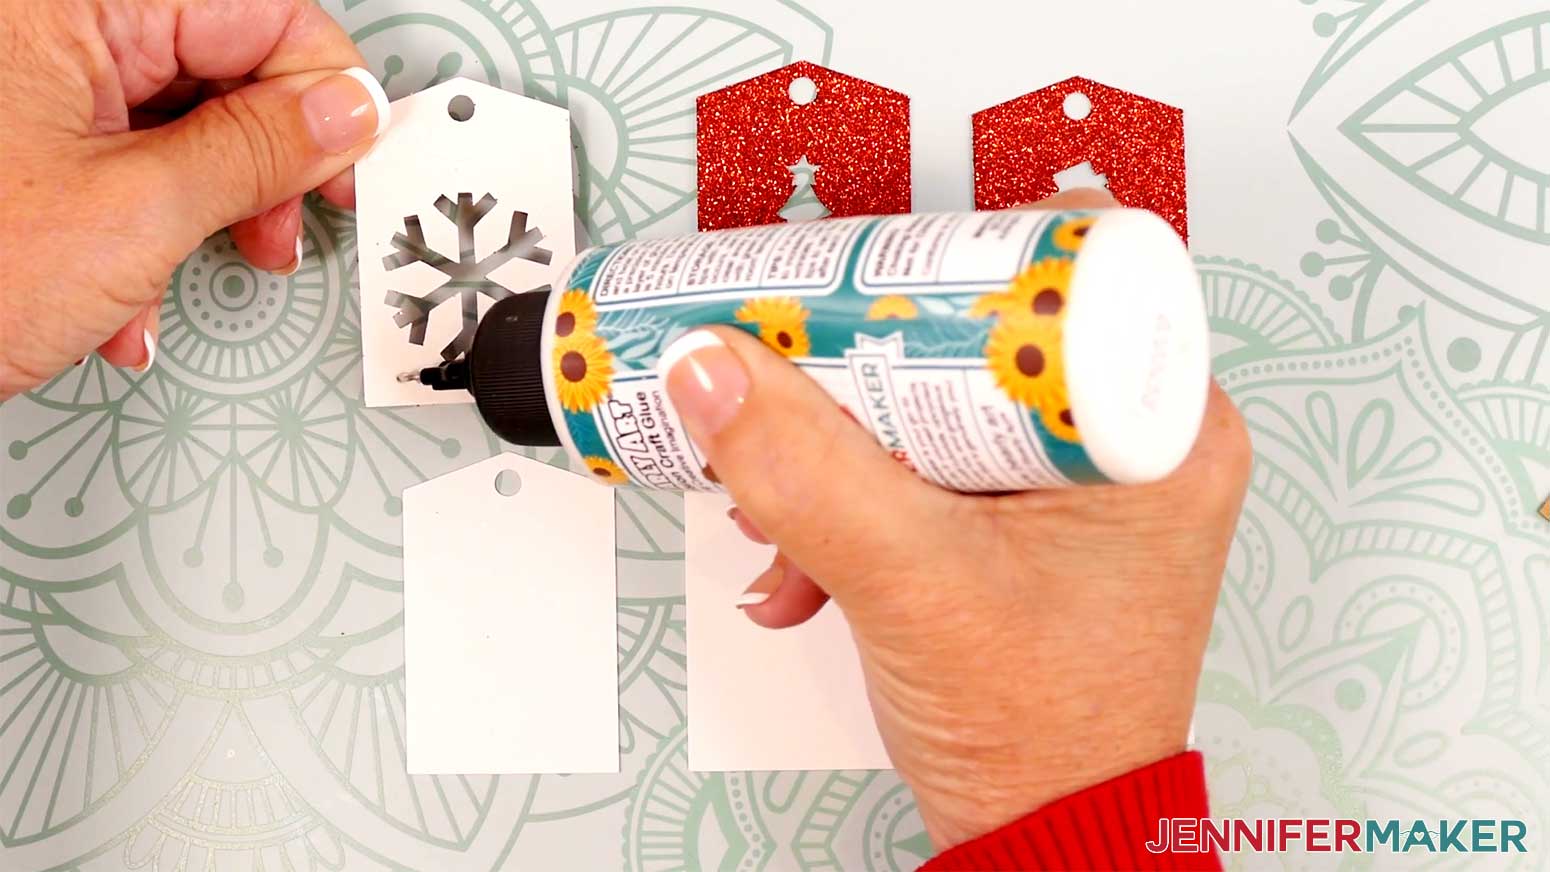
5. Adhere it to a solid white cardstock tag. Align the holes and edges, and press the layers together until the glue dries.

6. Repeat steps 4-5 with the remaining glitter tags.
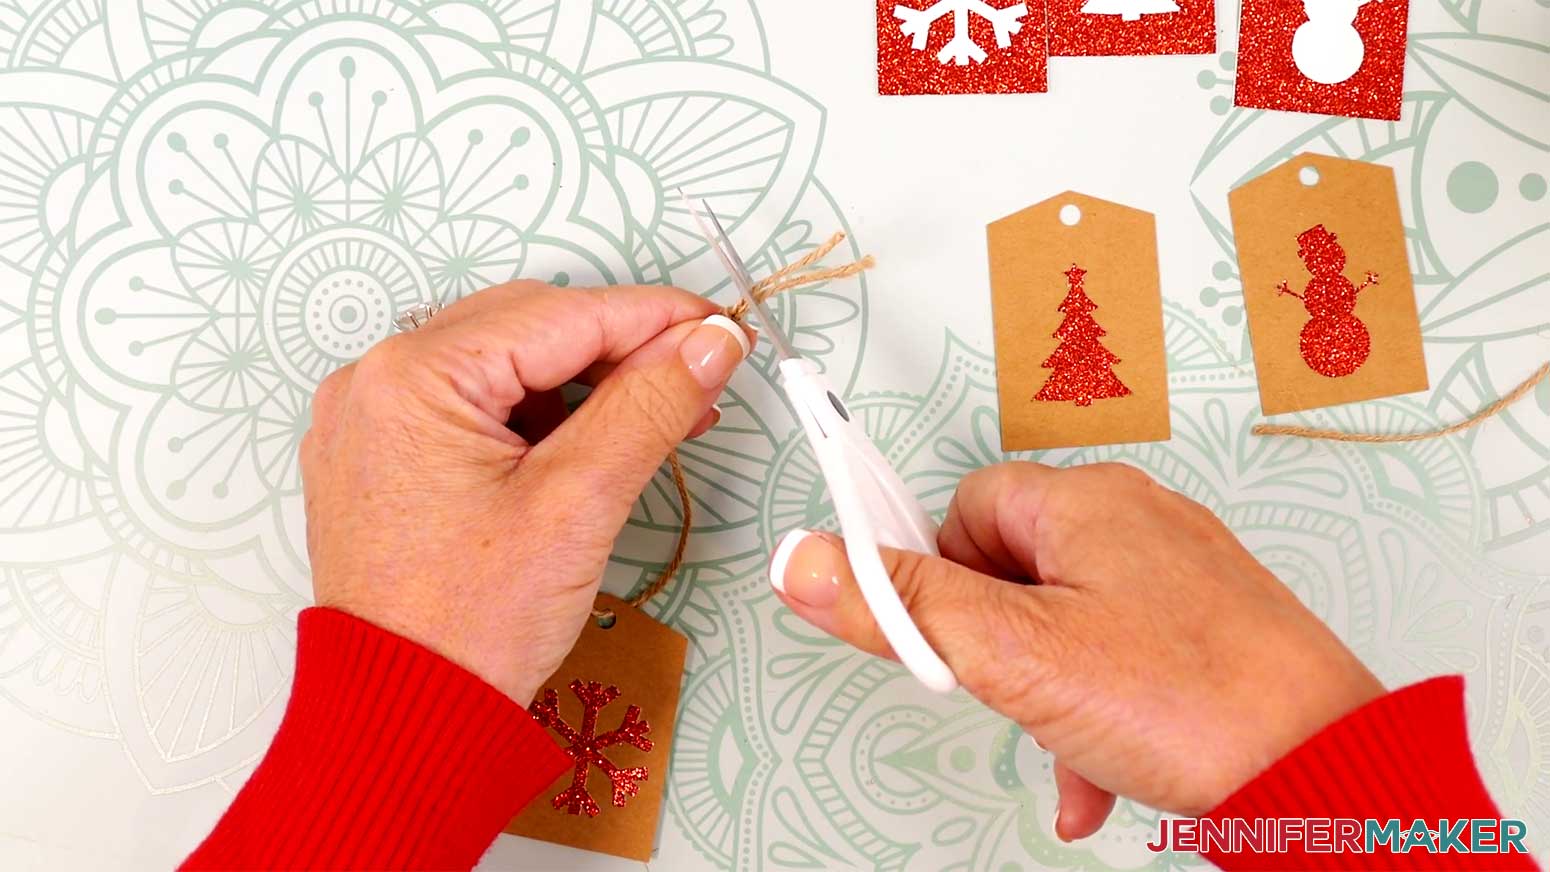
7. Cut a piece of twine or string approximately 10” long.
8. String the twine through the hole on a tag, then tie the ends together.
9. Trim any excess twine from the knot.
10. Use tape to attach the tag to a wrapped gift.
TIP: You can also cut a piece of twine or string long enough to tie around your gift, then attach it that way.
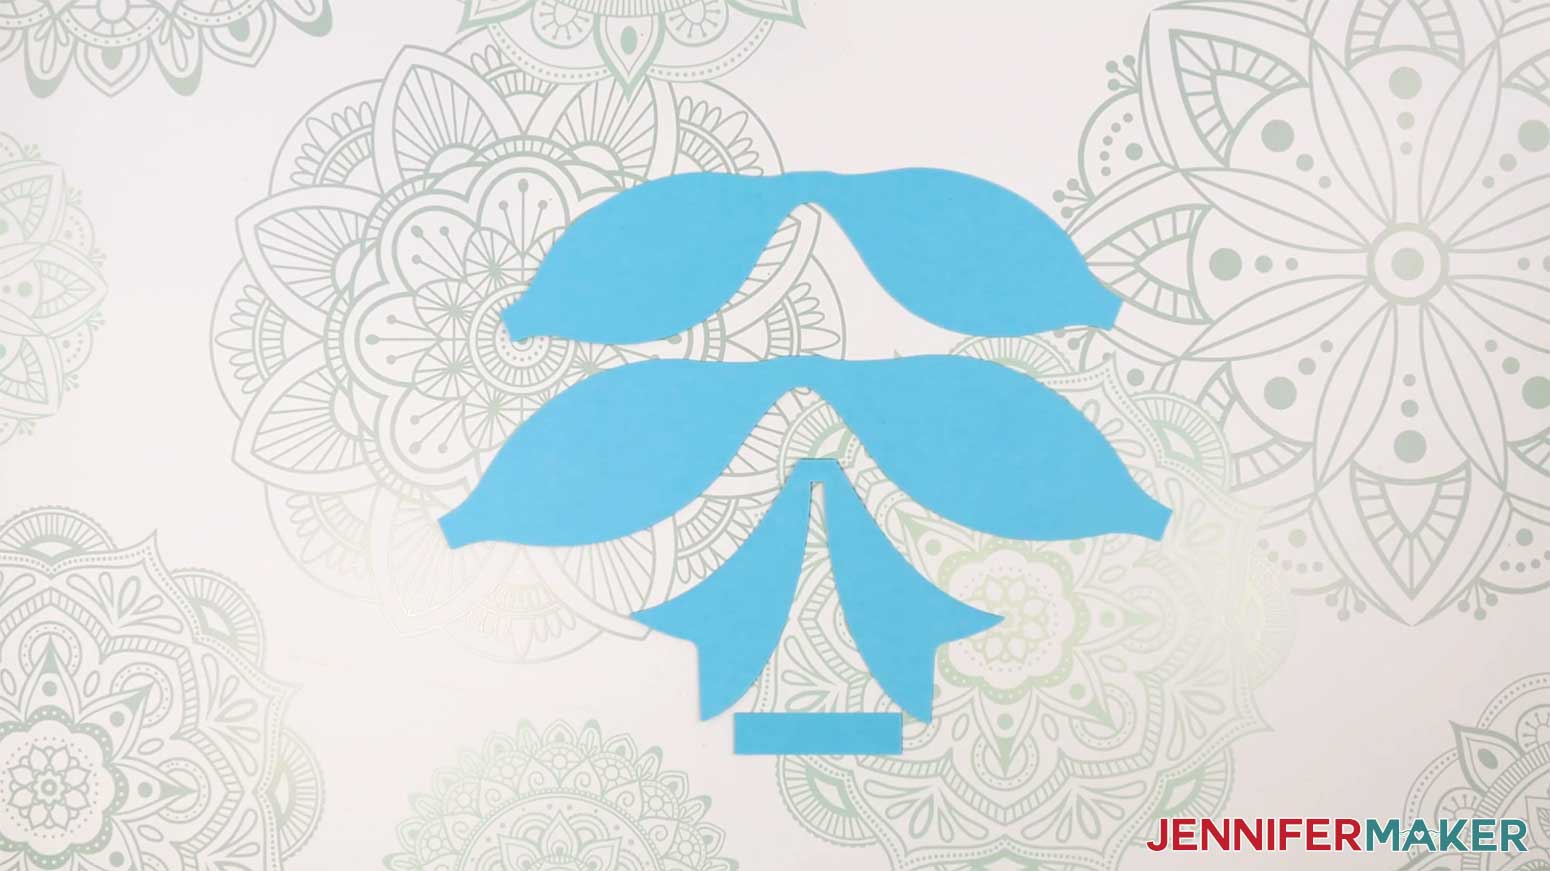
PROJECT 2: FANCY PAPER BOW
CRICUT DESIGN SPACE
1. In Cricut Design Space on a blank Canvas, click “Upload.”
2. Click “Upload Image.”
3. Click “Browse.”
4. Find and select the SVG with “paper-bow” in the name.
5. Click “Open” and then “Continue.”
6. Click “Upload” to add the SVG to your Canvas.
7. Click “Save” and give your project a name.
8. The design is sized to make an approximately 5.5” x 5.5” bow. If you’d like a different size, select the entire design and use the corner handles to resize it.
9. If you want to use a different color material for the pieces, select the appropriate layer in the Layers Panel and use the Color Box at the top to adjust it.
10. Your fancy paper bow is ready to cut! Make sure the correct machine is selected in the top right and click “Make.”
11. If prompted, click "On Mat," choose your mat size, and click “Confirm.”
12. On the Prepare screen, make sure the correct Material Size is selected for each of your mats.
13. Select the first mat again and click “Continue.”
CUTTING
1. On the Make screen, I used the “Medium Cardstock - 80 lb (216 gsm)” setting with “More” Pressure.
NOTE: I used teal 65 lb. cardstock.
2. Place your first mat’s material pretty-side up onto a green StandardGrip machine mat.
3. Use a brayer to make sure it’s fully adhered.
4. Check that your Fine-Point Blade is clean and in the clamp.
5. Load the mat into your Cricut and press the flashing middle button to begin cutting.
6. Before unloading the mat, use your weeding tool to peel back a corner of the material to make sure the cut went all the way through. If it didn’t, smooth the material back down into place and press the middle button again for another pass.
7. Once the material is cut all the way through, unload the mat, flip it over onto your work surface, and roll it back to release the material.
TIP: Use a spatula to carefully remove delicate areas. If any stubborn cardstock stays attached to the cut pieces, use a weeding tool to carefully poke them out.
8. Place the cut pieces face up on your work surface.
ASSEMBLY
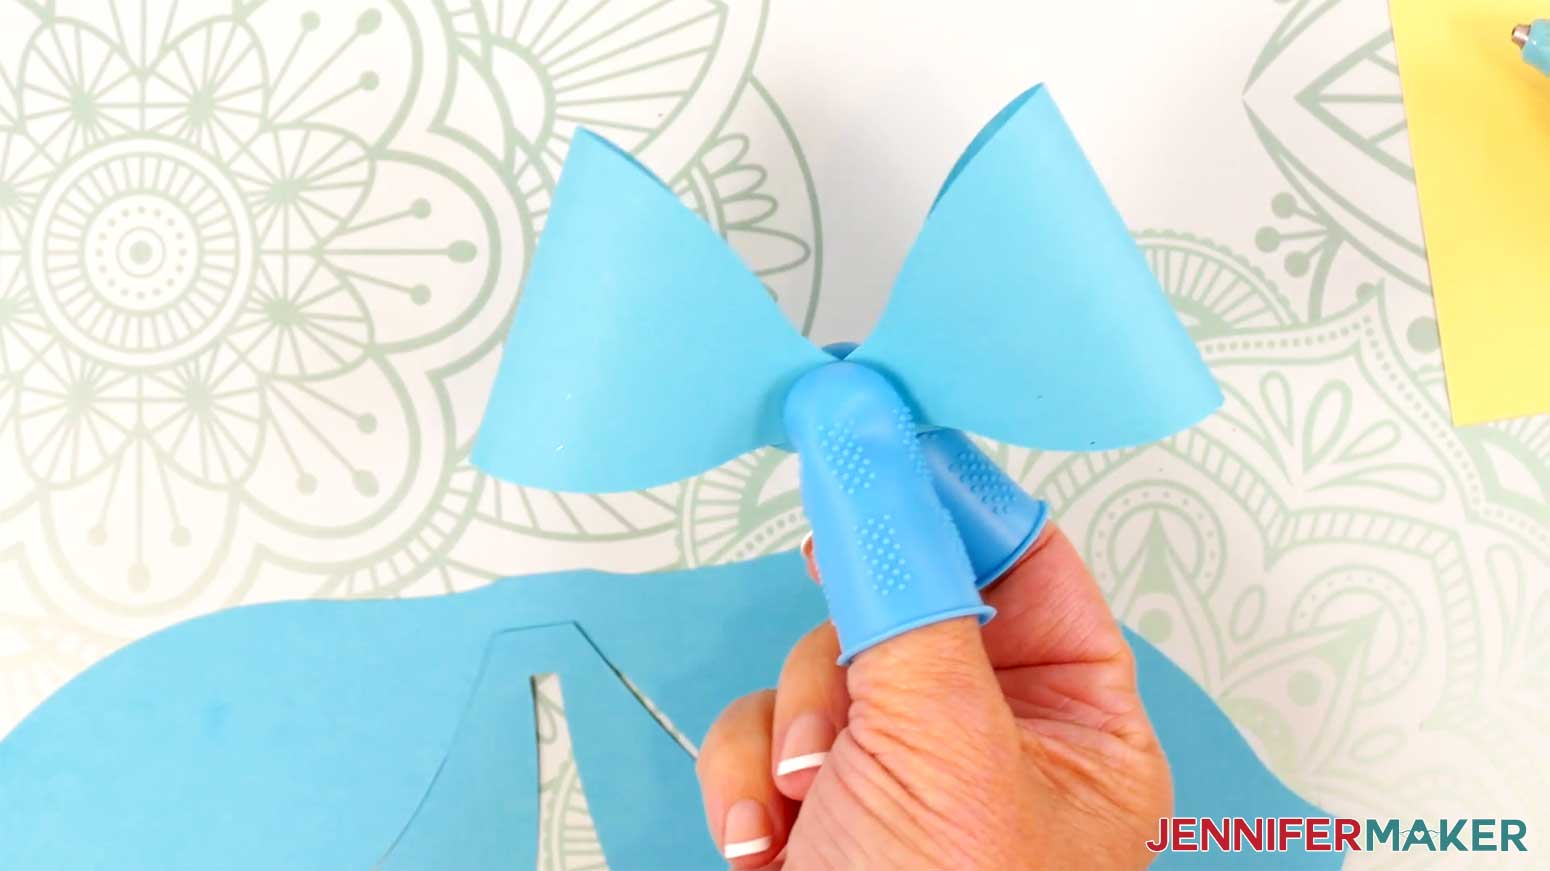
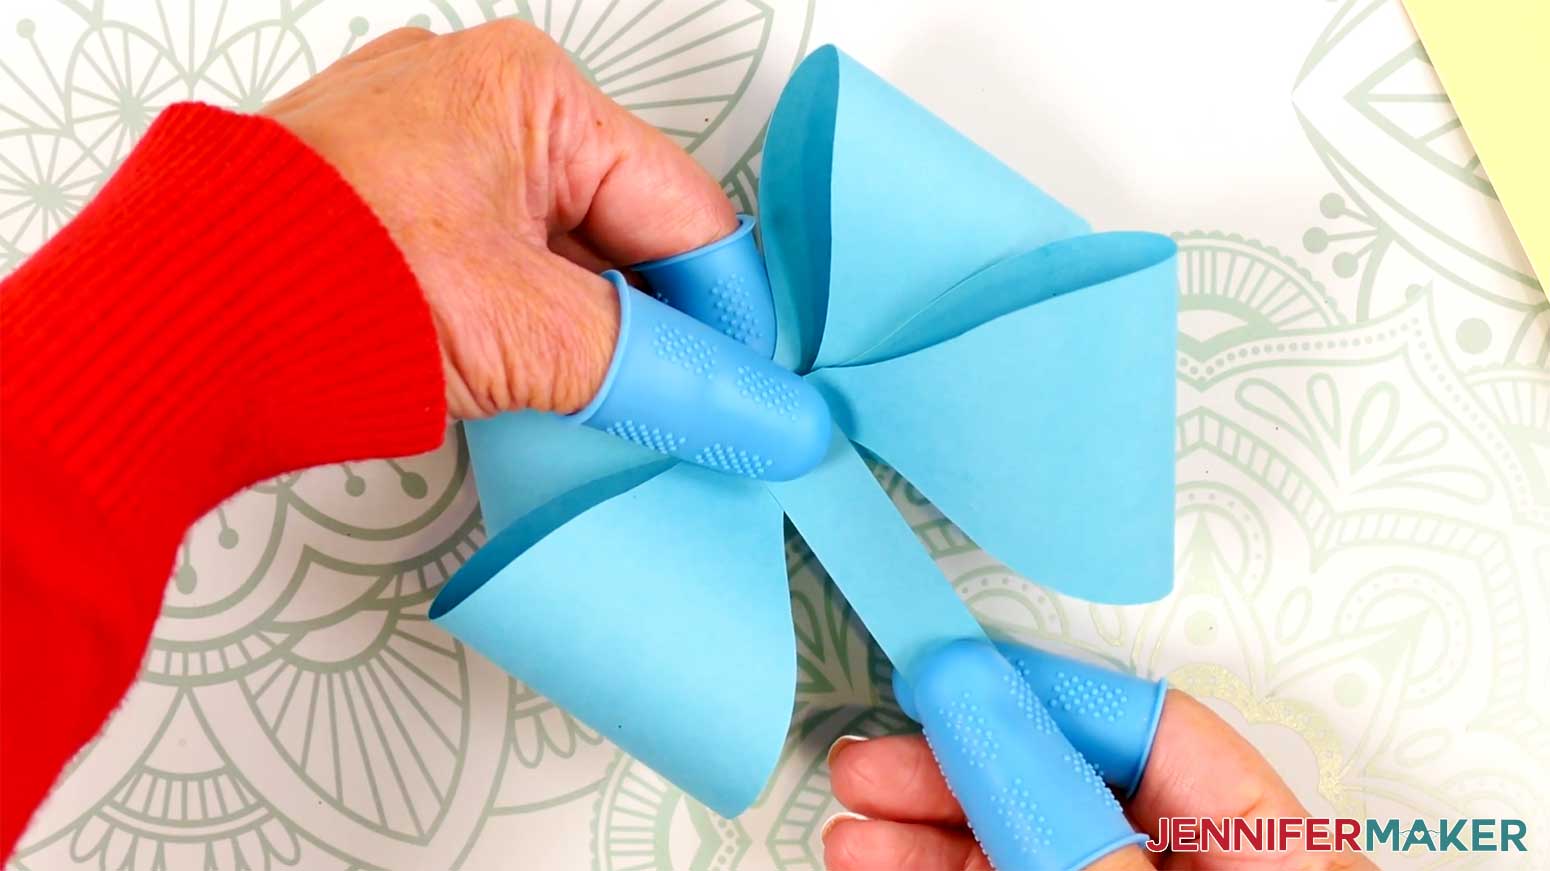
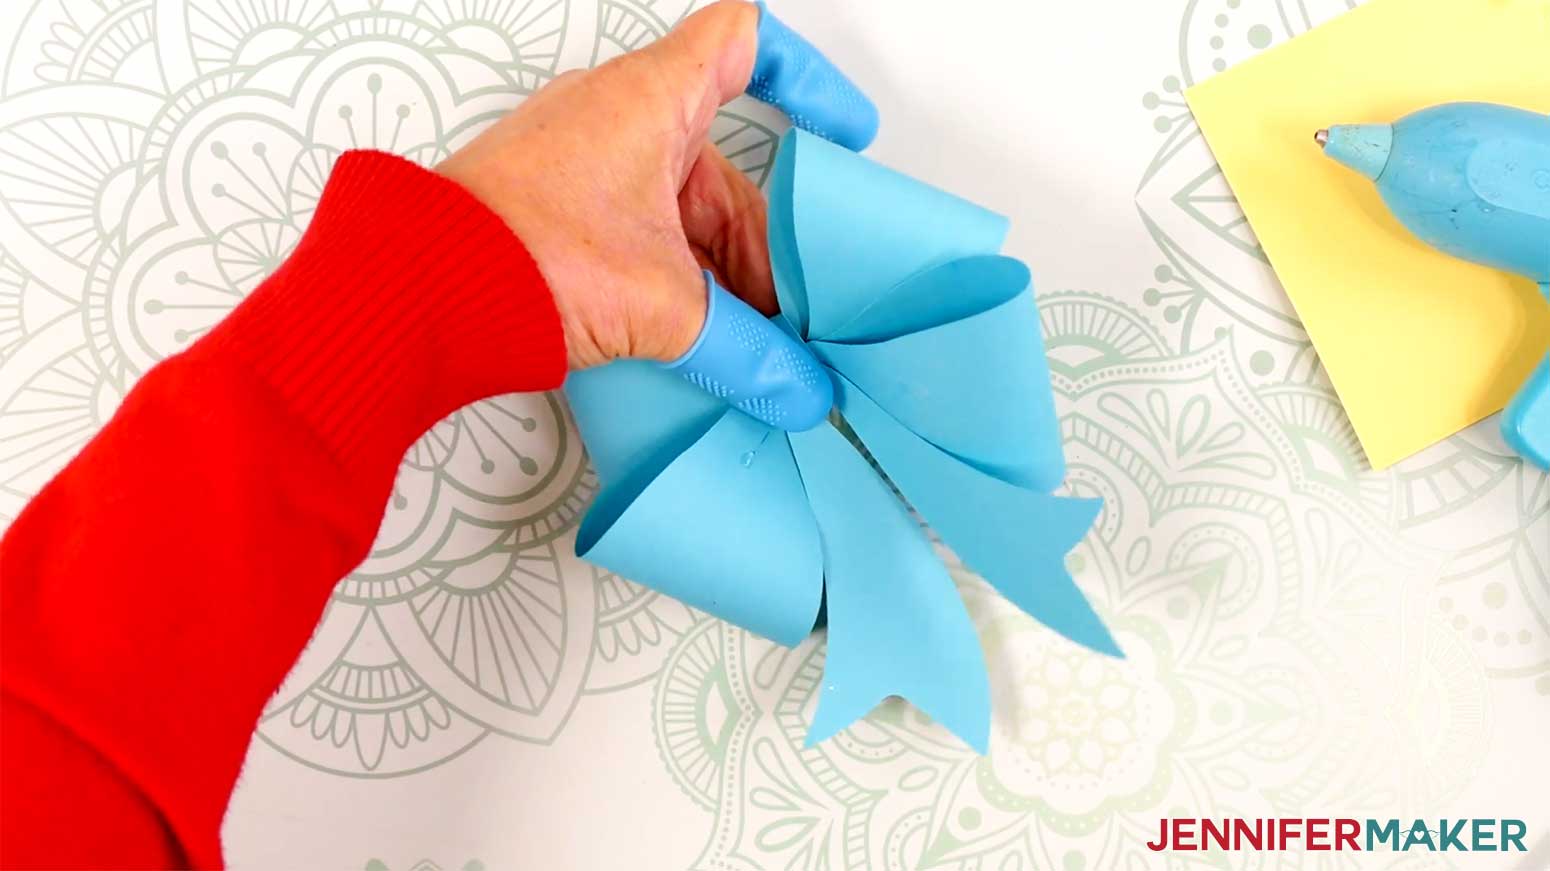
1. There is one top loop piece, one slightly larger bottom loop piece, one ribbon ends piece, and one rectangular strip.
2. Turn on your hot glue gun and put on your silicone finger caps.
3. On the top loop piece, apply a small amount of hot glue to the thin area in the center.
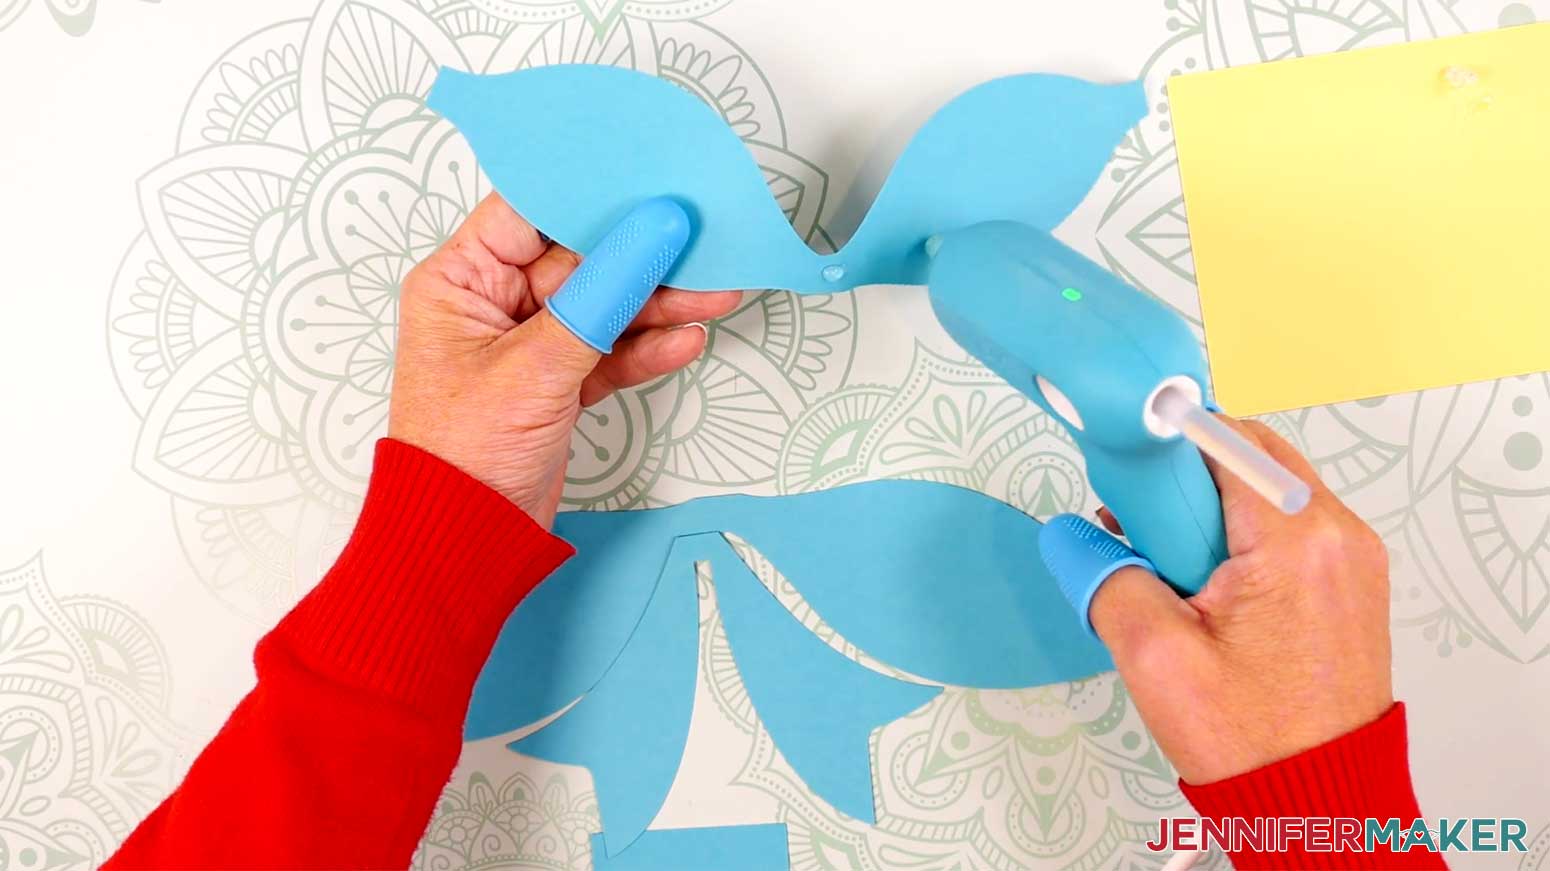
4. Curve one end of the piece into a loop, then press the pointed end into the hot glue in the center. Hold it there until the glue sets.
5. Apply a small amount of hot glue on top of the pointed end you just glued down.
6. Curve the other end into a loop, then press the pointed end into the hot glue in the center. Hold it there until the glue sets.
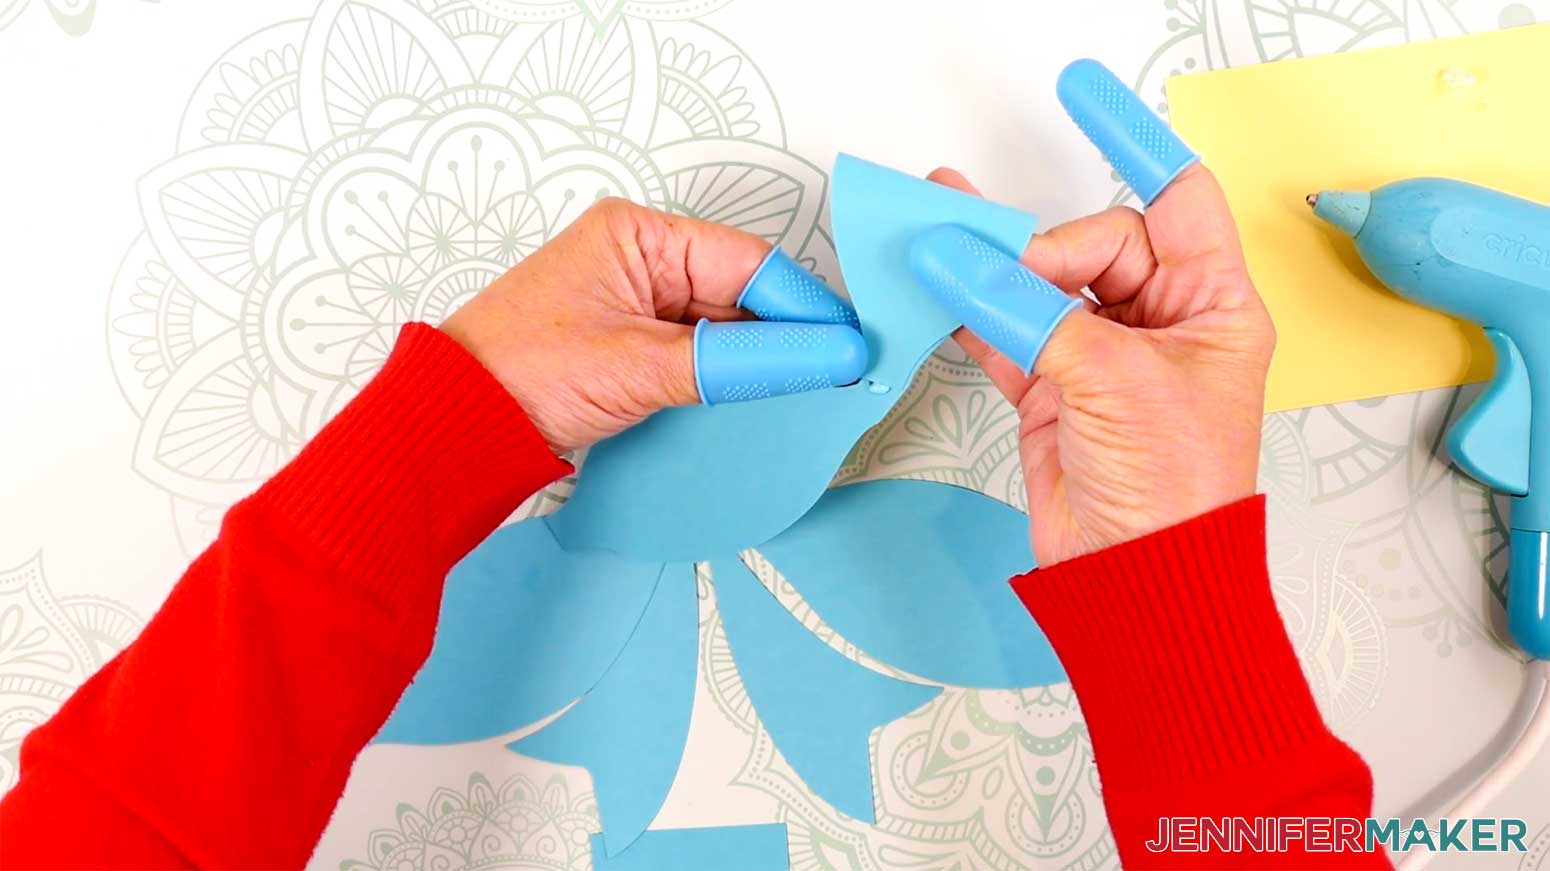
7. Repeat steps 3-6 with the larger bottom loop piece.
8. Hold the larger loop piece so the loops are pointed downward, and apply hot glue to the very center, on top of the other glued spots.
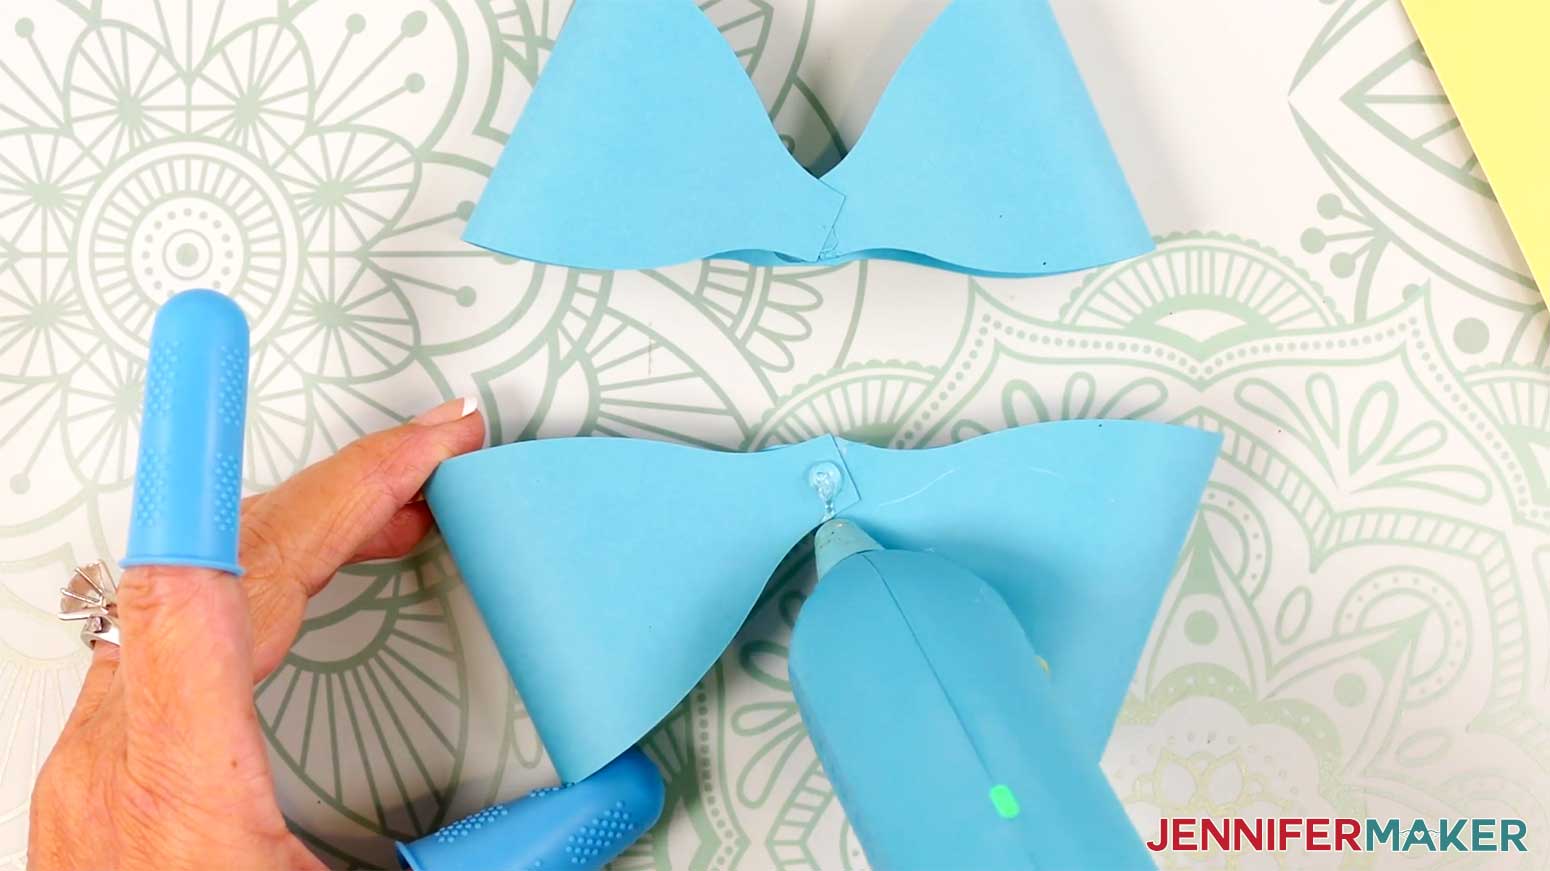
9. Hold the smaller loop piece so the loops are pointed upward, and press its center onto the hot glue on the larger loop piece.
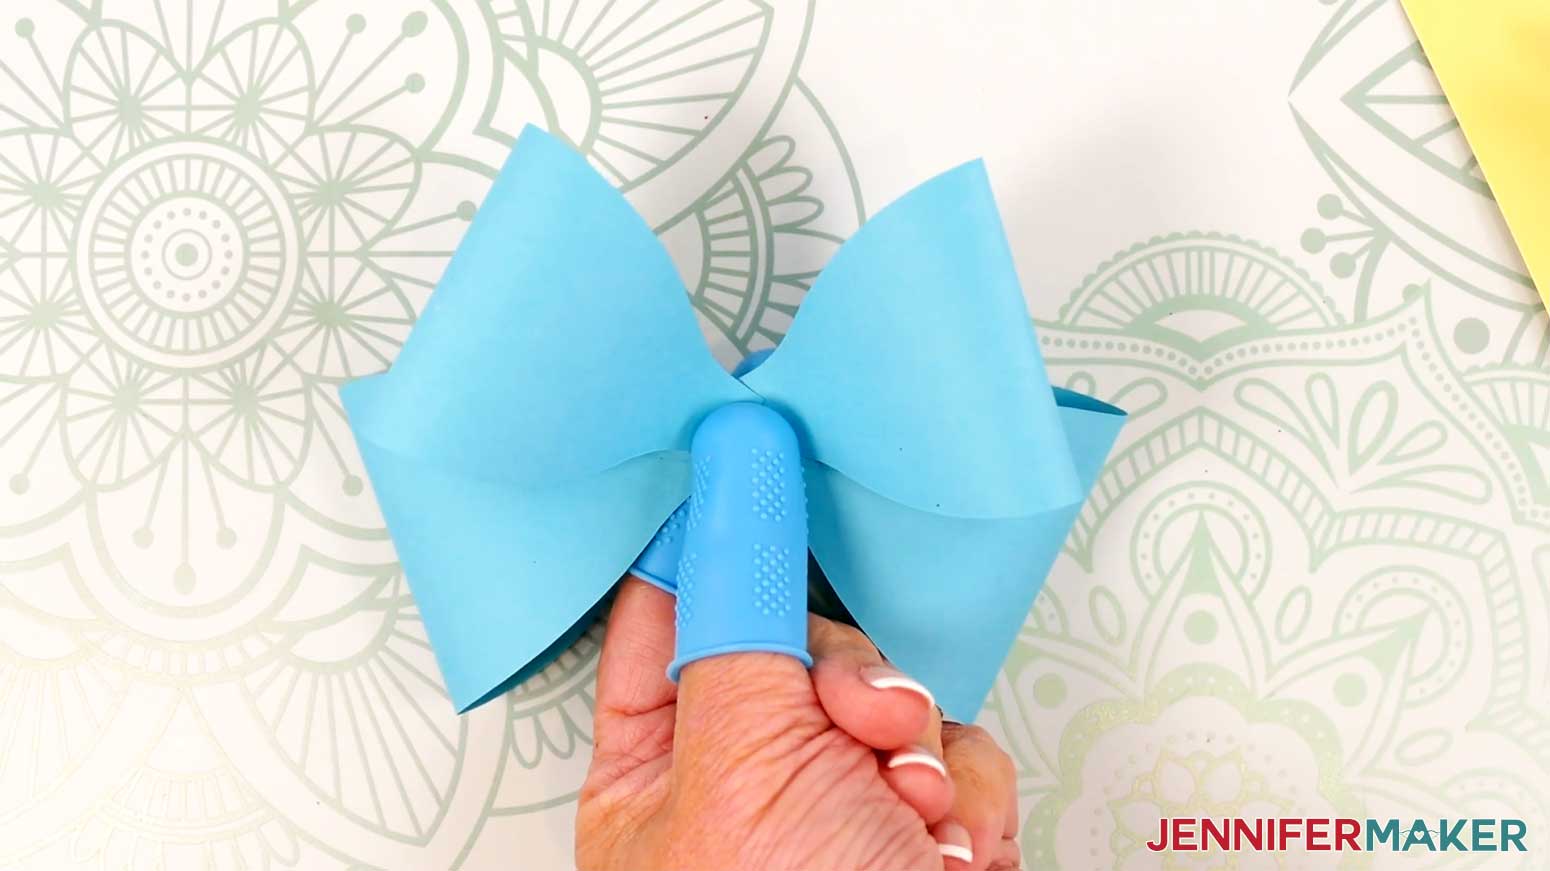
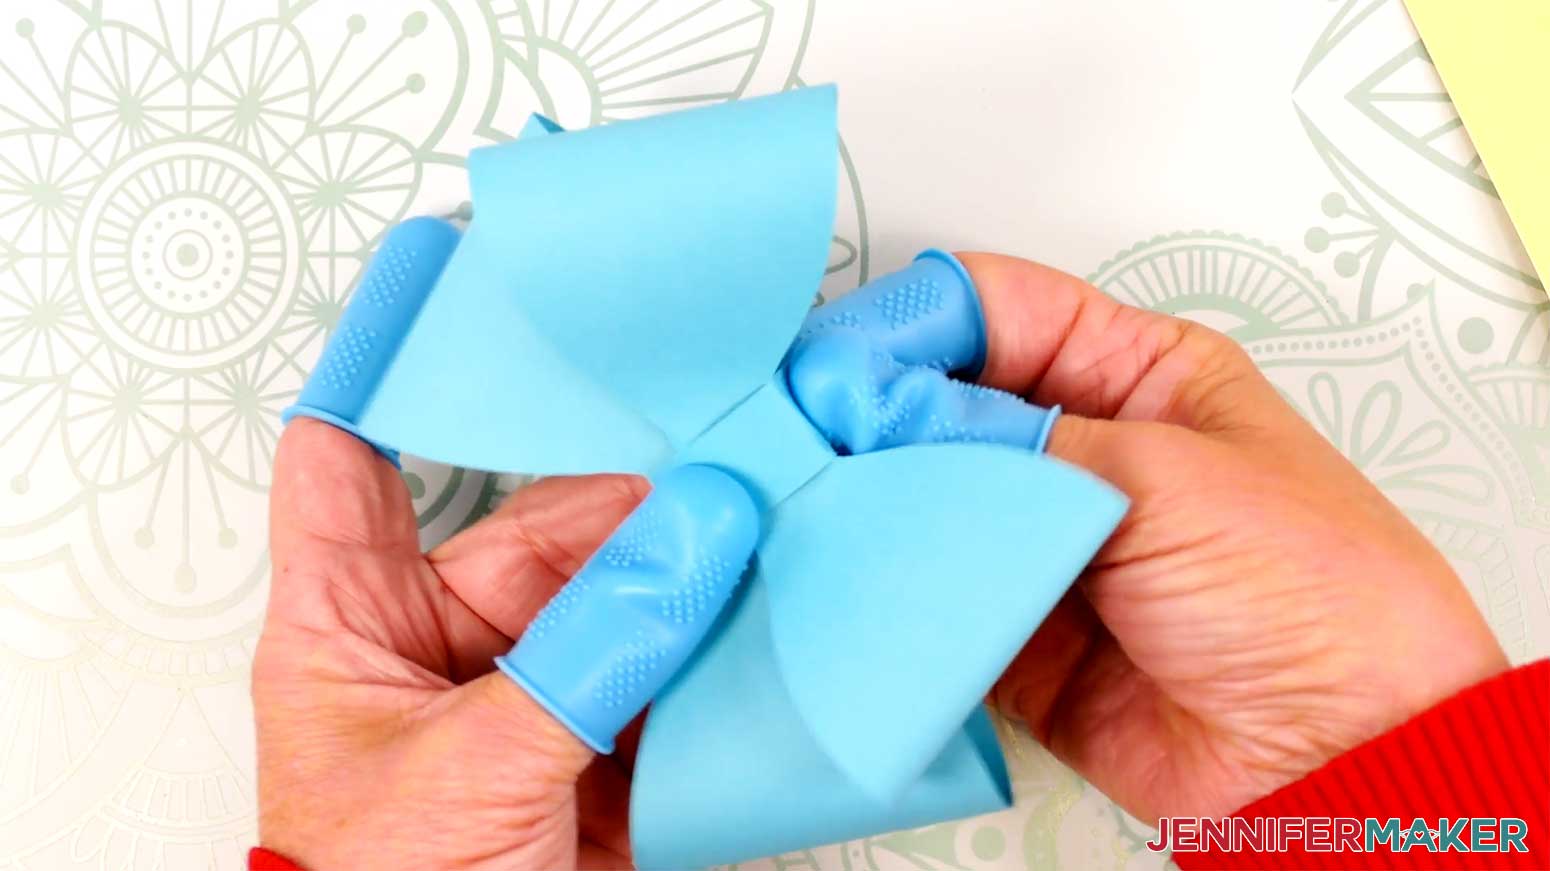
10. Apply a small amount of hot glue to the center of the back of the bow.
11. Adhere one end of the rectangular strip to the hot glue, and hold it in place until the glue sets.
12. Wrap the strip around the center of the bow, then secure the end with more hot glue.
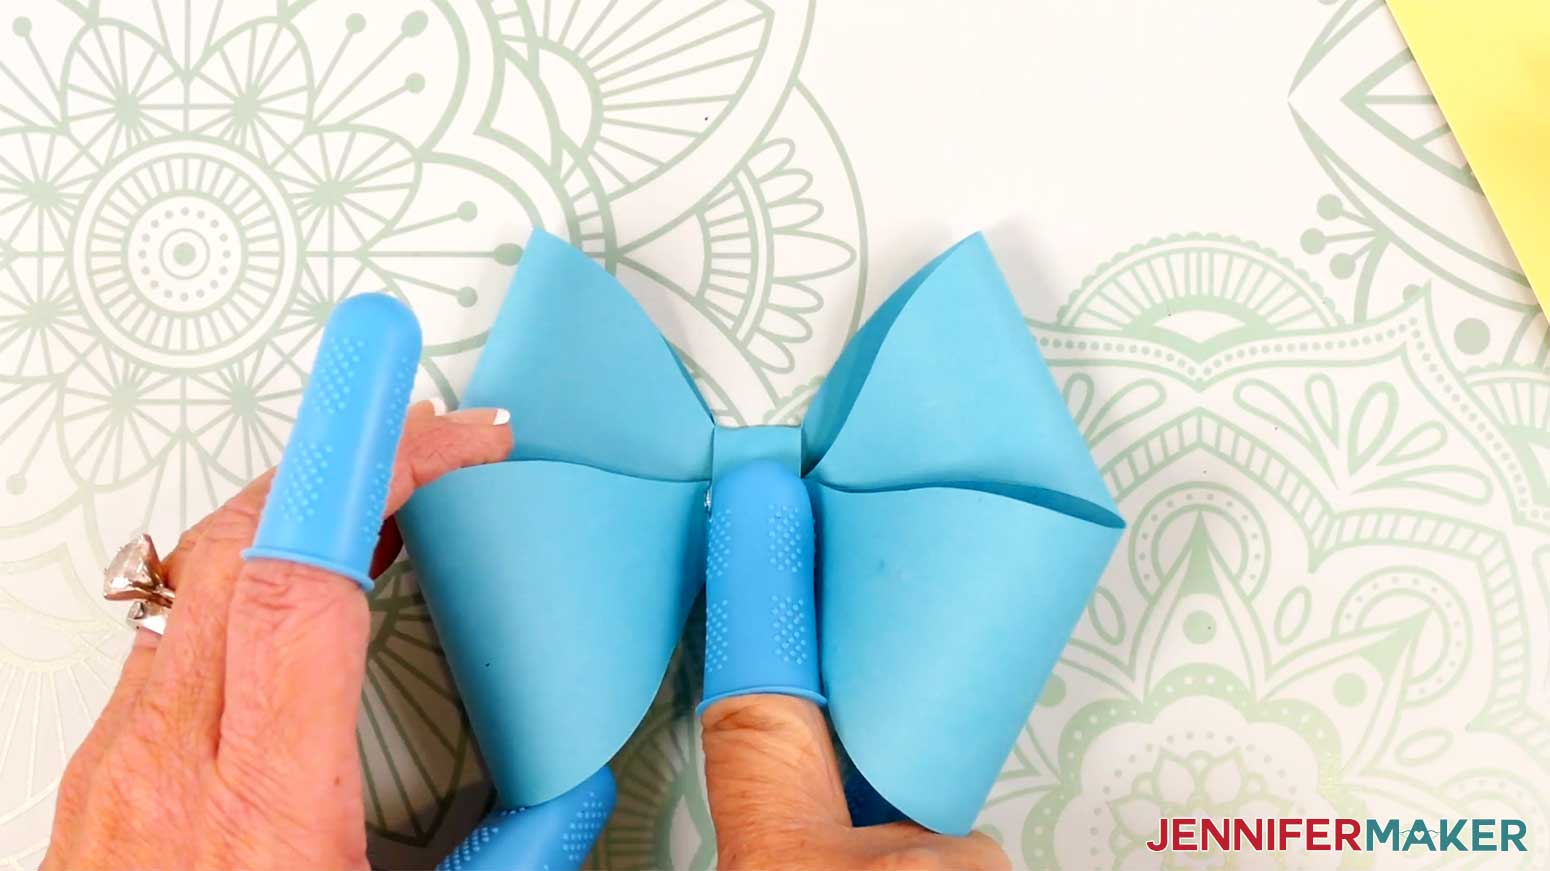
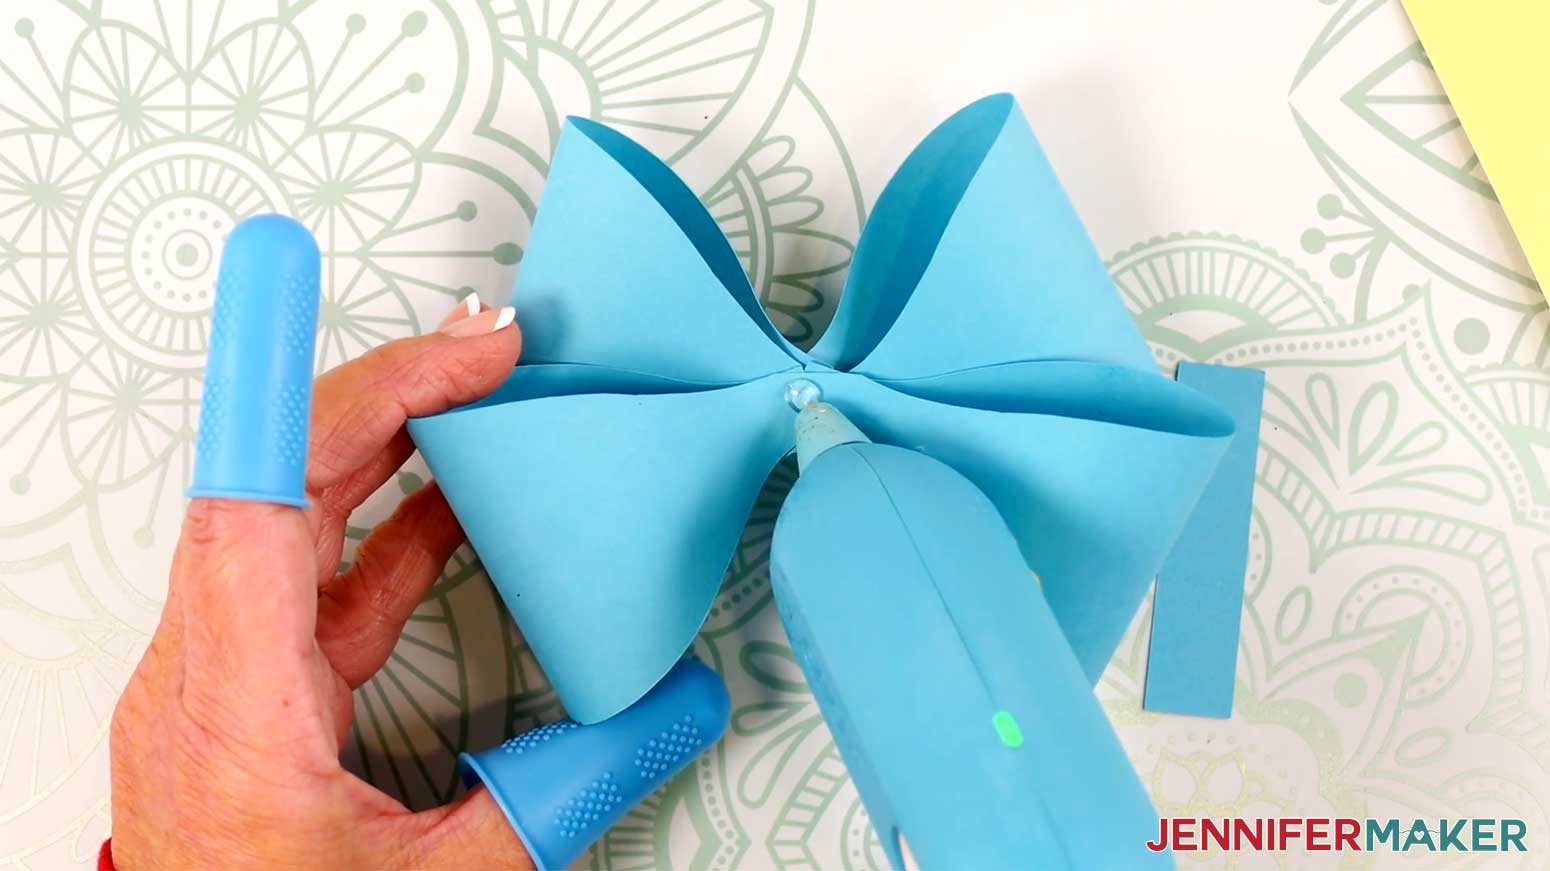
13. Hold the ribbon ends piece so the middle is pointing up, and apply hot glue to the front center, at the point.
14. Adhere the ribbon ends piece to the back center of the assembled bow, over the rectangular strip piece.
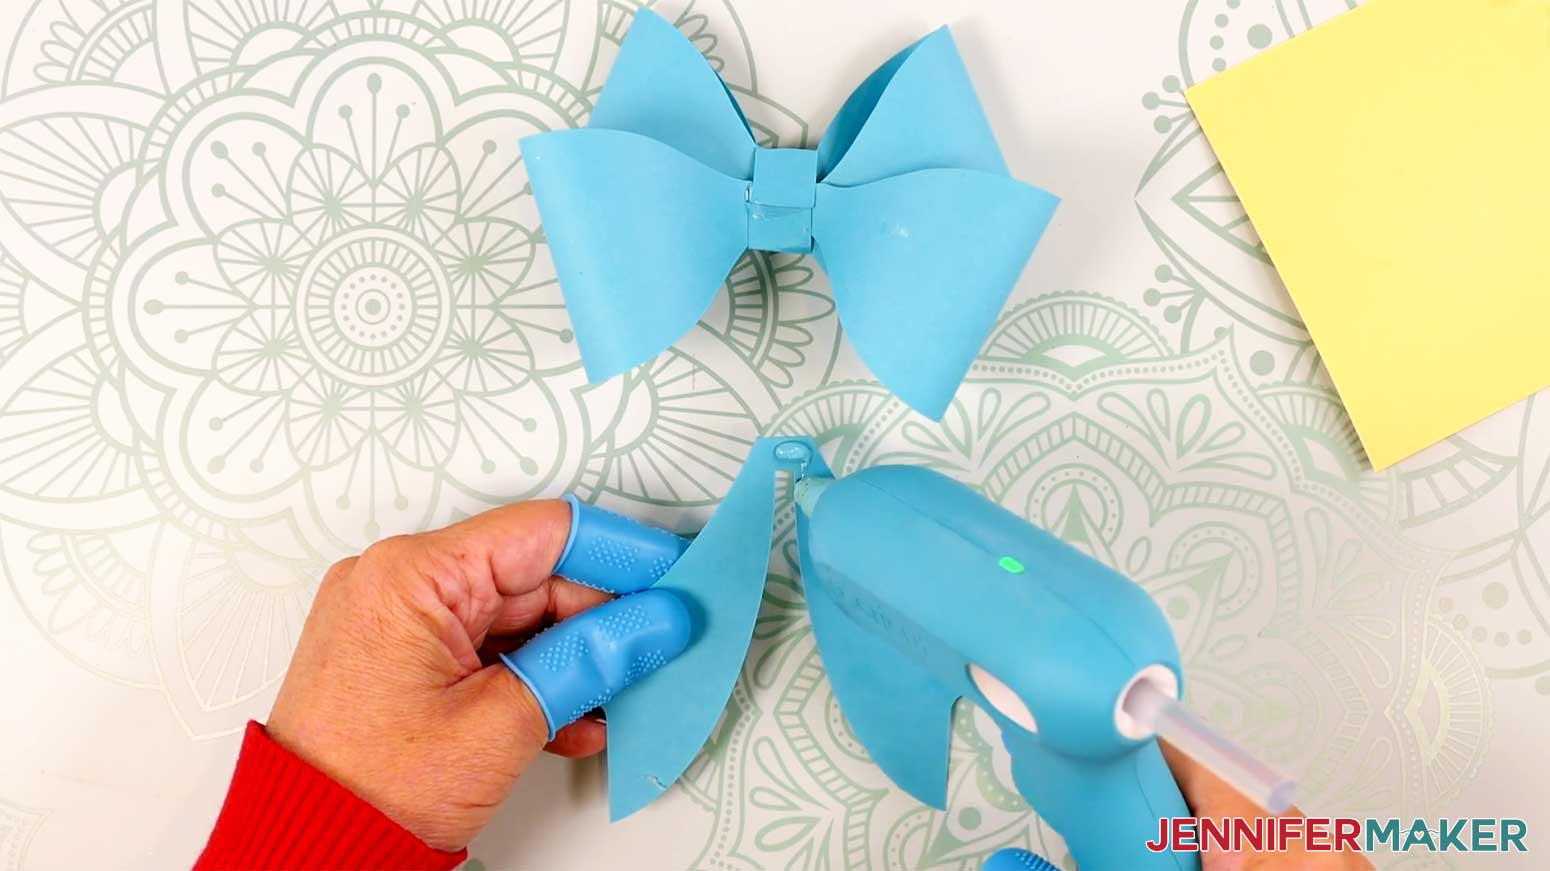
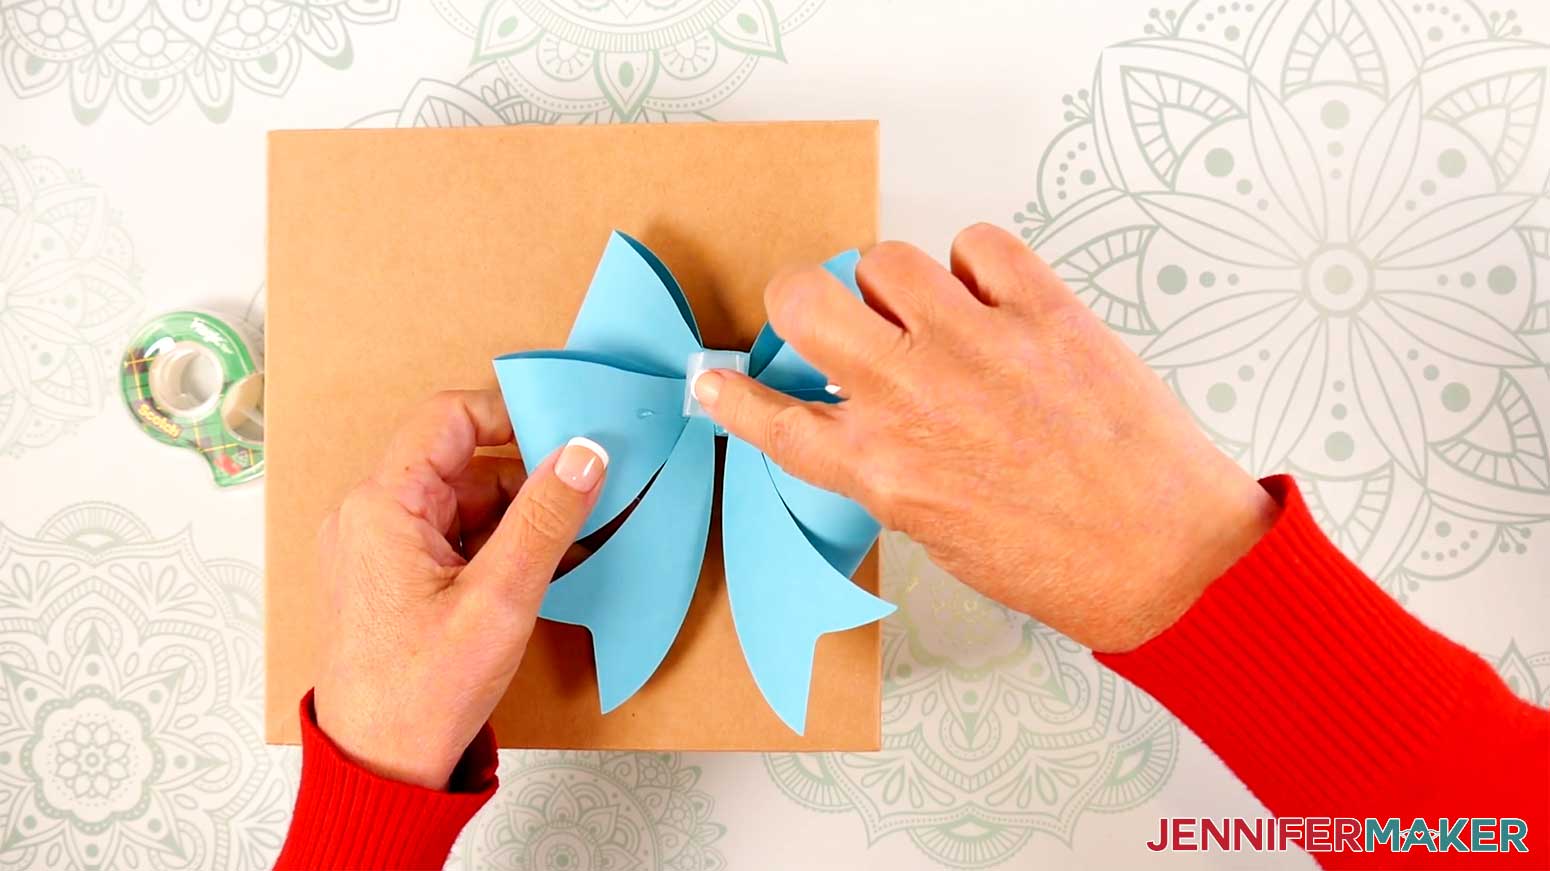
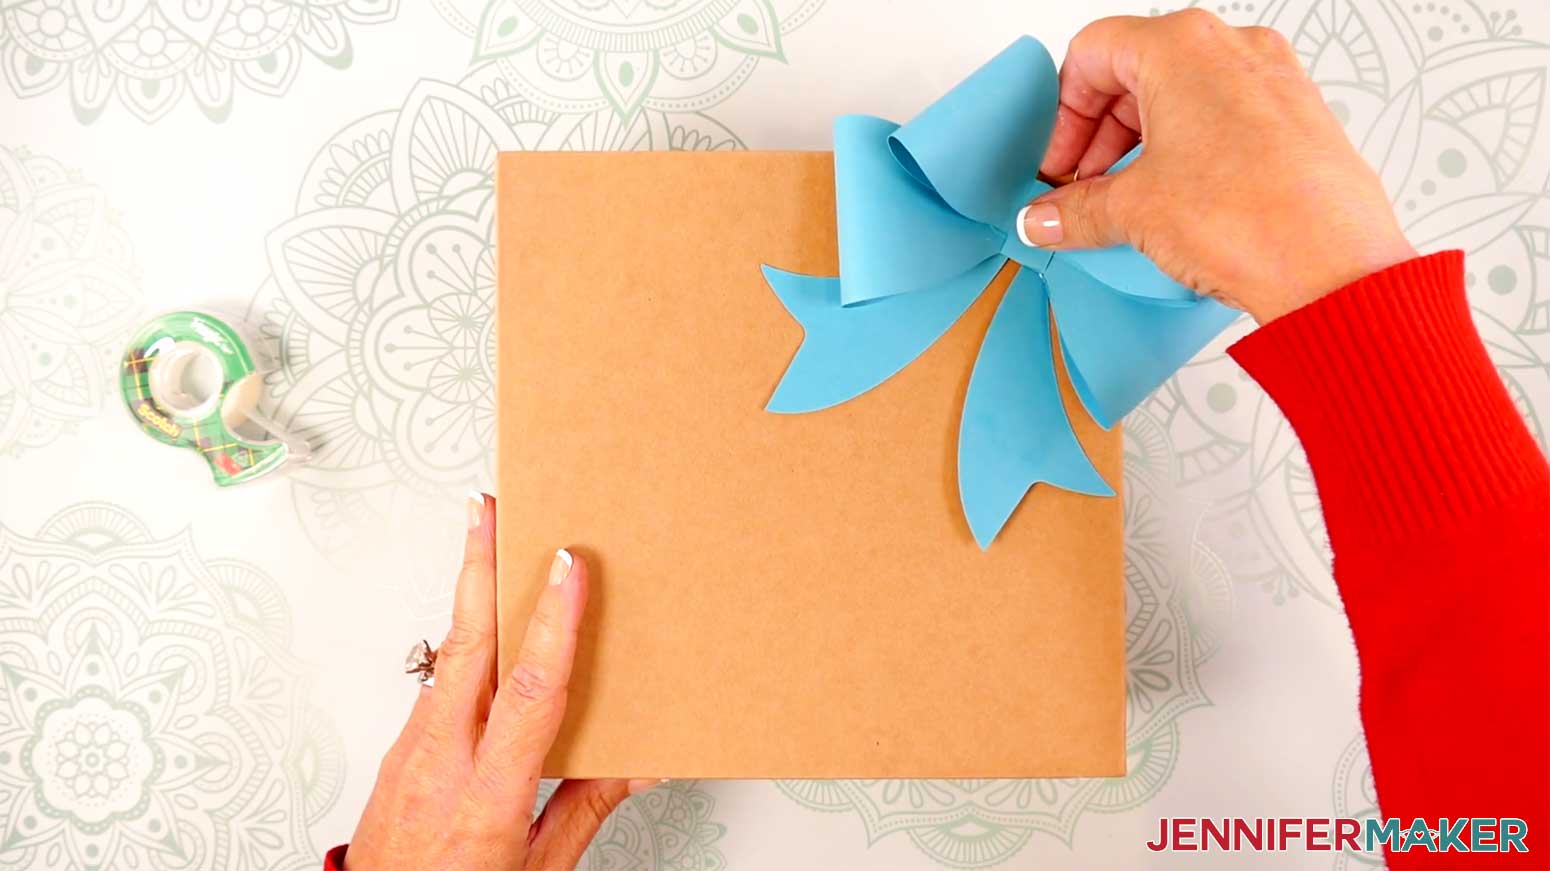
15. Attach your fancy paper bow to a gift with a looped piece of tape.
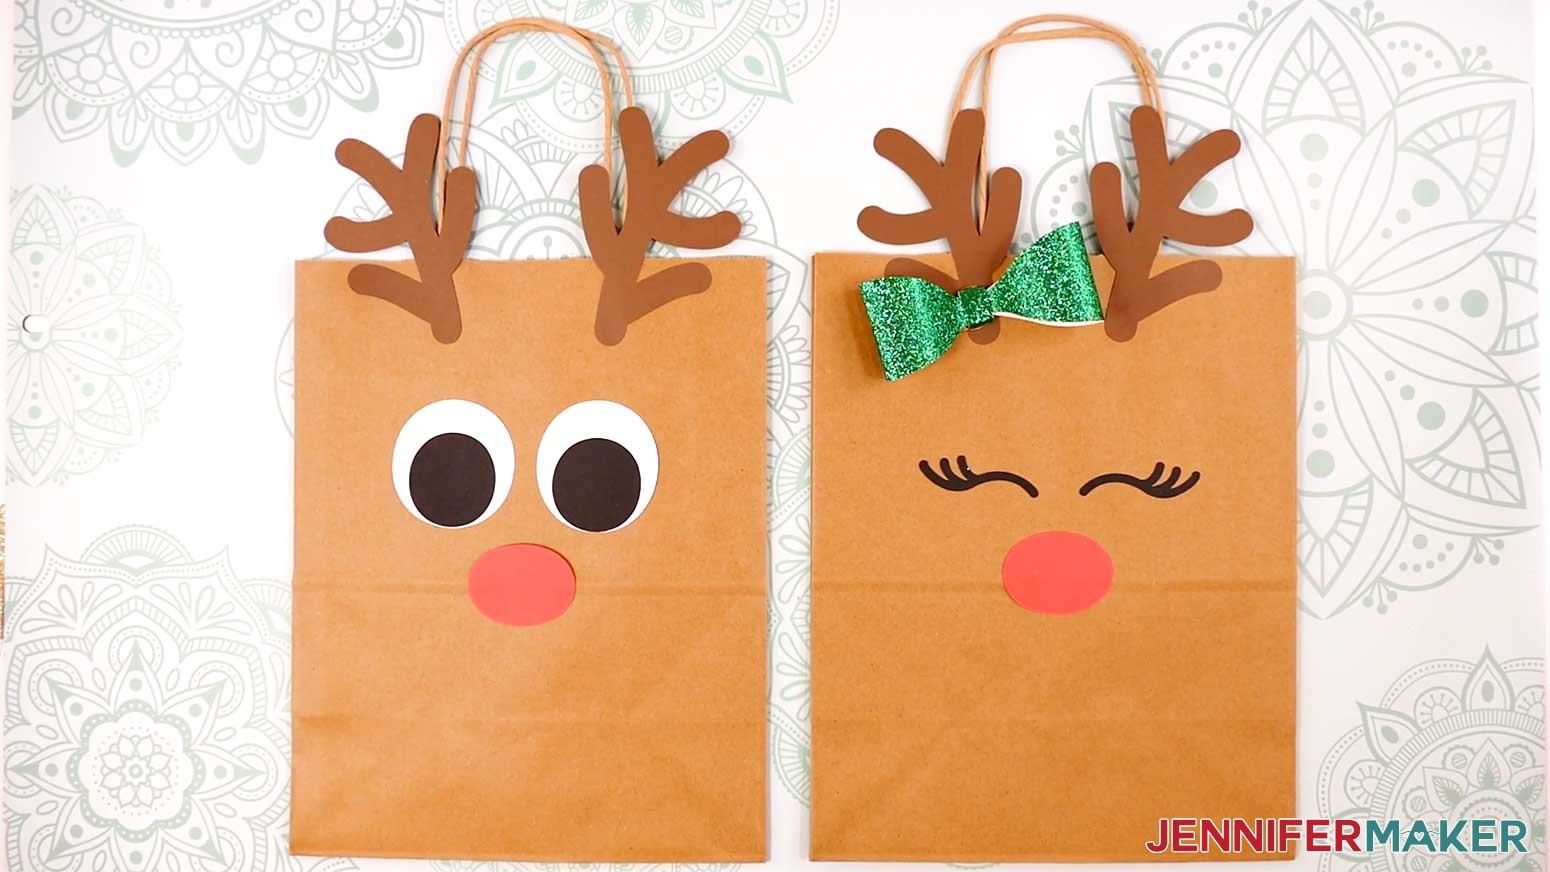
PROJECT 3: REINDEER GIFT BAGS
NOTE: Measure the height and width of the front of your gift bag before getting started.
CRICUT DESIGN SPACE
1. In Cricut Design Space on a blank Canvas, click “Upload.”
2. Click “Upload Image.”
3. Click “Browse.”
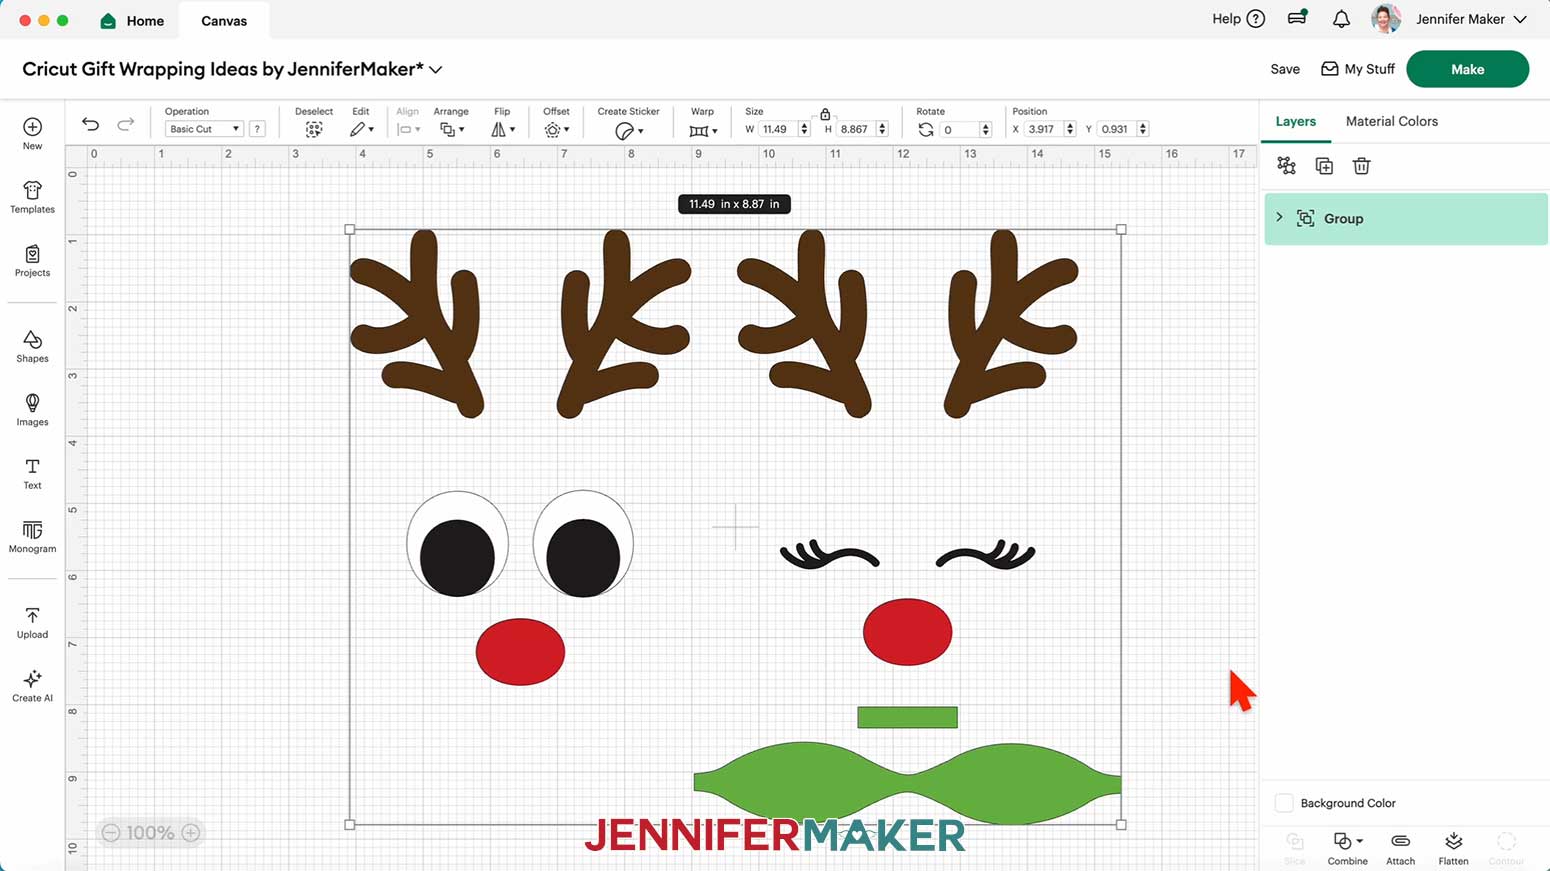
4. Find and select the SVG with “reindeer” in the name.
5. Click “Open” and then “Continue.”
6. Click “Upload” to add the SVG to your Canvas.
7. Here is how the reindeer designs look on my Canvas.
8. Click “Save” and give your project a name.
9. “Ungroup” the design.
NOTE: There are two designs – you can cut both, or delete the one you don’t want to use.
10. Click “Shapes” and add the free square to your Canvas.
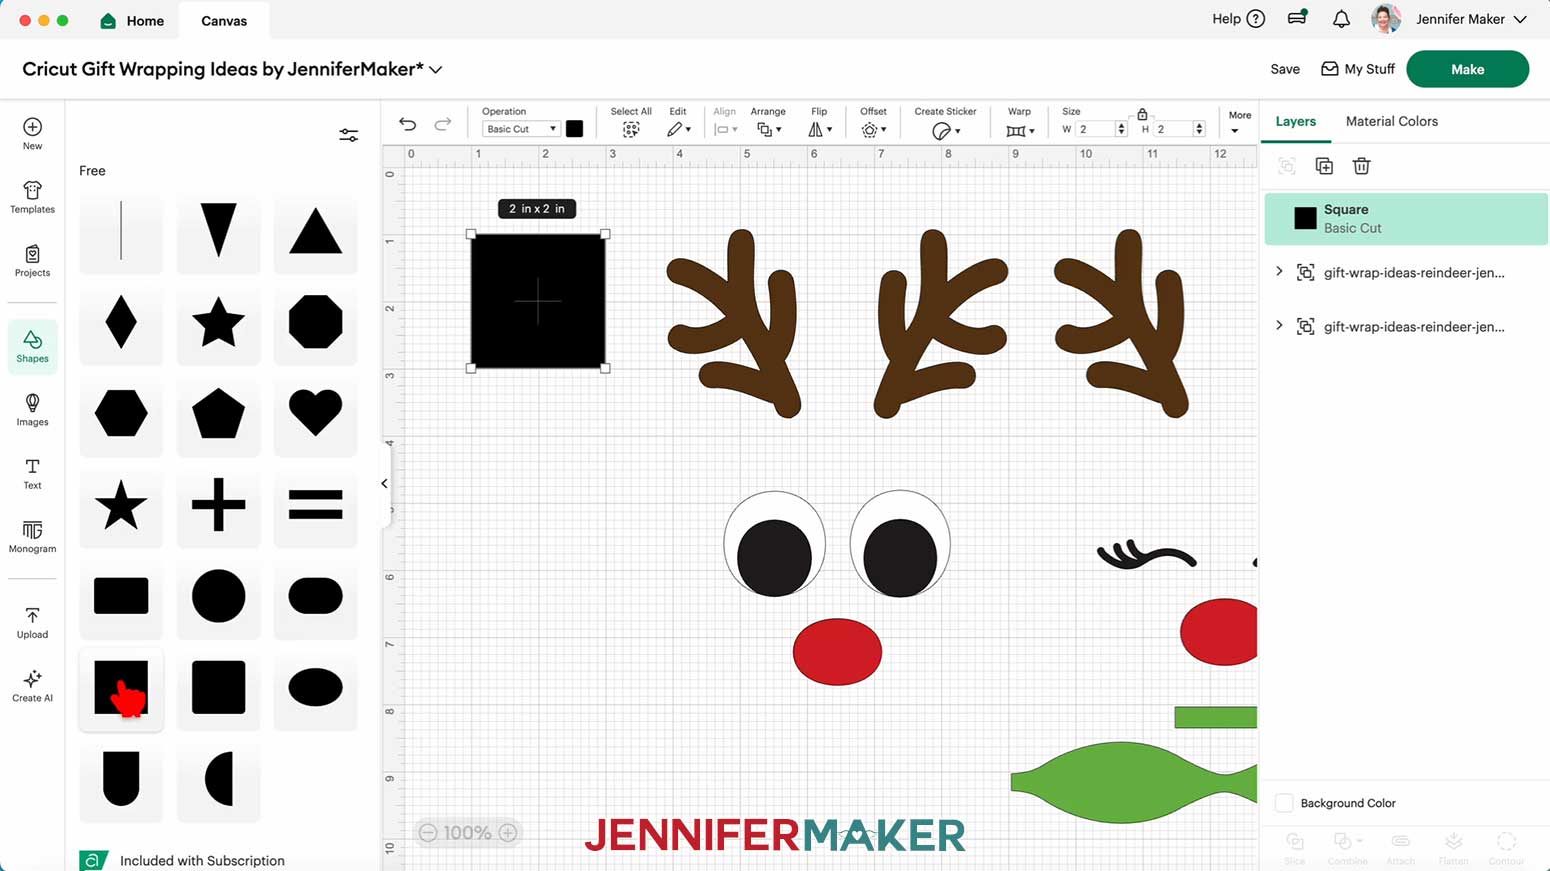
11. Under “Operation,” select “Guide.”
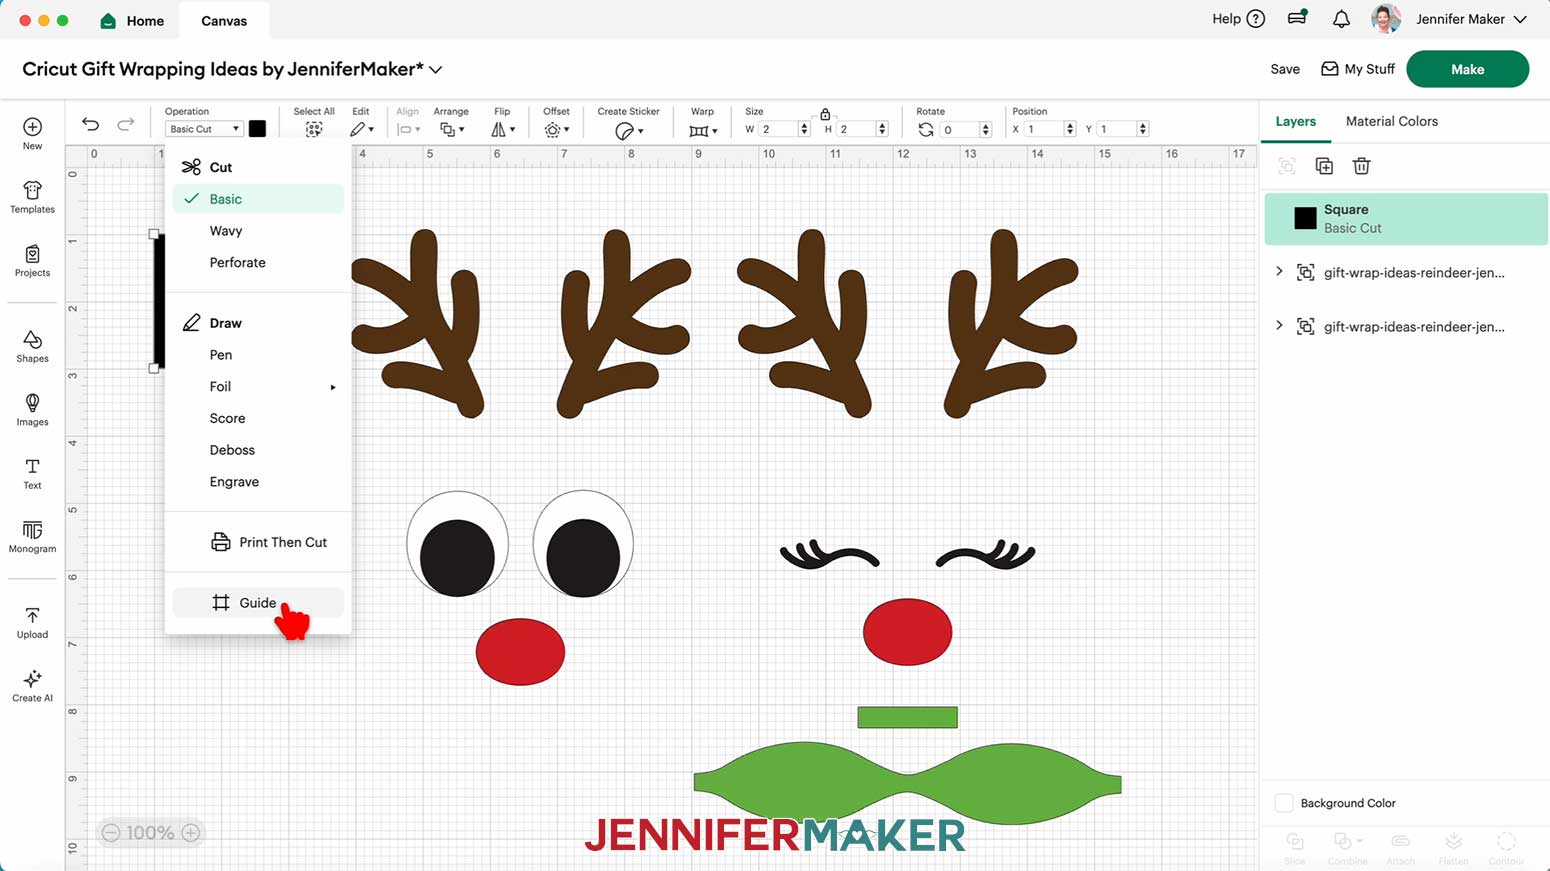
12. Click the lock icon above the size fields and resize the guide square to match the dimensions of the front of your gift bag.
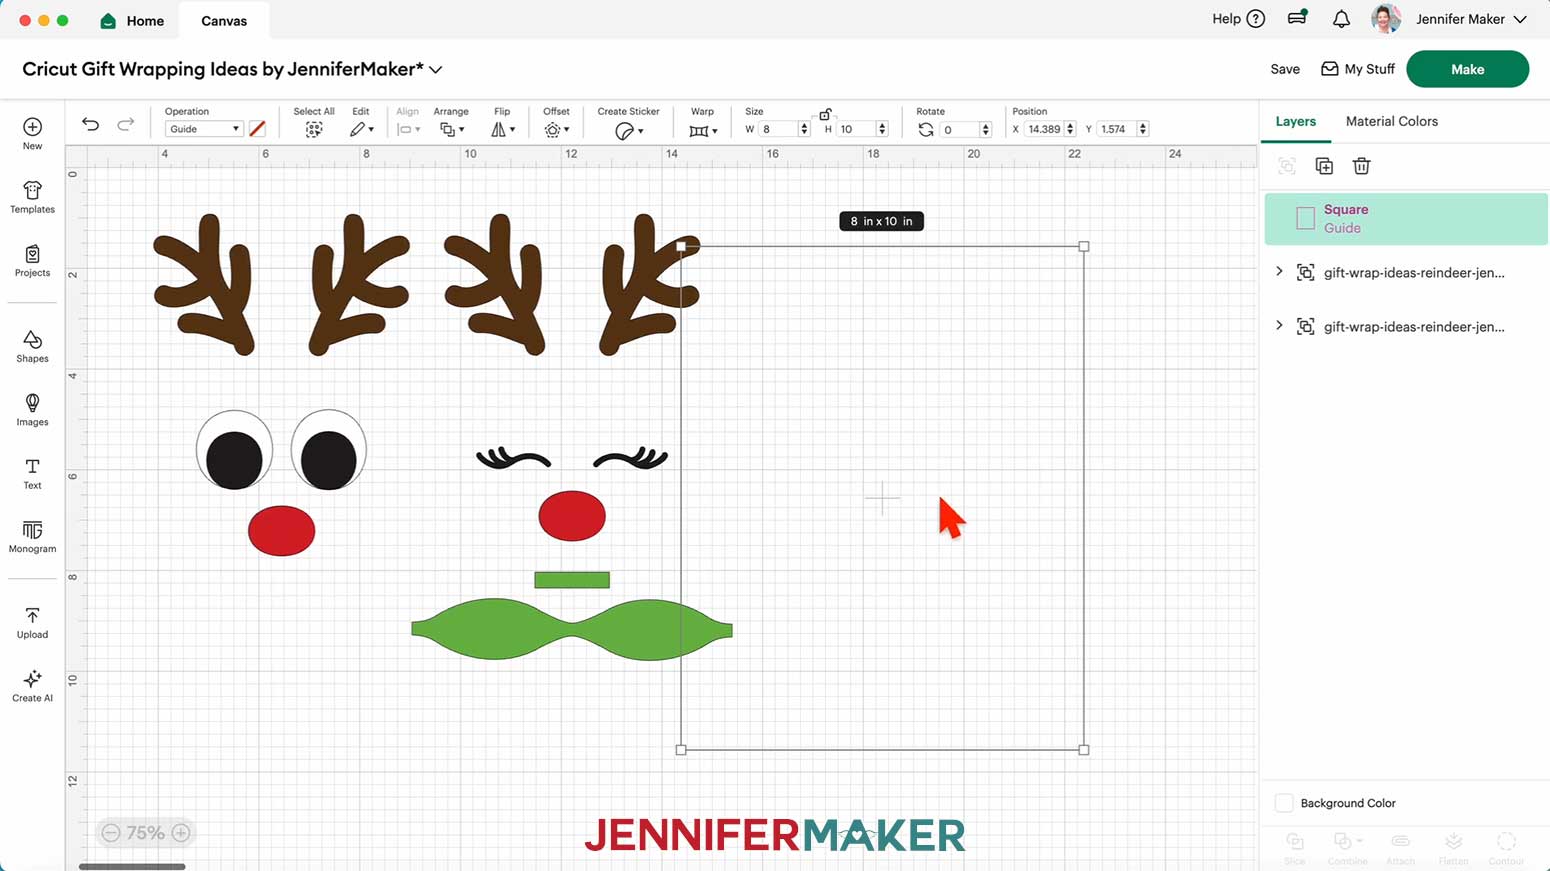
13. Drag the reindeer design over the guide.
14. Resize the reindeer design so the bottom of the antlers overlap the top of the guide, and their tops extend off the top of the bag. The facial features should be approximately in the center of the guide/bag.
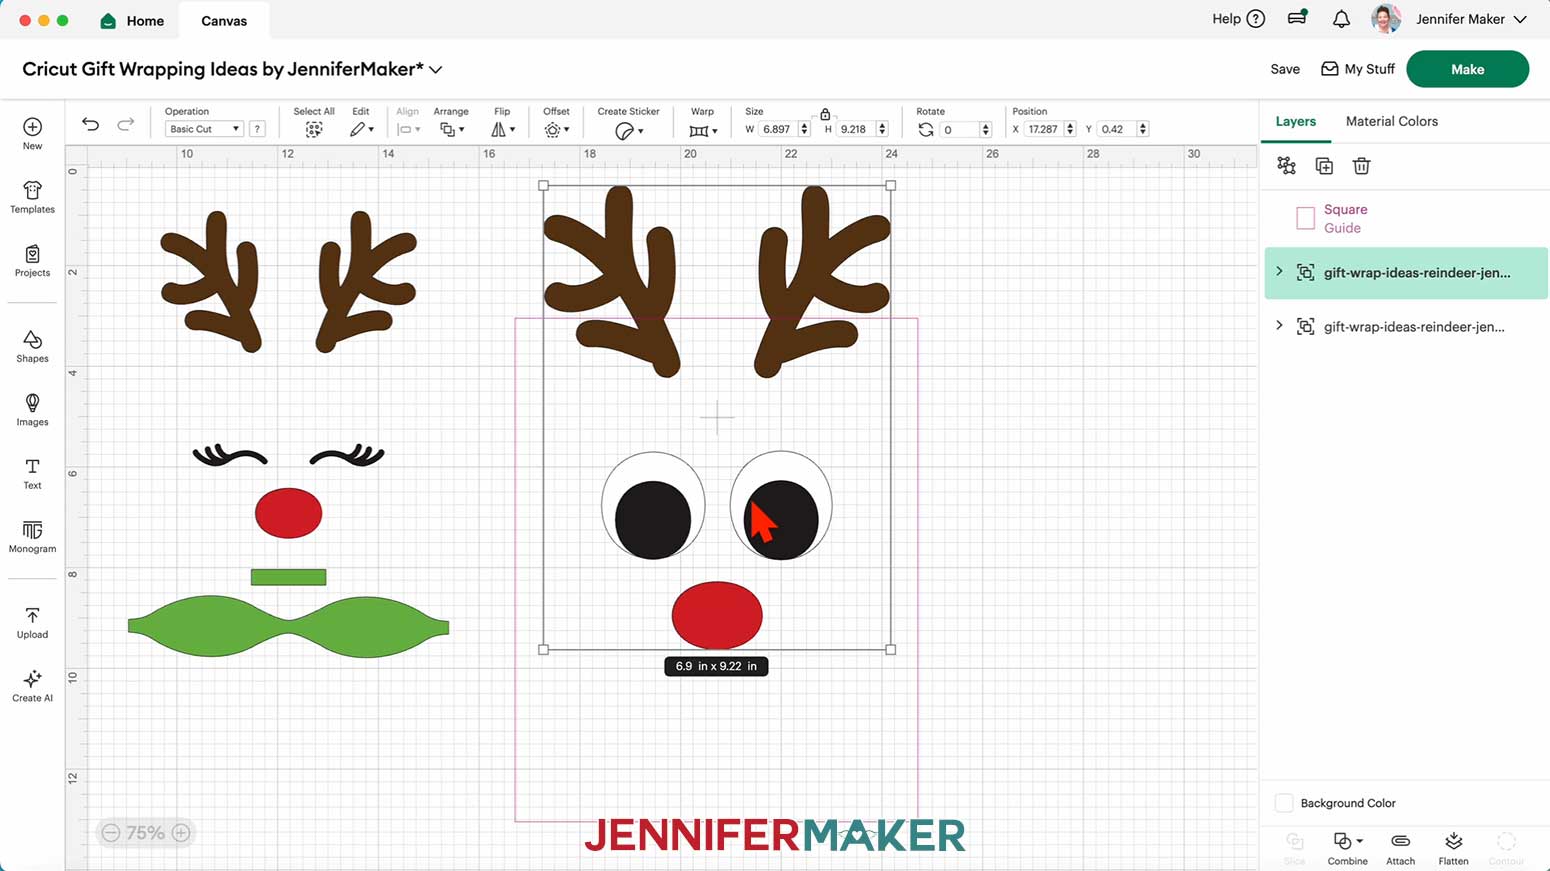
15. Delete the guide.
16. If you want to use a different color material for the pieces, select the appropriate layer in the Layers Panel and use the Color Box at the top to adjust it.
17. Your reindeer gift bag decorations are ready to cut! Make sure the correct machine is selected in the top right and click “Make.”
18. If prompted, click "On Mat," choose your mat size, and click “Confirm.”
19. On the Prepare screen, make sure the correct Material Size is selected for each of your mats.
20. Select the first mat again and click “Continue.”
CUTTING
1. On the Make screen, I used the following cut settings:
65 lb. cardstock: “Medium Cardstock - 80 lb (216 gsm)” setting with “More” Pressure
Glitter cardstock: “Glitter Cardstock” setting with “More” Pressure
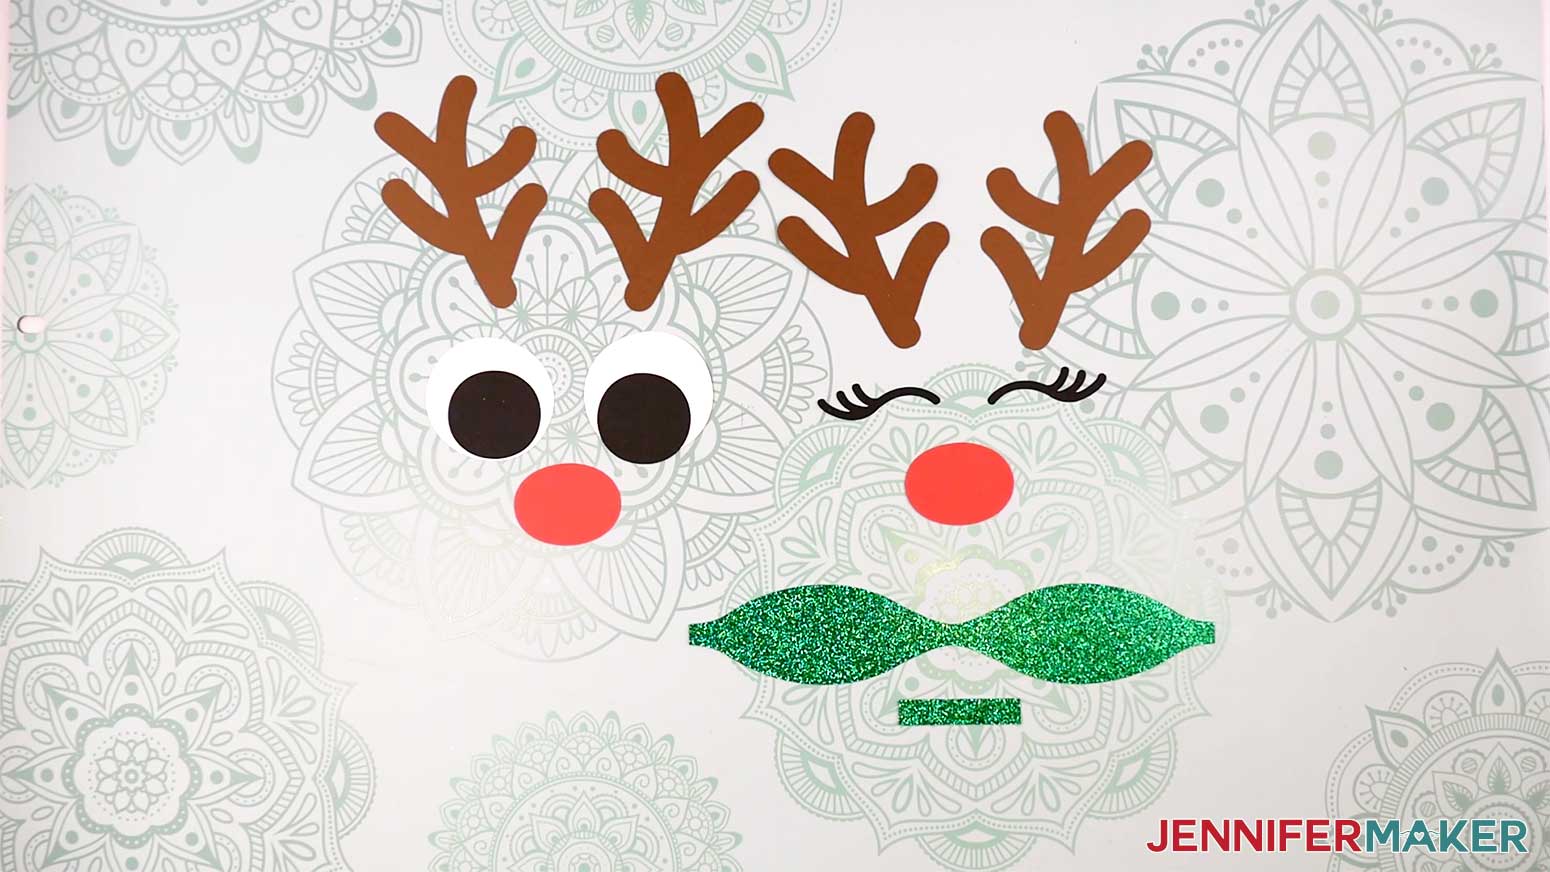
NOTE: I used black and white 65 lb. cardstock for the eyes, brown 65 lb. cardstock for the antlers, red 65 lb. cardstock for the noses, and green glitter cardstock for the bow.
2. Place your first mat’s material pretty-side up onto a green StandardGrip machine mat.
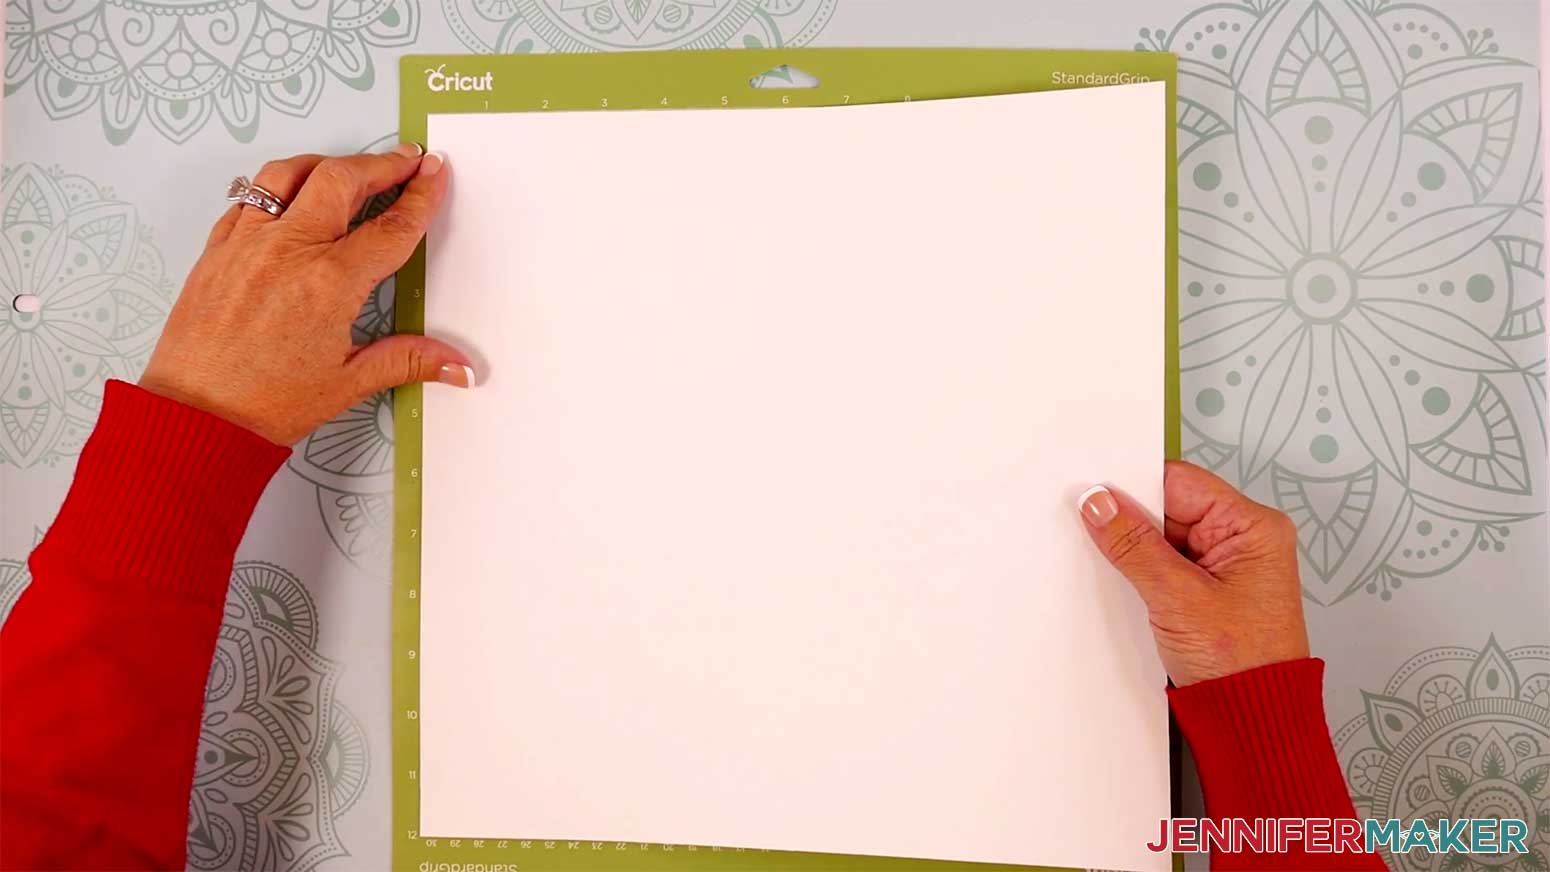
3. Use a brayer to make sure it’s fully adhered.
4. Check that your Fine-Point Blade is clean and in the clamp.
5. Load the mat into your Cricut and press the flashing middle button to begin cutting.
6. Before unloading the mat, use your weeding tool to peel back a corner of the material to make sure the cut went all the way through. If it didn’t, smooth the material back down into place and press the middle button again for another pass.
7. Once the material is cut all the way through, unload the mat, flip it over onto your work surface, and roll it back to release the material.
TIP: Use a spatula to carefully remove delicate areas.
8. Place the cut pieces face up on your work surface. Use your Canvas in Cricut Design Space as reference if needed.
9. Repeat steps 1-8 with the remaining mats.
ASSEMBLY
1. There are two reindeer faces – one with open eyes, and one with closed eyes and a bow.
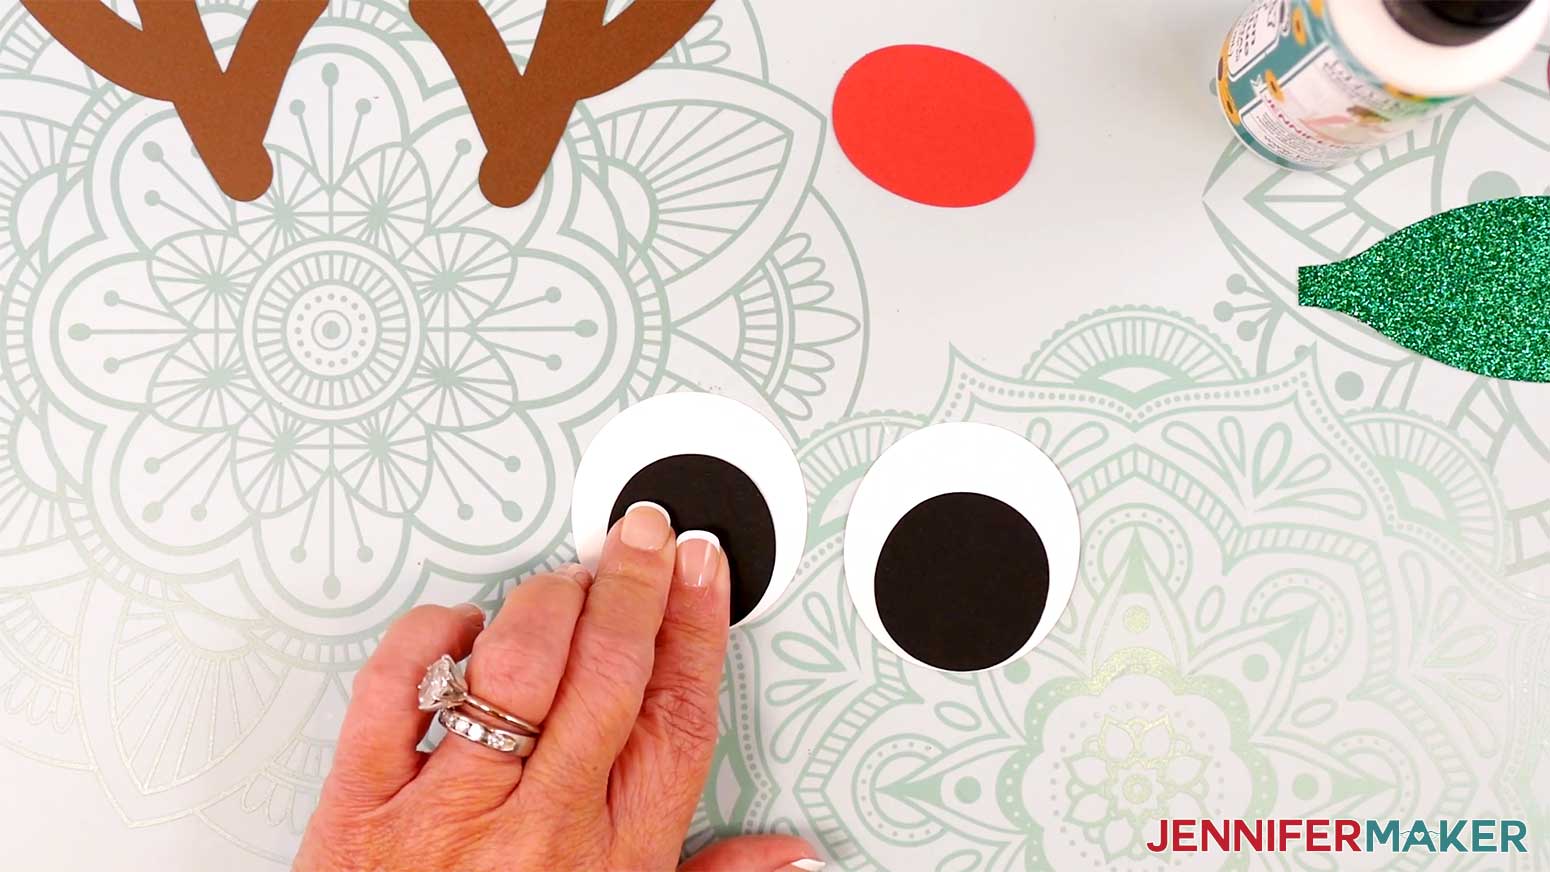
2. To assemble the open eyes, apply craft glue to the back of each black circle, then attach it to the front of a white circle so the outer edges align on one side.
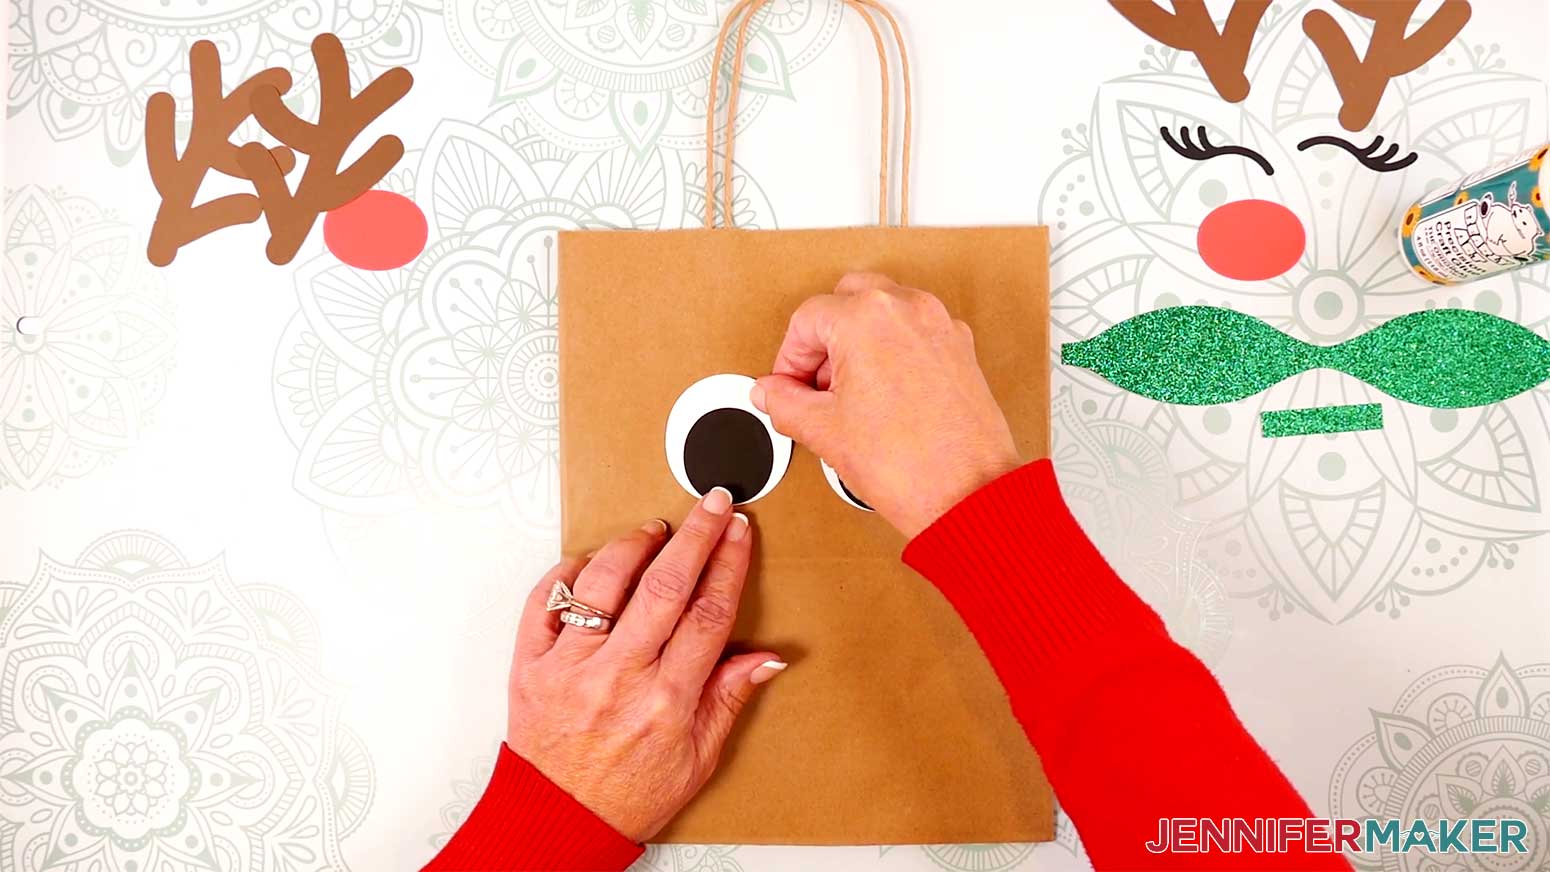
3. With your bag still folded flat and lying face up on your work surface (with the fold facing down), use craft glue to attach the eyes to the bag. Use the handles as a guide, center them on the bag below the handles, about ⅔ of the way between the top edge of the bag and the fold in the middle.
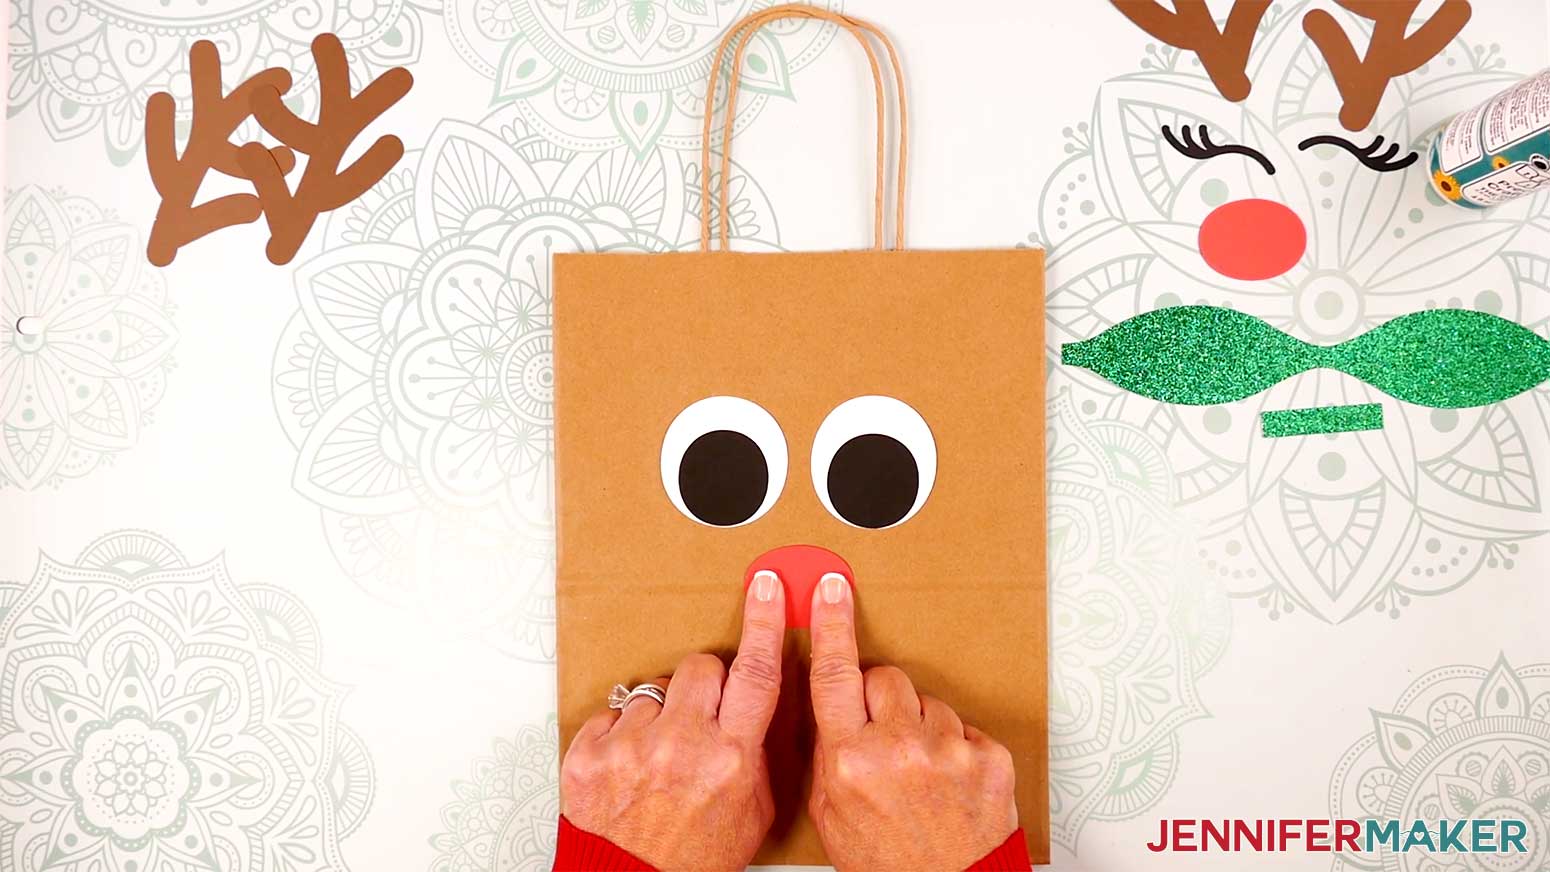
4. Use craft glue to apply the oval-shaped nose piece below the eyes, over the bag’s crease.
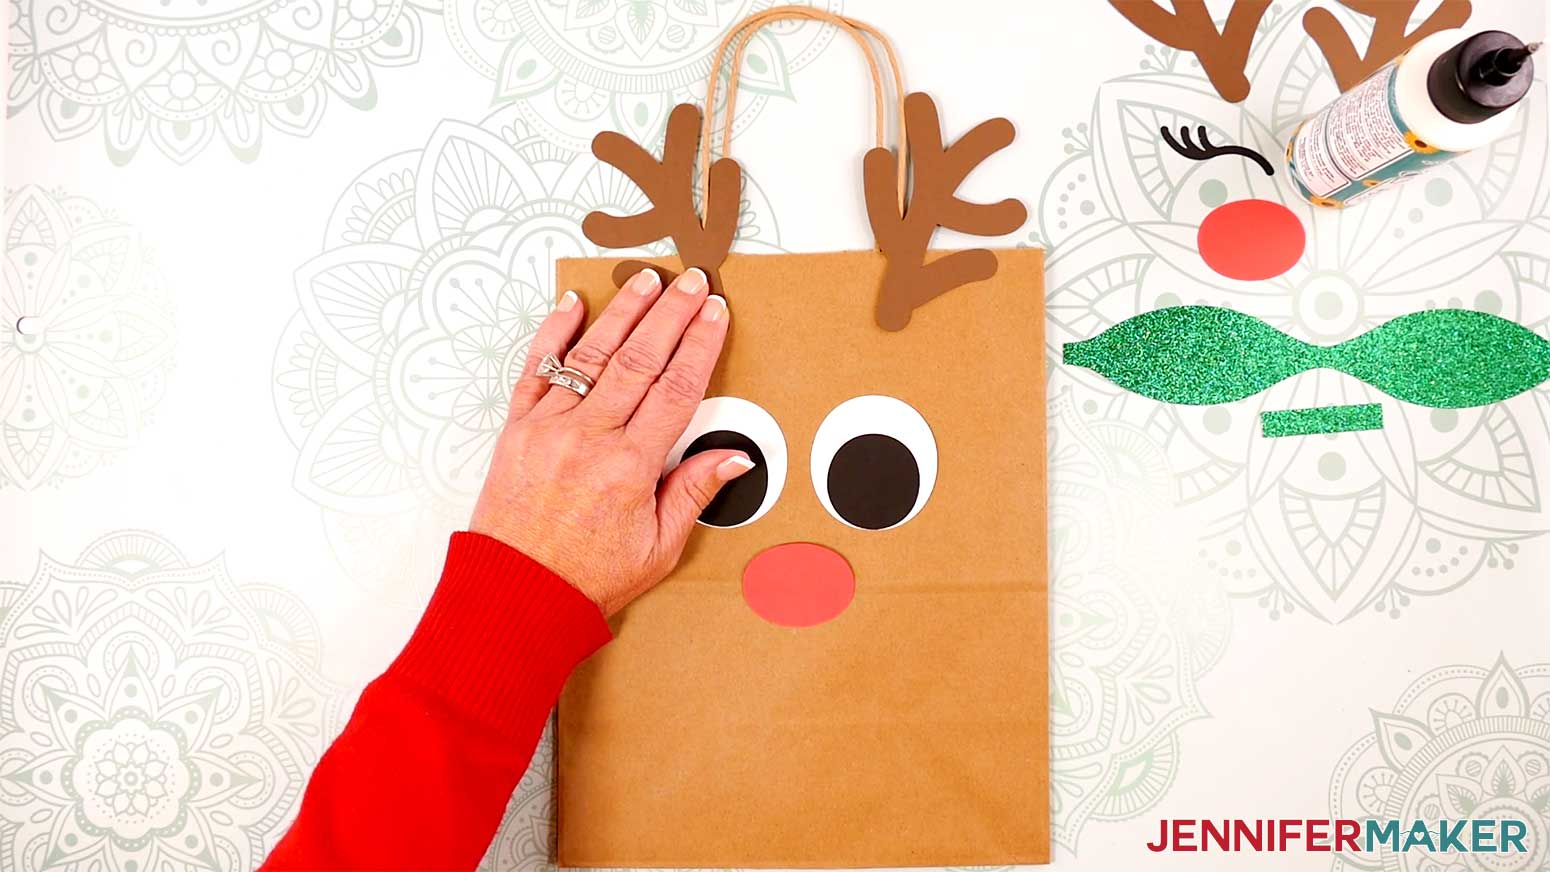
5. Apply craft glue to the bottom of each antler and secure it to the top edge of the bag, on either side of the handles. The antler points should be pointing up and outwards from the bag.
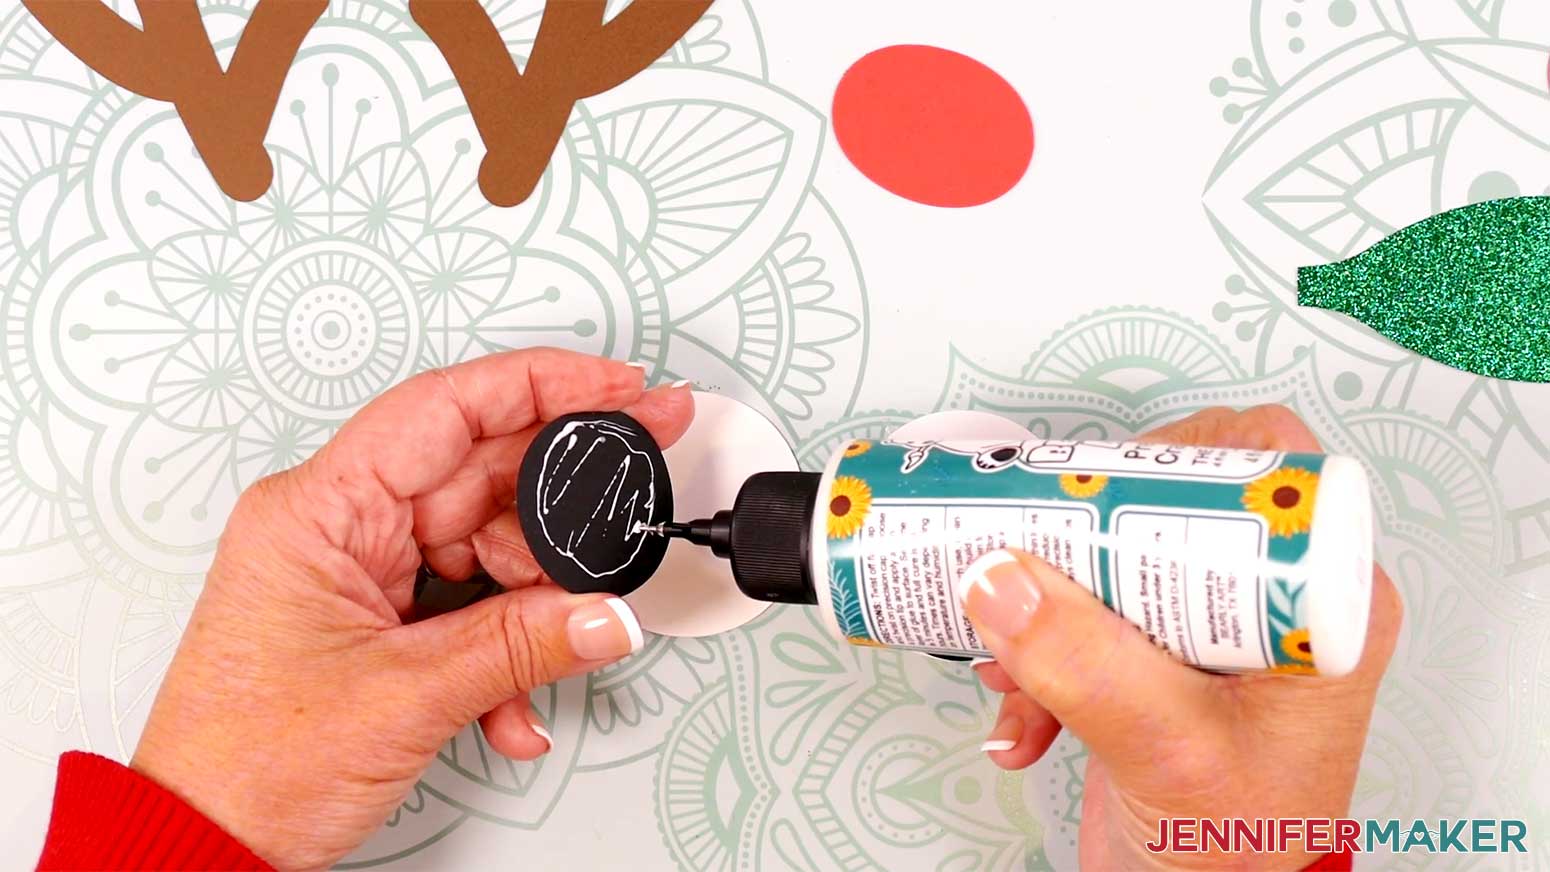
6. If using glitter cardstock to assemble the bow, first turn on your hot glue gun and put on your silicone finger protectors.
7. Turn the larger bow piece face down on your work surface.
8. Curve one side over (don’t crease it) and use hot glue to secure its point to the center of the bow piece.
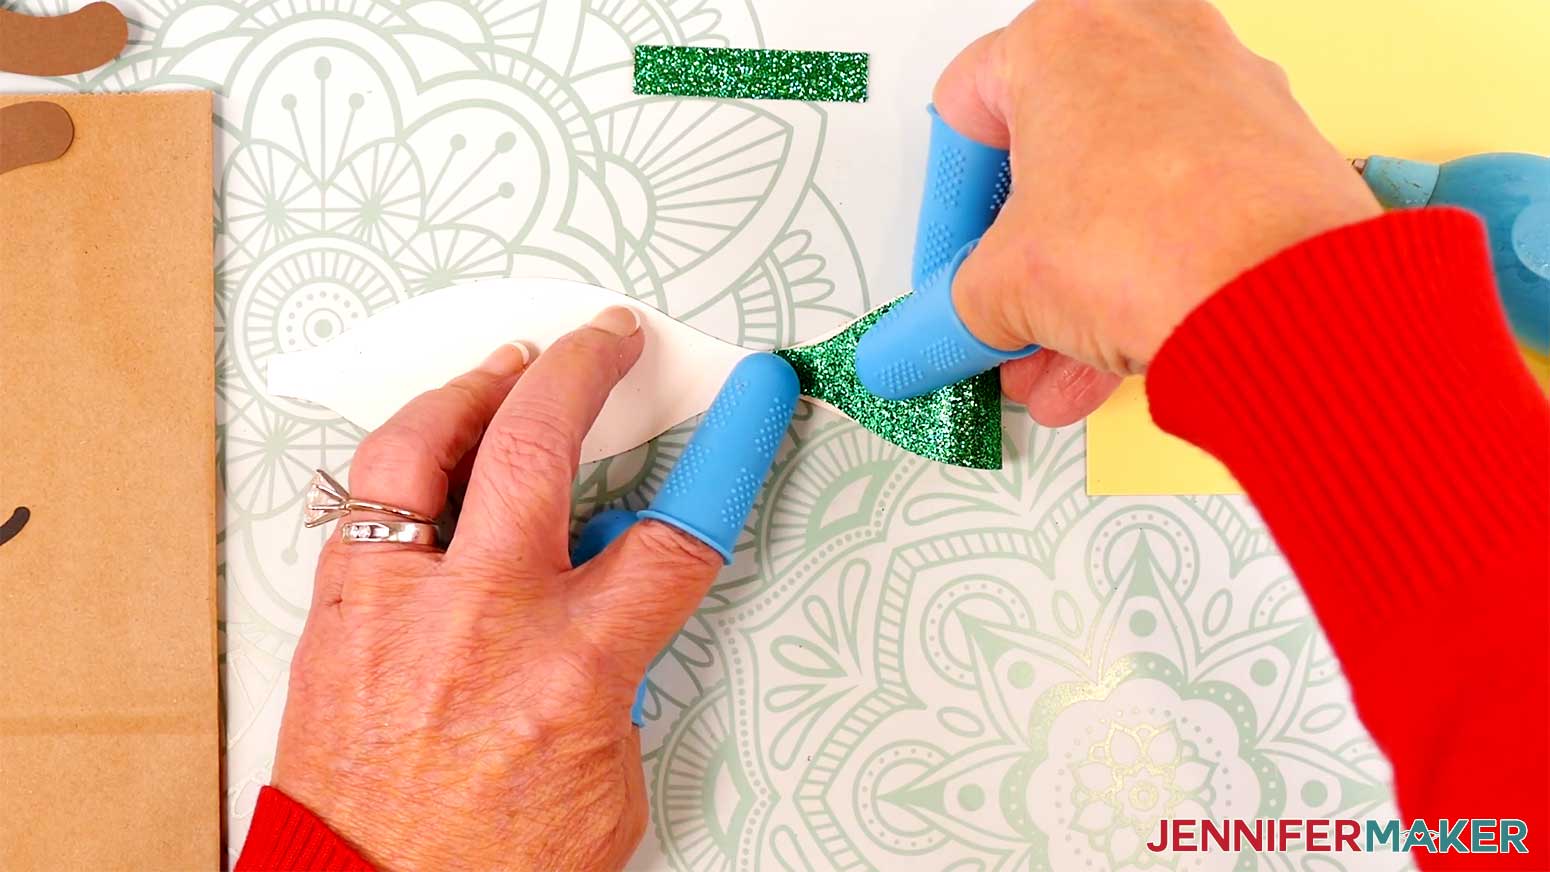
9. Repeat step 8 with the other side.
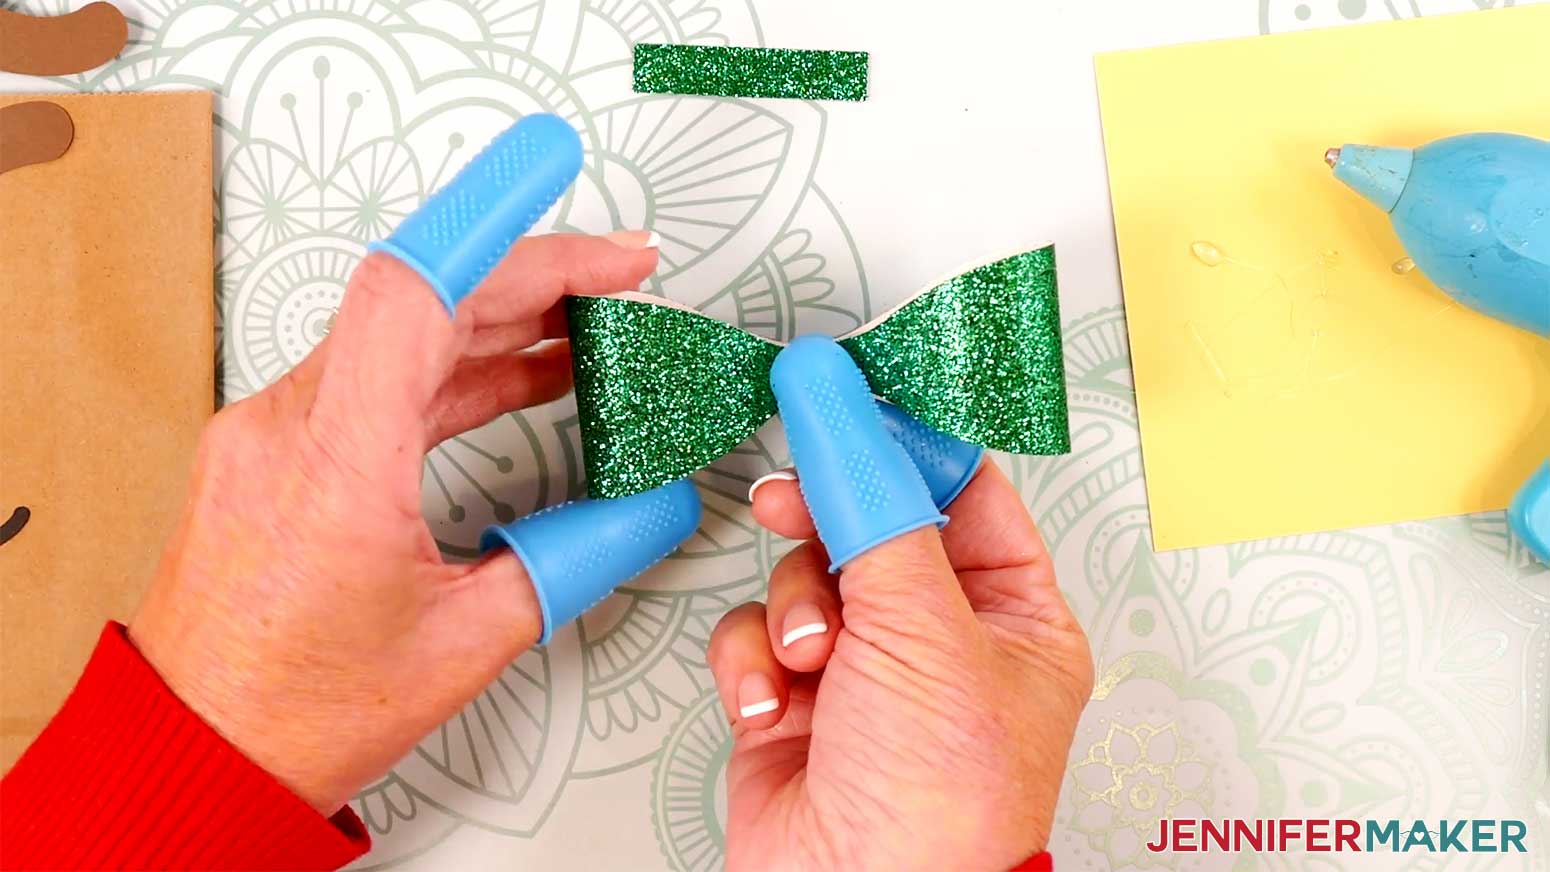
10. Grab the smaller rectangular strip piece and wrap it around the center of the assembled bow, then secure it on the back with hot glue.
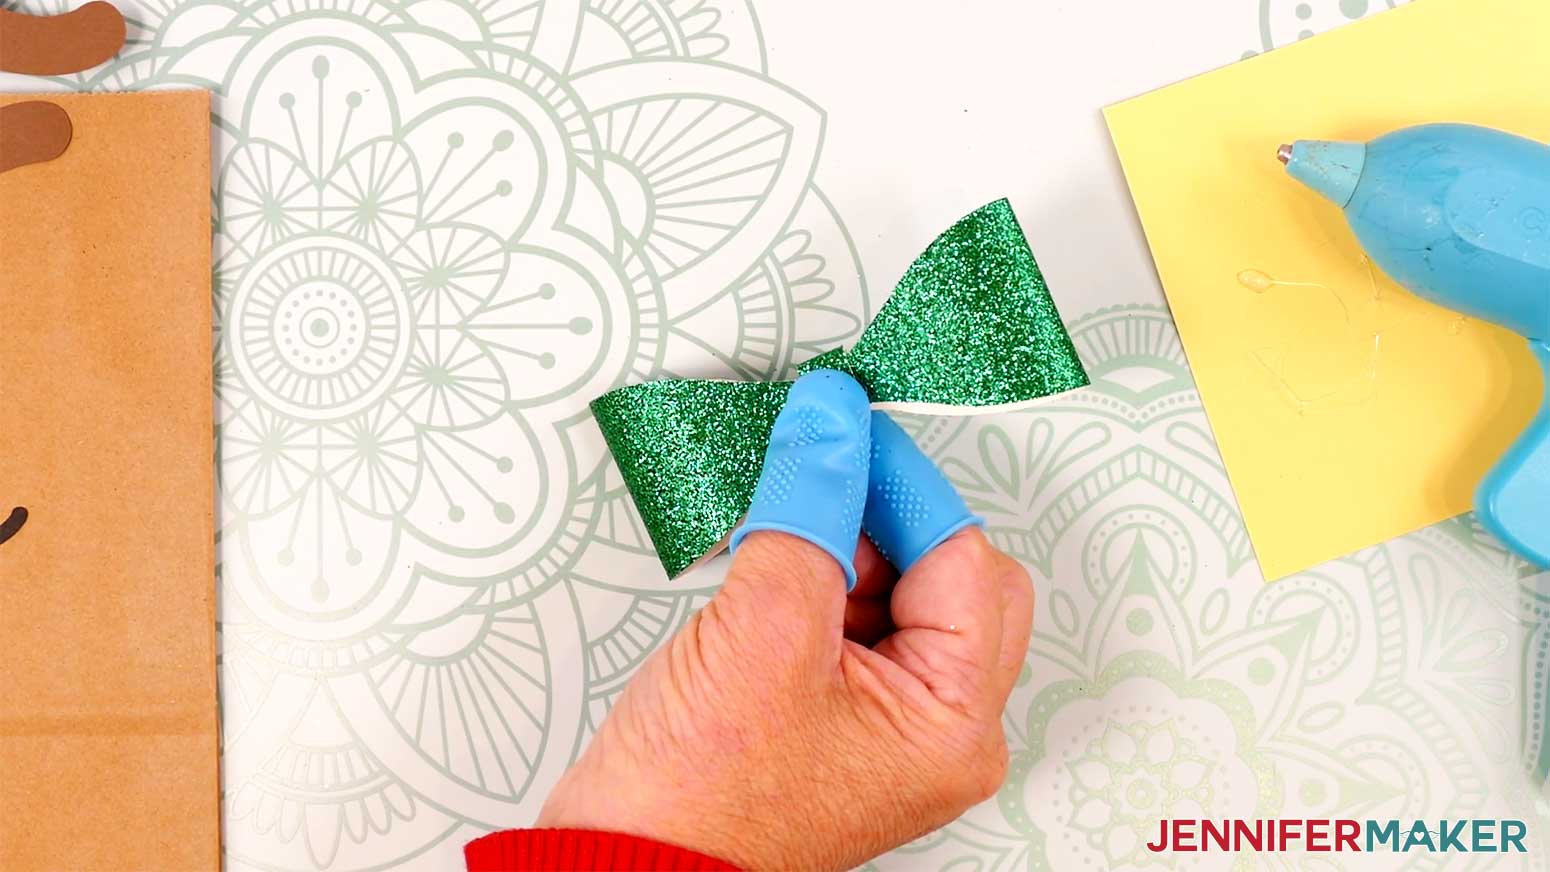
11. To attach the bow to the bag, use hot glue if you used glitter cardstock – otherwise, craft glue will work fine. I attached mine to the base of one antler.
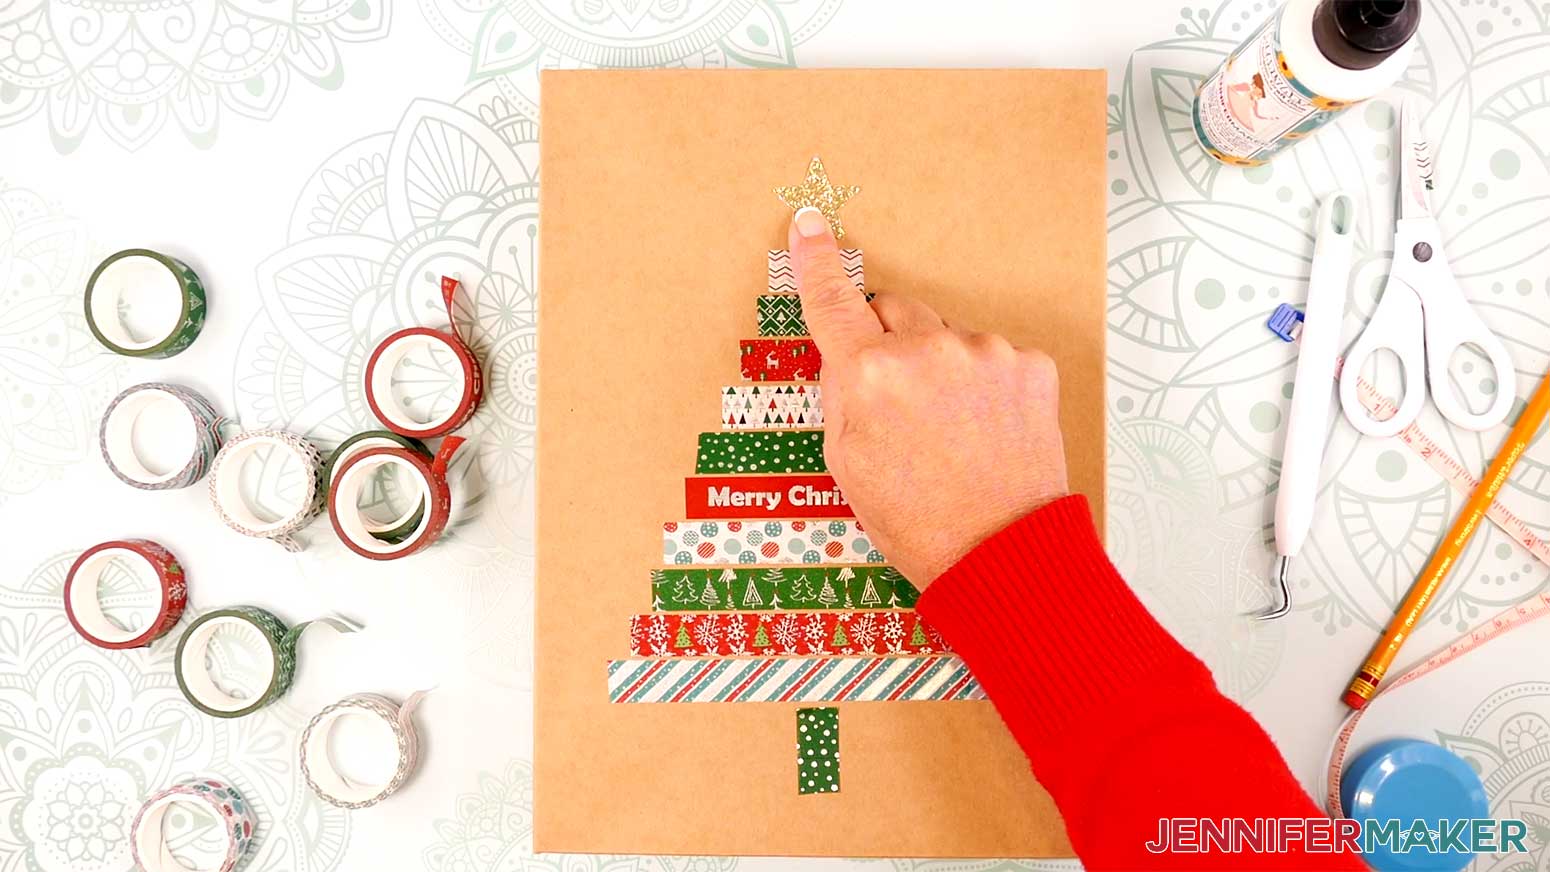
PROJECT 4: WASHI TAPE TREE WITH STAR
CRICUT DESIGN SPACE
1. In Cricut Design Space on a blank Canvas, click “Upload.”
2. Click “Upload Image.”
3. Click “Browse.”
4. Find and select the SVG with “star” in the name.
5. Click “Open” and then “Continue.”
6. Click “Upload” to add the SVG to your Canvas.
7. Here is how the star looks on my Canvas.
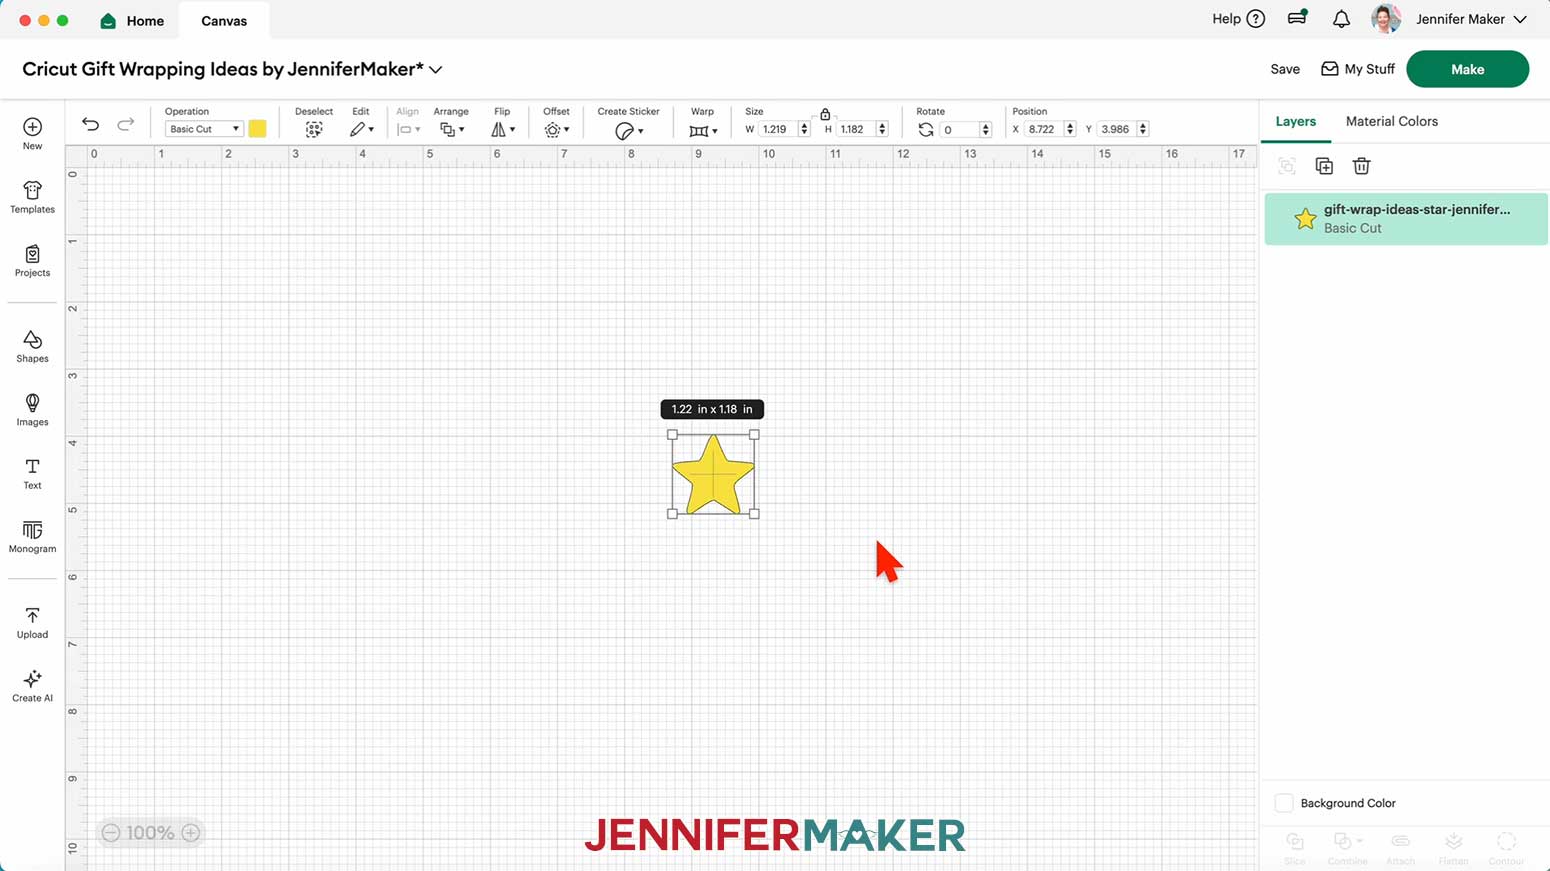
8. Click “Save” and give your project a name.
9. If you want to use a different color material for the star, select it and use the Color Box at the top to adjust it.
10. Your star for your washi tape star decoration is ready to cut! Make sure the correct machine is selected in the top right and click “Make.”
11. If prompted, click "On Mat," choose your mat size, and click “Confirm.”
12. On the Prepare screen, make sure the correct Material Size is selected.
13. Click “Continue.”
CUTTING
1. On the Make screen, I used the “Glitter Cardstock” setting with “More” Pressure.
NOTE: I used gold glitter cardstock for the star.
2. Place your material pretty-side up onto a green StandardGrip machine mat.
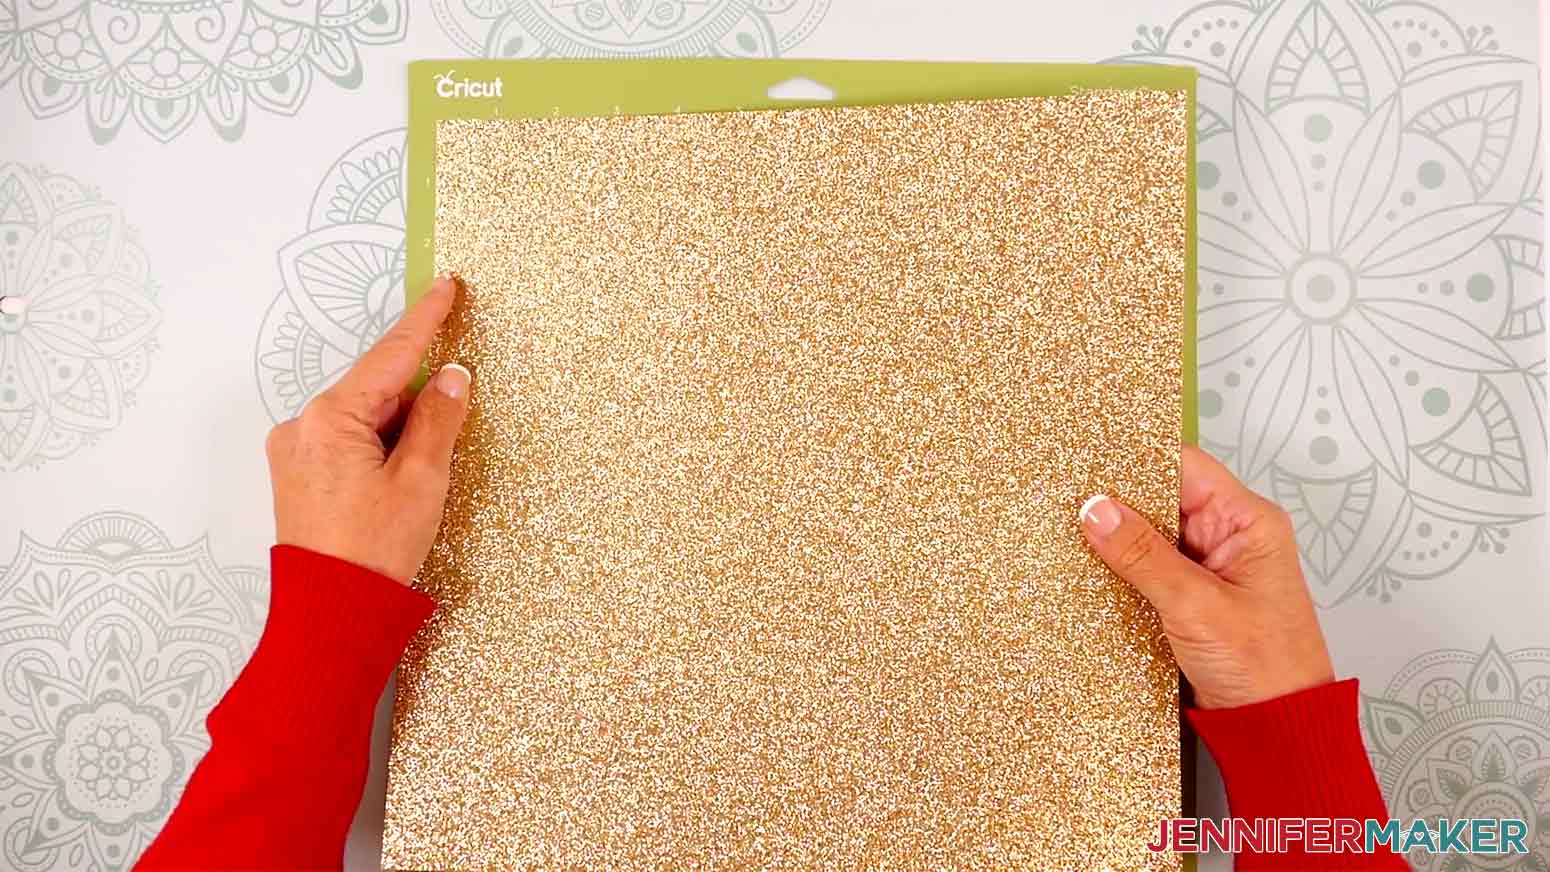
3. Use a brayer to make sure it’s fully adhered.
4. Check that your Fine-Point Blade is clean and in the clamp.
5. Load the mat into your Cricut and press the flashing middle button to begin cutting.
6. Before unloading the mat, use your weeding tool to peel back a corner of the material to make sure the cut went all the way through. If it didn’t, smooth the material back down into place and press the middle button again for another pass.
7. Once the material is cut all the way through, unload the mat, flip it over onto your work surface, and roll it back to release the material.
ASSEMBLY
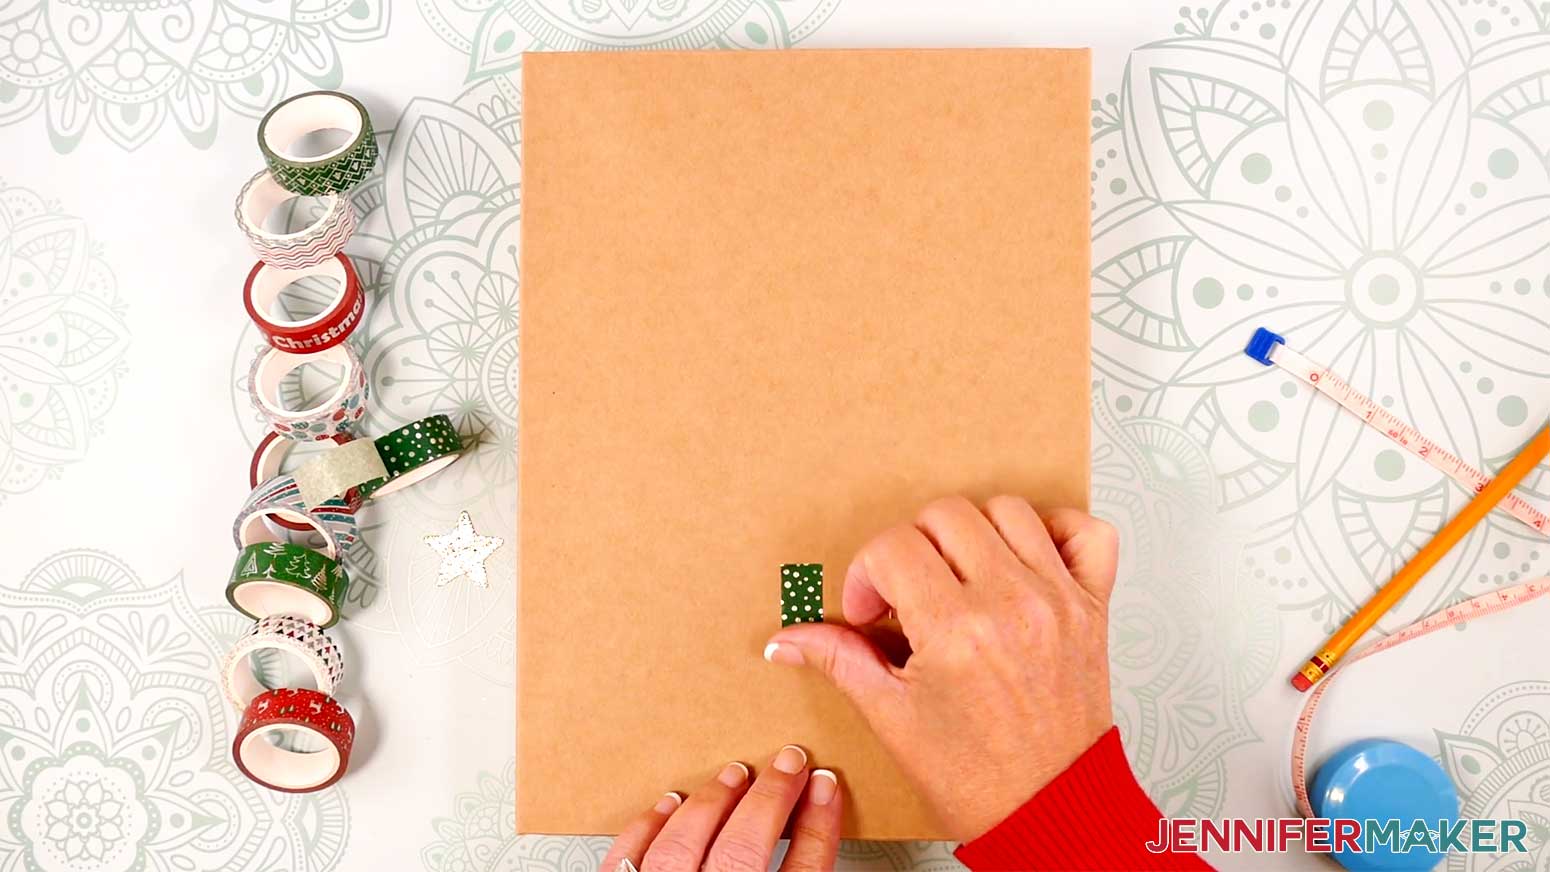
1. Wrap your gift box with your choice of wrapping paper first, or apply the decoration directly to a gift box. I applied mine directly to the lid of a gift box.
2. Cut a piece of washi tape about 1” long for the trunk of the tree.
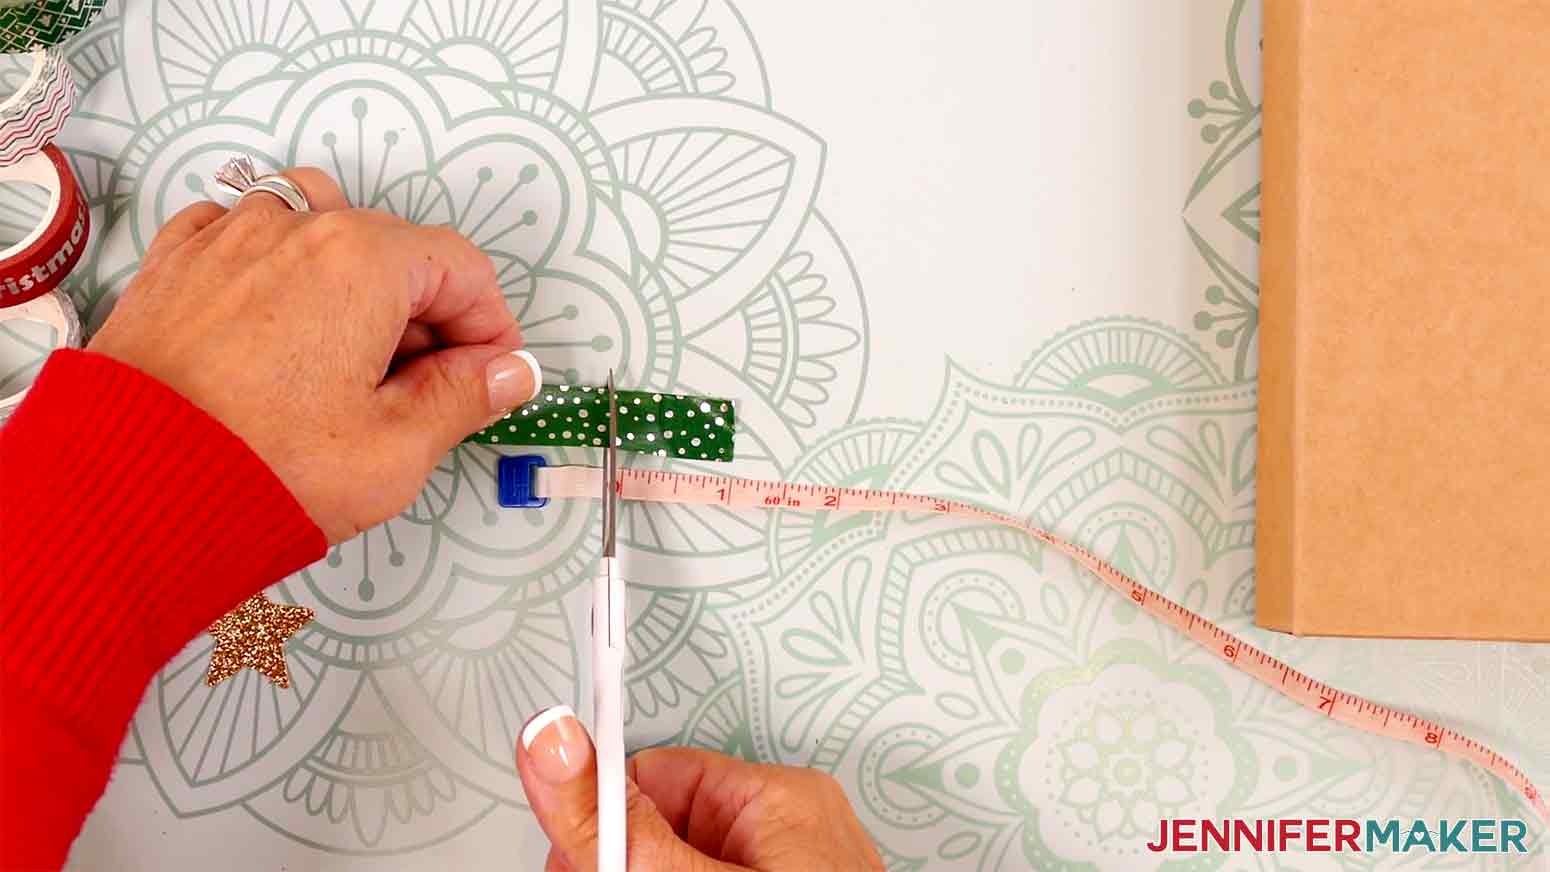
3. Apply the washi tape vertically to your gift box.
NOTE: Attach it to a spot that has enough room to apply the rest of the tree above it.
4. Cut a different pattern of washi tape in the width you’d like the base of your tree to be. Apply it horizontally to the gift box, perpendicularly above the trunk piece, centering it like a “T” with a small space between the pieces.
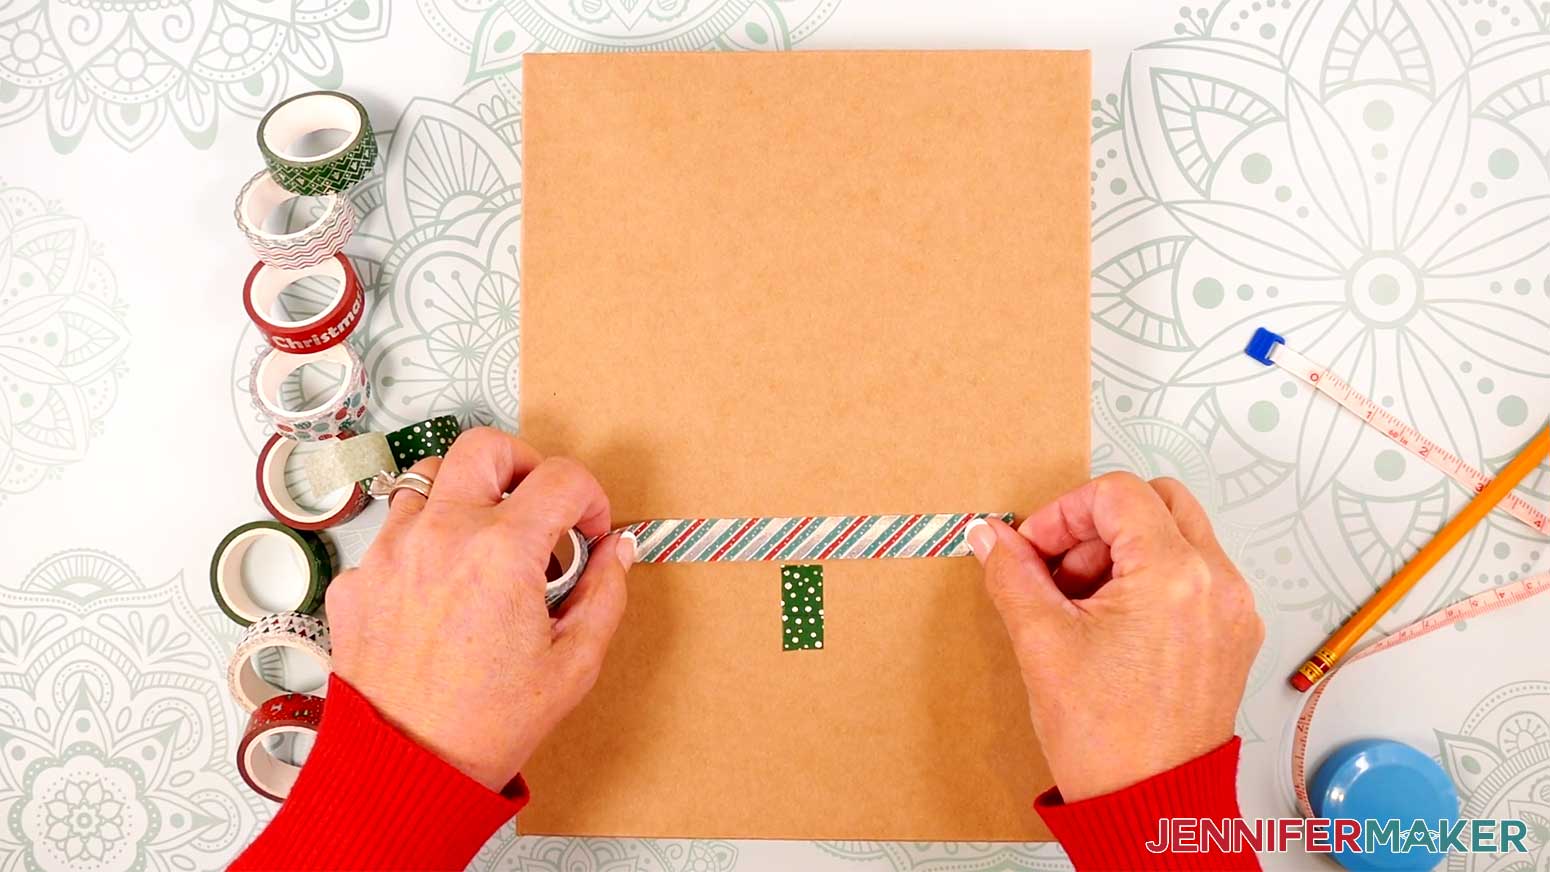
5. Cut a different pattern of washi tape, about 0.5” smaller than the last.
6. Adhere it above and parallel to the last piece of washi tape you applied.

7. Repeat steps 5-6 until you’ve applied a piece of washi tape approximately 0.5” wide at the top of your tree.
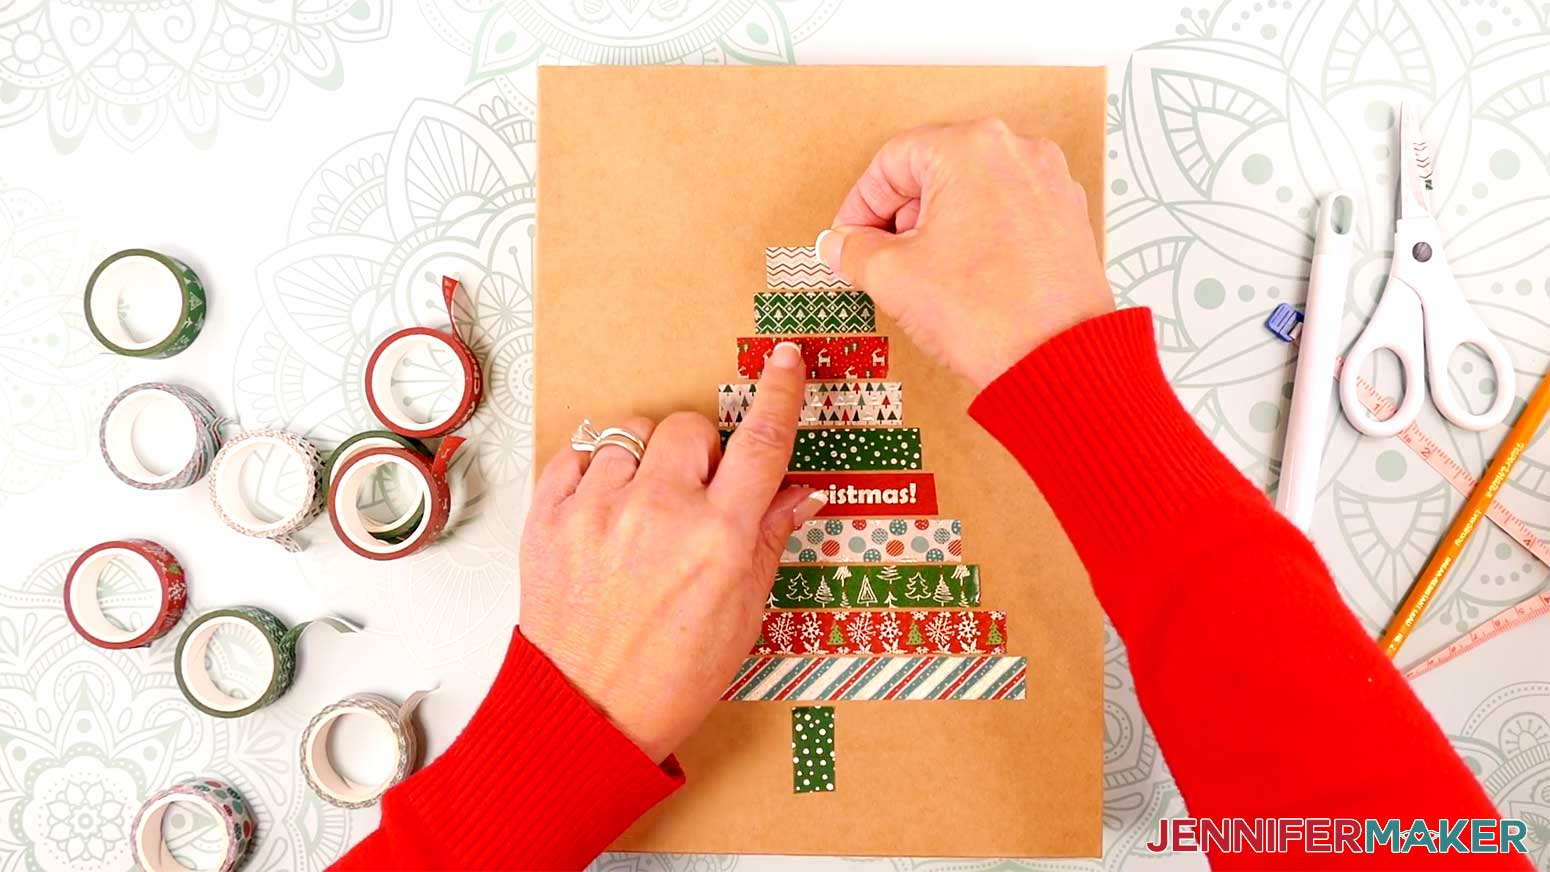
8. Washi tape is repositionable on most paper, so make any adjustments now.
9. Apply craft glue to the back of the star piece.
10. Apply the star to the top of the tree, above the topmost piece of washi tape.
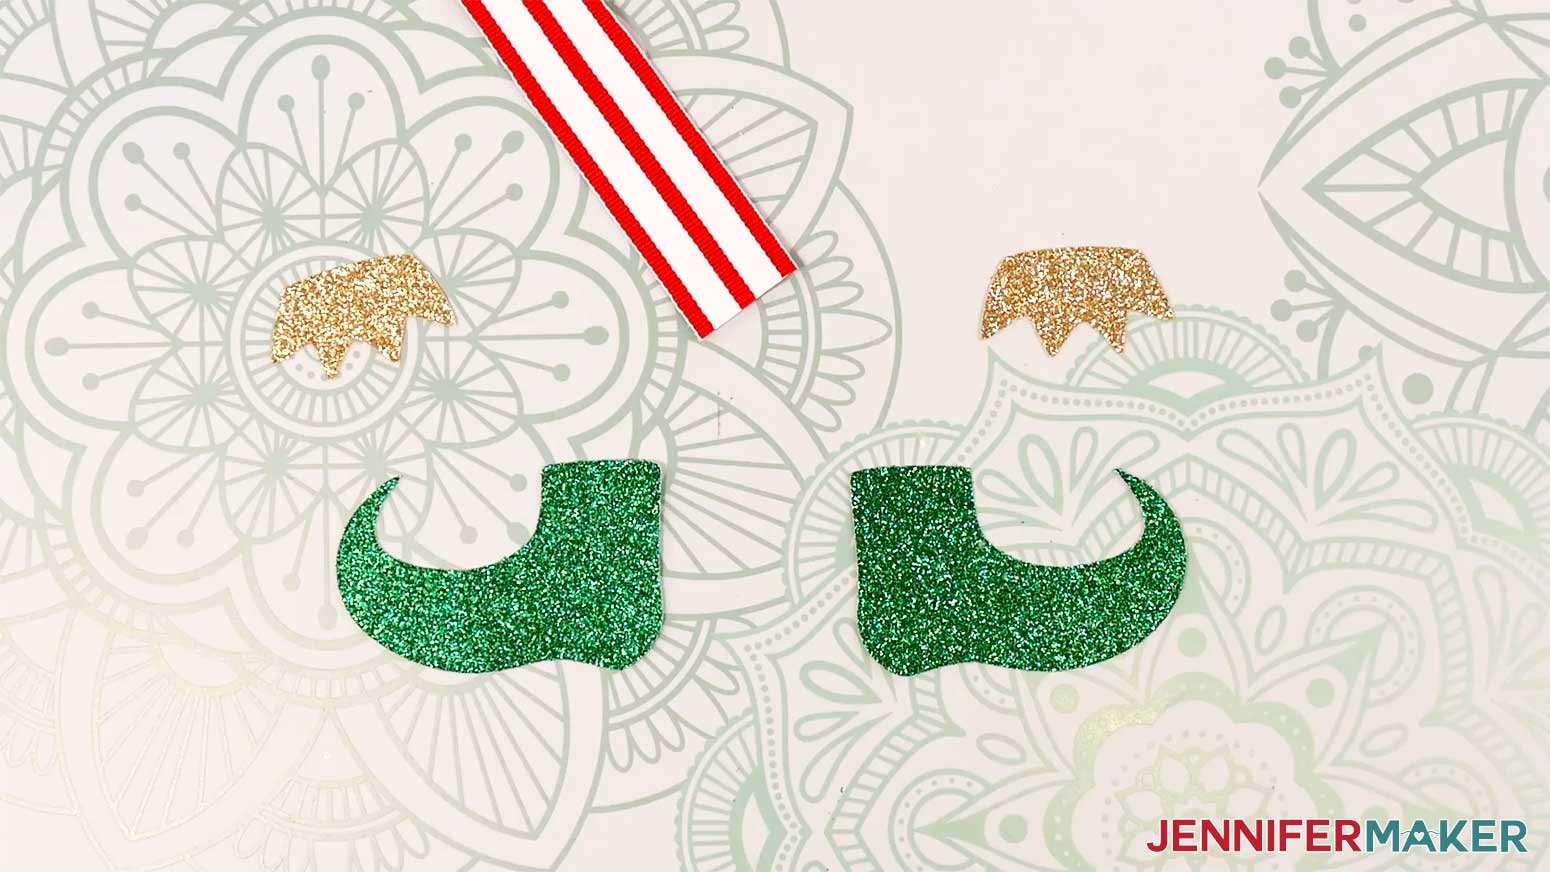
PROJECT 5: ELF BOOTS RIBBON
CRICUT DESIGN SPACE
1. In Cricut Design Space on a blank Canvas, click “Upload.”
2. Click “Upload Image.”
3. Click “Browse.”
4. Find and select the SVG with “elf-boots” in the name.
5. Click “Open” and then “Continue.”
6. Click “Upload” to add the SVG to your Canvas.
7. Here is how the elf boots look on my Canvas.
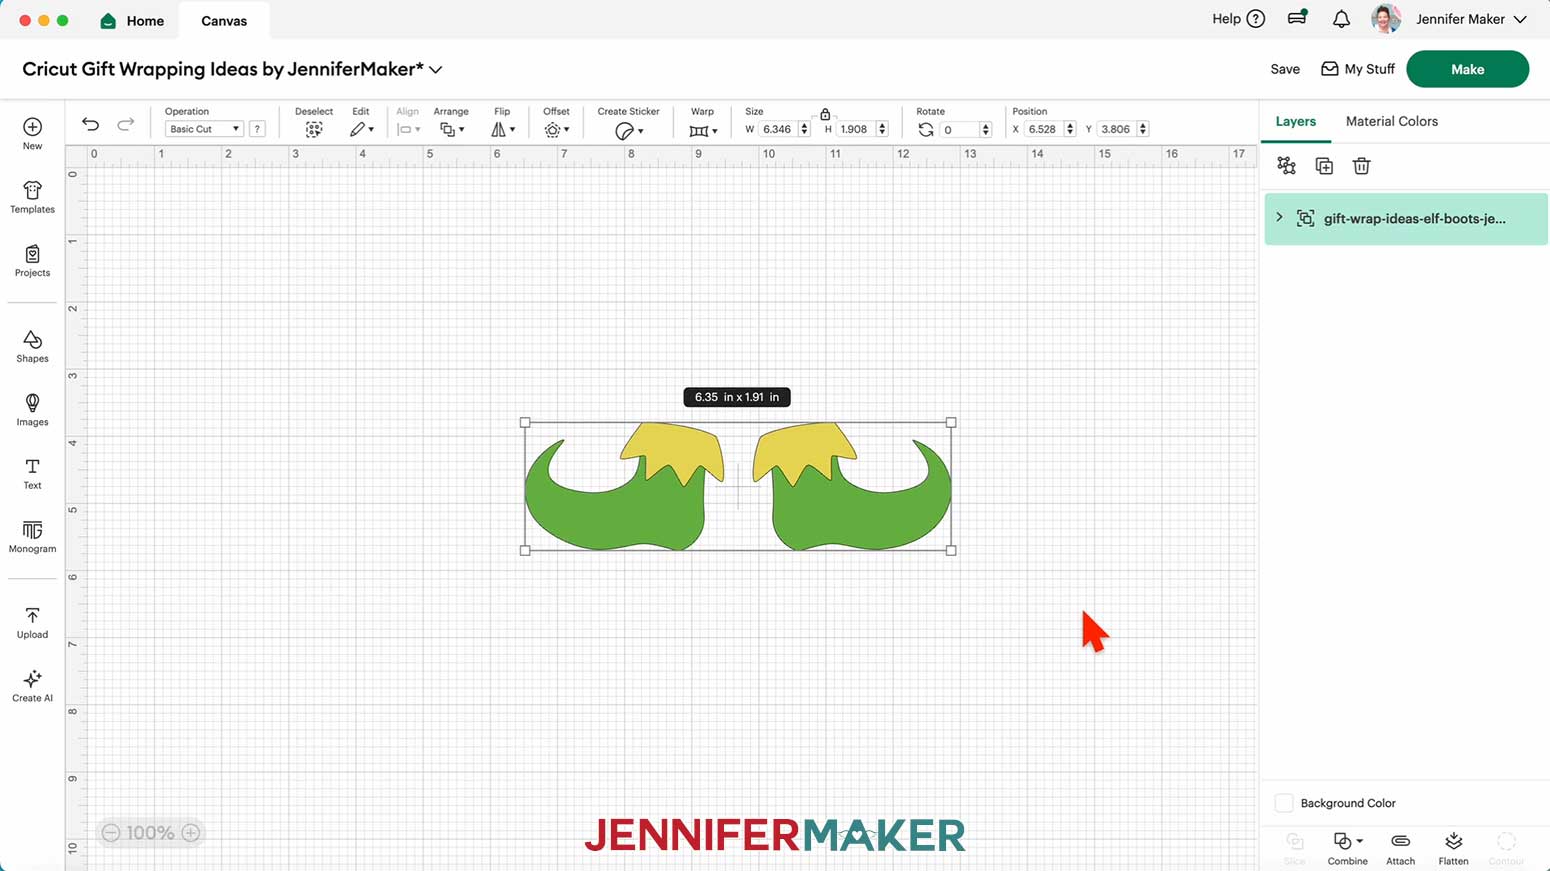
NOTE: The elf boots are sized to fit a 1” wide ribbon.
8. Click “Save” and give your project a name.
9. “Ungroup” the design.
10. Drag the layers of the design apart so you can see them all.
11. If you want to use a different color material for the pieces, select the appropriate layer in the Layers Panel and use the Color Box at the top to adjust it.
12. Your elf boots are ready to cut! Make sure the correct machine is selected in the top right and click “Make.”
13. If prompted, click "On Mat," choose your mat size, and click “Confirm.”
14. On the Prepare screen, make sure the correct Material Size is selected for each of your mats.
15. Select the first mat again and click “Continue.”
CUTTING
1. On the Make screen, I used the “Glitter Cardstock” setting with “More” Pressure
NOTE: I used green glitter cardstock for the boot and gold glitter cardstock for the boot fringe.
2. Place your first mat’s material pretty-side up onto a green StandardGrip machine mat.
3. Use a brayer to make sure it’s fully adhered.
4. Check that your Fine-Point Blade is clean and in the clamp.
5. Load the mat into your Cricut and press the flashing middle button to begin cutting.
6. Before unloading the mat, use your weeding tool to peel back a corner of the material to make sure the cut went all the way through. If it didn’t, smooth the material back down into place and press the middle button again for another pass.
7. Once the material is cut all the way through, unload the mat, flip it over onto your work surface, and roll it back to release the material.
8. Place the cut pieces face up on your work surface. Use your Canvas in Cricut Design Space as reference if needed.
TIP: Use a scraper tool to push the remaining cardstock pieces off of your machine mat.
ASSEMBLY
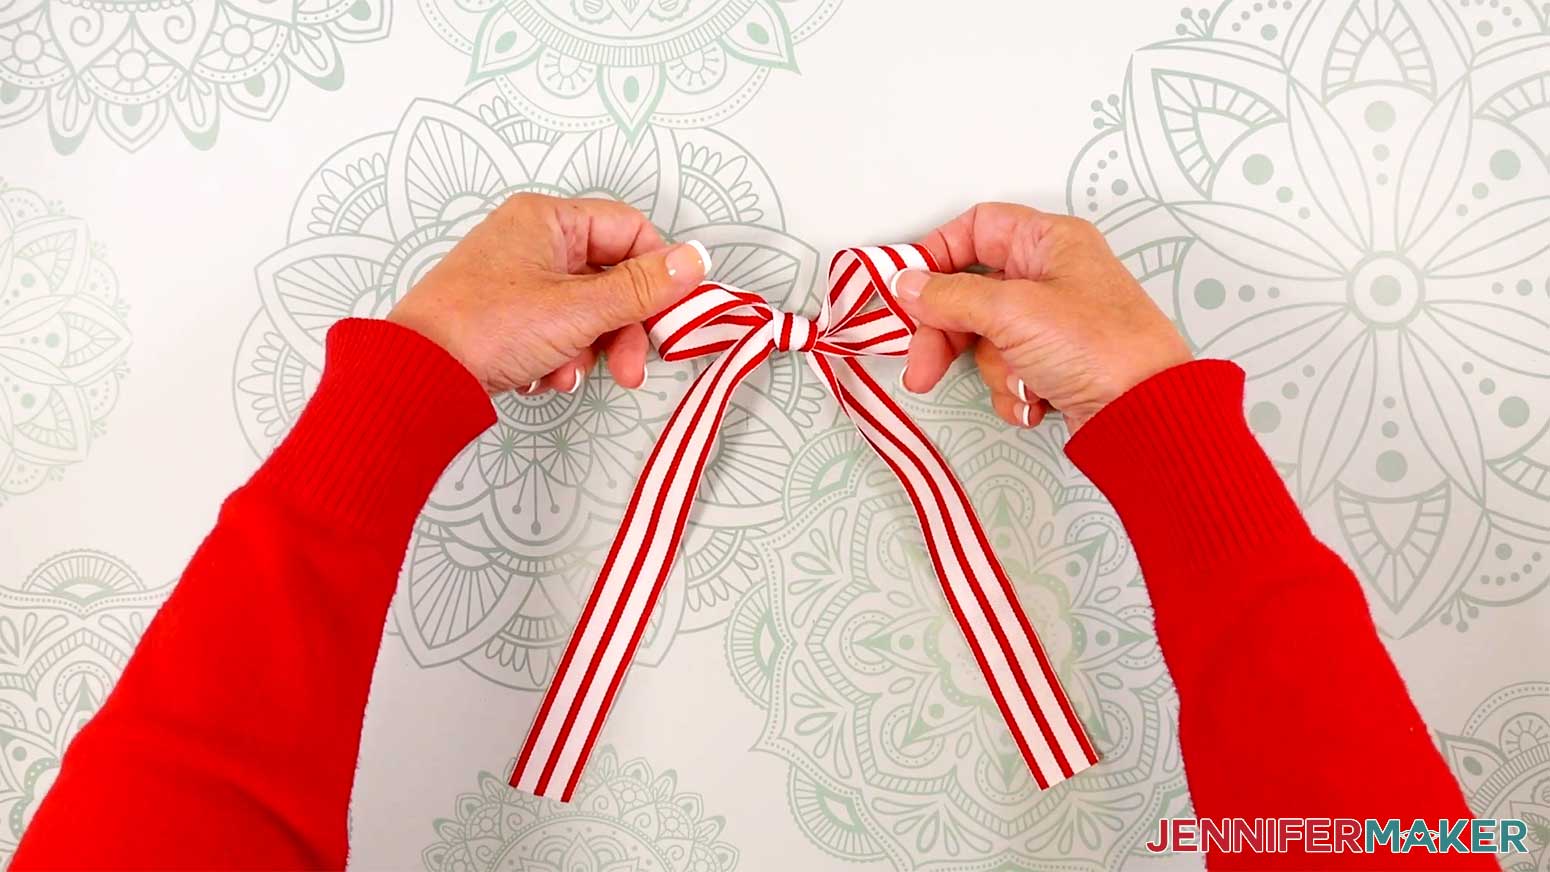
1. Follow my Tie A Perfect Bow tutorial to tie 1” wide ribbon into either an Easy Bow (with two pieces of ribbon: one about 30" long, and one about 2.75" long) or a Figure 8 Bow (with three pieces of ribbon: one about 36" long, one about 18" long, and one about 2.75" long). Be sure the loose ends of the ribbon are hanging down.
2. Turn on your hot glue gun and put on your silicone finger protectors.
3. Apply a line of hot glue along the top front edge of one boot piece.
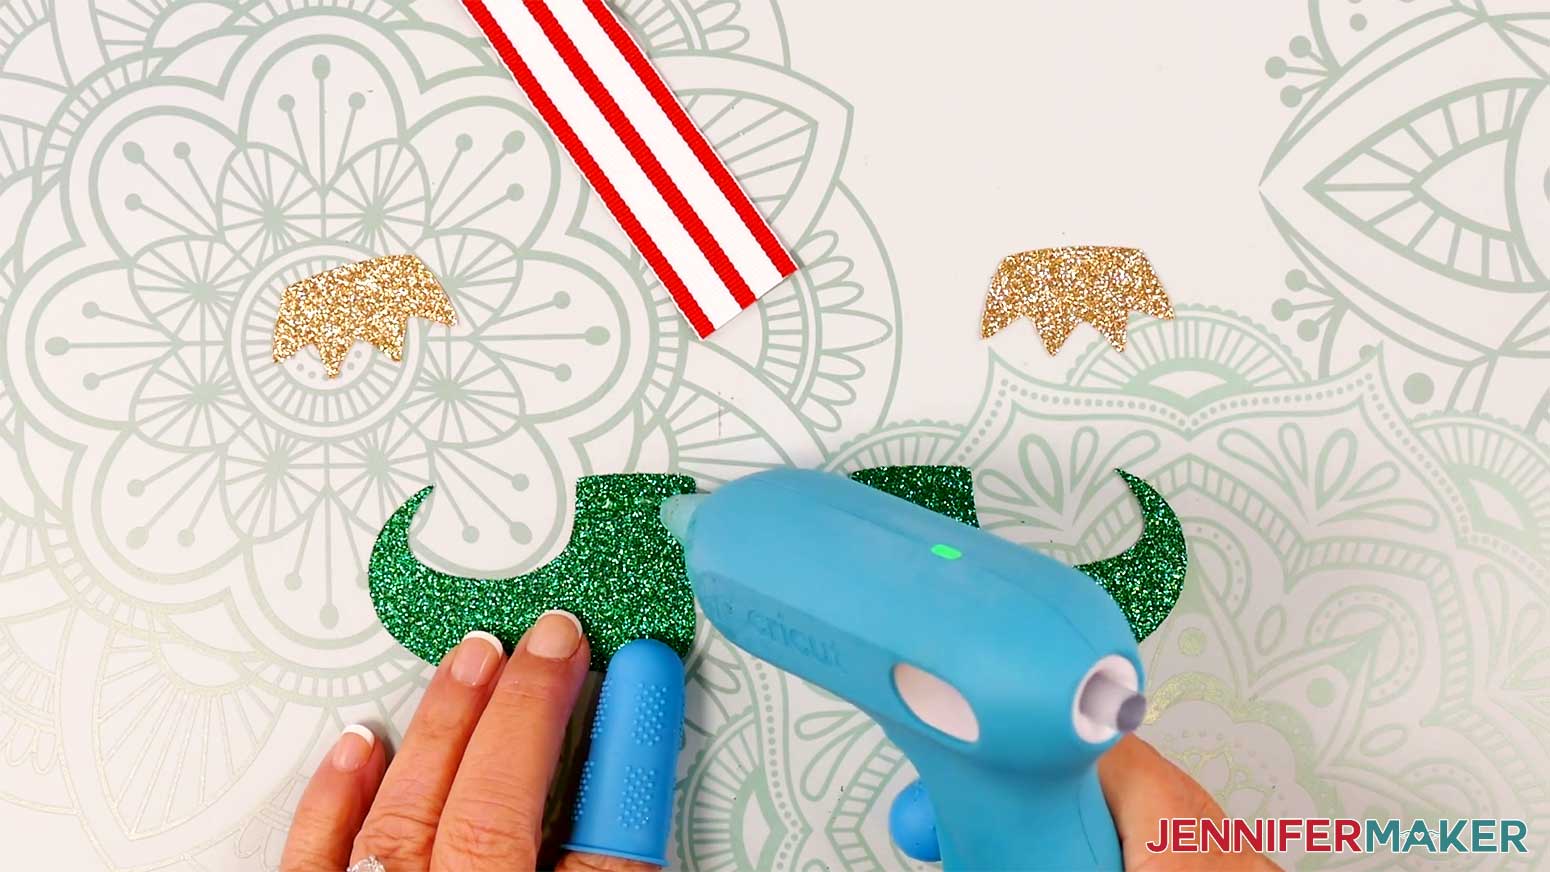
4. Attach one fringe piece to the top of the boot, with the points pointing down.
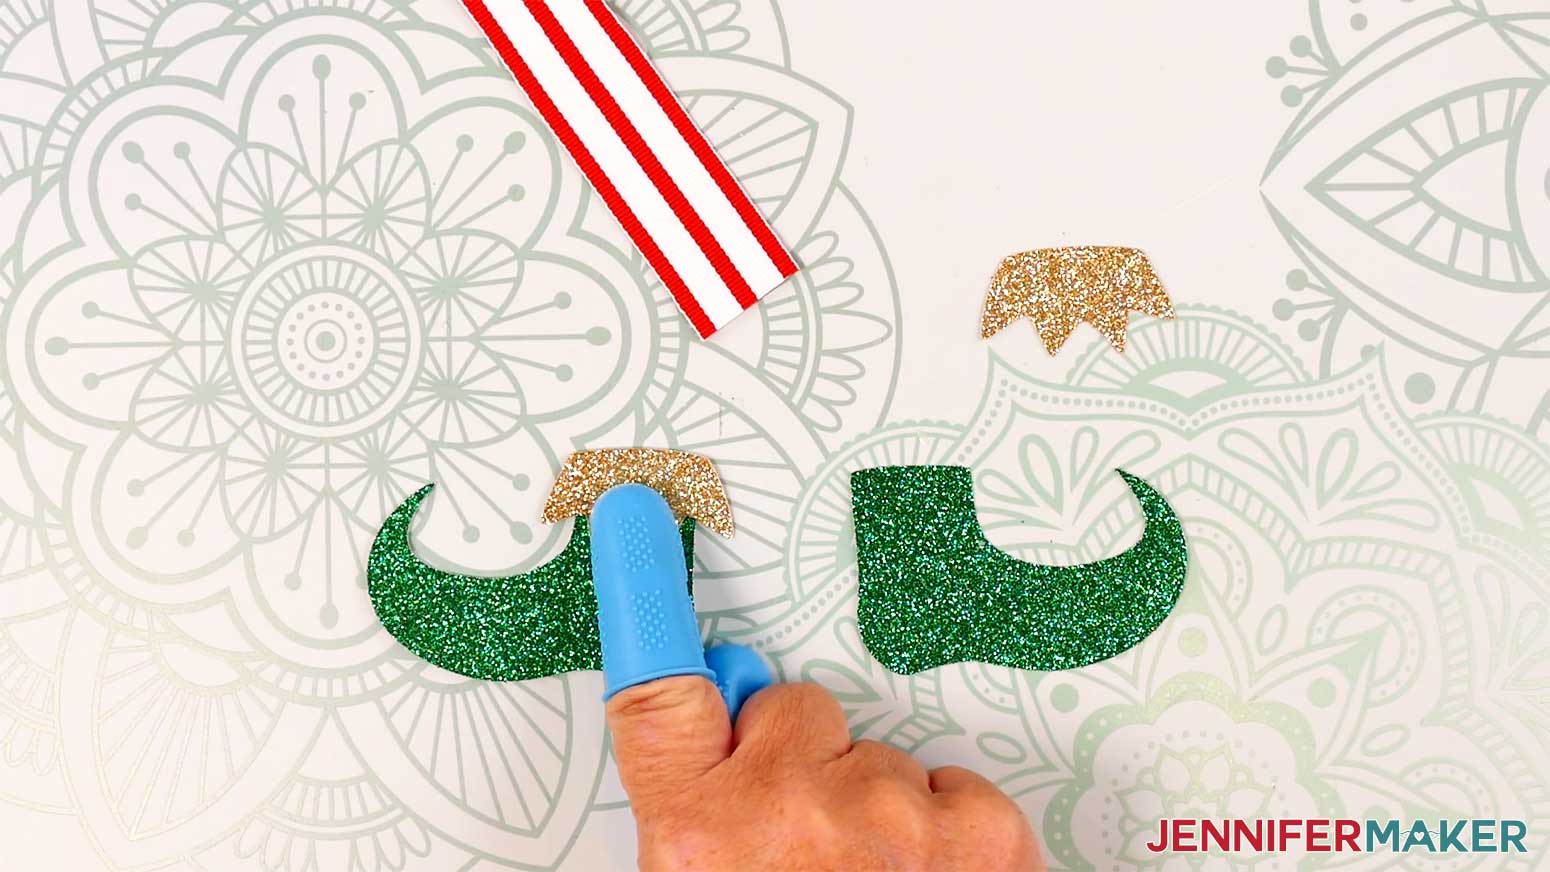
5. Repeat steps 3-4 to assemble the other boot.
6. Apply hot glue to the bottom of the bow’s left dangling end.
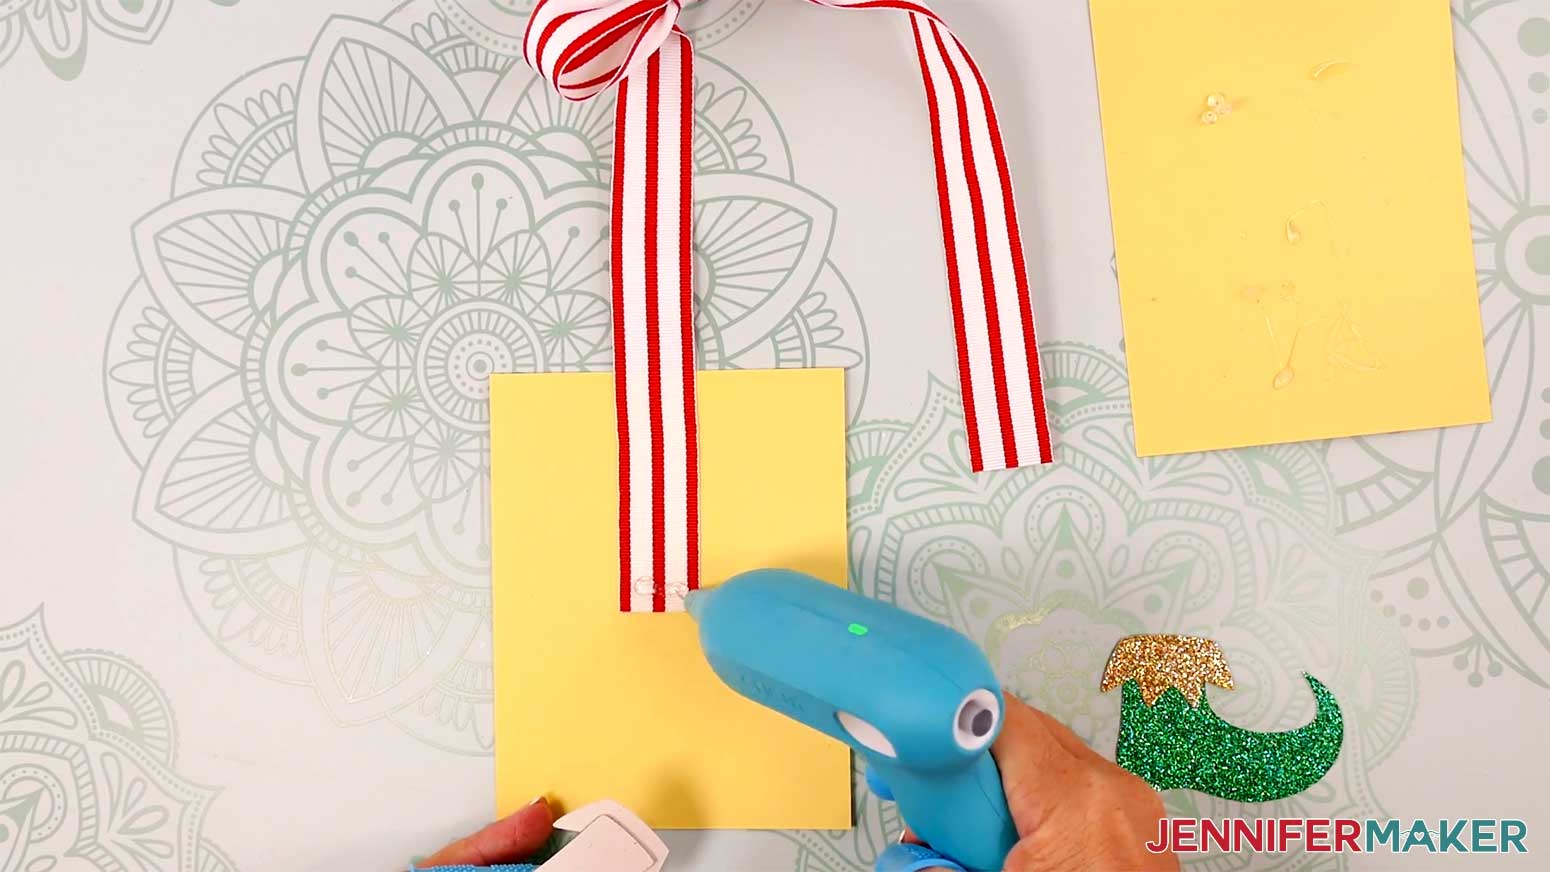
7. Grab the boot with the toe pointing to the left, and attach it face up to the end of the ribbon.
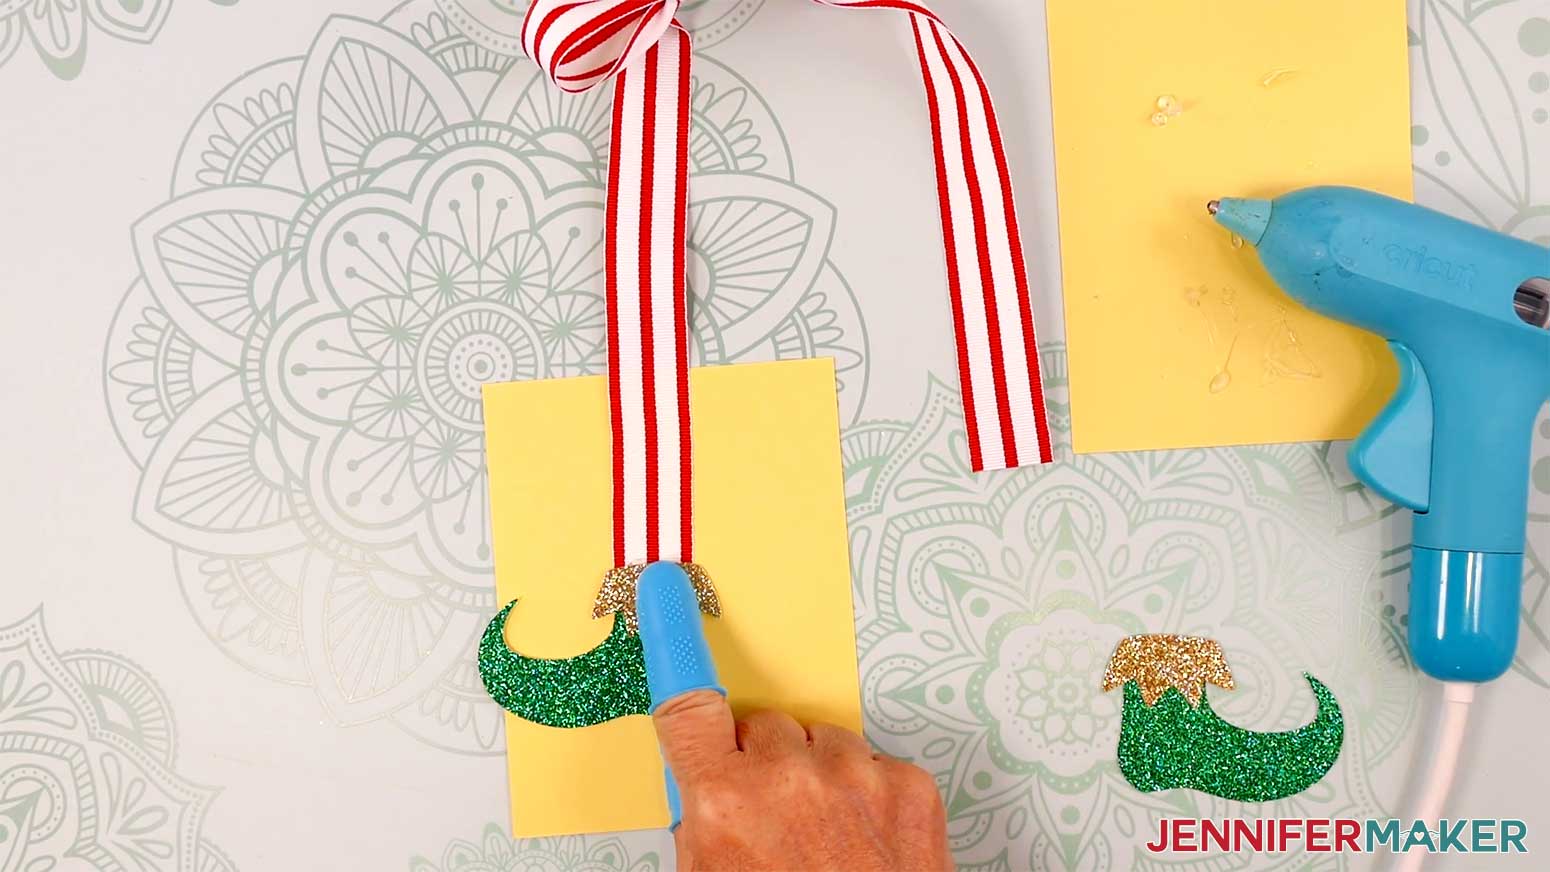
8. Repeat steps 6-7 to attach the right boot to the ribbon’s dangling right end.
9. Apply a very small amount of hot glue to the tip of one boot toe.
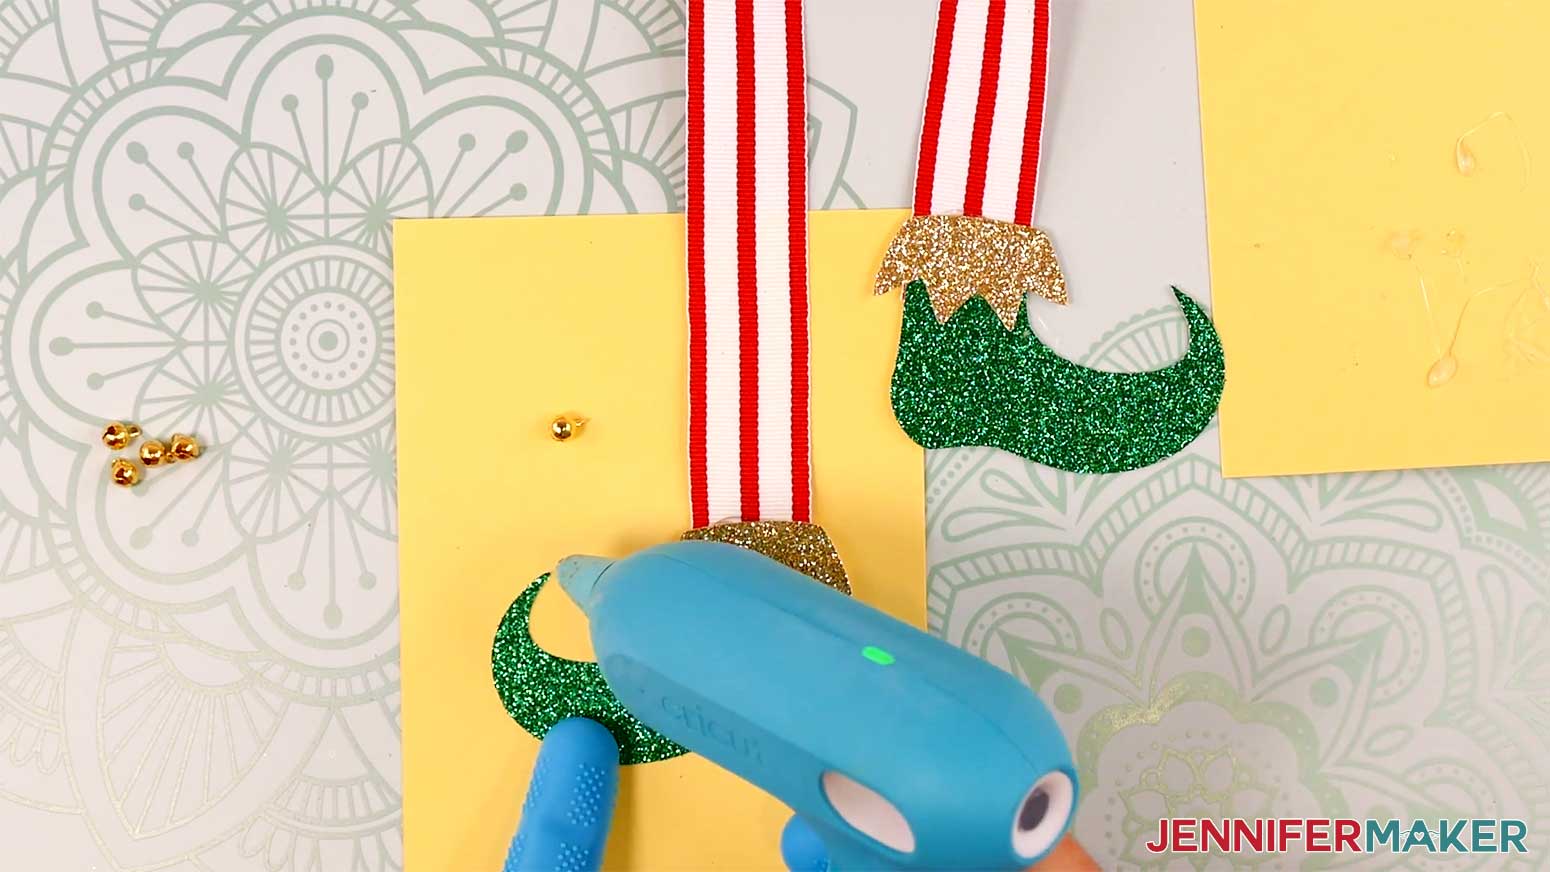
10. Place a bell into the glue so it looks as though it’s hanging from the toe.
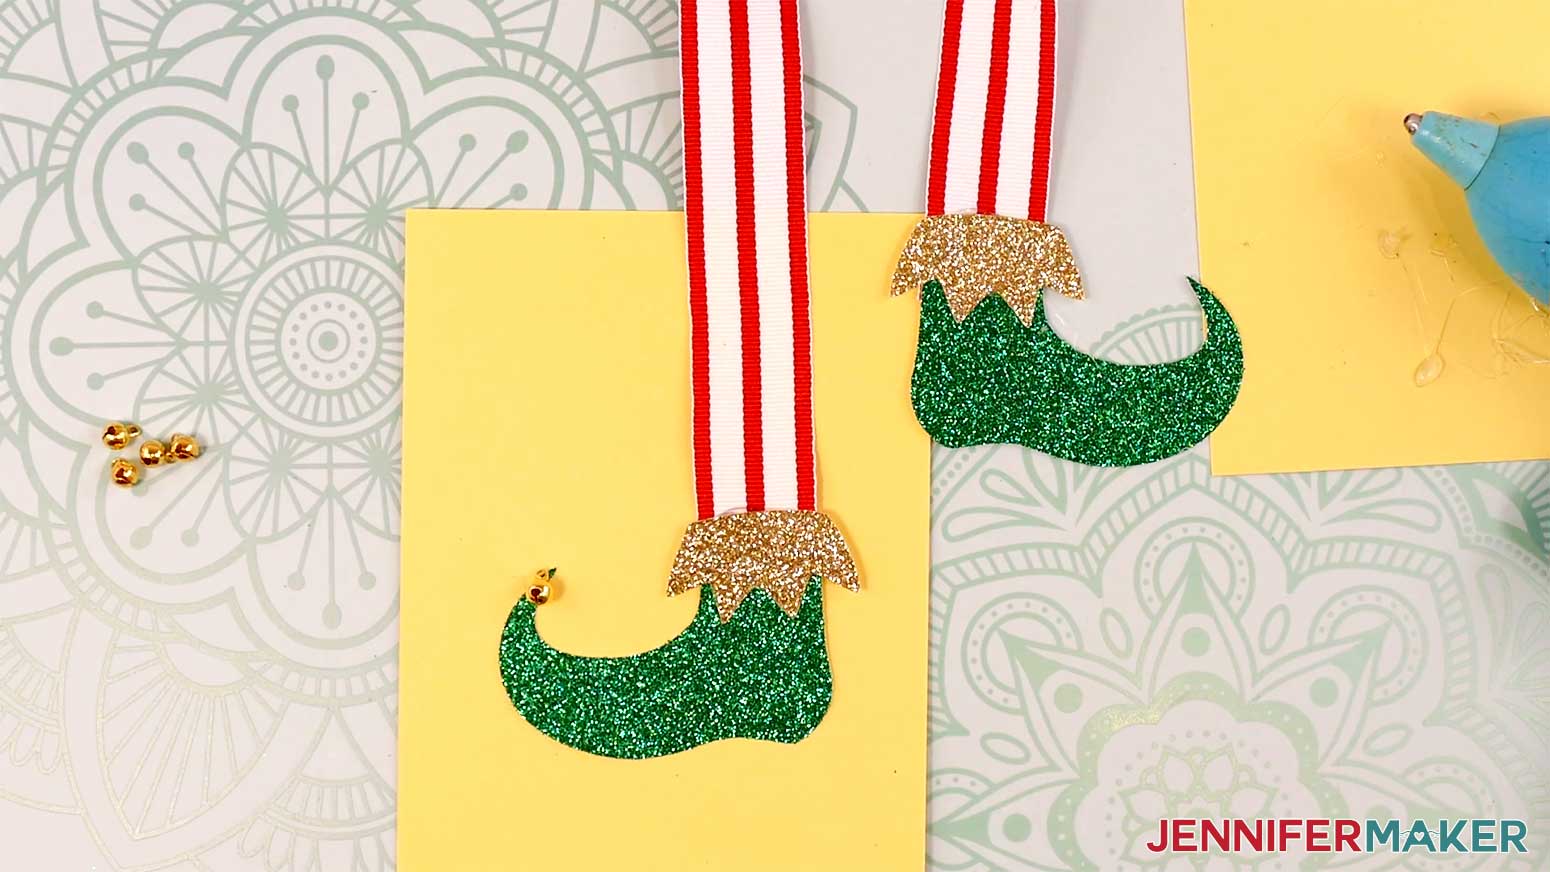
11. Repeat steps 9-10 to add a bell to the other toe.
12. If desired, use hot glue and bells to decorate the center of the bow.
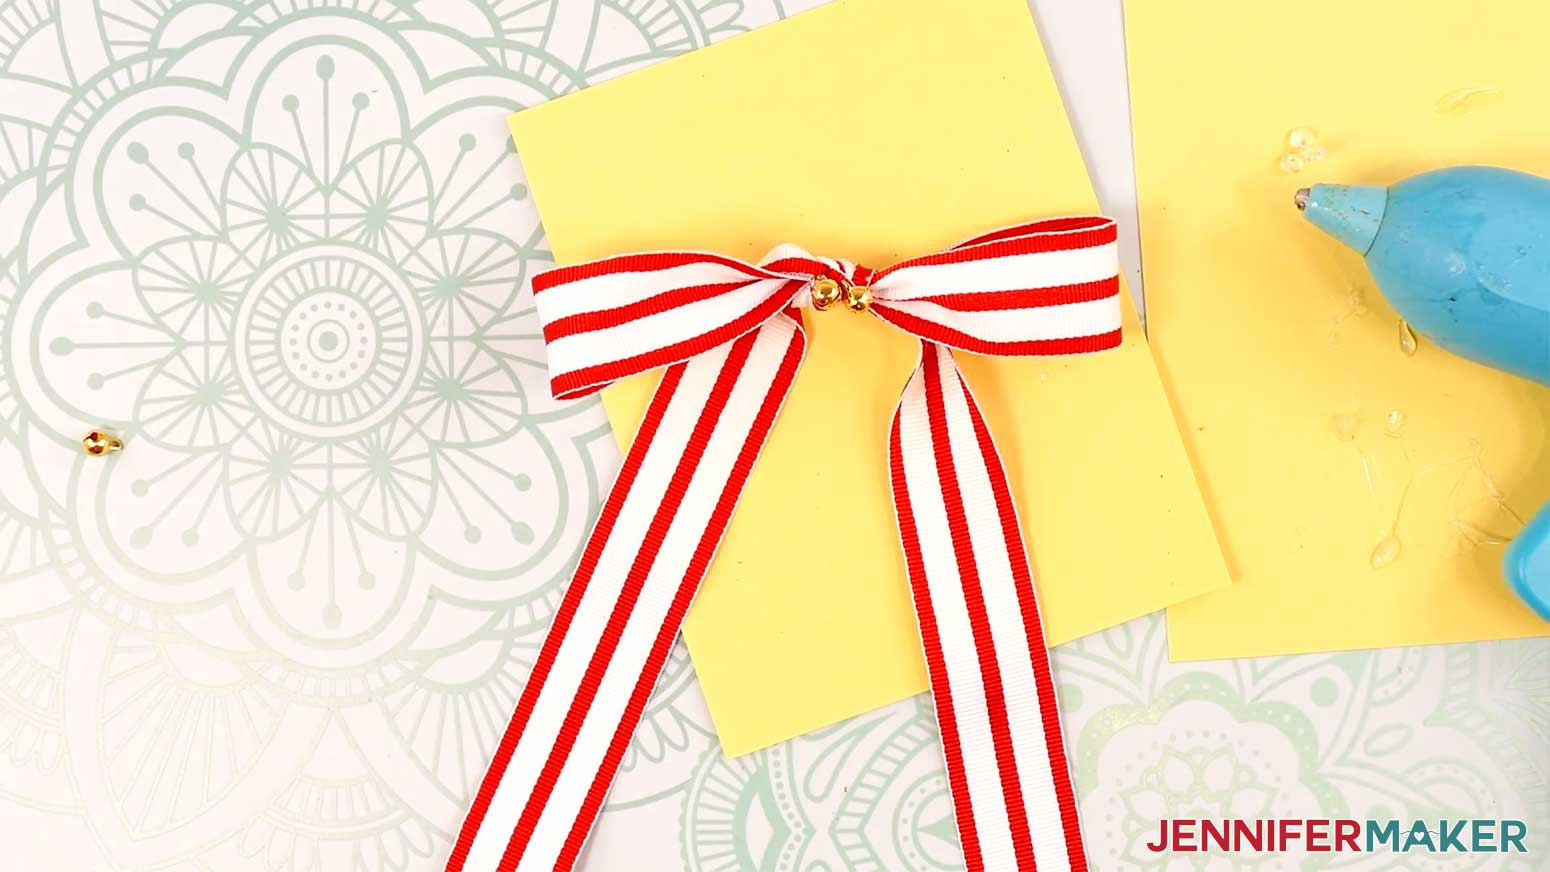
13. Apply hot glue to the back of the ribbon, and attach it to the outside of a gift bag.
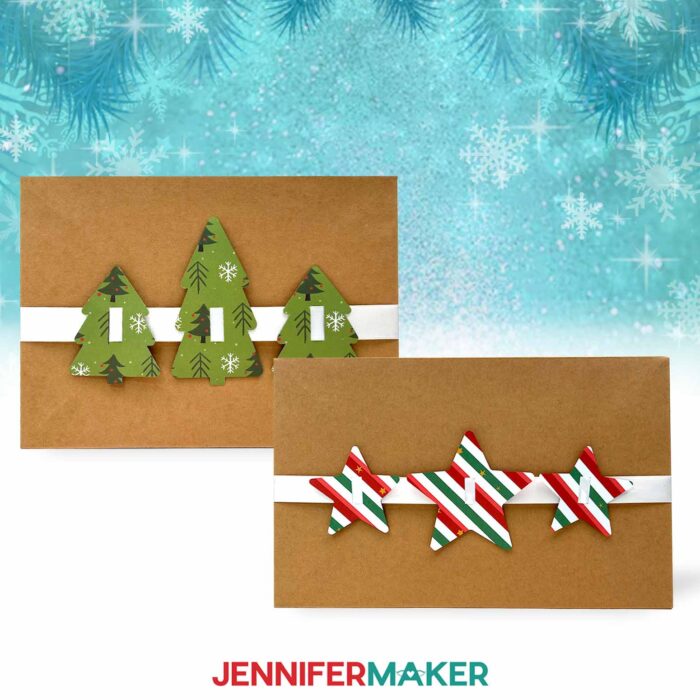
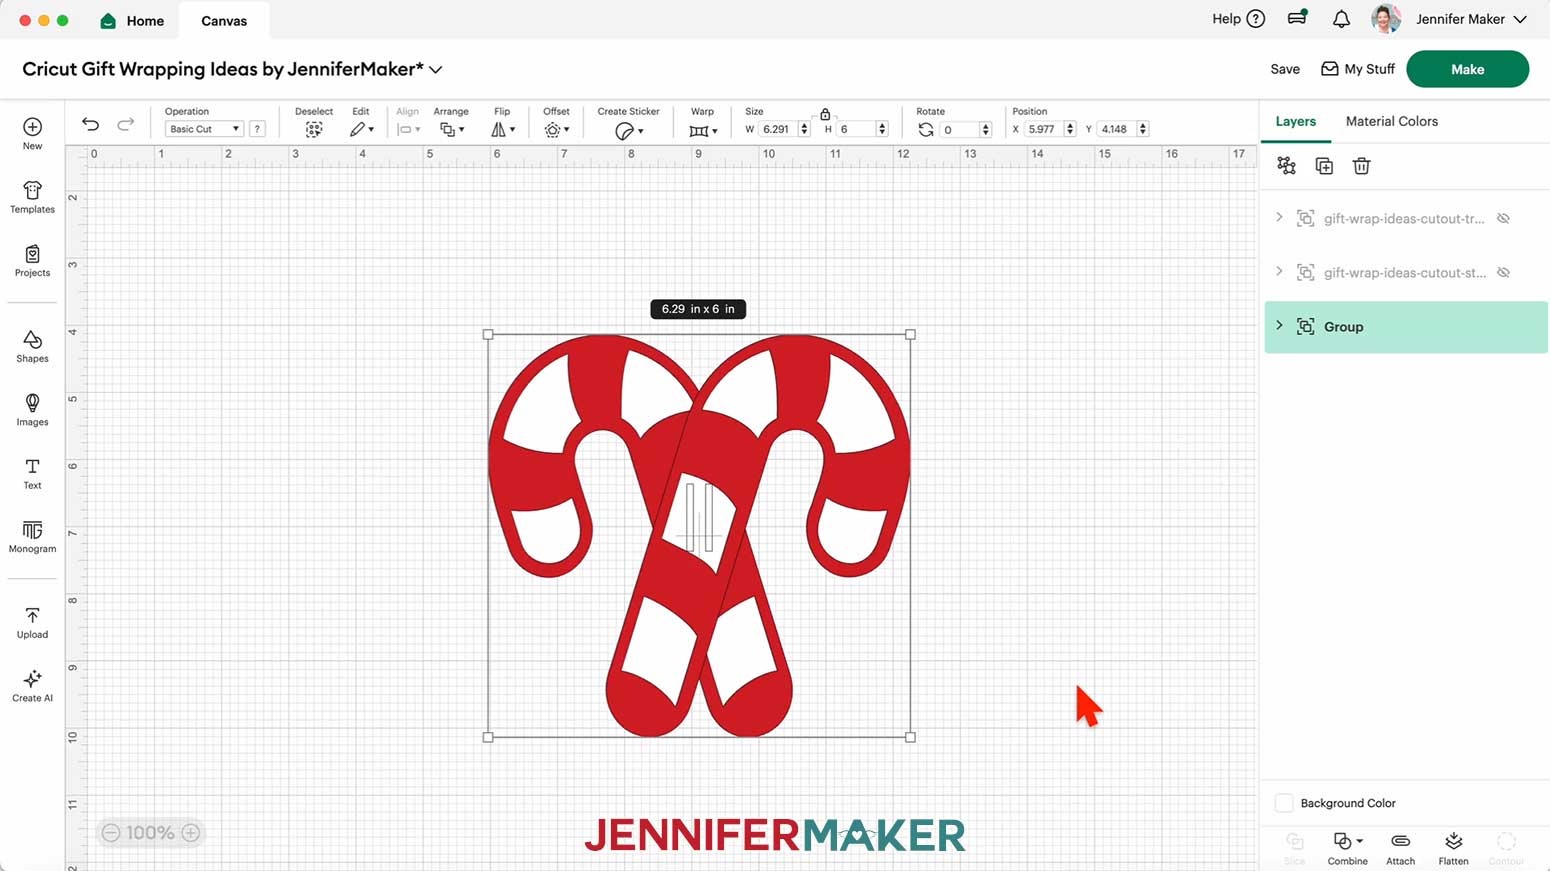
PROJECT 6: RIBBON SLIDERS
CRICUT DESIGN SPACE
1. In Cricut Design Space on a blank Canvas, click “Upload.”
2. Click “Upload Image.”
3. Click “Browse.”
4. Find and select the SVG you want to use. I’ll demonstrate with the “cutout-candy” candy cane design, but the “cutout-star” and “cutout-tree” follow the same basic instructions.
5. Click “Open” and then “Continue.”
6. Click “Upload” to add the SVG to your Canvas.
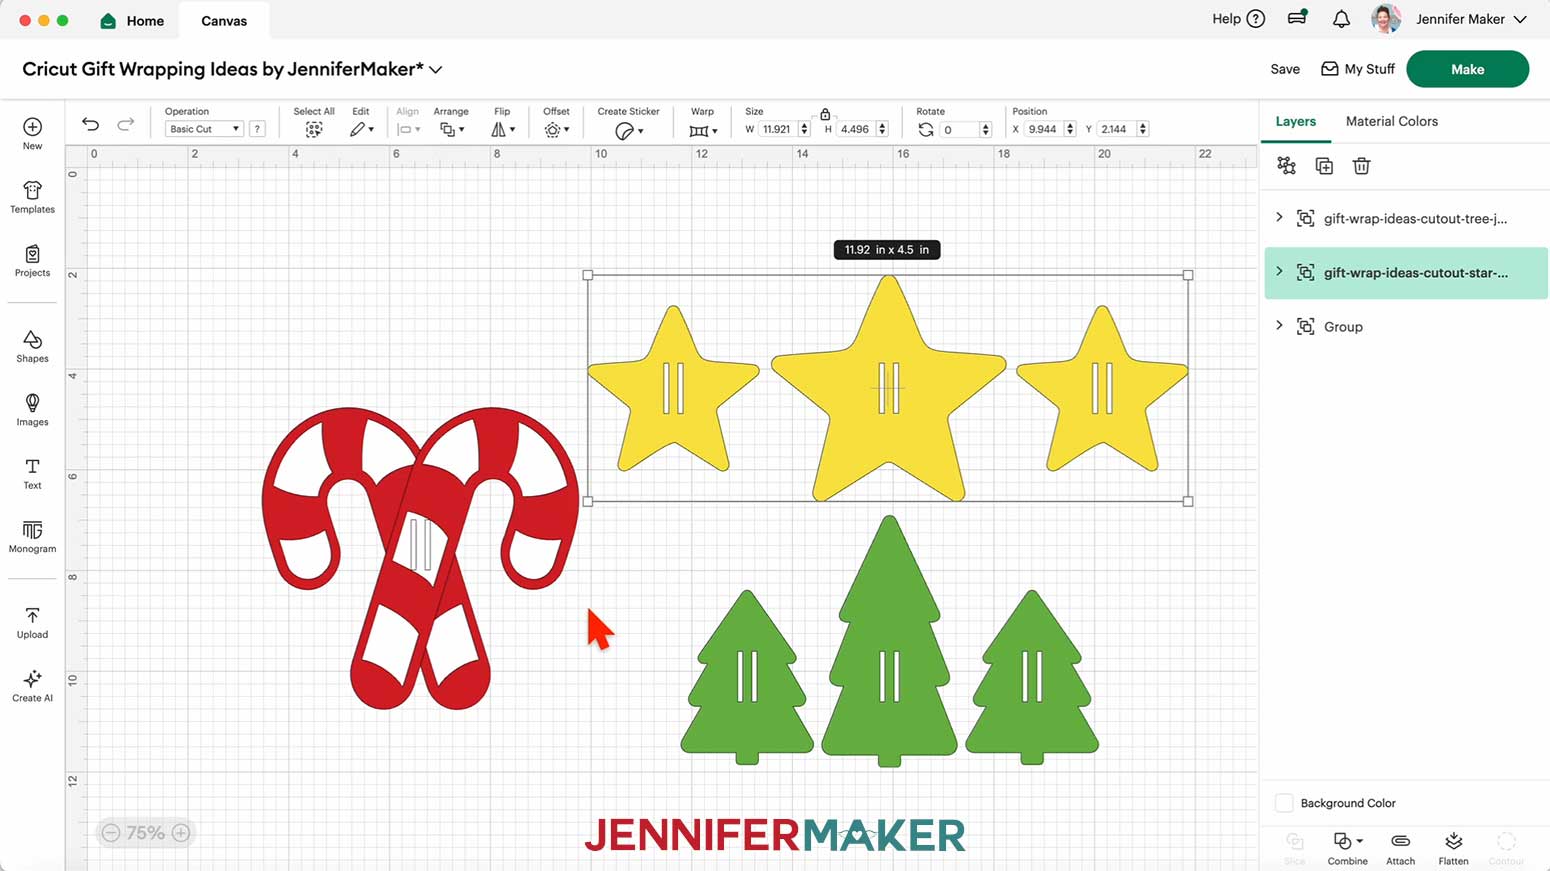
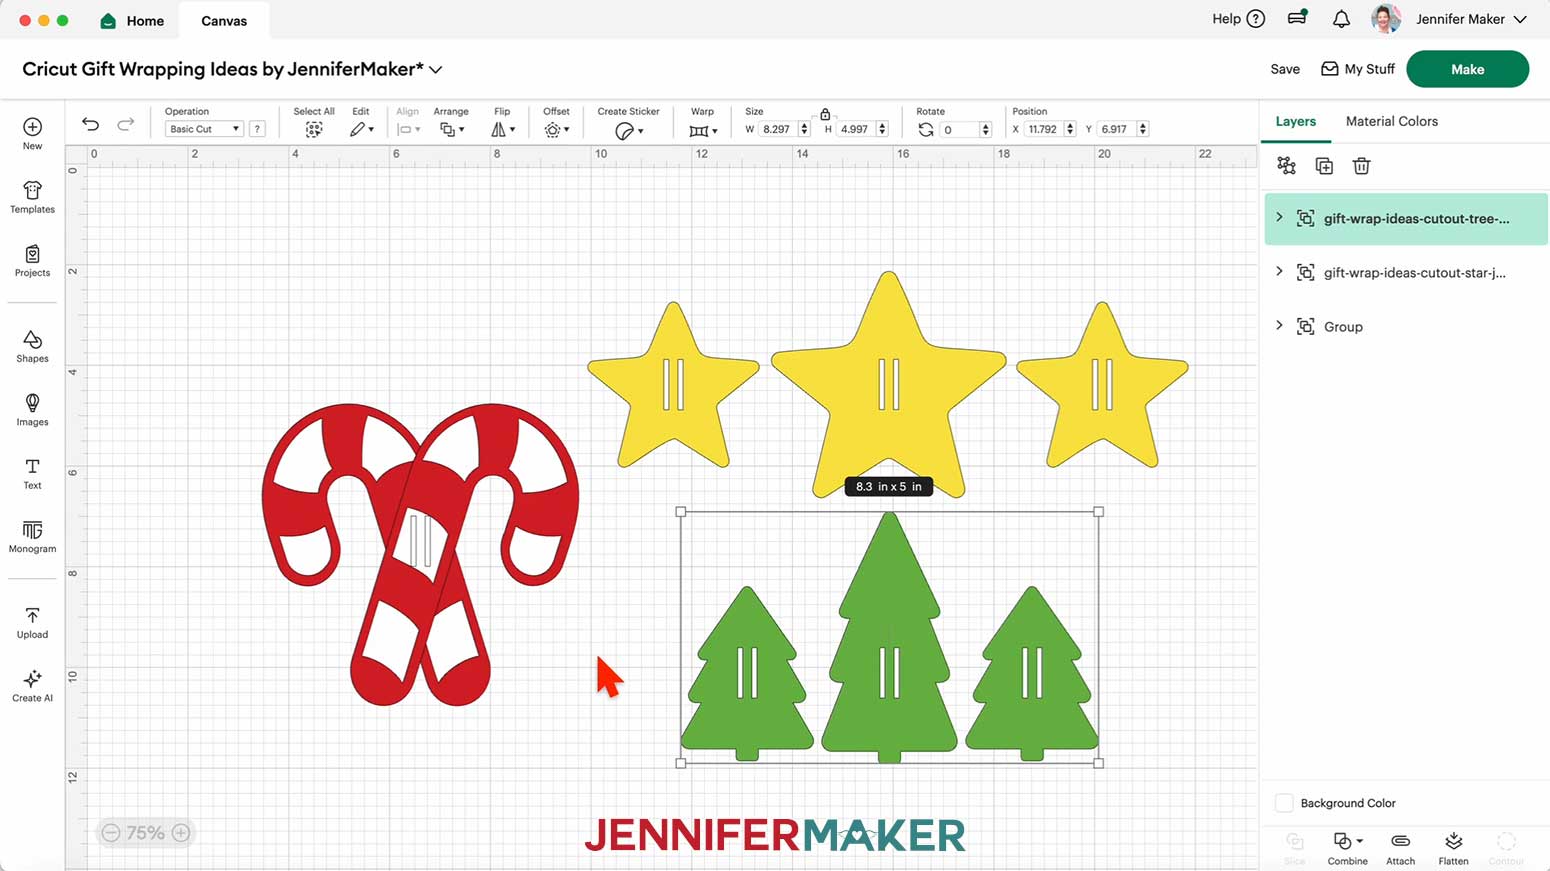
7. Here is how the candy cane, star, and tree ribbon slider designs each look on my Canvas.
8. Click “Save” and give your project a name.
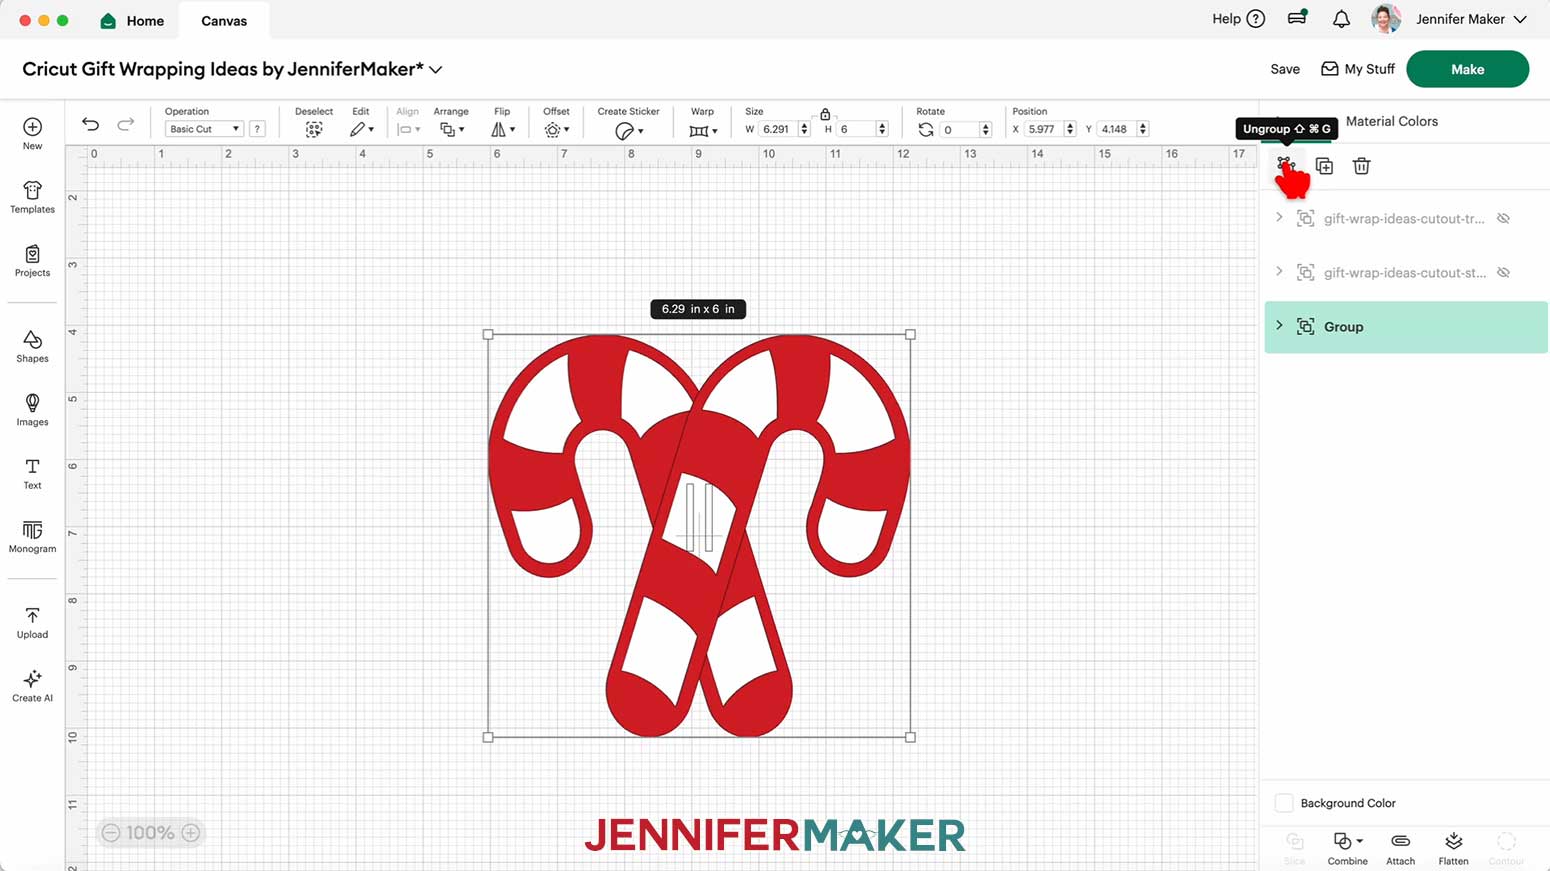
9. “Ungroup” the candy cane design.
10. “Ungroup” each of the candy cane design’s layers.
11. Drag the layers of the candy cane design apart so you can see them all.
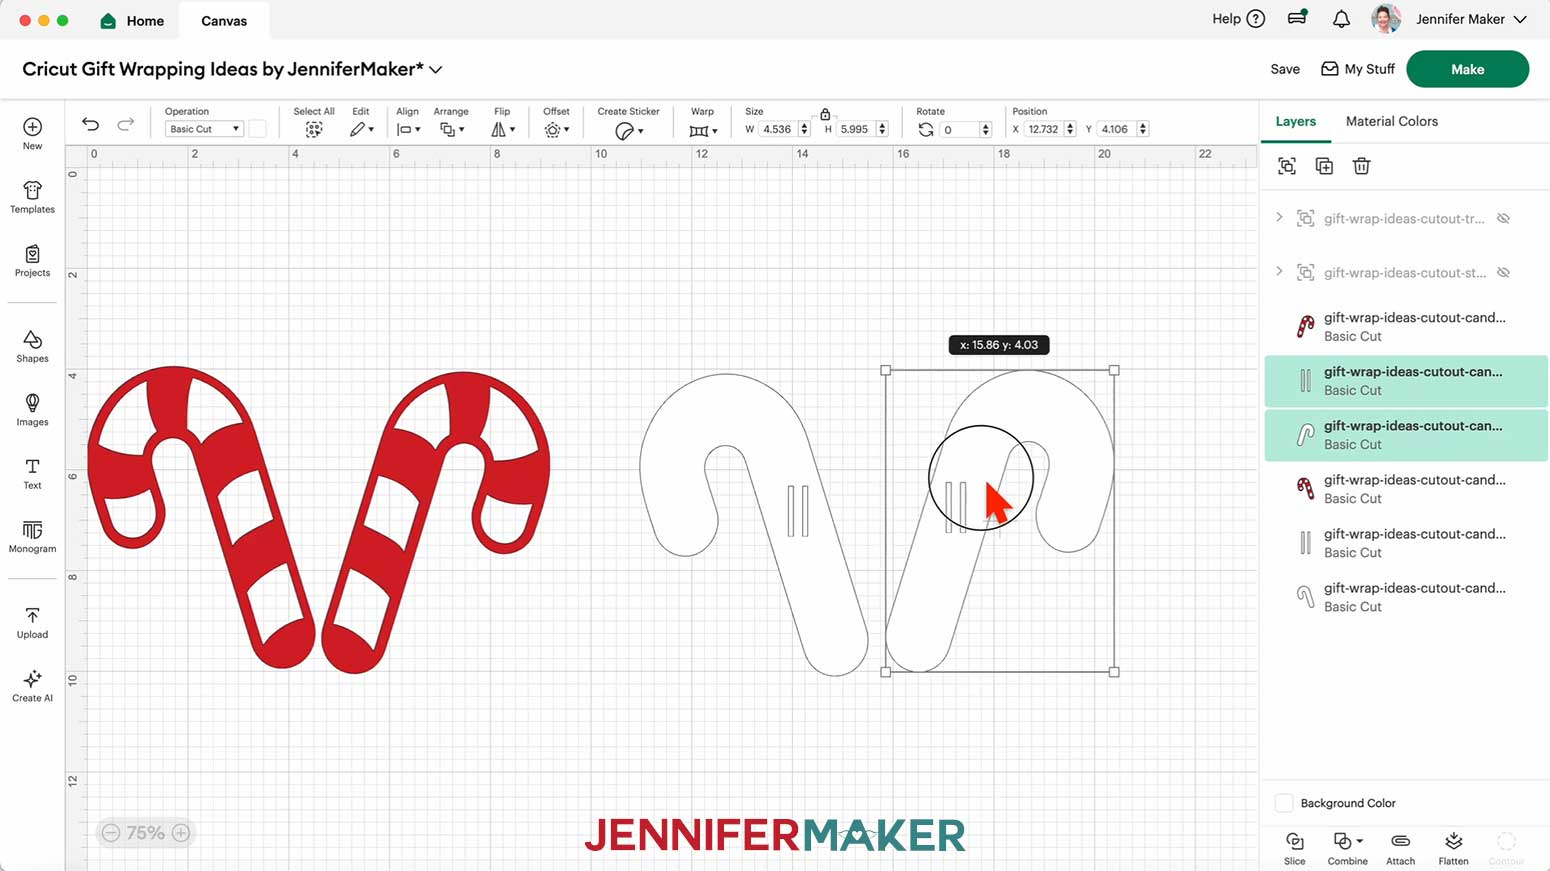
12. The slots are sized for 1” wide ribbon. If you’re using 1” ribbon, skip to step 15.
NOTE: The slots on tree and star sliders can be sized bigger or smaller for a different width ribbon, but the candy cane slots can only be sized smaller.
13. To resize the slots, select the layers with the slots and click the lock icon to unlock proportions. Then resize the height of each slot layer to match the width of your ribbon.
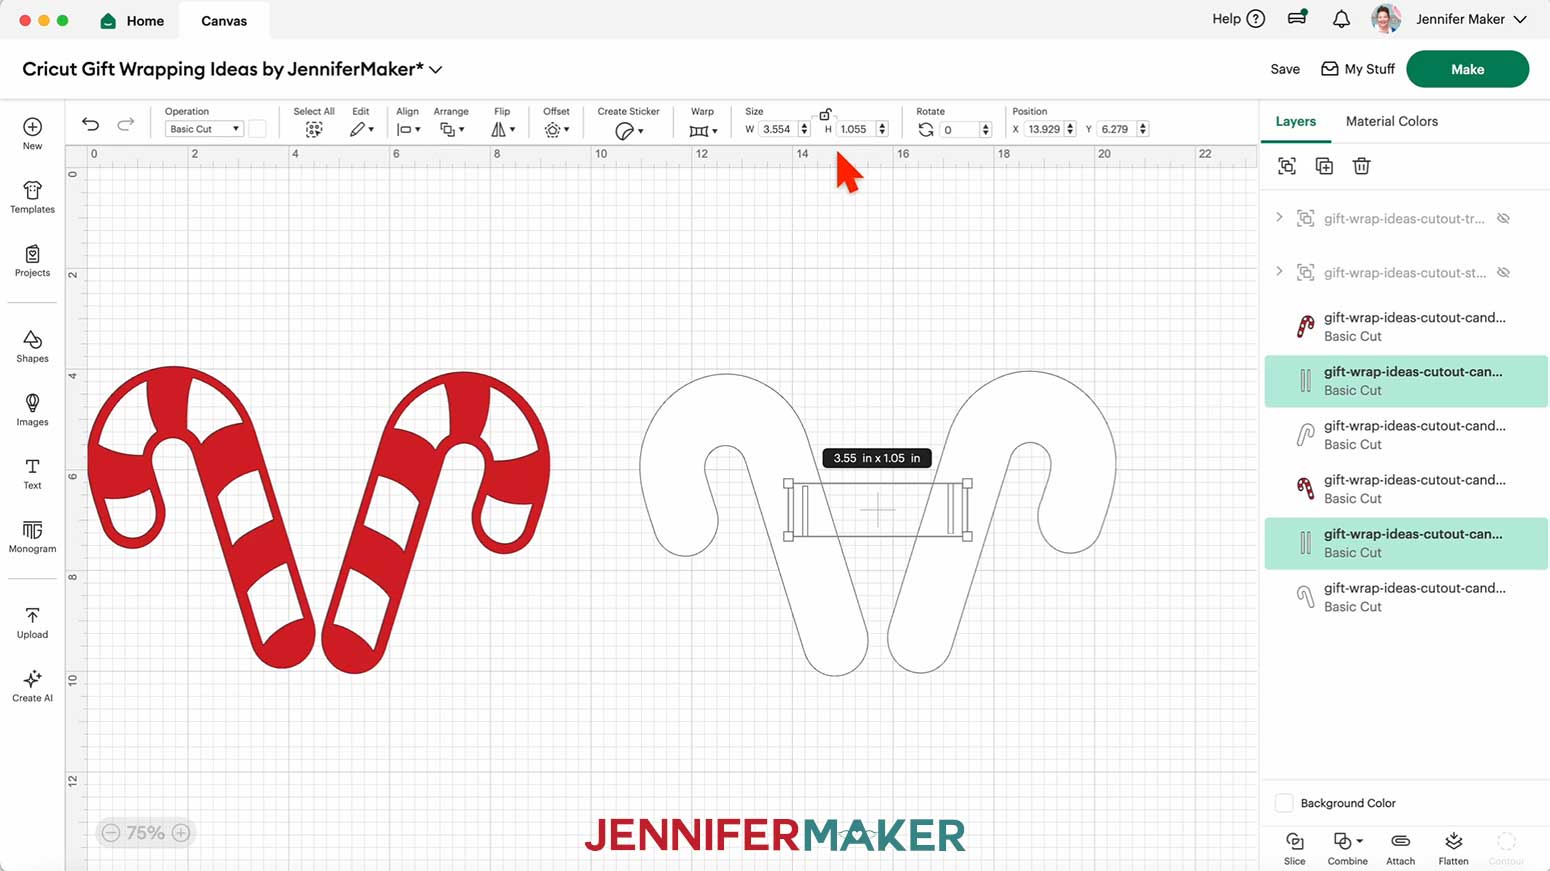
14. To make sure the slots are lined up correctly and nothing has shifted, select all of the slots, then click “Align” and “Align Top.”

15. If you want to use a different color material for the pieces, select the appropriate layer in the Layers Panel and use the Color Box at the top to adjust it.
16. Select one slider piece (the solid one) and its corresponding slot layer, and click “Attach.”
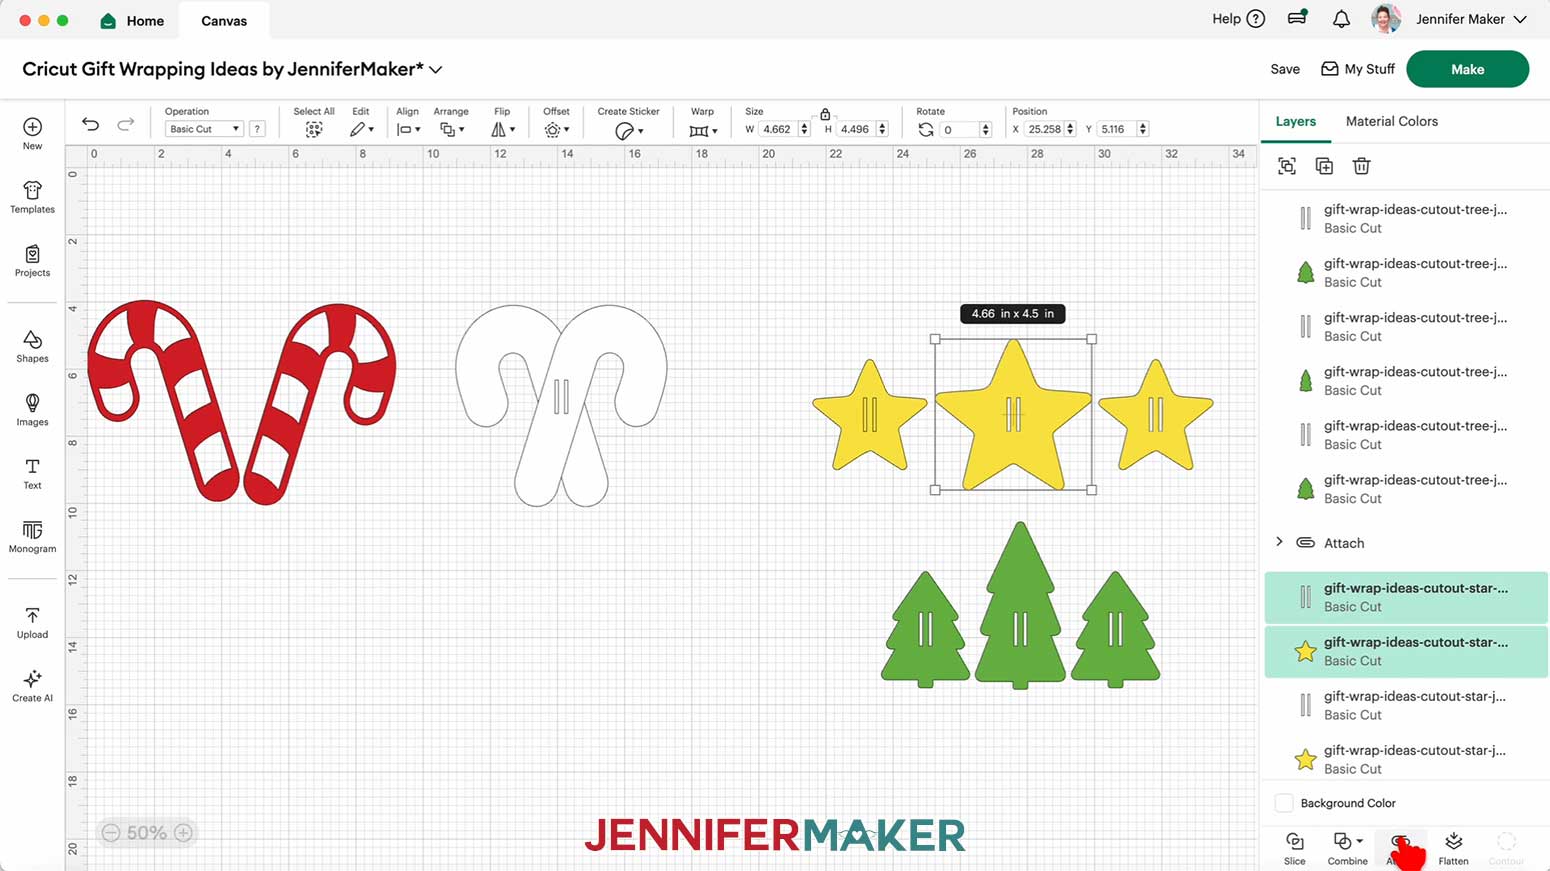
17. Repeat step 16 for the remaining slider pieces.
18. Your ribbon sliders are ready to cut! Make sure the correct machine is selected in the top right and click “Make.”
19. If prompted, click "On Mat," choose your mat size, and click “Confirm.”
20. On the Prepare screen, make sure the correct Material Size is selected for each of your mats.
21. Select the first mat again and click “Continue.”
CUTTING
1. On the Make screen, I used the following cut settings:
65 lb. cardstock: “Medium Cardstock - 80 lb (216 gsm)” setting with “More” Pressure
Glitter cardstock: “Glitter Cardstock” setting with “More” Pressure
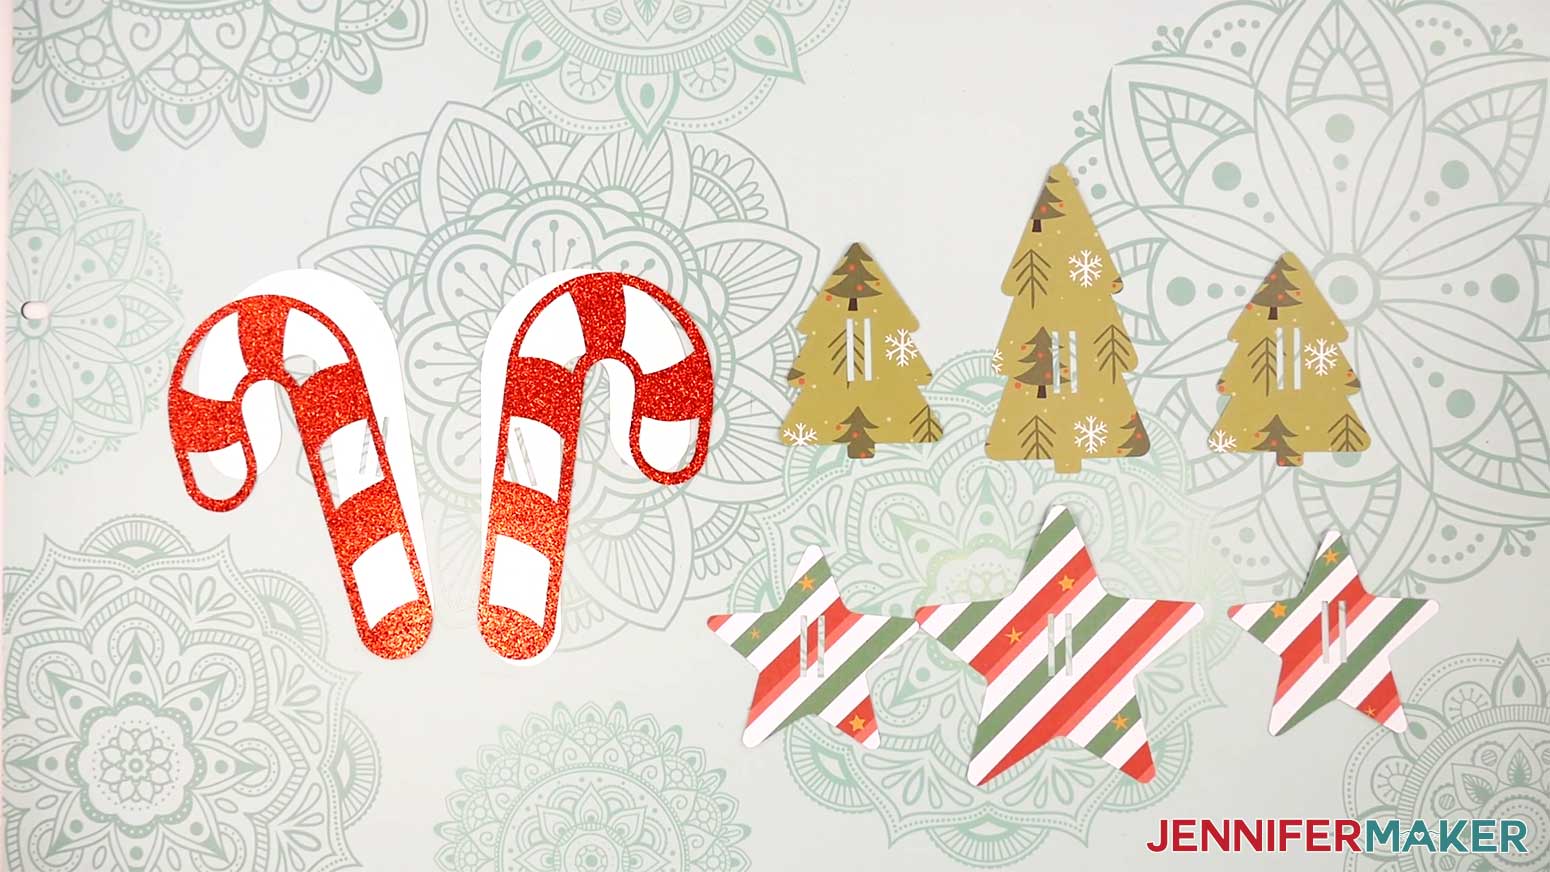
NOTE: I used patterned 65 lb. cardstock for the star and tree sliders, and white 65 lb. cardstock and red glitter cardstock for the candy cane sliders.
2. Place your first mat’s material pretty-side up onto a green StandardGrip machine mat.

3. Use a brayer to make sure it’s fully adhered.
4. Check that your Fine-Point Blade is clean and in the clamp.
5. Load the mat into your Cricut and press the flashing middle button to begin cutting.
6. Before unloading the mat, use your weeding tool to peel back a corner of the material to make sure the cut went all the way through. If it didn’t, smooth the material back down into place and press the middle button again for another pass.
7. Once the material is cut all the way through, unload the mat, flip it over onto your work surface, and roll it back to release the material.
TIP: Use a spatula to carefully remove delicate areas. If any stubborn cardstock stays attached to the cut pieces, use a weeding tool to carefully poke them out.
8. Place the cut pieces face up on your work surface. Use your Canvas in Cricut Design Space as reference if needed.
TIP: Use a scraper tool to push the remaining cardstock pieces off of your machine mat.
ASSEMBLY
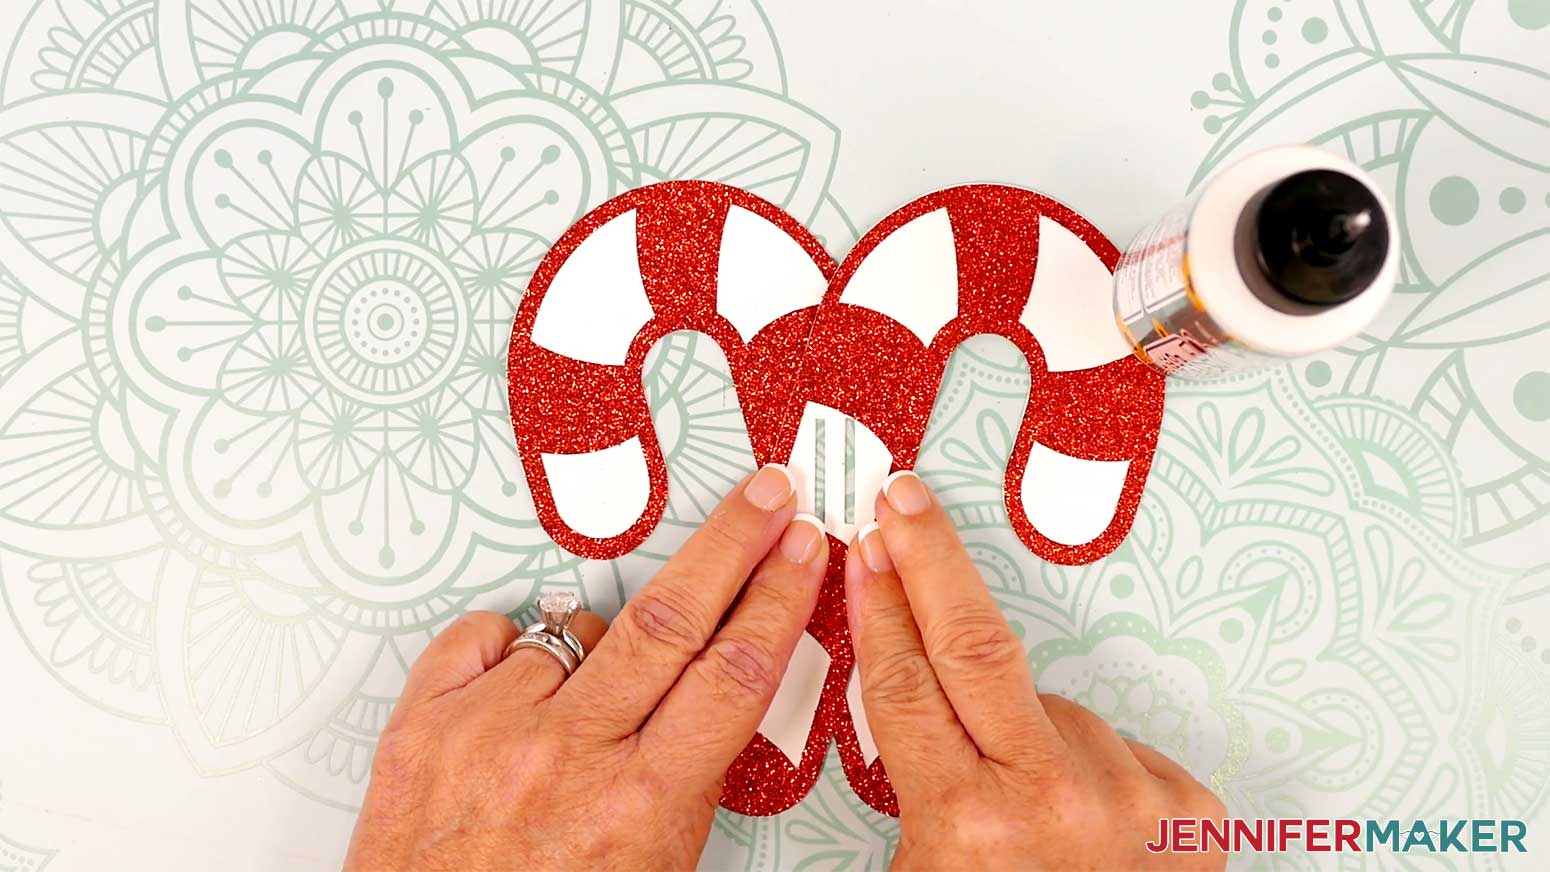
1. The Tree and Star designs are ready to go, but the Candy Cane design is two layers. To assemble them, apply glue to the back of one red stripe layer, then attach it to the front of the corresponding solid white layer, making sure the edges and slit cutouts align. Repeat with the other candy cane.
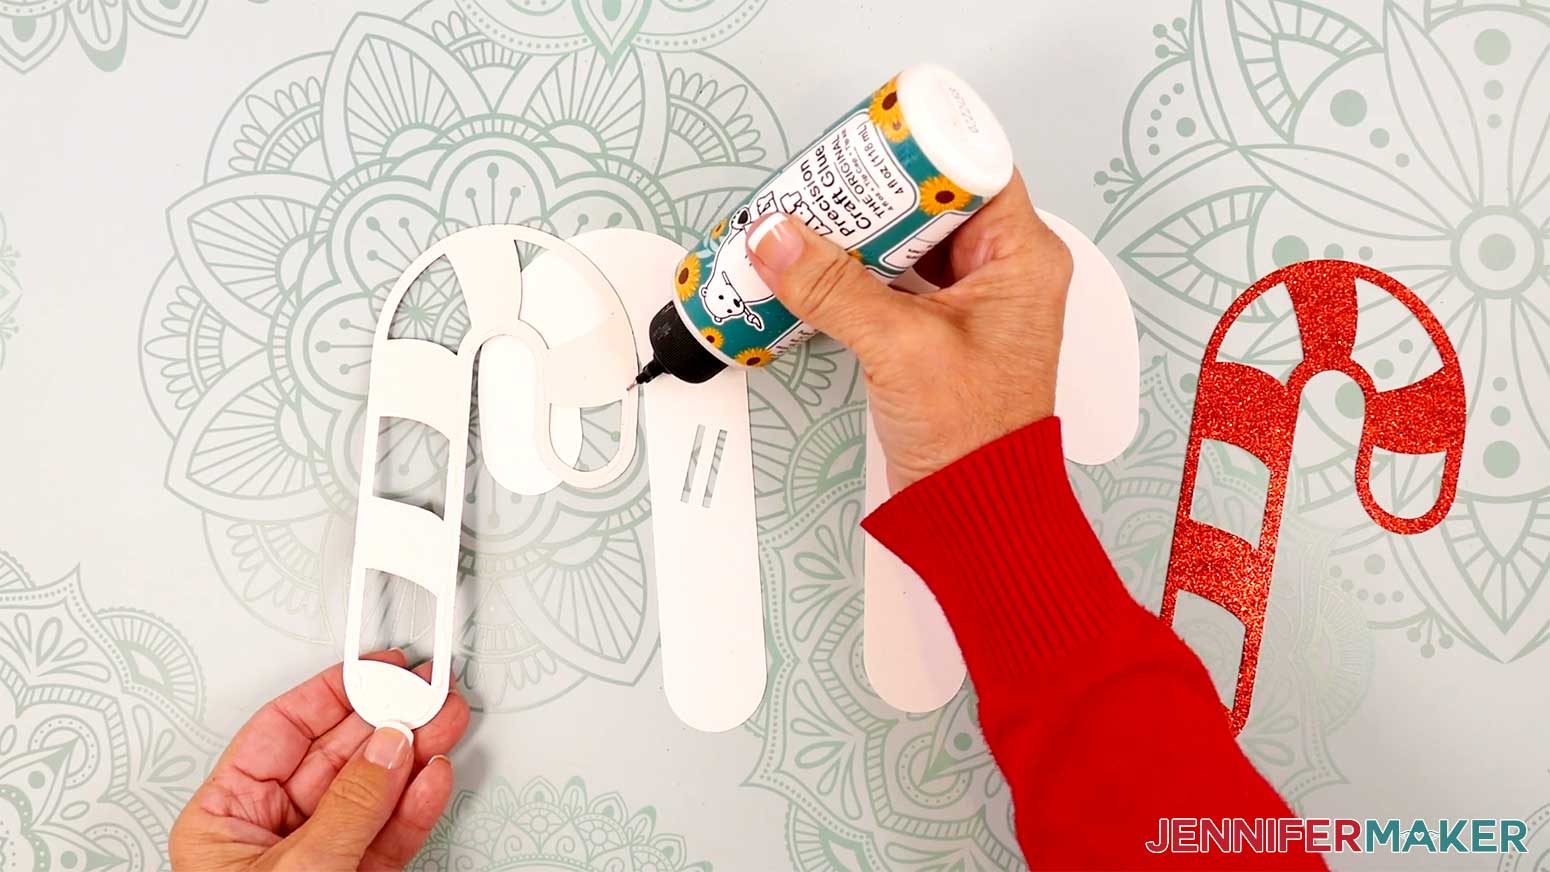

2. Cross the candy canes, one on top of the other, and align their slits.
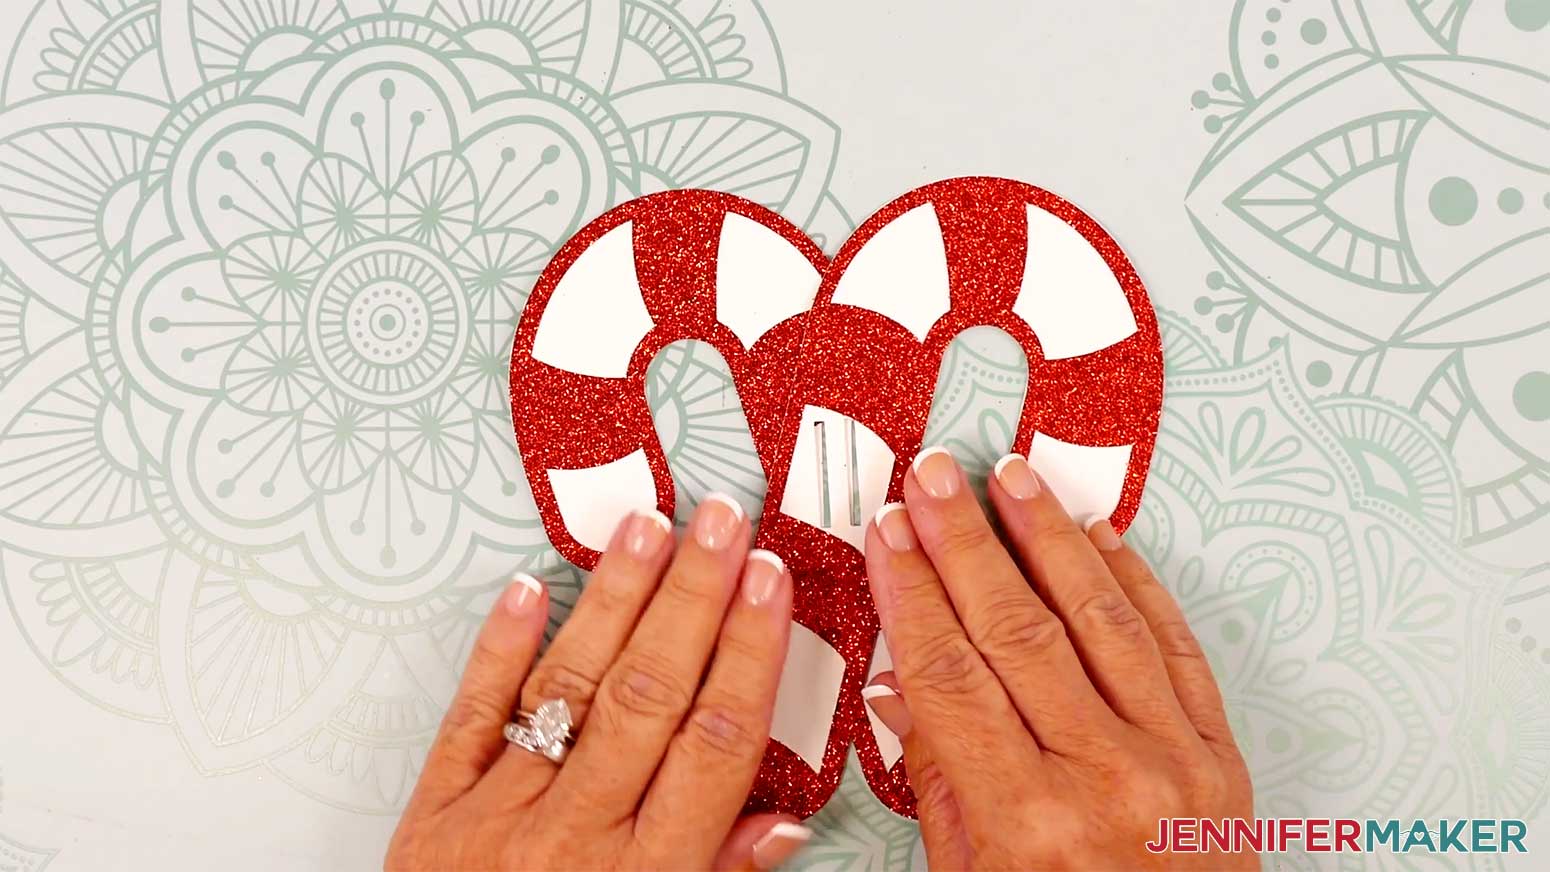
3. Lift up the top candy cane and apply glue to the bottom candy cane underneath, where they overlap. Press the candy canes together until the glue sets.
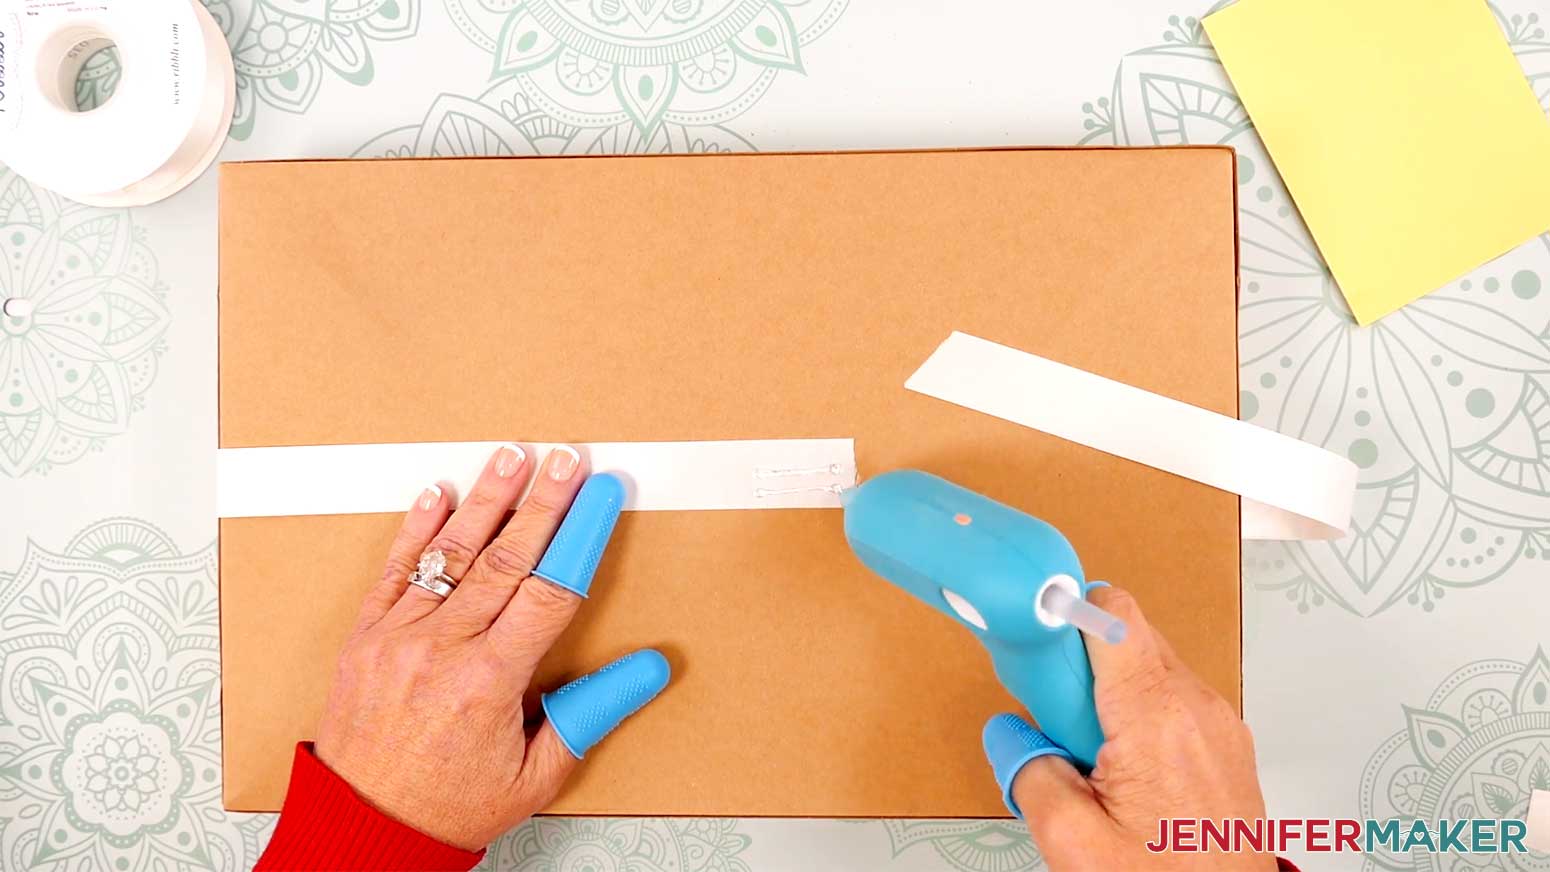
4. Cut a length of ribbon to fit around the wrapped box, with 1-2” of excess.
5. Slide the ribbon from the back of the slider through one slit (or set of slits), then down through the other slit.

6. Repeat step 4 to add more sliders to the ribbon, if you like.
7. Center the slider(s) on the ribbon.
8 .Wrap the ribbon around the box and secure its ends to the package with hot glue.
9. Slide the decoration(s) into place on the front of the box.
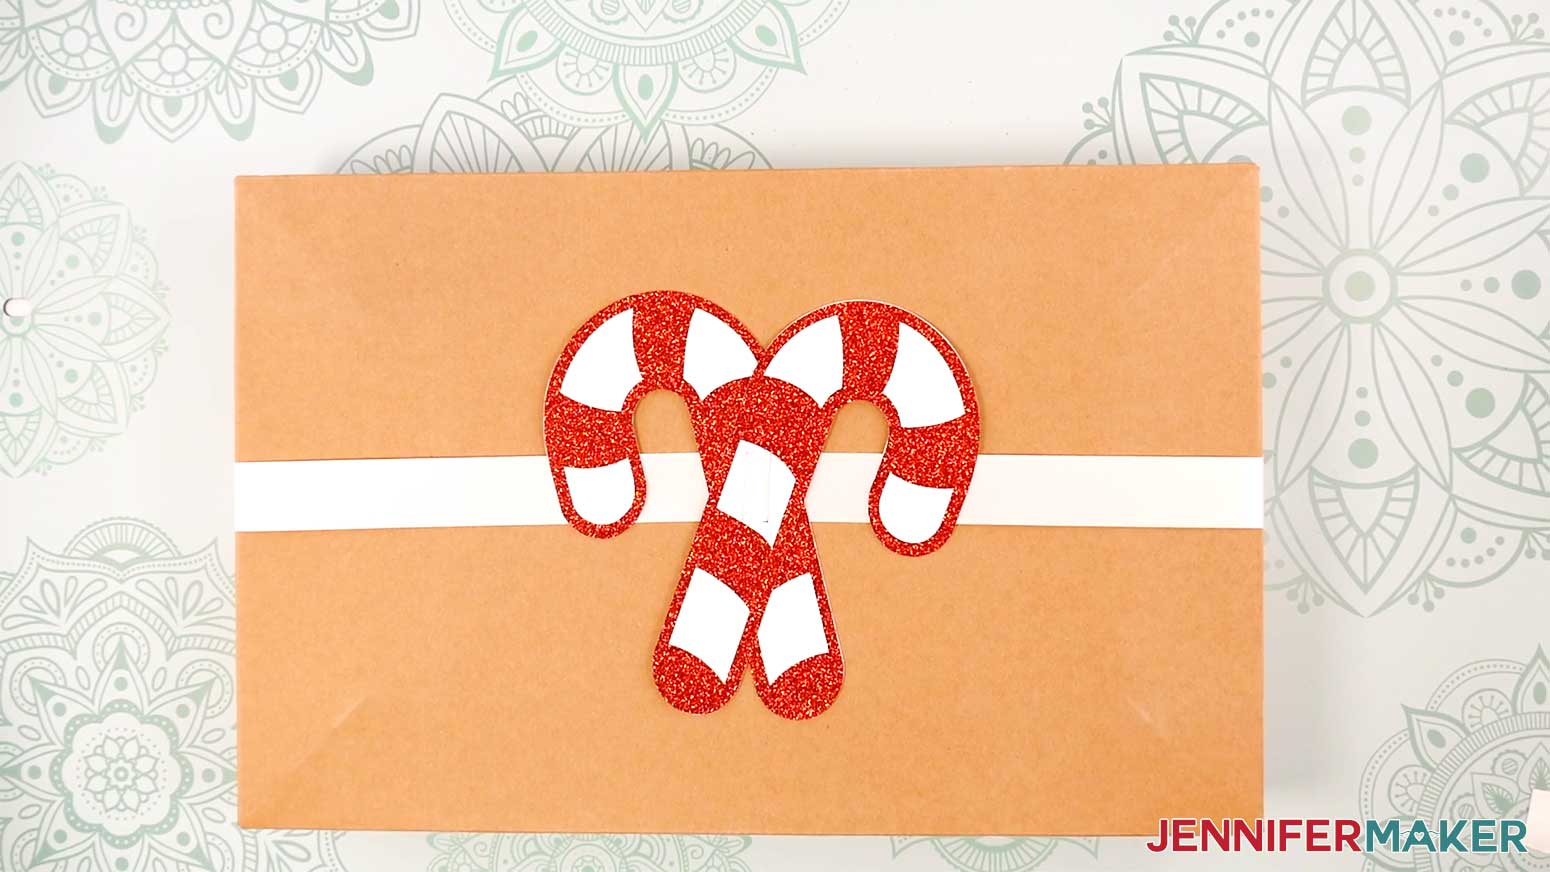
10. To keep the sliders from moving, you can roll up a piece of tape and stick it to the back, then press it into the box.
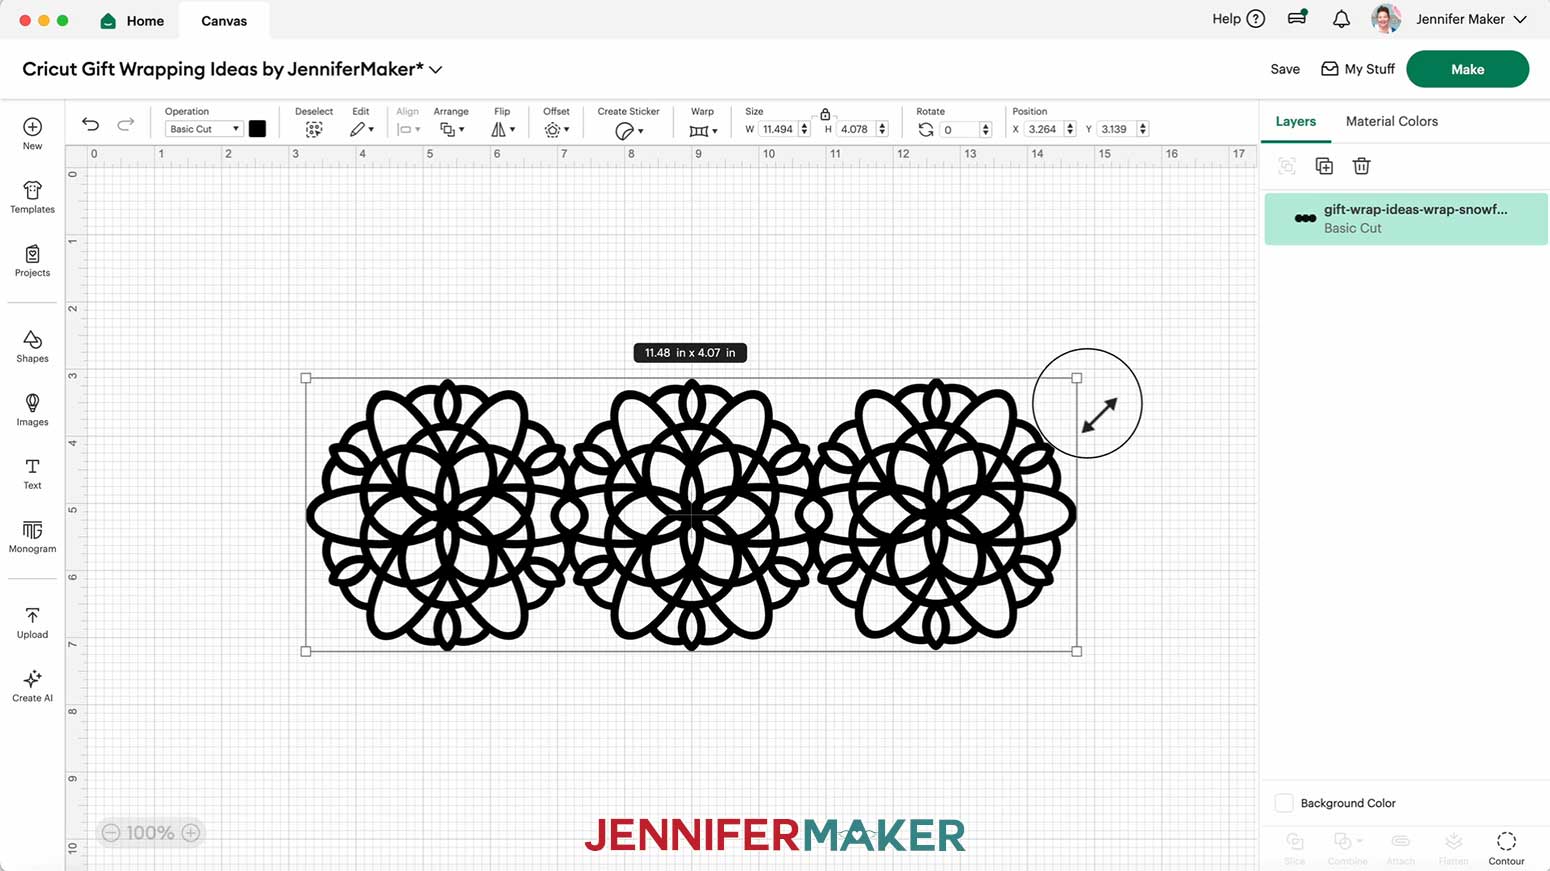
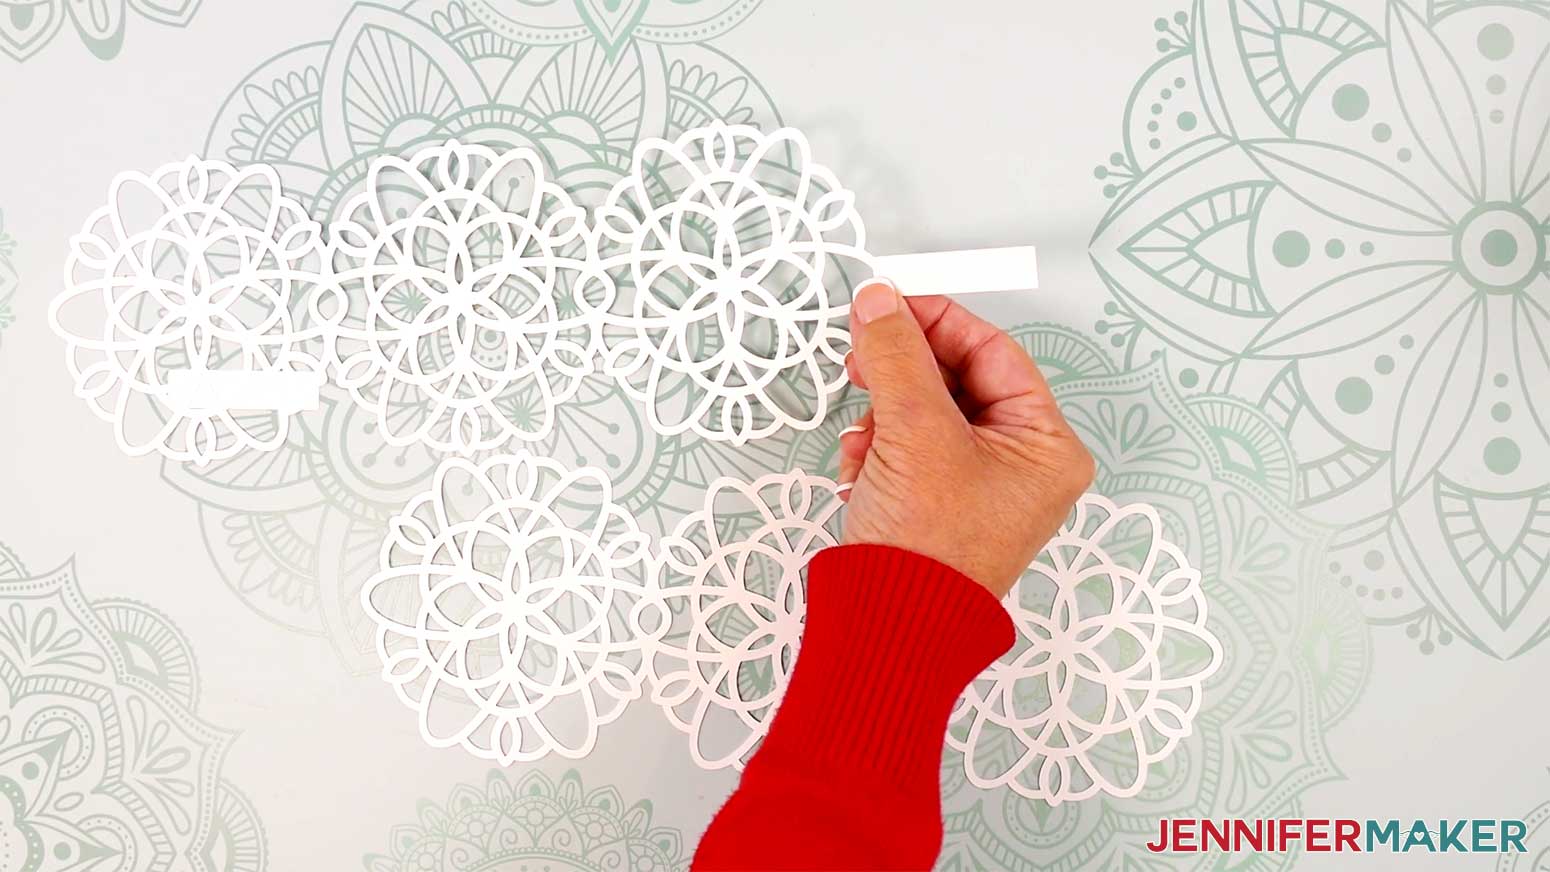
PROJECT 7: SNOWFLAKE BOX WRAP
First, measure across one side of the box in the same orientation that you’d like the snowflake box wrap to cover. Then, measure the width of the adjacent side.

NOTE: Each side of the snowflake wrap design cannot exceed 11.5” long. If you want it larger, you will need larger cardstock and a 12” x 24” mat.
CRICUT DESIGN SPACE
1. In Cricut Design Space on a blank Canvas, click “Upload.”
2. Click “Upload Image.”
3. Click “Browse.”
4. Find and select the SVG with “wrap-snowflake” in the name.
5. Click “Open” and then “Continue.”
6. Click “Upload” to add the SVG to your Canvas.
7. Click “Save” and give your project a name.
8. Resize the snowflake piece to match the width of the side of your package where you’d like the wrap to show.
9. Click “Shapes” and add the free square to your Canvas.
10. With the square selected, click the lock icon to unlock proportions, then resize it into a rectangle that is ½” tall and about ½” longer than the adjacent side of your package.
NOTE: I sized mine to 2” long.
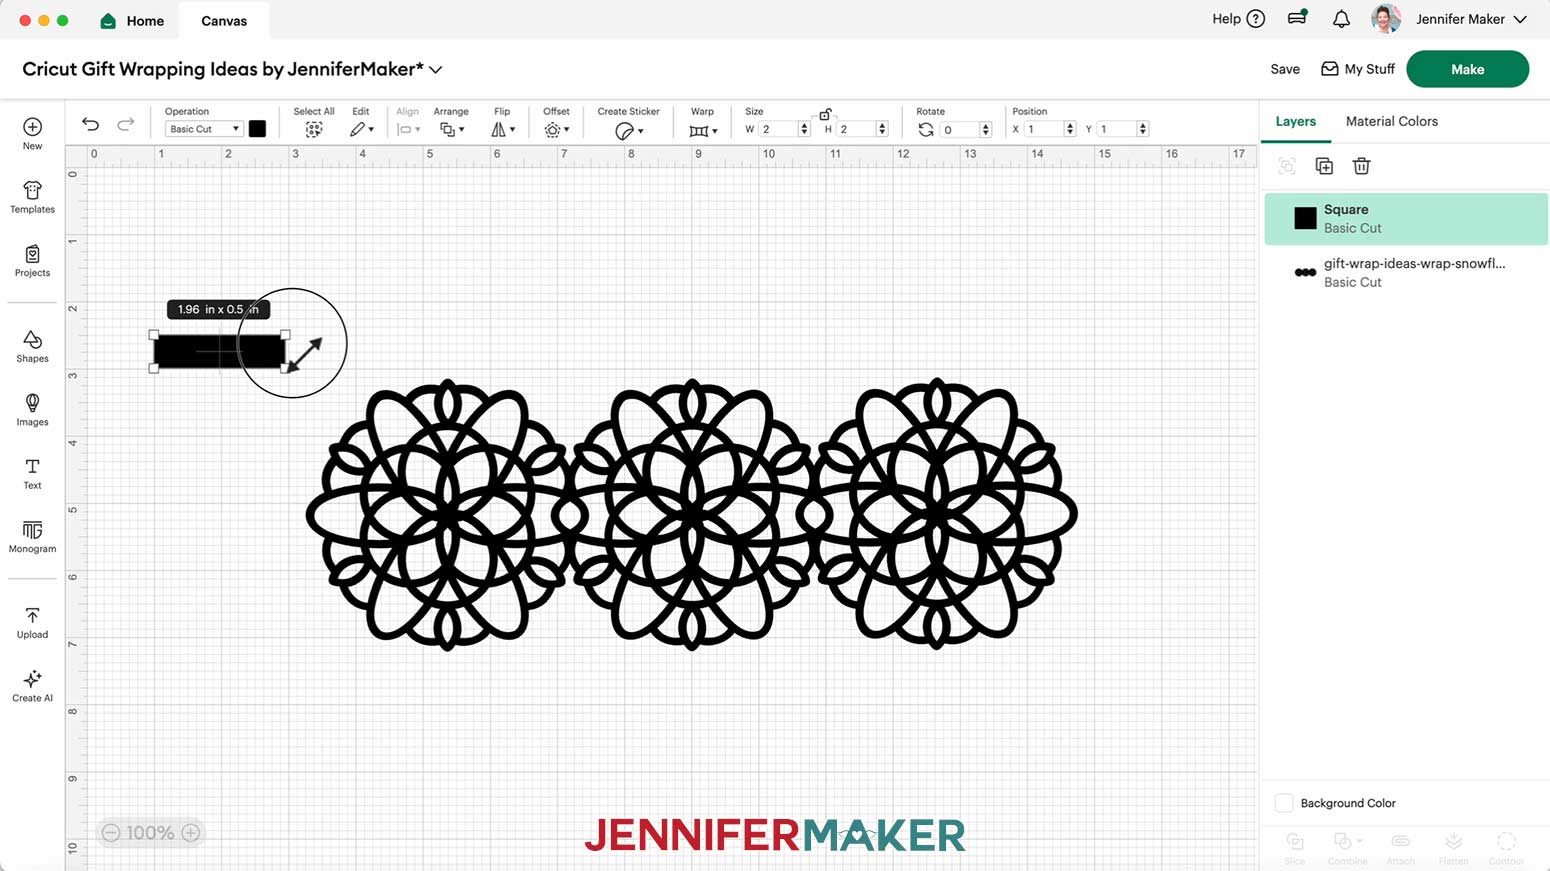
11. Use the color box at the top to change the rectangle’s color to white to match your snowflake design.

12. Select the rectangle and the snowflake design.
13. Click “Duplicate” to make a copy of both pieces.

14. Your snowflake box wrap is ready to cut! Make sure the correct machine is selected in the top right and click “Make.”
15. If prompted, click "On Mat," choose your mat size, and click “Confirm.”
16. On the Prepare screen, make sure the correct Material Size is selected for each of your mats.
17. Select the first mat again and click “Continue.”
CUTTING
1. On the Make screen, I used the “Medium Cardstock - 80 lb (216 gsm)” setting with “More” Pressure.
NOTE: I used white 65 lb. cardstock for my snowflake wrap.
2. Place your first mat’s material pretty-side up onto a green StandardGrip machine mat.
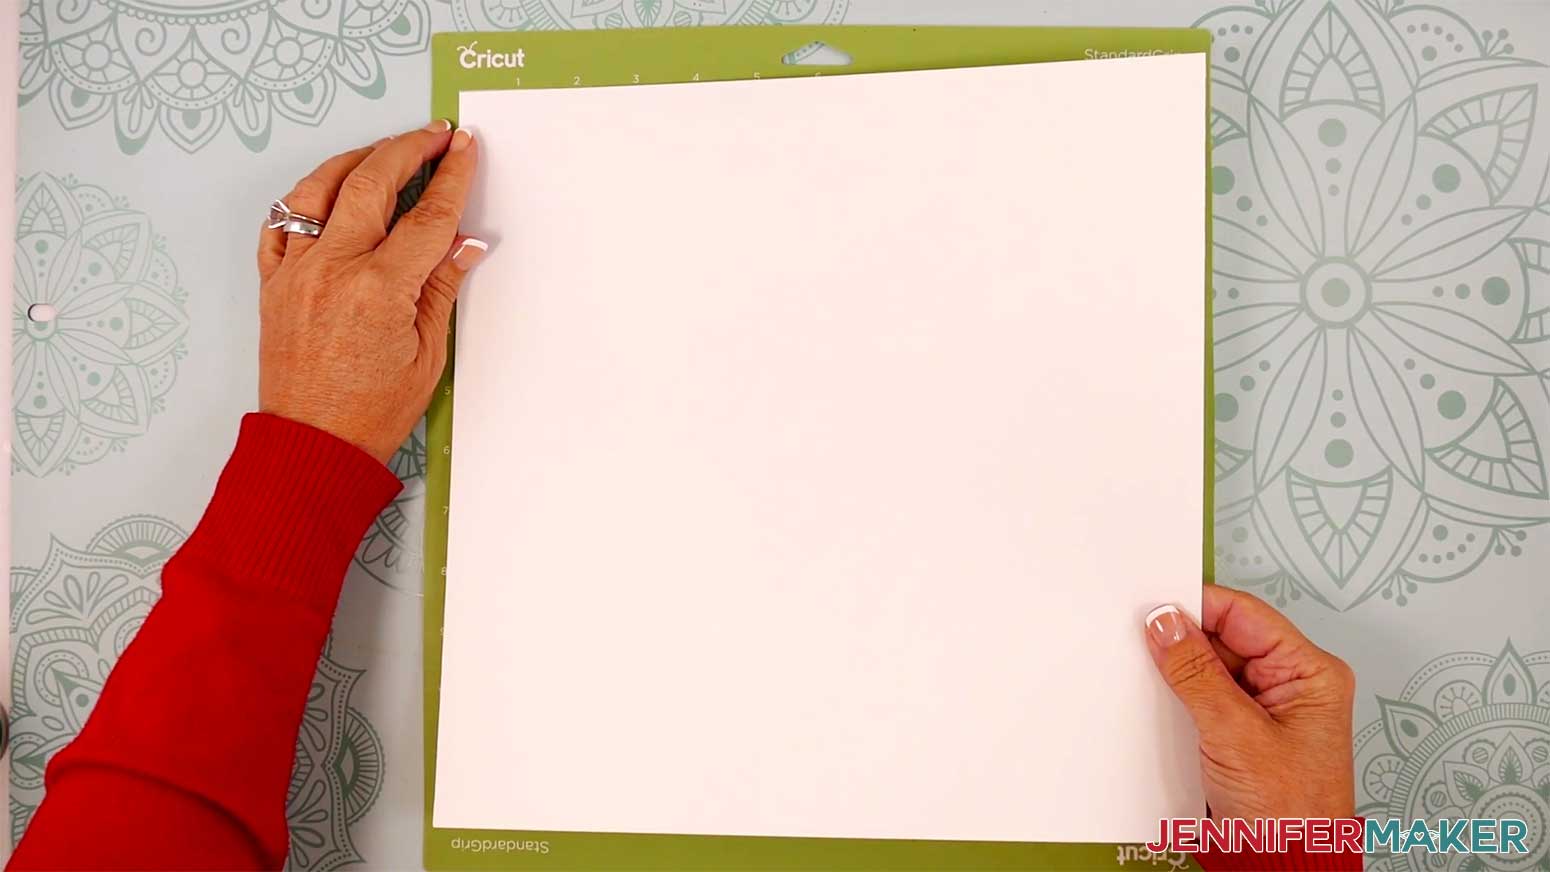
3. Use a brayer to make sure it’s fully adhered.
4. Check that your Fine-Point Blade is clean and in the clamp.
5. Load the mat into your Cricut and press the flashing middle button to begin cutting.
6. Before unloading the mat, use your weeding tool to peel back a corner of the material to make sure the cut went all the way through. If it didn’t, smooth the material back down into place and press the middle button again for another pass.
7. Once the material is cut all the way through, unload the mat, flip it over onto your work surface, and roll it back to release the material.
TIP: Use a spatula to carefully remove delicate areas. If any stubborn cardstock stays attached to the cut pieces, use a weeding tool to carefully poke them out. Use a scraper tool to push the remaining cardstock pieces off of your machine mat.
8. Place the cut pieces face up on your work surface.
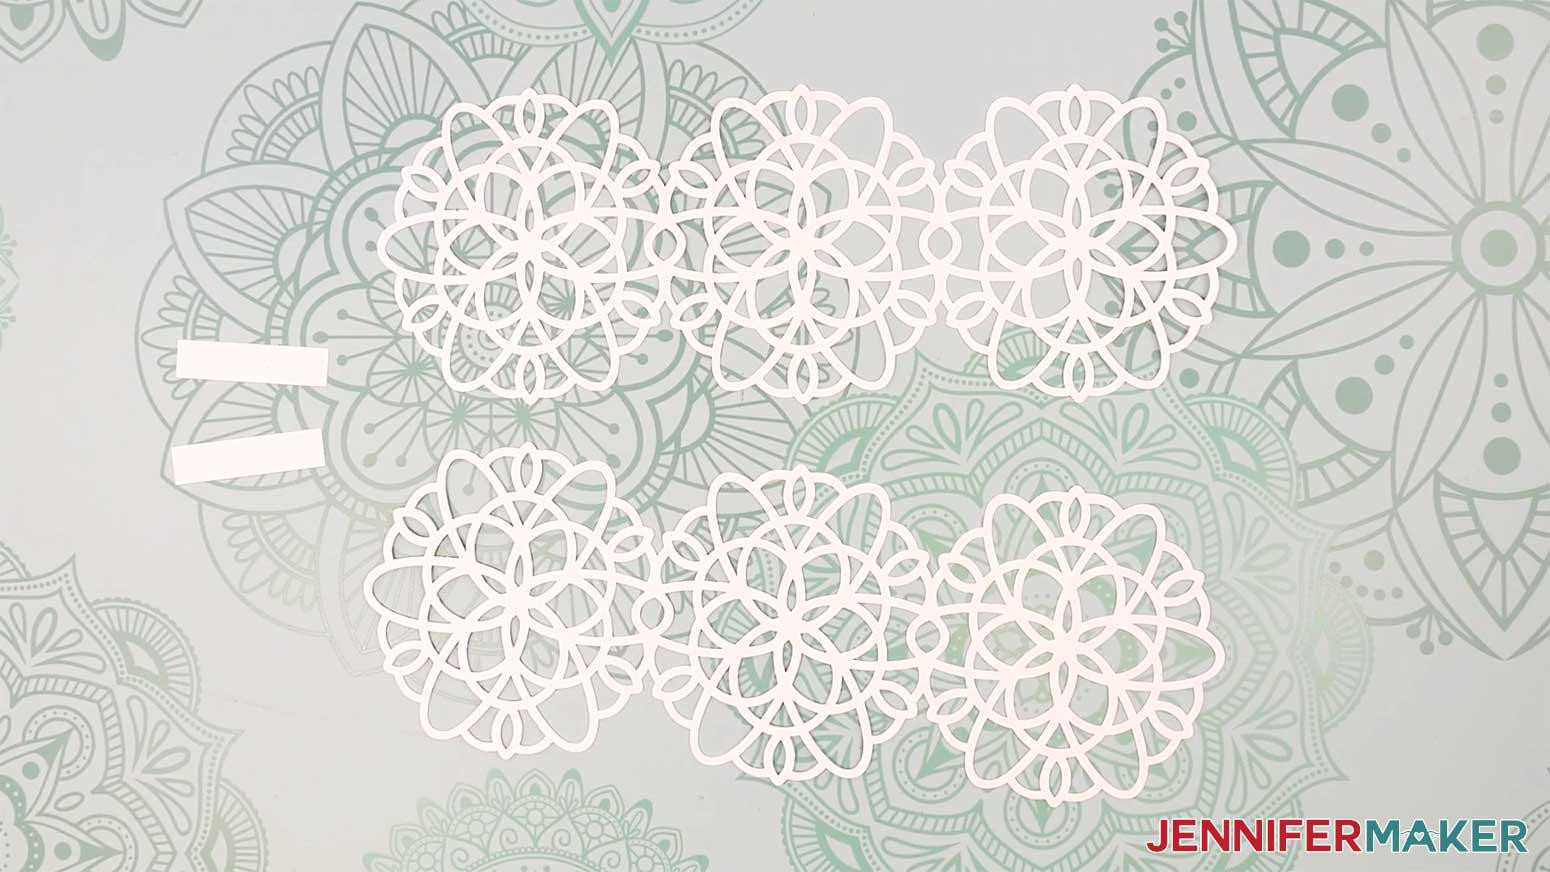
ASSEMBLY
1. Wrap your gift with your choice of wrapping paper. I used solid red wrapping paper.
2. Apply a small amount of craft glue to the end of one rectangular strip.

3. Adhere the end of the strip to one end of one snowflake design.
4. Repeat steps 2-3 with the other strip on the opposite end of the snowflake design.
5. Adhere the other end of the second strip to one end of the second snowflake design.
6. Center the set of three snowflakes with the free tab on one side of the box you’d like to decorate.
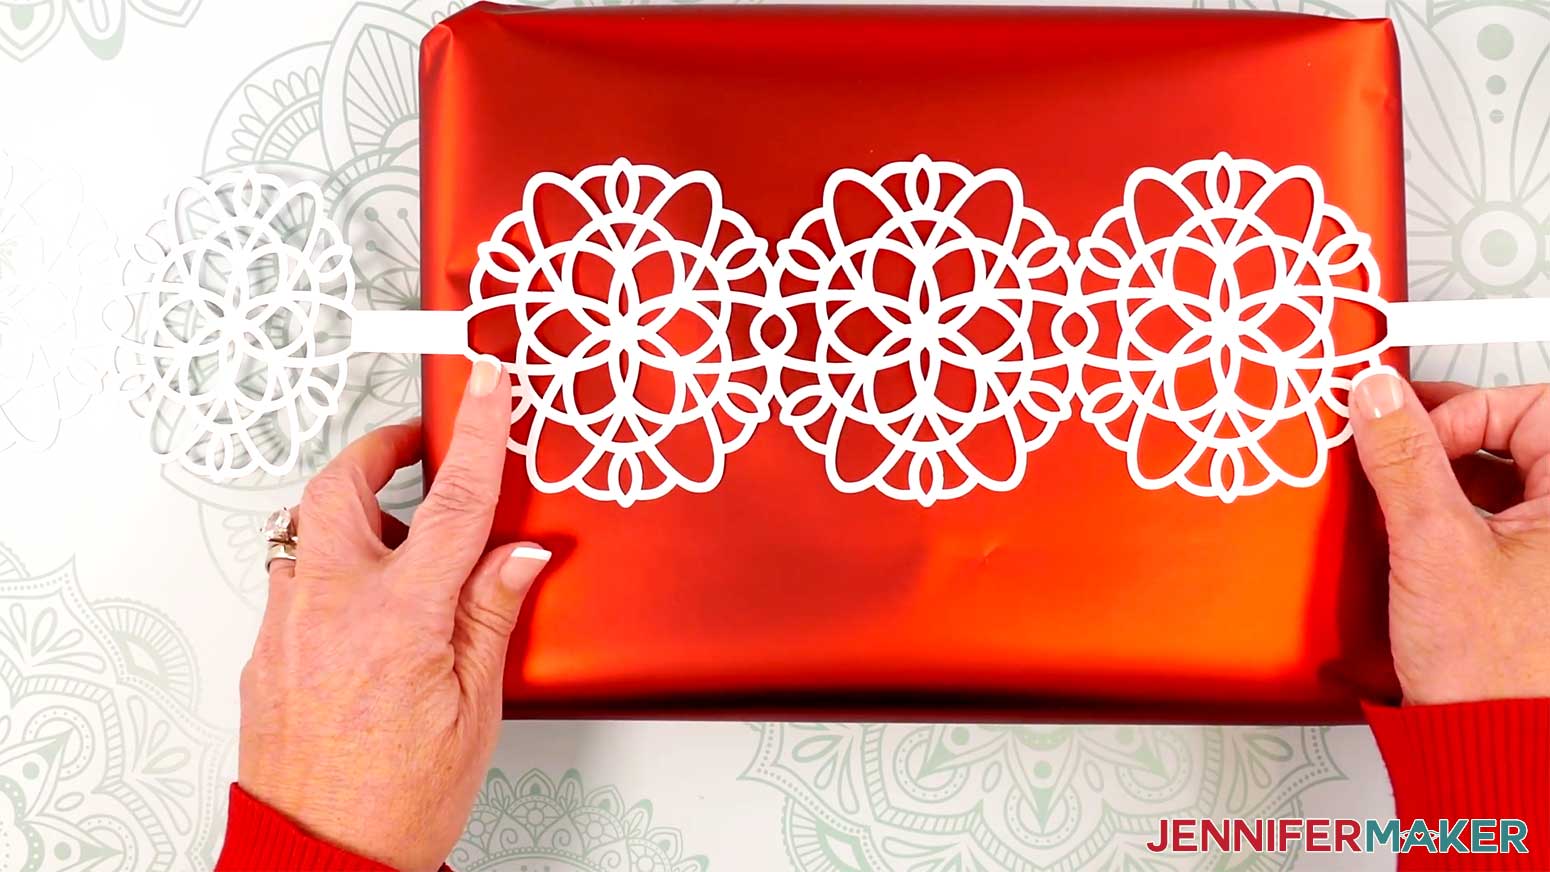
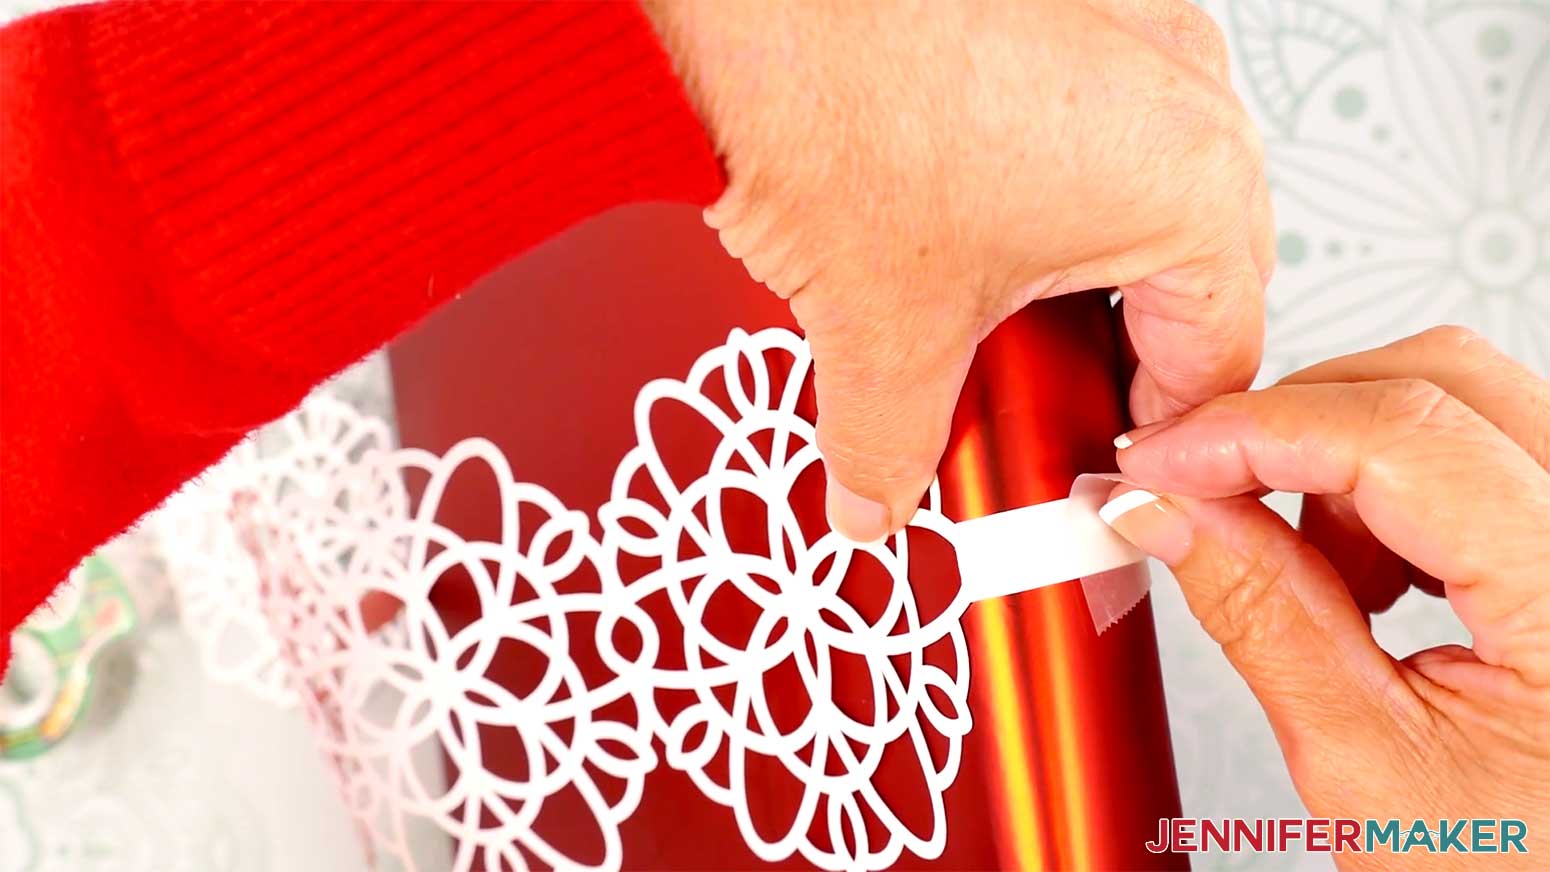
7. Use a piece of tape to secure the tab in place on the side of the box.
8. Wrap the rest of the snowflake wrap around the box, using your fingers to crease the paper around the corners.
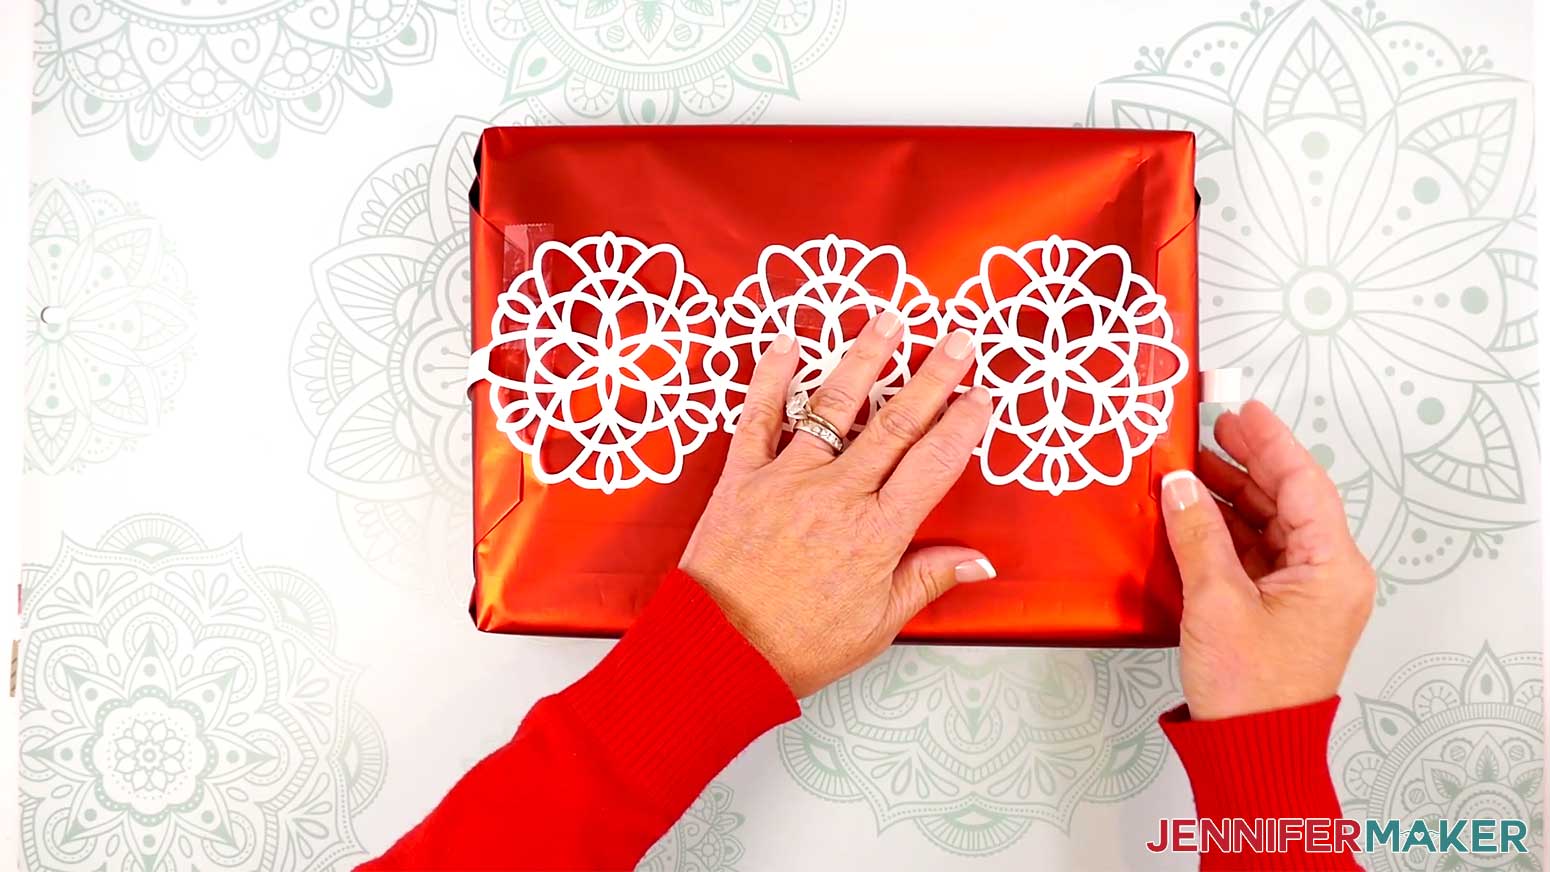
9. Secure the loose end of the snowflake wrap to the box with tape. Align the edge’s center with the first tab you taped down.
PROJECT 8: HOLLY LETTER GIFT TAGS
CRICUT DESIGN SPACE
1. In Cricut Design Space on a blank Canvas, click “Upload.”
2. Click “Upload Image.”
3. Click “Browse.”
4. Find and select the SVG with “holly” in the name.
5. Click “Open” and then “Continue.”
6. Click “Upload” to add the SVG to your Canvas.
7. Here is how the holly design looks on my Canvas.
8. Click “Save” and give your project a name.
9. . “Ungroup” the design. You will see three separate layers - two for the leaves and one for the berries.
10. If you want to use a different color material for the pieces, select the appropriate layer in the Layers Panel and use the Color Box at the top to adjust it.
11. Click the Text icon to add a text box to the Canvas.
12. Type your desired letter.
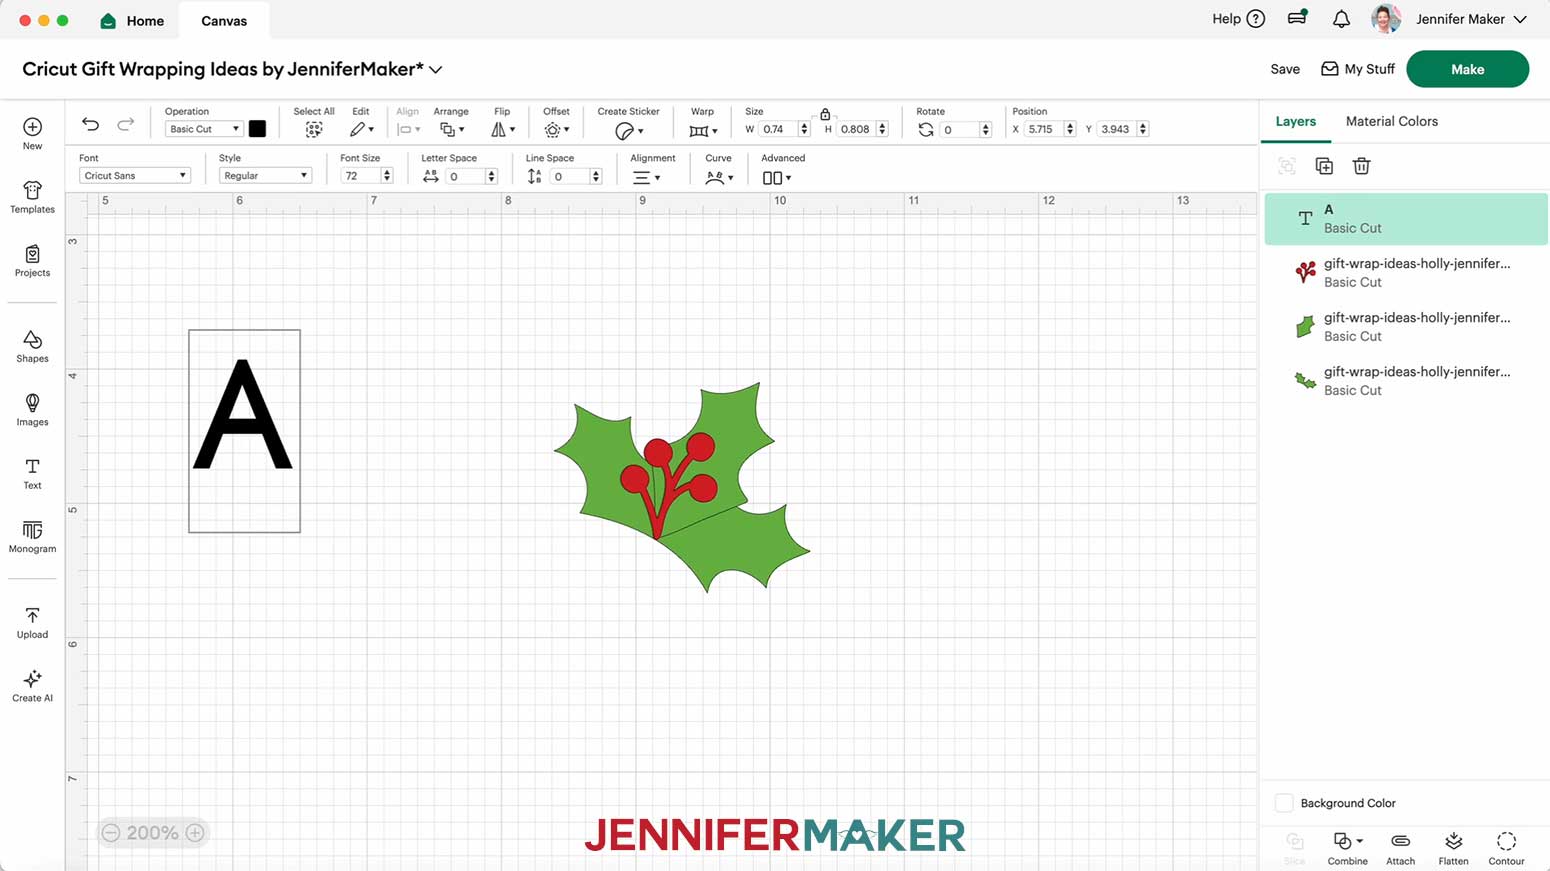
13. With your text box selected, click the Font menu and select a font.
TIP: Choose a bold font that can easily be cut from cardstock in one piece. If using the letters “I” or “J,” use capitals so there’s no dot. I used the font “Transcity.”
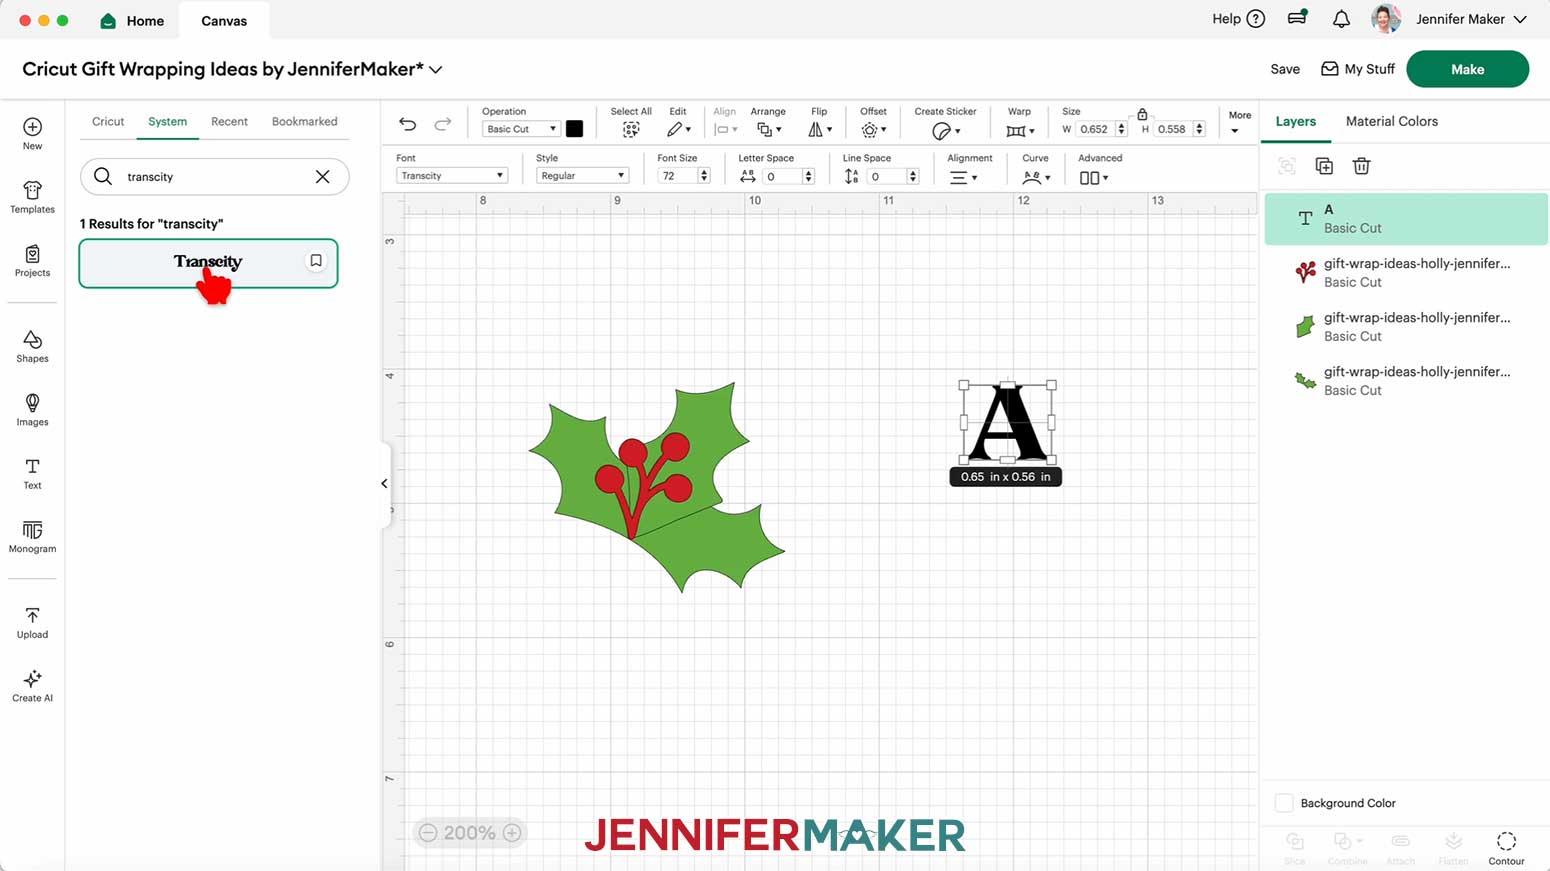
14. Resize the letter to your desired size. I made mine 5” high for a medium-sized gift box.
TIP: I think the tags look best when they’re about one half to one third the height or width of the package they’re decorating. The front of the medium-sized gift box in my materials list measures 11” by 8”, so sizing the letter to 5” tall works well. I recommend sizing your letter approximately 7” tall for an extra-large gift box, 6” tall for a large-size gift box, or 3” tall for a small gift box.
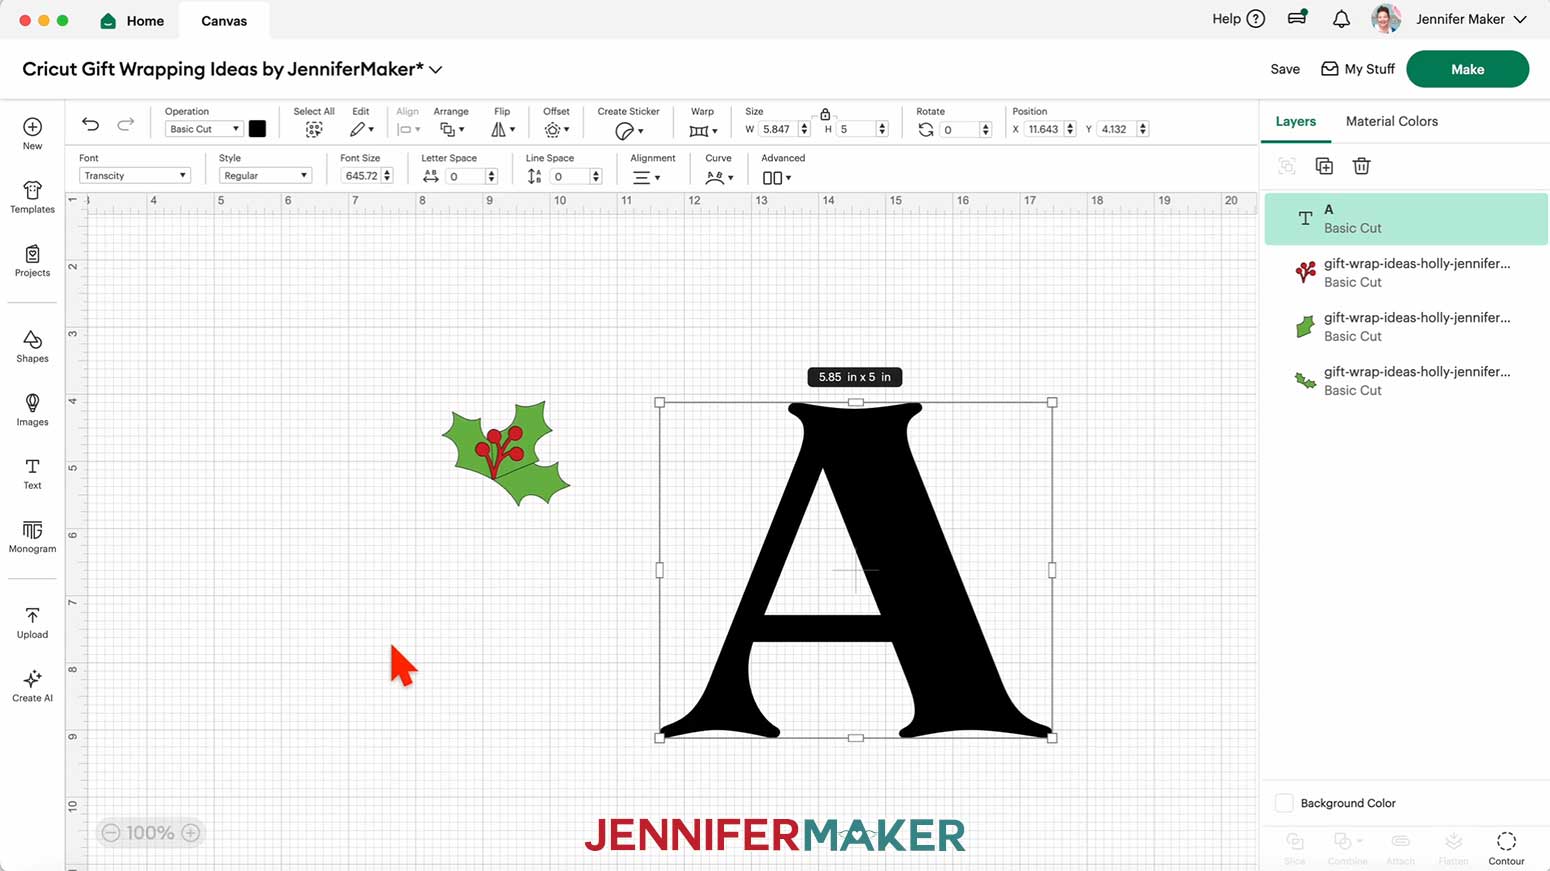
15. Resize the holly design to complement the letter. I made mine 2” wide for my 5” tall letter.
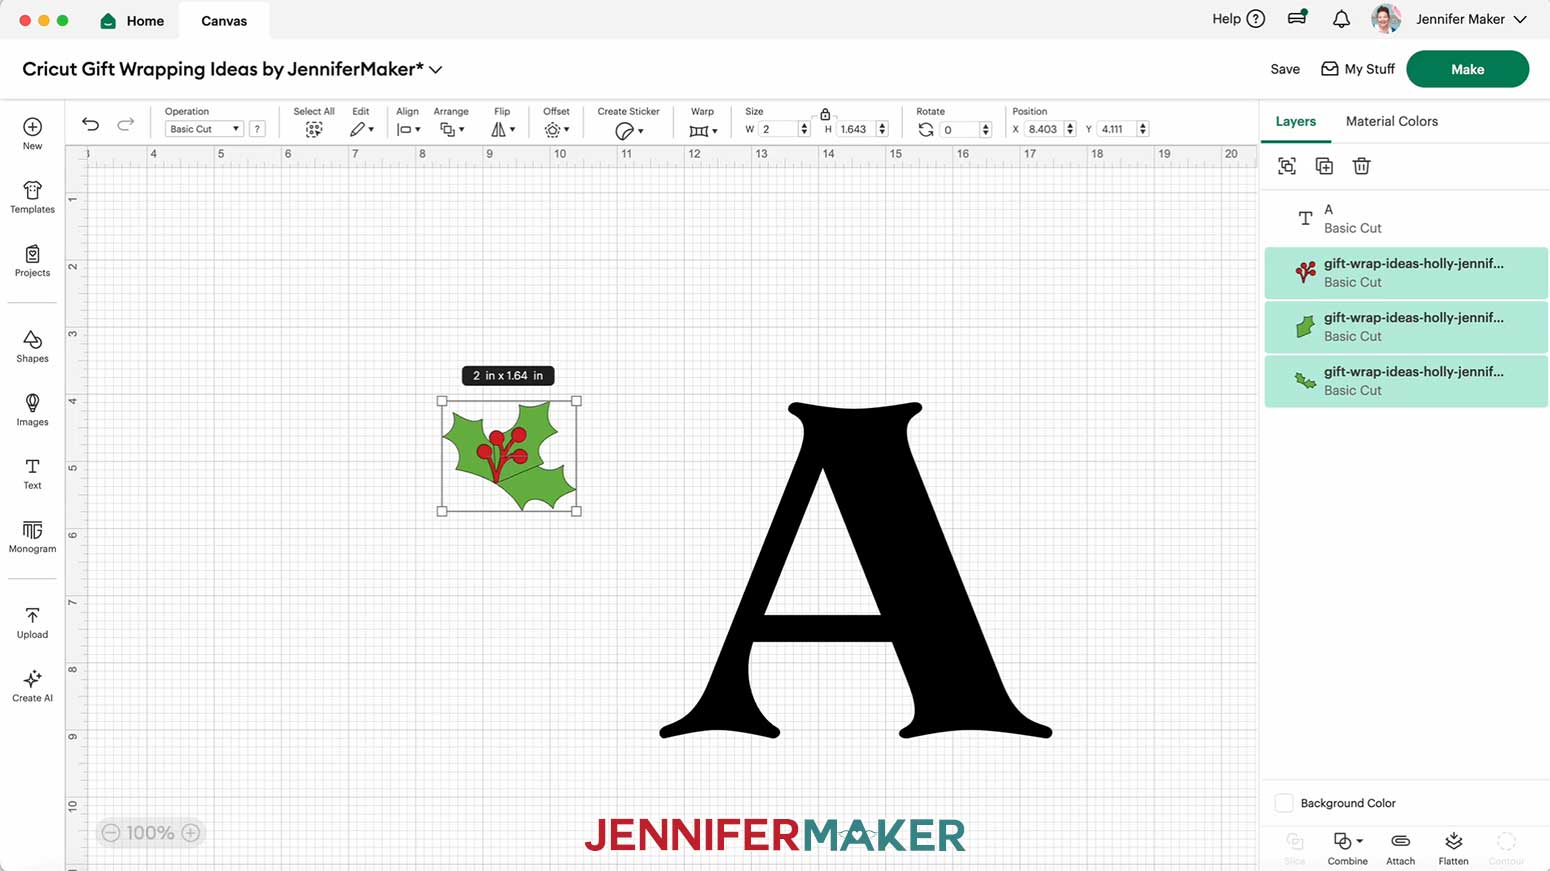
16. Move the holly into place on the letter to visualize how it will look when cut and assembled.
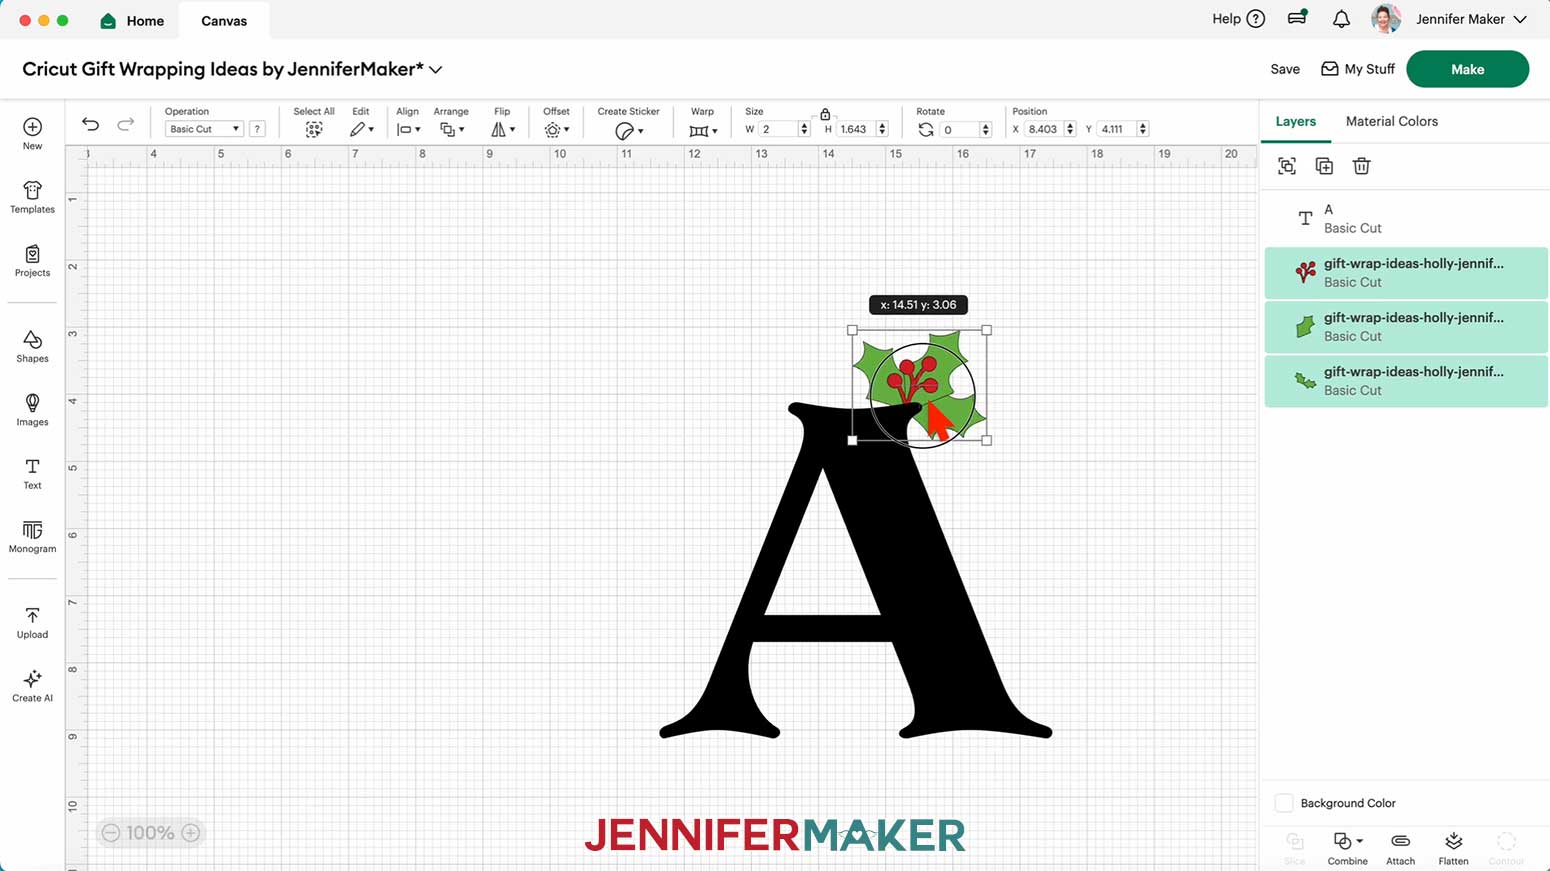
17. To create a hole from which to hang the tag with twine, in the Shapes menu, add the free circle to your Canvas.
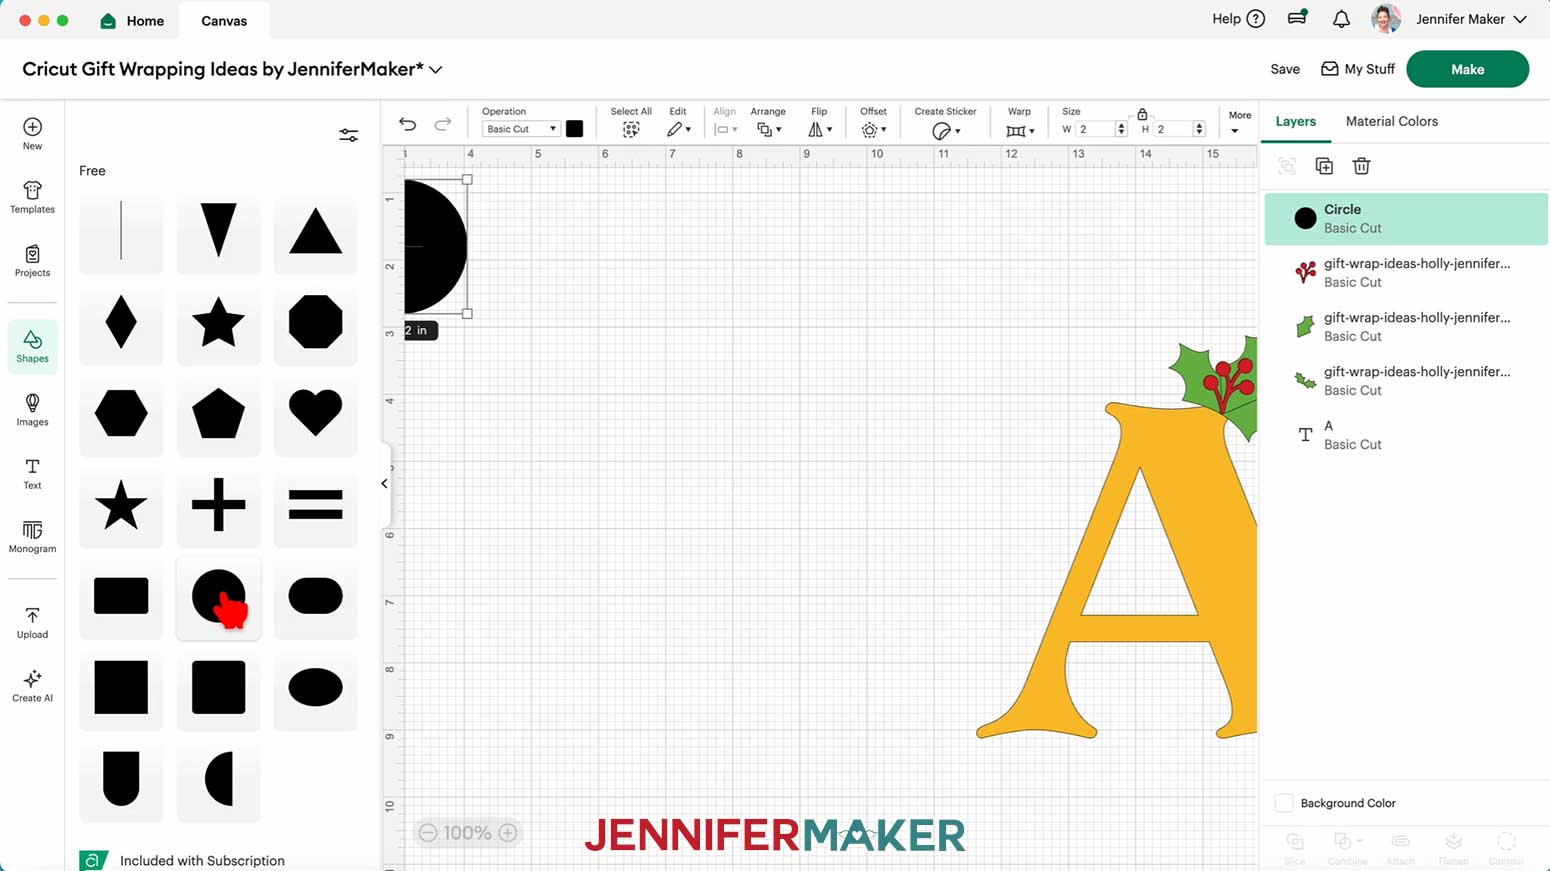
18. Resize the circle to about ¼”.
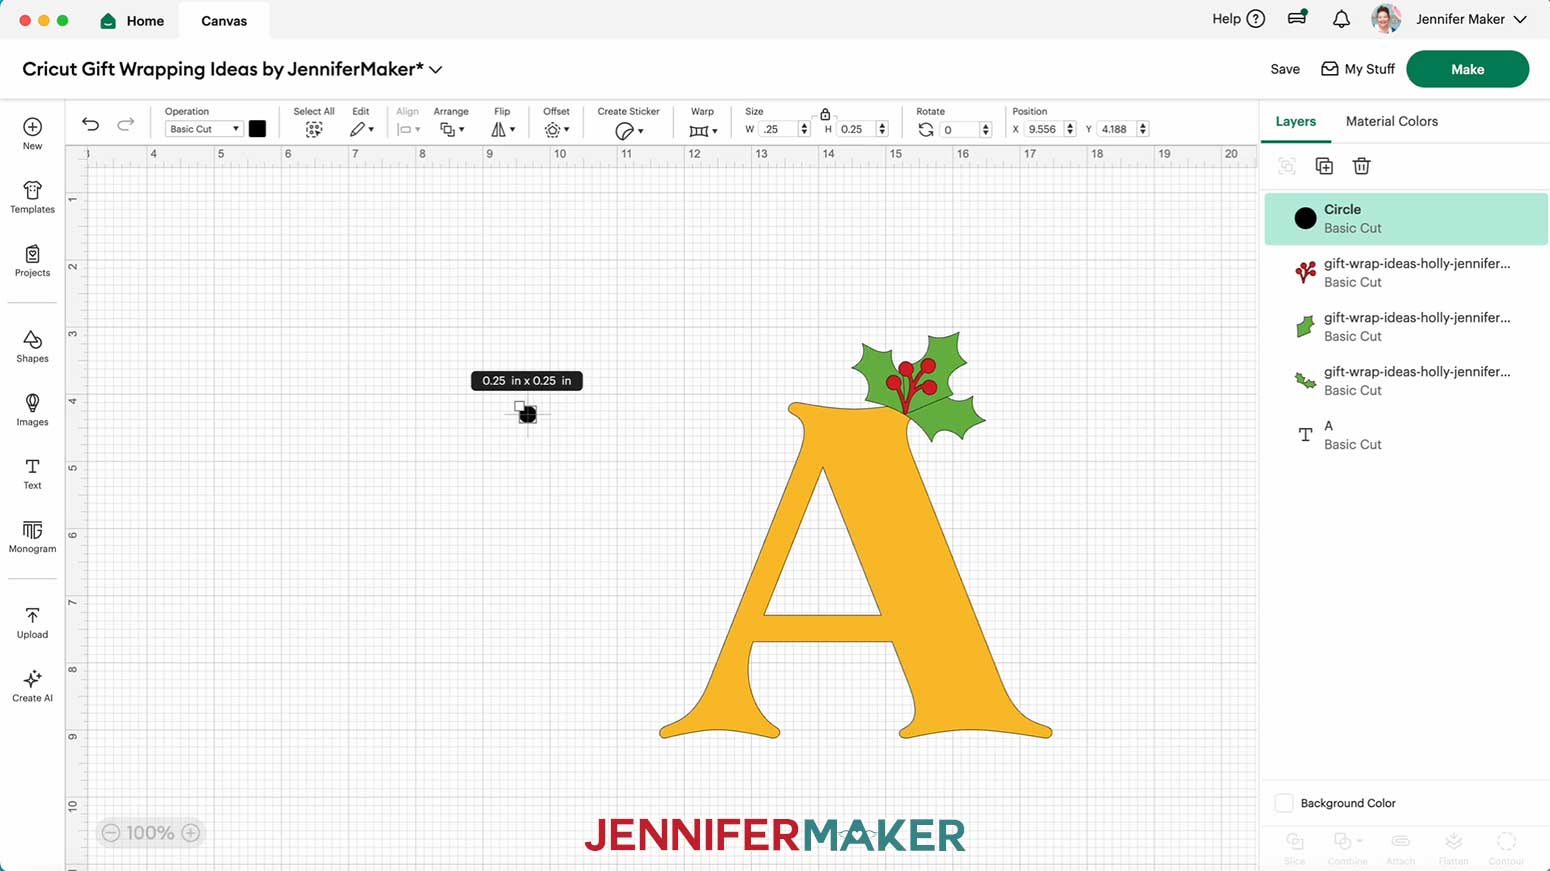
19. Drag the circle over the top of the letter where you’d like the hole to be.
20. Select the circle and the letter, then click “Slice.”
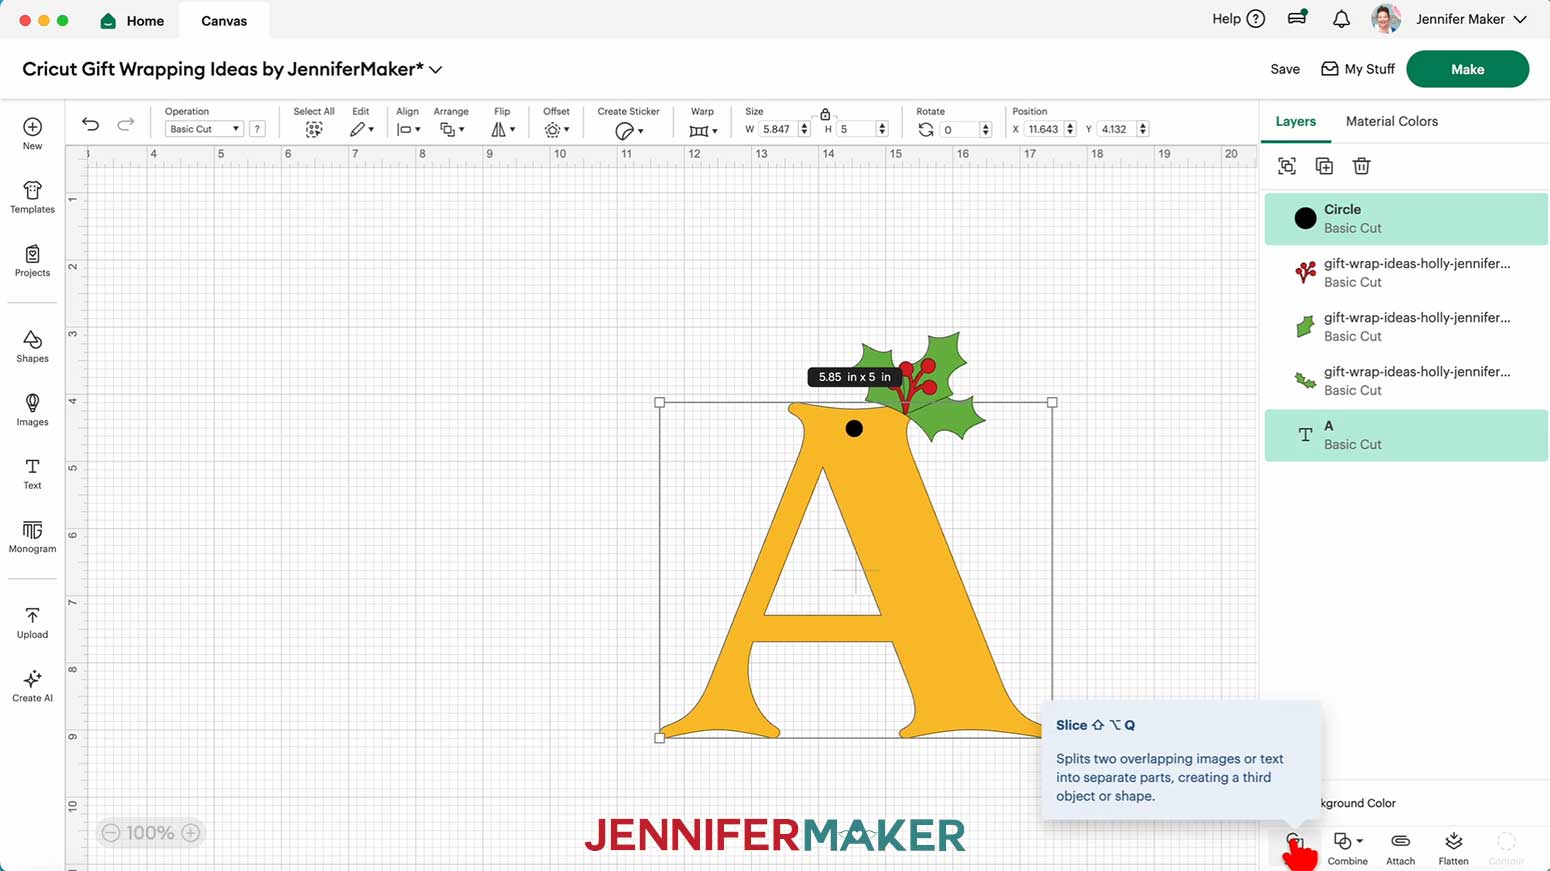
21. Delete the slice results that look like circles.
22. Your holly letter gift tag is ready to cut! Make sure the correct machine is selected in the top right and click “Make.”
23. If prompted, click "On Mat," choose your mat size, and click “Confirm.”
24. On the Prepare screen, make sure the correct Material Size is selected for each of your mats.
25. Select the first mat again and click “Continue.”
CUTTING
1. On the Make screen, I used the “Glitter Cardstock” setting with “More” Pressure.
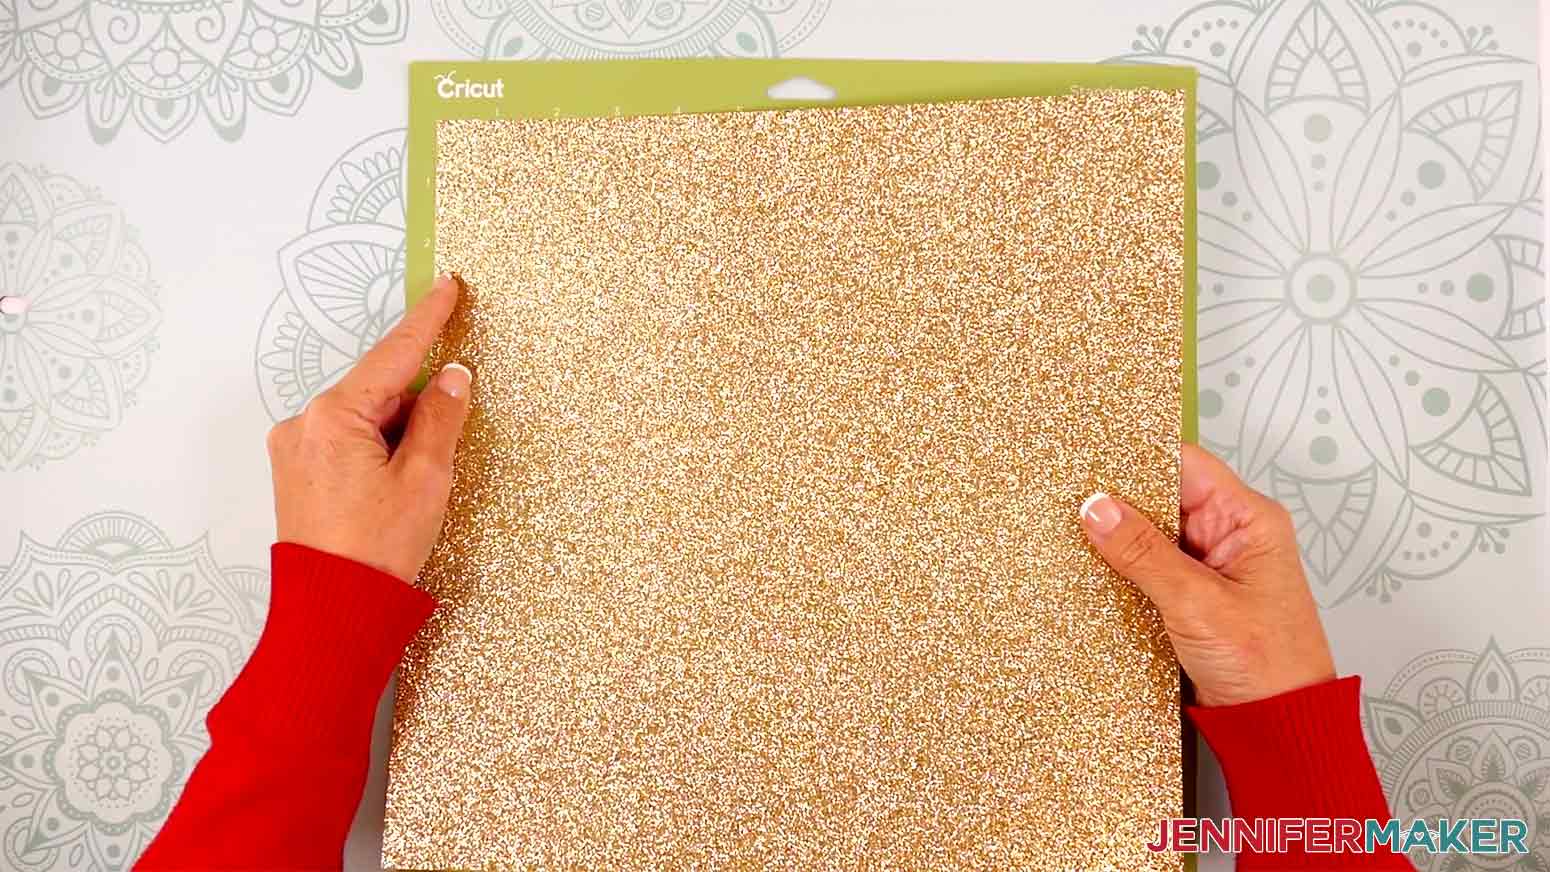
NOTE: I used gold glitter cardstock for the letter, green glitter cardstock for the holly leaves, and red glitter cardstock for the berries.
2. Place your first mat’s material pretty-side up onto a green StandardGrip machine mat.
3. Use a brayer to make sure it’s fully adhered.
4. Check that your Fine-Point Blade is clean and in the clamp.
5. Load the mat into your Cricut and press the flashing middle button to begin cutting.
6. Before unloading the mat, use your weeding tool to peel back a corner of the material to make sure the cut went all the way through. If it didn’t, smooth the material back down into place and press the middle button again for another pass.
7. Once the material is cut all the way through, unload the mat, flip it over onto your work surface, and roll it back to release the material.
TIP: Use a spatula to carefully remove delicate areas.
8. Place the cut pieces face up on your work surface. Use your Canvas in Cricut Design Space as reference if needed.
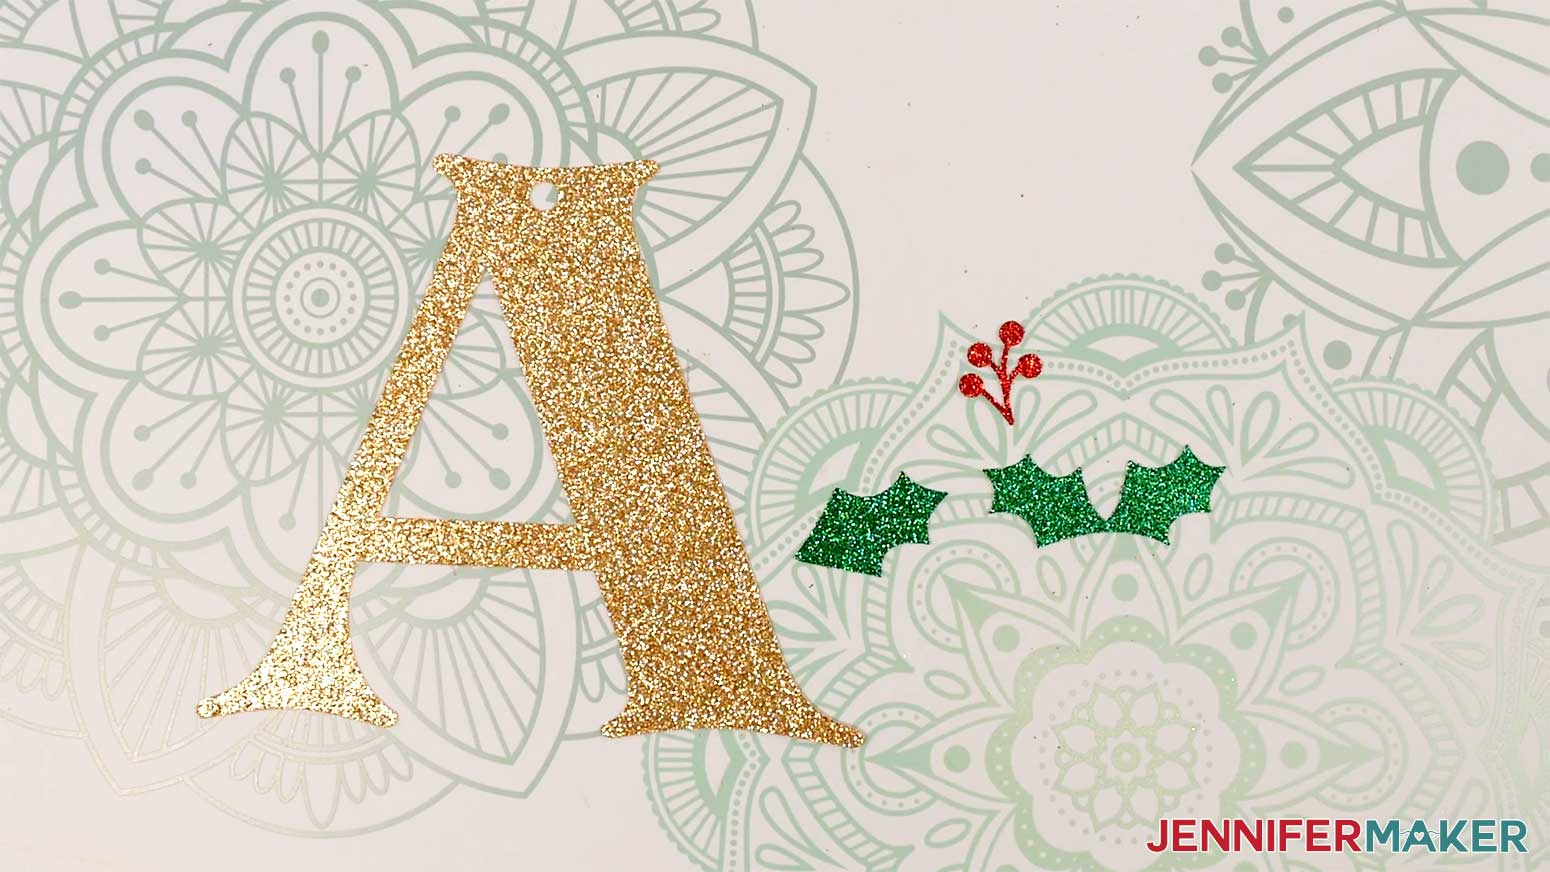
ASSEMBLY
1. Turn on your hot glue gun and put on your silicone finger caps.
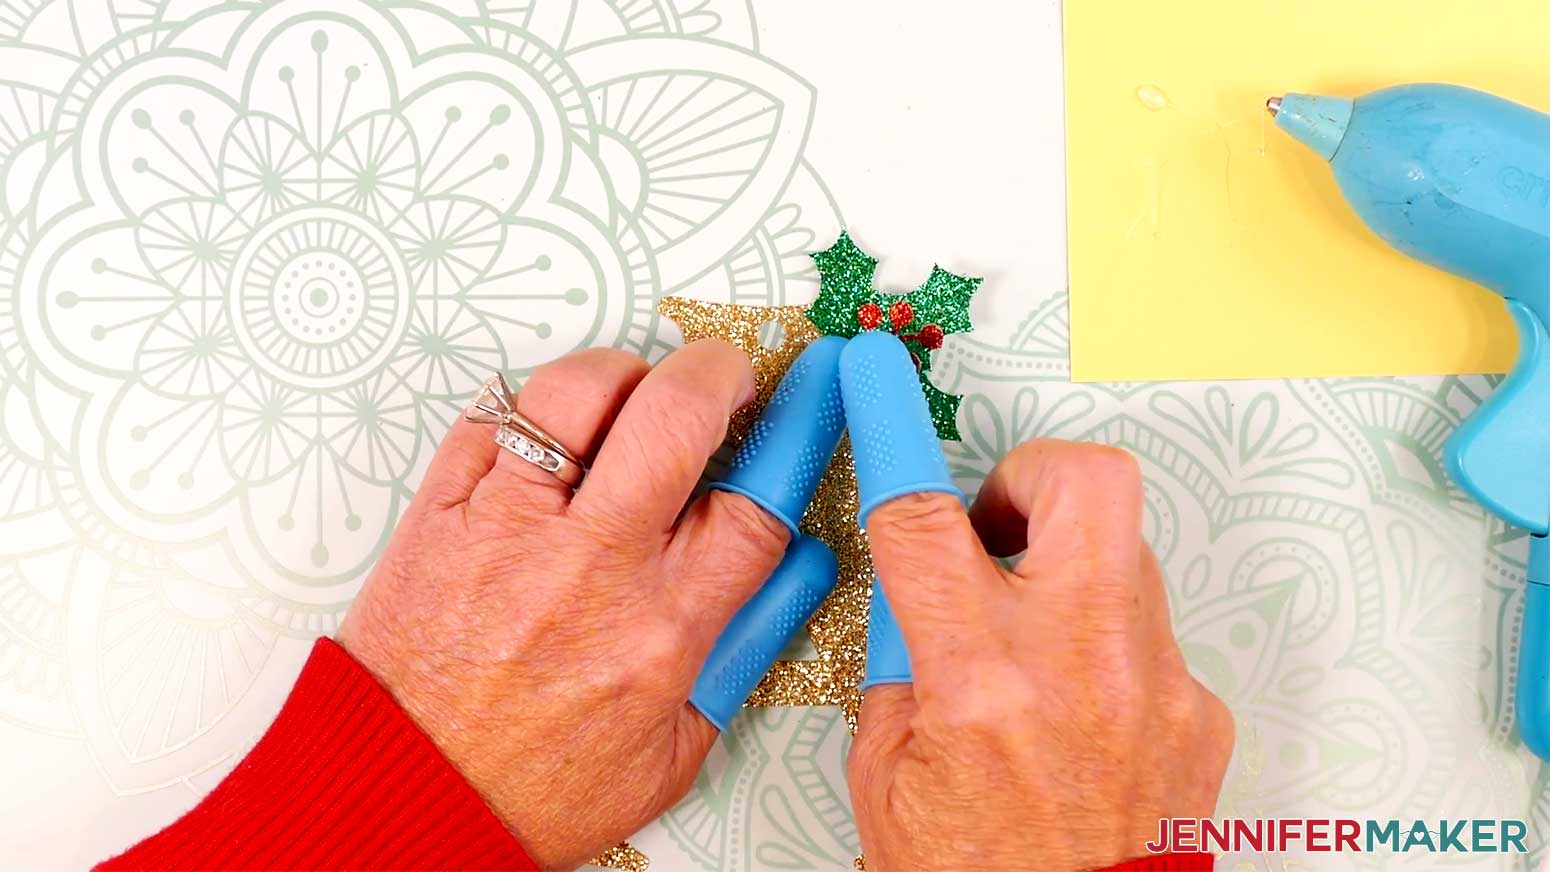
2. Apply hot glue to the back of the smaller leaf piece.
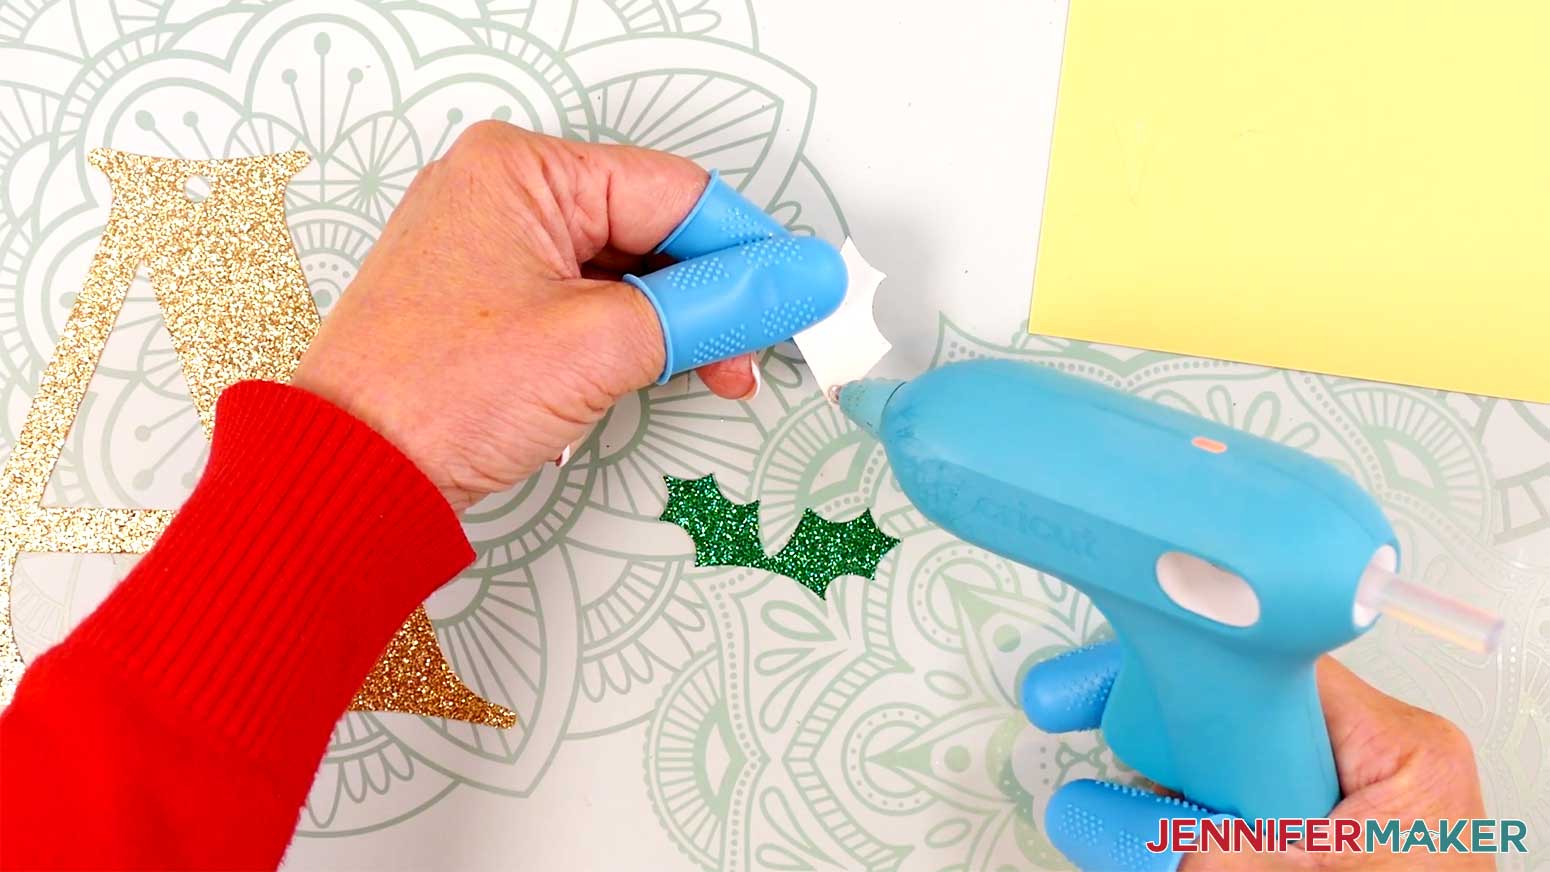
3. Adhere the smaller leaf piece onto the front center of the larger leaf piece. Use your Canvas in Cricut Design Space for reference if you need help positioning it.
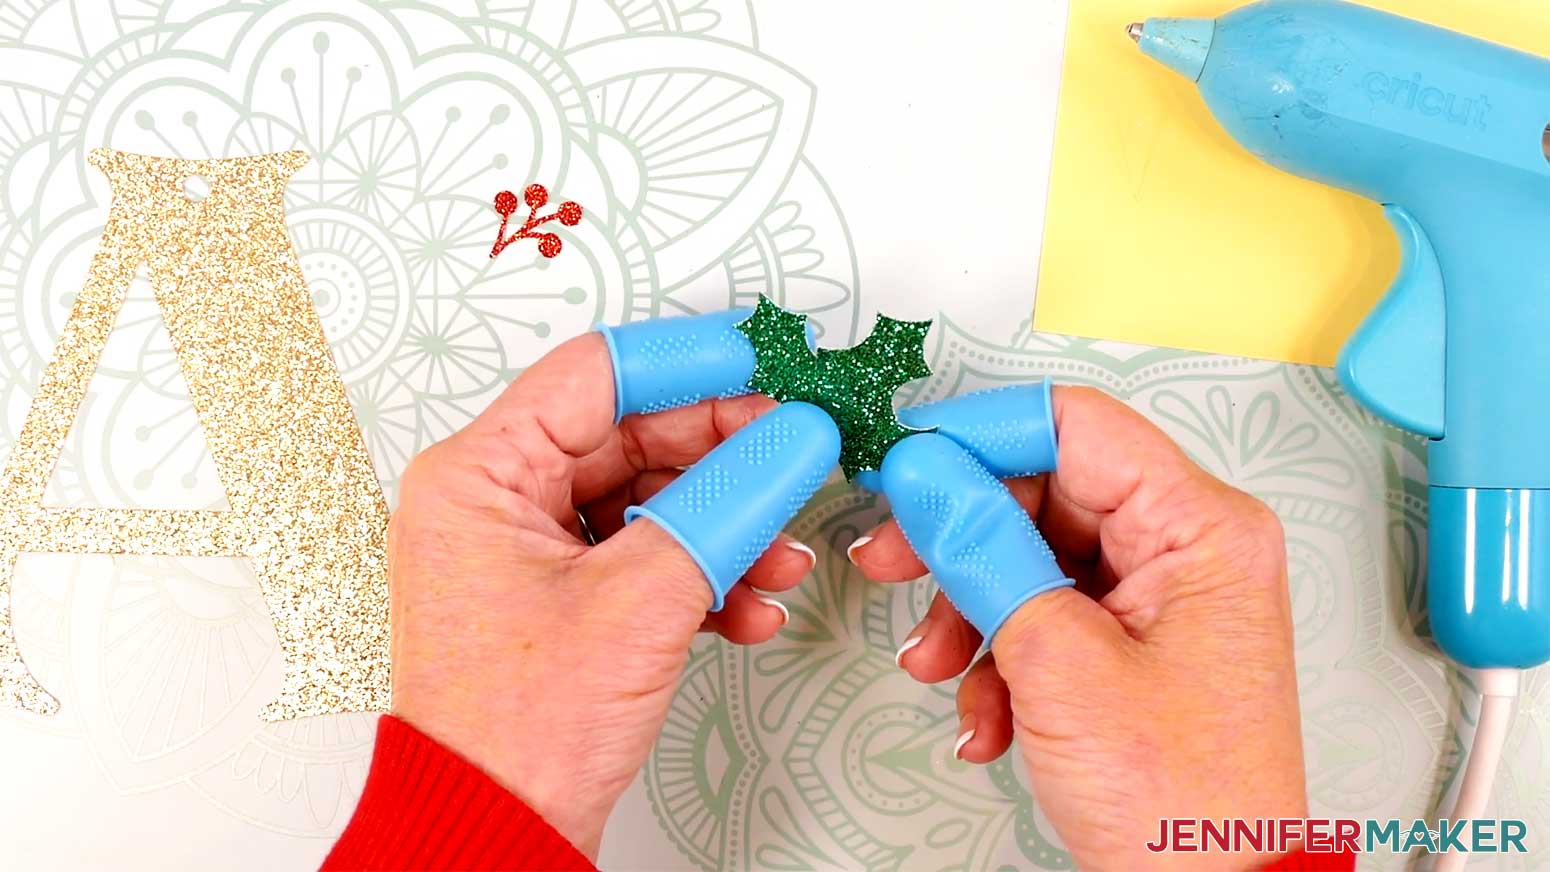
4. Apply a small amount of hot glue to the back of the berry piece.
5. Adhere the berry piece to the front center of the smaller leaf piece.
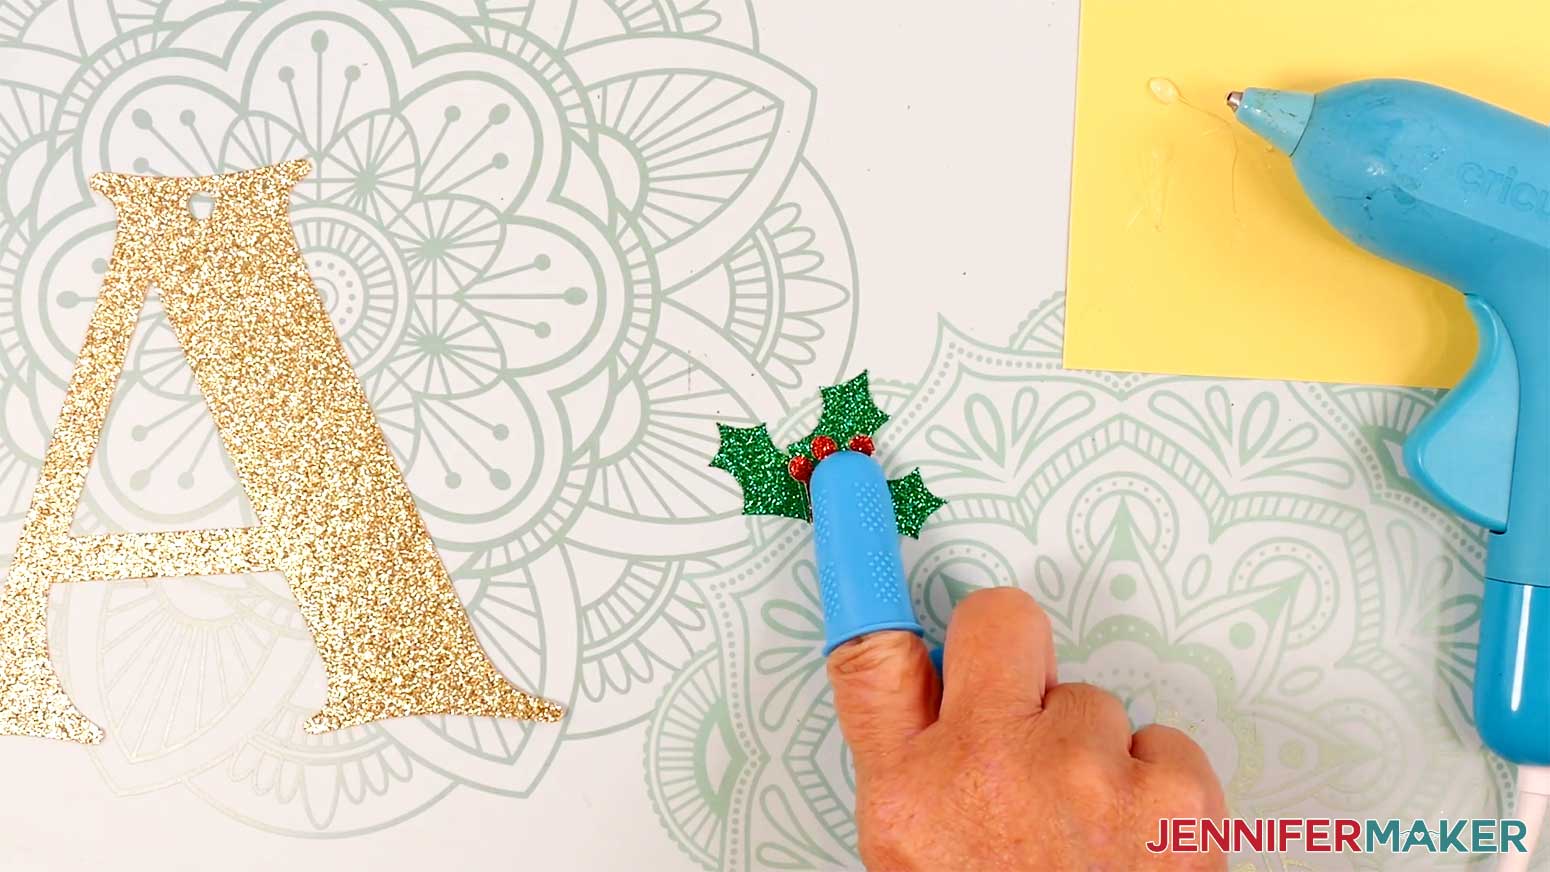
6. Apply a line of hot glue to the bottom back edge of the assembled holly piece.
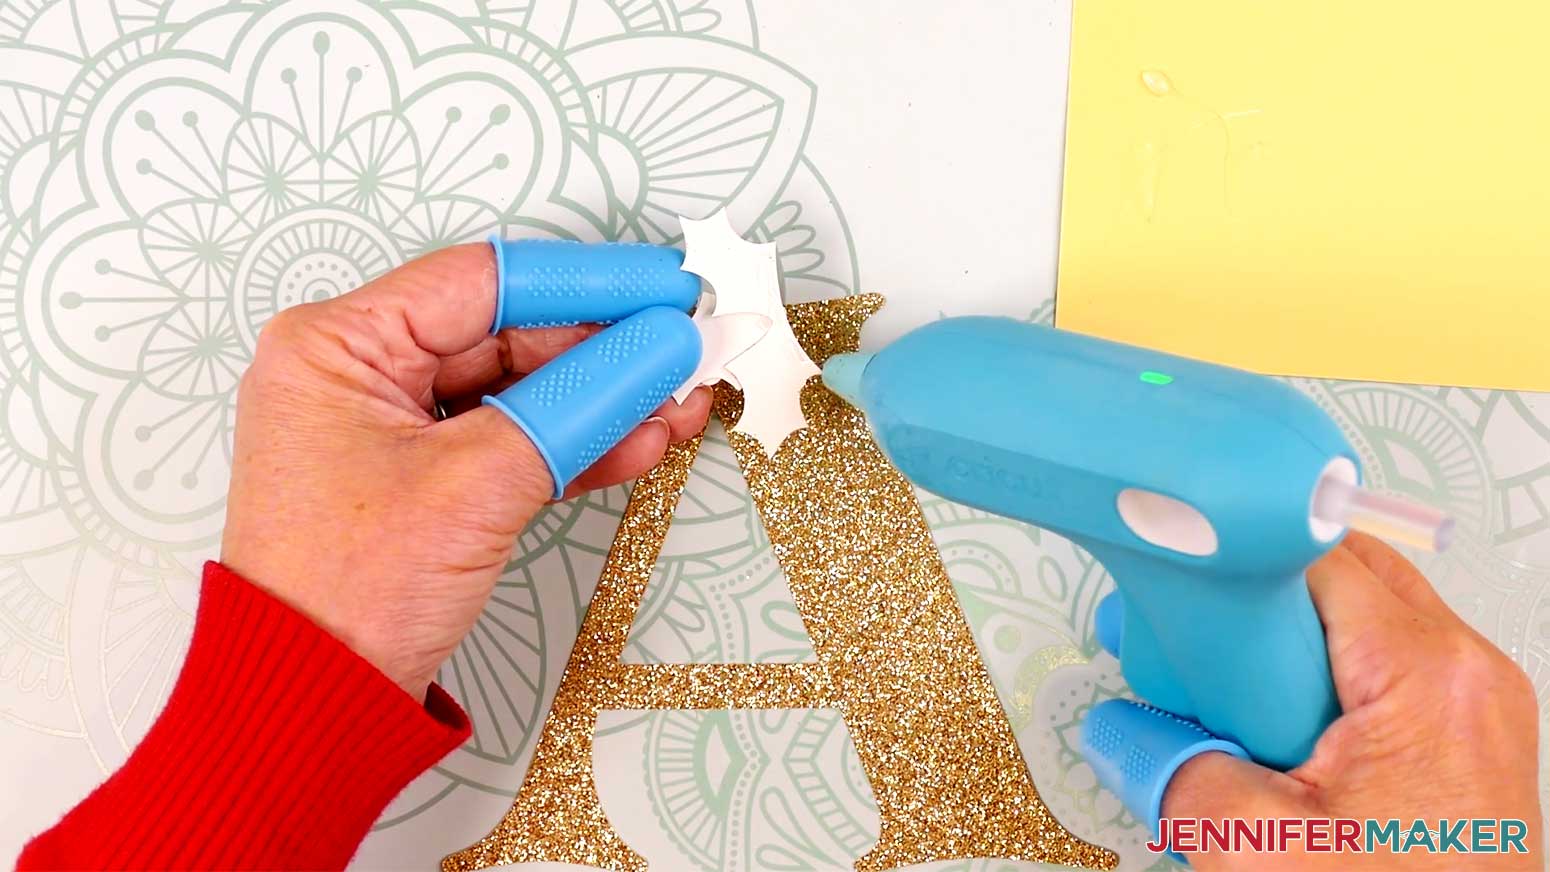
7. Adhere the holly piece to the letter so it partially hangs off the edges. Be sure not to obstruct the hole.
8. Cut enough twine to wrap around a wrapped gift three times, plus several inches of excess to tie it in a knot on the back of the gift.
NOTE: I cut 75” of twine to wrap around an 8” wide and 1.5” thick box.
9. String the twine through the hole in the assembled tag until the tag is in the center of the twine.
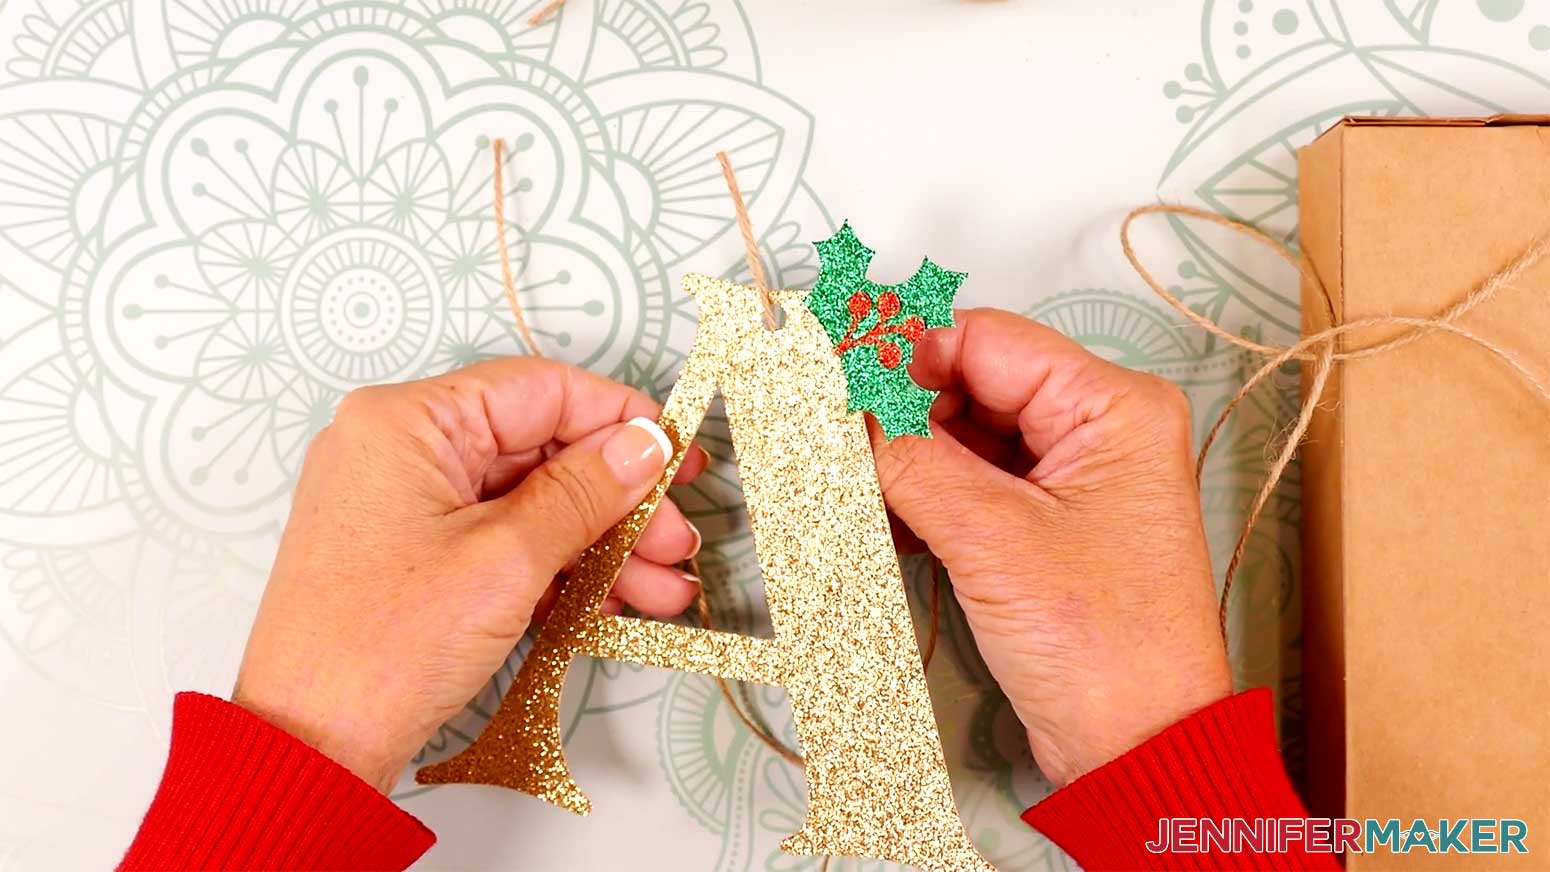
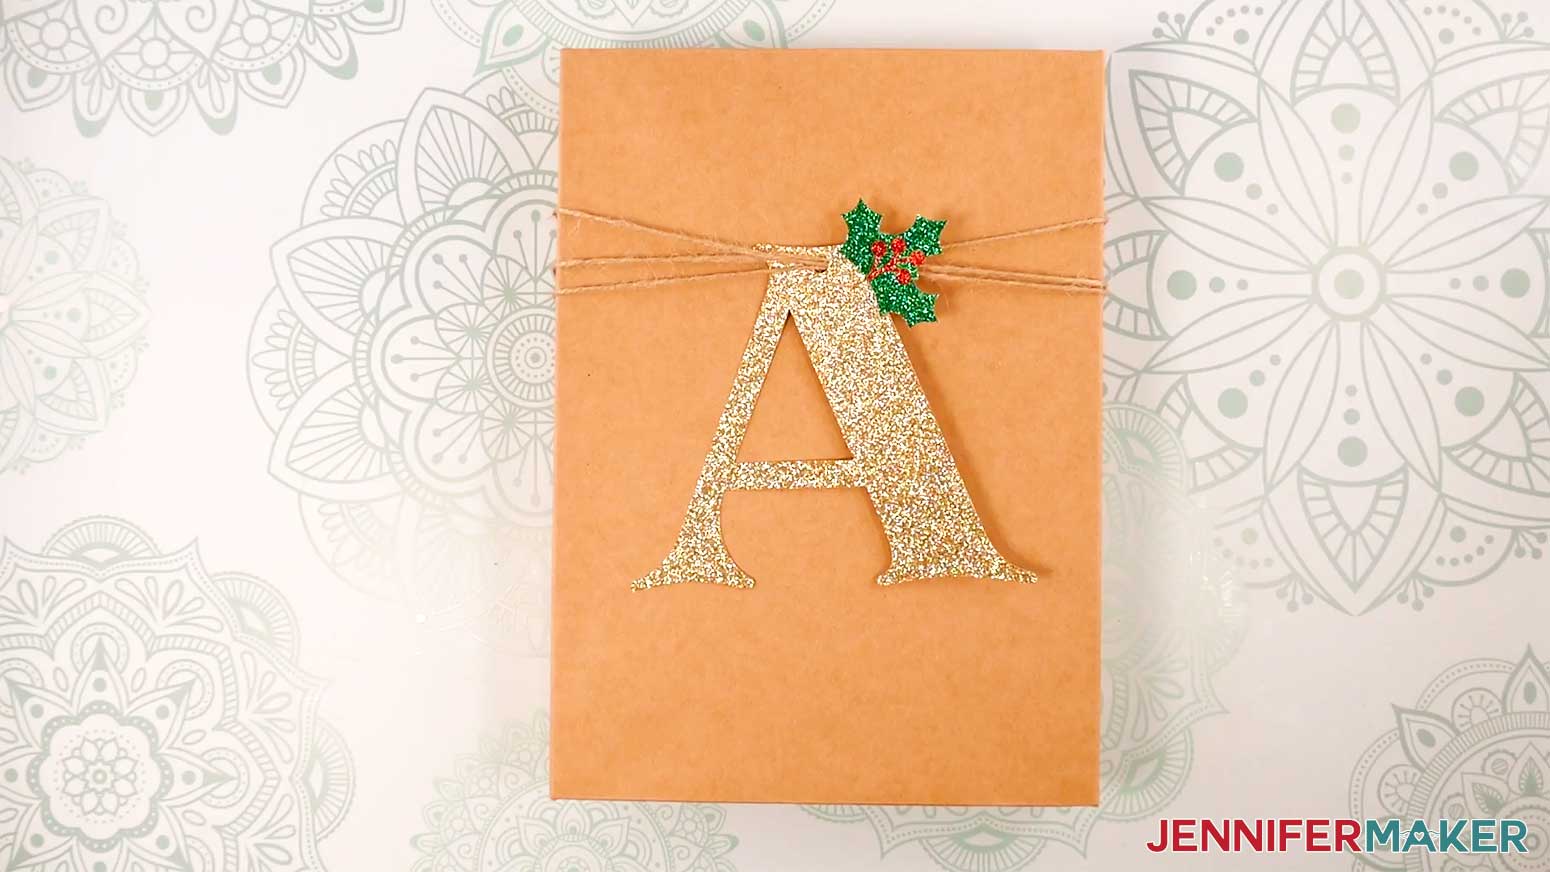
10. Place the tag onto the wrapped gift, and wrap the excess twine around the box.
11. Tie the ends of the twine into a knot on the back of the gift.
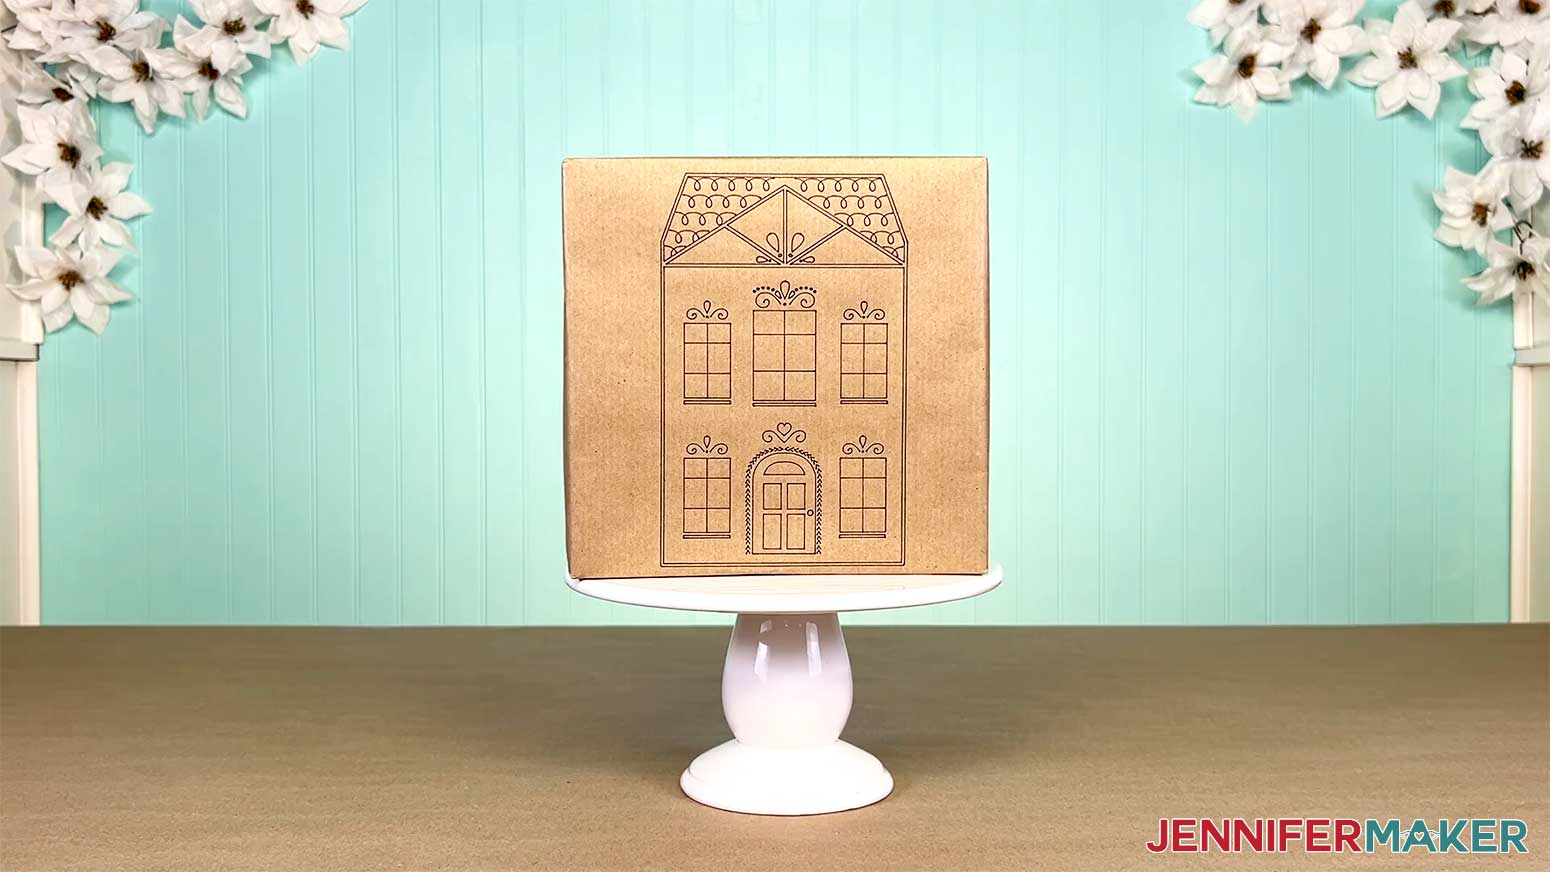
PROJECT 9: CRICUT PEN WRAPPING PAPER
First, measure the height and width of the side of your package where you’d like the image on the wrapping paper to be.
NOTE: Your finished sheet of wrapping paper cannot exceed 12” by 24” if you have a 24” machine mat, or 12” by 12” if you have a 12” machine mat.
CRICUT DESIGN SPACE
1. In Cricut Design Space on a blank Canvas, click “Upload.”
2. Click “Upload Image.”
3. Click “Browse.”
4. Find and select the SVG with “house” in the name.
5. Click “Open” and then “Continue.”
6. Click “Upload” to add the SVG to your Canvas.
7. Here is how the house design looks on my Canvas.
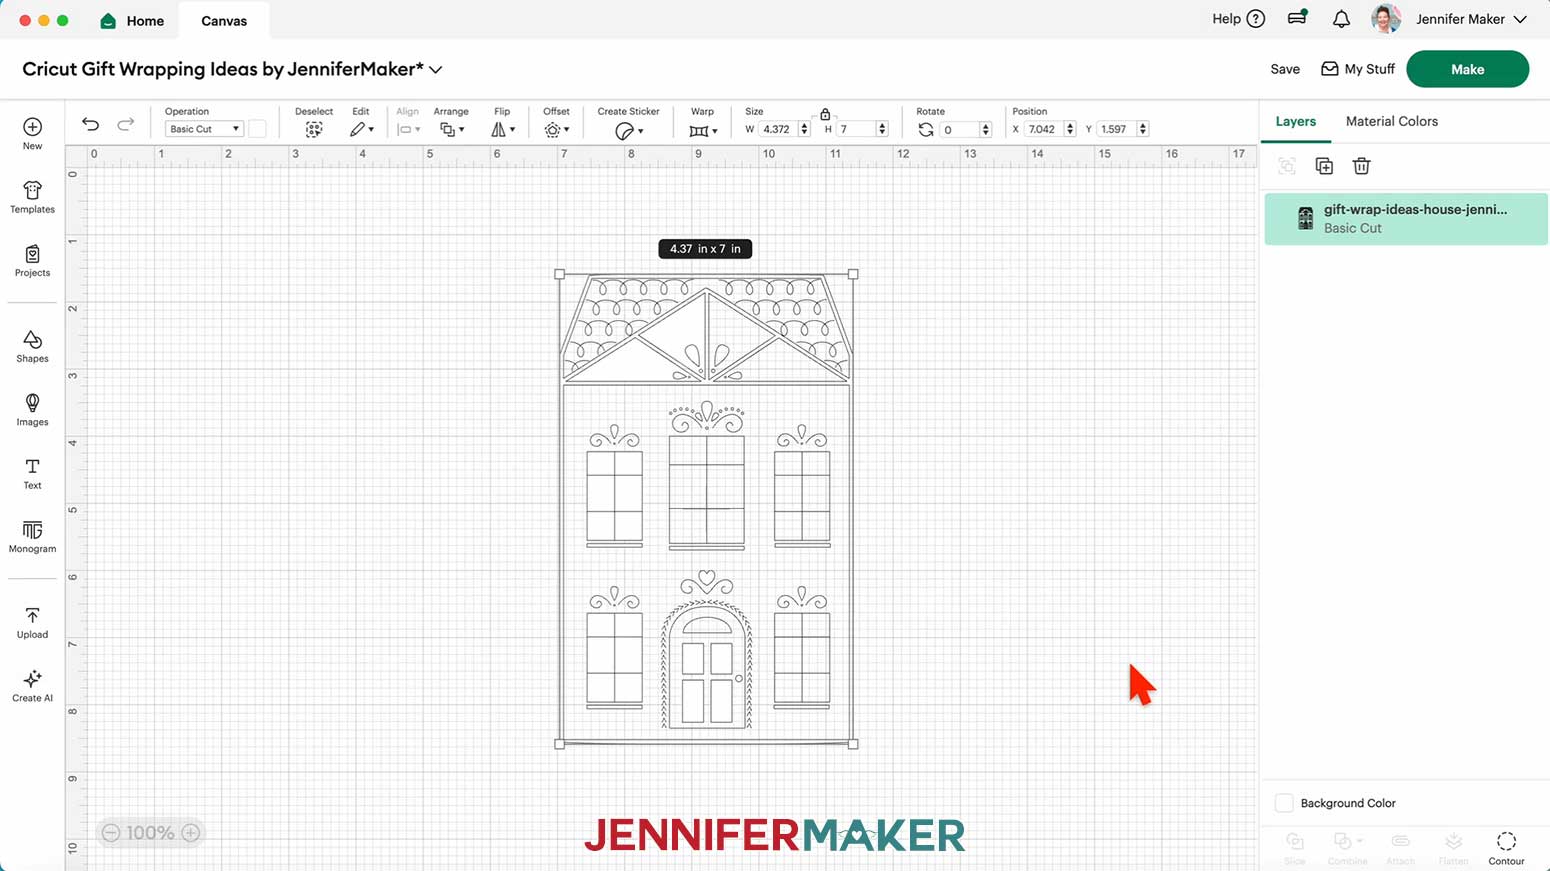
8. Click “Save” and give your project a name.
9. Click “Shapes” and add the free square to your Canvas.
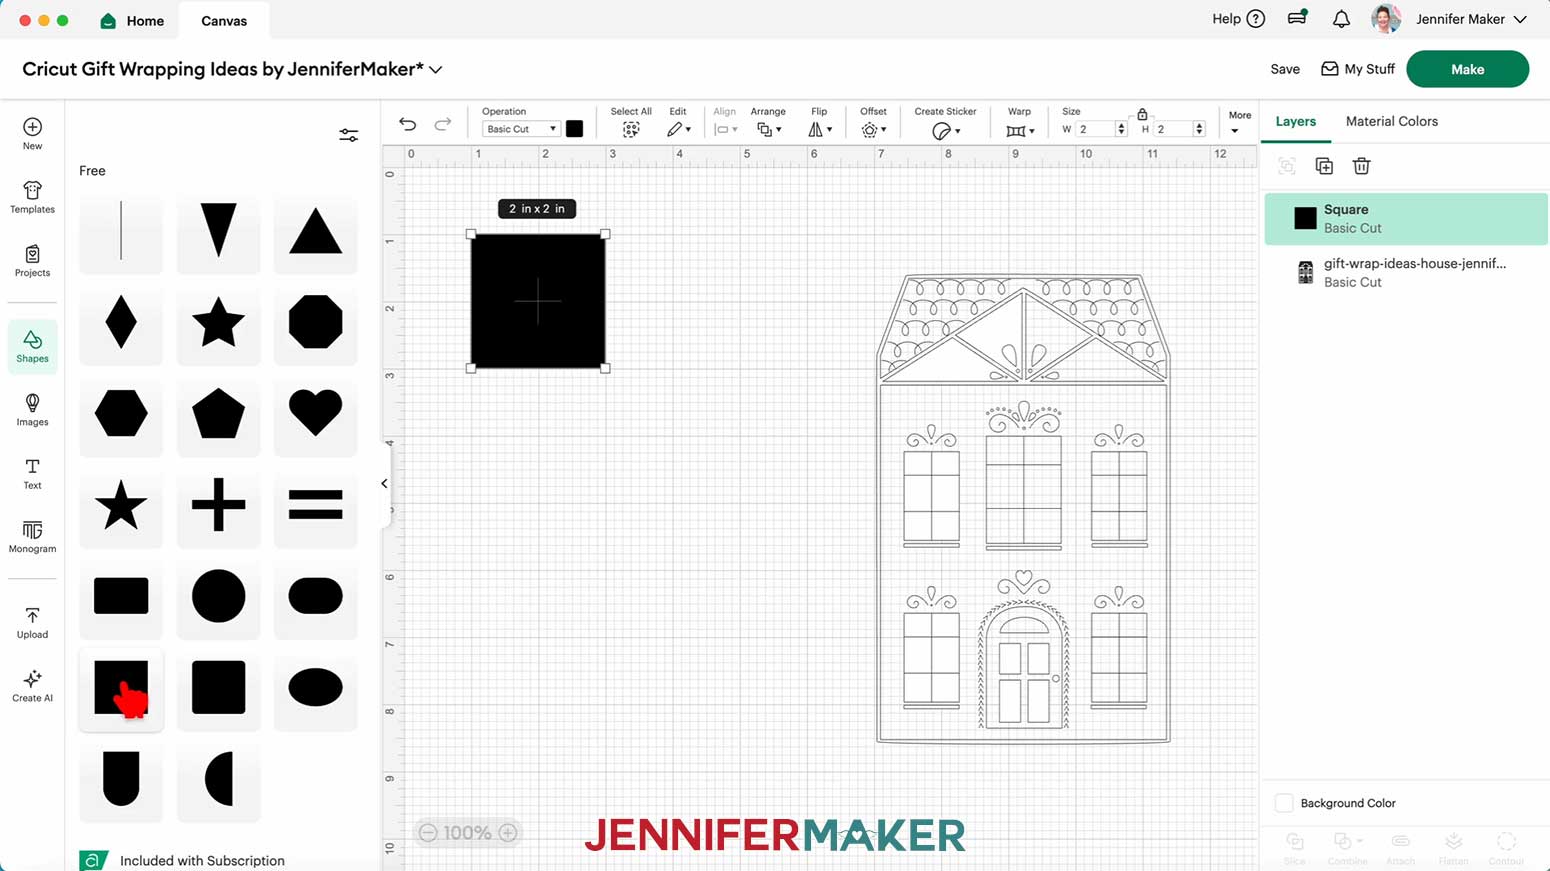
10. Under “Operation,” select “Guide."
11. Resize the guide square to match the side of your package where you’d like the image on the wrapping paper to be.
TIP: Click the lock icon to unlock the square’s proportions if the side of the package isn’t square.
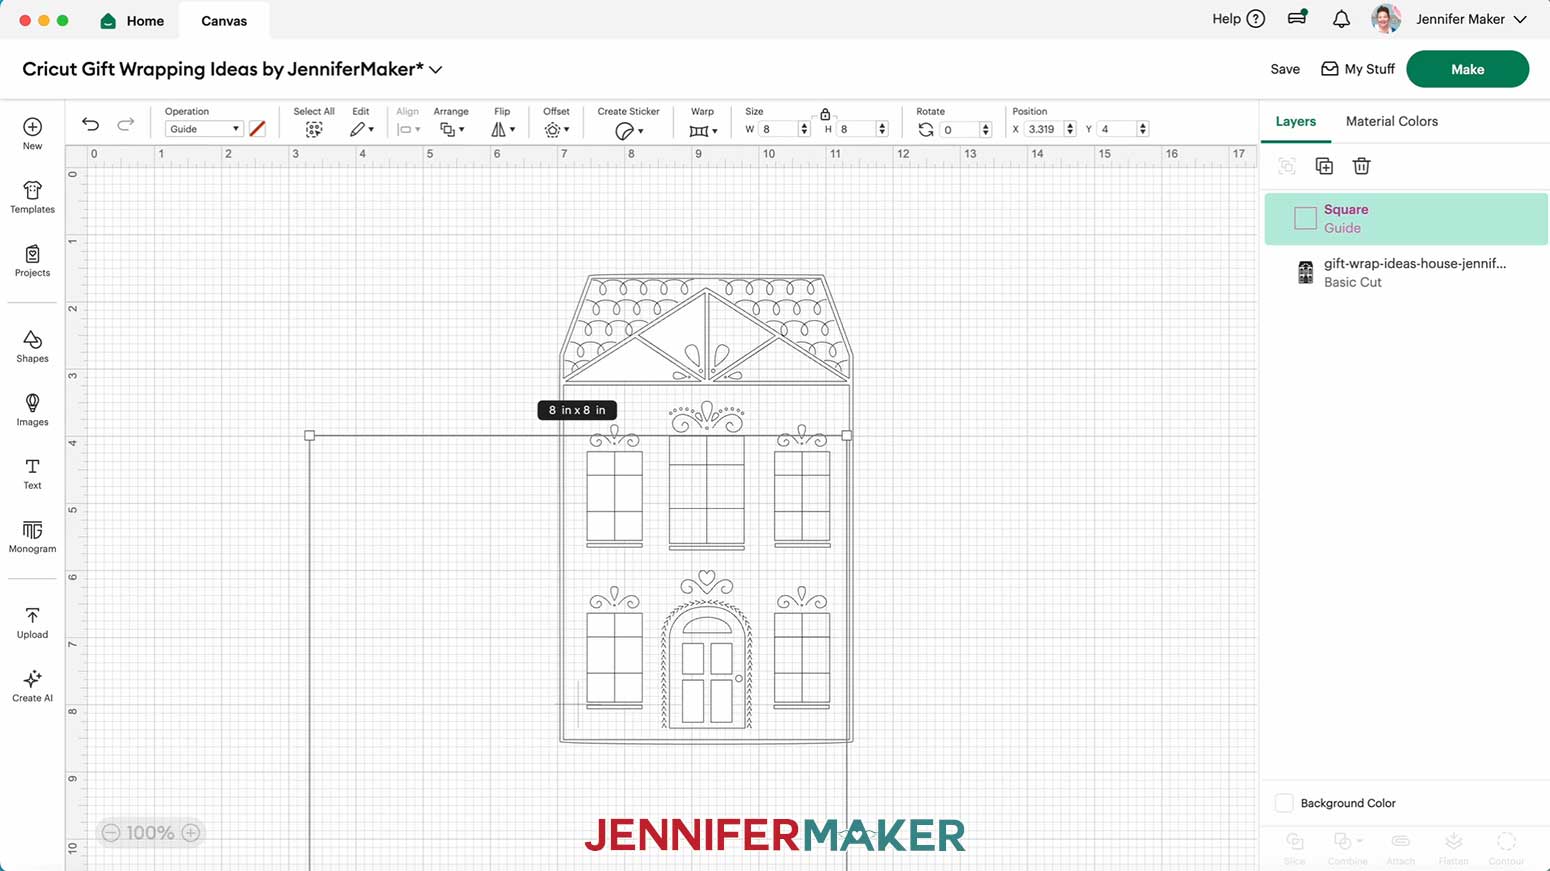
12. Drag the house design into the center of the guide.
13. Resize and position the design until it fills up most of the guide, leaving some space between the design and the edges of the guide.
14. Delete the guide.
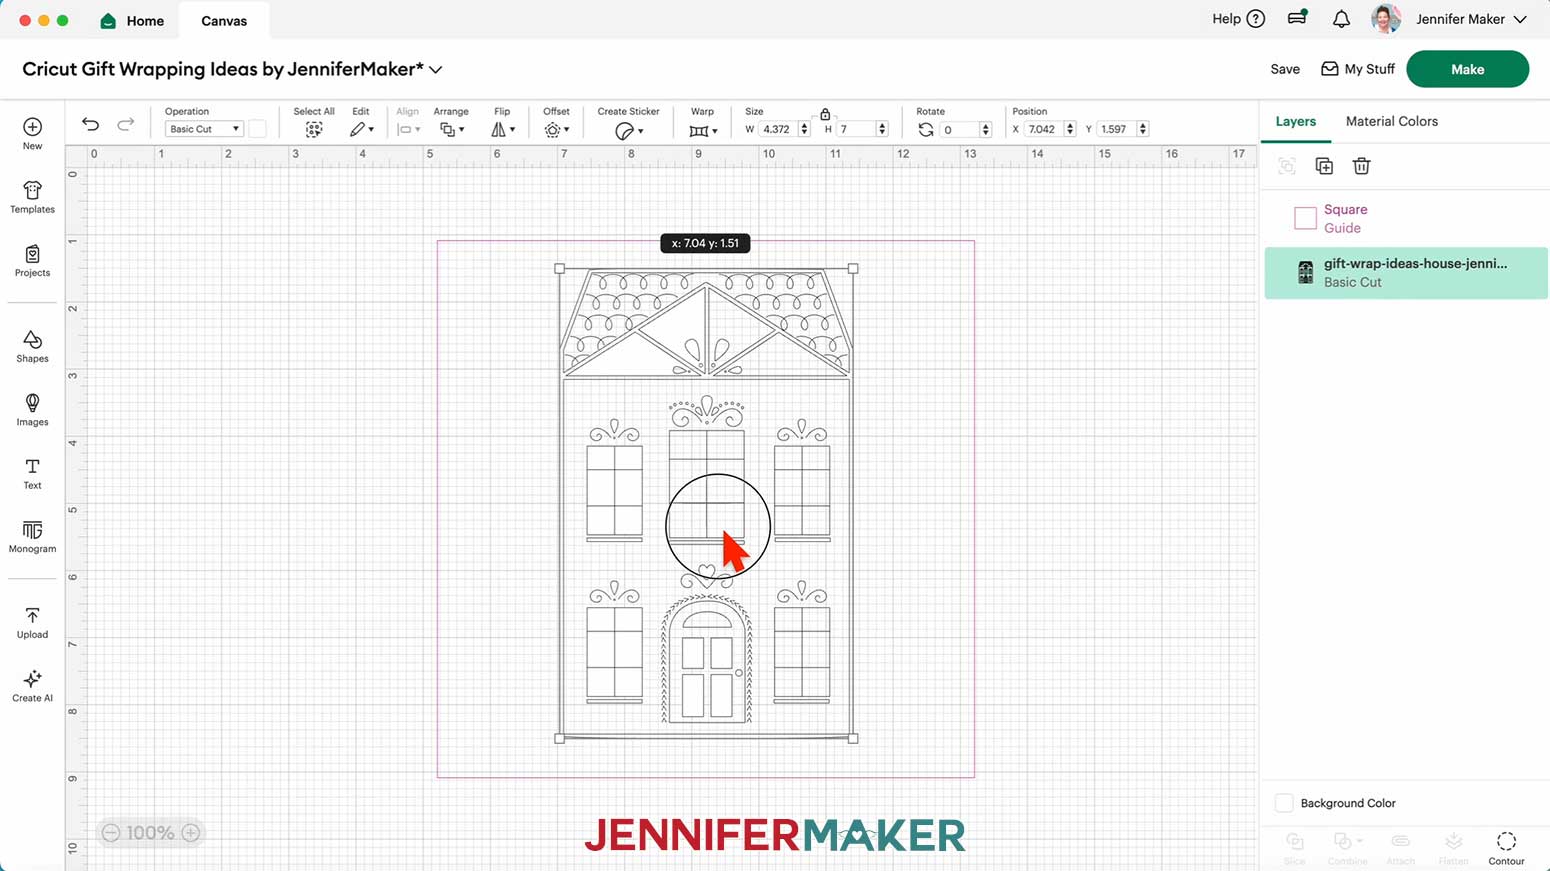
15. Select the design and under “Operation,” select “Pen.”
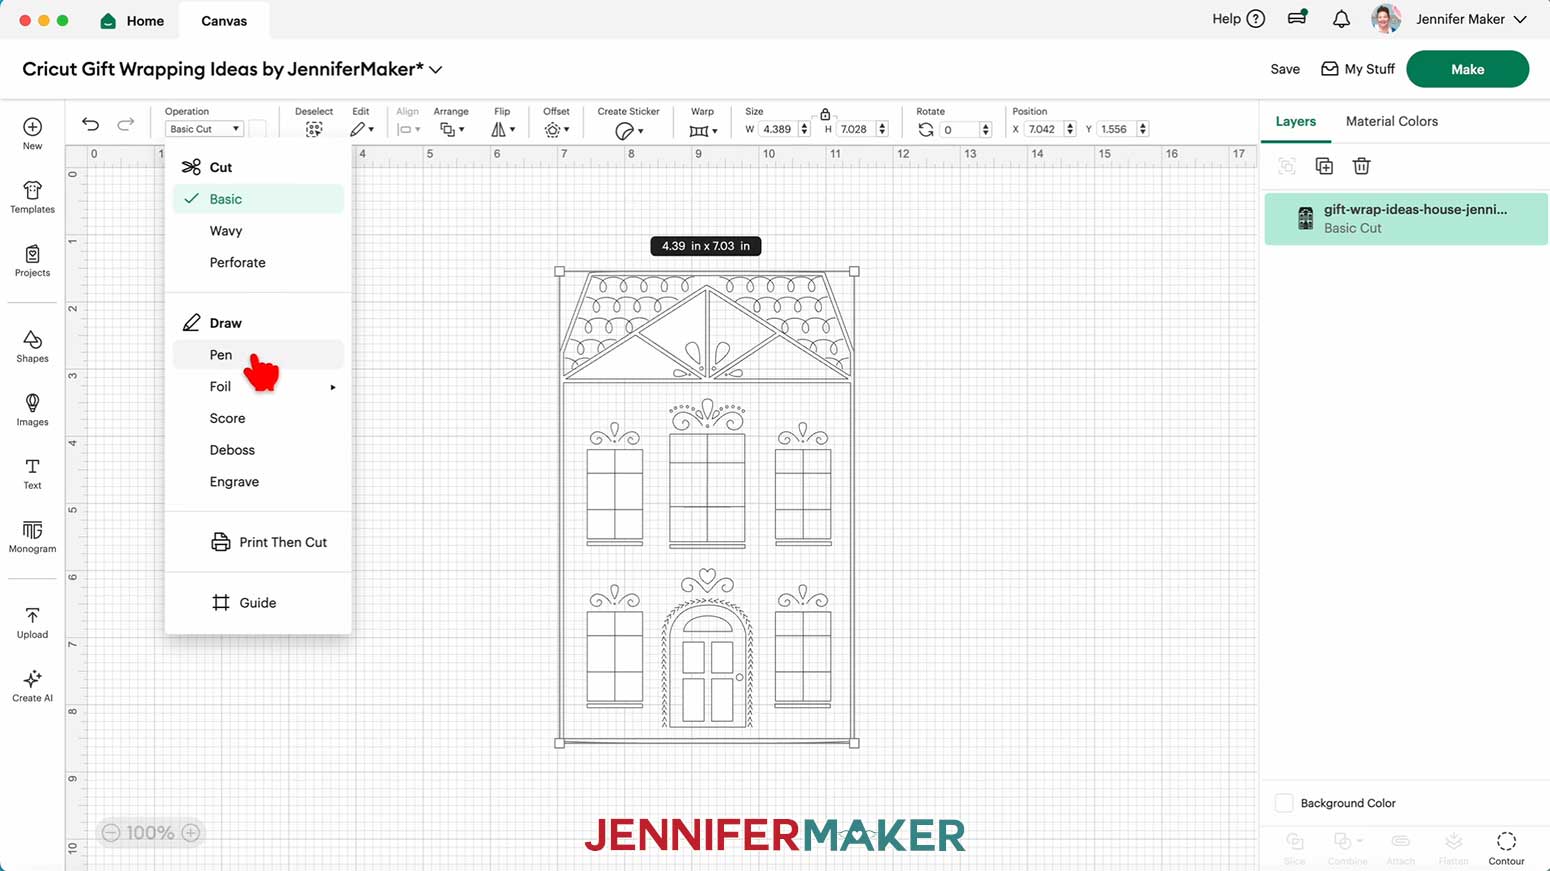
16. Click the color box next to the Operation menu, and select your pen. I used a black 0.4mm Fine Point Cricut Pen.

17. Your wrapping paper design is ready to draw! Make sure the correct machine is selected in the top right and click “Make.”
18. If prompted, click "On Mat," choose your mat size, and click “Confirm.”
19. On the Prepare screen, click and drag the design to the center of the mat. Use the gridlines to position it.
NOTE: I zoomed out to 25%.
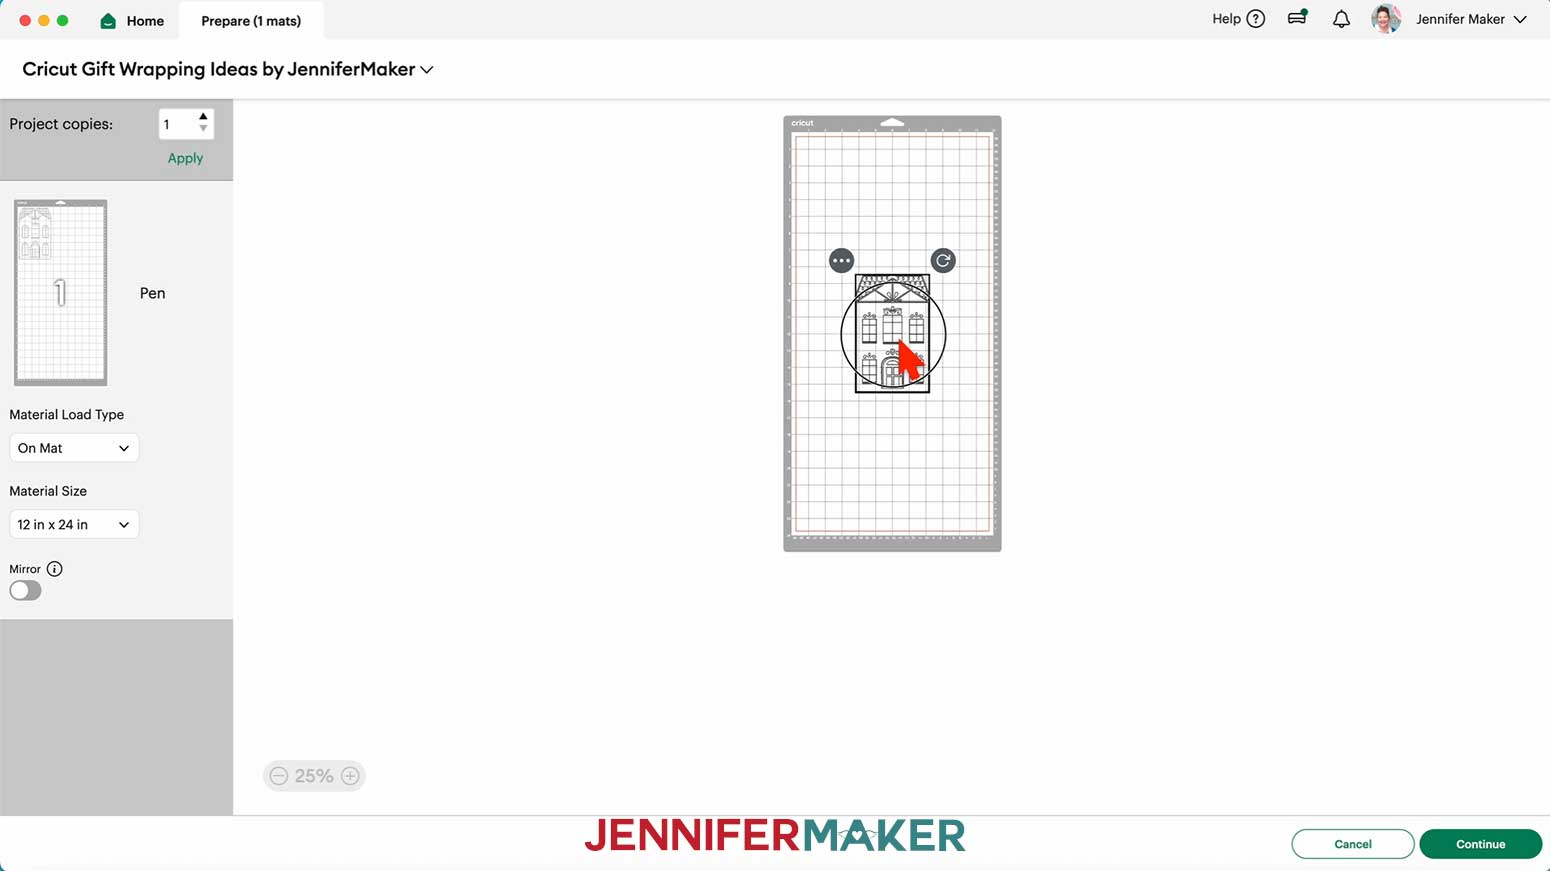
20. Make sure the correct Material Size is selected.
21. Click “Continue.”
CUTTING & DRAWING
NOTE: We won’t use a Cricut to cut the kraft paper, but Cricut Design Space still requires you to select a Base Material to proceed.
1. On the Make screen, I selected the “Medium Cardstock - 80 lb (216 gsm)” setting with “Default” Pressure.
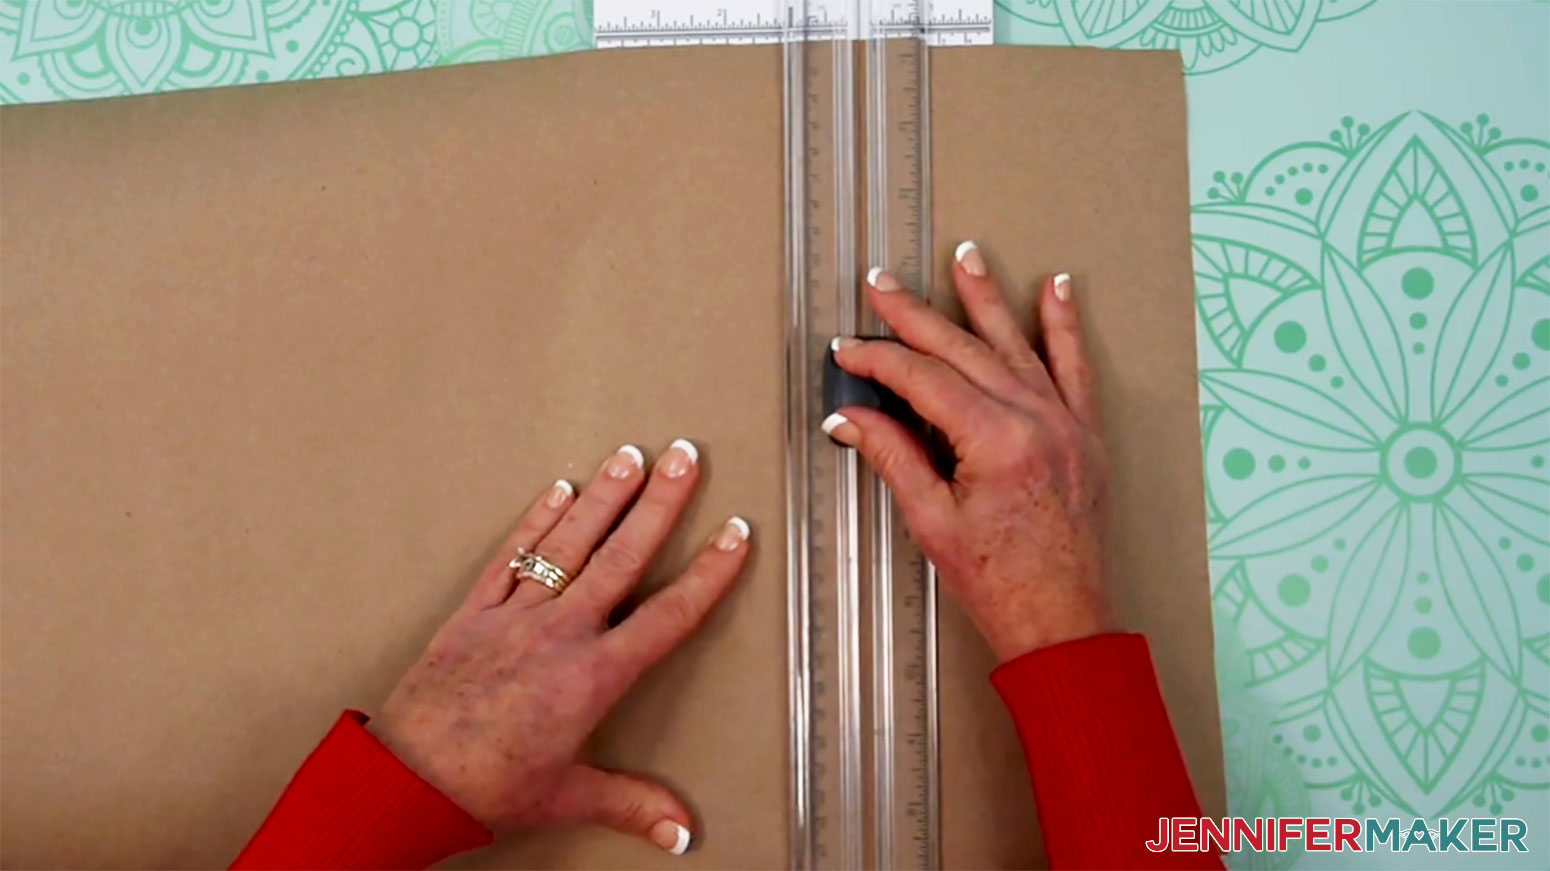
2. Use scissors or a paper trimmer to cut a 12” by 24” piece of kraft paper (if you have a 24” blue LightGrip machine mat) or a 12” by 12” piece of kraft paper (if you have a 12” blue LightGrip machine mat).
3. Place your mat’s material pretty-side up onto a blue LightGrip machine mat.
4. Use a brayer to make sure it’s fully adhered.
5. Place your Cricut Pen’s cap on the back so you don’t lose it, then test your pen on a piece of scrap paper.
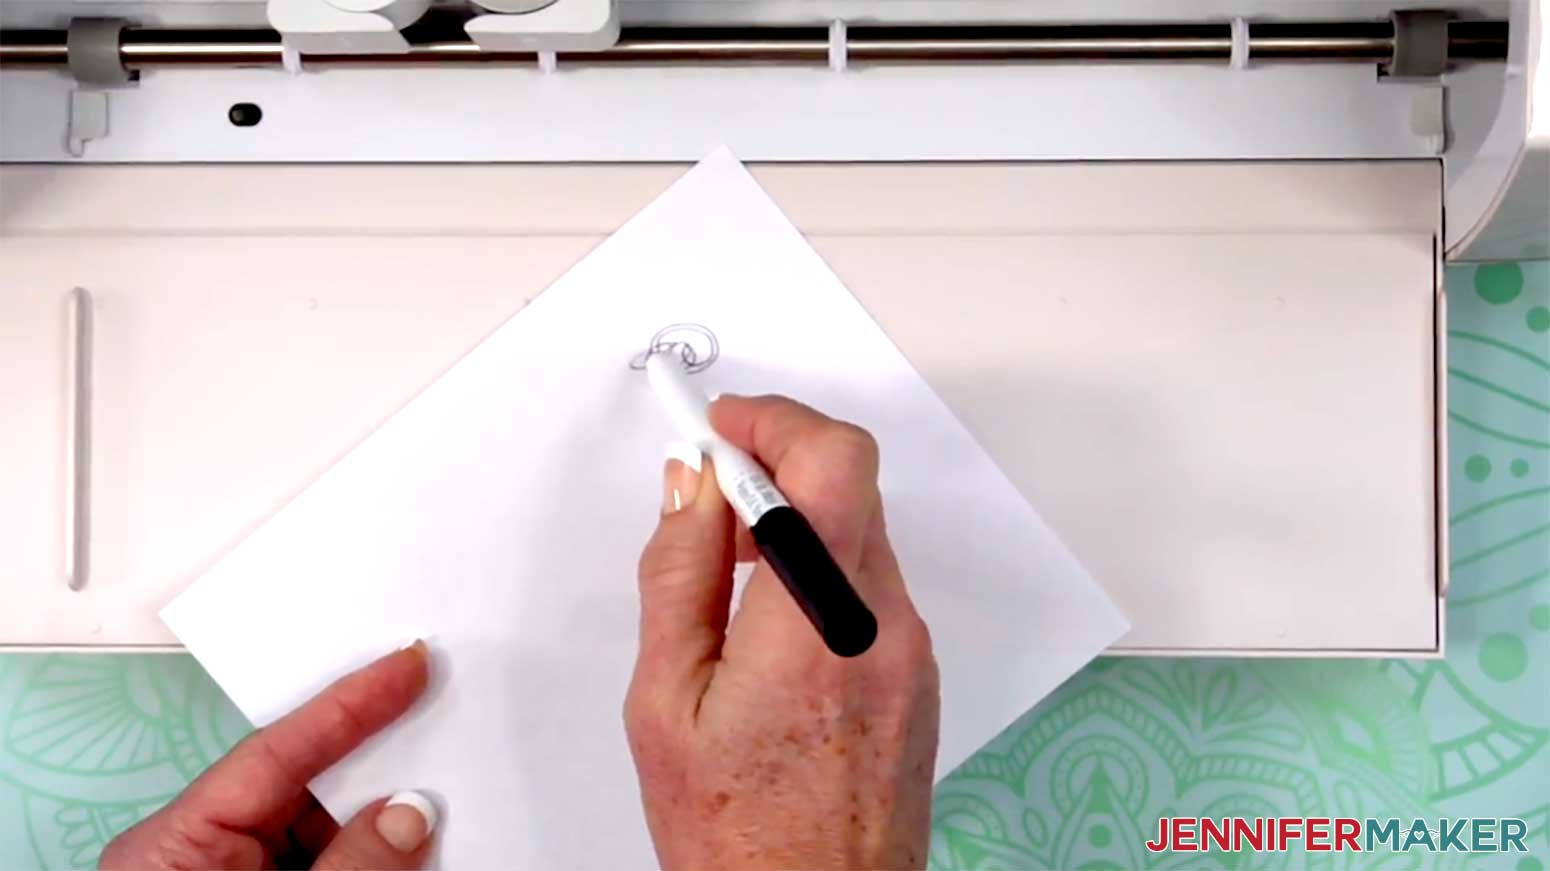
6. Place your Cricut Pen into the correct clamp.
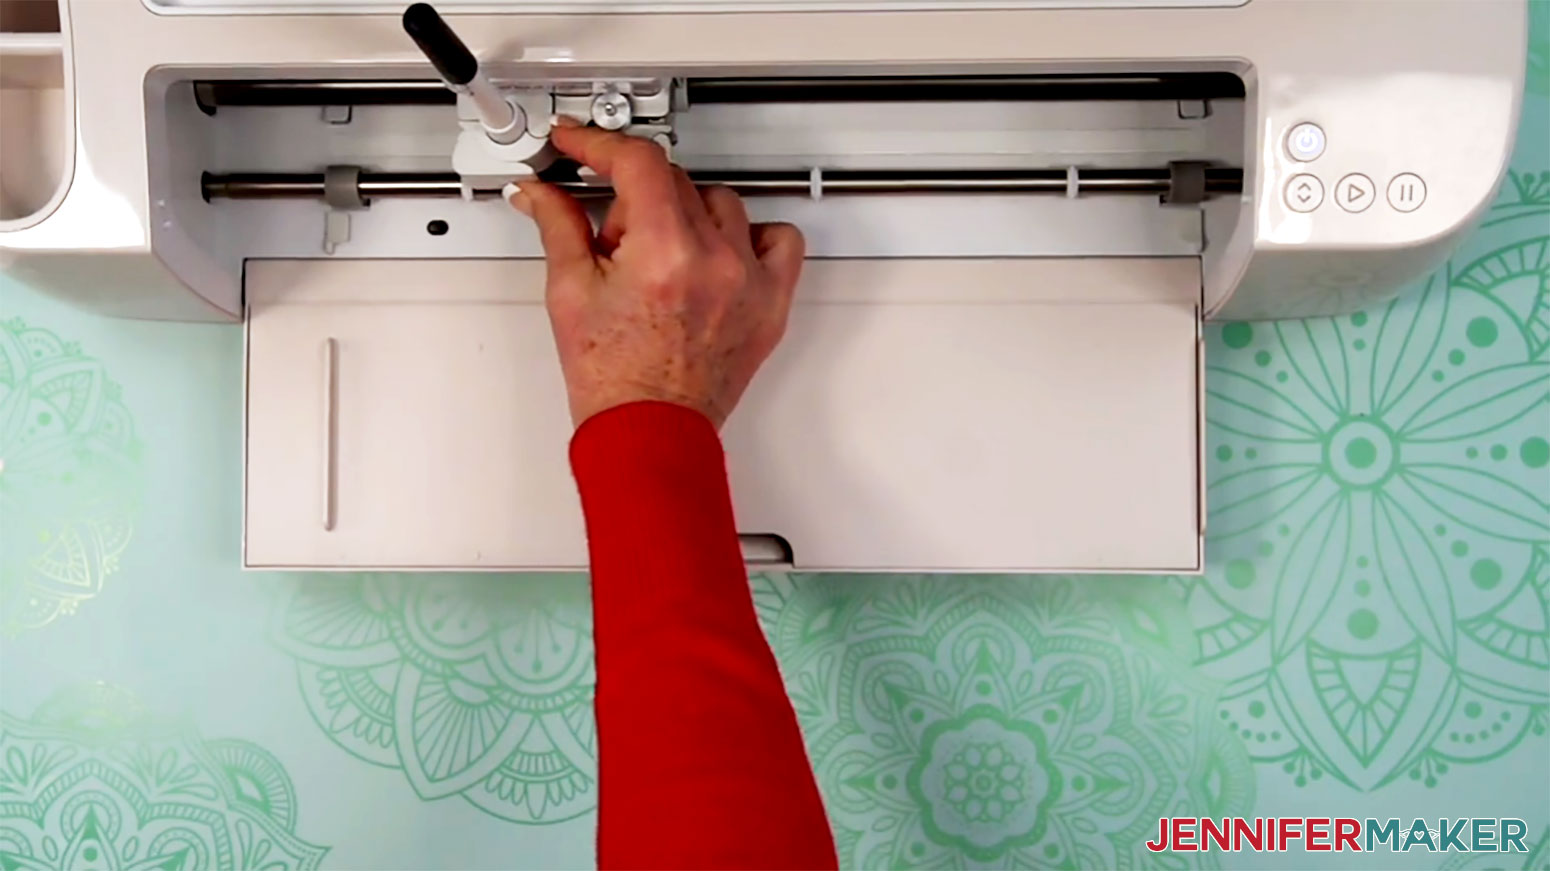
7. Load the mat into your Cricut and press the flashing middle button to begin drawing.
8. Once your Cricut is finished drawing, unload the mat, flip it over onto your work surface, and roll it back to release the material.
NOTE: When wrapping the gift, center the drawn image on the front or top of the gift box before folding and taping the sides.
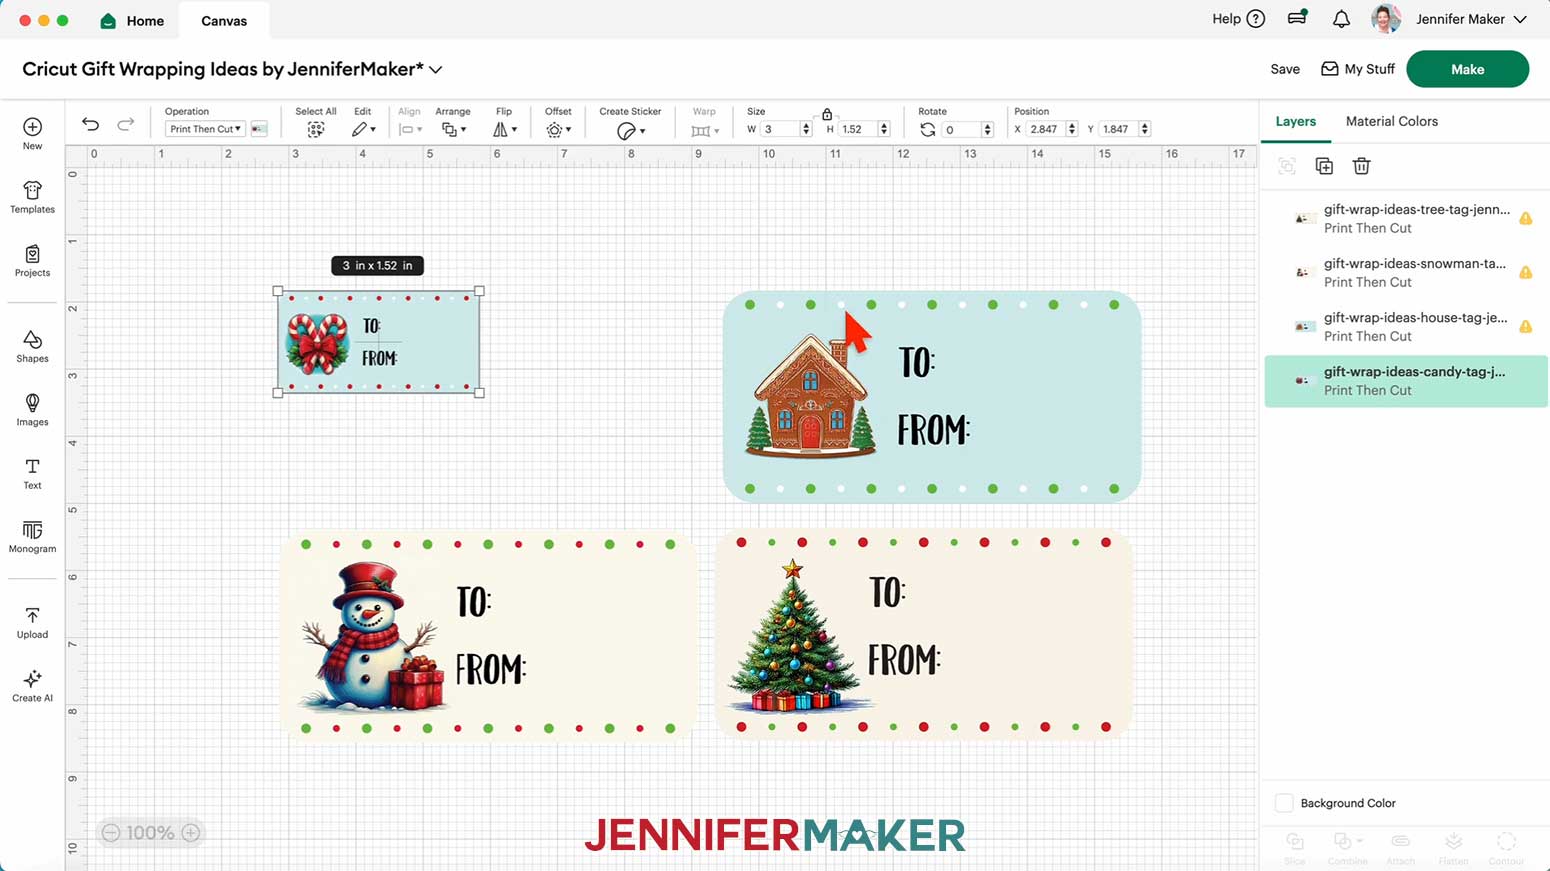
PROJECT 10: PRINT THEN CUT GIFT LABELS
CRICUT DESIGN SPACE
1. In Cricut Design Space on a blank Canvas, click “Upload.”
2. Click “Upload Image.”
3. Click “Browse.”
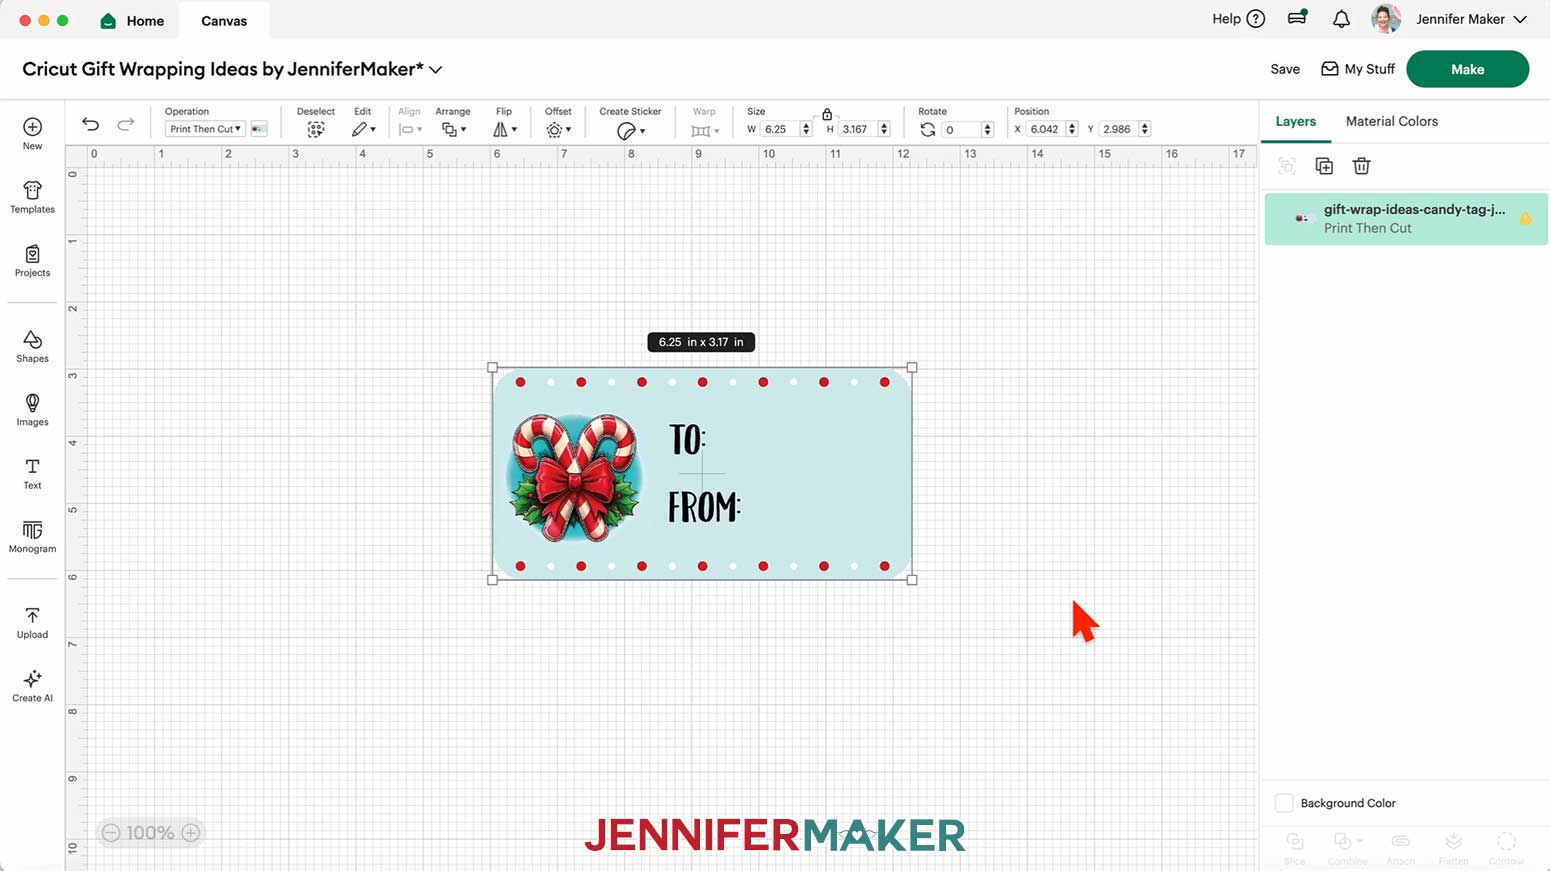
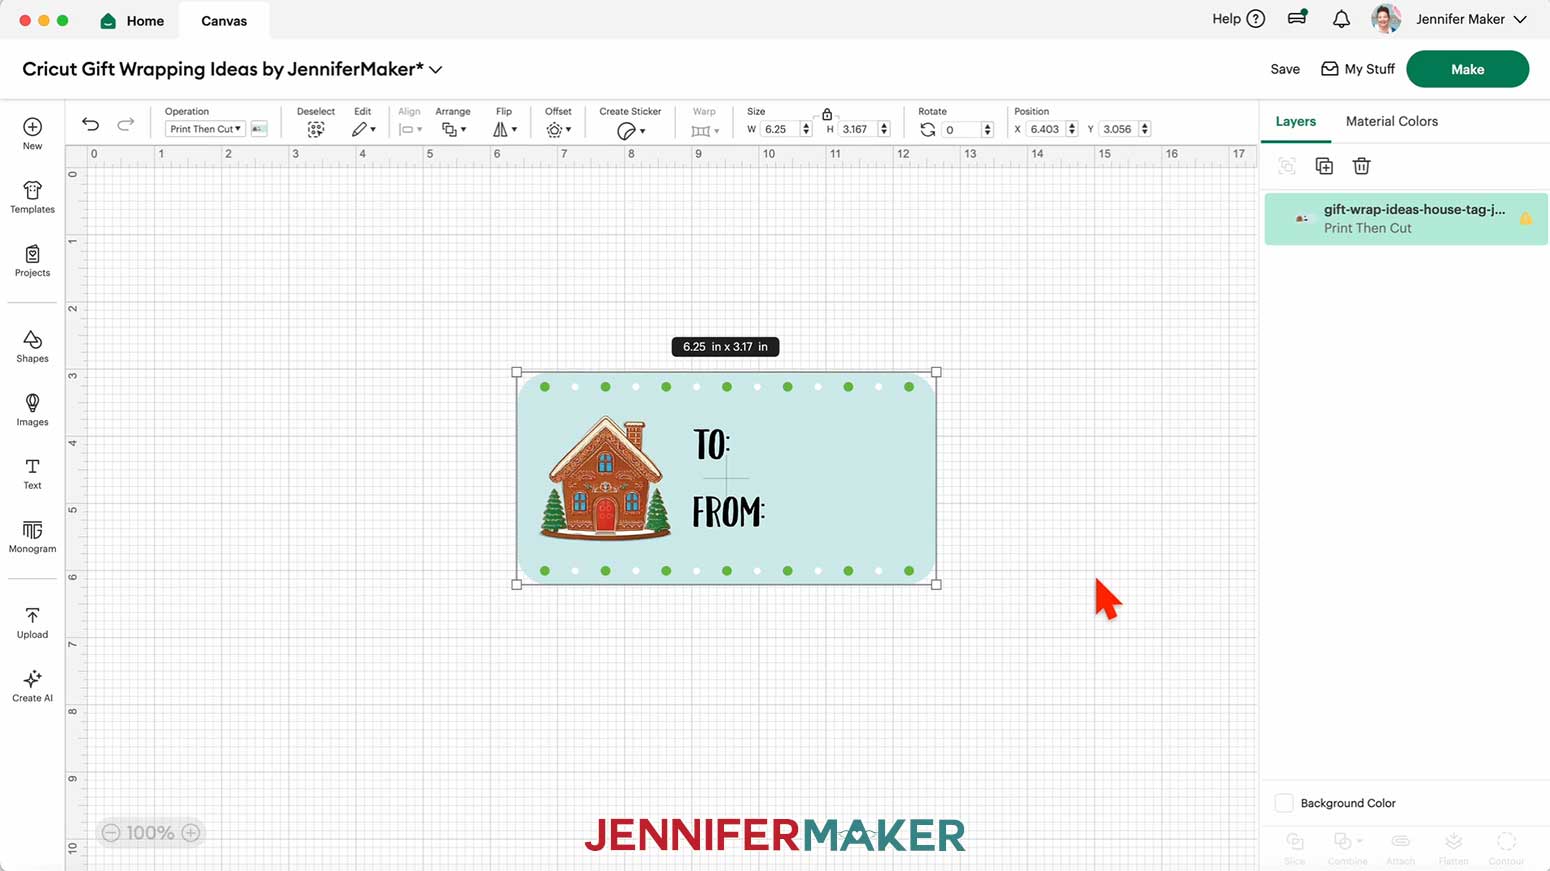
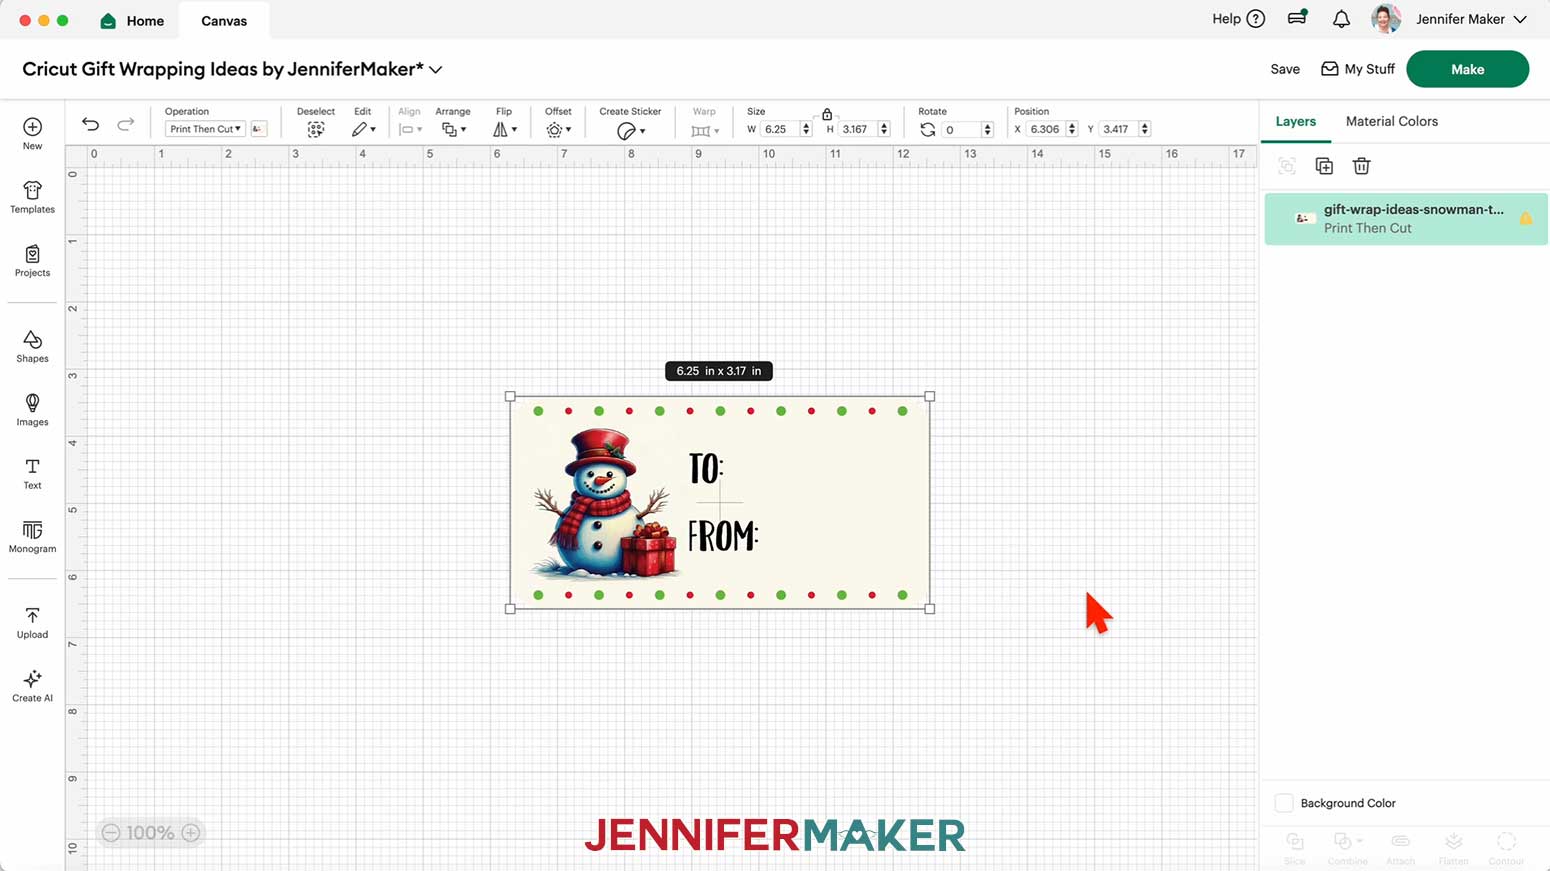
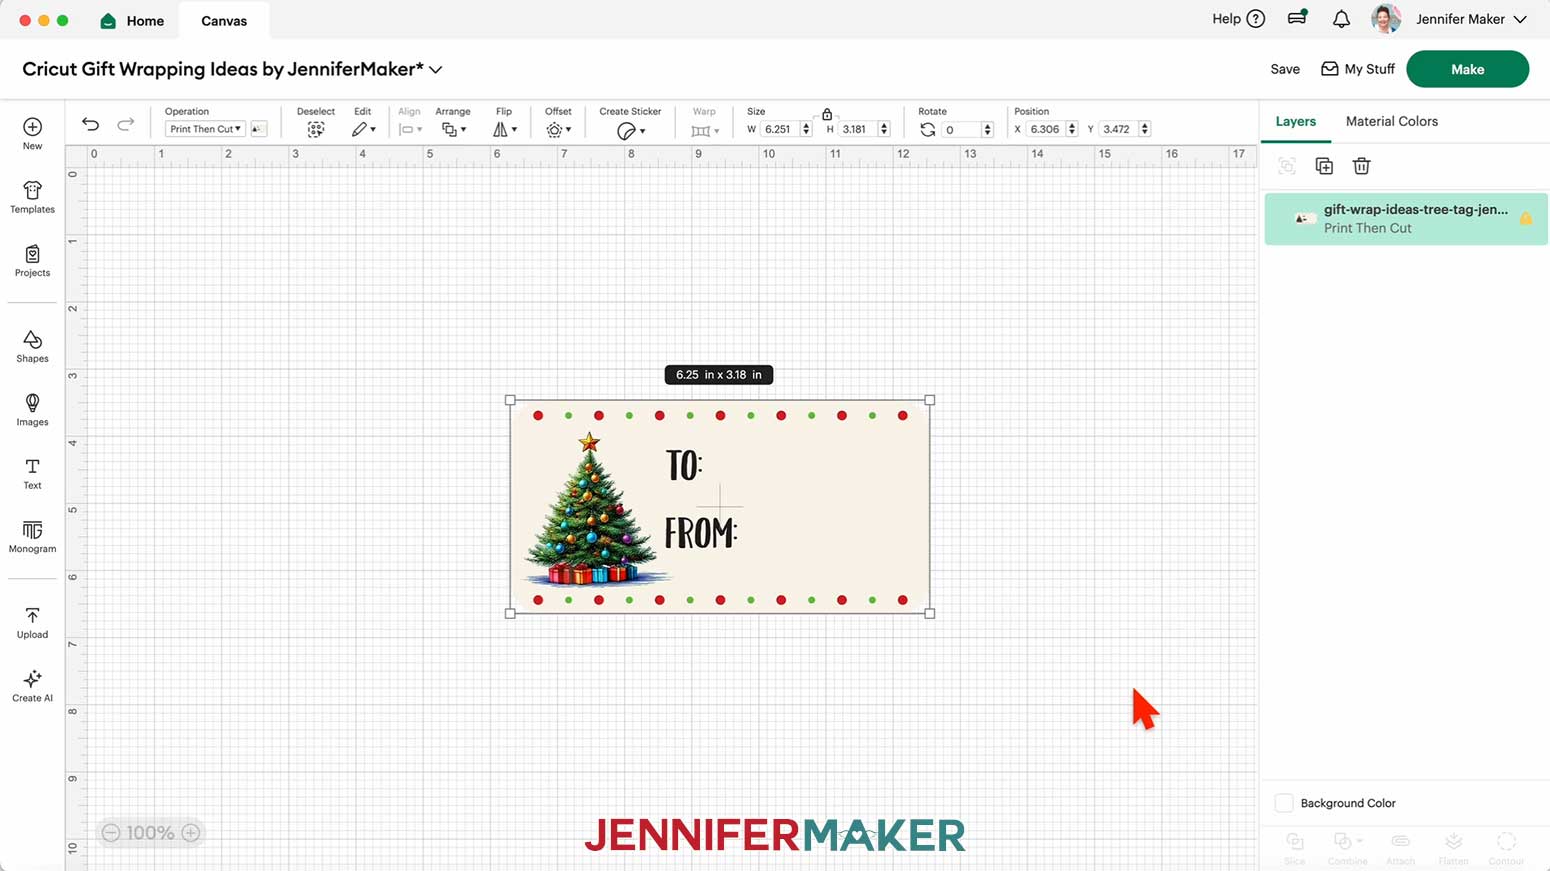
4. Find and select the PNG you want to use. There’s a “candy-tag,” “house-tag,” “snowman-tag,” and “tree-tag.”
5. Click “Open” and then “Continue.”
6. On the Background Remover screen, click “Apply & Continue.”
7. On the Convert Upload To screen, click “Flat Graphic.”
8. Click “Continue” and then “Upload” to add the PNG to your Canvas.
9. Repeat steps 1-8 to add more gift label PNGs to your Canvas.
NOTE: I added all four gift label PNG designs to my Canvas.
10. Here is how the gift labels look on my Canvas.
NOTE: You might see a warning message about low resolution, but you can ignore it.
11. Click “Save” and give your project a name.
12. Keeping the lock icon closed to maintain proportions, resize the tag(s) to your desired size.
NOTE: I resized my labels to 3” wide.
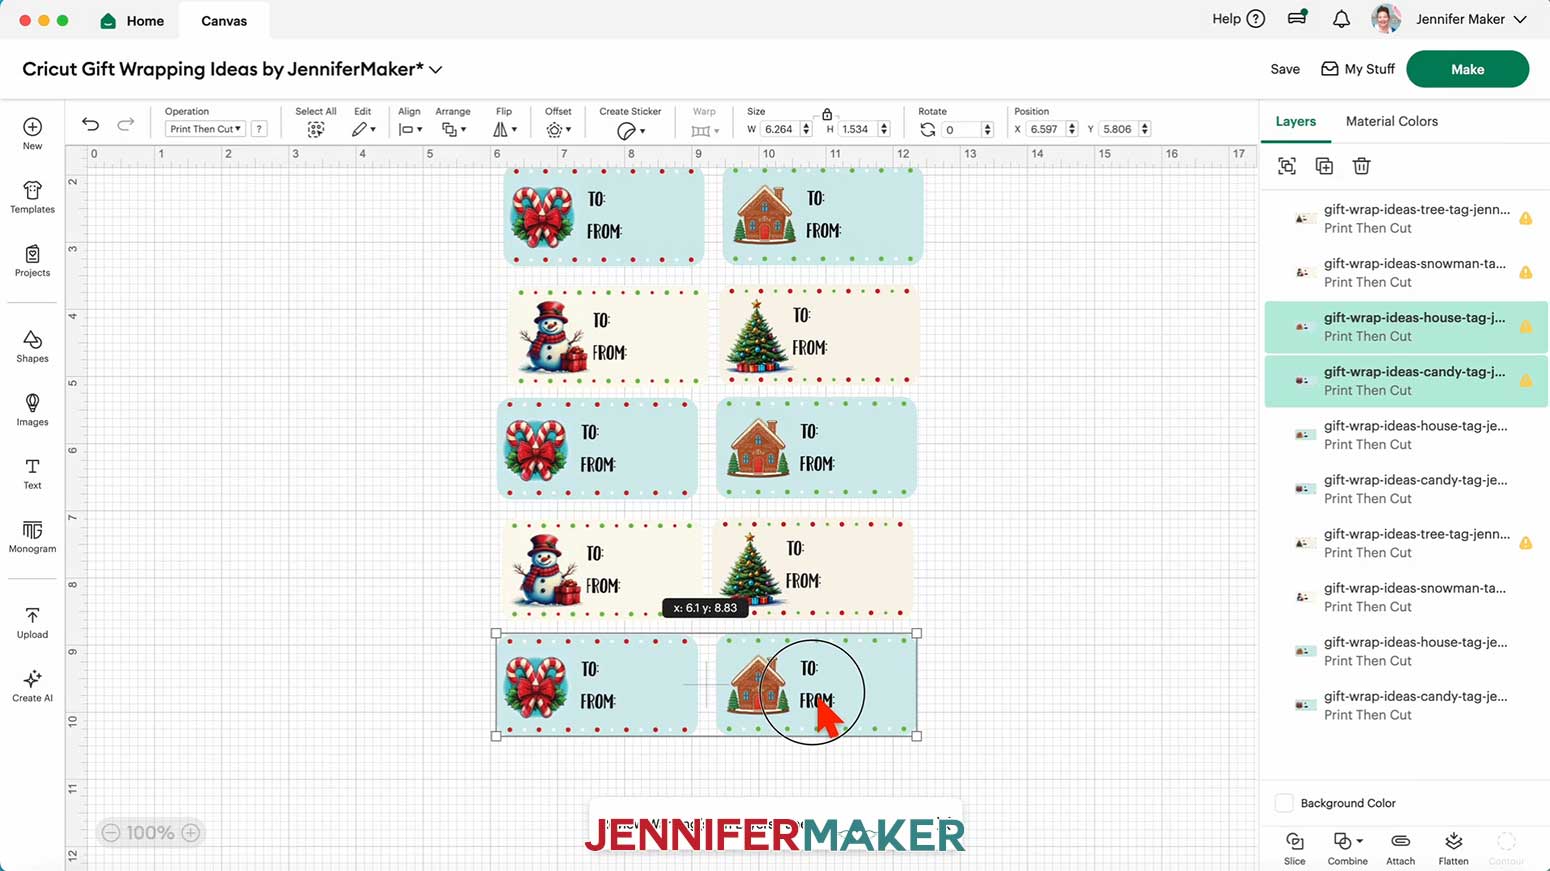
13. Duplicate the label(s) until you have the number you want.
TIP: At 3” wide, your Cricut can fit ten gift labels on one sheet of 8.5” x 11” sticker paper.
14. Your Print Then Cut gift labels are ready to go! Make sure the correct machine is selected in the top right and click “Make.”
15. If prompted, click "On Mat," choose your mat size, and click “Confirm.”
16. On the Prepare screen, make sure the correct Material Size is selected for each of your mats.
17. Select the first mat again and click “Continue.”
PRINTING & CUTTING
1. Make sure your inkjet printer is on, with sticker paper correctly loaded.
2. Click “Send to Printer”.
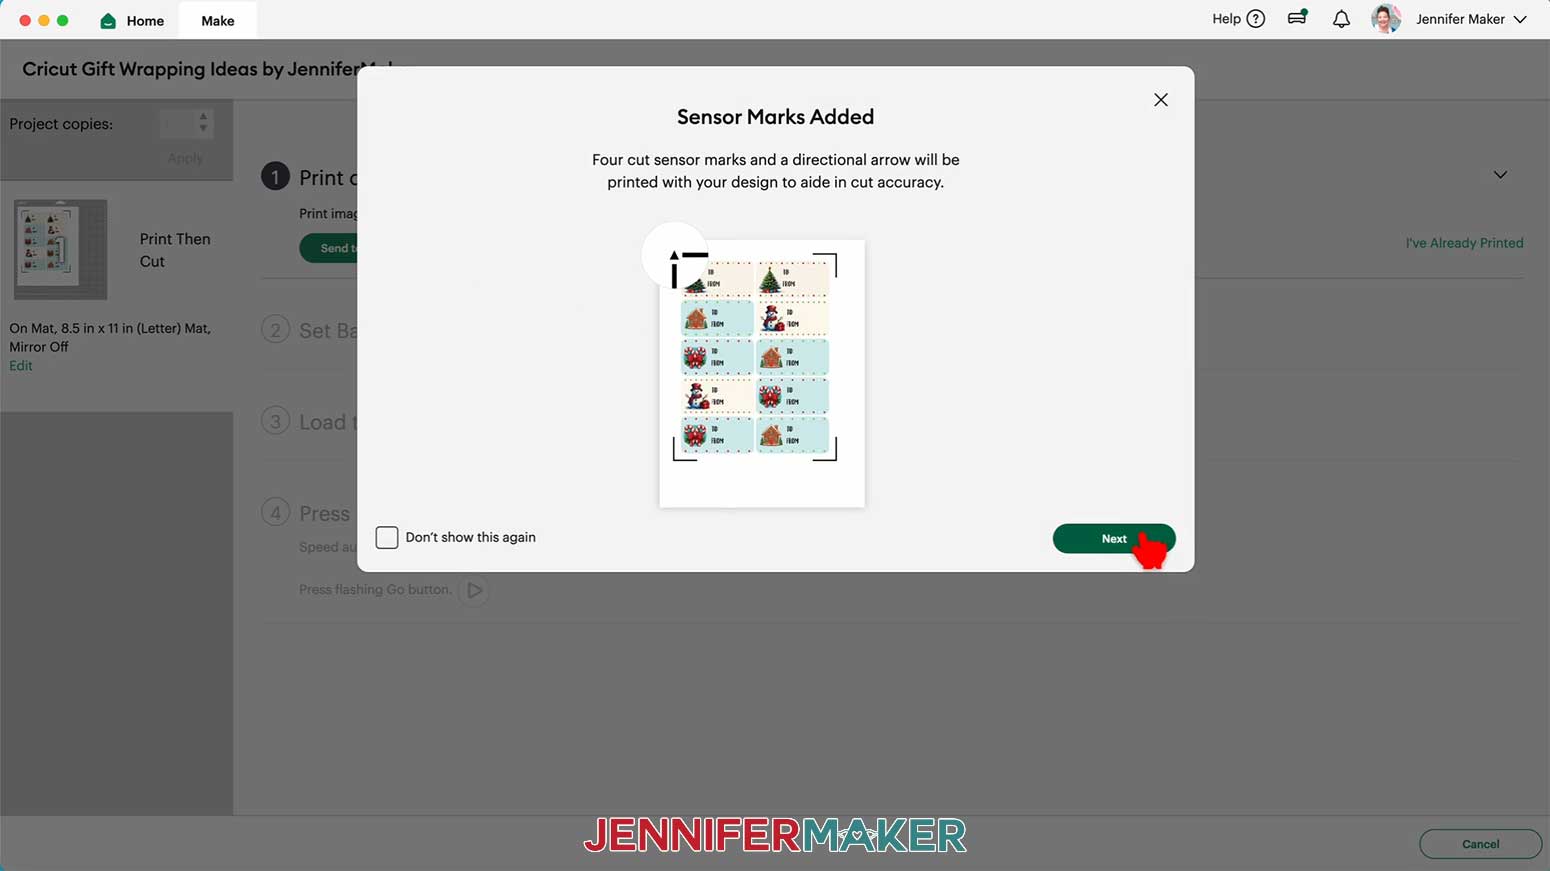
3. A Print Setup box will open to allow you to make some choices about how to print your labels. Make sure the correct printer is selected and the correct number of copies you wish to print are entered.
NOTE: The “Add Bleed” setting is used to minimize the chances of the cut leaving extra white on the outside of your image. Leave it turned on.
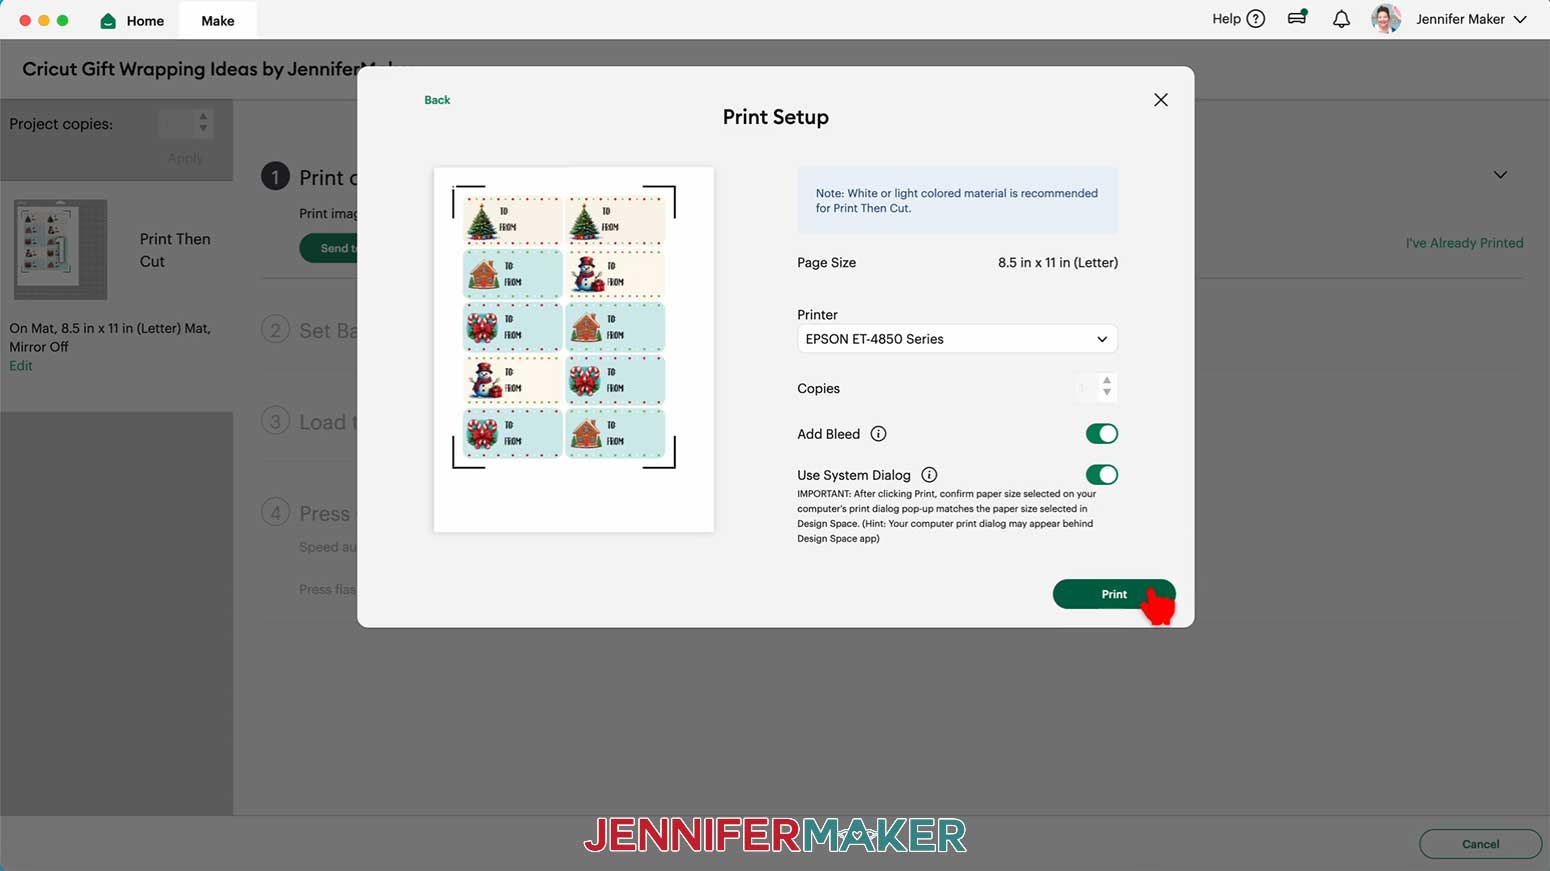
4. Turn on the “Use System Dialog” setting. After clicking “Print,” this brings up a print screen for the printer which allows you to specify the tray the vinyl will print from as well as the quality of the print job. I printed my images at “High Quality.”
NOTE: You may need to minimize or move your Design Space window to see the print dialog window. It sometimes pops up behind Design Space. There is a chance the system dialog box will not work on all printers. Each printer is different so consult your printer's user guide for additional support.
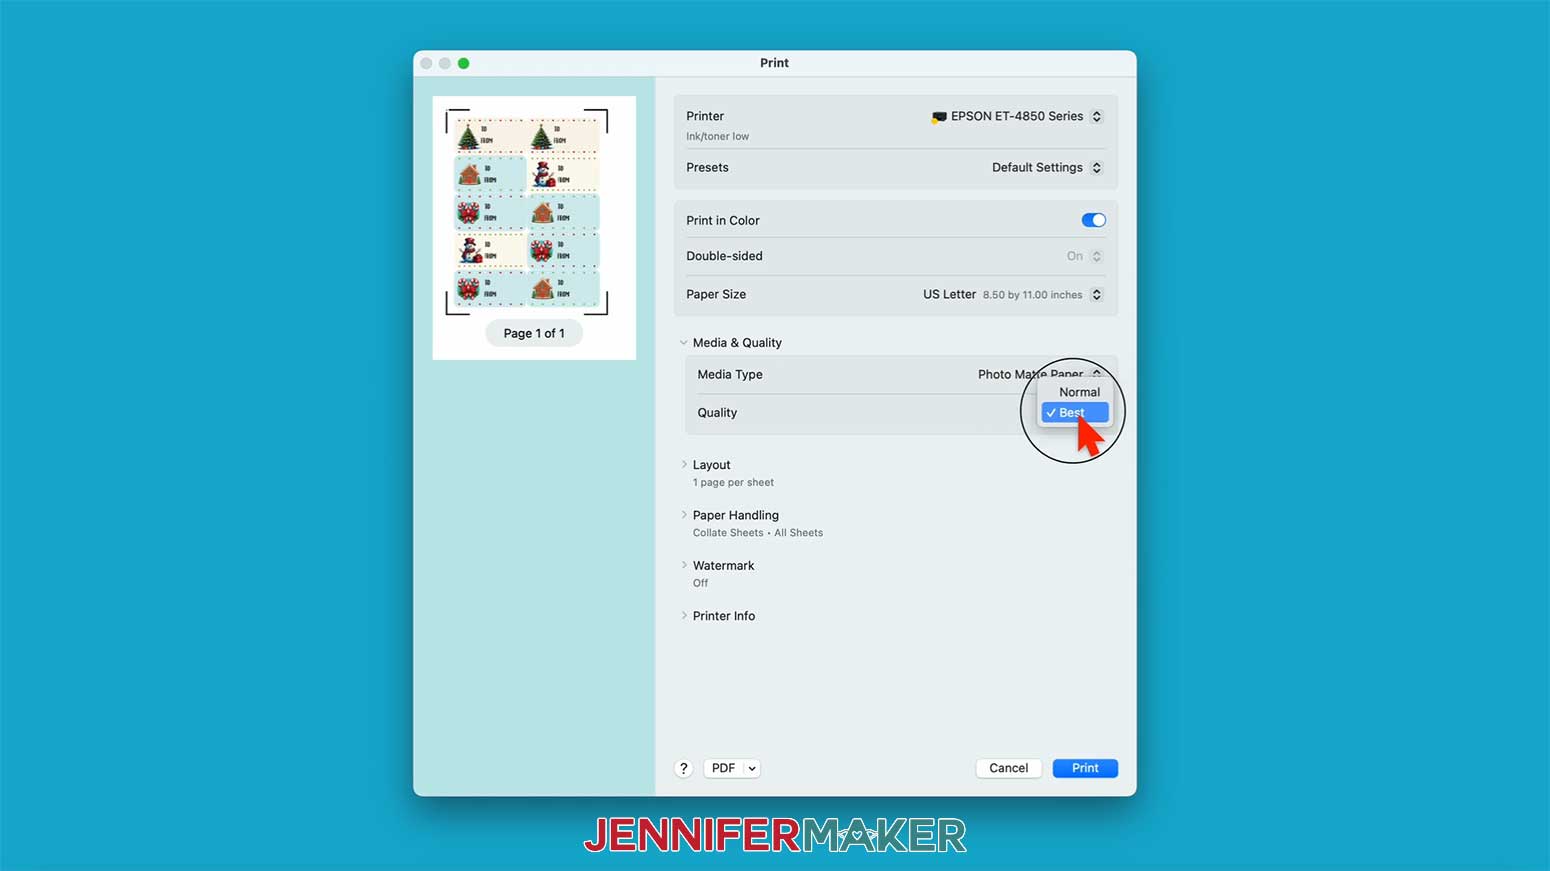
5. Your sticker sheet will print to your printer. Once the print is complete, let it sit for a moment to make sure the ink dries thoroughly.
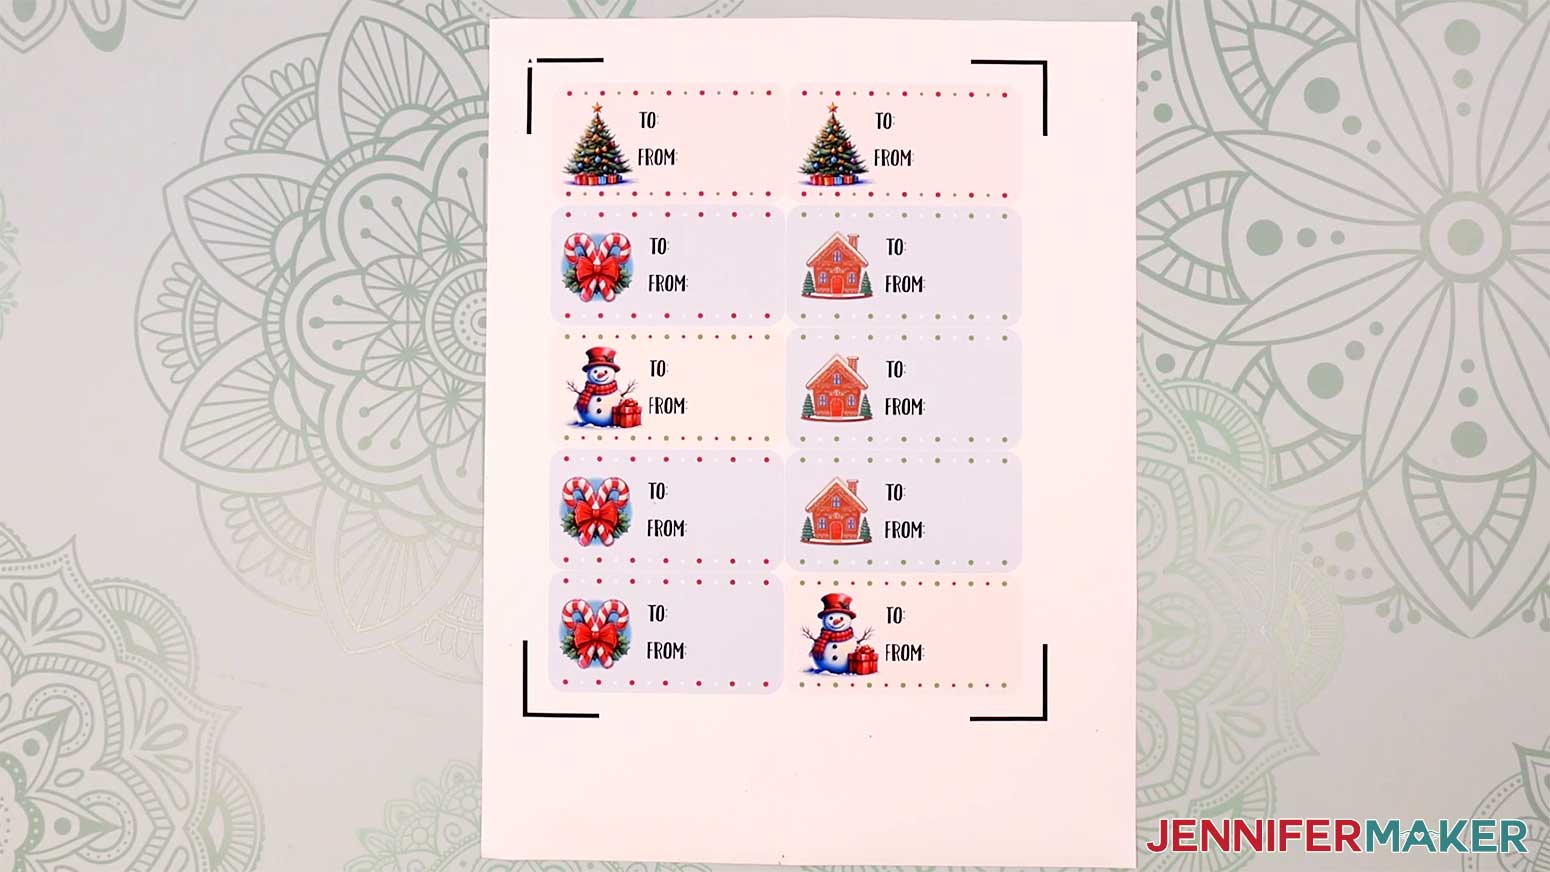
NOTE: Your sheet will print with a black rectangle around the stickers -- this is your Cricut's registration mark and it needs to be there.
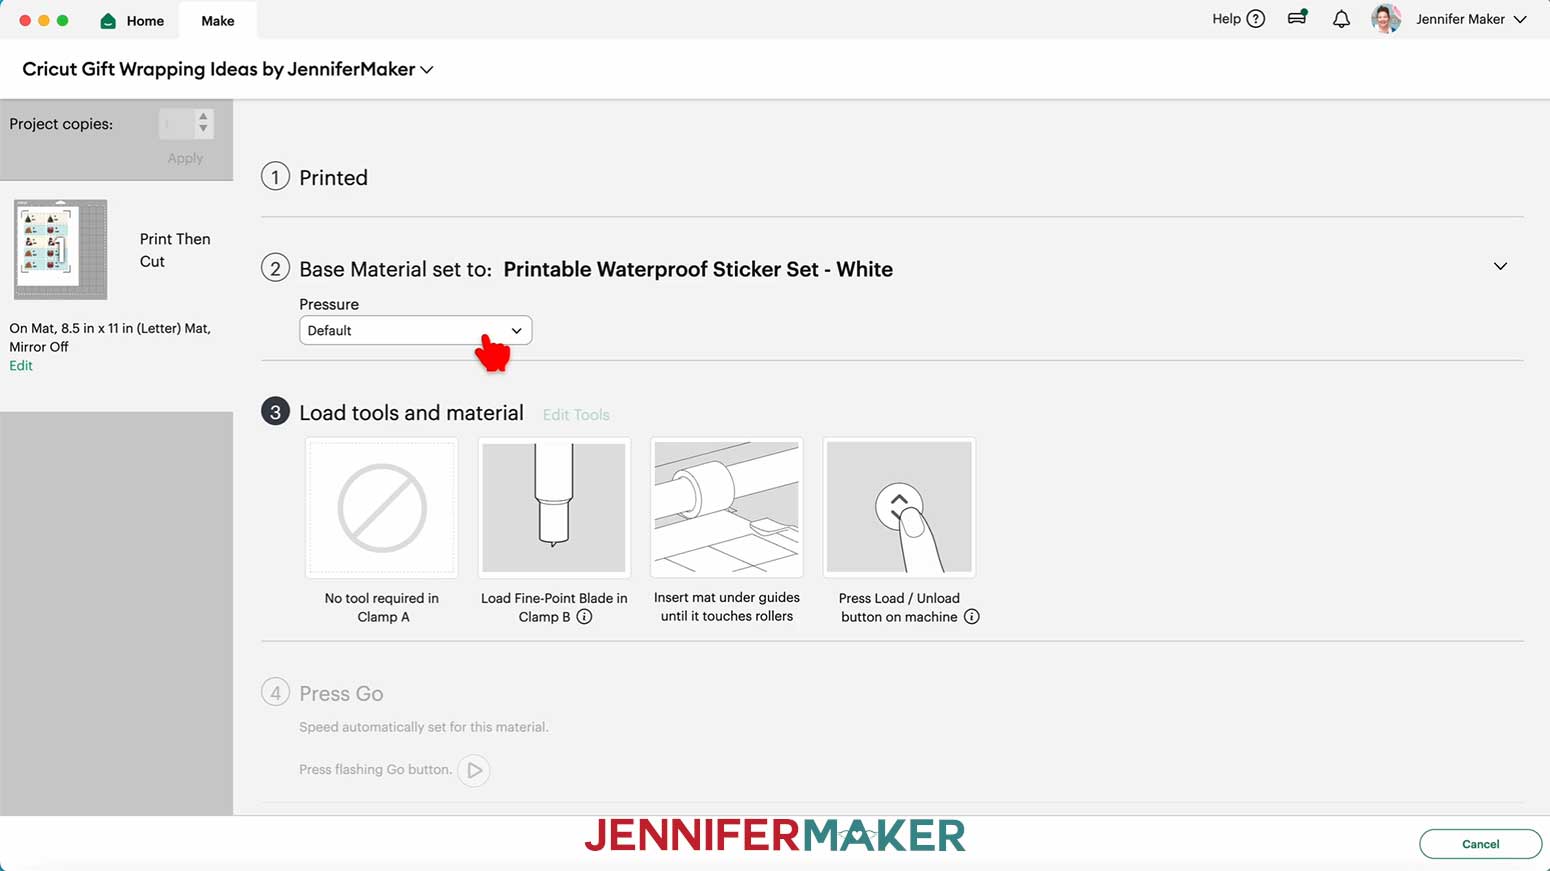
6. On the Make screen, I used the “Printable Waterproof Sticker Set - White” setting with “Default” Pressure.
7. Place your first mat’s material pretty-side up onto a green StandardGrip machine mat.
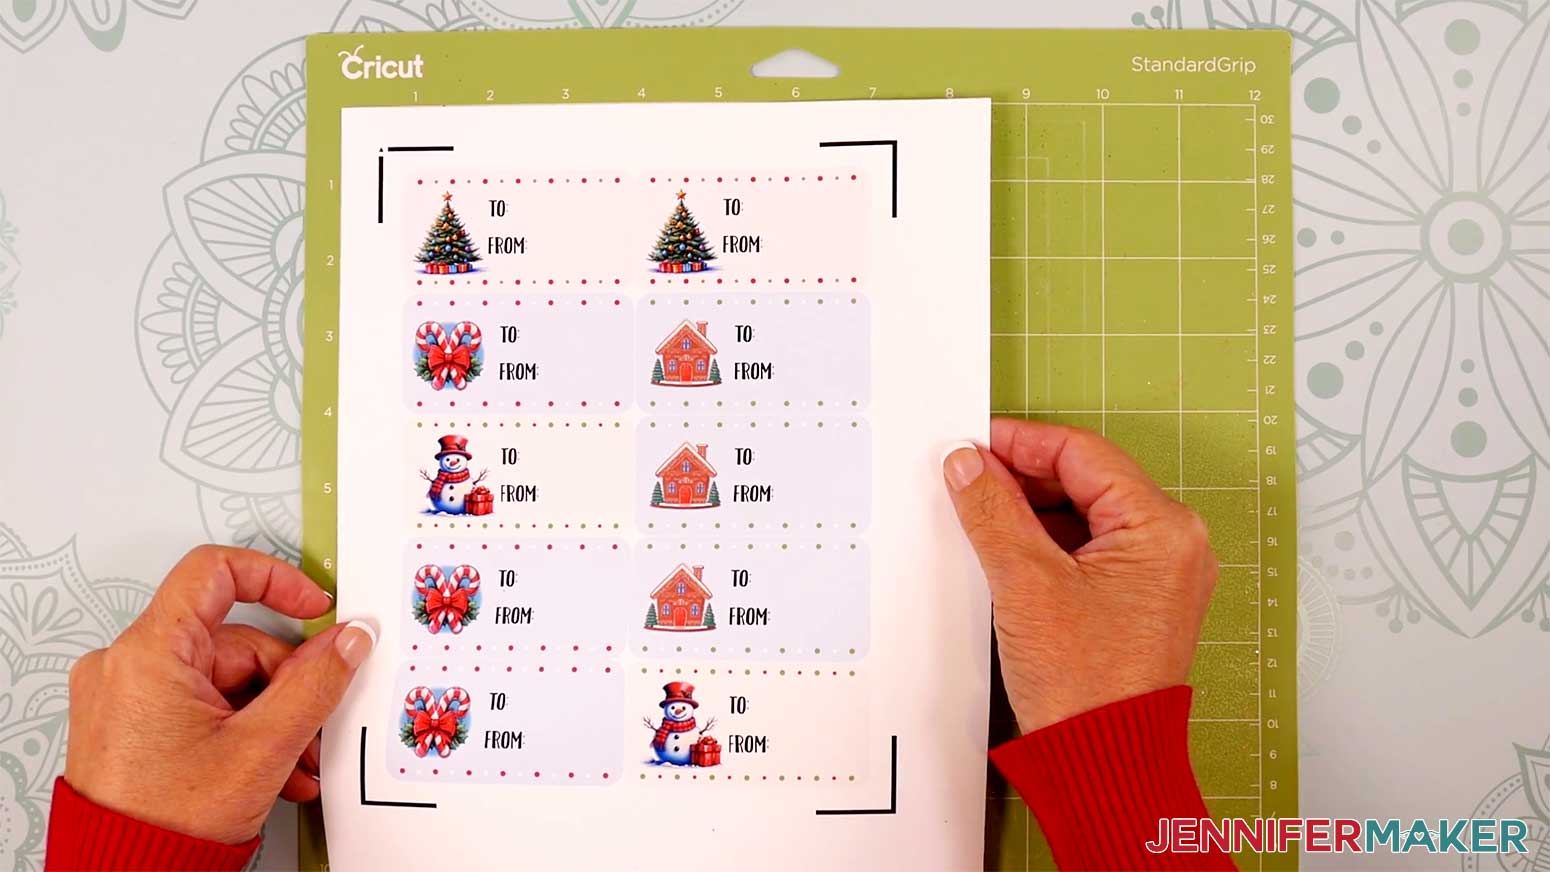
8. Use a brayer to make sure it’s fully adhered.
9. Check that your Fine-Point Blade is clean and in the clamp.
10. Load the mat into your Cricut and press the flashing middle button to begin cutting.
11. Before unloading the mat, check to see that the cut went through the sticker material, but not the backing. If it didn’t go through the sticker material, smooth the material back down into place and press the middle button again for another pass.
12. Once the material is cut, unload the mat, flip it over onto your work surface, and roll it back to release the material. Be careful not to peel the stickers off the sheet in the process.
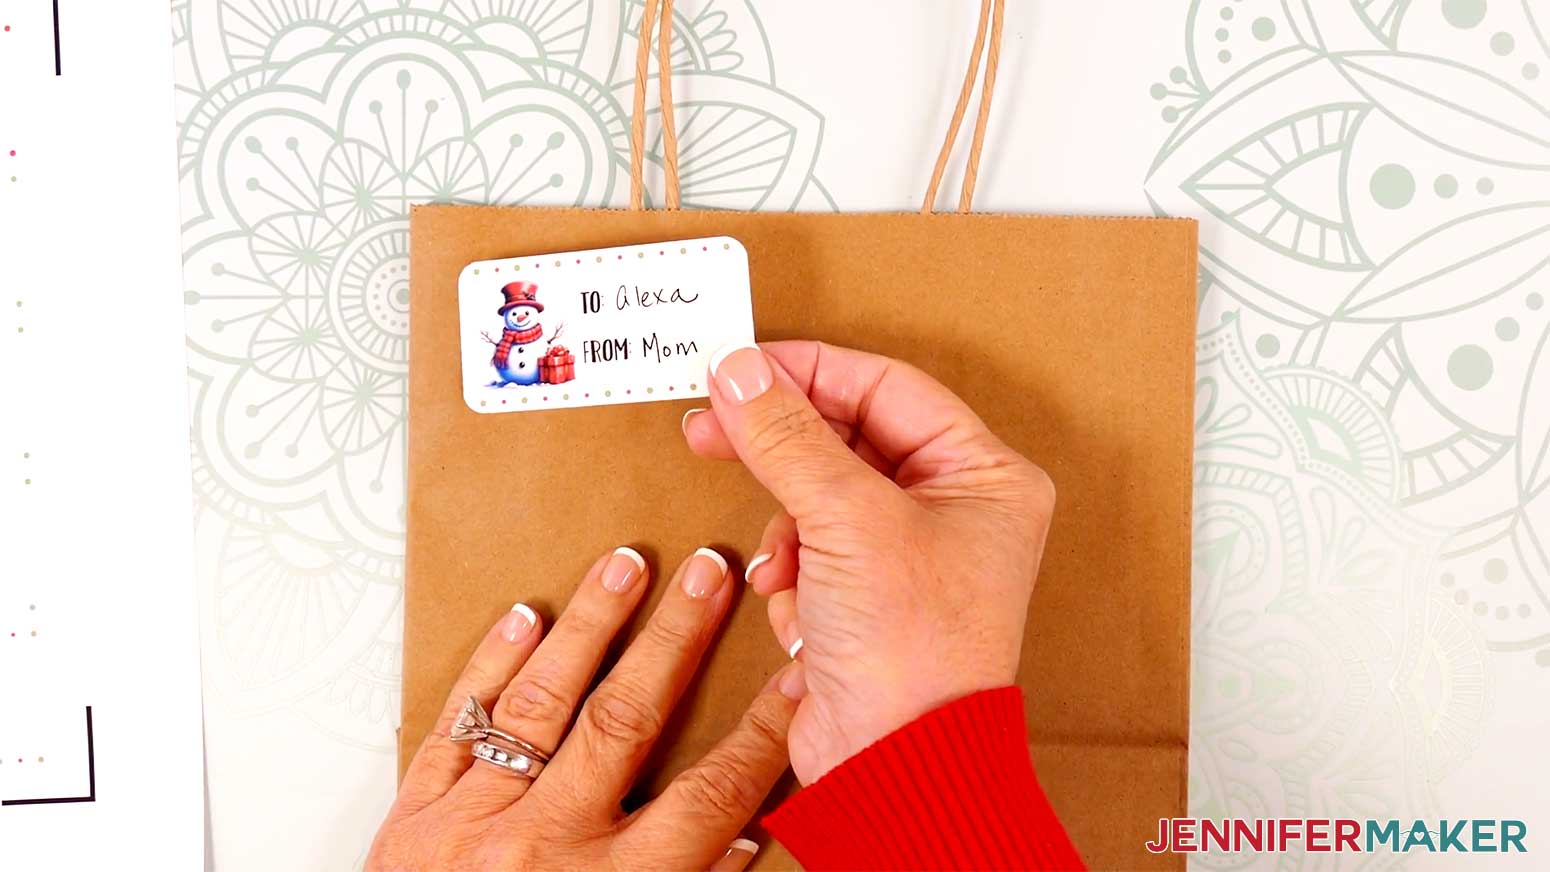
13. Use a pen to fill out your gift label, then peel it from the sheet and stick it to a wrapped gift or gift bag.
STEP 3: SHOW THEM OFF
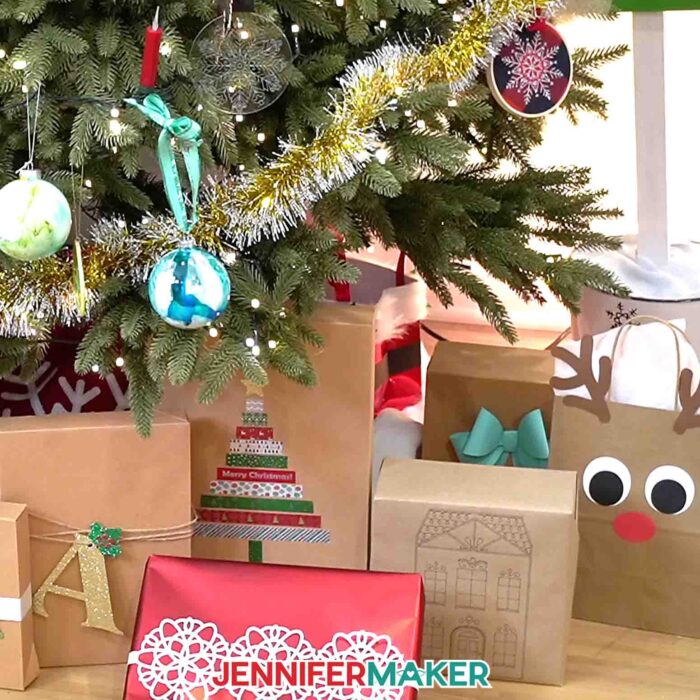
Here are what my finished Cricut gift wrapping ideas look like!

Notes
Fonts: JM Penwriting, Tingler Script (free alternative: Timberly), JM Tall
Assembled sizes:
Cutout Gift Tags: 1.5”W x 2.3”H
Ribbon Sliders: Three Trees 8.3”W x 5”H, Three Stars 12”W x 4.5”H, Candy Canes 6.3”W x 6”H
Fancy Paper Bow: 5.5”W x 5.5”H x 1.5“D
Snowflake Box Wrap: 11.5”W x 4”H
Holly Letter Tags: 6”W x 5.25”H
Cricut Pen Wrapping Paper: 12”W x 24”H
Reindeer Gift Bags: 8”W x 4.75”D x 10”H
Elf Boots Ribbon: Approximately 4.5”W x 6.5”H on ribbon
Washi Tape Tree with Star: Varies, Star 1.2”W x 1.2”H
Print Then Cut Gift Labels: 3”W x 1.5”H
Care: Store your Cricut gift wrapping projects inside of a sturdy box in a cool, dry place.
Answers to Your Questions About Making the Cricut Gift Wrapping Ideas in this Tutorial
Q: I want to create customized gift wrapping accessories. How do I do that?
A: You can learn how to design custom gift wrapping accessories including gift tags and paper bows in my ADVANCE program. Learn more about ADVANCE here!
Q: What Cricut machines can I use for these Cricut gift wrapping ideas?
A: You can make most of these projects with any modern Cricut machine, including the Cricut Maker series, Cricut Explore series, Cricut Venture, Cricut Joy, and Cricut Joy Xtra. The only exception is the Print Then Cut Gift Labels, which require a machine with Print Then Cut capability (Maker, Explore, Venture, or Joy Xtra). The Cricut Pen Wrapping Paper is sized for a full-size mat, so it works best on a Maker, Explore, or Venture, but you can resize it for smaller machines.
Q: How hard are these Cricut gift wrapping projects, and how long do they take?
A: These are all easy, beginner-friendly projects. Once your designs are in Cricut Design Space, most decorations take only a few minutes of active time each. You can batch-cut the pieces on your Cricut machine and then assemble everything pretty quickly for a big stack of Christmas gifts.
Q: Do I have to use the exact materials you used?
A: Not at all. I share exactly what I used so you can follow along, but you can absolutely raid your stash. The projects are designed around a variety of materials like 65 lb. cardstock, glitter cardstock, kraft cardstock, wrapping paper, kraft paper, twine, and ribbon. As long as your materials are a similar weight and your settings match, they should work just fine.
Q: Can I cut these projects by hand if I don’t have a Cricut?
A: Yes! The downloadable file includes PDF versions you can print and cut with scissors. You won’t get the same perfect cuts on small details as you do with a Cricut, but it’s a great option if you don’t have a cutting machine.
Q: How do I resize the designs to fit my gift boxes and bags?
A: Before you cut, measure the front of your gift boxes or bags and then resize the SVGs on your Canvas before Ungrouping them. The video tutorial shows exactly how to do this in Design Space
Q: Do I really need both craft glue and hot glue?
A: Craft glue works well for layering flat, smooth cardstock pieces like the Cutout Gift Tags, Ribbon Sliders, and Holly Letter Gift Tags. Hot glue is ideal when you’re working with glitter cardstock, or need a quick, strong hold on dimensional pieces like the Fancy Paper Bow, Elf Boots Ribbon, and Snowflake Box Wrap.
Q: Can kids help with these Cricut gift wrapping projects?
A: Yes, with supervision. Kids can help stick on washi tape for the Washi Tape Tree with Star, place eyes and noses on the Reindeer Gift Bags, thread twine through gift tags, and peel and stick the Print Then Cut Gift Labels. An adult should handle cutting with the Cricut machine, hot glue, and sharp tools.
Get my free Quick Cricut Gift Wrapping Designs in SVG/DXF/PDF formats!
(If you do not see the signup form above, click here.)
I love seeing what you make with my tutorials and how you customize them! Please share a photo of your Cricut gift wrapping ideas in our Facebook group or tag me on social media with #jennifermaker.
Love,

Want to remember this? Save this Cricut Gift Wrapping Ideas tutorial to your favorite Pinterest Board!