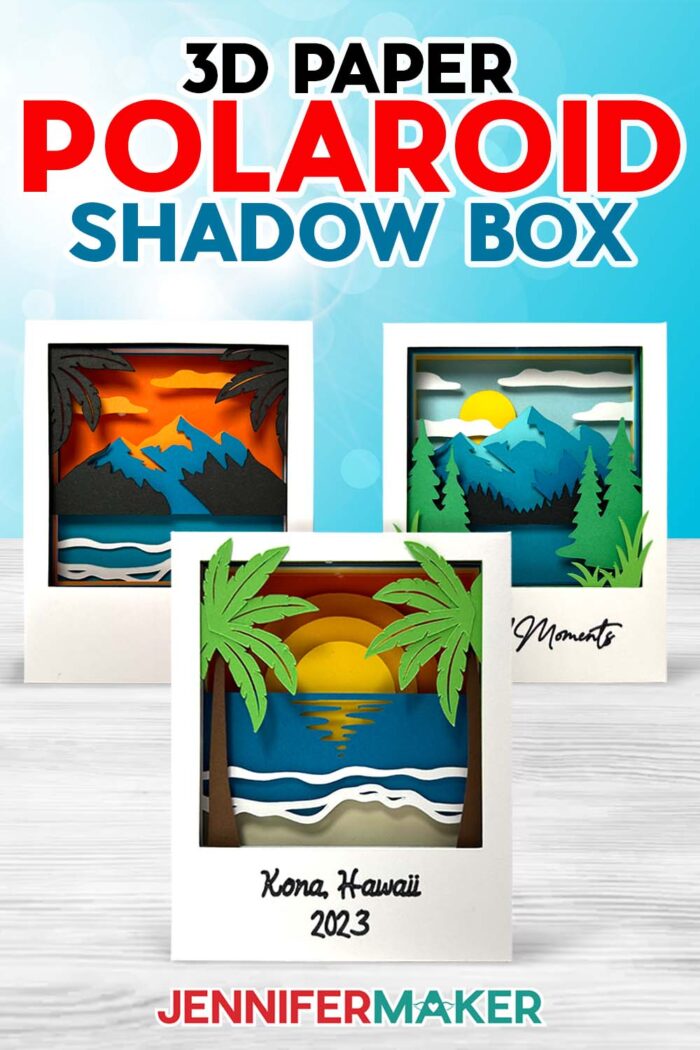
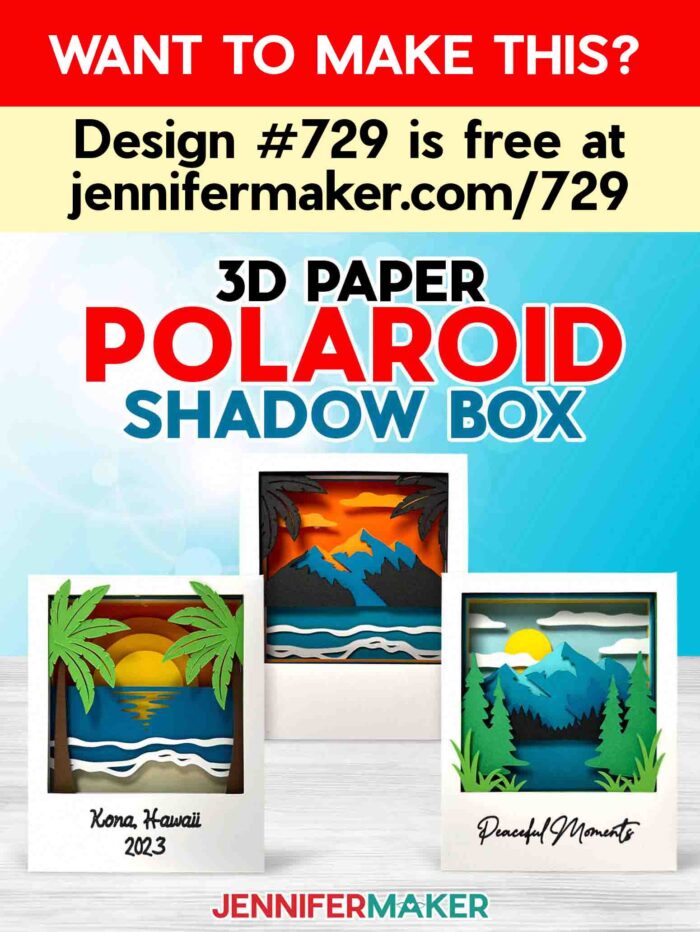
Learn how to make a Polaroid shadow box travel keepsake on-the-go!
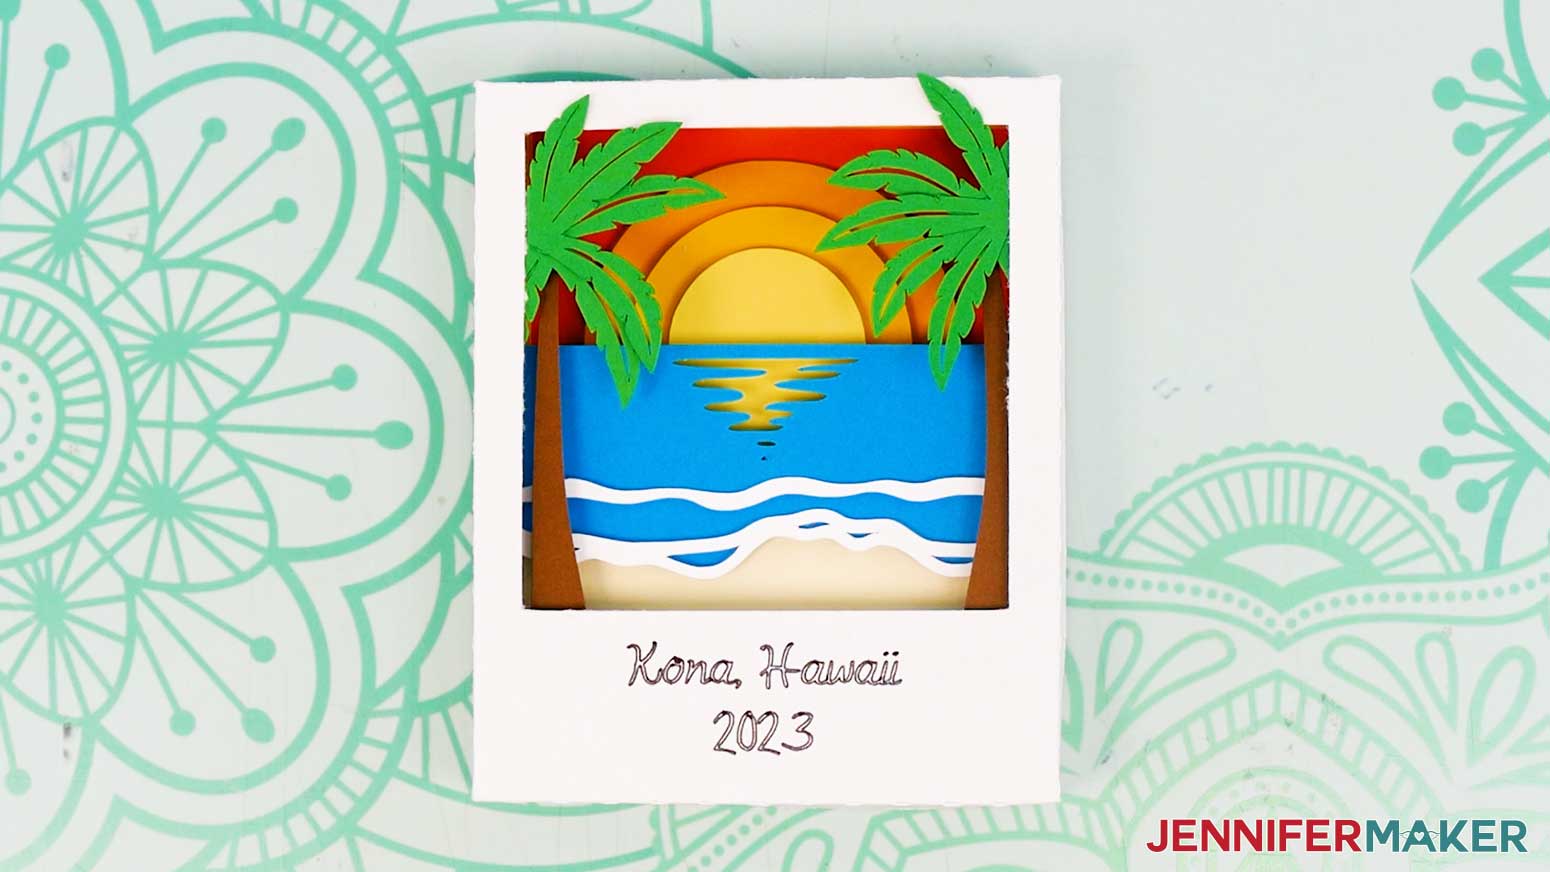
Some of my best ideas seem to land when I’m nowhere near my craft room. Maybe it’s the change of scenery, or maybe it’s just the way inspiration hits when you’re caught up in a moment you never want to forget. A few years back, I found myself sitting on a warm beach thousands of miles from home, watching the waves roll in and feeling both at peace and in awe. That view eventually became a project I adore: a Polaroid shadow box! It’s a tiny, three-dimensional snapshot you can make anywhere, before the inspiration fades… even if you’re on vacation!
Watch the full step-by-step video tutorial on how to make a Polaroid shadow box:

I actually brought my little Cricut Joy with me on that Hawaii trip, and it became my favorite travel companion. It’s just so cute and portable! I used it for a few projects at the time, but I kept thinking about how fun it would be to turn that perfect sunset into a handmade keepsake. When I got home, I did exactly that — by designing a full Polaroid picture scene with layered cardstock, a Polaroid-shaped frame, and all the details that made that evening feel real again. There’s something about crafting a memory with your own hands that brings it back even more vividly than any photo ever could.
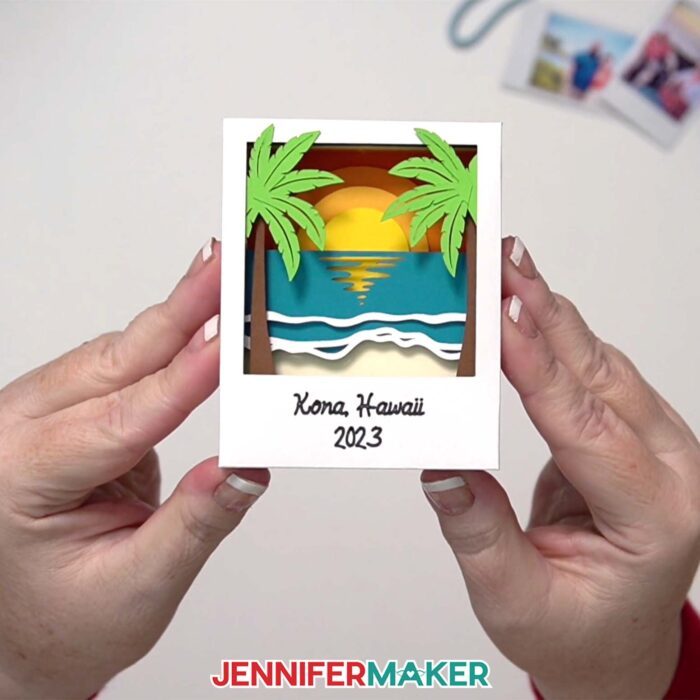
The result was something beautiful, light, portable, and so easy to personalize. Want to add a date, a short message, or a location to the photo frame? The writing feature in Cricut Design Space makes that simple, and my free video tutorial shows exactly how to attach your custom text to the frame so it writes in the perfect spot.

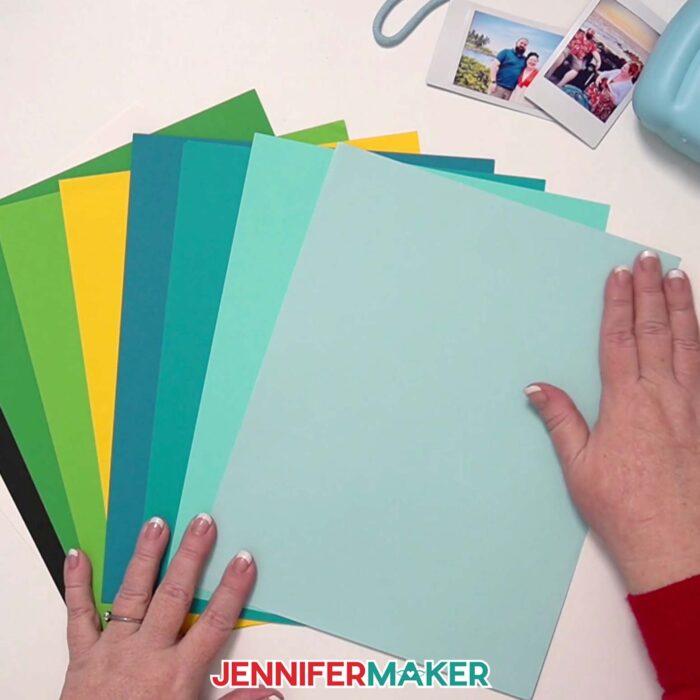
This project uses simple materials and tools you likely already have on-hand, and are easy to stash away in your carry-on bag! You’ll need some 8.5 inch by 11 inch 65. lb cardstock in a variety of solid colors, some craft glue, adhesive micro pop dots to create a dimensional look, and your choice of cutting machine.
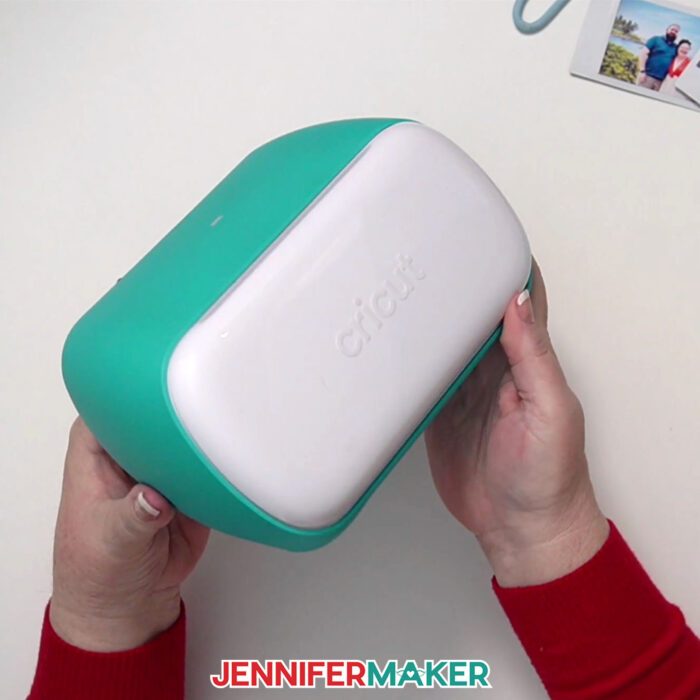
I love the Cricut Joy for this because it’s unbelievably portable (it takes up less space in a suitcase than a hair dryer!), but you can use any cutting machine if you prefer.
If you want to add a special caption or date to your Polaroid frame, you’ll want a fine point Cricut pen. Just be sure to get the right one for your machine, because they come in full sizes for the Cricut Maker, Explore, and Venture machines and small sizes for the Cricut Joy and Joy Xtra.
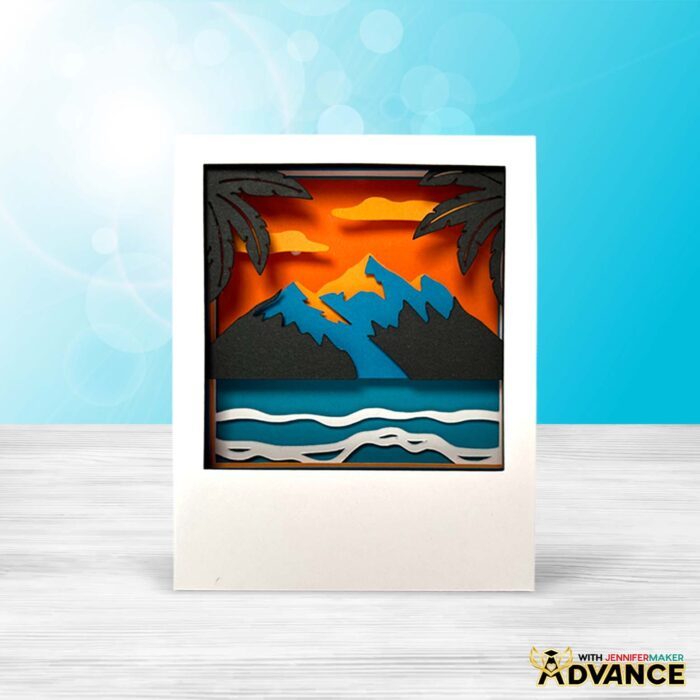
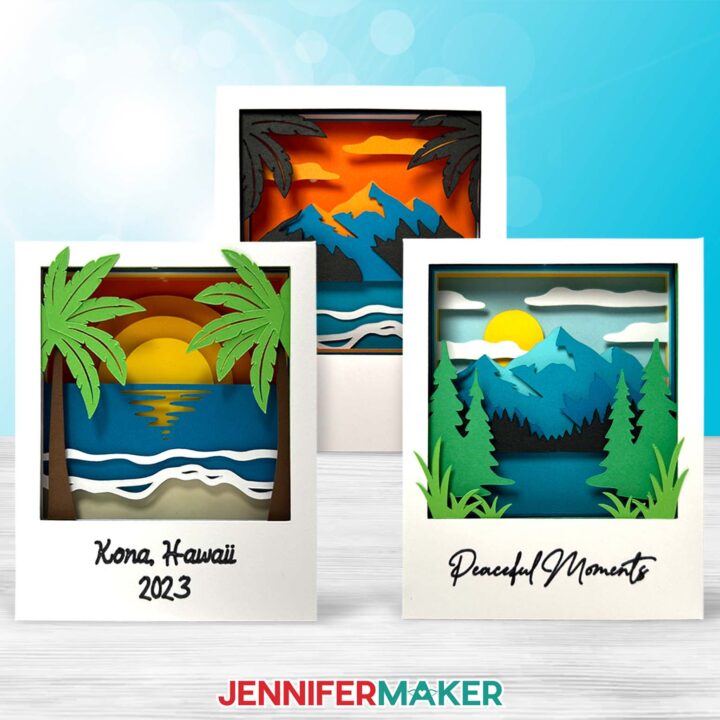
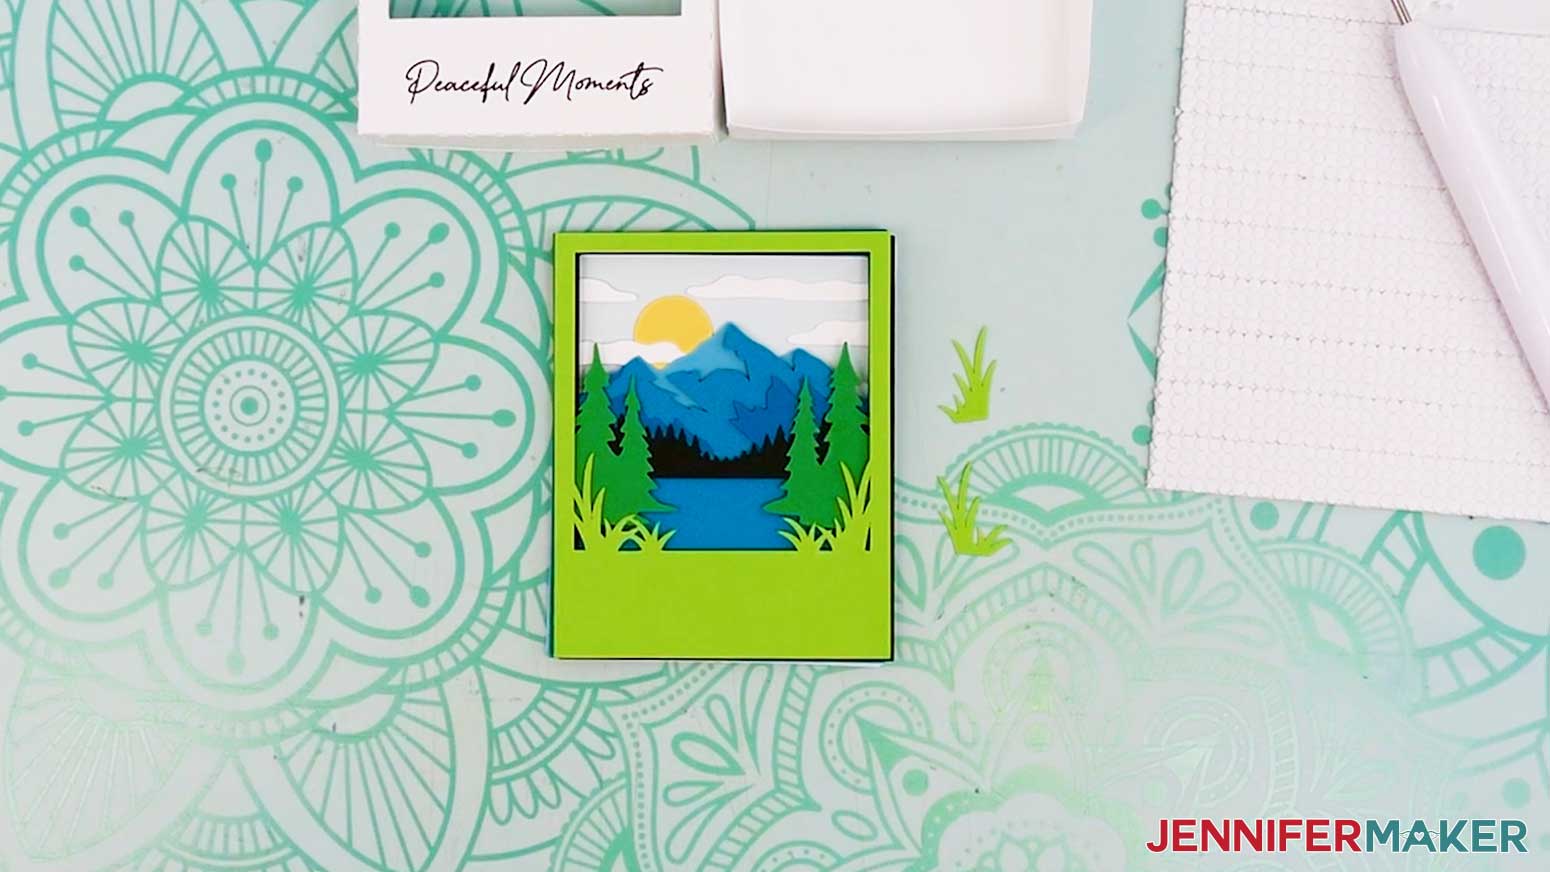
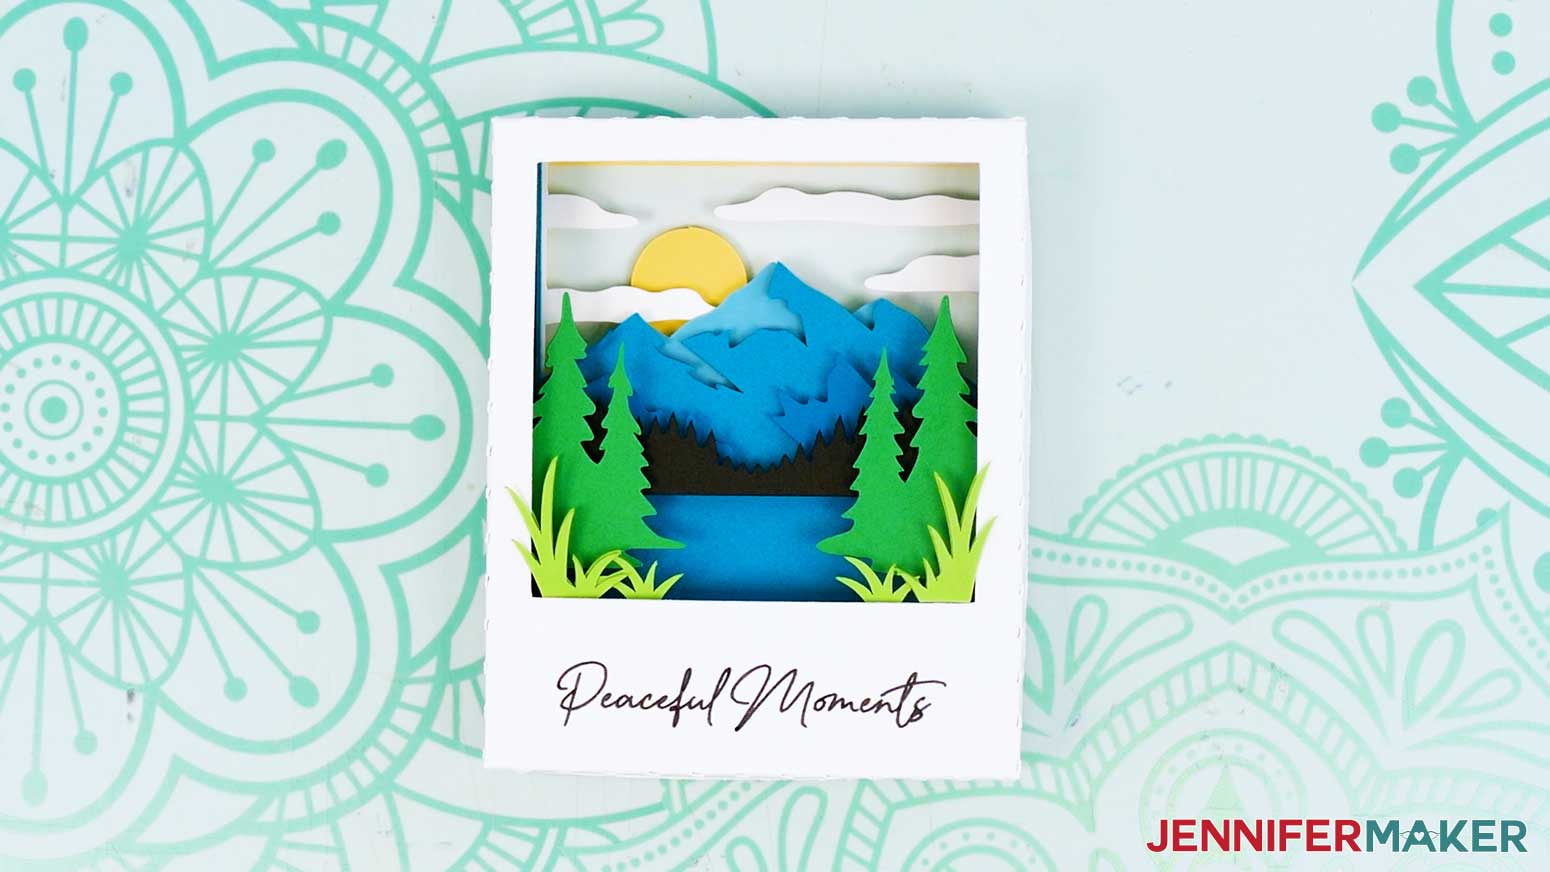
While the beach design is the original inspiration, I’ve also created a mountain version for makers who dream of the crisp air and sweeping overlooks. The method is exactly the same, but the finished look is totally different.
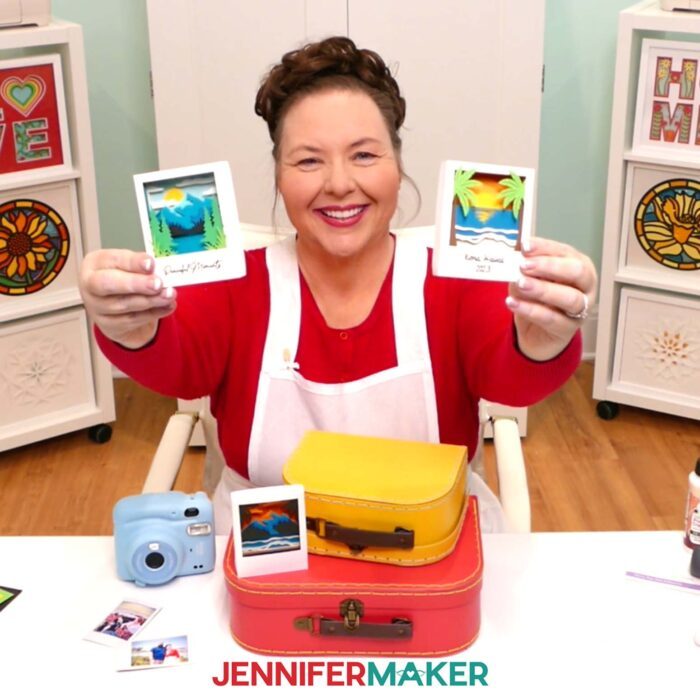
They really do make the perfect little holiday gift. A handmade Polaroid picture shadow box is also a sweet, thoughtful memento to give as a stocking stuffer, especially if you shared a special trip with someone this year. You can make one to commemorate a beach weekend, a favorite mountain hiking trail, a national park visit, or even a first flight across the United States. You can also gift one to share dreams of a future getaway. Imagine giving someone a tiny mountain or beach scene, only to reveal real vacation plans as an extra surprise!
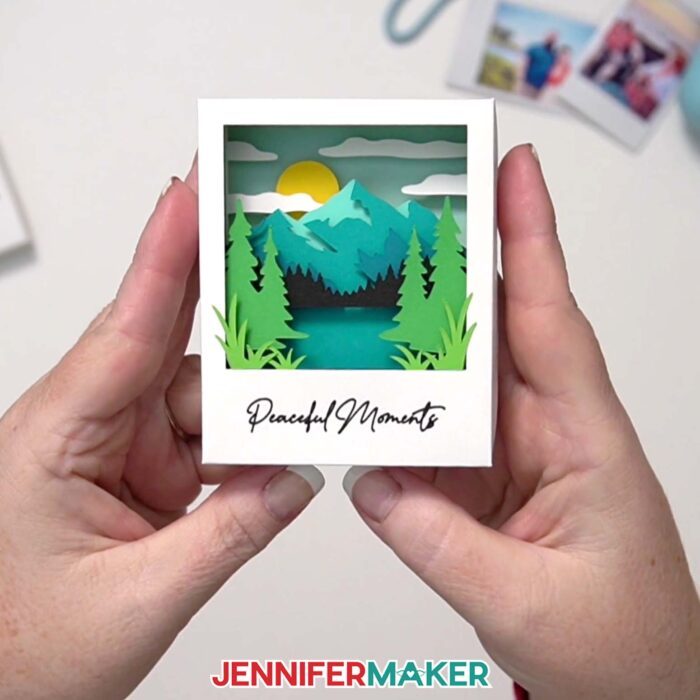
You can also make your scene feel more realistic simply by choosing cardstock colors that represent the natural light of the moment you’re trying to recreate. Warm colors like orange and pink can mimic a real sunrise. Deeper blues and purples can give your shadow box the look of true twilight. And bright hues instantly make the whole Polaroid picture feel sunlit and alive. It’s a subtle shift, but the right colors make your tiny scene really feel like a little window into that memory.

If making these little scenes has you dreaming about creating your own locations, you’ll love the full Polaroid shadow box workshop inside my ADVANCE with JenniferMaker program. In that tutorial, I walk you through the exact steps to build a personalized scene with my toolkit of elements so the finished shadow box looks like it came straight from your memories! Plus, I include a cheat sheet on choosing the perfect colors for your scene. You’ll also get access to tons more exclusive templates, toolkits, designs, and more that I only share with members! Learn more about ADVANCE with JenniferMaker here!
Let me show you how to make a Polaroid shadow box! This post contains some affiliate links for your convenience (which means if you make a purchase after clicking a link I will earn a small commission but it won’t cost you a penny more, there is no additional cost)! Read my full disclosure policy.
Materials to Make a Paper Polaroid Shadow Box
View my Amazon shopping list for the exact items I used!
- Nine (9) Sheets of 8.5″ x 11″ 65 lb. Cardstock -AND-
- Optional: 12″ x 12″ 65 lb. Teal Palette Cardstock (for the Mountain design, I used four (4) sheets of various blue/teal, one (1) sheet of light green, and one (1) sheet each of dark green, yellow, black, and white. For the Beach design, I used one (1) sheet each of blue, green, brown, cream, yellow, light orange, medium orange, dark orange, and white.)
- A way to cut your materials – I’m using the Cricut Joy, but you can also use a Cricut Maker series, a Cricut Explore Series machine, the Cricut Venture, the Cricut Joy 2, or the Cricut Joy Xtra
- Cricut StandardGrip Machine Mat 4.5″ x 6.5″ or 4.5″ x 12″ (if using a Cricut Joy) -OR-
- Cricut StandardGrip Machine Mat 12″ x 12″ (if using a Cricut Maker or Explore series)
- Scoring Stylus (optional for files with score lines) -OR-
- Single Scoring Wheel (optional for files with score lines)
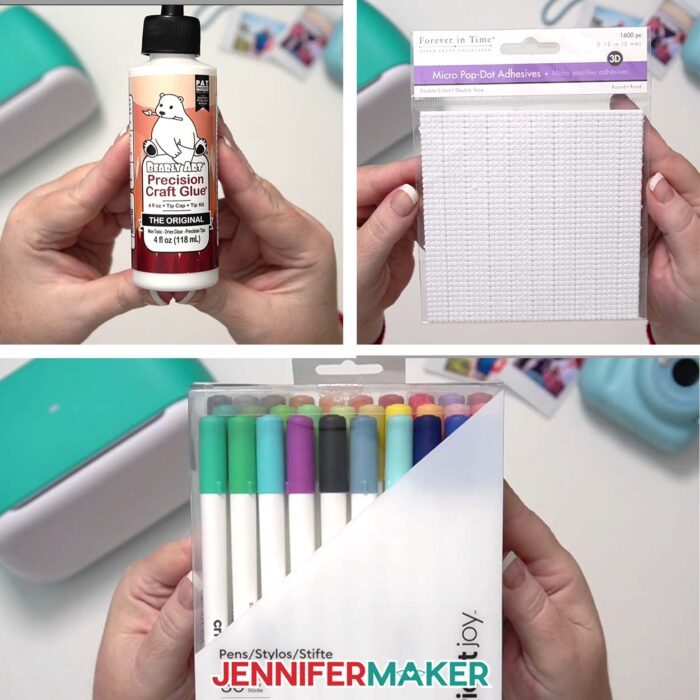
- Craft Glue (I used Bearly Art Precision Craft Glue)
- Double-Sided Adhesive Foam Micro Pop Dots
- Paper Trimmer (optional for cutting your cardstock to fit on a Cricut Joy machine mat)
- Brayer
- Spatula
- Scraper
- Weeding Tool (optional for poking out small cutouts)
- Tweezers (optional)
- Cricut Joy-Sized Cricut Fine Point Pen (for Cricut Joy and Joy Xtra machines only, optional for writing custom message on front) -OR-
- Cricut Fine Point Pen (for full-size Cricut machines only, optional for writing custom message on front)
How to Make a Polaroid Shadow Box!
Polaroid Shadow Box
Learn to create fun vacation-themed layered paper polaroids with just some cardstock and adhesive!
Materials
- Nine (9) Sheets of 8.5" x 11" 65 lb. Cardstock (For the Beach design, I used one sheet of blue, one green, one brown, one cream, one yellow, one light orange, one medium orange, one dark orange, and one white. For the Mountain design, I used one sheet of light green, one dark green, one yellow, one black, and one white.)
- 12" x 12" 65 lb. Teal Palette Cardstock (Optional for the Mountain design - I used four sheets of different shades.)
- Design #729 (My free SVG/PDF/DXF design files are available in my free resource library - get the password by filling out the form at the bottom of this page)
Tools
- A way to cut your cardstock - I’m using the Cricut Joy, but you can also use a Cricut Maker Series machine, a Cricut Explore Series machine, the Cricut Venture, or the Cricut Joy Xtra
- Cricut Joy StandardGrip Machine Mat 4.5” x 6.5” or 4.5" x 12" -OR-
- Cricut StandardGrip Machine Mat 12" x 12"
- Scoring Stylus (optional for files with score lines) -OR-
- Single Scoring Wheel (optional for files with score lines)
- Craft Glue (I used Bearly Art Precision Glue)
- Double-Sided Adhesive Foam Micro Pop Dots
- Paper Trimmer (optional for cutting your cardstock to fit on a Joy mat)
- Brayer
- Spatula
- Scraper
- Weeding Tool (optional for poking out small cutouts)
- Tweezers
- Joy-Sized Cricut Fine Point Pen (optional for writing custom message on front) -OR-
- Cricut Fine Point Pen (optional for writing custom message on front)
Instructions
STEP 1: GET MY FREE POLAROID SHADOW BOX DESIGNS
First, download my Paper Polaroid files from my free library – look for Design #729. Alternatively, you can use the Save This Project form near the top of this post and the design link will be emailed to you. The SVG and DXF folders contain two paper Polaroid shadow box designs to cut on a cutting machine. There’s a Beach and a Mountain, each with a “score” version that uses a score tool to create the foldable creases and a “no-score” version that uses dashed cut lines to create the creases. Inside the PDF folder is a version of each design you can print and cut by hand. Upload the SVG file to Cricut Design Space to get started. TIP: If you’re not sure how to upload, go to jennifermaker.com/svgs to learn how to unzip and upload SVG files.
STEP 2: PREPARE AND CUT YOUR POLAROID SHADOW BOX DESIGN
OPTION 1: NO-SCORE BEACH SCENE
CRICUT DESIGN SPACE
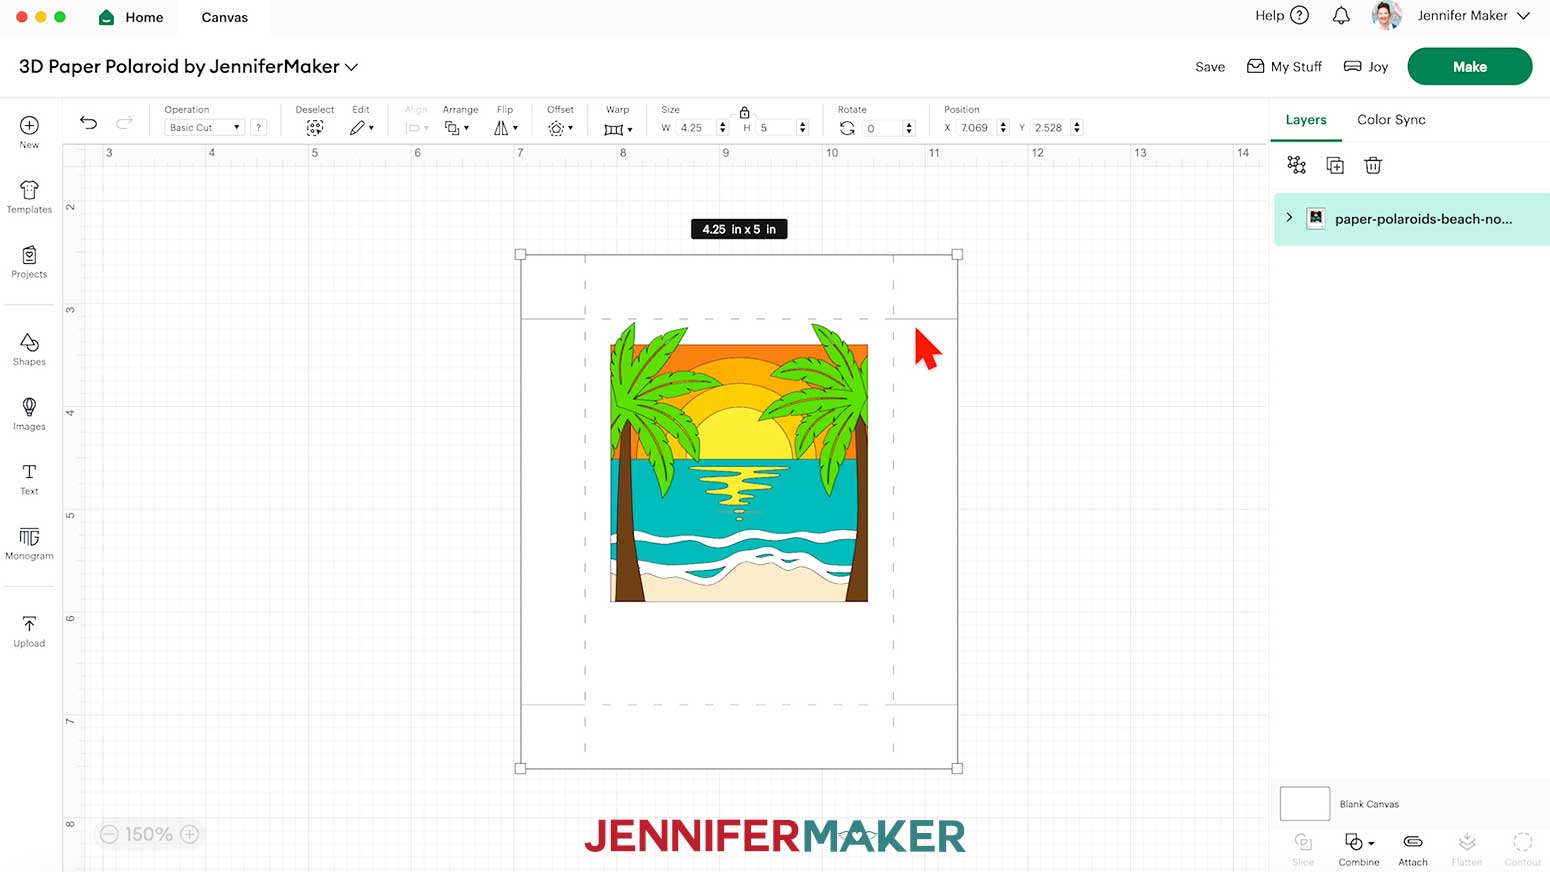
- In Cricut Design Space, open a blank Canvas. NOTE: If you’re new to using Cricut Design Space, go to cricutkickoff.com for my introductory tutorial on Design Space basics.
- Click “Upload” and then “Upload Image.”
- Click “Browse.”
- Select the SVG file of your choice. NOTE: I’ll select the “no-score” version of the Beach design.
- Click “Open,” and then “Continue.”
- Click “Upload” to add the design to your Canvas.
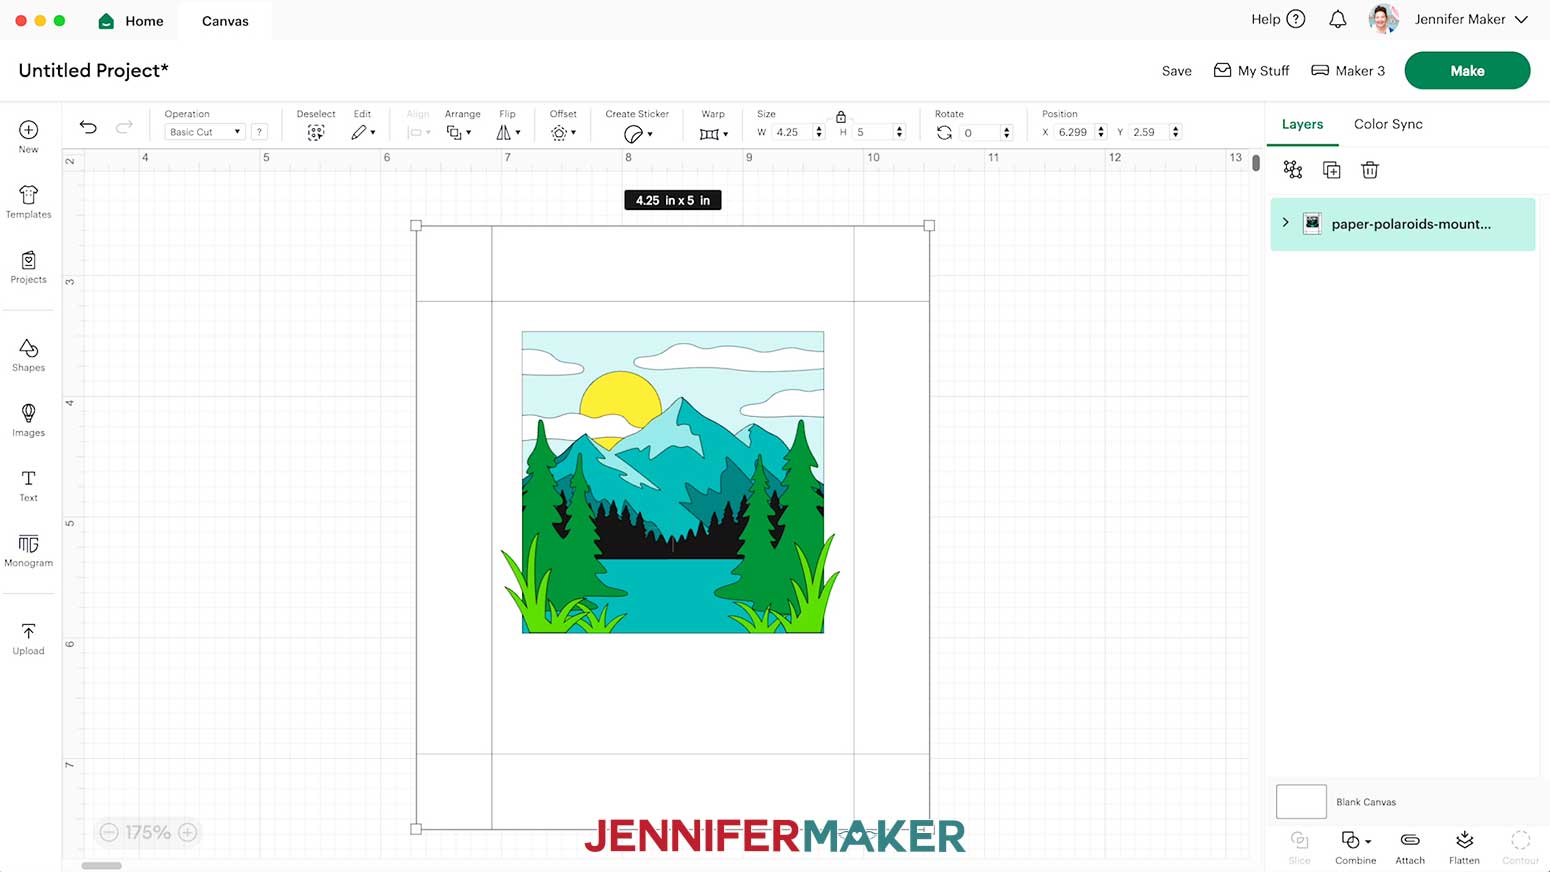
NOTE: There are nine inner layers, two decorative leaf pieces, and two outer frame pieces stacked on your Canvas.

- Click “Save” and give your project a name.
- Ungroup the design.
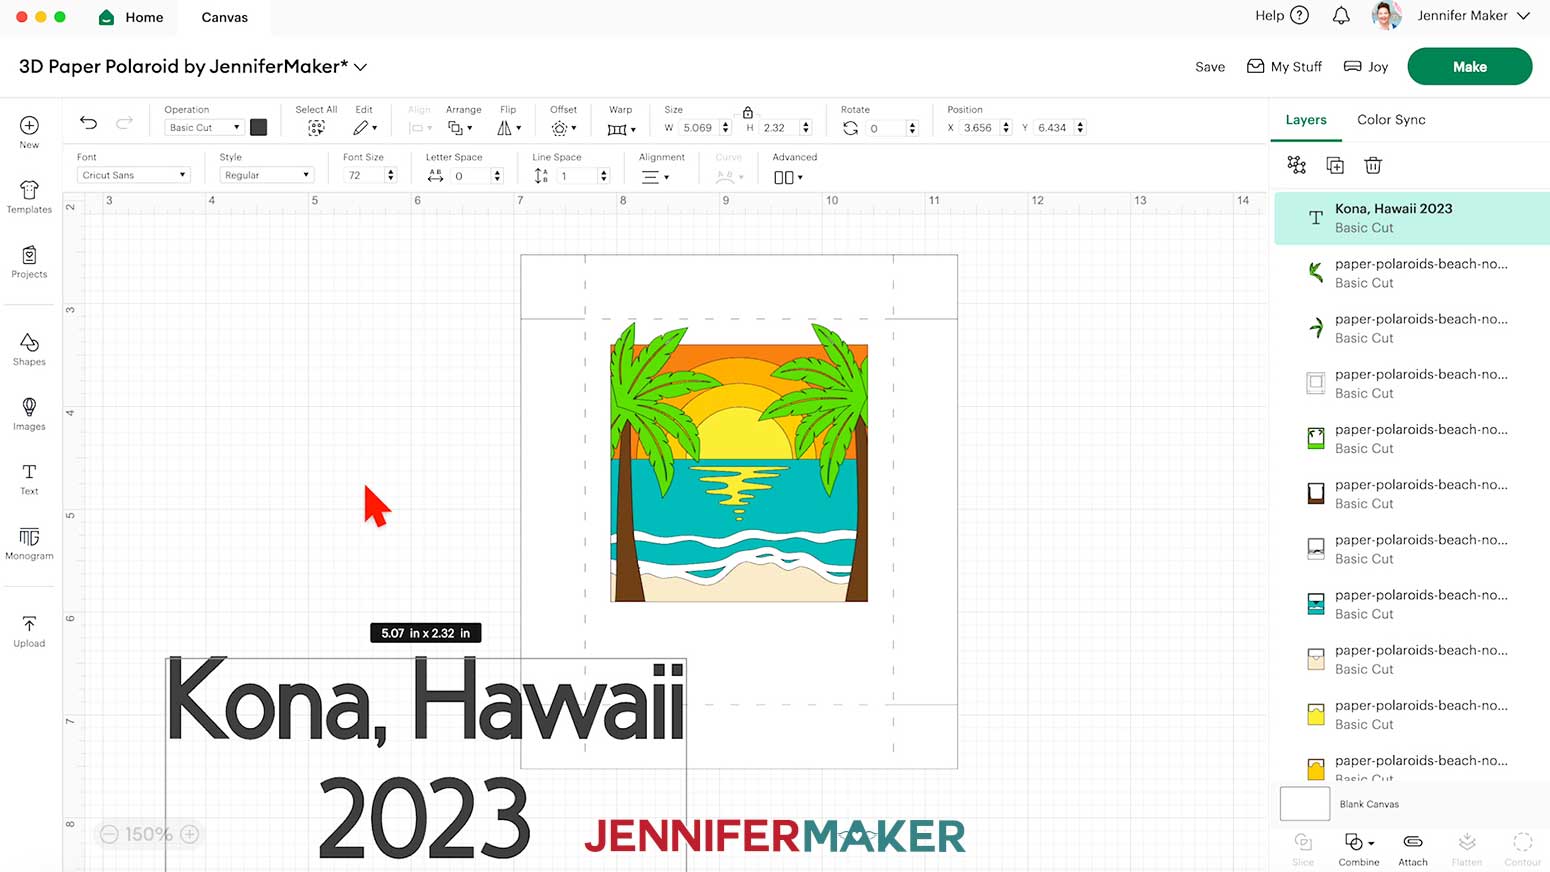
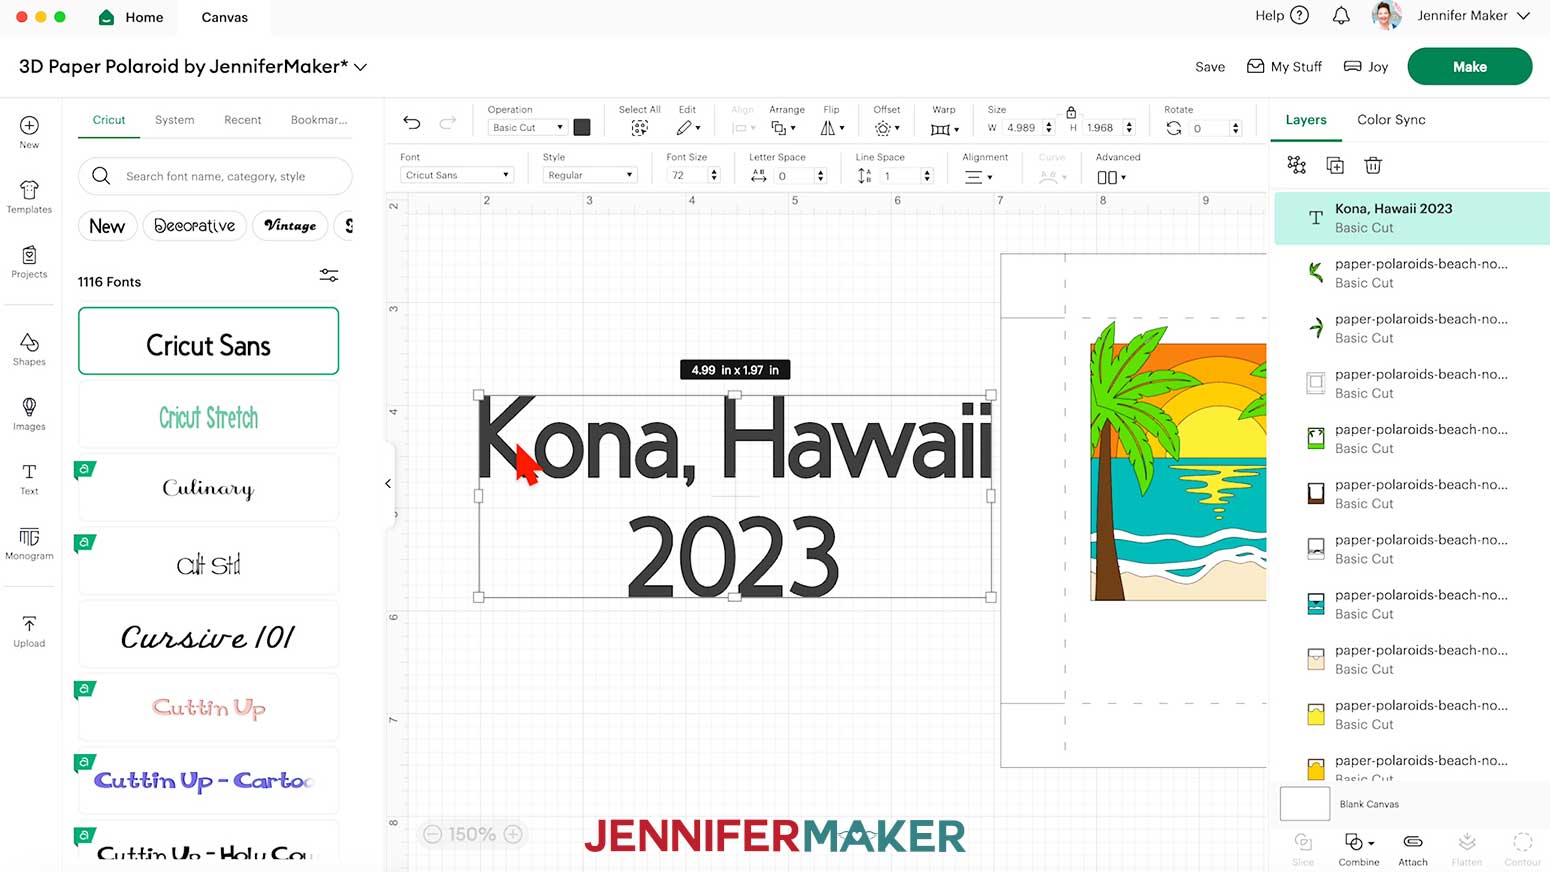
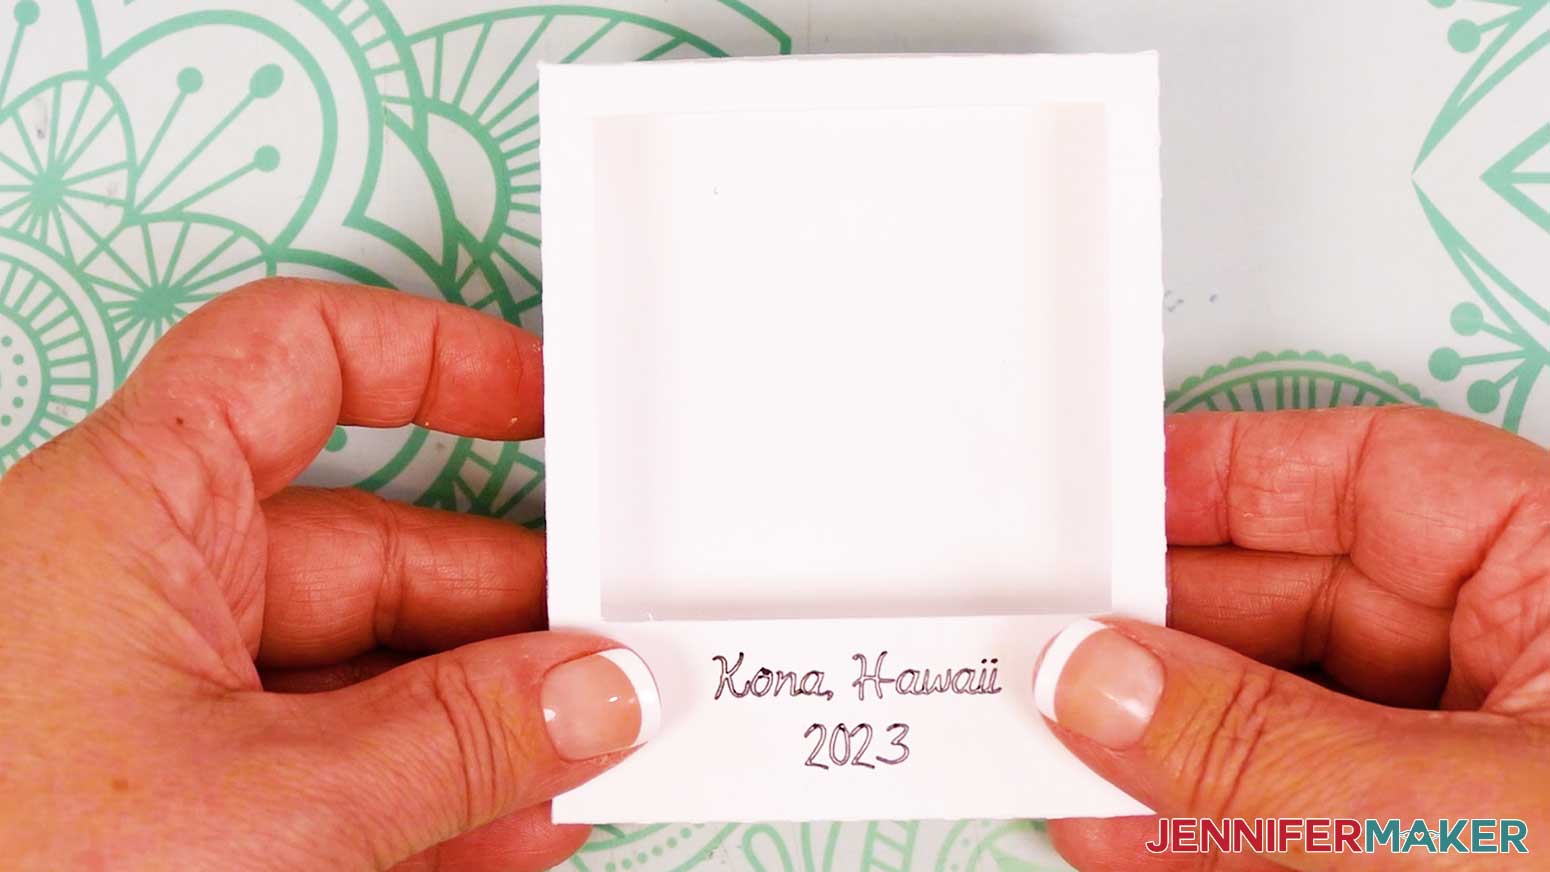
- To add a custom message to the bottom of your “photo,” click on the “Text” icon to add a text box.
- Double-click the text box and type in the message you want for your photo. Press the “Enter/Return” key on your keyboard to drop your text down a line if desired.
NOTE: I’ll type “Kona, Hawaii” on my first line, then press “Enter” and type “2023” on the second line.
- To change the text style, click the “Font” menu dropdown and select a font from the panel that opens up.
NOTE: To use a Cricut Design Space font, stay on the “Cricut” tab and click the “Filter” icon. Check the box next to “Free” to see free fonts, and check the box next to “Writing” to find single-line fonts that your Cricut can write without drawing outlines or “bubble” letters.
- To use a font installed on your computer, click the “System” tab on the Font panel.
NOTE: I used a typeface I designed called “JM Cursive,” which you can download at jennifermaker.com/font-bundle.
- Click the small arrow on the side of the Font panel to close it.
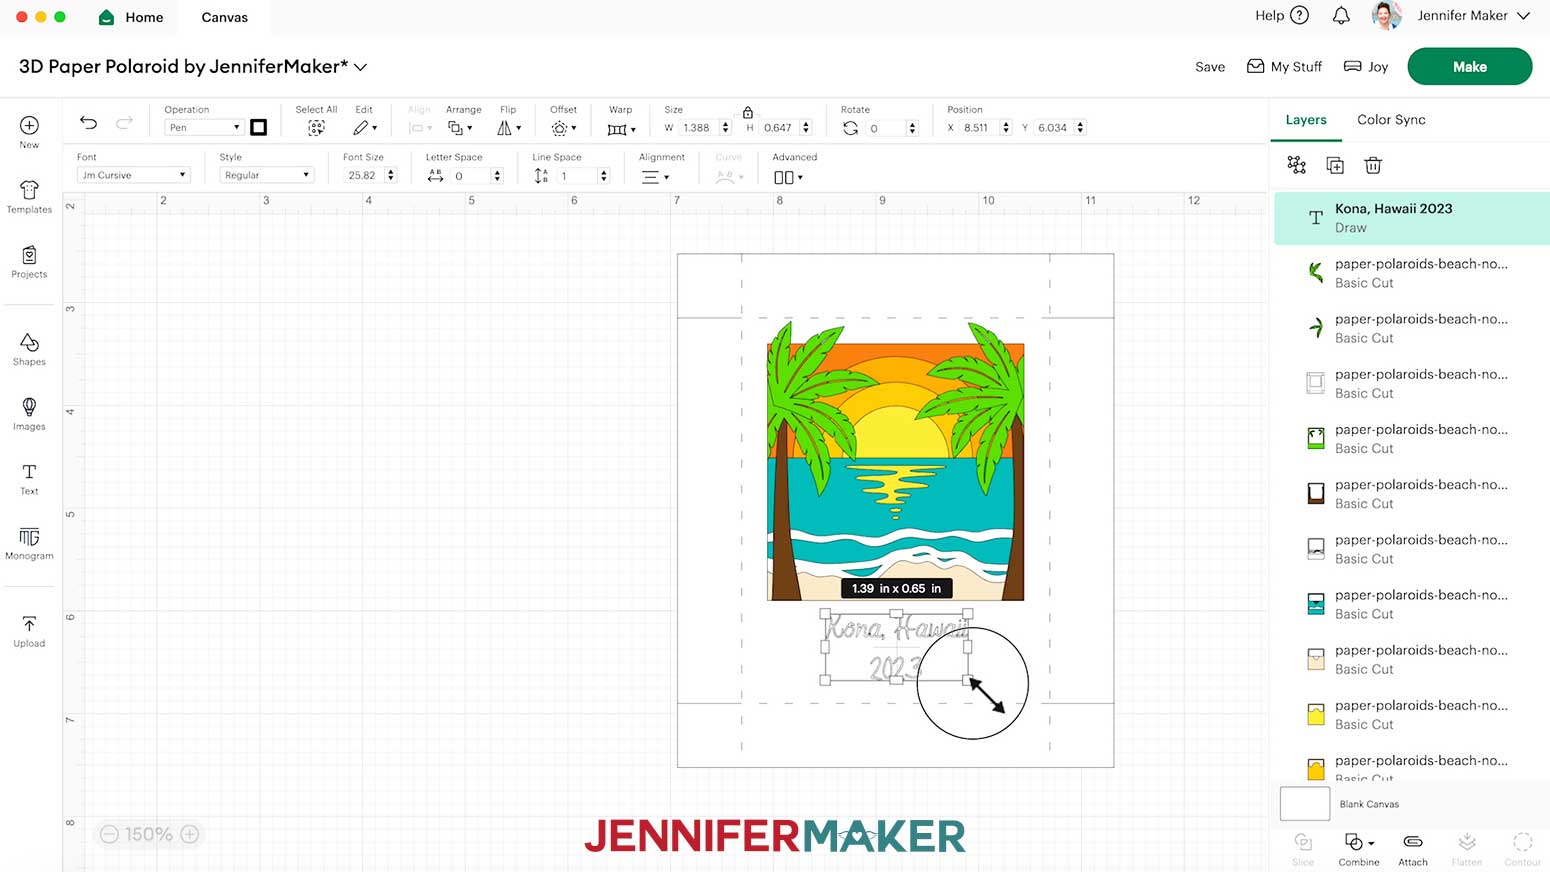
- With the “Lock” icon in the Size menu closed to maintain the text’s proportions, use the text box’s corner Resize handles to fit the message inside the template.
NOTE: You can also type a number in the “Font Size” field to resize your text. Size 26 point text worked well for me.
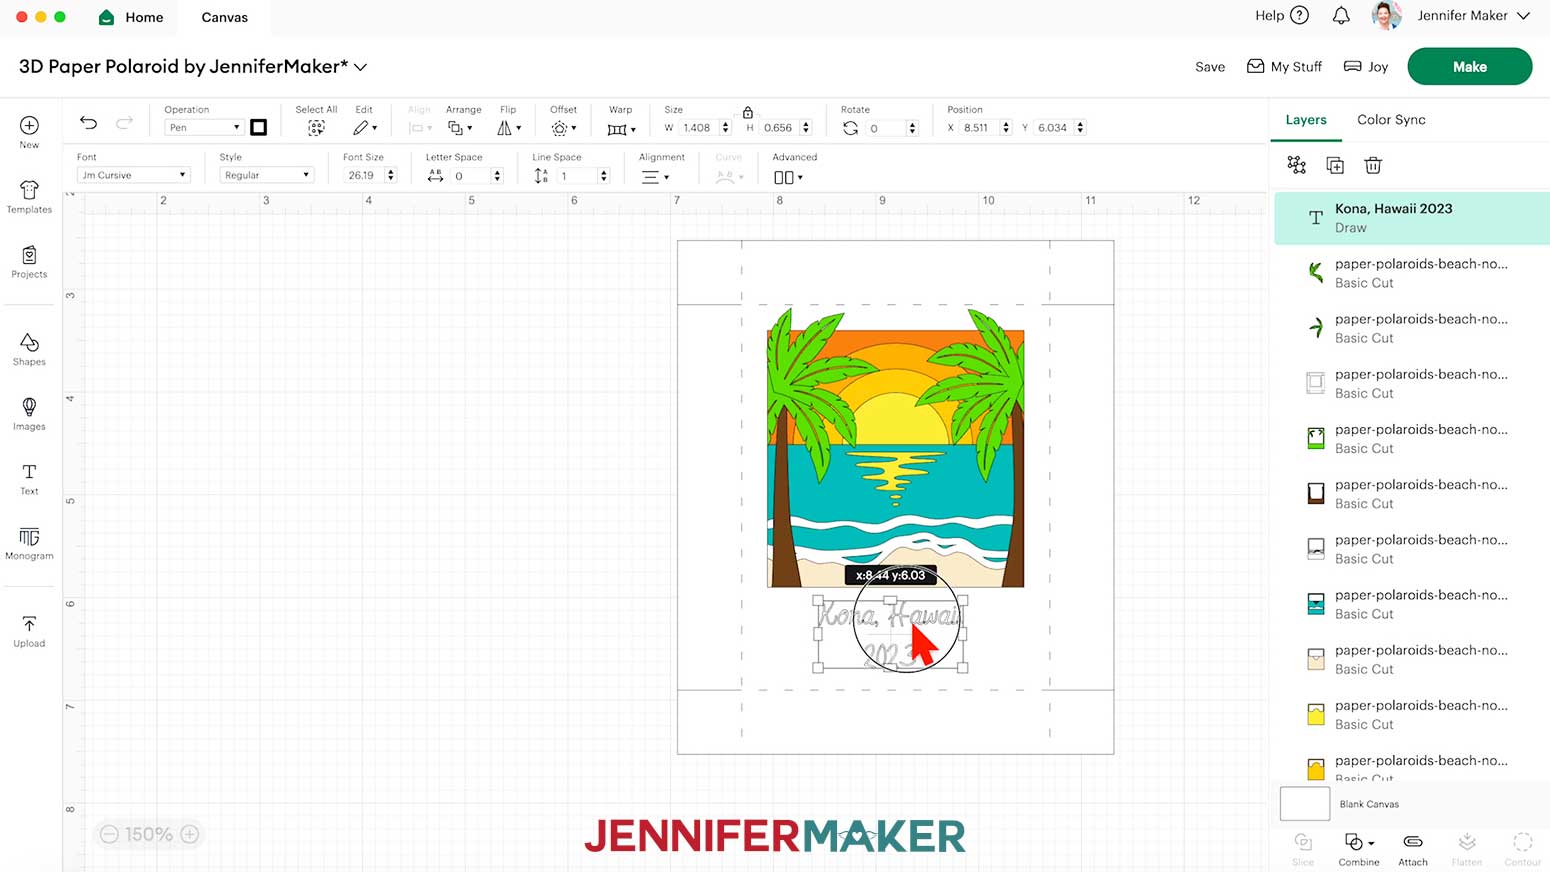
- Select the text box and position it where you want it to be on your photo.
NOTE: I’ll center mine in the white space below the colored layers and above the crease line.
- If you don’t like the amount of space between the lines of your text, in the “Line Space” field, click the up arrow to increase the spacing, or the down arrow to decrease the spacing. NOTE: I’ll adjust mine to -0.8 to pull the lines closer together.
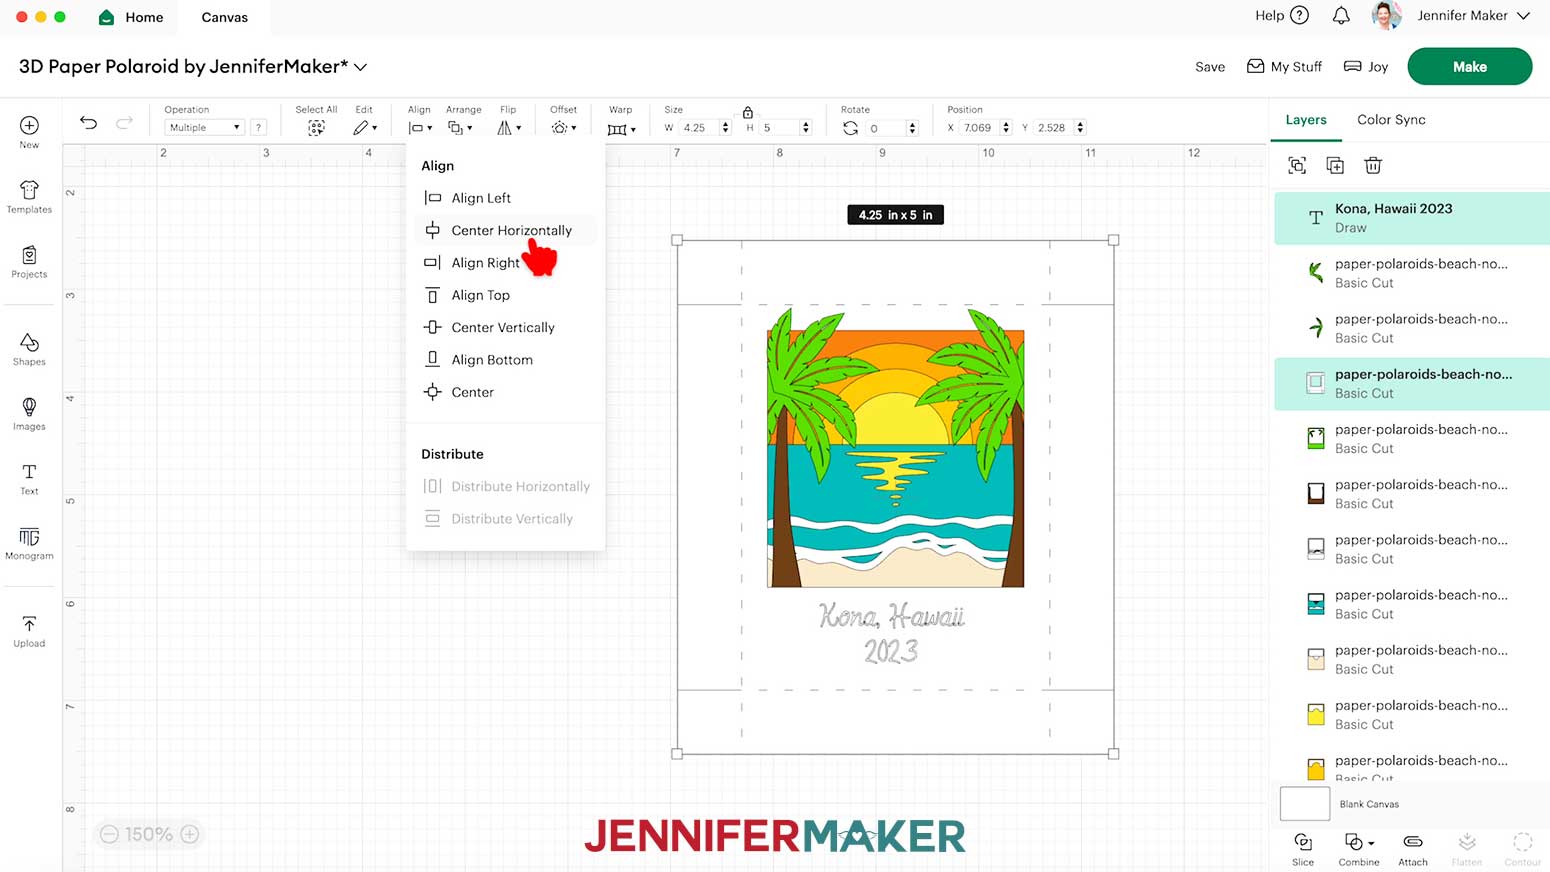
- To center the text between the left and right sides of your photo, hold down the “Shift” key on your keyboard and click the text box and the top frame layer.
- Then click on “Align” and “Center Horizontally.”
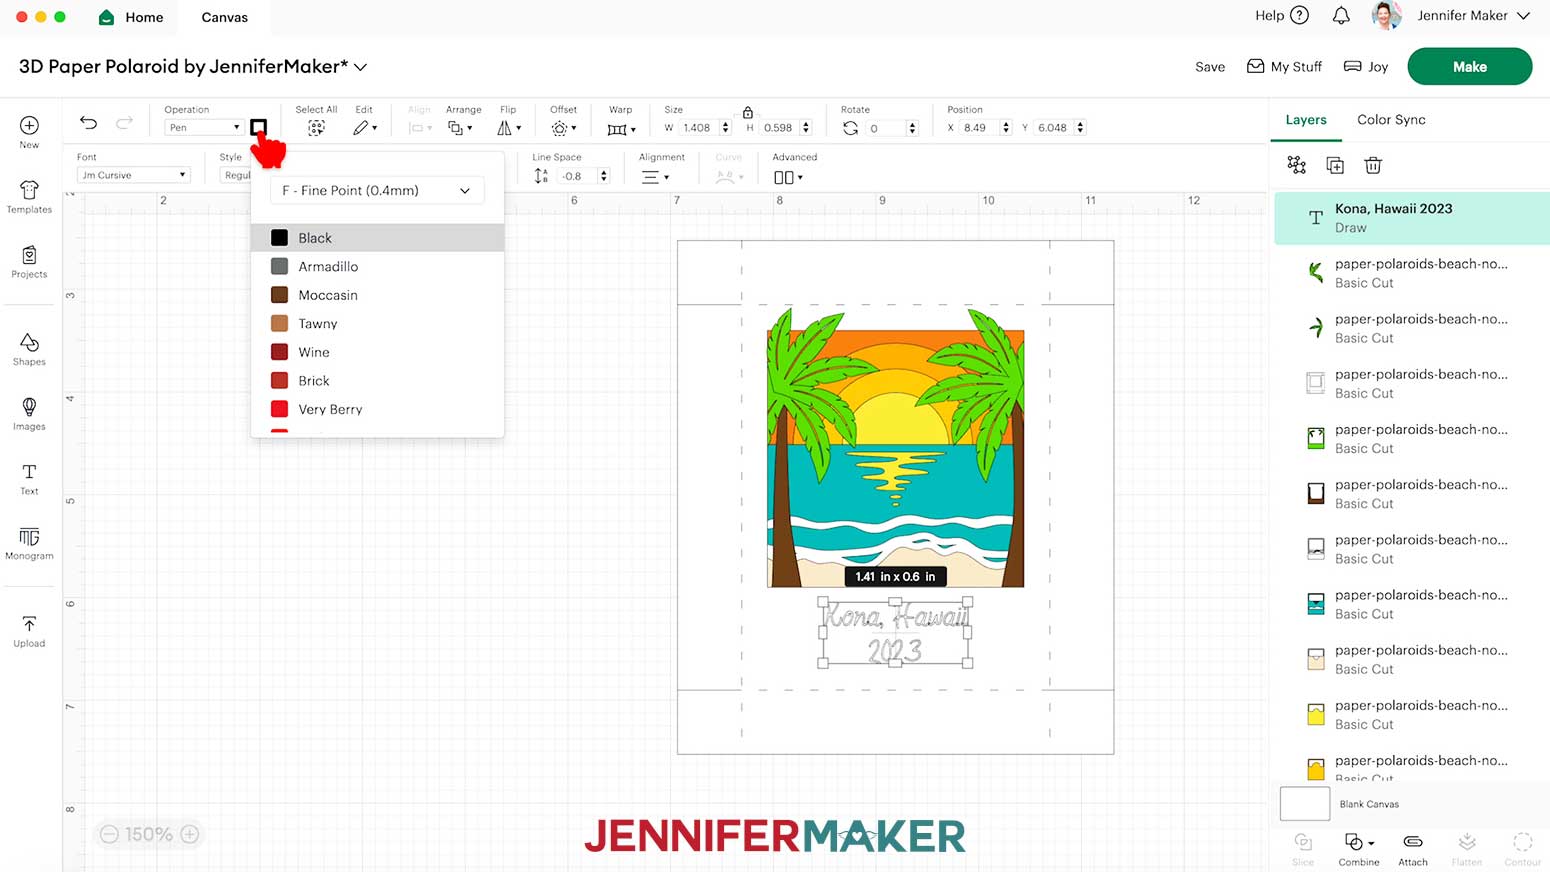
- With the text selected, click the dropdown menu under “Operation” and select “Pen” so your machine knows to write instead of cut this layer.
- Click the square next to the Operation menu to open the color box.
- In the dropdown menu, select your pen’s tip size. NOTE: I’ll select “F - Fine Point (0.4mm)”
- Select the color to match your pen. NOTE: I’ll select Black.
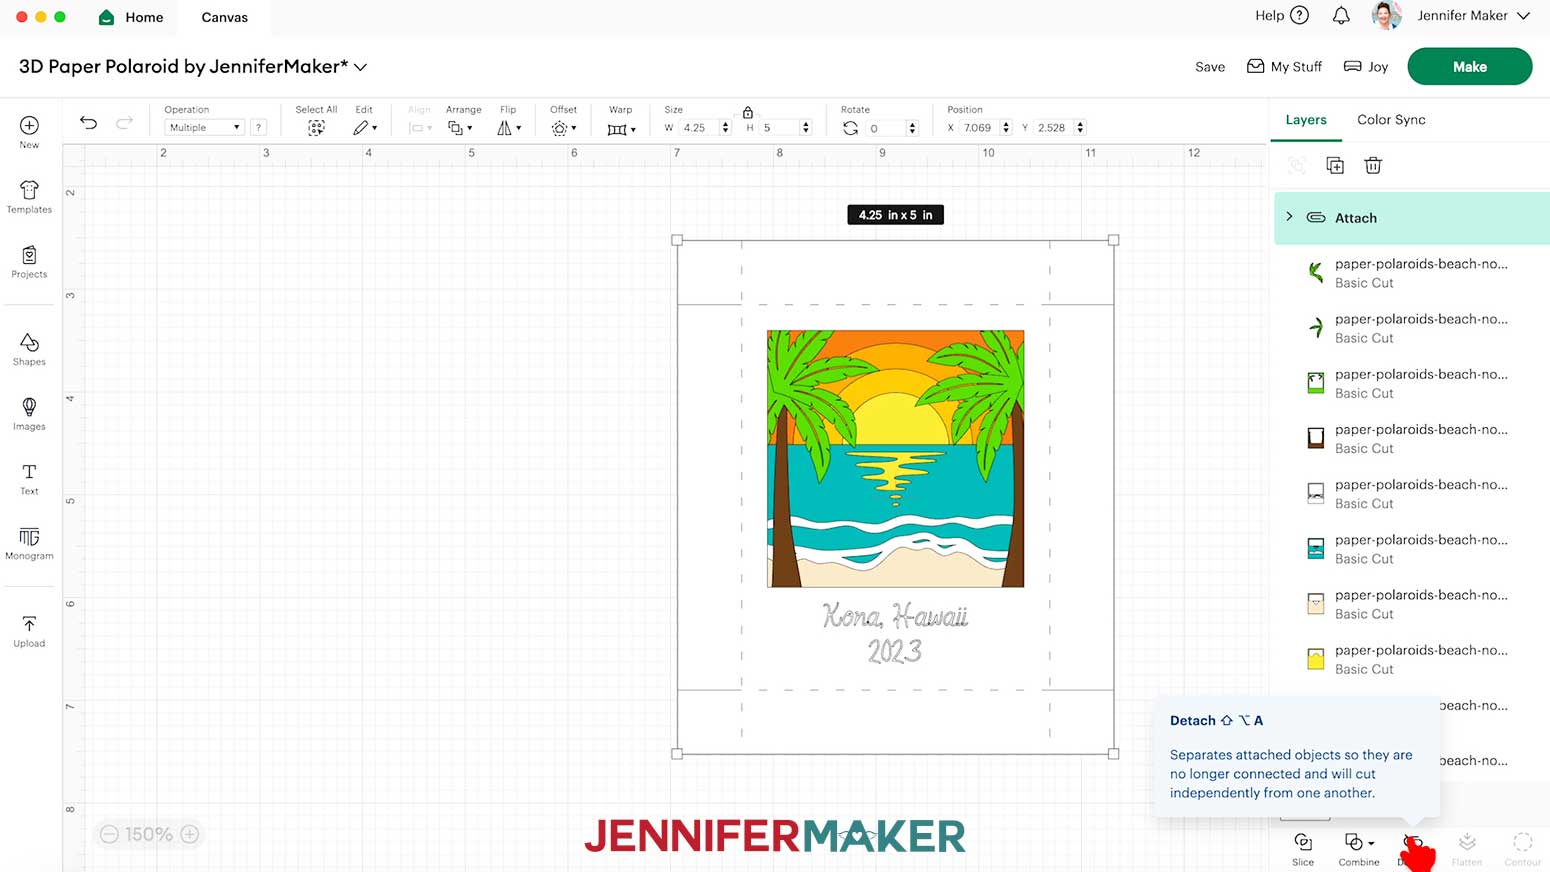
- Once the message looks the way you want, hold down the “Shift” key and select the text box and the top frame layer, then click “Attach” to make sure the message is written on your top frame layer.
- And now your layers are ready to cut!
 NOTE: To use a Cricut Design Space font, stay on the “Cricut” tab and click the “Filter” icon. Check the box next to “Free” to see free fonts, and check the box next to “Writing” to find single-line fonts that your Cricut can write without drawing outlines or “bubble” letters.
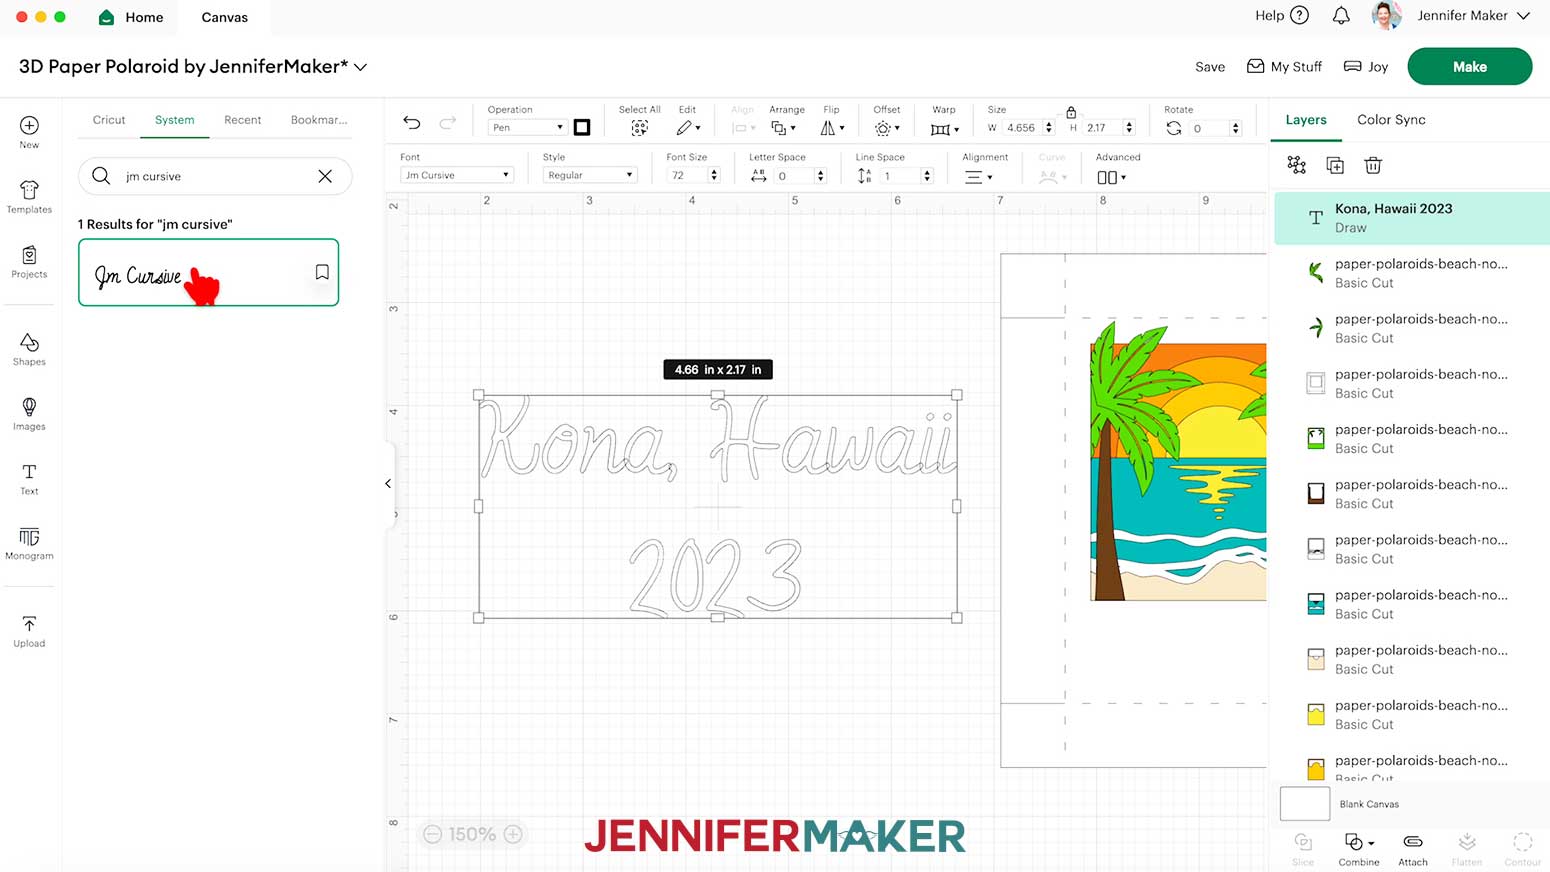
CUTTING (CRICUT JOY)
TIP: Use a paper trimmer to cut your 12” x 12” or 8.5” x 11” cardstock to 4.5” x 6.5” so it fits on your Cricut Joy’s green StandardGrip machine mat.
- Make sure the correct machine is selected in the top right.
- Click “Make.”
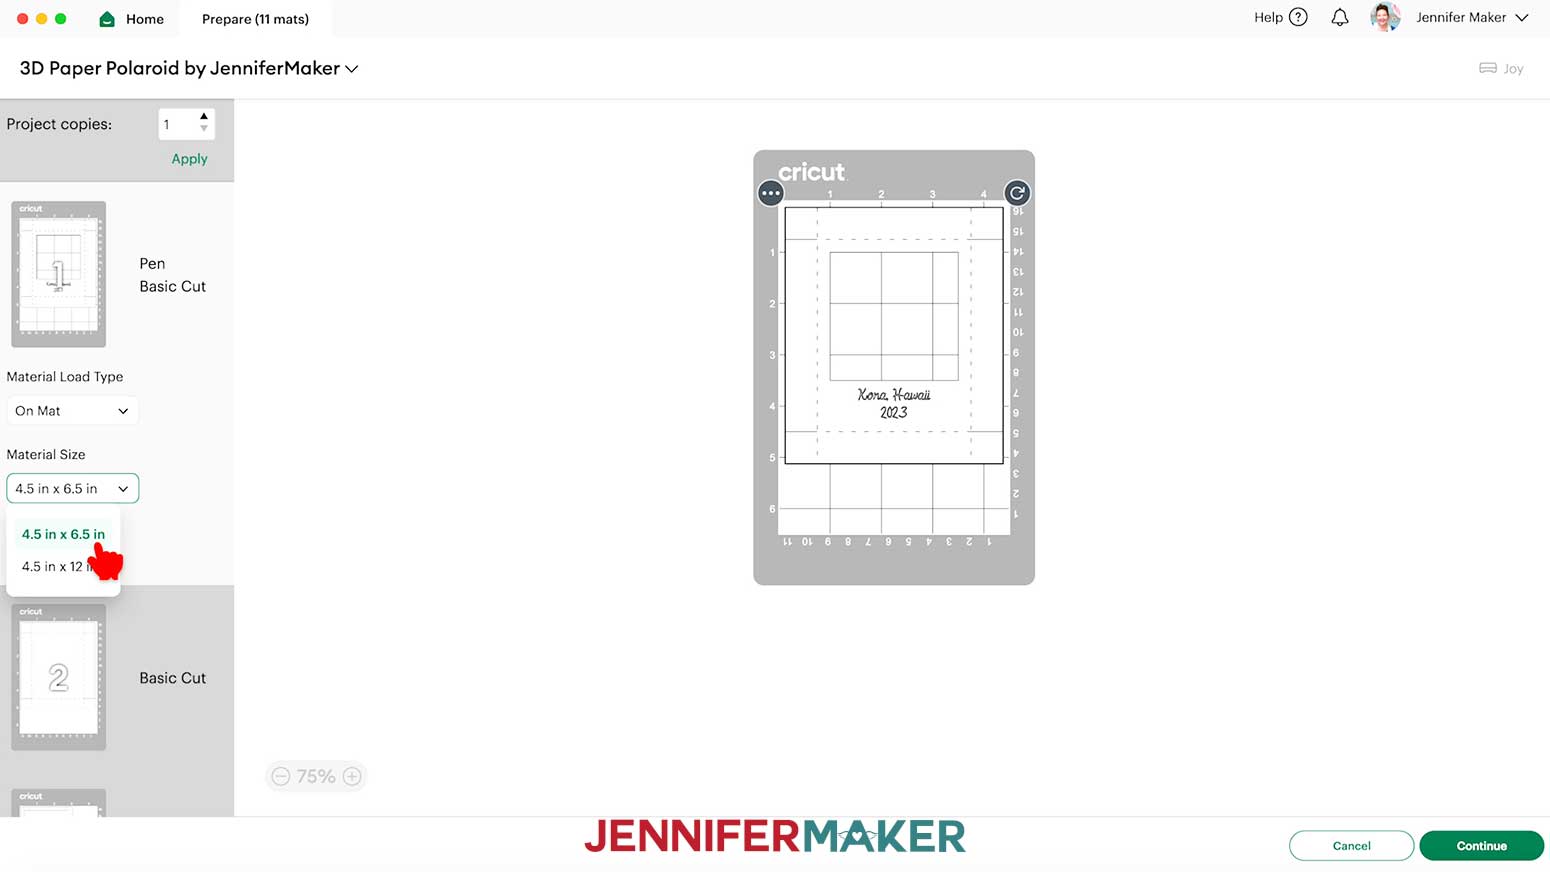
- On the Prepare screen, make sure the correct Material Size is selected for your mats.
NOTE: I’ll keep the “4.5 in x 6.5 in” size setting for all my mats.
TIP: If you see a mat with just “Pen” lines, your “Draw” layer may not have attached correctly, so click “Cancel” to go back to the Canvas to check and adjust as needed.
- Select the first mat so it loads first on the next screen and click “Continue.”
- On the Make screen, set the Base Material for your first mat. I used the “Medium Cardstock - 80 lb (216 gsm)” material setting to cut my 65 lb. cardstock.
- Change the pressure to “More.”
TIP: Changing the Pressure to “More” results in a cleaner cut.
TIP: Since your materials are the same for the remaining mats, check the box next to “Remember Material Settings” to save time between mats.
- Place your cardstock face up on a green StandardGrip machine mat.
- Use a brayer to make sure it’s fully adhered.
- Follow the screen prompts to select and add your pen in the clamp. TIP: Remove the pen’s cap (put it on the back so you don’t lose it) and test it on scrap paper to make sure it flows well first.
- Place the mat face up under the rollers so the Joy pulls it in.
- Click “Go” to begin drawing.
- When prompted, check that your Premium Fine-Point Blade is clean and load it in the clamp.
- Click “Go” to cut. TIP: If you have any issues with your cuts, go to jennifermaker.com/cleaner-cuts.
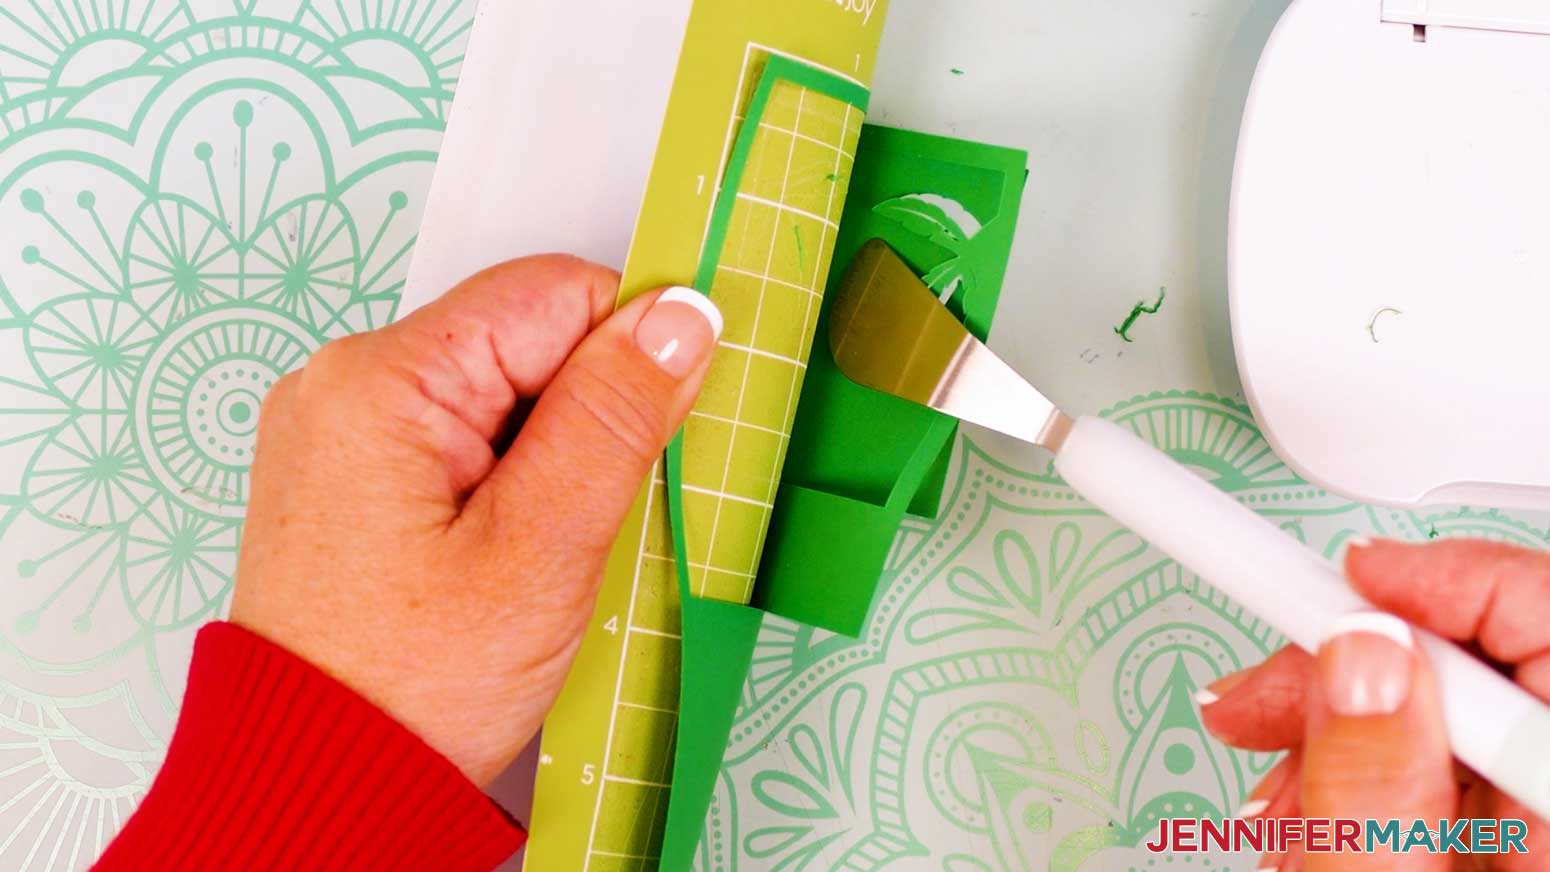
- When the cuts are complete, unload the mat, flip it over onto your work surface, and roll it back to release the cardstock.
TIP: Use the spatula to help lift delicate parts, and your weeding tool to poke out small bits of cardstock that are still attached to your cut pieces.
- Use a scraper tool to remove the small bits of cardstock left on your mat after you remove the cut pieces.
- Repeat steps 7-15 to cut your remaining layers.
- Lay out all of your cut pieces face up.
TIP: Refer to the Design Space screen if you’re not sure about some pieces’ orientation.
 TIP: If you see a mat with just “Pen” lines, your “Draw” layer may not have attached correctly, so click “Cancel” to go back to the Canvas to check and adjust as needed.
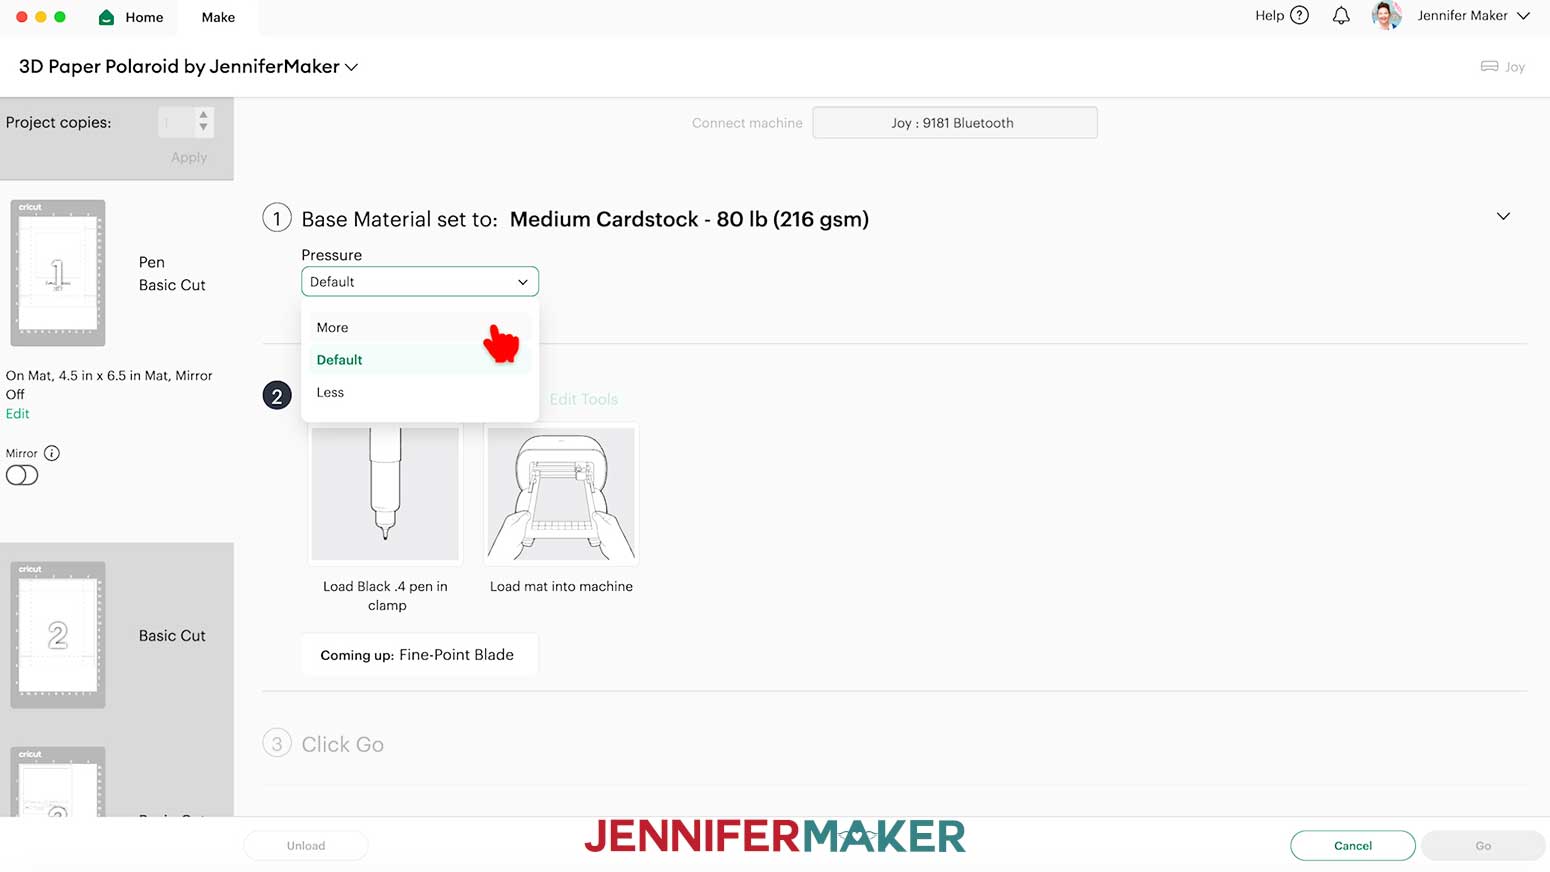 TIP: Since your materials are the same for the remaining mats, check the box next to “Remember Material Settings” to save time between mats.
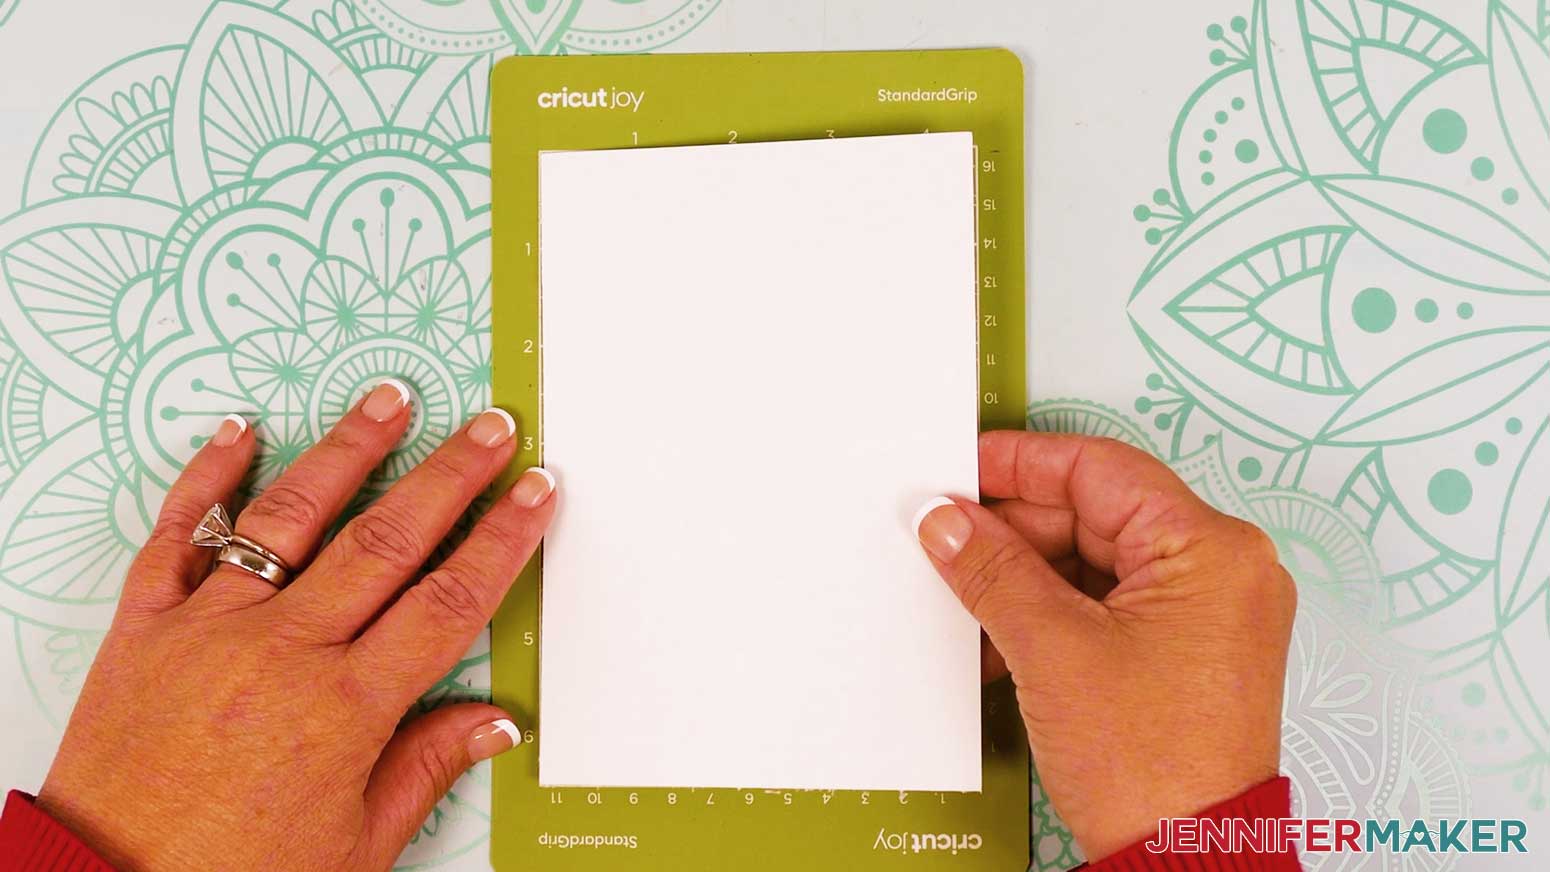
(BONUS) OPTION 2: MOUNTAIN SCENE WITH SCORE LINES
CRICUT DESIGN SPACE
- In Cricut Design Space, open a blank Canvas. NOTE: If you’re new to using Cricut Design Space, go to cricutkickoff.com for my introductory tutorial on Design Space basics.
- Click “Upload” and then “Upload Image.”
- Click “Browse.”
- Select the SVG file of your choice. NOTE: I’ll select the “score” version of the Mountain design.
- Click “Open,” and then “Continue.”
- Click “Upload” to add the design to your Canvas.
NOTE: There are nine inner cutout layers, two decorative grass pieces, and two outer frame pieces stacked on your Canvas.
- Click “Save” and give your project a name.
- Ungroup the design.
- In the Layers Panel, click the arrow next to the top outer frame piece to expand the group.
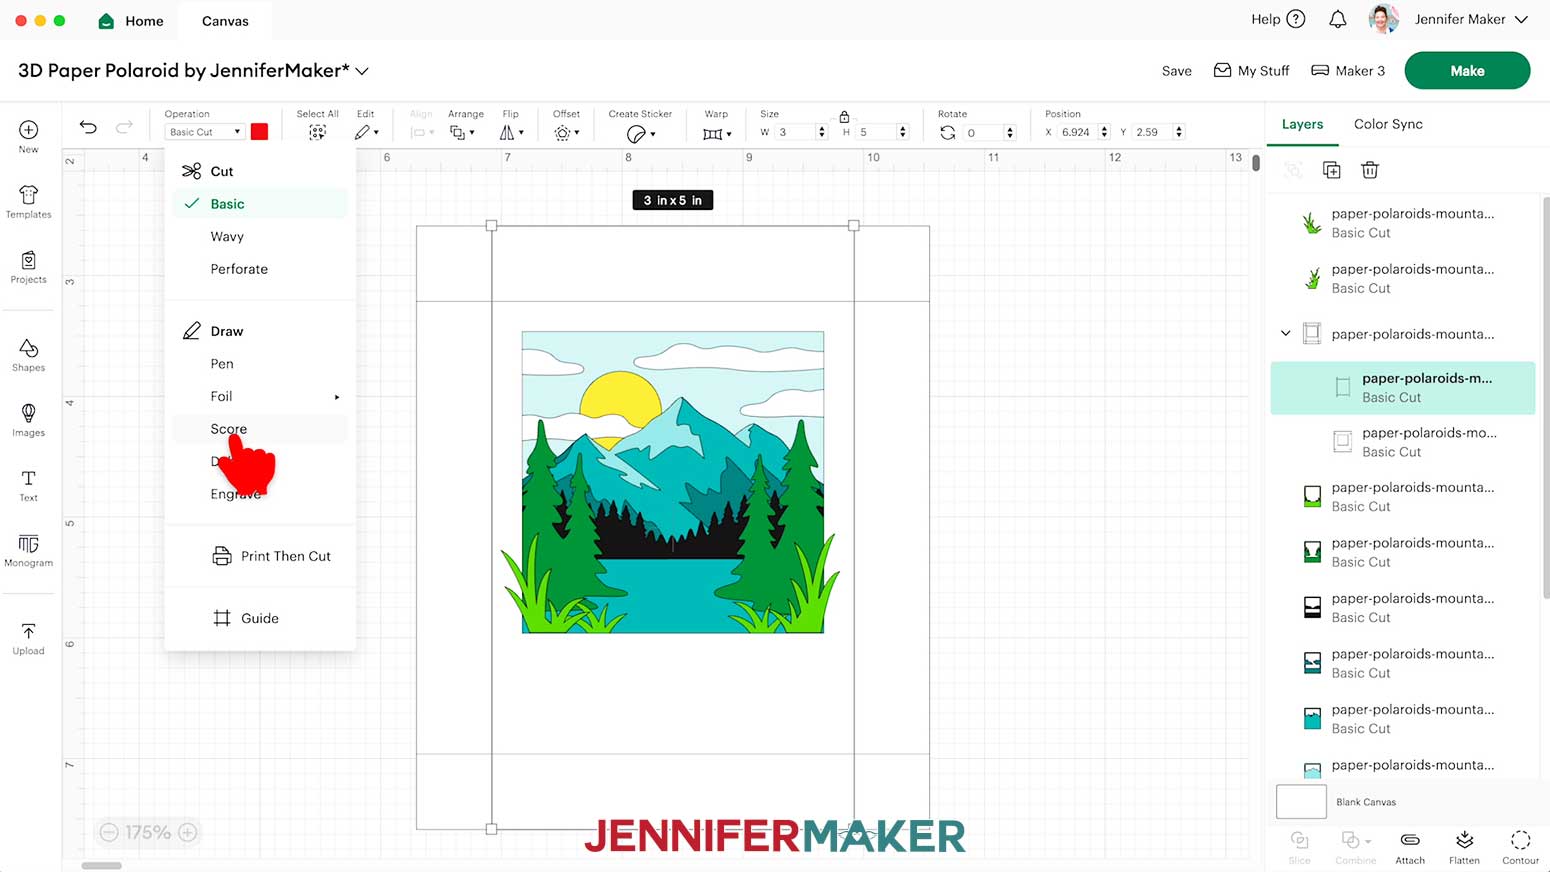
- Select the layer that looks like a simple rectangle (it will be red in the Color Box at the top). Then under “Operation,” click “Score.”
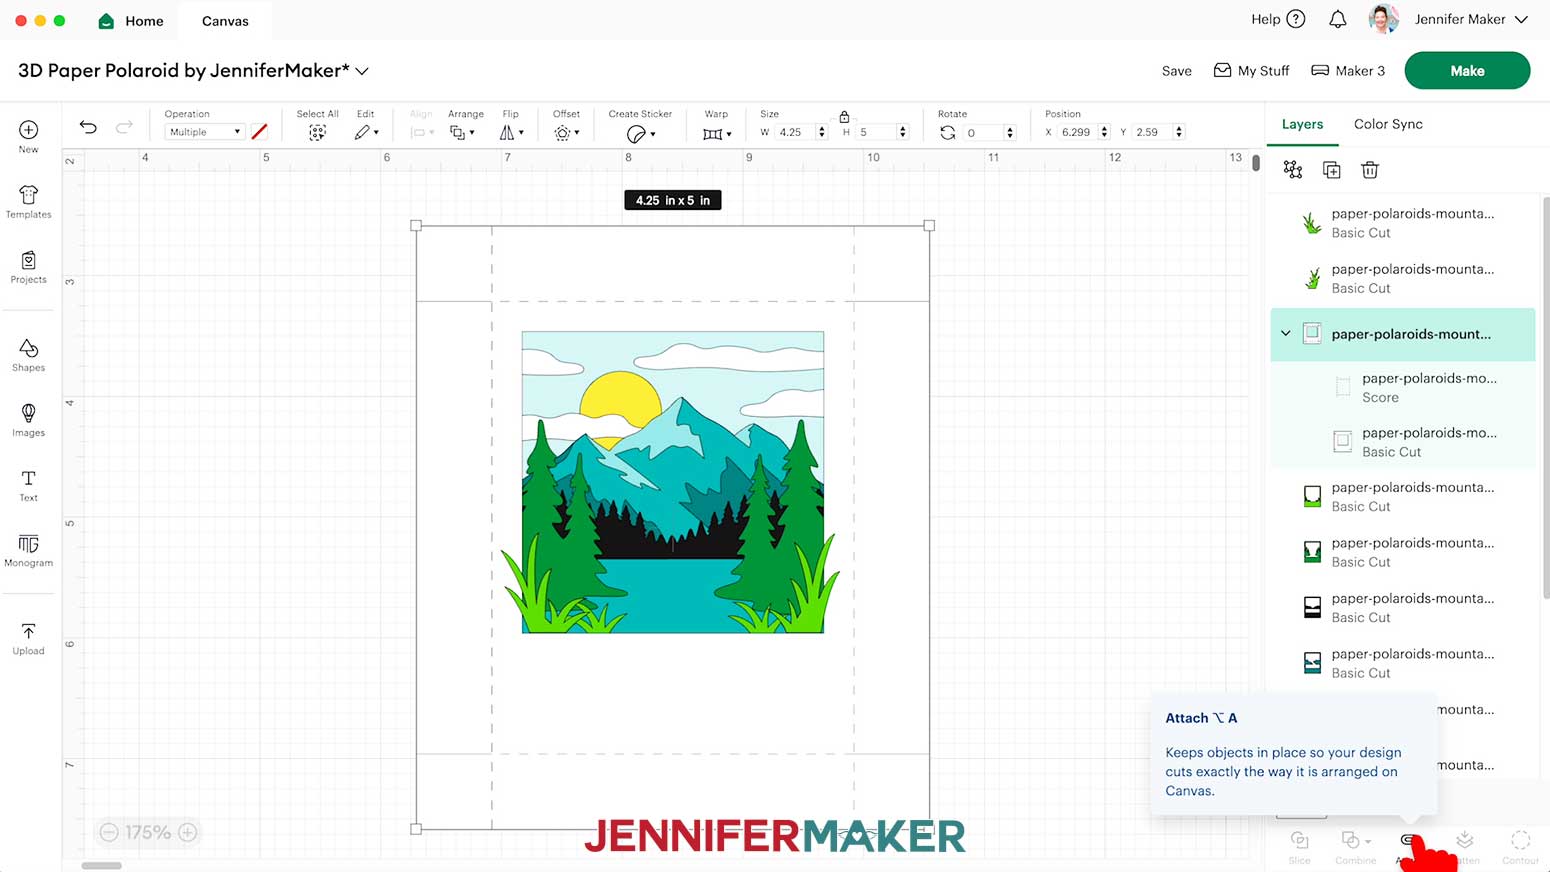
- Click the topmost layer of the group to select both the Score layer and the Basic Cut layer underneath it.
- Click “Attach.”
- That group will move to the top of the layers. Click “Arrange” and “Send to Back” to move it to the back.
- Repeat steps 9-13 to set and attach the score lines on the bottom outer frame piece.
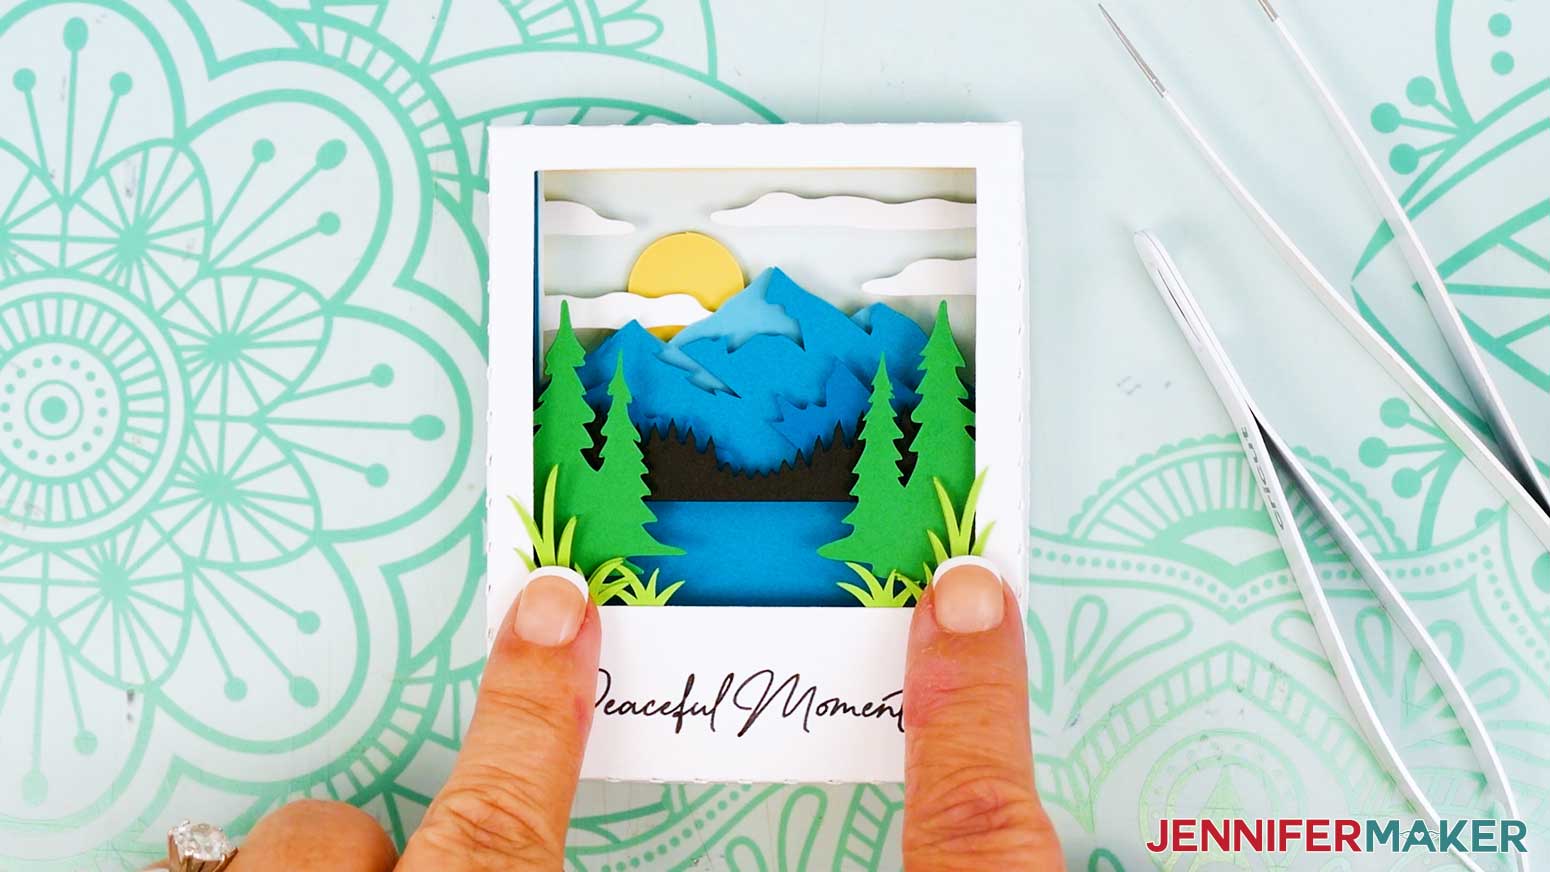
- If desired, follow Steps 9-22 from the “NO-SCORE BEACH SCENE” section to create a custom message for your design. NOTE: I added a message reading “Peaceful Moments” using a font called “Baldive,” which you can download at FontBundles.net. It’s also available free for personal use at dafont.com. I made my Font Size 36 to fit in the blank space at the bottom of my photo.
- To ensure the message is written on the correct layer, drag the text layer so it’s within the top outer frame layer’s group in the Layers Panel.
- And now your layers are ready to cut!
CUTTING (CRICUT MAKER OR EXPLORE SERIES MACHINES)
- Make sure the correct machine is selected in the top right.
- Click “Make.”
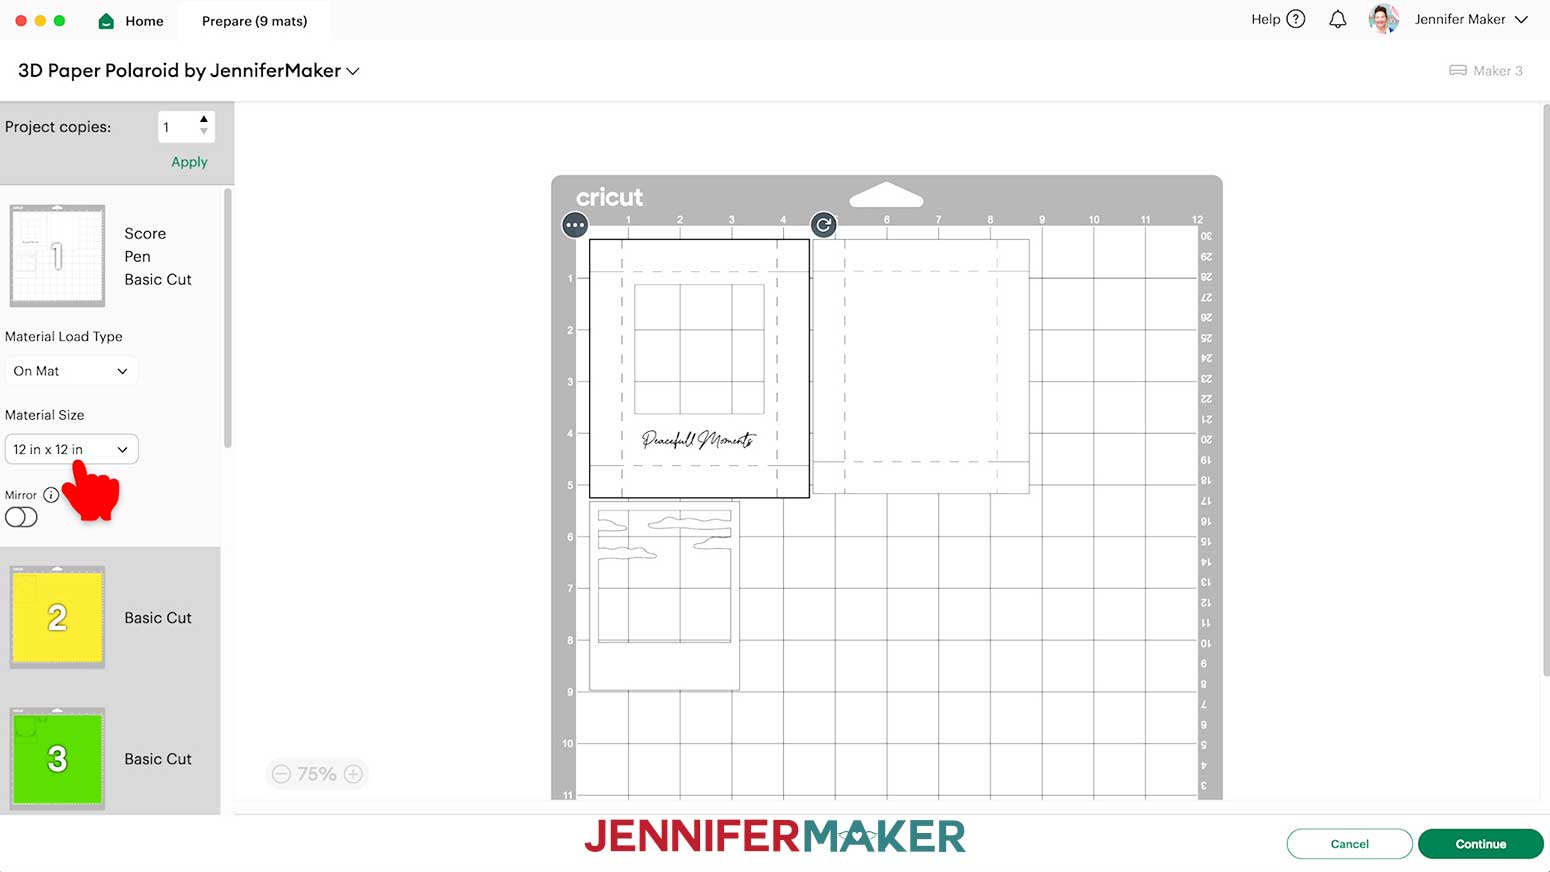
- On the Prepare screen, make sure the correct Material Size is selected for your mats.
NOTE: I’ll keep the “12 in x 12 in” size setting for all my mats.
TIP: If you see a mat with just Pen lines, your “Draw” layer may not have attached correctly, so click “Cancel” to go back to the Canvas to check and adjust as needed.
- Select the first mat so it loads first on the next screen and click “Continue.”
- On the Make screen, set the Base Material for your first mat. I used the “Medium Cardstock - 80 lb (216 gsm)” material setting to cut my 65 lb. cardstock.
- Change the pressure to “More.” TIP: Since your materials are the same for the remaining mats, check the box next to “Remember Material Settings” to save time between mats.
- Place your cardstock face up on a green StandardGrip machine mat.
- Use a brayer to make sure it’s fully adhered.
- Your machine will score first, so follow the screen prompts to load your scoring tool into the correct clamp.
NOTE: The Single Scoring Wheel will be selected by default. If you have a Scoring Stylus, click “Edit Tools” and select the Scoring Stylus.
- Press the flashing “Load/Unload” button to load the prepared mat into your Cricut.
- Press the flashing middle button to begin scoring.
- Your machine will draw next, followed by cutting. Follow the screen prompt to load your pen into its correct clamp. TIP: Remove the pen’s cap (put it on the back so you don’t lose it) and test it on scrap paper to make sure it flows well first.
- Check that your Premium Fine-Point Blade is clean, then follow the screen prompt to load it in the correct clamp.
- Press the flashing middle button to begin drawing.
- When prompted, remove the pen from the clamp and replace the cap.
- Press the flashing middle button to begin cutting, if needed.
- When it has finished cutting, don’t unload the mat right away. Gently lift a corner of the material to make sure the cuts went all the way through. If not, press the middle button again to make a second pass of cuts in the same spots. TIP: If you have any issues with your cuts, go to jennifermaker.com/cleaner-cuts.
- When the cuts are complete, unload the mat, flip it over onto your work surface, and roll it back to release the cardstock. TIP: Use the spatula to help lift delicate parts, and your weeding tool to poke out small bits of cardstock that are still attached to your cut pieces.
- Use a scraper tool to remove the small bits of cardstock left on your mat after you remove the cut pieces.
- Repeat Steps 7-8 to prepare each remaining mat, load it into your Cricut, then repeat steps 16-19 to cut your remaining layers.
- Lay out all of your layers face up in order.
TIP: Refer to the Design Space screen if you’re not sure about the orientation of your pieces.
 TIP: If you see a mat with just Pen lines, your “Draw” layer may not have attached correctly, so click “Cancel” to go back to the Canvas to check and adjust as needed.
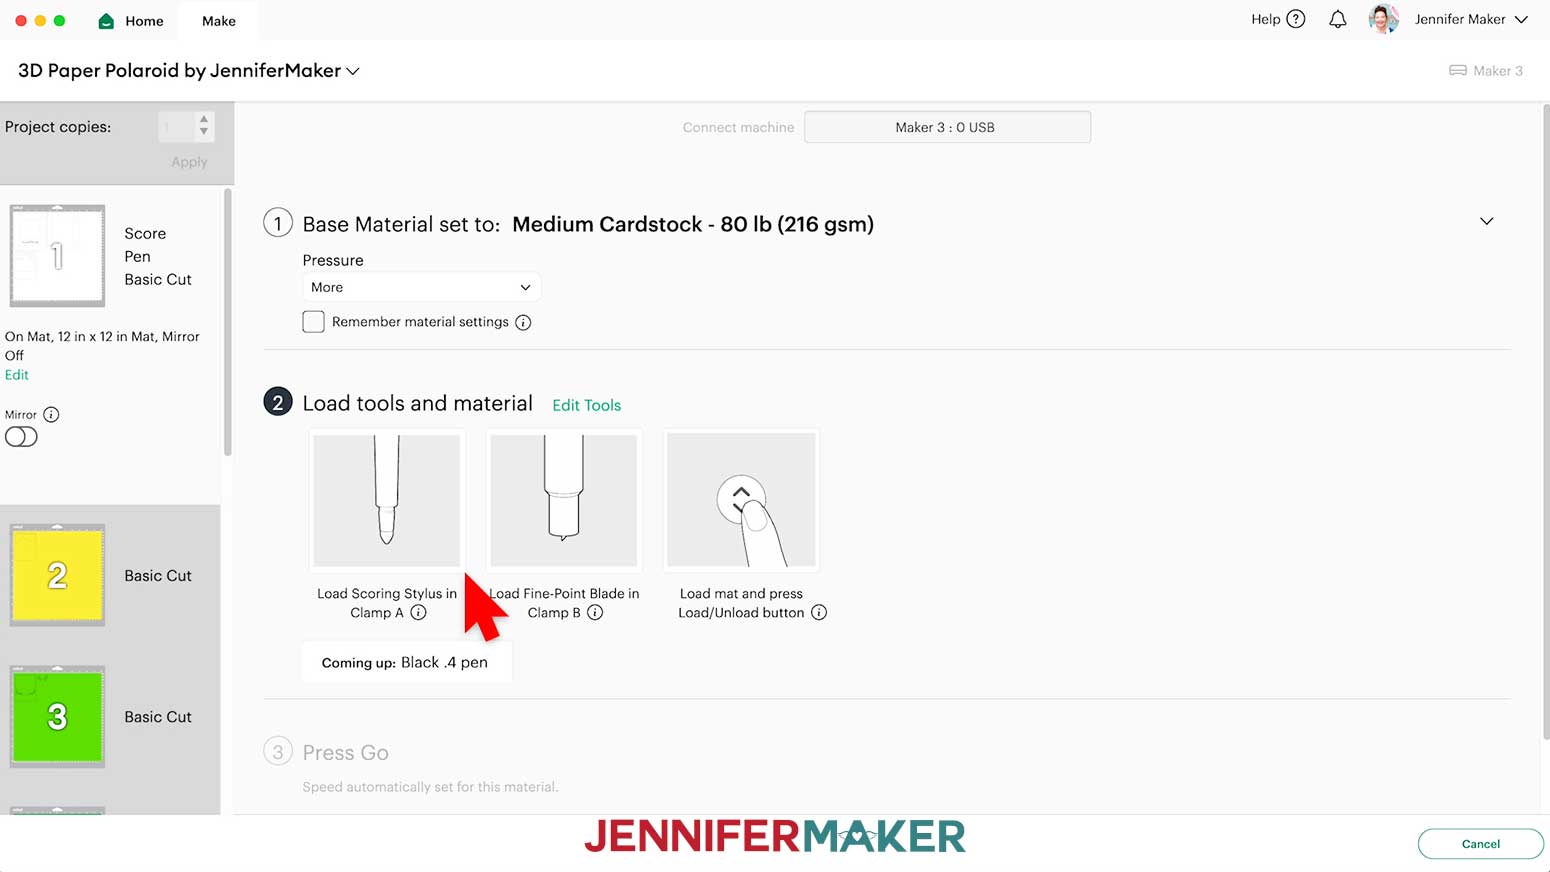

STEP 3: ASSEMBLE YOUR POLAROID SHADOW BOX
ASSEMBLE YOUR SHADOW BOX FRAME
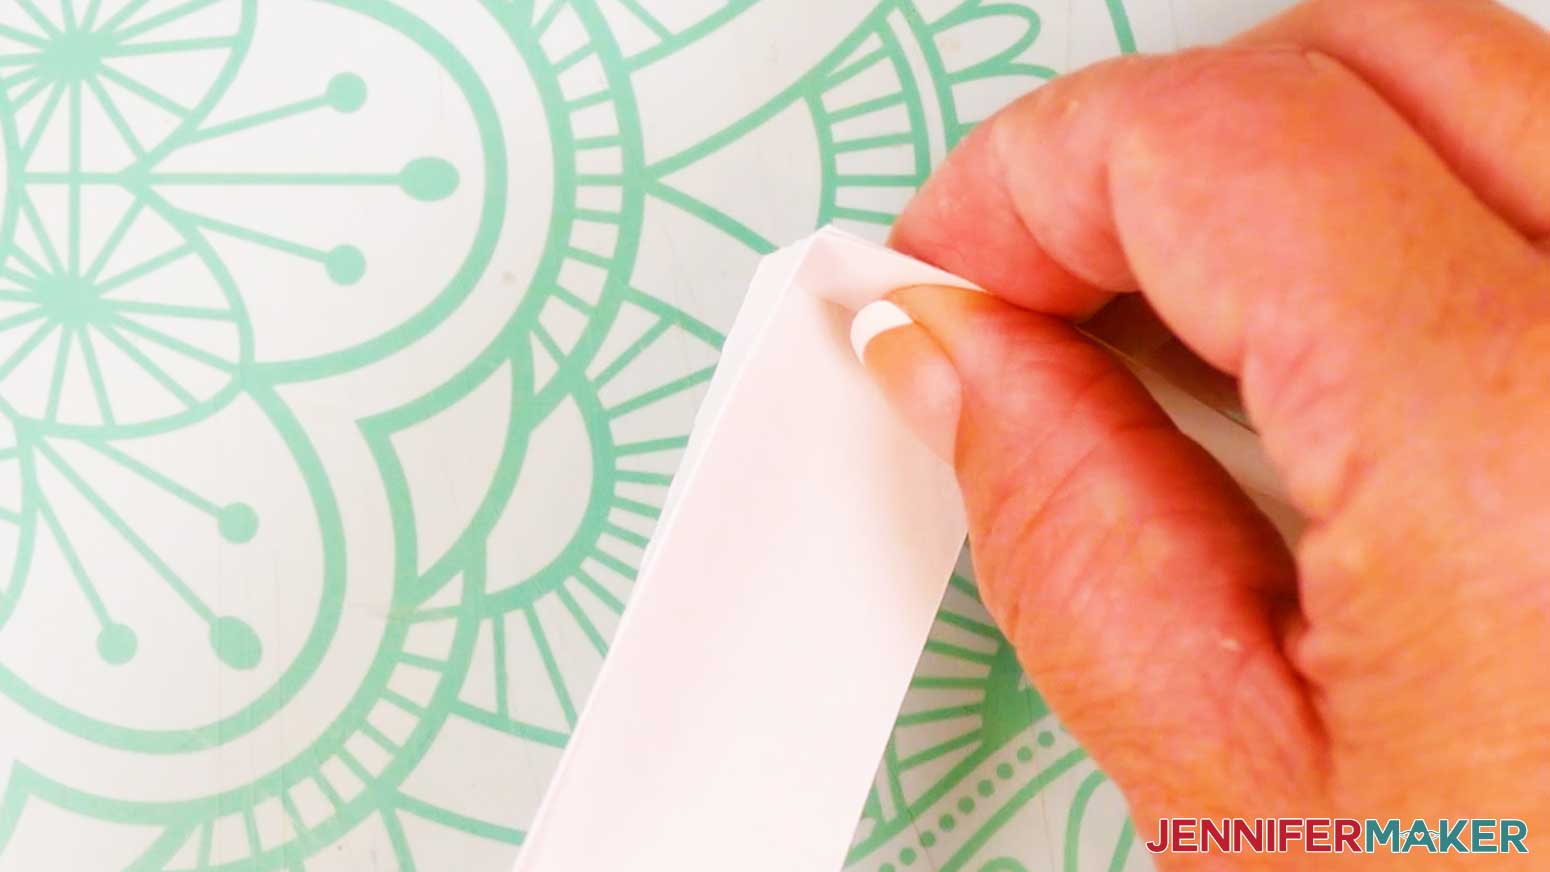
- Place the two white frame pieces with the crease lines in front of you, face down.
- Fold upward along the crease lines on both pieces. Fold them as straight as possible so the final shadow box fits together precisely.
TIP: It helps to bend the cardstock along a flat edged object, such as a scraper or a ruler, to make straight folds. Be sure the folds at the tabs line up with the edges of the frame sides.
- Fold inward along the crease lines on all four tabs on each piece.
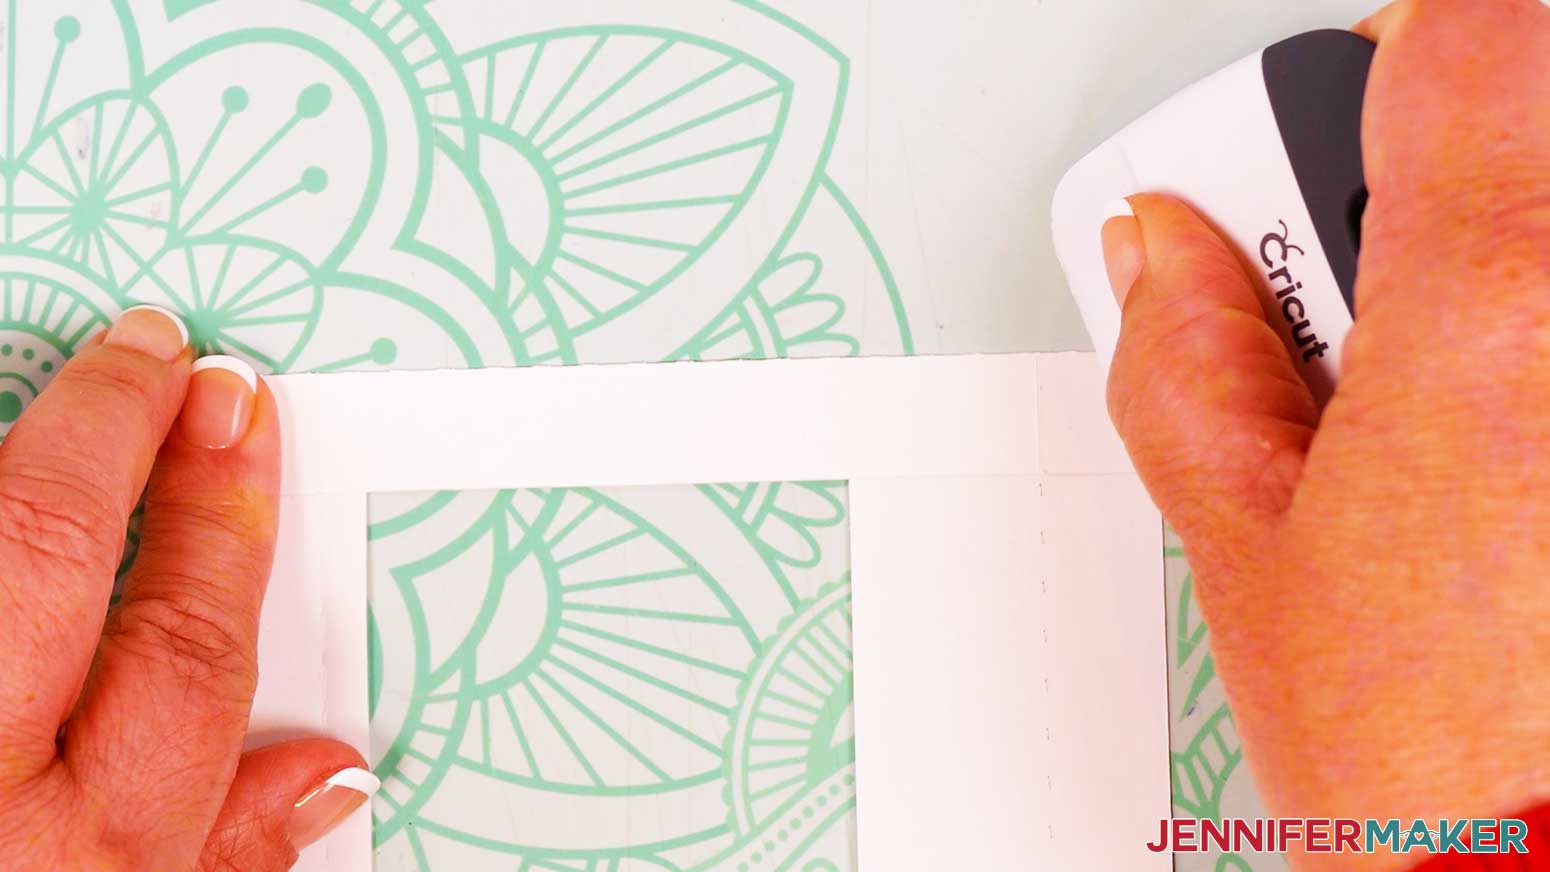
- Use your scraper tool to sharpen the folds.
- Apply craft glue to the outside of each short tab.
- Press to adhere it into place on the back of the adjacent frame side. Make sure that the edge of the frame side is flush with the fold in the tab for a sharp, square corner.
- Do this for all four tabs on both frame pieces.
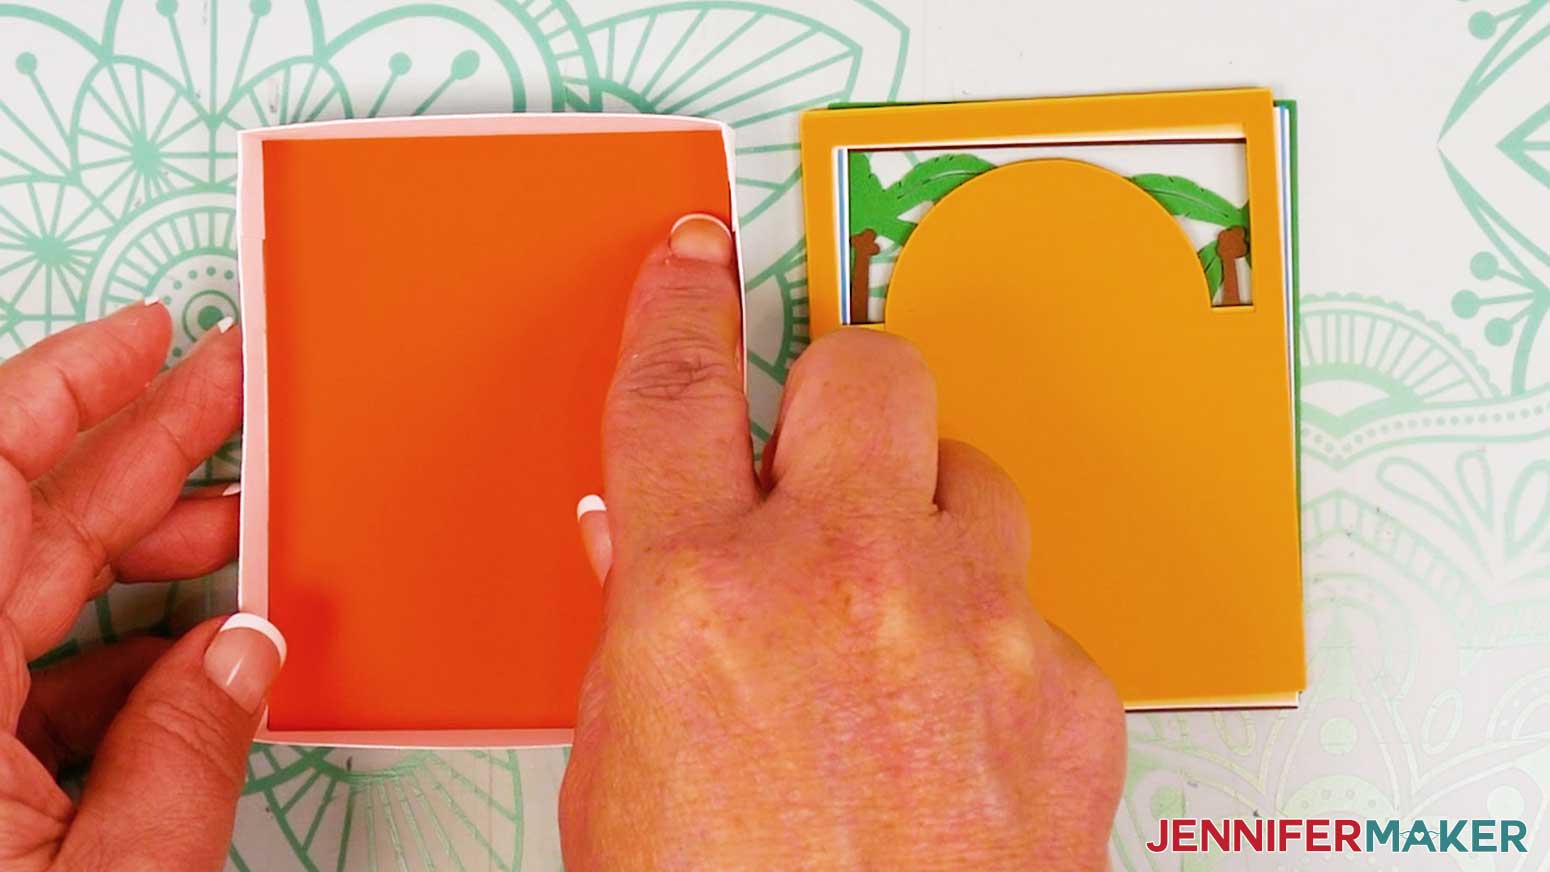
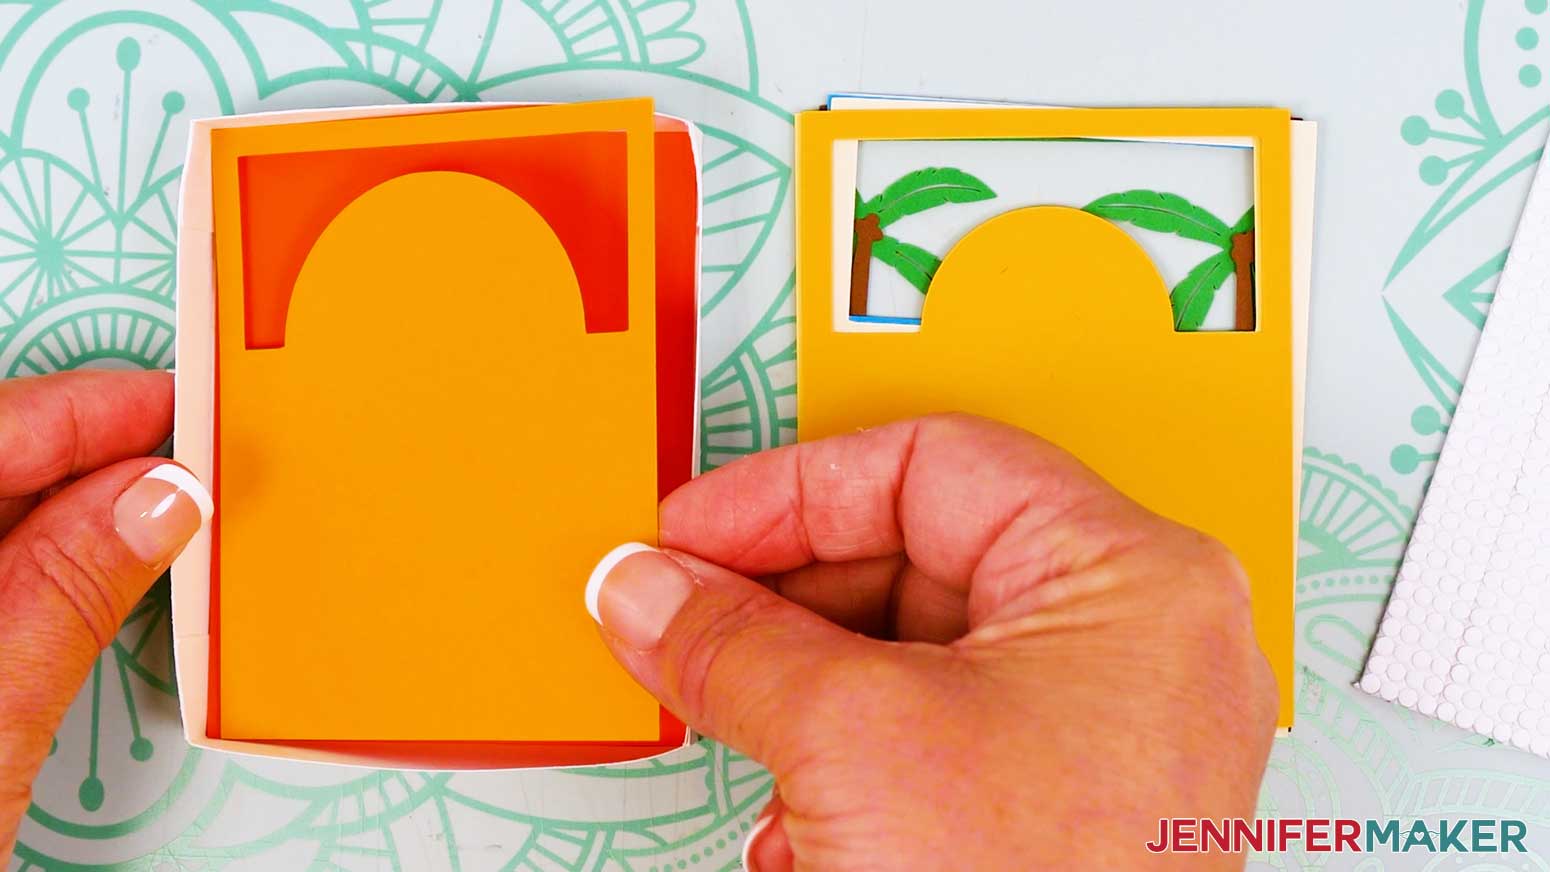
- Make sure your front frame piece (the one with the cutout in the center) slides easily onto your back frame piece.
ASSEMBLE YOUR SHADOW BOX LAYERS
BEACH
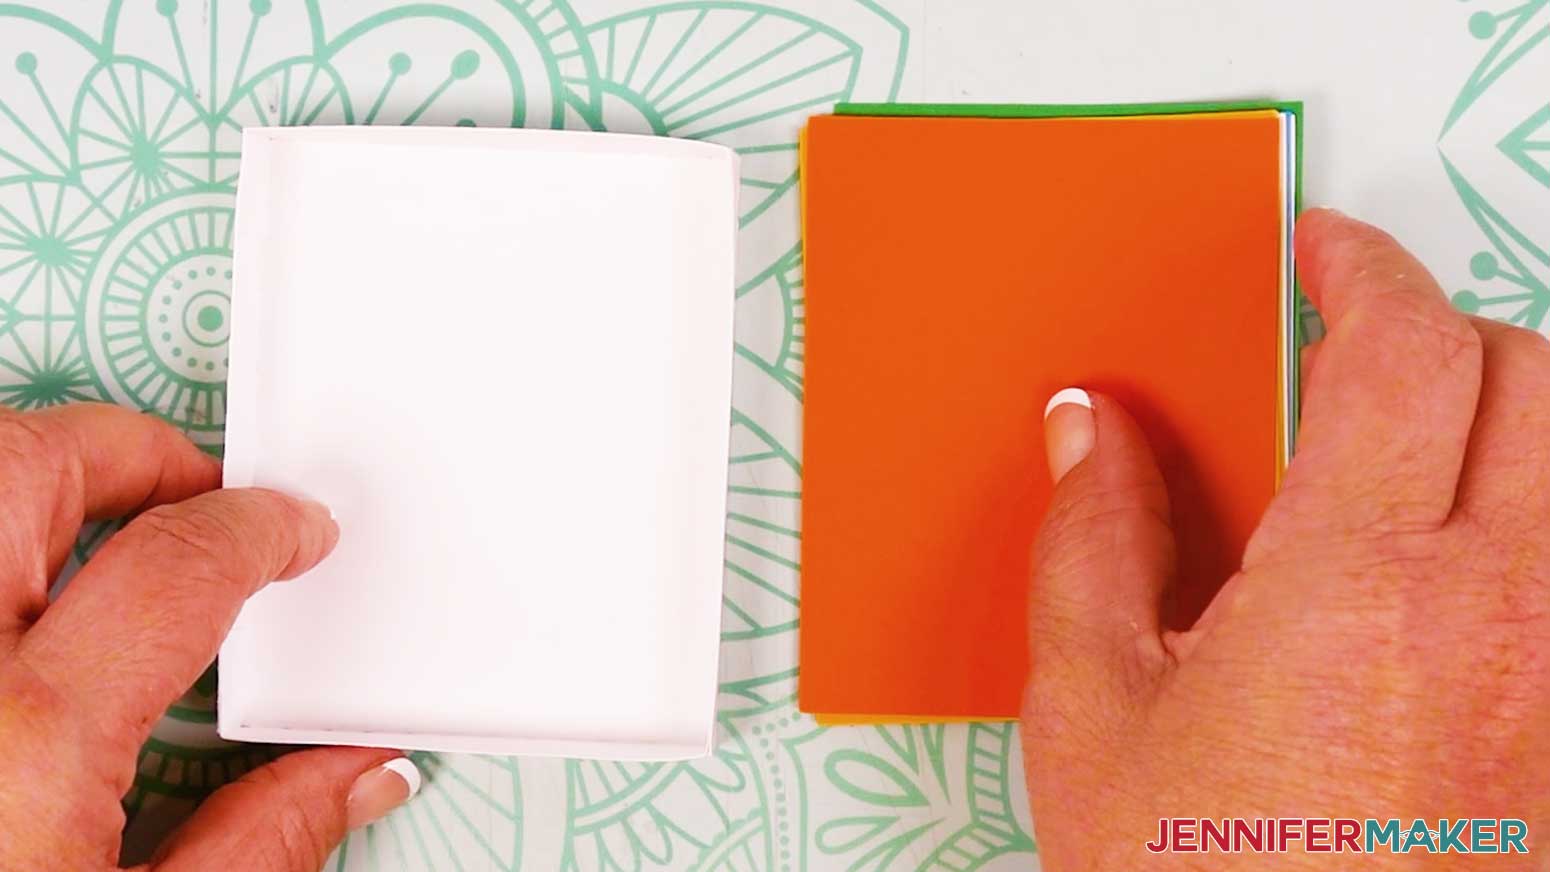
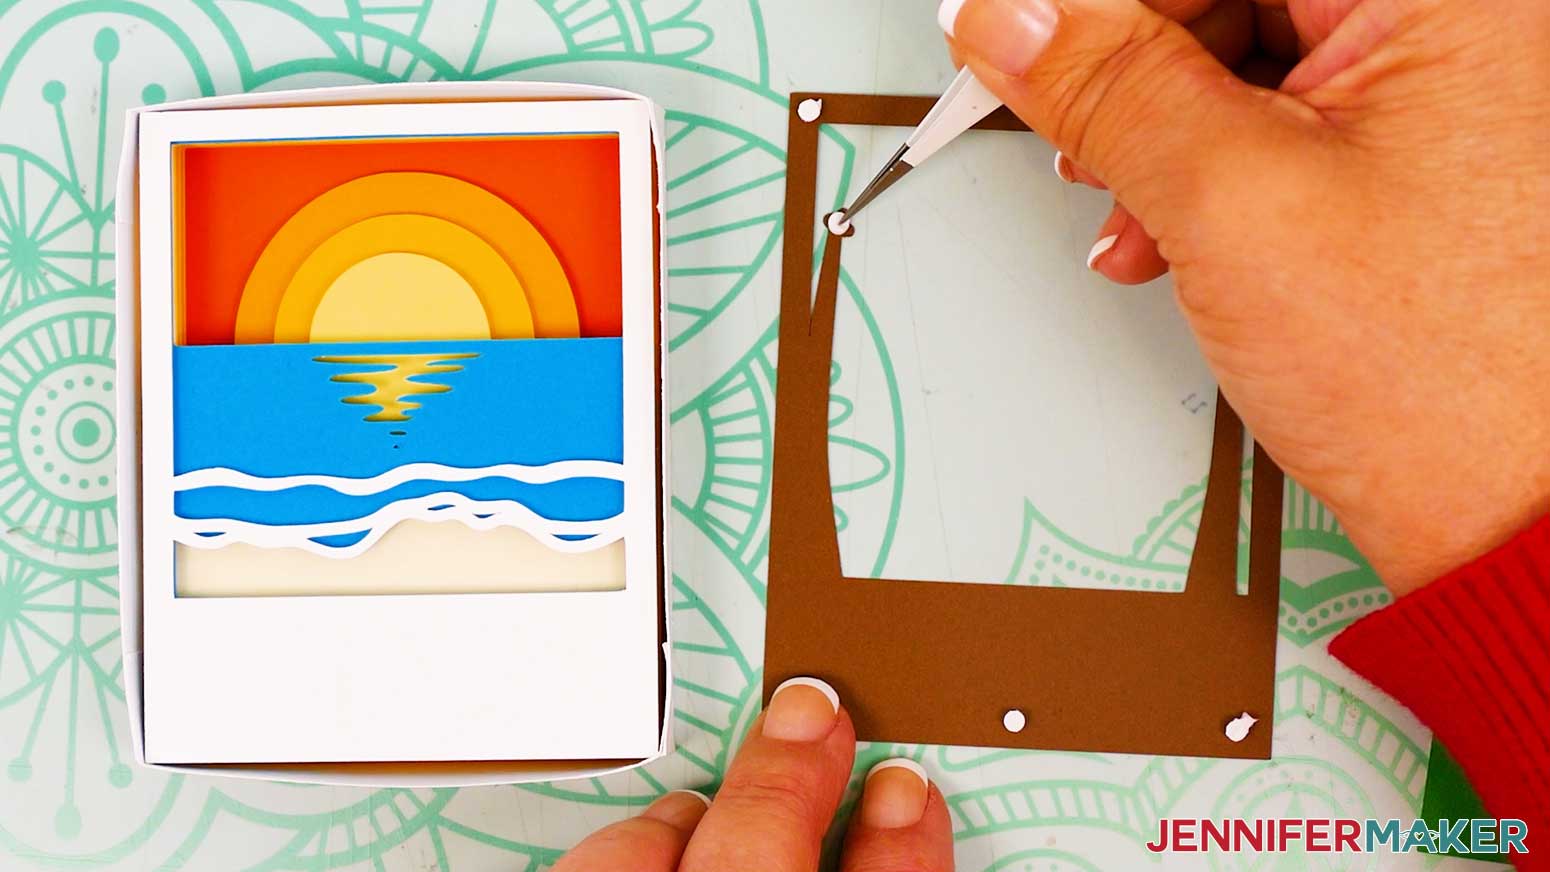
- Place the shadow box bottom on your work surface, open side up.
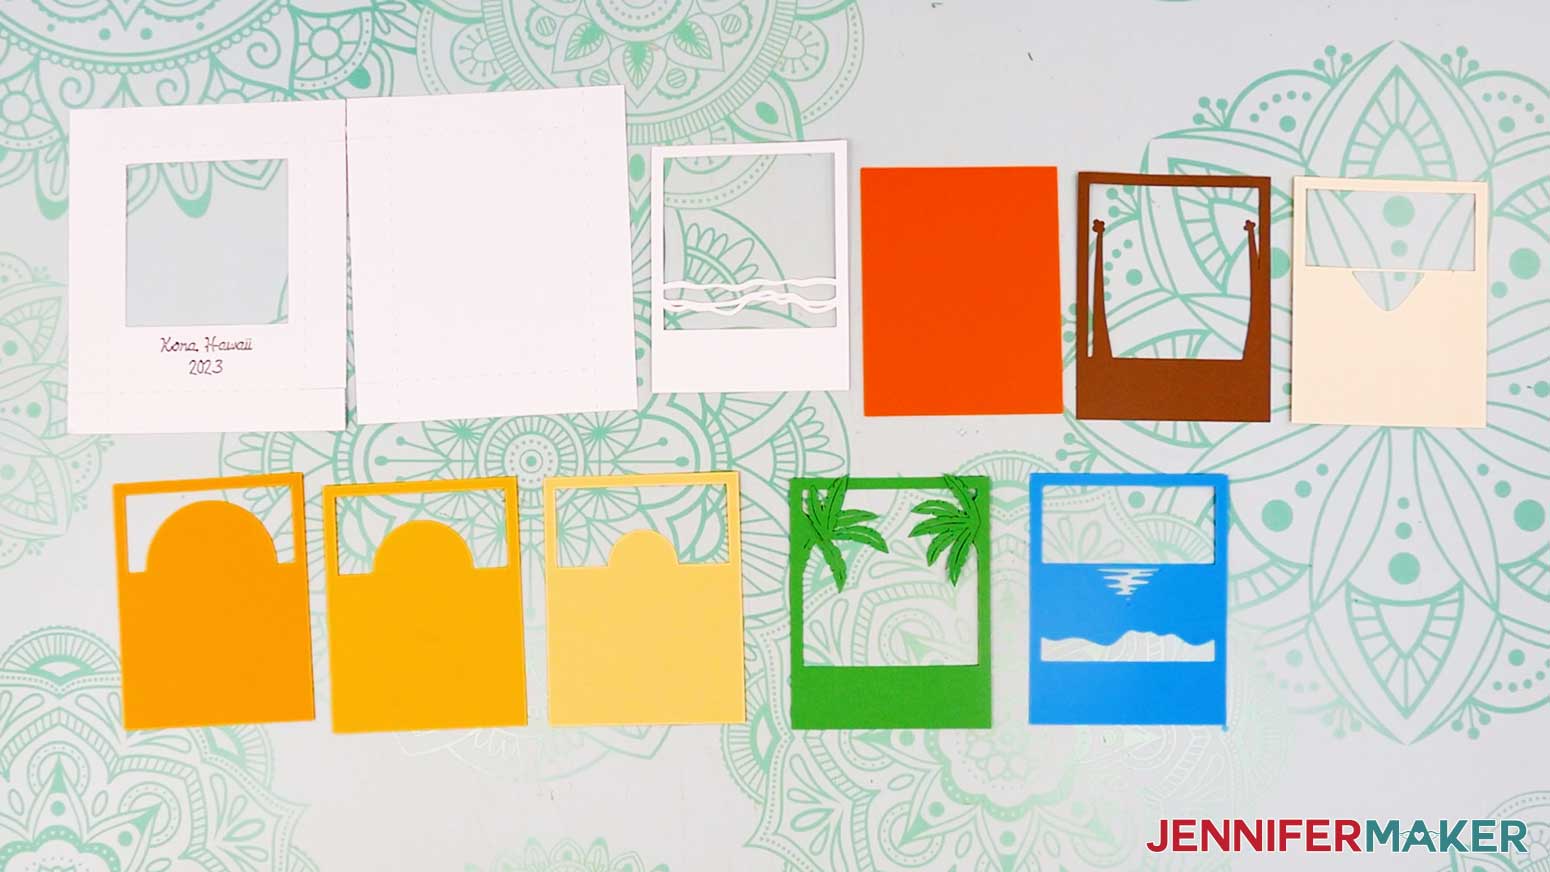
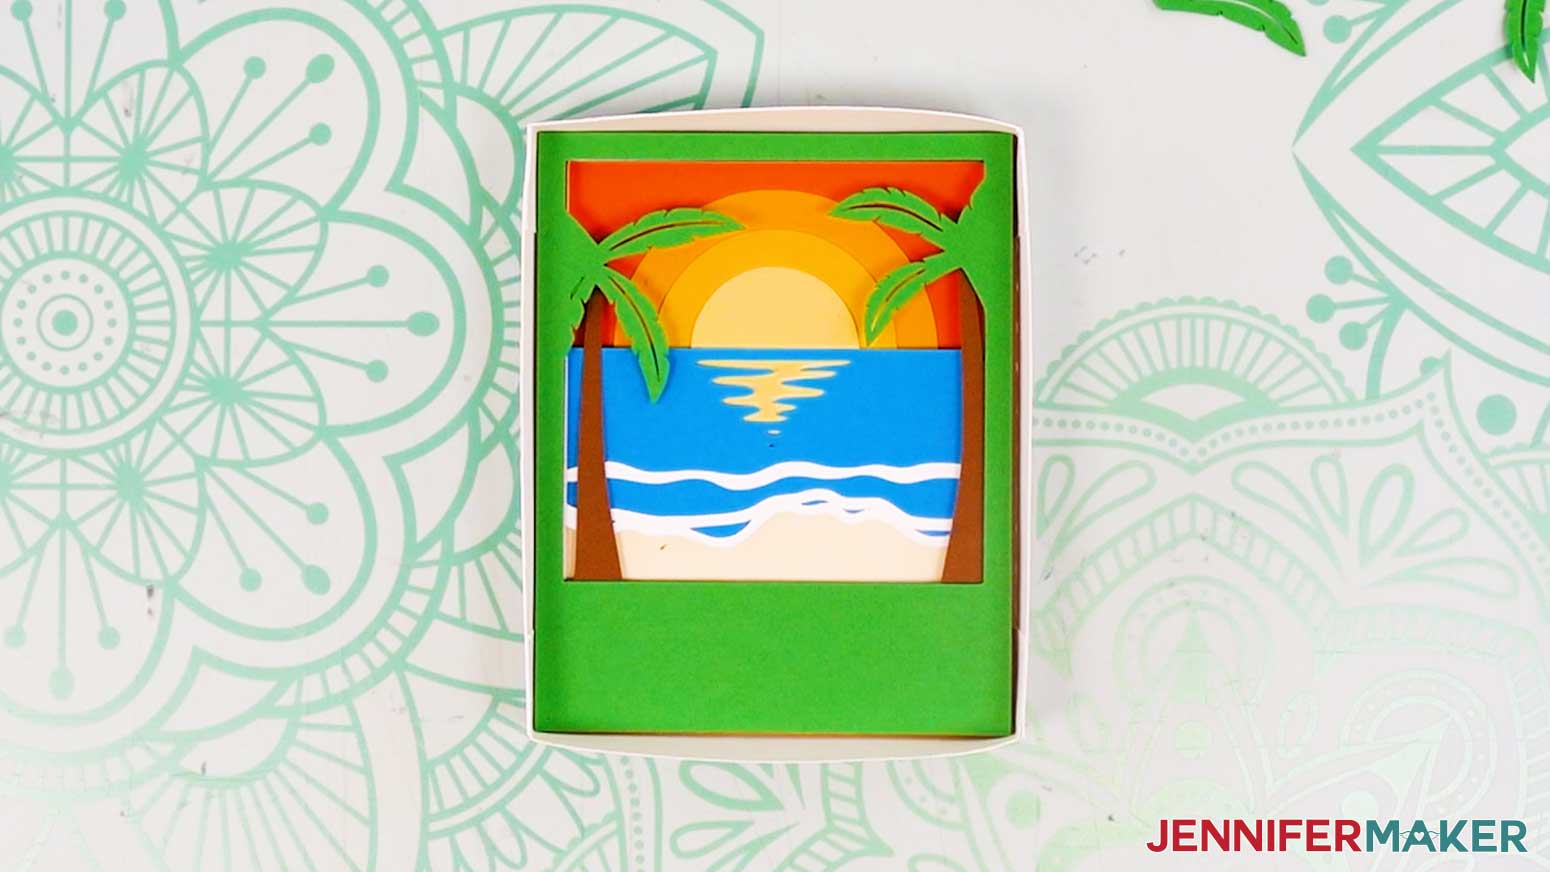
- Stack your cardstock layers face up in the correct order, with the dark orange sky layer at the back, followed by the medium orange sun, light orange sun, yellow sun, cream sand, blue water, white water, brown palm tree trunks, and green palm tree fronds layer on top. Use your Canvas in Cricut Design Space as reference for the correct layer order. Set the extra two small green palm frond pieces aside for now.
- Flip over your stack of layers so the solid back layer of the design is at the top of the stack.
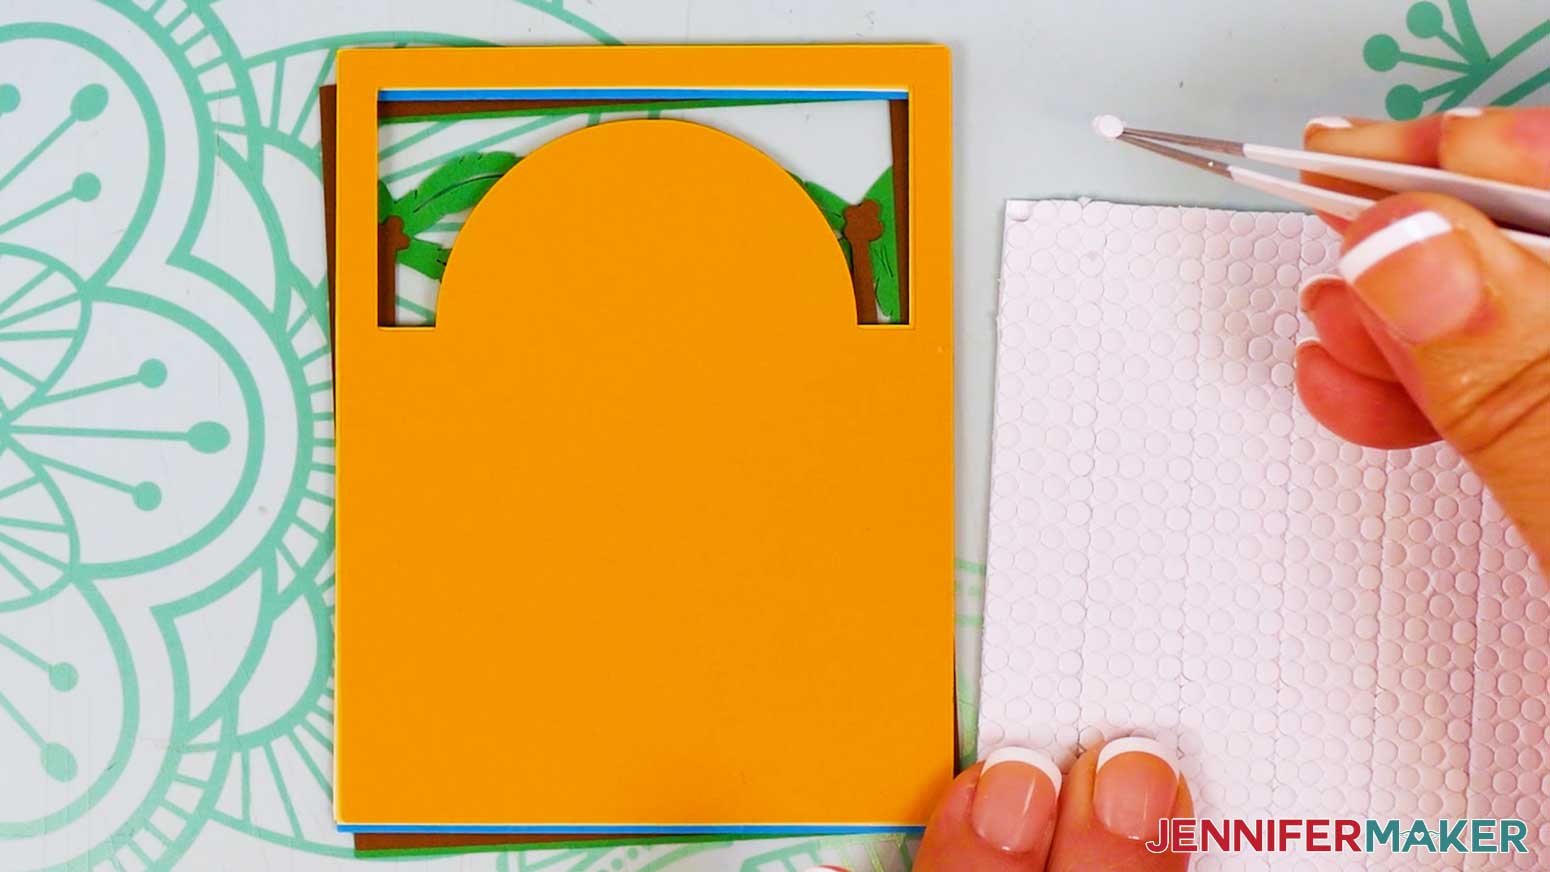
- Pick up the solid dark orange back piece on the stack, turn it face up, and place it into the bottom shadow box frame.
- Grab your tweezers, weeding tool, and micro pop dots.
- Use your tweezers to pull one micro pop dot at a time off of the sheet. Leave the adhesive backings on for now.
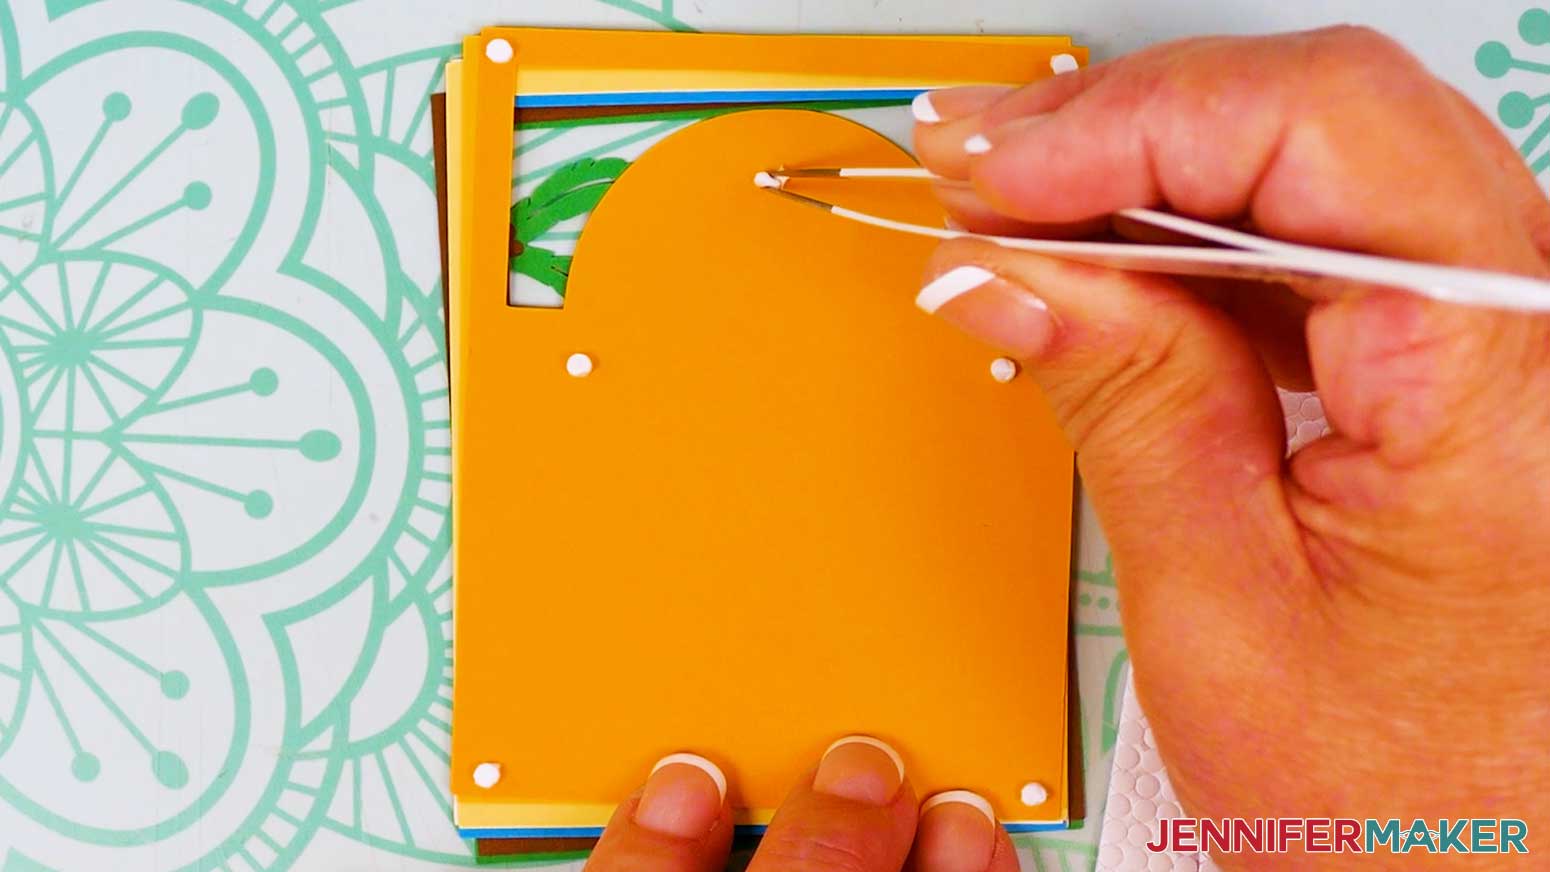
- Use the tweezers to place micro pop dots onto the back of the next layer on top of the stack – the medium orange sun layer. Apply one dot in each corner, one evenly spaced around each edge of the rectangle, and one or two in the solid middle area.
TIP: Don’t apply the micro pop dots too close to the edges within the “photo” area, or they may be visible in the final project.
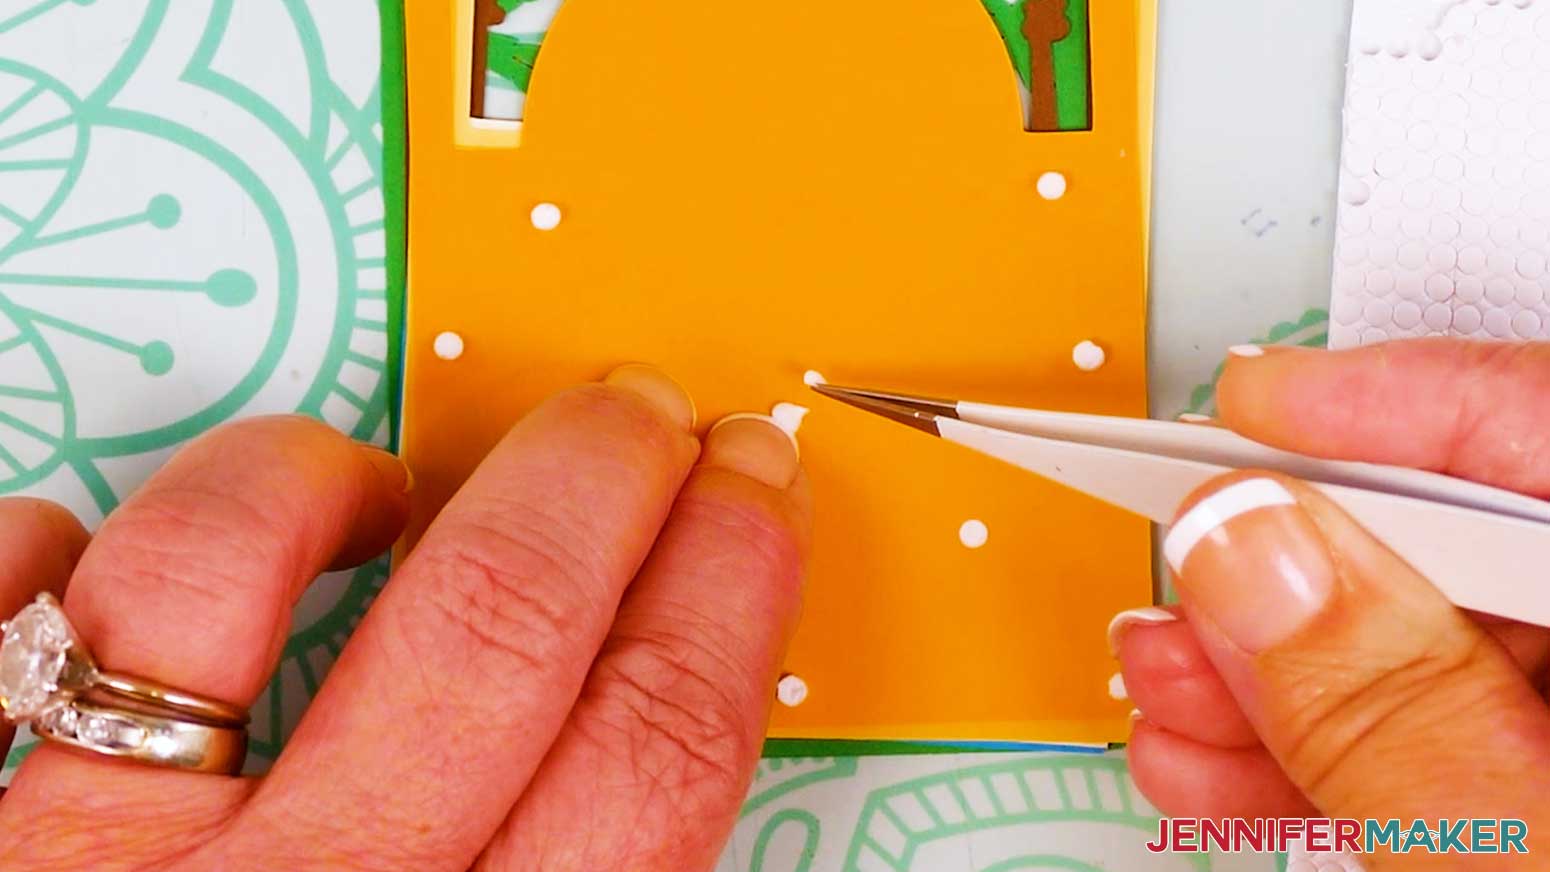
- Use the tweezers or a weeding tool to remove the adhesive backing on each micro pop dot.
TIP: Remove the backings in order around the design so you don’t miss any.
- Turn the layer over so the micro pop dots are facing down.
- Lower the layer into the bottom of the shadow box.
NOTE: The sides and corners of the shadow box help with alignment.
- Gently press down to adhere the layers.
TIP: To ensure the layers are well-attached, remove them from the shadow box’s back frame and press the layers together more firmly to adhere them before placing them back into the box bottom.
- Repeat Steps 6-11 to add the light orange, yellow, cream, blue, white, and brown layers in order. NOTE: Some of the more intricate areas (like the white water cutouts) are delicate, but don’t need much support – so I don’t recommend applying micro pop dots to these areas.
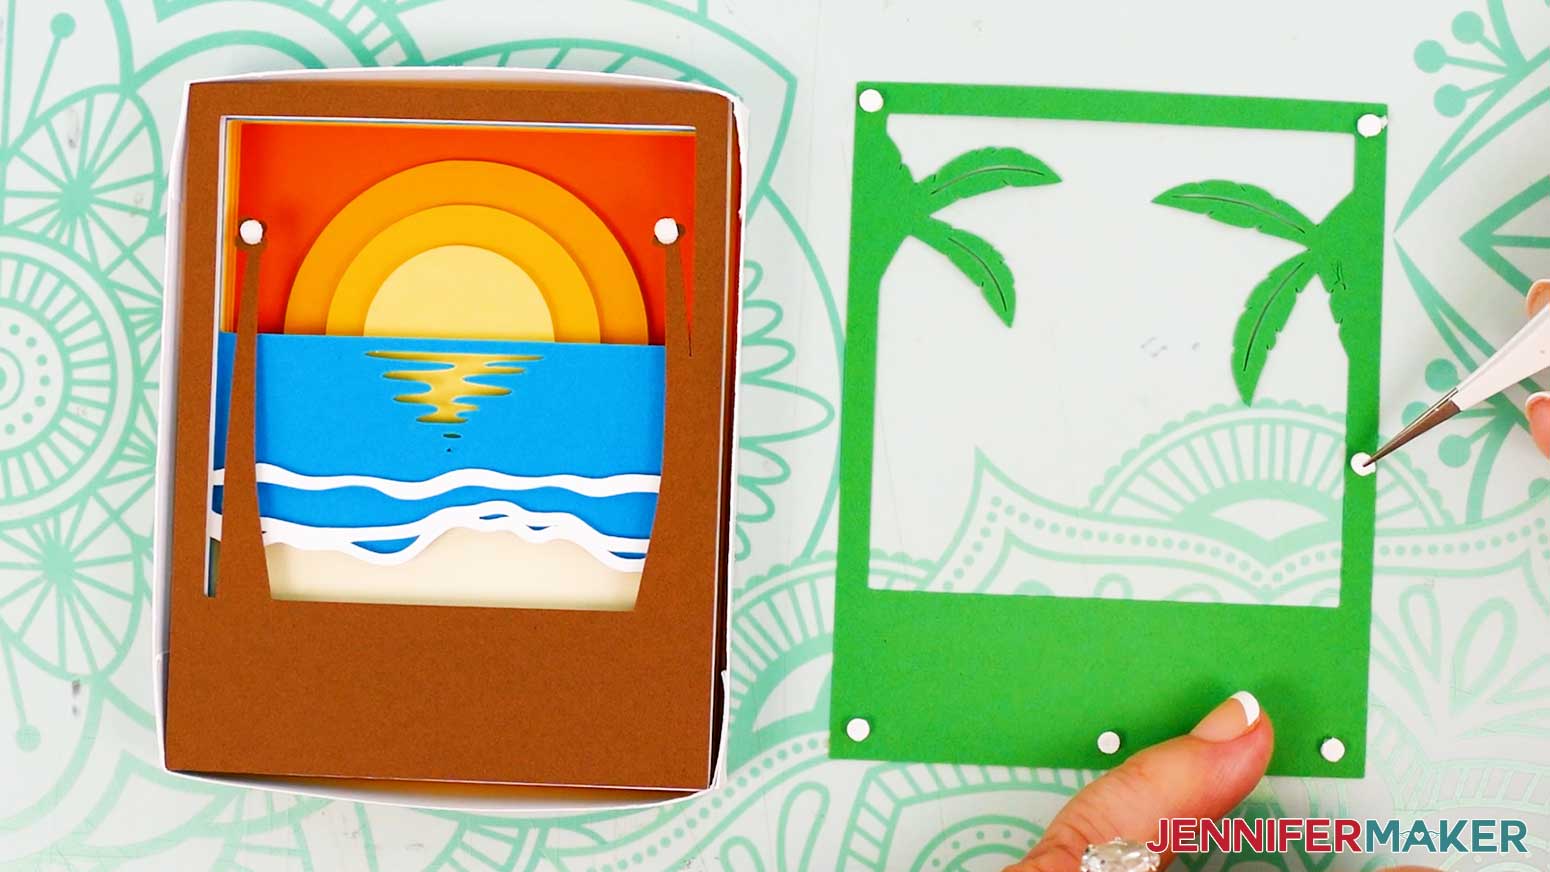
- Apply a micro pop dot to the tips of each palm tree trunk on the front of the brown layer.
- Remove the adhesive backing from each micro pop dot and then secure the brown layer in the shadow box.
- Place micro pop dots onto the back of the remaining green layer. Apply one dot in each corner and one evenly spaced around each edge of the rectangle.
- Remove the adhesive backing from each micro pop dot.
- Turn the layer over so the micro pop dots are facing down.
- Lower the green layer onto the brown layer in the bottom of the shadow box.
- Gently press down to adhere the layers, including the areas where the palm fronds overlap the micro pop dots on the palm trunks on the brown layer.
NOTE: The last layer will sit slightly higher than the edges of the box’s back frame, but they’ll be compressed to fit inside the shadow box once the front of the frame is placed on top.
- To ensure the layers are well-attached, remove them from the shadow box’s back frame and press the layers together more firmly to adhere them before placing them back into the box.
- Place the shadow box’s lid on top.
NOTE: Your shadow box will stay together without glue, but if desired, you can apply craft glue to the outer sides of the bottom of the box, then carefully slide the lid piece down over it. Gently press the edges together to adhere them.
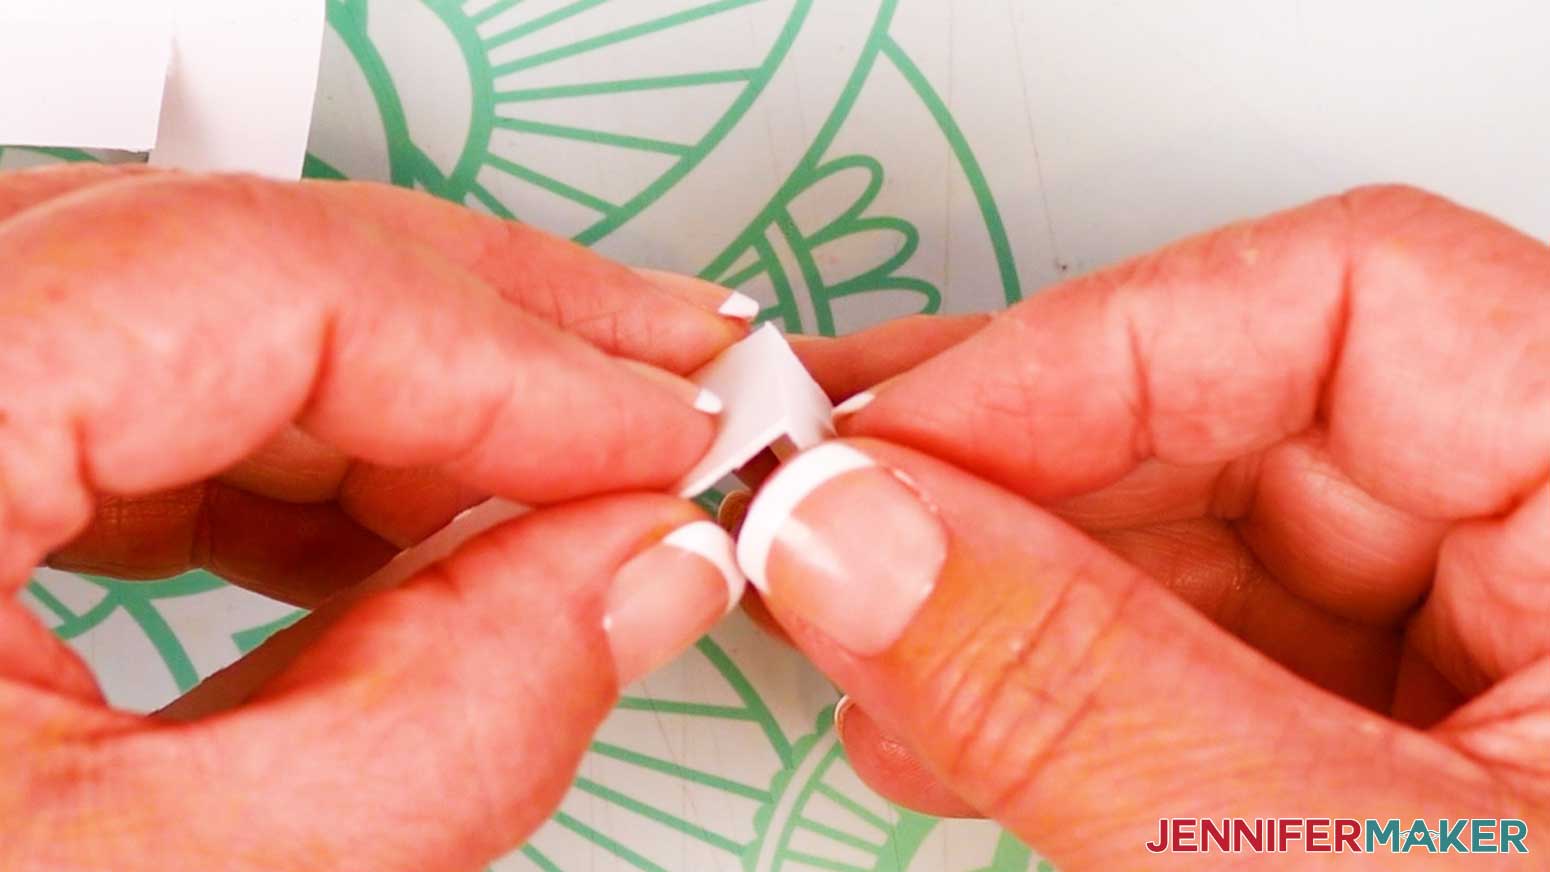
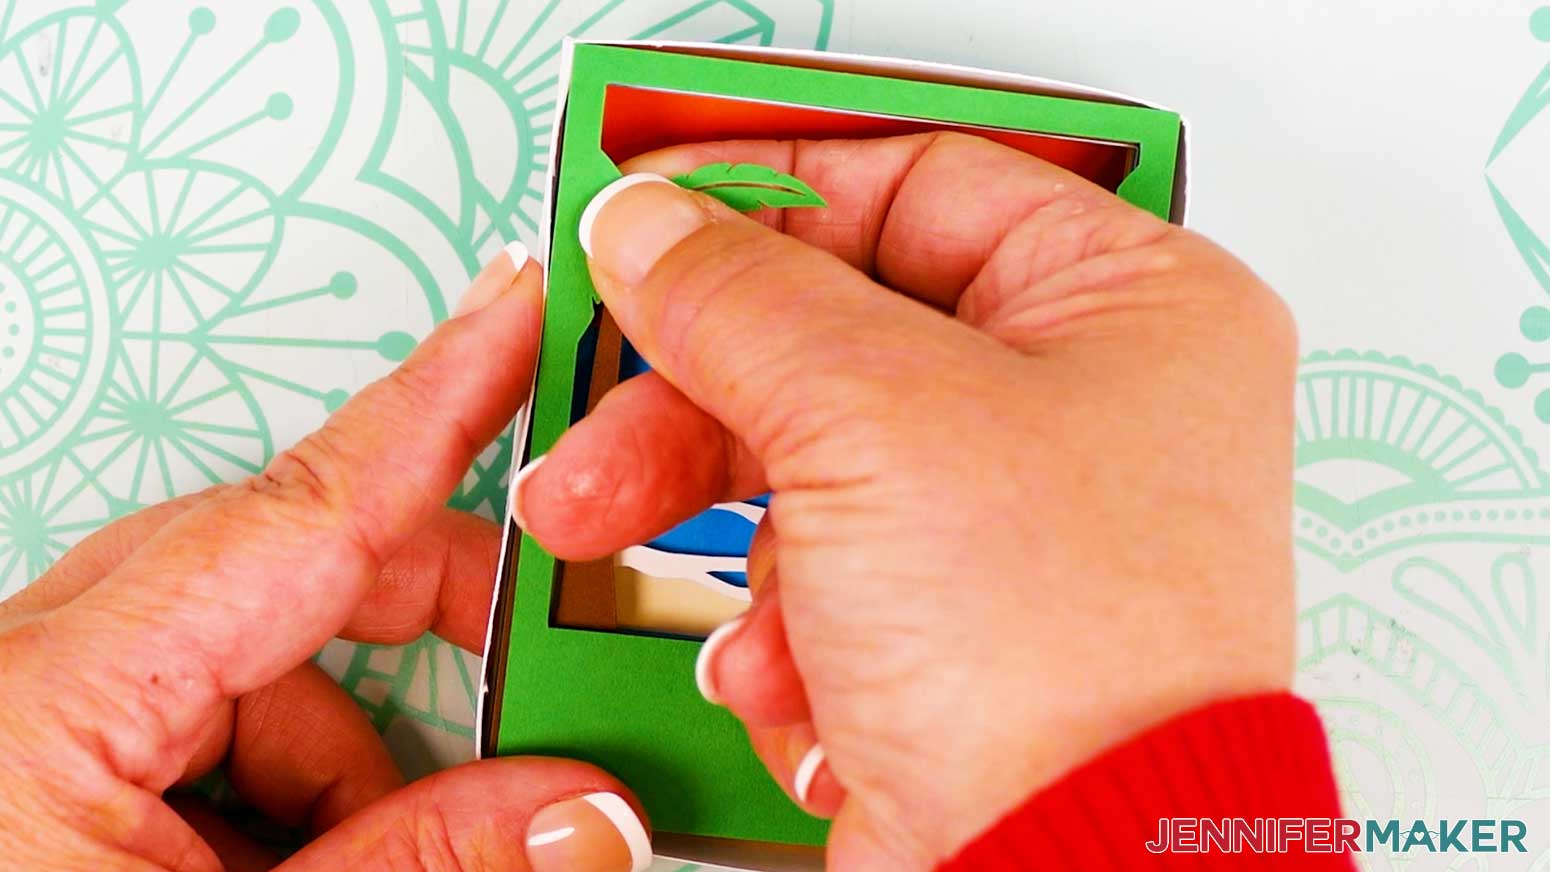
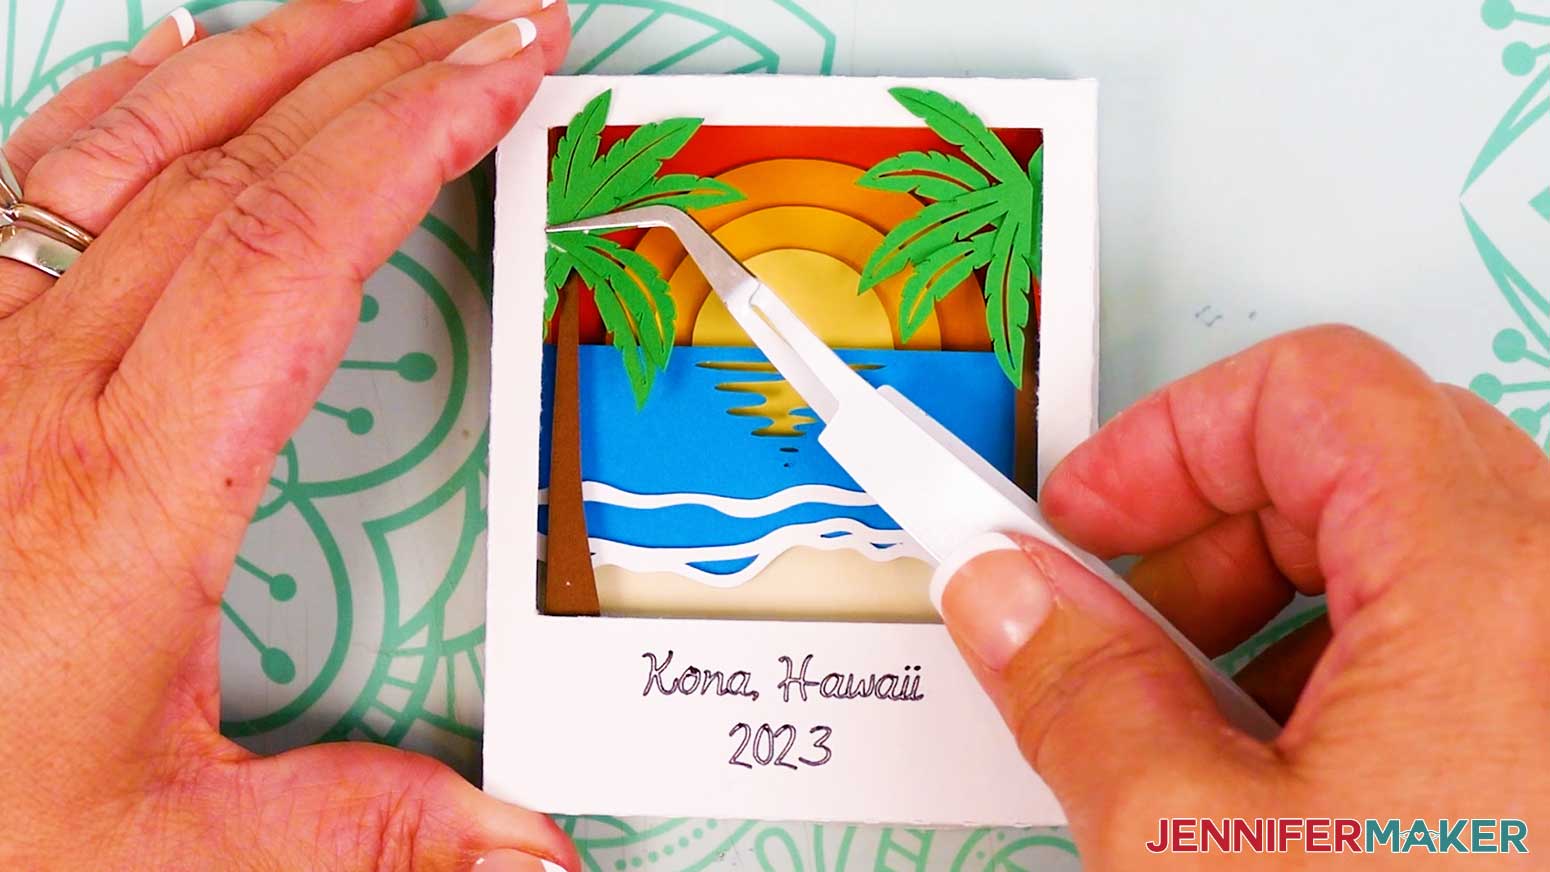
- Place the extra palm frond pieces in place on top of the assembled shadow box so they appear to burst out of the layered photo design. Use your Canvas in Cricut Design Space as reference for placement.
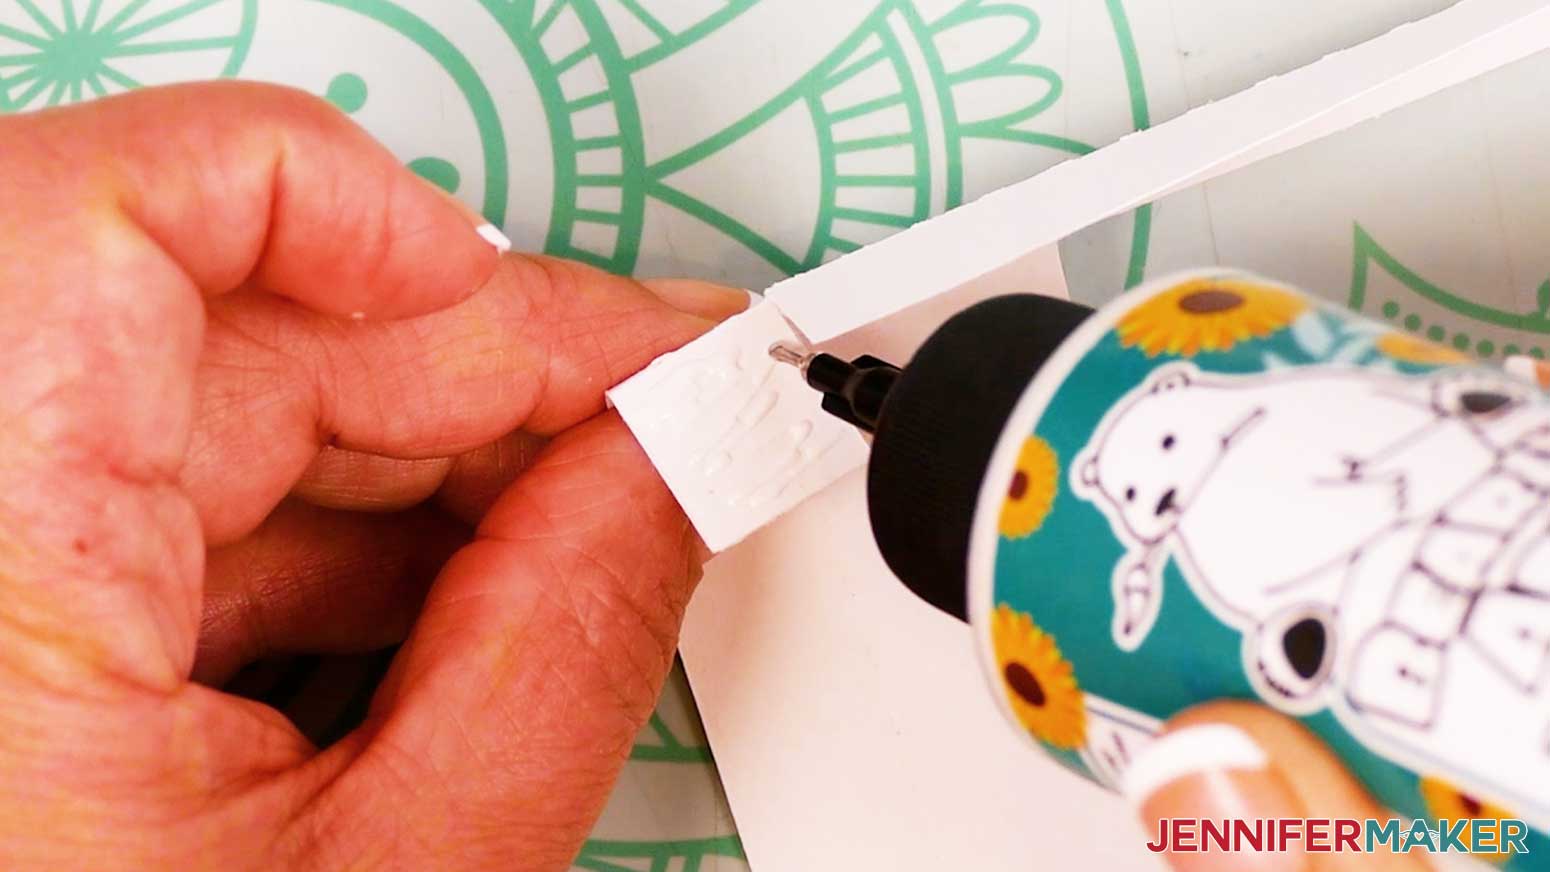
- Add a dot or two of craft glue to the back of one palm frond piece, where the leaves come together at the base.
- Place the palm frond glue-side down into place on the palm layer underneath. Use tweezers to press the layers together to adhere them.
- Repeat steps 23-24 with the other palm frond piece.
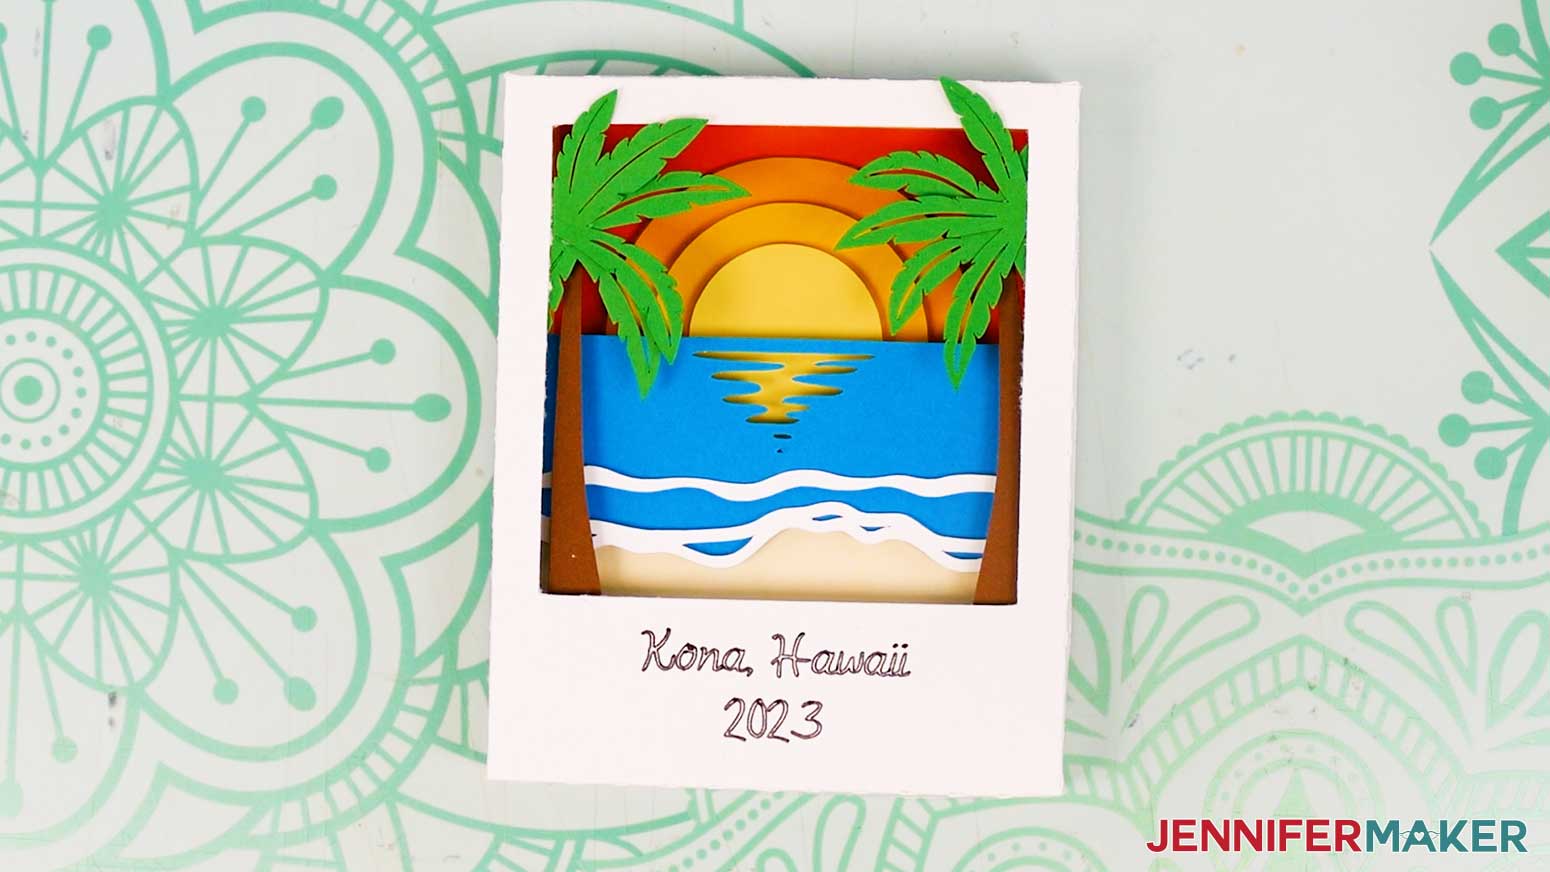
- Your beach scene Polaroid shadow box is complete!

 NOTE: The last layer will sit slightly higher than the edges of the box’s back frame, but they’ll be compressed to fit inside the shadow box once the front of the frame is placed on top.
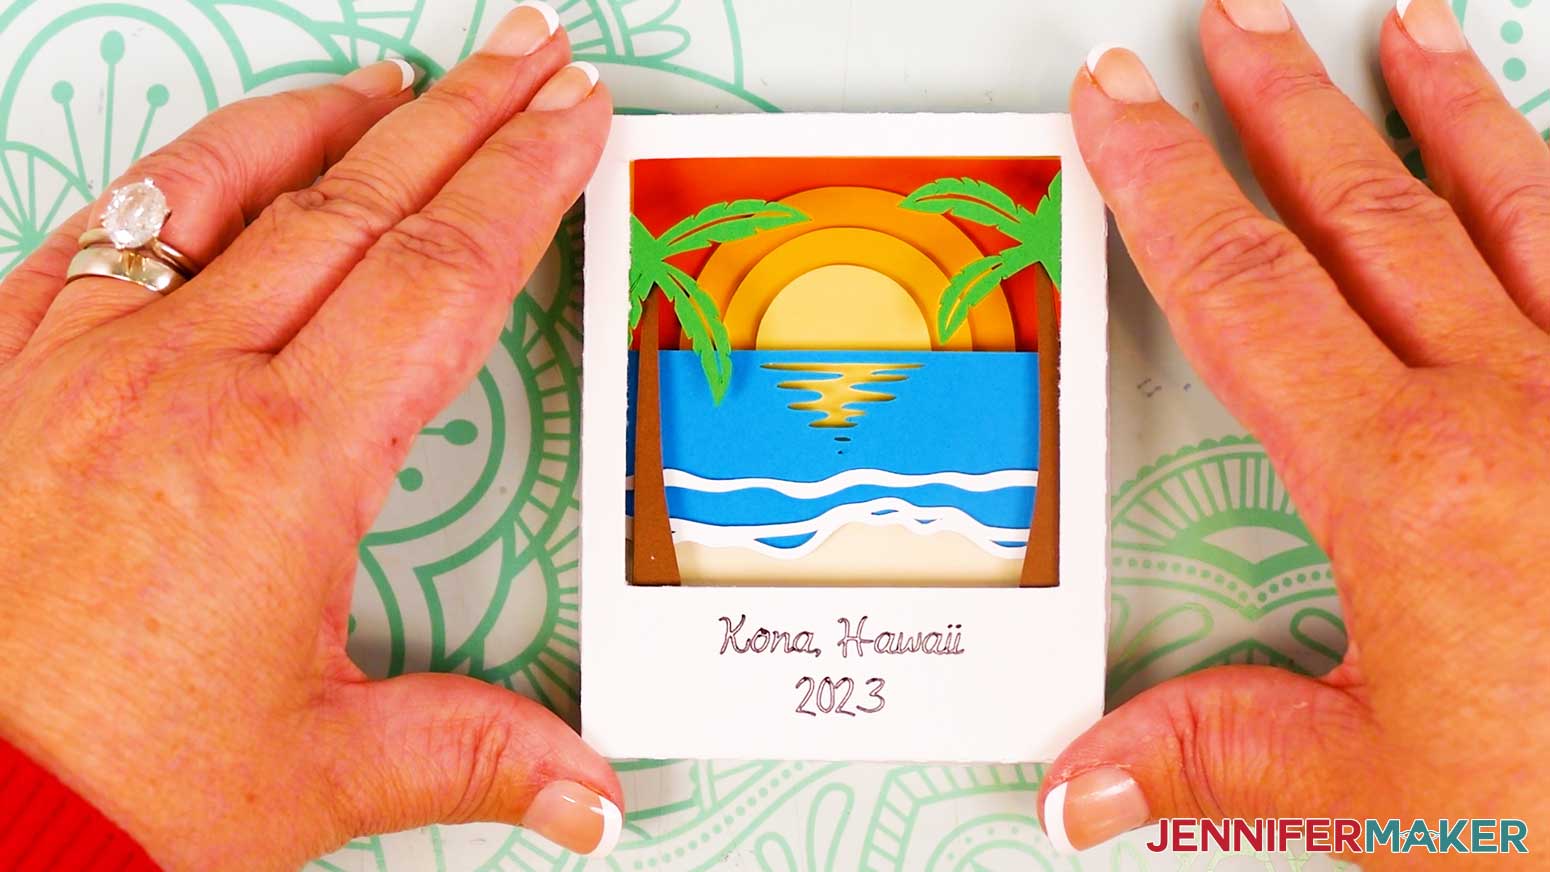 NOTE: Your shadow box will stay together without glue, but if desired, you can apply craft glue to the outer sides of the bottom of the box, then carefully slide the lid piece down over it. Gently press the edges together to adhere them.
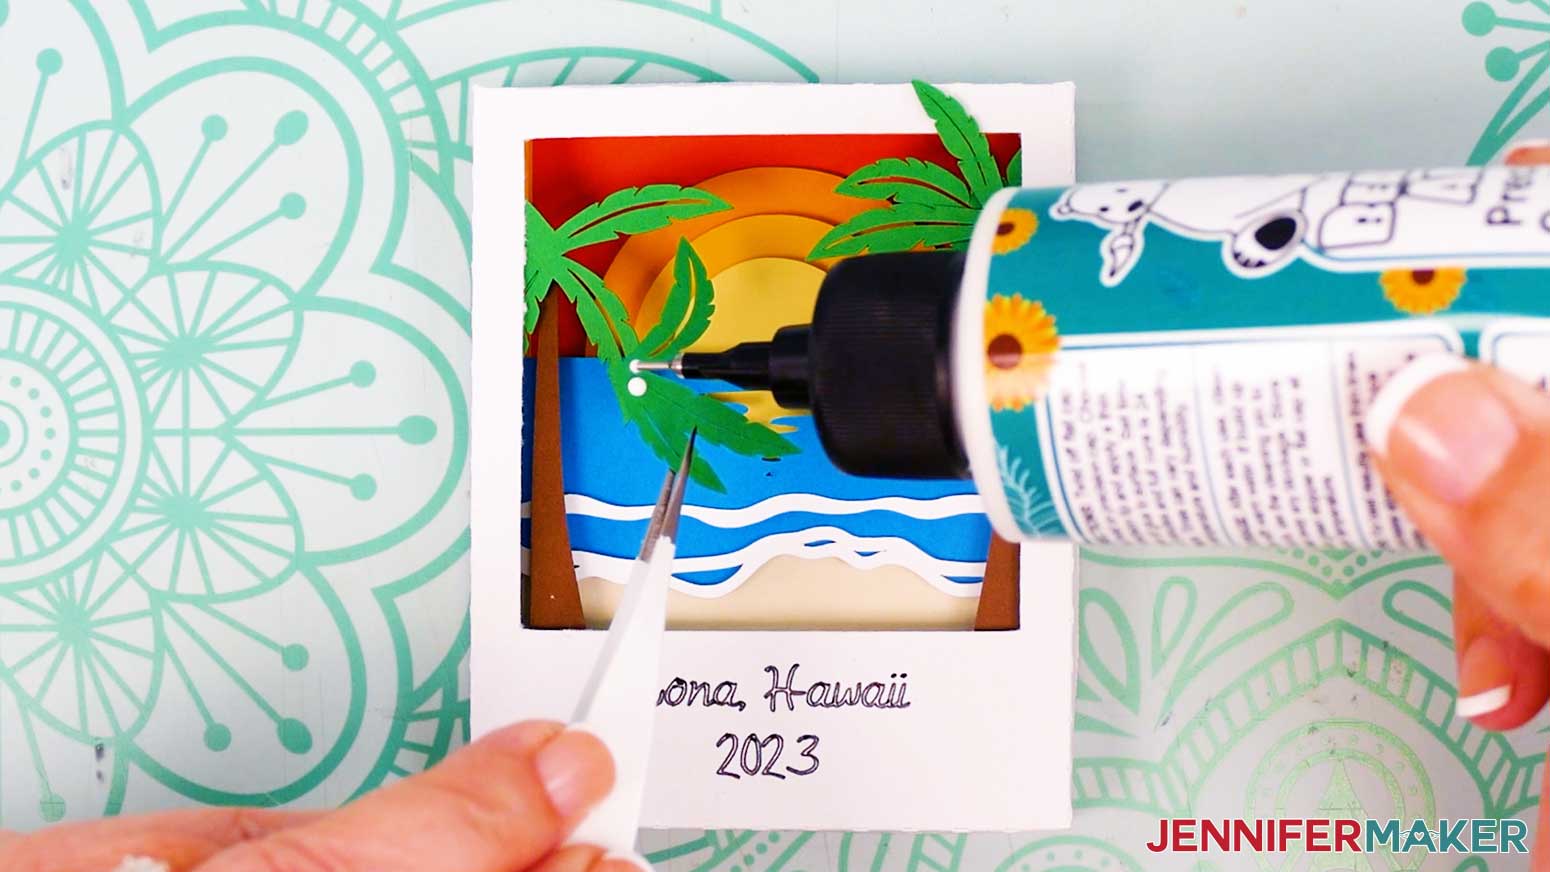
MOUNTAIN
- Stack your cardstock layers face up in the correct order, with the light blue sky layer at the back, followed by the yellow sun, white clouds, teal mountain, medium blue mountain, dark blue mountain, black tree line, green pine trees, and green grass layer on top. Use your Canvas in Cricut Design Space as reference for the correct layer order. Set the two small green grass pieces aside for now.
- Follow steps 3-11 from the “BEACH” directions above to add the first layer (light blue sky) and second layer (yellow sun) to the back shadow box frame.
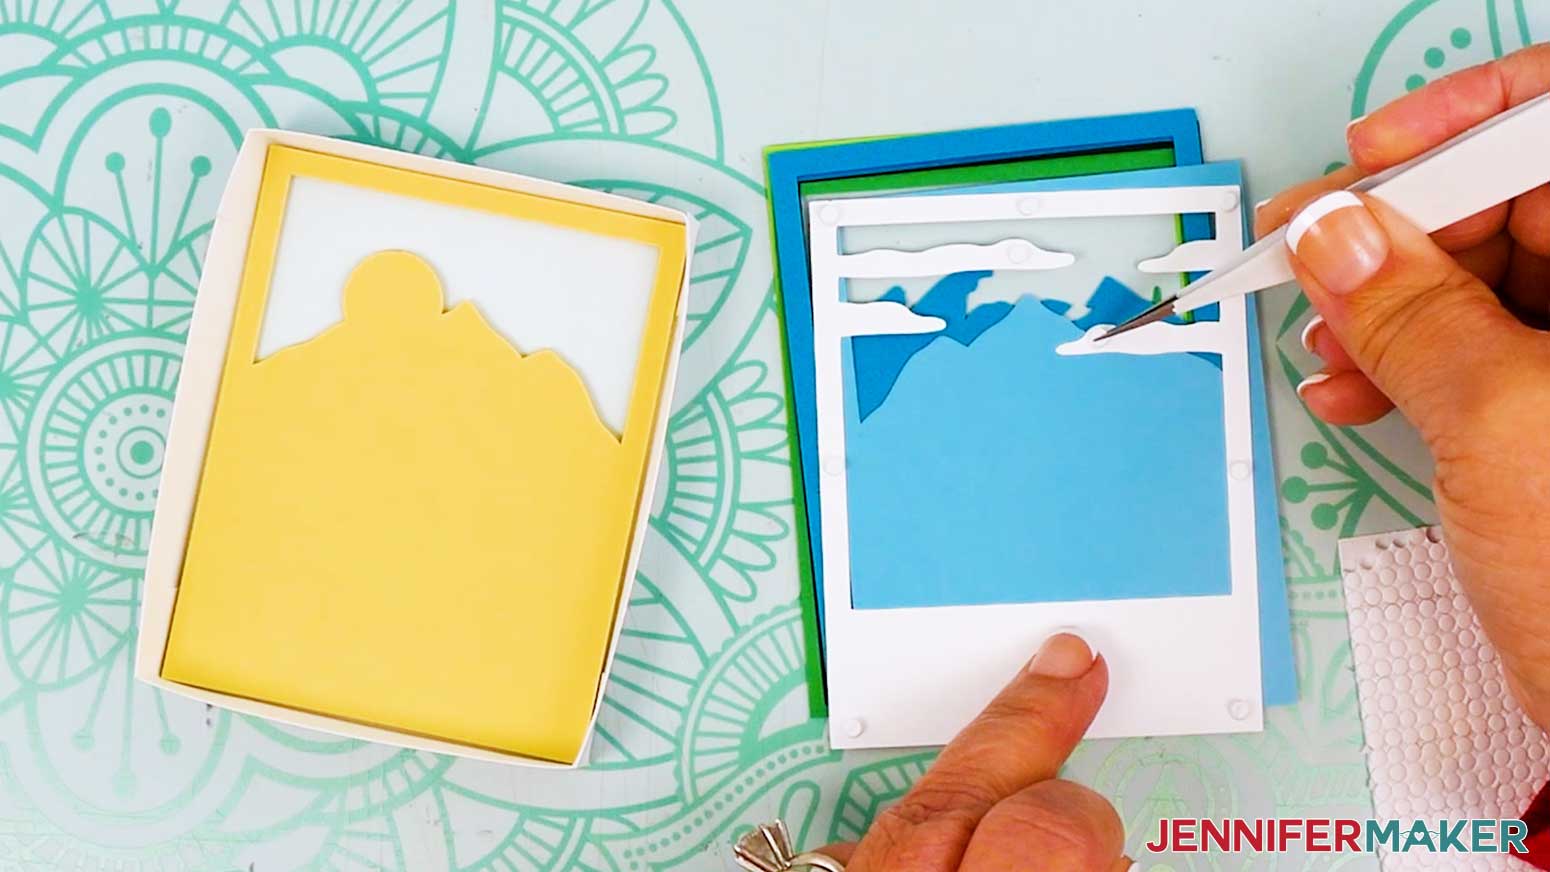
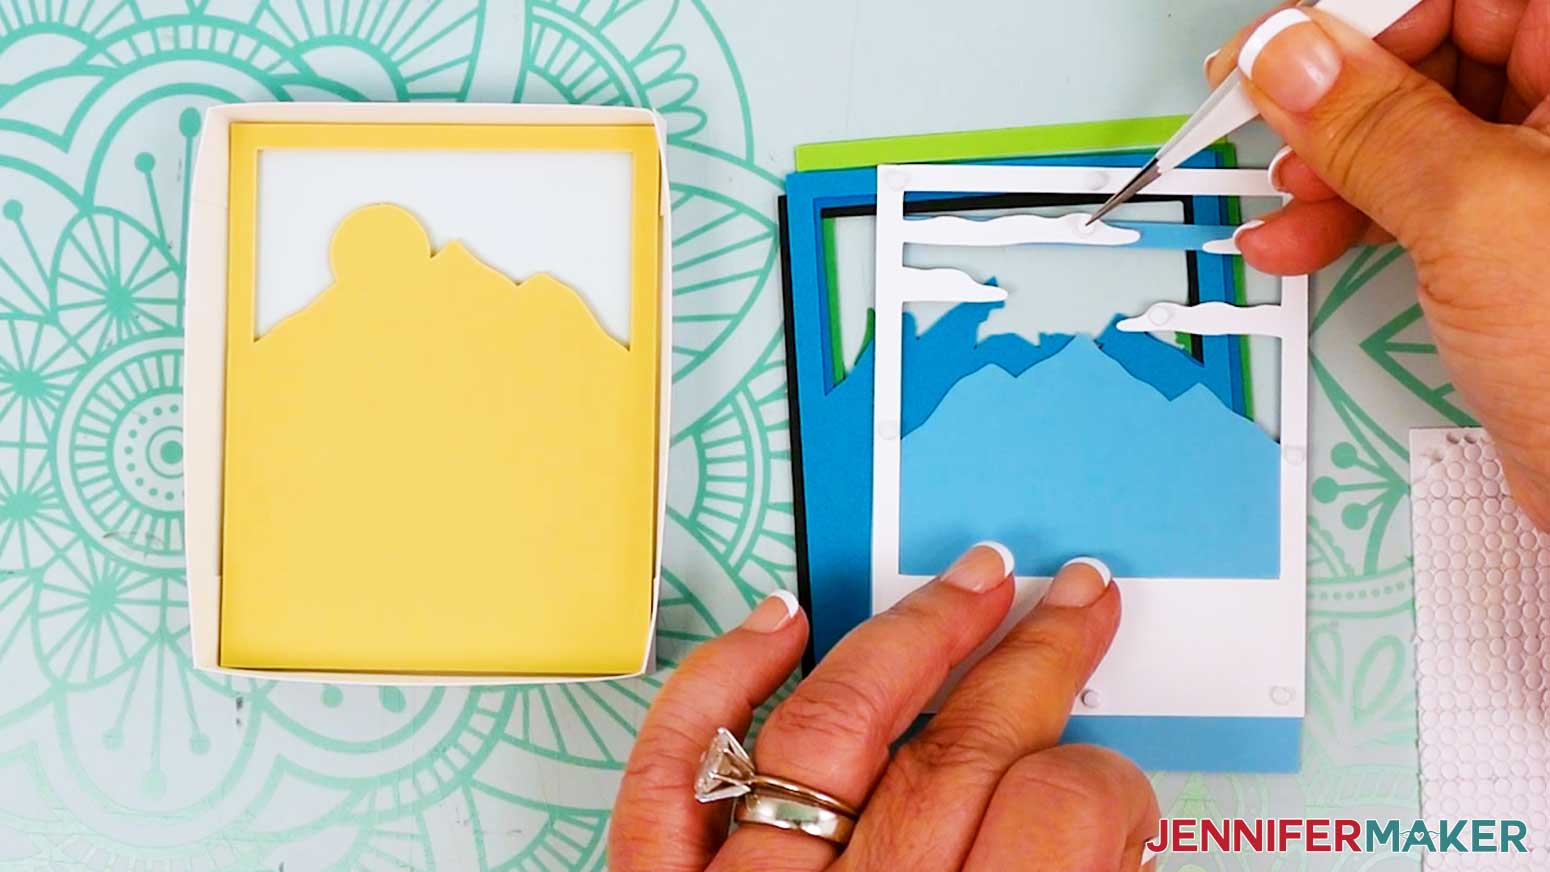
- When you get to the white layer with clouds, use tweezers to add a micro pop dot to each corner, one evenly spaced around each side of the frame, and one near the free end of each of the two longer clouds.
- Use your tweezers or a weeding tool to remove the adhesive backings.
- Because the longest cloud is over the light blue layer (which is two layers beneath it, instead of one), it will need more support. Add a second micro pop dot on top of the existing one, then remove its adhesive backing.
- Turn the white layer so the micro pop dots are facing down, then insert it into the bottom shadow box frame. Gently press down to adhere the layers, making sure to adhere the longest cloud to the light blue layer.
- Follow steps 6-11 from the “BEACH” directions above to add the rest of your layers to the shadow box in order.
NOTE: When you get to the green layer with the pine trees, apply pop dots to the back at each corner, one evenly spaced around each side of the frame, and one on each of the innermost tree shapes. Make sure the dots on the tree shapes are on areas that overlap the black layer below.
- Place the shadow box’s lid on top.
- Place the extra grass pieces in place on top of the assembled shadow box so they appear to burst out of the layered photo design. Use your Canvas in Cricut Design Space as reference for placement.
- Add some craft glue to the back of one grass piece, where it overlaps the grass pieces on the light green layer inside the shadow box.
- Place the grass piece glue-side down into place on the light green layer underneath. Use tweezers to press the layers together to adhere them.
- Repeat steps 10-11 with the other grass piece.
- Your mountain scene Polaroid shadow box is complete!


STEP 4: SHOW IT OFF
You now have an impressive paper Polaroid shadow box you can use as a neat travel memento!
Notes
Finished Size: 3"W x 3.75"H x 0.7"D
Fonts Used:
JM Cursive (Beach scene)
Baldive (Mountain scene) / Free Alternative: Baldive (free for personal use)
Answers to Your Questions About How to Make a Polaroid Shadow Box
Q: I want to customize my own Polaroid shadow box. How do I do that?
A: You can learn how to design your own customized Polaroid shadow box layers in my ADVANCE program. Learn more about ADVANCE here!
Q: Help! My Cricut Design Space screen or tools look different than yours!
A: If you’re using the latest version of Cricut Design Space, your screen may have slight variations than the screen you see on the video tutorial. Good news: All of the same functions are there, they may just be in different spots or have new icons. Pause the video to find the tools if you need, or follow along with the written tutorial. If you get stuck, ask for expert support in our Facebook group. Our group is a fun and friendly place to share your projects, ask questions, and find inspiration! Plus, you can catch the latest news on JenniferMaker projects, files, tutorials, and more.
Q: Can I make and sell Polaroid shadow boxes?
A: I love supporting creative entrepreneurs! If you want to use my designs and projects for commercial use, please familiarize yourself with my important licensing information before selling your crafts.
I do not permit sale of my digital items, but you can sell the creative goods you make with them — as long as you follow my licensing requirements. That means you cannot sell the Polaroid shadow box SVG, PDF, or DXF files, but you can sell Polaroid shadow boxes that you made with the files within the guidelines linked above.
Q: Can I resize the Polaroid shadow box SVGs?
A: Yes, you can resize the SVGs in my free download to various sizes that work best for you. I don’t recommend sizing them a lot smaller because they will be very tiny and hard to cut.
Q: Do I need a specific cutting machine to make a Polaroid shadow box?
A: Nope! You can make it with any Cricut machine (including the small Cricut Joy) or cut the DXF files with other machines. There’s also a printable PDF template if you prefer to cut everything by hand.
Q: Can I customize the scene?
A: Definitely. You can adjust the colors to match a season or time of day, add custom text to the Polaroid frame, or even design your own scene with the help of my ADVANCE workshop.
Q: What materials work best for clean, crisp layers?
A: Solid-core 65 lb. cardstock is ideal because it cuts smoothly and stacks neatly inside the shadow box to keep it sturdy without adding too much bulk.
Q: Where can I find the tools and supplies to make a Polaroid shadow box?
A: I love online shopping, and use Amazon for a lot of my craft supplies and tools because of the quick delivery time and free shipping with my Prime membership. You can also likely find the tools and supplies in your local craft store!
Get my free SVG/DXF/PDF files to make a 3D Paper Polaroid Shadow Box!
(If you do not see the signup form above, click here.)
I love seeing what you make with my designs and how you use them! Please share a photo of your Polaroid shadow box in our Facebook group or tag me on social media with #jennifermaker.
Love,

Want to remember this? Save this Polaroid Shadow Box tutorial to your favorite Pinterest Board!