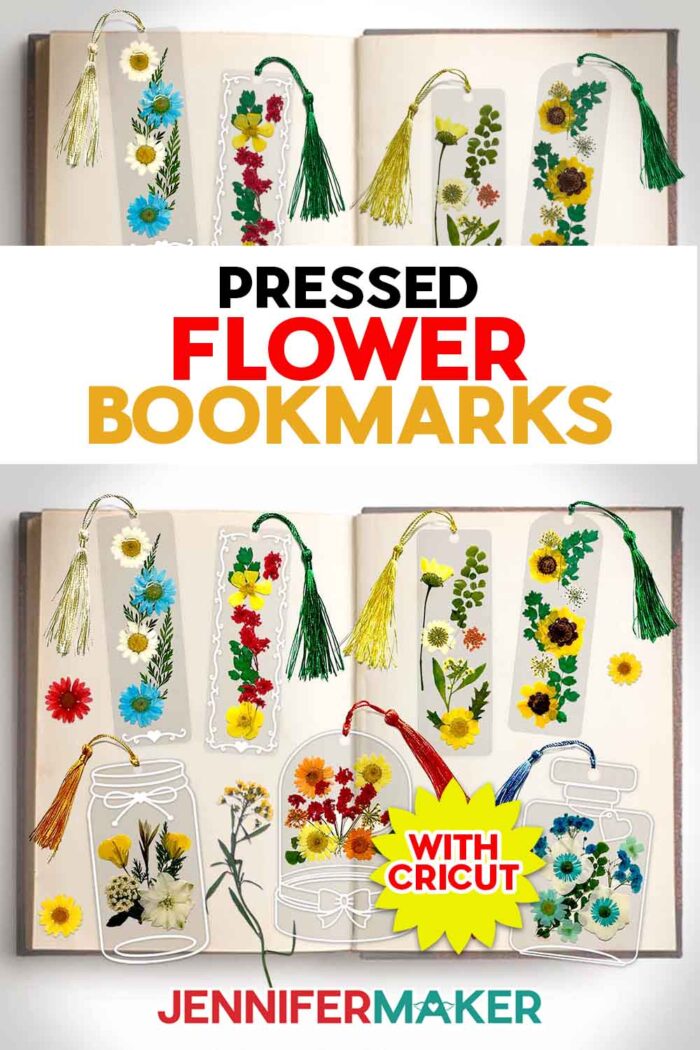
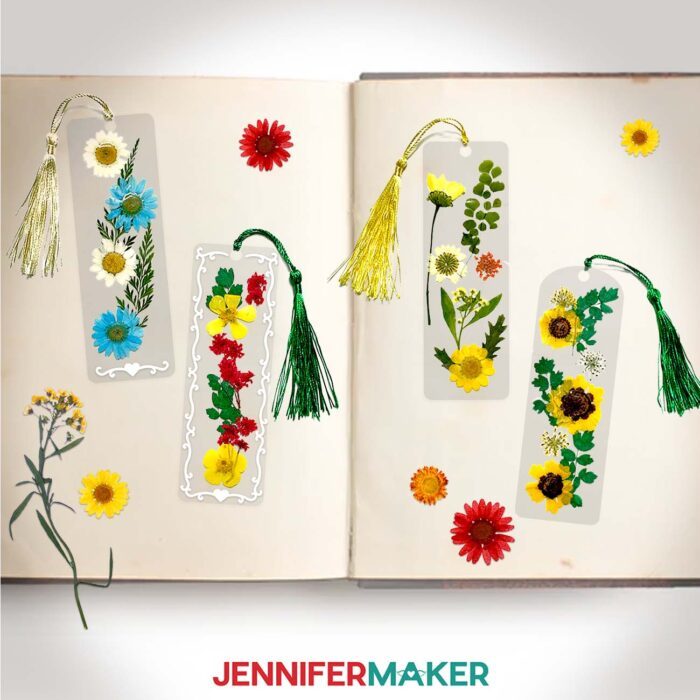
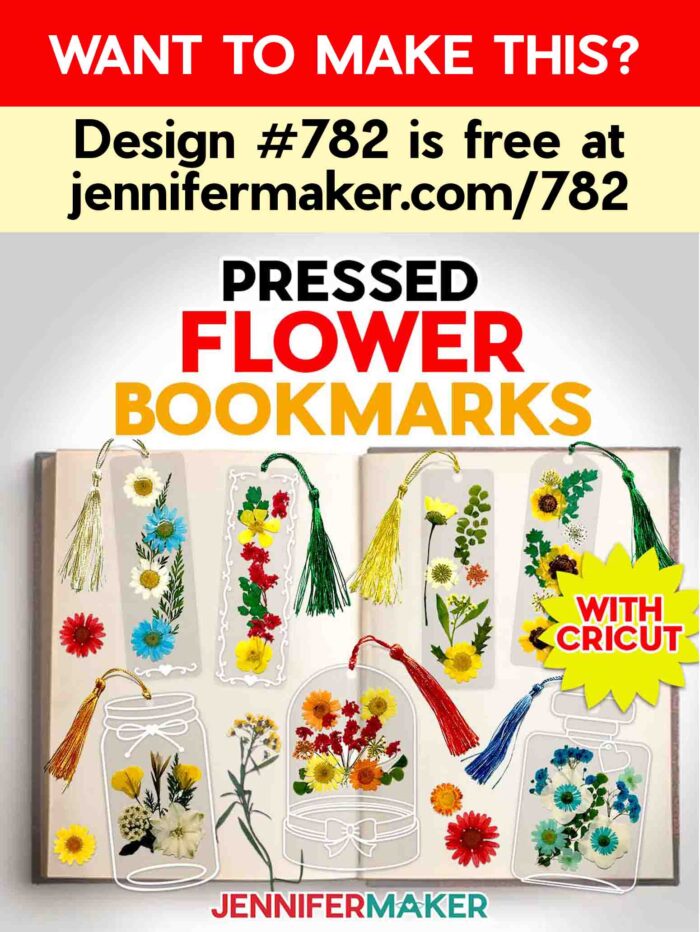
Learn how to make pretty pressed flower bookmarks using a laminator!
Pressed flower bookmarks are one of those crafts that make you stop and say, “Wow!” They’re delicate yet durable, full of color and meaning, and they turn a simple moment with a book into something truly special. Each one feels like a little piece of nature preserved forever: petals caught in time, ready to brighten the pages of your favorite story. But as beautiful as they look, making them can be surprisingly tricky. Those fragile petals love to shift, wrinkle, or trap air bubbles just when you think everything’s perfect. I had more than a few otherwise pretty bookmarks turn cloudy or crinkle before I found the secret to getting that flawless, glassy finish. Once I did, though, it completely changed how I make them. With the right steps and a few simple tools, you can create smooth, professional-looking pressed flower bookmarks that hold up through every chapter … and look as lovely as the blooms they capture.
See the full step-by-step video tutorial on how to make pressed flower bookmarks:

For this project, I’m using clear laminate pouches and a lamination machine to seal my pressed flowers in place. You can make your own flowers by tucking fresh blooms between the pages of a heavy book, or use a traditional flower press for quicker results. Dried flowers can be found online or in your local craft store, too, if you’d rather skip the waiting. I used a variety of smaller flowers with delicate petals because they press beautifully and stay flat inside the laminate. This is one of those DIY projects that’s relaxing and rewarding all at once, especially if you love the beauty of nature and the idea of preserving it in a creative way.
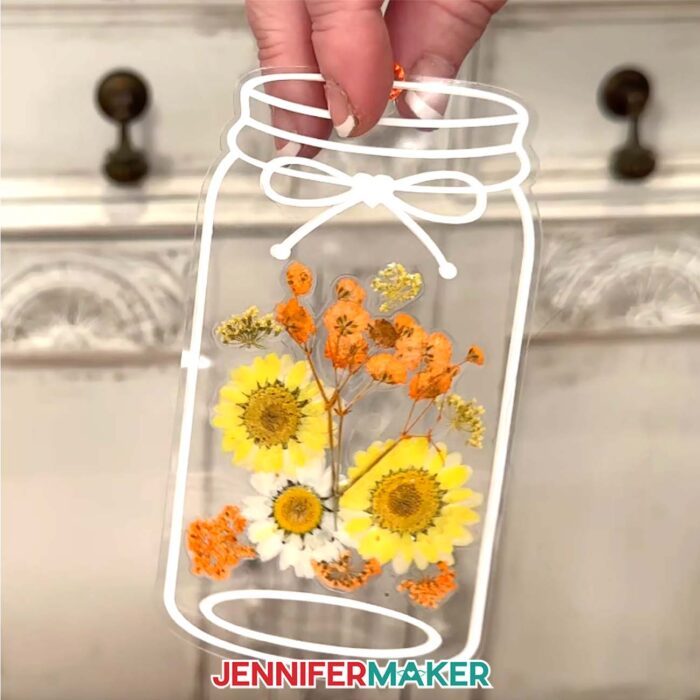
Each bookmark begins with a printed shape that acts as your guide. I like to use a pair of tweezers to carefully place each bloom where I want it. Think of it like arranging a tiny bouquet! This step feels almost meditative, a moment where you can slow down and enjoy the process of building your own dried floral arrangements. For the best results, leave just a bit of space between the flowers and the edge of your bookmark shape. That helps the laminate seal cleanly without trapping air bubbles.
Once your flowers are in position, it’s time to seal them. I use heat-resistant tape to keep everything perfectly still while the laminating machine does its magic. I also tested a household iron and a Cricut EasyPress to see if they could work in a pinch, but nothing gave the same crisp, clear finish as the laminator. It’s truly the better way to get that professional, glossy look. Investing in a laminator is absolutely worth it, and it opens up so many possibilities for future DIY bookmarks, cards, and decorative projects.
After laminating, you can add vinyl embellishments for a little extra flair. In my tutorial, I show how to apply a crisp white design to the bookmark without wrinkles or misalignment using a clever parchment paper trick. It’s a simple way to make your bookmarks look polished and store-bought, even though they’re lovingly handmade. Adding a tassel through the top hole gives it that final, elegant touch, because even a small detail can make a big difference in how your finished piece feels.
These floral bookmarks are wonderful keepsakes for yourself, but they also make beautiful handmade gifts. I love giving them as thoughtful presents for birthdays, weddings, or even Mother’s Day. They’re also great gifts for an avid reader or a book lover who enjoys having a touch of nature tucked between the pages of a book.
If you love to press flowers, this project is a great way to use up tiny extras from flowers you’ve dried yourself. Whether you gather petals from your garden, pick wildflowers on a walk, or save a special bouquet, you can transform them into something lasting. Making your own flowers part of a project like this is such a lovely way to preserve them and make them part of your everyday life.
In my ADVANCE with JenniferMaker workshop, I share how to take this project even further by creating double-sided bookmarks and arranging your floral design so it looks beautiful from both sides. You’ll also learn how to apply vinyl designs front and back for an even more polished look. It’s the perfect craft for anyone who loves flowers and wants to make beautiful handmade gifts that truly stand out. Learn more about ADVANCE with JenniferMaker here!

Whether you’re making them for yourself or for someone else, this DIY floral bookmark project is a great way to enjoy crafting without the stress. The materials are simple, the process is easy to follow, and the results are truly stunning. Once you see those delicate petals sealed perfectly in place, you’ll be hooked.
I’ll show you every step in my video tutorial so you can make your own beautiful pressed flower bookmark with confidence and joy. Add a tassel, give it as a gift, or slide it into one of your favorite books to enjoy during your next cozy reading session. However you use it, this project is a lovely reminder that a touch of nature, a bit of creativity, and a few moments of your time can come together to make something truly special. Happy reading!
Let me show you how to make pressed flower bookmarks! This post contains some affiliate links for your convenience (which means if you make a purchase after clicking a link I will earn a small commission but it won’t cost you a penny more, there is no additional cost)! Read my full disclosure policy.
Materials to Make Pressed Flower Bookmarks
View my Amazon shopping list with the exact items I used.
- One (1) Thermal Laminating Pouch
- Assorted Dried Pressed Flowers (I used yellow, white, and blue)
- White Cricut Value Vinyl
- Cricut StandardGrip Transfer Tape
- Parchment Paper
- Painter’s Tape
- Heat-Resistant Tape
- A way to cut your materials – I’m using the Cricut Maker 4, but you can also use a Cricut Maker series machine, a Cricut Explore series machine, the Cricut Venture, or a Cricut Joy series machine
- Cricut Green StandardGrip Machine Mat 12″ x 12″
- Laminator
- Scissors
- Scraper
- Spatula
- Weeding Tool
- Tweezers
- Mini Tassels
How to Make Pressed Flower Bookmarks!
Pressed Flower Bookmarks
Learn how to create Pressed Flower Bookmarks from lamination pouches, vinyl, and real flowers!
Materials
- One (1) Thermal Laminating Pouch
- Assorted Yellow Dried Pressed Flowers -OR-
- Assorted White Dried Pressed Flowers -OR-
- Assorted Blue Dried Pressed Flowers
- Mini Tassels
- White Cricut Value Permanent Vinyl
- StandardGrip Transfer Tape
- Design #782 (My free SVG/PDF/DXF design files are available in my free resource library - get the password by filling out the form at the bottom of this page)
Tools
- A way to cut your material - I’m using the Cricut Maker 4, but you can also use a Cricut Maker Series machine, a Cricut Explore Series machine, the Cricut Venture, the Cricut Joy Xtra, or the Cricut Joy.
- Cricut Green StandardGrip Machine Mat 12" x 12"
- Laminator
- Scissors
- Scraper
- Spatula
- Weeding Tool
- Tweezers (optional)
- Parchment Paper
- Painter’s Tape
- Heat-Resistant Tape
Instructions
STEP 1: GET MY FREE PRESSED FLOWER BOOKMARKS DESIGN FILES
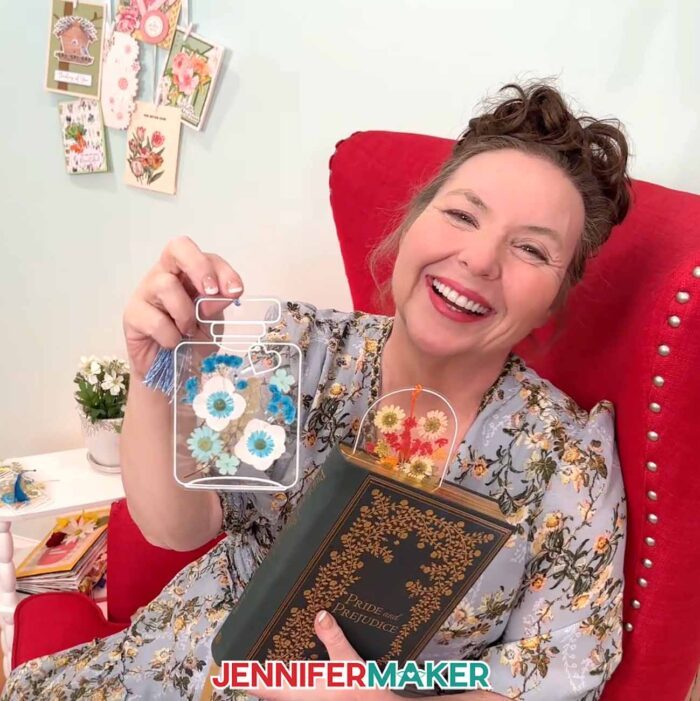
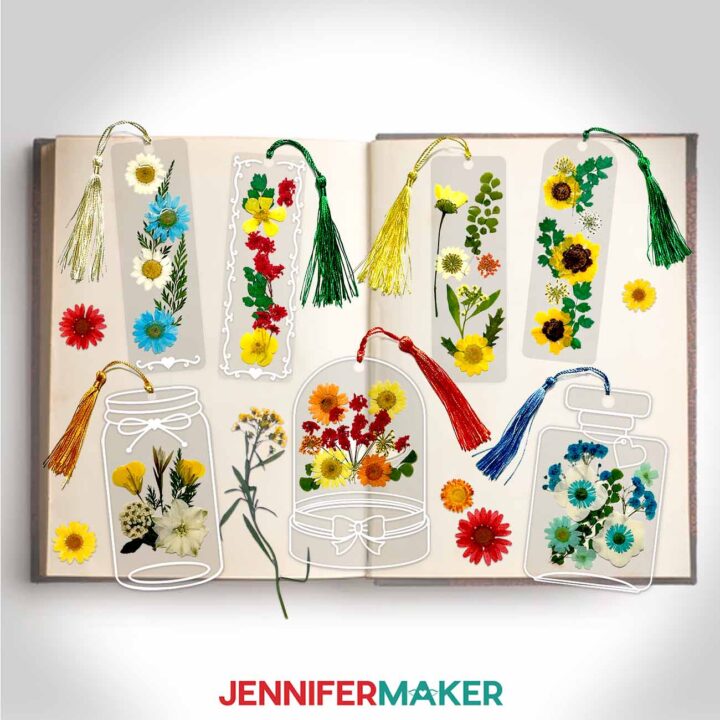
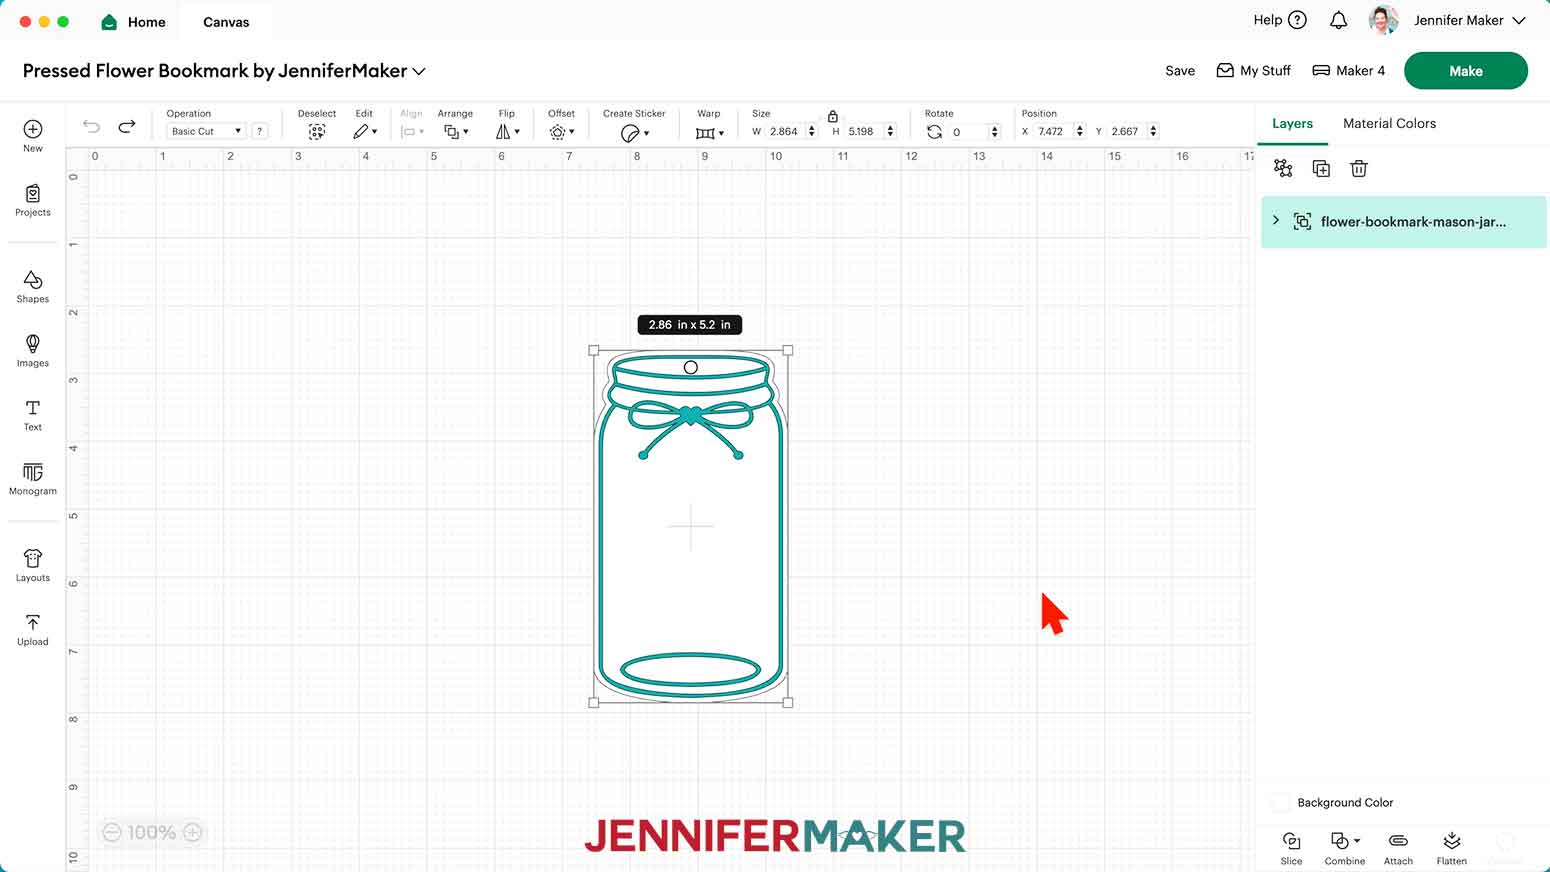
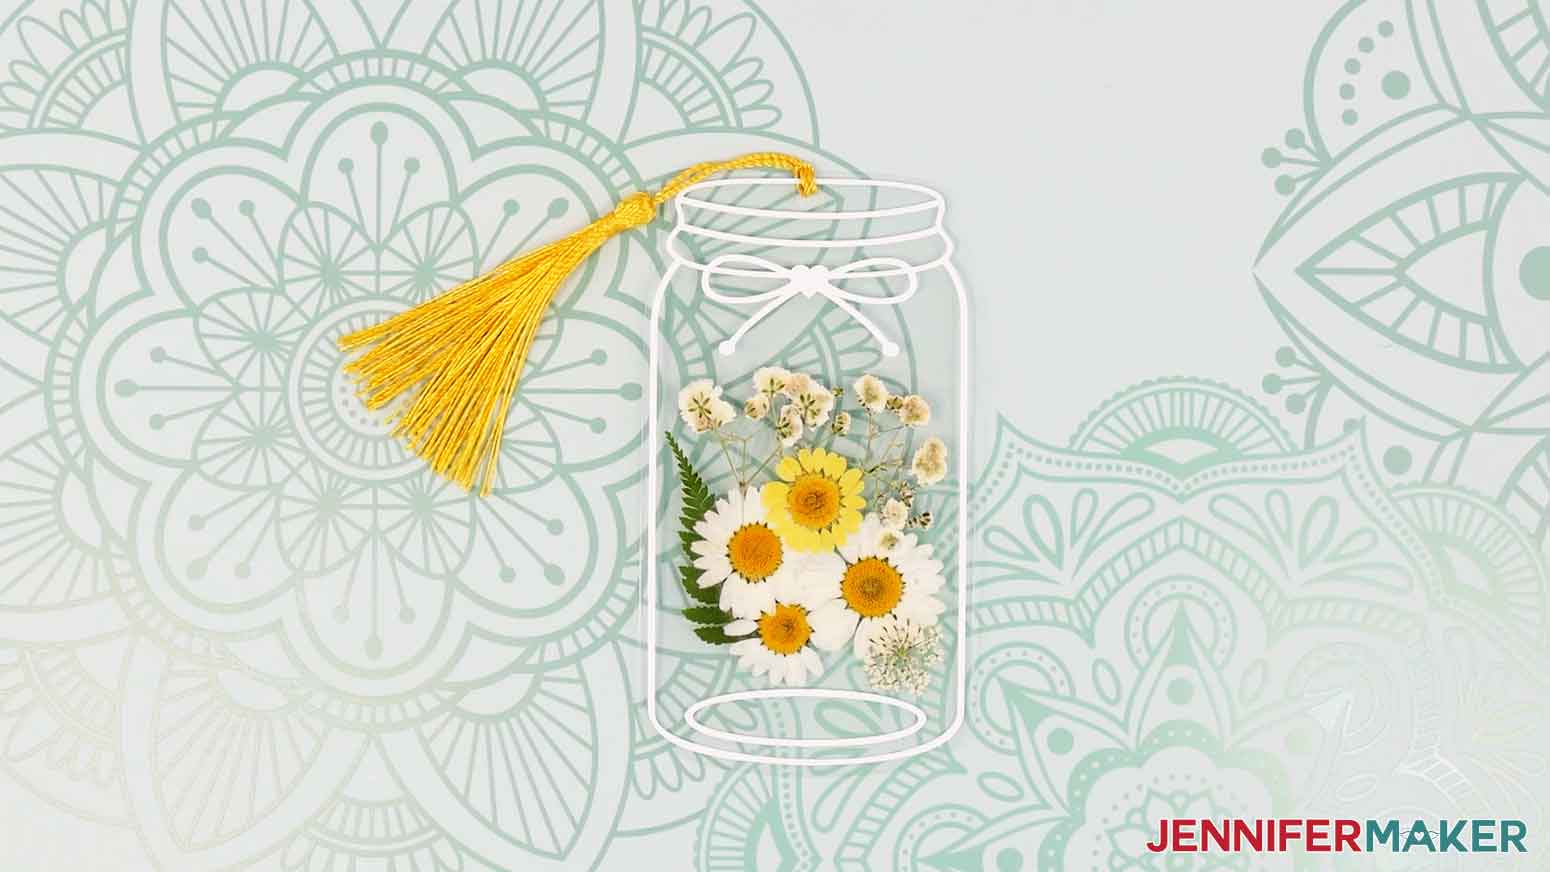
First, download my free Pressed Flower Bookmark designs from my free library – look for Design #782. Alternatively, you can use the Save This Project form near the top of this post and the design link will be emailed to you. TIP: If you’re not sure how to upload, go to jennifermaker.com/svgs to learn how to unzip and upload SVG files. Inside the SVG folder, you’ll see eight bookmark designs: “circle,” “cloche,” “flacon,” a rectangular “heart swirl” design, a “mason jar,” a “rectangular” design, a “rounded” rectangle design, and a rectangular “swirl border” design. The cloche, flacon, heart swirl, mason jar, and swirl border designs have an extra top layer you can cut from adhesive vinyl and apply to the laminated bookmark. For this tutorial, I’ll show you how to make the Mason Jar design using my Cricut Maker 4, but you can follow the same steps to make the other seven designs on any Cricut cutting machine.
STEP 2: PREPARE & CUT YOUR PRESSED FLOWER BOOKMARK DESIGN
CRICUT DESIGN SPACE
- In Cricut Design Space on a blank Canvas, click “Upload.”
- Click “Upload Image.”
- Click “Browse.”
- Find and select the SVG of your choice from the main SVG folder. NOTE: I’ll demonstrate with the Mason Jar design.
- Click “Open” and then “Continue.”
- Click “Upload” to add the design to your Canvas. The white shape will be cut from lamination pouches, and the teal design can be cut from permanent adhesive vinyl.

- Click “Save” and give your project a name.
- If you’d like to change the color of the vinyl layer, select it and use the Color Box at the top to select a new color.
- If you’d like to resize the bookmark, select the entire design and use the corner handles to resize it. Make sure the lock icon is closed to maintain proportions.
- Your design is ready to cut!
CUTTING
- Select your machine at the top right, then click “Make.”
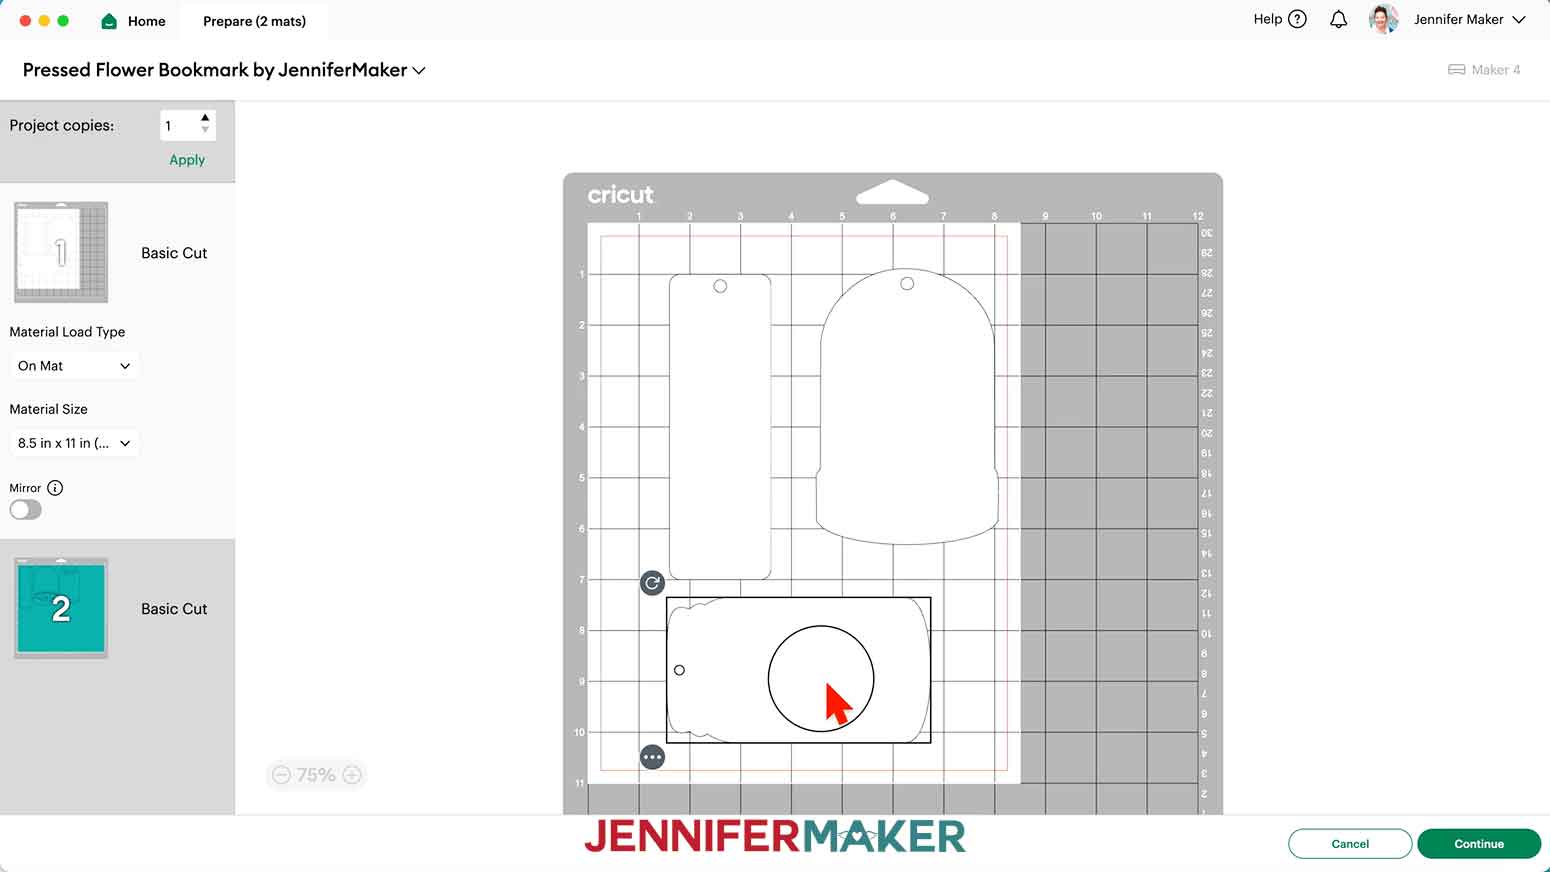
- If prompted, click "On Mat," choose your mat size, and click “Confirm.”
- On the Prepare screen, make sure the correct Material Size is selected for each of your mats.
- If you’re making more than one bookmark at a time, drag the pieces apart on the white mats so they have more room to cut. This ensures the best results when cutting lamination pouches.
- Click back onto the first mat, then click “Continue.”
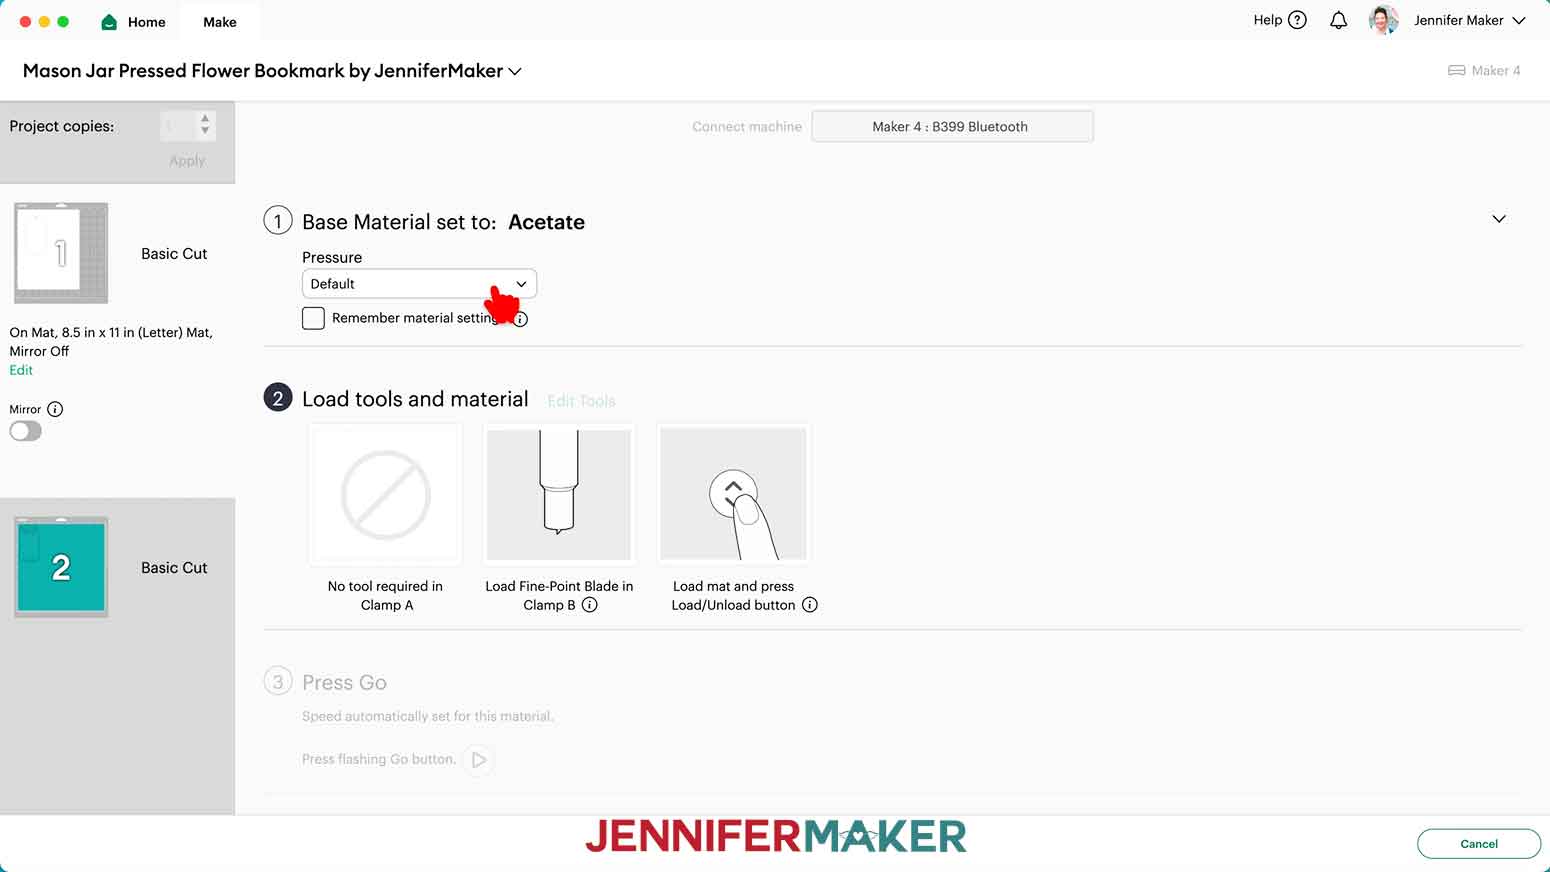
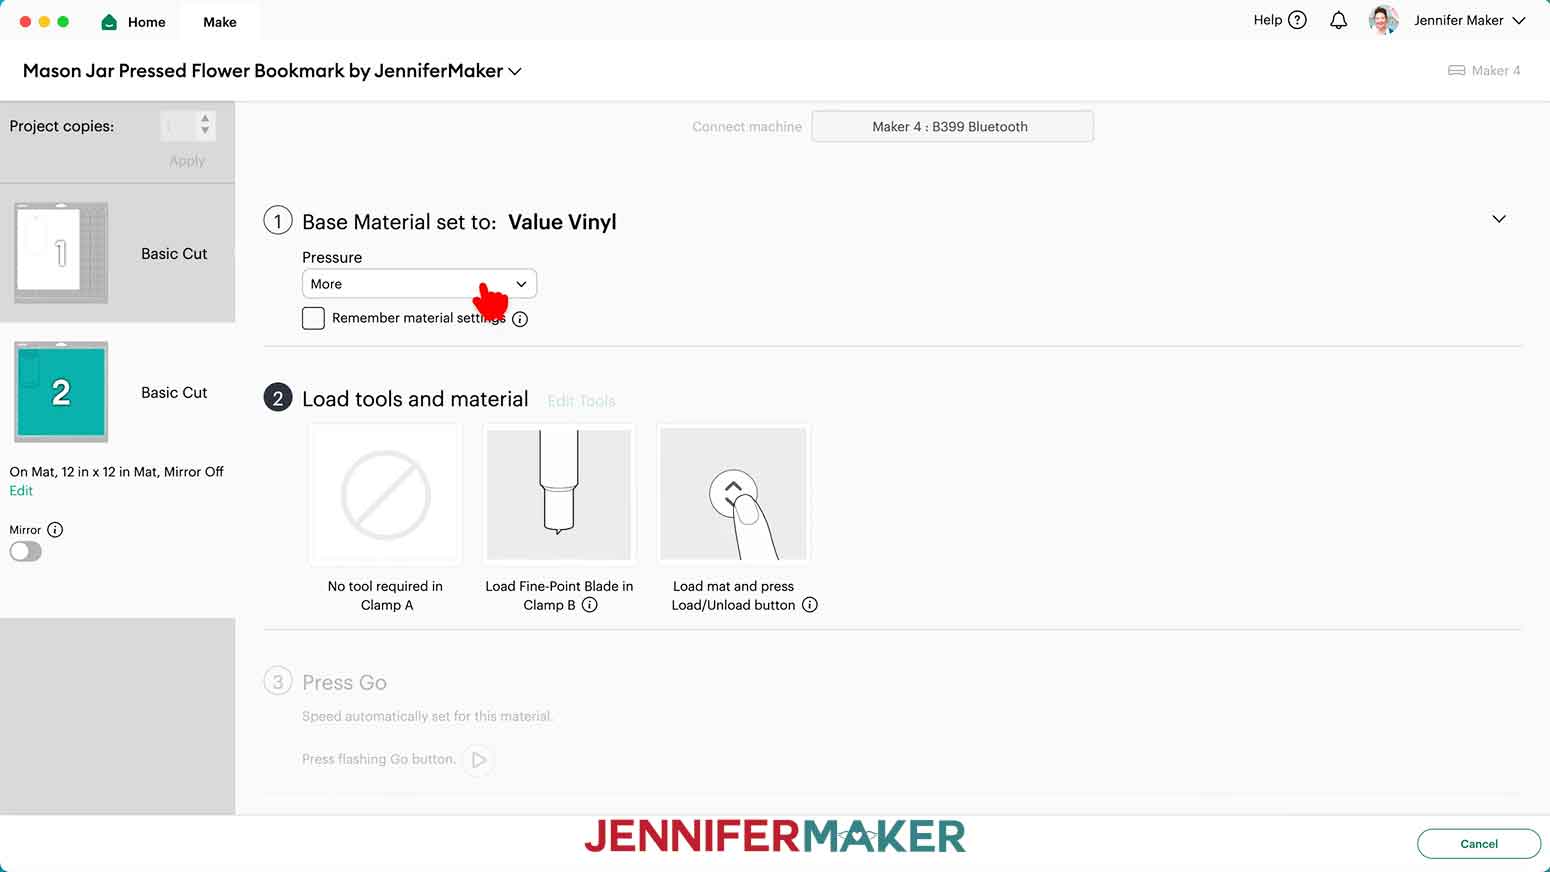
- On the Make screen, choose the Base Material settings that correspond to each of your mats. I used the following settings:
For lamination pouches: “Acetate” setting with “Default” Pressure
For Cricut Value permanent adhesive vinyl: “Value Vinyl” setting with “More” Pressure
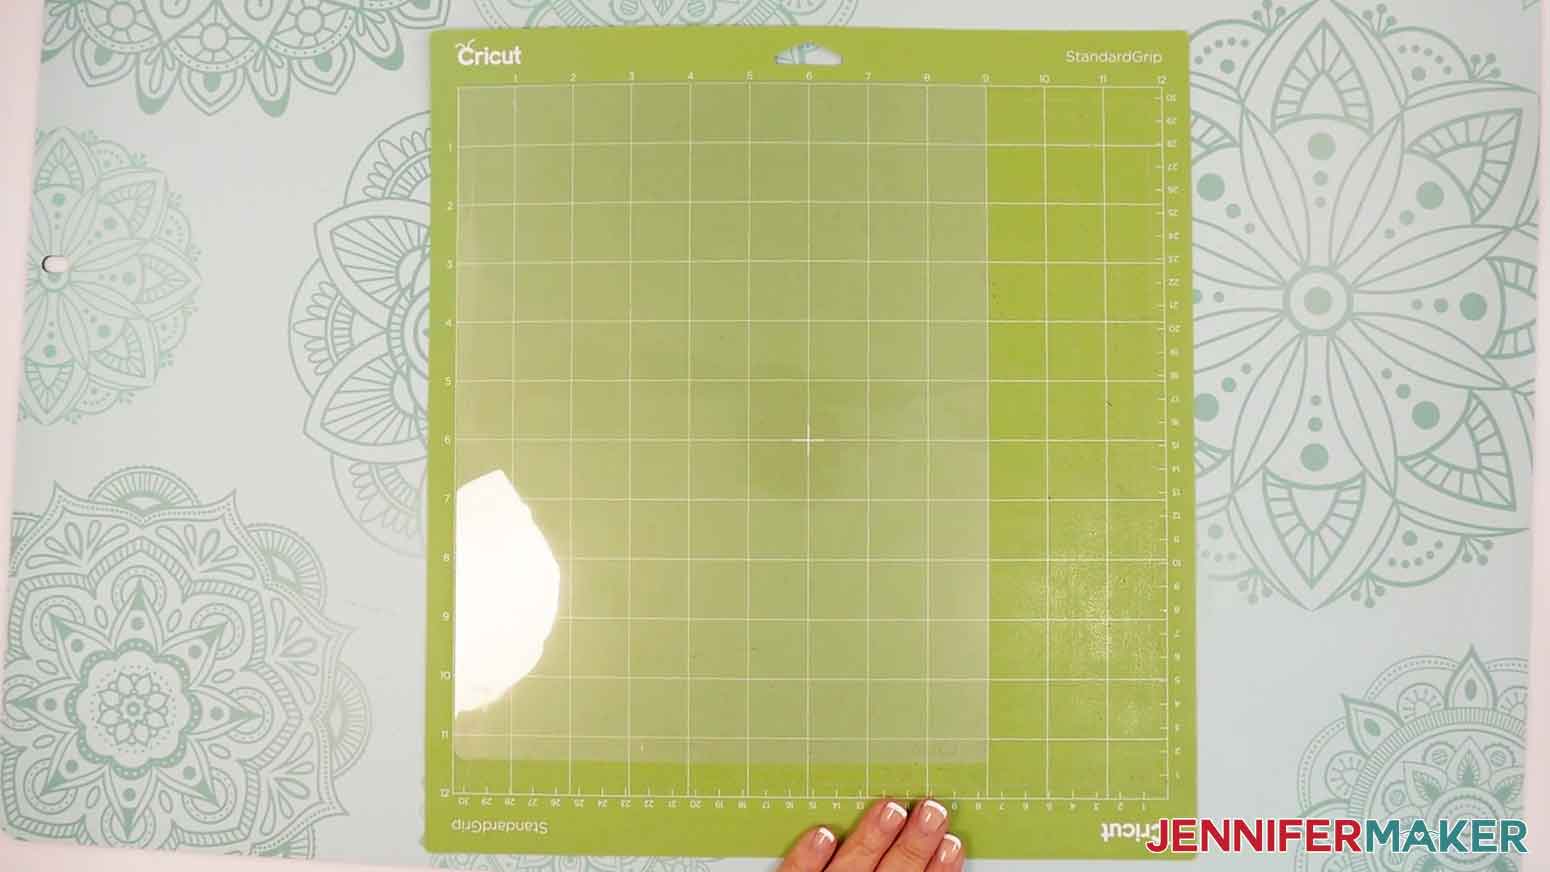
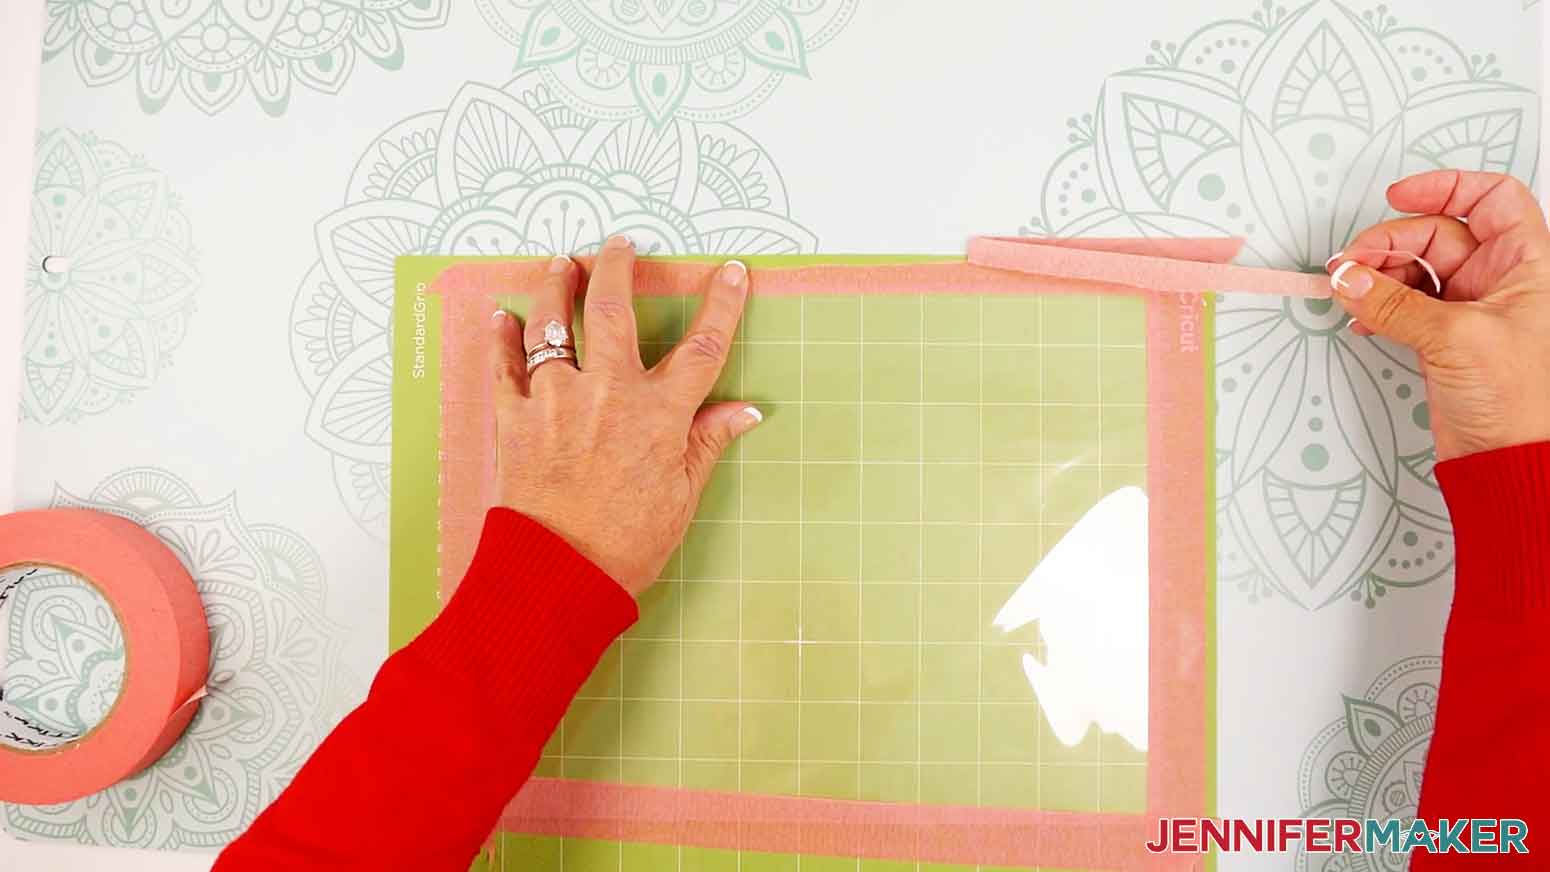
- My first mat will be cut from a laminate pouch. Hold the laminate pouch so the fold is at the top, then place it onto the top left of a green StandardGrip machine mat.
- Use a clean brayer to adhere it well.
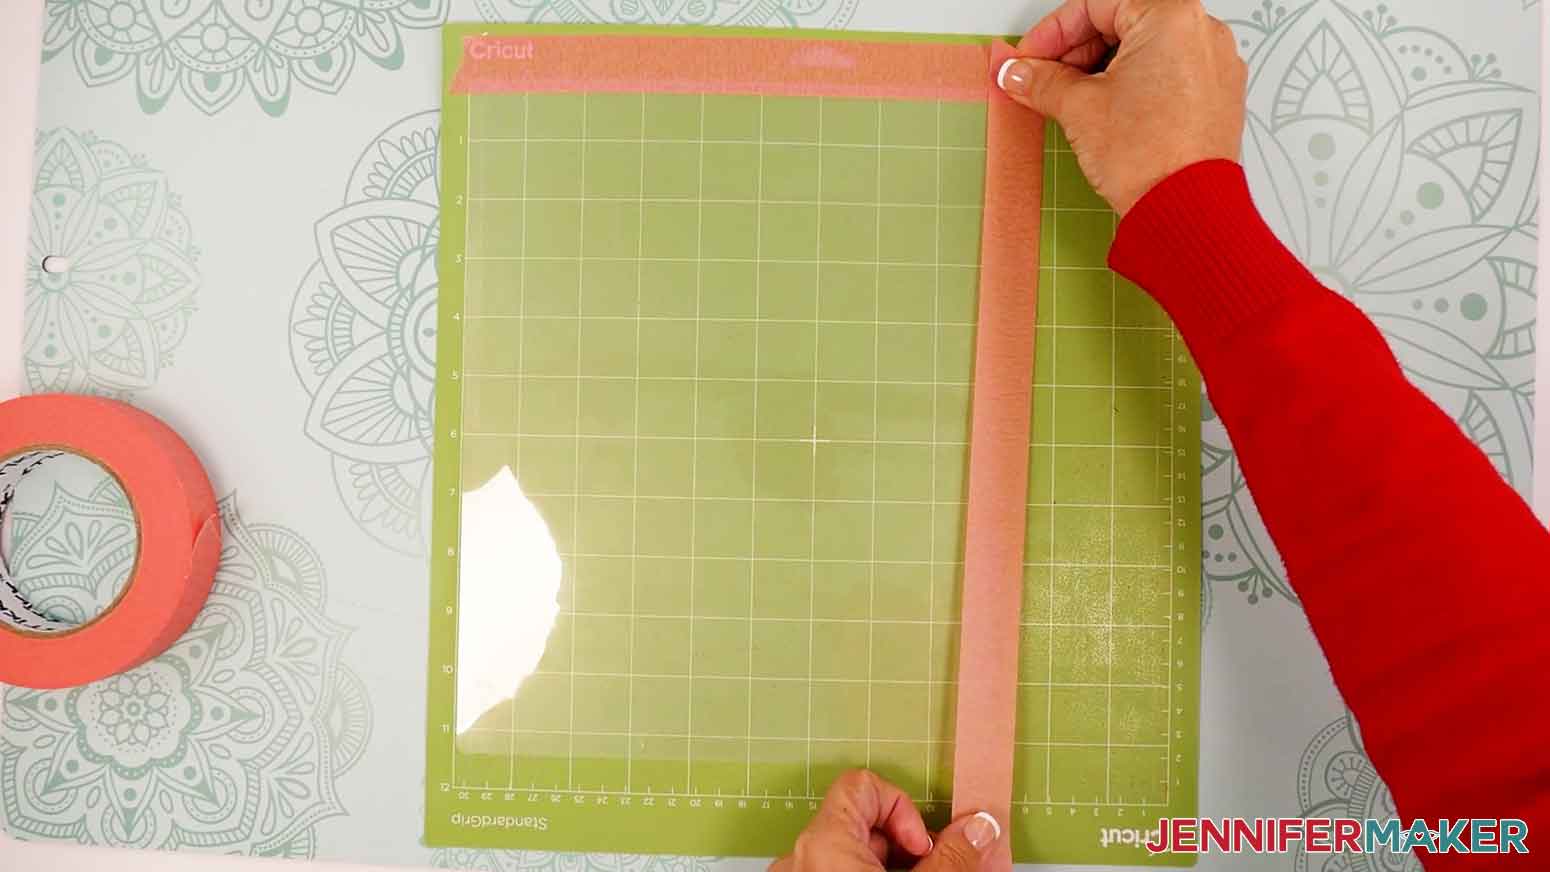
- To keep the top layer of the laminate pouch from shifting while cutting, apply a piece of painter’s tape along each edge of the laminate pouch. Each piece of tape should overlap the laminate slightly.
TIP: If any tape extends beyond the edge of the mat, tear off the excess before cutting.
- Check that your Fine-Point Blade is clean and in the clamp.
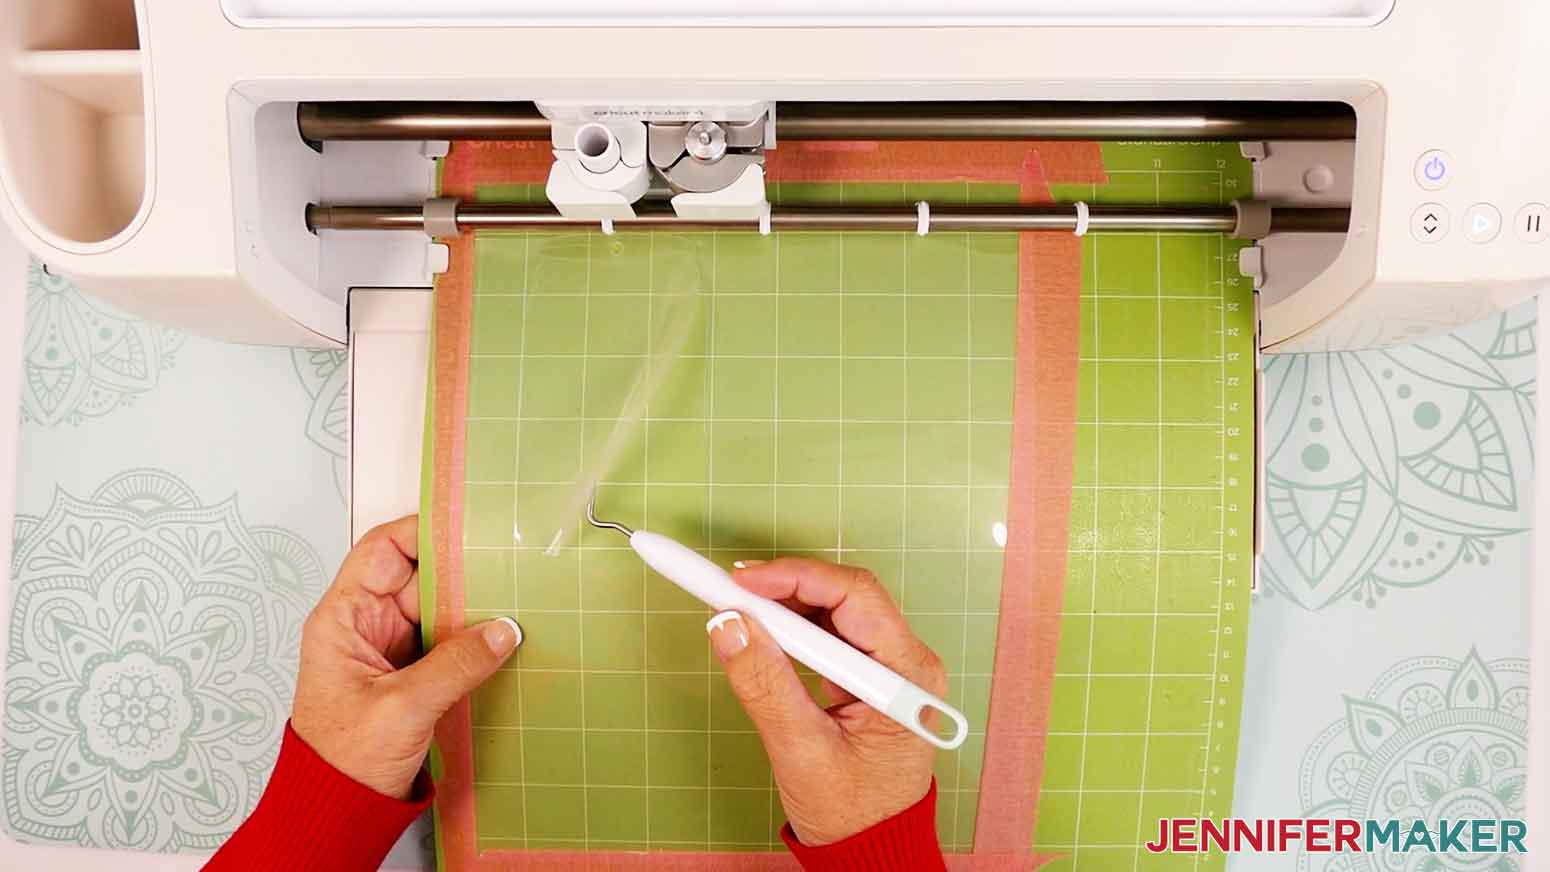
- Load your mat into your Cricut and press the flashing middle button to begin cutting.
- Before unloading the mat, use a weeding tool to gently lift part of the material where it’s cut to see if the cut went all the way through both layers of laminate. If not, press the middle button to cut the design in the same spot again.
- Once the material is cut all the way through, unload the mat. NOTE: If you have any issues with your cuts, check out my Tips & Tricks for Cleaner Cuts tutorial.
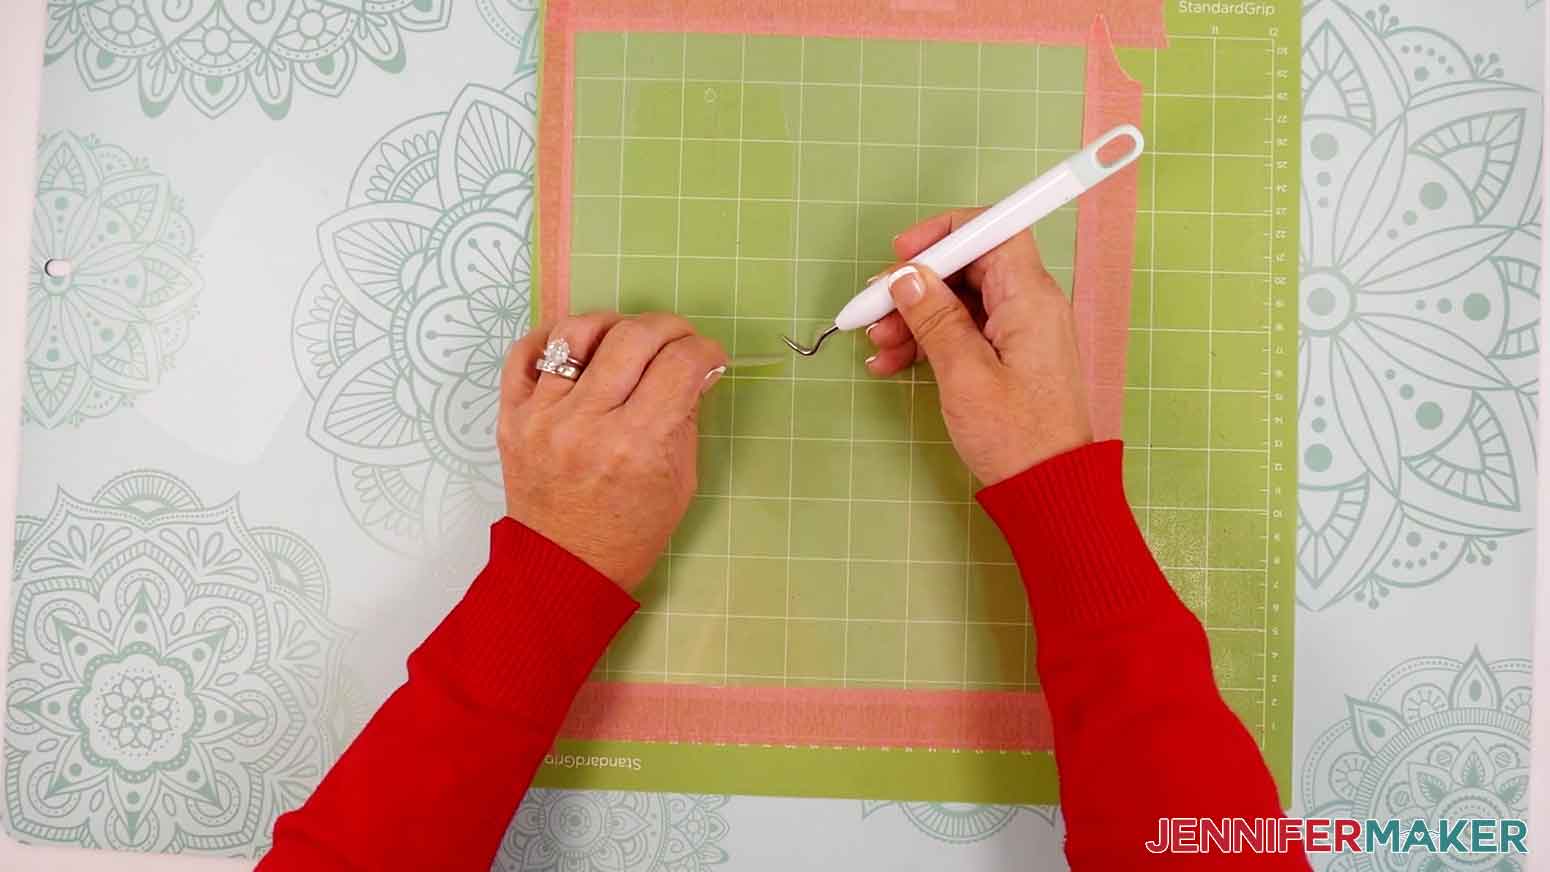
- Use your weeding tool to gently lift the material where it is cut and remove the bookmark pieces from the mat.
NOTE: Each cut piece has a shiny side and a matte side. If the pieces come off the mat separately, sandwich the pair of cut pieces back together so the shiny sides are on the outside and the matte sides are on the inside to keep them clean.
- Use your weeding tool to poke the cut hole out of the top of your bookmark.
- Follow steps 7-13 to cut your vinyl mat(s) if your bookmark design(s) include vinyl.
NOTE: I used Cricut Value permanent adhesive vinyl, with the “Value Vinyl” setting and “More” Pressure.
 TIP: If any tape extends beyond the edge of the mat, tear off the excess before cutting.
 NOTE: Each cut piece has a shiny side and a matte side. If the pieces come off the mat separately, sandwich the pair of cut pieces back together so the shiny sides are on the outside and the matte sides are on the inside to keep them clean.
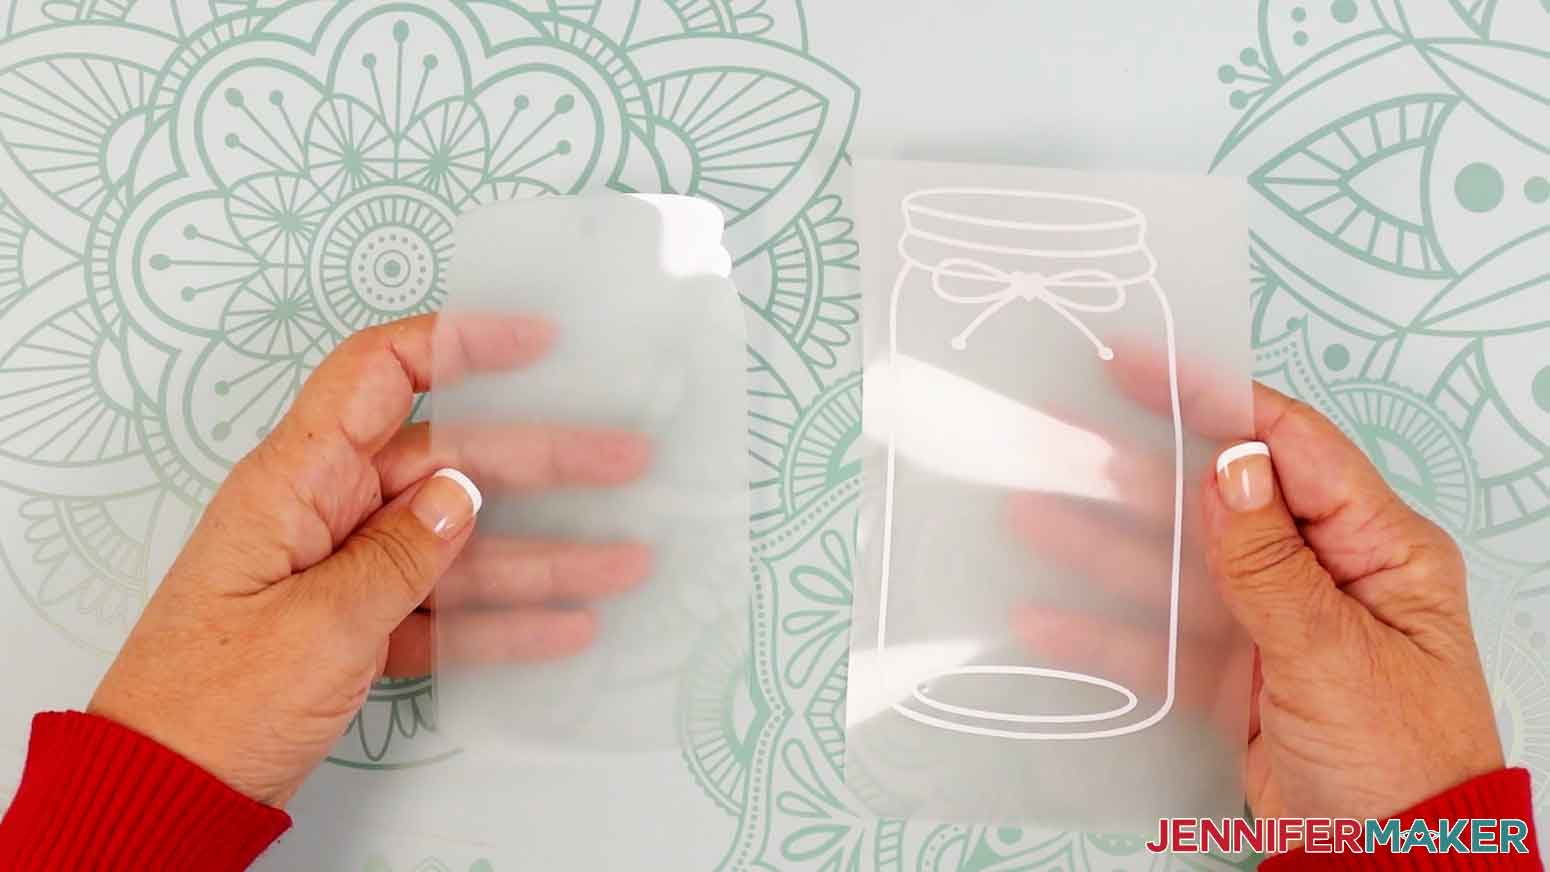
STEP 3: ASSEMBLE THE PRESSED FLOWER BOOKMARK
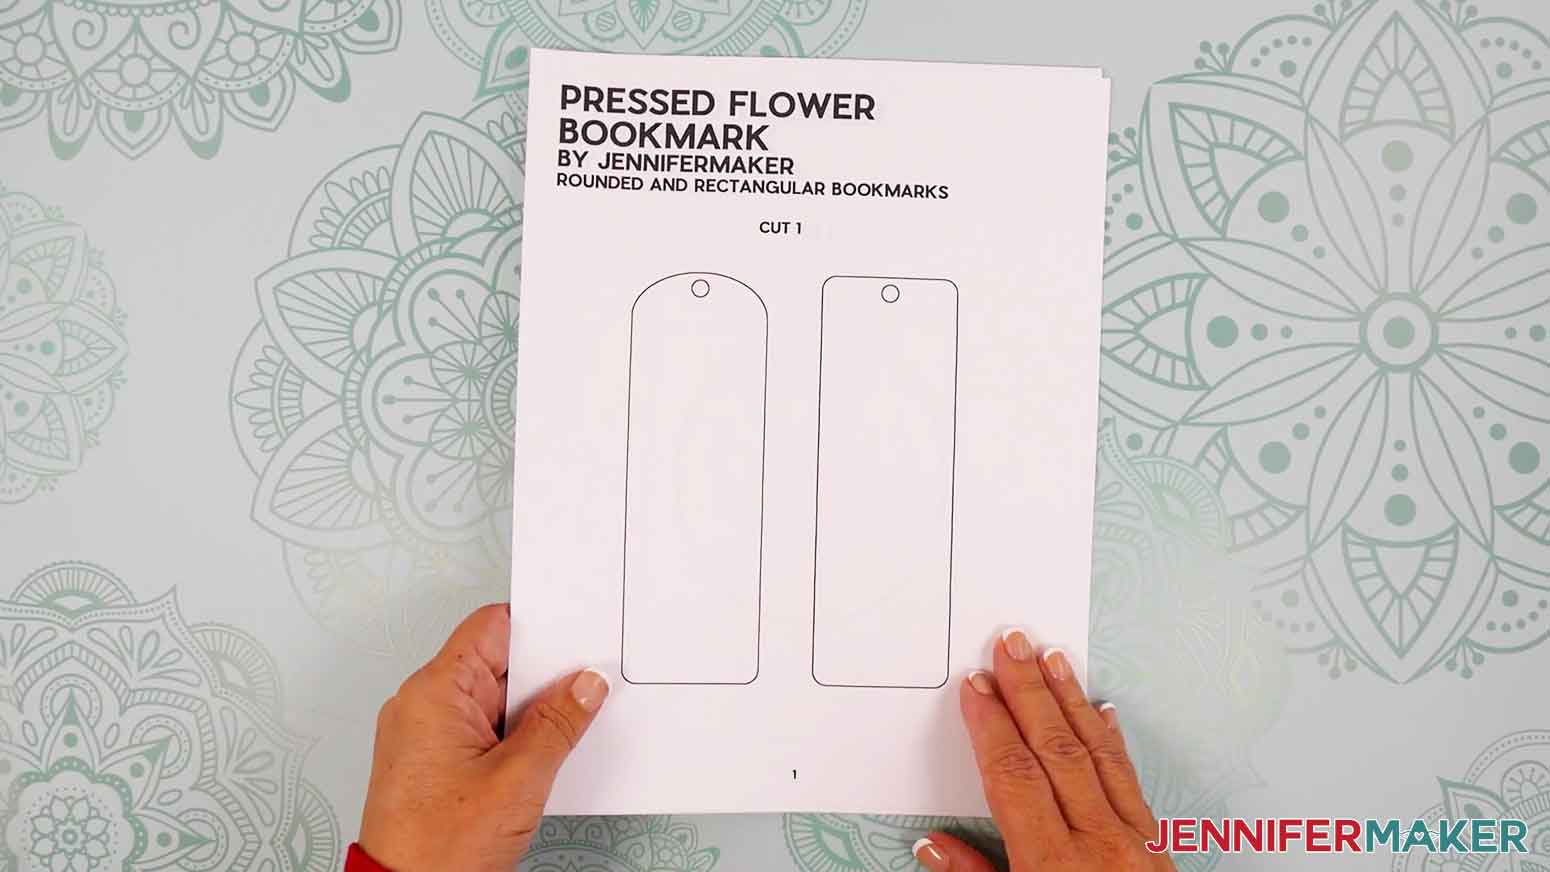
- Print the page of the PDF in the download file that has your bookmark shape.
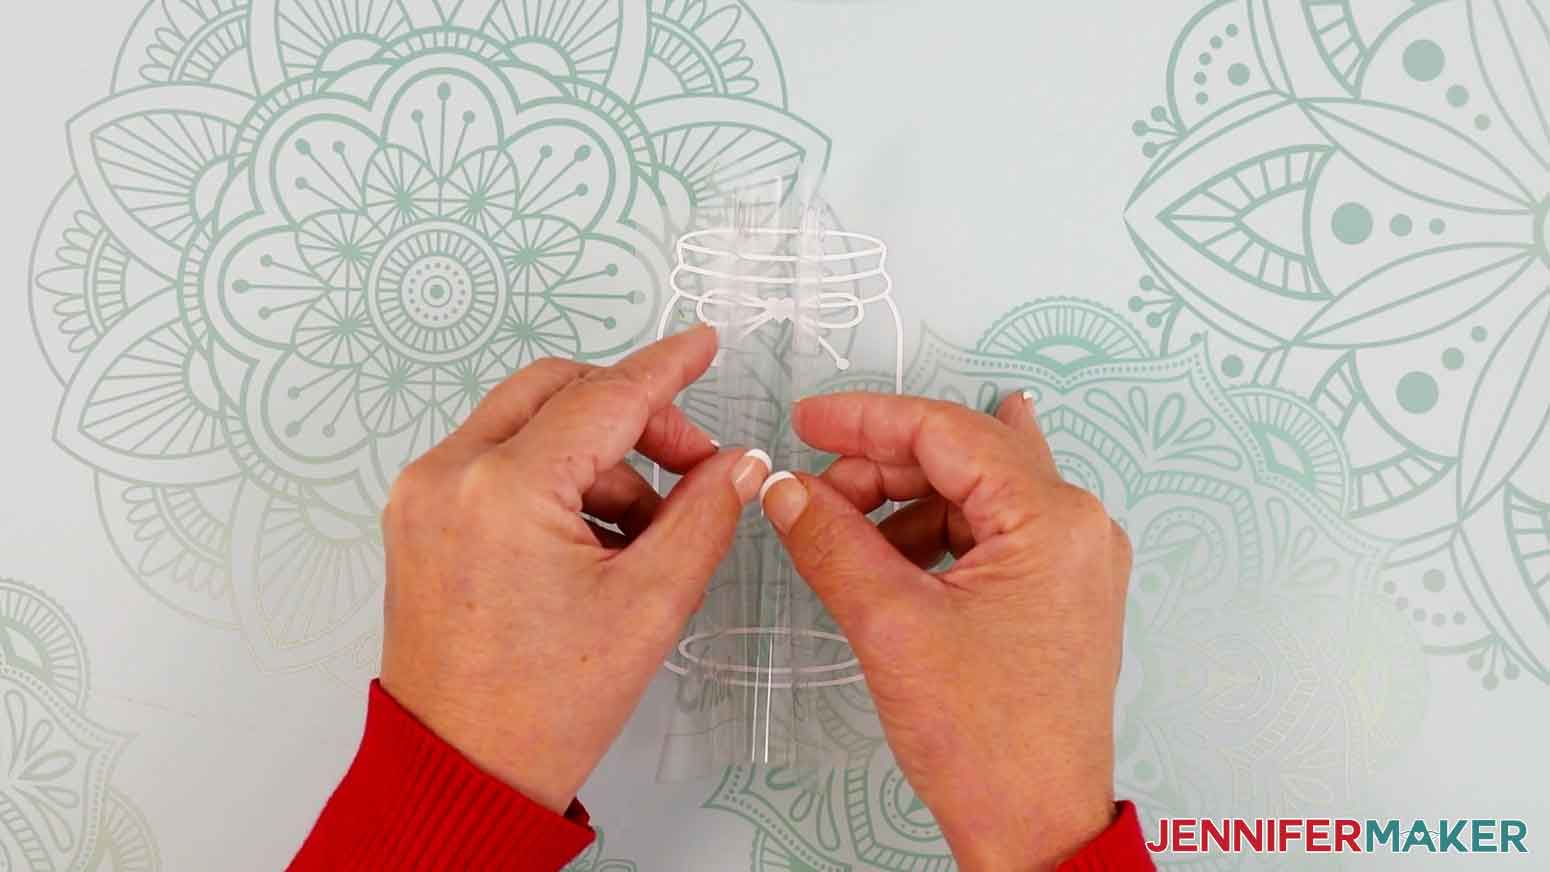
- Grab your cut pair of laminate bookmark pieces and separate the two layers so the matte sides of both are face up.
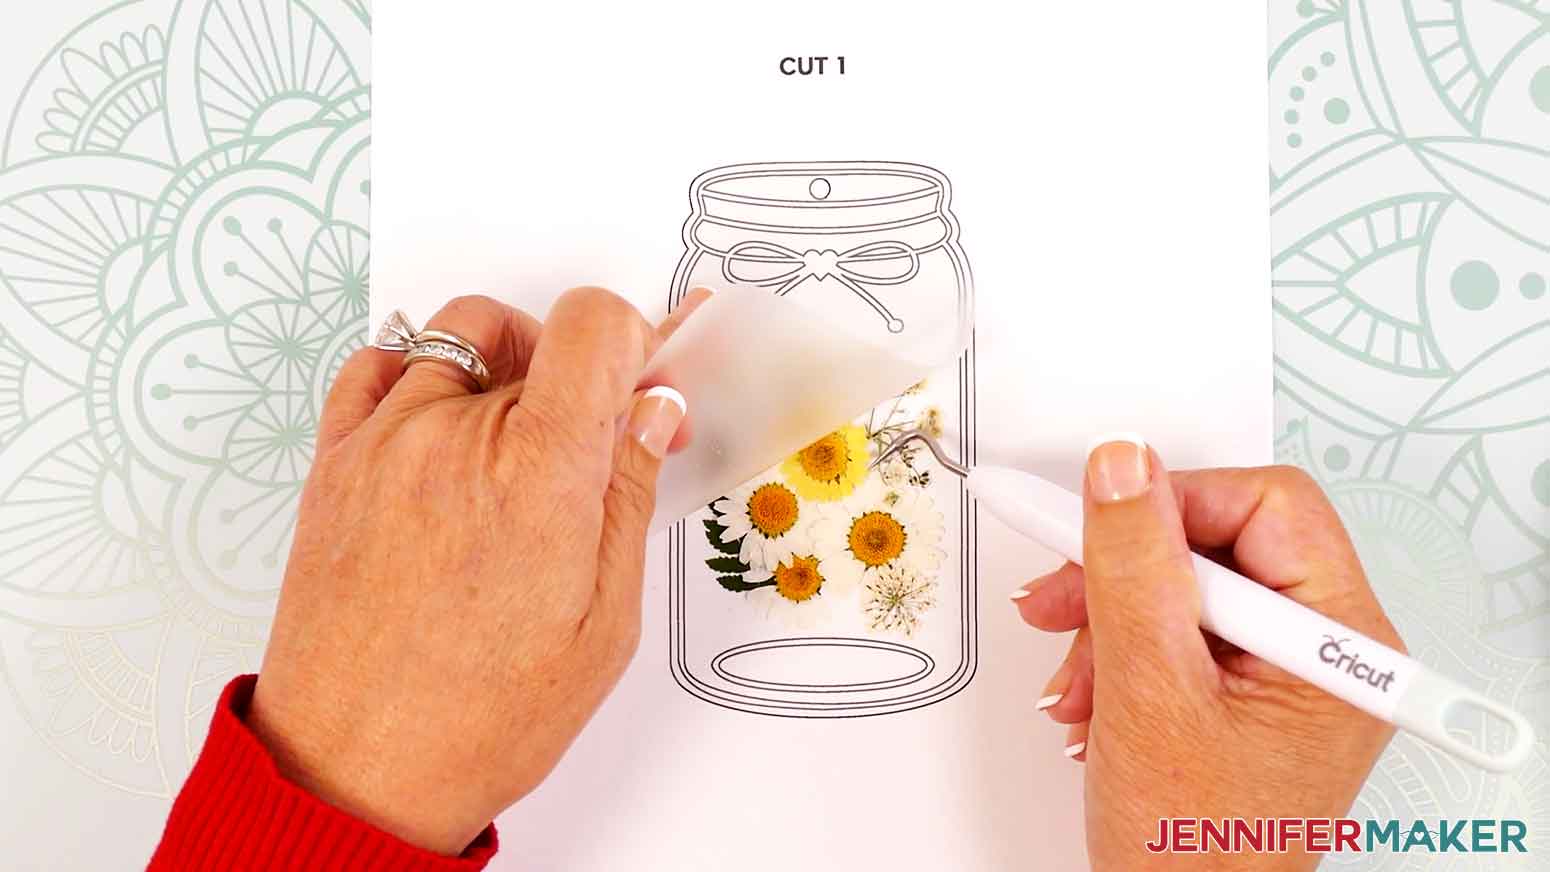
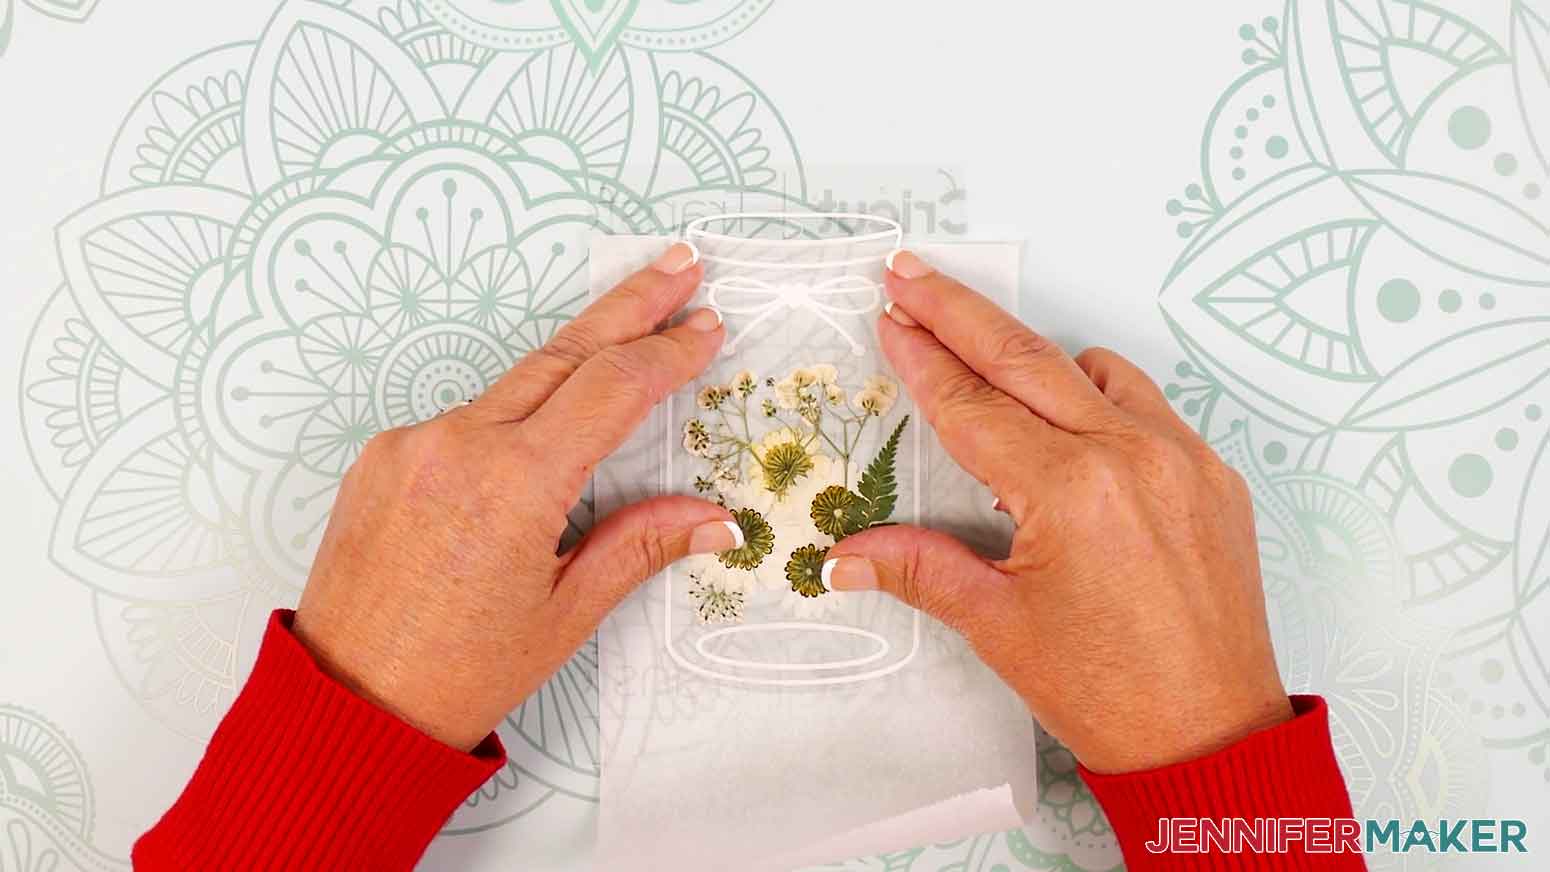
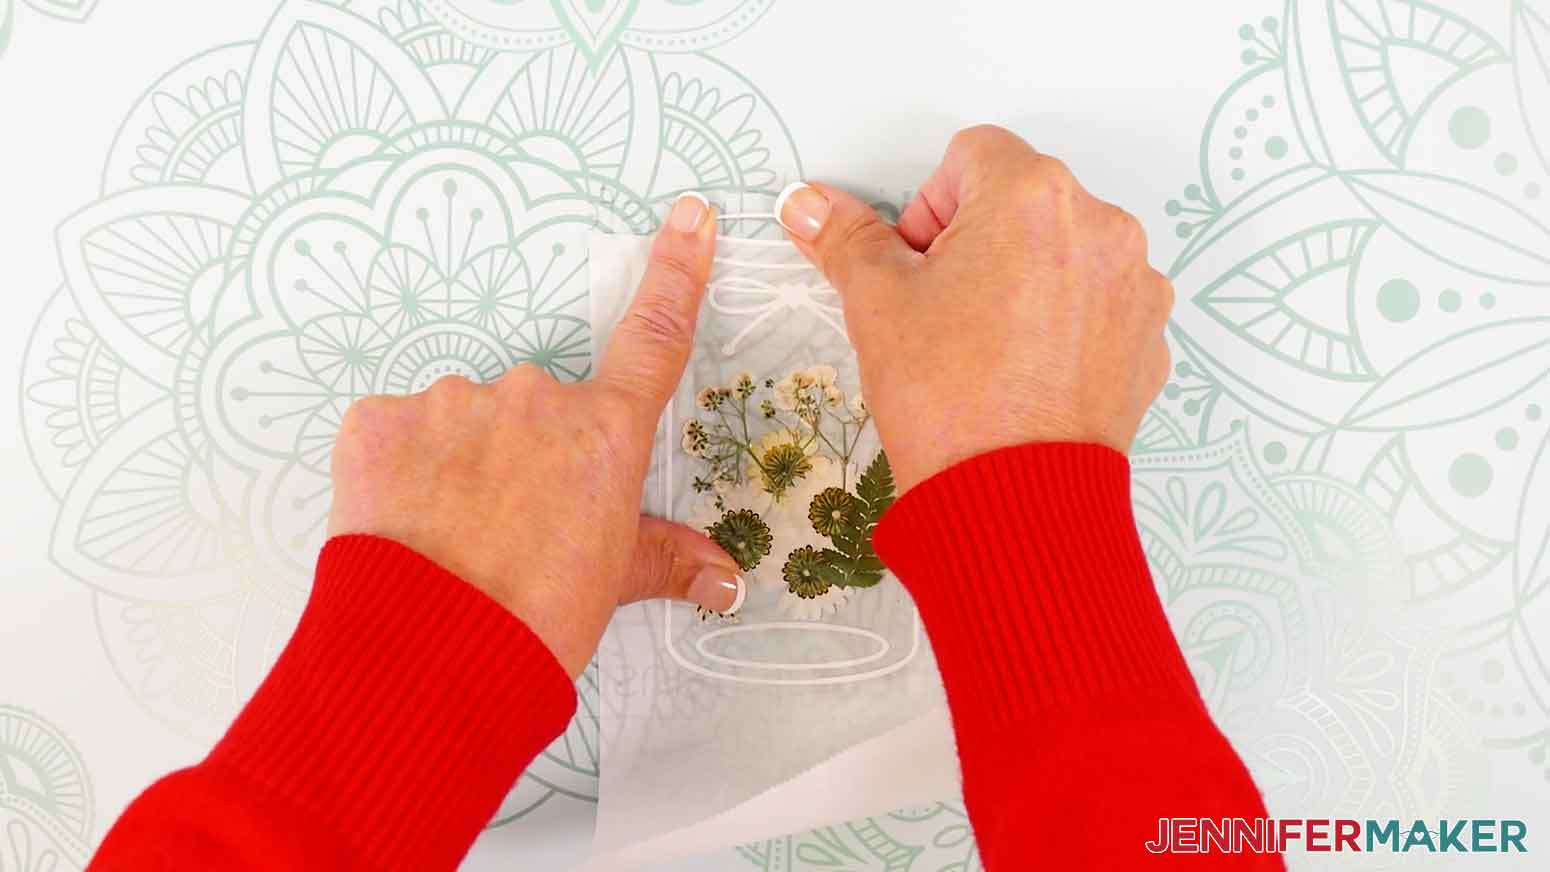
- Place one of the layers matte-side up over the bookmark shape on the printed PDF page.
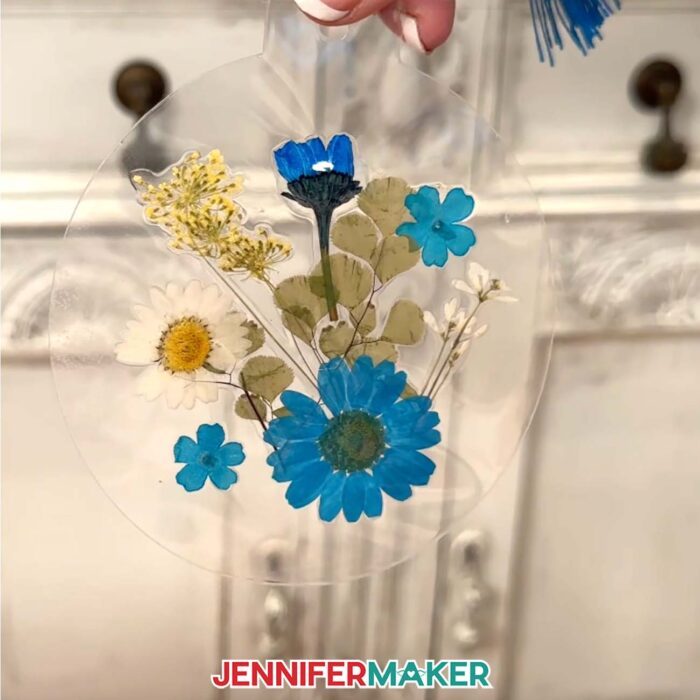
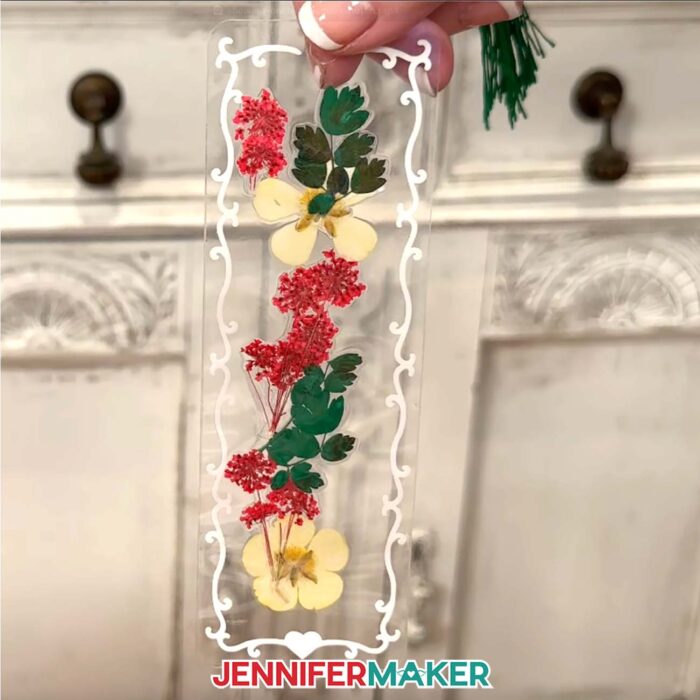
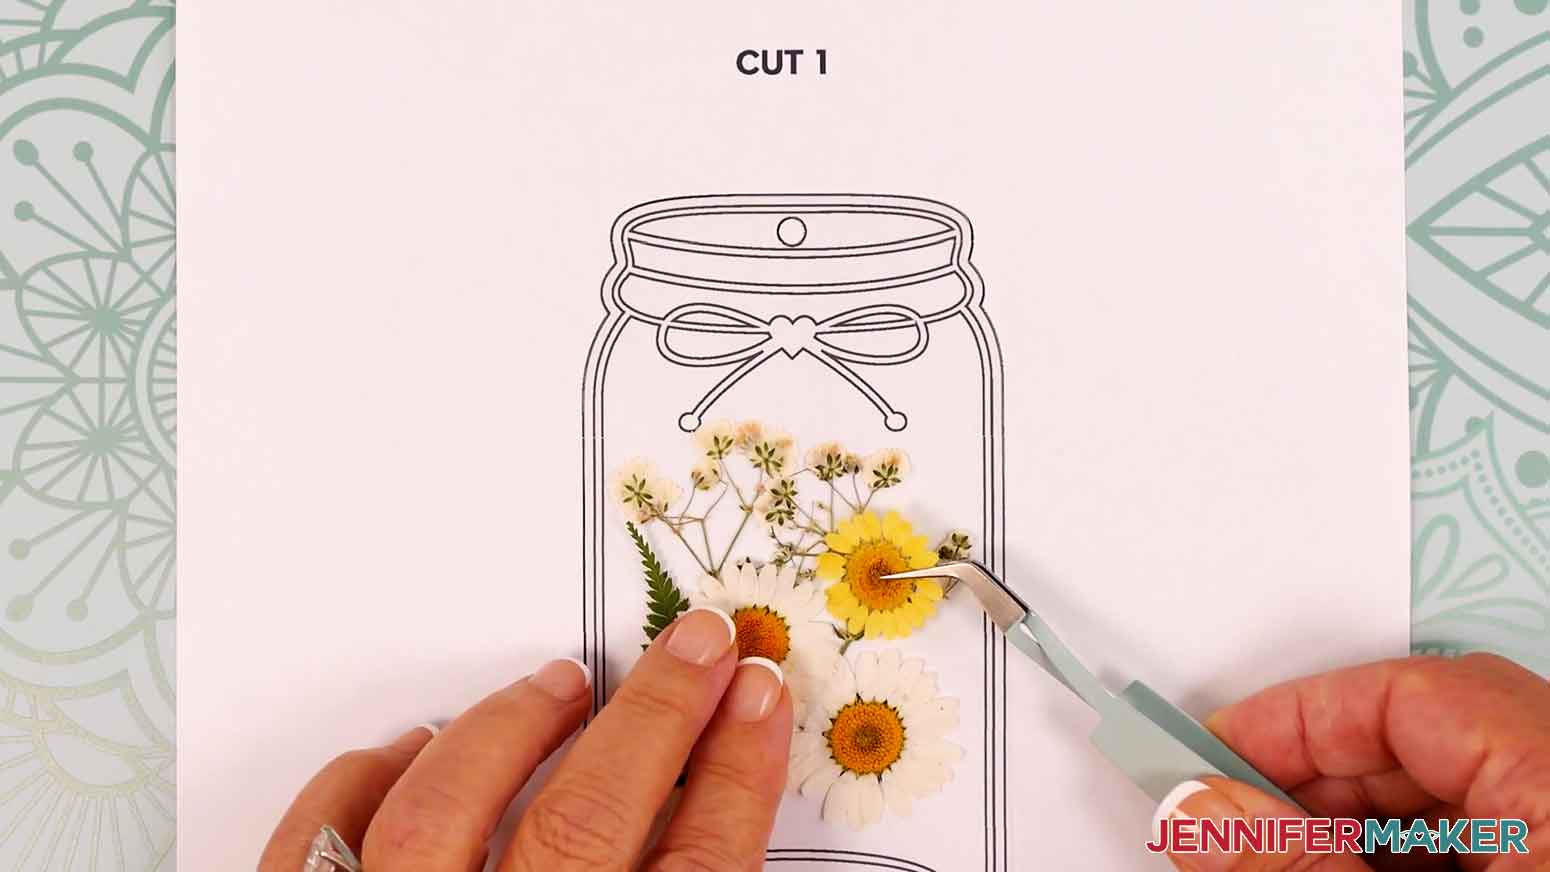
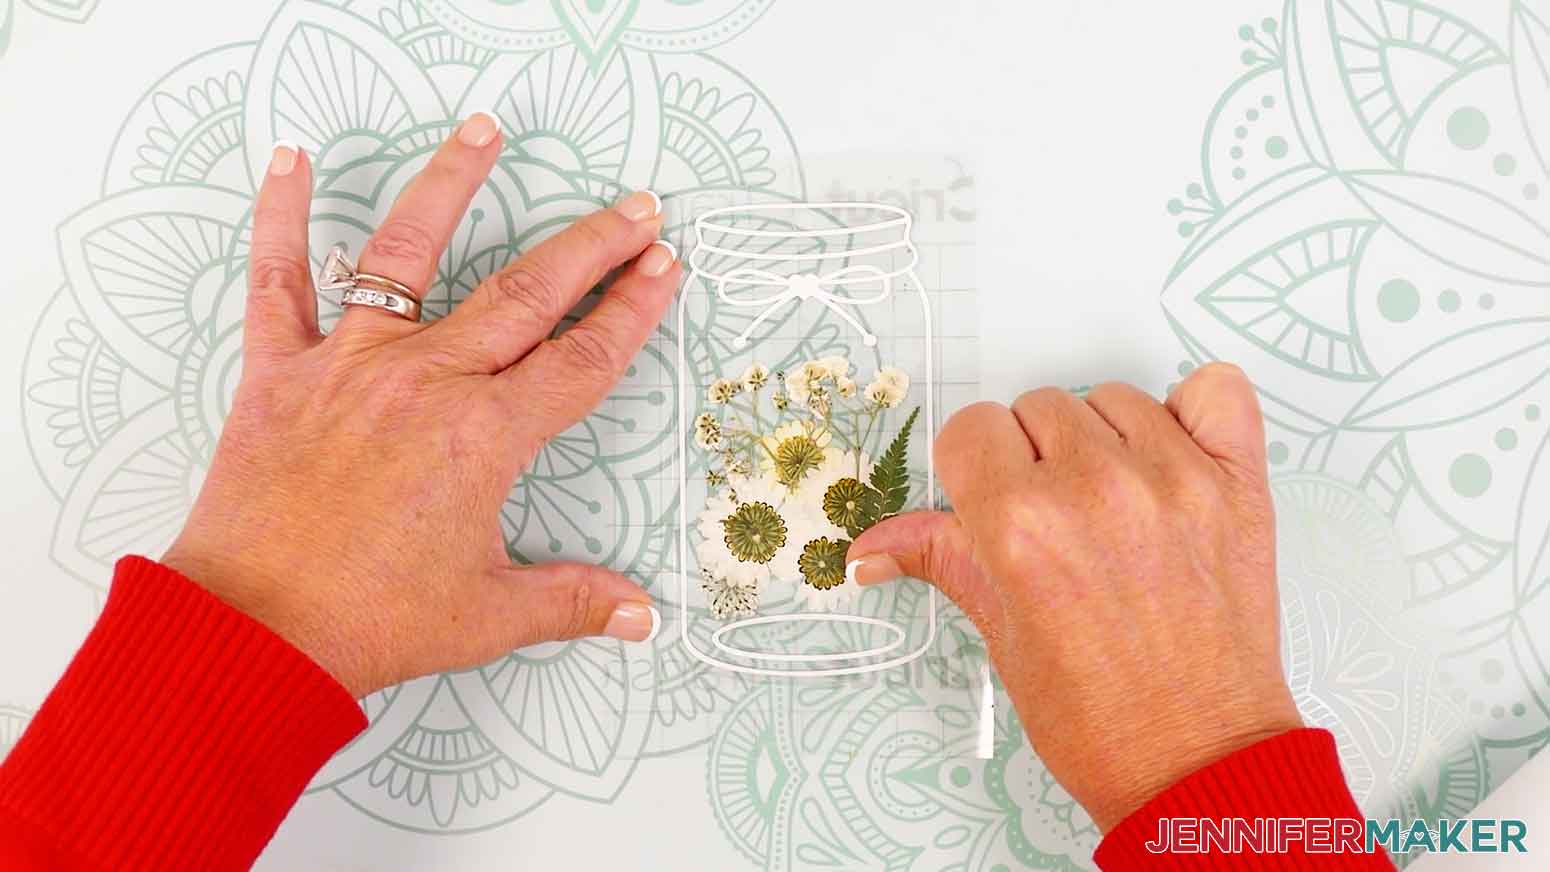
- Arrange dried flowers on top of the bookmark layer on the page, avoiding the hole, and leaving at least ⅛” of space around the flowers at the edge of the bookmark.
TIP: Use tweezers or a weeding tool to place or adjust them. Use scissors to trim stems or other areas if needed.
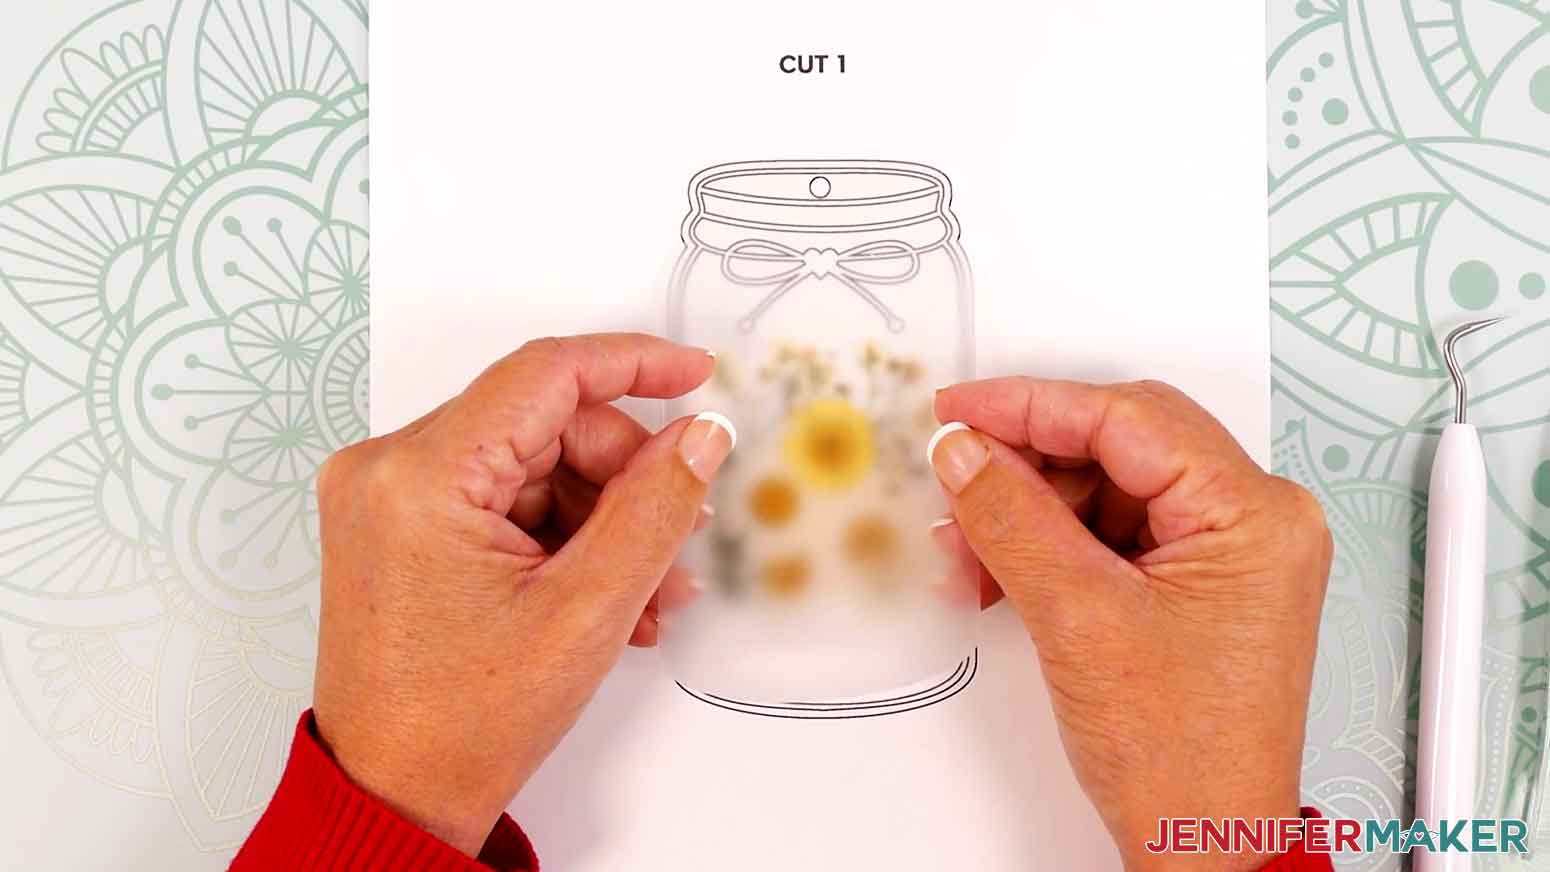
- Make sure the laminate layer with the flowers is aligned with the bookmark shape on the paper.
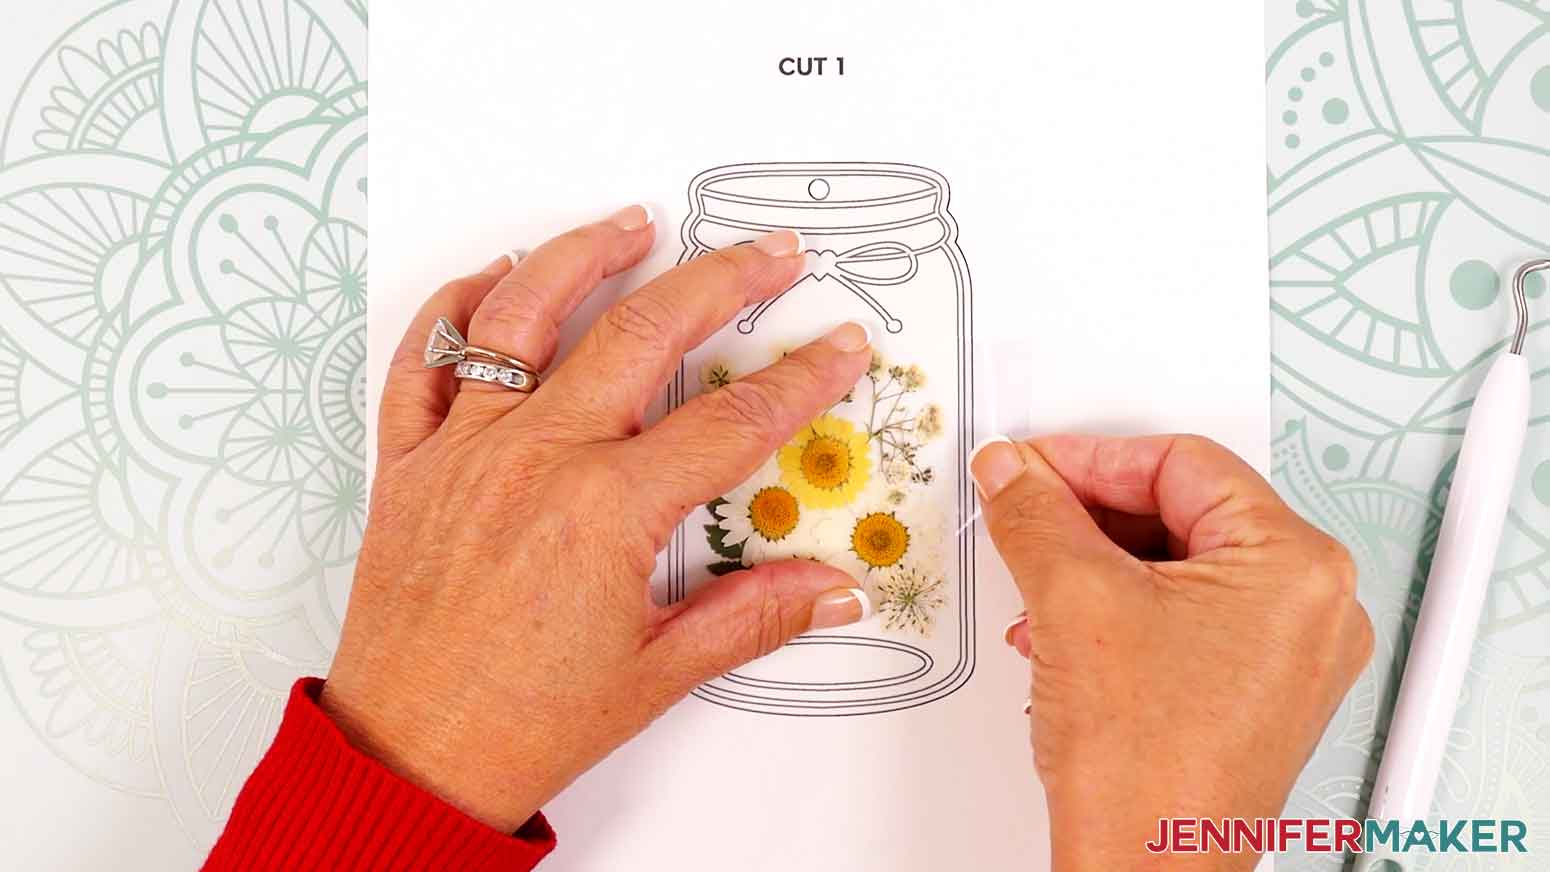
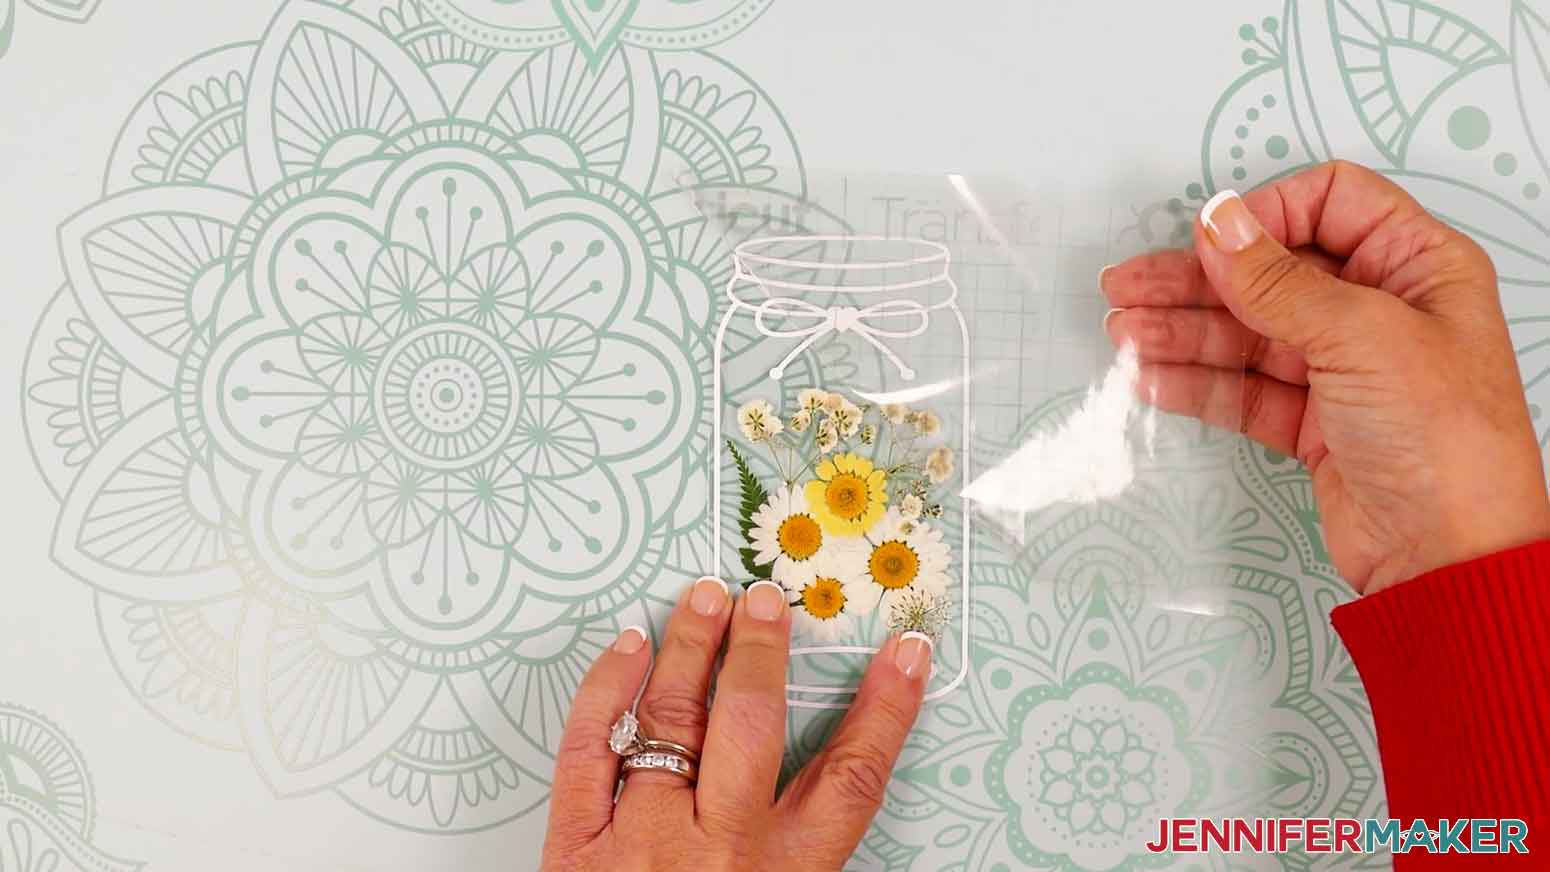
- Grab the other laminate bookmark layer, and turn it over so it’s shiny-side up, matte-side down.
- Align its top edge with the top edge of the layer that’s on the page.
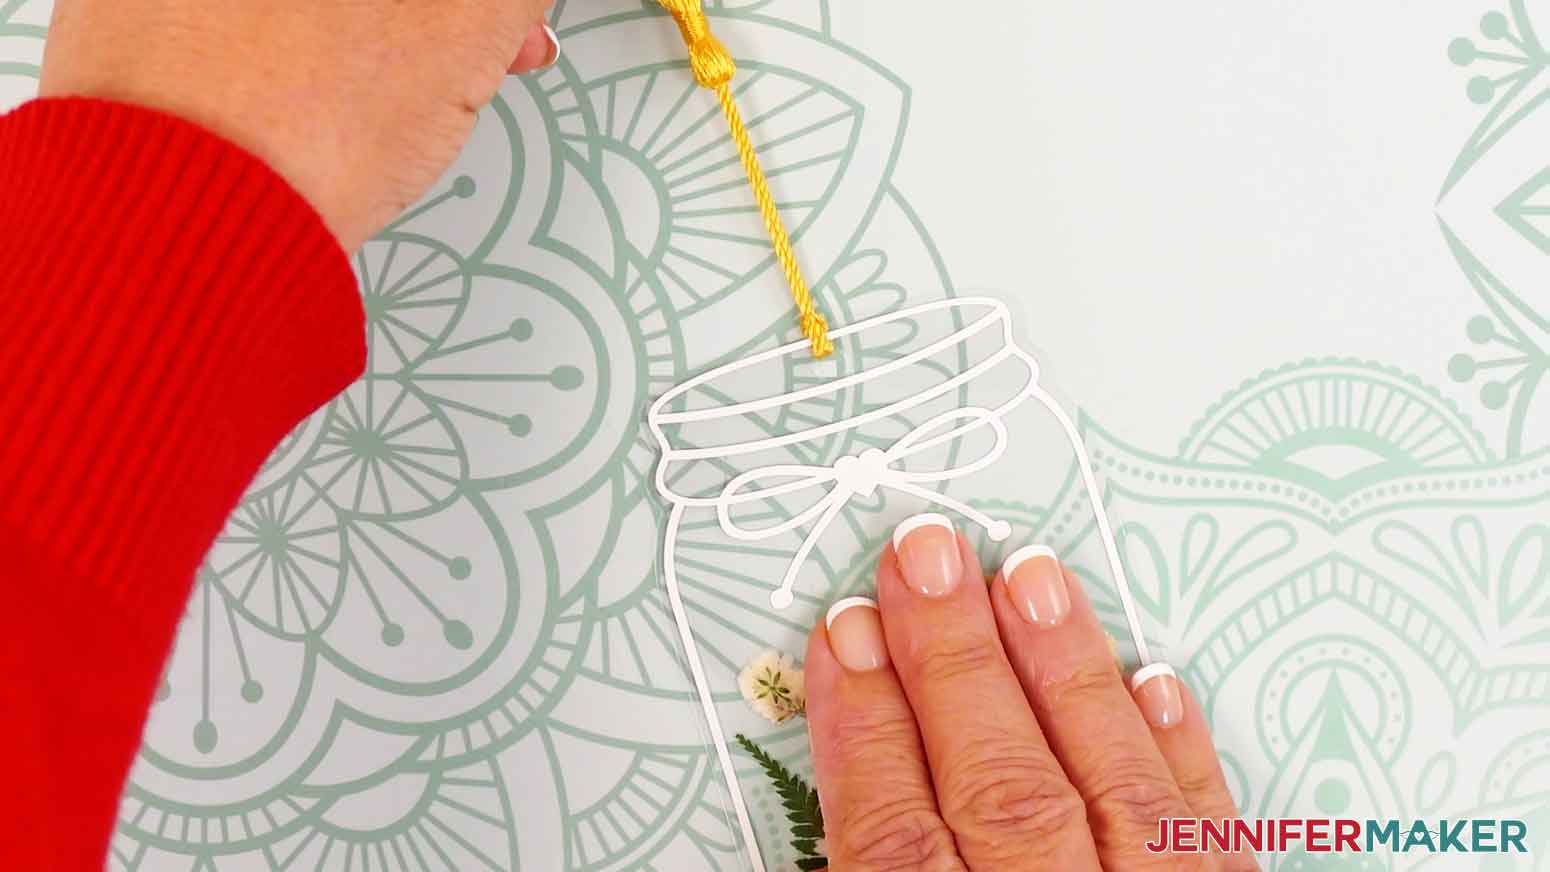
- Carefully lower the rest of the top layer down onto the flowers and bottom layer.
NOTE: If any of the flowers on the first layer shift, hold the top layer in place and use your weeding tool to poke between the layers and nudge the flowers back into place.
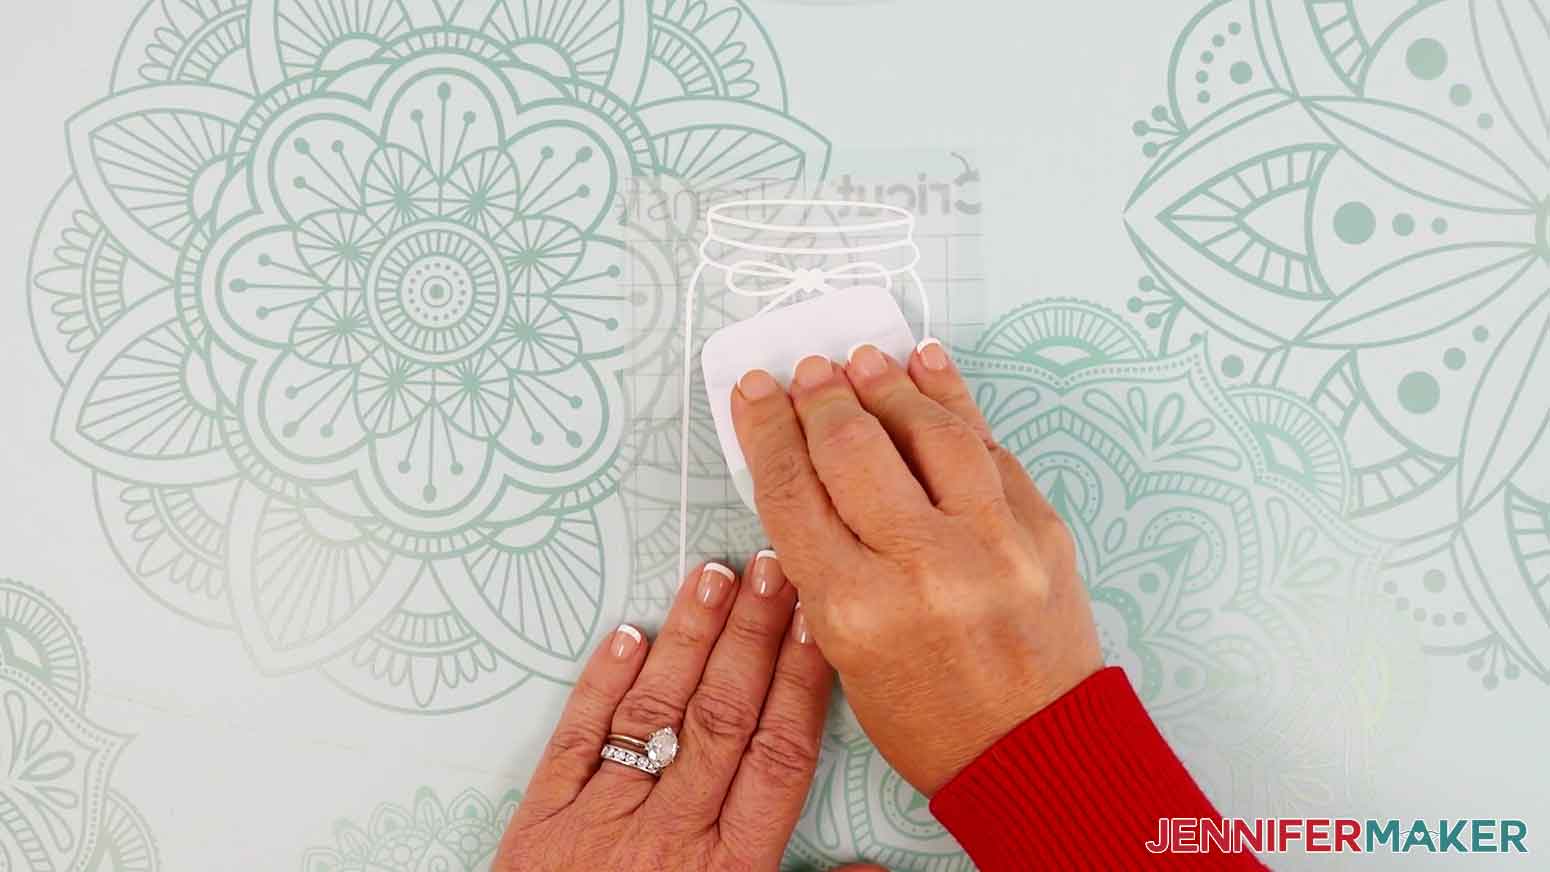
- To help keep the flowers from shifting when the bookmark goes through the laminator, apply a piece of heat-resistant tape to each edge of the bookmark to attach it to the page.
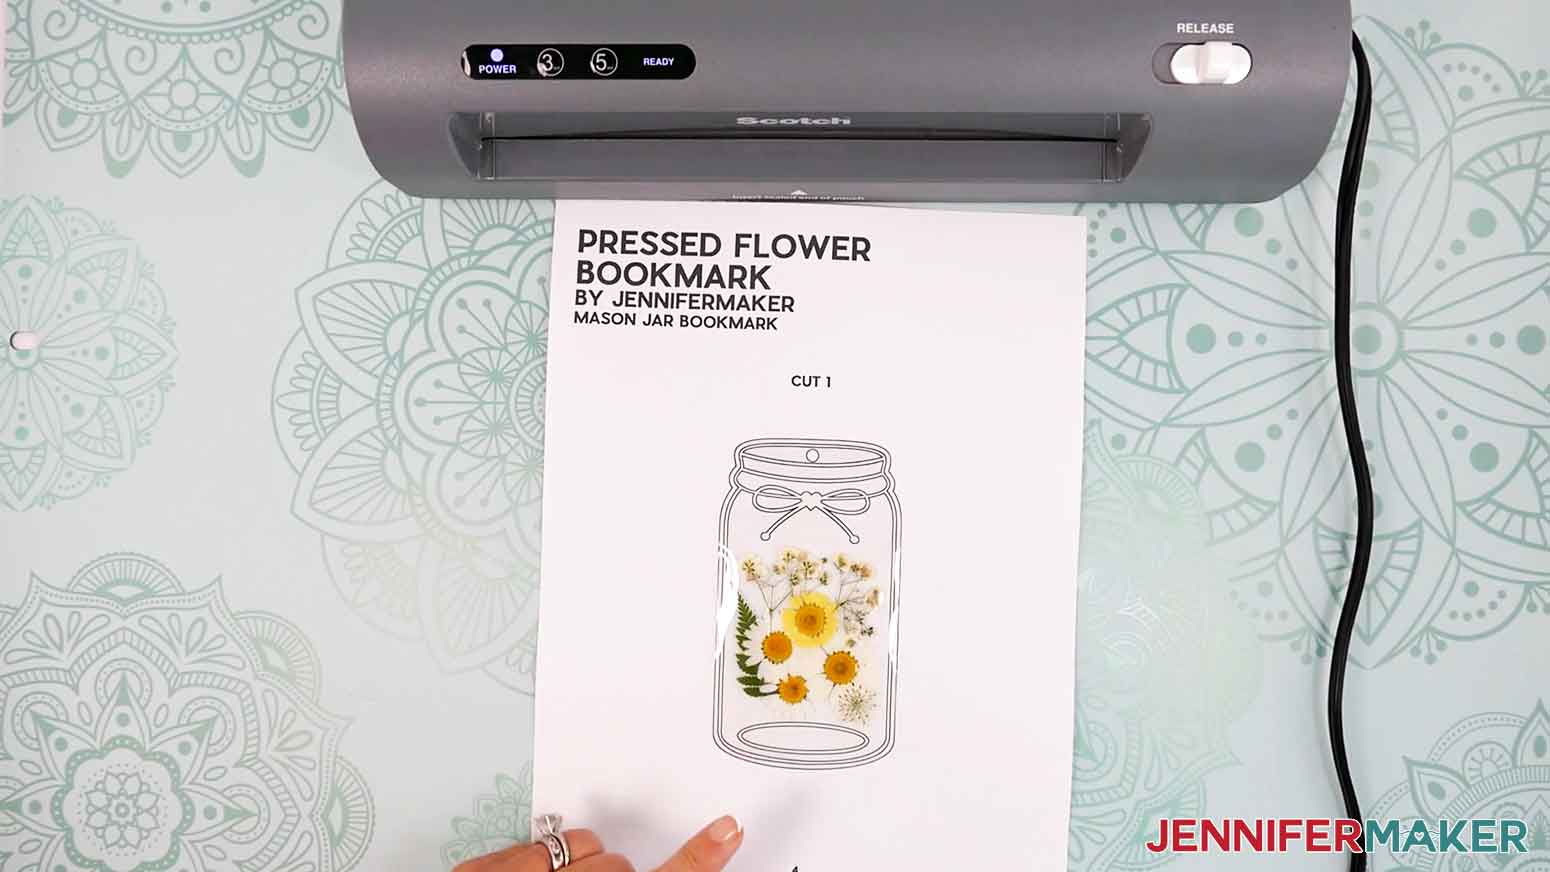
- With the bookmark on top, run the page through the laminating machine.
- Once it’s finished laminating, peel the bookmark off of the page.
- Peel the heat-resistant tape off of the bookmark.
TIP: If the bookmark is rippled or curled, you can send it through the lamination machine again or place it under a heavy book to smooth it out.
- If you’re decorating your bookmark with vinyl, follow the “VARIATION: ADD A VINYL DECAL TO THE BOOKMARK” directions below.

 NOTE: If any of the flowers on the first layer shift, hold the top layer in place and use your weeding tool to poke between the layers and nudge the flowers back into place.
 TIP: If the bookmark is rippled or curled, you can send it through the lamination machine again or place it under a heavy book to smooth it out.
VARIATION: ADD A VINYL DECAL TO THE BOOKMARK
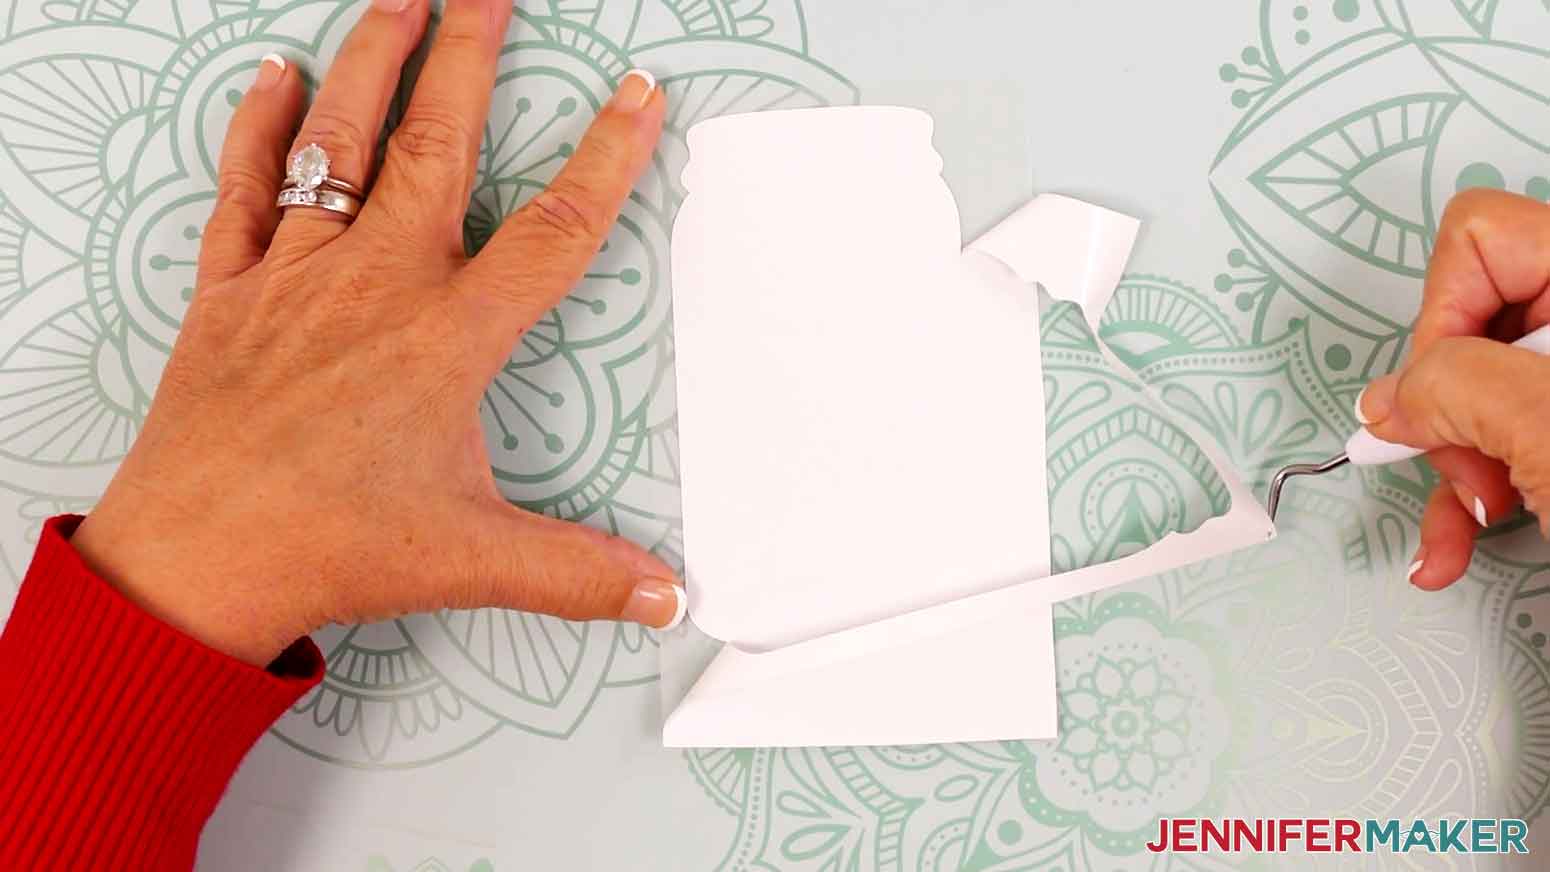
- Use a weeding tool to carefully peel away the extra background vinyl around your decal design, leaving the design behind on the carrier sheet.
- Use your weeding tool to gently lift and remove any other areas you want to remove, like the insides of small shapes. TIP: It can be easier to weed vinyl, especially small, detailed designs, while it is adhered to the machine mat. If any needed pieces lift up, use your weeding tool to carefully tack them back down to the carrier sheet before continuing.
- Cut a piece of StandardGrip transfer tape that is slightly larger than the vinyl decal.
- Remove the backing from the transfer tape.
- Hold your transfer tape in the shape of a “taco” sticky-side down, then put the bottom of the “taco” onto the middle of the vinyl decal.
- Smooth the transfer tape over the decal from the center outward and burnish it down using the scraper tool.
- Flip the decal over and burnish it with the scraper tool from the back.
- Gently peel off the backing from the vinyl, leaving the design on the transfer tape.
TIP: If any vinyl lifts up from the transfer tape, lay the backing back down and burnish again.
- Cut a piece of parchment paper about the same size as your transfer tape.
- With the transfer tape and decal sticky-side up on the work surface, press the parchment paper down onto the transfer tape and decal, leaving the top ½” of the transfer tape exposed.
- Decide which side of your laminated bookmark you want to be the front, then turn the bookmark so it’s face down.
- Place the bookmark onto the parchment and transfer tape, aligning the bookmark shape with the vinyl design on the transfer tape.
- Press the top part of the laminated bookmark onto the exposed area of transfer tape.
- Remove the parchment paper.
- Beginning at the top, smooth the bookmark down onto the transfer tape and vinyl decal.
- Flip the bookmark face up, and use your scraper tool to burnish the decal to the laminate material.
- Carefully peel away the transfer tape, leaving the vinyl design on the bookmark.
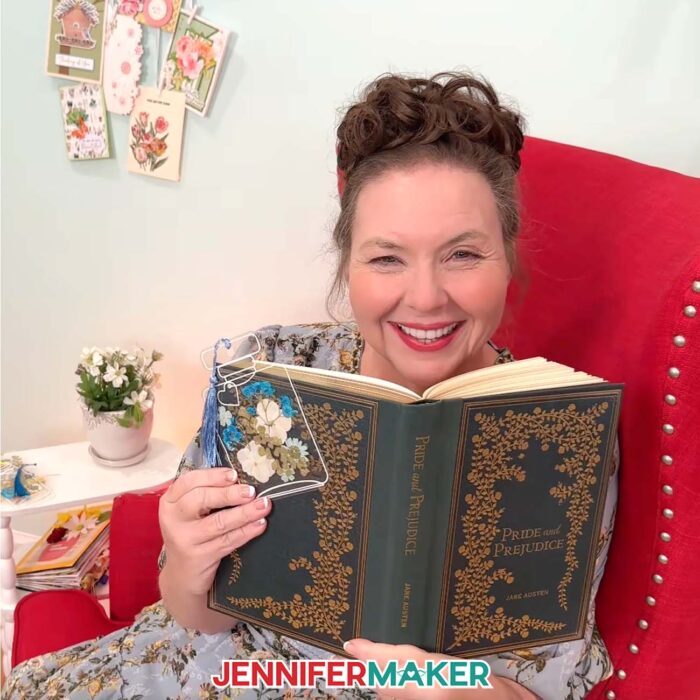
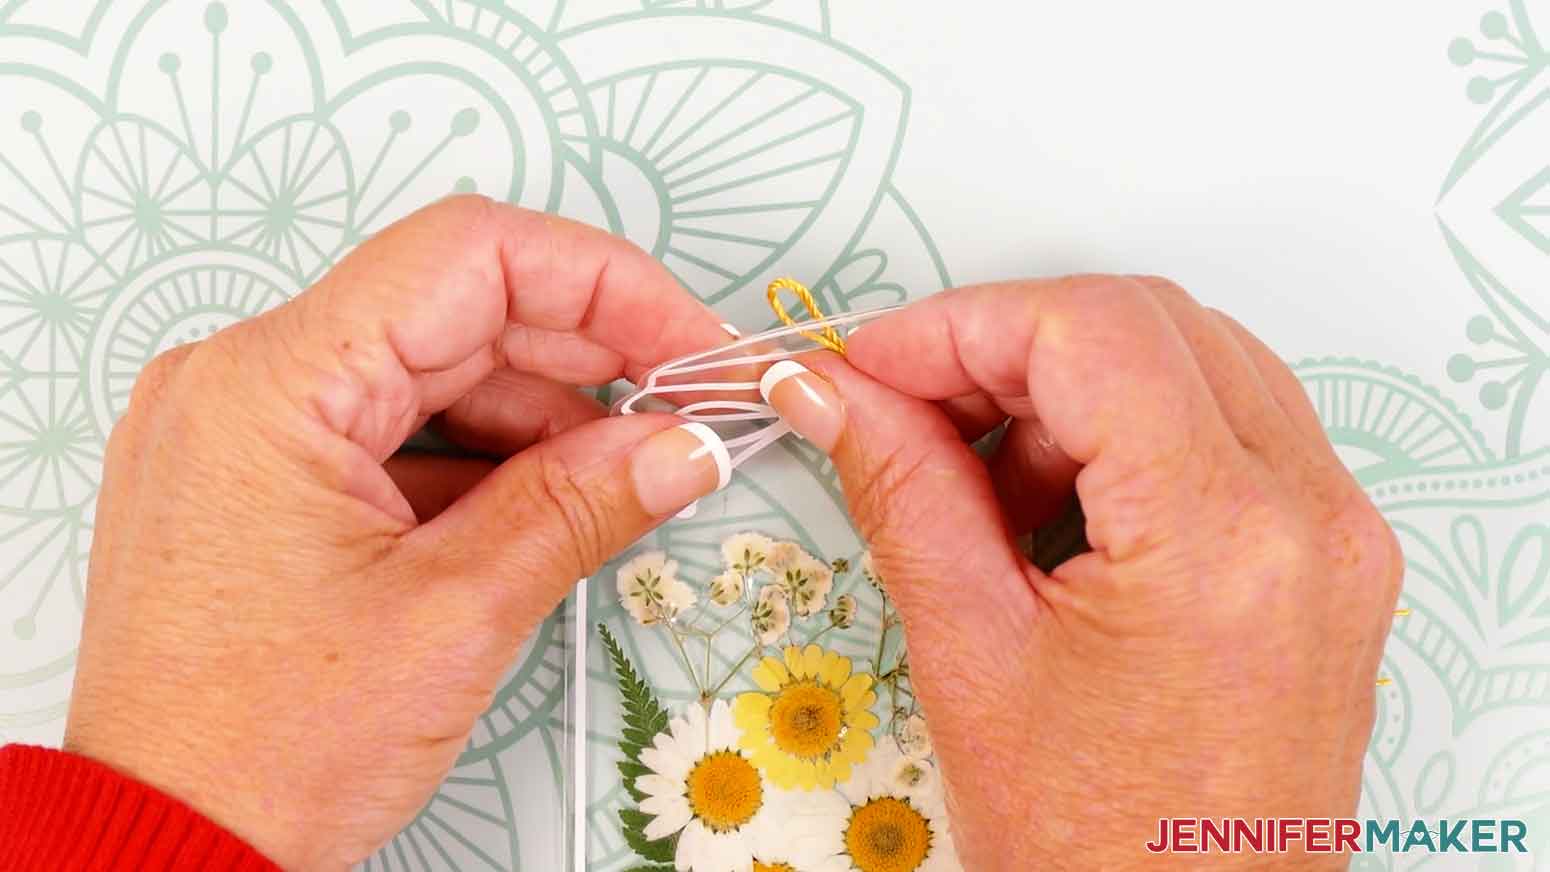
- Insert the looped end of a tassel through the hole in the bookmark.
- Insert the tassel end through the looped end and carefully pull it tight to attach it to the bookmark.
 TIP: If any vinyl lifts up from the transfer tape, lay the backing back down and burnish again.
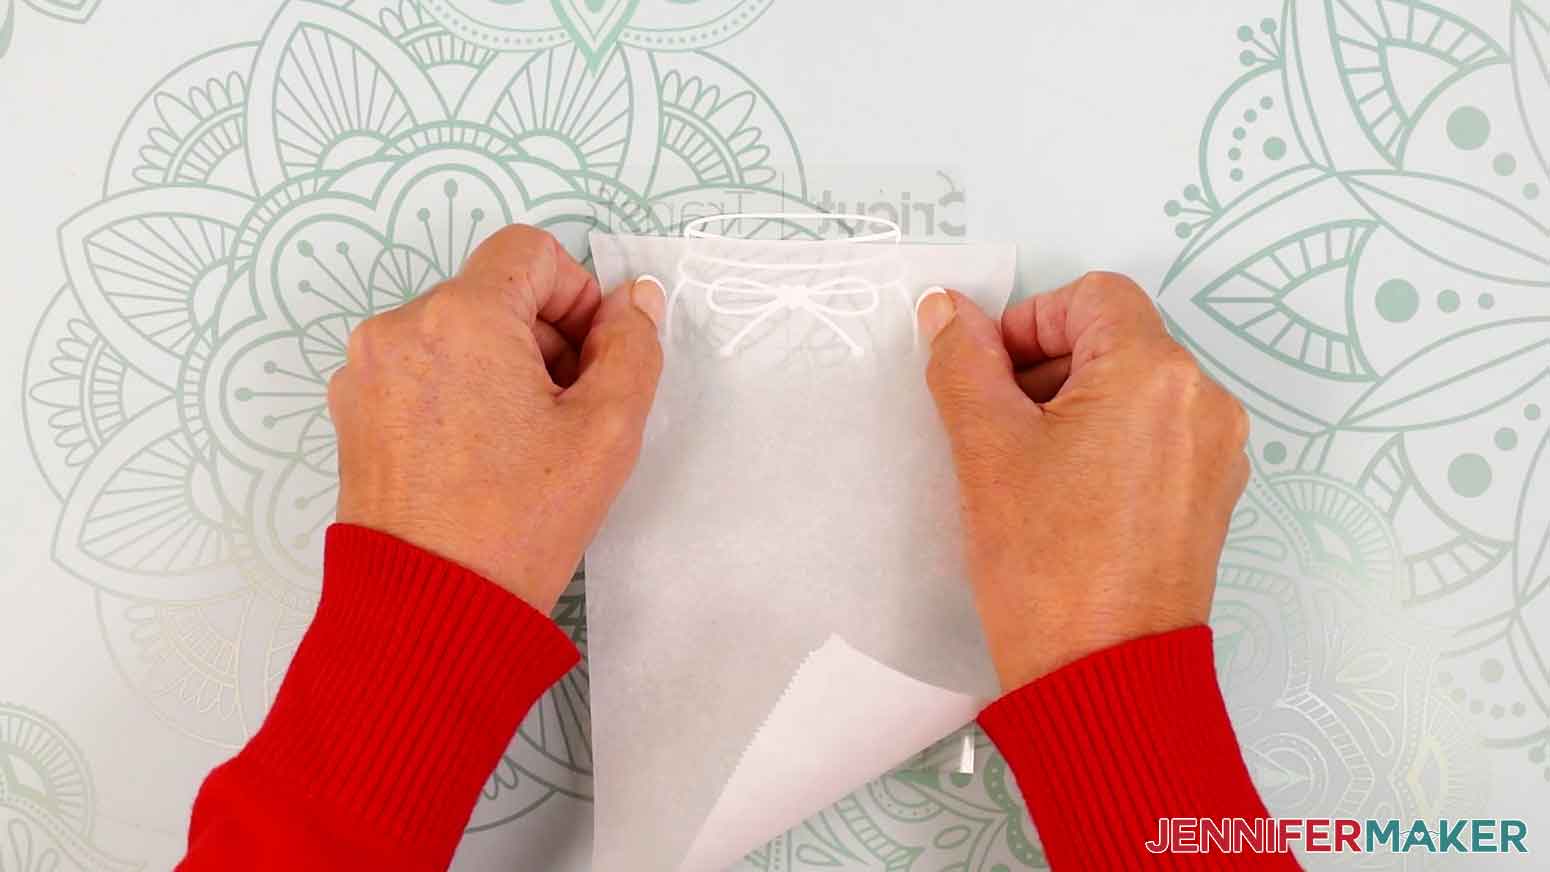
STEP 4: SHOW IT OFF!
Here’s what my finished pressed flower bookmark looks like!
Notes
Finished bookmark sizes: Circle: 3.94” x 4.72” Cloche: 3.59” x 5.42” Flacon: 3.63” x 5.53” Heart Swirl: 2” x 6” Mason Jar: 2.86” x 5.2” Rectangular: 2” x 6” Rounded: 2” x 6” Swirl: 2” x 6” Care: Gently wipe the bookmark clean with a lint-free cloth as needed.
Answers to Your Questions About Creating Pressed Flower Bookmarks
Q: I want to create a pressed flower bookmark that looks the same on both sides. How do I do that?
A: You can learn how to make a custom double-sided pressed flower bookmark in my ADVANCE program. Learn more about ADVANCE here!

Q: Can I make pressed flower bookmarks without a laminator?
A: You can try, but I don’t recommend it. I tested both a household iron and a Cricut EasyPress, and neither gave that clear, professional finish we want. The laminator really is the better way because it seals everything perfectly without haze, bubbles, or wrinkles.
Q: How do I press my own flowers for bookmarks?
A: You can press flowers by placing them between pages of a heavy book or using a flower press. I like smaller flowers and flatter petals best because they press beautifully and are less likely to cause air bubbles once laminated.
Q: Where can I get the flowers if I don’t want to press my own?
A: You can buy pre-pressed or dried flowers online or at craft stores. That’s what I used, and they’re a great option if you want to jump right into crafting without waiting for your flowers to dry.
Q: What kind of vinyl works best for the decorative layer?
A: I used white Cricut Value Vinyl because it stands out beautifully against the clear laminate and floral background. Any permanent adhesive vinyl works well for this project.
Q: What tools do I need to make pressed flower bookmarks?
A: You’ll need a laminating machine, laminating pouches, painter’s or heat-resistant tape, a brayer or scraper, a pair of tweezers for flower placement, as well as your Cricut and Cricut tools, especially if you’re adding vinyl. I’ve got a comprehensive list of tools and materials above, with handy links so you can find them easily. Don’t forget a tassel for that perfect finishing touch!
Q: My flowers keep shifting before laminating. What can I do?
A: Secure the laminate to your paper guide with heat-resistant tape before running it through the machine. This simple trick keeps everything in place and prevents flowers from moving around.
Q: How do I keep air bubbles from forming in my laminate?
A: Use smaller, flatter flowers, make sure your layers are aligned, and leave a small border between the flowers and the edge of your bookmark shape. These steps help the laminate bond evenly for a smooth finish.
Q: Can I make pressed flower bookmarks without a Cricut machine?
A: Absolutely! You can print the PDF templates and cut your laminate by hand with scissors or a craft knife.
Q: Are pressed flower bookmarks a good gift idea?
A: Definitely! These make beautiful handmade gifts for Mother’s Day, birthdays, or any special occasion. They’re especially meaningful for an avid reader or book lover, and they make great gifts to pair with a favorite novel or journal.
Get my free pressed flower bookmark SVG/DXF/PDF files!
(If you do not see the signup form above, click here.)
I love seeing what you make with my tutorials and how you customize them! Please share a photo of your pressed flower bookmarks in our Facebook group or tag me on social media with #jennifermaker.
Love,

Want to remember this? Save this How to Make Pressed Flower Bookmarks tutorial to your favorite Pinterest Board!