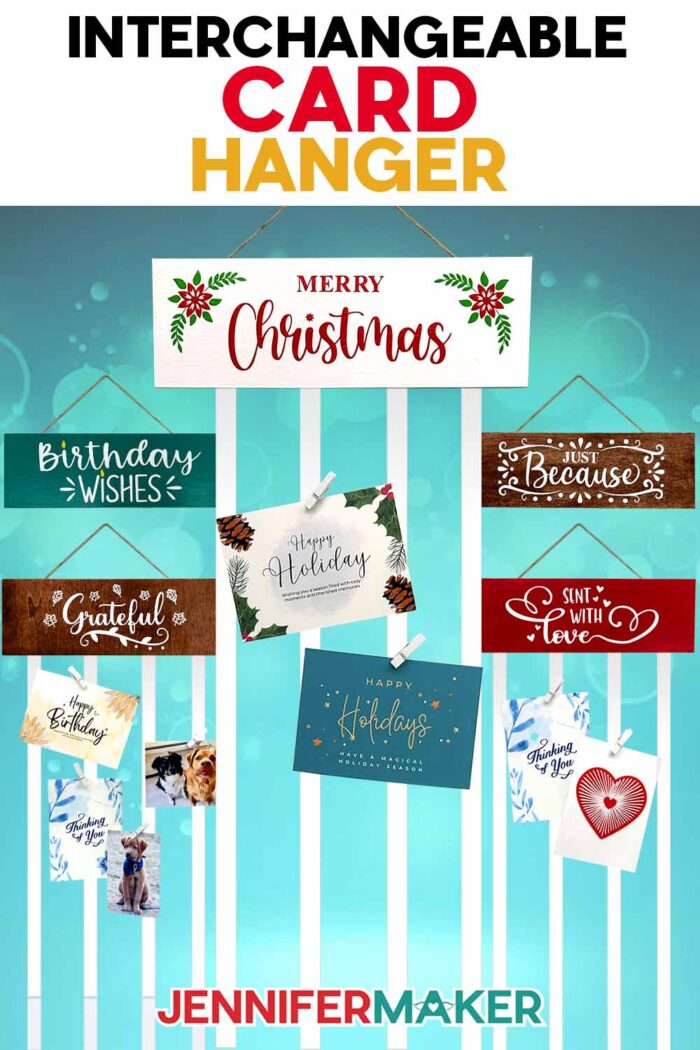
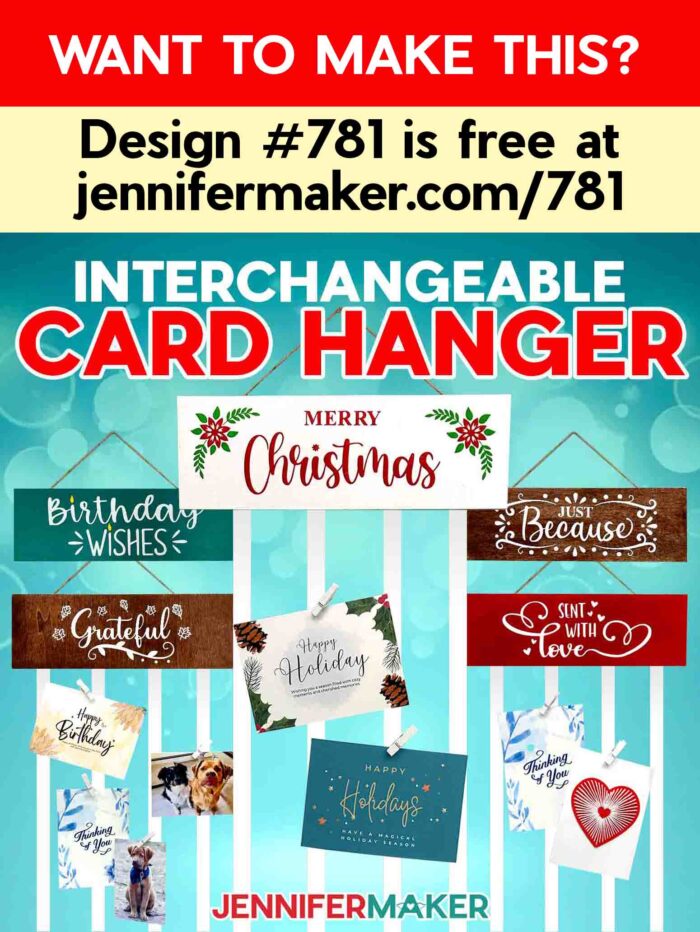
Learn how to make an interchangeable ribbon greeting card hanger to display your holiday cards!
Every year, as the holidays roll around, I find myself surrounded by the sweetest collection of greeting cards. They’re always such bright, joyful reminders of family and friends near and far! I love them all, but there’s always the same question: where do I put them? The fridge fills up fast, and the mantel turns into a balancing act of cards, crafts, and keepsakes. That’s why I decided to create something better. This year, I made a beautiful interchangeable ribbon greeting card holder that keeps those heartfelt notes, holiday wishes, and little memories on display throughout the holidays, and beyond!
See the full step-by-step video tutorial on how to make an interchangeable ribbon greeting card hanger:

I believe that there’s something really special about receiving cards in the mail. In a world full of quick texts and digital messages, that bit of paper with someone’s handwriting on it feels like a hug in an envelope. But too often, those treasures get tucked into boxes or drawers where we never see them again. This project is a great way to turn your cards, photos, and notes into a heartwarming piece of wall art you can enjoy every day. And it’s easier to make than you might think.
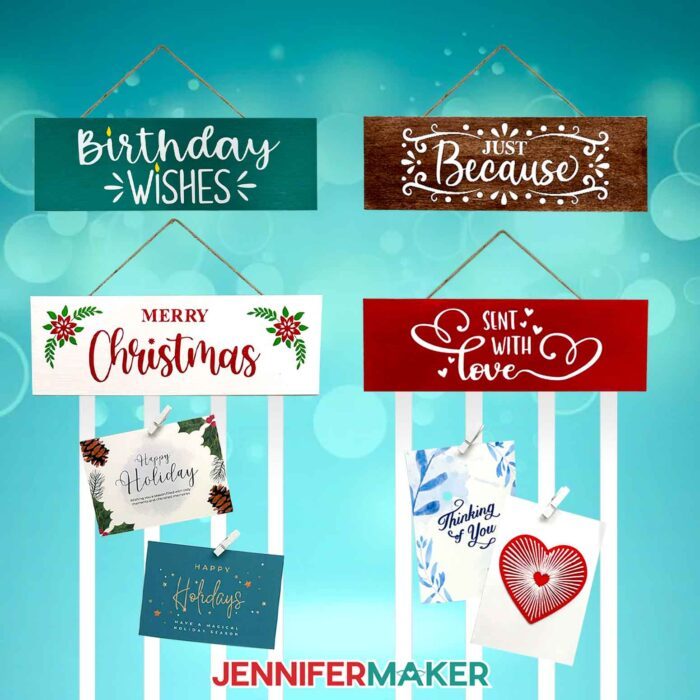
In my step-by-step video tutorial, I’ll walk you through how to make this lovely interchangeable ribbon card holder. It starts with a few simple wood panels, some craft supplies you probably already have on hand, and a handful of magnets or Command Strips to make it truly interchangeable. Once you add cascading ribbons and a few mini clothespins, you’ll have a creative, functional display that can hold Christmas cards, birthday notes, photos, and more. It’s sturdy, stylish, endlessly customizable, and perfect for your kitchen wall, craft room, or anywhere that could use a touch of cheer.
I used chalk paint for this project to give each panel its own character. You can go bold and colorful, or soft and natural with a faux stained effect that lets the wood grain peek through. I show both methods in the video so you can decide which look fits your home décor best. Once the paint is dry, a thin coat of Mod Podge seals it beautifully, protecting the surface and helping the vinyl decals stick perfectly later on. Letting everything cure overnight gives the best results.
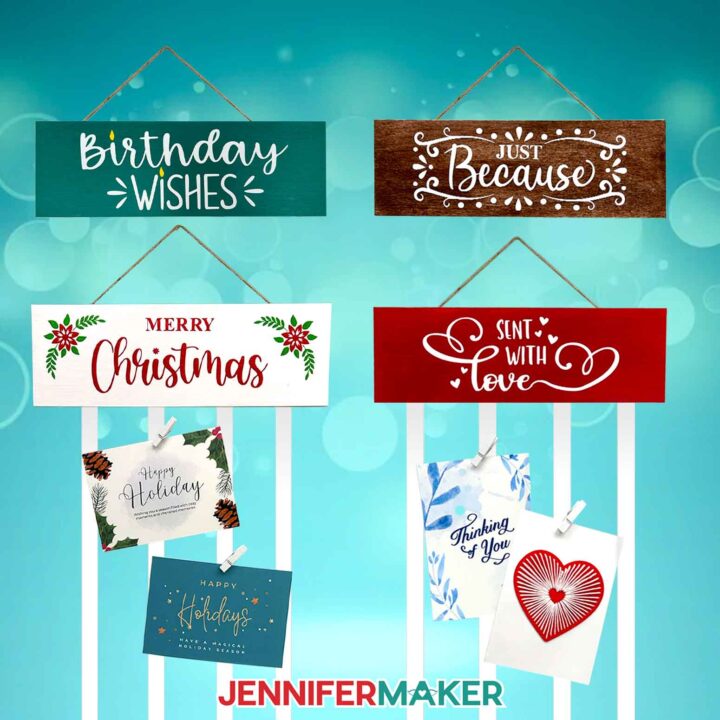
The next day is when the fun part begins: decorating! I used Cricut Value Vinyl to create four panel designs, each one suited for a different season or occasion. You’ll find “Merry Christmas,” “Birthday Wishes,” “Sent with Love,” and “Just Because” among the free designs in my resource library. You can download them at the bottom of this post!
With transfer tape, a scraper tool, and a little patience, the decals go on smoothly and look professionally made. A Cricut cutting machine makes it easy to cut clean, crisp lettering, but you can also use the included PDF patterns to cut your vinyl by hand if you prefer.
Each panel connects to the base using small adhesive magnets or adhesive strips, which makes it easy to switch them out whenever you want. The interchangeable design is one of my favorite parts of this project, because it means you can match your card displays to the season or special occasion! You could even paint extra panels later if you want to add more themes, like for graduation cards or a photo display.
Once the panels are ready, the ribbons bring it all together. I cut four lengths of ribbon, each about three feet long, and attached them to the bottom of the back panel with a bit of hot glue. This creates cascading strands for your cards to hang from — a simple, elegant way to show off your collection. You can use ribbons in colors that coordinate with your panels or go with neutrals for a classic look. Depending on your wall space, you can use shorter or longer ribbon as needed. I’ll even show you how to seal the ribbon ends so you can use your hanger again and again without worrying about frayed ends.
I love the versatility of this display. You can clip on holiday cards in December, switch to Valentine’s Day love notes in February, and fill it with birthday cards or little reminders of happy moments throughout the rest of the year. Because the panels attach magnetically, changing the look takes just seconds.

If you’d like to learn how to create your own custom vinyl panel design for a special occasion, I also share how to do that in my ADVANCE with JenniferMaker program. It’s perfect for crafters who want to design a personalized decal. Maybe you want to design one that celebrates your family name, a favorite quote, or a milestone memory. The process is fun and adds even more versatility to your interchangeable display panels! Learn more about ADVANCE with JenniferMaker here!
I truly love how this project combines crafting and sentiment. It’s practical yet heartfelt, and it transforms the little things we tend to overlook into something worth celebrating. Whether you’re making one for yourself or as a thoughtful handmade gift, it’s a creative way to display love all year long.
If you’re ready to make your own interchangeable ribbon greeting card hanger, visit my free resource library, download the designs, and follow along with the video tutorial. I’ll show you exactly how to paint, seal, apply vinyl, and assemble everything step by step so you can get the best results. You’ll end up with a card display that’s beautiful, personal, and sure to become one of your favorite pieces of home décor. . . a reminder of all the people and moments that make life so special!
Let me show you how to make an interchangeable ribbon greeting card hanger! This post contains some affiliate links for your convenience (which means if you make a purchase after clicking a link I will earn a small commission but it won’t cost you a penny more, there is no additional cost)! Read my full disclosure policy.
Materials to Make an Interchangeable Greeting Card Hanger
View my Amazon shopping list with the exact items I used.
- Five (5) 4″ x 12″ 2mm Wood Panels -OR-
- Five (5) 4″ x 12″ 3mm Wood Panels
- Chalk Paint (I used colors “White Adirondack,” “Imperial,” “Grotto,” and “Java“)
- Matte Mod Podge
- Twenty (20) Command Strips -OR-
- Twenty (20) Adhesive Magnets
- 11″ of Jute Twine
- 144″ of 5/8″ White Ribbon
- Mini White Clothes Pins
- Permanent Value Vinyl (I used colors white, red, green, and yellow) -AND-
- Premium Permanent Vinyl (optional – I used color yellow)
- Cricut StandardGrip Transfer Tape
- A way to cut your vinyl – I’m using the Cricut Maker 4, but you can use any Maker series machine, a Cricut Explore series machine, the Cricut Venture, the Cricut Joy, or the Cricut Joy Xtra
- Cricut Green StandardGrip Machine Mat 12″ x 12″
- Brayer
- Weeding Tool
- Scraper
- Scissors -OR-
- Paper Trimmer
- Measuring Tape
- Pencil
- 1″ Foam Brushes
- Hot Glue Gun & Glue Sticks
- Silicone Finger Protectors
- Butcher Paper
- Baby Wipes (for faux staining)
- Stop Fraying Fabric Glue (optional)
- Lint Roller (to clean wood panels before painting)
How to Make an Interchangeable Ribbon Greeting Card Hanger!
Interchangeable Ribbon Greeting Card Hanger
Learn how to make an interchangeable ribbon greeting card hanger for your favorite cards, postcards, and photos!
Materials
- Five (5) 4" x 12" 2mm Wood Panels -OR-
- Five (5) 4” x 12” 3mm Wood Panels
- Twenty (20) Adhesive Magnets -OR-
- Command Strips
- 11" of Jute Twine
- 144" of 5/8" White Ribbon
- Mini White Clothes Pins
- White Permanent Value Vinyl
- Red Permanent Value Vinyl
- Green Permanent Value Vinyl
- Yellow Permanent Value Vinyl -OR-
- Yellow Premium Permanent Vinyl
- Cricut StandardGrip Transfer Tape
- Chalk Paint - White Adirondack
- Chalk Paint - Imperial (Red)
- Chalk Paint - Grotto (Teal)
- Chalk Paint - Java (Brown)
- Matte Mod Podge
- Design #781 (My free SVG/PDF/DXF design files are available in my free resource library - get the password by filling out the form at the bottom of this page)
Tools
- A way to cut your vinyl - I’m using the Cricut Maker 4, but you can use any Cricut Maker Series machine, a Cricut Explore Series machine, the Cricut Venture, the Cricut Joy, or the Cricut Joy Xtra
- Cricut Green StandardGrip Machine Mat 12" x 12”
- Brayer
- Weeding Tool
- Scraper
- Scissors -OR-
- Paper Trimmer
- Measuring Tape
- Pencil
- 1” Foam Paint Brushes
- Hot Glue Gun & Glue Sticks
- Silicone Finger Protectors
- Butcher Paper (to cover work area for painting)
- Baby Wipes (for faux staining)
- Stop Fraying Fabric Glue (optional)
- Lint Roller (to clean the wood panels before painting)
Instructions
STEP 1: GET MY FREE INTERCHANGEABLE CARD HANGER DESIGNS
First, download my interchangeable ribbon greeting card hanger files from my free library – look for Design #781. Alternatively, you can use the Save This Project form near the top of this post and the design link will be emailed to you.
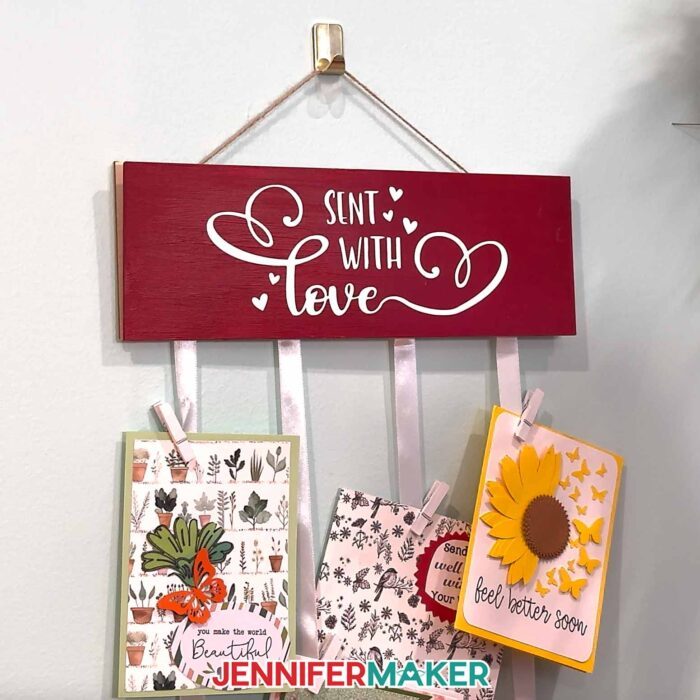
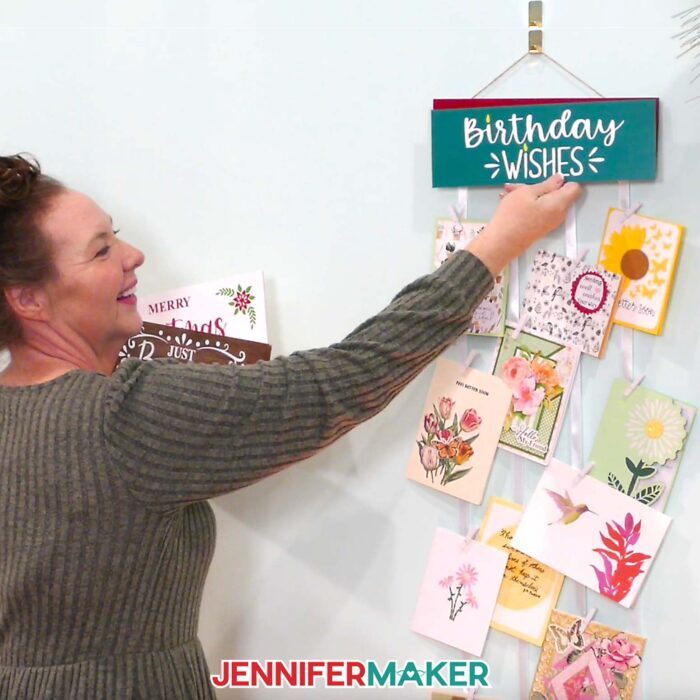
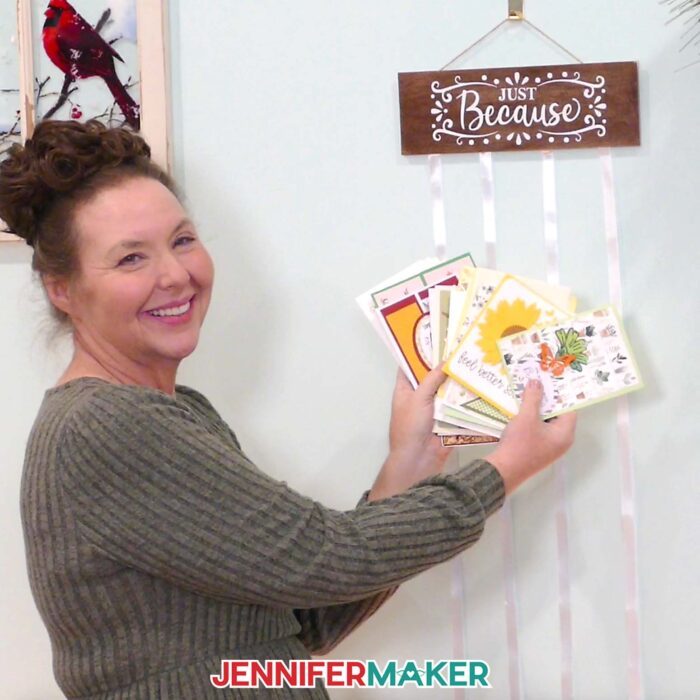
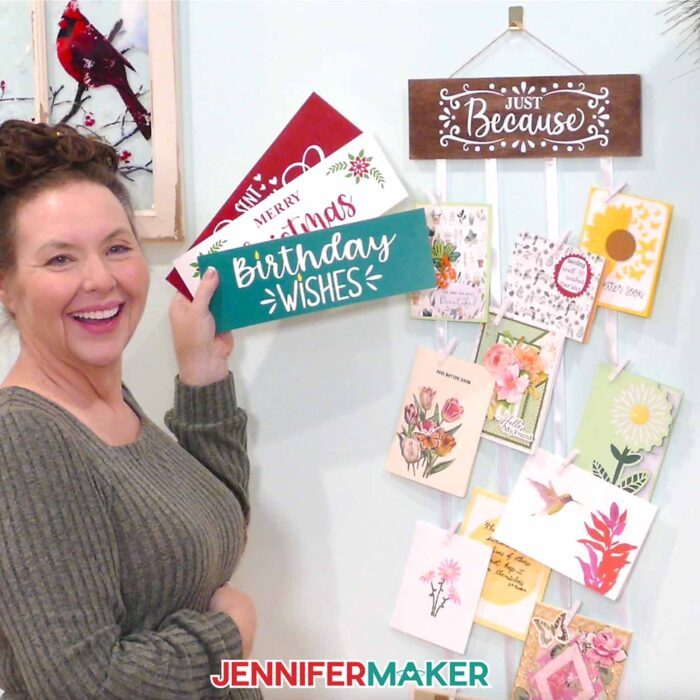
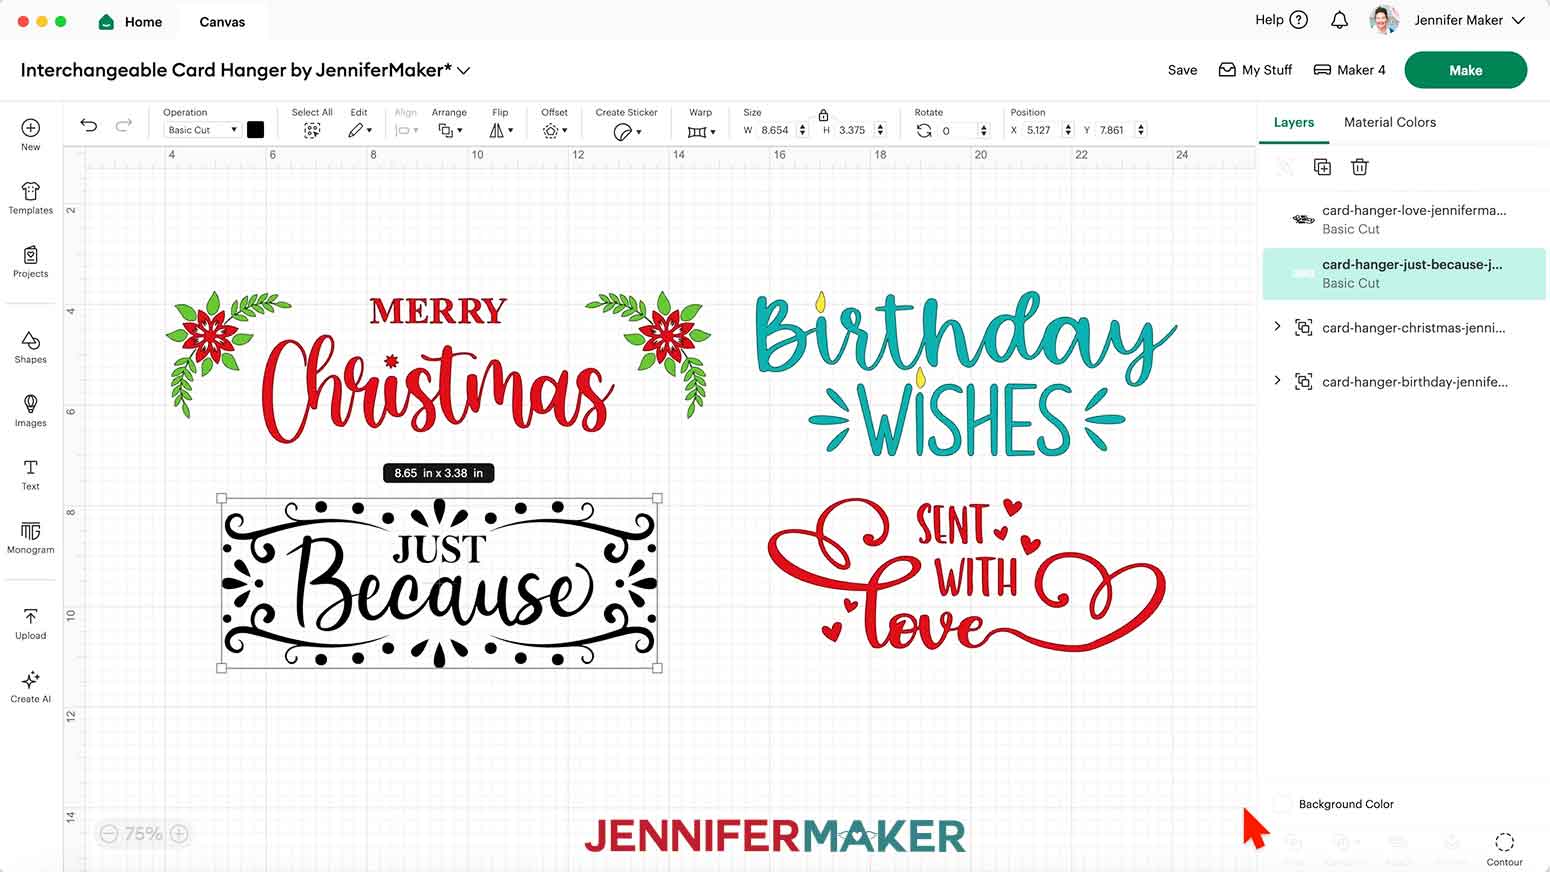
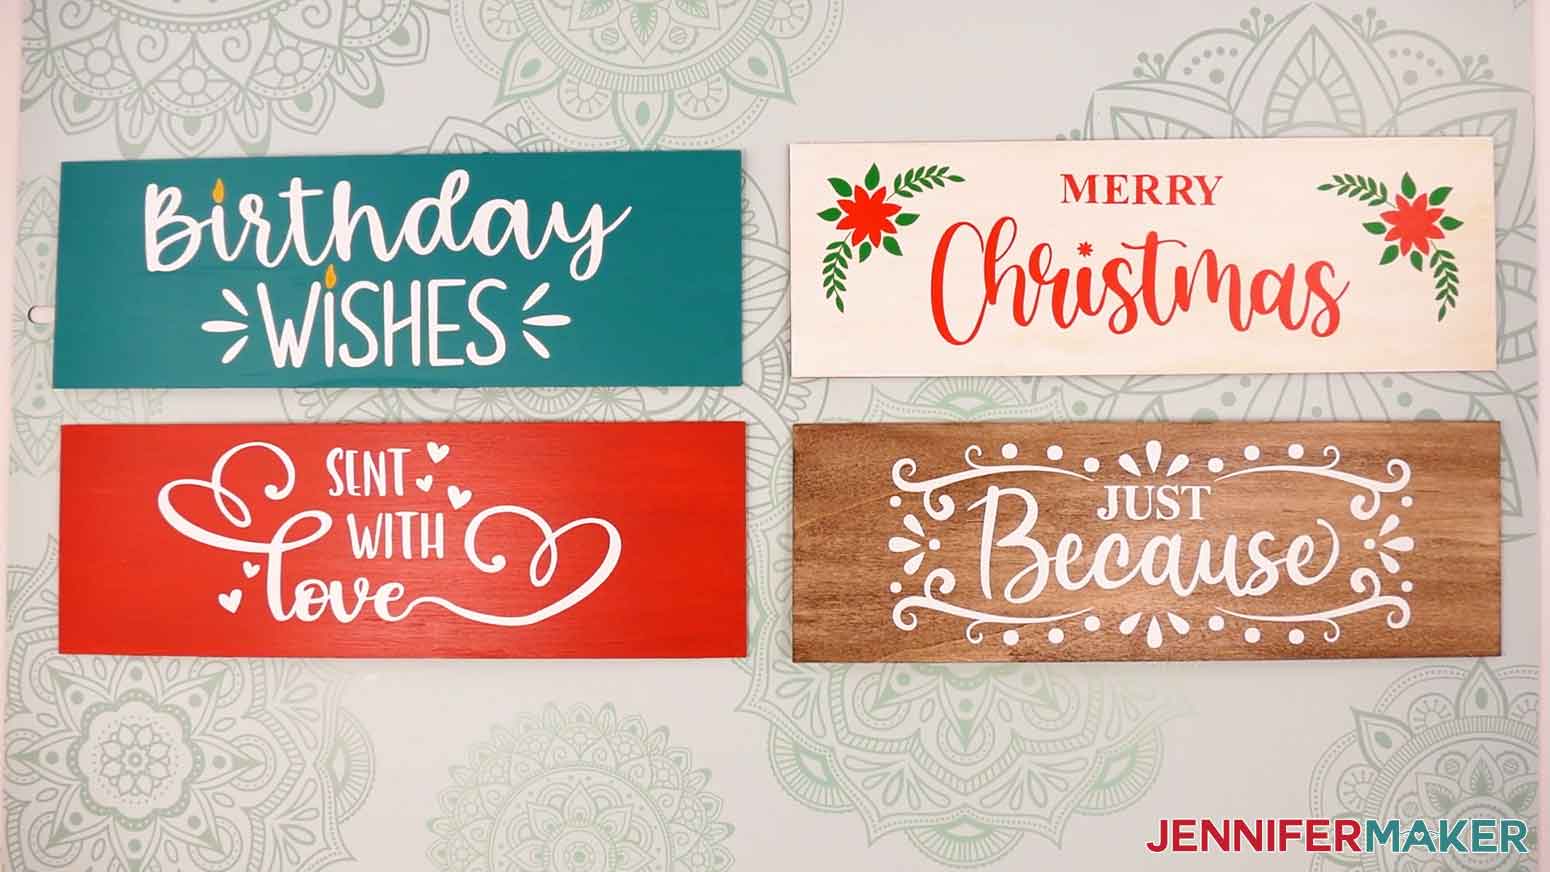
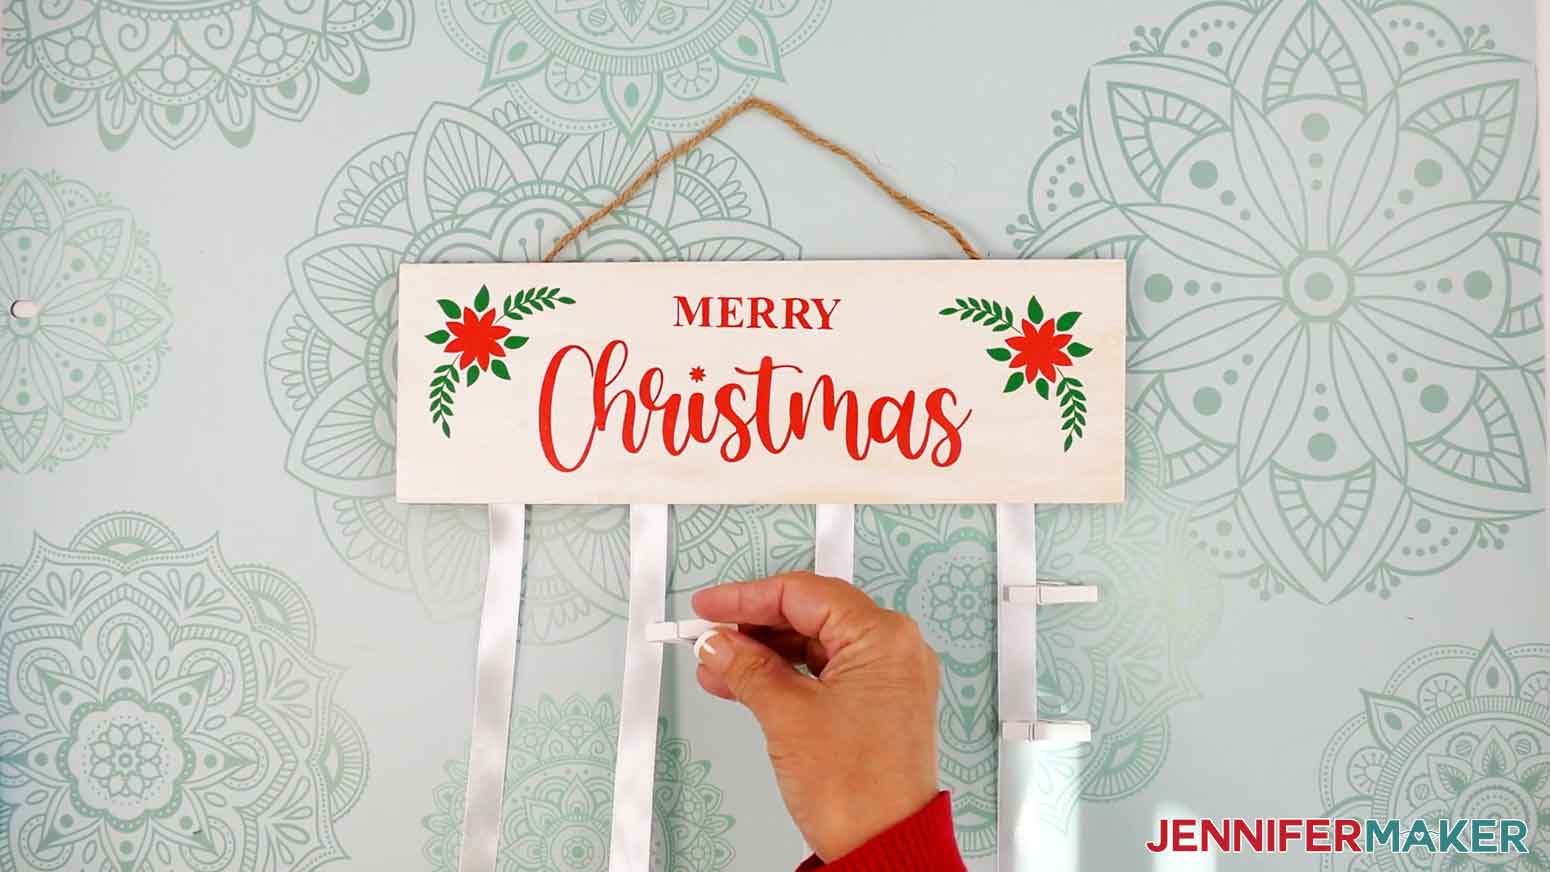
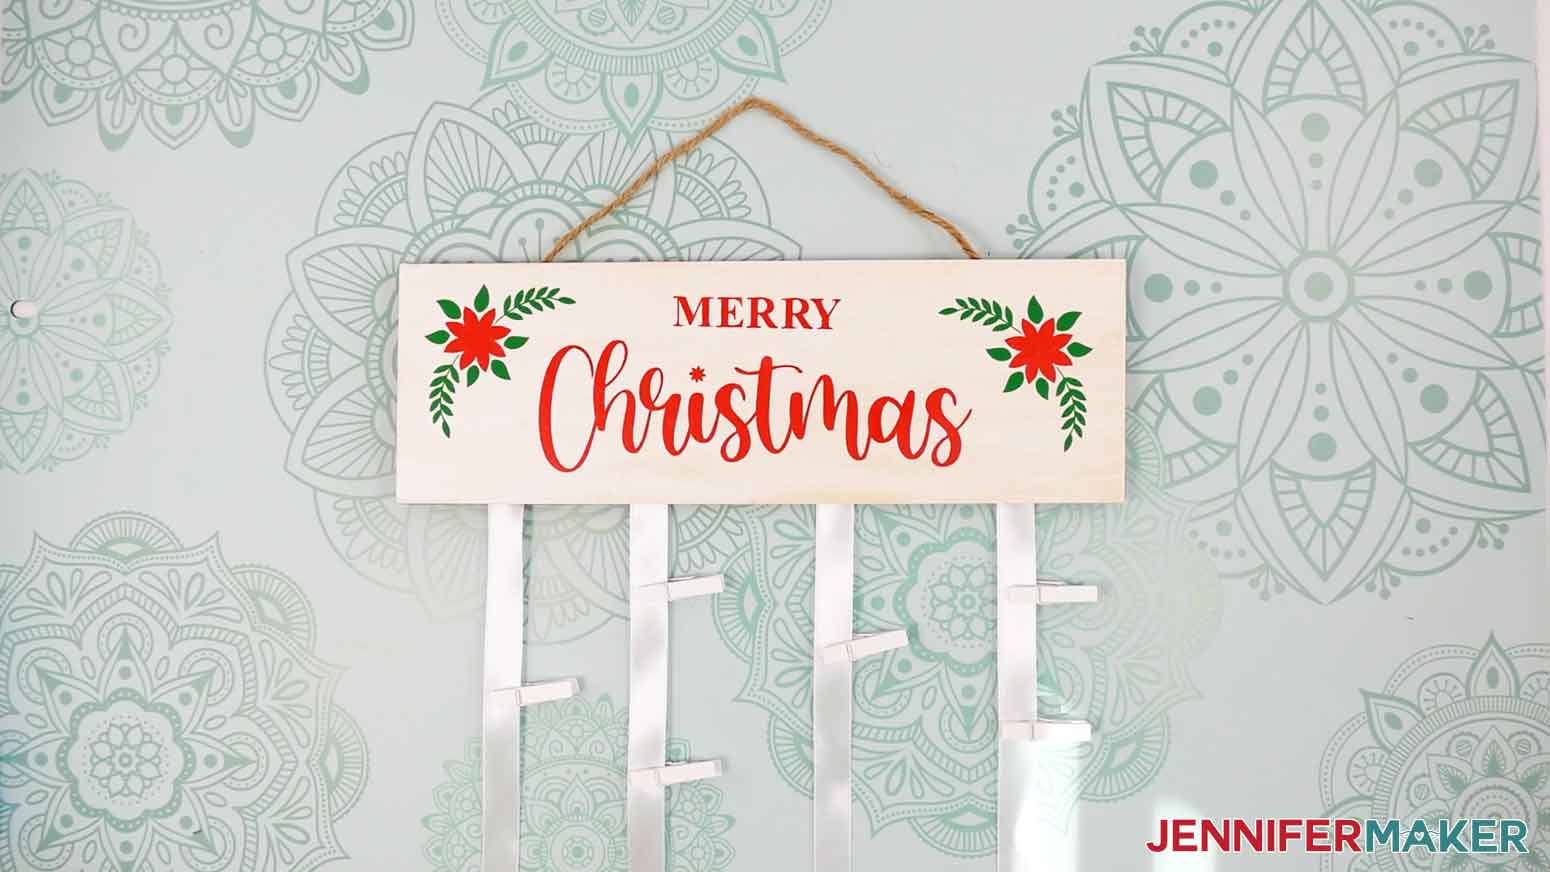
In the SVG folder, you’ll find four versions of my interchangeable card hanger design that you can use for different occasions: “Birthday Wishes,” “Merry Christmas,” “Just Because,” and “Sent with Love.”
There is also a DXF folder with cut files, and a PDF folder with versions you can print and cut by hand.
TIP: If you’re not sure how to upload, go to jennifermaker.com/svgs to learn how to unzip and upload SVG files.
STEP 2: PAINT YOUR TOP DISPLAY PANELS & SEAL WITH MOD PODGE
NOTE: Only the top display panels will be painted for this project. We’ll attach the display panels to an unpainted back panel. Plan to paint and seal your panels a day before applying your vinyl decals and assembling the rest of the pieces so the paint has plenty of time to dry.
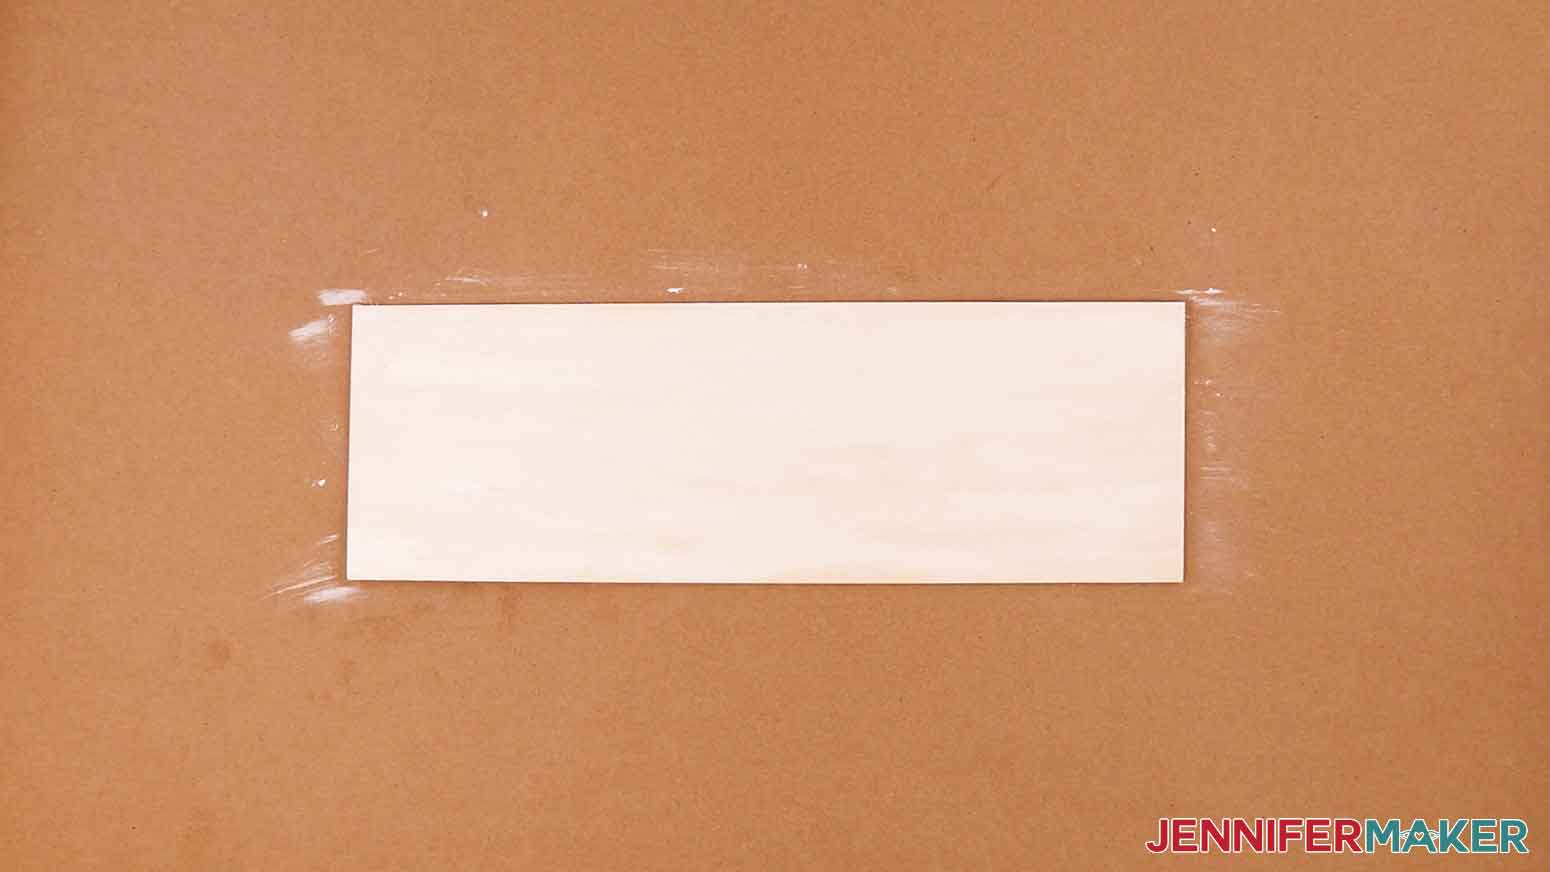
1. Cover your work area with butcher paper to protect the surface.
2. Use a lint roller to clean any debris from the panel.
3. Wood patterns and coloring on each side of the panel may vary, so check both sides for inconsistencies and choose the best side as your display side.
4. Lay your panel display side up.
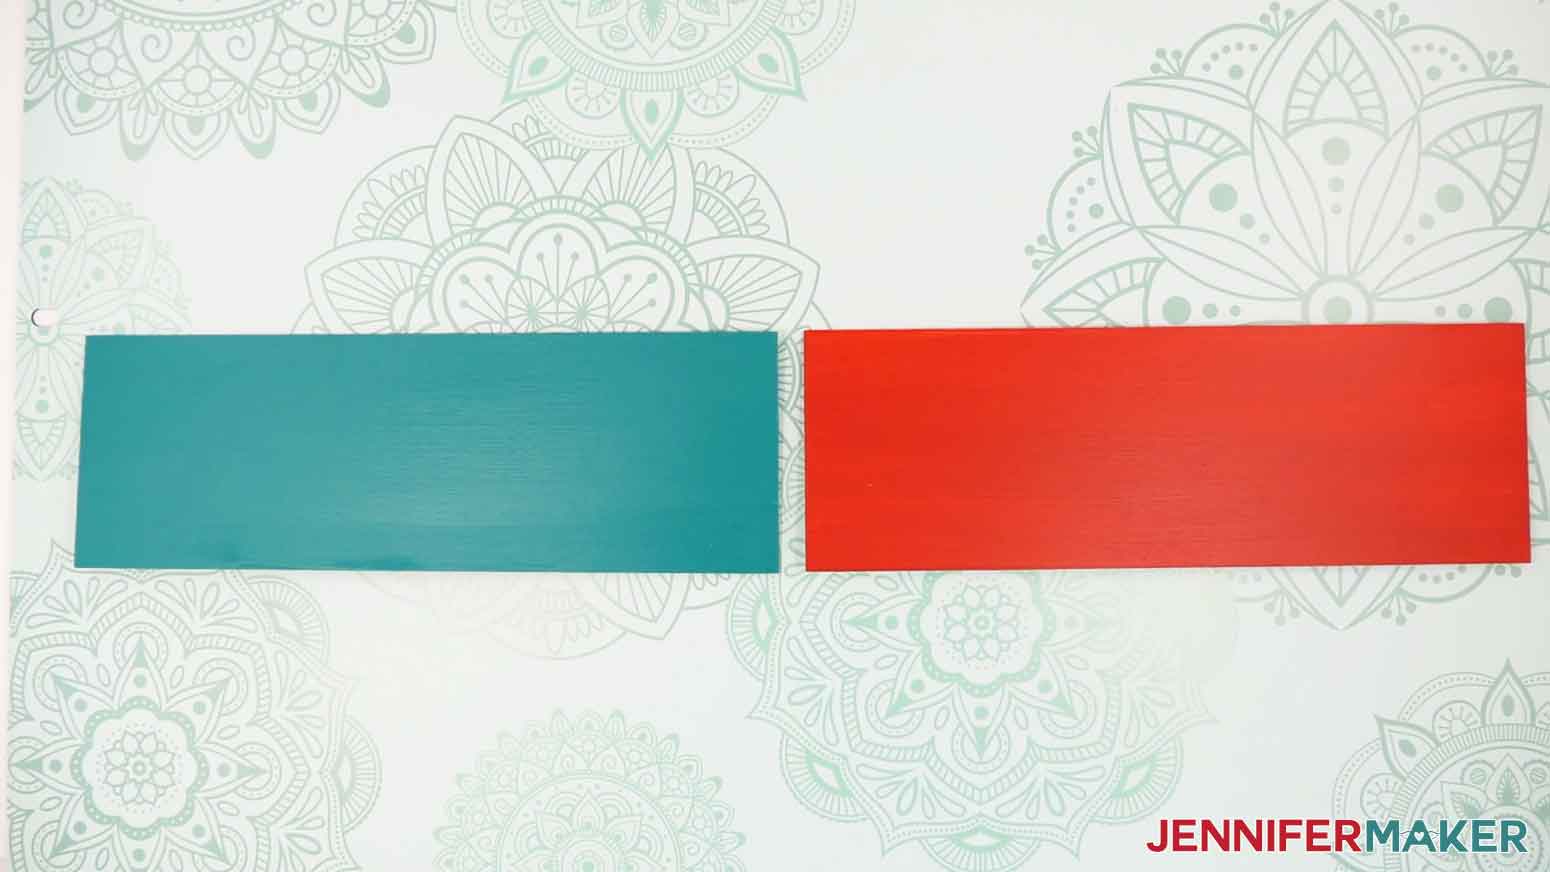
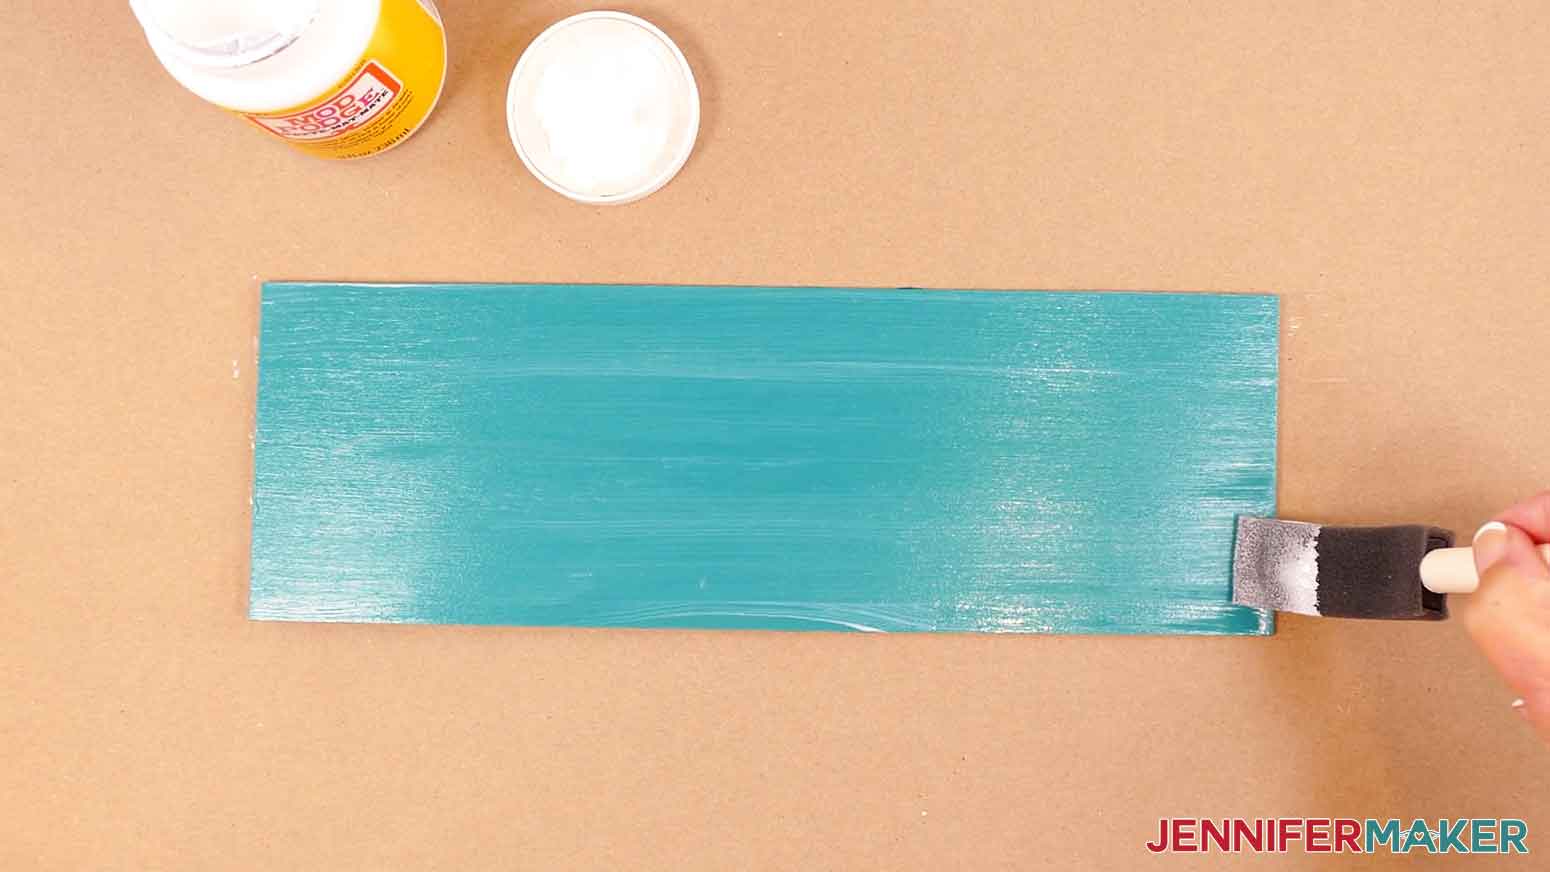
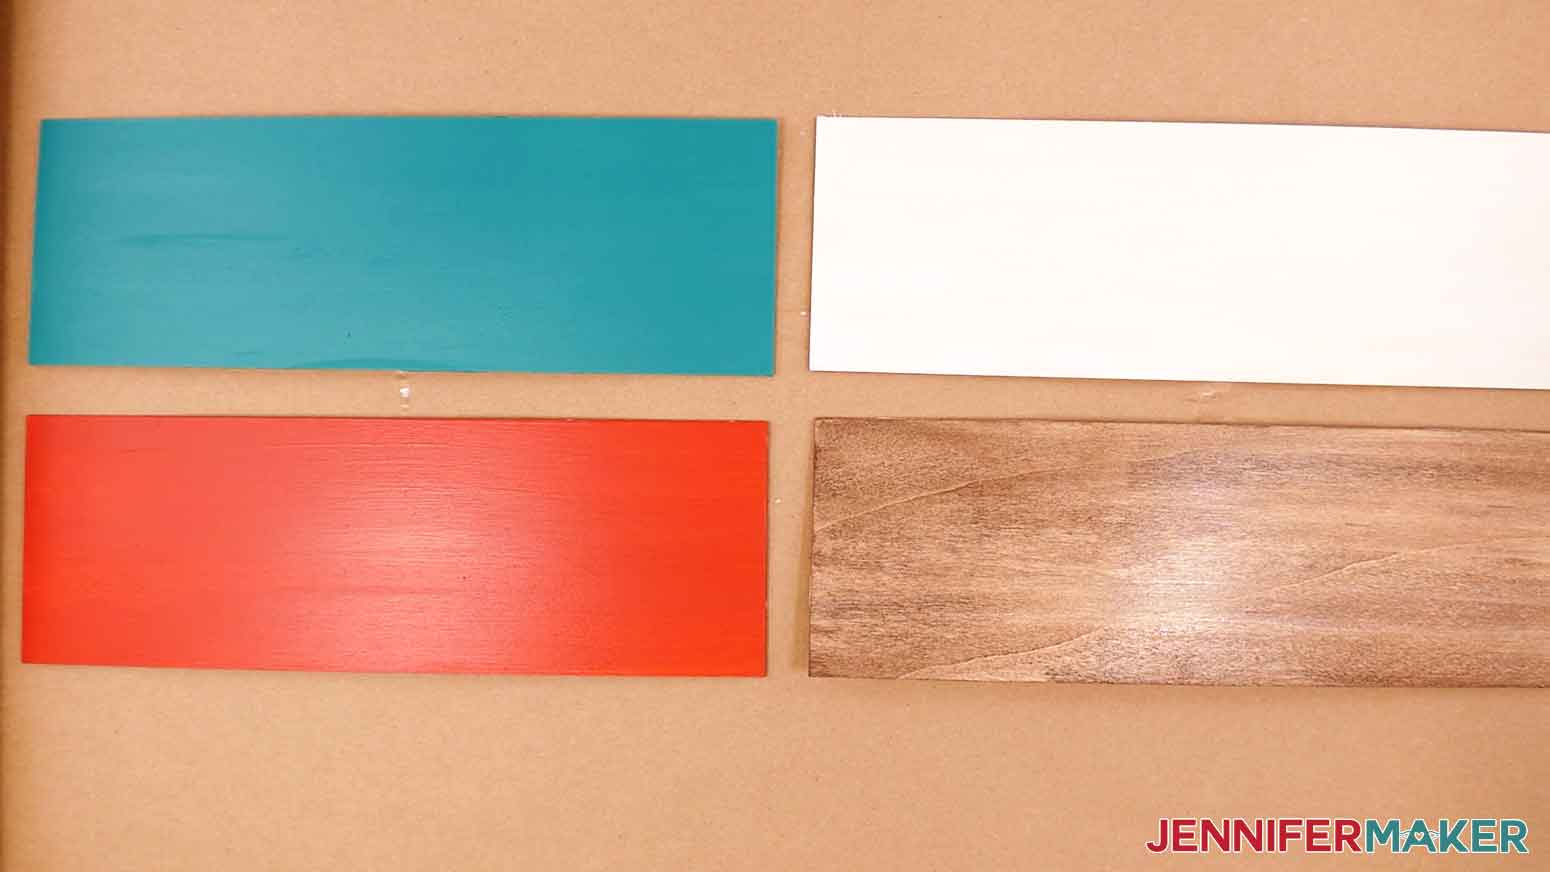
5. To paint a panel a solid color, apply a coat of chalk paint to the front and sides of your panel using a foam brush, painting with the grain of the wood.
TIP: Shake or stir your chalk paint before using to evenly distribute the pigments for consistent color.
NOTE: I’ll use solid red for my “Sent with Love” panel and solid teal for my “Birthday Wishes” panel.
6. Allow the paint to dry for two hours.
7. Apply a second coat of paint, then allow it to dry for another two hours.
8. Or, to create a faux wood stain look, take a baby wipe and fold it into fourths.
NOTE: We need the moisture from the baby wipe to spread the paint, so a regular paper towel won’t work here.
9. Dab a small amount of chalk paint onto the wipe.
NOTE: I’ll use white for my “Christmas” panel and brown for my “Just Because” panel.
10. Rub a thin coat of paint onto the front and sides of the wood panel using long, even strokes.
11. Allow the paint to dry for 10 minutes.
12. If you’d like the faux stain to be darker, repeat Steps 8-11 to apply a second coat.
13. If you’d like to seal a panel, once the paint is dry, use a clean foam paint brush to apply a small amount of Mod Podge to the front.
TIP: For solid paint, allow the full two hours to dry before sealing. For faux wood paint, you can add Mod Podge after drying for 10 minutes.
14. Brushing with the grain, completely cover the panel’s front and sides with an even layer of sealant.
15. Allow to dry for 24 hours for a full cure.
16. Repeat these steps to paint and seal each of your panels.
17. Your panels are ready to decorate!
STEP 3: PREPARE AND CUT YOUR INTERCHANGEABLE CARD HANGER DESIGN
CRICUT DESIGN SPACE
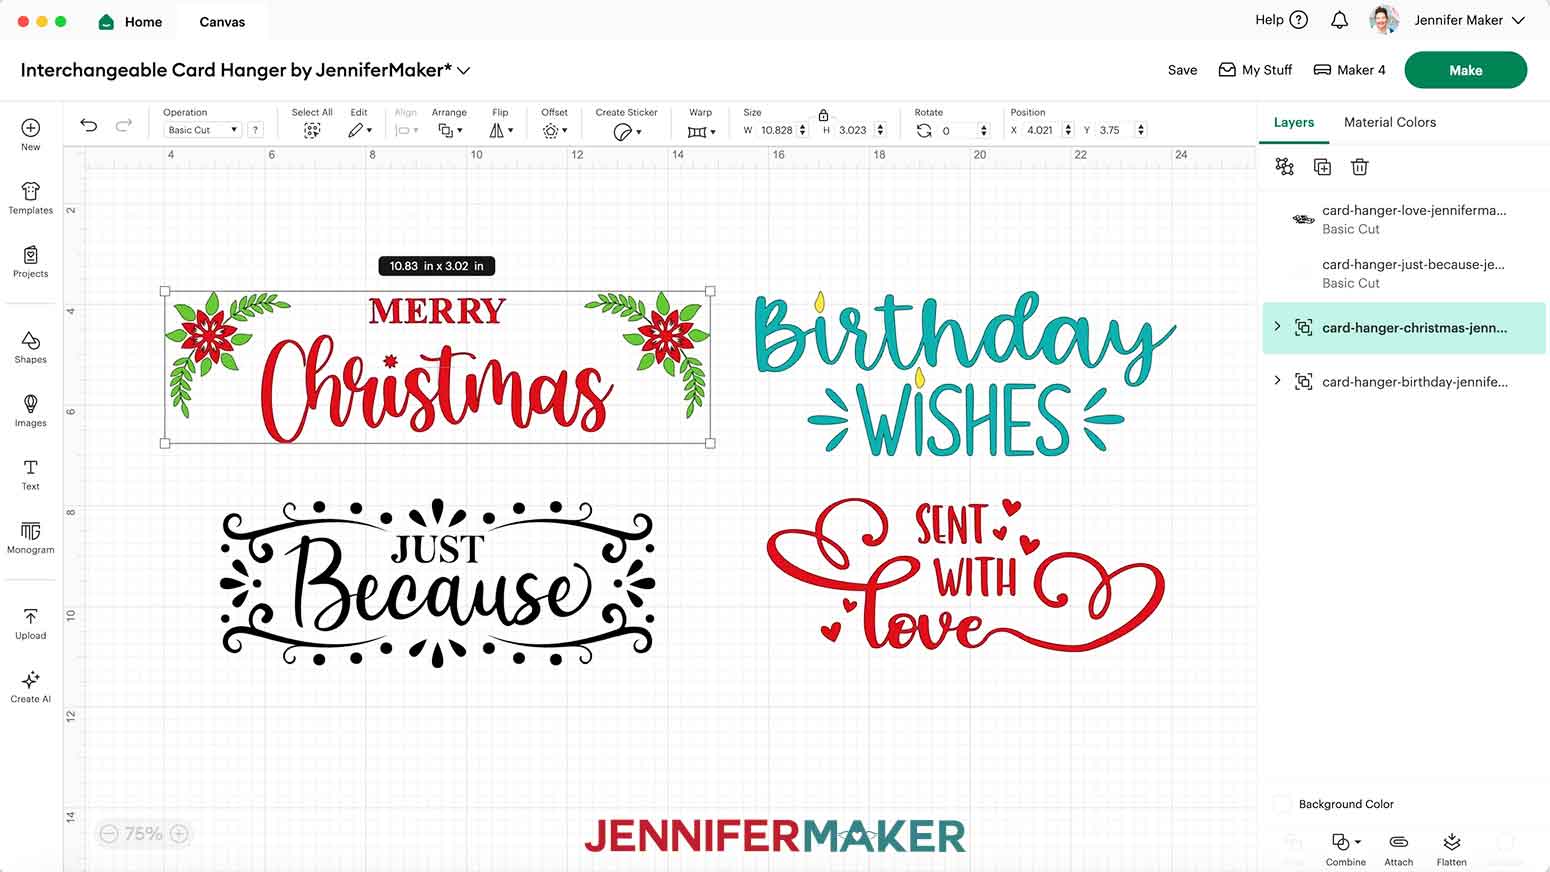
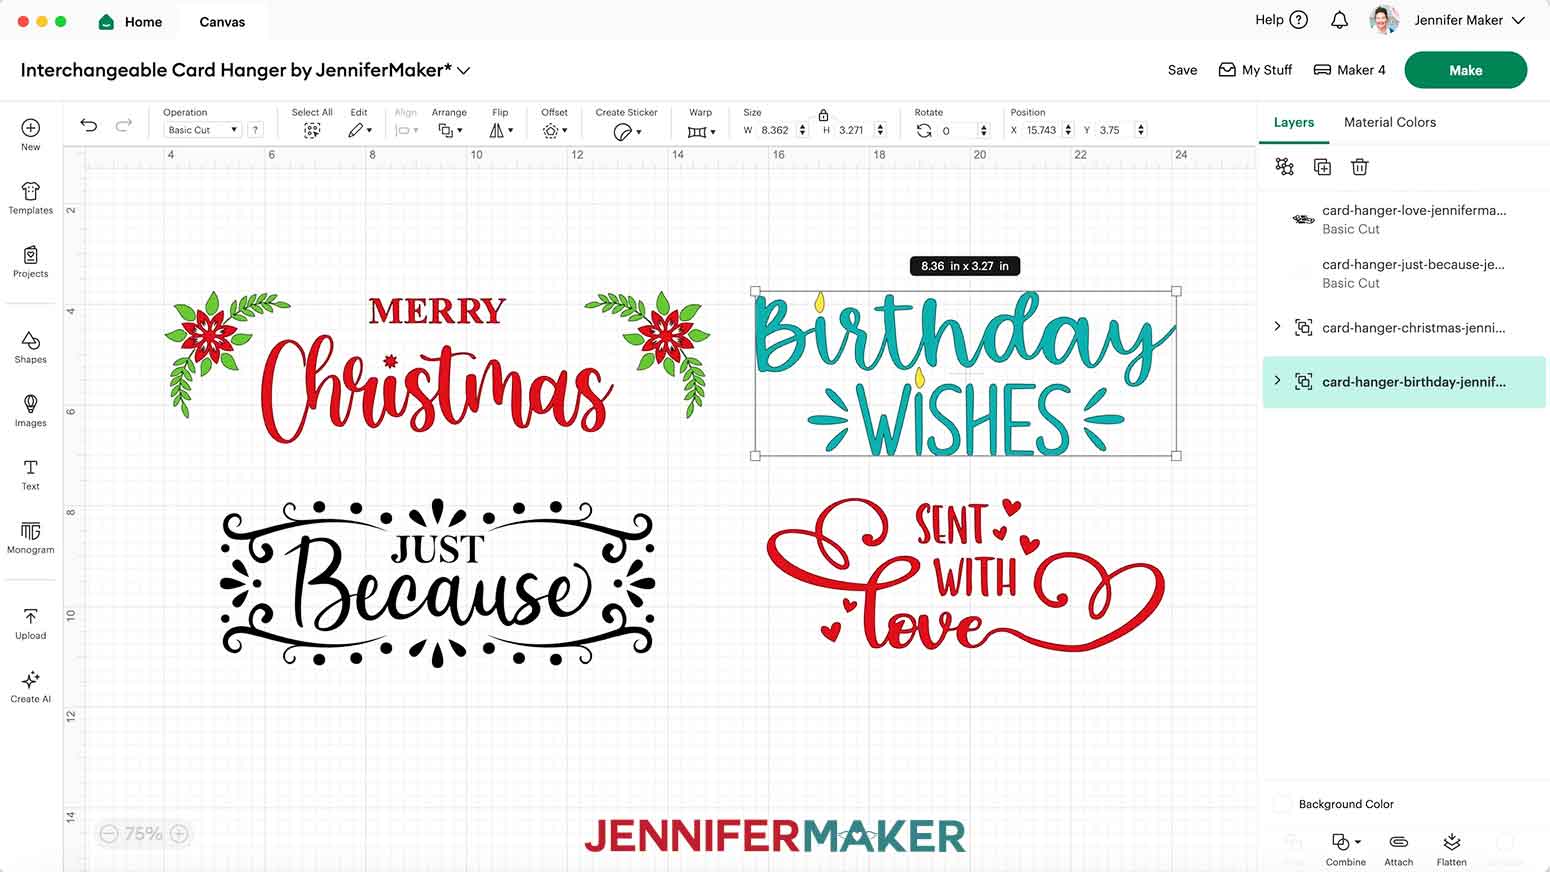
1. In Cricut Design Space, open a blank Canvas.
NOTE: If you’re new to using Cricut Design Space, go to cricutkickoff.com for my introductory tutorial on Design Space basics.
2. Click “Upload” and then “Upload Image.”
3. Click “Browse.”
4. Select the “christmas” SVG file to start.
5. Click “Open,” and then “Continue.”
6. Click “Upload” to add the design to your Canvas.
7. Repeat Steps 2-6 to add the “birthday,” “just-because,” and “love” SVGs as well.
NOTE: If you don’t want to make your hanger interchangeable, you can load the design you want to make in Step 4 and skip Step 7.
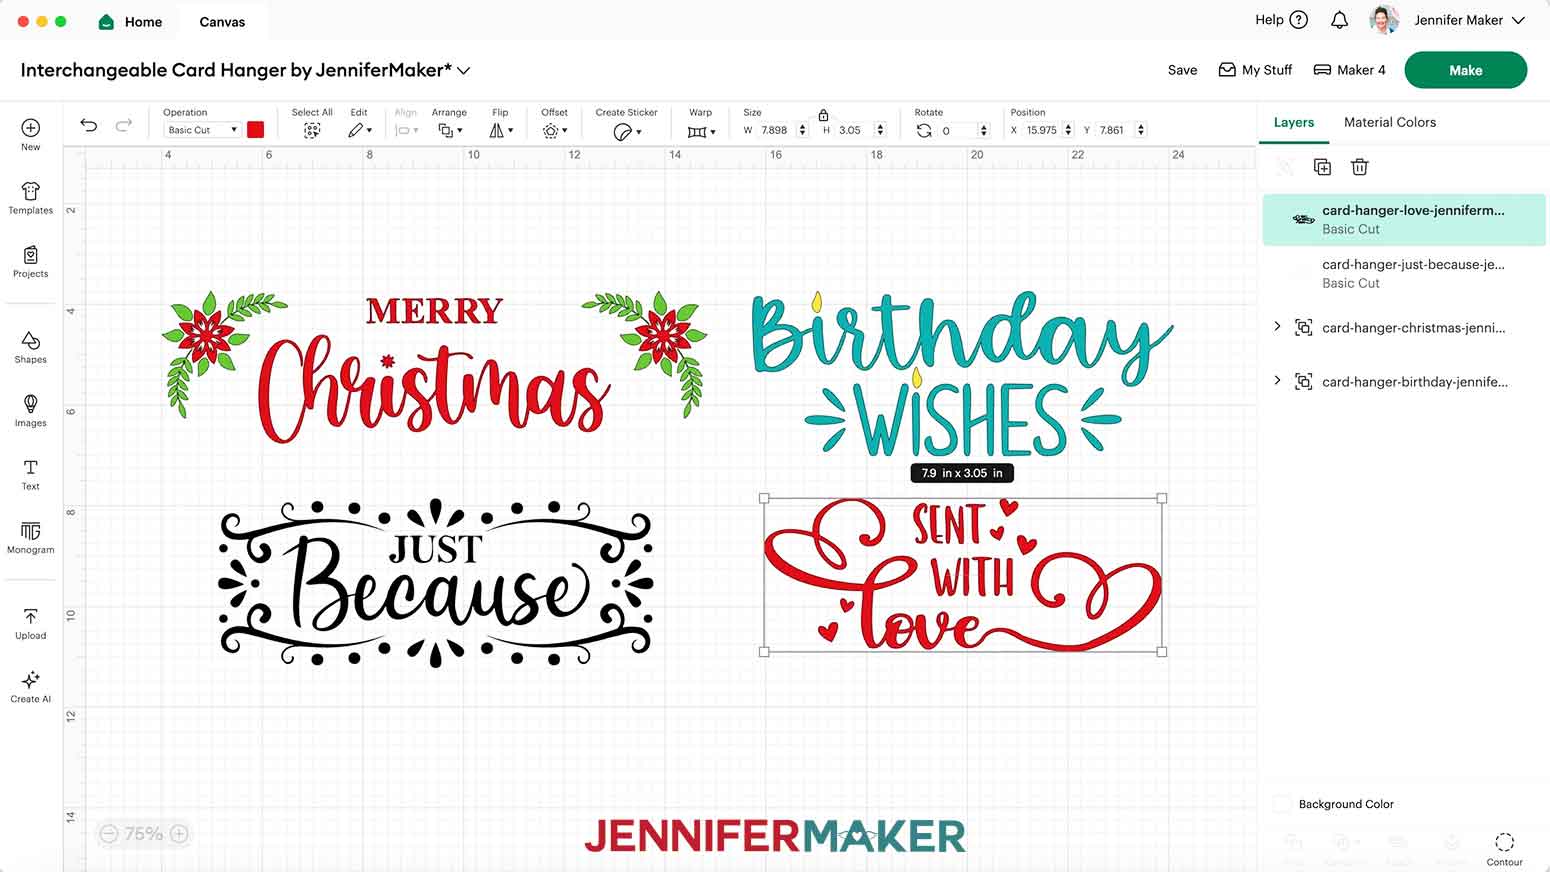
8. Spread out the designs.
TIP: Click the minus (-) icon in the lower left corner to zoom out if needed to see everything on your Canvas.
9. Click “Save” and give your project a name.
10. The designs are sized to fit the boards in my materials list. If you need to resize them to fit your boards, keep the “Lock” icon closed to maintain proportions, and use the corner Resize handles to adjust each decal’s size.
11. To change the color of a piece to match the vinyl you’ll cut it from, “Ungroup” the design if the piece is in a grouped layer.
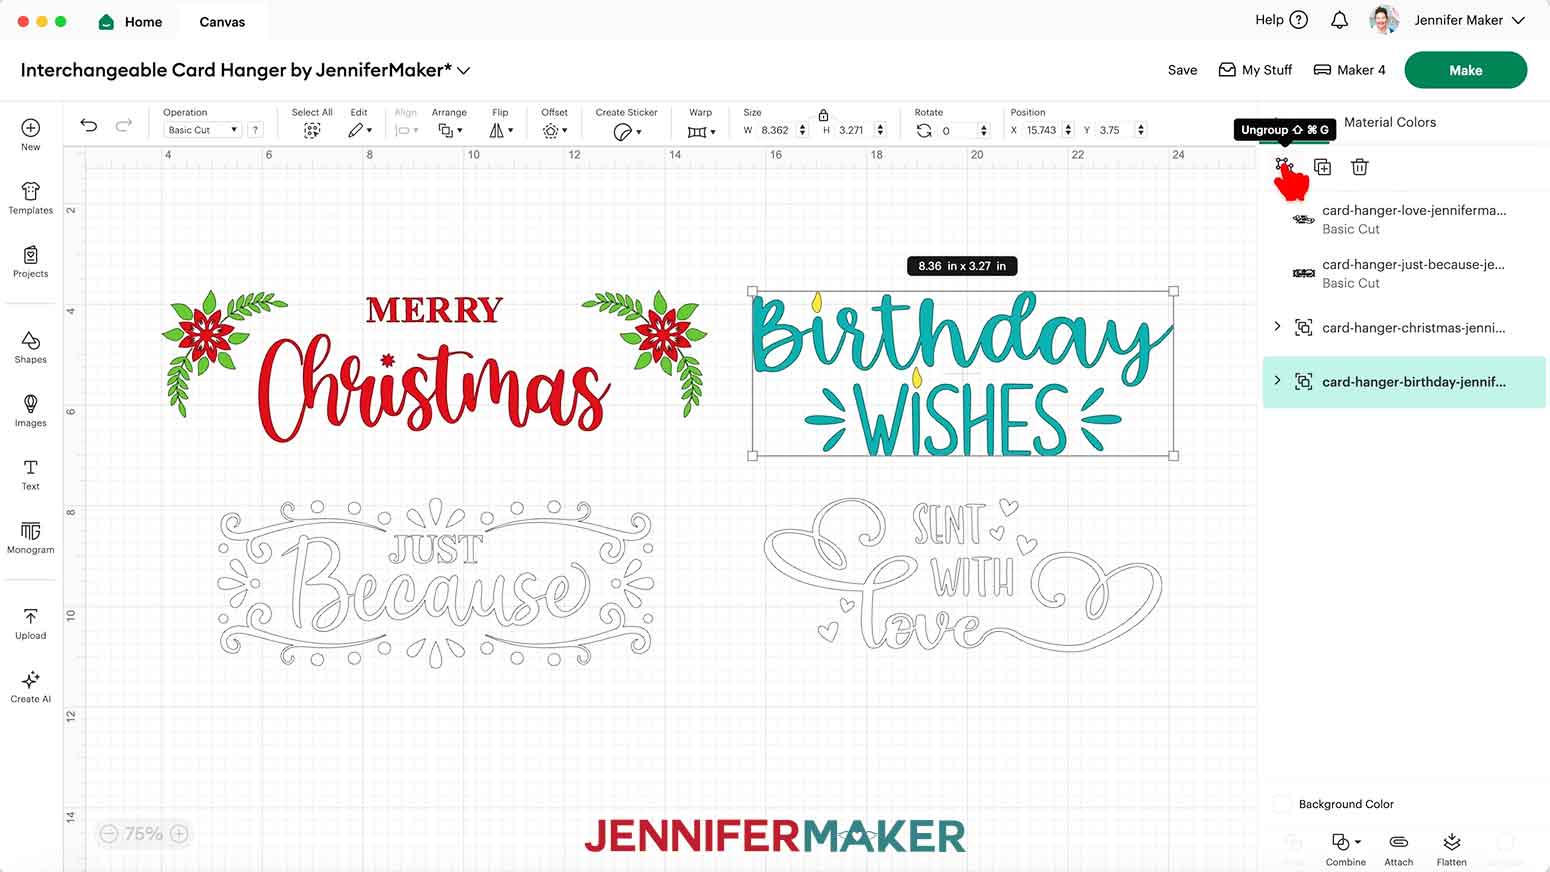
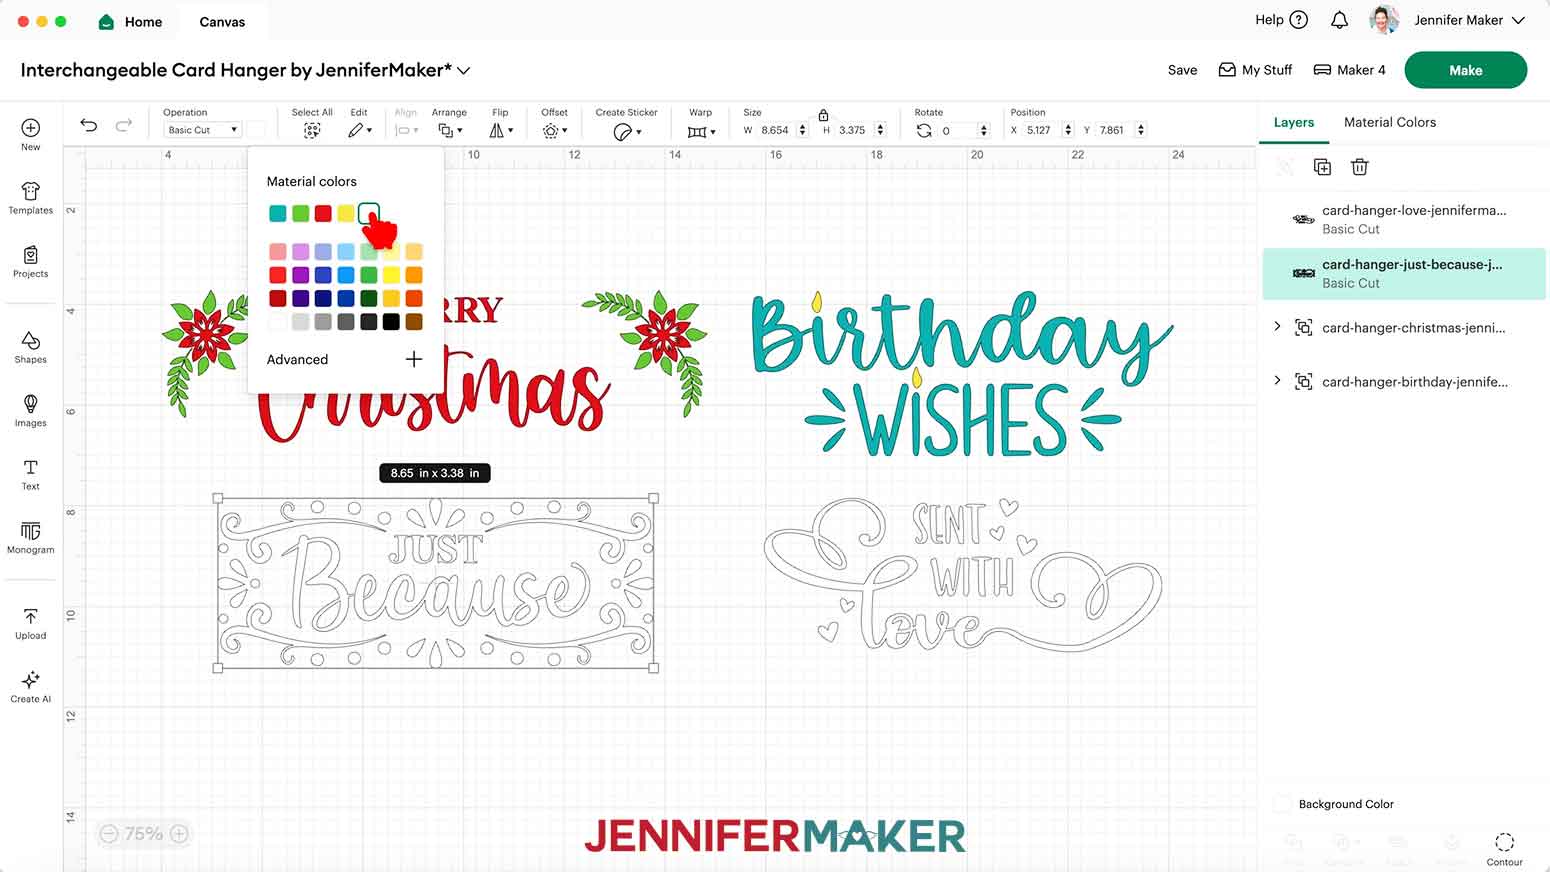
12. Select the piece you want to change and click the Color Box next to “Operation” to choose a new option.
NOTE: I’ll change my “love,” “just because,” and “birthday” text pieces to white.
13. Your project is ready to cut!

CUTTING & WEEDING
1. Make sure the correct machine is selected in the top right.
2. Click “Make.”
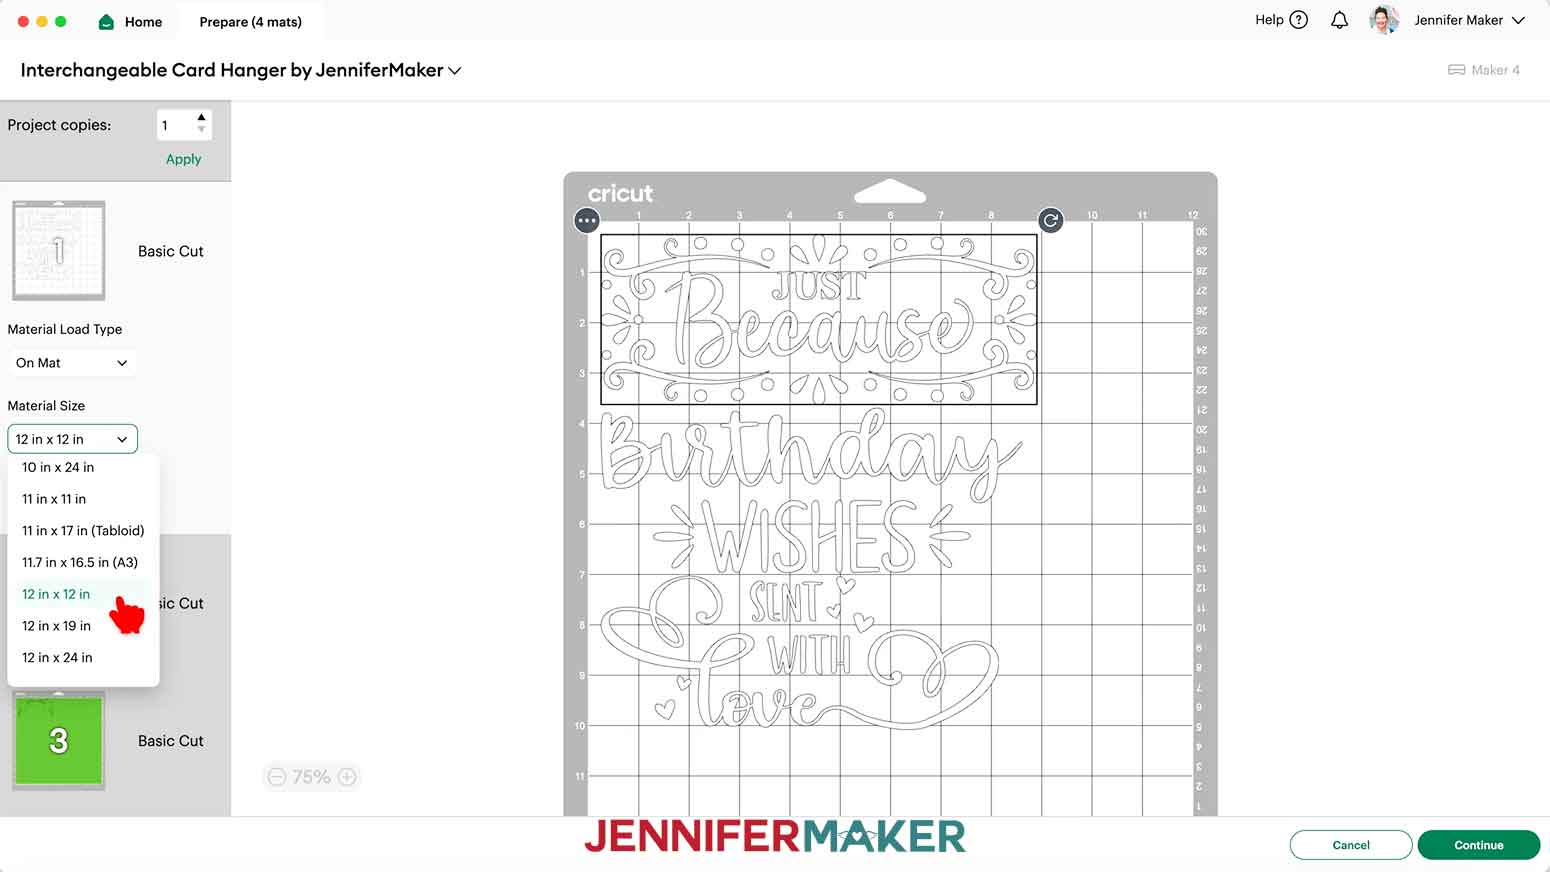
3. On the Prepare screen, make sure the correct Material Size is selected for your materials.
NOTE: I’ll choose 12” x 12” for all my mats, and trim my vinyl down to size.
4. If you like, drag the objects on the mat apart so you have room to trim them into separate pieces.
NOTE: I’ll spread apart the pieces on my white, yellow, and green mats.
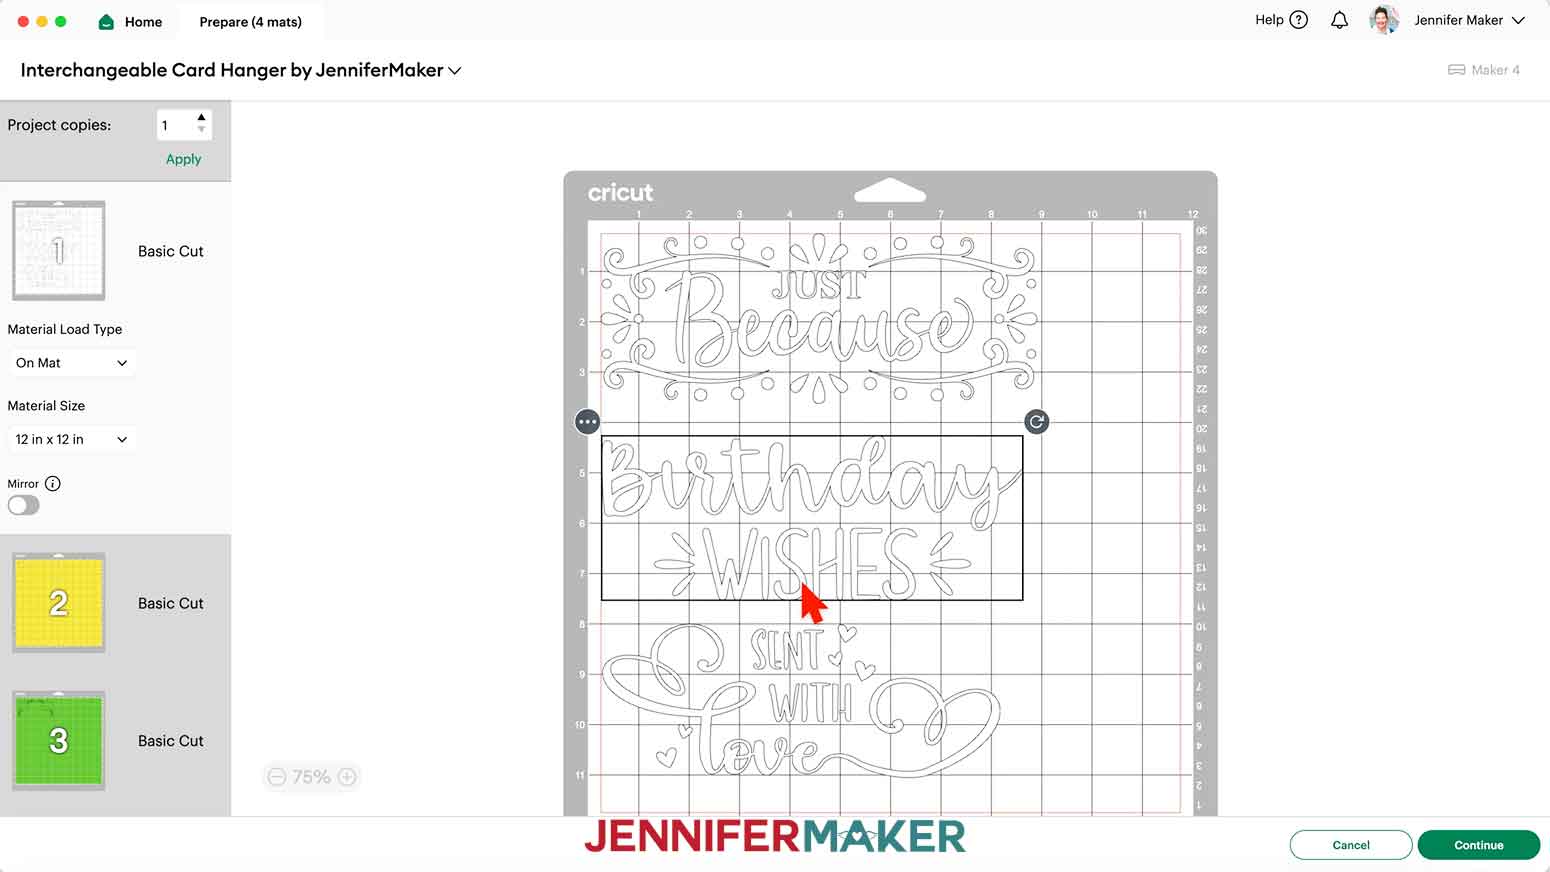
5. Once you are satisfied with your mat layouts, select the first mat again and click “Continue.”
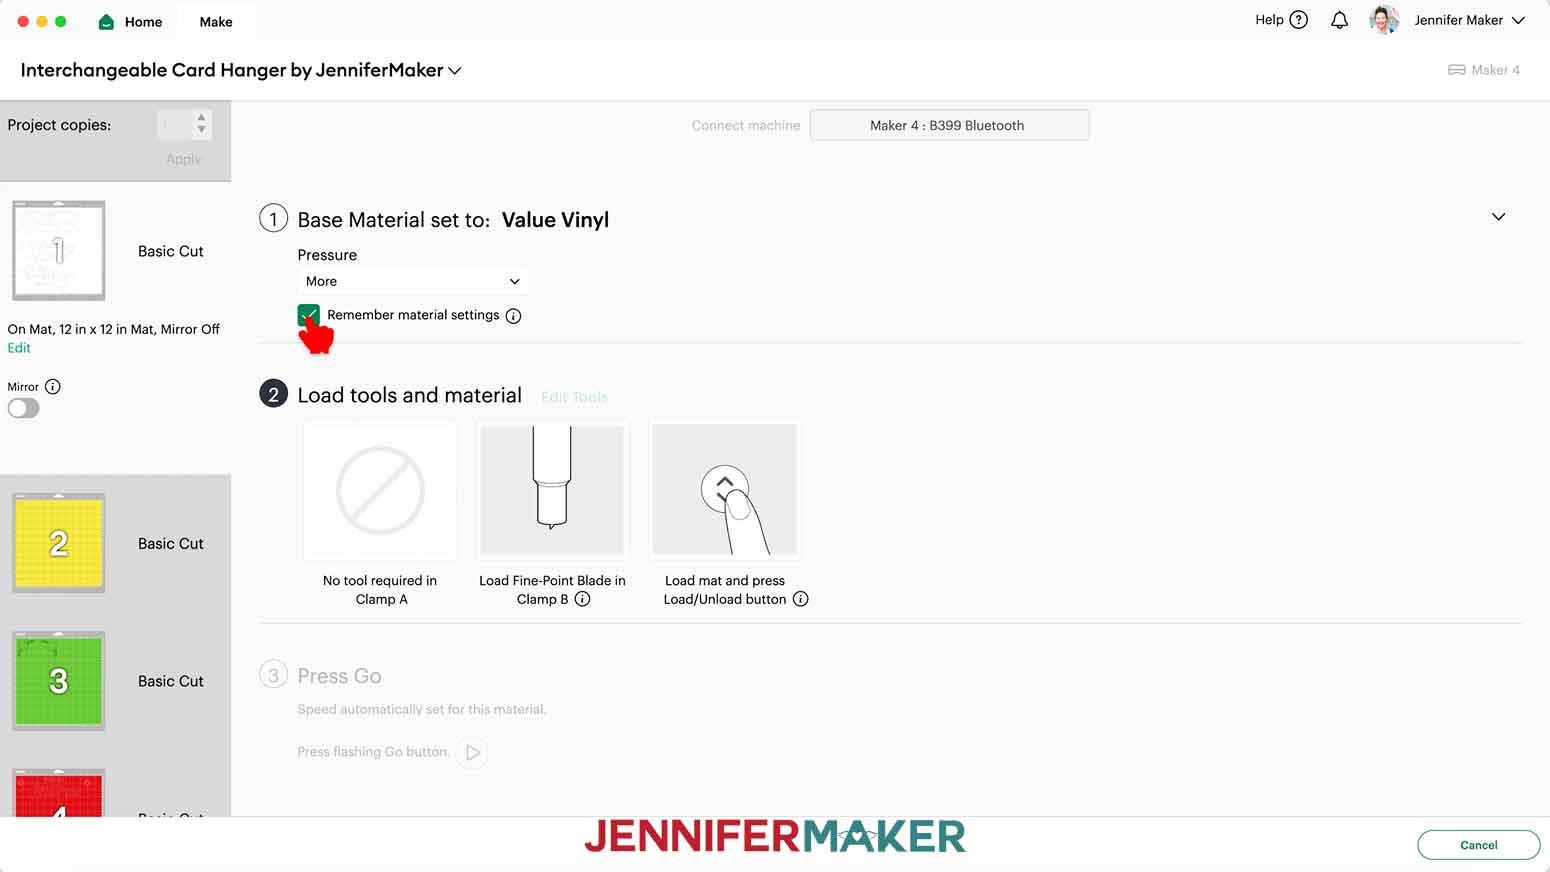
6. On the Make screen, set the Base Material for your first mat. I used the “Value Vinyl” material setting for all my mats.
7. Change the Pressure to “More” for cleaner cuts.
NOTE: After you set the material for a mat, you can check the box next to “Remember material settings” to save time between mats of the same material.
8. Use a paper trimmer or scissors to trim your vinyl to cover the design area shown on the screen, plus an inch or so of buffer.
TIP: You can save smaller pieces of vinyl for other projects.
9. Place your value vinyl matte/material side up on a green StandardGrip machine mat so it covers the design area on your screen.
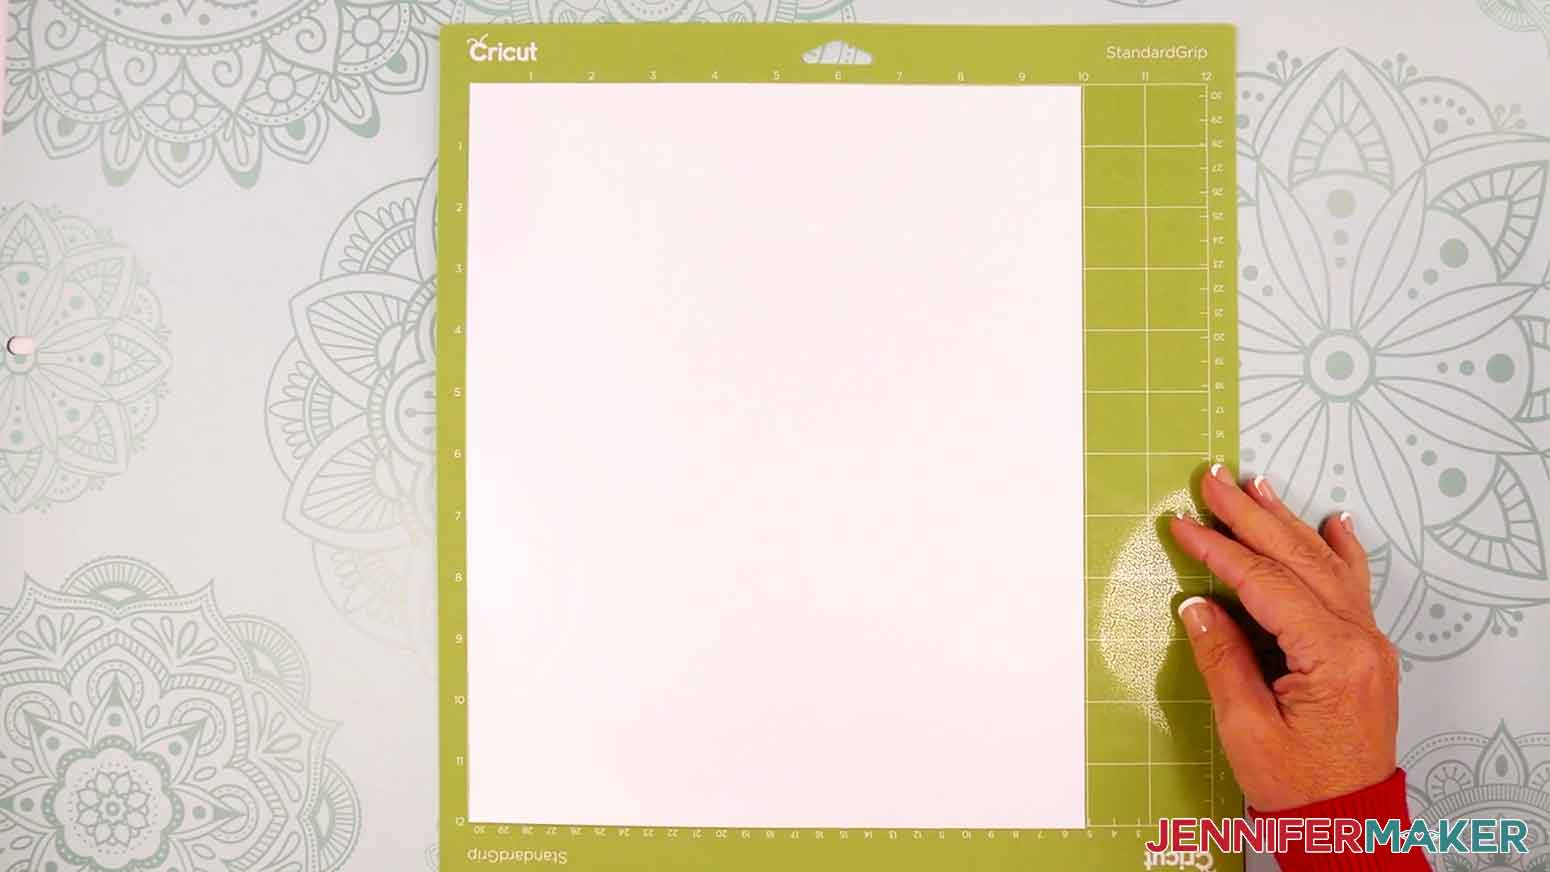
10. Use a brayer to make sure it’s fully adhered.
11. Check that your Premium Fine-Point Blade is clean and in the clamp.
12. Press the flashing “Load/Unload” button to load the prepared mat into your Cricut.
TIP: Make sure the vinyl’s placement matches the screen preview.
13. Press the flashing middle button to begin cutting.
14. When it has finished cutting, don’t unload the mat right away. Gently lift a corner of the material to make sure the cuts went all the way through the vinyl, but not the carrier sheet. If not, press the middle button again to make a second pass of cuts in the same spots.
15. When the cuts are complete, keep the vinyl on your mat.
TIP: It can be easier to weed vinyl, especially small, detailed designs, while it is still adhered to the machine mat.
16. Use your weeding tool to carefully peel away the extra background vinyl.
17. Poke your weeding tool into sections of the vinyl you want to remove, such as the small areas inside letters. Gently lift the tool away from the design to remove the excess vinyl.
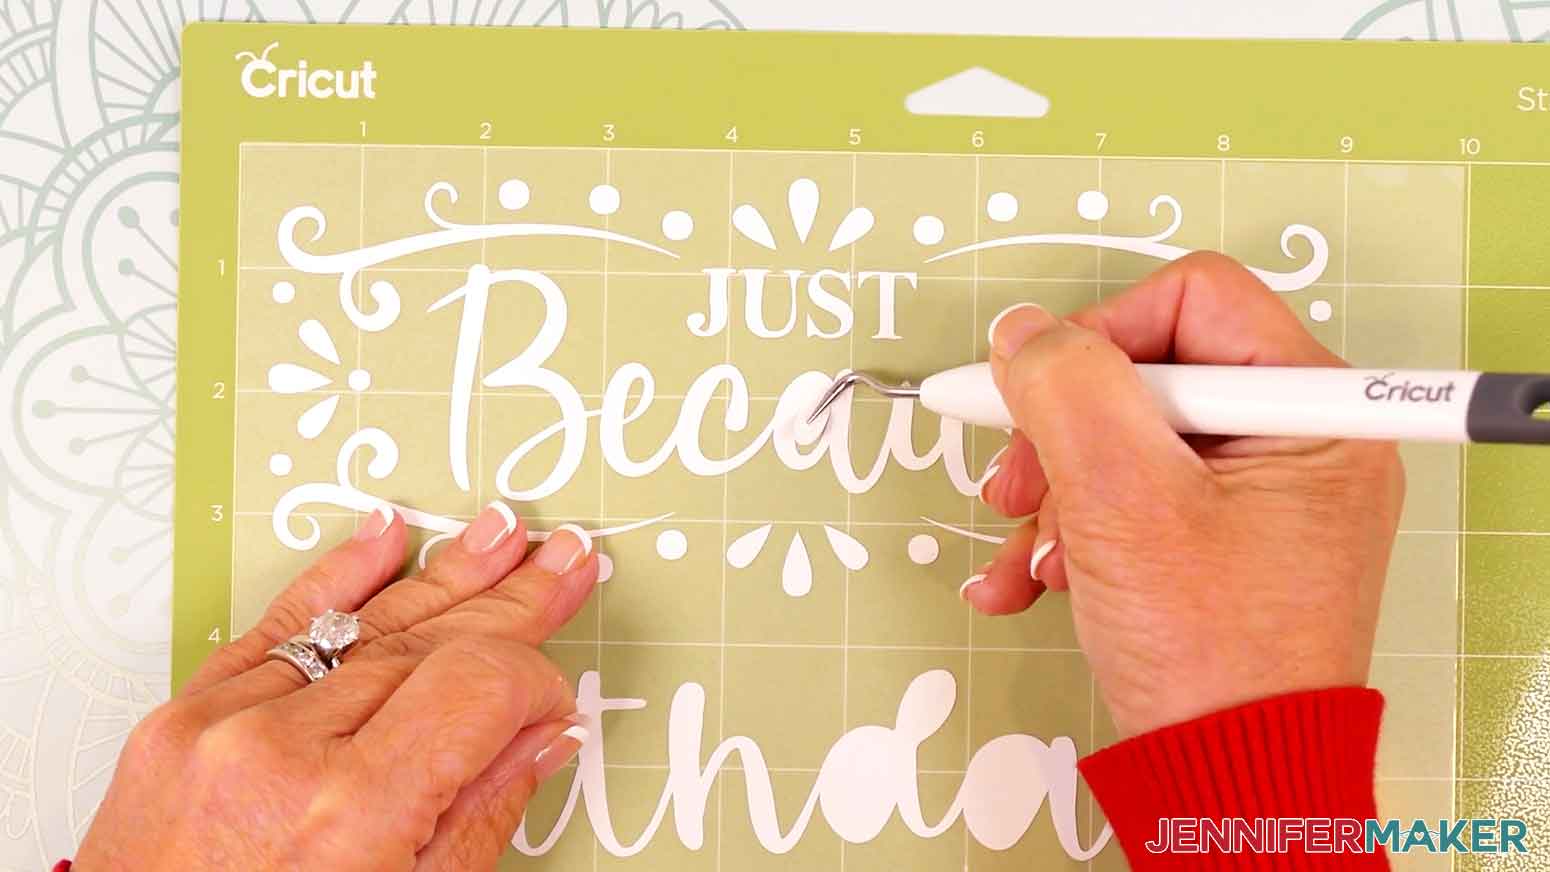
TIP: Make sure you do not pull up any pieces you want to keep! If they come up, gently pat them back in place and try again. Refer back to the Design Space screen if you’re not sure which pieces to remove.
18. Continue to weed until all that is left is the vinyl for your design.

19. Flip your mat over onto your work surface, and roll it back to release the vinyl decal.
20. Repeat Steps 8-19 to cut and weed your remaining mats. Make sure to match your vinyl color with the mat on screen!
21. Use scissors to cut each of your designs into individual decals.
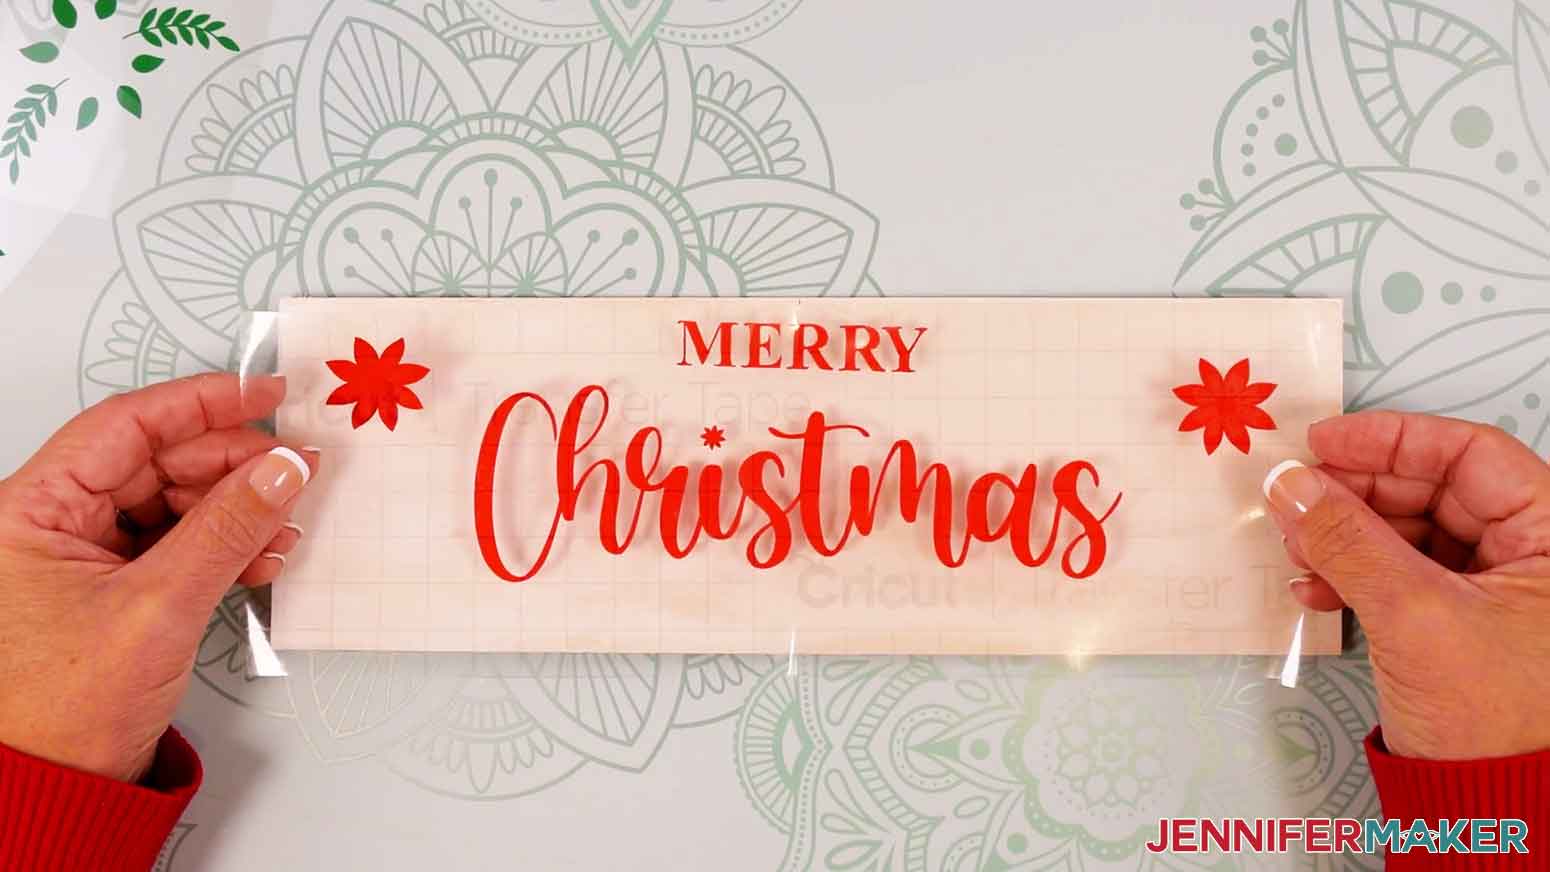
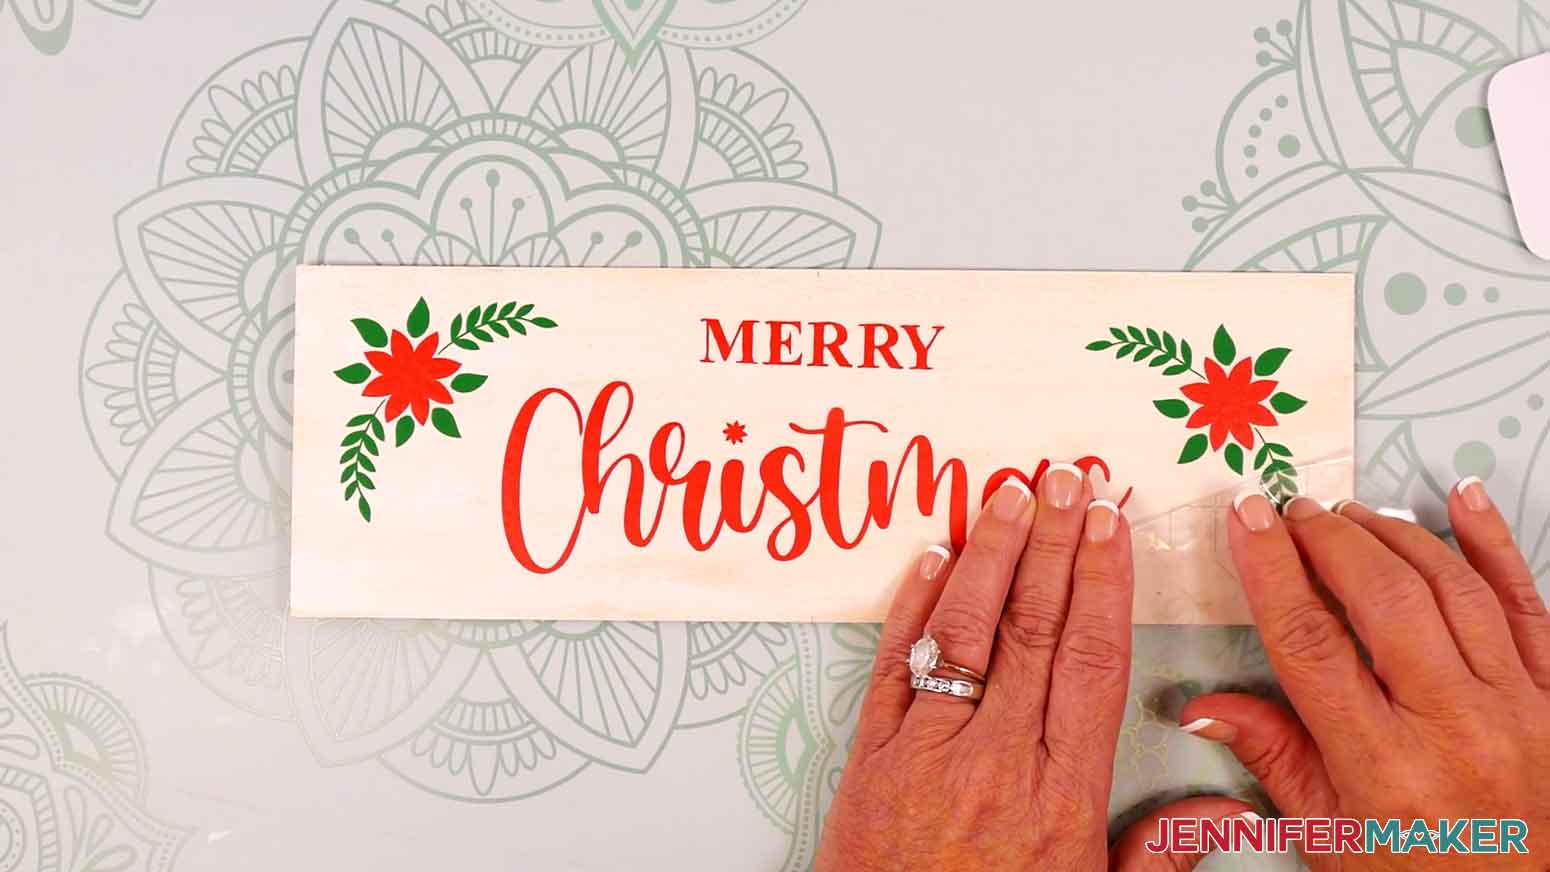
NOTE: The “Merry Christmas” design has a main decal with the text, and a second decal with extra leaf details.
NOTE: The “Birthday Wishes” design has a main decal with the text, and a second decal for the two candle flames.
22. Lay out all of the decals face up.
TIP: Refer to the Design Space screen if you’re not sure about some pieces’ orientations.

STEP 4: ASSEMBLE YOUR INTERCHANGEABLE RIBBON GREETING CARD HANGER
APPLY THE VINYL DECALS TO YOUR PAINTED PANELS
1. Gather the vinyl decals and the painted panel you want to assemble.
NOTE: I’ll apply the “Christmas” decals to my white panel first.
2. Lay the panel in your work area horizontally with the painted display side face up.
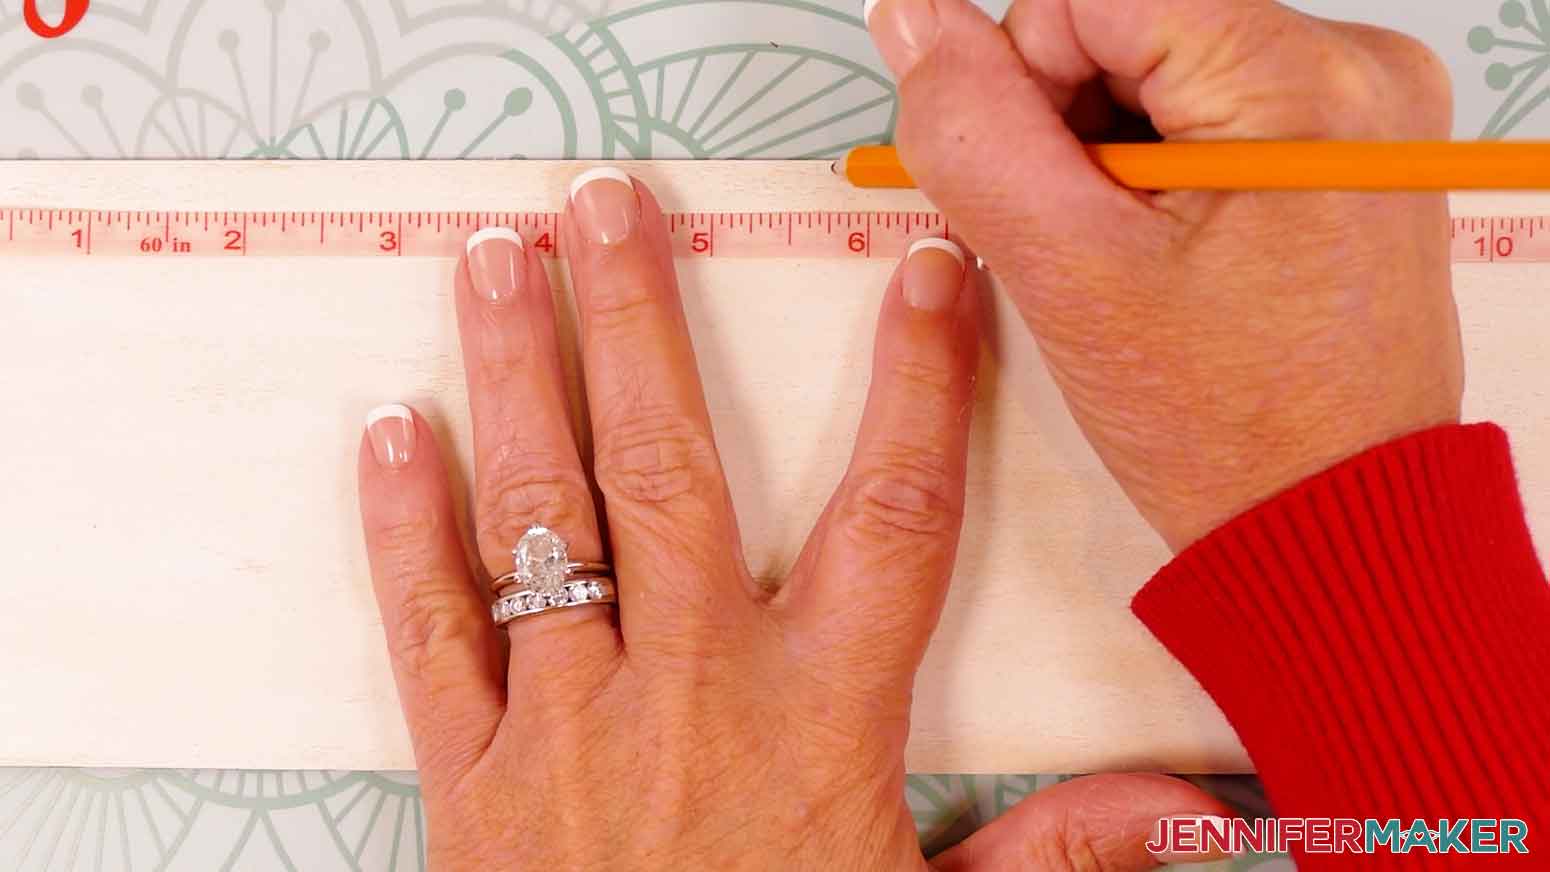
3. Use a tape measure to find the panel’s horizontal center and mark it with a pencil at the top and bottom of the midway point.
TIP: We’ll erase the marks later.
4. Next, cut a piece of StandardGrip transfer tape just larger than your design’s main vinyl decal (with the text).
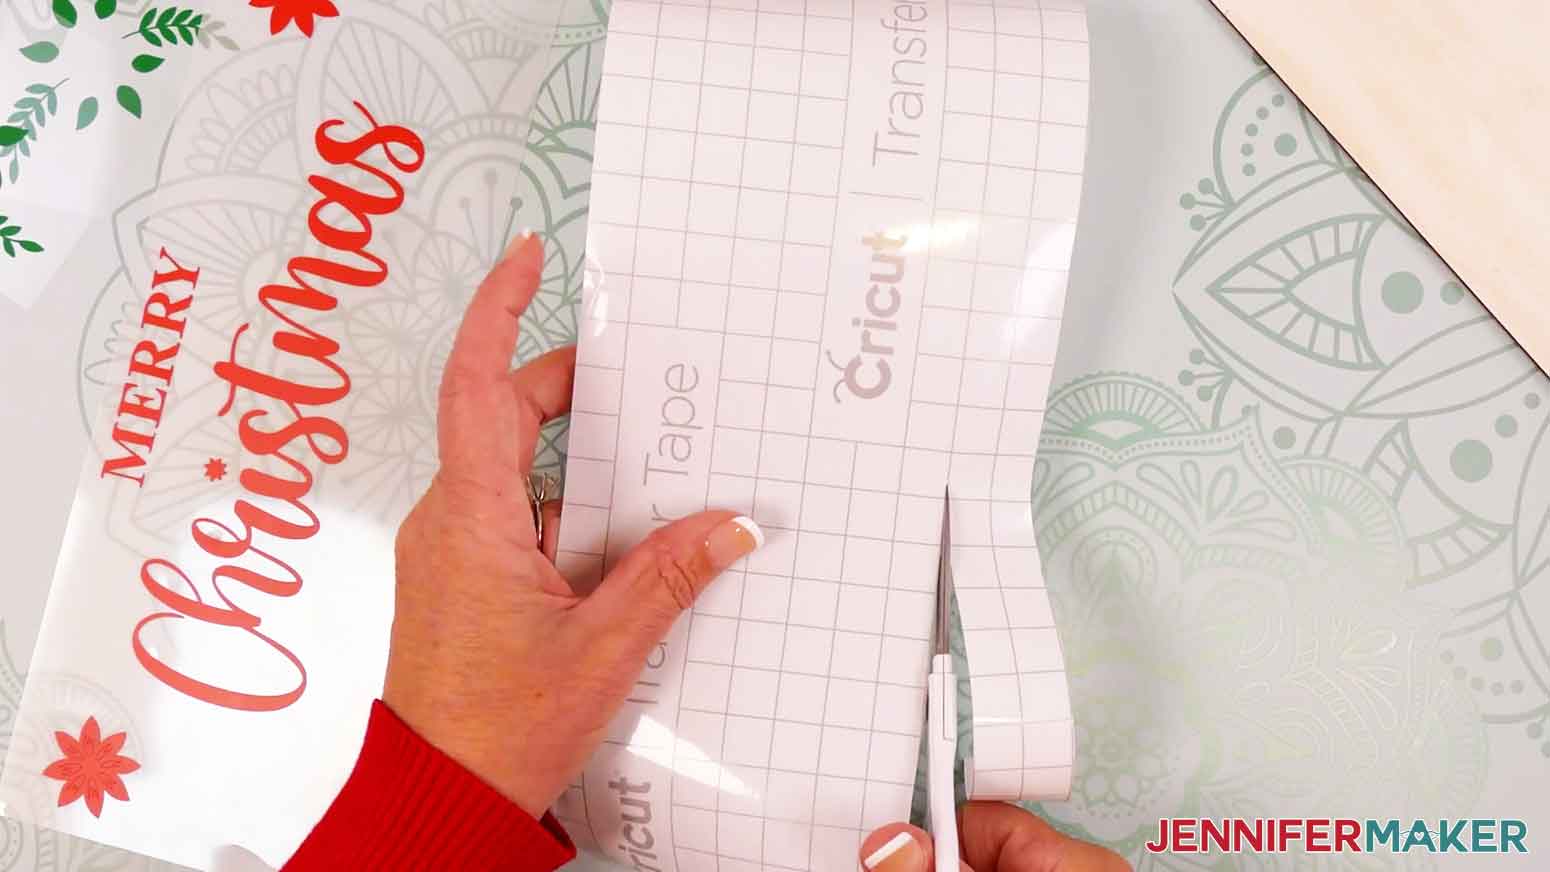
5. Remove the backing from the transfer tape.
TIP: If you chose not to seal your painted panels, press your transfer tape onto a cloth and peel it back up a few times to make it less sticky so it doesn’t remove the paint.
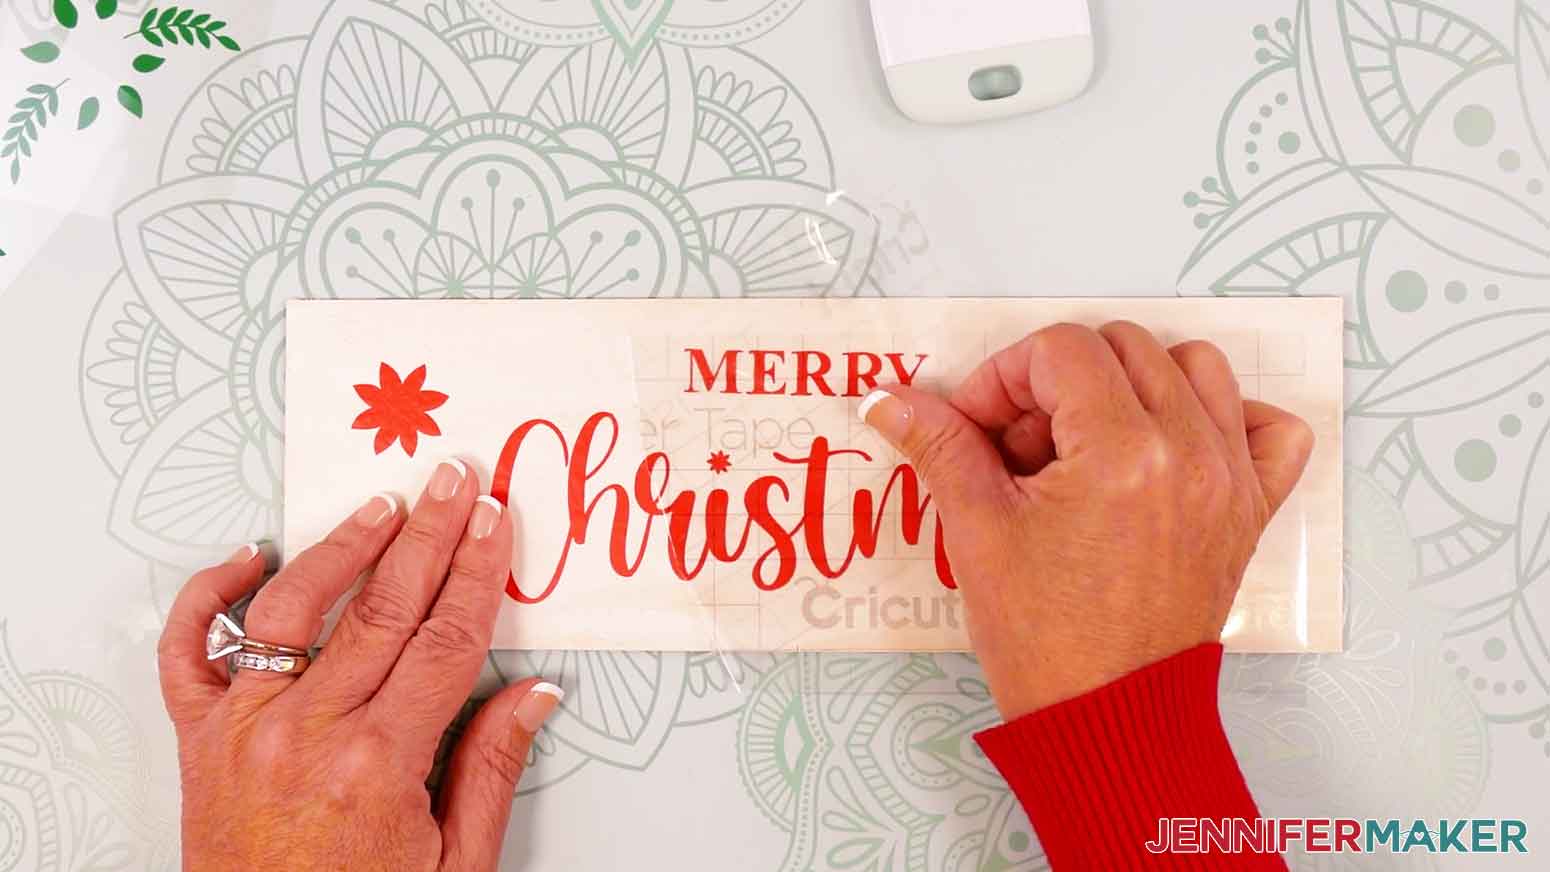
6. Hold your transfer tape in the shape of a “taco,” sticky side down, then center the bottom of the “taco” onto the middle of the decal.
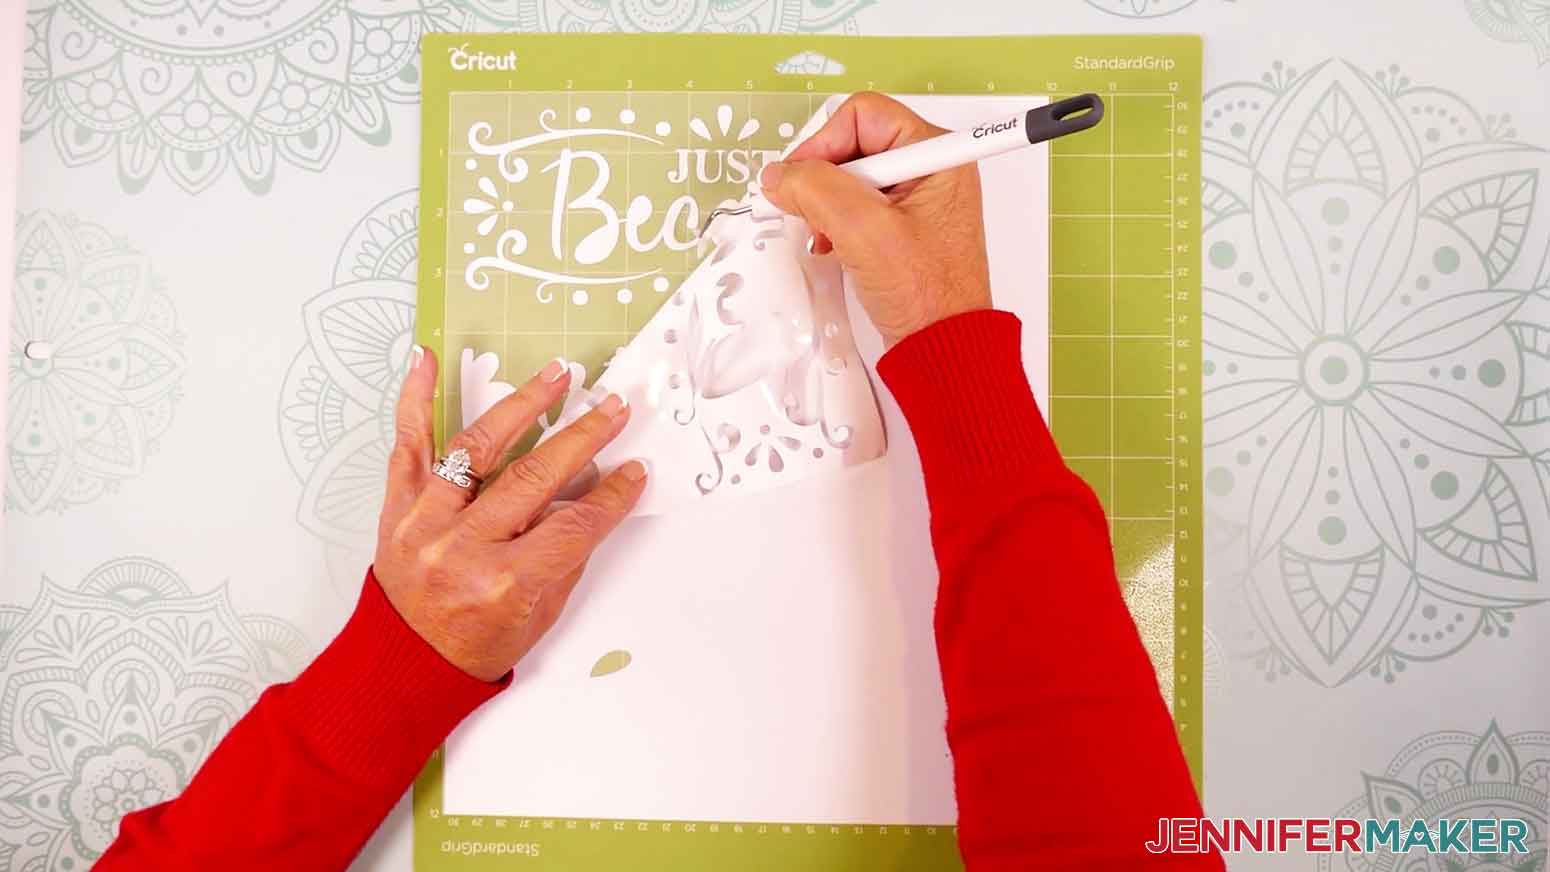
7. Smooth the transfer tape over the decal from the center outward and burnish it down using the Scraper Tool.
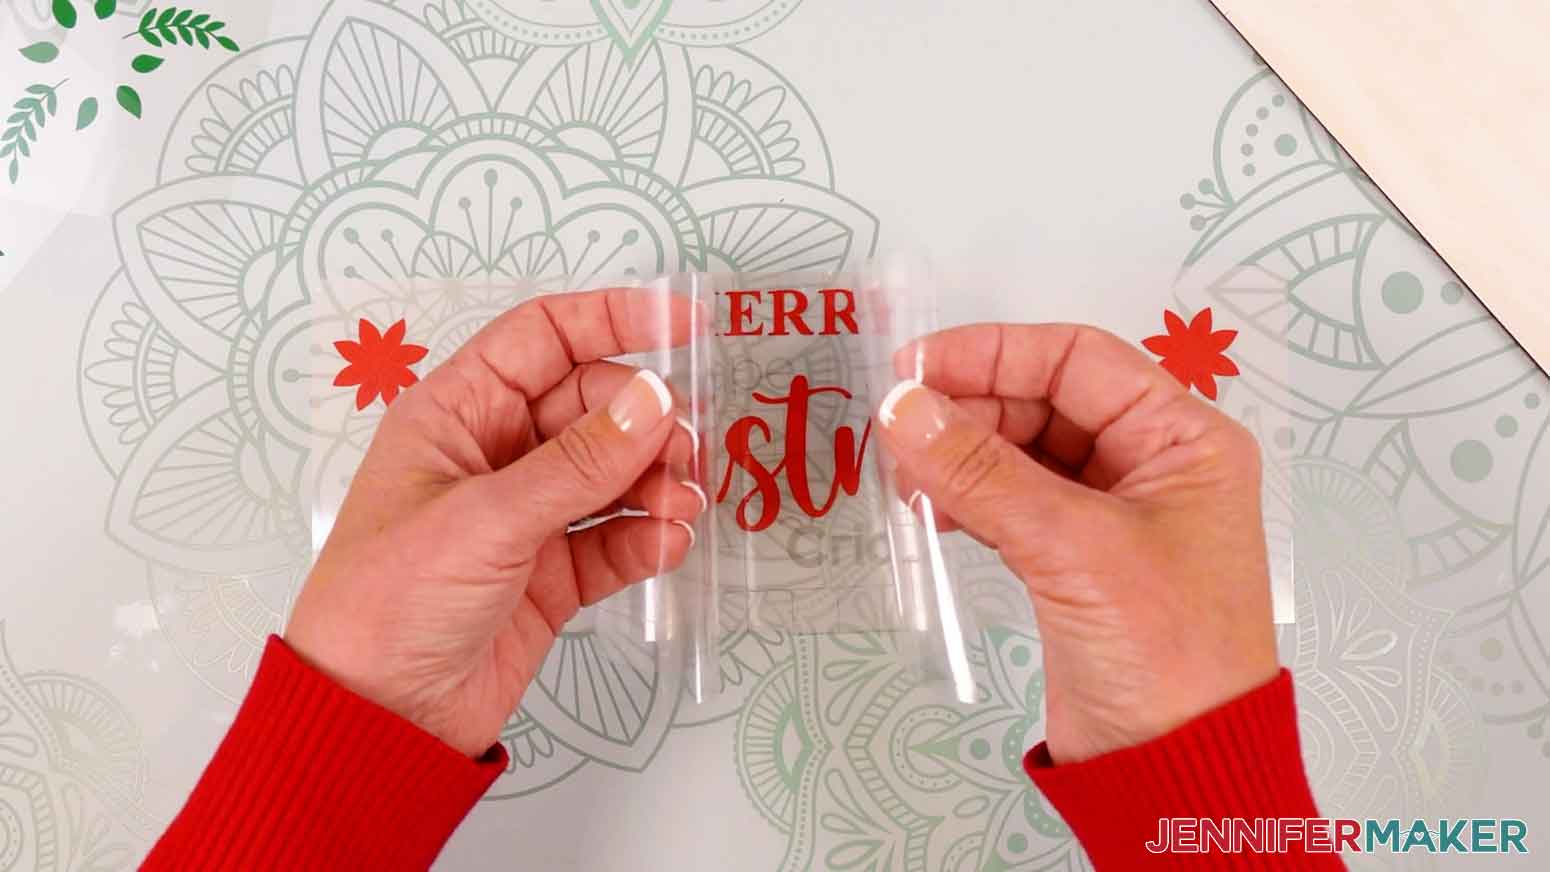
8. Flip your vinyl over and burnish the other side, then gently peel away the backing.
TIP: If any pieces of the decal cling to the carrier sheet instead of transferring to the tape, lay the sheet back down, burnish the area with your Scraper, and carefully try again.
9. Then curve your vinyl to find the decal’s center, and crease the transfer tape at the top and bottom of the midway point.
10. Hold your transfer tape sticky side down and center the decal on the panel piece, using the pencil marks and creases to help with alignment.
11. Once the decal is in place, lightly let the middle touch the board. Then, smooth each side down from the middle outward.
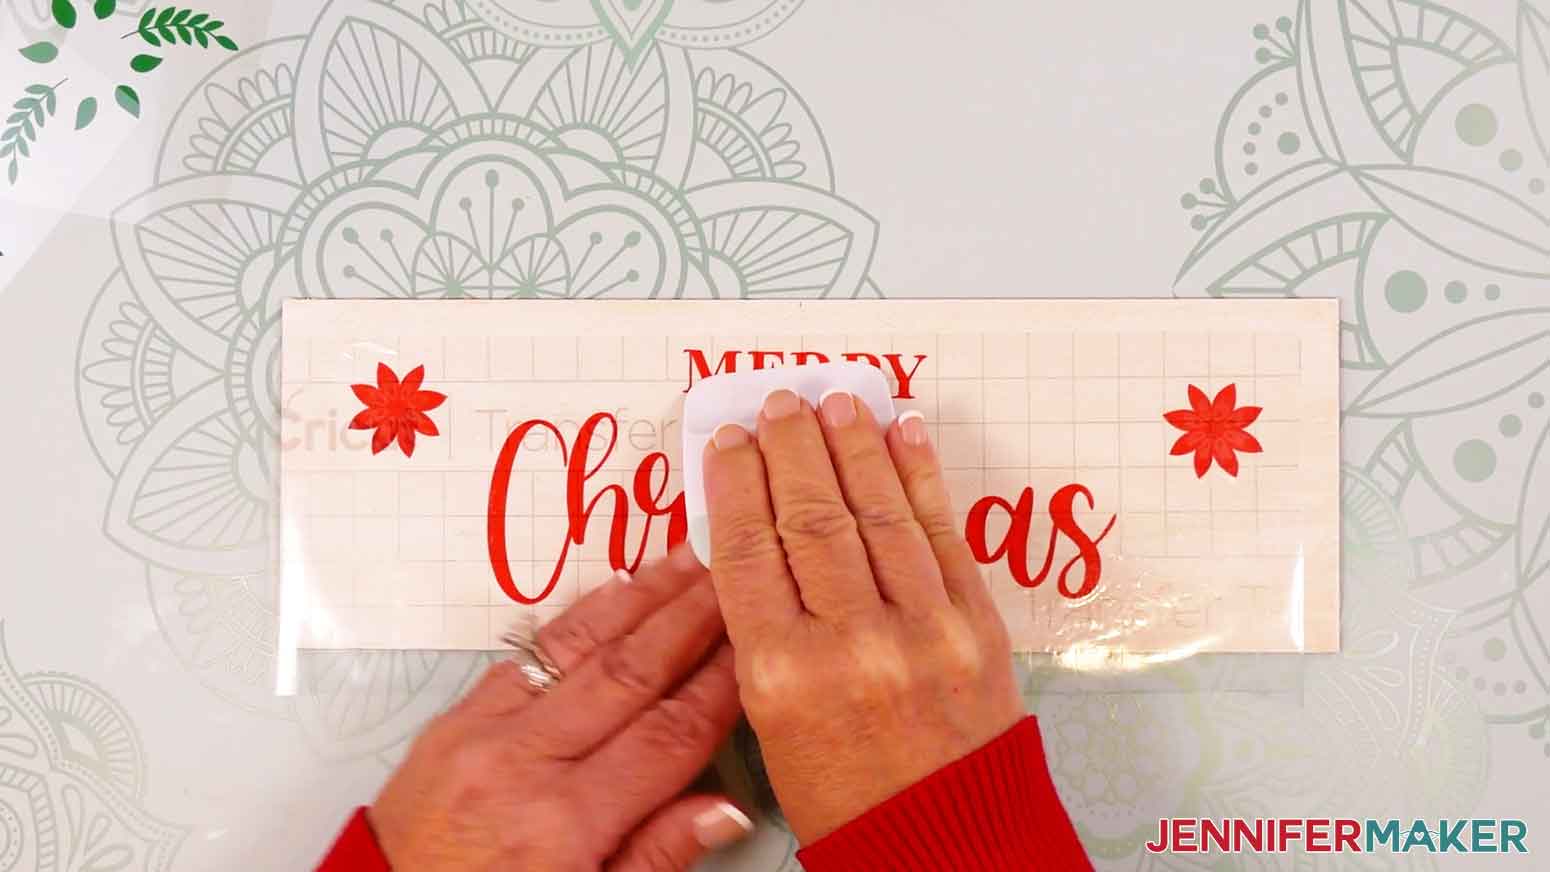
12. Burnish the decal firmly onto the panel, starting in the center of the design and working your way out.
TIP: Keep your pressure on the vinyl and not the empty transfer tape sections to avoid damaging the paint.
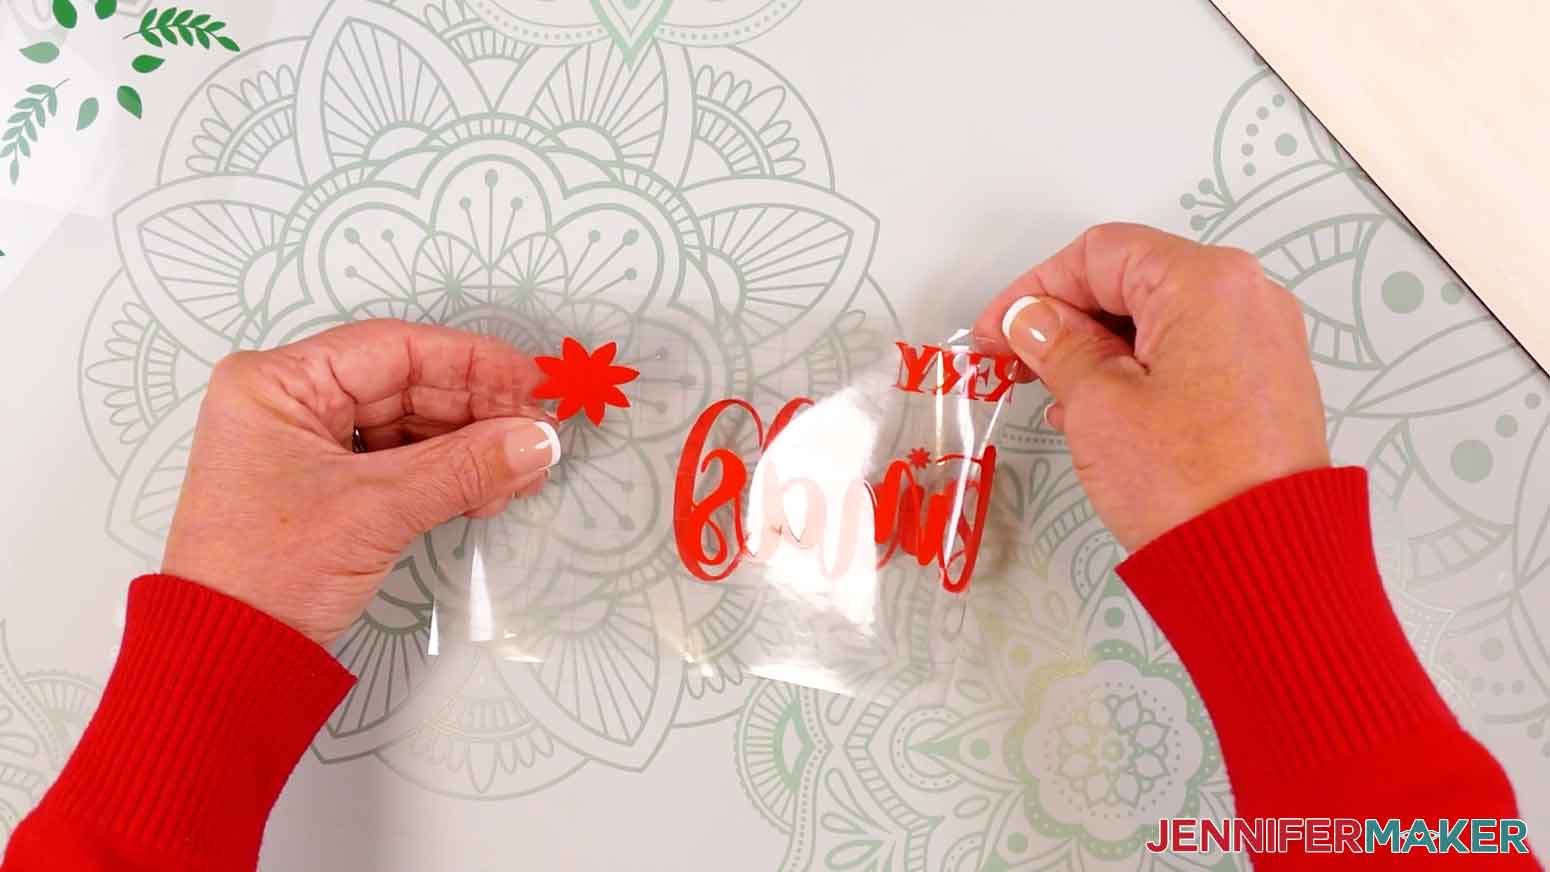
13. Starting in a corner, slowly and carefully peel the transfer tape away from the panel, burnishing down any vinyl that lifts from the surface as you go.
TIP: It can be helpful to pull your transfer tape parallel to the panel while peeling it away.
14. If your design has an additional vinyl decal, repeat Steps 4-8 to apply transfer tape to it.
15. Hold your transfer tape sticky side down and lightly position the vinyl in the correct place on the main decal.
NOTE: Refer back to your Design Space screen if you’re not sure where your details should go.
16. Then repeat Steps 12-13 to apply the vinyl to the panel and remove the transfer tape.
17. Erase the pencil marks on your panel.
18. Repeat Steps 1-17 for your remaining panels.
19. Your panels are ready to assemble!
ADD YOUR MAGNETS OR COMMAND STRIPS, RIBBONS, & CLIPS
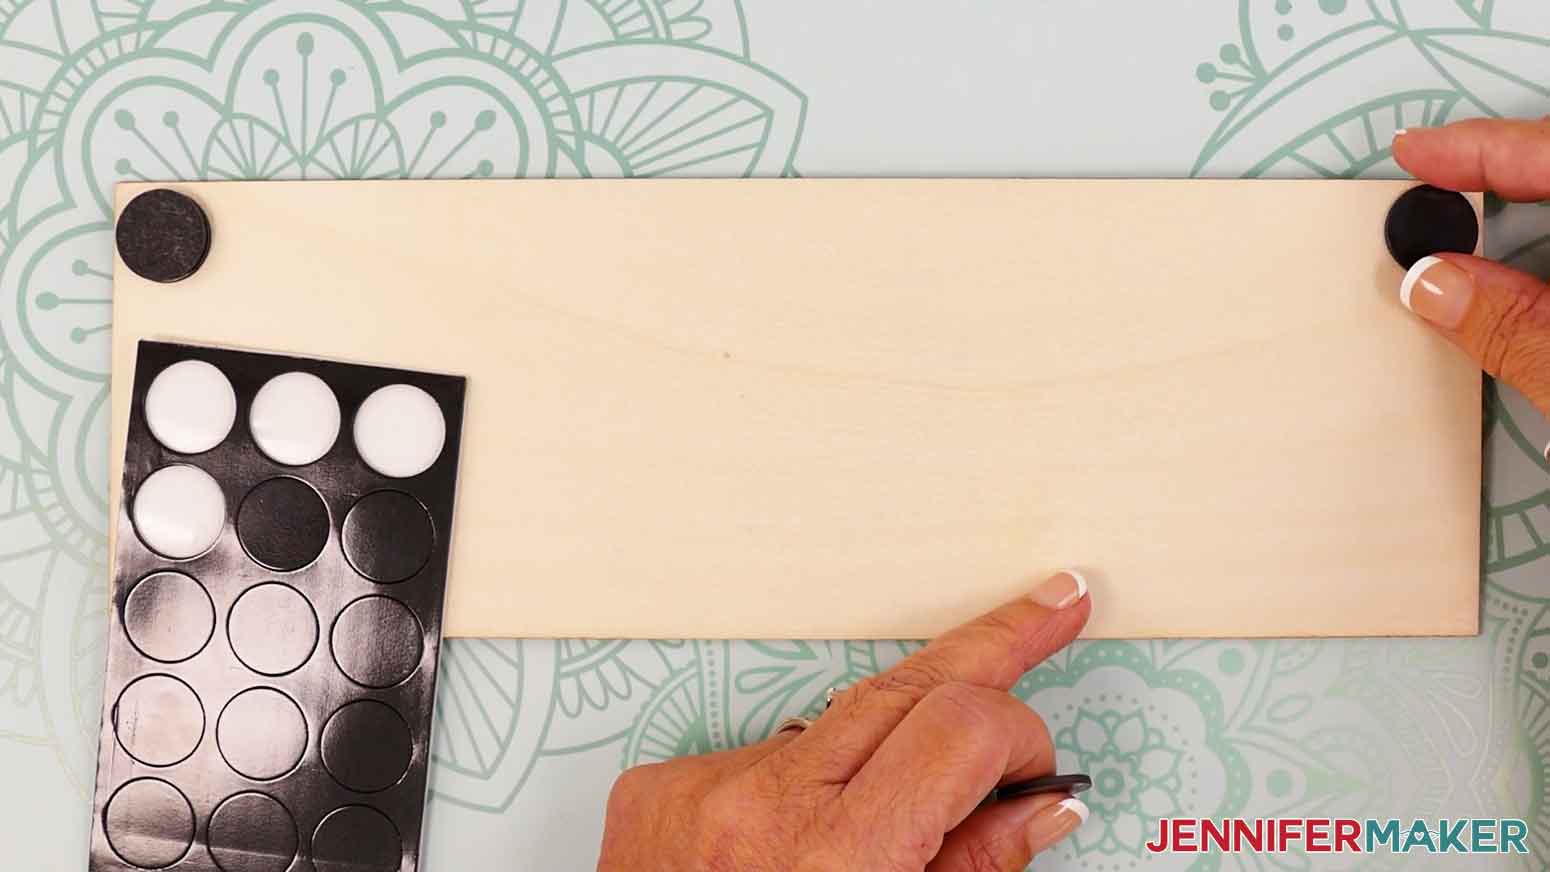
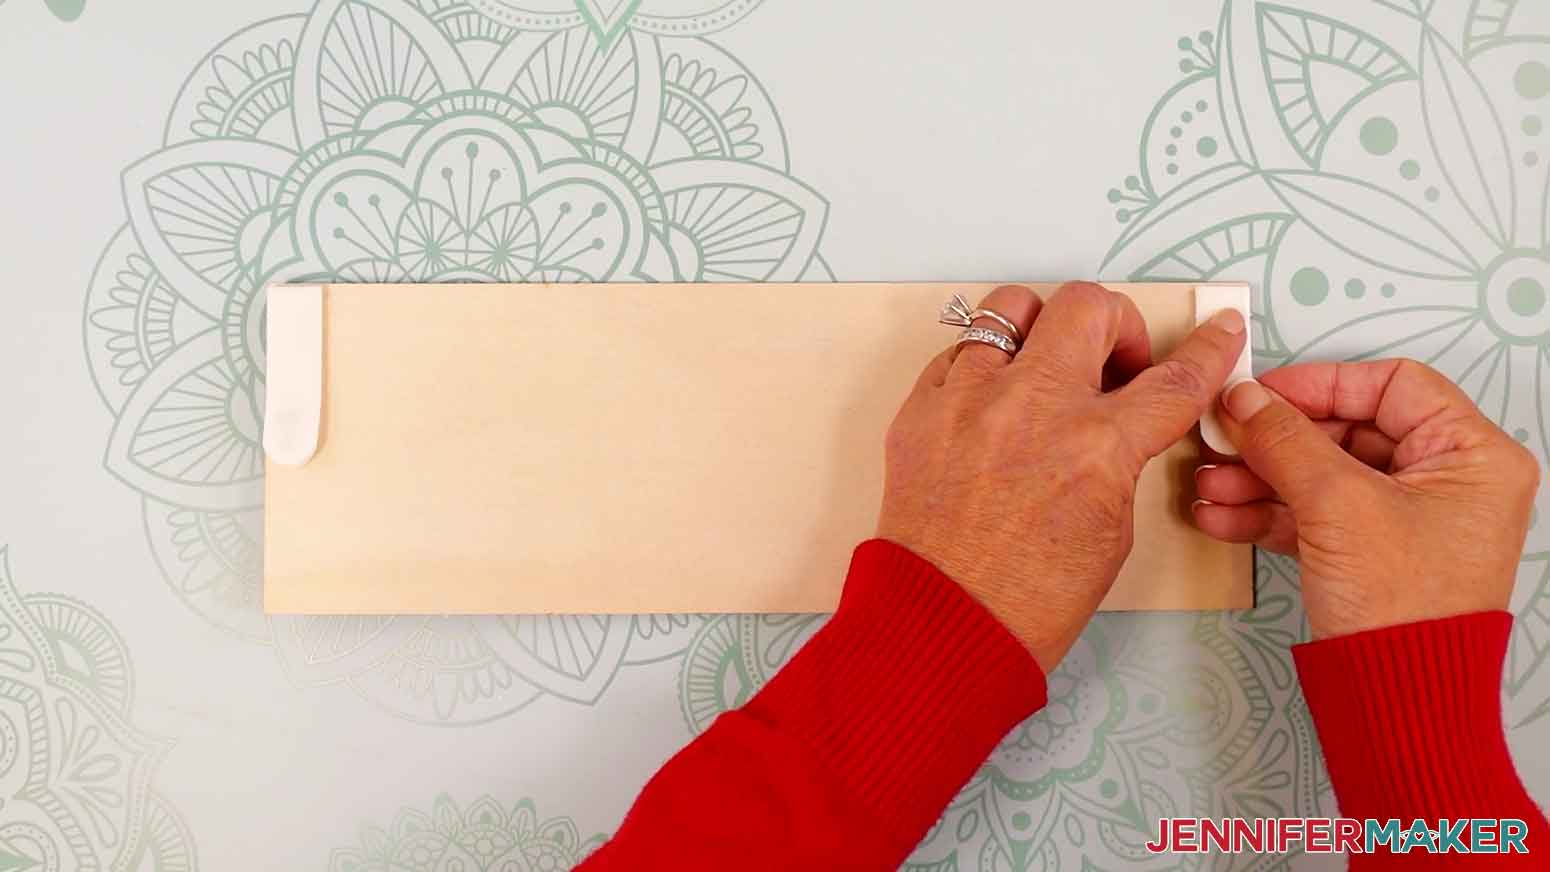
1. Lay your back (unpainted) wood panel horizontally on your work surface.
2. Peel an adhesive magnet from its carrier sheet and apply it sticky-side down in the top left corner of your panel.
3. Do the same to adhere magnets in the panel’s three remaining corners.
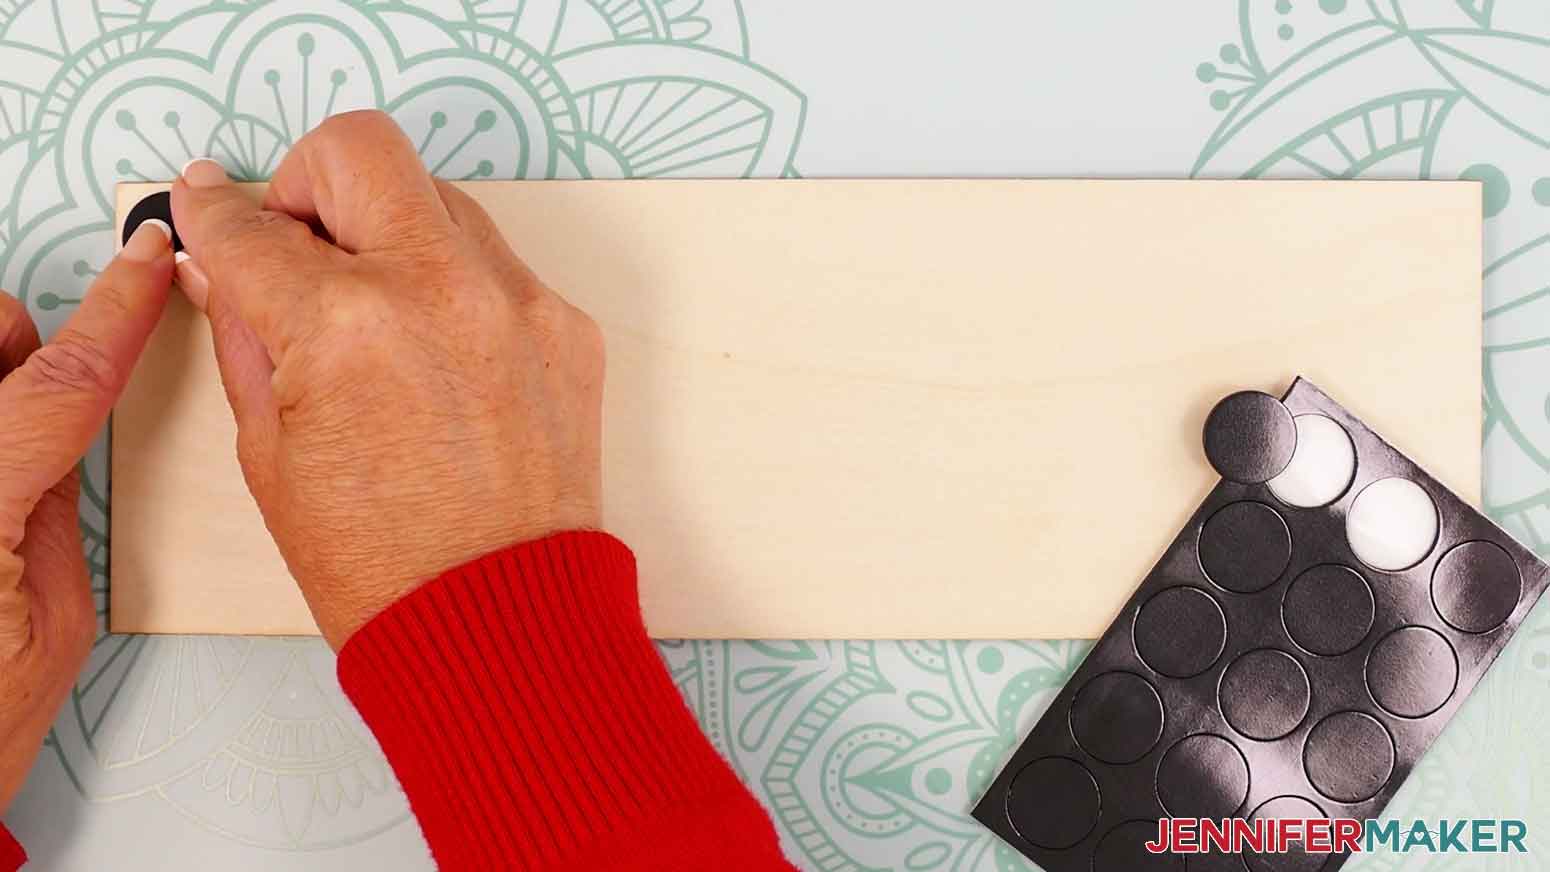
4. Next, peel an adhesive magnet from its carrier sheet and attach its magnetic side to the back panel’s top left magnet.
NOTE: Stacking the magnets this way instead of applying them directly to the panels ensures that they line up with each other properly.
5. Do the same to stack magnets in the panel’s three remaining corners.
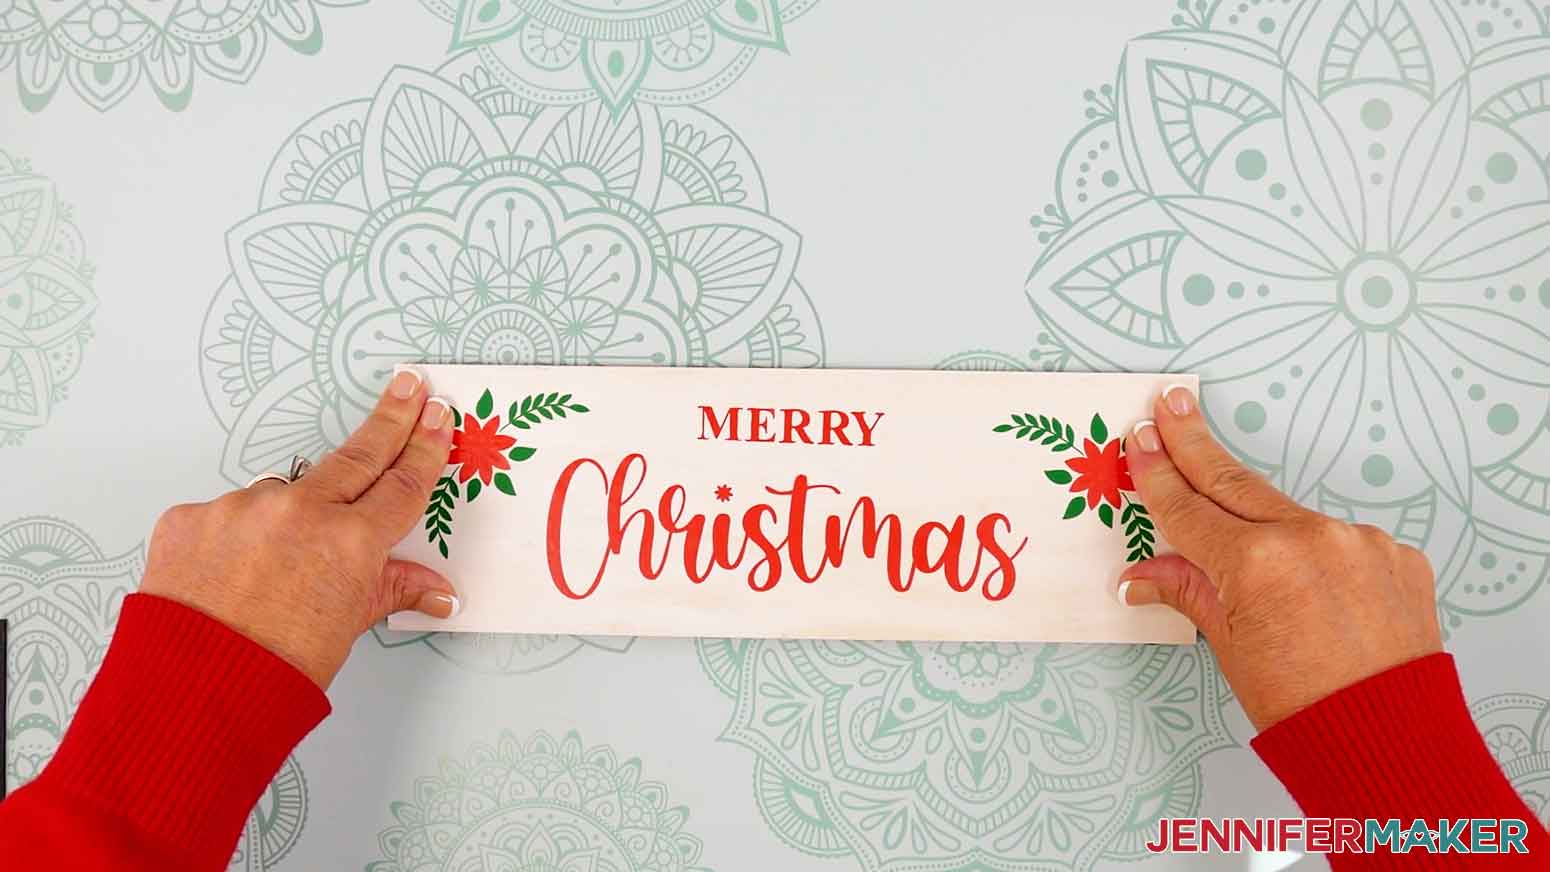
6. Hold your first prepared panel display side up and carefully lower it directly onto the back panel, keeping all four edges aligned.
7. Press down firmly to adhere the top layer of magnets to the back of your top panel.
8. Remove the panel.

9. Repeat Steps 4-8 to adhere magnets to the back of your remaining display panels.
10. Or, follow Steps 2-8 to adhere command strips instead of magnets. Apply the bottom strips to the base’s corners, place their matching tops on top, then press the display panel down on top to adhere the strips.
11. Set aside the display panels for now.
12. Turn on your hot glue gun and let it warm up.
13. Cut a piece of jute twine to about 11” in length.
14. Put on your finger caps to prevent burns from the hot glue.
15. Place one end of the twine on the back unpainted panel, about an inch to the right of the top left magnet.
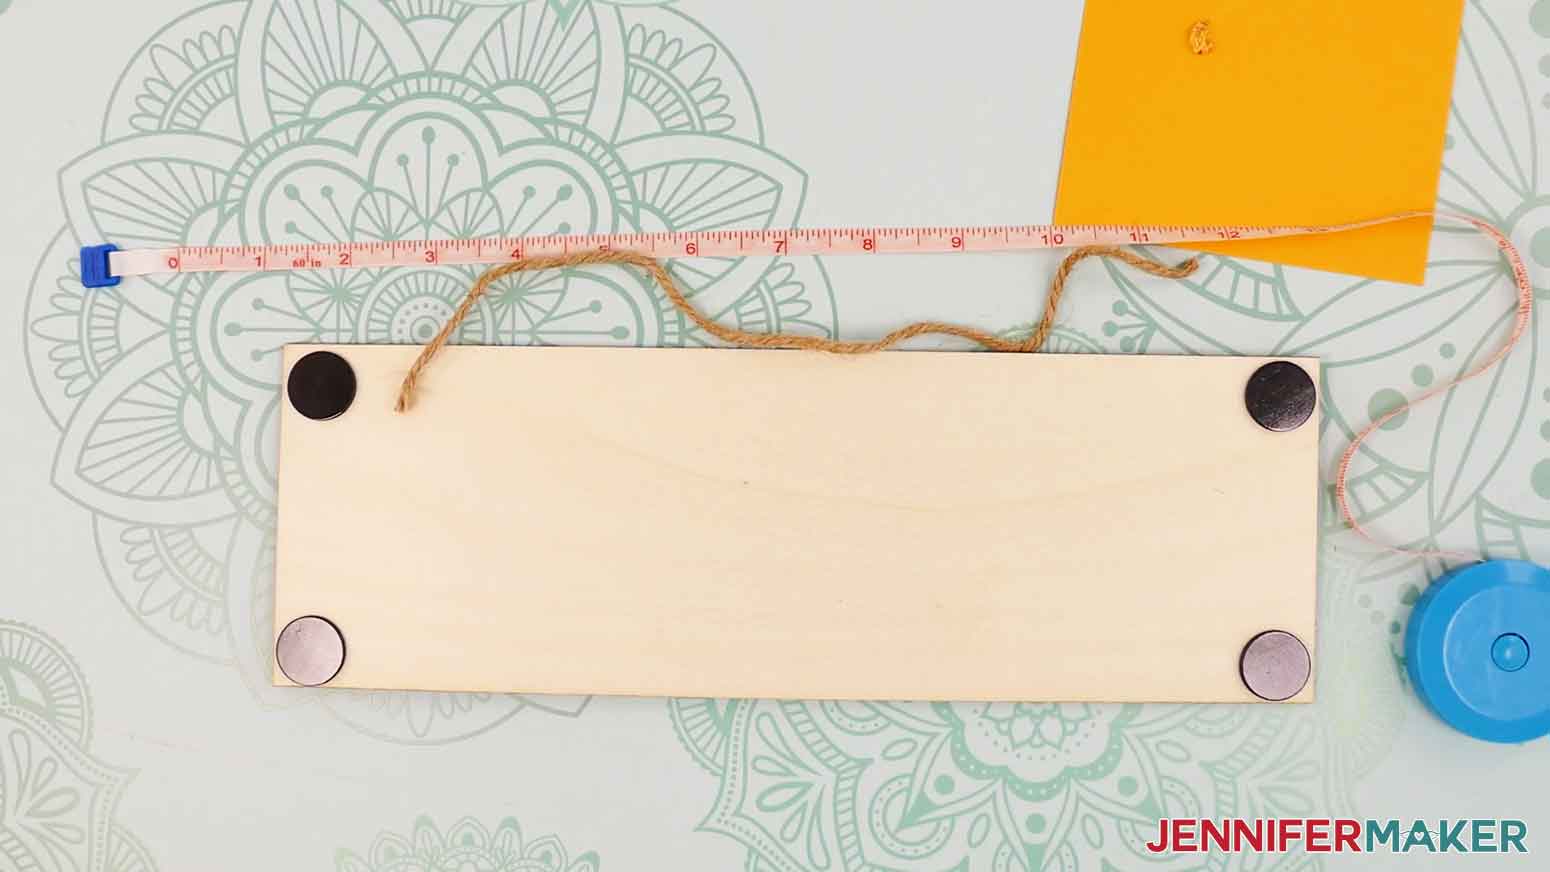
16. Add a generous amount of hot glue on top of the twine.
17. Then place the other end of the twine on the panel, about an inch to the left of the top right magnet, and add glue on top.
18. Use the tip of your weeding tool to make sure the twine is fully submerged in the glue, if needed.
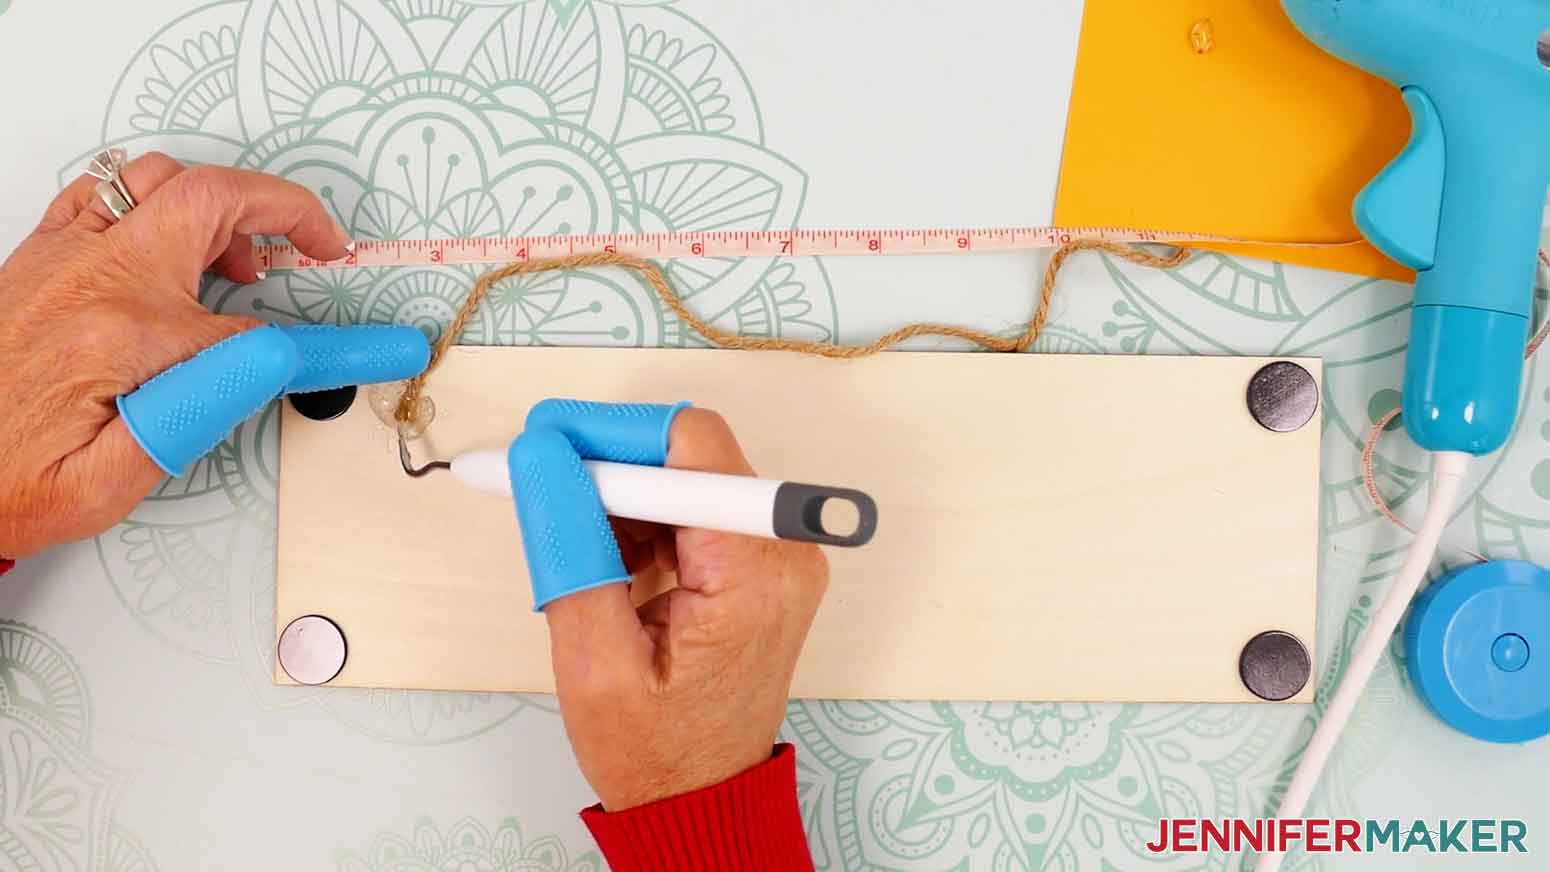
19. Allow the glue to dry to secure the twine to the back panel.
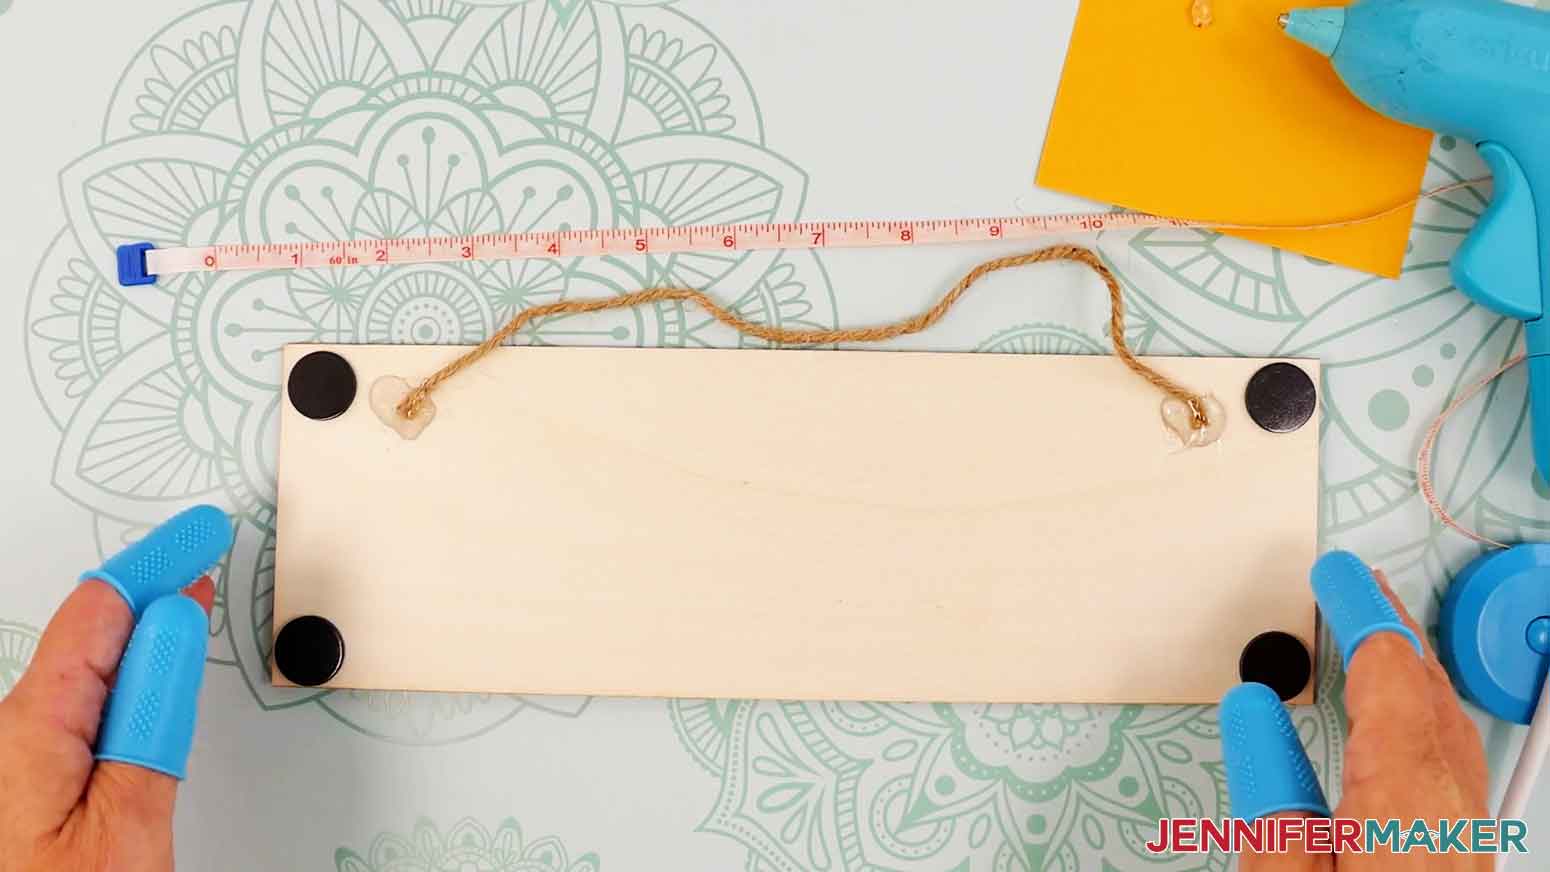
20. Next, cut four pieces of ribbon to 36” in length.
21. Add a small dot of hot glue about an inch to the right of the bottom left magnet.
22. Hold a piece of ribbon pretty side up and use a capped finger to press one end into the hot glue to secure it to the wood panel.
TIP: Make sure the ribbon will hang straight down from the panel.
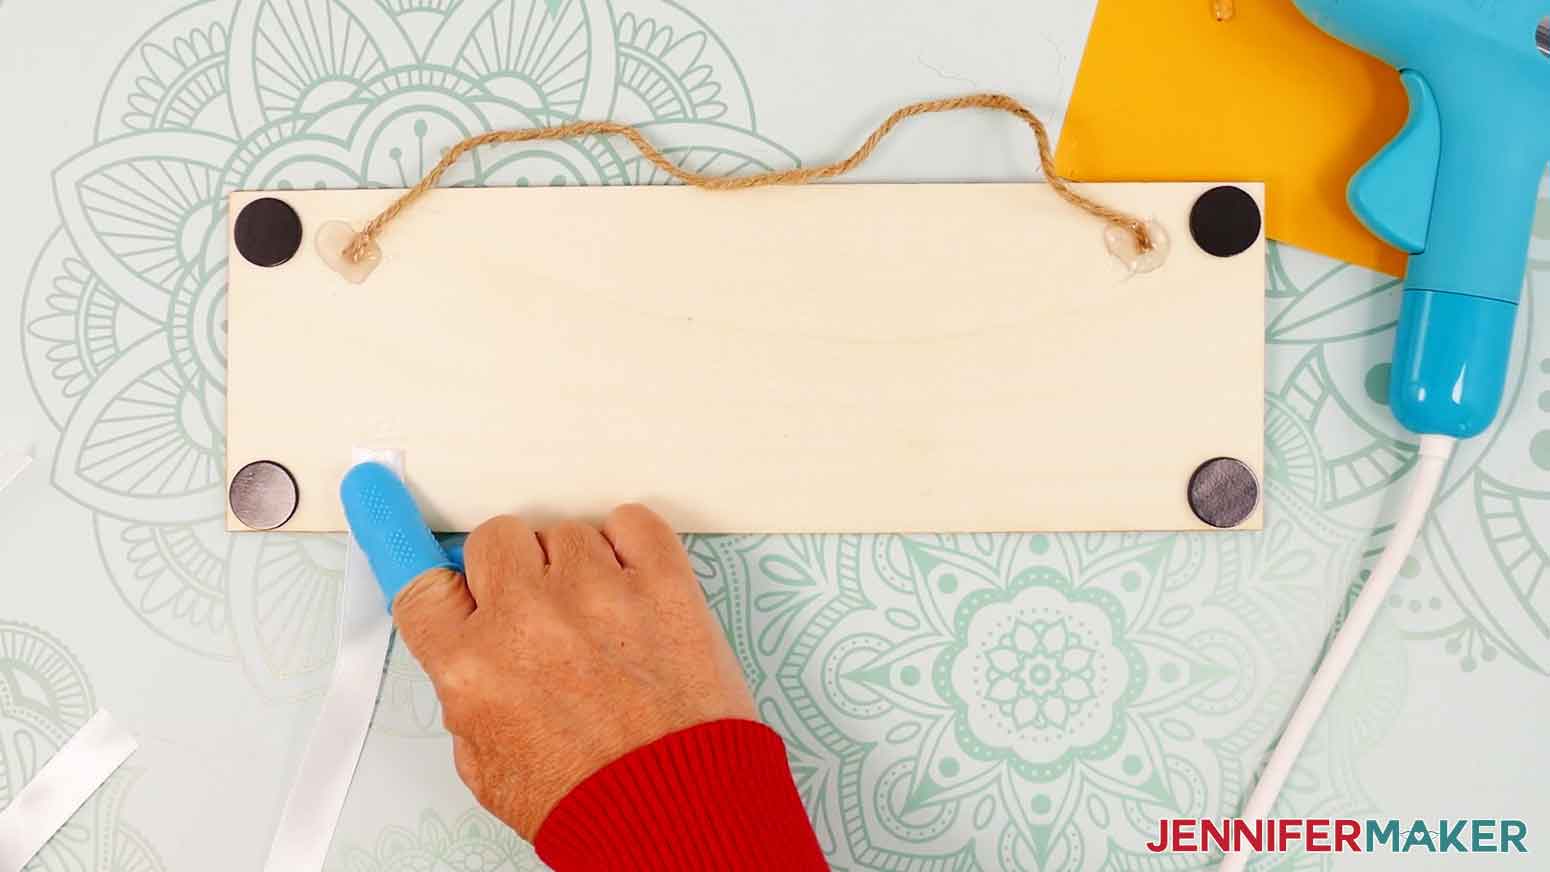
23. Repeat Steps 21-22 to secure one piece of ribbon an inch from the right magnet, and then two pieces of ribbon evenly spaced between the two outer ribbons.
NOTE: My ribbons are about three inches apart.
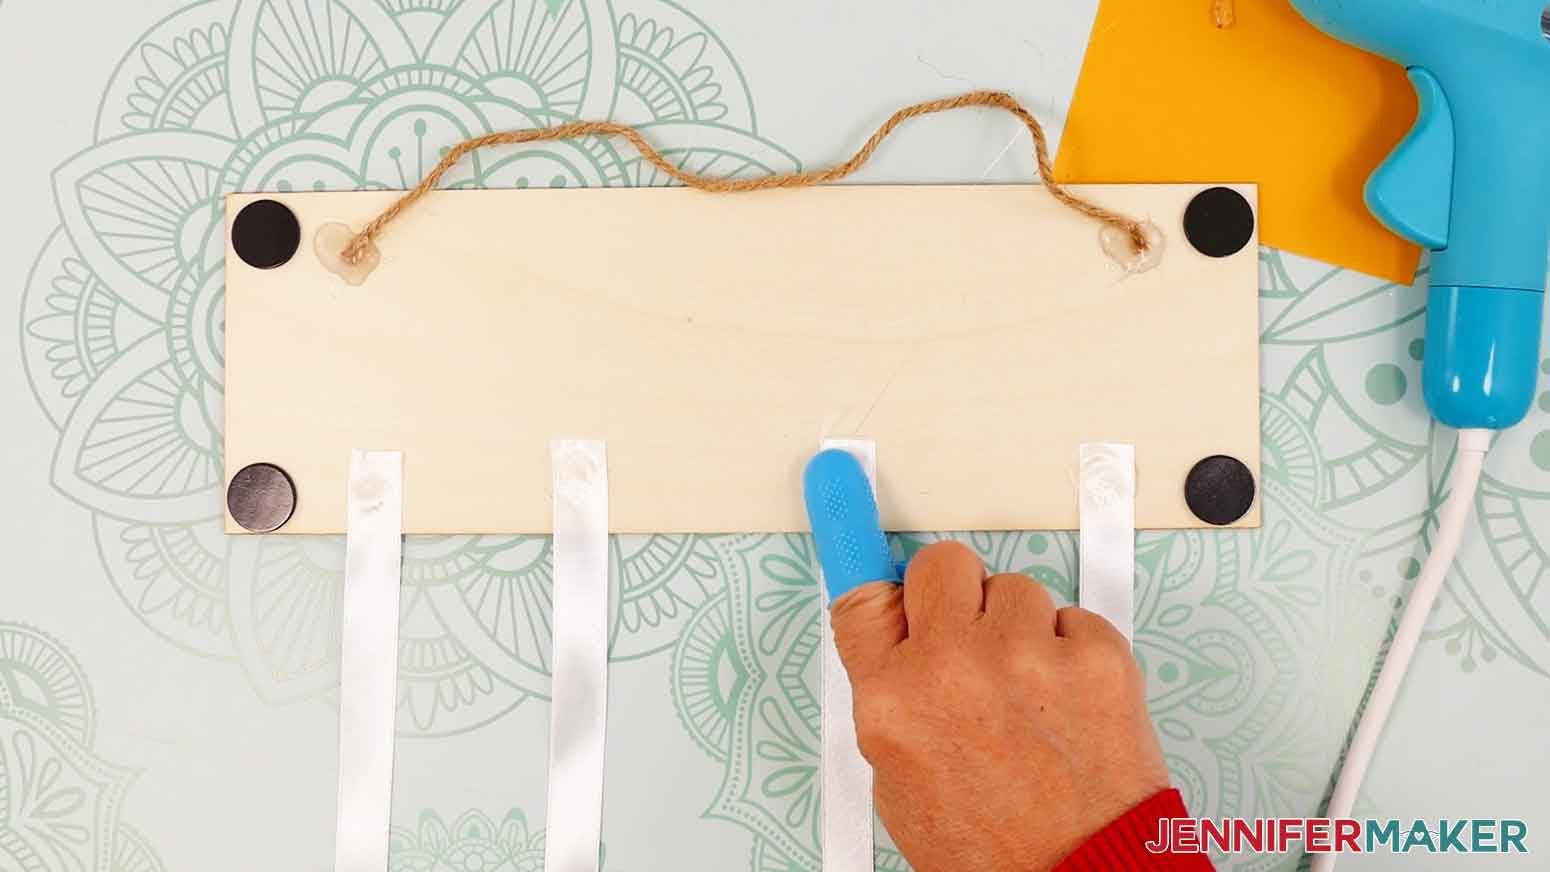
24. Allow the glue to fully dry.
25. If needed, trim the ribbon ends so they’re all the same length.
TIP: Hang your project on a wall to check the ribbon length!
26. Apply a small amount of Stop Fray or Mod Podge to the end of each ribbon to prevent fraying.
27. Attach one of the display panels using the magnets, and store the rest until you’re ready to use them.
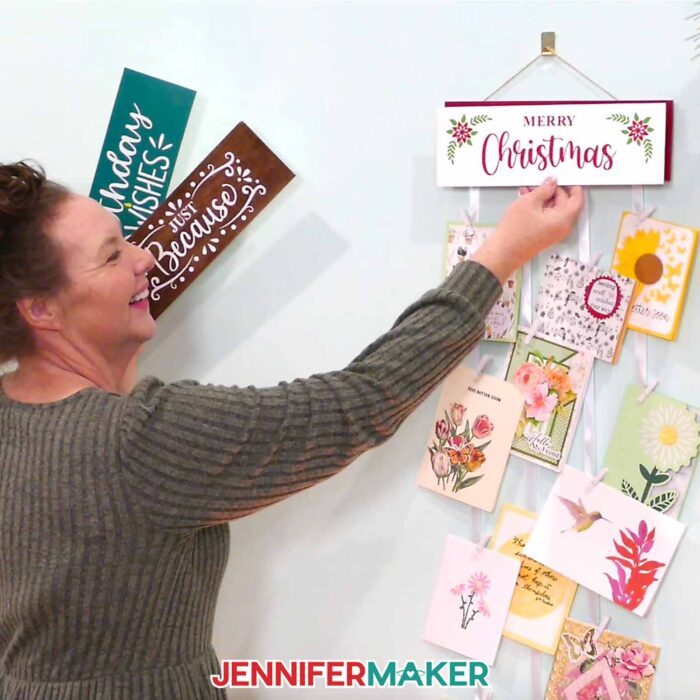
28. Use mini clothes pins to clip your cards to the ribbon, and keep extra pins clipped to your ribbons until you need them.
29. Your project is ready!
STEP 5: SHOW IT OFF
You now have an interchangeable greeting card holder with clips and ribbons to show off cards, letters, or even photos! Hang the back panel on a wall, and change the front display panel to match the time of year!
Notes
Finished size: 12” x 4”
Fonts used:
Hattie (Free Alternative: Millaris)
Goldie Rainbow (Free Alternative: Goldie Rainbow)
Girl Talk (Free Alternative: Peanut Butter)
Farm Dream (Free Alternative: Hello Beautiful Angel)
Amastery Hand (Free Alternative: Farmhouse)
Amastery Script (Free Alternative: Amarillo)
Sweetie Almeera (Free Alternative: Sweetie Anabela)
Answers to Your Questions About Greeting Card Hangers
Q: I want to design a custom vinyl decal for one of my display panels on my greeting card hanger. How do I do that?
A: You can learn how to design a custom vinyl decal for one of your greeting card hanger’s display panels in my ADVANCE program. Learn more about ADVANCE here!

Q: How do I display multiple greeting cards?
A: My favorite way to display multiple greeting cards is to use a ribbon greeting card hanger! I’ve designed this one with interchangeable display panels, which are a great way to easily swap out panels and cards for different holidays throughout the year. Just follow the video tutorial or read through the written tutorial above to learn how to make a greeting card holder with swappable panels for four different occasions.
Q: How do I make a hanging Christmas card holder?
A: My interchangeable ribbon greeting card hanger includes a display panel with a “Merry Christmas” vinyl decal so you can use it to show off all of your favorite Christmas Cards!
Q: How do I hang the cards on the ribbon?
A: I found adorable mini-clothespins for securing your cards to the ribbon. They’re strong enough to hold your cards in place with minimal slipping. And when they’re not in use, just clip them to the ribbon until you need them! You could also use double-sided tape, but I like that the clothespins don’t damage the card or the ribbon. Mini clip-on decorative bows or even chip clips might also work!
Q: Can I use this interchangeable greeting card hanger for photos, too?
A: Absolutely! Try hanging small photos, inspirational notes, lightweight mementos, or even little bits of package wrapping that you’ve saved because they made you smile. It’s a warm, personal way to keep happy memories in view and turn everyday items into meaningful décor.
Q: What is chalk paint? Can I use a different paint for my panels?
A: Chalk paint is a decorative acrylic paint with a matte finish and little bits of chalk mixed inside. It’s easy to use on wood panels without much surface prep. Plus, it goes on smoothly, dries quickly, and seals well with regular Mod Podge. Other types of acrylic paint also work well with wood, but I haven’t tested them with the panels in my list. You might need to sand or prime the wood first, like I did with my Custom Family Sign Posts.
Q: Can I use something besides magnets to attach my display panels?
A: Yes, you can use the Command Strips in my supplies list instead of magnets if you like!
Q: Where can I find the supplies for this project?
A: All of the materials for this project are easy to find, and you can get them at the best prices if you shop smart. I usually shop on Amazon because it’s so easy, but supplies should be available at most craft stores. This is the kind of project that looks impressive but doesn’t require a lot of specialized tools. Just a bit of creativity, some patience for drying time, and the willingness to get your hands a little painty!
Q: Did you use a special finish to get the stained look on your panels?
A: Nope! I used a special faux wood staining technique that I show you in my tutorial video. No extra supplies required!
Get my free interchangeable card hanger SVG/DXF/PDF files!
(If you do not see the signup form above, click here.)
I love seeing what you make with my tutorials and how you customize them! Please share a photo of your interchangeable ribbon greeting card hanger in our Facebook group or tag me on social media with #jennifermaker.
Love,

Want to remember this? Save this How to Make an Interchangeable Ribbon Greeting Card Hanger tutorial to your favorite Pinterest Board!