Learn how to create a custom journal in Canva with my free full-size journal pages!
I still remember the first time I held a store-bought planner that looked perfect on the outside but felt nothing like me on the inside. Sure, I could customize the inside with planner stickers or colorful clips, but I wanted pages that understood my schedule, my creativity, and my habits. That search is exactly what led me to explore how to create a custom journal in Canva. And once I made my first journal, I couldn’t believe how much easier it was than I expected. Now I will make a new version every year, and each one will feel more personal and more “me” than anything I could ever buy off a shelf!
See the full step-by-step video tutorial on how to create a custom journal in Canva:

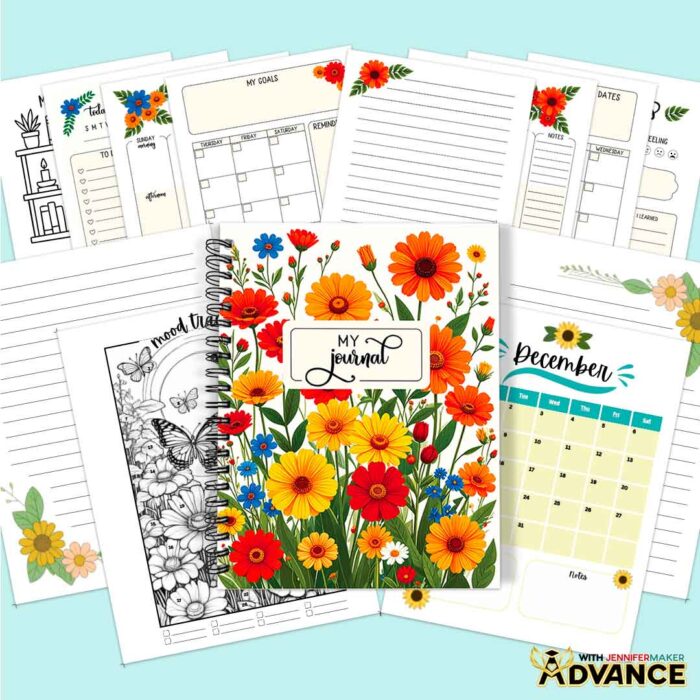
This project is incredibly fun because you’re not just decorating a notebook, you’re building something from the ground up. Canva makes it simple to bring in colors you love, layouts that fit your routine, and extras that support how you organize your days. I’ve even created full-size journal pages with matching embellishments so you can design a full journal from cover to cover, complete with monthly layouts, weekly plans, daily reflections, and decorative accents that pull everything together. All you need are my free PNG design files, a computer, and a free Canva account so you can start designing right away. It’s a great way to create something beautiful that also keeps your life on track.
The process begins with a blank bound document template, which instantly gives your project the structure it needs for printing. From there, the fun really begins. First, design a cover that is uniquely you! You can upload my premade journal cover, or find an image of your own from Canva’s media library. The search bar is especially helpful if you want to find themed graphics, little icons, or decorative accents that reflect your personal style without overwhelming the design. Just stick to the free resources without a crown. That keeps everything simple and beginner-friendly.
Once you start adding pages inside, you can customize your journal even more. Explore what type of journal layout fits your personality best, add any of my daily, weekly, or monthly pages, and arrange each spread exactly where you want it. You can even add your own images and text to design pages that feel unique to you. If you want additional pages—maybe a chore tracker, gratitude list, or habit chart—it’s easy to build them. The tutorial walks you through making a Book Review page, and the same steps apply to any layout you dream up. It’s genuinely exciting watching a blank page turn into something usable and beautiful right in front of you.
The best part is how seamlessly everything comes together once your pages are arranged. Canva’s print-on-demand option makes the entire process feel polished and professional. You can preview the full journal, make sure every spread lines up correctly, and send it straight to print. The paper quality is surprisingly nice, the colors are vibrant, and the clear protective covers make the finished book look crisp and durable. It feels like opening a brand-new planner from a boutique shop, except this one was designed entirely by you.
What makes this project so addictive is how flexible it is. You can build a minimalist planner, a goal-setting workbook, a creative journal, or something totally unconventional. You choose how many months, how many spreads, and how much decoration you want. And since the journal pages are printable through Canva whenever you want, you can refresh the design any time inspiration hits.
I also have an ADVANCE with JenniferMaker workshop that takes this project a step further. Inside, we explore how to use Canva apps to create gorgeous custom pages! I teach you how to make beautiful lined pages with pretty frame accents, quick and easy calendar pages for any month and year, and mood trackers to color in and keep track of how you’re feeling each day. Learn more about ADVANCE with JenniferMaker here!
If you enjoy crafting, organizing, and making something that supports your everyday life, then this tutorial is worth watching. The video walks you through every step in a clear, encouraging way, so you can follow along even if you’ve never designed anything digitally before. Pull up the tutorial, gather the downloadable files, open your blank project, and see where your imagination takes you. Once you flip through your finished journal for the first time, you’ll understand why so many crafters fall in love with making their own.
Let me show you how to create a custom journal in Canva! This post contains some affiliate links for your convenience (which means if you make a purchase after clicking a link I will earn a small commission but it won’t cost you a penny more, there is no additional cost)! Read my full disclosure policy.
Accessories to Pair & Use with a Custom Journal
View my Amazon shopping list with the exact items I used.
- A Free Canva Account
- Notebook Cover (optional, for protecting notebook and attaching accessories)
- Fineliner Pens (optional, for writing down notes)
- Highlighter Pens (optional, for color-coding notes)
- Washi Tape Set (optional, for decoration)
- Journaling Prompt Cards (alternative) (optional, for journaling ideas)
How to Create a Custom Journal!

How to Create a Custom Journal in Canva
Learn how to create a custom journal in Canva!
Materials
- Design #789 (My free PNG design files are available in my free resource library - get the password by filling out the form at the bottom of this page)
Tools
- A Free Canva Account
- Notebook Cover (optional, for protecting notebook and attaching accessories)
- Fineliner Pens (optional, for writing down notes)
- Highlighter Pens (optional, for color-coding notes)
- Washi Tape Set (optional, for decoration)
- Journaling Prompt Cards (optional, for journaling ideas)
Instructions
STEP 1: GET MY FREE CUSTOM JOURNAL DESIGNS
First, download my custom journal files from my free library – look for Design #789. Alternatively, you can use the Save This Project form near the top of this post and the design link will be emailed to you.
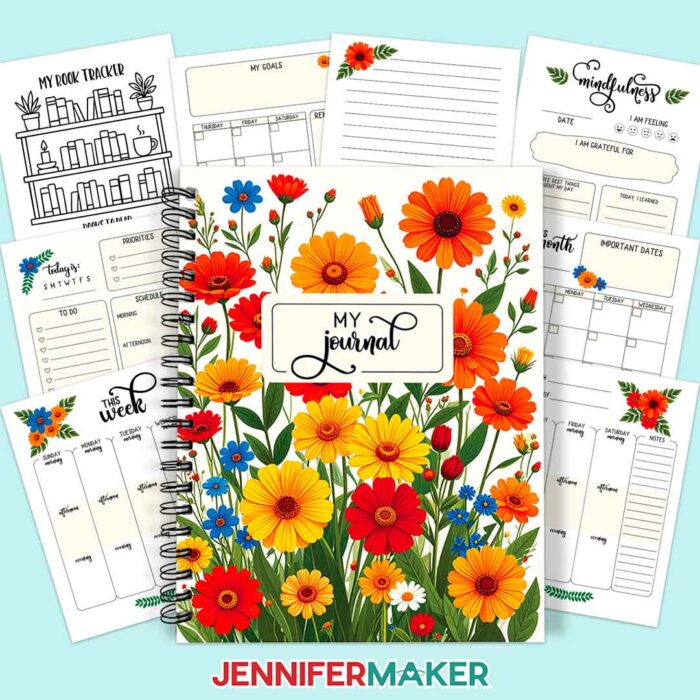
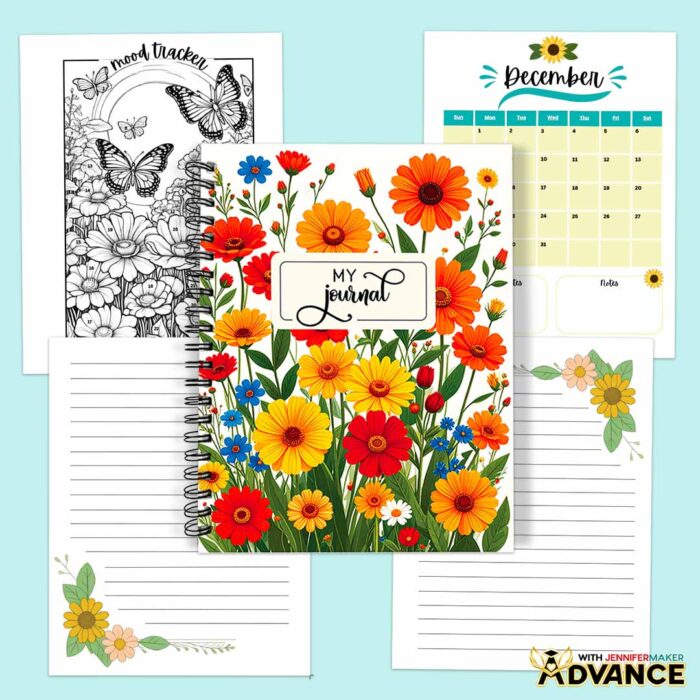
In the PNG folder, you’ll find a journal cover image, nine full-size images for individual journal pages, and twelve embellishment images to decorate your pages.
TIP: If you’re not sure how to unzip, go to jennifermaker.com/svgs to learn how to unzip files.
Your journal can have a maximum of 200 pages (including the cover page), and it must contain an even number of pages.
I recommend following along to design a journal like my example before trying the same steps with your own theme and goals.
STEP 2: PREPARE YOUR JOURNAL DESIGN IN CANVA
1. To get started, open your computer’s browser and go to jennifermaker.com/canva.
NOTE: If you’re new to Canva, check out my Canva for Beginners tutorial.
2. Either sign in to your account or follow the prompts on the screen to sign up for a free account.
NOTE: Canva does offer paid subscriptions with more tools and elements, but I’ll show you how to do everything with the free account.
3. On the Canva Home screen, click the “Templates” button to open Canva’s “Templates” menu.
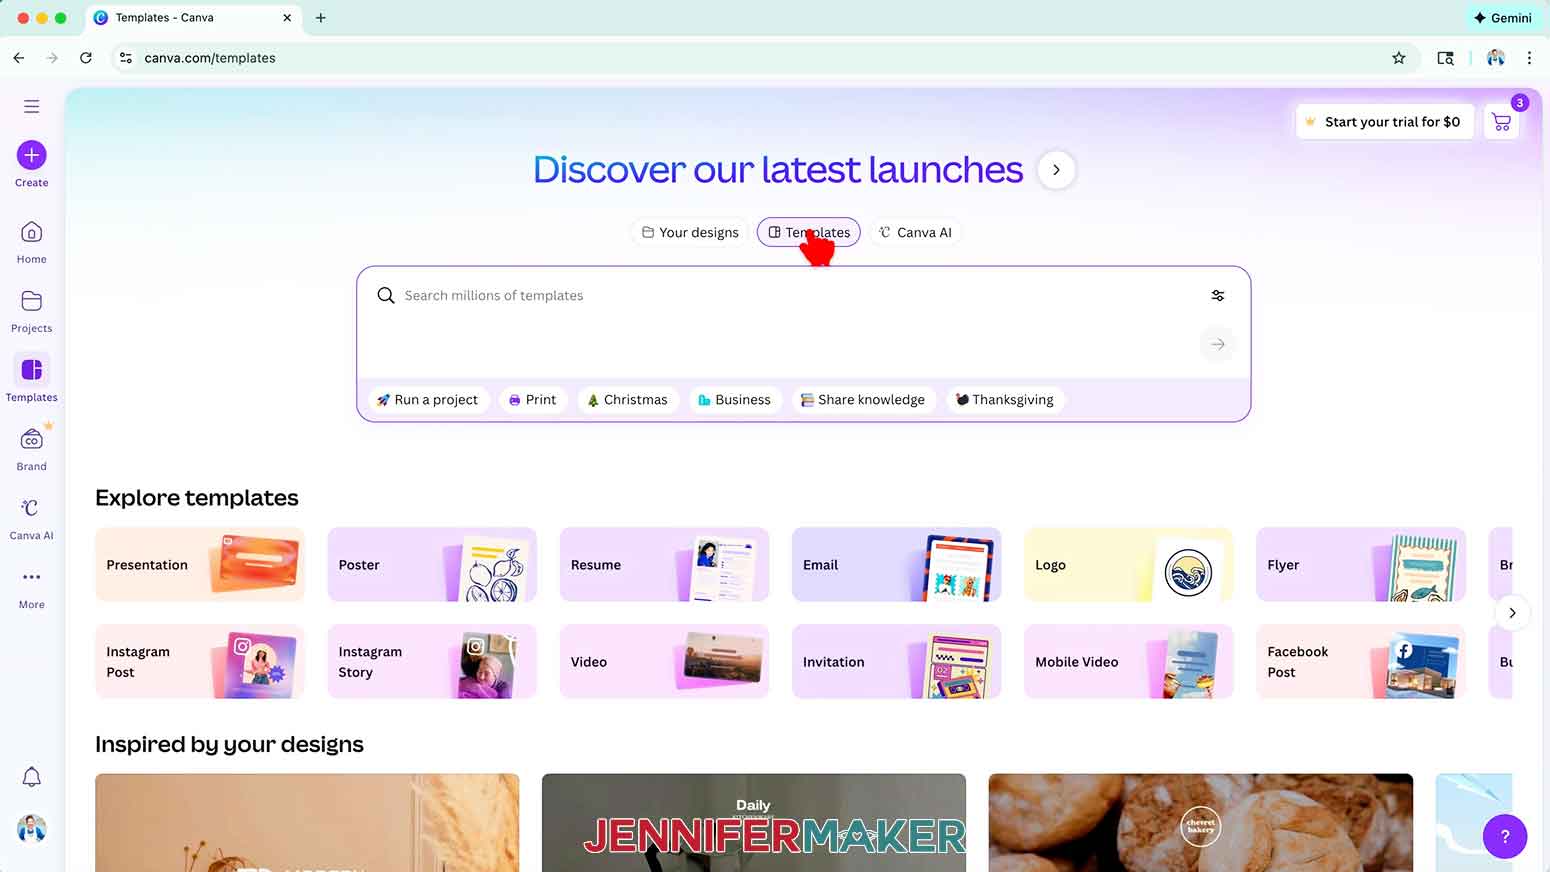
NOTE: Templates with a crown are Canva Pro items. You’ll need to purchase them individually or sign up for a paid membership to use them. We’ll use free options.
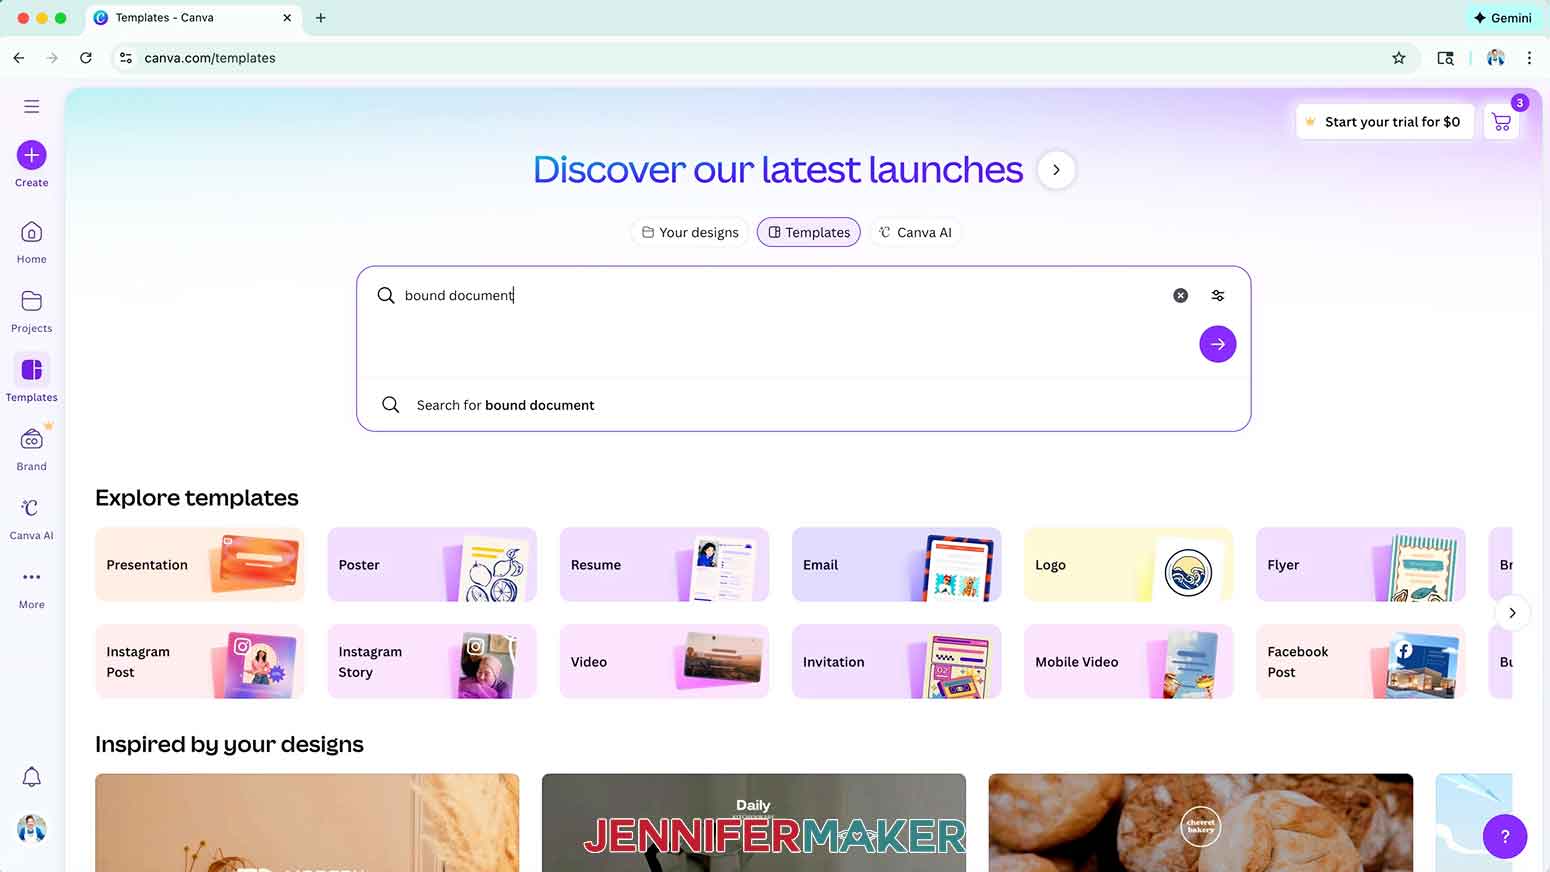
4. Search for “bound document” in the “Templates” search bar.
5. Click the first result to “Create a blank Bound Document (US Letter)” and open the template in a new canvas.
NOTE: Depending on your view, this might say “Create blank” with a plus sign.
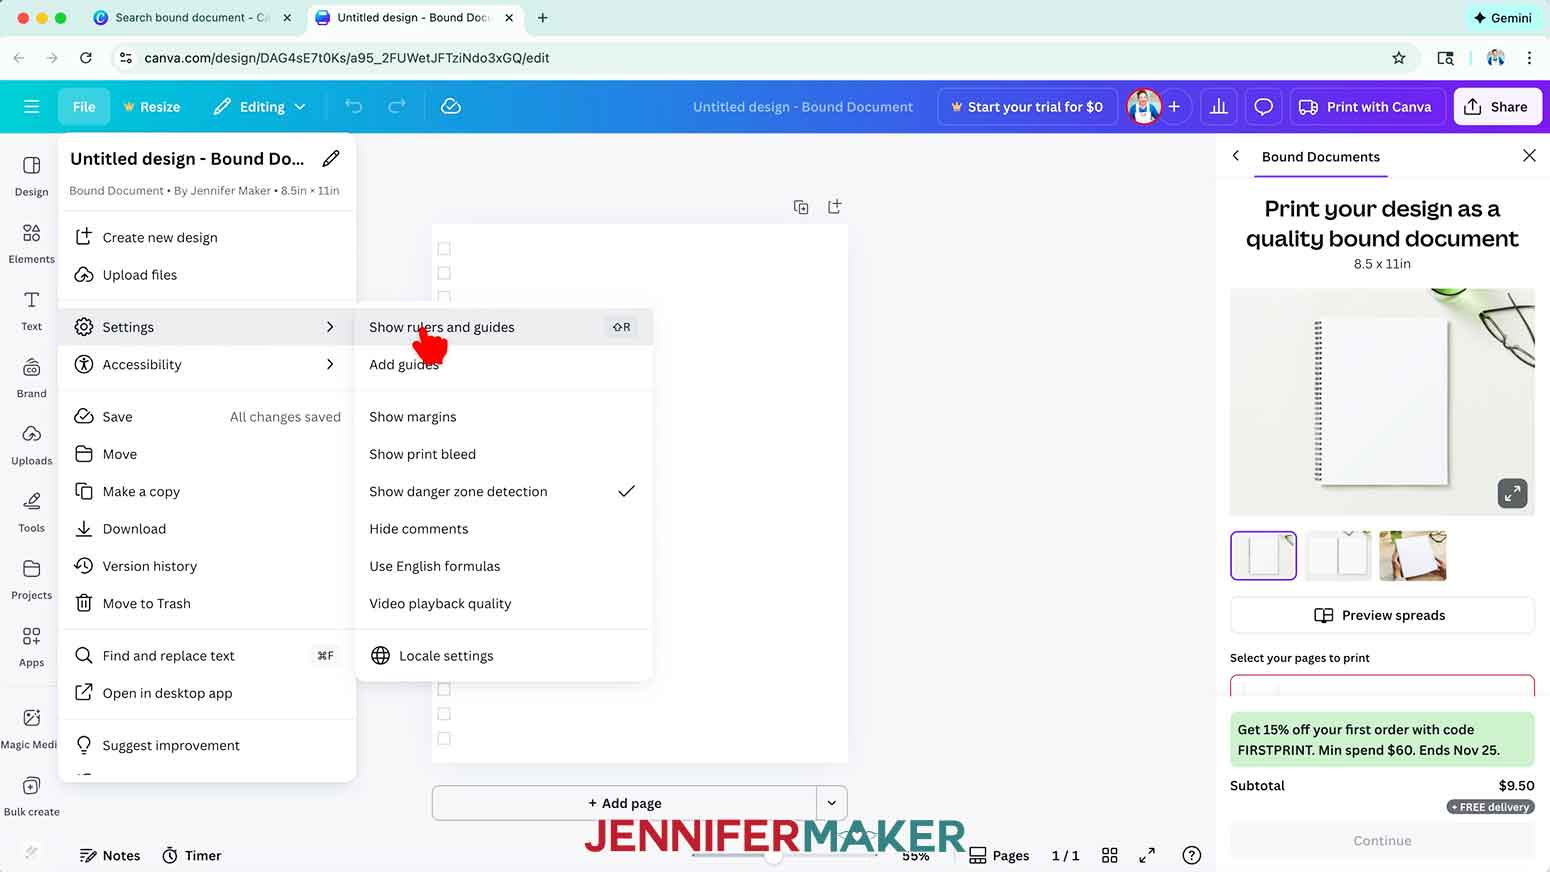
6. On the right side of your screen, you’ll see “Print with Canva” settings for printing your design as a bound document. We’ll go over these in more detail later.
NOTE: If you adjust these now, you can still change them later.
7. Click “File,” go down to “Settings,” and make sure “Show rulers and guides” has a check mark next to it.
8. Check that the “Pages” button in the bottom bar is highlighted gray so page thumbnails appear beneath your canvas. Click the button to highlight it if needed.
NOTE: This makes it easier to see lots of pages quickly without having to scroll through each one.

9. With the new project canvas ready, click the filename field at the top and replace the current name with your own.
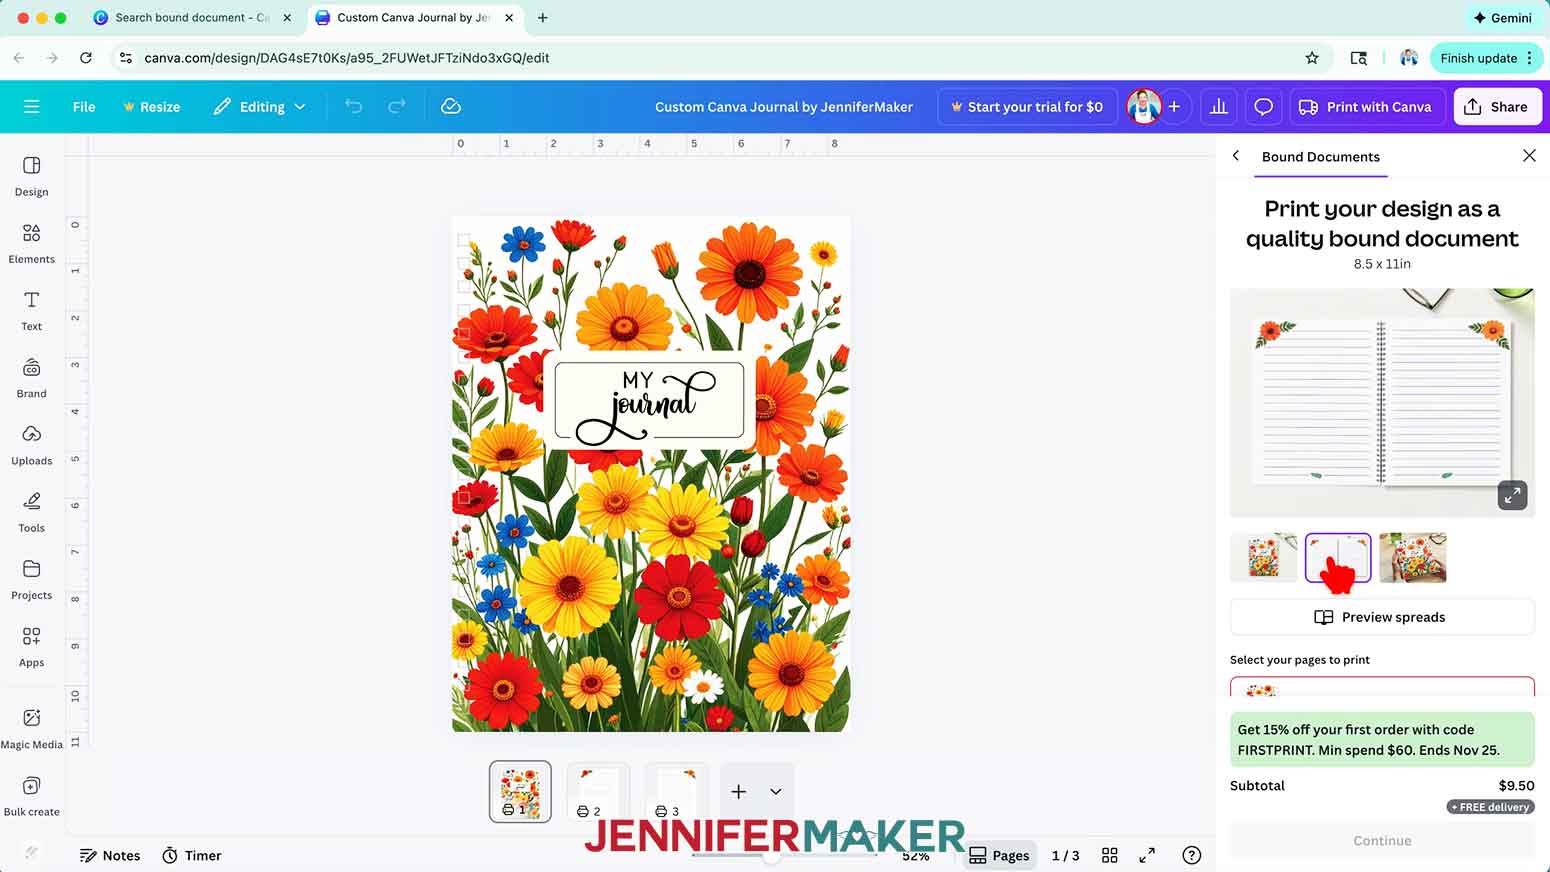
10. The first page is your journal’s cover. To add the cover PNG from my design files to your journal, click on “Uploads” in the side panel, then “Upload files.”
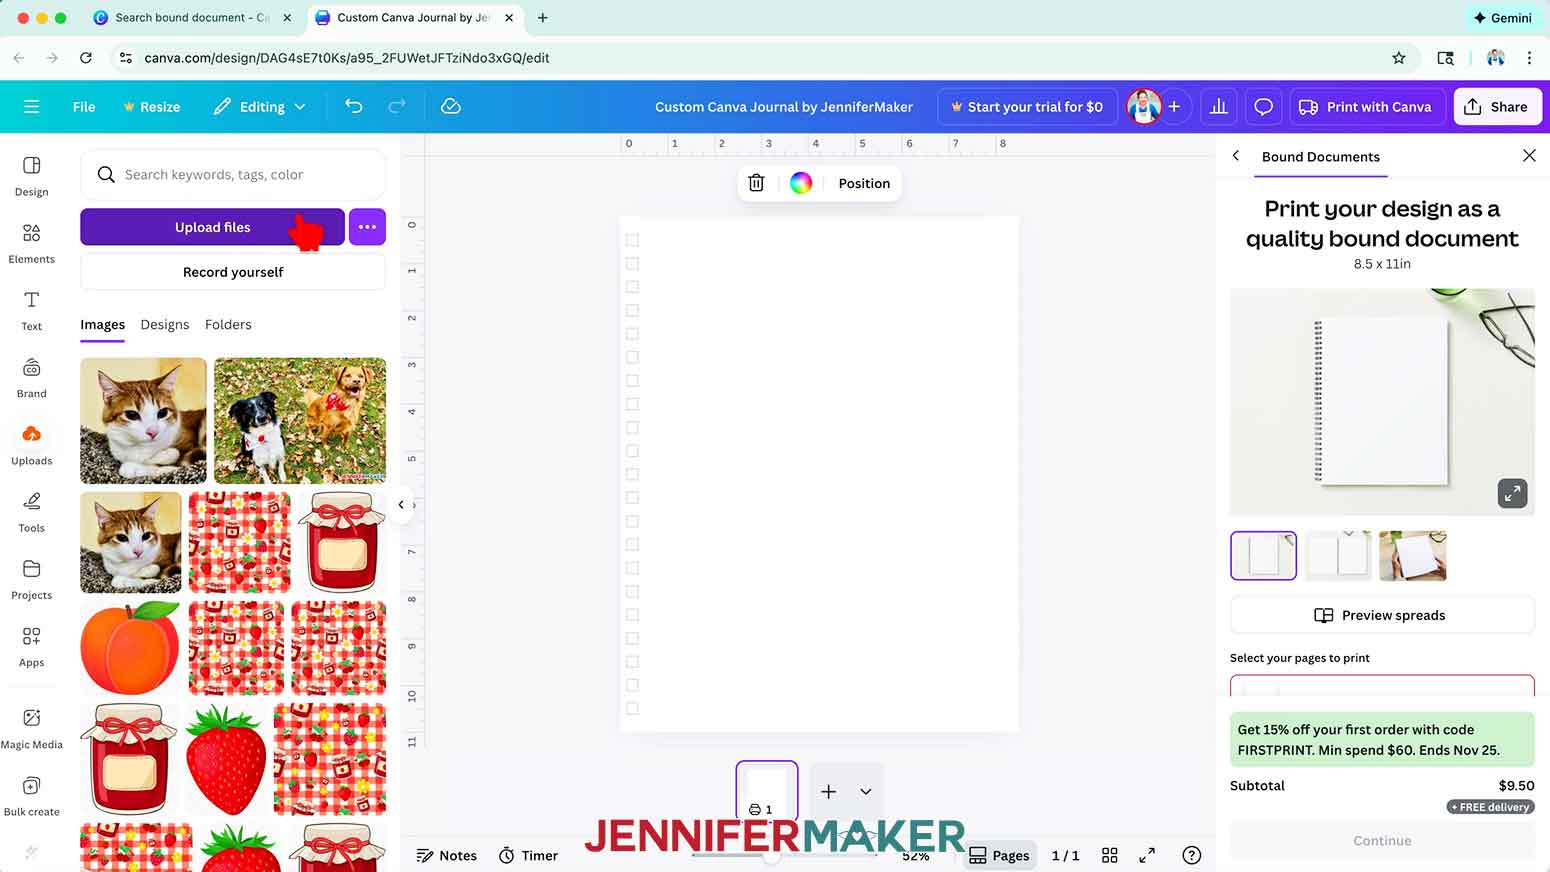
11. Select the “cover” PNG and click “Open.”
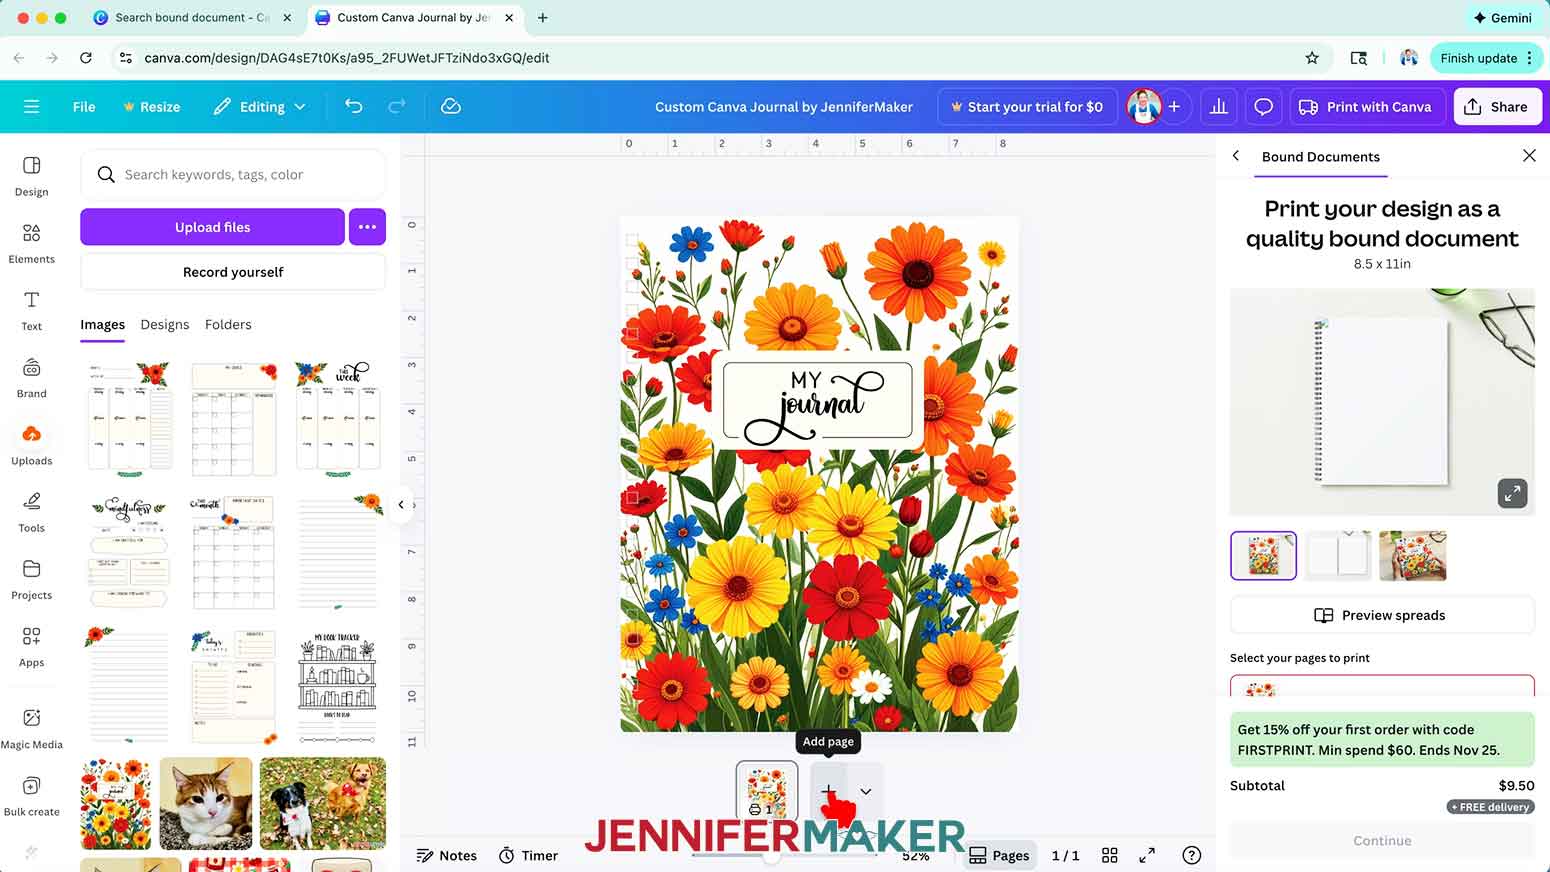
12. In the “Uploads” panel, drag the cover image over the canvas until it attaches to the background layer and fills the page.
NOTE: There is a column of squares down the left side to show where the journal’s binding rings will be. Anything inside these squares will be cut off, so avoid placing important design elements near them.

13. To design the inside of your journal, decide what kind of overall layout you want and upload your chosen full-page PNGs from my design files following Steps 10-11 above.
NOTE: I’ll show you how to design a yearly journal using the “book-tracker,” “daily,” “lined-left,” “lined-right,” “mindfulness,” “monthly-left,” “monthly-right,” “weekly-left,” and “weekly-right” PNGs in my design files.
14. To add lined pages for writing notes at the beginning of your journal, click the “Plus (+)” button below the canvas twice to add two new pages.
NOTE: Even-numbered pages will be on the left side in your journal, while odd-numbered pages will be on the right side.
15. Select the thumbnail for Page 2, then drag the “lined left” PNG with the top-left floral accent onto the canvas to fill it.
TIP: If you drag your image onto the wrong page, click and drag the page’s thumbnail into the correct position to reorder your pages as needed.
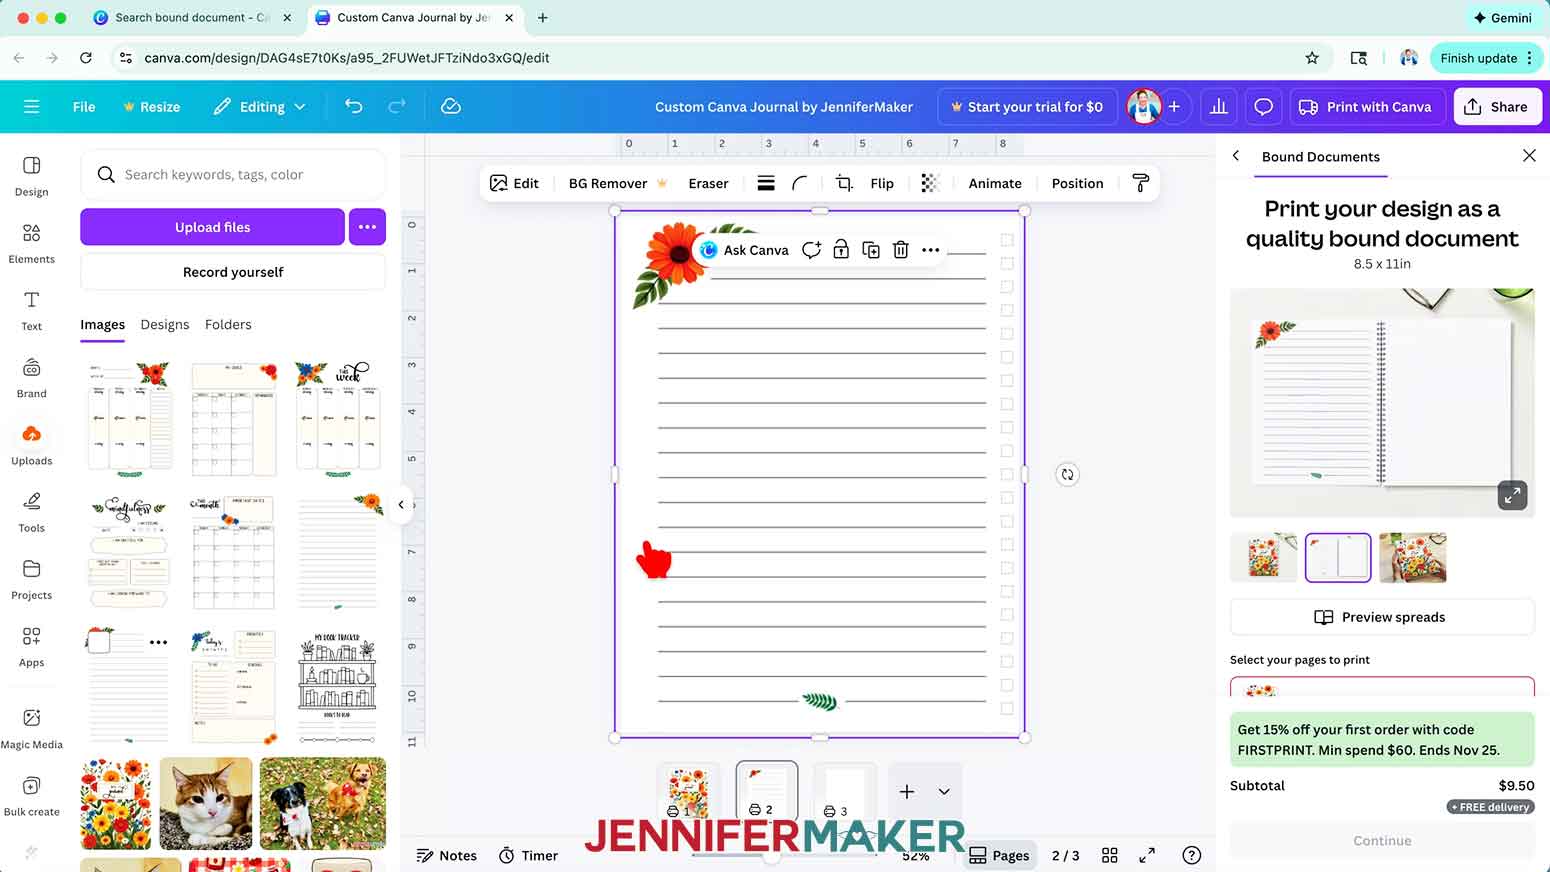
16. Select the thumbnail for Page 3, then drag the “lined right” PNG with the top-right floral accent onto the canvas to fill it.
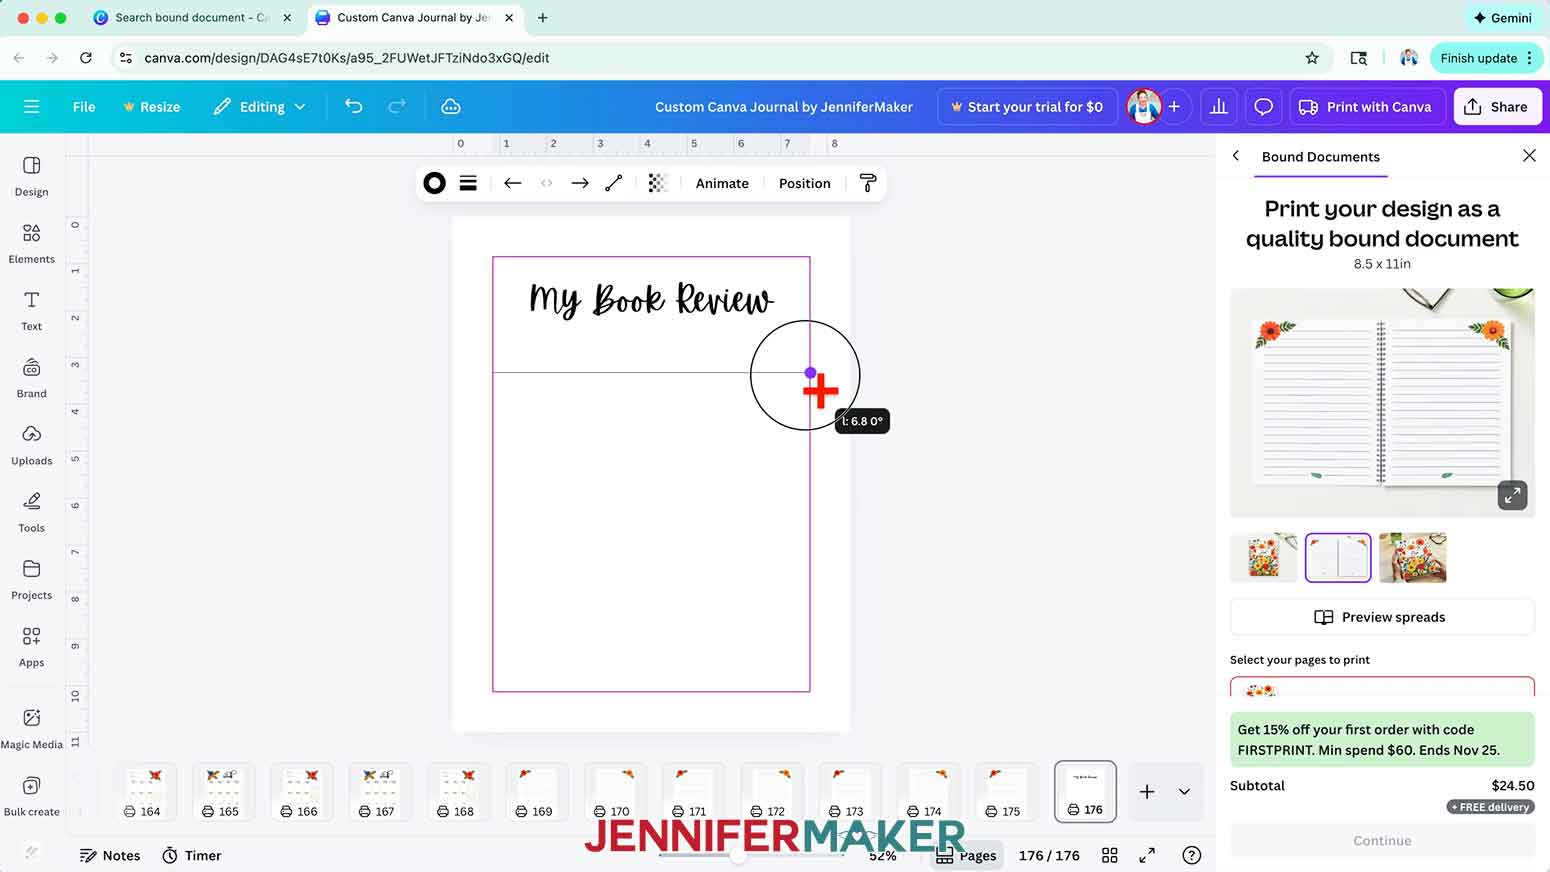
17. In the preview image within the “Print with Canva” panel on the right, select the inside layout to see how your two lined pages will look when side-by-side inside your journal.
TIP: If Canva doesn’t automatically update your preview window with your new images, click the “Refresh” button on your browser to reload the project.
18. To design your journal’s first month, click the “Plus (+)” button below the canvas twice to add two new pages.
19. Drag the “monthly left” PNG onto Page 4 and the “monthly right” PNG onto Page 5 to fill them.
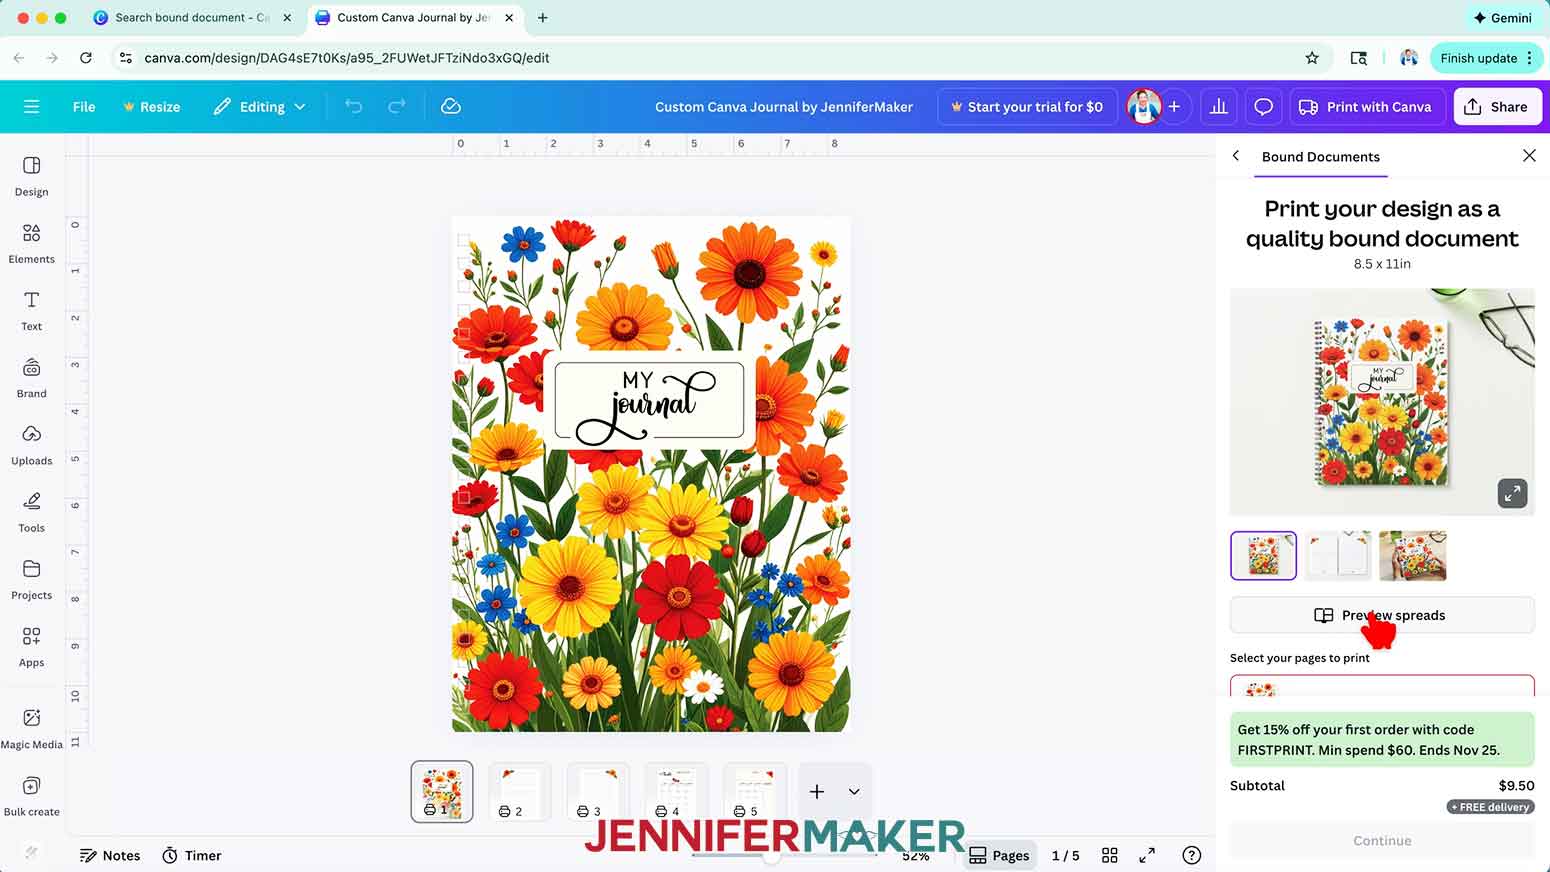
20. Click the “Preview spreads” button in the right panel and use the left and right arrows to flip through the pages to make sure they look correct when side-by-side. Close the preview to return to your canvas.
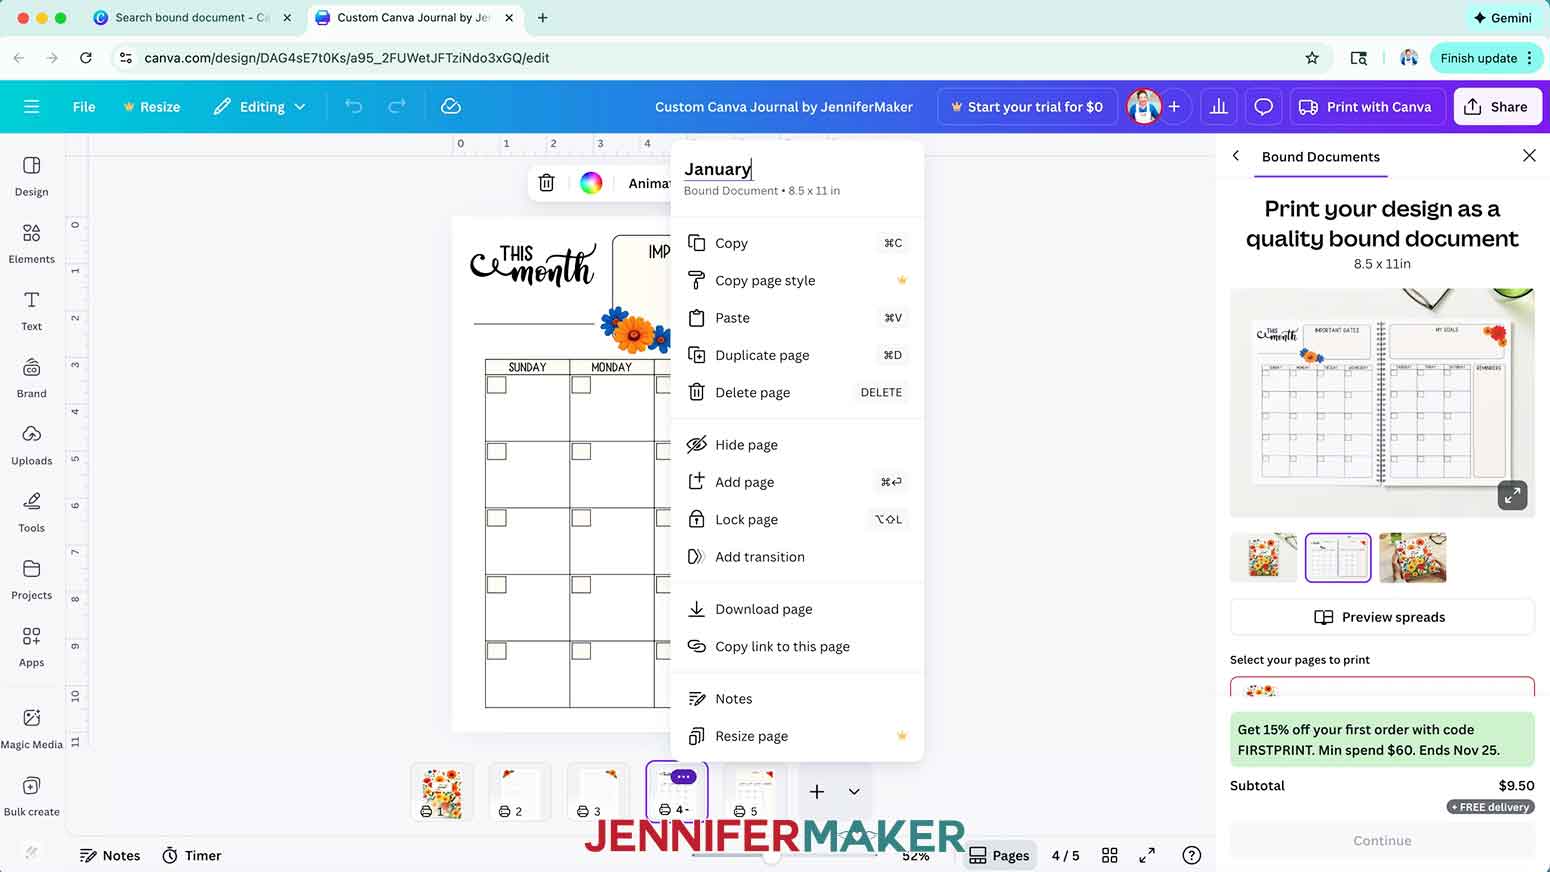
21. To help keep your pages organized, rename your page titles to group similar pages together by selecting a thumbnail, clicking the three dots, and entering a name in the “Add page title” area.
NOTE: I like to organize mine by month, so I’ll click Page 4’s thumbnail and change it to “January.”
22. To add weekly pages to your journal, click the “Plus (+)” button below the canvas twice to add two new pages.
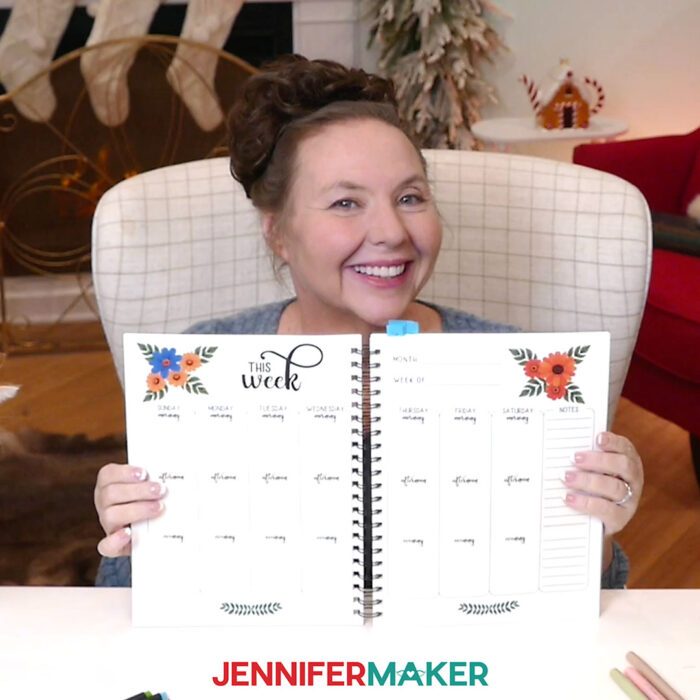
23. Drag the “weekly left” PNG onto Page 6 and the “weekly right” PNG onto Page 7.
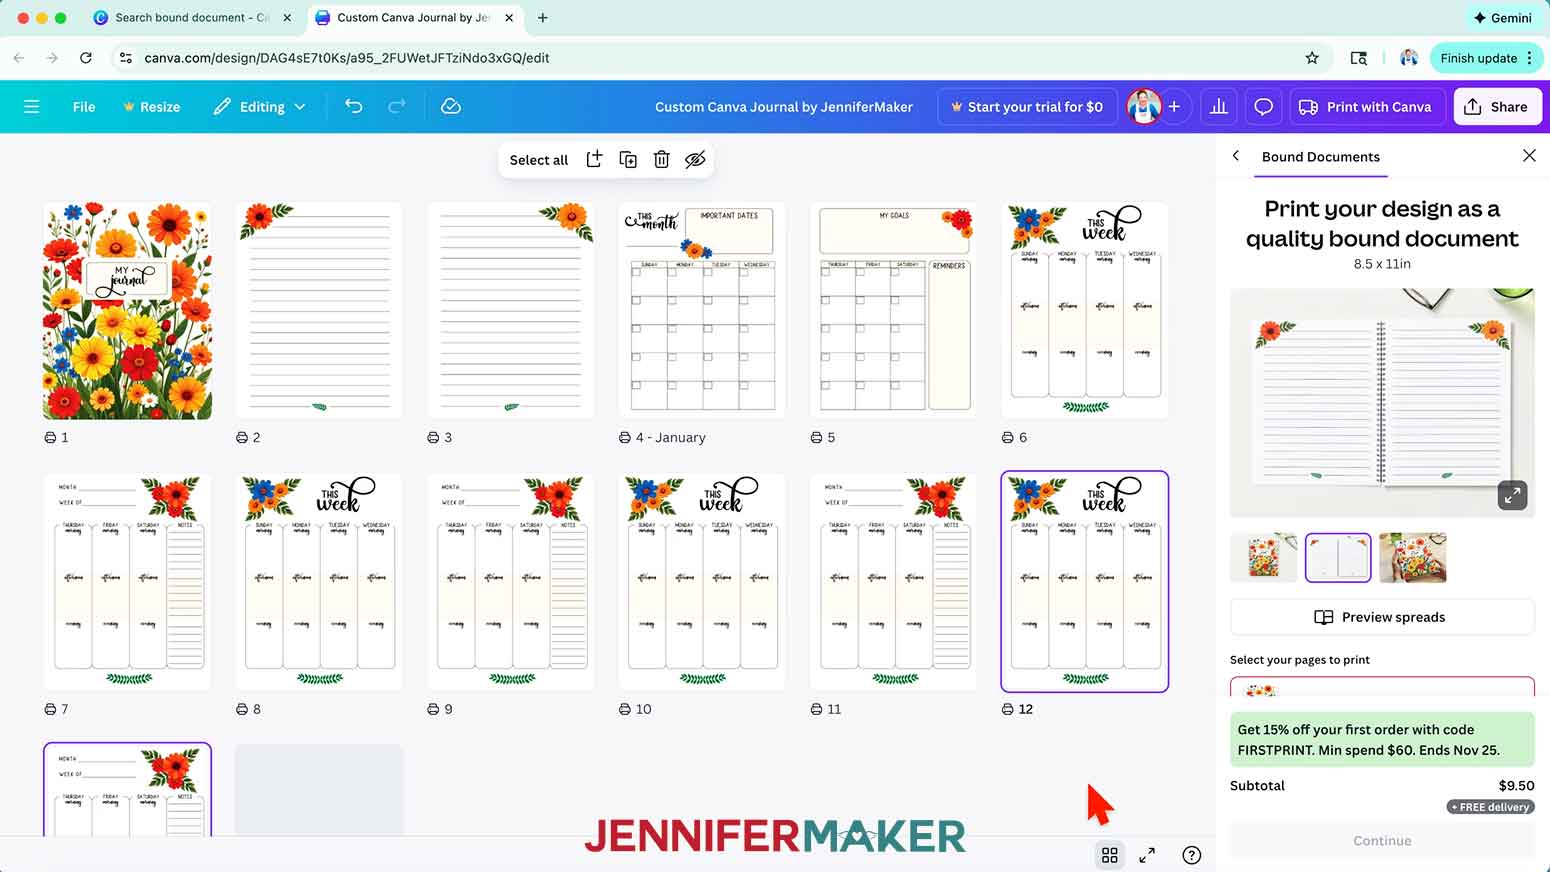
24. To add additional weekly pages to match the number of weeks in the month you’re designing, click the “Grid view” icon at the very bottom of the canvas to see just the thumbnails for each page.
TIP: Use a calendar app on your PC or mobile device to check how many weeks you need for a particular month.
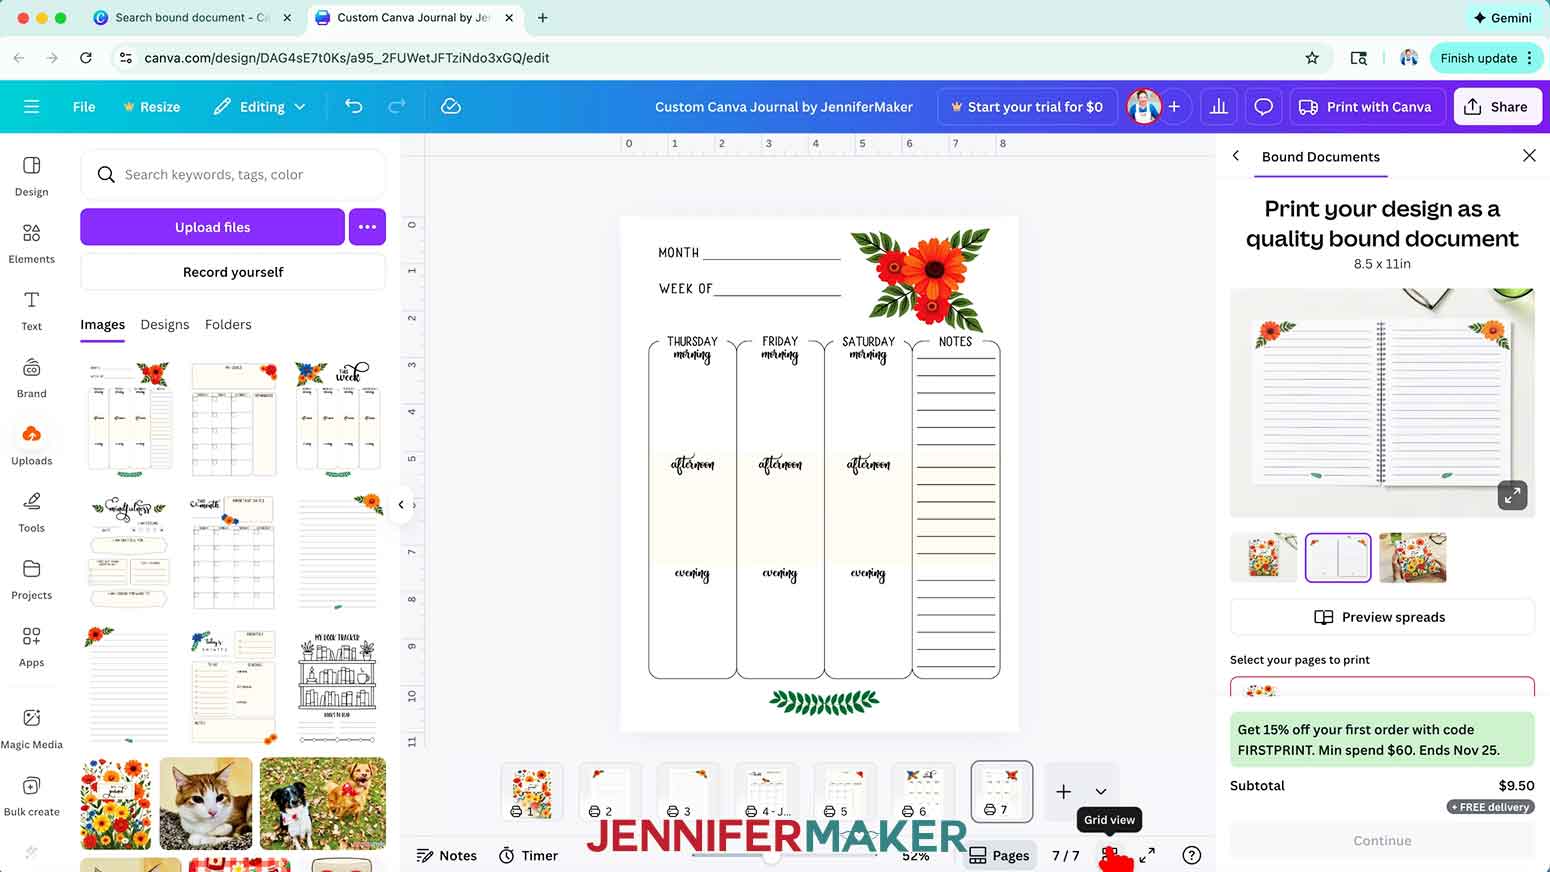
25. Hold the “Shift” key on your keyboard and click Pages 6 and 7 to select them to start your weekly pages.
26. Click the “Duplicate 2 pages” button in the Page Selection bar to add copies of both pages to your journal. Repeat as necessary to create as many weekly pages as needed.
NOTE: I’ll click “Duplicate 2 pages” three times so I have four pairs of weekly pages, spanning Pages 6-13.
27. Click the “Close grid view” button to return to your default canvas view.
28. Continue adding pages and PNGs to finish your first month’s layout.
NOTE: I’ll add the “mindfulness” PNG to Page 14, the “book tracker” PNG to Page 15, and two more left and right “lined” PNGs to Pages 16-17.
29. When you’re finished with your first month’s layout, refresh the page, then click the “Preview spreads” button to flip through your journal and check that the pages look the way you want. Close the preview to return to your canvas.
30. Repeat Steps 18-21 to begin your journal’s next month.
NOTE: I’ll add monthly pages to Pages 18-19, and rename Page 18 to “February.”
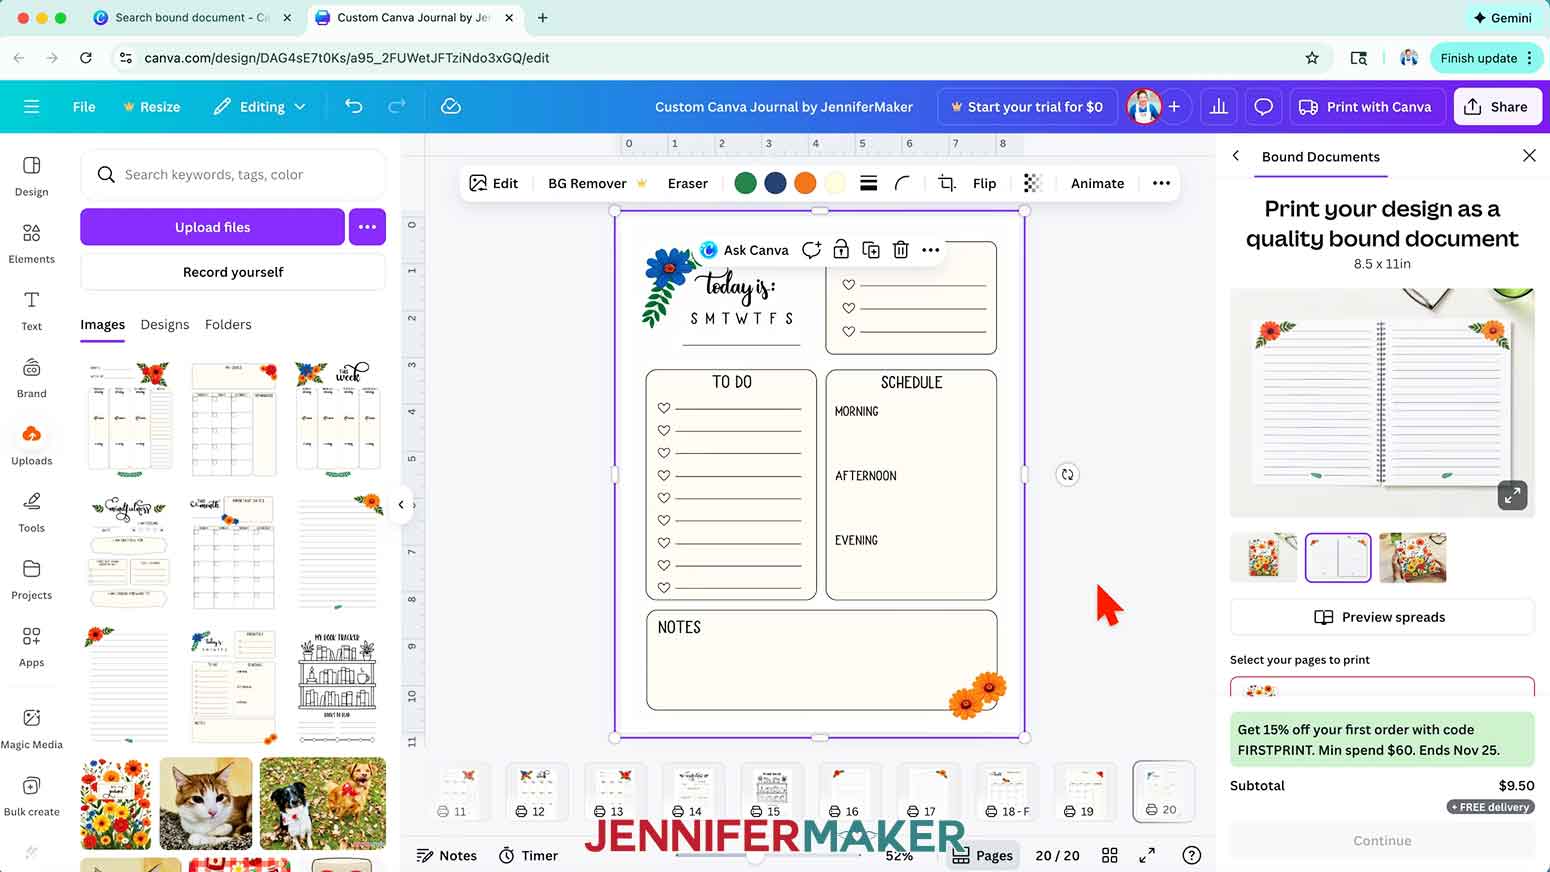
31. To add daily pages to your journal, click the “Plus (+)” button below the canvas to add a new page.
32. Drag the “daily” PNG onto Page 20.
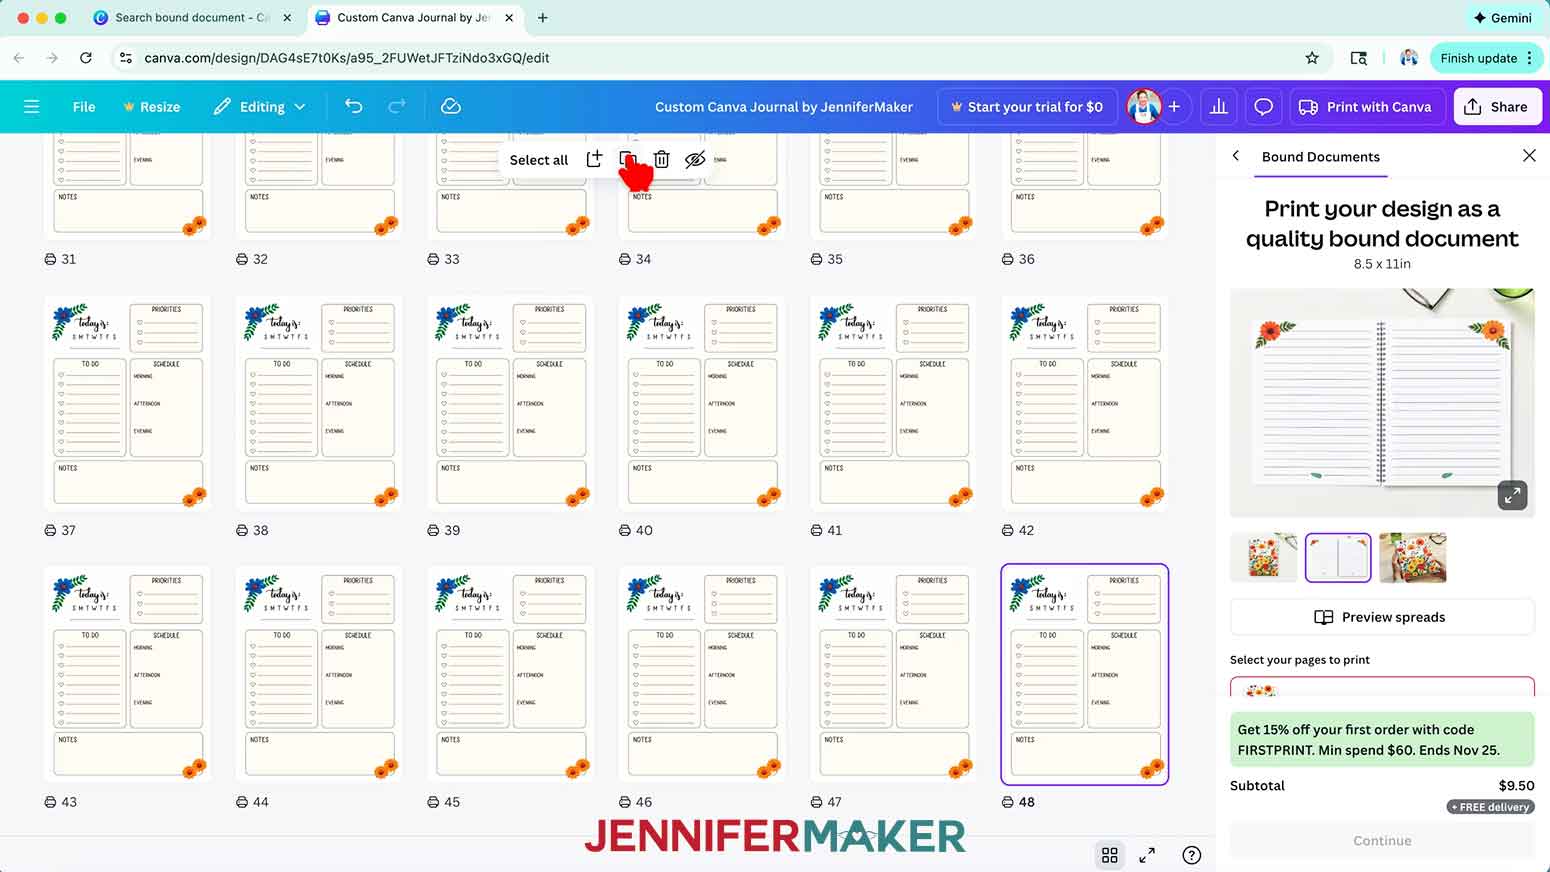
33. Then follow Steps 24-27 to open “Grid view” and create as many copies of the daily page as needed for your month.
TIP: Select and duplicate multiple pages to create groups of copies instead of duplicating one page at a time.
NOTE: I’ll create 29 daily pages, spanning pages 20-48.
34. Follow Steps 28-29 to finish your second month’s layout.
TIP: If your last page ends on an even number (for a left page), add an additional page. This way, your next month starts on a left page, and the next two “monthly” PNGs are in the same spread.
NOTE: I’ll add the “mindfulness” PNG to Page 49, and two more left and right “lined” PNGs to Pages 50-51.
35. Continue adding, duplicating, and organizing your desired pages month by month until your journal is filled up!
TIP: Remember to refresh and preview your spreads to make sure your pages are laid out correctly.
BONUS: HOW TO CREATE A BOOK REVIEW PAGE
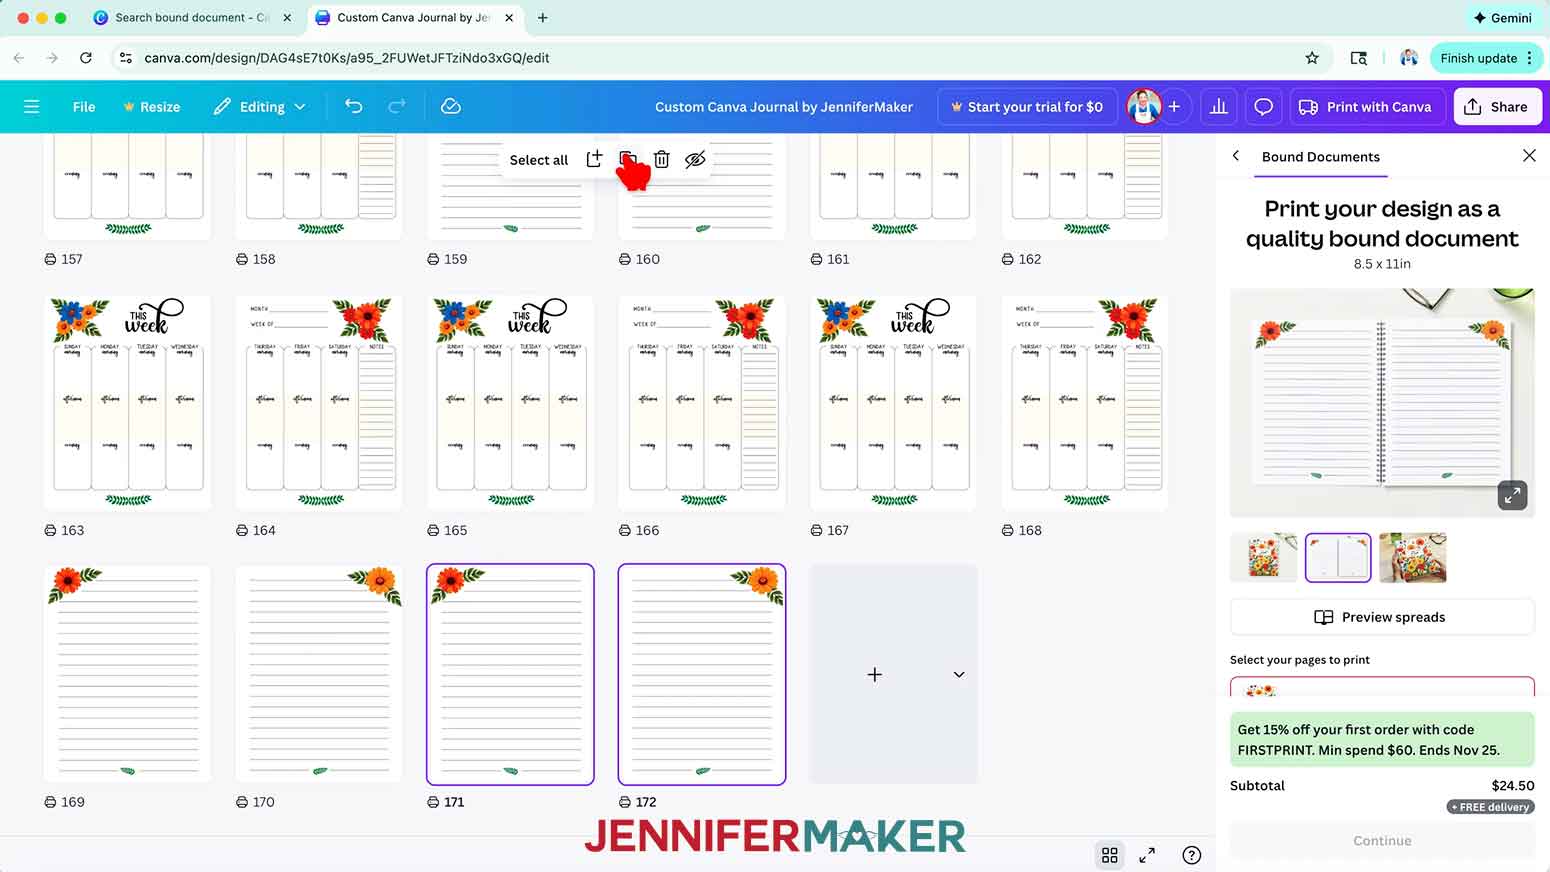
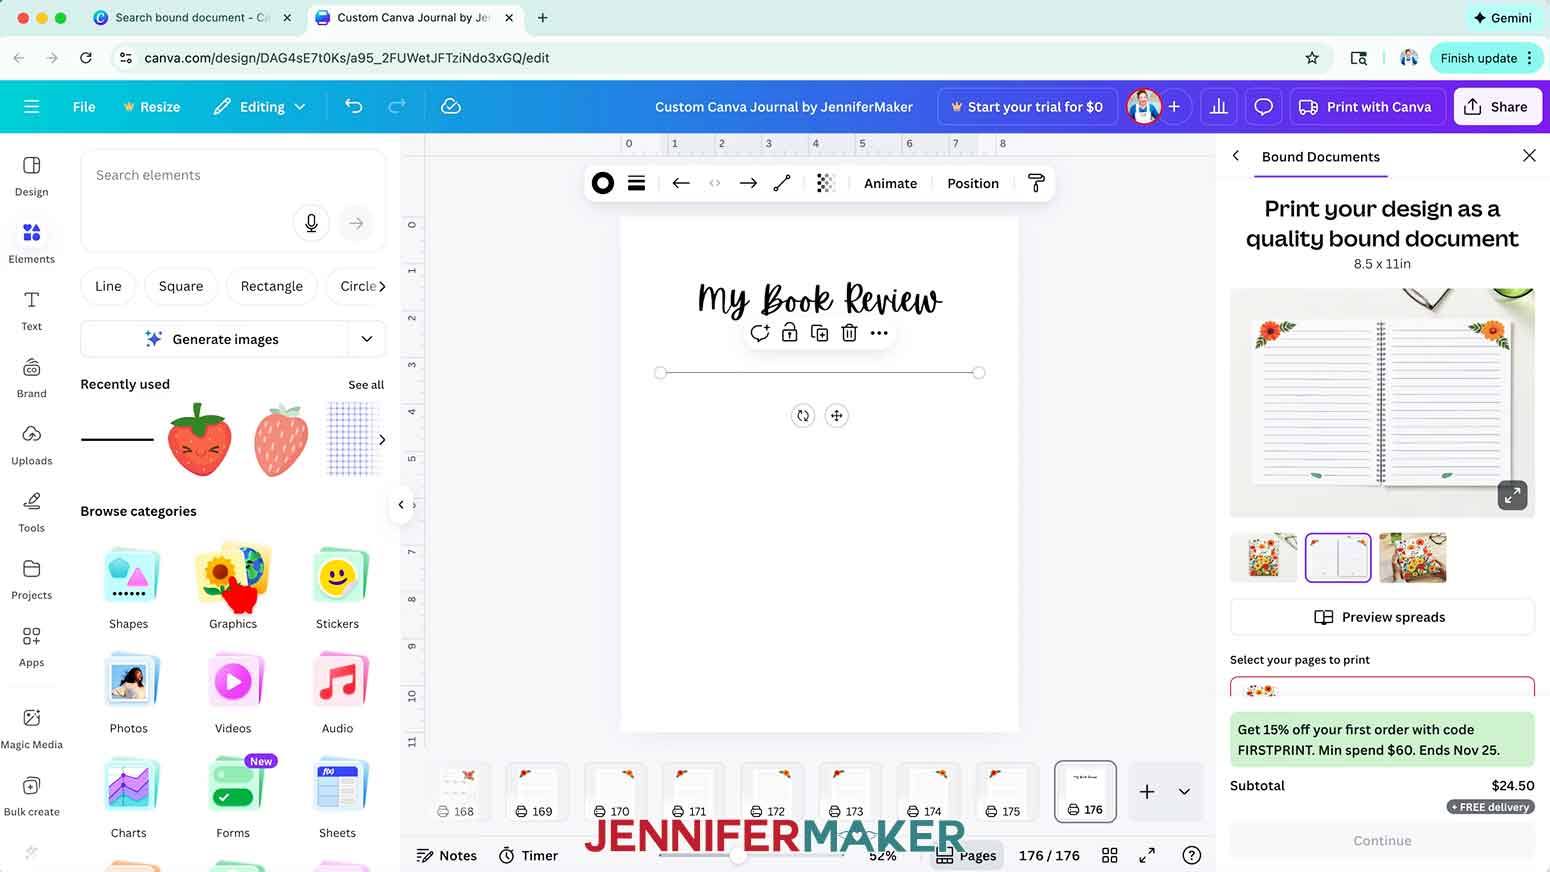
1. To create a book review page using Canva design elements, click the “Plus (+)” button next to the page thumbnails below the canvas to add a new page.
NOTE: You might need to scroll through the thumbnails to see the “Plus (+)” button.
TIP: You can use these steps to make a custom page of any type.
2. Click the “Text” icon in the side panel, then click “Add a text box.”
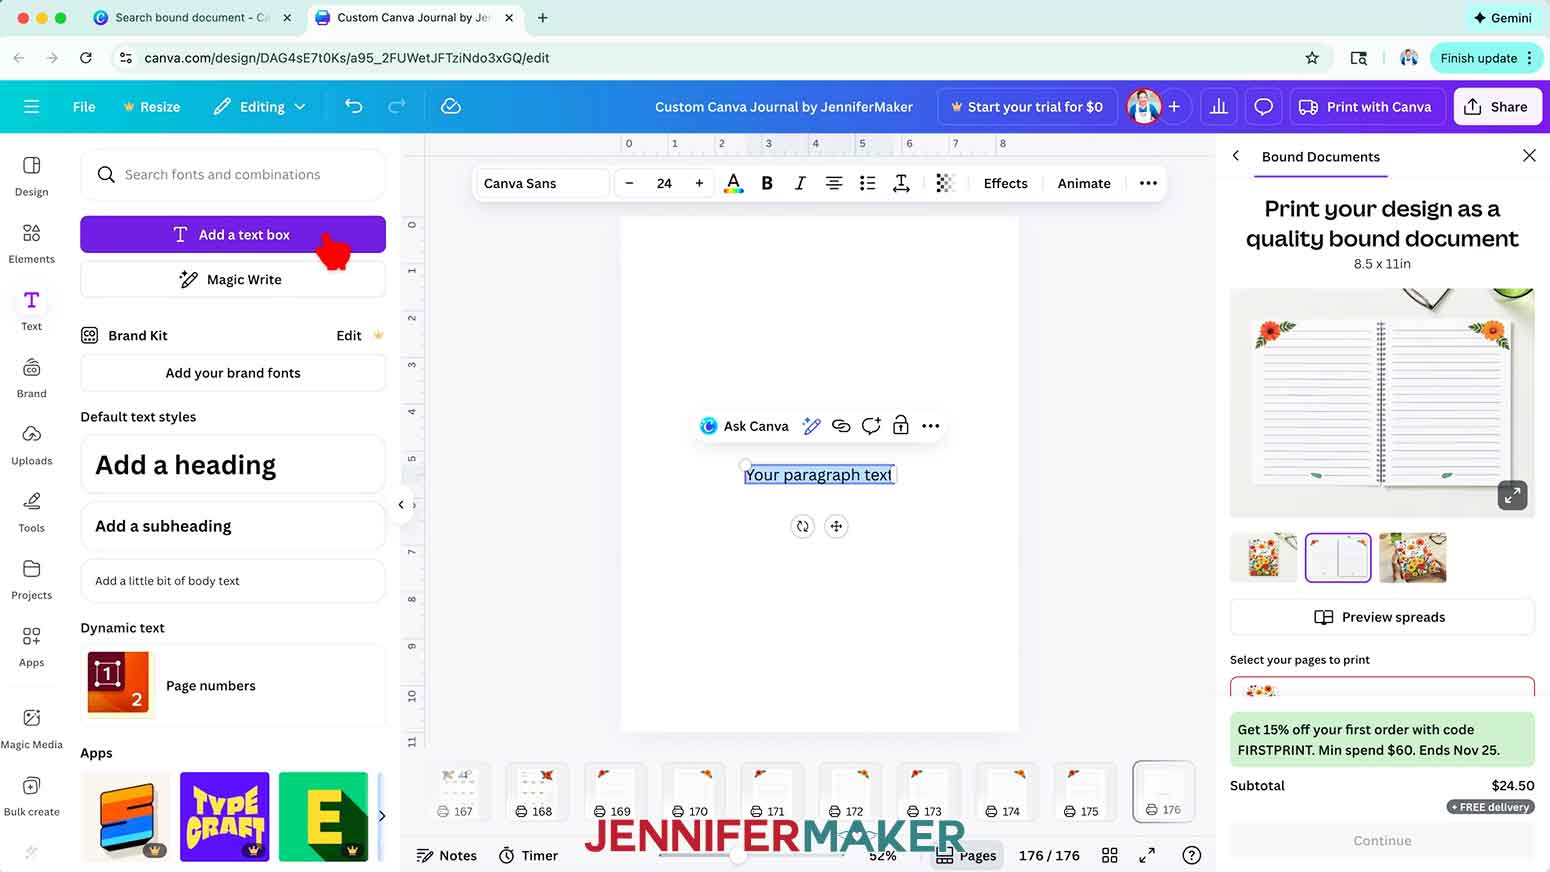
3. Type your desired text in the box.
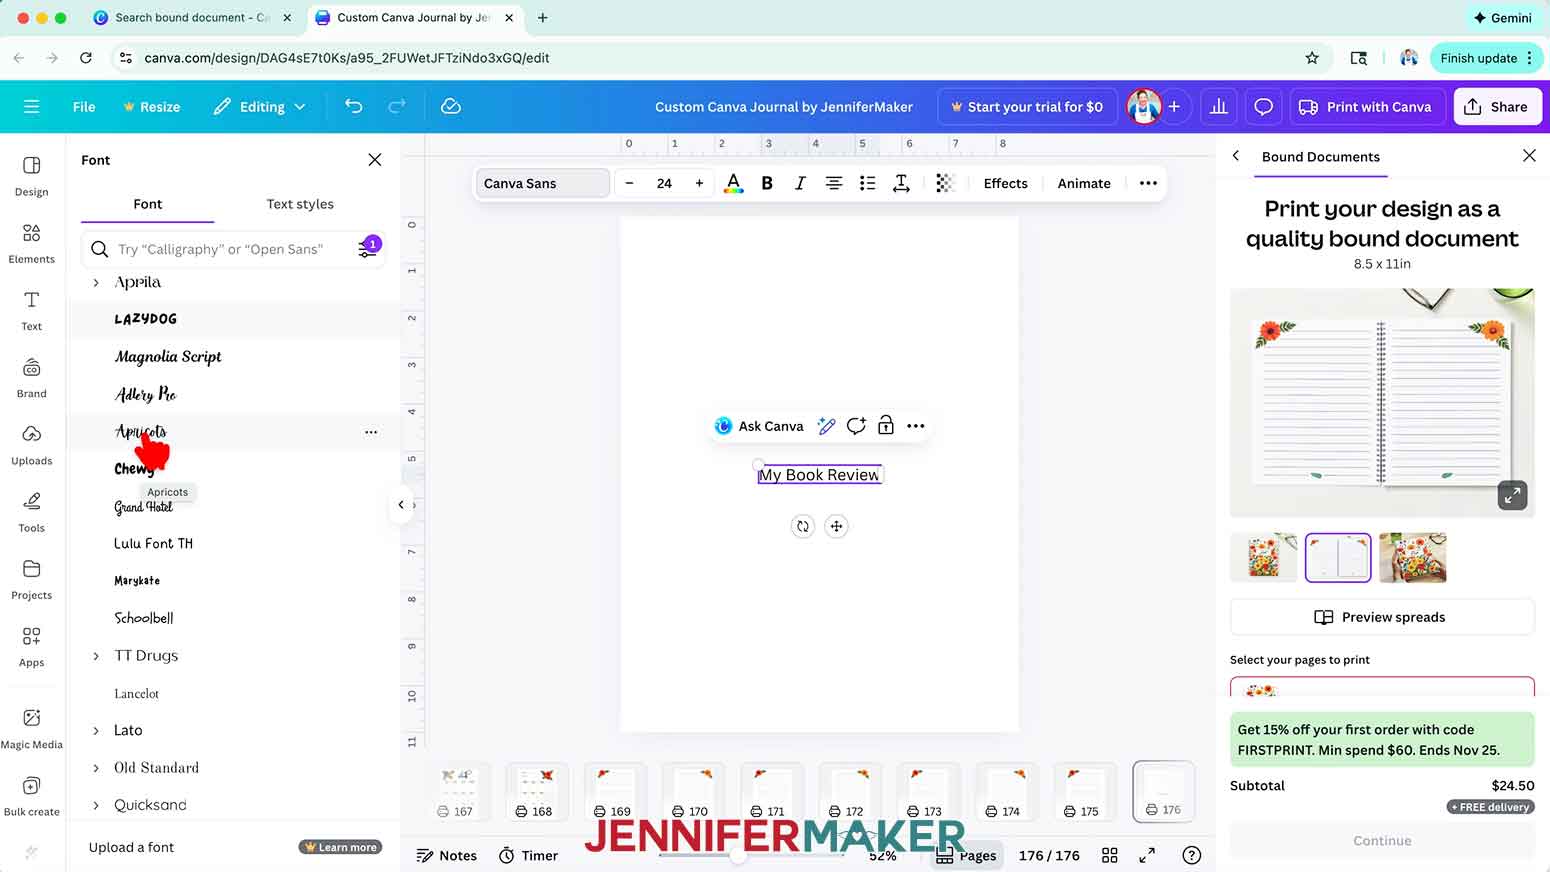
NOTE: I’ll type in “My Book Review.”

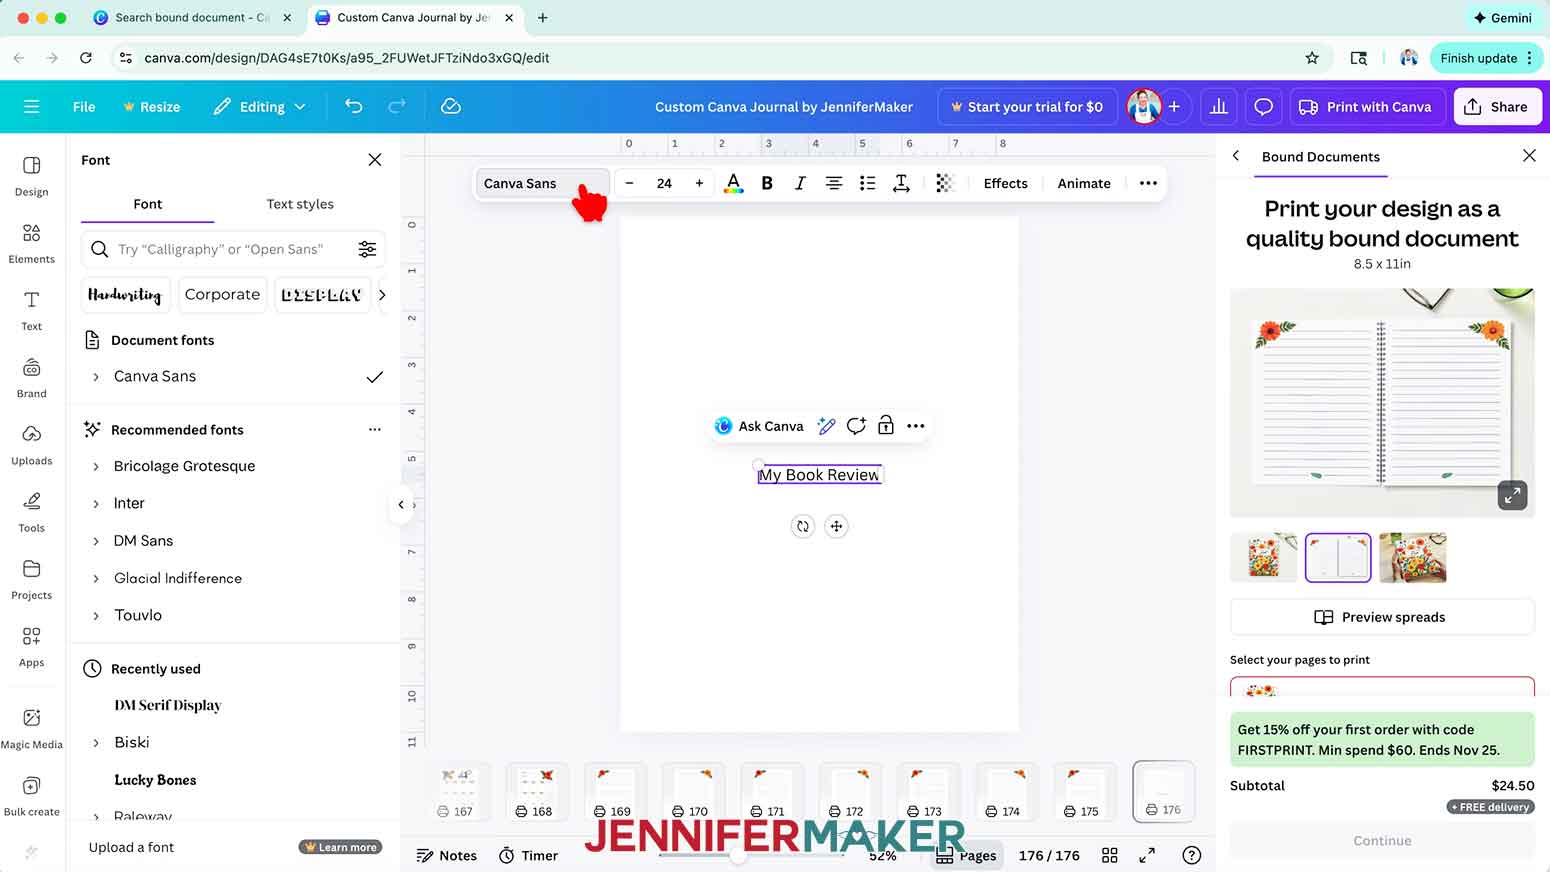
4. To change your text’s typeface, select the text box, then click the font name field to open the Font menu in the side panel.
NOTE: It likely says “Canva Sans.”
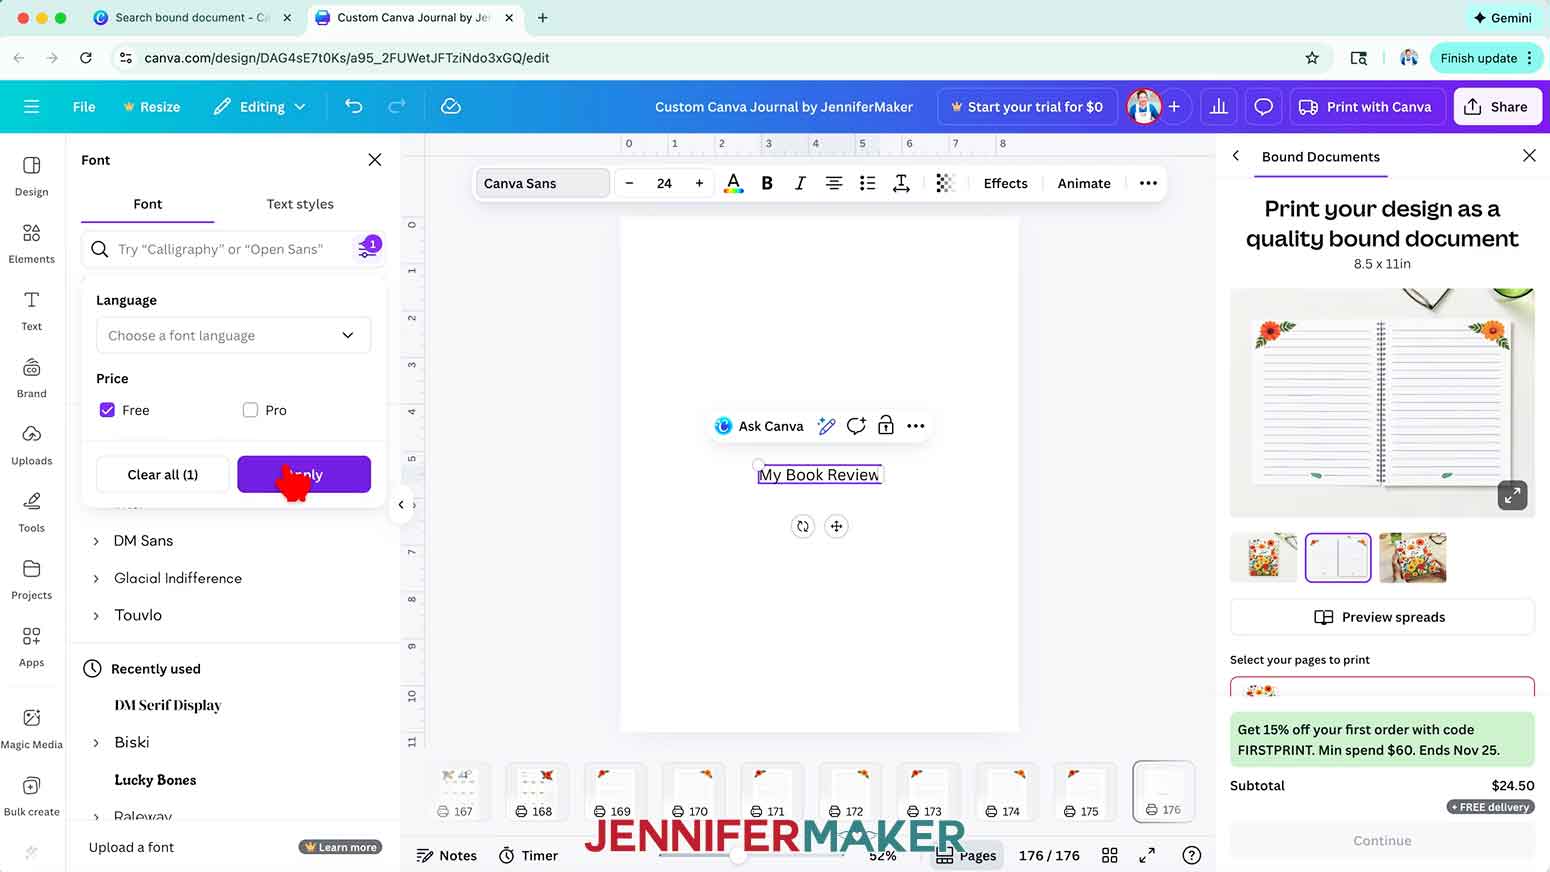
5. Click on the icon with three horizontal lines and small circles to open the “Filter” menu, check the box next to “Free,” and click “Apply” to show only typefaces you can use without a paid account.
6. Click a typeface you like from the list to apply it to your text.
TIP: If there’s a down arrow beside the typeface, you can click to expand it and see other formatting options, too.
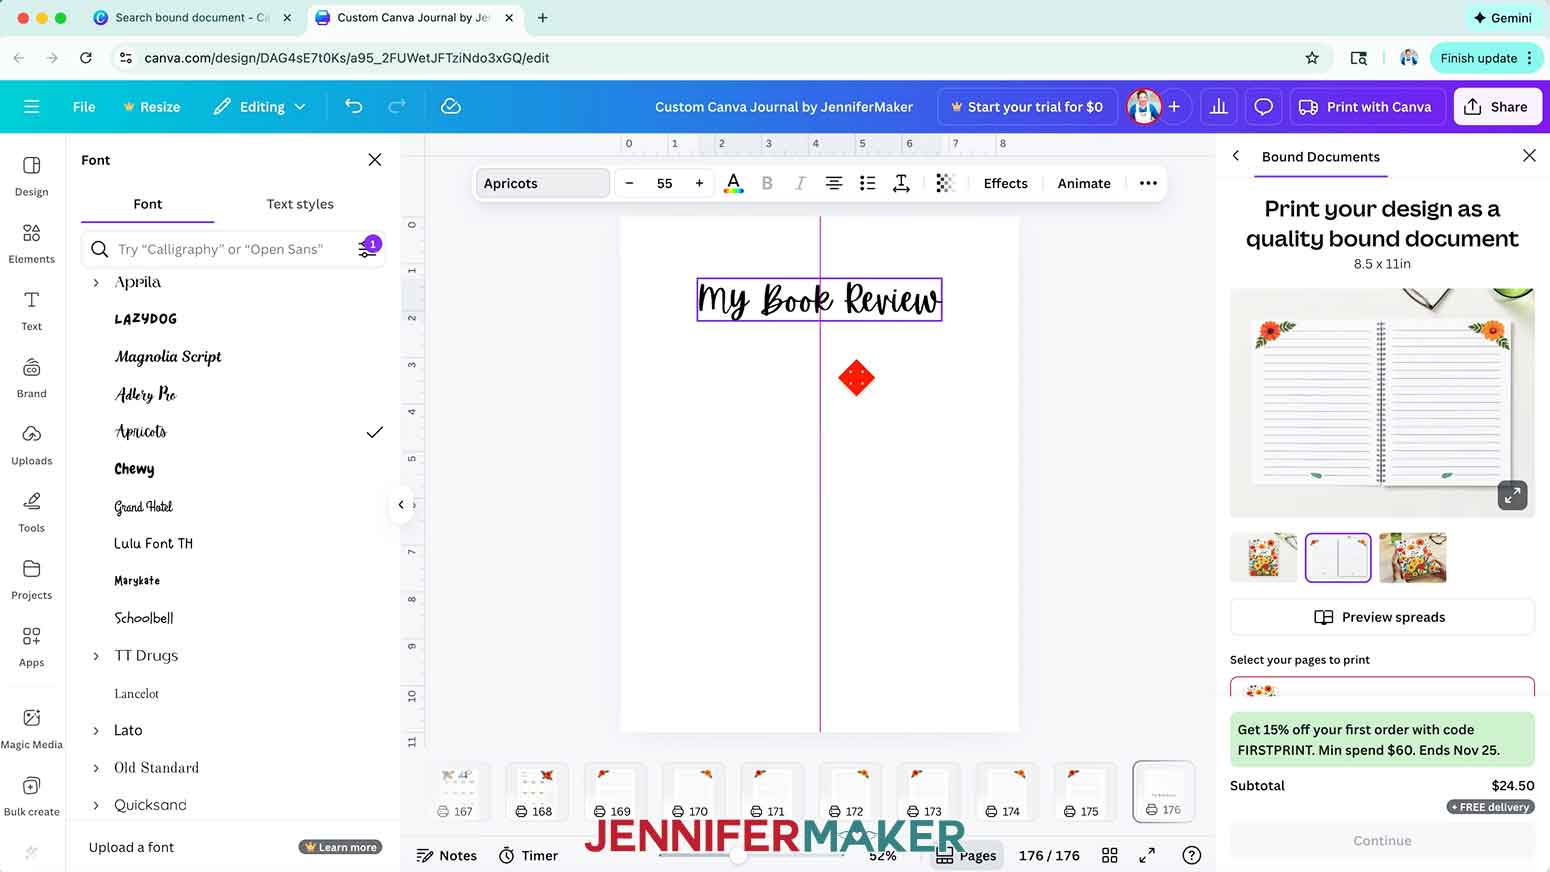
NOTE: I’ll choose the free Canva font “Apricots.”
7. Use the text box’s corner Resize handles to make your text larger or smaller as needed, and the side handles to adjust the text’s position inside the box. Or type a number in the Font Size field to resize the text.
NOTE: I’ll adjust mine to Font Size 55.
8. Then click and drag the text box to move it into your desired position.
NOTE: I’ll use the guidelines to center my text box near the top of the page.
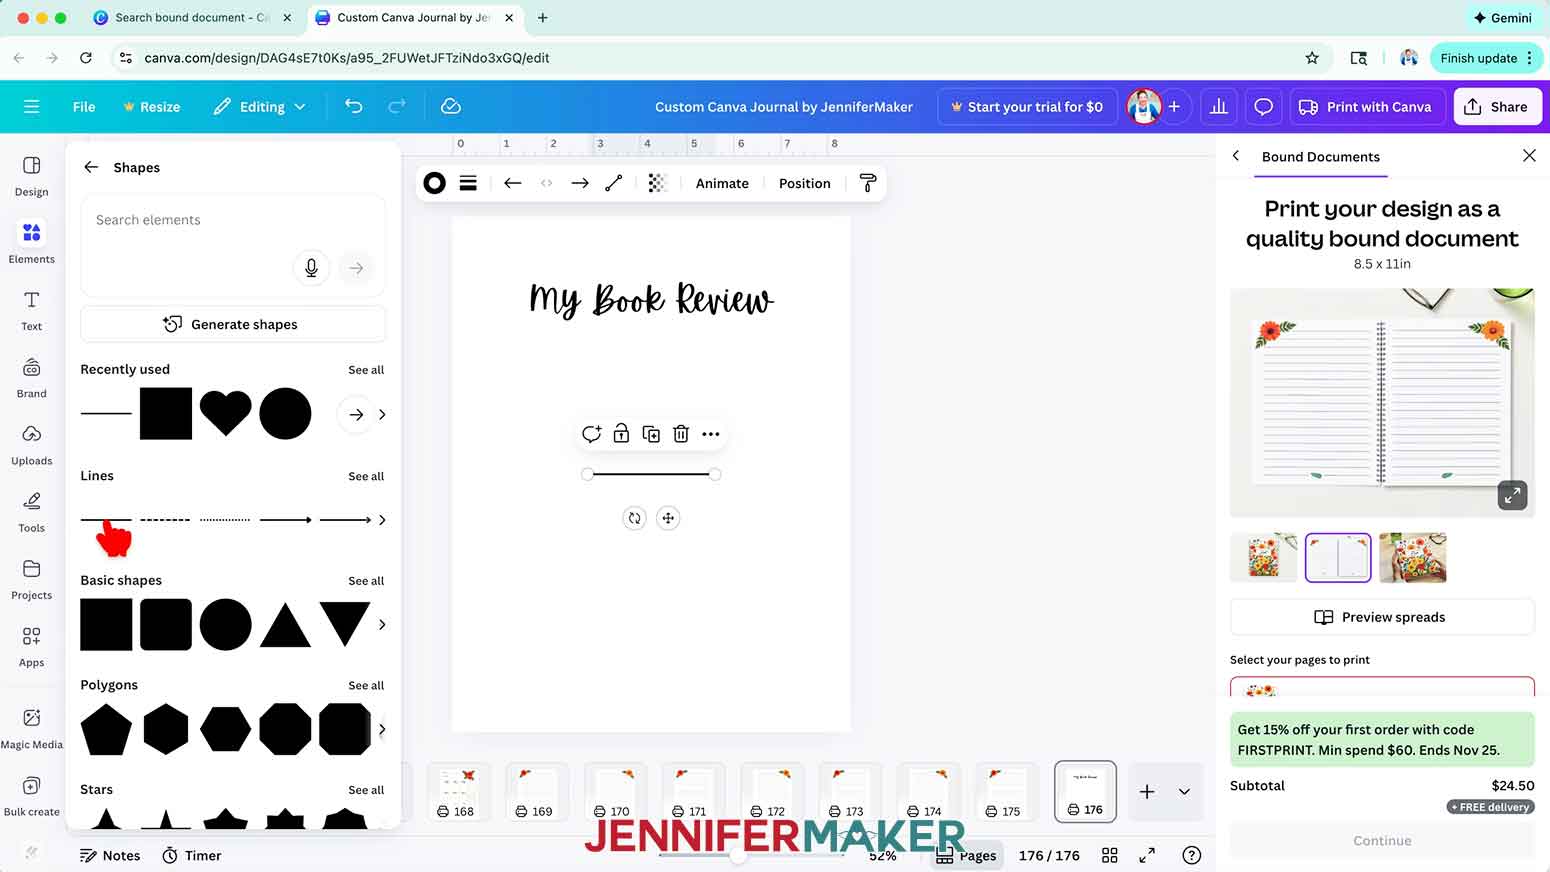
9. To add a line to your page, click on “Elements,” then click the “Shapes” category to browse Canva’s media library.
10. Click a free horizontal line under the “Lines” section to add it to your canvas.
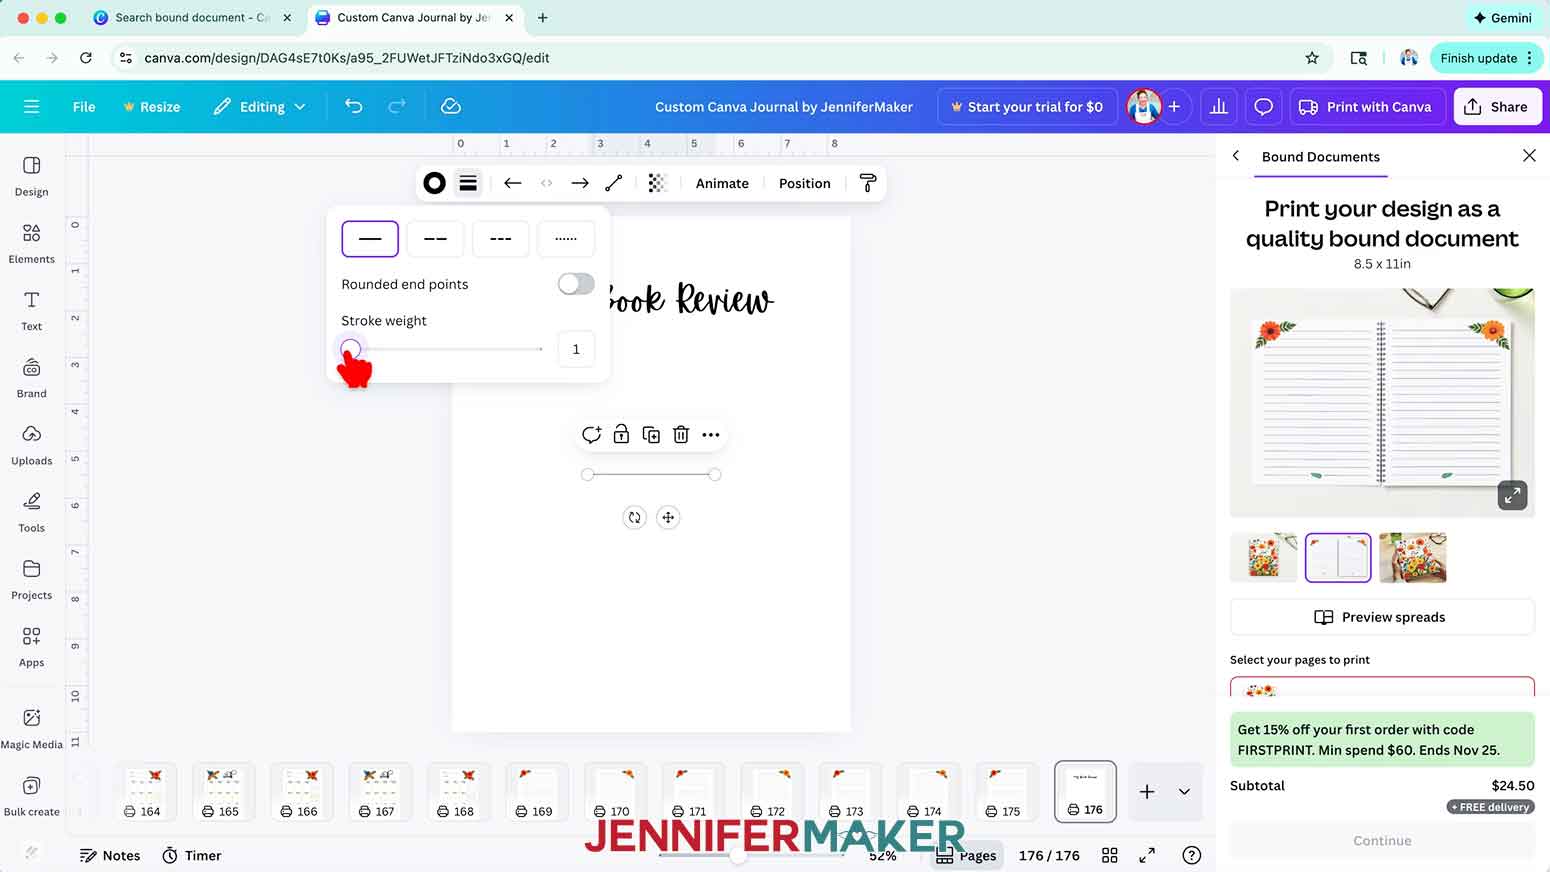
11. To change the line’s thickness, click the “Stroke style” icon (the button with three horizontal lines of varying thicknesses) and adjust the “Stroke weight” slider or value.
NOTE: I’ll set the “Stroke weight” to “1” for a thinner line.
12. Click and drag the line so its left edge touches the left margin guideline that appears.
NOTE: I’ll place mine about 1.5” beneath my text.
13. Drag the circle on the right end of the line to the right margin guideline that appears to extend the line across the page.
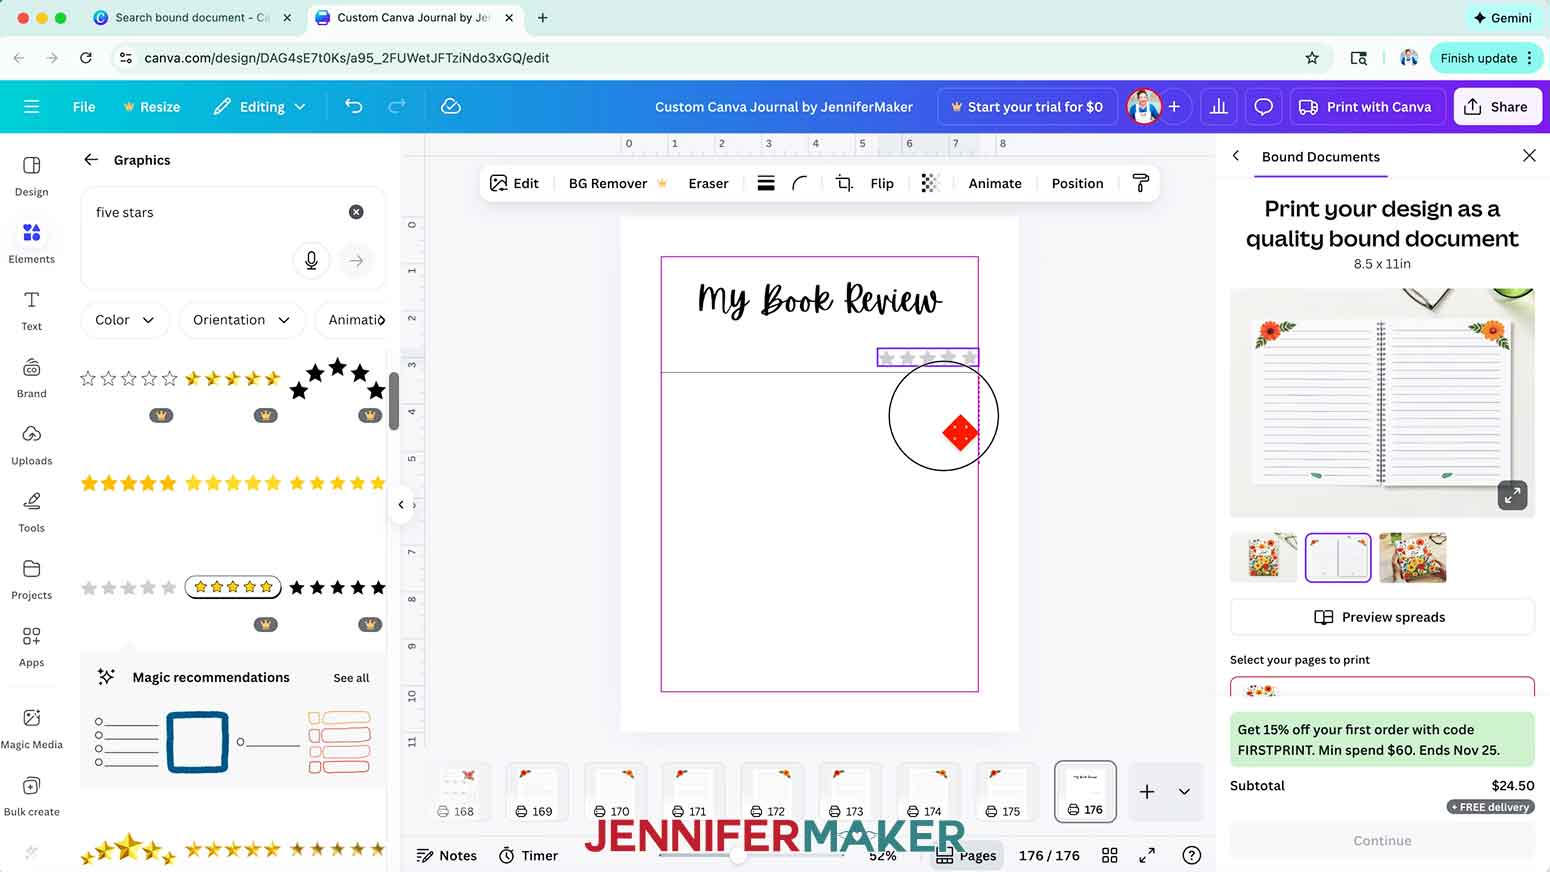
14. To add a graphic to your page, upload one of the embellishment images from my design files, or click the “Elements” icon, then click the “Graphics” category.
15. To find an image that fits a specific design you have in mind, type a related phrase in the “Search” bar.
NOTE: I’ll enter “five stars.”
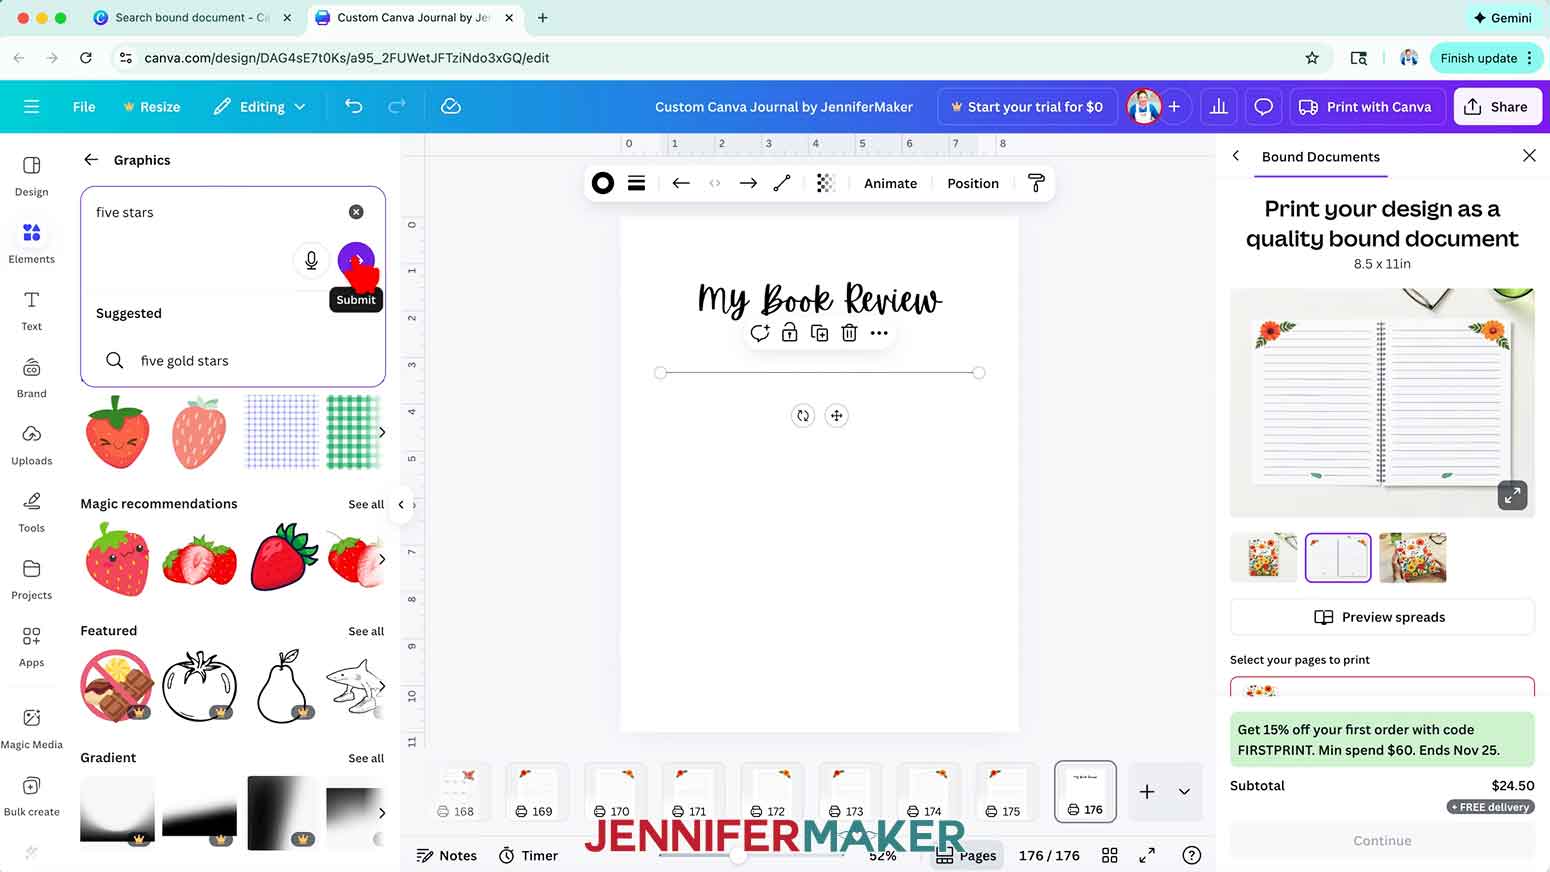
16. Click an image you like to add it to your canvas.
NOTE: I’ll add an image of five gray stars in a horizontal line.
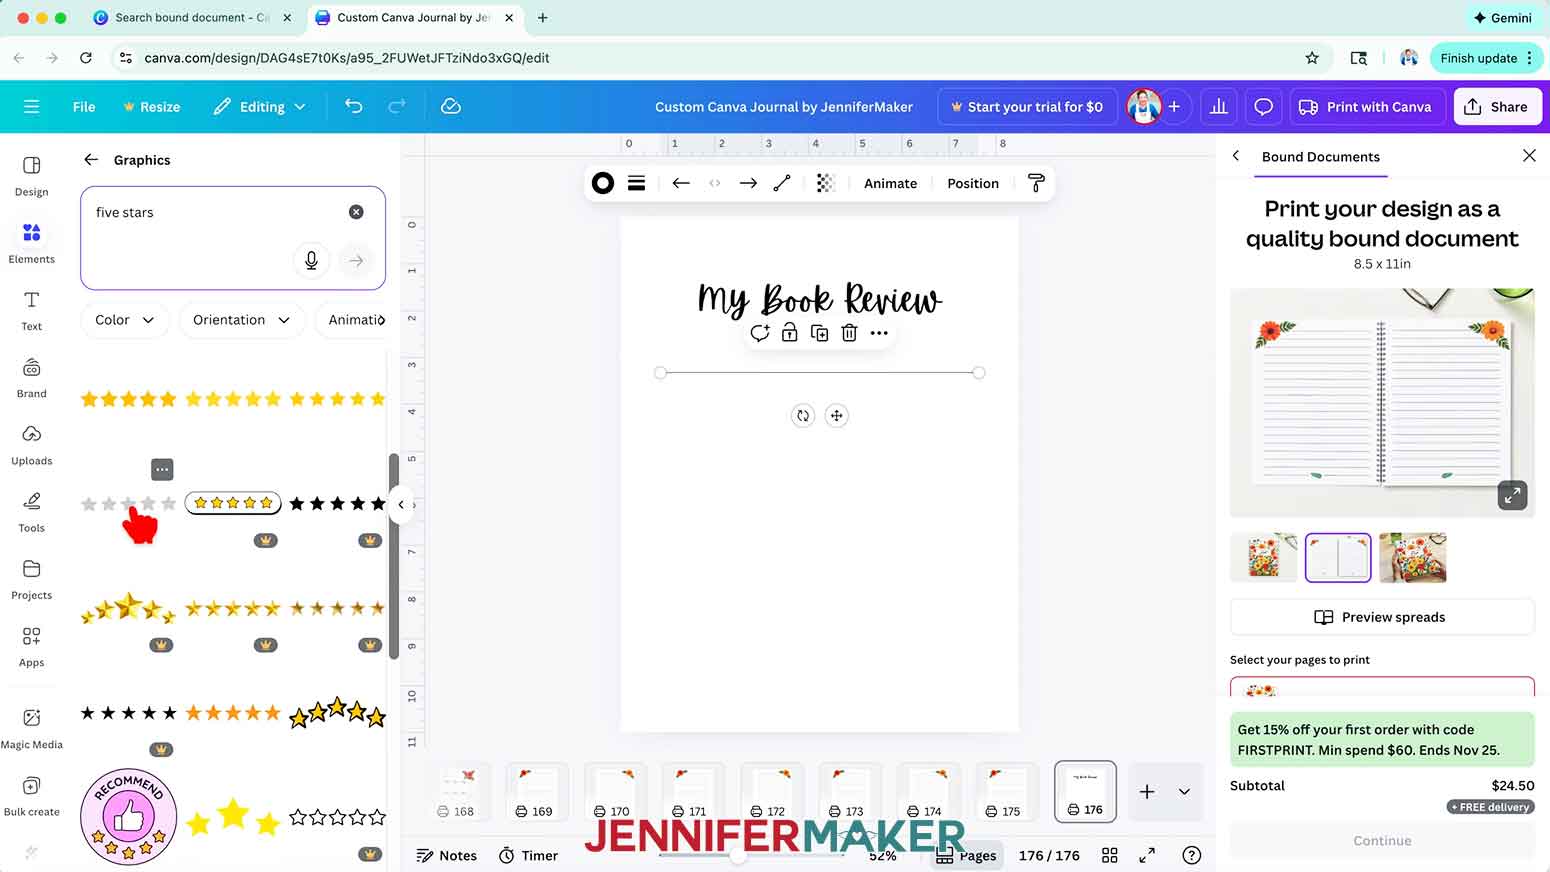
17. Resize and position the image as desired.
NOTE: I’ll add the stars graphic just above the right edge of my horizontal line.
18. To duplicate a set of elements, drag a selection box over the elements, then click “Group” to keep them together.
NOTE: I’ll group my line and stars together.
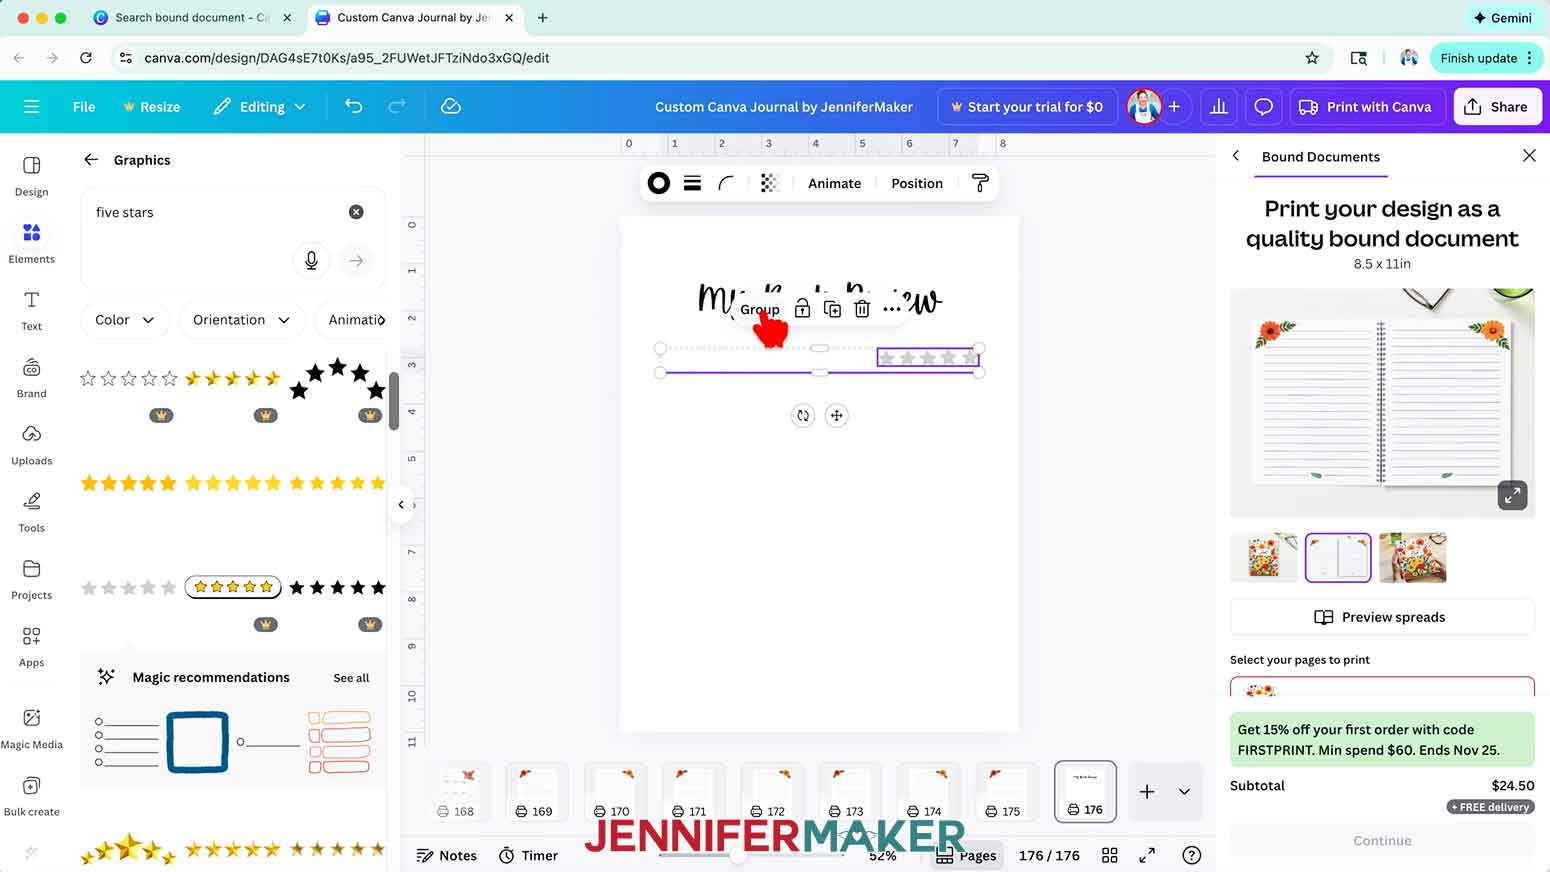
19. Click the “Duplicate” icon to add a copy of the group to your canvas, then position it as desired.
TIP: Use Canva’s guidelines to help position your elements with even spacing. Zoom in if you’re having trouble moving the elements.
NOTE: I’ll duplicate and position the groups to create spaces to review eight books.
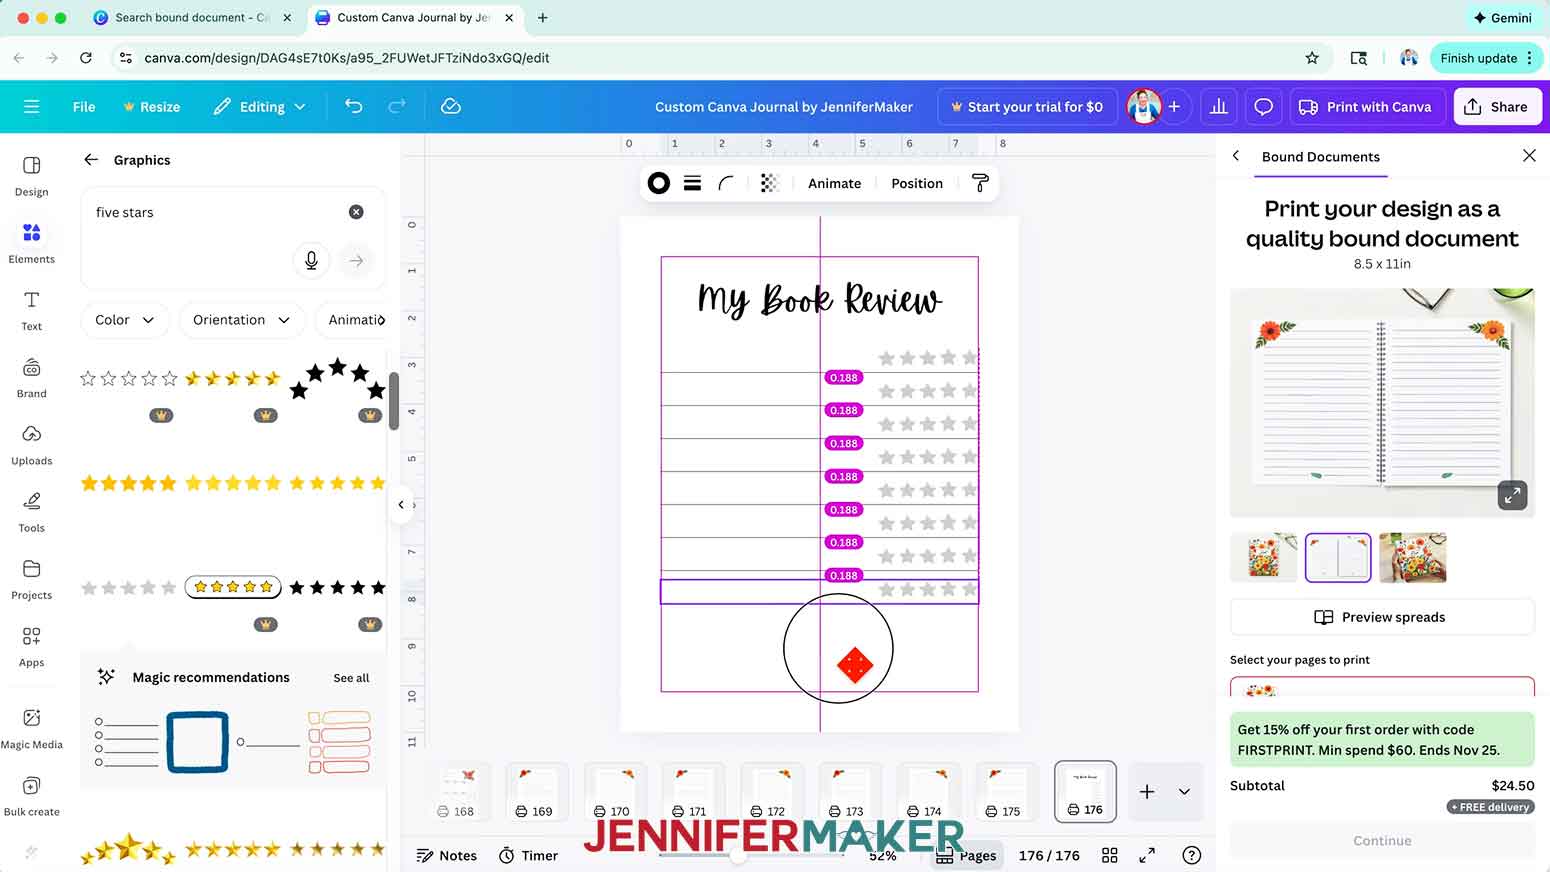
20. Add, resize, and position elements as desired to finish your page’s design.
NOTE: I’ll add some cute book and plant graphics in the empty space below my lines.
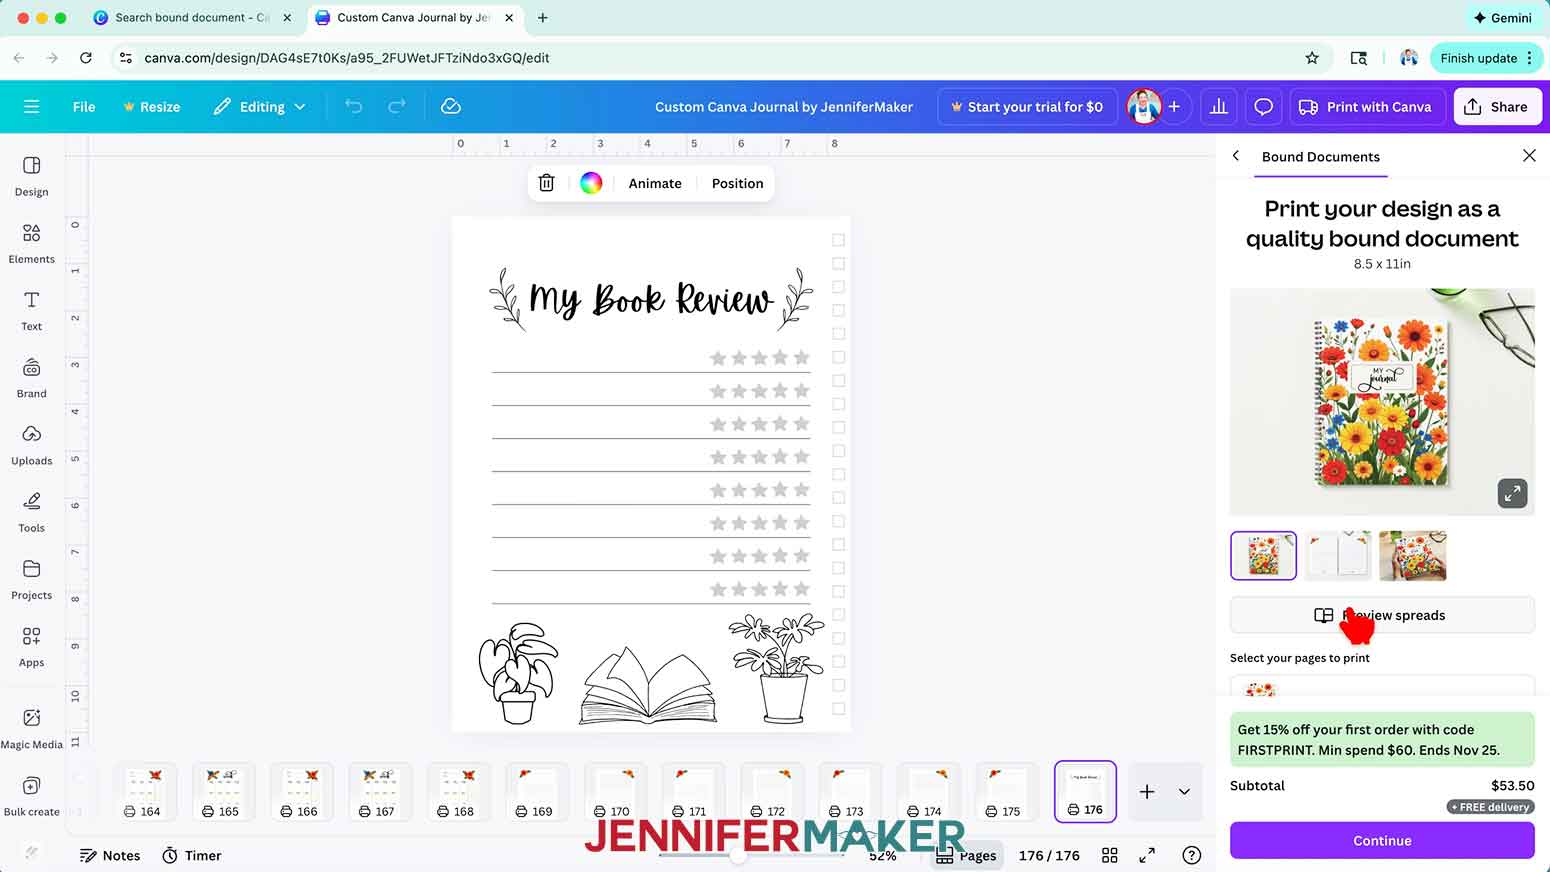
21. Drag your completed page’s thumbnail where you want it to go in your journal.
NOTE: I’ll place mine at the end of March and end of September.
STEP 3: ORDER YOUR CUSTOM JOURNAL IN CANVA
1. When you’re ready to order your custom journal, select “All pages” under “Select your pages to print” in the “Print with Canva” panel.
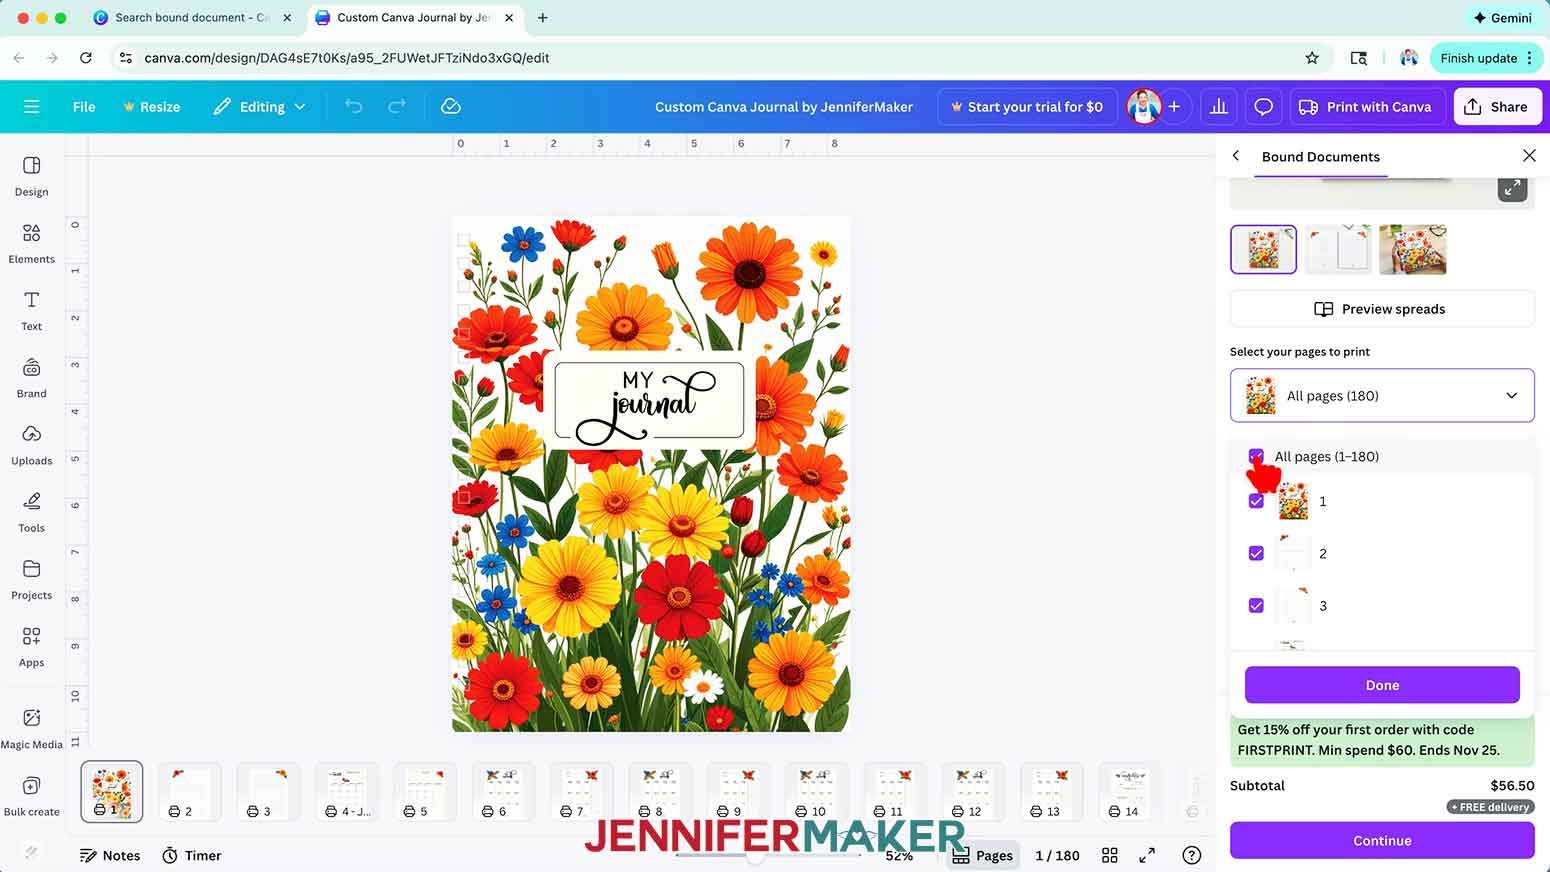
2. Then select your paper type.
NOTE: I’ll choose “Standard paper.”
3. Choose an option under “Cover type.”
NOTE: I’ll choose “Clear covers” to add front and back acetate covers for additional protection.
4. Choose the number of journals you want to print in the “How many?” dropdown box.
NOTE: I’ll choose “1 Bound Document.”
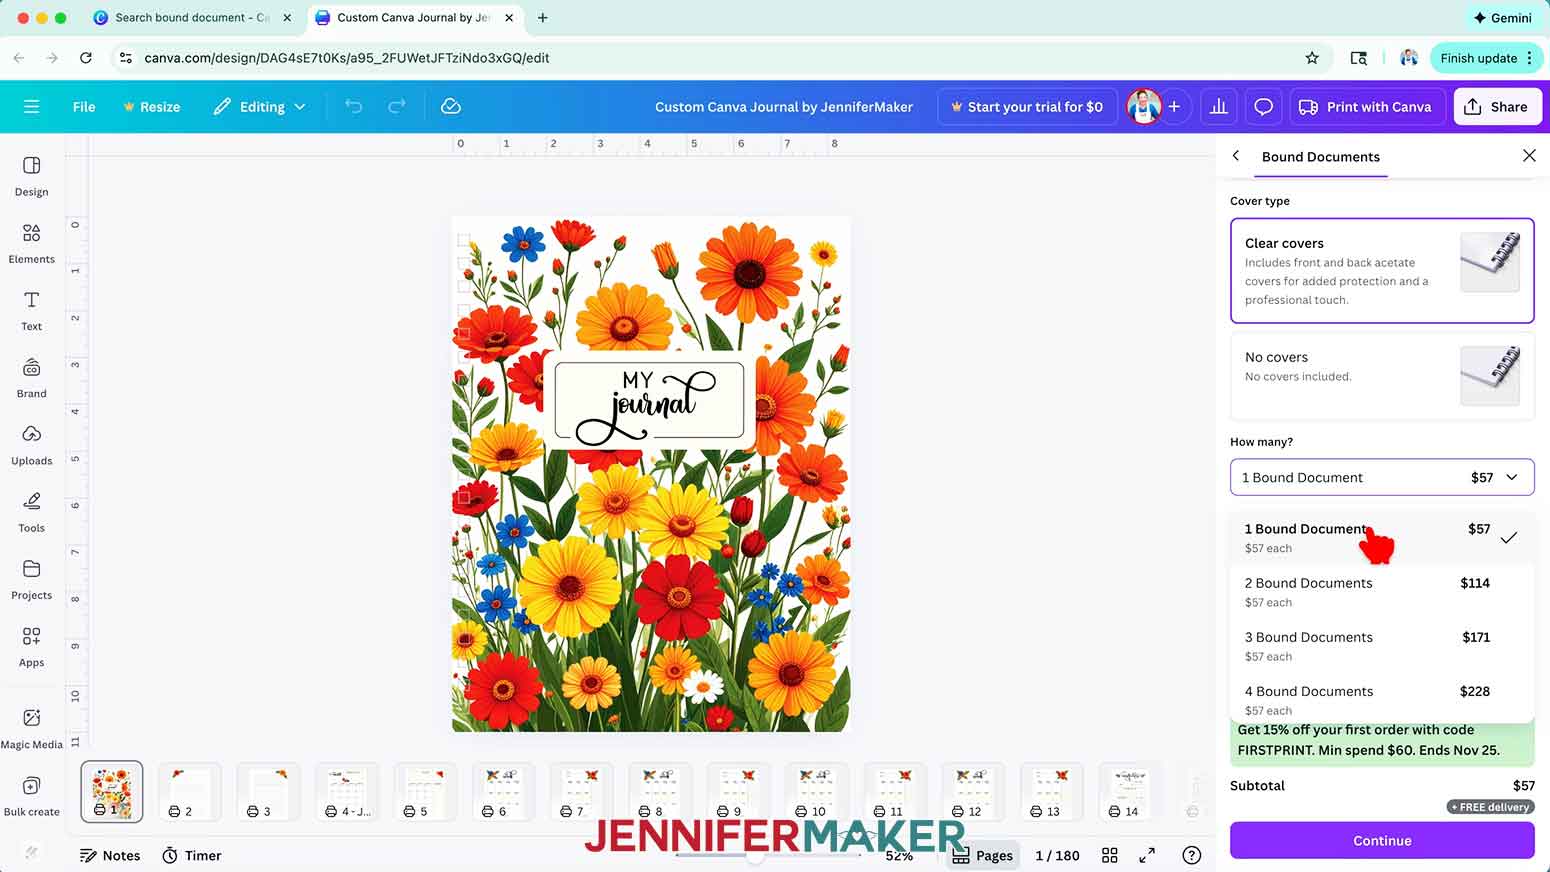
5. Click “Continue.”
6. If there are any issues with your design on the “Let’s get ready to print” screen, follow the suggestions to fix any problems that can affect your print quality.
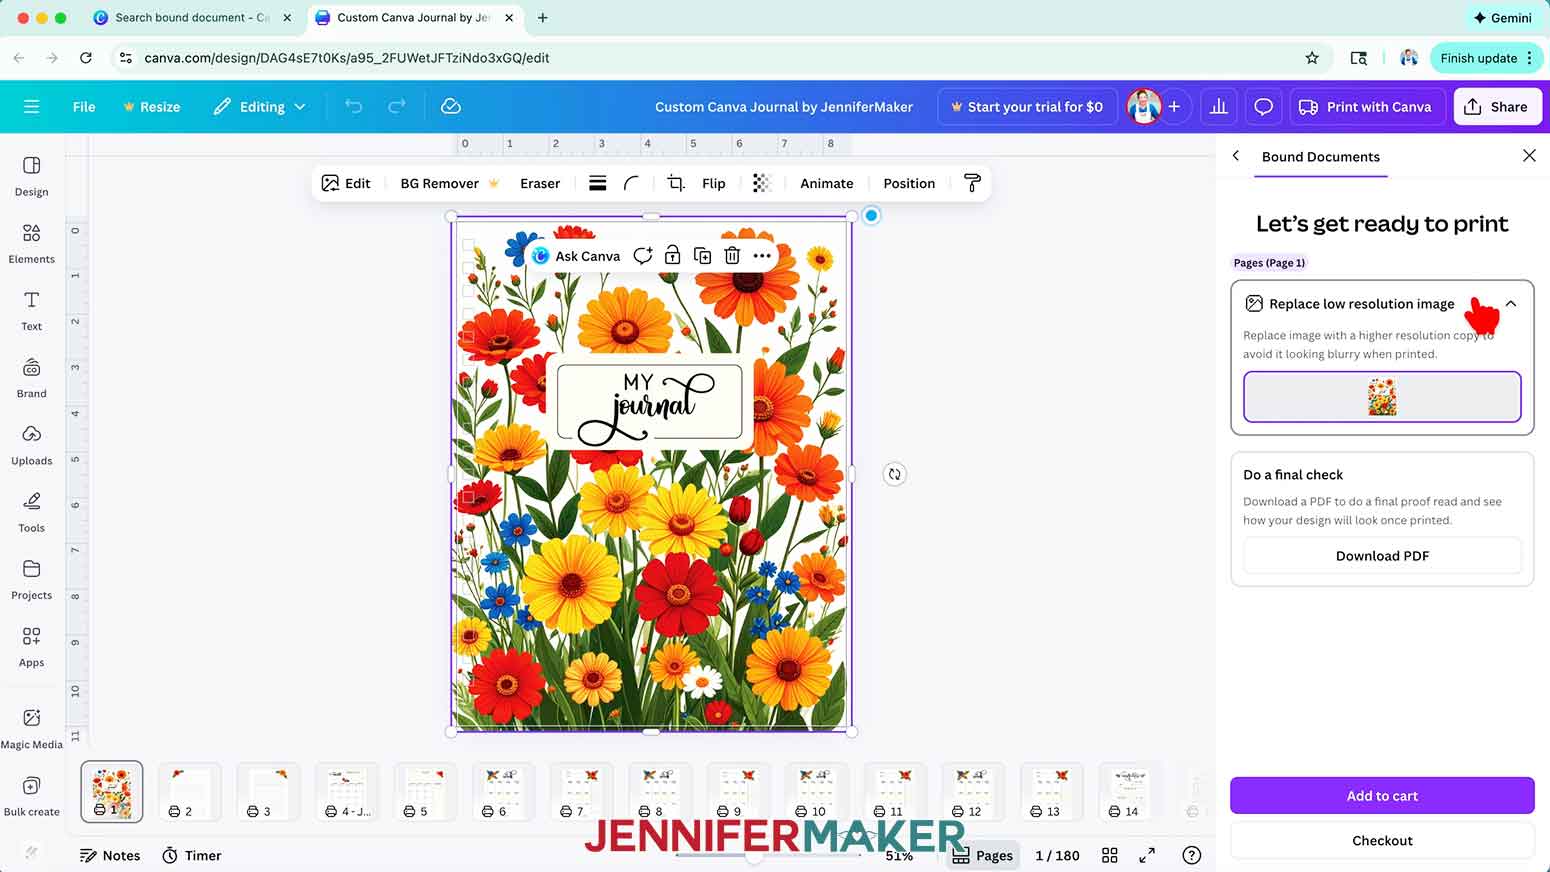
NOTE: If you see a “Replace low resolution image” suggestion for any pages using my design files, you can ignore these. I’ve tested the print quality as is, and there were no issues.
7. If you like, click “Download PDF” under “Do a final check” to see a preview of how your journal will look once printed.

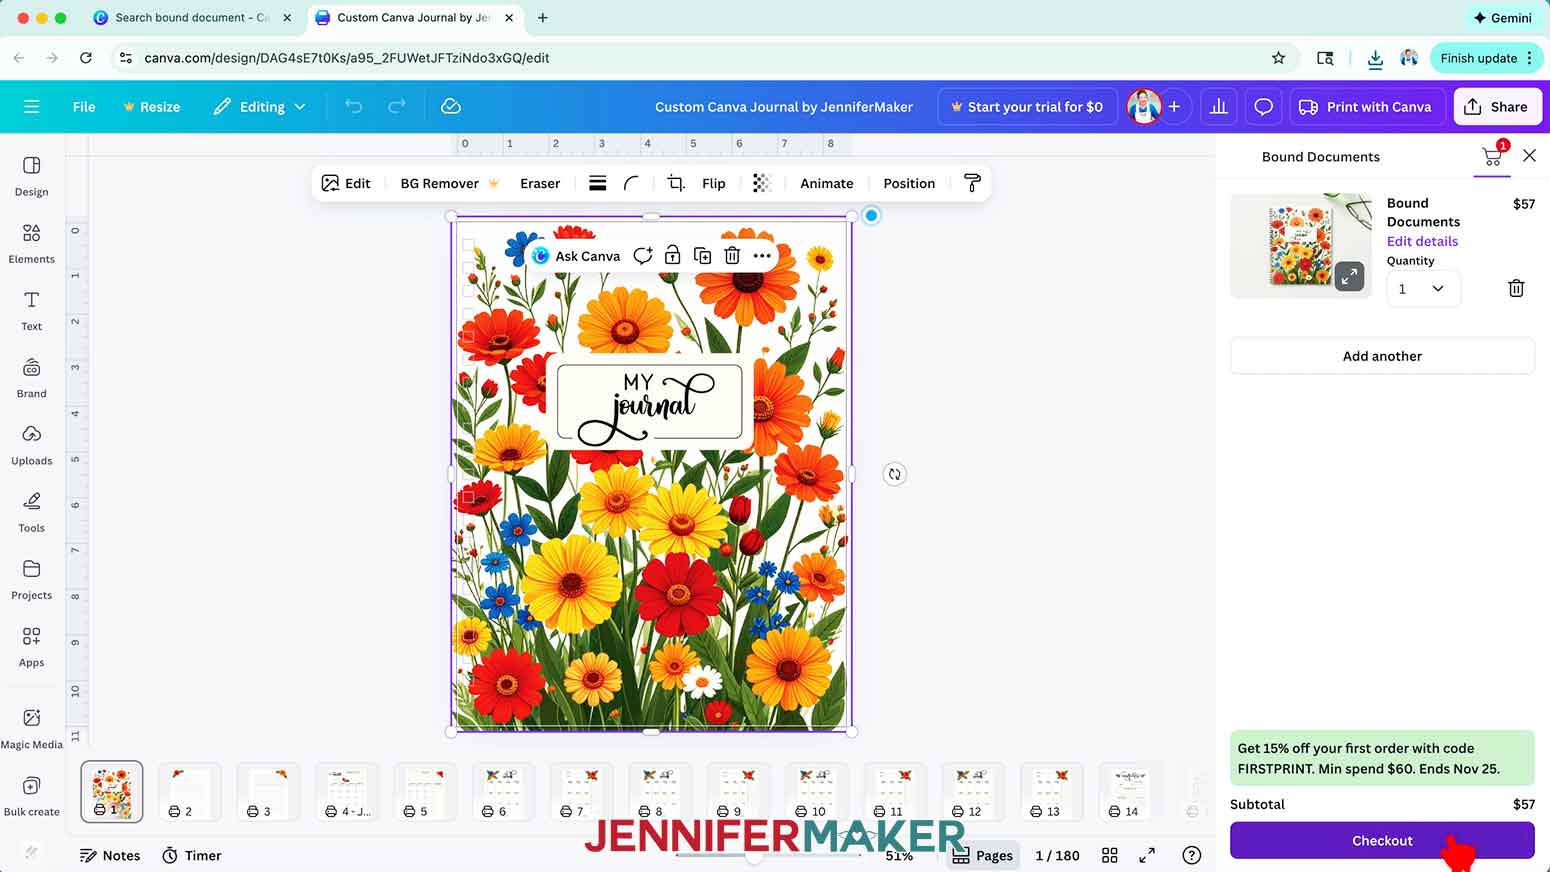
8. Click “Add to cart.”
9. Then click “Checkout.”
10. Fill in your details, choose your shipping method, and enter your payment information on the “Secure checkout” page.
11. Then click “Place order.”
NOTE: A confirmation window will pop up to let you know your order has been placed successfully.
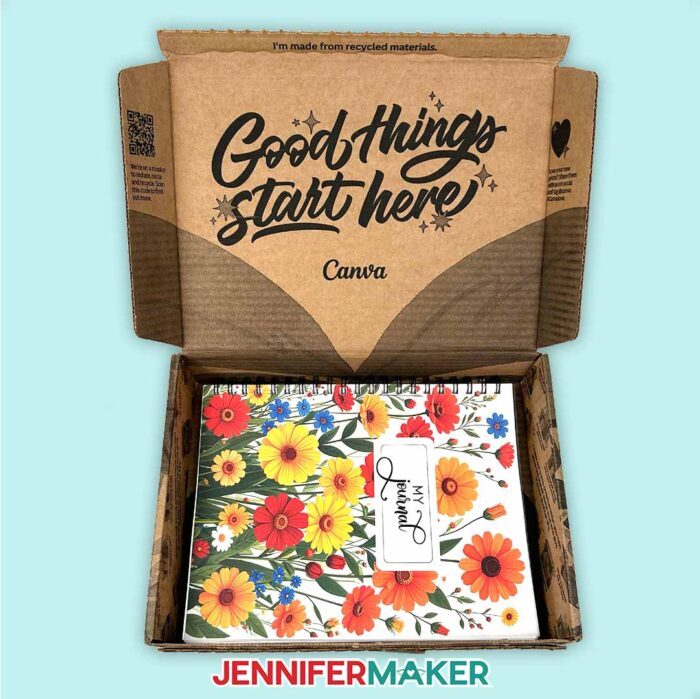
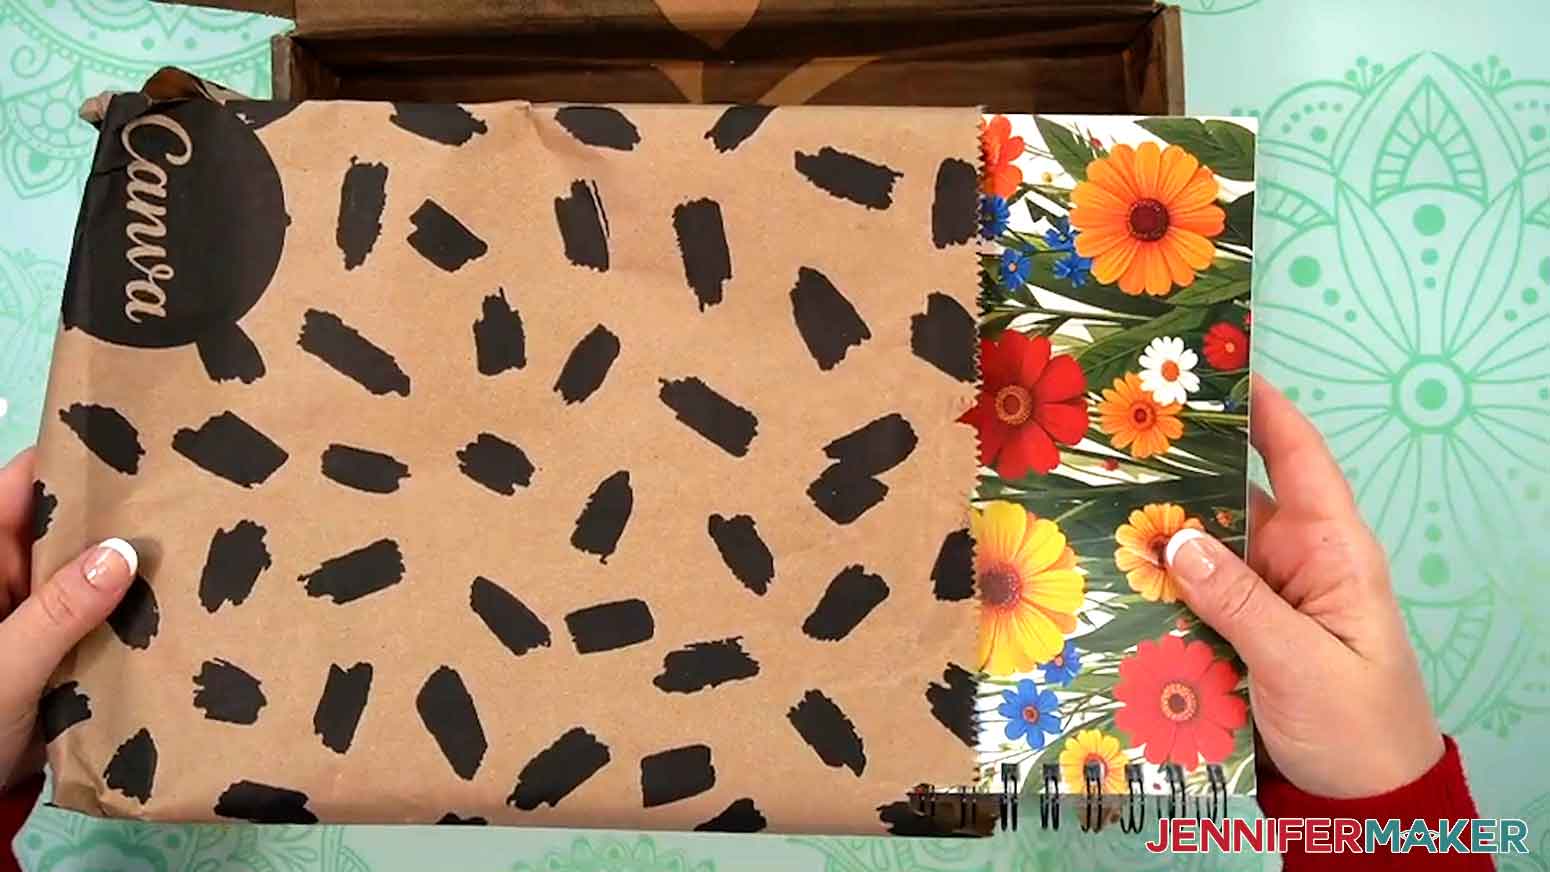
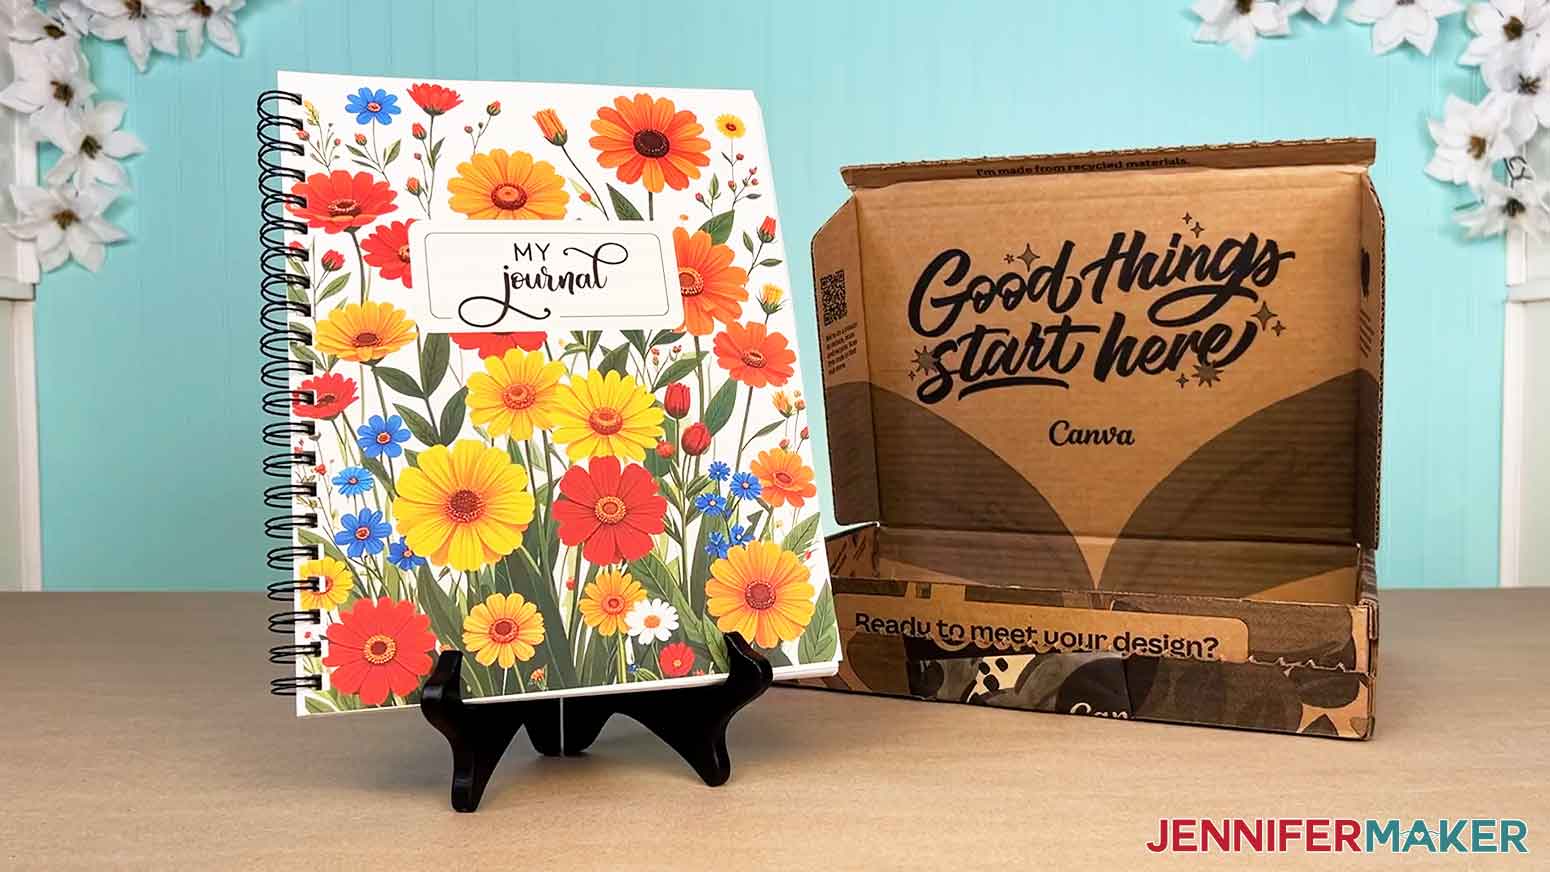
12. When your journal arrives, open the box to see how it turned out!
STEP 4: SHOW IT OFF
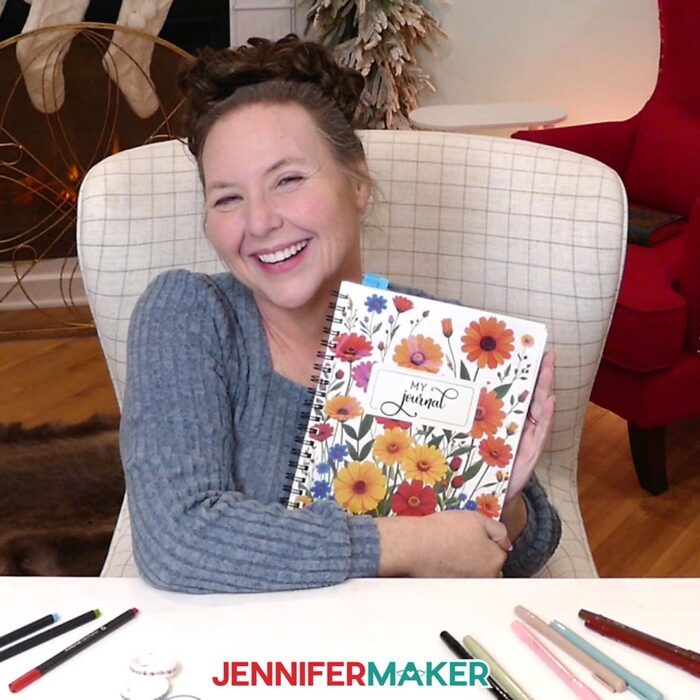
You now have an impressive custom journal you designed in Canva!
Notes
Finished Size: 8.5” x 11” bound journal, 186 pages.
Typefaces Used:
Amastery Script (Free Alternative: Goldie Rainbow)
Berson Dream Trio (Free Alternative: Papernotes)
Amastery Hand (Free Alternative: Note Book)
Canva Fonts Used:
Apricots
Answers to Your Questions About Using Canva to Create a Journal
Q: I want to learn how to make more detailed custom page designs. How do I do that?
A: You can learn more about using Canva apps to create beautiful custom journal pages in my ADVANCE program. Learn more about ADVANCE here!
Q: Can you make a journal in Canva? Is there a journal template?
A: You absolutely can use Canva’s free tools and templates to create journals! Canva doesn’t have a journal-specific template, but the “Bound Document” template I start with can be used to create journals of all kinds. Just follow my video tutorial to learn how to design your pages and spreads, and then you can create your own journal.
Q: Do I need Canva Pro to make a custom journal?
A: Nope! Everything in this project can be done with a free Canva account. In the video tutorial, I’ll show you how to use my custom pages to fill up your journal. I’ll teach you how to make simple custom pages to track important information, too.
Q: Can I print my journal from Canva?
A: Yes, you can! Canva has an excellent print-on-demand service so you can save your ink and paper! I walk you through the ordering process in my video tutorial, including which settings I chose for my journal, which turned out great!
Q: How is the print quality for the journal through Print With Canva?
A: Canva’s print quality is excellent! The colors match what I see on screen, the paper is smooth, and the cover is bright and bold. Everything is centered properly, and overall it just looks and feels professional.
Q: What kind of journal can I create in Canva?
A: You can create any journal you can dream up! I created a yearly journal for daily scheduling. I also added plenty of pages for writing down my thoughts, focusing on mindfulness, and organizing my reading list. You can make yours a simple journal with lined pages, or a just create a planner for a single month. It’s all about creating a journal that fits YOUR needs!
Q: How long does it take to receive my order?
A: Shipping times vary depending on how many journals you order and where you live, but my journal made it here quickly and came packed in a nice box.
Get my free Custom Journal PNG files!
(If you do not see the signup form above, click here.)
I love seeing what you make with my tutorials and how you customize them! Please share a photo of your custom journal in Canva in our Canva Creators Facebook group or tag me on social media with #jennifermaker.
Love,

Want to remember this? Save this Canva Journal tutorial to your favorite Pinterest Board!