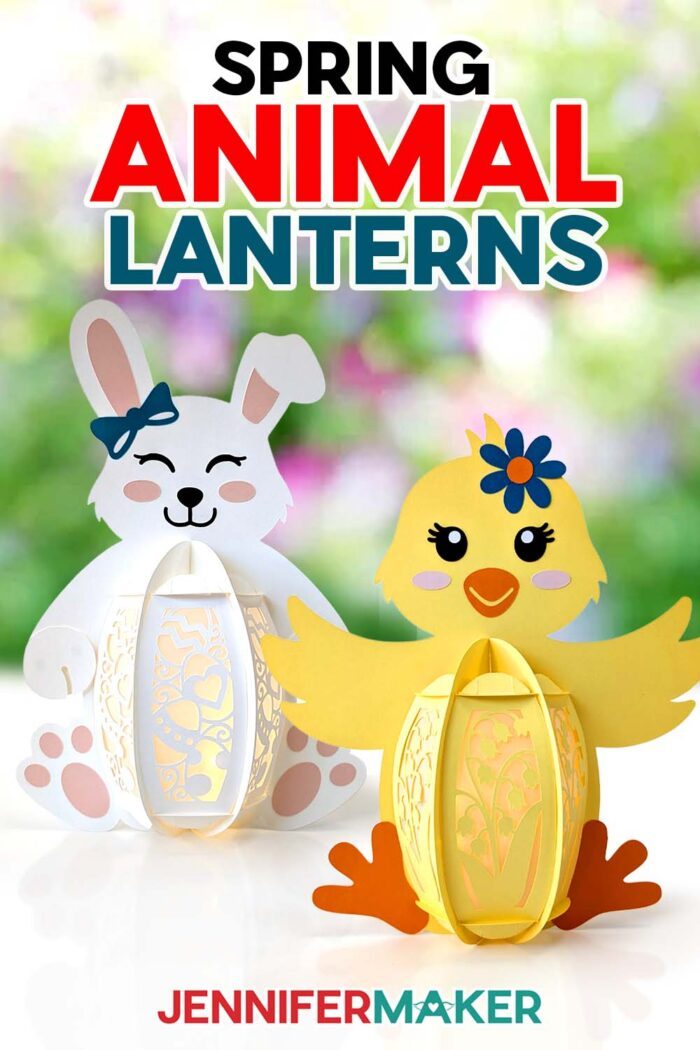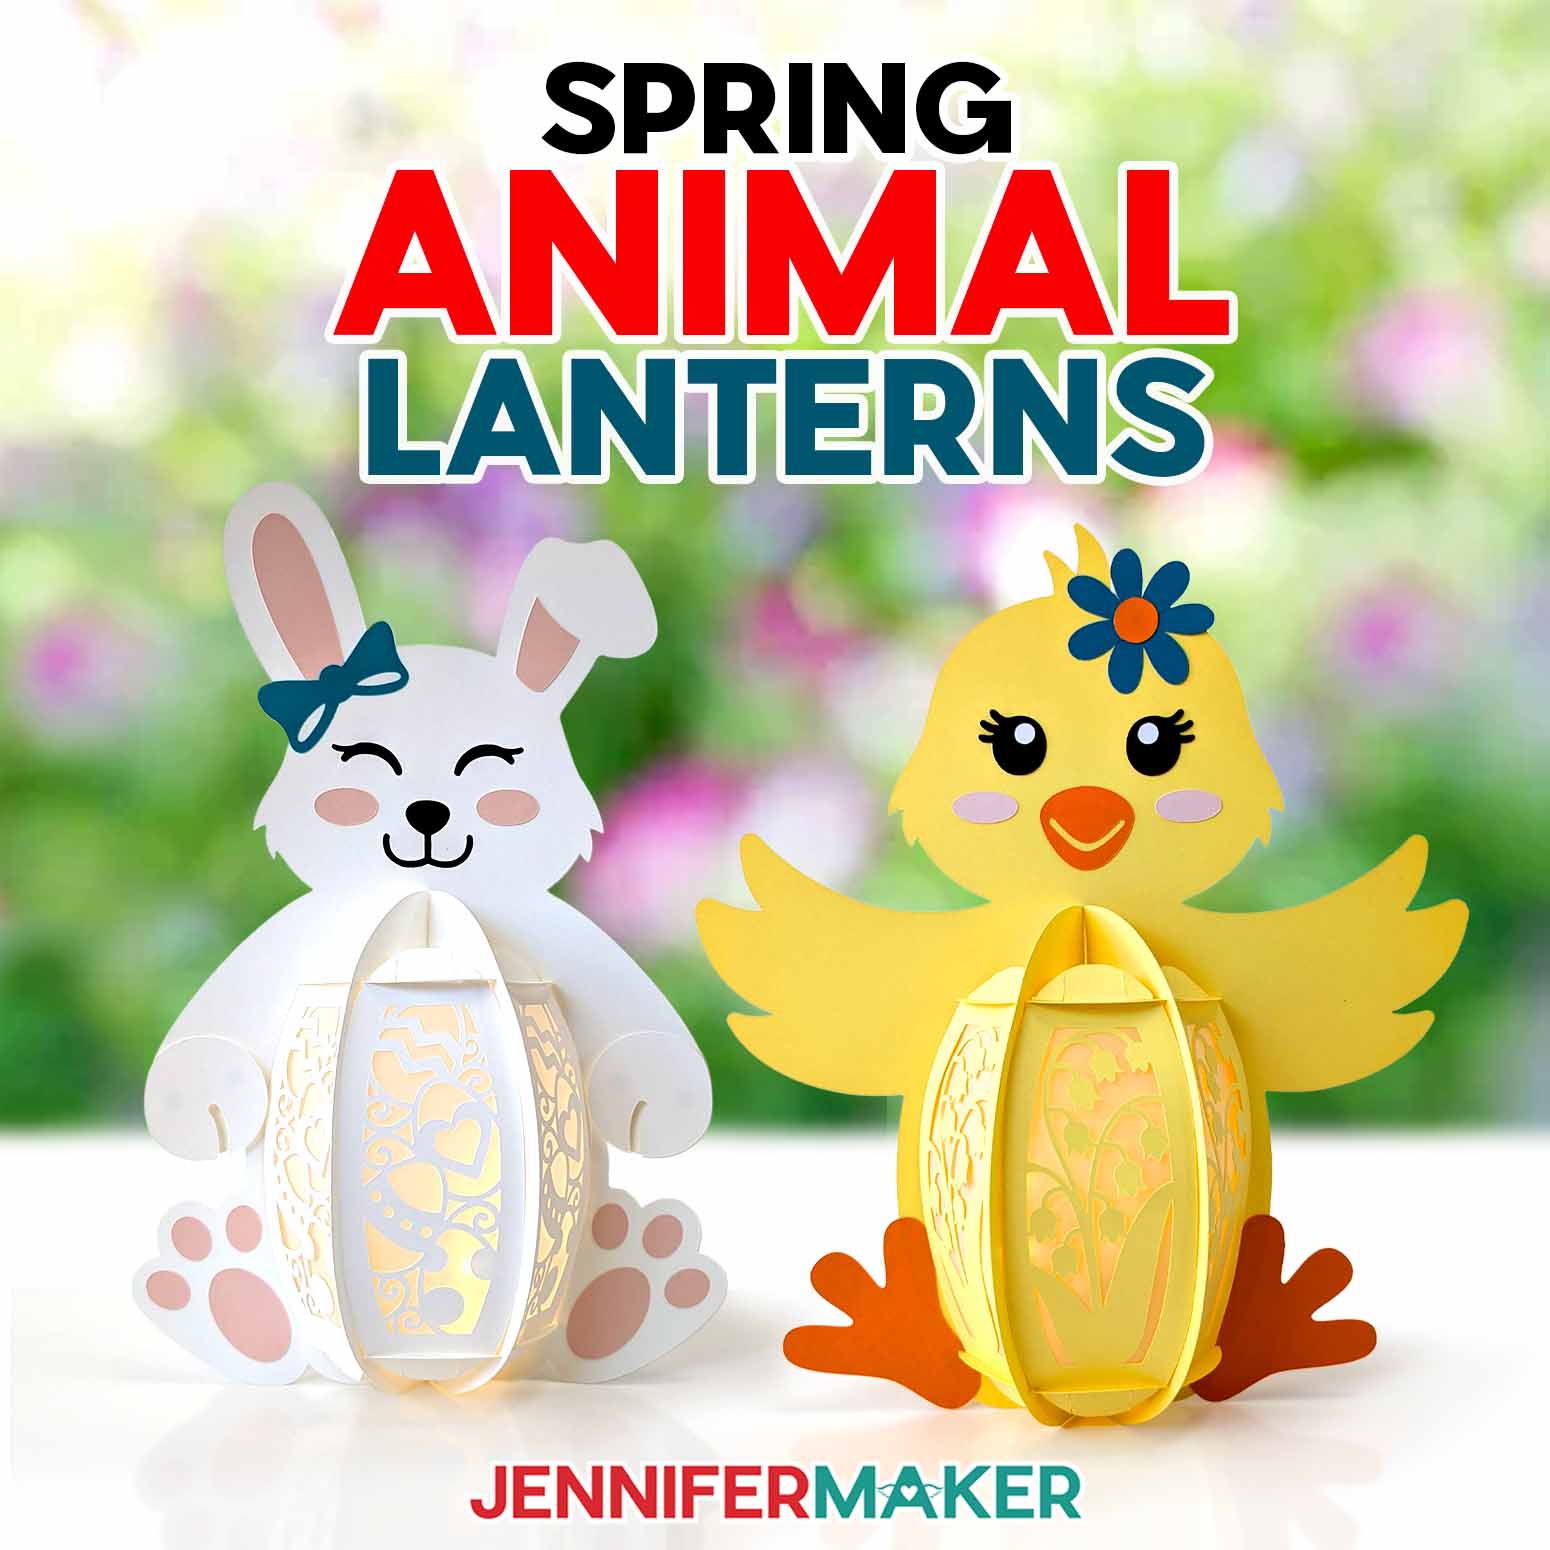
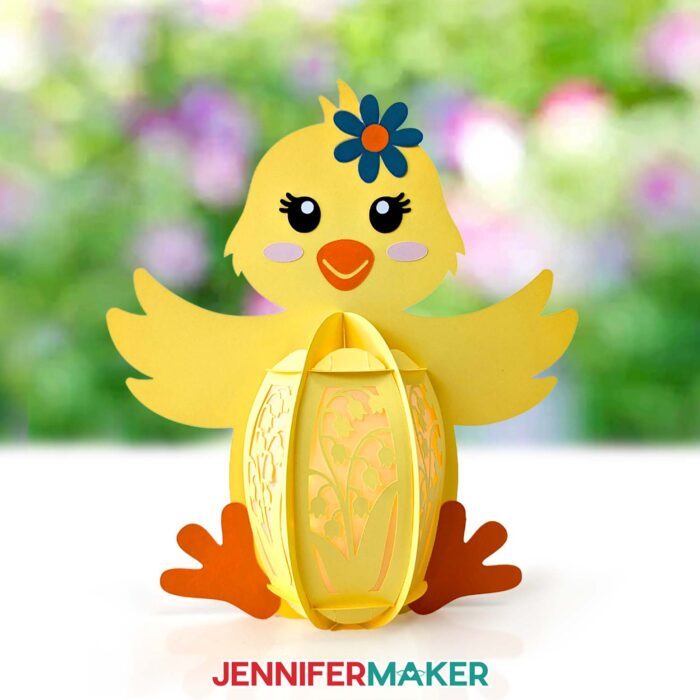
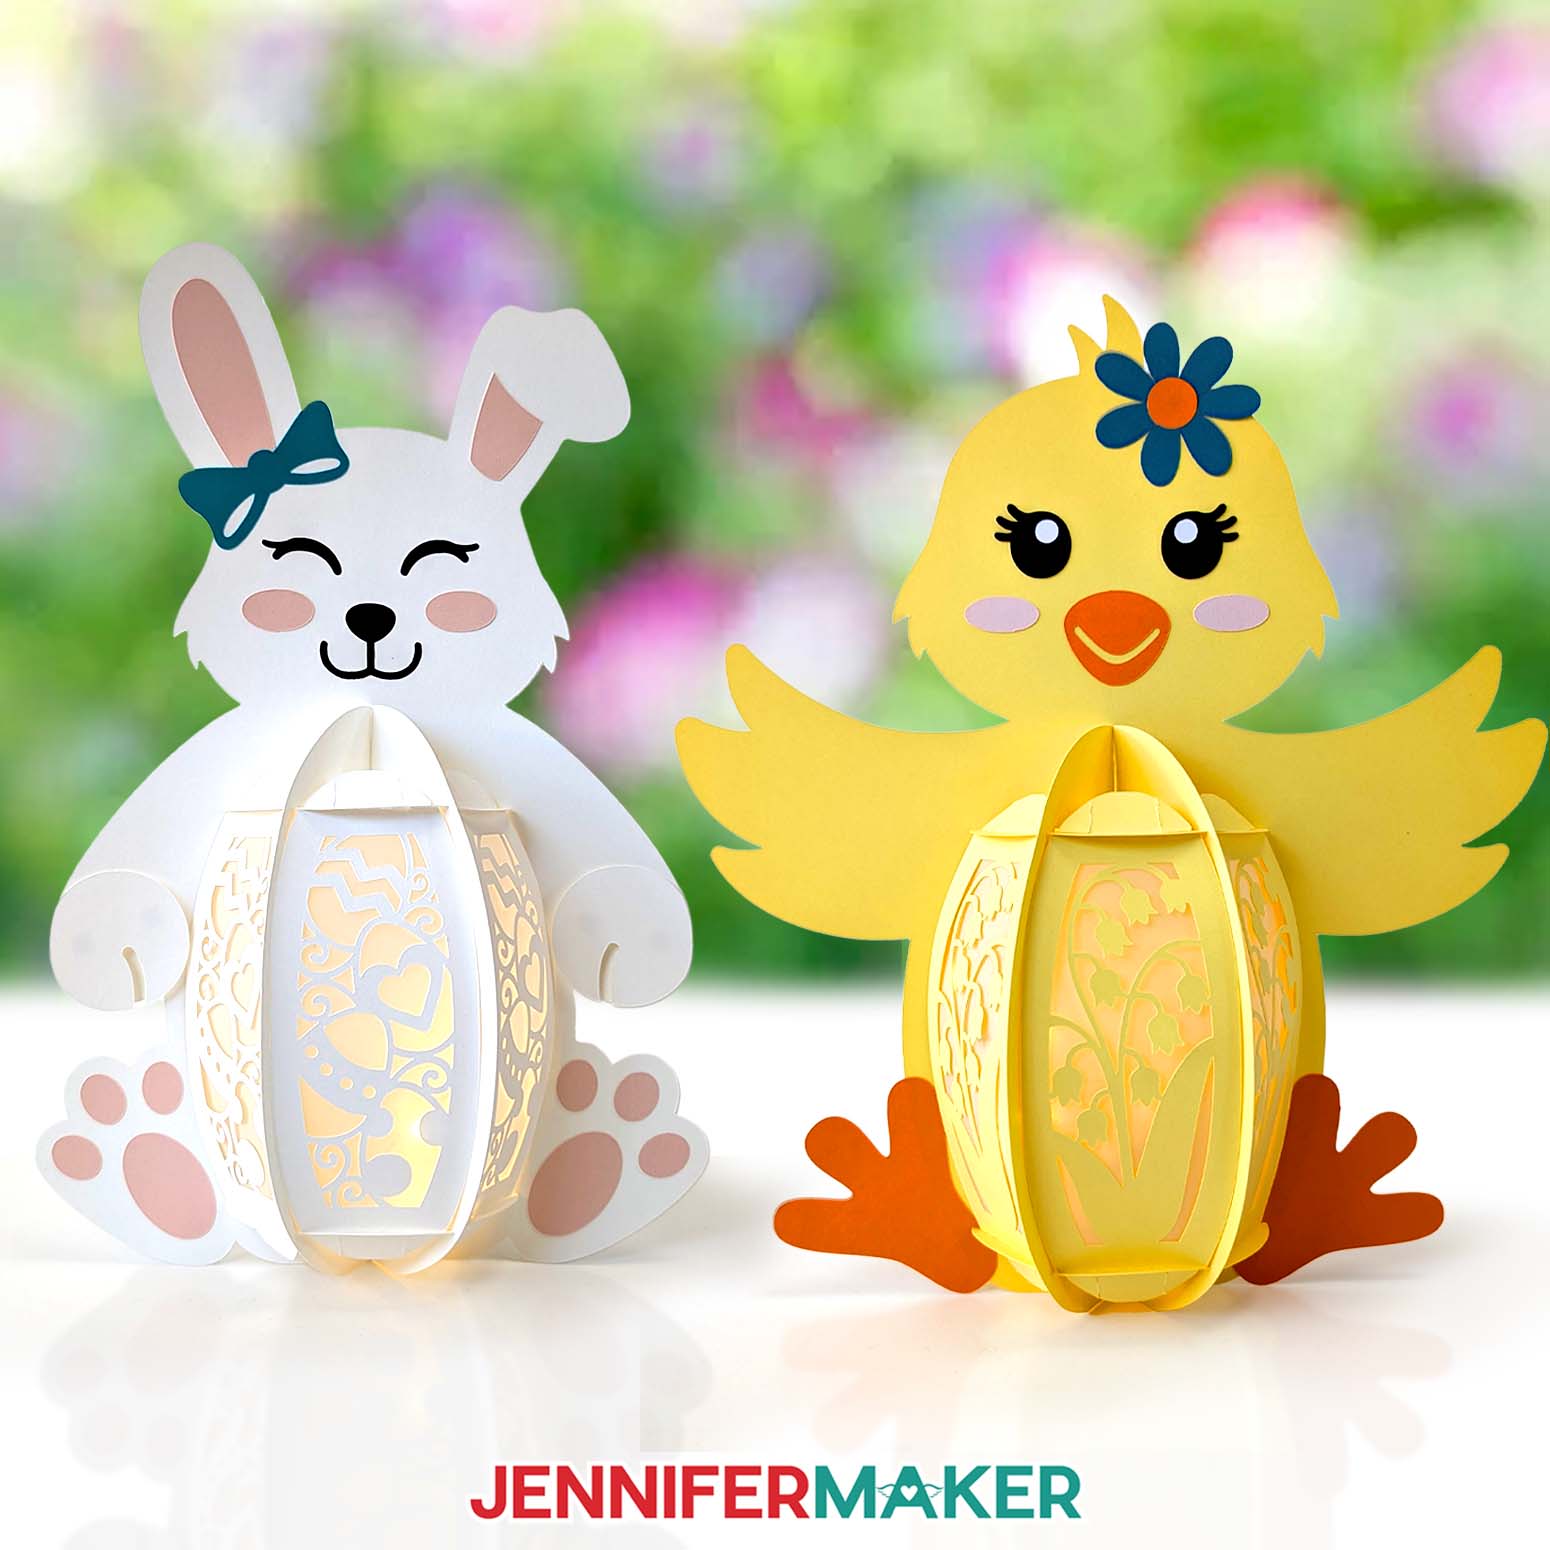
Learn how to light-up some springtime magic with adorable Easter animal lanterns!
Spring is (almost) in the air, and that means it’s time to start thinking about changing your decor for the season. Springtime always makes me think of flowers, butterflies, and cute baby animals, and my excitement for warmer weather has inspired me to make some adorable new animal lantern designs! Whether you’re hosting a family Easter dinner, preparing an egg hunt, or simply looking for a way to make your home feel a little festive, my Easter Lanterns are the perfect additions to your springtime decor.

Add a festive glow to your home this spring with adorable light-up Easter decorations shaped like cute animals! Each one has detailed panels with intricately cut cardstock flowers or and Easter eggs that glow with a battery-operated LED light.
These delightful paper lanterns can bring a bit of whimsy to your fireplace mantel, your Easter dinner centerpiece, or really any corner of your home that could use a dash of bright and cheery springtime cuteness. They also make super cute nightlights! And the best part? With a cutting machine, my tutorial, and my free Easter lantern SVG files, you can craft these light-up decorations yourself – easy peasy!
In the original Paper Animal Lantern tutorial, I walk you step-by-step through preparing an animal lantern in Cricut Design Space, then cutting it with a Cricut cutting machine. You can cut the lantern pieces by hand using my free PDF file as a guide, but a cutting machine ensures precision when cutting out the intricate details and making sure the pieces fit together correctly. Then I show you how to assemble the cute and cunning fox lantern, which come together just like my new bunny and chick designs. Need help placing the accent pieces on the bunny or chick lanterns? Scroll down for step-by-step directions with photos!
But first, to make these adorable Easter animal lanterns, you’ll need a few simple materials. I used 65 pound cardstock in white, soft pastel pinks and yellows, and some other bright and springy colors. For those who love to customize, there are endless possibilities for making these Easter lanterns uniquely your own with your favorite colors, patterns, and other materials! For extra customization, you can cut the optional diffuser panels in the SVG file from white or multicolored vellum to soften the glow of your lights through the cutouts.
You’ll need a little craft glue to attach the facial features and accents; my favorite kind is linked below in my materials list along with everything else you’ll need. As far as lighting goes, LED tea lights or LED fairy lights are a safe way to set your lantern aglow. Never use real candles or flames in paper lanterns!
Would you like to customize your own Easter lantern? ADVANCE by JenniferMaker members get access to an exclusive toolkit with elements to use in your own unique lantern panel designs to fit the bunny and chick from this collection, as well as the fox and hummingbird from the original tutorial! Learn more about ADVANCE here!
My Easter lanterns look beautiful nestled among Easter grass and fairy lights, or placed in windows to greet guests with a festive welcome. If you’re hosting an Easter event, lining your walkway with these glowing creations is a surefire way to create an unforgettable entrance! I hope you’ll make your own and share photos with me in my Cricut Crafters and Makers group!

Let me show you how to make adorable animal Easter lanterns! This post contains some affiliate links for your convenience (which means if you make a purchase after clicking a link I will earn a small commission but it won’t cost you a penny more, there is no additional cost)! Read my full disclosure policy.
Materials to Make Animal Easter Lanterns
View my Amazon shopping list for the exact items I used!
For the Bunny:
- Five (5) Sheets of 12″ x 12″ 65 lb. Solid Core Cardstock OR 12″ x 12″ 80 lb. Solid Core Cardstock (I used 2 white, 1 pink, 1 blue, and 1 black)
- Two (2) Sheets of 12″ x 12″ lb. White Cardstock (optional if white is not included in your pack)
- One (1) Sheet of 8.5″ x 11″ 80 lb. Black Cardstock (optional to use instead of 65 lb.)
For the Chick:
- Nine (9) Sheets of 12″ x 12″ 65 lb. Solid Core Cardstock OR 12″ x 12″ 80 lb. Solid Core Cardstock (I used 3 yellow, 1 white, 1 pink, 1 orange, 1 blue, and 1 black)
- Two (2) Sheets of 12″ x 12″ Orange Cardstock (optional)
- One (1) Sheet of 8.5″ x 11″ 80 lb. Black Cardstock (optional to use instead of 65 lb.)
For Either Design:
- One (1) Sheet of 8.5″ x 11″ or 12″ x 12″ Vellum (any color for optional diffuser panels)
- One (1) Strand of LED Fairy Lights -OR-
- One (1) Remote-Controlled LED Tea Light
- A way to cut your cardstock – I’m using the Cricut Maker 3, but you can also use the Cricut Maker, a Cricut Explore Series machine, the Cricut Venture, or the Cricut Joy Xtra
- Cricut Blue LightGrip Machine Mat 12″ x 12″ (optional for diffuser pieces)
- Scoring Stylus -OR- Single Scoring Wheel (optional for files with score lines)
- Craft Glue
- Brayer, Scraper. Spatula. Weeding Tool (optional for poking out small cutouts)
- Tweezers (optional)
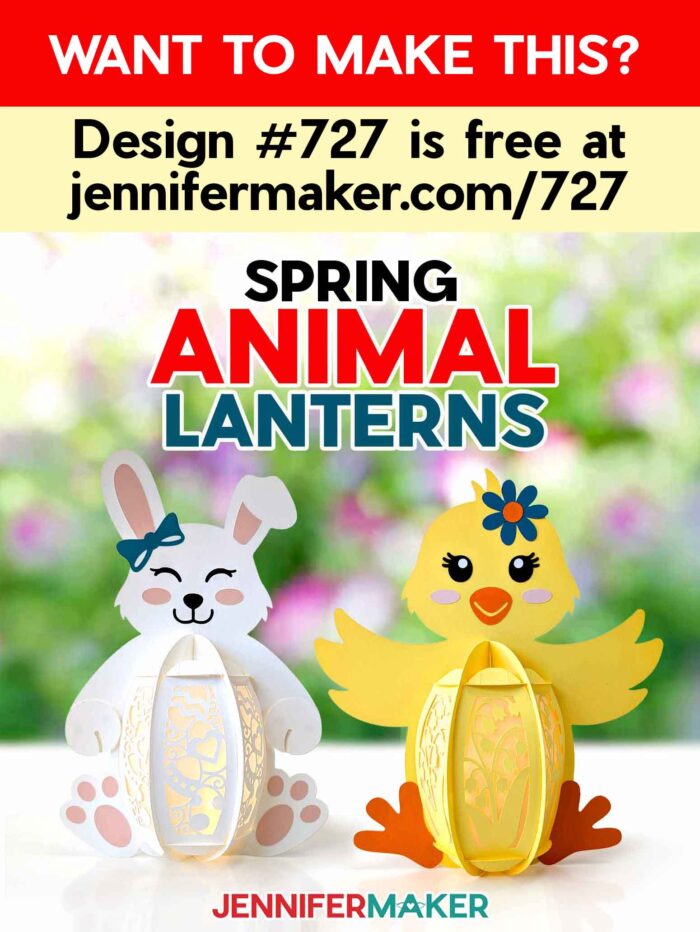
- Design #727 (My free SVG/DXF/PDF design files are available in my free resource library – get the password by filling out the form at the bottom of this page
How to Make Paper Animal Lanterns!

Spring Animal Lanterns
Learn how to make cute spring animal lanterns with cardstock and an LED tea light or fairy lights!
Materials
- Five to Eight (5-8) Sheets of 12" x 12" 65 lb. Solid Core Cardstock -OR-
- 12" x 12" 80 lb. Solid Core Cardstock (I used 2 white, 1 pink, 1 blue, and 1 black for the Bunny and 3 yellow, 1 white, 1 pink, 1 orange, 1 blue, and 1 black for the Chick)
- One to Two (1-2) Sheets of 12" x 12" 80 lb. White Cardstock (optional if white is not included in your pack)
- One (1) Sheet of 8.5" x 11" 80 lb. Black Cardstock (optional to use instead of 65 lb. black)
- One (1) Sheet of 12" x 12" 83 lb. Orange Cardstock (optional to use for Chick instead of 65 lb. orange)
- One (1) Sheet of 8.5" x 11" or 12" x 12" Vellum (any color for optional diffuser panels)
- One (1) Strand of LED Fairy Lights -OR-
- One (1) Remote-Controlled LED Tea Light
- Design #727 (My free SVG/PDF/DXF design files are available in my free resource library - get the password by filling out the form at the bottom of this page)
Tools
- A way to cut your cardstock - I’m using the Cricut Maker 3, but you can also use the Cricut Maker, a Cricut Explore Series machine, the Cricut Venture, or the Cricut Joy Xtra
- Cricut Green StandardGrip Machine Mat 12" x 12"
- Cricut Blue LightGrip Machine Mat 12" x 12" (optional for diffuser pieces)
- Scoring Stylus (optional for files with score lines) -OR-
- Single Scoring Wheel (optional for files with score lines)
- Craft Glue (I used Bearly Art Precision Glue)
- Foam Adhesive Squares (optional for attaching Bunny's paws)
- Brayer
- Spatula
- Scraper
- Weeding Tool (optional for poking out small cutouts)
- Tweezers (optional)
Instructions
STEP 1: GET MY FREE SPRING ANIMAL LANTERN DESIGNS
First, download my Spring Animal Lanterns SVG/PDF/DXF files from my free library -- look for Design #727. Alternatively, you can use the Save This Project form near the top of this post and the design link will be emailed to you.
There are two designs in the folder: a bunny and a chick. There is also a DXF folder with cut files, and a PDF folder with versions you can print and cut by hand.
TIP: If you’re not sure how to upload, go to jennifermaker.com/svgs to learn how to unzip and upload SVG files.
STEP 2: PREPARE AND CUT YOUR SPRING ANIMAL LANTERN DESIGN
See my original Paper Animal Lanterns tutorial for details on preparing and cutting these designs.
STEP 3: ASSEMBLE YOUR SPRING ANIMAL LANTERN DESIGNS
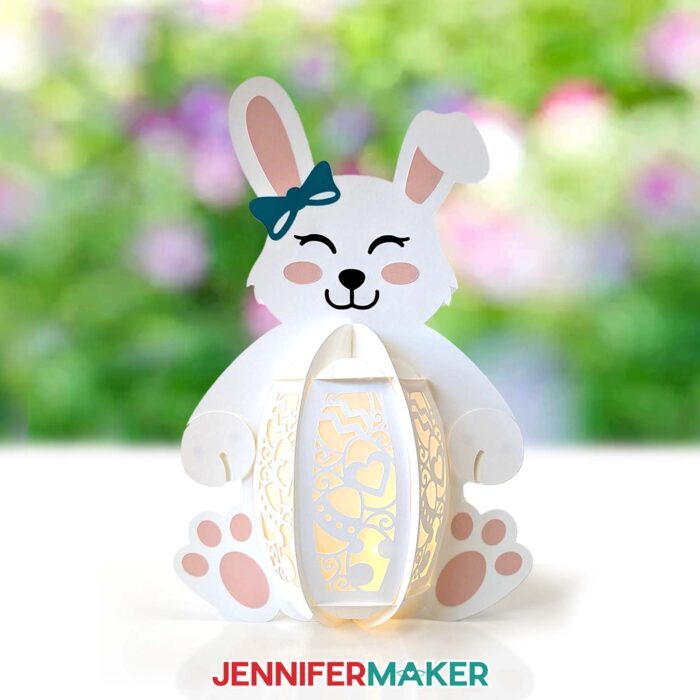
BUNNY
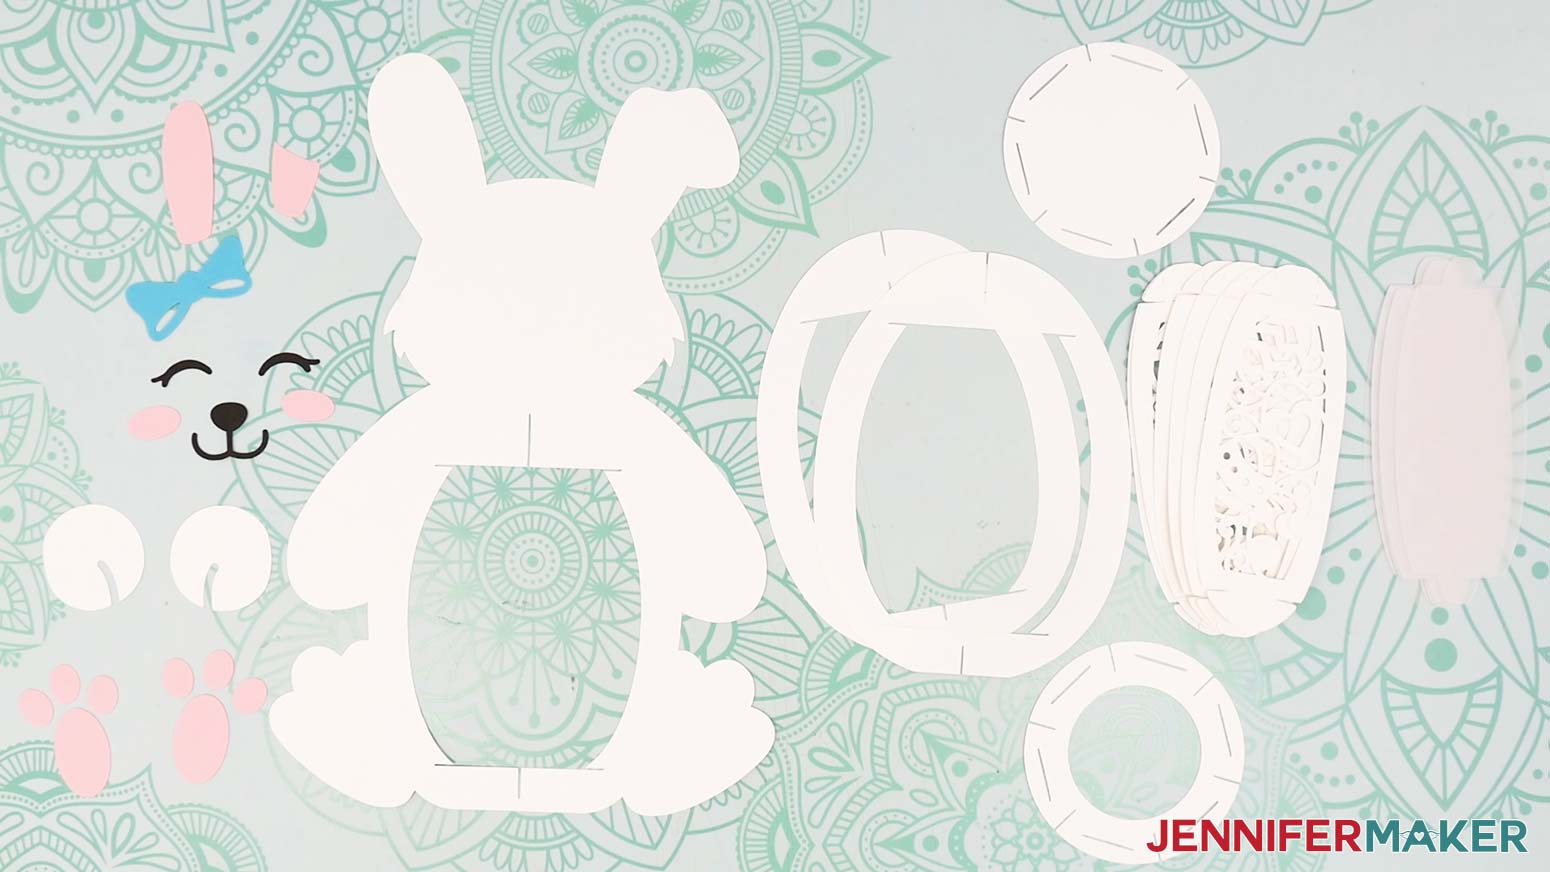
- Lay the bunny’s body frame face up on your work area, with the floppy ear on the right side.

- Using your Canvas in Cricut Design Space as reference, place the bunny’s small accent pieces in their correct spots on the body frame to avoid misplacing any of them.
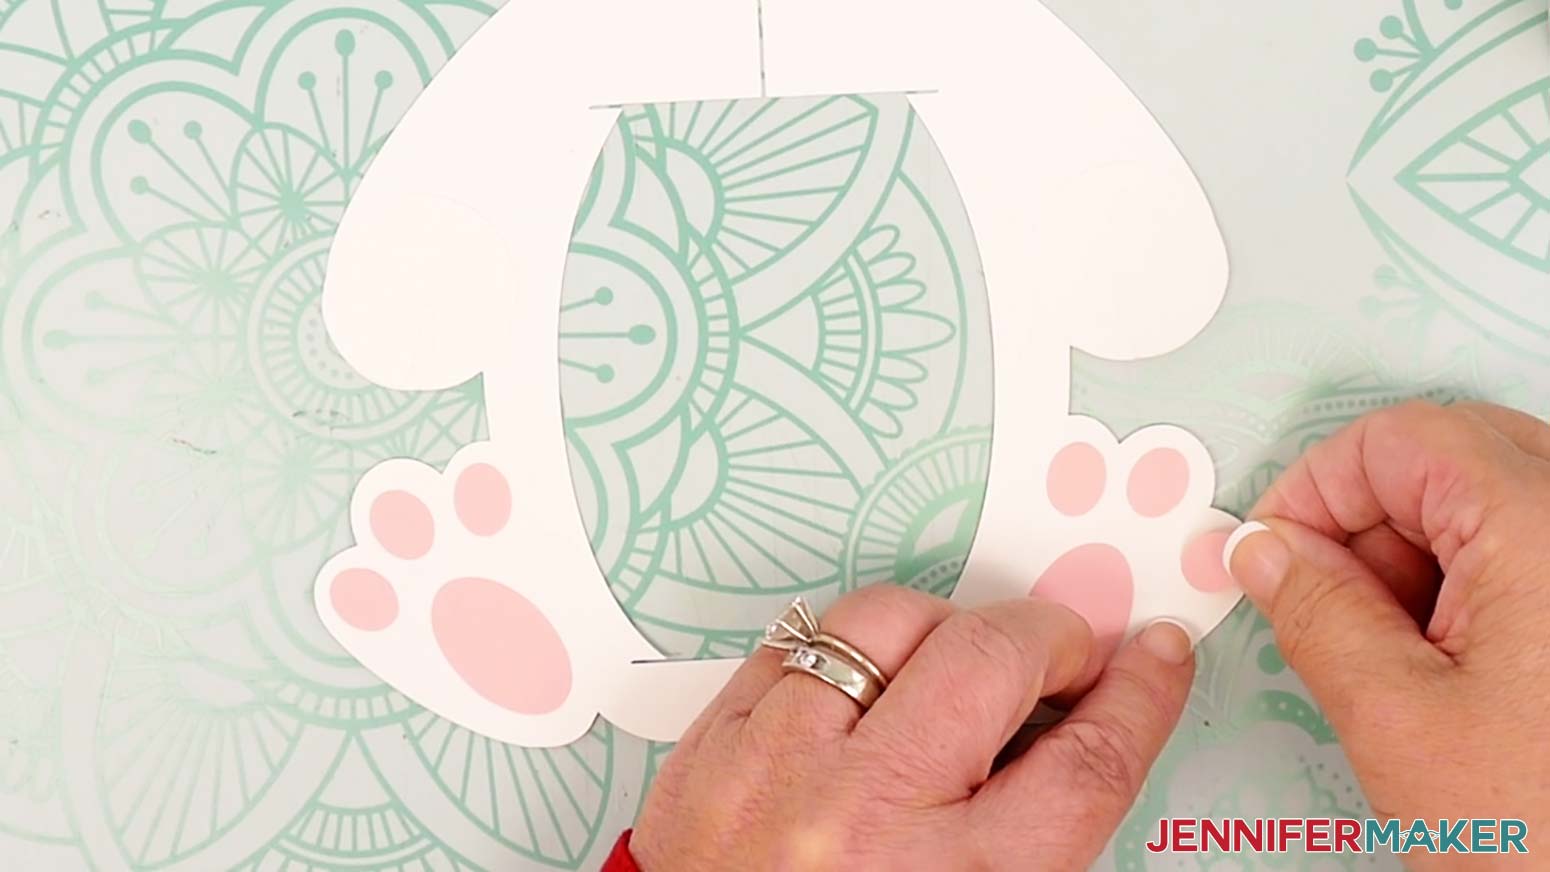
- Align the left paw on the bunny’s body frame, with the toe crease pointing down and curved slightly to the right.
TIP: Refer to your Design Space Canvas if you need help positioning the pieces correctly.
- Apply craft glue to the back of the paw piece, then place it back down into position on the body frame.
TIP: For added dimension, use small adhesive foam squares to attach the bunny’s paws instead of glue. - Press down to adhere the paw piece to the body.
- Repeat Steps 3-5 to align and adhere the right paw, with the toe crease pointing down and curved slightly to the left.

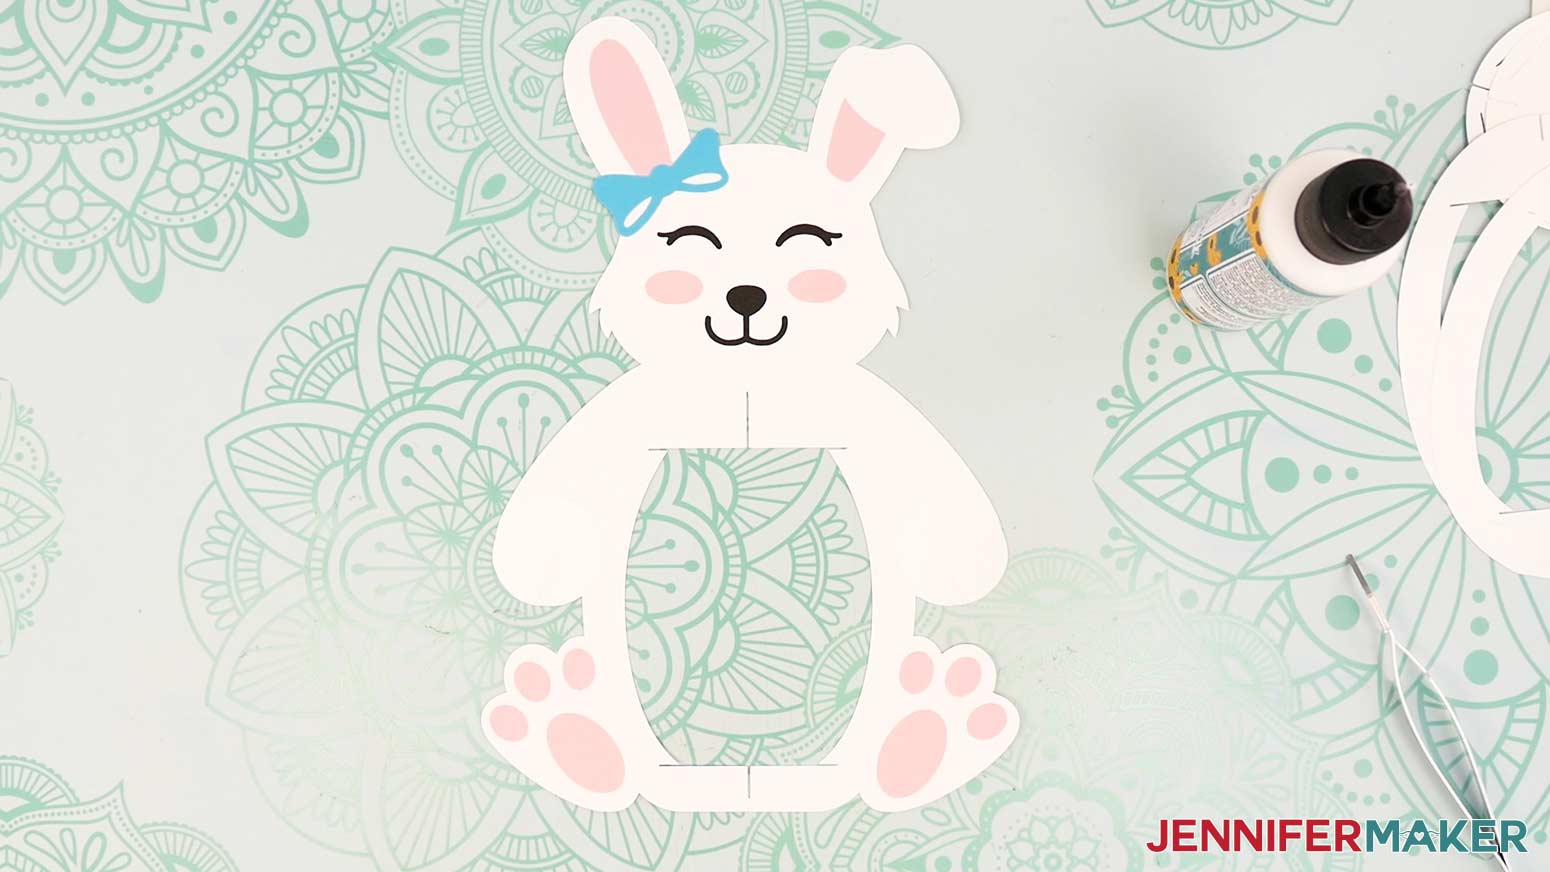
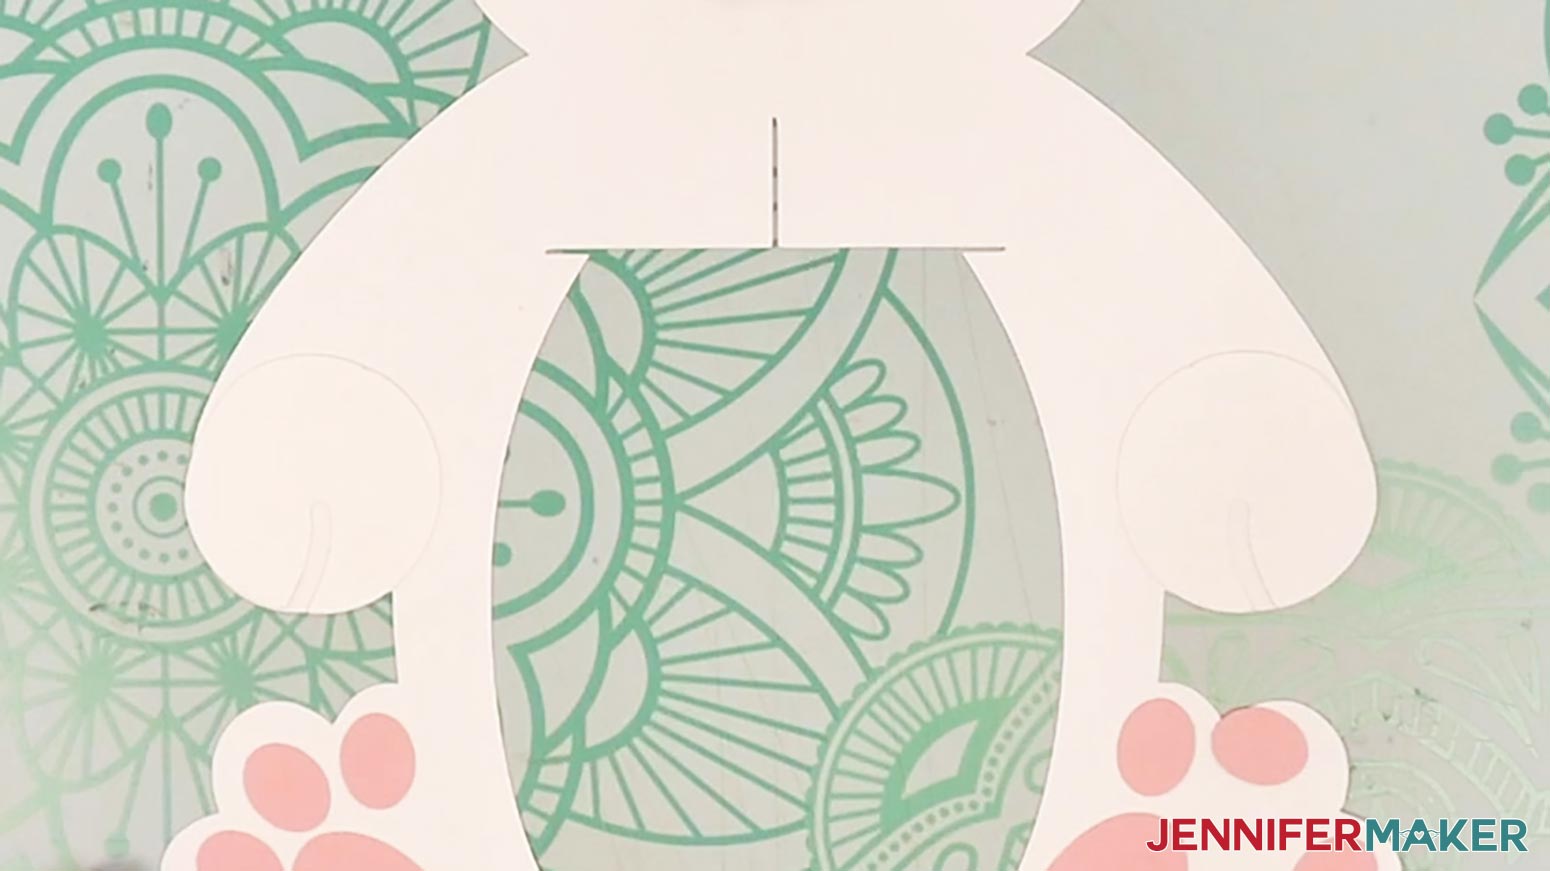
- Apply craft glue to the back of the nose and mouth piece, then adhere it to the face area of the body frame. The vertical line below the nose should align with the vertical slit on the bunny’s chest, and the nose should be level with the top tufts of hair on the bunny’s cheeks.
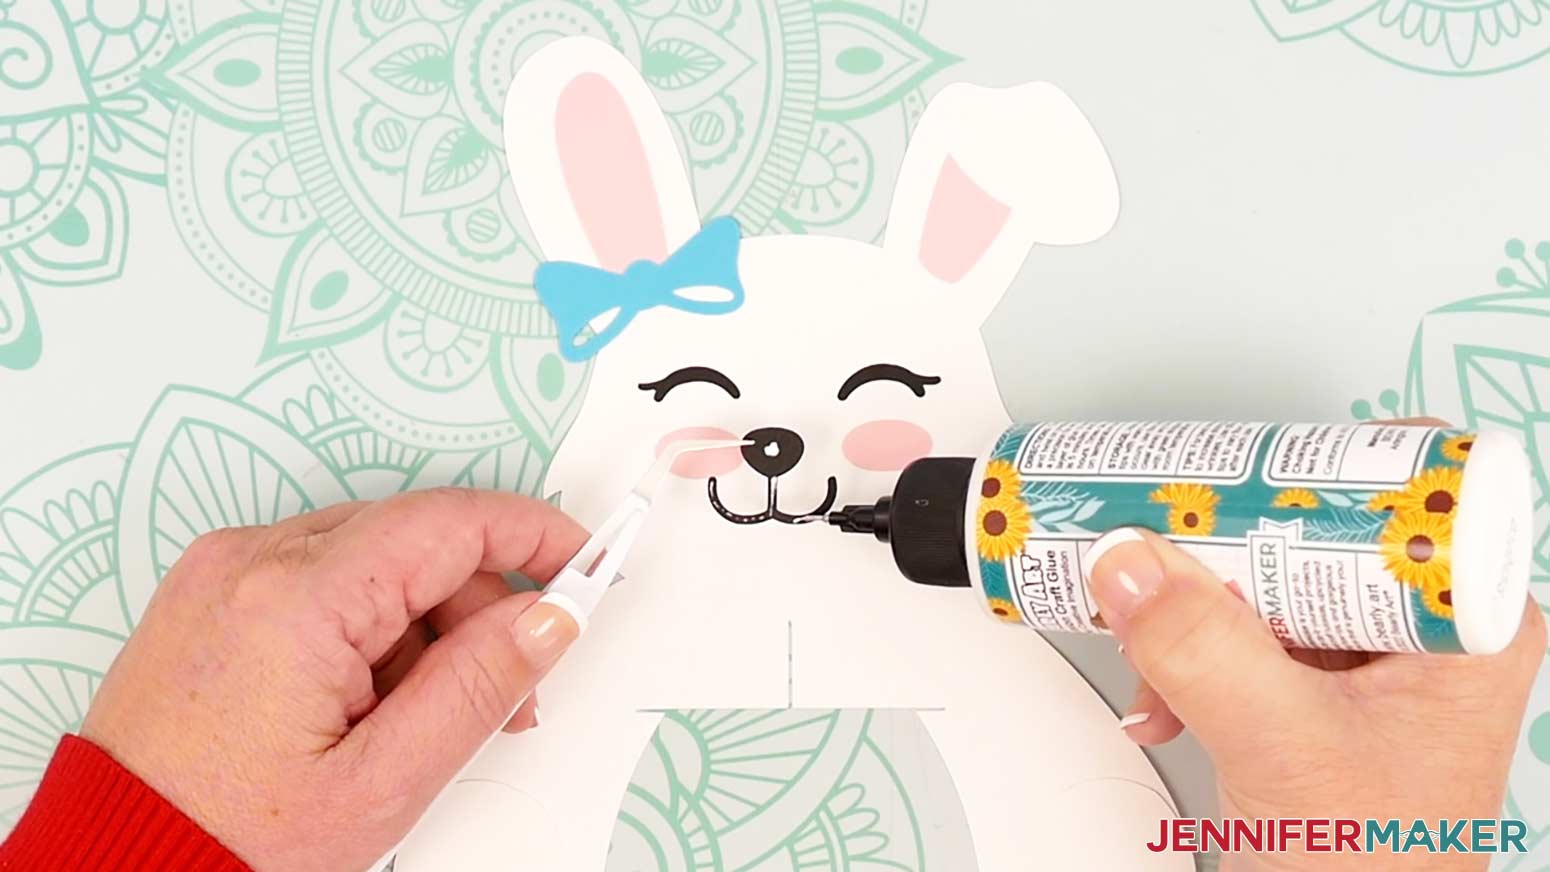
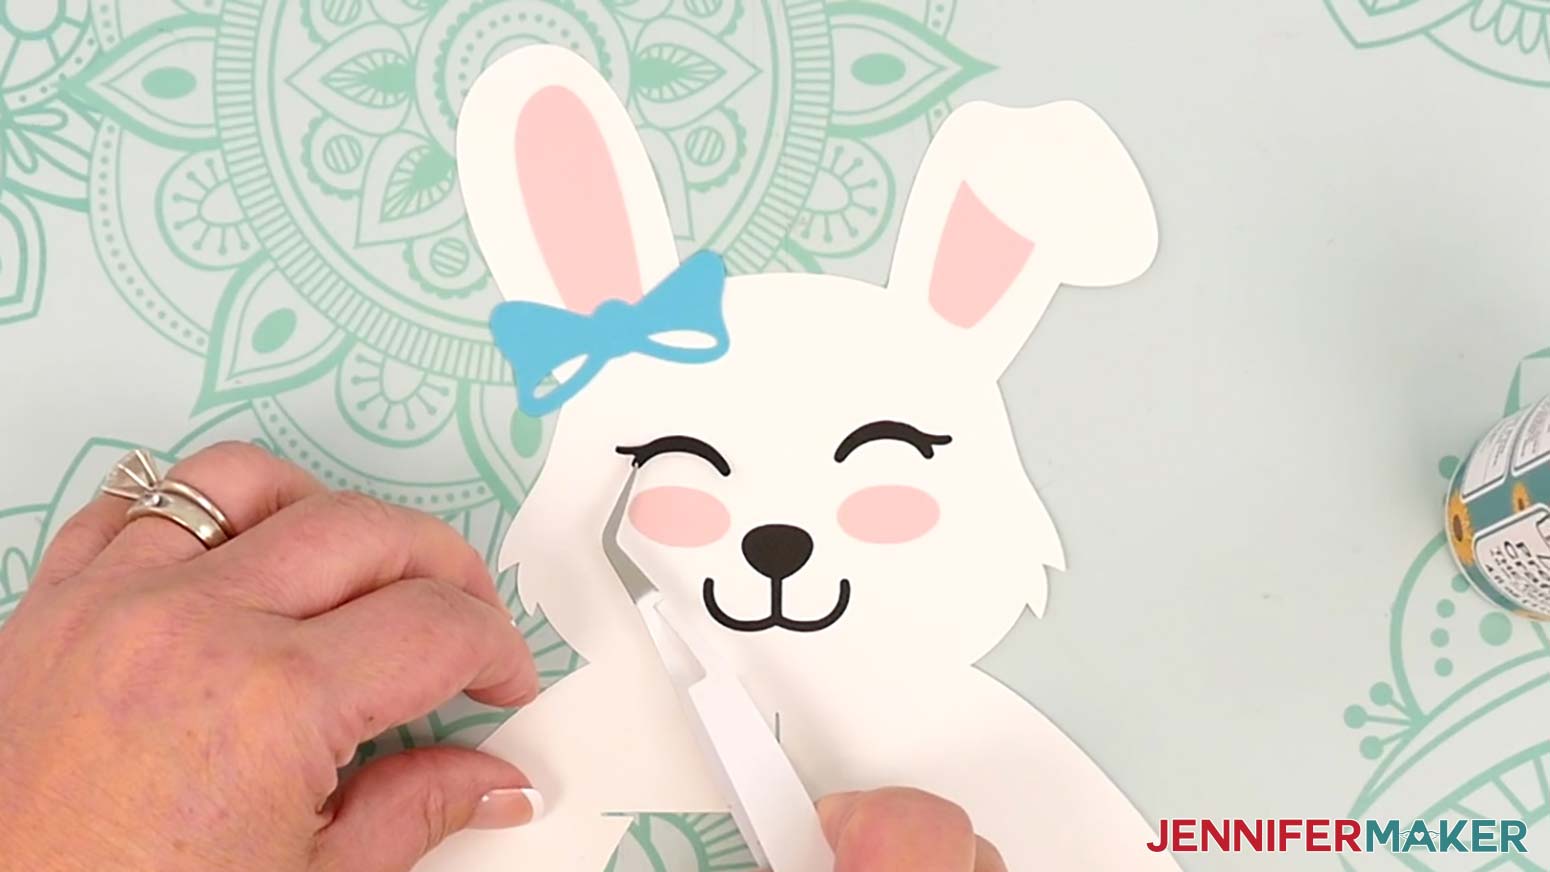
NOTE: If any glue seeps out, wipe it away with a finger or paper towel. - Apply dots of craft glue to the back of the left eye piece, which has the lashes pointing to the left. Then adhere it to the face area above and to the left of the nose. Be sure to leave room for the bow.
- Repeat step 8 with the right eye, with the lashes pointing to the right.
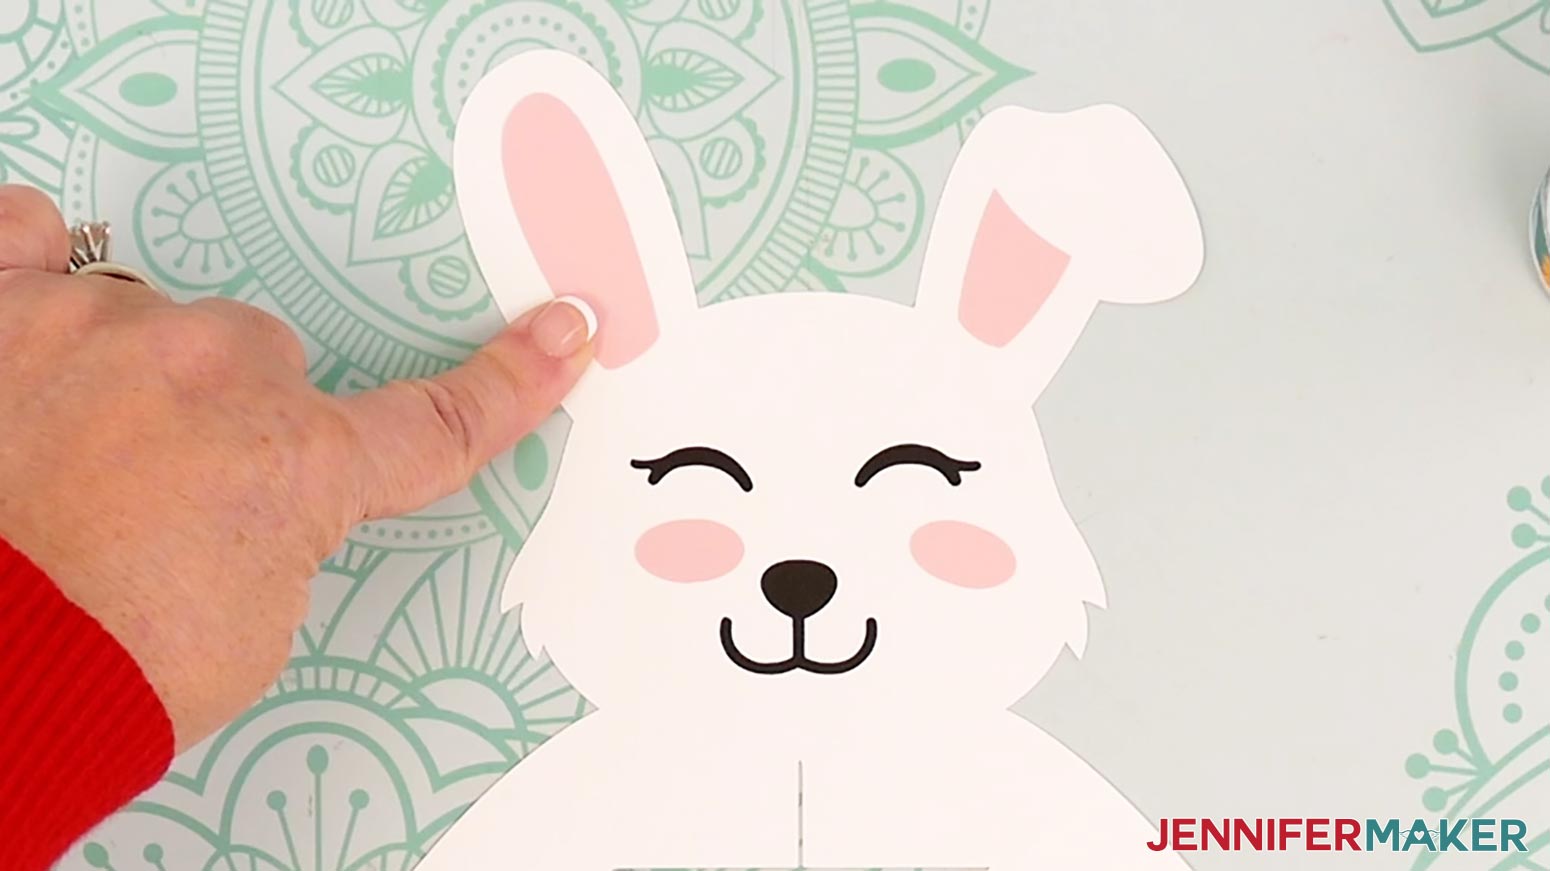
- Grab the larger inner ear piece for the bunny’s left ear. When it’s face up, the straighter edge on the bottom will point down to the left. Apply craft glue to the back, then center it within the left ear on the body frame. Align the bottom flat edge with the curve of the bunny’s head. Press to adhere it.
- Grab the smaller inner ear piece for the bunny’s right ear. When it’s face up, the straighter edge on the bottom will point down to the right. Apply craft glue to the back, then center it within the right ear on the body frame, aligning the bottom flat edge with the head’s curve. Its curved top edge should line up with the bunny’s flopped ear edge. Press to adhere it.
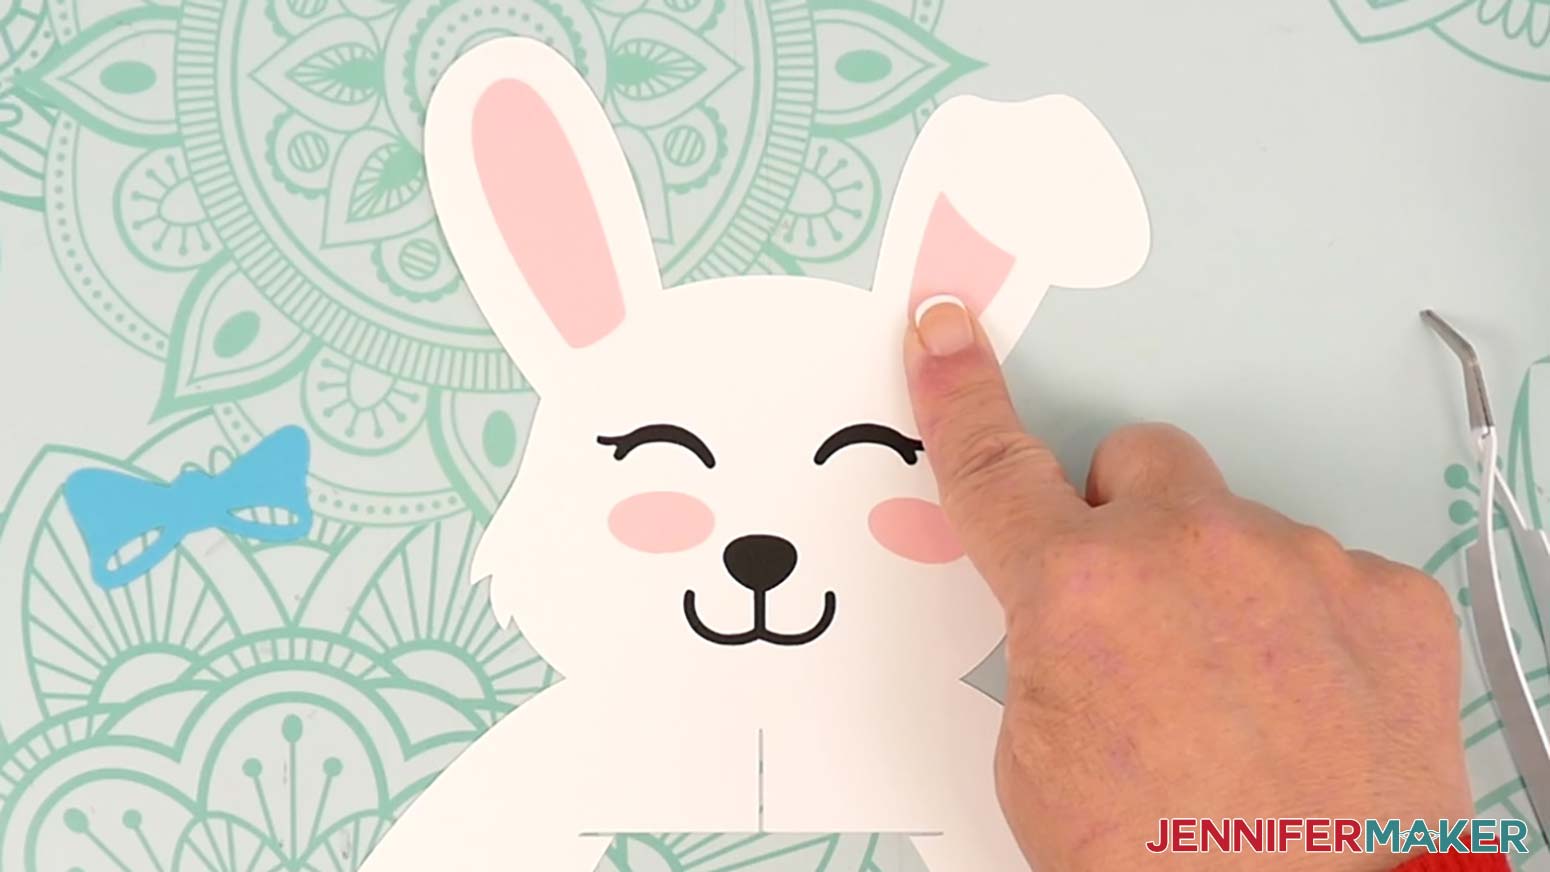
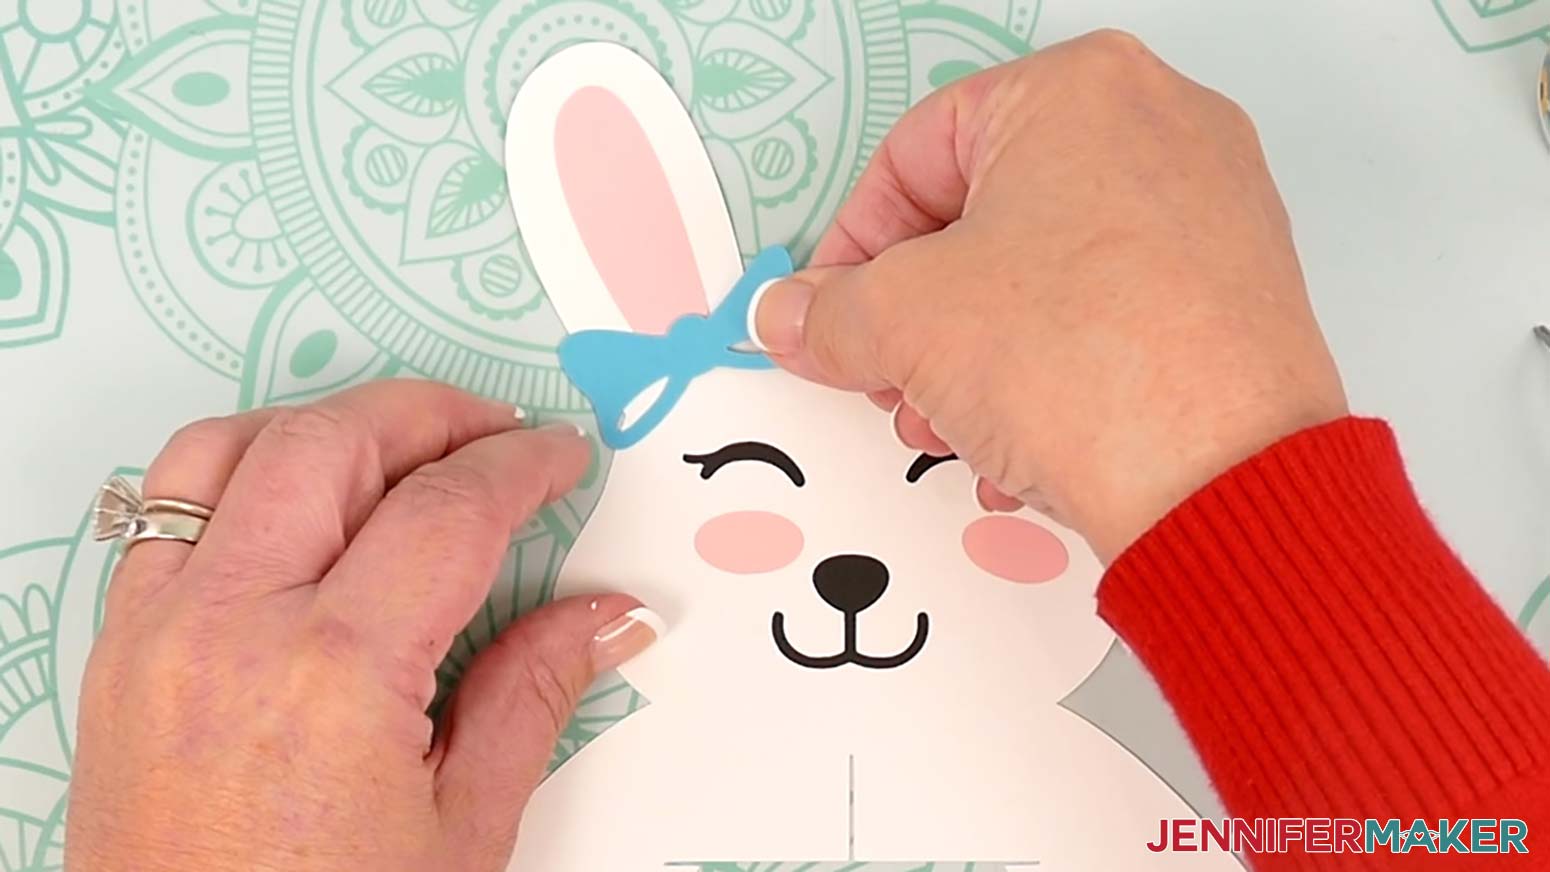
- Apply craft glue to the back center of the bow piece. With the bow’s cutouts on the bottom, adhere it to the base of the bunny’s left ear, covering the straight edge of the left inner ear piece.
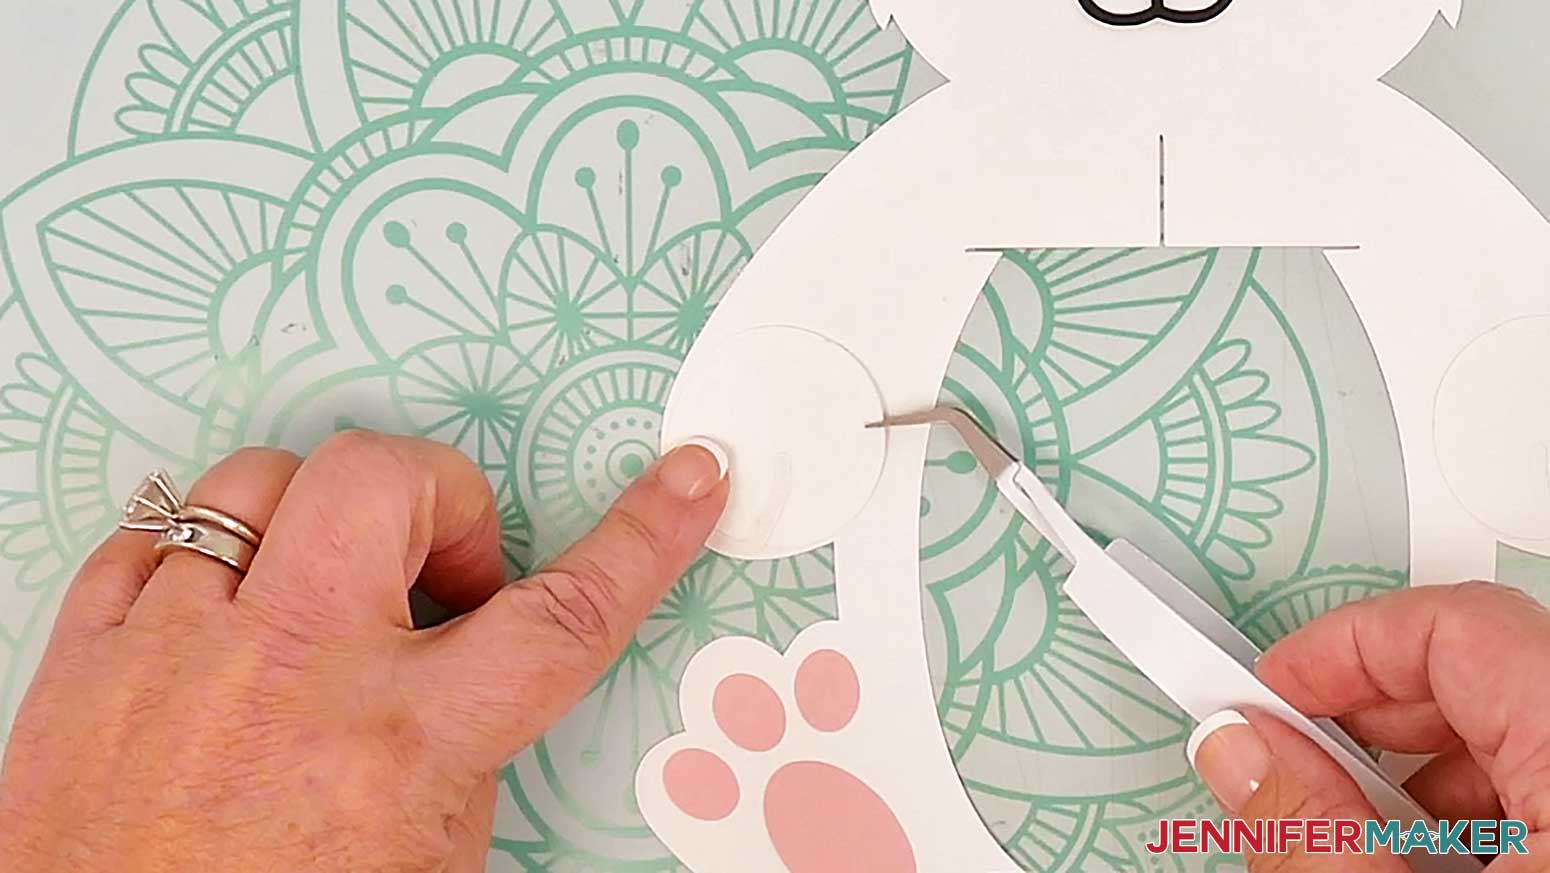
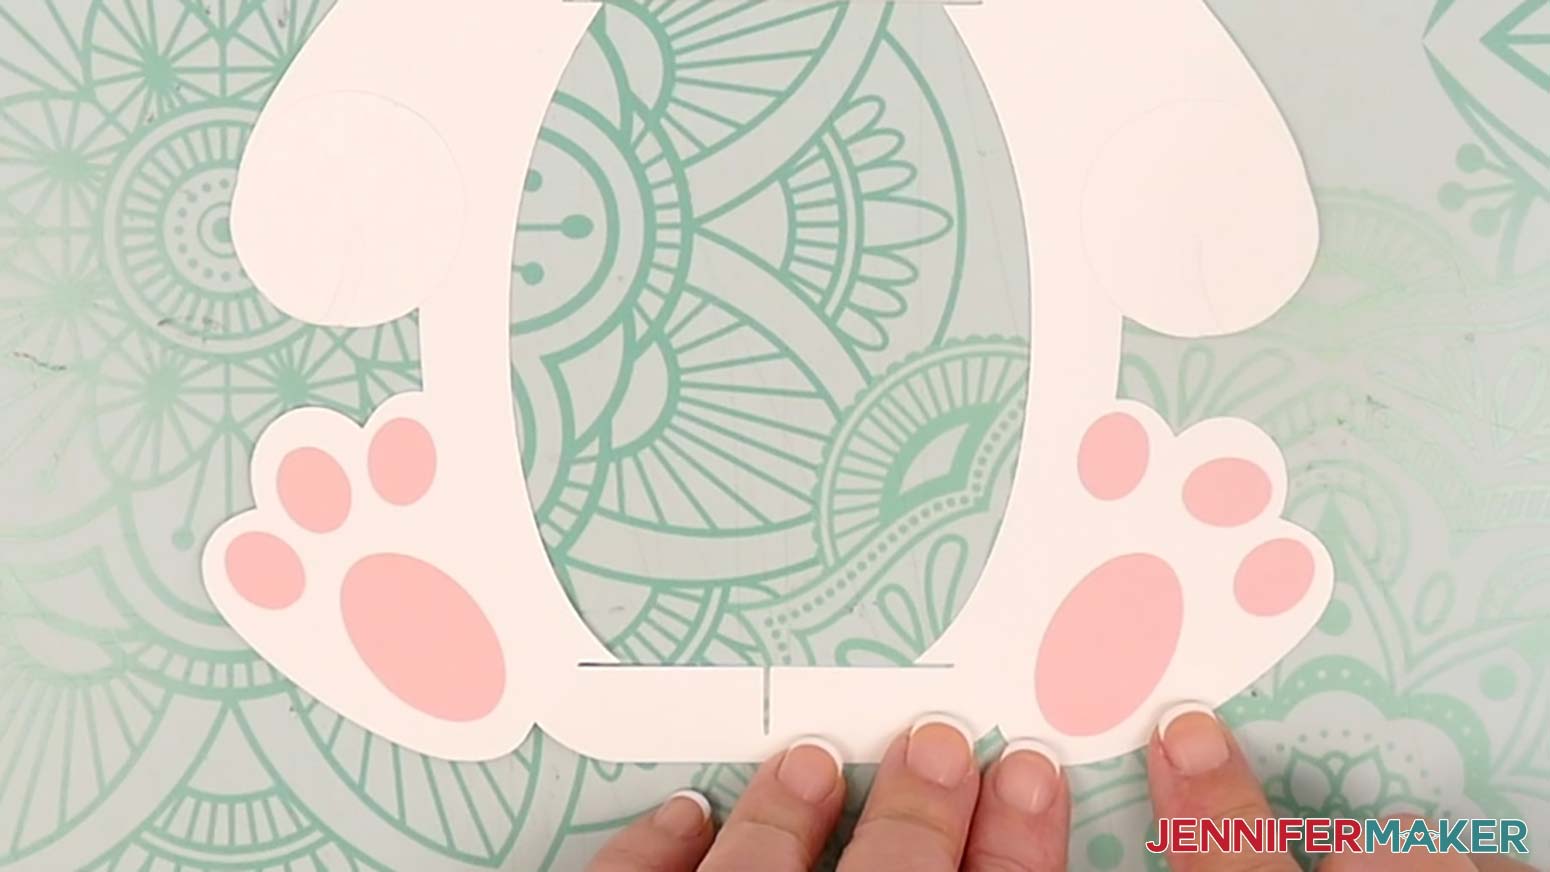
- Apply craft glue to the back of one of the two largest oval pieces. Adhere it to the bunny’s left foot on the body frame. The oval should be at an angle, closer to the bunny’s heel – with one tip following the curve of the heel and the other tip pointing toward the middle toe.
- Repeat step 13 with the other large oval on the right foot.
- Add glue to the back of one of the six smallest ovals. Adhere it to the center of the curved space between the large oval and one of the toe tips on the bunny’s foot on the body frame. The curve of the oval should follow the curve of the toe.
- Repeat step 15 with the remaining five small ovals, adhering one to each toe on both feet.
- Apply craft glue to the back of one of the two medium oval pieces. Adhere it to the bunny’s left cheek on the body frame. The oval should run horizontally, centered between the nose and head’s outer edge.
- Repeat step 17 with the other medium oval on the right cheek.
- Follow steps 18-35 in the original tutorial to assemble your paper bunny lantern!

CHICK
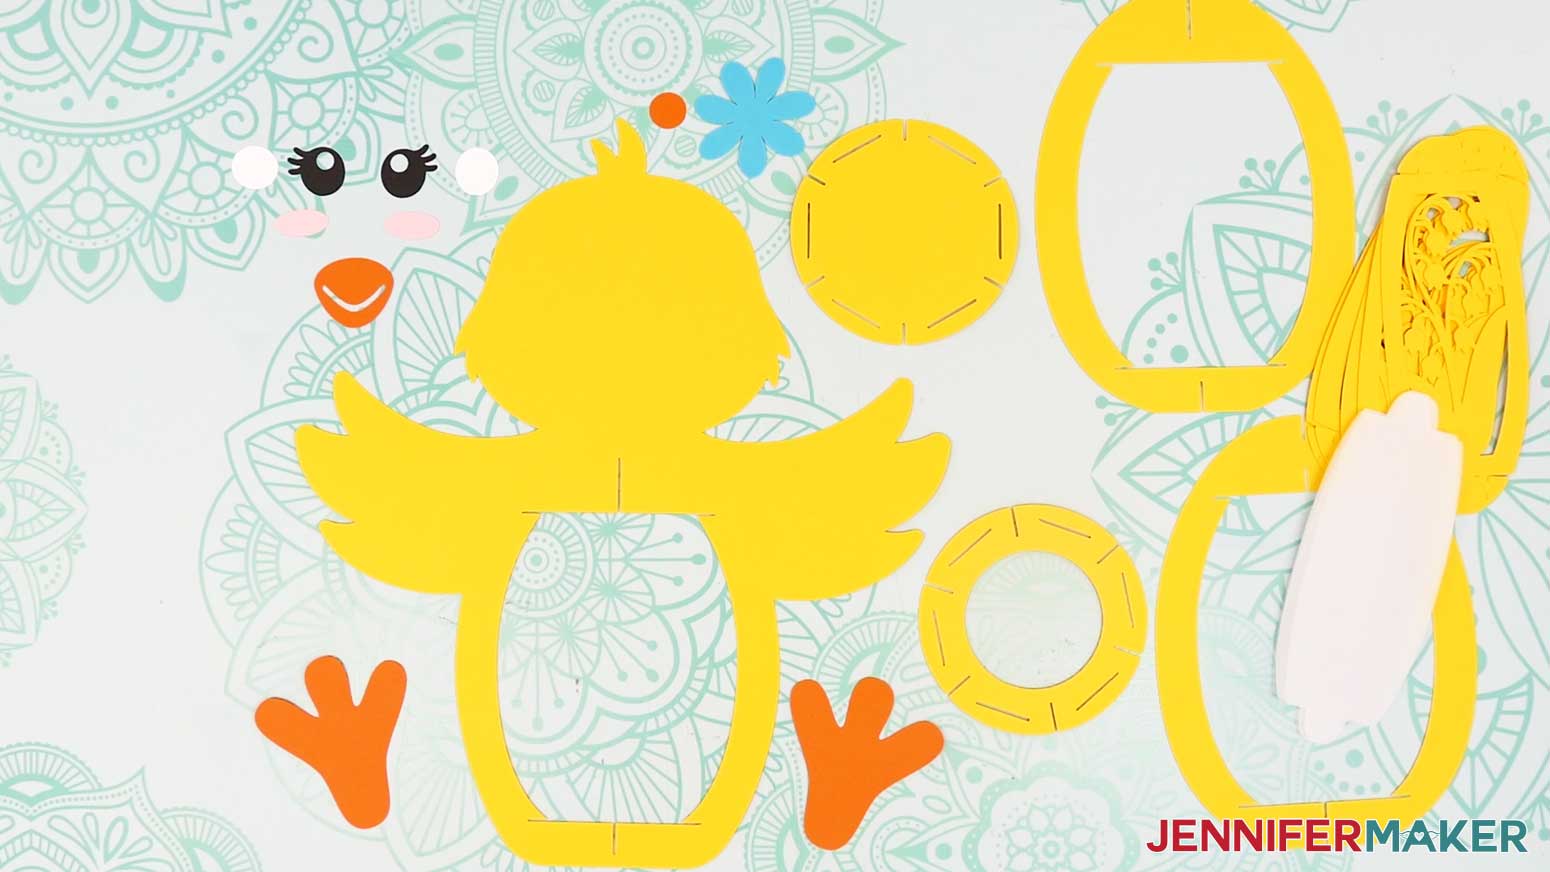
- Lay the chick’s body frame face up on your work area, with the feathers on the top of the head pointing left.
- Using your Canvas in Cricut Design Space as reference, place the chick’s small accent pieces in their correct spots on the body frame to avoid misplacing any of them.
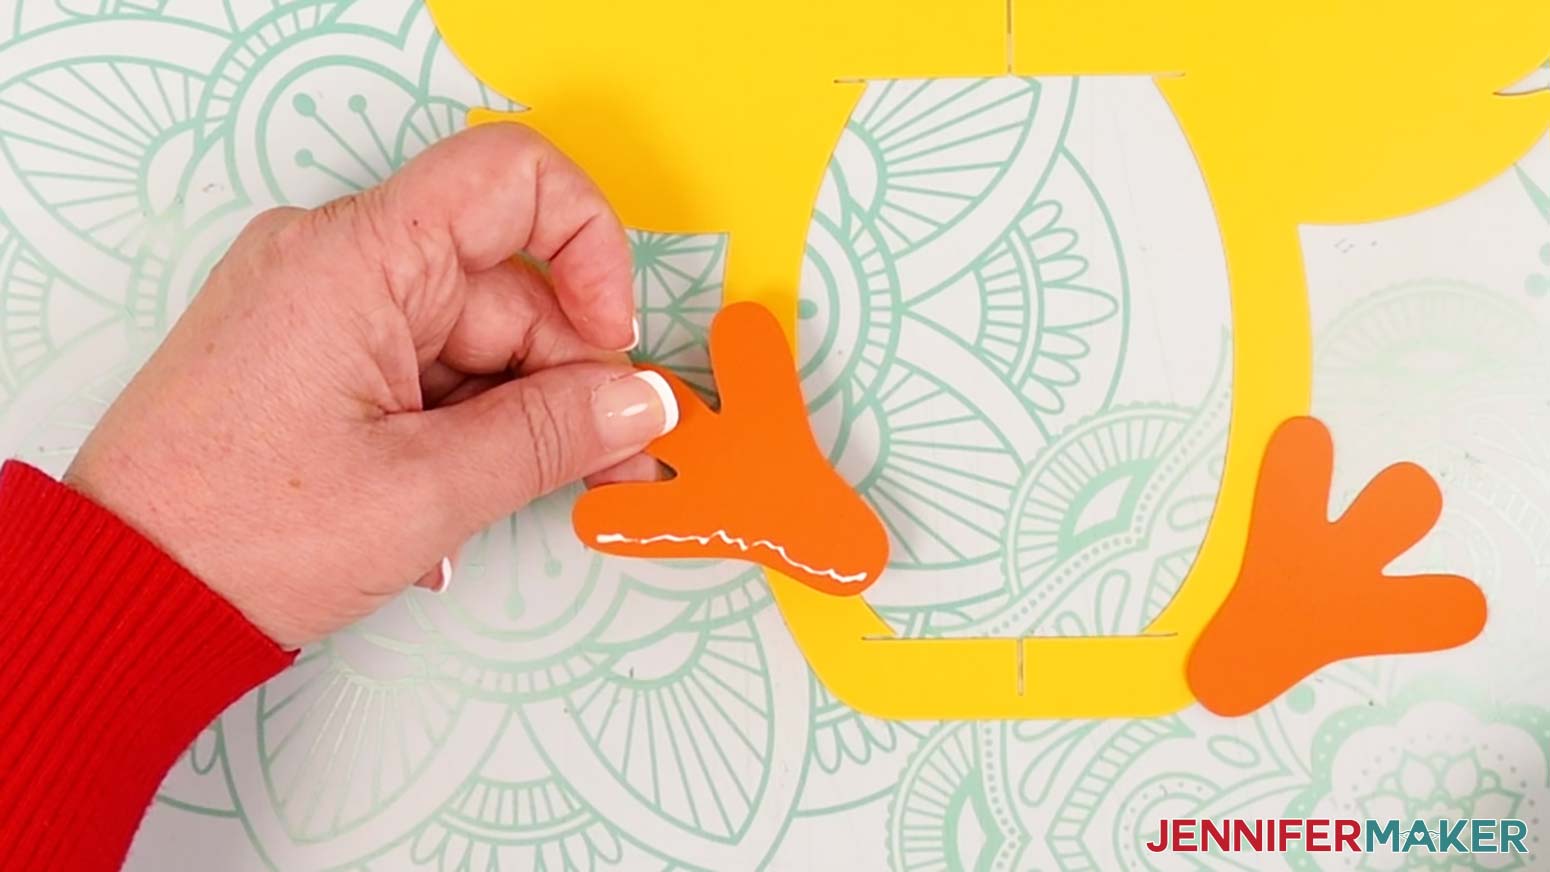
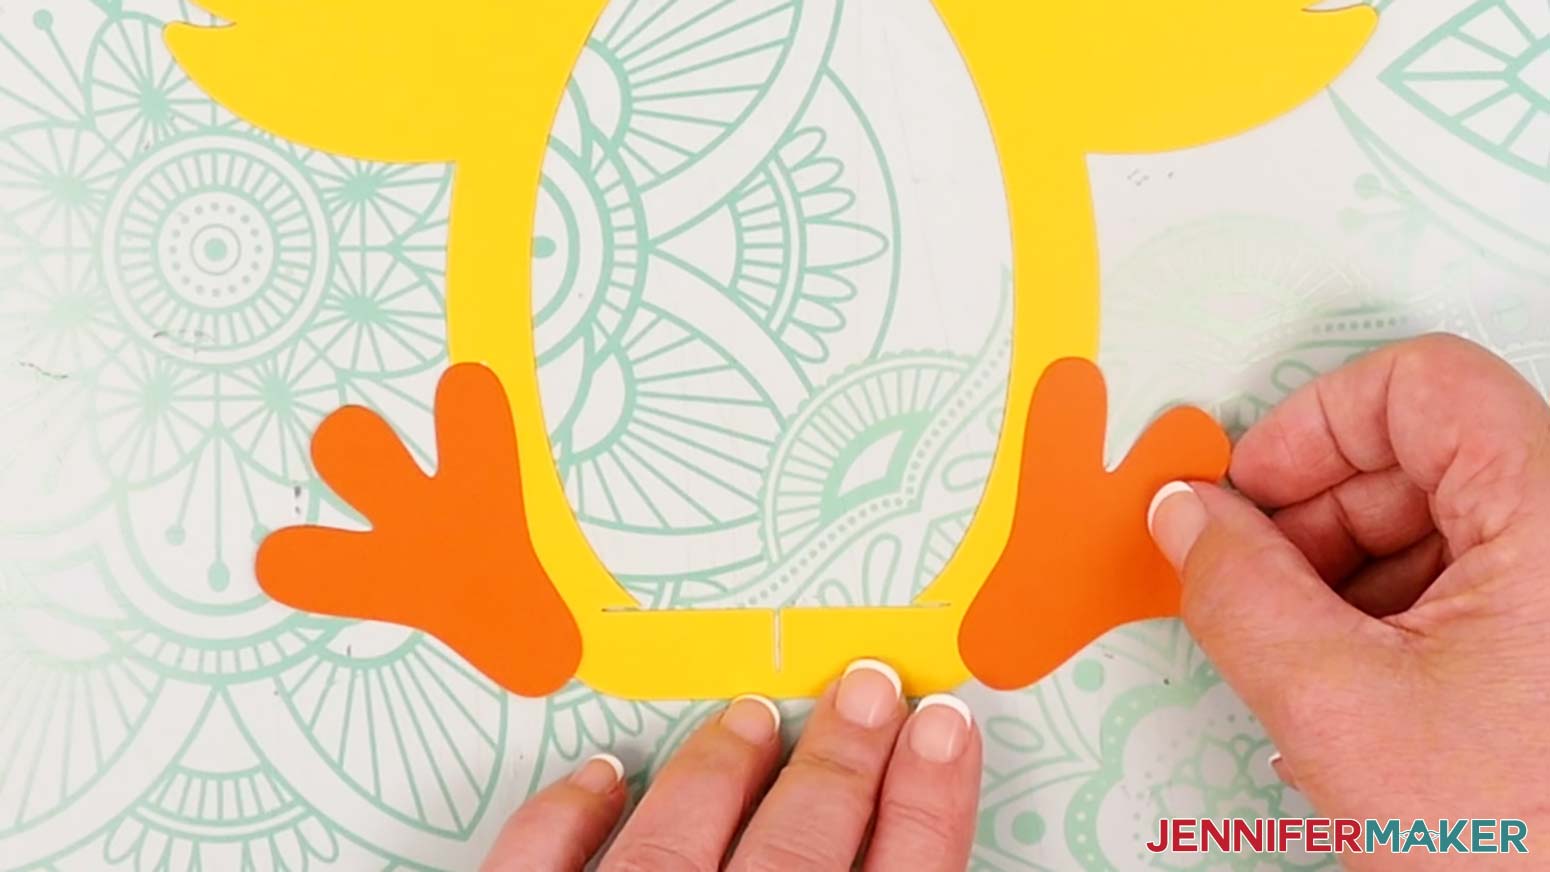
- Position the left foot piece on the body frame to make sure it’s oriented correctly, with the heel and the right toe overlapping the bottom left edge.
TIP: Refer to your Design Space Canvas if you need help positioning the pieces correctly. - Lift up the left foot and apply craft glue to the area on the back of the foot where it attaches to the body frame, then place the foot back down into position on the body frame.
- Press down to adhere the left foot to the body.
- Repeat Steps 3-5 to align and adhere the right foot, making sure to mirror it so the left toe and heel overlap the body frame.
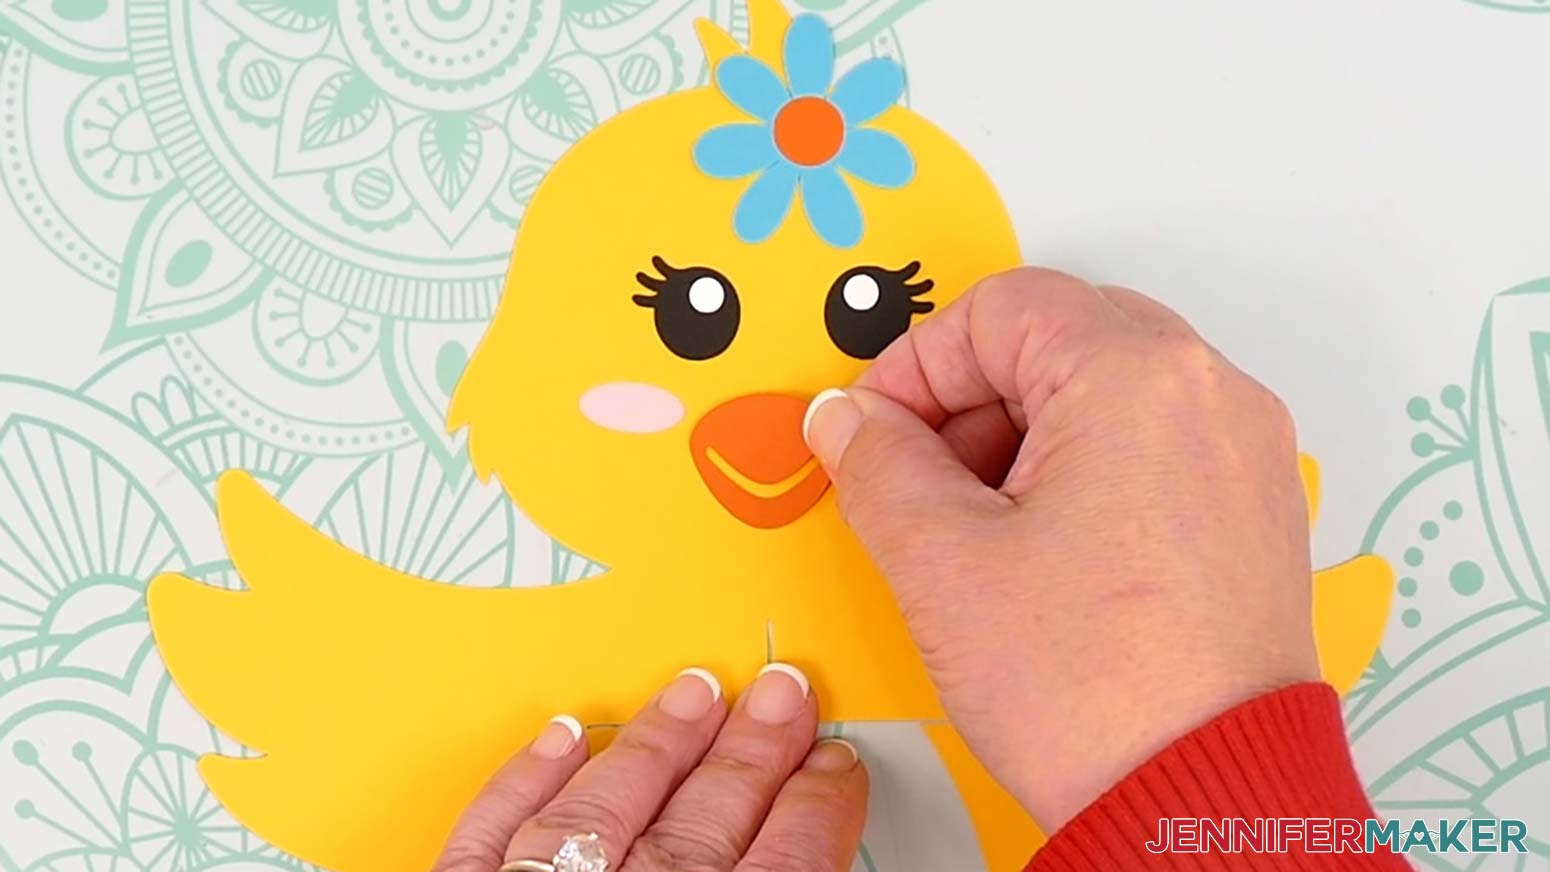
- Apply craft glue to the back of the beak piece, then adhere it to the face area of the body frame. The point in the beak cutout should align with the vertical slit on the chick’s chest, and the bottom edge should be about ¼” to ½” above the chick’s “neck” area.
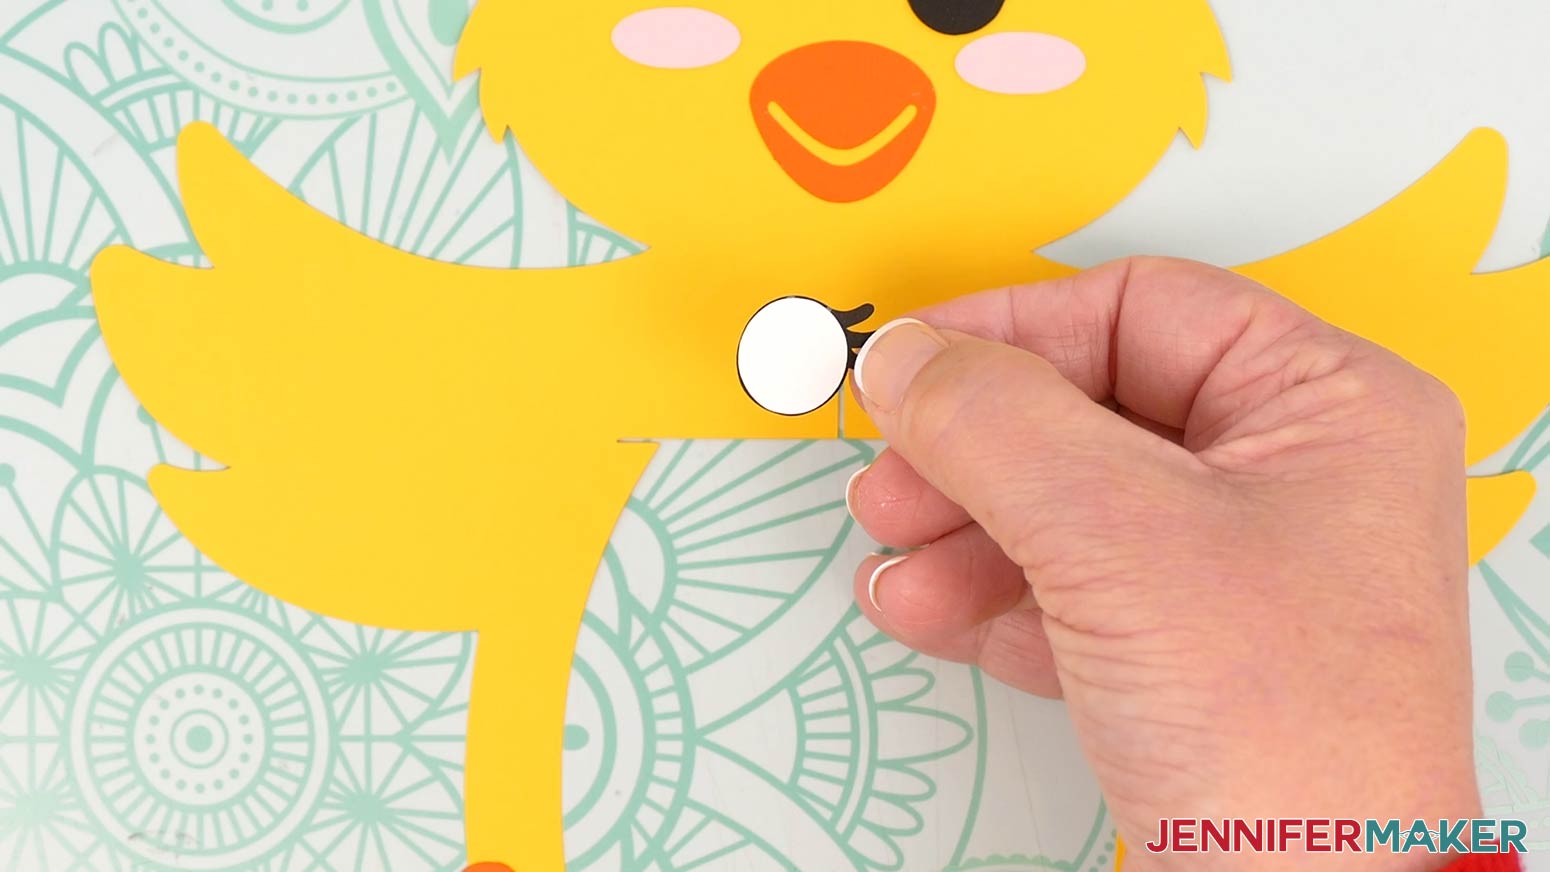
NOTE: If any glue seeps out, wipe it away with a finger or paper towel. - There is one black piece and one white circle piece for each eye. Grab the left black eye piece, which has lashes pointing to the left when the circle cutout is at the top.
- Turn the left black eye piece over and apply craft glue to the back, avoiding the cutout and the lashes.
- Adhere one of the white circles to the back center of the left black eye piece. Adjust the position so there’s an even black outline around the white piece before the glue dries.
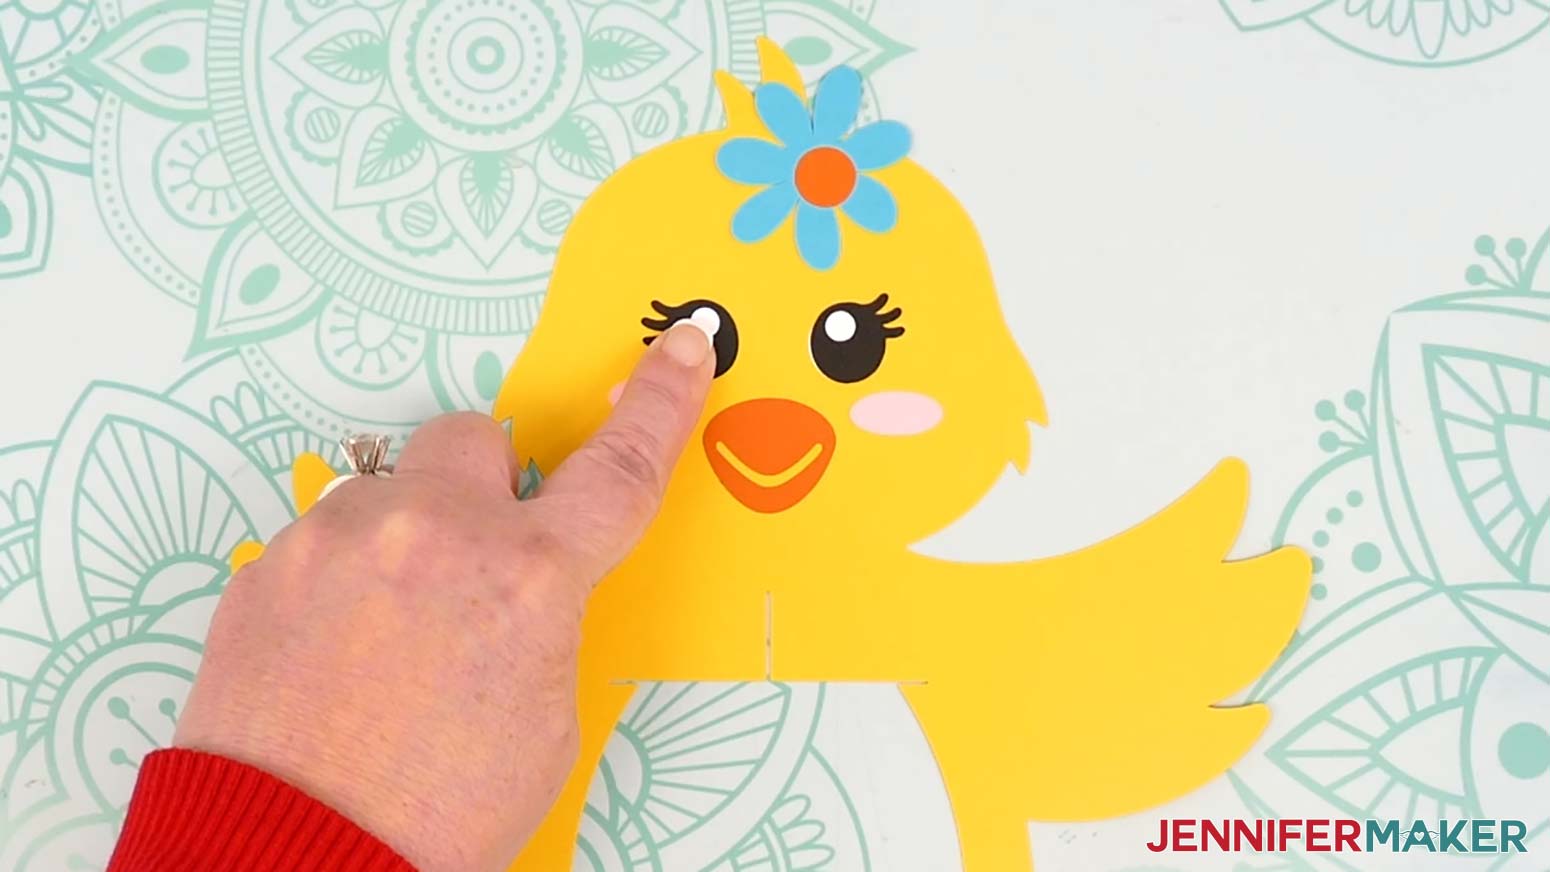
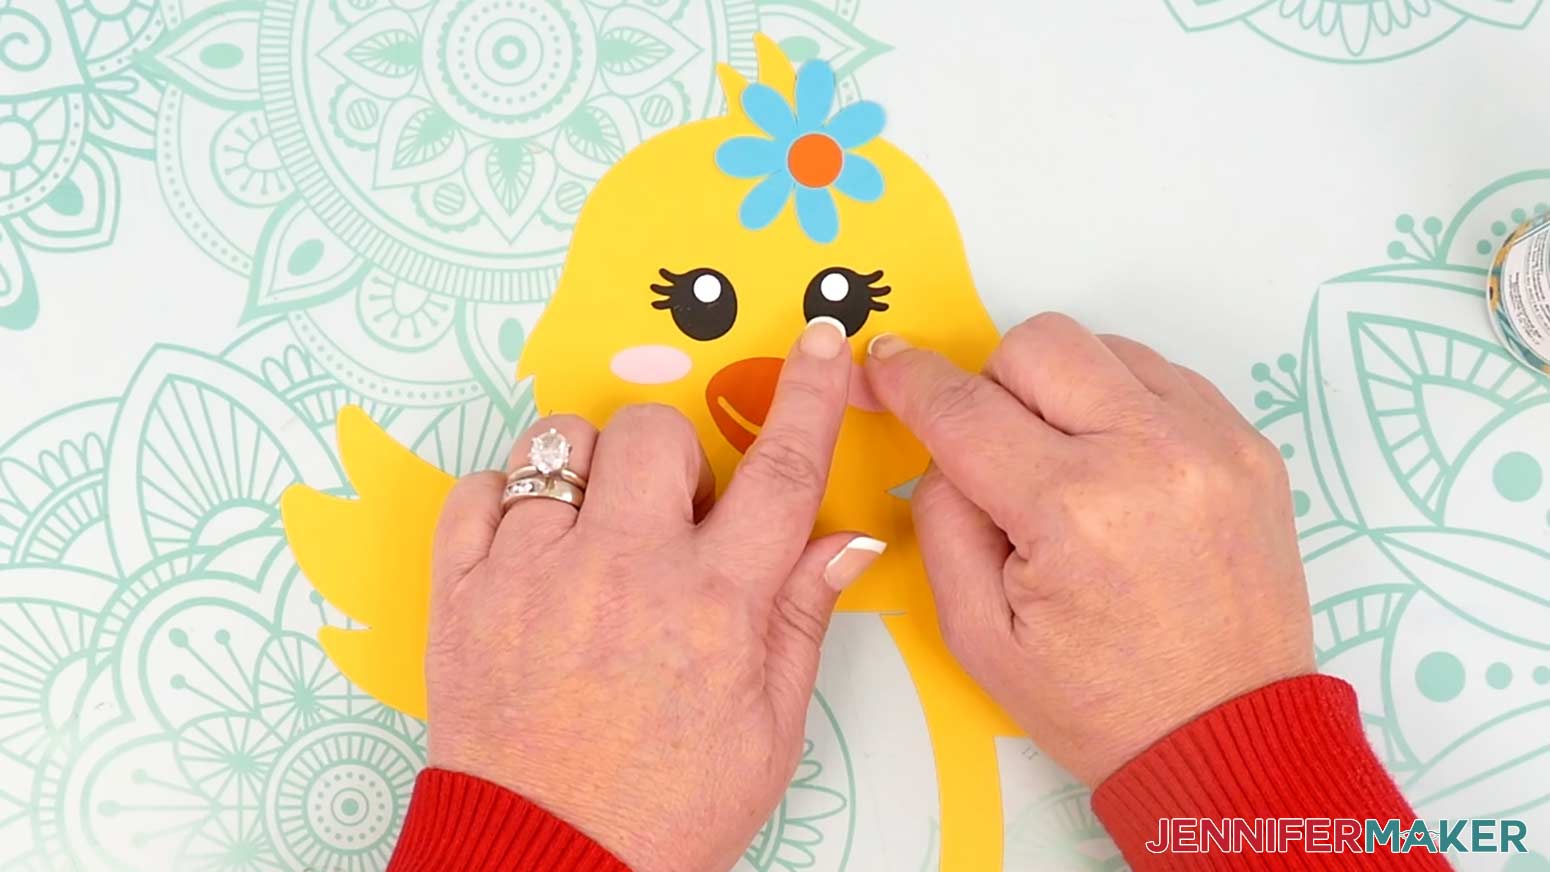
- Apply glue to the back of the left eye piece, then adhere it to the face area, aligning it about halfway between the head’s top and bottom.
- Grab the right black eye piece, which has lashes pointing to the right when the circle cutout is at the top.
- Repeat steps 8-10 to assemble the right eye.
- Repeat step 11 to adhere the right eye to the body frame, with the lashes pointing to the right.
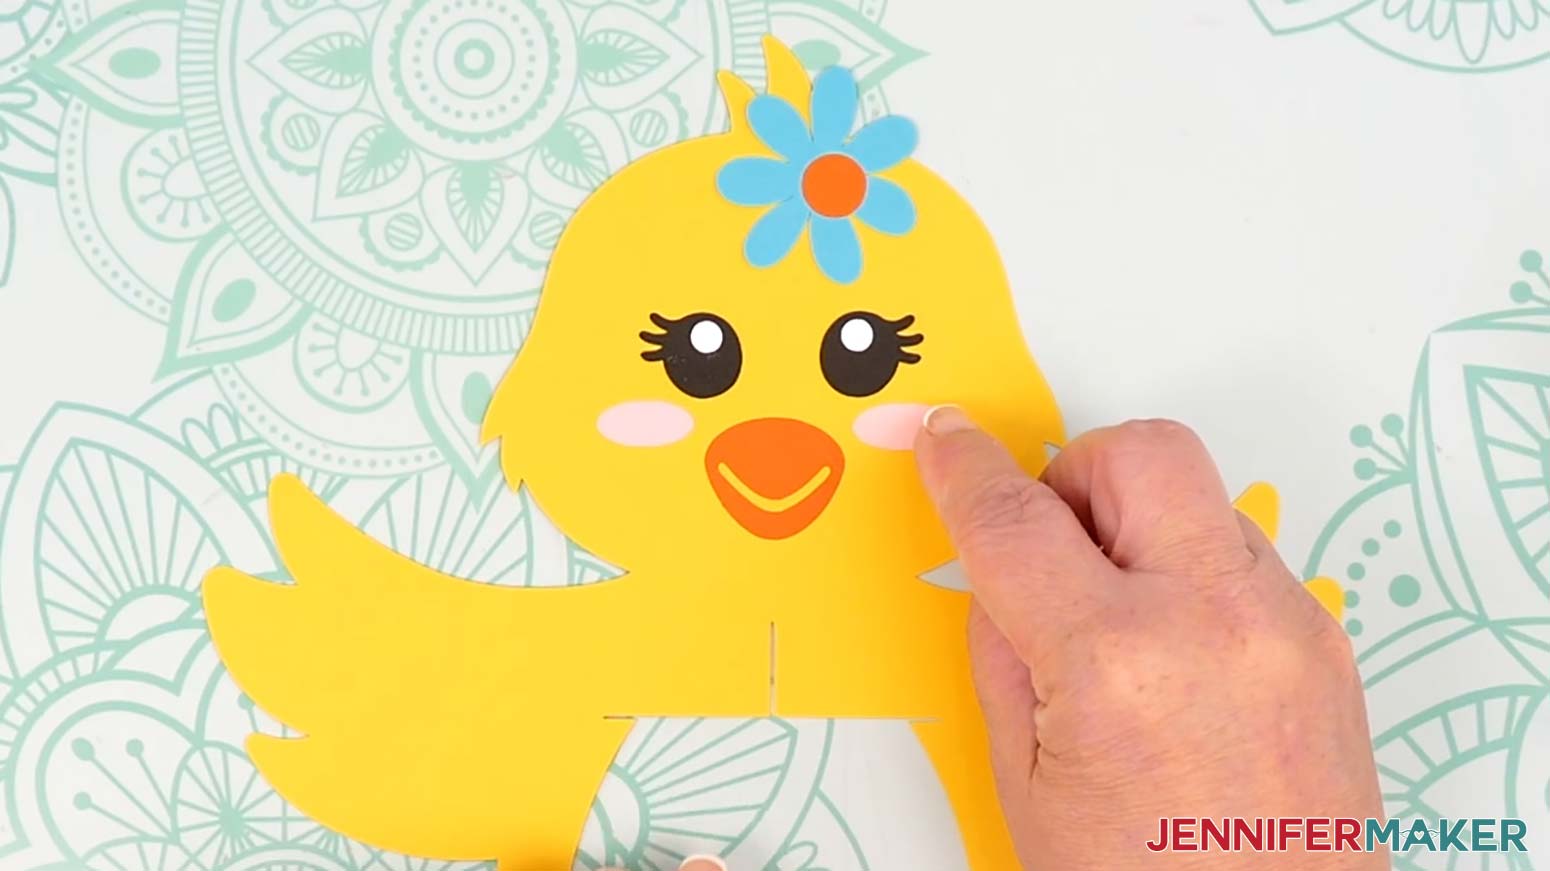
- Apply craft glue to the back of one of the two oval pieces, then adhere it to the chick’s left cheek on the body frame. The oval should run horizontally, centered between the beak and outer edge of the head.
- Repeat step 15 with the other oval piece on the right cheek.
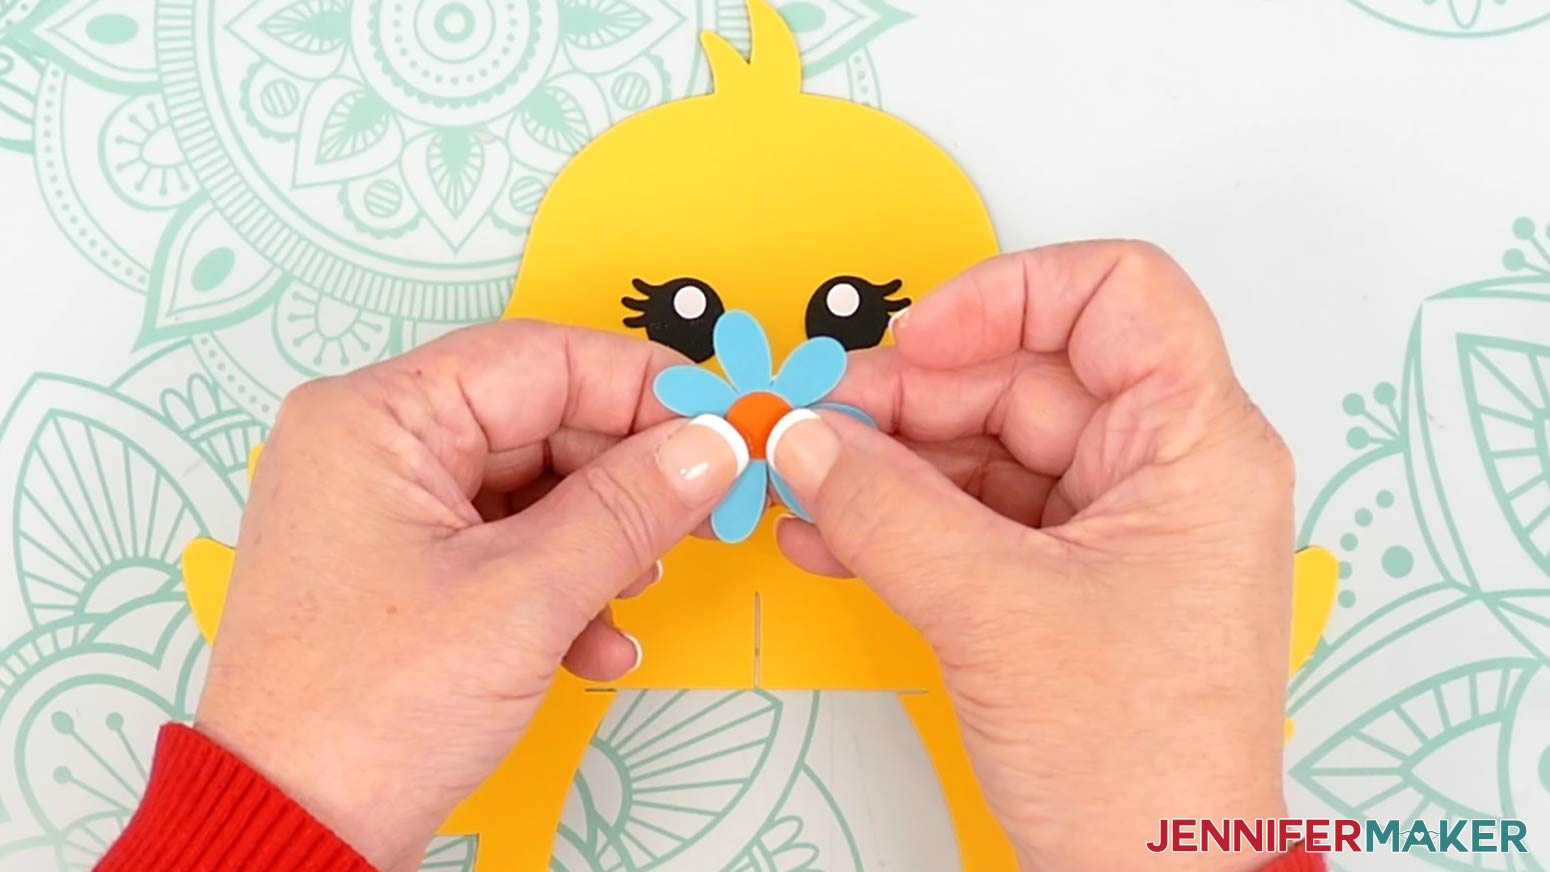
- Grab the flower piece and its center circle piece. Apply craft glue to the back of the circle piece, then adhere it to the center of the flower.
- Apply craft glue to the back of the assembled flower, just in the center area. Adhere it to the top of the chick’s head, overlapping the edge of the body piece, below the feathers on the head.
- Follow steps 18-35 in the original tutorial to assemble your paper chick lantern!
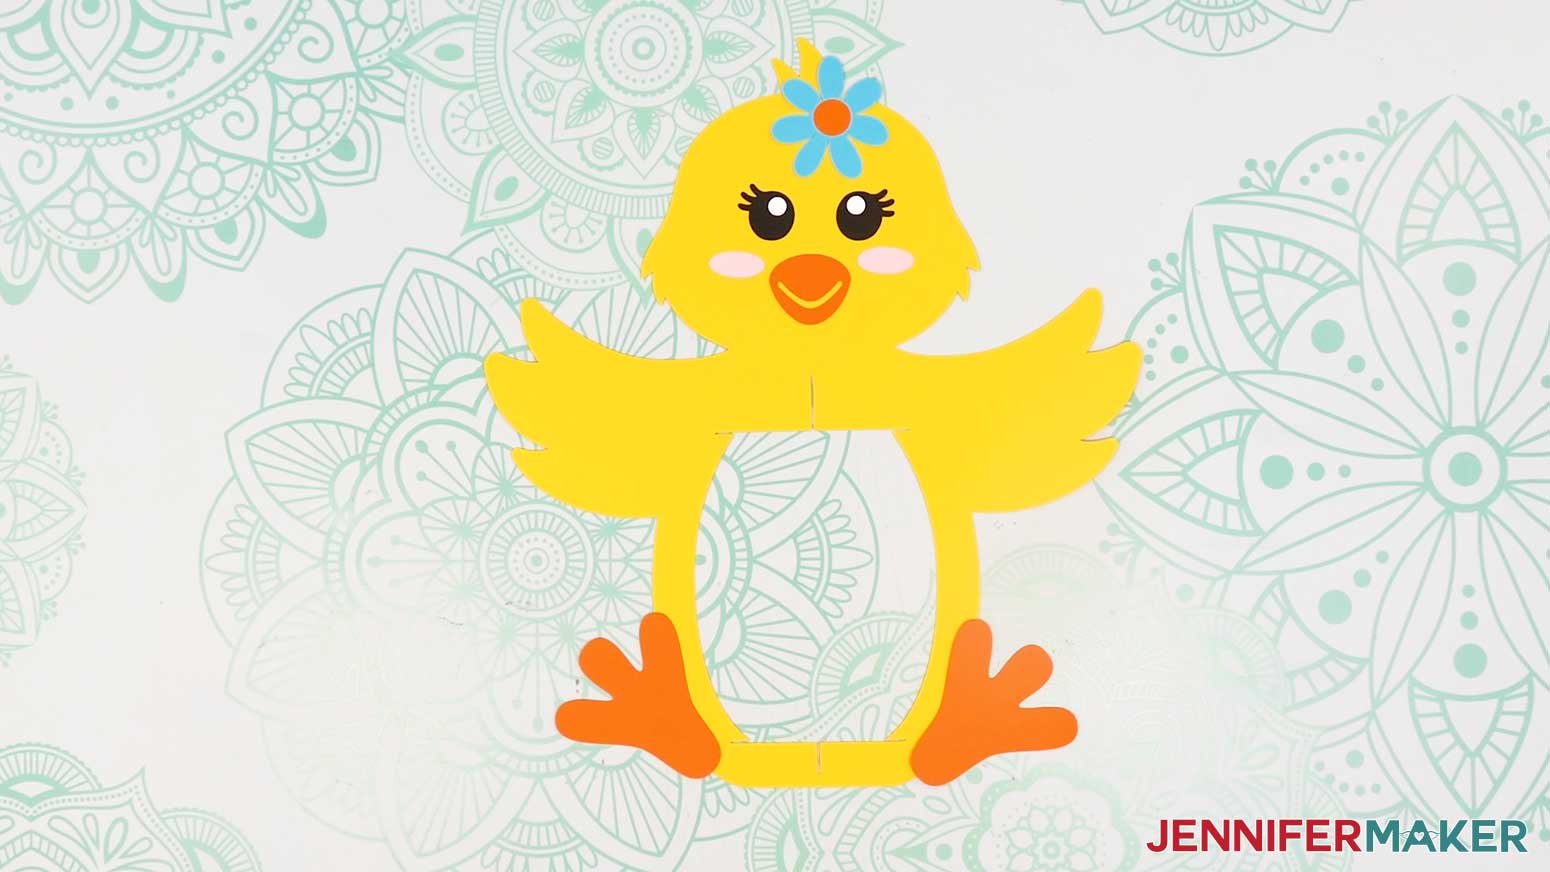

STEP 4: SHOW IT OFF
Here are what my finished bunny and chick spring animal lanterns look like!
Notes
Finished Sizes:
Bunny: 7"W x 10.5"H x 4"D
Chick: 9"W x 10.5"H x 4"D
Answers to Your Questions About Making Easter Lanterns
Q: I want to make an Easter lantern with my own custom panel designs. How do I do that?
A: You can learn how to make a custom Easter lantern in my ADVANCE program. Learn more about ADVANCE here!
Q: Can you show me step-by-step how to make an Easter lantern?
A: The video tutorial at the top of this page will show you how to prepare, cut, and assemble a cardstock animal lantern. Reference the steps above for help assembling your bunny or chick lantern.
Q: What paper is best for making paper lanterns?
A: When making a paper lantern, I recommend using high quality 65 pound cardstock. It’s durable and strong, but easy to fold and curve into the shapes necessary to build lantern frame and panels. If you don’t have a local craft store, there are many cardstock sources online, like Amazon.
Q. Do I have to use a Cricut?
A: No! In my free download file, I’ve included a PDF you can print and use as a template to cut your cardstock pieces. There’s files to work with different cutting machines, too. If you have a Silhouette Cameo, which uses Silhouette Studio, you can use the DXF cut files in Silhouette Basic Edition. If you have upgraded to Silhouette Designer Edition, Designer Edition Plus, or Business, you can use the SVG file. A Brother ScanNCut works, too,
Q: Can I cut this project on a Cricut Joy?
A: I don’t recommend cutting Easter lanterns on an original Cricut Joy. When I tested these designs sized smaller to cut on a the Joy, I found that it was difficult to work with the tiny tabs, and areas of the intricate cutouts did not cut well. Additionally, neither the LED tea light nor the LED fairy lights I used fit inside the smaller version. This project can be cut on the slightly larger Cricut Joy Xtra (which uses 8.5″ x 11″ materials) without resizing the design.
Q: Help! My Cricut Design Space screen looks different than yours!
A: If you’re using the latest version of Cricut Design Space, your screen may have slight variations than the screen you see on the video tutorial. Good news: All of the same functions are there, they may just be in different spots or have new icons. Pause the video if you need, or follow along with the written tutorial. If you get stuck, ask for expert support in our Facebook group. Our group has become not just a help center, but also a vibrant community of real people and crafters! Plus, you can catch the latest news on JenniferMaker tutorials and more.
Q: Can I make and sell these Easter lanterns?
A: I love supporting creative entrepreneurs! If you want to use my designs and projects for commercial use, please familiarize yourself with my important licensing information before selling your crafts.
I do not permit sale of my digital files, but you can sell the creative goods you make with them — as long as you follow my licensing requirements. That means you cannot sell the lantern SVG files, but you can sell lanterns that you made with the files within the guidelines linked above.
Q: How do I know if my design is the right size?
A: Not sure if your design is uploading at the correct size or aspect ratio? If you are using Cricut Design Space Beta for Desktop, try switching to the Live version as this has worked in our testing. Here are the dimensions you should see for each design on your Canvas:
-
animal-lanterns-toolkit-score-jennifermaker-SVG: 8.17” x 7.02”
-
animal-lanterns-toolkit-noscore-jennifermaker-SVG: 8.17” x 7.02”
-
animal-lanterns-humbird-template-jennifermaker-SVG: 3.95” x 4.69”
-
animal-lanterns-chick-score-jennifermaker-SVG: 11.91” x 10.3”
-
animal-lanterns-chick-noscore-jennifermaker-SVG: 11.91” x 10.3”
-
animal-lanterns-bunny-score-jennifermaker-SVG: 11.85” x 10.7”
-
animal-lanterns-bunny-noscore-jennifermaker-SVG: 11.85” x 10.7”
If you need help resizing your design, open my Resizing Guide in a new window.
Q: Do you have other spring lanterns I can make?
A: If you liked these Easter animal lanterns, check out these other light-up springtime projects:
- Easter Egg Paper Lanterns
- Japanese Cherry Blossom Lantern
- Cylinder Floral Lantern
- Paper Birdhouse Lantern
- Light-Up Dollar Tree Bunny
- Paper Gazebo Luminary
- Rose Arbor Luminary
- Valentine Heart Hanging Lantern
- Love Paper Lanterns
Get my free SVG/DXF/PDF files to make Easter lanterns!
(If you do not see the signup form above, click here.)
I love seeing what you make with my designs and how you use them! Please share a photo of your Easter lantern in our Facebook group or tag me on social media with #jennifermaker.
Love,

Want to remember this? Save this Easter Lanterns tutorial to your favorite Pinterest Board!