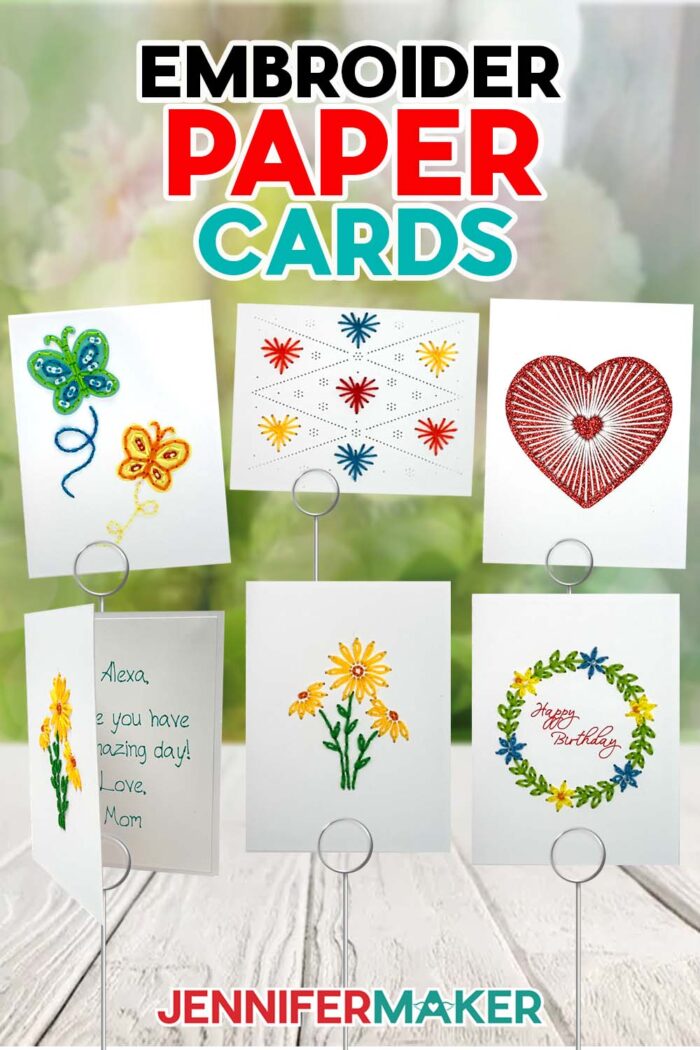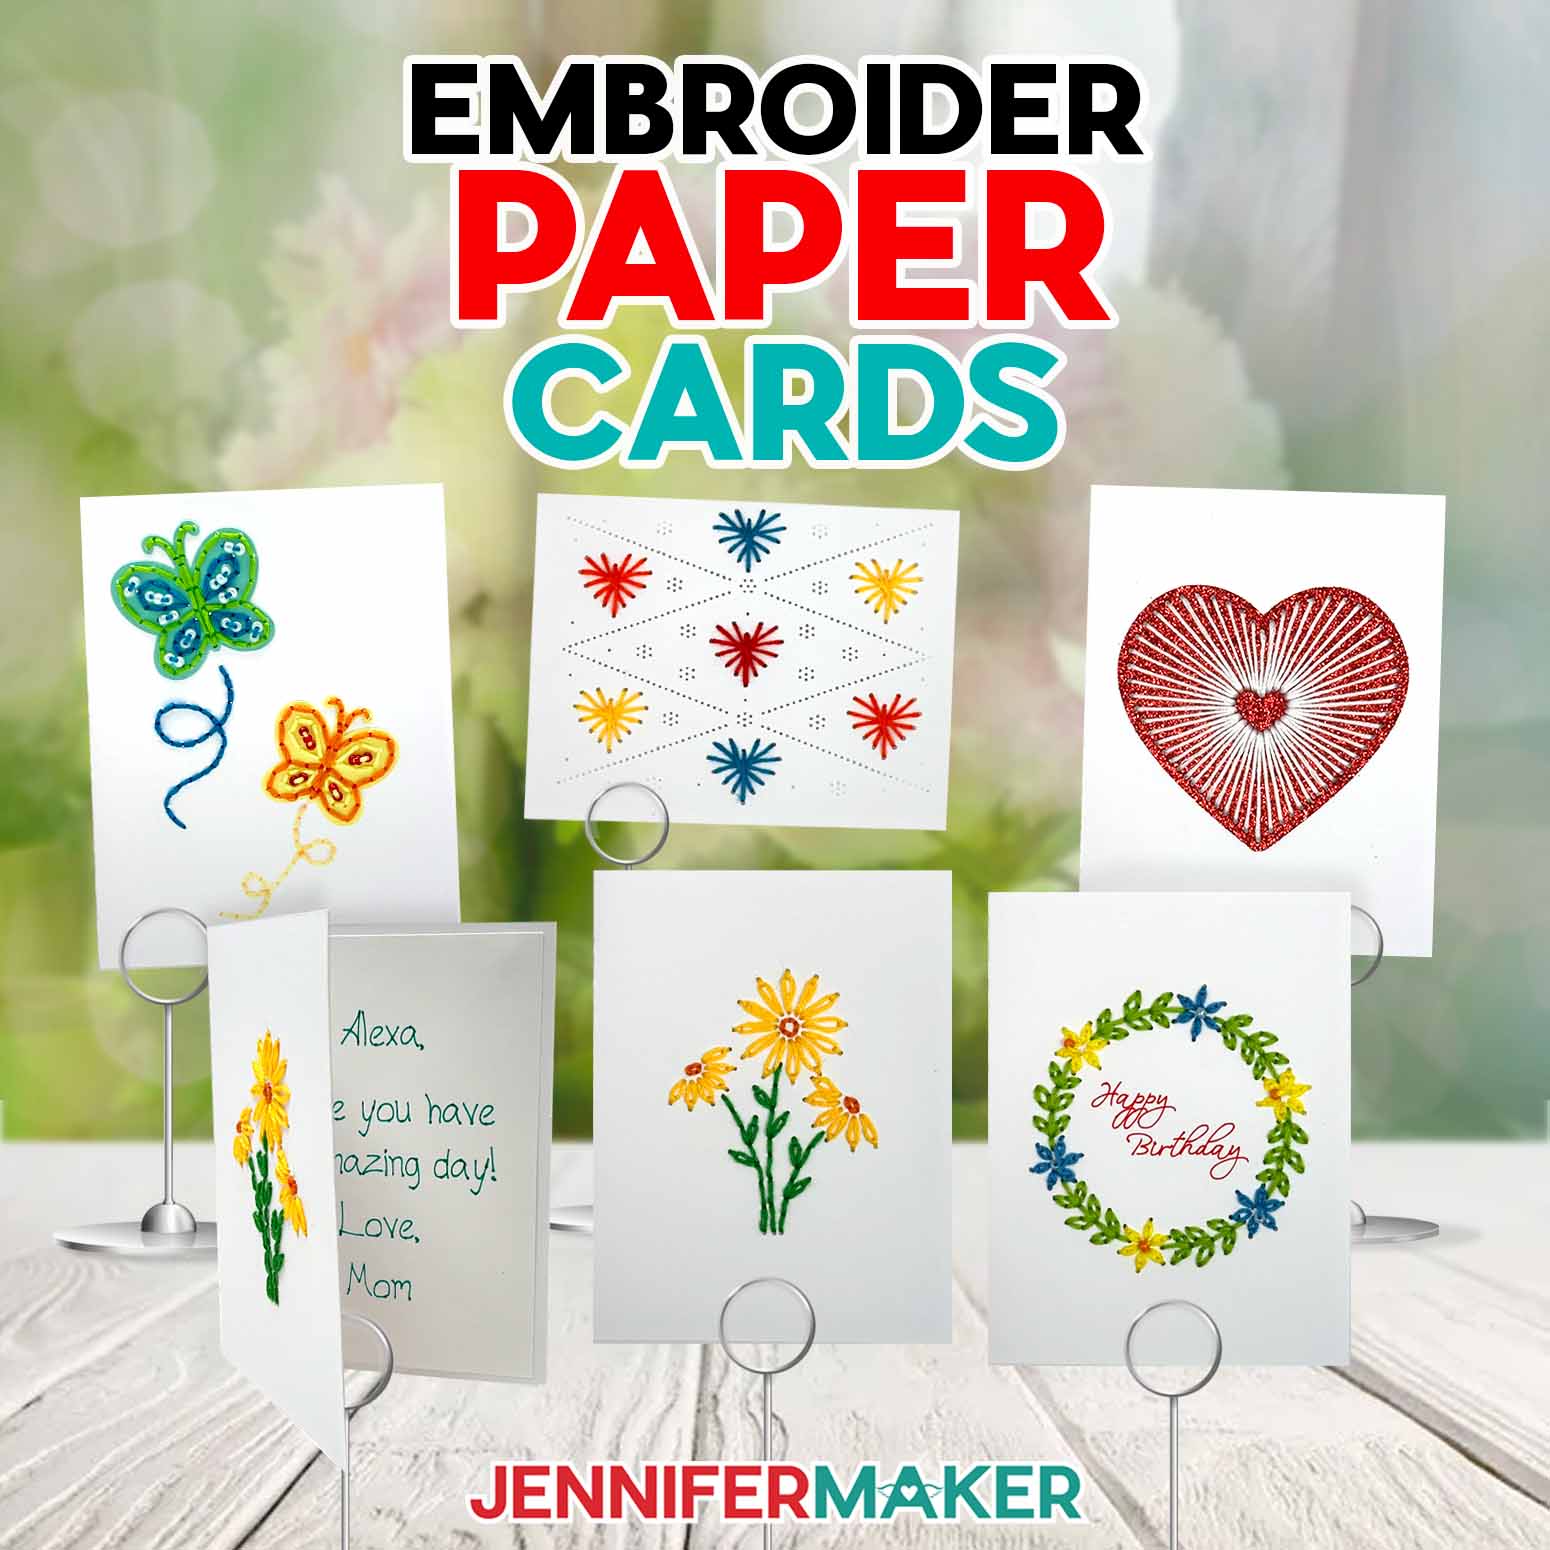
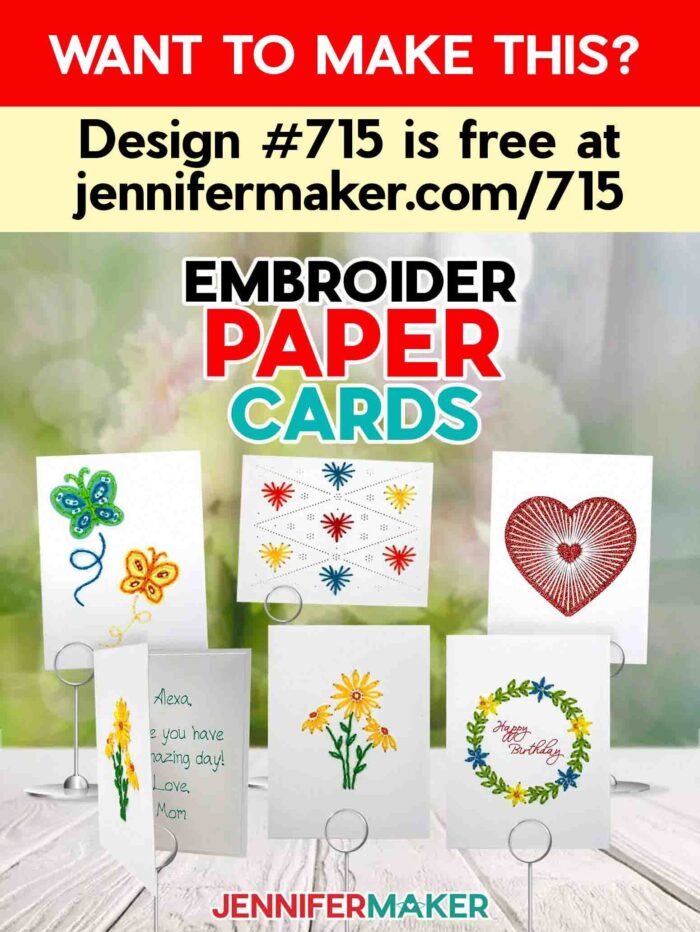
Learn how to make paper embroidery cards with real hand-stitched details!
Don’t you love receiving a handmade card? Homemade cards are my favorite, and having a cutting machine makes it so easy to create unique, customized paper cards with thoughtful touches and impressive details. But did you know that you can make hand-stitched cards easily, even if you’ve never embroidered before? Let’s learn how to make Paper Embroidery Cards with the help of a cutting machine! Each can be stitched with a beautiful embroidered design on the front of the card, with added embellishments and beaded accents to make it even more special. No embroidery machines necessary!
Watch the full step-by-step video tutorial on making paper embroidery cards:

Embroidery greeting cards are a delightful way to elevate your cardmaking skills, blending the charm of homemade handiwork with the precision of modern crafting tools. Imagine sending a heartfelt handmade card adorned with intricate stitches and sparkling beads that you crafted yourself — it’s like gifting a tiny piece of paper art!

Follow the step-by-step instructions in my video and written tutorials from the first stitch to the end for a card that doubles as a pretty, homemade keepsake! You’ll need a few things to get started, like heavy cardstock, embroidery thread, and my free embroidered card SVG files.
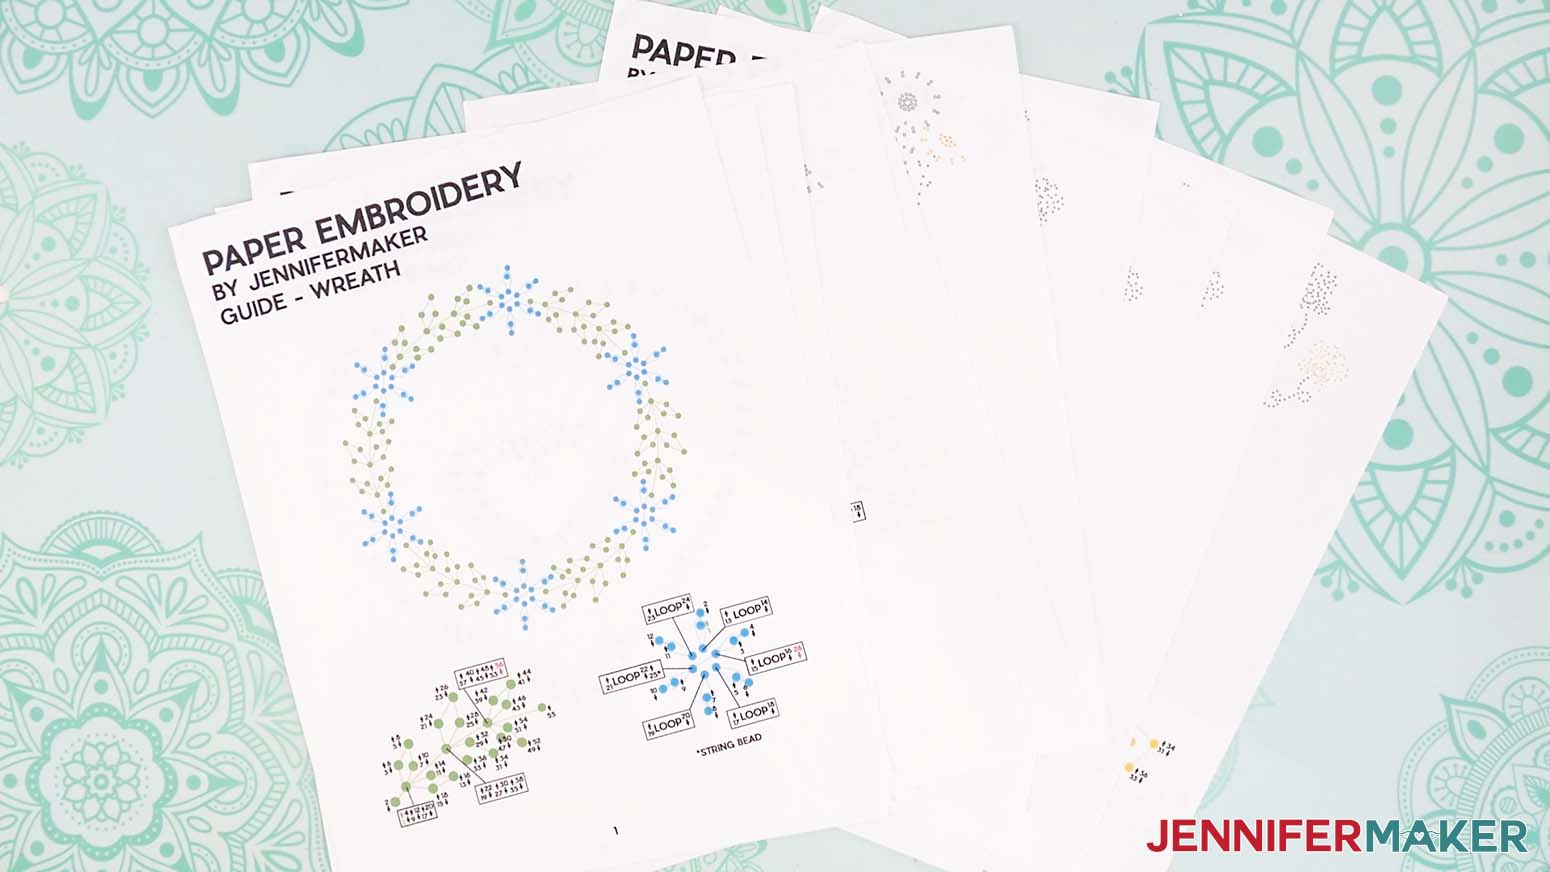
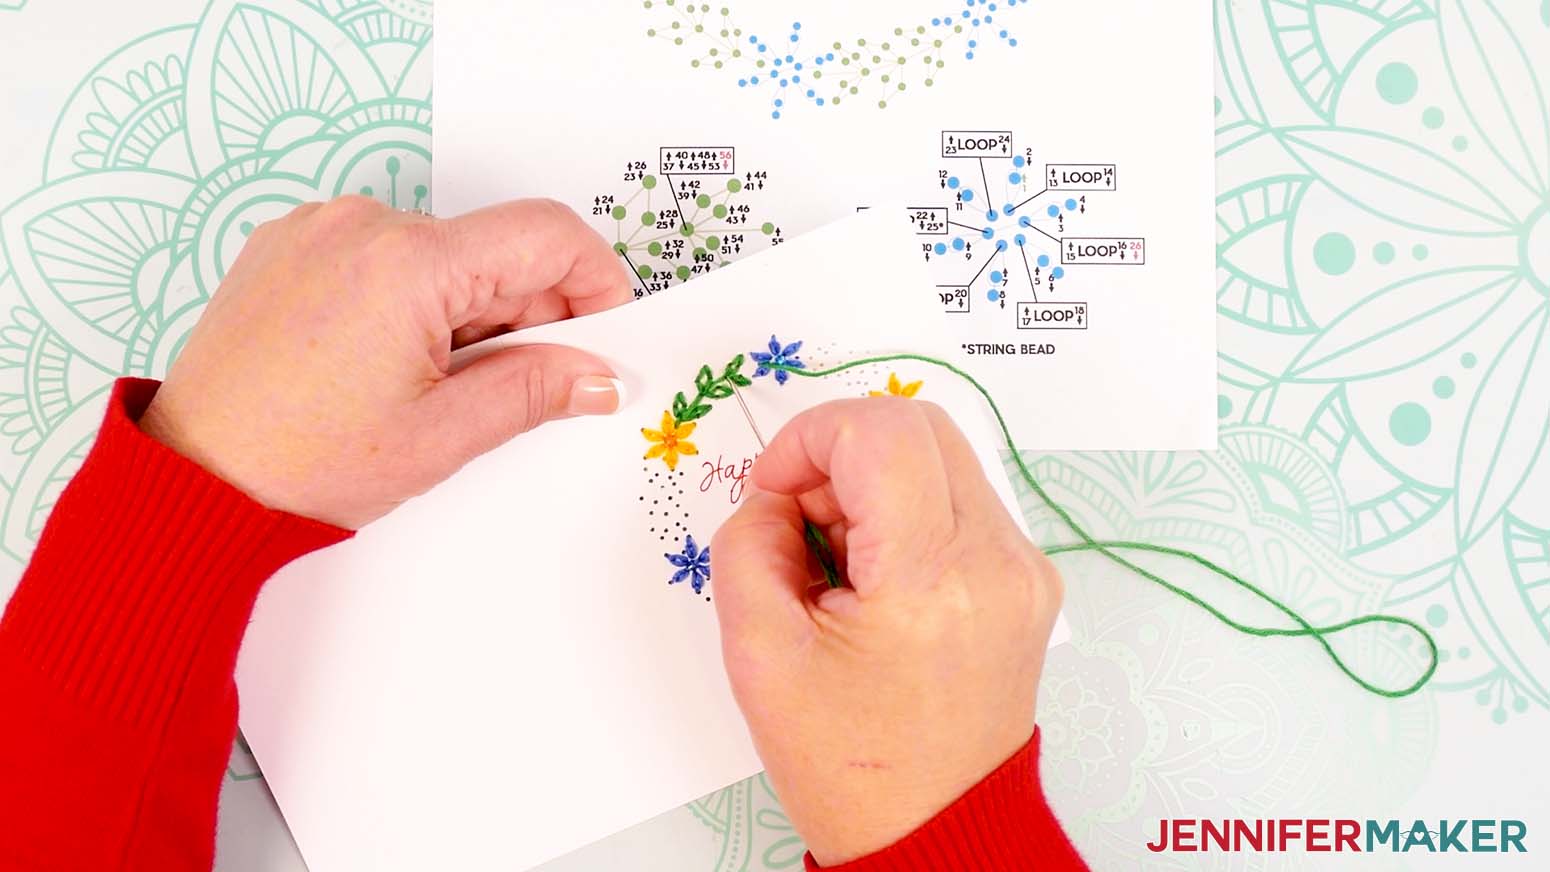
My free download contains the files you need to cut your card, plus a free pattern and numbered diagram for each design in the PDF guide. This guide helps you ensure that every stitch on each design is made in its proper place. I made the guide in PDF format, so you can print it out and keep it handy or reference it on your computer screen while you work.
You can cut the full-size cards by hand, but it’s much easier to cut them with a cutting machine like the Cricut Maker 3, original Maker, a Cricut Explore series machine, the Cricut Venture, or Cricut Joy Xtra. Using a cutting machine helps you to cut the holes in your cardstock in intricate and precise patterns, setting you up to embroider beautifully stitched designs.
For those with a Cricut Joy, don’t worry – you have a special set of card designs prepared just for you, complete with dashed cut lines for easy folding. Check the materials list below for some other Cricut tools you’ll need to help cut your cards.
If you have a Maker or Explore series machine, or the Venture, you can use a scoring tool like a scoring stylus or single scoring wheel with the “score” version of the full-size designs to add a fold line. I’ve also included a no-score version with dashed cut lines for the Joy Xtra, just like the versions for the Cricut Joy.

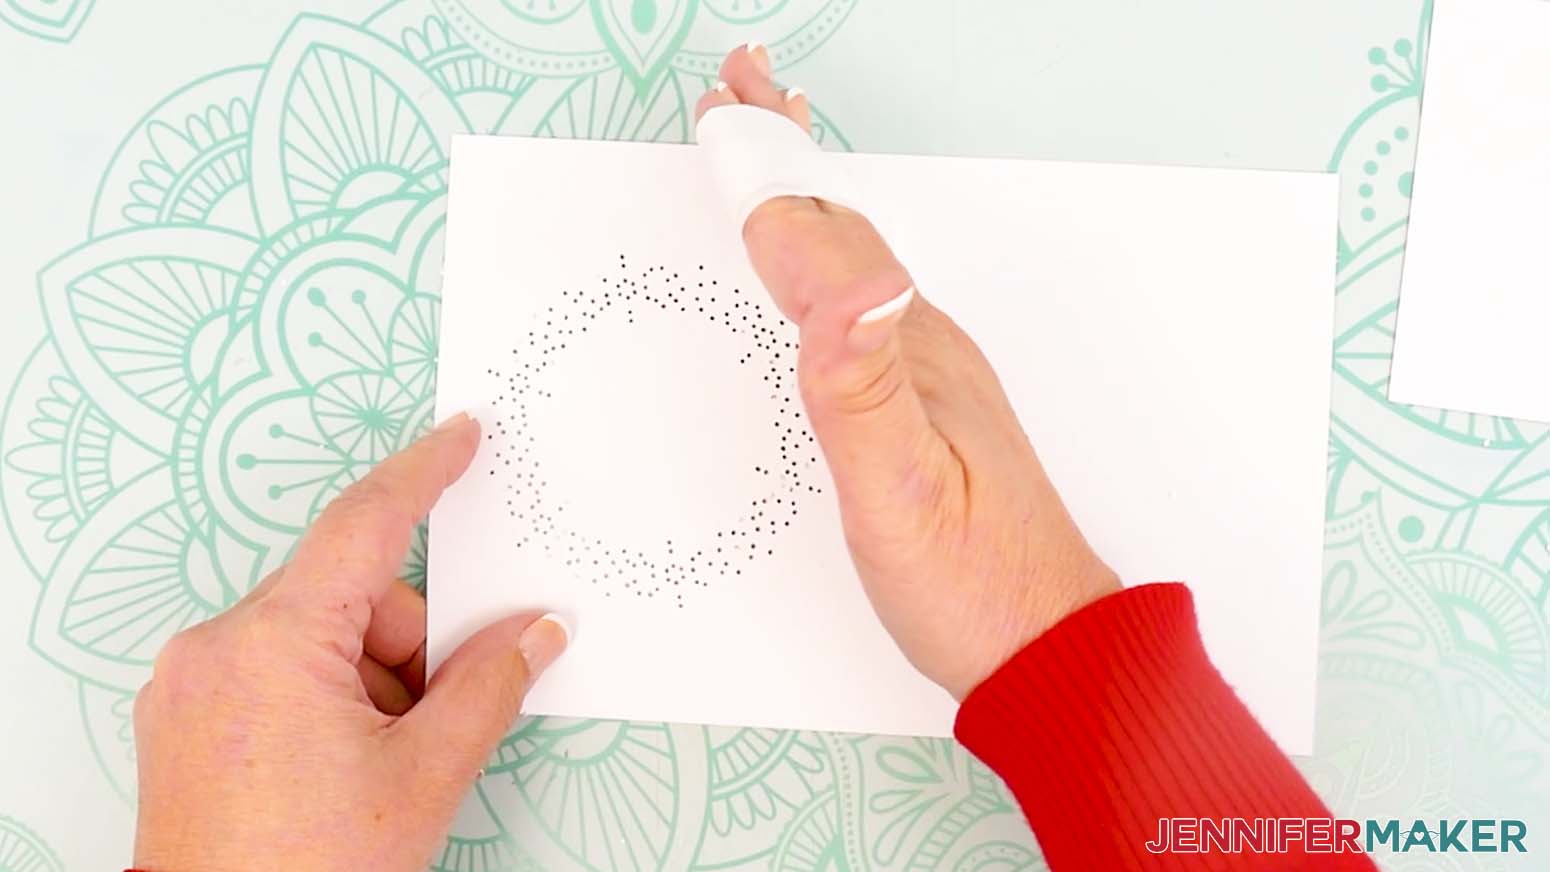
In Cricut Design Space, I’ll show you how to use your Cricut to write the “Happy Birthday” sentiment inside the Wreath card design, as well as how to remove it if you don’t want to include it.
For the best cut results, make sure your Cricut blade is clean. A quick cleaning with a tin foil ball or isopropyl alcohol and a soft cloth can make a world of difference, especially when cutting intricate details or using textured materials like glitter cardstock.
Once your card is cut and removed from your machine mat, you may need to poke holes out of the embroidery pattern if there’s still cardstock stuck inside. You can do this with your embroidery needle, a weeding tool, or you can roll up a piece of painter’s tape, stick it to the design, then peel it off to remove the extra cardstock bits.
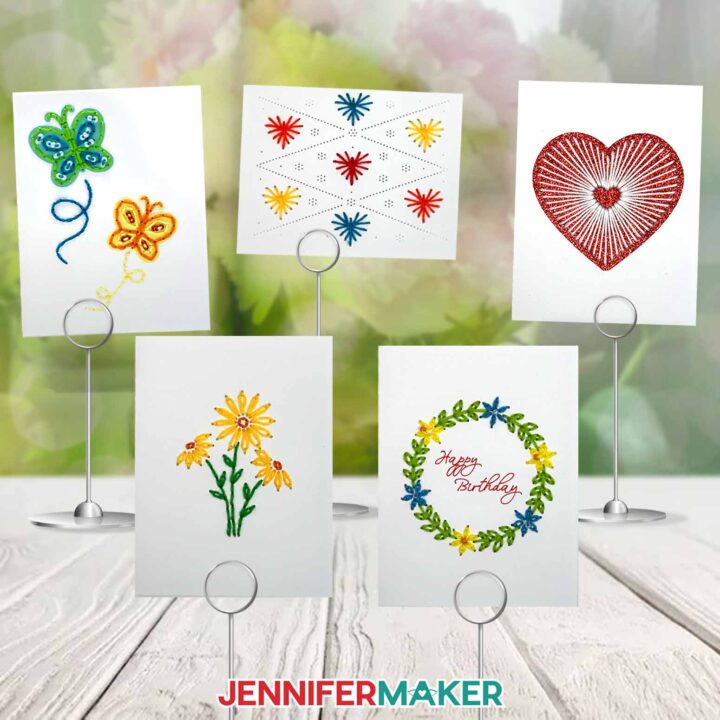
Then it’s time to grab your embroidery floss and needle and start embroidering! Stitching cards may look intimidating, but it’s easy with my video and written instructions. If you’re a beginner or have never embroidered before, I recommend starting with the Heart or Small Hearts designs, as they’re the easiest. Try the Butterflies, Daisies, and Wreath patterns once you’ve gotten more comfortable with the techniques!
One of the joys of this craft is the creative freedom it offers. While the designs are stunning on their own, you can enhance them further by mixing up your embroidery floss colors, cardstock colors and types, or even adding beads to the embroidered designs. Beads are optional, but I love how they add a little sparkle to the Wreath and Butterflies designs! A beading needle with a collapsible eye is the best needle add these details, and I’ll show you each step in the video as well as in the written tutorial below.

In each embroidery greeting card SVG, there’s a blank rectangle shape that can be cut to cover the back side of the finished embroidery inside the front of your card. Covering this stitching not only protects the design on the front from becoming damaged, but it also gives your card a cleaner, more polished look.
Once your embroidery is complete, your cards are ready to be sent off — in style! Slip them into an A2 sized envelope, or make your own with my easy envelope tutorial.
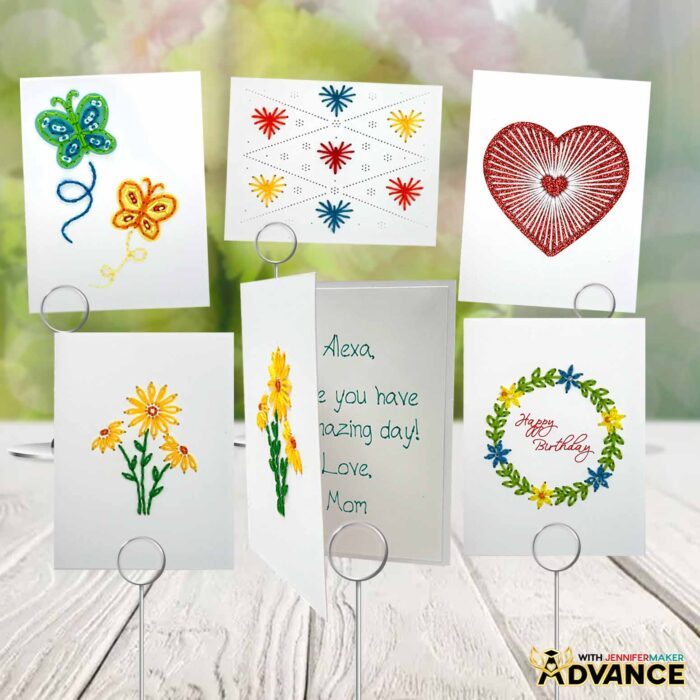
Would you like to add a Cricut-written message insert to your paper embroidery card? I have a workshop designed to teach you just that in my Advance program. Learn more about Advance with JenniferMaker here!
Whether you’re crafting a birthday card, a thank-you note, or a simple “just because” gesture, these embroidered cards are sure to impress. They’re not just cards; they’re handmade keepsakes that loved ones will keep and cherish!
So, are you ready to dive into the world of paper embroidery? With my free files and step-by-step instructions, it’s never been easier to create stunning handmade cards. I can’t wait to see the beautiful embroidery greeting cards you string to life!
Let me show you how to make paper embroidery cards! This post contains some affiliate links for your convenience (which means if you make a purchase after clicking a link I will earn a small commission but it won’t cost you a penny more, there is no additional cost)! Read my full disclosure policy.
Materials to Make Paper Embroidery Cards
View my Amazon shopping list for the exact items I used!
- One (1) Sheet of 12” x 12” White 100 lb. Cardstock -OR-
- One (1) Sheet of 8.5” x 11” White 110 lb. Cardstock
- One (1) Sheet of 12” x 12” Red Glitter Cardstock (for Heart Accent)
- One (1) Sheet of 8.5” x 11” 65 lb. Cardstock (for Yellow Butterfly Accent) -AND-
- One (1) Sheet of 8.5” x 11” 65 lb. Teal Cardstock (alternative) (for Teal Butterfly Accent)
- A way to cut your materials – I’m using the Cricut Maker 3, but you can also use a Cricut Maker series machine, a Cricut Explore Series machine, the Cricut Venture, or even the Cricut Joy Xtra, the original Cricut Joy, or the Joy 2
- Cricut Green StandardGrip Machine Mat 12″ x 12”
- Cricut Purple StrongGrip Machine Mat 12″ x 12” (optional for Heavy Cardstock)
- Brayer
- Cricut Fine Point Pen (optional for the “Happy Birthday” message on the Wreath card
- Weeding Tool
- Scissors
- Scraper
- Embroidery Floss – (I used white for the Big Heart card; orange, yellow, blue, and red for the Small Hearts card; green, yellow, and orange for the Daisies card; green, blue, orange, and yellow for the Butterflies card; and green, yellow, and blue for the Wreath card)
- Large Eye Sewing Needle -AND-
- OPTIONAL: Embroidery Needle Threader Tool
- Approximately 40 2mm Glass Beads (optional for the Butterfly and Wreath designs) -AND-
- Collapsible Needle (optional for adding beads to the Butterfly or Wreath designs)
- Craft Glue – I used Bearly Art Precision Craft Glue
- Color Inkjet Printer (optional for printing the guides) -AND-
- Copy Paper (optional for printing the guides)
How to Make Paper Embroidery Cards!
Paper Embroidery Cards
Learn how to make paper embroidery cards with your Cricut!
Materials
- One (1) Sheet of 12” x 12” White 100 lb. Cardstock -OR-
- One (1) Sheet of 8.5” x 11” White 110 lb. Cardstock
- One (1) Sheet of 12” x 12” Red Glitter Cardstock (for Heart Accent)
- One (1) Sheet of 8.5” x 11” 65 lb. Cardstock (for Yellow Butterfly Accent) -AND-
- One (1) Sheet of 8.5” x 11” 65 lb. Teal Cardstock (for Teal Butterfly Accent)
- Embroidery Floss - (I used white for the Big Heart card; orange, yellow, blue, and red for the Small Hearts card; green, yellow, and orange for the Daisies card; green,blue, orange, and yellow for the Butterflies card; and green, yellow, and blue for the Wreath card)
- Large Eye Sewing Needle
- Approximately 40 2mm Glass Beads (optional for the Butterfly and Wreath designs) -AND-
- Collapsible Needle (optional for adding beads to the Butterfly or Wreath designs)
- Design #715 (My free SVG/PDF/DXF design files are available in my free resource library - get the password by filling out the form at the bottom of this page)
Tools
- A way to cut your materials - I’m using the Cricut Maker 3, but you can also use the Cricut Maker, a Cricut Explore Series machine, the Cricut Venture, or even the Cricut Joy Xtra or the original Cricut Joy
- Cricut Green StandardGrip Machine Mat 12" x 12”
- Cricut Purple StrongGrip Machine Mat 12" x 12” (optional for Heavy Cardstock)
- Brayer
- Cricut Fine Point Pen (optional for the “Happy Birthday” message on the Wreath card)
- Weeding Tool
- Scissors
- Scraper
- Craft Glue - I used Bearly Art Precision Craft Glue
- Embroidery Needle Threader Tool
- Color Inkjet Printer (Optional for printing the guides)
- Painter's Tape (Optional)
Instructions
STEP 1: GET MY FREE PAPER EMBROIDERY CARD DESIGNS
First, download my Paper Embroidery Card designs from my free library – look for Design #715. Alternatively, you can use the Save This Project form near the top of this post and the design link will be emailed to you.
The designs are sized to be cut on a Cricut Maker, Maker 3, Explore series machines, the Cricut Venture, and the Joy Xtra cutting machines. The “For Joy Users” folder contains versions of each design that are sized to be cut with a Cricut Joy cutting machine.
The SVG and DXF folders contain five embroidery card designs. There’s a wreath, small hearts, a big heart, daisies, and butterflies. Each design has a “score” and “no-score” version.
TIP: If you’re not sure how to download zip files and upload designs, go to jennifermaker.com/svgs.
STEP 2: PREPARE AND CUT YOUR PAPER EMBROIDERY CARD DESIGNS
CRICUT DESIGN SPACE
- In Cricut Design Space on a blank Canvas, click “Upload.”
- Click “Upload Image.”
- Click “Browse.”
- Find and select the SVG of your choice from the main SVG folder.
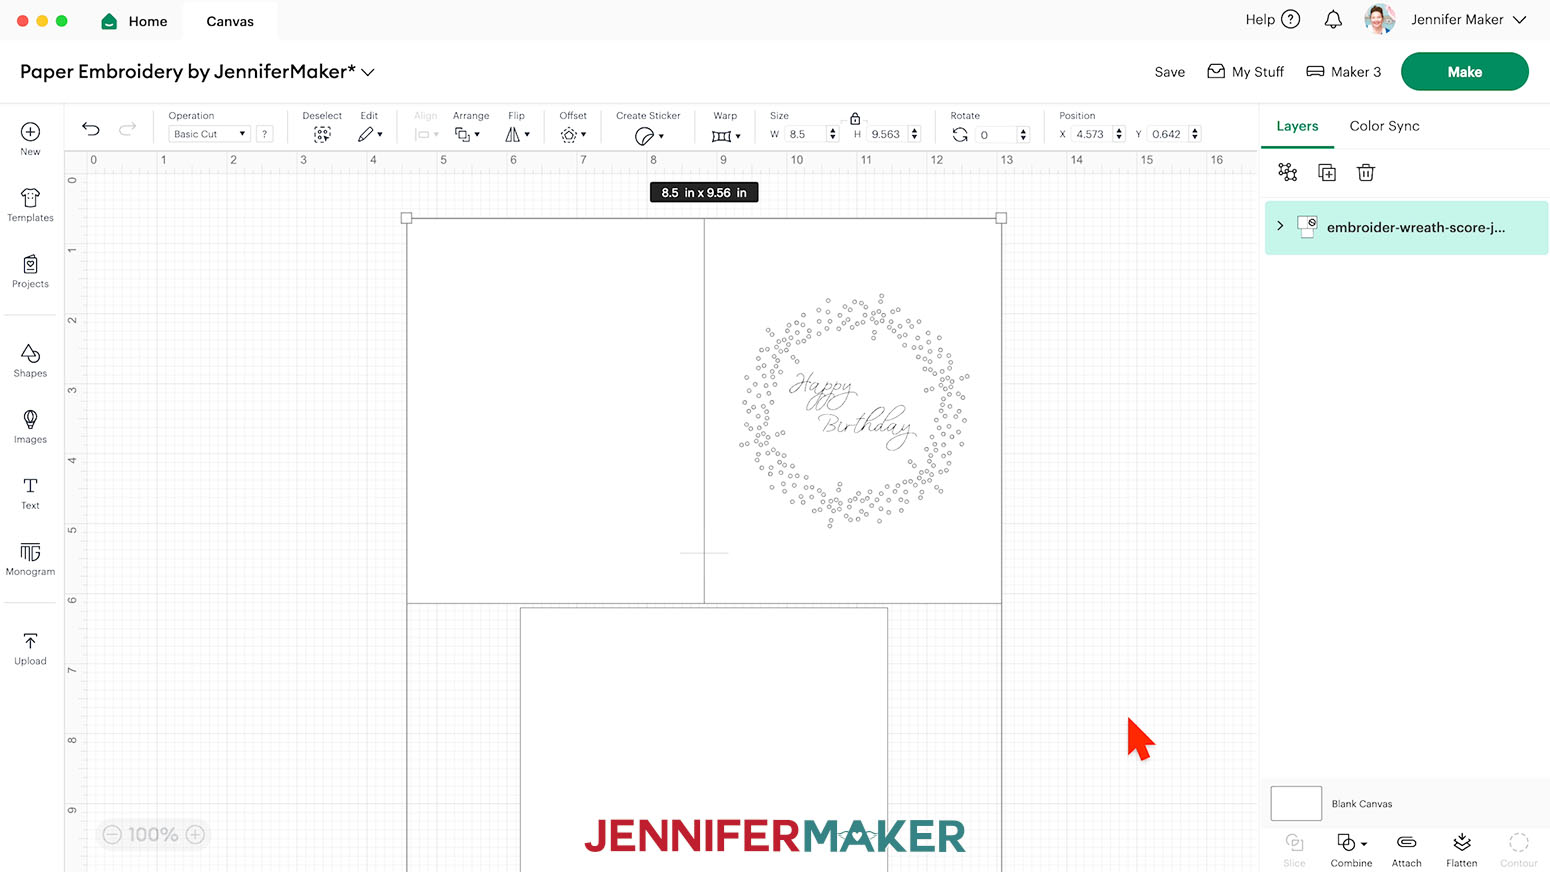
NOTE: I’ll demonstrate with the Wreath design. I’ll use the “score” version so I can show you how to set and attach score lines, and how to attach the optional “Happy Birthday” message on the front. If you do not have a scoring tool, use the “no-score” version of the file. - Click “Open” and then “Continue.”
- Click “Upload” to add the design to your Canvas.

- Click “Save” and give your project a name.
- Ungroup the design.
- The large rectangle will be the card, and the smaller rectangle will be a liner to cover the back of the finished embroidery.
NOTE: If you’re making the Butterflies or Big Heart cards, you will also have optional embellishment pieces on your Canvas to use under the embroidery. If you do not want to use the embellishments, delete them now.
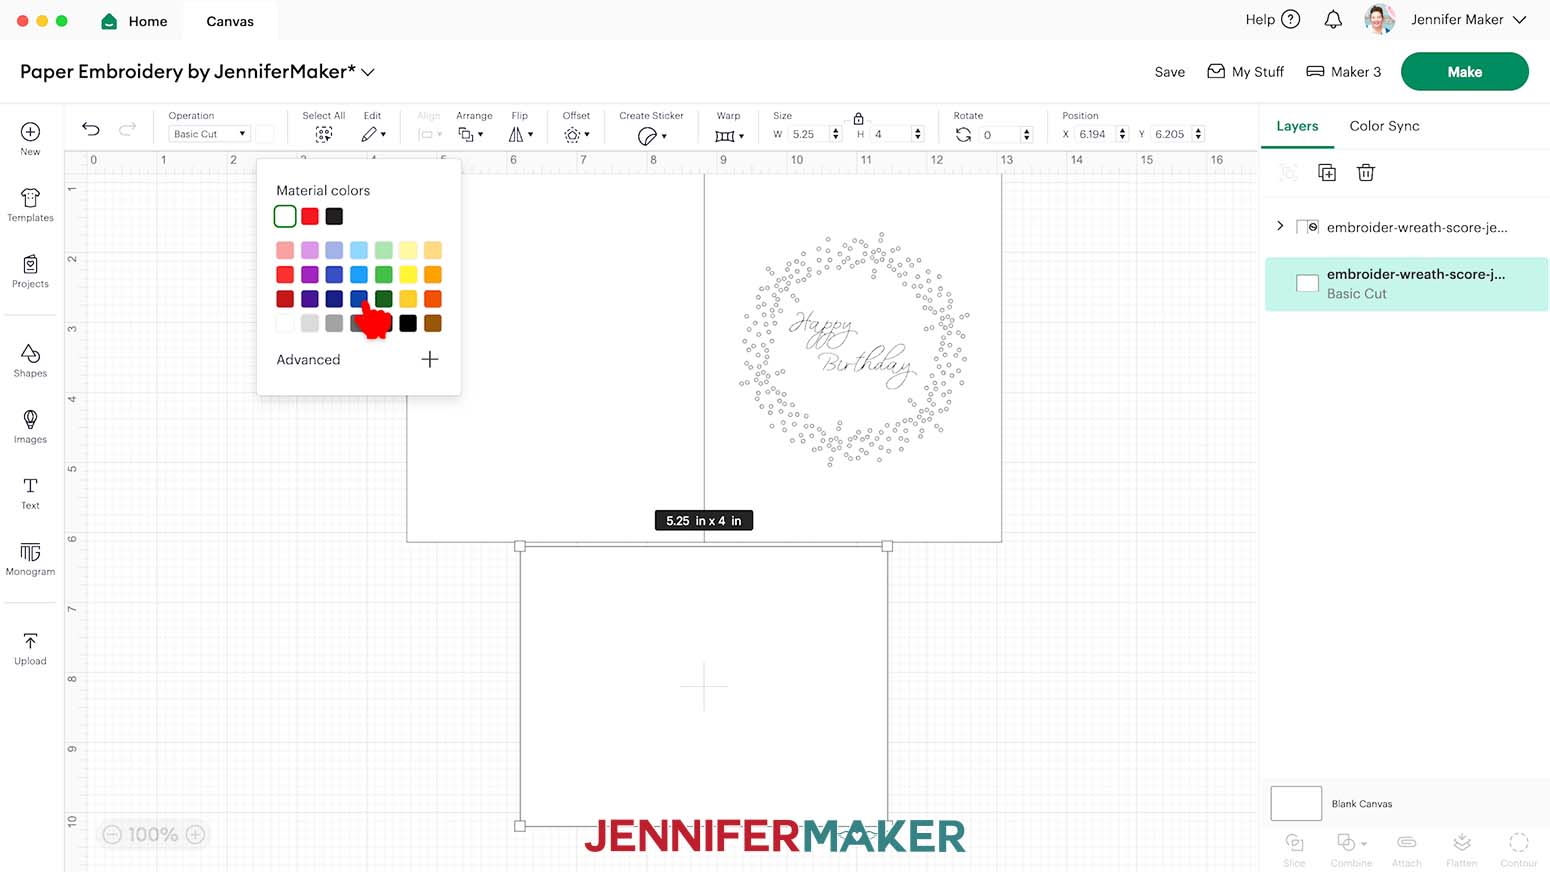
TIP: I don’t recommend resizing the cards because the holes will either be too big and look obvious, or be too small for the needle and thread to pass through. - If you want to use different color cardstock for the pieces, select the appropriate layer in the Layers Panel and use the Color Box at the top to adjust it.
- If you’re using the “no-score” version of the card, skip ahead to step 15.
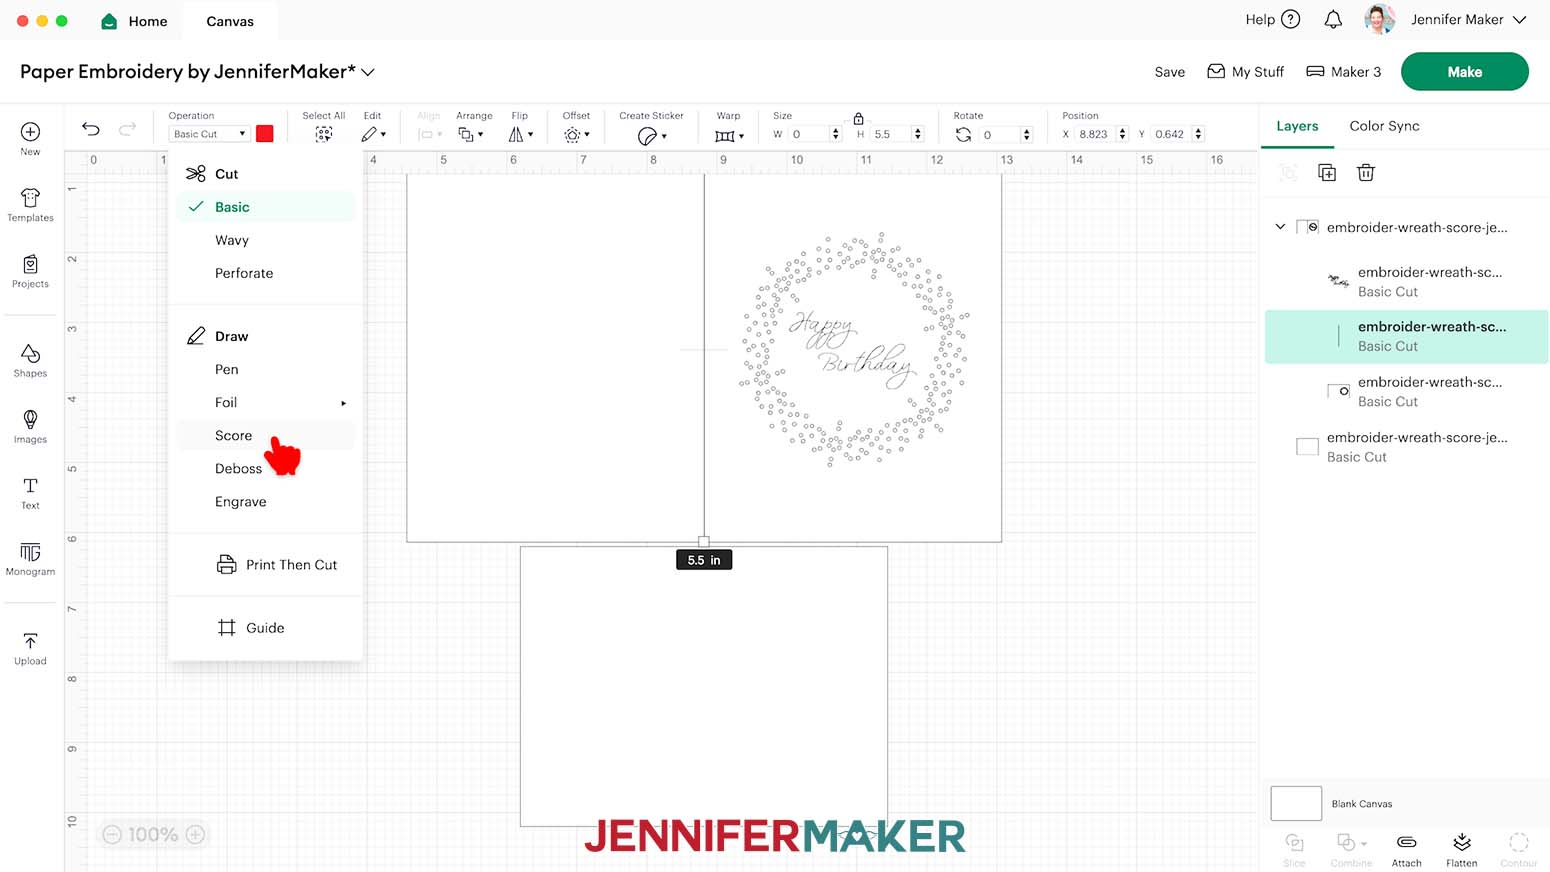
- If you’re using the “score” version of the card, click the arrow in the Layers Panel to expand the layer group.
- Select the layer that looks like a single line.
- Set its Operation to “Score.”
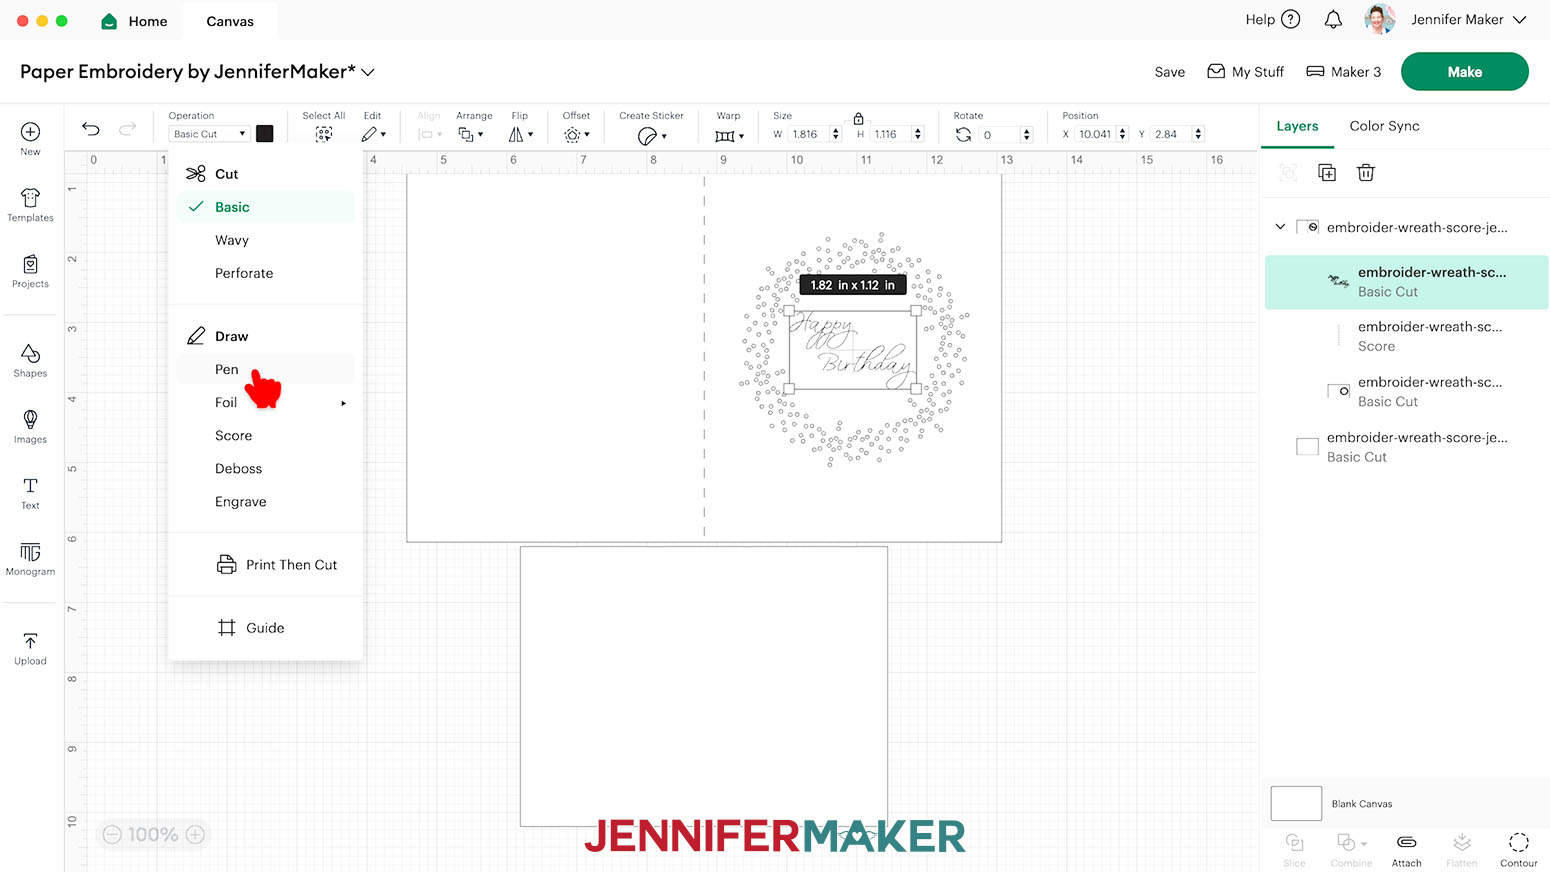
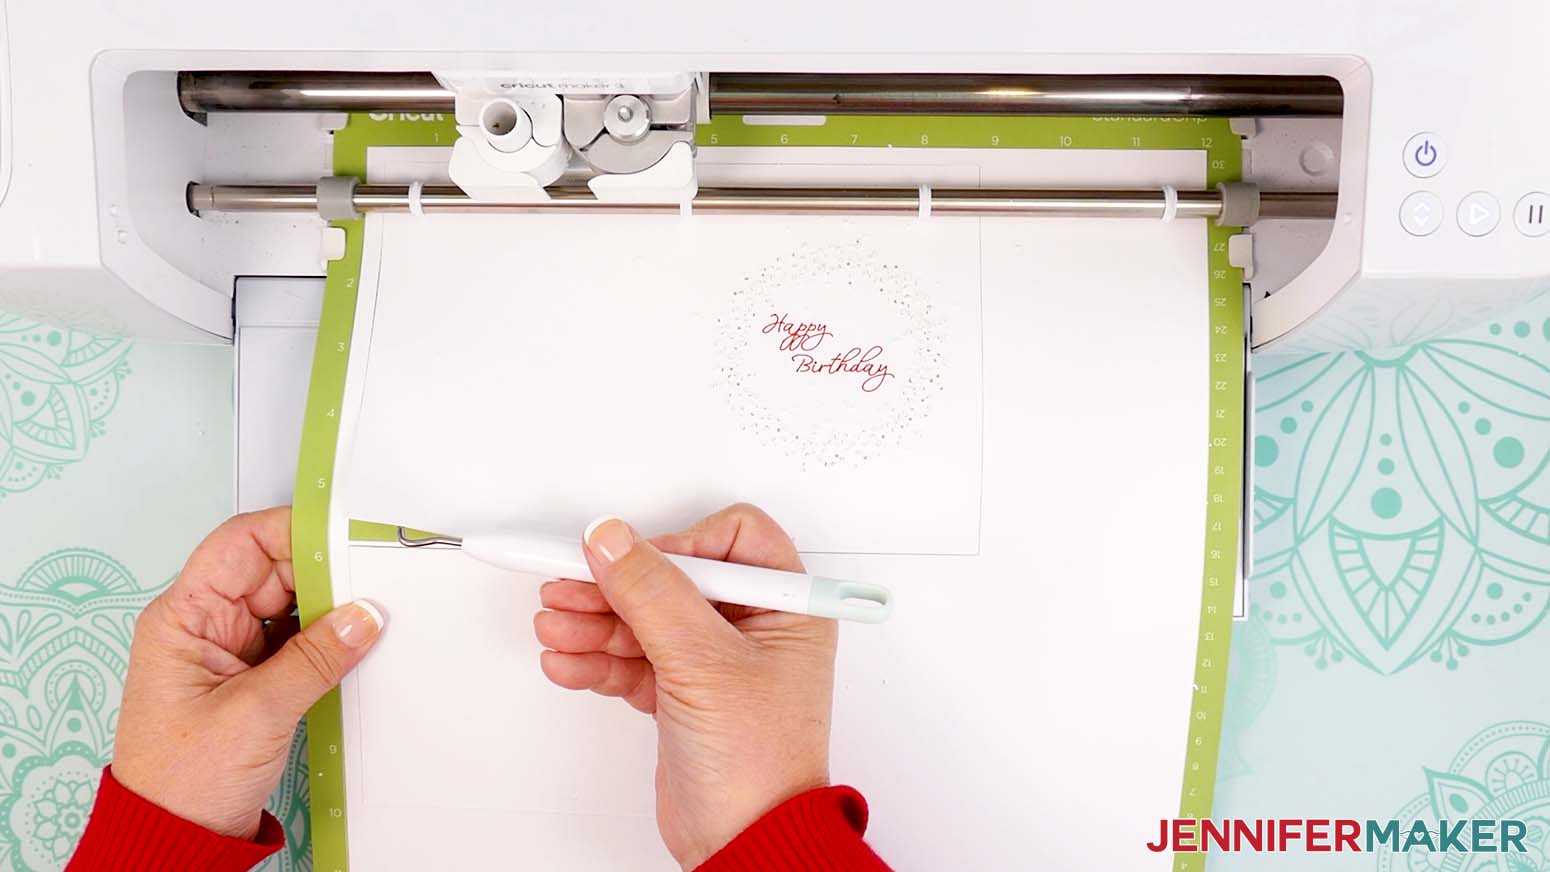
- If you do not want to use the optional “Happy Birthday” message that can be written with a Cricut-compatible pen, select the message layer and delete it, then skip to step 19.
- If you want to use the “Happy Birthday” message, select the message layer and under “Operation,” select “Pen.”
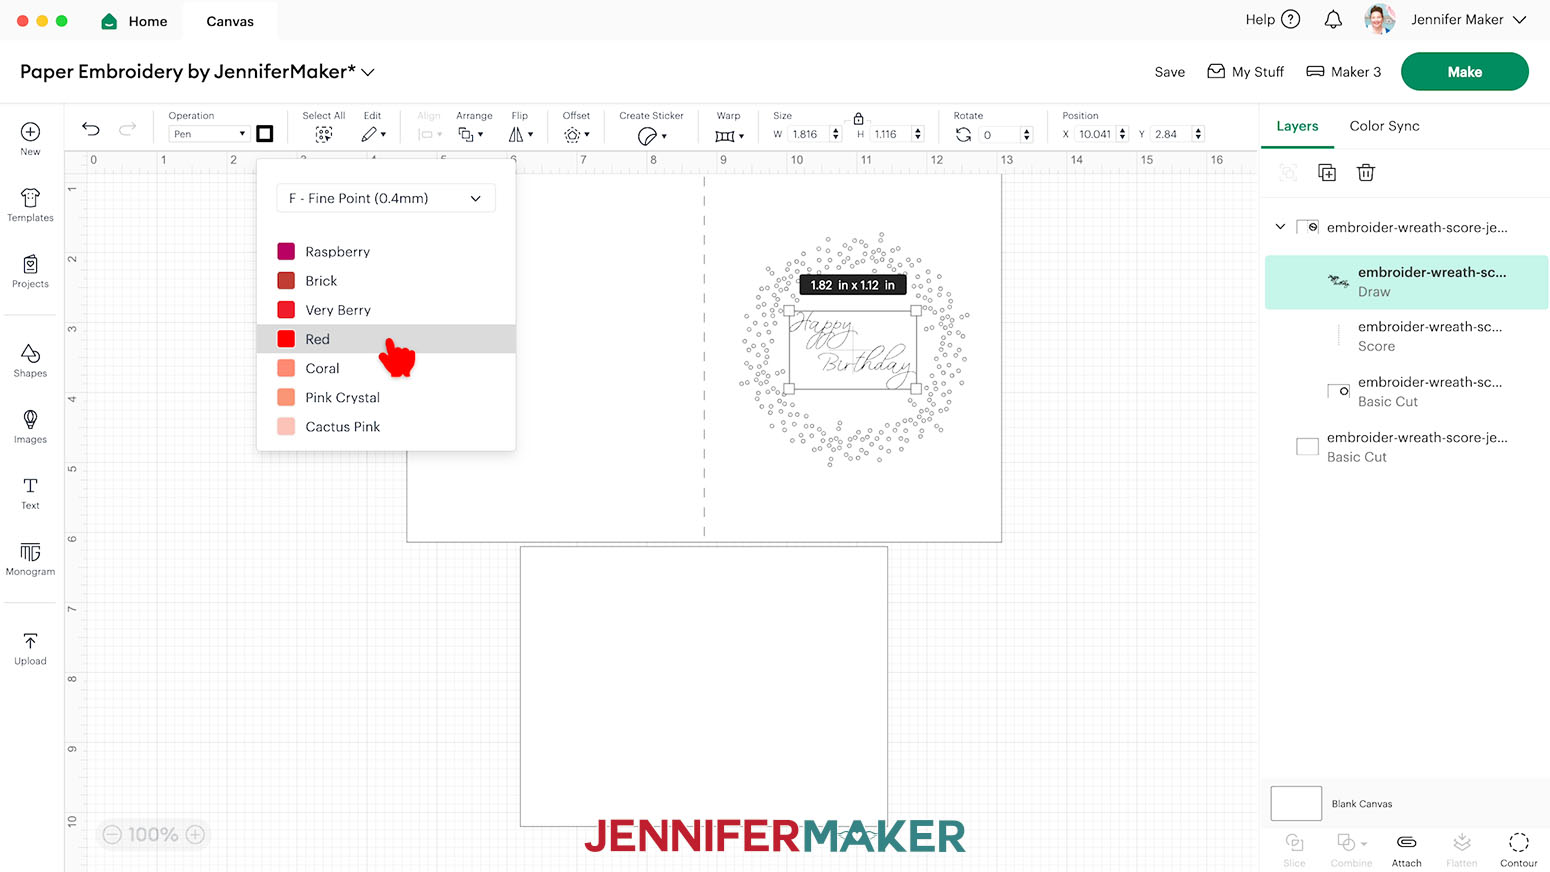
- Click the square next to the Operation menu and select your Cricut-compatible pen’s tip size. I selected “F - Fine Point (0.44mm)” to match my pen.
- Beneath the dropdown menu, select the color of your pen.
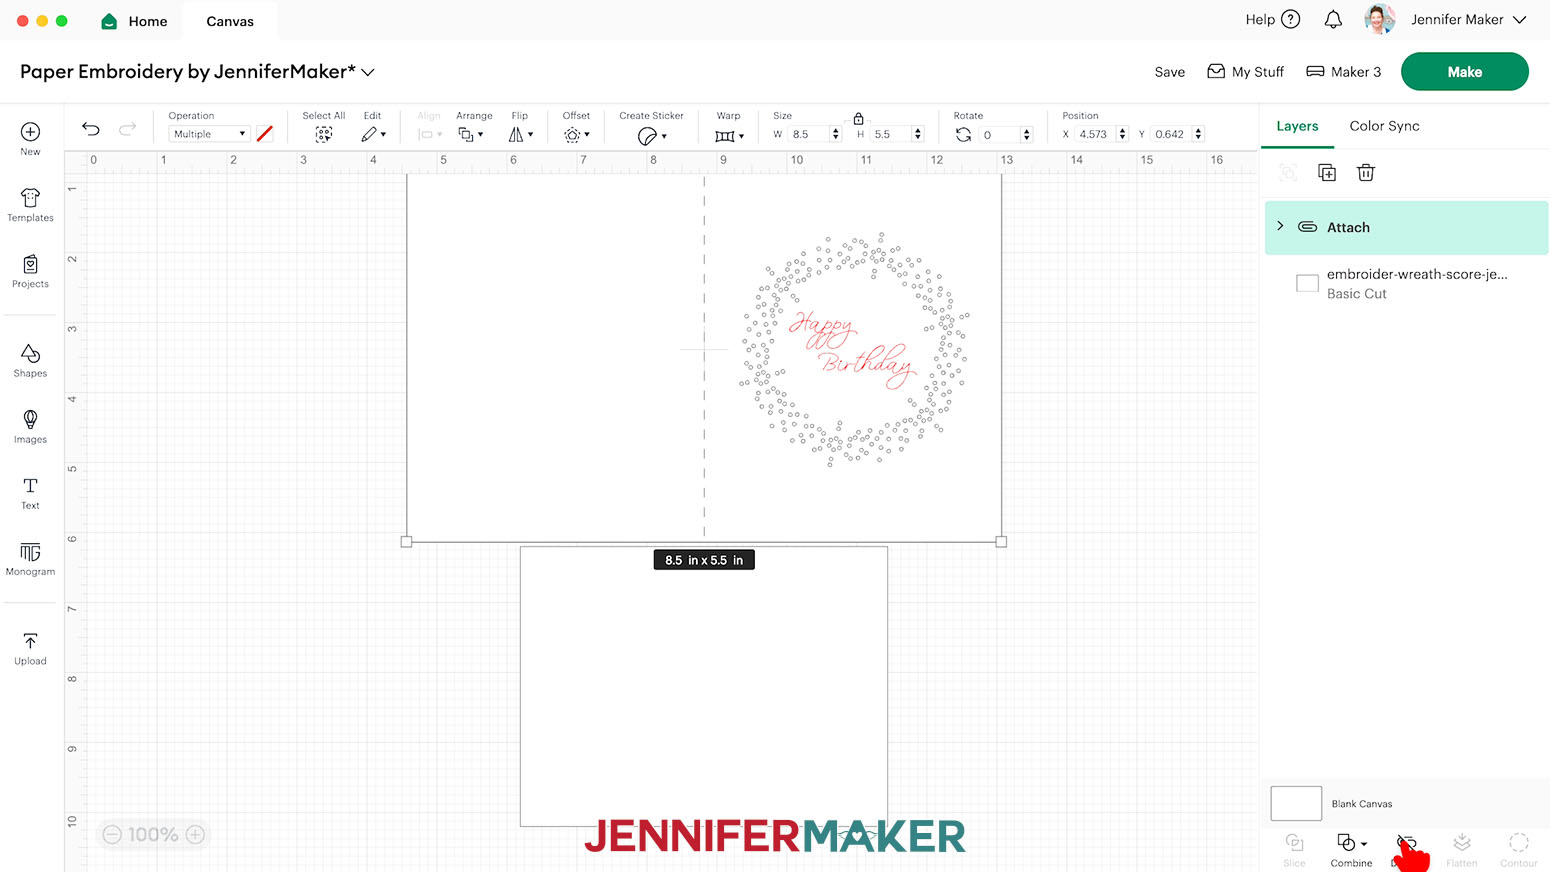
- In the Layers Panel, click the topmost layer of the expanded group.
- Click “Attach” to attach the Score line and the message Draw layer to their corresponding cut layer.
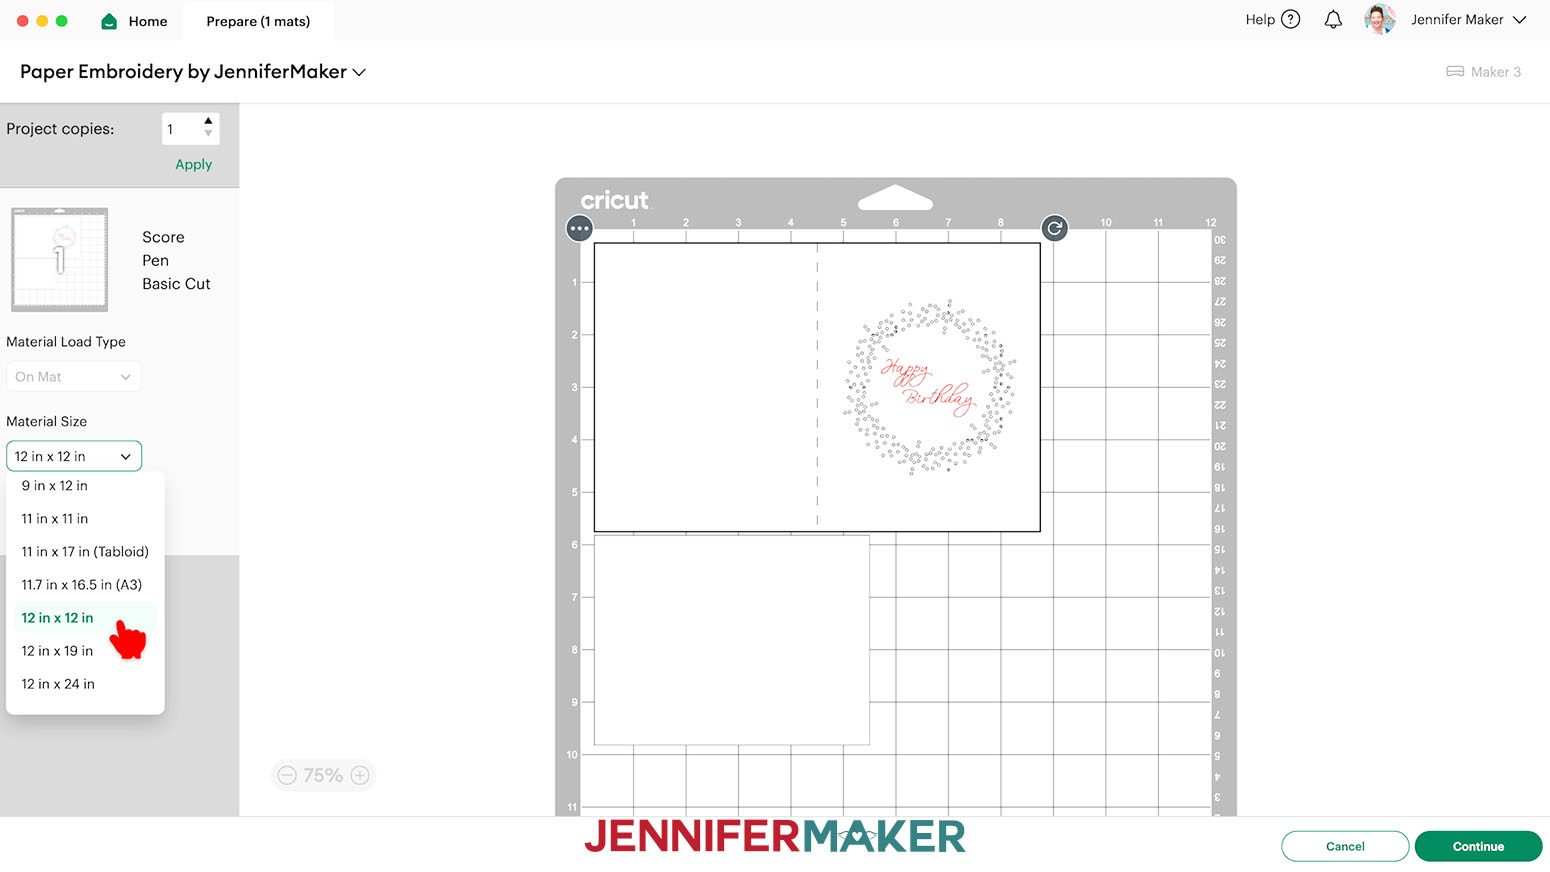
- Your card is ready to score, write, and cut! Make sure the correct machine is selected in the top right, then click “Make.”
- On the Prepare screen, make sure the correct Material Size is selected for each of your materials.
- Select the first mat again and click “Continue.”
CUTTING
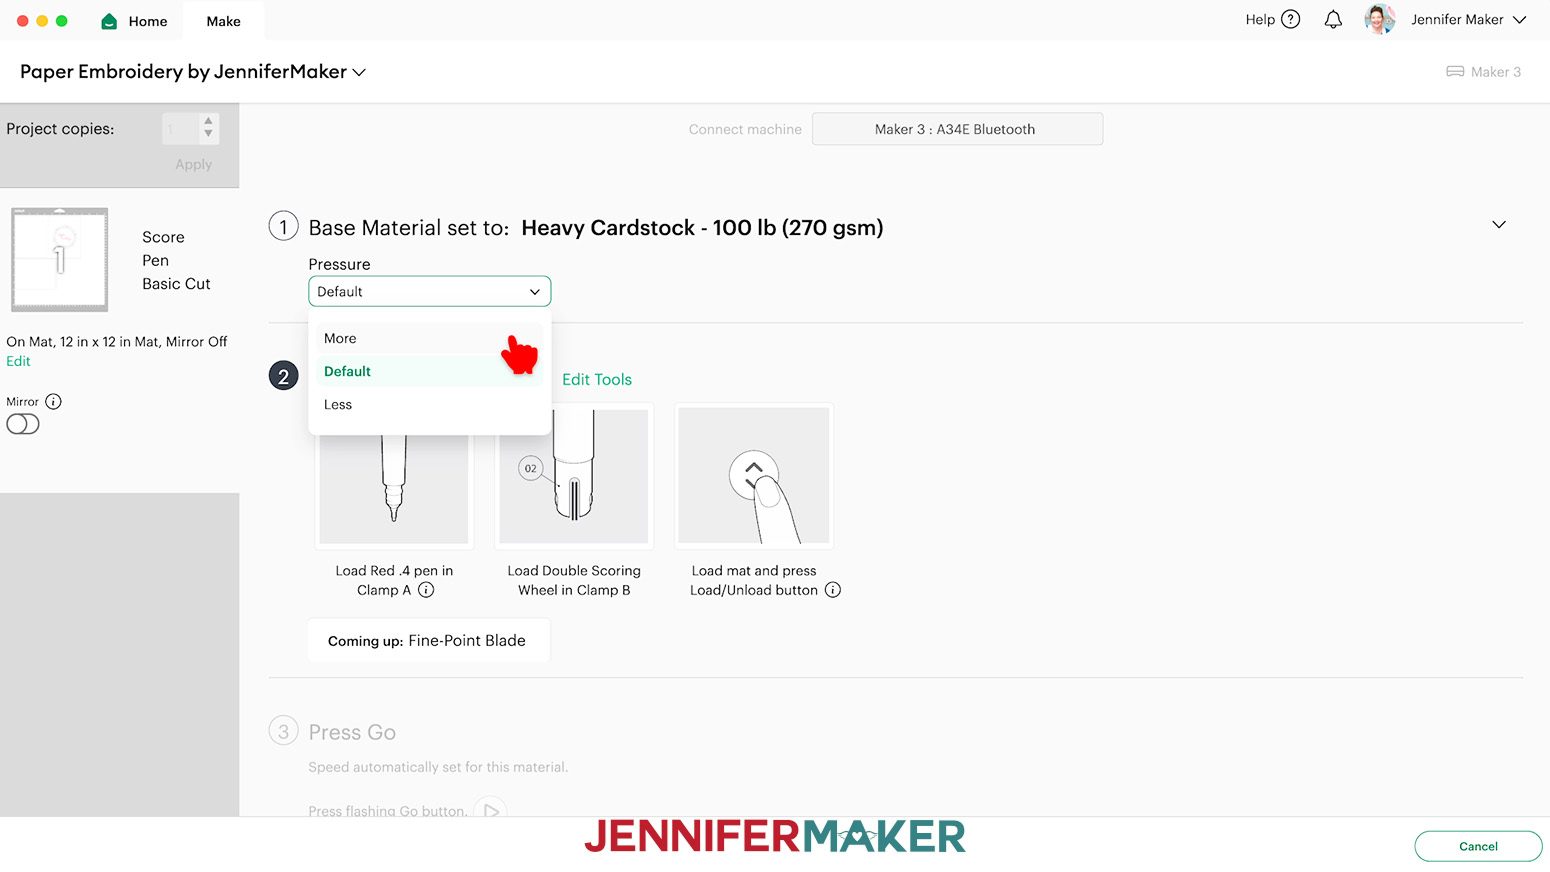
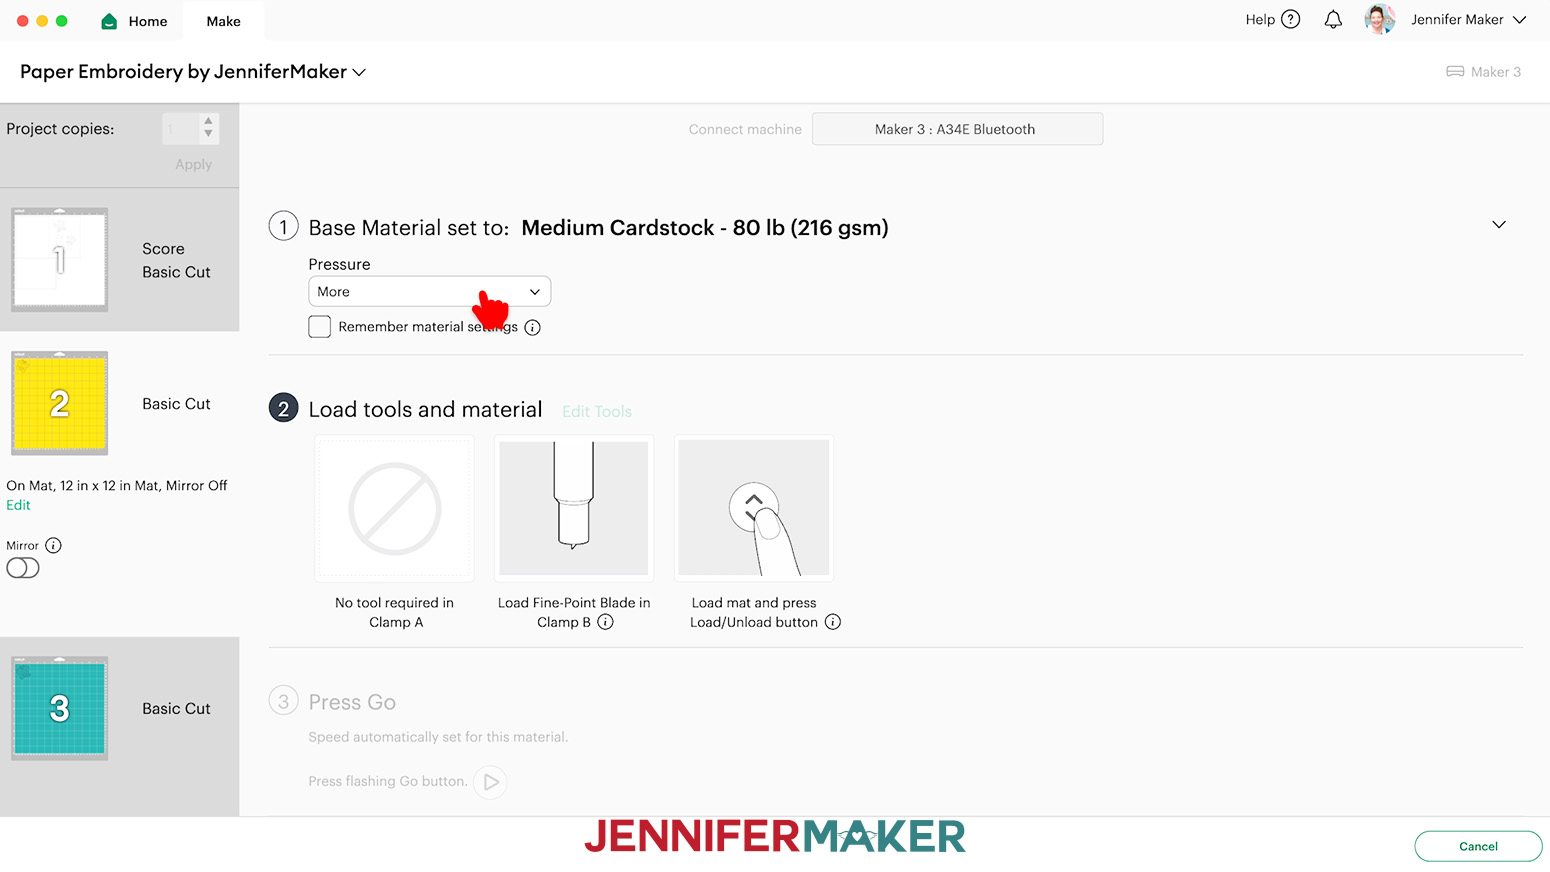
- On the Make screen, I used the following cut settings:
“Heavy Cardstock - 100 lb (270 gsm)” setting with “More” Pressure for 100 and 110 lb. cardstock (I found two passes works best to get the holes cut cleanly, so when the heavy cardstock mat is finished cutting, do not unload it – instead, press the middle “Go” button to have your Cricut re-cut the cuts a second time).
NOTE: If you're having difficulty cutting the tiny holes on the "Heavy Cardstock" setting even with multiple passes, you can try the "Poster Board" setting instead.
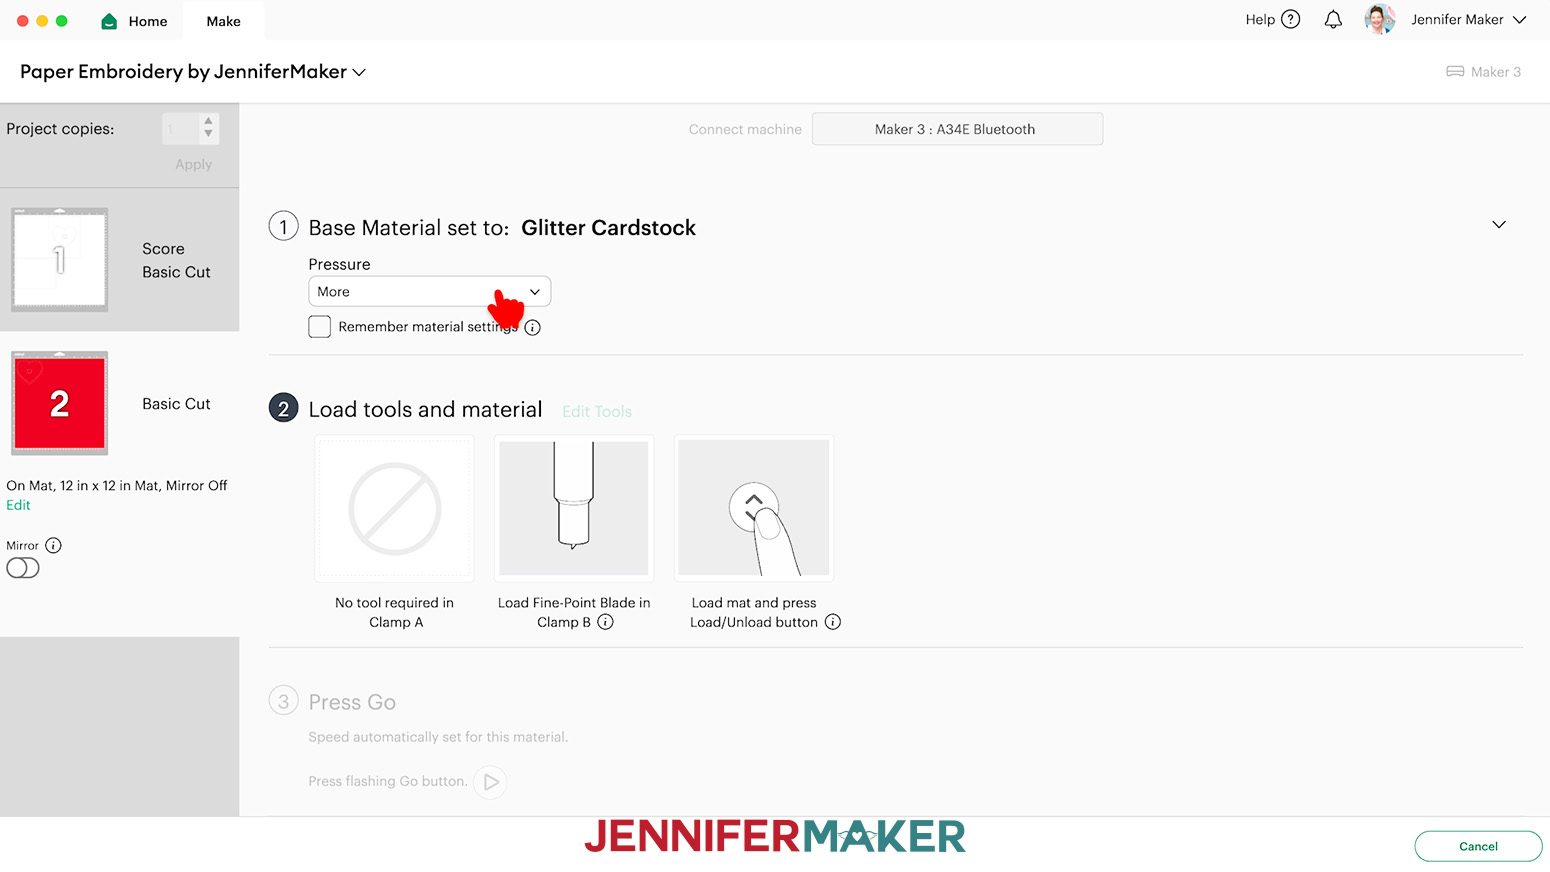
“Glitter Cardstock” with “More” Pressure for glitter cardstock (I used glitter cardstock for my Big Heart embellishment).
“Medium Cardstock - 80 lb (216 gsm)” setting with “More” Pressure for 65 lb. cardstock. - If you’re using the “no-score” version, skip ahead to step 3. If you’re using a score tool, click “Edit tools” and select your tool. If you’re using a Scoring Stylus, insert it into the correct clamp now. If you’re using the Single Scoring Wheel, insert it into the correct clamp when prompted.
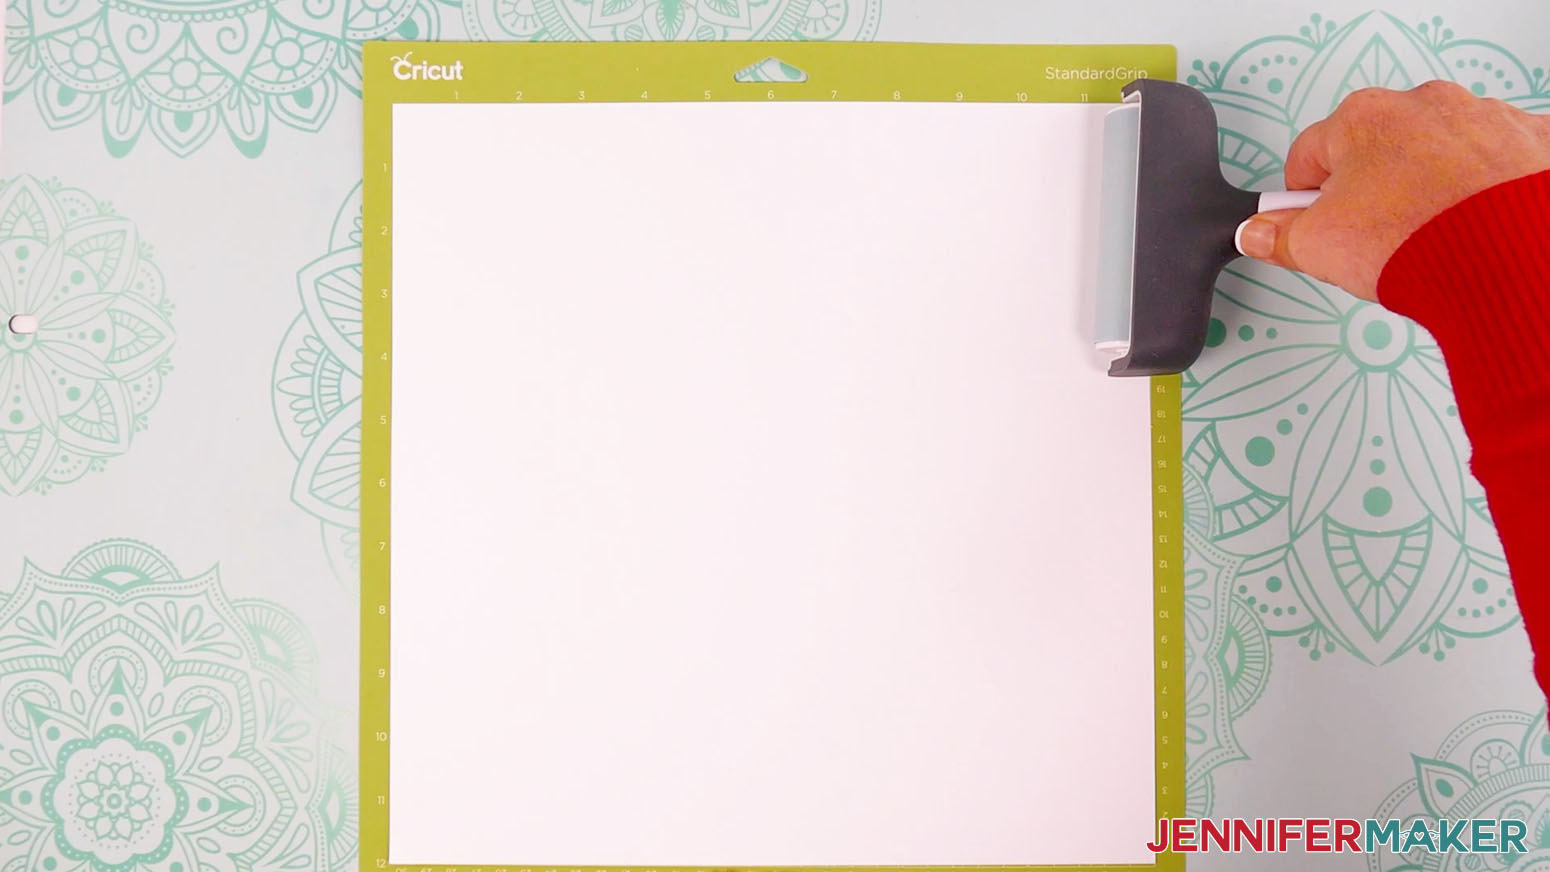
- Place your first mat’s material pretty-side up on a green StandardGrip machine mat.
TIP: Be sure to place the right material face-side up on each mat. If your green StandardGrip machine mat isn’t new and sticky, a purple StrongGrip machine mat may work better for your heavier cardstock. - Use a brayer to make sure it’s fully adhered.
- Check that your Premium Fine-Point Blade is clean and in the correct clamp.
- Press the flashing “Load/Unload” button to load the prepared mat into your Cricut.
- Press the flashing middle button to begin cutting.
- When prompted, remove your Scoring tool. Take your Fine-Point pen and place the cap on its back so you don’t lose it. Then load it into the clamp and press the middle button to continue.
NOTE: Test the pen on scrap felt to make sure it flows well before loading it. - If you’re using heavy cardstock, skip to step 10.
- When using 65 lb. or glitter cardstock, when the cut is complete, before unloading the mat, use your weeding tool to peel back a corner of the material to make sure the cut went all the way through. If it didn’t, smooth the material back down into place and press the middle button again for another pass.
- When using heavy cardstock, you should make two passes before checking if the material is cut all the way through. Make sure to remove the pen from the clamp after the first pass so it doesn't write again. Press the middle button again for a second pass. Once the second pass is complete, before unloading the mat, use your weeding tool to peel back a corner of the material to make sure the cut went all the way through. If it didn’t, smooth the material back down into place and press the middle button again for a third pass.
- Once the material is cut all the way through, unload the mat, flip it over onto your work surface, and roll it back to release the material.
TIP: If you have any issues with your cuts, check out my Intricate Cuts tutorial. - Follow steps 3-12 to continue cutting the rest of your mats.
TIP: Use a small scraper tool to push any leftover bits of material off of your mat between cuts. - If any stubborn cardstock stays attached to the tiny holes on the cards and embellishments, use a piece of rolled up painter’s tape to pull them out, or use your needle or a weeding tool to carefully poke them out.
PRINT THE GUIDE
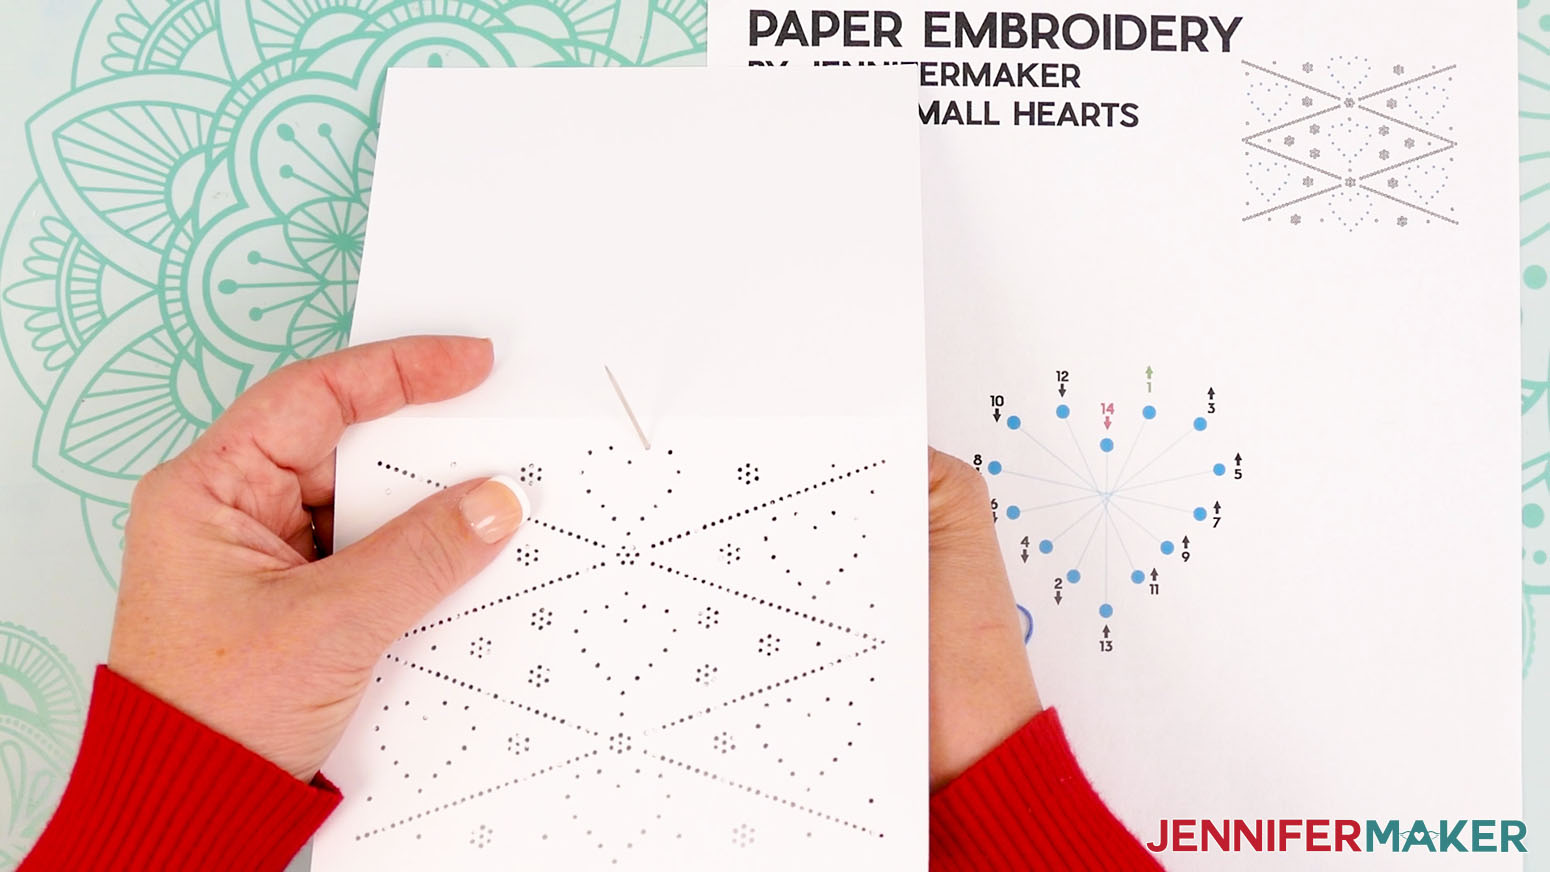
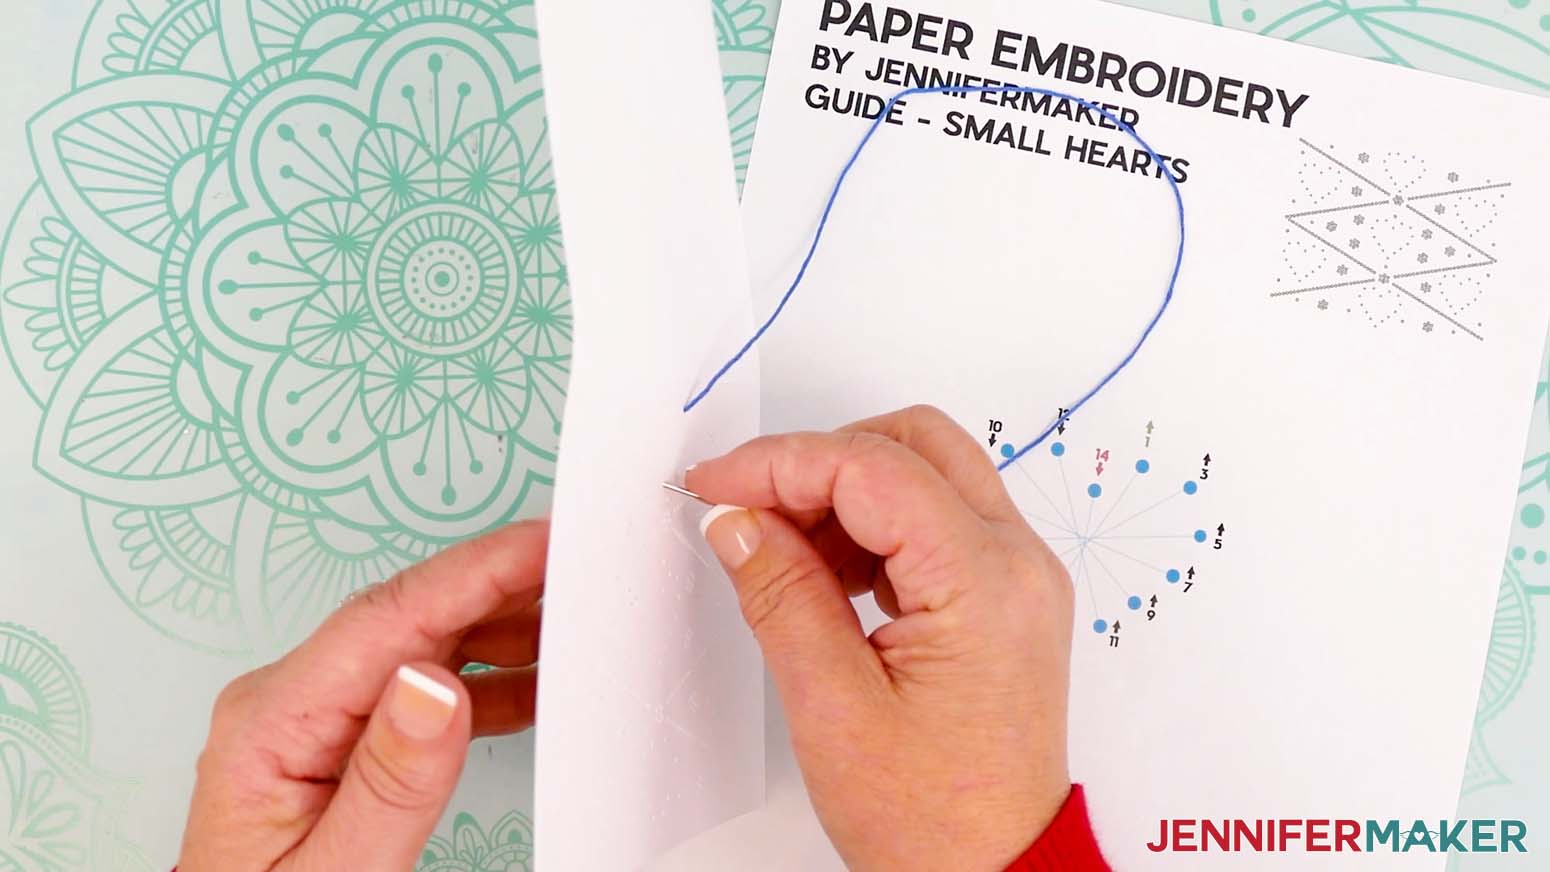
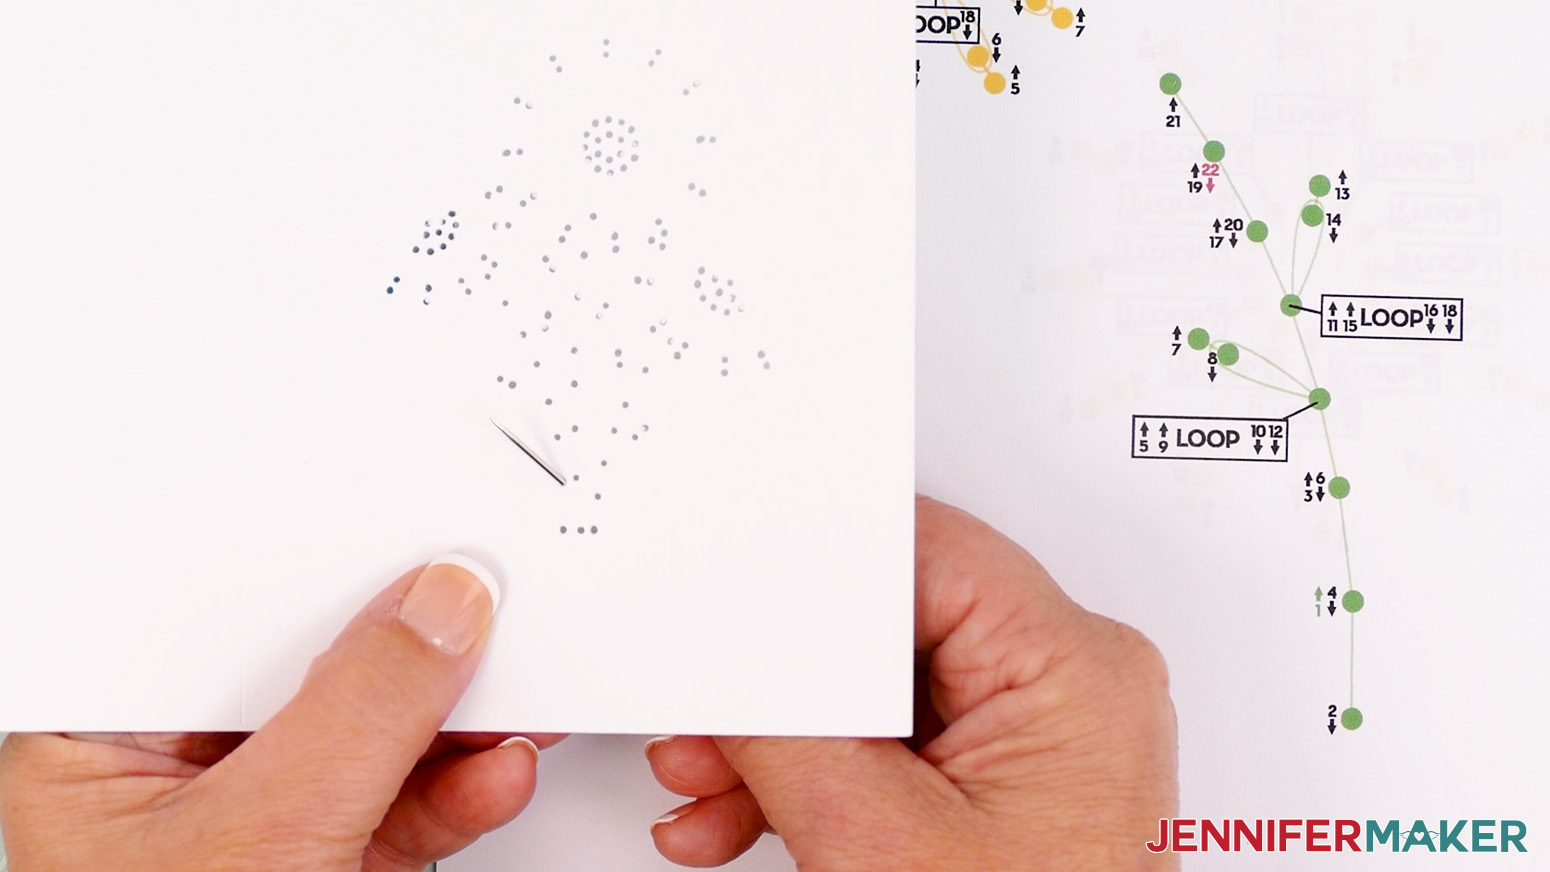
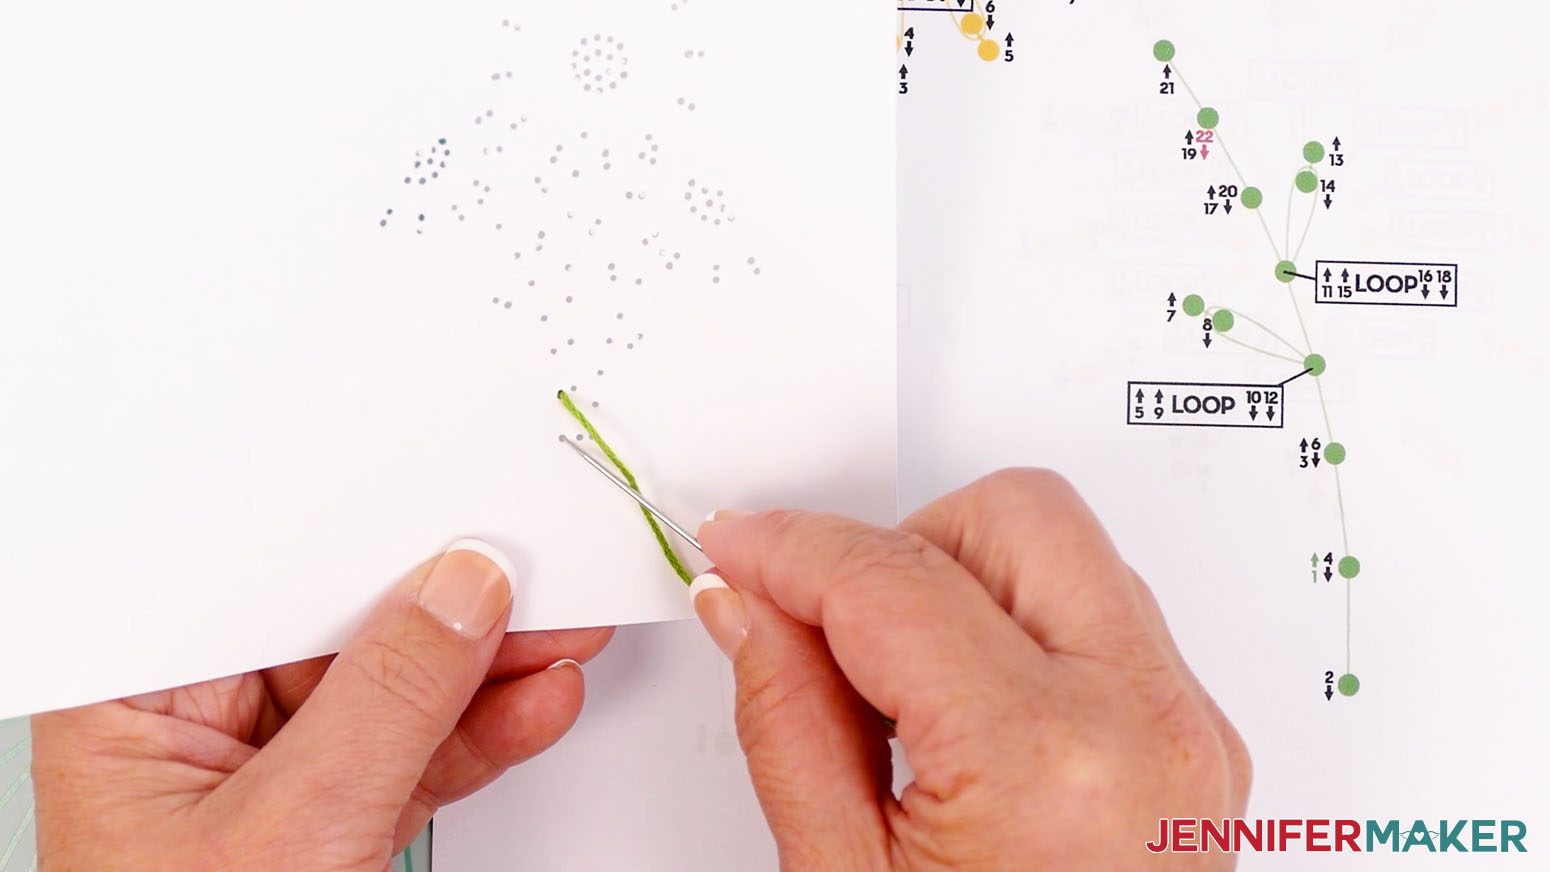
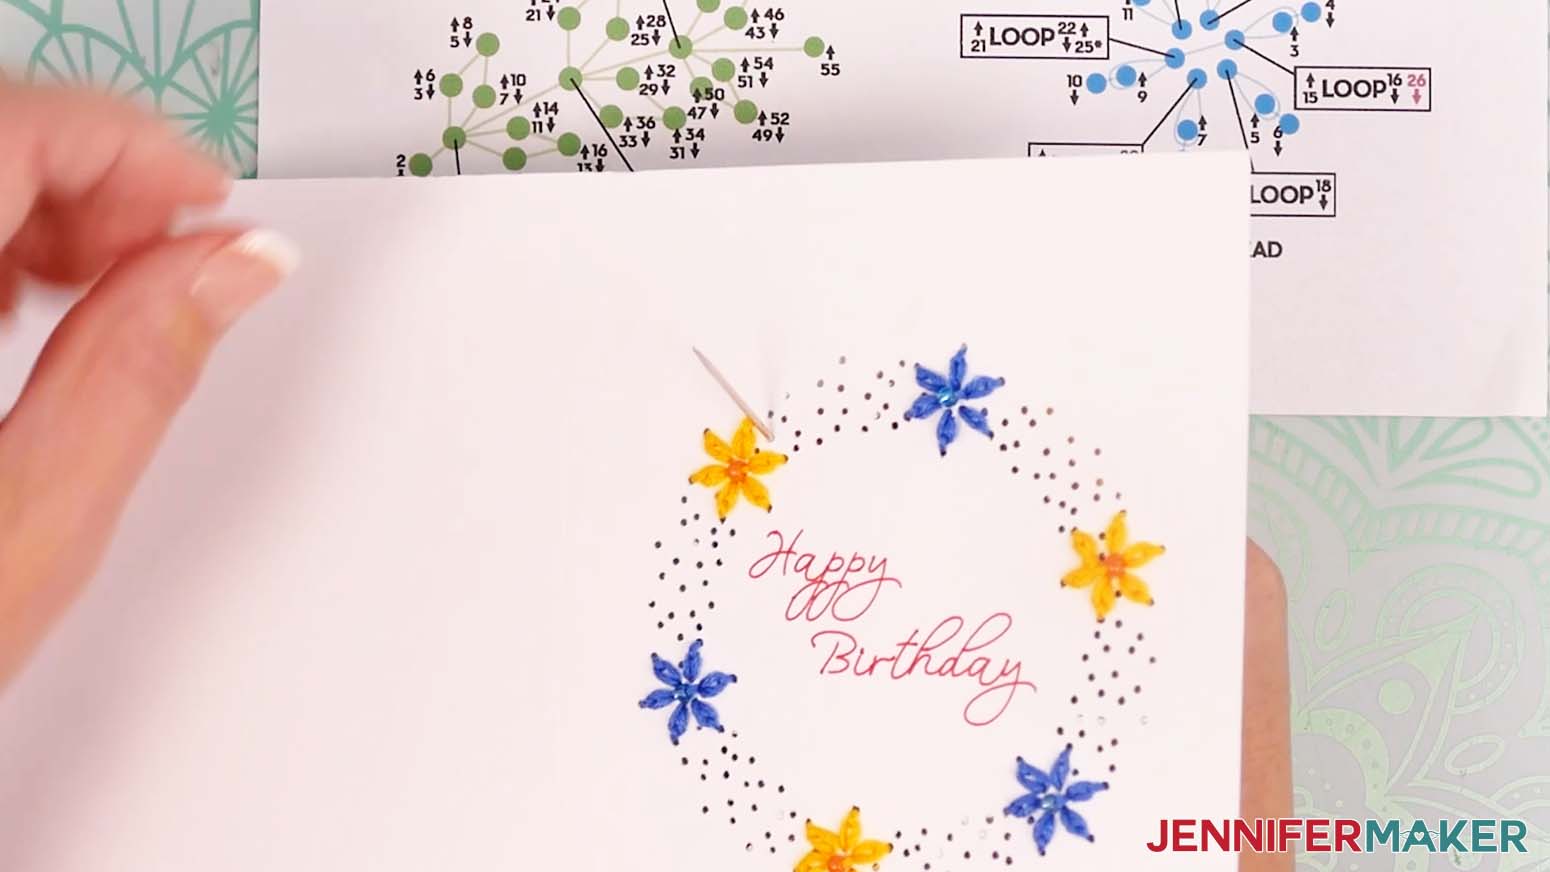
You can open the “guide” PDF file on your computer for reference, or print it with an inkjet printer. Each step for inserting your threaded needle is numbered, with hole 1 being green and the last hole being red. The arrows indicate whether you'll insert your needle down from the front or up through the back.
- To print, first open the PDF file in Adobe Acrobat Reader or another program that can open PDF files.
- Make sure your printer is loaded with regular printer paper.
- Click “File” then “Print.”
- Follow your system’s prompts to print the guide(s).
STEP 3: EMBROIDER YOUR PAPER EMBROIDERY CARDS
New to embroidery? My “Big Heart” design is easiest, followed by the “Small Hearts,” “Daisies,” “Butterflies,” and “Wreath.” If you’re a beginning embroiderer, I recommend starting with the simpler patterns first.
TIP: If you have a hard time getting the floss through the needle’s eye, wet the tip of the floss and pinch it together with your fingers to make it rigid.
If you find that the length of floss you cut is too long to manage easily while embroidering, cut a shorter piece for your next color.
If you find that the length of floss you cut is too short to finish the colored section you’re working on, pull the floss off of the needle, then tie the end of the floss in a knot against the back of the card. Use a needle to help get the knot close against the card. Trim the ends to ⅛” long, then follow the steps in each design to prepare another piece of threaded floss.
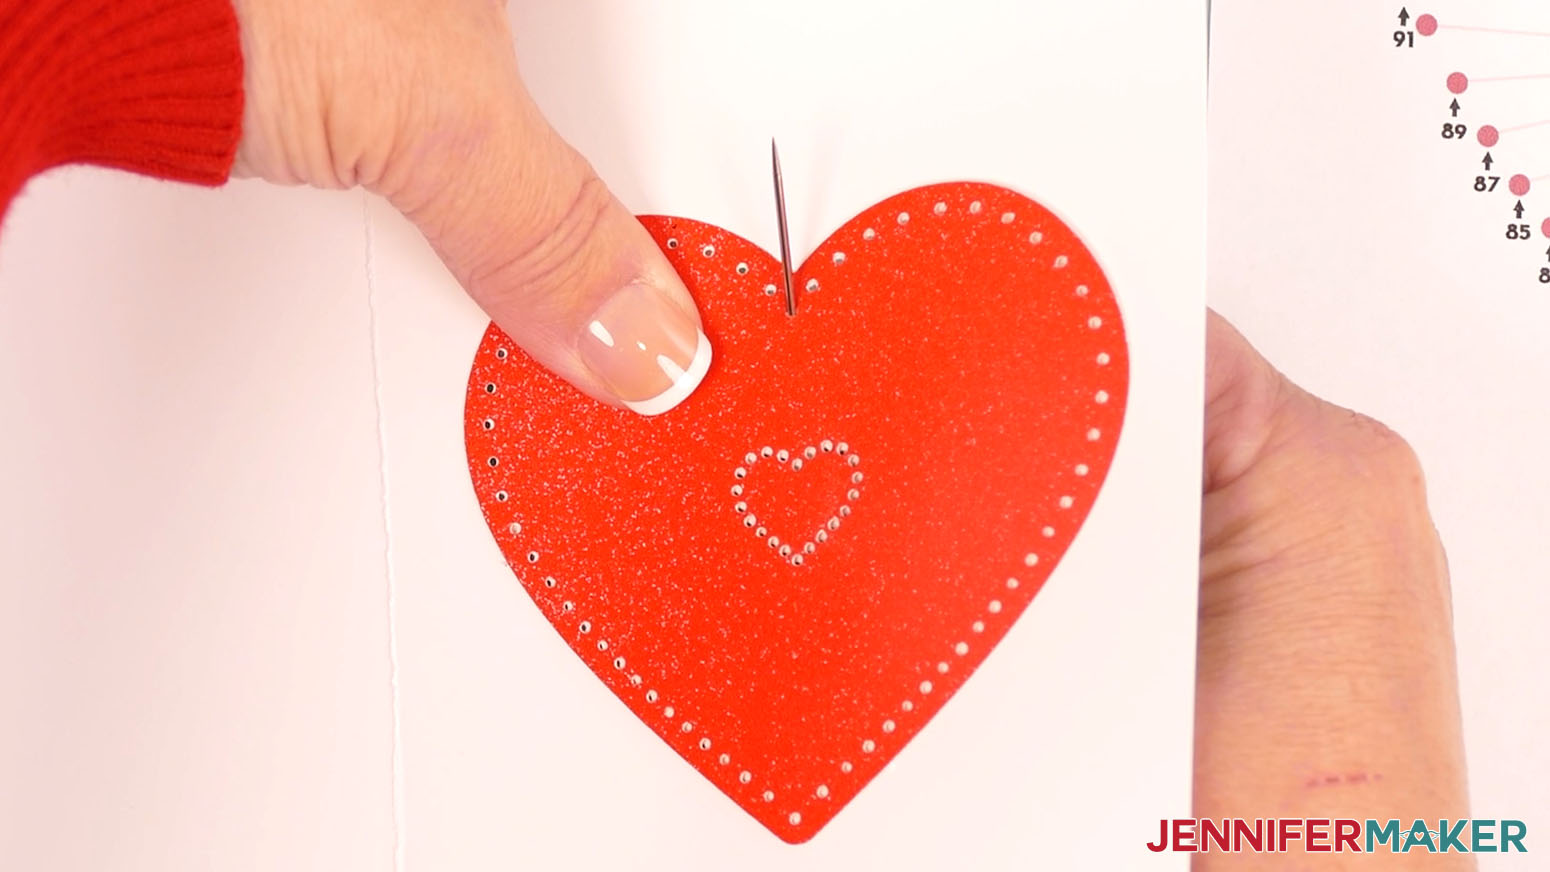
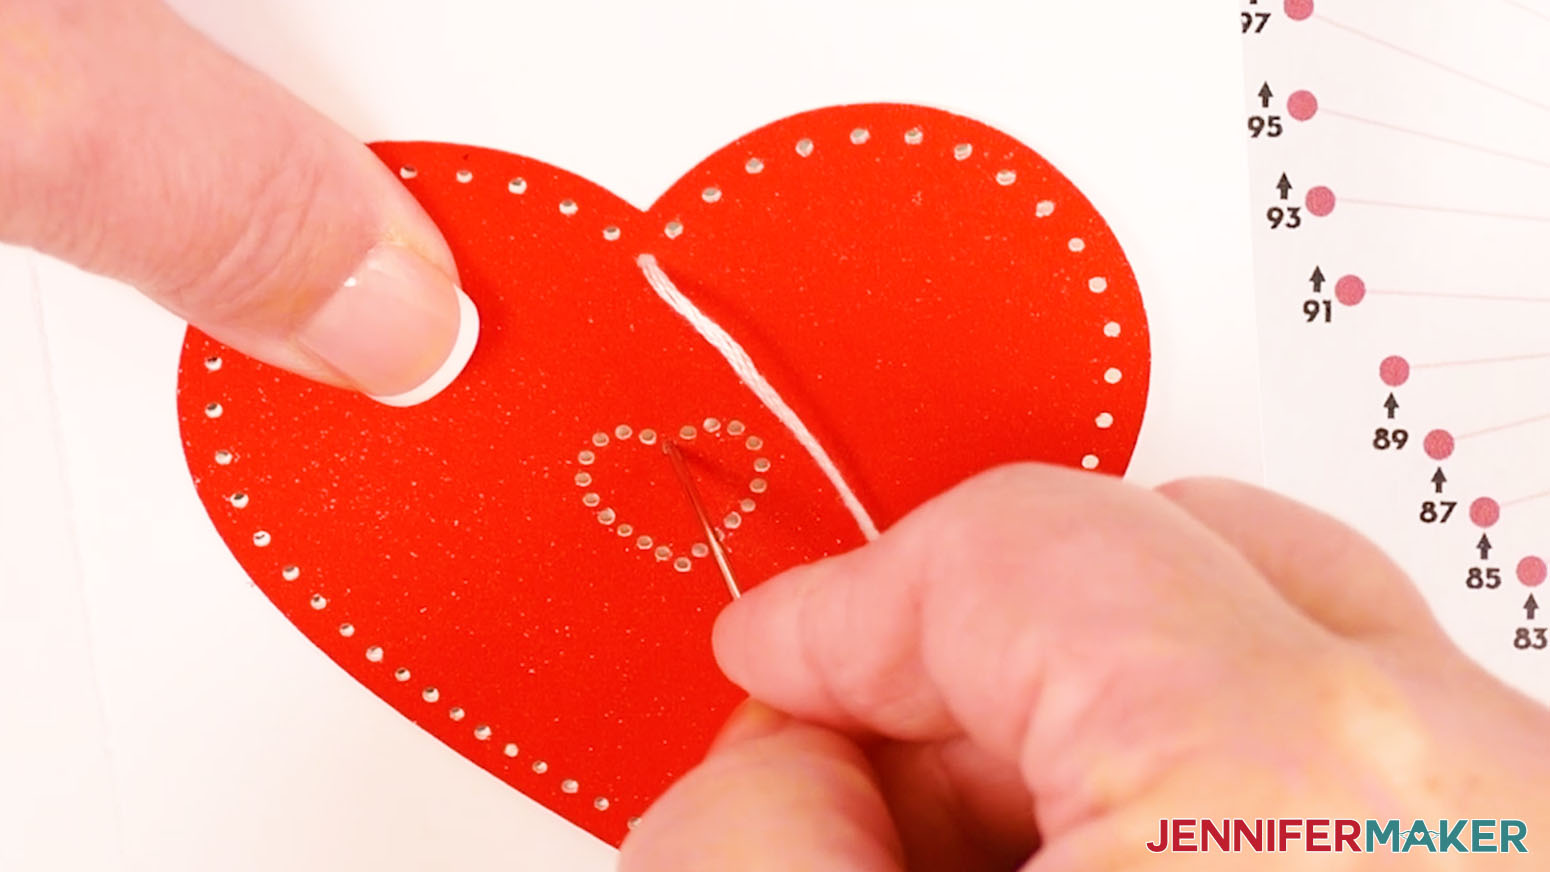
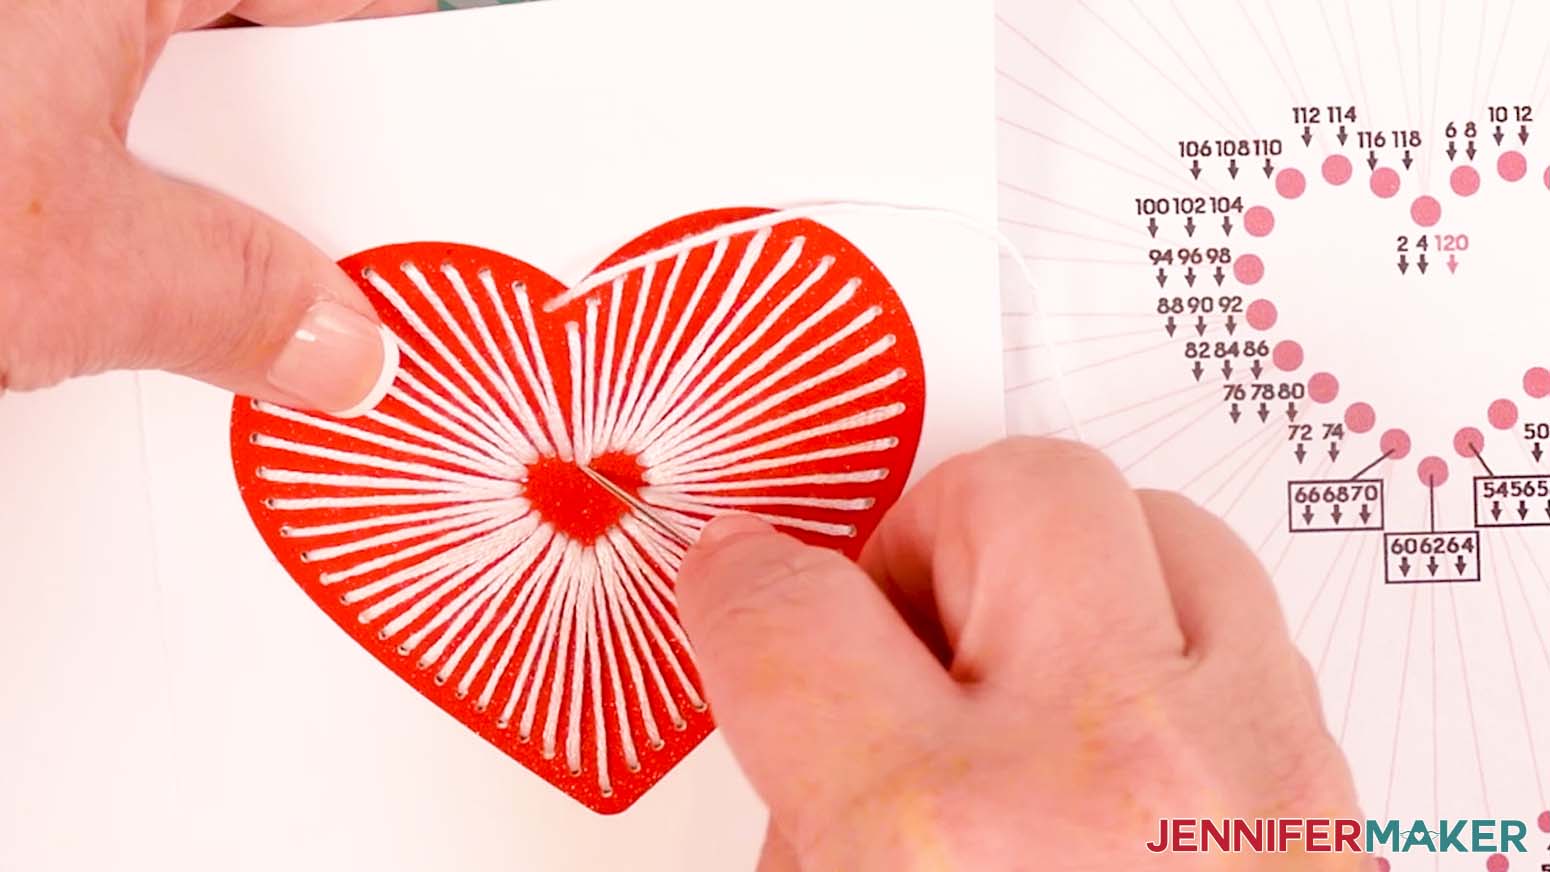
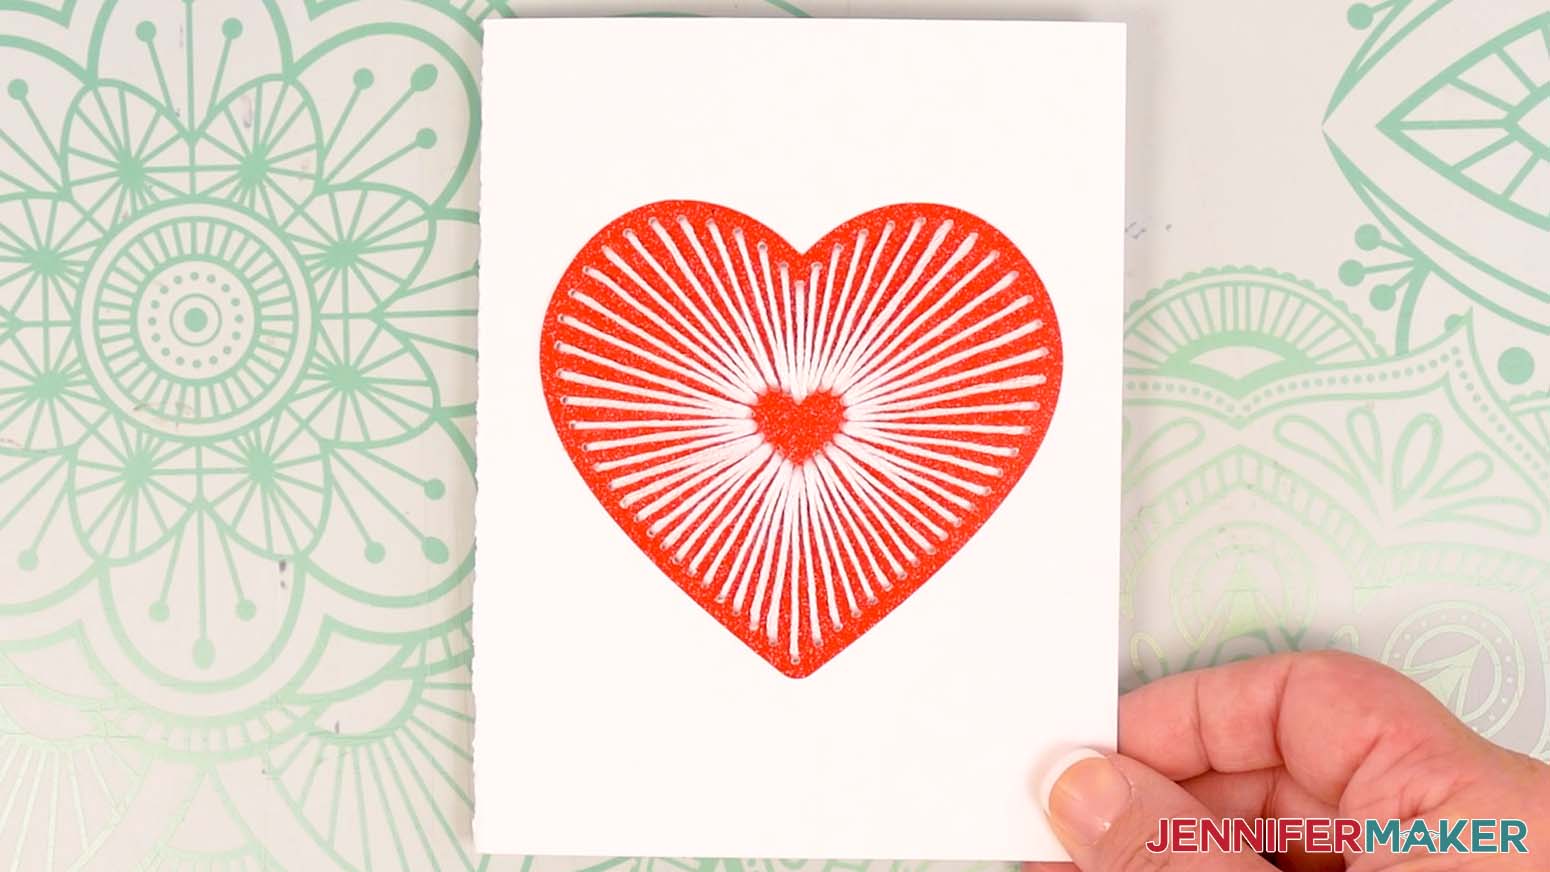
HEART
Grab your embroidery floss. I used red floss directly on my white card, and white floss when I used the optional red heart embellishment piece.
- Use scissors to cut a piece of floss about 18-24” long.
- Thread the floss through the eye of your sewing needle.
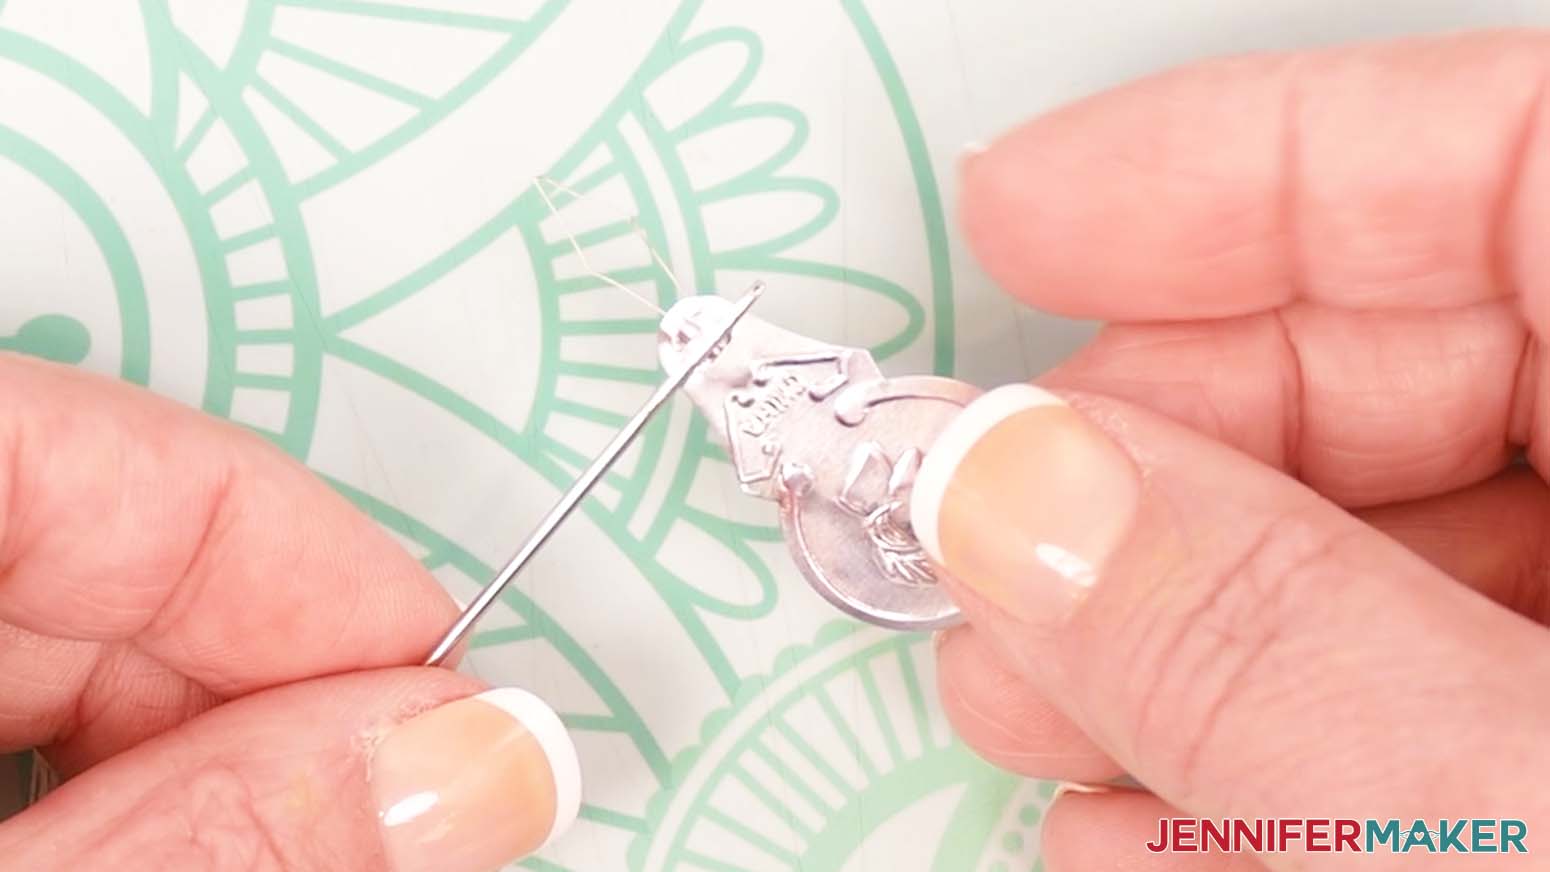
TIP: If you have trouble threading your needle, you can also use a needle threading tool. Push the loop end of the threader through the needle’s eye. Slide your thread through the loop, then pull the loop back through the eye. - Tie a knot about 1” from the end of the thread farthest from the needle. Now you’re ready to begin stitching!
NOTE: If you’re using the optional embellishment piece, be sure the holes on both pieces are aligned before inserting the needle. - Start by inserting the threaded needle from the back of the card up into hole 1 (shown in green on the guide). This number has an up arrow, meaning the needle will go from the back up through the hole on that step.
- Insert the threaded needle down into hole 2. This number has a down arrow, meaning the needle will go down on that step. Pull the entire length of the floss through so the knot rests at the back of the card. Don’t pull too hard or the knot may come through.
- Bring the needle back up through hole 3.
- Continue following the numbers and arrows until you thread the hole with a red 120 next to it on the diagram. Your needle should be pointing down for the last step because the number has a down arrow.
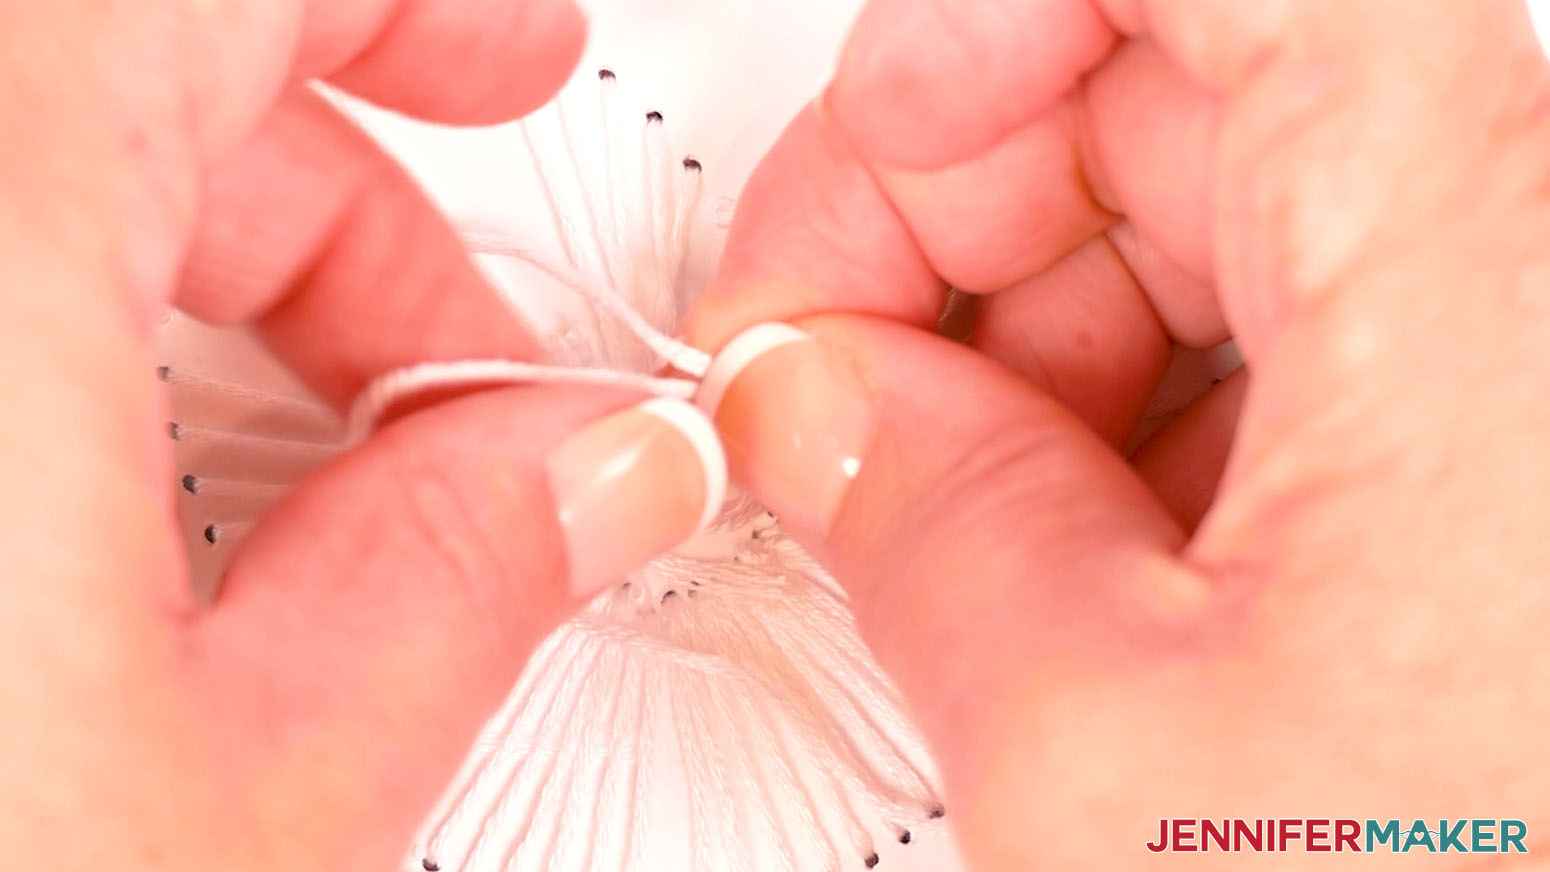
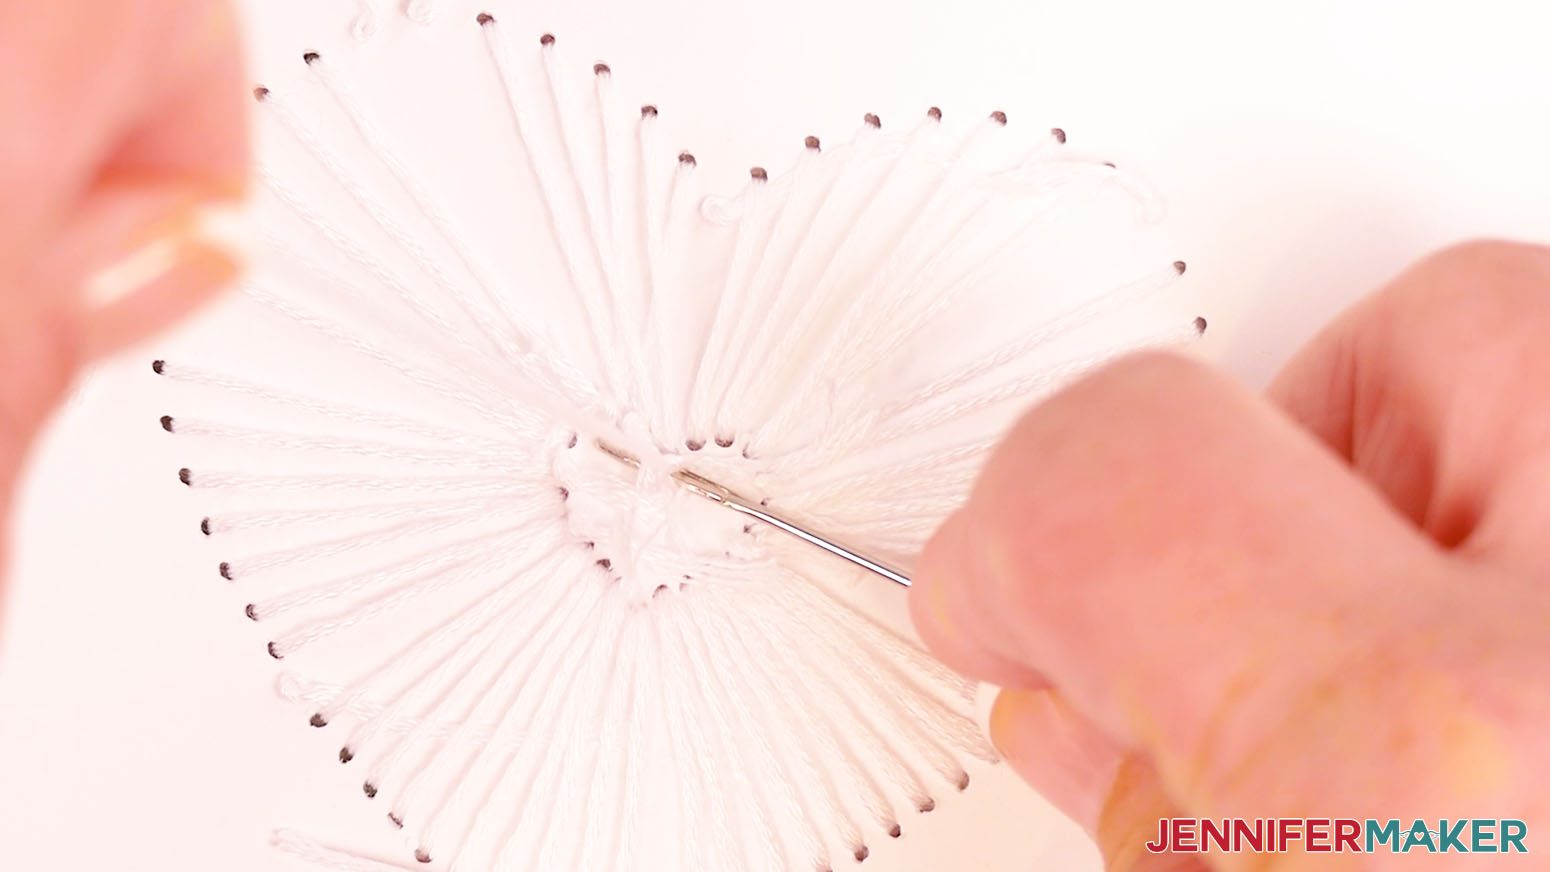
- Remove the needle from the floss.
- Tie a loose knot in the floss.
- Place the end of your needle in the loop of the knot, and slide it close to the cardstock.
- Hold the strands in place with the needle while you pull the tail to tighten the knot.
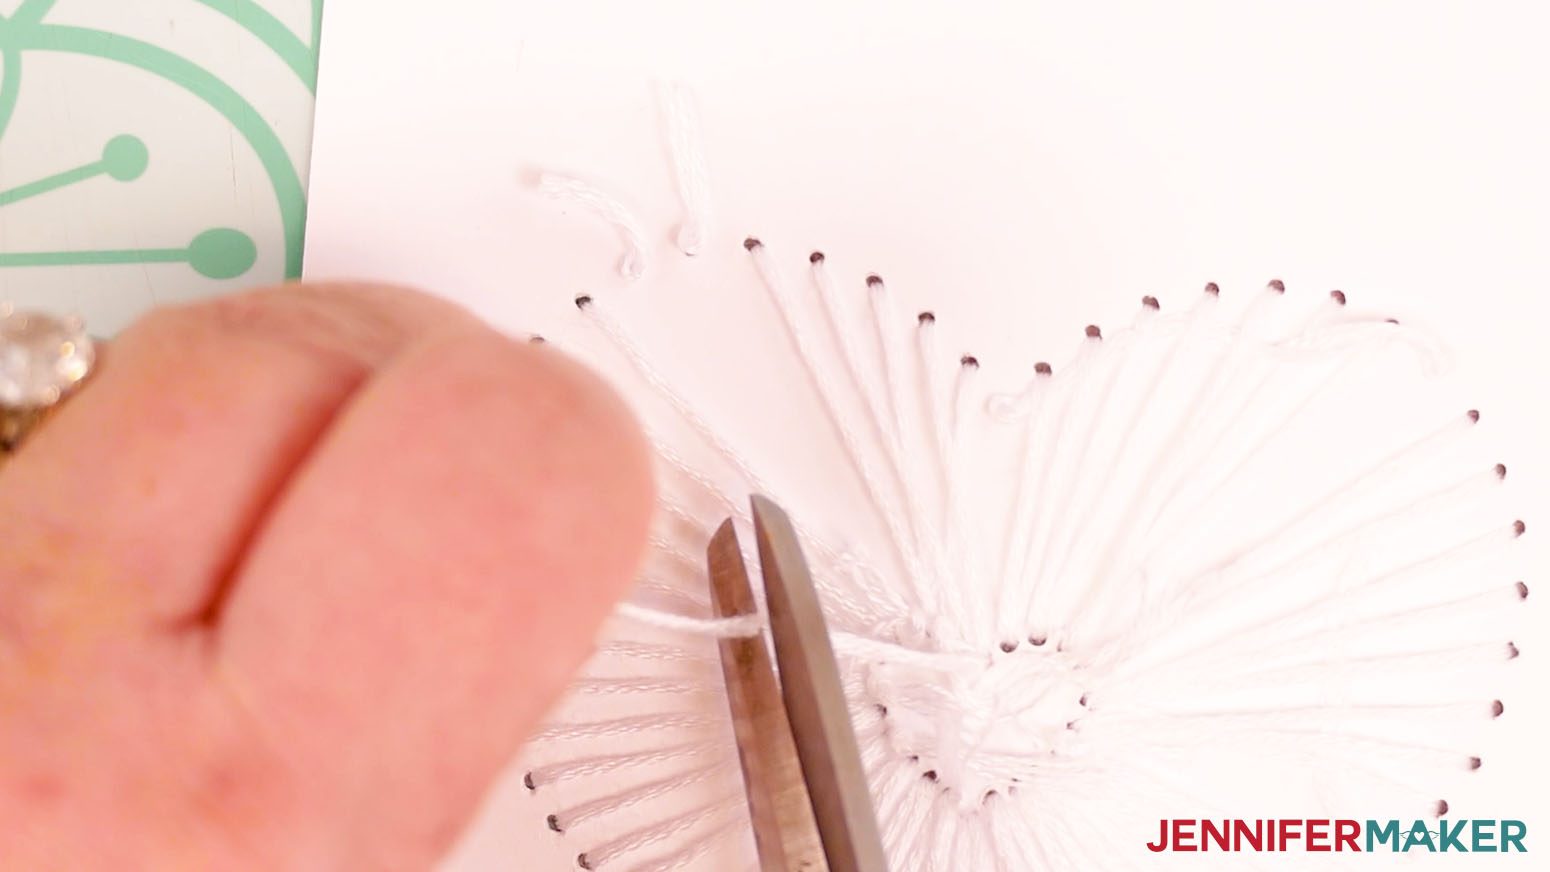
- Trim the excess floss to about ⅛” long.
- This is what the finished Heart embroidery looks like on my card.
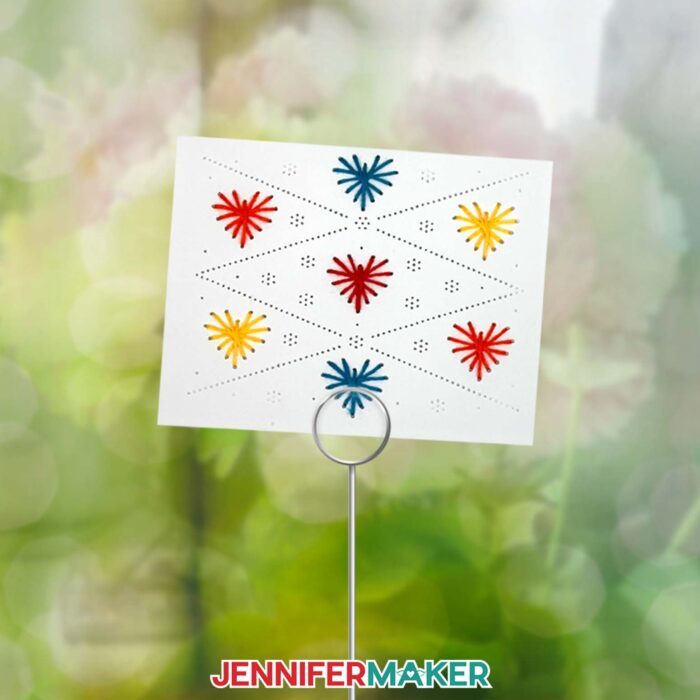
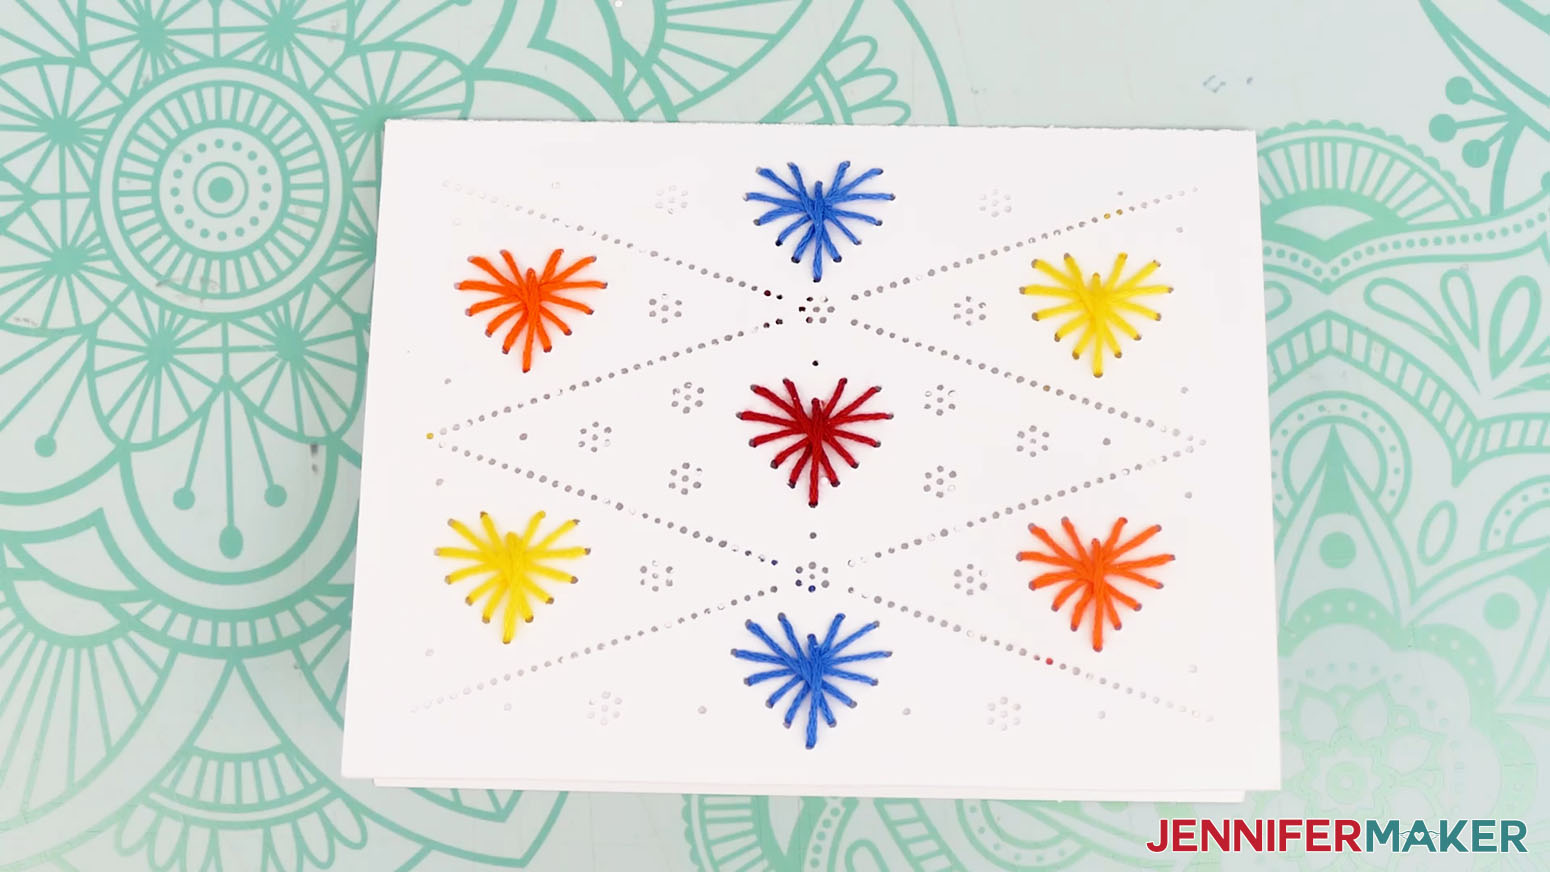
SMALL HEARTS
Gather your embroidery floss colors. I used orange, yellow, blue, and red floss for my different hearts, but you can use any colors you want.
- Use scissors to cut a piece of floss for your first heart, about 18" long.
- Thread the floss through the eye of your sewing needle.
TIP: If you have trouble threading your needle, you can also use a needle threading tool. Push the loop end of the threader through the needle’s eye. Slide your thread through the loop, then pull the loop back through the eye. - Tie a knot about 1” from the end of the thread farthest from the needle. Now you’re ready to begin stitching!
- Pick one of the hearts to embroider first. Start by inserting the threaded needle from the back of the card up into hole 1. This number is green and has an up arrow, meaning the needle will go from the back up through the hole on that step.
- Insert the threaded needle down into hole 2. This number has a down arrow, meaning the needle will go down on that step. Pull the entire length of the floss through so the knot rests at the back of the card. Don’t pull too hard or the knot may come through.
- Bring the needle back up through hole 3.
- Continue following the numbers and arrows until you thread the hole with a red 14 next to it on the diagram. Your needle should be pointing down for the last step because the number has a down arrow.
- Remove the needle from the floss.
- Tie a loose knot in the floss.
- Place the end of your needle in the loop of the knot, and slide it close to the cardstock.
- Hold the strands in place with the needle while you pull the tail to tighten the knot.
- Trim the excess floss to about ⅛” long.
- Follow steps 1-12 to embroider the remaining hearts using 18" long pieces of floss for each heart.
- This is what the finished Small Hearts embroidery looks like on my card.

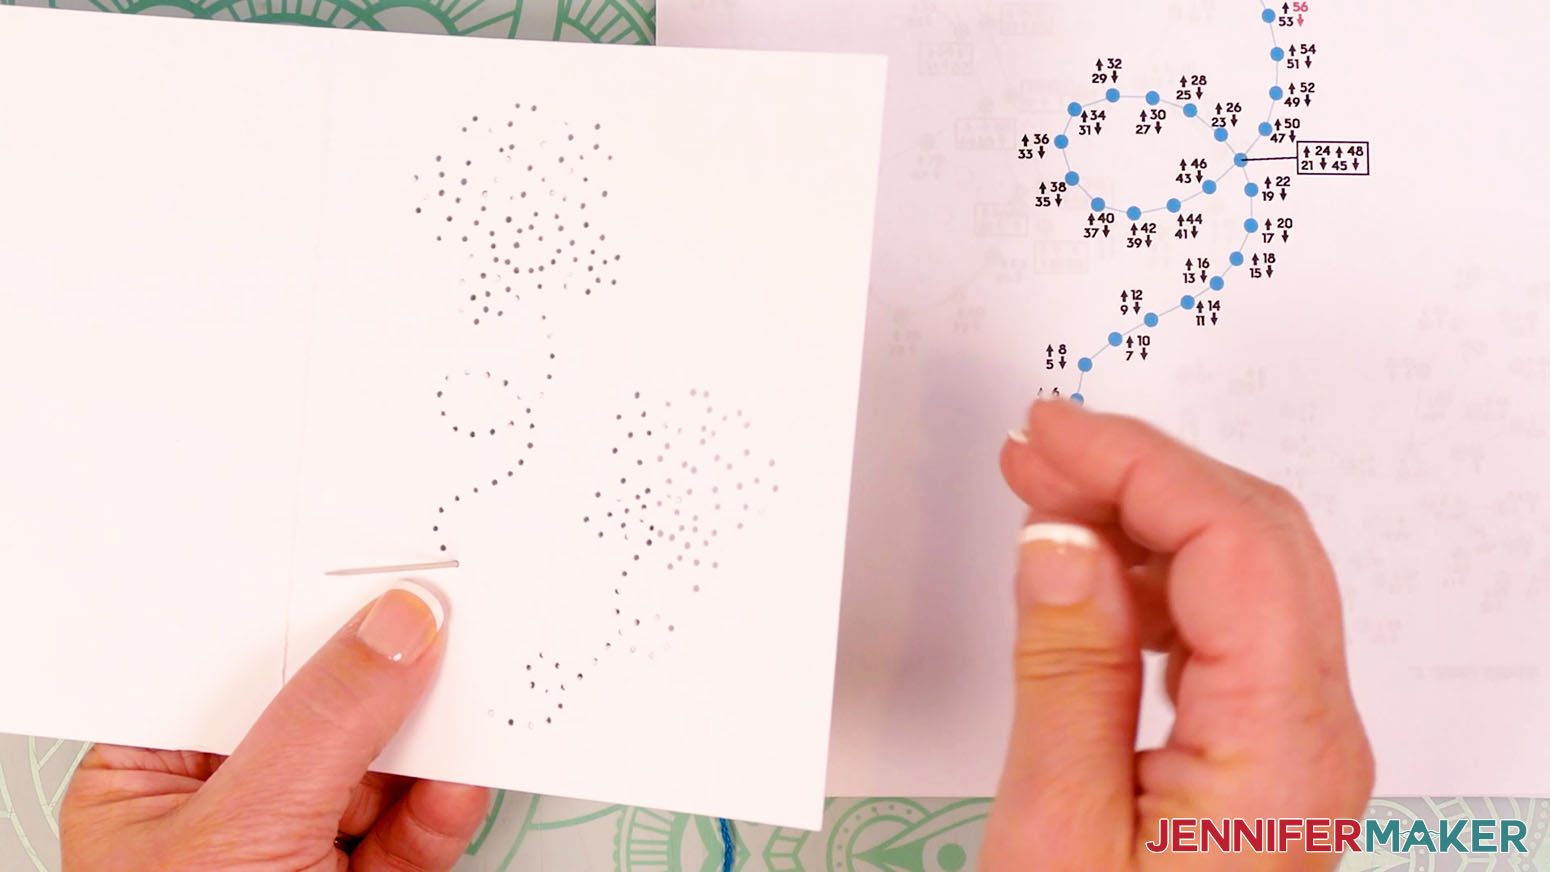
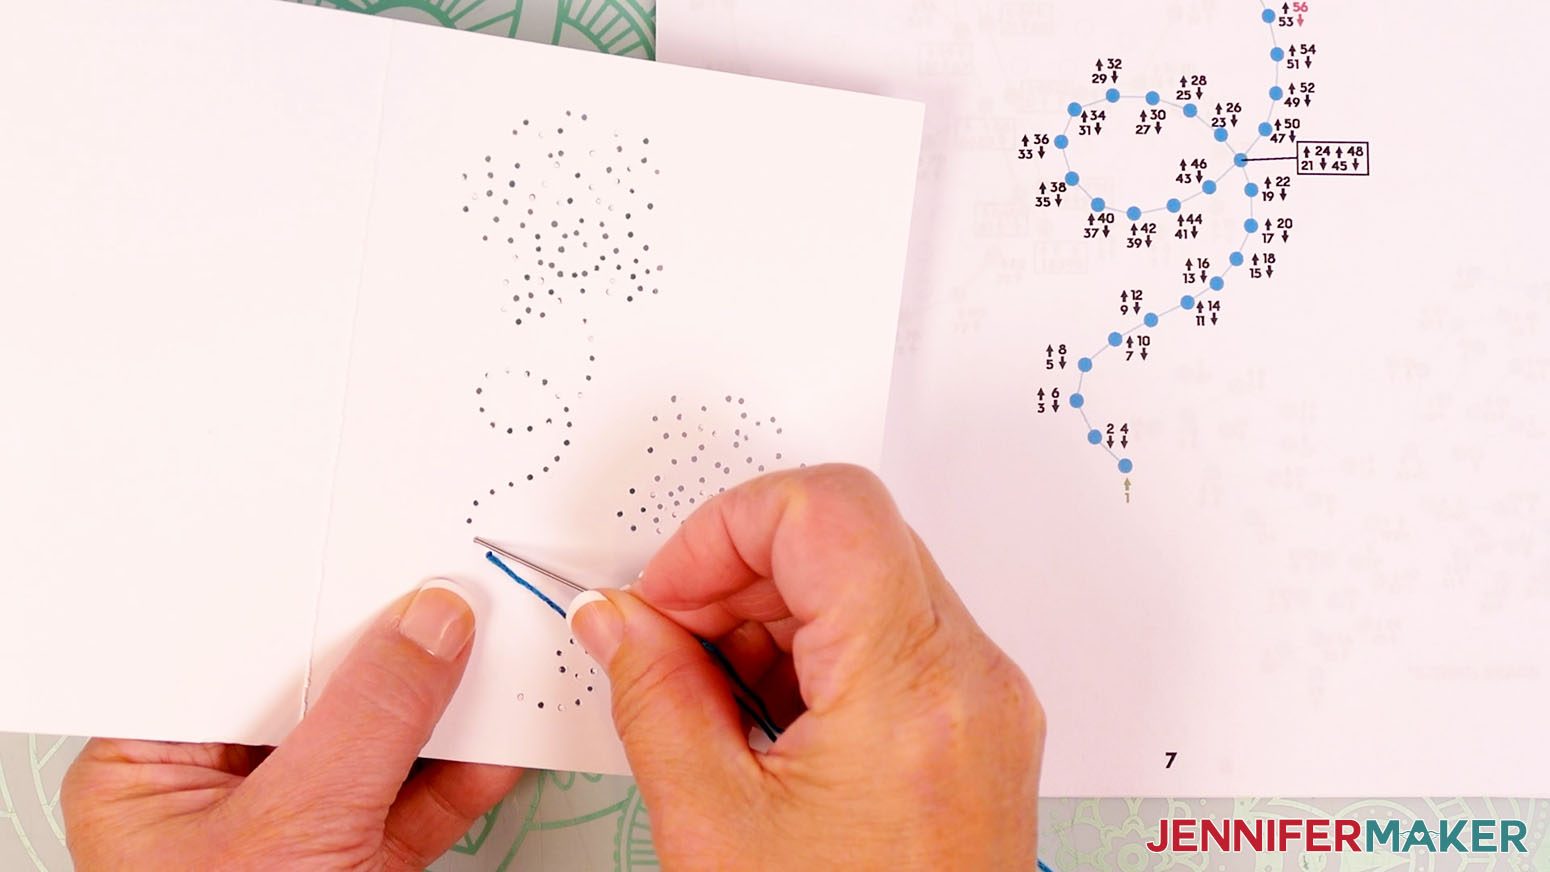
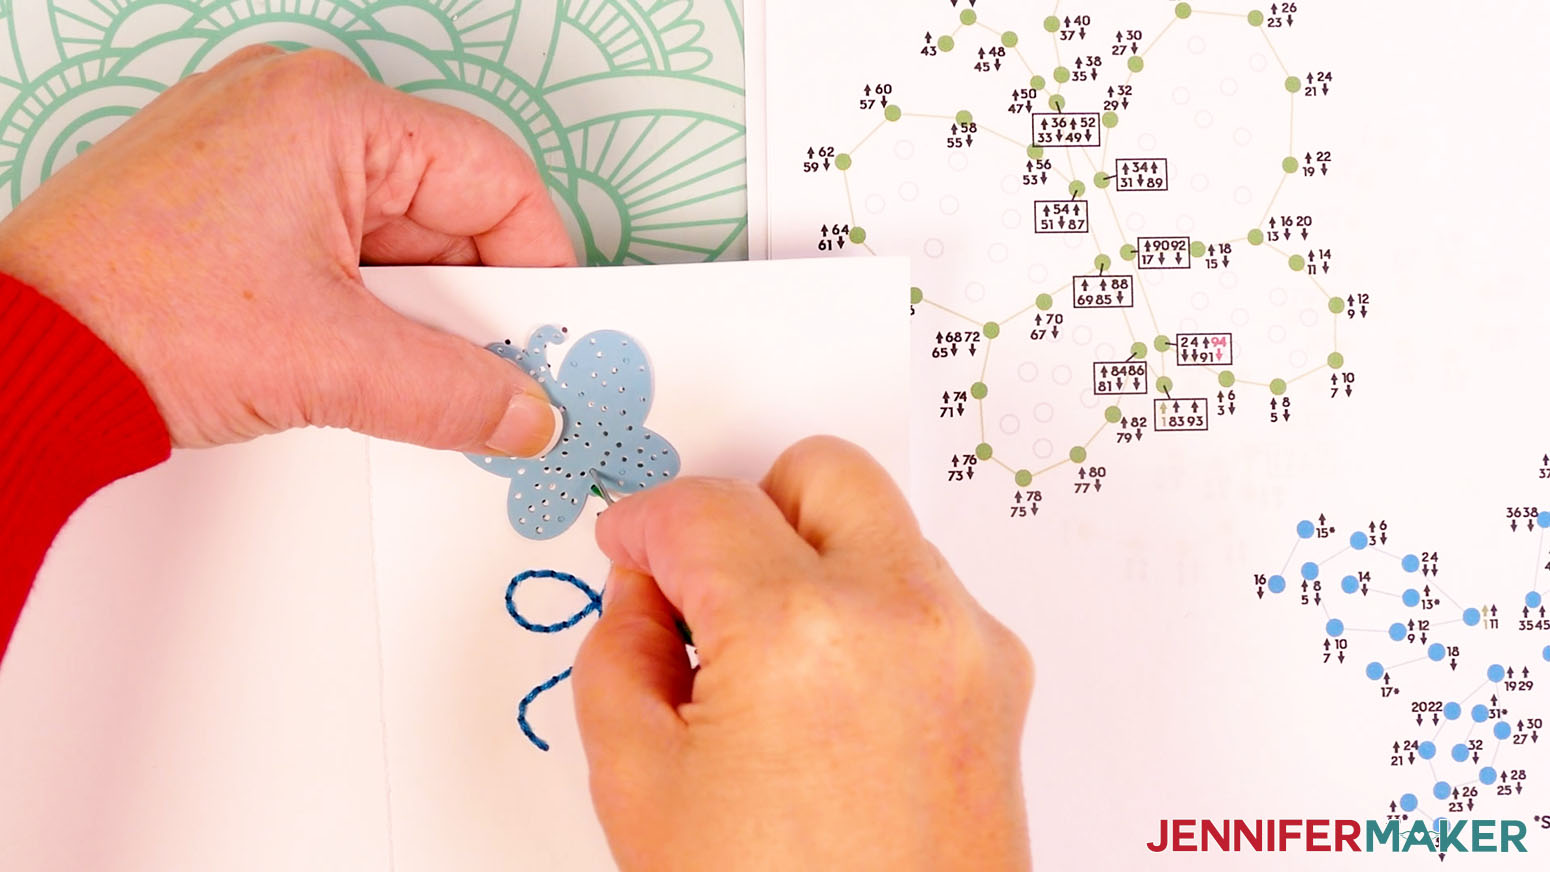
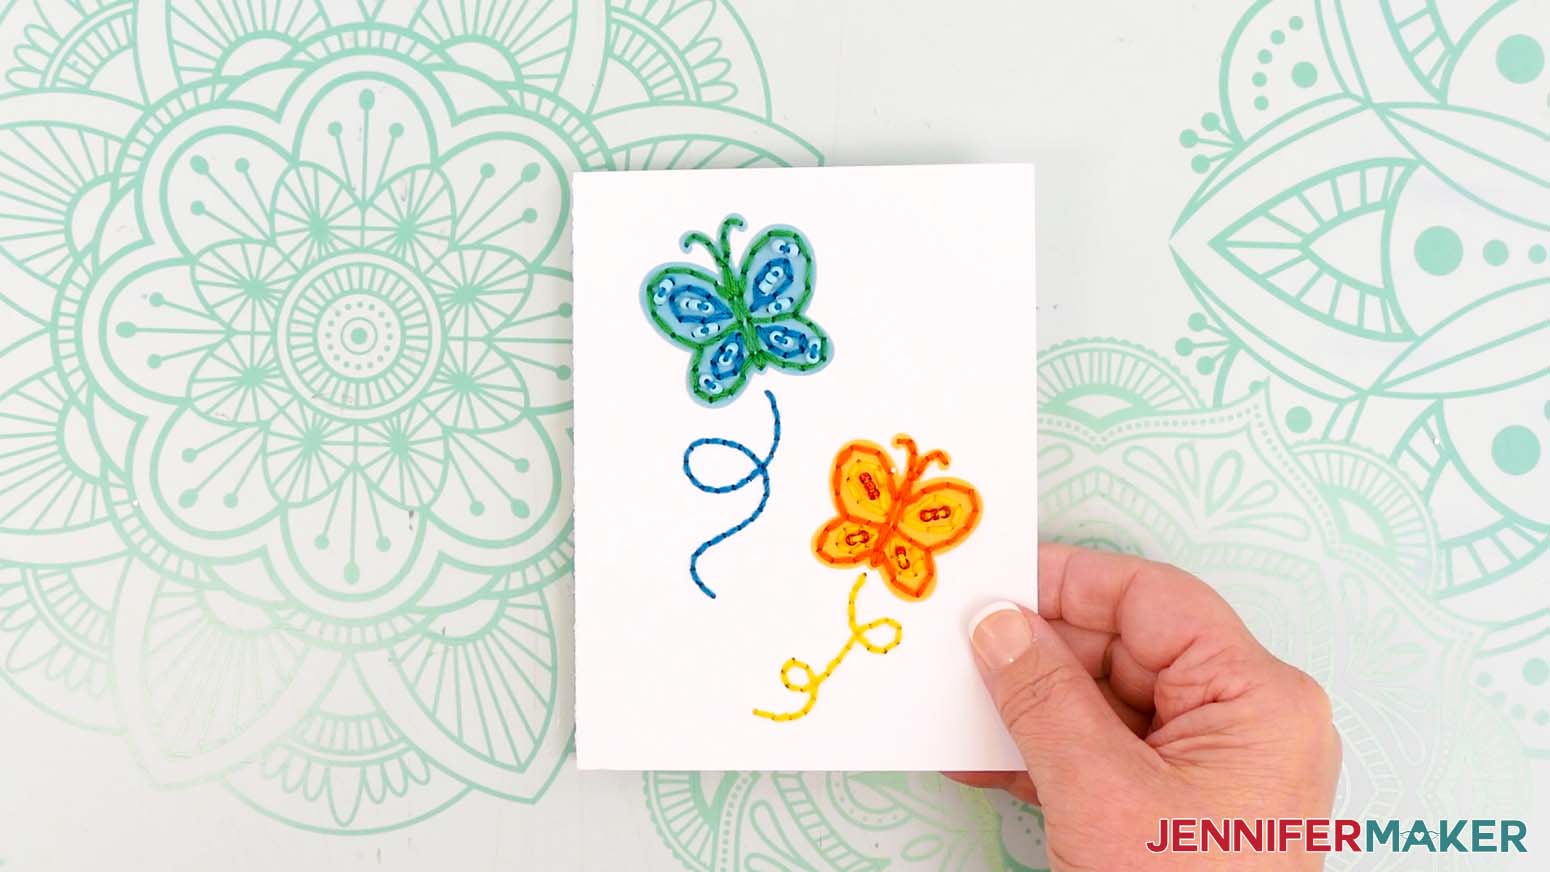
BUTTERFLIES
Gather your embroidery floss colors. I used blue, green, yellow, and orange for my butterflies, but you can use whichever colors you want.
- Use scissors to cut a piece of blue floss for the left butterfly trail, about 18-24” long.
- Thread the floss through the eye of your sewing needle.
TIP: If you have trouble threading your needle, you can also use a needle threading tool. Push the loop end of the threader through the needle’s eye. Slide your thread through the loop, then pull the loop back through the eye. - Tie a knot about 1” from the end of the thread farthest from the needle. Now you’re ready to begin stitching!
- Start by inserting the threaded needle from the back of the card up into hole 1. This number is green and has an up arrow, meaning the needle will go from the back up through the hole on that step.
- Insert the threaded needle down into hole 2. This number has a down arrow, meaning the needle will go down on that step. Pull the entire length of the floss through so the knot rests at the back of the card. Don’t pull too hard or the knot may come through.
- Bring the needle back up through hole 3.
- Continue following the numbers and arrows until you thread the hole with a red 56 next to it on the diagram. Your needle should be pointing down for the last step because the number has a down arrow.
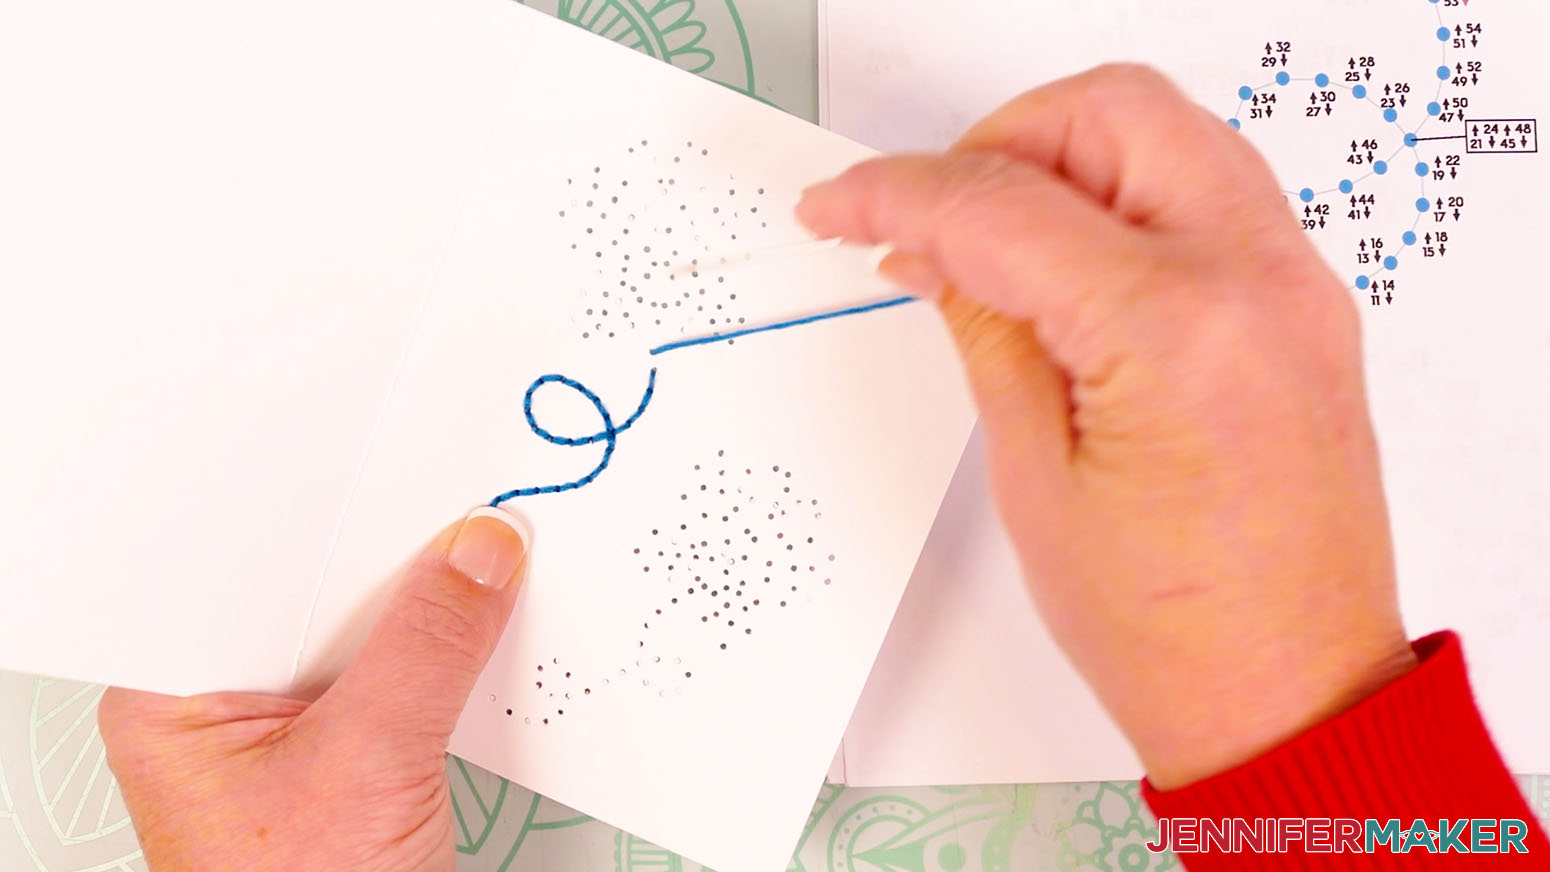
- Remove the needle from the floss.
- Tie a loose knot in the floss.
- Place the end of your needle in the loop of the knot, and slide it close to the cardstock.
- Hold the strands in place with the needle while you pull the tail to tighten the knot.
- Trim the excess floss to about ⅛” long.
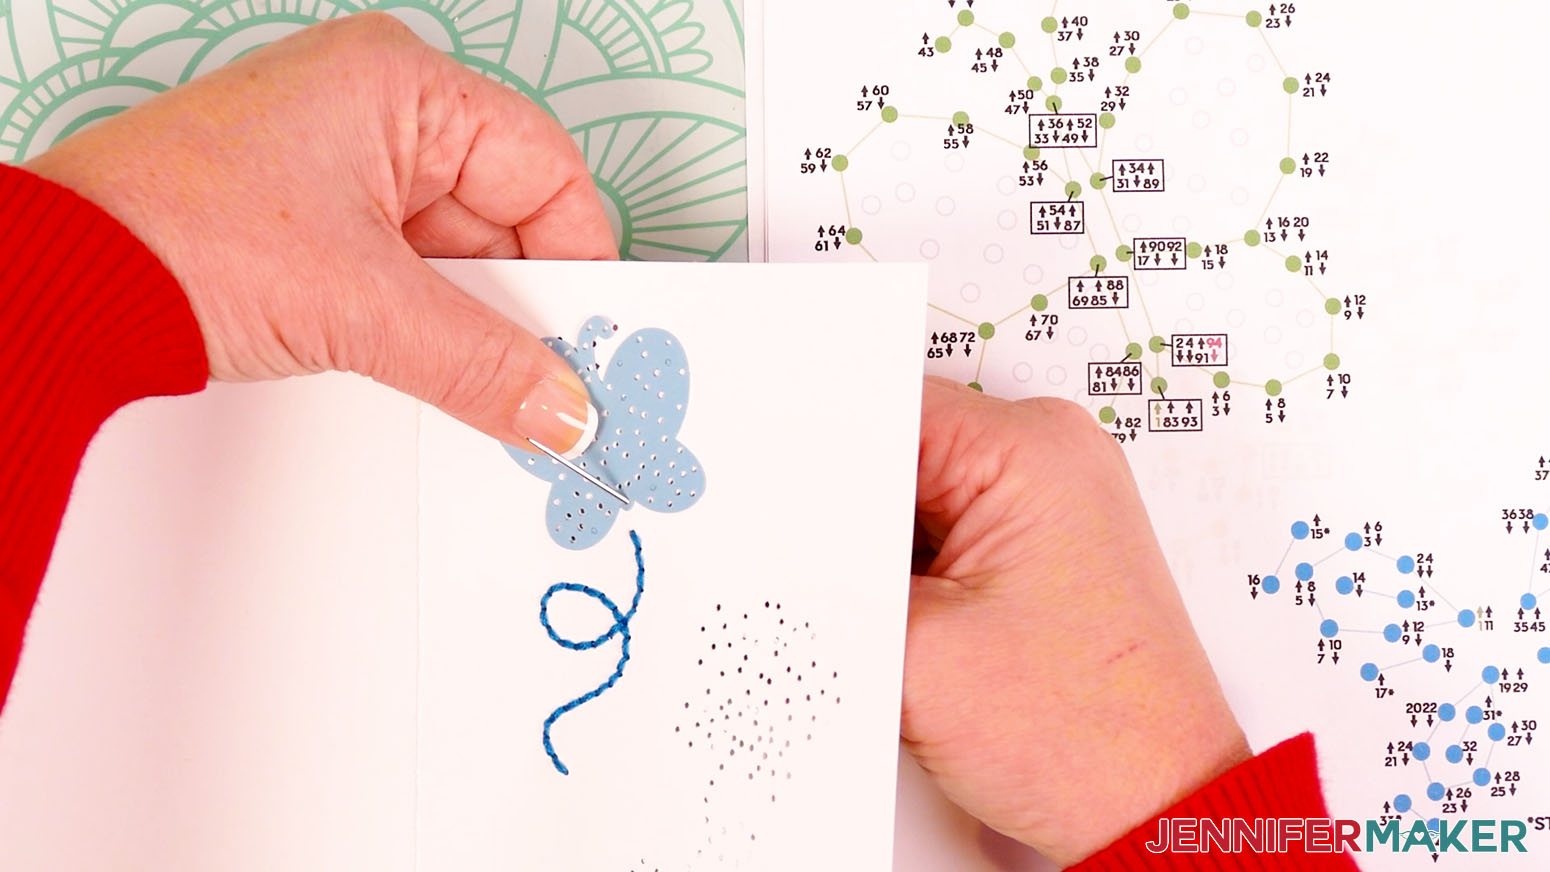
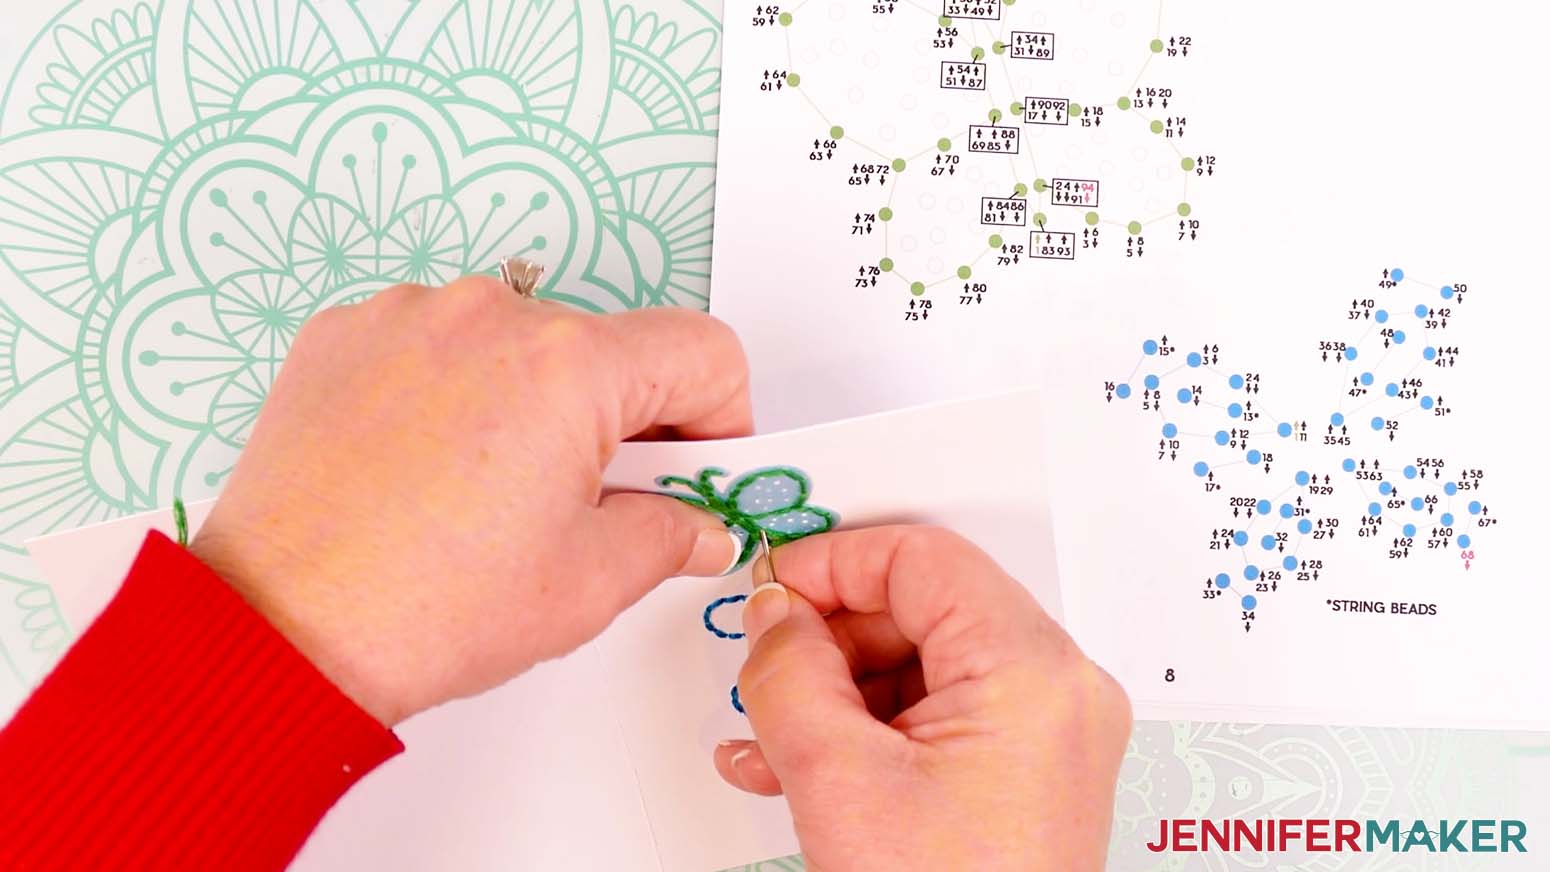
- Now let’s embroider the outline of the left butterfly. Follow steps 2-3 to prepare your needle with an 18-24" long piece of green floss.
NOTE: If you’re using the optional embellishment piece, be sure the holes on both pieces are aligned before inserting the needle. - Start by inserting the threaded needle from the back of the card up into hole 1.
- Insert the threaded needle down into hole 2. Pull the entire length of the floss through so the knot rests at the back of the card. Don’t pull too hard or the knot may come through.
- Bring the needle back up through hole 3.
- Continue following the numbers and arrows until you thread the hole with a red 94 next to it on the diagram. Your needle should be pointing down for the last step because the number has a down arrow.
- Remove the needle from the floss.
- Tie a loose knot in the floss.
- Place the end of your needle in the loop of the knot, and slide it close to the cardstock.
- Hold the strands in place with the needle while you pull the tail to tighten the knot.
- Trim the excess floss to about ⅛” long.
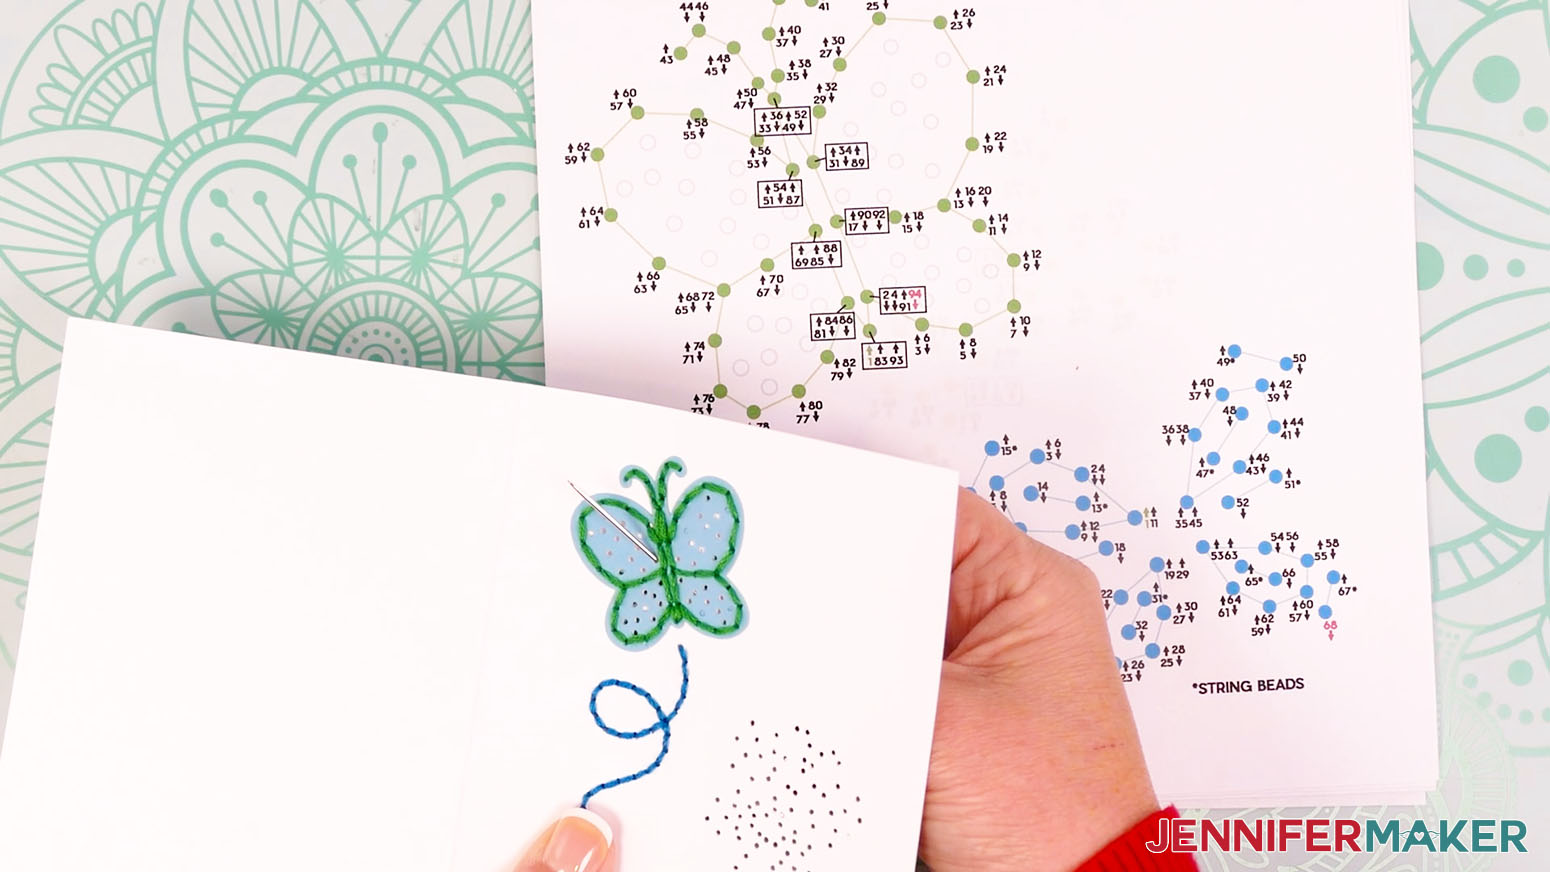
- Now let’s embroider the inside of the left butterfly. Follow steps 2-3 to prepare your needle with an 18-24" long piece of floss.
NOTE: If your outline will be the same color as the inside of the butterfly’s wings, I still recommend starting a new strand to ensure you have enough floss to finish the inside. - Start by inserting the threaded needle from the back of the card up into hole 1.
- Insert the threaded needle down into hole 2. Pull the entire length of the floss through so the knot rests at the back of the card. Don’t pull too hard or the knot may come through.
- Bring the needle back up through hole 3.
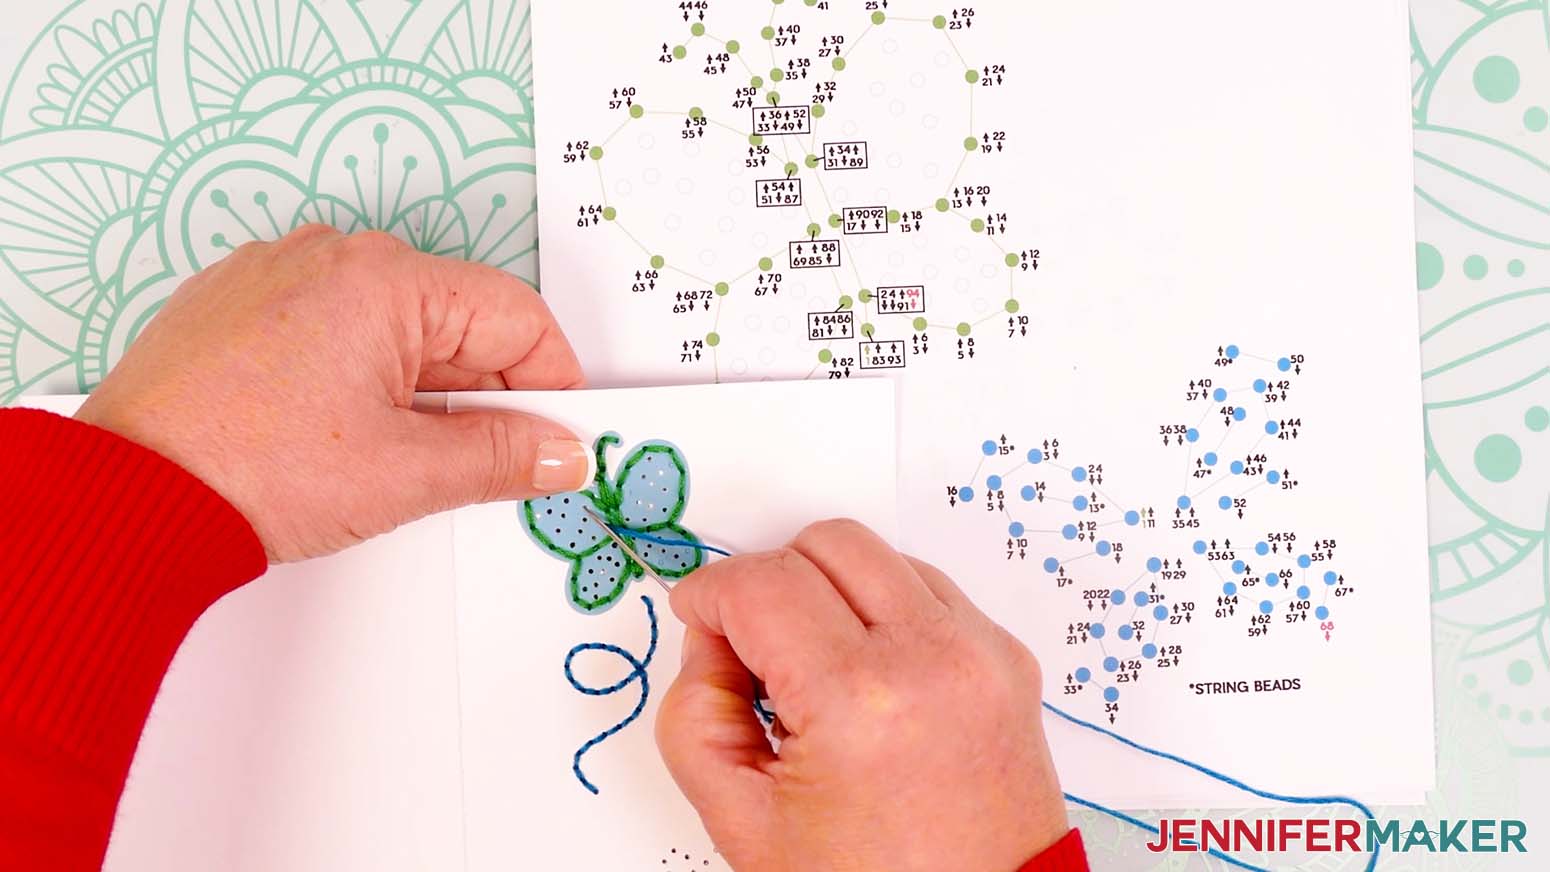
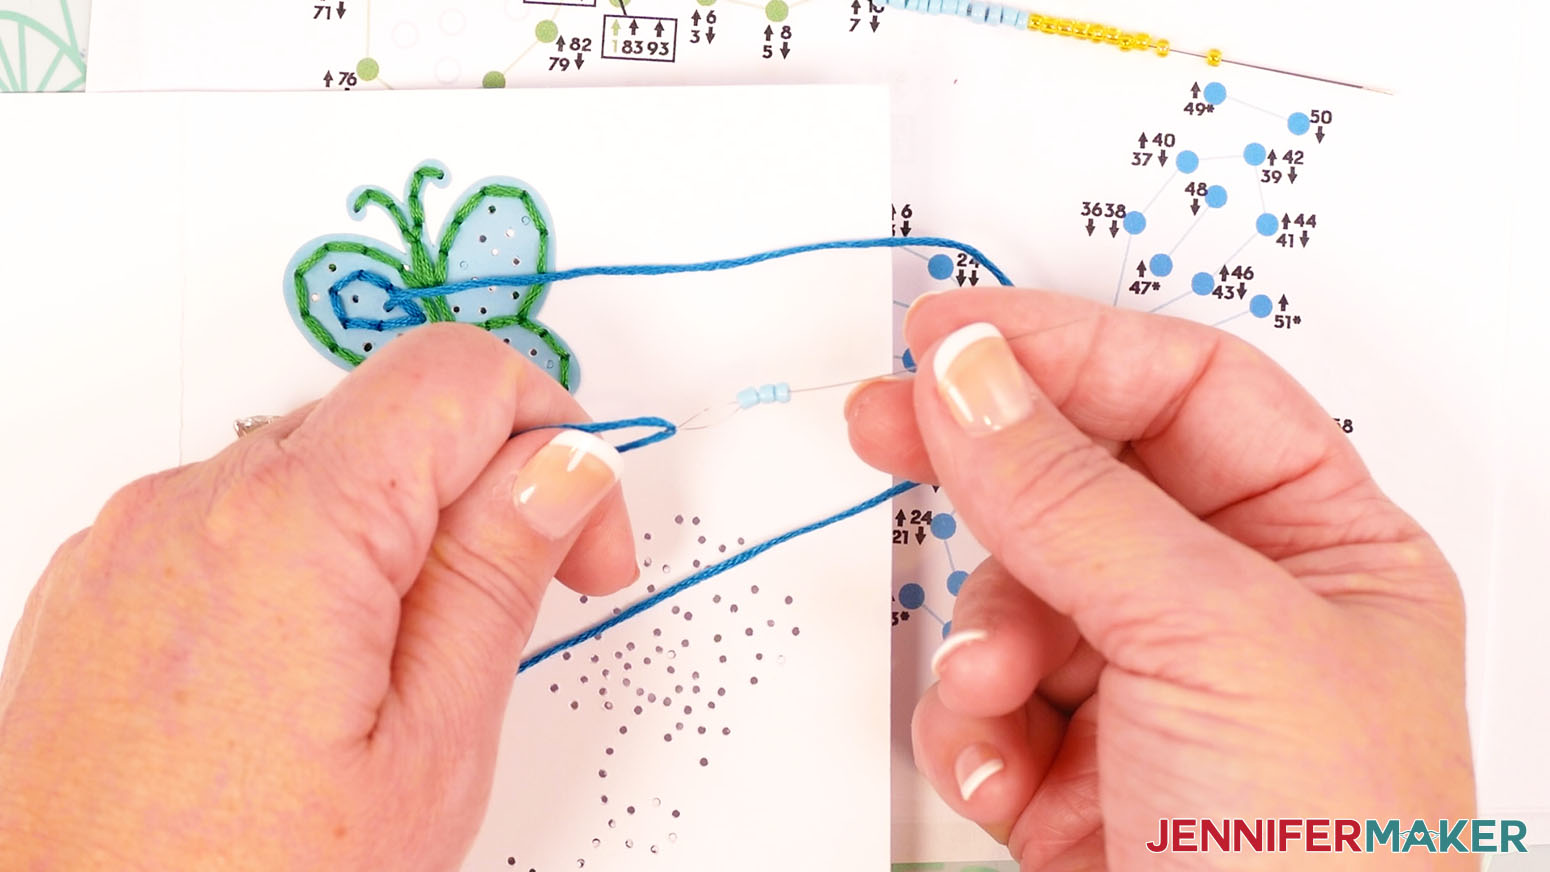
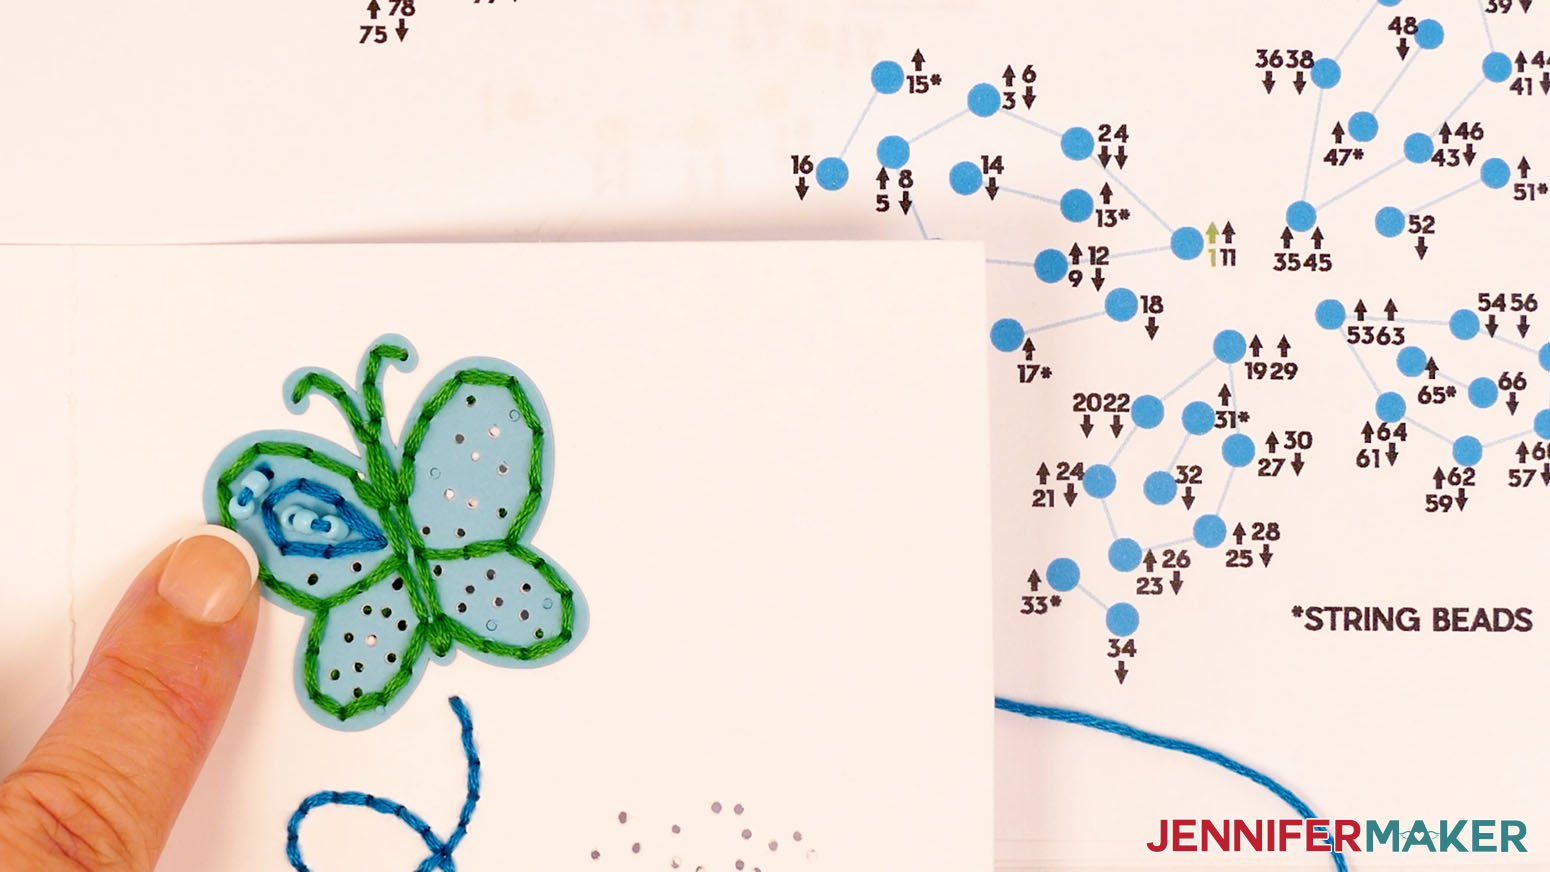
- If you do not want to add optional beads, continue embroidering the design following the numbers and arrows and skip to step 52. If you do want to add beads, continue following the numbers and arrows until you thread hole 13 – then select three beads.
- String the beads onto the floss.
- Insert the needle down into the next hole, which is hole 14.
- Push your needle back up through hole 15 – then select two beads.
- String the beads onto the floss.
- Insert the needle down into the next hole, which is hole 16.
- Push your needle back up through hole 17 – then select two beads.
- String the beads onto the floss.
- Insert the needle down into the next hole, which is hole 18.
- Continue following the numbers and arrows until you thread hole 31 – then select two beads.
- String the beads onto the floss.
- Insert the needle down into the next hole, which is hole 32.
- Push your needle back up through hole 33 – then select two beads.
- String the beads onto the floss.
- Insert the needle down into the next hole, which is hole 34.
- Continue following the numbers and arrows until you thread hole 47 – then select three beads.
- String the beads onto the floss.
- Insert the needle down into the next hole, which is hole 48.
- Push your needle back up through hole 49 – then select two beads.
- String the beads onto the floss.
- Insert the needle down into the next hole, which is hole 50.
- Push your needle back up through hole 51 – then select two beads.
- String the beads onto the floss.
- Insert the needle down into the next hole, which is hole 52.
- Continue following the numbers and arrows until you thread hole 65 – then select two beads.
- String the beads onto the floss.
- Insert the needle down into the next hole, which is hole 66.
- Push your needle back up through hole 67 – then select two beads.
- String the beads onto the floss.
- Insert the needle down into the next hole, which is the hole with a red 68 next to it on the diagram. Your needle should be pointing down for the last step because the number has a down arrow.
- Remove the needle from the floss.
- Tie a loose knot in the floss.
- Place the end of your needle in the loop of the knot, and slide it close to the cardstock.
- Hold the strands in place with the needle while you pull the tail to tighten the knot.
- Trim the excess floss to about ⅛” long.
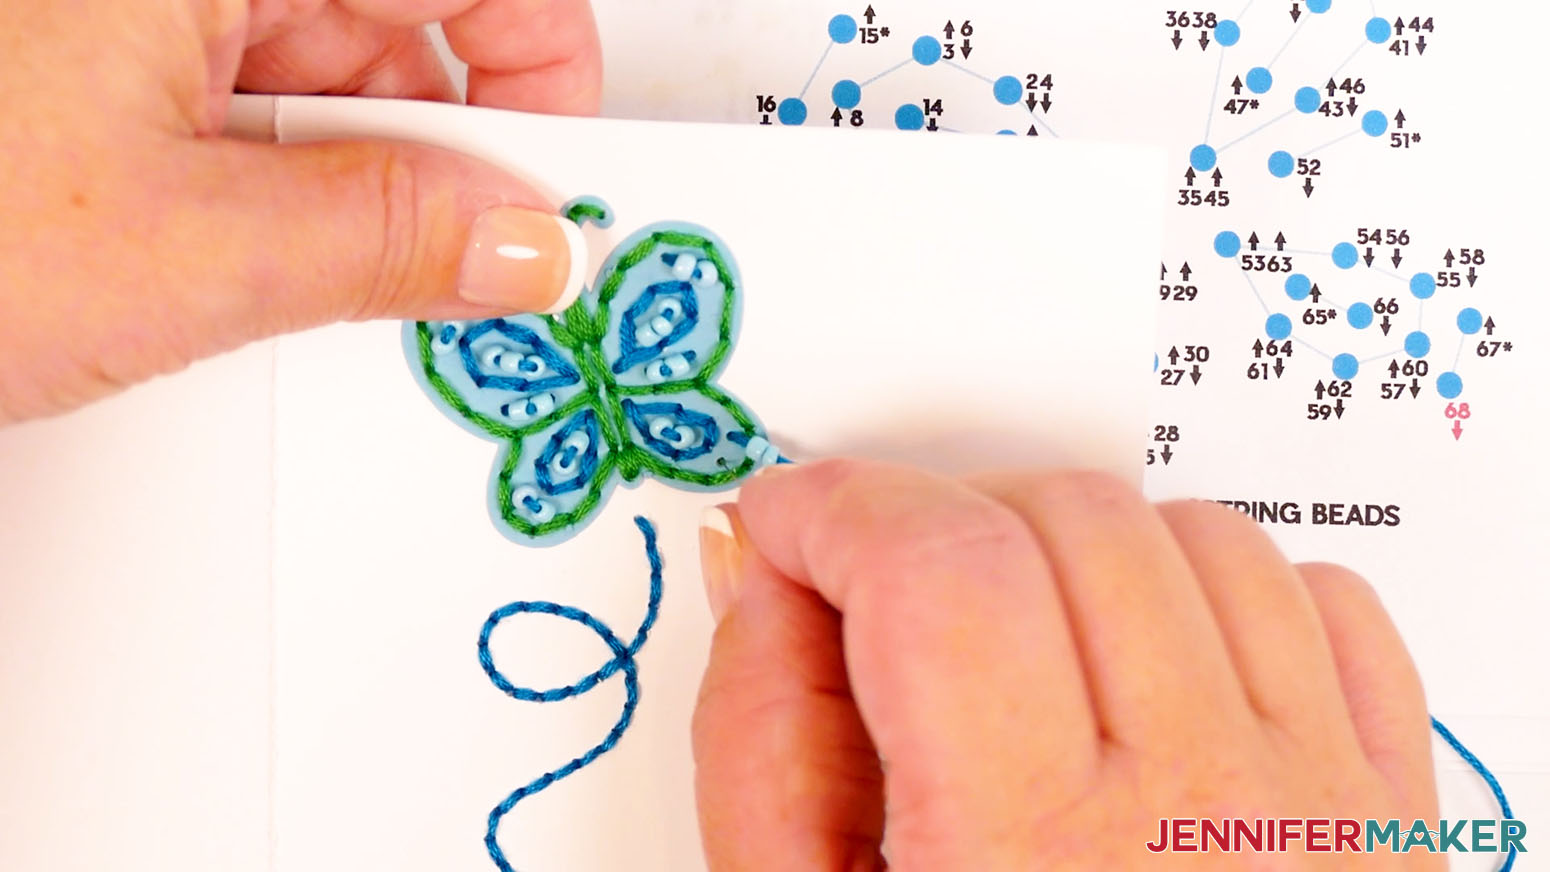
- Use the guide and follow the same techniques to embroider the second butterfly and its trail with orange and yellow floss.
- This is what the finished Butterfly embroidery looks like on my card.
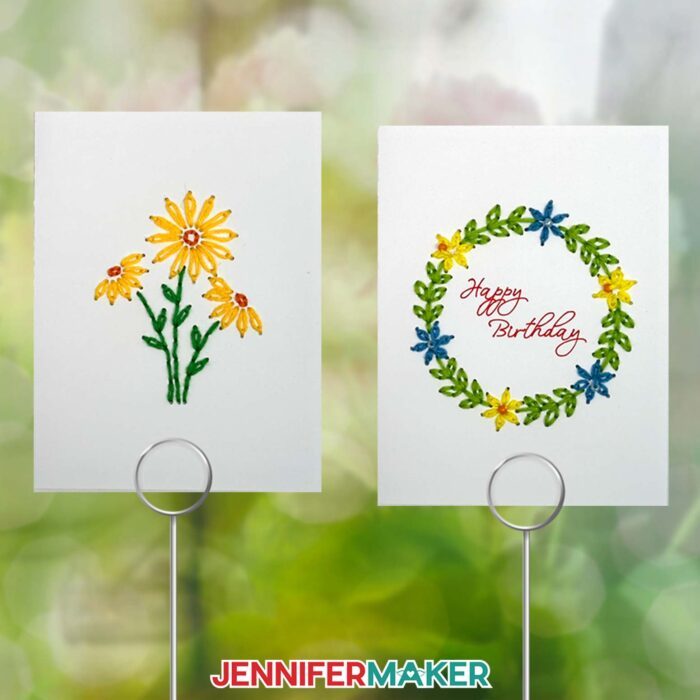
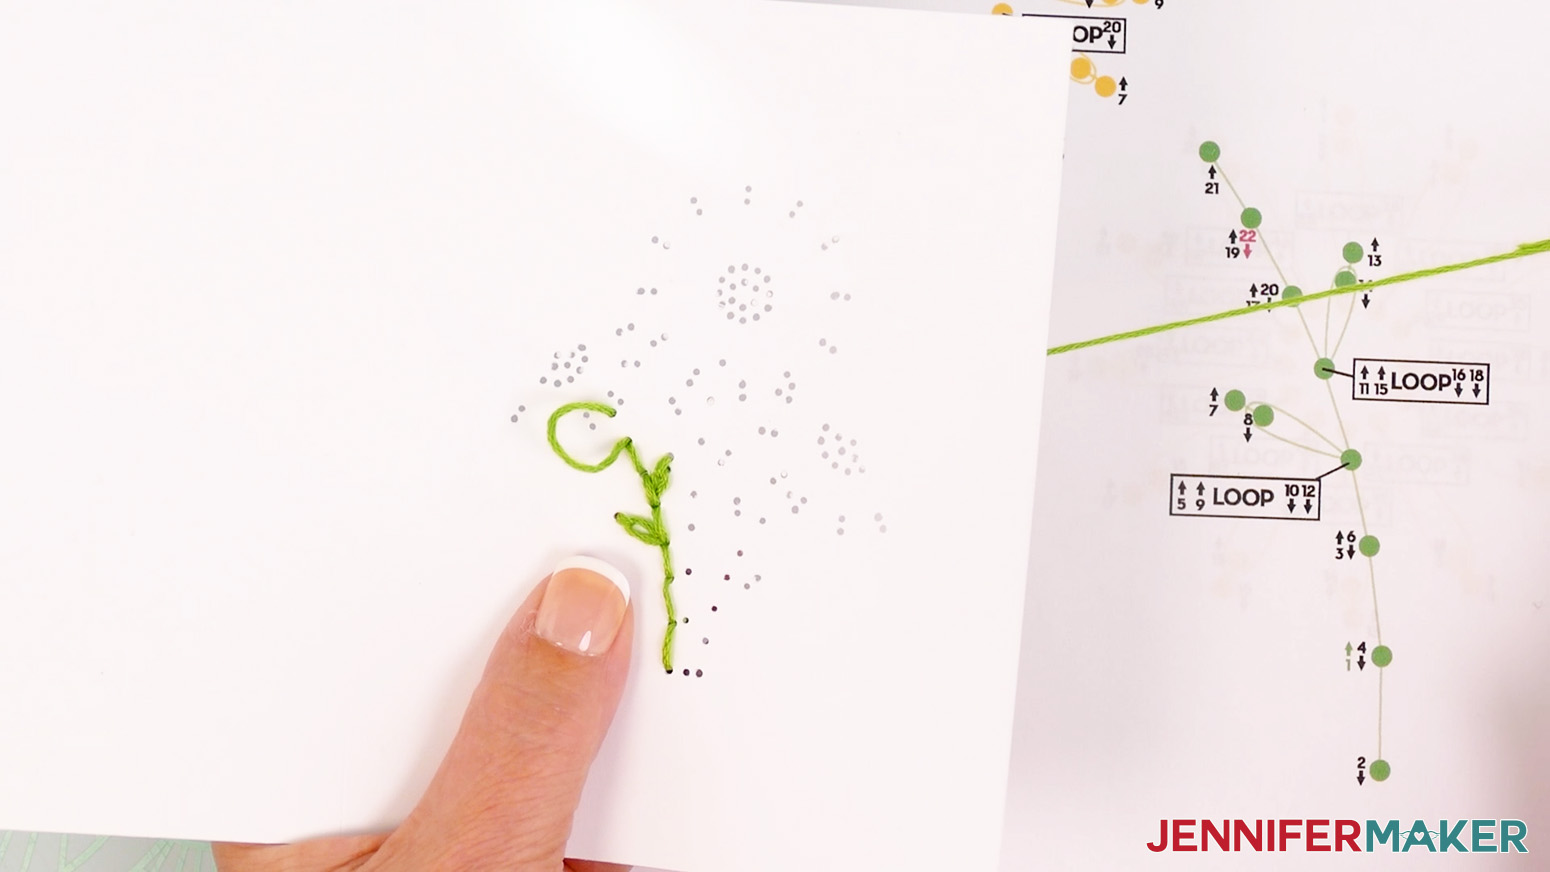
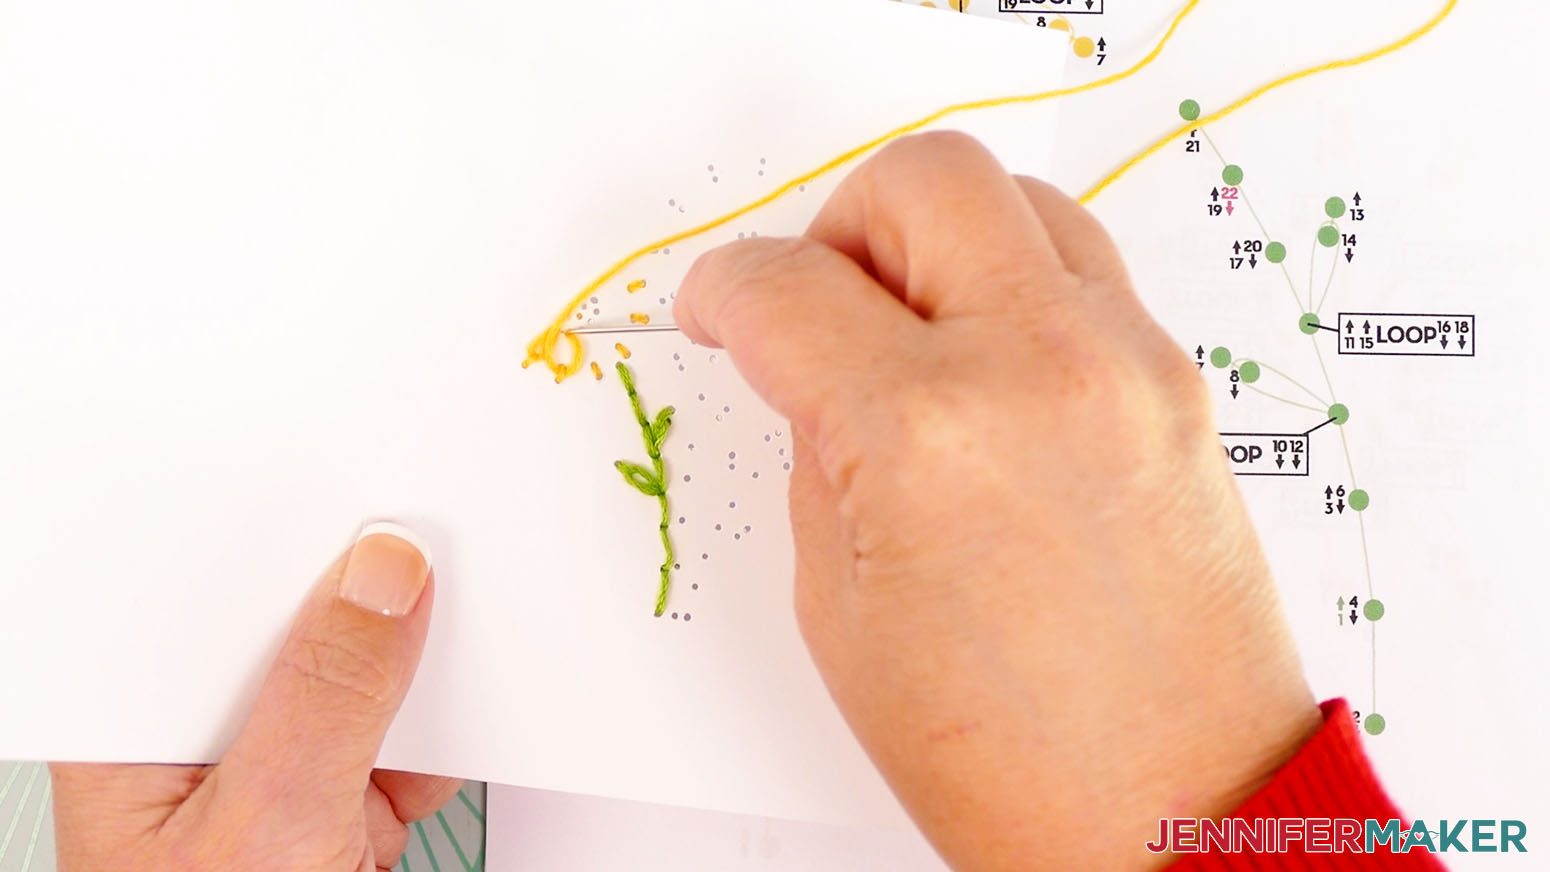
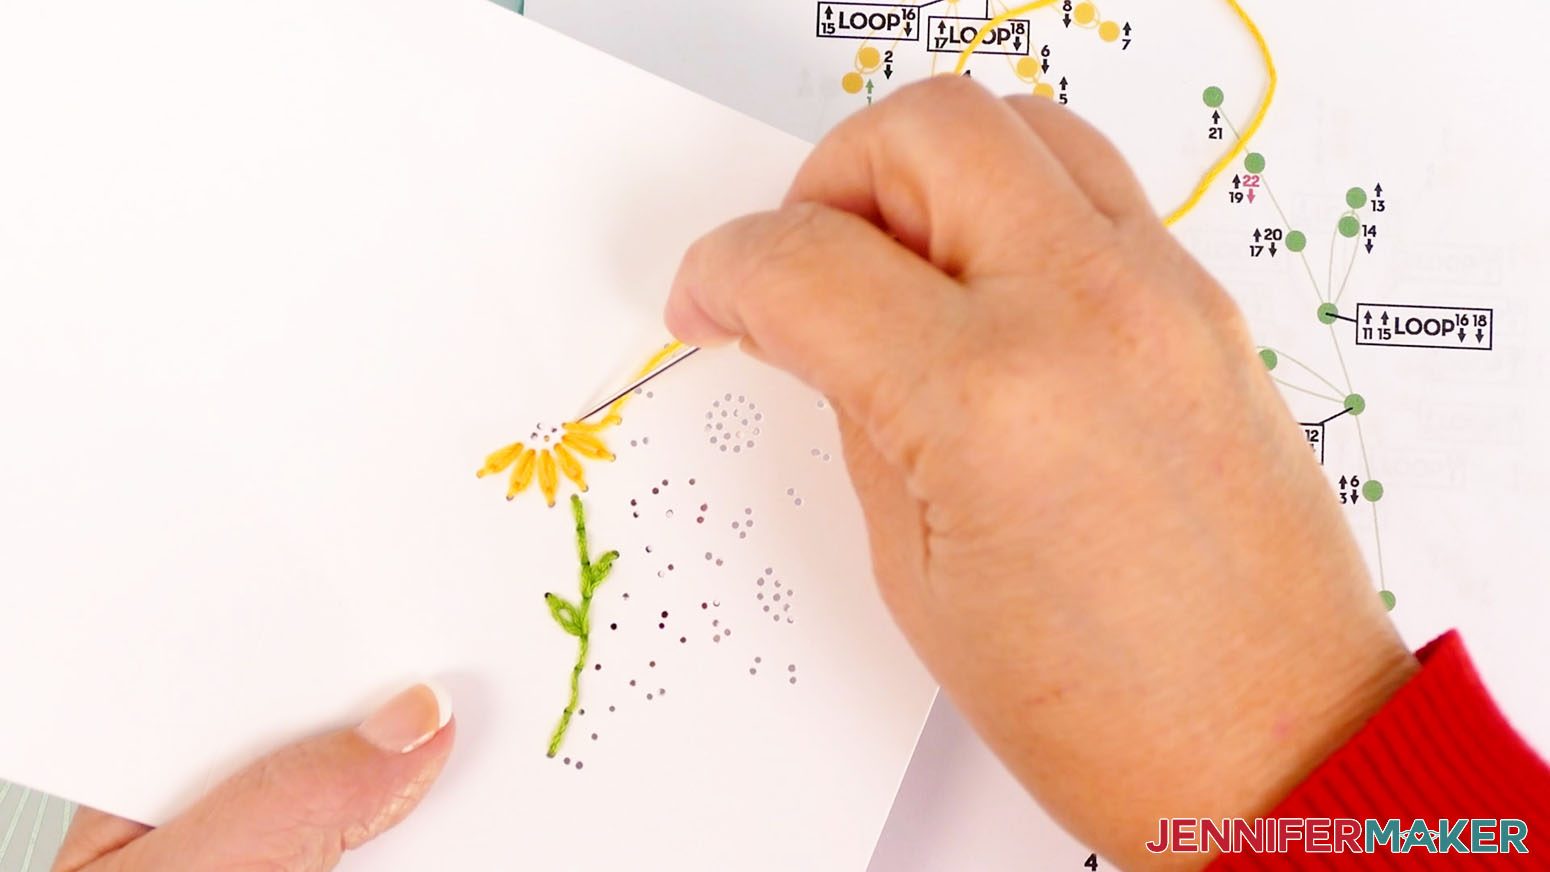
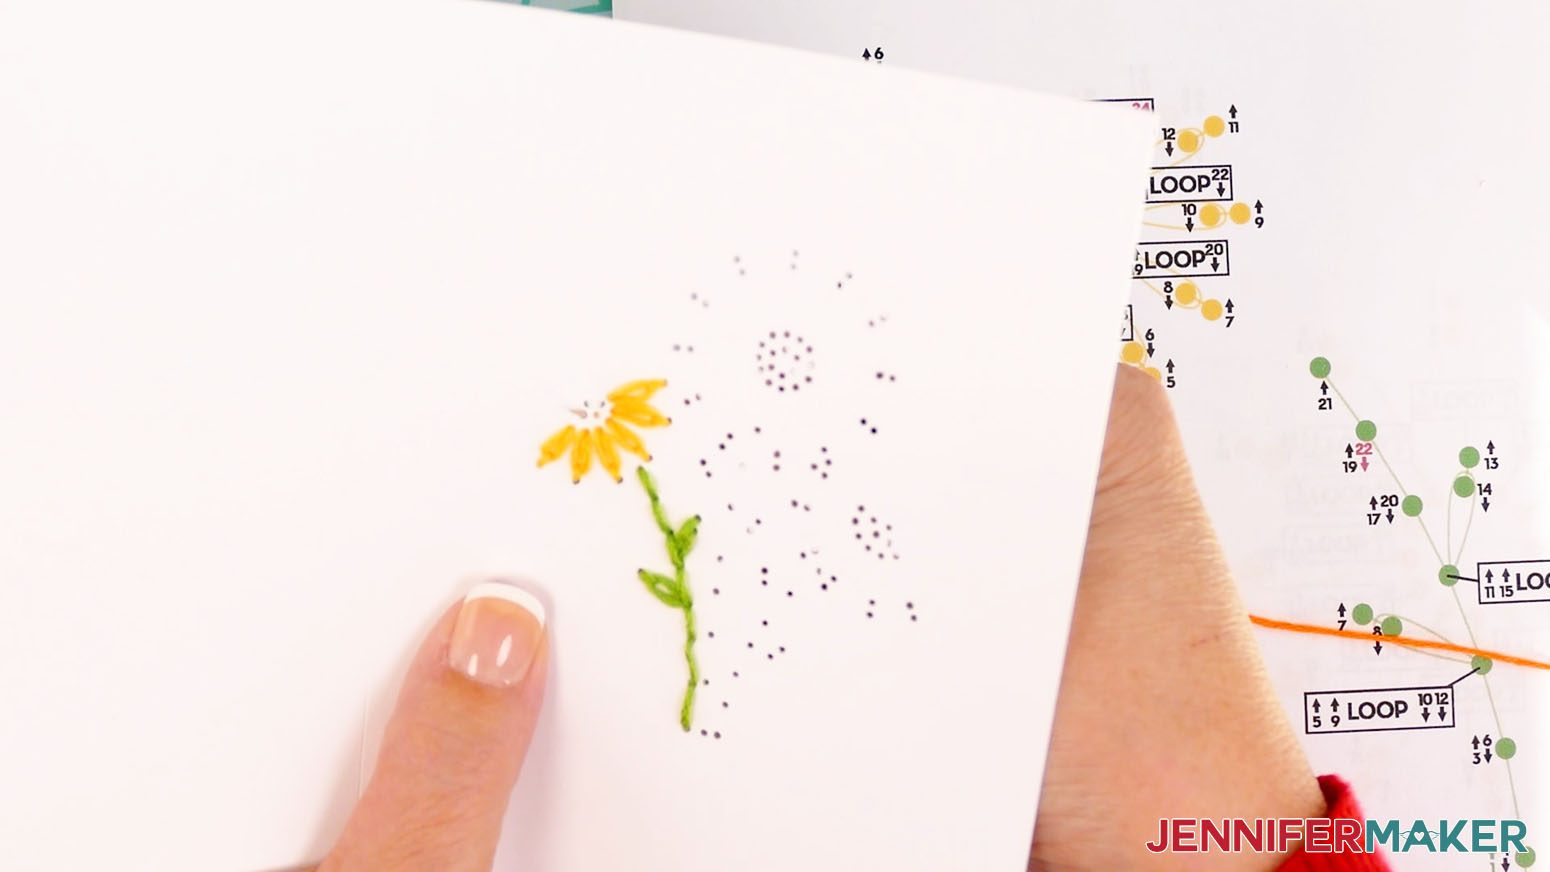
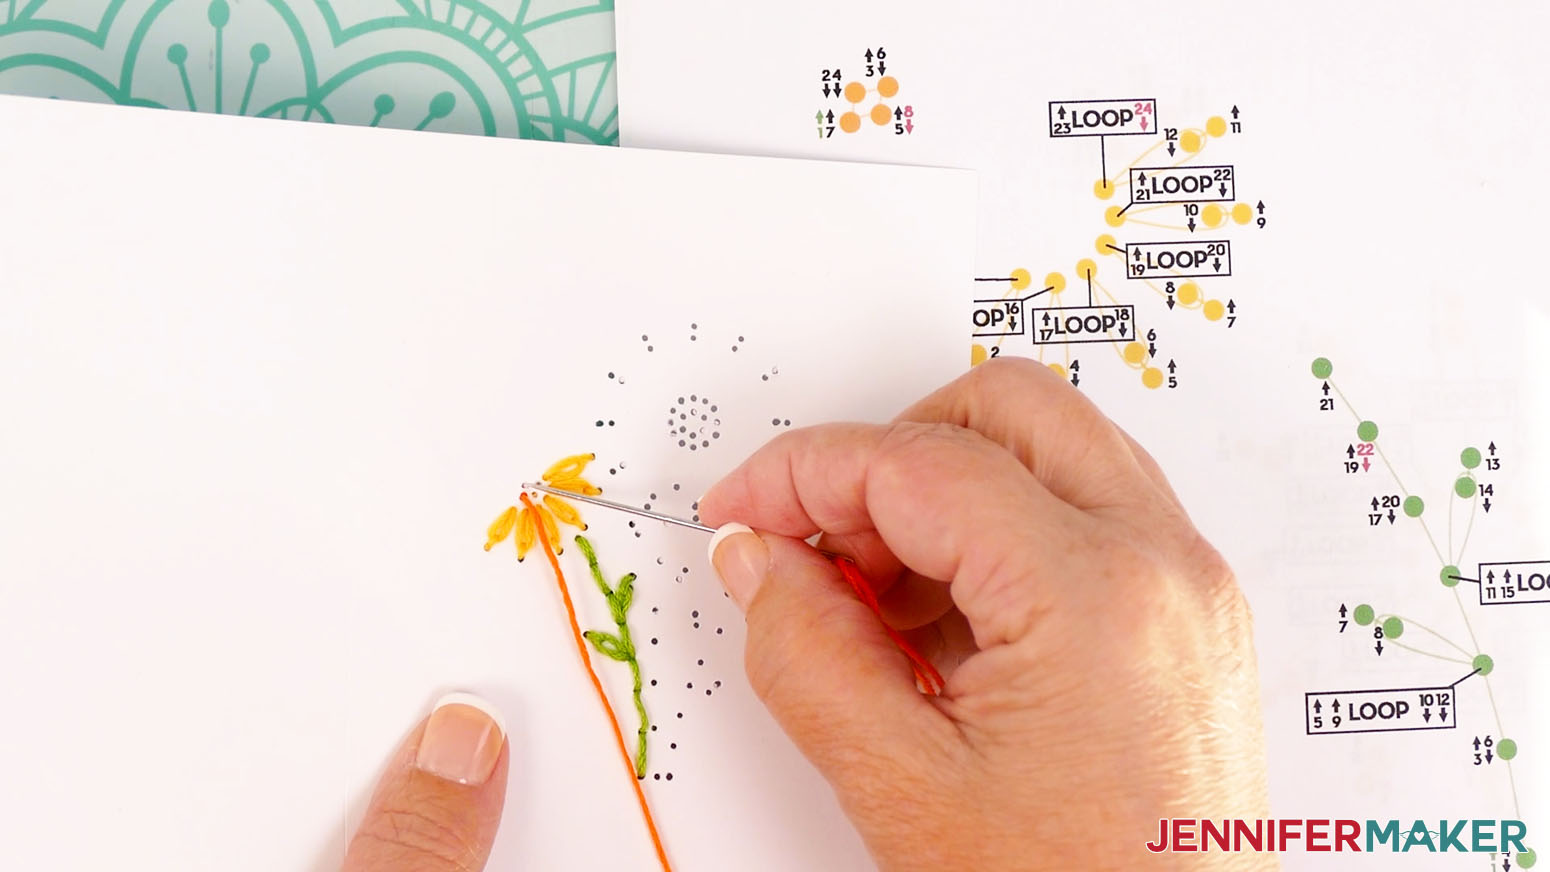
DAISIES
Gather your embroidery floss colors. I used green for the stems, yellow for the flower petals, and orange for the center of the flowers.
I will demonstrate how to embroider the daisies one by one, but you can also use the guides and these techniques to embroider all three stems first, then all three petals, and then all three centers.
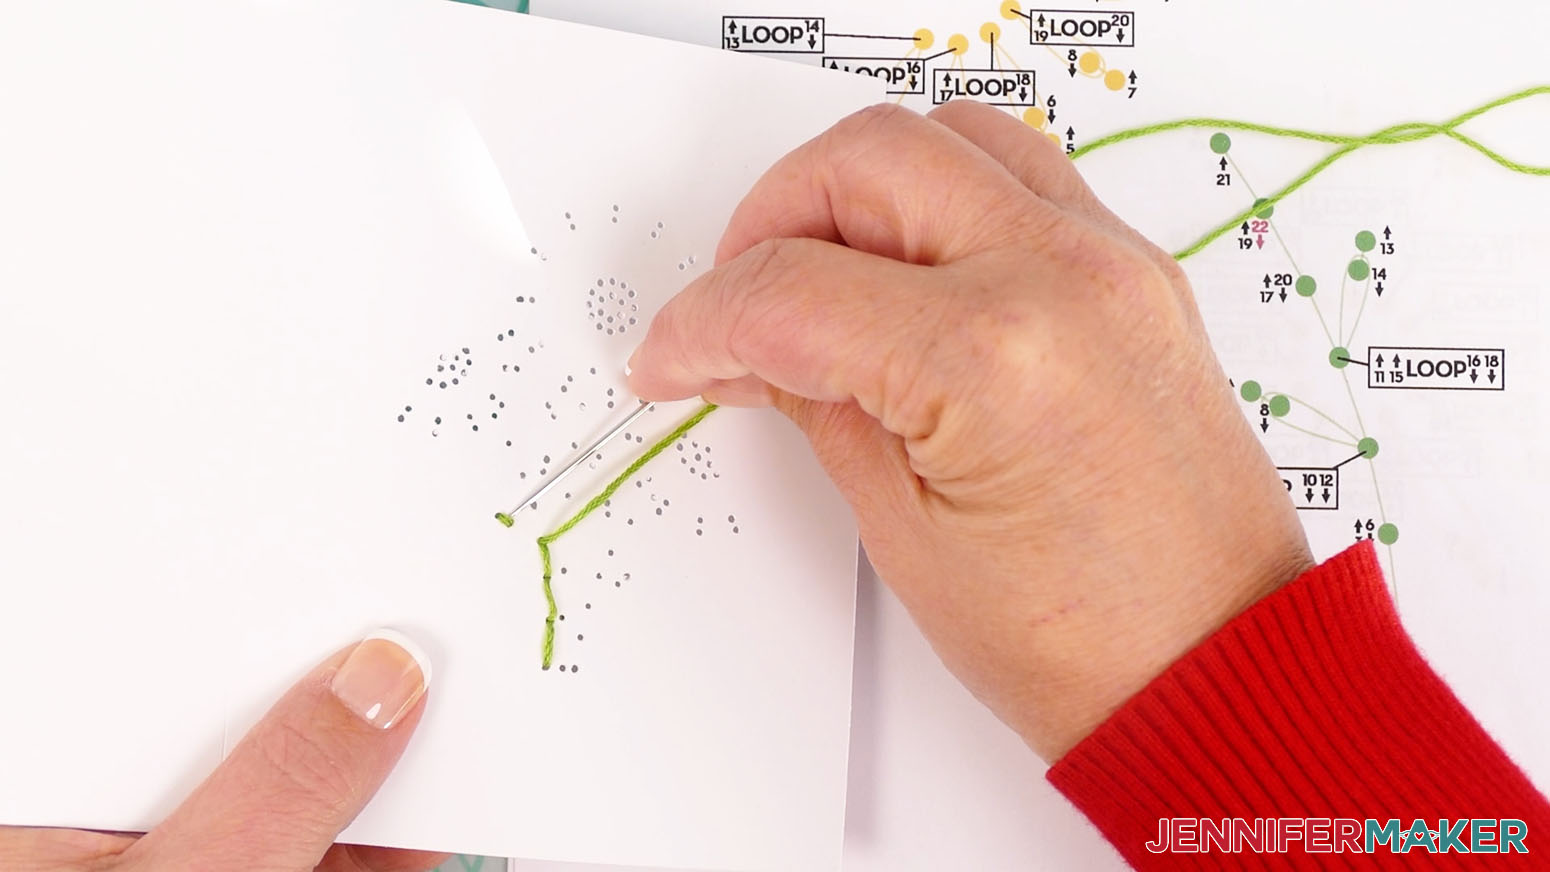
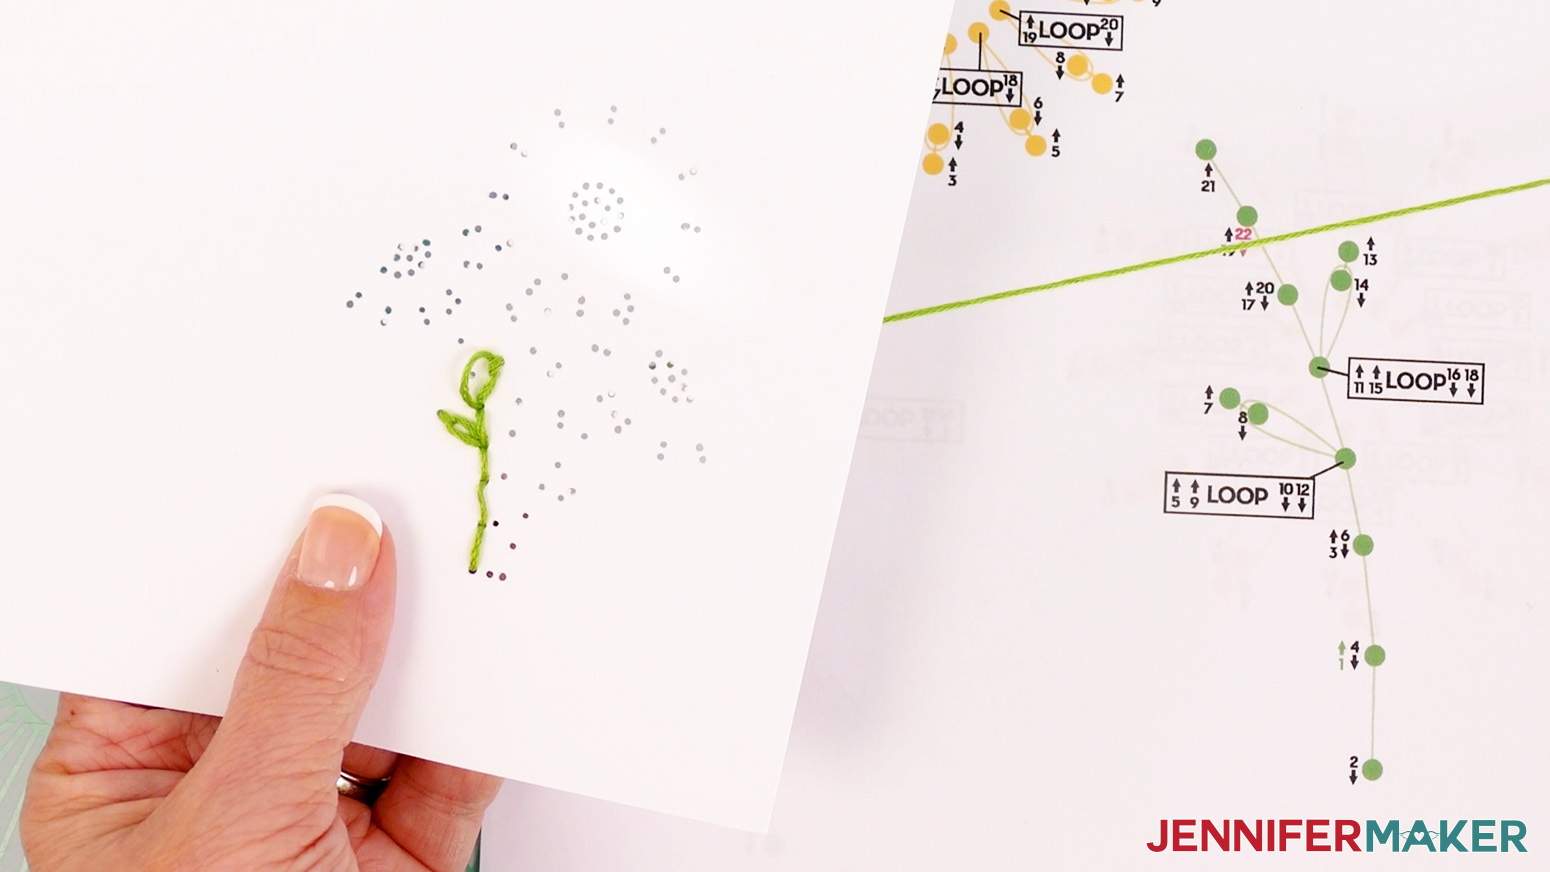
- Let’s start with the left flower. First we’ll embroider the stem. Use scissors to cut a piece of green floss about 18-24" long.
- Thread the floss through the eye of your sewing needle.
TIP: If you have trouble threading your needle, you can also use a needle threading tool. Push the loop end of the threader through the needle’s eye. Slide your thread through the loop, then pull the loop back through the eye. - Tie a knot about 1” from the end of the thread farthest from the needle. Now you’re ready to begin stitching!
- Start by inserting the threaded needle from the back of the card up into hole 1. This number is green and has an up arrow, meaning the needle will go from the back up through the hole on that step.
- Insert the threaded needle down into hole 2. This number has a down arrow, meaning the needle will go down on that step. Pull the entire length of the floss through so the knot rests at the back of the card. Don’t pull too hard or the knot may come through.
- Bring the needle back up through hole 3.
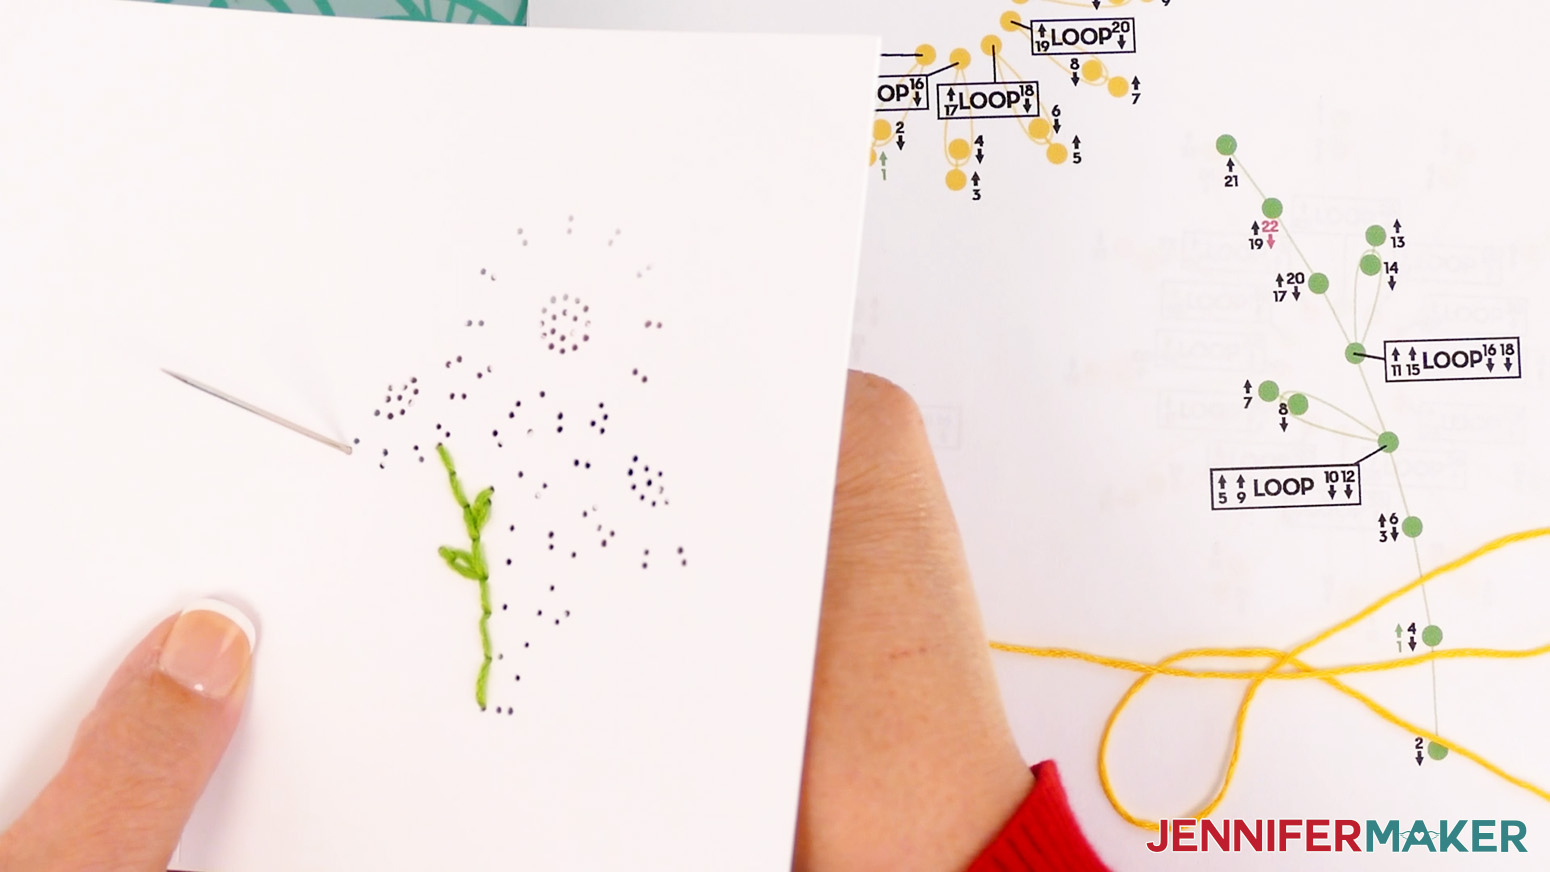
- Continue following the numbers and arrows until you thread hole 9.
- Coming from the top side, insert the threaded needle under the strand of floss between holes 7 and 8.
TIP: Make sure the floss is pushed UNDER the loop, not through the fibers of the floss. - Push the needle down through hole 10.
- Continue following the numbers and arrows until you thread hole 15.
- Coming from the right side, insert the threaded needle under the strand of floss between holes 13 and 14.
- Push the needle down into hole 16.
- Continue following the numbers and arrows until you thread the hole with the red 22 next to it on the diagram. Your needle should be pointing down for the last step because the number has a down arrow.
- Remove the needle from the floss.
- Tie a loose knot in the floss.
- Place the end of your needle in the loop of the knot, and slide it close to the cardstock.
- Hold the strands in place with the needle while you pull the tail to tighten the knot.
- Trim the excess floss to about ⅛” long.
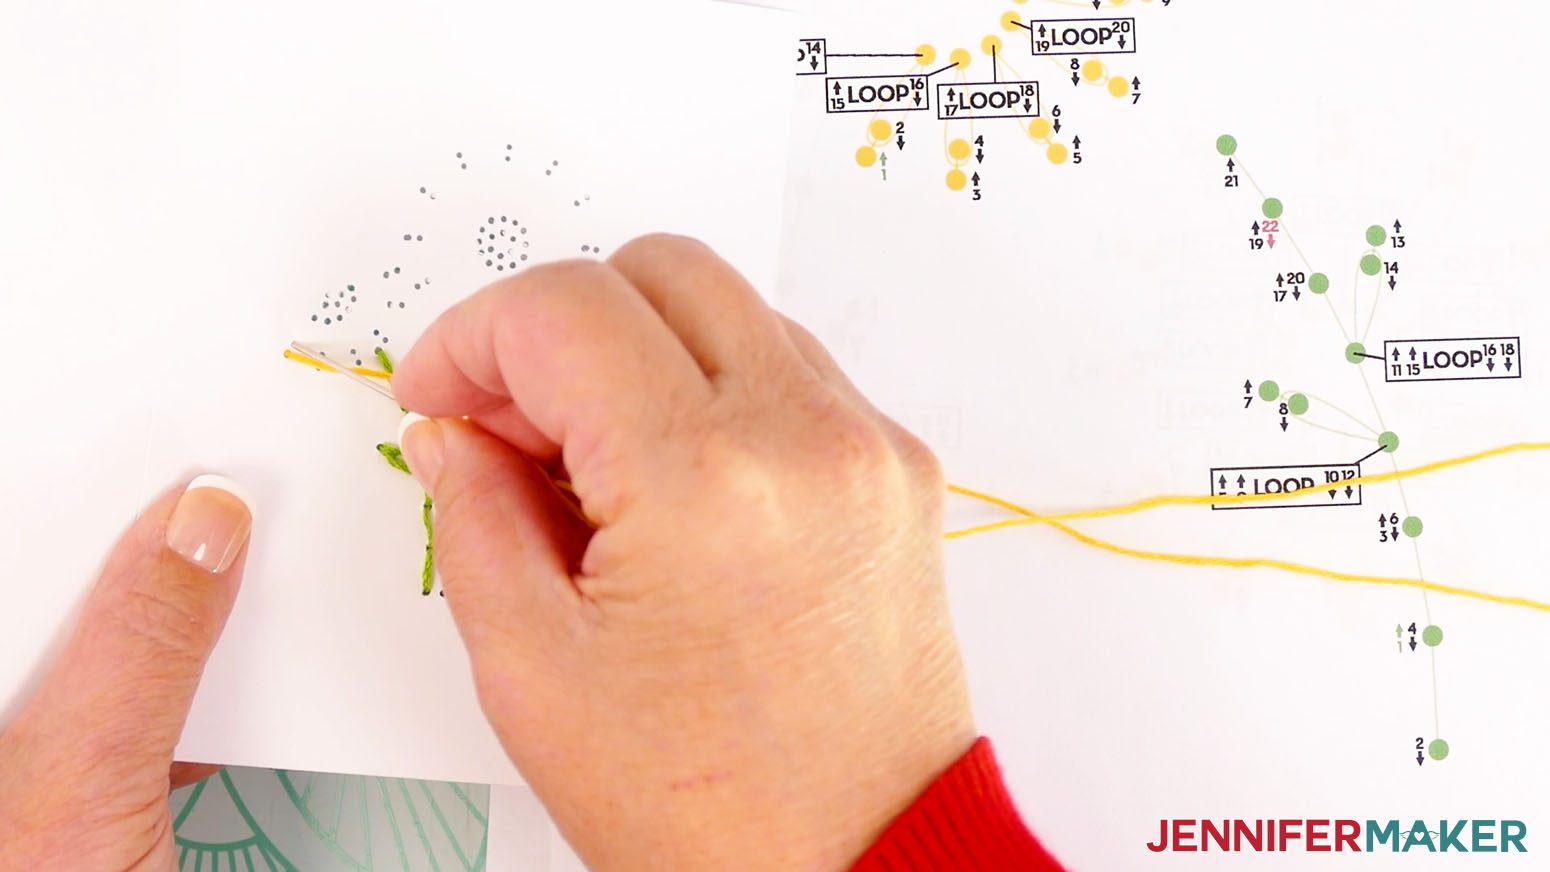
- Now let’s embroider the left flower petals. Follow steps 2-3 to prepare your needle with an 18-24" long piece of yellow floss. Start by inserting the threaded needle from the back of the card up into hole 1.
- Insert the threaded needle down into hole 2. Pull the entire length of the floss through so the knot rests at the back of the card. Don’t pull too hard or the knot may come through.
- Bring the needle back up through hole 3.
- Continue following the numbers and arrows until you thread hole 13.
NOTE: On the middle flower, I recommend starting a new strand after embroidering the outer ring of the petals to ensure you have enough floss to finish the petals. - Coming from one side, insert the threaded needle under the strand of floss between holes 1 and 2.
- Push the needle down through hole 14.
- Bring the needle back up through hole 15.
- Coming from the same side as the last loop, insert the threaded needle under the strand of floss between holes 3 and 4.
- Push the needle down through hole 16.
- Bring the needle back up through hole 17.
- Coming from the same side as the last loop, insert the threaded needle under the strand of floss between holes 5 and 6.
- Push the needle down through hole 18.
- Bring the needle back up through hole 19.
- Coming from the same side as the last loop, insert the threaded needle under the strand of floss between holes 7 and 8.
- Push the needle down through hole 20.
- Bring the needle back up through hole 21.
- Coming from the same side as the last loop, insert the threaded needle under the strand of floss between holes 9 and 10.
- Push the needle down through hole 22.
- Bring the needle back up through hole 23.
- Coming from the same side as the last loop, insert the threaded needle under the strand of floss between holes 11 and 12.
- Thread the hole with the red 24 next to it on the diagram. Your needle should be pointing down for the last step because the number has a down arrow.
- Remove the needle from the floss.
- Tie a loose knot in the floss.
- Place the end of your needle in the loop of the knot, and slide it close to the cardstock.
- Hold the strands in place with the needle while you pull the tail to tighten the knot.
- Trim the excess floss to about ⅛” long.
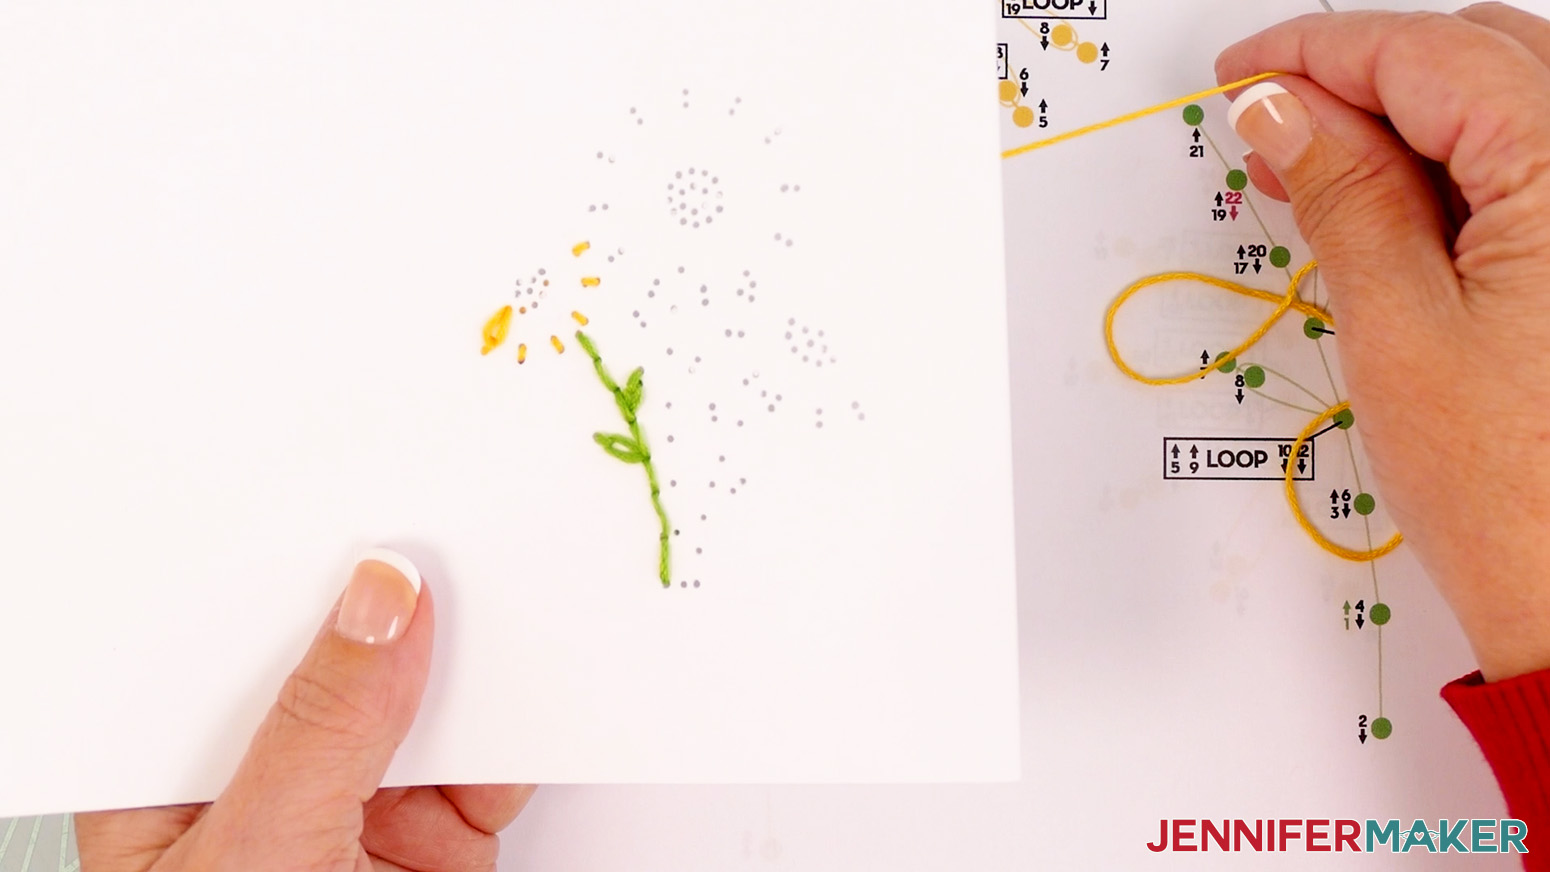
- Now let’s embroider the flower center. Follow steps 2-3 to prepare your needle with a 12" long piece of orange floss.
- Start by inserting the threaded needle from the back of the card up into hole 1.
- Insert the threaded needle down into hole 2. Pull the entire length of the floss through so the knot rests at the back of the card. Don’t pull too hard or the knot may come through.
- Bring the needle back up through hole 3.
- Continue following the numbers and arrows until you thread the hole with a red 8 next to it on the diagram. Your needle should be pointing down for the last step because the number has a down arrow.
- Follow the same techniques to embroider the second and third daisies.
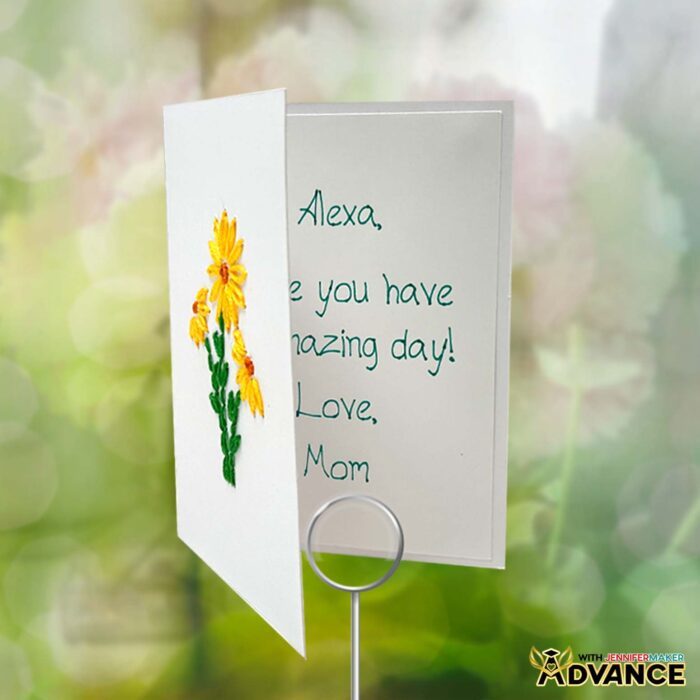
- This is what the finished Daisies embroidery looks like on my card.
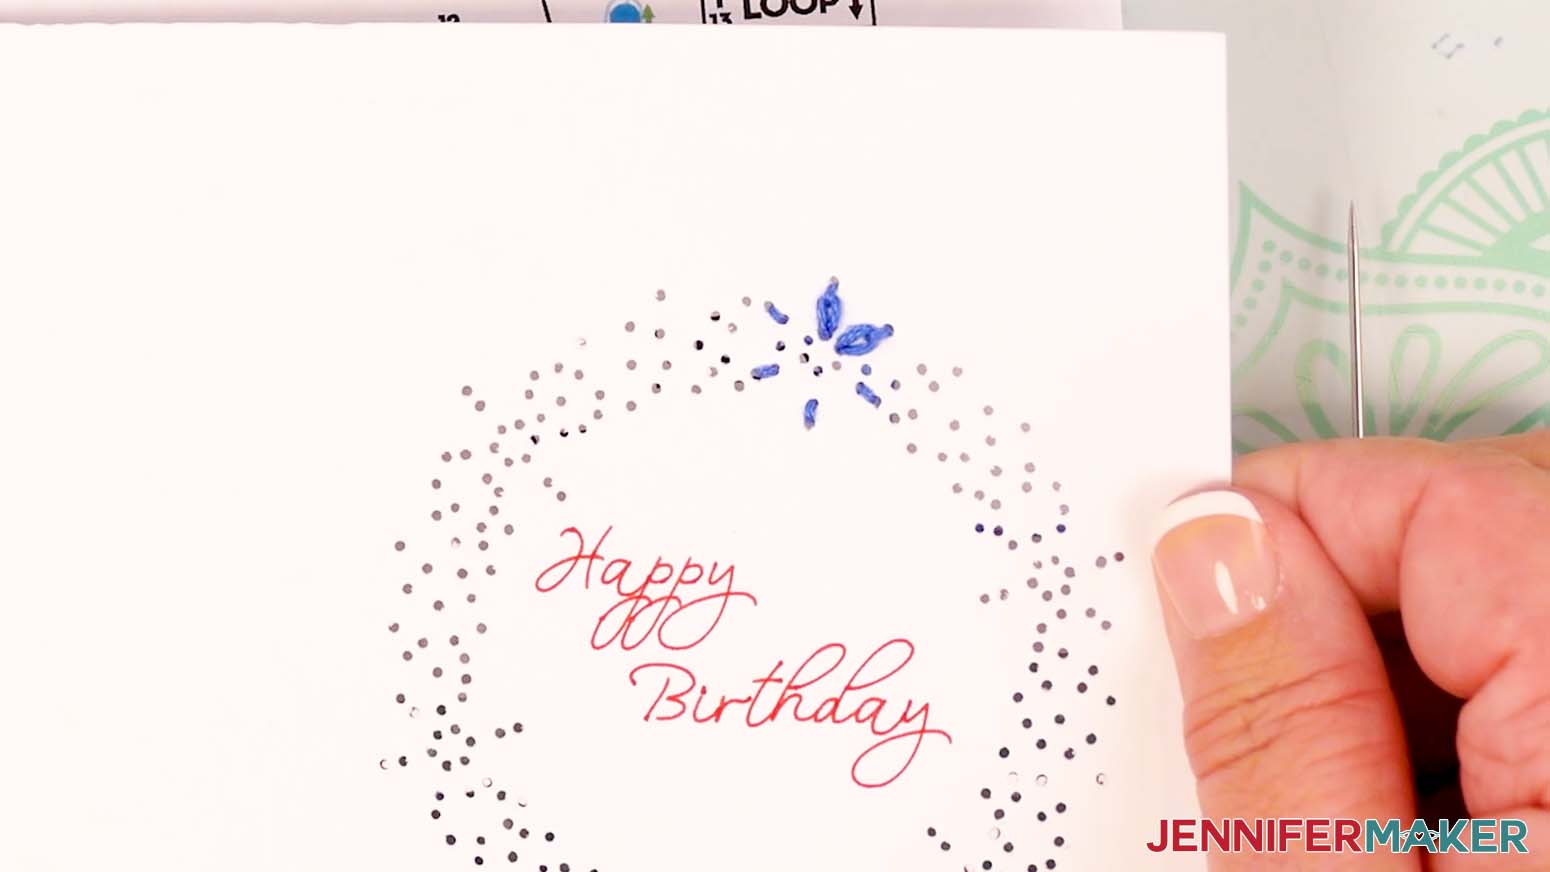
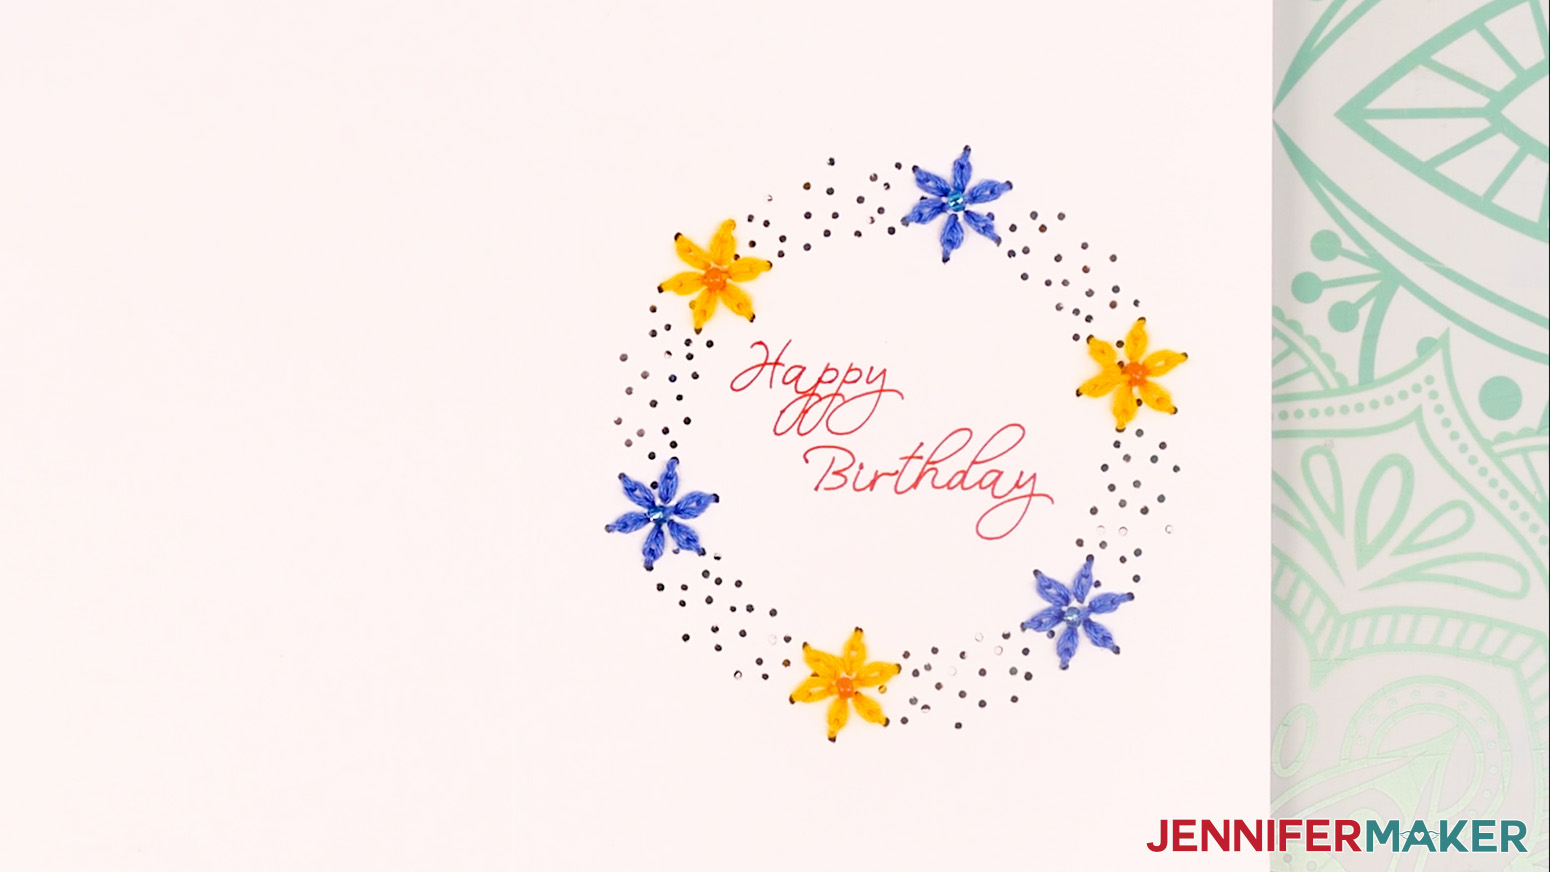
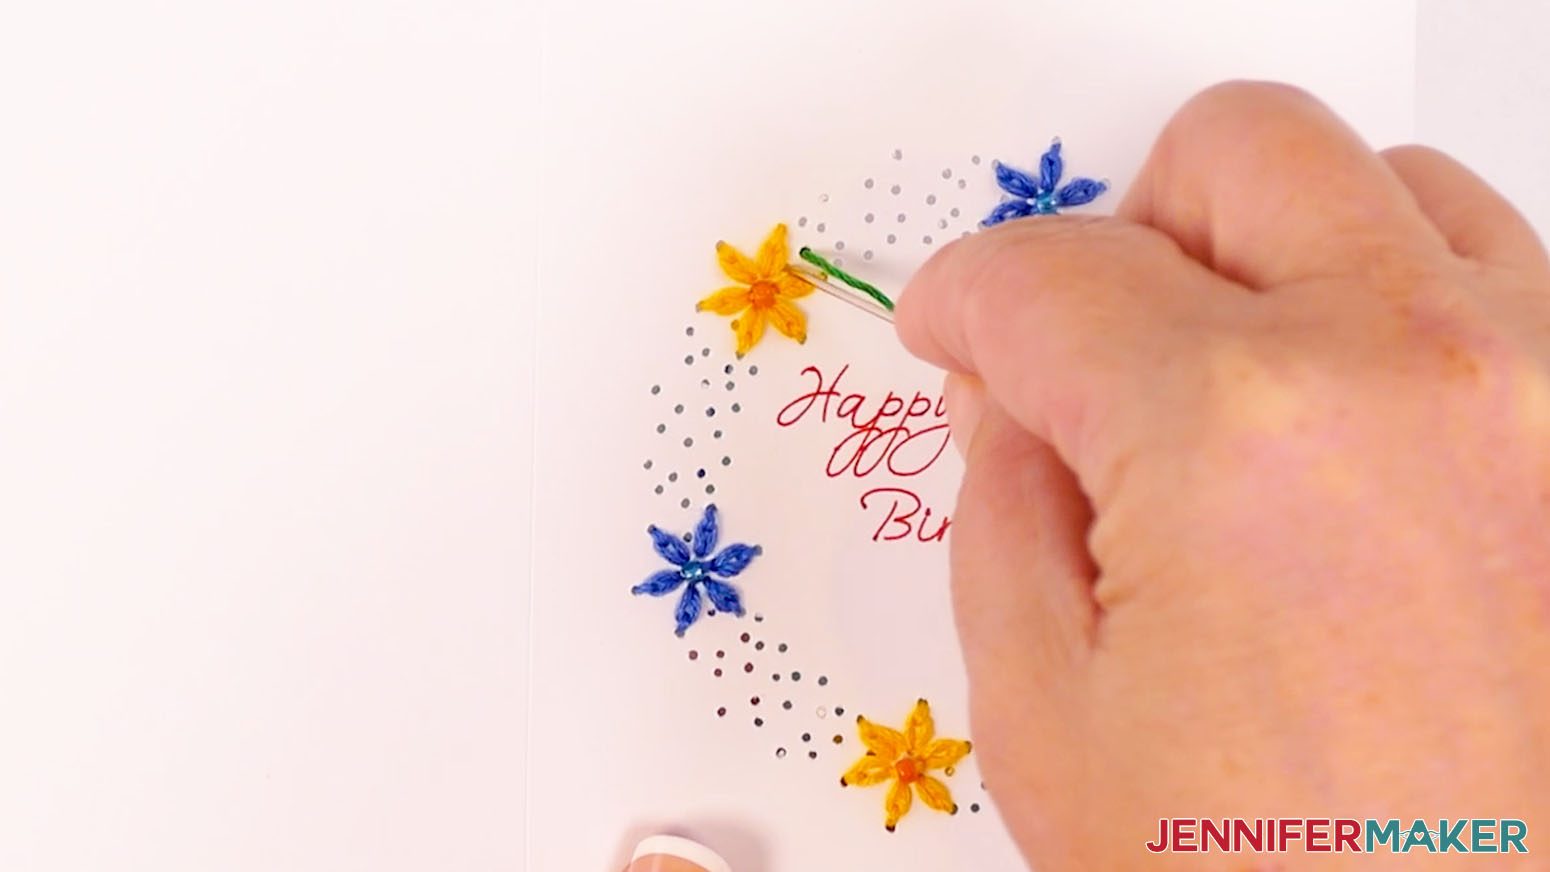
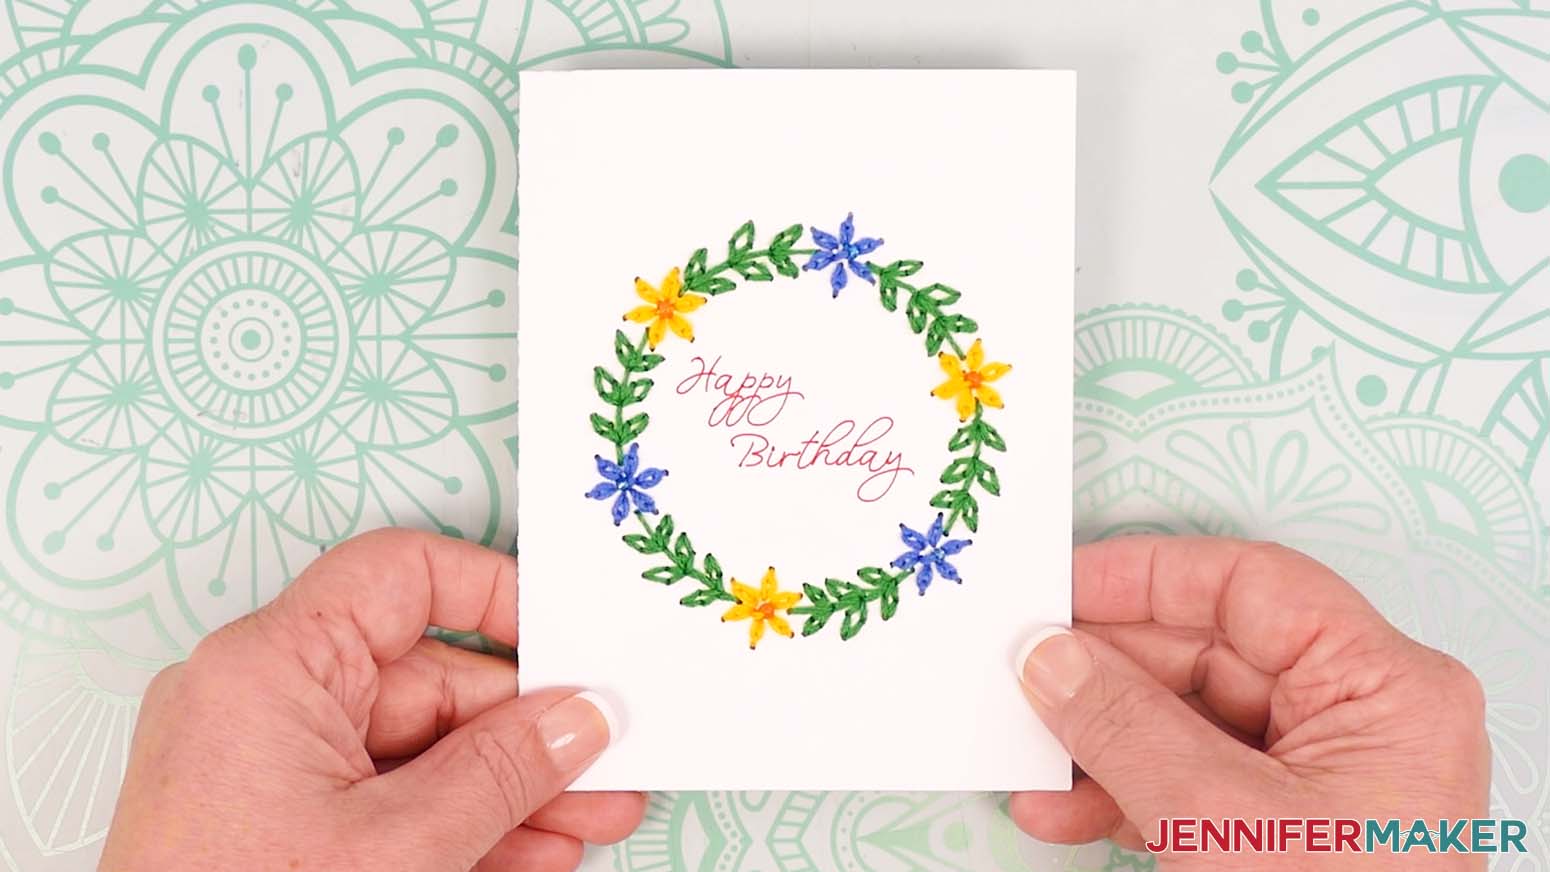
WREATH
Gather your embroidery floss colors. I used green for the leaves and alternated blue and yellow for the flowers.
- First let’s embroider a flower. Use scissors to cut a piece of blue floss about 18-24" long.
TIP: If you have trouble threading your needle, you can also use a needle threading tool. Push the loop end of the threader through the needle’s eye. Slide your thread through the loop, then pull the loop back through the eye. - Thread the floss through the eye of your sewing needle.
- Tie a knot about 1” from the end of the thread farthest from the needle.
- Start by inserting the threaded needle from the back of the card up into hole 1. This number is green and has an up arrow, meaning the needle will go from the back up through the hole on that step.
- Insert the threaded needle down into hole 2. This number has a down arrow, meaning the needle will go down on that step. Pull the entire length of the floss through so the knot rests at the back of the card. Don’t pull too hard or the knot may come through.
- Bring the needle back up through hole 3.
- Continue following the numbers and arrows until you get to hole 13.
- Coming from the right side, insert the threaded needle under the strand of floss between holes 1 and 2.
TIP: Make sure the floss is pushed UNDER the loop, not through the fibers of the floss. - Insert the threaded needle down into hole 14.
NOTE: This area of the design is very delicate. Take extra care to thread the holes gently and do not pull the floss too tight to avoid tearing the paper between them. - Pull the needle back up through hole 15.
- Coming from the bottom side, insert the threaded needle under the strand of floss between holes 3 and 4.
- Insert the threaded needle down into hole 16.
- Pull the needle back up through hole 17.
- Coming from the left side, insert the threaded needle under the strand of floss between holes 5 and 6.
- Insert the threaded needle down into hole 18.
- Pull the needle back up through hole 19.
- Coming from the left side, insert the threaded needle under the strand of floss between holes 7 and 8.
- Insert the threaded needle down into hole 20.
- Pull the needle back up through hole 21.
- Coming from the bottom, insert the threaded needle under the strand of floss between holes 9 and 10.
- Insert the threaded needle down into hole 22.
- Pull the needle back up through hole 23.
- Coming from the left, insert the threaded needle under the strand of floss between holes 11 and 12.
- Insert the threaded needle down into hole 24.
- Pull the needle back up through hole 25.
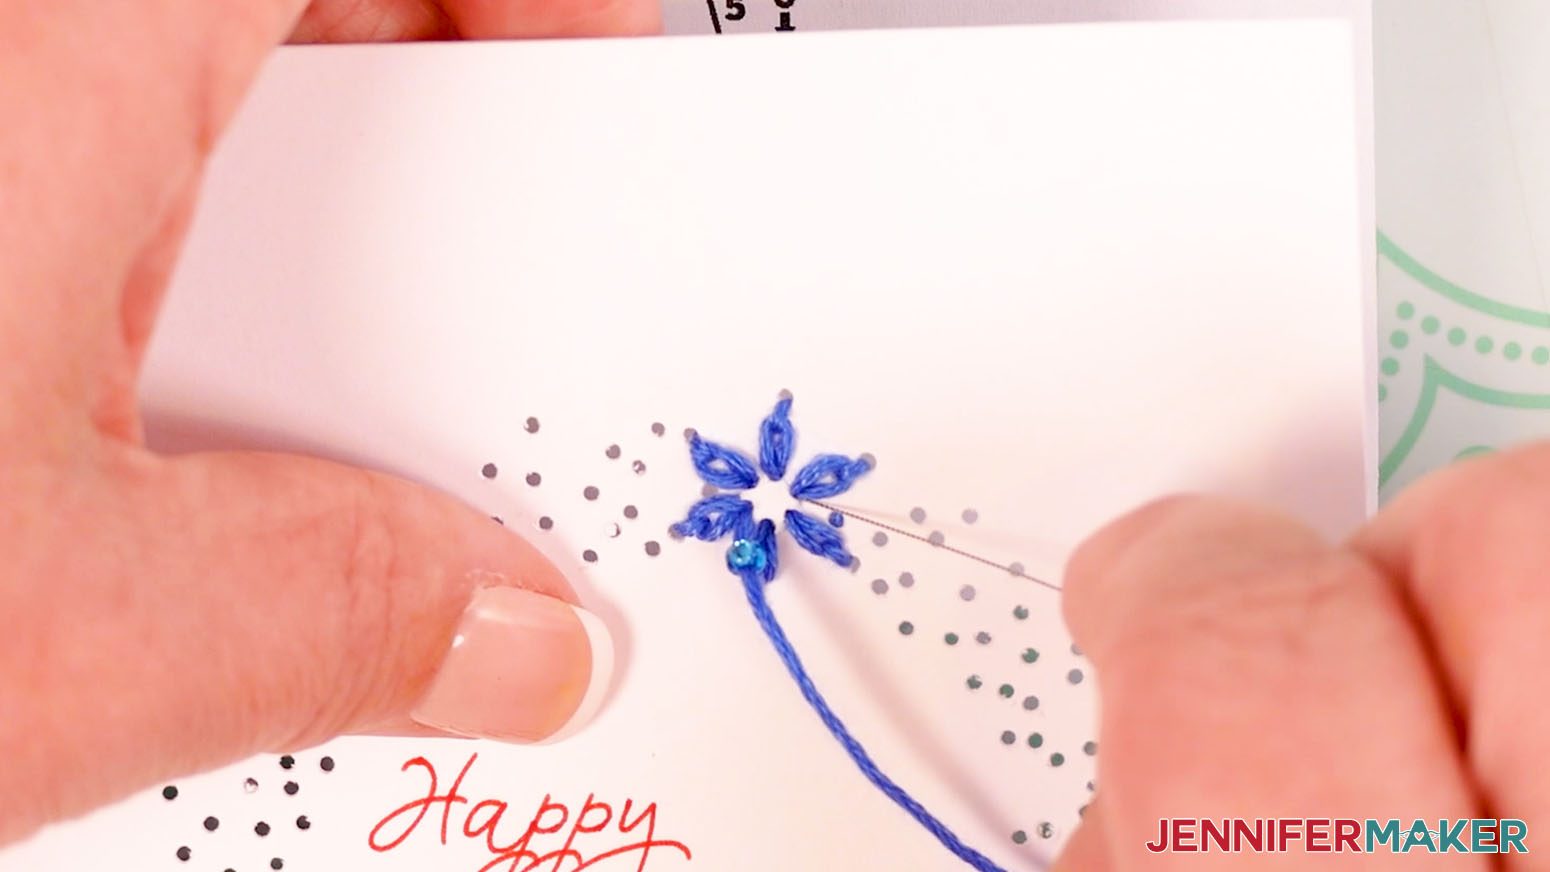
- If you’d like to add the optional beads to the design, string a bead onto the floss.
- Insert the needle down into the hole with a red 26 next to it on the diagram. Your needle should be pointing down for the last step because the number has a down arrow.
- Remove the needle from the floss.
- Tie a loose knot in the floss.
- Place the end of your needle in the loop of the knot, and slide it close to the cardstock.
- Hold the strands in place with the needle while you pull the tail to tighten the knot.
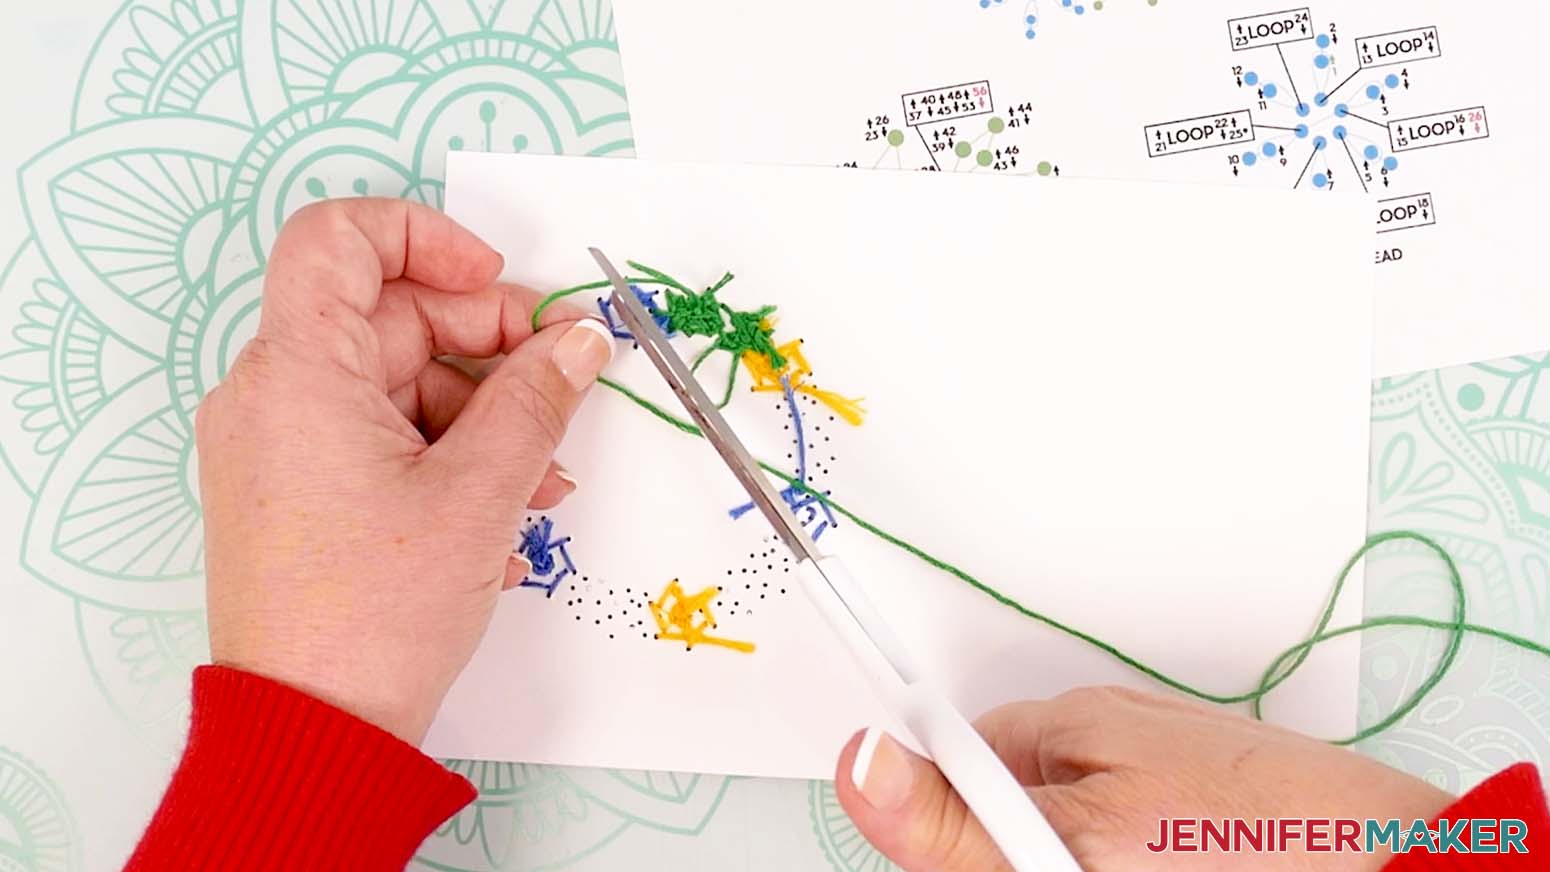
- Trim the excess floss to about ⅛” long.
- Follow steps 1-32 to embroider the remaining flowers.
- Now let’s embroider a green leaf segment. Use scissors to cut a piece of green floss about 18-24" long.
- Thread the floss through the eye of your sewing needle.
- Tie a knot about 1” from the end of the thread farthest from the needle. Now you’re ready to begin stitching!
- Start by inserting the threaded needle from the back of the card up into hole 1.
- Insert the threaded needle down into hole 2. Pull the entire length of the floss through so the knot rests at the back of the card. Don’t pull too hard or the knot may come through.
- Bring the needle back up through hole 3.
- Push the needle down through hole 4 (which was also hole 1).
- Continue following the numbers and arrows until you thread the hole with a red 56 next to it on the diagram. Your needle should be pointing down for the last step because the number has a down arrow.
- Remove the needle from the floss.
- Tie a loose knot in the floss.
- Place the end of your needle in the loop of the knot, and slide it close to the cardstock.
- Hold the strands in place with the needle while you pull the tail to tighten the knot.
- Trim the excess floss to about ⅛” long.
- Follow steps 32-46 to embroider the remaining leaf segments using an 18-24" long piece of green floss per segment.
- This is what the finished Wreath embroidery looks like on my card.


ASSEMBLE A CARD FOR JOY USERS
- Grab the back piece with the flap along one edge, and place it on your work surface with the flap on the left.
NOTE: If your cardstock is one-sided, place it pretty side down. - Fold the flap inward.
- Crease the flap with your scraper tool.
- Apply a line of glue down the outside of the flap.
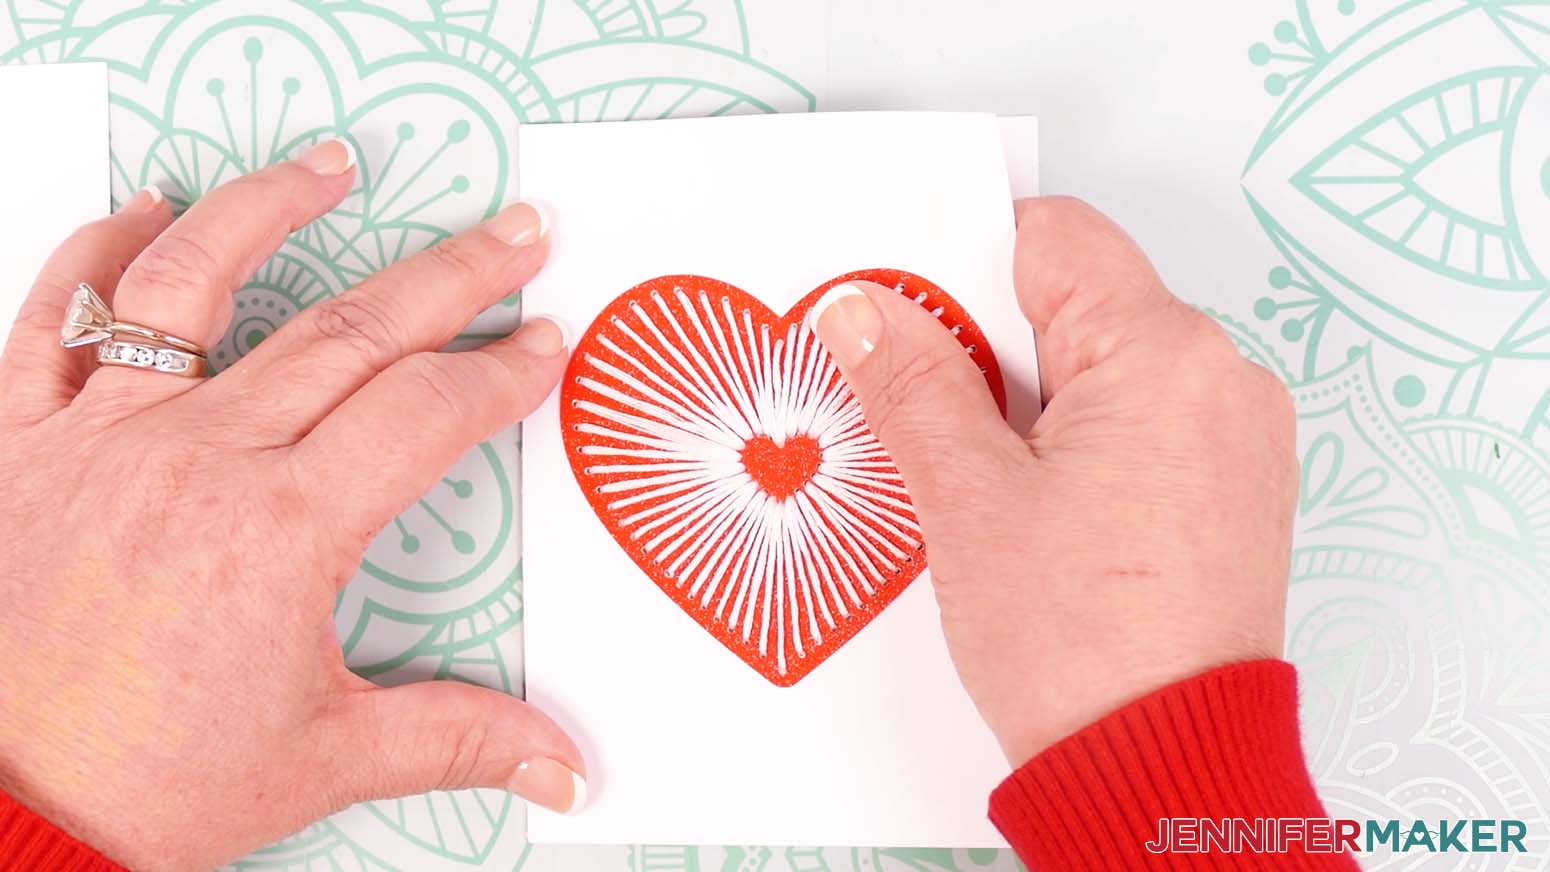
- Grab the front embroidered piece. Hold it with the finished embroidered side facing up.
- Lower the left edge of the embroidered piece down onto the glued flap.
- Make sure the edge of the embroidered piece is aligned and flush with the crease in the flap.
- Press the pieces together to adhere them.
STEP 4: COVER THE BACK OF THE EMBROIDERY
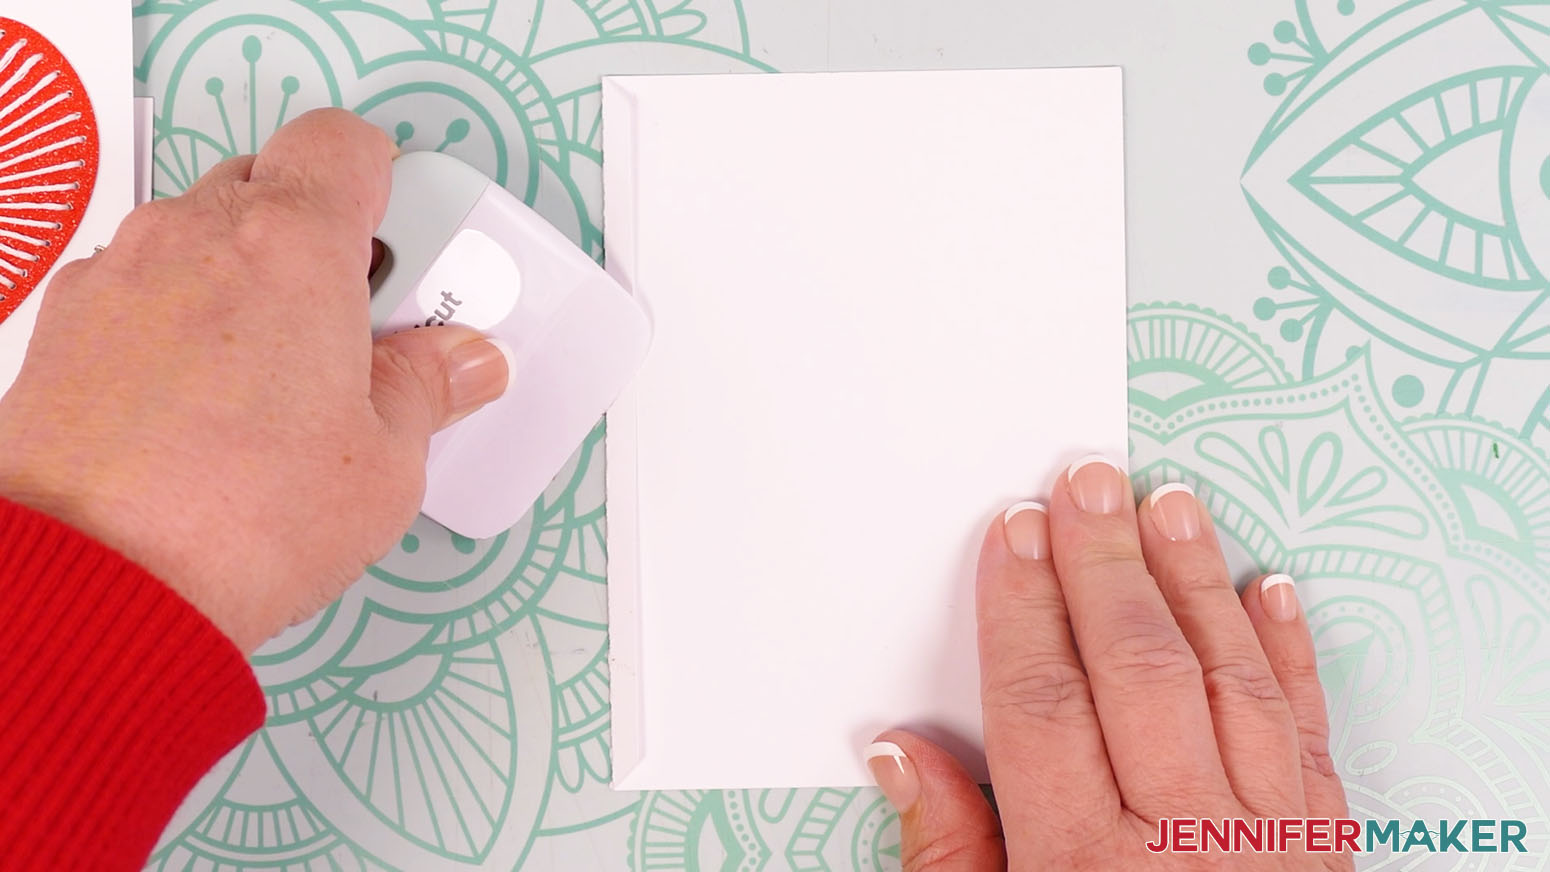
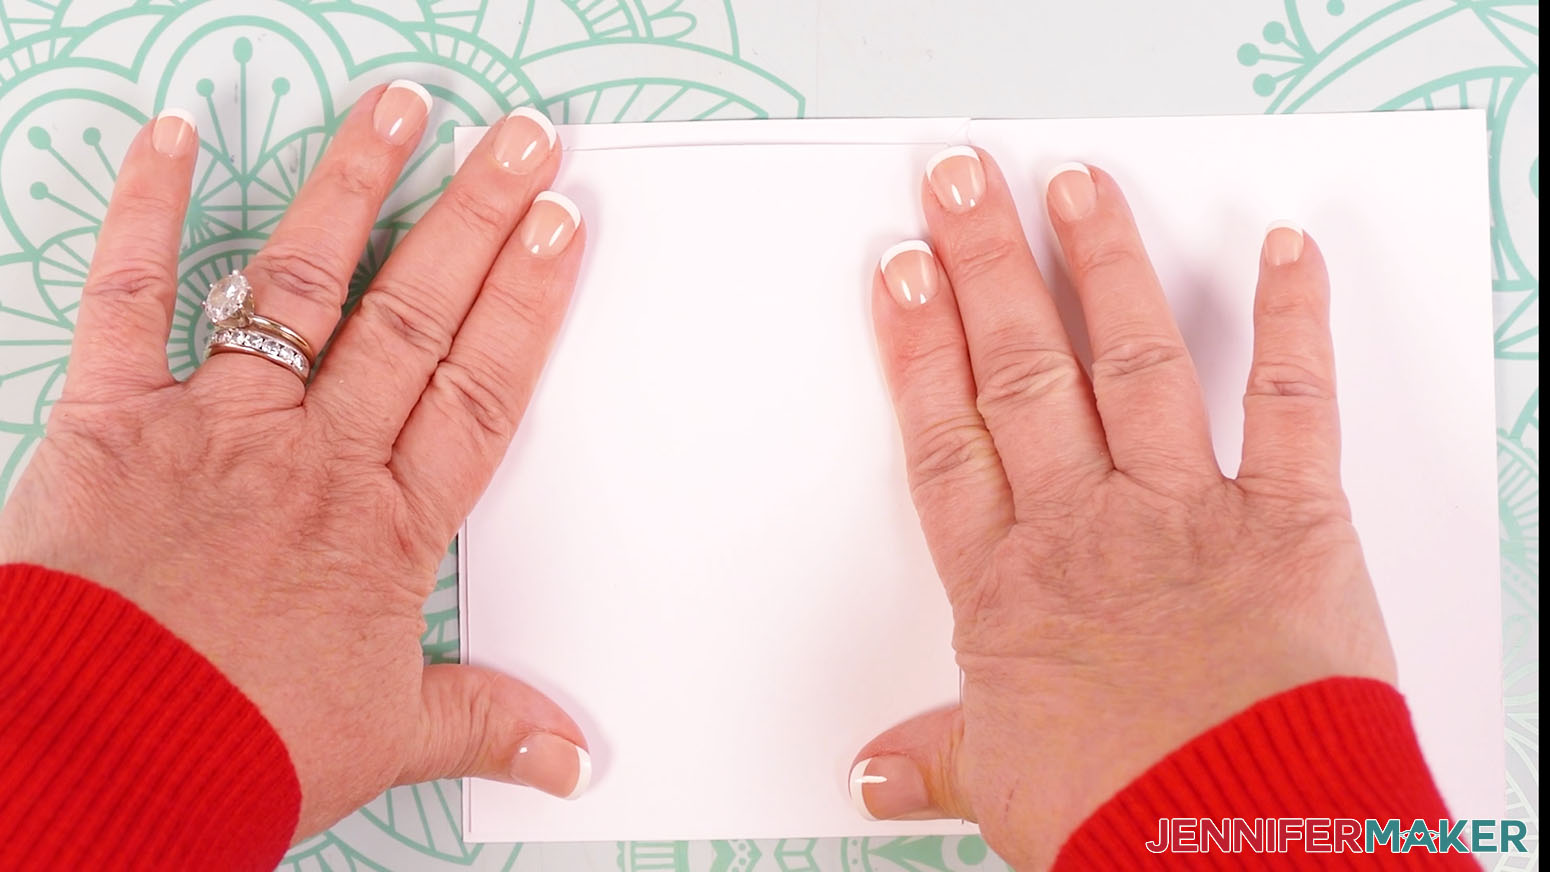
- Fold the card on the crease line so the finished embroidered design is face-up.
- Use a small scraper tool to crease the fold.
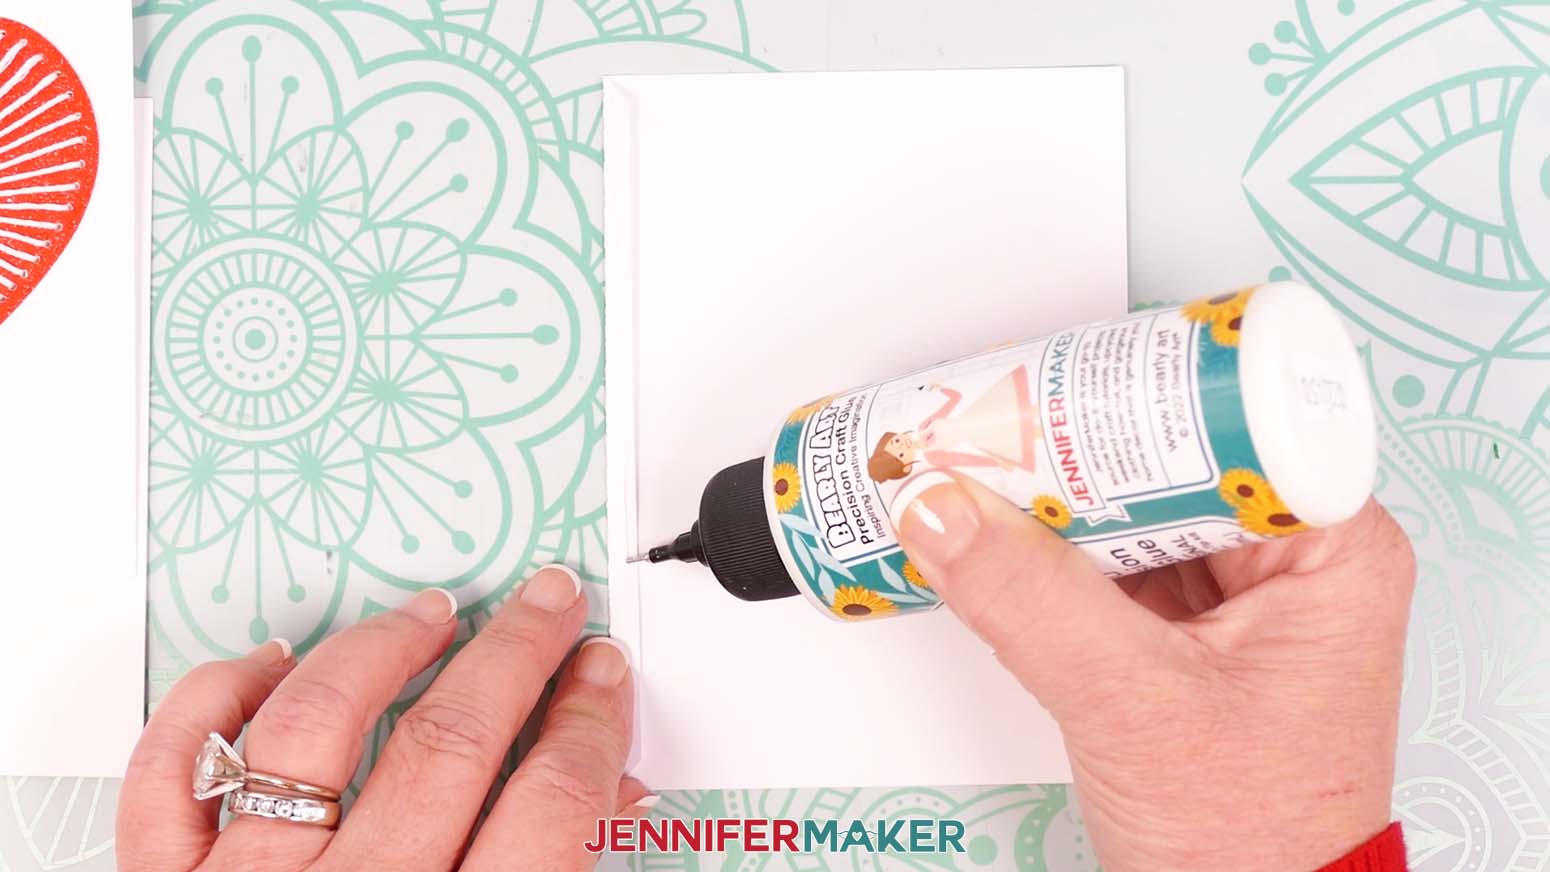
- Open the card back up to show the inside.
- Grab the rectangular cover piece.
- Apply glue along the edges.
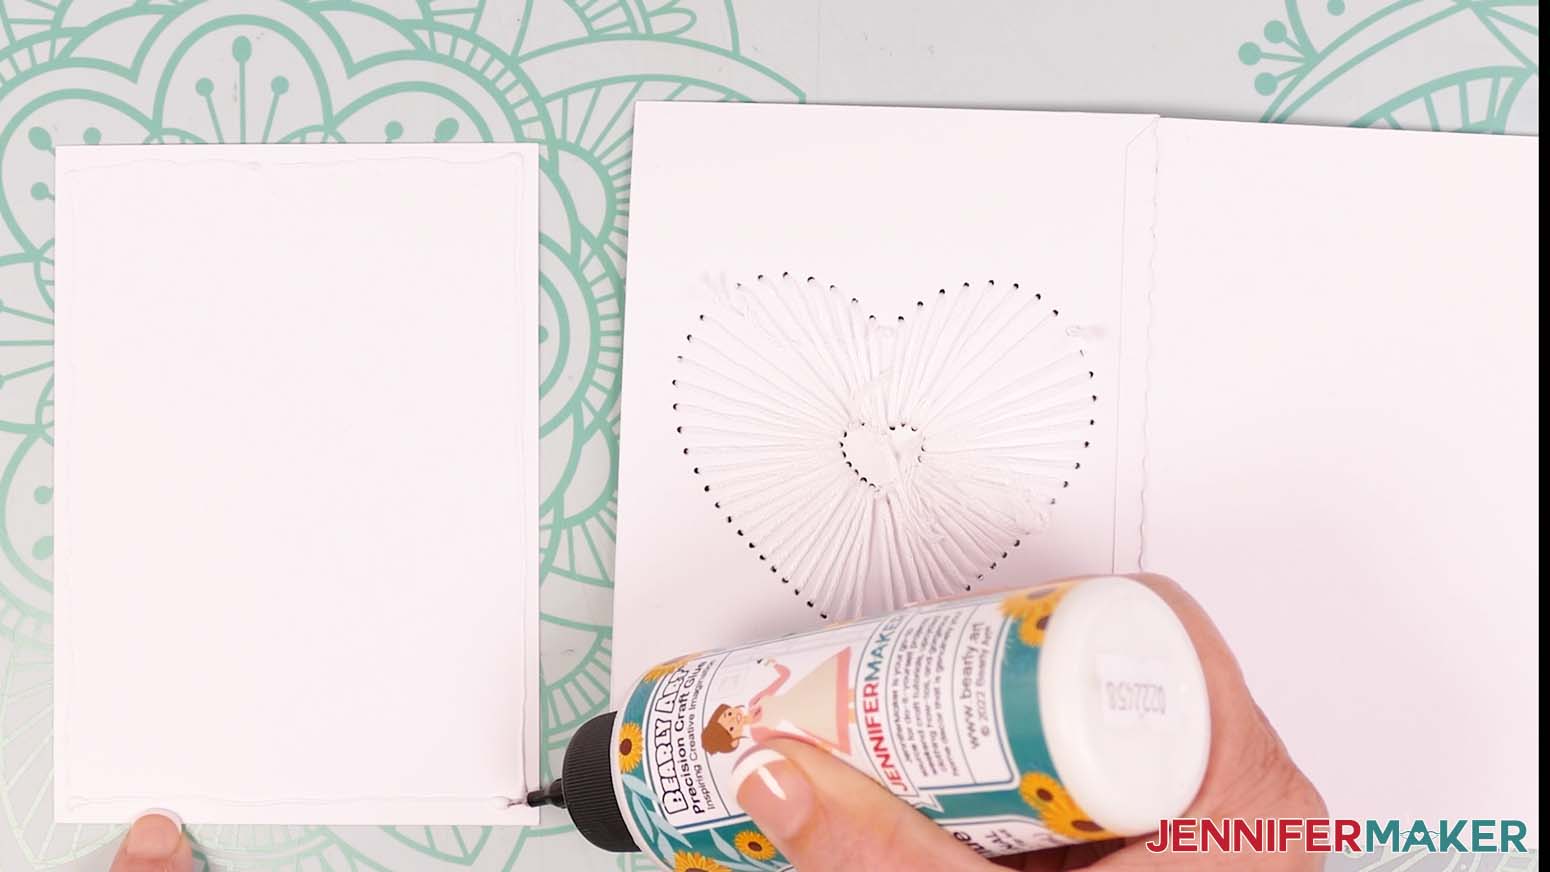
- Turn the rectangle so the glued side is facing down.
- Center it on the inside left of the card, over the back of the embroidery.
- Press to adhere it in place, then hold it down until the glue dries.
- Let the glue dry fully before closing the card.
STEP 5: SHOW IT OFF!
Here are my finished paper embroidery cards!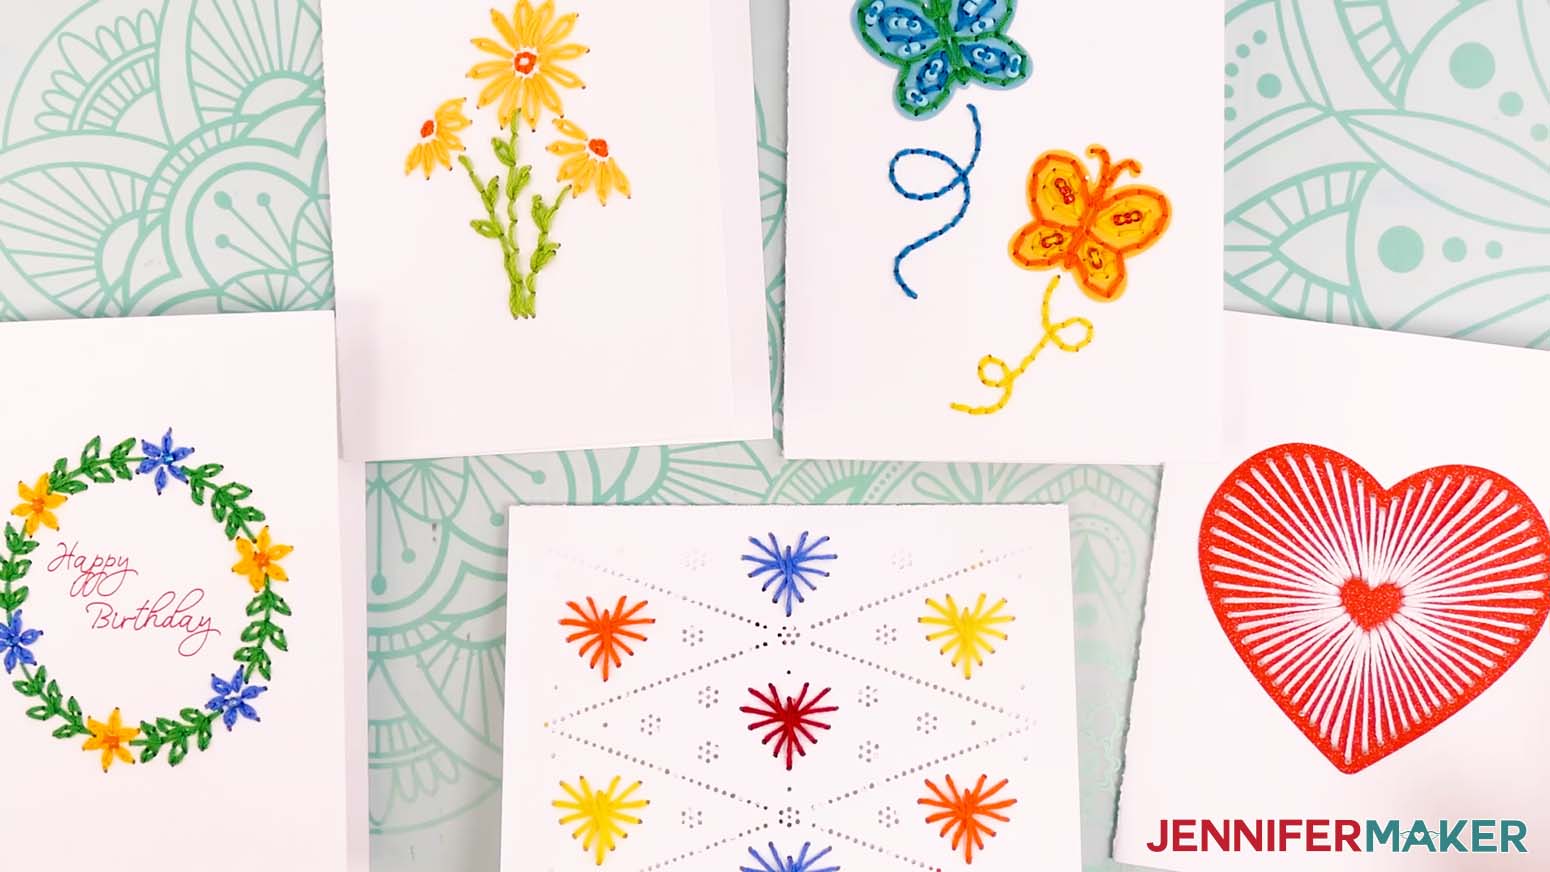
Want to make your own envelope to send your embroidered cards through the mail? Follow my envelope tutorial to make A2 sized envelopes for your embroidered cards. 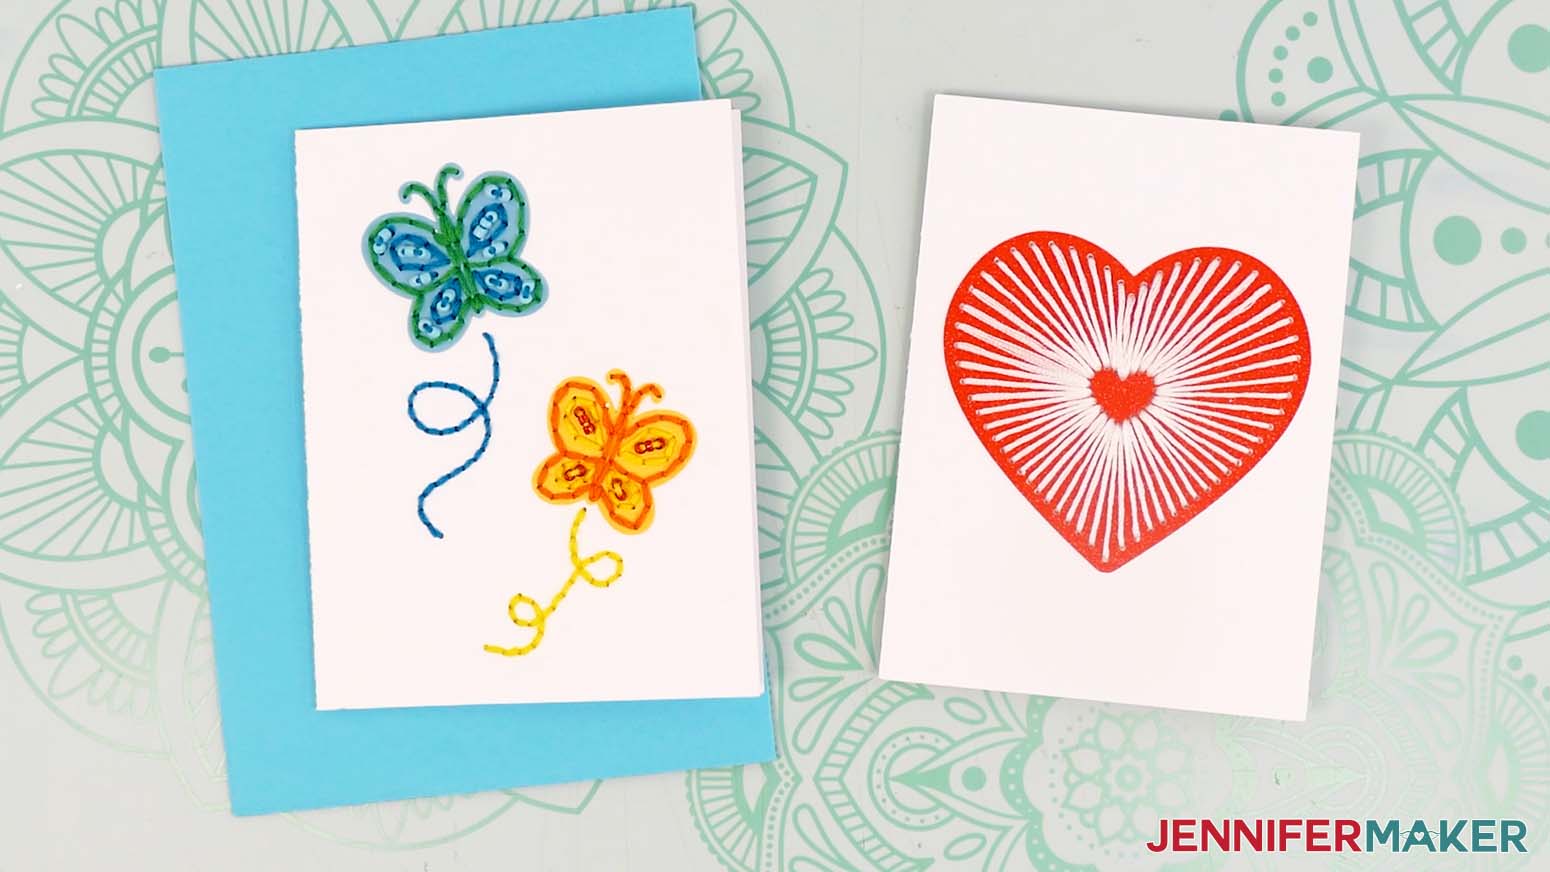
Notes
Finished full-size cards: 4.25” x 5.5”
Finished Joy-sized cards: 4” x 5.5”
FONTS: “Happy Birthday” on wreath design: That Girl / Free Alternative: JM Penwriting
Answers to Your Questions About Making Paper Embroidery Cards
Q: I want to customize my paper embroidery cards with a Cricut-written message inside. How do I do that?
A: You can learn how to create a custom Cricut-written message insert in my ADVANCE program. Learn more about ADVANCE here!
Q: Can you embroider on cardstock? Can you show me how to make embroidery on paper?
A: Yes, you can embroider on cardstock! Follow the written tutorial above, watch my tutorial video, and download my free paper embroidery card SVGs, which come with a complete PDF guide to stitching each design.
Q: What is the best thread for paper embroidery?
A: Embroidery thread is best for paper embroidery because it’s dense, silky, and glides through the cut holes easily.
Q: Can I use normal thread for embroidery?
A: You can regular sewing thread for your paper embroidery cards, but I recommend using embroidery floss instead. Sewing thread is thinner and has a duller finish than embroidery thread, so your results may not look like mine.
Q: Where can I find the supplies and tools to make paper embroidery cards?
A: My paper embroidery card SVG files can be made with simple supplies you may already have in your crafting stash. I like to shop on Amazon for their free shipping and quick delivery time with my Amazon Prime membership (just make sure to look for sellers with 5-star reviews, carefully review product information, and check out the product preview). You can also find most, if not all of the supplies and tools at your local craft store, sometimes even at a cheaper regular price or sale price, so be sure to check for current sales as you continue shopping for supplies.
Q: Help! My Cricut Design Space screen looks different than yours!
A: If you’re using the latest version of Cricut Design Space, your screen may have slight variations than the screen you see on the video tutorial. Good news: All of the same functions are there, they may just be in different spots or have new icons. Pause the video if you need, or follow along with the written tutorial. If you get stuck, ask for expert support in our Facebook group. Our group has become not just a help center, but also a vibrant community of real people and crafters! Plus, you can catch the latest news on JenniferMaker tutorials and more.
Q: Can I make and sell these paper embroidery cards?
A: I love supporting creative entrepreneurs! If you want to use my designs and projects for commercial use, please familiarize yourself with my important licensing information before selling your crafts.
I do not permit sale of my digital items, but you can sell the creative goods you make with them — as long as you follow my licensing requirements. That means you cannot sell the card SVG files, but you can sell cards that you made with the files within the guidelines linked above.
Q: How do I know if my design is the right size?
A: Not sure if your design is uploading at the correct size or aspect ratio? If you are using Cricut Design Space Beta for Desktop, try switching to the Live version as this has worked in our testing. Here are the dimensions you should see for each design on your Canvas:
-
embroider-butterfly-no-score-jennifermaker-SVG: 8.5″ x 9.57″
- embroider-butterfly-score-jennifermaker-SVG: 8.5″ x 9.57″
-
embroider-daisies-no-score-jennifermaker-SVG: 8.5″ x 9.64″
- embroider-daisies-score-jennifermaker-SVG: 8.5″ x 9.64″
-
embroider-heart-no-score-jennifermaker-SVG: 8.5″ x 9.67″
- embroider-heart-score-jennifermaker-SVG: 8.5″ x 9.67
-
embroider-smallhearts-no-score-jennifermaker-SVG: 10.81″ x 8.5″
- embroider-smallhearts-score-jennifermaker-SVG: 10.81″ x 8.5″
-
embroider-wreath-no-score-jennifermaker-SVG: 8.5″ x 9.56″
- embroider-wreath-score-jennifermaker-SVG: 8.5″ x 9.56″
-
embroider-butterfly-joy-jennifermaker-SVG: 9.57″ x 8.14″
- embroider-daisies-joy-jennifermaker-SVG: 9.56″ x 8.15″
-
embroider-heart-joy-jennifermaker-SVG: 9.55″ x 8.14″
- embroider-smallhearts-joy-jennifermaker-SVG: 10.84″ x 8.3″
- embroider-wreath-joy-jennifermaker-SVG: 9.6″ x 8.14″
If you need help resizing your design, open my Resizing Guide in a new window.
Q: Can I resize the paper embroidery card SVGs?
A: I don’t recommend resizing the card designs. If you resize the cards smaller, the holes will be too small for the embroidery floss. If you resize them larger, the holes will be too large and the design may look different than you expect when it’s embroidered.
Q: Do you have other paper embroidery projects I can make?
A: If you liked stitching my paper embroidery cards, check out these other embroidery and embroidery-inspired tutorials for even more ideas:
- Seasonal Embroidered Cards
- String Art Patterns for Beginners
- DIY Map Pillow with State-to-State Hearts
- Hand Hemstitched Handkerchief
- Felt Coasters with Cricut
- DIY Hand Warmers
- Fall Friends Ornaments & Cards
- Super Easy Stitched Leather Wallets
- DIY Plushies with Cricut
- Stick and Stitch Embroidery Napkins
- Felt Christmas Ornaments
- Embroidery Hoop Ornaments
Get my free SVG/DXF/PDF files to make paper embroidery cards!
(If you do not see the signup form above, click here.)
I love seeing what you make with my designs and how you use them! Please share a photo of your paper embroidery cards in our Facebook group or tag me on social media with #jennifermaker.
Love,

Want to remember this? Save this Paper Embroidery Cards tutorial to your favorite Pinterest Board!