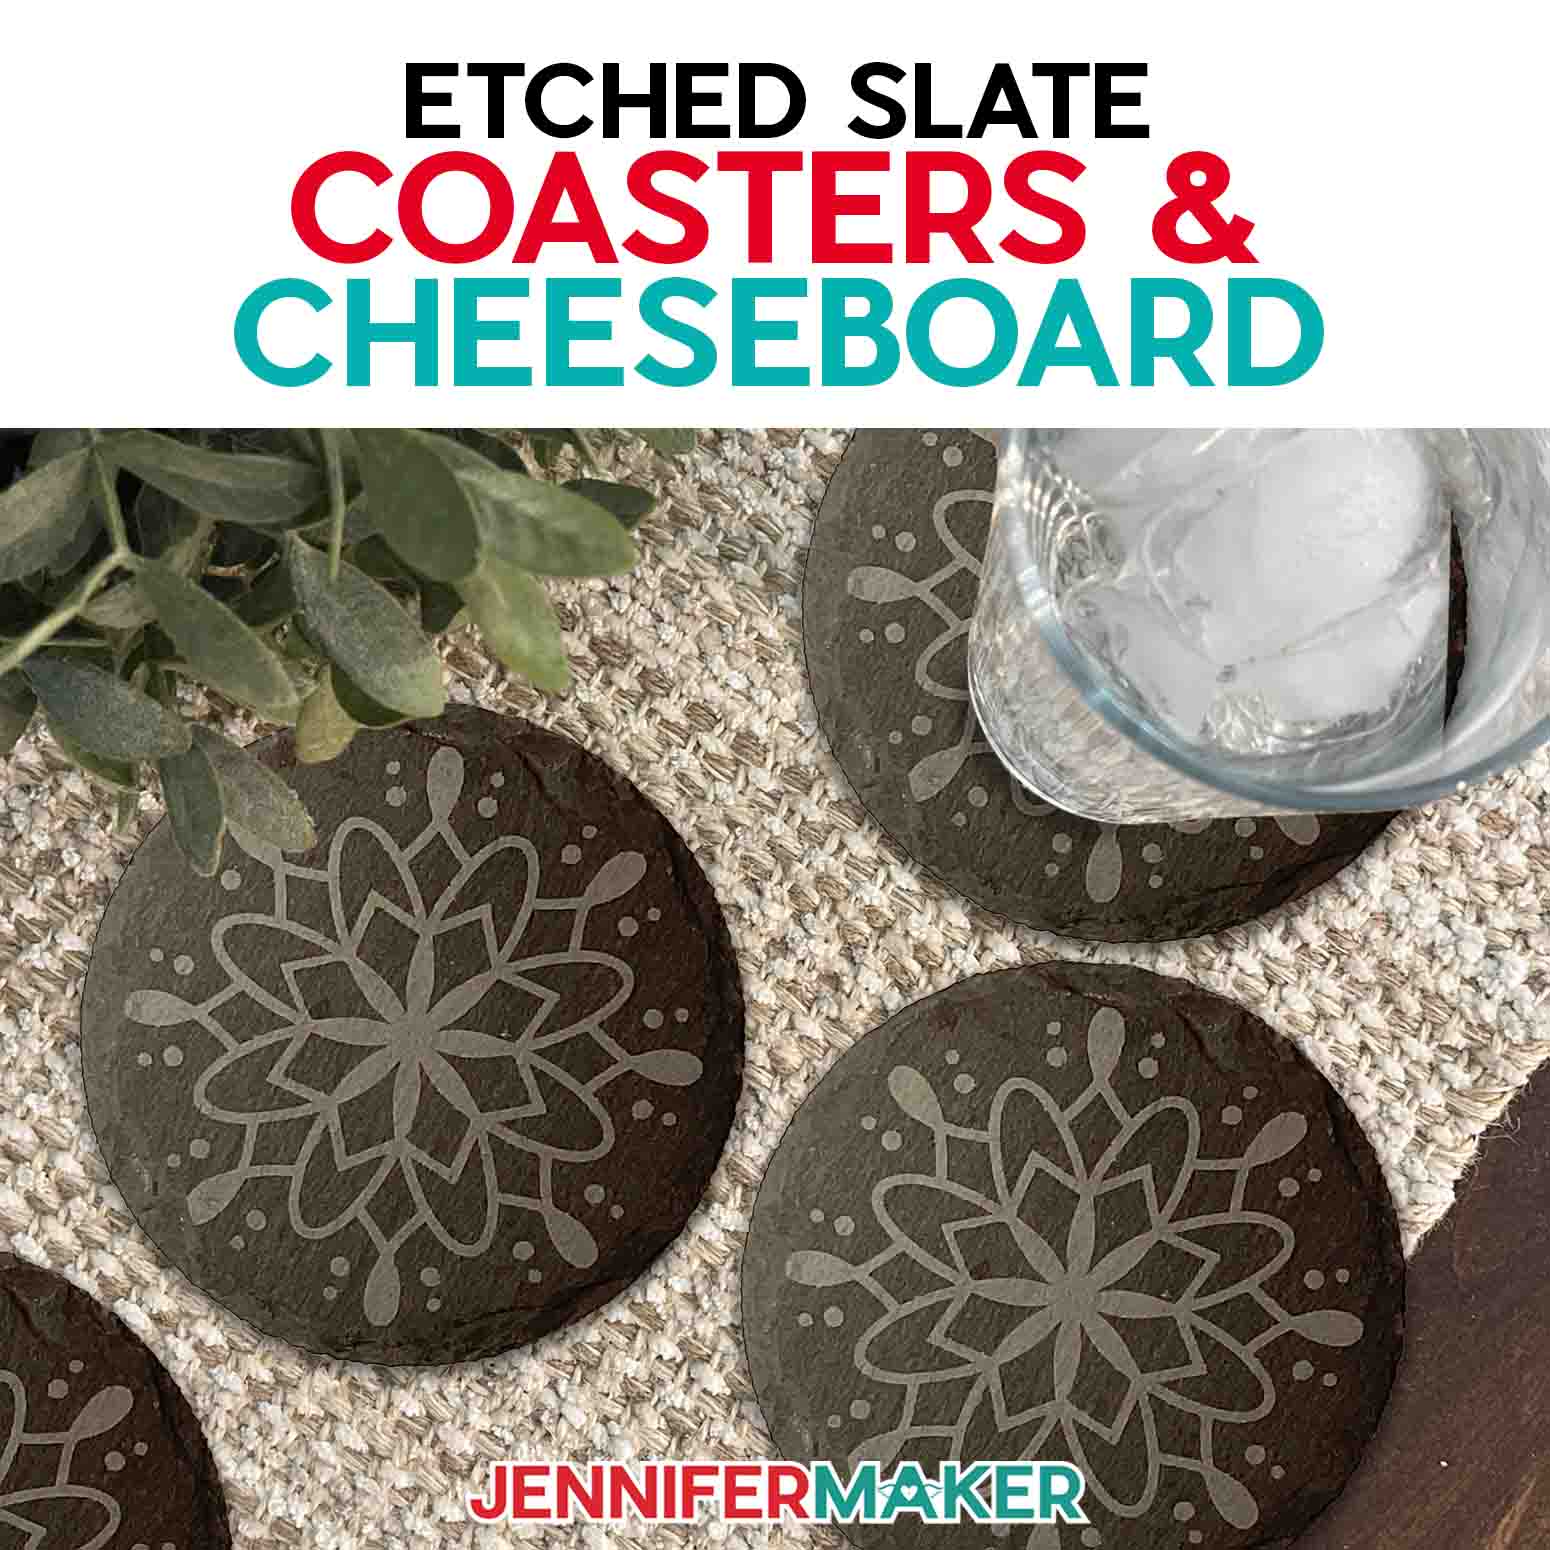
Learn how to etch slate for charcuterie boards, coasters, and more!
With charcuterie being all the rage these days (and for good reason — YUM!), custom etched slate is where it’s at. I can’t wait to show you how to etch slate to make jaw-dropping cheeseboards and coasters. Etching slate is such a fun way to create gorgeous gift-worthy items perfect for a wedding gift, for entertaining friends and family, or any other occasion — even just dinner at home!
Want to save this project? Enter your email below and we’ll send the project straight to your inbox.
Watch the full step-by-step video tutorial on etching slate coasters:

A Note About Safety: To make these gorgeous etched slate items, it’s important to stay safe. So important, in fact, that I recommend you wear a respirator, eye protection, and gloves while you use (and clean up) the etching cream. No, I’m not kidding — etching cream is seriously toxic stuff, and no craft is worth risking your health and safety. Please only attempt this project if you plan to take full safety precautions outlined in the tutorial. I can’t emphasize this enough!
First, I’ll walk you through preparing your stencil in Cricut Design Space. I’ve got some adorable charcuterie board and coaster designs to share with you, which are perfect for entertaining or giving as a personalized gift! Once you know how to etch slate, you’ll want to make these for everyone.
The etched slate cheeseboard stencils are sized to fit on the 8” x 12” slate boards in my materials list, and can be cut on Cricut Maker and Explore series machines, as well as the Venture. The “Hangry Guests” stencil is ready to cut, and the mandala cheeseboard design is customizable; I’ll show you how to add a name or a short message to make it unique!
All of my coaster stencil files are sized to fit on 4” round slate coasters, and are ready to cut on any Cricut machine, including the Joys!
Next, we’ll use a Cricut to cut the designs out of permanent adhesive vinyl, then weed and apply it to the slate surface using a piece of transfer tape. Whenever I work with a new material, I like to do tests to find out which techniques give the best results. In the tutorial, you’ll learn my secrets for getting the vinyl to stick super well to the slate, so the etching cream doesn’t bleed underneath the stencil and you end up with nice, clean edges.
Then comes the fun part! We’ll put on our protective equipment and you’ll start learning how to etch slate. Using the vinyl stencil, first I’ll show you how to apply the etching cream to the exposed areas and then we’ll let it work its magic.
I can’t wait til you see the results! They’re truly amazing, and once you have the process of knowing how to etch slate down, you’ll have so much fun etching different slate products to give as unique gifts or to enjoy at home!
Here’s a supply list of what you need to lean how to etch slate and make gorgeous custom cheeseboards and coasters! This post contains some affiliate links for your convenience (which means if you make a purchase after clicking a link I will earn a small commission but it won’t cost you a penny more)! Read my full disclosure policy.
Materials and Tools to Etch Slate: Make an Etched Cheeseboard and Etched Coasters
View my Amazon shopping list with the exact items we used to make this project
- Four (4) Slate 4″ Round Coasters -OR-
- One (1) Slate 8″ x 12″ Charcuterie Board
- Permanent Vinyl – any color, approximately 8″ x 12″
- Cricut StandardGrip Transfer Tape
- Armour Etch Cream (I used about a tablespoon for the coasters and about two tablespoons for the cheeseboard)
- A way to cut your vinyl stencil – I’m using the Cricut Maker 3, but you can also use the Cricut Maker, a Cricut Explore Series machine, the Cricut Venture, or even the Joy or Joy Xtra for the coaster stencils
- Cricut Green StandardGrip Machine Mat 12″ x 12″
- Respirator with proper fit
- Respirator Cartridge
- Safety Goggles if your breathing protection doesn’t cover your eyes
- Disposable Gloves
- Apron to protect your clothing
- Butcher Paper to protect your work surface
- Paint Brush to apply Armour Etch
- Painter’s Tape to cover areas of slate you don’t want to etch
- Scissors
- Brayer
- Weeding Tool
- Scraper
- Lint-Free Cloth or Coffee Filter (to wipe slate clean before applying stencil)
- Low Temp Heat Gun or Blow Dryer
- Timer
- Access to a plastic or metal sink to rinse off etching cream
- Hot Glue Finger Caps (optional, to help adhere vinyl to slate after applying heat)
- Weeding Ring or Sticky Piece of Tape (optional for collecting weeded vinyl pieces)
- Measuring Tape (optional, if you need to measure your coaster or board to change the stencil size)
How to Make Your Own Etched Cheeseboard and Coasters
How to Etch Slate
Learn how to etch slate with your Cricut and some etching cream to make fun coasters and cheeseboards!
Materials
- Here is a shopping list of the actual items I used to create this project! This list contains affiliate links. As an Amazon Associate I earn from qualifying purchases.
- Four (4) Slate 4" Round Coasters -OR-
- One (1) Slate 8" x 12" Charcuterie Board
- Cricut StandardGrip Transfer Tape
- Permanent Vinyl (any color, approximately 8" x 12")
- Armour Etch Cream (I used about a tablespoon for the coasters and about two tablespoons for the cheeseboard)
- Design #522 (My free SVG/PDF/DXF design files are available in my free resource library - get the password by filling out the form at the bottom of this page)
Tools
- A way to cut your vinyl stencil - I'm using the Cricut Maker 3, but you can also use the Cricut Maker, a Cricut Explore Series machine, the Cricut Venture, the Joy Xtra, or even the Joy for the coaster stencils.
- Cricut Green StandardGrip Machine Mat 12" x 12"
- Respirator (with proper fit)
- Respirator Cartridge
- Safety Goggles (if your breathing protection doesn't cover your eyes)
- Disposable Gloves
- Apron (to protect your clothing)
- Butcher Paper (to protect your work surface)
- Paint Brush (to apply Armour Etch)
- Painter's Tape (to cover areas of slate you don't want to etch)
- Scissors
- Brayer
- Weeding Tool
- Scraper
- Lint-Free Cloth or Coffee Filter (to wipe slate clean before applying stencil)
- Low Temp Heat Gun or Blow Dryer
- Timer
- Access to a plastic or metal sink to rinse off etching cream
- Hot Glue Finger Caps (optional, to help adhere vinyl to slate after applying heat)
- Weeding Ring or Sticky Piece of Tape (optional for collecting weeded vinyl pieces)
- Measuring Tape (optional, if you need to measure your coaster or board to change the stencil size)
Instructions
STEP 1: GET MY FREE HOW TO ETCH SLATE DESIGN FILES
First, download my Etching Designs SVG/PDF/DXF files from my free library -- look for Design #522. Alternatively, you can use the Save This Project form near the top of this post and the design link will be emailed to you.
There are four different designs in the folder:
- A customizable mandala cheeseboard stencil
- A fun “Hangry Guests” cheeseboard stencil
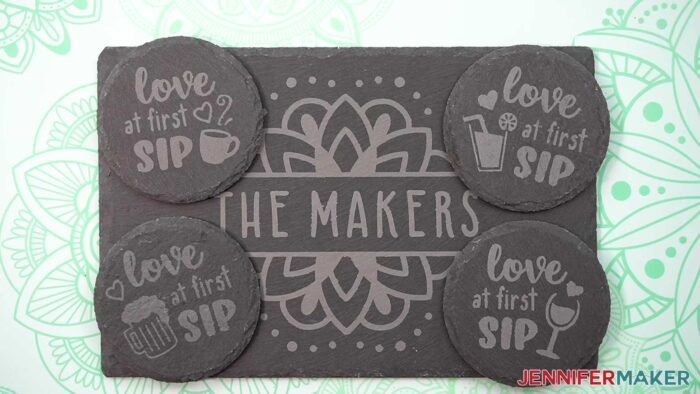
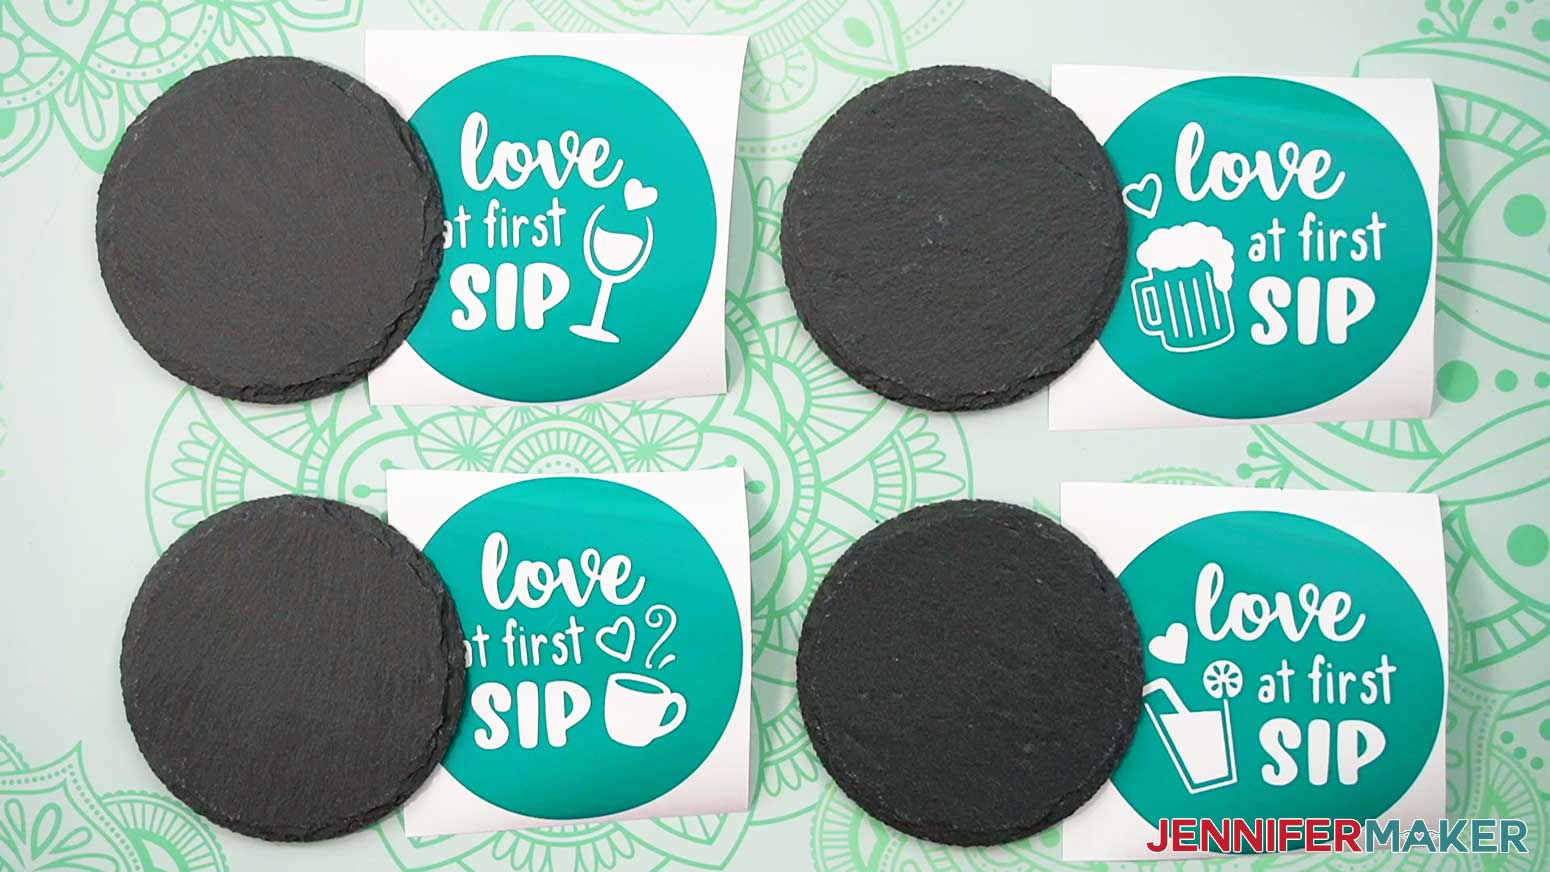
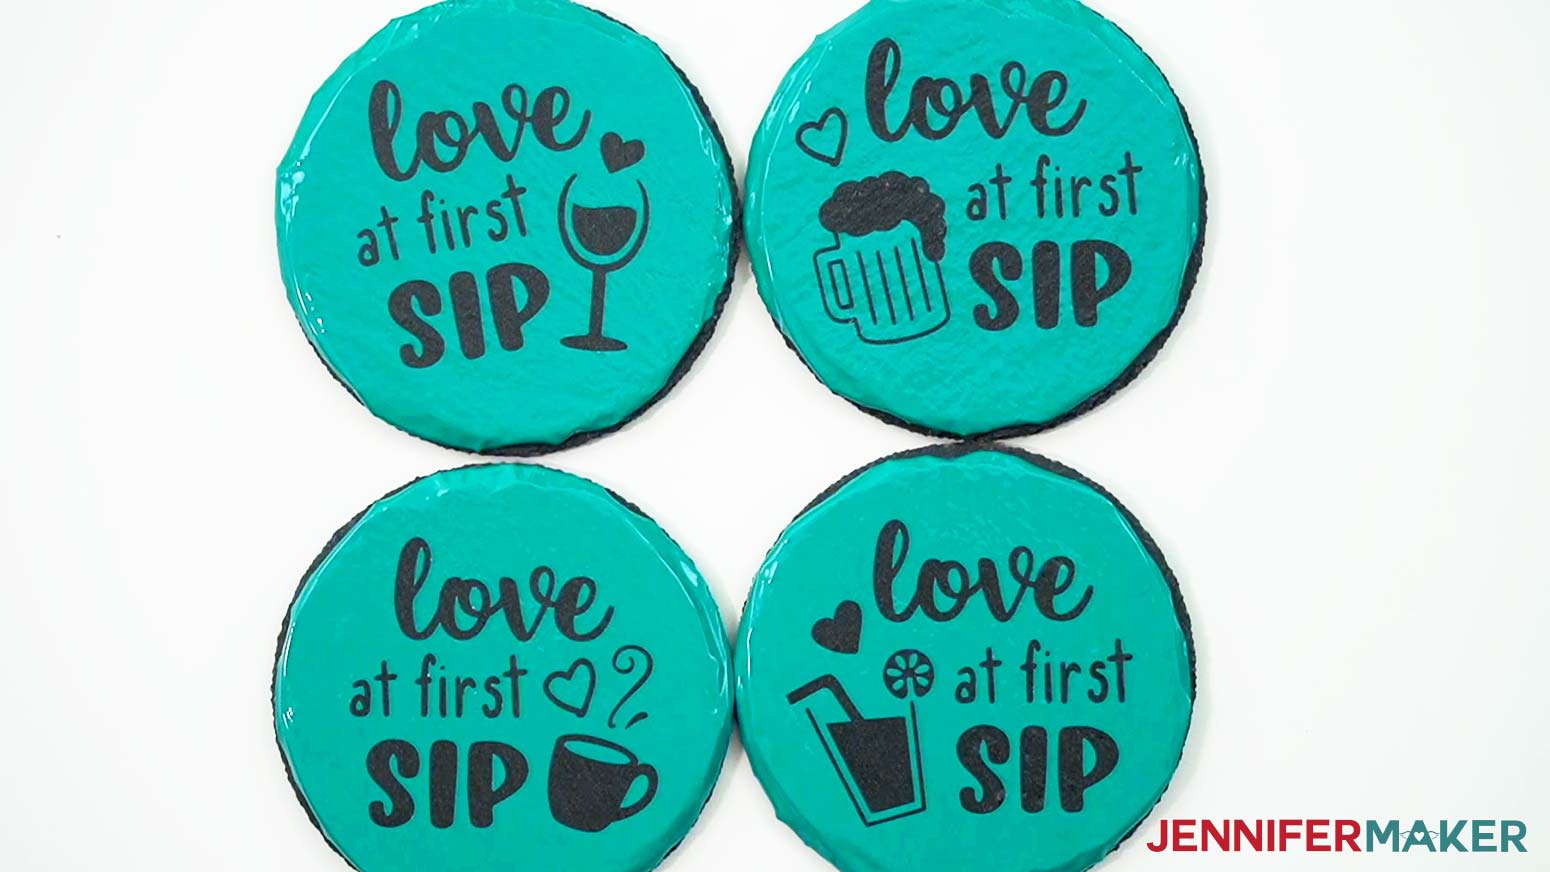
- A set of four fun “Love at First Sip” stencils for coasters
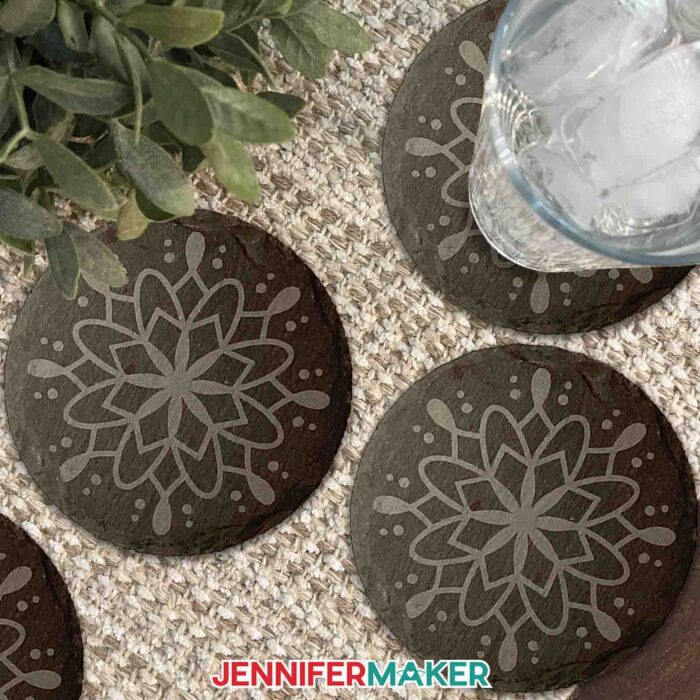
- A set of four mandala stencils for coasters
I'll show you how to etch a fun design on a 4” round slate coaster and customize the mandala design for etching on an 8” x 12” slate cheeseboard. Upload your chosen SVG files to Cricut Design Space and add them to your Canvas.
TIP: If you're not sure how to upload, go to jennifermaker.com/svgs to learn how to unzip and upload SVG files. If you are on an iPad or iPhone, here is how to download and upload SVG files to the Cricut Design Space app.
STEP 2: PREPARE AND CUSTOMIZE THE STENCIL DESIGNS
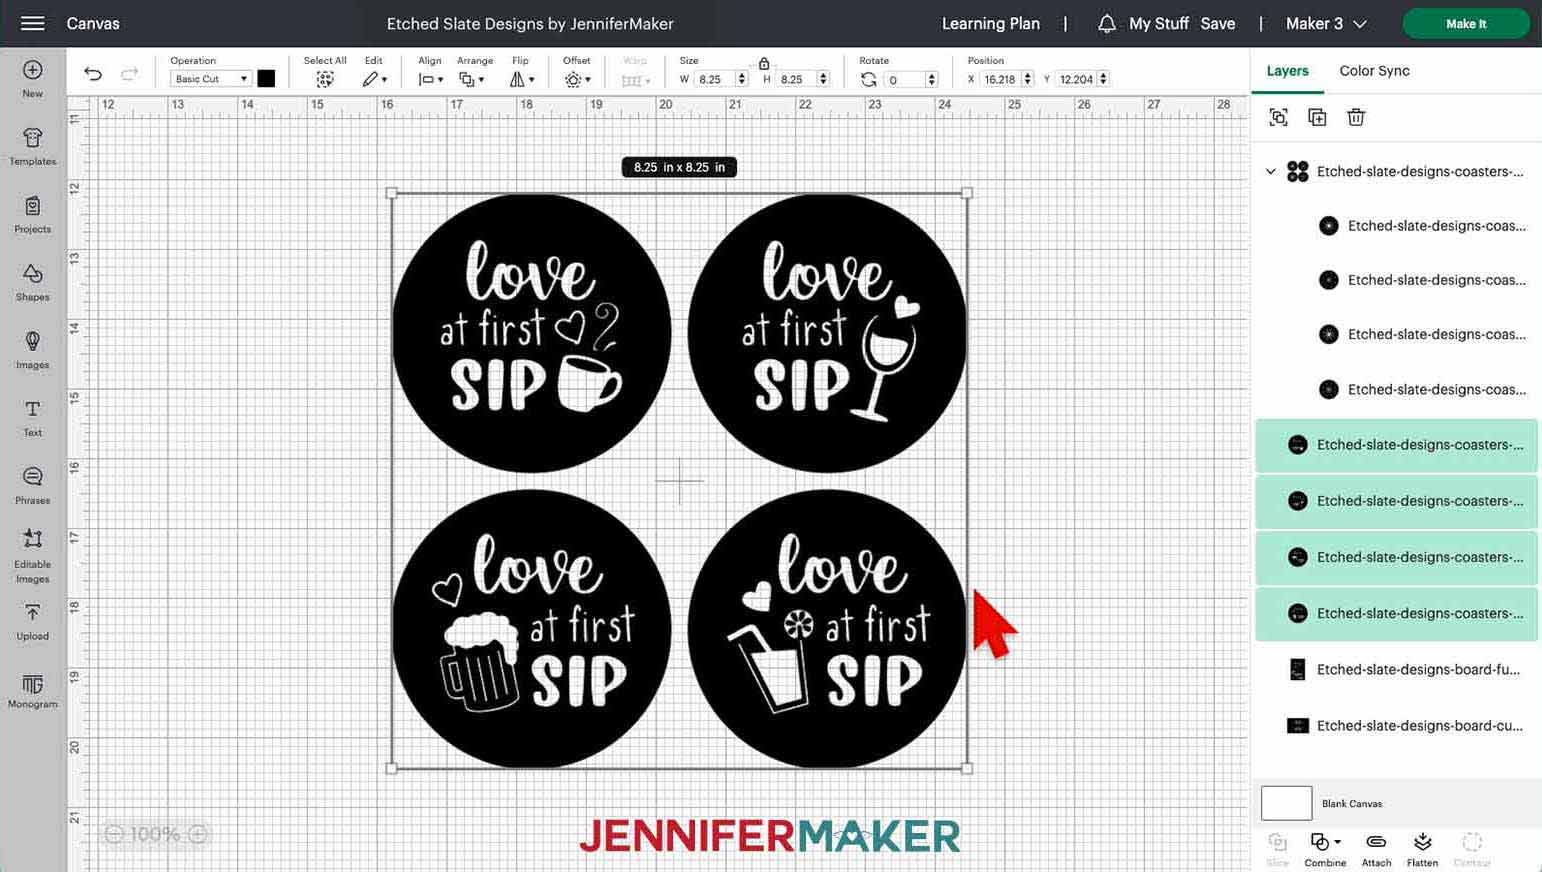
This is what each of my etched coaster and etched cheeseboard stencil designs look like on my Canvas.
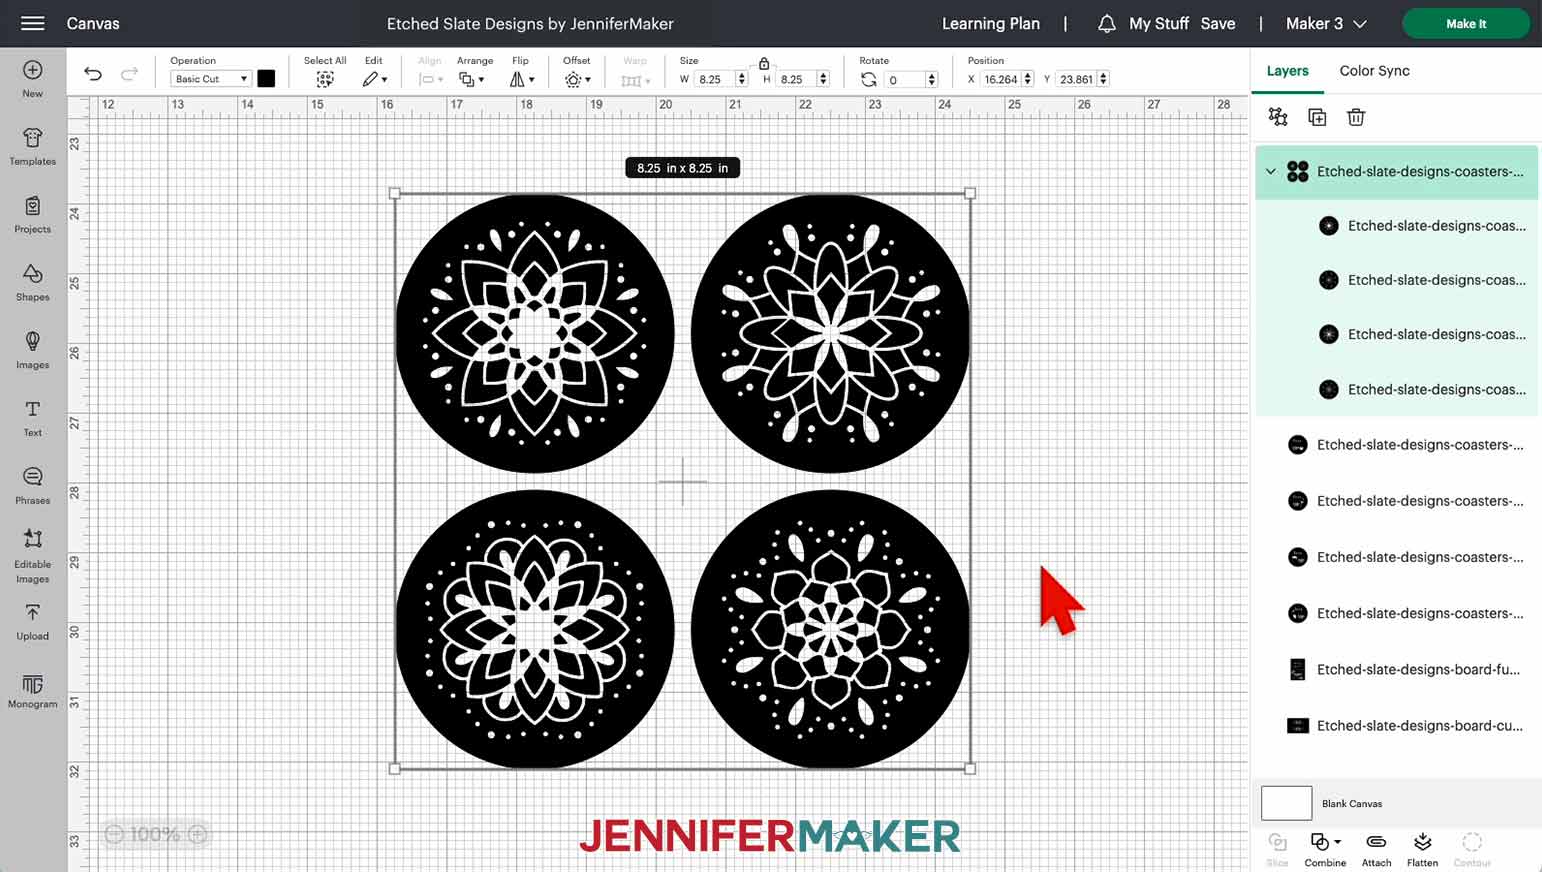
You can zoom out to see all of the designs by clicking on the minus (-) sign on the lower left.
All the coaster stencils are sized to fit on 4” round slate coasters and are ready to cut. At their current size, they can be cut on any Cricut machine, including the Joy.
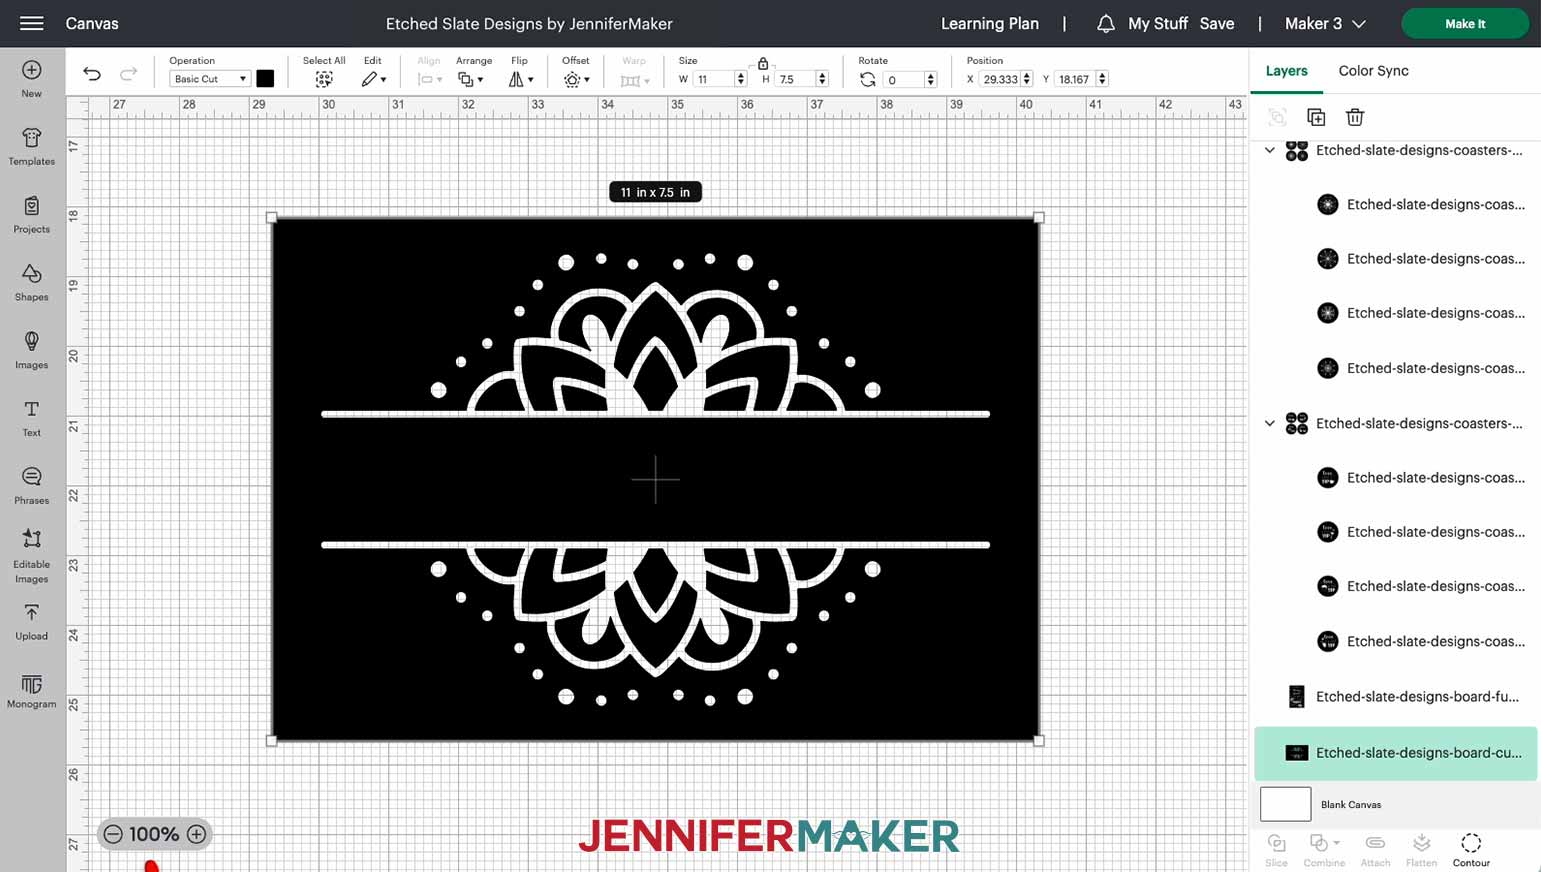
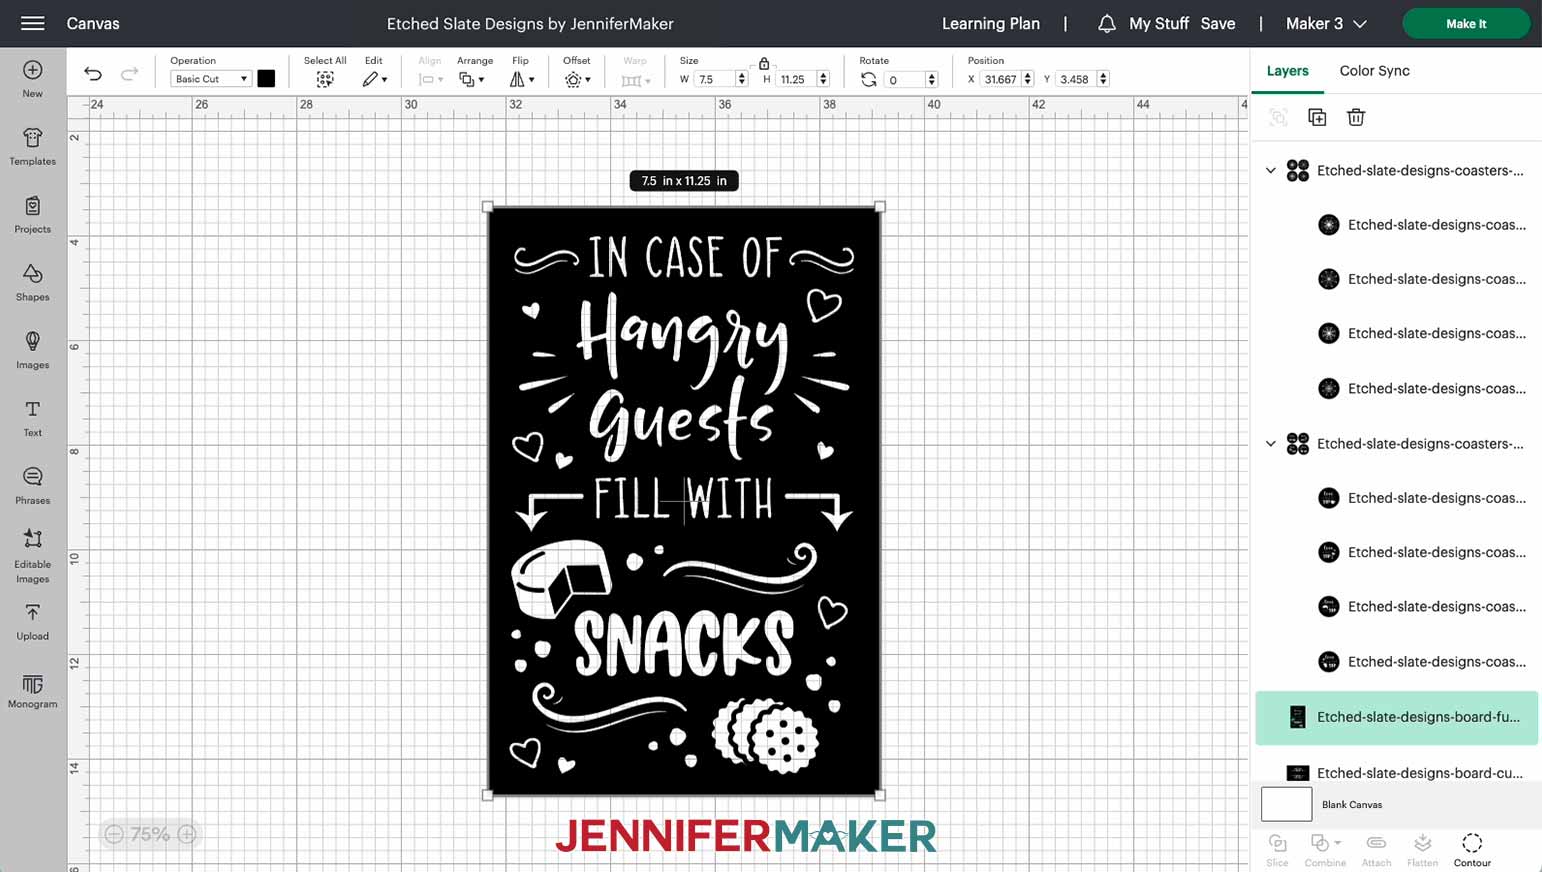
The cheeseboard stencils are sized to fit on the 8” x 12” slate cheeseboards in my materials list. The “Hangry Guests” stencil is 7.5” wide by 11.25” tall and is also ready to cut. The mandala cheeseboard stencil is 11" wide by 7.5” tall. We’ll need to add a word or phrase in the center of this stencil to get it ready to cut. I’ll show you how in the next step!
NOTE: If you are etching the designs on a different sized coaster or board, enlarge or reduce them accordingly. Just measure the height and width of your coaster and/or board. Then, with your design selected on the Canvas, type the new dimension into the width ("W") or height ("H") box at the top menu under Size. Remember to keep the lock icon closed to maintain the design proportions! And if you make your design larger, use larger pieces of vinyl and transfer tape.
Customizing the Mandala Cheeseboard Stencil
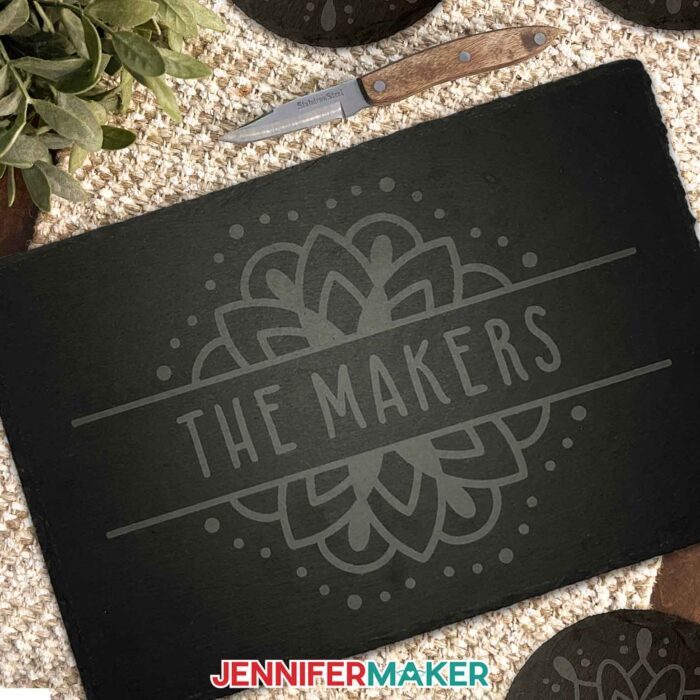
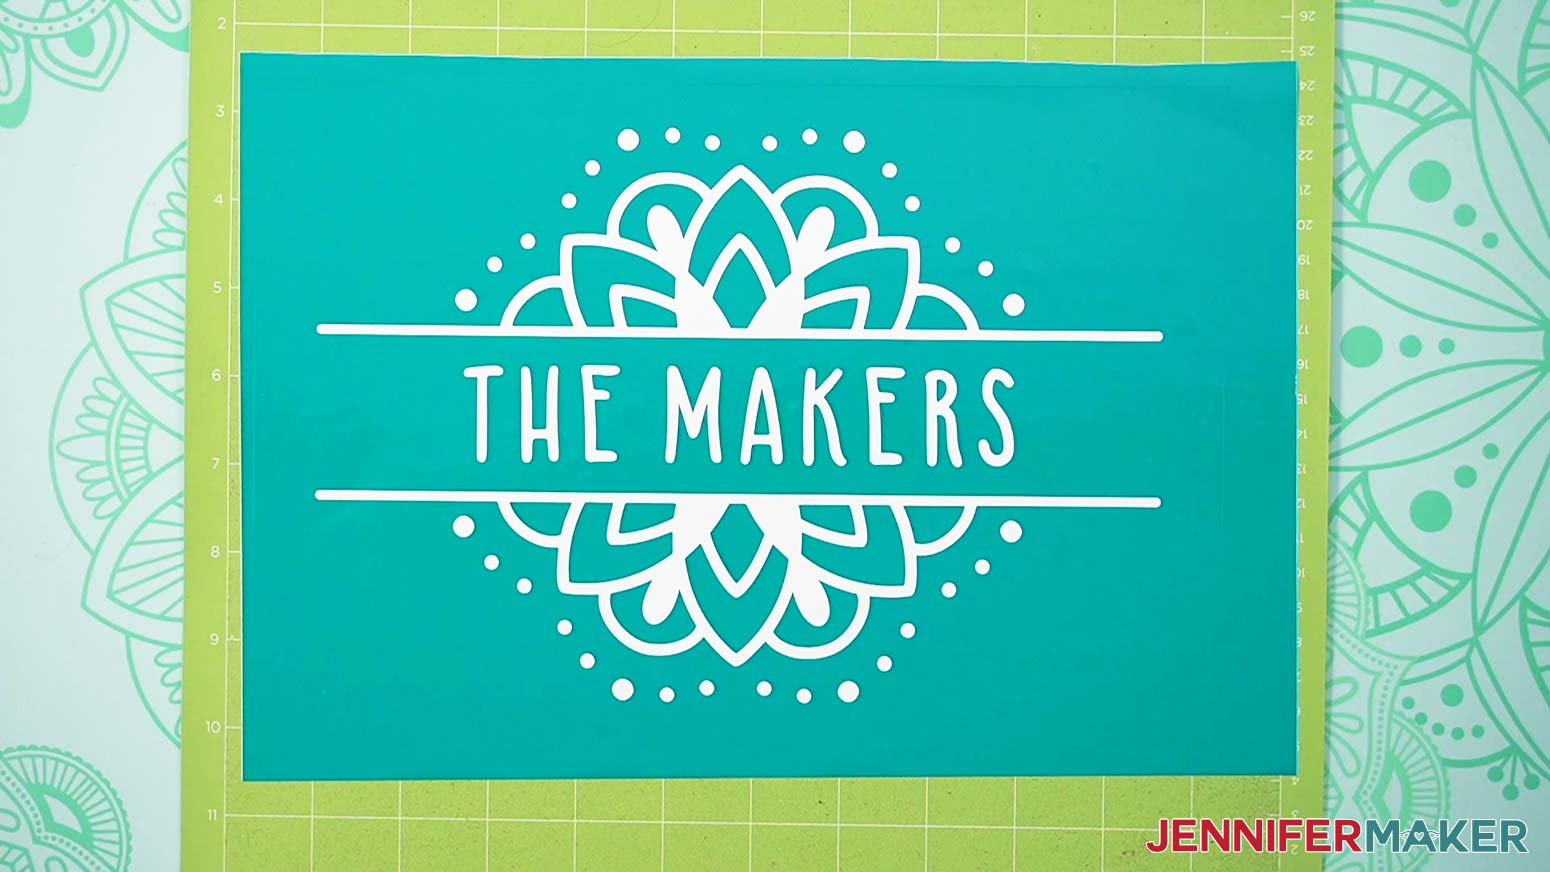
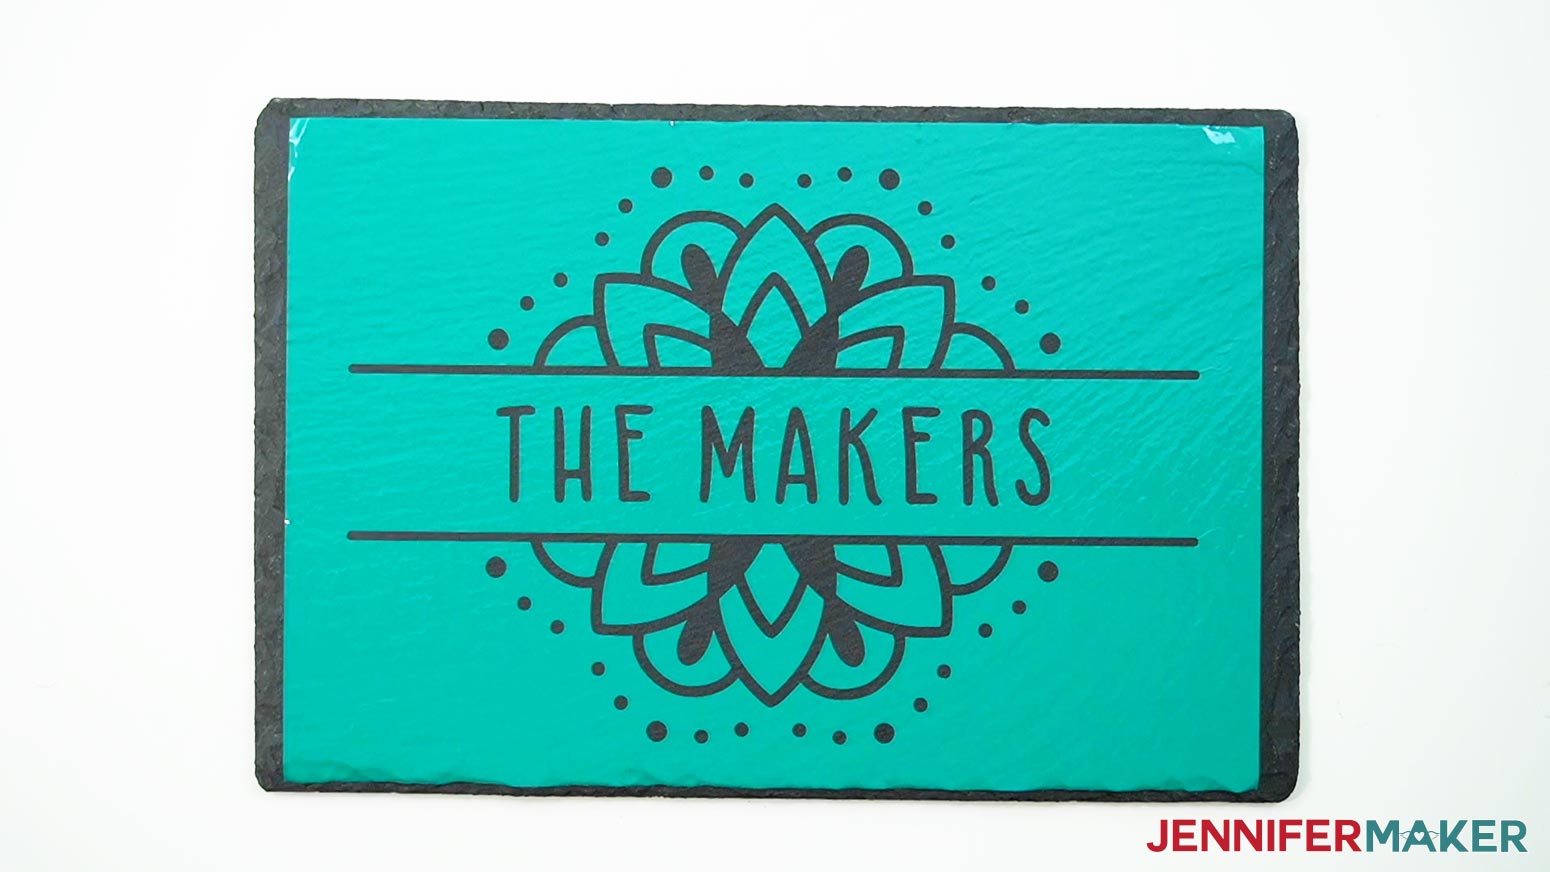
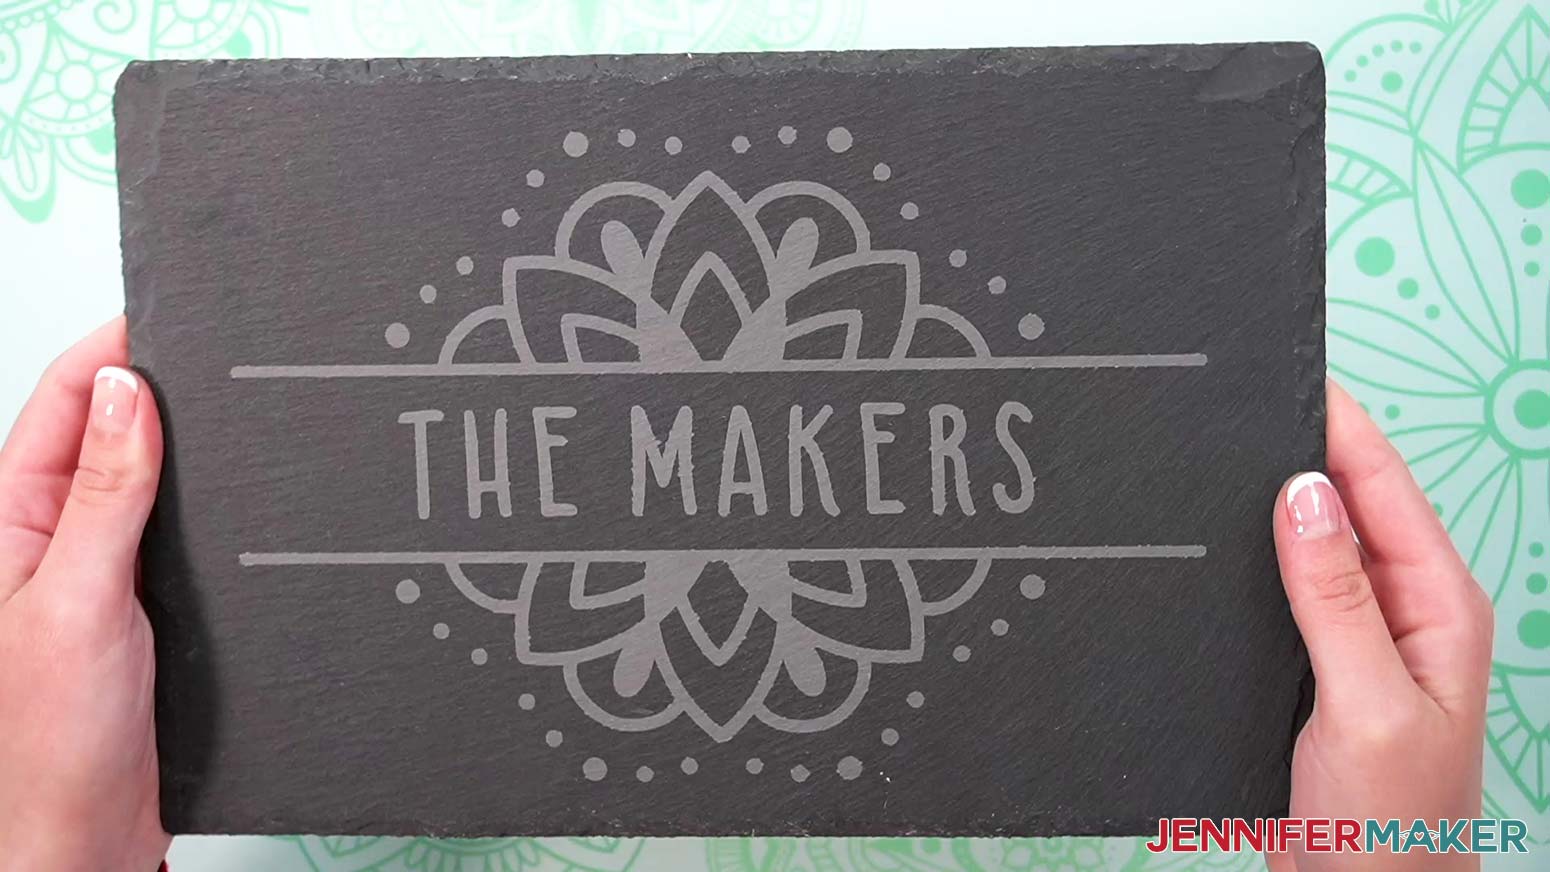
If you look at the mandala cheeseboard stencil, you'll notice a blank space in the center. This is where we'll put our text! Click the Text icon on the left-hand side of the screen. A box with "Text" highlighted in it will appear on the Canvas. Without clicking anything else, type in the text you want. I'll use “THE MAKERS.”
Click the box that says "Cricut Sans" under Font in the top menu to see your font options. I'm going to use my own custom font “JM Sweet,” which you can download here for free. Remember to click the “System” section to find fonts you've downloaded. Close the font window once you’ve selected your font by clicking the X in the top right corner.
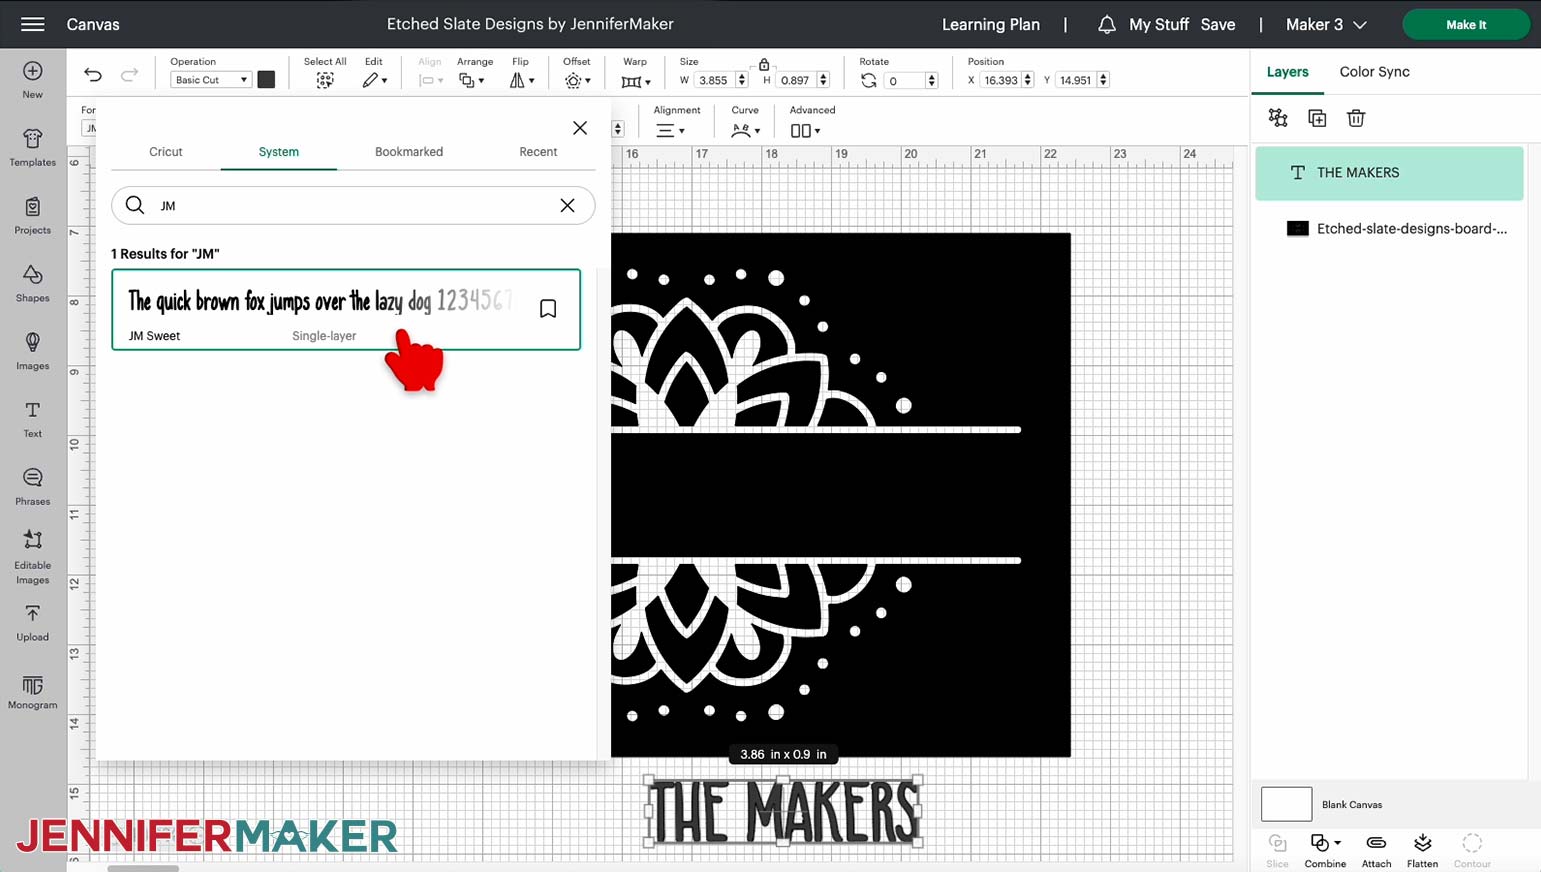
TIP: If the font window is covering your typed text, you can click at the top of the window and drag it to move it out of the way!
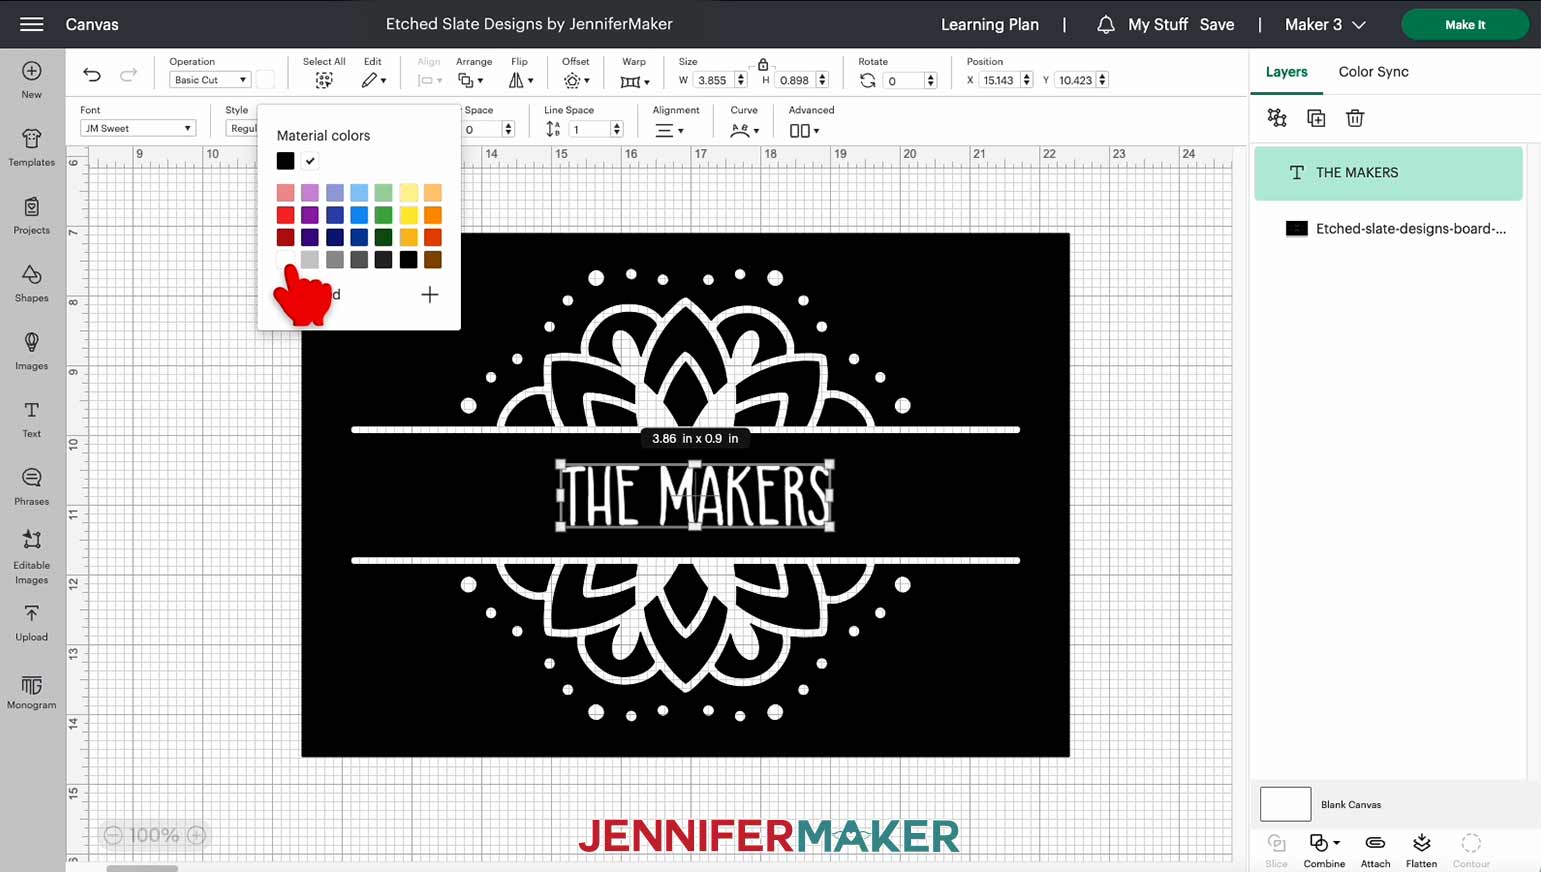
Move your text into the blank area and change its color so it’s easier to see on the dark stencil. Just select the color swatch box next to “Operation” in the top menu, and click on a new swatch to change the color. I’ll make mine white.
Now resize your text to fit. I made mine Font Size 90 in the top menu. I wanted the width of my text to better fill the space, so I also increased the Letter Space to 1.6.
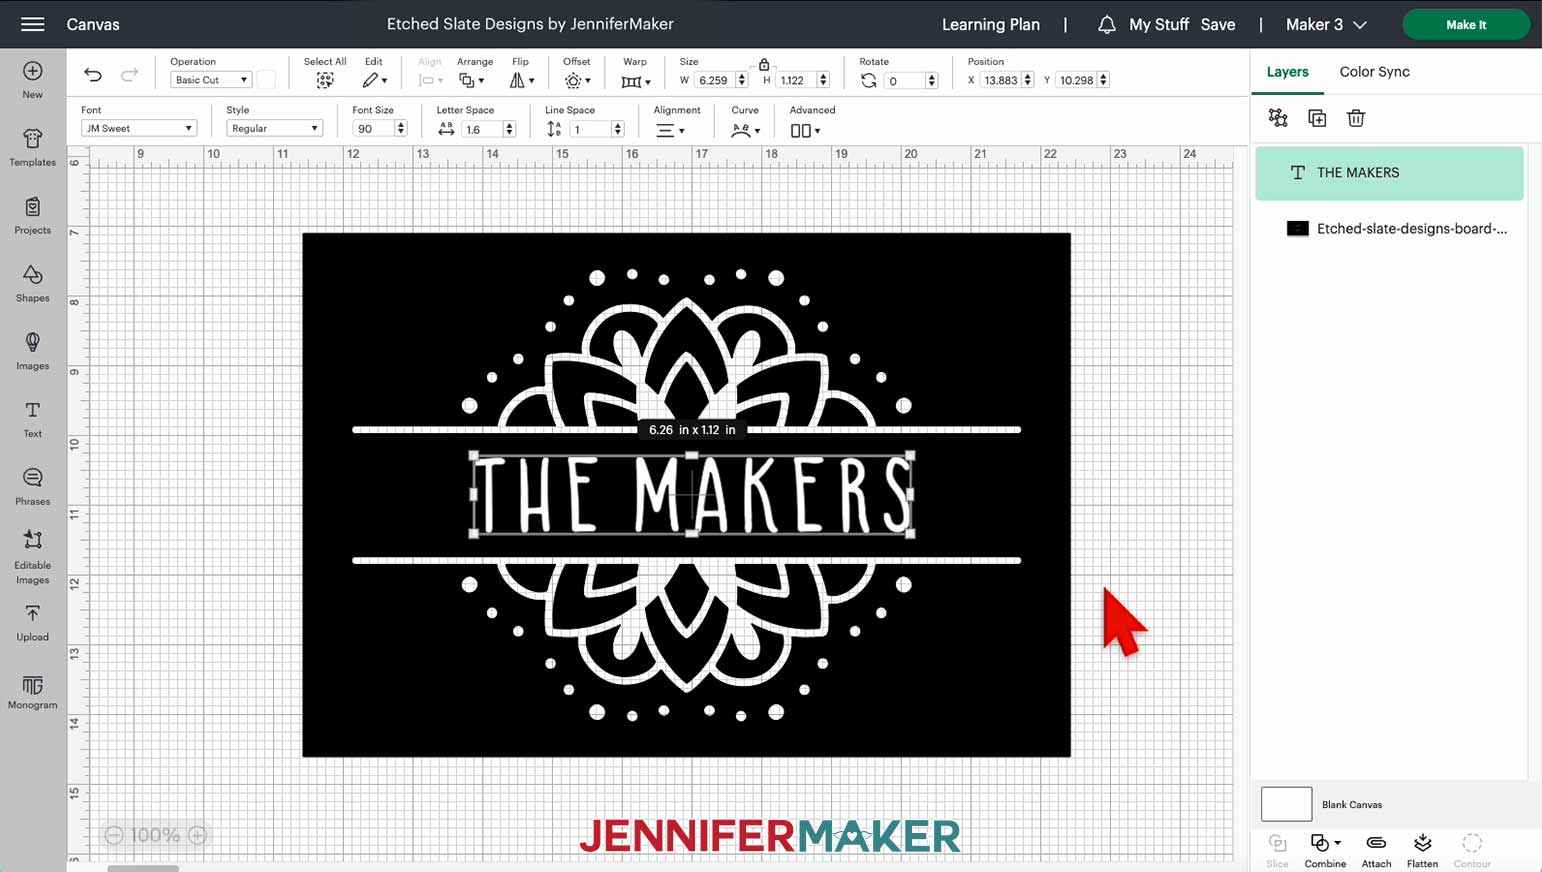
Center your text within the blank area. Make sure it doesn't get too close to the other elements or it may be hard to read after etching.
Once you're happy with the placement, hold Shift and click the stencil design and the text you just added. Then, click “Combine” at the bottom of the Layers Panel and choose “Subtract.”
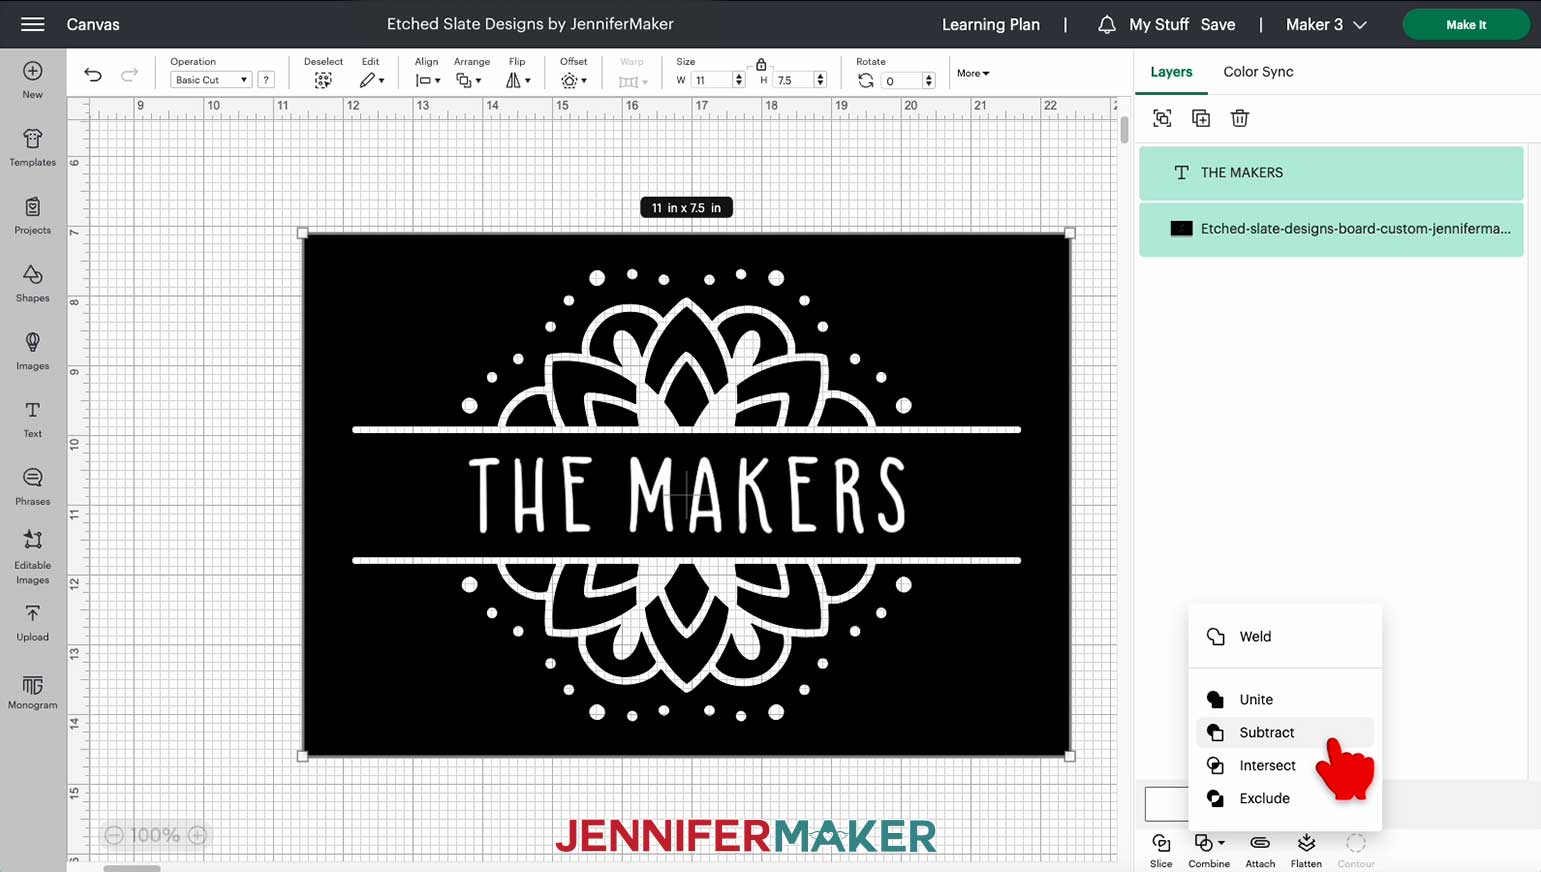
A new “Subtract” group will appear in your Layers Panel with your text and stencil layers inside it, and the text will be subtracted from the inside of the stencil on your Canvas. This will ensure your text cuts in the correct spot on your stencil and allow you to edit it later if needed.
Your design is now ready to cut!
STEP 3: CUT THE STENCIL DESIGNS
Check that the right machine is listed in the top right corner, then click "Make It.”
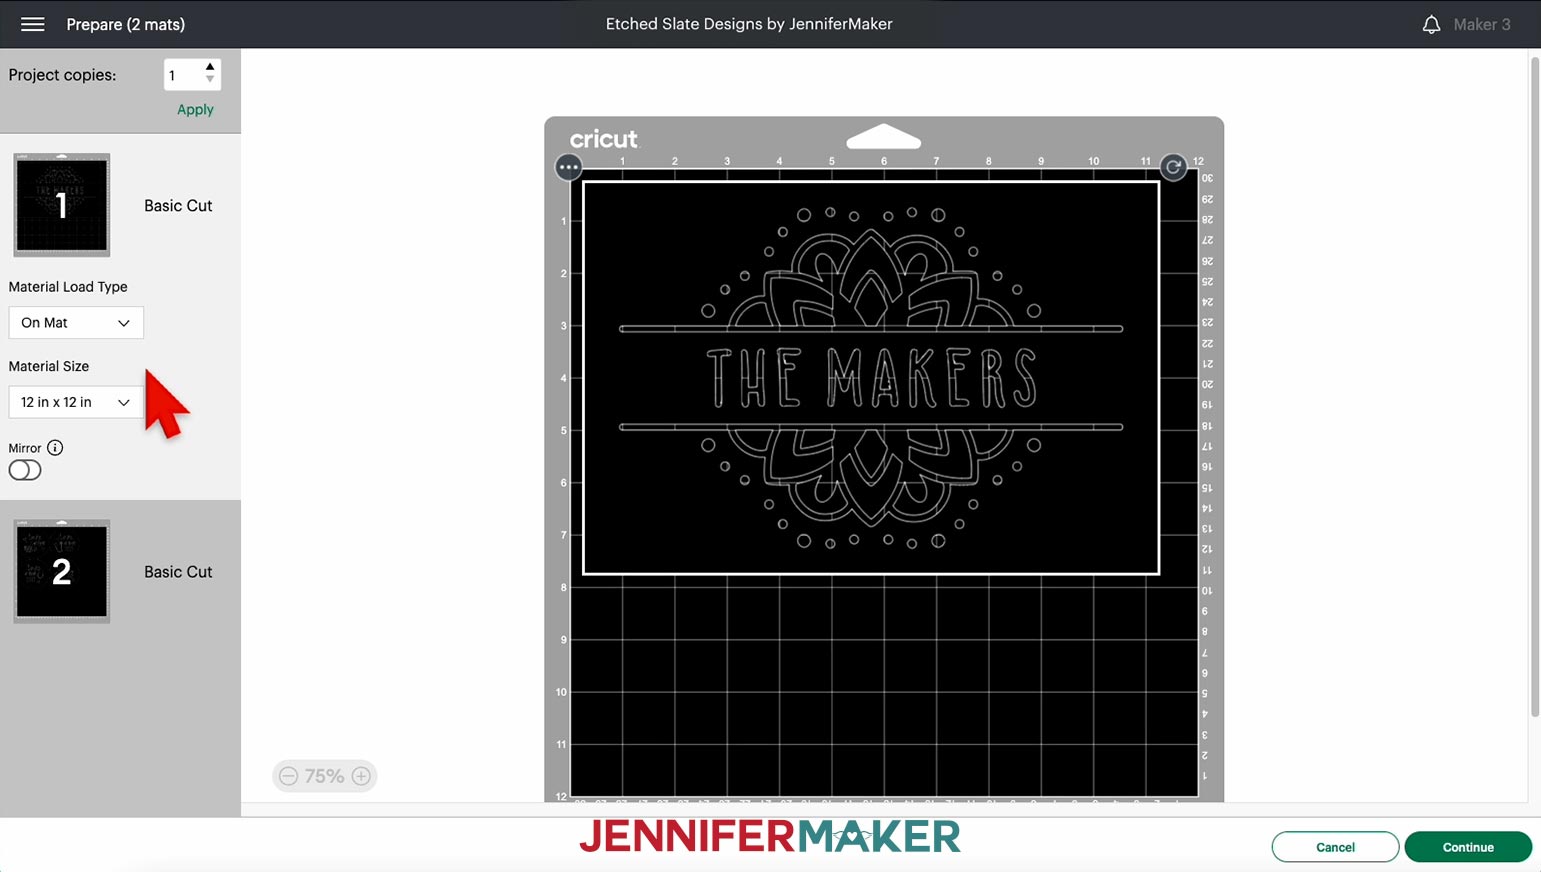
If prompted, click "On Mat," choose your mat size, and click “Confirm.”
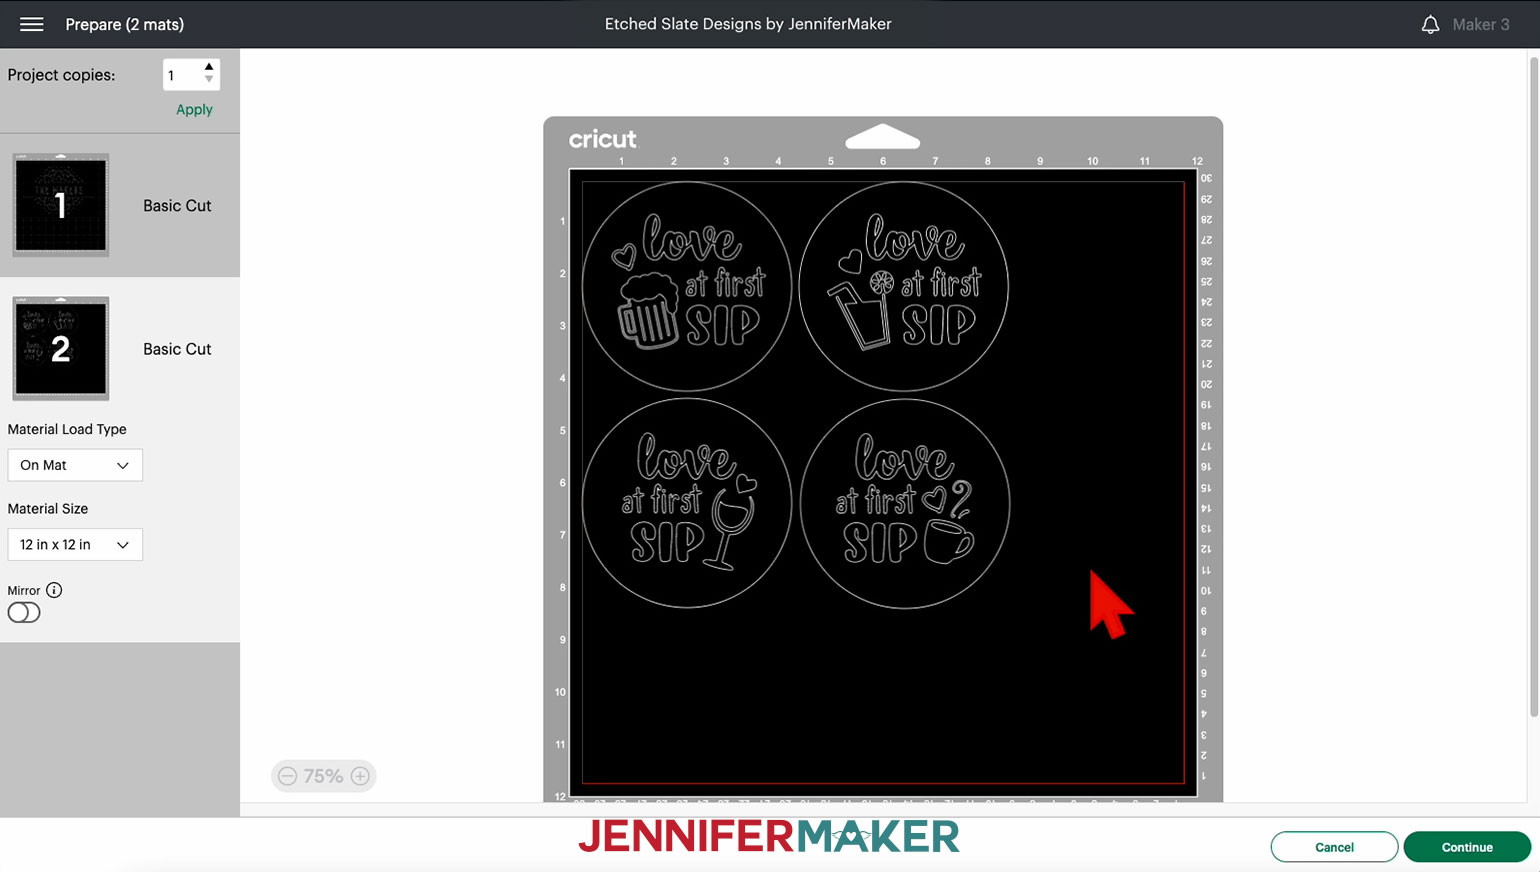
On the Prepare screen, make sure your design is laid out correctly on one mat (or two mats if you’re making a cheeseboard and coaster). Do not mirror your design, since we need it to face the right way on the coaster and cheeseboard.
NOTE: If you’re making more than one coaster stencil, you’ll need to cut them apart with scissors after your machine cuts the designs. To make sure there's enough space between them to do this, you can move them apart from each other on the screen by clicking and dragging each object.
Click "Continue" to move to the Make screen.
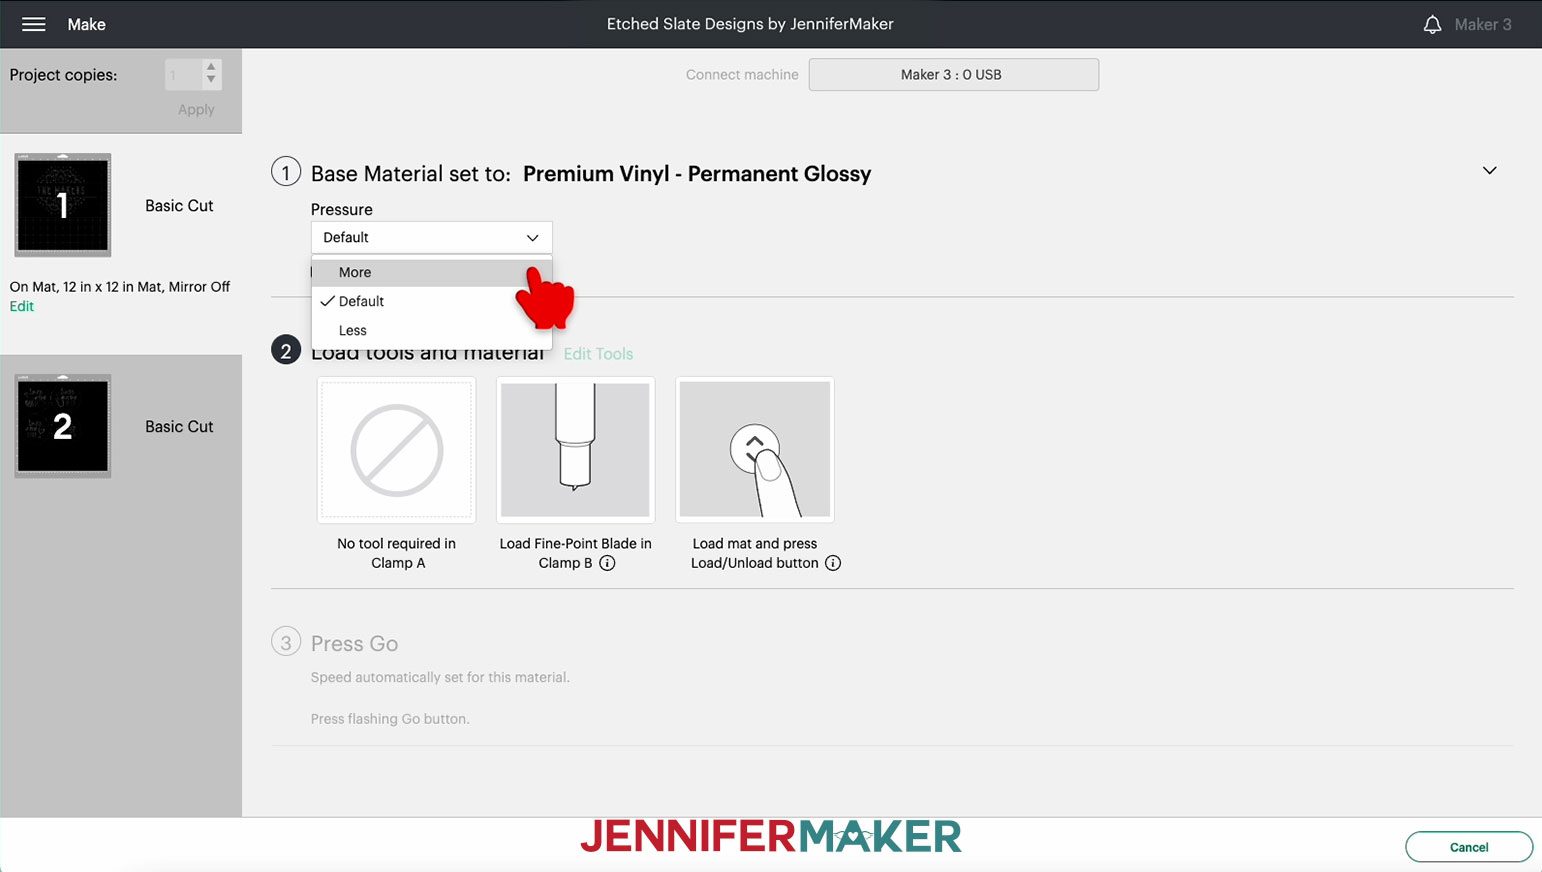
Under “Set Base Material,” I am choosing "Premium Vinyl - Permanent Glossy", which means permanent vinyl. I always change my Pressure to "More" for a cleaner cut.
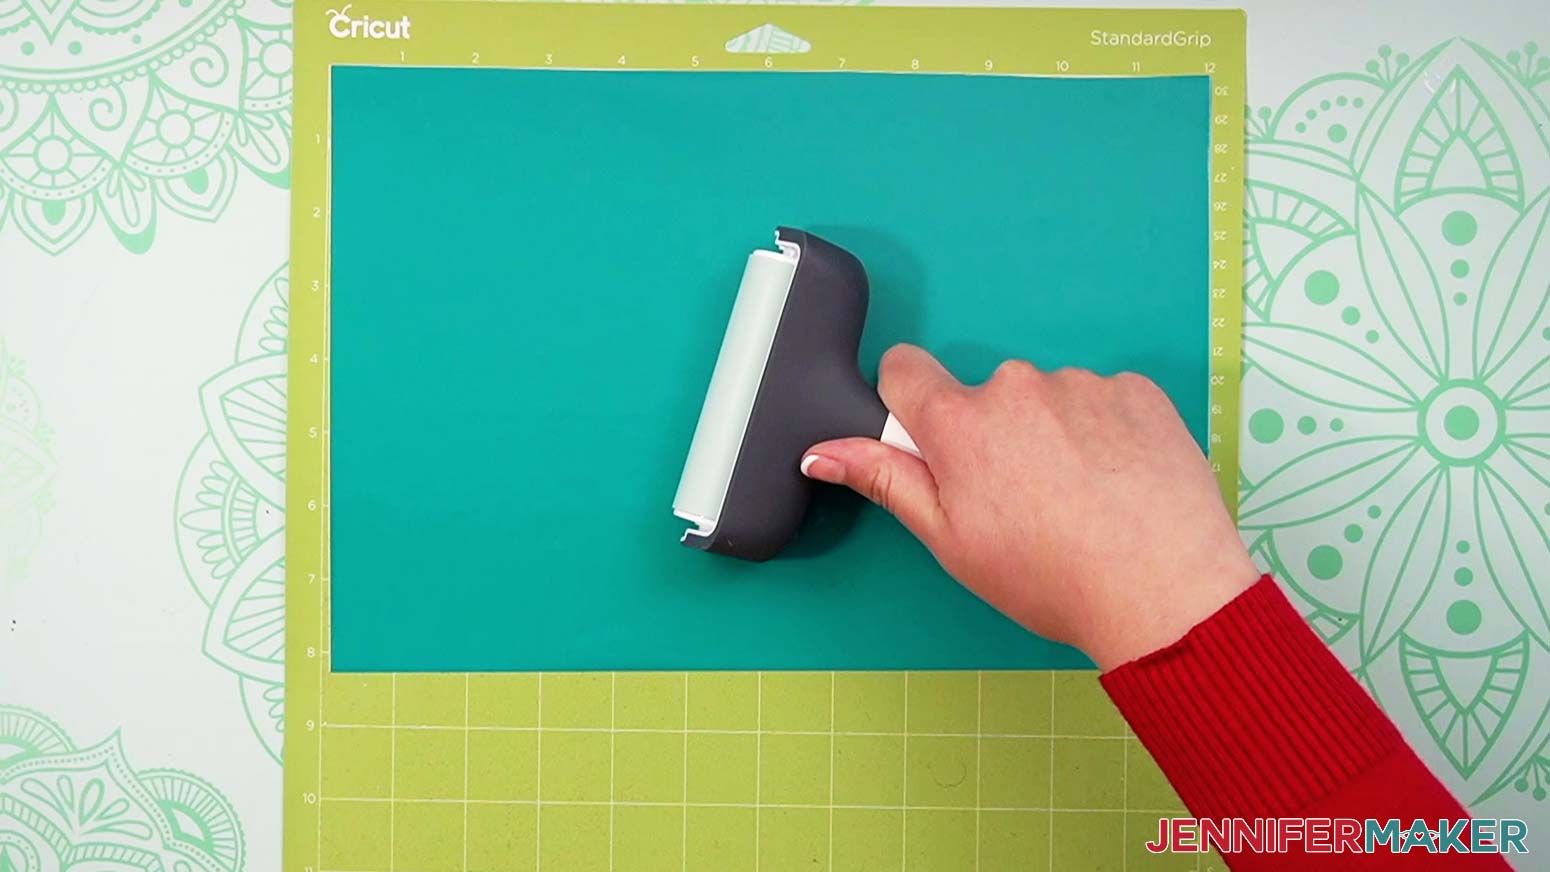
Put your vinyl shiny side up on your machine mat, making sure it covers the correct design areas visible on your screen. Use a brayer to get the vinyl as smooth as possible on your mat.
Make sure your Cricut Fine-Point Blade is clean and in the clamp. Then, load the mat into your Cricut and press the flashing button to begin cutting. When the cut is complete, unload the mat, flip it over on your work surface, and gently roll a corner back to release the vinyl.
TIP: If you have any trouble cutting the vinyl, check out my Cricut Tips & Tricks for Cleaner Cuts.
STEP 4: PREPARE THE STENCILS, COASTER, AND CHEESEBOARD
Stencils require the opposite weeding approach from traditional vinyl projects. Since we want the etching cream to create the design, we need the vinyl to protect the area between and around our designs and words.
Instead of removing the vinyl around the designs and words, you’ll be removing the designs and words themselves. Be sure to leave the centers of any letters in place. If they accidentally come off while weeding, just put them back in place carefully. Also remove the vinyl around the coaster circles and/or cheeseboard rectangle.
When weeding the tiny details of the mandala designs, go slowly and make sure you don’t lose any of the inner pieces when removing the excess vinyl.
TIP: Use a weeding ring or sticky piece of tape to capture all the tiny circles as you weed.
If you’re making more than one coaster, cut around each stencil with scissors before applying your transfer tape.
Here’s what my weeded coaster and cheeseboard stencils look like.
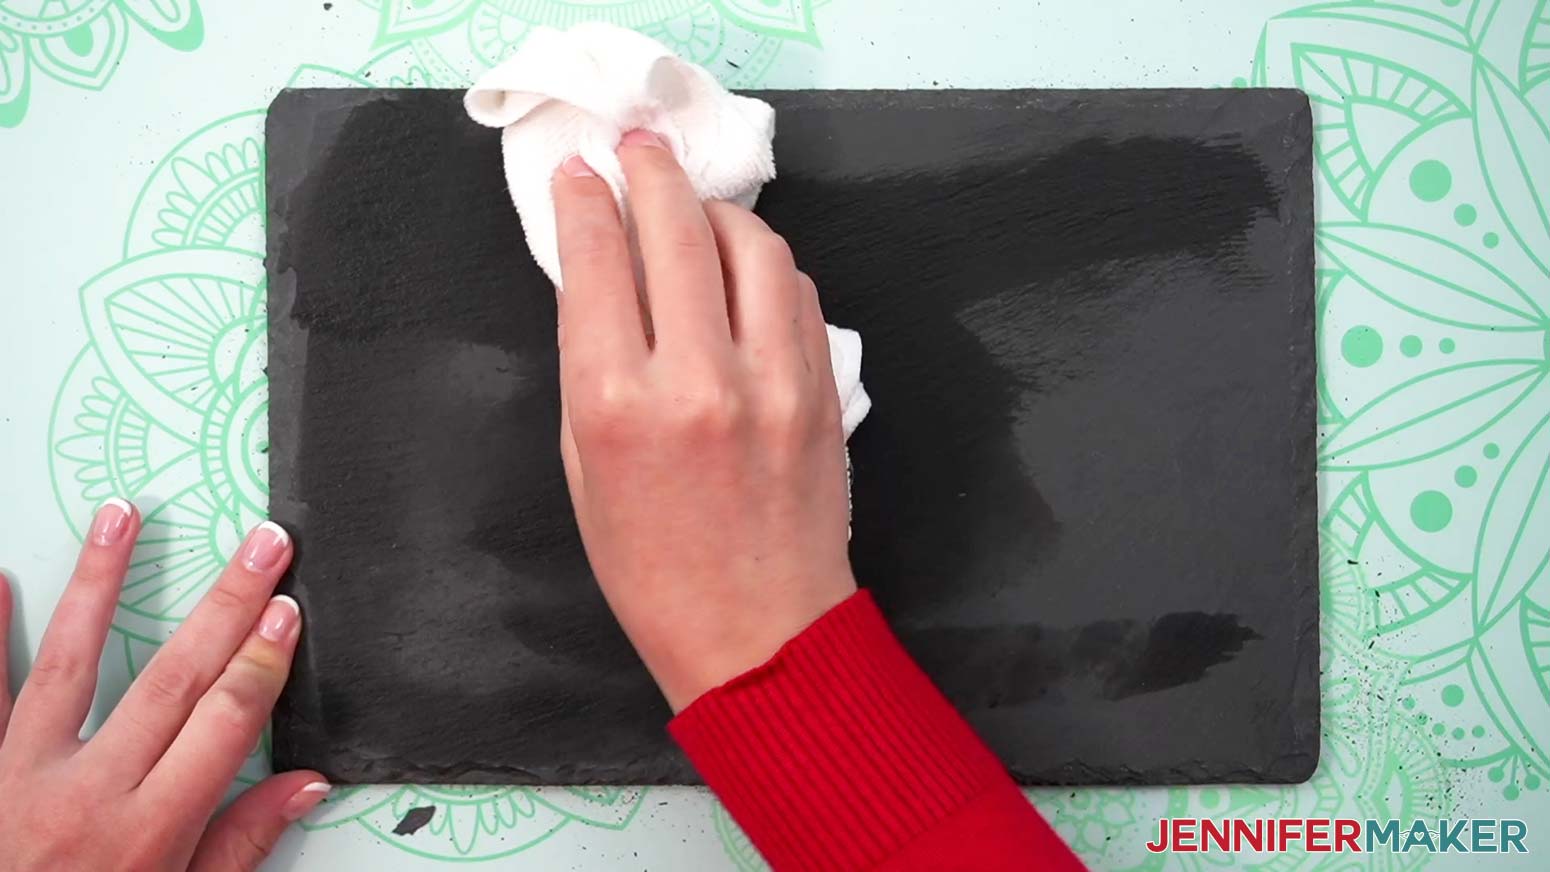
To prepare your coaster and cheeseboard for good vinyl adherence, wipe them with a lint-free cloth or coffee filter to remove excess dirt and dust. You can use some rubbing alcohol to clean them if they’re especially dirty, but it’s not necessary.
Next, we'll move the vinyl stencils from their carrier sheets to the coasters and cheeseboard. You'll want to focus on one stencil at a time.
Cut a piece of transfer tape slightly larger than your stencil. Remove the backing from the transfer tape. Apply it to your stencil by using my Taco Method. Hold the transfer tape in the shape of a taco, or a "U" shape. Then, put the bottom of your “taco” onto the middle of your design. Smooth the tape over the decal from the center outward to minimize wrinkles and bubbles.
With the transfer tape in place, run a scraper tool or other hard and flat-edged item (like a store loyalty card) all over the project’s front and back with medium pressure.
Now, flip your design over and remove the backing paper from the vinyl. If your stencil is still sticking to the backing paper, replace the transfer tape and burnish again before peeling off the backing paper.
Your stencil is now ready to use!
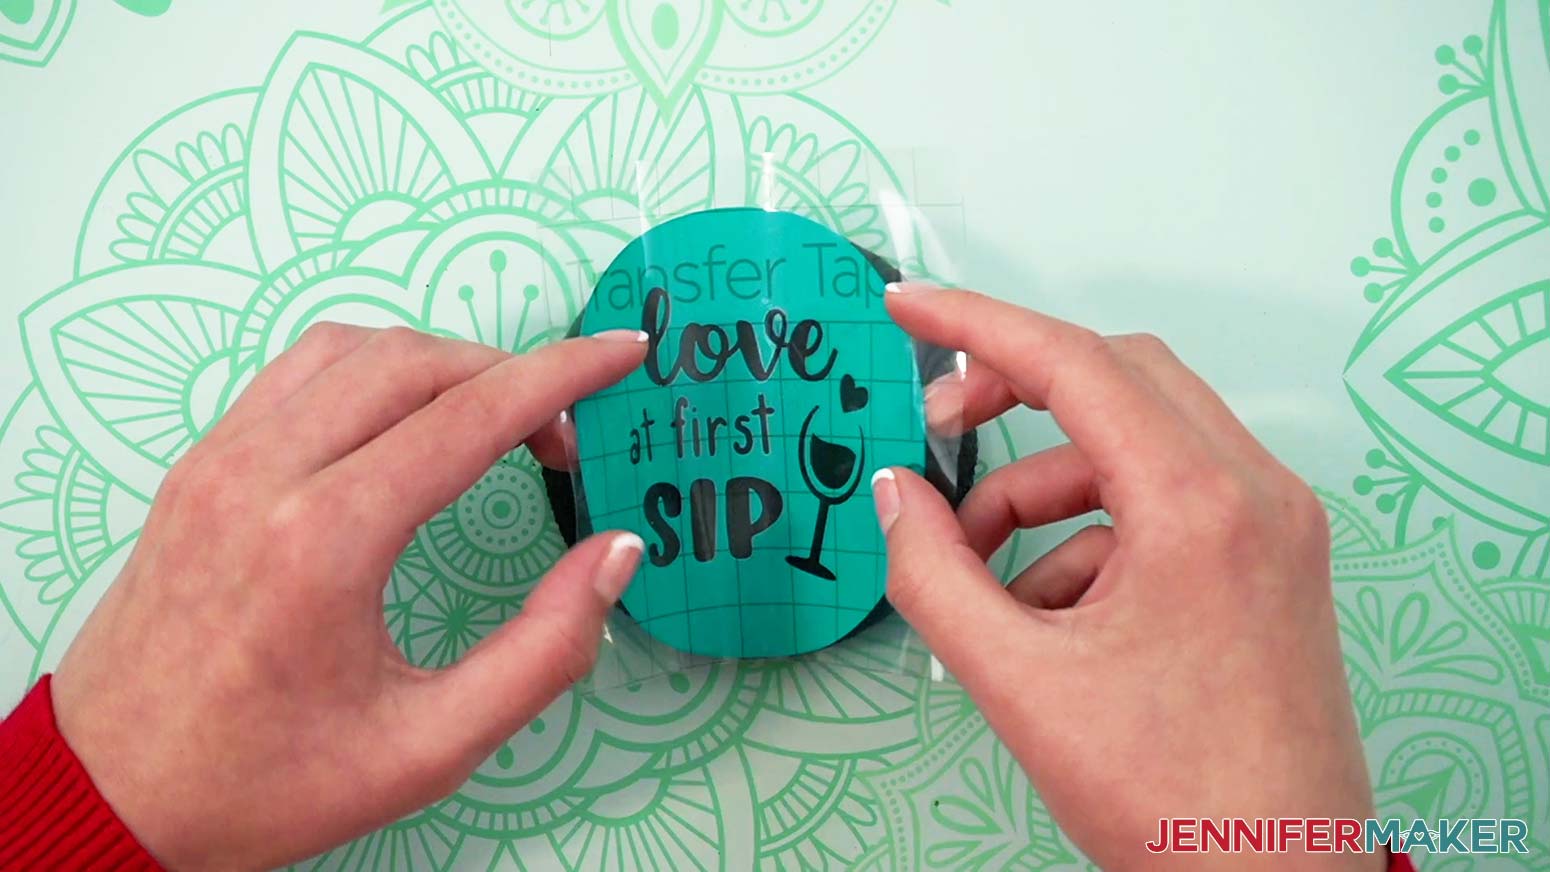
When applying the stencil to your coaster, you can use the outer edges of the circle as a guideline for positioning the stencil in the center.
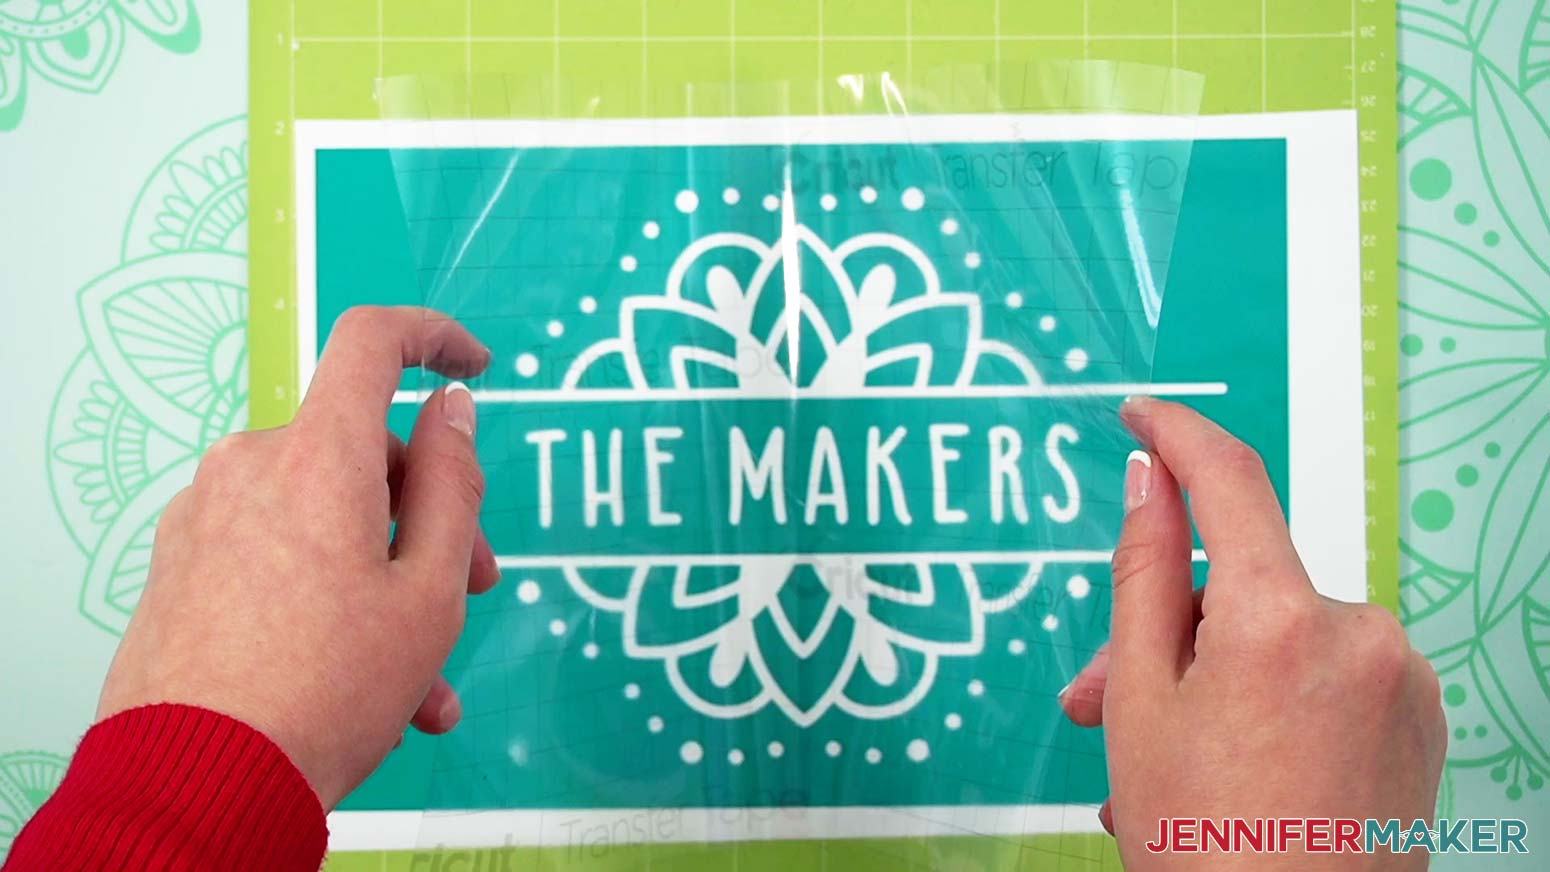
When applying the stencil to your cheeseboard, bend your design into a taco shape and lay the middle onto your board, smoothing it from the center outward with your fingers.
TIP: You can reposition your stencil on the slate before burnishing by carefully peeling it off and reapplying it.
Then use your scraper to burnish the vinyl to the slate as best as you can.
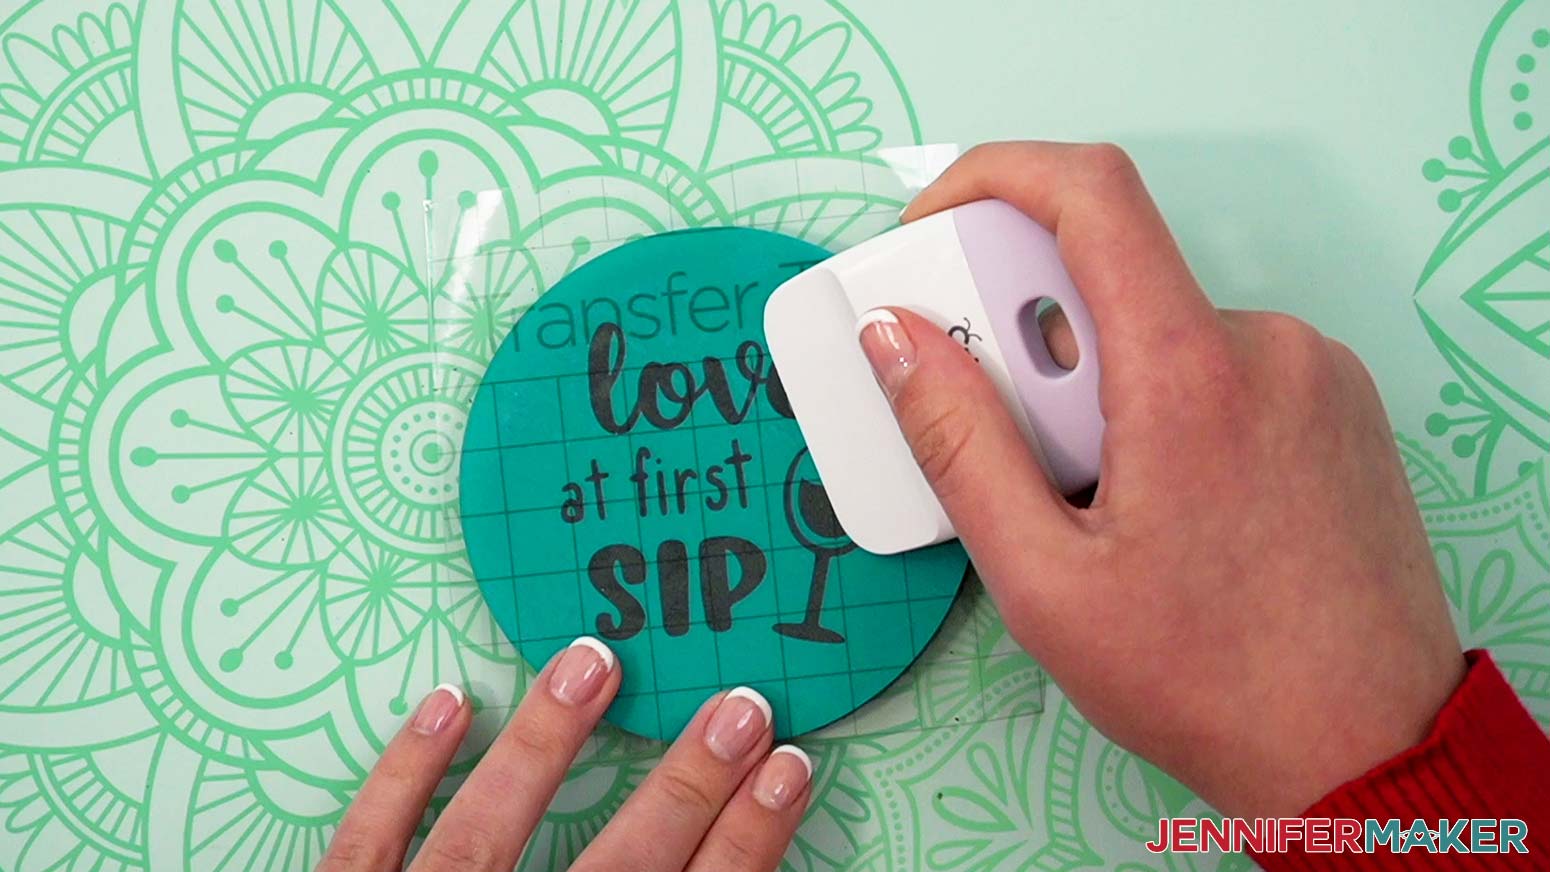
Slowly peel back and remove the transfer tape from the vinyl on the coaster or cheeseboard. If there are some vinyl pieces that are not stuck to the slate, push them down again with a little more pressure and continue to remove the transfer tape.
Once the transfer tape has been removed, you can use a low temp heat gun or household blow dryer to heat the vinyl so it adheres to the slate better. Heat the vinyl for about thirty seconds, then push it down with your finger. This step is important, as it will stop your etching cream from bleeding into areas you don't want it to etch.
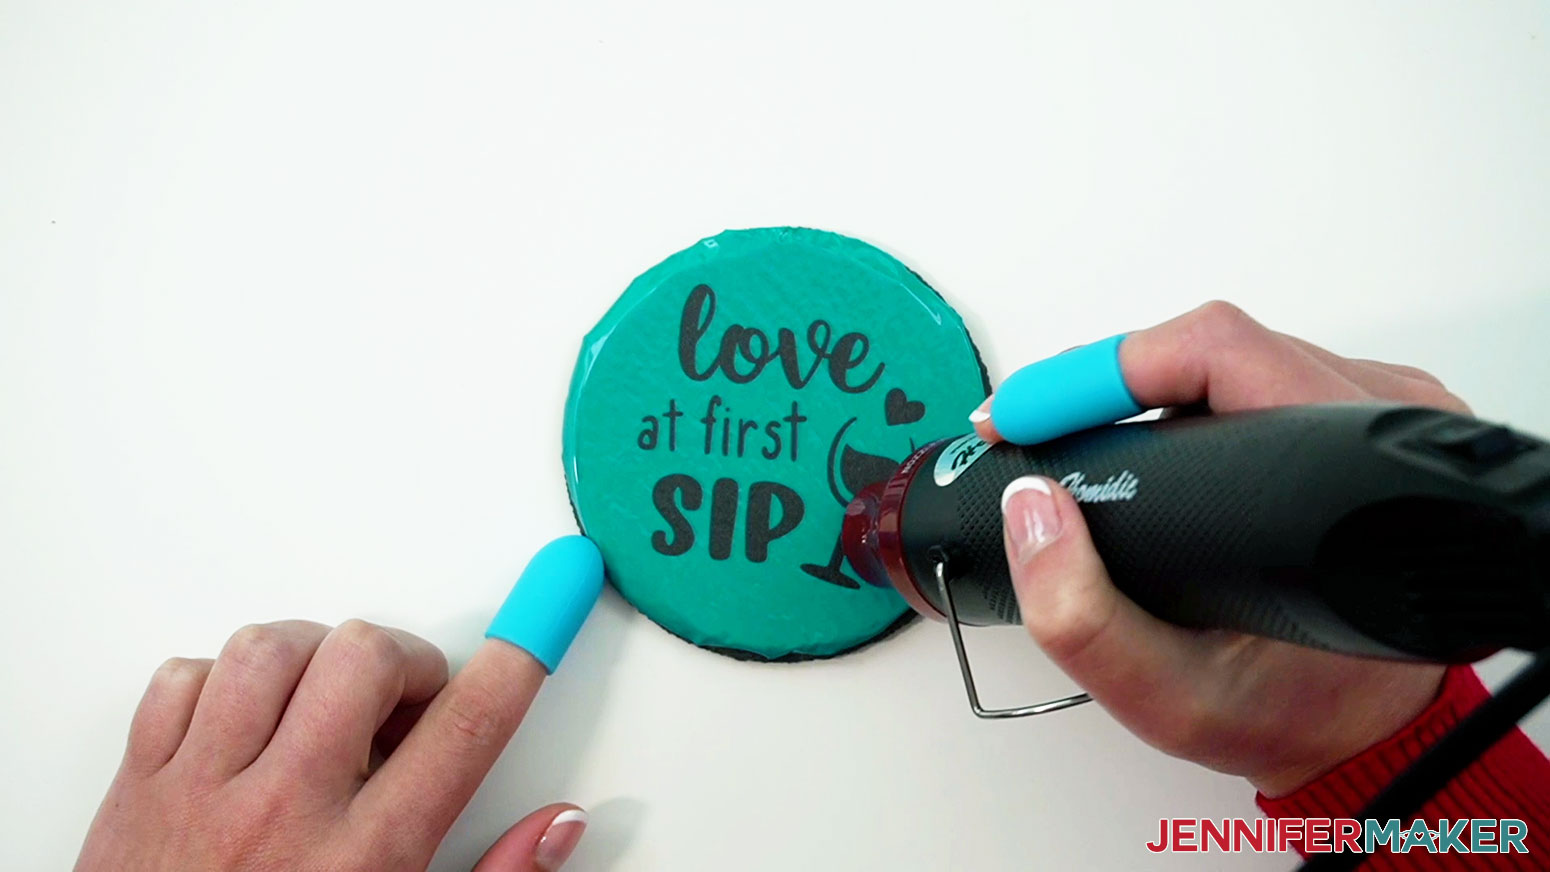
Slate gets hot when heated, so I used a hot glue finger cap when pressing on the heated vinyl so I didn’t burn my finger. The rubber texture of the finger cap also helps to push the vinyl down into the tiny crevices of the slate.
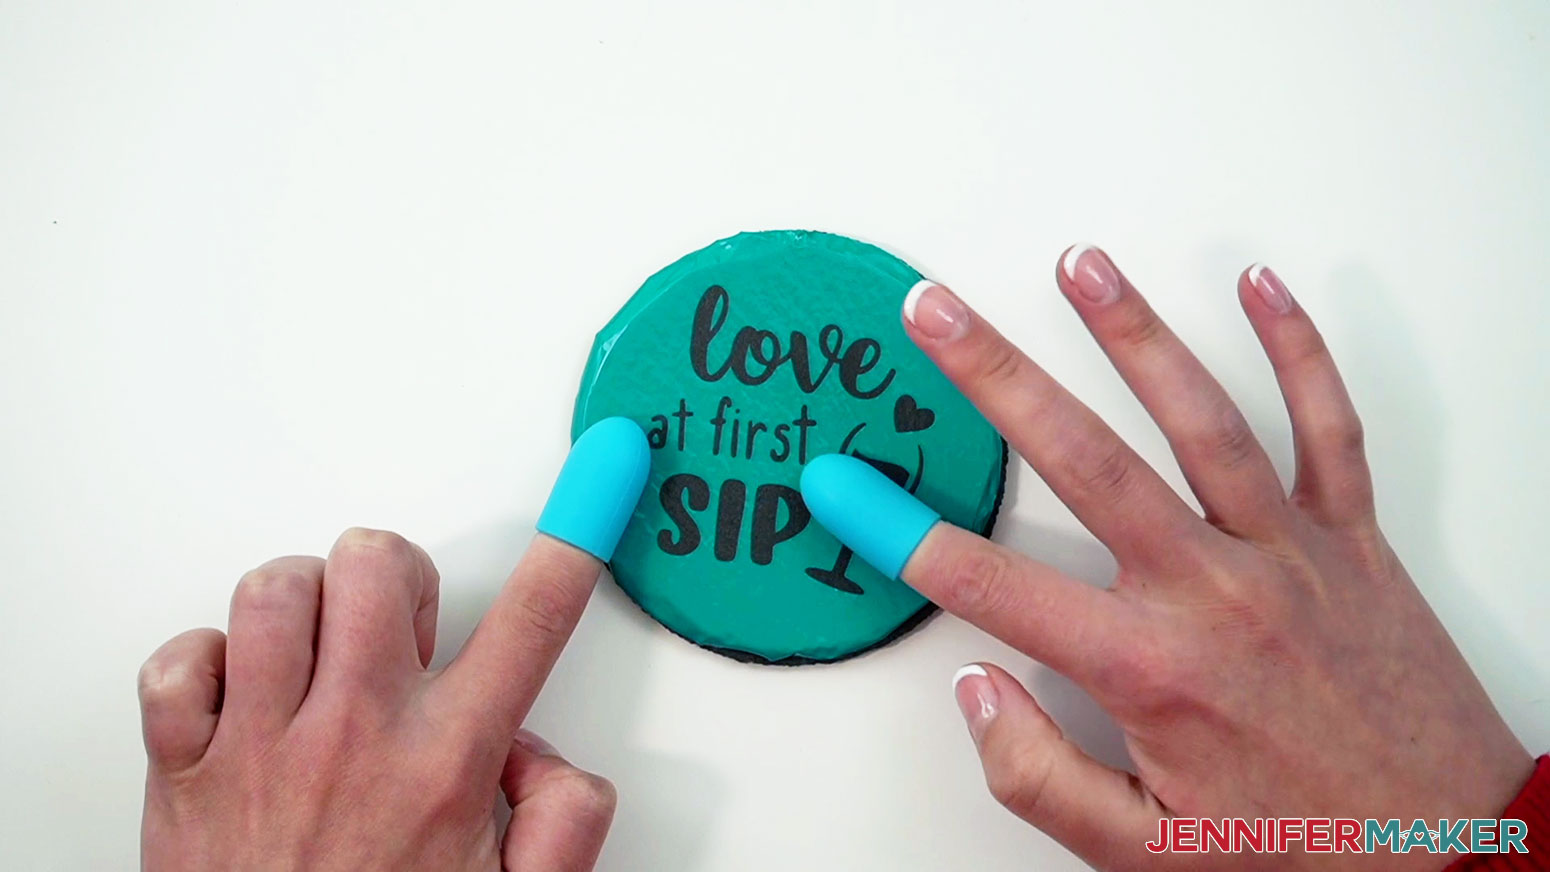
Go over all parts of the design with your finger and press down any vinyl that may not be adhered properly. Remove all bubbles as best as you can. If you have some spots in the vinyl that have creases in them, carefully use your weeding tool to lift them a bit so you can lay them flat.
When the vinyl is properly adhered, it will “meld” into the coaster or cheeseboard and take on the slate’s texture, making it look like a shiny piece of colored slate. If you notice any areas that aren’t well adhered, just reheat them and press them down again.
Here are what my coaster and cheeseboard stencils look like after properly adhering them with a heat gun.
STEP 5: APPLY THE ETCHING CREAM
IMPORTANT: Read the etching cream's instructions and guidance on accidental exposure before proceeding. Etching cream is caustic and you don't want to inhale it or get it on your skin or in your eyes. Before opening the etching cream, be sure to put on a pair of safety goggles, disposable gloves, an apron, and a fitted respirator. If you do come in contact with the cream, follow the bottle's directions immediately.
Be sure you're in a well-ventilated area or outside with a flat surface on which to work. Cover your work surface with butcher paper before you begin, as you don't want to get any etching cream on it.
Shake your etching cream really well before you open it.
Set your timer for fifteen minutes. When testing, I found that leaving the cream on for at least fifteen minutes gave the best results.
NOTE: I etched my coaster separately from my cheeseboard, but the directions are the same for both. I recommend etching one item at a time for the best results.
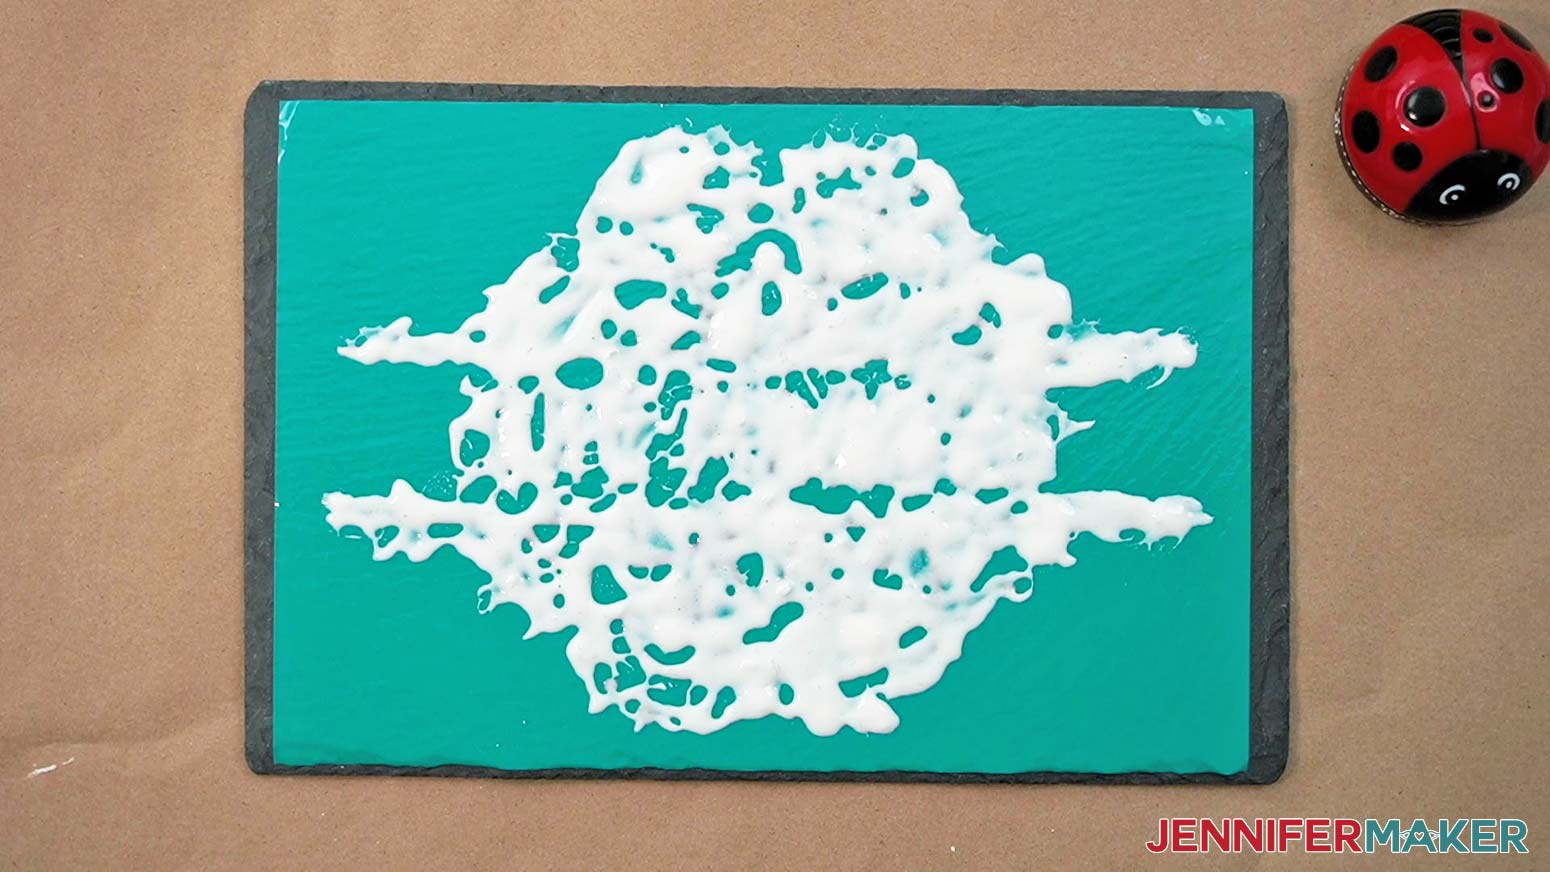
Apply the cream to the slate with a regular paint brush (avoid foam brushes). For the cheeseboard, larger brushes work better, as there's a lot of surface to cover.
Use your brush to move the cream on top of your stencil. Brush up and down, side to side, and diagonally. Work in sections and keep the cream moving as you go, getting it into every nook and cranny. Use enough cream that the dark slate underneath doesn’t show through.
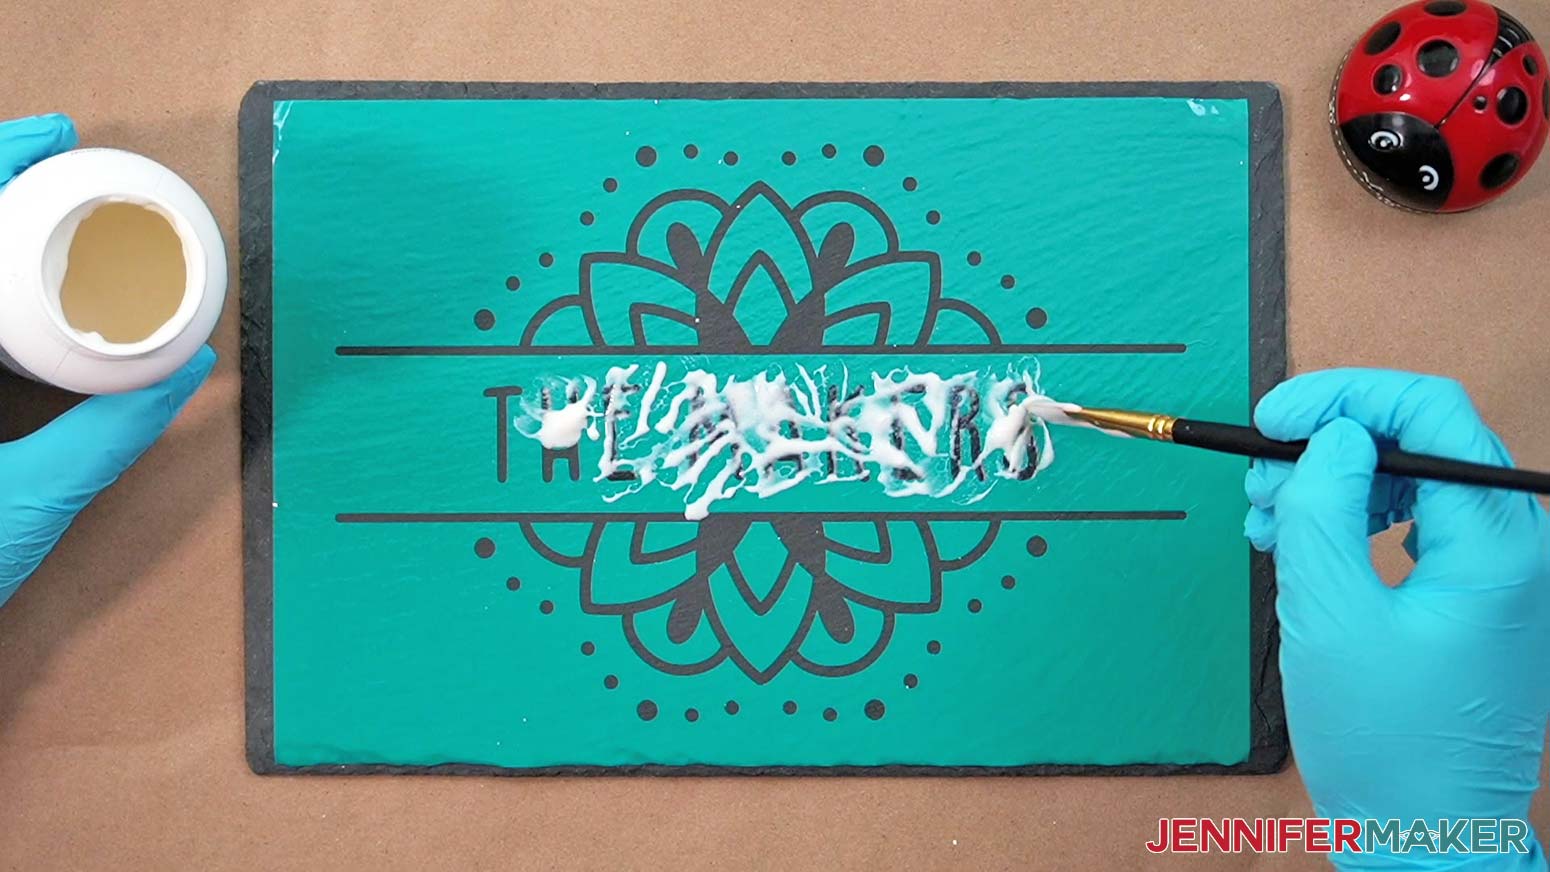
After the entire surface is covered, apply more cream in areas where it looks thinned out and then let it sit on the butcher paper until the timer chimes. It took me about five minutes to apply the cream to the entire cheeseboard design. After that, I let it sit without moving the cream around for the remaining ten minutes.
For the coaster, I kept the cream moving for the first five minutes and let it sit after that.
When the timer chimes, you can remove the cream. Be sure to wear your protective equipment! If you used a lot of cream, scrape it back into the container to be reused. Rinse the remaining cream off of the slate under running water into a plastic or metal sink. If you rinse the cream into a porcelain or ceramic sink, you run the risk of etching your sink as well.
Be sure to get all the etching cream off the slate before you remove the vinyl stencils. You do not want to accidentally touch it or get it on your work surface.
Dry the item well and remove the stencil. You may need to use your weeding tool to help remove some of the small pieces. Just be careful not to scratch the slate!
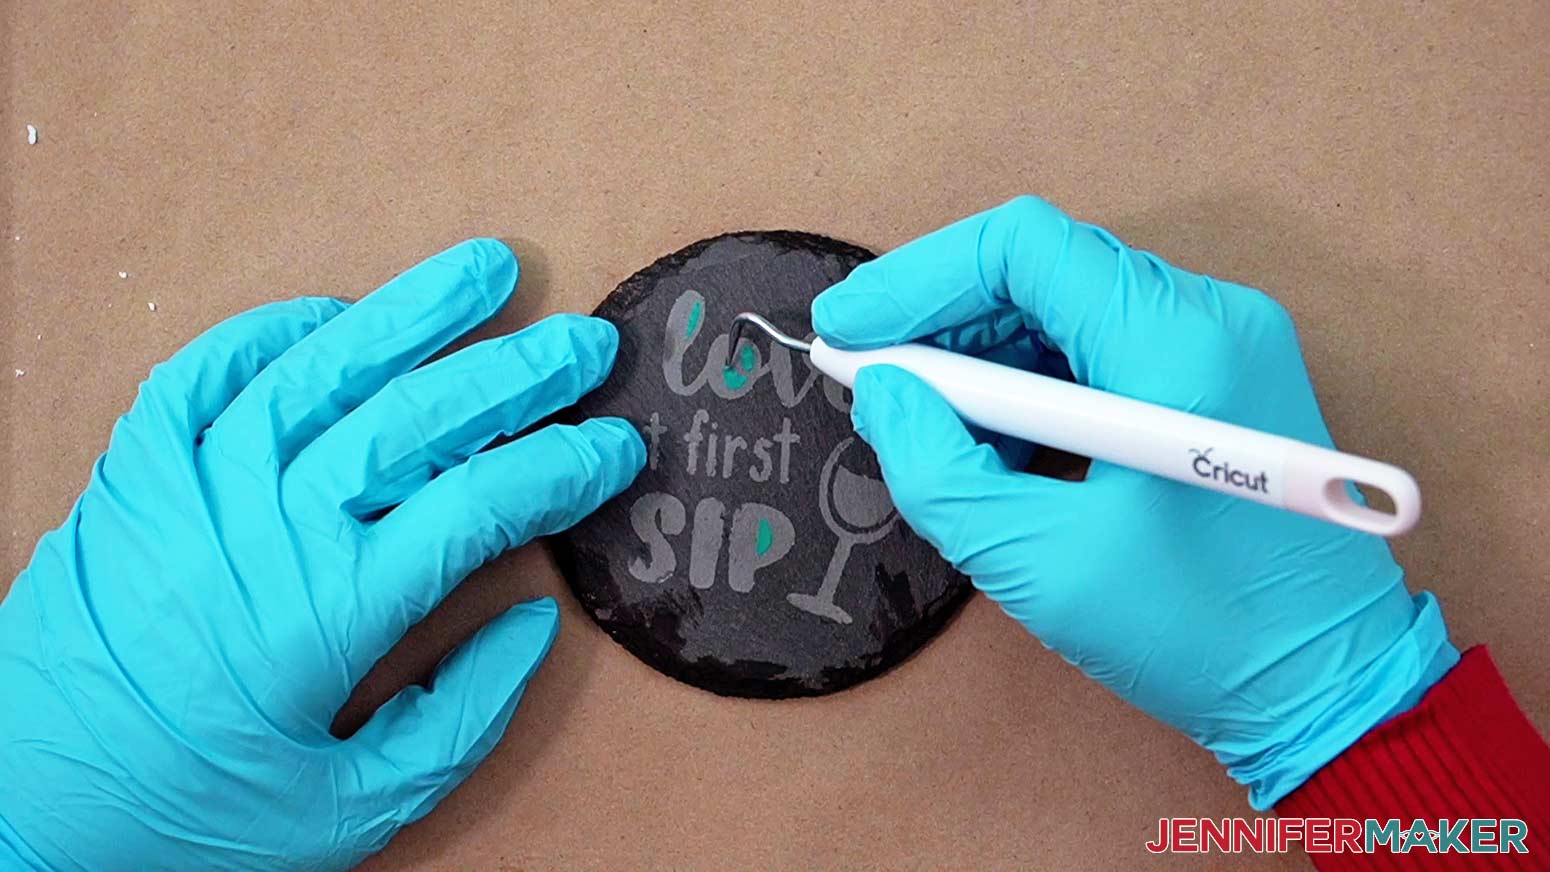
Give the coaster or cheeseboard a final rinse after all the stencil pieces have been removed, and dry it off. Make sure to clean off any etching cream from your brush before you put everything away. Now you can remove your safety equipment.
STEP 6: SHOW IT OFF!
Here's what one of my finished etched coasters and my custom etched cheeseboard look like.
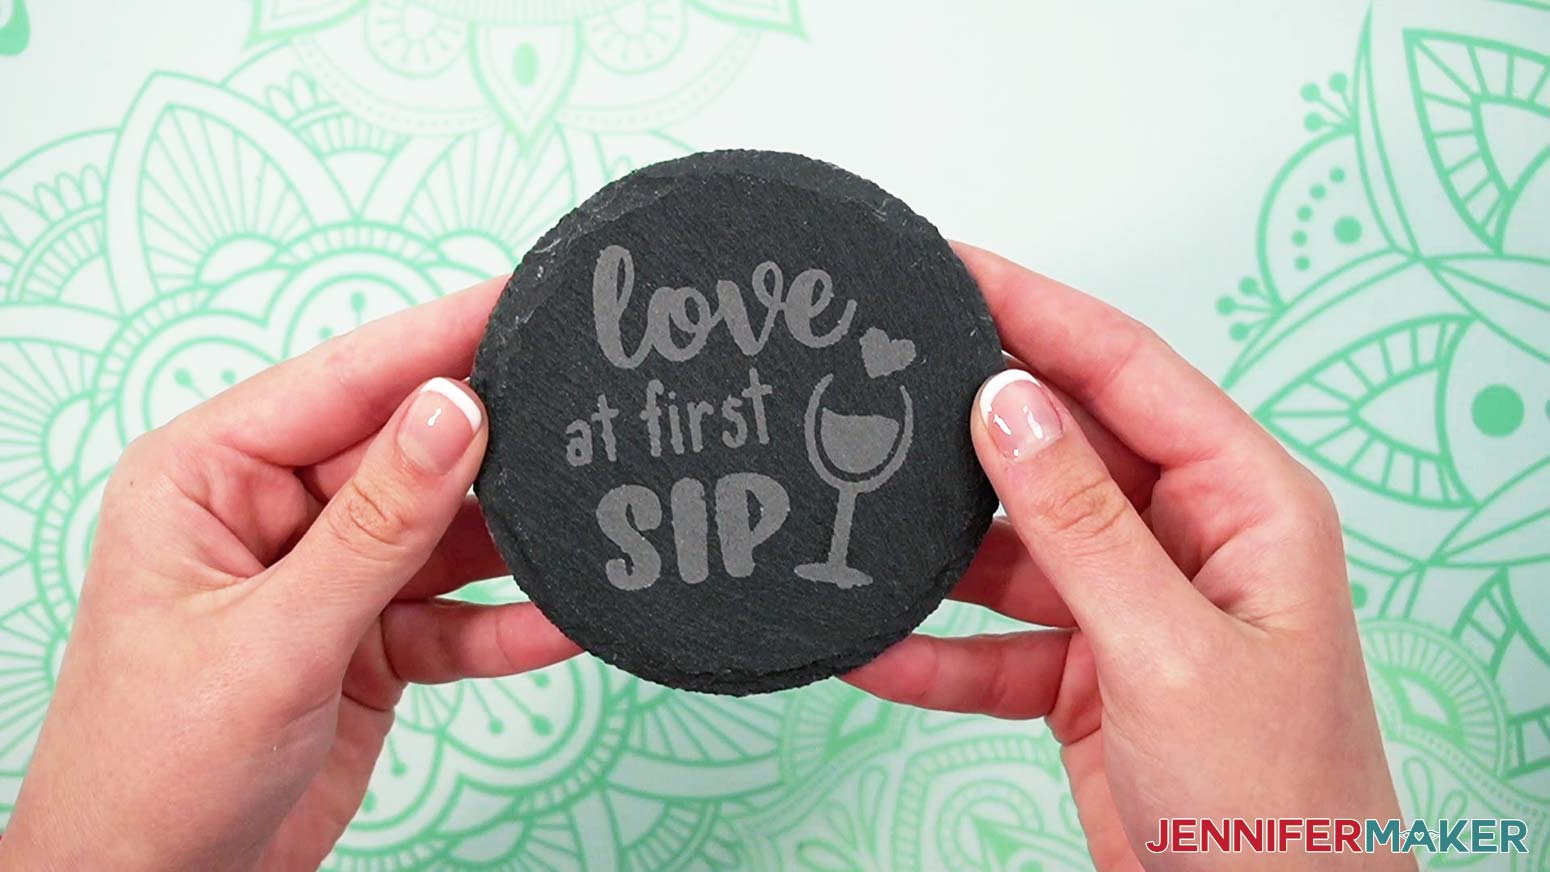
I just love how the same etching cream many of us already have on hand for glass projects can be used to etch slate too! These make great home decor items that you can use again and again. And a set of coasters or a custom cheeseboard would make great gifts!
You can even etch some custom wine glasses to go with your coasters! I have many tutorials to help guide you -- here are a few: How to Etch Glass the Easy Way, Etched Wine Glasses and Glass Bottles, and Color Glass Etching.
The etching on your finished cheeseboard and coaster is permanent, and the items can be hand washed with soap and water. You can also use rubbing alcohol and a soft cloth to spot-clean them.
Notes
It’s important to know, etching slate isn’t an exact science and takes practice.
Each piece of slate is different and can result in inconsistent appearances after etching. Some etched designs may look darker or more prominent, while others may look lighter.
Slate can also have defects that may affect the look of etched areas. Before etching an item, look it over for any defects. Smooth slate surfaces without cracks or bumps work best.
Make sure to apply an even amount of cream to all areas of the design and leave the cream on for at least fifteen minutes to get the best results. You can leave the cream on for up to twenty minutes, but there isn't a noticeable difference in the strength of the etch after that.
Finished Sizes:
Coasters: 4" x 4" (circle)
Cheeseboards: 8" wide x 12" high
Typefaces Used:
JM Sweet (all designs) - available as Design #496 in my free resource library
Cherry Cordial Alternates ("Hangry Guests" cheeseboard design) / Free Alternative: Kabut Hitam
Splash (fun coaster and cheeseboard designs) / Free Alternative: Brighly Crush
Timberly Script (fun coaster designs)
Answers to Your Questions About How to Etch Slate and Make Your Own
Q: What do you use to etch on slate? Will etching cream work on slate?
A: Good news: No need for an expensive laser etching machine here! Etching cream does work on slate, and that’s what we’ll use in this tutorial. I recommend Armour etching cream. When you’re finished etching your slate, you can even scrape the excess cream back into the container and re-use it on another project!
Q: How do you know how long to leave etch cream on slate?
A: If you’ve been following my tutorials for a while, you know that I love doing tests on new materials to see what works best so I can pass that information on to you! When testing, I found that leaving the cream on for at least fifteen minutes gave the best results. You may find that more or less time works for you, so I recommend having some extra materials on hand to do tests if you need.
Q: What surfaces does Armour etch work on?
A: Armour etch cream works on slate, glass, mirrors, porcelain, and glazed ceramic surfaces. There are so many different projects you can customize with etching cream! Want to etch more projects? I’ve got a blog post for that! Check out how to etch easy wine glasses, wine bottles, casserole dishes, Christmas ornaments, glass jars, and even etching in color! And if you like the etched glass look but don’t have a lot of time (or a respirator), check out my tutorial on how to make faux etched wine glasses using none other than frosted permanent vinyl!
Q: Is etched slate food safe? Is slate good for a cheese board?
A: Absolutely! Once all the etching cream is thoroughly washed off, the slate surface is indeed food safe. Slate material is great for a cheeseboard because you can label it right on the board with chalk!
Q: How do you clean etched slate?
A: You can clean your etched slate board, coasters, or other items with a damp cloth or sponge and mild dish soap. Rinse clean and air dry. Do not put your slate projects in the dishwasher. Take note that your slate item will look really dark after you get it wet or wash it. This is a normal characteristic of the natural material, so don’t worry! The slate will lighten back up a little once it’s dry.
Get my free SVG/DXF/PDF files to make paper embroidery cards!
(If you do not see the signup form above, click here.)
I SO hope you’ll make some etched slate projects after seeing my tutorial! Please share a photo of your etched slate creations in our Facebook group or tag me on social media with #jennifermaker.
Love,

Want to remember this? Save this How to Etch Slate tutorial to your favorite Pinterest Board!