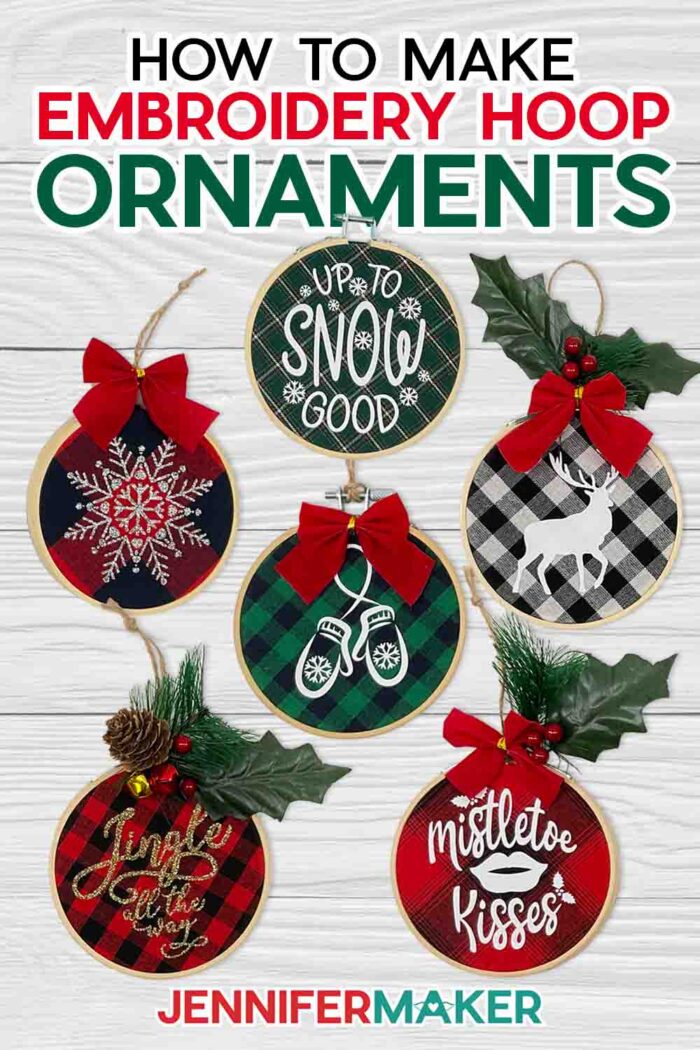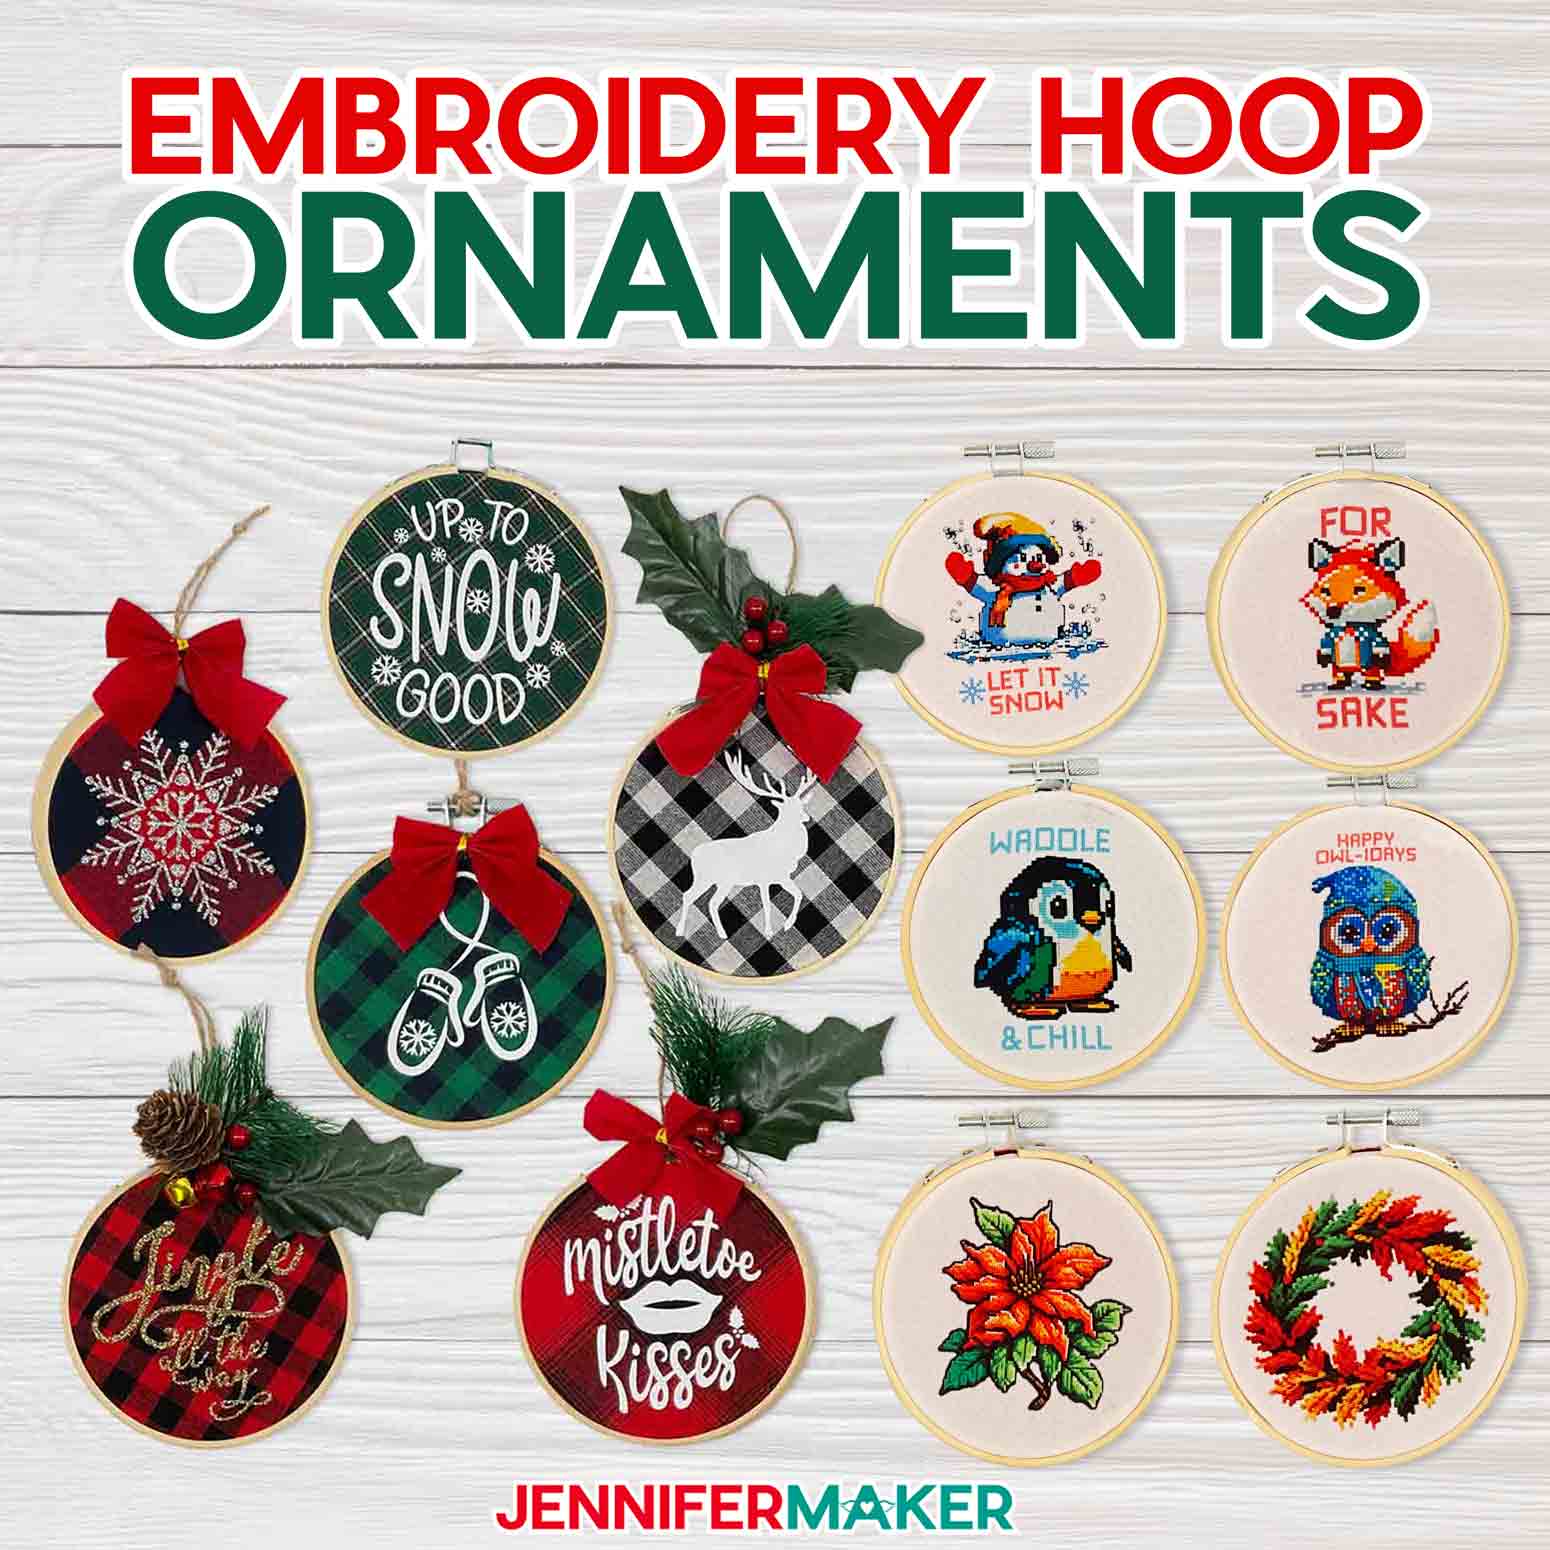
Learn how to make embroidery hoop ornaments with free designs!
Embroidery hoop ornaments are a classic holiday decoration in many families. Every holiday season, I love to make a homemade ornament (or several) for my Christmas tree. Last year, my etched glass ornaments were a big hit, and I had lots of fun making them for my family, friends, and myself. This year however, embroidery hoops have surged in popularity. But if you don’t have time to do all that needle work, I’ve got an adorable alternative, with some fun and creative ideas for turning small embroidery hoops into something super cute to gift or hang on your own tree.
Want to save this project? Enter your email below and we’ll send the project straight to your inbox.
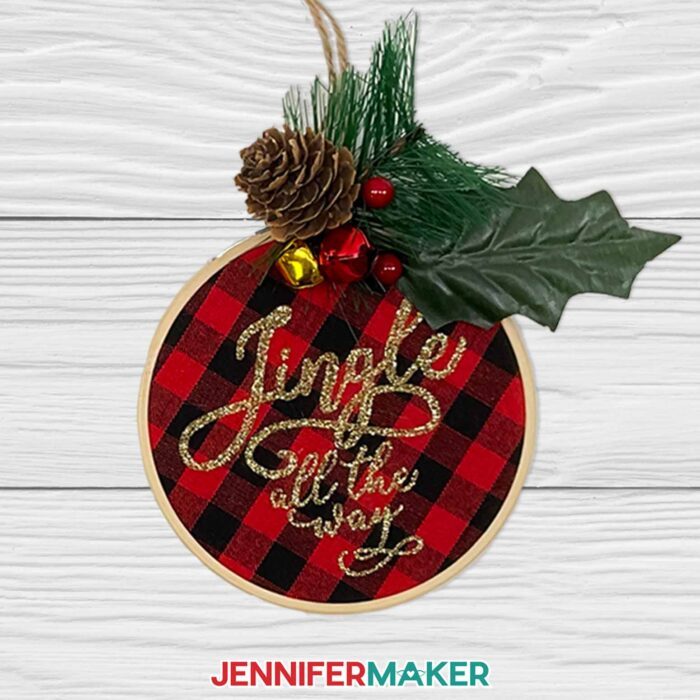
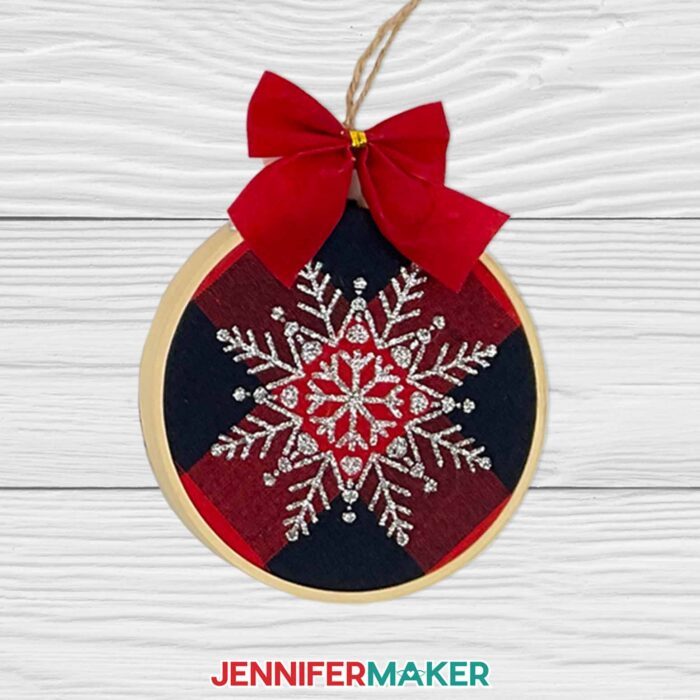
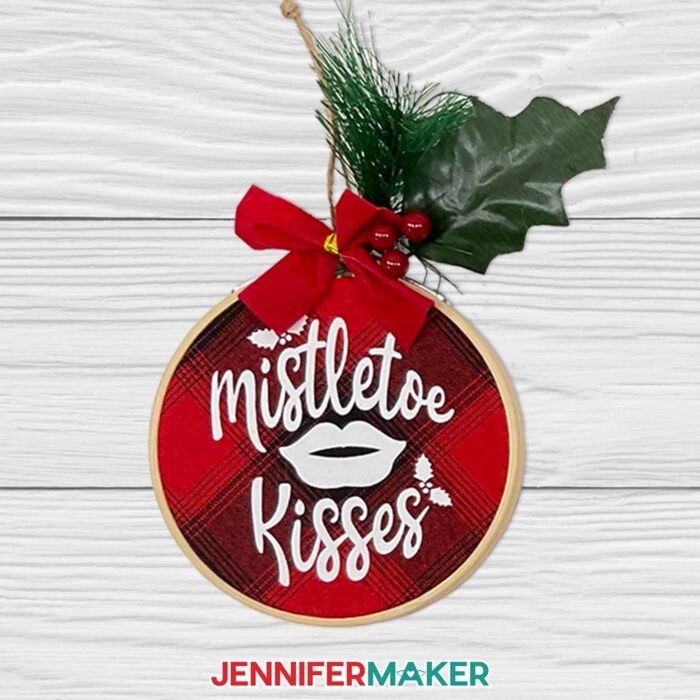
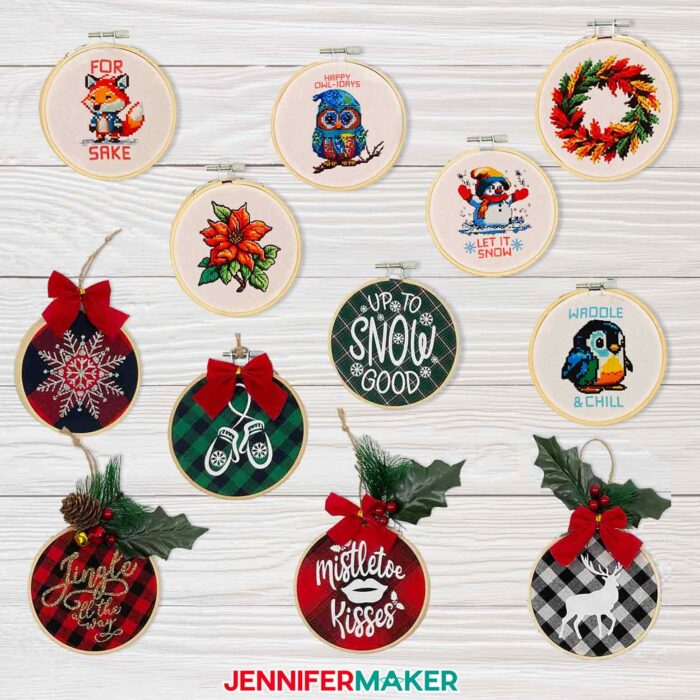
These DIY embroidery hoop Christmas ornaments have become one of my favorite Christmas crafts this year, and I’ll show you how to make them — three different ways! I’ll walk you through how to use the SVGs with heat transfer vinyl or infusible ink transfer sheets, and how to sublimate the PNG designs. Then we’ll finish the ornaments with embroidery hoops! I’m using materials from this kit that includes 4” hoops and lots of cute accessories.
My SVG designs make really cute vinyl and infusible ink ornaments, and the best part is you can customize them with different colors or styles. Or, you can make my sublimation ornaments, which look like traditional cross stitch designs without needing to worry about embroidery floss and a needle. I’ll show you how to make both styles and how to finish the backs for a polished look.
For this project, I’m using my trusty Cricut Maker 3, but you can also use a Maker, Explore 3, Explore Air 2, Explore, Venture, Joy, or Joy Xtra!

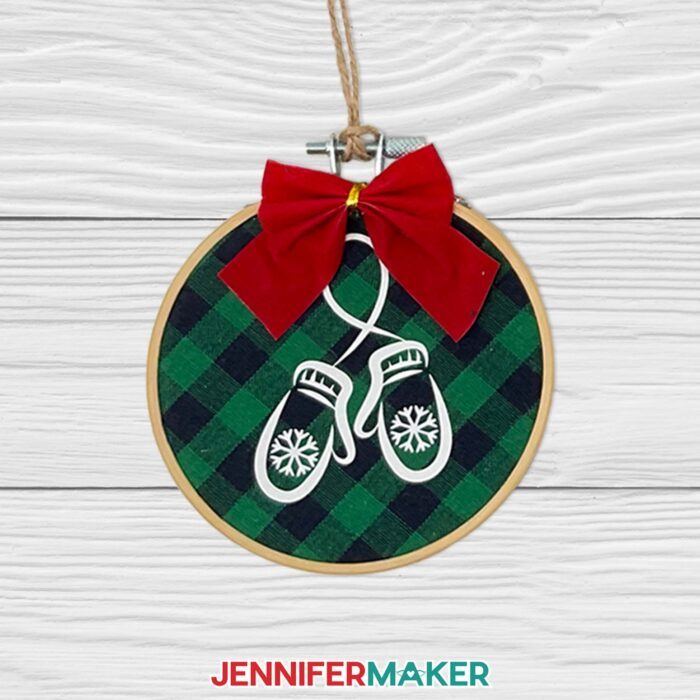
First, I’ll demonstrate the iron-on vinyl embroidery hoop ornaments. After you prepare your file, then cut and weed the vinyl, you can choose your fabric. Use a 6” square of unwashed cotton material in a color or pattern that will look nice with the design. When working with HTV, I’ve always found that the fabric is easier to work with if you don’t pre-wash it. I’ll use a piece of red plaid cotton fabric from the kit in my materials list.
For our second project, I’ll show you how to create embroidery hoop ornaments, but this time using infusible ink. While infusible ink is actually a sublimation process, you can prepare the SVGs using the same steps as you did with the iron on vinyl! You can even cut it out on your Cricut. For this ornament, I’ll take it a step further and show you how to make a “cut-out image” with ink surrounding the design instead of inside it.
Infusible ink is fun to work with, but has a few interesting quirks. One important thing to keep in mind is that moisture and skin oils can interfere with Infusible Ink, so wash and dry your hands well before you start this part of the project.
Secondly, weeding infusible ink transfer sheets is a little different than weeding vinyl! You’ll begin by carefully bending and rolling the cut infusible ink design until you hear a cracking sound. Don’t panic, it’s normal! These sounds are just the cuts separating, and it’s why we call this the “Cracking Method.”
My last method uses sublimation and requires a sublimation printer. This is a fantastic beginning sublimation project, and I’ll demonstrate the basics like how to avoid shifting the design while it’s still sublimating, which can cause unsightly ghosting or blurry edges. Before we sublimate, though, I’ll show you how to create a guide in Cricut Design Space which will be a huge help when positioning the sublimation paper on your fabric.
As with any infusible ink or sublimation project, you’ll need to use polyester fabric, not cotton like we used with the iron-on vinyl ornaments.
When your piece of fabric is decorated to your liking, it’s finally time to assemble the embroidery hoop ornament! When I was doing my tests, I found that using a lightbox like a Cricut BrightPad to see the design on the other side of the fabric was a total game changer. You can, of course, assemble your ornaments without it, but it really made putting them together so much easier!
You might be wondering, “Jennifer, isn’t the back of the fabric going to look unfinished?” I know that sometimes ornaments don’t hang perfectly, and that making the back of the ornament look a bit more finished just looks nicer. I’ll show you my favorite way to add felt to the back so it looks nice and clean and finished. It’s not difficult, but it is more steps than you might imagine — so I definitely recommend watching my tutorial to find out how I do it.

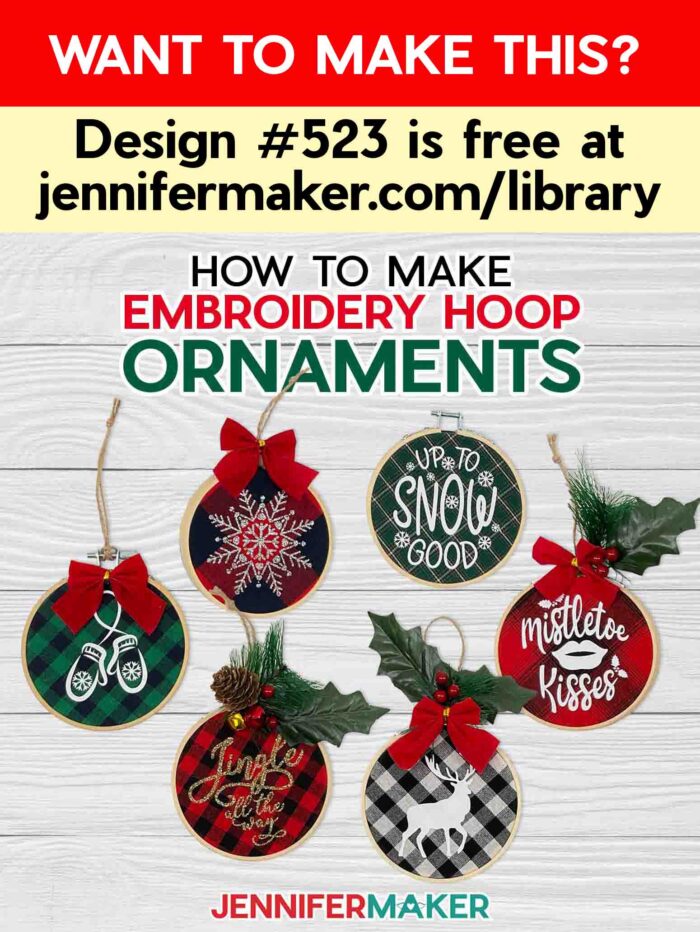
For a finishing touch, decorate the top with pieces of greenery, ribbons, bells, faux berries, or any other small and festive items you like. The kit in my materials list includes a lot of these, and you can use hot glue or wire to wrap the little decorations around the bolt posts, then add a piece of twine for hanging. This simple Christmas craft is so trendy and fun, so make it a Merry Christmas and gift them to everyone you know!
This project involves a lot of detailed cutting, but it’s so worth the time! Before you start, you might want to review my Tips for Cleaner Cuts to get the best results.
Christmas time gets busy, so make a bunch of embroidery hoop ornaments for your friends, family, quick neighbor gifts, or even to attach to stockings or wrapped presents for a fun little addition!
Here’s a supply list of what you need to make embroidery hoop ornaments! This post contains some affiliate links for your convenience (which means if you make a purchase after clicking a link I will earn a small commission but it won’t cost you a penny more)! Read my full disclosure policy.
Materials and Tools to Make Embroidery Hoop Ornaments
View my Amazon shopping list with the exact items we used to make this project
For vinyl ornaments:
- Plaid Cotton Fabric Squares
- Silver & Gold Cricut Glitter Iron-On Vinyl -or-
- White Cricut Everyday Iron-On Vinyl
For Infusible Ink ornaments
- White 100% Polyester Fabric
- Buffalo Check Cricut Infusible Ink Transfer Sheets -or-
- Bright Teal Cricut Infusible Ink Sheets -or-
- Cherry Red Cricut Infusible Ink Sheets
- Ventilation – I used this fan
- Tweezers – optional to help weed
For sublimation ornaments
- Sublimation Printer
- Sublimation Ink
- 8.5″ x 11″ Sublimation Paper
- White 12″ x 12″ 65 lb Cardstock
- White Butcher Paper
- Ventilation – I used this fan
For all ornaments:
- 1 Each Christmas Ornament Hoop Kit – includes vinyl, cloth, twine, and decorations to make six vinyl press ornaments -OR- 4″ Embroidery Hoops
- A method to cut your vinyl or infusible ink sheets – I used the amazing Cricut Maker 3, but you can also use the Cricut Maker, Cricut Explore Series, or Cricut Joy
- Cricut Green StandardGrip Machine Mat 12″ x 12″
- Brayer
- Heat Resistant Tape
- Scissors
- Weeding Tool
- Lint Roller
- Ruler
- Cricut EasyPress
- Cricut EasyPress Mat (12″x12″)
- Finger Protectors
- Black Marker
- Cricut BrightPad – optional to help center designs in the hoops!
- Hot Glue Gun
- Hot Glue Sticks
- Jingle Bells – optional
- Decorative Pieces – optional
- Felt Multi-Pack with Red, Green, White, Black
- Ribbon – I used 1.5″ wide turquoise
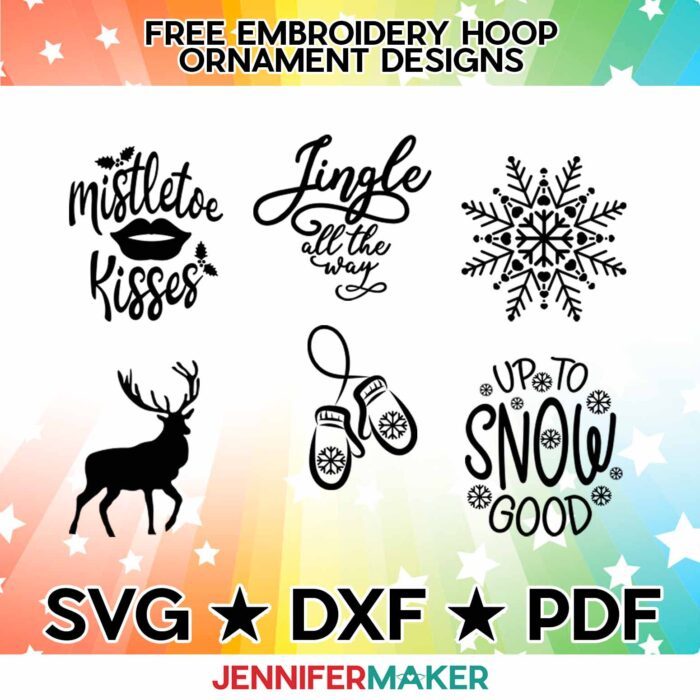
- Design #523 – (My free SVG/PDF/DXF design files are available in my free resource library (get the password by filling out the form at the bottom of this page)
How to Make Your Own Embroidery Hoop Ornaments
The detailed step-by-step assembly video on how to make embroidery hoop ornaments debuted during Maker Academy Weekend 2023, held online November 1-5, 2023. Get an on-demand pass to watch all 30+ workshops, each with a printable handbook, transcript, audio file, design files, and support with a VIP pass below:

Answers to Your Questions About How to Make Embroidery Hoop Ornaments
Q: Where is your tutorial for this project?
A: These embroidery hoop ornaments are a special project we made for our free Maker Academy Weekend 2023 event! A complete and detailed step-by-step video premiered during the event November 1-5, 2023 — this tutorial video was available to watch for free for 24 hours only during the event. If you missed it, you can get access to the full video, the 15-page printable handbook that details how to make this beautiful project with a VIP Pass to Maker Academy Weekend 2023, which comes with other perks and bonuses, too! Look at all the star ornaments made by our VIP passholders in the lead up to our big event!
Q: What size is a regular ornament?
A: My embroidery hoop ornaments in this tutorial are 4″, which I think is the perfect size for a regular size Christmas tree. It’s also the size hoop that works well with the 6″ pieces of fabric I recommend. If you’re using larger or smaller hoops, size your fabric (and HTV, sublimation, or infusible ink designs) accordingly.
Q. How do you finish the back of an embroidery hoop ornament?
A. I used felt to finish the back of my ornaments, but you can use another type of fabric if you wish. The method I used is outlined in detail in my tutorial, which you can read step-by-step in this blog post or check out my tutorial video to learn how.
Q. How to decorate your embroidery hoop?
A. In addition to applying either heat transfer vinyl, infusible ink, or a sublimation transfer design onto your mini embroidery hoop ornaments, you can also decorate them with cute little elements like tiny pinecones, greenery, small red berries, bells, or anything else you can find online or at your local craft store to add a nice personal touch.
Q: How do you make ornaments with an embroidery hoop?
A. My tutorial shows you everything you need to know about making faux embroidered sublimation ornaments, infusible ink ornaments, and homemade Christmas ornaments with iron-on vinyl. Check my materials list for things you already have on hand, and follow my free tutorial to make your own Christmas ornaments that are sure to impress!
Q: How do you cut your vinyl so intricately without tearing and ripping?
A: The key is to use a clean sticky machine mat and a clean fine point blade. Learn more about getting cleaner cuts on your Cricut cardstock projects in my Cricut Cutting Problems guide.
Q: What size ornaments should I use for my tree?
A: The number of ornaments you’ll need depends on the size and shape of your tree, the look you’re going for, and how much time you have to create them!
Get my free SVG/PNG files to create these ornaments!
Get FREE access to this design and ALL of my SVG cut files!

Subscribe (free!) to my newsletter with updates and tips PLUS get instant access to my resource library with this file and all of my other free files, printables, and patterns! Once subscribed, I will send you a newsletter with details about my new free and helpful files each week.
Enter my free resource library for my latest files, printables, and patterns! Password is 'craft' -- please copy and paste that in at the link above. Thanks for being a subscriber!!
I hope you’ll make some embroidery hoop ornaments! Please share a photo of your ornaments in our Facebook group or tag me on social media with #jennifermaker.
Love,

Want to remember this? Save this Embroidery Hoop Ornaments tutorial to your favorite Pinterest Board!