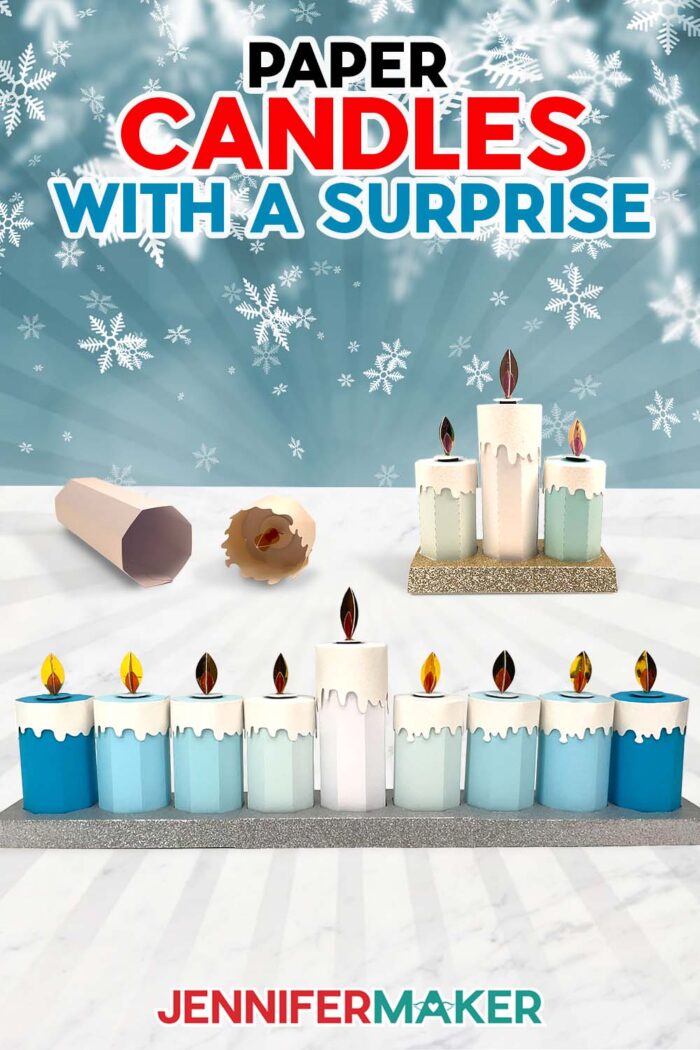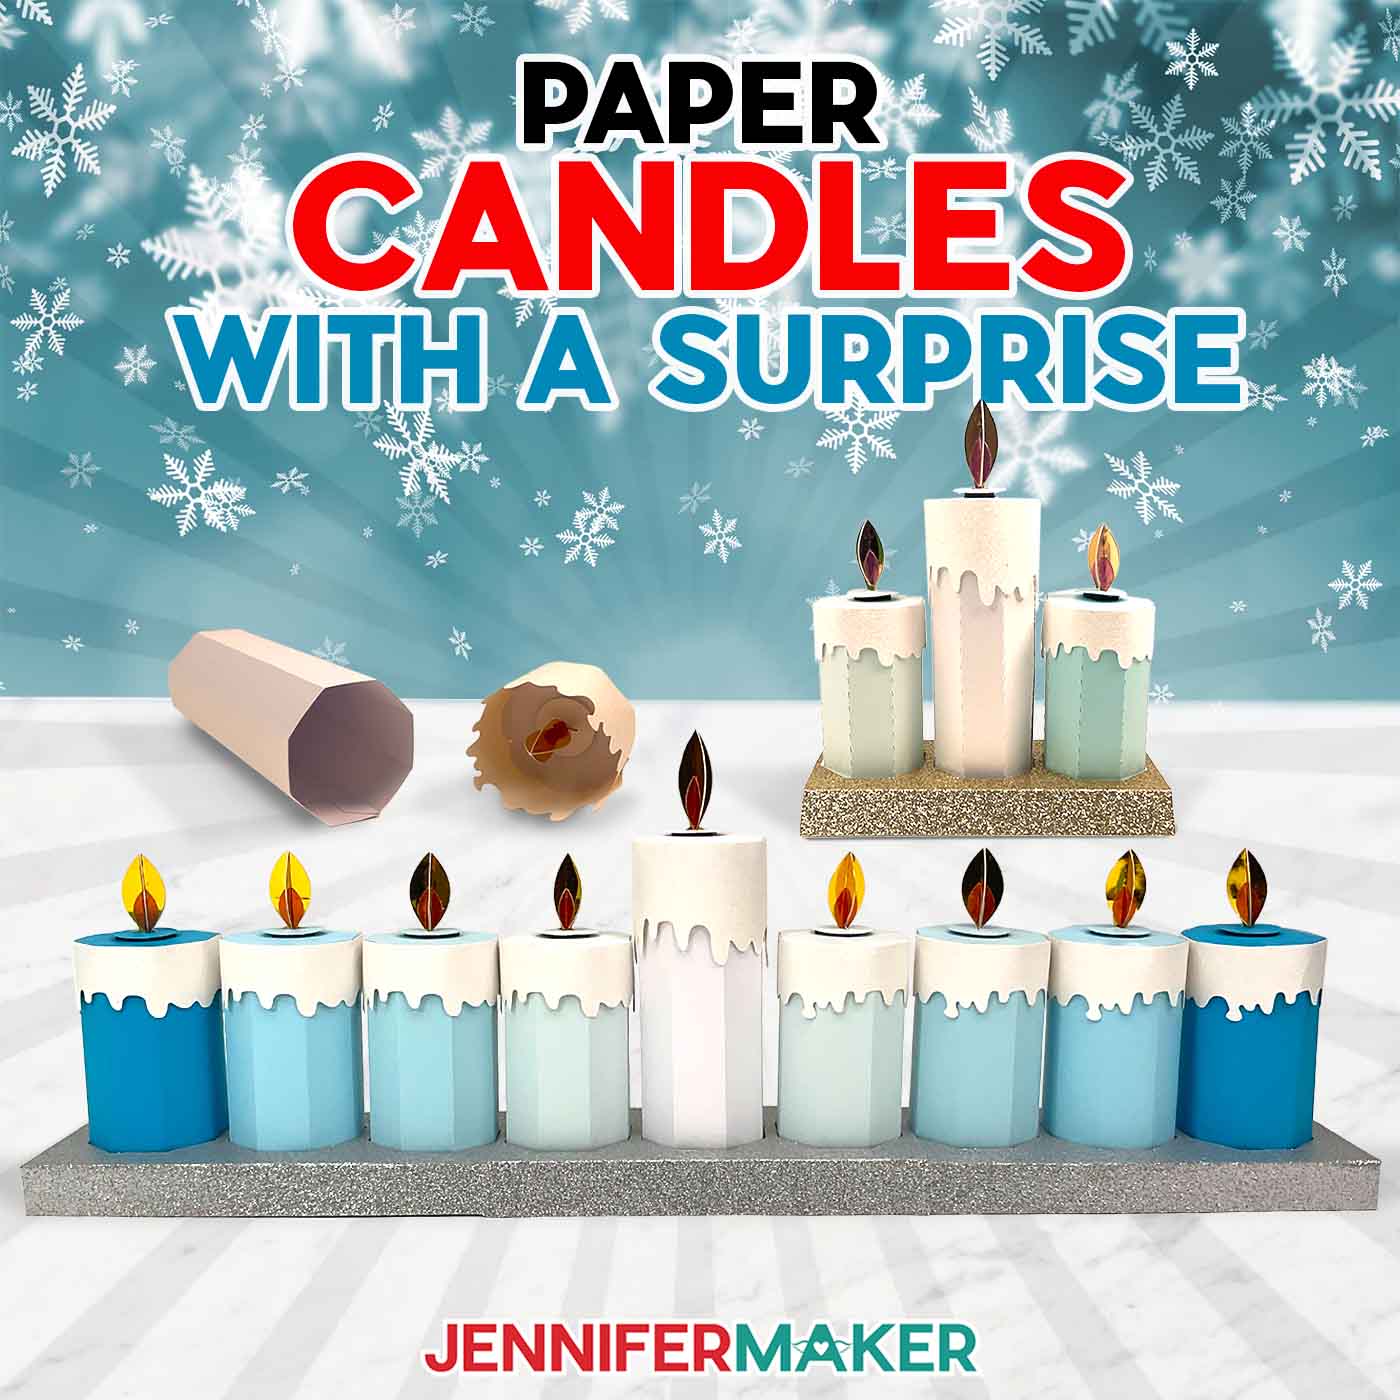
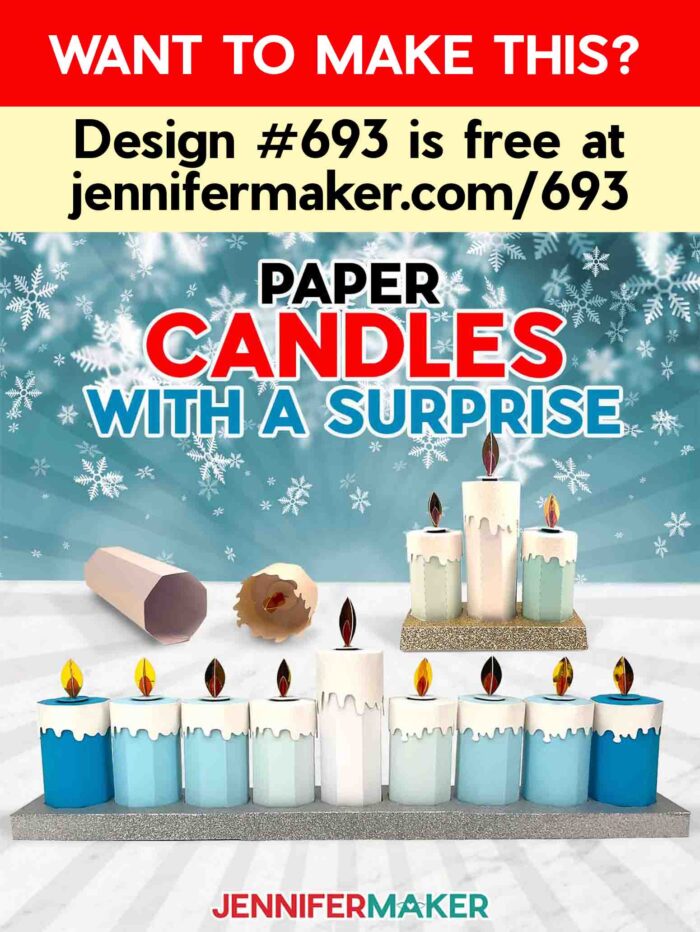
Learn how to make a fun menorah with candle gift boxes!
Candles are not just about light — they’re about ambiance, warmth, comfort, and hope. Now imagine capturing all that magic in a gift box! My paper candle gift boxes are the perfect solution: elegant, creative, and functional! In this tutorial, I’ll show you how to turn these candle box designs into a unique menorah for Hanukkah, with space inside for eight fun nights of gifts! These candles are also perfect for birthdays or other celebrations, too!
Watch the full step-by-step video tutorial on making a candle gift boxes:

Candles have a timeless appeal, and they make for great gifts or a touch of elegance in a holiday centerpiece. With the help of a few materials and tools, you can craft pretty candle-shaped gift boxes that are as delightful to make as they are to receive.
These candle boxes are a great choice for Hanukkah, and they’re also a perfect way to create unique decorations or gifts for other occasions. They work for birthdays, other holidays, or just-because moments. These boxes are sure to light up someone’s day — no flame required!
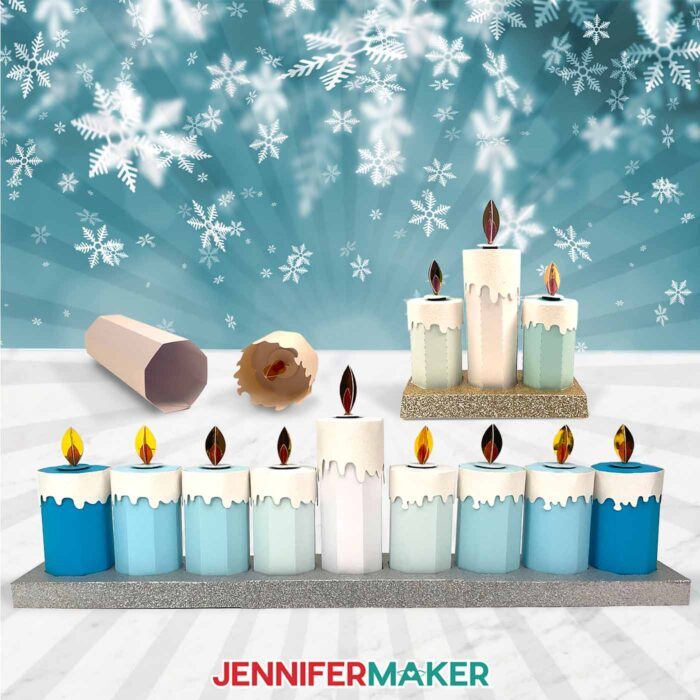
You can make a single candle, candle gift sets, or a whole arrangement to display in your home. In this tutorial, I’ll demonstrate how to make a menorah for Hanukkah.
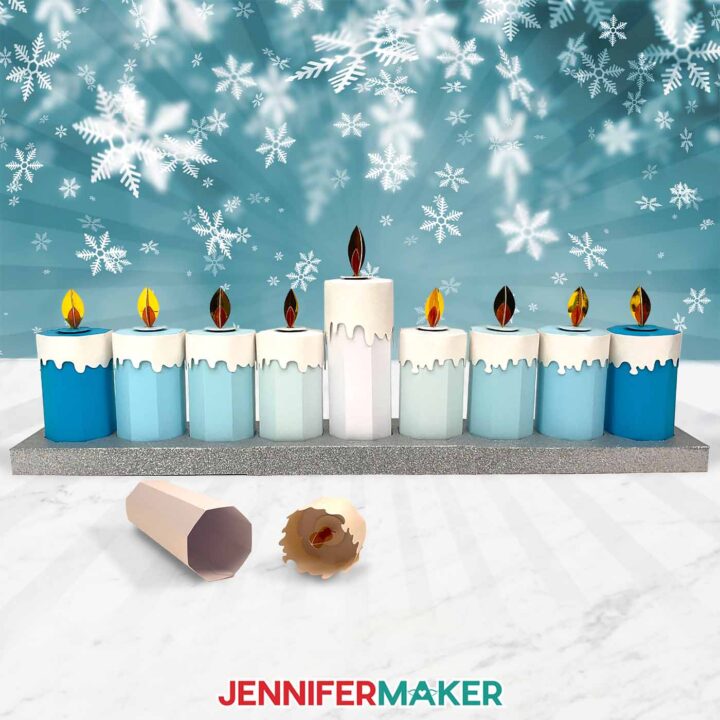
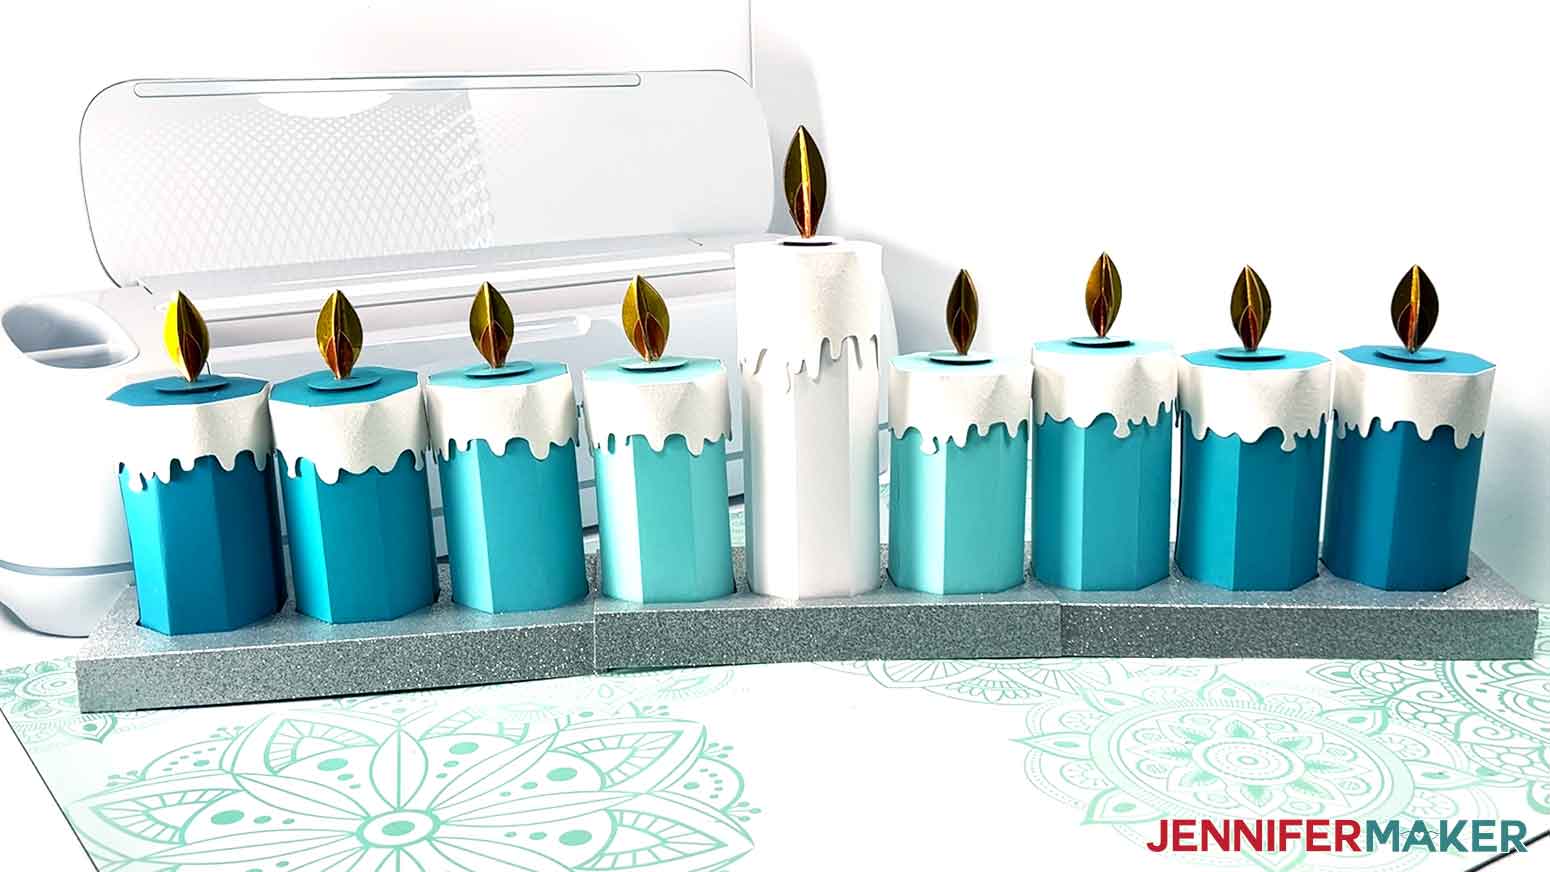
A traditional menorah features nine candles: eight for the nights of Hanukkah and one taller candle — the shamash — in the center. Each night of Hanukkah, a candle is lit and gifts are exchanged. But instead of wrapping individual gifts for each night, you can just place the surprises inside the candle itself!
These gift boxes use a foil cardstock “flame” instead of a real flame or battery-operated LED candle, but I do have a tutorial on how to make a candle box using LED tea lights. I wanted to try something a bit simpler this year, and I love how the foil accents catch the light without being a fire hazard!

I’ll show you the whole process of preparing, cutting, and assembling a candle box. You can cut the pieces by hand, but I’ll show you how to do it more easily using a Cricut cutting machine with a SVG file.
If your cutting machine uses DXF files instead of SVGs, no worries — I’ve included those, too! You can also use the included PDF files so you can cut them by hand, but it’s much more fun to sit back and watch your machine do the precise cuts for you!
I’ll demonstrate how to cut the SVG pieces with my Cricut Maker 3, but you can also cut the full size candles on the original Cricut Maker, a Cricut Explore series machine, the Cricut Venture, or the Cricut Joy Xtra. I’ve included a folder with Cricut Joy-friendly versions of the candle boxes, too!
You’ll need some basic Cricut paper crafting supplies like a green StandardGrip machine mat to cut your cardstock. I have a full list of tools and craft supplies you’ll need to make it below, along with links where to find them!
In the download file, there’s a version of the full-size design with score lines that uses a scoring stylus or single scoring wheel to create the foldable creases, and a no-score version that uses dashed cut lines to make the creases.
I used a few different types of high quality plain, shimmer, and glitter cardstock to make my candle gift boxes, but you can use any combination of papers to create your own. Making custom boxes is easy when you experiment with different colors, types, and patterns of paper.
After cutting, I’ll walk you through how to fold and glue the pieces together to form the candle shape.
Attaching small magnets to the flame base and inside the box lid allows you to “light” and “blow out” the candles easily – no matches needed. It’s as simple as setting the flame on top of the candle box. The magnets do the rest!
Scroll down to see the written tutorial for full details on preparation, cutting, and assembly for your candle boxes!
I love decorating with candles, even when real fire or LED lights aren’t an option. These are the perfect way to celebrate Hanukkah or another occasion in a safe way! Once your candle box is finished, you can place gifts or treats inside. Candy, store-bought trinkets, or small crafted surprises work great!
I hope you’ll craft a menorah or candle arrangement that lights up the season with hope, joy, and creativity!
Let me show you how to make candle gift boxes! This post contains some affiliate links for your convenience (which means if you make a purchase after clicking a link I will earn a small commission but it won’t cost you a penny more, there is no additional cost)! Read my full disclosure policy.
Materials to Make Candle Gift Boxes
View my Amazon shopping list for the exact items I used!
- Eight (8) Sheets of 12″ x 12″ 65 lb. Blue Palette Cardstock
- Two (2) Sheets of 8.5″ x 11″ 65 lb. White Shimmer Cardstock -OR-
- One (1) Sheet of 12″ x 12″ 65 lb. White Shimmer Cardstock
- Two (2) Sheets of 12″ x 12″ White Glitter Cardstock
- Two (2) Sheets of 12″ x 12″ Silver Glitter Cardstock
- Four (4) Sheets of 4.5″ x 7″ 65 lb. Yellow Foil Cardstock
- One (1) Sheet of 4.5″ x 7″ 65 lb. Orange Foil Cardstock
- Eighteen (18) Magnetic Squares
- A way to cut your cardstock – I’m using the Cricut Maker 3, but you can also use the Cricut Maker, an Cricut Explore Series machine, the Cricut Venture, Cricut Joy Xtra, or the Cricut Joy (with smaller files).
- Cricut Green StandardGrip Machine Mat 12″ x 12″
- Scoring Stylus (optional, for files with score lines) -OR-
- Single Scoring Wheel (optional, for files with score lines)
- Brayer
- Spatula
- Scraper
- Craft Glue (I used Bearly Art Precision Glue)
- Hot Glue Gun & Glue Sticks
- Silicone Finger Protectors
How to Make Candle-Shaped Gift Boxes!
Candle Gift Boxes
Learn how to make candle boxes with cardstock and use magnets to attach the flames!
Materials
- Eight (8) Sheets of 12” x 12” 65 lb. Blue Palette Cardstock
- Two (2) Sheets of 8.5” x 11” 65 lb. White Shimmer Cardstock -OR-
- One (1) Sheet of 12” x 12” 65 lb. White Shimmer Cardstock
- Two (2) Sheets of 12” x 12” White Glitter Cardstock
- Two (2) Sheets of 12” x 12” Silver Glitter Cardstock
- Four (4) Sheets of 4.5” x 7” 65 lb. Yellow Foil Cardstock
- One (1) Sheet of 4.5” x 7” 65 lb. Orange Foil Cardstock
- Eighteen (18) Magnetic Squares
- Design #693 (My free SVG/PDF/DXF design files are available in my free resource library - get the password by filling out the form at the bottom of this page)
Tools
- A way to cut your cardstock - I’m using the Cricut Maker 3, but you can also use the Cricut Maker, a Cricut Explore Series machine, the Cricut Venture, or even the Cricut Joy Xtra or the original Joy
- Cricut Green StandardGrip Machine Mat 12" x 12”
- Scoring Stylus (optional for files with score lines) -OR-
- Scoring Wheel (optional for files with score lines)
- Brayer
- Spatula
- Scraper
- Craft Glue (I used Bearly Art Precision Glue)
- Hot Glue Gun & Glue Sticks
- Silicone Finger Protectors
Instructions
STEP 1: GET MY FREE CANDLE BOXES DESIGNS
First, download my Candle Box designs from my free library – look for Design #693. Alternatively, you can use the Save This Project form near the top of this post and the design link will be emailed to you.
The designs are sized to be cut on any Cricut cutting machine.
The SVG and DXF folders contain three designs. There’s a base, a short candle, and a tall candle. Each design has a score and no-score version. The “For Joy Users” folder contains a base, short candle, and tall candle that are sized to be cut with a Cricut Joy cutting machine.
TIP: If you’re not sure how to download zip files and upload designs, go to jennifermaker.com/svgs.
STEP 2: PREPARE AND CUT YOUR CANDLE BOXES
HANUKKAH MENORAH CANDLE SET
CRICUT DESIGN SPACE
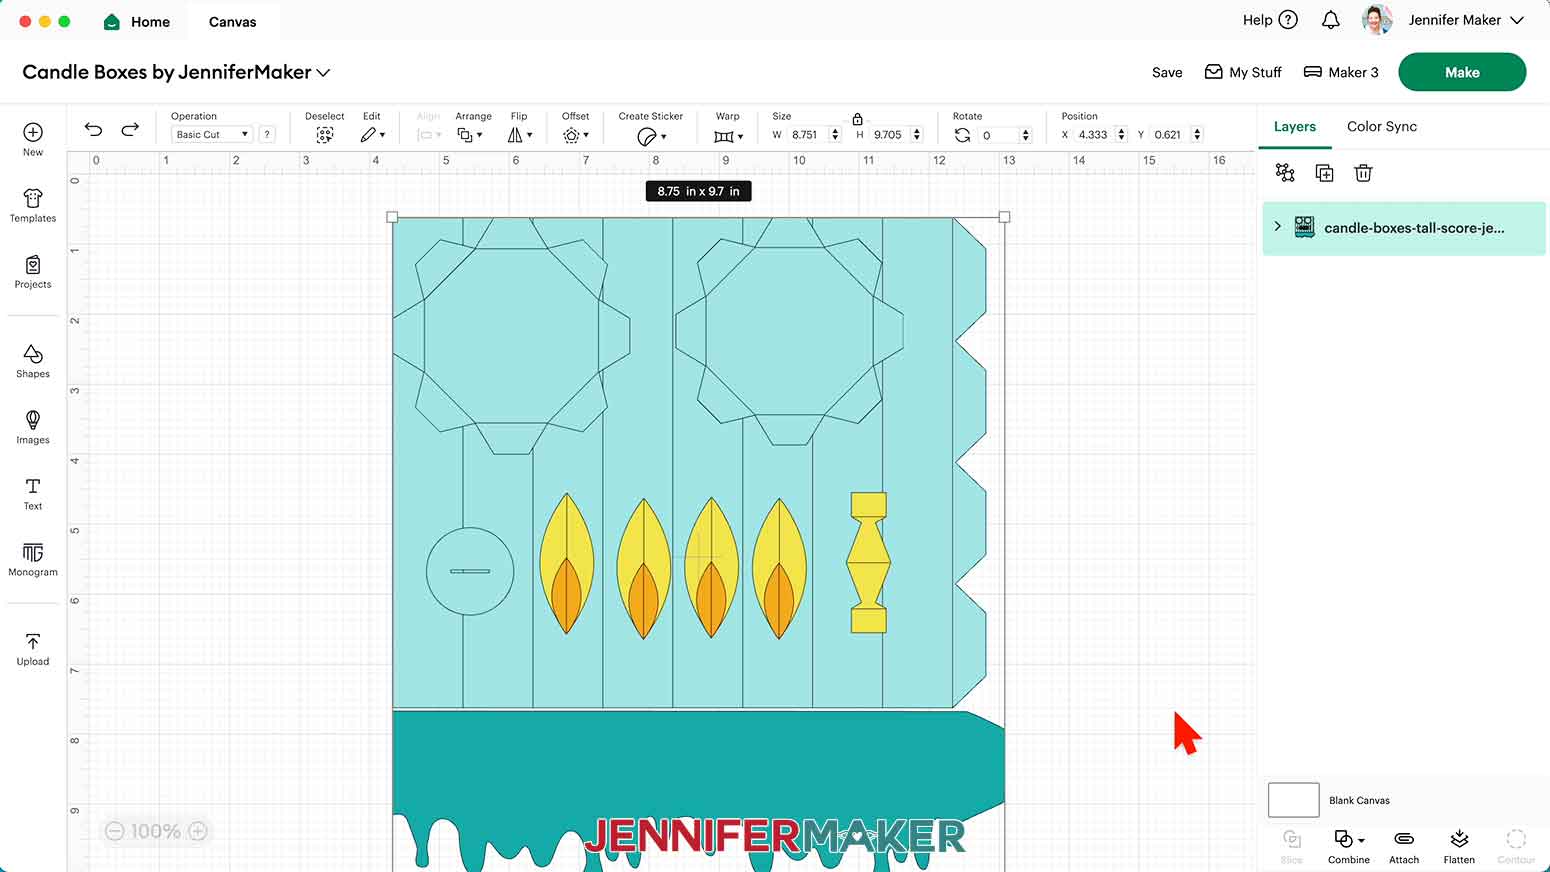
- In Cricut Design Space on a blank Canvas, click “Upload.”
- Click “Upload Image.”
- Click “Browse.”
- Find and select the “tall” SVG in the main SVG folder.
NOTE: I’ll demonstrate with the “score” version of the tall candle SVG so I can show you how to set and attach score lines. If you do not have a scoring tool, use the “no-score” version of the file. - Click “Open” and then “Continue.”
- Click “Upload” to add the design to your Canvas.
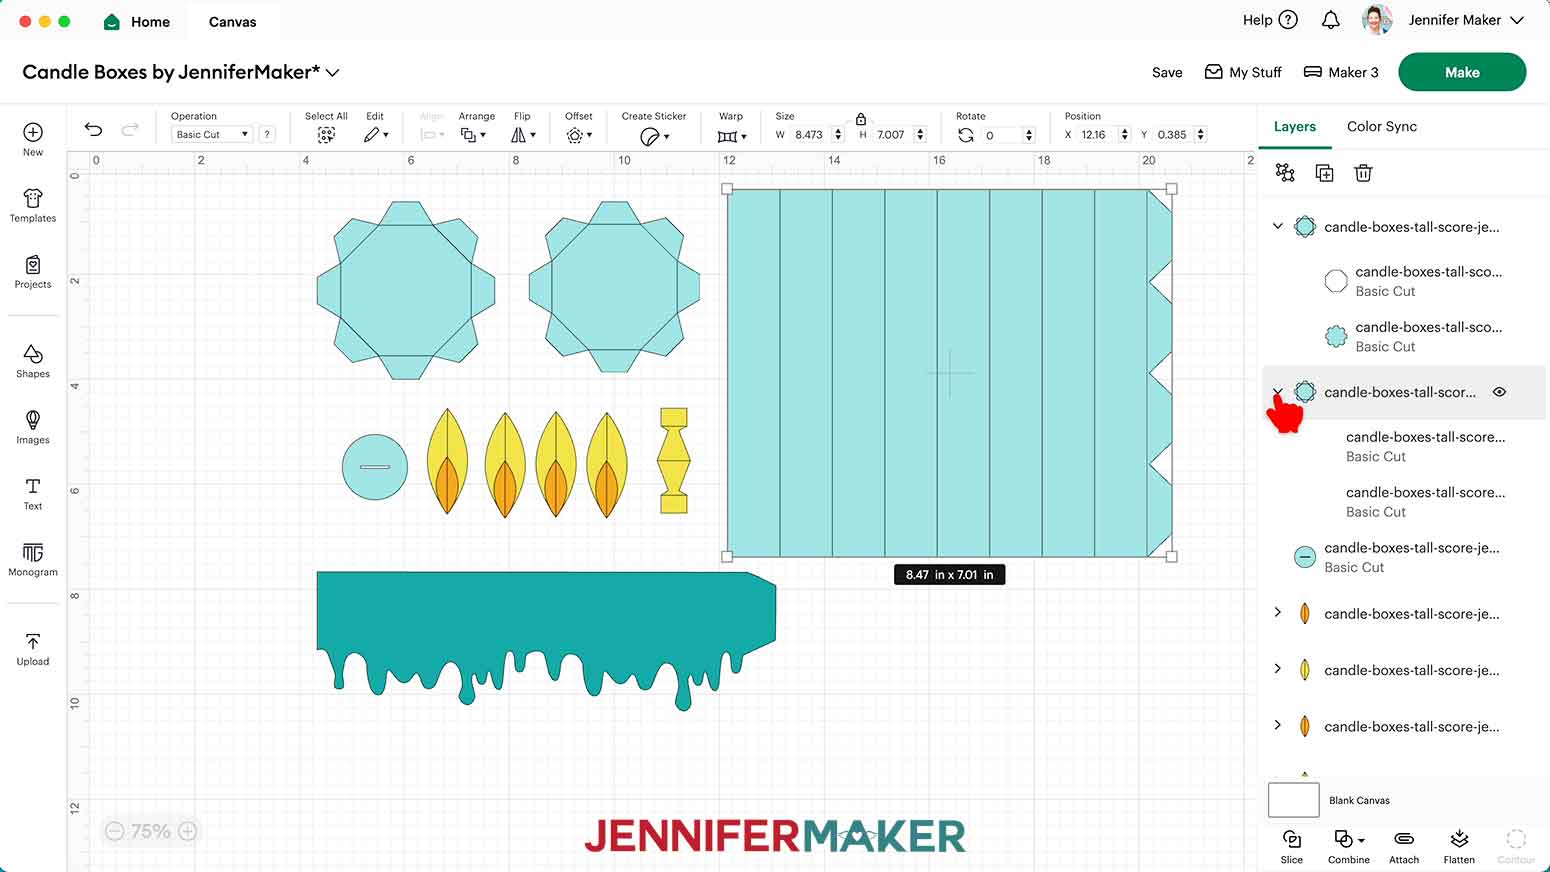
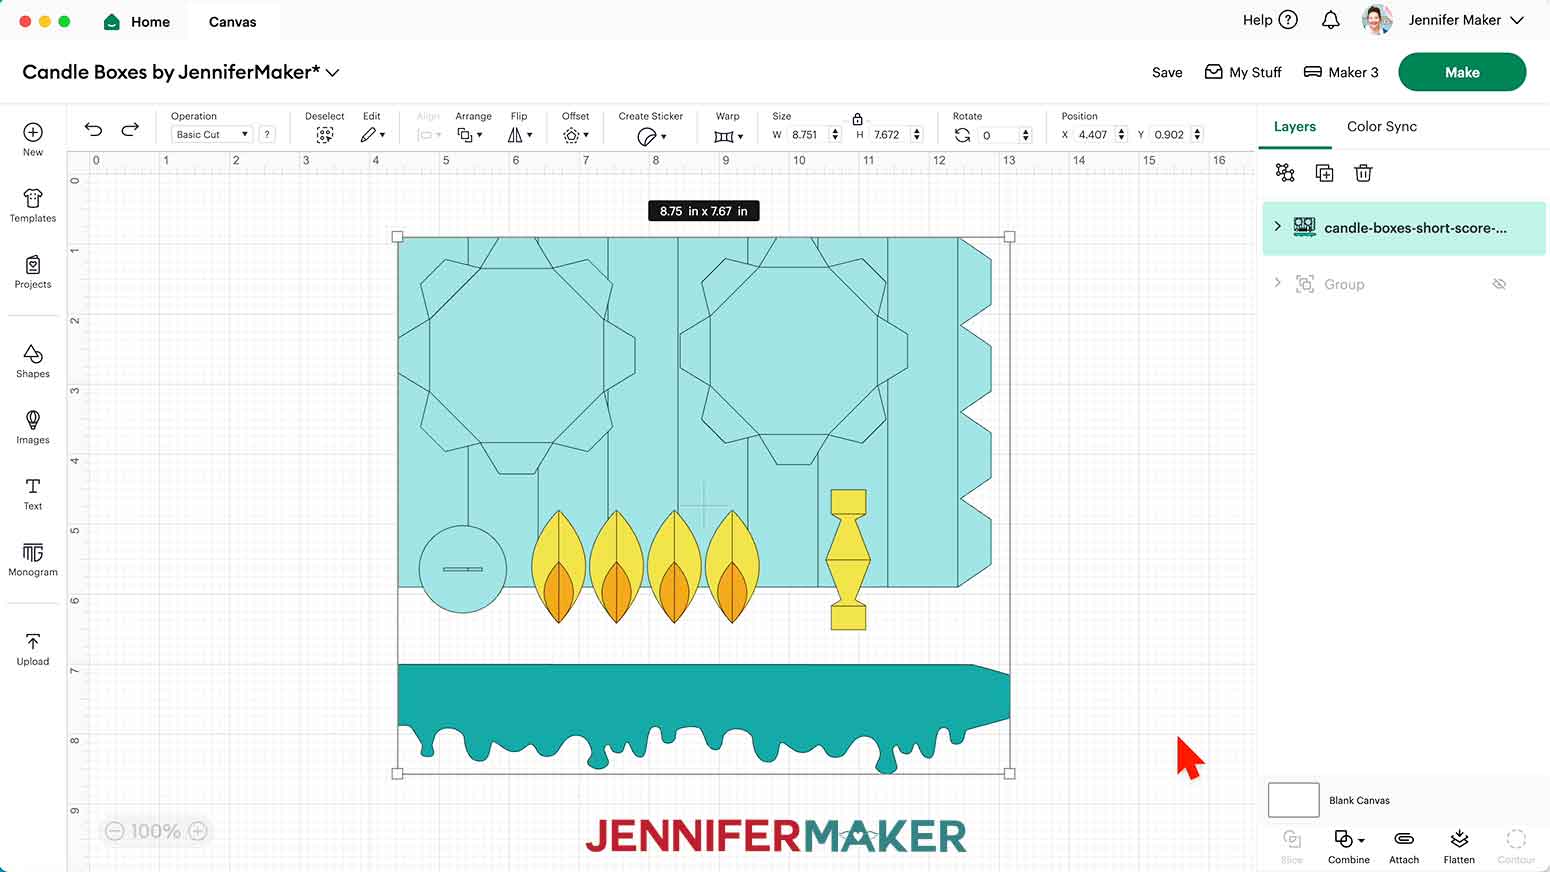
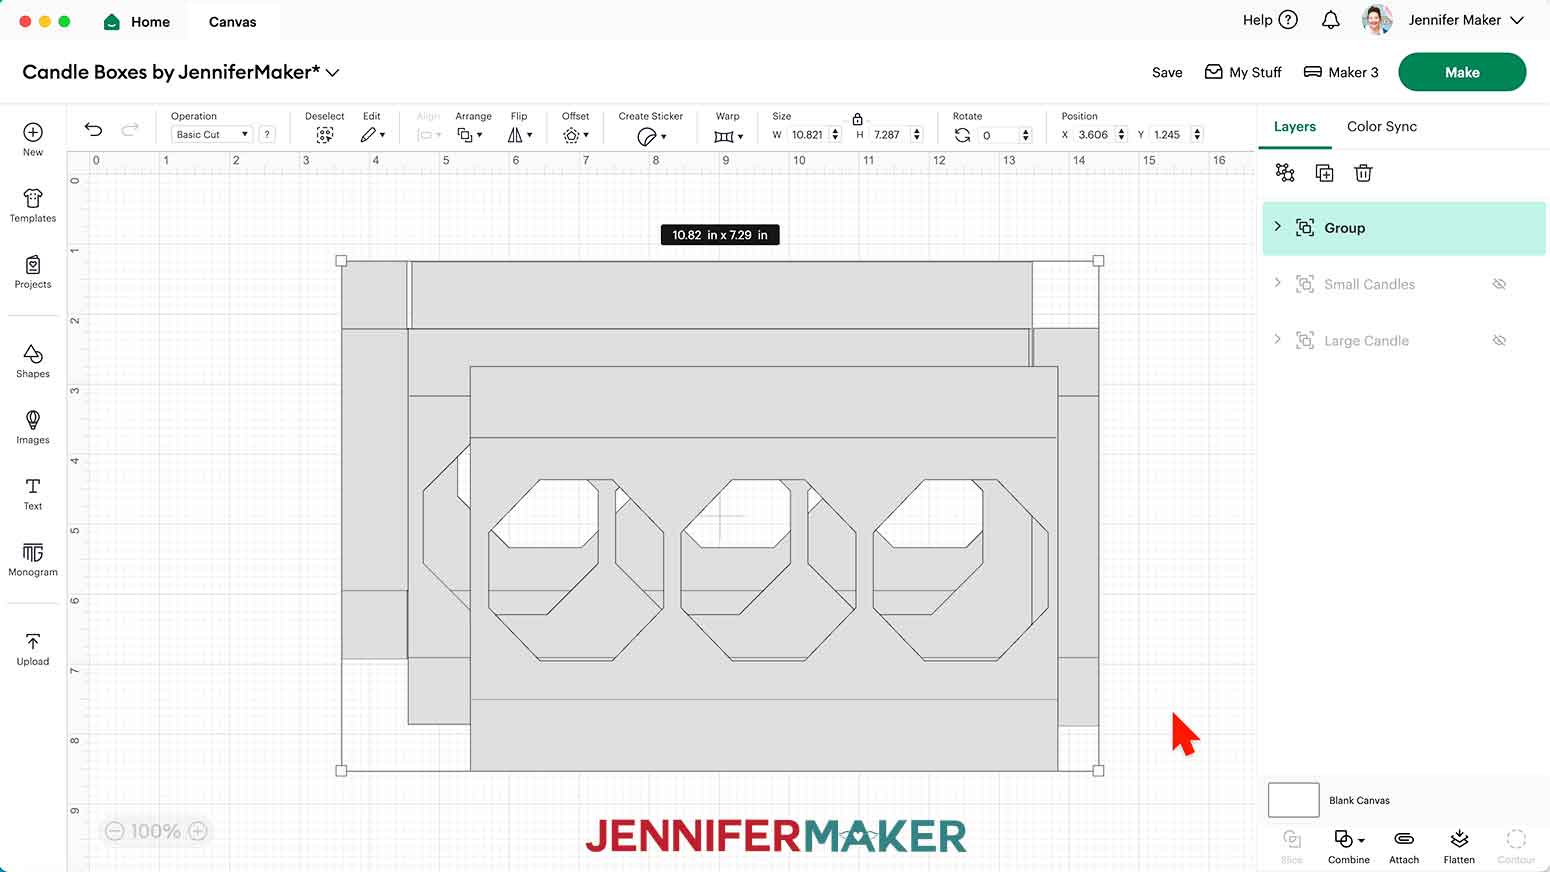
- The large rectangular piece will be the candle body, the larger octagonal piece with tabs will be the lid base, the smaller octagonal piece with tabs will be the candle base, the circle with a slit will be part of the flame assembly, the larger yellow ellipse shapes and the smaller orange ellipse shapes will be the flames, the single yellow piece will be the flame support piece, and the long shape with the drippy edge will be the drippy candle wax lid piece.

- Click “Save” and give your project a name.
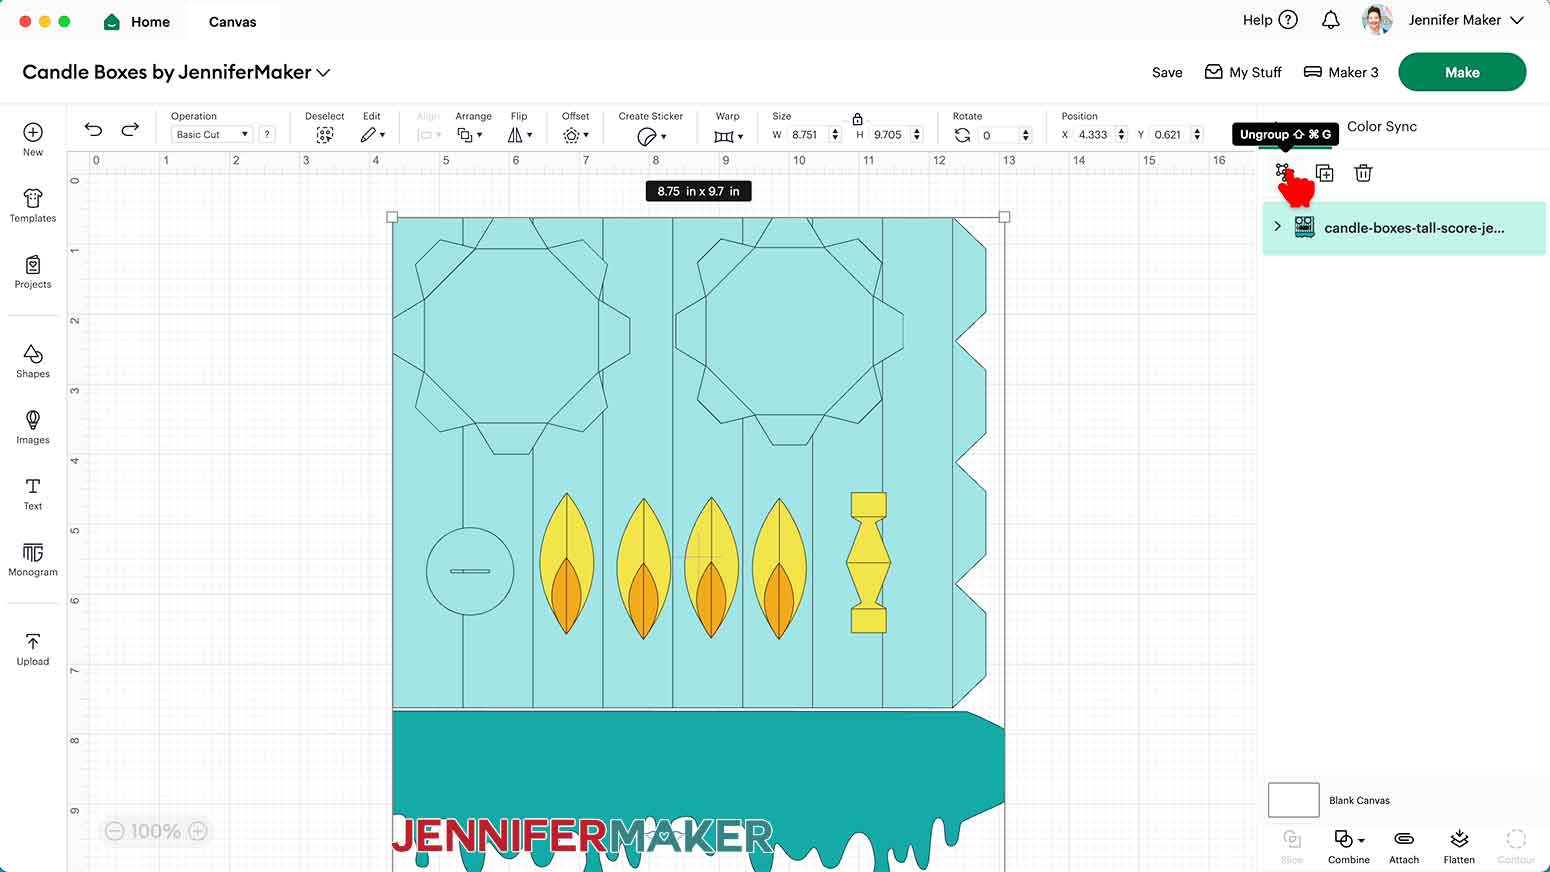
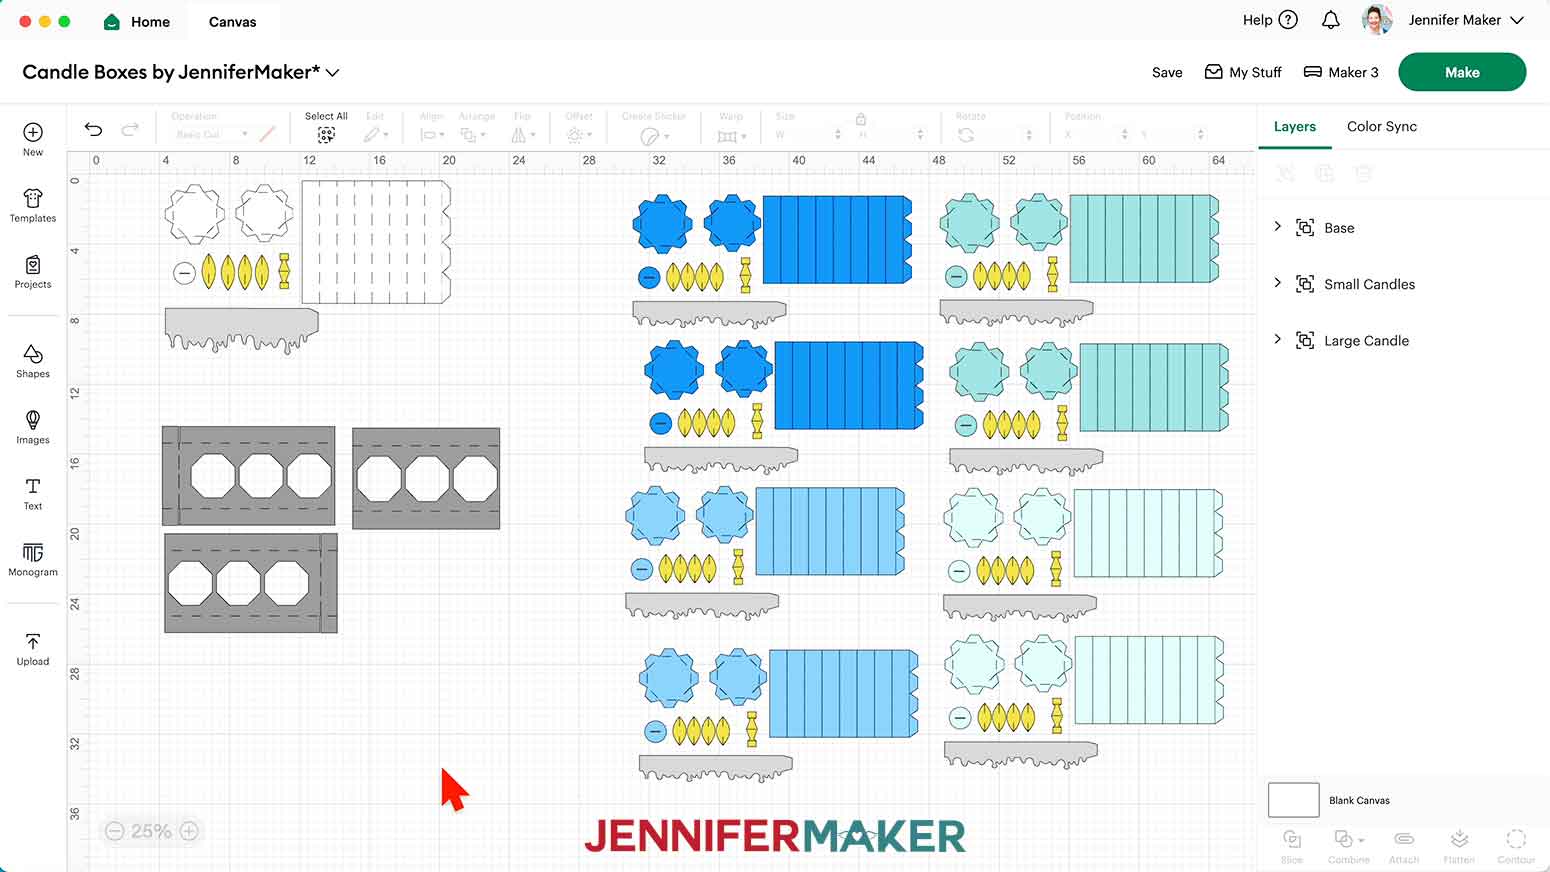
- Ungroup the design and spread the pieces out.
- To use different colors of cardstock for the pieces, scroll through the Layers Panel and click the arrows to expand any layer groups, then select the bottom colored layer in the group and use the Color Box at the top to pick a new color to match your cardstock. I changed the tall candle piece colors to white.
NOTE: If you want, change the color of the drippy wax piece, too. I set mine to gray to indicate glitter cardstock, ensuring it cuts on a different mat. - If you’re using the no-score version of the tall candle, skip ahead to step 18
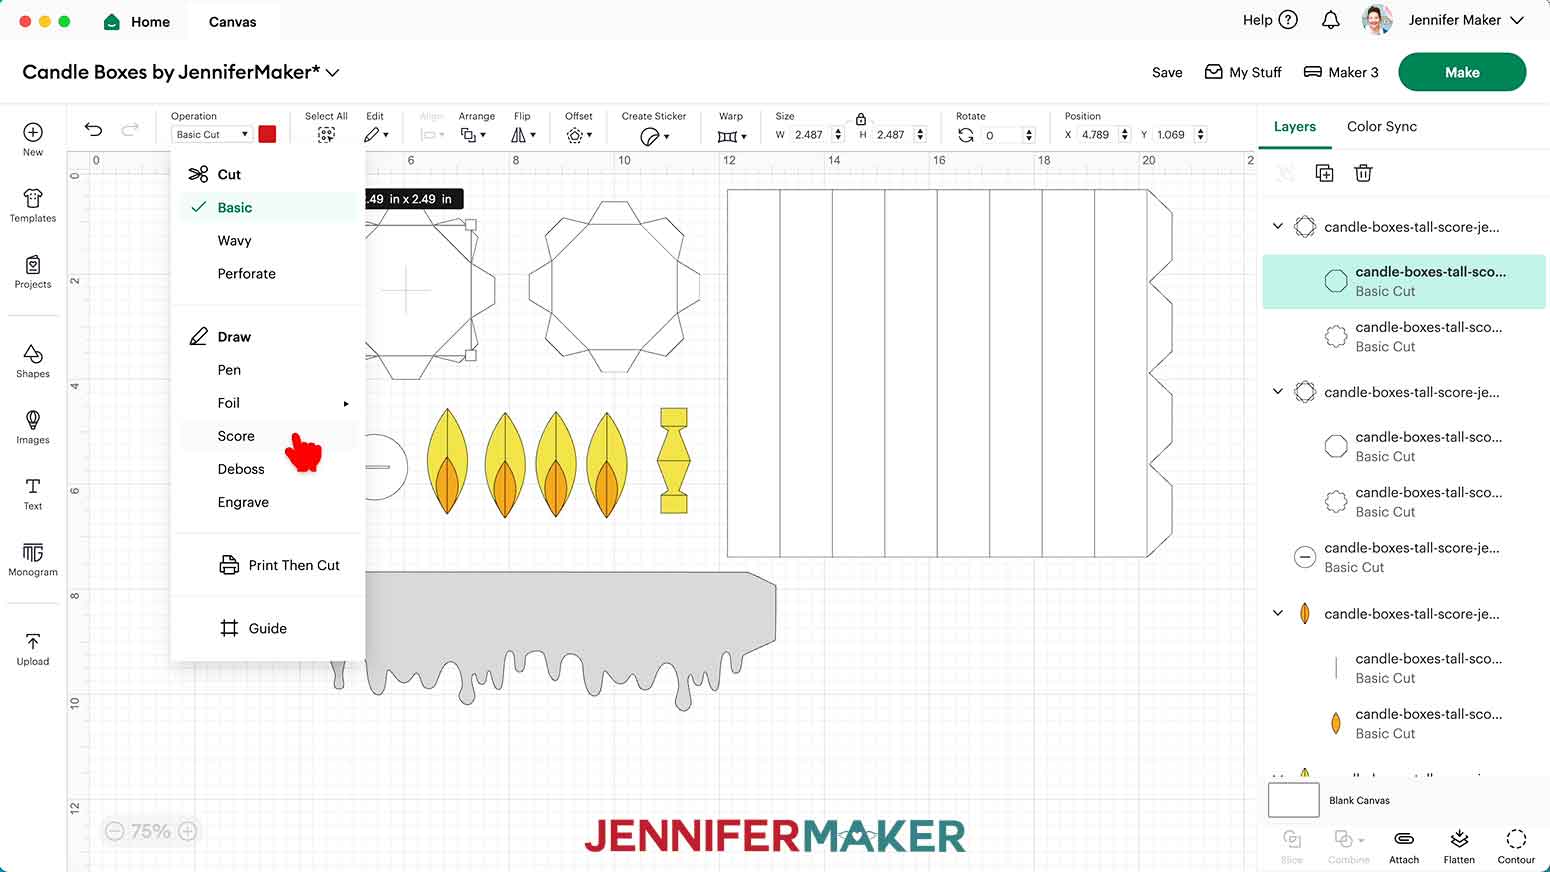
- If you’re using the score version of the candle, scroll through the Layers Panel and click the arrows to expand any layer groups if you haven't already.
- Find the top layer in the first group. It will look like black lines.
- Set the Operation to “Score.”
- Click the topmost layer of the expanded group to select both the Score layer and Basic Cut layer.
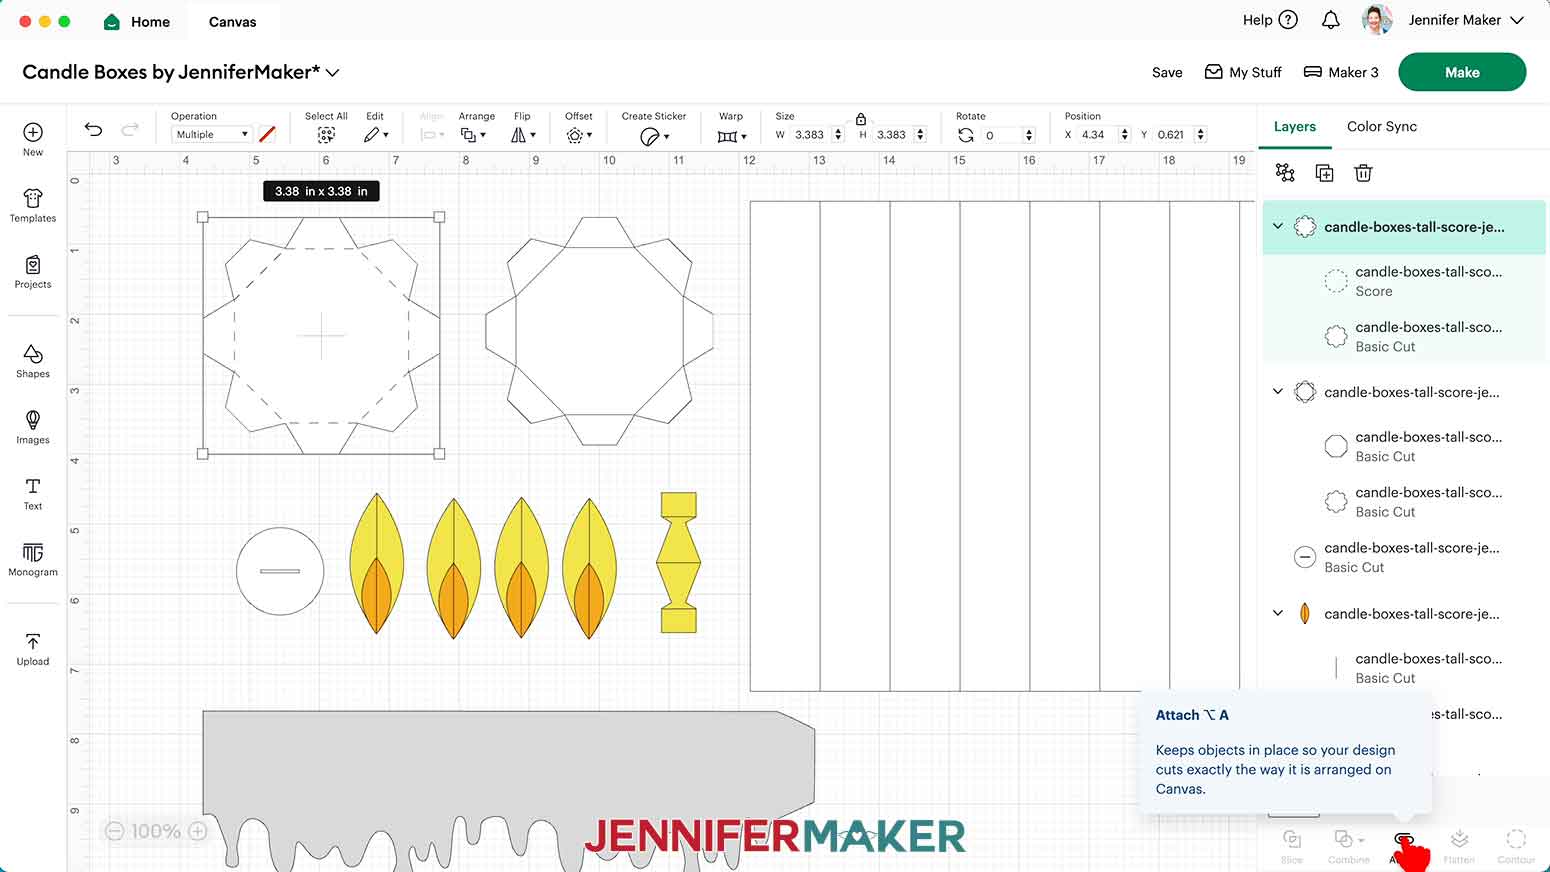
- Click “Attach” to attach the score line to its corresponding cut layer.
- Repeat steps 12-16 with the remaining 11 layer groups with score lines.
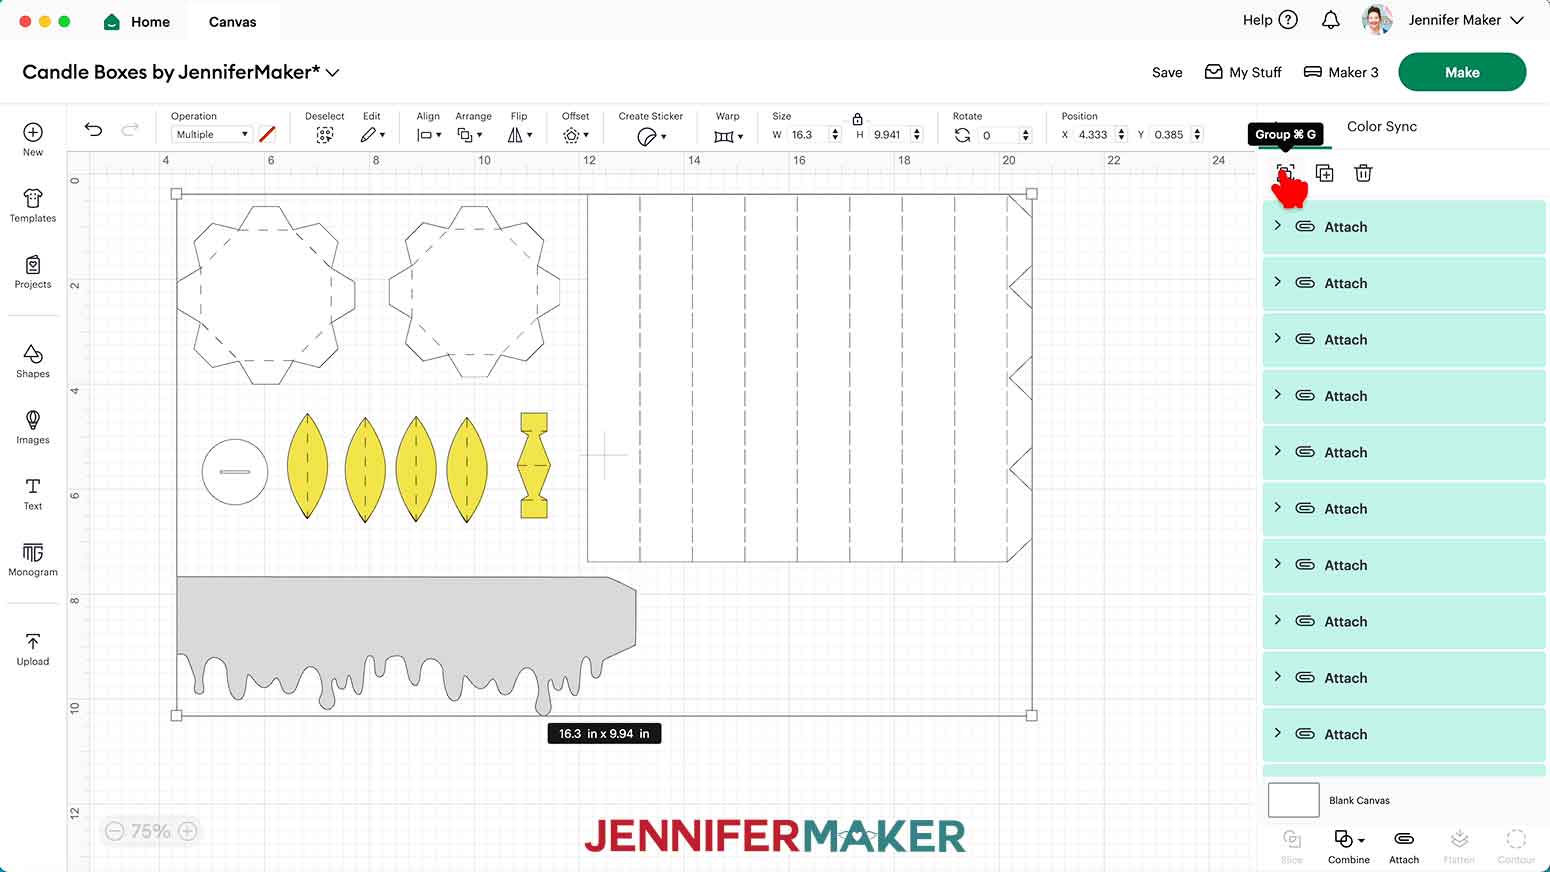
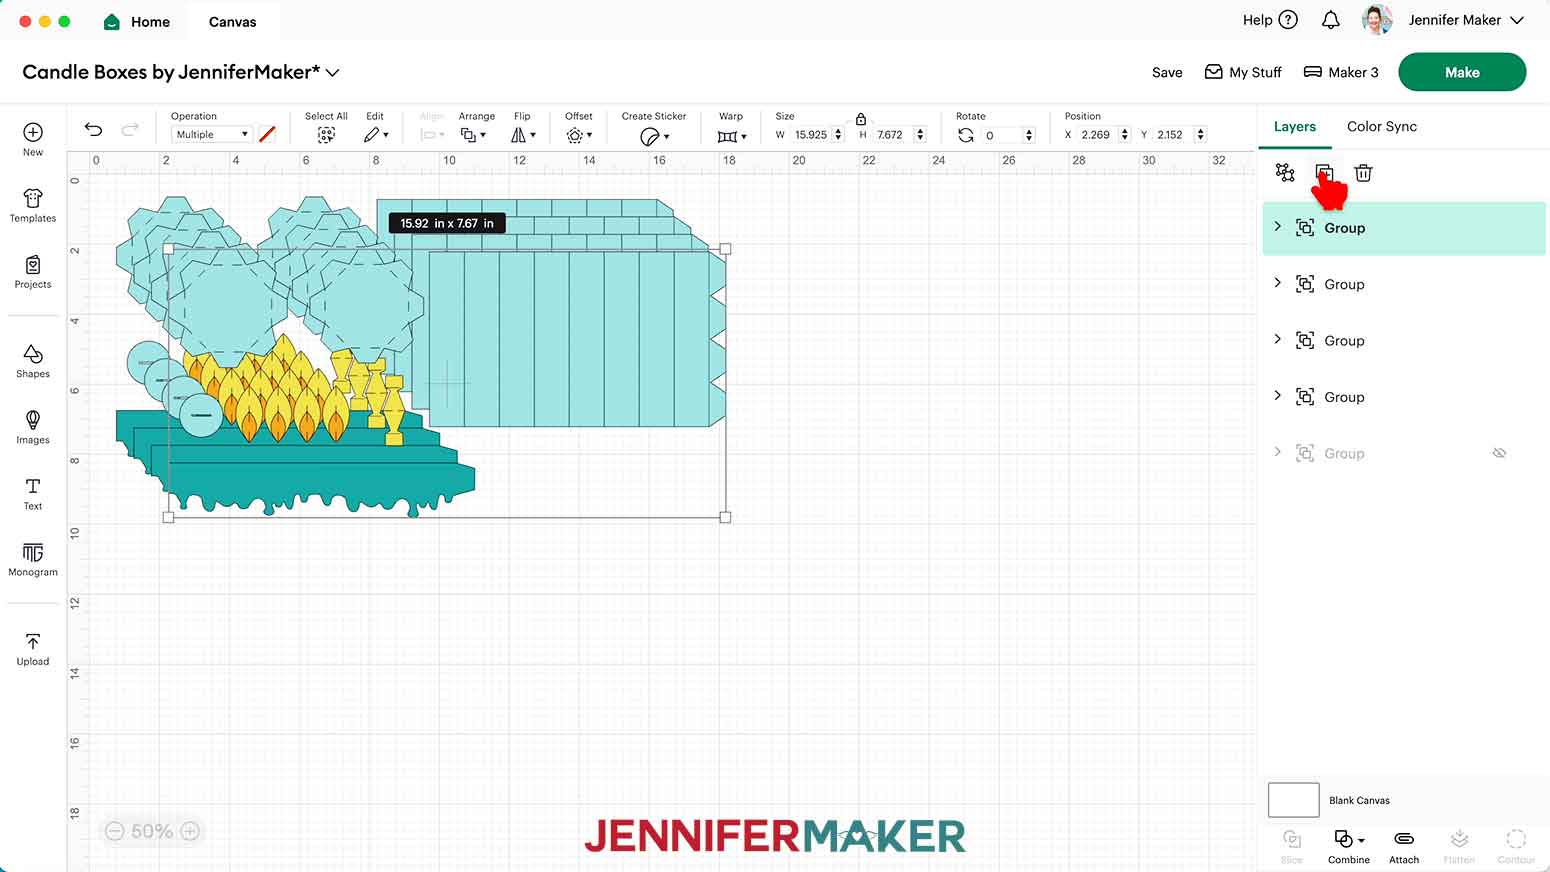
- Click “Select All” and then “Group” to group the entire tall candle design to keep the Layers Panel organized.
- Follow steps 1-6 to upload the “short” candle SVG. I used the score version.
NOTE: The large rectangular piece will be the candle body, the larger octagonal piece with tabs will be the lid base, the smaller octagonal piece with tabs will be the candle base, the circle with a slit will be part of the flame assembly, the larger yellow ellipse shapes and the smaller orange ellipse shapes will be the flames, the single yellow piece will be the flame support piece, and the long shape with the drippy edge will be the drippy candle wax lid piece. - Ungroup the design and drag the pieces apart.
- Drag a bounding box around the entire short candle design.
- Duplicate the short candle design three times, for a total of four sets.
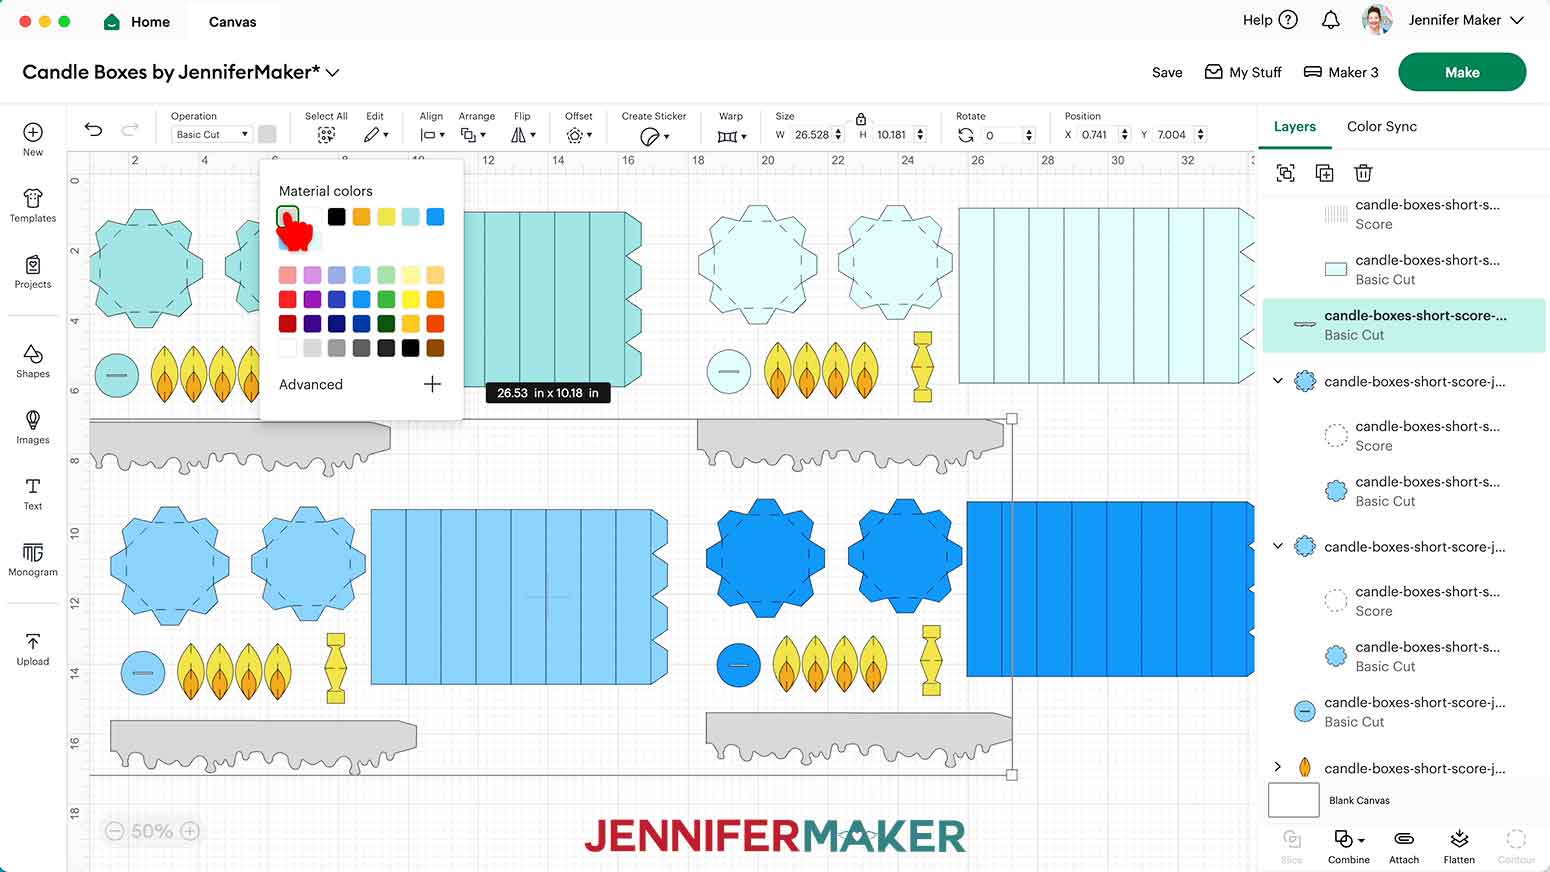
- To use different colors of cardstock for the pieces, scroll through the Layers Panel and click the arrows to expand any layer groups, then select the bottom colored layer in the group and use the Color Box at the top to pick a new color to match your cardstock. I changed the short candle pieces from three of the designs to different shades of blue to match my materials.
NOTE: If you want, change the color of the drippy wax pieces, too. I set mine to gray to indicate glitter cardstock, ensuring they cut on a different mat. - If you’re using the no-score version of the short candle, skip to step 26.
- If you’re using the score version of the short candle, follow steps 12-17 above to set and attach the score lines.
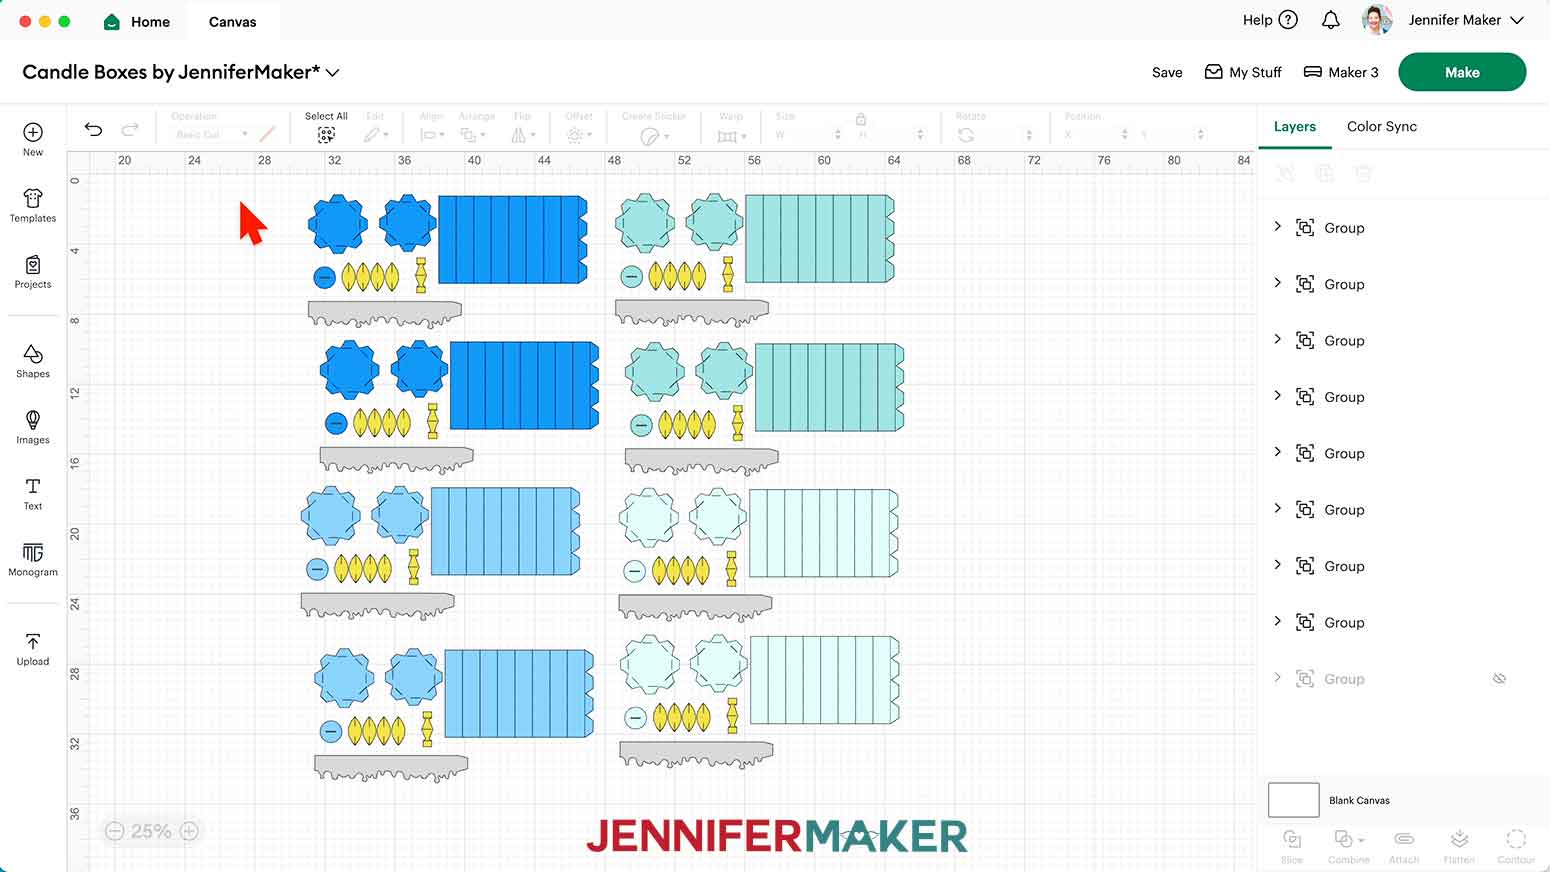
- Select all four of the short candle designs.
- Duplicate the four short candle designs once, so you have a total of eight sets.
- To make the optional menorah base, follow steps 1-6 to upload the “base” SVG. I used the score version. If you use the no-score version, skip to step 30.
NOTE: The base comes in three pieces. The piece with tabs on top and bottom is the middle piece, the piece with tabs on the top, bottom, and left will be the left piece, and the piece with the tabs on the top, bottom, and right will be the right piece. - Follow steps 9-17 above to set the score lines and change the base’s color if you want.
- Your menorah is ready to cut!
CUTTING
- Make sure the correct machine is selected.
- Click “Make” in the upper right corner of the screen.
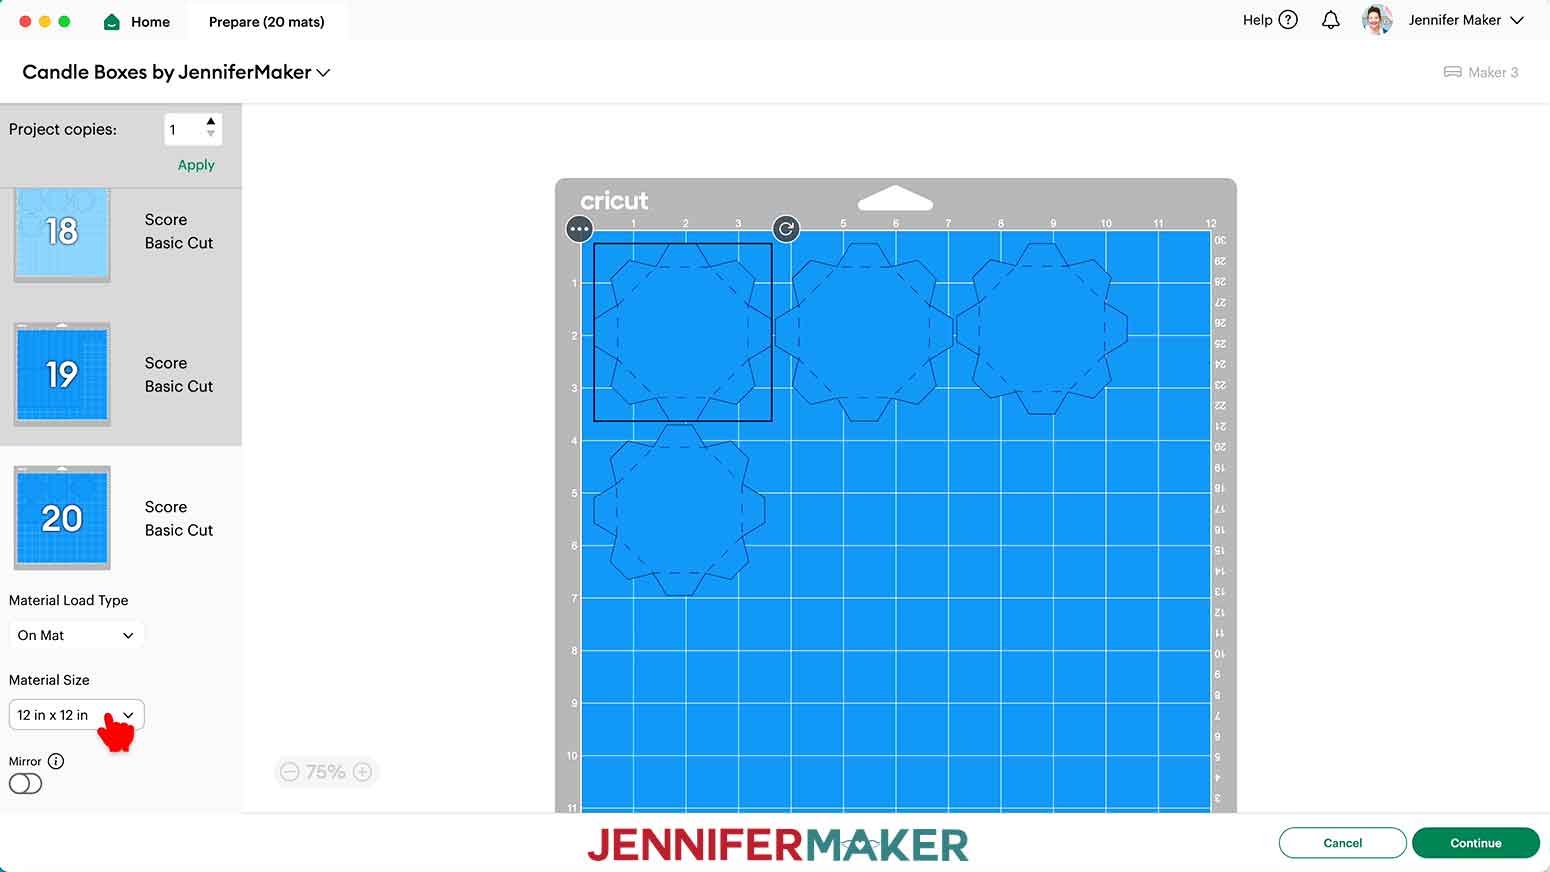
- On the Prepare screen, make sure that “On Mat” is selected.
- Set your Material Sizes to match your cardstock.
My white mats were cut from 8.5” x 11” shimmer cardstock, so I changed the Material Size on those mats to “8.5 in x 11 in (Letter)”.
My orange and yellow mats were cut from 4” x 6” cardstock, so I changed the Material Size on those mats to “4 in x 6 in”.
My blue and gray mats were all cut from 12” x 12” cardstock, so I left the Material Size for those mats as is. - Click “Continue.”
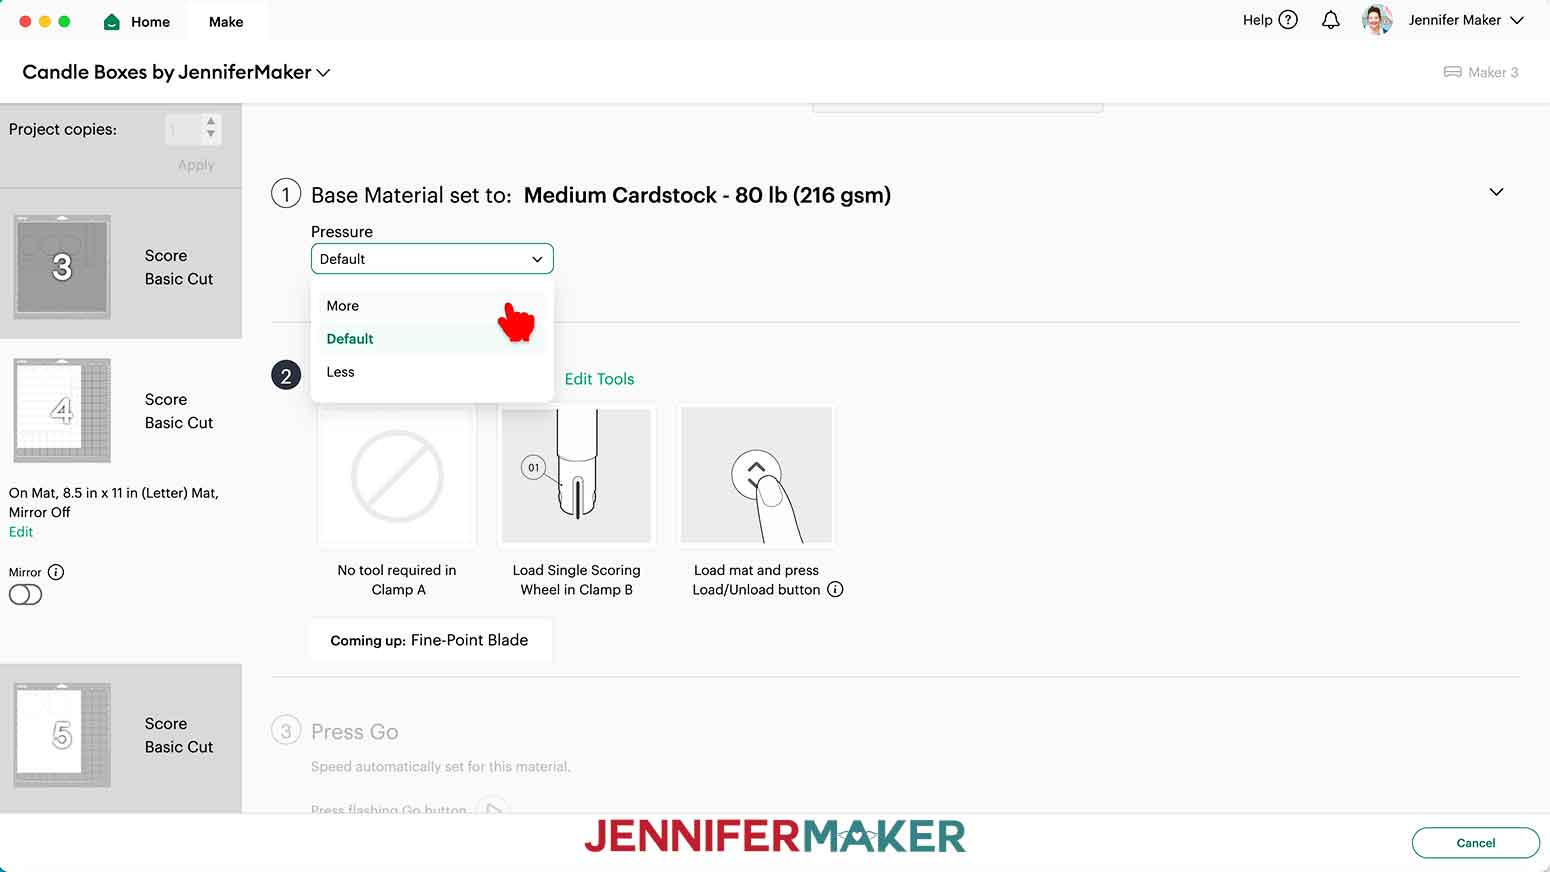
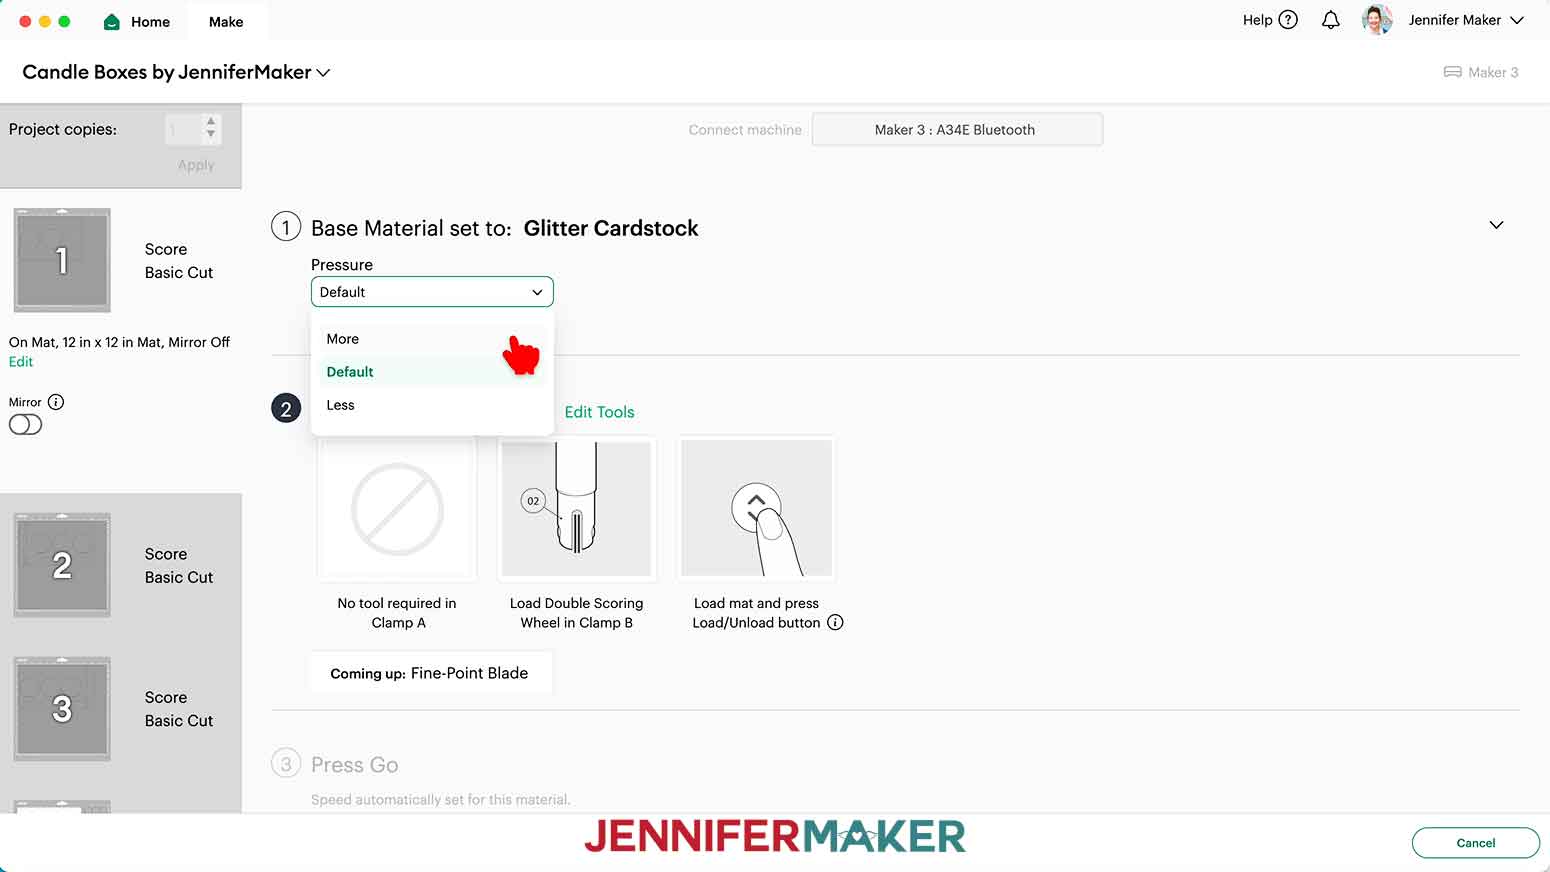
- On the Make screen, I used the following settings:
Plain, shimmer, and foil cardstock: “Medium Cardstock - 80 lb (216 gsm)” setting with “More” Pressure.
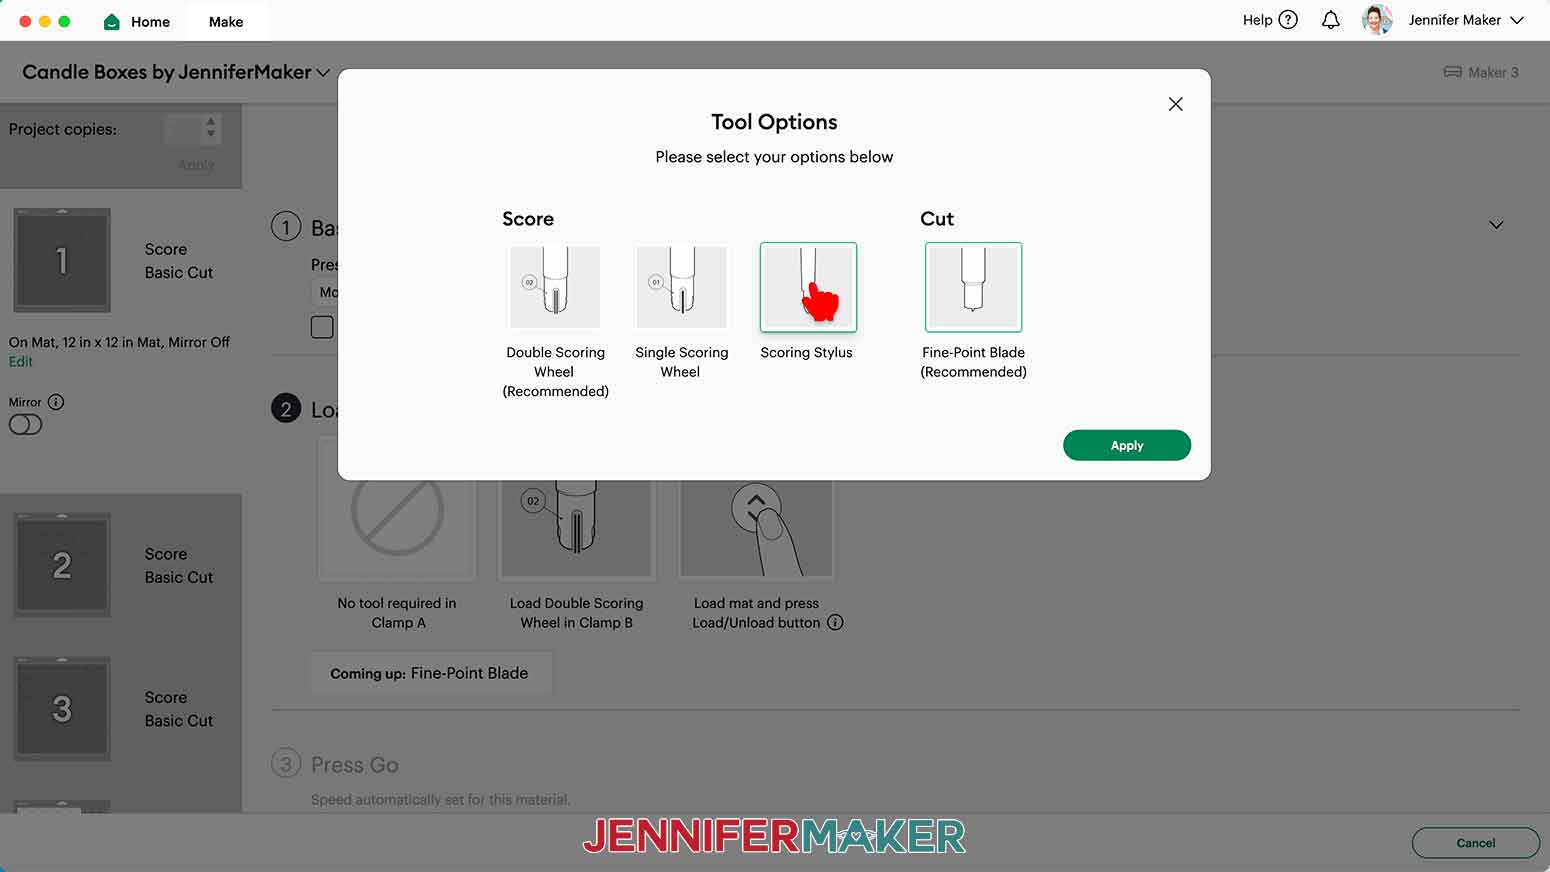
Glitter cardstock: “Glitter Cardstock” setting with “More” Pressure. - If you’re using a scoring tool, make sure the correct one is selected under “Load tools and material.” If not, click “Edit Tools” and select the correct scoring tool. If you’re not using a scoring tool, skip this step.
TIP: If all of your materials use the same cut setting, check the box next to “Remember material settings” on your first mat to apply the settings to all of the mats. If you’re using a scoring tool, be sure to check the box AFTER you’ve finished step 7 above. - Place your first mat’s cardstock face up on a green StandardGrip machine mat so it covers the design area on the screen.
- Use your brayer to smooth the sheet down and make sure it’s adhered well.
- Make sure your Premium Fine Point Blade is clean and in the correct clamp.
- Insert your prepared mat into your cutting machine so it matches the screen’s orientation, and press the flashing button to load it.
- Press the flashing middle button to begin the cuts.
- When it has finished cutting, don’t unload the mat just yet. Instead, gently lift a corner of the design to see if the cut went all the way through the sheet in the correct spots.
- If it’s not cut through, smooth the material back down and press the middle “Go” button again so your Cricut can go back over the cuts one more time.
- When the cut is finished, press the flashing button to unload the mat.
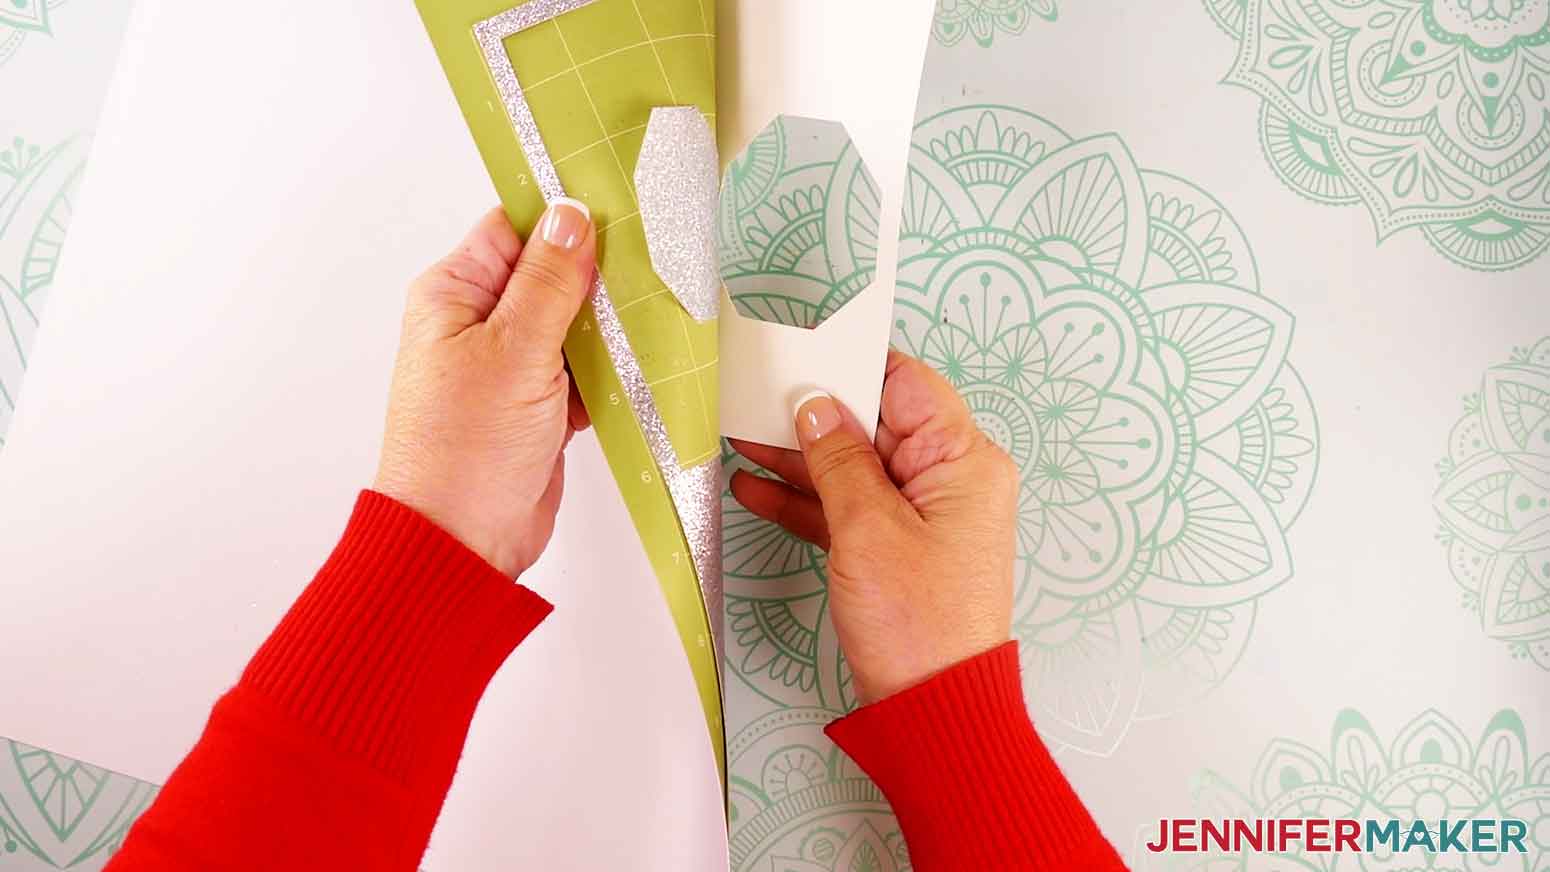
- Flip your mat over and peel it away from the cardstock.
NOTE: If making multiple candles, separate each of the candles’ pieces into a separate pile to make assembly easier. The tall candle uses a larger candle body, flame, and drippy wax pieces, and the short candle uses smaller versions of these parts. - Repeat steps 8-16 for the other mats.


STEP 3: ASSEMBLE YOUR CANDLE BOXES
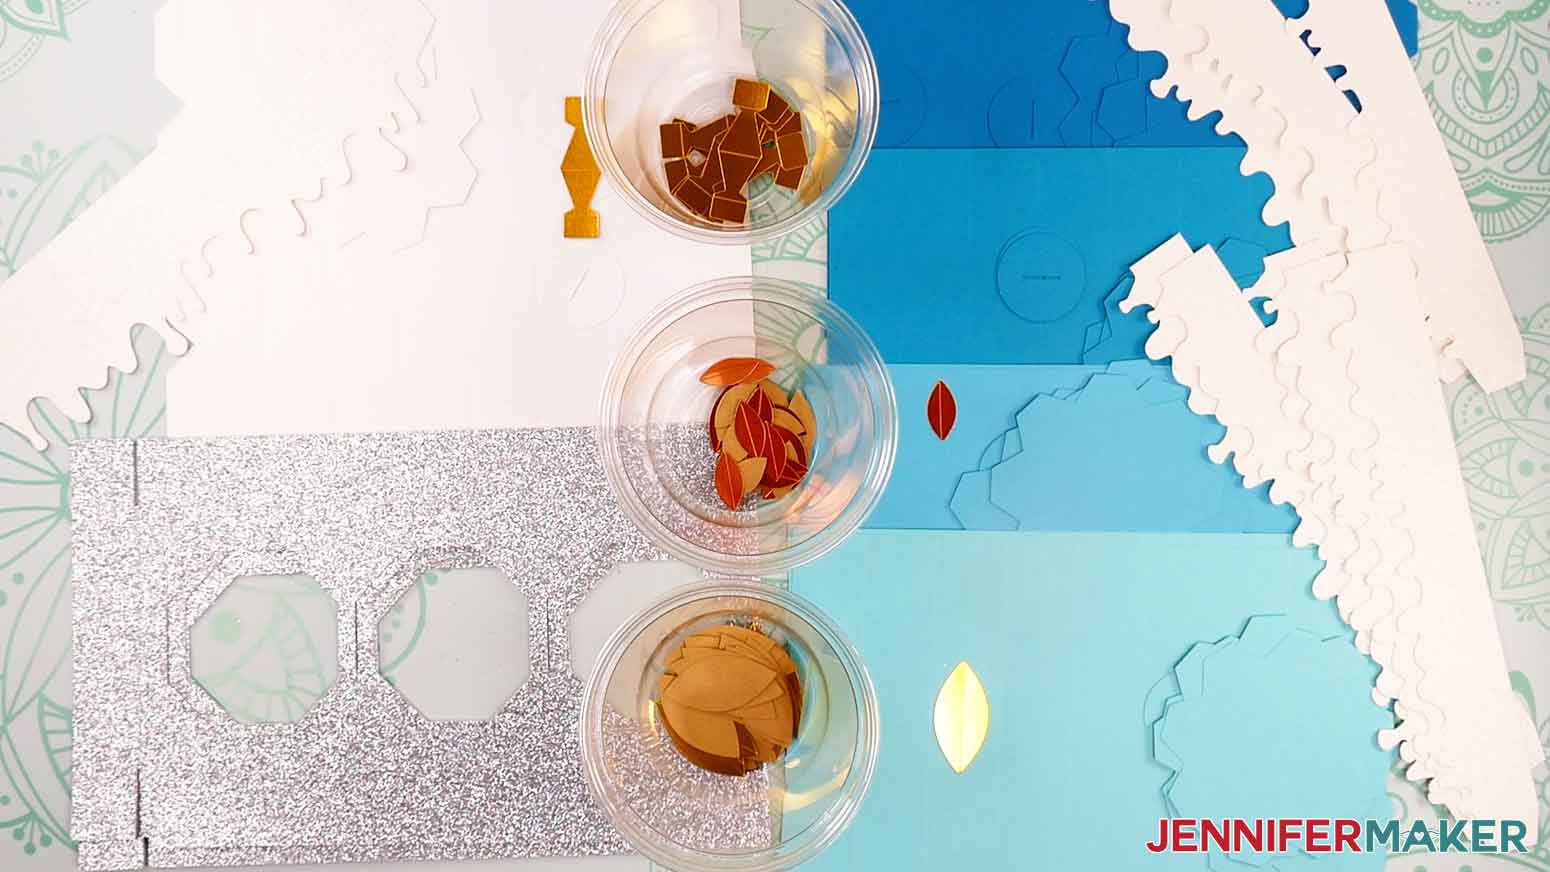
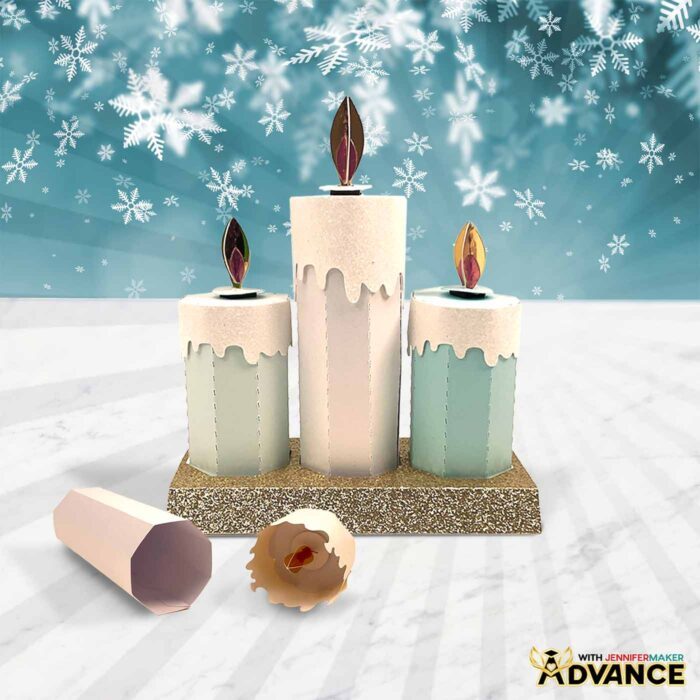
Each candle has a large rectangular piece for the “body” of the candle, two base or lid pieces with eight tabs each, a small circular piece with a slit, four larger flame pieces, four smaller flame pieces, a flame support piece, and a drippy wax piece.
I’ll demonstrate with the tall candle, but the short candle pieces assemble the same way.
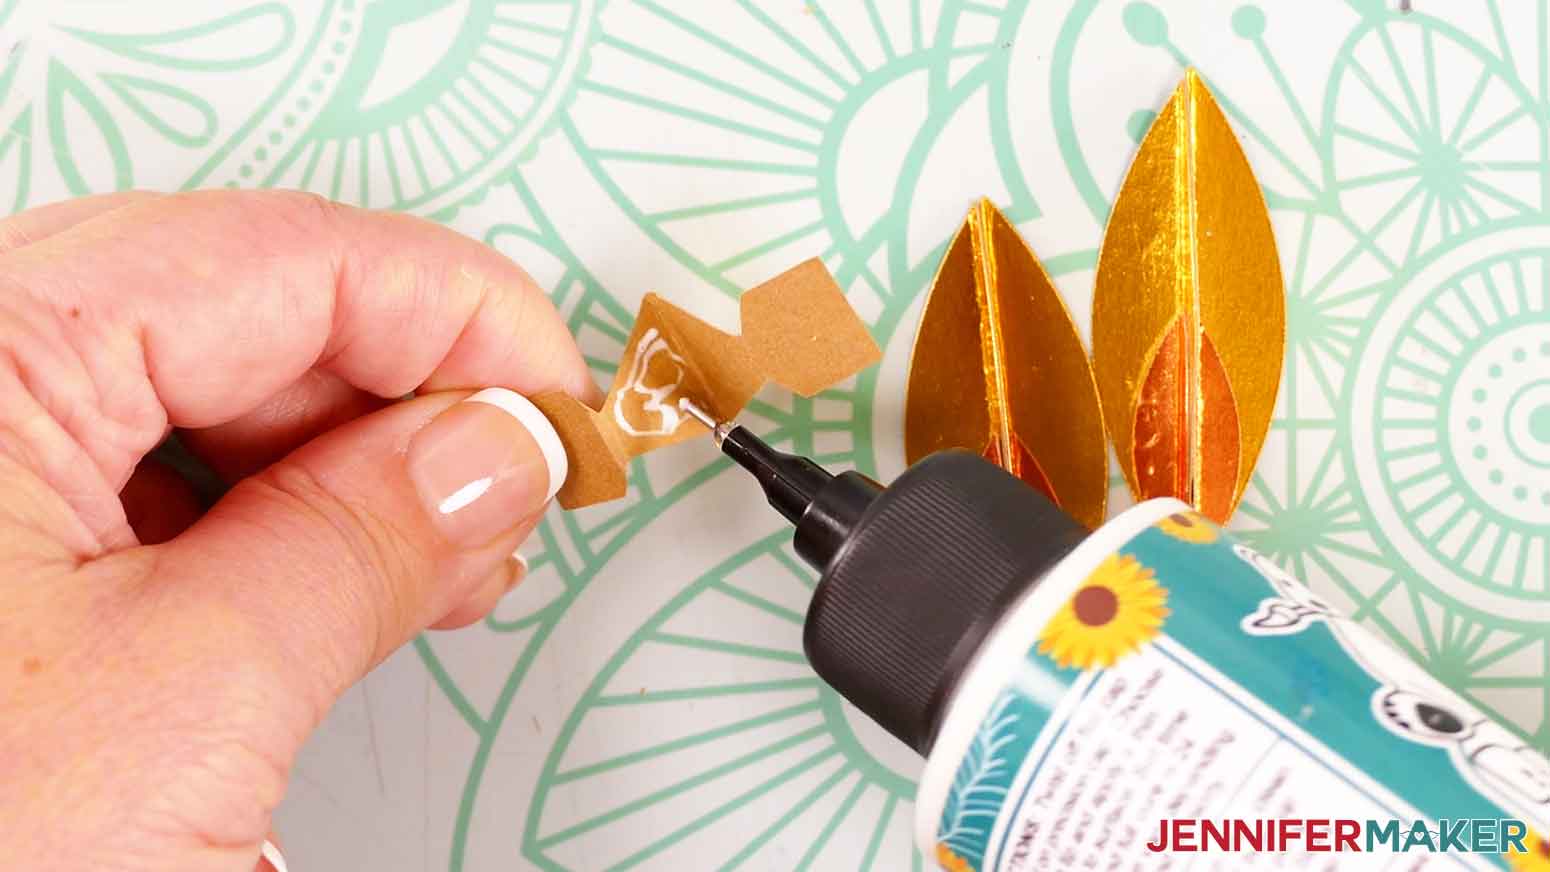
- Grab the flame pieces. Fold and crease each smaller and larger almond-shaped flame piece inward along its score line (or dashed cut line if you used the no-score version).
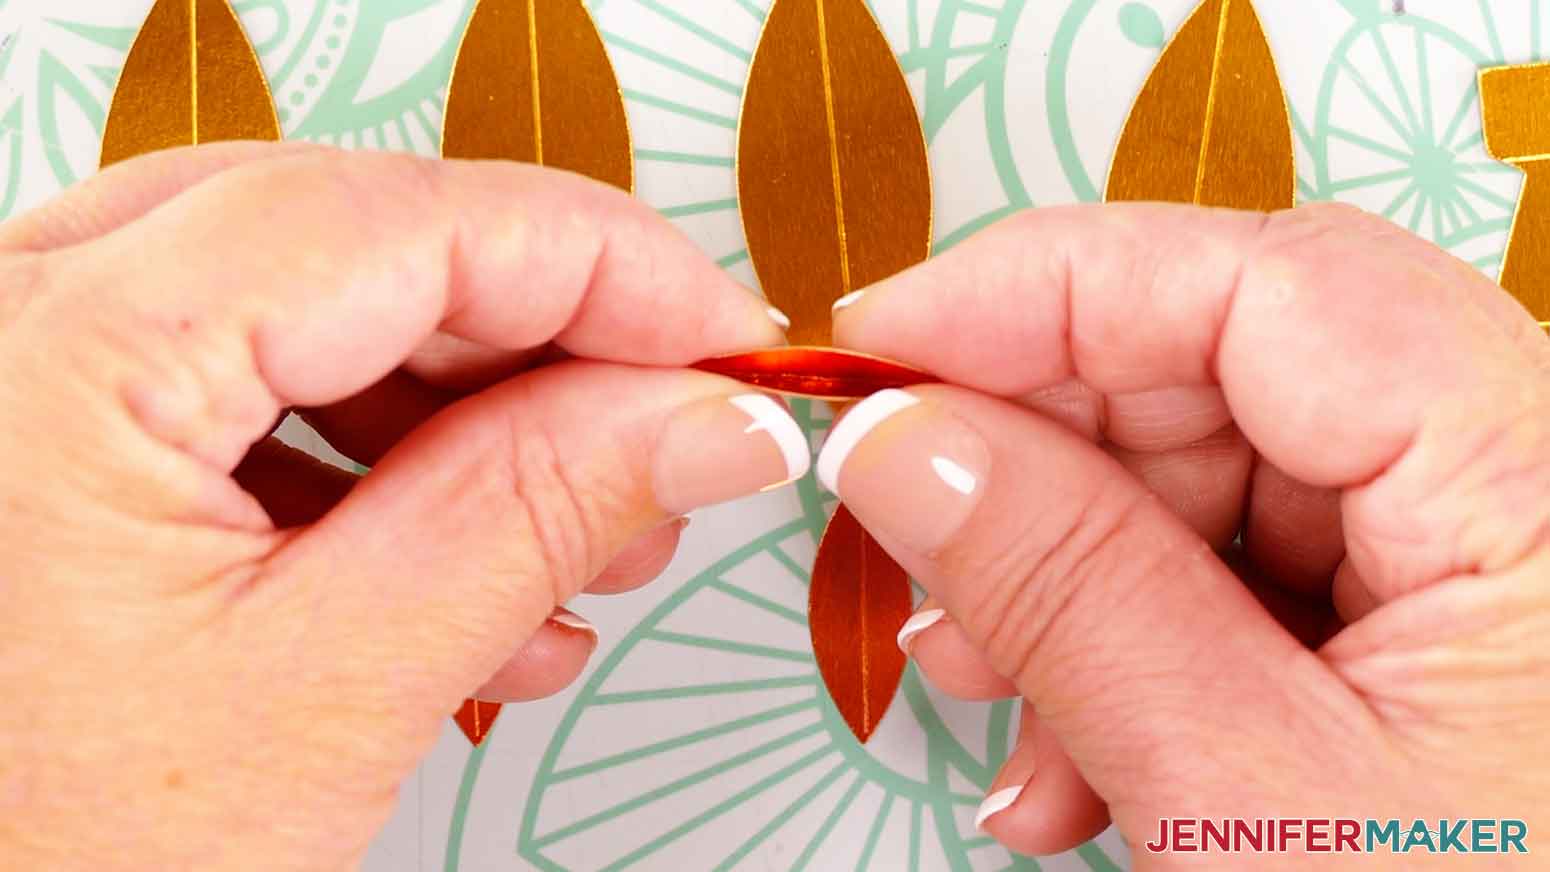
- On a larger flame piece, apply a small line of craft glue along the end of approximately one third of the inner crease.
- Grab a smaller flame piece and, aligning the folds, press it onto the glue at the end of the larger piece. Make sure the tips of the large and small flame pieces align. Hold the pieces together for several seconds until the glue sets.
TIP: If any glue seeps out, wipe it away quickly with your finger. - Repeat steps 2-3 with the remaining flame pieces.
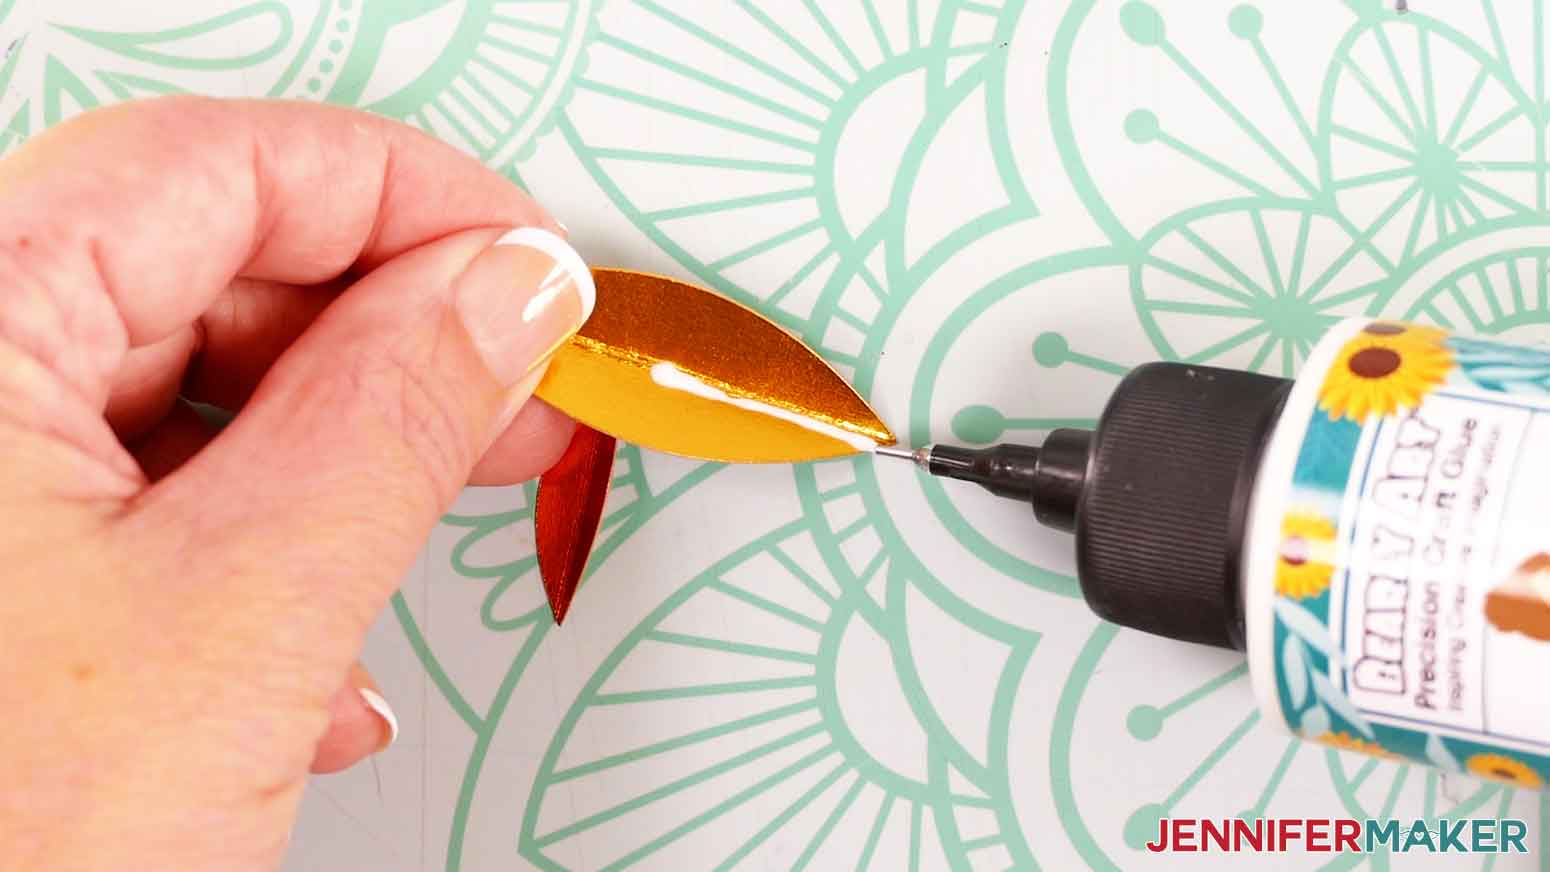
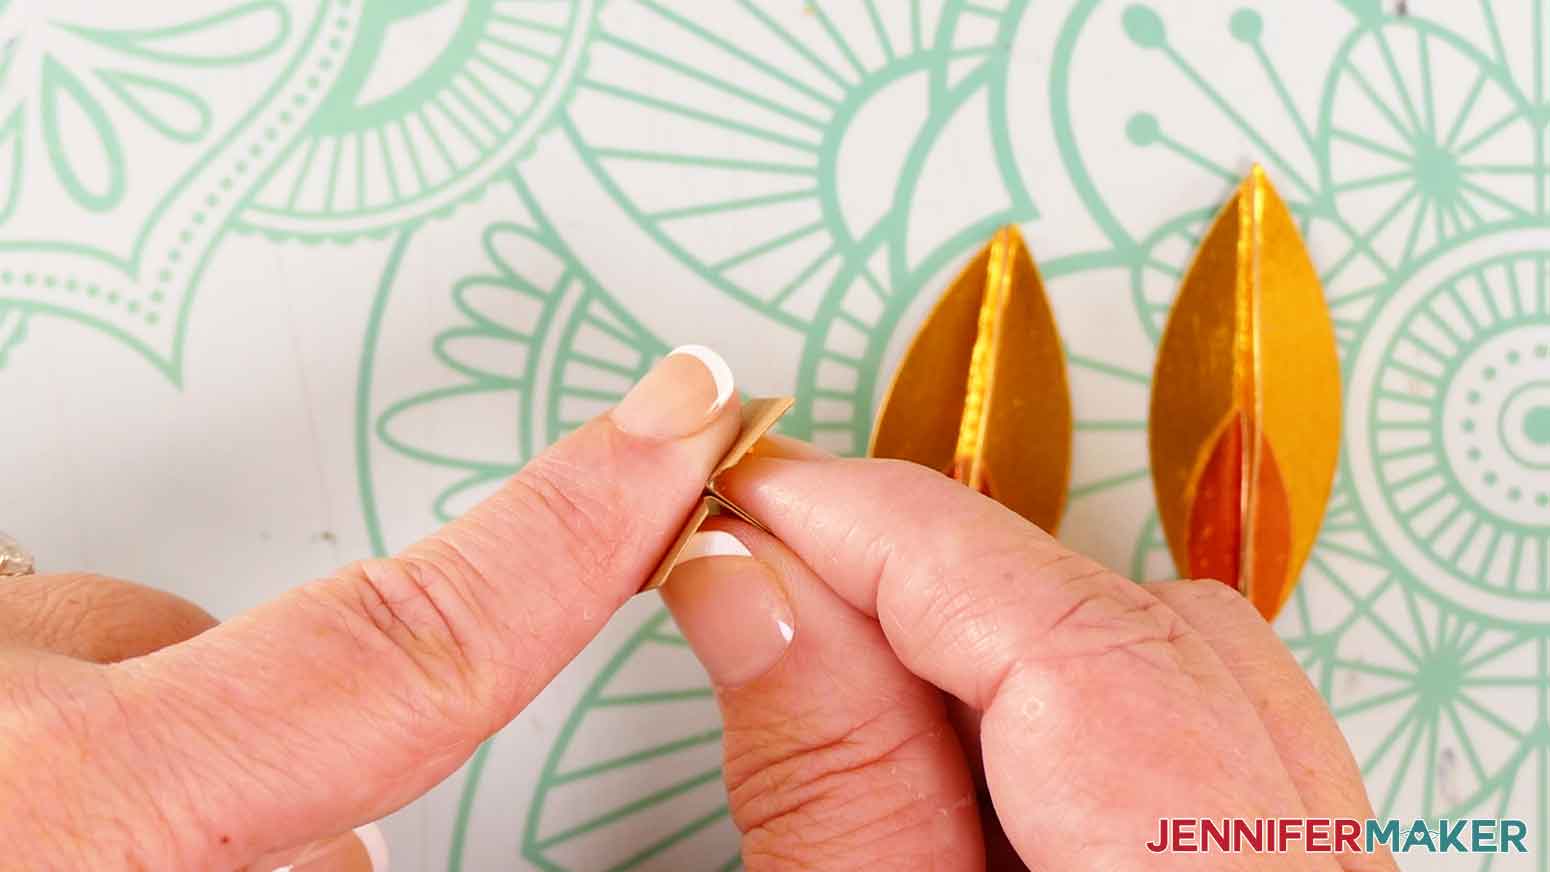
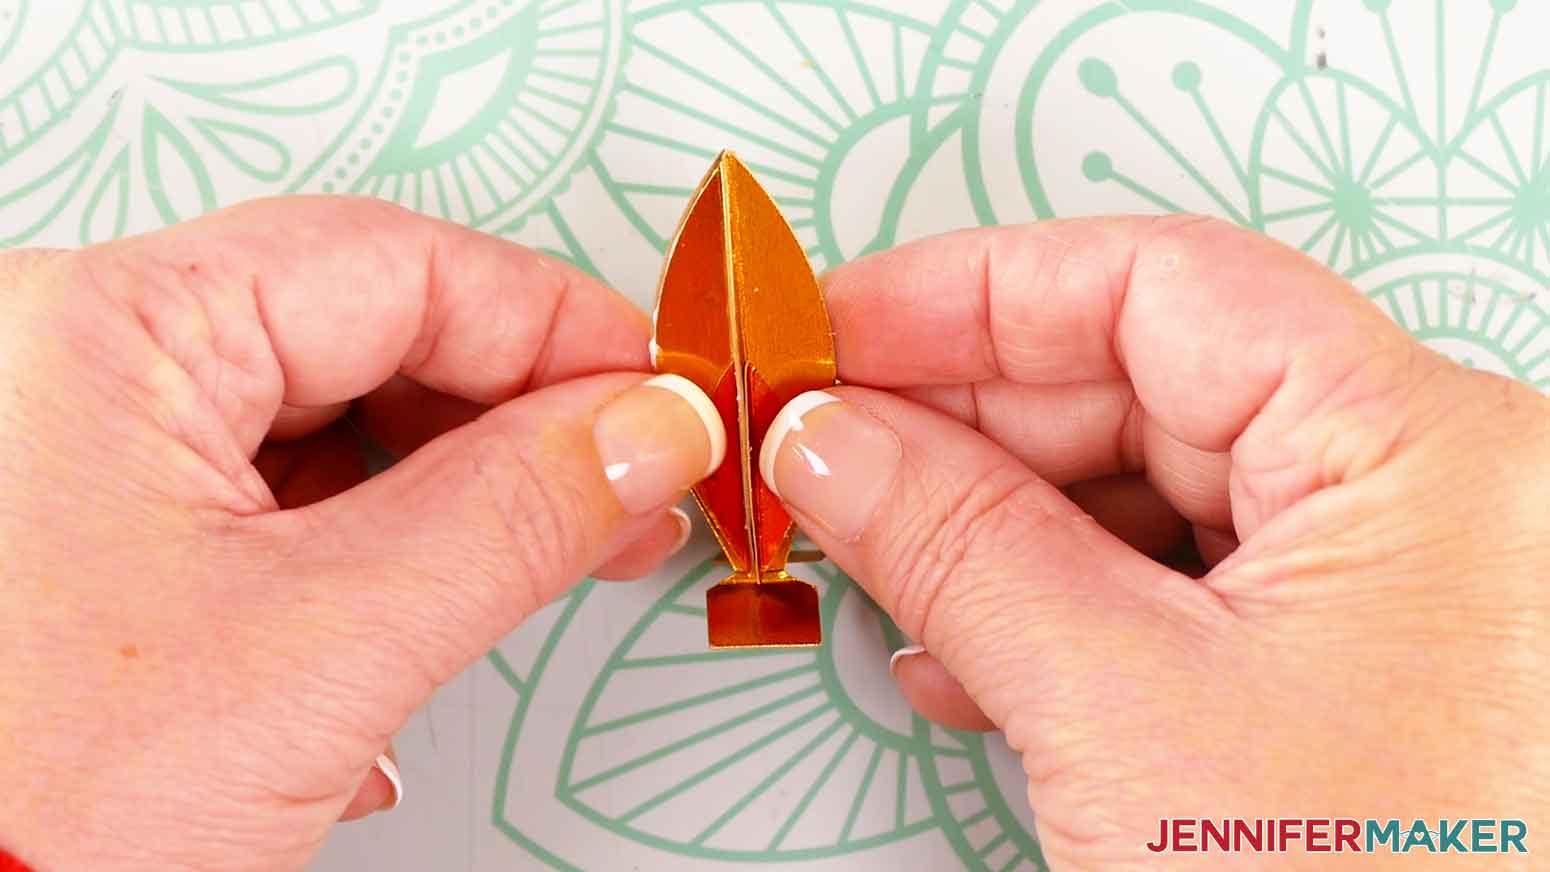
- Apply craft glue to the back of one half of one assembled flame piece.
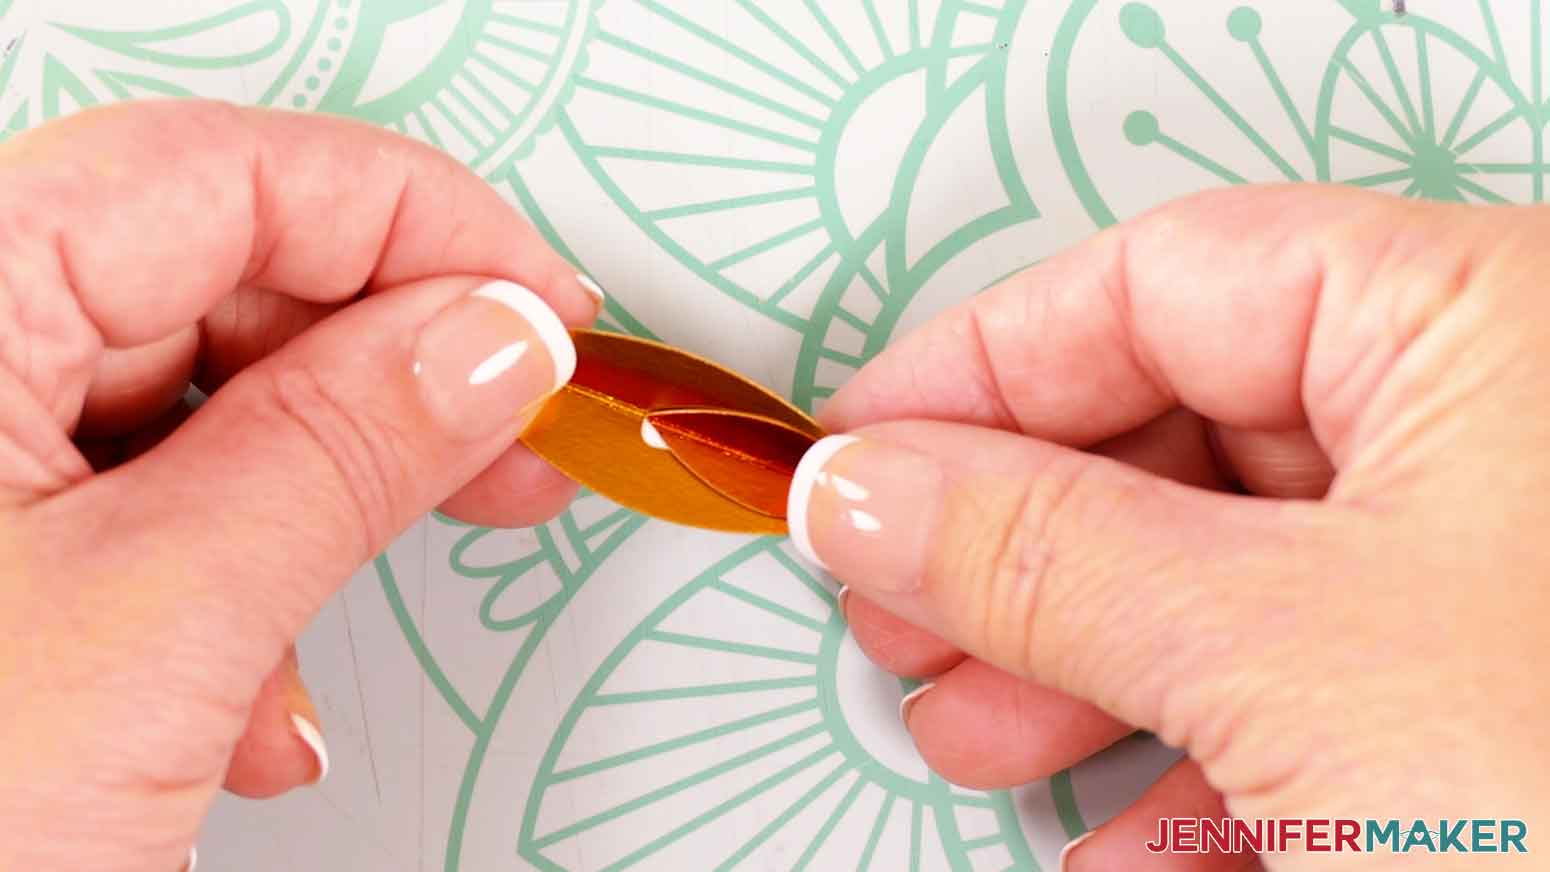
- Position another assembled flame piece so both small flame accents are at the bottom and facing outward
- Press the back half of the unglued flame piece onto the glued half of the other. Hold the pieces together for several seconds until the glue sets.
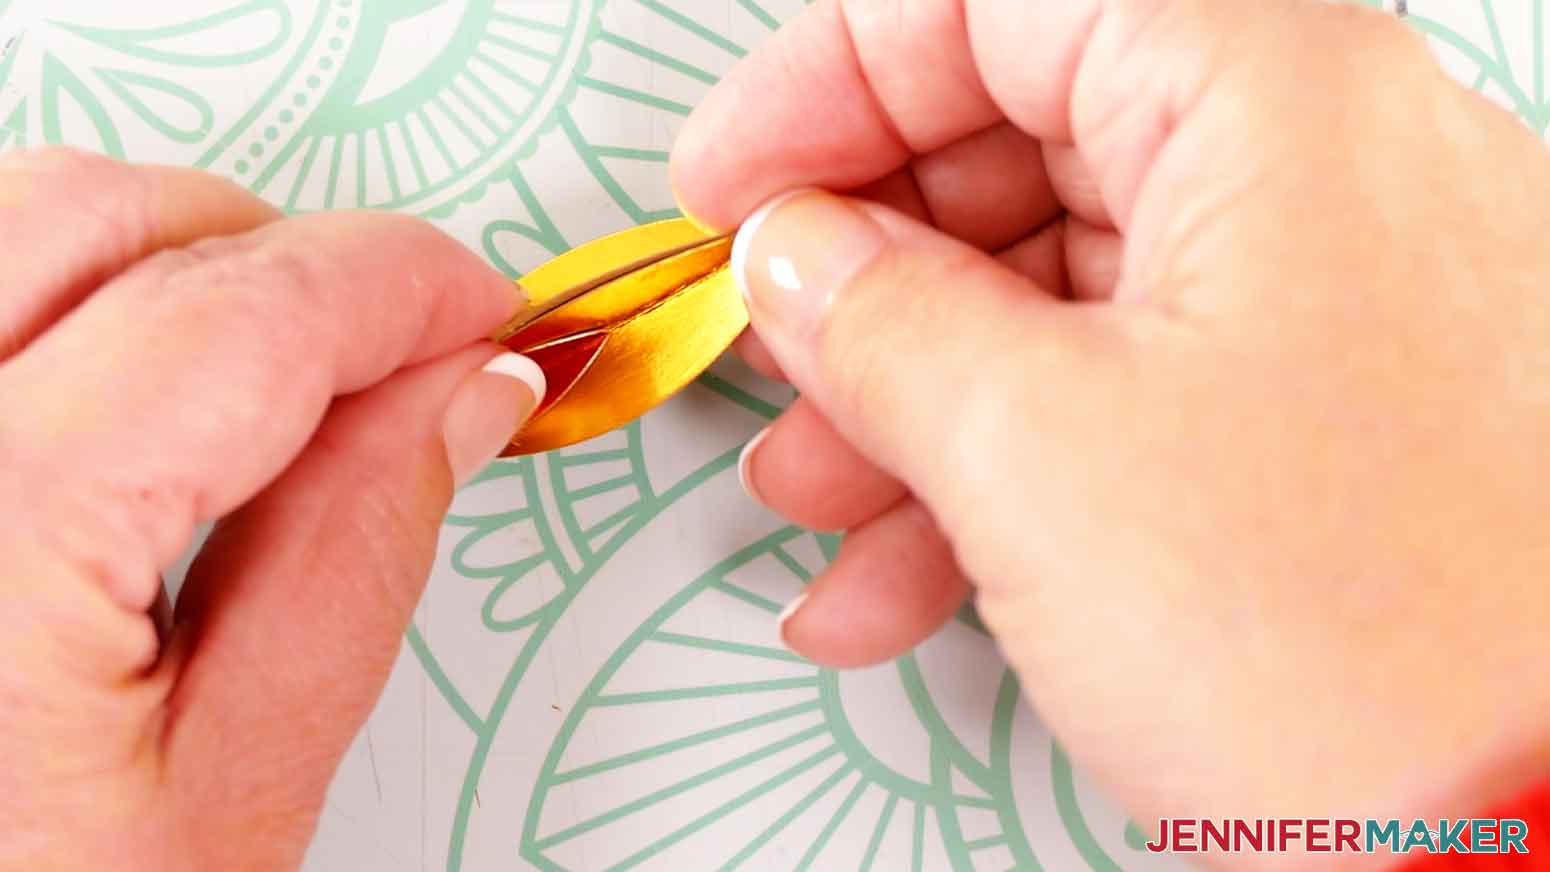
- Repeat step 5-7 with two more assembled flame pieces.
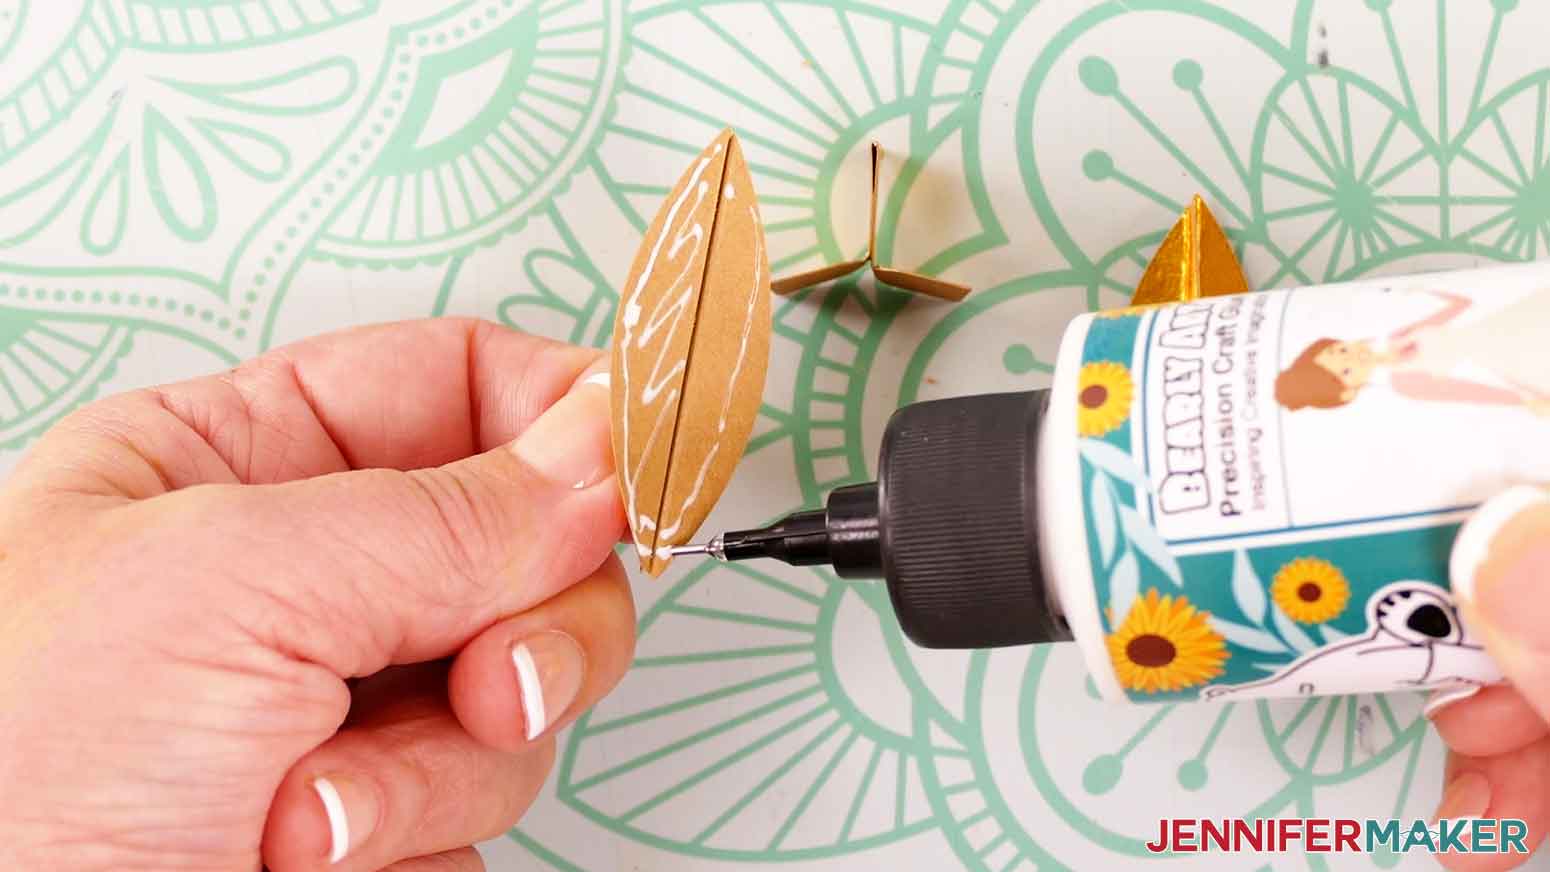
- Fold and crease the flame support piece in half along the scored or dashed line so the pretty side is facing out.
- Apply glue to the inside of one half of the flame support piece. Do not apply glue to the rectangular-shaped areas.
- Press the halves together and hold until the glue sets.
- Fold back the rectangular portions in opposite directions along their crease lines.
- Apply glue to the back side of two assembled flame pieces.
- Line up the bottom point of the flame piece with the crease on one side of the flame support piece. Press the support piece onto the glue.
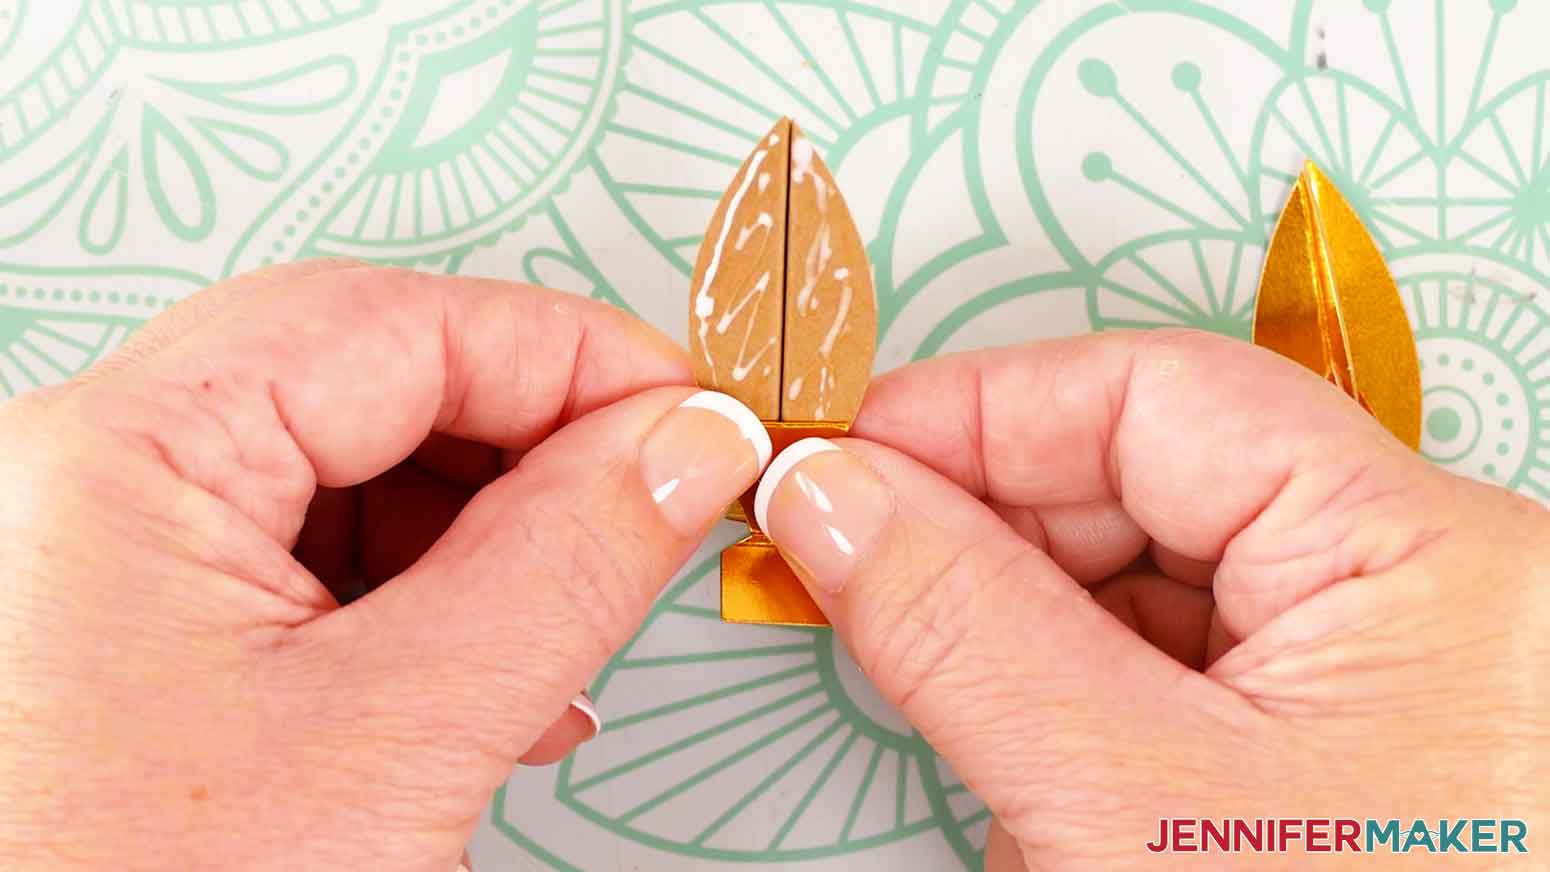
TIP: Foil cardstock can be more difficult to adhere using craft glue. Press the pieces together firmly and wait until the glue sets before moving on to the next step. - Apply glue to the exposed triangular-shaped area of the flame support piece.
- Grab the other assembled flame piece and press it onto the glue, aligning the edges of this flame with the edges of the first flame to complete the flame piece.
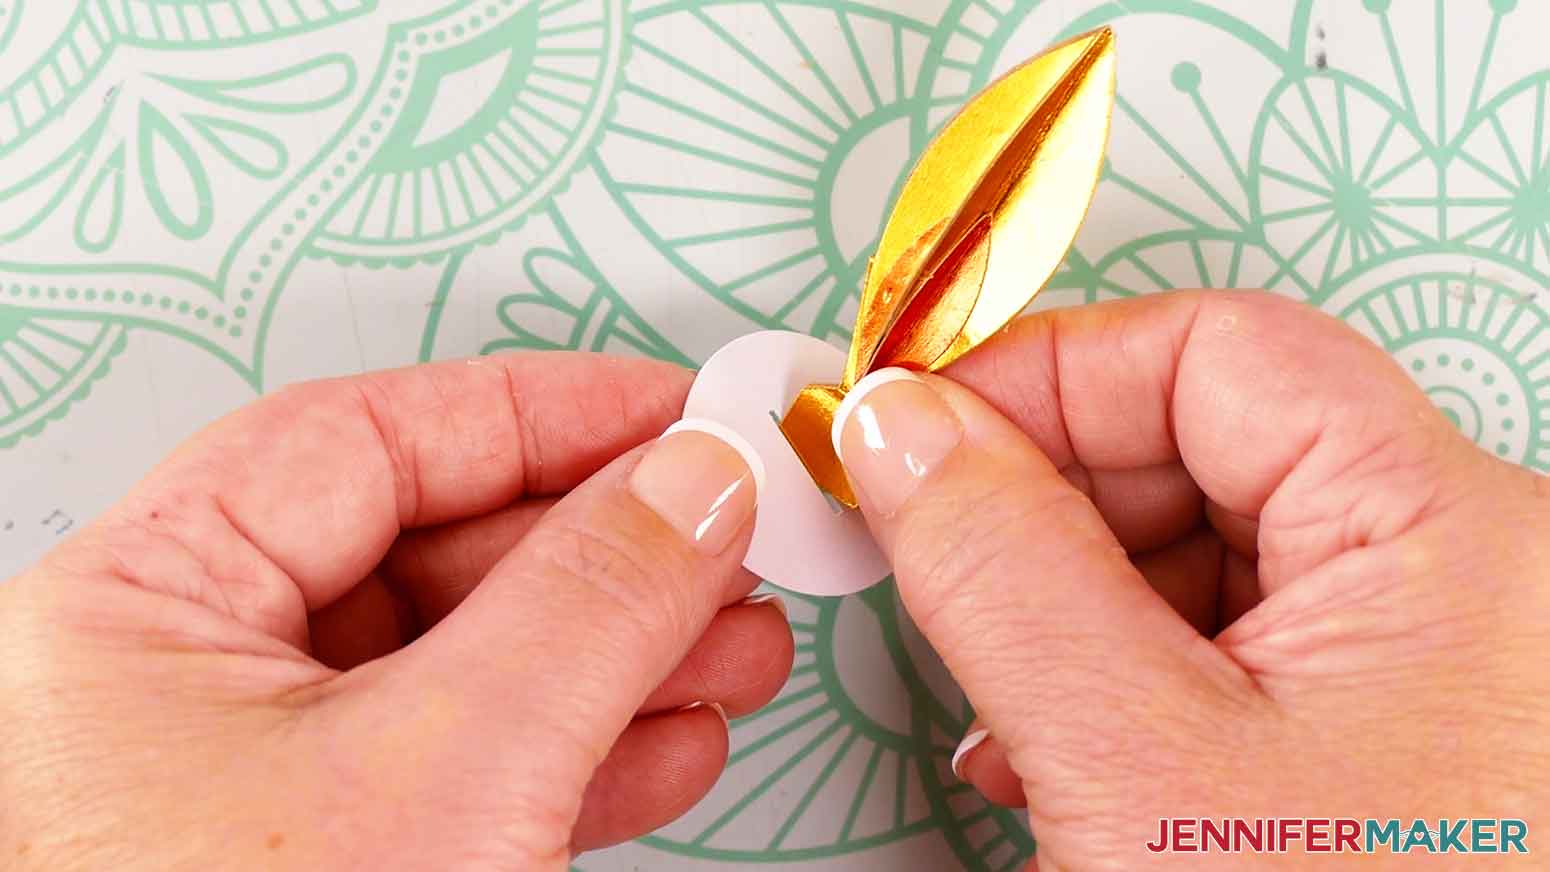
- Grab the small circular piece with the slit in the middle. With the circle facing pretty side up, hold the rectangular tabs from the flame support piece together and insert them down through the slit.
- Apply glue to the outside of the rectangular tabs.
- Fold the rectangular tabs up and press them against the underside of the circle piece. Hold them in place for several seconds until the glue sets.
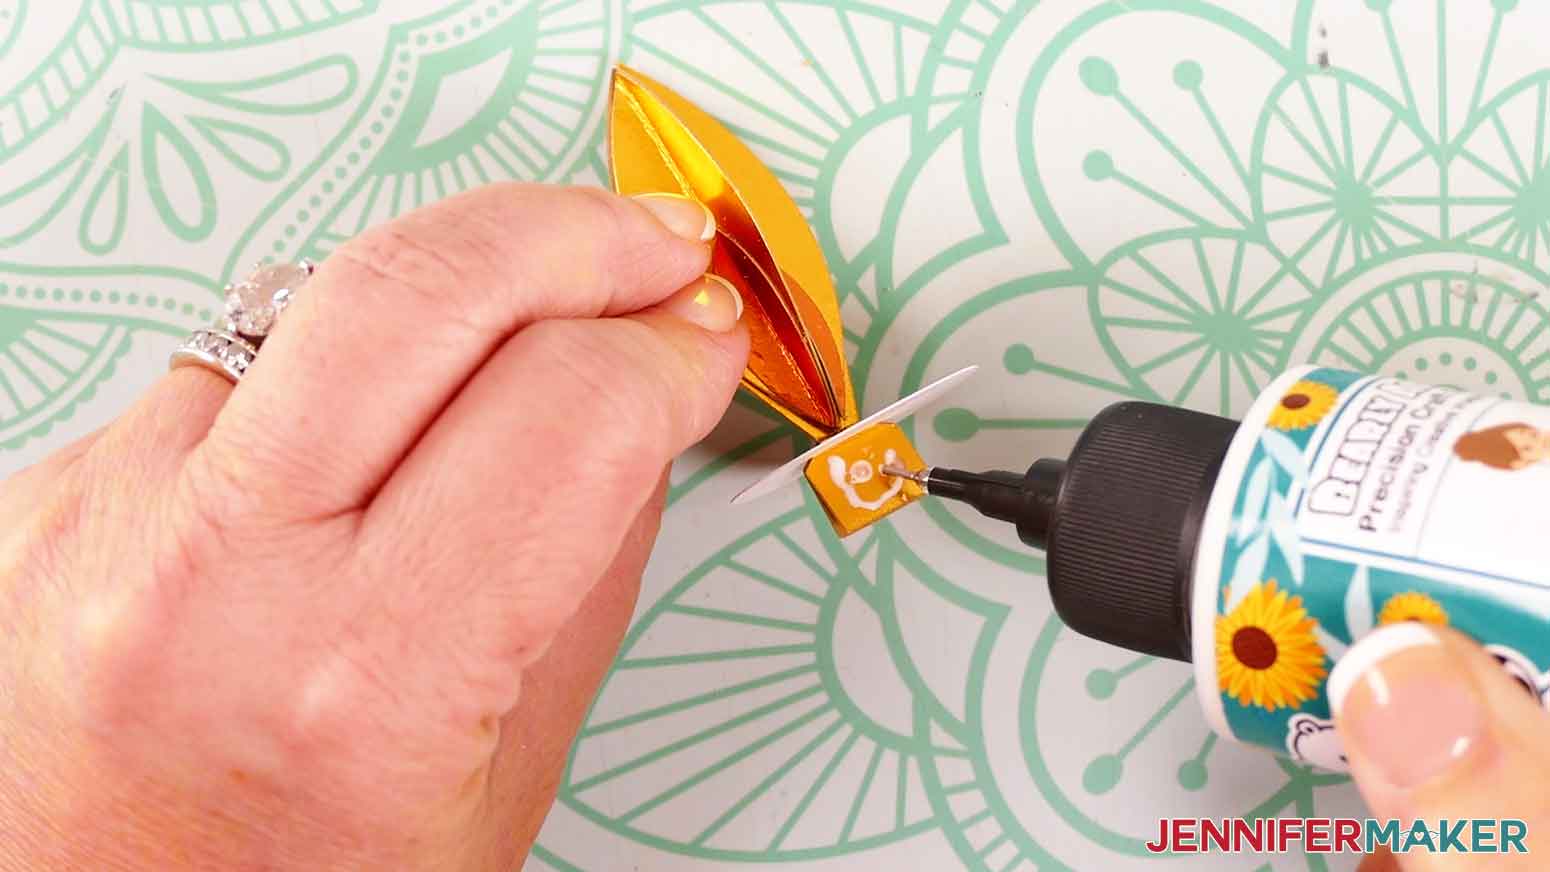
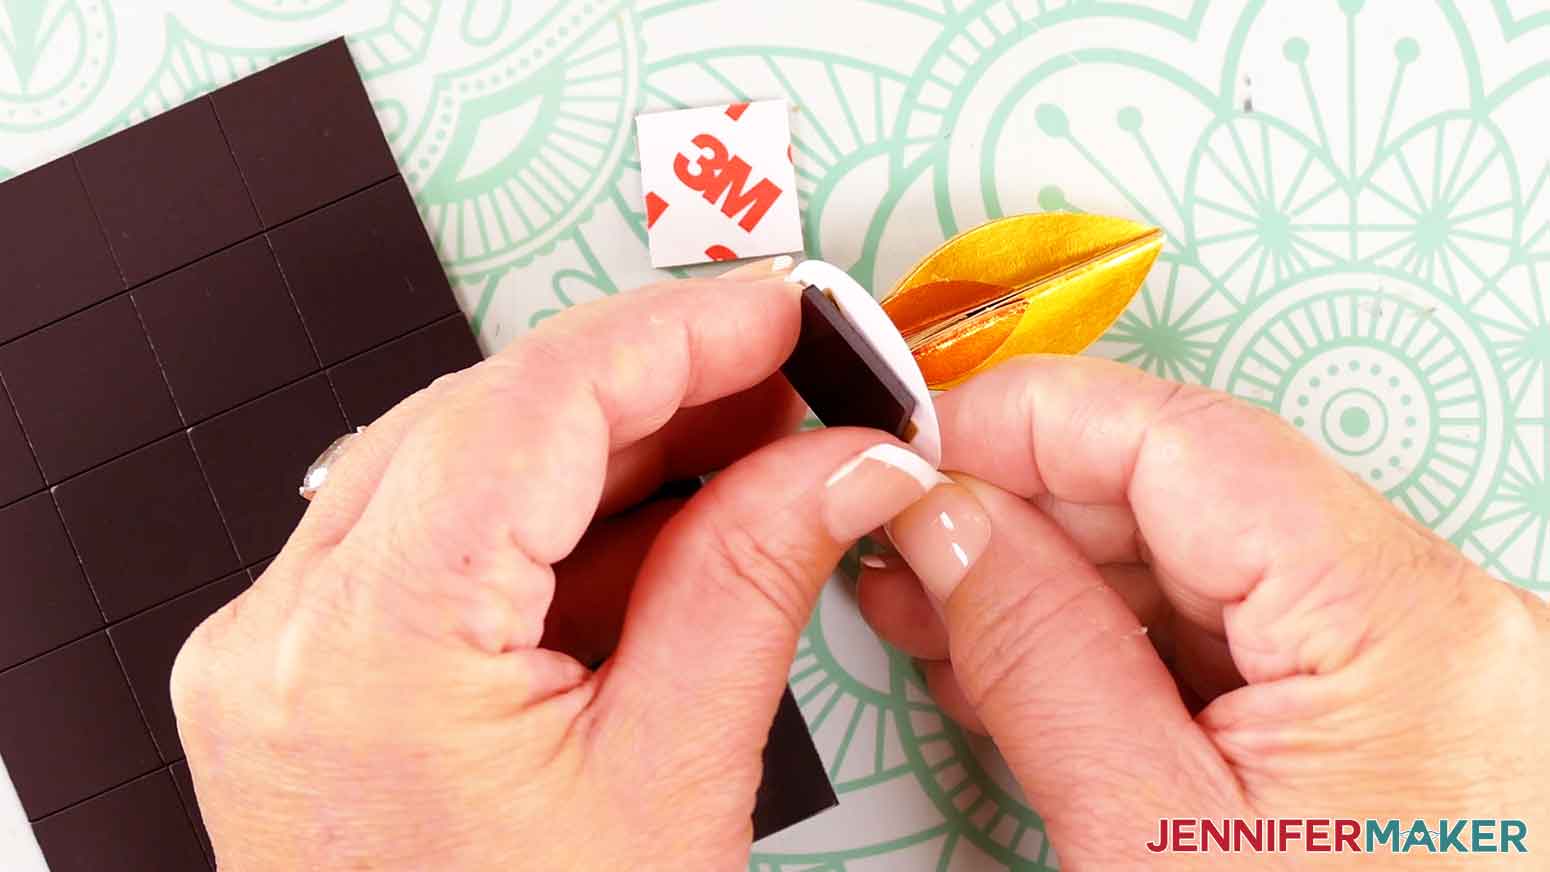
- Grab two magnet squares and test them to make sure they attract. Peel the backing off of one magnetic square.
- Press the sticky side of the magnetic square onto the bottom of the assembled flame and circle piece.
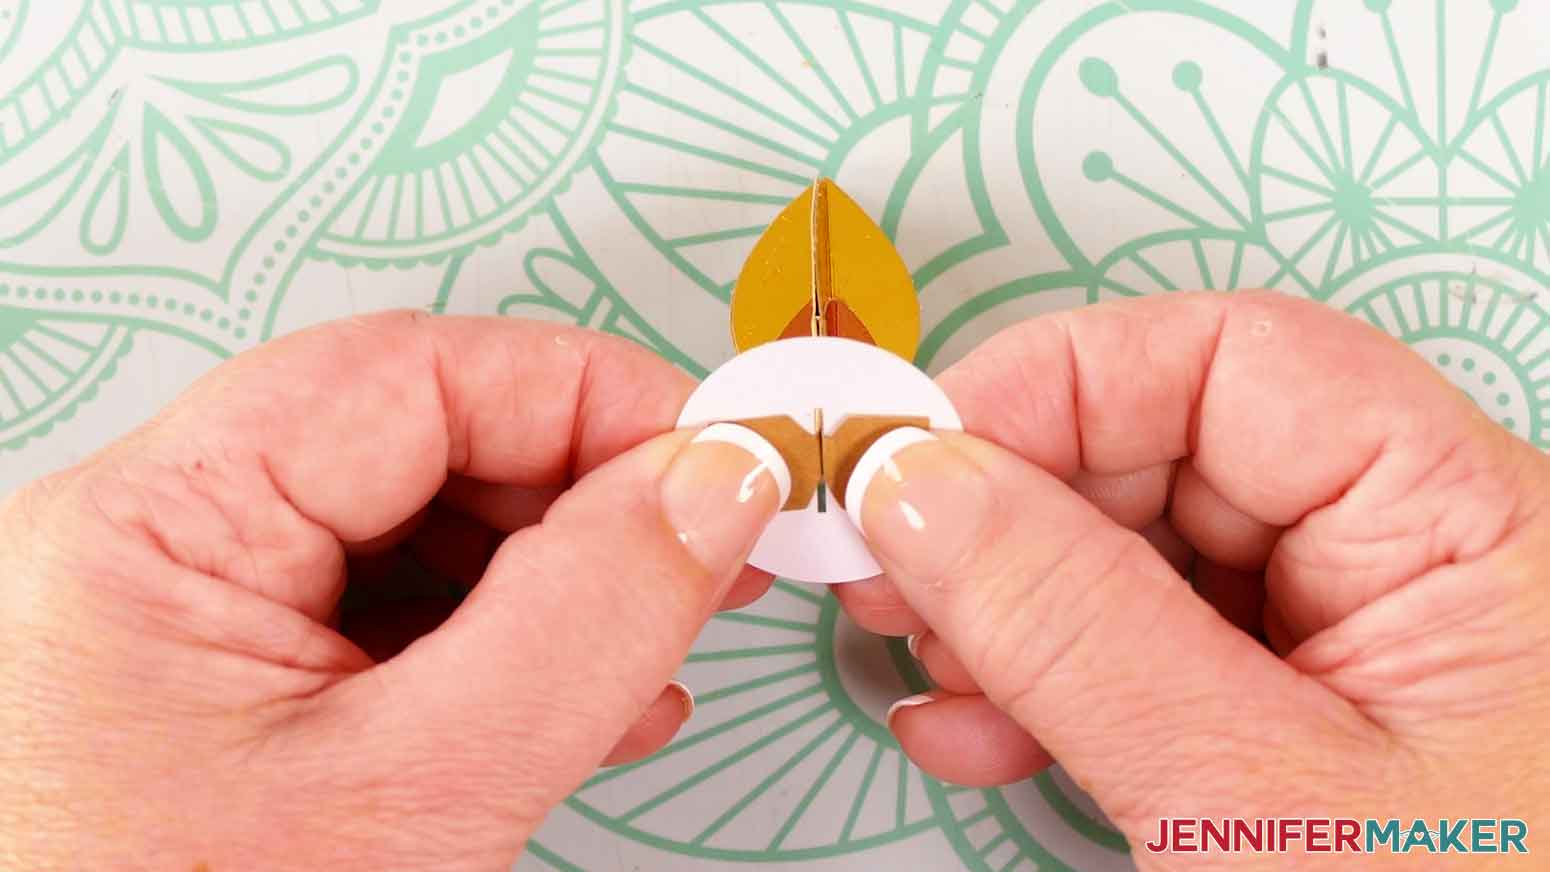
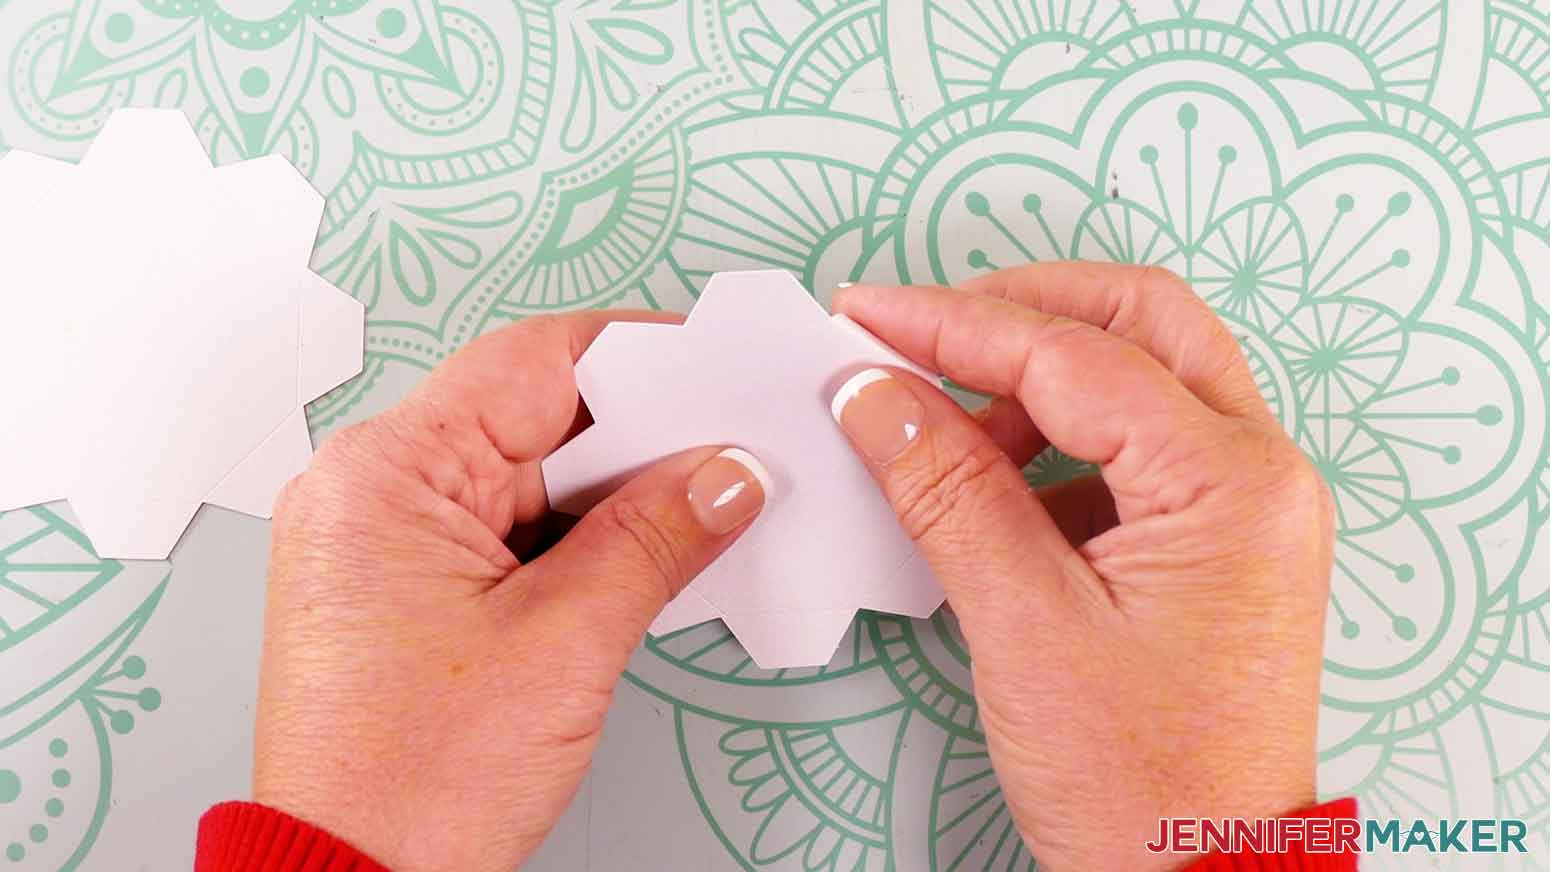
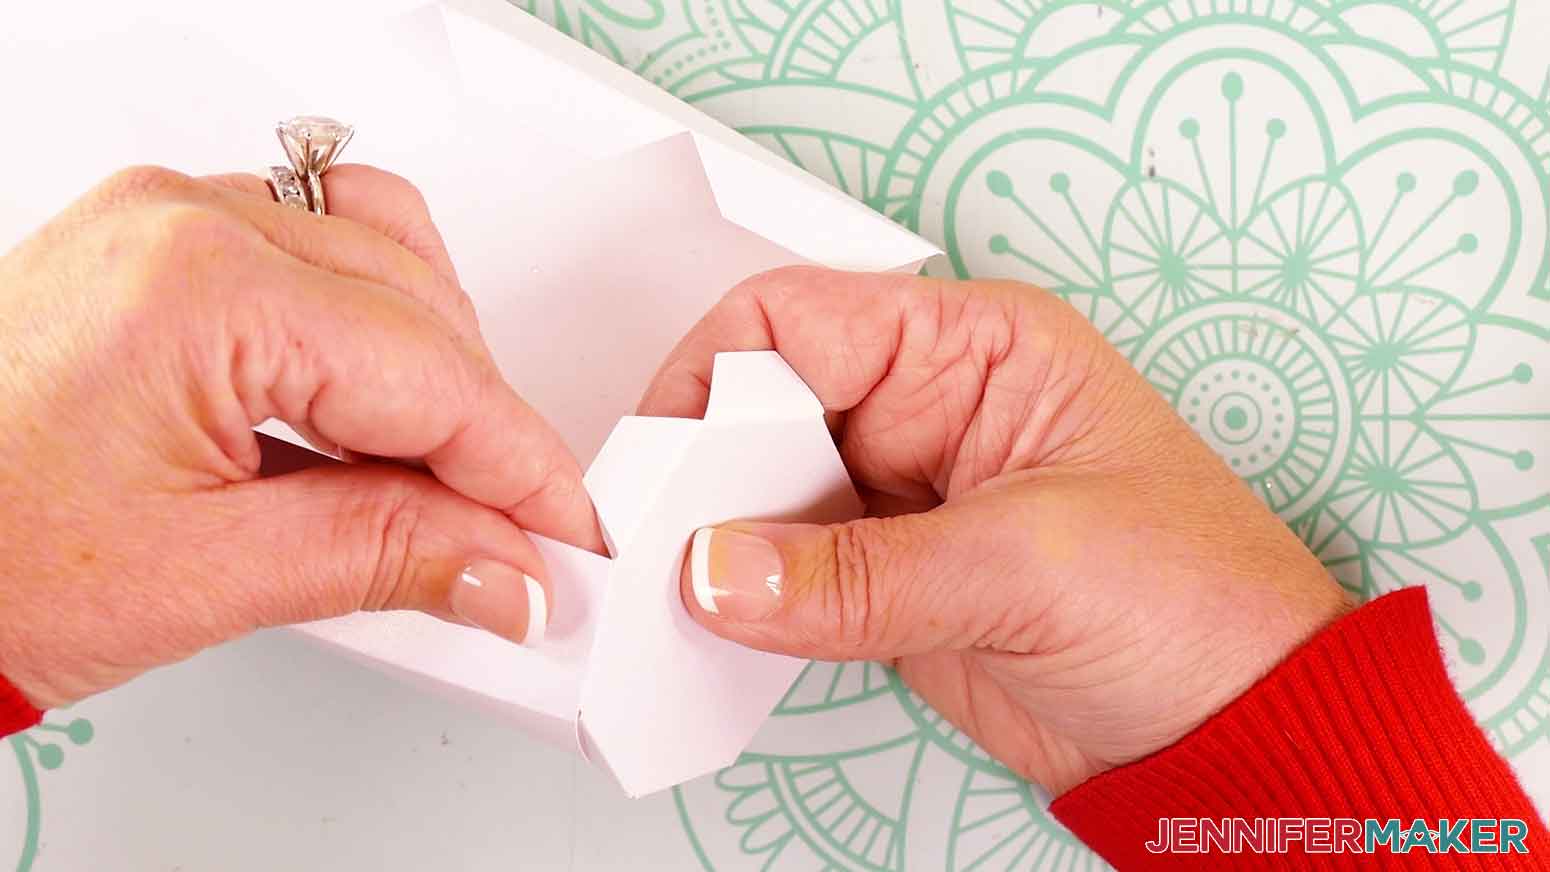
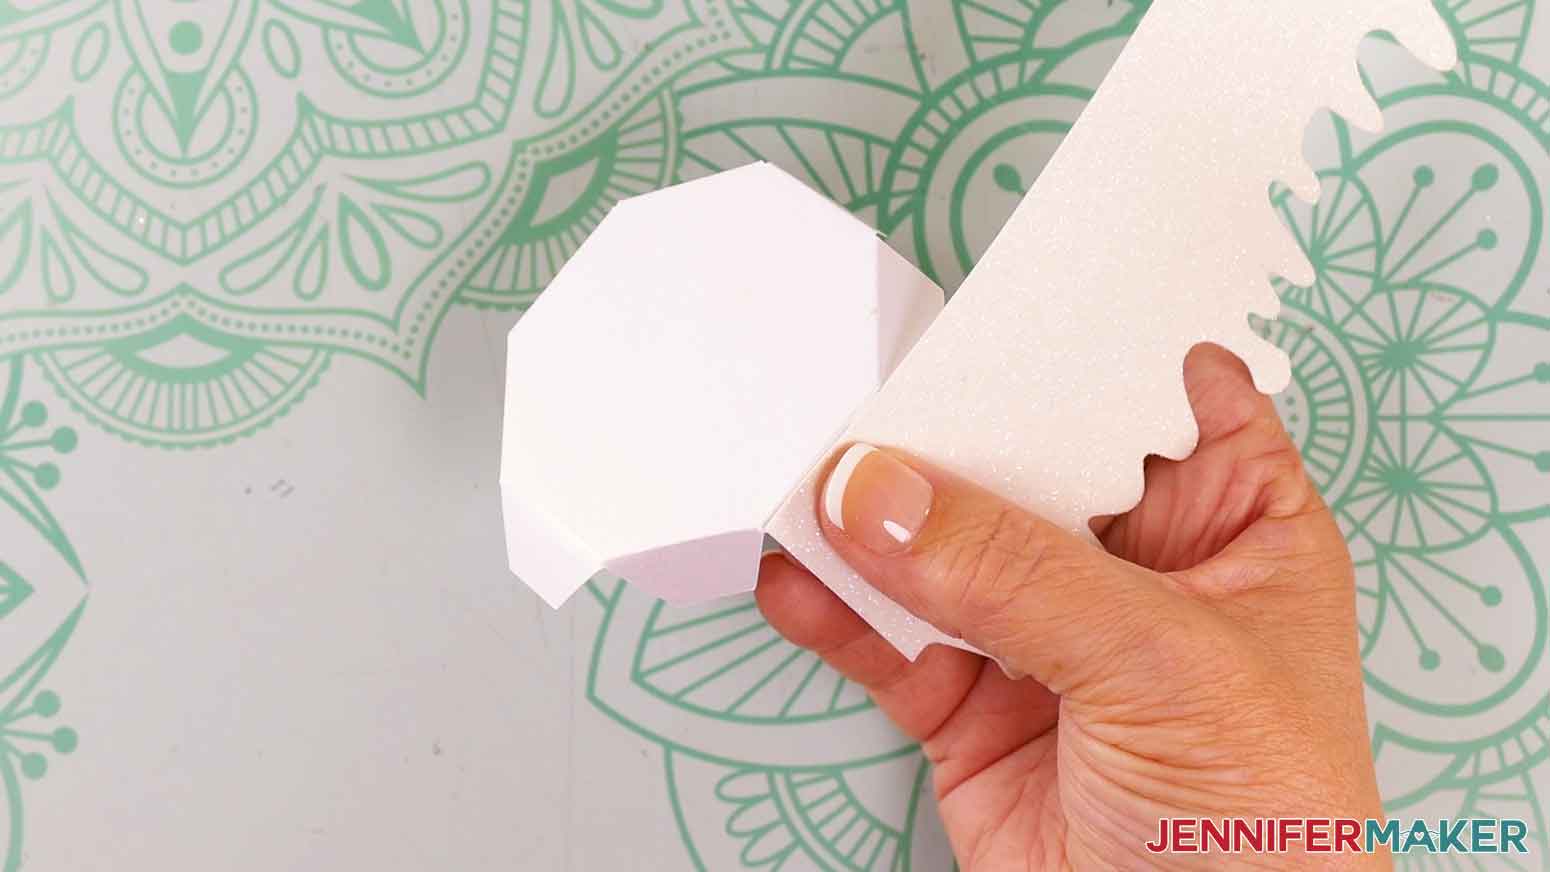
TIP: I found it easiest to attach the magnet, then press the flat circle down onto the magnet on my work surface to adhere it well. - Grab the two candle base pieces with eight tabs each. There is a smaller one that goes at the bottom of the candle, and a larger one that is part of the candle box’s lid.
- Starting with the smaller piece for the bottom of the candle, fold its tabs inward along their crease lines.
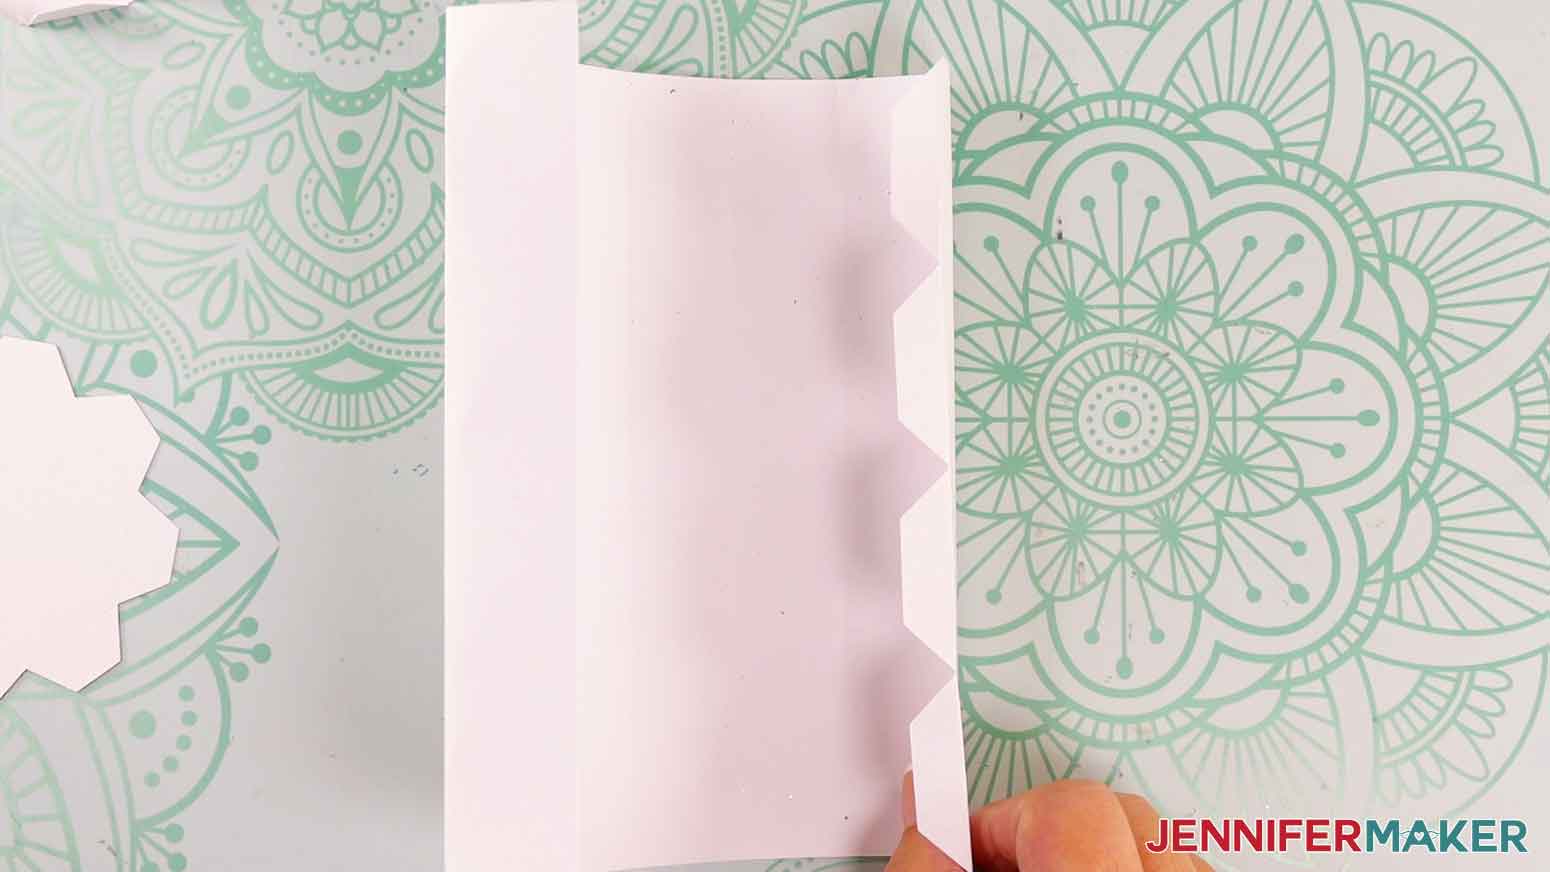
- Grab the large rectangular candle body piece and fold inward on each of the crease lines until you have a loose cylinder shape.
- Fold the four tabs at the end of the candle body piece inward in the same direction as the other folds.
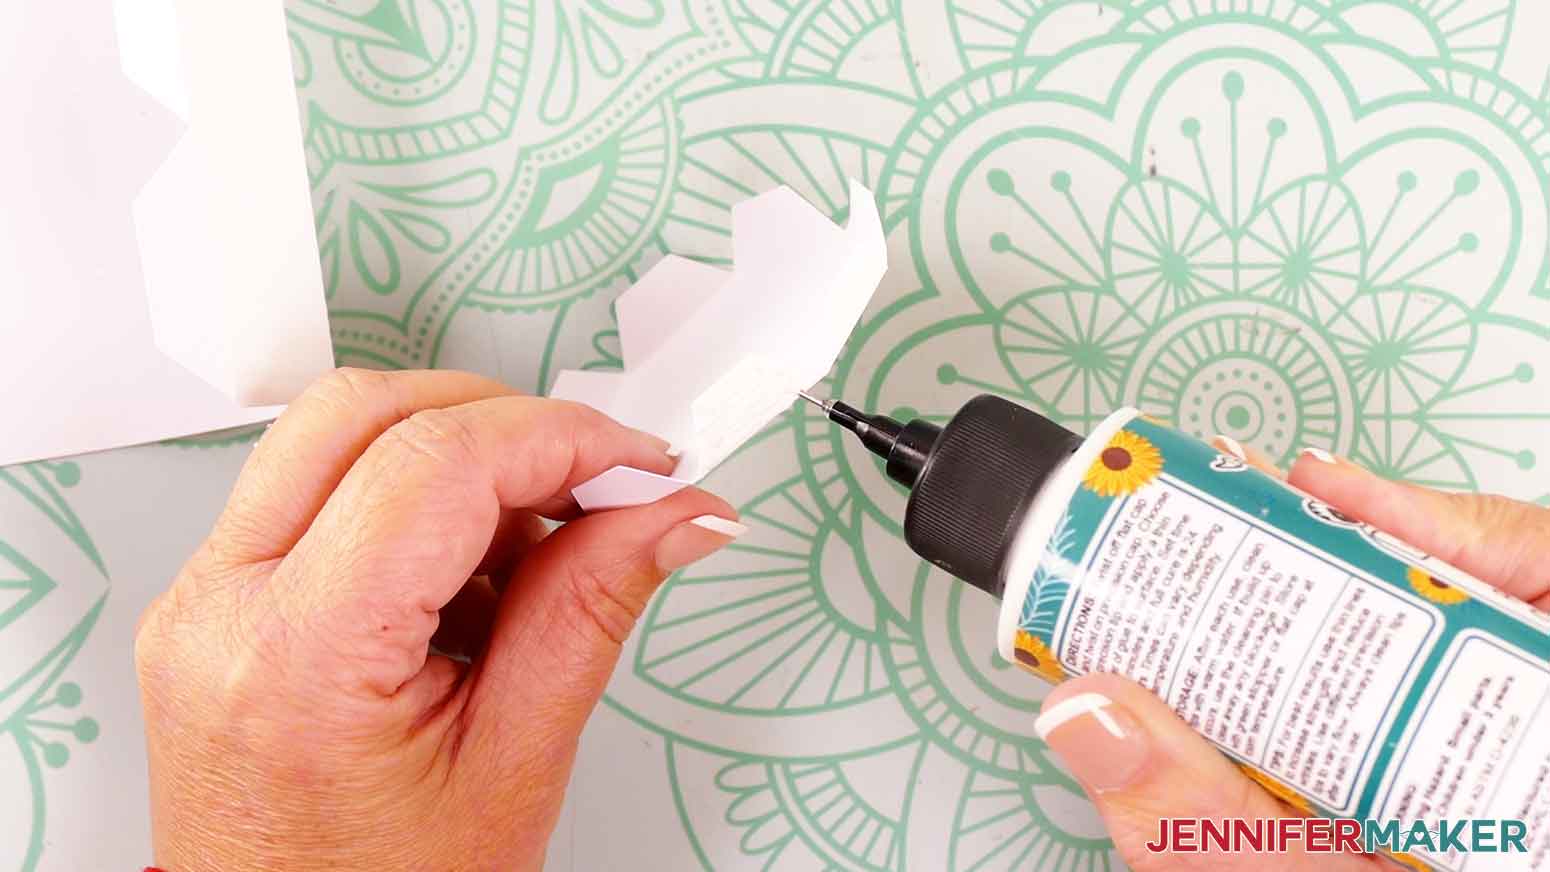
- Grab the smaller piece for the bottom of the candle, and apply glue to the outside of one of its tabs.
- On the candle body piece, starting at the end without the tabs, press the glued tab from the base piece onto the bottom of the first folded panel. Make sure the folded edge on the base is flush with the bottom edge of the panel. Press and hold the pieces together for several seconds until the glue sets.
- Repeat steps 26-27 to attach the remaining tabs on the base piece to the remaining panels on the candle body piece.
TIP: The last few tabs may be difficult to attach as the candle takes shape. Use the end of your scoring stylus or a pencil to reach down into the candle body and press the tabs into place while the glue sets. - Add craft glue to the outside of each of the tabs along the side of the cylindrical candle body.
- Press the tabs into place on the inside of the candle body. Make sure the creases in the tabs align with the other side’s straight edge.
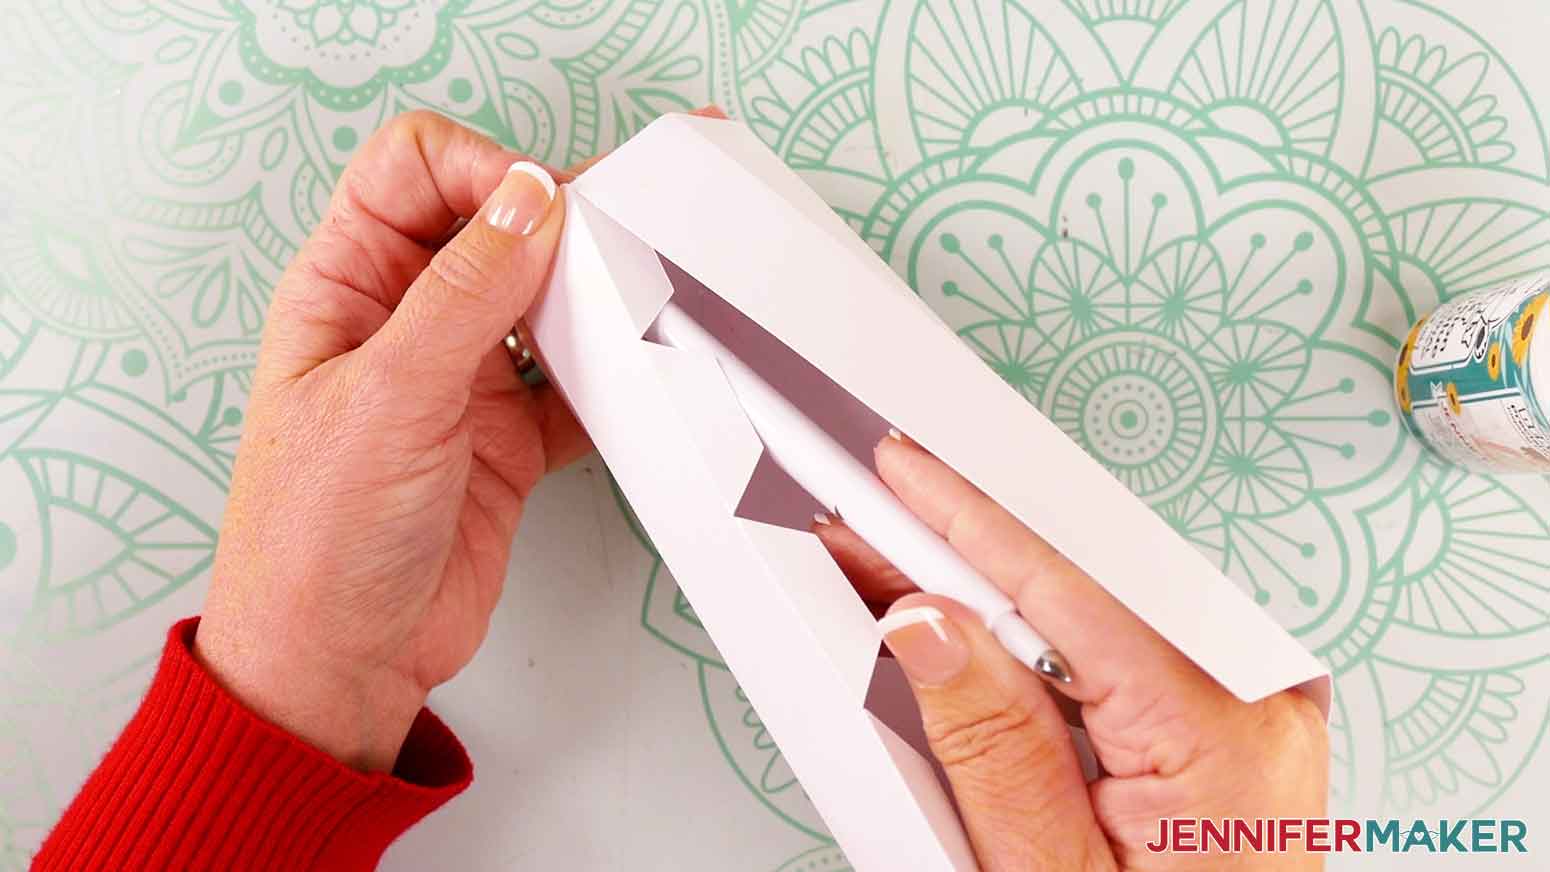
TIP: The bottommost tabs inside the candle body may be difficult to reach. Use the end of your scoring stylus or a pencil to reach down into the candle body and press the tabs into place while the glue sets. - Now let’s create the candle box’s lid. Grab the larger base piece for the lid and fold its tabs inward on their crease lines.
- Apply a dab of craft glue to the outside of one of the tabs on the base piece.
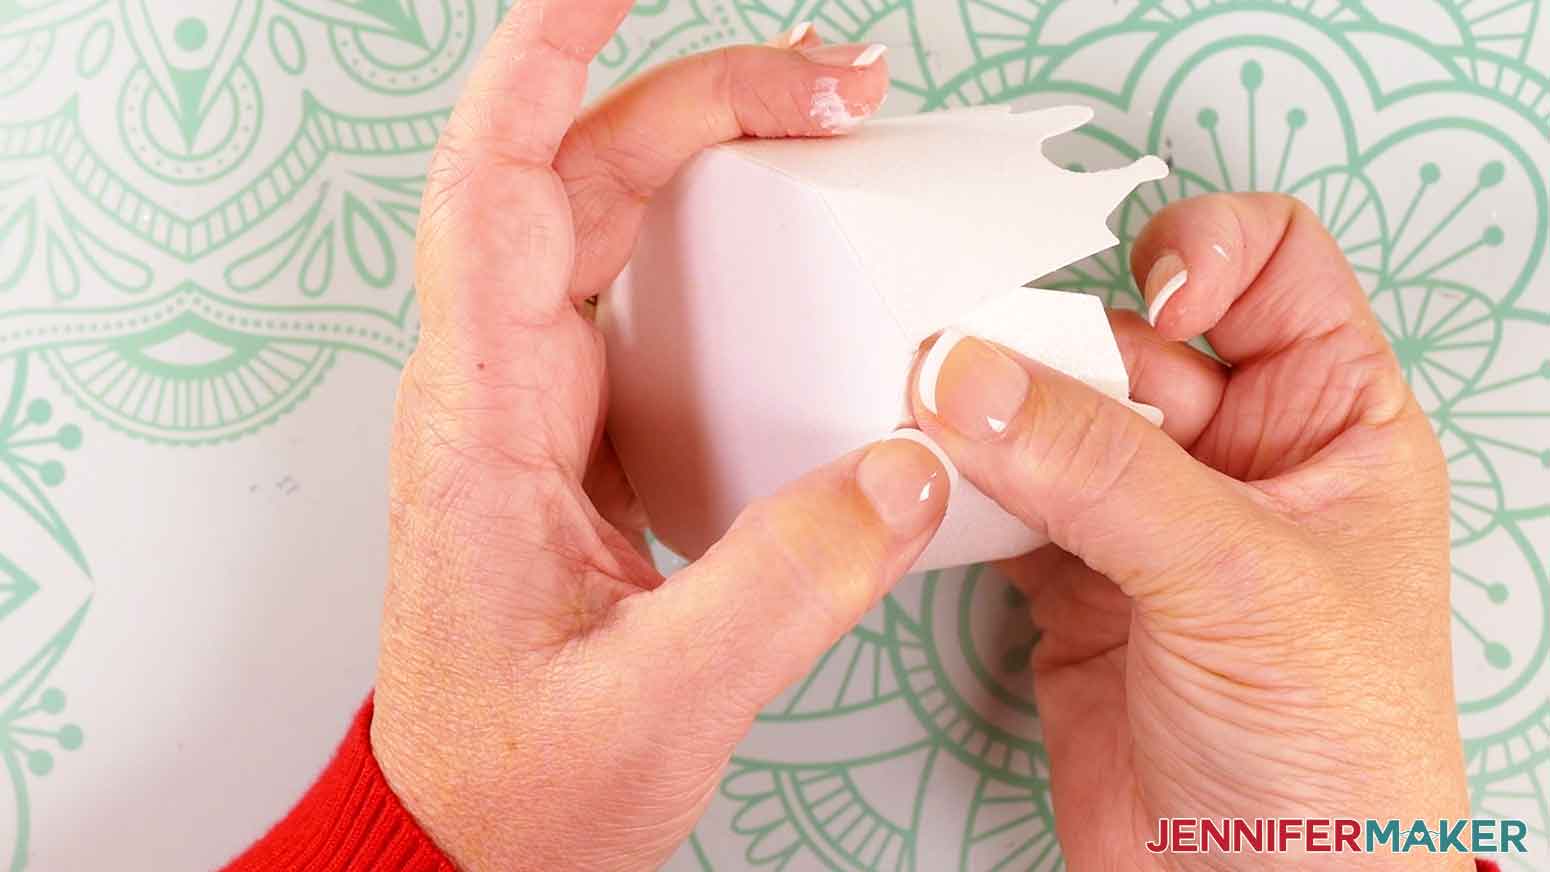
- Press one end of the drippy wax piece onto the glued tab, making sure the crease on the base is flush with the top, straight edge of the drippy wax piece. Hold the pieces together for several seconds until the glue sets.
- Repeat steps 32-33 to attach the remaining tabs on the base piece to the wax piece. When you get to the last tab, tuck the end of the drippy wax piece underneath its first end.
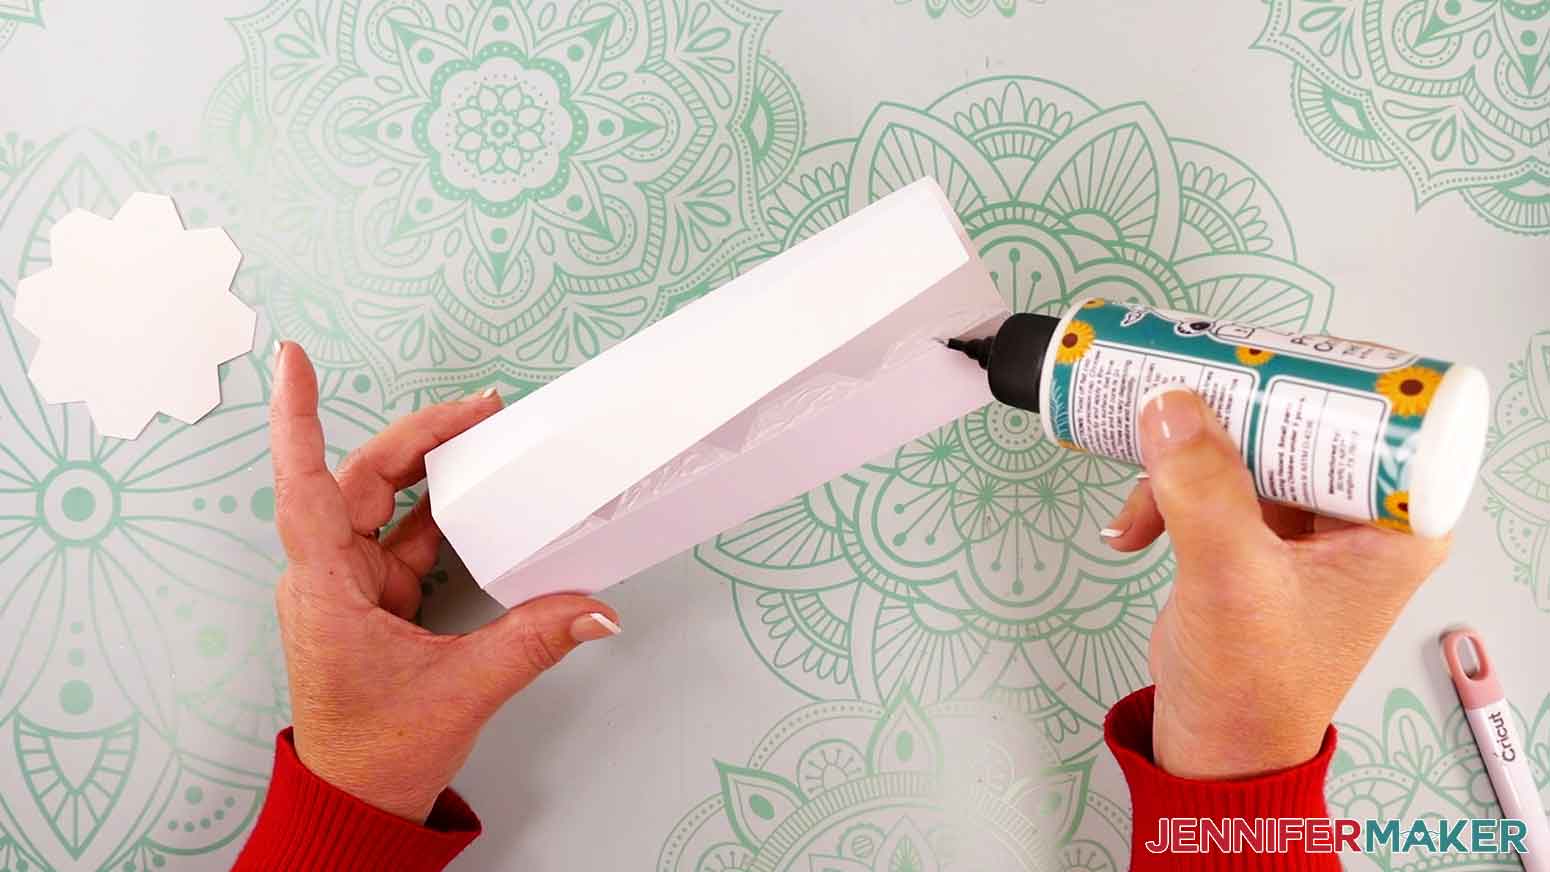
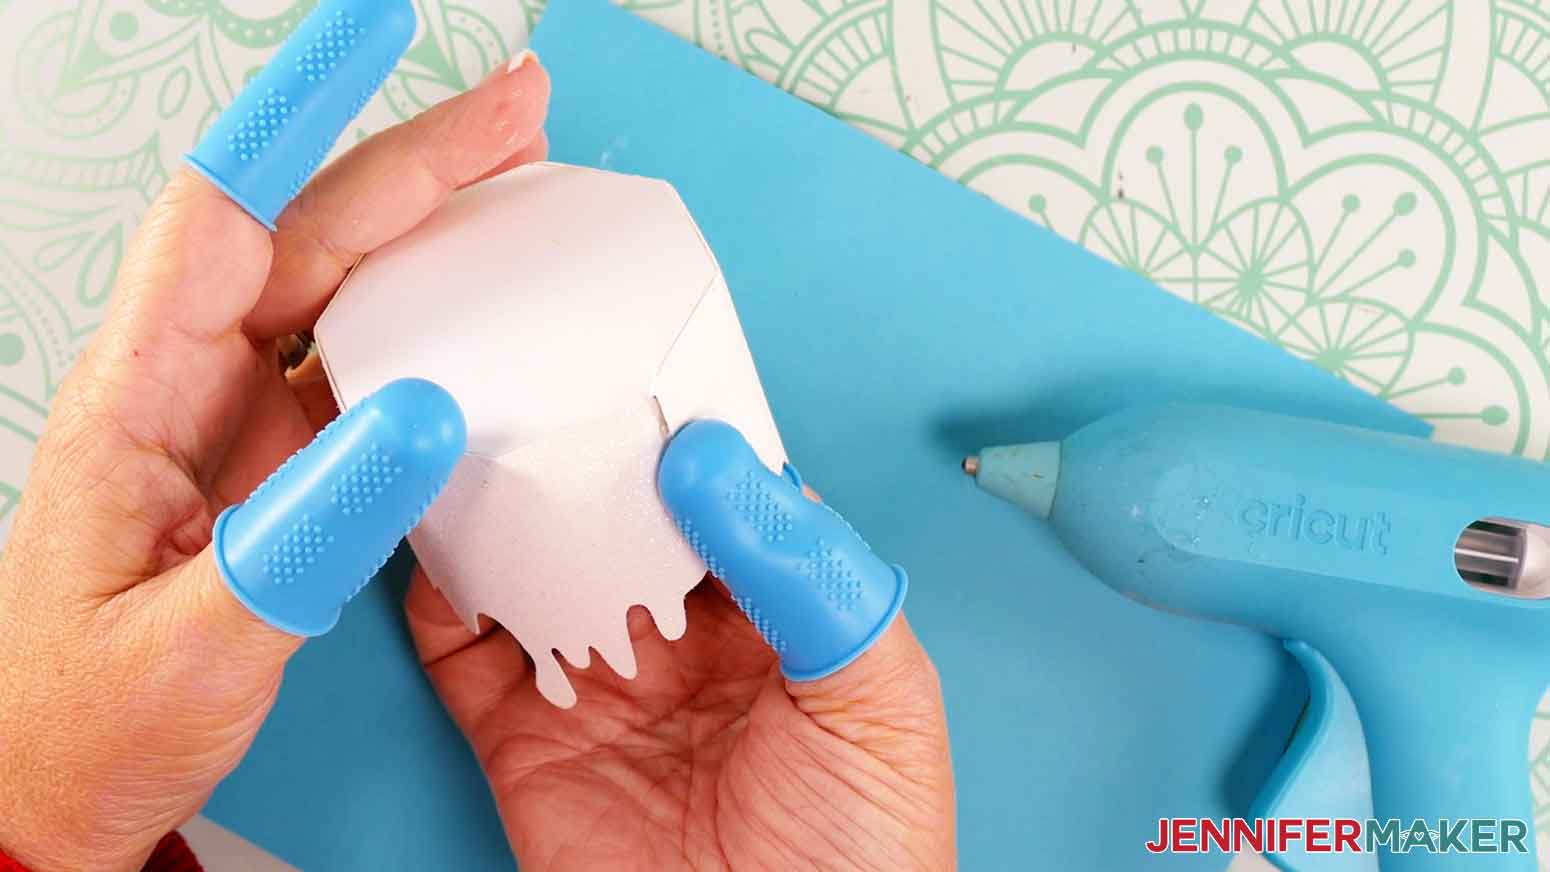
- Plug in your glue gun and wait for it to come up to temperature. When it’s ready, put on hot glue finger protectors and insert a stick of glue into the glue gun.
NOTE: If you’re using plain cardstock, you can use craft glue instead for this next step. Since I’m using heavier glitter cardstock for the drippy wax piece, the stronger hot glue is needed to ensure it stays adhered to the base piece. - Apply a strip of hot glue to the very end of the drippy wax piece, then press to adhere it to the first end. Hold it for several seconds until the glue sets.
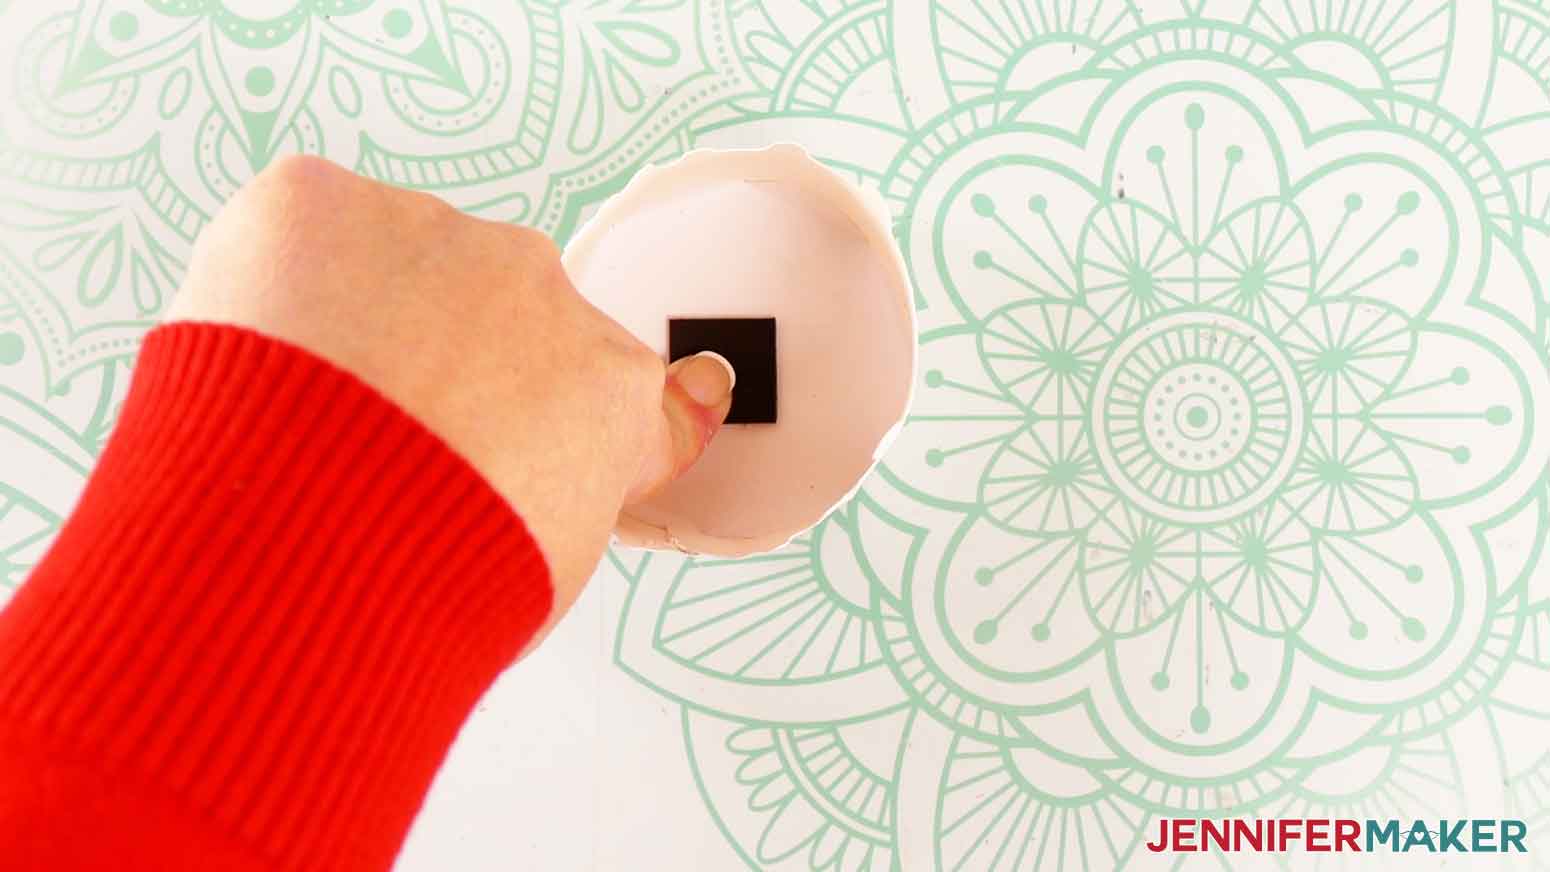
- Grab the second of your set of two magnetic squares.
- Peel the backing off of the magnetic square.
NOTE: If you’re making the Joy version, use scissors to cut your magnet into four pieces so it will fit. - Press the sticky side of the magnetic square onto the inside top of the candle’s lid.
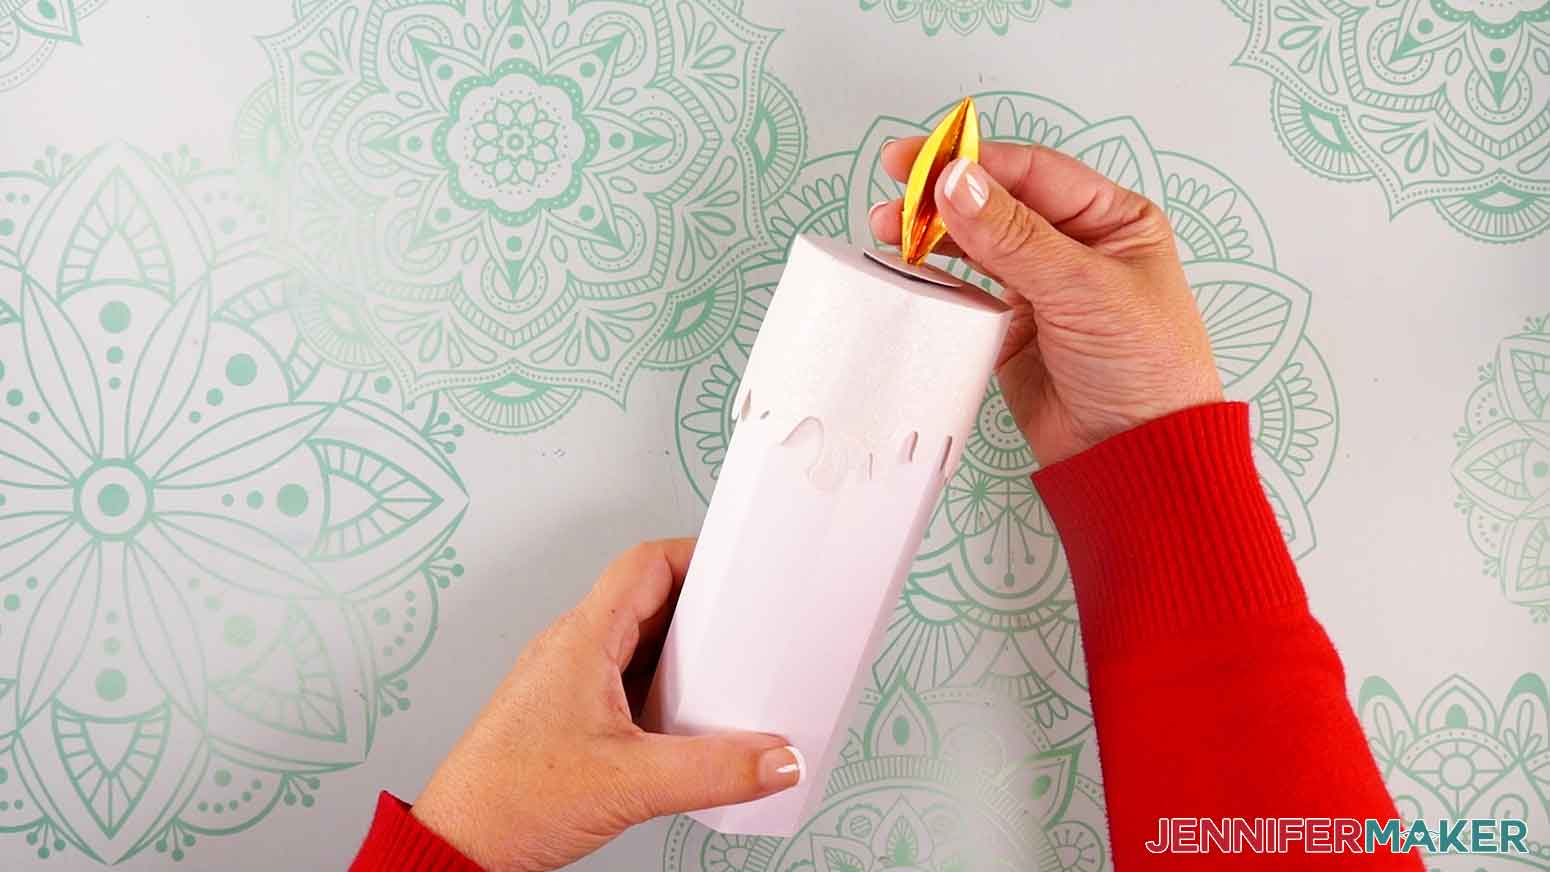
TIP: I found it easiest to attach the magnet, then press the magnet down onto the inside of the lid on my work surface to adhere it well. - Place the lid over the open end of the assembled candle body.
- Place the magnetic flame piece on top of the lid to “light” the candle. The magnet inside the lid will hold the flame in place! Remove the flame to “blow out” the candle.


ASSEMBLE THE OPTIONAL BASE
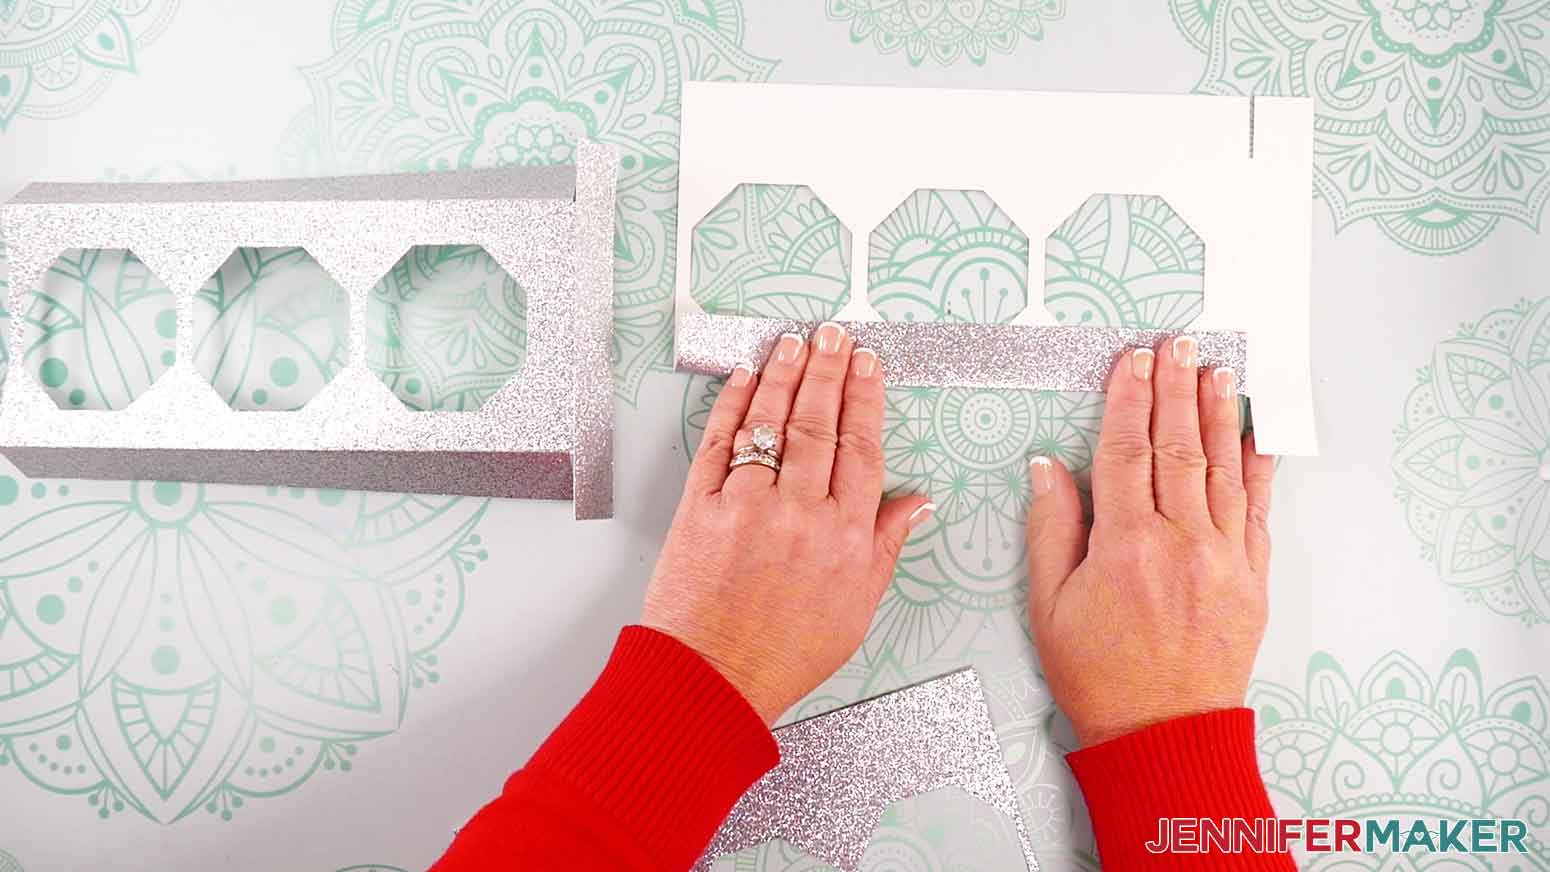
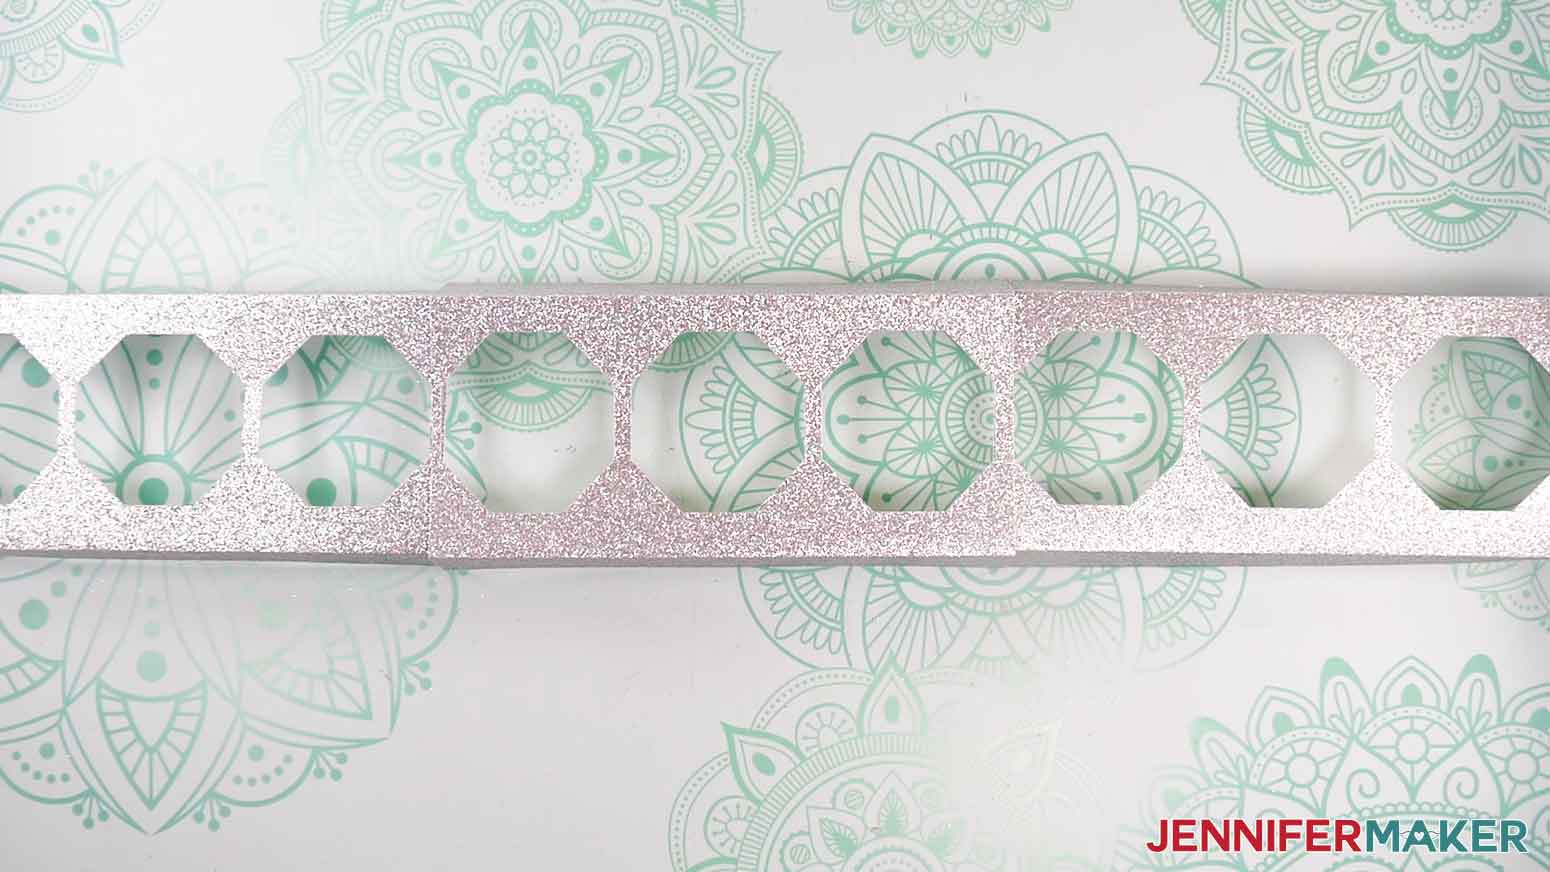
- The menorah base is in three pieces. The two end pieces each have three flaps and one open side, and the middle piece has two flaps and two open sides. Place the middle piece horizontally in the center of your workspace.
- Place the base pieces pretty-side down on your work surface.
- Fold the long flaps on each piece along the creases.
- Fold the shorter tabs on the end pieces inward.
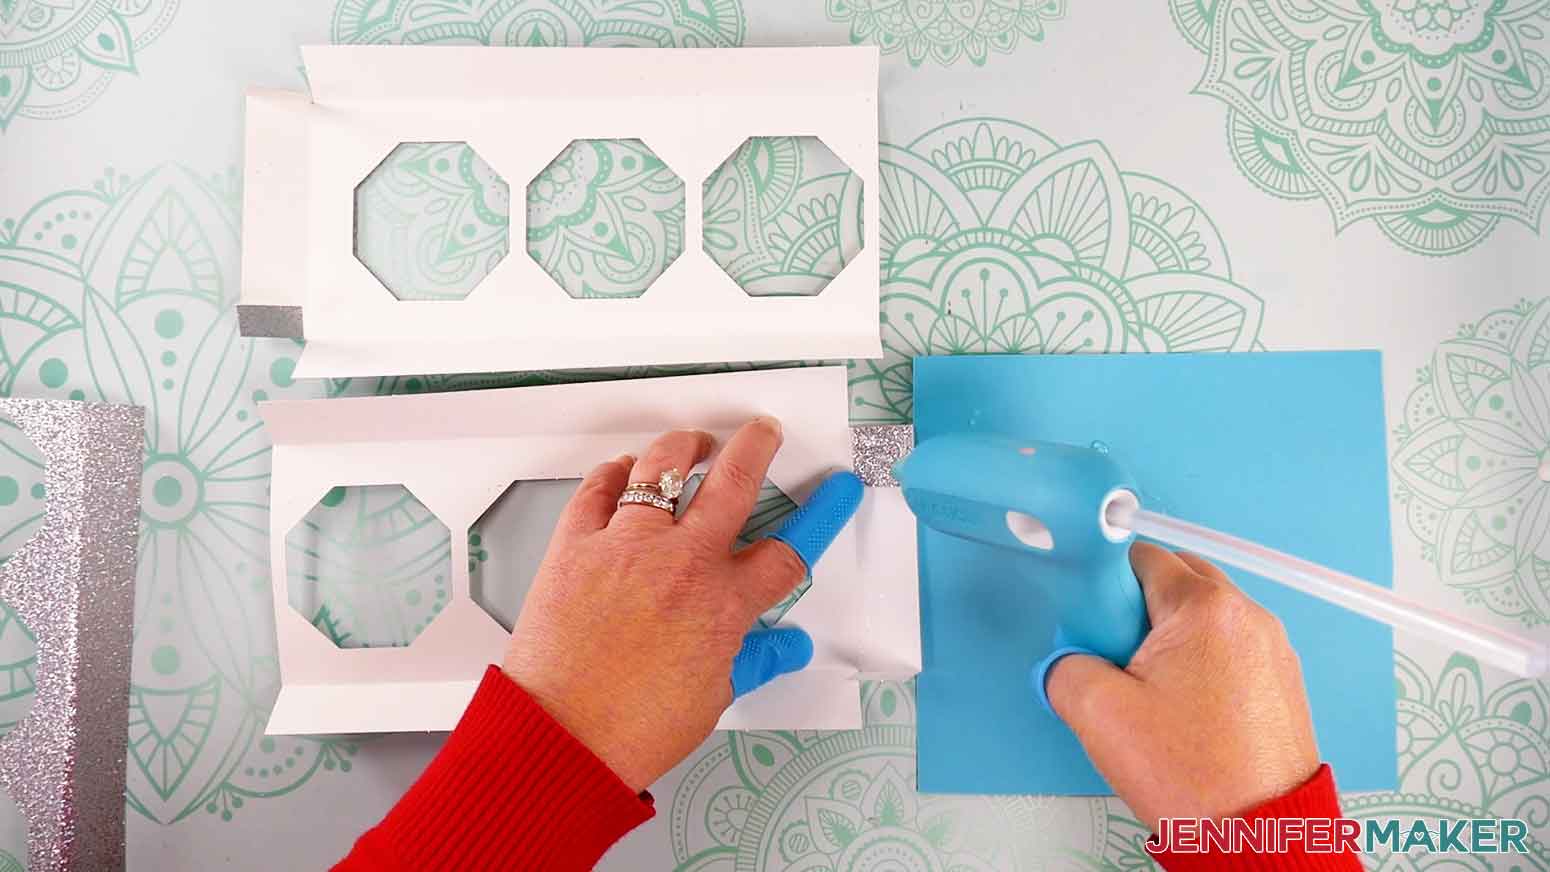
NOTE: If you’re using plain cardstock, you can use craft glue instead for this next step. Since I’m using heavier glitter cardstock for the drippy wax piece, the stronger hot glue is needed to ensure it stays adhered to the base piece. - Apply hot glue to the outside of each tab, then press it into place on the back of the adjacent flap.
- Repeat step 5 for each corner on each base piece.
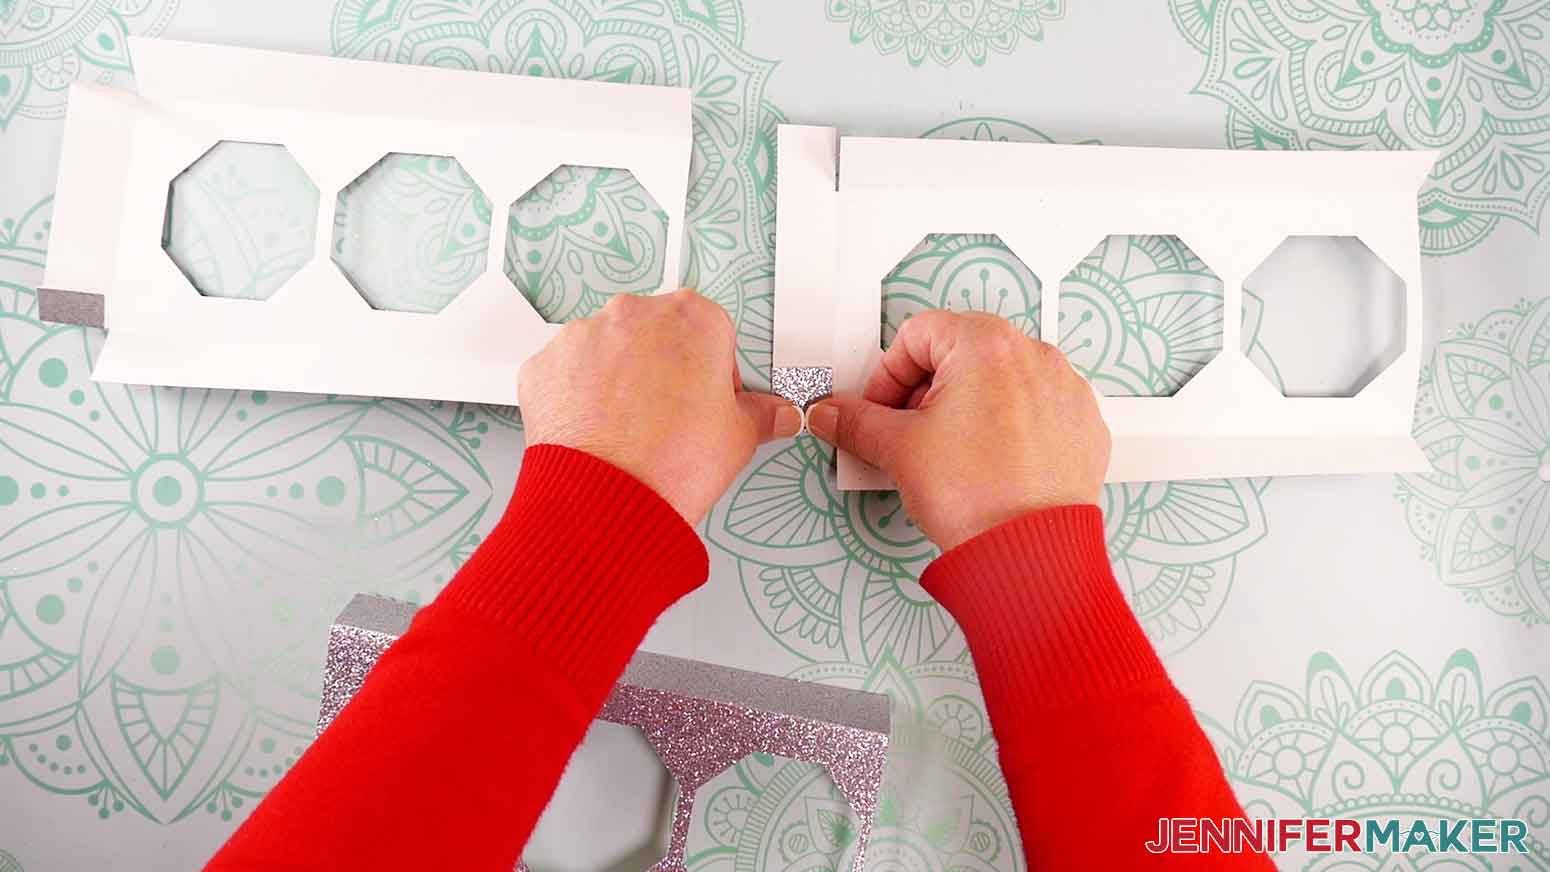
- Grab one end piece and slide the open end face-up underneath one open end of the middle piece.
- Repeat step 7 with the other end piece.
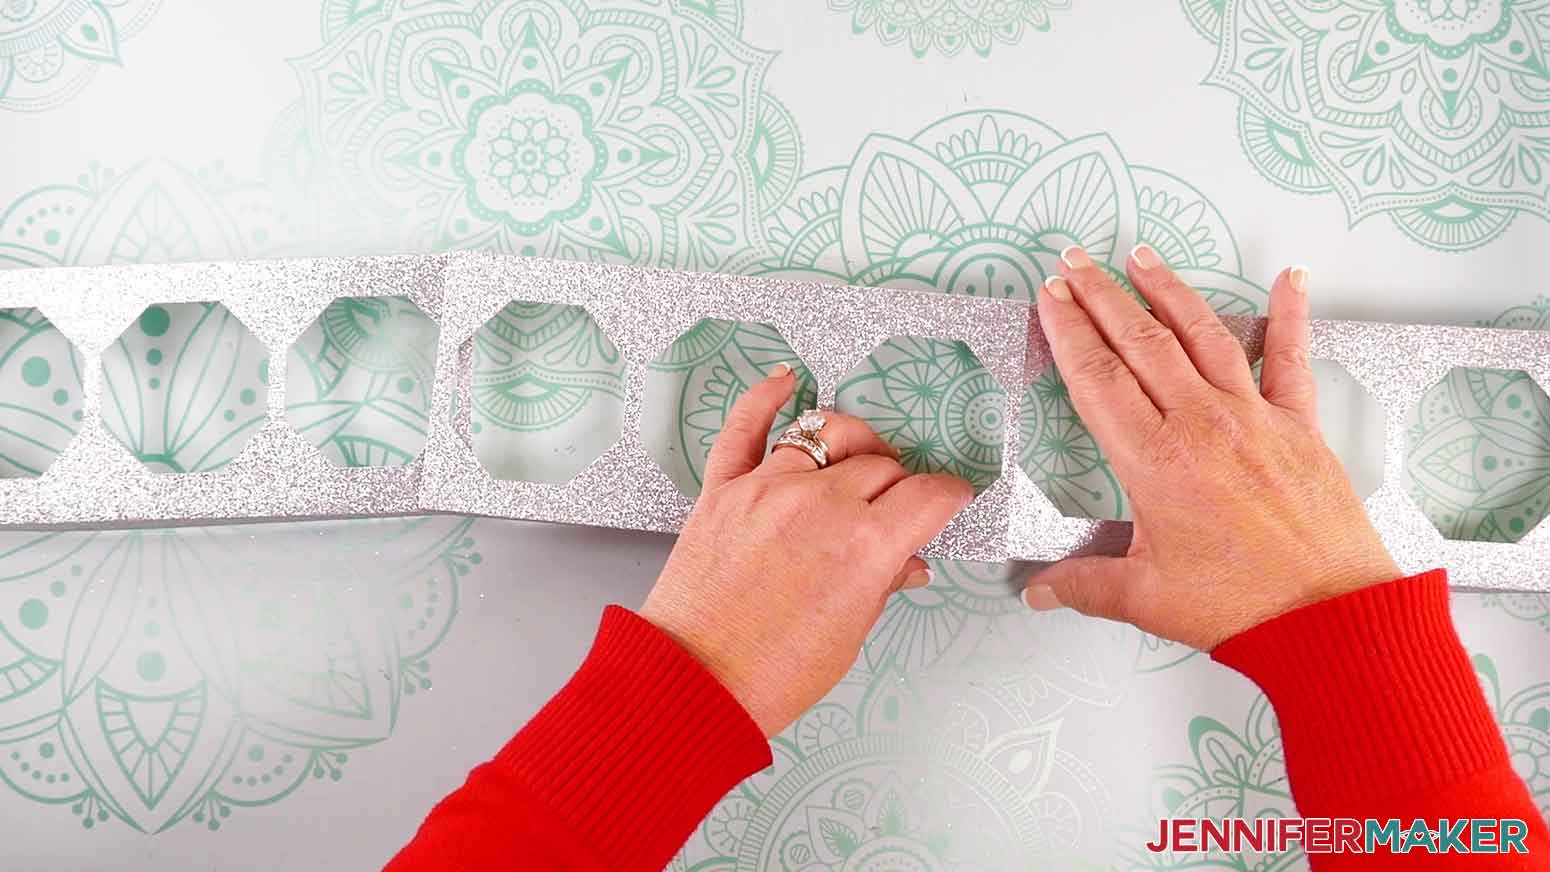
- Adjust the base pieces so there is an even space between the nine holes at the top, and the middle piece isn’t overlapping the holes on the end pieces.
NOTE: The base pieces can be left unattached for easier storage, but if desired, you can attach them together with lines of glue where each of the side pieces and middle piece overlap. Craft glue works with most types of cardstock, but if using glitter cardstock, I recommend using hot glue. - Insert the candles into the menorah base for display.
STEP 4: SHOW IT OFF
Here are my finished candle boxes!
Notes
Finished Sizes:
Tall Candle without flame 2.75" x 7"
Short Candle without flame 2.75" x 5"
Joy Tall without flame 1.5" x 4.5"
Joy Short without flame 1.5" x 3.25"
Short Flame: 1.75" Tall
Tall Flame: 2" Tall
Assembled Base: 26" Wide x 1" Tall x 3.75" Deep
Answers to Your Questions About How to Make Candle Boxes
Q: I want a different size candle gift box. How do I customize the size?
A: You can learn how to create a custom candle gift boxes in my ADVANCE program. Learn more about ADVANCE here!
Q: How do I know if my design is the right size?
A: Not sure if your design is uploading at the correct size? If you are using Cricut Design Space Beta for Desktop, try switching to the Live version as this has worked in our testing. Here are the dimensions you should see for each design on your Canvas:
candle-boxes-short-score-jennifermaker-SVG: 8.75″ x 8.94″
candle-boxes-short-no-score-jennifermaker-SVG: 8.75″ x 8.94″
candle-boxes-tall-score-jennifermaker-SVG: 8.75″ x 9.83″
candle-boxes-tall-no-score-jennifermaker-SVG: 8.75″ x 9.83″
candle-boxes-base-score-jennifermaker-SVG: 10.81″ x 7.3″
candle-boxes-base-no-score-jennifermaker-SVG: 10.81″ x 7.3″
candle-boxes-joy-short-jennifermaker-SVG: 5.13″ x 7.31″
candle-boxes-joy-tall-jennifermaker-SVG: 5.29″ x 7.19″
candle-boxes-joy-base-jennifermaker-SVG: 6.62″ x 4.66″
candle-boxes-toolkit-no-score-jennifermaker-SVG: 8.75″ x 11.17″
candle-boxes-toolkit-score-jennifermaker-SVG: 8.75″ x 11.17″
If you need help resizing your design, see my Resizing Guide.
Q: Can I cut the candle gift boxes on a Cricut Joy Xtra or original Cricut Joy?
A: While the full-size desigs will cut on the Cricut Joy Xtra, they are not sized to fit the original Cricut Joy. If you have a Cricut Joy, use the files in the “For Joy Users” folder — they’ll fit your machine!
Q: Do I have to use a Cricut to cut my candle gift boxes?
A: No! You can make candle gift boxes from paper or cardstock that works with your equipment, or even just with scissors. We always include several versions of each free file in the free download ZIP file. If you have a Silhouette Cameo, which uses Silhouette Studio, you can use the DXF file in Silhouette Basic Edition. If you have upgraded to Silhouette Designer Edition, Designer Edition Plus, or Business, you can use the SVG format with your Silhouette machine to cut each intricate design. If you don’t have a cutting machine, you can print and then cut out my digital download PDF files, too! The ZIP archive in my resource library includes these file types and more!
Q: What kinds of gifts can I fit inside these candle gift boxes?
A: Small gifts and candy work best, or you can even fill them with cash! Some candle gift ideas that will fit inside include Hanukkah gelt, perfume bottles, jewelry, makeup items, toy cars, small reed diffusers, pretty glass baubles for the holiday season, or anything else small enough to fit inside. You could even gift a real candle inside of candle packaging! This gift box candle business is a fantastic way to flex your crafting skills on some tiny but mighty gift ideas, too. My DIY Faux Leather Earrings or Sublimated Pens would be a perfect fit! The candle gift boxes will make a lasting impression all by themselves, no matter what you fill them with.
Q: Do you have any other unique gift box ideas I can make?
A: I have lots of fun and functional gift box ideas, beyond your typical cube boxes! Check these out, or go to my home page and click “Libraries” at the top to search for more:
- Top Hat & Fascinator Gift Boxes
- Christmas Tree Explosion Box
- Cupcake Gift Box
- Baseball Cap Gift Box
- “Impossible” Box
Q: Where can I buy the materials and tools for this project?
A: I like to purchase my craft supplies and tools on Amazon for their exclusive discounts. I rarely pay regular price! I also love the free shipping I get in the United States with my Prime membership. It’s great to receive my order within just a few days of purchase! That they have a full range of crafting equipment, tools, and materials with just a the click of my mouse. Fairy lights, Cricut machine mats, a glass jar for a project, or ink for my sublimation printer — they’ve got it all!
Q: How do I learn more about Cricut crafting?
A: Want to learn all there is to know about cutting machine crafting? Check out my ultimate guide: Cricut Coach Playbook. It’s full of tips, tricks, and techniques, for all kinds of Cricut crafts. The best part is you can apply these tips to thousands of projects — not just mandalas or shadow boxes, but tons of special goods!
By signing up for our mailing list, you can gain access to more creative ideas and exclusive tutorials to elevate your crafts.
Q: Can I make and sell these menorah or candle gift box designs?
A: I love supporting creative entrepreneurs! If you want to use my designs and projects for commercial use, please familiarize yourself with my important licensing information before selling your crafts.
I do not permit sale of my digital items, but you can sell the creative goods you make with them — as long as you follow my licensing requirements. That means you cannot sell the candle SVG files, but you can sell items that you made with the files.
Get my free SVG/DXF/PDF files to make candle gift boxes!
(If you do not see the signup form above, click here.)
I love seeing what you make with my designs and how you use them! Please share a photo of your candle gift boxes in our Facebook group or tag me on social media with #jennifermaker.
Love,

Want to remember this? Save this Candle Gift Boxes Tutorial to your favorite Pinterest Board!