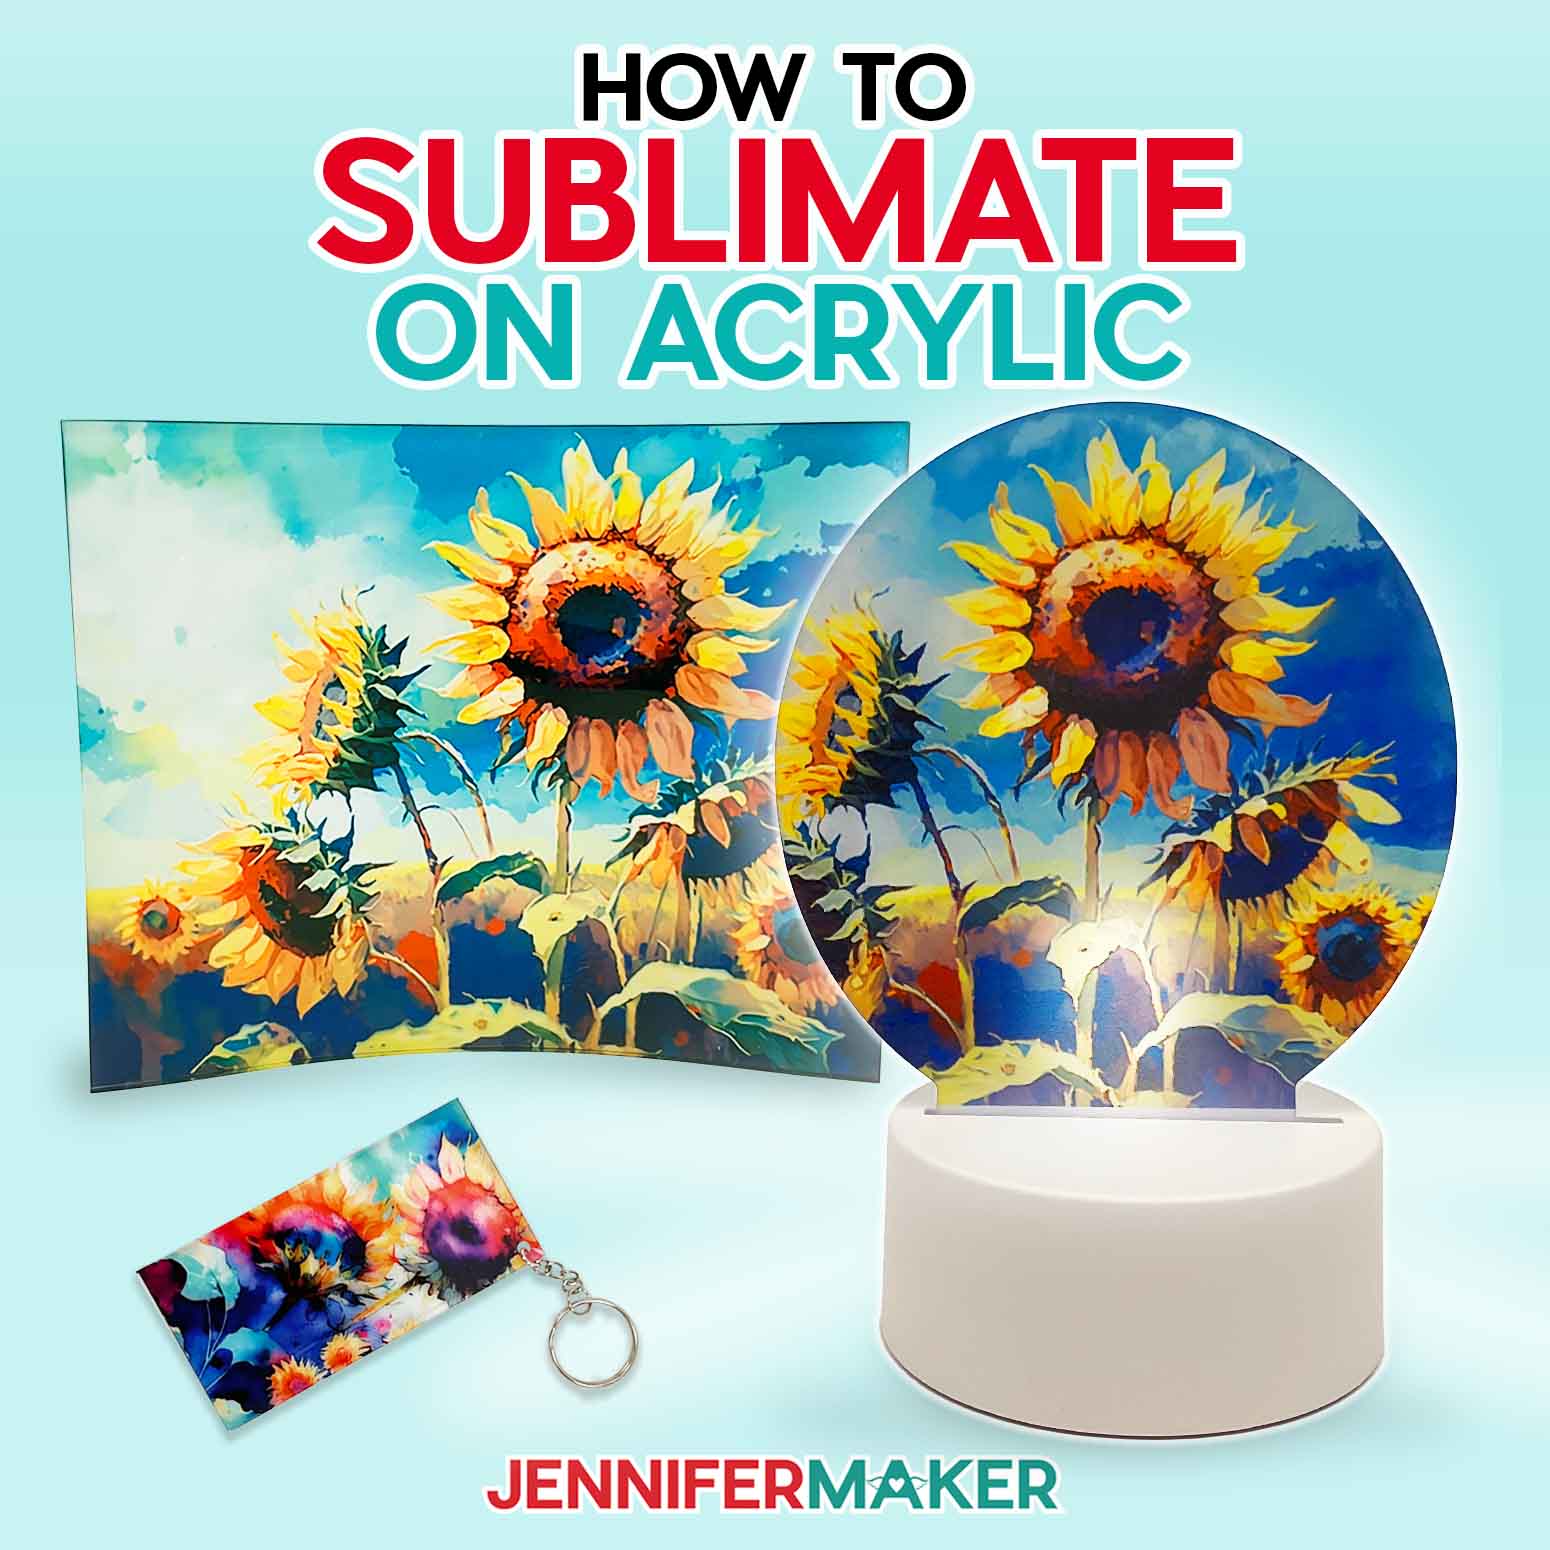
Create custom designs using your favorite photos and phrases for sublimation projects!
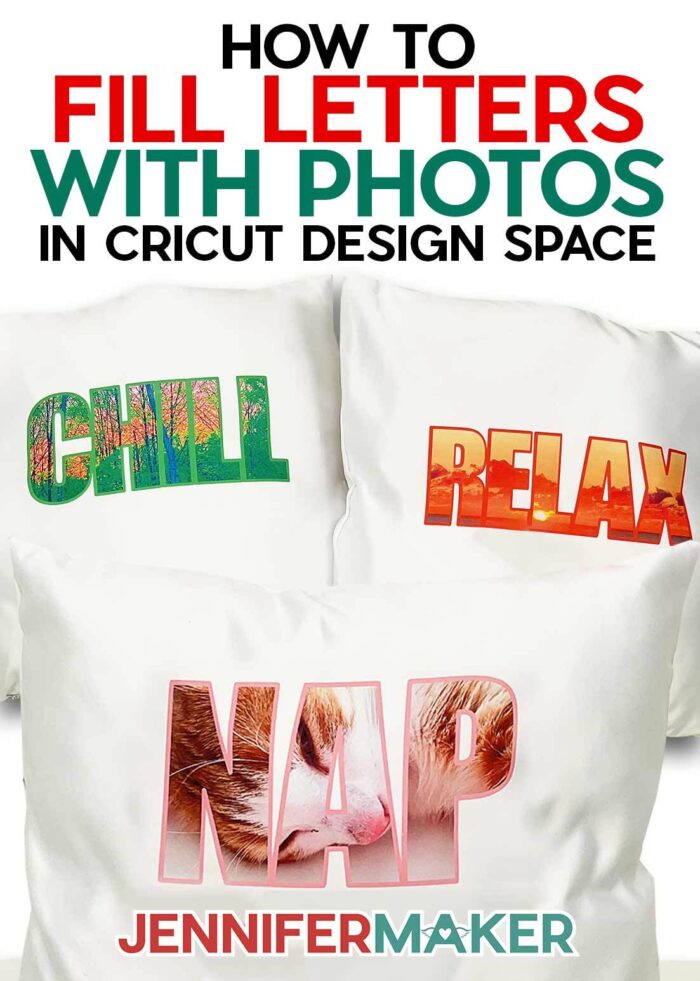
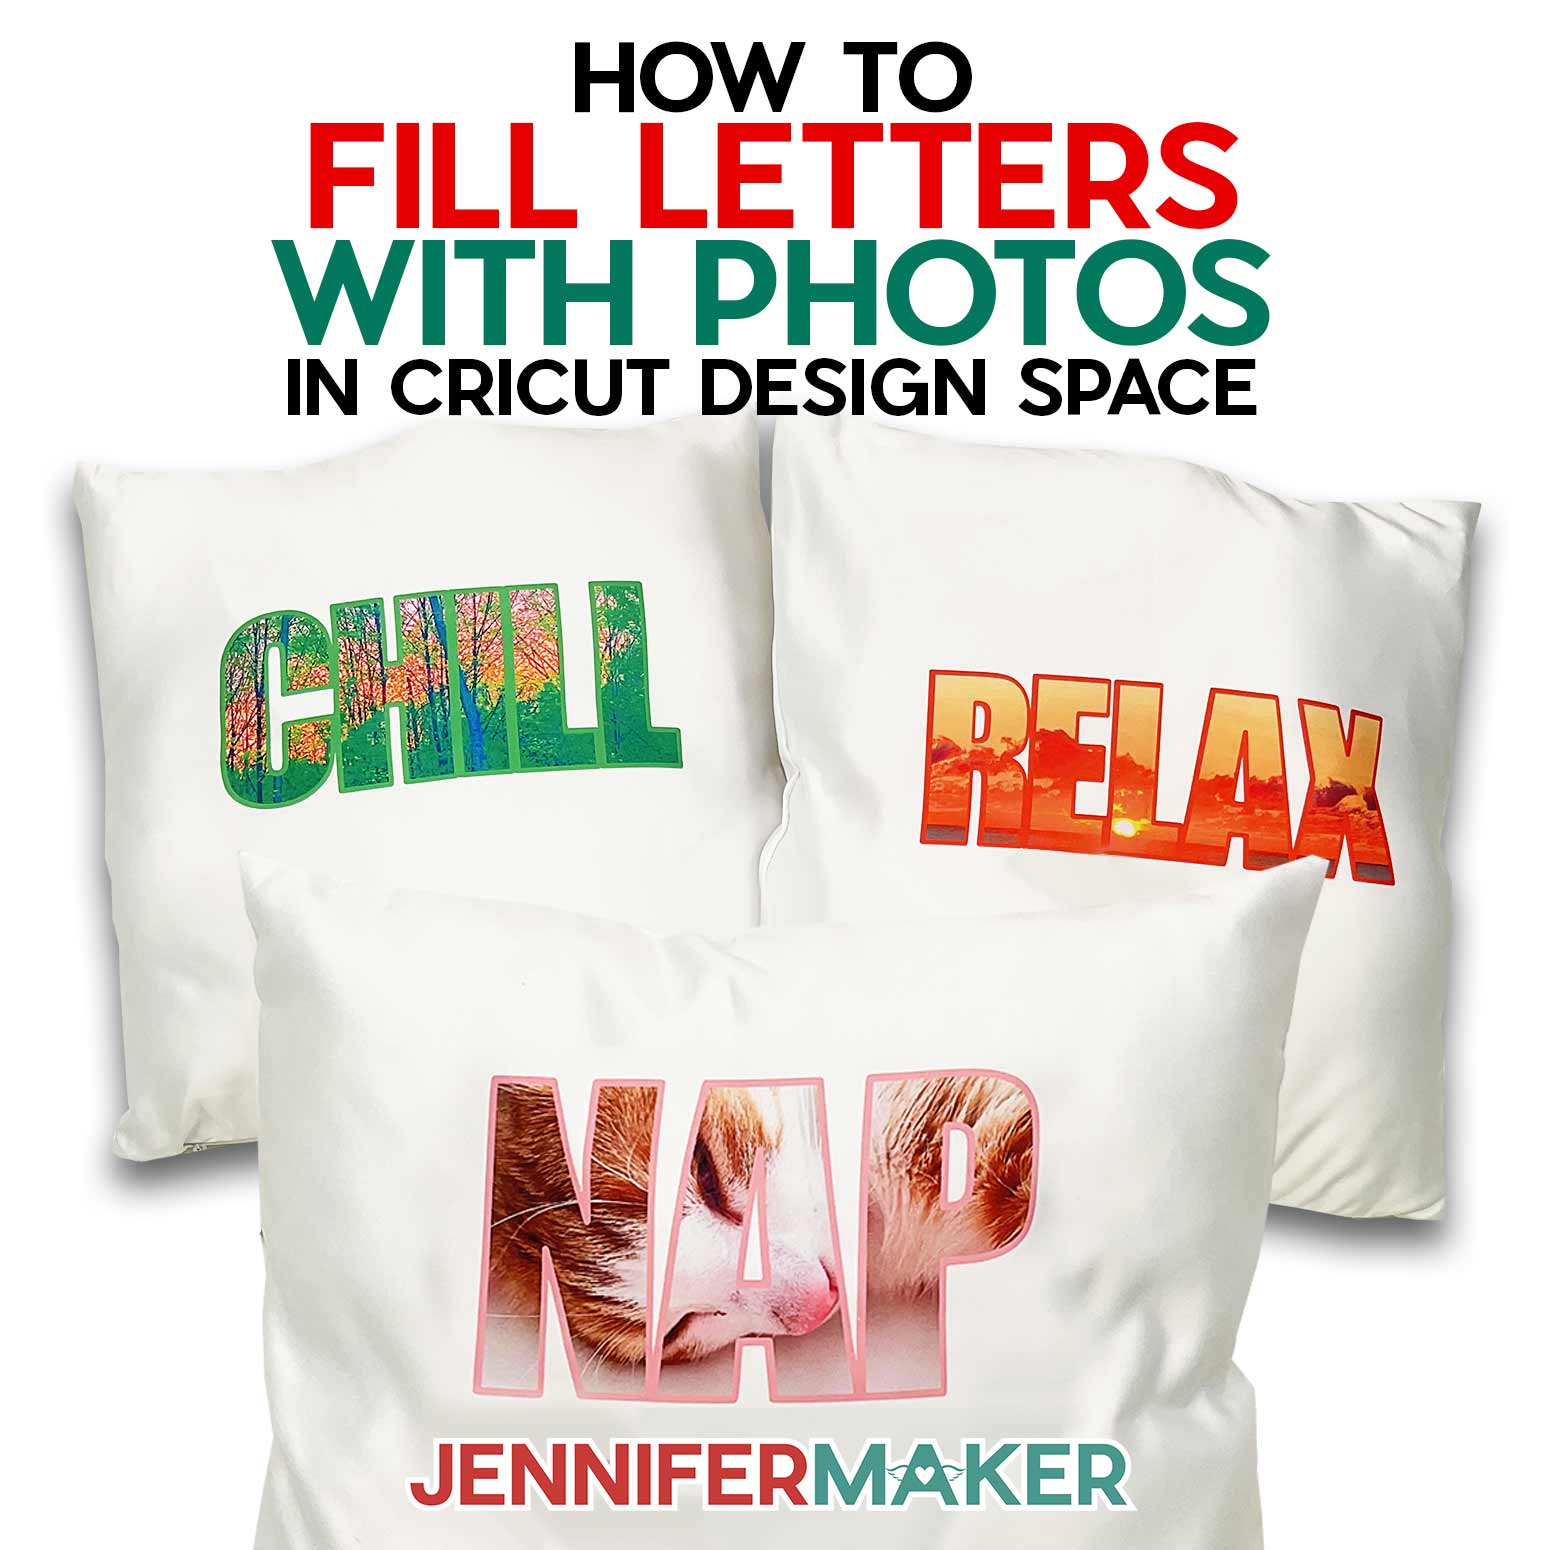
Editing photos into letter designs may look intimidating, but it’s easier than you think with the right tools! I’ll show you how to fill letters with photos in Cricut Design Space using the text tool, the best free fonts, the slice tool, letter spacing, and an offset outline. You can add your designs to anything, but I’ll decorate some pillows — including one with sequins! We’ll hack the Print then Cut feature to make a custom sublimation design, so you don’t have to use any extra software.
Want to save this project? Enter your email below and we’ll send the project straight to your inbox.
Watch my complete step-by-step tutorial on how to fill letters with photos in Cricut Design Space:

If you have a favorite photo you’d like to feature on decor or clothing, combining it with letters is a fun, easy project. Especially if you can make them into a sublimation design! You can use my free designs, or follow my steps to make your own for great results.
Selecting the right photo is very important. Pick a photo that will be recognizable even if you can only see some parts of the subject. Landscapes work really well when you’re first learning how to fill letters with photos in Cricut Design Space, but you can also feature people and pets with a little bit of planning and extra time. See the video for some helpful tips!
When you’re ready to create your own designs, font selection is very important. There are tons of free fonts available in Cricut Design Space under the font menu, but how do you pick the best one? Here are a few easy ways to decide:
- First thing, don’t use a writing font (or select the writing style) since they are intended to be drawn and so they have a single line. That means there’s no space to fill with photos!
- Bold, consistent fonts will be easier, especially while you’re learning how to fill letters with photos in Cricut Design space. Script fonts or a cursive font will be tougher with their curves and thin areas. Once you have the process down, I’d love to see you try it with fancier, different fonts!
- Kerned fonts are designed with good letter spacing, so they’re easier to work with when learning how to fill letters with photos in Cricut projects.
- If you’ve downloaded a font but can’t find it in the main Cricut fonts menu, remember to check the System Fonts area for options on your computer and use the search bar.
Want to experiment with more styles once you know how to fill letters with photos in Cricut Design Space? You can find many of my favorite fonts in my Cricut Font Finder cheat sheets!
Once you’ve created an image, I’ll show you how easy it is to print sublimation designs right from Cricut Design Space with one click in the operation menu. We’ll approach it like a Print then Cut project with a few hacks to save time! I used a Maker 3, but you don’t need a specific machine since it’s a sublimation design, which is different from the SVG files we often use. Sublimation is my favorite way to decorate with photos because you can get the best result with so many different colors.
To make the sublimation print, you’ll need a sublimation printer with compatible ink and paper, scissors, and a ruler. Then, to transfer the design, you’ll use a heat press, heat resistant tape, white cardstock, and white butcher paper. A fan and lint roller are also helpful when sublimating your own projects. You can find the full details and my recommendation in the tool and material list below.
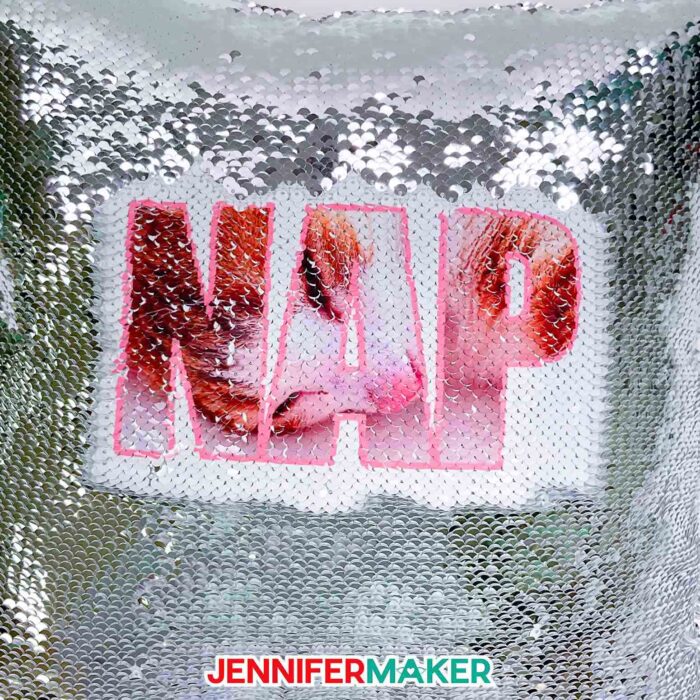
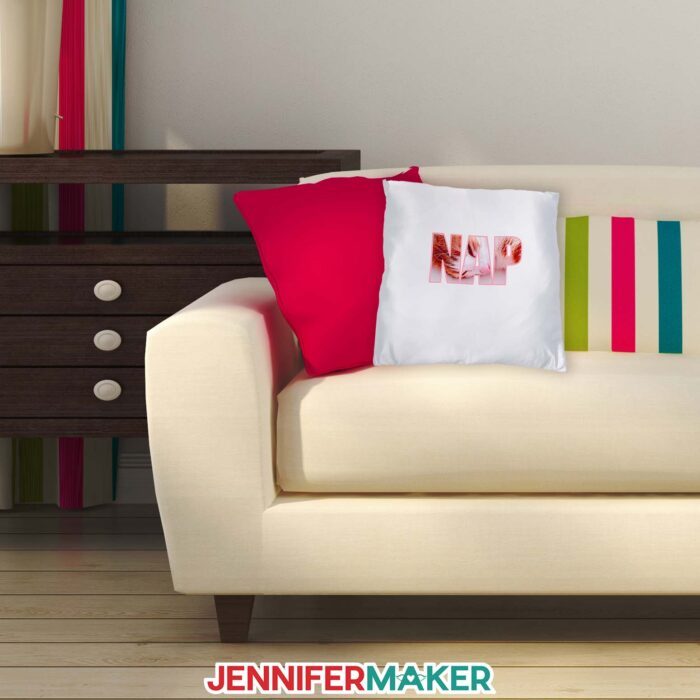
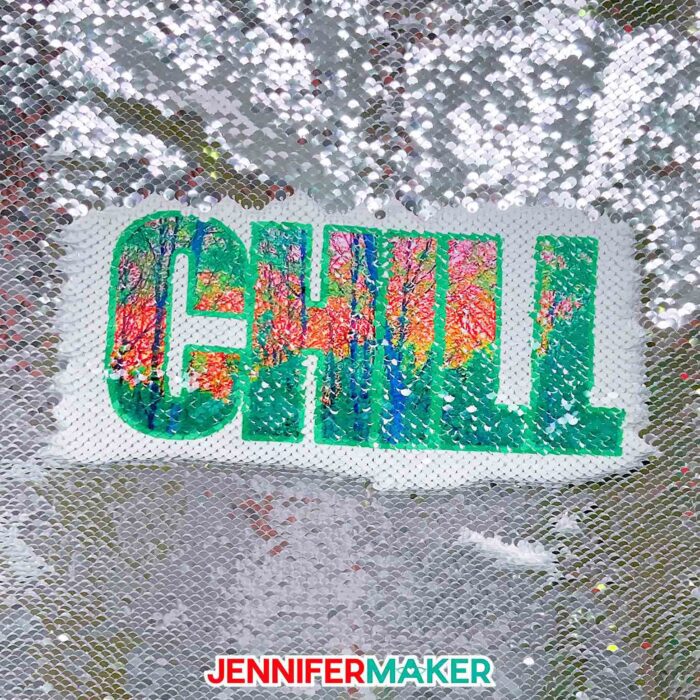
And since we’re using a sublimation design, you can also decorate non-traditional materials, like sequins! I tried out the process on a pillow cover with double-sided sequins. I’ll show you how to add the filled letters design on the white side. You can hide and reveal the design by smoothing the sequins one way or the other.
Whichever item you decorate, I hope you’ll love learning how to fill letters with photos in Cricut Design Space and the end result!
Ready to learn how to fill letters with photos in Cricut Design Space? I’m super excited to show you how! This post contains some affiliate links for your convenience (which means if you make a purchase after clicking a link I will earn a small commission but it won’t cost you a penny more)! Read my full disclosure policy.
Materials for How to Fill Letters With Photos in Cricut Design Space
View my Amazon shopping list with the exact items we used to make this project
- Sublimation Pillow Covers 15.7″ x 15.7″ -OR- Sequin Pillow Covers 16″ x 16″
- Pillow Inserts 16′ x 16″
- Sublimation Printer – I used my Sawgrass but a converted Epson EcoTank also works with compatible Sublimation Ink, like Hiipoo
- Sublimation Paper – I used A-Sub 8.5″ x 11″
- Heat Press – like an EasyPress and Pressing Mat or an Autopress
- Heat Resistant Tape
- White Cardstock 12″ x 12″
- White Butcher Paper
- Fan
- Lint Roller
- Ruler
- Personal Digital Photos -OR-
- Design #469 – My free designs (available in my free resource library—get the password at the bottom of this post)
How to Fill Letters with Photos in Cricut Design Space

How to Fill Letters with Photos in Cricut
Learn how to fill letters with photos in Cricut Design Space.
Materials
- Sublimation Pillow Covers 15.7" x 15.7" -OR-
- Sequin Pillow Covers 16" x 16"
- Pillow Inserts 16' x 16"
- Heat Resistant Tape
- White Cardstock 12" x 12"
- White Butcher Paper
- Sublimation Paper - I used A-Sub 8.5" x 11"
- Personal Digital Photos -OR-
- Design #469 – My free designs (available in my free resource library—get the password at the bottom of this post)
Tools
- Sublimation Printer - I used a Sawgrass SG500, but a converted Epson EcoTank ET-4700 Inkjet Printer or other printer will work well
- Sublimation Ink - I used Sawgrass ink but use Hiipoo ink with my Epson
- Heat Press - I used my Cricut Autopress but you can also use an EasyPress with a pressing mat
- Fan
- Lint Roller
- Measuring Tape
- Scissors
Instructions
STEP 1: GET OR PREPARE A DESIGN
You can use any of my How to Fill Letters with Photos in Cricut design files from my resource library, Design #469. You can also make your own design with letters and use your own photos by following my instructions.
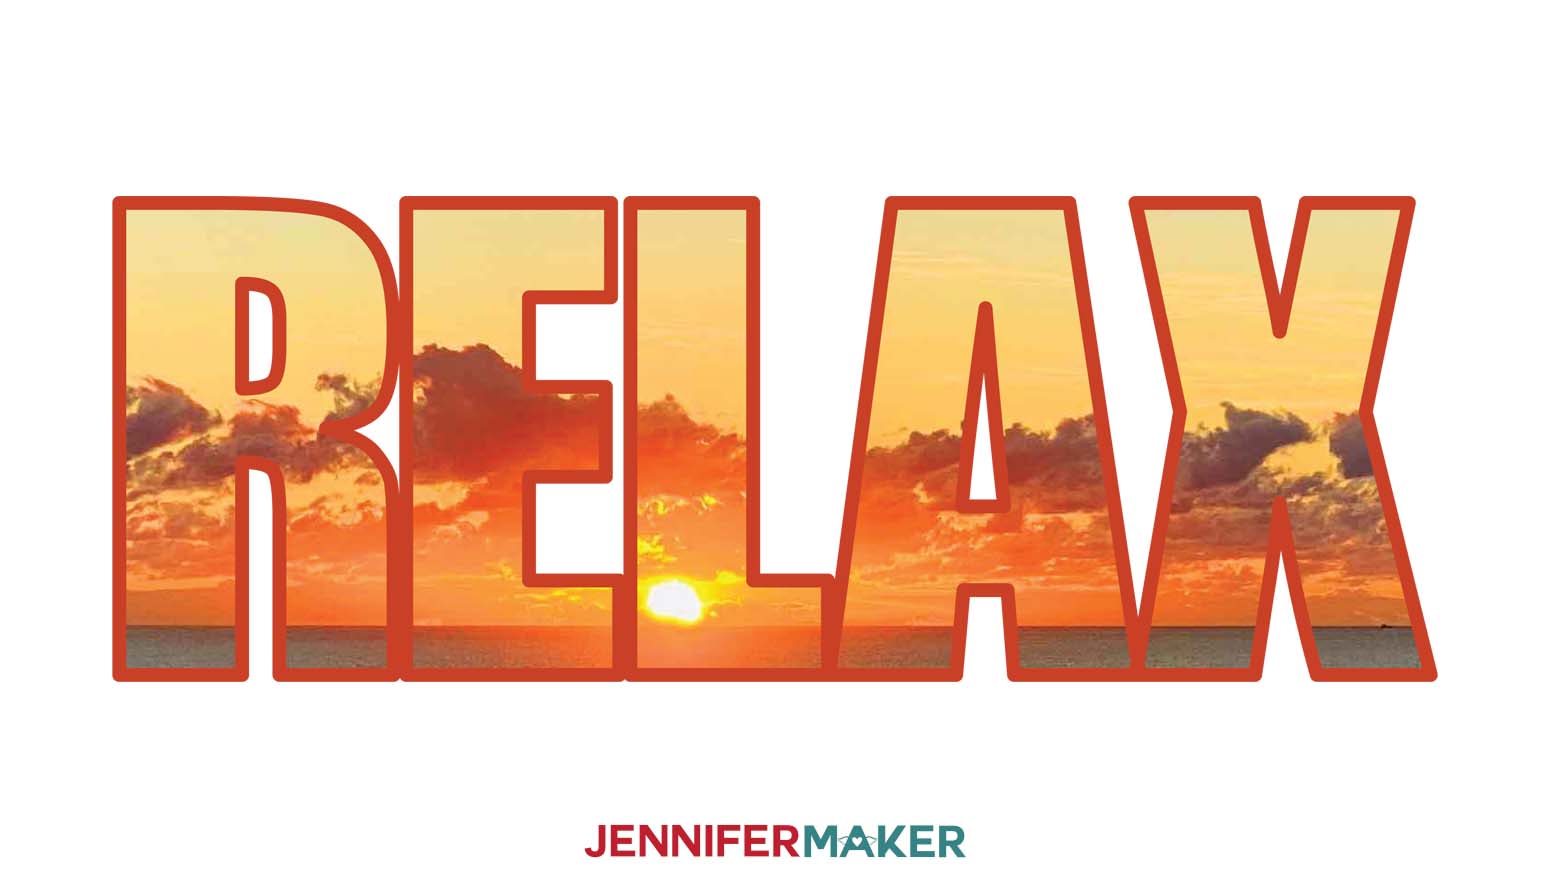
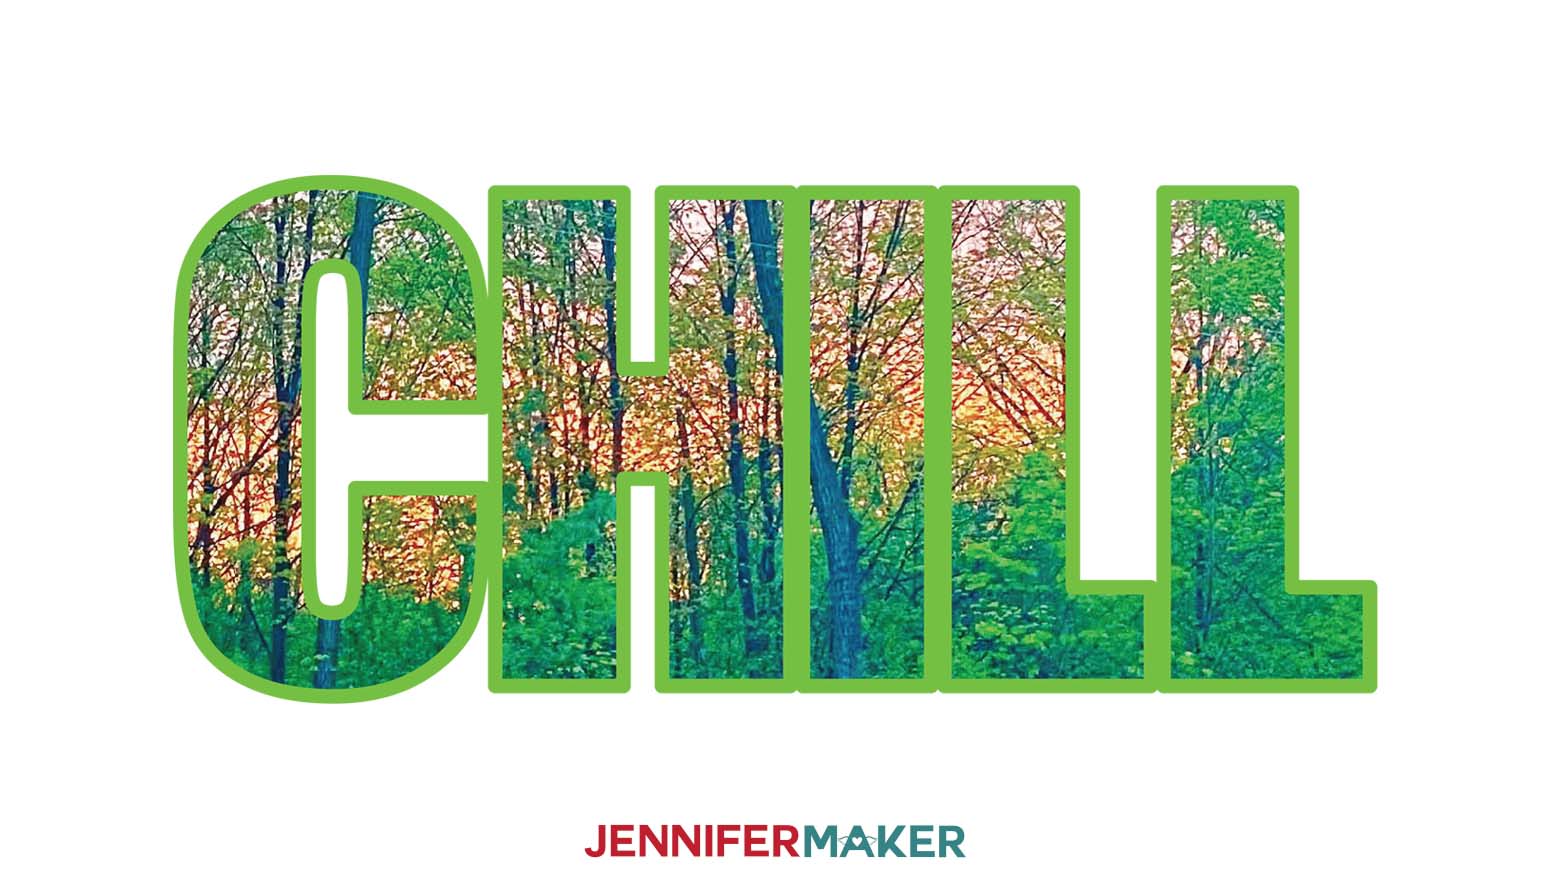
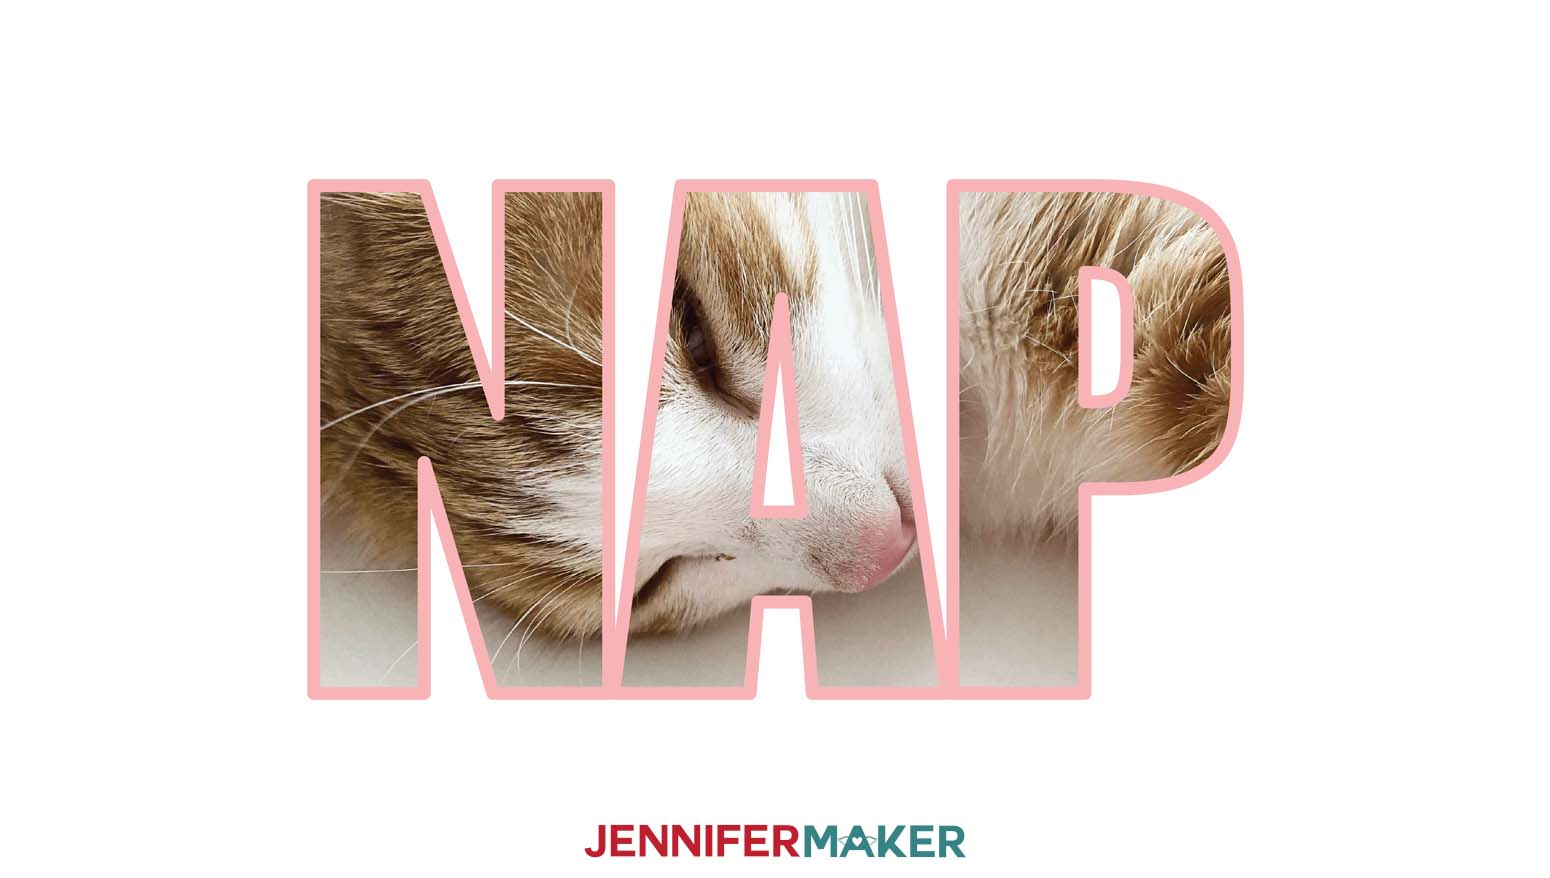
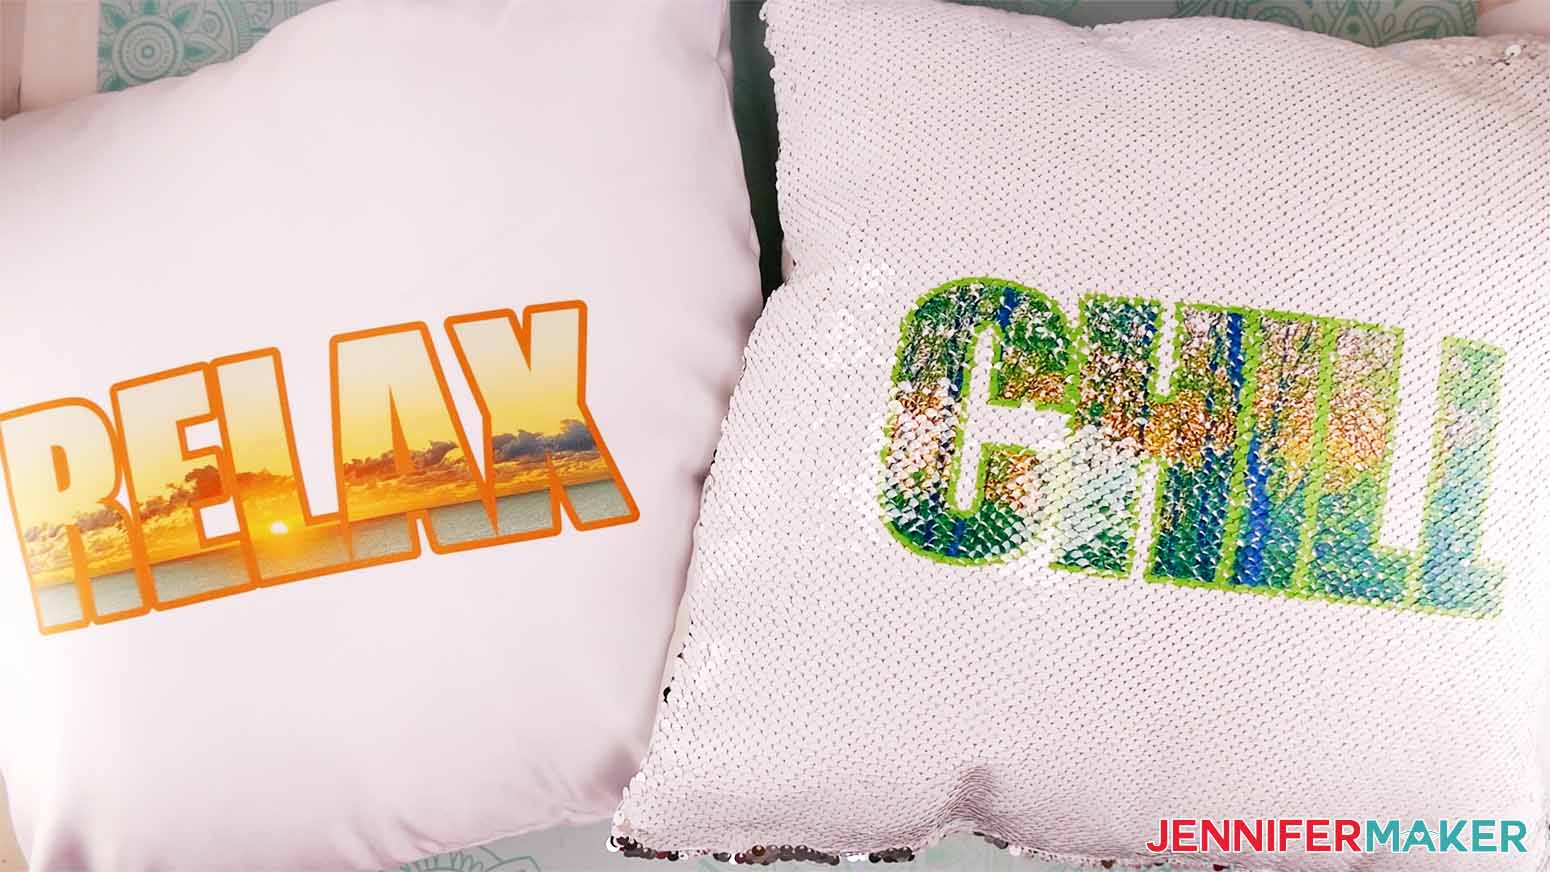
There are three completed designs to choose from.
Relax
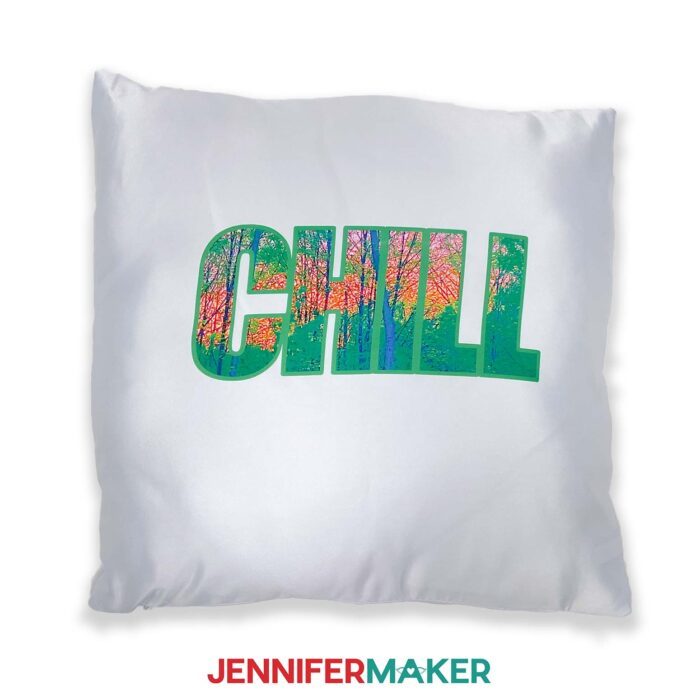
Chill
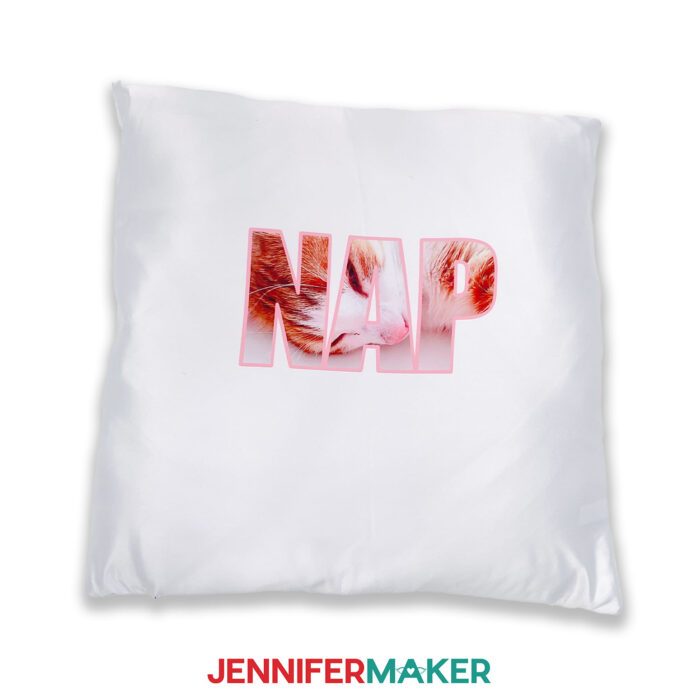
Nap
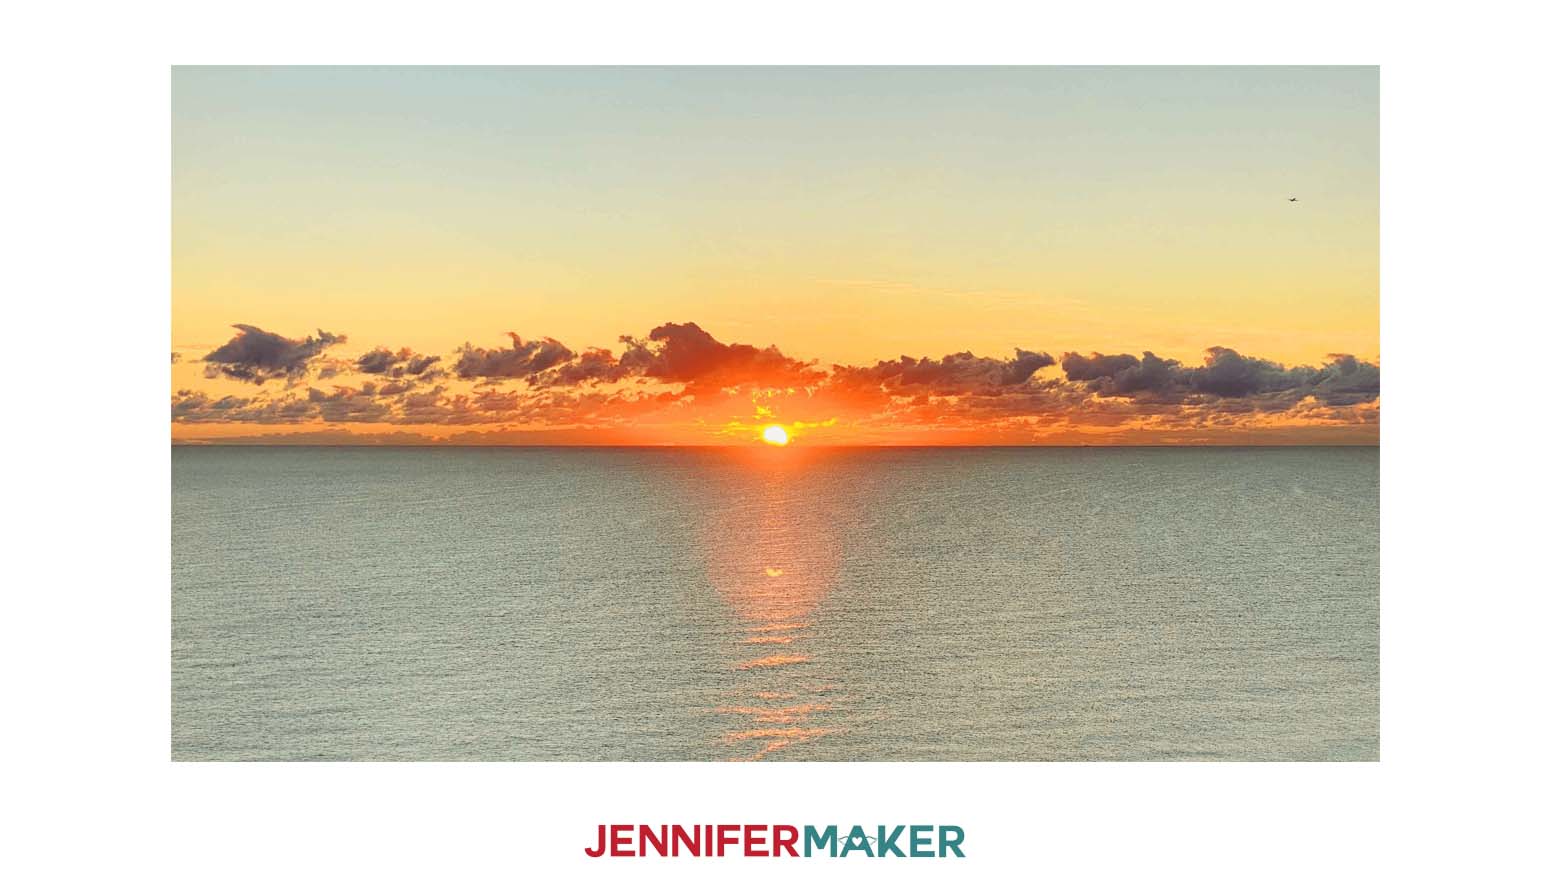
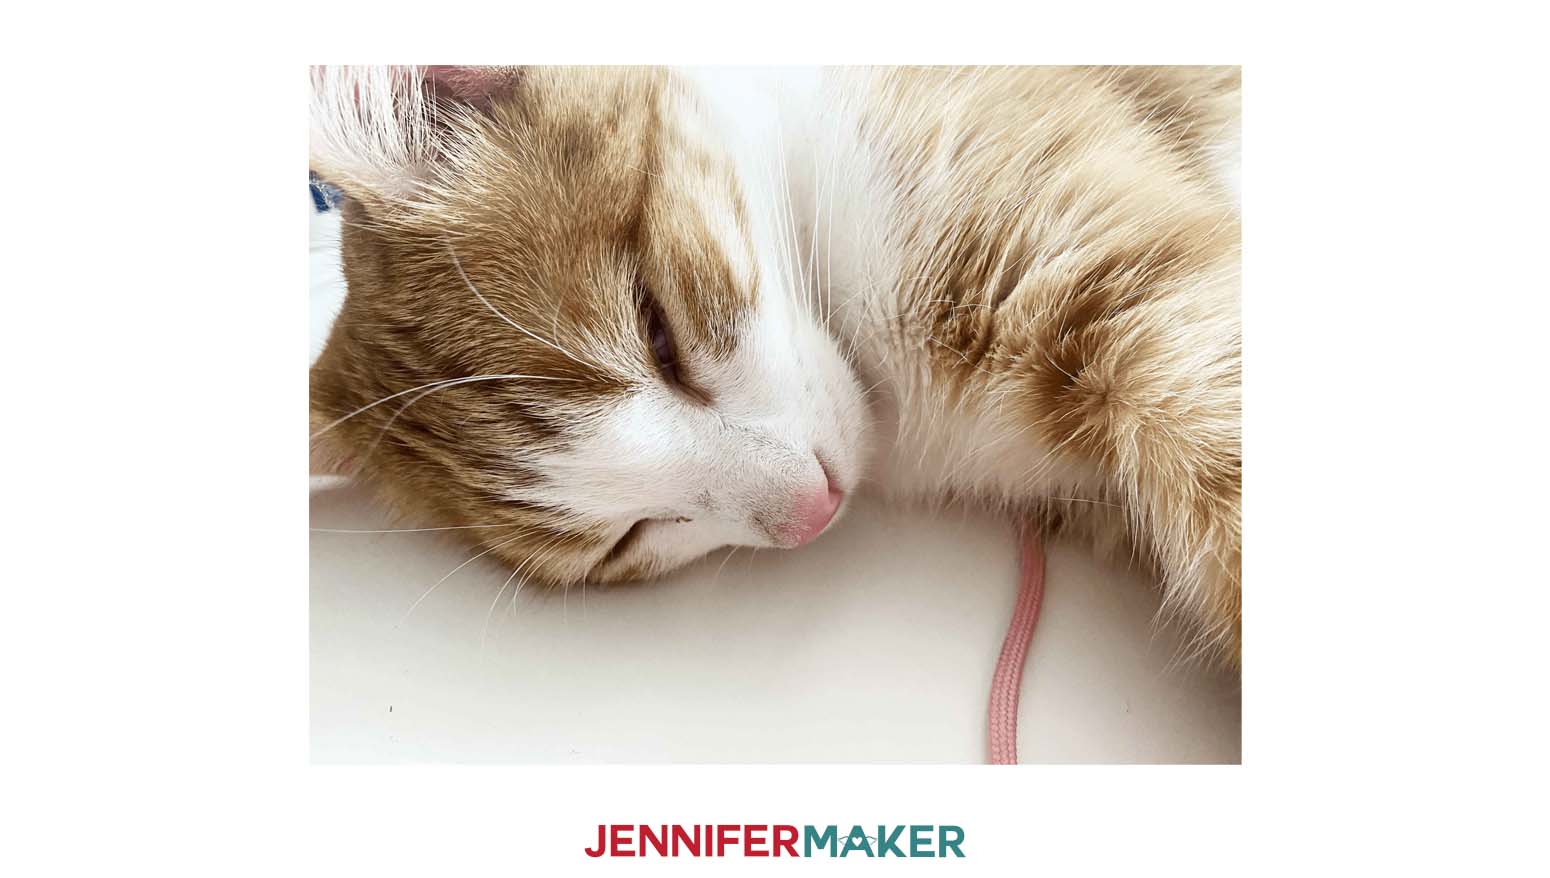
And there are three photos to practice with, or you can upload your own photo.
Sunset
Woods

Cat
STEP 2: FILL WORDS WITH PHOTOS IN CRICUT DESIGN SPACE
If you are using a completed word design, you can upload the image as a Complex Print then Cut image and skip to resizing later in this step.
But here's how to make your own design! I'll show you how with my photos and words, but you can adapt the steps to your images.
On a blank Canvas, click "Text" on the left side and type your word or name. I'll use "RELAX".
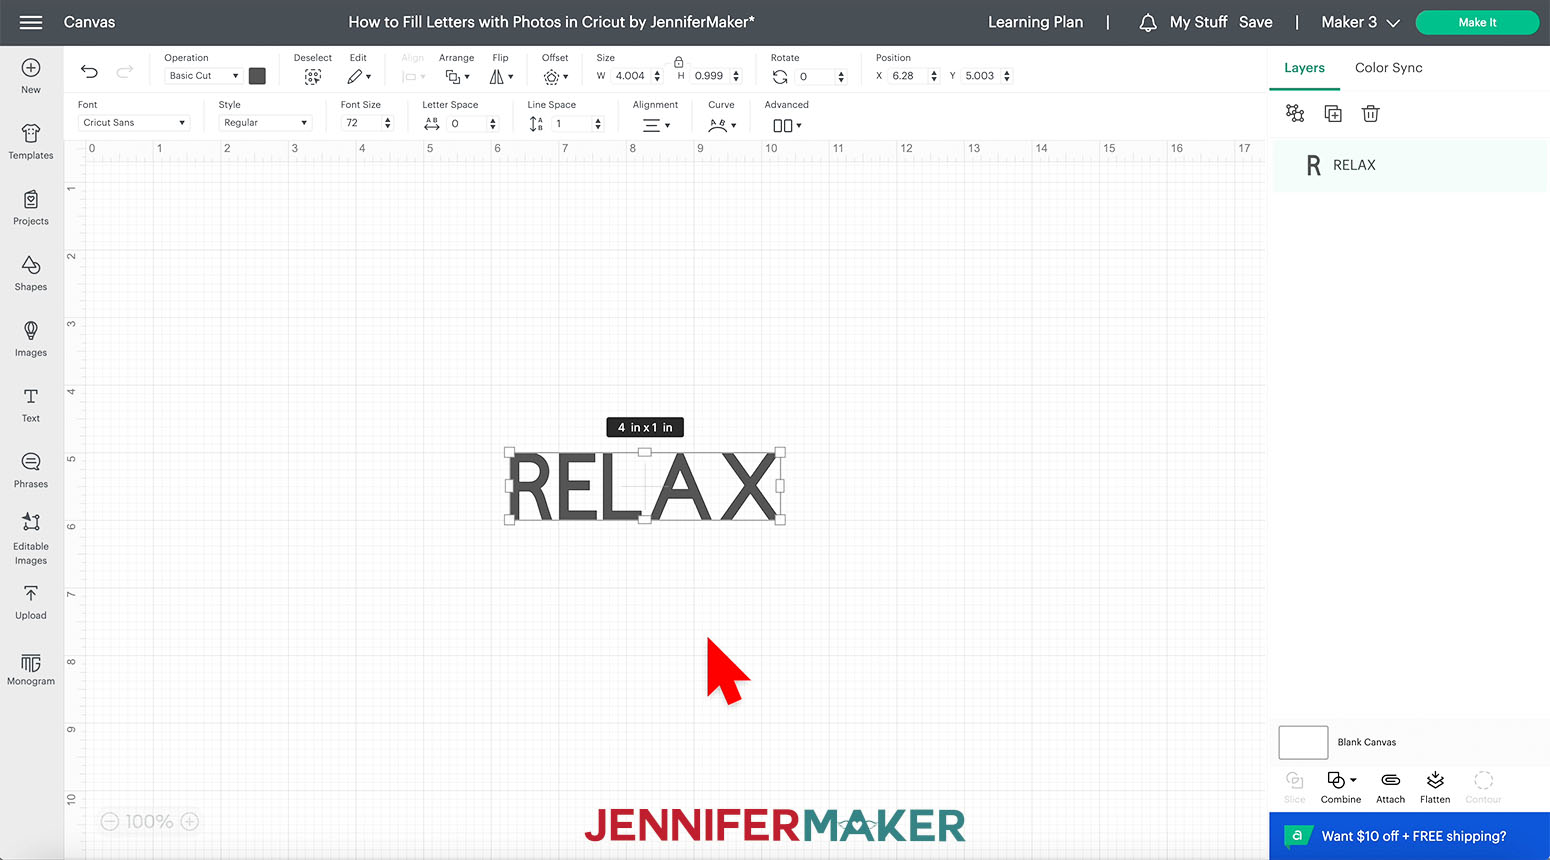
With the word selected, click on the Font menu.
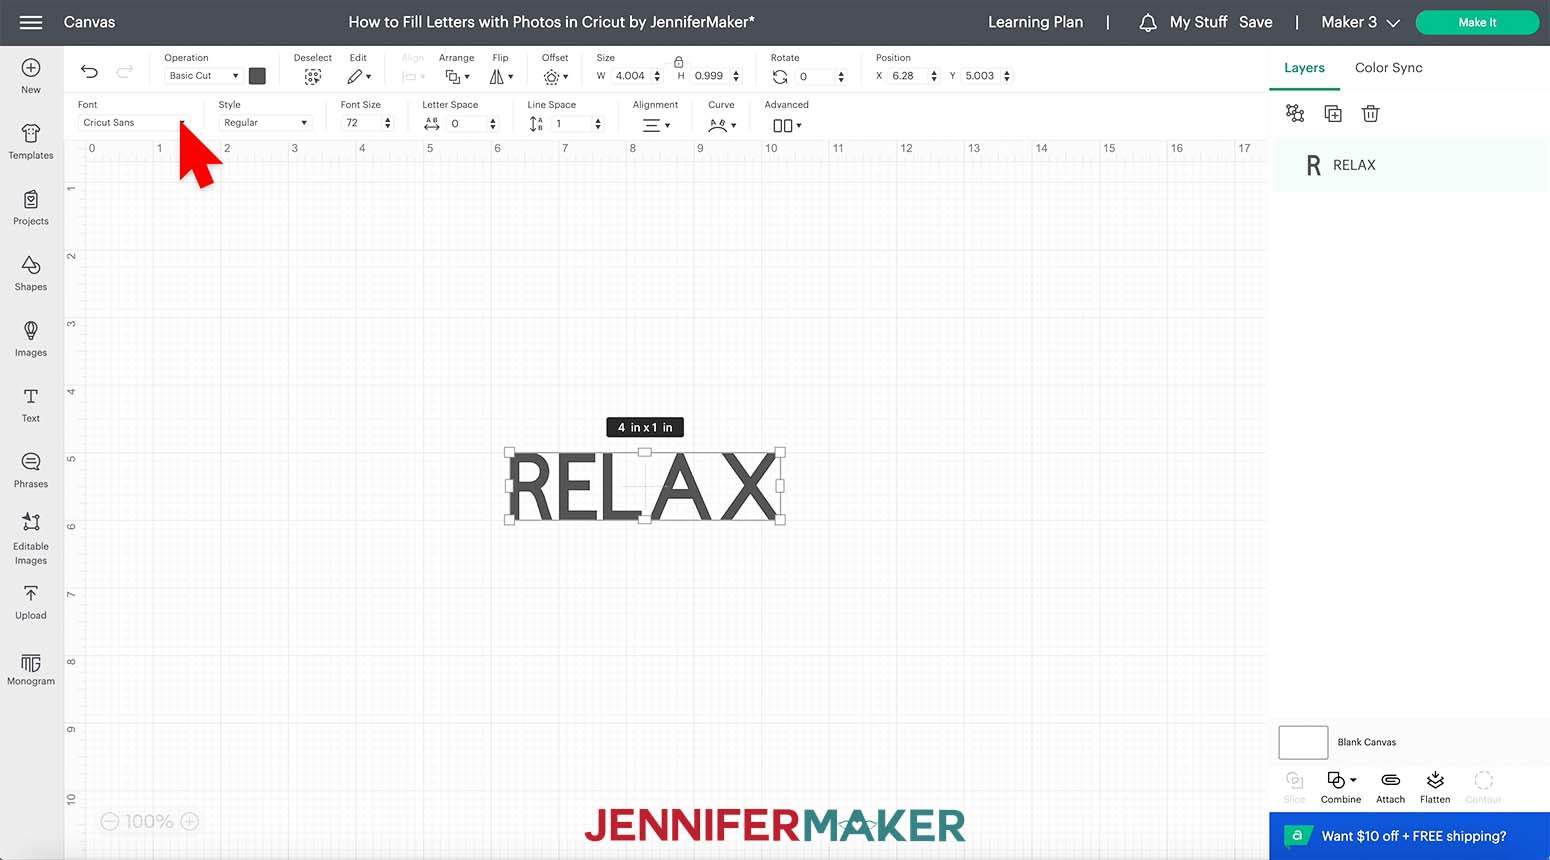
There are so many typefaces to choose from it can be overwhelming. For a successful design, look for something bold and thick. Script or handwritten typefaces will not look as good because they have thin areas and curved lines. The photos will be harder to see.
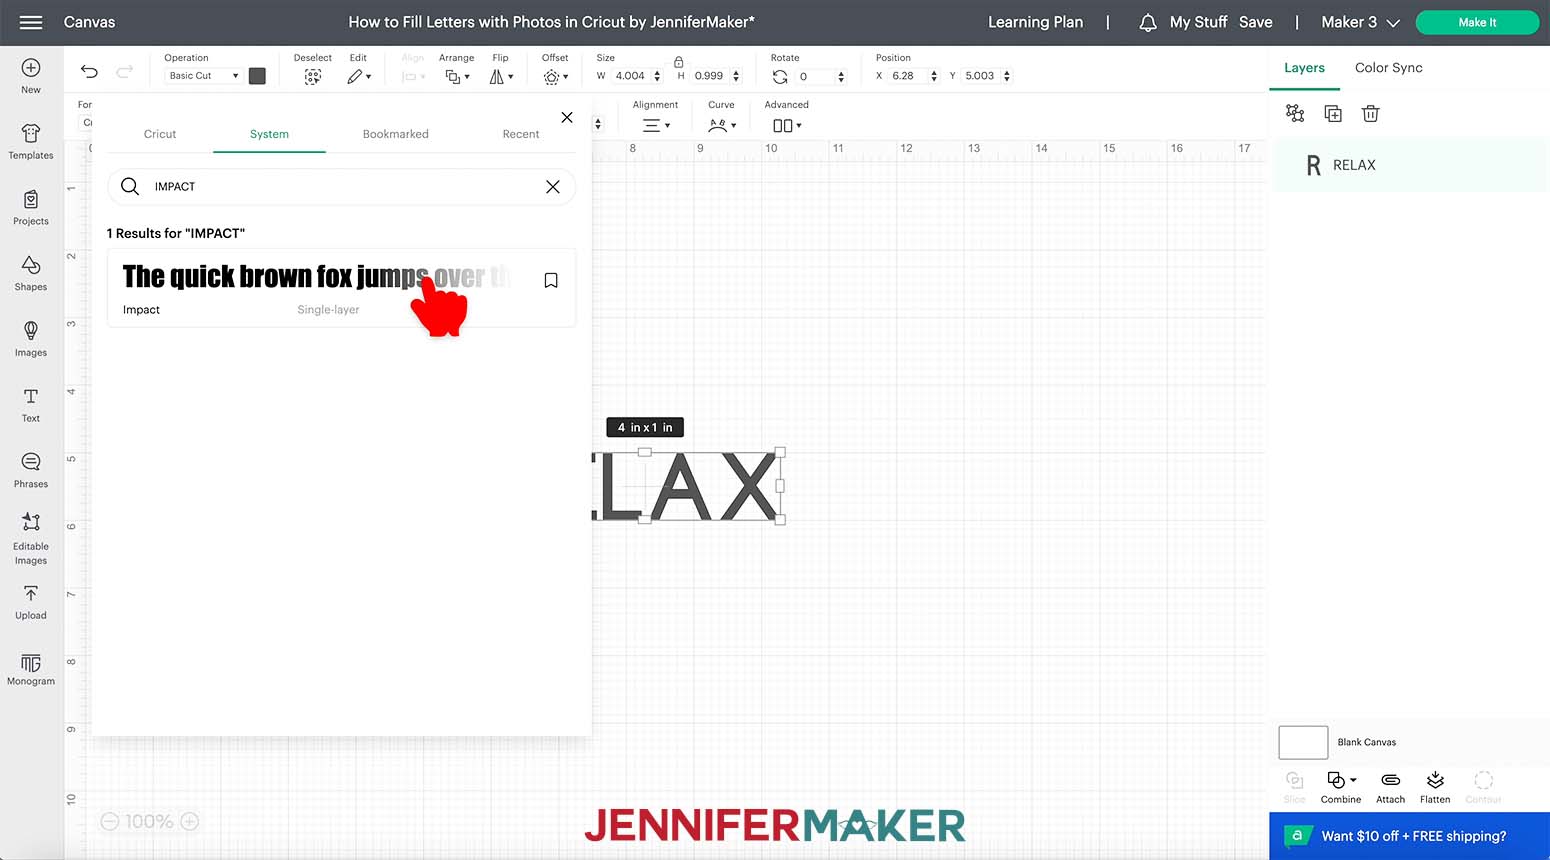
I'm going to use Impact, which comes with most computers. To find it, click on the word System. In the search bar, type "Impact" and select it.
You can certainly experiment with other fonts, just know it might take time! For some ideas, check out my font finder cheat sheets.
Measure the width of your pillow case. Mine is 15.75" wide (the sequin cover is a bit larger). So I can use the maximum width of 9.25" that Cricut's Print then Cut feature allows.
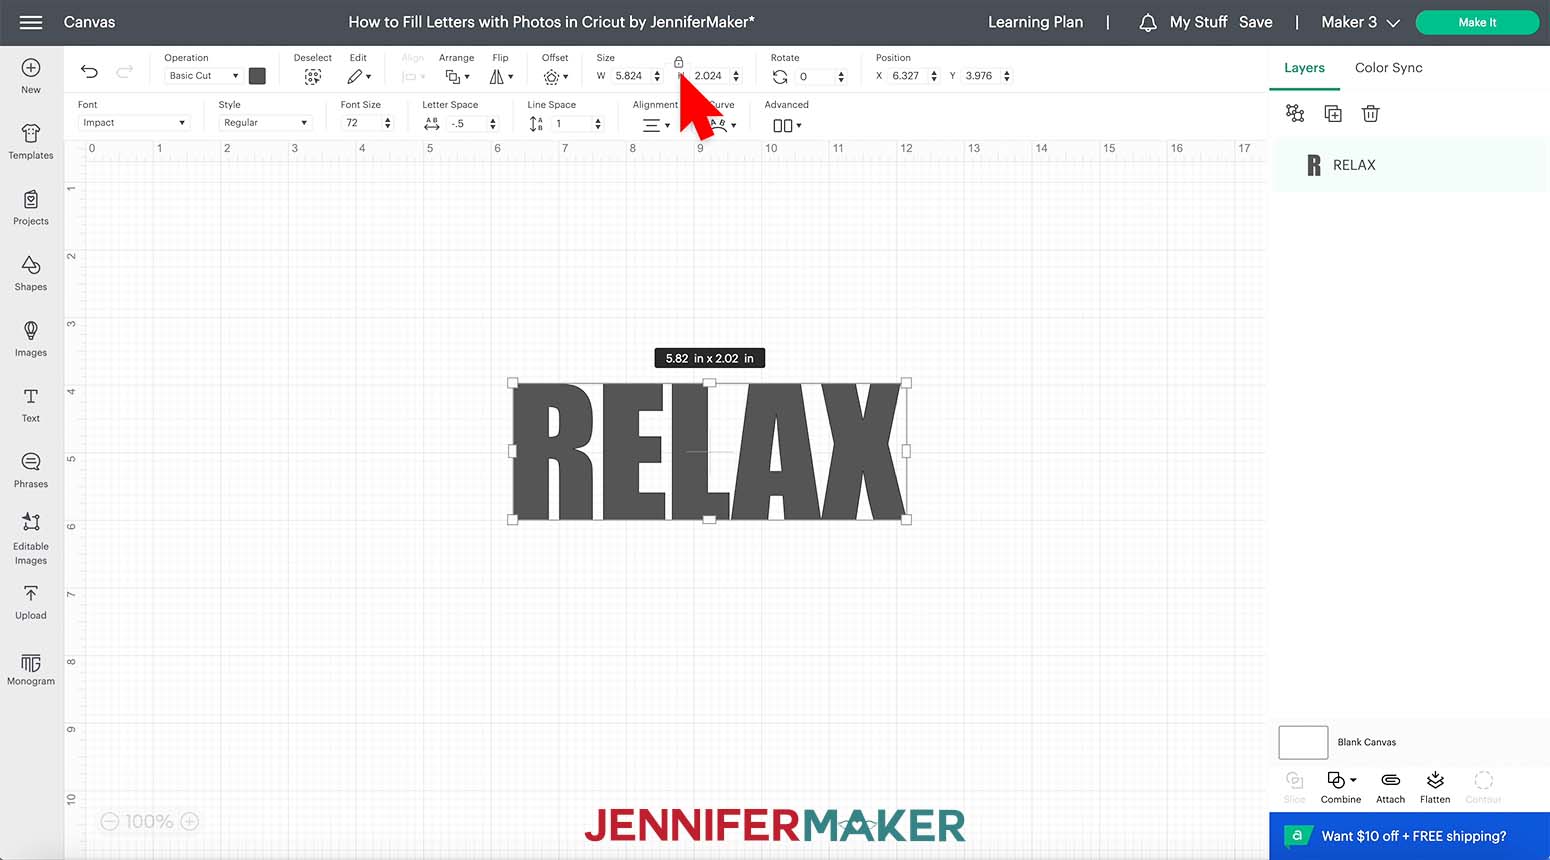
Next, we'll decrease the spacing between the letters. Click "Letter Space" and enter "-.5".
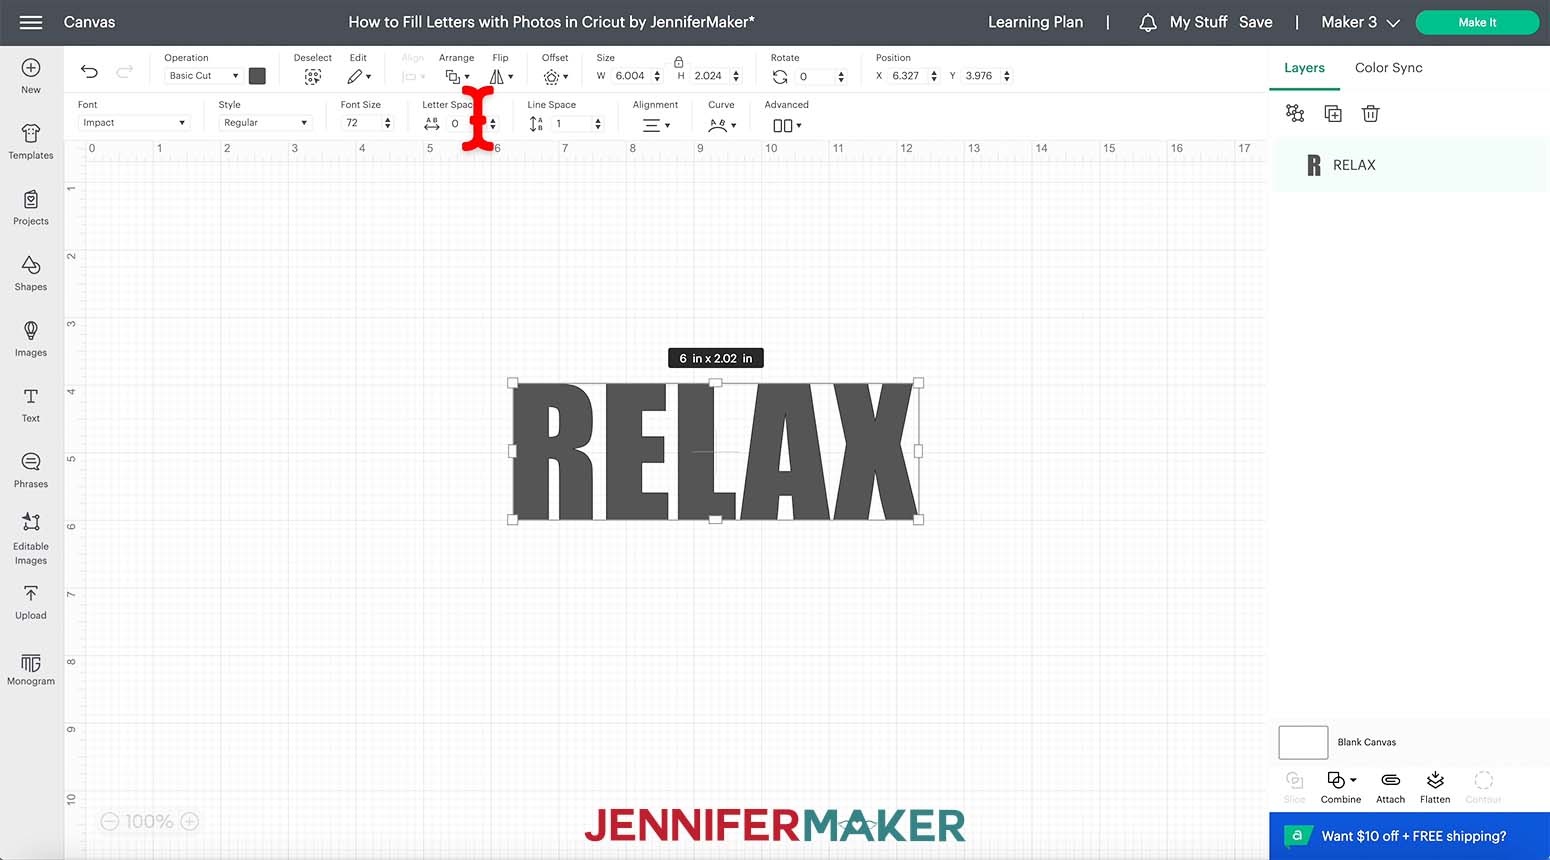
Make sure the lock is closed in the "Size" menu and enter a width of 9" to leave room for an offset we'll add.
Next, upload your photo as a Complex Print then Cut image and add it to your Canvas. I'll use the sunset photo, but you can choose any photo you would like.
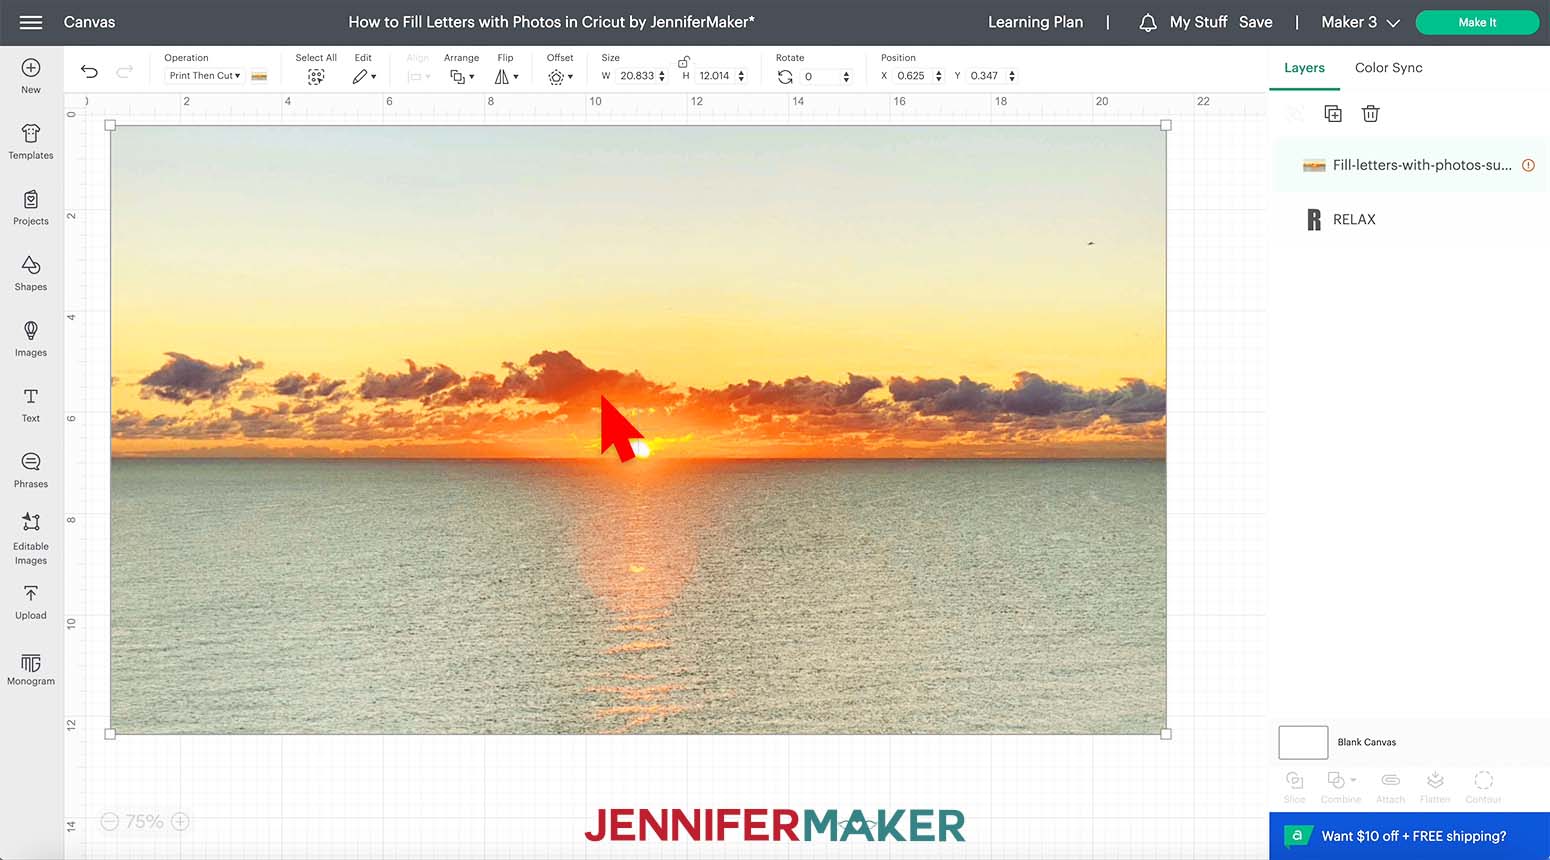
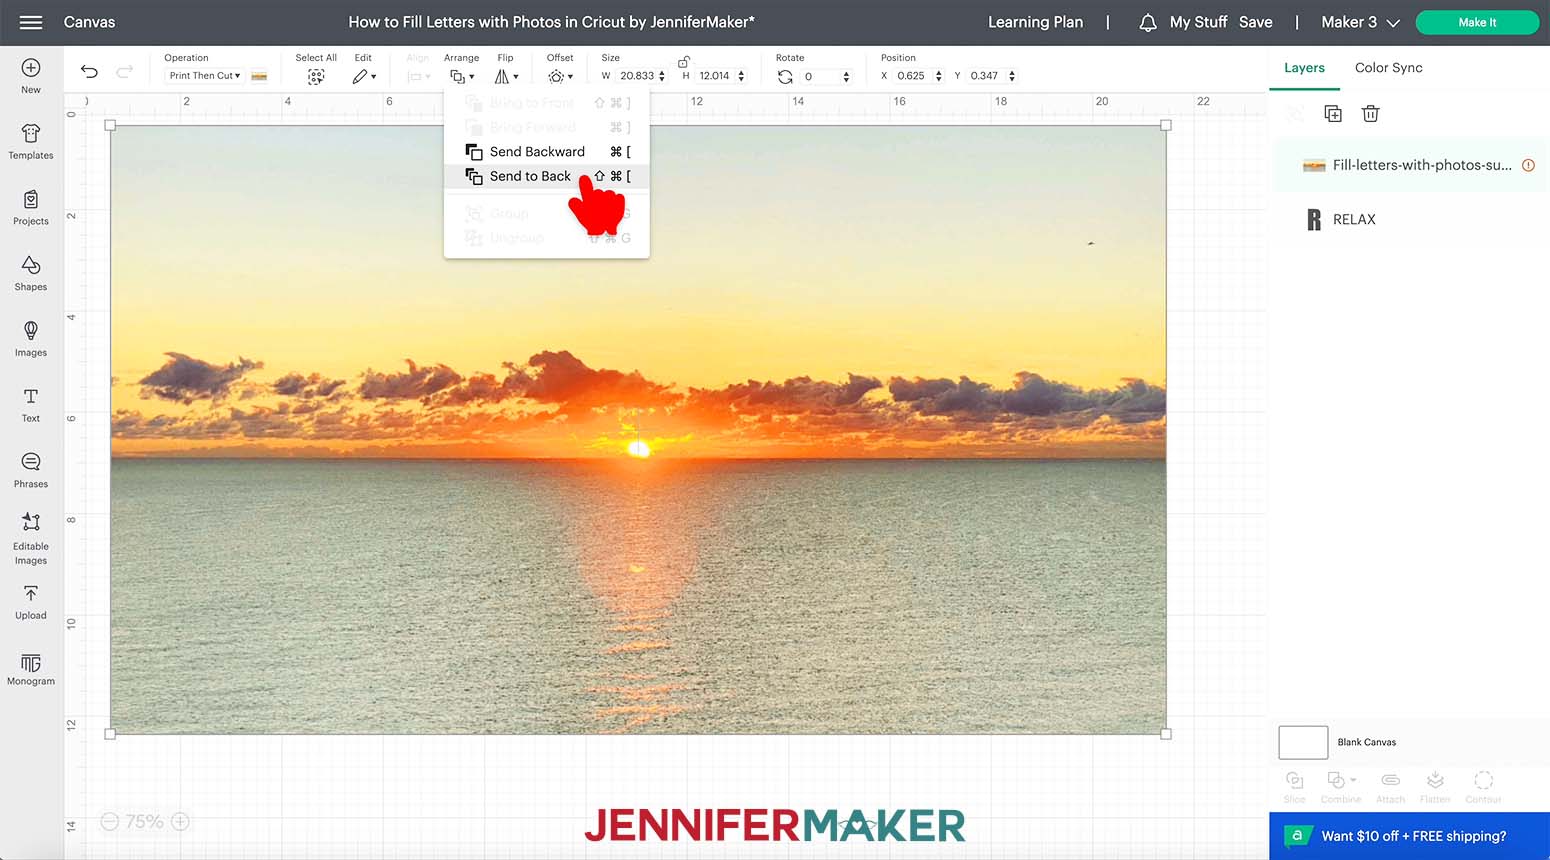
With the photo selected, use the "Arrange" menu to select "Send to Back".
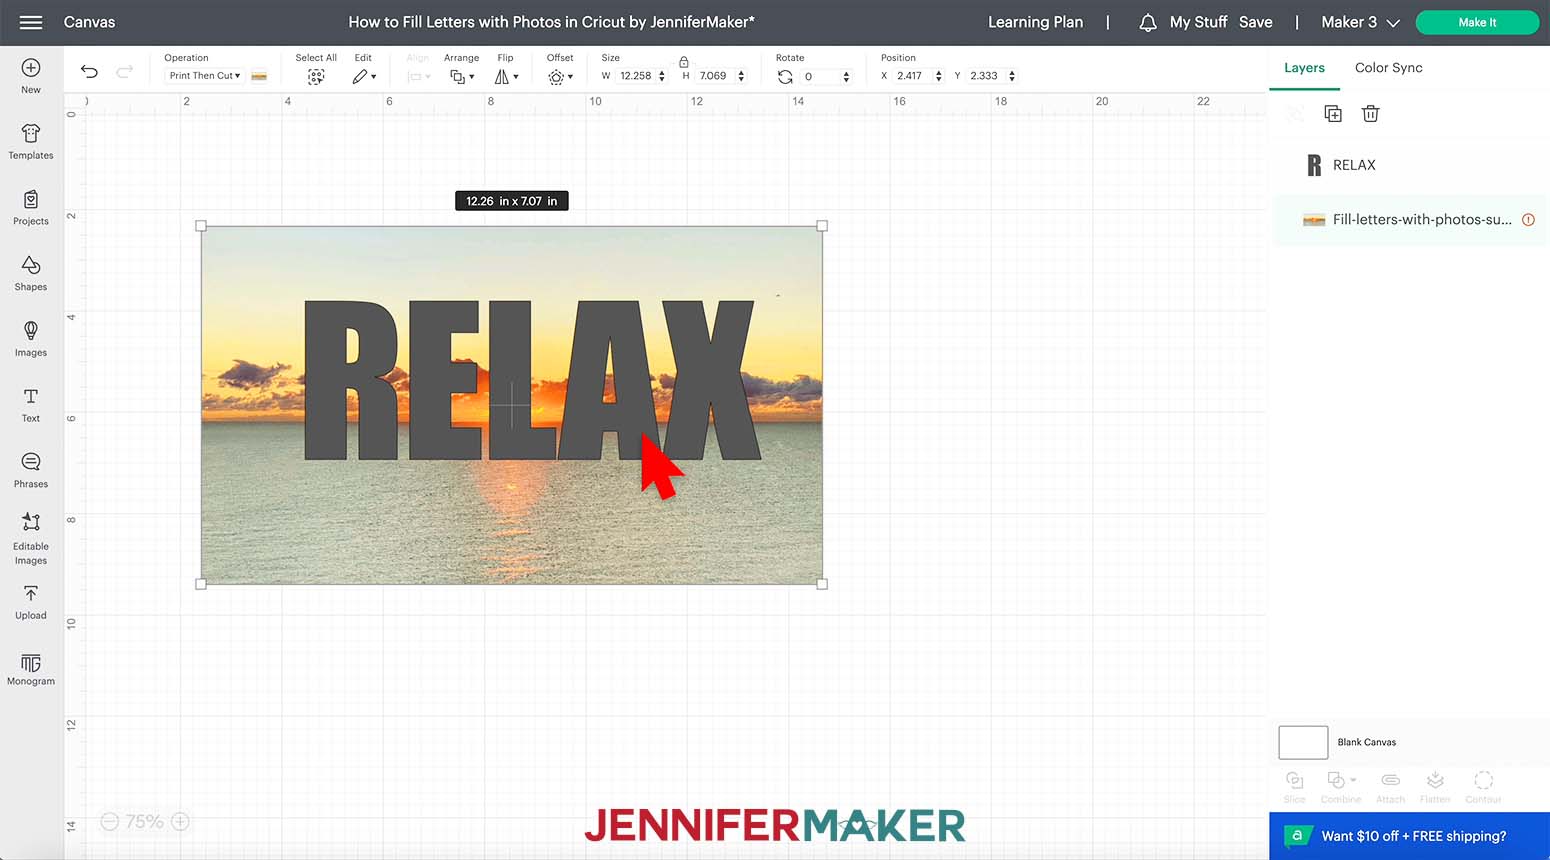
Keep the lock icon closed and make the photo bigger or smaller as needed.
Drag the word over the photo and find the placement that you like. If you have a photo with people in it, make sure it's placed so that most of the face or faces are covered by the letters so they'll be in the final design.
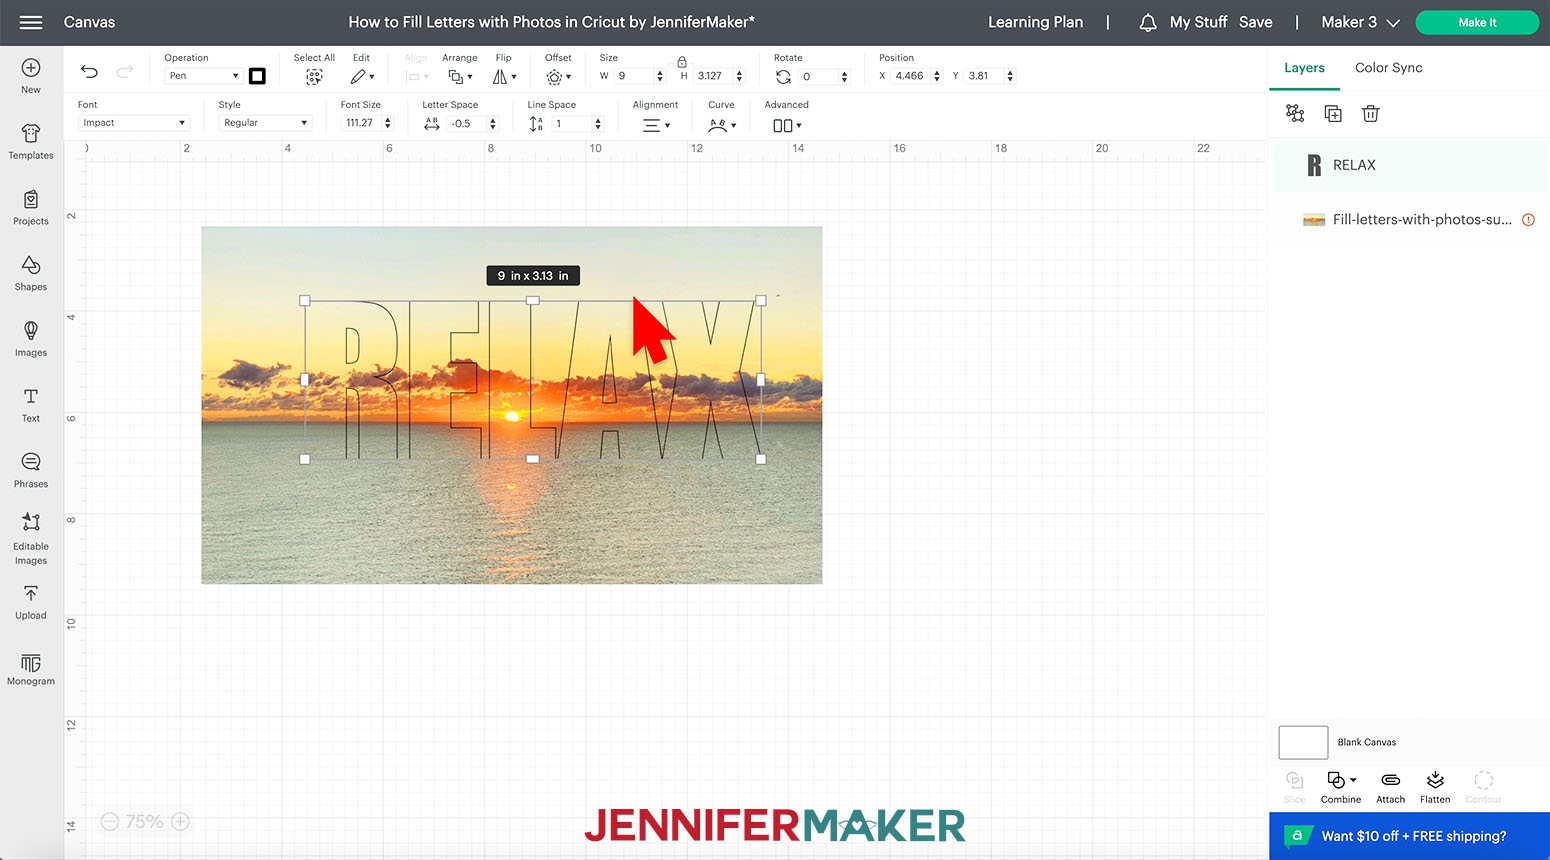
To get a better idea of what parts of the photo will show, temporarily change the "Operation" of your word to "Pen" which will outline it. Just remember to change the Operation back to Print then Cut when you are finished.
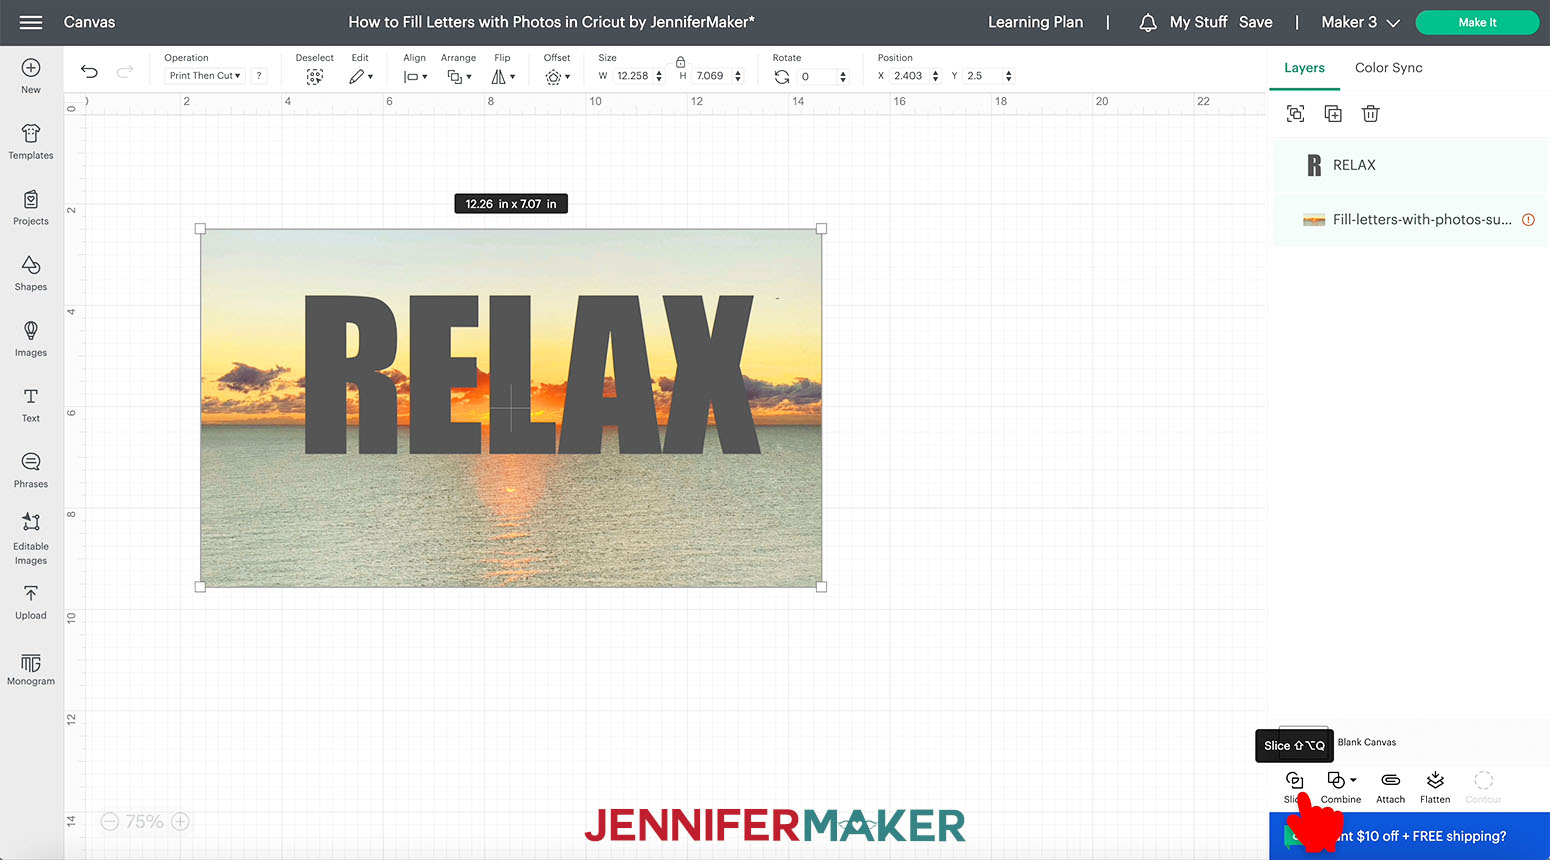
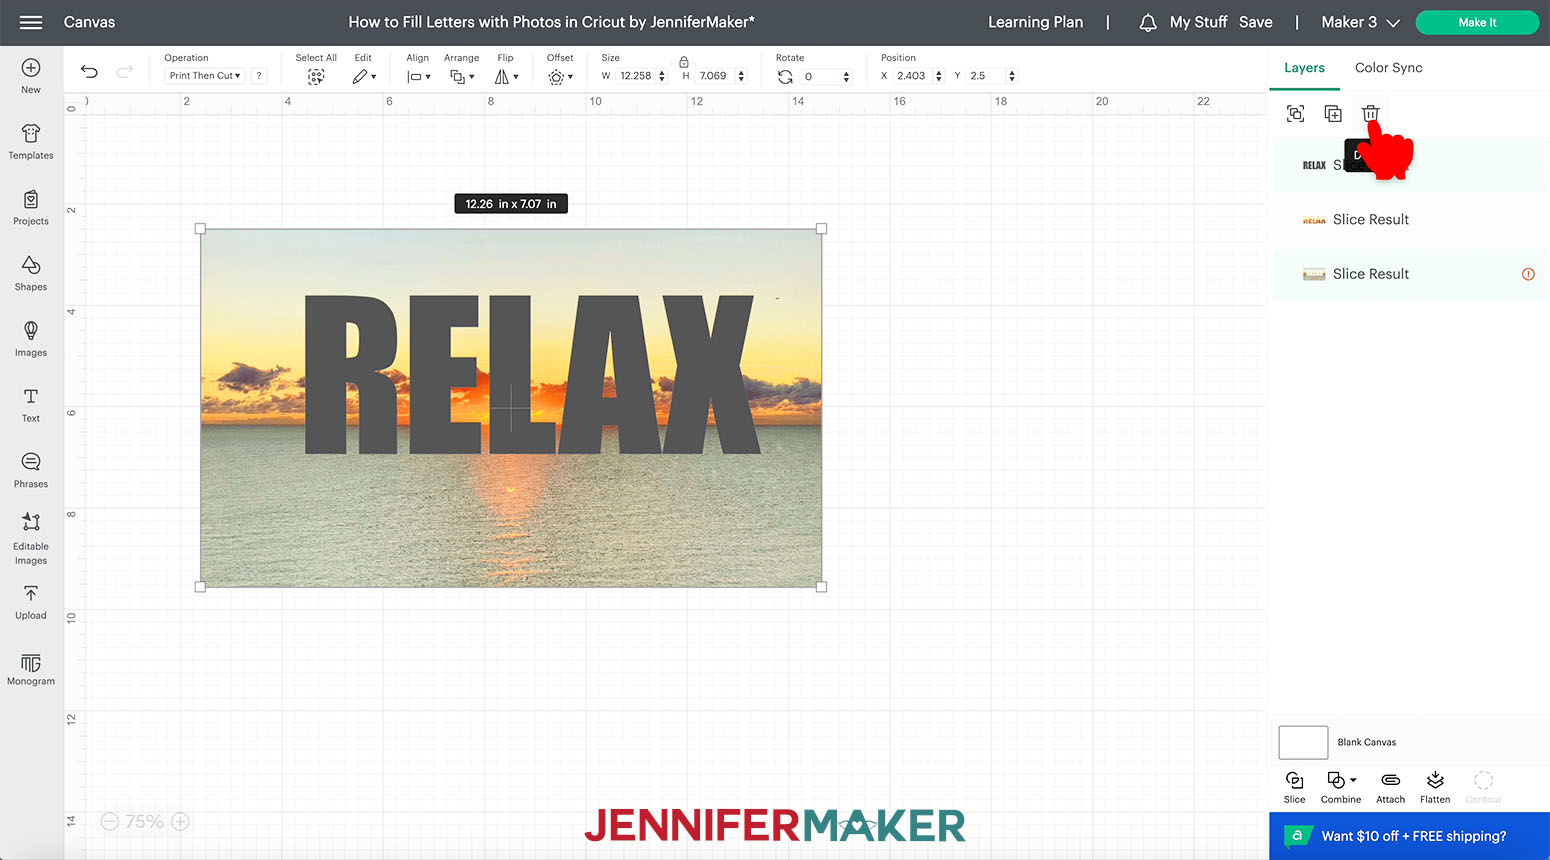
Hold your Shift key to select the word RELAX and the photo. Then click Slice in the lower left of the Layer Panel.
The gray RELAX, the sliced photo RELAX and the photo have all moved to the top of the Layer Panel. Select the gray RELAX and delete it.
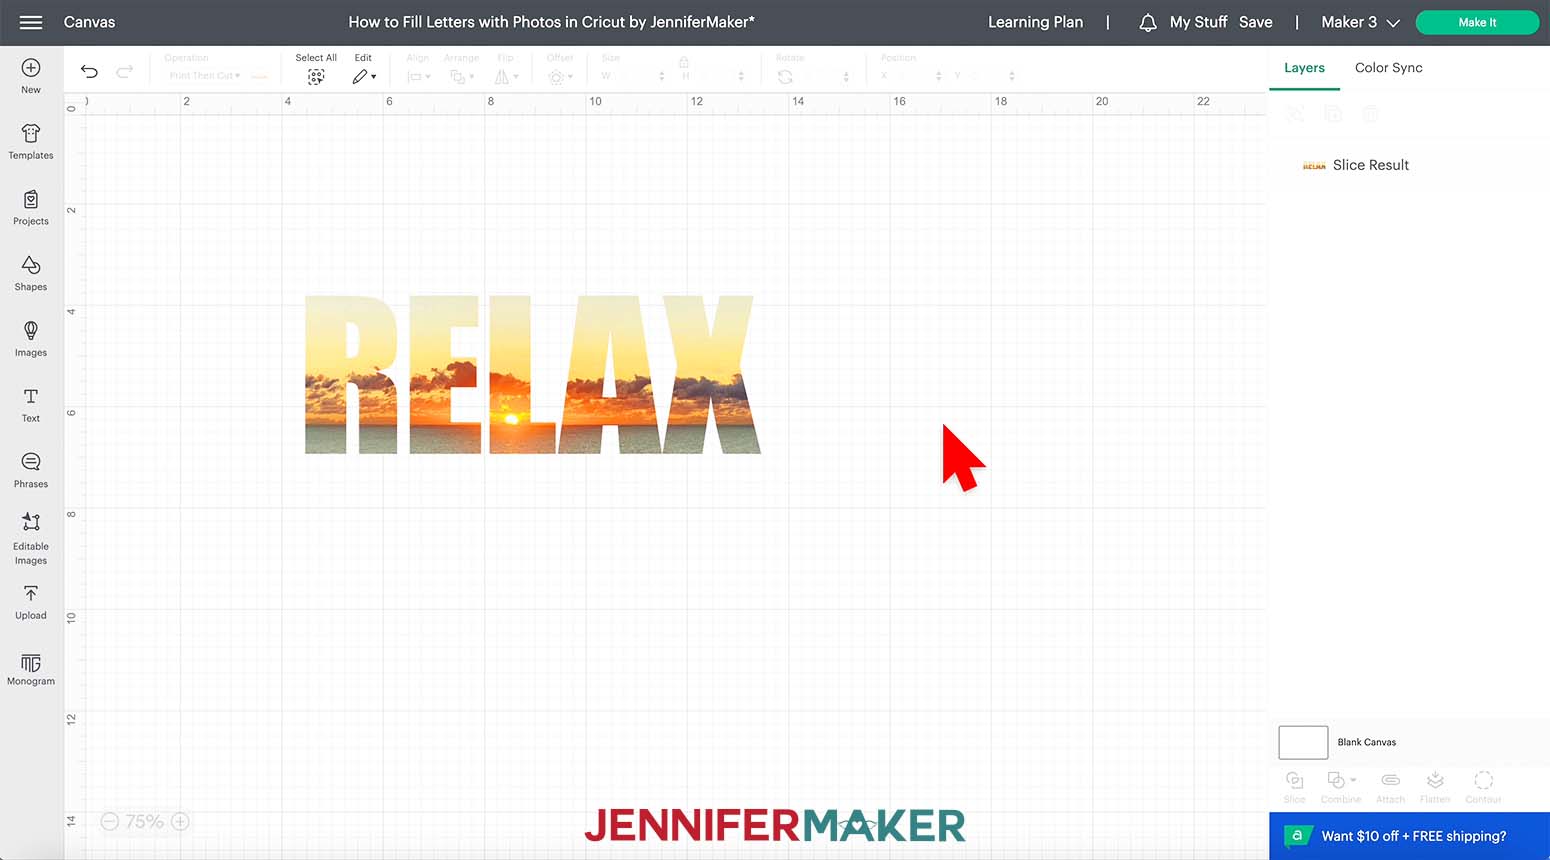
Now you can delete the photo and what remains is the word RELAX filled with a photo image.
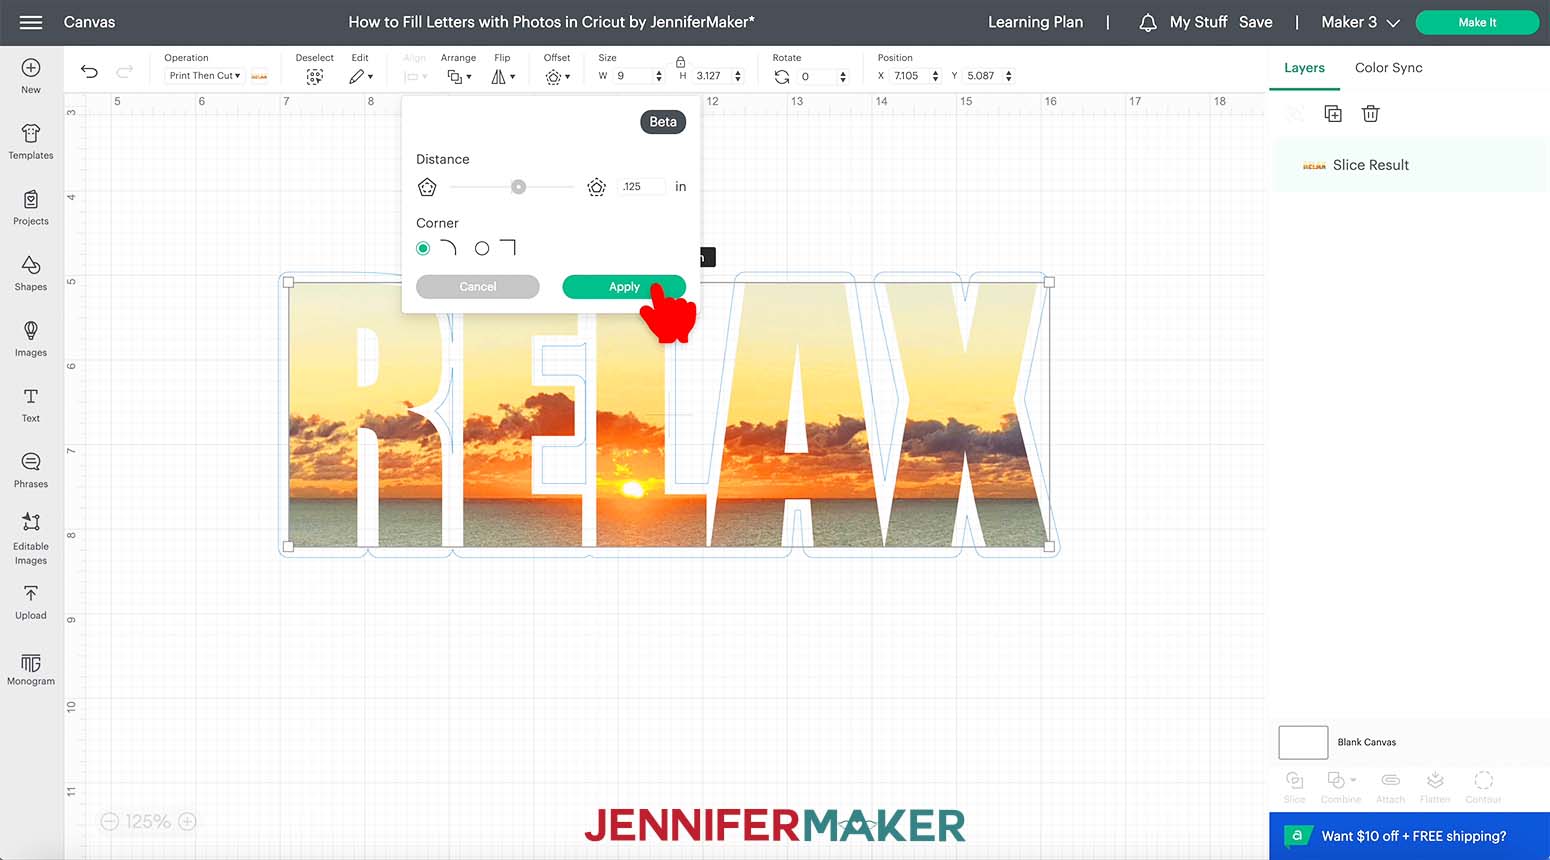
You can also add an outline by selecting the word and clicking on the "Offset" menu. You can use the sliding control or input a number, I found that 0.125 worked well for my design. Click "Apply".
You can also change the color of the outline if you'd like. I changed mine to a dark orange.
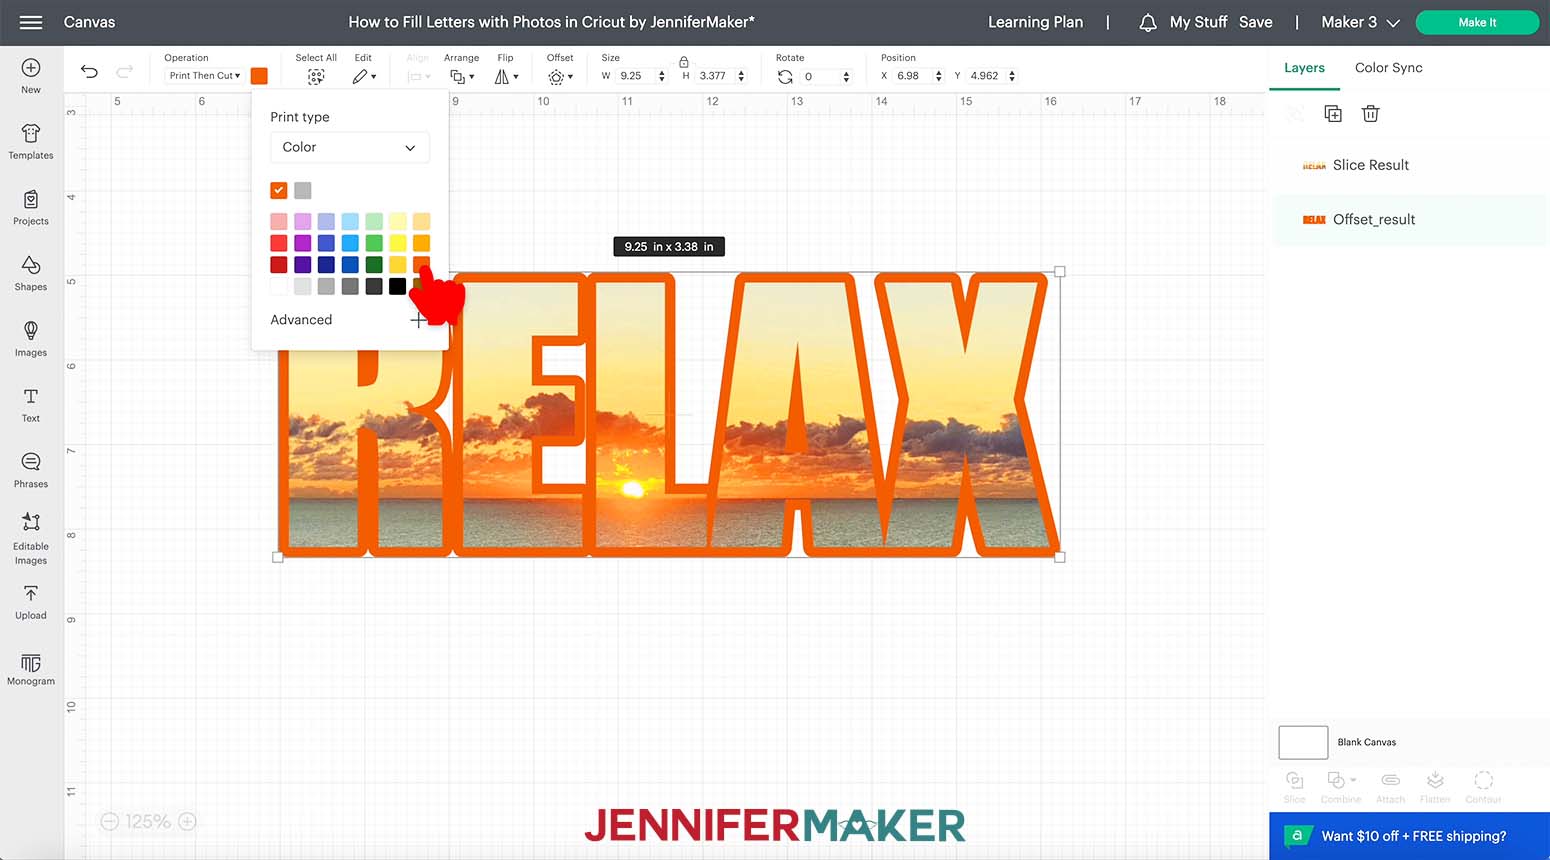
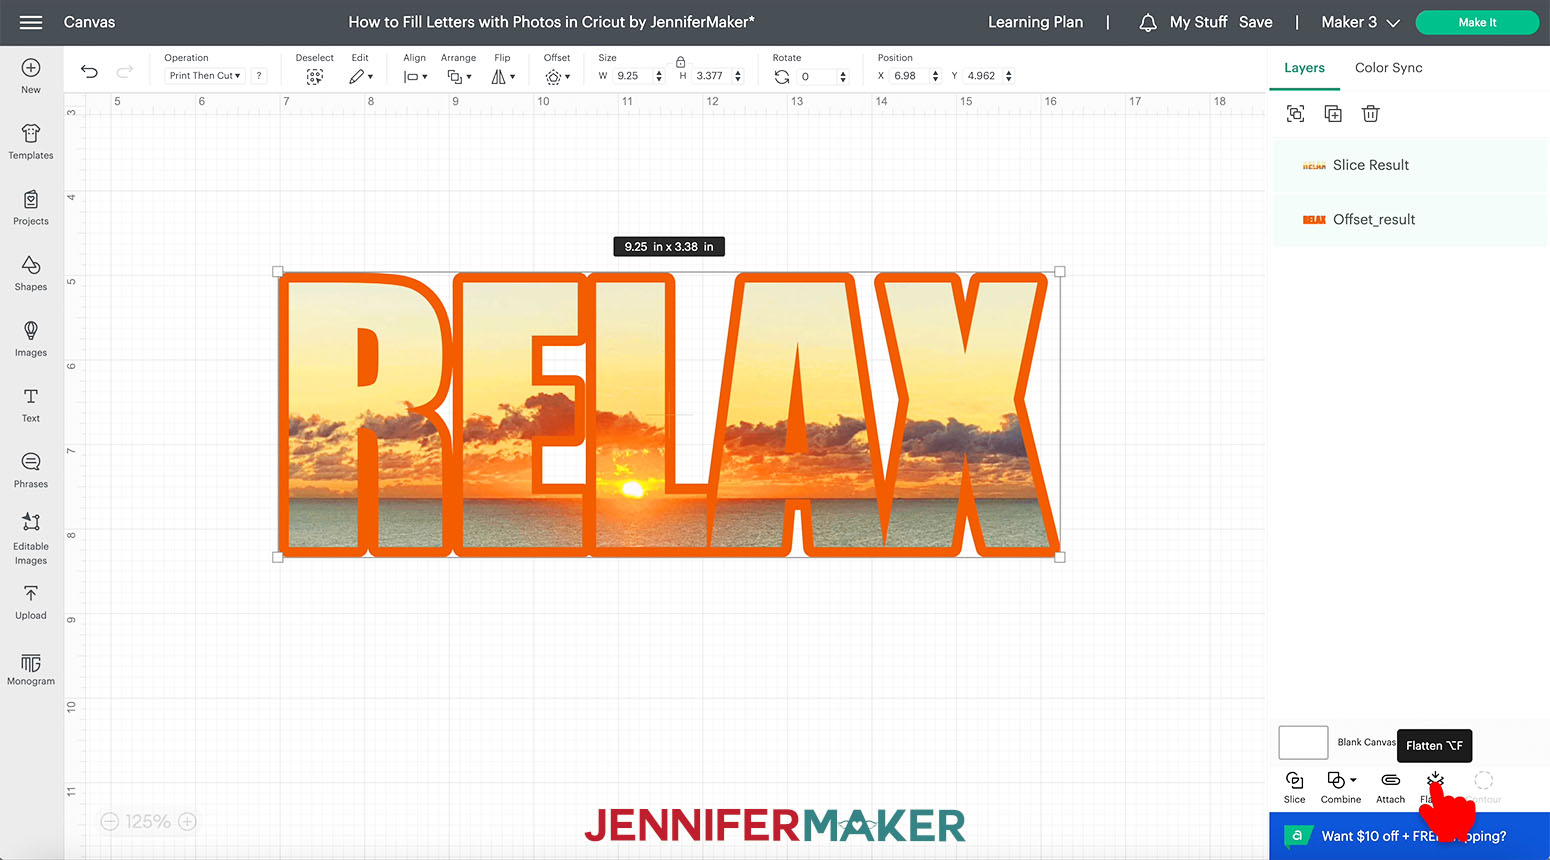
Select the word RELAX and its offset and click "Flatten" at the bottom of the Layers Panel.
STEP 3: PRINT YOUR SUBLIMATION DESIGN
Double check that you design fits into the 9.25" x 6.75" dimensions needed for Print then Cut.
Make sure the correct machine is selected, then click "Make It" in the upper right corner.
On the Prepare screen, make sure your first mat says Print Then Cut and that the Material Size fits your sublimation paper. Mine is 8.5" x 11". Make sure the Mirror toggle is turned on.
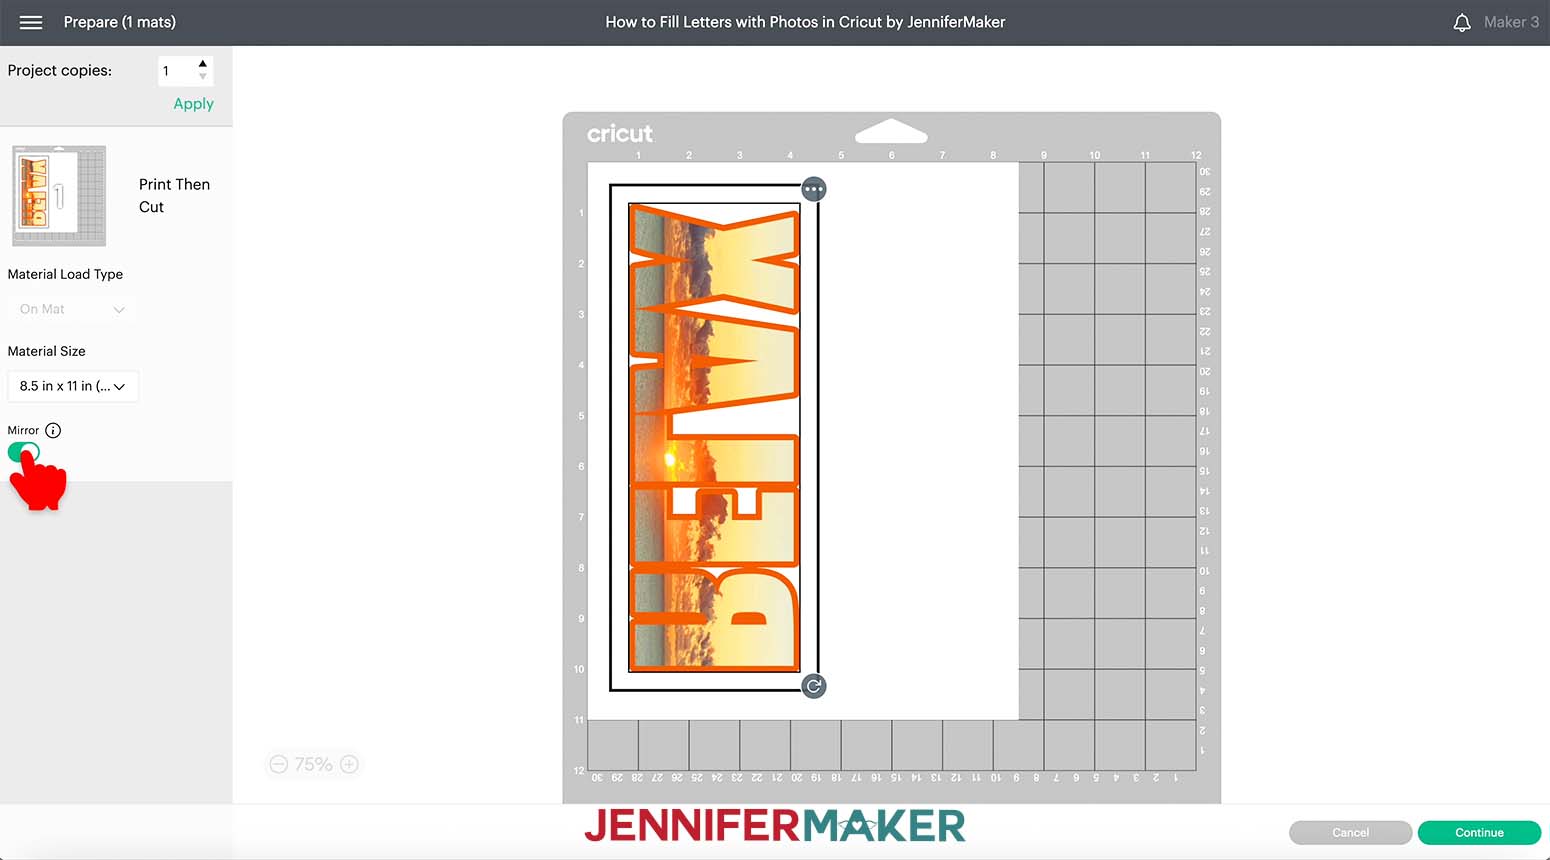
Click Continue.
Before we print, make sure your paper is loaded correctly. Check your printer manual and paper packaging for help identifying the right side to print on and how to load it.
On the Make screen, click the "Send to Printer" button to prepare to print your design.
While printer settings vary, the main things we have to watch for are paper type and print quality. Here are the processed for a Sawgrass SG500 and then a converted Epson EcoTank.
Sawgrass Print Method
Make sure your sublimation printer is listed. Then turn off “Add Bleed” and turn on “Use System Dialog” before clicking the print button.
Your printer’s controls will appear, but might be hidden behind Cricut Design Space. Minimize your Cricut window to find it.
The Sawgrass Print Manager is the best way to control your printer, but it’s not an option!
To find it, select the PDF menu and choose Sawgrass Print Manager. The application’s window will pop up. This is the only way to access the helpful ICC printer profiles that Sawgrass provides!
Your window might look different, but choose your settings that match your project. For mine, I’ll set the substrate – that means what we’re sublimating on to – to “Polyester” and paper to “Type A”. That’s a good setting even if you’re not sure of the paper type. I recommend High Quality over High Speed! Since we already mirrored the design, make sure “Mirror” is unchecked.
[fill-letters-with-photos-DS-printer-settings-flip-horizontally-unchecked]
Click the Color tab and set the Color Mode to “Photographic”. I always recommend “Vivid” unless you’re printing a photo, which we are!
Finally, click the Print button!
Epson Print Method
Make sure your sublimation printer is listed. Then turn off “Add Bleed” and turn on “Use System Dialog” before clicking the print button.
Your printer’s controls will appear, but might be hidden behind Cricut Design Space. Minimize your Cricut window to find it.
Make sure your sublimation printer is selected under "Printer". Use the drop-down to select "Layout" then uncheck "Flip horizontally" since we already mirrored the design.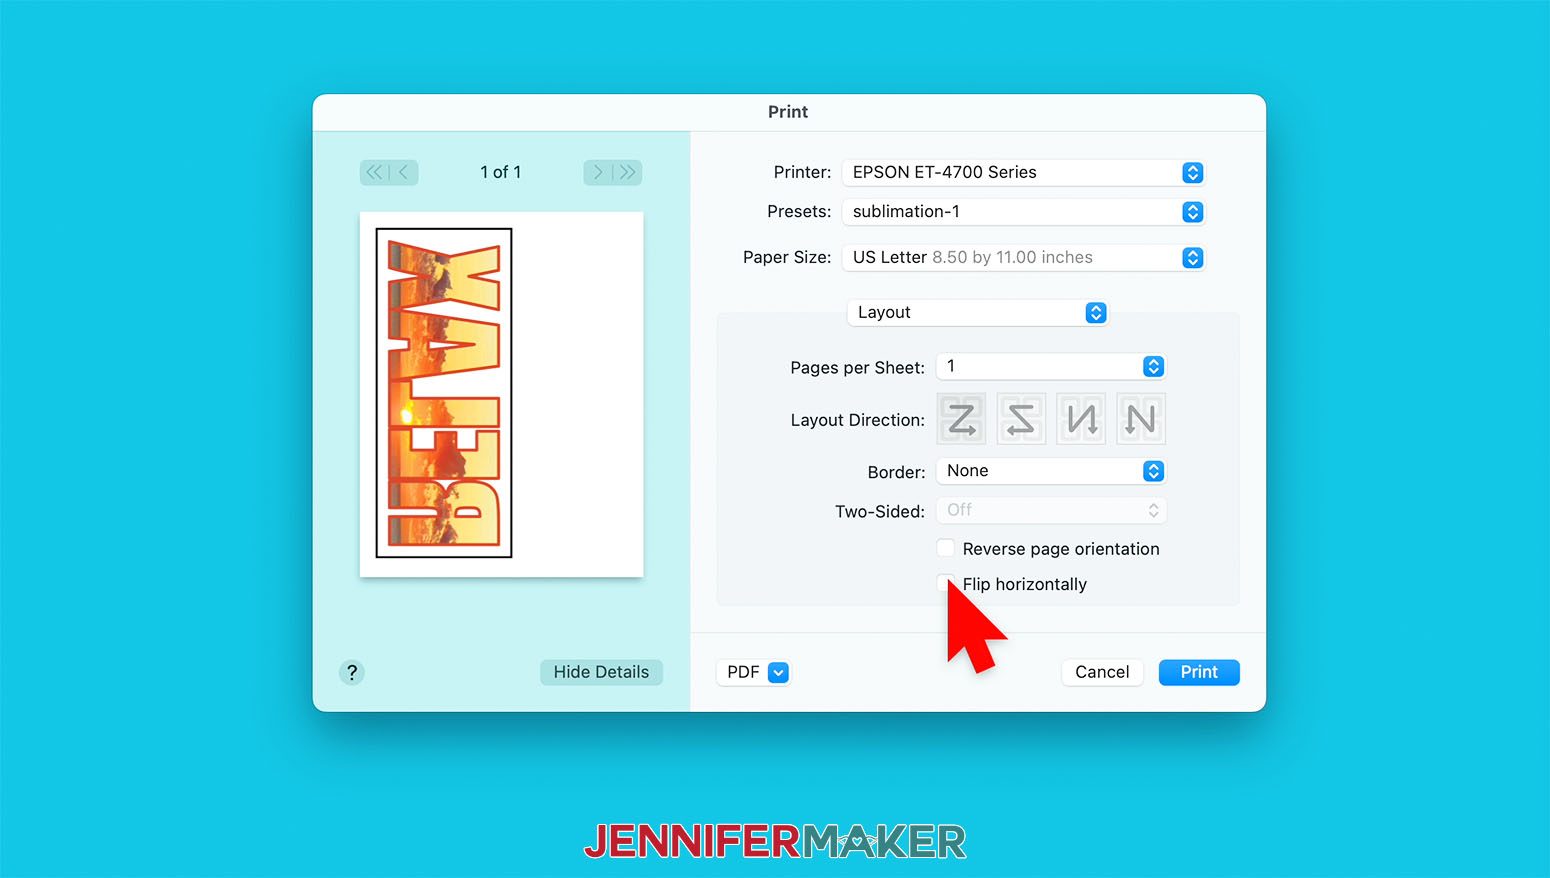
Switch to Color Matching to use ColorSync if you’re on a Mac like me, then select the correct ICC profile from the drop-down. You can find more information on ICC profiles at my sublimation printers post.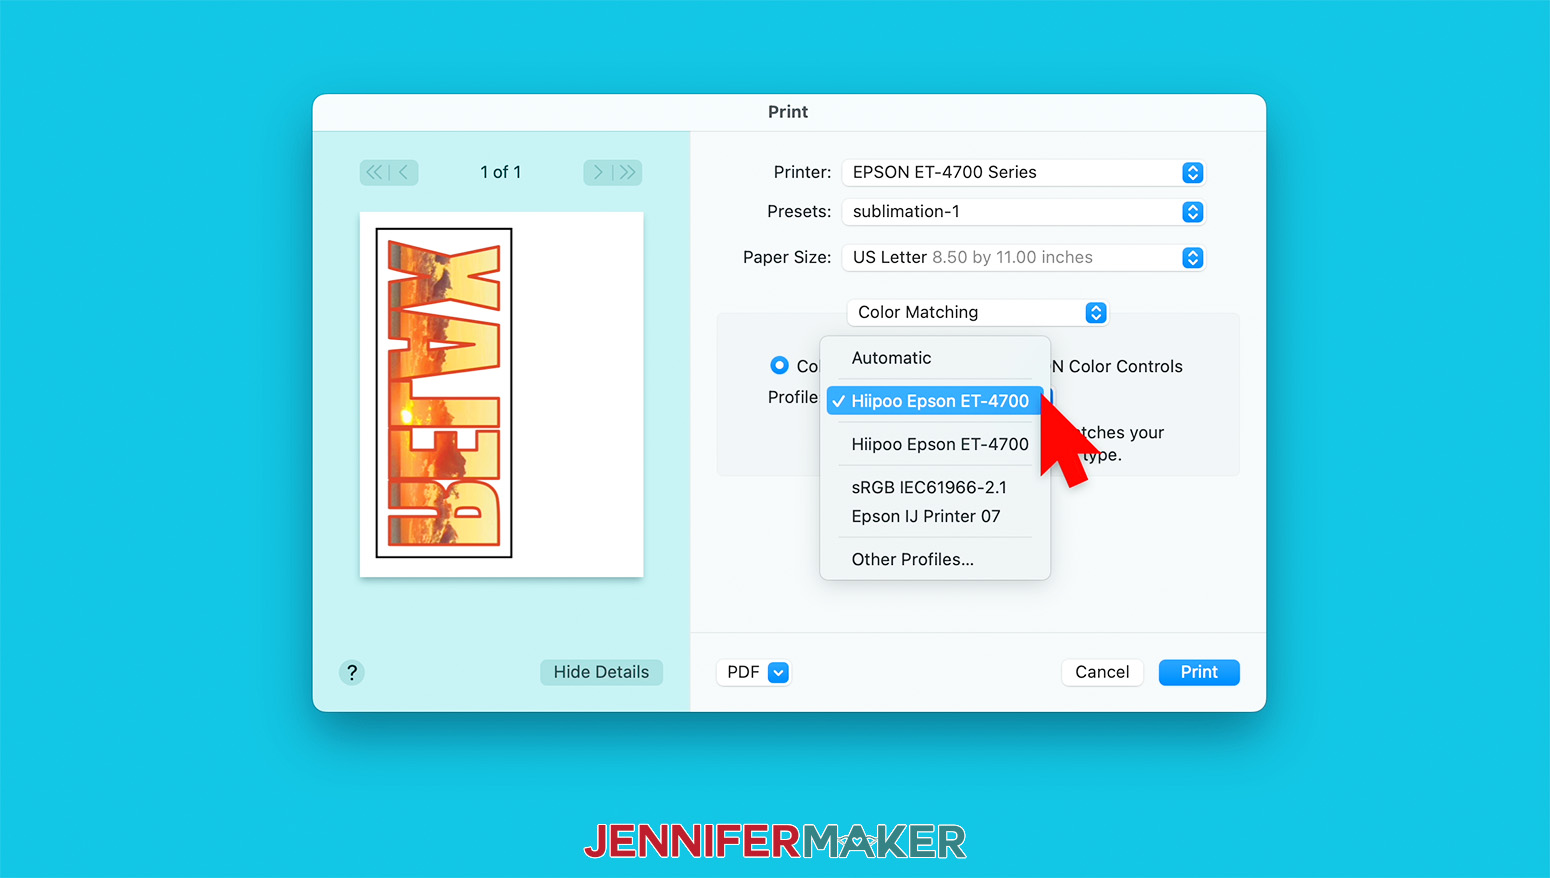
Then press Print!
For Either Printer
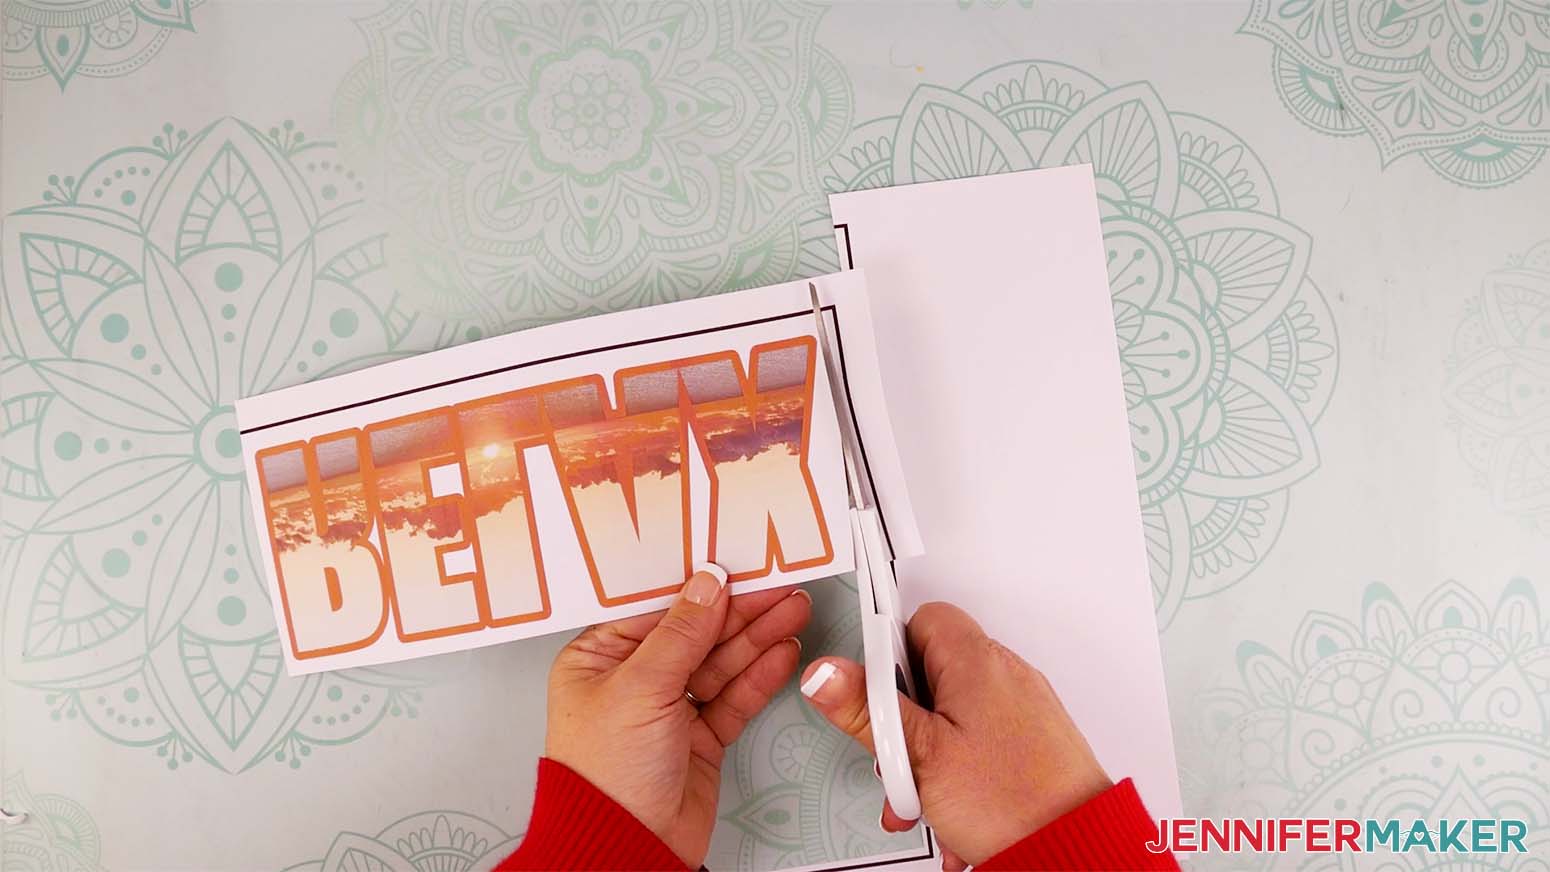
After your design has printed, set it aside until the ink is completely dry to avoid any smears during the cutting process.
For a normal Print then Cut project, we’d put the printed image on a machine mat and use the Cricut to cut out the shape. But since we’re sublimating the design, just trim the black registration marks away.
STEP 4: SUBLIMATE YOUR PILLOW
I'm using an Autopress, but you can also use an EasyPress with a pressing mat.
Set the temperature of your press to 385° and the time to 10 seconds. These settings work well with the sublimation pillow cover in the materials list.
Make sure you have proper ventilation by opening a window or turning on a fan.
Lint roll the pillow's front to remove any dust and debris.
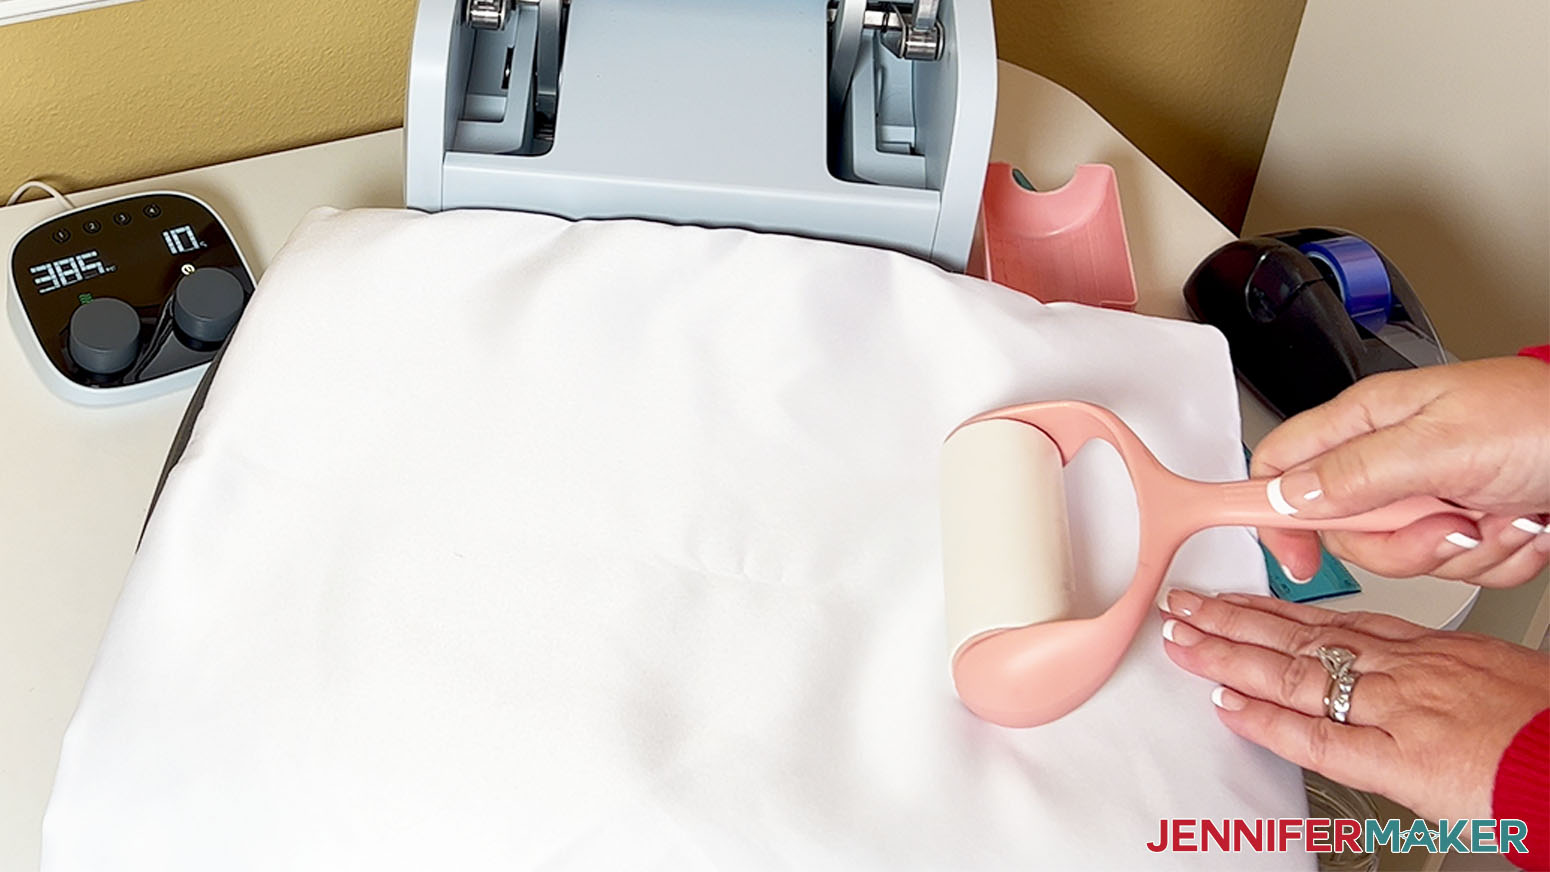
Place a clean sheet of cardstock inside the pillow under the area you're decorating. Put the cover on the pressing area so the zipper, which we'll use as the bottom, is closest to you. Make sure the zipper head is outside of the pressing area.
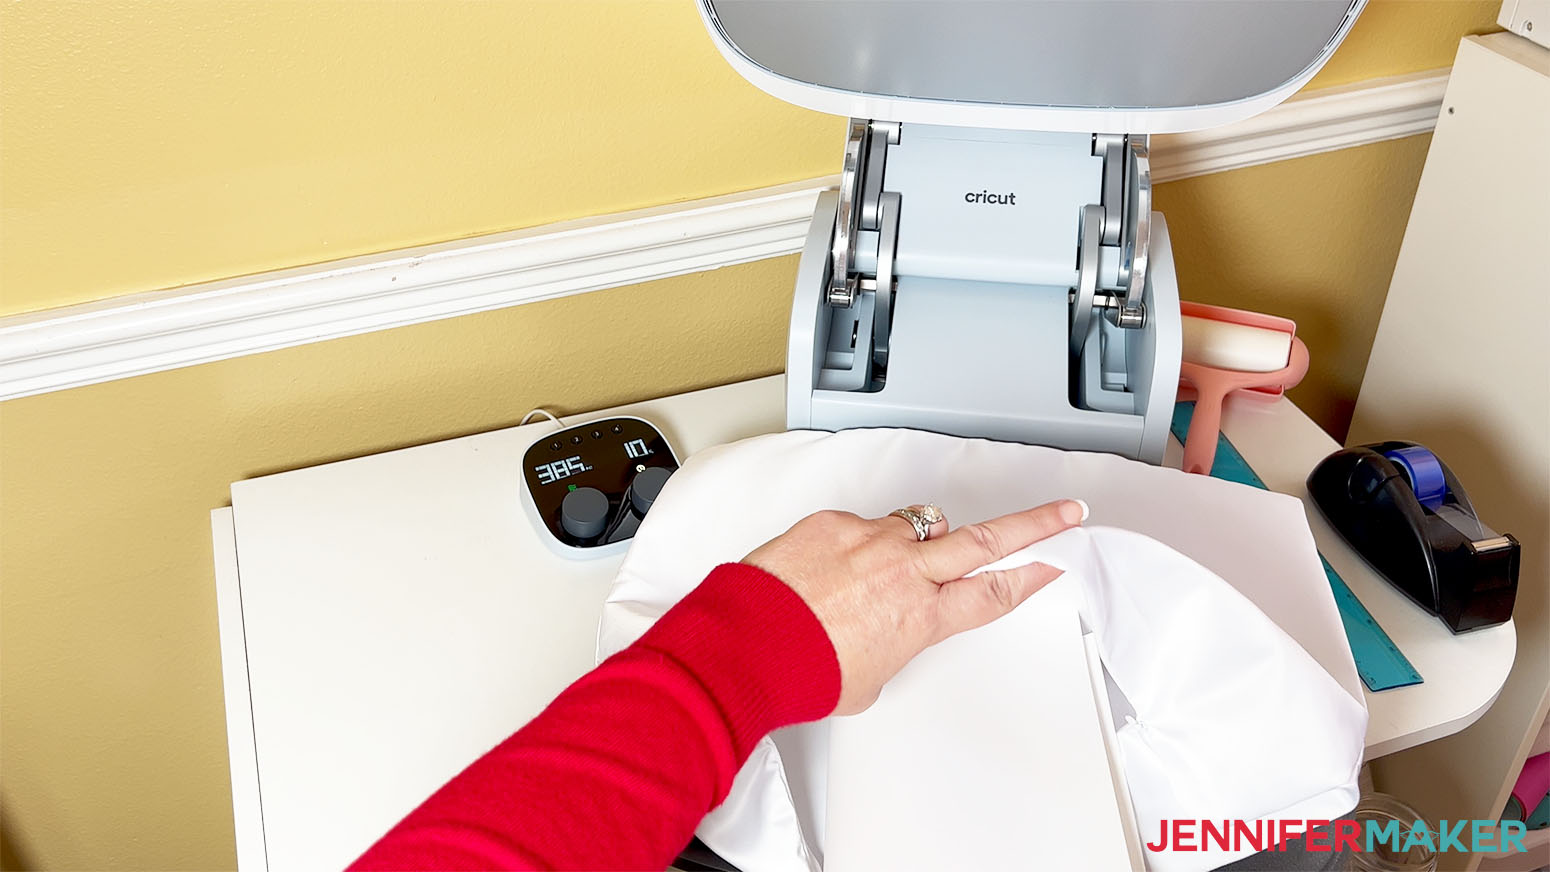
When the press is ready, preheat your pillowcase for 10 seconds. This smooths any wrinkles and removes moisture.
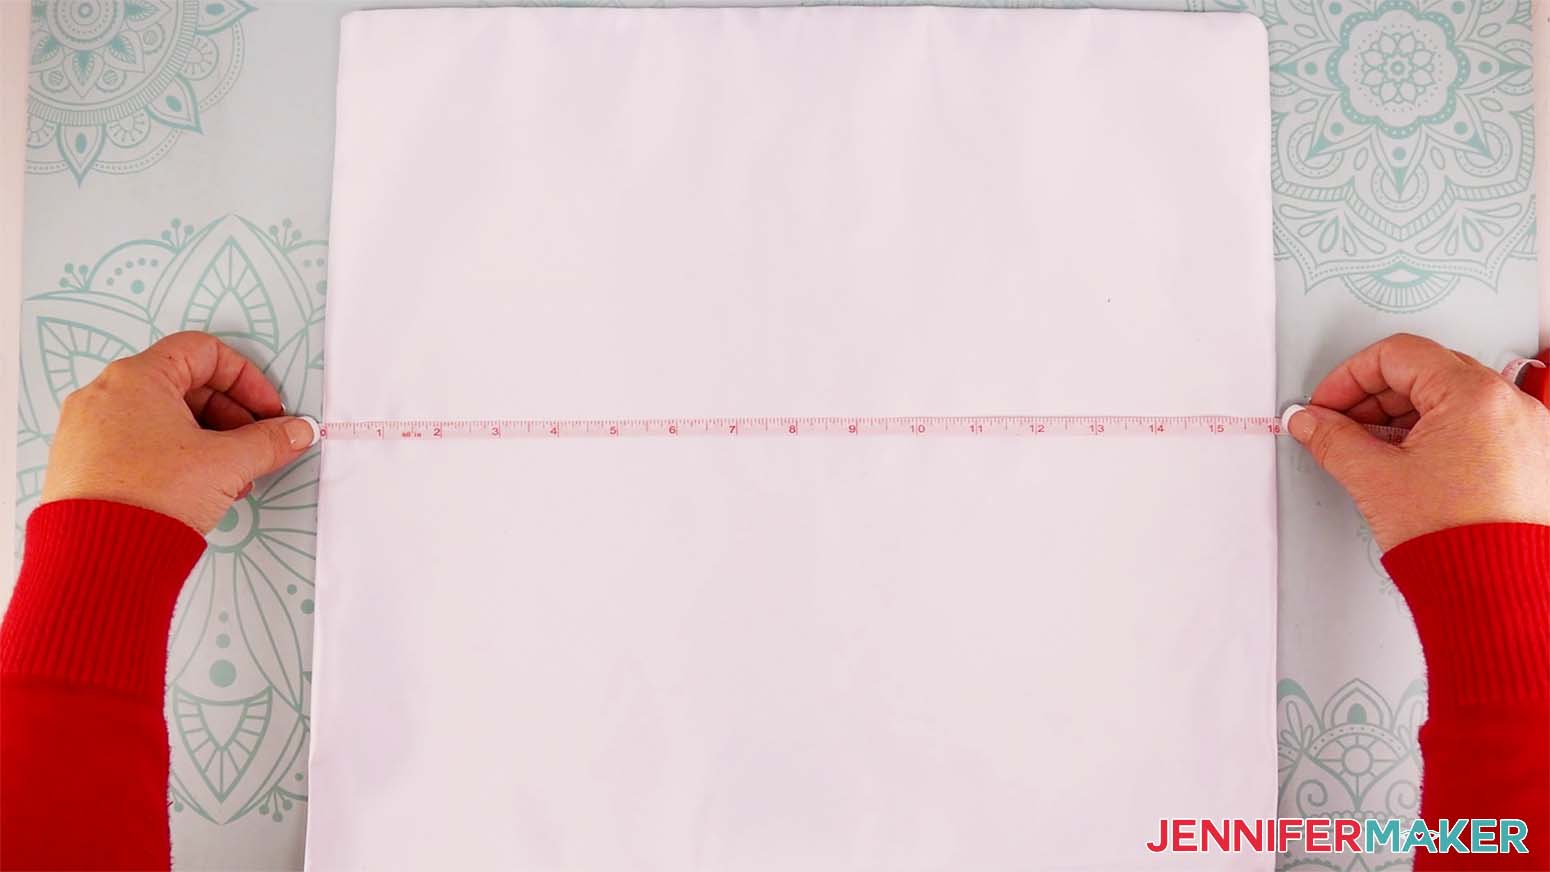
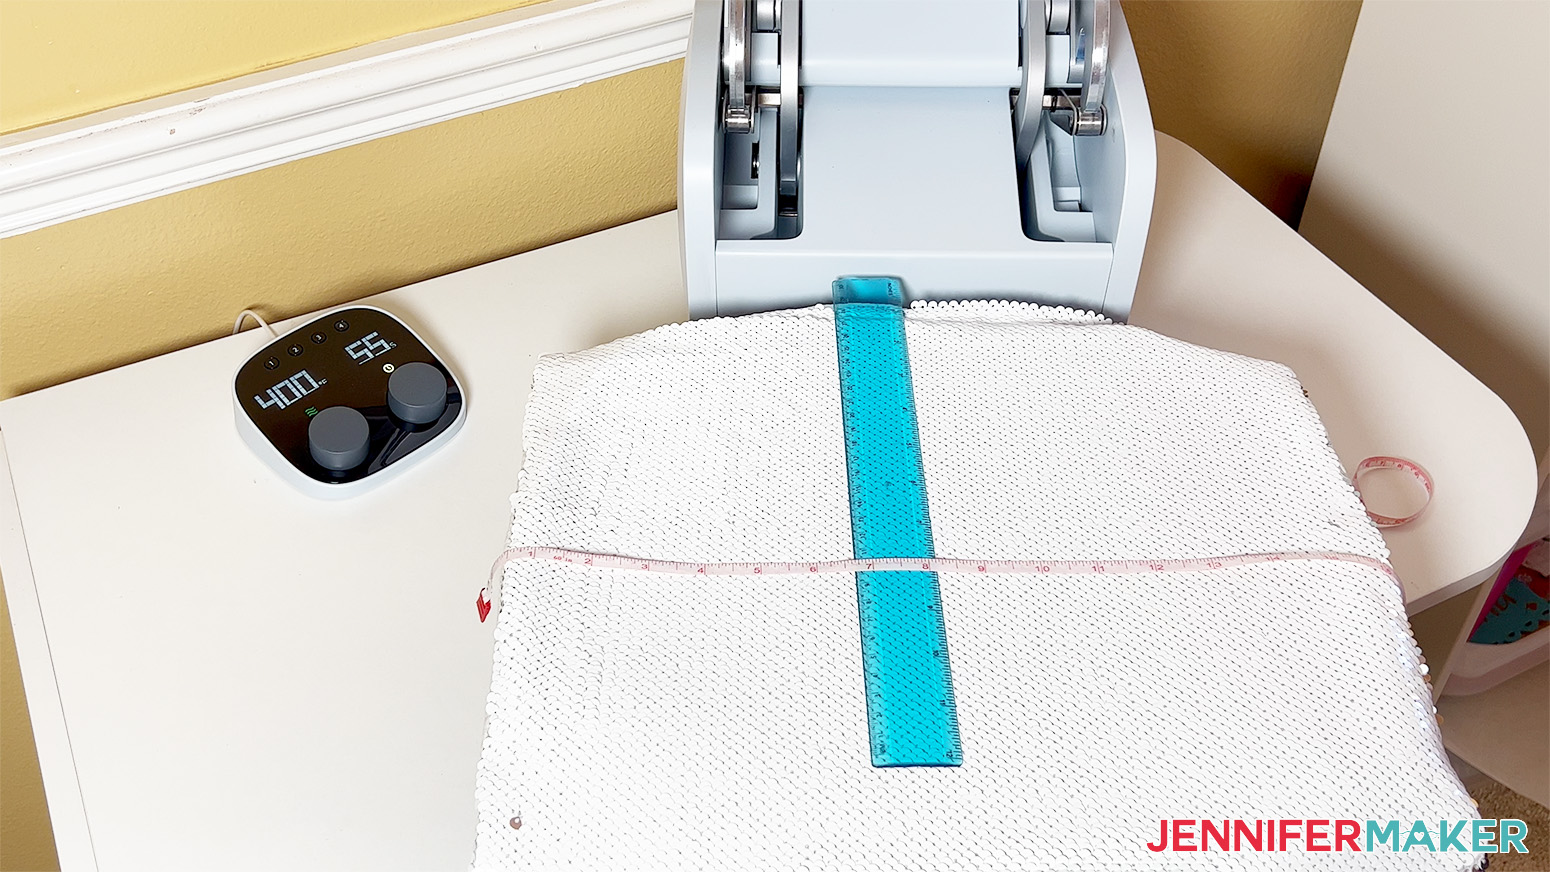
To place your design in the middle, measure the width to find the center of the cover. Then, measure 9" down from the top in the middle of the pillow.
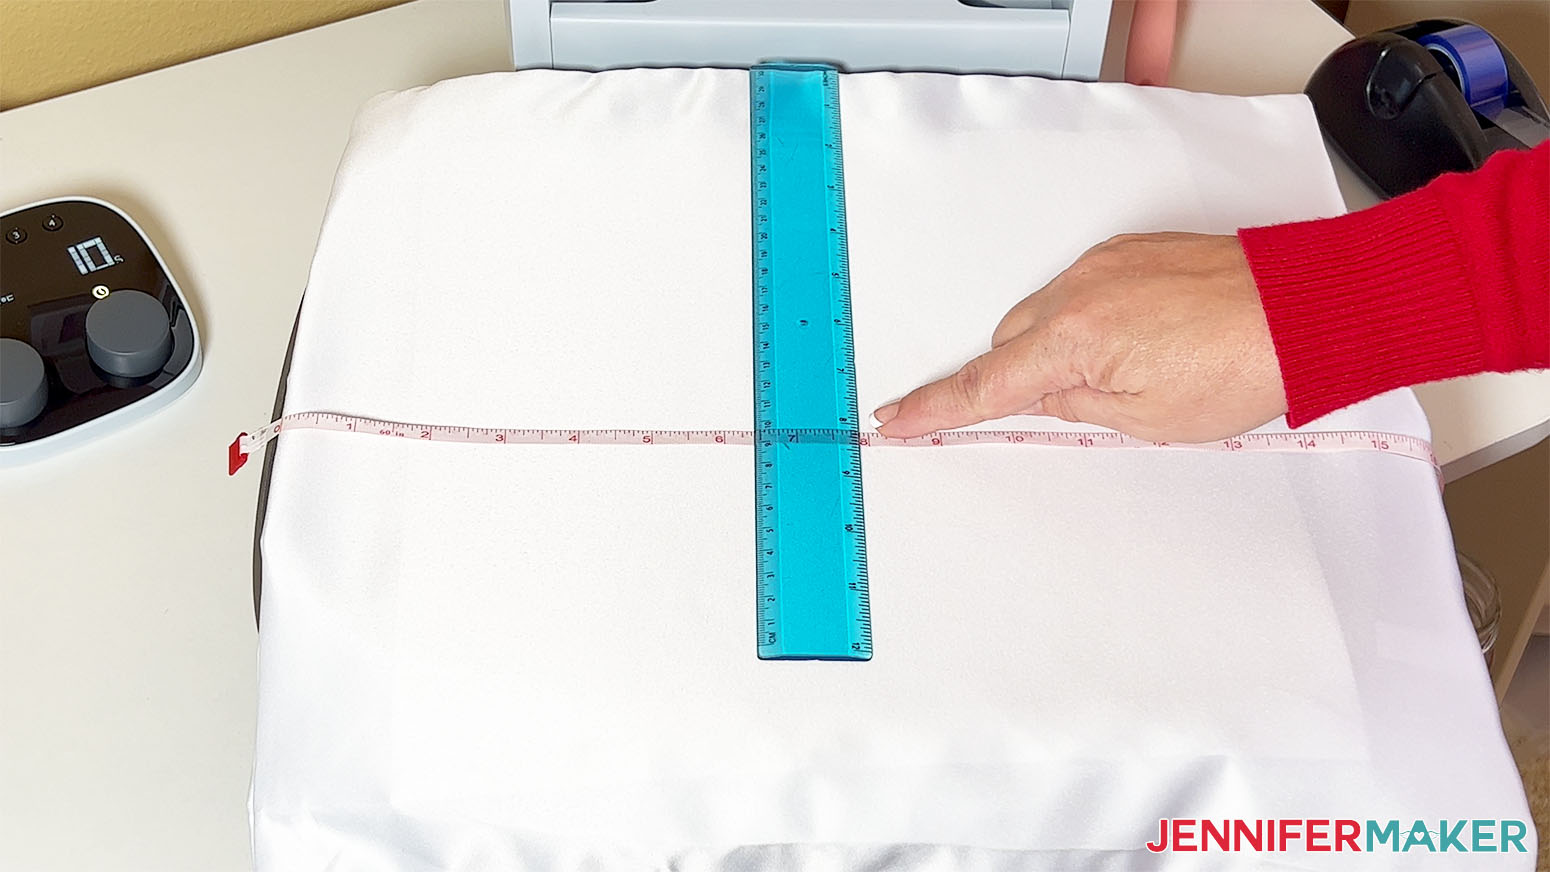
Place the word face down on the pillow so its bottom edge is at the 9" mark you measured. To make sure the word is straight on the pillow, place the ruler to the left and right sides of the word and make sure both top edges sides line up at the 9 inch mark.
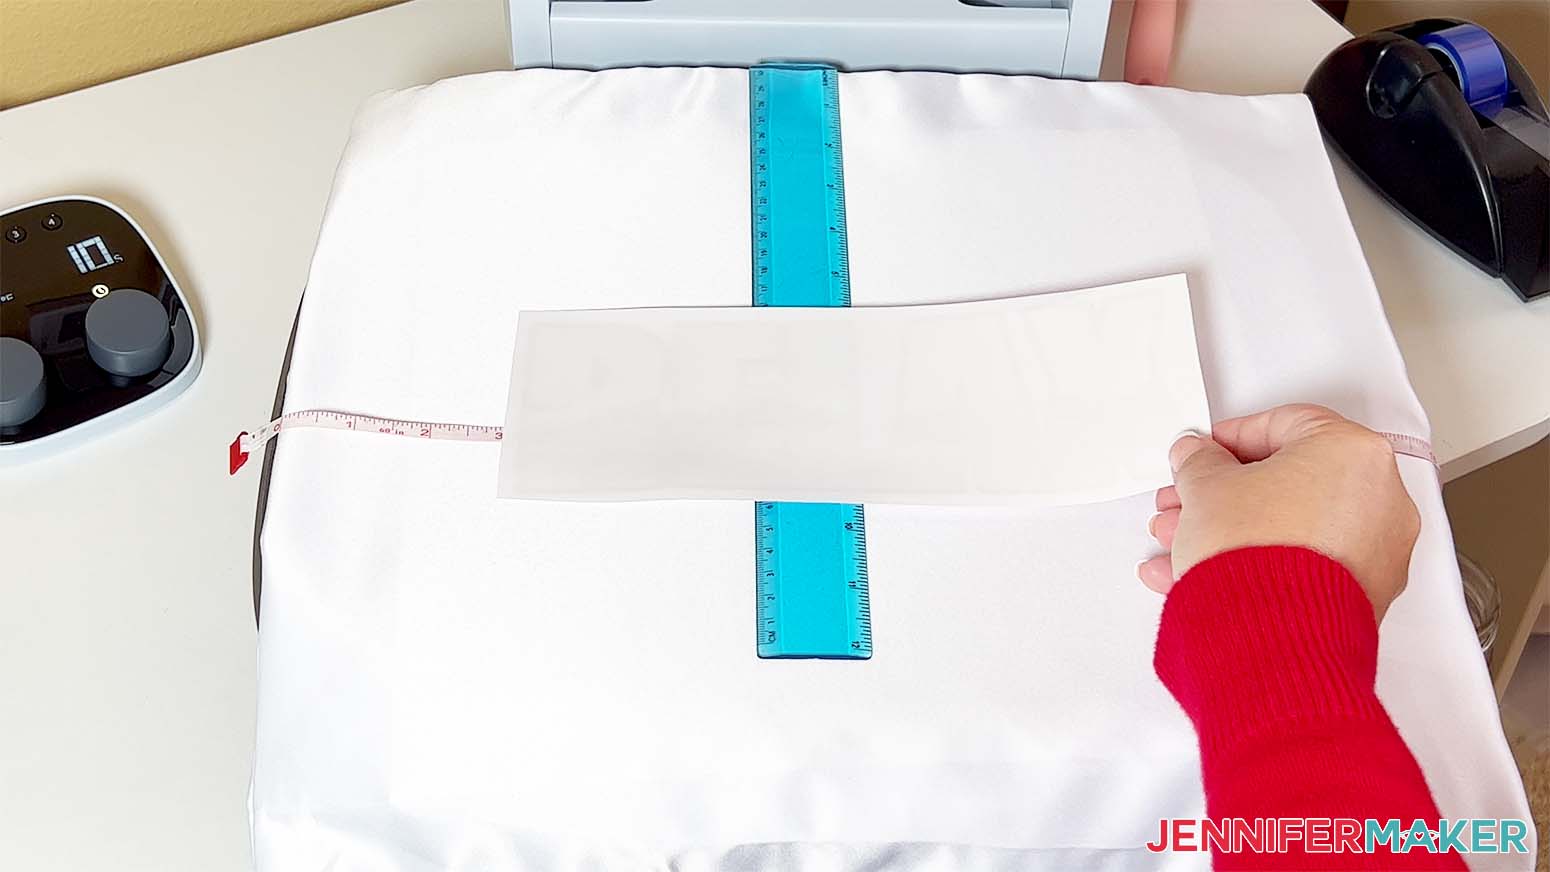
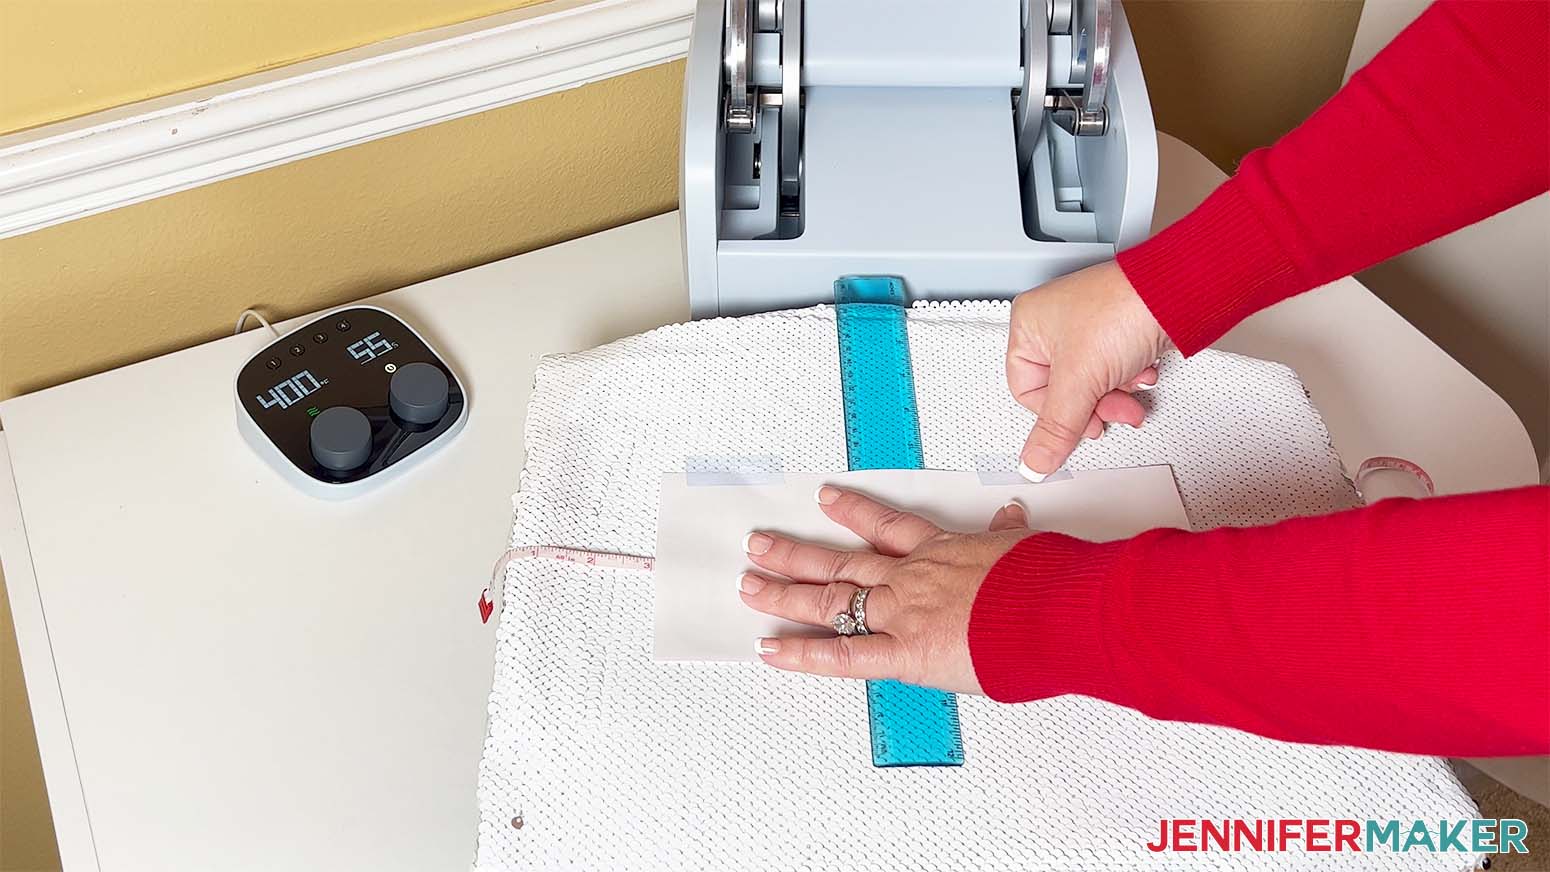
I want my design in the center of the pillowcase. I'll measure from the top and sides to find the middle. Of course your pillow might be a different size or maybe you want to place your design in a different location, so just find that spot and use heat resistant tape to hold the sublimation print in place, face down.
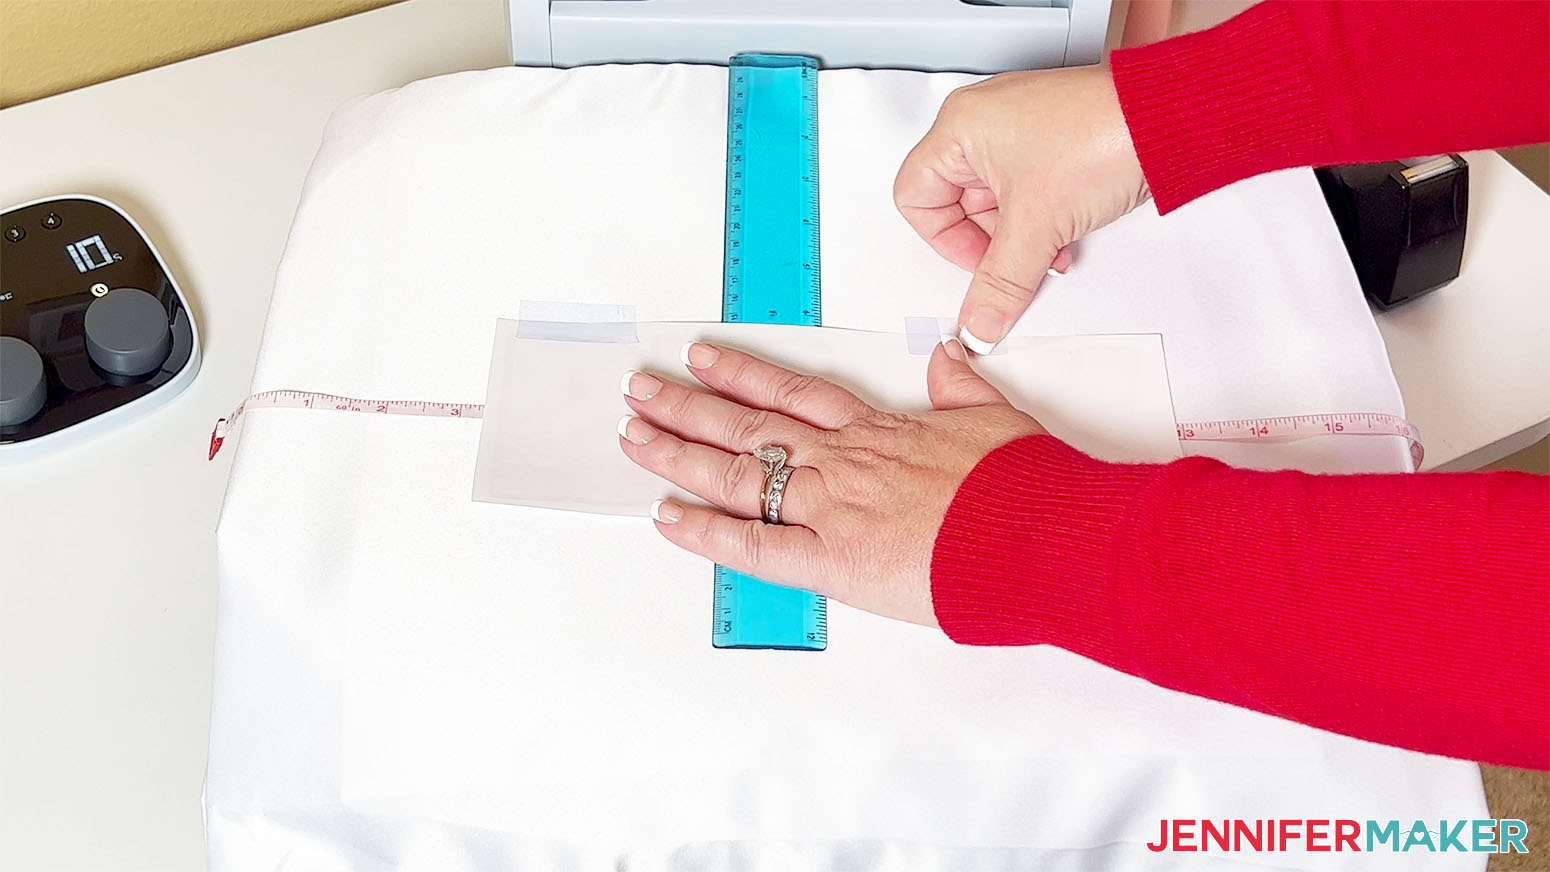
This is really important to prevent ghosting. Ghosting can happen if the sublimation paper slips as you open the heat press. That's because the sublimation is still in progress and the ink isn't dry. If the paper shifts it can leave behind a shadow making your design look blurry, so you don't want to skip this step!
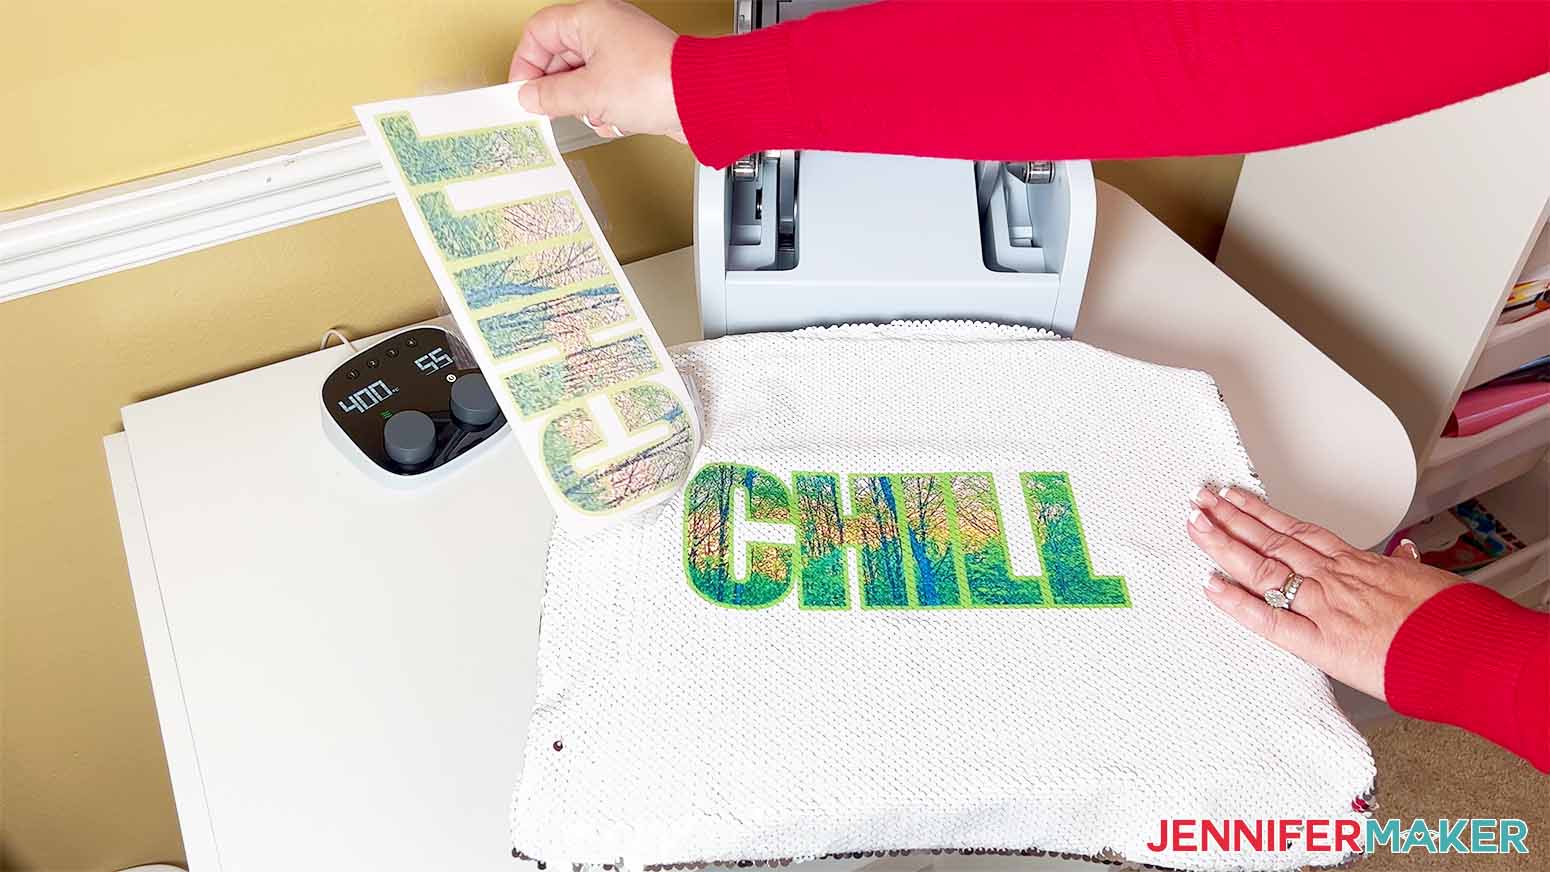
Cover the pillow with a clean sheet of white butcher paper and press at 385° for 35 seconds.
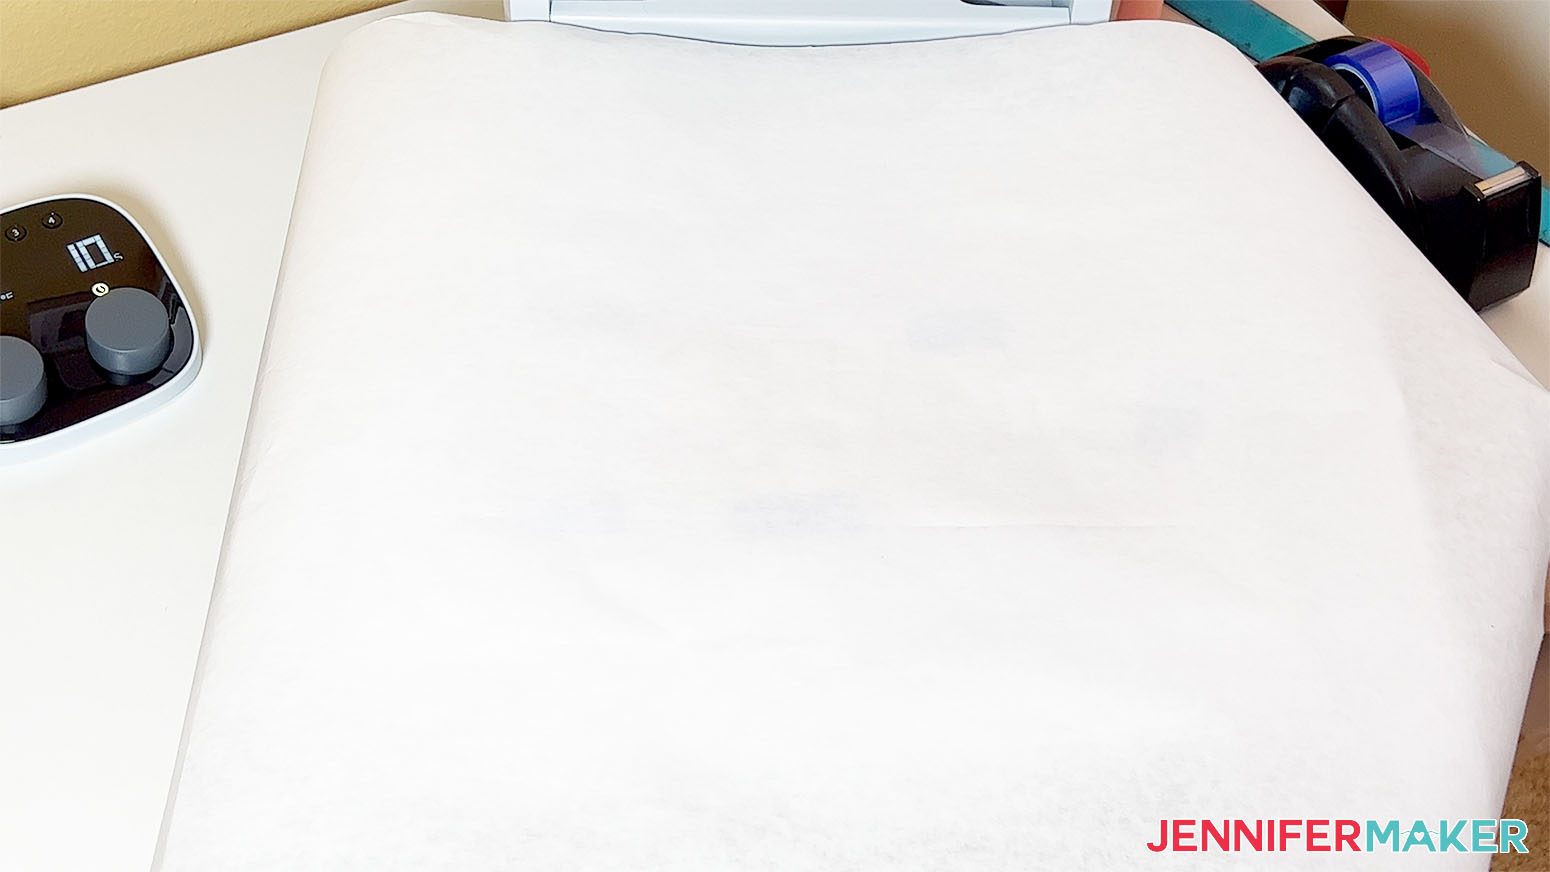
When the time is up, remove the butcher paper and let the design cool a bit so the dye can settle into the fabric. Then, carefully remove the tape and excess design paper.
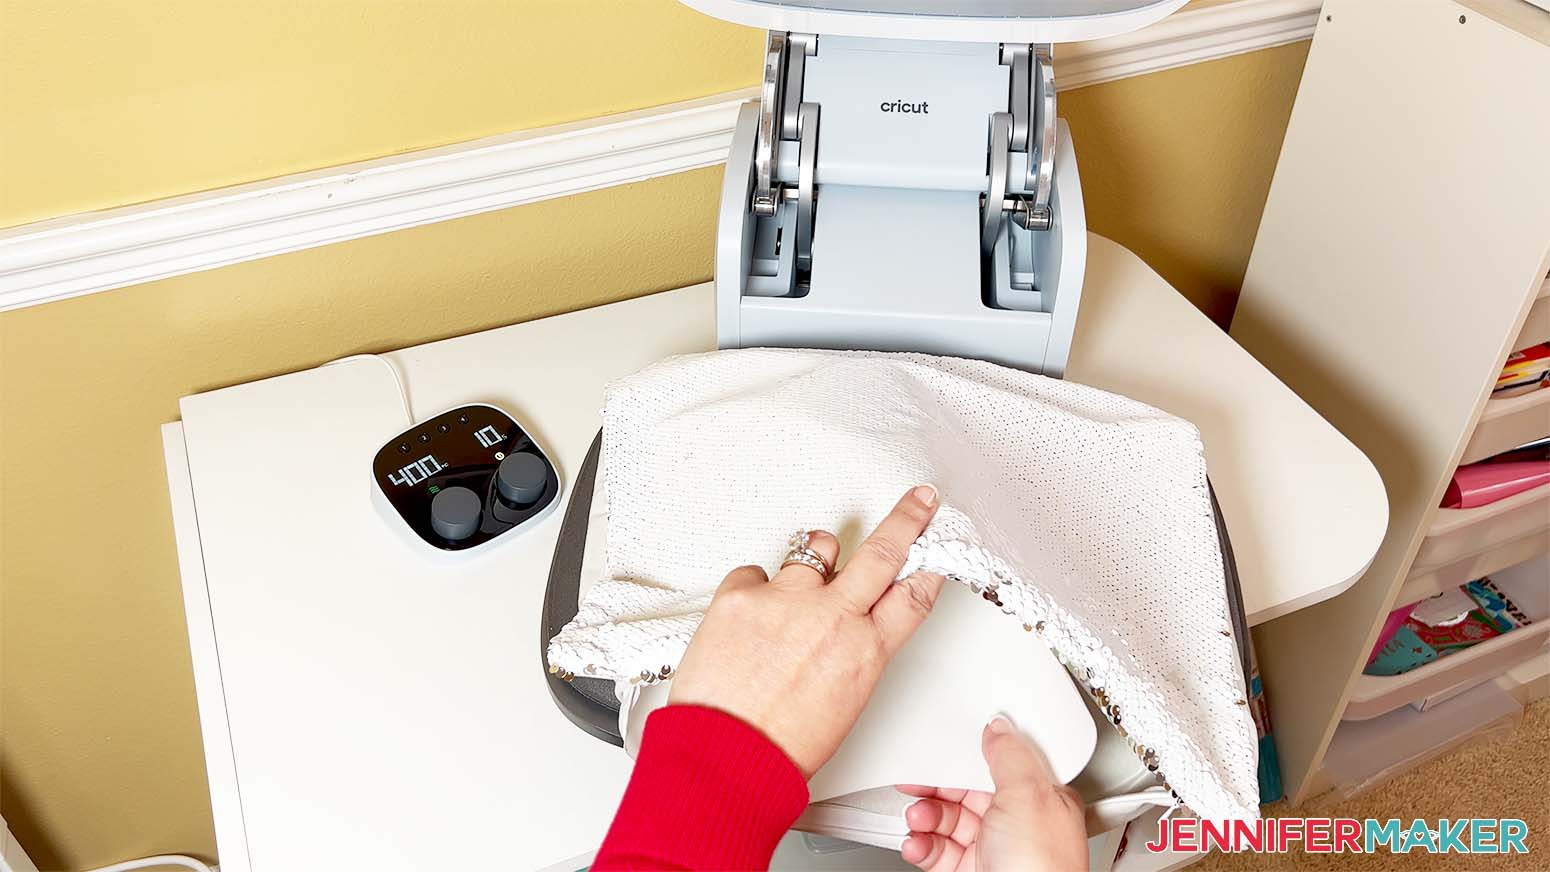
VARIATION SEQUINED PILLOW
Set the temperature on your heat press to 400° and time to 10 seconds.
Push all the sequins so that only the white sides show and lint roll to remove anything loose. You don't need to worry about the sequins on the edges or outside of the print area, fortunately.

Cover the pillow with butcher paper.
Preheat the pillow for 10 seconds.
Put a sheet of white cardstock inside the pillow. Remember that the bottom with the zipper should be closest to you.
Just like the other pillow, place the design face down where you want it.
Using heat resistant tape, secure the paper to the pillow.
Put butcher paper on top of the pillow and press at 400° for 55 seconds.
When the time is up, remove the butcher paper. When the pillow has cooled, carefully peel away the tape and see your result.
STEP 5: SHOW IT OFF
Place a pillow insert inside the pillow case and zip it up.
To help the plain case last, machine wash it in cold water and dry it on low heat.
Sequins cannot be machine washed, so hand wash the decorative pillowcase gently and hang it to dry.
Answers to Your Questions About How to Fill Letters With Photos in Cricut Design Space
Q: How do you fill letters with pictures?
A: If you want to put separate photos in individual letters, resize your word in the text box, then use the Ungroup to Letters feature to put each letter on a different layer. Then, use my slice technique to work with each pair separately. Once everything is shaped, use Flatten to put them back together before printing.
Q: How do I crop a picture into letters?
A: In Cricut Design Space, the easiest way to shape your pictures into letters is to slice the two layers.
Q: How can I remember the fonts that work well to fill with photos?
A: Bookmark it! In the font menu, just click the flag icon next to a font you want to remember. Any bookmarked fonts appear under Bookmarked for you to find quickly.
Q: How do you fill in text when drawing on Cricut?
A: There are several ways to fill in font designs with your Cricut machine, but the best technique depends on the tool you’re using. My How to Fill Letters tutorial covers using Cricut pens, the foil transfer tool, and engraving.
Q: Where can I find images to learn how to fill letters with photos in Cricut Design Space?
A: In addition to my free resource library, check out Cricut Design Space, Adobe Photoshop, Design Bundles, Silhouette Studio software, Creative Fabrica, Creative Market, Font Bundles, and other online marketplaces for photos.
Q: Where can I get free fonts for Cricut projects?
A: My favorite place for free fonts is Dafont. I have a tutorial to help you get their fonts into Cricut Design Space easily! You can also find free high-quality fonts at Font Bundles– just go there and click on the Free tab, but they change all the time. There are also free fonts over at Creative Fabrica under Freebies > Free Fonts. The nice thing about the free fonts at FontBundles and CreativeFabrica is that they offer some commercial license fonts free, too.
Q: What kind of paper do I use for sublimation?
A: While some people will use just regular laser paper, I really recommend you use special sublimation paper for the best and most vibrant results and ink transfer. I used A-SUB paper during my tests.
Q: What kind of ink do I use for sublimation?
A: You must use special sublimation ink to do sublimation projects.
Q: How do I test my sublimation prints for vibrancy and color?
A: Use my free subliflower design to see how your colors look on the special paper! It’s Design #385 in my resource library!
Q: How do I learn sublimation for beginners?
A: Join Sublimation Startup for a logical, step-by-step guide to getting setup for success with sublimation! You can ask questions and feel confident that you’ll get help! The Sublimation Startup mini-course is also great for those who enjoy learning from Jennifer Maker’s easy-to-understand, calm, and clear method of teaching. This is a no-fluff, no-mess, no-distraction workshop … it’s like sitting down with Jennifer in her craft room to learn directly from her! We work in logical steps to build your understanding and confidence with sublimation, and then provide support to keep helping you as you continue on your journey! Register now!
Q: Can I make this with a Cricut Joy or a Cricut Explore?
A: Technically, yes! Normal Print then Cut Cricut projects don’t work with the Joy because it doesn’t have the correct tool to read the registration marks and avoid making the cut lines in the wrong spots. However, I recommend cutting these sublimation designs with scissors, so you can just set your Design Space machine to a Maker to trick it into letting you print the design no matter which machine you have.
Q: Can I use a sublimation printer for regular prints, too?
A: No, a high-quality sublimation printer (whether purpose-built or converted) only prints in sublimation ink. And you cannot really switch a converted printer back to being an inkjet printer without a LOT of effort and wasted ink. An Epson Ecotank printer is an inexpensive option to convert.
Get my free download of the practice and finished files to learn how to fill letters with Cricut Design Space here:
(If you do not see the signup form above, click here.)
If you make any projects using this technique, I’d love to see them! Please share your results in my Cricut Crafters & Makers Facebook group where you’ll find hundreds of thousands of crafters like you, sharing their tips, projects, and inspiration.
By the way, you’re free to use my free digital files to create physical items to sell — I just ask that you share that you used one of my designs on your listing or with your product.
Love,

Want to remember this? Save this How to Fill Letters With Photos in Cricut Design Space Tutorial to your favorite Pinterest Board!