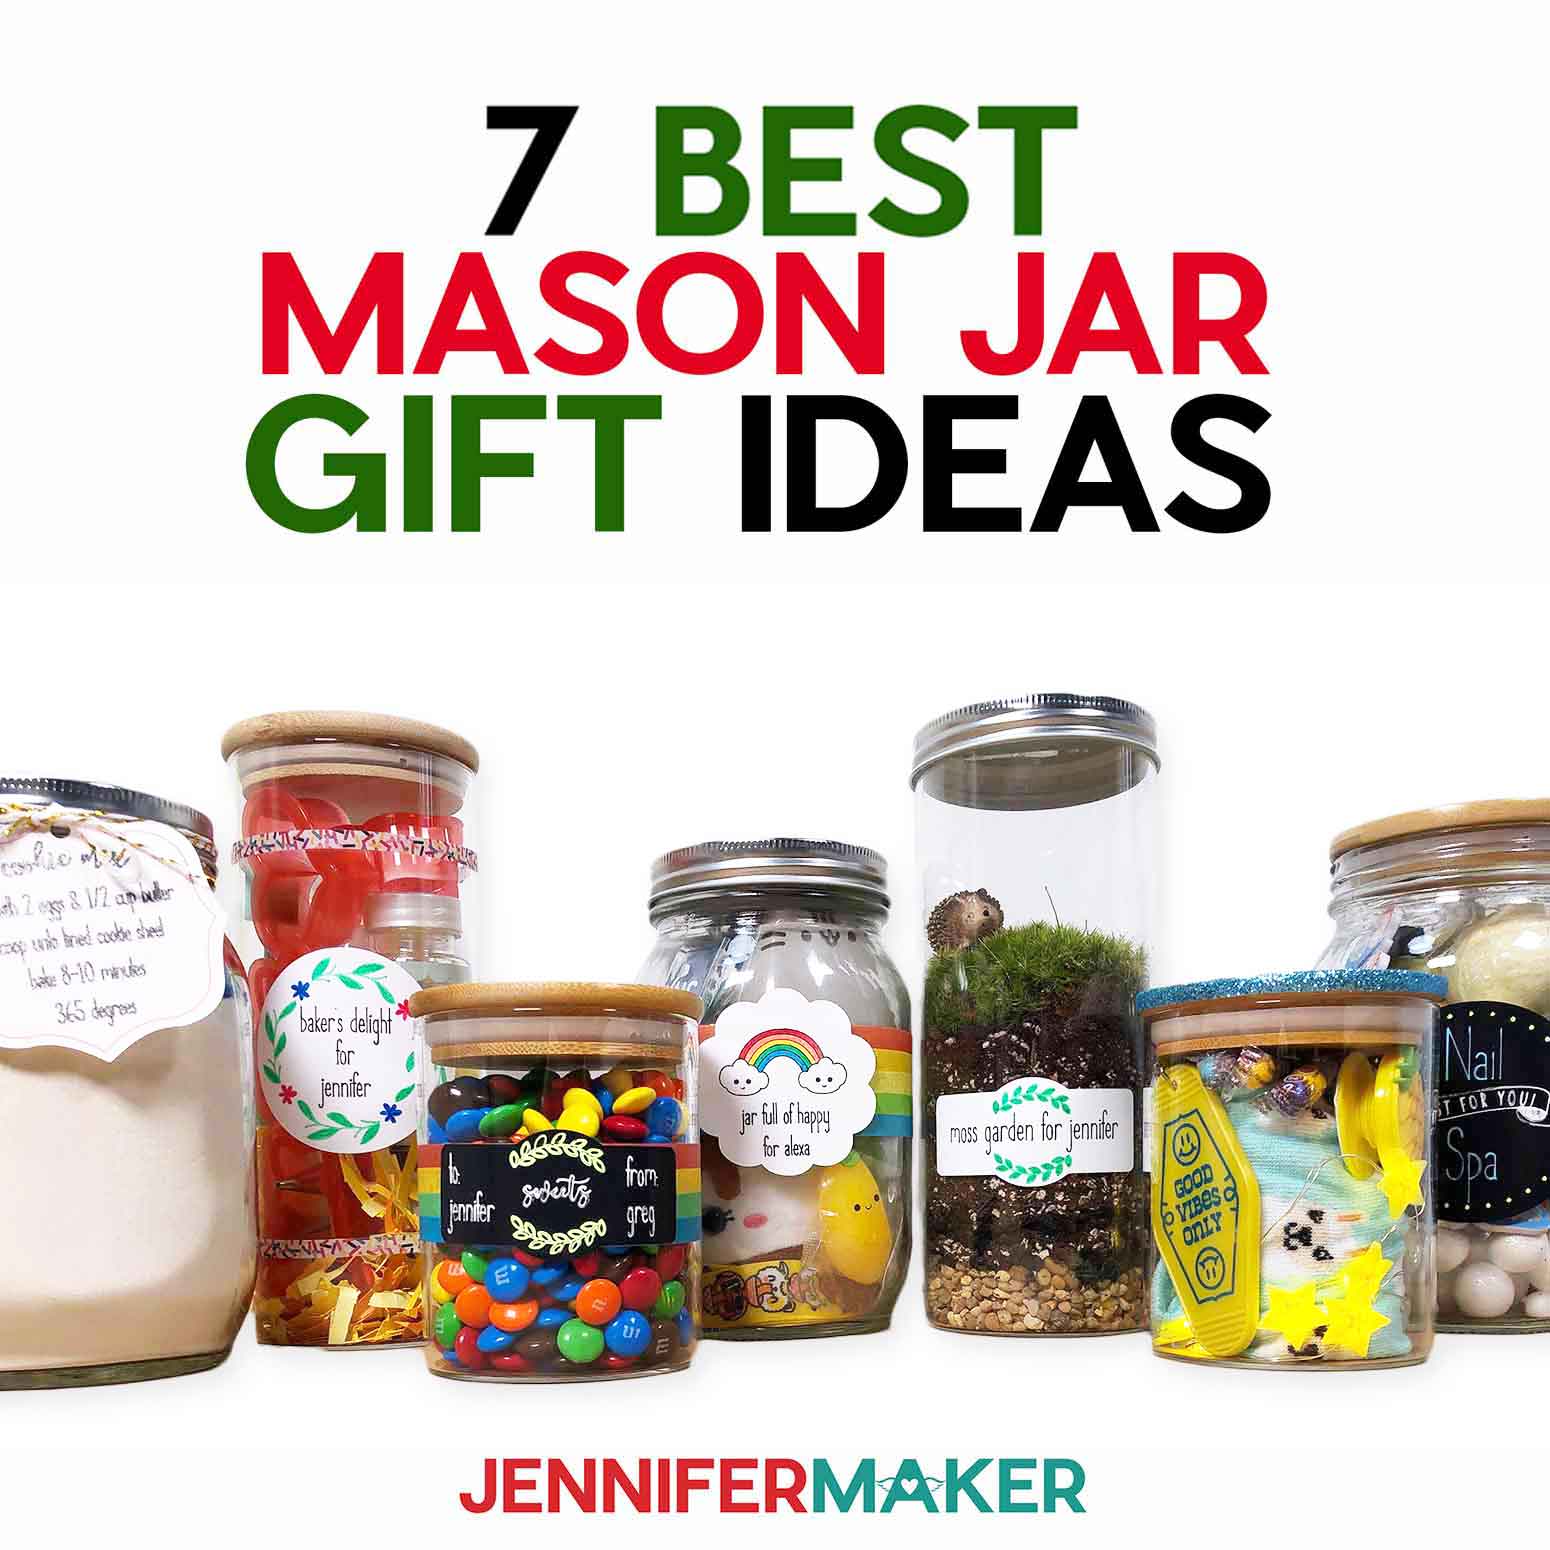
Learn how to make labels and decorations for Mason jar gift ideas!
Mason jars are one of my favorite ways to start to an easy gift idea! I’ll share my favorite Mason jar gift ideas, but a personal touch helps set your handmade gift apart. So, let’s see how to make custom decorations and tags using writable vinyl and different pens in your Cricut. My free SVG collection has several label shapes, but you can also use components from other labeling projects. I’ll show you how to combine the elements for these and ideas how to put the themed containers together!
Watch the full step-by-step mason jar gift ideas tutorial on my channel:

 What is the Merry Maker Mingle? This is an annual tradition here at JenniferMaker! Every day for the first 25 days of December, we gift you with a brand new project, design, tutorial, and video for something YOU asked us to make. On top of that, we host a giveaway with 25 days of prizes. Some of the amazing prizes are Cricut cutting machines, sewing machines, gift cards, and beautiful print editions of our popular Cricut Coach Playbook. You can even earn bonus entries for sharing photos of the daily projects! Click here to learn more about the Merry Maker Mingle!
I love using Mason jars in craft projects and homemade gifts! They’re the perfect size for a small holiday gift or handful of themed items. I’ll show you how to go the extra mile with customizable labels written with a Cricut’s perfect penmanship. No more guessing who these gifts are for!
And of course, you can use any clean glass container with a lid for these Mason Jar gift ideas. If the sides are too decorative to cover up, just move the label to the top!

I used me Cricut to draw designs and written messages that won’t smudge with the opaque gel pens. These are a fast holiday gift, especially with the Cricut Writable Smart Vinyl that doesn’t require a mat. I used a Cricut Maker 3, but you can use any machine, just pick compatible materials and tools.
Of course, one of the reasons Mason jar gift ideas are so popular is that we all have glass jars around and they last years! You can make the jar easy for the gift recipient to reuse by using the removable vinyl, or turn a label shape into a hang tag by cutting it from cardstock on a green StandardGrip machine mat. They’re a great way to be more eco-friendly during the holiday season.
And they’re not just for Christmas, of course. You can personalize jars for a thoughtful present for a loved one any time of year. They’re a perfect gift that takes little money. I love those projects! They’re also perfect for gift baskets, because you can put together a few using the same theme.
Jar just a bit too small, or not sure how to fit the ice cream for a sundae party gift? No worries, put the caramel sauce in the jar and add gift cards in a decorated envelope for the other items. Remember, if you’re making edible gifts, check that the jar is food grade. I’ve listed several good options in the materials list.
I have some great ideas to inspire you in the directions below!
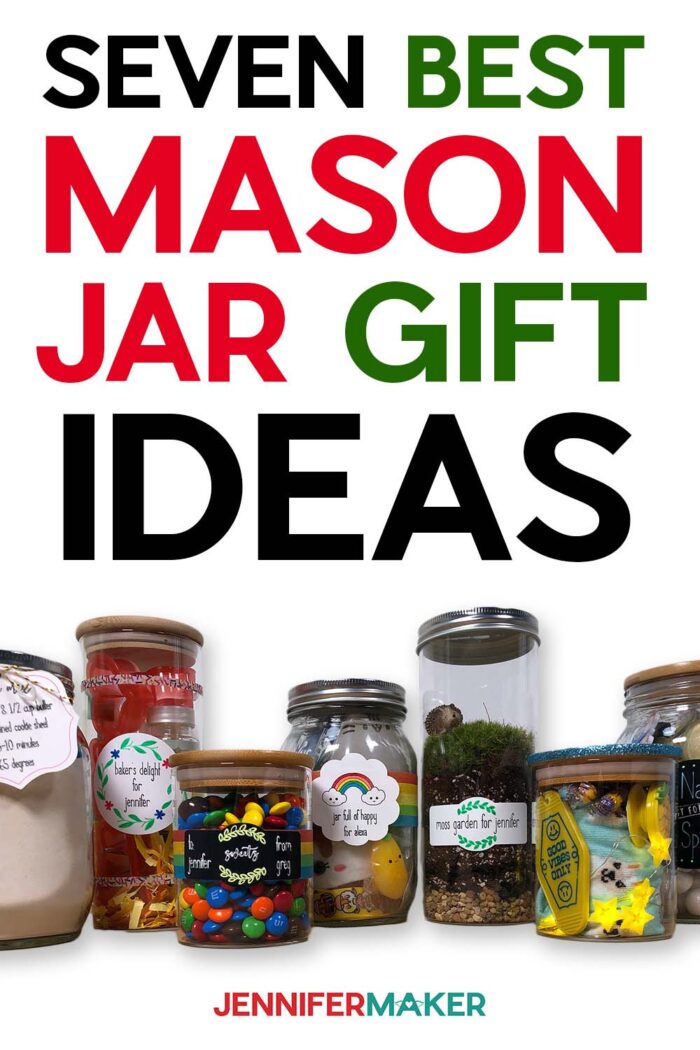
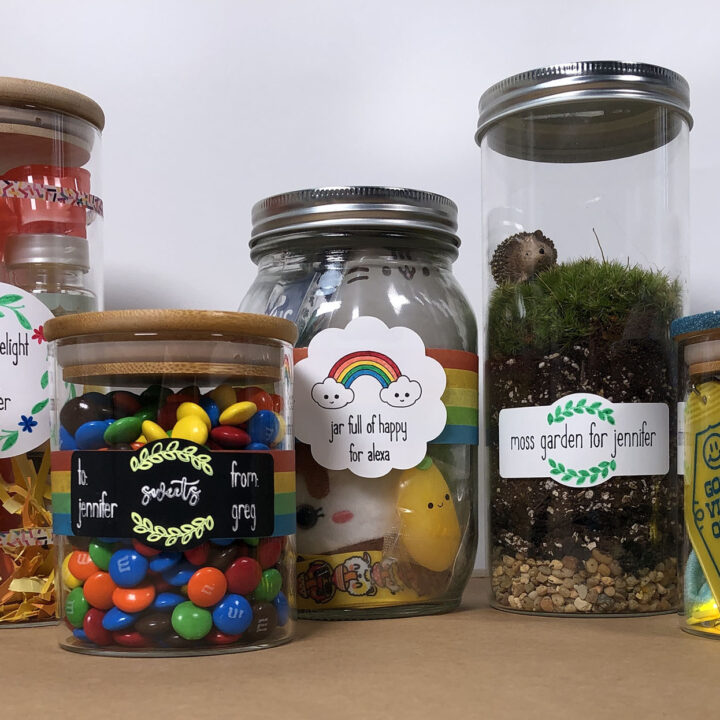
My favorite is the fun terrarium! I’ll show you how to layer the materials in the video to make a beautiful ecosystem in a jar! Remember to tell the recipient, moss gardens should be placed in indirect sunlight only. Then open the top to spritz with water 1-2 times a week as needed! It’s a great gift for someone who needs a little Spring even in the Winter. I know I do!
My Jar Full of Happy has fidget toys from Five Below. With the right items, it’s perfect for the Kawaii lovers in your life!
The Good Vibes Jar is filled with Dollar Tree items for a relaxing night at home. I added lights so it can double as a nightlight.
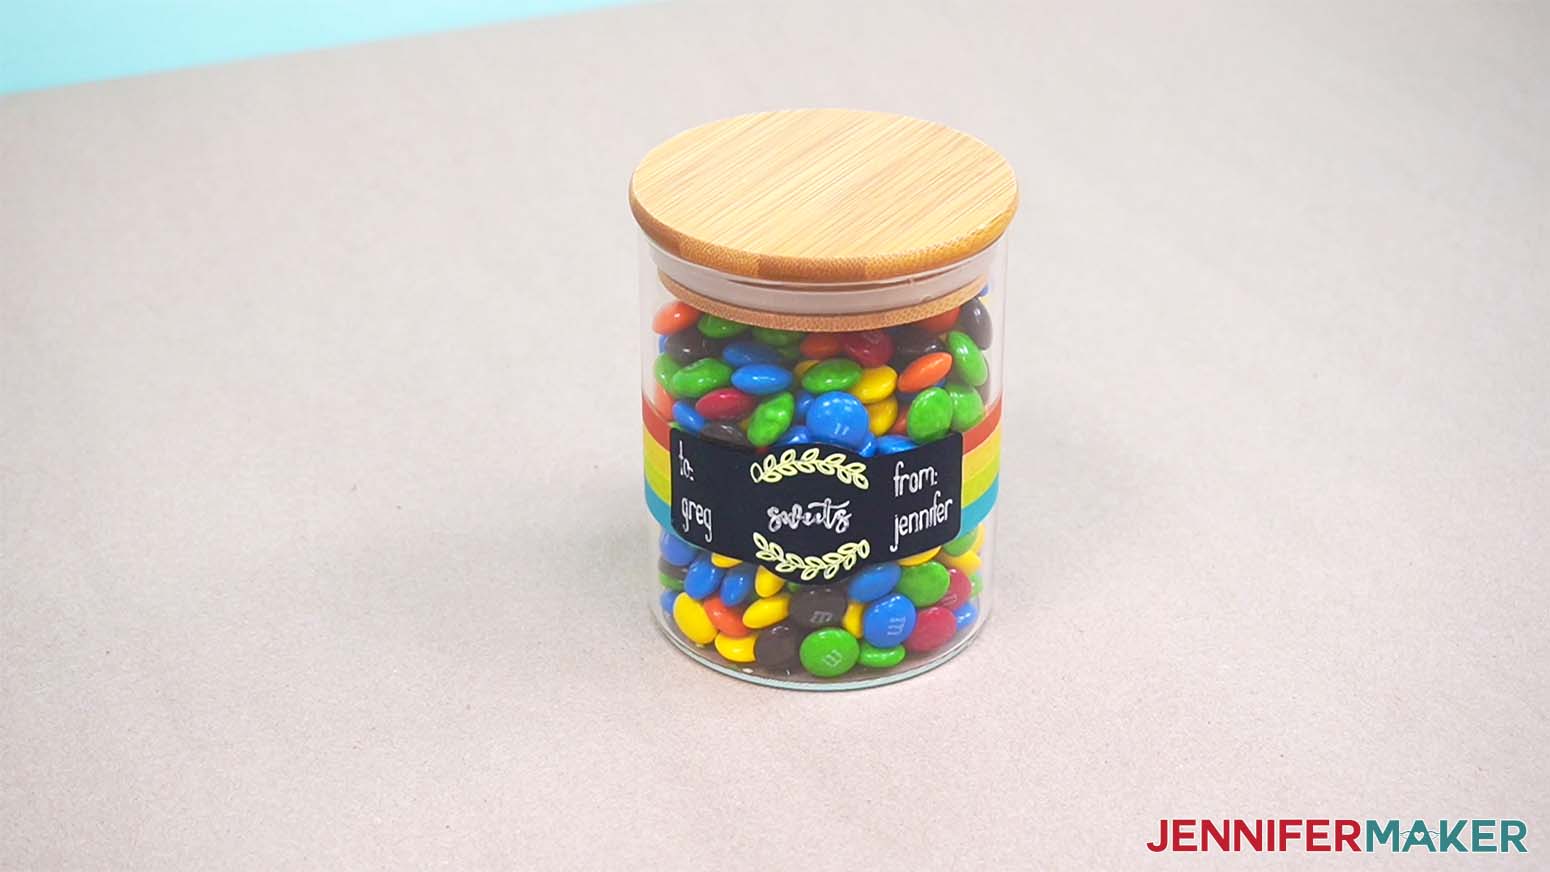
My Sweets Candy Jar is super simple if you have a family member with a sweet tooth. Just grab a cute Mason jar and fill it with their favorite candy.
Baker’s Delight If you use a larger jar like I did, cut some scrap paper into padding and filler.

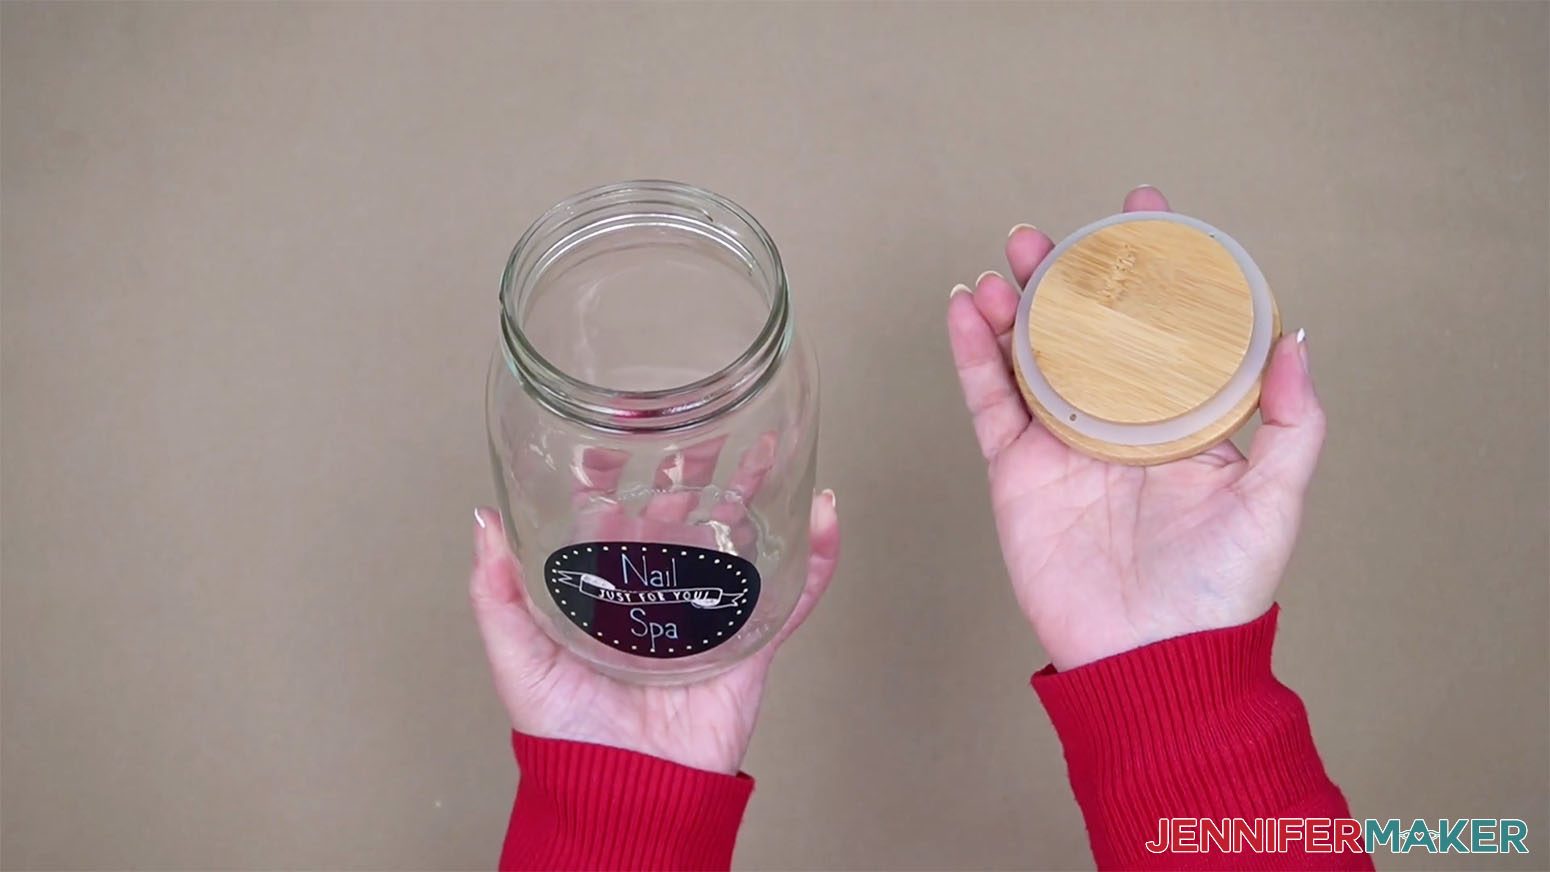
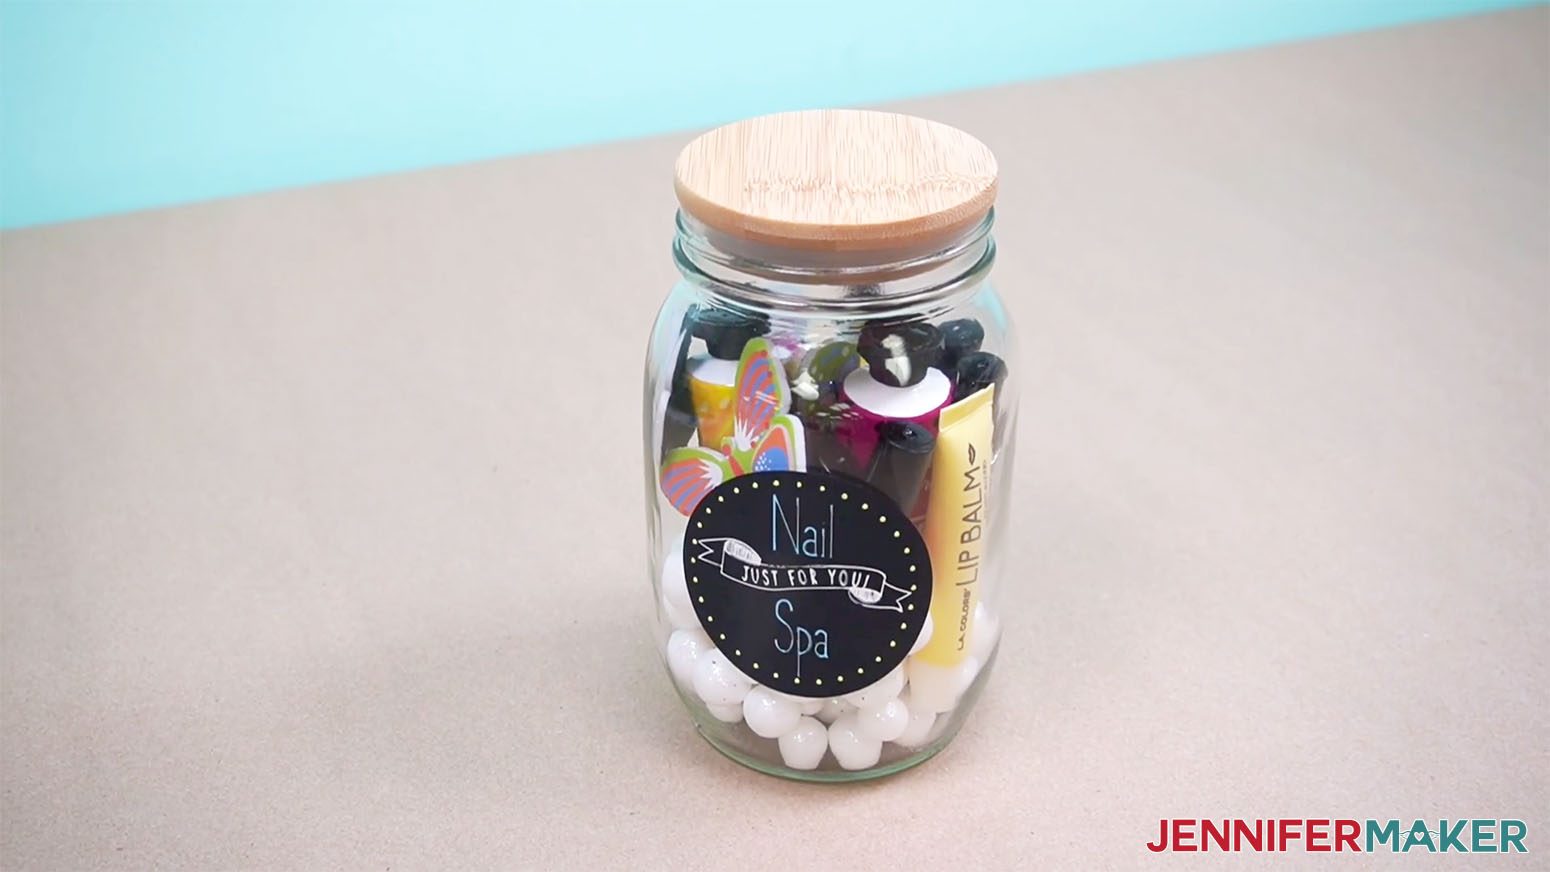
A Nail Spa in a Jar with pampering supplies like nail polish, lip balm, bath salts, and lotion from the dollar store is the perfect winter survival kit. You could even add some essential oils if the recipient is a fan!
The Cookie Mix Jar is a perfect way to share a treasured recipe and a few of the secret ingredients. Chocolate chips, cinnamon sticks, and cookie mixes in bags fit well in the jars I used!
Let me show you how easy it is to make Mason jar gift ideas! This post contains some affiliate links for your convenience (which means if you make a purchase after clicking a link I will earn a small commission but it won’t cost you a penny more)! Read my full disclosure policy.
Materials to Make Mason Jar Gift Ideas
View my Amazon shopping list with the exact items we used to make this project
- Wood Lidded Glass Food Storage Jars 15 oz, Glass Food Storage Jars 32 oz, or Wide Mouth Mason Jars 32 oz.
- Cricut Writable Smart Vinyl Permanent or Cricut Writable Smart Vinyl Removable
- Cricut Glitter Gel Pens, 0.8 mm, Rainbow for Cricut Makers or Explores, or for glitter gel pens for the Cricut Joy
- Cricut Opaque Gel Pens, 1mm for Cricut Makers or Explores
- White Cardstock 8.5 x 11″ 65 lbs
- Washi Tape
- Twine
- A method to cut your materials — I used the amazing Cricut Maker 3 but you can also use the original Maker or an Explore, or even a Joy
- Green StandardGrip Machine Mat, 12″ x 12″
- Scissors
- Brayer
- Design #448 – My free Mason Jar Gift Idea Labels SVG/DXF/PDF collection (available in my free resource library—get the password at the bottom of this post)Don’t forget the goodies to go inside!
How to Make Mason Jar Gift Ideas
Mason Jar Gift Ideas
Prepare and personalize Mason jar gift ideas using Cricut Writable Vinyl and pens instead of a printer!
Materials
- Wide Mouth Mason Jars 32 oz. -OR-
- Glass Food Storage Jars 15 oz -OR-
- Glass Food Storage Jars 32 oz -OR-
- Cricut Writable Smart Vinyl Permanent -OR-
- Cricut Writable Smart Vinyl Removable
- Cricut Glitter Gel Pens -OR-
- Cricut Opaque Gel Pens
- Decorative Bamboo Lids (optional for the wide mouth jars)
- White Cardstock 8.5 x 11" 65 lbs.
- Washi Tape
- Twine
- Design #448 – My free Mason Jar Gift Idea Labels SVG/DXF/PDF collection (available in my free resource library—get the password at the bottom of this post)
Tools
Instructions
STEP 1: GET MY FREE MASON JAR GIFT LABEL FILES
You can download my free mason jar label designs — look for Design #448, from my free resource library.
All the designs are in one file for you to mix and match the pen drawings with the label shapes. I'll show you how to combine shapes and phrases, and customize them to make two labels.
If you’re not sure how to upload an SVG file to Cricut Design Space, watch this helpful SVGs Made Simple training series I made. It will help you SO much! If you're on an iPhone or iPad, here's how to download and upload SVG files to the Cricut Design Space app.
Next, download my two fonts, JM Penwriting and JM Tall, from my free resource library -- they’re in Design #437. You’ll need to install the fonts on your computer and make sure they work in Cricut Design Space before starting the project. If you aren’t sure how to do that, I have a helpful blog post that will guide you through the steps! You’ll need to install my font(s) on your computer and THEN open (or reload) Cricut Design Space in order to use it.
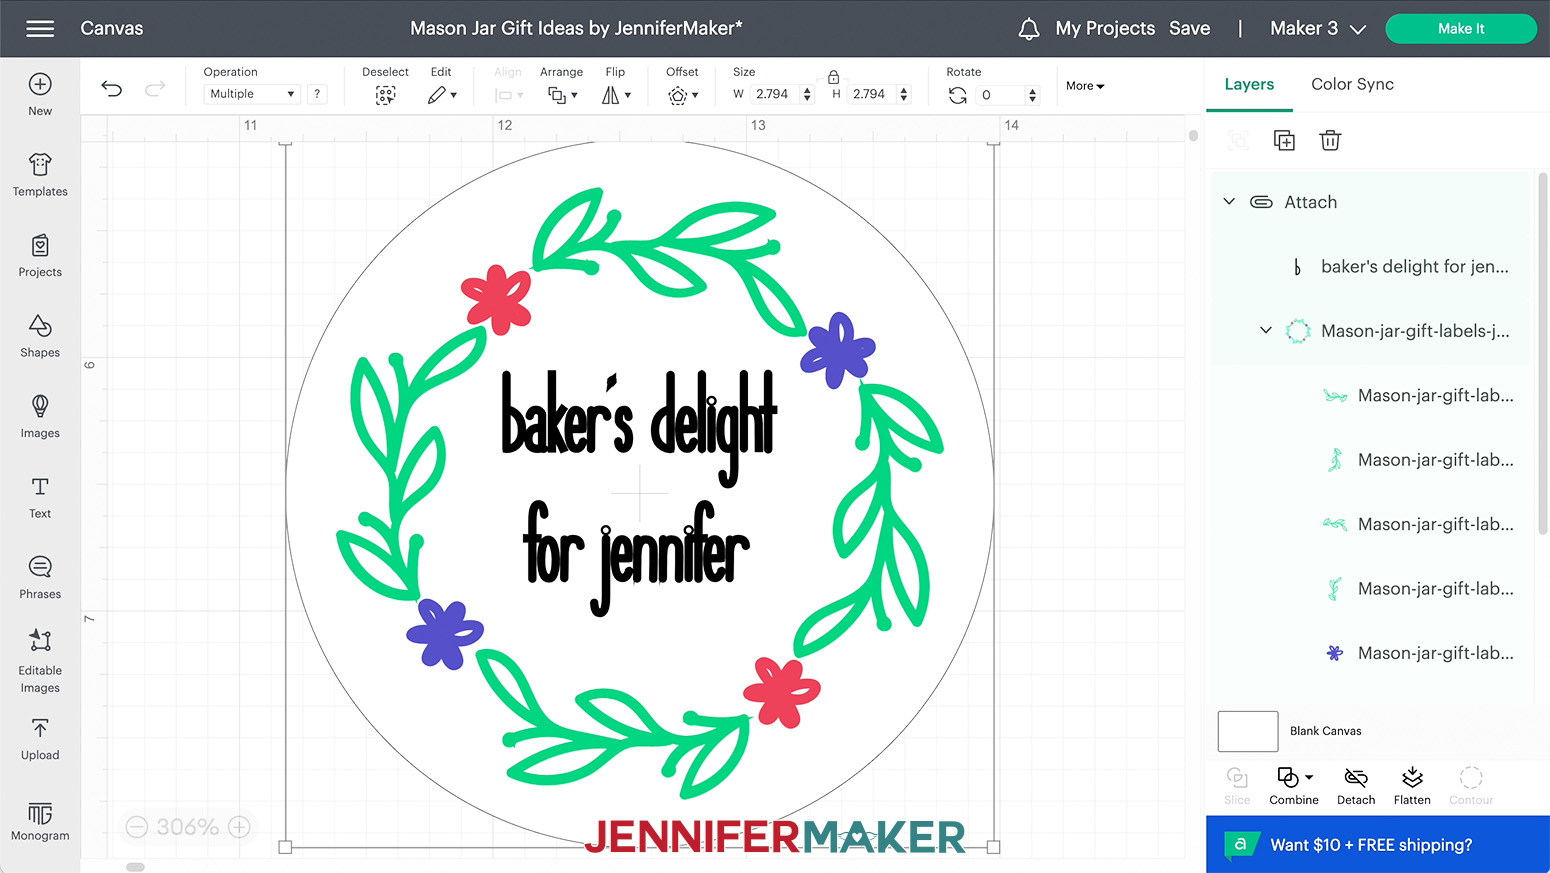
STEP 2: PREPARE YOUR DESIGN
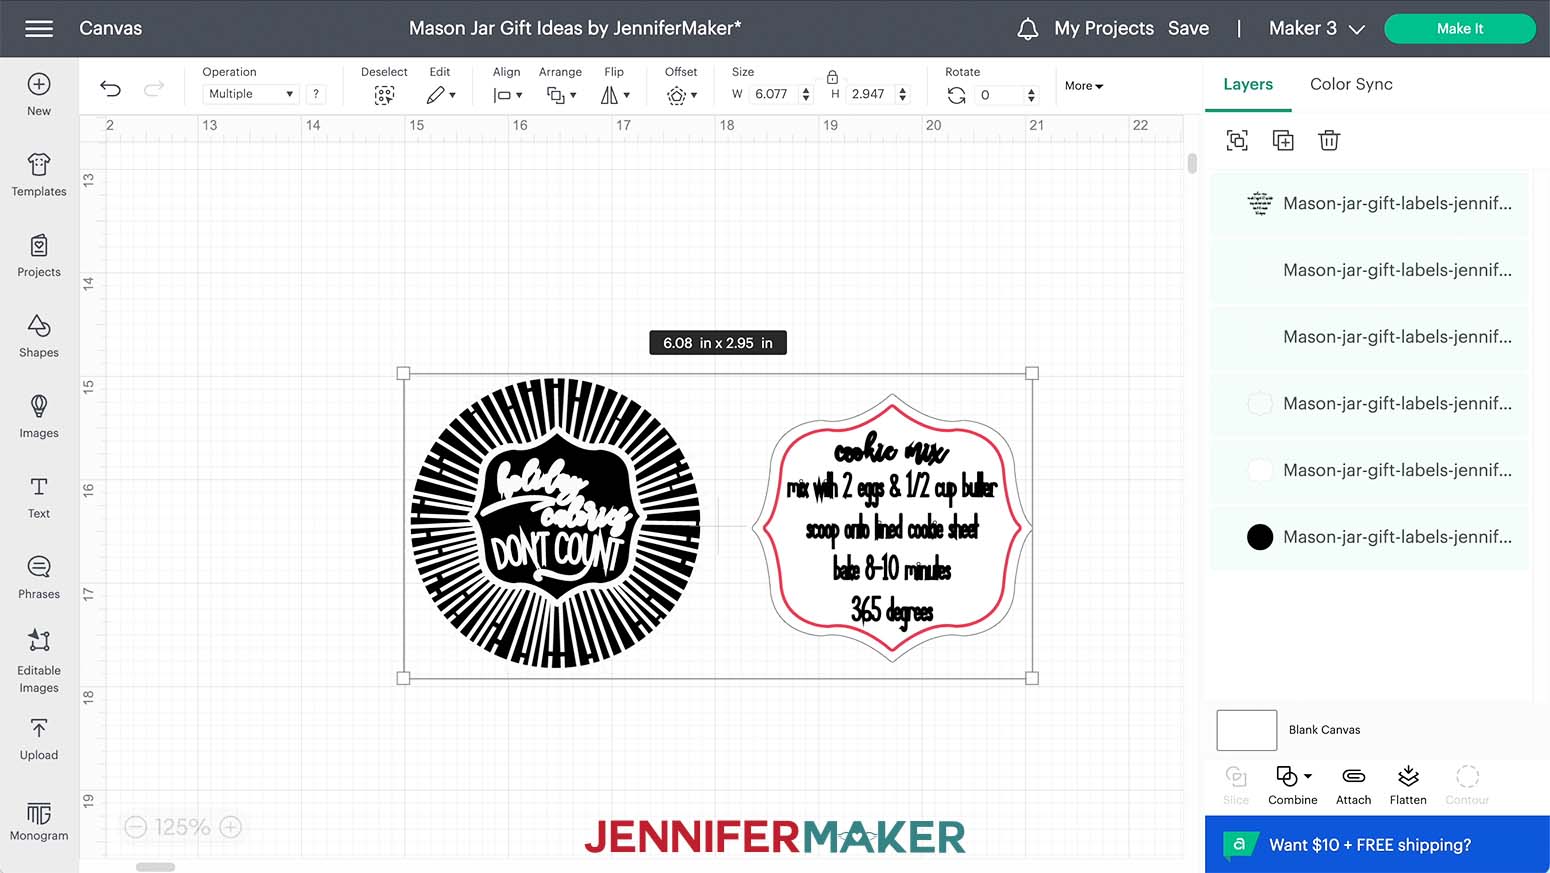
Here's what my mason jar label file looks like on my Canvas.
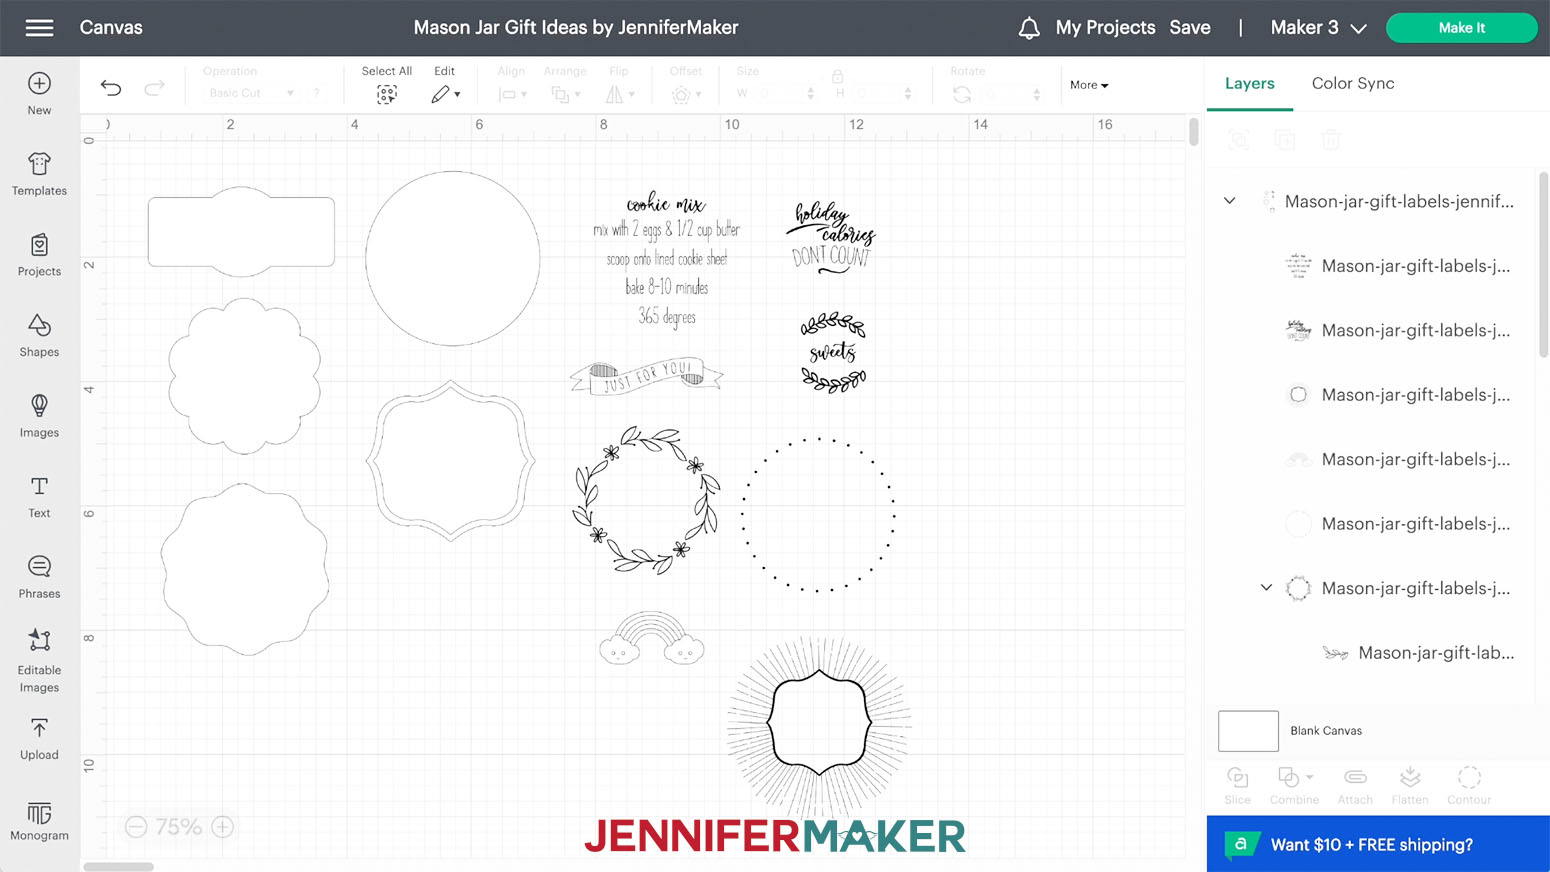
You have five different label cut shapes on the left and eight design elements for the pen to choose from on the right. For most of my labels I used the Removable Cricut Writable Smart Vinyl. It is great for making sure the label is placed just right. I found that the Permanent Cricut Writable Smart Vinyl sticks to washi tape better than the Removable, so I'll show you how to layer them. There really isn't a difference between the two vinyls when it comes to how a pen writes on them, so use which one works best for you.
NOTE: If you'd like to try different label shapes, I have many available in my Pantry Labels project, Design #189!
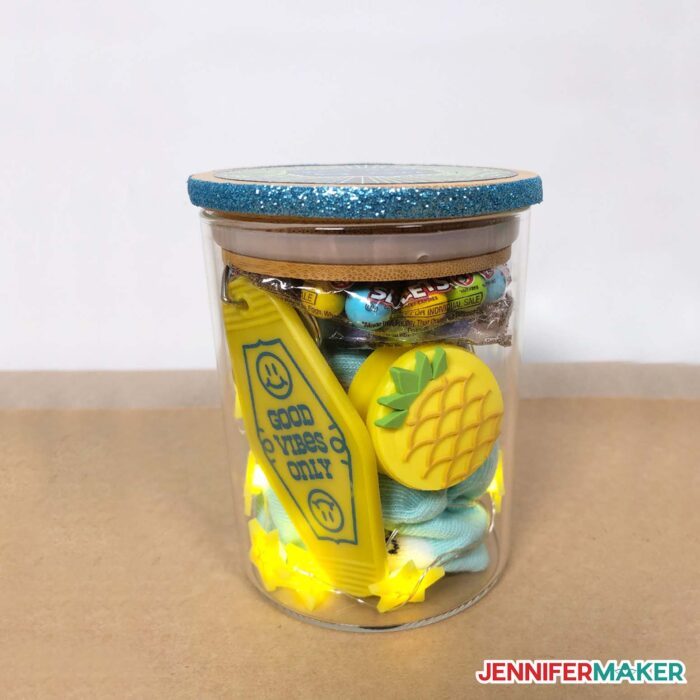
I’m going to make two versions: a permanent white label for my Jar Full of Happy and a removable black gift label for a Good Vibes jar.
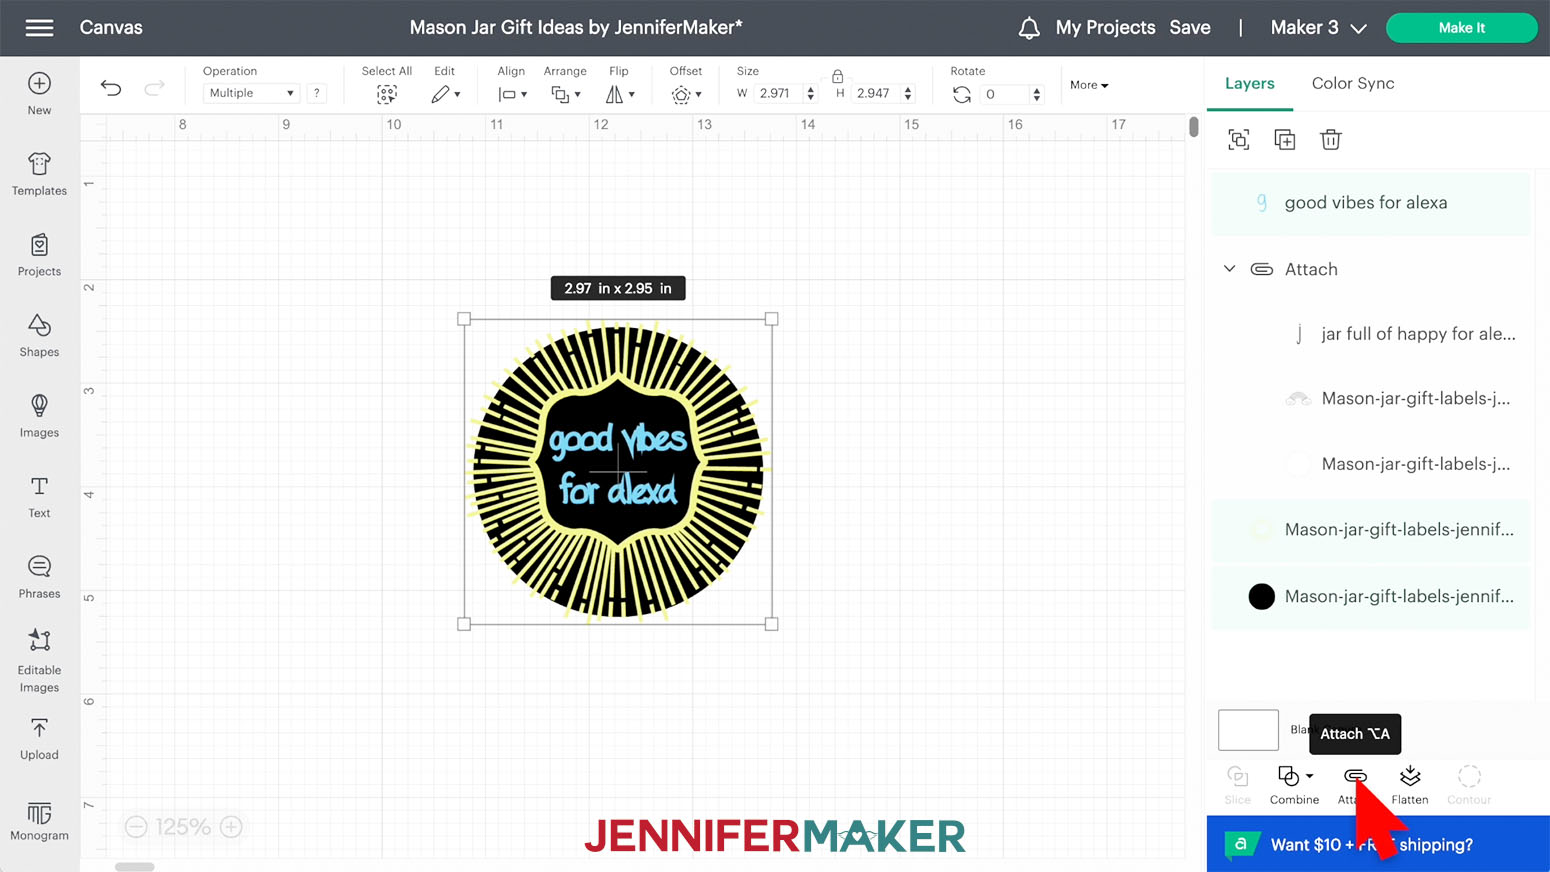
Ungroup the designs. Hold Shift and click the elements you don’t want to use and delete them. I’m going to delete everything except the scalloped edge circle and rainbow for the happy jar and the circle shape and the starburst designs for the good vibes jar.
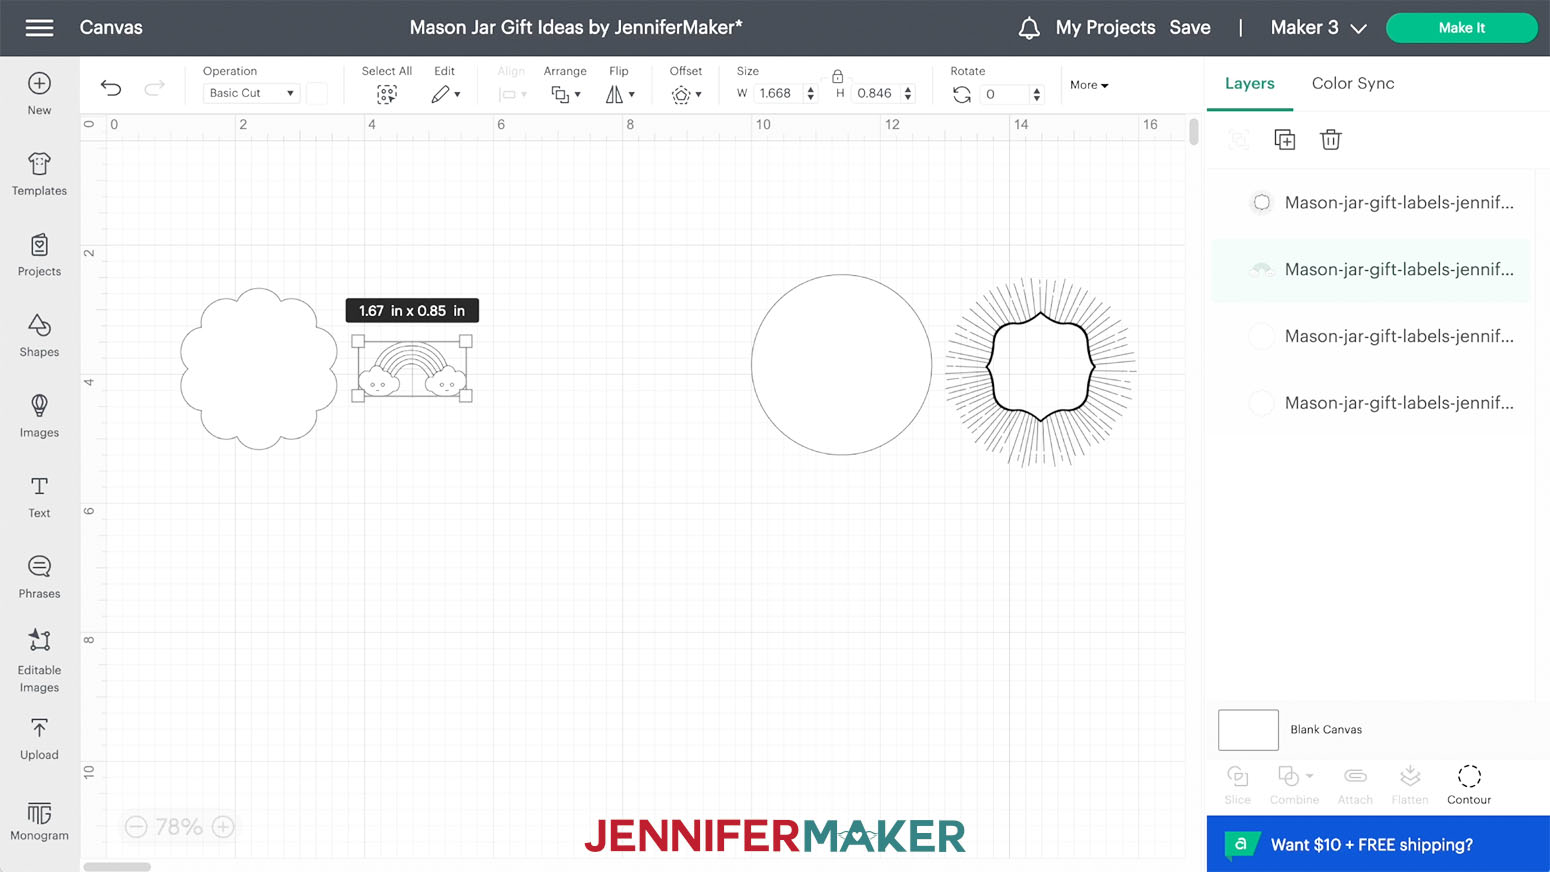
Place the elements you’ll combine closer together, and let’s work on the happy label first.
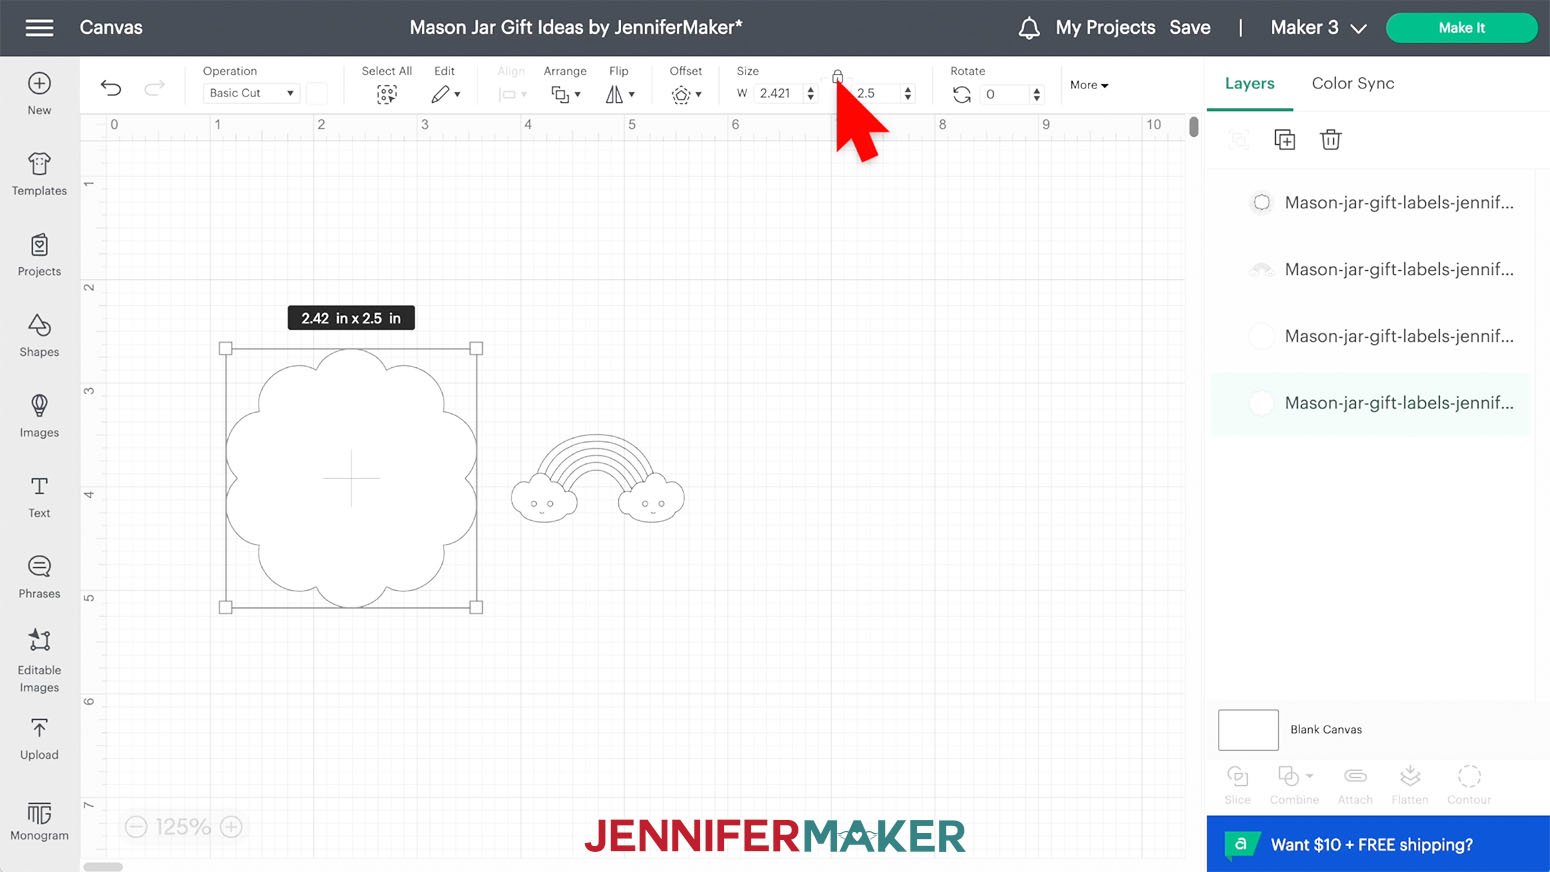
The scallop shape measures 2.987" X 1.443". This is a good size to use on the side of a 15 oz food storage jars. If you need to adjust the size, make sure the lock is closed in the size menu and make your adjustment.
Drag the rainbow over to the label so it is roughly centered but in the upper half of the shape.
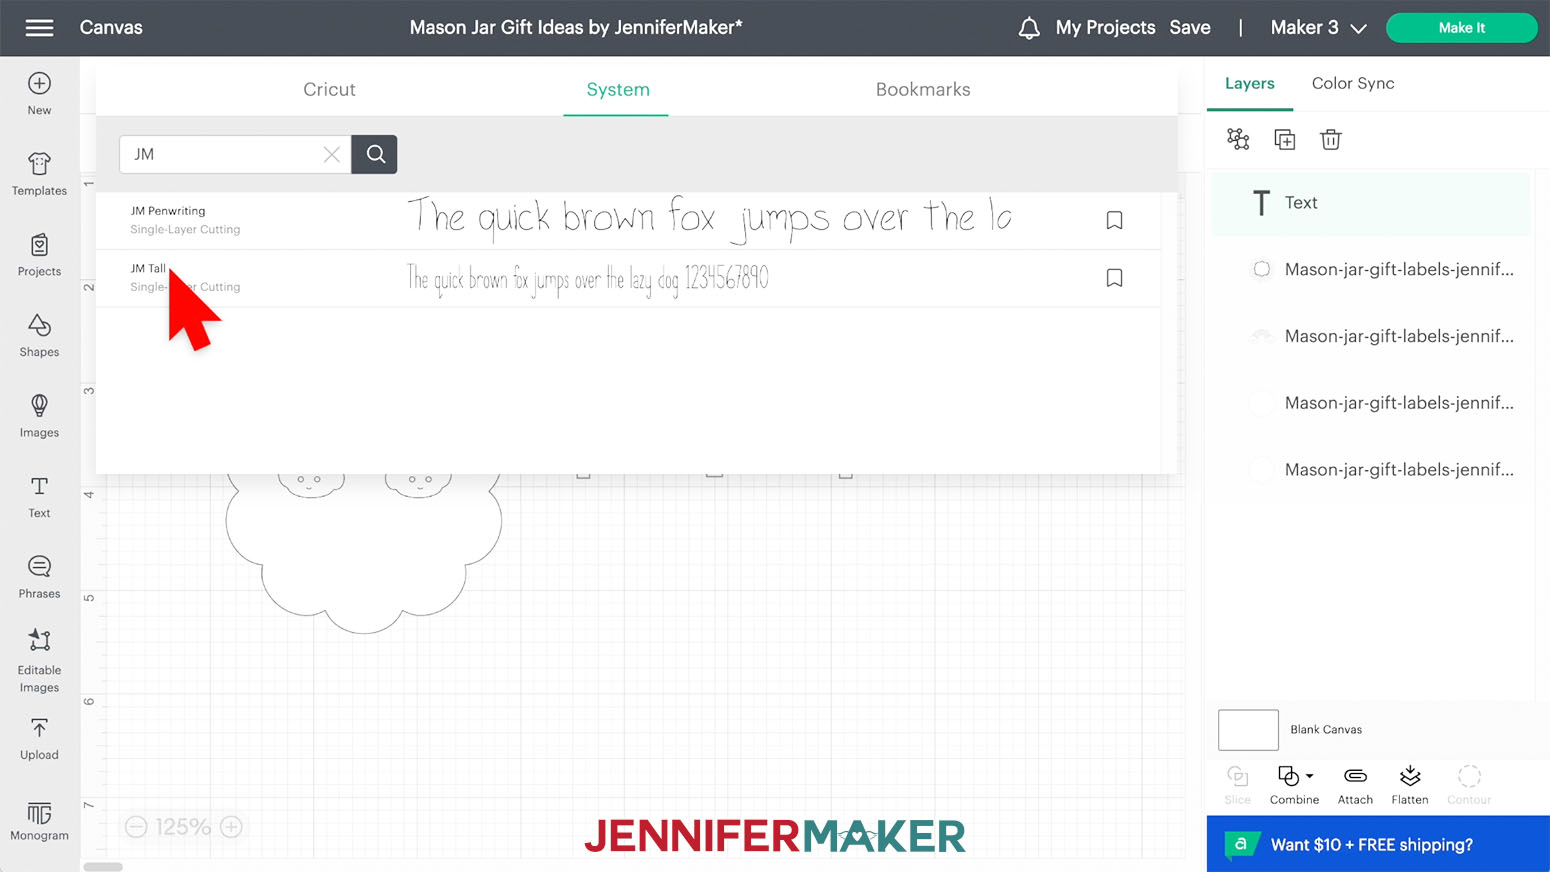
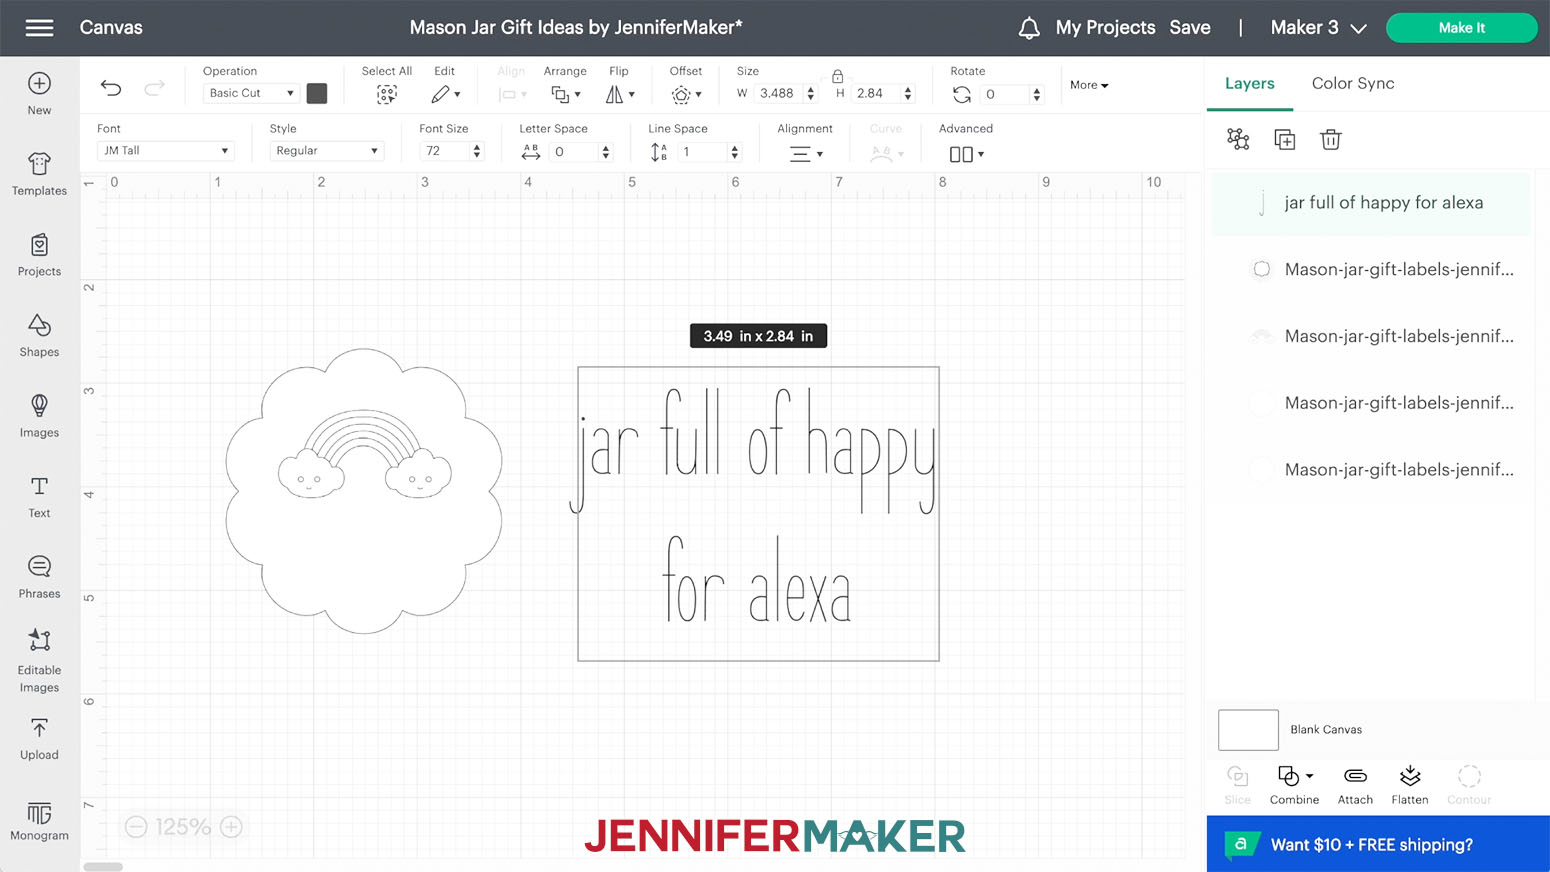
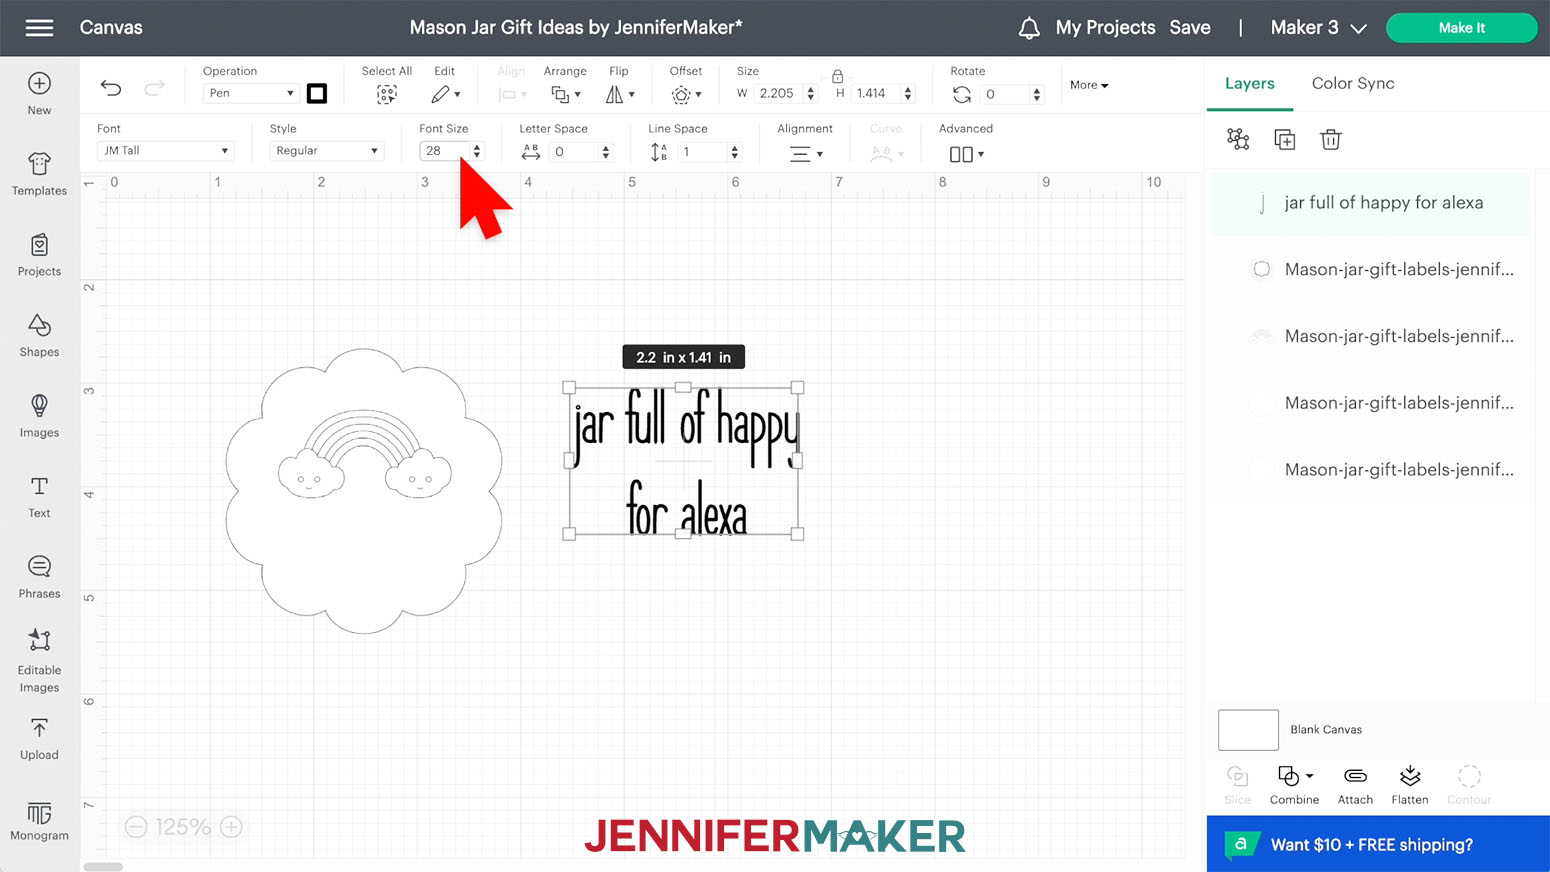
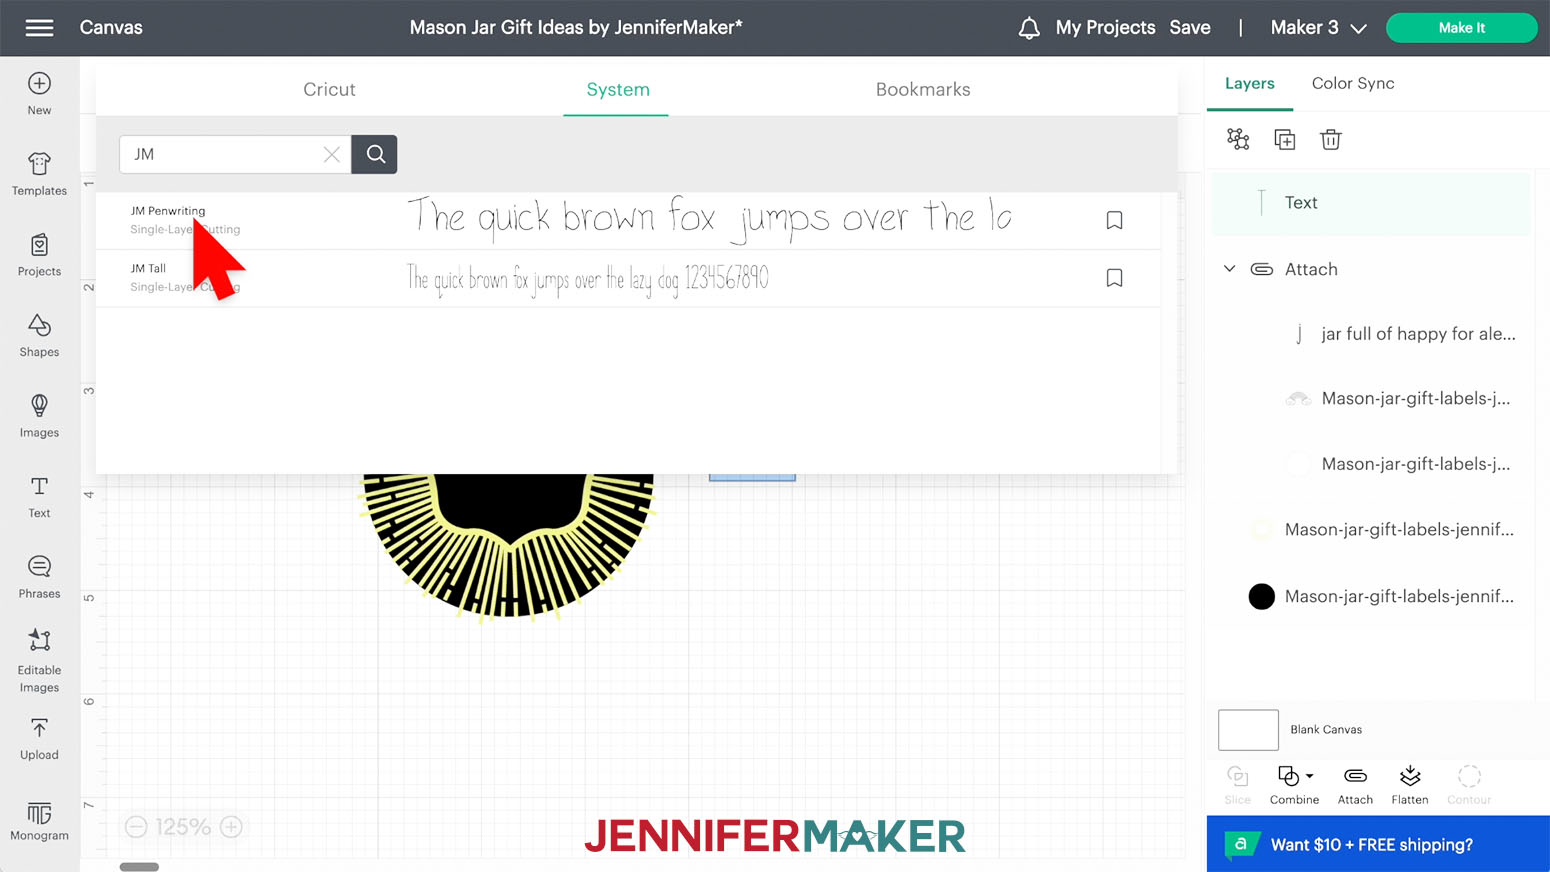
To add a message, click on "Text" and then click on the "Font" menu. Since we want to use a Cricut pen to write on the labels, we need to change the Font to one with a Writing style, which means it uses one line at a time. I'm going to use my own typeface called JM Tall,which you can find in my resource library, in Design #437. At the top of the Font menu click System and search for JM. Select JM Tall.
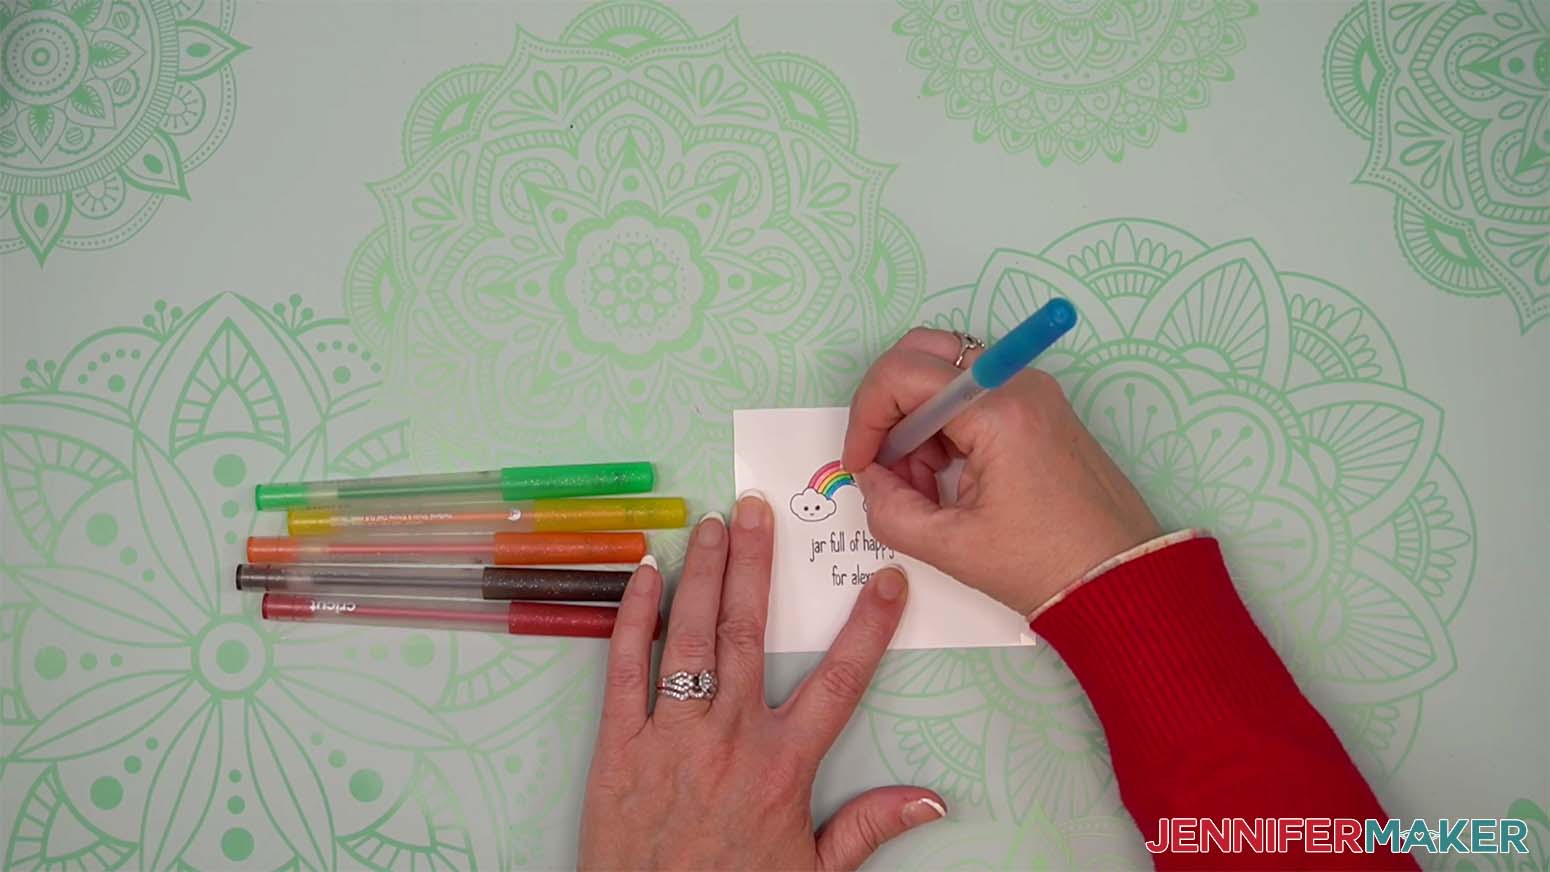
Double click the word "Text" and add your personalization. I’ll type the gift’s theme, “jar full of happy,” press Enter to start a new line, then add “for alexa.”
In the Operation menu, change "Basic Cut" to "Pen" so you can see what the message will look like.
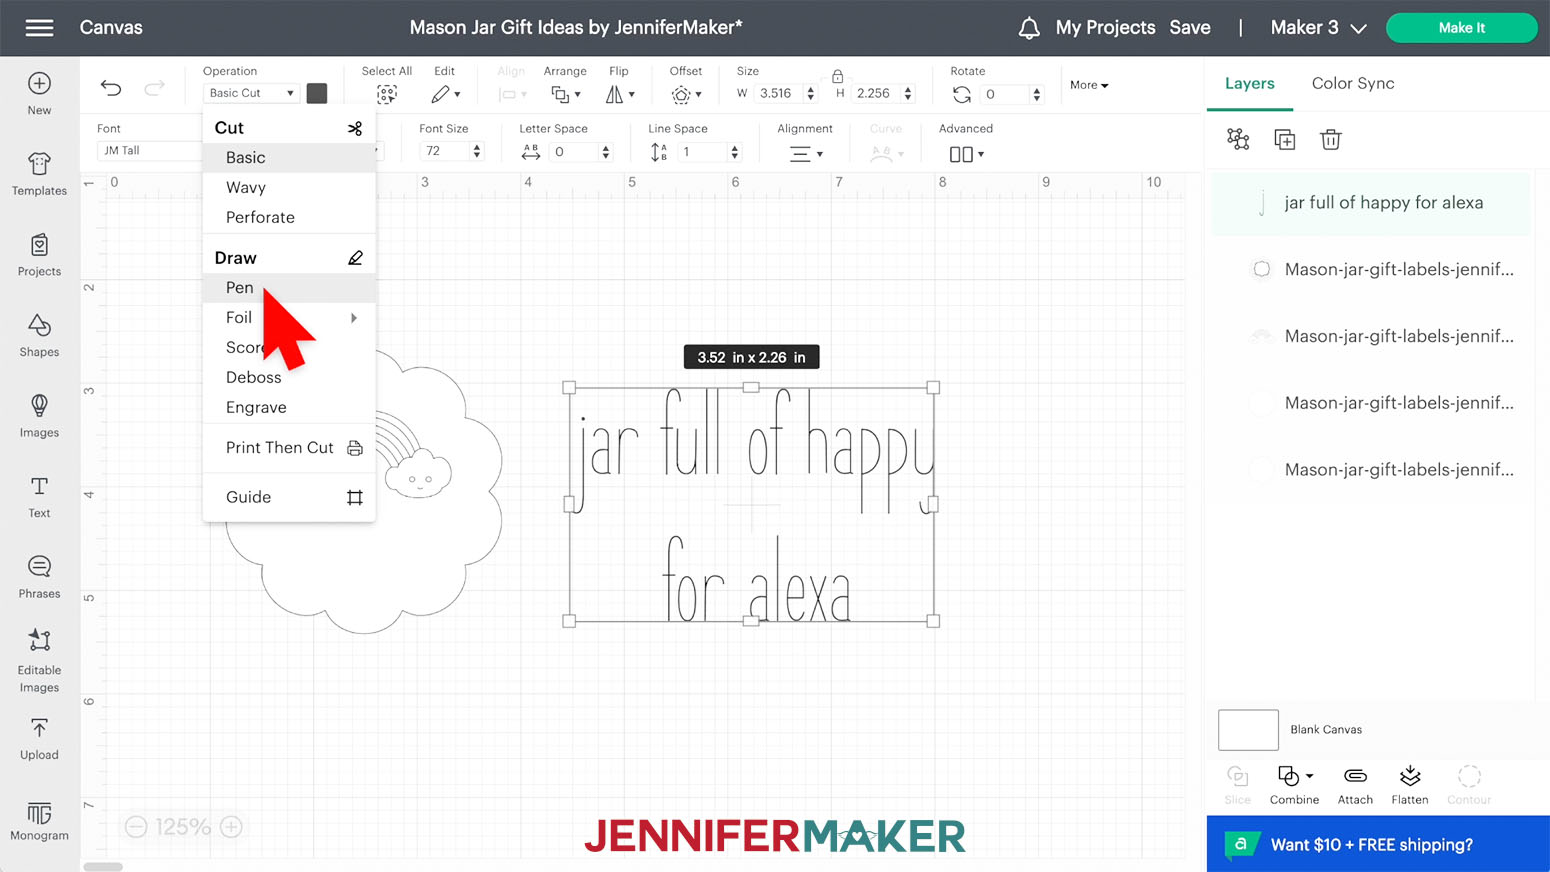
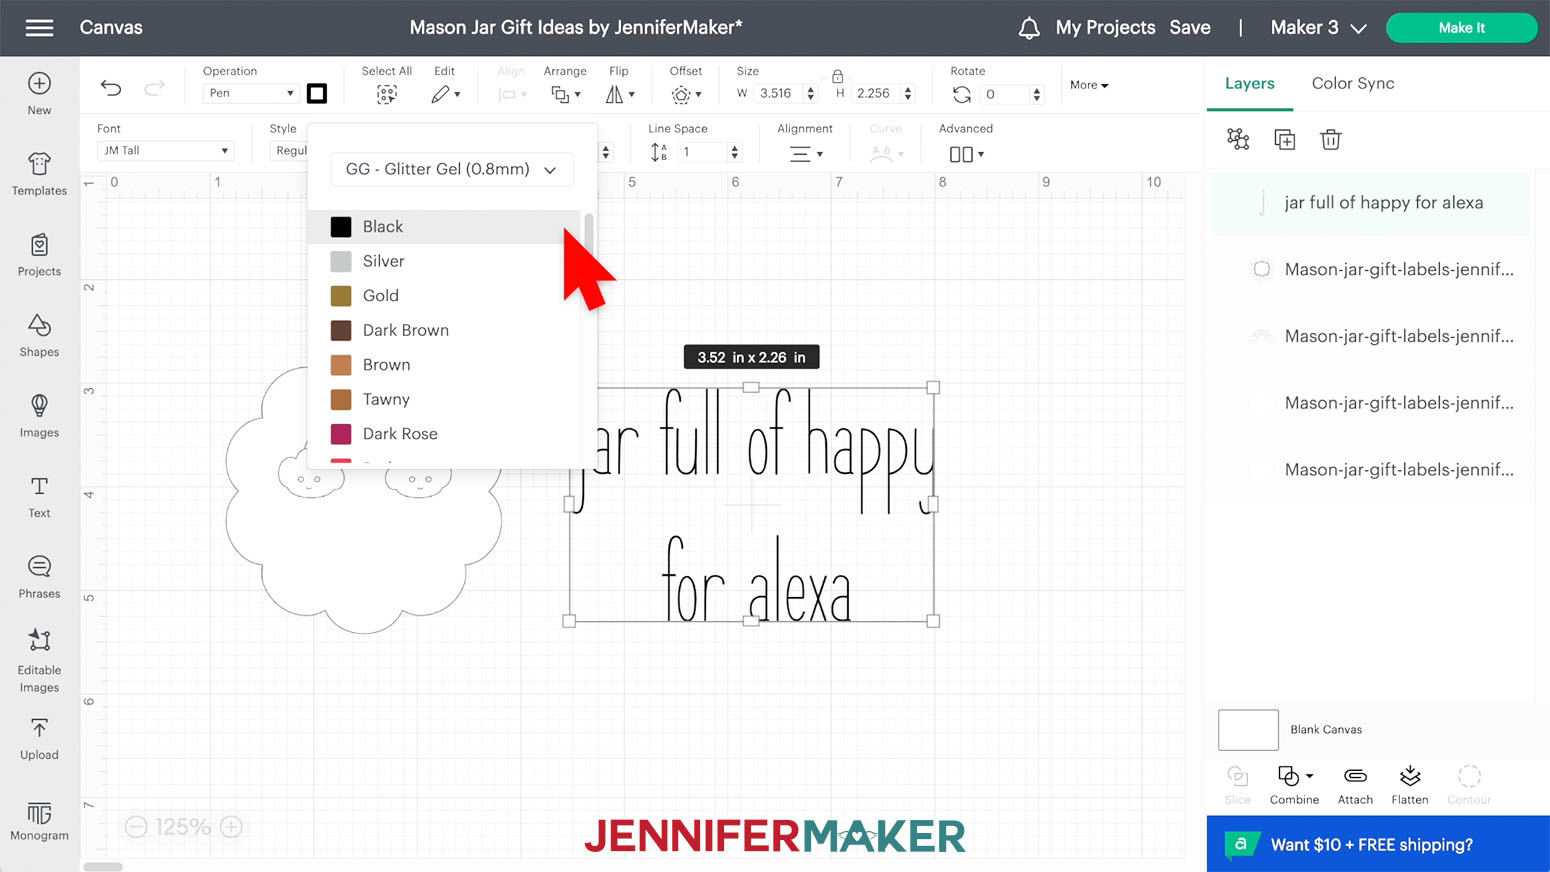
Click on the box next to the "Operation" menu to change the pen to "GG-Glitter Gel (0.8mm)" in Black.
Drag the text over the label below the rainbow.
To change the size of the text, type a new number in the “Font Size” field. I found that 28 worked well. If the lines are too far apart, click on "Line Space" and type “-3” to change the space between the lines of text.
Select the rainbow, then change its Operation to Pen and set it to the same black glitter gel pen, too.
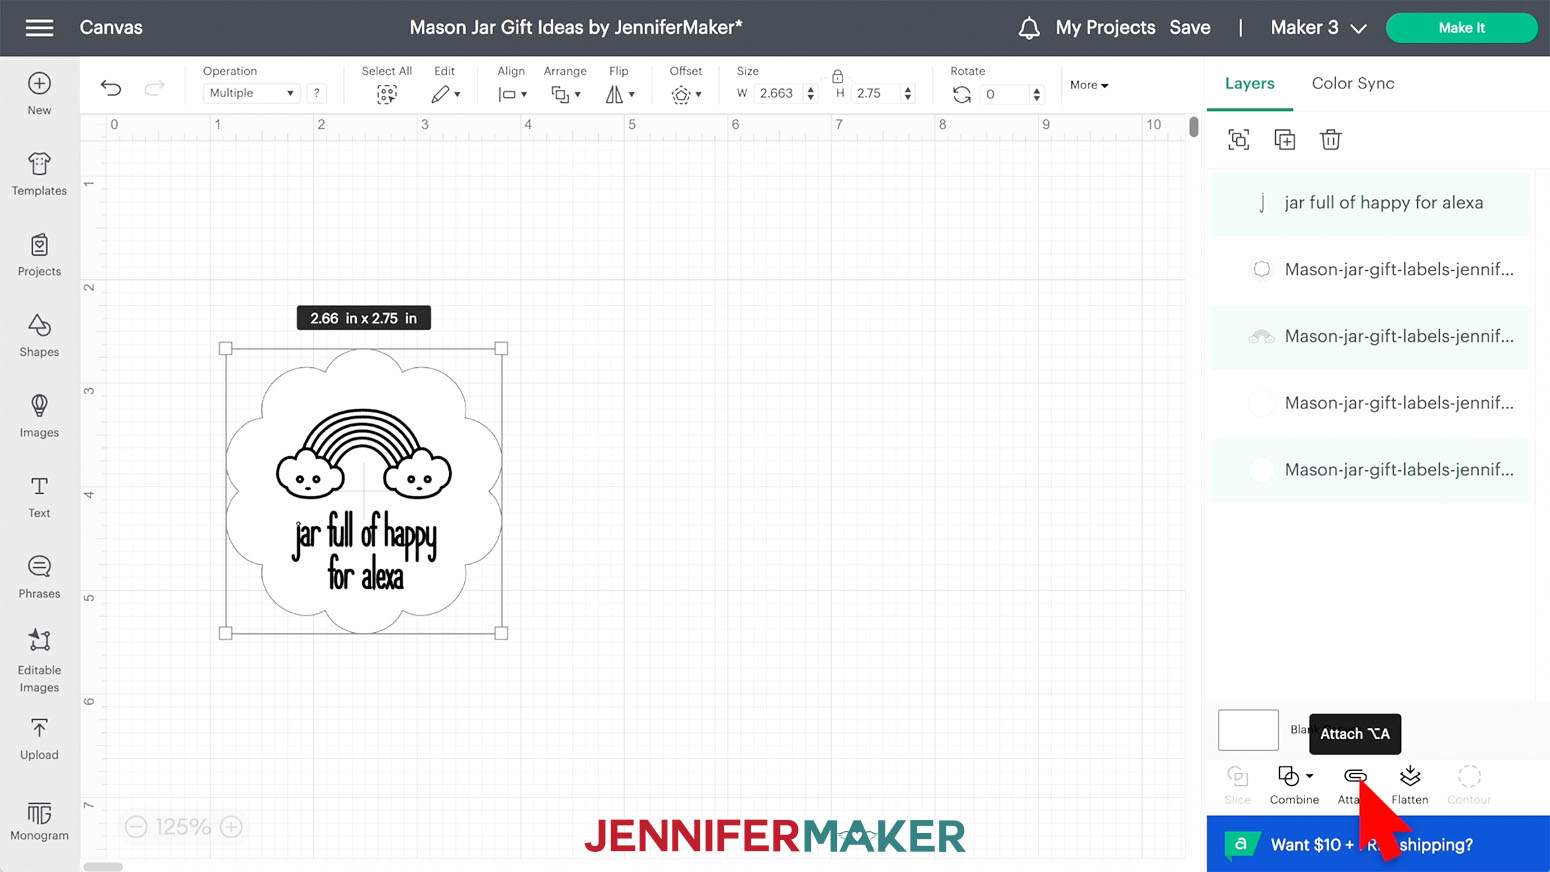
Drag a box over the three label elements, then click “Align” and “Center Horizontally.”
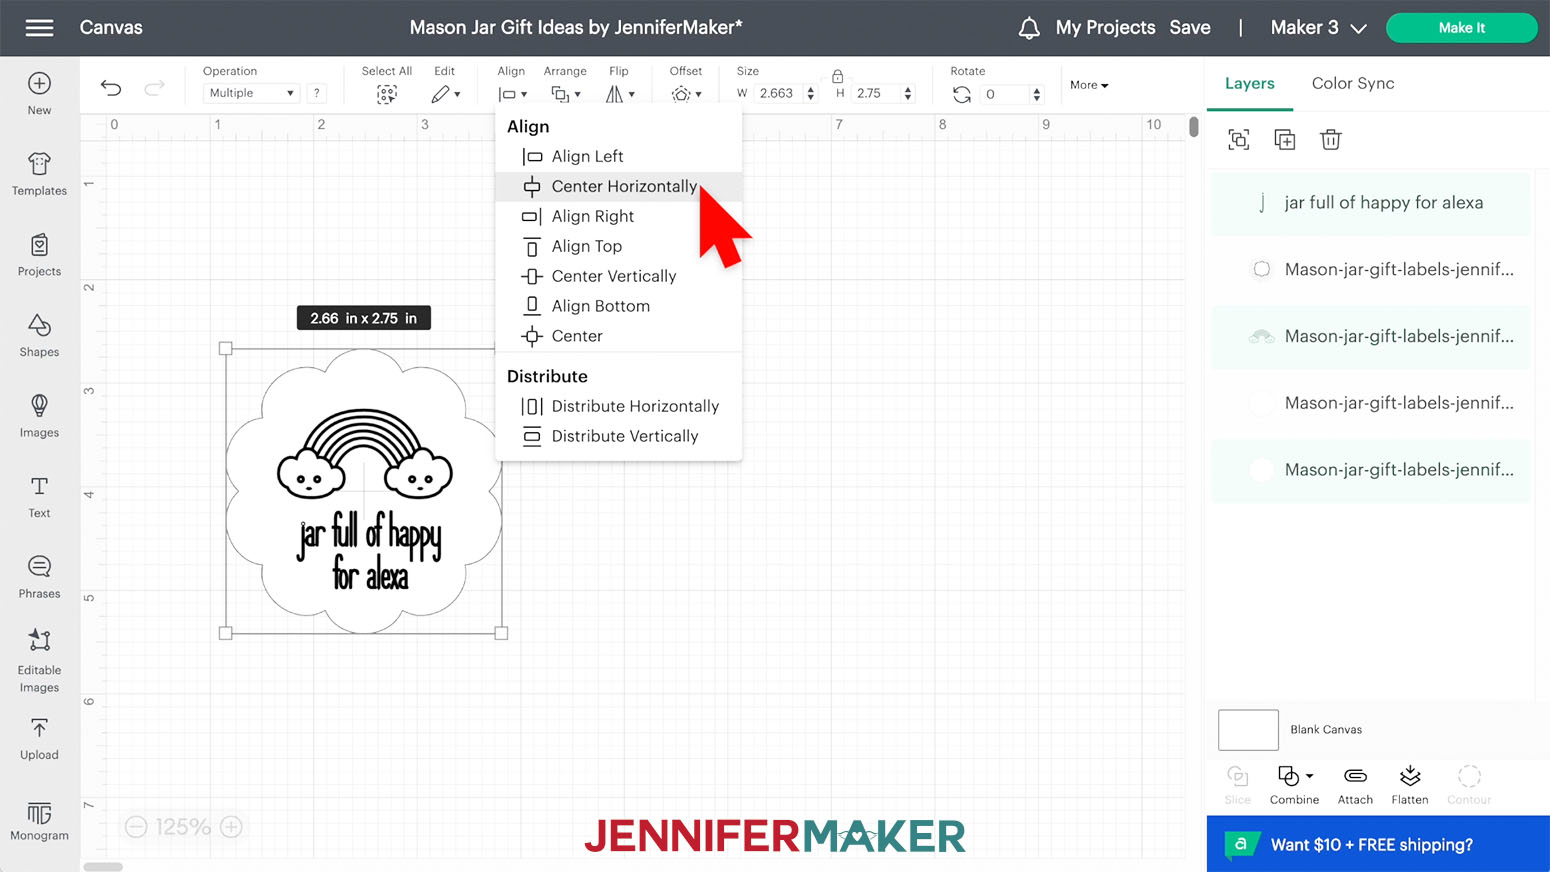
With those still selected, click “Attach” below the Layers Panel so they will be cut and drawn together.
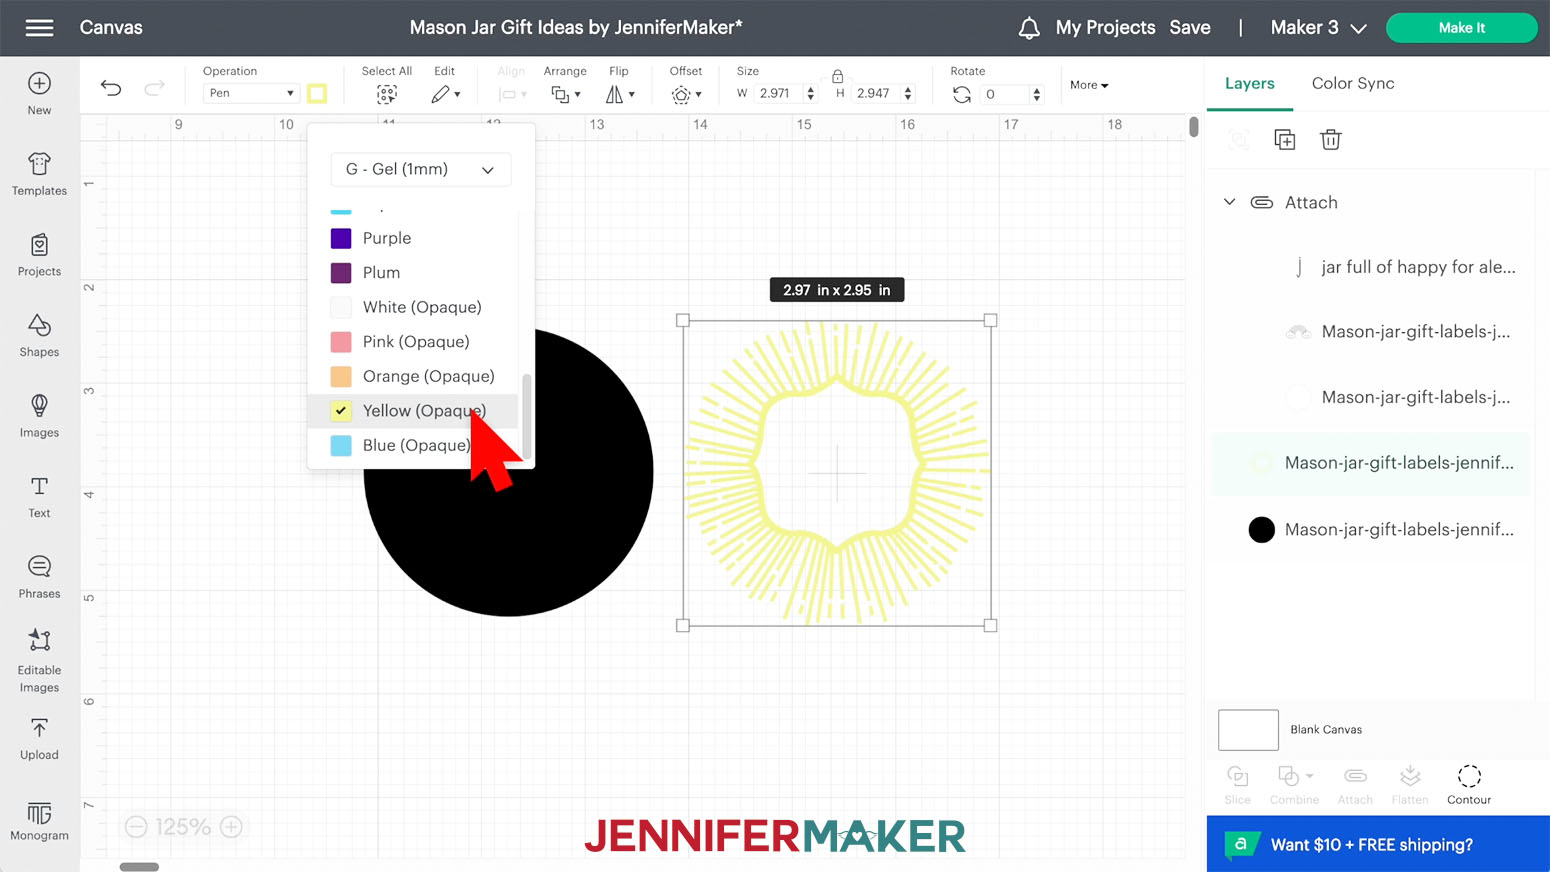
For the good vibes label, you will need the circle shape and starburst design.
I’m going to make this a black label, so I'll select the circle shape and change it in the Color Box.
Select the starburst layer in the Layers Panel, then change the Operation to “Pen,” and change the color box to "G-Gel (1 mm)" and "Yellow (Opaque)"
To add personalization, click on "Text" and then click on the "Font" menu. I'm going to use my own typeface called JM Penwriting, which you can find in my resource library, look for Design #437. At the top of the Font menu click "System" and search for "JM." Select JM Penwriting.
Double click the word "Text" and add your personalization. I’ll type “good vibes” then hit Enter to move to the next line and then add “for alexa”.
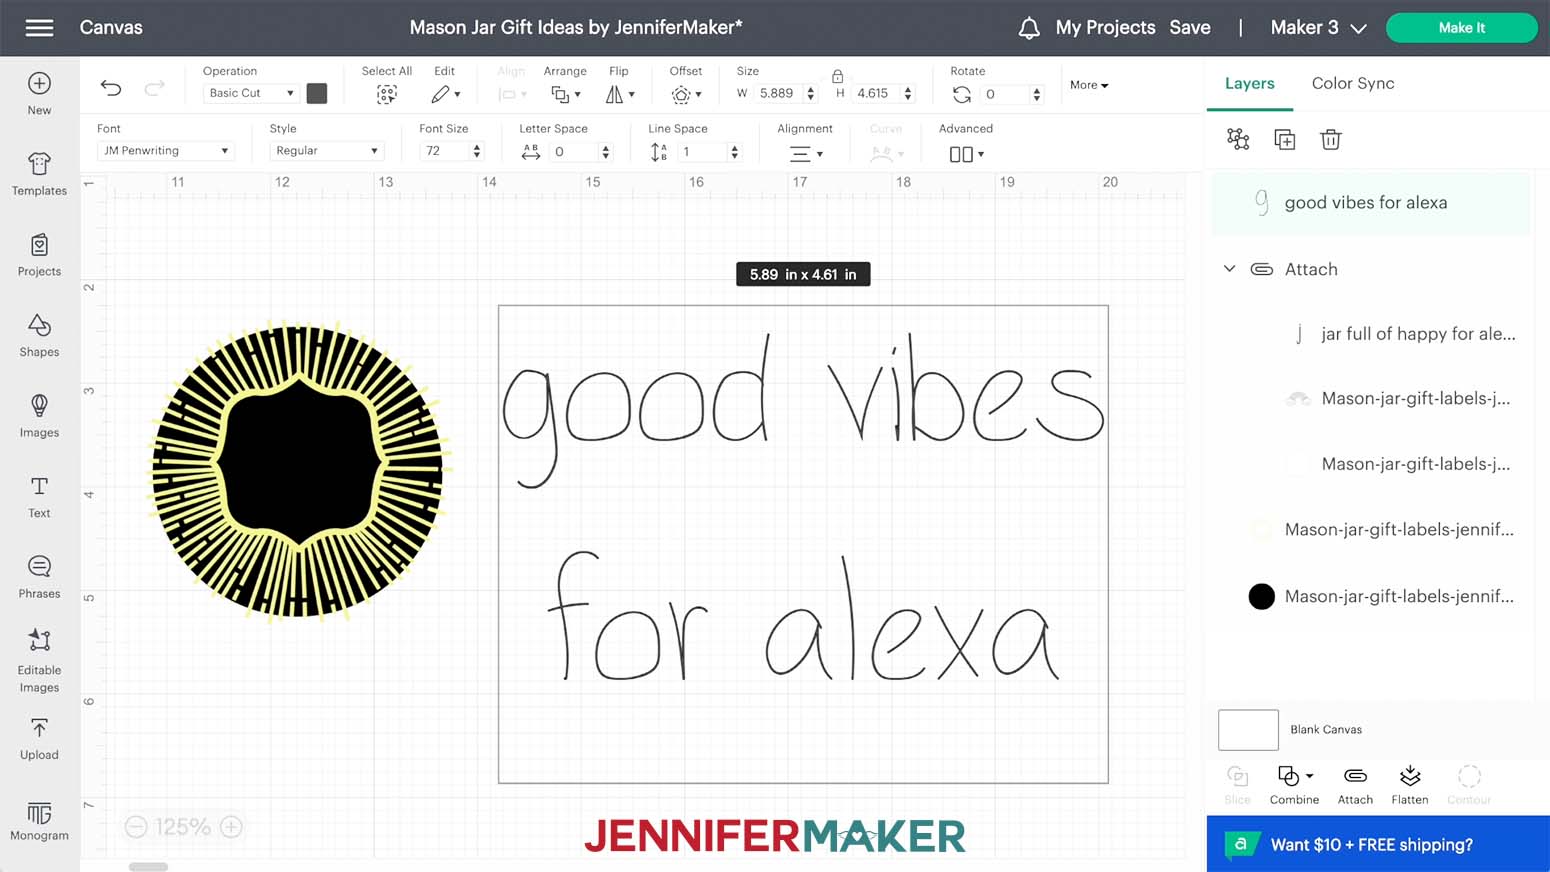
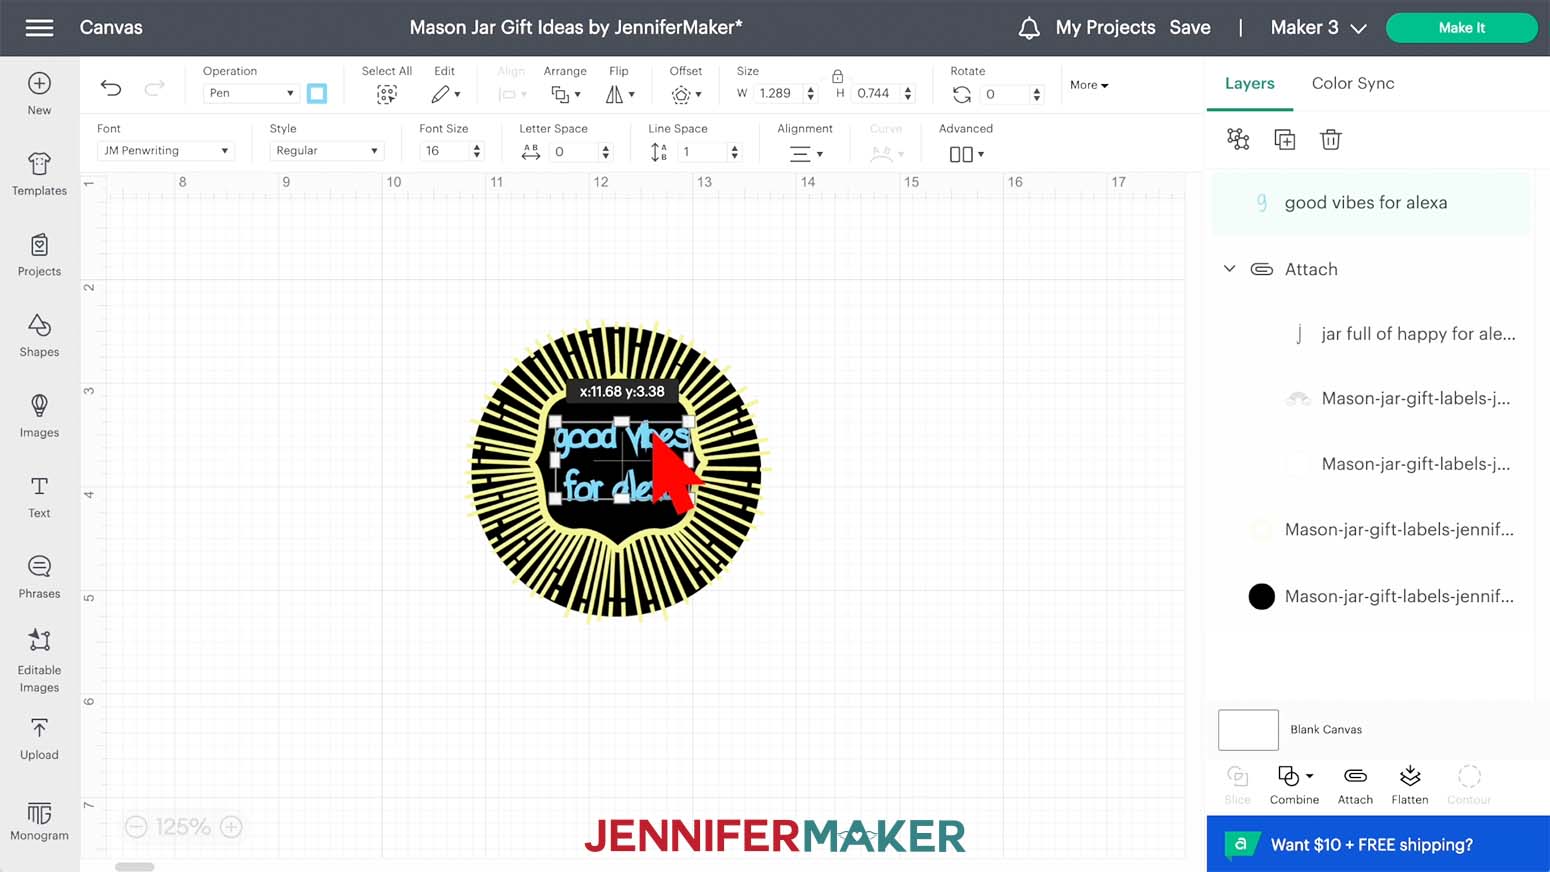
I want to write this in white pen but that's hard to see on the Canvas, so drag the text over the black circle for better contrast.
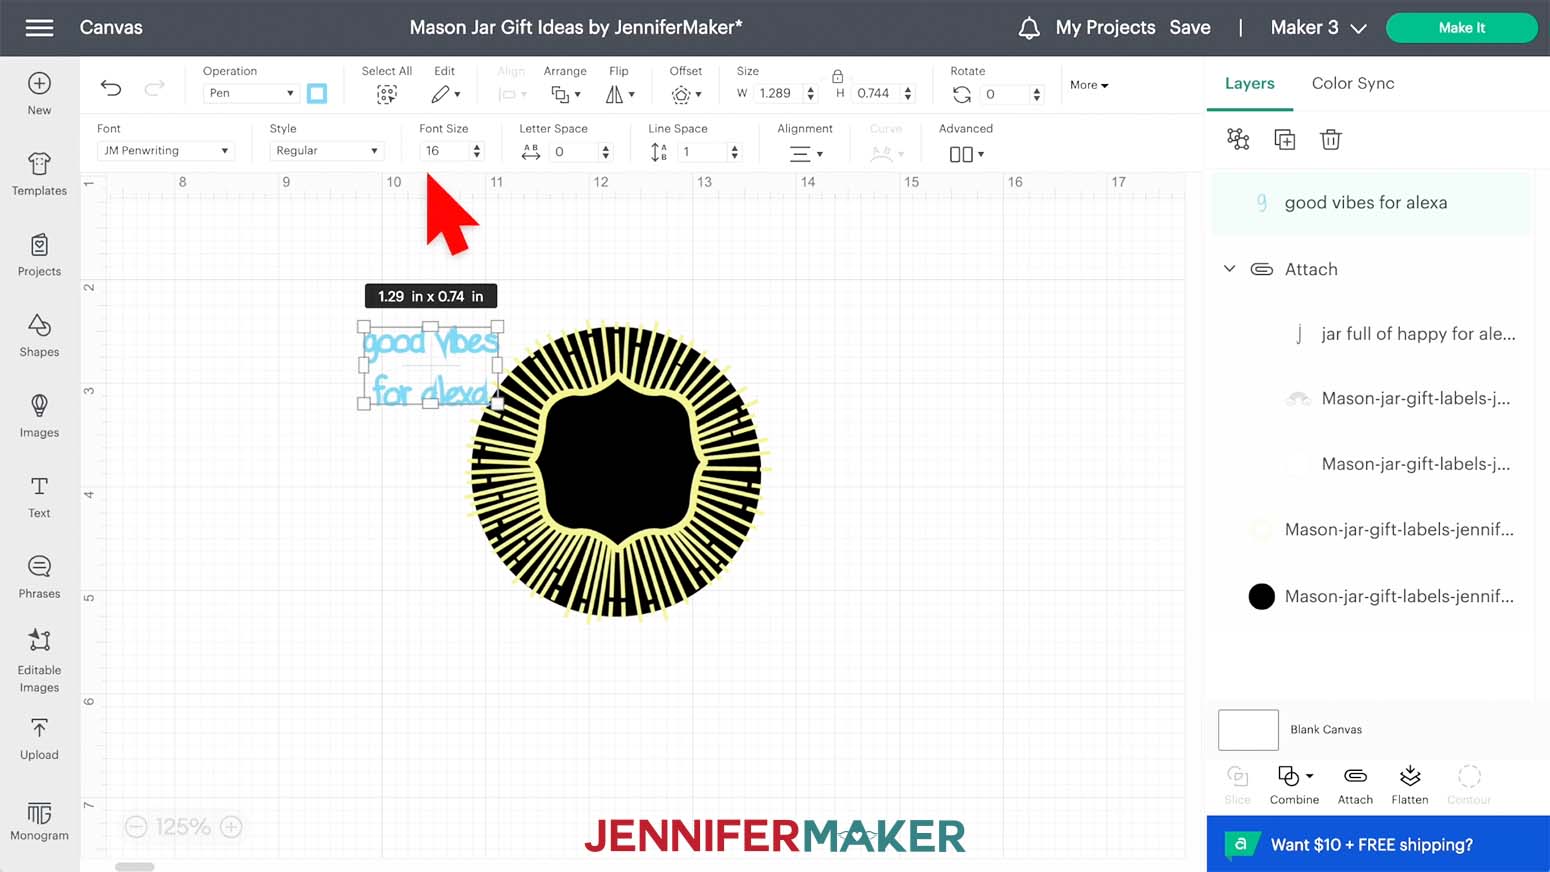
In the operation menu, change "Basic Cut" to "Pen" so you can see what the message will look like. Then click on the box next to the "Operation" menu to change the pen to "G-Gel (1 mm)" and "Blue (Opaque)".
To change the size of the text, make sure that it is selected and using the "Font Size" menu, change the size. I found that 16 worked well. Click on "Line Space" and type "1" to change the space between the lines of text if needed.
Hold Shift and select both the starburst, text, and circle shape layers in the Layers Panel. Use the "Align" menu to select "Align Center".
Click “Attach” to keep everything together during drawing and cutting.
STEP 3: CREATE THE LABELS
Make sure the correct machine is selected in the upper right of Design Space and then click "Make It."
Click "On Mat" if prompted.
Make sure your labels look correct on the Prepare screen, then click Continue.
I will use the White Permanent Cricut Writable Smart Label for my jar full of happy, which is my first mat.
Set the Base Material to "Smart Label Writeable Vinyl" and pressure to "Default."
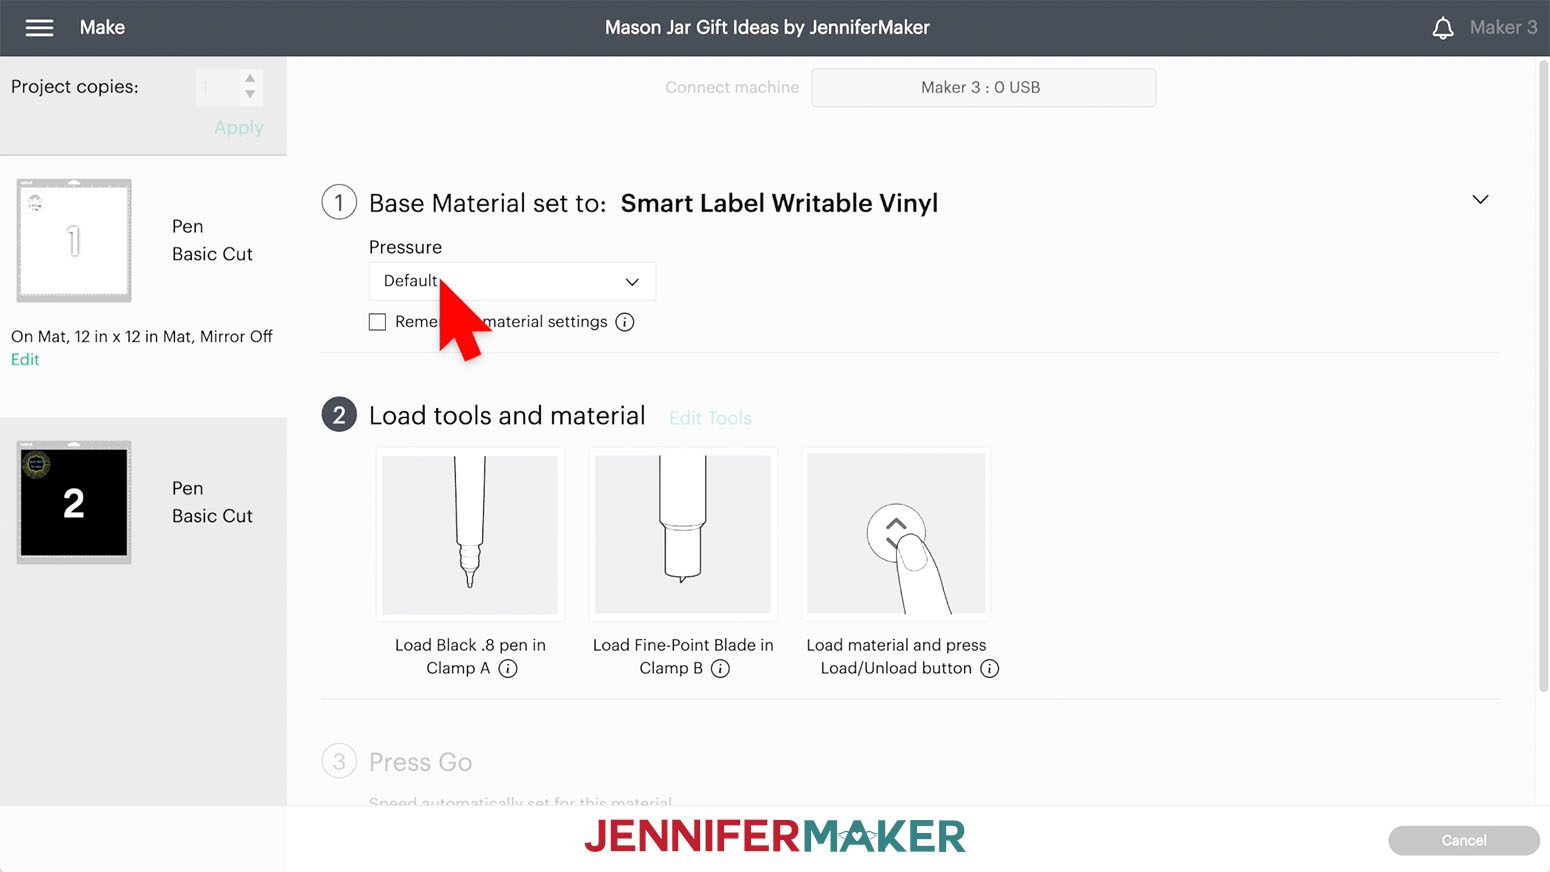
Before loading your black glitter pen, scribble on a scrap piece of paper or vinyl to get the ink flowing.
TIP: I stuck a small piece of removable vinyl on my Cricut to remind me to test pens!
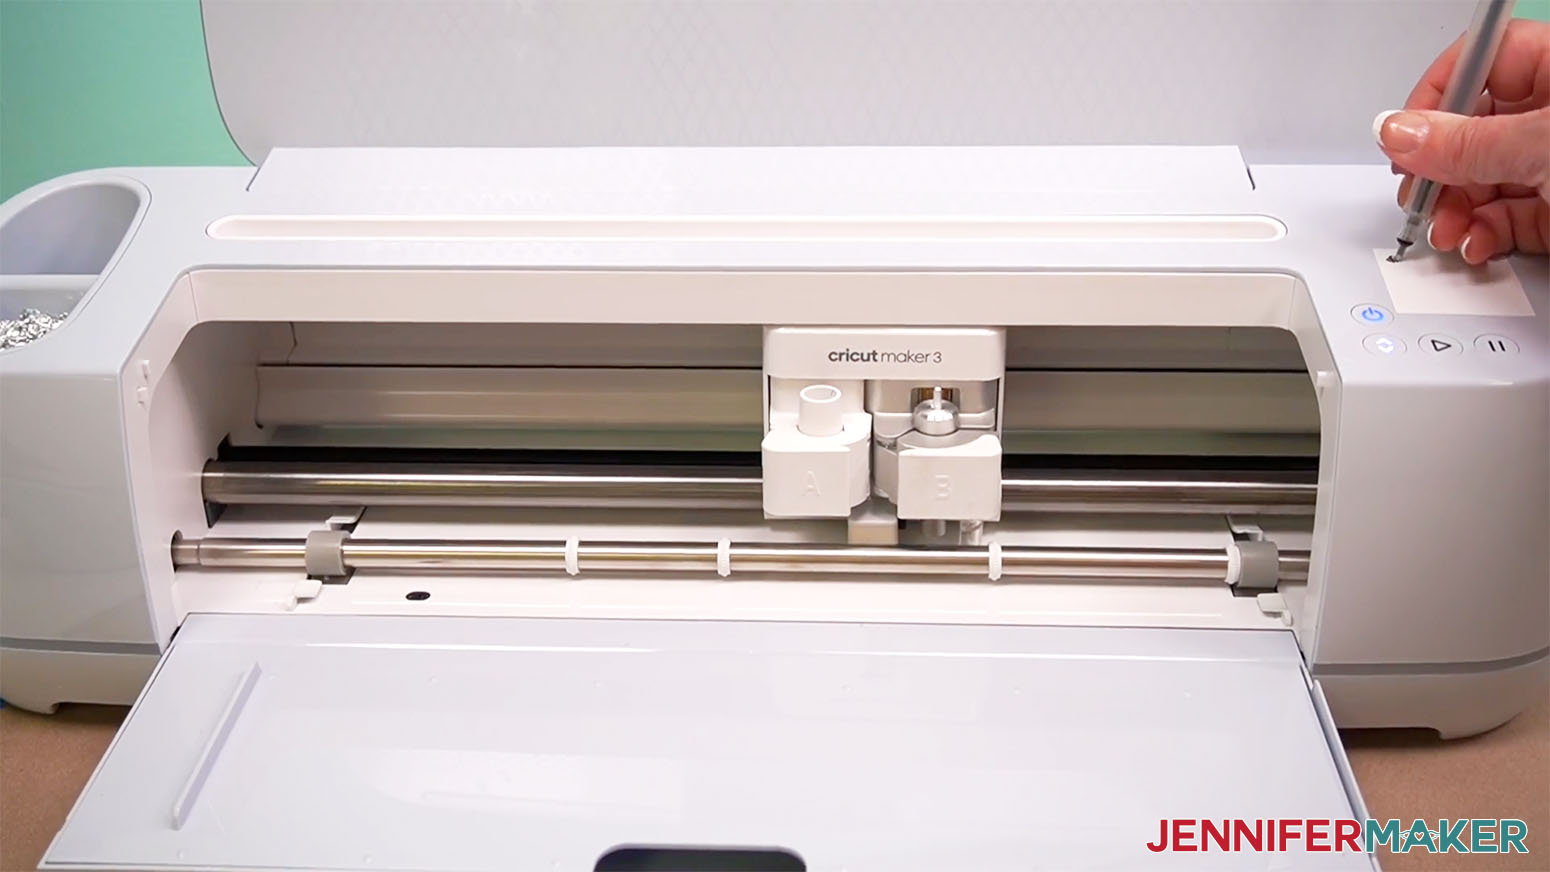
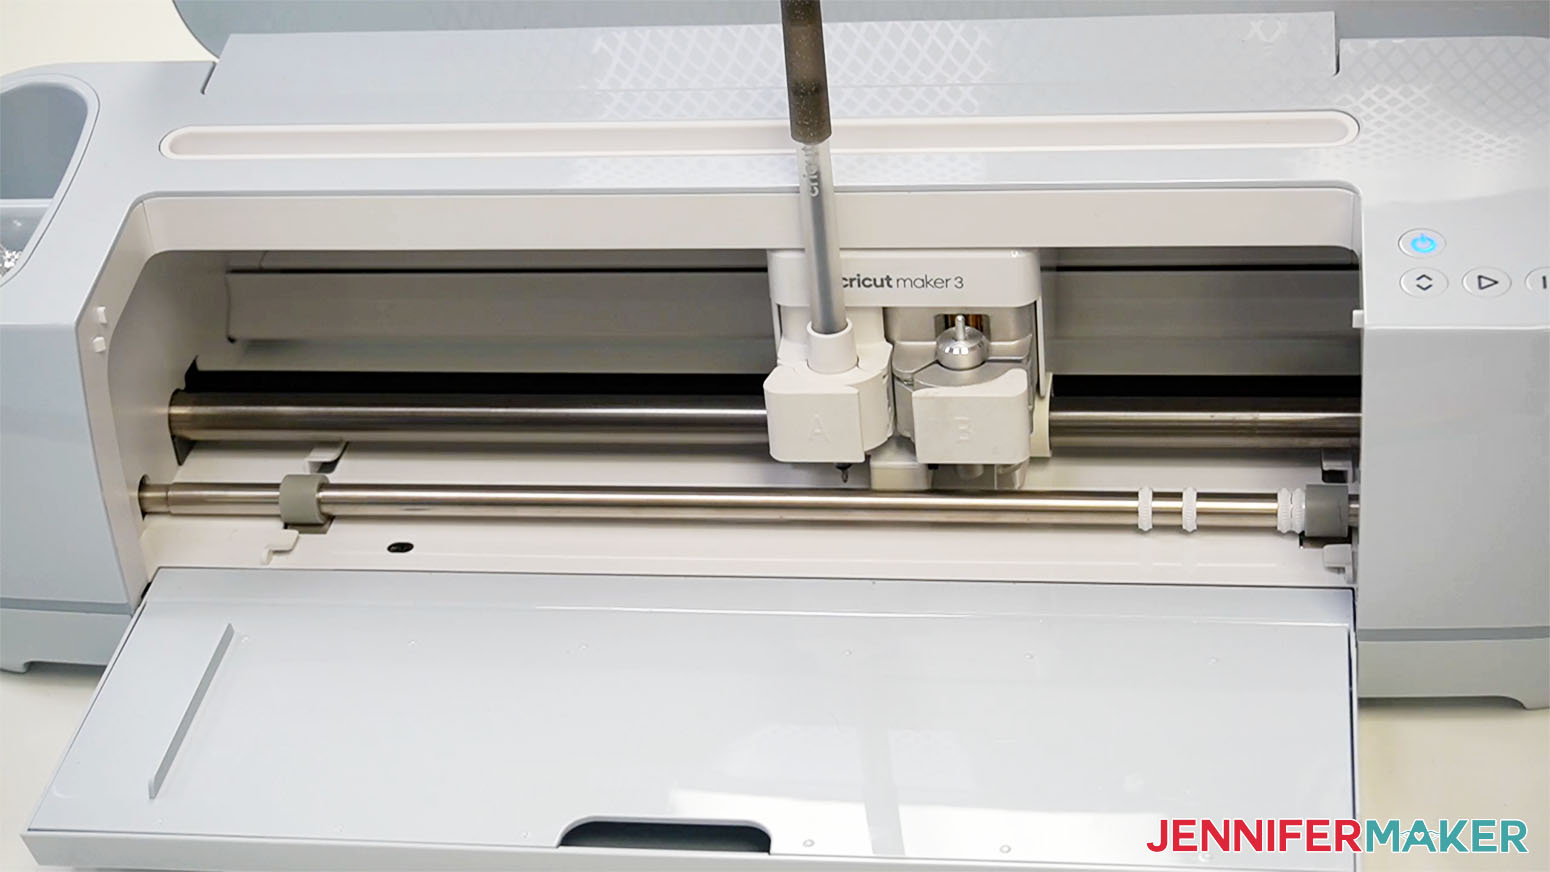
If you’re using a Maker 3 like me, place the pen in clamp A and put the cap on the top to avoid losing it.

Make sure your fine-point blade is clean and in clamp B.
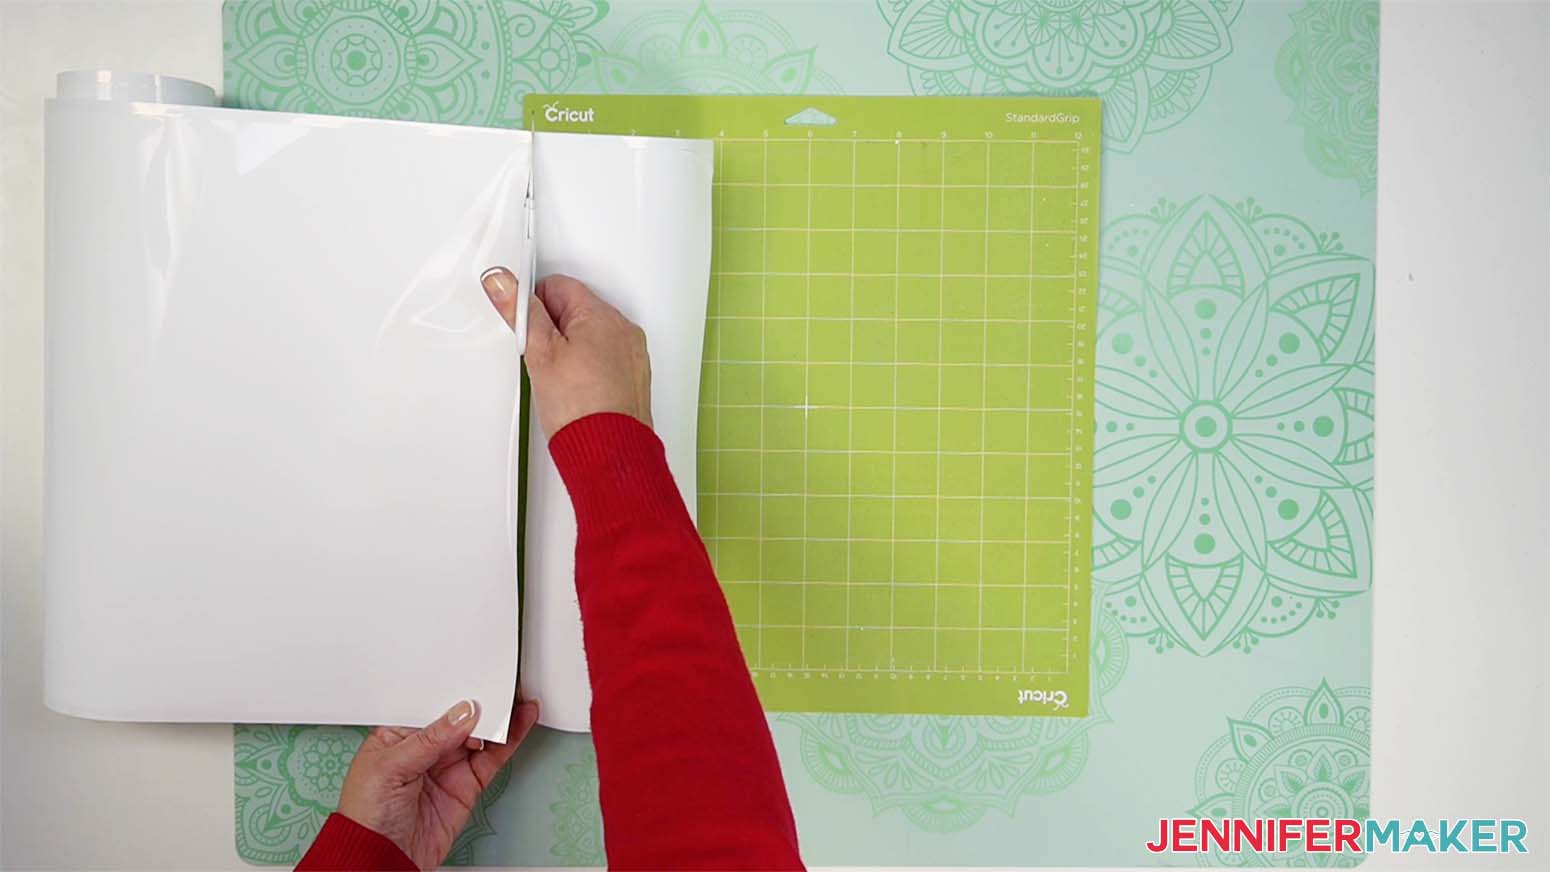
Even though it doesn't require a mat, I had the best results by cutting a piece of Cricut Writeable Smart Vinyl near the size of my label instead of using the whole piece. Cut your material to size and place it face up on a Green StandardGrip machine mat, checking that it will cover the design area shown on the screen. Use your brayer to adhere it well.
The pens can take a bit to dry, so we need to plan ahead to avoid smudges. To keep the star wheels from smearing your lines, move them to the right so they don’t run over the wet ink.
Load your mat and click the Go button.
The Cricut will draw your designs first, then cut the label’s shape. If you’re using two pens like my second label, the Cricut will tell you which one you should load first, run that section, then pause and prompt you to swap in the next color.
When the cut is complete, turn the mat over and roll the vinyl off the mat without touching the ink.
Set the label aside so the ink can dry fully before you work with it.
Place your black material on the mat, change your pen, and create the second design.
Keep in mind, the Cricut treats pen lines as simple lines, so the ink won’t blend together to fill in spaces. This is more noticeable on the black label, but it’s still really pretty! If you’d prefer a smoother look, you can use the same color pen to fill in the shapes a bit by hand.
You can also fill in the rainbow’s arches by hand!
STEP 4: ASSEMBLE YOUR MASON JAR GIFTS
Once the labels are totally dry, you can work with them like stickers since they're simple shapes. The inks are water-soluble, so they could still smear if you get water on them, so be careful!
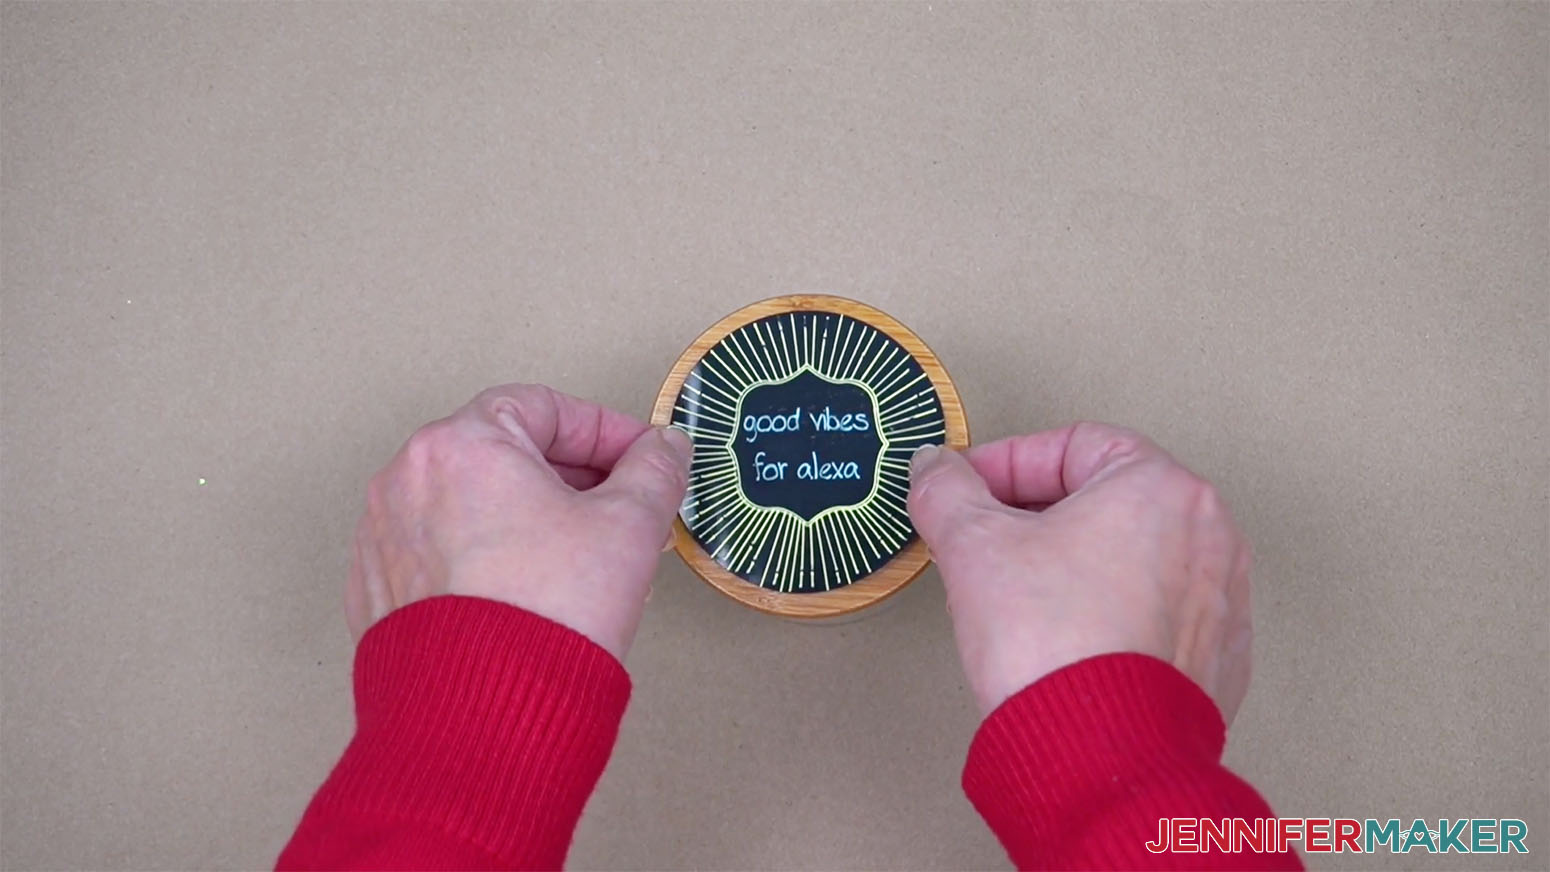
To apply a label on a lid, hold the label taut on both sides and place it on top. To put one on the jar, lay the item on its side before placing the label. If you are using removable vinyl, and don’t like the placement, gently peel it off and try again.
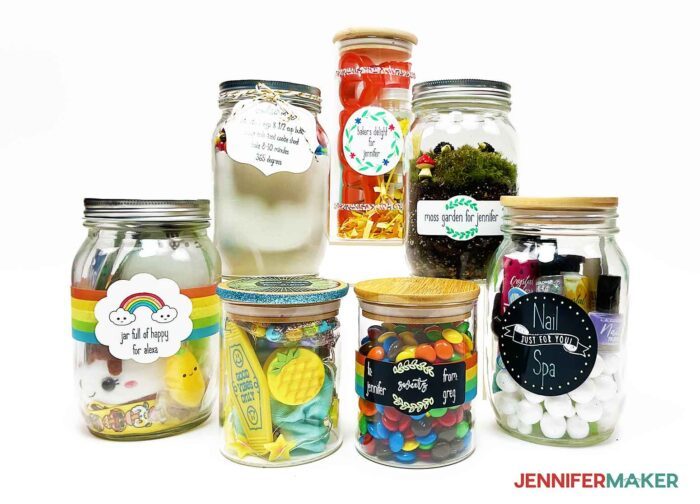
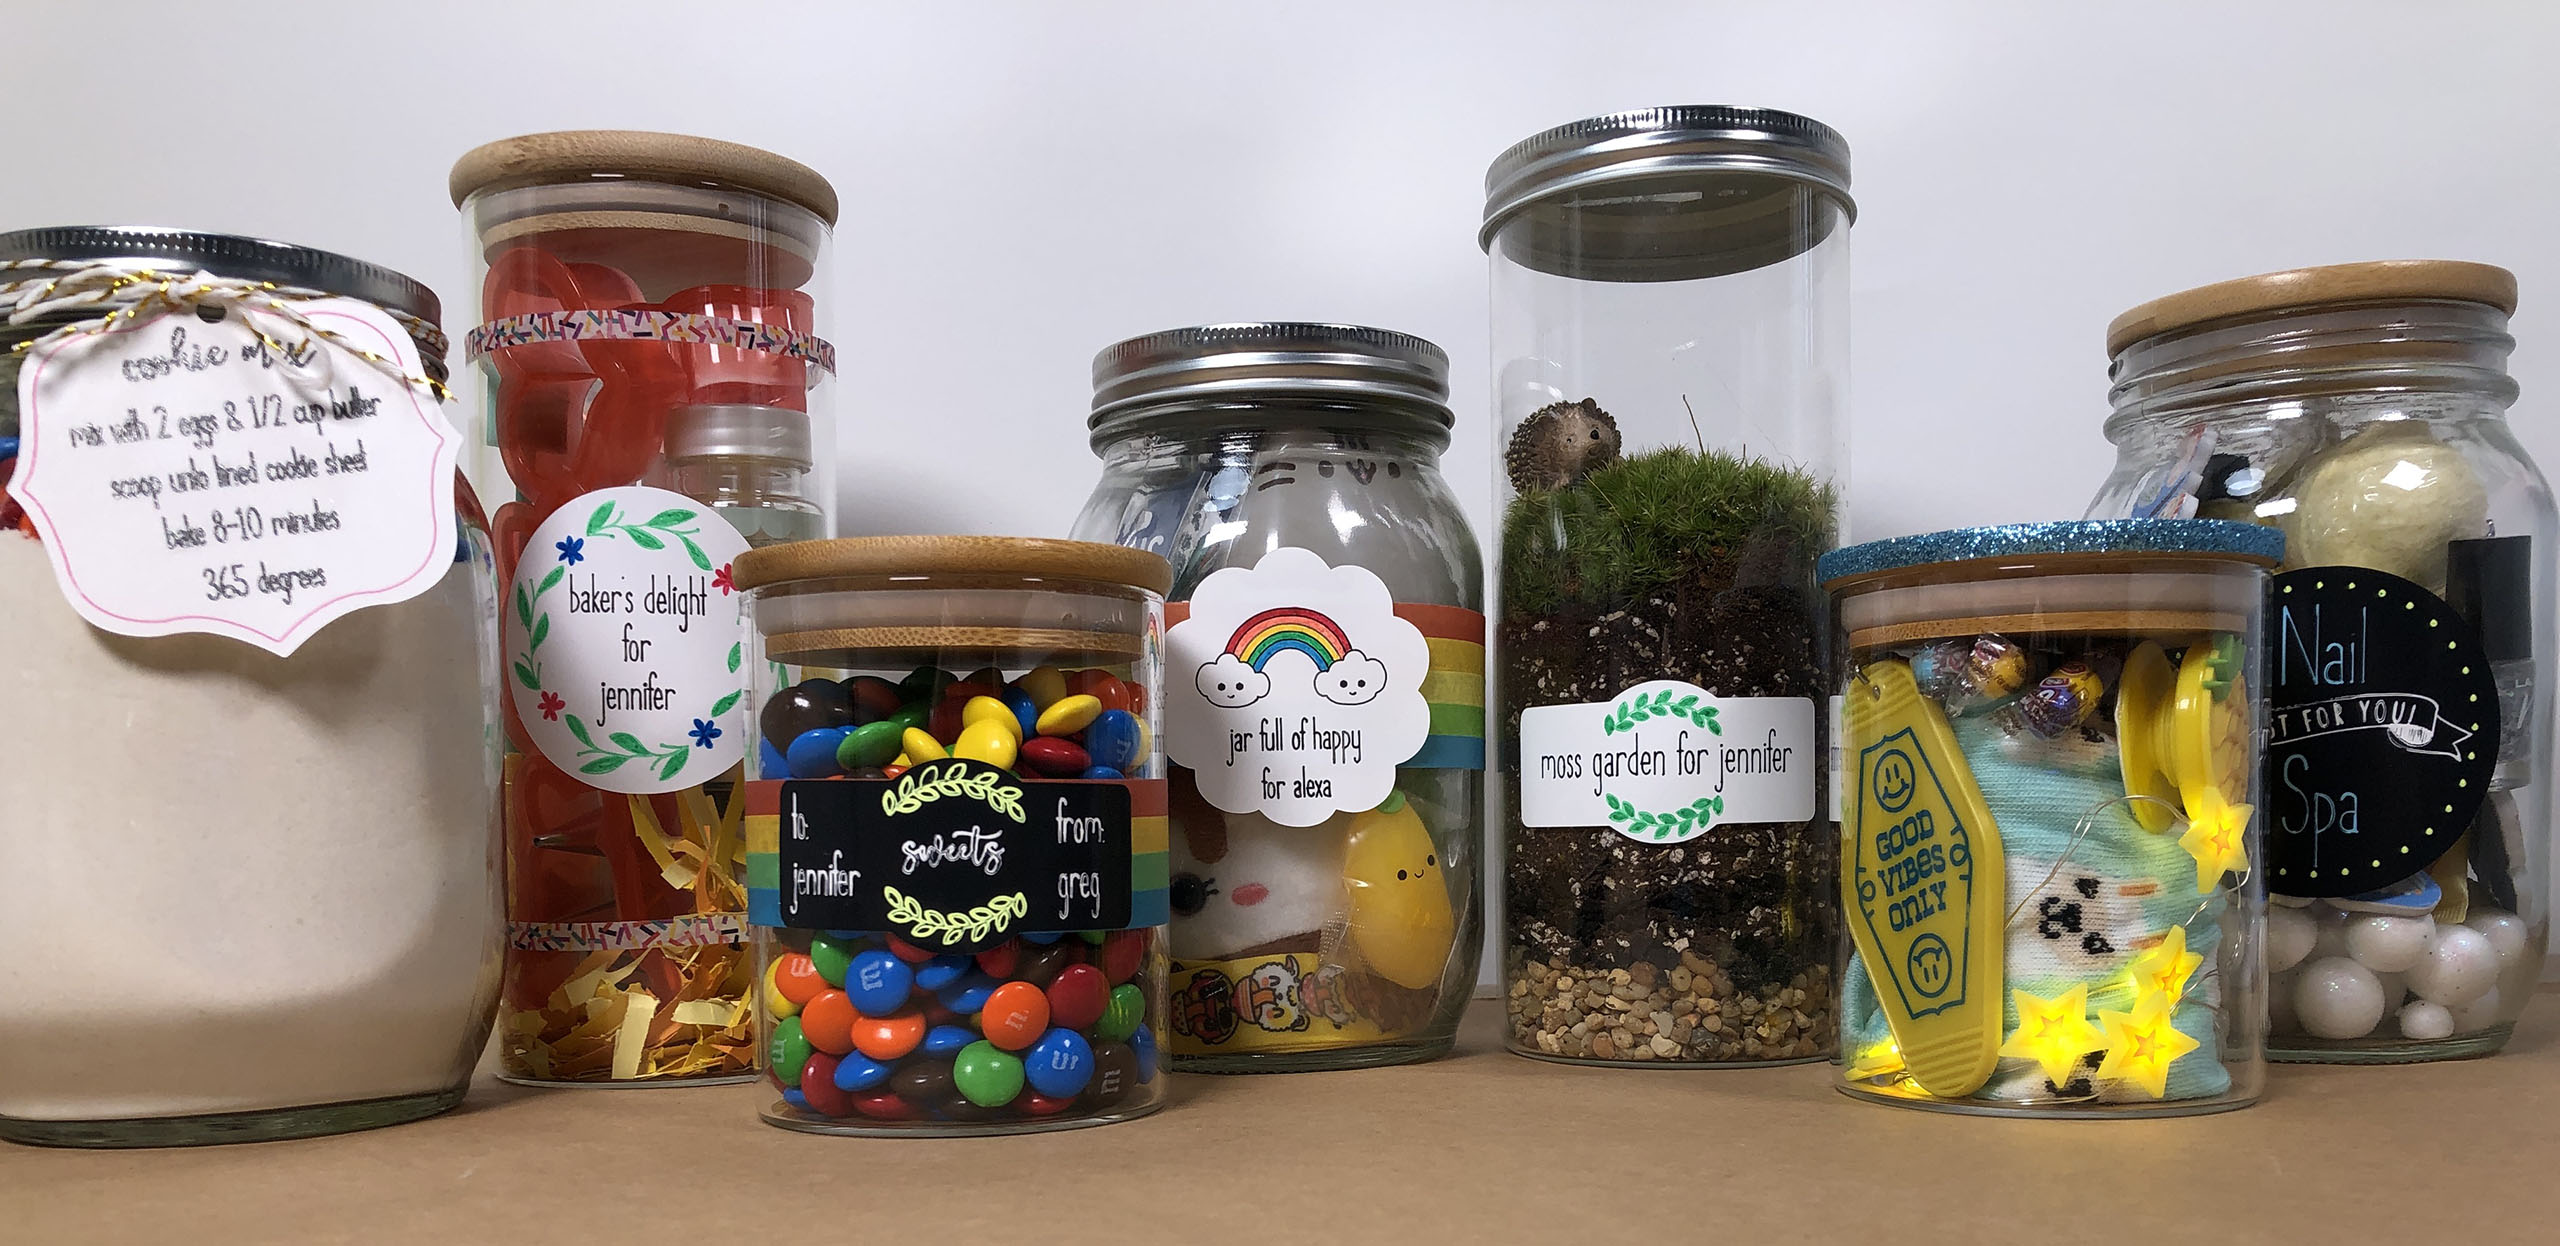
There are so many ways to make a cute mason jar gift. I will give you a couple of "recipes" to start with, but the possibilities are endless.
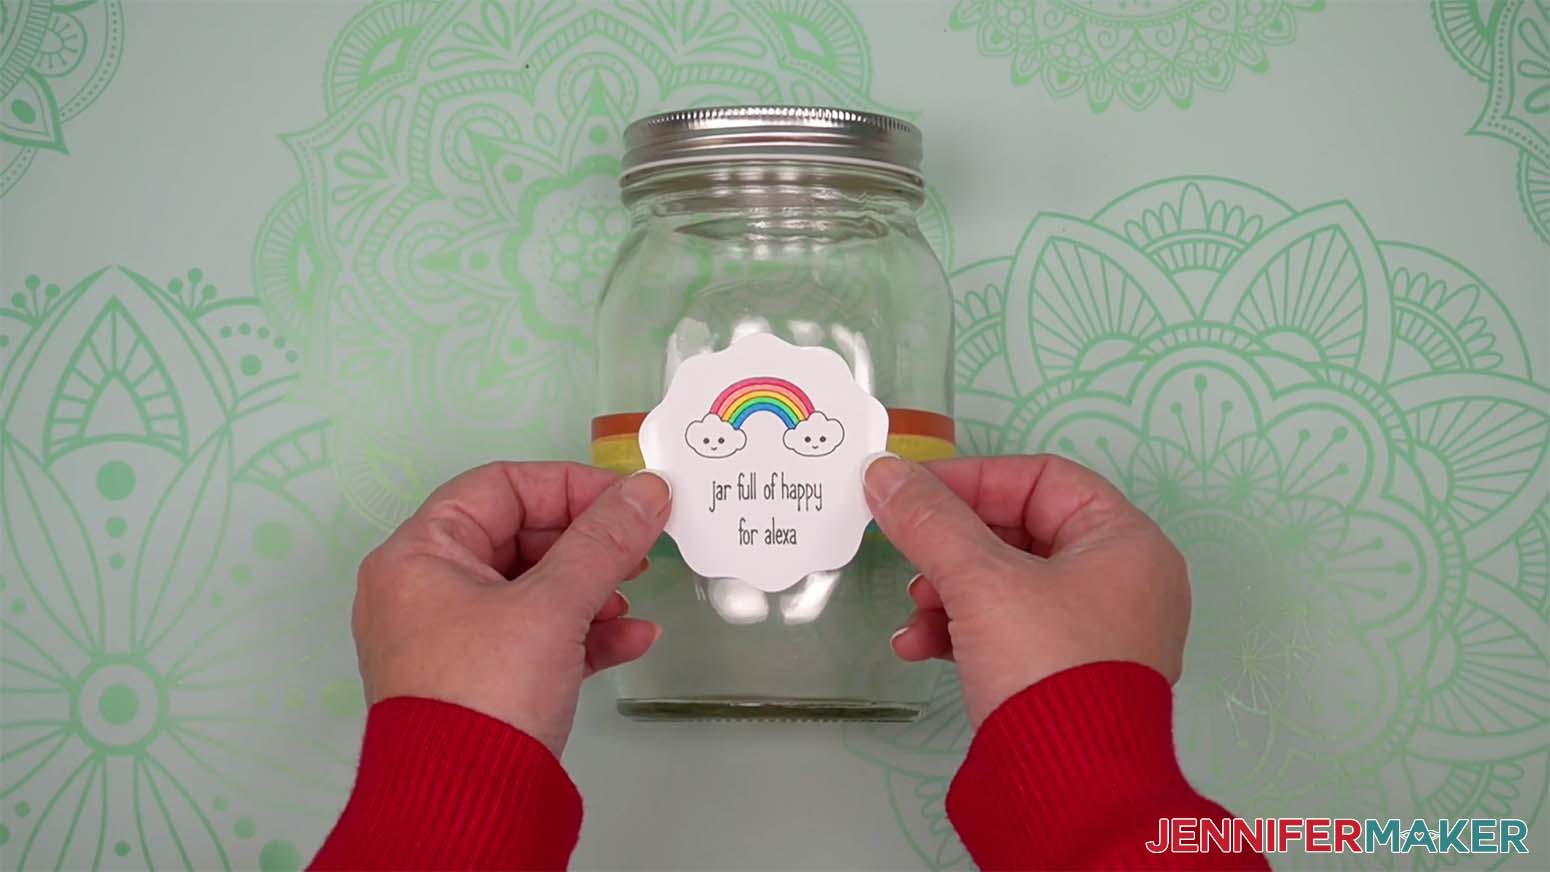
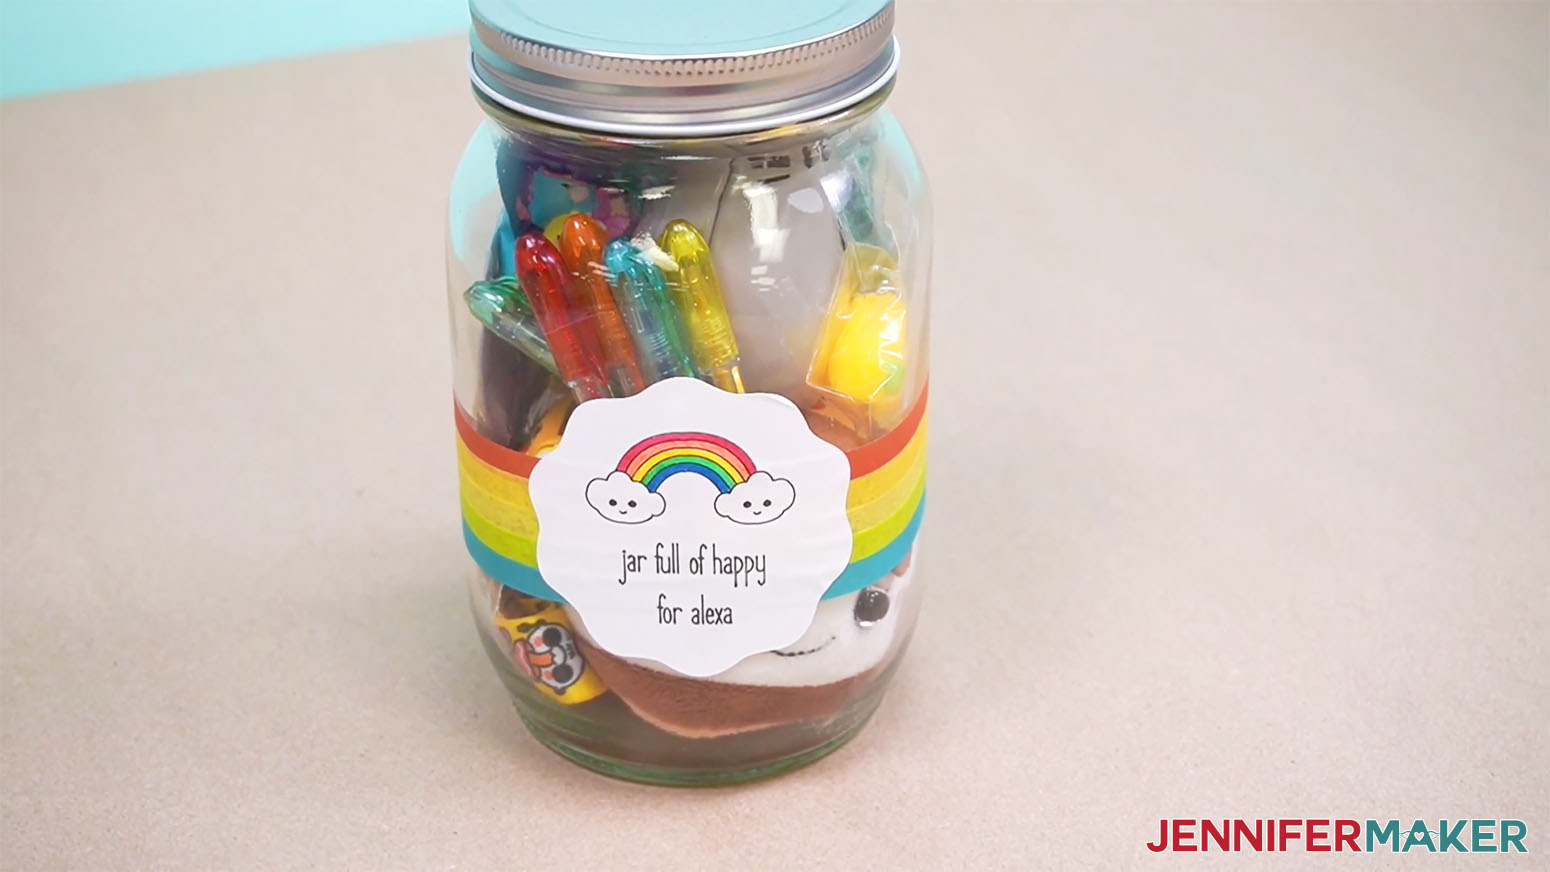
Jar Full of Happy
I found all of these cute Kawaii-themed items at Five Below.
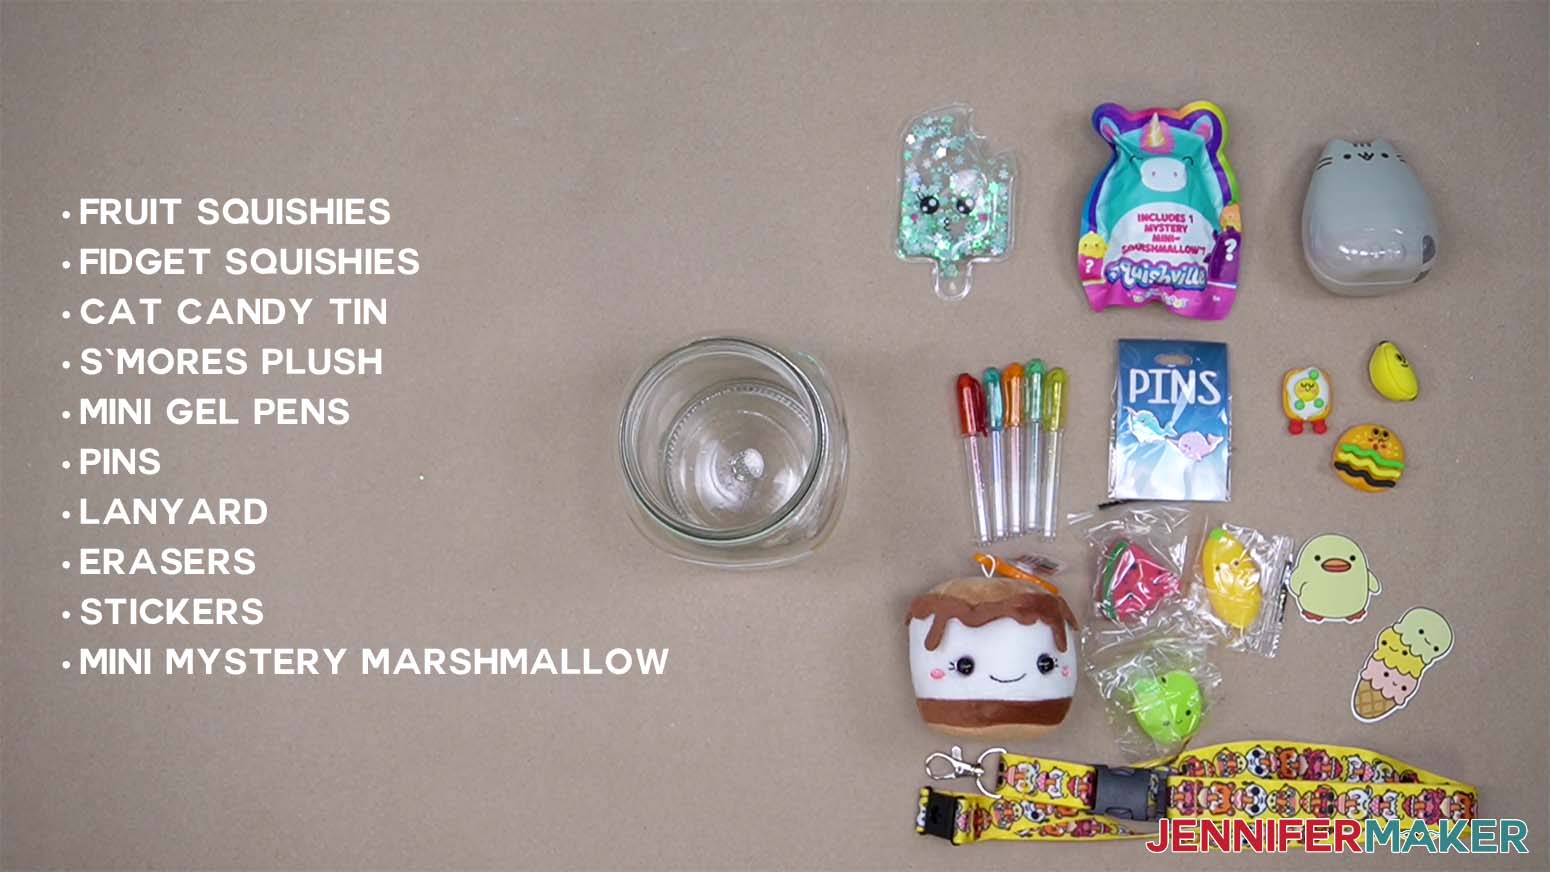
Recipe:
- Fruit Squishies
- Fidget Squishies
- Cat Candy Tin
- S'mores Plush
- Mini Gel Pens
- Pins
- Lanyard
- Erasers
- Stickers
- Mini Mystery Marshmallow
I wrapped my jar with rainbow washi tape and applied the permanent label on top of it.
To apply washi tape around the jar, first decide how far down from the lid you want the decorations to start. I chose 2.5".
Cut four pieces of scrap washi tape to that size. Place one piece of cut washi tape at the base of the lid and smooth it straight down the side. Do this on all four sides of the jar.
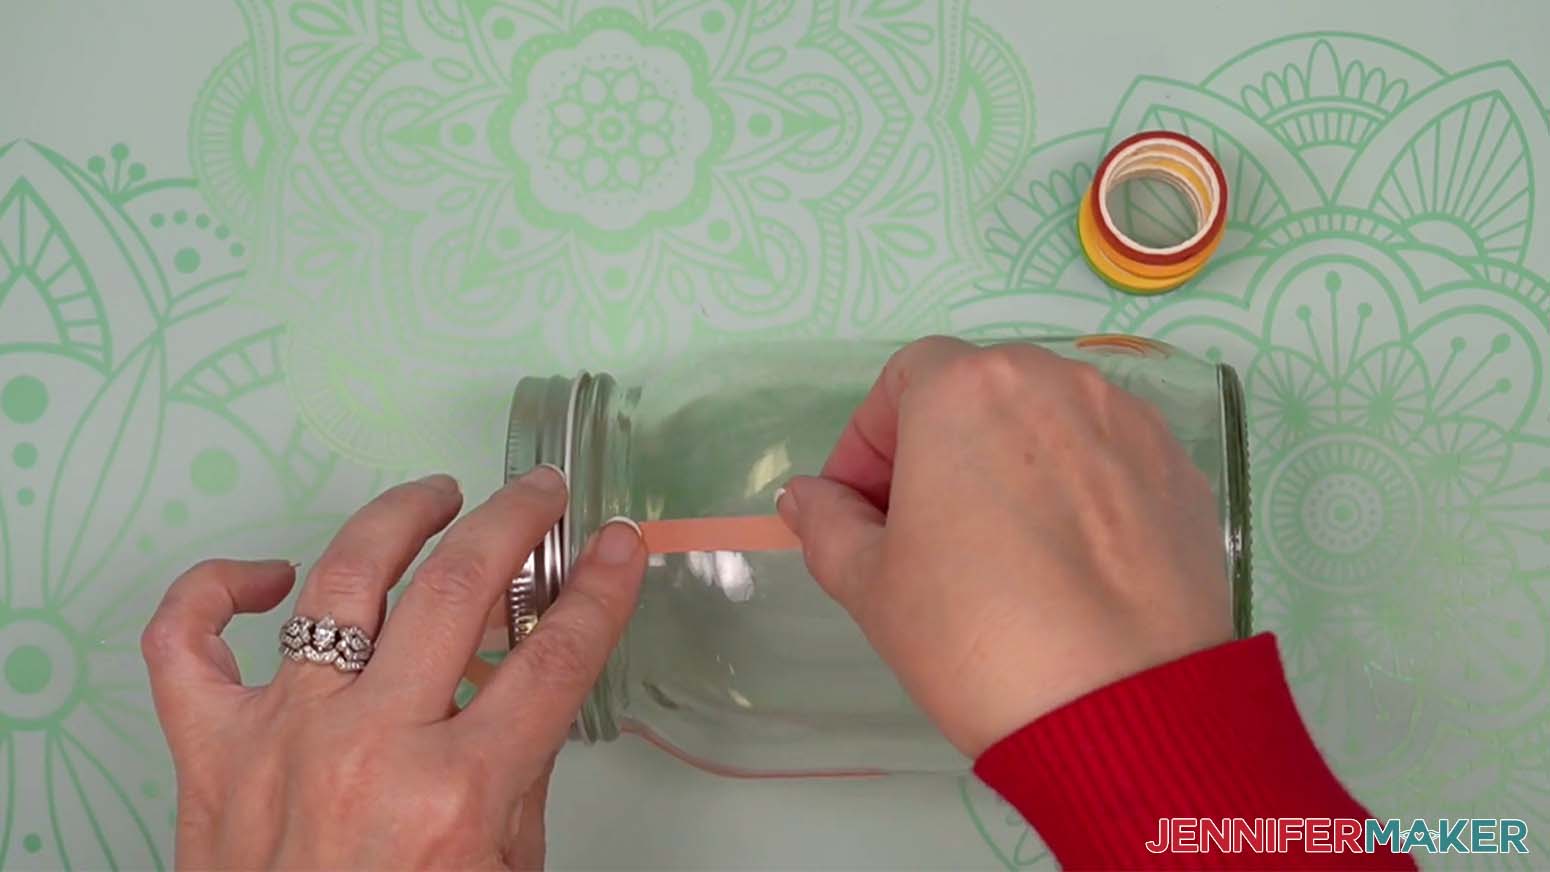
Next take the washi tape you want to put on the mason jar. Place the edge of the decorative tape up perpendicular to the the bottom of a vertical washi tape piece.
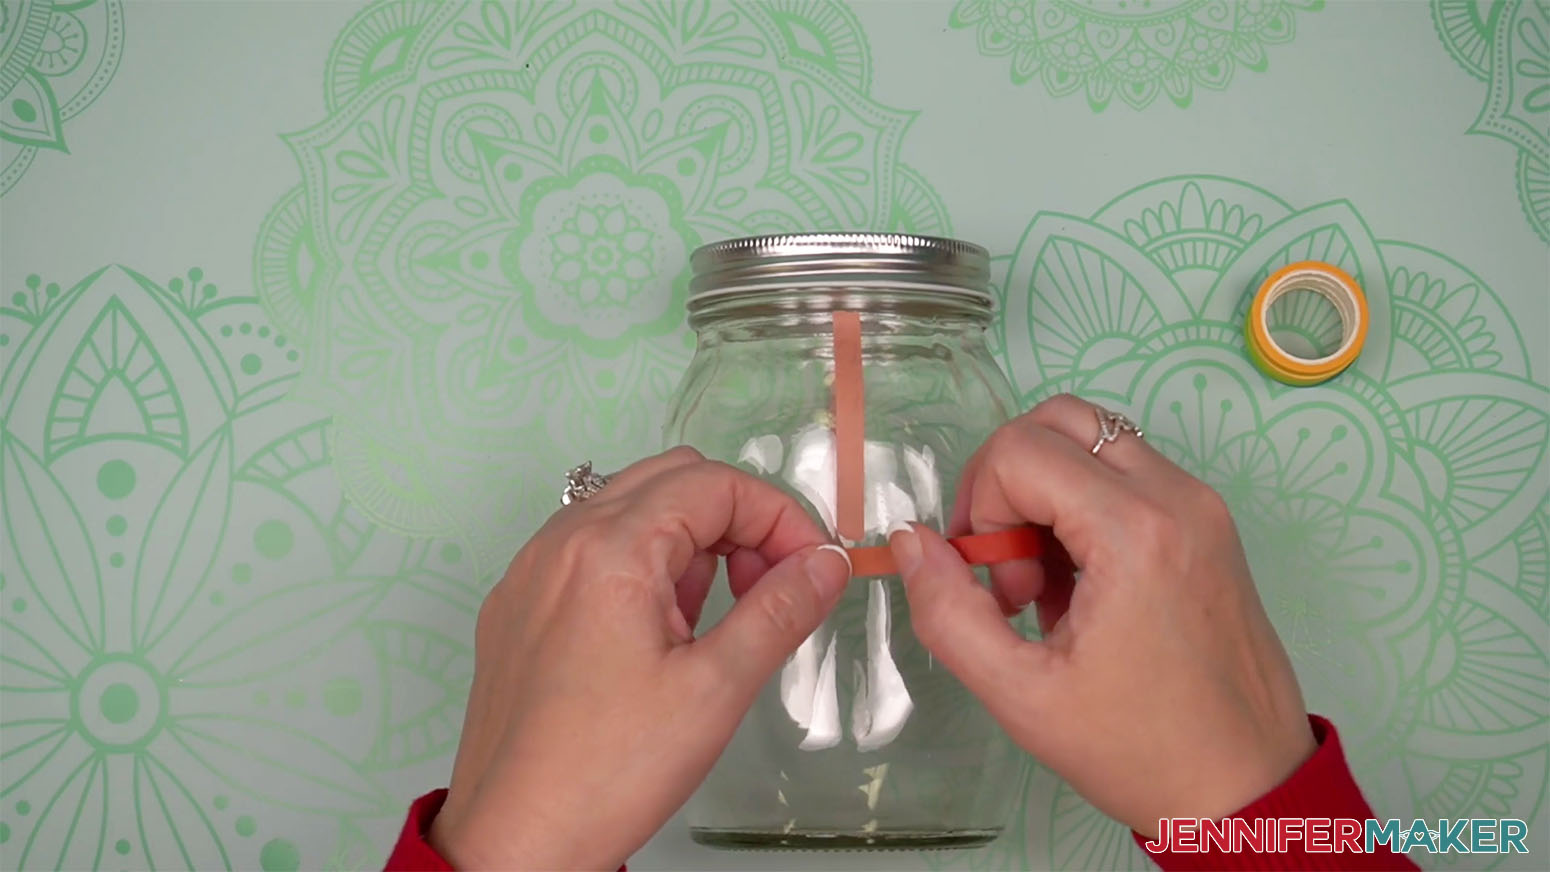
Smooth the tape around the jar, keeping it even but making the top edge touch the bottoms of the vertical alignment pieces.
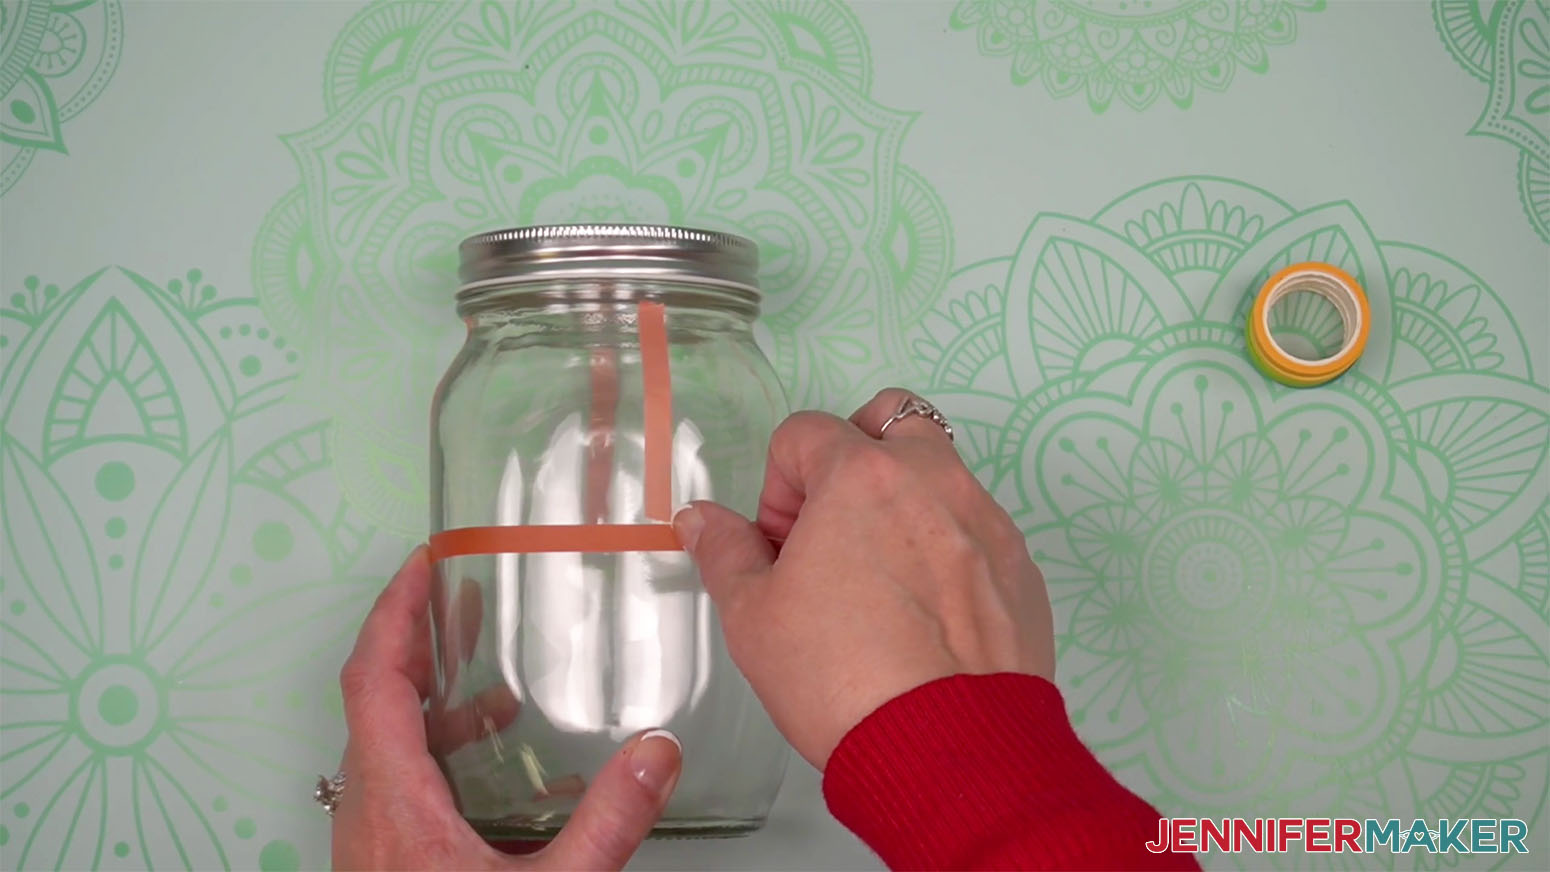
Add several more wraps if you like, keeping them straight by matching with the lower edge of the previous piece. Remove the alignment pieces afterward.
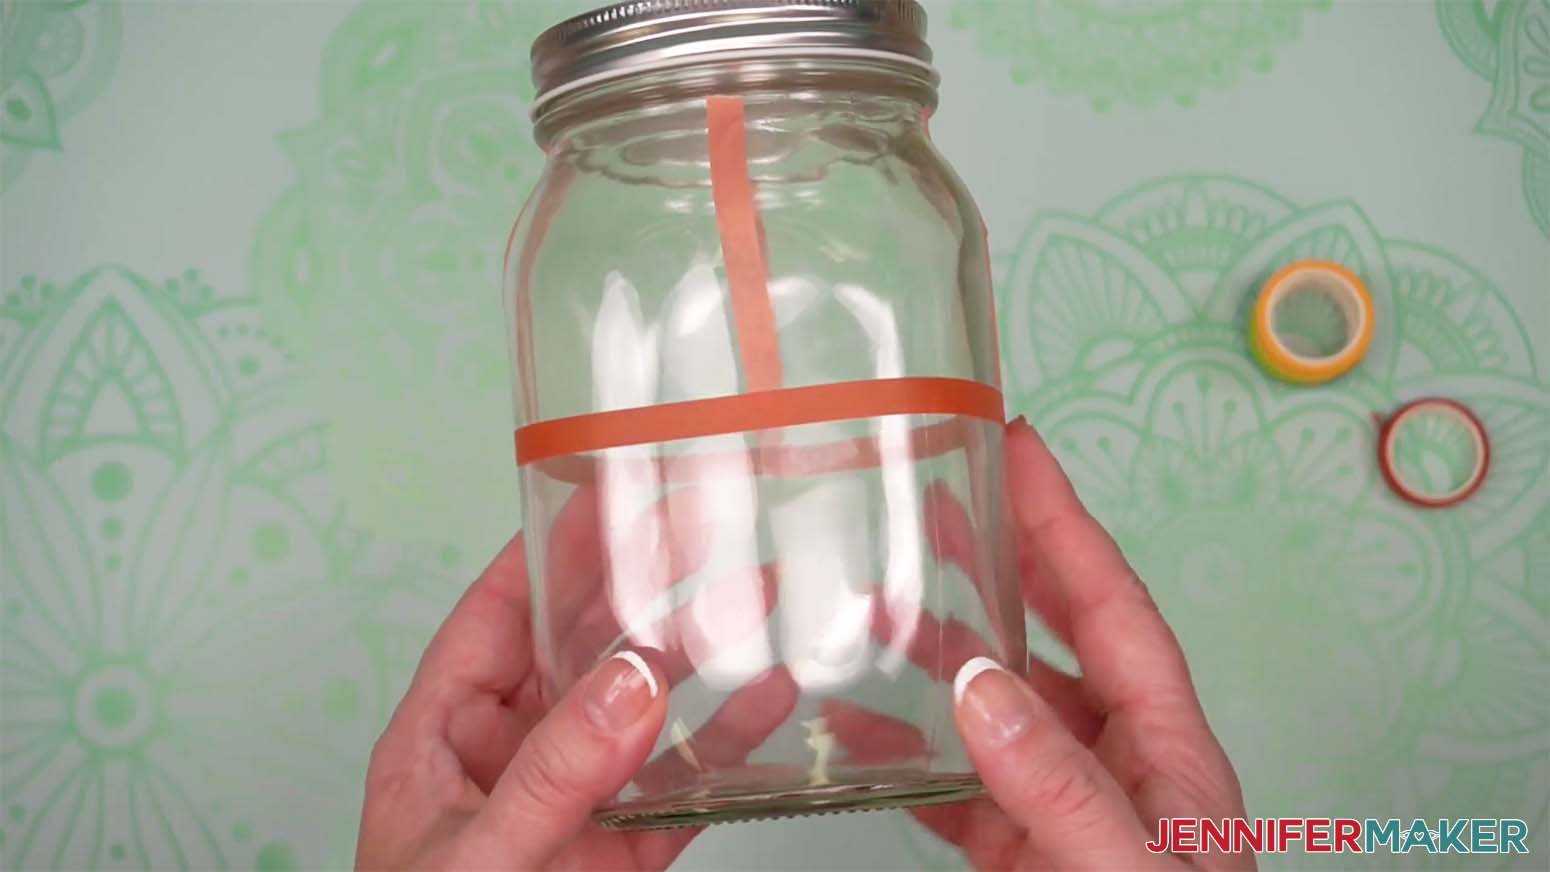
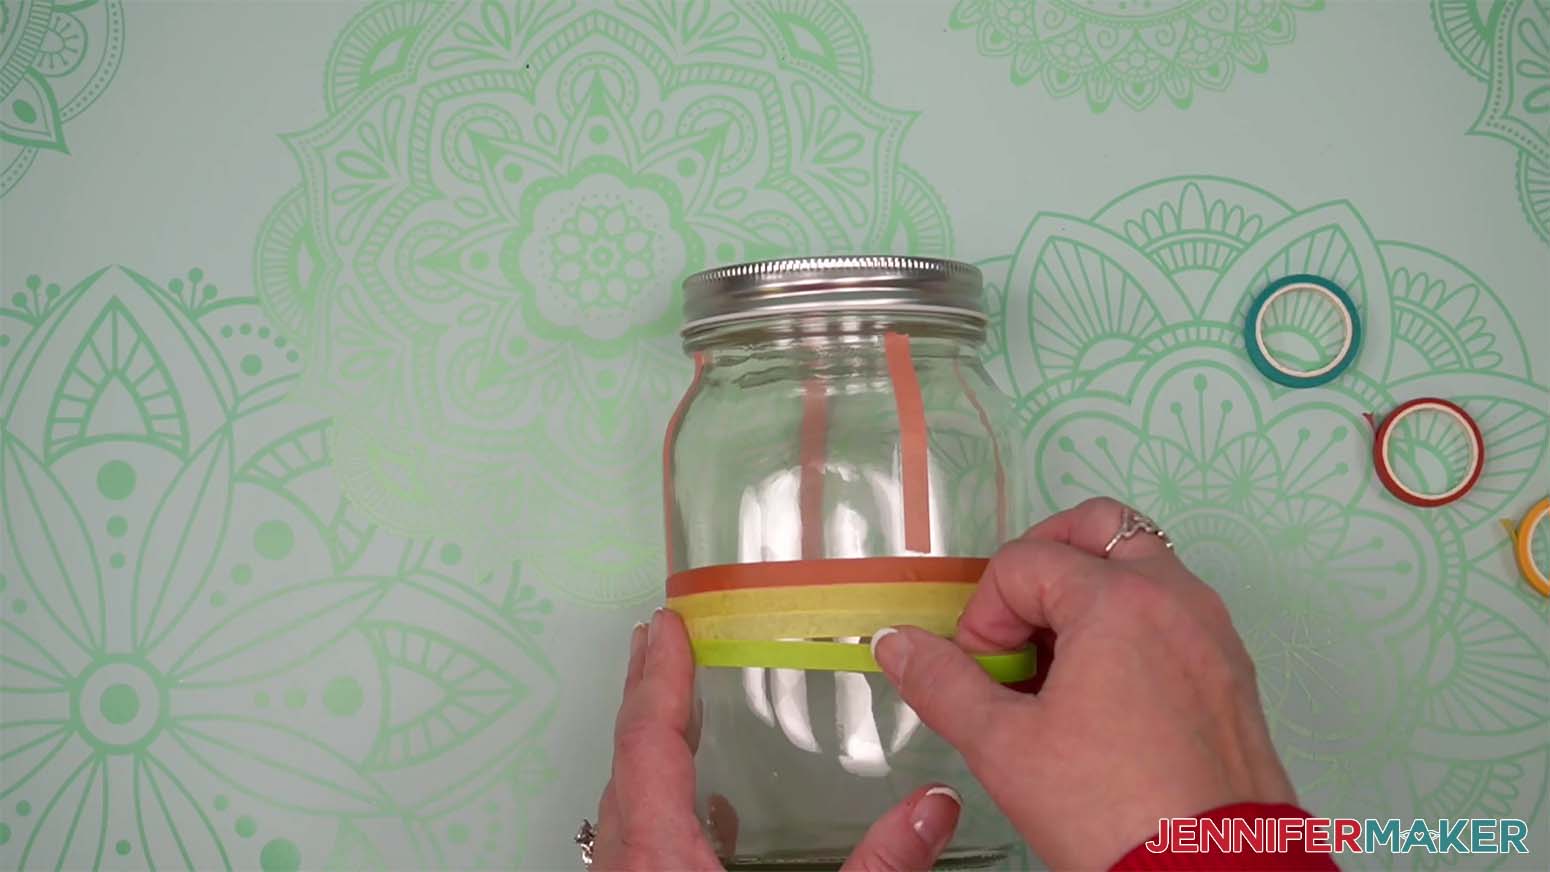
Add the label on top of the washi stripes. You might be able to cover the seams , but if not, put the seam in the back.
Place all the items in the jar. I started by putting the smores plush in first and then added everything else around that.
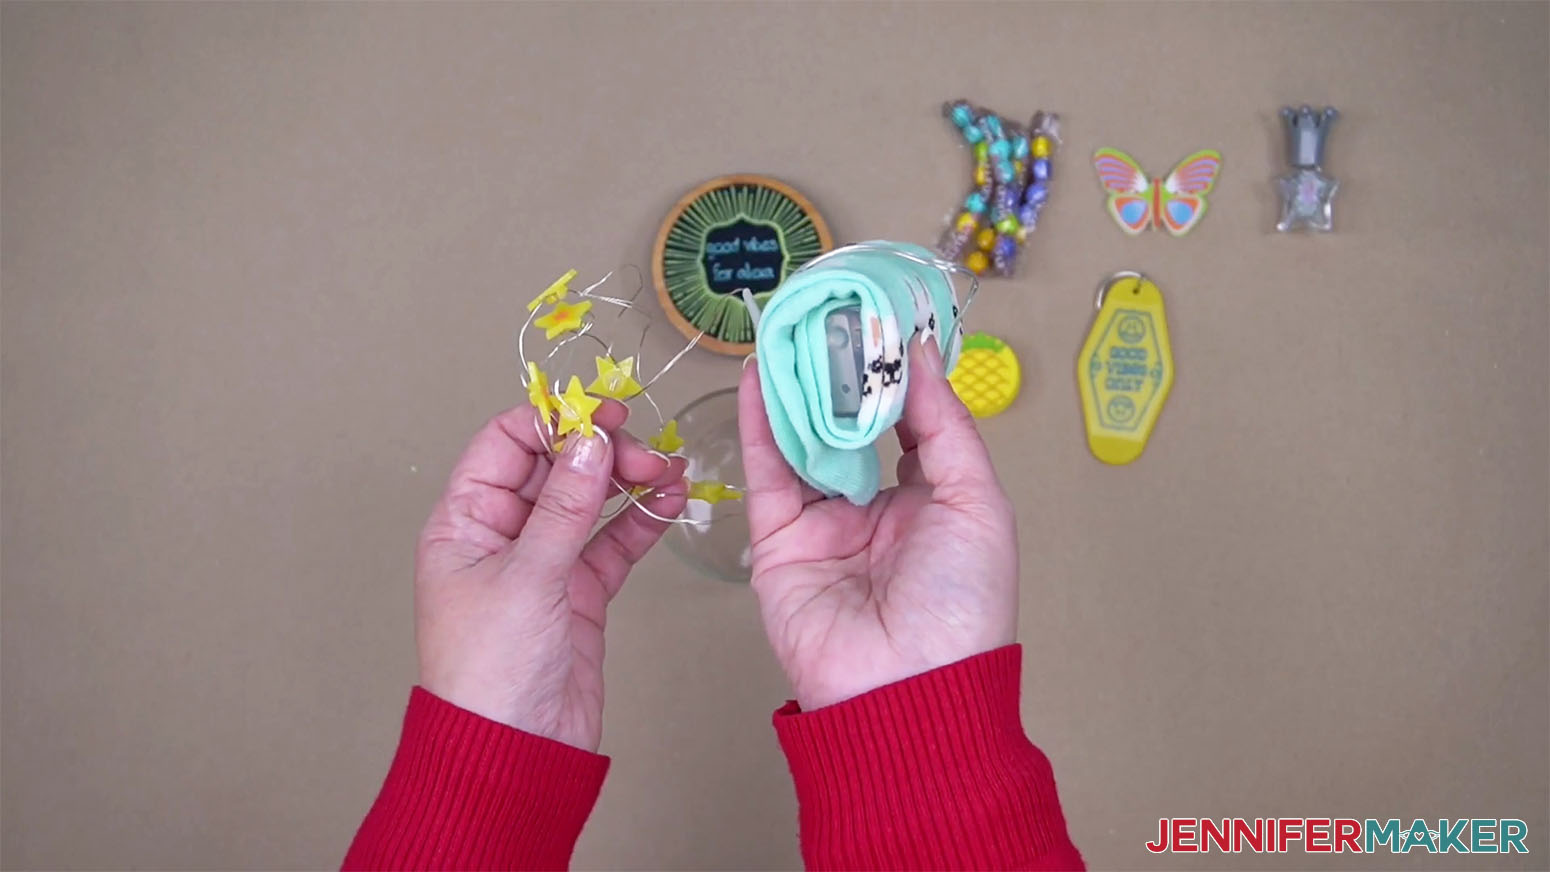
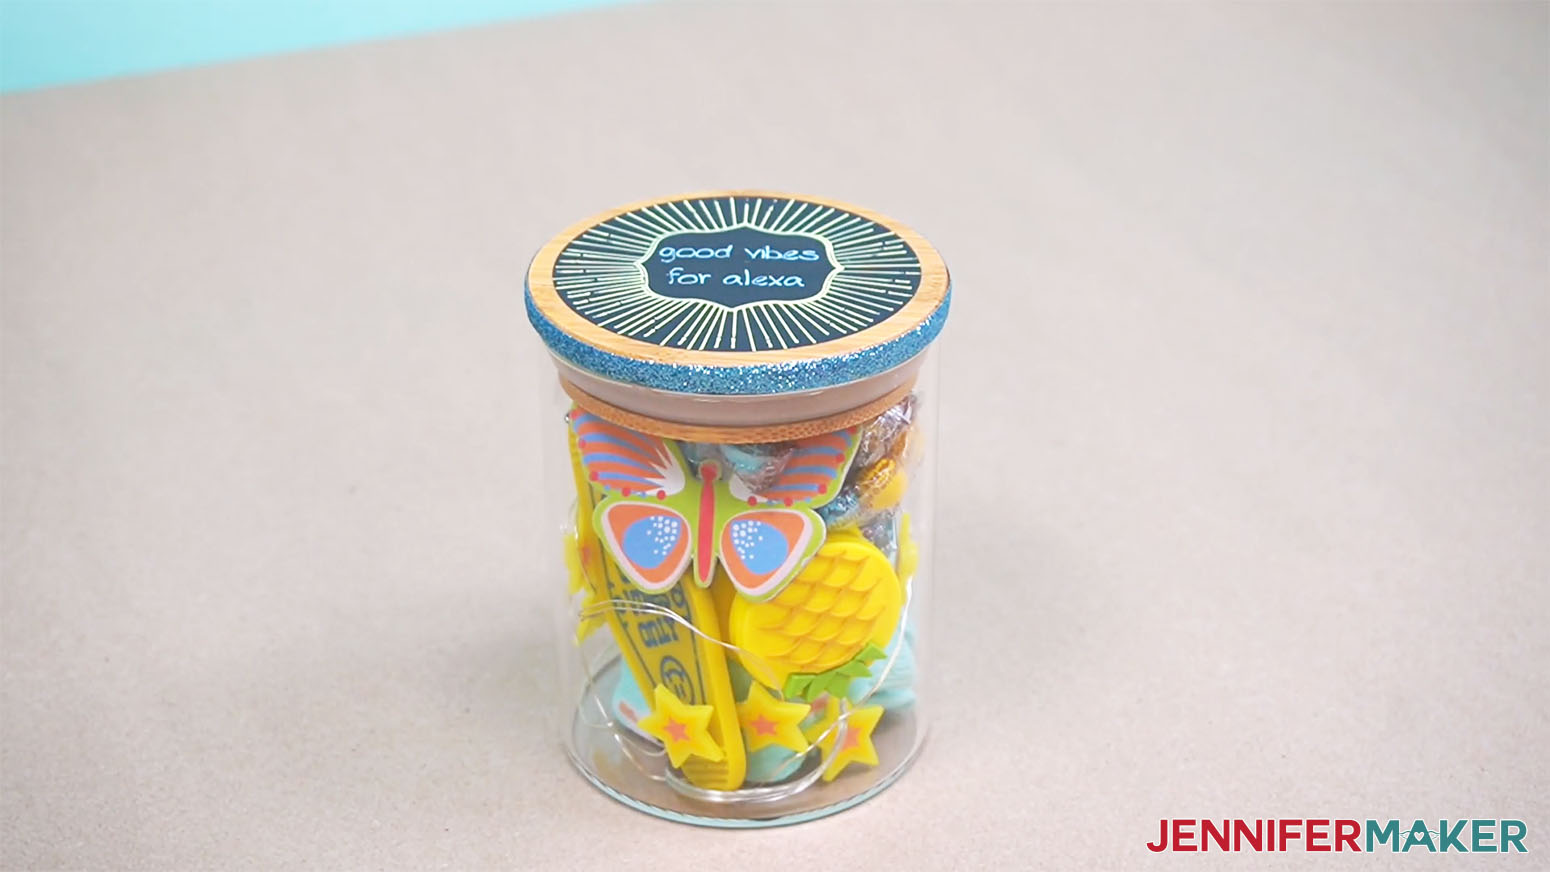
Good Vibes Jar
I found all of these goodies at the Dollar Tree and used a 15 oz food storage jar.
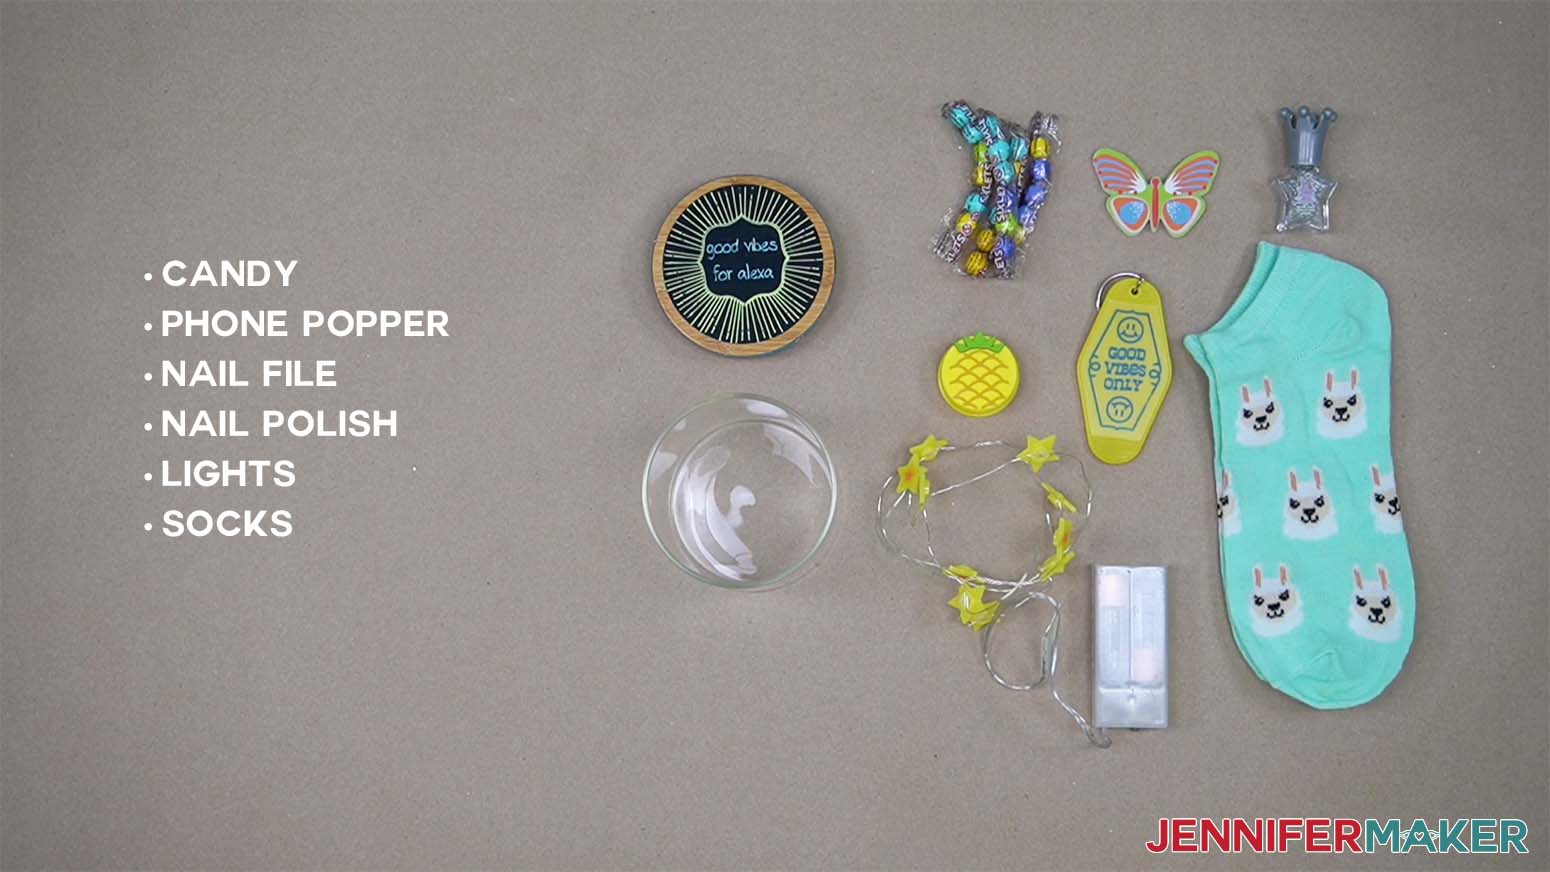
Recipe:
- Candy
- Phone Popper
- Nail FIle
- Nail Polish
- Lights
- Socks
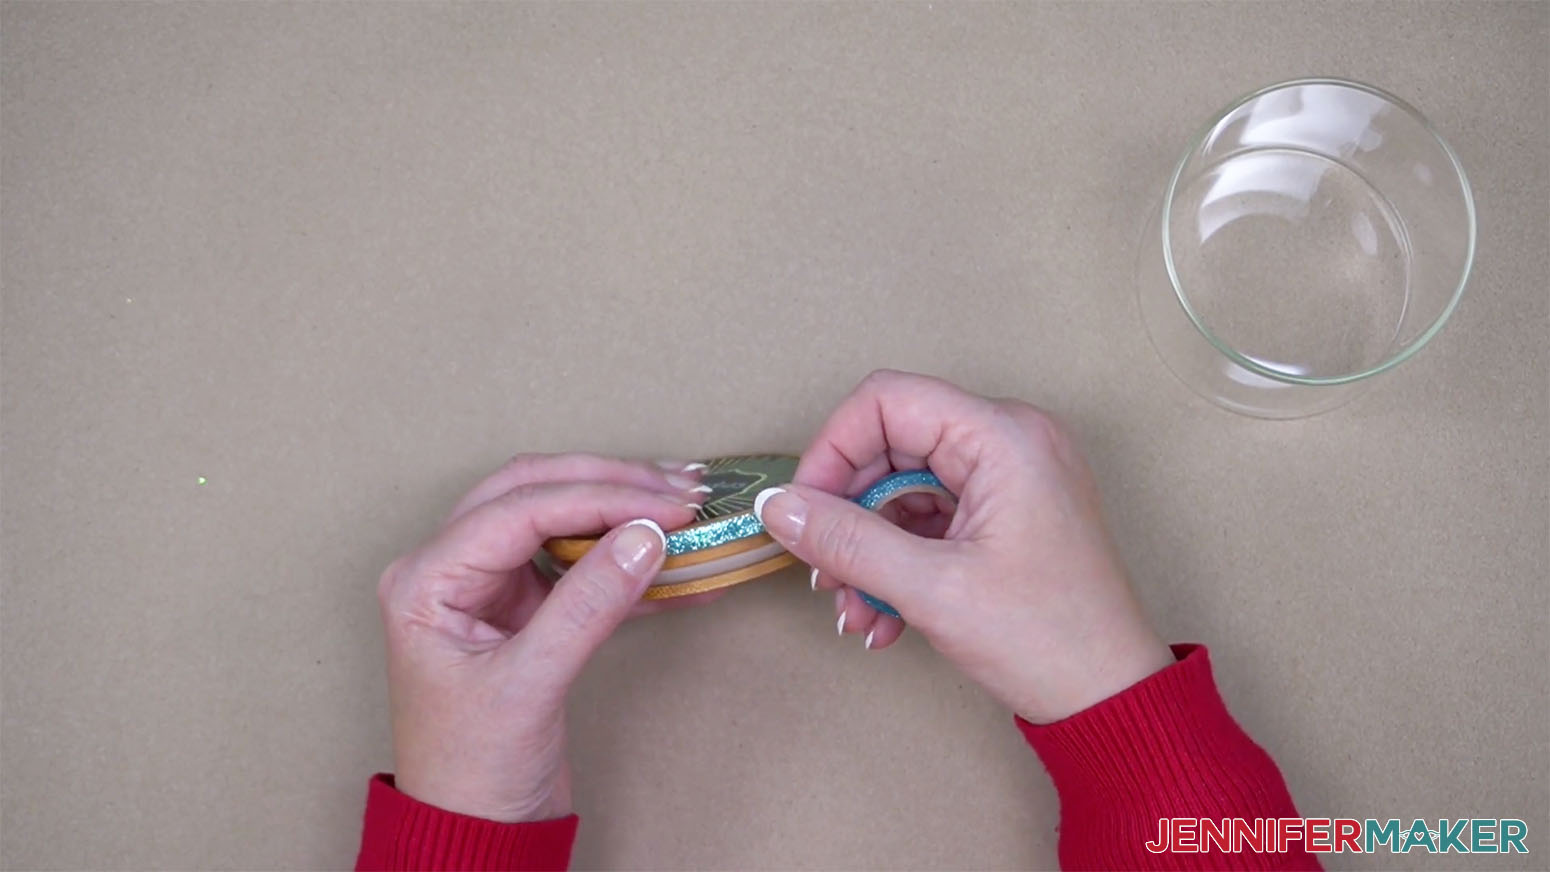
Because I wanted the lights to shine, I placed the label on the lid for this gift jar.
I also used glitter washi tape around the edge of the lid.
I wrapped the battery pack in the socks to hide it. Make sure to place the pack so that the light switch is facing up in the jar.
Sweets Candy Jar
This is a cute idea for a quick gift. Using the smaller 15 oz food storage jar, fill it with candy. You can decorate it with washi tape if you’d like.
Add your label and you’re done!
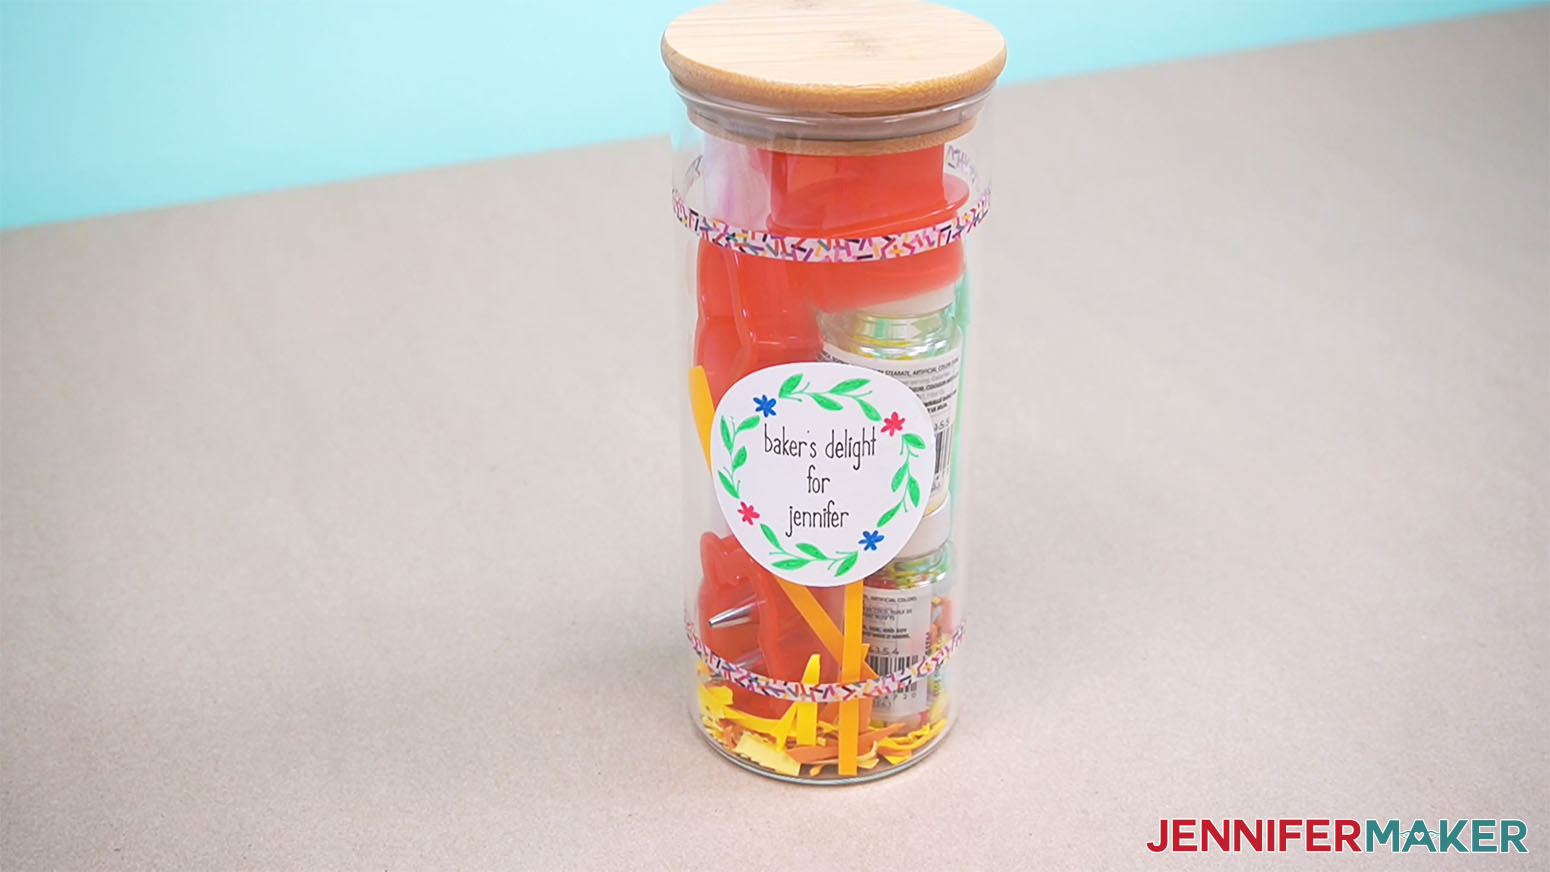
Baker's Delight
I found all of these items at Michael's craft store.
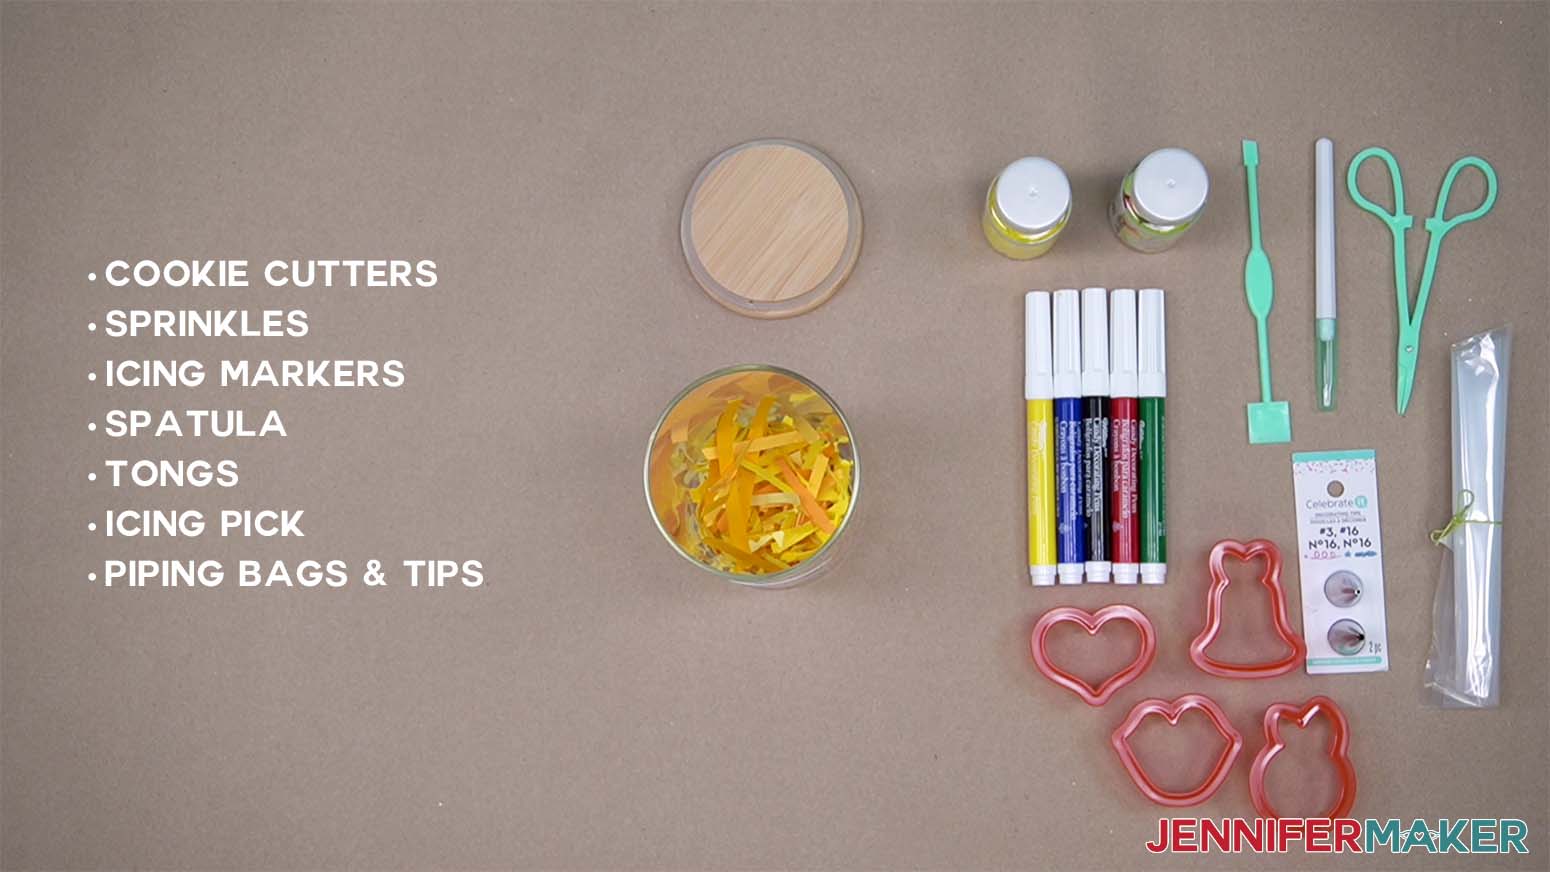
Recipe:
- Cookie Cutters
- Sprinkles
- Icing Markers
- Spatula
- Tongs
- Icing Pick
- Piping Bags & Tips
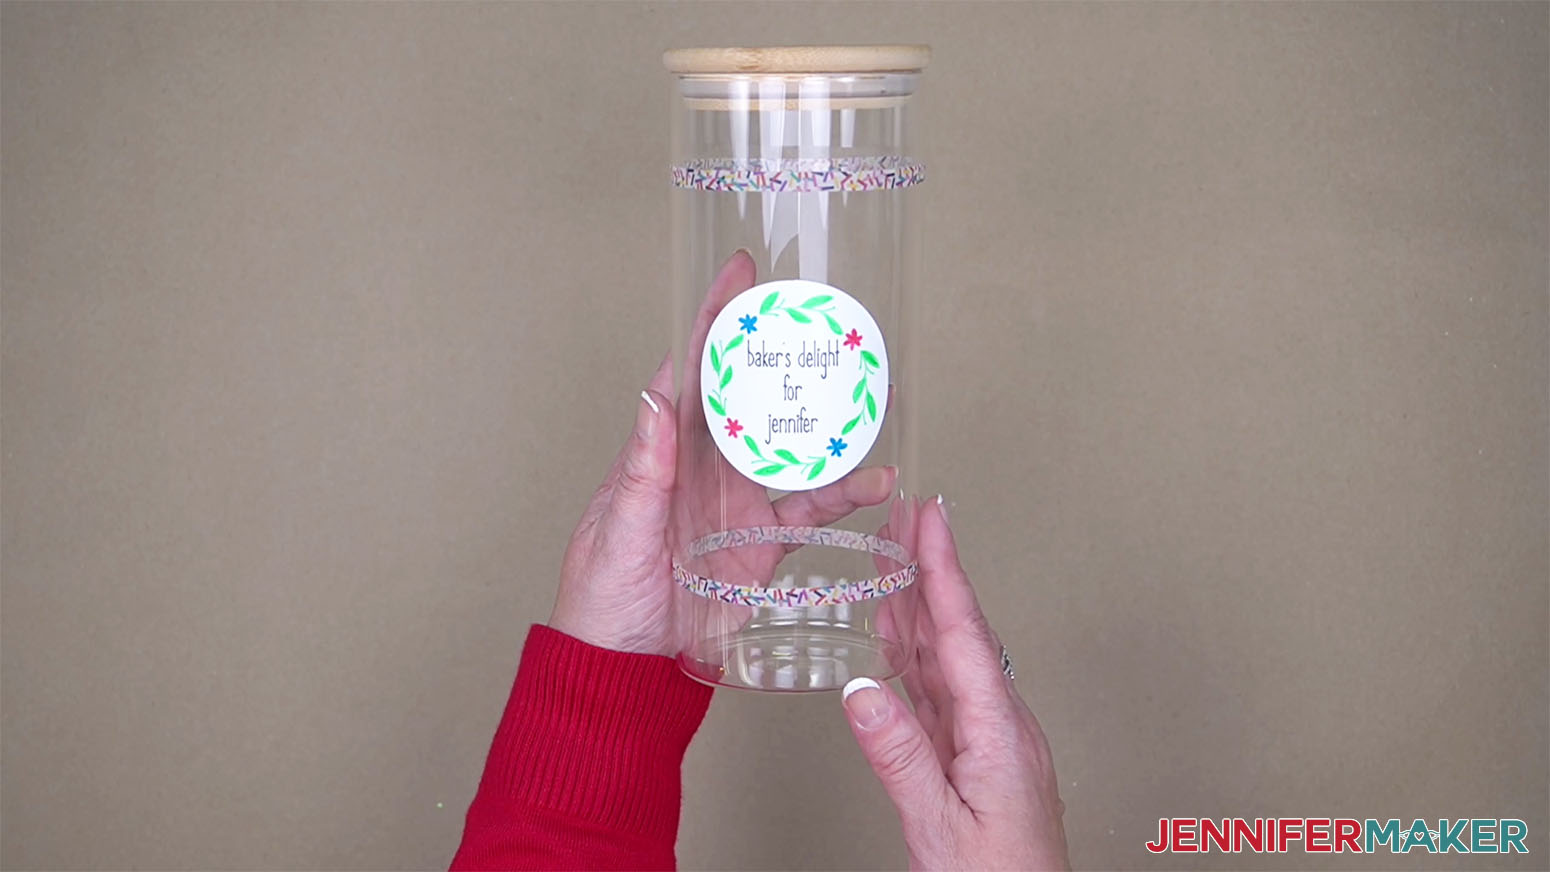
For the label, I combined the circle shape and flower design and added a personalization using JM Tall. I used the glitter gel pens and cut it out of the white removable label vinyl.
Using a tall 32 oz food storage jar, I wrapped washi tape around the top and bottom and placed the label in the middle.
TIP: Don't know what to do with your small scraps of cardstock? Use them as pretty packing material! Using scissors or a paper shredder, cut your scrap paper into smaller pieces. You can place it as padding at the bottom of a glass jar.
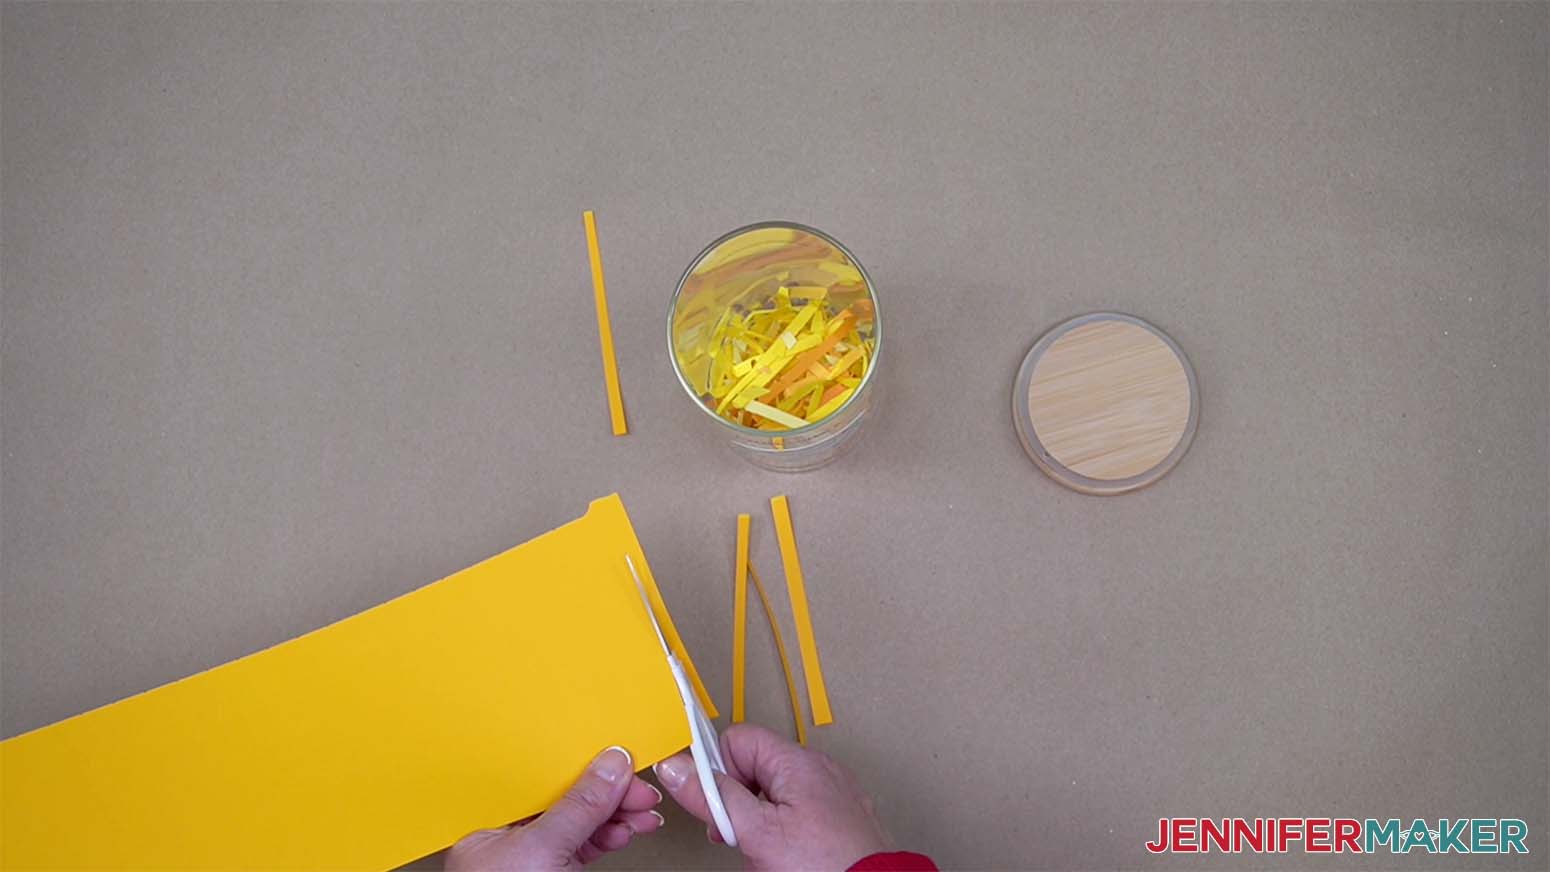
After placing the scrap paper on the bottom, I stacked the sprinkle jars and then put the piping bags rolled up and tied with twine in the jar followed by the markers and tools. Then I filled in the open spaces with everything else.
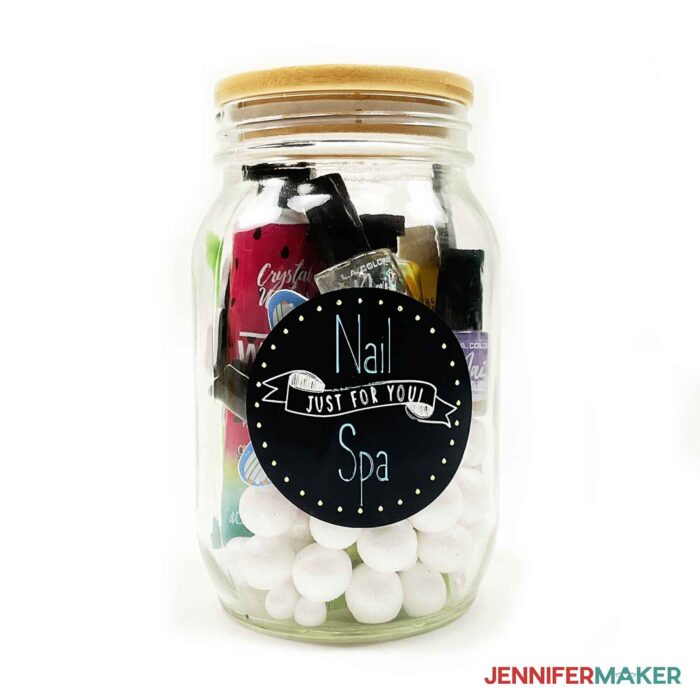
Nail Spa
These items were all found at the Dollar Tree.
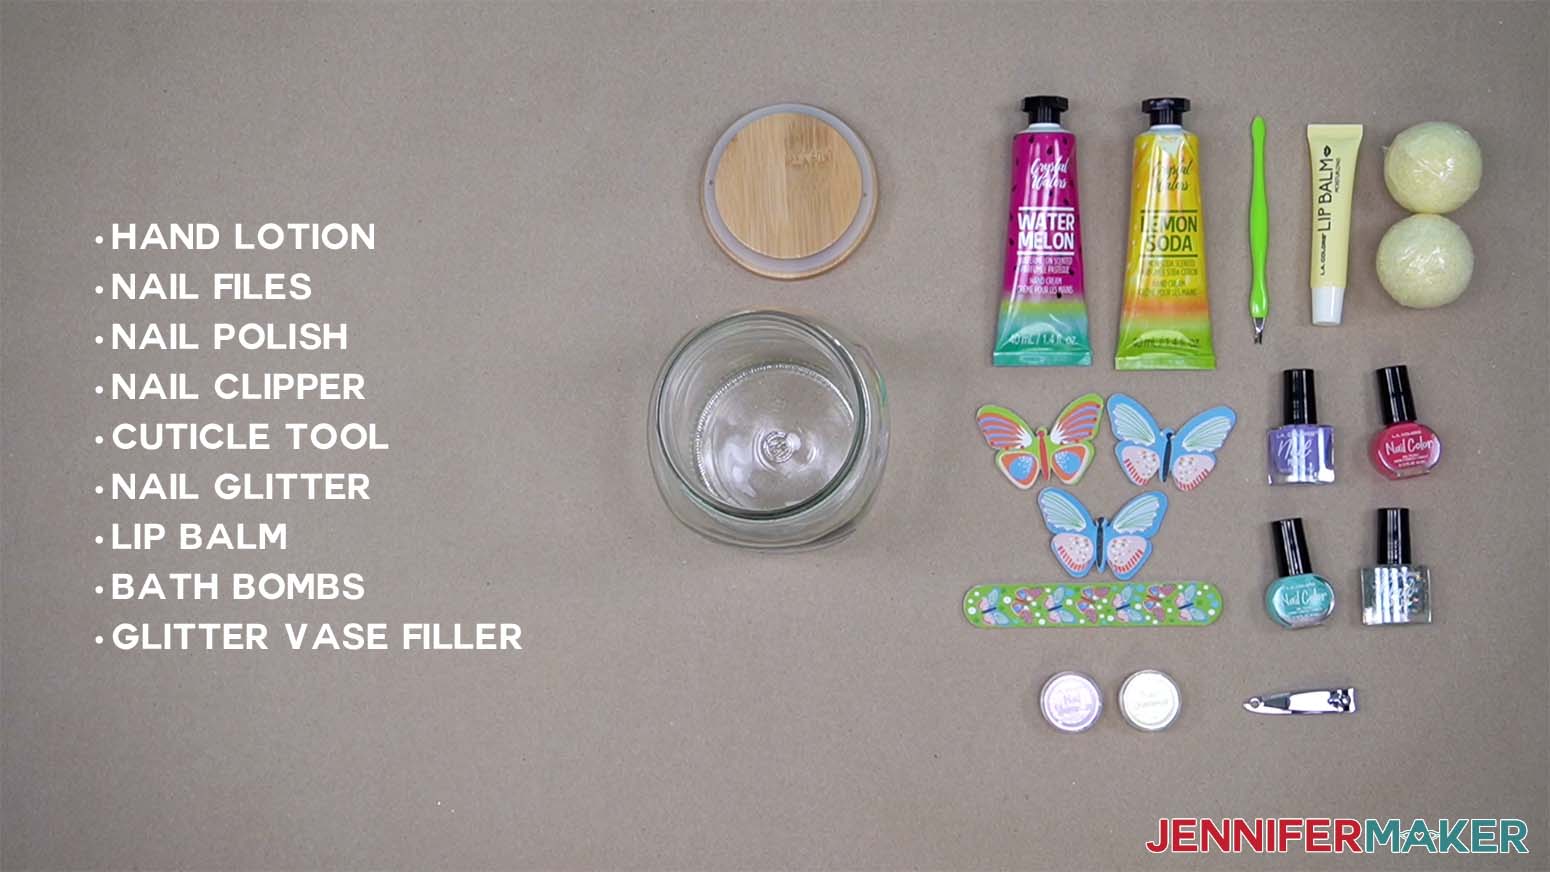
Recipe:
- Hand Lotion
- Nail Files
- Nail Polish
- Nail Clipper
- Cuticle Tool
- Nail Glitter
- Lip Balm
- Bath Bombs
- Glitter Vase Filler
For this label combined the circle shape, dotted circle, and the Just For You banner in Design Space. You can add Nail Spa in Cricut Sans if you'd like to personalize the label. I used black removable vinyl and opaque gel pens for this label. 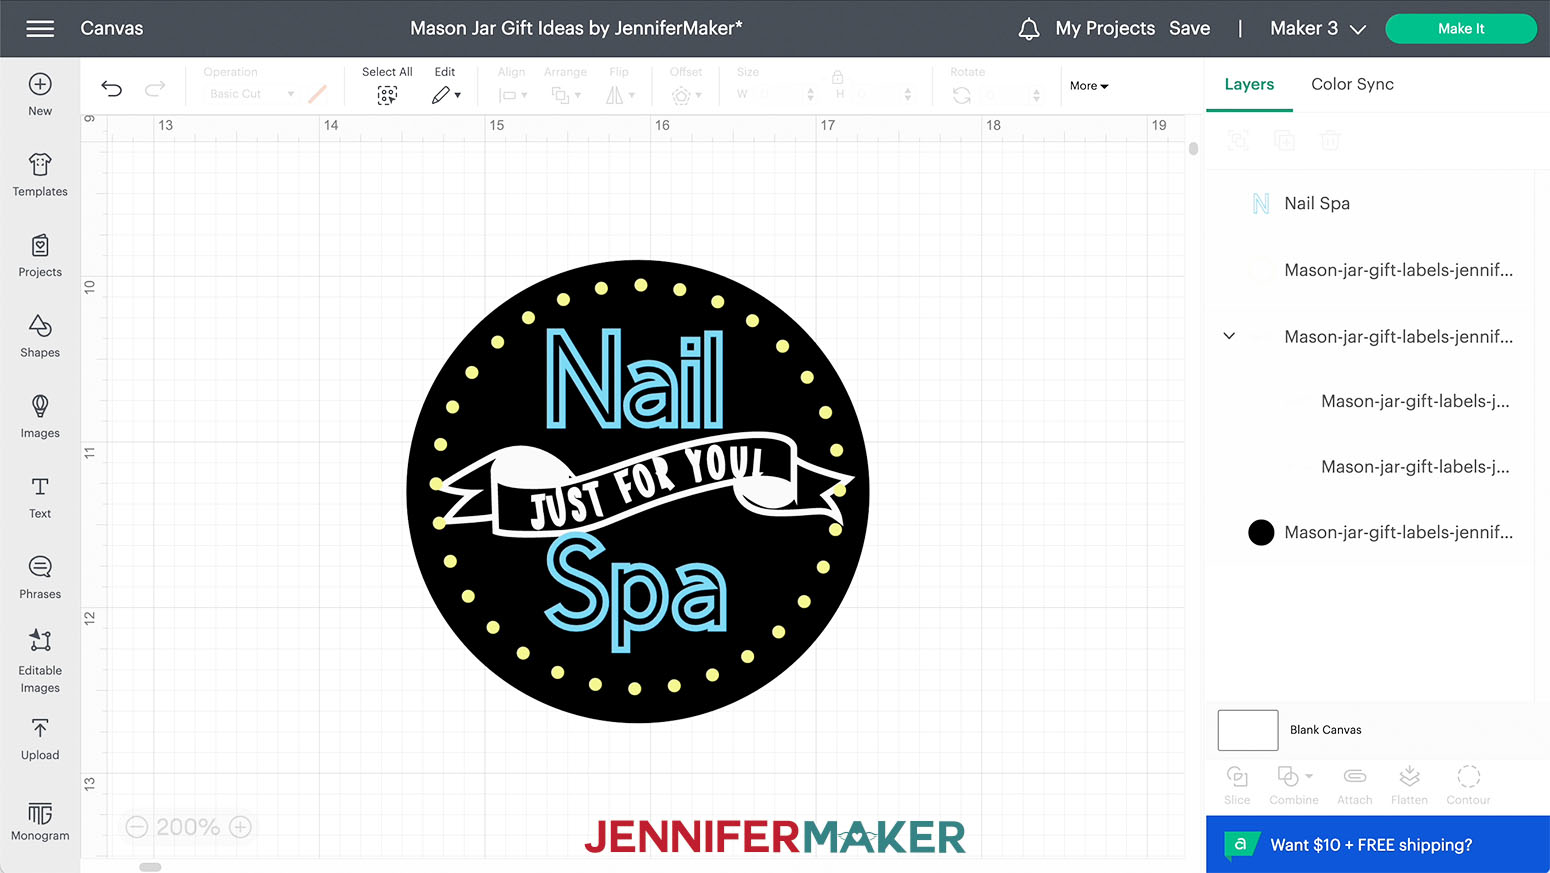
I wanted to keep this simple so I just eyeballed the center of the jar and placed the label like a sticker.
I also used a decorative bamboo lid that fits the wide mouth mason jars.
Fill the bottom of the jar with the glitter vase filler. Then, place the taller items: lotion, lip balm, cuticle tool, and bath bombs. Fill in the open spaces with the smaller items.
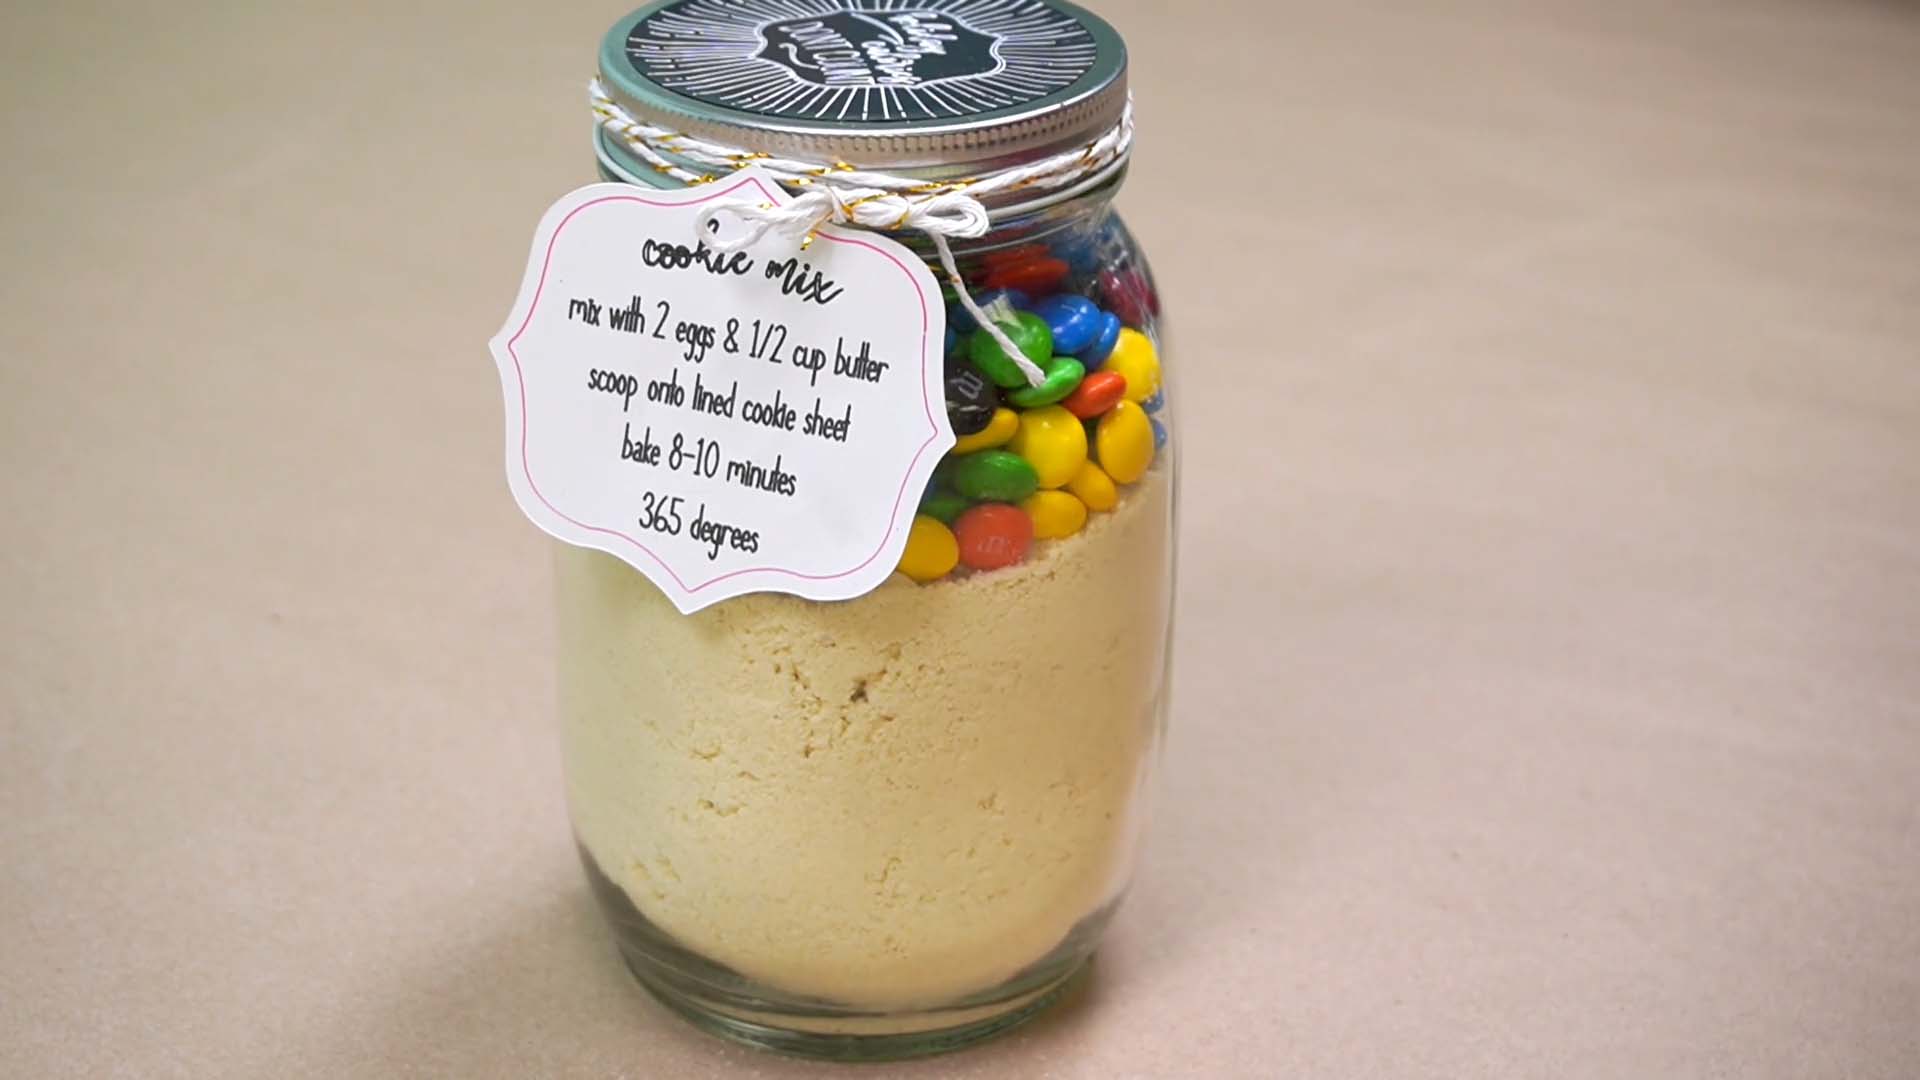
Cookie Mix
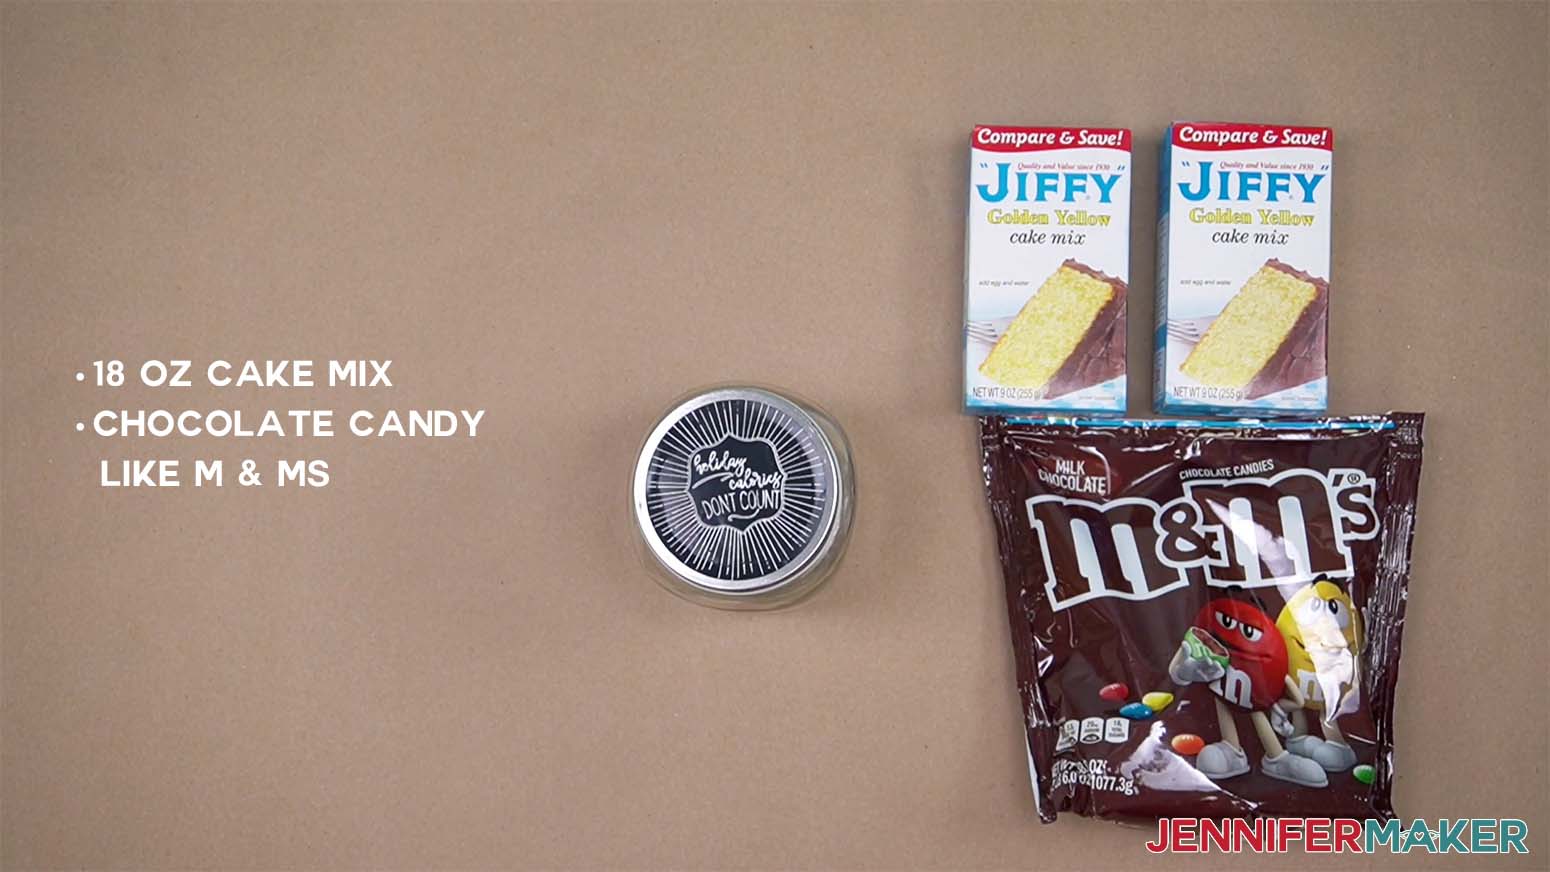
Recipe:
- 18 oz Cake Mix
- Chocolate Candy like M & Ms
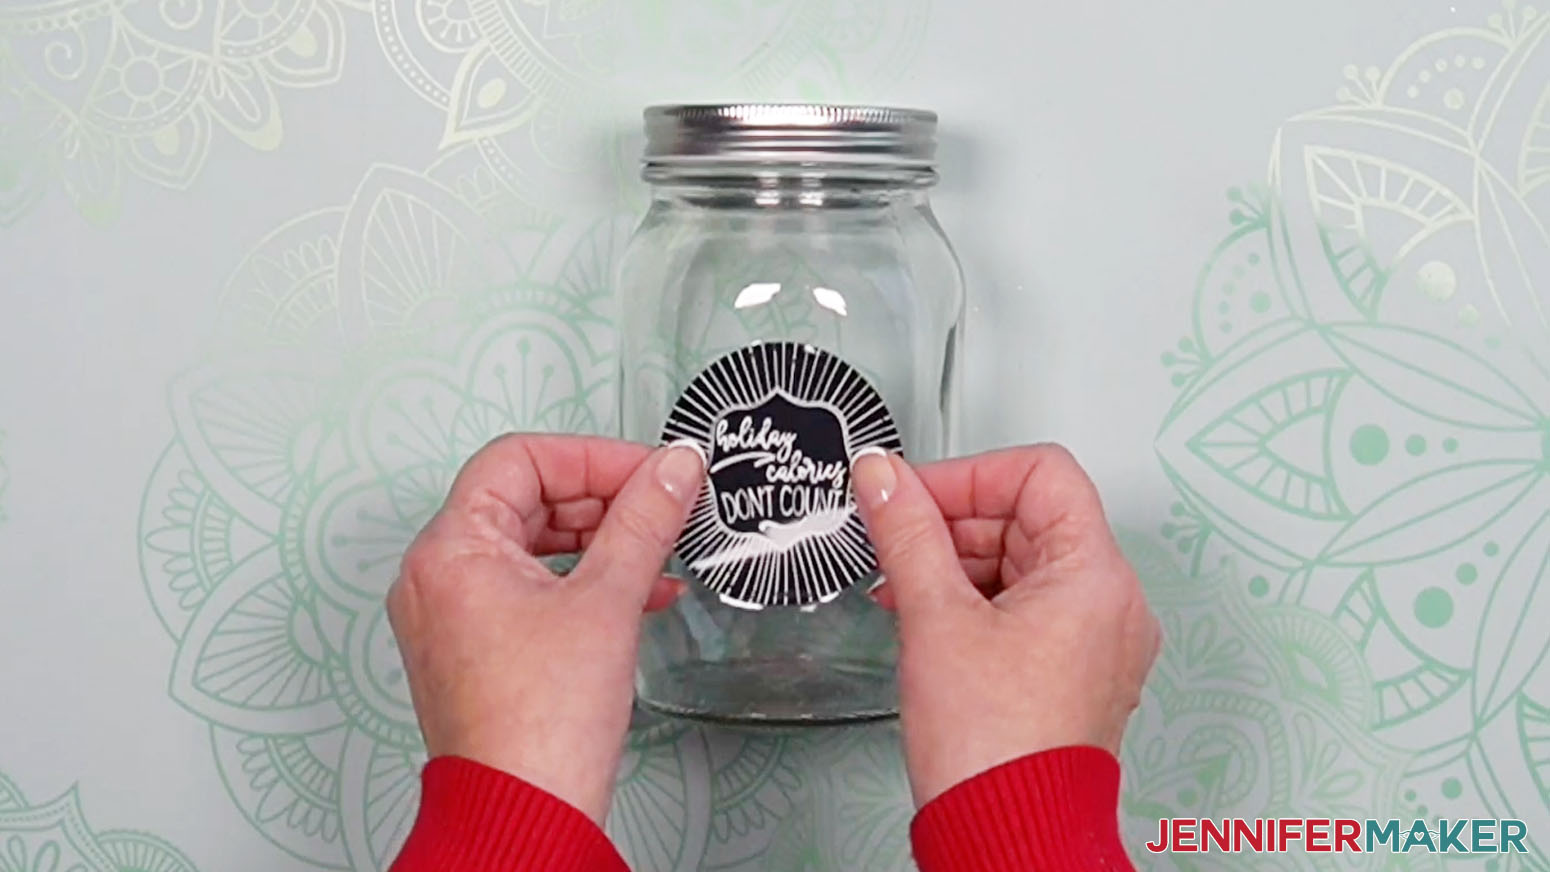
I made two labels for this jar. For the top of the jar, I combined the circle shape, Holiday Calories Don't Count, and the starburst design. I used the black removable vinyl with the opaque gel pens. Second, I created the recipe tag by combining the four point badge with the Cookie Mix recipe. I used white card stock for this along with the glitter gel pens.
Layer the cake mix and top off the jar with candies.
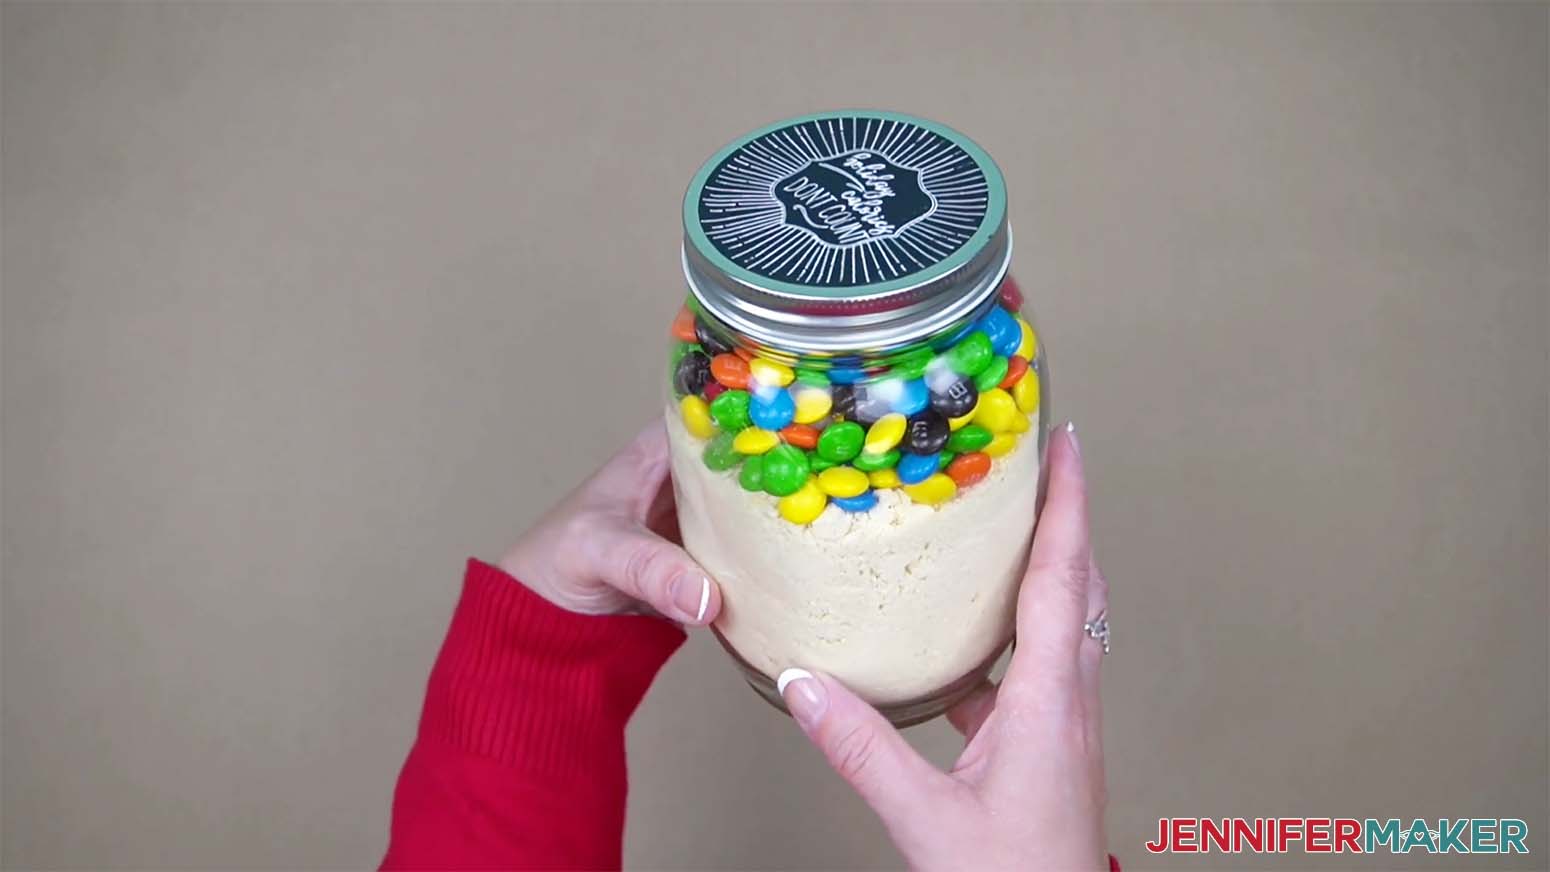
Place the holiday calories label on the lid. Then punch a hole in the cardstock recipe and attach it to the lid with twine.
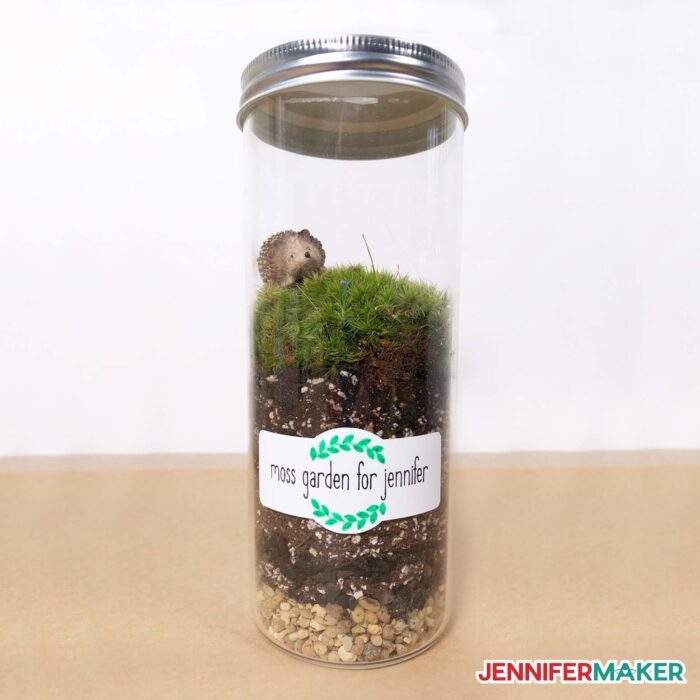
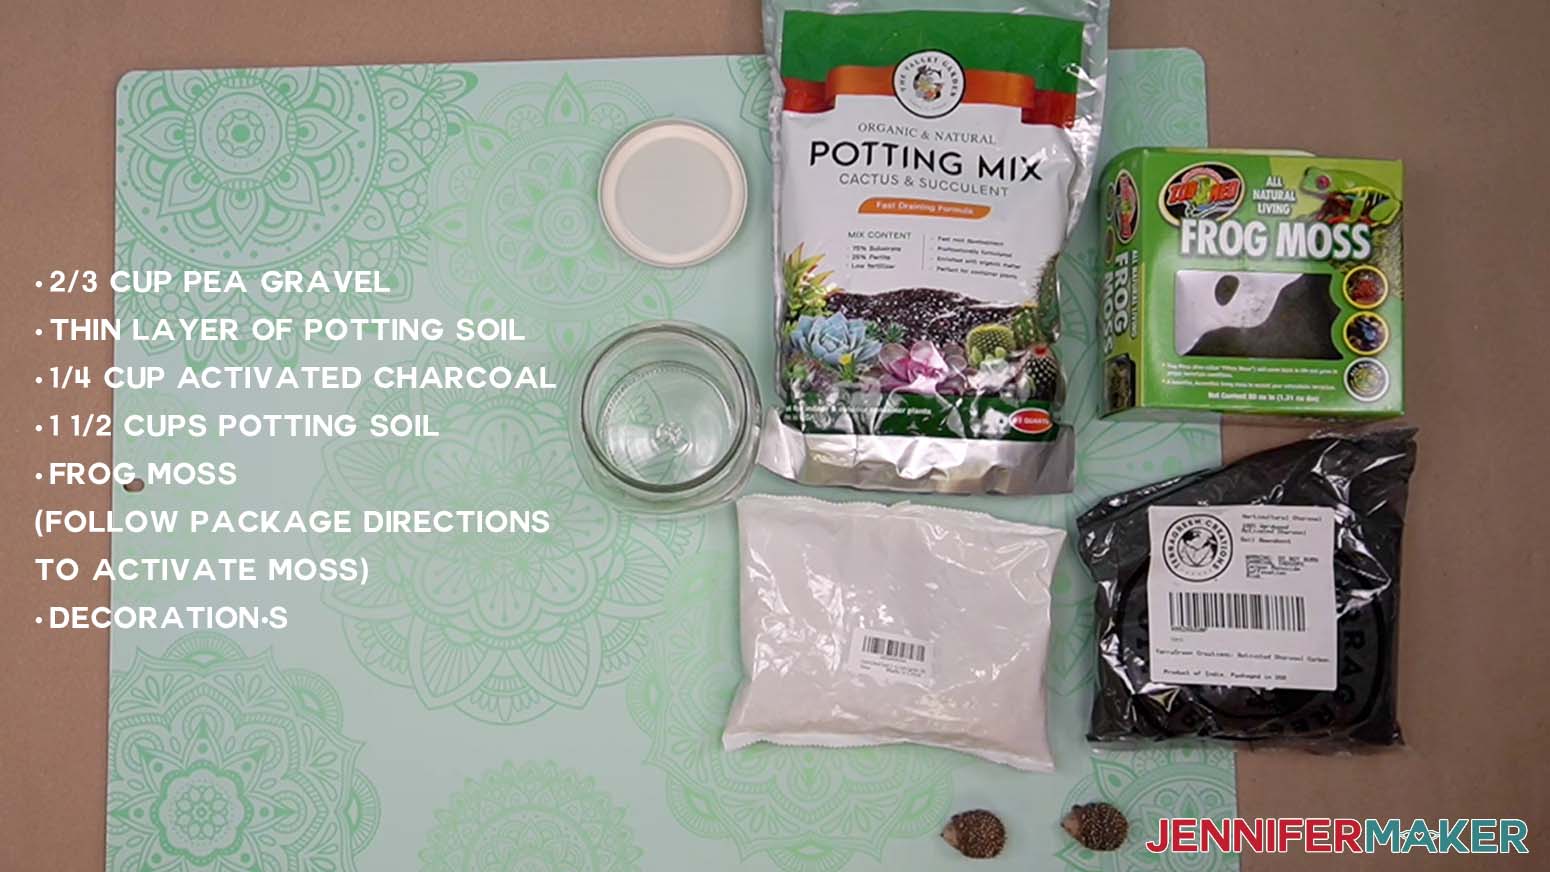
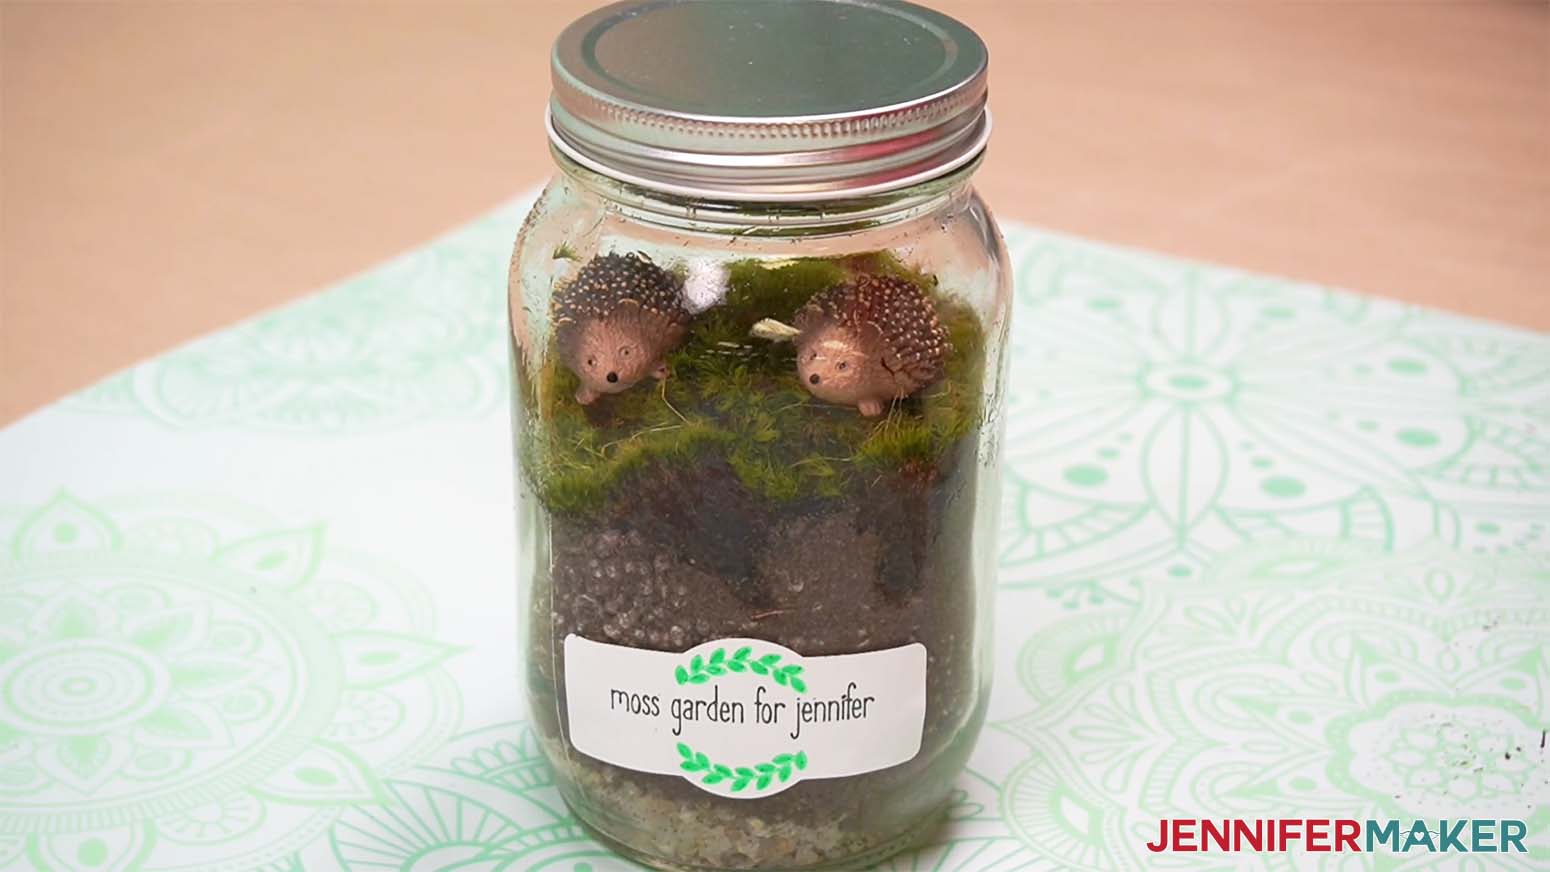
Moss Garden
This is a cute little terrarium that you can give to your favorite gardener.
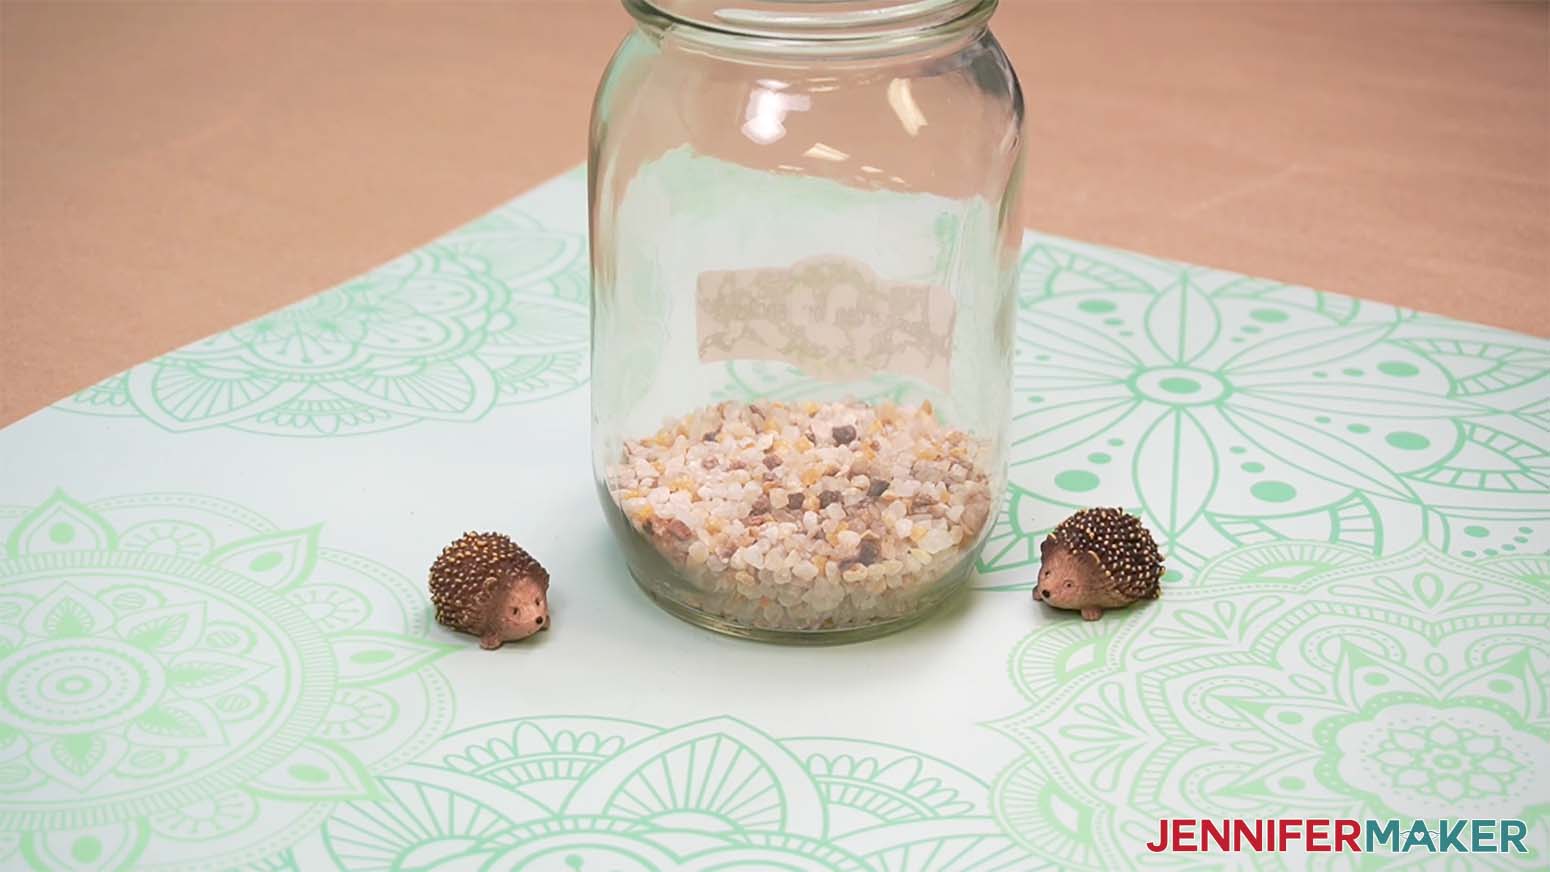
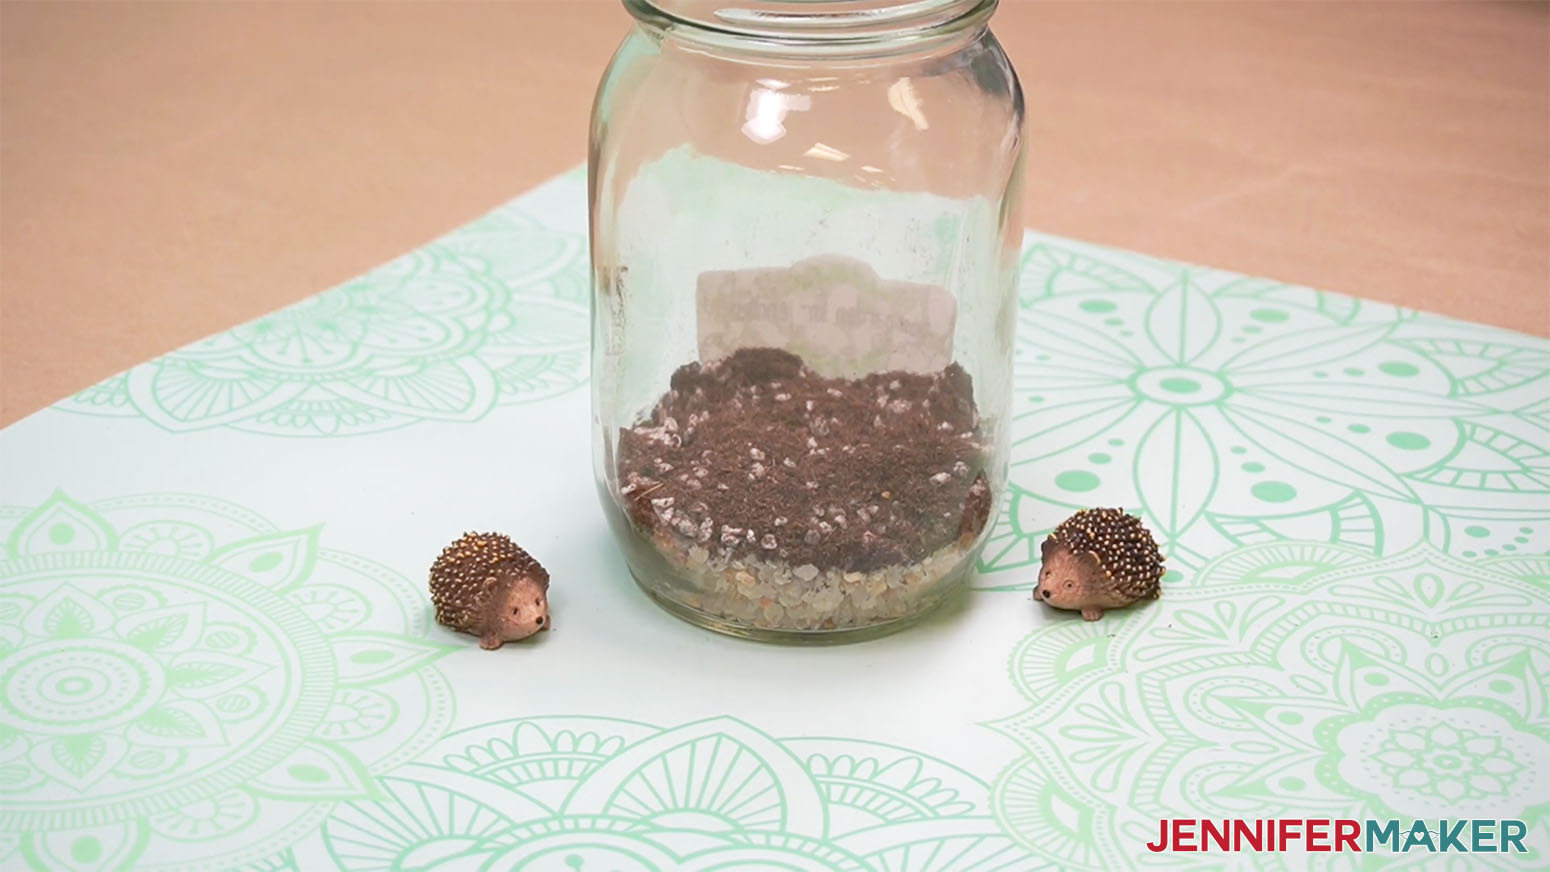
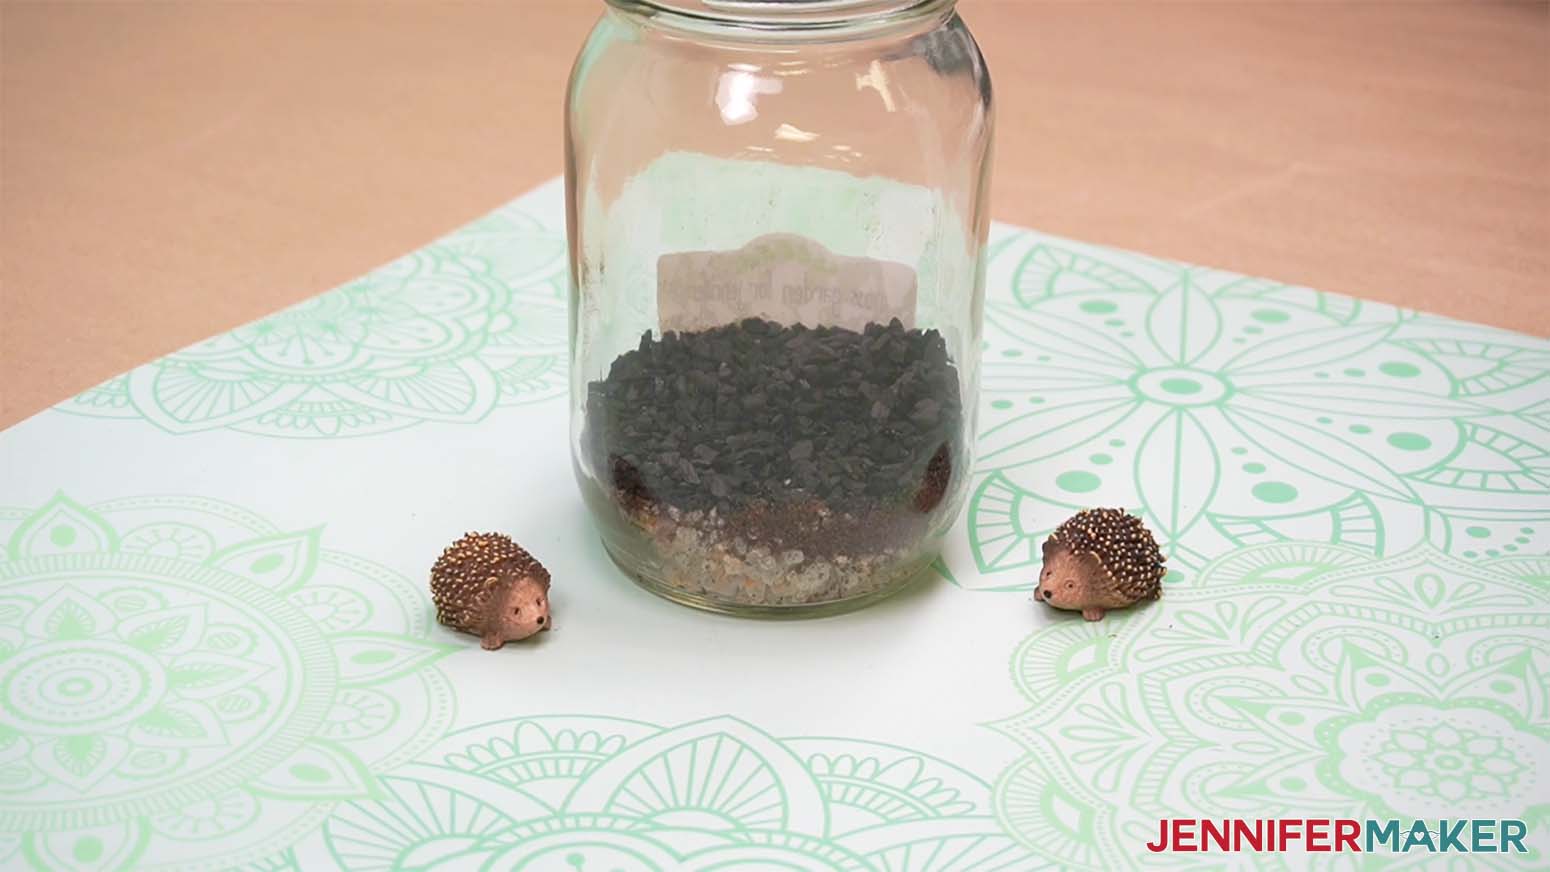
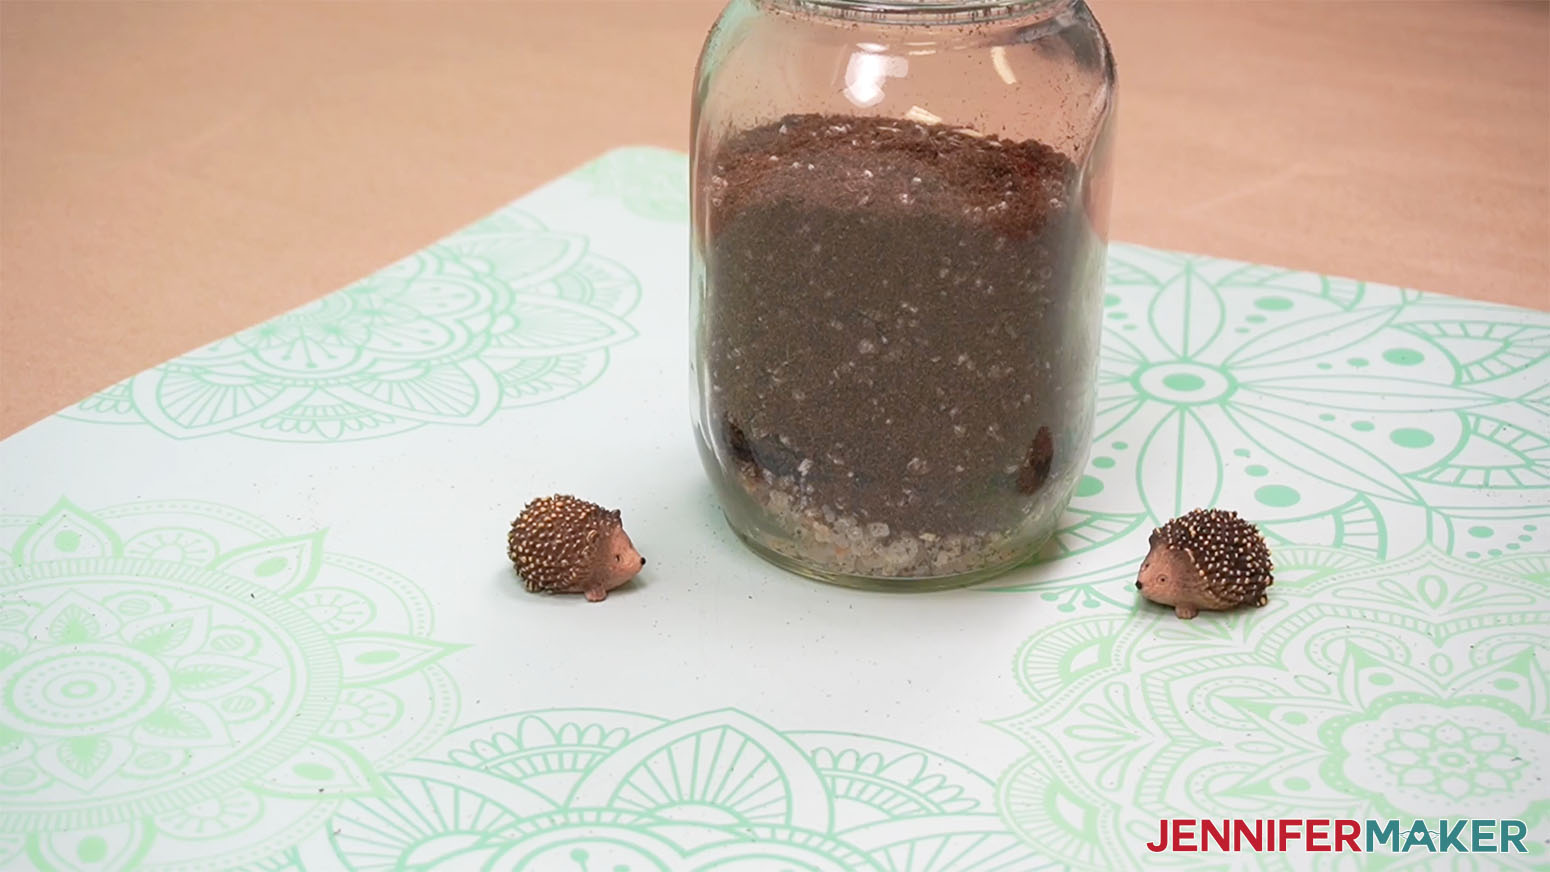
Recipe: Place these following ingredients in the order that they are listed.
- 2/3 cup Pea Gravel
- Thin layer of Potting Soil
- 1/4 cup Activated Charcoal
- 1 1/2 cups Potting Soil
- Frog Moss (follow package directions to activate moss)
- Decorations
For this label, I combined the horizontal shape with the leaf vines and personalized it with JM Tall. I created the label with white removable vinyl and used the glitter gel pens. After the label was finished, I colored the leaves in by hand.

Place the label in the lower third of the jar so it won't block any of the growing area.
[image mason-jar-gift-ideas-moss-garden-label
Add the materials in the order they are in the recipe.
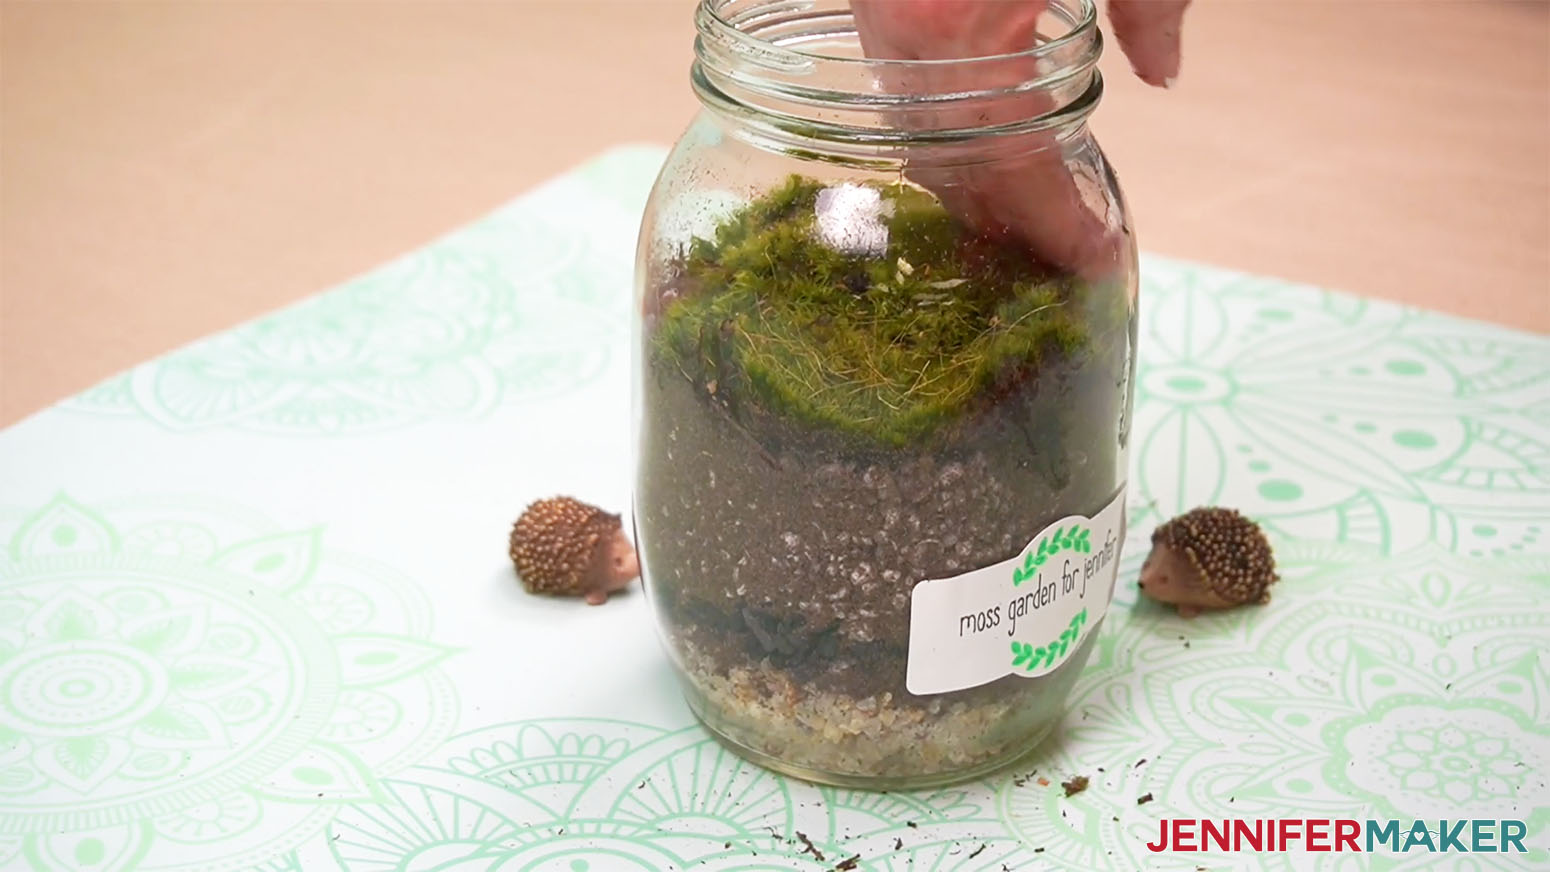
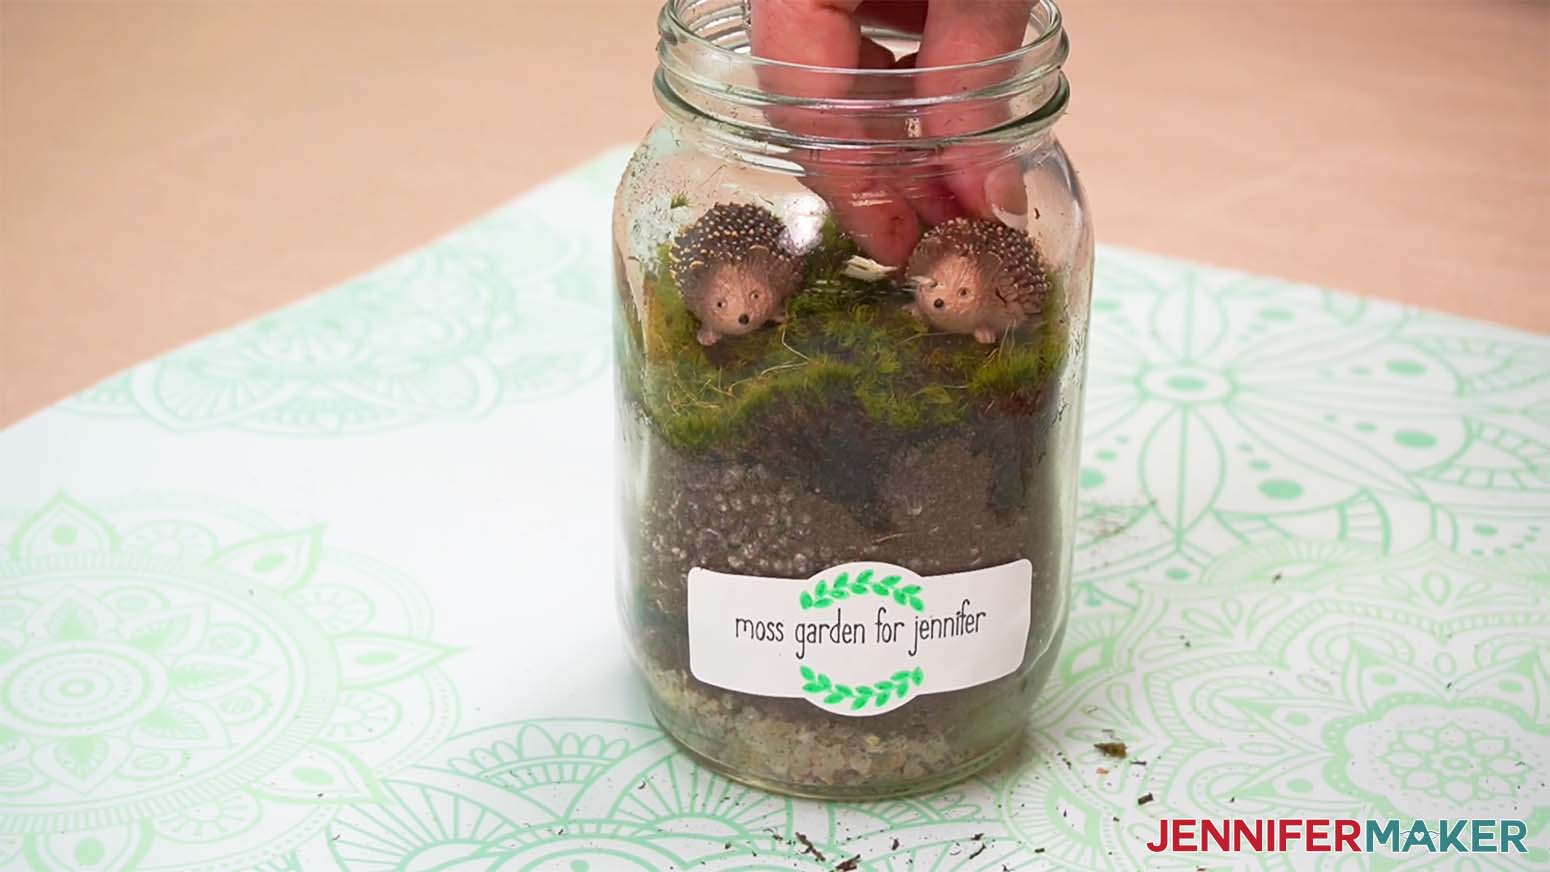
NOTE: Moss gardens should be placed in indirect sunlight only. Spritz with water 1-2 times a week as needed.
STEP 5: SHOW IT OFF!
To keep your gift jars a surprise, carefully place them in gift bags and surround them in tissue paper.
Notes
Typefaces used: Cream Candy, JM Tall, JM Penwriting
Alternative: Goldie Rainbow
Answers to Your Questions About Making Mason Jar Gift Ideas
Q: What can you fill Mason jars with for gifts?
A: My favorite way is to fill them with themed items, like gift cards for a dinner in and hot chocolate mix for dessert after!
Q: How do you decorate a Mason jar for a gift?
A: Think about your recipient and go from there! You can add a personalization using a free printable label, then tie on a candy cane with matching ribbon.
Q: What do you put in decorative mason jars?
A: Beautiful Mason jars are the perfect opportunity for gifts the recipient might display. Like, for a tea lover, add some loose tea to the jar and attach a teaspoon with twine on the tag. Hot cocoa mix would work, too!
Q: What can I put in a jar for a Christmas gift?
A: Pretty much anything can fit in a jar for DIY Christmas gifts! If you have a budding baker on your Christmas list, gift them your favorite brownie mix or an important ingredient, like brown sugar.
Q: How can I customize my own mason jars?
A: There are so many different ways to personalize Mason jar gift ideas, but my favorite are the custom labels I made with Cricut’s Smart Labels — no printer needed.
Q: How do you decorate empty jars?
A: You can add strips of washi tape, stickers, vinyl decals, ribbons, pretty much anything you like to spice up a jar.
Q: How do you gift wrap a Mason jar?
A: If you’re using a glass jar, you can put it in a padded gift basket, or wrap it in several layers of tissue paper and gift in in a bag.
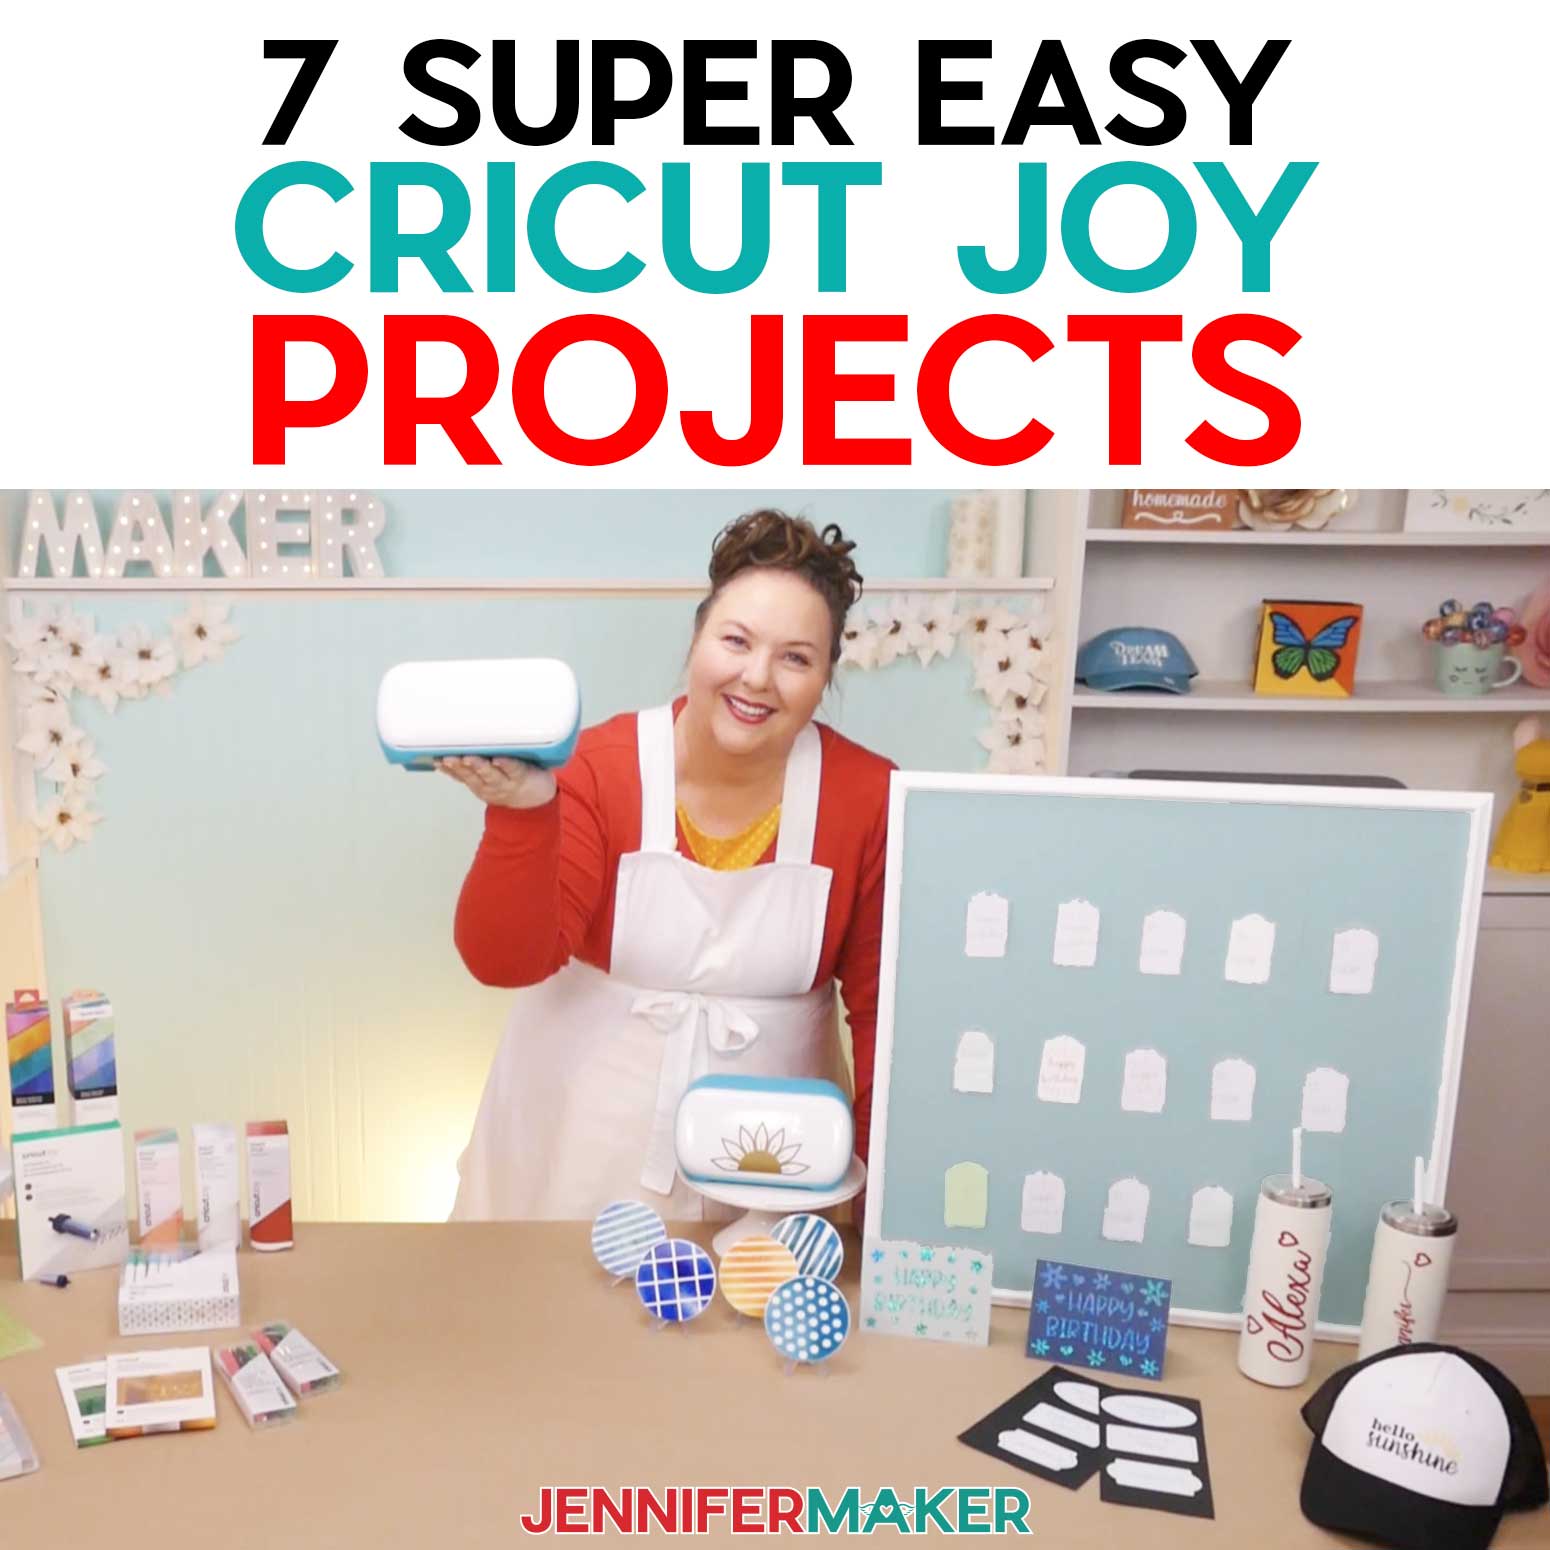
Q: Can I cut this project on a Cricut Joy?
Yes, these labels can be created with a Cricut Joy! Just make sure to use compatible materials and tools, like the Cricut Joy gel pens and opaque pens.
Q: What is Merry Maker Mingle?
Each day in December leading to Christmas, I present you with a brand new “gift” — a project to craft, make, or do. You can make these projects on a Cricut cutting machine or by hand if you don’t have one. Most of our Merry Maker Mingle projects will come with a fun video with yours truly, a step-by-step printable photo tutorial, and a free pattern/SVG cut file. Sign up to get daily updates and prizes!
Get my free SVG files to create Mason Jar Gift Ideas!
I love seeing what you make with my designs and how you use them! Please share a photo of your Mason Jar Gift Ideas in our Facebook group or tag me on social media with #jennifermaker.
Love,

Want to remember this? Save this Mason Jar Gift Ideas Tutorial to your favorite Pinterest Board!