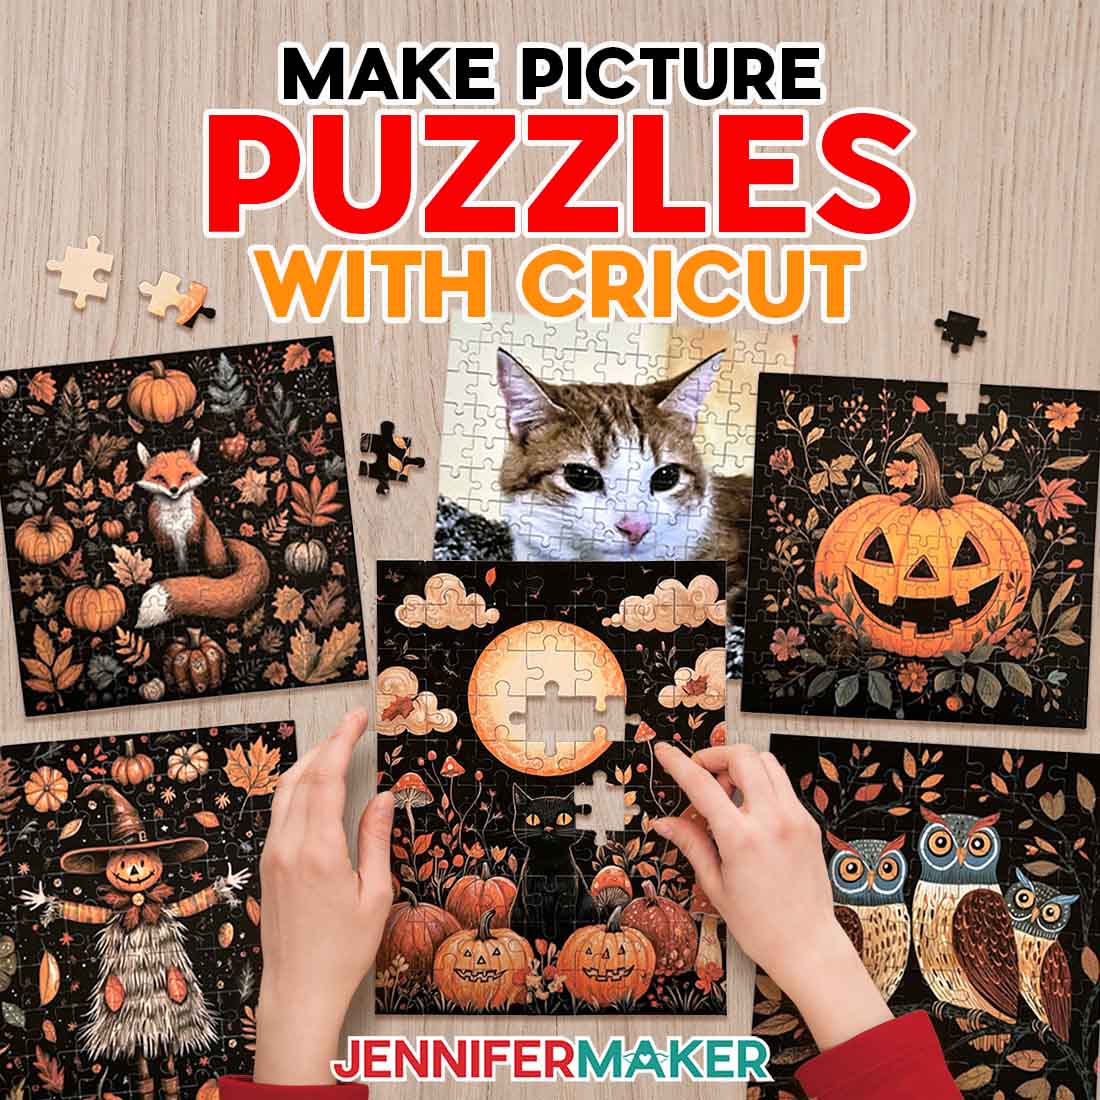
Learn how to make DIY picture puzzles with your Cricut!
Often, crafters forget the huge variety of materials that Cricut machines can cut. It’s capabilities go far beyond just cardstock and vinyl, and I love testing the limits of my cutting machines. It’s so satisfying to make incredible crafts that have my family and friends asking “You MADE that?” This is one of those projects! In this tutorial, I’ll show you how to make beautiful picture puzzles with your Cricut using my easy to use Puzzle Templates!
Watch the full step-by-step tutorial to make puzzles with your Cricut:

Greg and I are big fans of puzzles and games. Lately on Maker Farm, we’ve been taking time between tasks to do puzzles together. Sometimes, we work together to complete one — but usually, we each start with a puzzle and see who can put it together the fastest!
Putting the last piece in a puzzle is a great feeling, but it’s even better when it’s a puzzle you made yourself. So, let’s learn how to do that!
The puzzles I’ll show you how to make use images printed onto sticker paper, which are then applied to a firm backing like chip board, Kraft board, or a surprising option you might have in your pantry. We’ll do it all with the help of a Cricut cutting machine and a regular inkjet printer. I’ll help you get the perfect settings in Cricut Design Space for a quality, high resolution result for your image. Then I’ll share my favorite tools and cut settings for getting nice, clean results on your cut puzzles — no matter which material you choose.

I’ve also got a brand new set of puzzle designs to share! They’re in my free download file for this project, and include pretty autumn images I made with the help of AI image generating software. To learn all about how to make your own AI-generated images for crafting, check out my AI Art Playbook!
But how do you cut your beautiful image into a puzzle with nicely shaped pieces? Puzzle piece templates! I’ll show you how to use them with an image in Cricut Design Space. I used my Cricut Maker 3 to cut my jigsaw puzzle, but you can use an original Cricut Maker, any of the Cricut Explore series machines, the Cricut Venture, or the Cricut Joy Xtra for this project. These machines have Print Then Cut capabilities, which we need to make sure our cuts end up in the right places.
Speaking of Print Then Cut, if you’ve never used the feature before, it’s a really neat way to create projects that are cut precisely around printed designs, or have cuts placed in certain spots on a printed image — just like we’re doing with these puzzles. When your image prints , you’ll see a black outline around parts of the design. Don’t worry! These are registration marks, which help the sensor on your Cricut know where to place its cuts according to the puzzle template. The black outline won’t be part of the final puzzle.

When it comes time to cut your puzzle with your Cricut, the blade you use matters depending on the material. I’ll show you how to choose which blade is right for your project and the type of backer you’re using.
Once you have a perfect handle on making your own homemade puzzles, you can make them as gifts for others! The disassembled pieces fit perfectly inside the small boxes from my DIY Gift Box tutorial. You can also send your puzzle through the mail in an A7 or larger envelope. Interested? Learn how to make your own DIY envelope using my Envelope Tutorial. You can even slip a gift card or homemade coupon inside to take the gift up a notch!
DIY puzzles are a great addition to your game collection, perfect for family game night or a quiet, rainy day. They allow us to step away from screens for a while, and are effective ways to flex our critical thinking skills! They’re also a good way to repurpose materials that may otherwise be thrown away. I hope you’ll make your own puzzles, too!
Let me show you how easy it is to make your own puzzles with puzzle templates! This post contains some affiliate links for your convenience (which means if you make a purchase after clicking a link I will earn a small commission but it won’t cost you a penny more)! Read my full disclosure policy.
Materials to Make a DIY Jigsaw Puzzle with a Cricut
View my Amazon shopping list with the exact items I used.
-
- 8.5″ x 11″ Cricut Printable Sticker Paper -OR-
- 8.5″ x 11″ Staples brand Printable Sticker Paper
- Light chipboard (aka a cereal box) -OR-
- 8.5″ x 11″ 22 Point Chip Board
- Color Printer
- A way to cut your puzzle – I’m using the Cricut Maker 3, but you can also use a Maker series, an Explore series, a Venture, or Joy Extra
- Cricut Purple StrongGrip machine mat 12″ x 12″
- Cricut Blue LightGrip Machine Mat 12″ x 12″
- Cricut Deep Point Blade and Housing (for light chipboard) -OR-
- Cricut Premium Fine-Point Blade (for Kraft board)
- Scraper
- Brayer
- Spatula
-
- Design #646 (My free SVG/DXF/PDF/PNG design files are available in my free resource library – get the password by filling out the form at the bottom of this page)

How to Create a Puzzle Using Puzzle Templates

Picture Puzzles
Learn how to make picture puzzles with a Cricut!
Materials
- Cricut Printable Sticker Paper 8.5" x 11" -OR-
- Staples Brand Printable Sticker Paper 8.5″ x 11″
- Cereal box with a flat front panel larger than 8.5″ x 11″ -OR-
- Light Chipboard (22 pt. 8.5” x 11”)
- Design #646 - (My free SVG/PDF/DXF/PNG design files are available in my free resource library - get the password by filling out the form at the bottom of this page)
Tools
- A way to cut your materials - I’m using the Cricut Maker 3, but you can also use the original Maker, the Explore series machines, the Venture, or the Joy Xtra
- A Color Inkjet Printer
- Deep Point Blade and Housing (for cereal box or light chipboard) -OR-
- Premium Fine-Point Blade (for Kraft board)
- Cricut Purple StrongGrip machine mat 12" x 12"
- Scraper
- Spatula
- Brayer
- Scissors (to cut cereal box)
Instructions
STEP 1: GET MY PICTURE PUZZLE DESIGNS
First, download my Picture Puzzle design files from my free library – look for Design #646. Alternatively, you can use the Save This Project form near the top of this post and the design link will be emailed to you.
In the SVG folder, you’ll find square and rectangle puzzle templates. There is also a DXF folder with cut files, and a PDF folder with versions you can print and cut by hand.
In the PNG folder, there are images you can use on your puzzle featuring a cat, fox, owls, pumpkin, and scarecrow. I made these designs with the help of AI art generation and adjusted them with image editing software.
NOTE: If you want to make the design with a hidden heart piece, the “Original Puzzle Files” folder has those SVG and DXF files.
I’ll show you how to prepare and Print Then Cut a rectangular puzzle featuring the cat image.
TIP: If you’re not sure how to download zip files, go to jennifermaker.com/svgs to learn how.
IMPORTANT: If you haven’t calibrated your Cricut in a while, or if your Print Then Cut projects aren’t cutting precisely, follow the steps in my Patterns in Design Space tutorial to improve your cuts.
STEP 2: PREPARE YOUR PUZZLE IN CRICUT DESIGN SPACE
- Open Cricut Design Space and click “New Project.”
- Click “Upload” and then “Upload Image.”
- Click “Browse.”
- Select the SVG puzzle file of your choice.
NOTE: I’ll use the rectangle. - Click “Open.”
- Click “Continue.”
- On the next screen, click “Upload.”
- The puzzle template is now on your Canvas.

- To add your image, click “Upload.”
- Click “Upload Image.”
- Click “Browse” and select the PNG image you want to use.
NOTE: I’ll use the cat. - Click “Continue.”
- You don’t need to do anything on the next screen, so click “Apply & Continue.”
- Select “Flat Graphic” as the upload type and click “Continue.”
- Click “Upload” to add the image to your Canvas.
- With the Lock icon closed, resize the image to match the puzzle template’s shape and dimensions.
- Select the image and click “Arrange” then “Send to Back.”
- Select both the image and the puzzle, then click ”Align” and select “Center.”
- Click “Attach.”
- Your puzzle is ready.


CUTTING
- Make sure the correct machine is selected, then click “Make.”
- On the “Prepare” screen, you should have one “Print Then Cut” mat.
- Make sure your “Material Size” matches your printable material.
NOTE: I’m using “8.5 in. x 11 in. (Letter).” - Click “Continue.”
- On the “Make” screen, click “Send to Printer.”
- In the “Print setup” window, select your printer, toggle on “Add Bleed” to avoid white sections at the puzzle’s edges, and “Use System Dialog.”
- Click “Print.”
NOTE: Your System Dialog window might be behind the Cricut Design Space window, so minimize it if you don’t see the settings. - In the System Dialog window, make sure your printer is selected, change the paper to “Photo Matte Paper,” and the Quality to “Best,”
NOTE: Not all printer settings will be the same, but you can use my choices as guidelines. - Click “Print.”
- Let the printed design dry a little in case the ink is still a little wet and could smudge.
- Cut out the front of the cereal box to a size larger than your printed sheet, not just the image.
NOTE: Make sure it’s clean and sturdy. - Place the cereal box face up on your clean work surface so the backs of the puzzle pieces will be plain. Make sure there will be enough space to fit the entire sheet on the cereal box piece.
- Peel back about 1” of the printed design’s backing from one end and fold it down so just a little of the sticky section is exposed.
- Apply the paper’s exposed adhesive near one edge of the cereal box.
TIP: Don’t let it stick until you’re sure of the placement! - Use your scraper to adhere the sticker’s edge.
- Reach one hand under the printed sheet, between it and the cereal box. Pull a small section of the backing away from the edge you just secured.
- With your other hand, use the scraper to press the sticker down onto the cereal box in small strips. Peel the backing off from underneath as you go.
TIP: Work slowly and make sure to smooth out any wrinkles before peeling off more backing! - Place the backing paper on top of the design and roll over it with a brayer to make sure it’s secure.
- Use scissors to trim the cereal box along the edges of the sticker paper.
- Place the printed sheet face up on a Purple StrongGrip machine mat with the top left corner aligned on the grid and oriented to match the screen.
NOTE: The black marks on the printed sheet are what the Cricut will use to make the cuts in the right spots, no matter what else is on the mat. - Put the sticker’s backing paper over the design to protect it, then use a brayer to secure the design to the mat.
- Remove the protective paper.
- On your screen, set your “Base Material” to “Cereal Box” and change the “Pressure” to “More” for a cleaner cut.
NOTE: This setting worked for both my cereal box and light chipboard in testing. If you’re using Kraft Board, use the “Kraft Board” setting with “More” Pressure and the Fine-Point Blade. - Check that your Deep-Point Blade is clean and in the clamp.
- Press the flashing “Load/Unload” button to load the prepared mat into your Cricut.
- Press the flashing “Go” button to begin cutting.
- When it has finished cutting, don’t unload the mat right away. Carefully lift a corner of the cardstock to make sure the cuts went all the way through. If not, press the “Go” button again to make a second pass of cuts in the same spots.
- Once the cuts are complete, unload the mat, but don’t remove the pieces right away.
TIP: If you have any issues with your cuts, go to jennifermaker.com/cleaner-cuts.


STEP 3: PUT YOUR PICTURE PUZZLE TOGETHER
- Lift and remove the excess material from around the puzzle.
- Gently flip the machine mat over on your work surface, which might help some of the pieces come off.
- To remove the pieces without damaging them, gently roll back an edge of the mat. Curling the sticky surface will help the flat puzzle pieces start lifting.
- Carefully run your spatula between the pieces and the machine mat to help them come off.
NOTE: The pieces will probably separate from each other. Just watch for any that have tiny connections and help them to avoid ripping the materials. - Here are what my cut pieces look like.
- Gift it or put it together just like a store bought puzzle.


STEP 4: SHOW IT OFF
Here is my finished puzzle!

Notes
Finished Sizes: 6.75” x 8.75”, 7.38” x 7.38”
Answers to Your Questions About Using Puzzle Templates
Q: I want to make my own custom puzzle. How do I design my own puzzle?
A: You can learn how to design your own custom puzzle in my ADVANCE program. Learn more about ADVANCE here!
Q: How do I find images for my custom puzzle?
A: You can use any of the images in my free library! You can also use your own photos and designs, images created through AI generators, graphics from Canva or other online sources, or stock photos for your puzzle.

Q: Can you show me how to make a DIY puzzle?
A: I sure can! Watch my video tutorial or follow the written tutorial above to learn how to create your own puzzle using my puzzle templates in Cricut Design Space.
Q: Is there a trick to putting puzzles together?
A: There are lots of different puzzle methods, but I like to turn all the pieces face up, do the frame, then put small sections together to fill in the middle!
Q: Can I resize the puzzle templates?
A: While I don’t recommend resizing the puzzle smaller, because the puzzle pieces will be too difficult to cut, you can resize the puzzle larger — as long as you have the right sized materials!
Q: Help! My Cricut is cutting in the wrong places!
A: If you haven’t used Print then Cut before, or if it’s been a while, I recommend calibrating your machine.
Q: I only have a Fine-Point blade, can I still make this project?
A: Yes you can! Just be sure to use Kraft board instead of chip board for your puzzle.
Q: I don’t have a Cricut. Can I still make a puzzle?
A: While a Cricut makes the job much easier, it is still possible to cut a puzzle by hand using scissors or a craft knife and my PDF file, which is included in my free downloads for this project.
Q: Can I use poster board to make a puzzle?
A: You can experiment with using poster board for your puzzles, but keep in mind that it may be flimsier than chip board or Kraft board, and you may not be happy with the results.
Q: How do I make a wooden puzzle?
A: Check out my Cut Wood Letters with Cricut tutorial to learn how to make wooden name puzzles!
Q: Do you have other crafts like this one I can make?
A: You can find my original puzzle tutorial here. Get inspired by my DIY Board Game post or Picture Frame Word Search project! Check out my free videos and tutorials to learn useful and popular crafting techniques, and take advantage of my unlimited downloads of SVG and PNG design files to create your own incredible crafts!
Q: Can I make and sell these puzzles?
A: If you want to use my designs and projects for commercial use, please familiarize yourself with my important licensing information before selling your crafts.
Get my free PNG files and puzzle templates to make your own puzzles!
(If you do not see the signup form above, click here.)
I love seeing what you make with my puzzle templates and designs, and how you use them! Inspire others and share a photo of your puzzle in our Facebook group or tag me on social media with #jennifermaker.
Love,

Want to remember this? Save this DIY Picture Puzzle Tutorial to your favorite Pinterest Board!