Learn how to make a 3D pumpkin lantern out of paper!
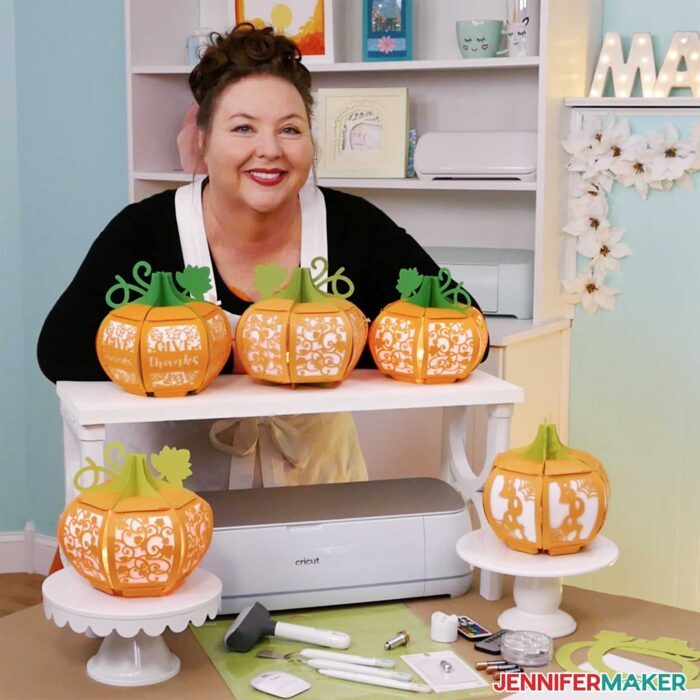
The subtle change of the light, slightly cooler temperatures, and a few more leaves on the ground can only mean one thing … fall is almost here. And that means it’s time to decorate! The JenniferMaker community has been busy talking, and one thing is clear: Light-up paper pumpkins are THE hot craft this fall! I wanted to create my own design — so, naturally, I ended up making four. Plus, I’m going to show you how to design your own 3D pumpkin lantern!
If you haven’t already begun decorating for autumn, this is the perfect craft to get you started. Why? Because it’s so easy with so few materials that you probably already have in your craft supplies. That’s right, my 3D pumpkin lantern design is made almost ENTIRELY out of paper! I’m not kidding — there’s no glue, no tape, nothing other than cardstock, some copy paper, and a battery-powered LED light.

Sometimes, the hardest part of a craft project is simply getting started. It can be nice to have a quick crafting “win” to inspire us to keep creating!
That’s why I love these paper pumpkins. Besides the fact that they’re really beautiful, you only need four sheets of 12″ x 12″ cardstock and an LED light to make them! I’ll show you how you can diffuse the light with some copy paper, too — but that’s totally optional.
I want to note that I was inspired to design this pumpkin lantern by the many different pumpkin lanterns being made and shared by the members of my Cricut Crafters & Makers group, who found their designs originally on Etsy. There, you’ll find many wonderful pumpkin lantern designs available from Etsy sellers in a wide variety of styles and themes. I do want to note that my design is not the same as theirs, so you should expect some differences.
Aside from cardstock, some optional copy paper, and an LED light, you just need a cutting machine and a few basic tools. I’ve got a full list, plus links to where to find them, in my materials section below.
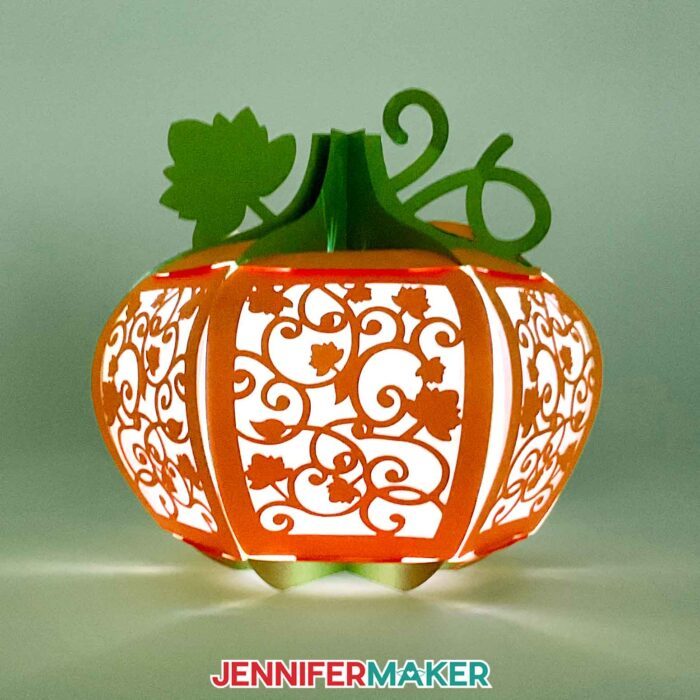
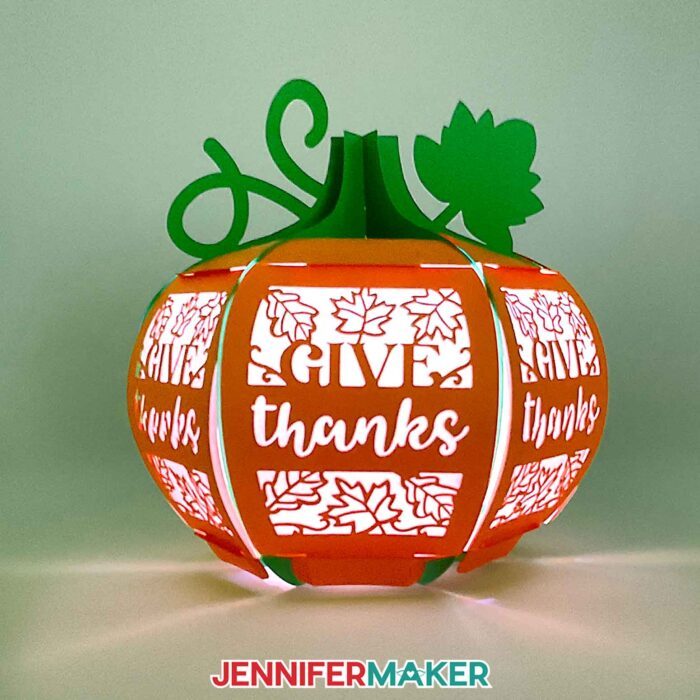
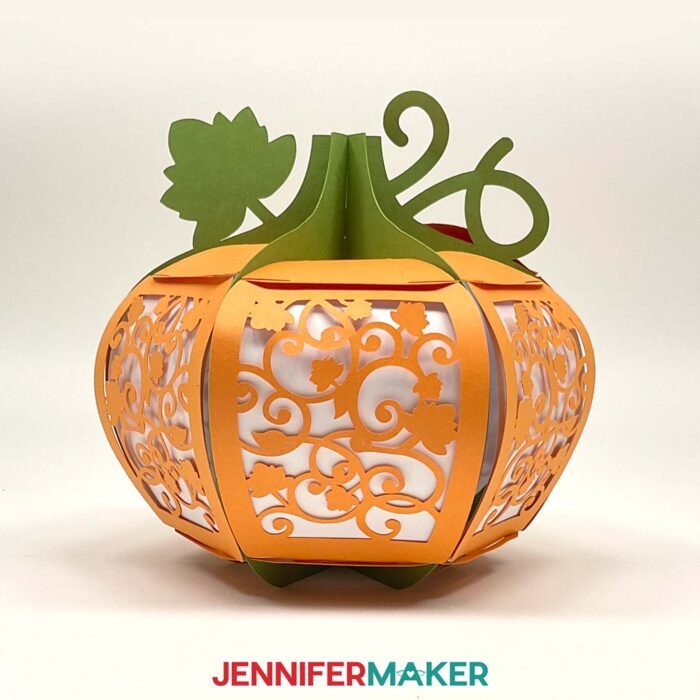
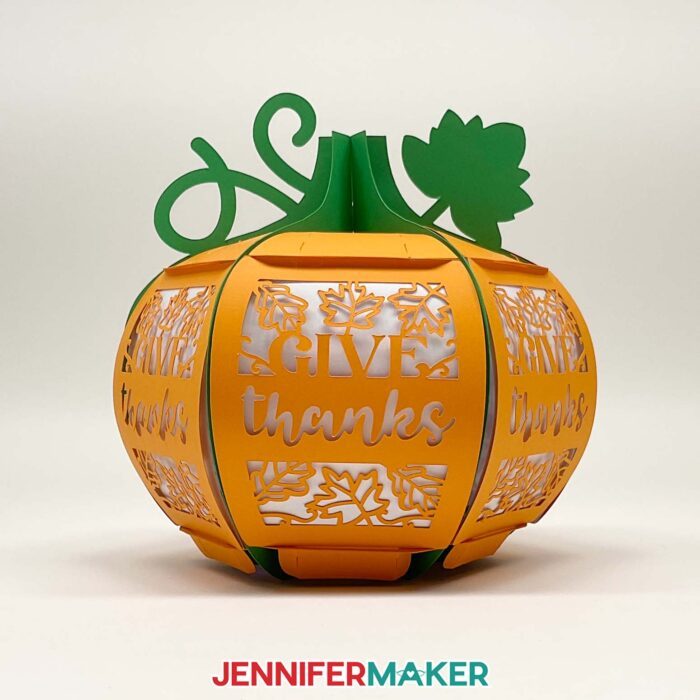
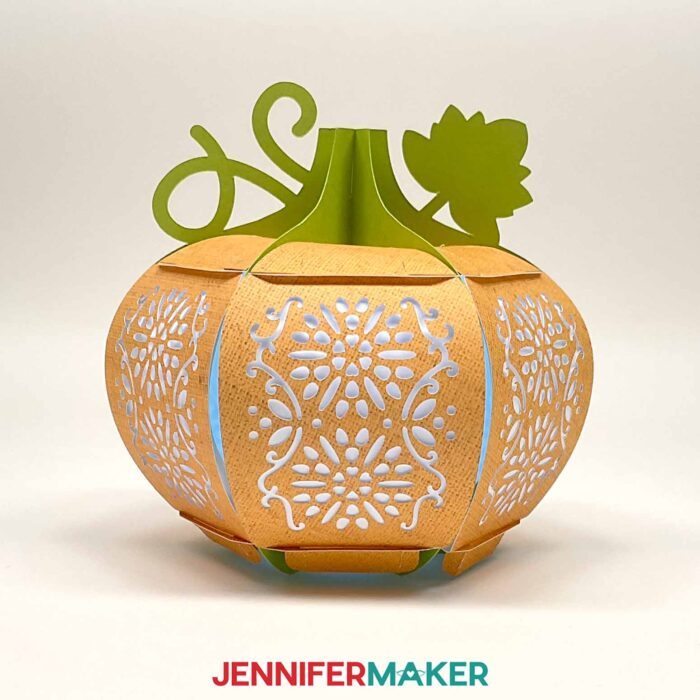
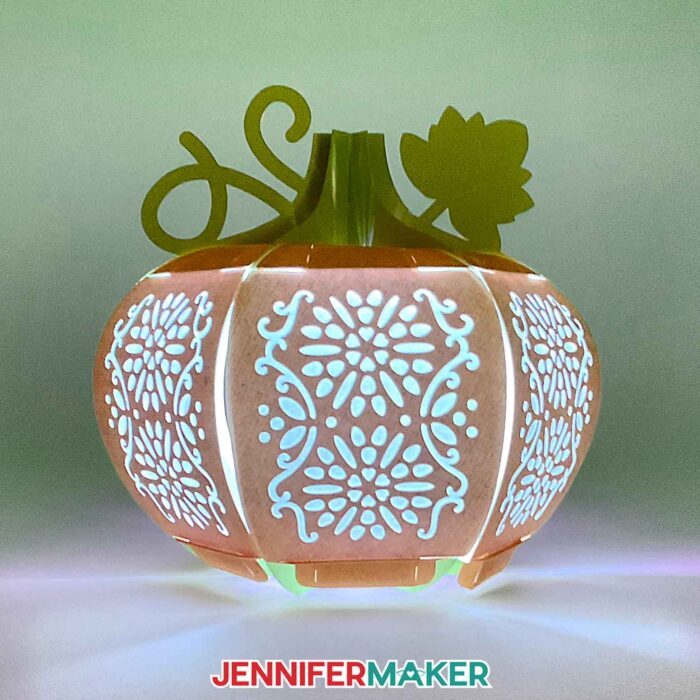
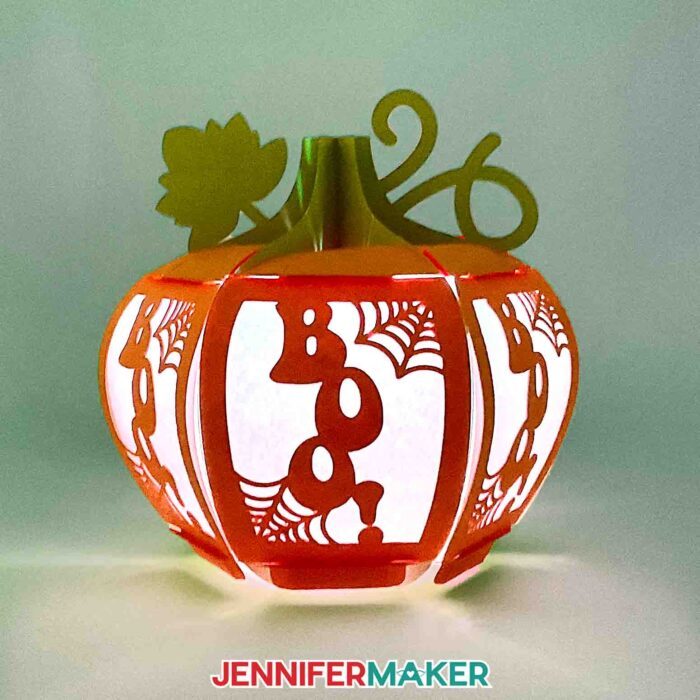
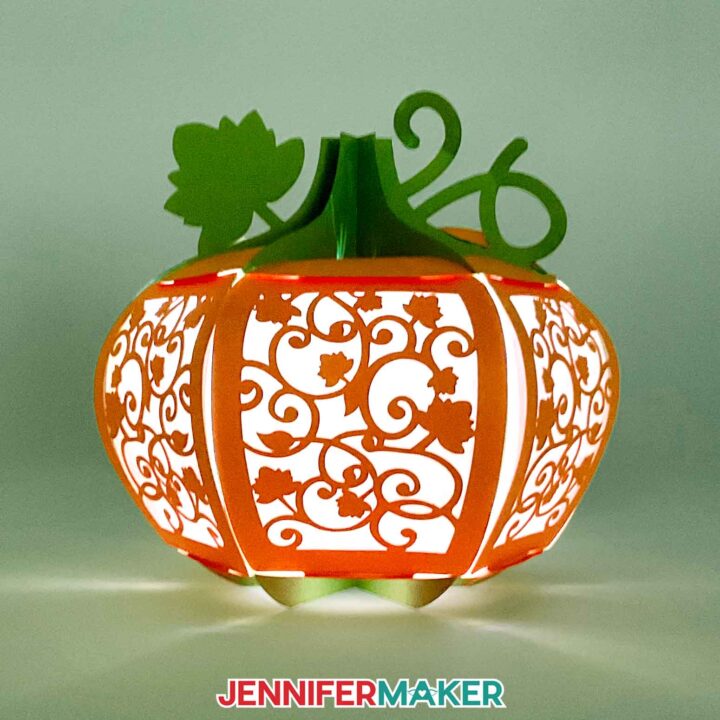
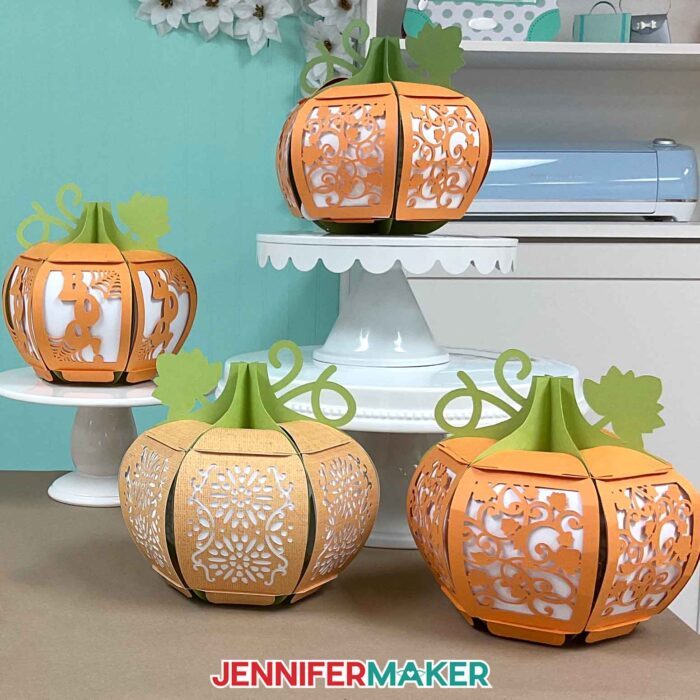
You also need some designs to cut! As far as these awesome paper pumpkins go, I’ve got four different designs to share with you! There’s a filigree leaves design, a floral filigree design, a “Give Thanks” design with fall leaves, and a “BOO!” design with spiderwebs.
Inside the download folder, there are SVG and DXF files for each design that you can use with a cutting machine. There are also PDF files if you’d like to try cutting them out by hand. I would highly recommend using a cutting machine, though, because the small cuts and details will be very difficult to cut with scissors or a craft knife. Cricut machines are powerful tools, which can do all those intricate cuts for you!
In this tutorial I use a Cricut Maker 3 to cut the pieces for my lantern, but you can also use the original maker, any of the Explore series machines, the Venture, or the Cricut Joy Xtra for this project. If you have the smaller Cricut Joy, you’ll find a folder with files to make a Joy-sized version, too!
But what if you want to create your own design? Then, the second part of the tutorial is the best match for you! There, I’ll walk you through adding a word and elements to a blank panel so you can custom design each and every panel of your own unique 3D pumpkin lantern.
I always recommend working with the latest version of Cricut Design Space, so be sure to make any necessary updates before beginning this project.
For the best results, I recommend using the score lines version to make your custom design. I’ll show you how to locate the score layer and set up the panels to make for easier folding. The good news is that it’s not difficult at all with my step-by-step instructions!
Cutting the details of the panel designs will take a little while, so I recommend putting on a fun fall movie or your favorite show while your Cricut does its magic. With this project, I highly recommend cleaning your blade with a balled up piece of aluminum foil between each mat. It will help your Cricut perform at its best and create the cleanest cuts.
After your 3D pumpkin lantern pieces are cut, removing them from the mat can be tricky because of the intricate details. Be sure to have your spatula handy to lift finely-cut areas, and use a weeding tool to poke out any “holes” that didn’t stay behind on your mat.
When you get to the frame pieces, take extraordinary care to not tear the cardstock at the delicate notches. Go slow, it’s worth it!
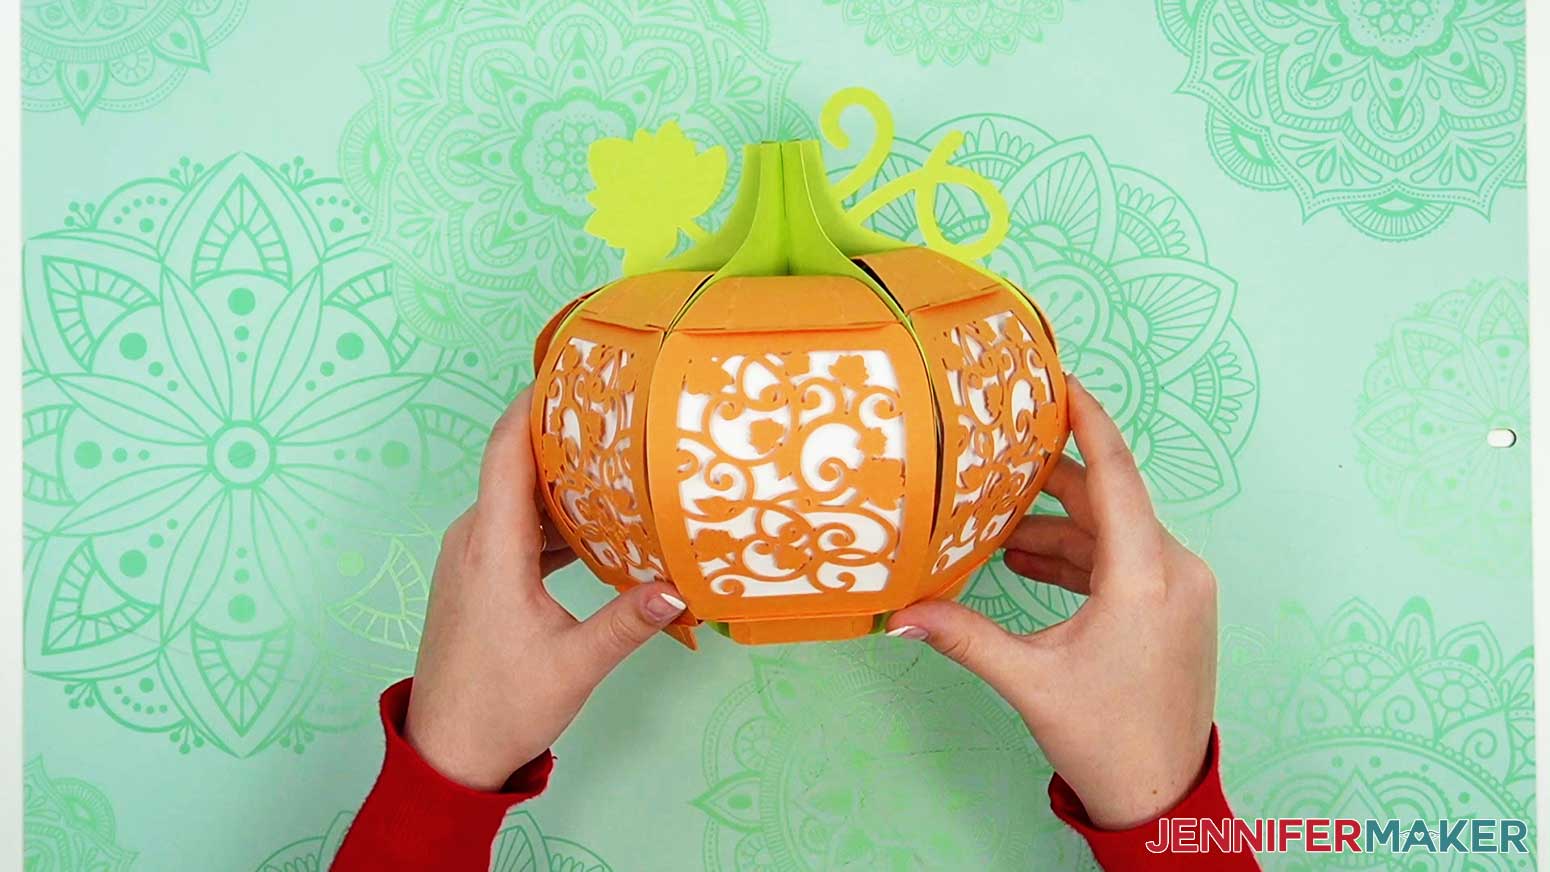
After all your pieces are cut, it’s time to assemble your 3D pumpkin lantern. Again, be extra careful not to tear the cardstock, especially as you insert the hexagon-shaped pieces inside the pumpkin’s frame.
Because the decorative panels end up being slightly curved when put together, small pieces of the design may stick out after your pumpkin is assembled. To help avoid this, you can gently roll each panel lengthwise to create a soft curve. You can use a cylindrical object, such as a tube of vinyl, to help.
To customize these further, you can use different colored cardstock of course, but also patterned, glitter, or even holographic cardstock! Just be sure to only use it on the panels if it’s one-sided, because the white backs will show on the stem and leaf parts.
I love how these are so simple and easy to put together — they only LOOK complex! Plus, the fact that they’re made from paper and ONLY paper makes them that much easier. Who doesn’t have some cardstock around, right?
Ready to learn how to make a 3D pumpkin lantern? This post contains some affiliate links for your convenience (which means if you make a purchase after clicking a link I will earn a small commission but it won’t cost you a penny more)! Read my full disclosure policy.
Materials And Tools to Make a Paper Pumpkin Lantern
See my full and complete Amazon shopping list for the exact items used in this project!
- Two (2) Sheets of Orange 12” x 12” 65-100 lb Cardstock (or three sheets of 8.5″ x 11 ” cardstock)
- Two (2) Sheets of Green 12” x 12” 65-100 lb Cardstock (or three sheets of 8.5″ x 11″ cardstock)
- (Optional for the diffuser panels) Two (2) Sheets of 8.5″ x 11″ Copy Paper -OR- Two (2) Sheets of 8.5” x 11” Colored Vellum -OR- One (1) Sheet of 12” x 12” Wax Paper or Parchment Paper
- A way to light up your pumpkin, such as One (1) Battery-Operated LED Puck Light -AND- Three (3) AAA Batteries -OR- One (1) Remote-Controlled LED Tea Light -OR- One (1) Strand of Fairy Lights
- A way to cut your materials – I’m using the Cricut Maker 3, but you can also use the Cricut Maker, a Cricut Explore Series machine, or the Cricut Venture. or even the Cricut Joy Xtra
- Green StandardGrip Machine Mat 12″ x 12″
- (Optional for file with score lines) Scoring Stylus -OR- Single Scoring Wheel
- Brayer
- Spatula
- Scraper
- Weeding Tool (for popping out small cutouts from intricate areas)
- Design #534 – My free pumpkin lantern SVG/DXF/PDF design files are available in my free resource library – get the password by filling out the form at the bottom of this page
How to Make a 3D Pumpkin Lantern!
3D Pumpkin Lantern
Learn how to make a 3D pumpkin lantern completely out of paper with no glue or tape required!
Materials
- Two (2) Sheets of Orange 12” x 12” 65-100 lb. Cardstock
- Two (2) Sheets of Green 12” x 12” 65-100 lb. Cardstock
- Two (2) Sheets of 8.5" x 11" Copy Paper (optional for diffuser panels) -OR-
- Two (2) Sheets of 8.5” x 11” Colored Vellum (optional for diffuser panels) -OR-
- One (1) Sheet of 12” x 12” Wax Paper or Parchment Paper (optional for diffuser panels)
- One (1) Battery-Operated LED Puck Light -OR-
- One (1) Remote-Controlled LED Tea Light -OR-
- One (1) Strand of Fairy Lights
- Three (3) AAA Batteries (for LED Puck Light)
- Design #534 (My free SVG/PDF/DXF design files are available in my free resource library - get the password by filling out the form at the bottom of this page)
Tools
- A way to cut your cardstock - I’m using the Cricut Maker 3, but you can also use the Cricut Maker, a Cricut Explore Series machine, the Cricut Venture, or even the Cricut Joy Xtra.
- Cricut Green StandardGrip Machine Mat 12" x 12"
- Scoring Stylus (optional for file with score lines) -OR-
- Single Scoring Wheel (optional for file with score lines)
- Brayer
- Spatula
- Scraper
- Weeding Tool (for popping out small pieces from intricate areas)
- Tweezers (optional)
Instructions
STEP 1: GET MY FREE 3D PUMPKIN LANTERN DESIGNS
First, download my 3D Pumpkin Lantern designs from my free library -- look for Design #534. Alternatively, you can use the Save This Project form near the top of this post and the design link will be emailed to you.
There are five designs in the main SVG folder: a leaves filigree design, a flowers filigree design, a “Boo!” design, a “Give Thanks” design, and a blank design that you can customize with your own design, word, or phrase. I will show you how to make the leaves design and how to customize the blank design with the word “Boo!” in Cricut Design Space. The "Files for Cricut Joy" folder has smaller SVGs with a few simplifications to cut on the smaller machine.
Upload the files you need to Design Space to get started.
TIP: If you’re not sure how to upload, go to jennifermaker.com/svgs to learn how to unzip and upload SVG files.
STEP 2: PREPARE YOUR DESIGN
CRICUT DESIGN SPACE
1. Open Cricut Design Space and click “New Project.”
2. Click “Upload” and then “Upload Image.”
3. Click “Browse.”
4. Select the SVG file.
5. On the Prepare to Upload screen, it will say “Cut image” with the design preview.
6. Click “Upload.”
7. Find your design in Recent Uploads and add it to the Canvas.
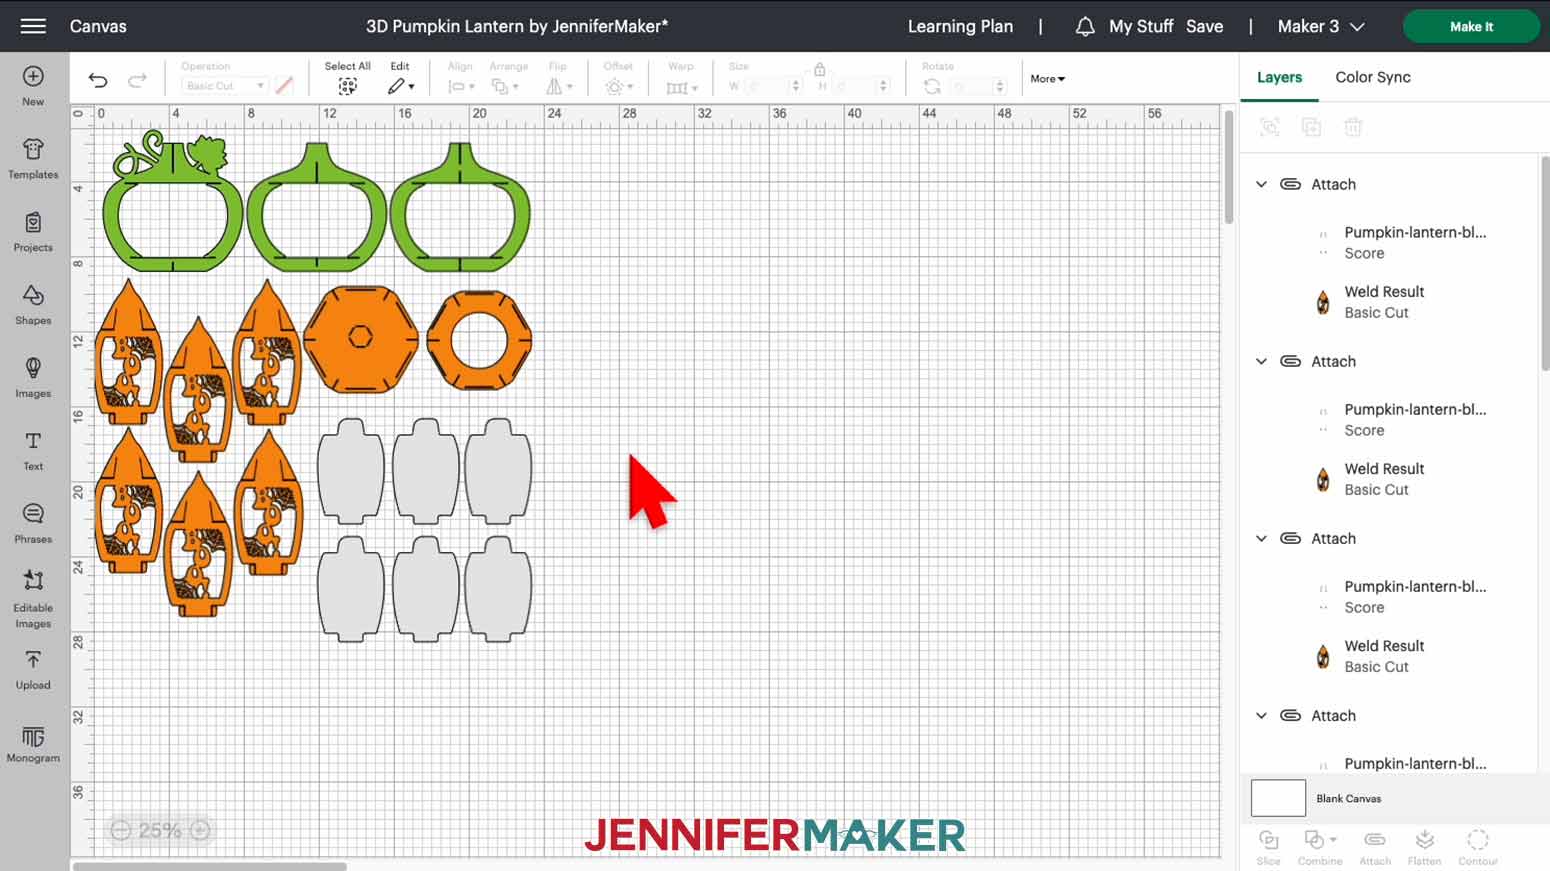
8. Click the minus (-) sign to zoom out and see the entire design (25% works well).
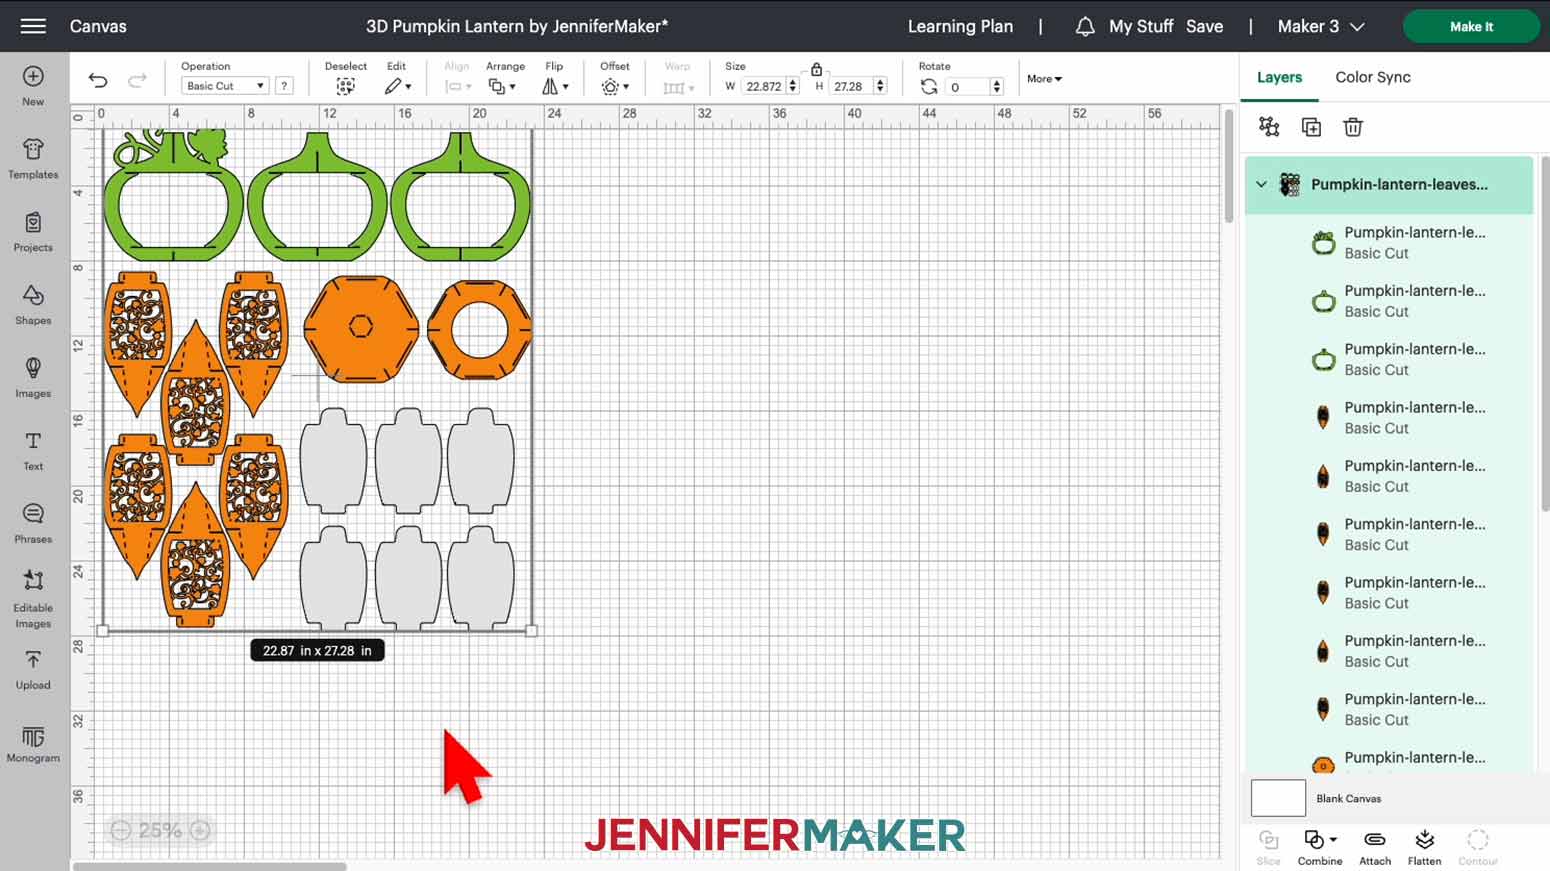
9. Make sure the correct machine is selected in the top right.
10. Click “Make It.”
11. If prompted, click "On Mat," choose your mat size, and click “Confirm.”
12. On the Prepare Screen, you should have seven mats.
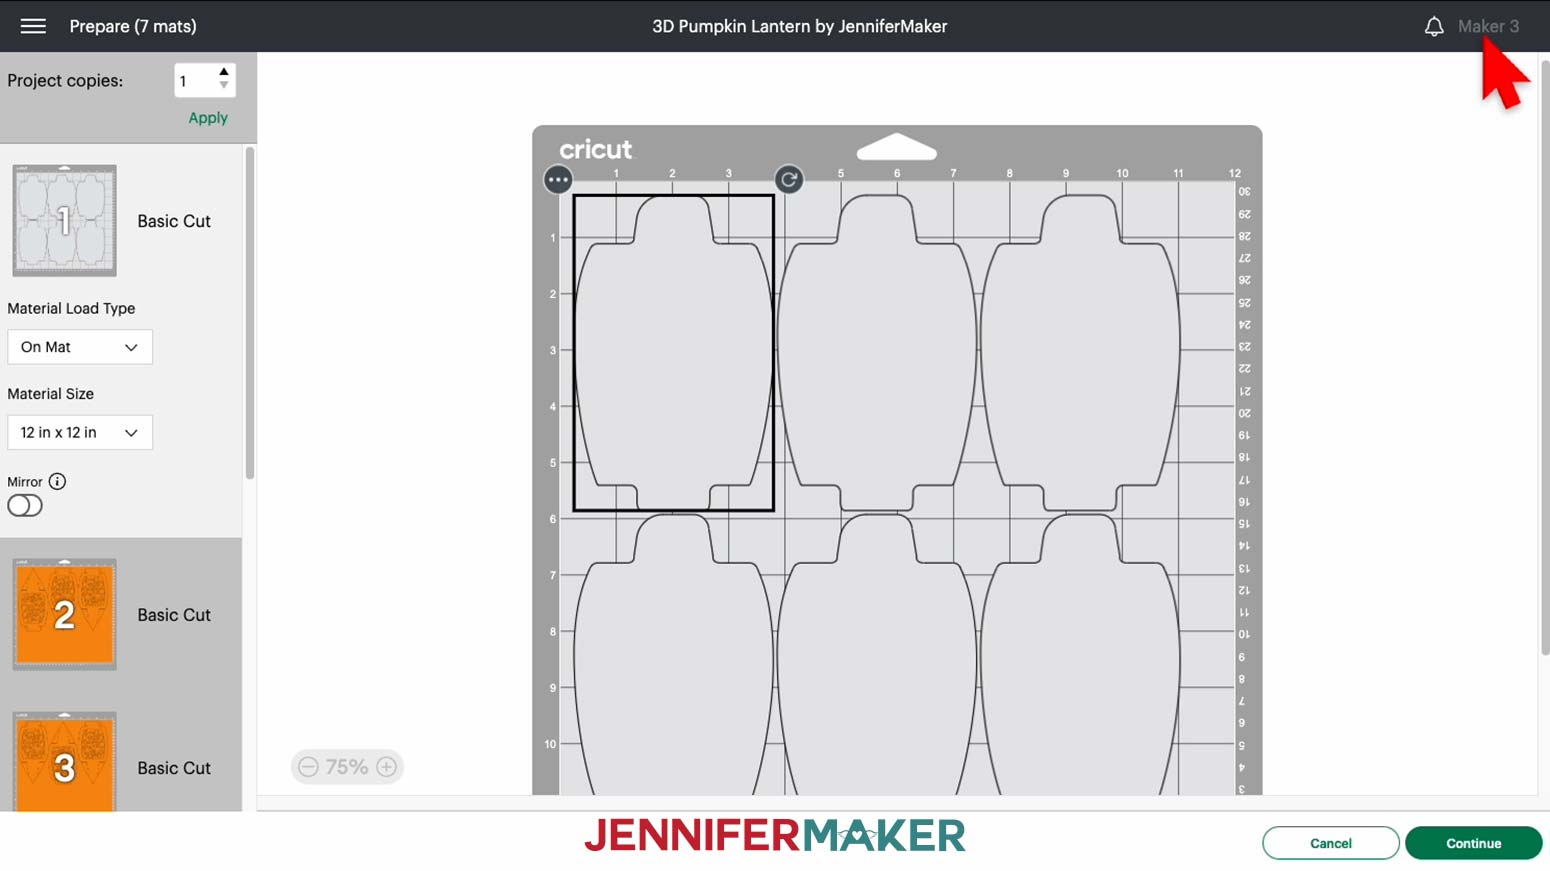
TIP: You can rearrange your orange and green pieces to fit on two 12” x 12” orange mats and two 12” x 12” green mats to save time and materials. If you're using 8.5" x 11" paper, don't forget to change the Material Size for those mats.
13. Select the first mat again and click “Continue.”
VARIATION: CUSTOMIZE YOUR PANELS WITH A WORD OR PHRASE
NOTE: In order to customize our lantern in Design Space, we need to use a file with score lines for the folded parts. I’ve included red score lines in the blank SVG file and will show you how to convert and attach them to your finished design below.
1. Follow steps 1-8 above to upload the blank SVG file to Design Space and add it to your Canvas.
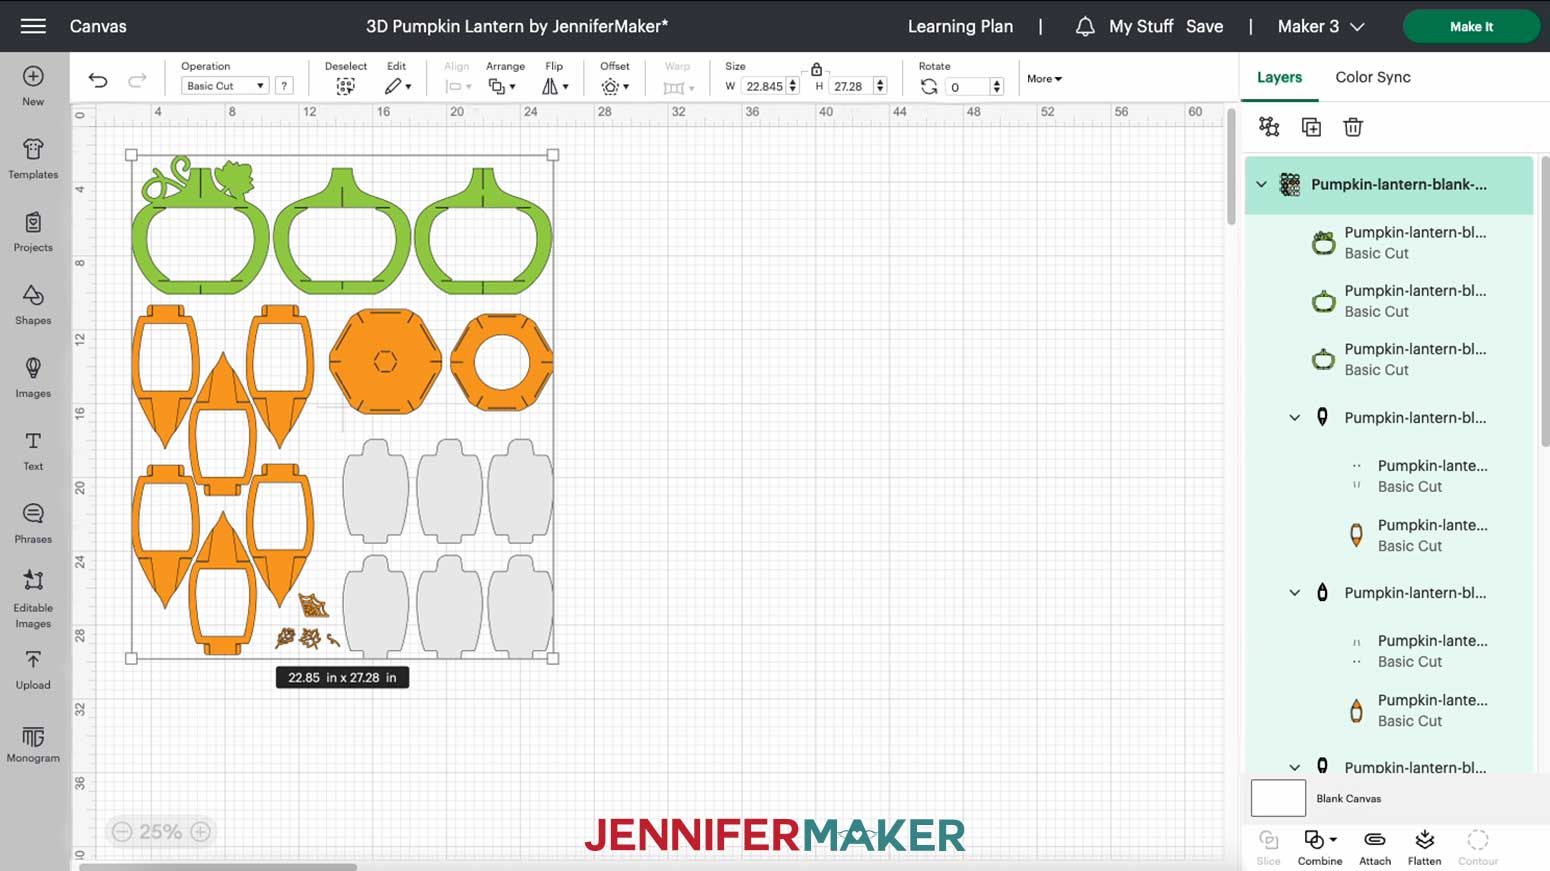
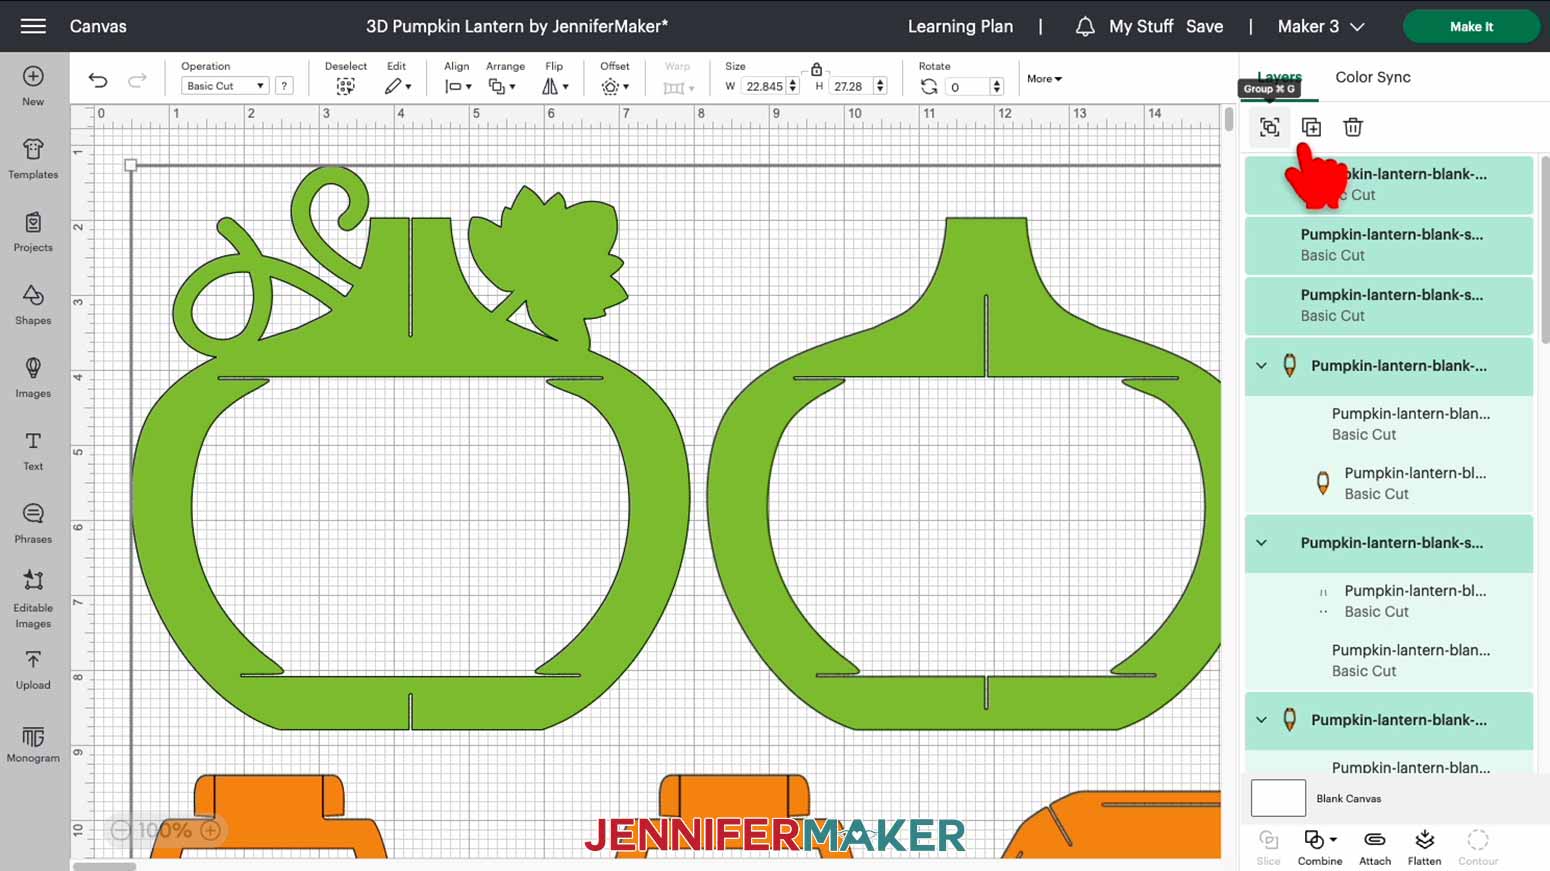
2. Click the Ungroup icon.
3. Click the "Text" icon to create a text box.
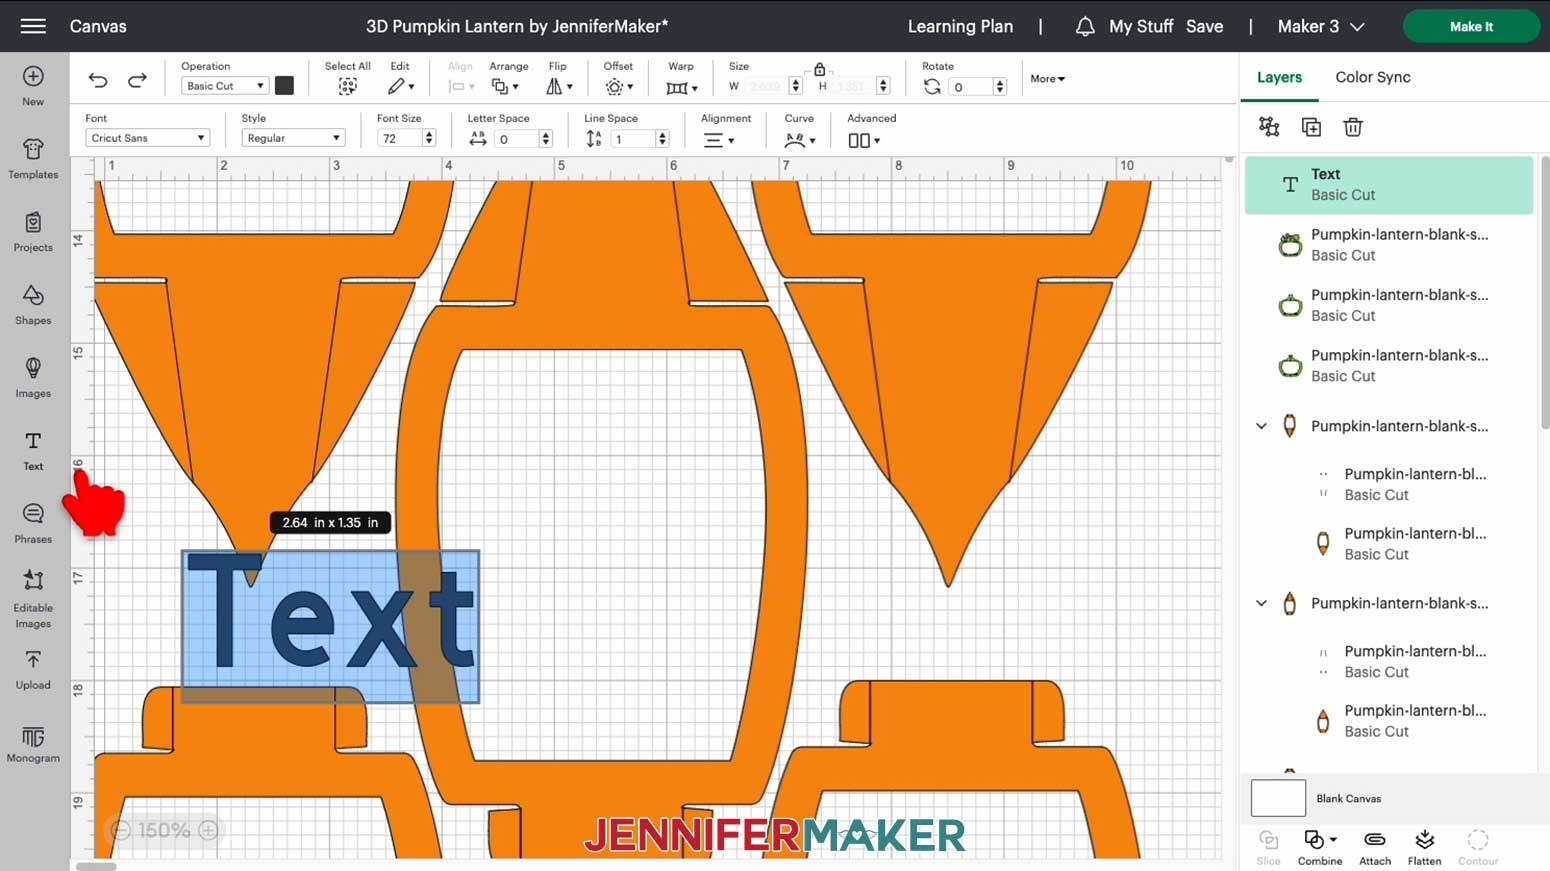
4. Type the word you want to use. I'm going to type "BOO!"
TIP: If you can't see the word well, click on a blank area of the Canvas to exit the editing mode, and then click and drag the text box to a clear area.
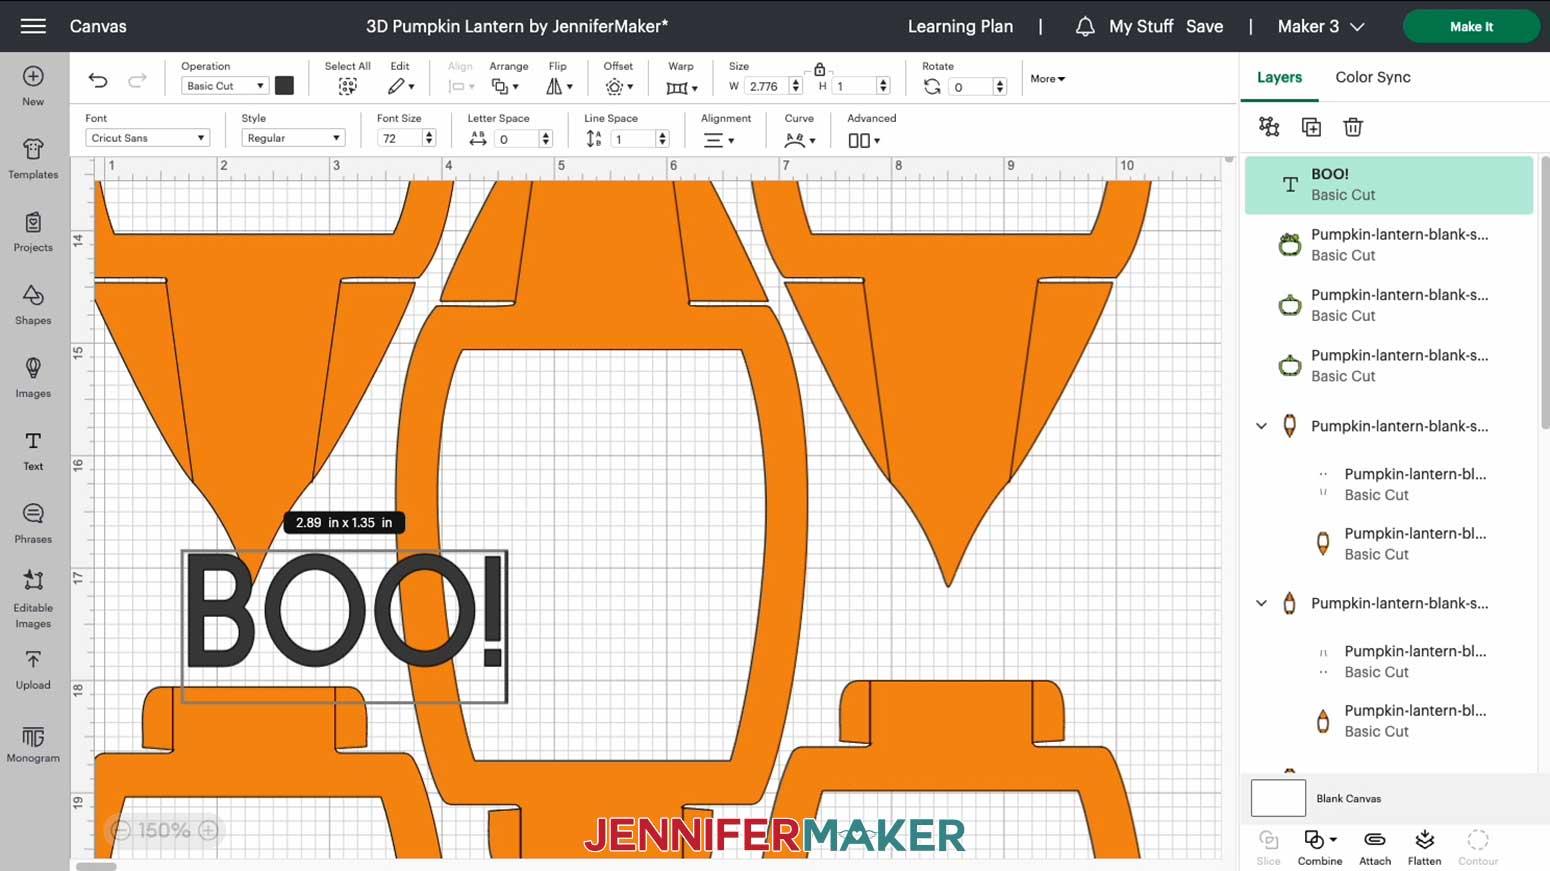
5. Single-click the text box to select it, if it isn't still selected.
6. Click the Font Menu dropdown arrow to select a font.

7. Click "System" to view your installed fonts. You can type the font name or scroll through the options. I’ll use a font I designed called JM Groovy, so I’ll search for that.
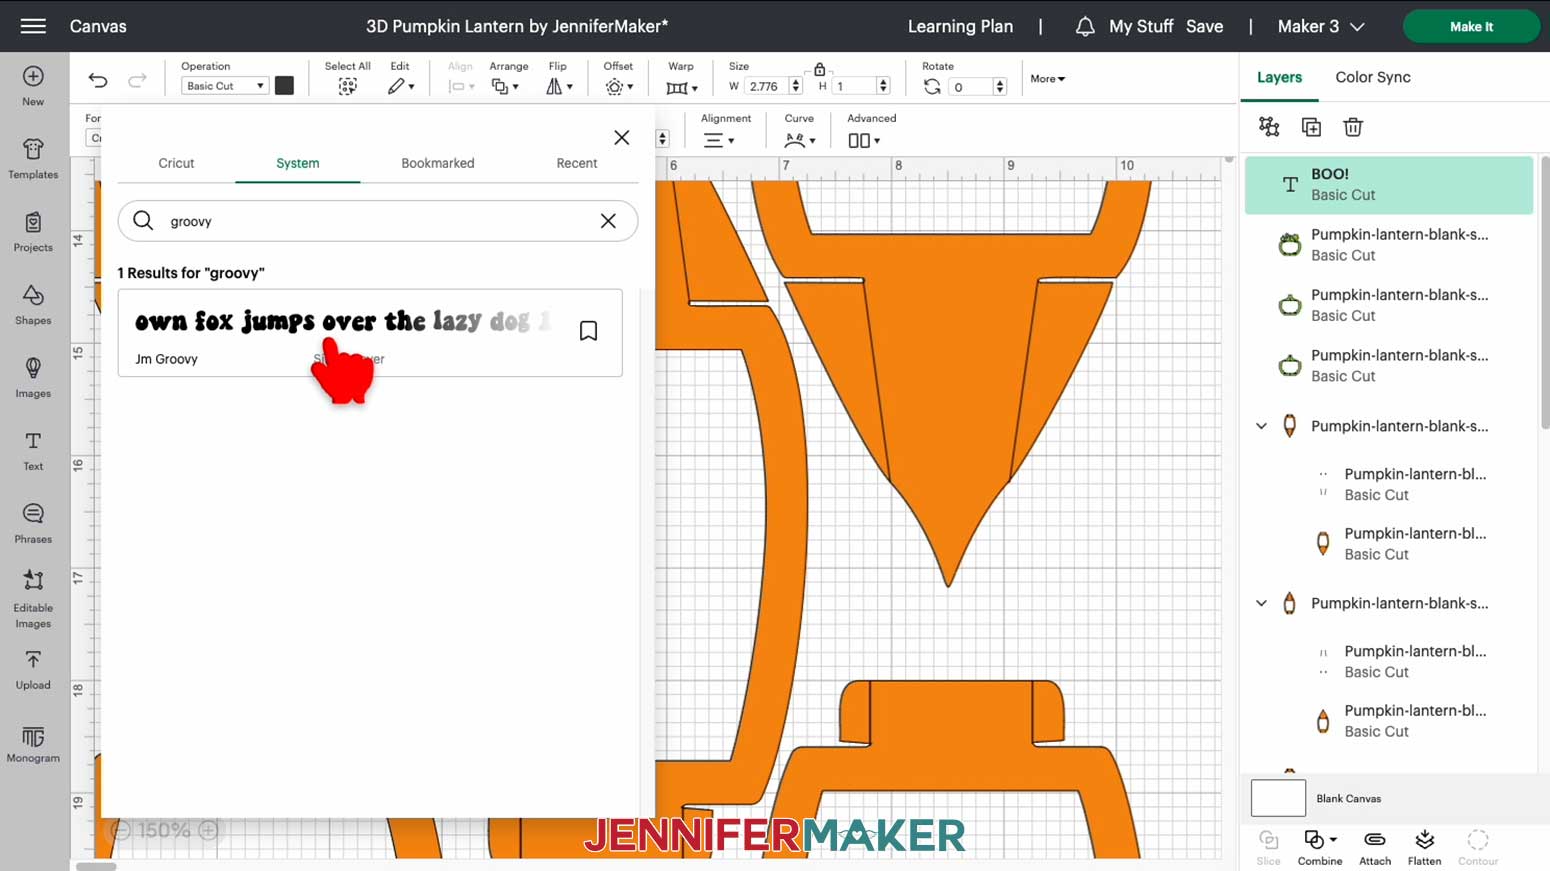
TIP: If you need help installing fonts for use in Cricut Design Space, check out this blog post to guide you through the steps.
8. To stack the letters vertically, single-click on the text to select it. Then click the "Advanced" icon and select "Ungroup to Letters."
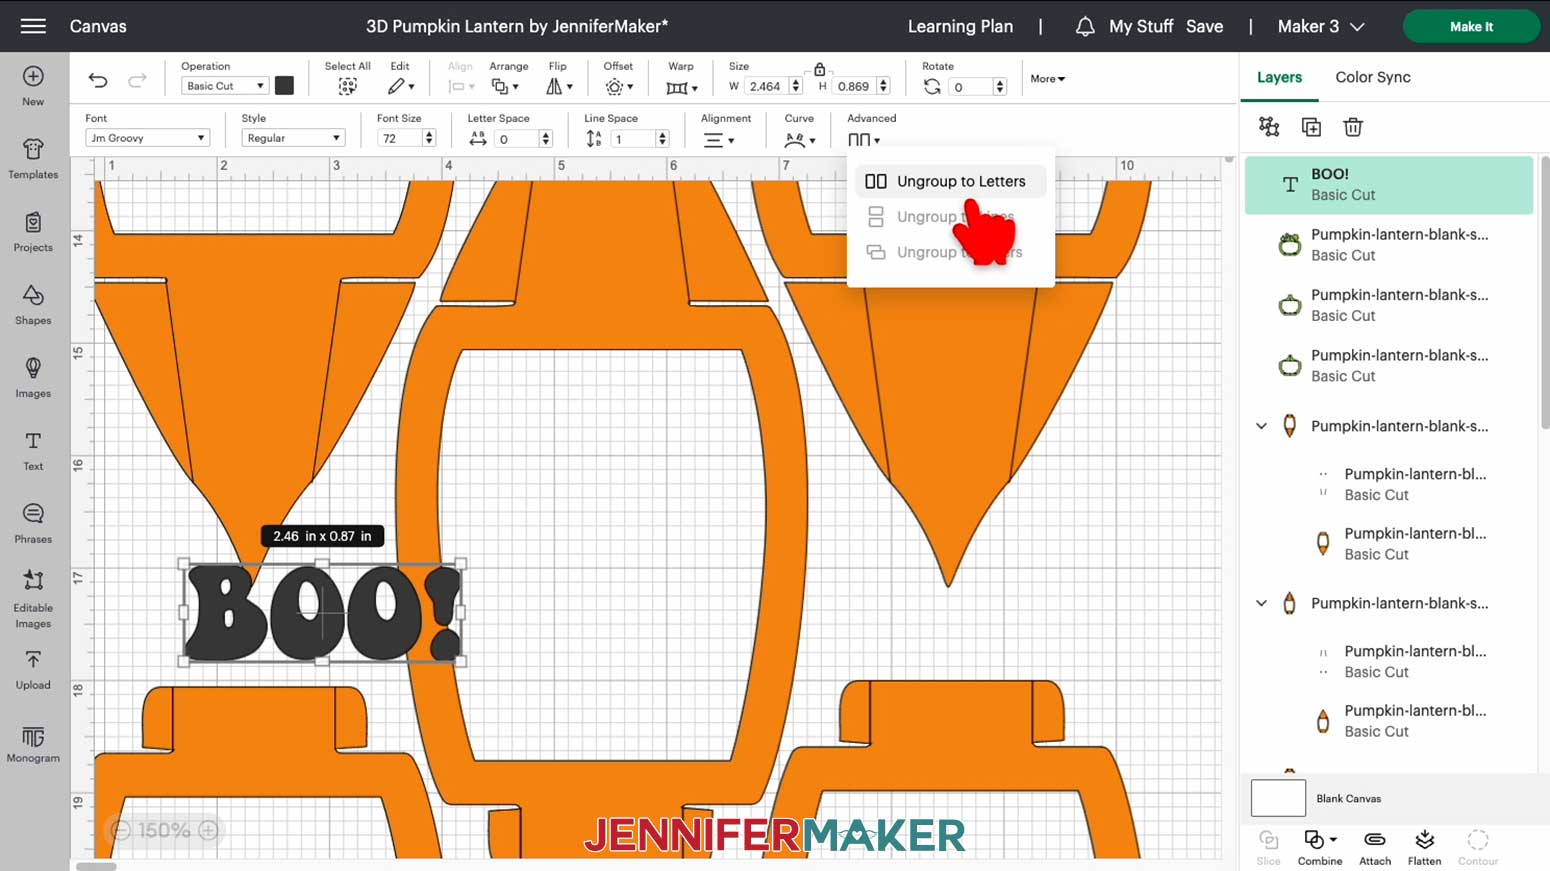
TIP: If you chose a font with thin letters, you may need to thicken some or all of them so they will cut well. You can use the Offset tool. Just select the letter you’d like to thicken, click “Offset,” adjust the settings until you’re happy with the added thickness, and then click “Apply.” Use the new Offset letter in your design and delete the original.
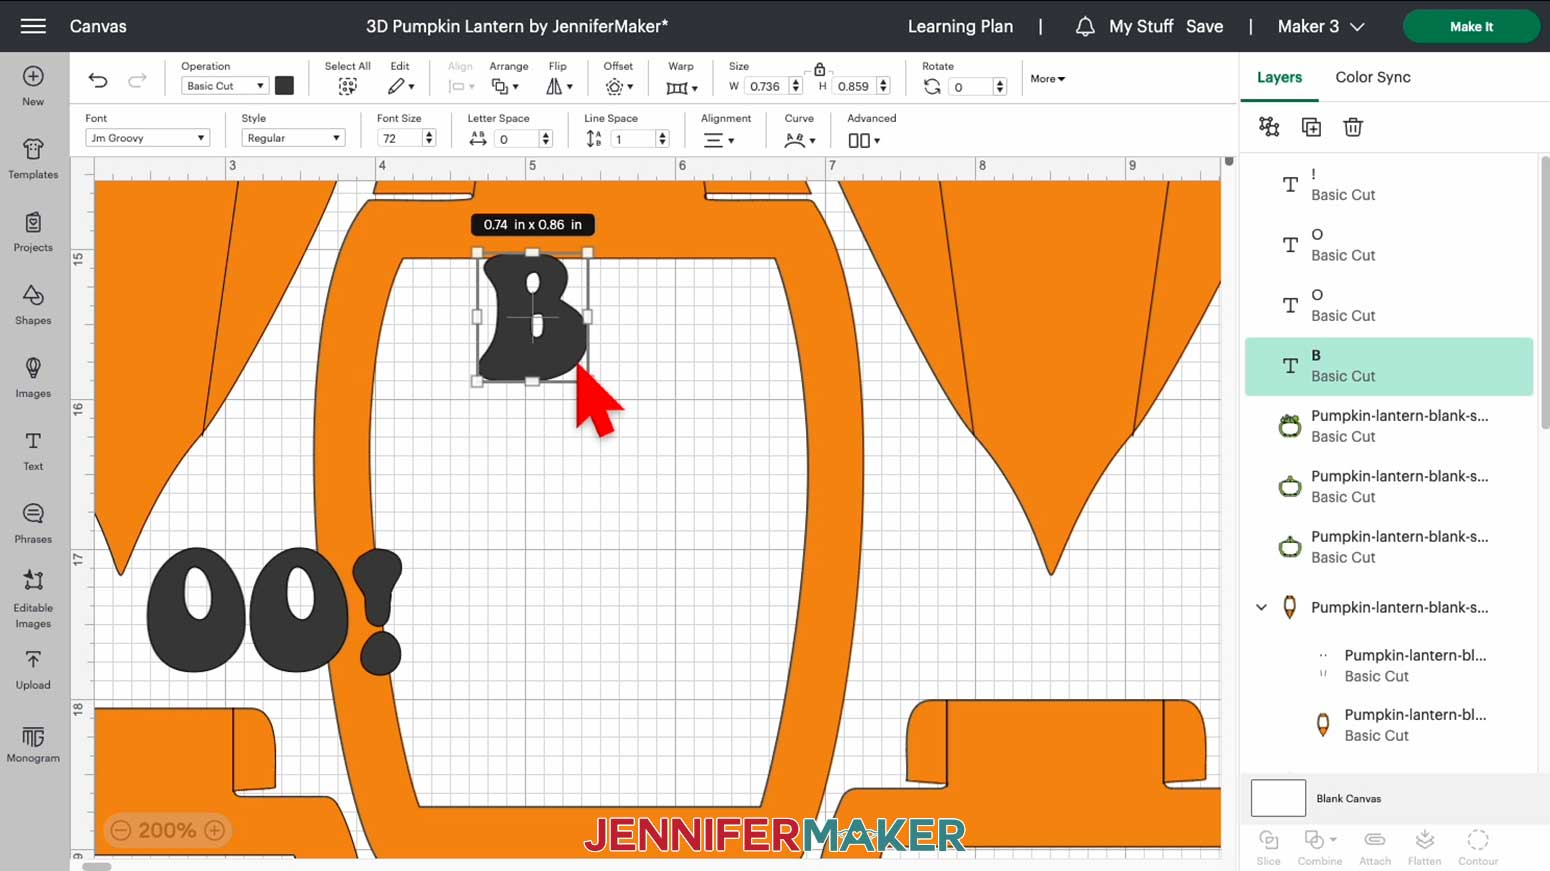
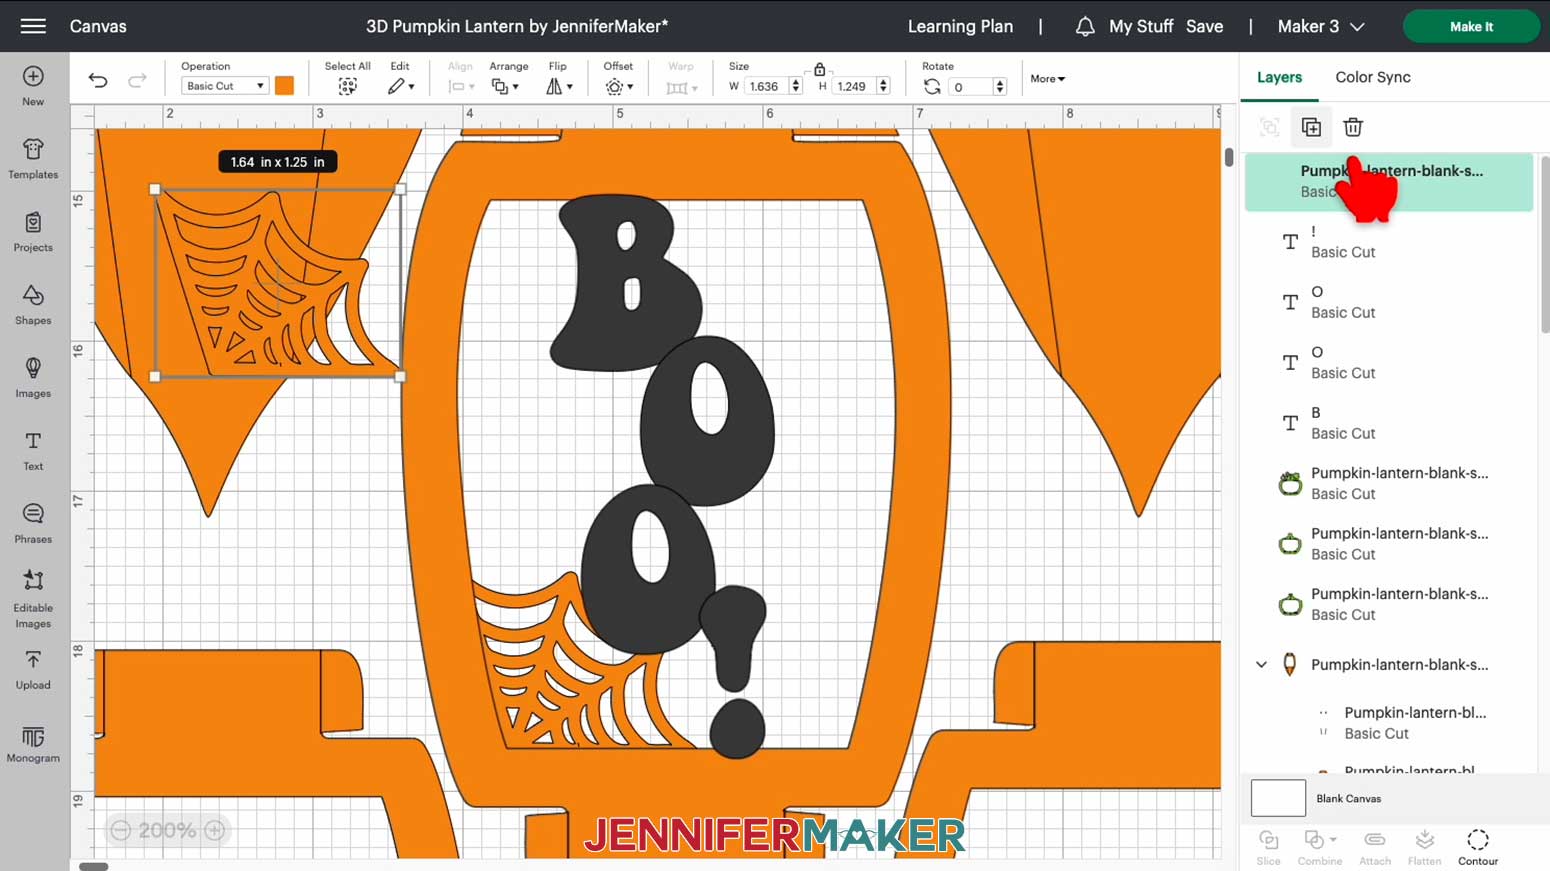
9. We can now manually move each of the letters into place. First select the "B” and drag it within the blank frame of the top center orange panel. We’ll use this panel for our customization because it’s already oriented with the top facing up on our Canvas.
10. Position the “B” so its top is just barely overlapping the top of the frame. Zoom in if needed.
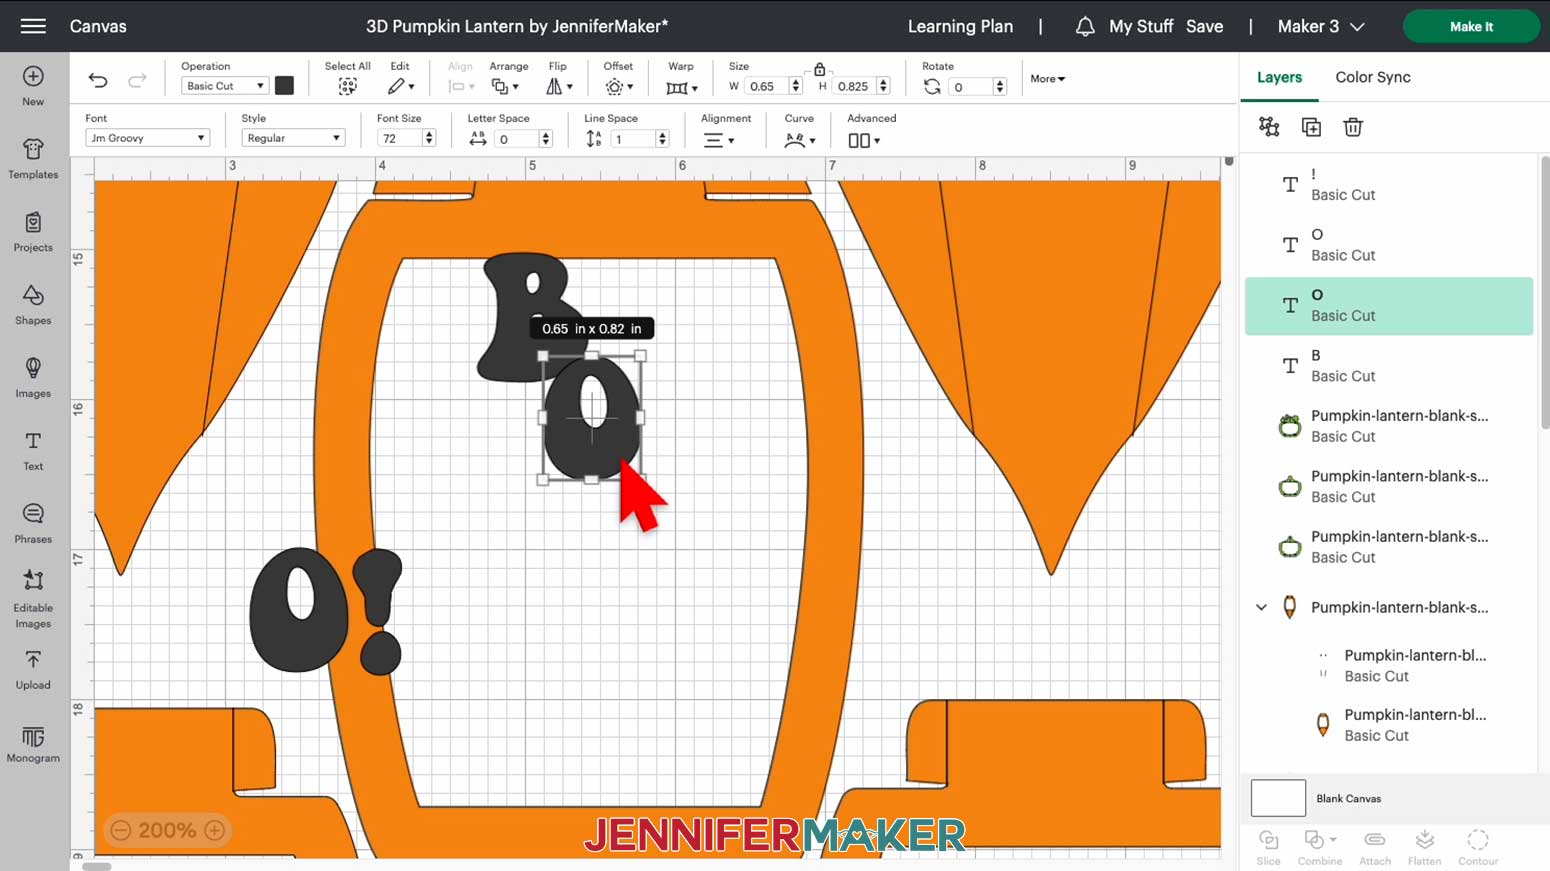
11. Now move one of the “O” text boxes into the same panel’s frame. Make sure it is slightly overlapping the “B.”
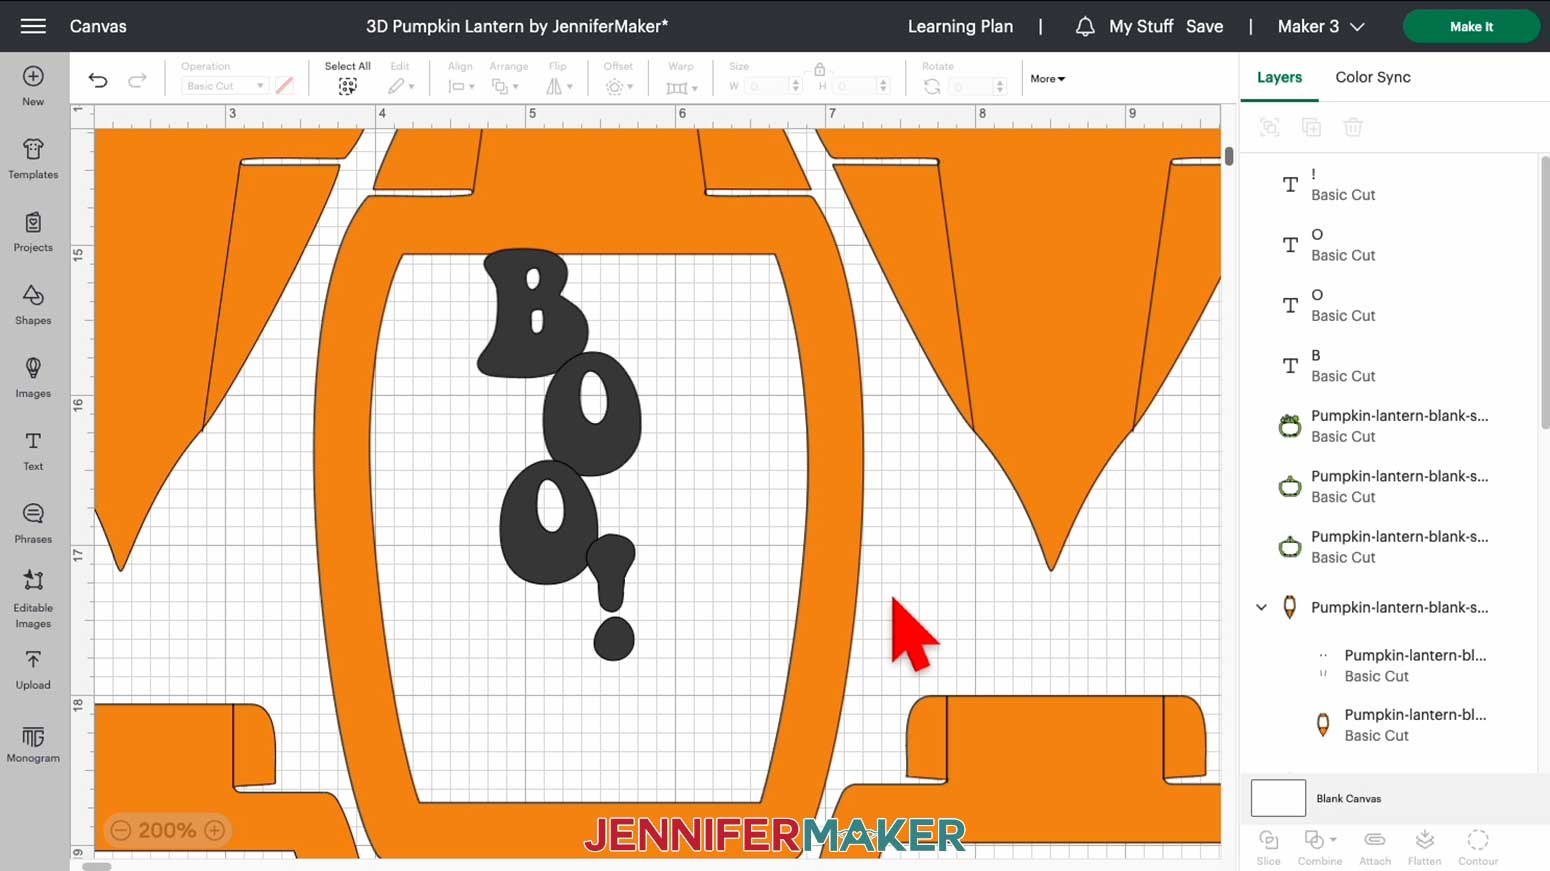
12. Move the other “O” and the exclamation point so they are stacked and offset from each other, just like the “B” and first “O.”
IMPORTANT: When positioning your letters, make sure each one is touching another letter or the inside frame of the orange panel. It's important that the top letter slightly overlaps the top of the frame, and the bottom letter slightly overlaps the bottom of the frame, or this technique won't work right.
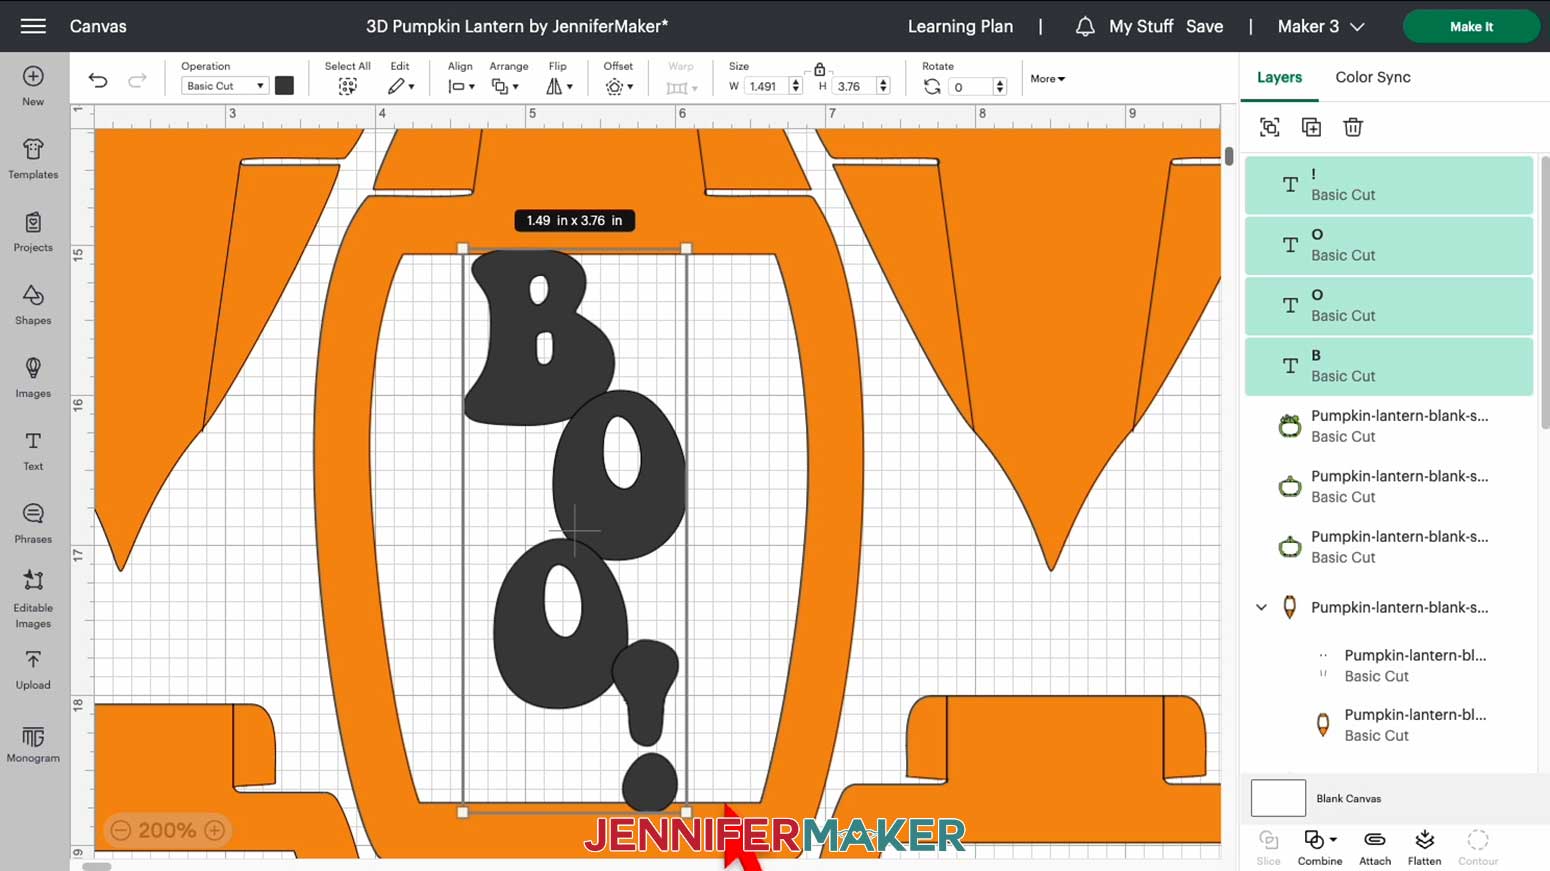
13. If you need to resize your letters, hold Shift and select all of them on your Canvas. Click and drag a corner handle on the bounding box inward or outward until the word is sized to fit within the frame of the panel.
14. If you are using a different word, you may have other letters to adjust. Repeat steps 9-13 as necessary.
15. You can also add some optional design elements to your panel to customize it. I’ve included a spiderweb, leaves, and a filigree design in the file. Choose the designs you’d like to use and delete or hide the rest.
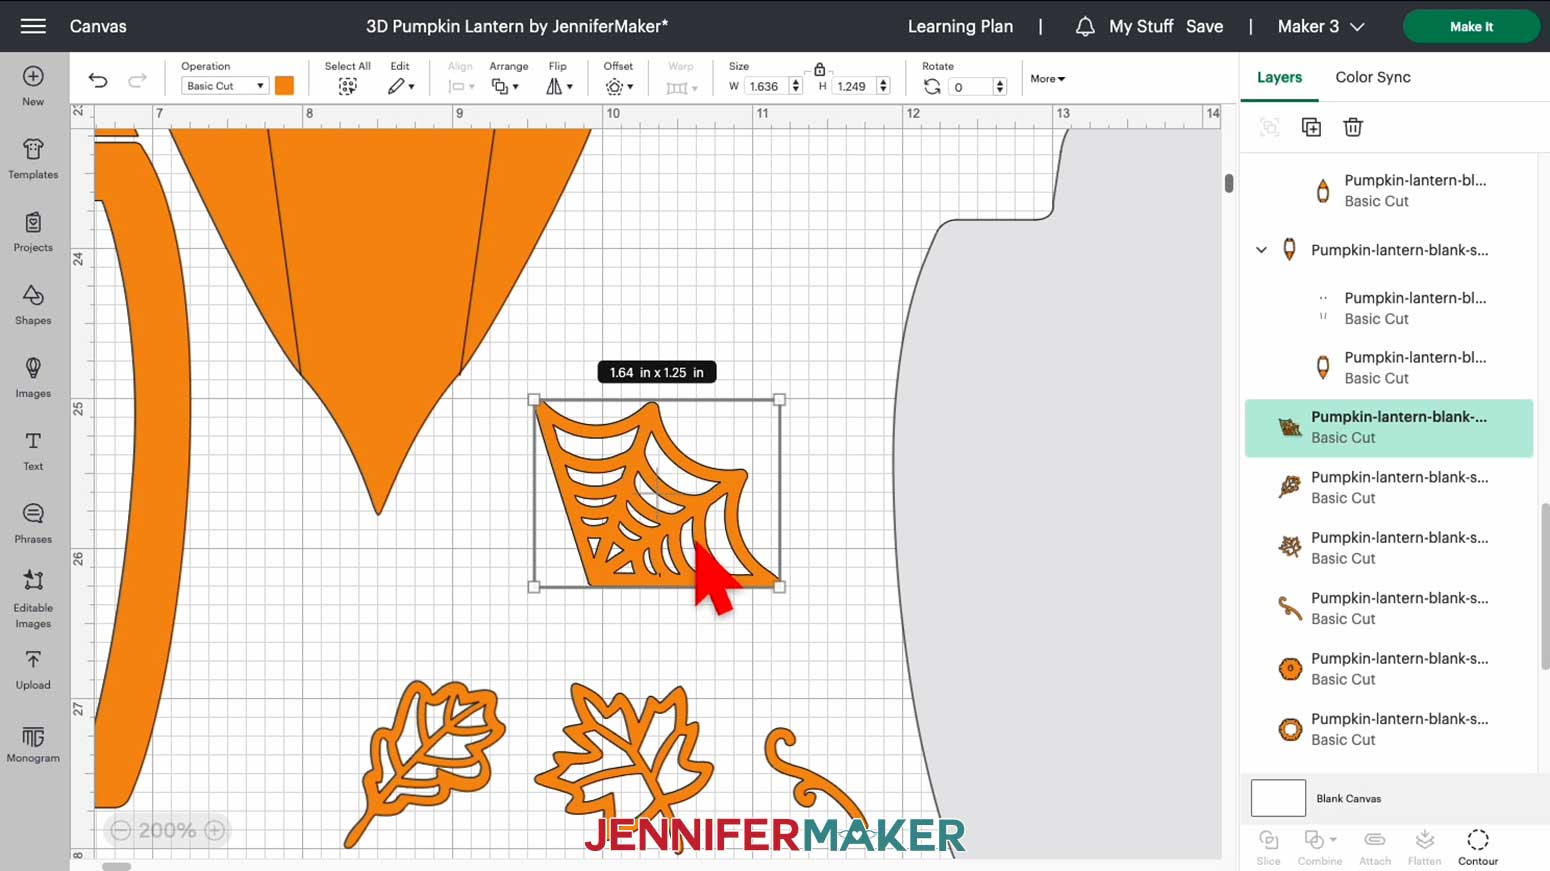
16. To add 2 spiderwebs like me, Duplicate the layer.
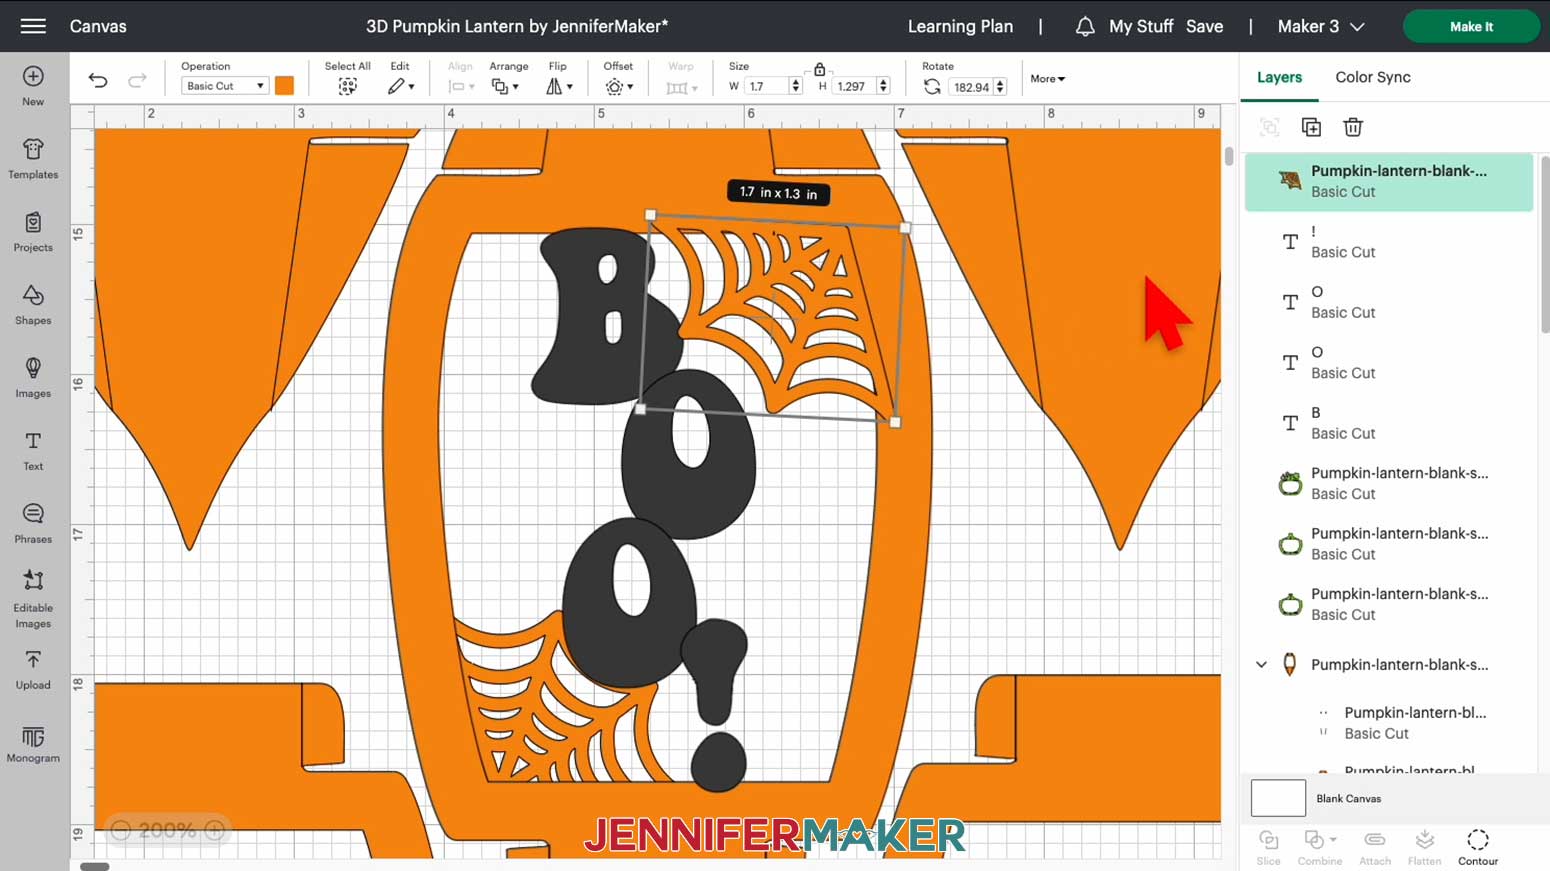
17. Move a spiderweb into each corner, so each slightly overlaps the frame or a letter on at least one side. Resize and rotate any elements as needed.
18. Ungroup the orange base panel layer and its score layer.
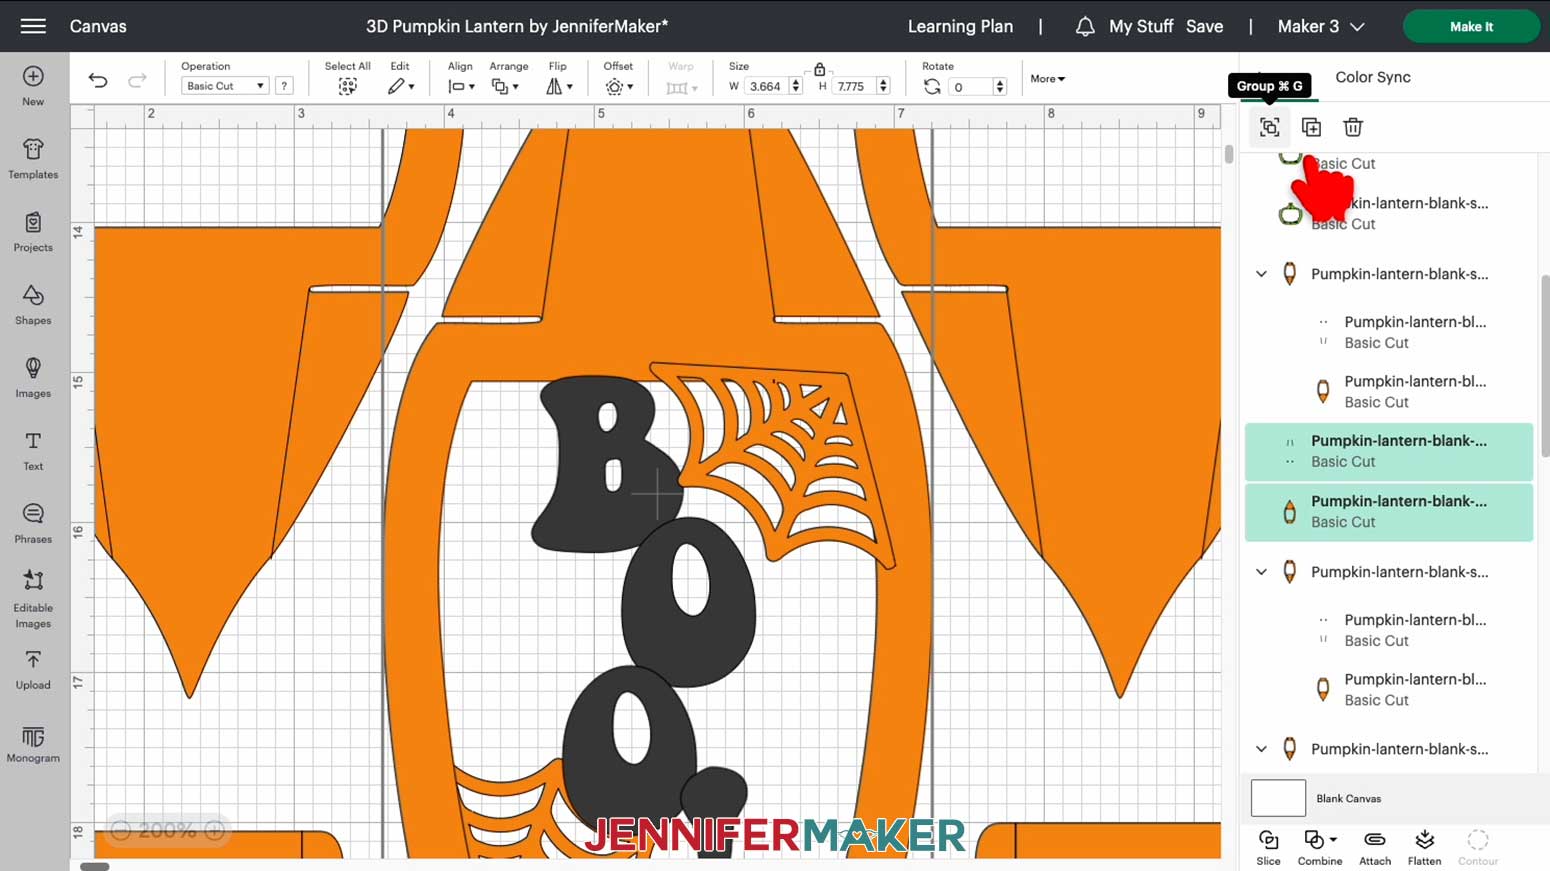
19. Click a blank space on your Canvas to deselect everything.
20. Hold Shift and select all of the letters in your word, all of your design elements, and the orange base panel layer.
21. Click "Combine" and choose "Weld."
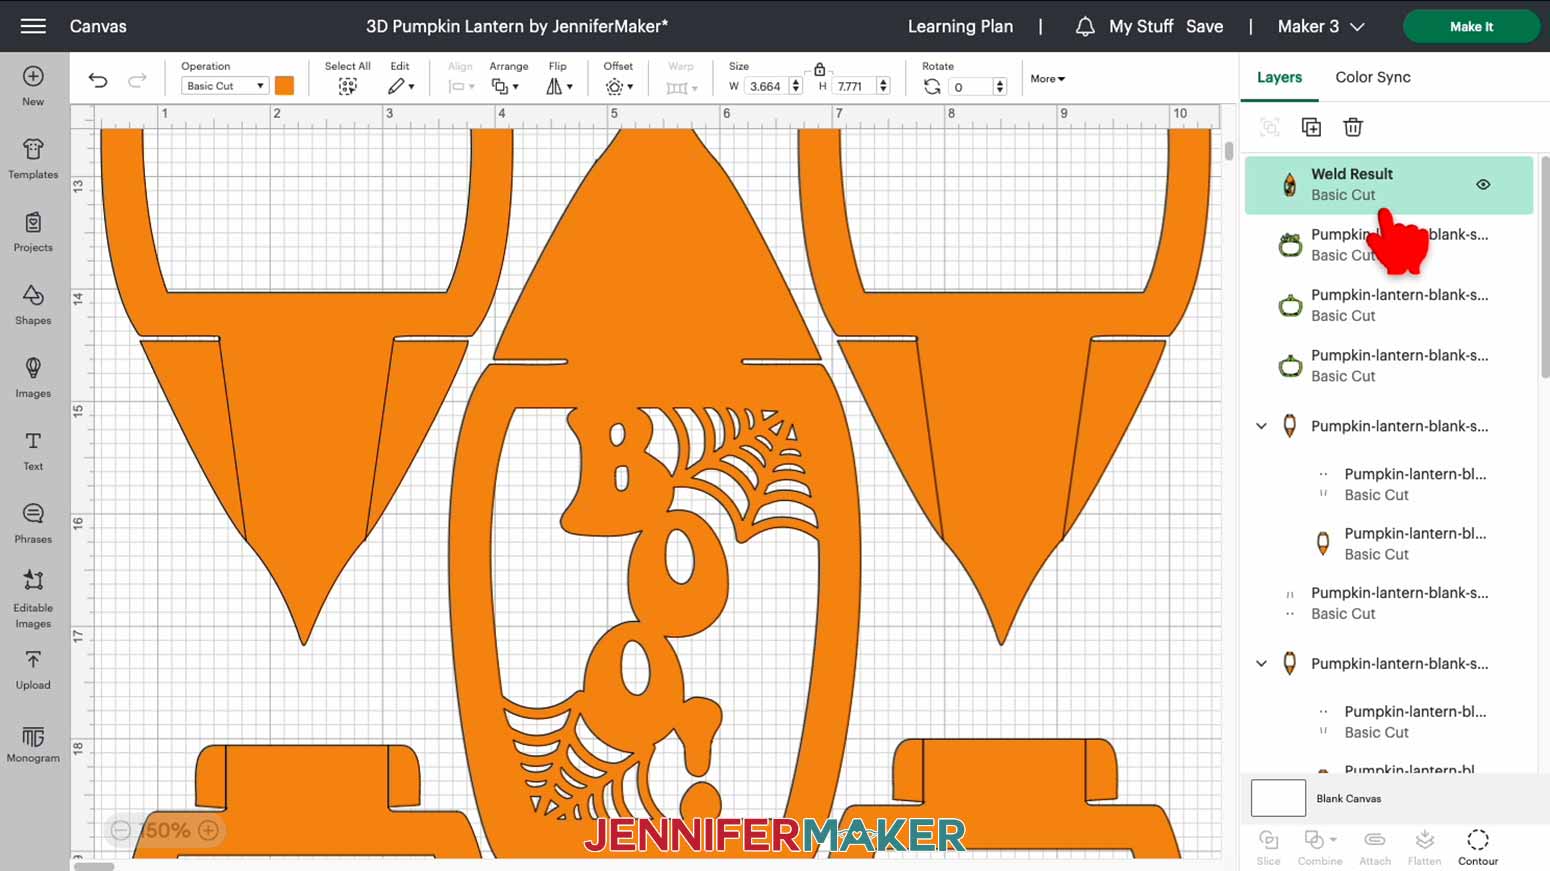
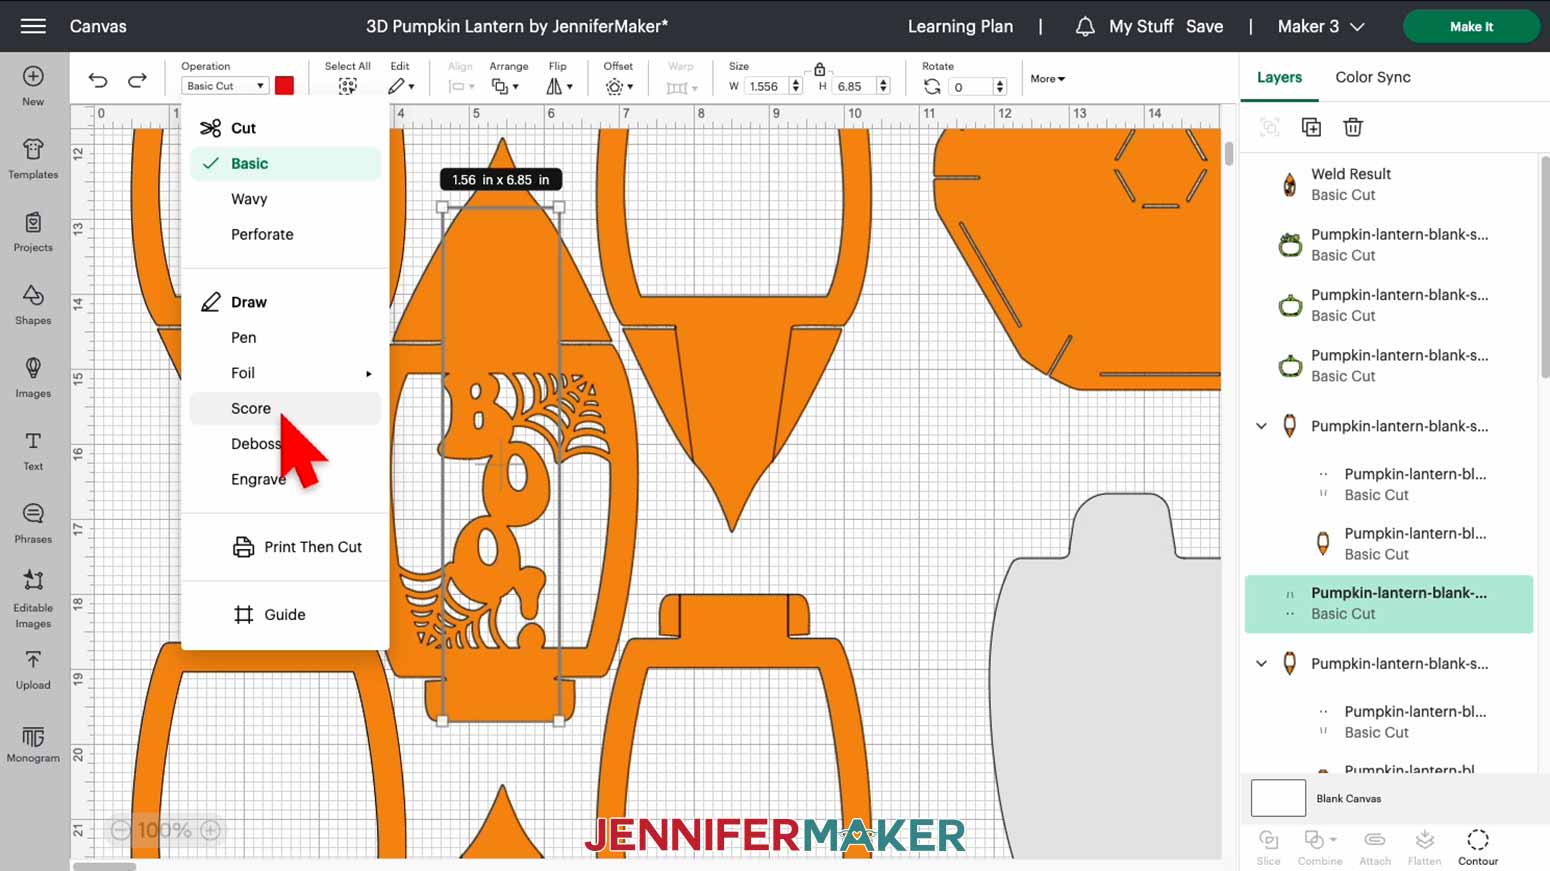
22. Select the layer with faint lines and no fill color in the Layers Panel.
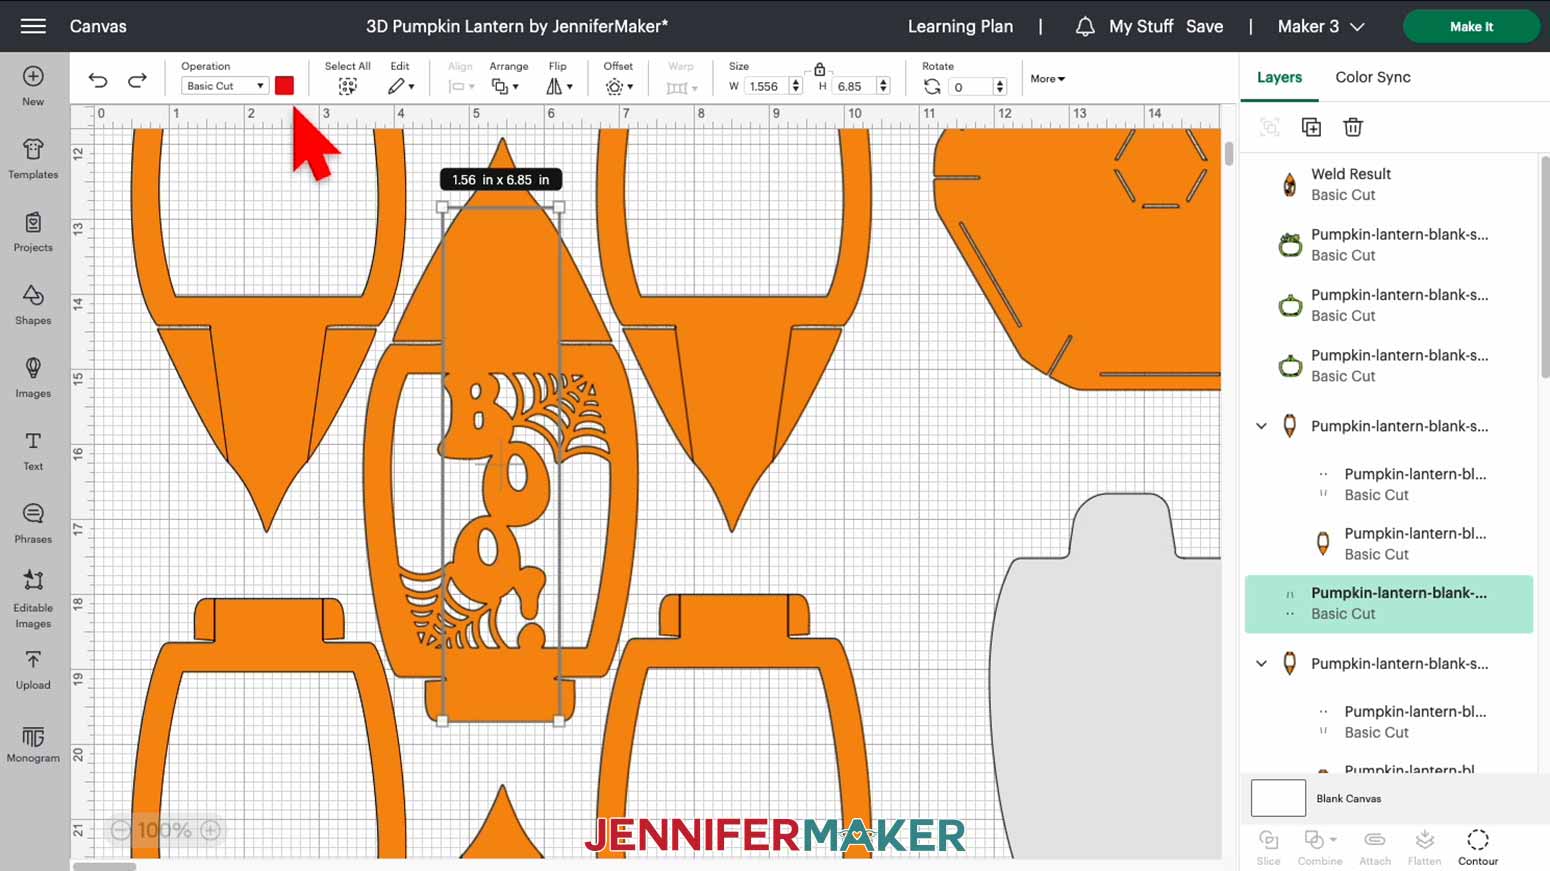
23. Click the dropdown arrow under “Operation” and select “Score.” The lines will change from solid to dashed to show that the machine will score them.
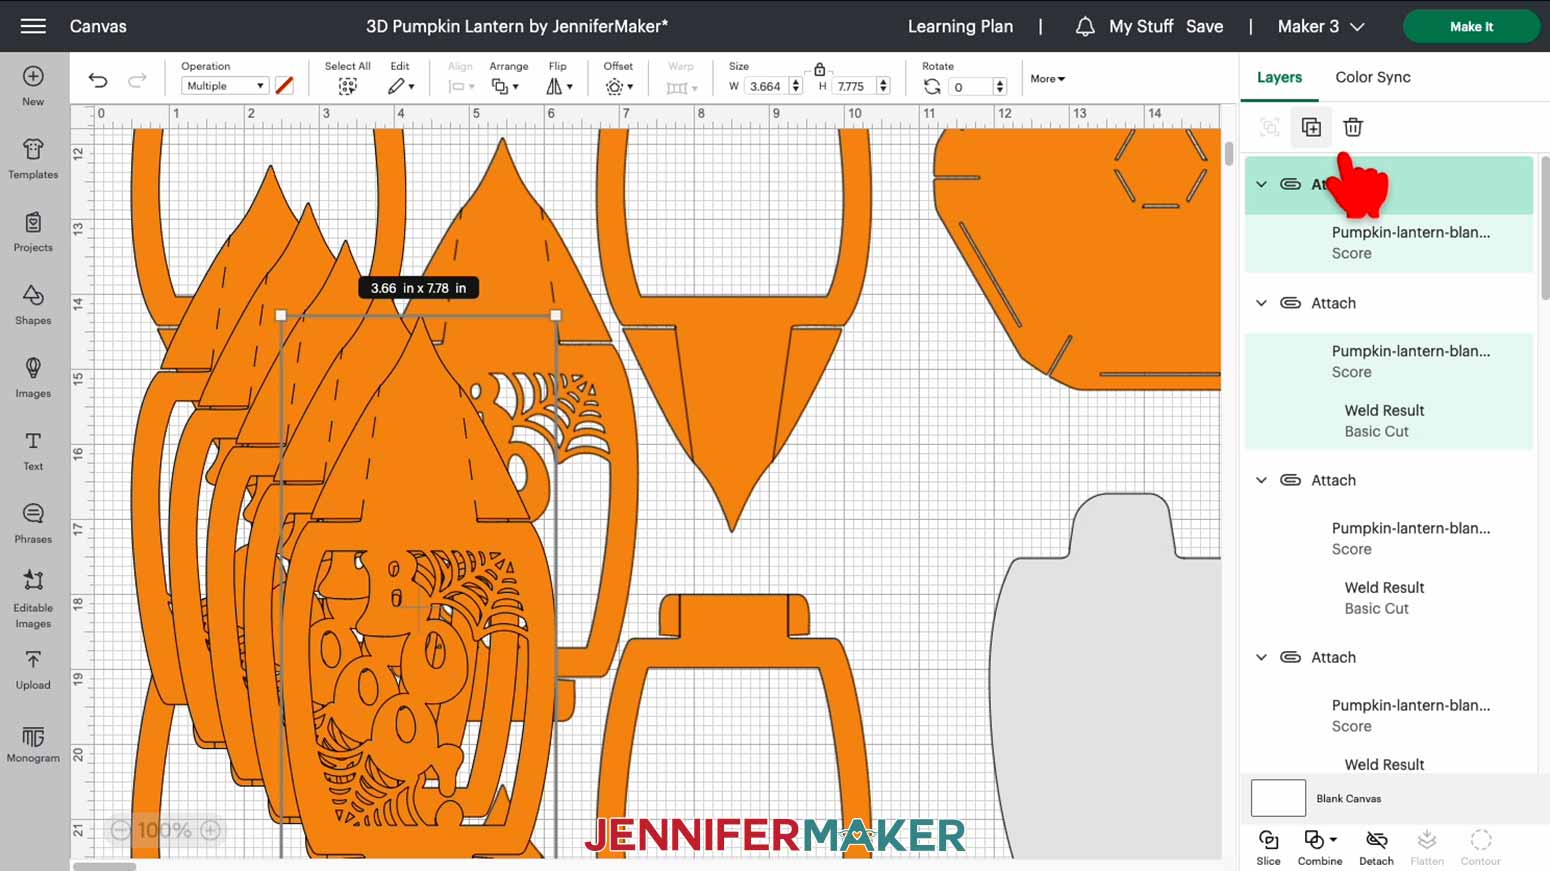
24. Select both the panel and score layers and then click “Attach.”

25. If you’d like all six of your pumpkin panels to look the same, you can select your completed panel and then click the Duplicate icon five times.
NOTE: Be sure to delete the blank panels, so you only cut a total of six decorative panels.
26. If you’d like each of your panels to have a different word or design, follow steps 3-26 above to prepare your other five panels.
27. When you’re finished, your panels should look similar to mine.
28. Make sure the correct machine is selected in the top right.
29. Click “Make It.”
30. If prompted, click "On Mat," choose your mat size, and click “Confirm.”
31. On the Prepare Screen, you should have seven mats.
TIP: You can rearrange your orange and green pieces to fit on two 12” x 12” orange mats and two 12” x 12” green mats to save time and materials. If you're using 8.5" x 11" paper, don't forget to change the Material Size for those mats.
32. Select the first mat again and click “Continue.”
CUTTING
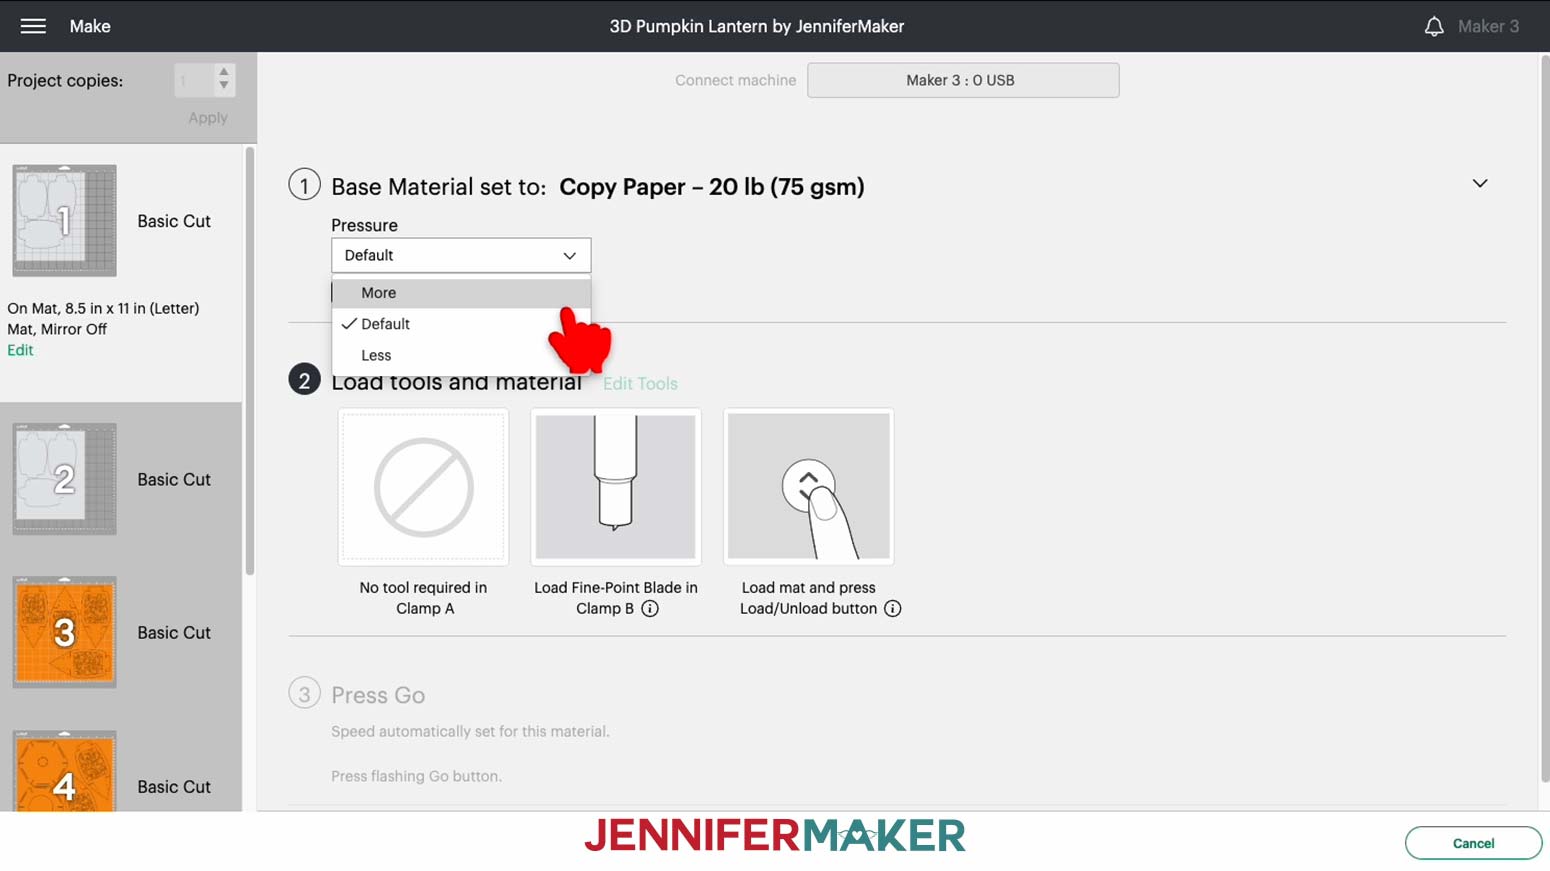
1. On the Make Screen, click “Browse All Materials.”
2. Search for and select the setting needed for your gray diffuser pieces. For copy paper, select the “Copy Paper – 20 lb (75 gsm)” setting. For vellum, select the “Vellum” setting. For parchment paper, select the “Parchment Paper” setting.
NOTE: Skip this step if you don’t want to use diffuser pieces in your pumpkin.
3. Change the Pressure to “More” for a cleaner cut.
4. Place your paper face up on a green StandardGrip machine mat and use a brayer to make sure it’s fully adhered.
5. Check that your Fine-Point Blade is clean and in the clamp.
6. Press the flashing “Load/Unload” button to load the prepared mat into your Cricut.
7. Press the flashing “Go” button to begin cutting.
8. When it has finished cutting, unload the mat, flip it over onto your work surface, and roll it back to release the paper.
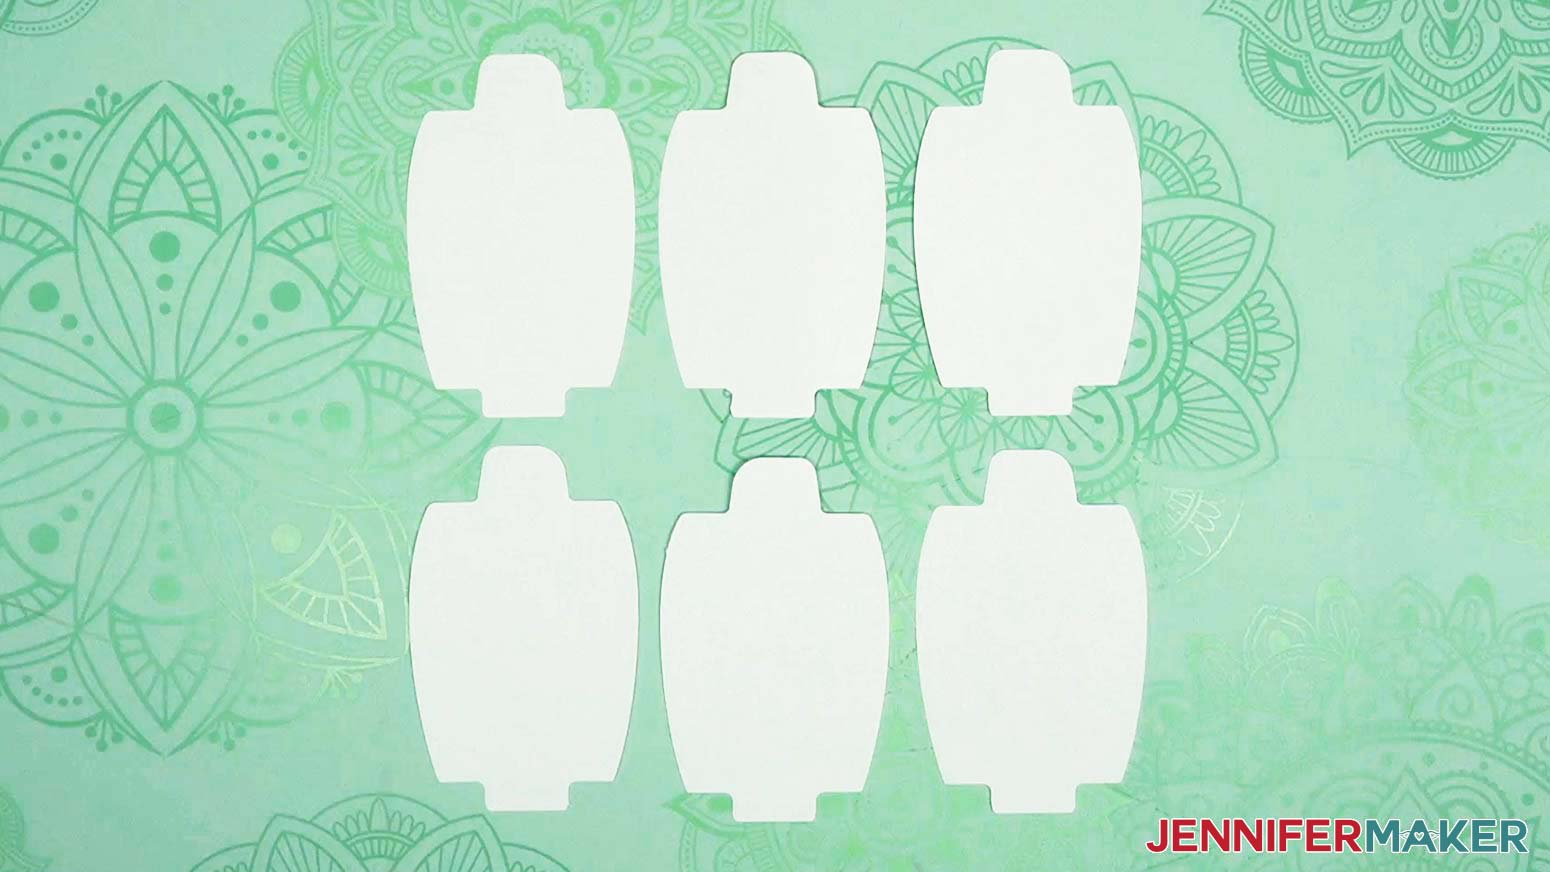
9. Here are what my six diffuser panels look like.
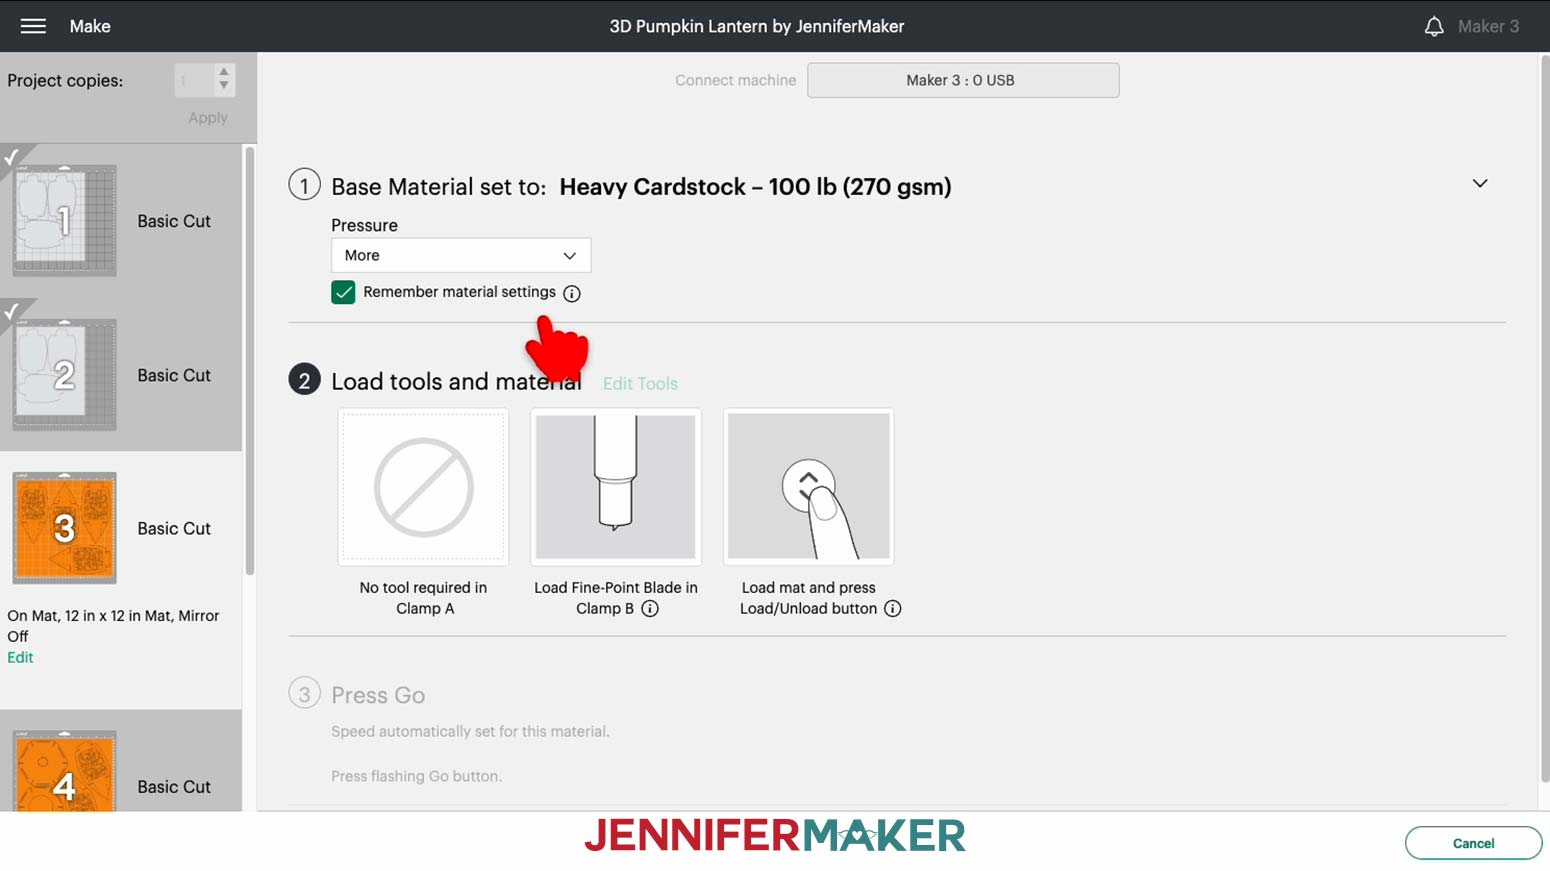
10. For your cardstock pieces, search for and select the “Heavy Cardstock – 100 lb (270 gsm)” setting if you’re using 100 lb. cardstock like me. Be sure to choose the correct setting for your weight of cardstock.
11. Change the Pressure to “More” for a cleaner cut.
12. Follow steps 4-8 to cut and remove your remaining pieces.
TIP: Use a spatula to carefully remove any intricate parts and a weeding tool to pop out any small pieces. If you have trouble with any of your cuts, check out my Cricut Tips & Tricks for Cleaner Cuts.
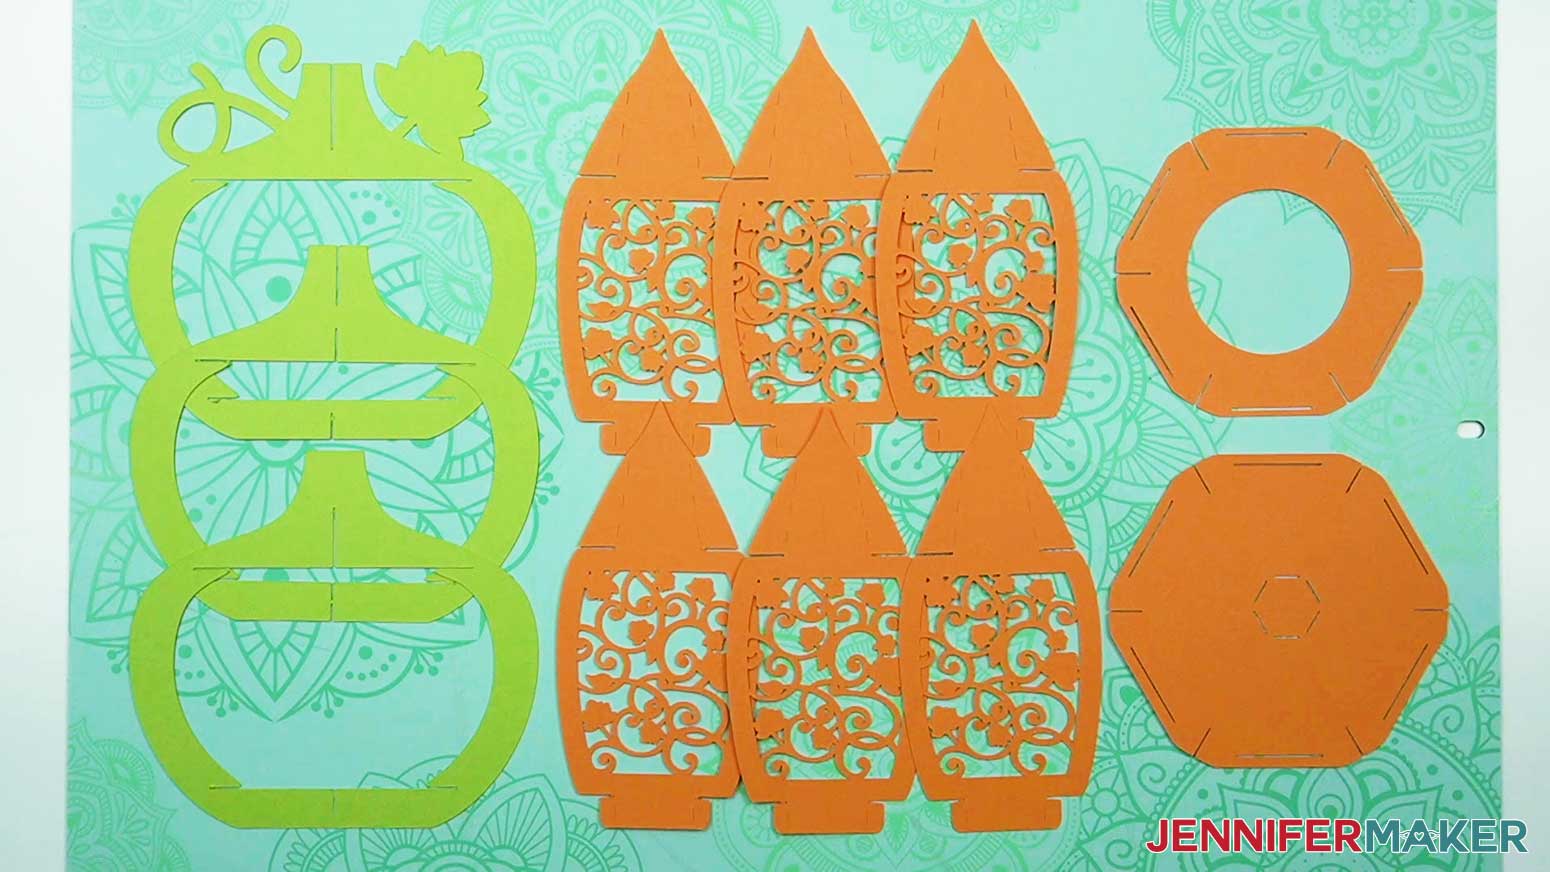
13. You will end up with three green vertical frames, two orange horizontal hexagonal bases, and six orange decorative panels.
STEP 3: ASSEMBLE YOUR 3D PUMPKIN LANTERN
1. Grab the two green vertical frame pieces without the leaf and vine. Slot one of them into the other.
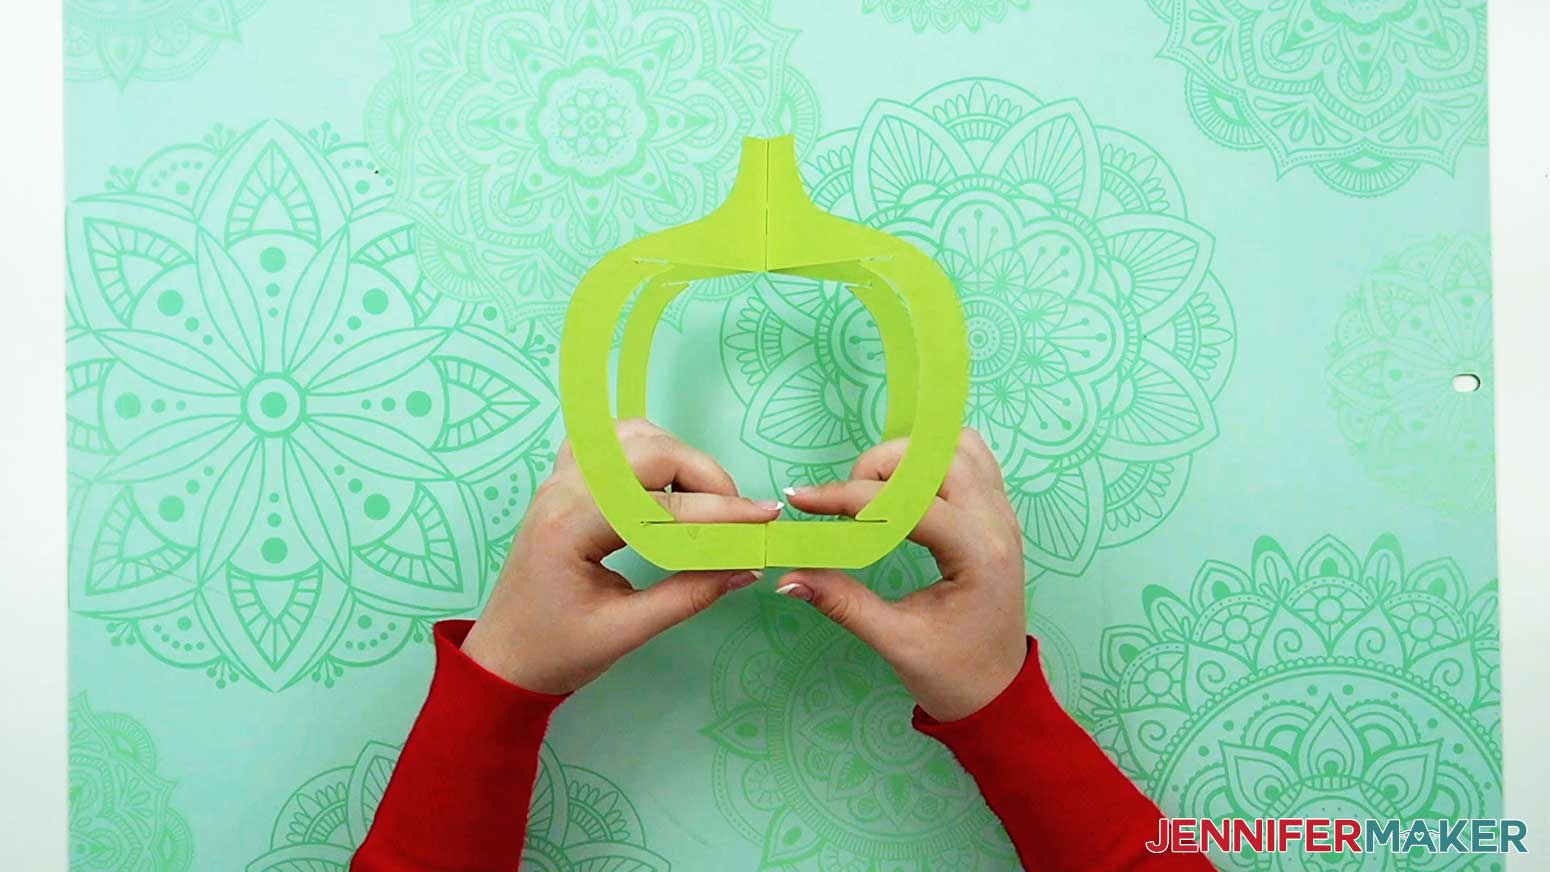
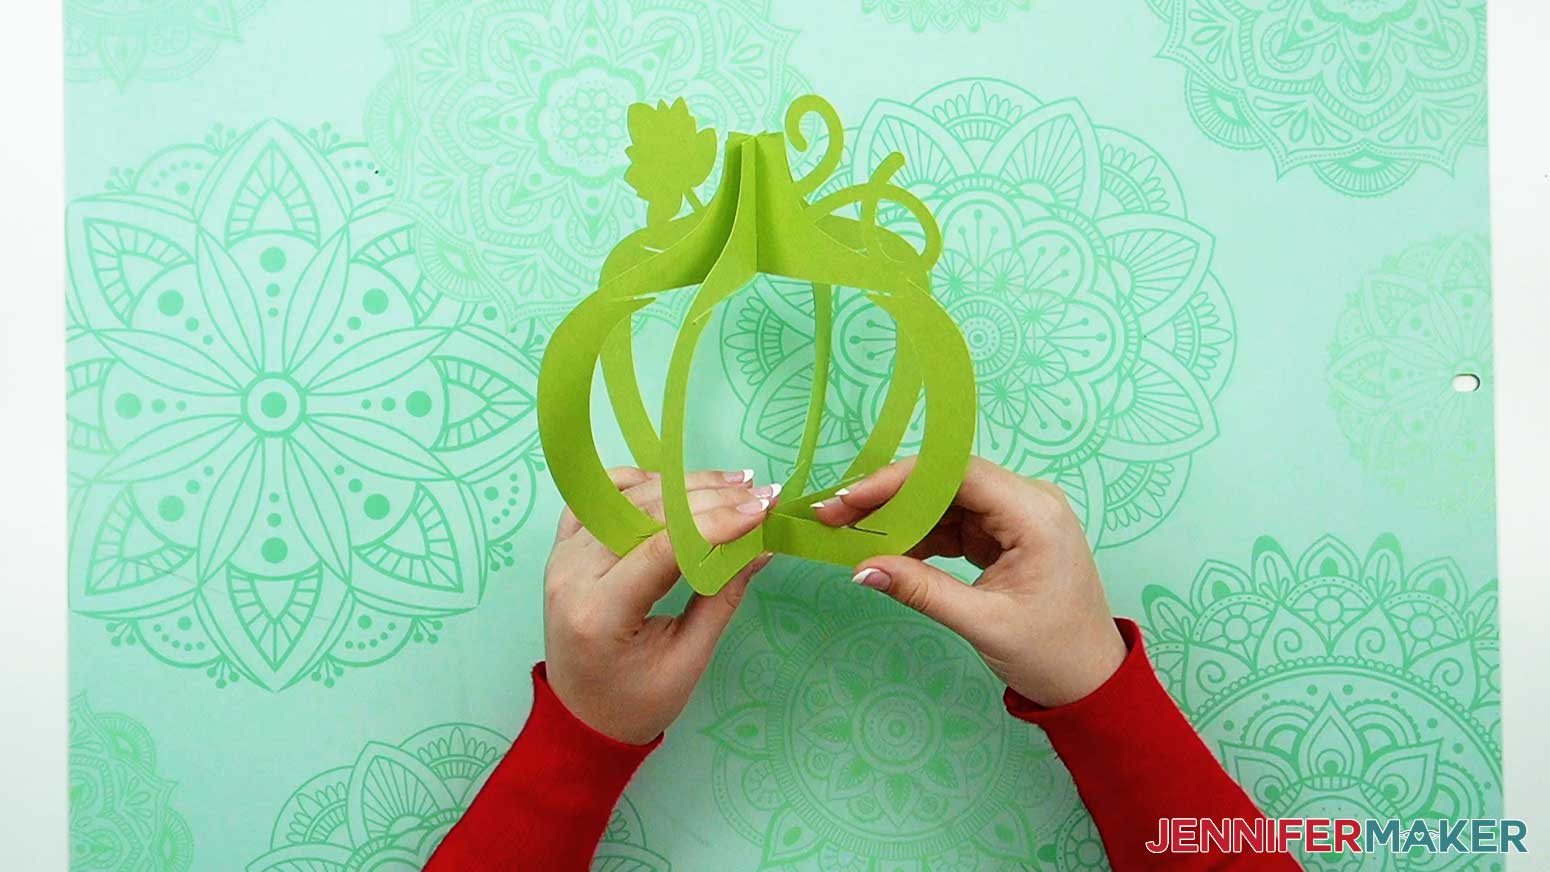
2. Grab the third green vertical frame piece (the one with the leaf and vine). Slot it into the first two frame pieces.
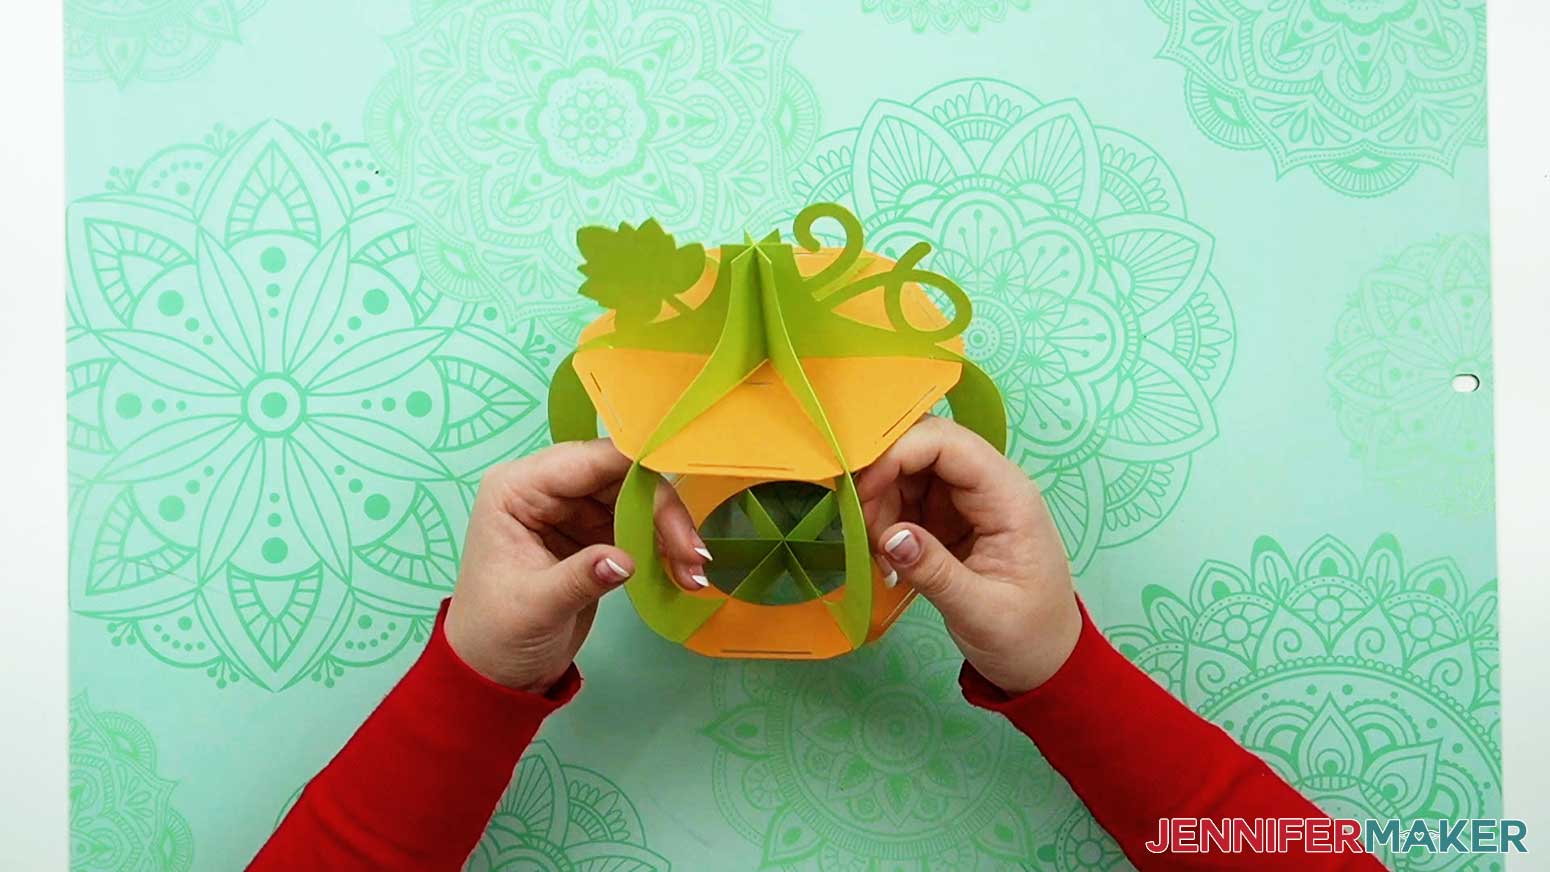
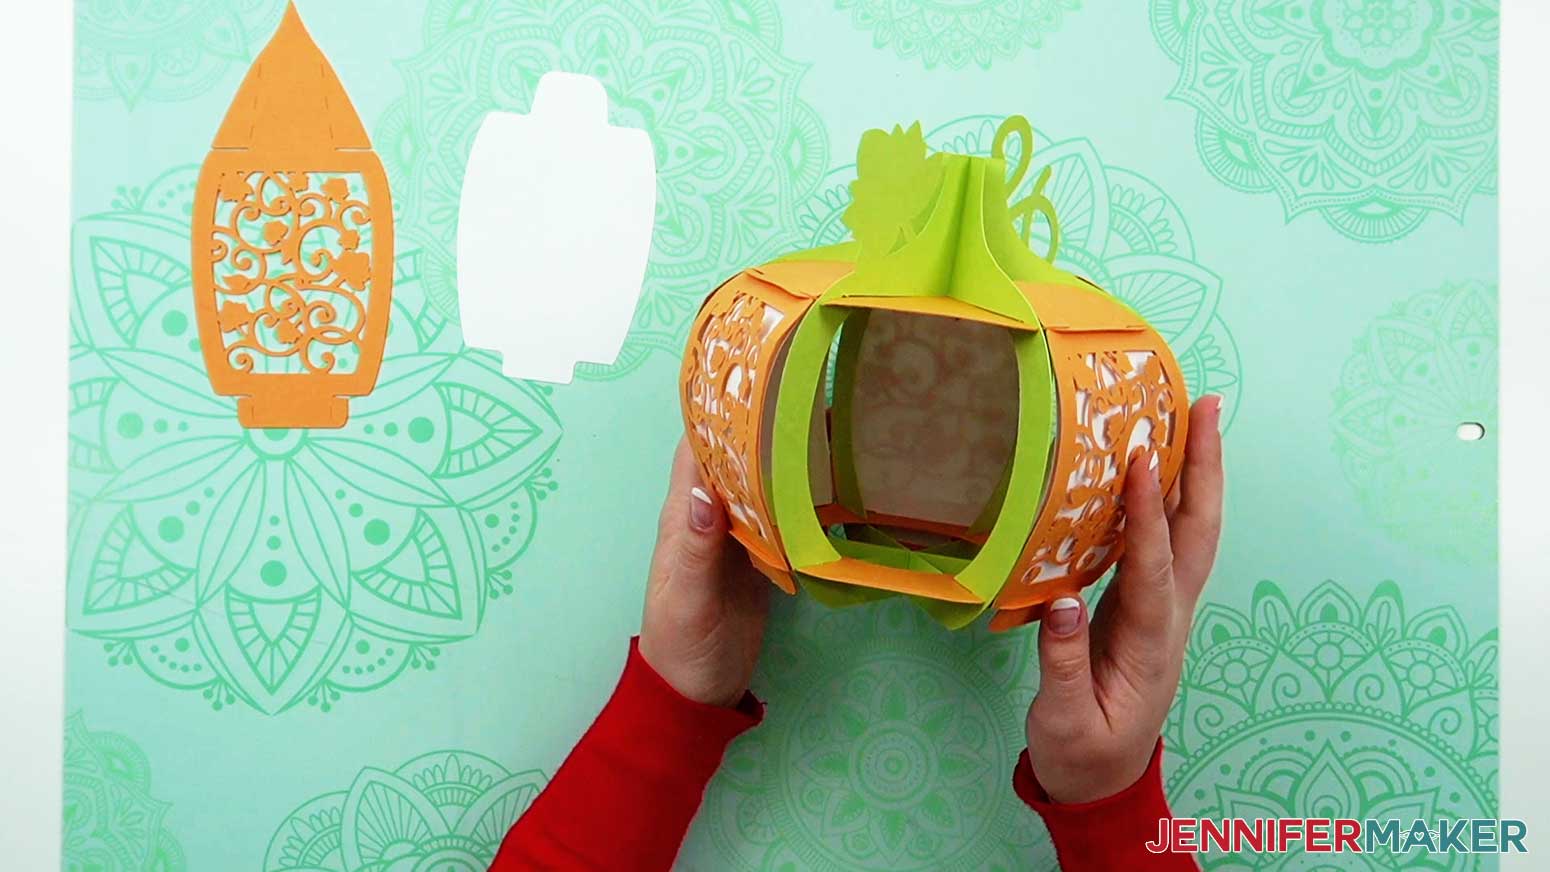
3. Insert the smaller hexagonal base into the bottom slots on the inside of the assembled frame.
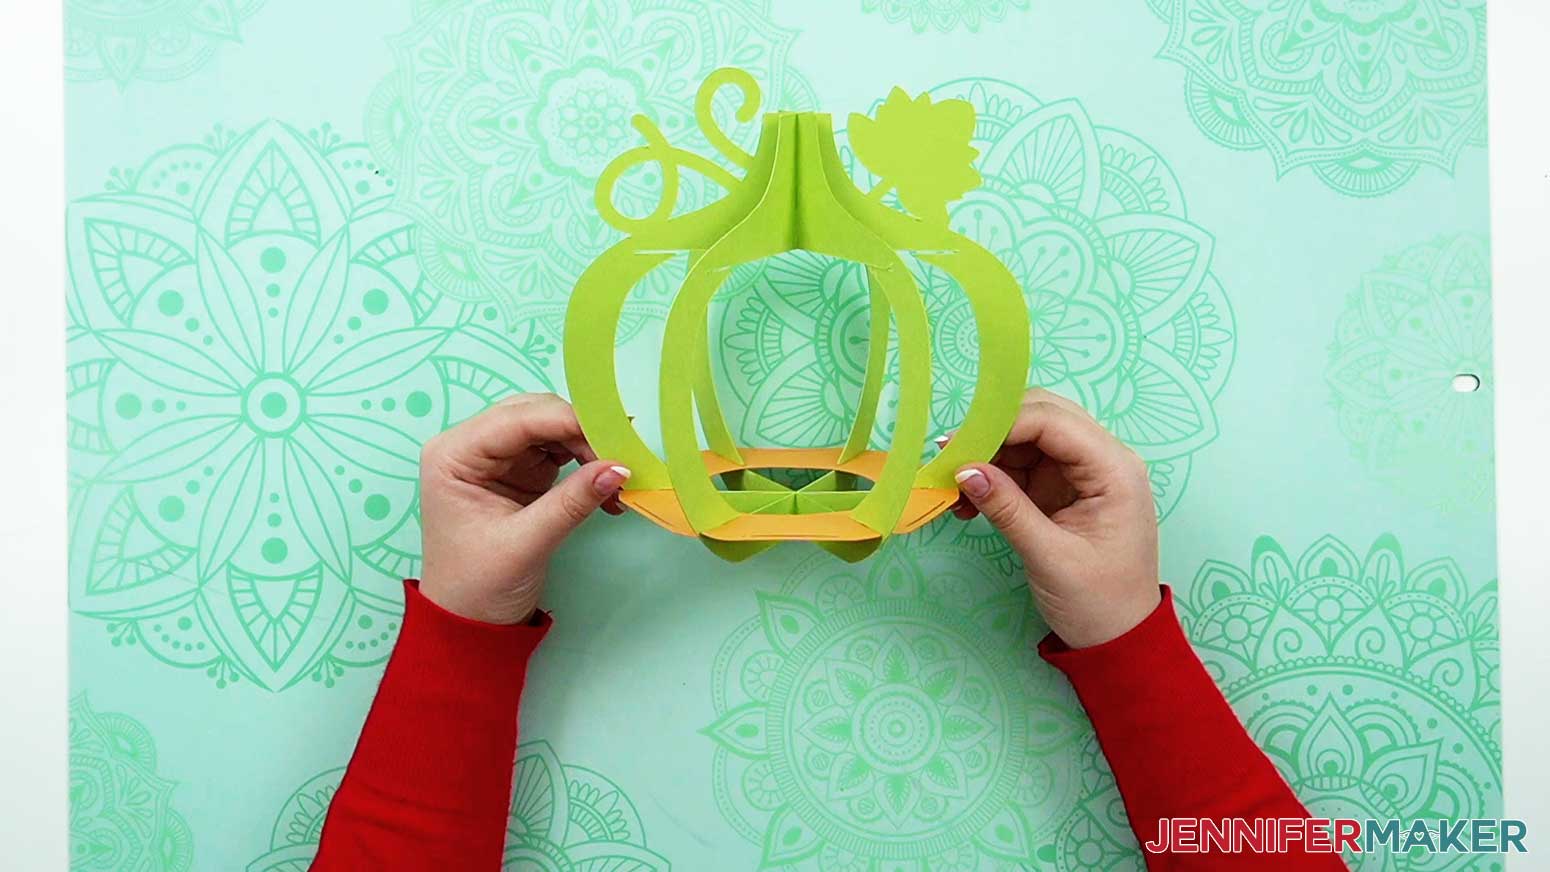
4. Insert the larger hexagonal top base into the top slots on the inside of the assembled frame.
NOTE: You will need to gently curve the frame pieces out of the way in order to get the base piece inside.
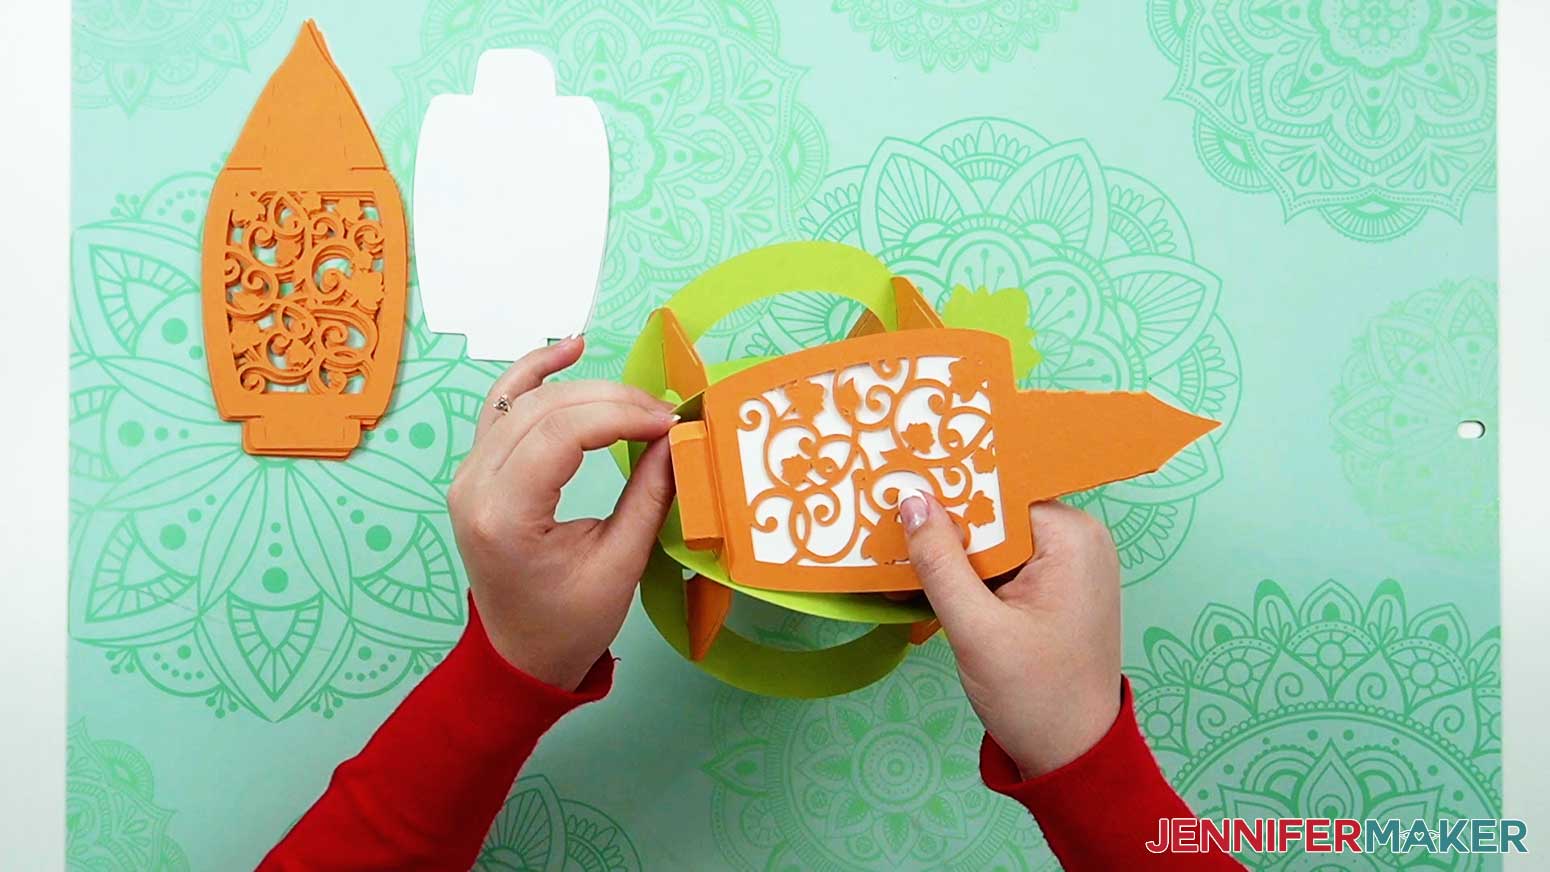
5. Fold the tabs at the top and bottom of the six decorative panels inward along the crease lines.
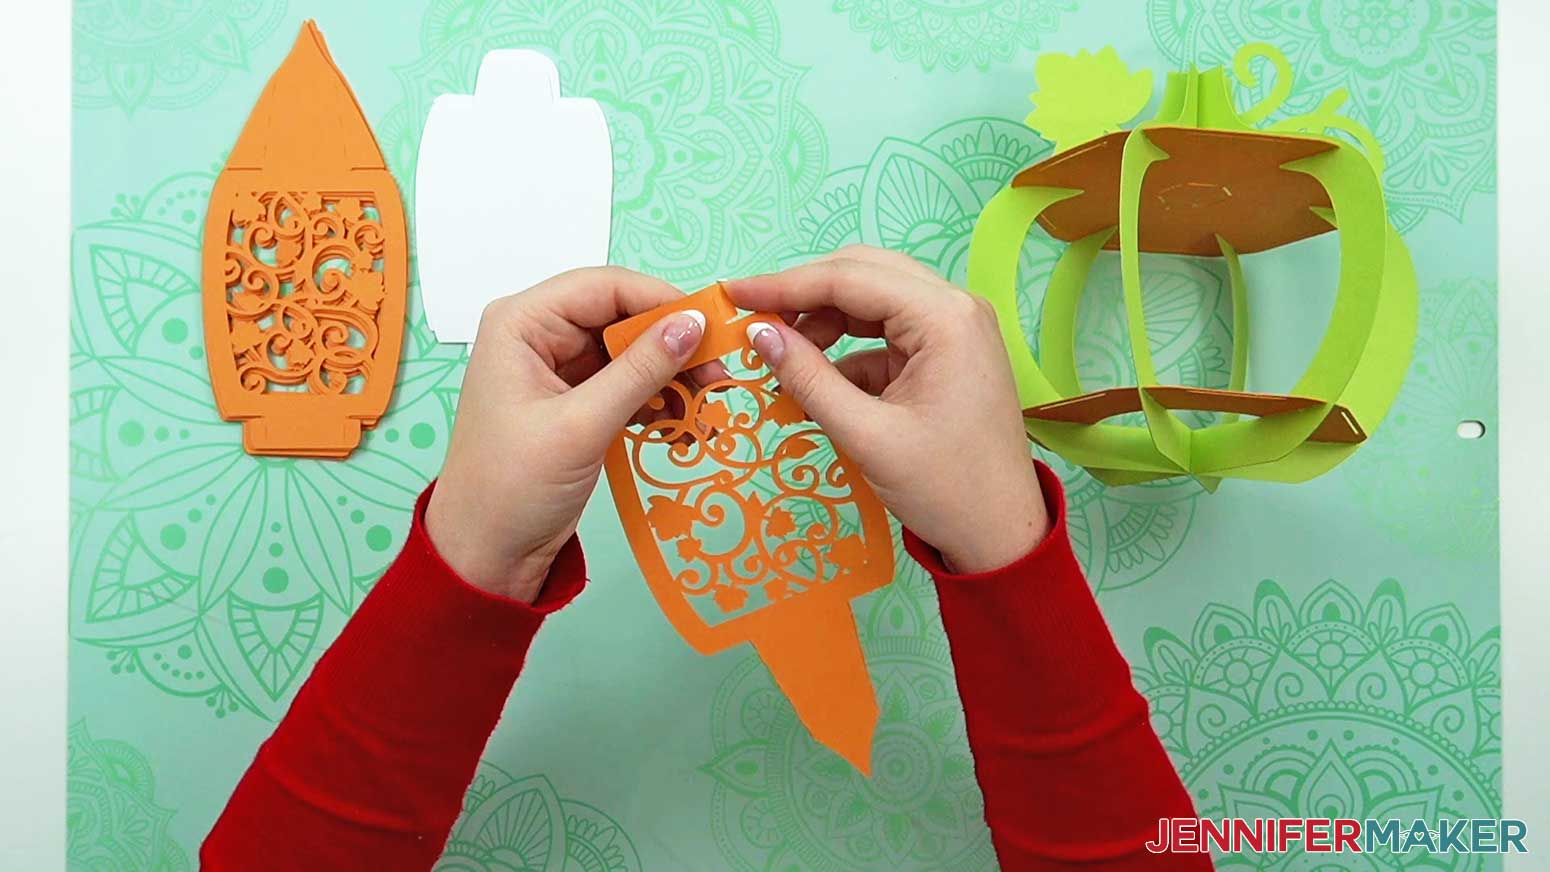
TIP: To help prevent small pieces of the design from sticking out after your pumpkin is assembled, gently roll each decorative panel lengthwise to create a soft curve. You can use a cylindrical object, such as a tube of vinyl, to help with this.
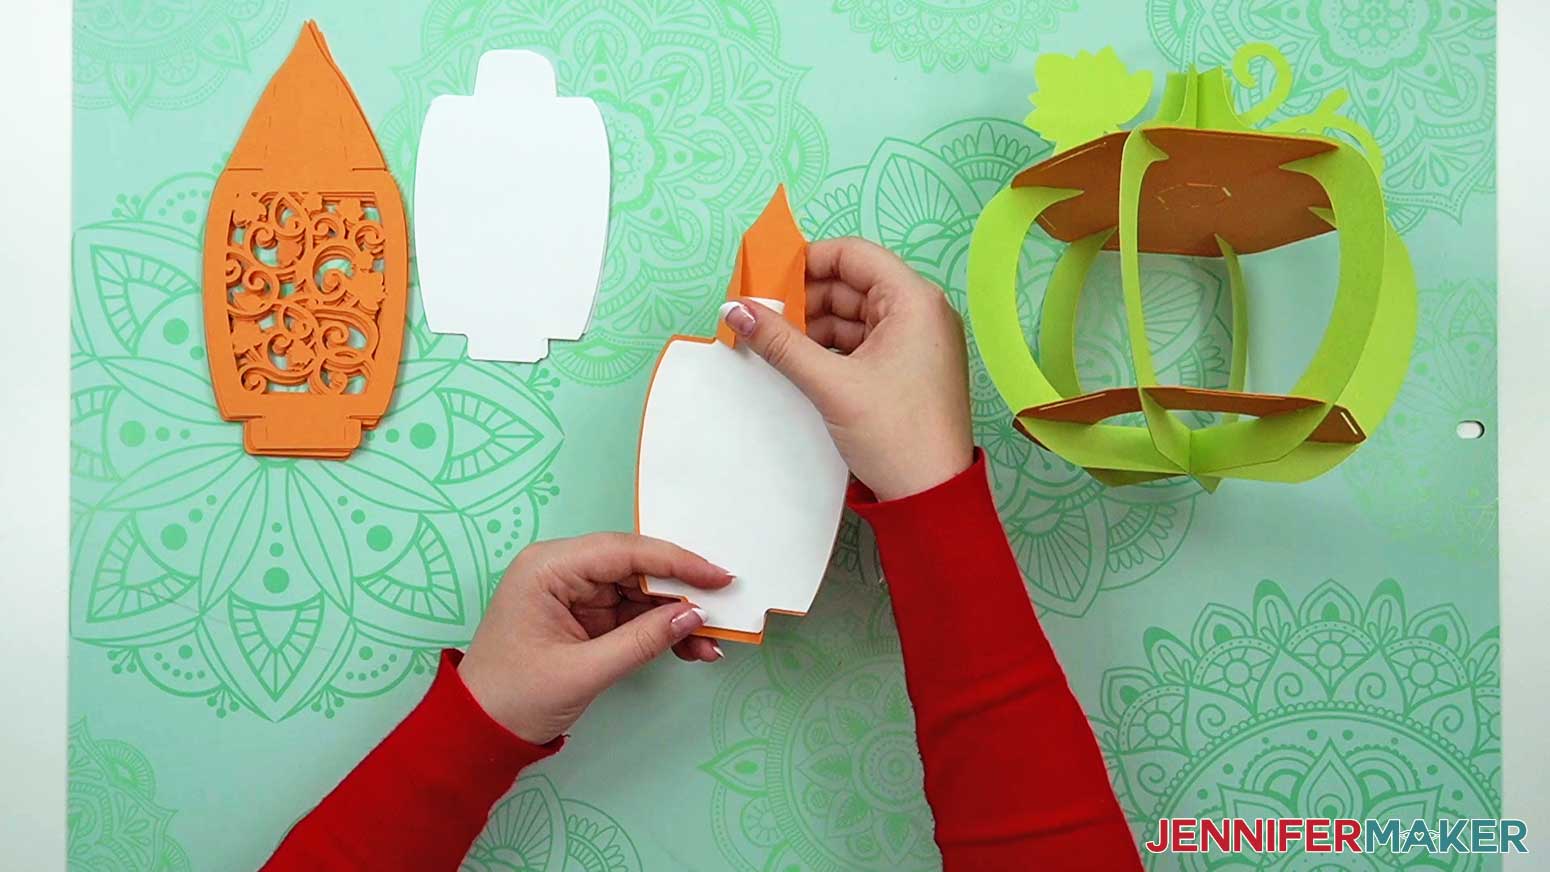
6. Add a diffuser panel to the back of one of the decorative panels.
NOTE: No glue is needed, but you could add some if you wanted.
7. Insert the bottom of the two pieces (decorative and diffuser) into a slot on the bottom base.
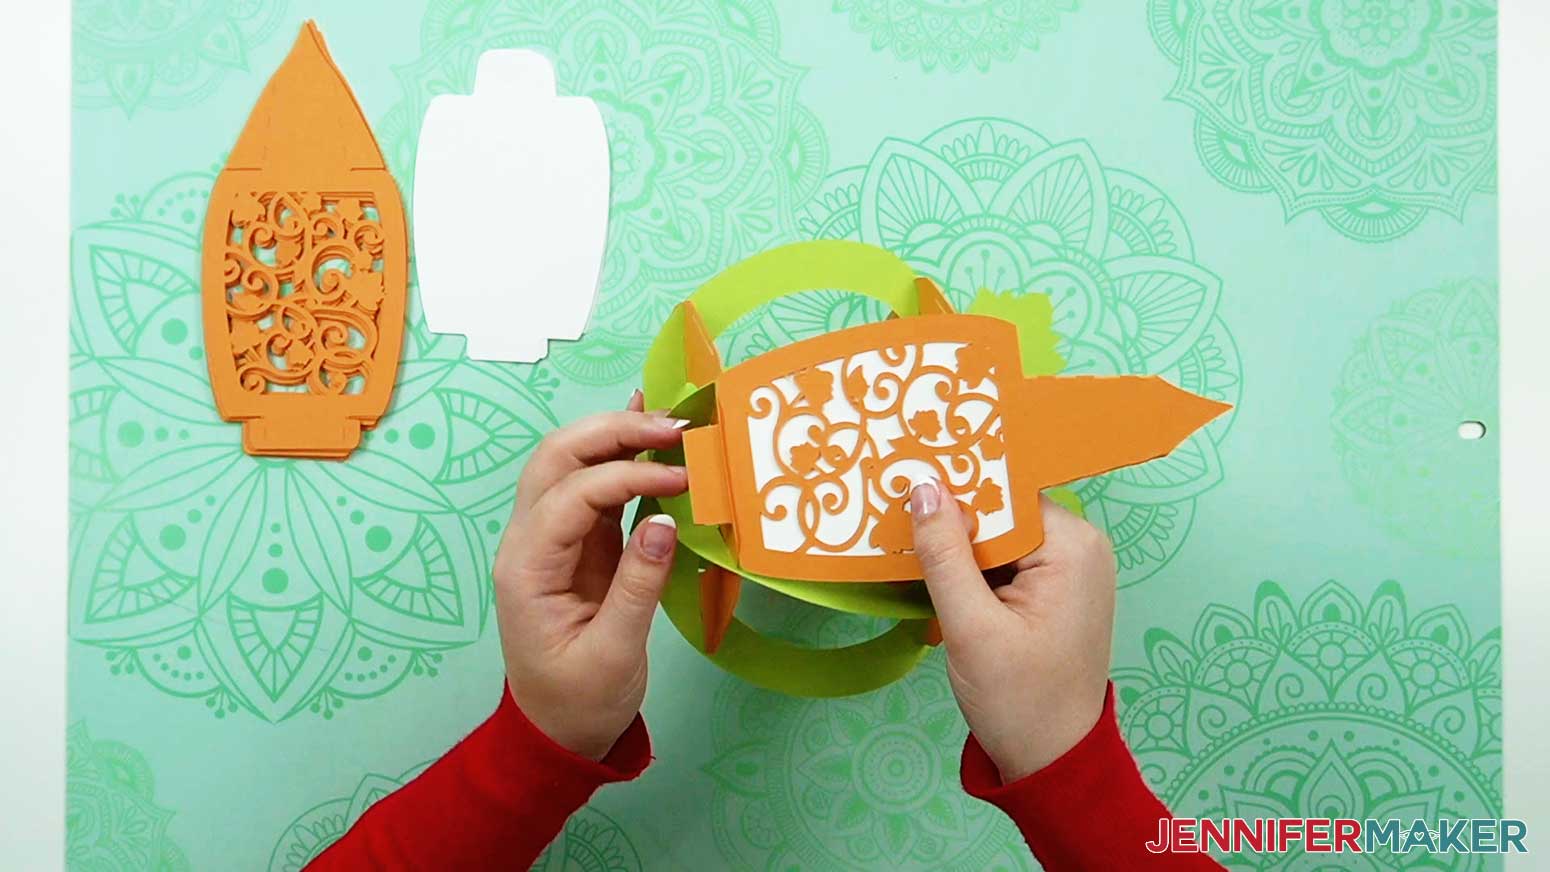
8. Unfold the tab pieces at the bottom.
9. Insert the top of the two pieces (decorative and diffuser) into a slot on the top base.

10. Unfold the tab pieces at the top.
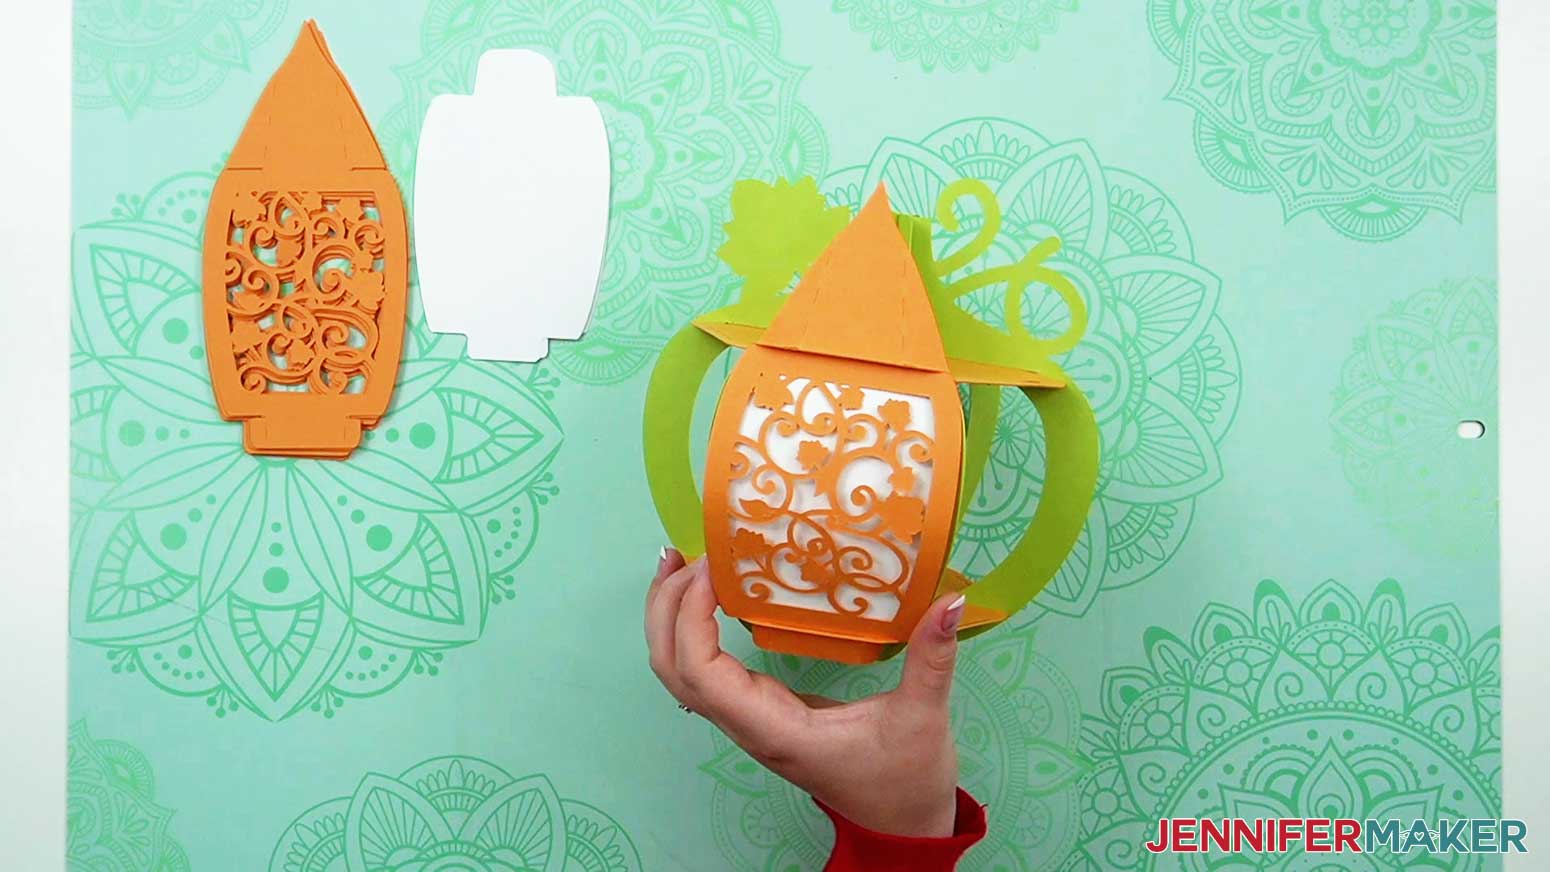
11. Push the tip of the decorative panel into the slot in the middle of the top base.

12. Repeat steps 6-11 for all but the last panel.
13. Before you insert your last panel, add an LED light or fairy lights inside your pumpkin.
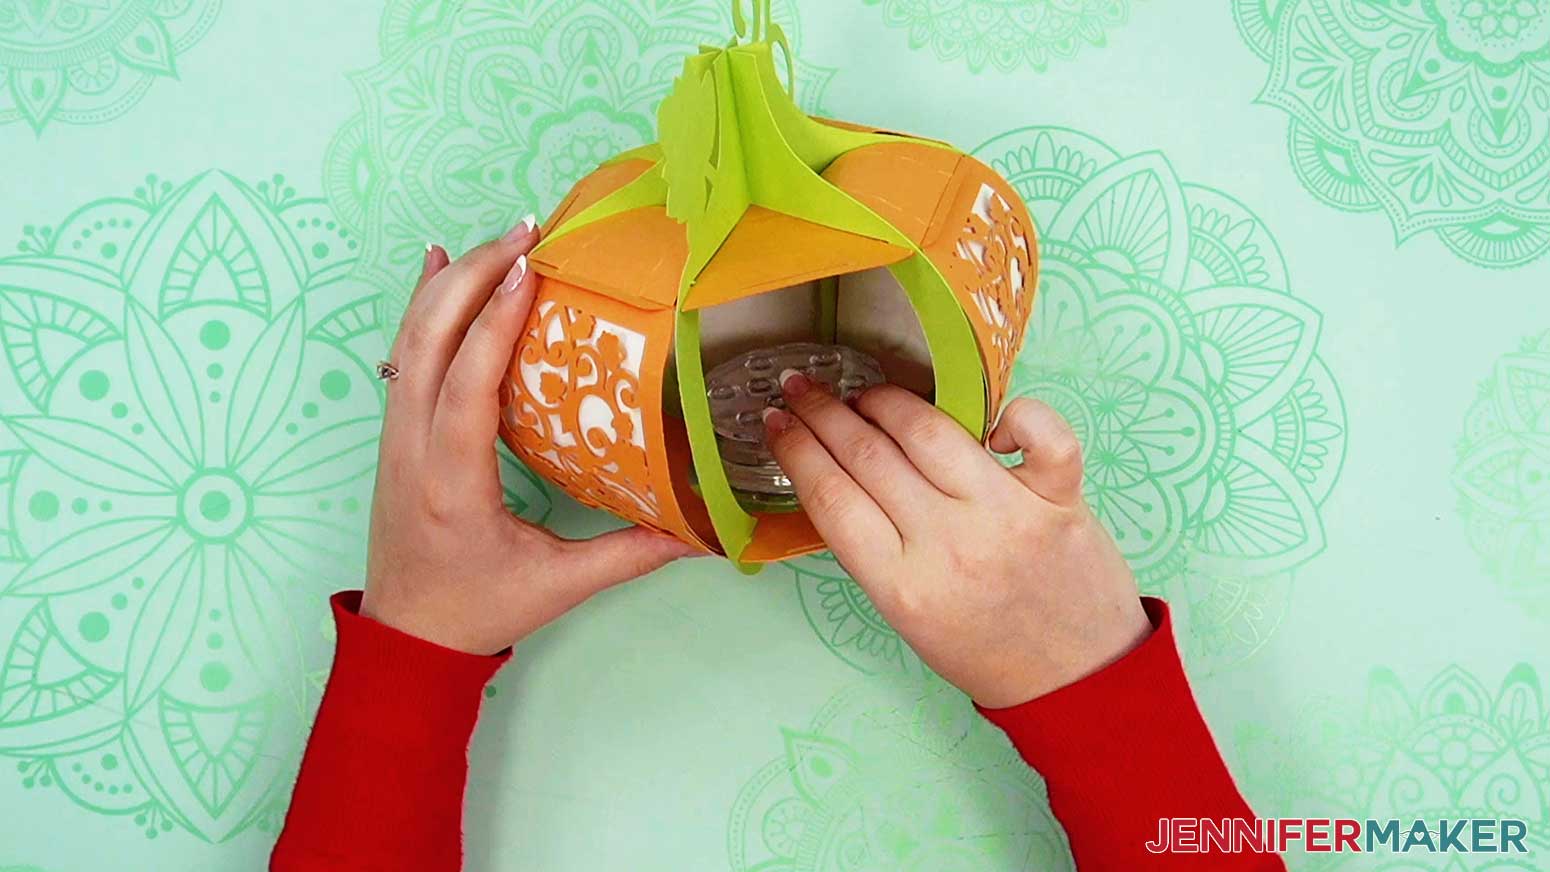
14. Add your last panel and you’re done! Here's what both of my finished pumpkin lanterns look like.

STEP 4: SHOW IT OFF!
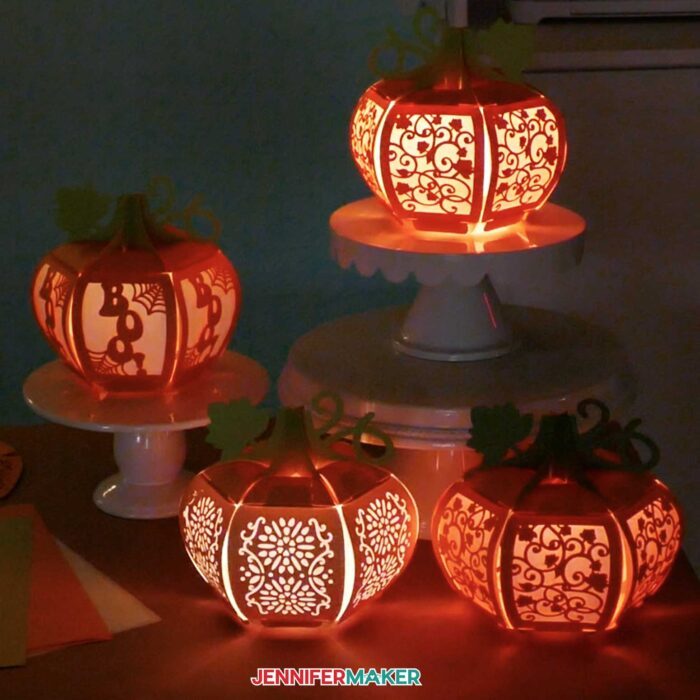
Here is what my finished 3D pumpkin lanterns look like all lit up!
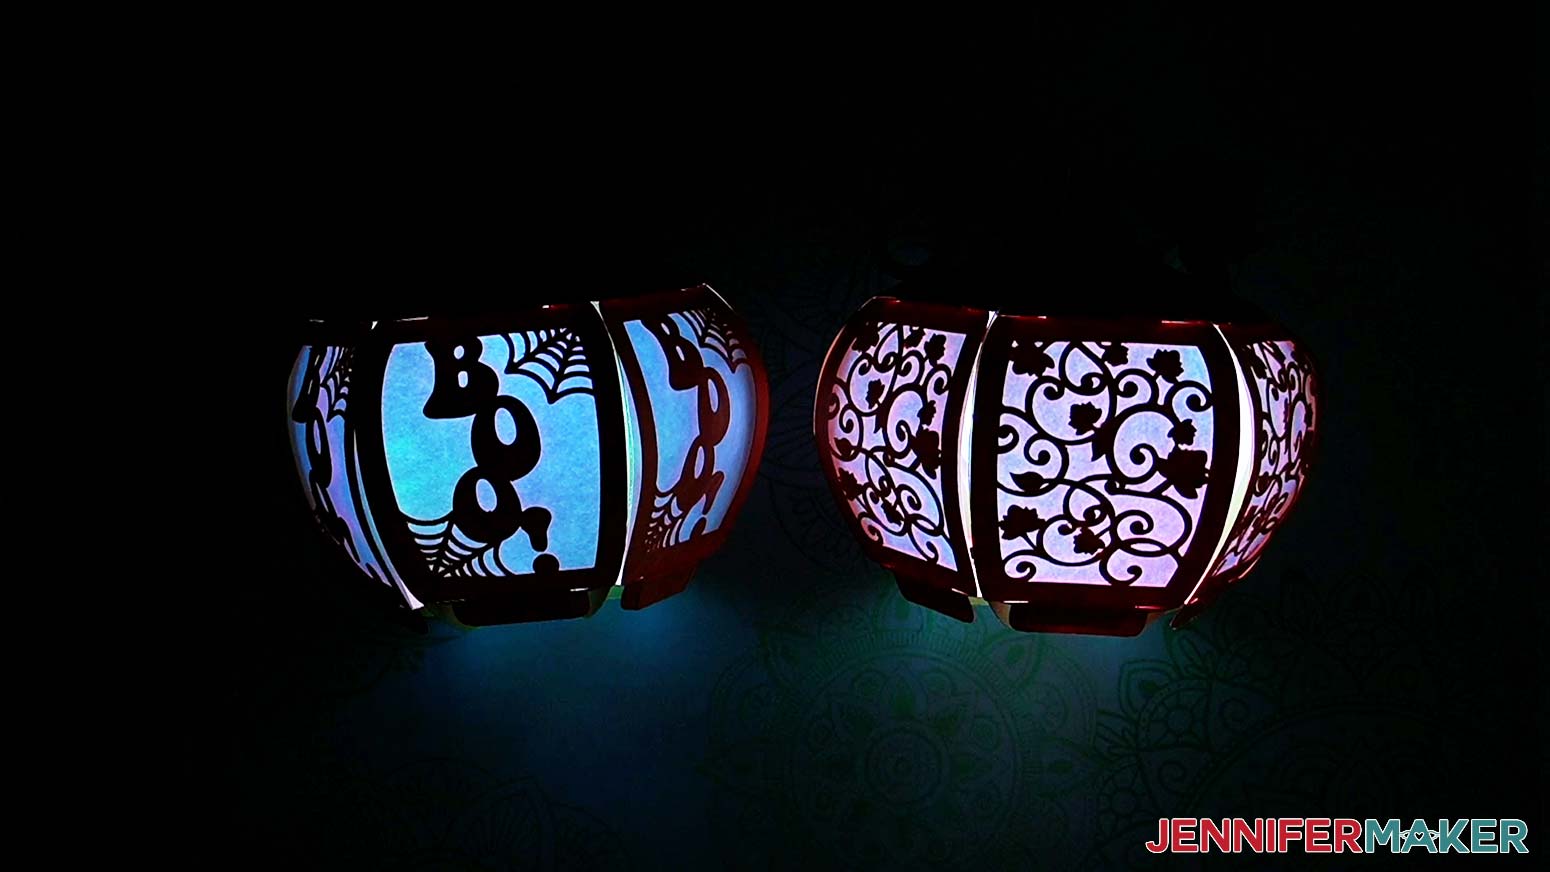
You can display yours on a table or shelf to admire all season long. You can turn the LED light on/off by reaching underneath (I left an open circle for access).
Notes
Typefaces Used:
JM Groovy (Boo! design)
Transcity (Give Thanks design), Free Alternative: Buttershine Serif
Tingler Script (Give Thanks design), Free Alternative: Brannboll Stencil
Finished Size: Approximately 8” x 8” x 8”
Answers to Your Questions About How to Make a 3D Pumpkin Lantern
Q: How do you make a 3D pumpkin out of paper?
A: Making a 3D pumpkin to add to your Halloween decor is easy with my tutorial, a Cricut cutting machine, and a few supplies and tools. Just get my free downloads, follow the steps in this post, or watch my video to learn how.
Q. How do you make a pumpkin luminary?
A. After you make your pumpkin lantern following this tutorial, turn it into a luminary by adding an LED tea light or puck light! Or even fairy lights! If you’ve already completed the pumpkin, carefully remove one of the panels from its top slot, then insert the LED light inside. Replace the panel, and now you can reach up through the bottom of the pumpkin to turn the light on and off.
Q. What is a pumpkin lantern called?
A:Traditionally, a lantern made from a cut and hollowed-out pumpkin is known as a jack-o’-lantern. This Halloween tradition was born from Irish, Scottish, and English folklore in the 19th century, and often involved using candles to make lanterns out of gourds, turnips, and other root vegetables. Since we’re making paper pumpkins in this tutorial, I’ll just stick to calling it a lantern for now.
Q: How do you make a simple paper lantern?
A: My 3D pumpkin lantern is pretty simple and easy, but if you’re looking for something even easier, I have several beginner lantern and luminary tutorials here on my blog. I’ve got super simple cylinder paper lanterns, a winter luminary with diffusing panels, and a fall leaves luminary that is super easy to make and only requires one sheet of cardstock!
Q: Can you show me how to make pumpkin decorations for Halloween?
A: With my tutorials, you can create one of a kind items to decorate your home all season long with creative goods. Your Halloween party guests will be so impressed by all your amazing handmade pieces and spooky decorations!
Q: Do you have more designs for the pumpkin lantern?
A: I don’t, but you’ll find many more designs on Etsy. Check out these awesome designs and designers:
- GOMArtCraft has a classic vine pumpkin lantern design
- Printsables has a lovely sunflower pumpkin lantern design
- PaperTakerStore has a 5-pack of pumpkin lantern designs with butterflies and a witch
- BGirlStore has a 3-pack of designs with a Hocus Pocus pumpkin and a 5-pack with a skeleton and spider
- M3DArtCraft has a 3-pack of haunted cemetery pumpkin lantern designs
Q. What other pumpkin crafts do you have? Will Cricut vinyl stick to pumpkins?
A. I have a whole host of other pumpkin and Halloween crafts for you to check out! Smashing pumpkins, pumpkin SVGS, and even (felt) pumpkin pie!
And to answer your question, yes — permanent vinyl will stick to real pumpkins. Make sure your pumpkin is room temperature, and also clean and dry before you apply the vinyl. Use transfer tape and don’t expect the application to be perfect — pumpkins are not flat and smooth, after all! Or, make a faux carved pumpkin using my 3 D model!
Q. Where can I find help with this and other crafts?
A. Join my Facebook group just for Cricut crafters and makers! Our unofficial “help center,” my group is a vibrant community of real people who love to support, inspire, and share ideas! You can meet and learn from hobby crafters who are learning and fine-tuning new skills, as well as creative entrepreneurs making amazing and special goods for their small businesses. Plus, you’ll have the opportunity to get expert support from our team here at JenniferMaker!
Get my free SVG files to make a 3D pumpkin lantern!
I’d love to see YOUR amazing paper pumpkin lanterns! Please share a photo in our Facebook group or tag me on social media with #jennifermaker.
Love,

Want to remember this? Save this tutorial on How to Make a 3D Pumpkin Lantern to your favorite Pinterest Board!