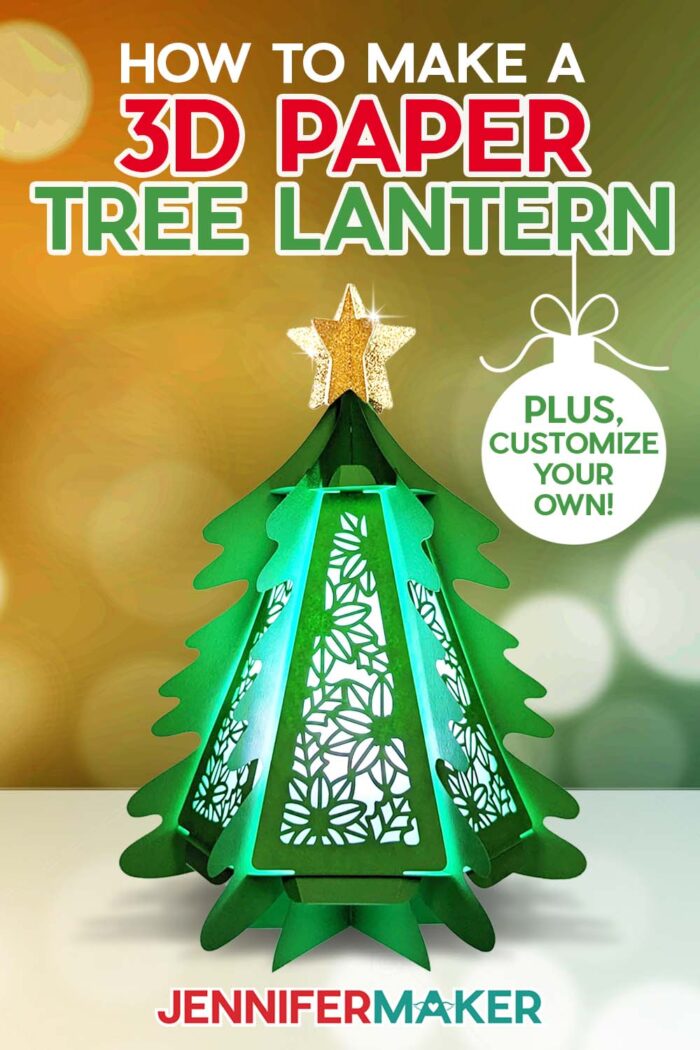
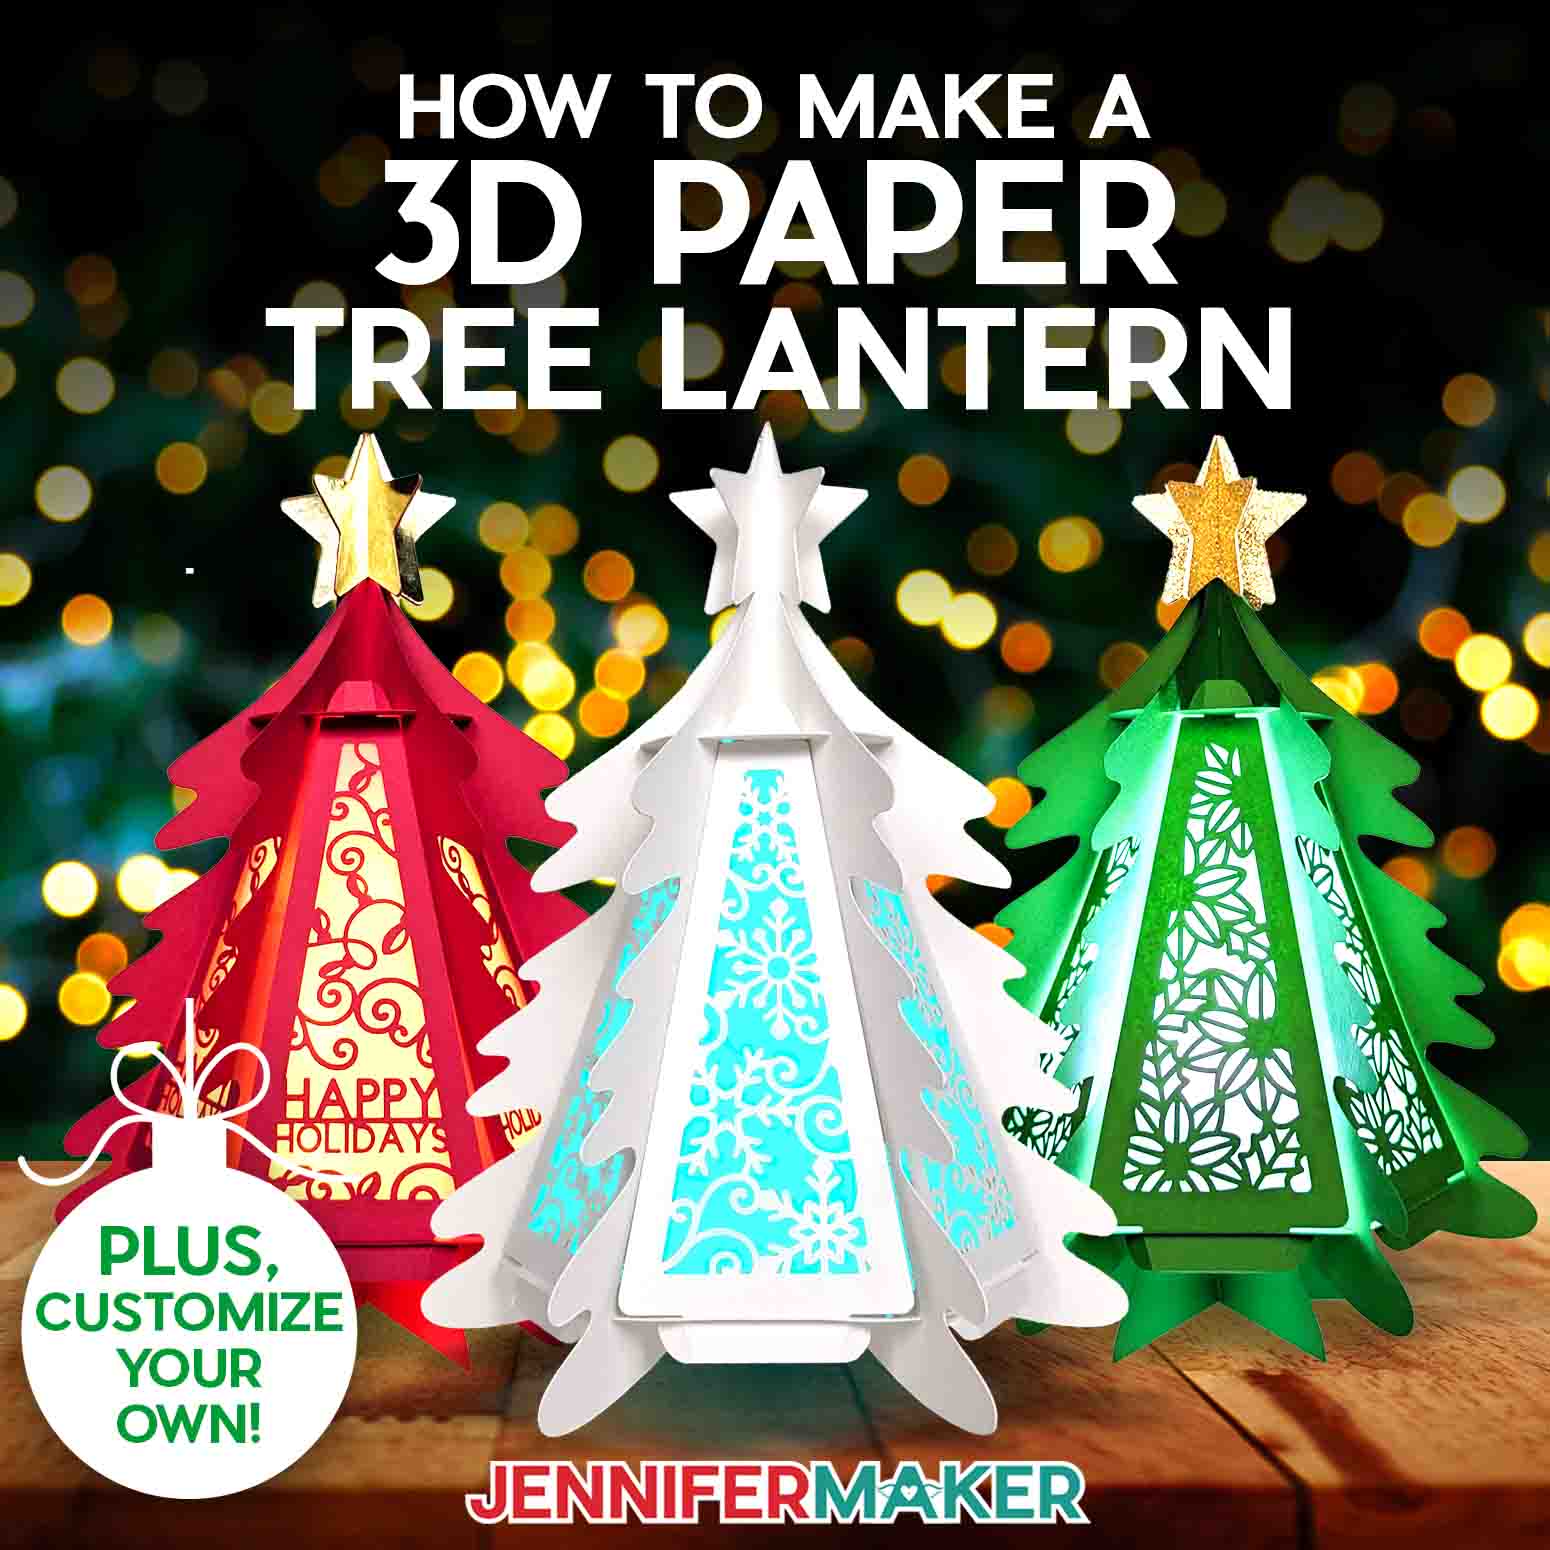
Learn how to make a 3D Paper Tree Lantern for Christmas!
Looking for a quick and easy DIY project that doubles as a glowing piece of Christmas decor? Light up your holiday season with a customized 3D Paper Tree Lantern! Inspired by my pumpkin lantern and previous Christmas tree luminaries, this tree lantern is extra special — because it can be assembled with zero glue, zero tape. That’s right, only cardstock (and maybe a little copy paper or vellum). But how do we do it?

Paper crafts are some of my favorite things to make, especially at the holidays. They’re fantastic because they’re often so simple to make, but really impressive to show off. Even on the busiest winter days, I can usually squeeze in a quick papercraft if I try!

My 3D Paper Tree Lantern is no exception. If you made my 3D Pumpkin Lantern this fall, it’s a lot like that — so you know how easy it is. If that’s not cool enough, you can even customize your OWN unique design! The best part? You can make the whole thing with just cardstock and an LED light. That’s right – no glue needed!
This project requires so few supplies, in fact, that you only need five sheets of 12″ x 12″ cardstock to make your lantern, plus a battery-operated LED light. I’ll use green cardstock, but you can use a different color or use glitter, patterned or other specialty cardstock to make your DIY Christmas lantern unique!
You can also add some copy paper or vellum to diffuse the light if you’d like, but it’s optional. If you want to use the star pieces, you will need a little bit of glue — but again, they’re optional and your 3D Paper Tree Lantern will look gorgeous with or without them!

Inside my free download folder, you’ll find PDF files for cutting your tree by hand, as well as SVG and DXF files for use with a cutting machine. I’ll show you how to use the SVG file with a Cricut cutting machine — one of the most powerful tools you can have for papercrafting!
I used a Cricut Maker 3 to cut my lantern pieces, but you can use any cutting machine that fits 12″ x 12″ or 8.5″ x 11″ cardstock. That includes the original Maker, any of the Explore series machines, or the Cricut Joy Xtra.
Cricut Joy user? I’ve got you covered. There’s a Joy version of the files, so you can make your own mini tree, too! The smaller version is especially great if you’re decorating for the holidays in only a little bit of space. Easy peasy!
These intricate cuts come out best when you have a clean blade, so be sure to do my foil ball trick between mats! Not sure what I mean? You can learn how clean your blade for the best cuts in the video tutorial.
Removing the super intricate cut cardstock from your mat will require extraordinary care to avoid tearing, but a spatula can help lift tough spots. You’ll need a few other items, but don’t worry, I’ve got a full list of tools and supplies, plus links to where to find them, in my materials list below.
First I’ll show you how to prepare the file without score lines, which requires fewer tools, and will give you dashed cut lines to fold on. If you’re a beginner looking to do this the easy way, I recommend making the version without score lines.
After that, I’ll show you how to prepare the 3D Paper Tree Lantern file with score lines. That version looks a little neater when it’s assembled, but it does require you have a Scoring Tool or Single Scoring Wheel for your Cricut. 
Later on, I’ll even show you how to create your own custom side pieces on your 3D Paper Tree Lantern using text and some cute holiday elements I included in the free downloads! You can even personalize your tree to have different designs and words on every panel. TIP: Make sure you have the latest version of Cricut Design Space for the best results.
Paper luminaries are so beautiful, they’re like little handmade pieces of illuminated art! Display your paper trees along your mantle, on a side table, or even a part of your holiday table to bring a festive glow to your space.
Ready to learn how to make a 3D Paper Tree Lantern? This post contains some affiliate links for your convenience (which means if you make a purchase after clicking a link I will earn a small commission but it won’t cost you a penny more)! Read my full disclosure policy.
Materials And Tools to Make a 3D Paper Tree Lantern
- Three (3) Sheets of 12″ x 12″ 65 lb. Solid Core Cardstock (any color) -OR- Three (3) Sheets of 12” x 12” 100 lb. Solid Core Cardstock (any color)
- Optional for diffuser panels: Two (2) Sheets of 8.5” x 11” Vellum (any color) -OR- One (1) Sheet of 12” x 12” Wax Paper or Parchment Paper -OR- Two (2) Sheets of 8.5″ x 11″ Copy Paper
- One (1) Sheet of 8.5″ x 11″ or 12″ x 12″ Glitter or Foil Cardstock (optional for star pieces)
- One (1) Battery-Operated LED Puck Light -AND- Three (3) AAA Batteries (for puck light) -OR- One (1) Strand of LED Fairy Lights -OR- One (1) Remote-Controlled LED Tea Light
- A way to cut your materials – I’m using the Cricut Maker 3, but you can also use the Cricut Maker, a Cricut Explore Series machine, the Cricut Venture, or even the Cricut Joy Xtra.
- Cricut Green StandardGrip Machine Mat 12″ x 12″
- Cricut Blue LightGrip Machine Mat 12″ x 12″ (optional for diffuser pieces)
- Scoring Stylus -OR- Single Scoring Wheel (optional for files with score lines)
- Brayer
- Spatula
- Scraper
- Weeding Tool (for popping out small pieces from intricate areas)
- Tweezers (optional for handling delicate areas)
- Bearly Art Precision Craft Glue (optional for the star pieces)
- Design #547 – My free SVG/DXF/PDF design files are available in my free resource library – get the password by filling out the form at the bottom of this page
How to Make a 3D Paper Tree Lantern!

3D Paper Tree Lantern
Learn how to make a six-panel 3D paper tree lantern using only cardstock, optional vellum diffusers, and an LED light!
Materials
- Three to Five (3-5) Sheets of 12" x 12" or 8.5" x 11" 65 lb. Solid Core Cardstock (any color) -OR-
- Three to Five (3-5) Sheets of 12” x 12” or 8.5" x 11" 100 lb. Solid Core Cardstock (any color)
- Two (2) Sheets of 8.5” x 11” Vellum (any color, optional for diffuser panels) -OR-
- One (1) Sheet of 12” x 12” Wax Paper or Parchment Paper (optional for diffuser panels) -OR-
- Two (2) Sheets of 8.5" x 11" Copy Paper (optional for diffuser panels)
- One (1) Sheet of 8.5" x 11" or 12" x 12" Glitter or Foil Cardstock (optional for star pieces)
- One (1) Battery-Operated LED Puck Light -OR-
- One (1) Strand of LED Fairy Lights -OR-
- One (1) Remote-Controlled LED Tea Light
- Three (3) AAA Batteries (for LED Puck Light)
- Design #547 (My free SVG/PDF/DXF design files are available in my free resource library - get the password by filling out the form at the bottom of this page)
Tools
- A way to cut your materials - I’m using the Cricut Maker 3, but you can also use the Cricut Maker, a Cricut Explore Series machine, the Cricut Venture, the Cricut Joy Xtra, or even the Cricut Joy for smaller files
- Cricut Green StandardGrip Machine Mat 12" x 12"
- Cricut Blue LightGrip Machine Mat 12" x 12" (optional for diffuser pieces)
- Scoring Stylus (optional for files with score lines) -OR-
- Single Scoring Wheel (optional for files with score lines)
- Brayer
- Spatula
- Scraper
- Weeding Tool (for popping out small pieces from intricate areas)
- Tweezers (optional)
- Bearly Art Precision Craft Glue (optional for star pieces)
Instructions
STEP 1: GET MY FREE 3D PAPER TREE LANTERN DESIGNS
First, download my 3D Paper Tree Lantern designs from my free library -- look for Design #547. Alternatively, you can use the Save This Project form near the top of this post and the design link will be emailed to you.
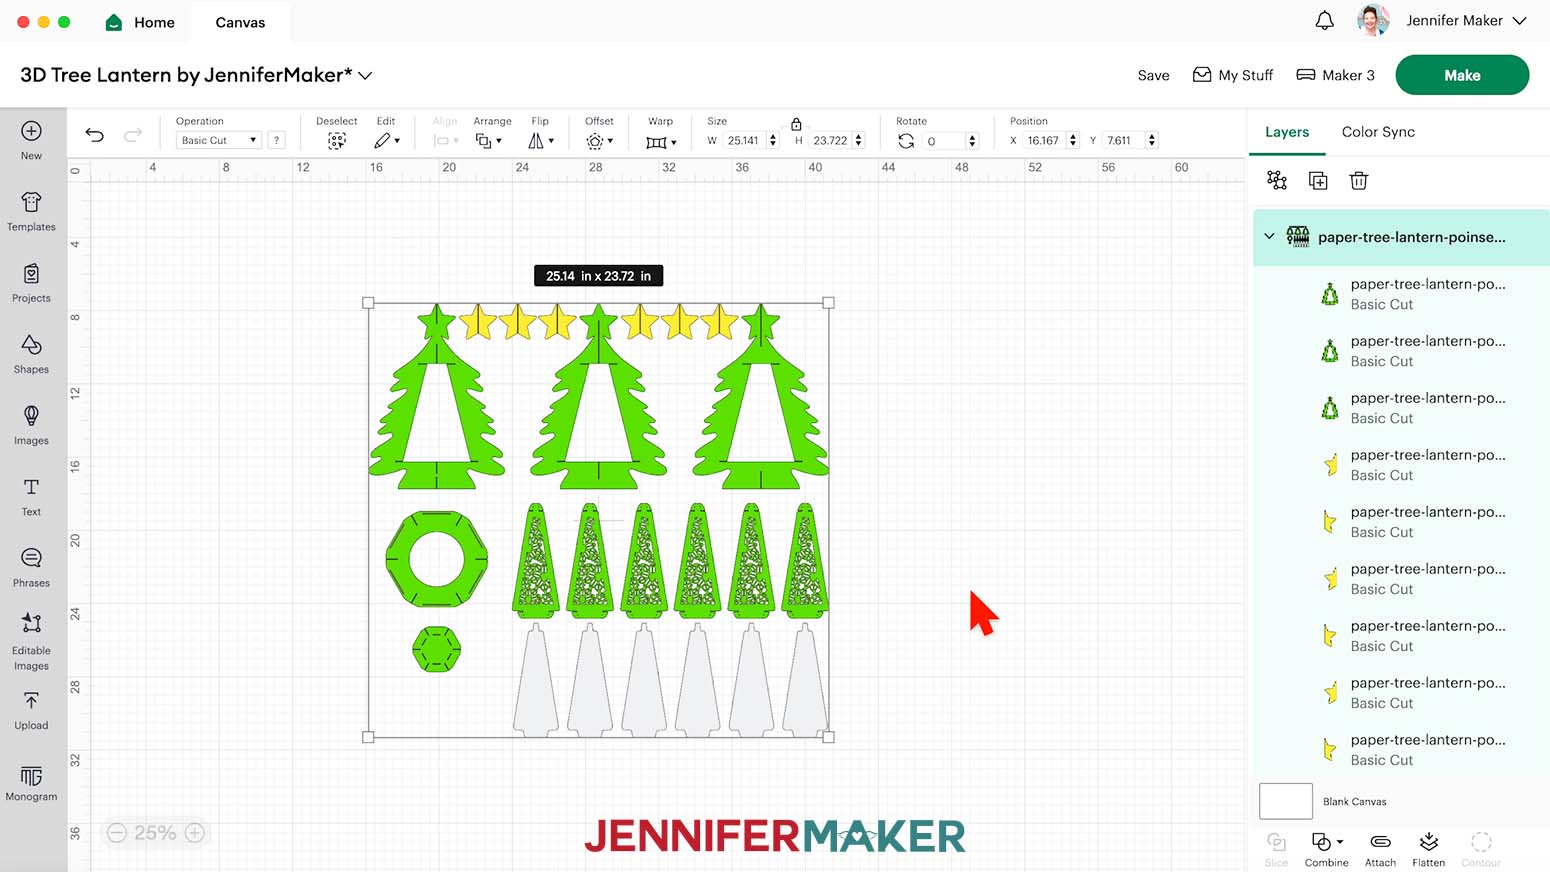
There are four designs in the SVG folder: snowflakes, poinsettias, Happy Holidays, and a file with blank panels that you can customize, each with score and no-score versions. There’s even a “For Joy Users” folder with smaller files that can be cut on the Cricut Joy.
NOTE: I’ll show you the basic steps to make the no-score poinsettia design using cardstock and vellum. If you want to use different materials or assemble the other designs, there is more detail in the Variation section below!
TIP: If you’re not sure how to upload, go to jennifermaker.com/svgs to learn how to unzip and upload SVG files.
STEP 2: PREPARE AND CUT YOUR 3D PAPER TREE LANTERN DESIGN
CRICUT DESIGN SPACE
1. Open Cricut Design Space and click “New Project.”
2. Click “Upload” and then “Upload Image.”
3. Click “Browse.”
4. Select the SVG file you want to use.
5. On the Prepare to Upload screen, it will say “Cut image” with the design preview.
6. Click “Upload.”
7. Find your design in Recent Uploads and add it to the Canvas.
NOTE: The design is set up to make a 10.5” tall x 7.5” wide tree. You can enlarge your design to make a bigger tree if you have a large-format cutting machine like a Cricut Venture.
8. Make sure the correct machine is selected in the top right.
9. Click “Make.”
10. If prompted, click "On Mat," choose your mat size, and click “Confirm.”
11. On the Prepare Screen, set the Material Size to match each paper you’re using.
12. Select the first mat again and click “Continue.”
VARIATION: CUSTOMIZE YOUR PANELS
1. Open Cricut Design Space and click “New Project.”
2. Click “Upload” and then “Upload Image.”
3. Click “Browse.”
4. Select the SVG file called “paper-tree-lantern-blank-score-jennifermaker-SVG.”
5. On the Prepare to Upload screen, it will say “Cut image” with the design preview.
6. Click “Upload.”
7. Find your design in Recent Uploads and add it to the Canvas.
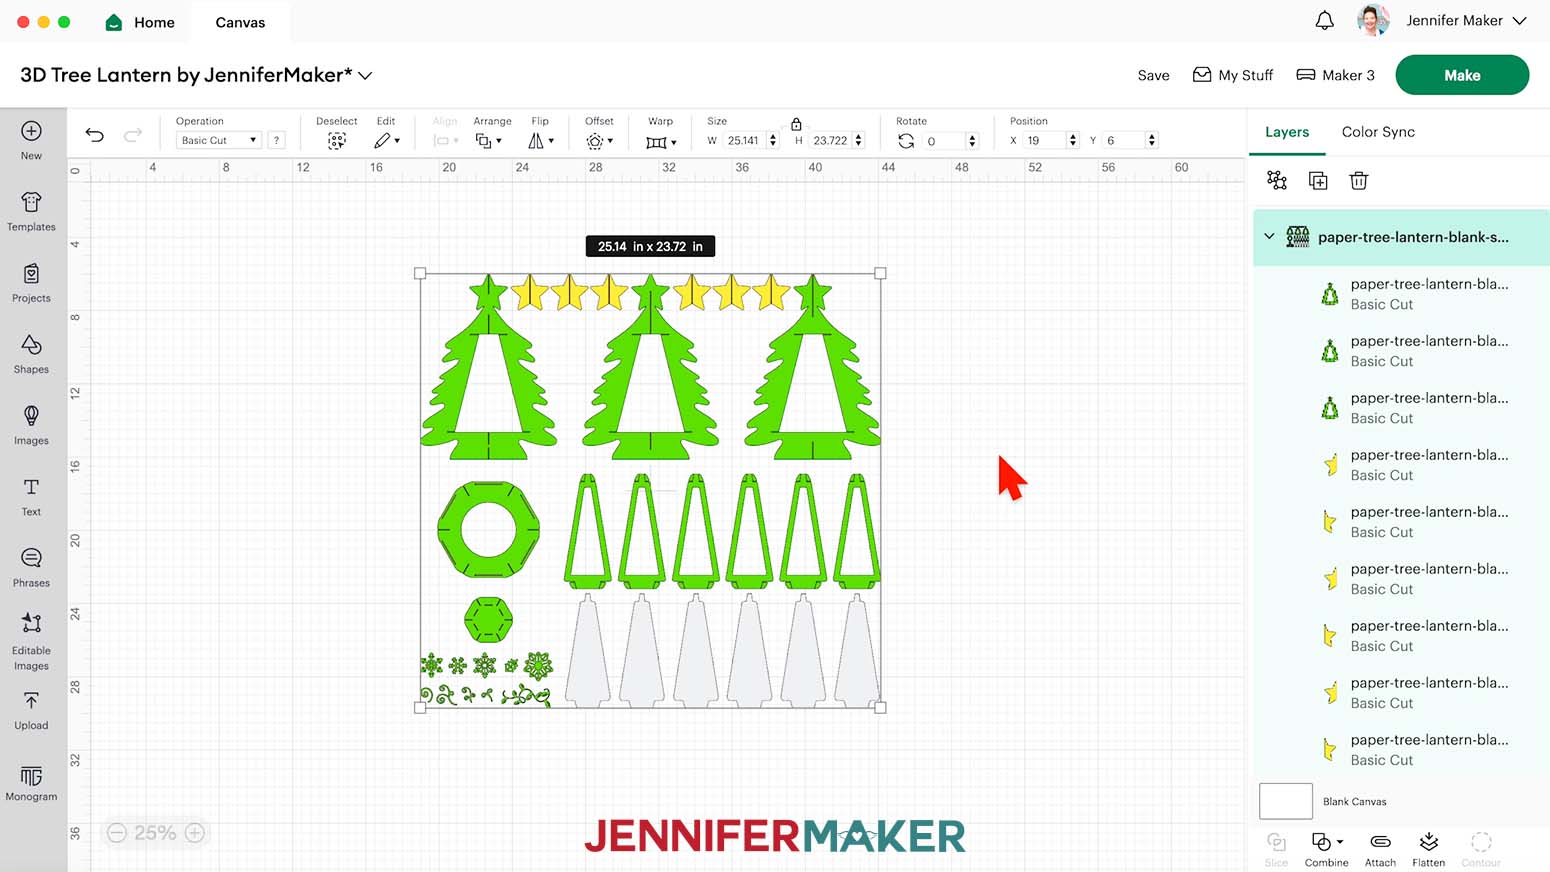
NOTE: The design is set up to make a 10.5” tall x 7.5” wide tree. You can enlarge your design to make a bigger tree if you have a large-format cutting machine like a Cricut Venture.
8. With the design selected, click the “Ungroup” icon above the Layers Panel.
9. Using the plus (+) icon in the lower left, zoom in on one of the blank panels.
10. Click the Text icon to create a text box.
11. Type your word or phrase. I’ll type “HAPPY HOLIDAYS.”
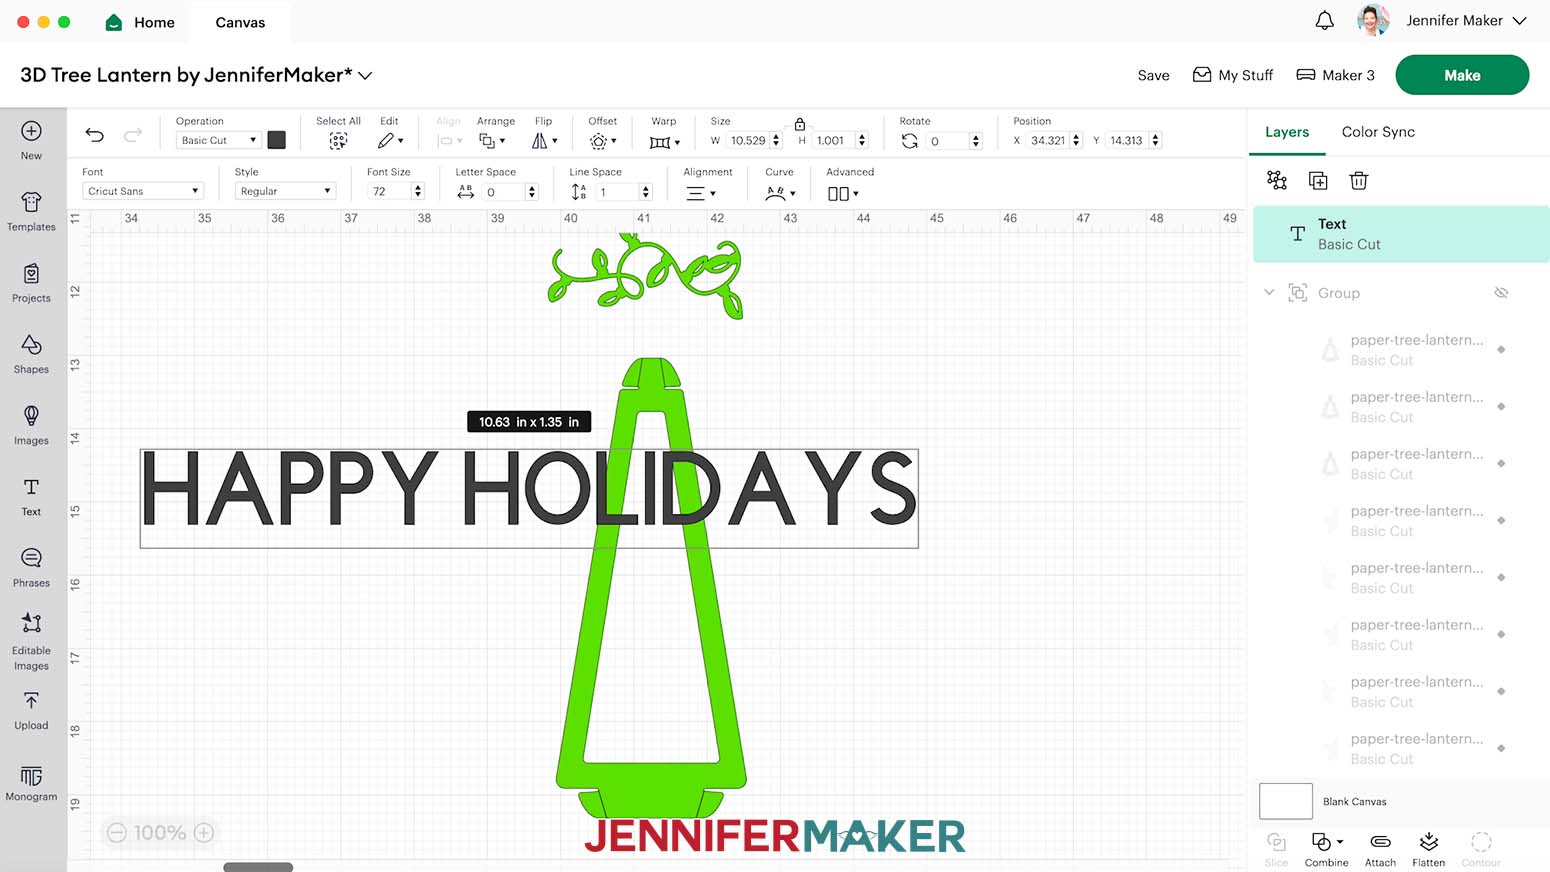
12. Choose a font from the font dropdown. I will stick with Cricut Sans.
13. Highlight the text and set the Style to “Bold.” This will make for easier cuts.
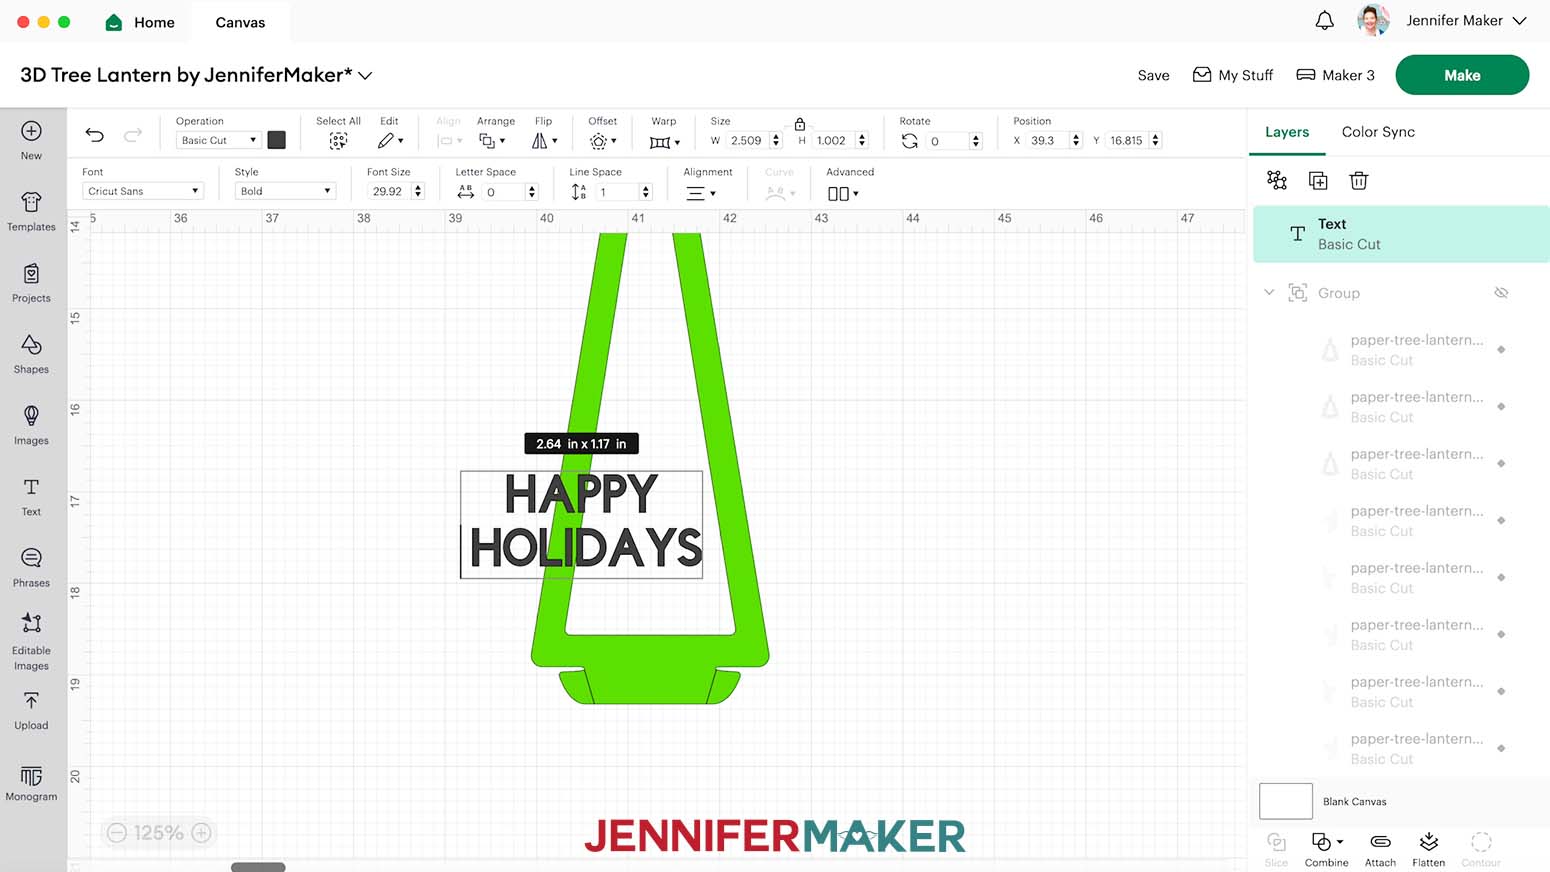
14. If you’re using a phrase with two or more words, move each word to its own line by pressing your Enter key after the previous word.
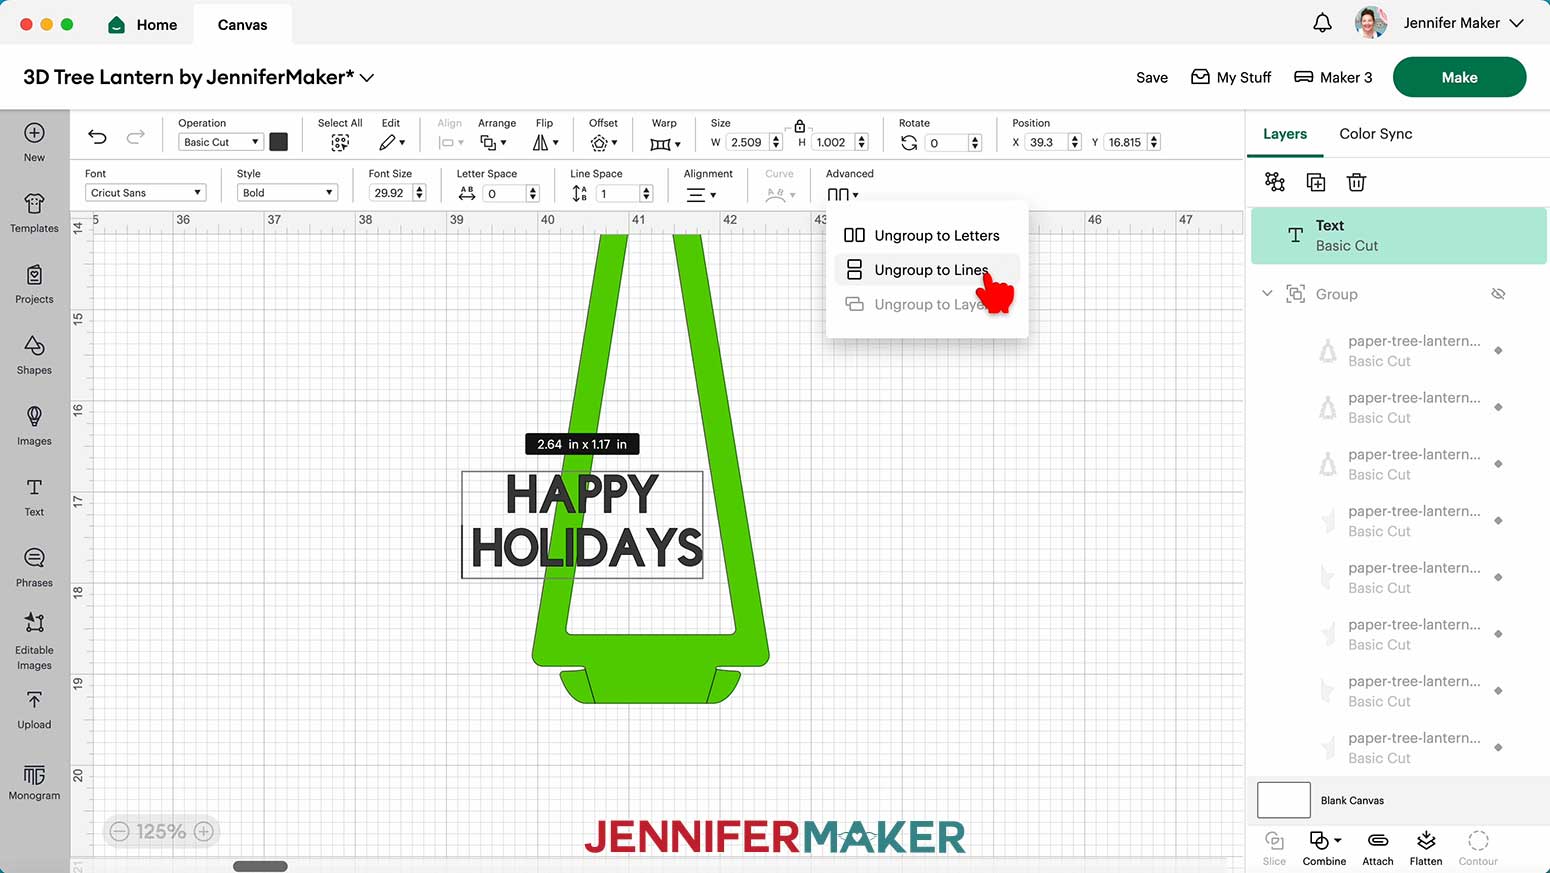
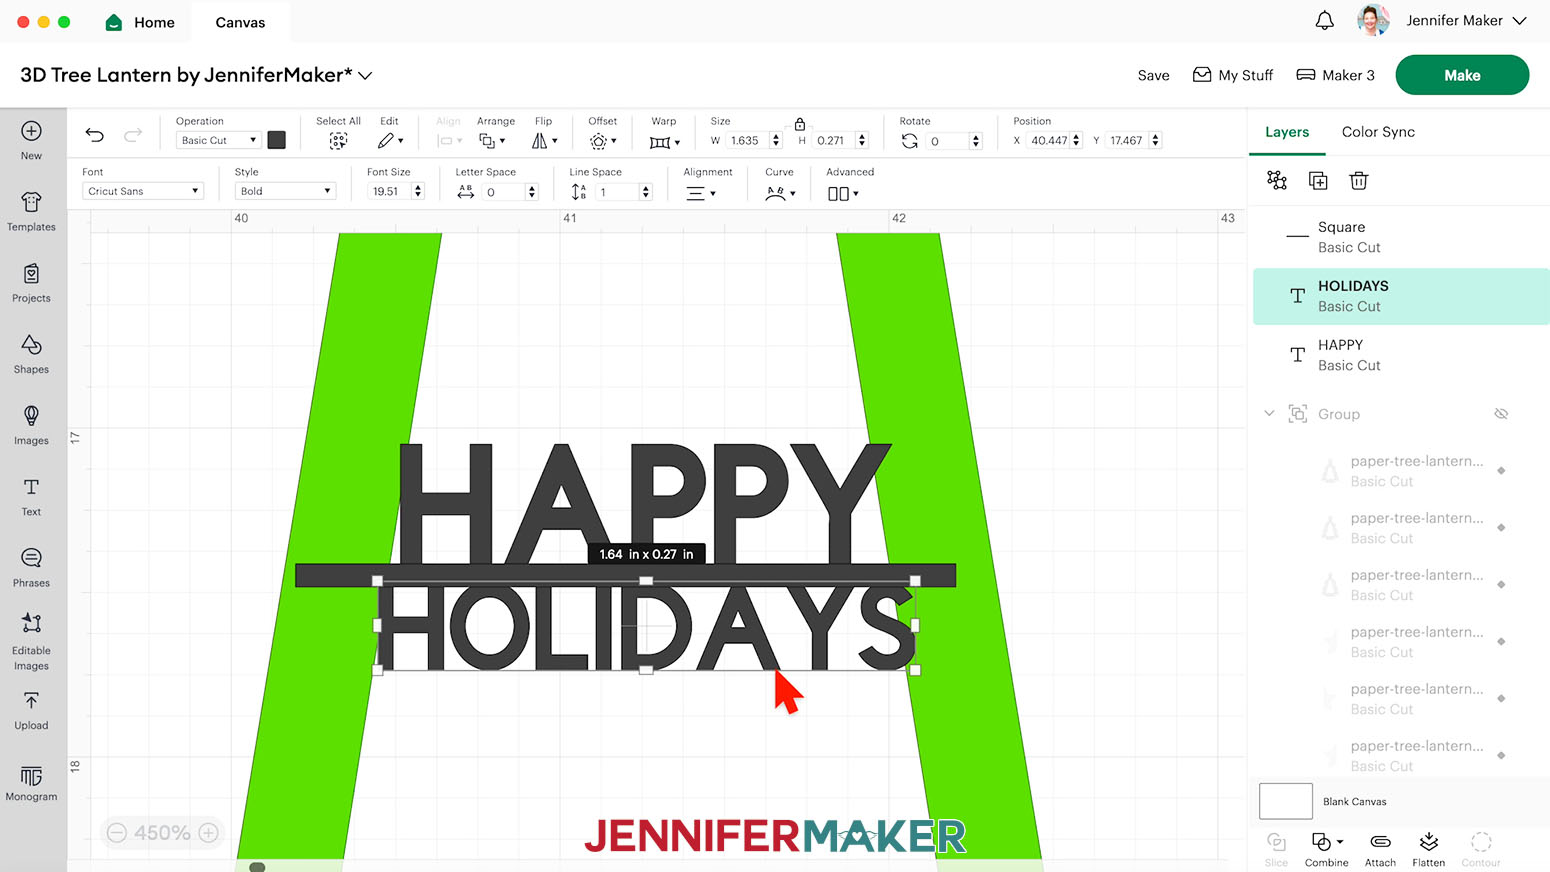
15. With the text box still selected, click “Advanced” and then “Ungroup to Lines.”
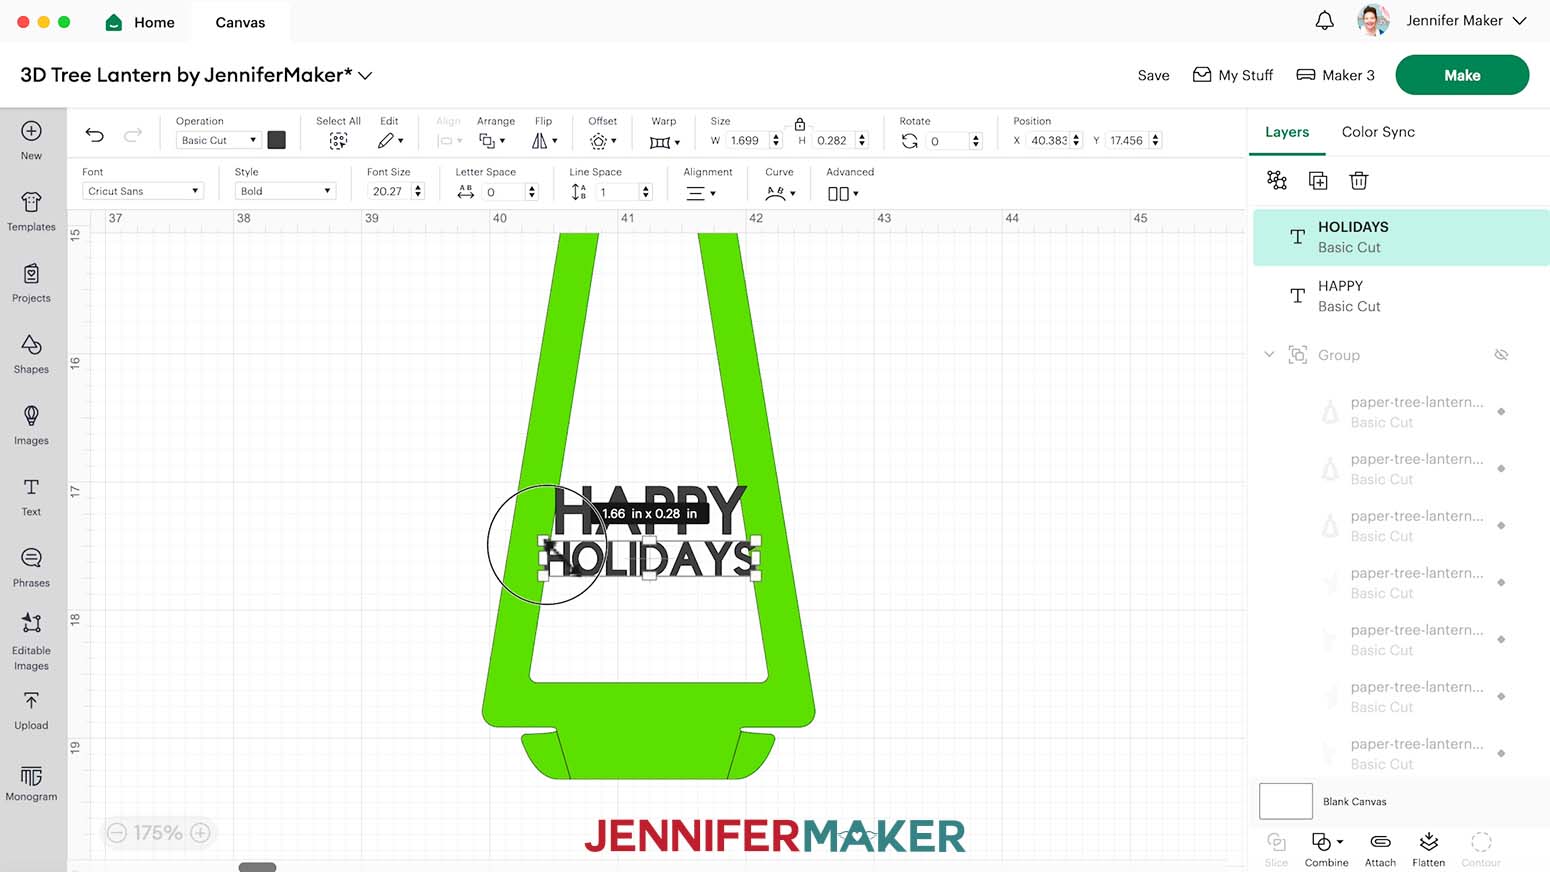
16. With the size locked to maintain proportions, click and drag the bounding box on each word to resize it so it fits across the base of one of the blank panels, overlapping the frame a little on each side. It’s OK if each of your words is a different size.
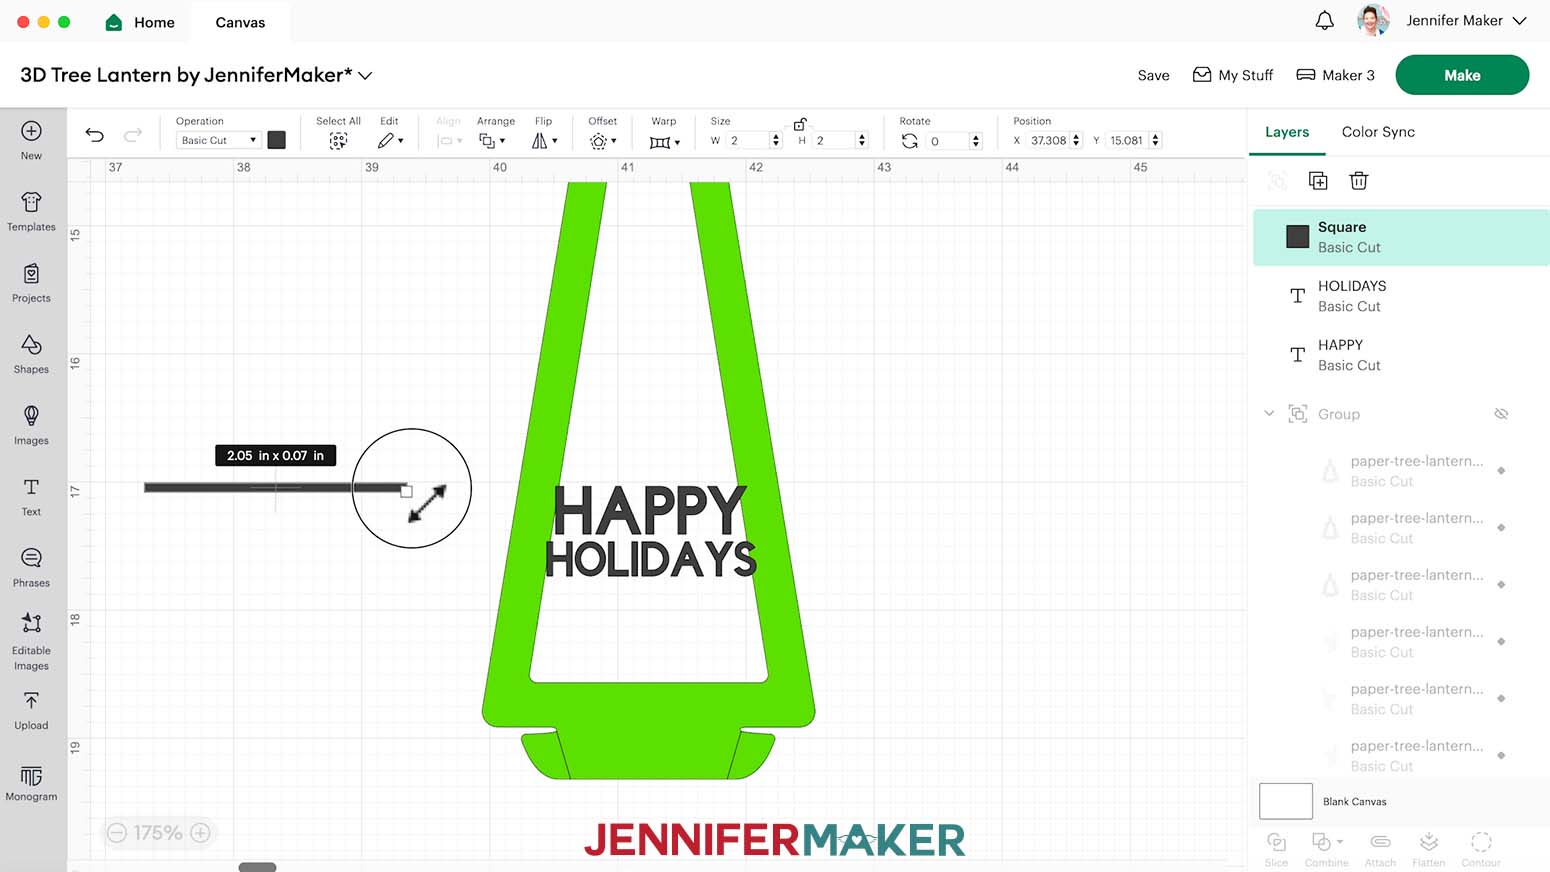
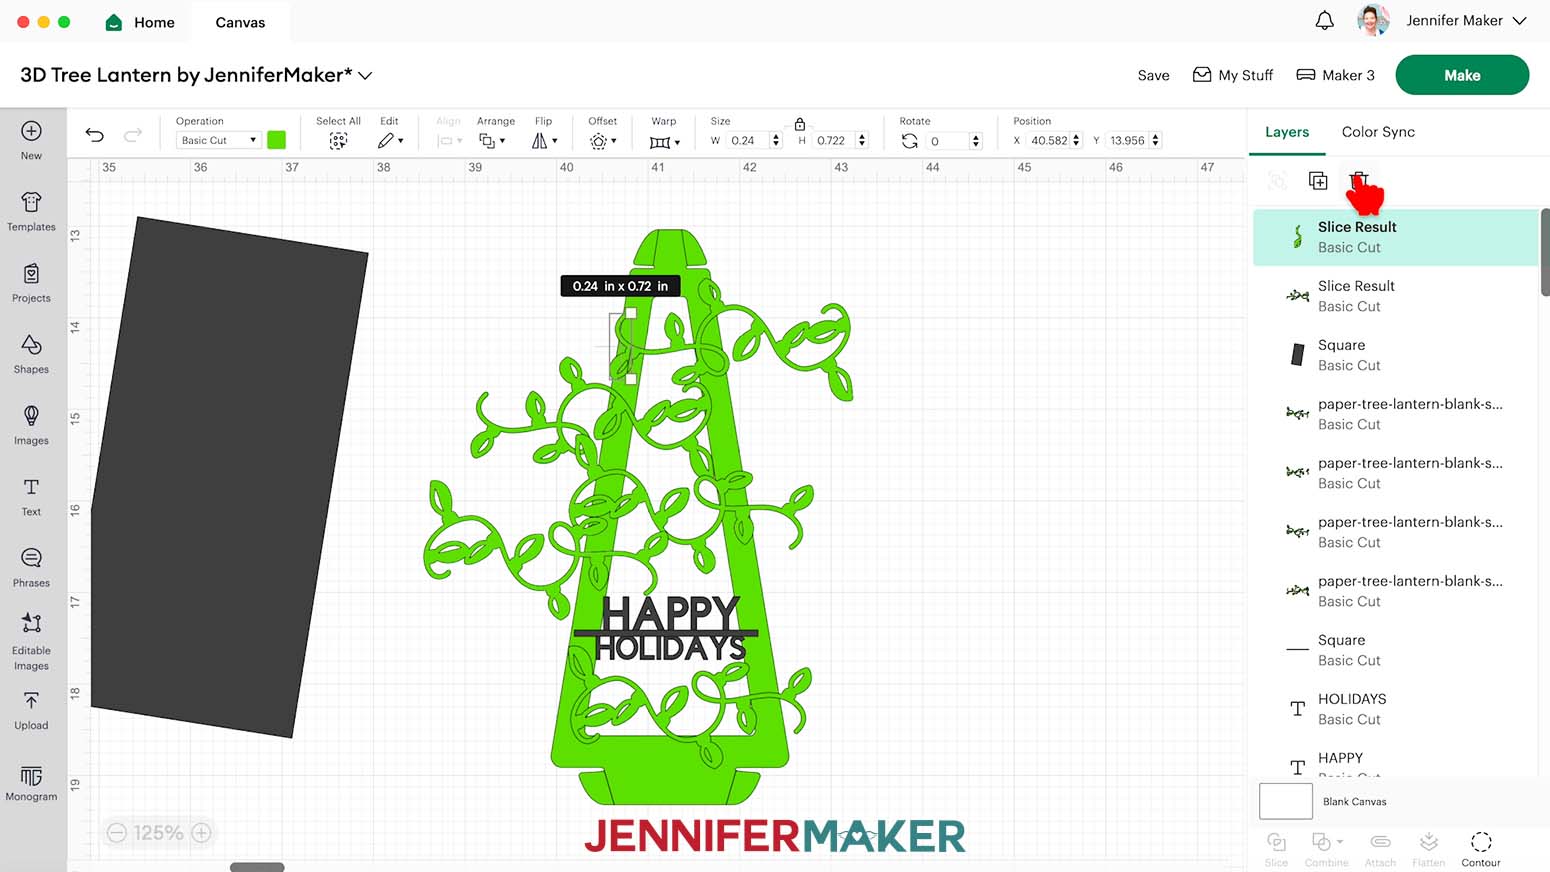
17. Click the “Shapes” menu and select the Square.
18. Click the lock icon to unlock proportions. Then, click and drag the bounding box to resize the square into a skinny, horizontal rectangle that will overlap the area between your two words. My rectangle ended up being about 2” x 0.07”.
NOTE: If you have more than two lines of text, add a rectangle between them, too.
19. Move the words and rectangle(s) to ensure they’re all overlapping each other and the frame slightly. As much of the outer letters as possible should be touching the frame, while still maintaining readability. Zoom in if you need to see better.
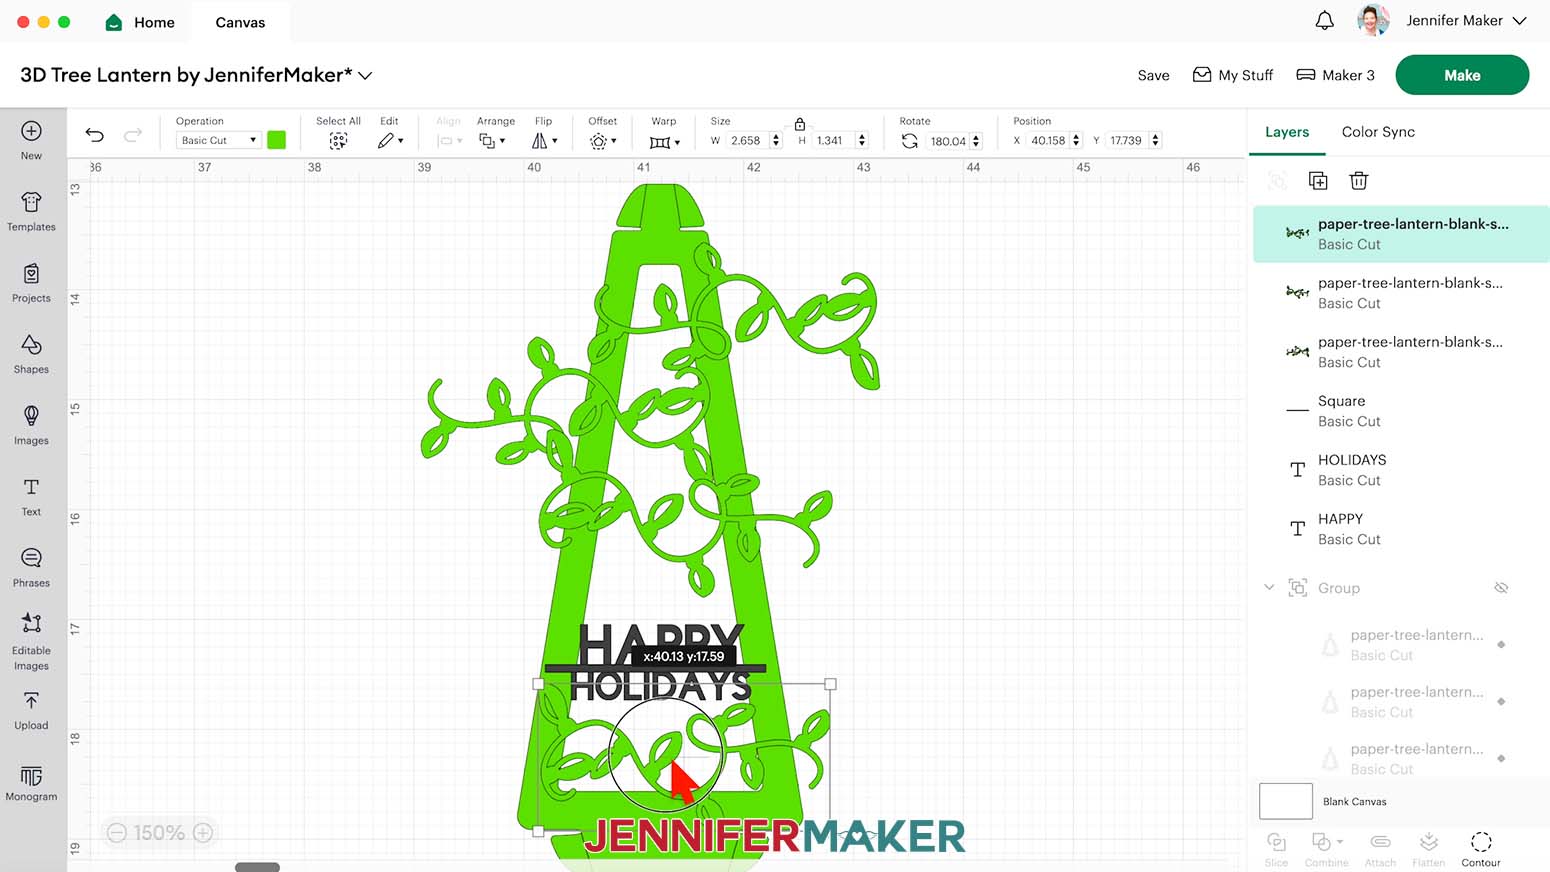
20. Scroll down (or zoom out) and select an element(s) you’d like to add to your panel. I’ve included some snowflakes, holiday lights, and various flower and vine elements for you to choose from.
TIP: You can also choose your own elements from Cricut Design Space images.
21. With your chosen element(s) selected, click “Arrange” and “Bring to Front.”
22. Drag, rotate, and resize the elements to fill the frame, duplicating elements as desired. Overlap them with the words, the edges of the frame, and each other. Don’t worry if some of the elements extend beyond the outer edges of the frame.
23. Click the “Shapes” icon and select another square.
24. Click the Lock icon to unlock the proportions, then size it to roughly the height of the panel.
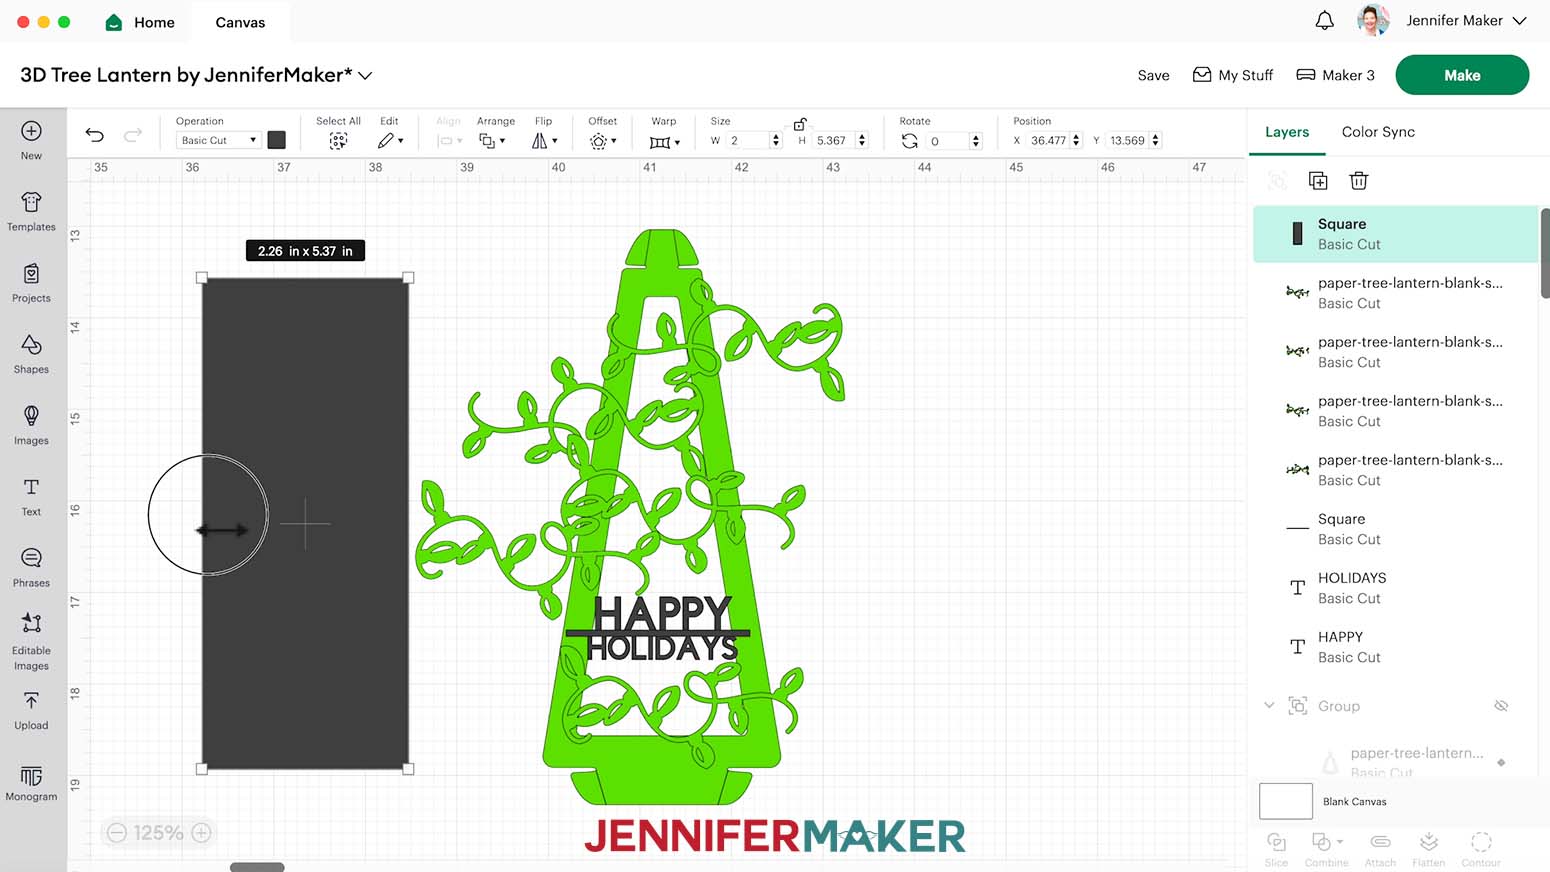
25. Hover your cursor over a corner of the bounding box until the rotate function becomes active, then rotate the rectangle until its right edge is at the same angle as the panel’s left edge, about 9°.

26. Drag it so it’s overlapping any elements that are extending past the panel’s outer frame.
27. With the rectangle selected, click the “Duplicate” icon.

28. Click back on the original rectangle, then hold Shift to select it and one of the extending elements.
29. Click “Slice.”
30. Delete the Slice results, except for the piece remaining inside the frame as part of the design.
31. Move the other rectangle onto the frame in the same spot as the original.
32. With the rectangle selected, click the “Duplicate” icon.
33. Repeat steps 26-32 for the remainder of the elements extending past the left side of the panel.
34. Once the left side is finished, select the last duplicated rectangle.
35. Click “Flip” and “Flip Horizontal.”

36. Repeat steps 26-32 for the elements extending past the right side of the panel.
37. Once the right side is finished, select the last duplicated rectangle.
38. Hover your cursor over a corner until the rotate function becomes active, then rotate the rectangle to about 90 degrees, so it runs horizontally.
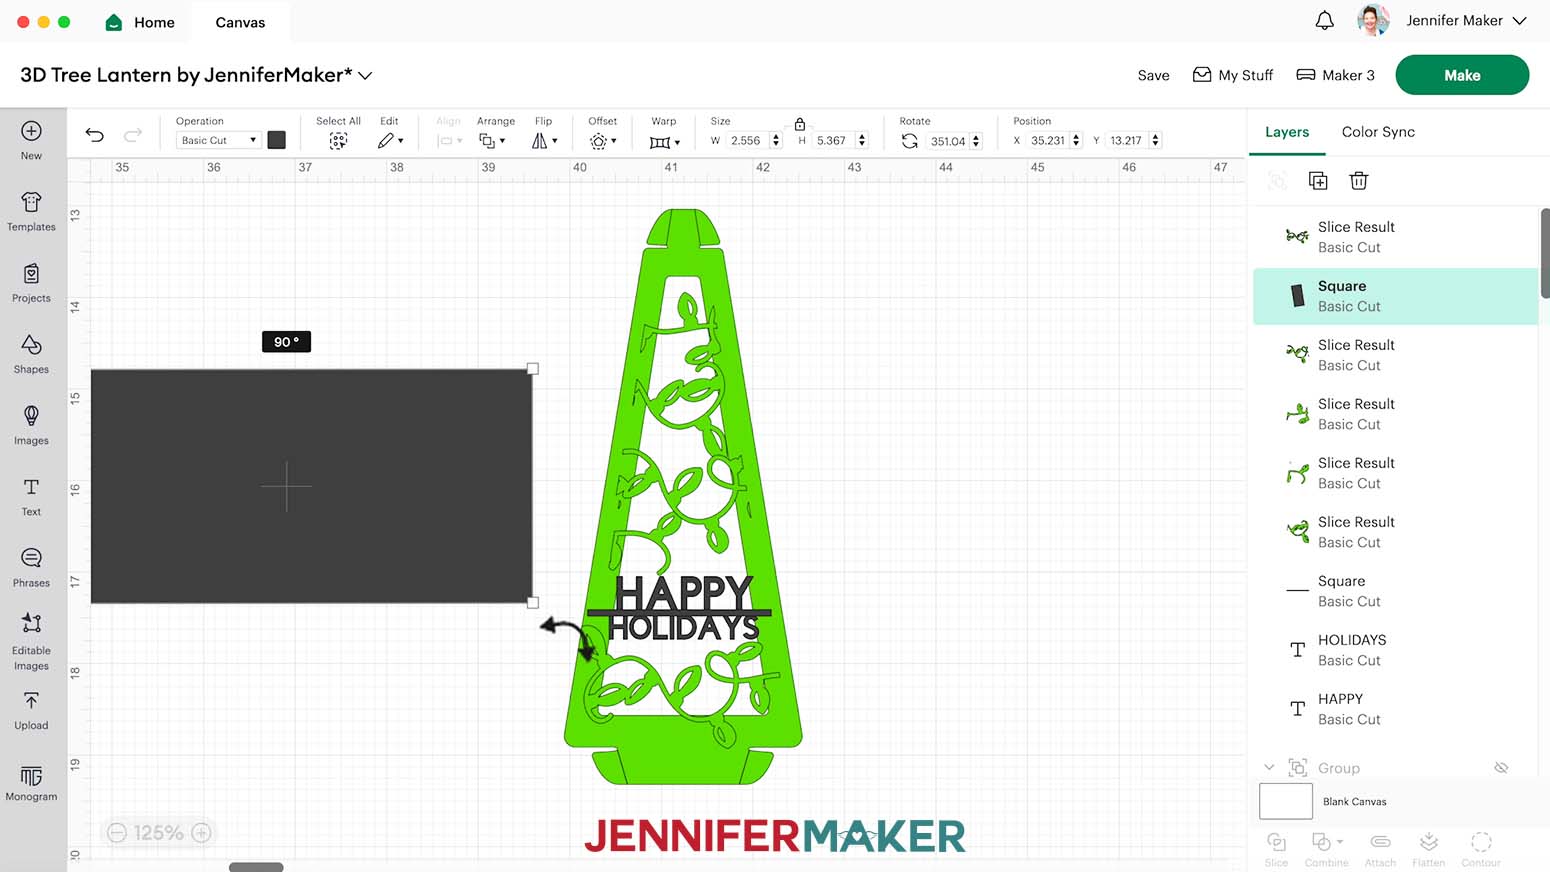
39. Repeat steps 26-32 for any elements extending past the bottom side of the panel.
40. When you’re finished, delete the last rectangle.
41. In the Layers Panel, find the group with the panel frame. Select it and click the “Ungroup” icon.
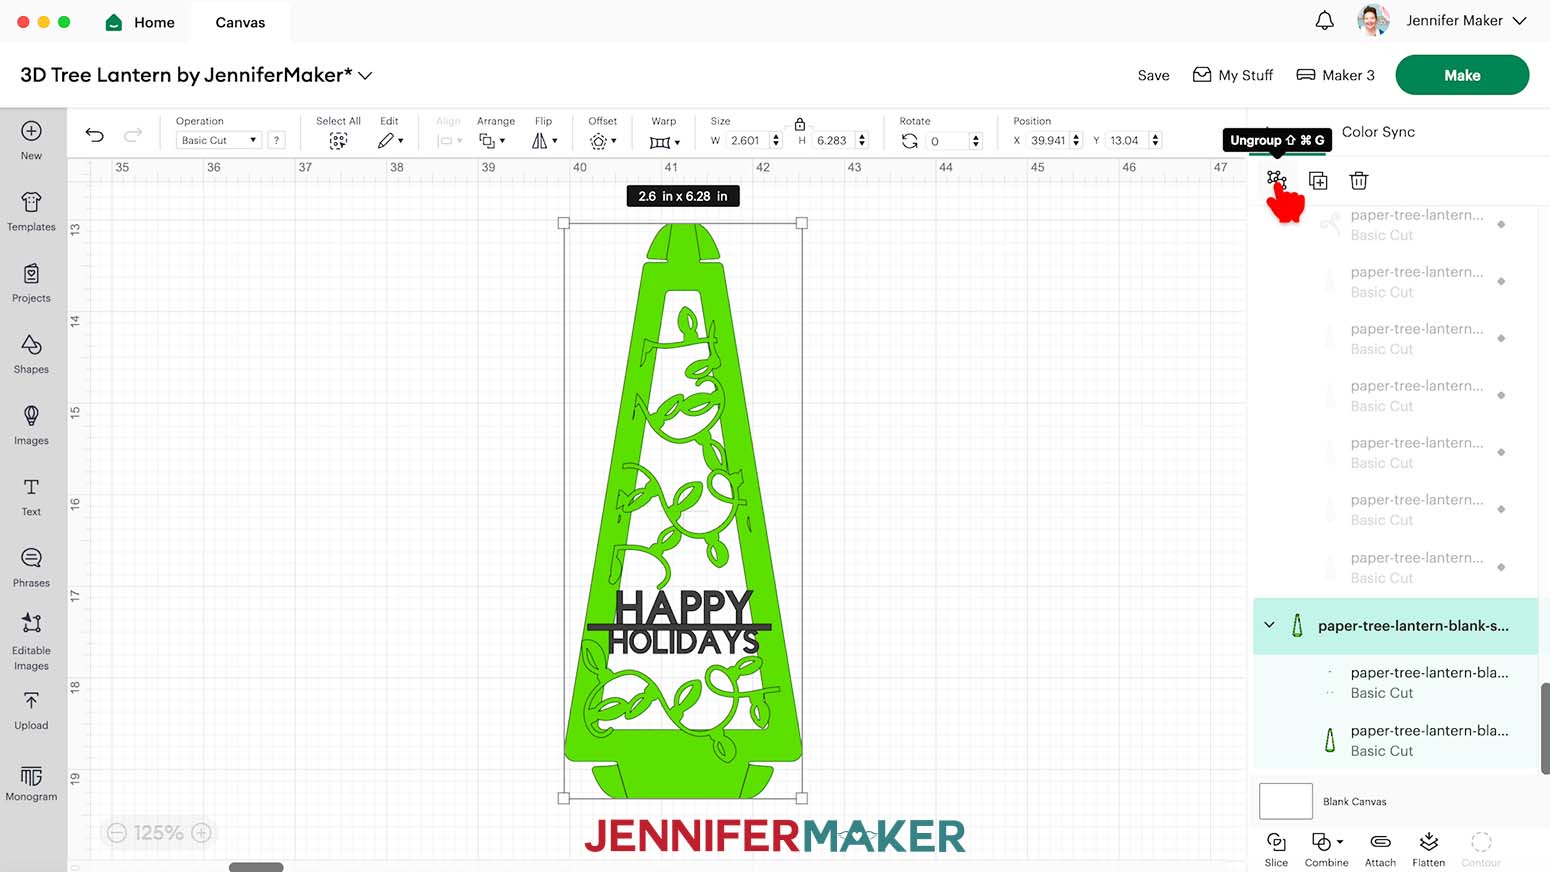
42. Find the score line layer from that group (it will be colored red), and double-click its name. Rename it “SCORE.”
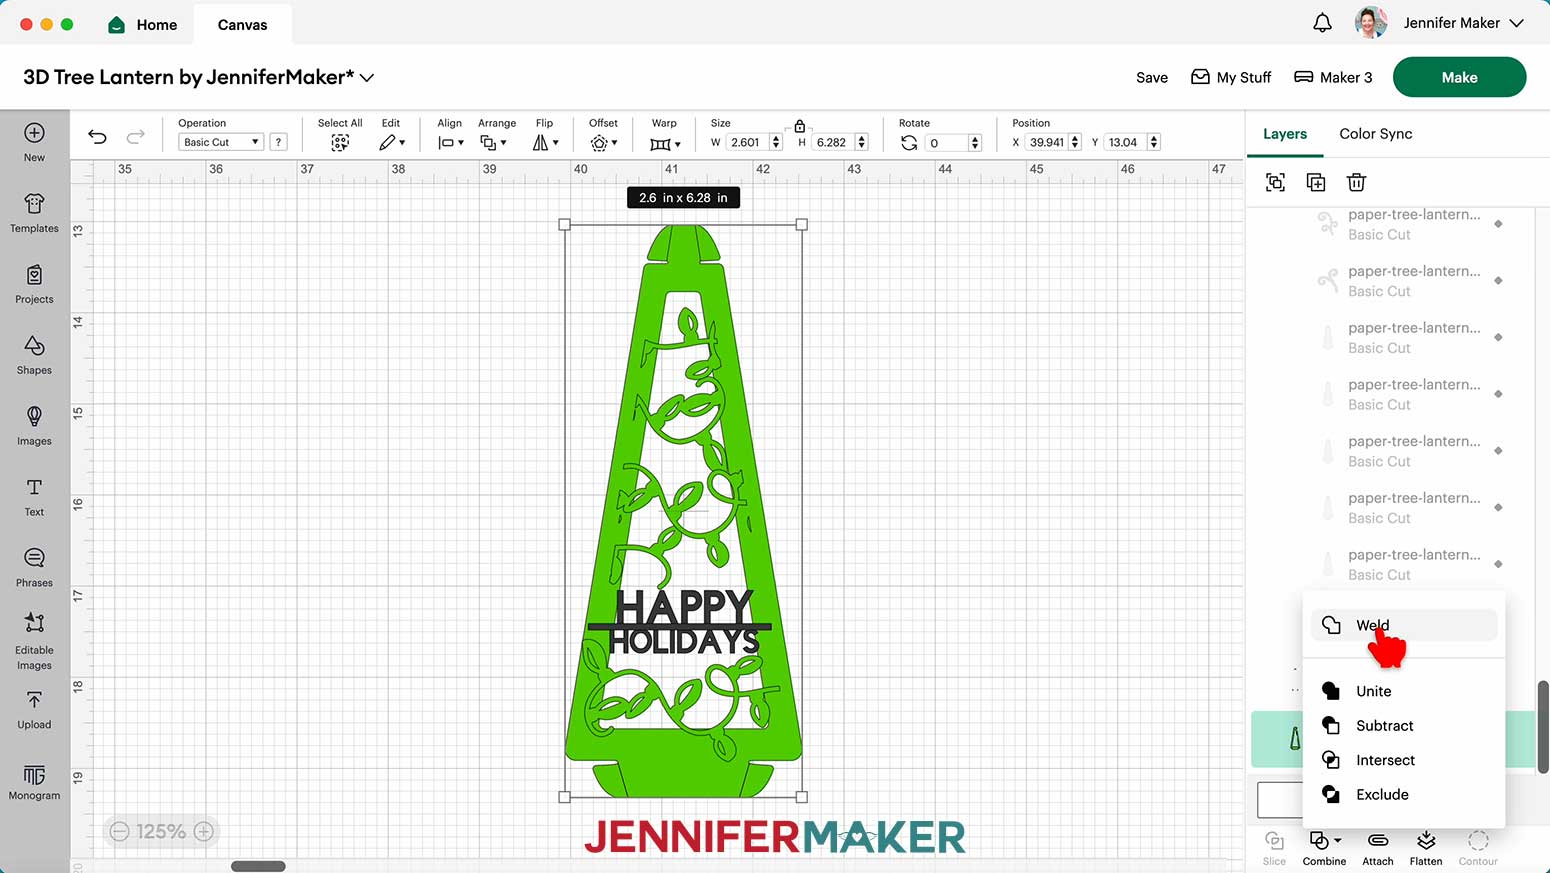
43. Make sure you’re happy with the position and size of all your elements and words inside your customized panel. Then drag a bounding box around the frame to select it and all of its added elements.
44. Click on the “SCORE” layer in the Layers Panel to deselect it.
45. Click “Combine” and choose “Weld” to permanently attach everything but the score lines.
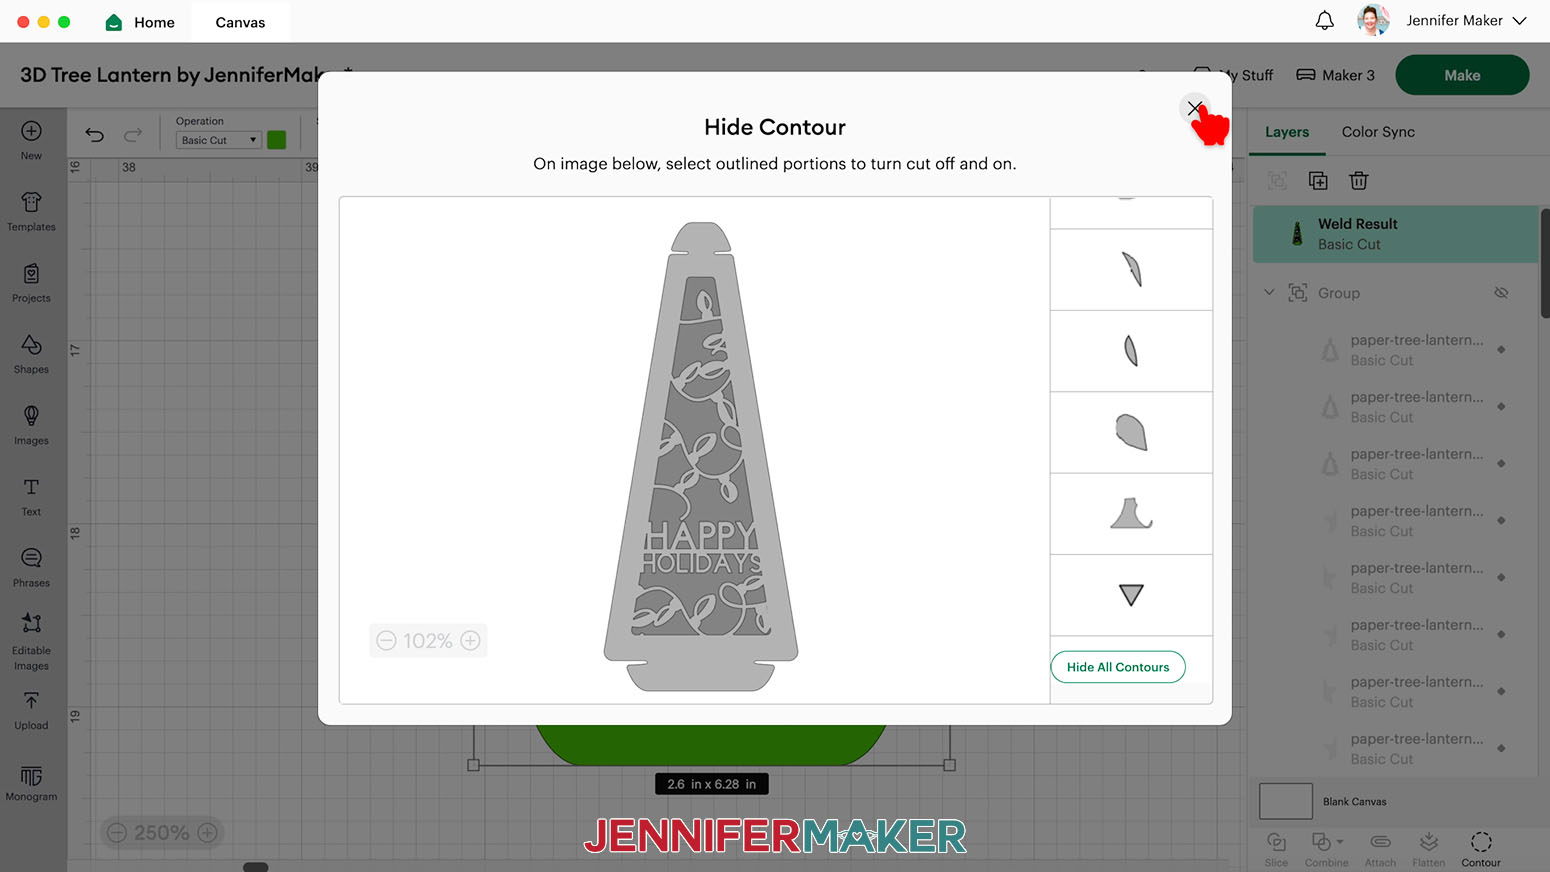
46. You may notice small cutout areas within the design that may be too tiny or intricate for your Cricut to cut.
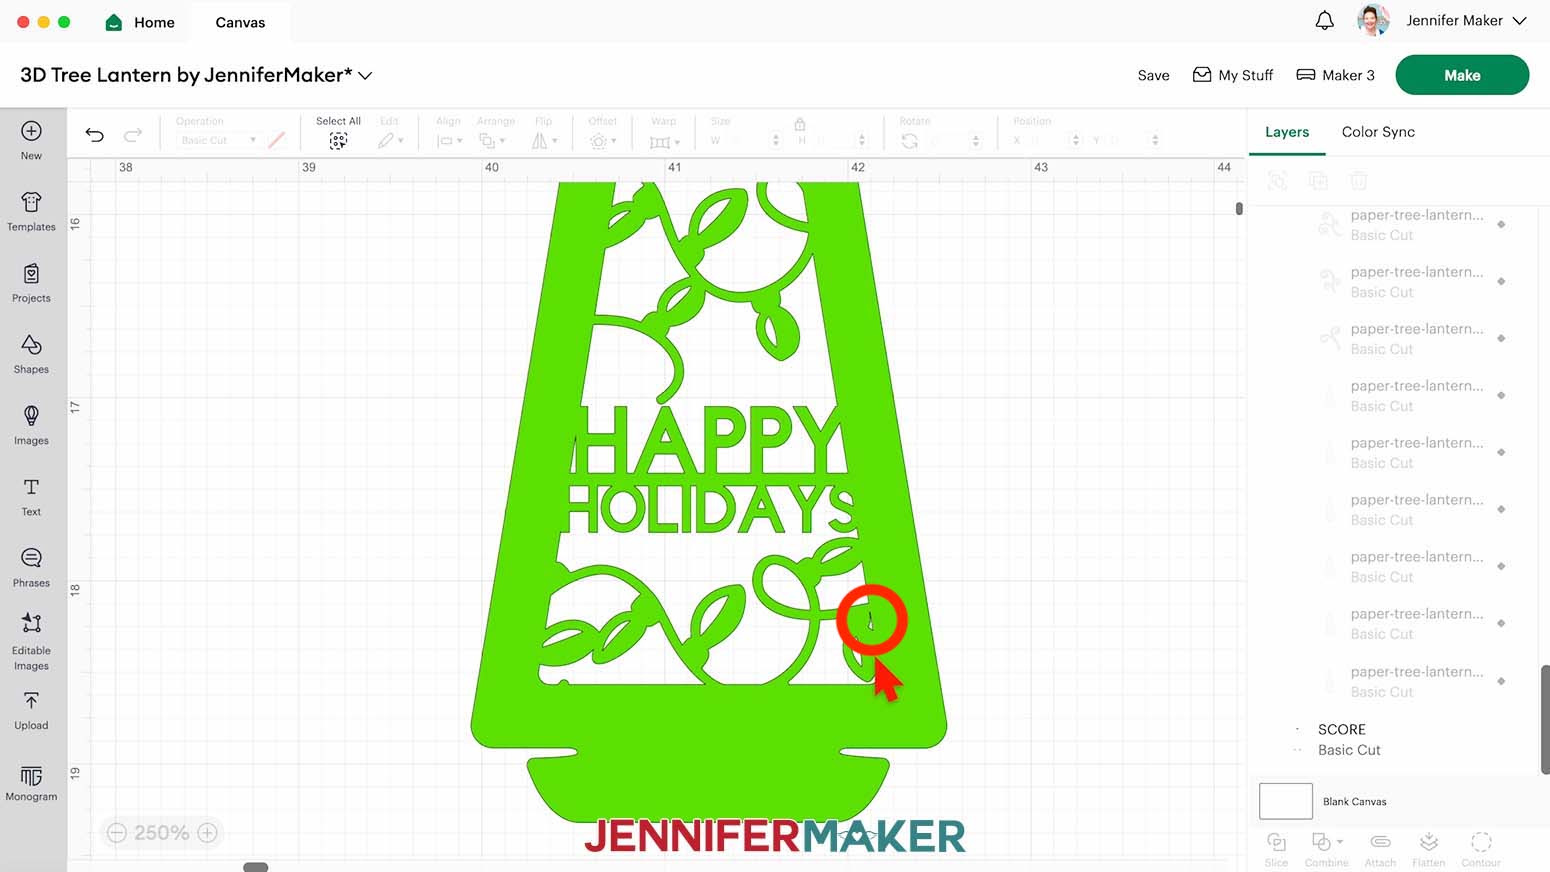
47. With your welded design selected, click the “Contour” icon at the bottom of the Layers Panel.
48. Click on the tiny cutouts to hide them. Click the “X” to exit the "Hide Contour" menu when you’re done.
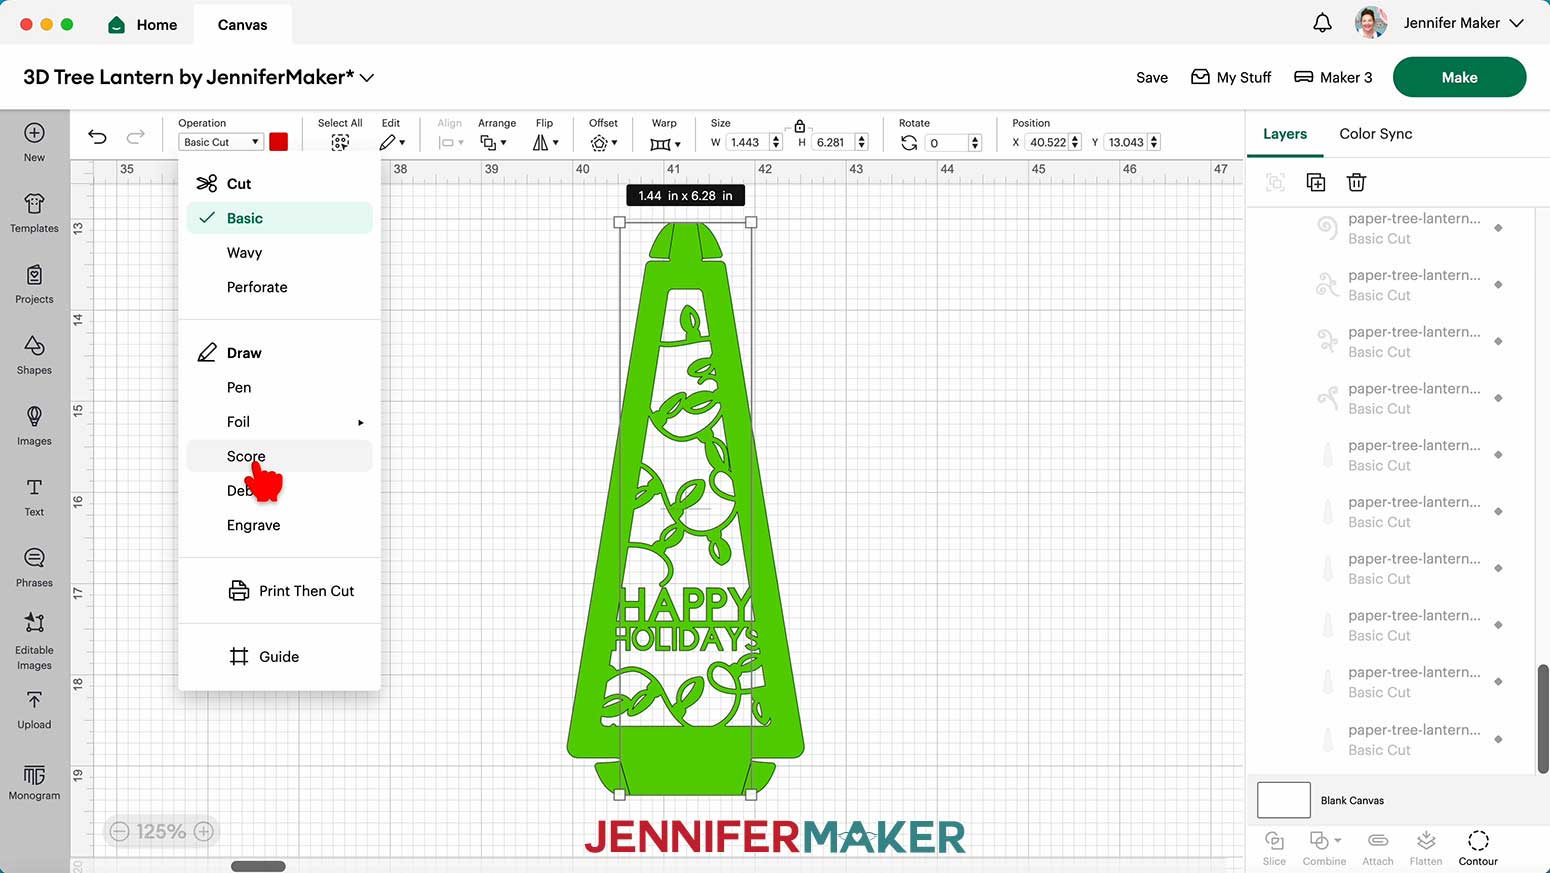
49. Select the layer you renamed “SCORE” in the Layers Panel.
50. Under “Arrange,” click “Bring to Front.”
51. With the "SCORE" layer still selected, click the “Operation” dropdown and select “Score.”
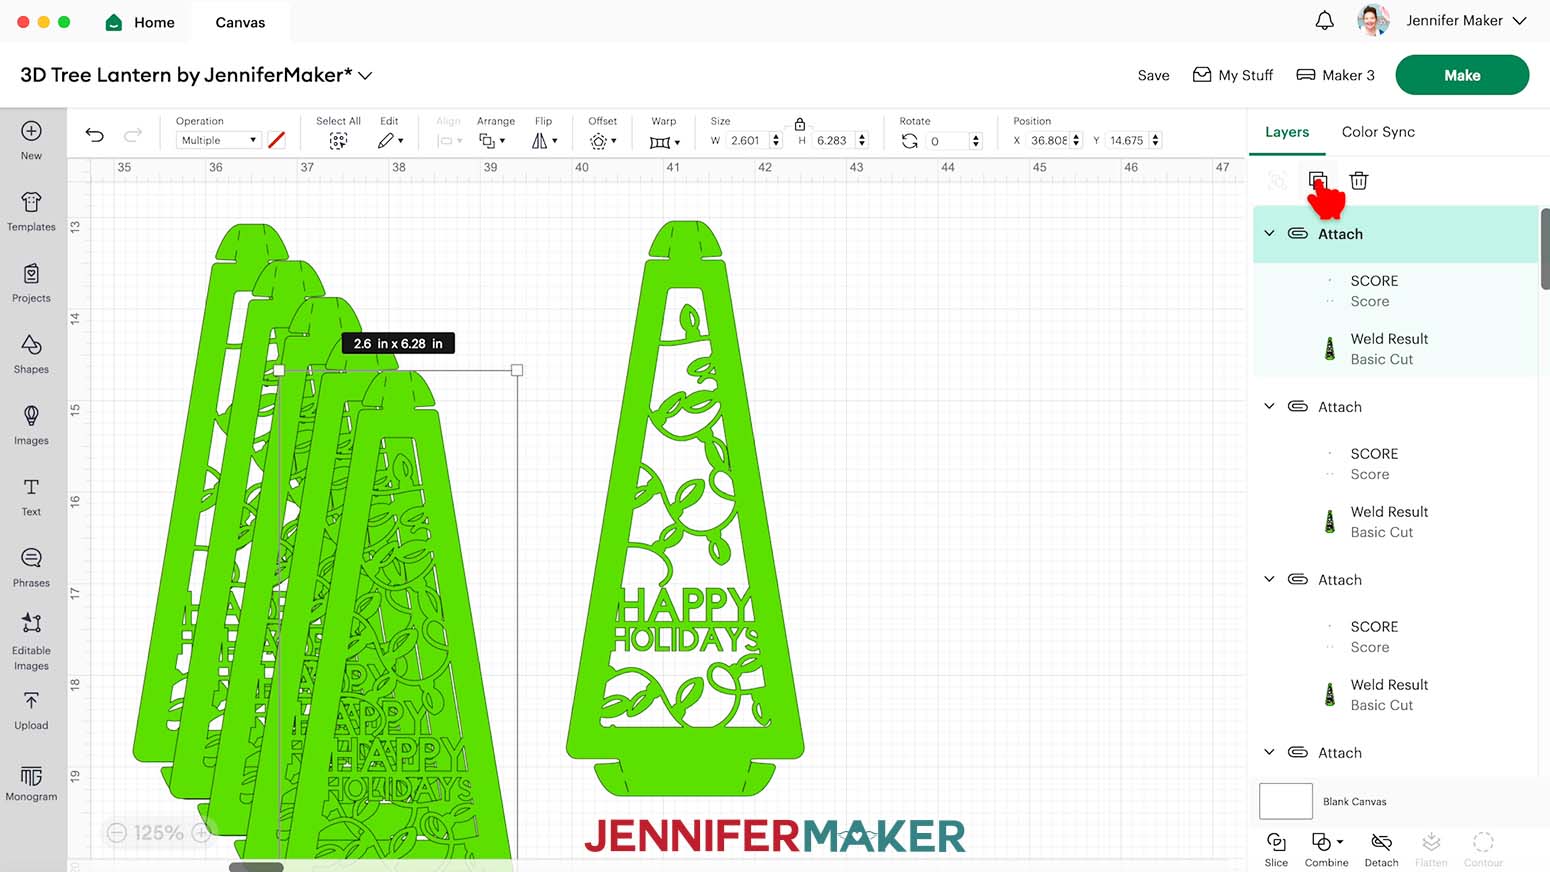
52. Select the score lines and customized frame, then click “Attach.”
53. Zoom out to see all of the pieces of the design.
54. If you’d like all of your panels to match, select the five blank panels and click the Delete icon. Then select the custom panel and duplicate it until you have a total of six panels.
55. If you have any hidden pieces, click the eye icons to unhide them. Then, delete anything you don’t want to cut and skip to step 57.
56. If you’d like your panels to be different, follow steps 9-52 for each blank panel. Then, unhide any hidden pieces and delete anything you don't want to cut.
57. Follow the “Cricut Design Space” steps 8-12 above.
CUTTING
1. On the Make Screen, search for and select the setting needed for your diffuser pieces. If you’re not cutting diffuser pieces, skip to Step 2.
- Copy paper: “Copy Paper – 20 lb (75 gsm)” setting with “More” Pressure
- Vellum: “Vellum” setting with “More” Pressure
- Parchment paper: “Parchment Paper” setting with “More” Pressure

2. Search for and select the setting needed for your cardstock pieces. For the 65 lb. cardstock in my materials list, use the “Medium Cardstock - 80 lb (216 gsm)” setting with “More” Pressure.
3. Place your material face up on a green StandardGrip machine mat.
TIP: You can also use a blue LightGrip machine mat for your diffuser pieces.
4. Use a brayer to adhere it well.
5. Check that your Fine-Point Blade is clean and in the clamp.
6. Press the flashing “Load/Unload” button to load the prepared mat into your Cricut.
7. Press the flashing “Go” button to begin cutting.
8. When it has finished cutting, check that the cut is complete. If it's not, press the “Go” button again to make another cut in the same design.
9. When the cut is complete, unload the mat, flip it over onto your work surface, and roll it back to release the paper.
TIP: A spatula helps lift delicate areas and a weeding tool helps to pop out small pieces from intricate areas.
10. Place the pieces face up in the correct orientation so they’re easier to assemble.
11. Use a scraper to remove cutouts left on the mat.
12. Repeat Steps 3-11 for each mat.
STEP 3: ASSEMBLE YOUR 3D PAPER TREE LANTERN
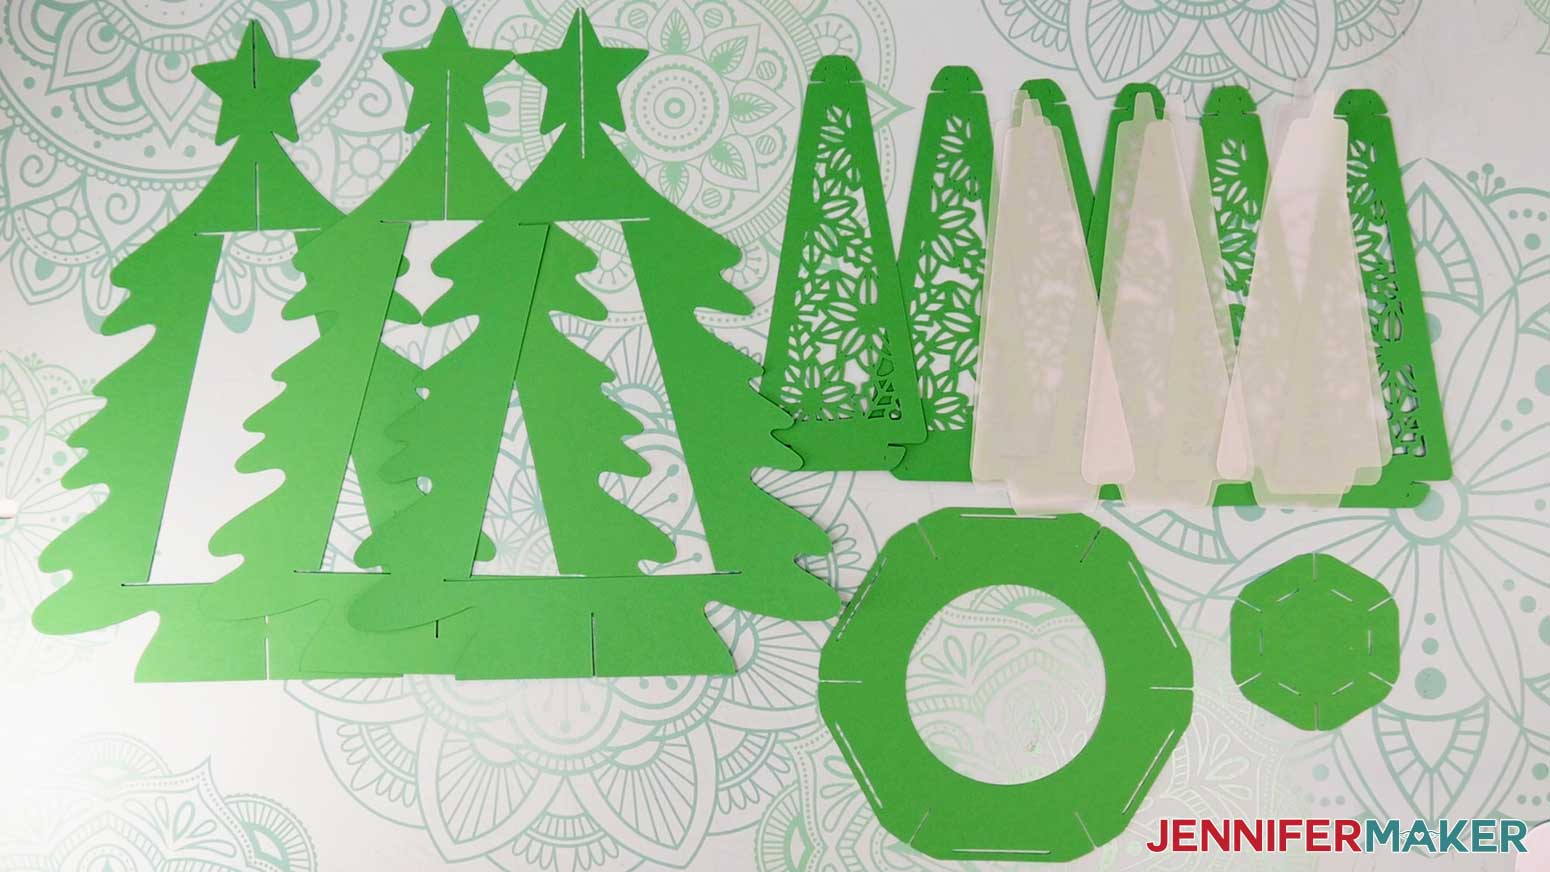
1. Arrange the pieces face up on your workspace. You should have 3 large frame pieces, 6 panel pieces, 1 small top base piece, 1 large bottom base piece, plus 6 optional diffuser pieces and 12 optional star pieces.
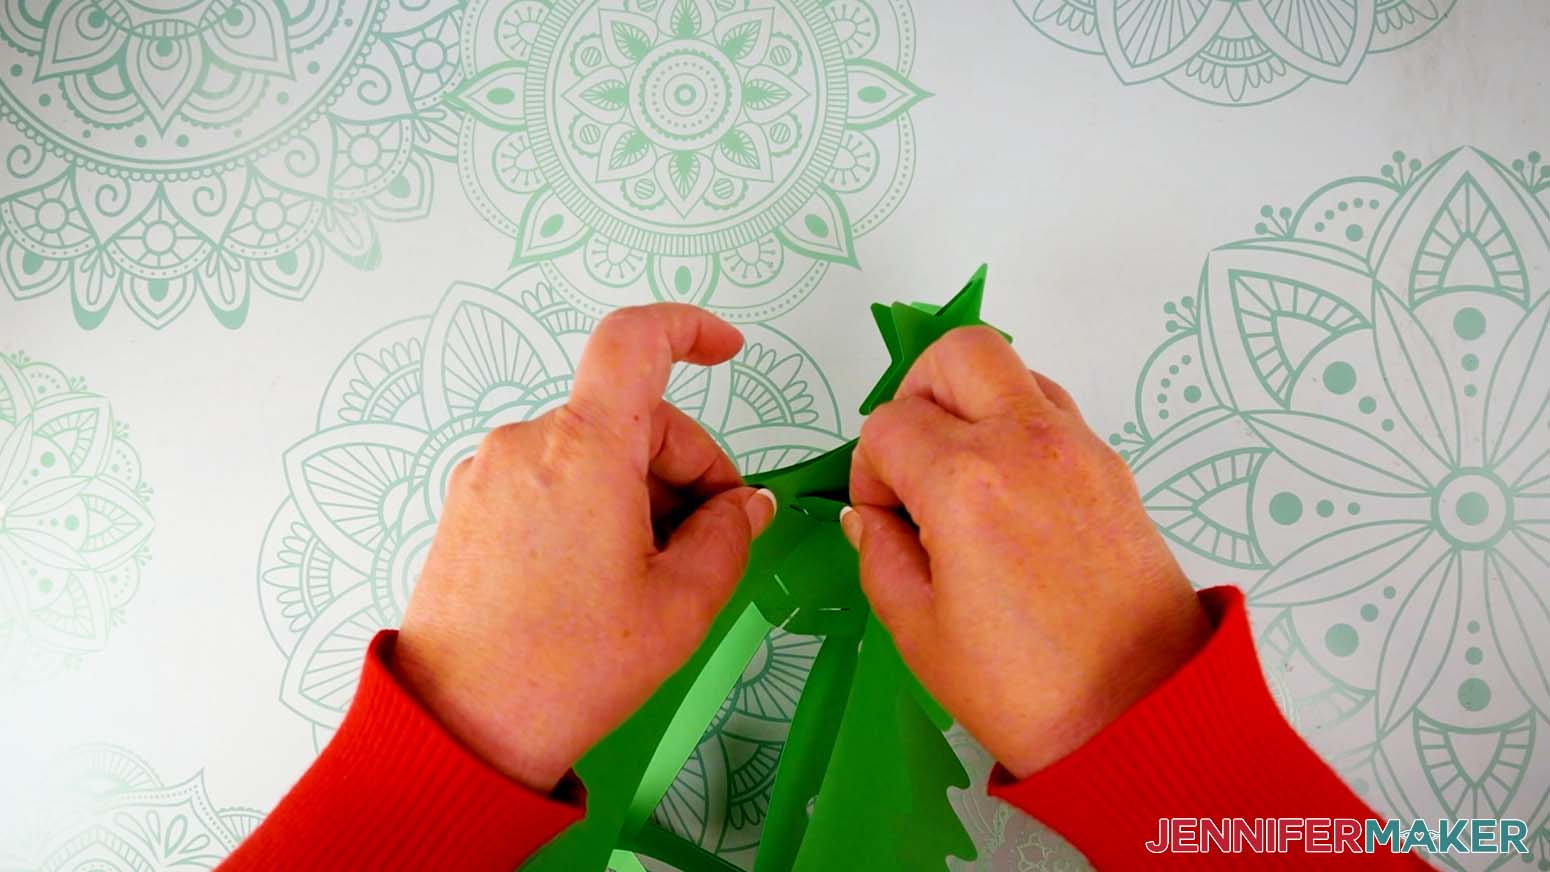
2. Find the large frame piece that has 2 notches at the top. Then find one of the other frames.
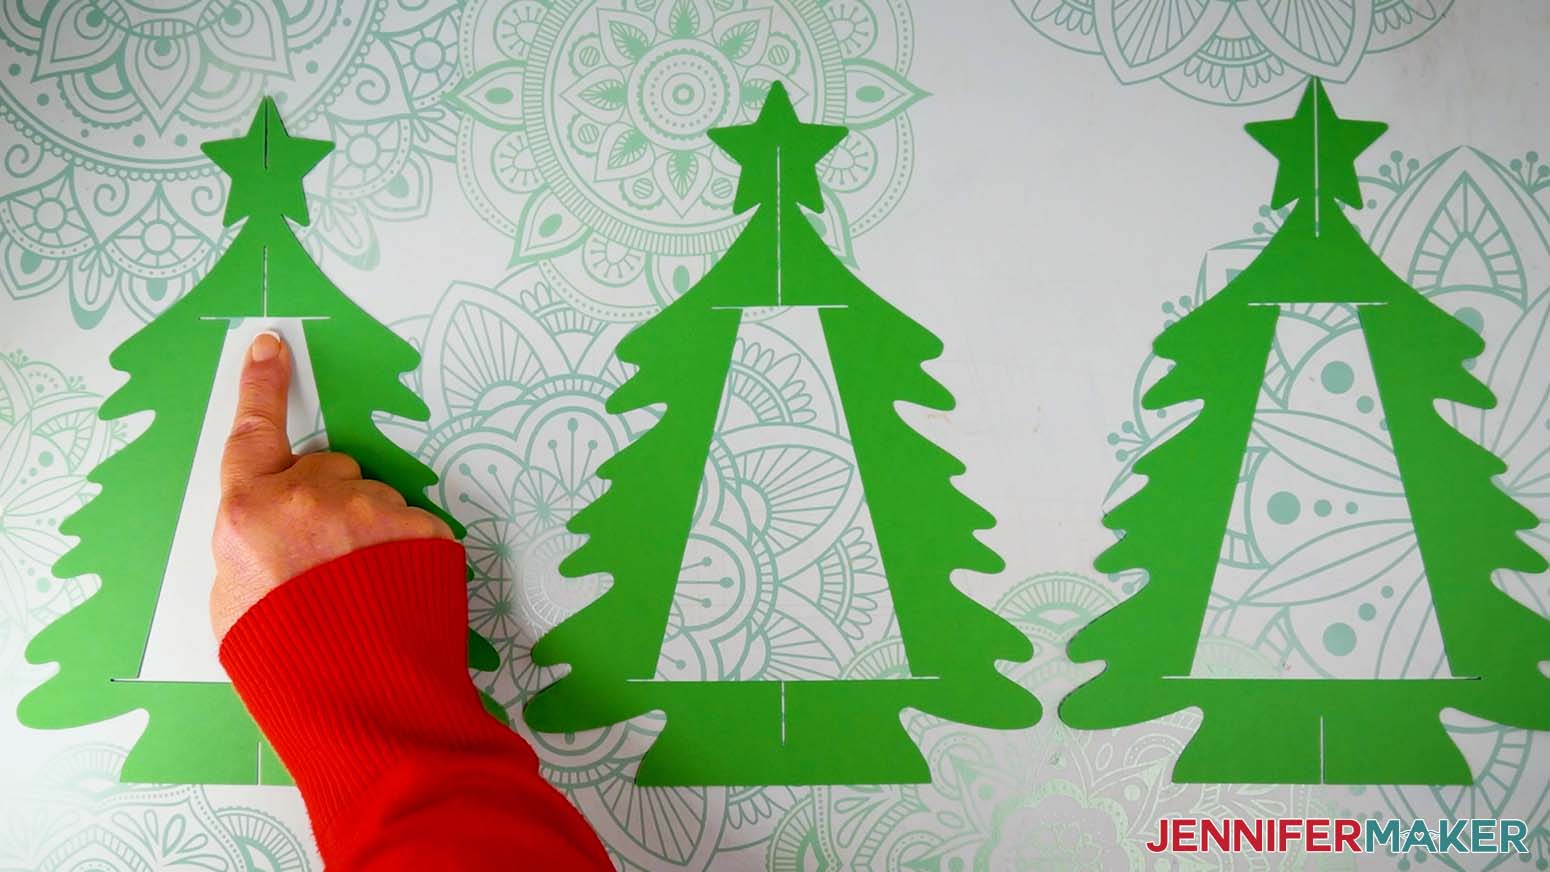
3. Slot them together – first at the top, then at the bottom. Curve the cardstock to make them fit together.
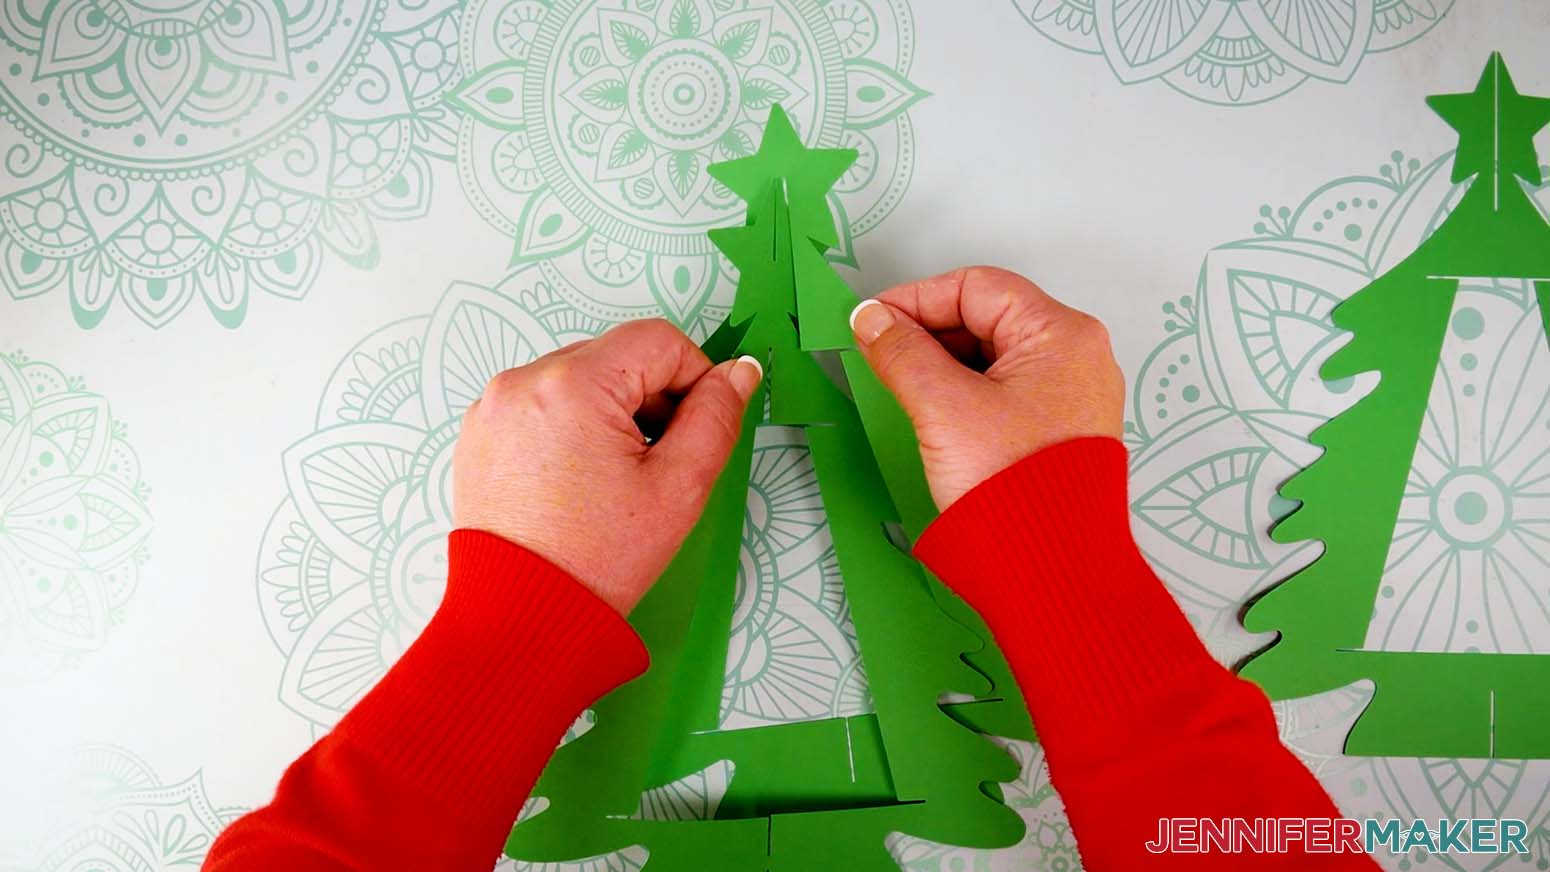
4. Press the two layers flat, then grab the last frame piece and slot it into the other two.
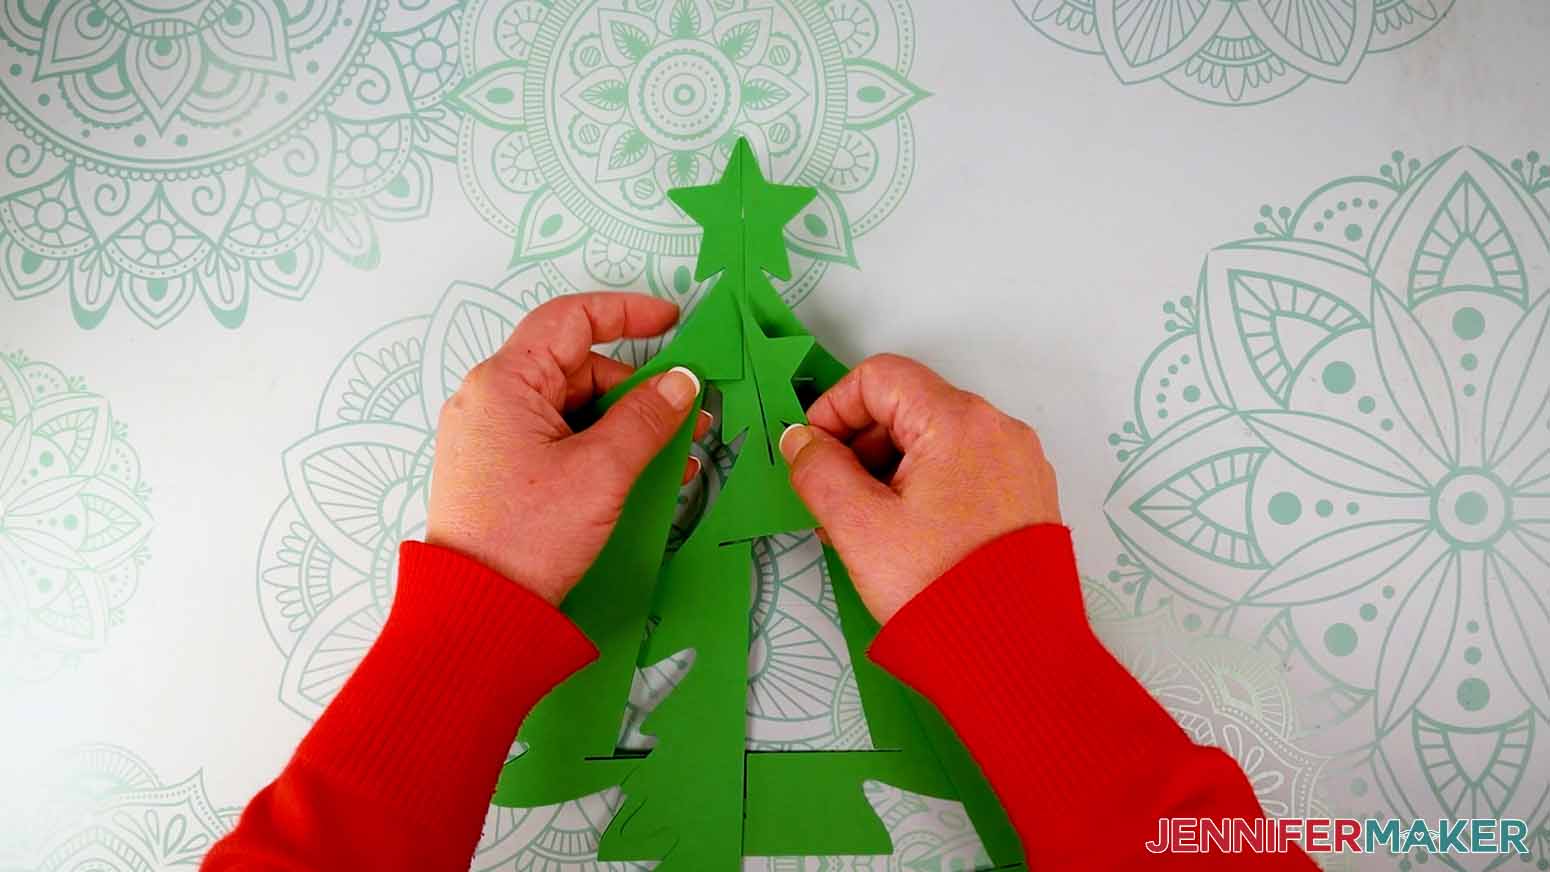
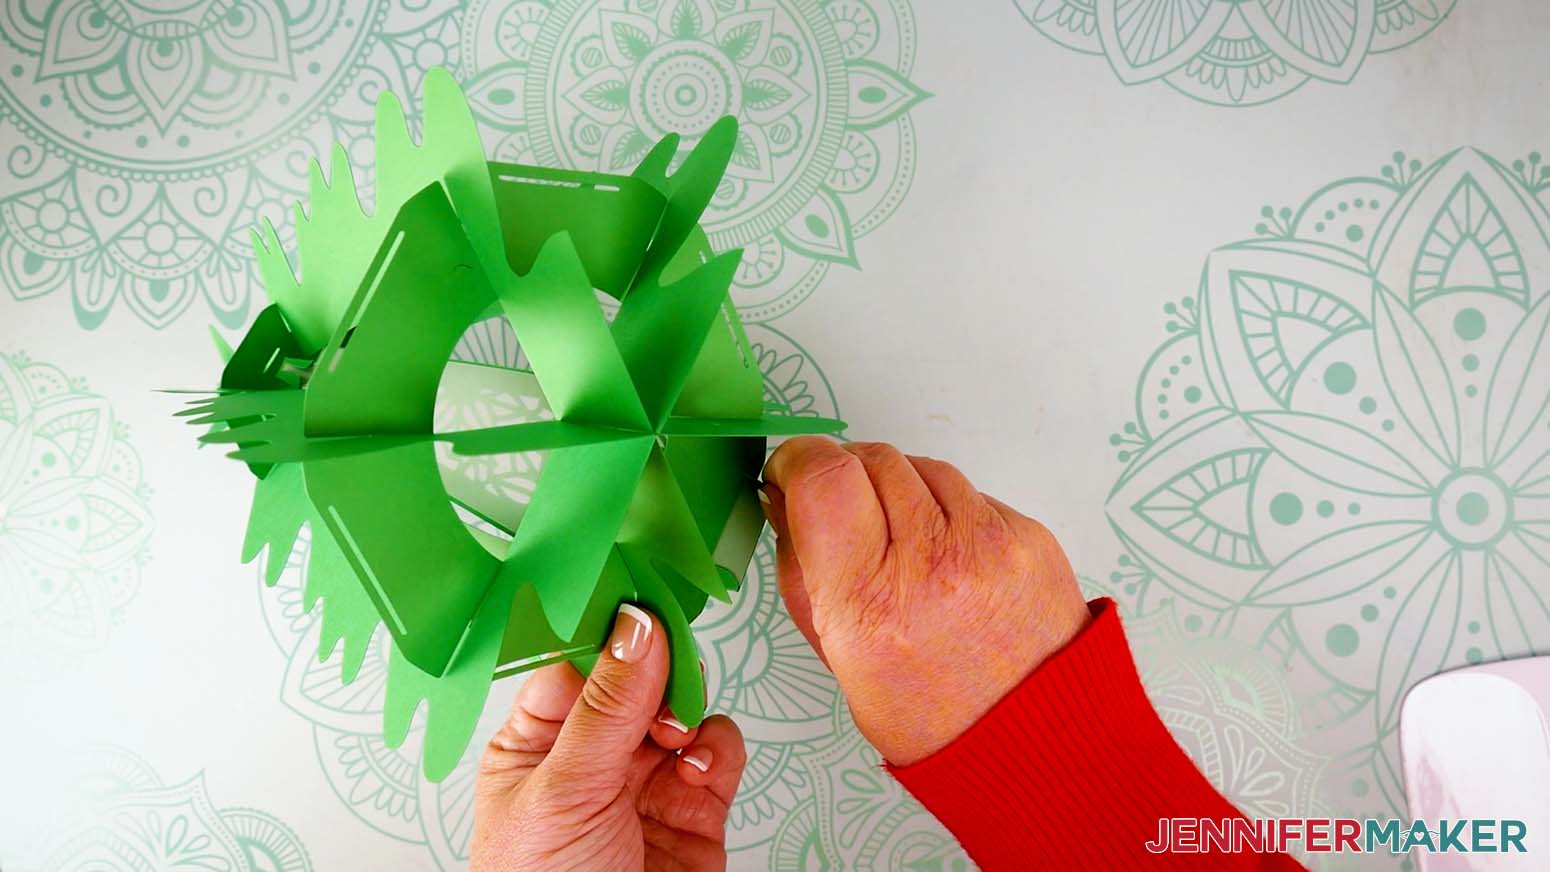
5. Once the three pieces are assembled, separate the layers to make the tree stand up.
6. Find the large bottom base piece.
7. Insert the notches on the bottom base piece into the notches on the bottom of the assembled tree frame, in order, one at a time. You’ll need to bend the cardstock, so be careful not to tear it.
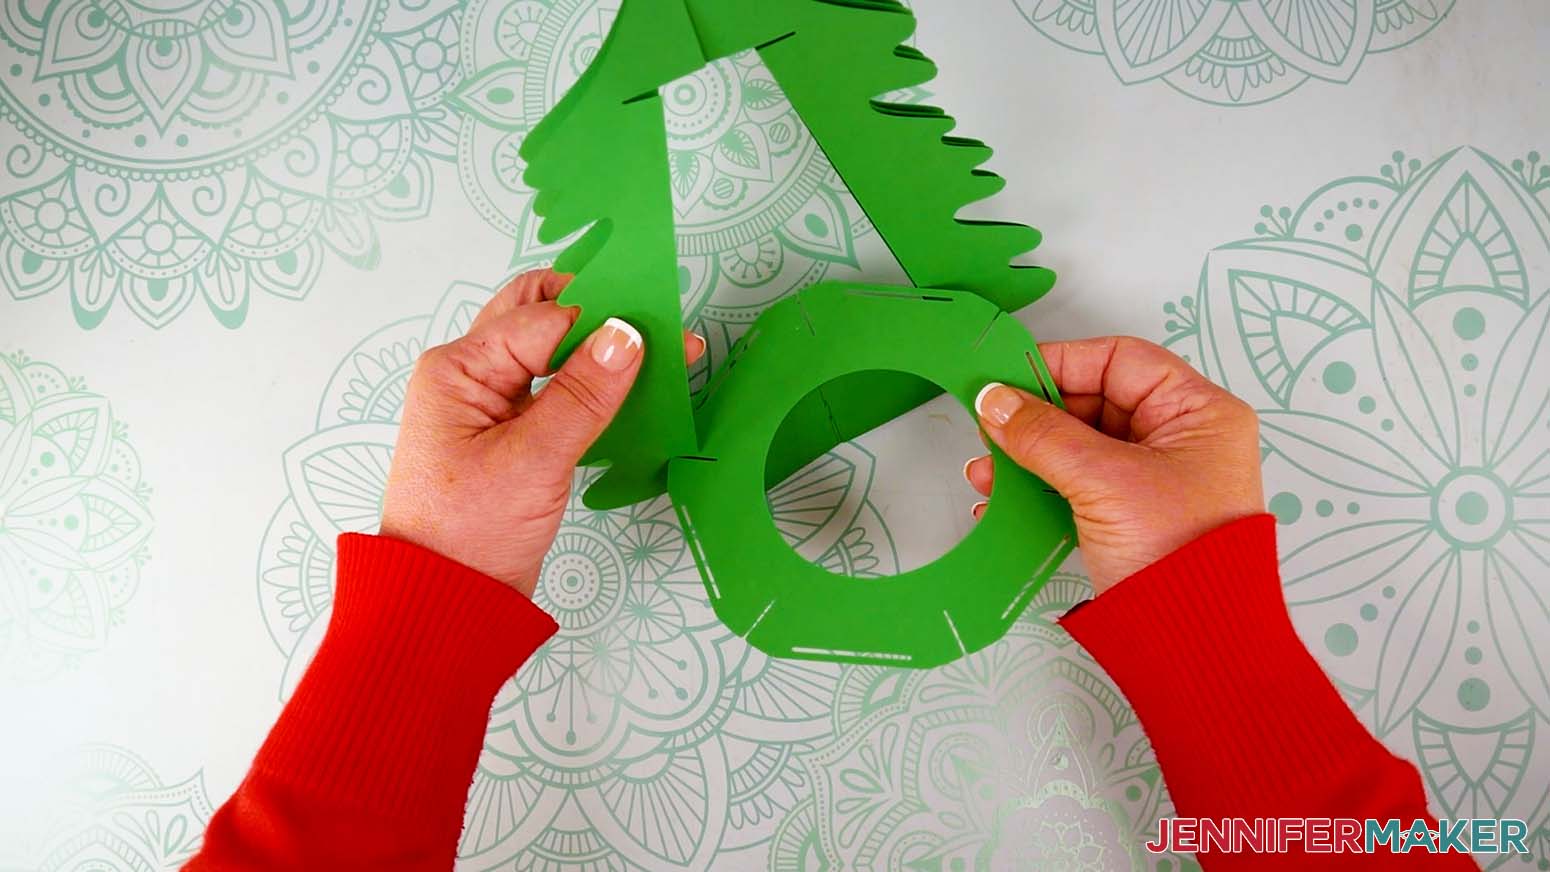
8. Find the small top base piece.
9. Insert the notches on the top base piece into the notches on the top of the assembled tree frame, in order, one at a time. This piece is a little more difficult to insert than the bottom base piece. Just go slowly and be gentle with the paper so it doesn’t rip.
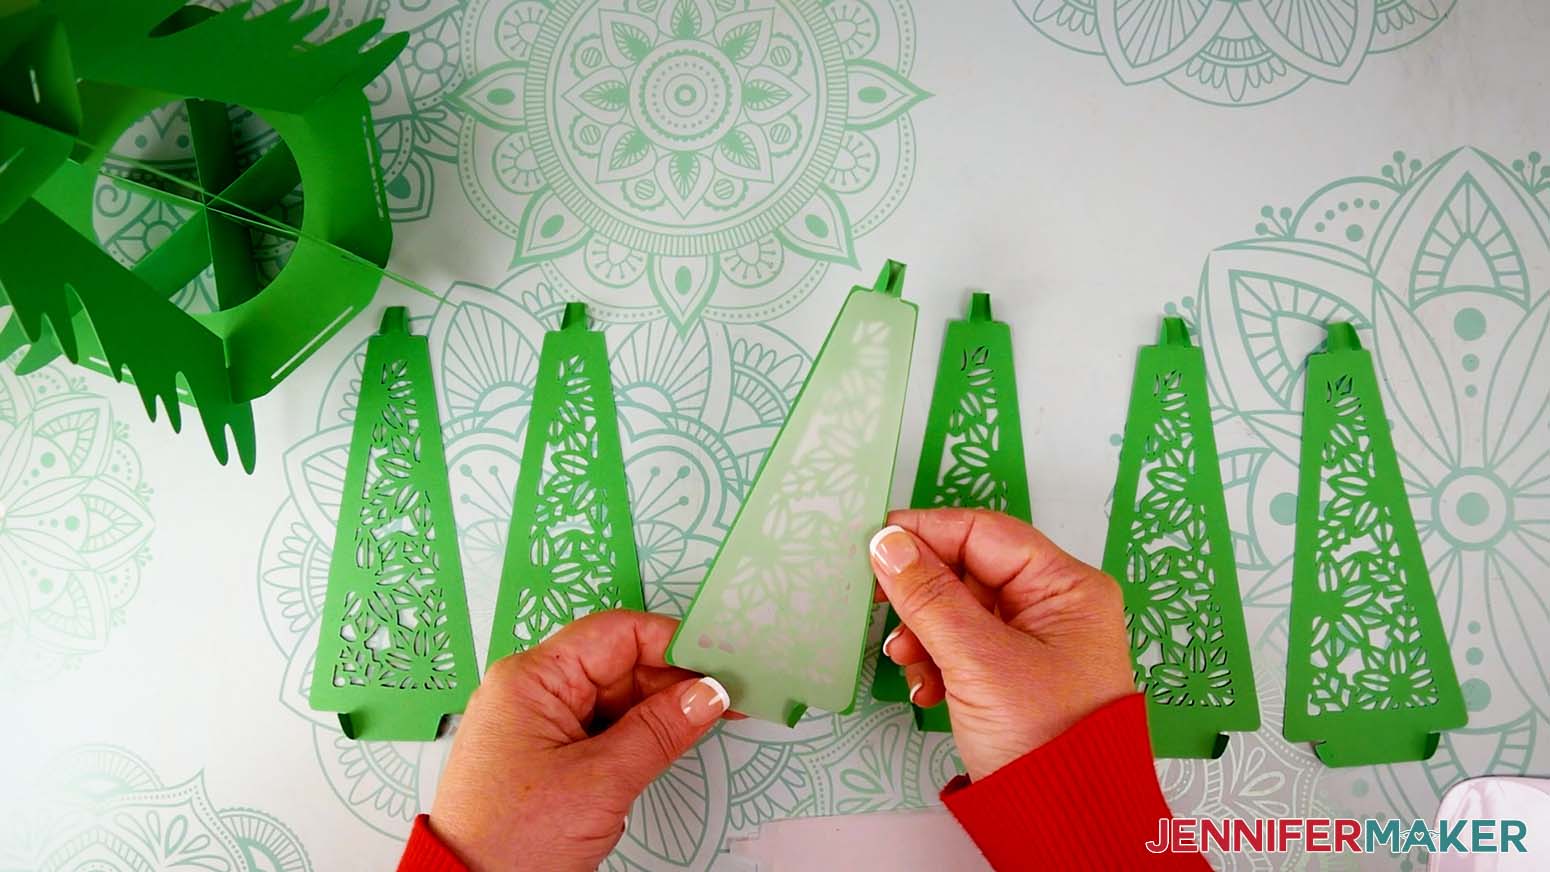
10. Find the six panels and the six diffuser pieces, if you cut them.
11. Lay out the panels so the designs are all in the same direction. Each panel has tabs with scored or dashed lines at the top and bottom. Fold all of the tabs in the same direction.

12. If you cut the diffuser pieces, lay one against the back side of one of the panels, matching up the tabs in the right direction. The diffuser tabs will fit snugly inside the folded panel tabs.
NOTE: No glue is necessary here, but if you’d like to add some you can.
13. Slide the panel’s large bottom tab into a slot on the bottom tree base.

14. Unfold the small tabs to lock the bottom of the panel into place.
15. Slide the panel’s small top tab into the slot on the top tree base.

16. Unfold the small tabs to lock the top of the panel into place.
17. Repeat steps 12-16 to add the next four panels to your tree. Leave one panel off for now.
18. Test your LED light to make sure it’s functioning properly. If your LED light requires batteries, put those in now.
19. Insert the LED light into the tree through the missing panel. Make sure it’s centered.
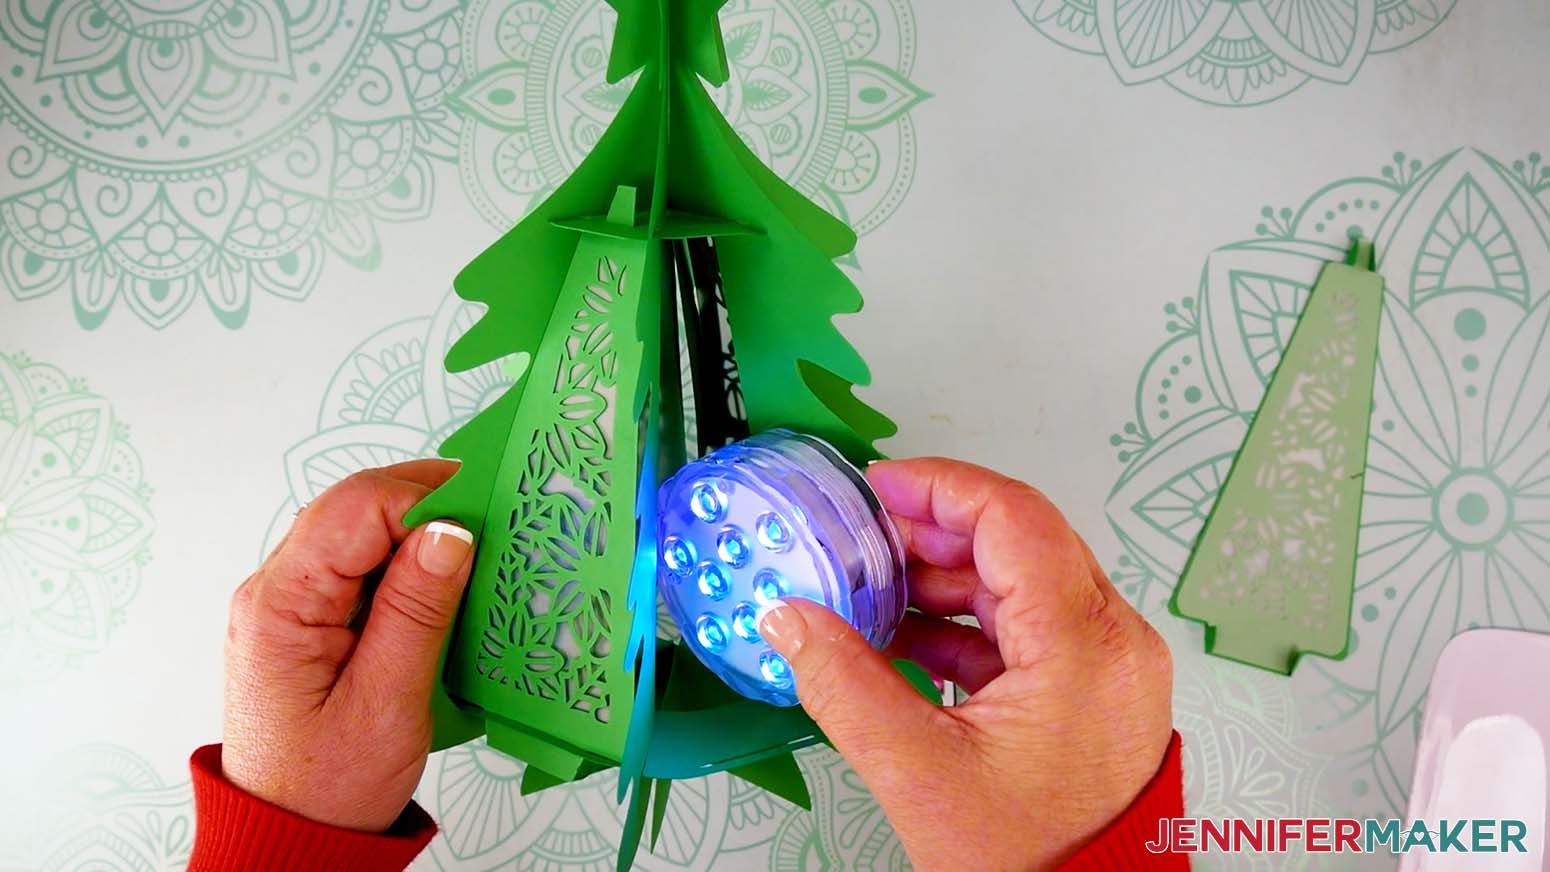
20. Follow steps 12-16 to insert the last panel.
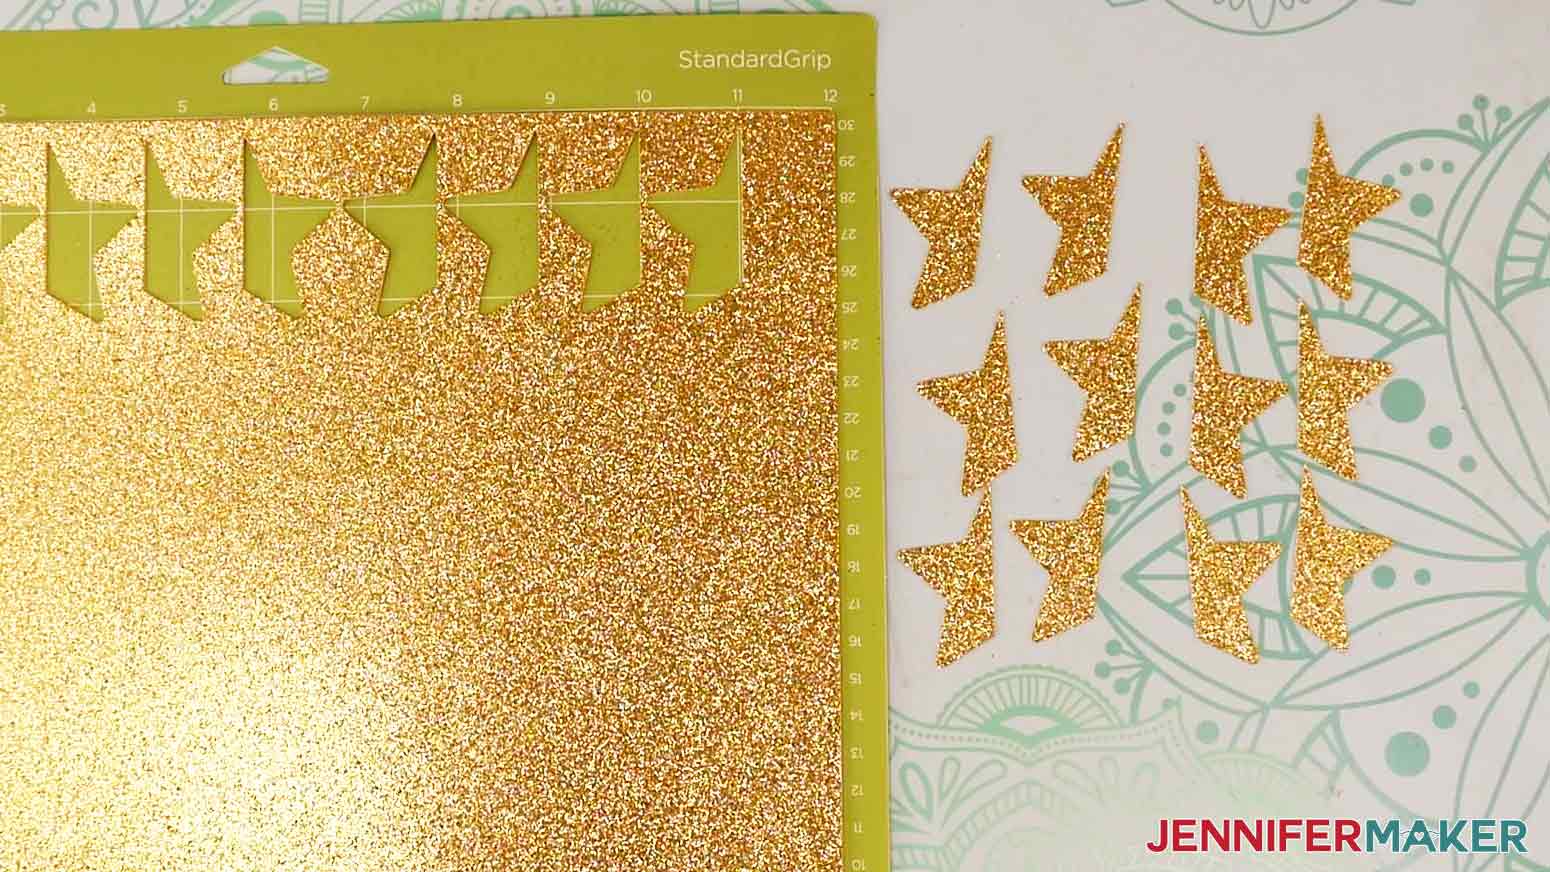
21. Find the 12 star pieces, if you cut them. They face two different ways. If you did not cut star pieces, skip to step 23.
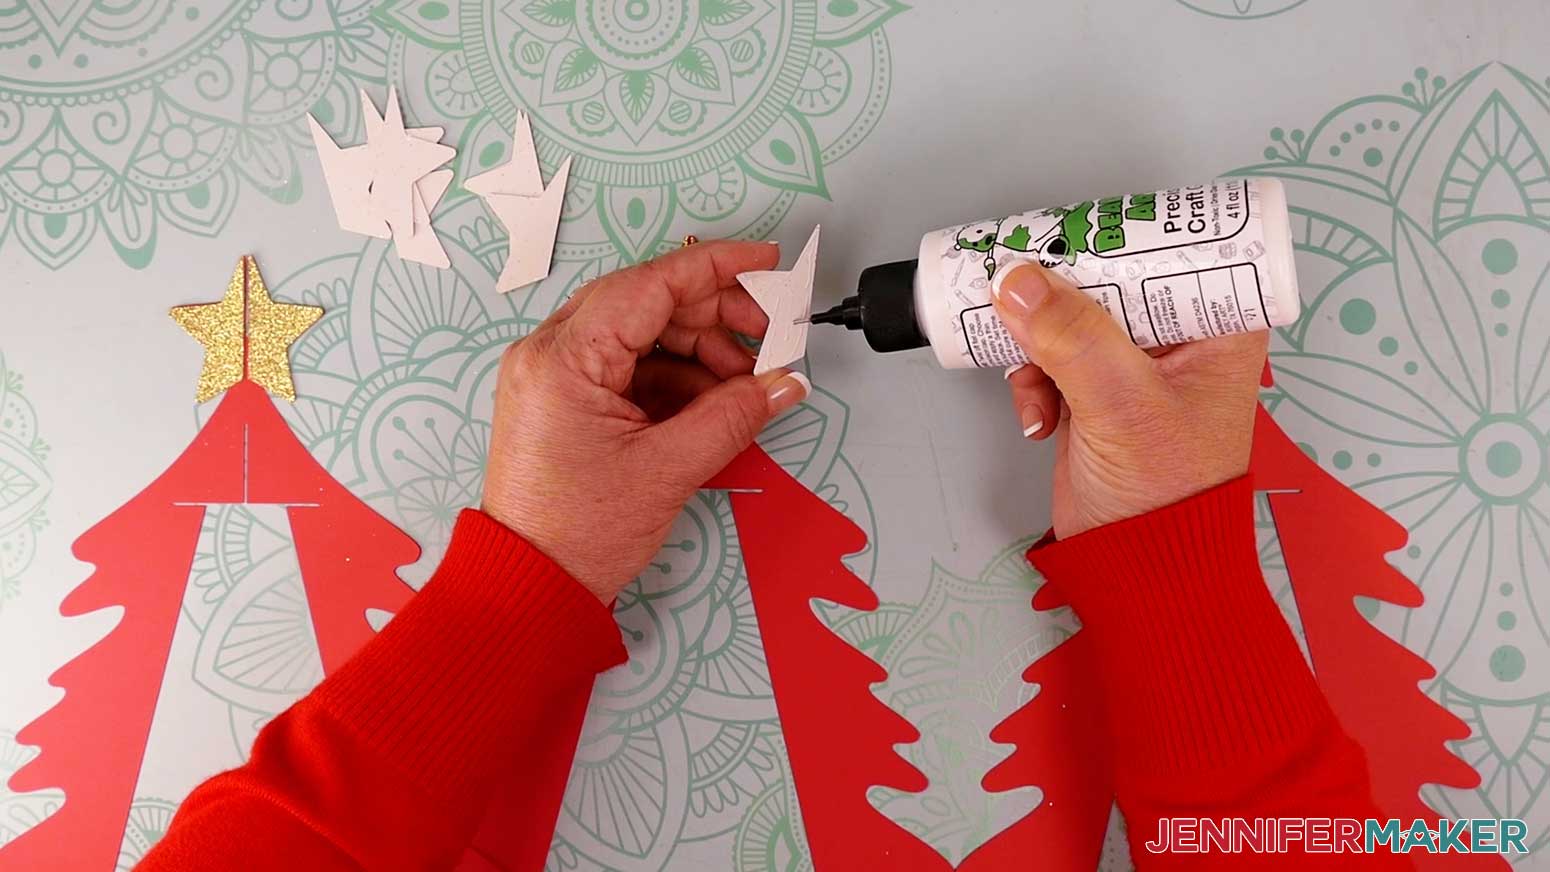
22. One at a time, add some craft glue to the back of each star piece and affix them to the star shapes at the top of the tree.
TIP: You can also attach the star pieces before assembling your tree.
23. Your tree is finished! Use the remote to control the LED light inside.

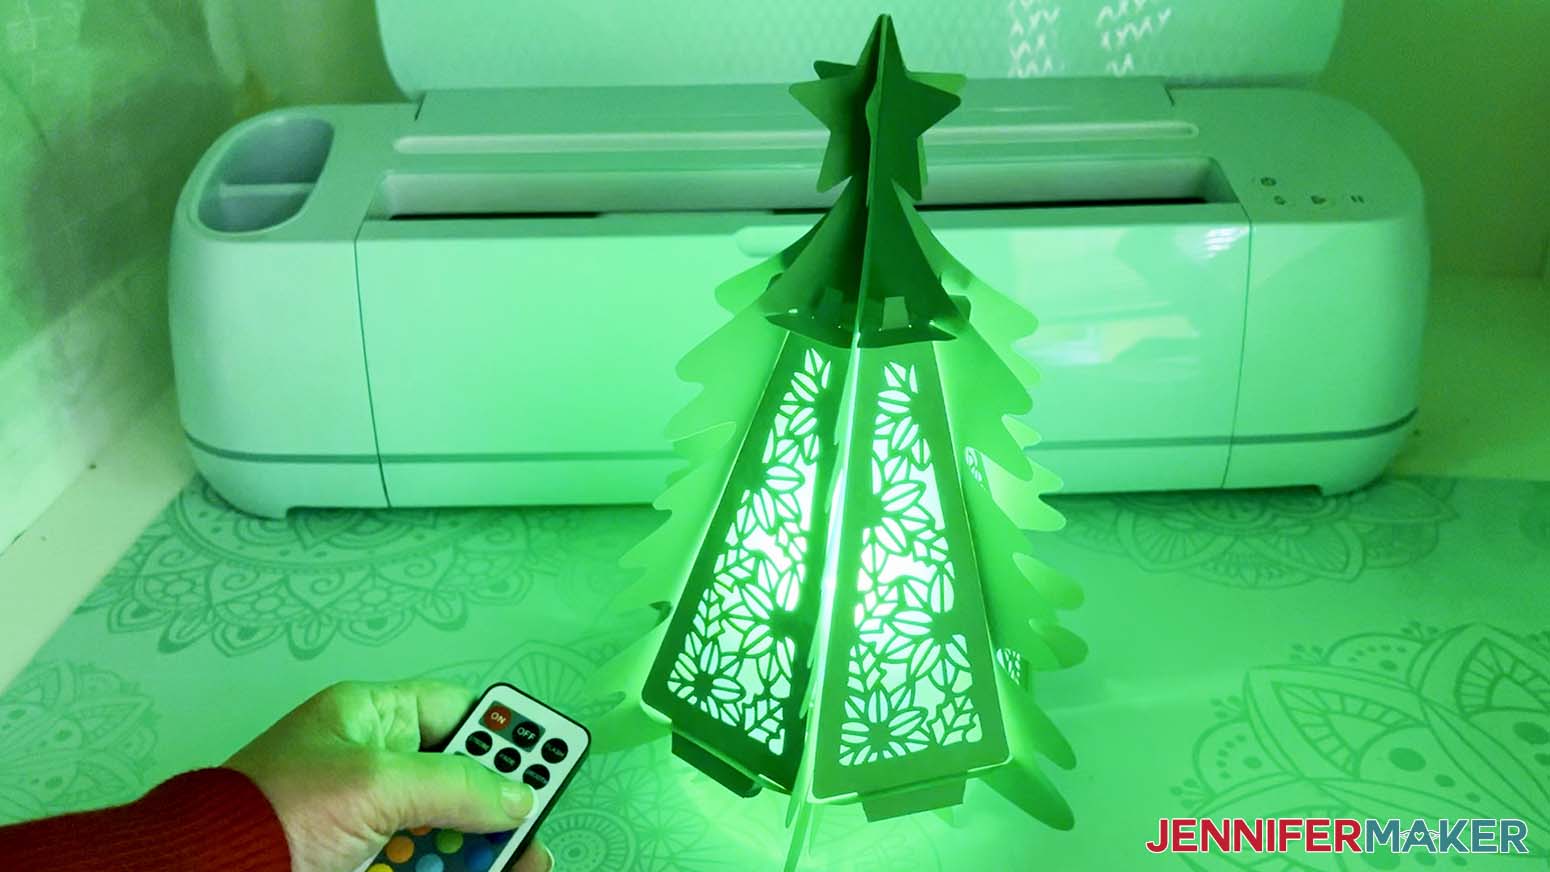
STEP 4: SHOW IT OFF!
Here’s how my finished 3D Paper Tree Lantern looks, all lit up and ready for Christmas!
Notes
Finished Sizes:
Standard Tree: Approximately 10.5" tall x 7.5" wide
Joy-Sized Tree: Approximately 6” tall x 4.25” wide
Typeface Used: Crafty Font Regular (Happy Holidays design)
Answers to Your Questions About How to Make a 3D Paper Tree Lantern
Q: How do you make paper lanterns out of paper?
A: Good news! This tutorial is a great place to start. There are lots of different ways to create paper lanterns, but this tutorial will help you build an intricate (yet easy to assemble) light-up Christmas lantern. You’ll learn how to make it completely out of paper you can find easily at your local craft shop, plus an LED light. Download my free files and follow my step-by-step instructions to make your own!
Q: What paper is best for paper lanterns?
A: There are many different ways to create a paper lantern, using all different materials. There are lanterns that use cardboard, tissue paper, brown paper, and more. You probably already have the materials in your craft supplies stash! For my 3D Paper Tree Lantern, I tried both 65 lb cardstock and 100 lb cardstock and had great results. 80 lb cardstock would also work well. You can use special goods like solid colored cardstock, textured cardstock, glitter cardstock, or even patterned cardstock to make your tree lantern unique.
Q: What glue works best on paper lanterns?
A: I’ve got good new, my 3D Paper Tree Lantern can be made without glue! If you’d like to add the optional star pieces to the topper of your tree (and for paper lantern designs that DO require glue), I’m a big fan of Bearly Art Precision Craft Glue.
Q: What lights do you put in paper lanterns? Can you put fairy lights in paper lanterns?
A: My first choice for paper lanterns like this one are LED puck lights, because they’re easy to insert and give off a lot of light, but you can absolutely use small LED string lights too. The key factor being that they’re LED — incandescent bulbs give off heat and shouldn’t be used with paper crafts. And real candles are a HUGE no! You can find LED lights safe for papercraft projects on Amazon (which I love because I get free shipping with my Prime membership). Plus I get to read customer reviews before I purchase!
Q: Can you put tea lights in paper lanterns?
A: NO! Do not use real candles with real flames inside your decorative paper lanterns. LED tea lights are safe, though.
Q: Do you have any other lantern projects I can make for the holidays?
A: I’ve got the tutorials, you turn them into creative goods for the season! There are a whole host of light-up projects on my blog. Check out this short list of winter-time luminaries and lanterns below, and create your own one of a kind items to light up your home:
- Paper Winter Luminary (tutorial and files)
- Easy Christmas Tree Luminary (tutorial and files)
- Paper Star Lantern (tutorial and files)
- Hanging Star Lantern (tutorial and files)
- Lantern Pop-Up Cards (tutorial and files)
- DIY Paper Luminaries (tutorial and files)
Want other winter or holiday projects? Find everything from simple paper snowflakes to DIY advent calendars on my blog!
Get my free SVG files to make a 3D Paper Tree Lantern!
I’d love to see YOUR beautiful 3D Paper Tree Lantern! Please share a photo in our Facebook group — we’re a vibrant community of real people, new and experienced crafters, and creative entrepreneurs who love to share our projects and be inspired! Consider it part help center, part gallery for all your amazing creations! Post a photo of your lantern on social media and tag me with #jennifermaker.
Love,

Want to remember this? Save this tutorial on How to Make a 3D Paper Tree Lantern to your favorite Pinterest Board!