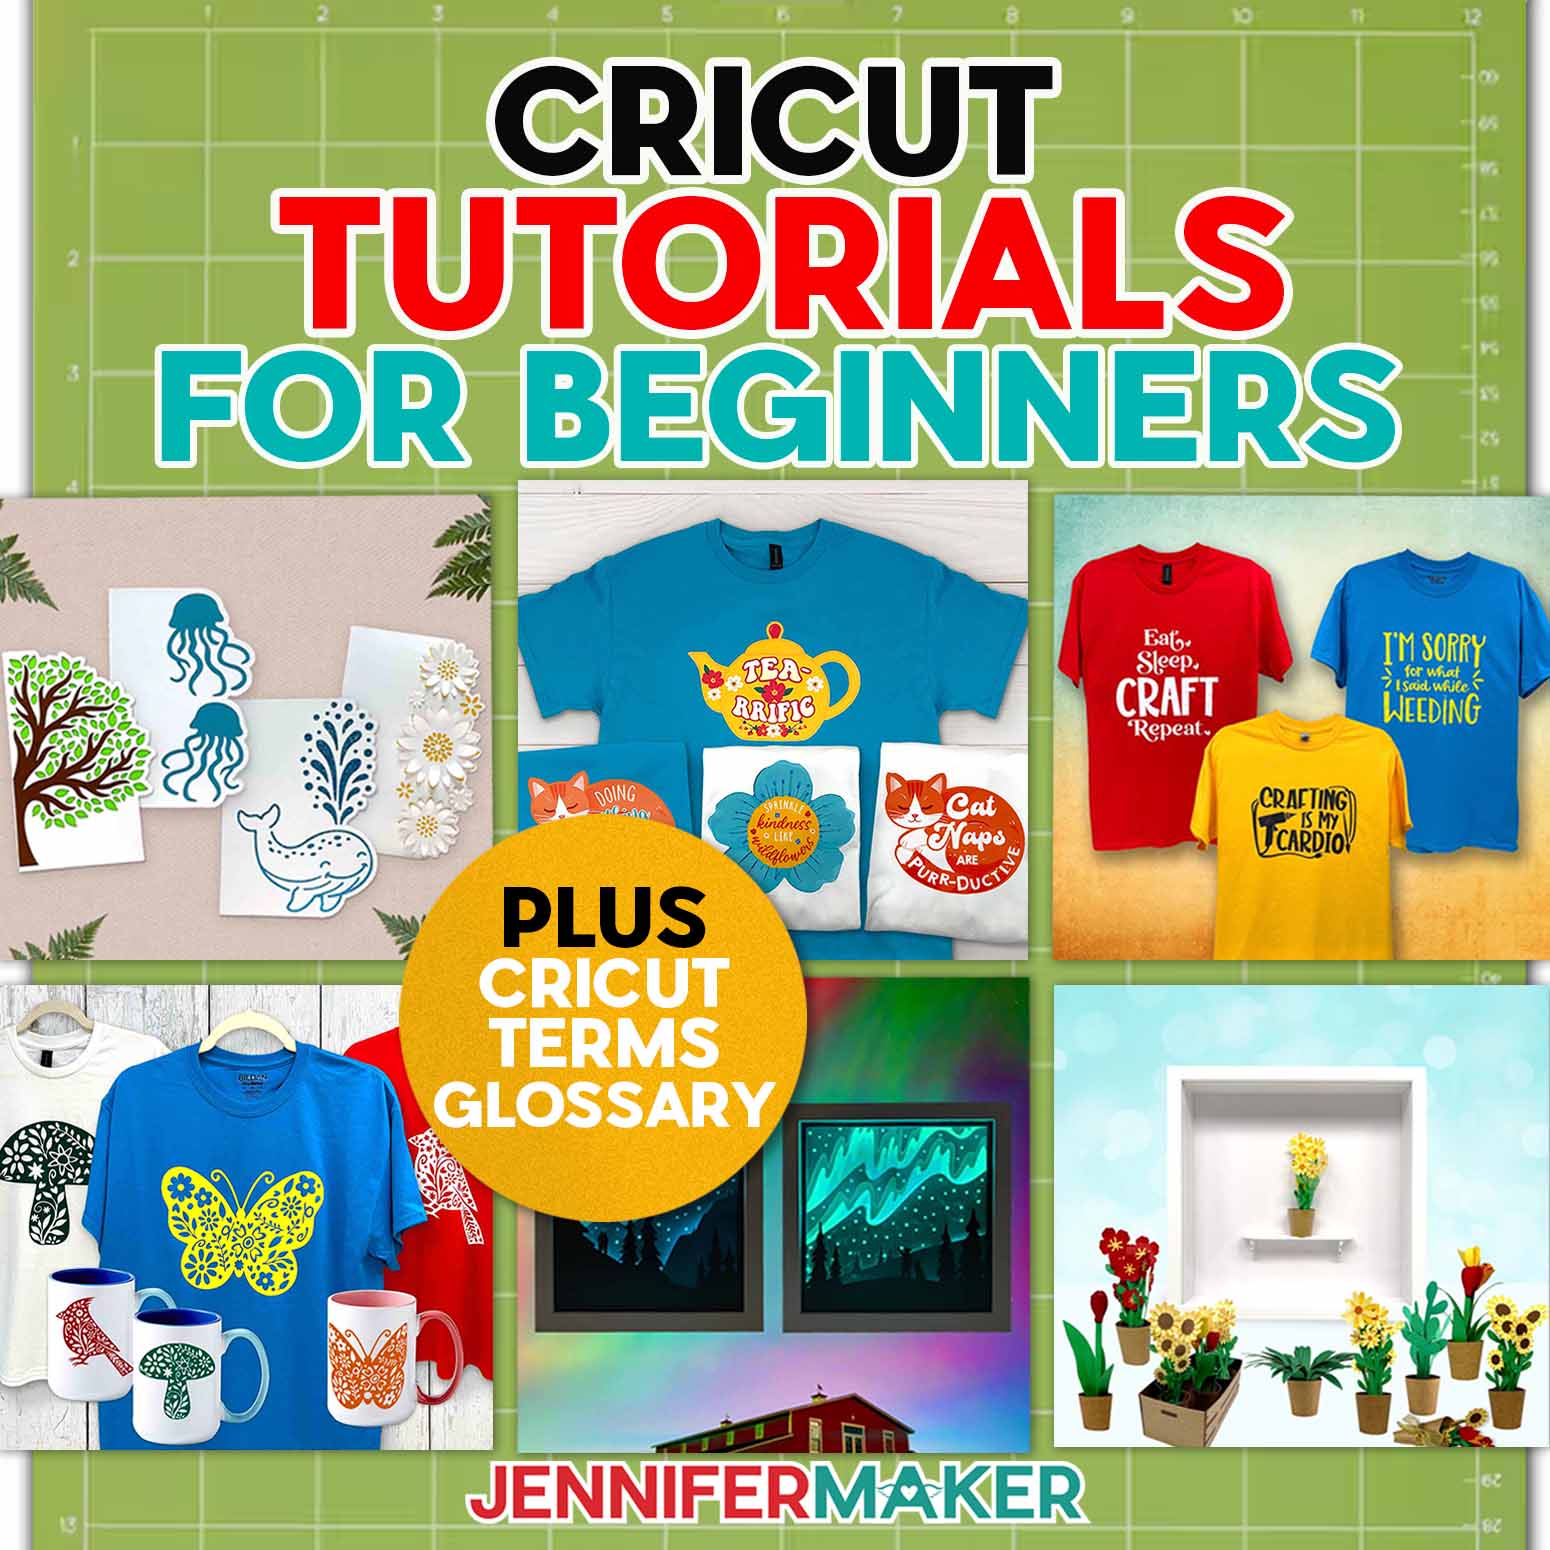
New to Cricut? Start here with beginner Cricut tutorials, easy first projects, and the Cricut terms you need to know before you make your first cut!
If you’re brand new to Cricut, I want you to hear this first: you don’t need to learn everything before you make something beautiful.
I know Cricut can feel like a lot at the beginning. Maybe you just got a new Cricut machine, maybe it’s still sitting in the box, or maybe you’ve opened Cricut Design Space and thought, “Oh goodness, where do I even start?”
And then the words start coming at you: weed, weld, attach, mirror, HTV, SVG file, kiss cut, registration marks, transfer tape, carrier sheet. No wonder a Cricut newbie can feel overwhelmed sometimes!
But take a breath. You’re in the right place. We’re not going to learn all the things Cricut can do at once. We’re going to start with the first things that matter most: one simple project, one material, and one clear next step.
The best first project for most beginners is a simple adhesive vinyl decal.
Why? Because it teaches the basic Cricut workflow without too many extra steps. You’ll learn how to open or upload a design in Cricut Design Space, resize it, place vinyl on a mat, cut it, weed away the extra vinyl, use transfer tape, and apply your design to a blank.
And once you know how to do that, you’ll use those Cricut skills again and again for future Cricut projects like labels, holiday season crafts, gifts, and even home decor.
Cricut words feeling like a whole new language? Download my free Cricut Terms PDF with 300 beginner-friendly definitions so you can look up words while you craft.

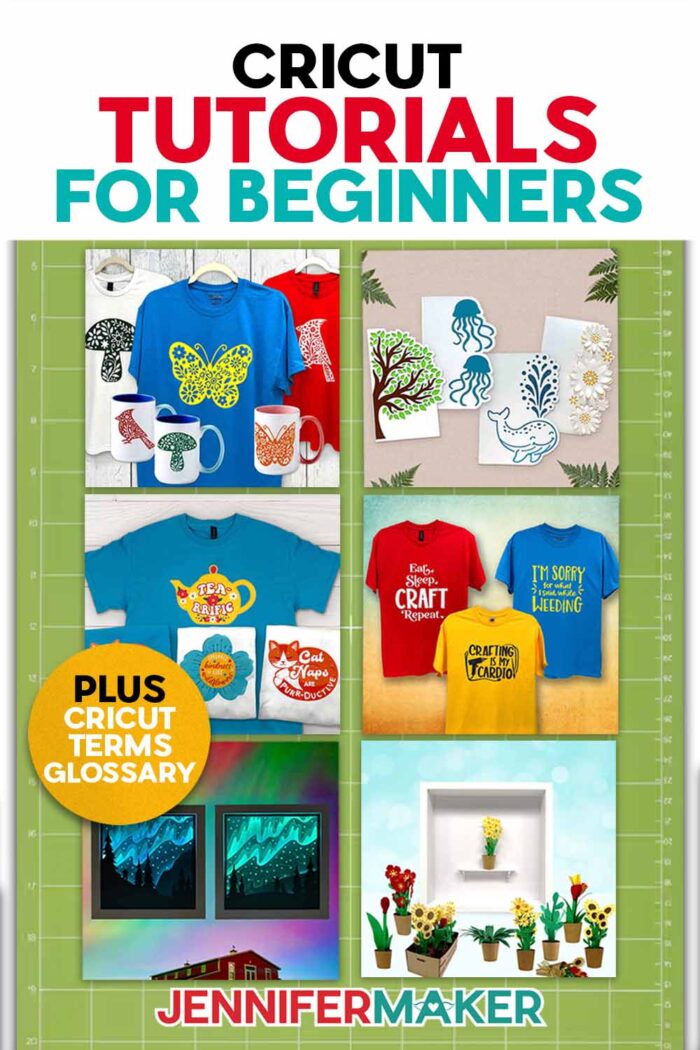
Ready to start learning Cricut tutorials for beginners? This beginner Cricut roadmap will help you choose your first projects, understand the basic tools, and feel less stuck when a tutorial uses a word you don’t know yet. This post contains some affiliate links for your convenience, which means if you make a purchase after clicking a link I may earn a small commission, but it won’t cost you a penny more! Read my full disclosure policy.
Quick Answer: What Is the Easiest Cricut Tutorial for Beginners?
The easiest Cricut tutorial for beginners is a vinyl decal project using adhesive vinyl, transfer tape, and a smooth blank like a mug, jar, notebook, or storage bin.
I like this as a first project because it uses:
- One material
- One blade
- One cutting machine mat
- One simple design
- No heat press
- No printer
- No scoring or folding
That makes it a wonderful “get to know your Cricut” project. Start with a bold shape, a simple word, or a design with nice thick lines. Save the tiny script typefaces and detailed designs for later. They’re beautiful, yes, but they can also make your first project feel harder than it needs to be.
What Should I Make First With My Cricut?
Your first steps with Cricut should be simple, confidence-building, and easy to finish. That’s why I recommend starting with adhesive vinyl projects before jumping into more detailed Cricut projects.
Here’s the Cricut beginner learning path I recommend:
- Adhesive vinyl decal — learn about cutting, weeding, and transfer tape
- Simple cardstock card — learn paper cutting and how to carefully remove it from sticky mats
- Iron-on T-shirt — learn mirroring, weeding HTV, and heat pressing
- Print Then Cut stickers — learn printing, sensor marks, and sticker paper
- Paper flowers — learn shaping, curling, and dimensional glue work
- Shadow box or framed layered cardstock art — put several beginner skills together
If that sounds like a lot, don’t worry. We’ll take this one step at a time, just like I would if I were standing right beside you at your craft table.

And remember, there are a number of ways to learn. You can read step-by-step tutorials, watch short videos, follow tutorials on the JenniferMaker YouTube channel, ask questions in the Cricut community, or come back to helpful resources like this guide when you need a little bit of extra Cricut guidance.
What Is a Cricut Machine?
A Cricut is a smart cutting machine that cuts designs from materials like adhesive vinyl, iron-on vinyl, cardstock, sticker paper, and more.
You create or open your design in Cricut Design Space, choose your material, place the material on a sticky cutting mat, and send the project to your machine.
Depending on which Cricut you have, your machine may also draw, score, foil, engrave, deboss, or cut thicker materials.
The most common Cricut machines for beginners are:
- Cricut Joy 2 — Best for small labels, cards, decals, and quick projects
- Cricut Joy Xtra — Great for stickers, cards, labels, and smaller printable projects
- Cricut Explore series — A strong beginner-friendly choice for vinyl, cardstock, iron-on, stickers, and everyday crafts
- Cricut Maker series — The most versatile option, especially if you want to cut fabric, chipboard, leather, or thicker materials
No matter which machine you have, you can start with the same first steps: learn Cricut Design Space, make a simple first project, and build your Cricut skills one project at a time.
You don’t need the fanciest machine to start. The best Cricut machine is the one that helps you make the projects you actually want to make. A small label on a pantry jar can feel just as exciting as a big layered shadow box when it’s your very first Cricut success.
What Can You Make With a Cricut as a Beginner?
You can make so many beginner-friendly Cricut projects, including:
- Vinyl decals
- Personalized mugs
- Pantry labels
- T-shirts
- Tote bags
- Greeting cards
- Stickers
- Gift tags
- Paper flowers
- Party decorations
- Shadow boxes
- Wall decals
- Holiday ornaments
- Gift boxes
The easiest Cricut projects use one main material and teach one main skill. That’s why I recommend starting with vinyl, cardstock, and iron-on before trying thicker, specialty materials, or highly-detailed techniques. Those beginner materials give you quick wins, and quick wins matter when you’re learning.
I’d much rather see you make one simple project you love than get stuck halfway through something too complicated and feel like Cricut isn’t for you. Because it is for you. We just need to start in the right place.
Cricut Terms Beginners Should Know First
Cricut has its own little language, and I know that can feel confusing when you’re new. One tutorial says to weed your vinyl, another says to weld your letters, and then Design Space asks if you want to mirror your mat.
No wonder beginners feel stuck sometimes! You don’t need to memorize every Cricut word before you start. But knowing a few common terms will make beginner Cricut tutorials much easier to follow.
Here are some Cricut terms you’ll see often:
Adhesive Vinyl: A sticky-backed vinyl used for decals, labels, mugs, signs, storage bins, and smooth hard surfaces.
HTV: Heat transfer vinyl, also called iron-on vinyl. It’s applied to fabric with heat.
Weeding: Removing the extra vinyl, iron-on, or cardstock pieces from around your cut design.
Burnish: Rubbing firmly with a scraper or tool to help vinyl stick to transfer tape or to your project surface.
Transfer Tape: A sticky sheet used to move adhesive vinyl from its backing to your project surface.
Mat: The sticky cutting surface that holds your material while the Cricut cuts.
SVG: A scalable vector graphic. SVG files are helpful for Cricut projects because they can usually be resized without losing quality and often keep layers separate.
Upload: A Design Space tool used to bring your own image or cut file into Cricut Design Space.
Attach: A Design Space tool that keeps items in position on the mat.
Weld: A Design Space tool that joins overlapping shapes or letters into one cut piece.
Mirror: A setting that flips your design before cutting. This is most often used for iron-on vinyl.
Print Then Cut: A Cricut feature that lets you print a design on your printer, then cut around it with your Cricut.
Registration Marks: The black box or marks printed around a Print Then Cut design that help your Cricut know where to cut.
Kiss Cut: A cut that goes through the top layer of a material, like sticker paper, but doesn’t cut all the way through the backing.
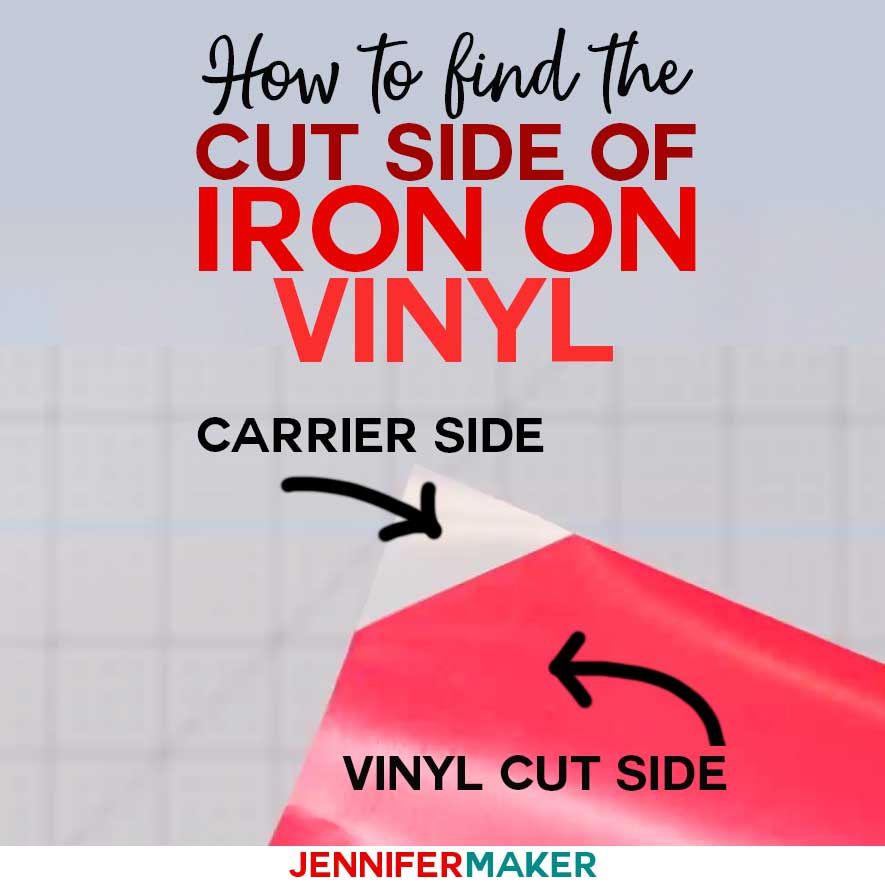
Carrier Sheet: The clear shiny sheet attached to iron-on vinyl. It holds your design in place while you press it onto your fabric.
This is just a small starter list. If you want the full beginner-friendly reference, download my free Cricut Terms PDF with 300 plain-English definitions. Keep it near your Cricut so you can look up unfamiliar words as you go. I love a good reference guide because it takes the pressure off your memory. You don’t have to remember every Cricut detail at once. You just need a simple way to check a word, understand the next step, and keep crafting.
Cricut Supplies for Beginners
You don’t need to buy every Cricut tool right away. I know it’s tempting. Craft tools are fun, and it’s very easy to think, “Maybe I need this one too!” But when you’re just starting, it’s much easier to choose one project, gather only what you need for that project, and learn how those tools work.
For most beginner Cricut tutorials, these are the basic supplies to have nearby:
- Cricut machine
- Fine-Point Blade (comes with all machines)
- Green StandardGrip machine mat
- Blue LightGrip machine mat
- Weeding tool
- Scraper
- Brayer (optional but helpful)
- Adhesive vinyl
- Transfer tape for adhesive vinyl
- Cardstock
- Iron-on vinyl, also called heat transfer vinyl (HTV)
- Scissors
- Lint roller for fabric projects
- Heat source for iron-on vinyl, such as a Cricut EasyPress, heat press, or home iron
- Tape Measure
If you’re making your very first project, choose just one material: adhesive vinyl, cardstock, or iron-on vinyl. That keeps things simple and helps you feel successful faster. And once you finish that first project, you’ll have a much better idea of what tools you actually want next.
Start With These Beginner Cricut Tutorials
Think of these as your Cricut beginner roadmap. You don’t need to do every project today. Choose the one that sounds useful, fun, and not too scary, then come back for the next one when you’re ready.
Use the following links to go to the full tutorials for each project. This page is your starting point, and the linked tutorials are where you’ll get the full step-by-step photos, supply lists, and extra tips.
These are also great projects to bookmark if you’re planning upcoming projects, making gifts, or getting ready for the holiday season.
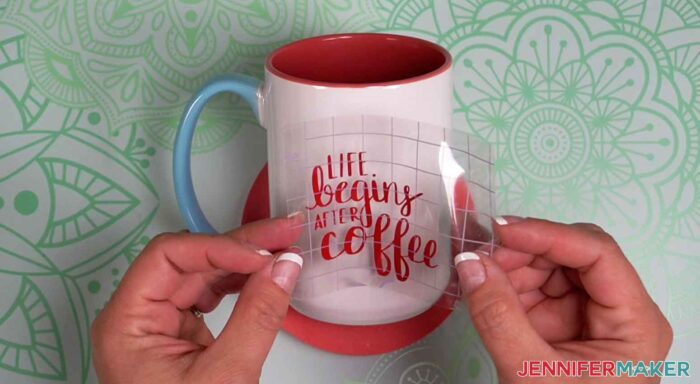
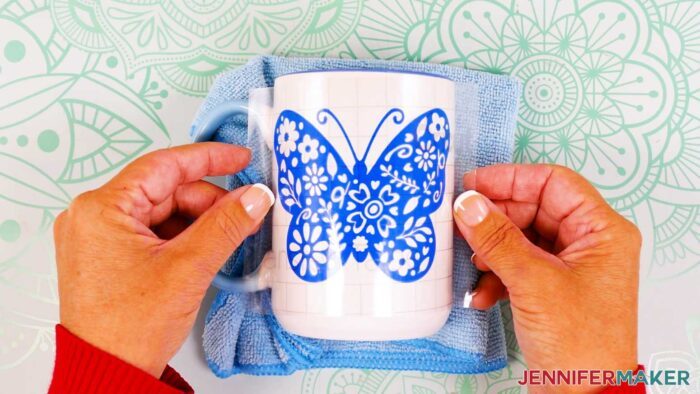
1. Make an Adhesive Vinyl Decal: A simple vinyl decal is my favorite first Cricut project because it teaches the basic Cricut workflow: size your design, cut vinyl, weed away the extra, use transfer tape, and apply the decal to a smooth blank.
You can put vinyl decals on mugs, jars, notebooks, storage bins, tumblers, signs, and so many other things around your home.
- You’ll learn: Adhesive vinyl, weeding, transfer tape, and basic Design Space sizing.
- Best beginner blank: A mug, notebook, jar, tumbler, or storage bin.
- Mistake to avoid: Don’t start with tiny script letters. A bold word or simple shape is much easier to weed and transfer.
Start here: How to Make a Vinyl Decal With Cricut
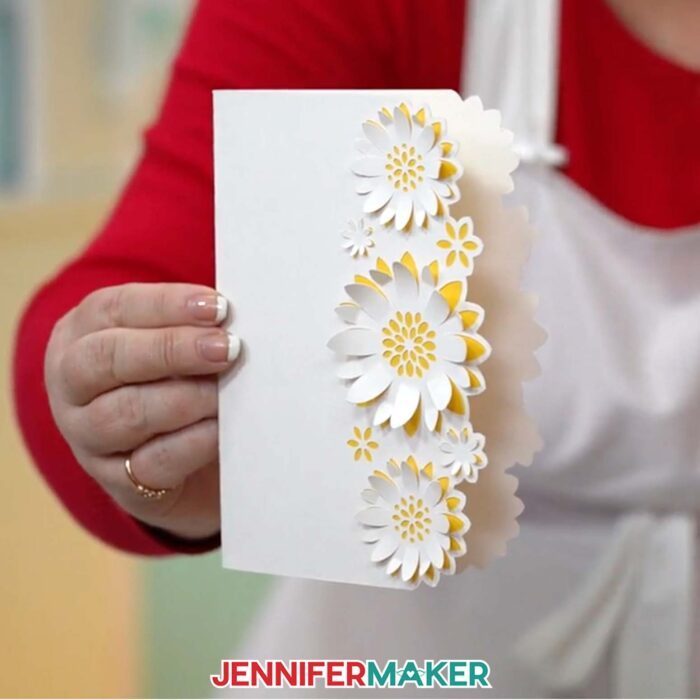
2. Make a Cricut Card: Cards are a great second project because they teach cardstock cutting, mat removal, folding, and simple assembly. They’re also quick, useful, and easy to customize.
And honestly, there’s something so satisfying about making a card from a flat sheet of cardstock. It feels like a little paper magic trick.
- You’ll learn: Cardstock cutting, LightGrip mats, basic assembly, and optional Cricut pen writing.
- Best beginner project: A simple insert card, cutaway card, or one-layer greeting card.
- Mistake to avoid: Don’t pull cardstock straight up from the mat. Instead, flip the mat over and peel the mat away from the cardstock to reduce curling.
This is one of those small tips that makes a big difference. If your cardstock curls like a potato chip, it’s usually just the way the paper came off the mat. But I’ll show you how to curl paper when you actually want some dimension, too!
Try this next: Easy Cricut Cards for Beginners
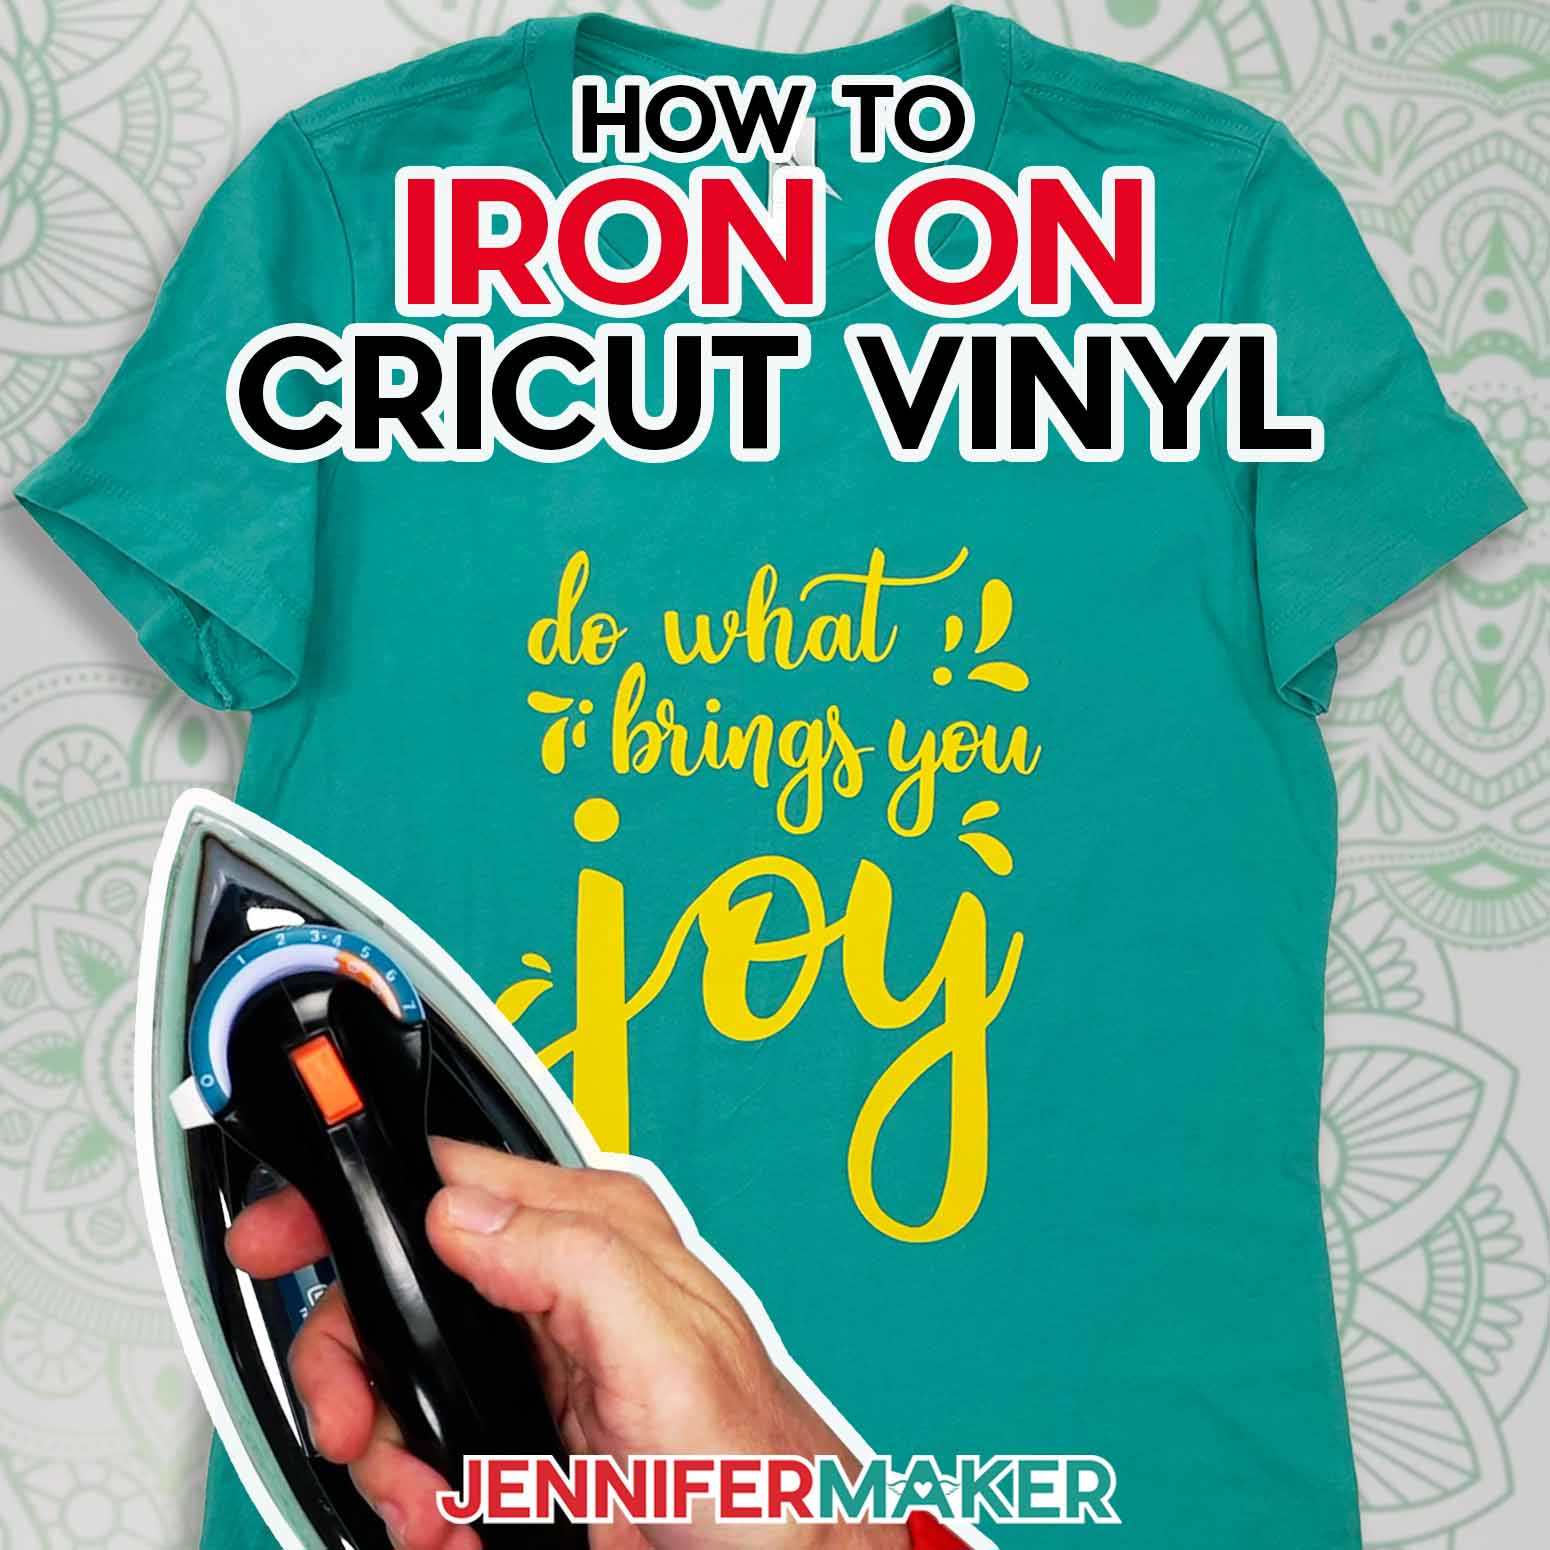
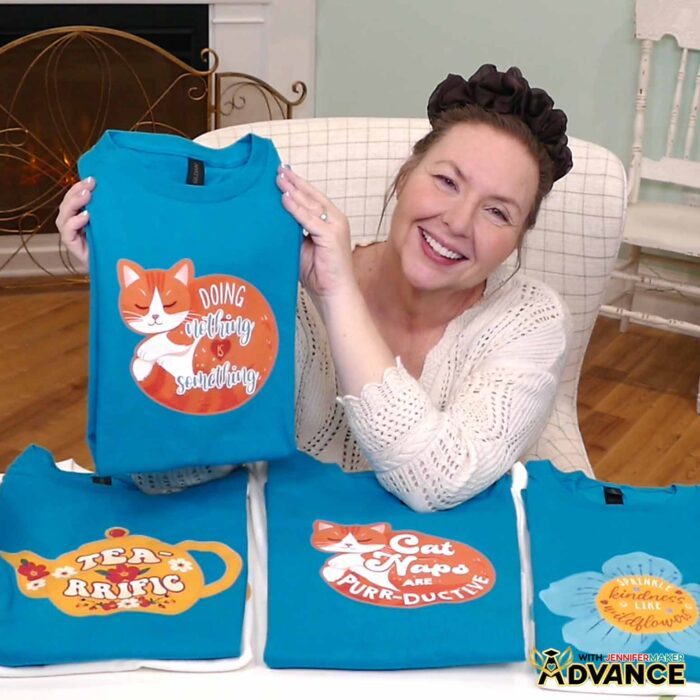
3. Make an Iron-On T-Shirt: Iron-on vinyl, also called HTV, is one of the most useful Cricut skills because you can use it on shirts, tote bags, pillows, aprons, and other fabric gifts.
This is where Cricut starts to feel really personal. A plain shirt becomes a birthday shirt, a team shirt, a holiday shirt, or a “this is so me” shirt.
- You’ll learn: HTV placement, mirroring, weeding iron-on, and pressing with heat.
- Best beginner blank: A cotton or cotton-blend T-shirt or tote bag.
- Mistake to avoid: Always mirror iron-on before cutting. This is the classic beginner mistake, and it’s so easy to miss when you’re excited to press “Make.”
Ask me how I know! Mirroring is one of those little Cricut habits that becomes automatic over time, but in the beginning, I like to say it out loud: “Iron-on means mirror.”
Learn it here: Cricut Iron-On Vinyl Tutorial for Beginners

4. Make Print Then Cut Designs: Stickers are a fun beginner project once you’re comfortable with basic cutting. You’ll use your printer first, then your Cricut will cut around the printed designs.
I love this project because it shows you that your Cricut isn’t just for plain cut shapes. You can make colorful, detailed designs without layering vinyl or cardstock.
- You’ll learn: Print Then Cut, printable vinyl, registration marks, and printer settings.
- Best beginner project: A simple printable iron-on decal.
- Mistake to avoid: Don’t trim off the black registration box before cutting. Your Cricut needs those marks to read the sheet.
Make printed designs here: How to Make Print Then Cut Shirts With Cricut
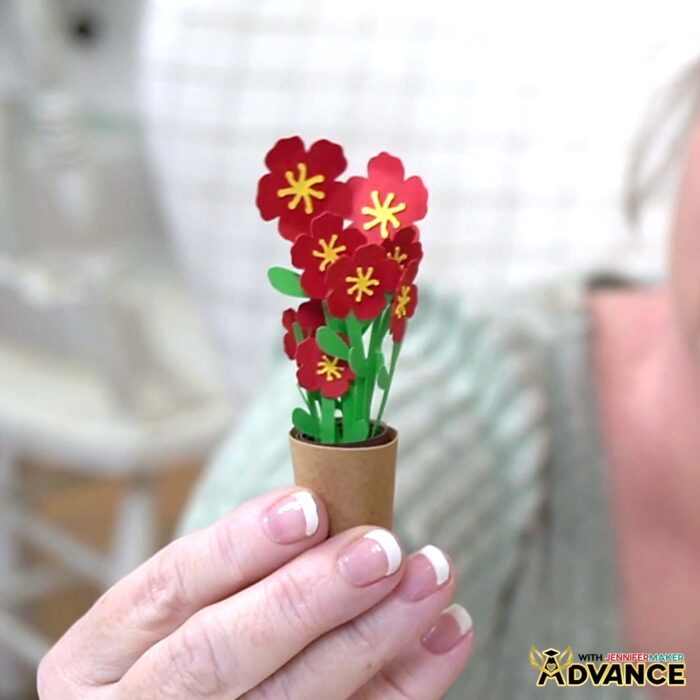
5. Make Paper Flowers: Paper flowers are a beautiful way to practice cardstock cutting, shaping, curling, and glue control.
They’re also one of those projects that look much harder than they are. Once you see how the petals curl and layer, it starts to make sense.
- You’ll learn: Cardstock cutting, petal shaping, rolled flowers, layered flowers, and dimensional assembly.
- Best beginner project: A simple rolled flower or layered flower with larger petals.
- Mistake to avoid: Use less glue than you think. Too much glue can warp cardstock or make the flower harder to shape.
A tiny dot of glue is often all you need. I know it’s tempting to add more “just to be safe,” but paper flowers usually behave better with a light touch.
Start blooming here: Easy Cricut Paper Flowers for Beginners
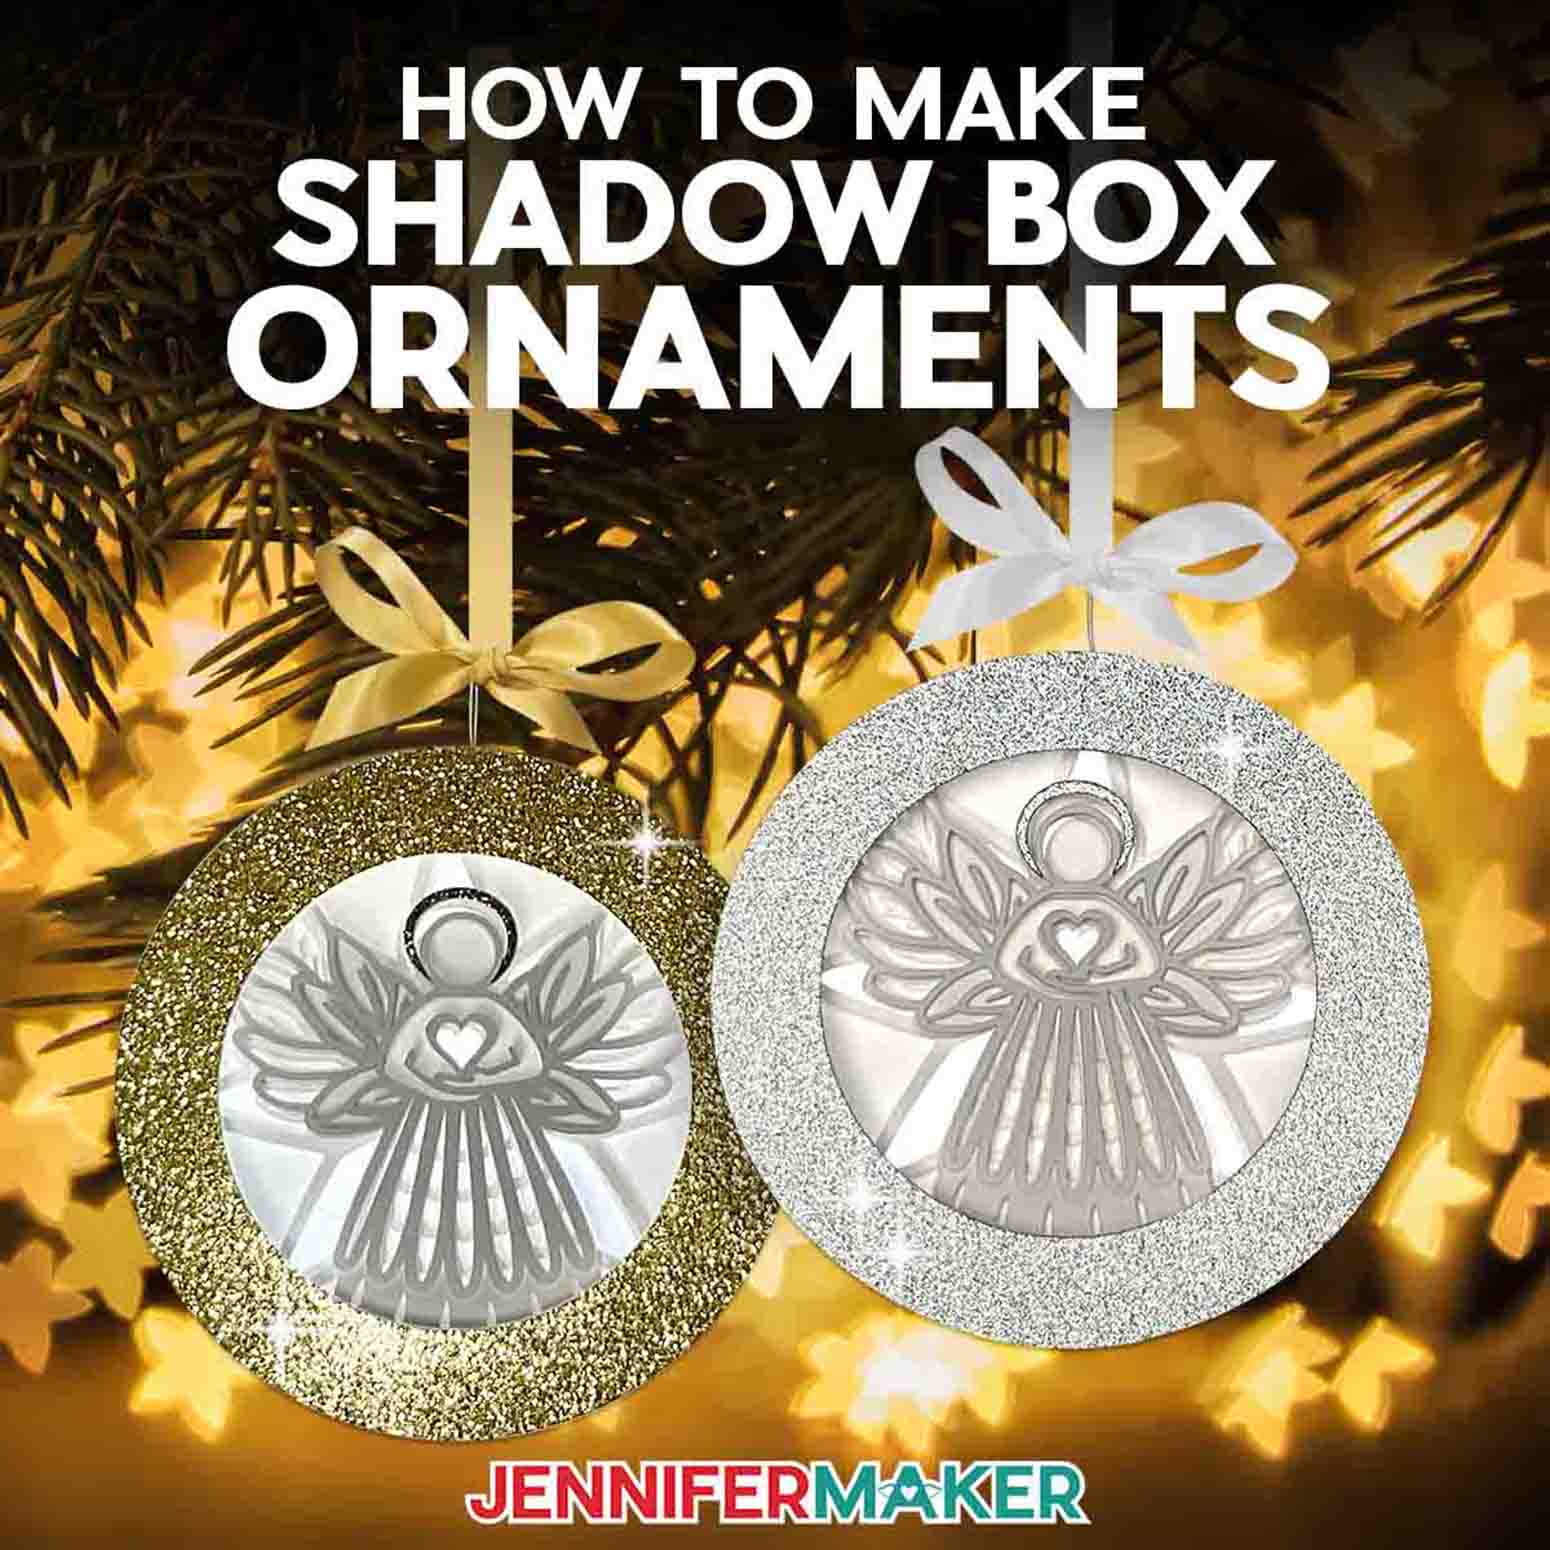
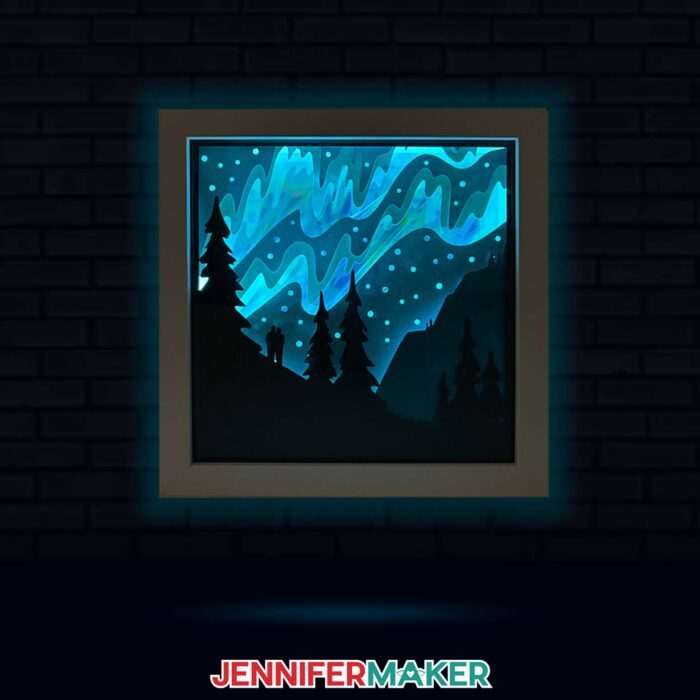
6. Make a Layered Cardstock Shadow Box Project: A layered cardstock shadow box is a great next step after you’ve made a card or two because it builds on skills you already know, then turns them into something dimensional you can display.
Layered cardstock projects look impressive, but they’re very doable when you choose a design with bold pieces and clear layers. And when you place those layers inside a shadow box, your Cricut project is instant home decor. You can make something for a nursery, a holiday display, a craft room, or a special gift.
- You’ll learn: Color layers, mat order, paper assembly, layered spacing, foam tape, and framing.
- Best beginner project: A simple layered cardstock shadow box with bold shapes and clear layer order.
- Mistake to avoid: Don’t glue too soon or choose very tiny cuts for your first shadow box. Lay out all the pieces first, almost like a little paper puzzle, so you can check the order before the adhesives come out.
Try this tutorial: Easy Layered Cardstock Shadow Box Project
Where Can Cricut Beginners Get More Help?
If you’re a Cricut beginner and you still have burning questions after reading a tutorial, that’s completely normal. Cricut has a learning curve, and no question is silly when you’re trying something new.
Here are a few useful resources I recommend:
JenniferMaker tutorials: My step-by-step Cricut blog posts are a great place to start because you can pause, reread, zoom in on photos, and follow along at your own pace.
JenniferMaker YouTube channel: If you like to follow videos, short videos and full tutorials can help you see exactly what each step looks like in real time.
Cricut community groups: There are lots of Cricut Facebook groups where Cricut friends share tips, answer similar questions, and show what worked for them. Just remember that advice can vary, so when in doubt, check the tutorial instructions or your material manufacturer’s guidance. I’d love for you to join us in the JenniferMaker Cricut Group!
Free workshops: Workshops are a very special place to get more guided help because they give you a focused project and a clear path to follow.
Official Cricut support: For machine, account, Cricut Access, or technical problems, look for official Cricut Member Care options through Cricut’s current support pages. I’d use official online chat or support links instead of random phone lines or free phone numbers you find elsewhere online.
Between tutorials, videos, community help, and expert help when you need it, you don’t have to figure everything out alone.
Cricut Design Space Tutorial for Beginners
Cricut Design Space is where you set up your project before sending it to your Cricut machine. You don’t need to learn every button right away. For your first project, focus on these basic steps.
- Open or upload your design. If you’re using an SVG file, Upload it to Cricut Design Space and add it to your Canvas.
- Resize the design for your blank. Measure your mug, jar, shirt, card, or sign first so your design fits before you cut.
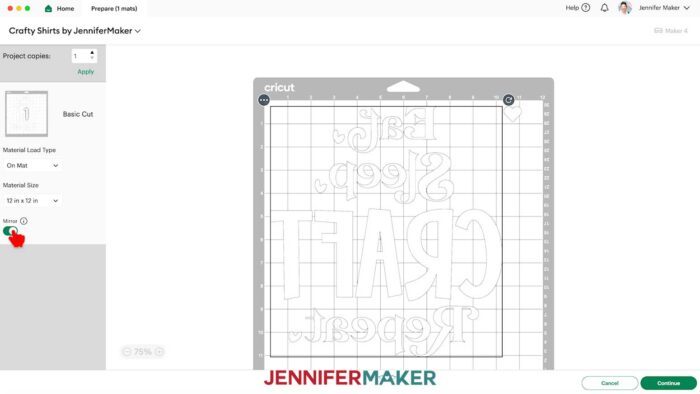
- Check the operation. Most beginner vinyl and cardstock projects should be set to Basic Cut. Pen, Score, and Print Then Cut projects use different operations.
- Attach anything that needs to stay in place. If your project has writing, scoring, or carefully placed layers, Attach helps keep those pieces positioned correctly on the mat.
- Mirror iron-on designs. If you’re cutting heat transfer vinyl, turn on Mirror before cutting.
- Choose the right material setting. Pick the material you’re actually cutting, like vinyl, cardstock, or iron-on, before you load the mat.
That’s enough to get started. Tools like Weld, Slice, Contour, and Flatten are helpful later, but you don’t need to master them before your first cut.
Common Cricut Beginner Mistakes and How to Fix Them
Every Cricut crafter makes mistakes, I promise! I still think the best Cricut skill you can learn is not perfection. It’s troubleshooting.
When something goes wrong, it usually means one small setting, material, blade, or placement needs attention. So let’s look at the most common beginner problems and what to try next.
A lot of Cricut troubleshooting gets easier once the words make sense. If a tutorial says to burnish, weed, mirror, kiss cut, or use registration marks, you’ll know what to do next with the free Cricut Terms PDF beside you.
My Cricut did not cut all the way through: Check that you selected the correct material setting, make sure your blade is clean, press the material firmly to the mat, try More Pressure if your material needs it, or replace the blade if it’s dull. If your machine almost cut through but not quite, you’re close. That’s usually a setting, blade, or pressure issue, not a reason to give up.
My cardstock tore on the mat: Use a LightGrip mat, flip the mat over and peel the mat away from the cardstock, use a clean sharp blade, check your material setting, and avoid very intricate cuts until you’ve had more practice. A mat that’s too sticky can be tough on paper, so treat it gently and remove it slowly.
My vinyl won’t stick to transfer tape: Burnish the front with a scraper, flip the design over and burnish from the back, peel the backing away slowly at an angle, or try a different transfer tape if yours is too weak or too sticky.
My iron-on design looks backward: This usually means the design wasn’t mirrored before cutting. For your next HTV project, turn on Mirror on the Prepare screen before cutting. And here’s my gentle reminder: this happens to lots of crafters. It’s practically a Cricut beginner badge.
My vinyl is lifting from the blank: Clean the blank before applying vinyl, avoid touching the sticky side of the vinyl, burnish well after application, let permanent vinyl cure before washing, and use permanent vinyl for mugs, tumblers, and handled items.
My design is too hard to weed: Make the design larger, use a simpler font, avoid very thin lines, use better lighting, and weed slowly from the outside in. A tiny, detailed design may look beautiful on the screen, but it can be frustrating on your mat. Bigger and bolder is usually easier when you’re learning.
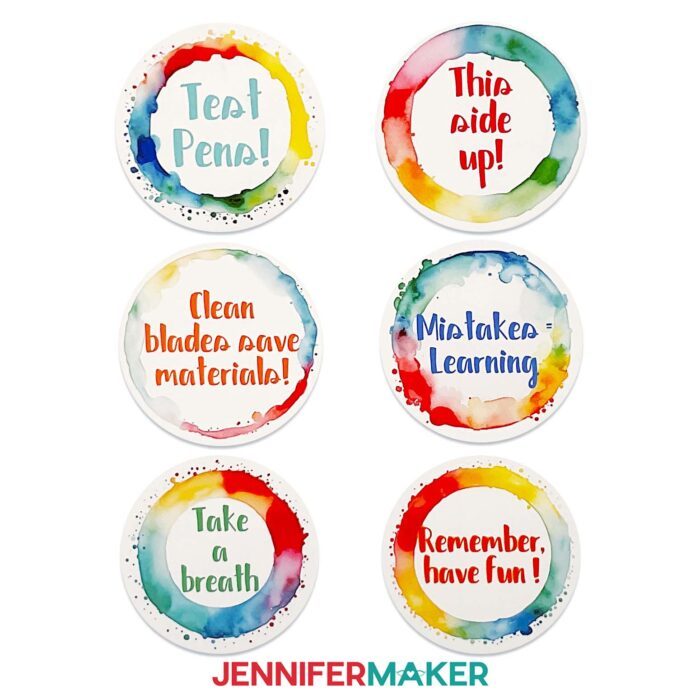
Need helpful reminders? Make my Cricut Mistake Reminder Stickers!
What Should I Learn First in Cricut Design Space?
Learn these five things first:
- How to upload a design
- How to resize a design
- How to choose the correct operation, such as Basic Cut, Pen, or Print Then Cut
- How to attach writing or scoring layers
- How to choose the right material setting before cutting
You can learn the other tools as you need them.
You don’t need to master the whole program before making your first project. In fact, I don’t want you to. Make something simple first. The tools make more sense when you have a real project in front of you.
What Can A Cricut Do?
Want a sneak peek at what you can make with a Cricut as you build your skills? Watch the video to see 21 fun Cricut projects plus the tutorial for my material labels:
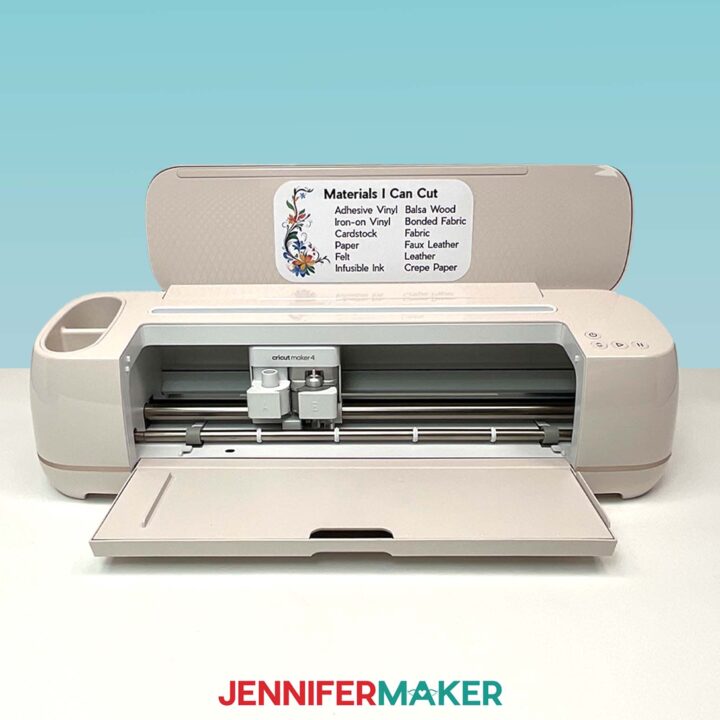
Cricut Material Labels
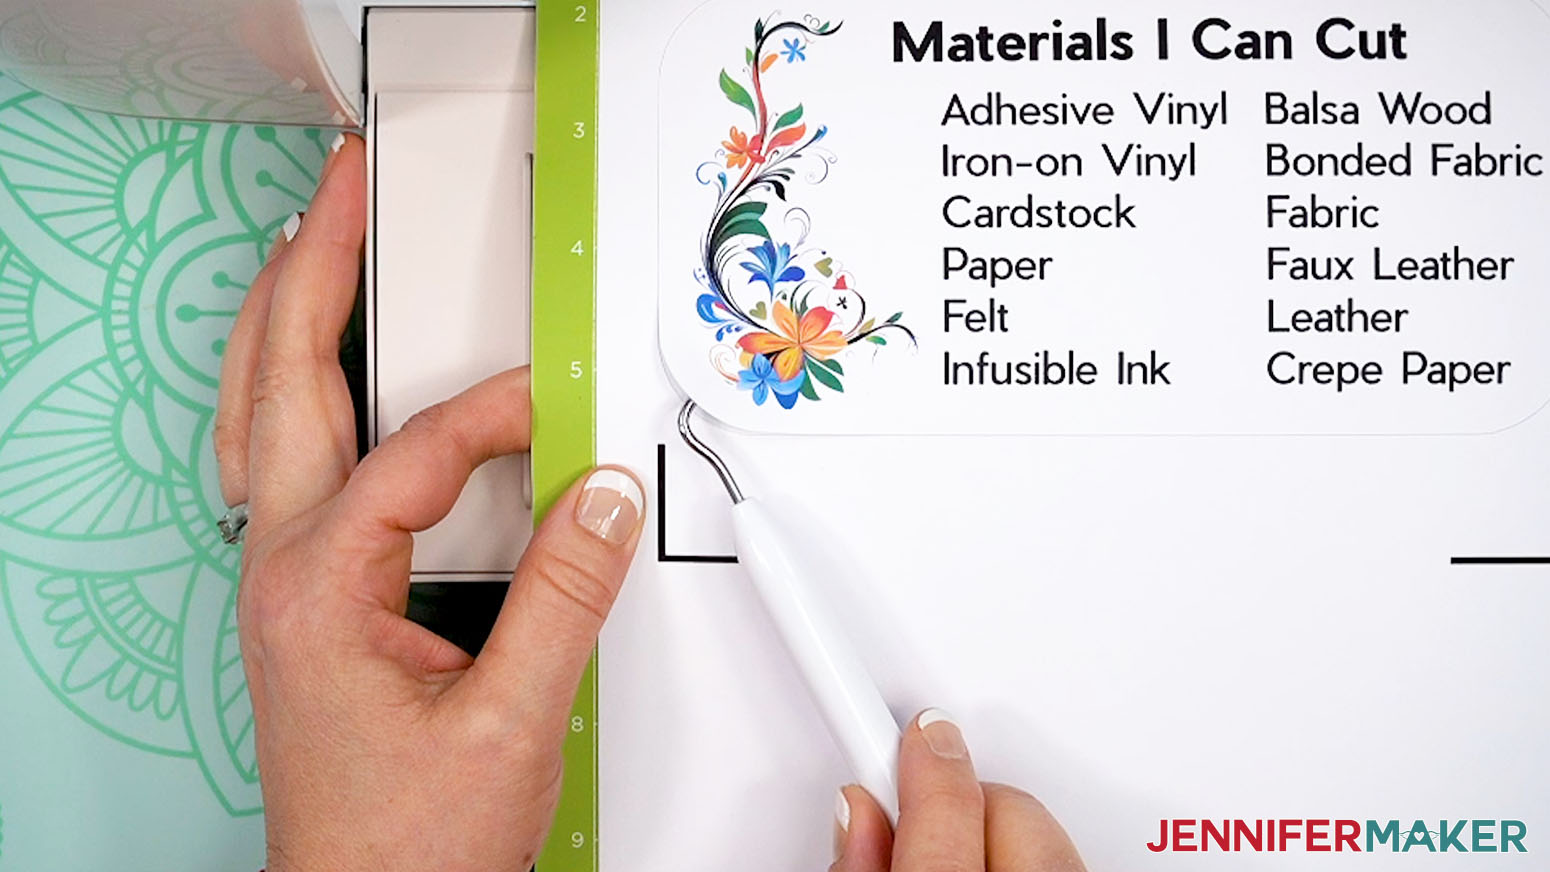
What can a Cricut do? Keep track with these snazzy Print Then Cut Cricut material labels!
Materials
- One (1) Sheet of 8.5” x 11” Cricut Printable Sticker Paper
- 8.5” x 11” Copy Paper (optional to protect print when adhering to machine mat)
- Design #731 (My free SVG/PDF/DXF design files are available in my free resource library - get the password by filling out the form at the bottom of this page)
Tools
- A way to print and cut your stickers - I’m using the Cricut Maker 4, but you can also use any Cricut Maker, a Cricut Explore Series machine, the Cricut Venture, or the Cricut Joy Xtra
- A Color Inkjet Printer
- Cricut Green StandardGrip Machine Mat 12" x 12”
- Brayer
- Weeding Tool
- Paper Trimmer (for Joy users)
- Isopropyl Alcohol
- Lint-Free Cloth
Instructions
STEP 1: GET MY CRICUT MATERIAL LABEL DESIGNS
First, download my Cricut Material Label files from my free library – look for Design #731. Alternatively, you can use the Save This Project form near the top of this post and the design link will be emailed to you.
In the PNG folder, you’ll find versions of my Cricut Material Label designs for the Maker, Explore, Joy, and Joy Xtra machines.
TIP: If you’re not sure how to upload, go to jennifermaker.com/svgs to learn how to unzip and upload files.
STEP 2: PREPARE AND CUT YOUR MATERIAL LABEL
In this tutorial, I'll show you how to use Print Then Cut to create stickers for Maker, Explore, and Joy Xtra labels.
For the Joy label, I recommend printing the design in Google Docs and cutting along the crop marks with a Paper Trimmer instead. For more information on printing with Google Docs, follow the instructions in "STEP 4" of my Busted Canvas Tutorial.
NOTE: Change the image height to 4" in Step 15 so your label prints at the correct size.
CRICUT DESIGN SPACE
- In Cricut Design Space, open a blank Canvas.
- Click “Upload” and then “Upload Image.”
- Click “Browse.”
- Select the PNG label that matches your machine.
NOTE: I’ll demonstrate with the “maker” PNG to create a label for my Maker 4. - Click “Open,” and then “Continue.”
- On the “Background Remover” screen, click “Apply & Continue.”
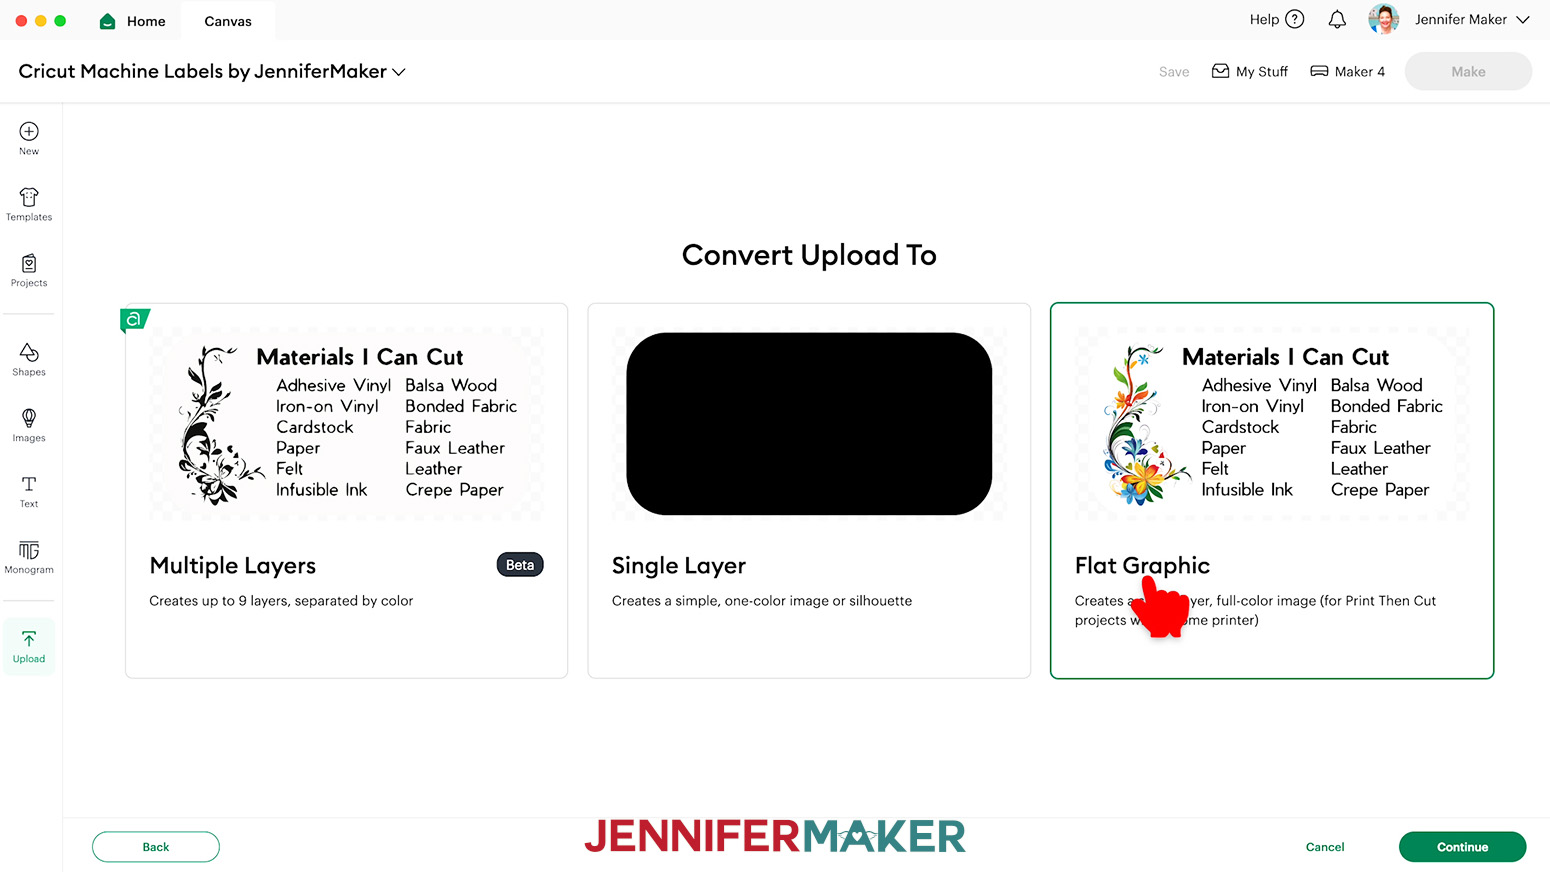
- On the “Convert Upload To” page, select “Flat Graphic” and click “Continue.”

- Click “Upload” to add the image to your Canvas.
- Click “Save” and give your project a name.
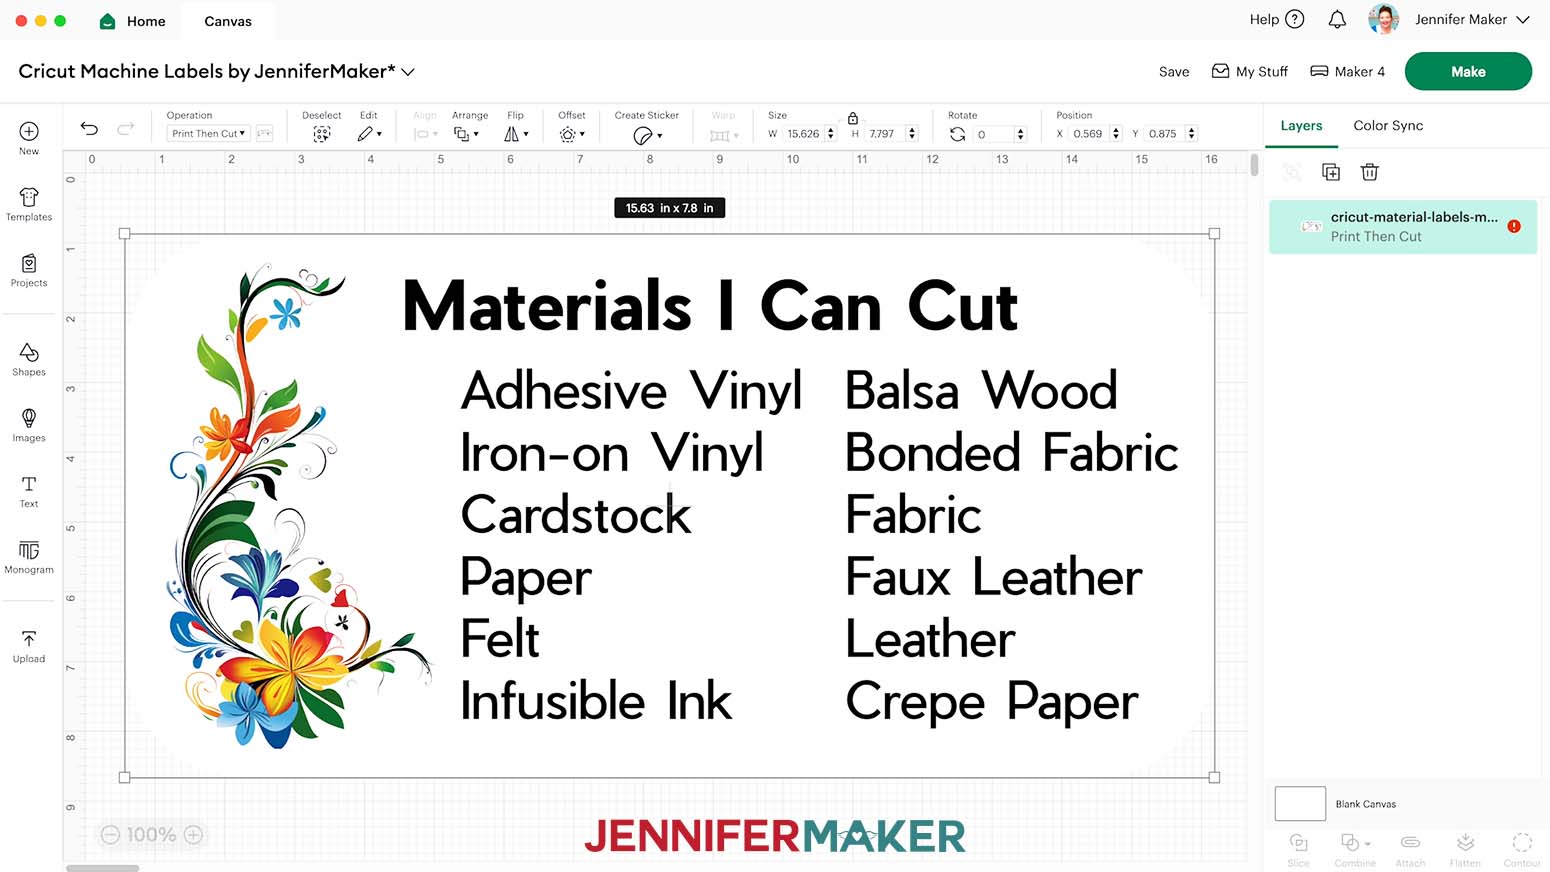
- The image will load in too large for Print Then Cut.
NOTE: You’ll see a red warning icon in the Layers Panel, but don't worry, we'll fix this. - Select the image.
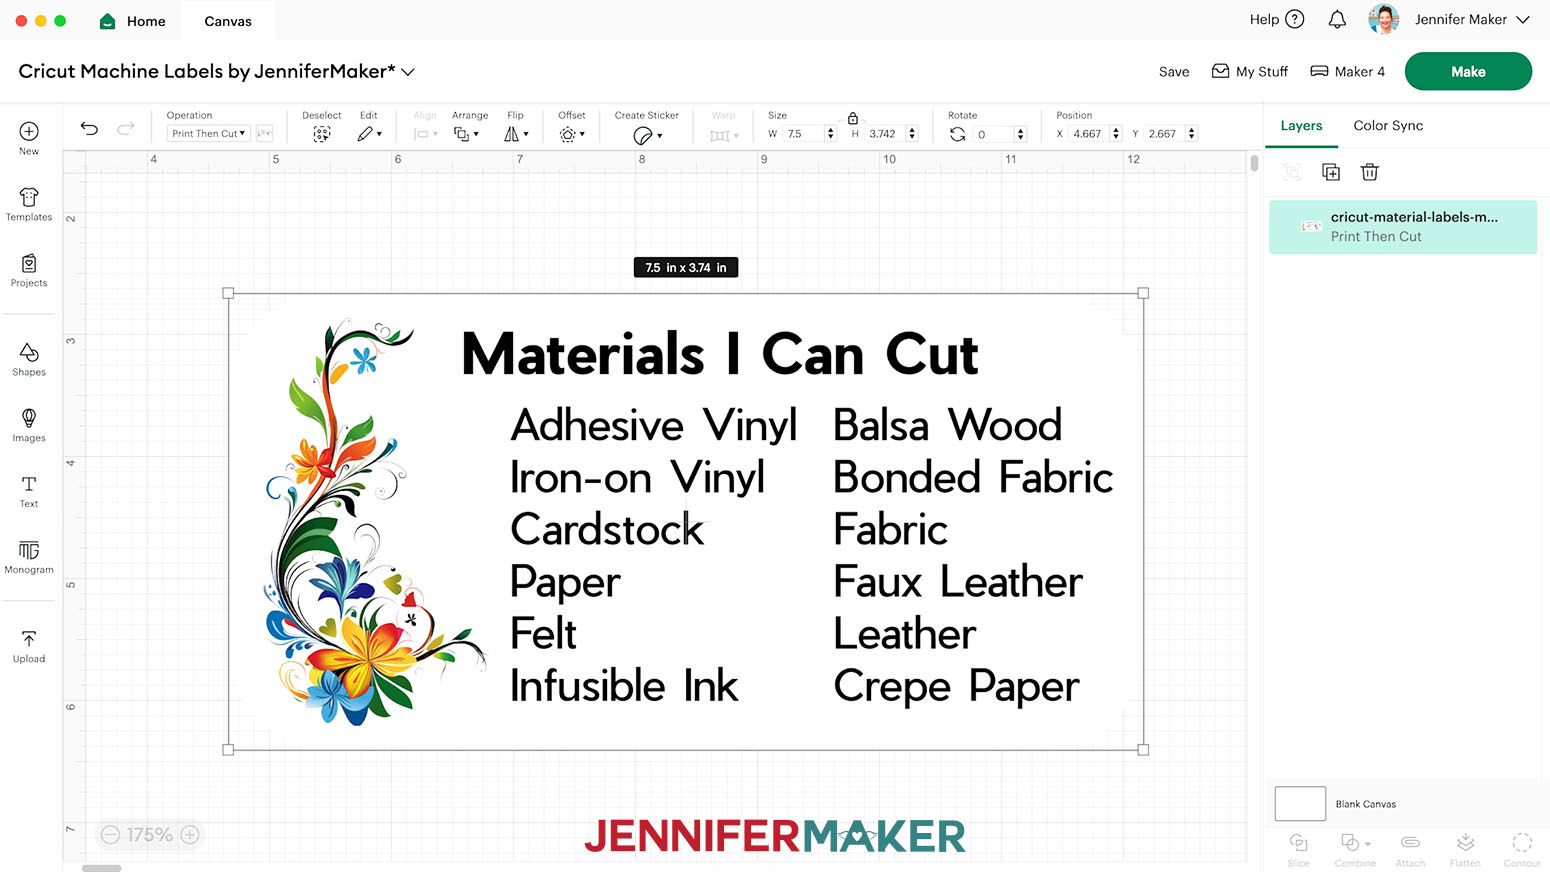
- With the “Lock” icon closed, enter “7.5” in the “Width (W)” field on the “Size” menu for Maker and Explore labels. Then press “Enter/Return” on your keyboard. The “Height (H)” field will adjust automatically.
NOTE: For the Joy Xtra label, with the “Lock” icon closed, enter “2.5” in the “Height (H)” field, and the “Width (W)” will adjust automatically. - Your project is ready to Print Then Cut!
PRINT THEN CUT
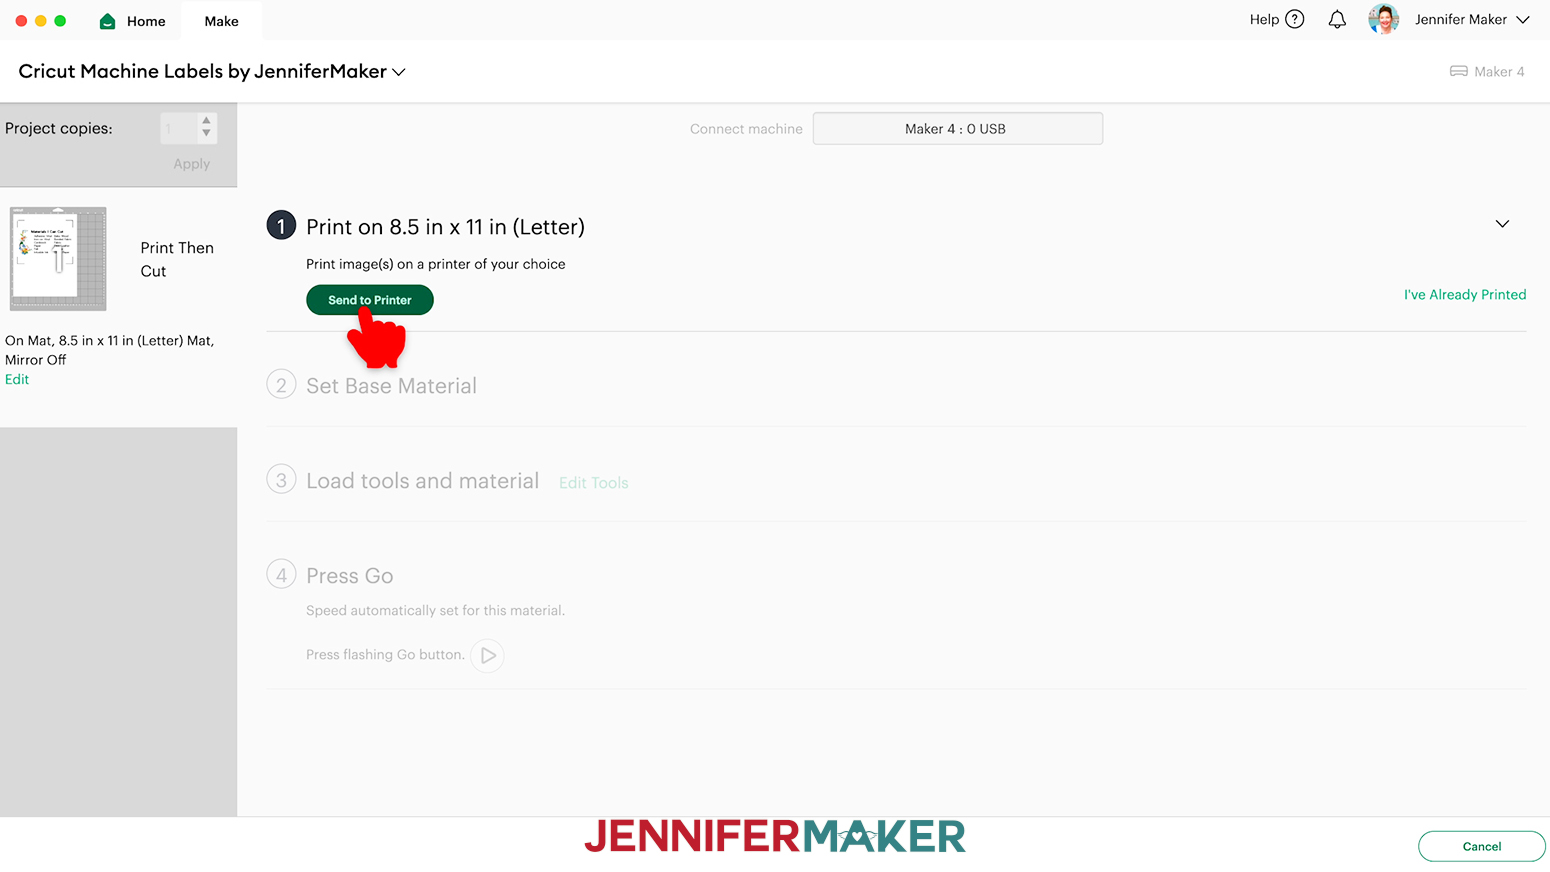
- Make sure the correct machine is selected in the top right.
- Click “Make.”
- On the Prepare screen, make sure the correct Material Size is selected for your mats.
NOTE: I’ll use “8.5 in x 11 in” for my Print Then Cut mat. - When you’re satisfied with your mat layout, click “Continue.”
- On the Make Screen, click “Send to Printer.”
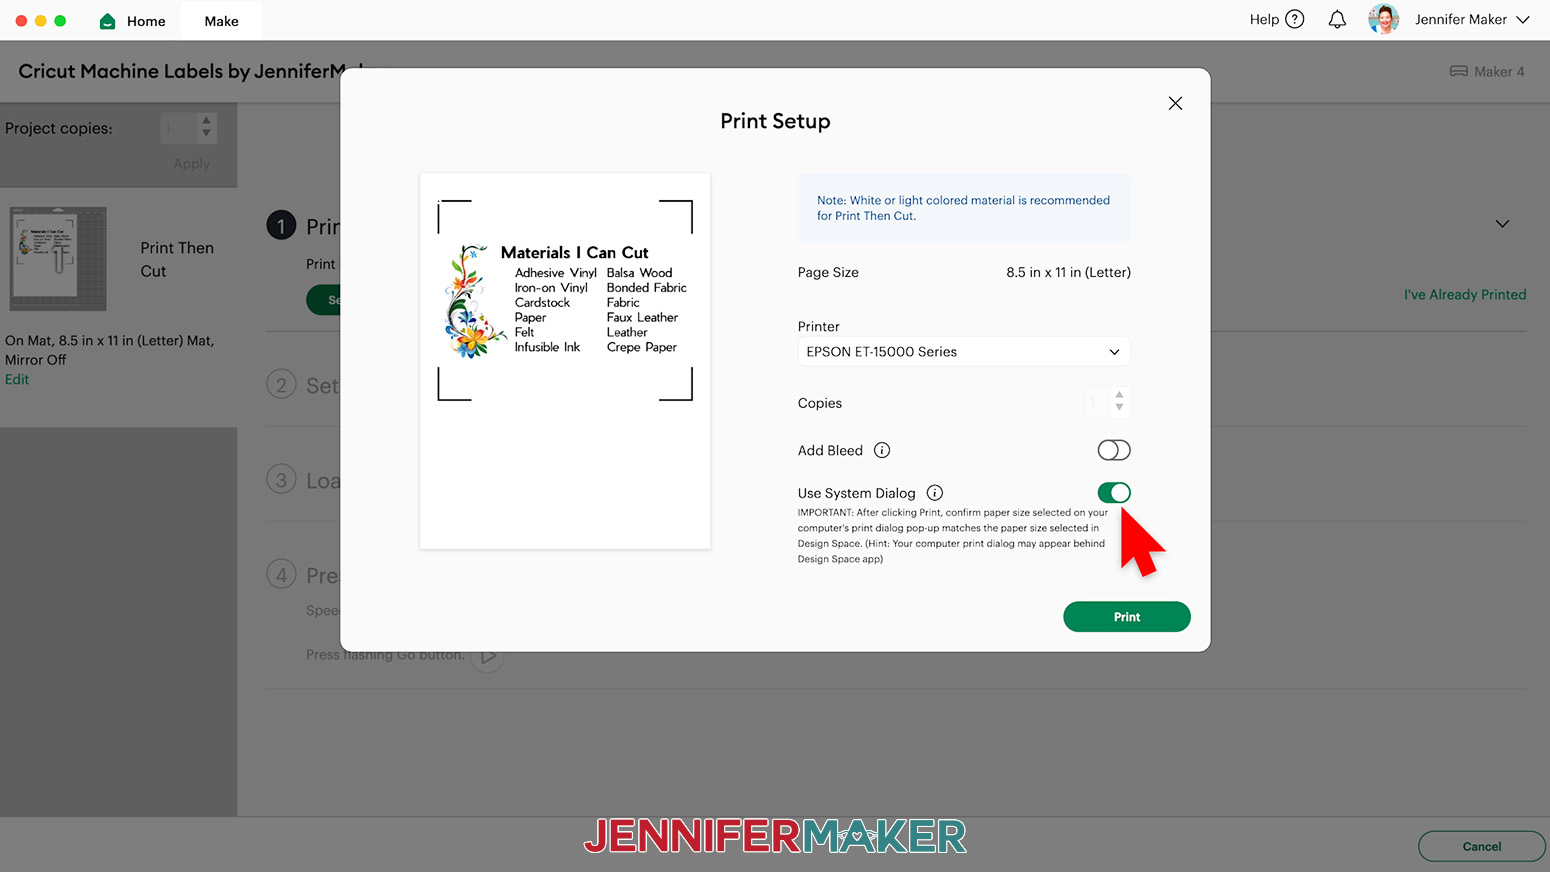
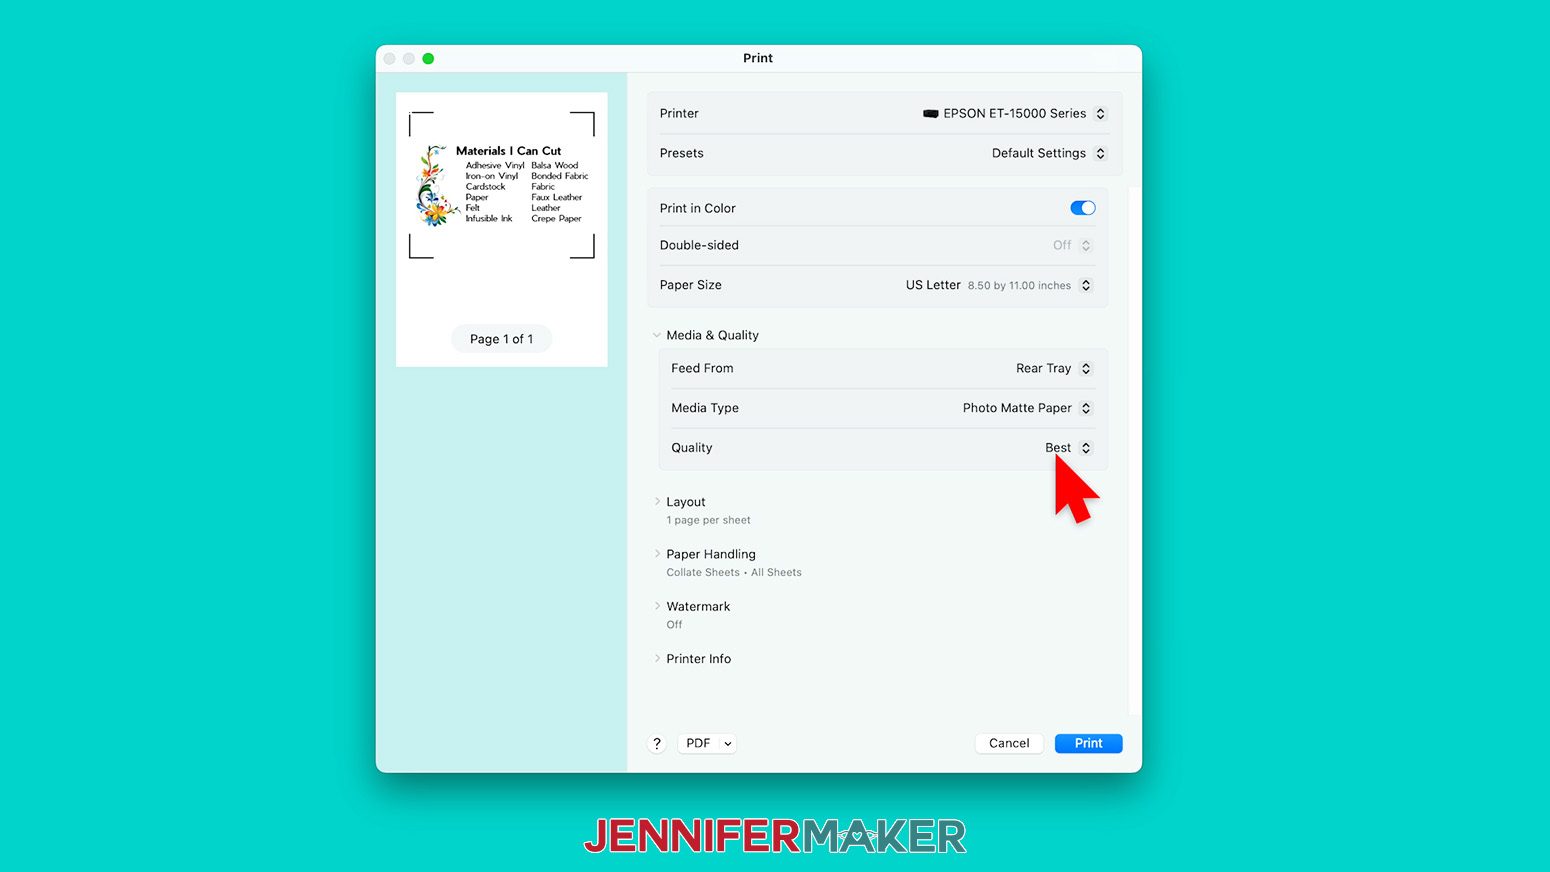
- In the “Print Setup” window, select the correct printer, then toggle “Add Bleed” off, and “Use System Dialog” on.
- Click “Print.”
NOTE: Your System Dialog window might be behind the Cricut Design Space window, so minimize it if you don’t see the settings. - In the System Dialog window, make sure the correct printer is selected, change the Media Type to “Photo Matte Paper” and the Quality to “Best,” or whichever settings are closest.
NOTE: Not all printer settings will be the same, but you can use my choices as guidelines. - Load the sticker paper into your printer according to the directions on the package.
- Click “Print” to send the Print Then Cut label to your printer.
- Let the print dry before handling it to avoid smudges.
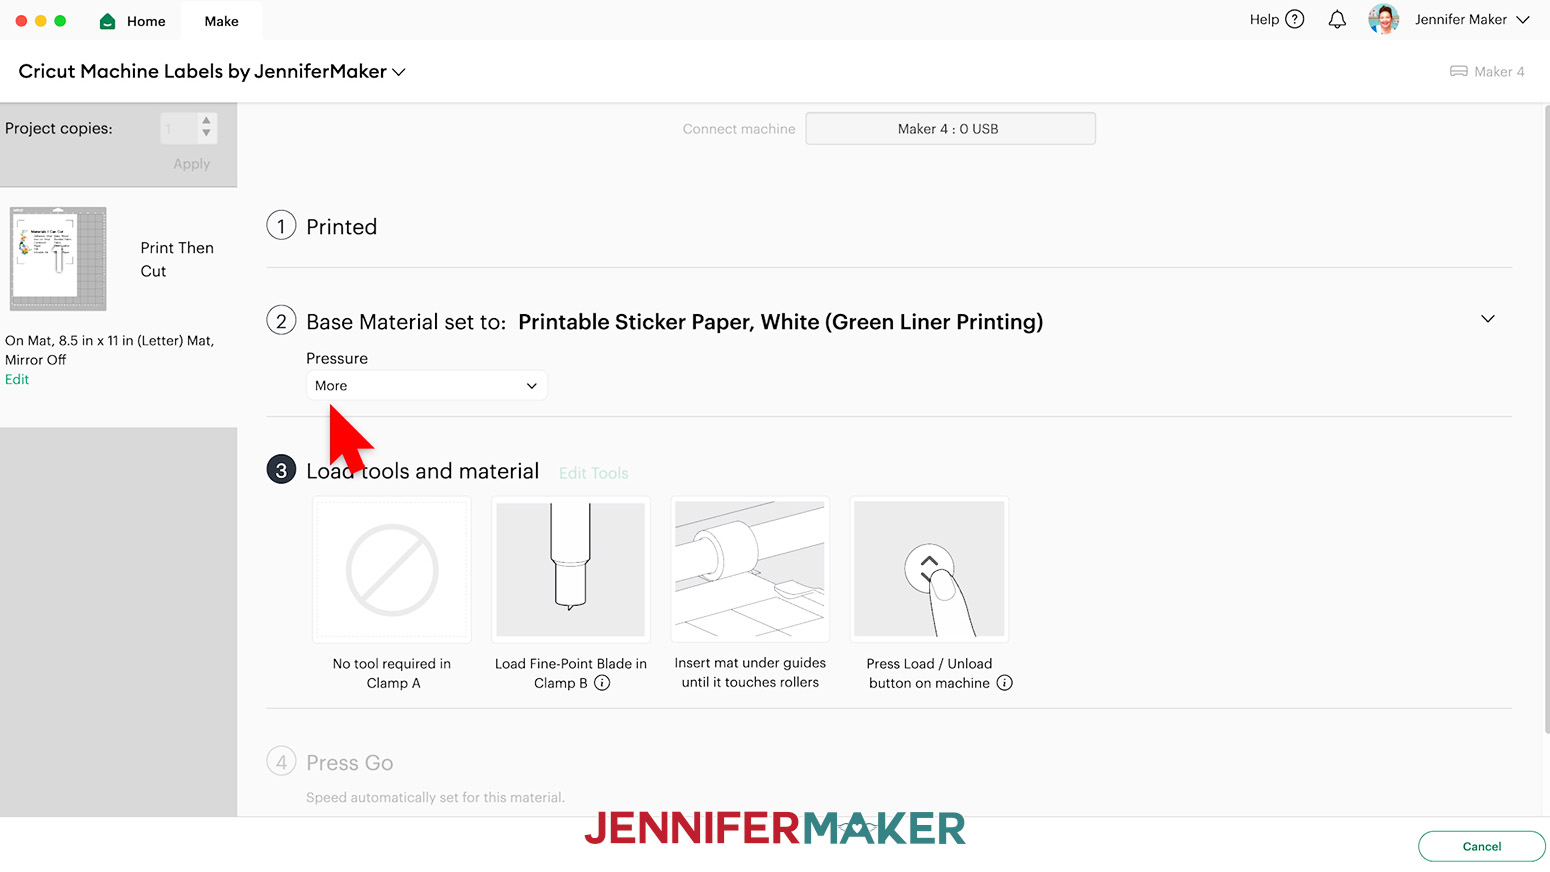
- Back on Cricut Design Space’s Make Screen, set the Base Material for your mat. I’ll use the “Printable Sticker Paper, White (Green Liner Printing)” setting with “More” Pressure.
NOTE: If you don’t see “Printable Sticker Paper” in your materials list, click on “Browse All Materials.” Then type in “Sticker Paper” to search for and select the correct “Printable Sticker Paper” setting.
NOTE: We’ll be cutting all the way through the sticker sheet.
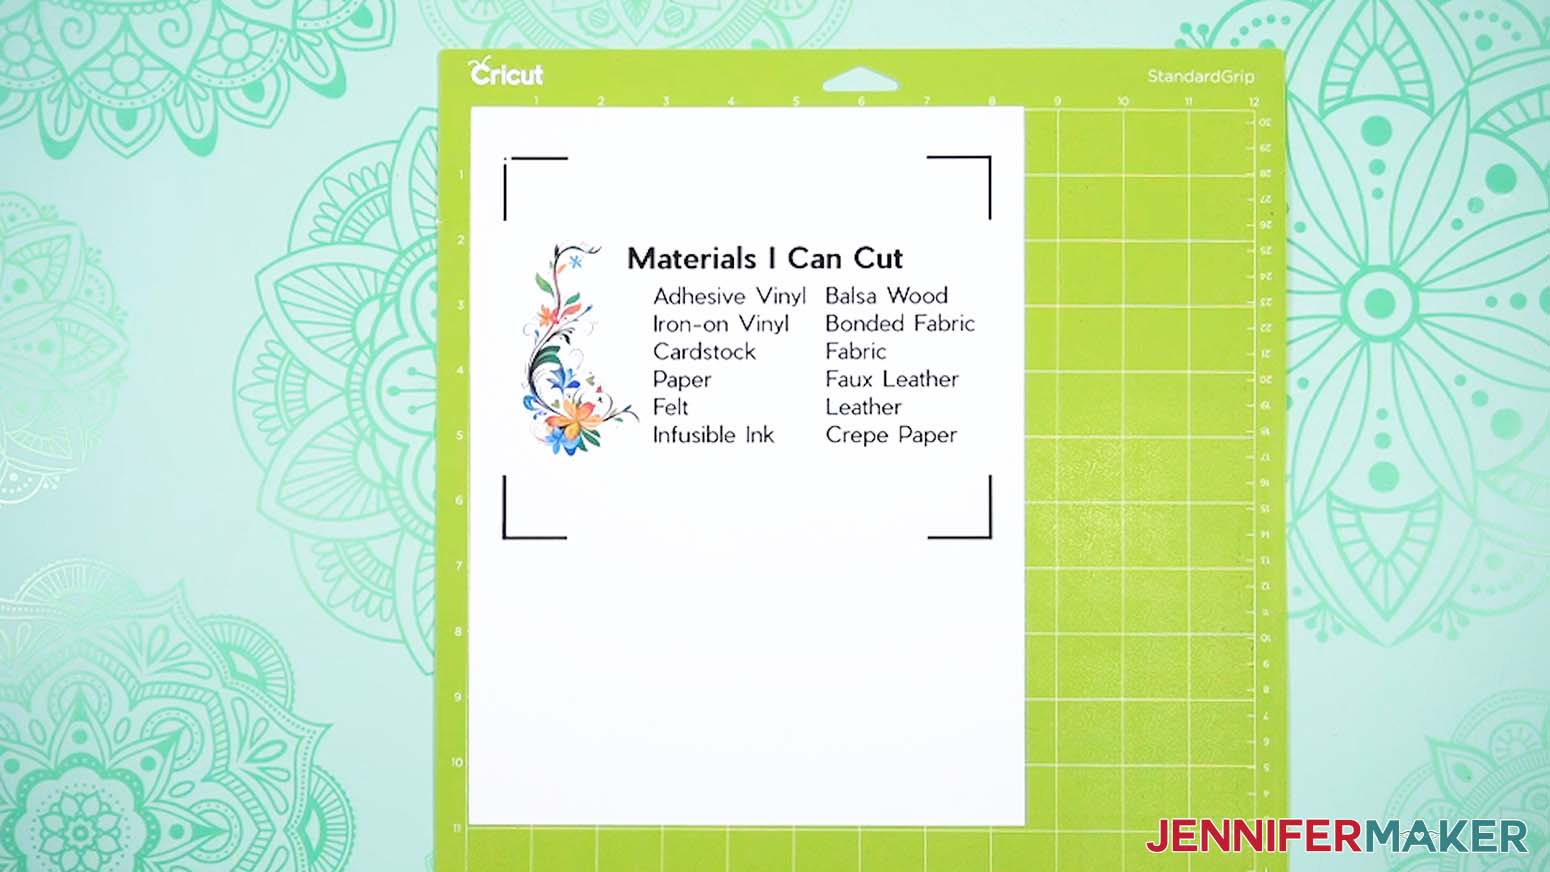
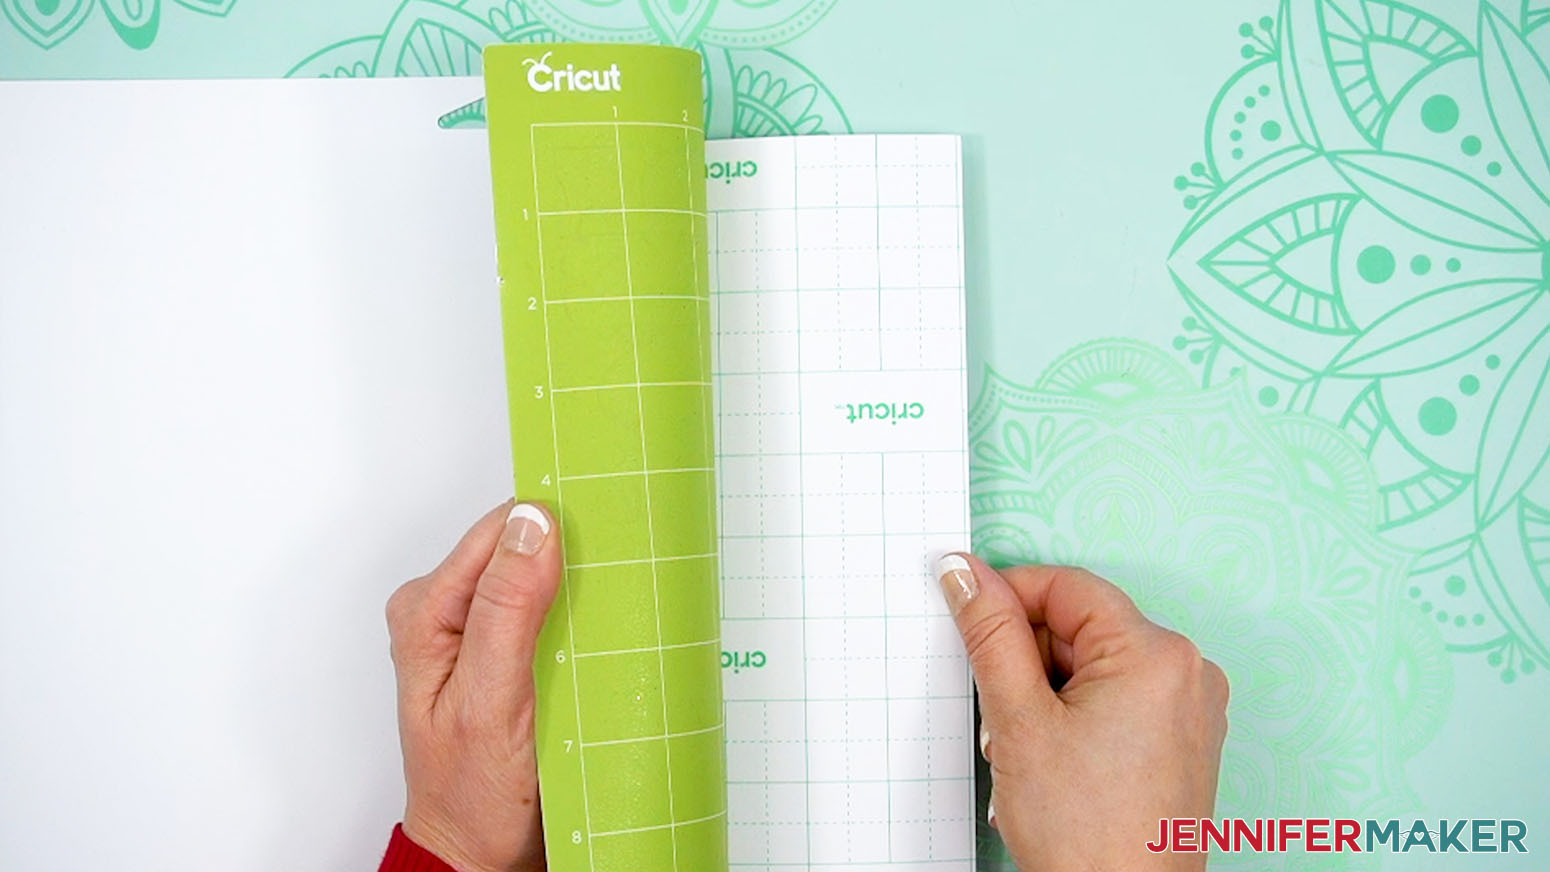
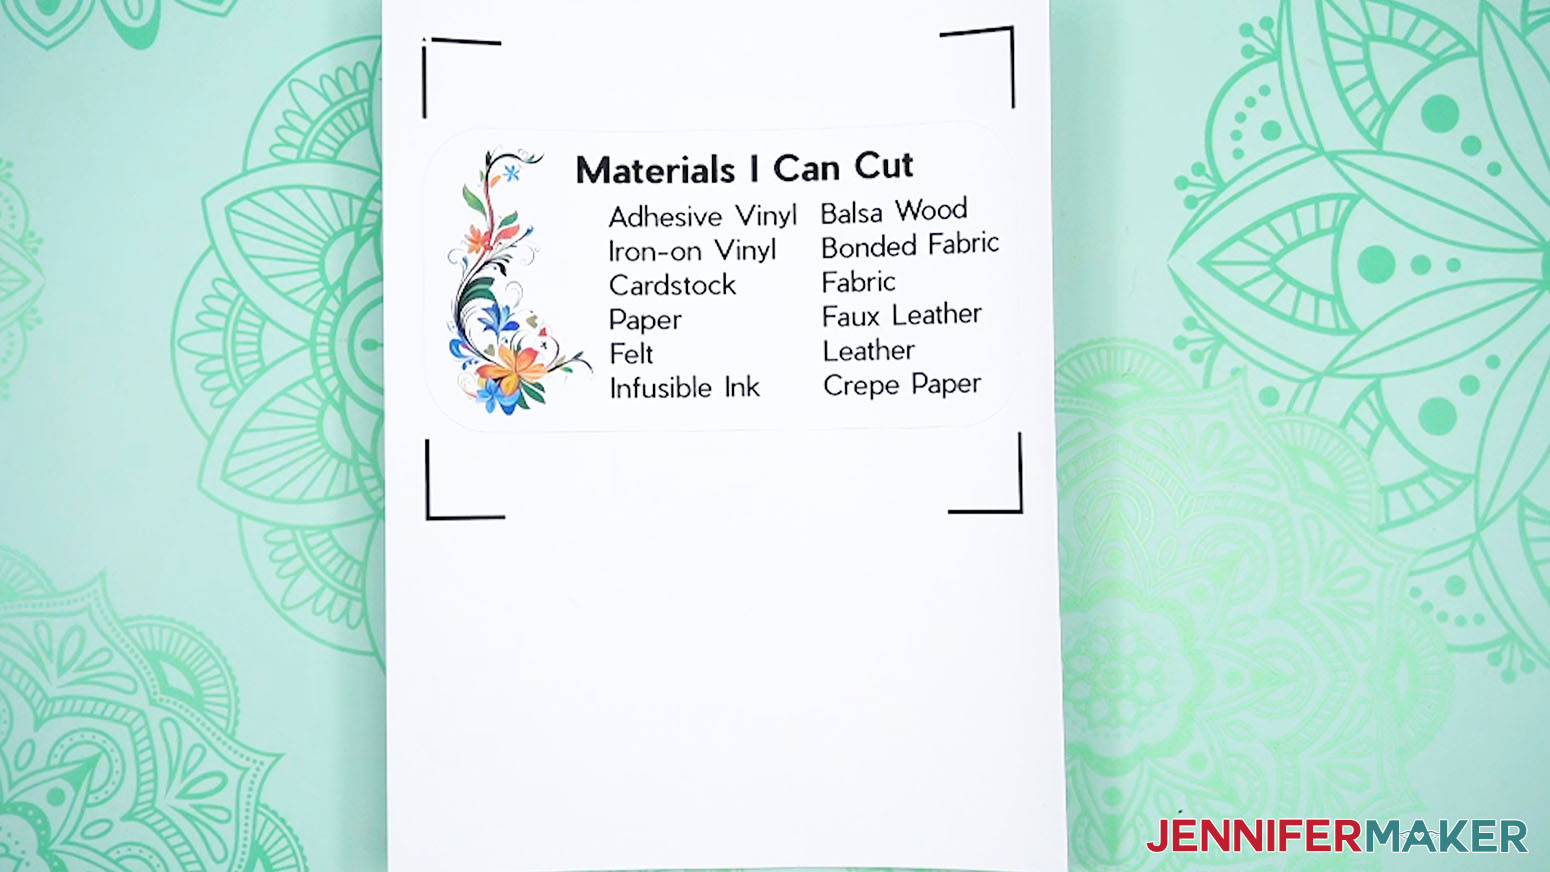
TIP: Changing the Pressure to “More” results in a cleaner cut. - Place your printed label face up on a green StandardGrip machine mat.
- Place a clean sheet of copy paper on top of the print and use a brayer to make sure the print is fully adhered. Remove the copy paper.
- Check that your Premium Fine-Point Blade is clean and in the clamp.
- Press the flashing “Load/Unload” button to load the prepared mat into your Cricut.
- Press the flashing middle button to begin cutting.
- When it has finished cutting, don’t unload the mat right away. Gently lift a corner of the material to make sure the cuts went all the way through the sticker sheet. If not, press the middle button again to make a second pass of cuts in the same spots.
TIP: If you have any issues with your cuts, go to jennifermaker.com/cleaner-cuts. - When the cuts are complete, unload the mat, flip it over onto your work surface, and roll it back to release the sticker paper.
- Leave your label on the backer until you’re ready to use it.
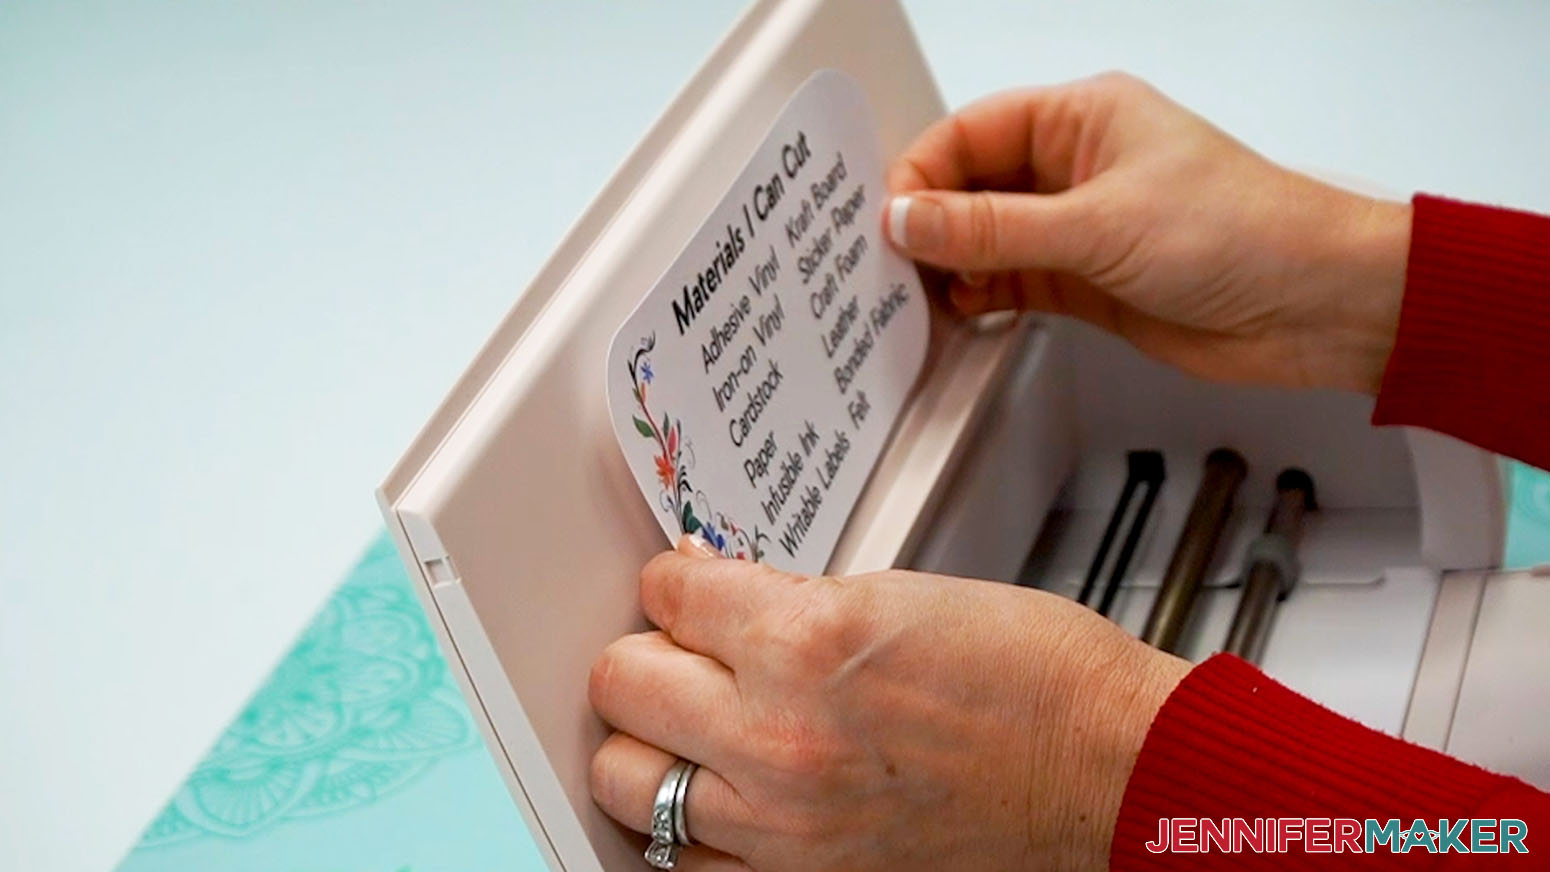
STEP 3: ADHERE YOUR LABEL TO YOUR MACHINE
- Use isopropyl alcohol and a lint-free cloth to clean the area where you want to apply your Cricut machine label.
- Peel the backing off the label.
- Carefully smooth your label across the machine’s surface, applying pressure to push out bubbles or wrinkles as you go.
- Press down and smooth to adhere well.
STEP 4: SHOW IT OFF
You now have a handy reference label listing the most common materials your Cricut machine can cut!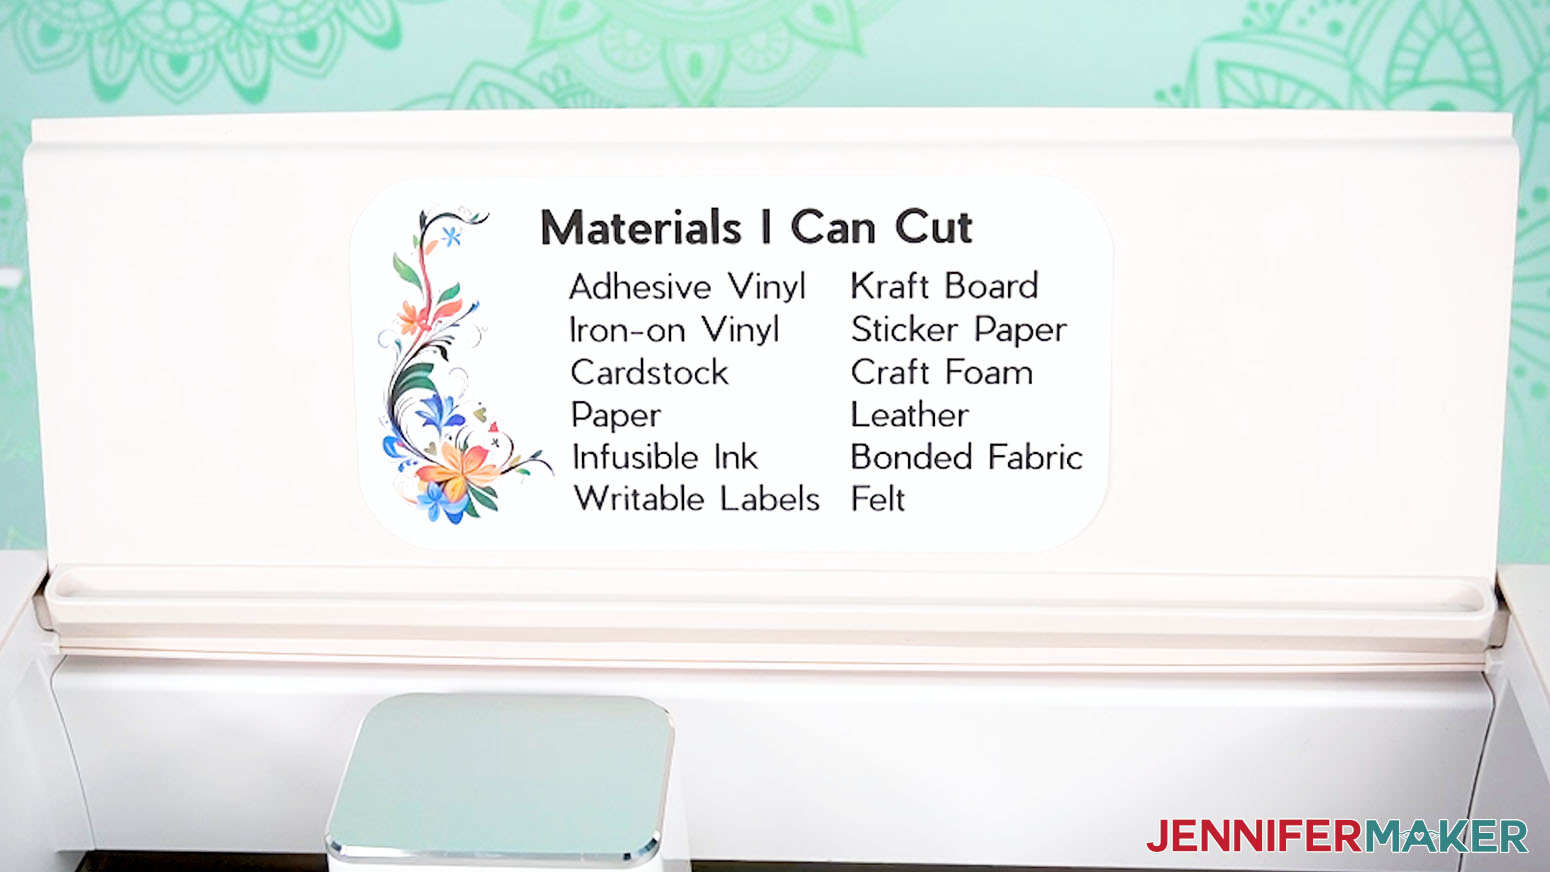
Notes
Finished Size
Maker/Explore Labels: 7.5" x 3.75"
Joy/Joy Xtra Labels: 4.35" x 2.5"
Fonts Used: Pier Sans, Free Alternate: Arial
Recommended Products
As an Amazon Associate and member of other affiliate programs, I earn from qualifying purchases.
Frequently Asked Questions About Cricut Tutorials for Beginners
Q: What is the easiest Cricut project for beginners?
A: The easiest Cricut project for beginners is a simple adhesive vinyl decal. It teaches the basic Cricut workflow: open or upload a design, resize it, cut vinyl, weed the design, use transfer tape, and apply the decal to a blank.
Q: What should I make first with my Cricut?
A: Make a simple vinyl decal first. After that, try a cardstock card, then an iron-on T-shirt. That order helps you learn one new skill at a time.
I know it’s tempting to jump straight to the big exciting project, but a simple first project gives you the confidence to keep going.
Q: Which Cricut machine is best for beginners?
A: The best Cricut machine for beginners depends on what you want to make. Cricut Joy machines are great for small projects and labels, Cricut Explore machines are great all-purpose beginner machines, and Cricut Maker machines offer the most material options.
Q: Do I need Cricut Access to use a Cricut?
A: No, you don’t need Cricut Access to use a Cricut. You can use your own uploaded files, free designs, and purchased SVGs. Cricut Access gives you more images, fonts, and projects inside Design Space, but it’s optional.
Q: Can I use free SVG files with Cricut?
A: Yes, you can upload free SVG files into Cricut Design Space. SVG files are often the easiest file type for Cricut cut projects because they usually keep the design layers separate.
Q: What is the difference between adhesive vinyl and iron-on vinyl?
A: Adhesive vinyl has a sticky back and is used on hard surfaces like mugs, jars, signs, and storage bins. Iron-on vinyl, also called HTV, is applied with heat and is used on fabric items like shirts, tote bags, pillows, and aprons.
Q: Do I need a printer to use a Cricut?
A: No, you don’t need a printer for most Cricut projects. You only need a printer for Print Then Cut projects, such as stickers, printable labels, and printable iron-on.
Q: Do I need a computer to use a Cricut?
A: You can use Cricut Design Space on a computer, tablet, or phone. A computer is often easiest for beginners because the screen is larger and the tools are easier to see.
Q: Why is my Cricut not cutting through my material?
A: Your Cricut may not cut through if the wrong material setting is selected, the blade is dull or dirty, the mat isn’t sticky enough, or the material isn’t pressed firmly to the mat. Try cleaning the blade, checking the material setting, using more pressure, or replacing the blade.
Q: Why is my cardstock curling?
A: Cardstock often curls when it’s pulled straight up from the mat. Flip the mat over and peel the mat away from the cardstock instead. This helps the paper stay flatter.
This is one of my favorite beginner paper tips because it’s simple and it works.
Q: Why is my vinyl not sticking to transfer tape?
A: Burnish the vinyl well with a scraper, then peel the backing away slowly at an angle. You can also flip the design over and burnish from the back before peeling.
Q: What Cricut terms should beginners know first?
A: The most important Cricut terms for beginners are vinyl, HTV, SVG, mat, blade, weeding, transfer tape, burnish, mirror, attach, weld, upload, and Print Then Cut. These words show up often in beginner Cricut tutorials, so learning them makes your first projects easier.
Q: Is there a Cricut glossary for beginners?
A: Yes. A beginner Cricut glossary can help you understand common Cricut words before you start cutting. My free Cricut Terms PDF includes 300 plain-English definitions you can keep nearby while you follow tutorials.
Q: Do I need to memorize Cricut terms before making a project?
A: No. You don’t need to memorize Cricut terms before making your first project. It’s better to start with a simple project and look up terms as you need them.
That’s exactly why I created the free Cricut Terms PDF. It’s there to help you keep going when a tutorial uses a word you haven’t learned yet.
Q: Can I make money with Cricut projects?
A: Yes, many people sell Cricut-made projects, but you need to make sure your designs, fonts, and images are licensed for commercial use. Practice first so your finished projects are clean, consistent, and durable.
Get My Free Cricut Terms PDF With 300 Beginner-Friendly Definitions
If Cricut feels like it has its own language, you’re not imagining it. There are a lot of new words at the beginning, and I don’t want those words to stop you from making something you love.
That’s why I put together a free Cricut Terms PDF with 300 plain-English definitions. Keep it beside your Cricut, and when a tutorial uses a word you don’t know yet, you can look it up and keep going instead of getting stuck.
IMAGE AND LINK
Final Thoughts: Start Small and Learn the Words as You Go
Learning Cricut is much easier when you stop trying to learn everything at once. Start with one simple vinyl decal. Then make one card. Then try one shirt.
Each project teaches you something useful, and those skills stack quickly. You’ll learn how your mat feels, how your vinyl weeds, how cardstock comes off the mat, and how Design Space behaves when you send a project to cut.
Your first project doesn’t need to be perfect. It just needs to get you started. And I really mean that!
A slightly crooked decal still teaches you how transfer tape works. A creased piece of cardstock still teaches you how to remove paper from the mat next time. A mirrored mistake on iron-on still teaches you the most important HTV rule you’ll ever learn.
That’s how we learn. One project, one little lesson, one “oh, now I get it” moment at a time.
Once you make that first cut and place that first design on a real project, your Cricut will feel a lot less mysterious. And before long, you’ll be looking around your craft room thinking, “What can I personalize next?”
Love,

Want to remember this? Save this Cricut Tutorials For Beginners page to your favorite Pinterest board!