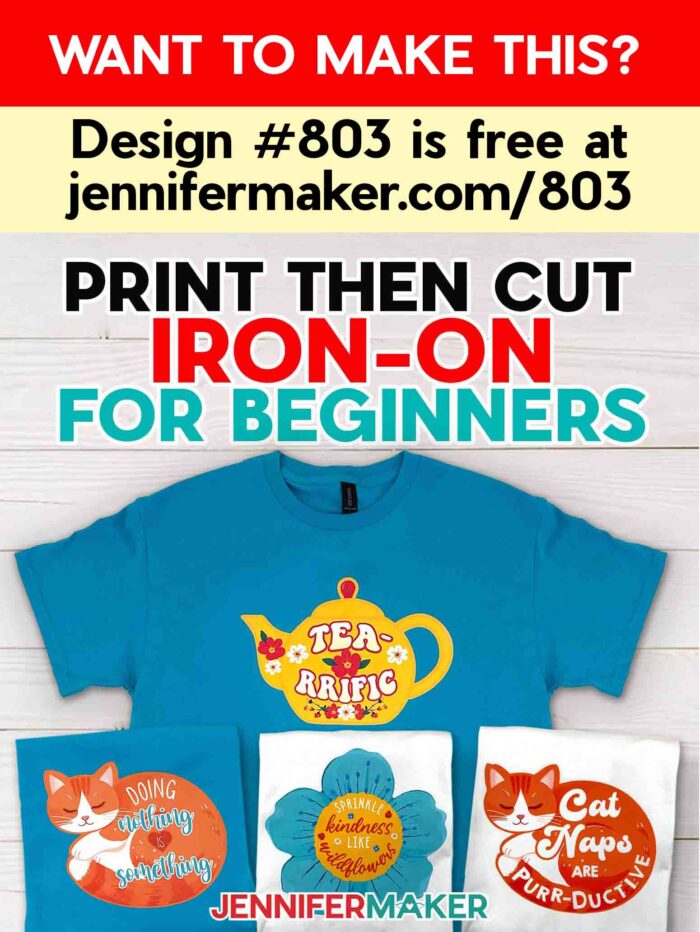
Learn how to make Print Then Cut iron-on projects that print, cut, and press perfectly… every time!
I’ll be honest… my very first attempt at a Print Then Cut iron-on T-shirt was a mess. The colors looked great, but the cut was off just enough to ruin the design… and there went my printable material, ink, and patience. If that sounds familiar, you’re in the right place, because I’m sharing all my latest Print Then Cut iron-on tips with some purrr-fectly colorful, free designs!
Watch the full step-by-step tutorial on how to make Print Then Cut iron-on T-shirts:

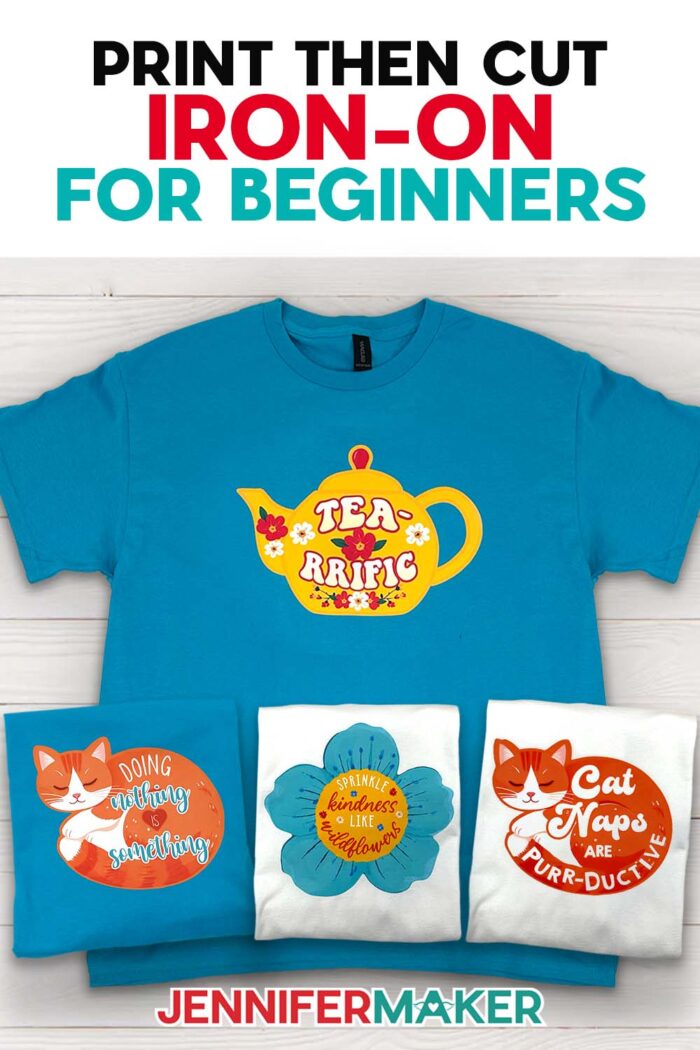
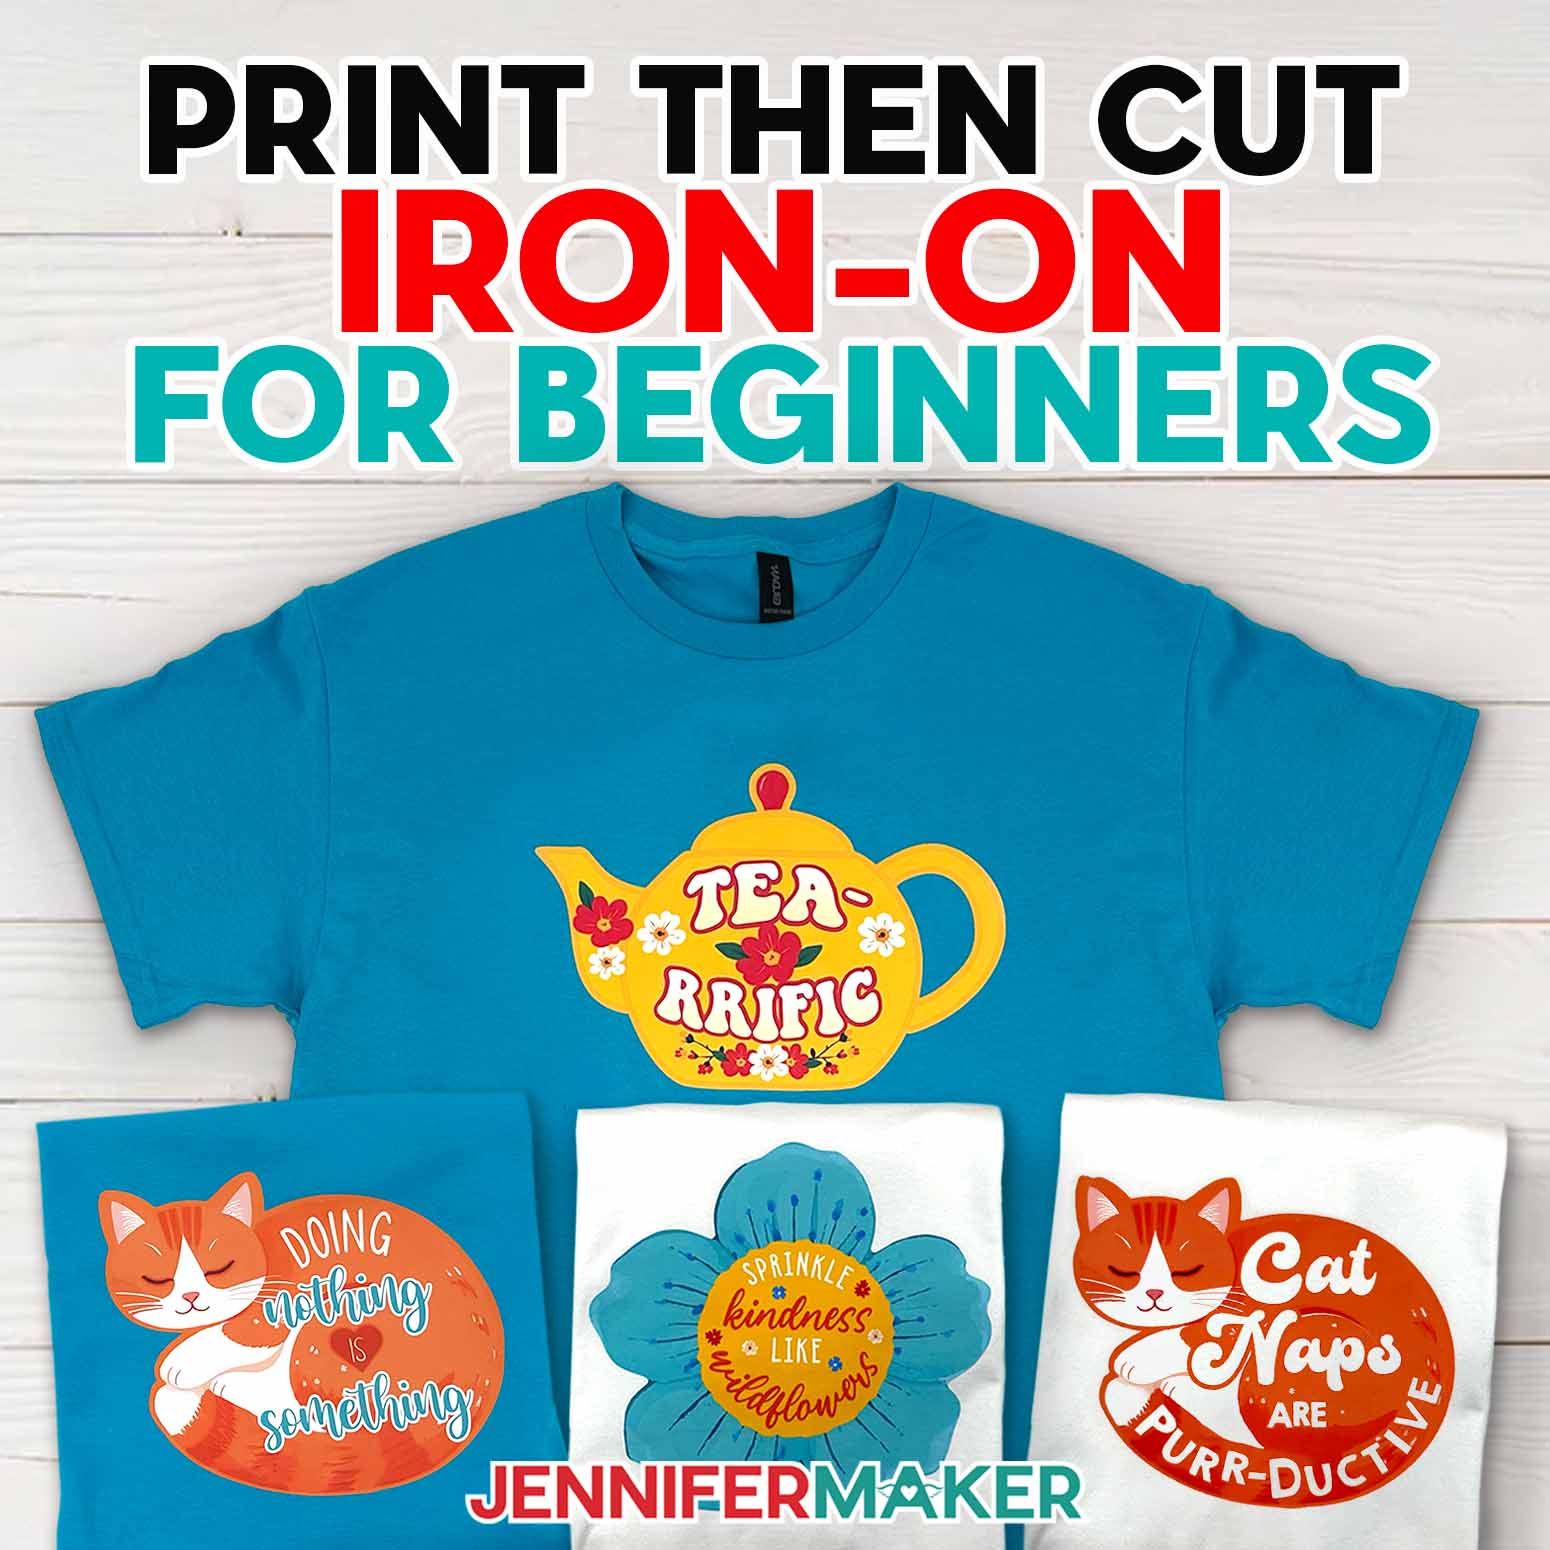
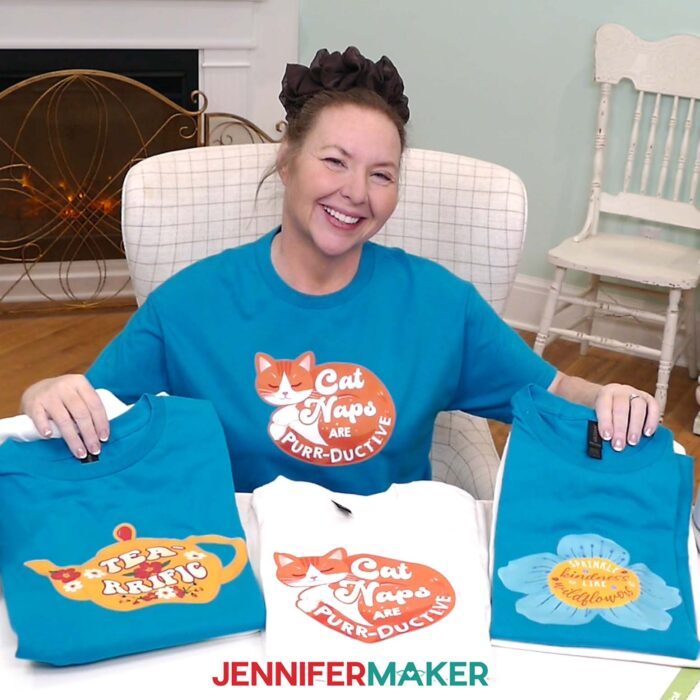
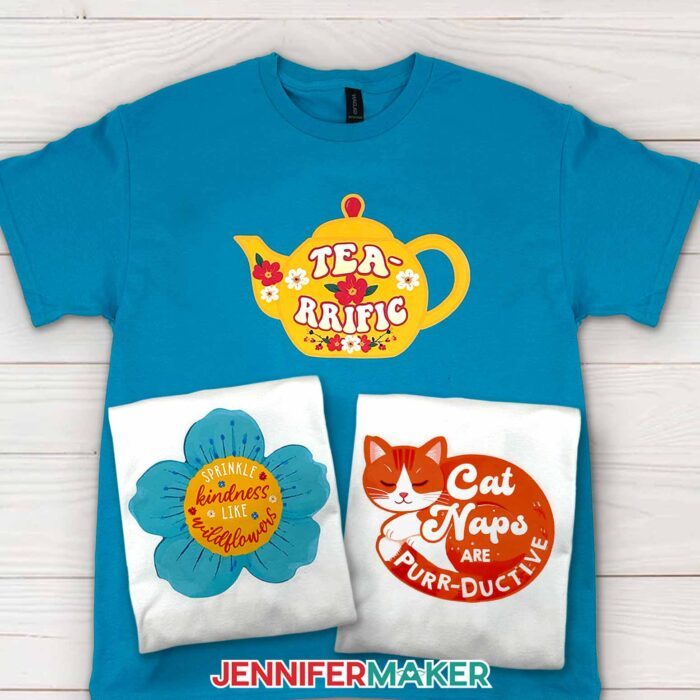
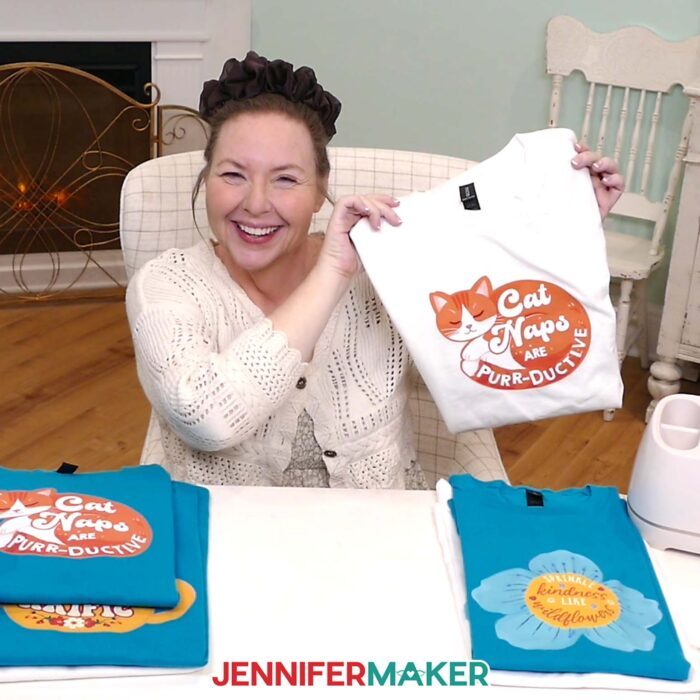
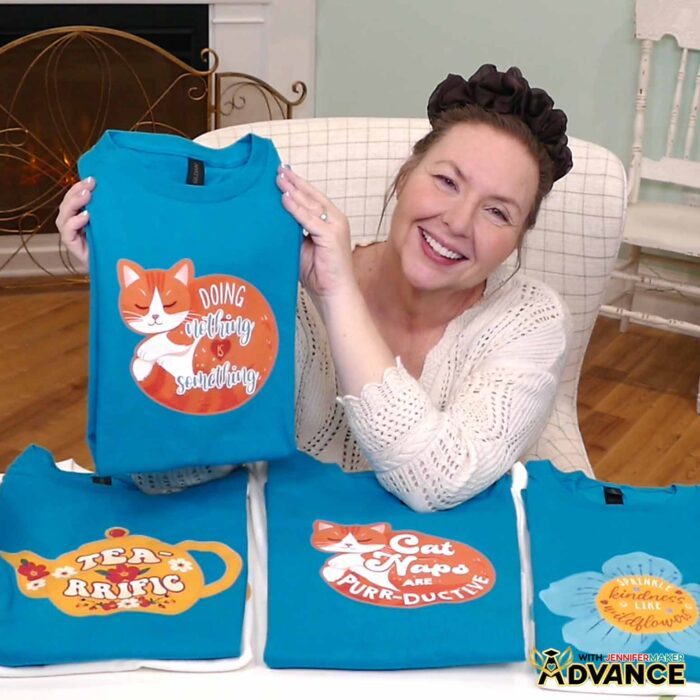
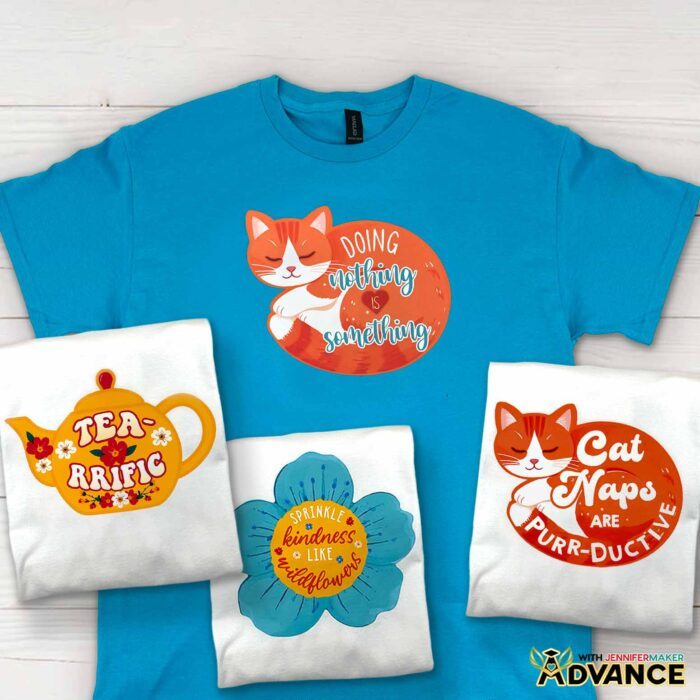
Once you understand how Print Then Cut really works (especially in the latest versions of Cricut Design Space), it becomes one of the most powerful Cricut techniques you can use. And once you find the right material for your project, you can create full color designs even on fabric, from T-shirts to tote bags. My “cat nap,” “tea-rrific,” and “Sprinkle kindness like wildflowers” designs are free for you to try until you have a new project in mind! I made these designs with the help of AI image-generating software and an image editor.
Using printable transfer paper (yes, paper, not vinyl like you may see this called!) is perfect when you want high quality, detailed artwork without layering vinyl. Unlike traditional HTV or sublimation, the main difference is that you’re printing your design first using a regular home printer, then cutting it with your cutting machine. No special printer or bulky layers, and you can use blended colors like on my wildflower design. Those details would be impossible to create with HTV!

Here’s what makes this awesome technique so exciting:
- You can print full color designs with gradients and fine details
- It works on all colors, dark fabrics and white shirts alike
- No layering or complex assembly
- Great for beginners trying Cricut for the first time
To get the best results, a few materials and tools really matter:
- Printable iron-on transfer paper (I recommend dark fabric versions even for light fabrics)
- Inkjet printer (not laser or sublimation!)
- Cricut cutting machine with Print Then Cut capabilities
- StandardGrip machine mat and brayer
- Premium Fine-Point blade
- Heat press or household iron
Inside Cricut Design Space, setup is everything. Upload your image using the “Print Then Cut (Flat Graphic)” setting, size it correctly, and set your material to “Printable Iron-On, Dark.” Turning bleed ON and using high quality print settings will help avoid white edges and give you cleaner cuts.
Once printed, let your design dry, have your Cricut cut it carefully, and carefully prepare your shirt following my tips. Then, press it at the right temperature with firm pressure. That’s what transforms it from “just printed” into something that actually lasts.
If you want a full walkthrough—including how to avoid misaligned cuts, sensor errors, and wasted sheets—watch the step-by-step video tutorial. I walk you through everything so your first time (or next try!) actually works.

And if you’re ready to take things further, my ADVANCE tutorial shows you how to customize your own Print Then Cut iron-on designs, add text, and build polished, professional-looking iron-on transfers using Cricut Design Space. It’s the fastest way to go from following projects to confidently creating your own.
Do you want to learn how to make Print Then Cut iron-on projects? Let me show you how fun and easy it is with my Print Then Cut tutorial and cute cozy designs! This post contains some affiliate links for your convenience (which means if you make a purchase after clicking a link I will earn a small commission but it won’t cost you a penny more)! Read my full disclosure policy.
Materials to Make Print Then Cut Iron-On T-Shirts
View my Amazon shopping list with the exact items I used.
- One (1) Cotton T-Shirt (I used turquoise and white)
- One (1) Sheet of 8.5″ x 11″ Iron-On Transfer Paper for Dark Fabrics (alternative #1, alternative #2)
- Several Sheets of 8.5″ x 11″ White Printer Paper (optional, for Print Then Cut calibration)
- Color Inkjet Printer
- Heat Press – I used the Cricut EasyPress 3 (12″ x 10″) -OR-
- Household Iron -AND-
- Pressing Pad
- A way to cut your materials – I’m using the Cricut Maker 4, but you can also use any Cricut Maker series machine, a Cricut Explore Series machine, the Cricut Venture, the Cricut Joy 2, or the Cricut Joy Xtra
- Cricut Green StandardGrip Machine Mat 12″ x 12″
- Cricut Blue LightGrip Machine Mat 12″ x 12″ (optional, for Print Then Cut calibration)
- Brayer
- Scraper
- Weeding Tool
- Scissors
- Tape Measure
- Lint Roller
- My Free T-Shirt Ruler Guide (optional for aligning the design on the T-shirt)
- Design #803 (My free PNG design files are available in my free library – get the password by filling out the form at the bottom of this page)
How to Make Print Then Cut Iron-On T-Shirts

Print Then Cut Iron-On
Learn how to make a Print Then Cut Iron-On T-shirt, and when to pick it over vinyl or sublimation!
Materials
- One (1) Cotton T-Shirt (I used turquoise and white)
- One (1) Sheet of 8.5” x 11” Iron-On Transfer Paper for Dark Fabrics
- Several Sheets of 8.5" x 11" White Printer Paper (optional, for Print Then Cut calibration)
- Design #803 (My free PNG design files are available in my free resource library - get the password by filling out the form at the bottom of this page)
Tools
- A way to cut your iron-on transfer paper - I’m using the Cricut Maker 4, but you can use any Cricut Maker Series machine, a Cricut Explore Series machine, the Cricut Venture, the Cricut Joy 2, or the Cricut Joy Xtra
- Cricut Green StandardGrip Machine Mat 12" x 12"
- Cricut Blue LightGrip Machine Mat 12" x 12" (optional, for Print Then Cut calibration)
- Color Inkjet Printer
- Heat Press - I used the Cricut EasyPress 3 (12" x 10") -OR-
- Household Iron -AND-
- Pressing Pad
- My Free T-Shirt Ruler Guide
- Weeding Tool
- Scissors
- Brayer
- Tape Measure
- Lint Roller
Instructions
STEP 1: GET MY FREE PRINT THEN CUT IRON-ON DESIGNS
First, download my free Print Then Cut Iron-On designs from my free library – look for Design #803. Alternatively, you can use the Save This Project form near the top of this post and the design link will be emailed to you.
TIP: If you’re not sure how to upload, go to jennifermaker.com/svgs to learn how to unzip and upload files.
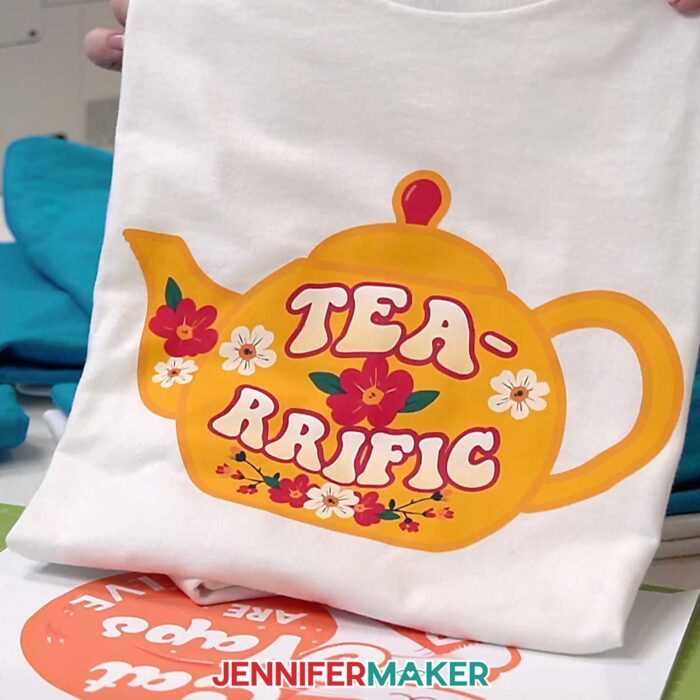
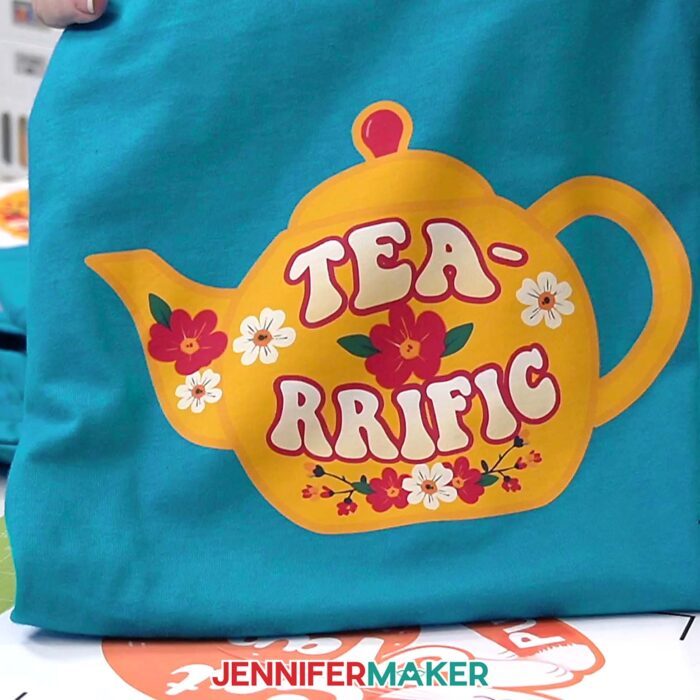
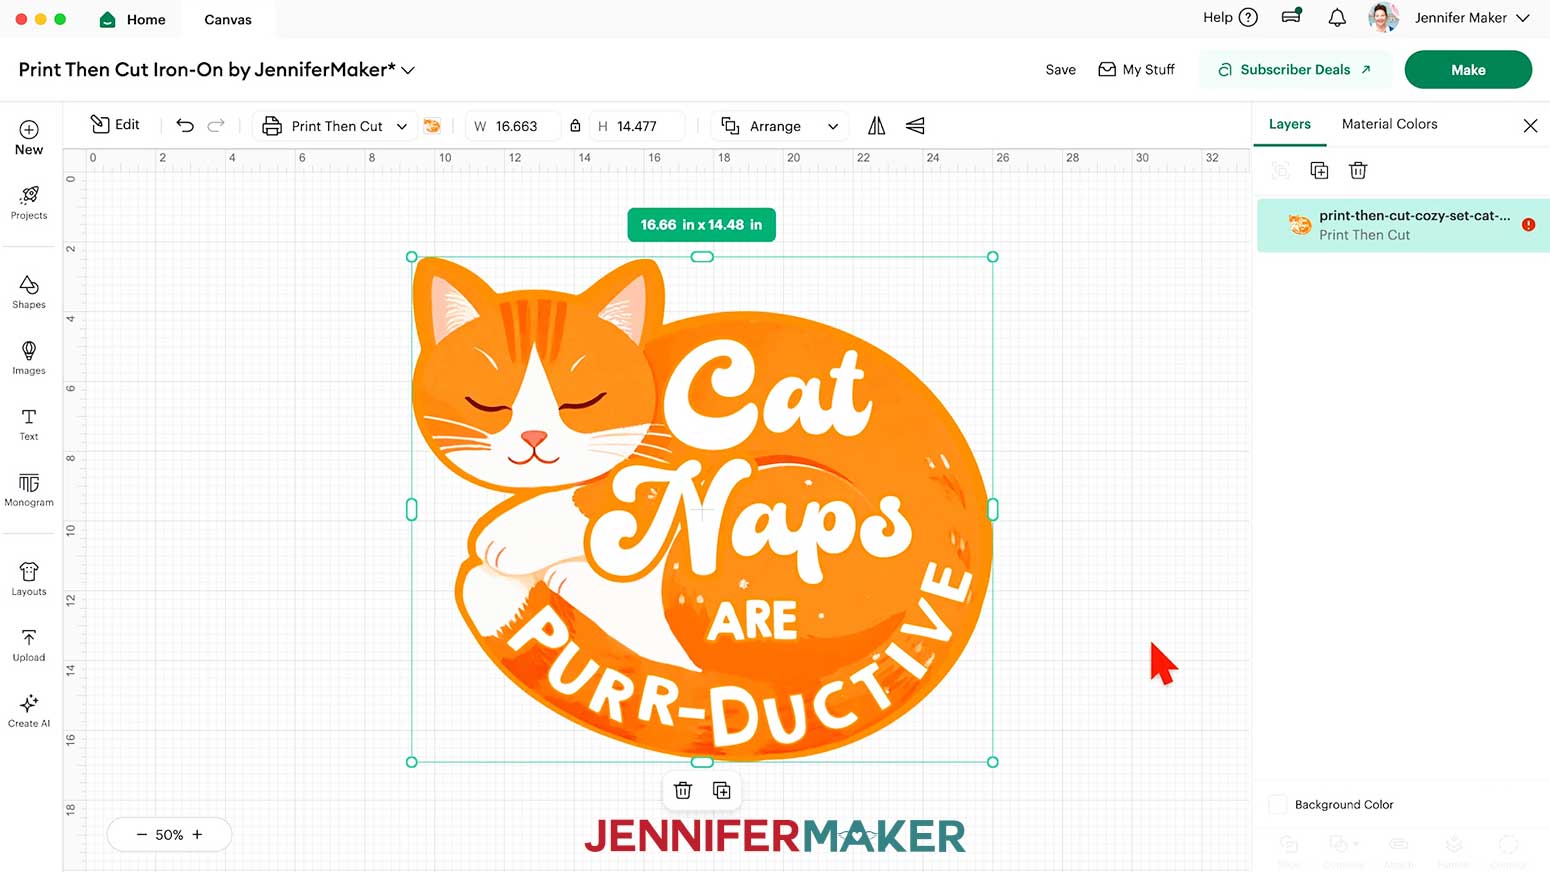
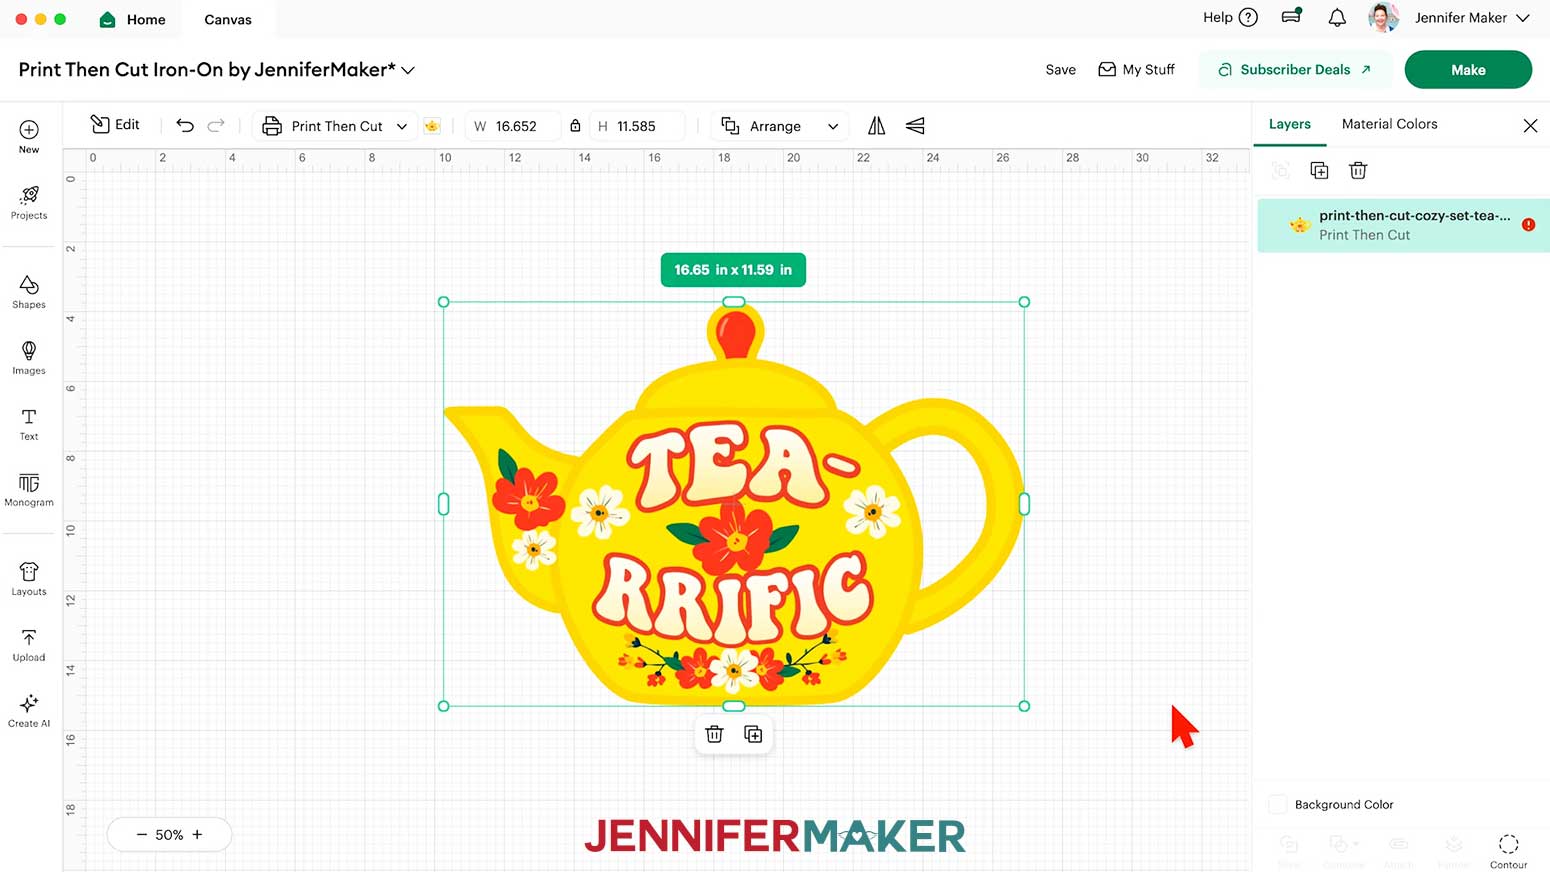
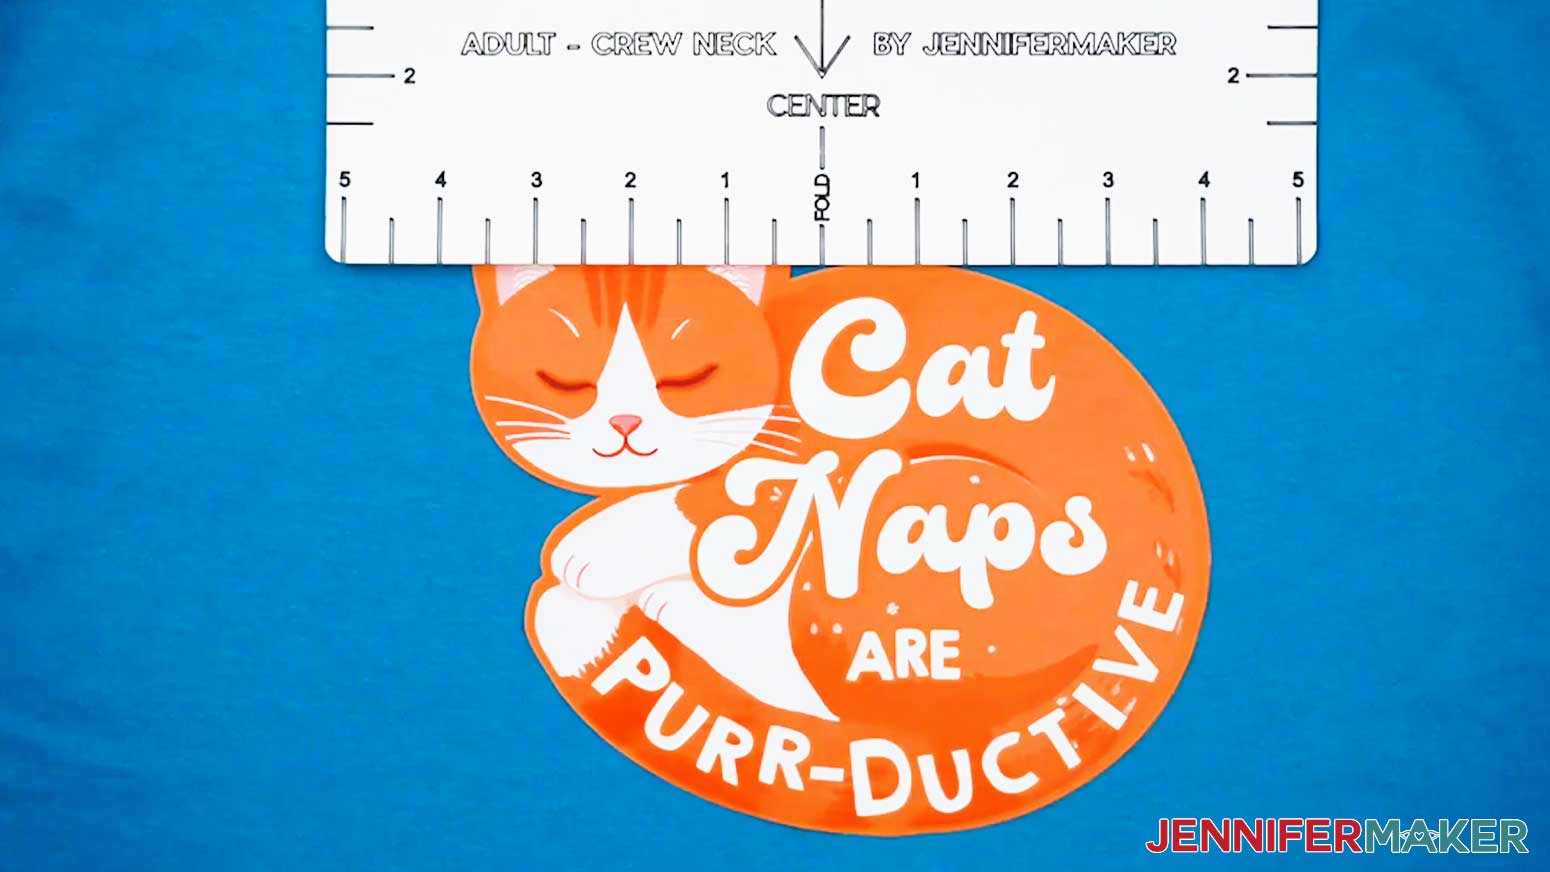
Inside the PNG folder, you’ll see three cozy designs: “bloom,” “cat,” and “tea.” I made these designs with the help of AI art generation and adjusted them with image editing software.
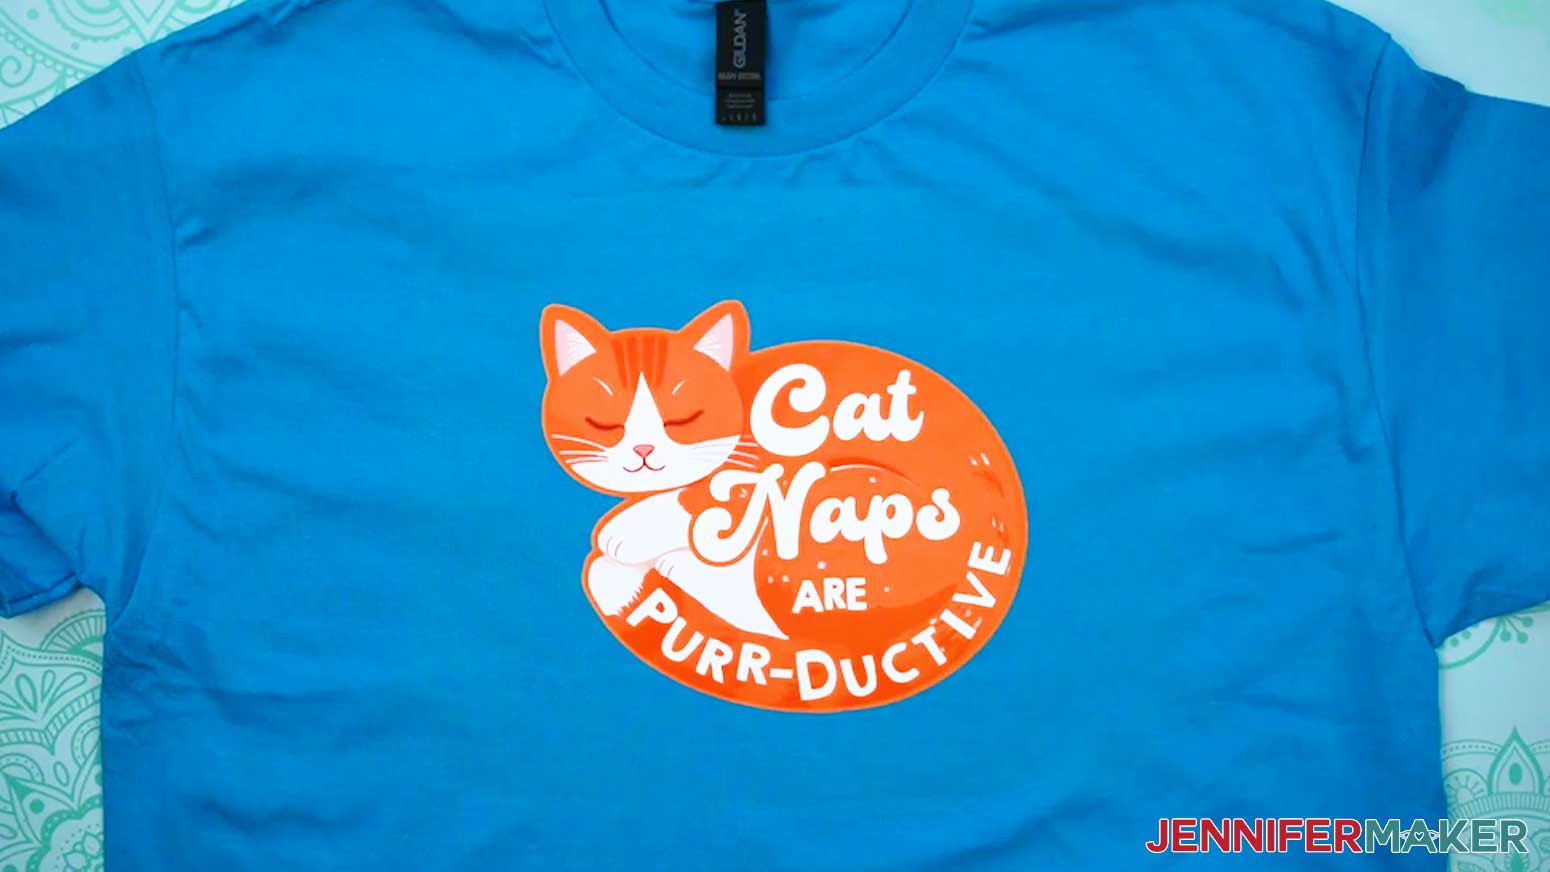
For this tutorial, I’ll show you how to Print Then Cut the “cat” PNG design using iron-on transfer paper for colored fabrics, an inkjet printer, and a Cricut Maker 4, then apply it to a T-shirt with a Cricut EasyPress, but you can use the same steps to prepare, cut, and apply the other two designs.
STEP 2: PREPARE YOUR PRINT THEN CUT IRON-ON T-SHIRT DESIGN
CRICUT DESIGN SPACE
TIP: If it’s been a while since you’ve used the Print Then Cut feature, I recommend calibrating your Cricut. Learn more about Print Then Cut calibration in my Fill Patterns in Cricut Design Space tutorial.
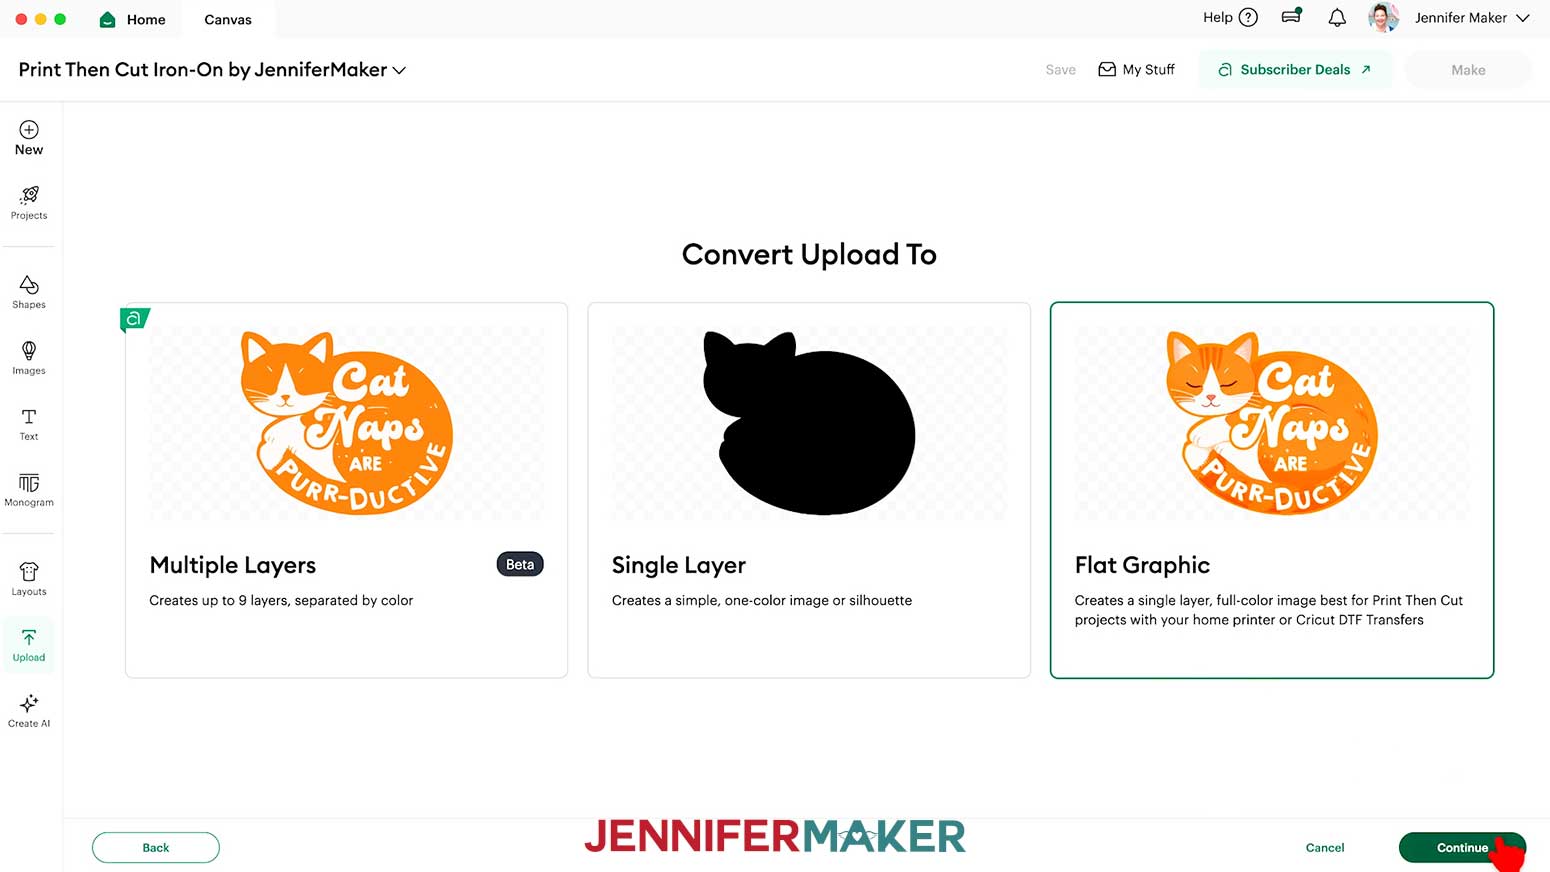
- In Cricut Design Space on a blank Canvas, click “Upload.”
- Click “Upload Image.”
- Click “Browse.”
- Find and select the PNG of your choice.
NOTE: I uploaded the “cat” design. - Click “Open” and then “Continue.”
- We don’t need to remove the background, so click “Apply & Continue.”
- Select “Flat Graphic” to tell your Cricut it’s a Print Then Cut project, then click “Continue."

- Click “Upload” to add the design to your Canvas.
TIP: When choosing images for Print Then Cut iron-on projects, choose designs with smoother, less detailed edges for easier cutting and weeding later. - Click “Save” and give your project a name.
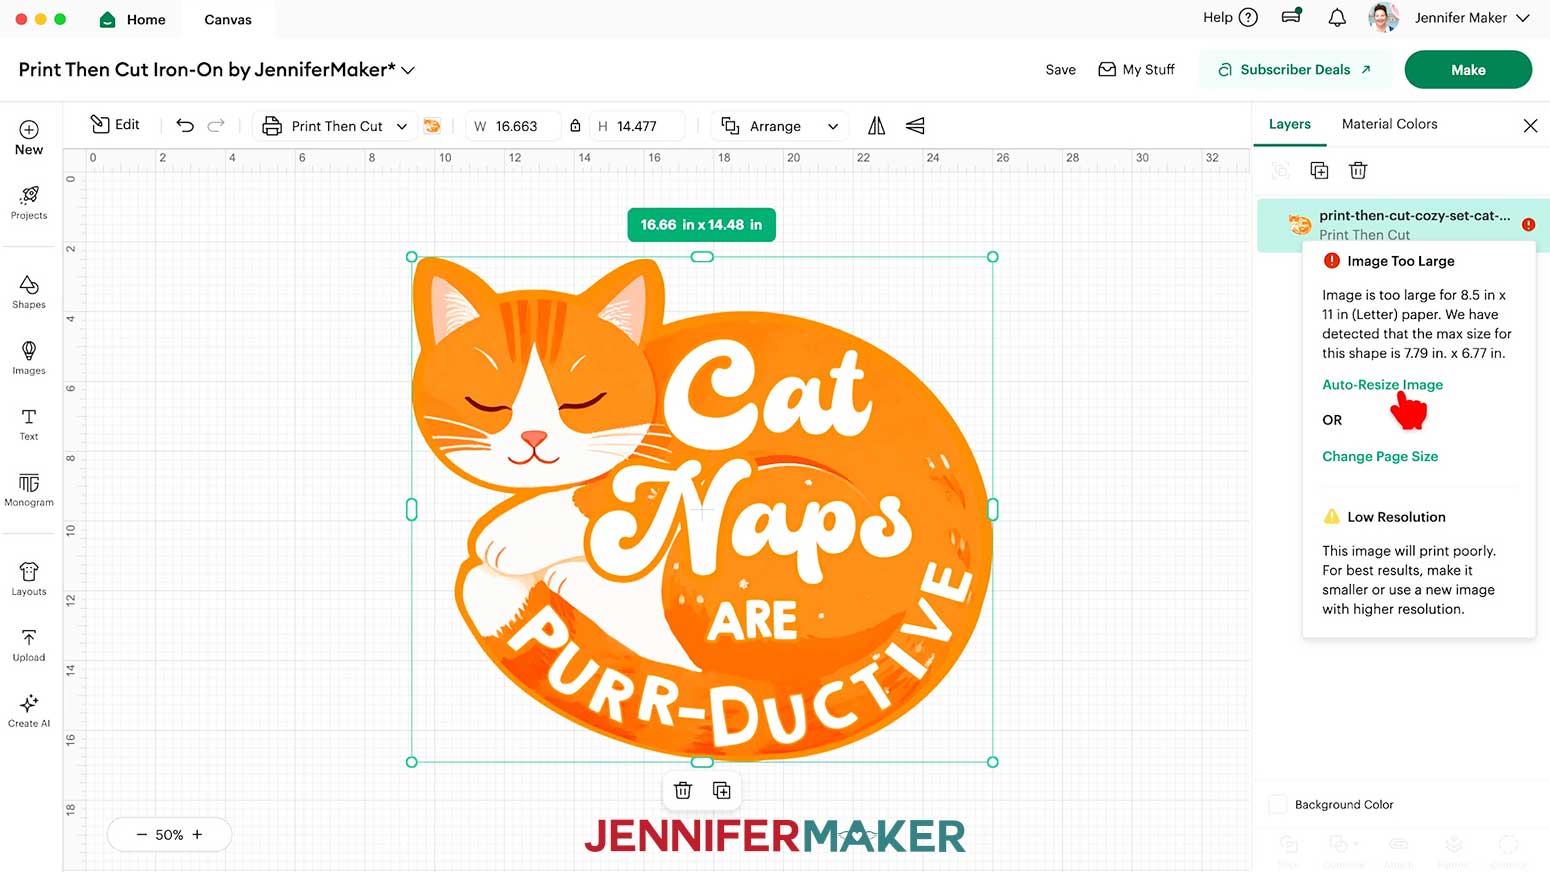
- The design will upload very large to the Canvas, and you’ll see a red warning icon in the Layers Panel that says your image is too large. Click the icon and select “Auto-Resize Image” to resize it to the maximum size it can print.
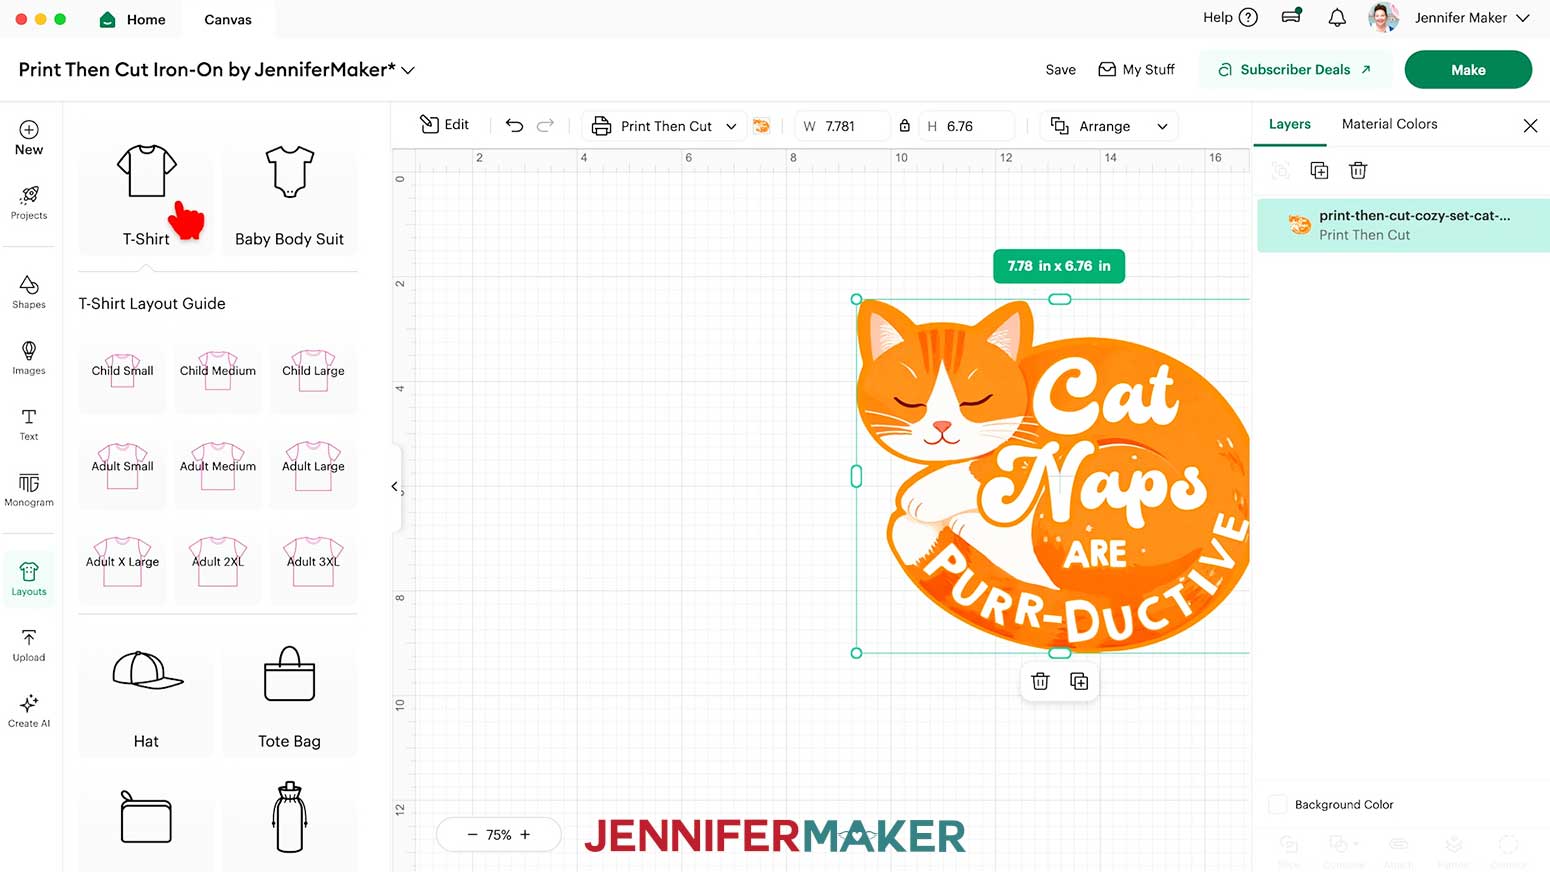
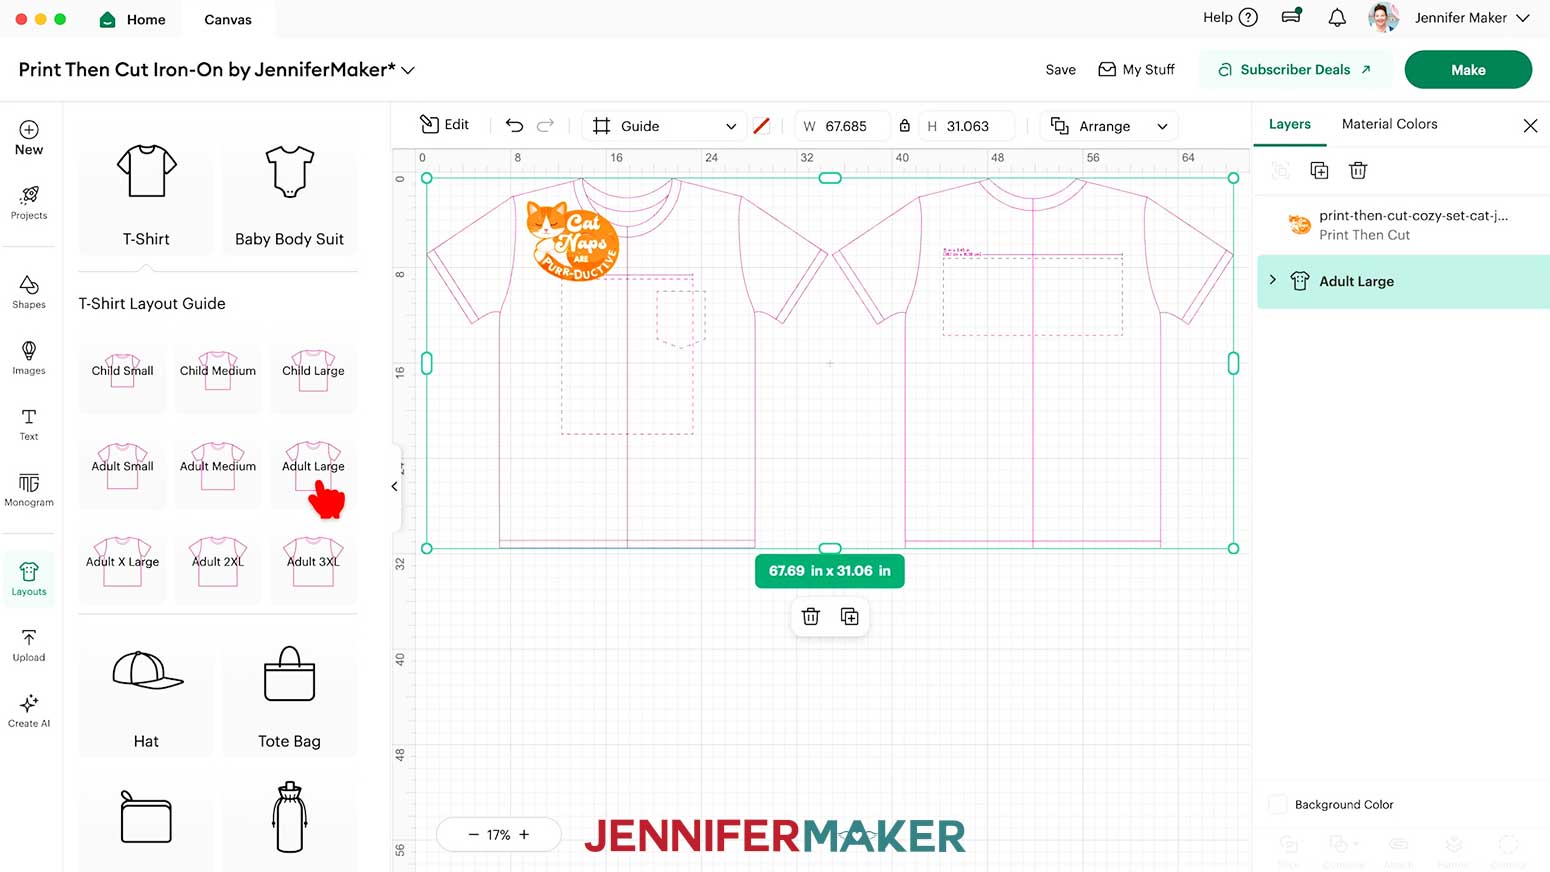
- To resize your design smaller than the maximum print size, click the “Layouts” icon and choose “T-Shirt.” This adds a shirt template to your Canvas so you can see how large your design will look when worn.
NOTE: If you don’t see the “Layouts” icon, it may be called “Templates” depending on your version of Cricut Design Space. - Select the shirt type and size to match yours.
NOTE: I used the “Adult Large” layout. - The shirt template will appear on your Canvas. The shirt shape on the left represents the front, and the one on the right represents the back.
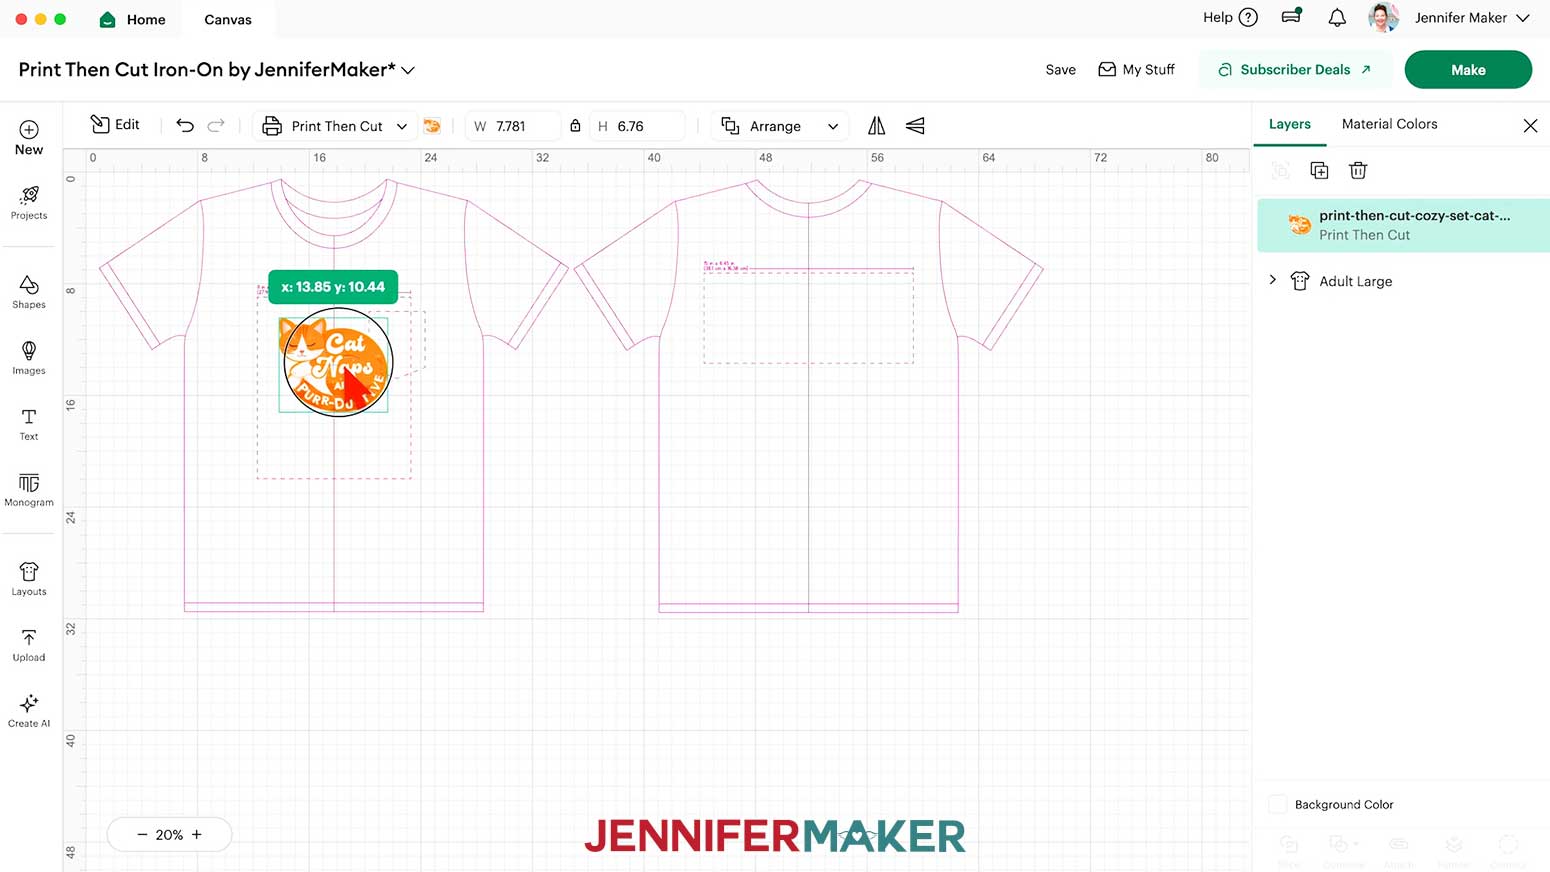
TIP: When sizing the decal for the front of your shirt, I recommend making and using a T-shirt ruler guide. - Drag your design inside the dashed-line area of the section you want to decorate.
- If you need to make it smaller, make sure the Lock icon is closed, then drag a corner handle of the bounding box to resize it proportionally.
NOTE: Since we clicked “Auto-Resize Image” earlier, the design is already the maximum size to print on a sheet of 8.5” x 11” iron-on transfer paper and it fits the front of this size shirt.
TIP: Zoom in to the dashed lined areas to see the maximum recommended dimensions for designs placed in those spots. - Your design is ready to Print Then Cut!
NOTE: You do not have to delete the T-shirt template from the Canvas – it will not print or cut.


STEP 3: PRINT THEN CUT YOUR IRON-ON DESIGN
- Select your machine at the top right, then click “Make.”
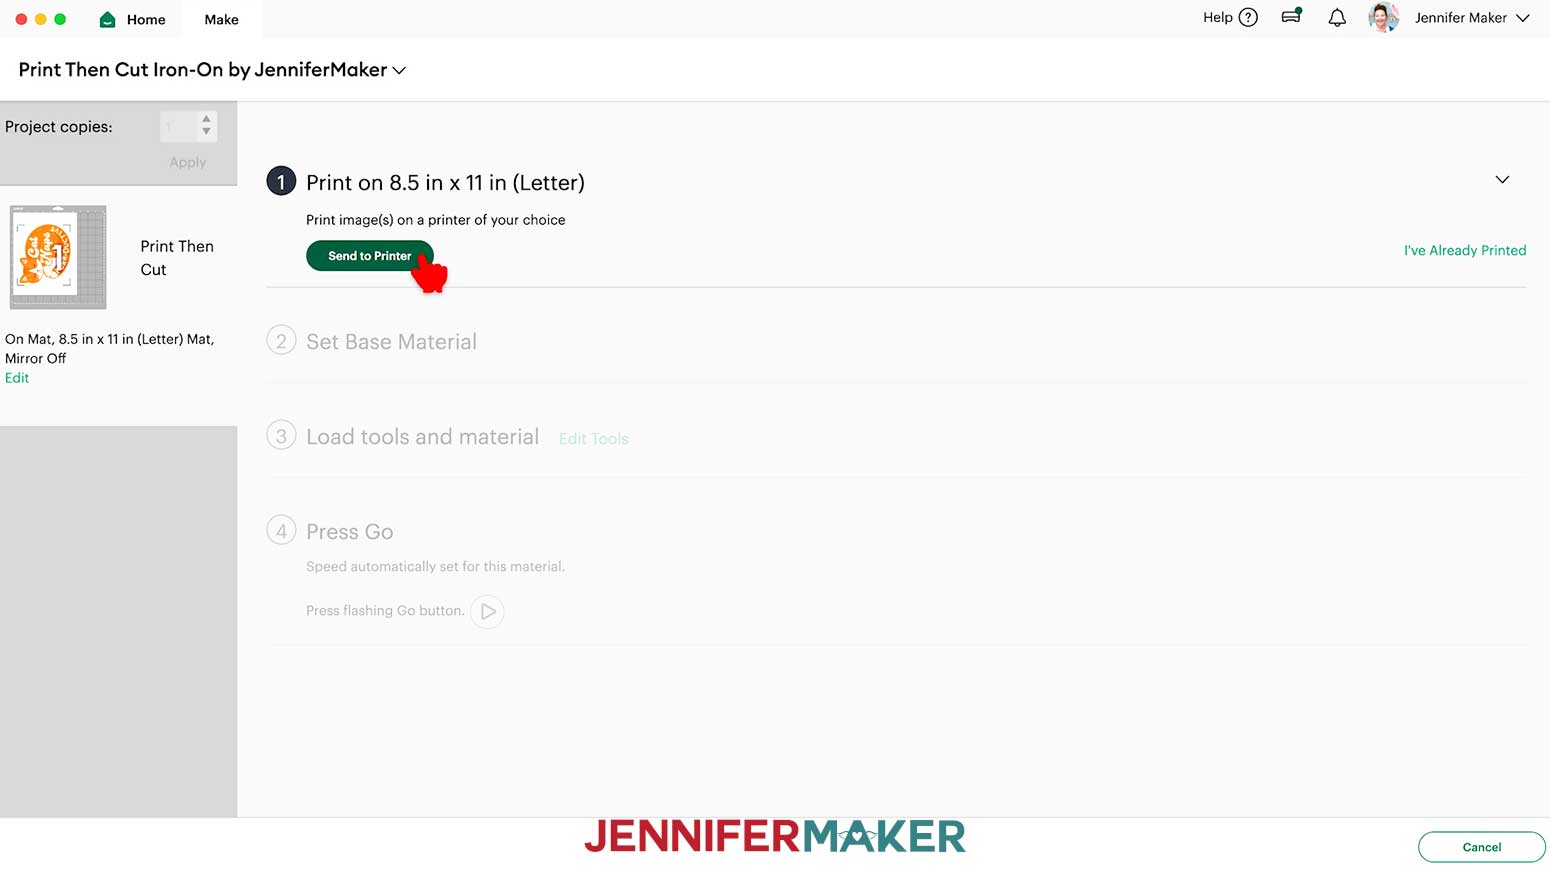
- On the Prepare screen, make sure the correct Material Size is selected and “Mirror” is toggled OFF.
NOTE: My iron-on transfer paper for dark fabric is 8.5” x 11”, or letter-size, so I set my Material Size to that setting. - Click “Continue.”
- On the Make screen, click “Send to Printer.”
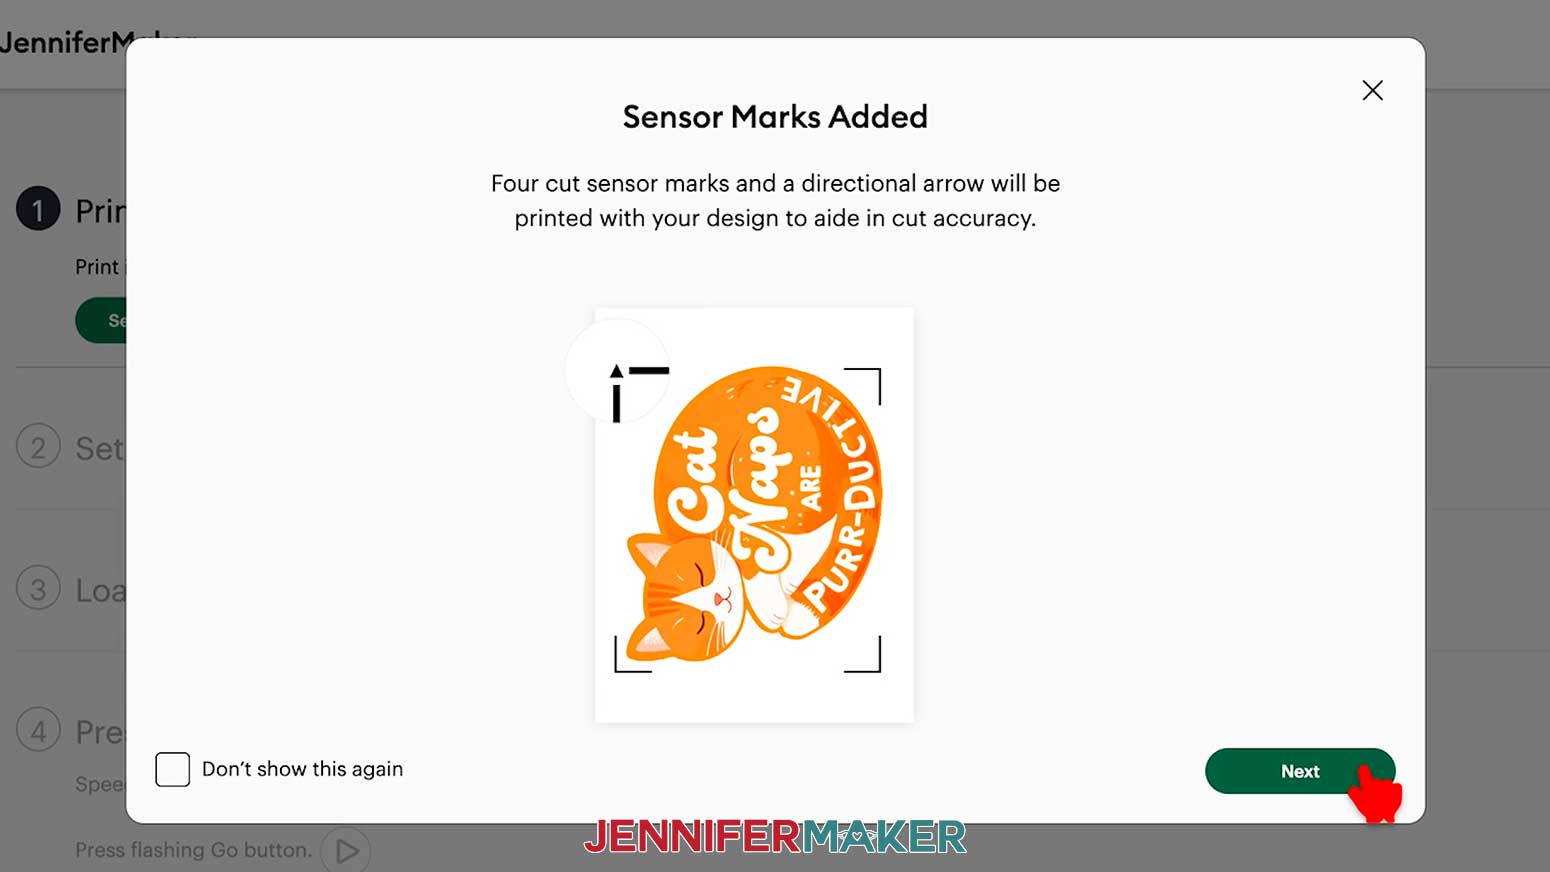
- A window may pop up letting you know that sensor marks (registration marks) will be added to your printed page. Click “Next.”
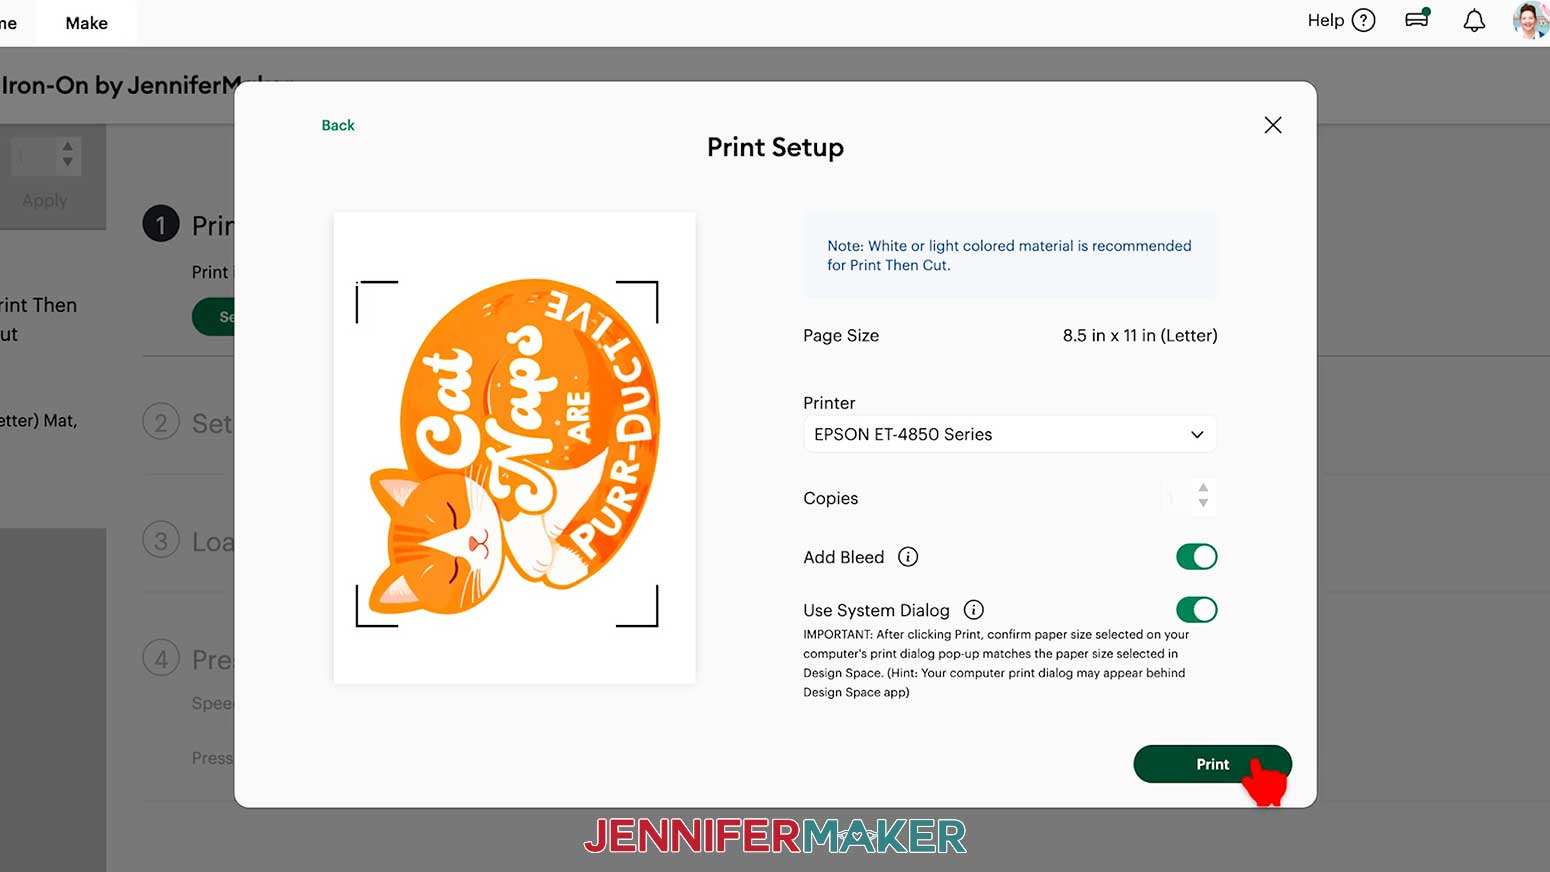
- In the “Print Setup” window, make sure the correct printer is selected.
- Turn the “Add Bleed” toggle ON.
NOTE: Adding bleed helps avoid any white edges around the cut design. - Turn the “Use System Dialog” toggle ON for more control.
- Click “Print.”
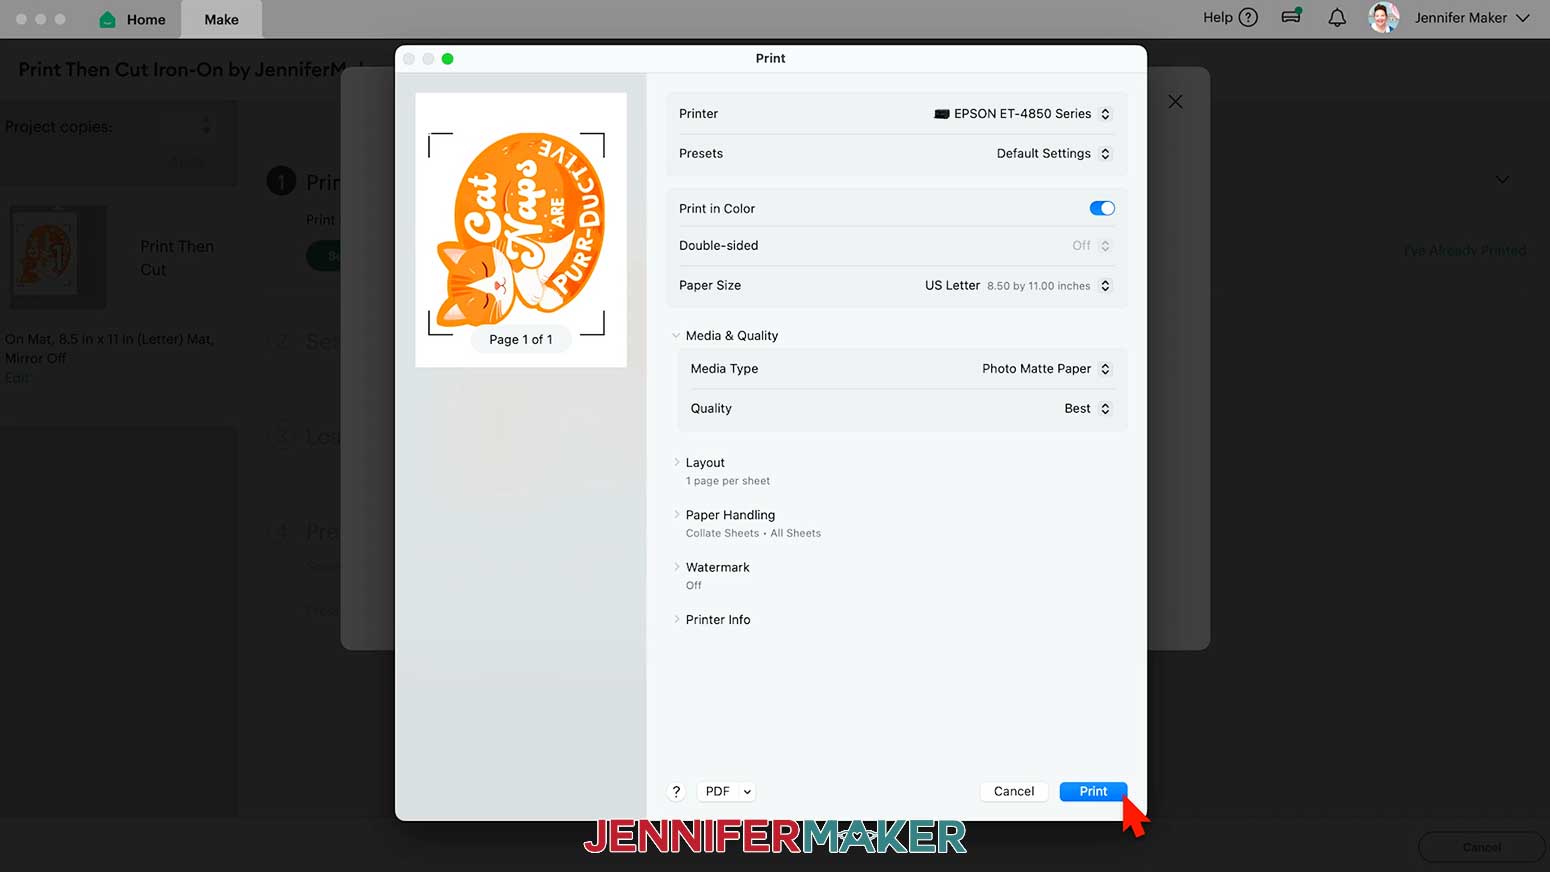
TIP: The Print Dialog box may be behind your Cricut Design Space window, so minimize it if needed.
NOTE: Your Print Dialog box may look different than mine, and that’s okay. Follow the instructions as closely as you can. - In the Print Dialog Box, change the paper size to match your material, if needed.
NOTE: I changed my paper size to 8.5” x 11”, or letter-size, to match my iron-on transfer paper. - Under “Printer Options,” click “Print Settings.”
- Select the highest quality matte photo paper or plain paper option.
- Select the best quality print settings.
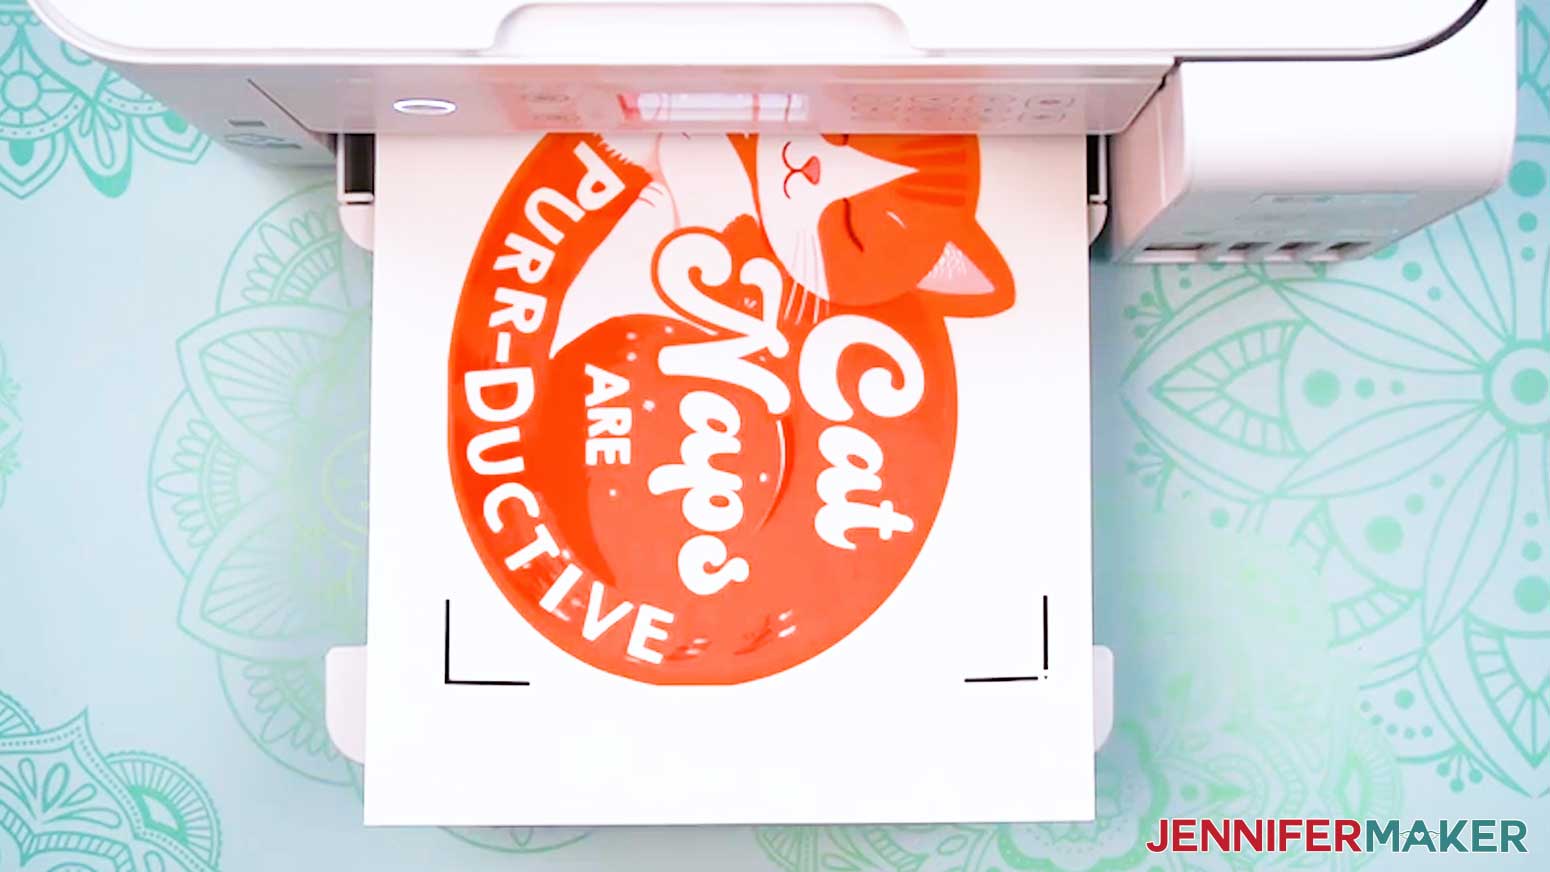
- Insert a sheet of iron-on transfer paper correctly into your inkjet printer.
TIP: When loaded correctly, the design should print on the side of the paper without lines.
NOTE: I highly recommend using iron-on transfer paper for colored fabrics (instead of paper for light fabrics) because the results are clearer, more vivid, and more consistent. - Click “Print.”
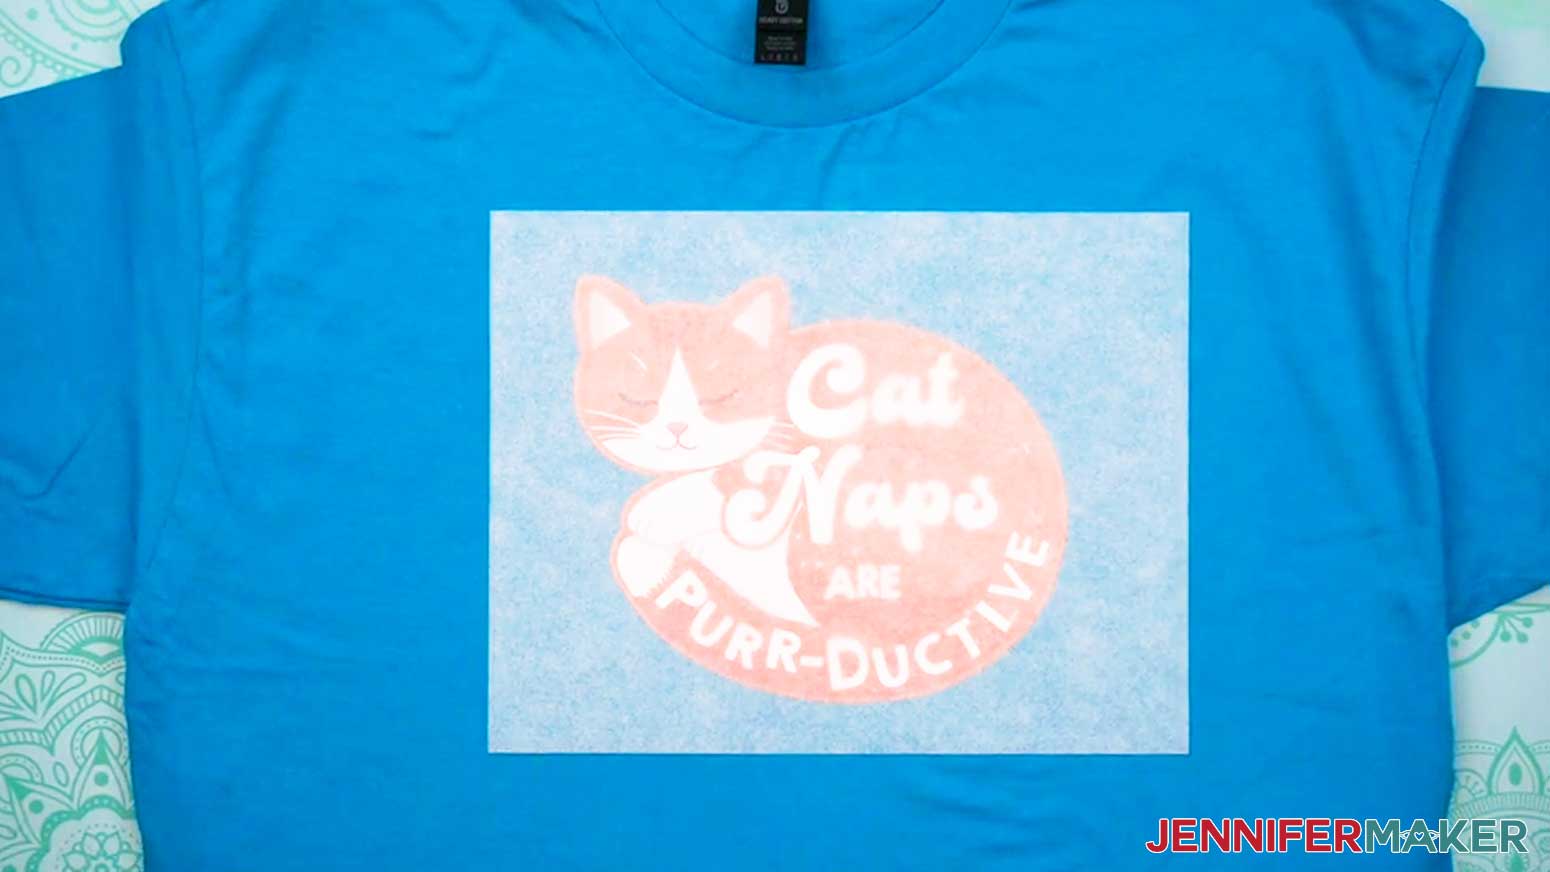
- Carefully remove the sheet from the printer by its edges and leave it to dry face up for 5-10 minutes to avoid ink smearing.
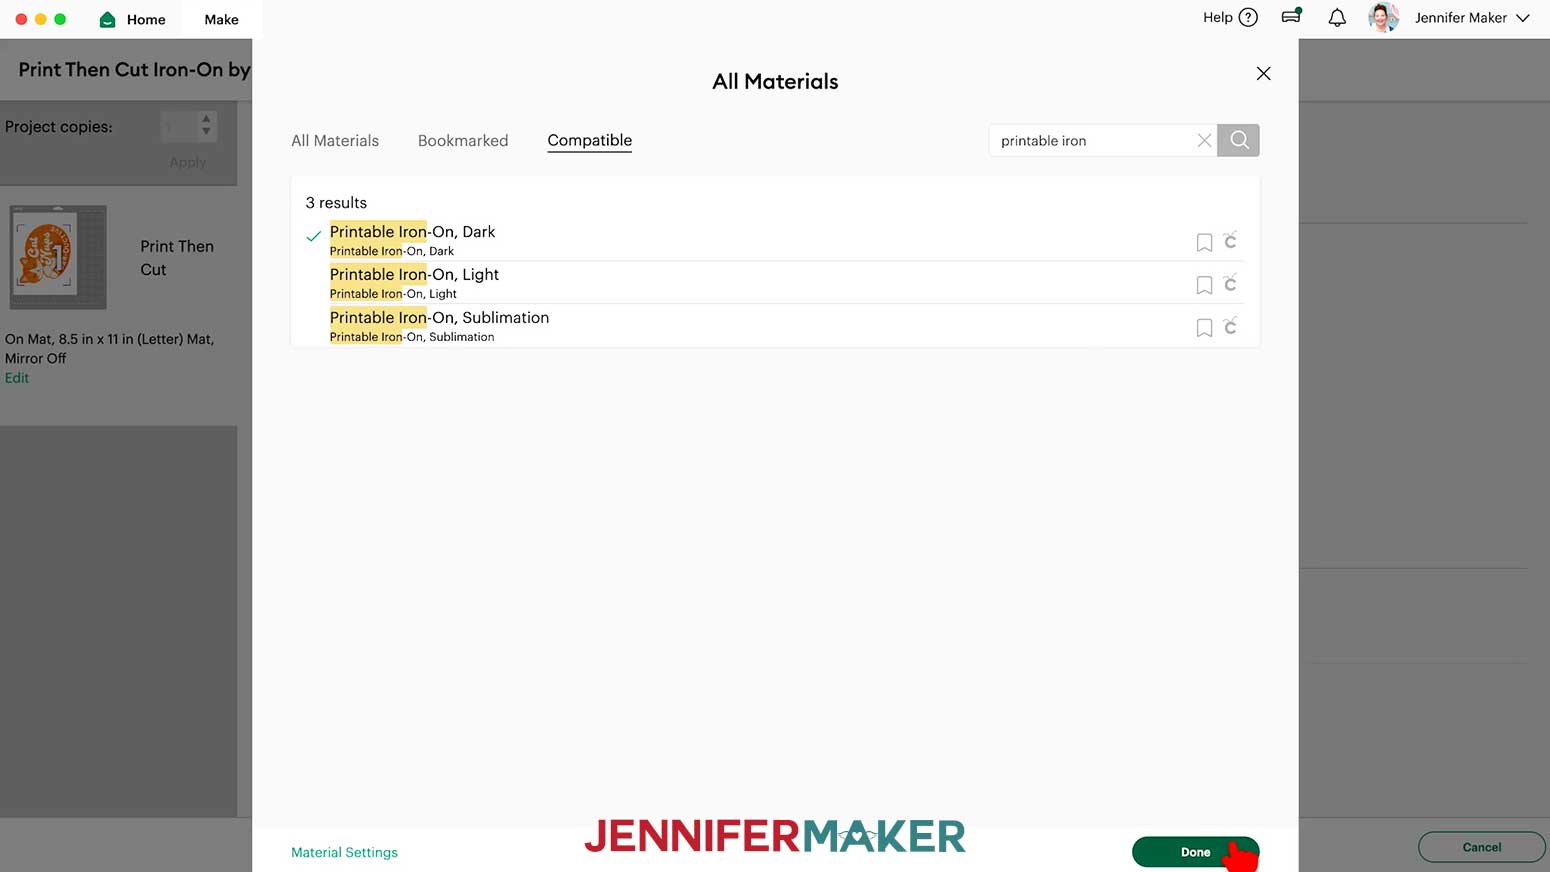
NOTE: A “Verify Print Quality” window may appear, prompting you to check for specific features to ensure a proper cut. Check your print, then click “Done.” If you need to print your design again, return to Step 4 to try again. - On the “Make” screen in Design Space, click “Browse All Materials.”
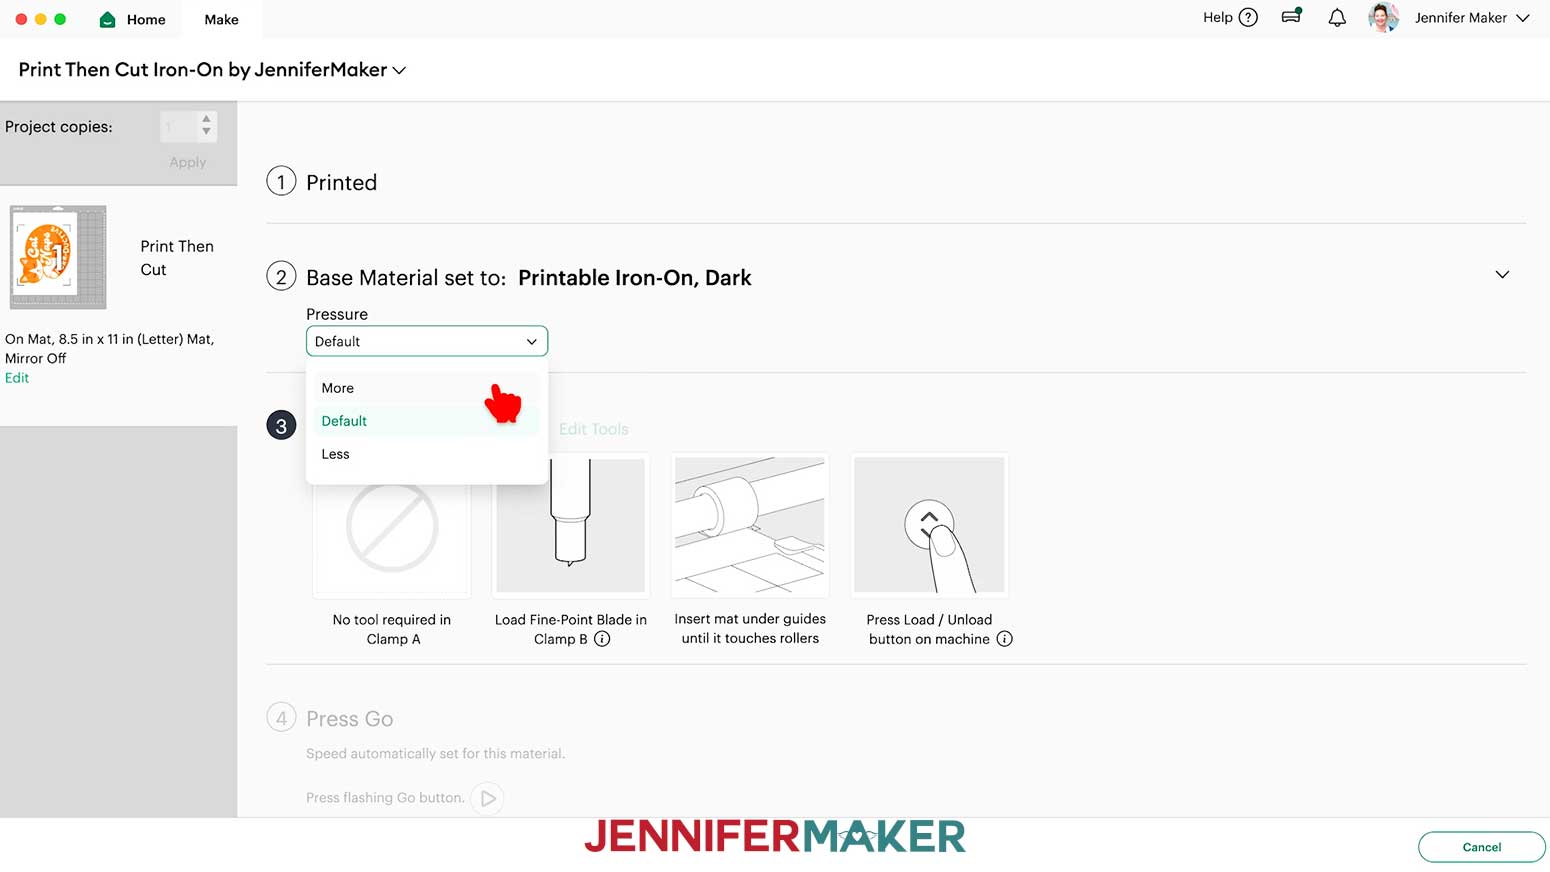
- Search for and select the “Printable Iron-On, Dark” setting, then click “Done.”
- Under “Pressure,” select “More” for a cleaner cut.
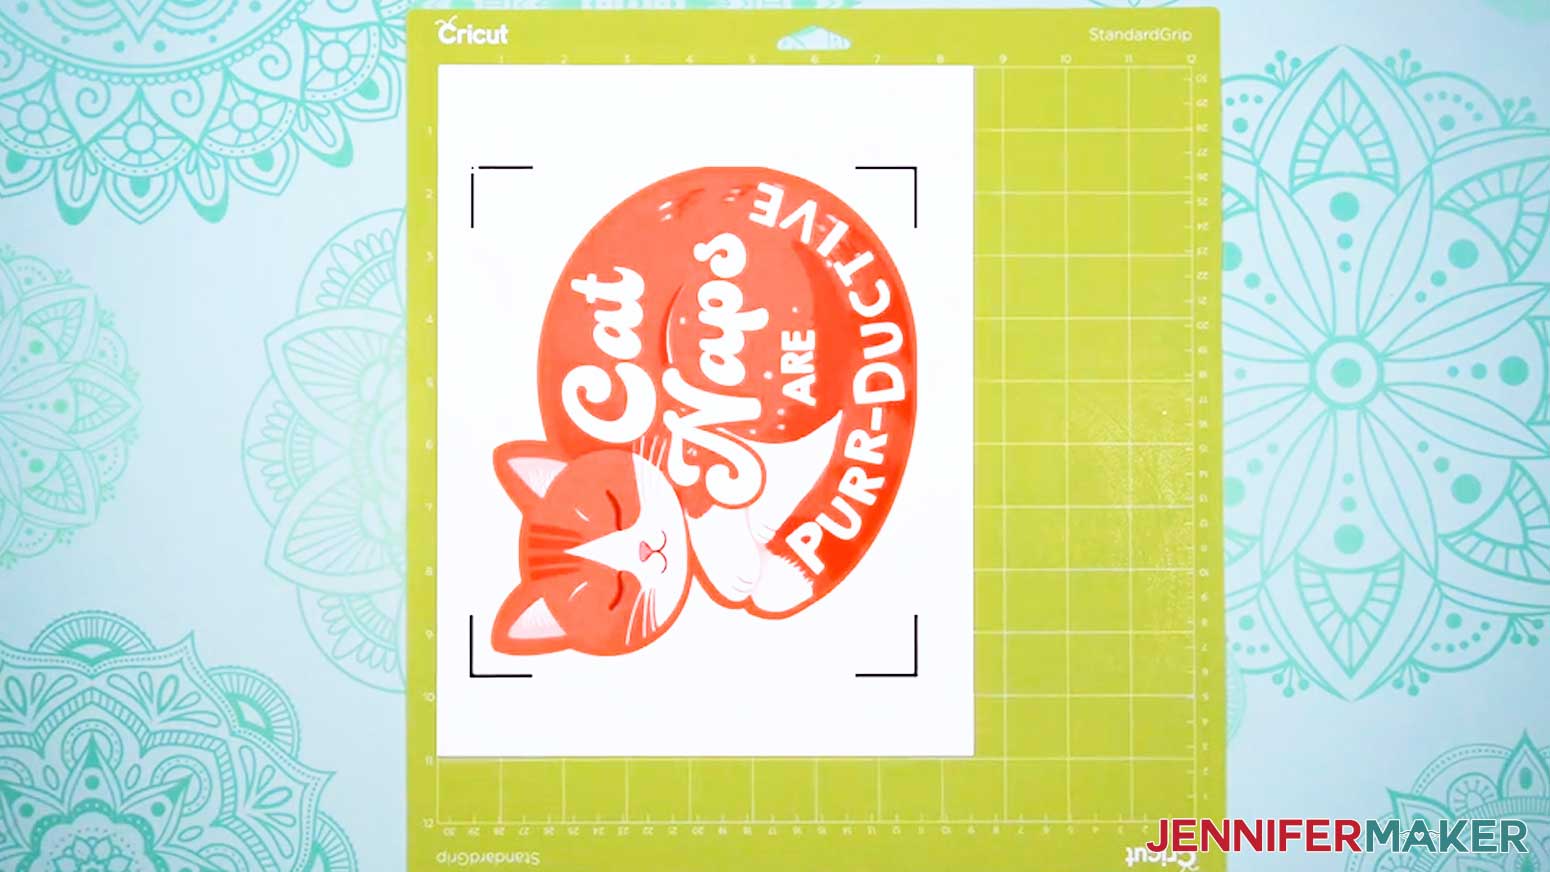
- Place your iron-on transfer paper face up onto a green StandardGrip machine mat, in the orientation shown on your screen.
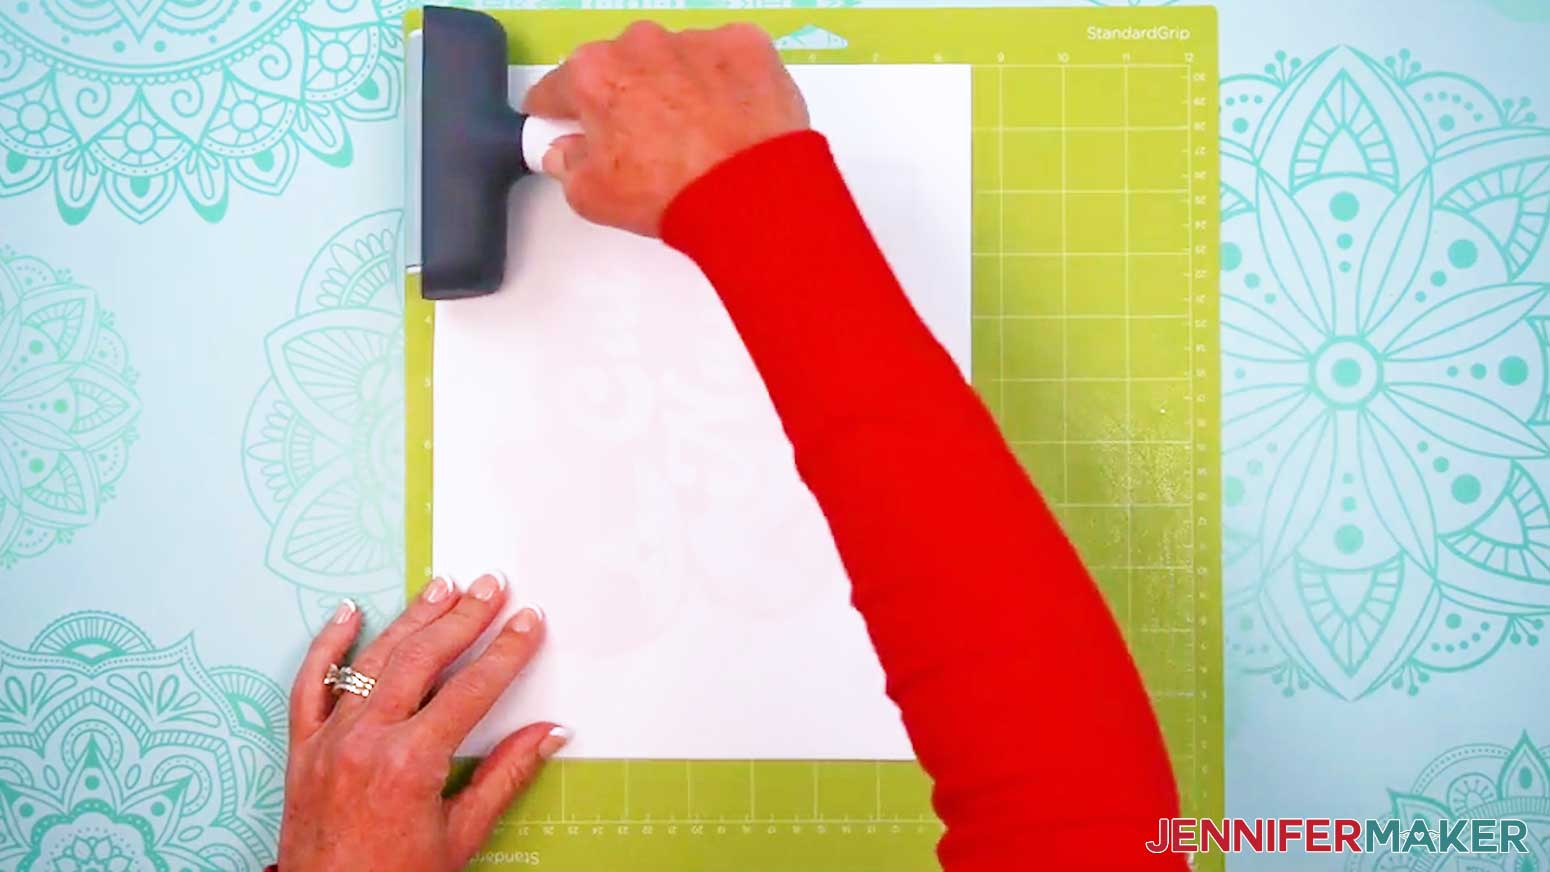
- Place a clean sheet of copy paper over the design to protect it, then use a brayer to adhere the transfer paper well to the mat.
- Check that your Fine-Point Blade is clean and in the clamp.
- Load your mat into your Cricut matching the screen preview and press the flashing middle button to begin cutting.
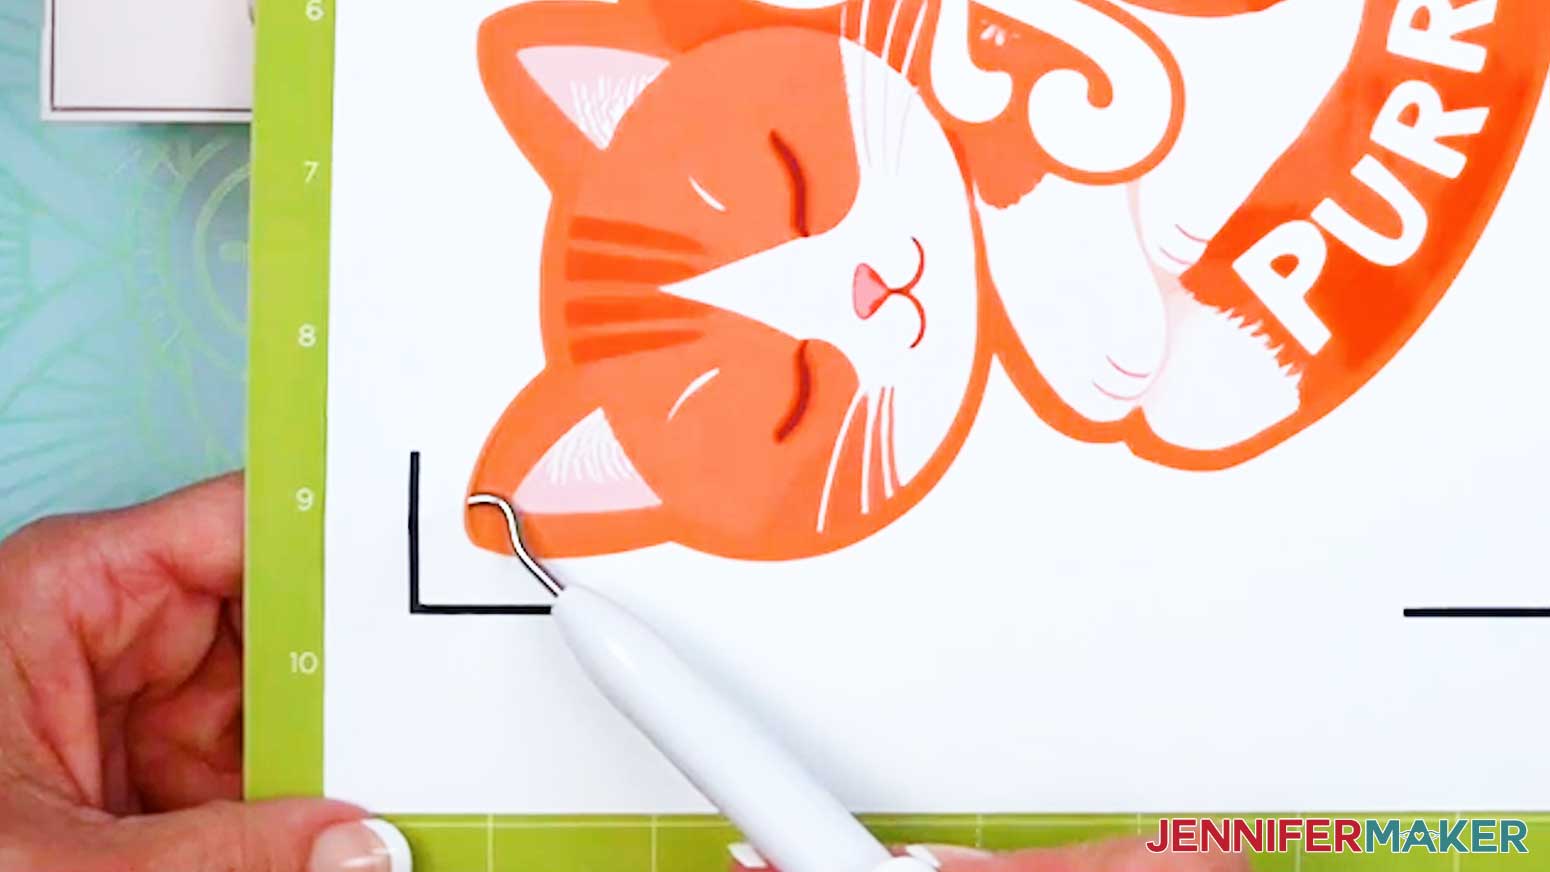
- Before unloading the mat, use your weeding tool to gently lift along the cut area of the design to see if the cut went through the iron-on transfer paper, but not the carrier sheet.
NOTE: If it’s not cut through the iron-on layer, you can press the middle button to cut the design in the same spot again. - Once the top layer of iron-on transfer paper is cut through to the carrier sheet, unload the mat, flip it over onto your work surface, and roll it back to release the entire sheet.
NOTE: If you have any issues with your cuts, check out my Intricate Cuts tutorial.

STEP 4: APPLY YOUR IRON-ON DESIGN TO A T-SHIRT
NOTE: If you’re making the T-shirt to gift or sell, I recommend not washing the shirt prior to applying the design to keep the shirt looking new. If you’re making the shirt for yourself, you may wish to wash first to pre-shrink and remove chemicals that could interfere with the iron-on transfer’s adhesion. Don’t use fabric softener, as it can interfere with the adhesion.
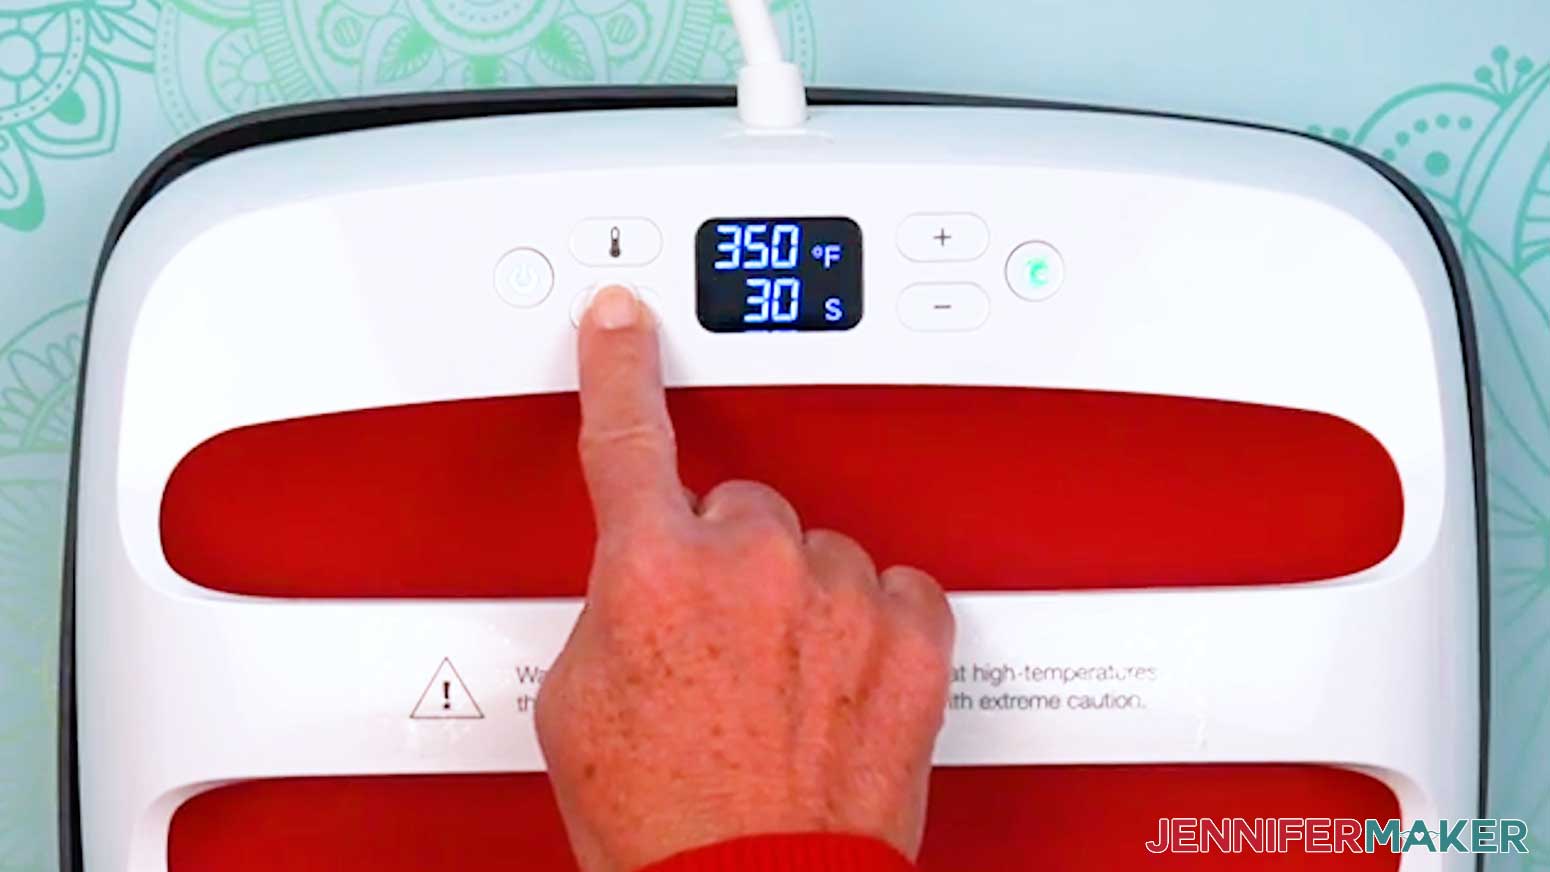
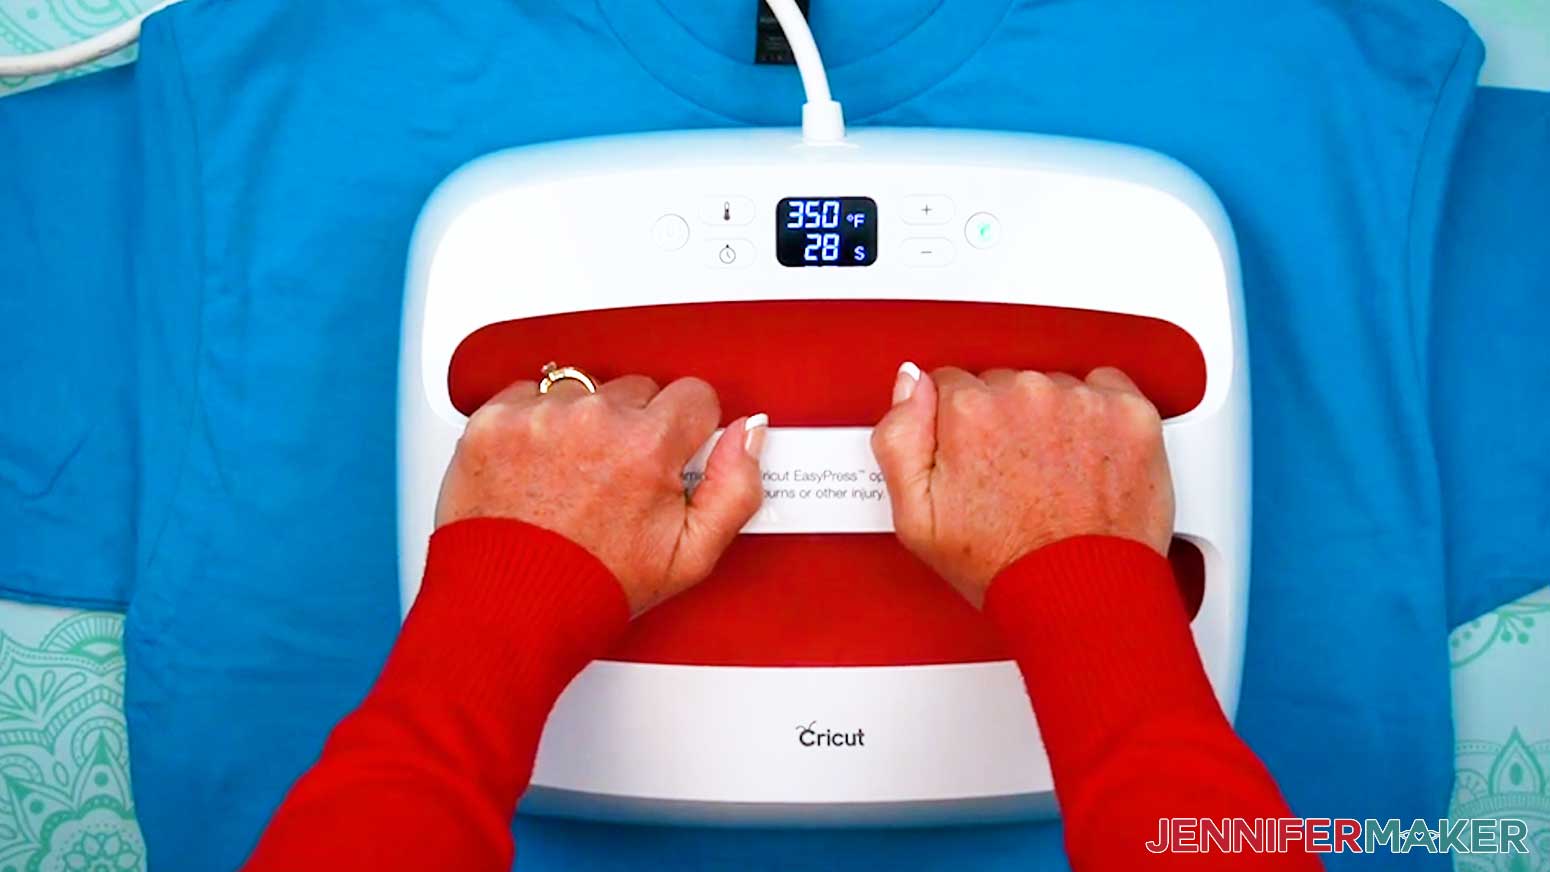
- Preheat your heat press to 350°F (177°C) and set the timer for 30 seconds.
TIP: Always check the manufacturer’s instructions for general times and temperatures, but my HTV Cookbook has lots of tips for this and other projects.
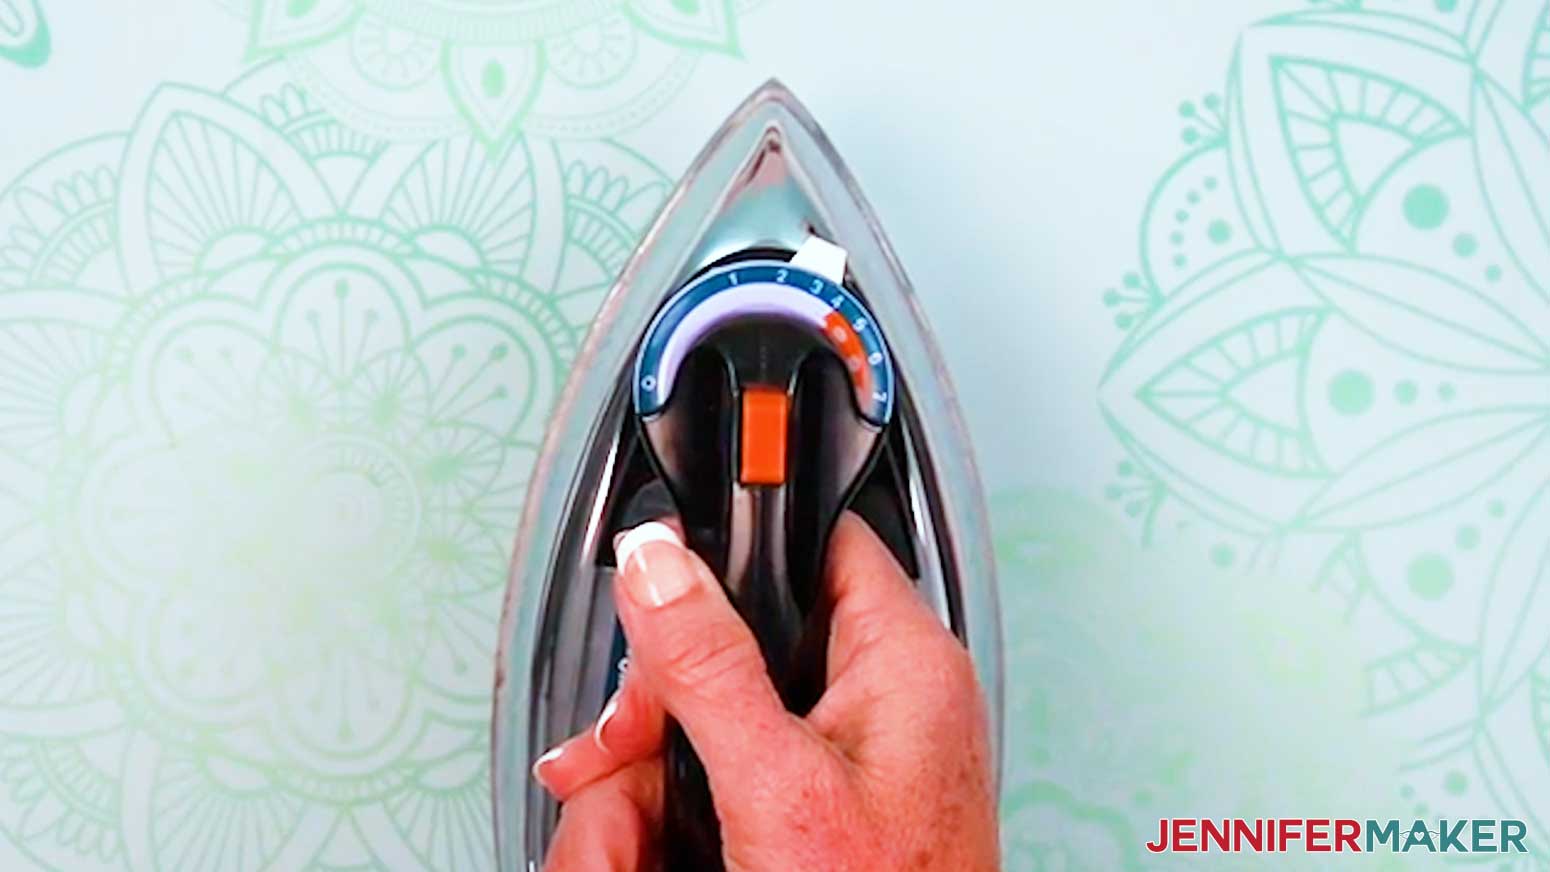
NOTE: If you are using a household iron, use the setting that matches your T-shirt material, but avoid steam. If your iron has High, Medium, and Low settings, I recommend doing a test using the Medium setting. Follow the steps below to apply a test piece inside the lower hem to see if you need to adjust your settings before pressing your main design. - Use a lint roller to remove lint or fuzz from the front of the shirt.
- Fold the shirt on the vertical center by matching up the sleeves.
- Place your T-shirt on a Cricut EasyPress Mat or folded towel to protect your work surface.
- Use your heat press to lightly crease the fold for about 5 seconds. This will also pre-heat the shirt to smooth wrinkles and remove excess moisture.
- Open it up to reveal the crease line, which you can use to line up the T-shirt ruler guide!
- Place the T-shirt so the area you’ll add the design is over the pressing mat.
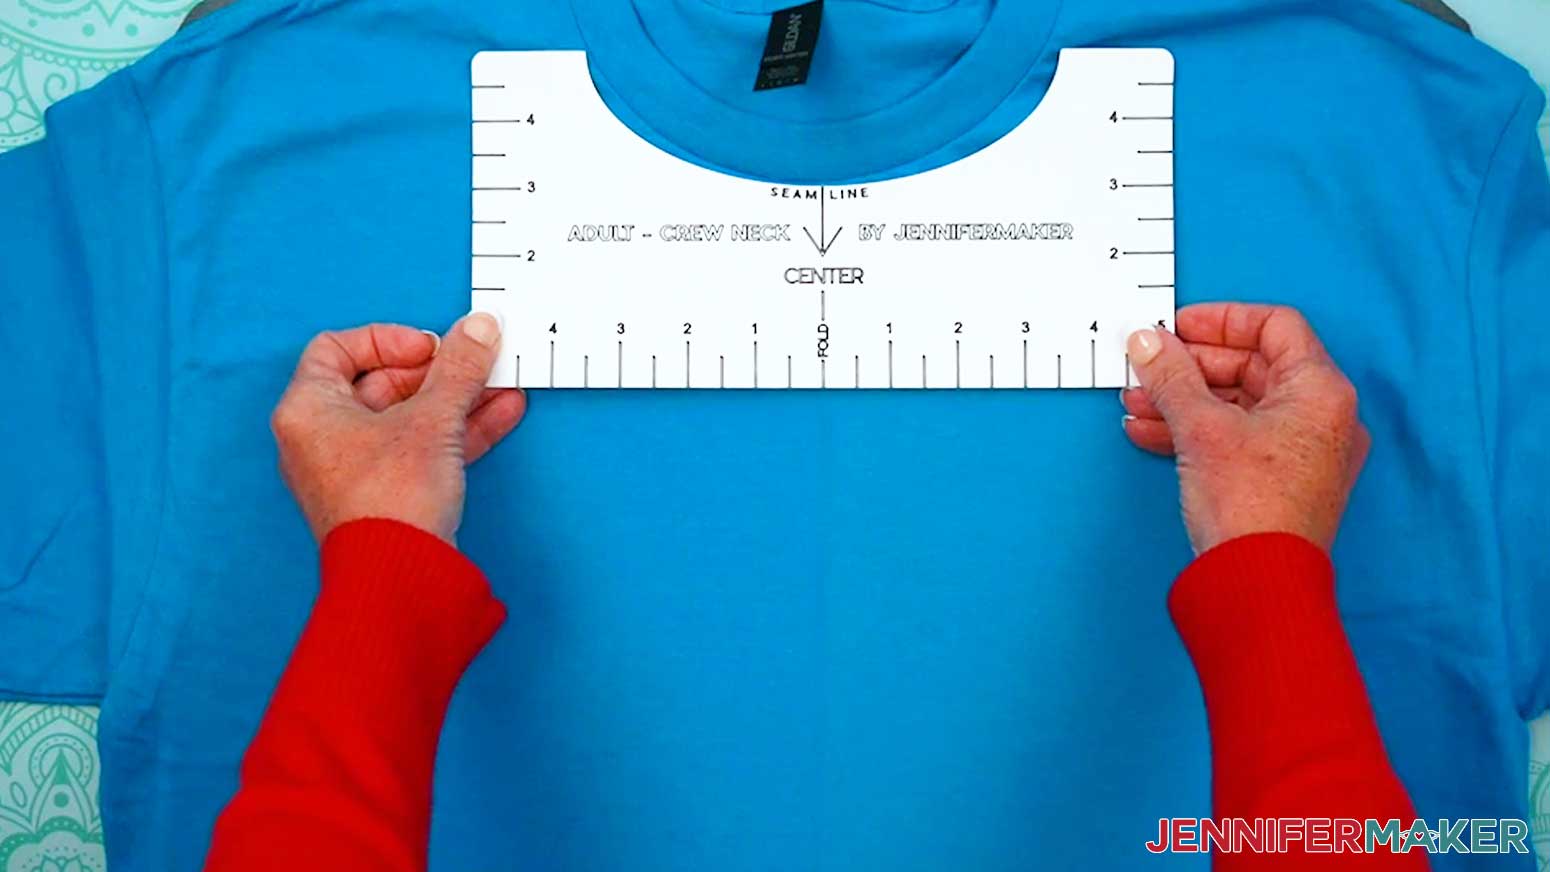
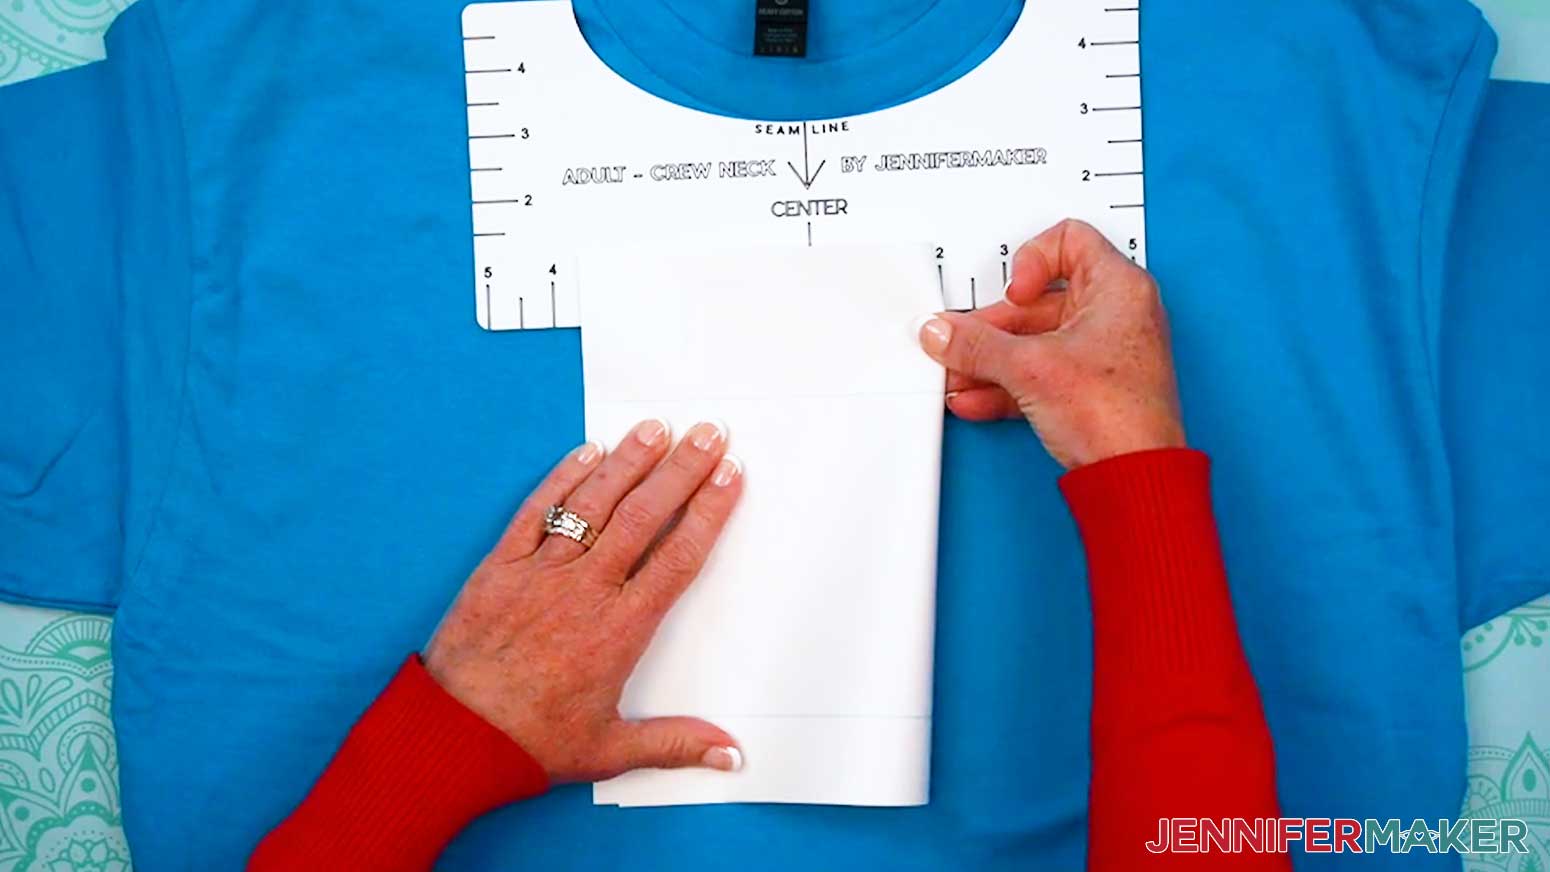
- Place your T-shirt ruler just below the collar seam so the center mark matches the crease.
NOTE: If you’re not using one of my T-shirt rulers, measure to help place the top of the design about 2-3” below the shirt’s collar. - Fold the sides of your design together vertically, and use the registration marks to find the center.
- Very lightly crease the top and bottom edges of the design.
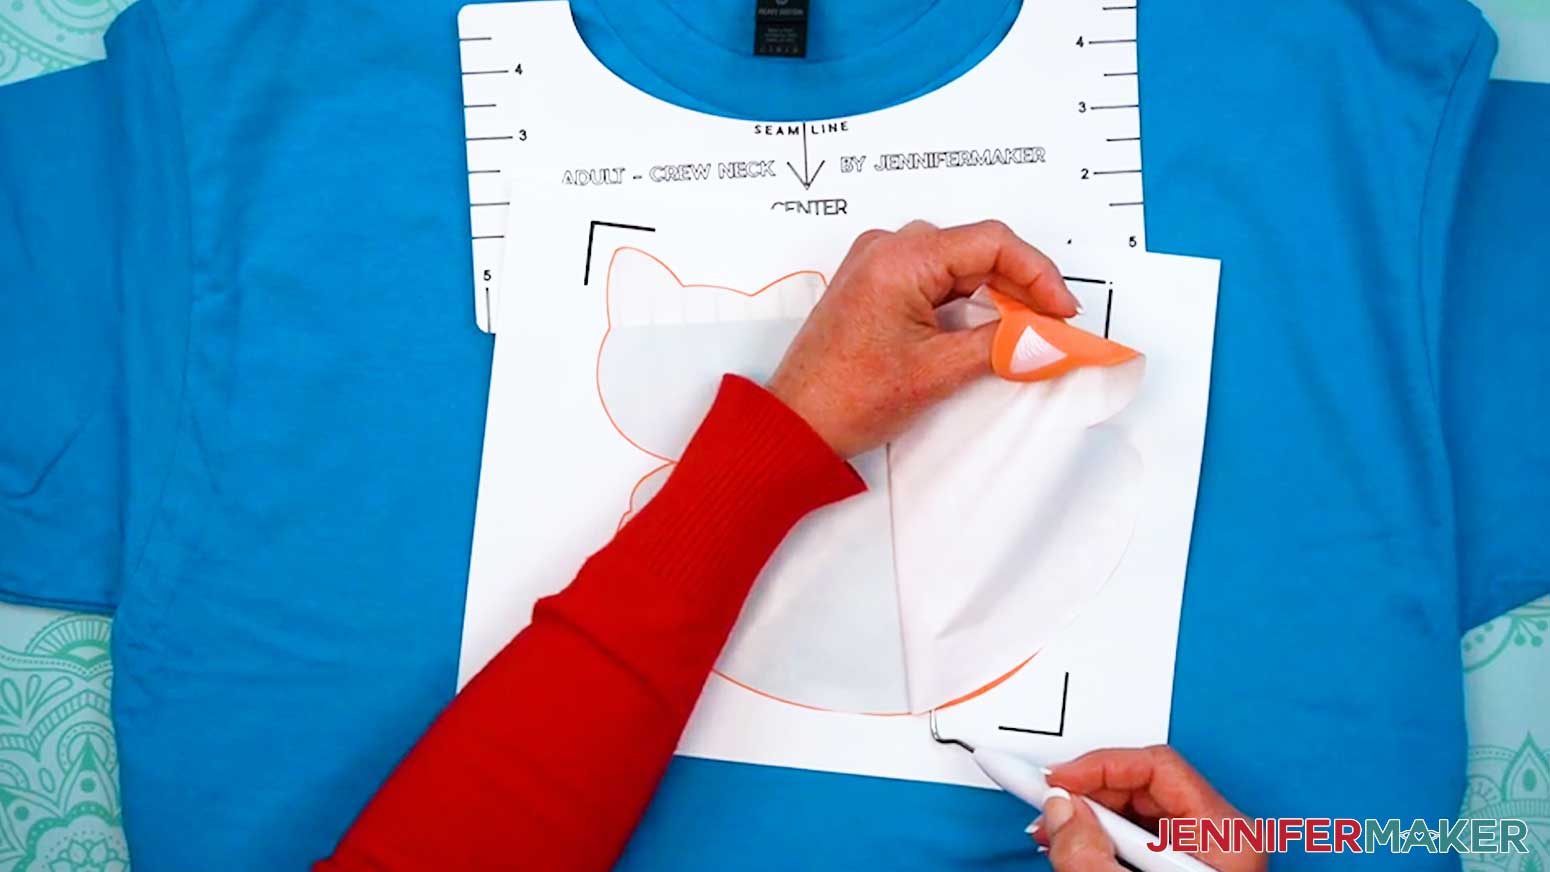
NOTE: These designs aren't symmetrical, so it is easier to find the center before removing the transfer from the carrier sheet. The crease will flatten once the design is pressed. - Peel the design off the carrier sheet, using the weeding tool to help lift the edges as you go. Go slowly to prevent tearing.
- Holding the paper face up, align the design with the crease on the T-shirt and the ruler edge.
TIP: You can prioritize visual balance over perfect centering. If a small piece of your design (like a cat ear) makes it uneven, don’t center using the farthest edge. Center the largest main part of the design on your ruler, then let the tiny detail sit off to the side. This keeps the design looking visually centered on your project. - Remove the T-shirt ruler.
- Place the sheet of parchment paper that came with the iron-on transfer paper over the design and T-shirt.
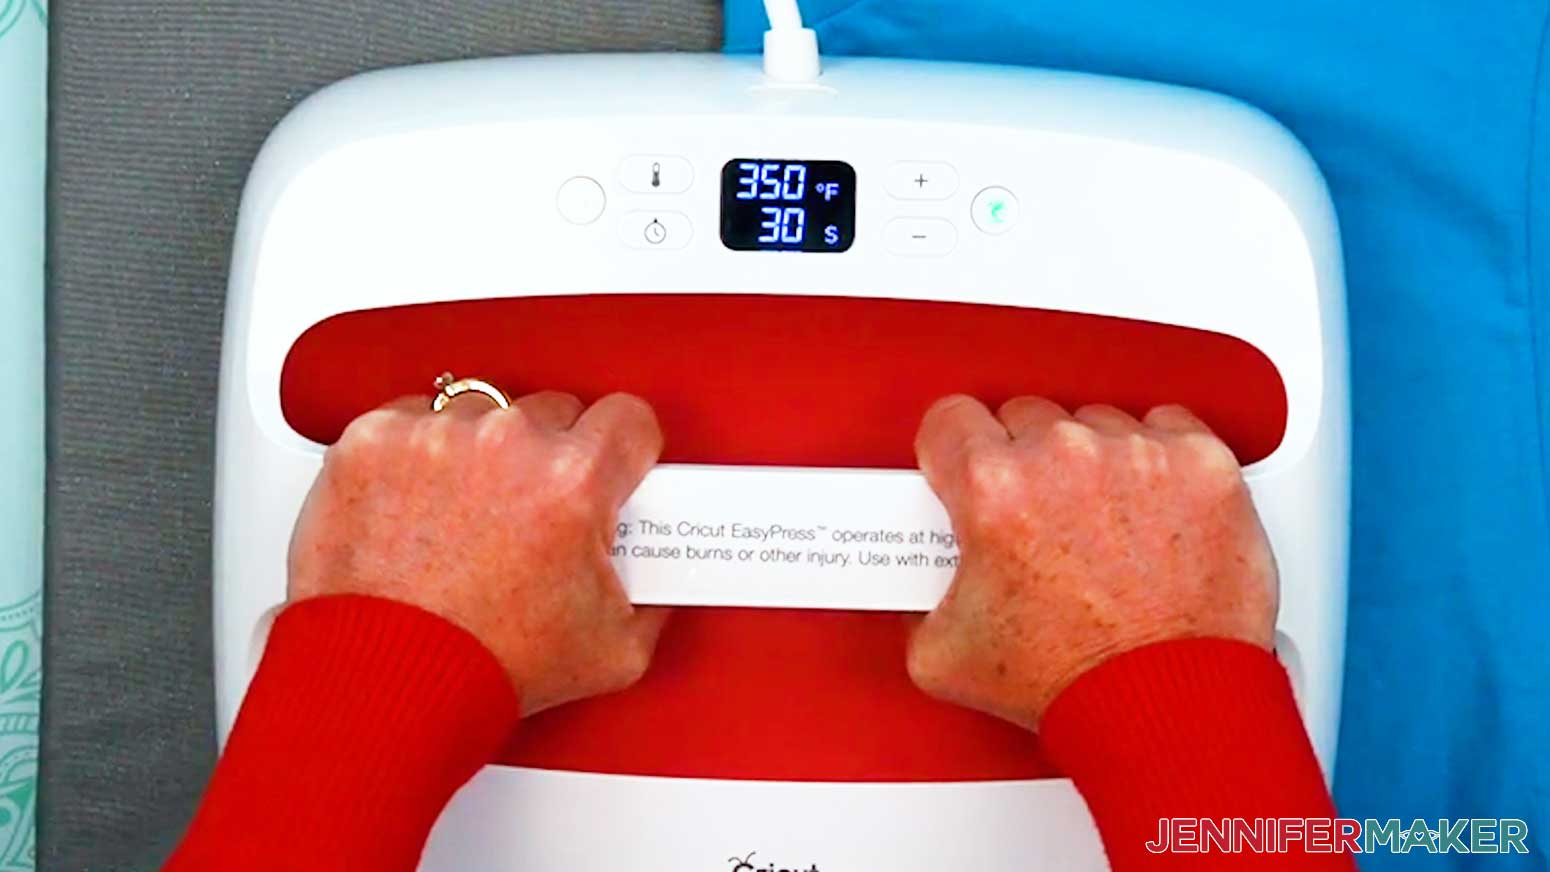
- Press your design at 350°F (177°C) for 30 seconds with firm pressure. Keep both hands on the press and lean on it with some of your body weight.
NOTE: If the design is larger than your iron or press, press it in sections with a tiny overlap to make sure you press the entire design evenly for the correct time. - Remove the press and place it back in its cradle.
- Carefully remove the parchment paper once it’s cooled enough that it’s safe to touch.
- Your Print Then Cut iron-on T-shirt is finished!
STEP 5: SHOW IT OFF!
Here are all of my Print Then Cut iron-on T-shirts!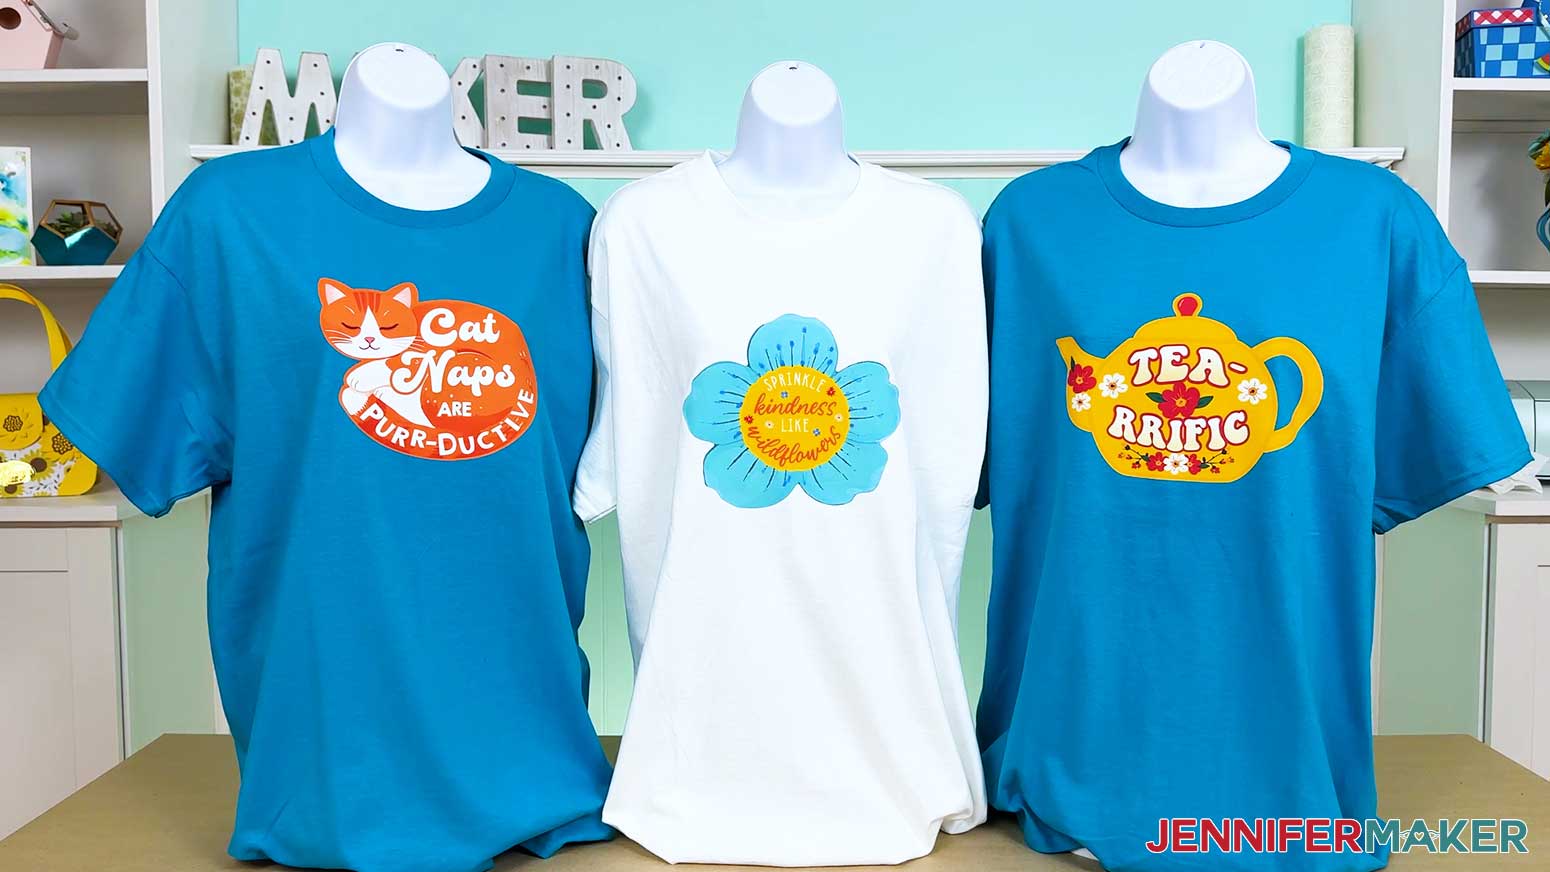
Notes
Design Sizes:
Cat: 16.66” x 14.48”
Bloom: 16.57” x 14.57”
Tea: 16.65” x 11.59”
Typefaces Used:
Cat: Whimsical Bold (free alternative: Grandstander) & Brenson Charlotte (free alternative: Retrovert)
Bloom: JM Sweet & Palace (free alternative: Palace (for personal use))
Tea: JM Groovy
Care: Let the pressed design sit for at least 24 hours. Then wash your shirt inside out in cold water and do not use any bleach. Tumble on low or hang to dry.
Answers to Your Questions About Making Print Then Cut Iron-On Projects
Q: Is there a way to create a custom Print Then Cut iron-on design?
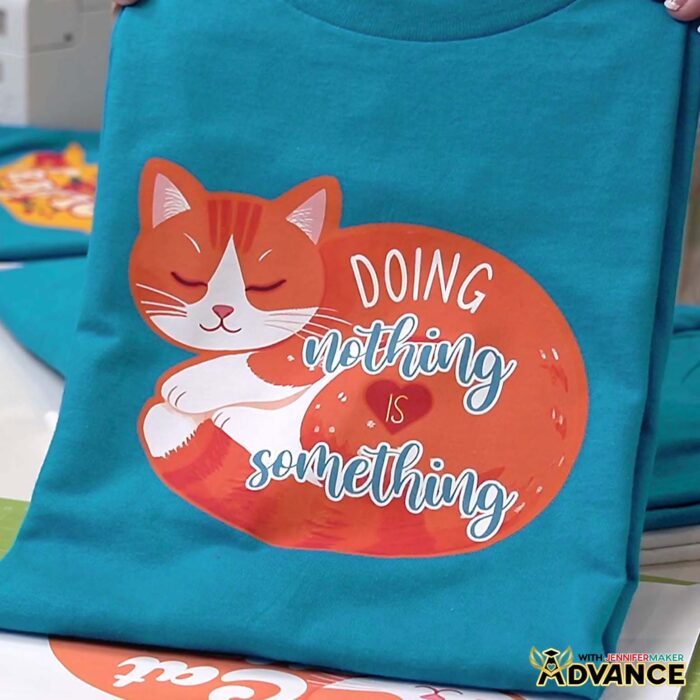
A: You can learn how to create your own Print Then Cut iron-on design like the cat design below in my ADVANCE program. Learn more about ADVANCE here!
Q: Is there such a thing as Printable Iron-On vinyl?
A: The printable iron-on materials I’ve tested are paper-based, but often referred to as vinyl.
Q: Help! My Cricut Design Space screen looks different from yours!
A: If you’re using the latest version of Cricut Design Space, your screen may have slight variations from the screen you see on the video tutorial. Good news! All of the same functions are there, they may just be in different spots or have new icons.
Q: Can I make and sell Print Then Cut projects using your designs?
A: If you want to use my Print Then Cut designs and project for commercial use, please familiarize yourself with my important licensing information before selling your crafts.
Q: Which Cricut machines work for Print Then Cut iron-on projects?
A: Cricut Maker series machines, Explore series machines, the Venture, the Joy Xtra, and the Joy 2 all have Print Then Cut capability. At the time of this blog post, the original Cricut Joy is the only available Cricut machine without the ability to cut Print Then Cut projects.
Q: What is the main difference between Print Then Cut and regular iron-on?
A: Print Then Cut uses a printable material and inkjet printer to create full color designs, instead of layering solid vinyl.
Q: Can I use these transfers on dark fabrics and light fabrics?
A: Yes! That’s one of the biggest advantages. The transfer material linked in my supply list works on both dark fabrics and light fabrics, including cotton.
Q: Do I need a special printer?
A: You’ll need an inkjet printer for transferable Print Then Cut projects. Laser printers won’t work with most printable iron-on materials.
Q: What material settings should I use?
A: When cutting the material I’ve listed, choose “Printable Iron-On, Dark” in Cricut Design Space and set the pressure to “More” for clean cuts.
Q: What blade should I use?
A: A Premium Fine-Point blade (the one that came with your machine) works best for accurate cuts on printable transfer paper.
Q: Can I use a Cricut Joy?
A: The original Cricut Joy machines do not have Print Then Cut capabilities, but the Cricut Joy Xtra and Cricut Joy 2 do! You can use these machines with design size adjustments (larger designs may require a full-size machine).
If you have a Cricut Joy, you can still make this project. Just print the design onto iron-on transfer material, then cut around the design by hand with scissors.
Q: How do I wash the finished shirt?
A: Wait 24 hours for the transfer to set, then wash inside out in cold water and tumble dry low or hang dry for best results.
Q: Why are my cuts not lining up?
A: Calibration and proper lighting during scanning are key. Avoid direct light and recalibrate your machine if needed.
Q: Where can I get help if I get stuck?
A: If you want quick troubleshooting or you want to show off your finished Print Then Cut iron-on project, my Cricut Facebook group is a helpful place to get help, compare notes, and see what others are making!
Get my free PNG files to make your own Print Then Cut iron-on T-shirts and other projects!
(If you do not see the signup form above, click here.)
I absolutely love seeing your Print Then Cut iron-on projects! Once you’ve learned how to make your own, inspire others and share photos of your projects in our Facebook group or tag me on social media with #jennifermaker.
Love,

Want to remember this? Save this tutorial on How To Make Print Then Cut Iron-On T-Shirts to your favorite Pinterest Board!