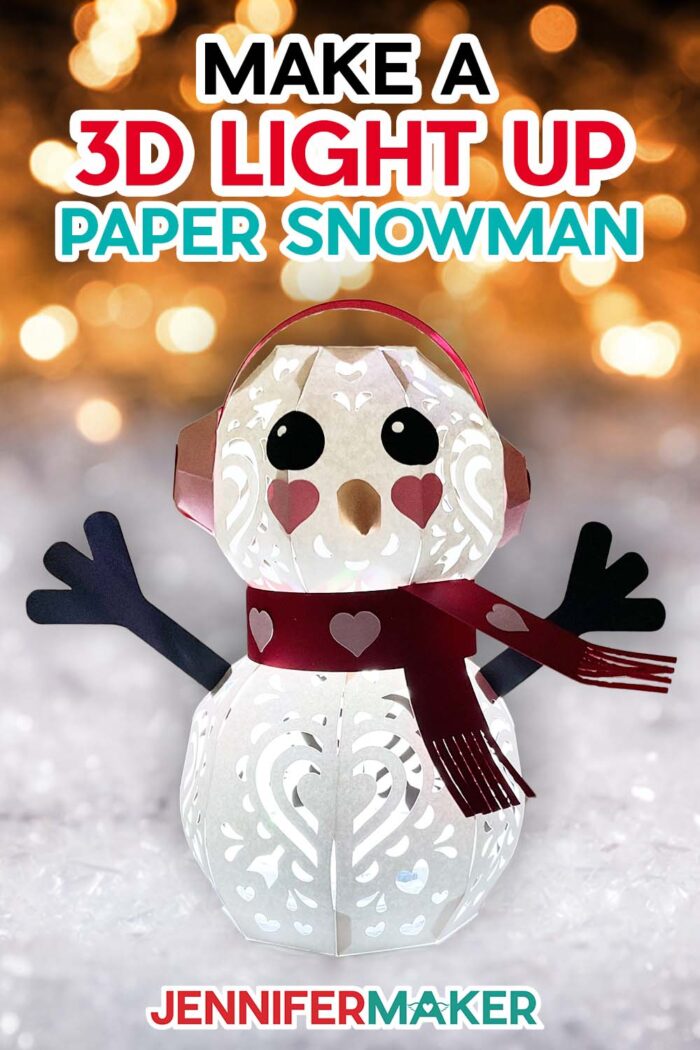
Learn how to make a 3D light up snowman from cardstock!
I really love snowmen. They’re just so jolly and fun, they really cheer up a cold wintery day! But, I definitely don’t like going out in the cold to make them! Instead, I like to make these adorable light up snowman designs using paper! They combine my love for snowman crafts and luminaries, and they’re surprisingly easy to make!
Watch the full step-by-step light up snowman tutorial:
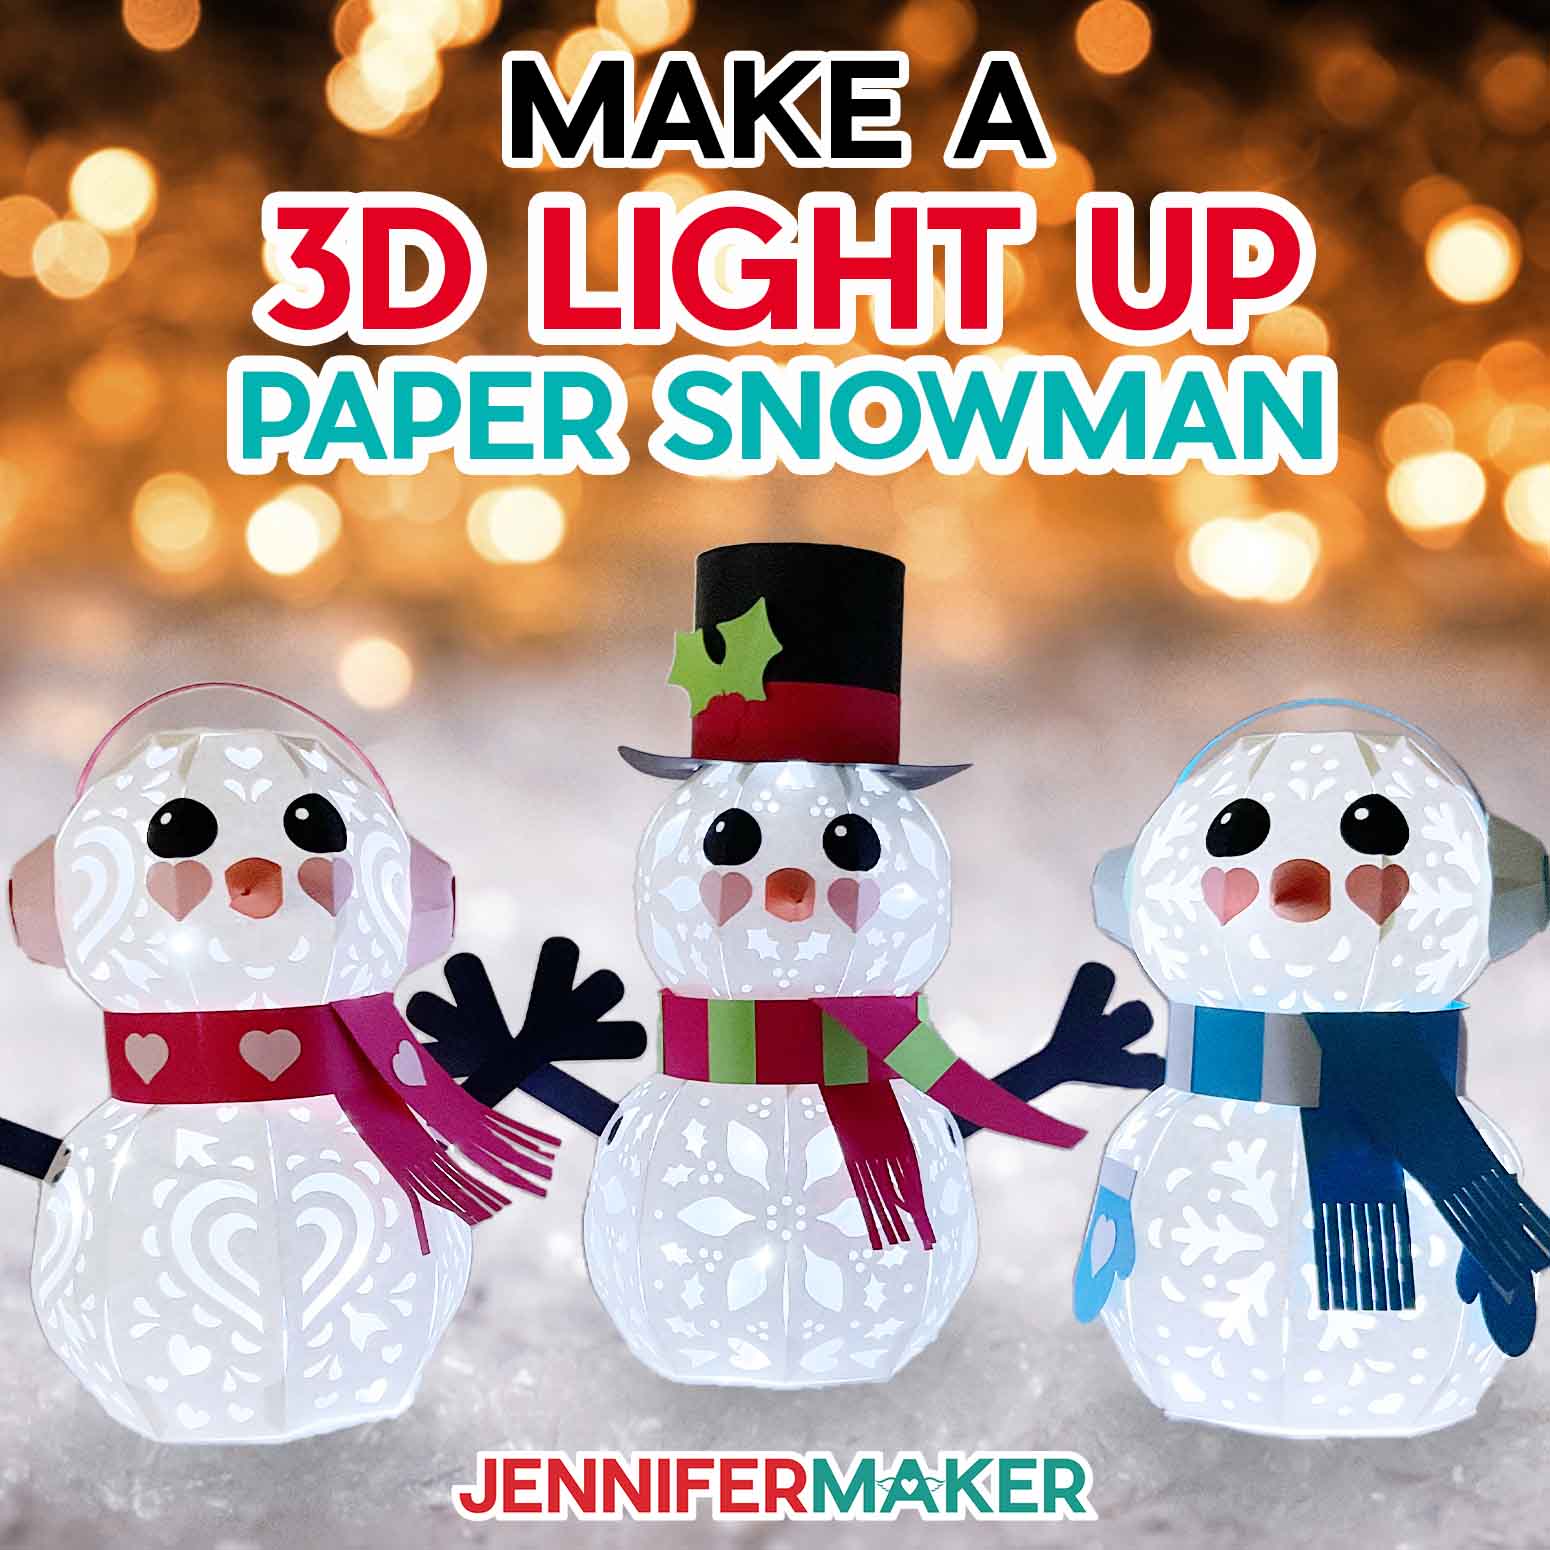

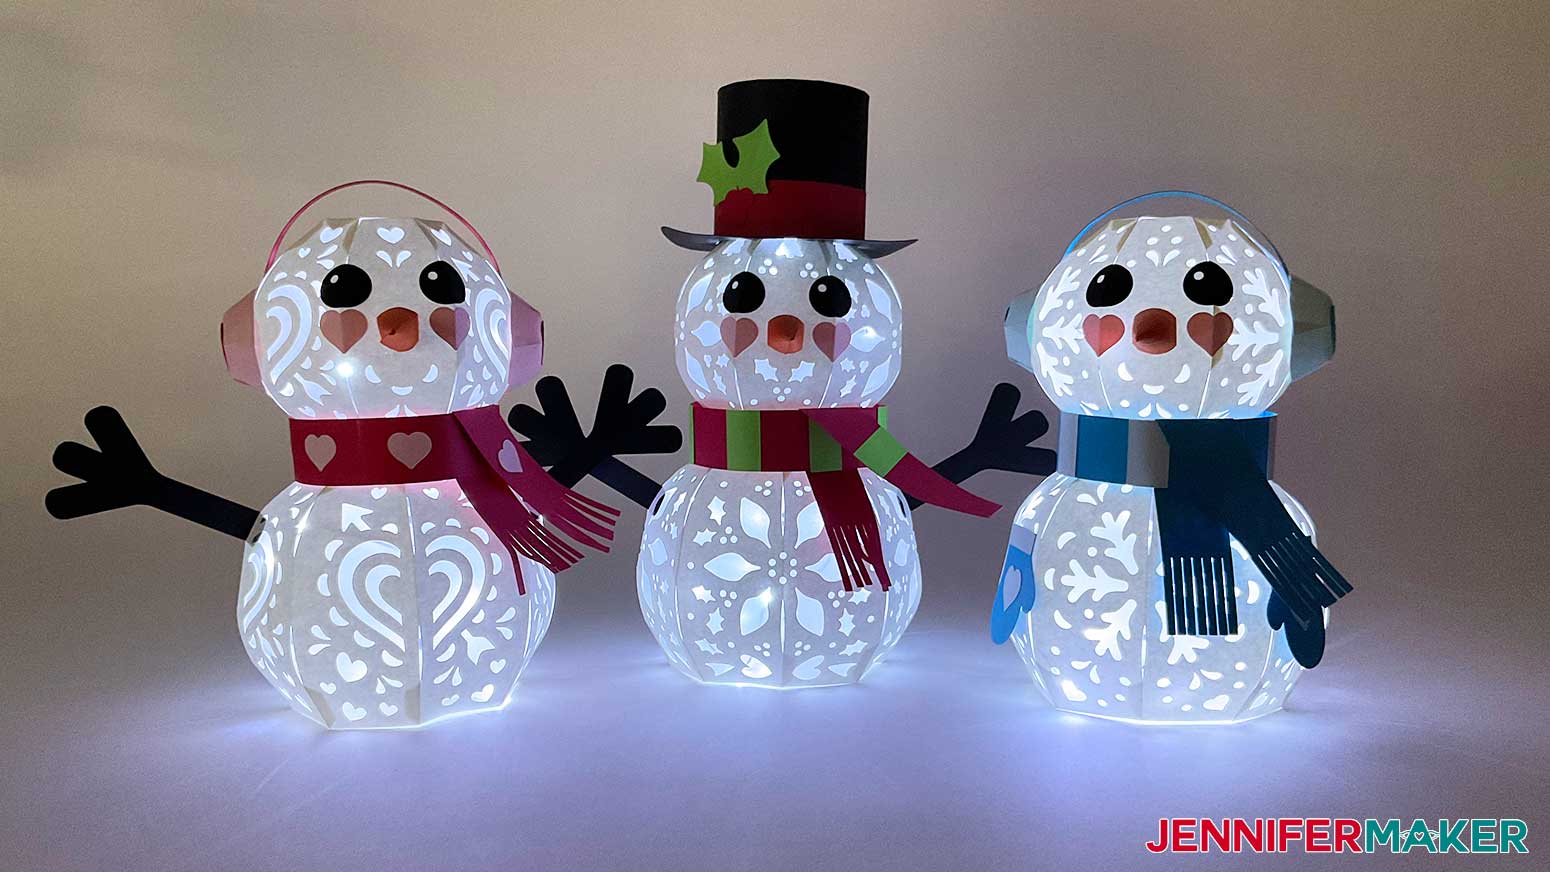
These cool cuties are not quite sturdy enough for an outdoor display, but would look lovely on a mantle or table! I’ve made three FREE light up snowman designs for you to pick from. The full set or multiples would make beautiful Christmas decor.
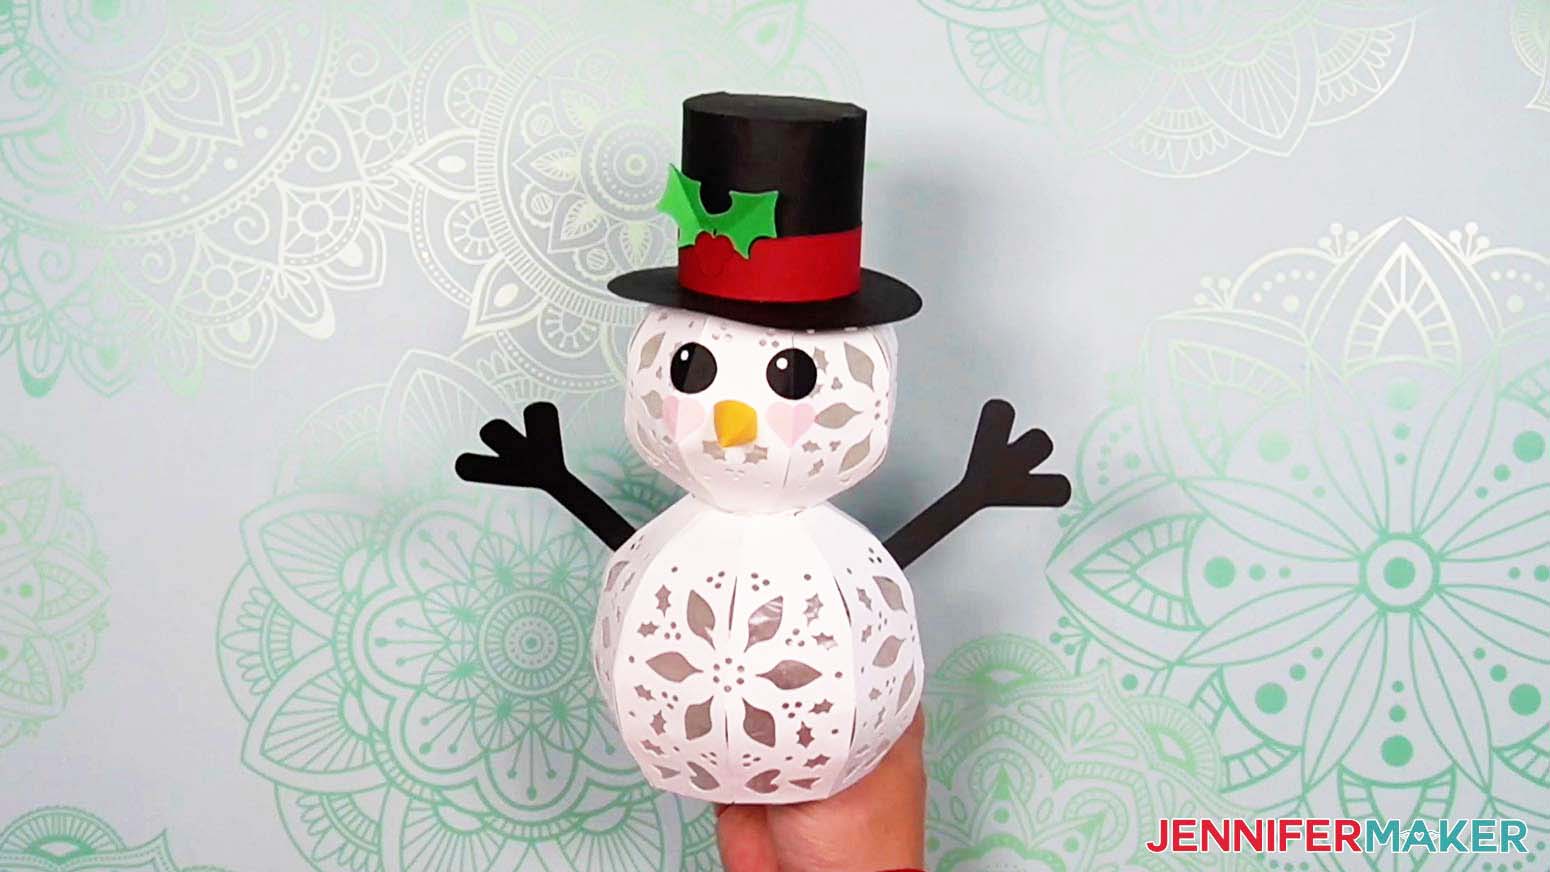
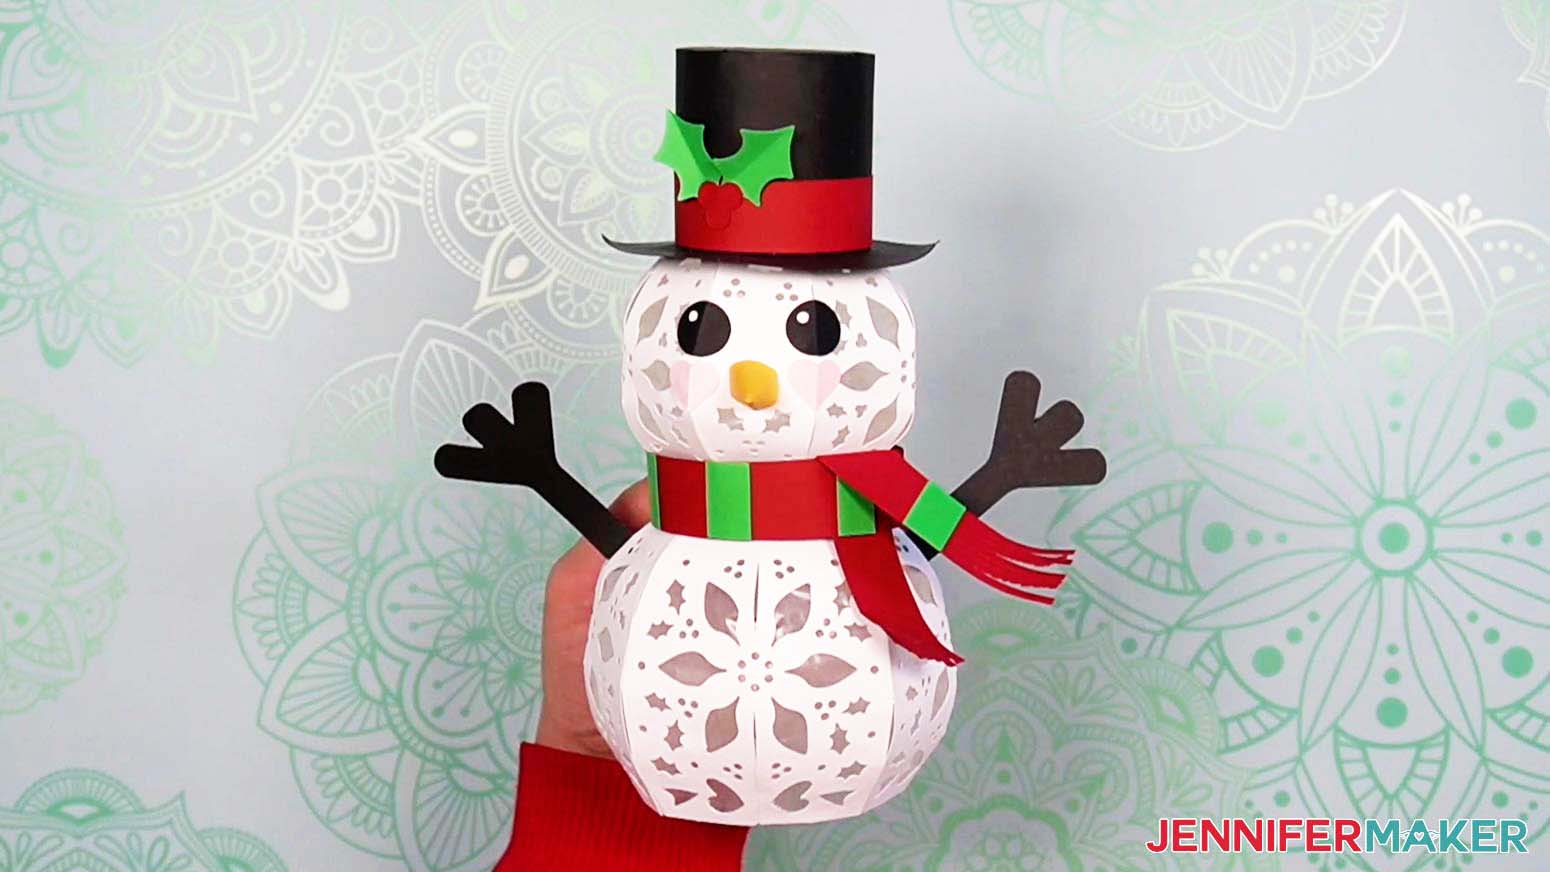
The snowman with a top hat has lots of Christmas cheer!
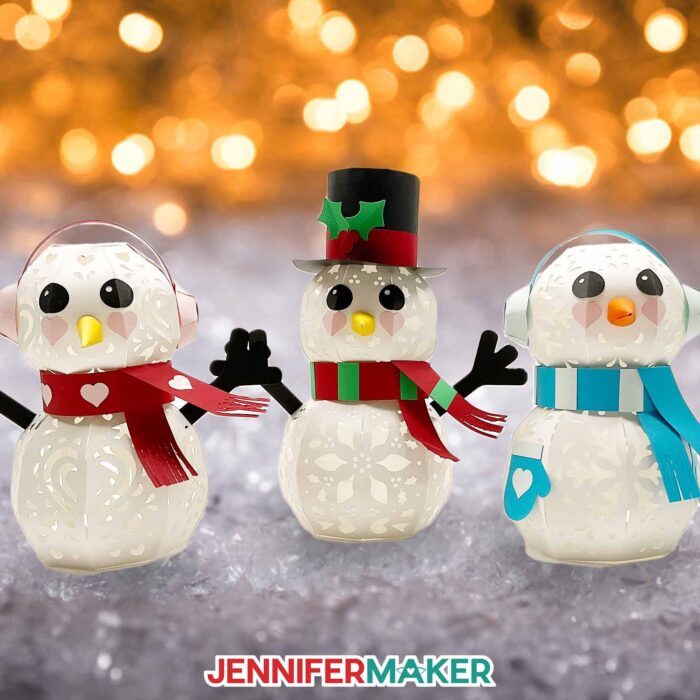
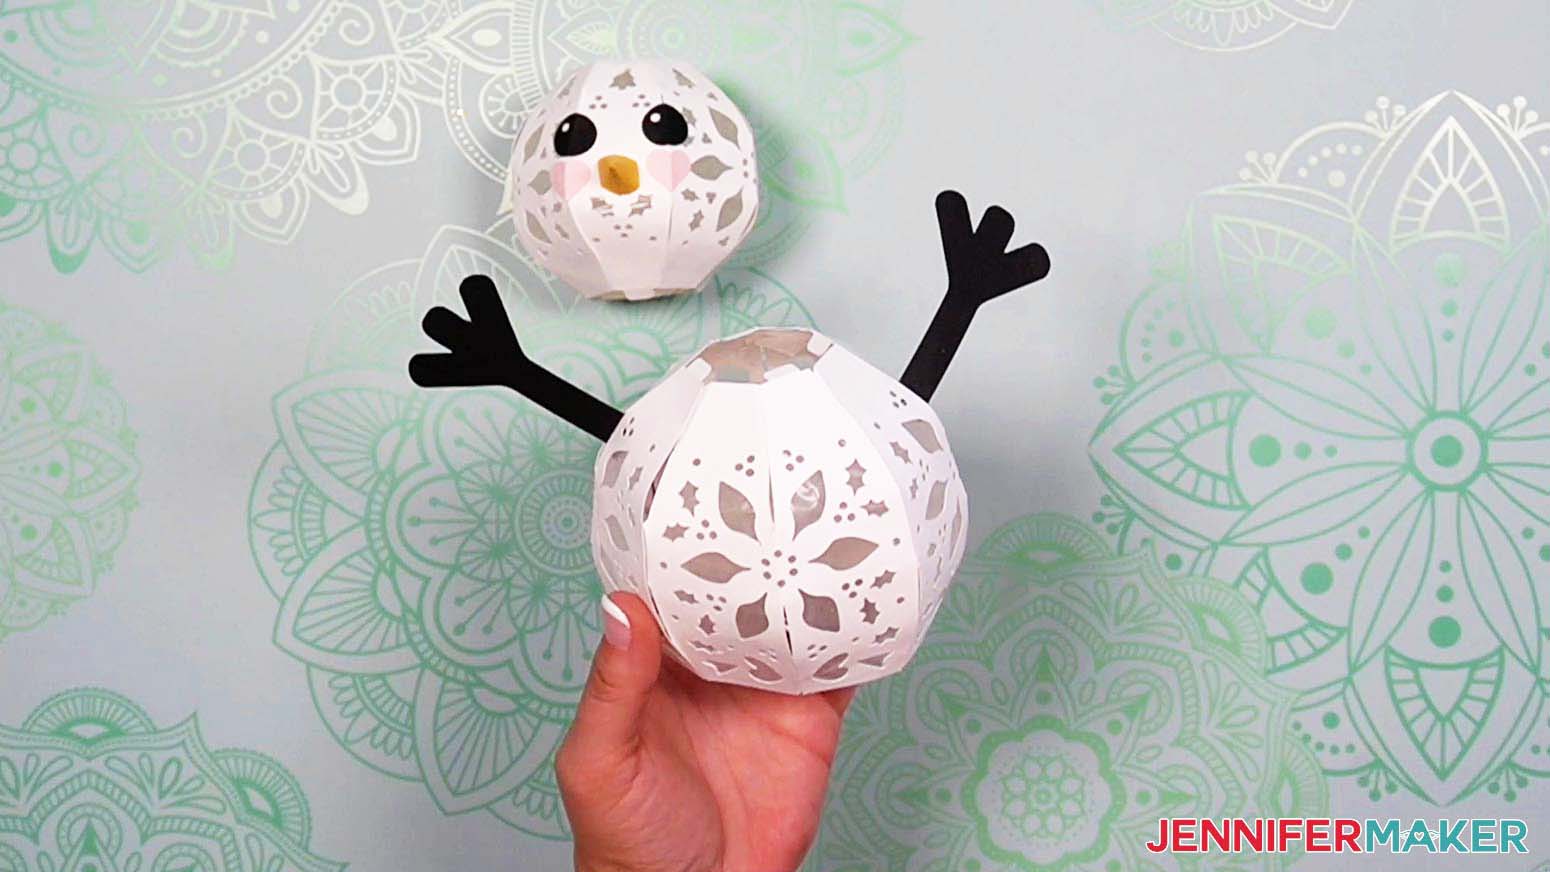
And my wintery light up snowman is ready for any weather with his snowflake cutouts and warm accessories.

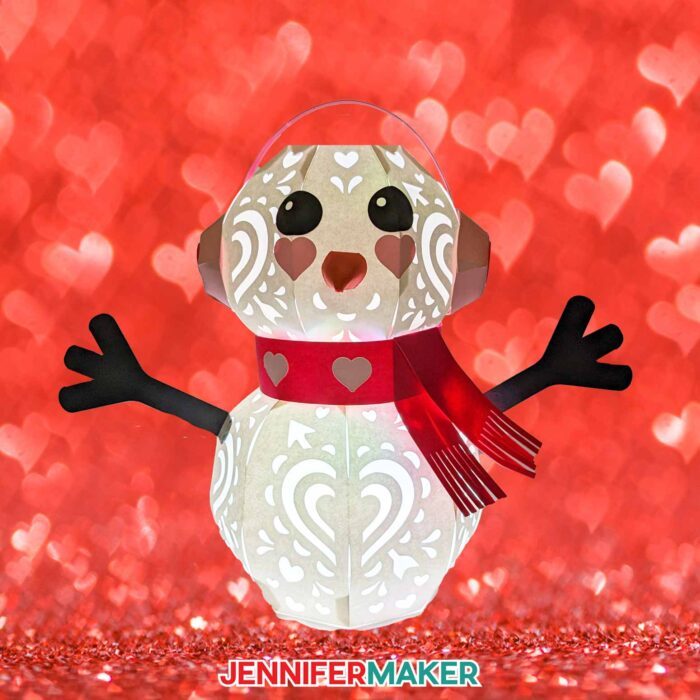
But the Valentine-themed light up snowman might be my favorite. I love how the heart cutouts look lit up with a tea light or fairy lights! I’ll show you how to use either option to celebrate multiple holiday seasons!
I cut my papercraft designs out of 12″ x 12″ 65-80 lb. solid core cardstock on a Maker 3, but you can use any Cricut machine to cut them. I added wax paper to the insides to diffuse the lights on some versions, but it looks nice without the extra layer, too. You’ll just need our usual papercrafting tools listed below!
Let me show you how easy it is to make a light upsnowman! This post contains some affiliate links for your convenience (which means if you make a purchase after clicking a link I will earn a small commission but it won’t cost you a penny more)! Read my full disclosure policy.
Materials to Make a Light Up Snowman
View my Amazon shopping list with the exact items we used to make this project
- Two (2) Sheets of 12″ x 12″ 65-80 lb. White Cardstock
- 12″ x 12″ 65-80 lb. Solid Core Cardstock Various Colors for Accent Pieces – I used one (1) sheet of Black, one (1) sheet of Pink, one (1) sheet of Orange, one (1) sheet of Green, and one (1) sheet of Red for the Christmas design
- Two (2) 12″ x 12″ Sheets of Wax Paper (optional, for diffusing light behind the layers)
- One (1) 2.7″ Color-Changing LED Tea Light and 3 AAA Batteries -OR-
- One (1) 3.3′ Strand of Fairy Lights
- A way to cut your cardstock – I used the amazing Cricut Maker 3 but you can also use the original Maker or an Explore series machine with the Fine-Point Blade. You can even use the Joy for smaller snowmen.
- Green StandardGrip Machine Mat 12″ x 12″
- Blue LightGrip Machine Mat 12″ x 12″ (optional for wax paper)
- Craft Glue
- Brayer
- Scraper
- Spatula
- Weeding Tool (optional, for popping out small cardstock pieces from intricate areas)
- Scoring Stylus (optional) -OR- Single Scoring Wheel (optional, works on Maker machines only)
- Butcher Paper (optional, to keep your white cardstock clean)
- Pen, Pencil, or Other Rounded Object (for curving some of the cardstock pieces)
- Design #456 (My free SVG/PDF/DXF design files available in my free resource library – get the password by filling out the form at the bottom of this page)
How to Make Your Own Light Up Snowman

Light Up Snowman
Learn how to make a 3D light up snowman entirely out of cardstock!
Materials
- Two (2) Sheets of 12" x 12" 65-80 lb. White Cardstock
- 12" x 12" 65-80 lb. Solid Core Cardstock (Various Colors for Accent Pieces) - I used one (1) sheet of Black, one (1) sheet of Pink, one (1) sheet of Orange, one (1) sheet of Green, and one (1) sheet of Red for the Christmas design
- Two (2) 12" x 12" Sheets of Wax Paper (optional, for diffusing light behind the layers)
- One (1) 2.7" Color-Changing LED Tea Light -OR-
- One (1) 3.3' Strand of Fairy Lights
- 3 AAA Batteries (for LED Tea Light)
- Design #456 (My free SVG/PDF/DXF design files available in my free resource library - get the password by filling out the form at the bottom of this page)
Tools
- A way to cut your cardstock - I used the amazing Cricut Maker 3 but you can also use the original Maker or an Explore series machine with the Fine-Point Blade. You can even use the Joy for smaller snowmen.
- Cricut Green StandardGrip Machine Mat 12" x 12"
- Cricut Blue LightGrip Machine Mat 12" x 12" (optional for wax paper)
- Craft Glue
- Brayer
- Scraper
- Spatula
- Weeding Tool (optional, for popping out small cardstock pieces from intricate areas)
- Scoring Stylus (optional) -OR-
- Single Scoring Wheel (optional, works on Maker machines only)
- Butcher Paper (optional, to keep your white cardstock clean)
- Pen, Pencil, or Other Rounded Object (for curving some of the cardstock pieces)
Instructions
STEP 1: GET MY FREE LIGHT UP SNOWMAN DESIGNS
First, download my free Light Up Snowman SVG/PDF/DXF files from my free resource library. It's Design #456. The SVG folder contains three different designs. Each design has a version with score lines (with "score" in the name) that requires a scoring wheel or stylus and a version with dashed cut lines (with "no-score" in the name) that only needs the Fine-Point Blade.
NOTE: If you'd like to put a tea light or fairy lights inside your finished snowman, you can use either file version. However, you will get some light leaking out of the dashed cut lines if you use that version.
I will show you how to make the Christmas design with score lines using the scoring stylus. You can follow the same steps to make the other design variations.
Upload your chosen SVG file to Cricut Design Space and add it to your Canvas.
TIP: If you are not sure how to upload an SVG cut file to Cricut Design Space, watch this helpful video training series I made.
If you are on an iPad or iPhone, here is how to download and upload SVG files to the Cricut Design Space app.
STEP 2: PREPARE YOUR DESIGN FILE
Here is what each of the Light Up Snowman designs looks like on my Canvas. You can zoom out to see all of the design by clicking on the minus (-) sign on the lower left.
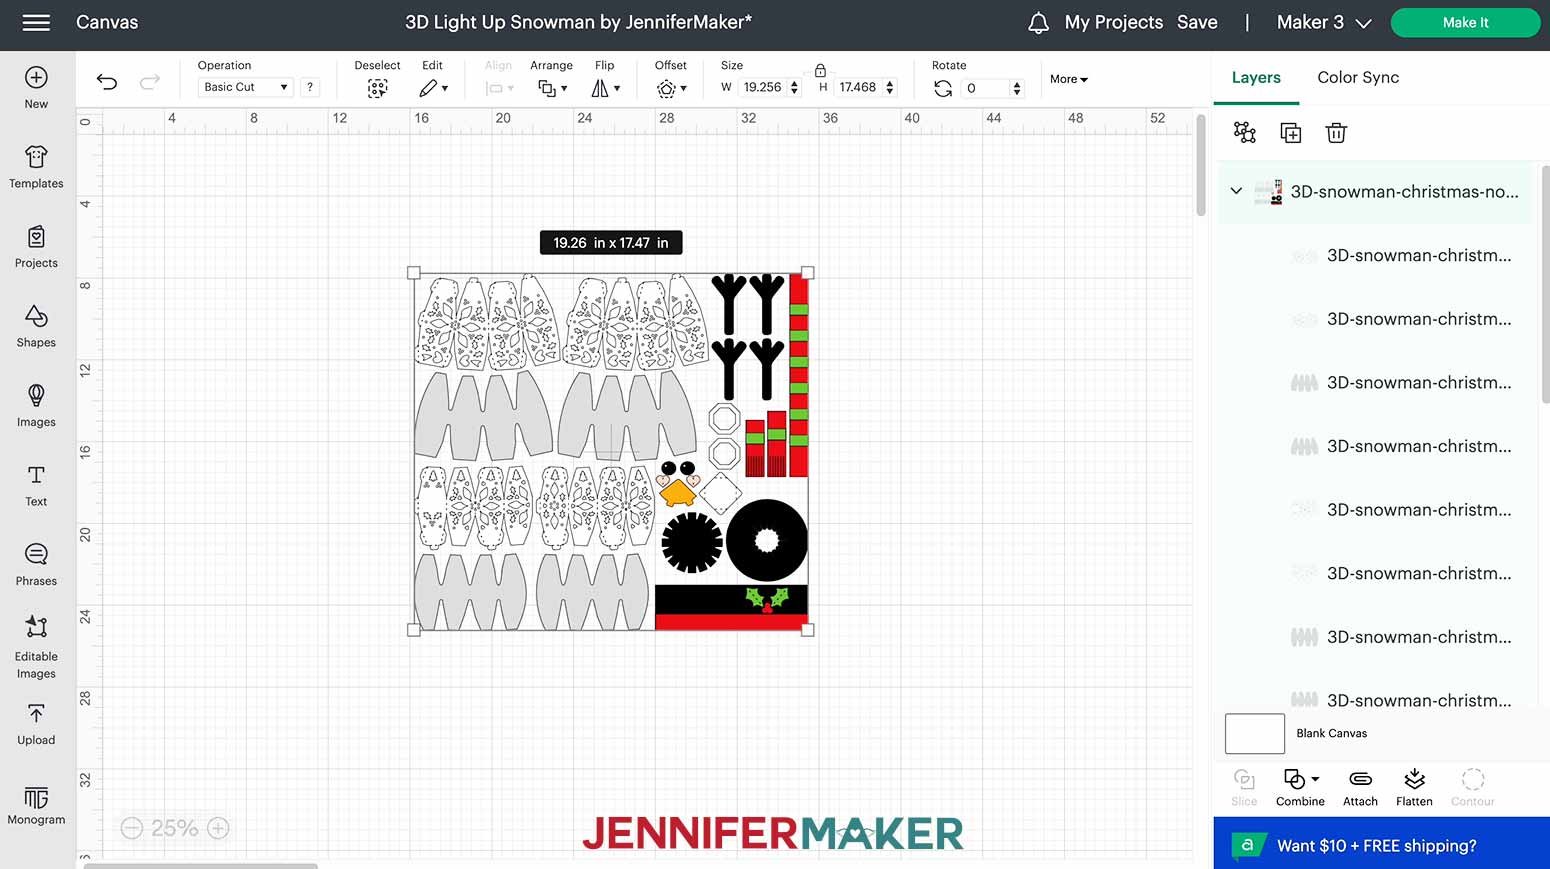
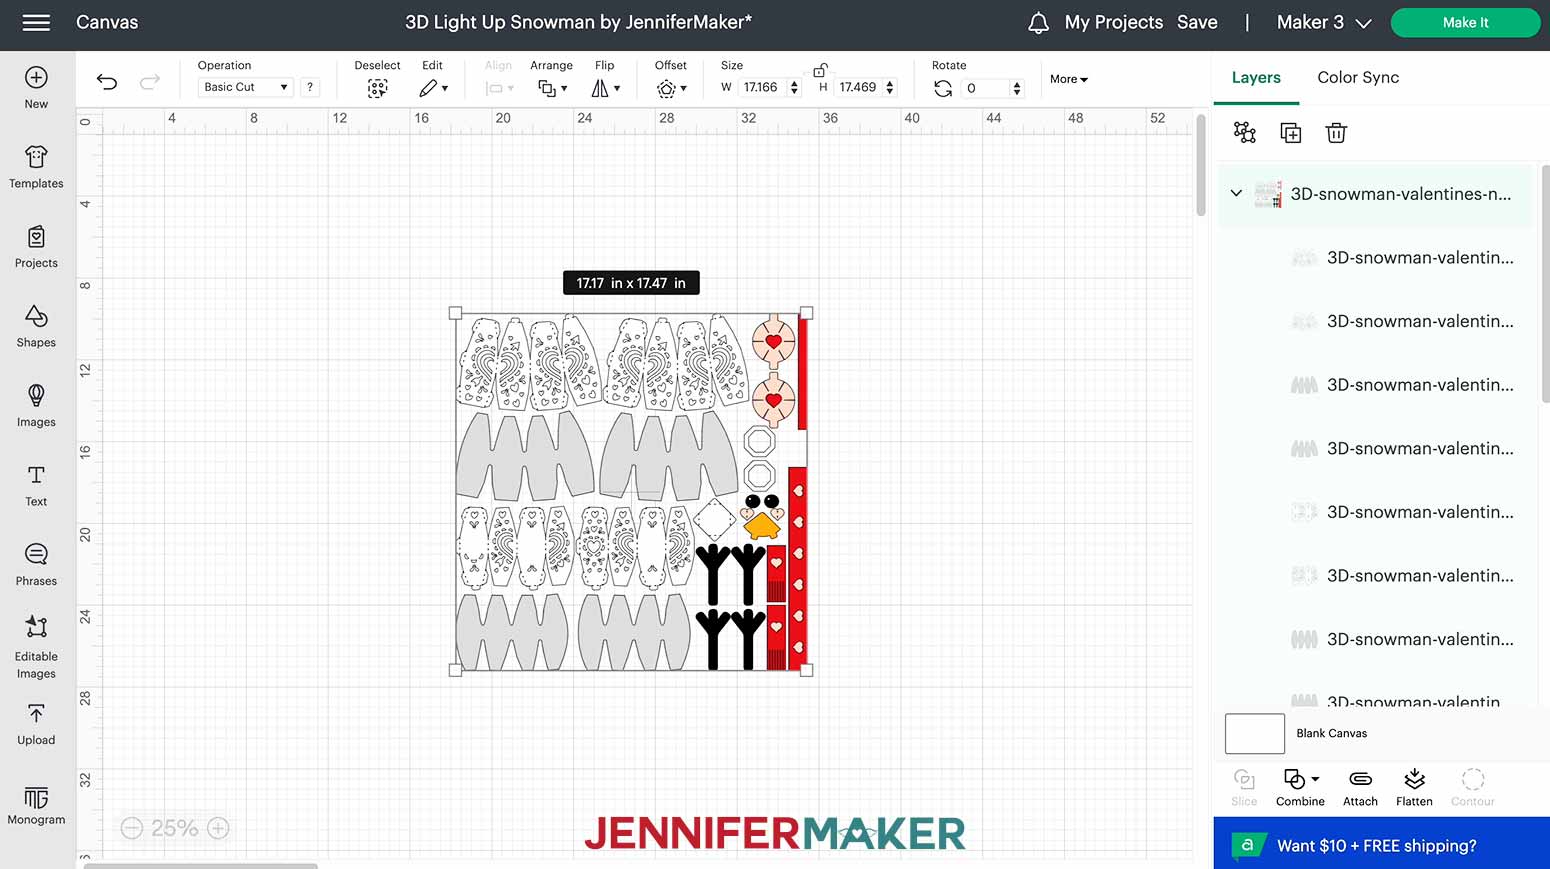

Each design is set up to make one 3D snowman measuring approximately 7.5” tall by 8.5” wide by 4.75” deep. The Christmas snowman is a bit taller -- approximately 9” -- since he has a top hat on. The winter snowman isn’t as wide -- approximately 4.5” -- because he has mittens instead of stick arms.
The color-changing LED tea lights linked in my materials list fit perfectly into the bottom of each assembled snowman. If you choose to reduce the size of your light up snowman, you can put fairy lights inside instead.
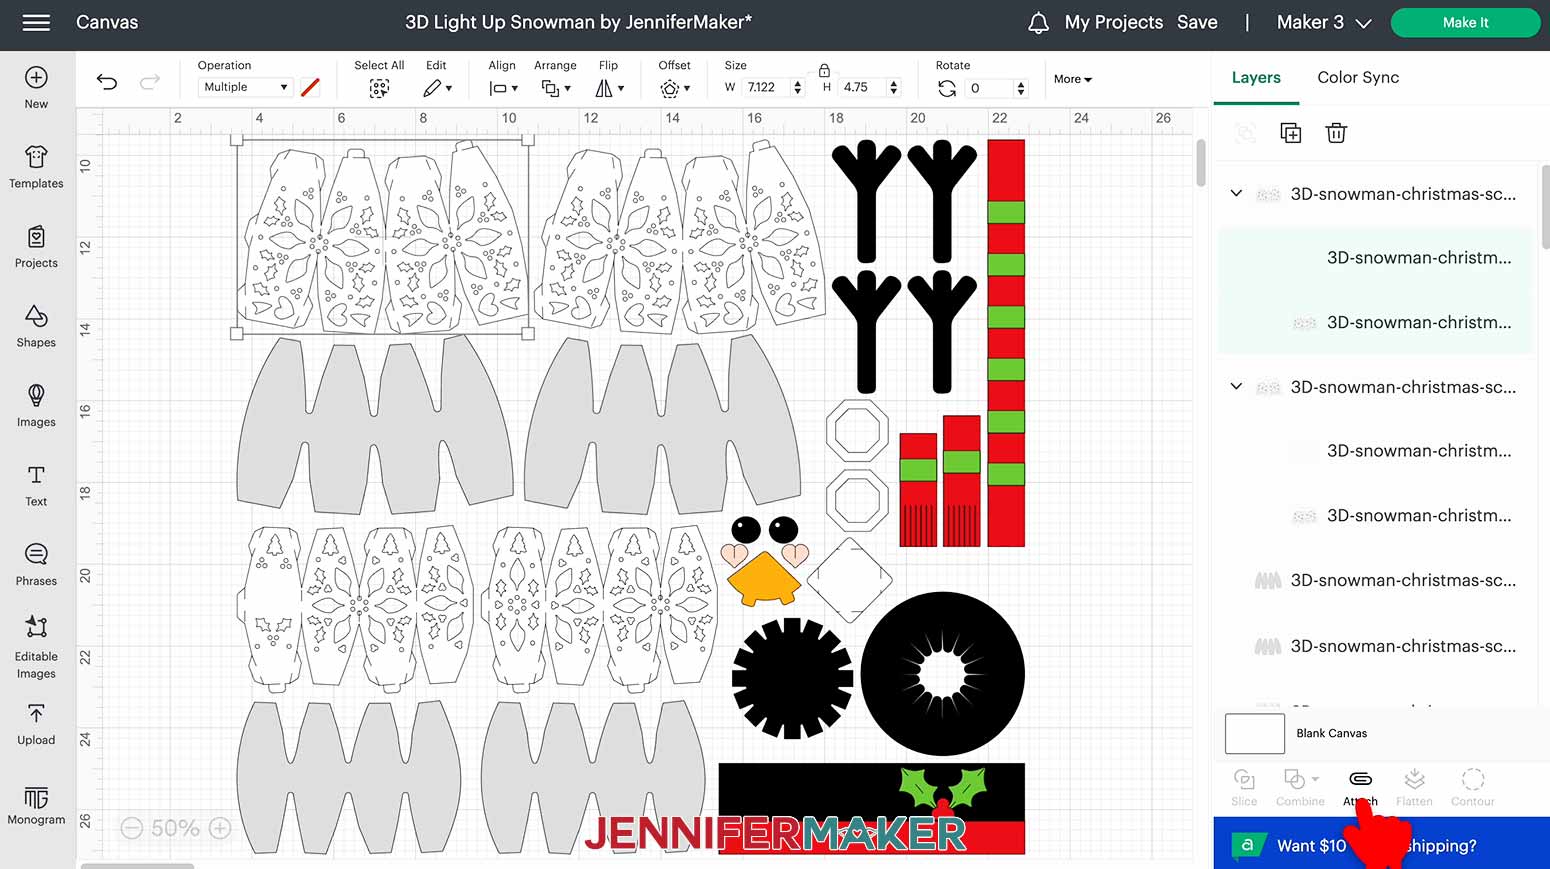
If you're making the “score” version of the design like I am, you will need to convert and attach the score lines before cutting. For the Christmas design, the score lines are the nine layers with faint lines and no shapes in the Layers Panel. You’ll notice the color swatch icon is red for each of them so they’re easy to distinguish from the other elements.

With your design selected, click the Ungroup button at the top of the Layers Panel (the two stacked squares on the very left). Hold Shift while clicking on each of the intended score layers in the Layers Panel. Make sure the color swatch in your top menu panel is red. If it’s not, you may have accidentally selected another layer. Just click off of the design and try again.
TIP: I found it easiest to select my score layers starting at the bottom of the Layers Panel. Just look for the layers that are grouped with their corresponding cut layer.
With the correct layers selected, change the Operation at the top from "Basic Cut" to "Score." The lines are now dashed to indicate the machine will score instead of cut them.
To attach the score lines to their appropriate cut layers, hold down your Shift key while selecting a Score layer and the Cut layer directly below it in the Layers Panel. Then, click "Attach" at the bottom of the Layers Panel. The newly-attached layers will jump to the top of the Layers Panel. Repeat for the other cut and score layer pairs.
If you’d like to change the color of any of your snowman’s accessories, you can do that now. You can also hide or delete elements if you don’t want to include them.
STEP 3: CUT YOUR LIGHT UP SNOWMAN DESIGN
Your design is now ready to cut!
Make sure the correct machine is selected, then click "Make It" in the upper right corner. If prompted, click "On Mat" and "12 x 12" on the pop up.
On the Prepare screen, you should see nine mats. Click on your first white mat and click “Continue” in the bottom right corner.
On your Make Screen, select the “Medium Cardstock – 80 lb (216 gsm)” setting and change the Pressure to "More" for a cleaner cut.
If you’re making the “score” version of the design like I am, you'll need to load either the scoring stylus in Clamp A or scoring wheel in Clamp B for those mats. Follow the on-screen prompts to load your tools in the correct order for the appropriate mats.
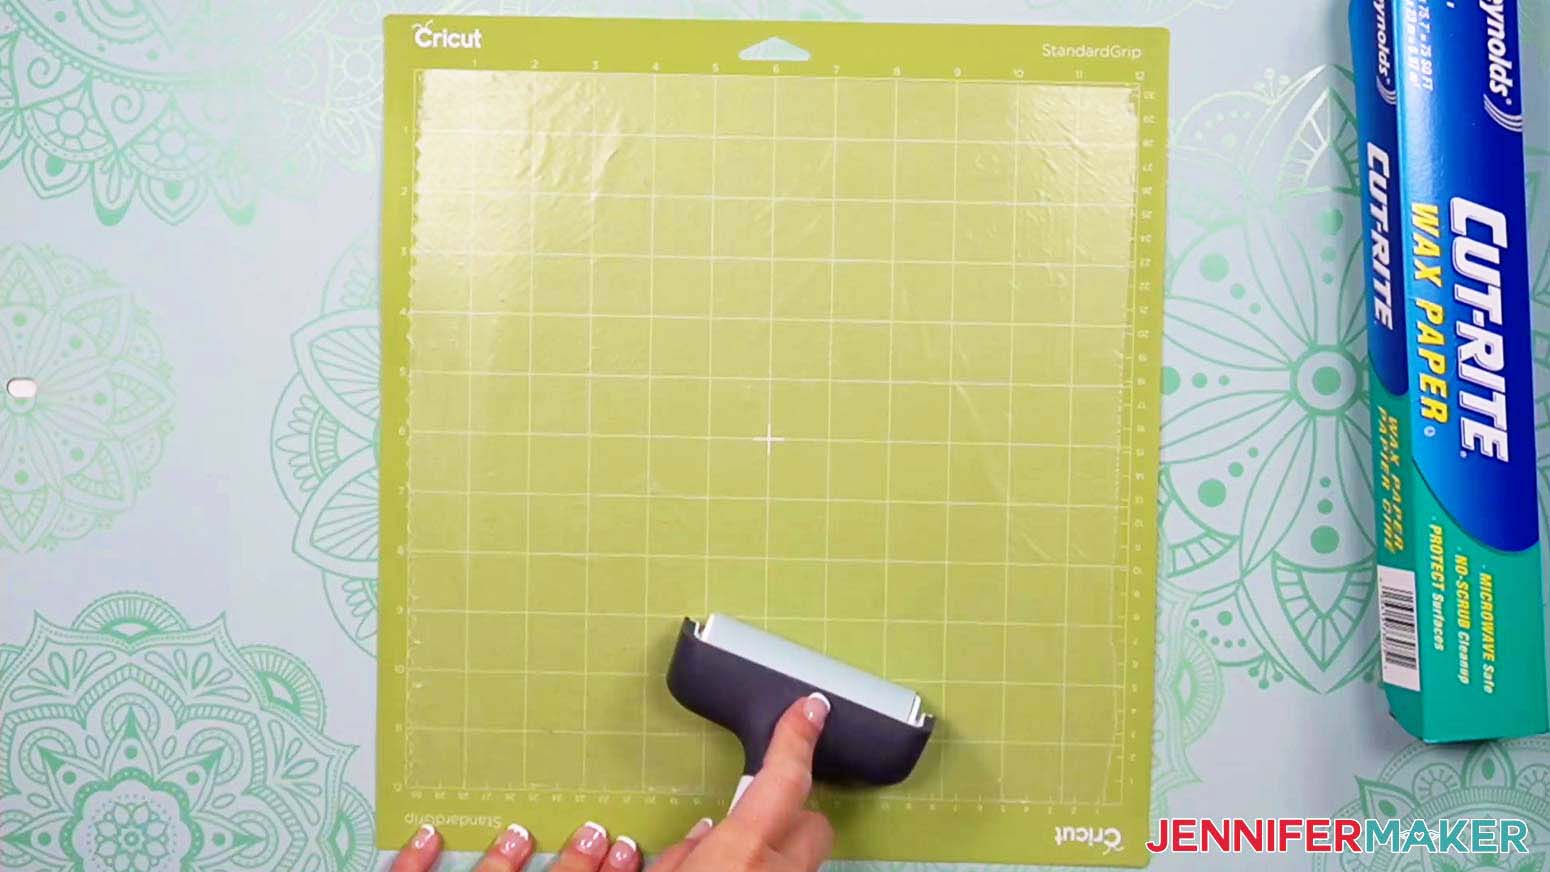
Place your first mat's material on your green StandardGrip machine mat and use a brayer to make sure it's fully adhered. If you're using the same tools as me, check that your Fine-Point Blade is clean and in Clamp B. Then, load the mat into the machine and press the flashing button to begin cutting.
When the cut is finished, unload the mat, flip it over, and roll it back to release the cardstock. This helps prevent the material from curling and ripping.
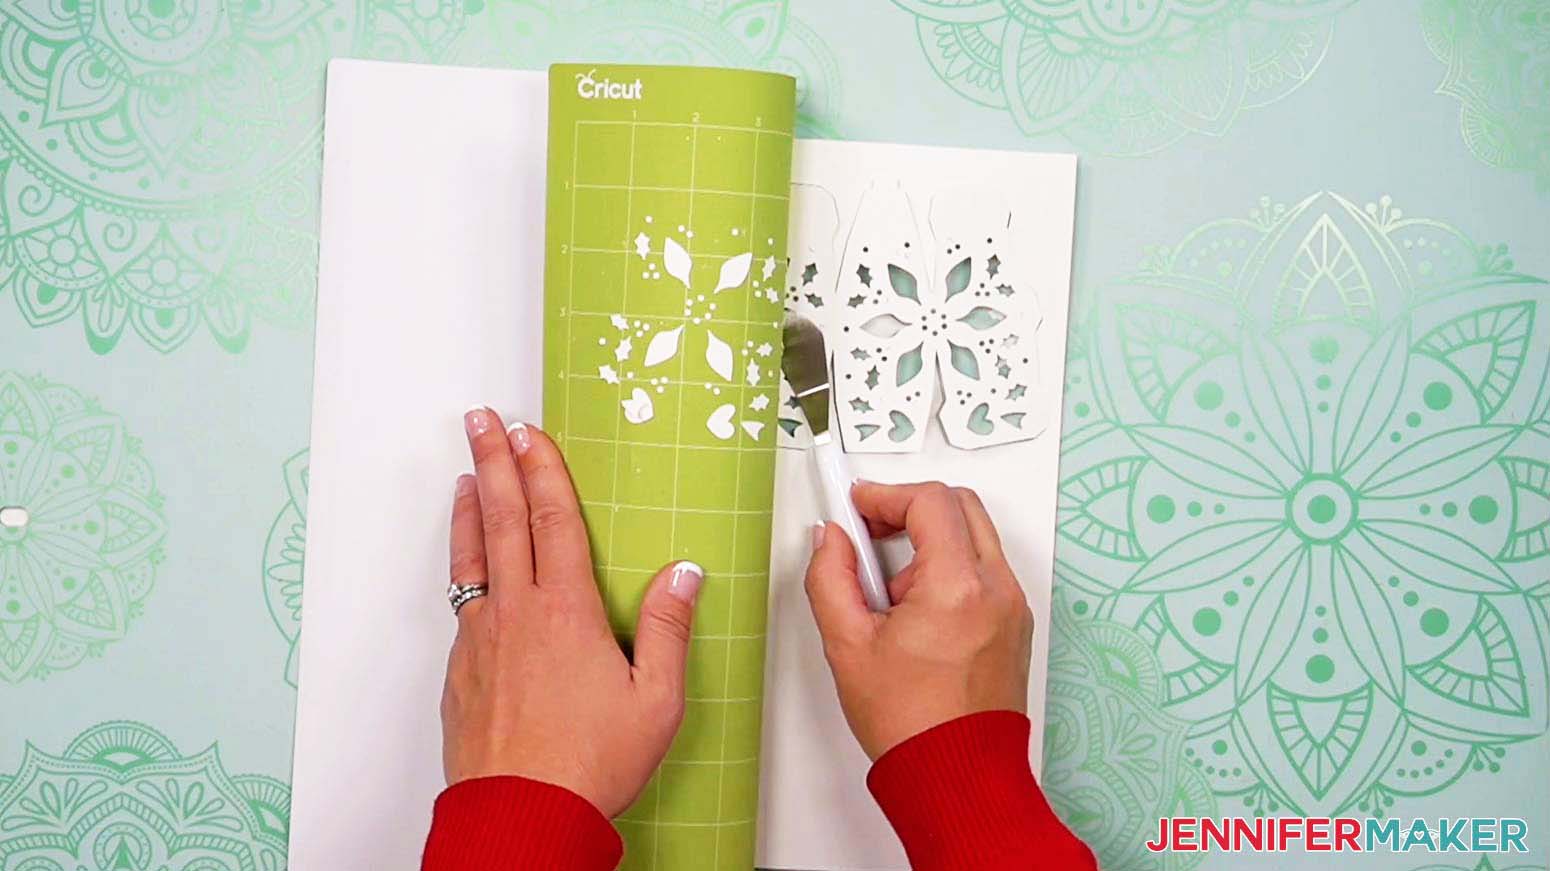
The mats with intricate details will take longer to cut. You can slide your spatula gently under those pieces to remove them. Don't lose track of the small pieces! Use your scraper to remove any bits of cardstock that are left on the mat.
When you get to the optional mats with wax paper (the light gray ones), select the “Wax Paper” setting and leave the Pressure at “Default.”
Place your wax paper on your green StandardGrip or blue LightGrip machine mat and use a brayer to make sure it’s fully adhered.
NOTE: It’s very important that the mat you use to cut your wax paper is clean and sticky. You’ll also want to remove all wrinkles and bubbles when adhering the paper to your mat. This will help you get nice, clean cuts.
Remove the pieces from the mat very slowly and carefully so they don’t rip.
TIP: Check your blade before and after cutting your wax paper layers to make sure it’s clean. If you run into any issues, check out my Cricut Tips & Tricks for Cleaner Cuts.
When you’re finished cutting your wax paper pieces, you can use the “Medium Cardstock” setting with "More" Pressure for the rest of your mats. Check the "Remember material settings" box to save time when cutting. Follow the same steps as above to cut and remove the rest of your pieces.
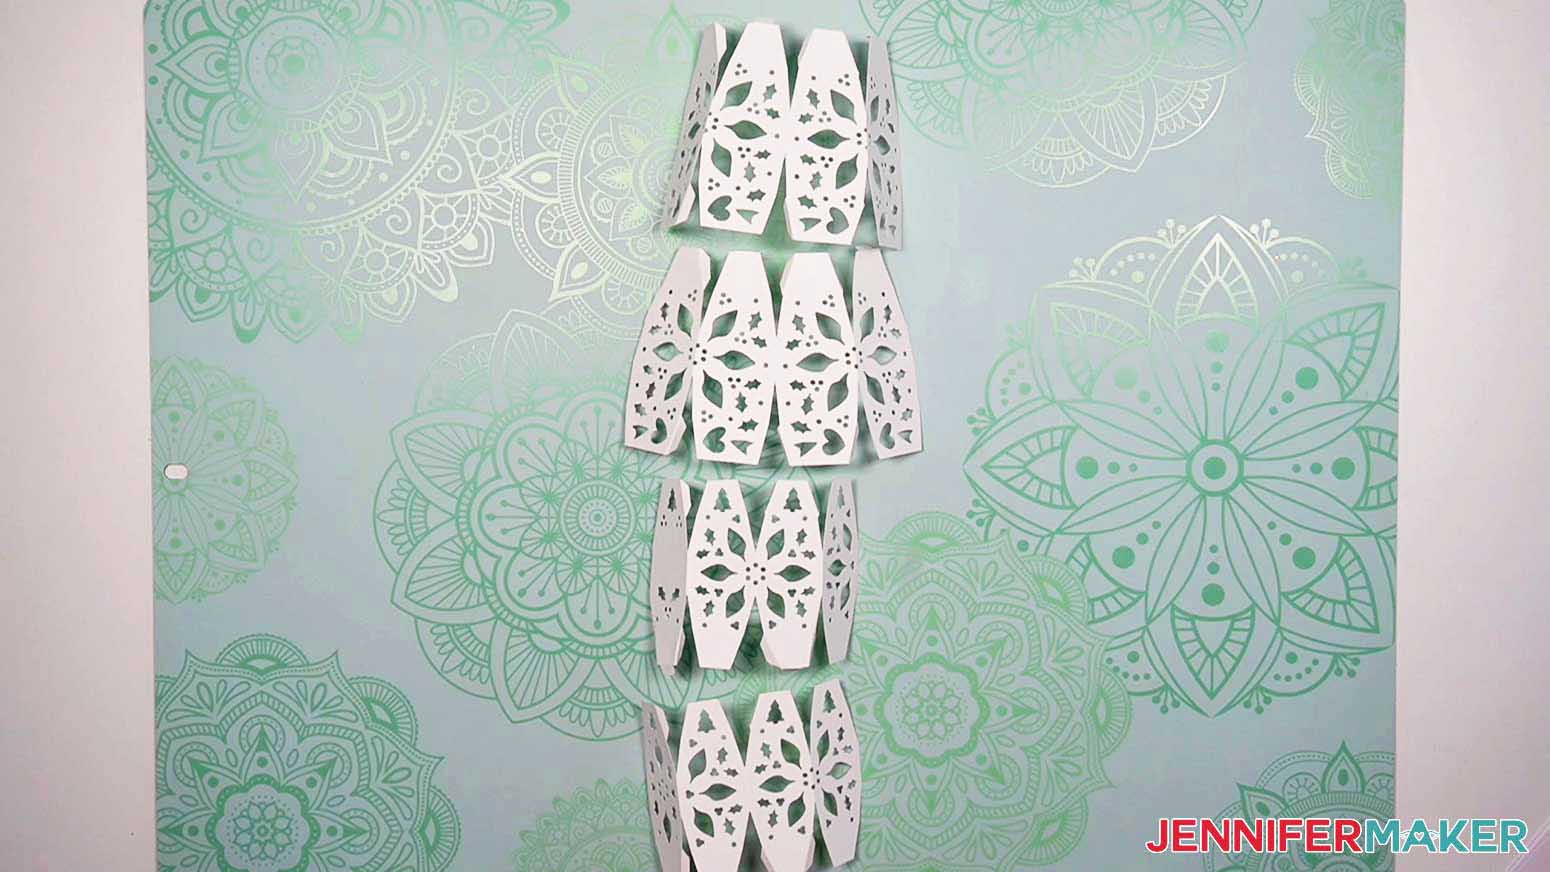
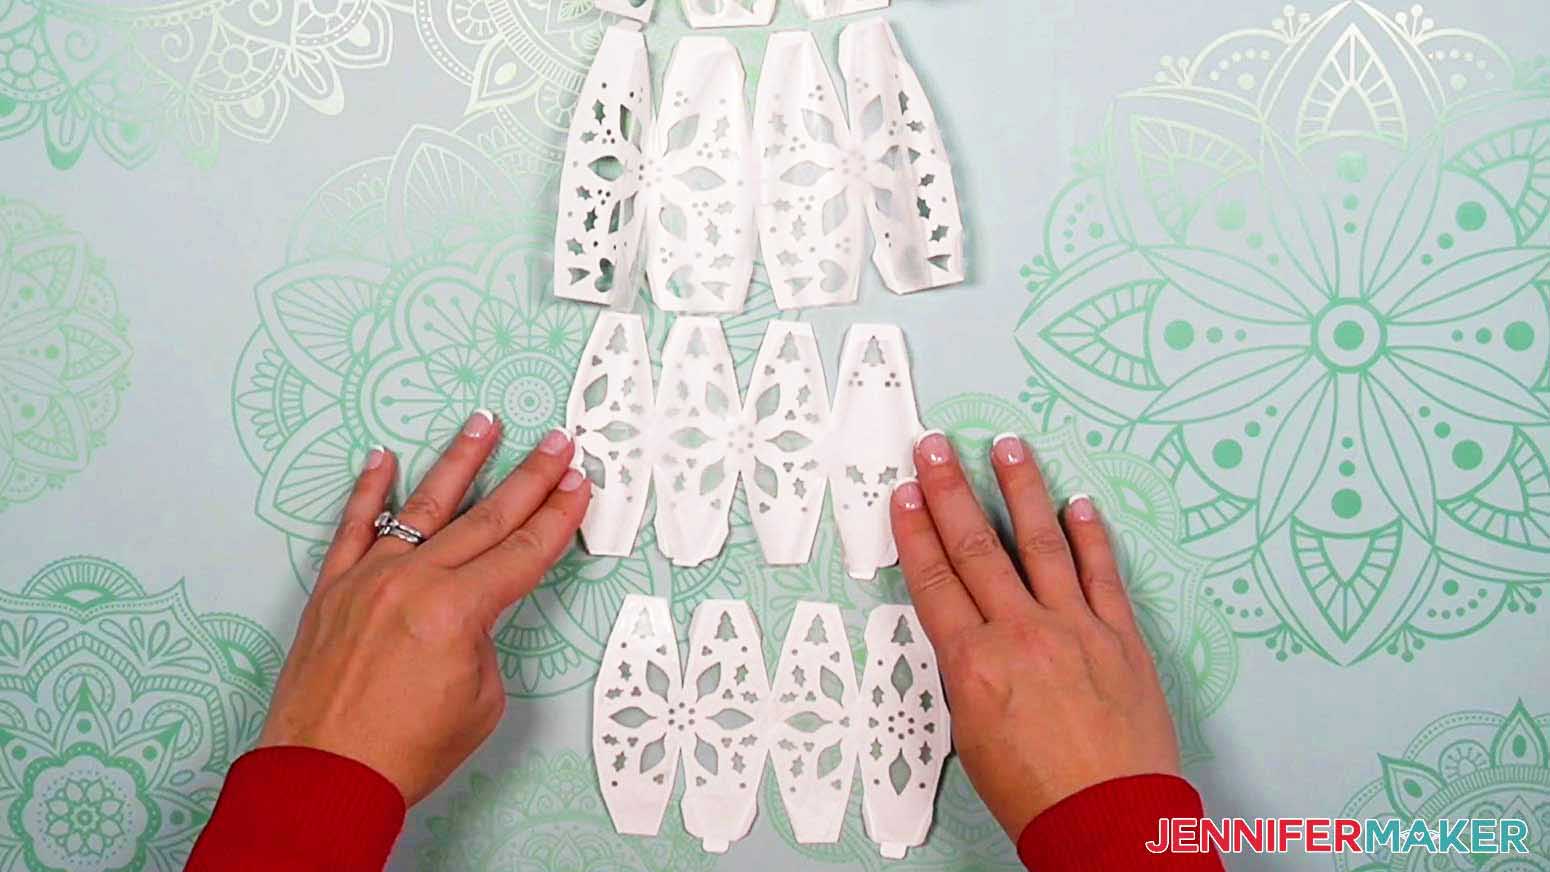
Here's what the cut pieces for my Christmas 3D Light Up Snowman look like.

STEP 4: ASSEMBLE YOUR LIGHT UP SNOWMAN
To begin, lay a piece of butcher paper down on your work surface to keep your cut pieces nice and clean while working.
Assemble the Body and Head Shapes
Place your four white pieces with cutout designs for the body (two of Piece A) and head (Pieces B and C) face down. Use a scraper to fold all the tabs (other than the two at the top or bottom) in the same direction. Also fold along the three center connections of each piece.

The important thing to remember is to fold all the tabs in the same direction -- otherwise they won't glue together properly. Keep the pieces in the same orientation with the tabs in the same spots. This way, you won't accidentally turn one around and end up gluing it the wrong way.
If you're using the wax paper, match up the pieces so they line up nicely at the edges with about 1/8" of cardstock showing. The two smaller pieces (Piece E) go with the head and the two larger ones (Piece D) go with the body. You may need to rotate or flip your wax paper pieces around to get them lined up just right.
Now you can glue the wax paper to the cardstock's back, one section at a time. Lift up the wax paper from a section and put a thin line of glue around your cutout design on the cardstock, making sure to avoid the cutouts themselves.
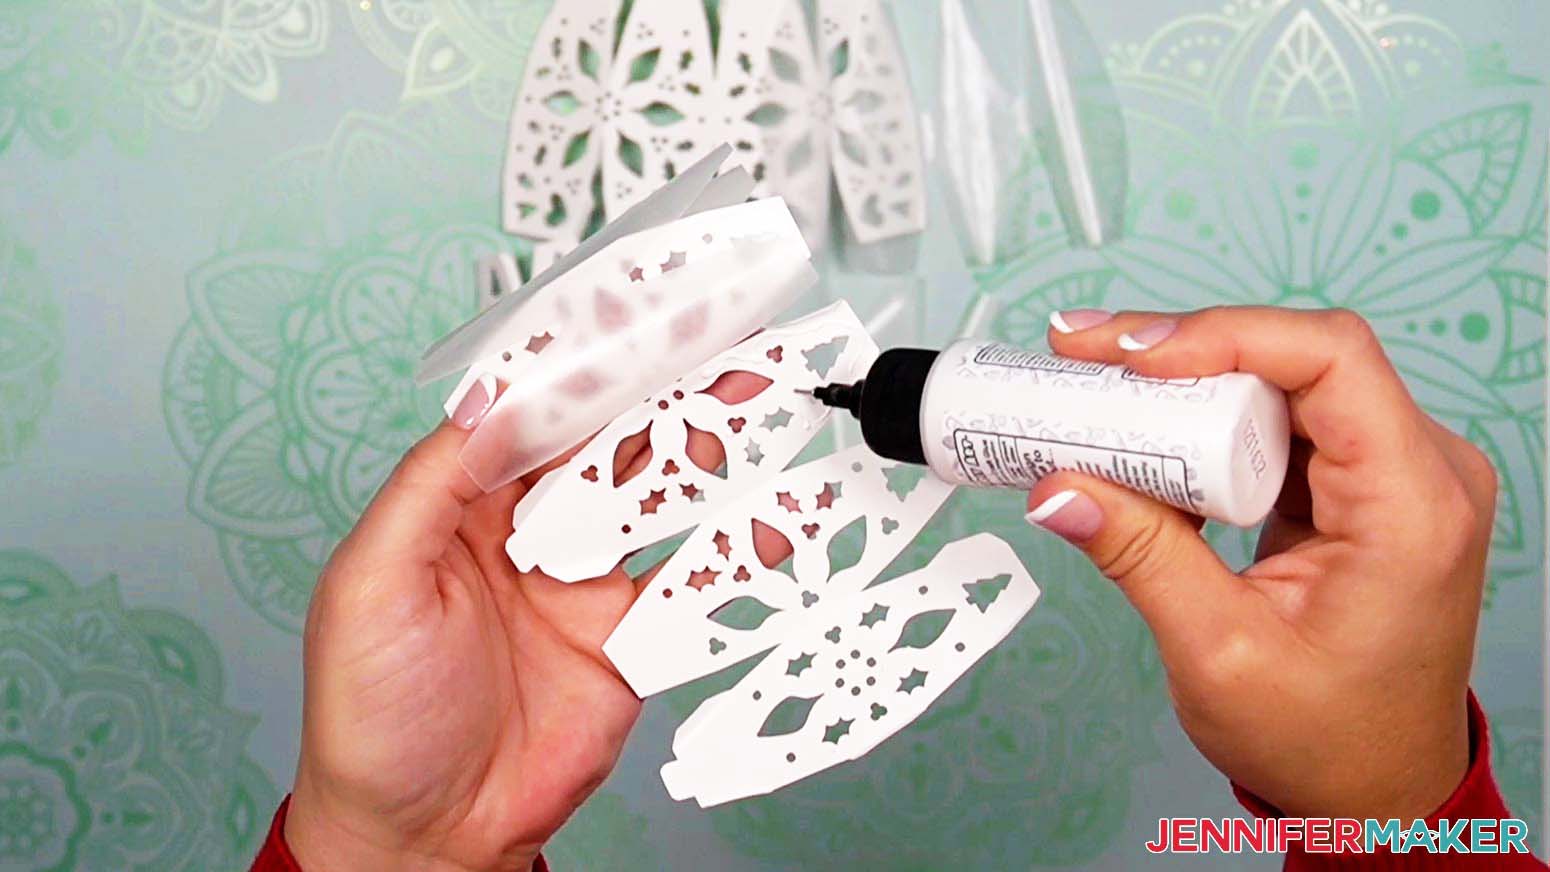
Then, press the wax paper down and make sure it’s positioned correctly before the glue dries. Wait at least fifteen seconds before moving on to the next section so the glue is set and the wax paper stays in place.
Continue with the rest of your sections until the entire wax paper piece is attached. Then, follow the same steps to attach the other three wax paper pieces to their respective cardstock pieces.
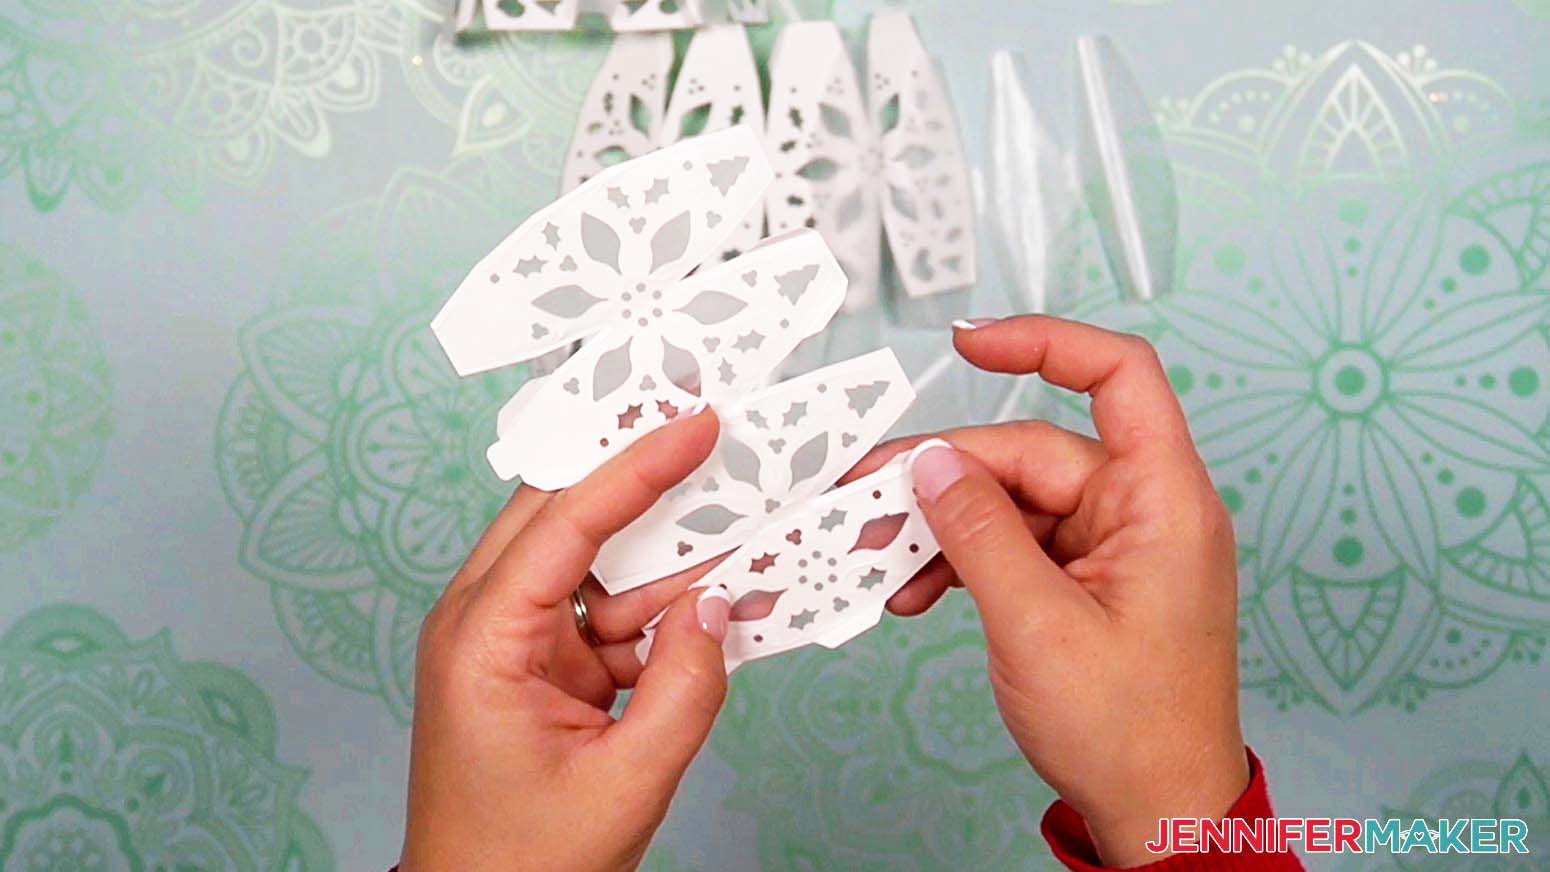
Now we'll use the vertical creases and six inner tabs to help each piece take shape. Add a bit of glue on each tab's front and press it to the back of the adjacent section, making sure the edges line up. Hold it for at least fifteen seconds before gluing your next tab. It doesn’t matter in what order you glue the tabs, just as long as you attach all six before moving on.
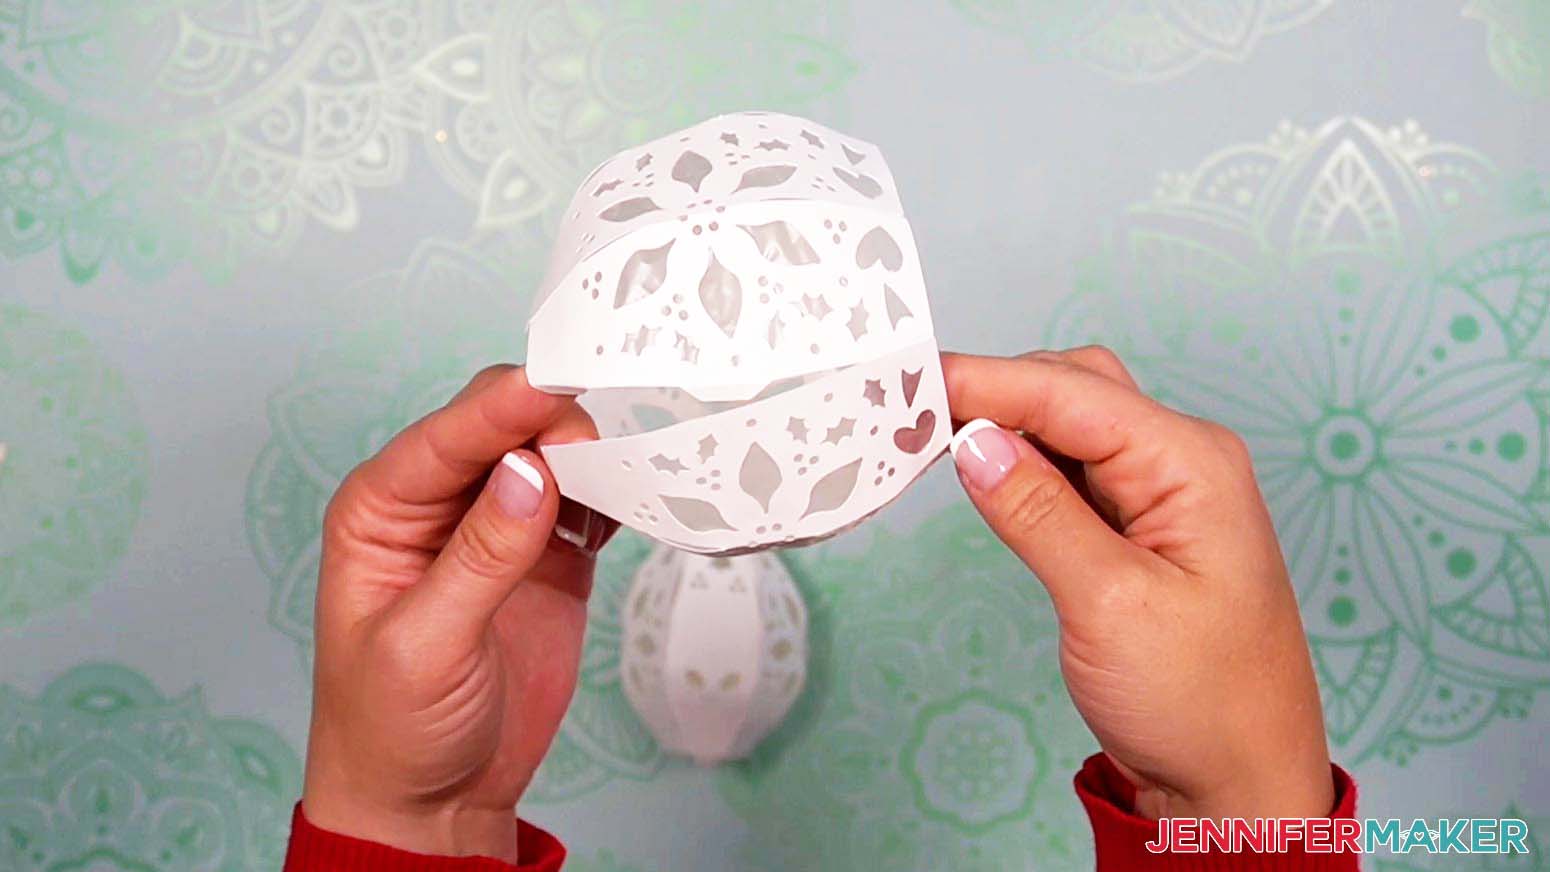
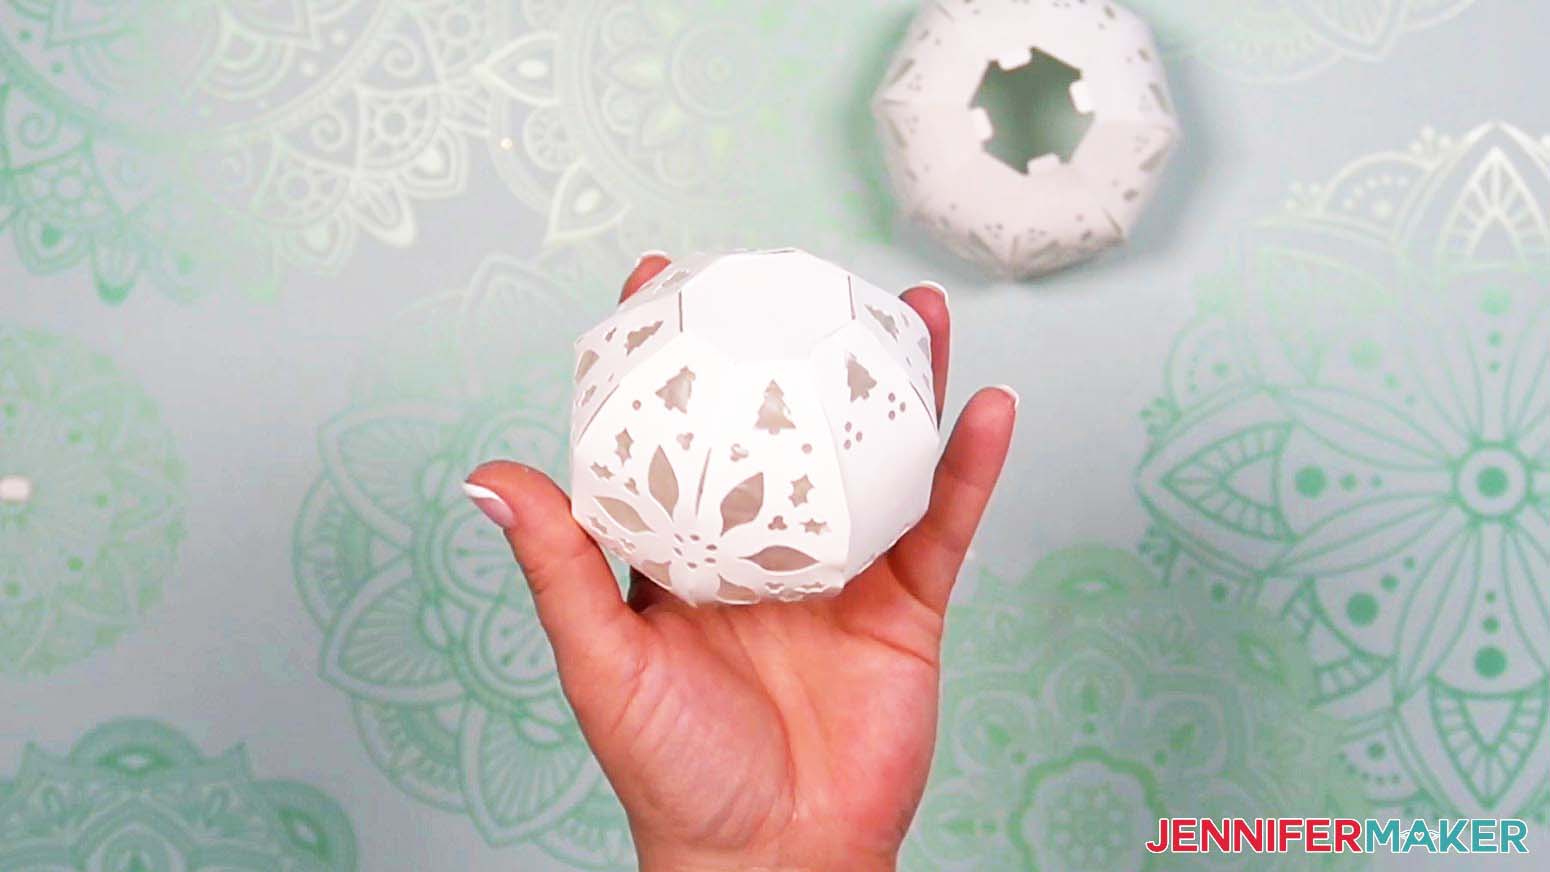
Once the tabs are attached on each of your four pieces so they’re making curved shapes, we can make the head and body spheres.
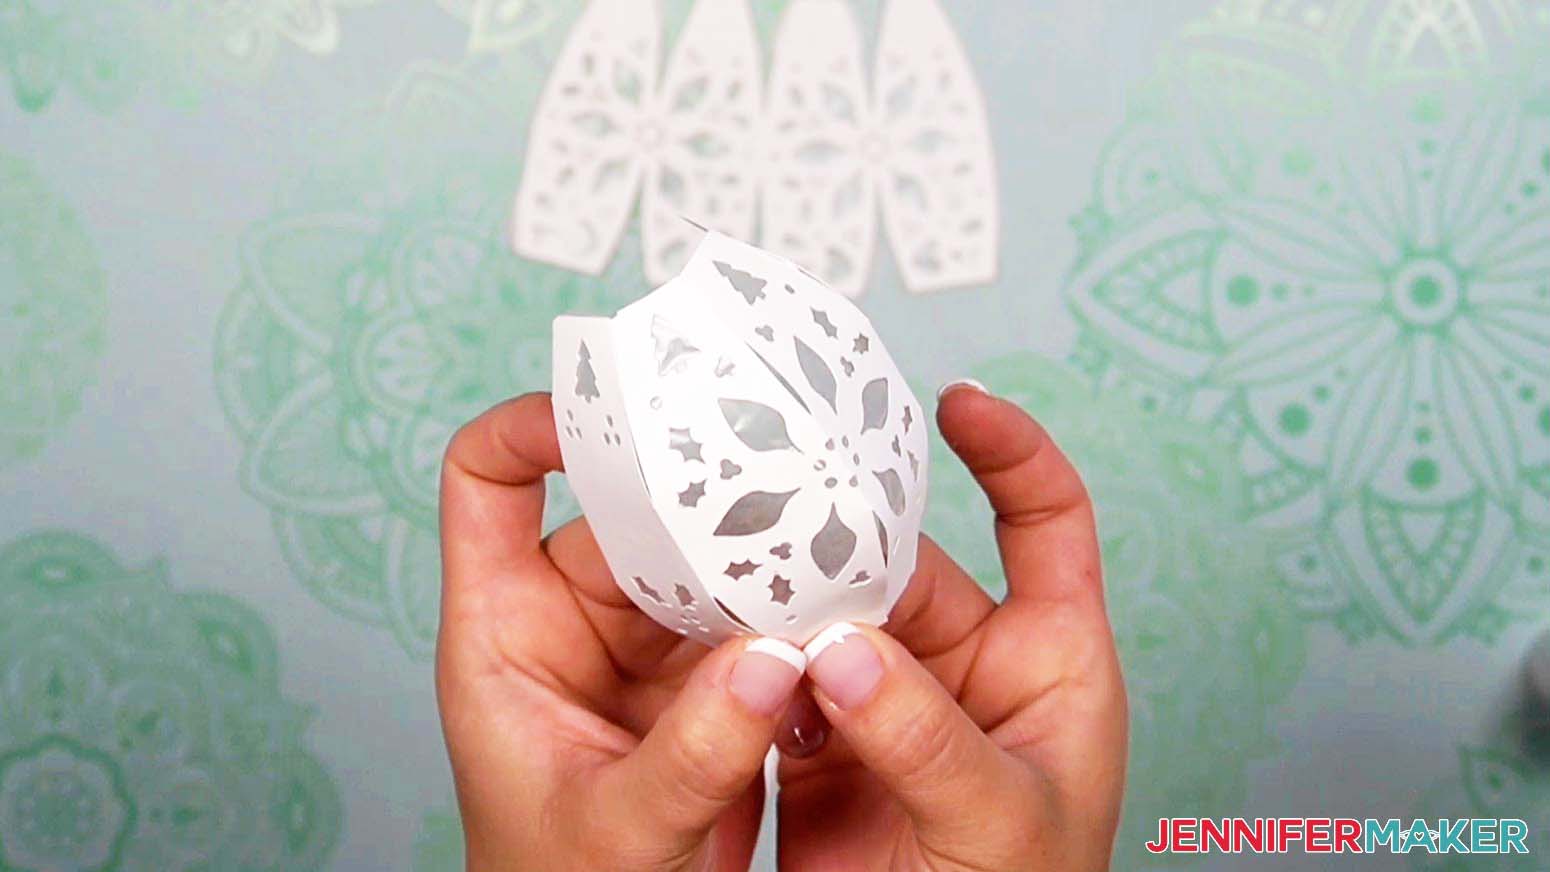
Place the two larger body pieces on their sides with the flat bottoms facing you. You’ll notice there are three tabs along one vertical edge of each piece and the other edge is smooth. Add glue to the top tab on one of the pieces. Then attach that tab to the back of your other body piece -- on the smooth vertical edge -- so your two pieces curve in toward each other and the edges are aligned.

Then attach the center tab following the same process, and finally attach the bottom tab. If you have trouble holding the tabs in place, a spatula can help. When you’re finished, your combined piece should look similar to mine, with one vertical seam connected and the other still open.
The first seam needs to be totally dry before we work on the other, or it could come apart. So repeat the process above to attach your two head pieces together along one vertical seam. For the head, the assembled pieces will be smooth at the top and have tabs at the bottom, which will eventually connect to the tabs on the top of the body sphere.
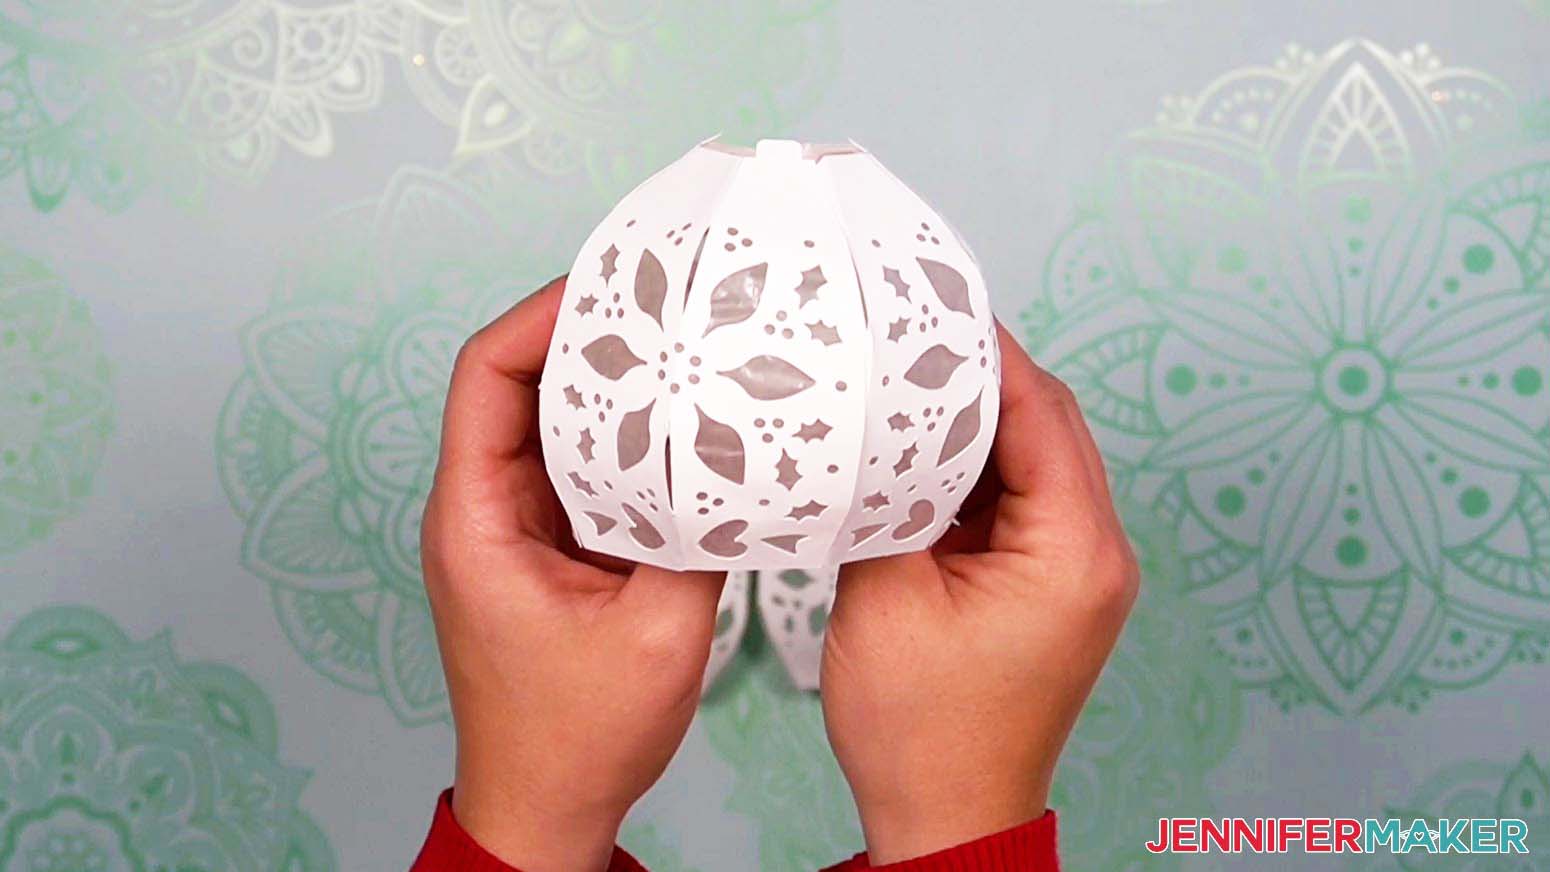
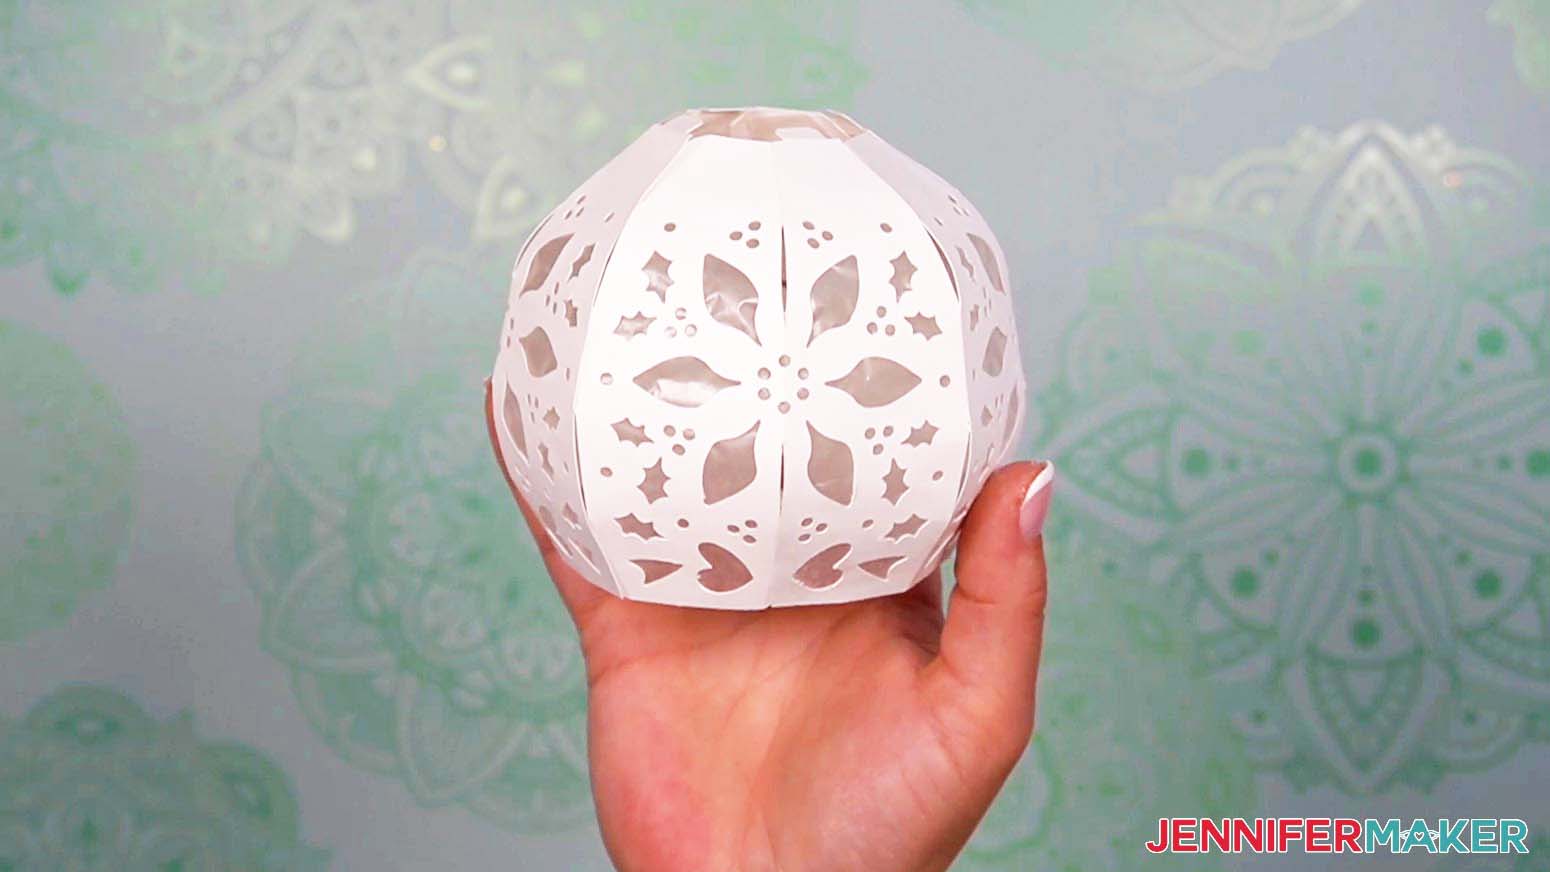
Now we can make our two pieces into spheres by closing up the other seams! Start with the body piece. Apply glue to the bottom tab along the side -- this will be the wider end of your sphere. I found that it was easiest to hold the shape together when I started with this tab. You may need to wait longer than fifteen seconds for the glue to set and hold the tab in place permanently, as the pieces will naturally want to curl inward.
After your bottom tab is attached, you can add glue to the center tab and press it to the inside of your sphere. You may need to put one hand inside the sphere while the other remains outside so that you can press and hold the tab in place from both sides.
Finally, add glue and attach the top tab to complete your snowman’s body.
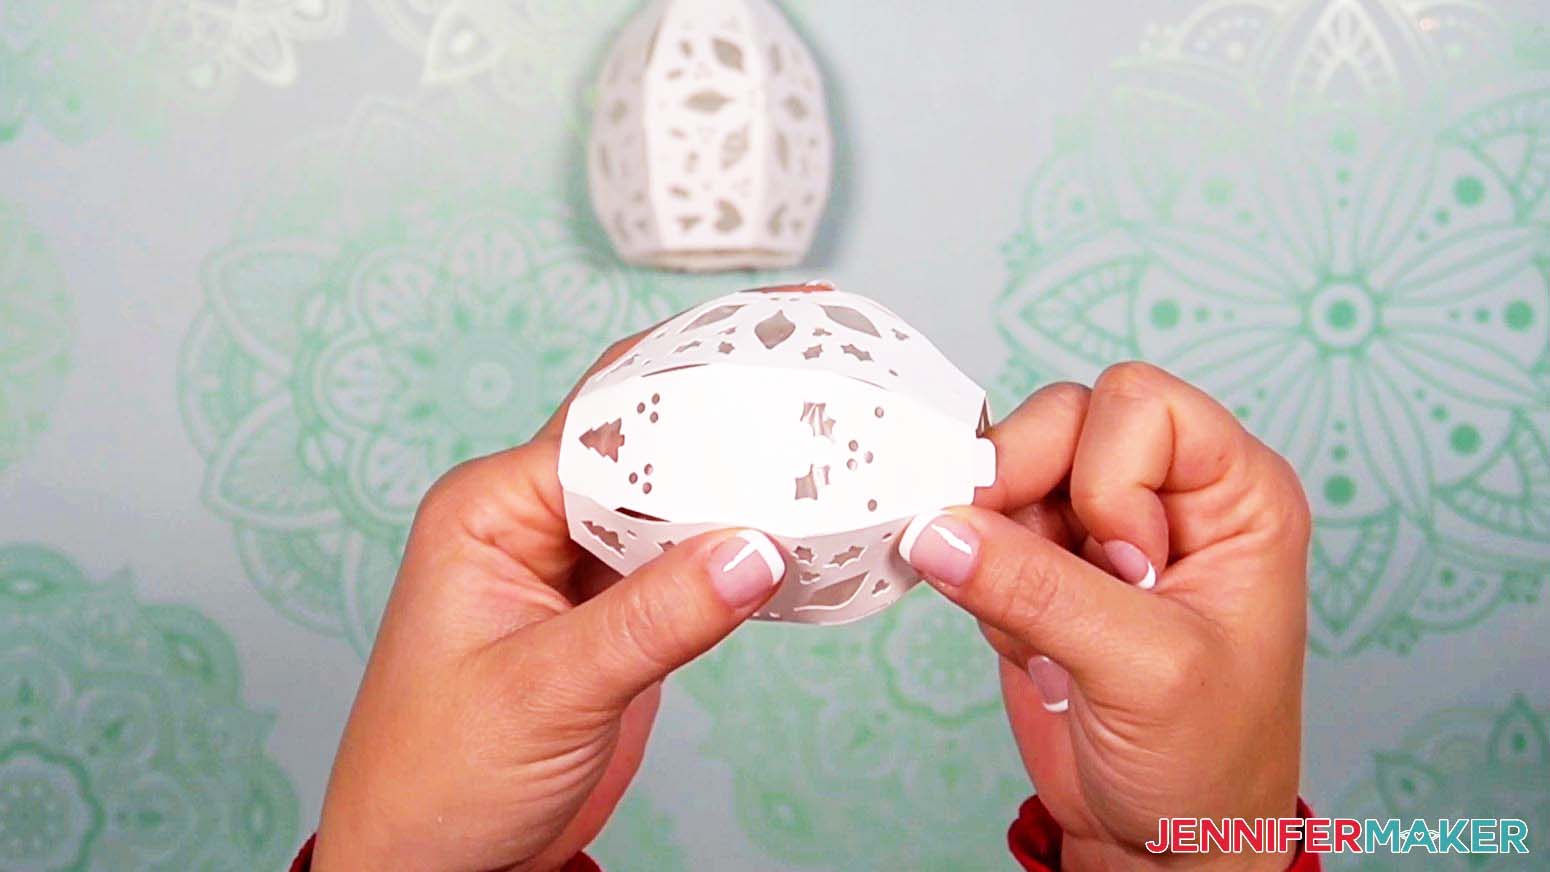
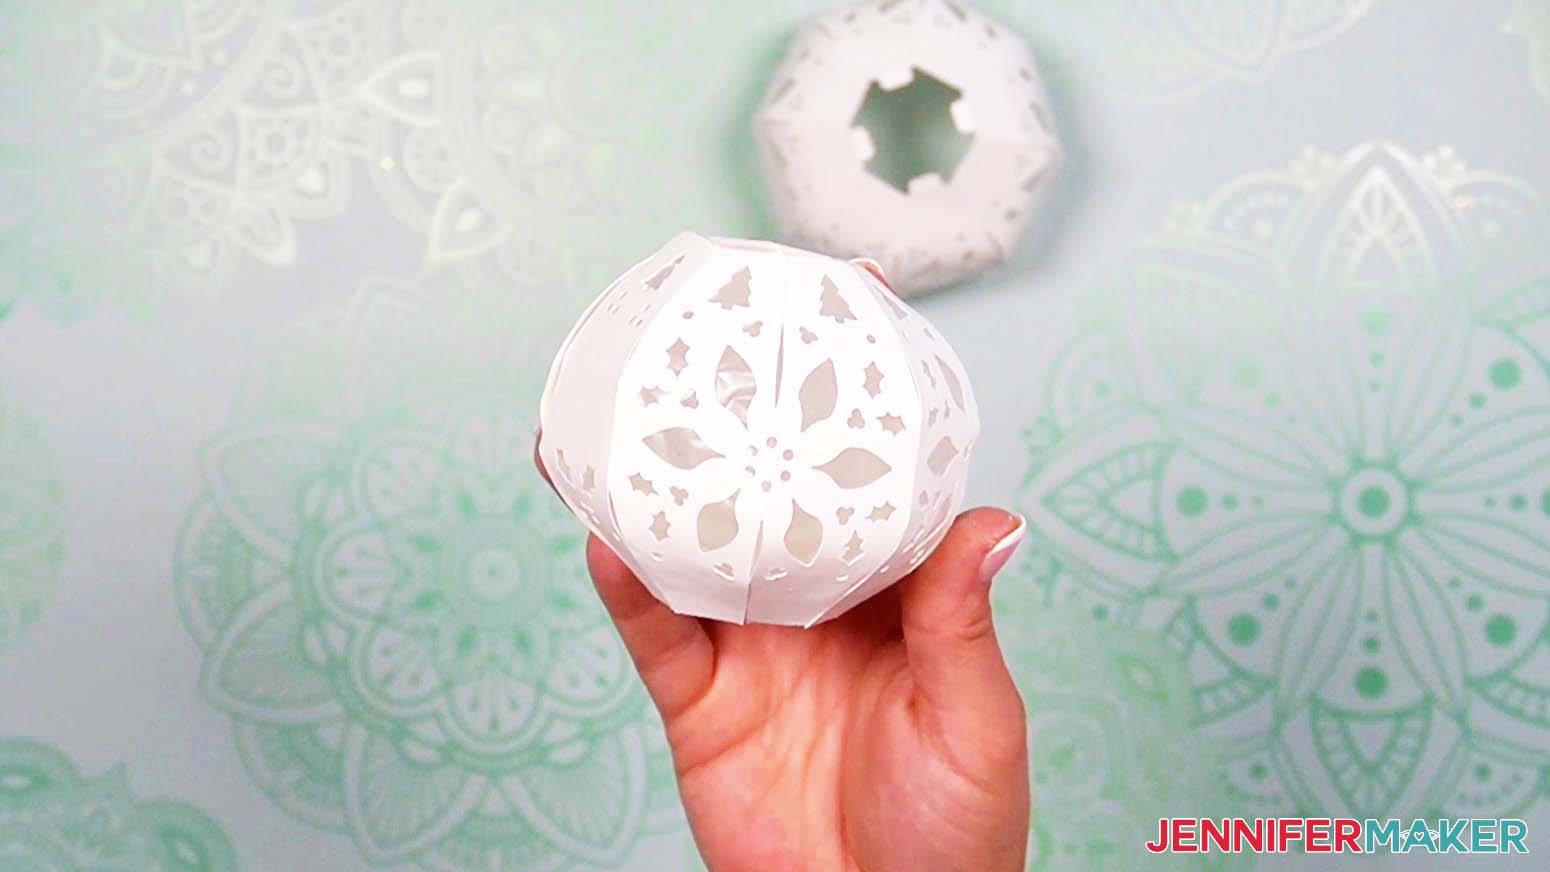
Repeat the process above to attach your three remaining tabs on your head piece to make it into a smaller sphere shape. Start at the top -- not the center -- and be patient while waiting for the glue to dry between tabs.
TIP: When gluing the center tab in place, you probably won’t be able to fit your entire hand inside the sphere, but you can push from the inside with your finger or your Cricut spatula.
Add the Face
Let’s finish the snowman’s head by adding the top piece and the face!
First, find the square-shaped Head Top Piece with rounded edges (Piece F). Use your scraper tool to help you fold the four tabs around the outside edge upward.
Now place it on top of the head so the edges are aligned. Add a small amount of glue to one of the tabs and push it down so it's against the inside edge of the head. Hold it in place until the glue dries.
TIP: Use your Cricut spatula to help you press against the tab from the inside.
Now do the same thing for the other three tabs. Make sure to hold each tab in place with your finger or spatula until the glue dries.
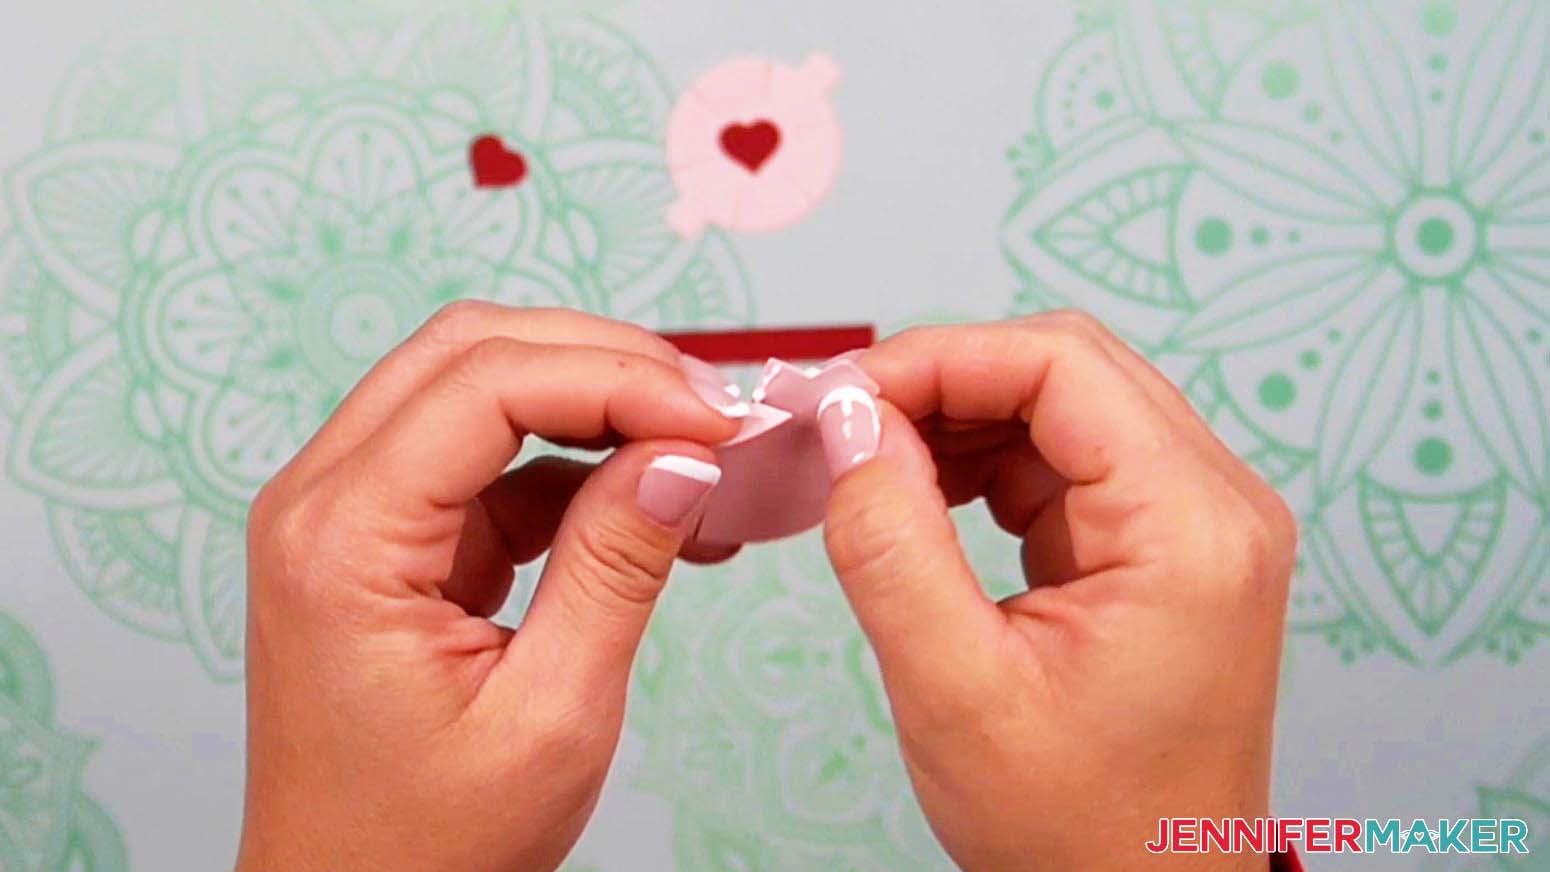
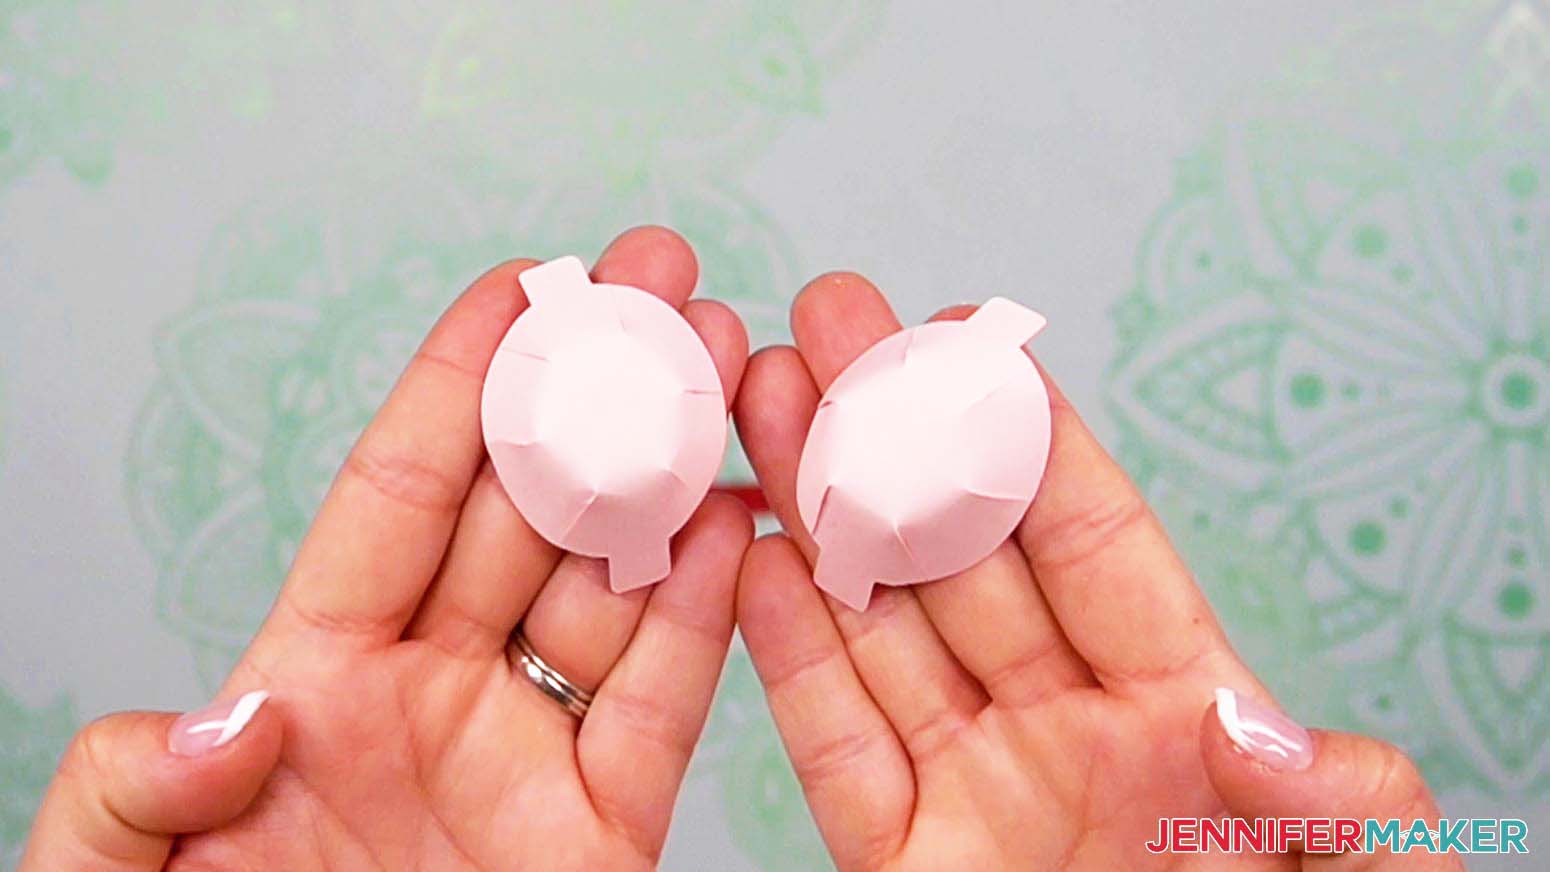
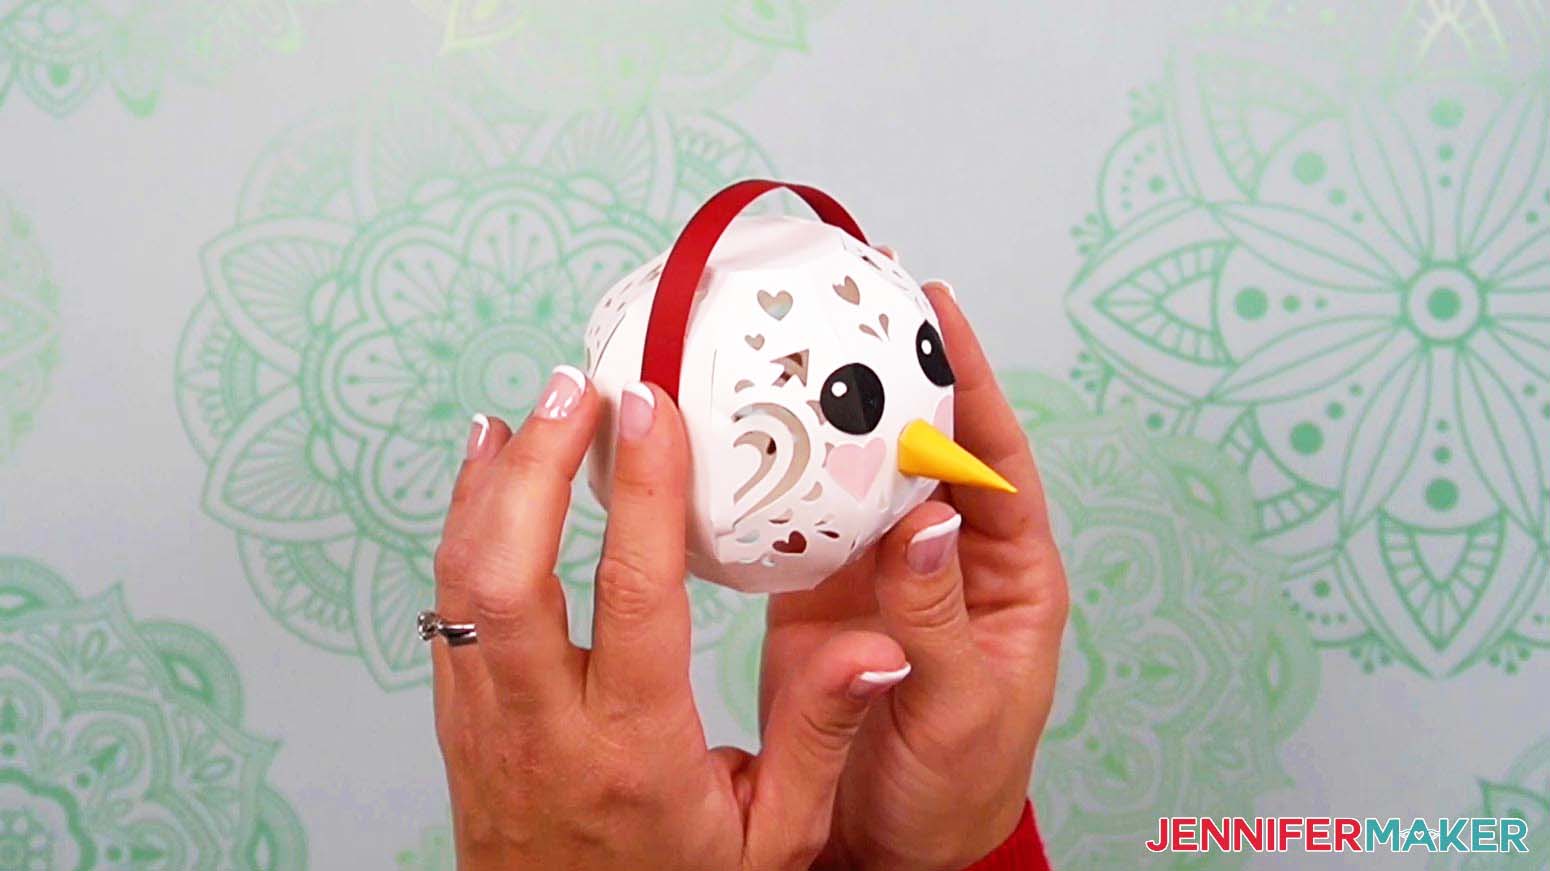
Now let’s add the face! Find the two eyes (Piece G), two heart-shaped cheek pieces (Piece H), and orange nose piece (Piece I).
Fold the eyes and cheeks along the center crease lines. Use your scraper tool to help if needed.

Now take your nose piece and wrap it into a cone shape to make it look like a carrot. The pointed end will be the tip of the nose. I wrapped the piece around my Cricut pen to encourage the cardstock to curve without bending or creasing.

Roll the ends of the piece together between your fingers until it forms a cone with the two tabs on opposite sides at the wider end. The edges of the cardstock will overlap each other just a bit.
Try to close up the tip of the nose as much as possible by rolling the cardstock tightly at that end.
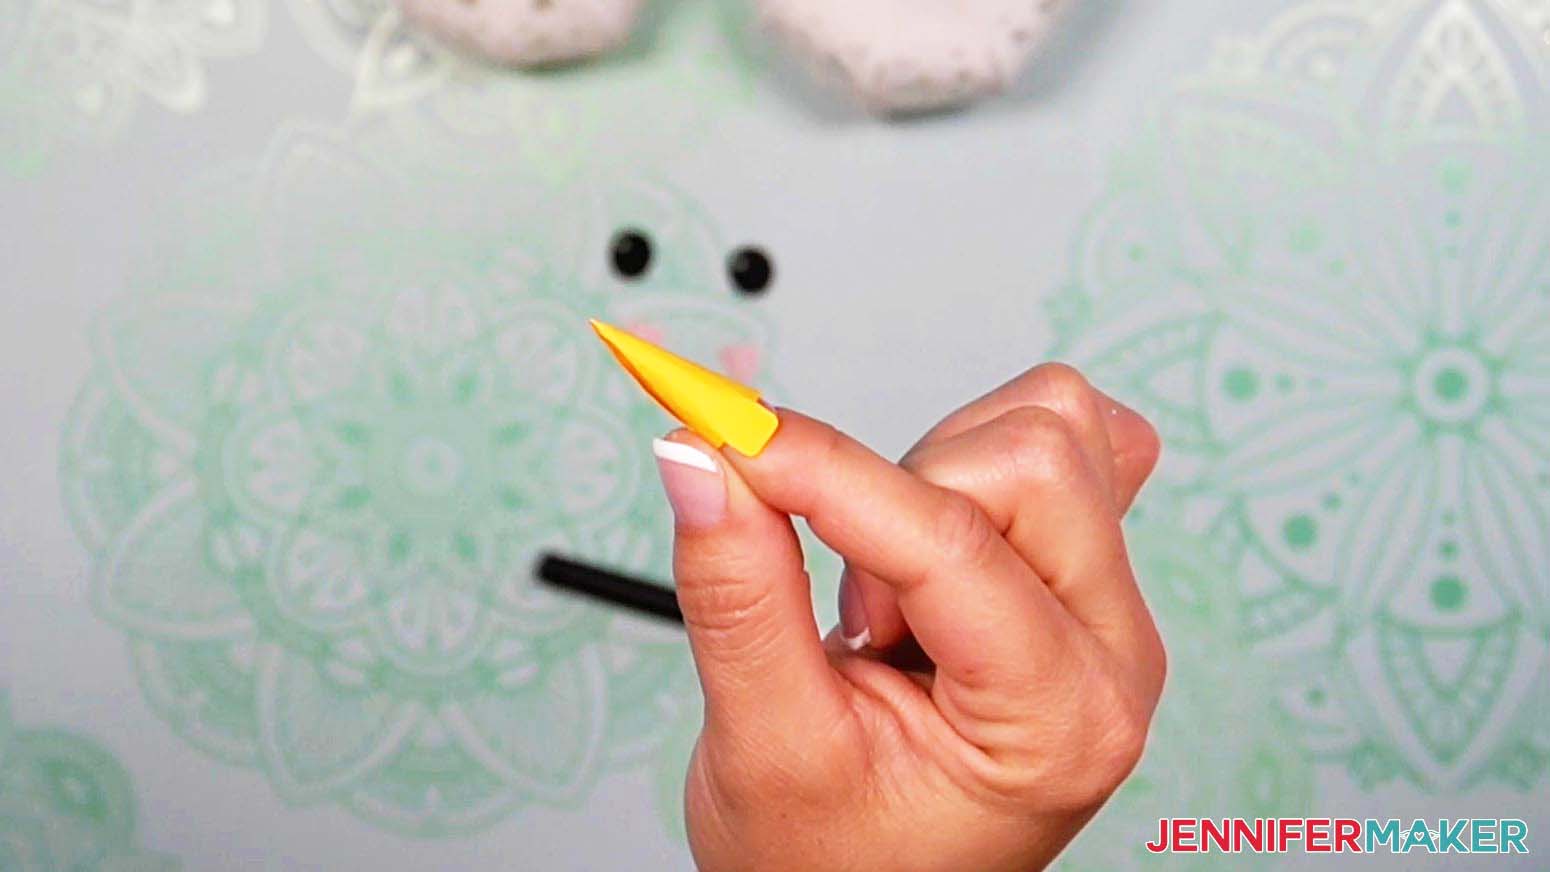
Apply a very thin line of glue along the edge of the overlapped area to hold the two ends together. Press down until the glue dries, which will take at least fifteen seconds.
Fold the two tabs inward until they’re perpendicular to the sides of the nose.
Now you can attach the face pieces starting with the eyes. Find the front of the head, the flat section with a blank space in the center.
NOTE: If you’re making the Winter or Valentine’s Day designs, the front of the head will be the section with three semicircle cutouts below the blank space.
Apply glue to the back of the eyes, avoiding the small cutouts. Make sure the two cutouts -- the reflections in the eyes -- are facing the same direction. Press the center of each eye onto the slit above each fold on the left and right of the front head section. Try not to cover any of the cutout designs at the top.

Now add the heart-shaped cheek pieces just below the eyes on each side using the same method.
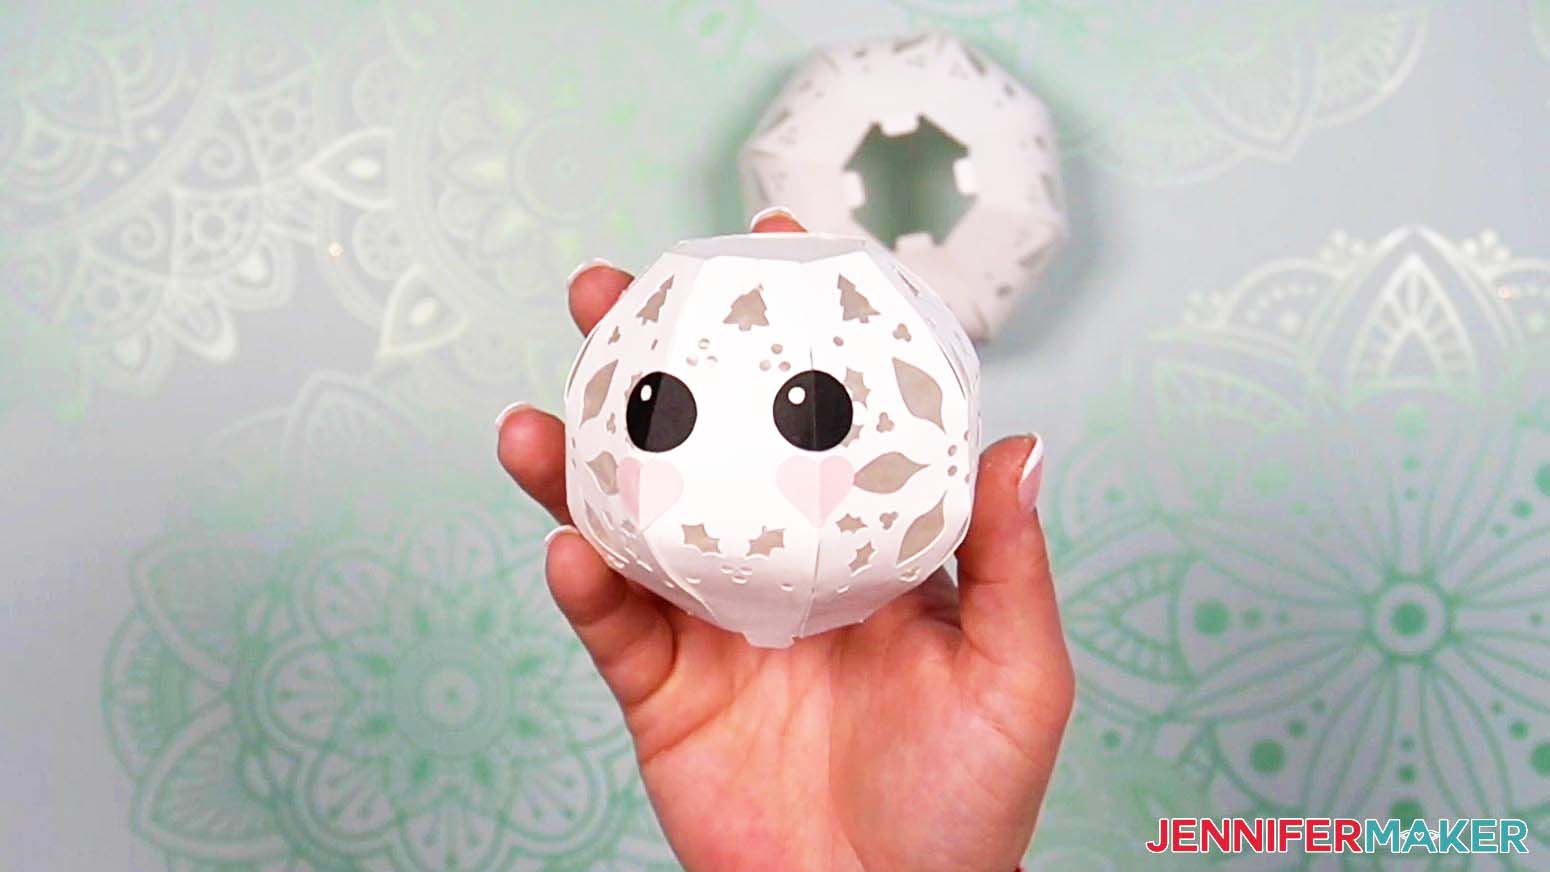
Finally, attach the nose. Apply glue to the two tabs and then position the nose on the face so the tabs are on the left and right sides and the nose is centered between the cheeks. Press the nose against the face with a bit of pressure to make sure the tabs are well adhered. Hold the nose in place for at least twenty seconds so the glue can fully dry.
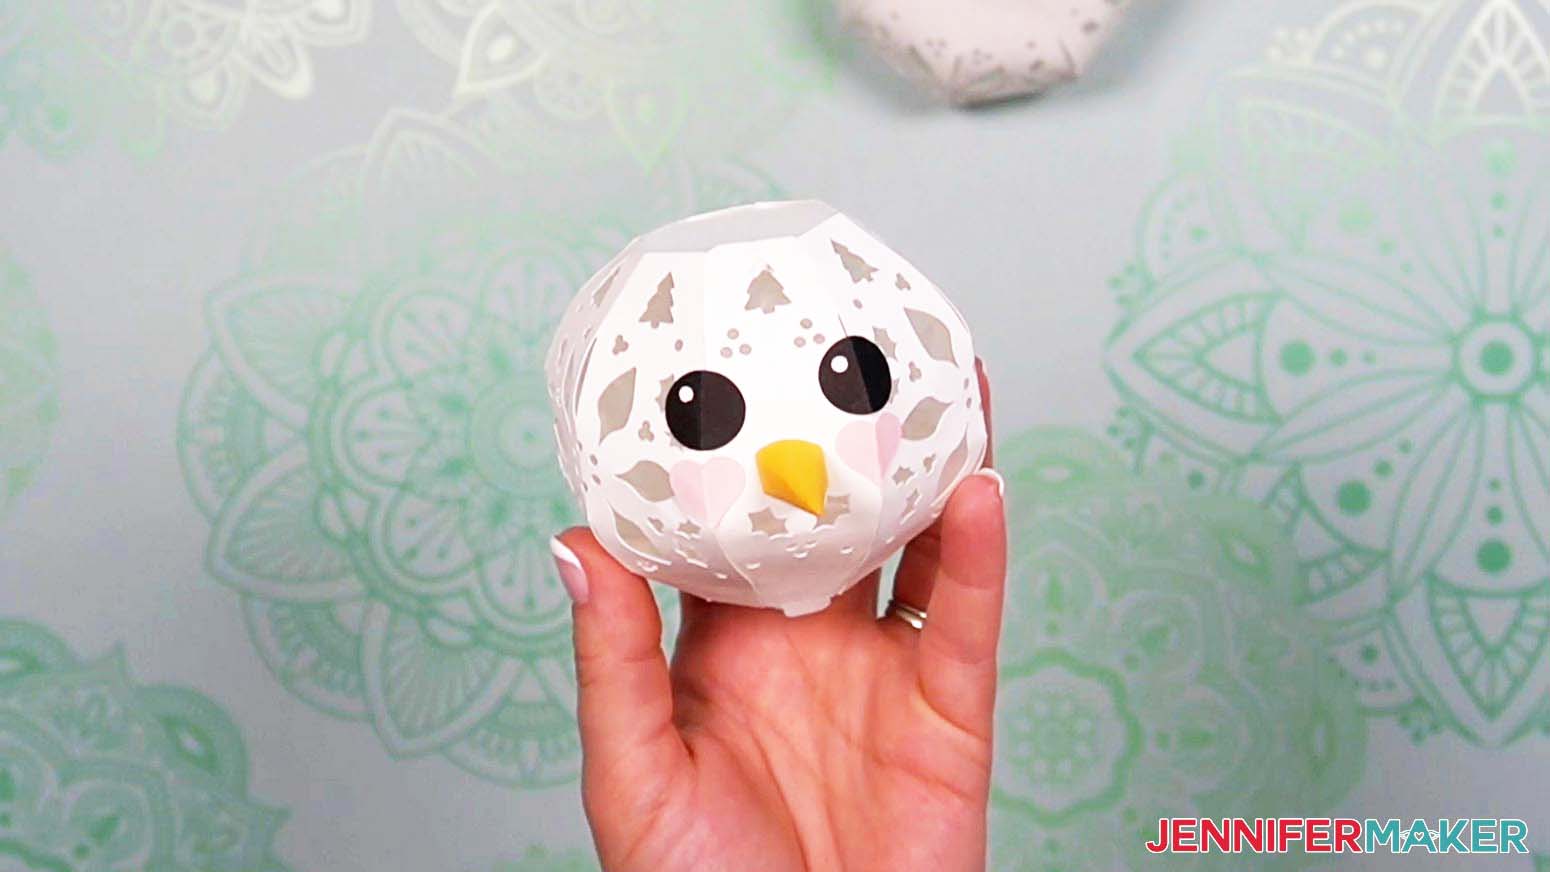
Our snowman has a face now! Isn’t it cute? Set the completed head aside for now.
Assemble and Attach the Arms
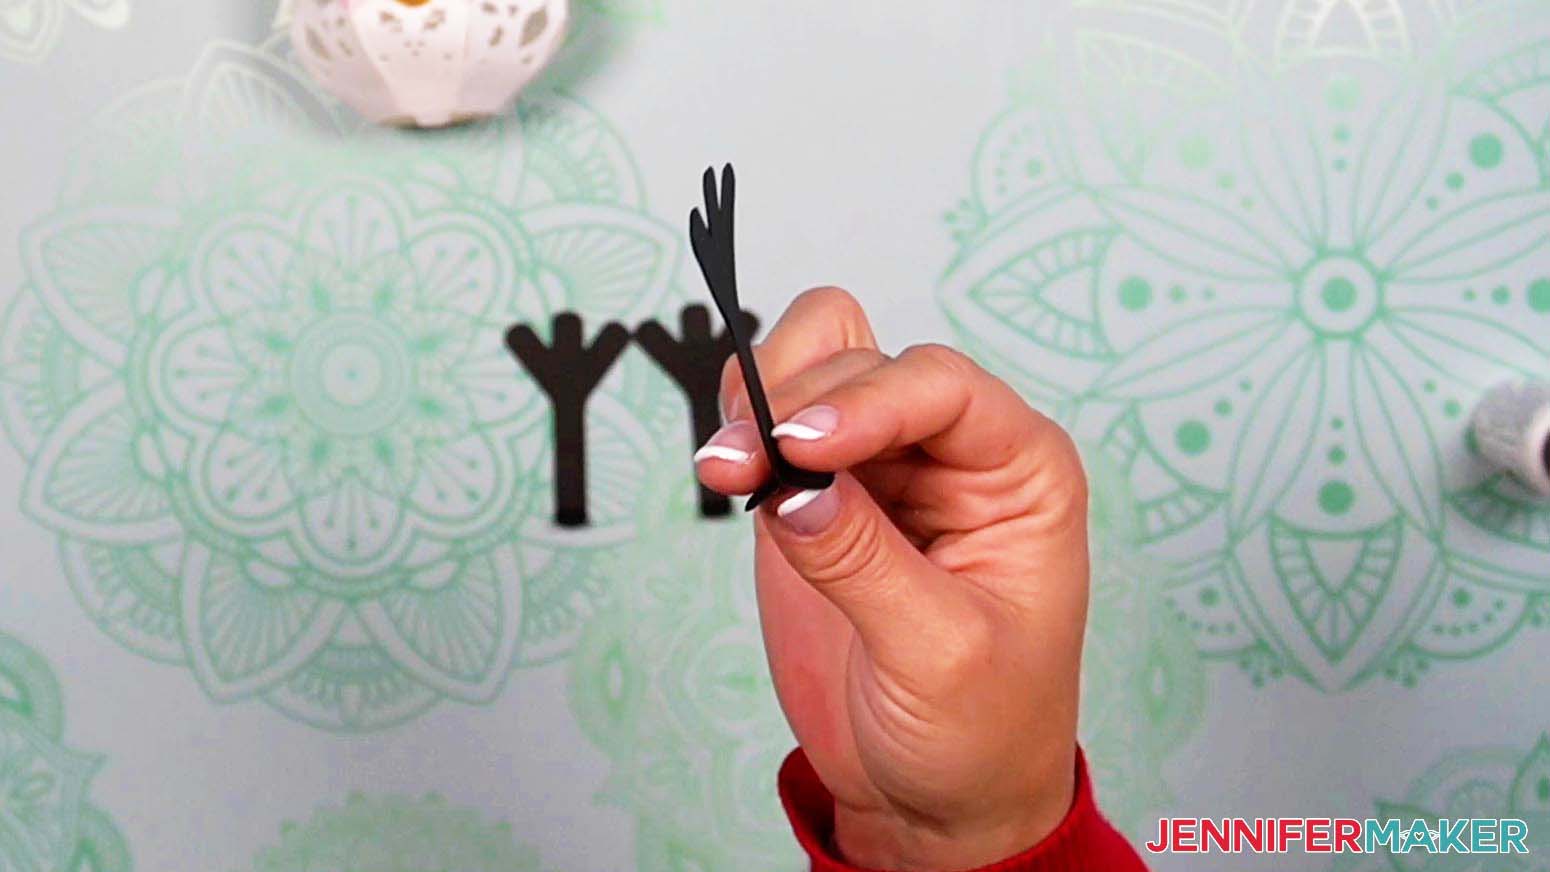
Now for the arms (four of Piece J). Fold the tabs at the bottom of each piece upward.
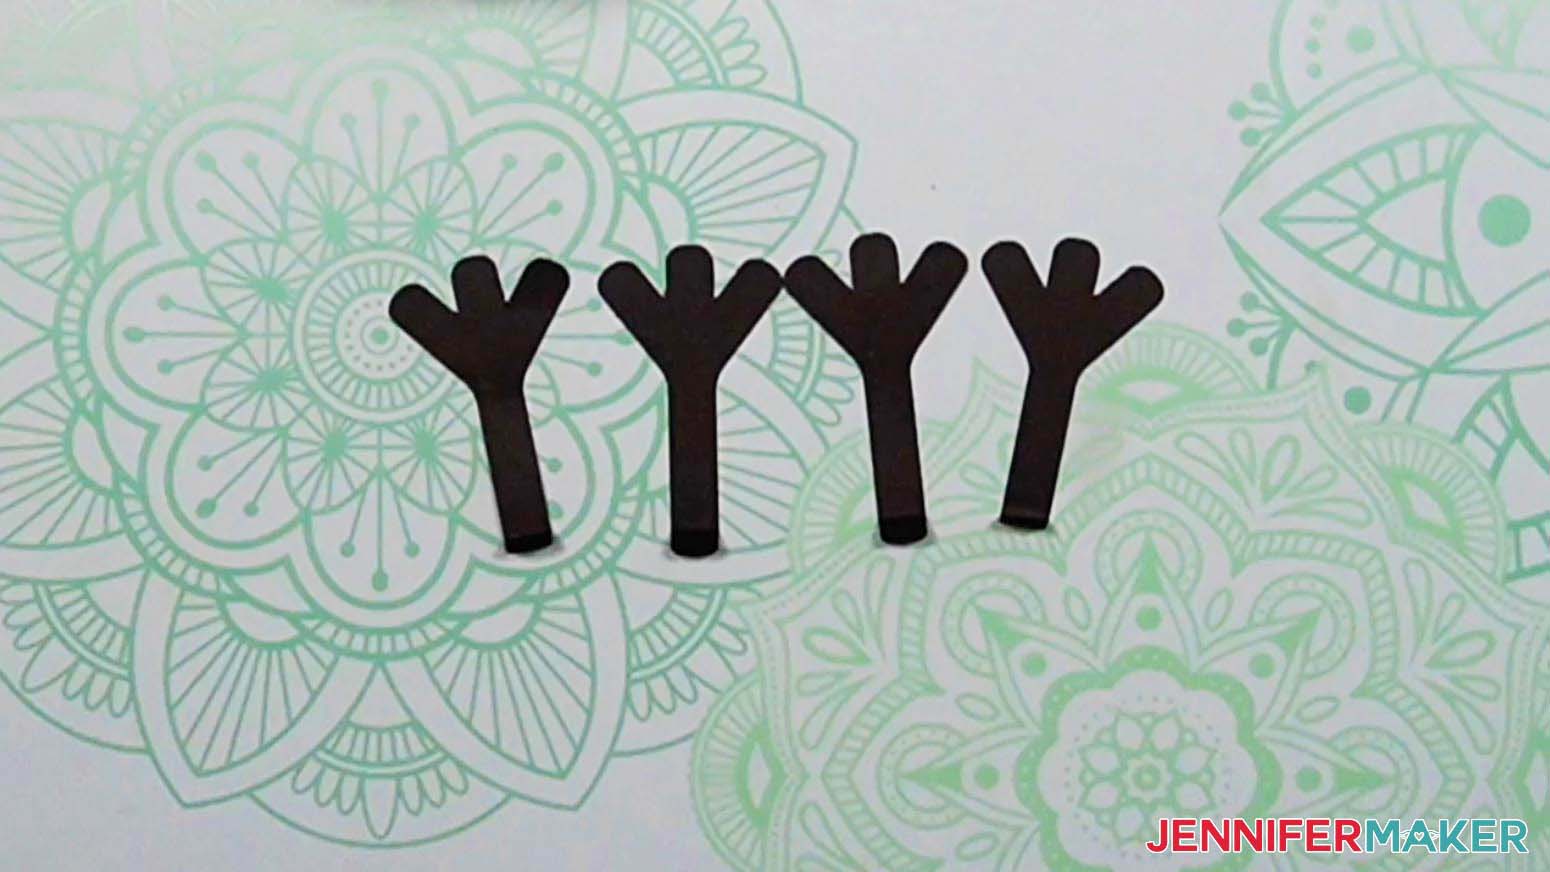
Then take two of the pieces and place them back to back so the tabs are facing outward. Add a thin line of glue on the back of one piece and press them together. Do the same thing with the other two arm pieces.
To add the arms, make sure the front of the body is facing you. For the Christmas design, pick a section showing a full poinsettia with a fold down the center. There are four sides like this -- you can choose whichever one you want for the front.
NOTE: For the Valentine’s version, pick a full heart section with a center fold. The Winter version uses mittens instead of arms, but the front is a snowflake section with the same fold.
Now we need to insert the arms into the slits on the body piece. First, take an arm and press the two tabs together while sliding them into one of the top slits on the side of the body.

Flip the body piece over so you can see into it from the bottom. Carefully add a dot of glue to each of the arm tabs.
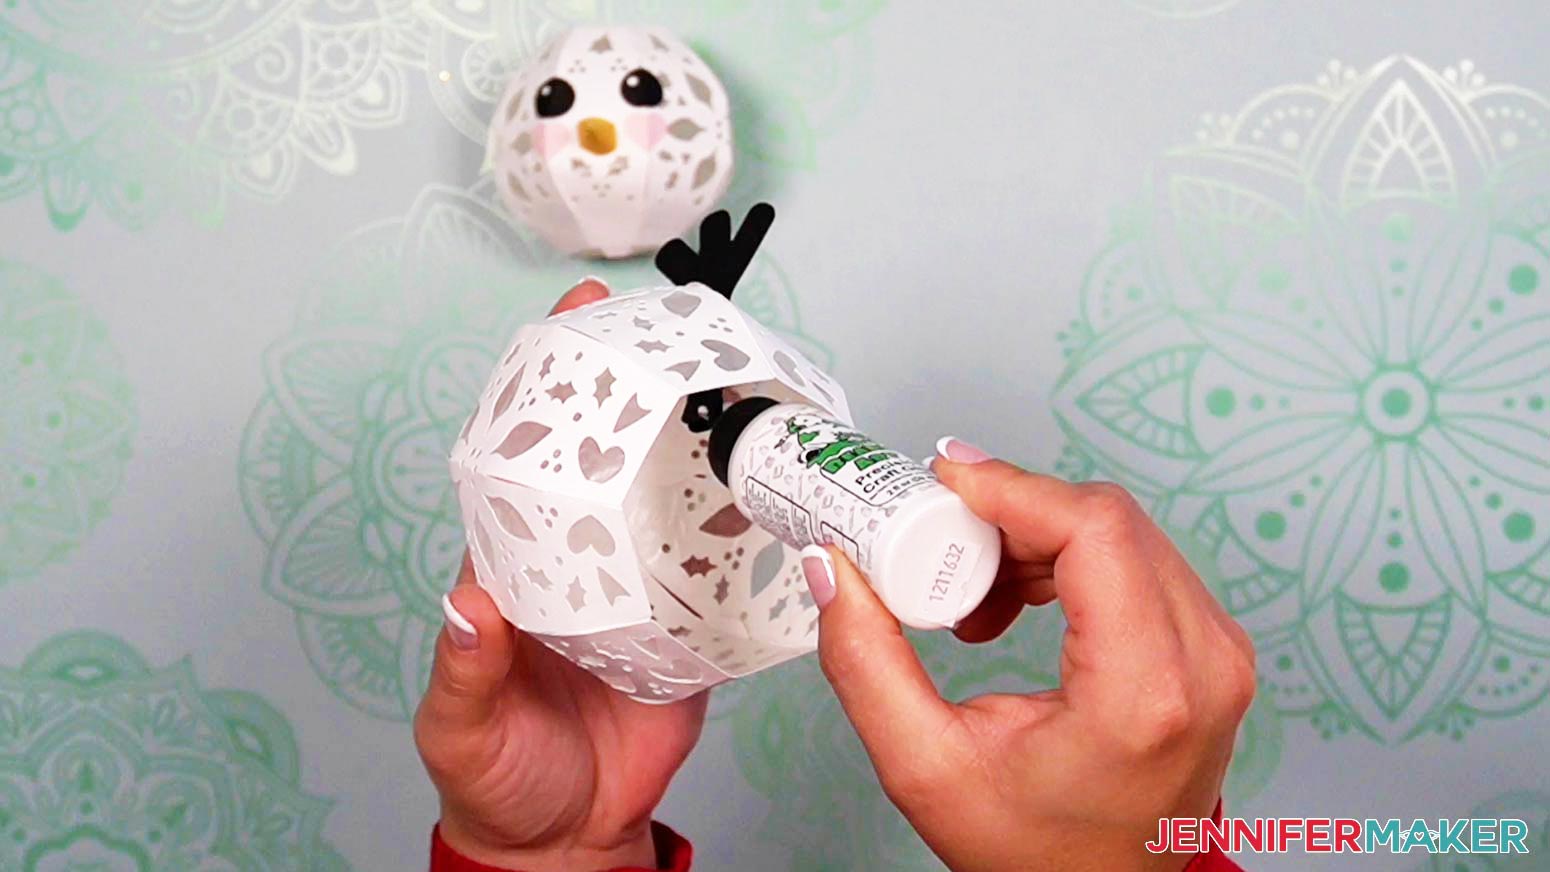
Press the tabs against the side of the body from the inside. Use your other hand to press against the tabs from the outside until the glue dries. I positioned my arms at the very bottom of the slit on the body. You don’t want them to be too high or they’ll get in the way of the scarf we’ll add later.
Once your first arm is attached, follow the steps above to attach the other arm on the opposite side of the body.
Variation: Add the Mittens
If you’re making the Winter design, you’ll have two cute mittens to add in place of the arms. Let me show you how to attach those!
First, find the two mitten-shaped pieces and the two rectangular trim pieces and two hearts of the same color. Your mitten trim pieces may be the same color as your scarf trim pieces, but the mitten pieces will be thinner.

Place your mitten pieces (Piece J) in front of you with the two thumbs facing each other. Add glue to the back of each trim piece (Piece L) and attach them to the bottom of each mitten. Then add glue to the back of each heart piece (Piece K) and attach them to the center of each mitten.
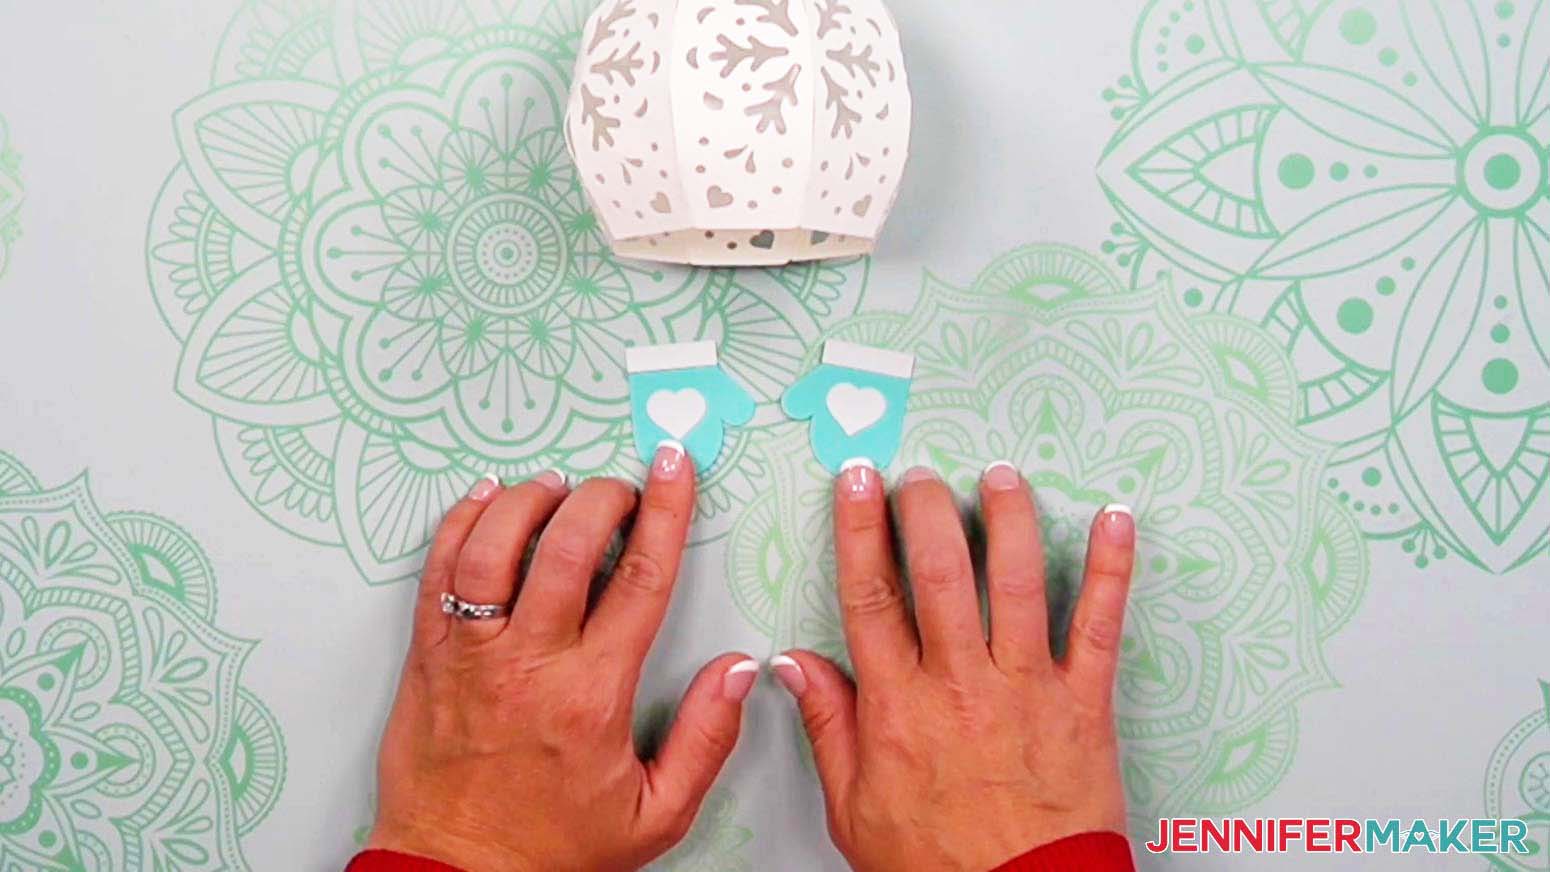
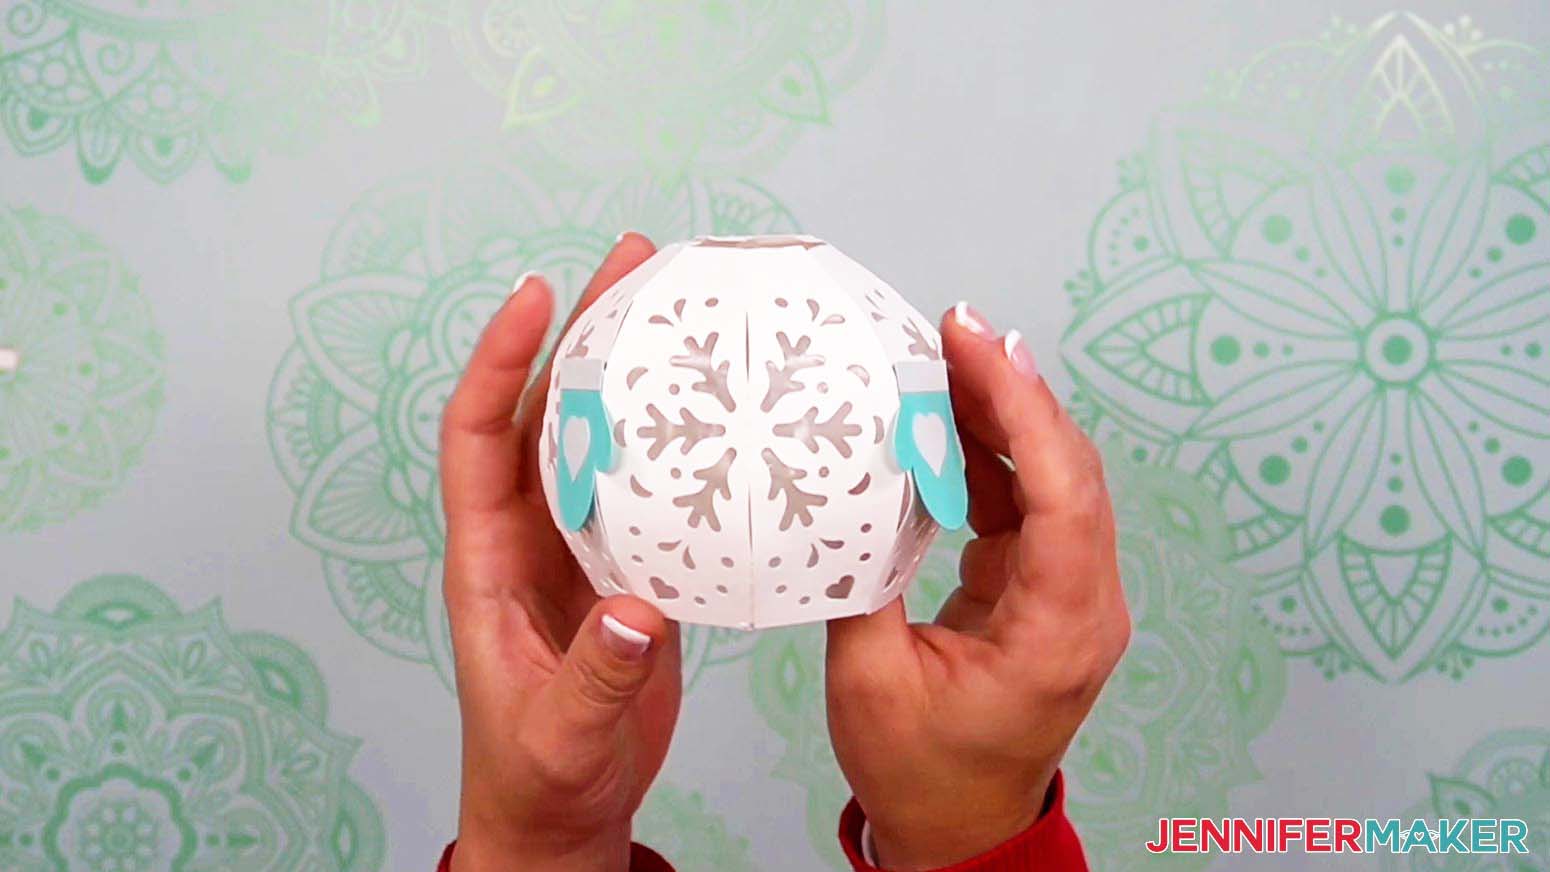
Now you can attach the mittens to the sides of your snowman’s body. Just make sure the thumbs are facing forward! Add glue to the back of each mitten and attach them on opposite sides of the center of your body. Make sure to attach them on a flat piece and not on a fold.
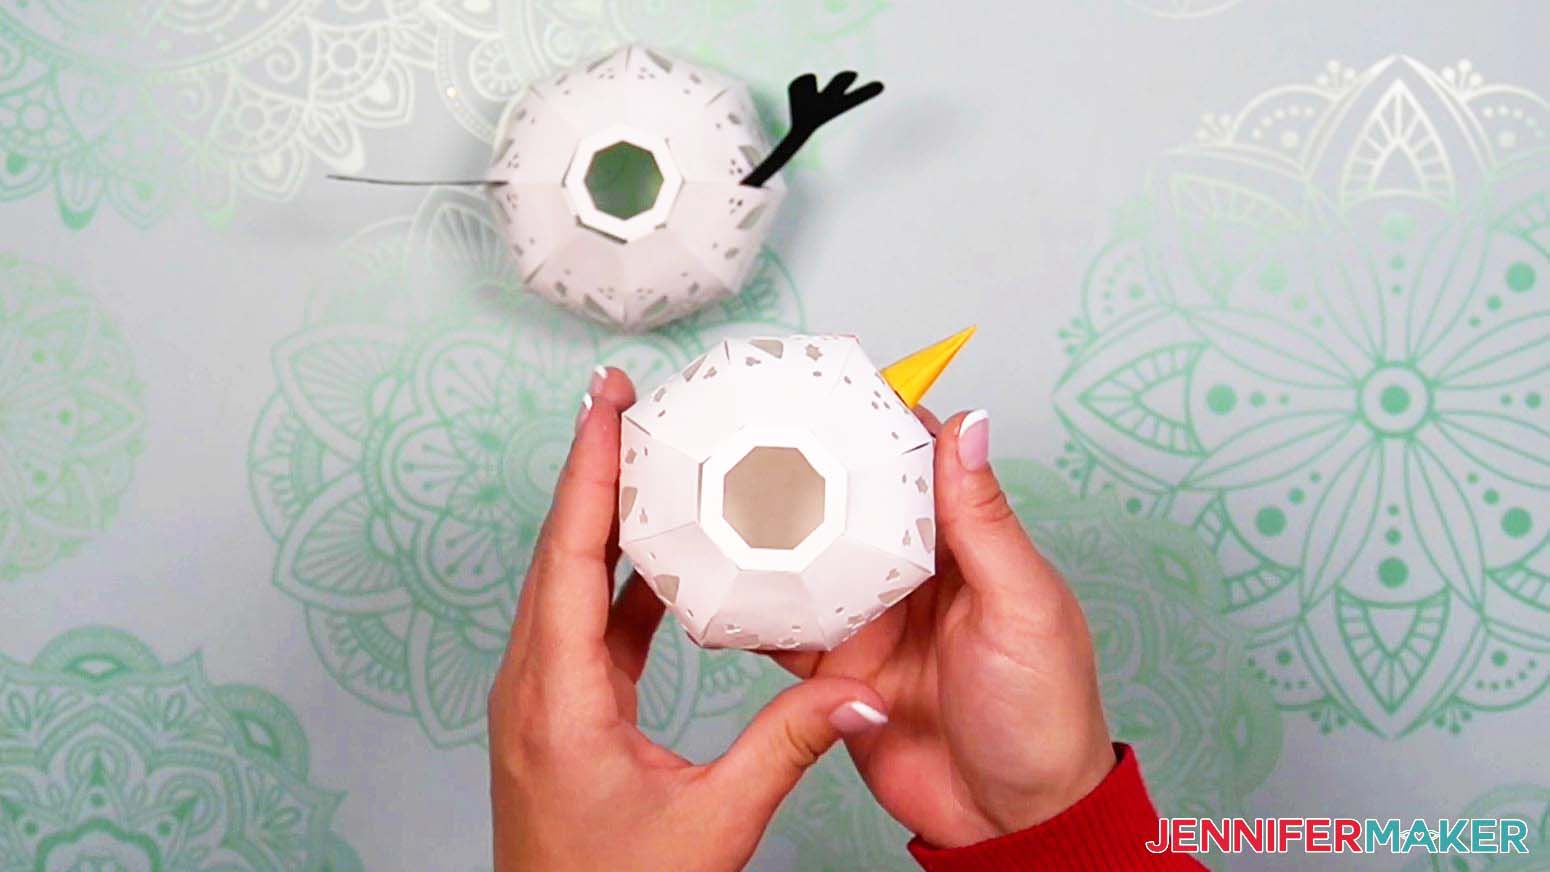
Attach the Head to the Body
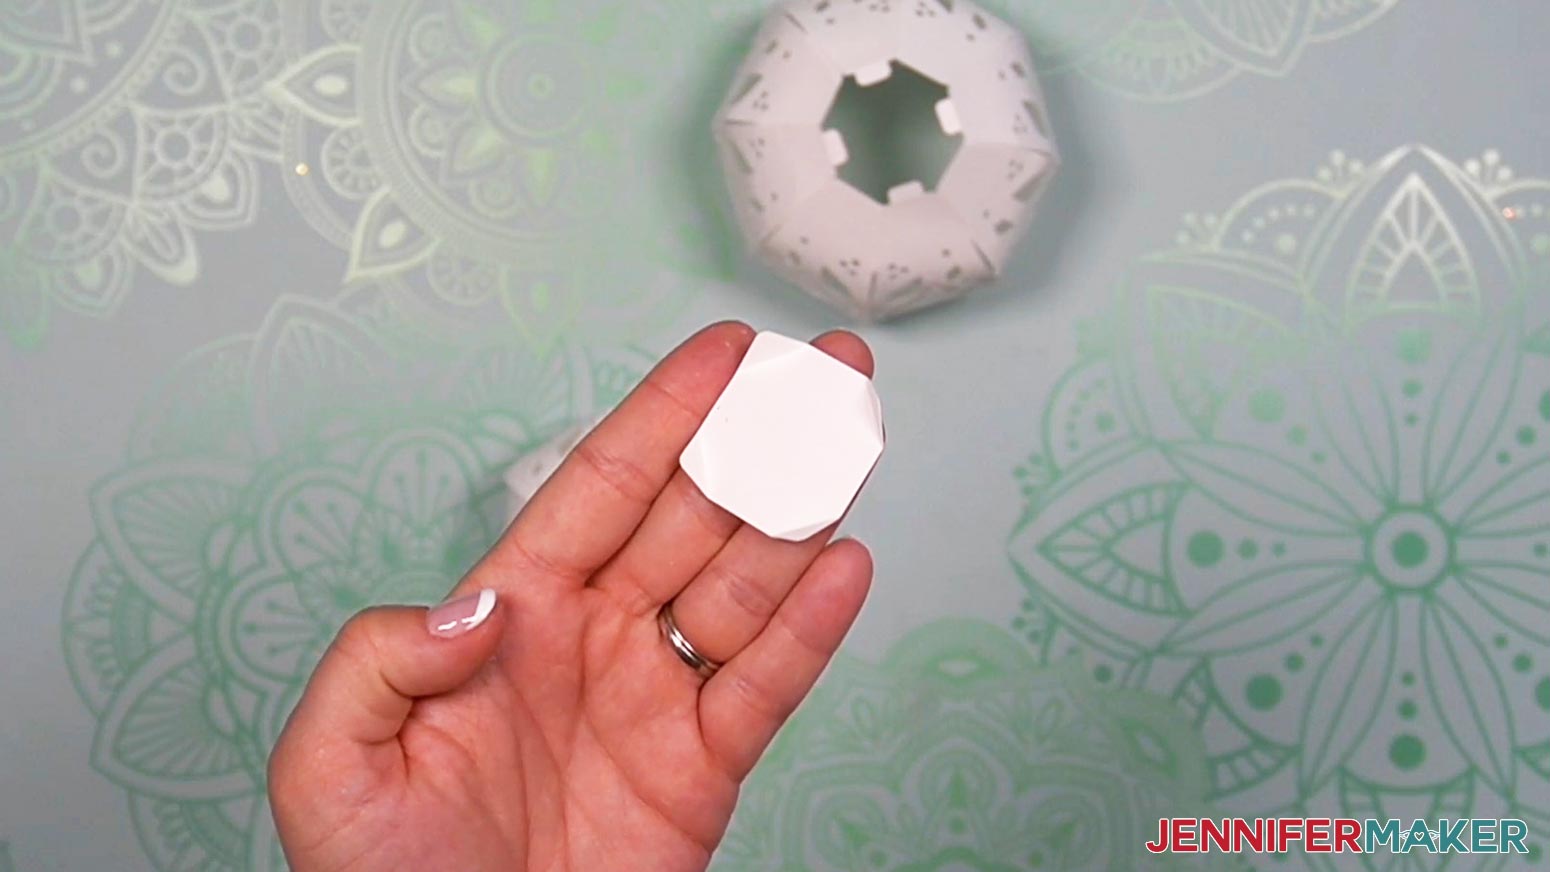
Now you can fold the four tabs at the top of your body piece and bottom of your head piece inward. You don’t need to fold them down completely – just enough to make them perpendicular to the sides, which will create a flat surface to attach each connector piece (two of Piece K).

Now find your two octagonal-shaped connector pieces with cutouts in the center. Place one on top of the body tabs that are folded inward. Turn your head piece upside down and place the other connector piece on the tabs that are now showing. Your connector pieces may not line up perfectly with the sides of your body or head pieces, but that’s OK! You won’t see these pieces once we attach our snowman’s head to his body and add the scarf.
Lift one of the connectors and add glue to the tabs underneath. Then, gently press down on the connector piece to attach it to the tabs. You may need to pinch the tab and connector between your fingers to make sure they’re stuck together really well.
Do the same thing with your other connector piece, making sure all four tabs are attached really well.
Now we can attach the head to the body! Flip your head piece back over so it’s face up. Now add glue to the connector piece on top of your snowman’s body. Make sure your body piece is flat on your work surface and place your head piece down on it. Line up the two pieces so the face is centered with the front of the body.
NOTE: When your snowman is correctly aligned, the edges of the two connector pieces won’t match up exactly. This won’t cause any issues with attaching the two pieces together, however.
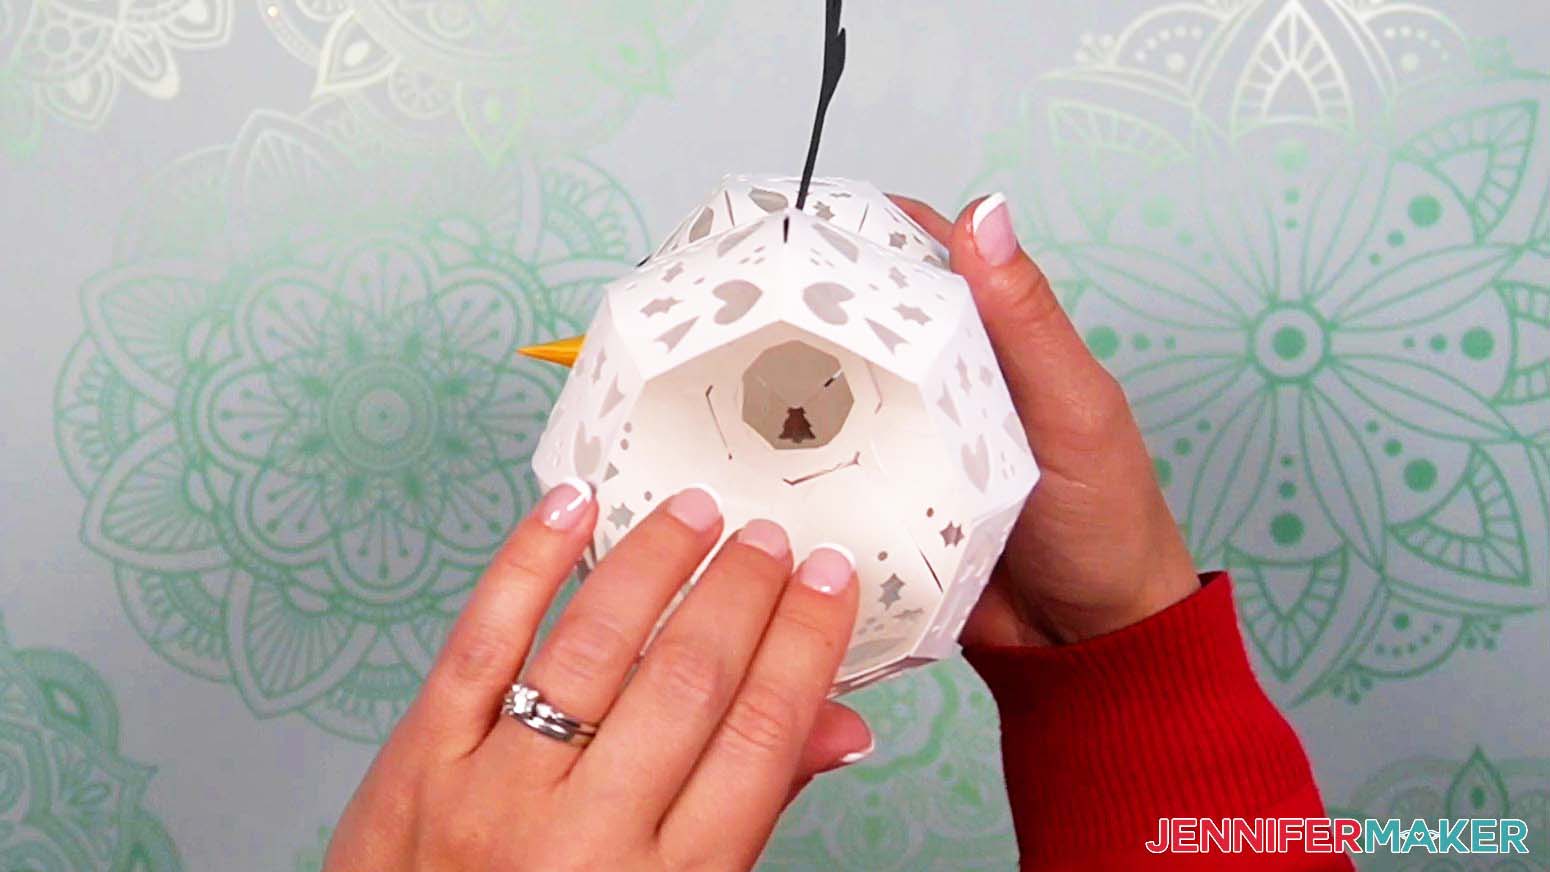
Press down on the head to attach it to the body. Wait twenty to thirty seconds for the glue to dry. If you find that your two connector pieces didn’t stick together very well, just add more glue and press down again, but this time place your hand inside the body and pinch the two connector pieces together in a few spots with your fingers.
Now our snowman is really taking shape!
Add the Hat and Scarf
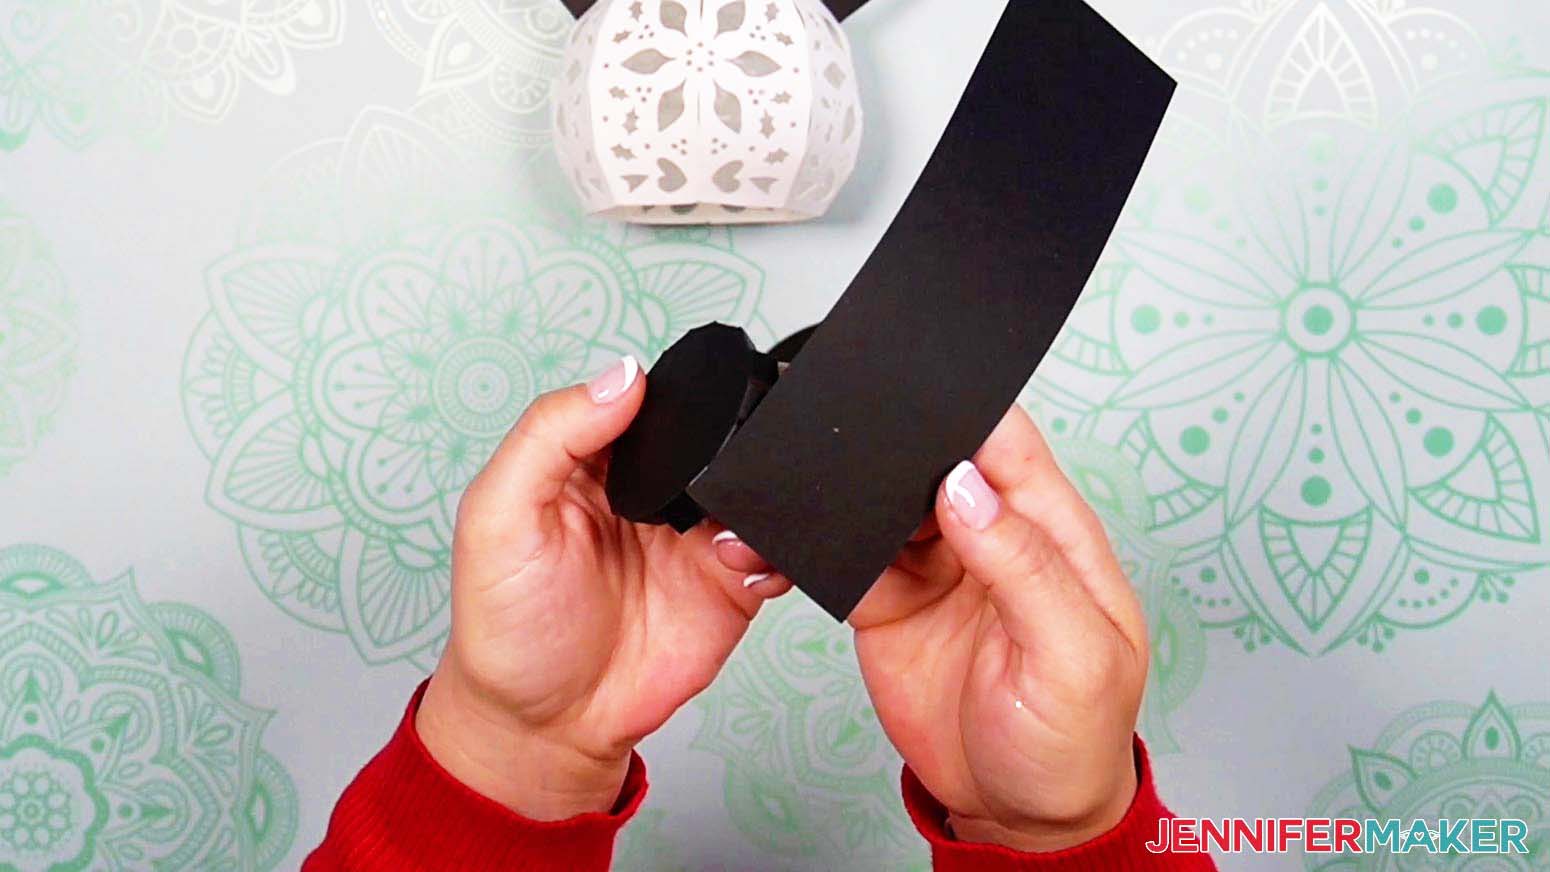
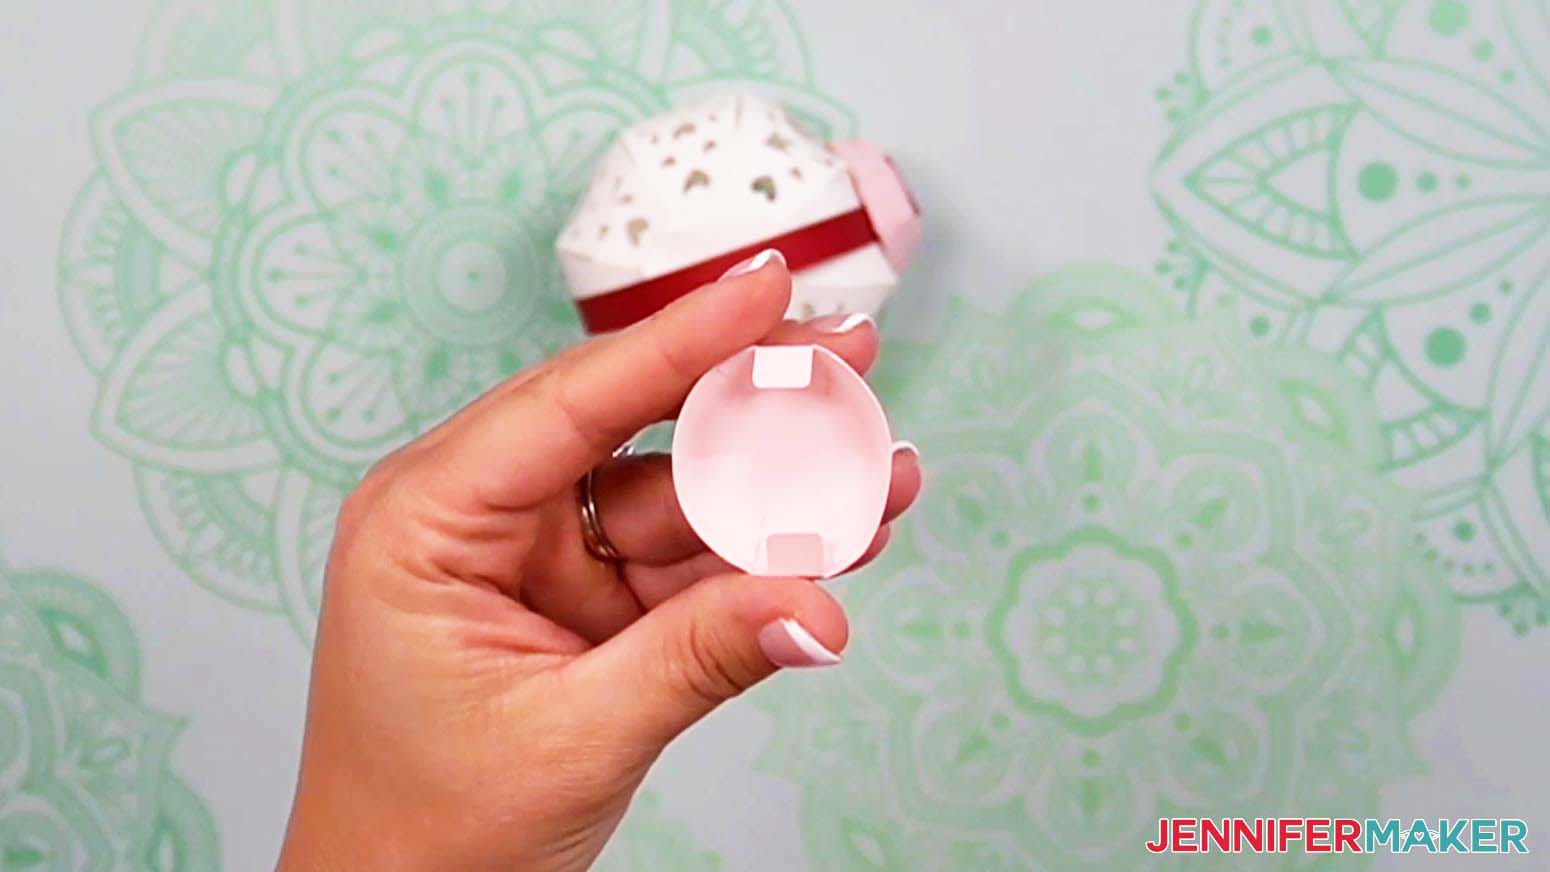
Now we can add the finishing touches! First, find the two black circular pieces (Pieces L and M) and the large black rectangle (Piece N). These will form the top hat shape.
Take the circle with tabs along the outside edge -- the hat’s top, Piece L -- and fold all the tabs upward at the point where the corners meet.
Then, take the other circular piece with tabs along the inside edge -- the hat’s brim (Piece M) -- and fold those tabs upward where their corners meet.
Now we’ll glue the side of the hat -- the rectangular piece (Piece N) -- to the top of the hat. Apply glue to a single tab on the top piece (Piece L) and then press the long edge of the rectangular side piece (Piece N) against it, making sure to match up the top of the hat to the top of the side. Wait about fifteen seconds for the glue to dry. It doesn’t matter which part of the side you attach first, but I started at one end and worked my way toward the other end.
Continue gluing the tabs to the side piece one at a time, waiting for the glue to dry completely between each one. Doing this part slowly will encourage the paper to curve instead of fold or bend. As you go, check periodically to make sure the side of your hat isn’t too far above or below the top of your hat.
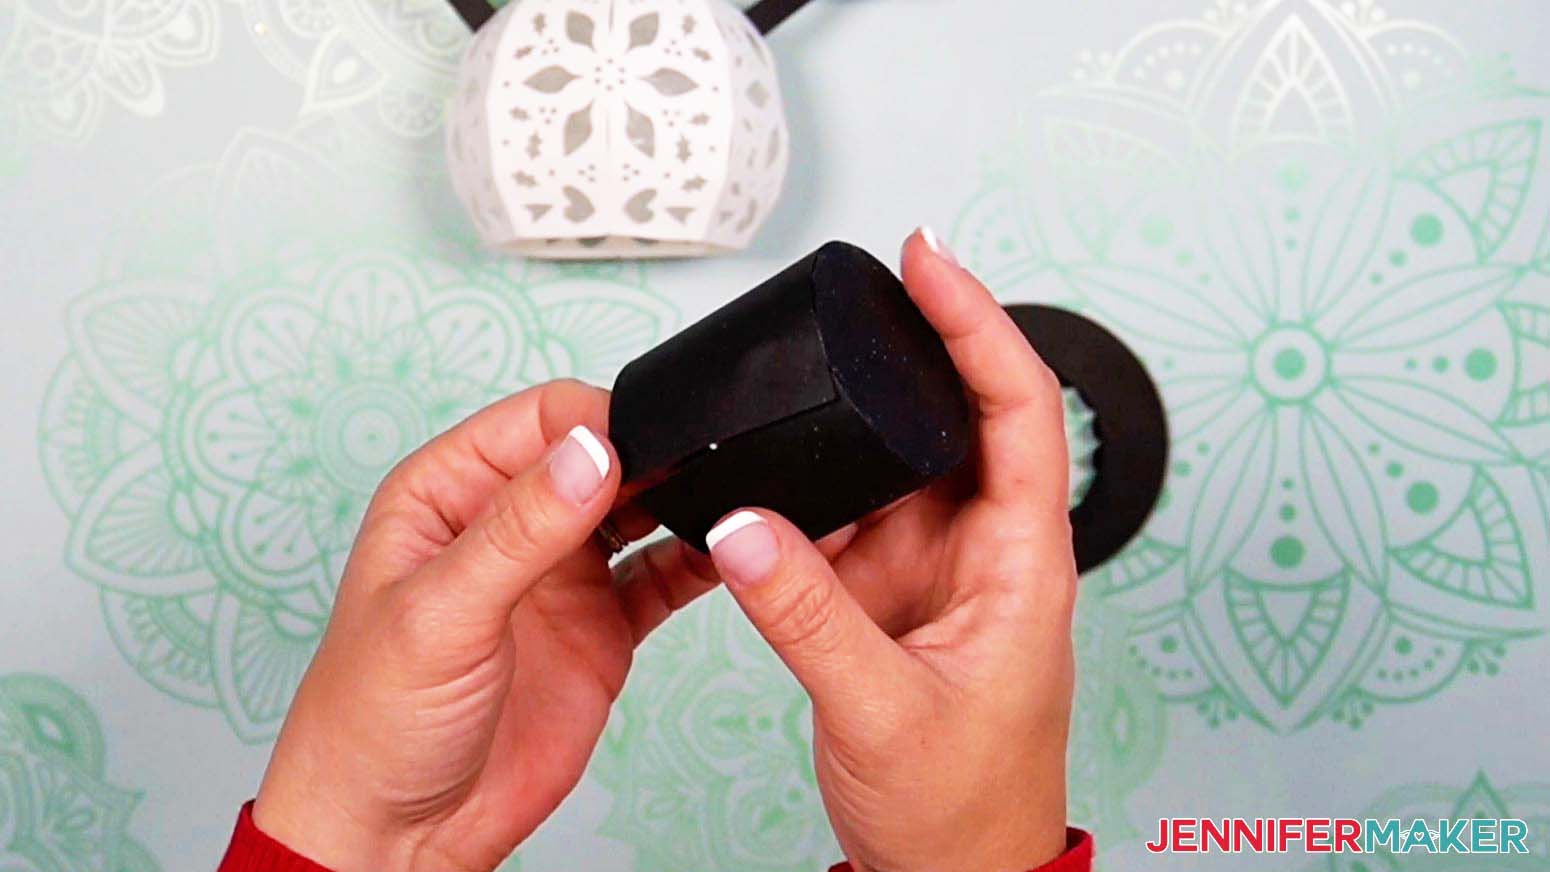
Once you’ve attached the last tab, you’ll notice that the two ends of your side piece overlap each other slightly. You can close up your hat by applying a thin line of glue along the edge in this area and pressing down to make sure it adheres. You can position your hat so the overlapped edges are flat against your work surface and press against them from inside the hat to help hold them in place. Make sure to wait for the glue to dry completely before letting go.
Now you can add the hat brim (Piece M). Place your assembled top piece down on top of your brim so its folded tabs are inside. We’ll need to add glue to the tabs inside the hat one at a time to attach the two pieces. Start at the front of your hat -- the side opposite your seam. This will ensure that the front looks nice and even.
Carefully lift up one brim tab and add a small amount of glue to it. Then press it back down against the inside of the hat and hold it in place while the glue dries.
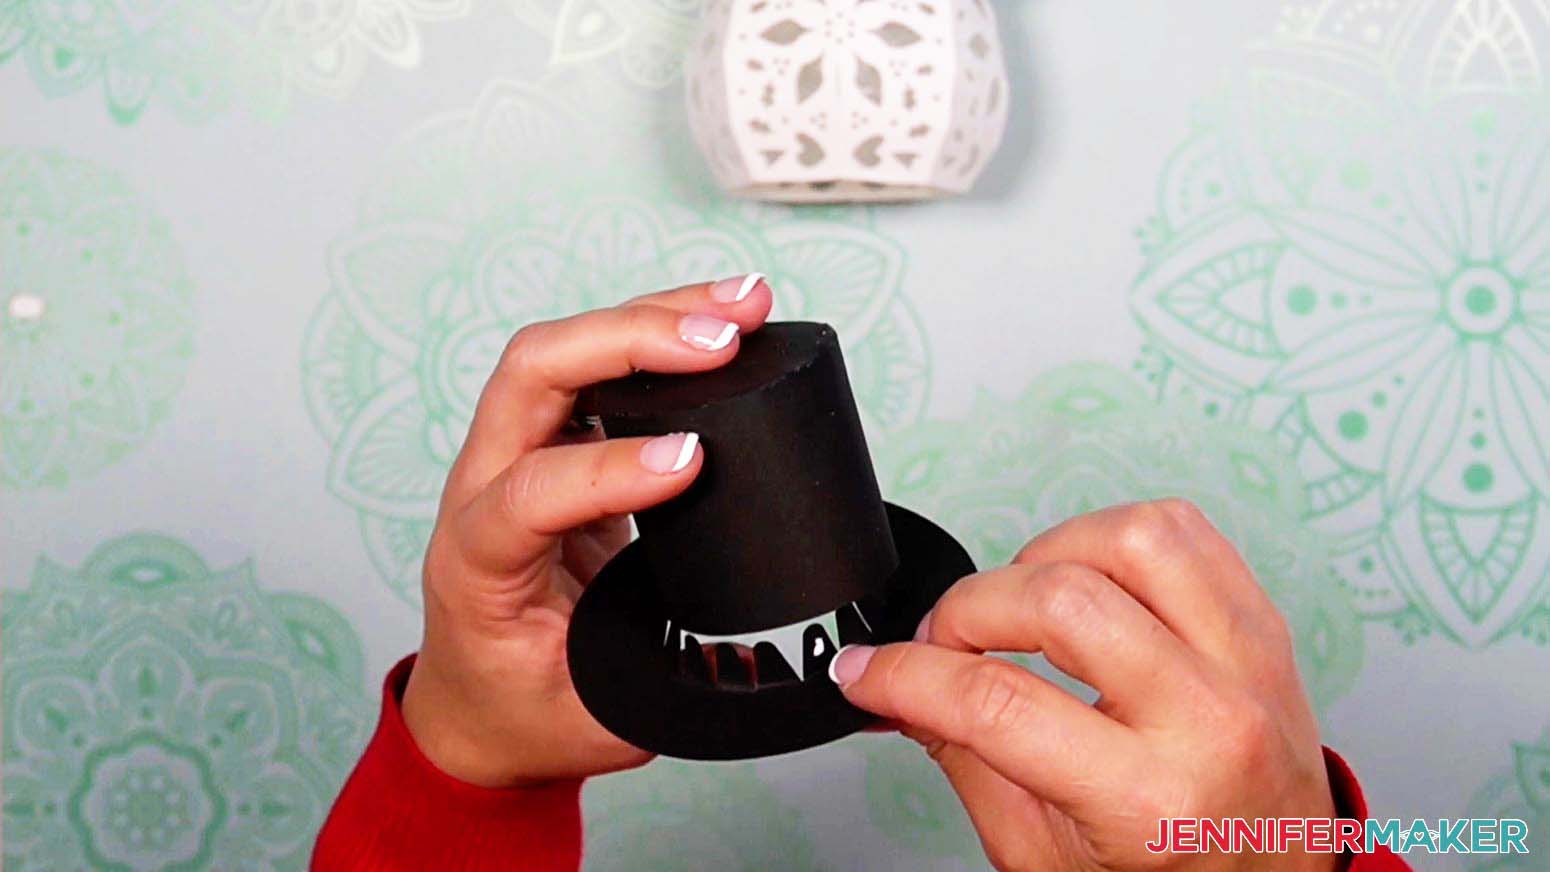
Do the same thing with the rest of the tabs, making sure to hold the top of the hat in place against the brim while waiting for the glue to dry on each tab. When you’re finished, your hat should look similar to mine.
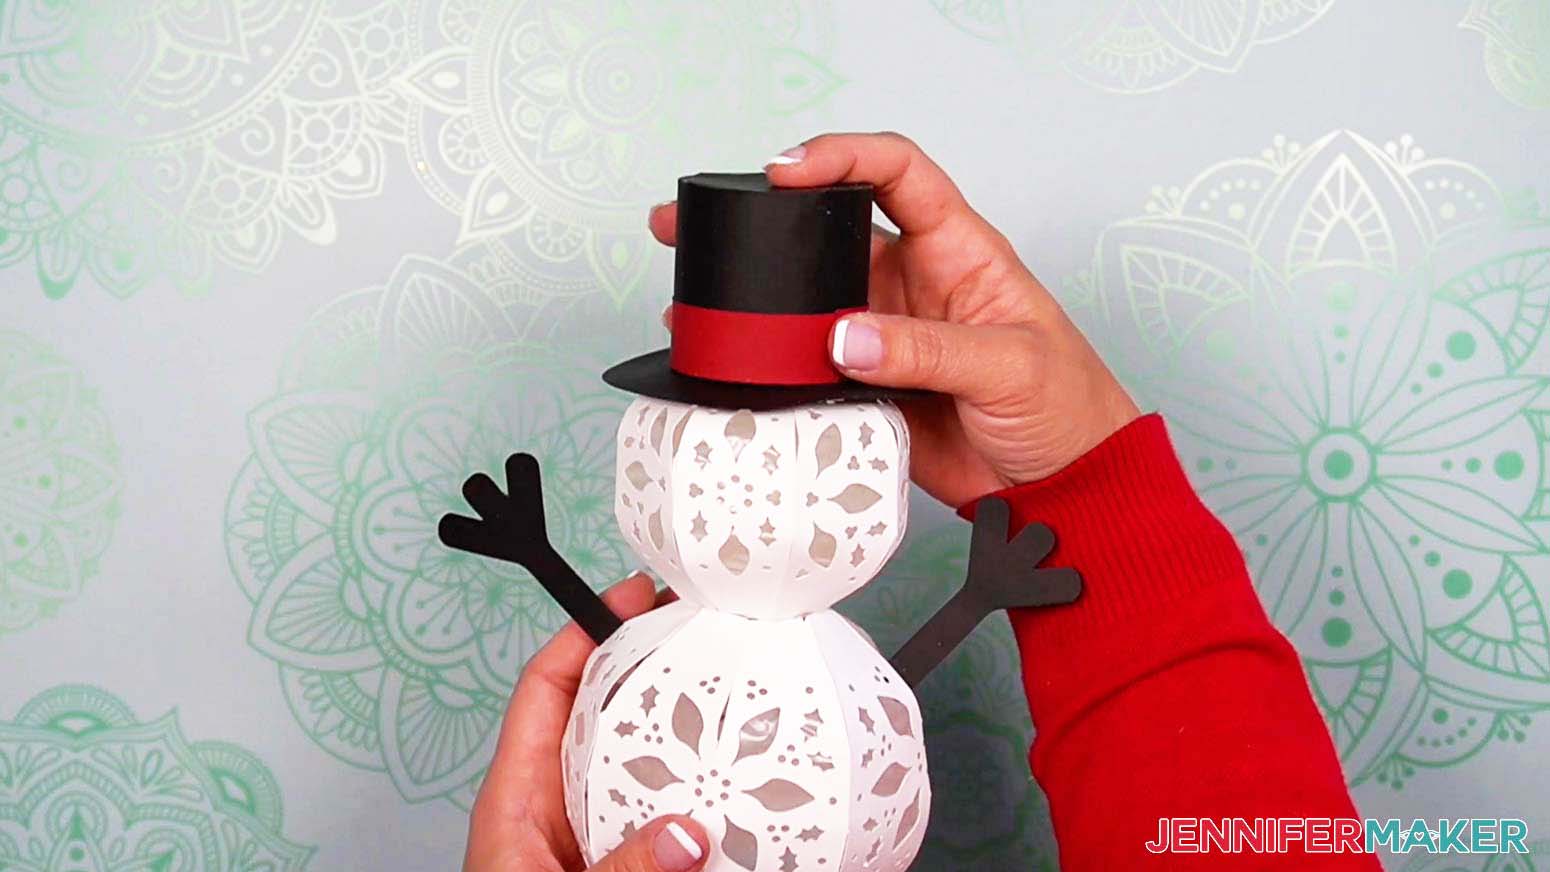
Let’s attach our assembled top hat to our snowman’s head! Place a generous line of glue around the inside edge of the hat at the very corner, where the brim meets the side.

Then carefully place the hat on your snowman’s head and press down. Make sure the hat is positioned how you like it -- with the seam at the back -- and hold it there for twenty to thirty seconds while the glue dries.
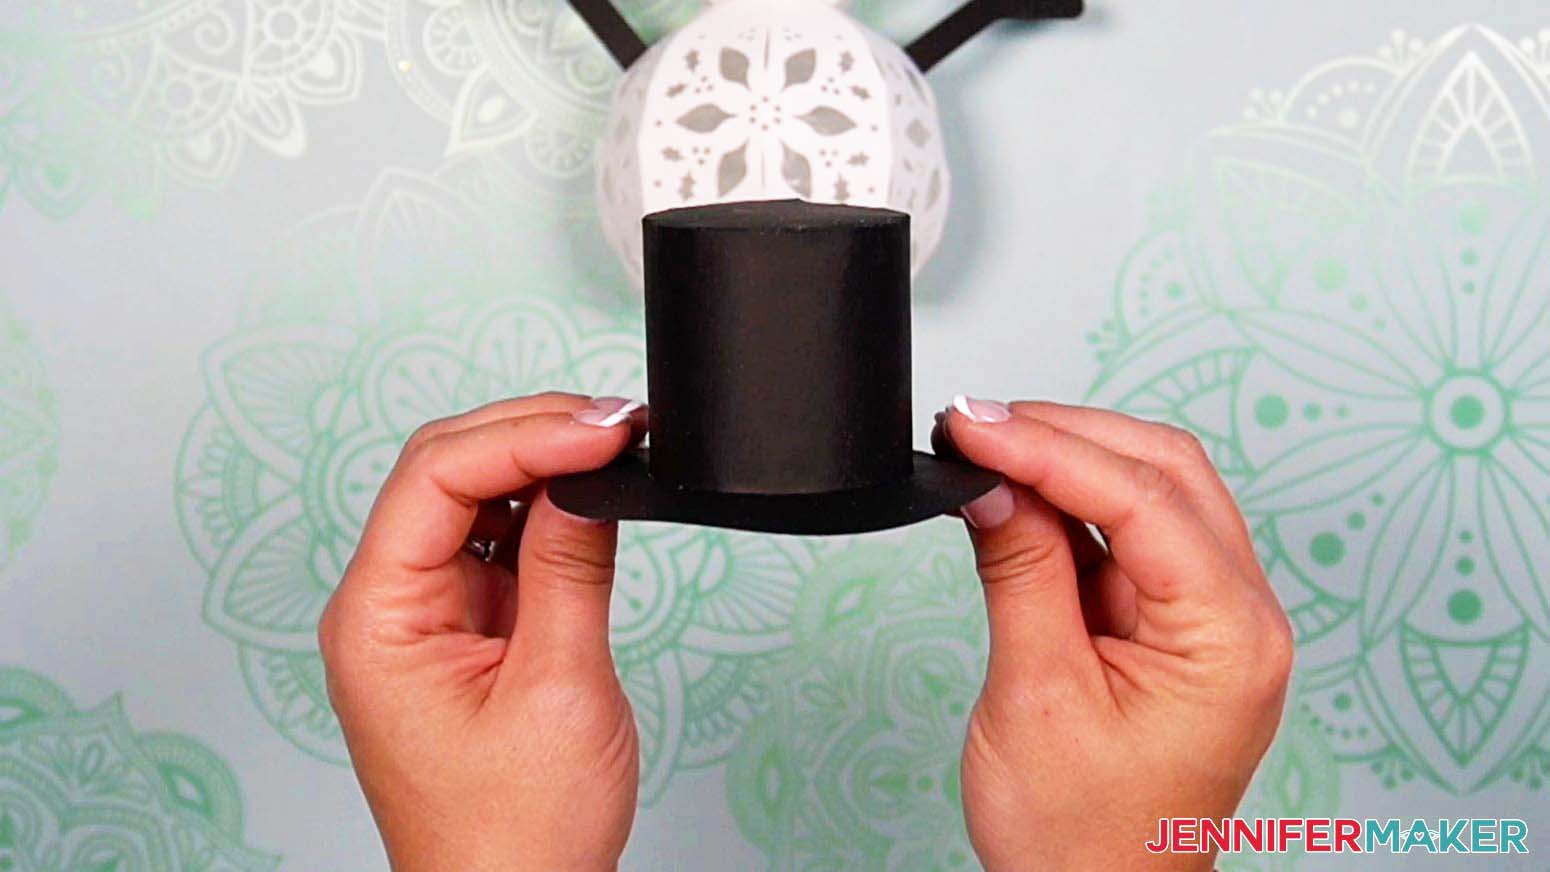
Now you can add the ribbon (Piece O) and holly (Pieces P and Q) to your hat if you’d like. To add the ribbon piece around the bottom edge of your hat, start by applying glue to one end and pressing that end against the hat in the same spot as your hat seam. Hold it there until the glue dries. Then wrap the rest of the ribbon around the hat, following the bottom edge. Apply glue to the other end of the ribbon and press it down, making sure it’s aligned with the end you already attached.
Now fold the holly leaves (two of Piece P) along the center score line, using your scraper tool if needed. Place a dot of glue at one end of each leaf and press them against the ribbon on the hat wherever you think they look best.
Finally, add the holly berries (Piece Q) by applying a dot of glue to the back of the piece and placing it on the hat where the two leaves meet.
You’re done with the top hat! If you’d like to add a finishing touch, you can even curl the edges of your brim up using a rounded object, such as your Cricut pen. Curving the edges against an object will prevent the paper from folding or bending.

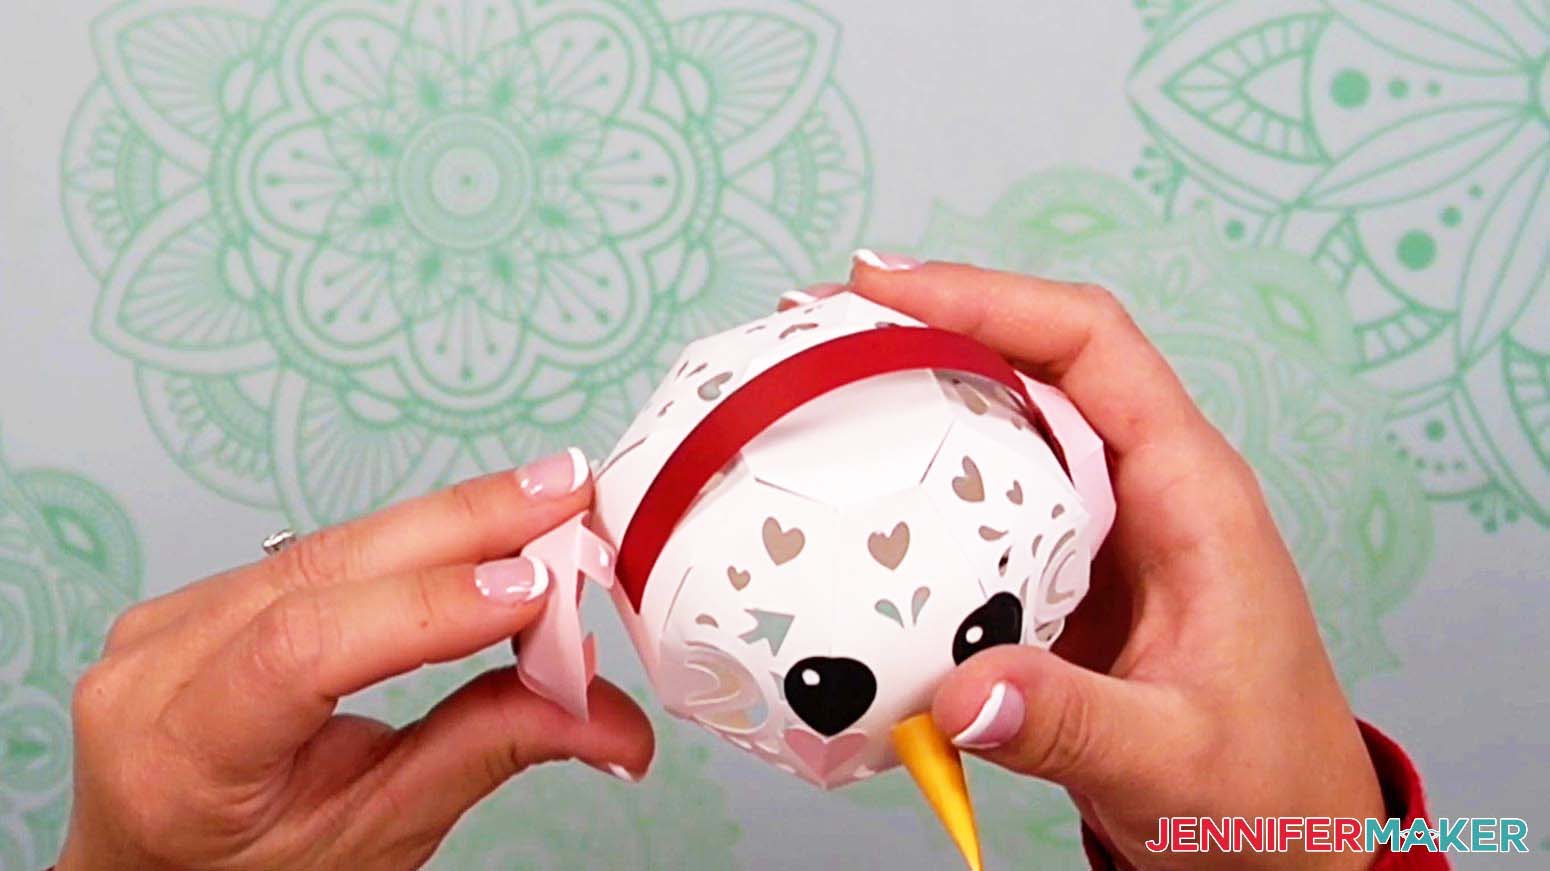
Now let’s finish our snowman by adding his scarf! Find the largest remaining rectangle piece (Piece R), the two rectangles with tassels at one end (Pieces T and S), and the eight small rectangles (Piece U). If you're making the Valentine's Day version, you'll have hearts (Piece R) instead of stripes for the scarf.
First attach your two scarf ends -- the pieces with tassels -- to the main scarf piece, an inch or two from one end. To make the scarf look more realistic, attach the smaller end piece (Piece T) perpendicular behind the scarf and the larger end piece (Piece S) in front of the scarf at an angle so all three overlap. Fold one corner of your larger piece (S) over the top of your scarf and glue the folded section to the back of the scarf. This will make it look like your scarf is one continuous piece of cardstock that has been folded over itself -- like a real scarf!

Now wrap your assembled scarf around your snowman’s neck, making sure the tasseled ends are in the front. Place a small amount of glue at one end and then pinch the two ends together to secure the scarf. Hold the pieces together until the glue dries -- at least fifteen seconds.

Now we can add the stripes!
NOTE: I glued my stripes on after attaching the scarf to my snowman because I wanted to cover up the seam with one of them, but you can also add them to your scarf pieces beforehand. Either way works!
I found it easier to attach them if I curved them around my Cricut pen, or another rounded object, first. Glue the first one over your scarf’s seam to hide it. Make sure the glue is set before moving on. Then glue the rest one at a time, spacing them as evenly as you can. You can even glue one or two to your scarf ends.
If you’d like to add a finishing touch, you can “fluff” and curve the scarf pieces to make them look like they’re blowing in the wind! Just slightly lift the ends and tassel pieces to curve them a bit.
Variation: Add the Earmuffs
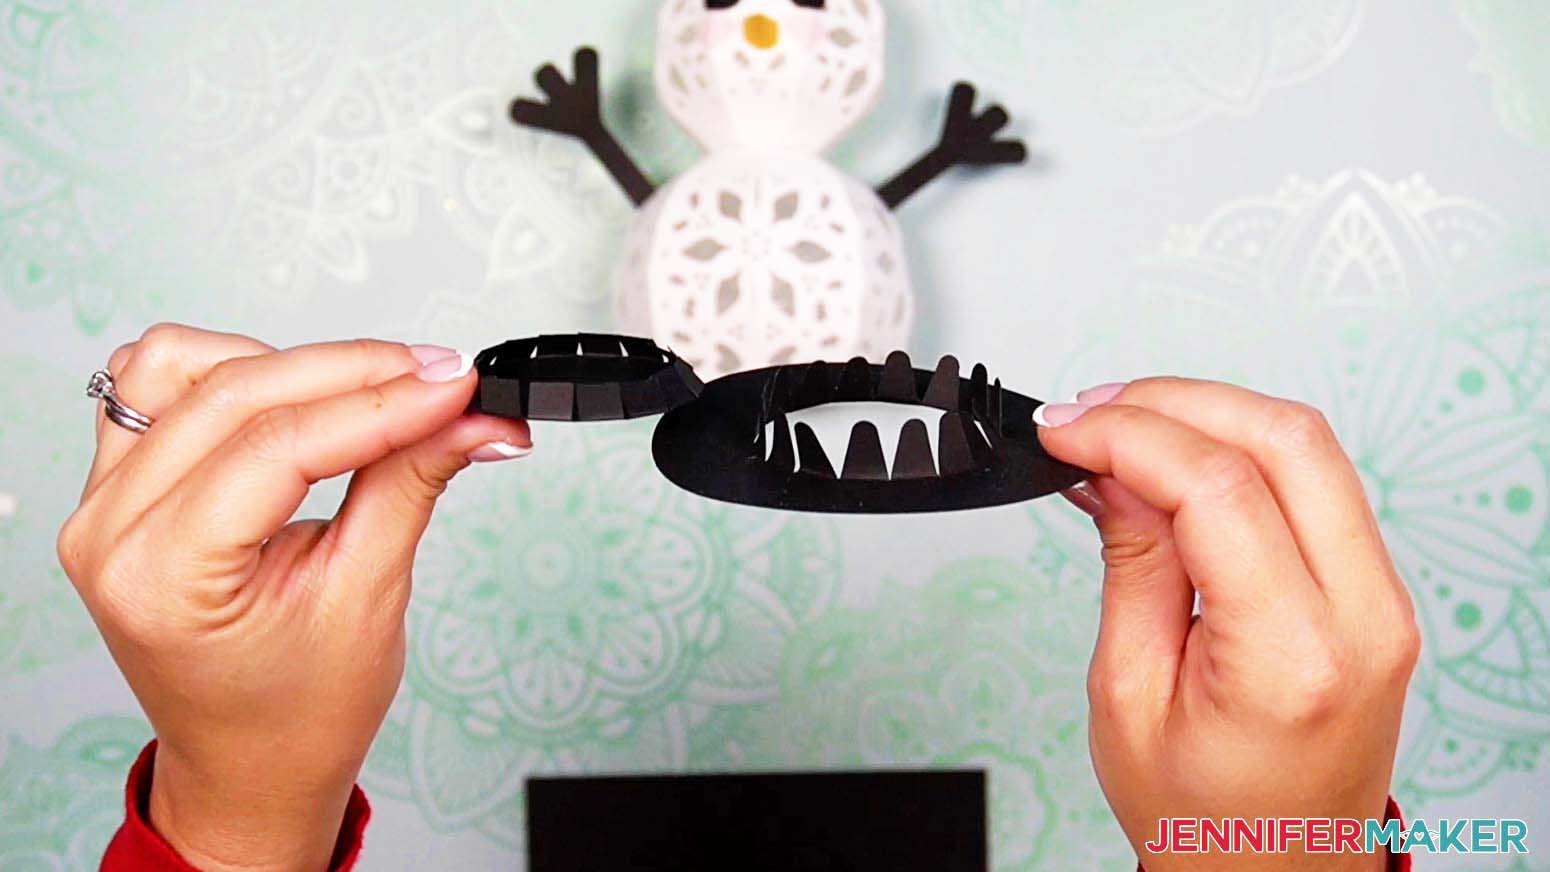
If you’re making the Winter or Valentine’s Day designs, you’ll have some cozy earmuffs instead of the top hat. Let me show you how to attach those!
First, find the two circular pieces with slits around the edges (two of Piece L for the Valentine's version or two of Piece N for the Winter version), the thin rectangular connector piece (Valentine's Piece N, Winter Piece P), and the two hearts (Valentine's Piece M and Winter Piece O) in the same color as the rectangle.

We’ll start by overlapping the edges of one of the earmuff pieces to create the 3D shape that will make it look like an earmuff. Place a very thin line of glue along the edge of one of the slits and then overlap the section of cardstock next to it and hold it there until the glue dries. You won’t need to overlap the two pieces much -- just enough to get them to stay together.
Continue doing this with the rest of the sections until you have a curved edge around the center of your earmuff. Repeat this process with your other earmuff piece. Your assembled earmuffs should look similar to mine.
Once you’re finished, you can glue the two hearts in the center of each earmuff if you’d like.

Now let’s attach the earmuff connector piece to our snowman’s head. Apply a small amount of glue to one end of your rectangular piece and press it against the side of the head. You can align it right in the center of the flat section on the head’s side.
Now apply glue to the other end and attach it to the opposite side of your snowman’s head in the same spot.
Now we can attach the earmuffs themselves. First fold the two tabs inward so they’re perpendicular to the sides of the earmuff.
Then apply glue to the tabs and position the earmuff so it’s centered over the connector piece with the tabs at the top and bottom. Press the earmuff against the head with a bit of pressure to make sure the tabs are well adhered. Hold it in place for at least twenty seconds so the glue can fully dry.
Do the same thing with the other earmuff on the opposite side of the head to complete the set.
STEP 5: SHOW IT OFF!
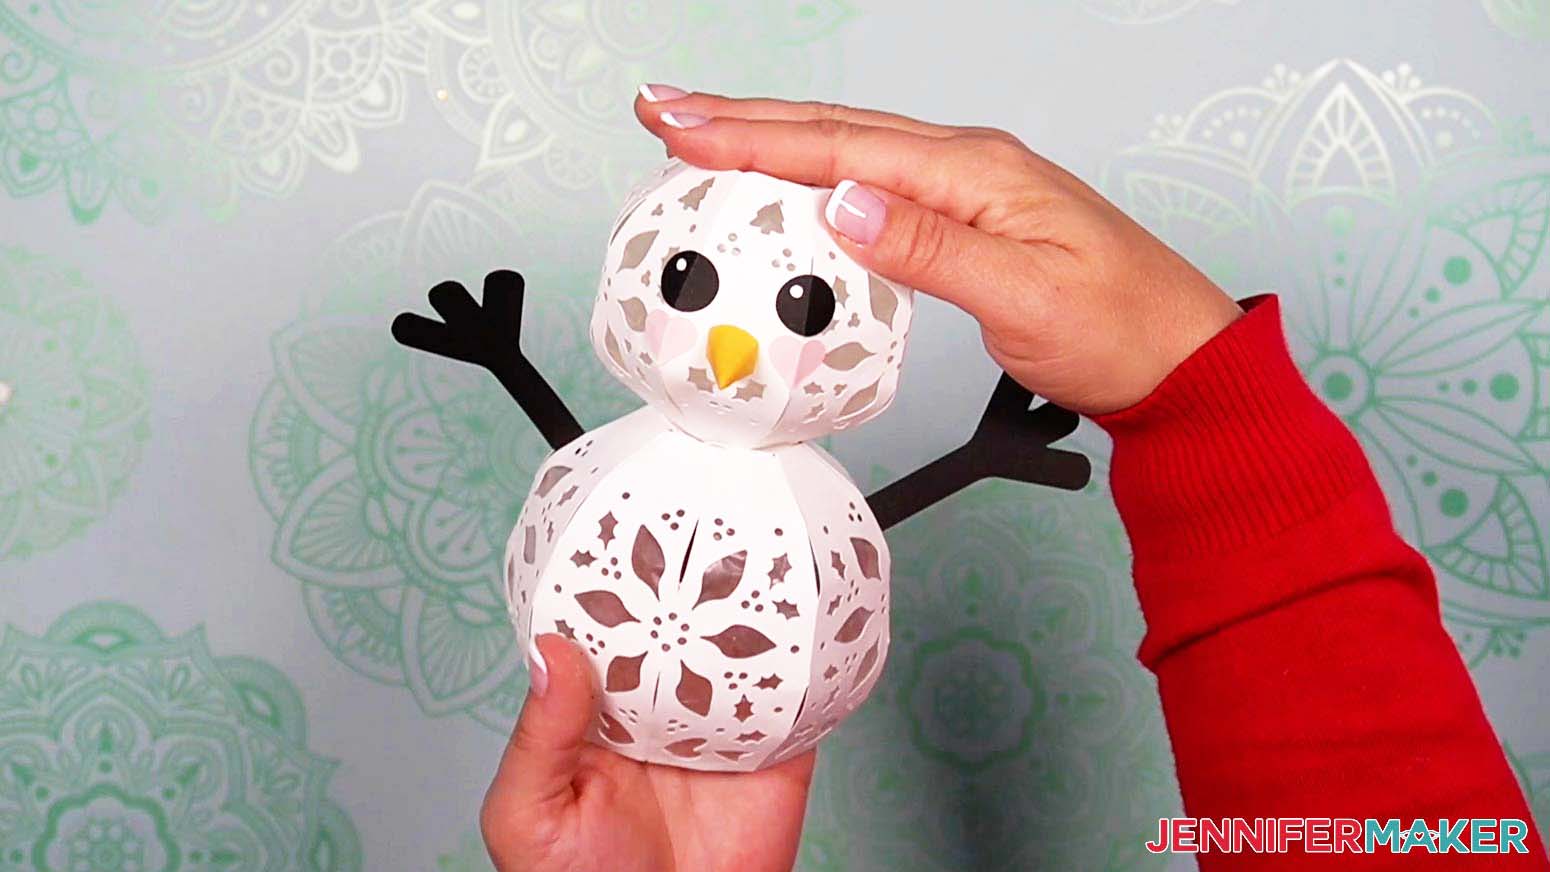
You're done! Here's what my finished 3D Light Up Snowmen look like. Aren't they adorable? I just love how you can make a 3D object like this completely out of paper!

Now you can add a tea light or fairy lights inside and display your snowman on a tabletop, mantle, or shelf to brighten up your holiday season!
You can even make a Dollar Tree Light Up Snowman to display next to this one!
Notes
Finished Sizes:
Christmas: 9" tall x 8.5" wide x 4.75" deep
Winter: 7.5" tall x 4.5" wide x 4.75" deep
Valentine's Day: 7.5" tall x 8.5" wide x 4.75" deep
Answers to Your Questions About Making a Light Up Snowman
Q: What is the best weight of cardstock for the light up snowman?
You can use 65 or 80 lb. cardstock for this project.
Q: Can I cut this project on a Cricut Joy?
Yes, if you resize it so that the largest piece fits on the Cricut Joy machine mat. See our Resizing Guide for more details.
Q: What is Merry Maker Mingle?
A: Each day in December leading to Christmas, I present you with a brand new “gift” — a project to craft, make, or do. You can make these projects on a Cricut cutting machine or by hand if you don’t have one. Most of our Merry Maker Mingle projects will come with a fun video with yours truly, a step-by-step printable photo tutorial, and a free pattern/SVG cut file. Sign up with your email address to get daily updates and prizes!
Get my free SVG files to create a light up paper snowman!
I love seeing what you make with my designs and how you use them! Please share a photo of your light up snowman in our Facebook group or tag me on social media with #jennifermaker.
Love,

Want to remember this? Save this Light Up Snowman Tutorial to your favorite Pinterest Board!