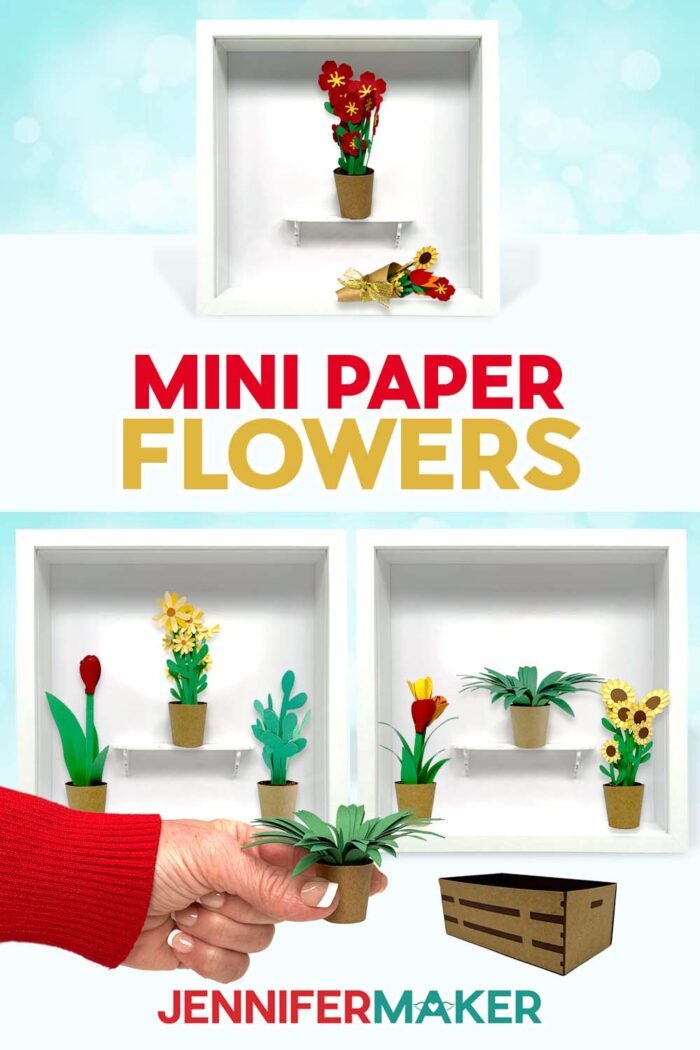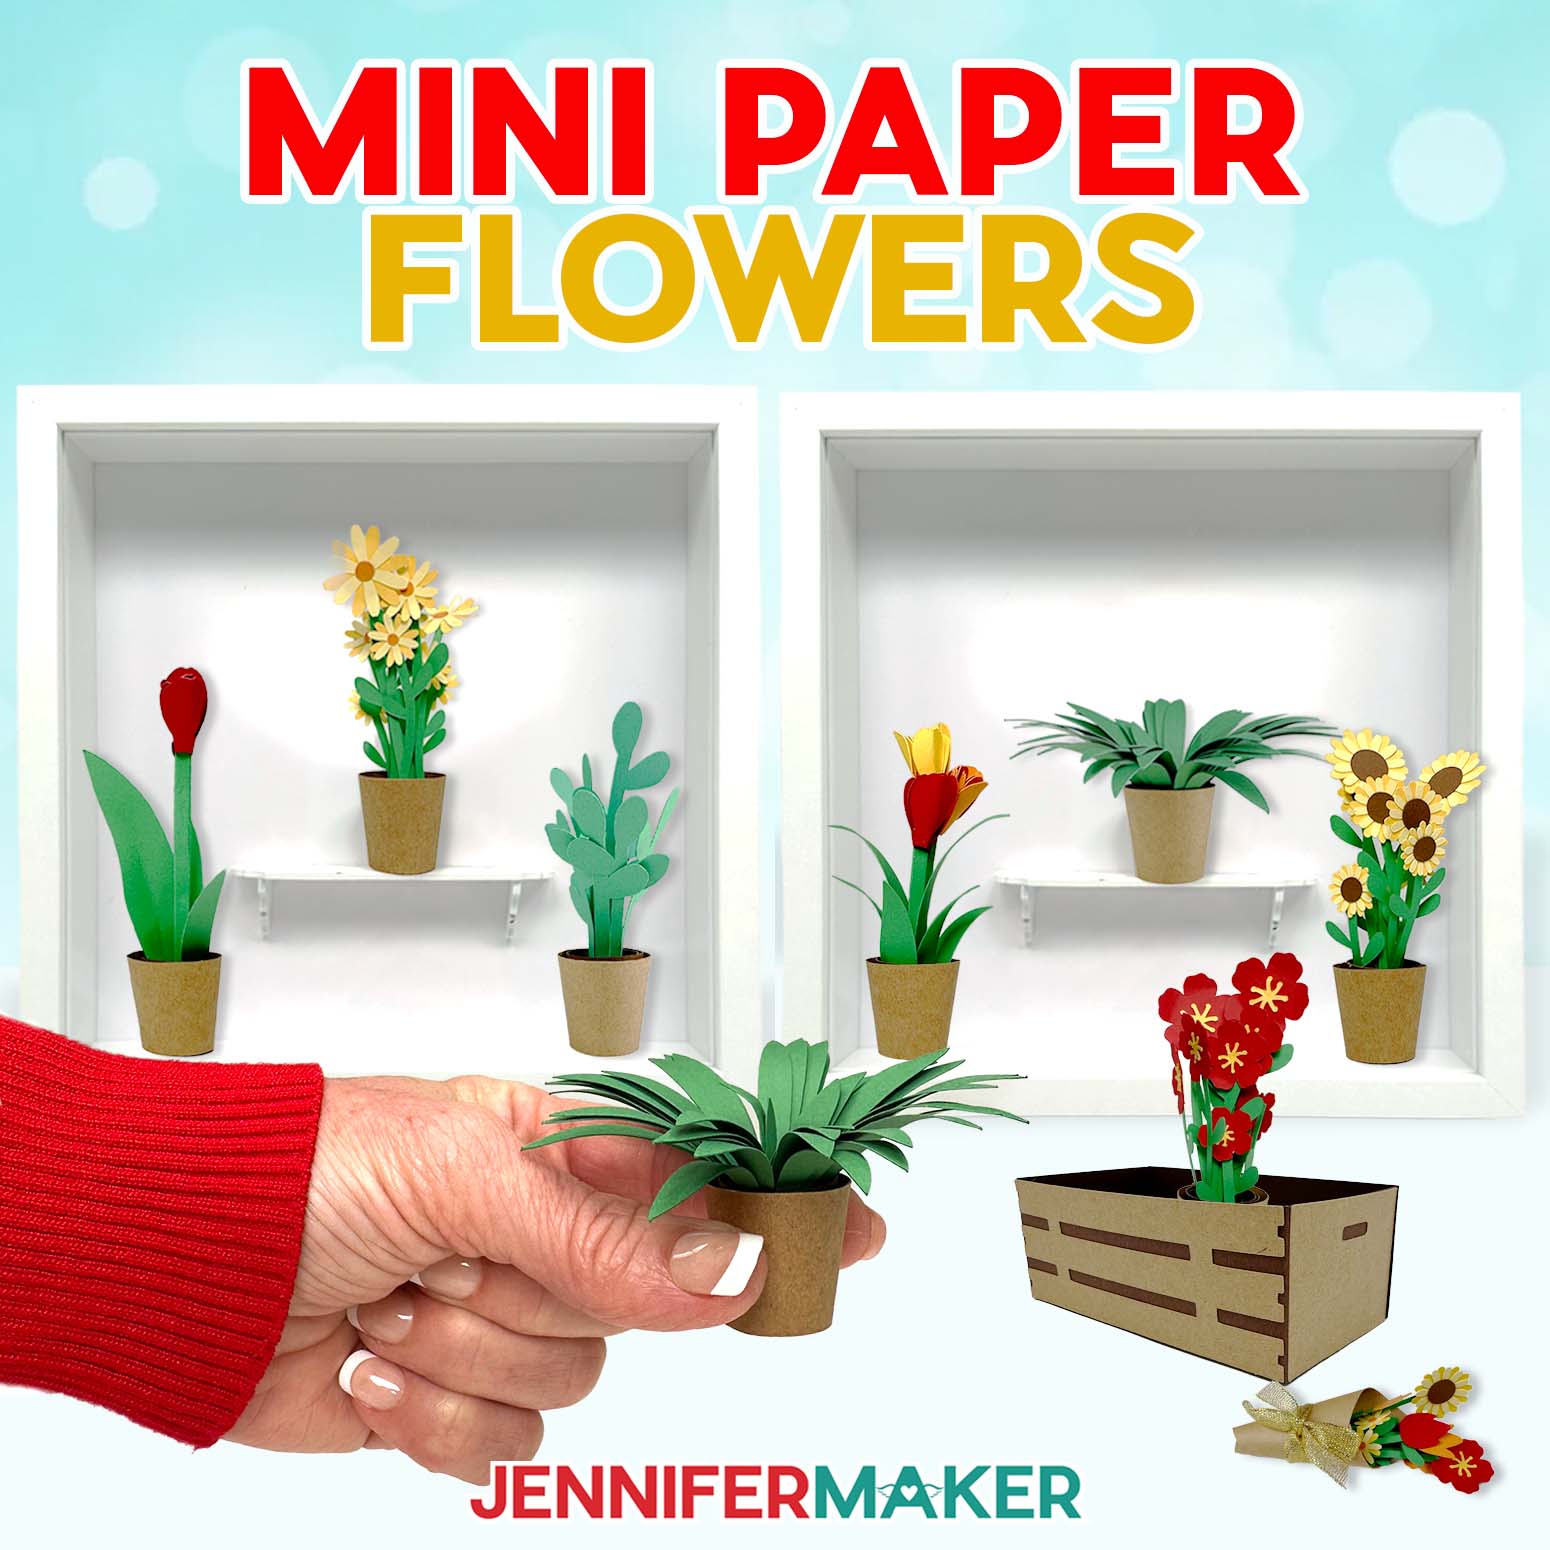
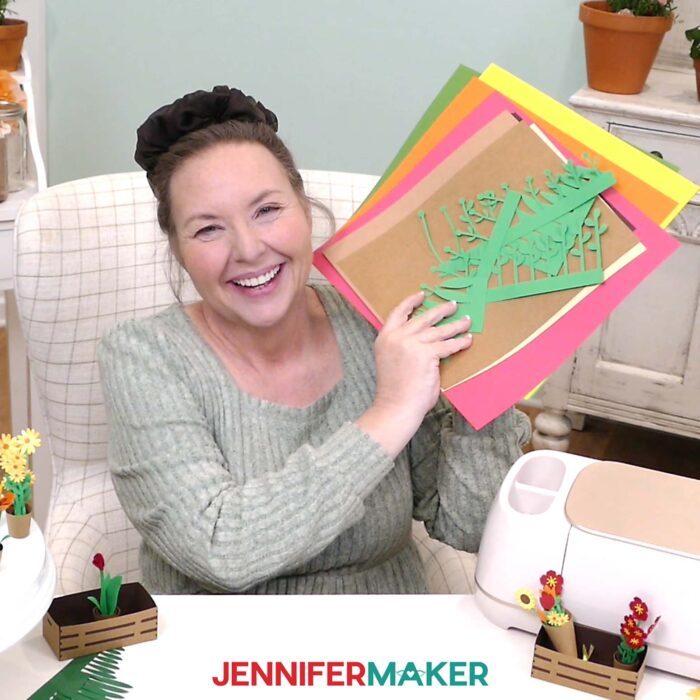
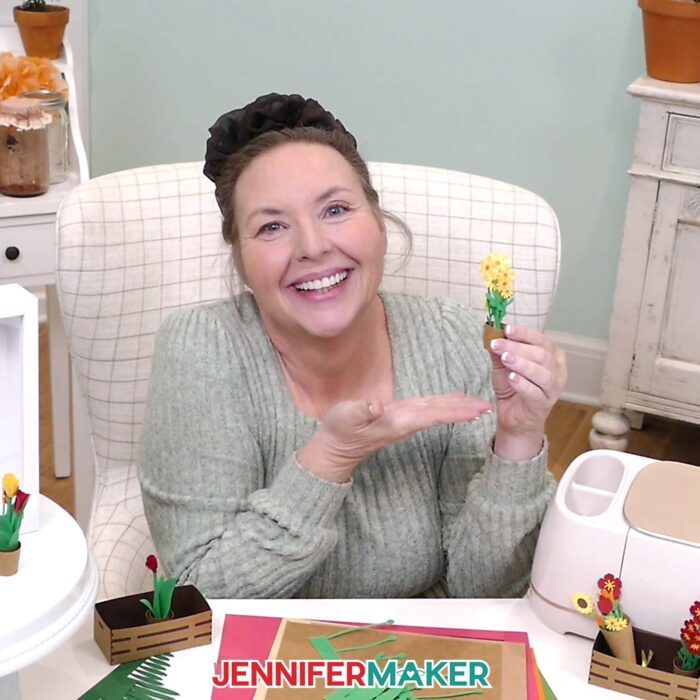
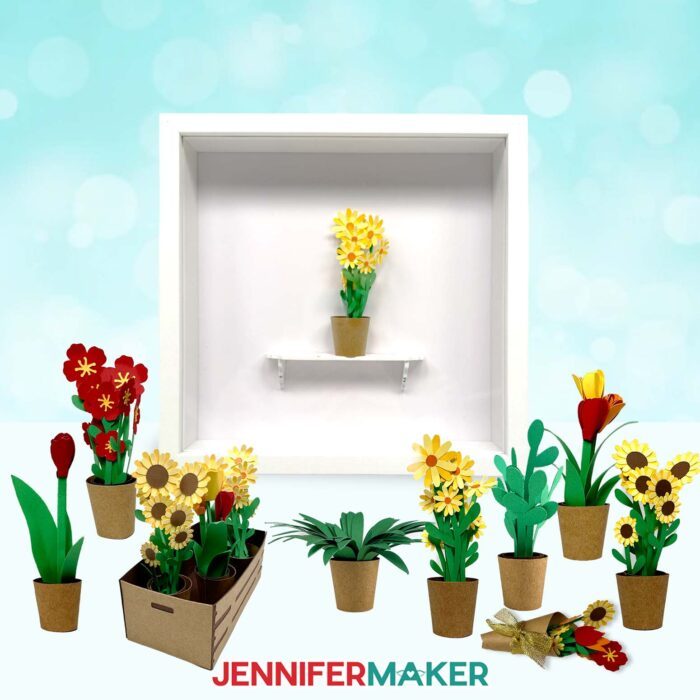
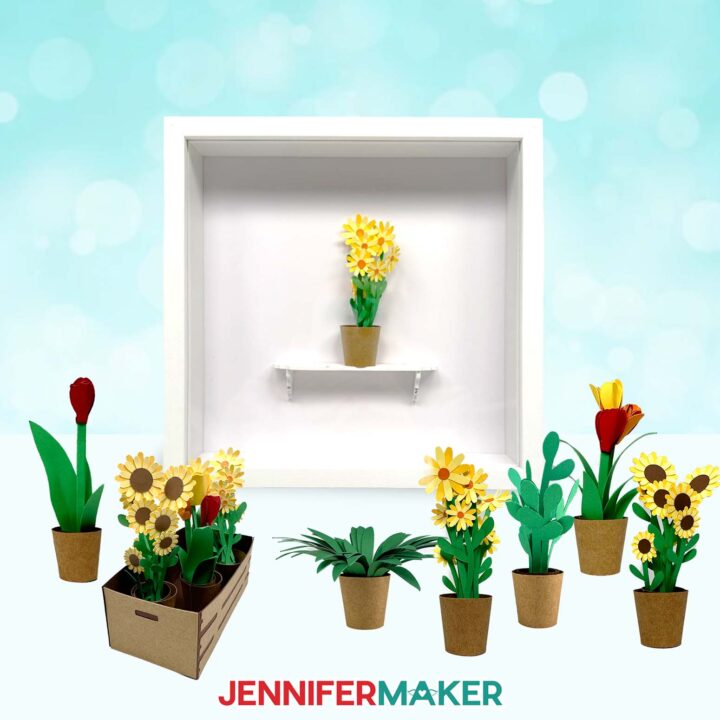
Learn how to craft lovely little floral arrangements with a Cricut & my mini paper flower tutorial!
Miniature crafts are just plain fun. I mean… tiny versions of real things? Yes please! I keep seeing these little projects pop up and every time I think, “Okay, but how small can we actually go?” I’ll be honest, I was a little skeptical… so of course I had to try it myself. And turns out, it works! And with my mini paper flower tutorial, you can make tiny blooms, too!
See the full step-by-step video tutorial for how to make mini paper flowers here:

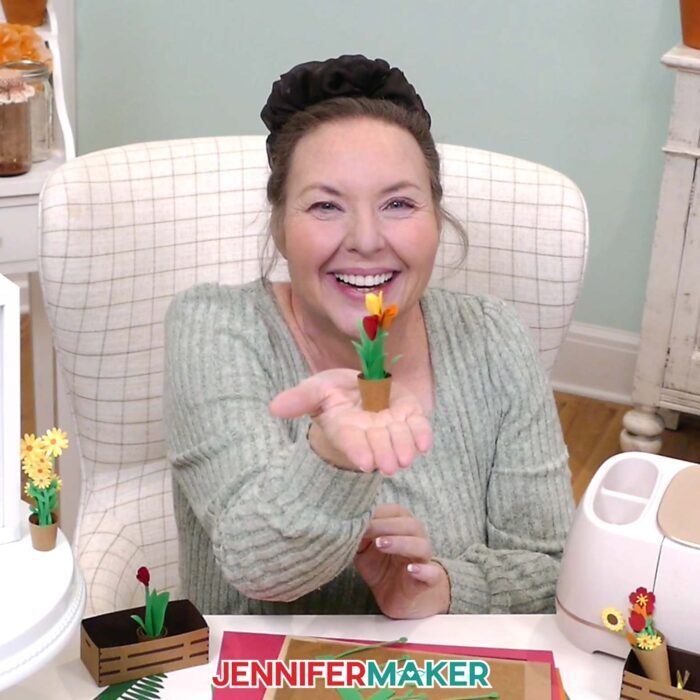
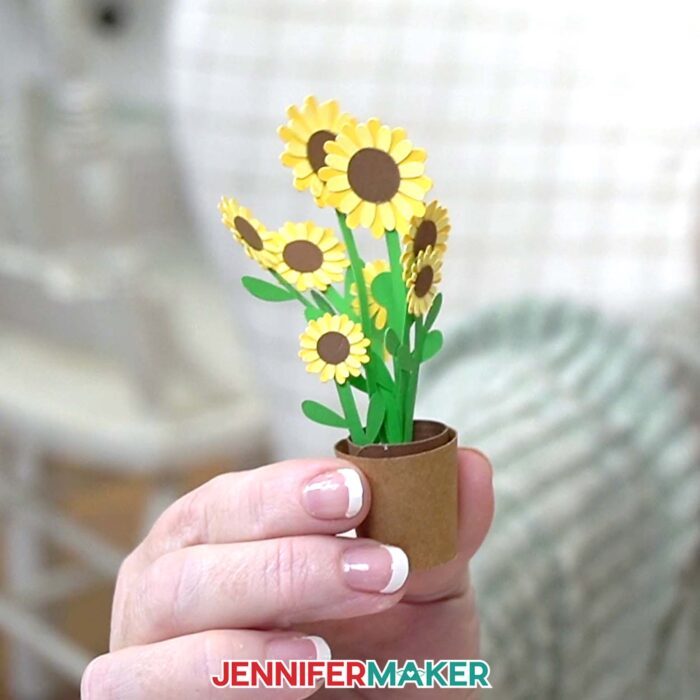
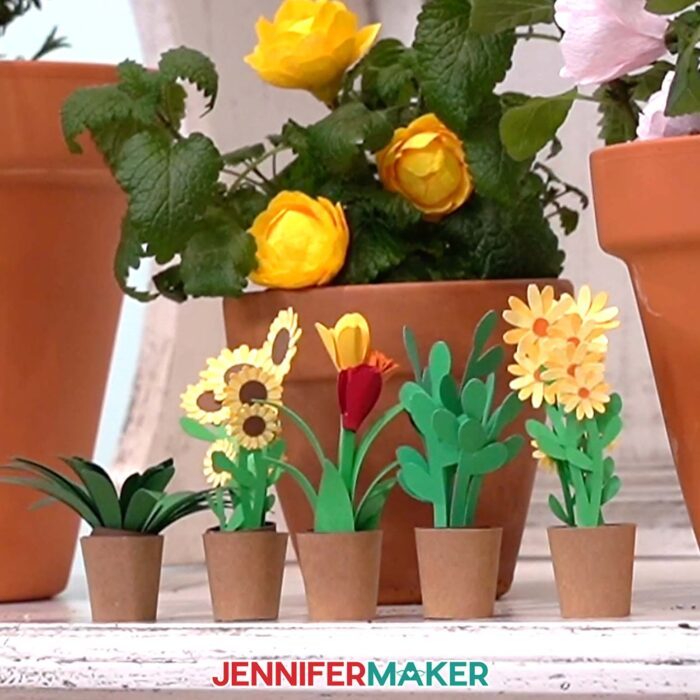
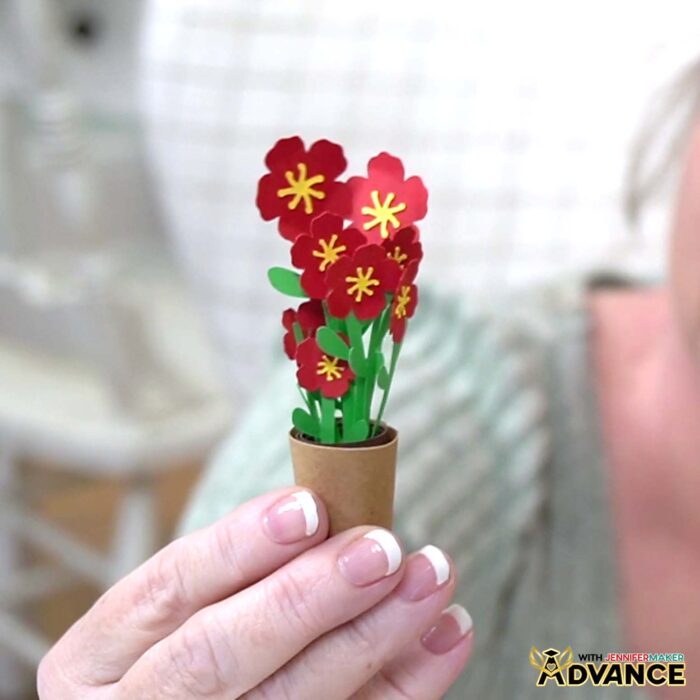
In my mini paper flower tutorial, I show you how to make little tulips, daisies, sunflowers, and tiny plants, all small enough to sit right in your hand.
Now, don’t worry if that sounds tricky, it’s totally normal to feel a little unsure when things get this small. The good news is, with the right setup, your Cricut can handle it beautifully!
Here’s what you’ll need to make them:
- Cardstock (65 lb. for most, with 92 lb. for structured pieces like the crate display)
- Cricut cutting machine with a Premium Fine-Point blade
- StandardGrip machine mat (clean and sticky really matters here)
- Precision-tip craft glue
- Flow Tool and a quilling tool (or tweezers, whatever works for you)
A sticky machine mat is one of the most important factors to ensure clean cuts. This helps because when your paper stays firmly in place, those tiny cuts stay clean instead of tearing. Be sure your Premium Fine-Point blade is clean, too!
Once your pieces are cut, I’ll show you how to roll the base pieces and form the stems. One common mistake is letting the bottom edge get uneven while rolling. But I’ll show you how a Flow Tool can keep the edge straight as you go. This gives your flower a flat base so it can stand up nicely later.
I’ll also show you how to prepare your flower petals. I’ve found that gently curving the petals before assembling makes a big difference in how realistic your mini flowers look at the end.
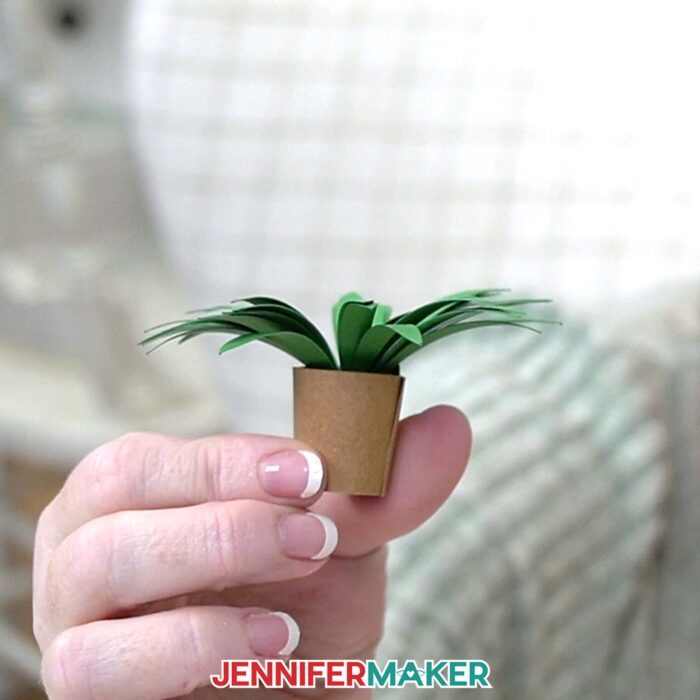
Did I mention there’s miniature plants, too? Look how cute this mini spider plant is!
Don’t worry if your first mini paper flower feels a little awkward. That’s totally normal! It took me a couple tries to get a feel for it, too.
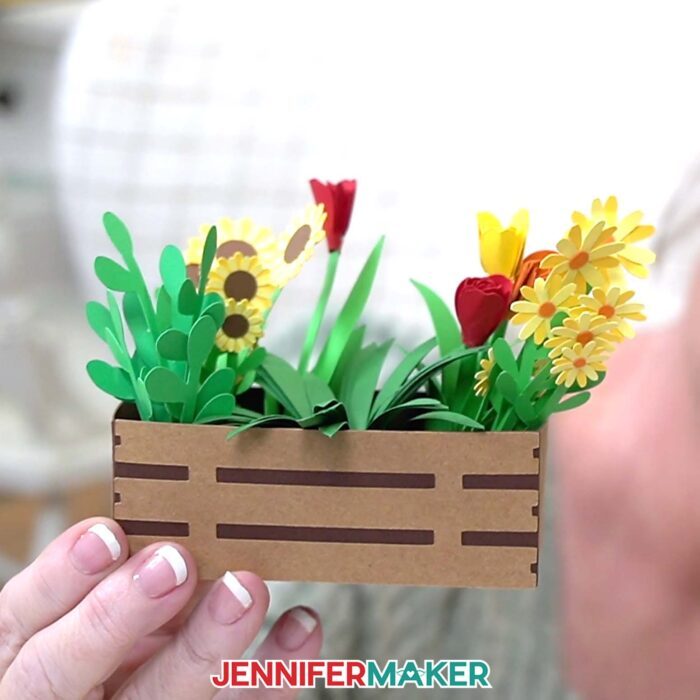
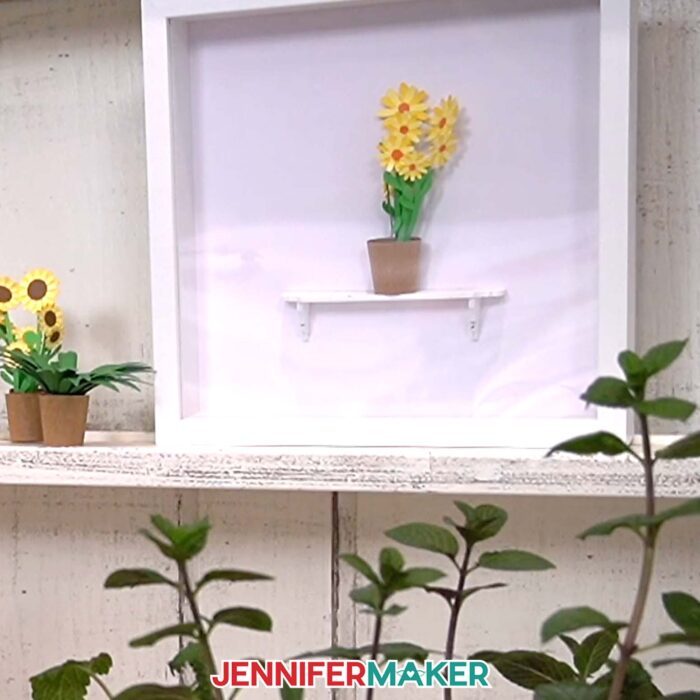
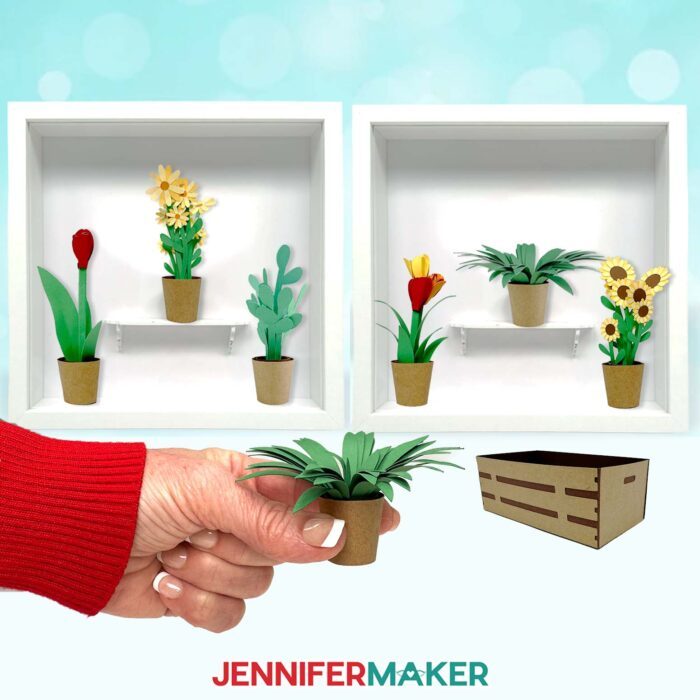
From there, you can mix and match designs to create arrangements, tuck them into little pots, or build a display in a paper pot, crate, or even a framed shadow box.
If you’d like to see exactly how each step comes together, follow along with the full video tutorial. I walk you through the process of making each one, so you feel confident when crafting along with me.
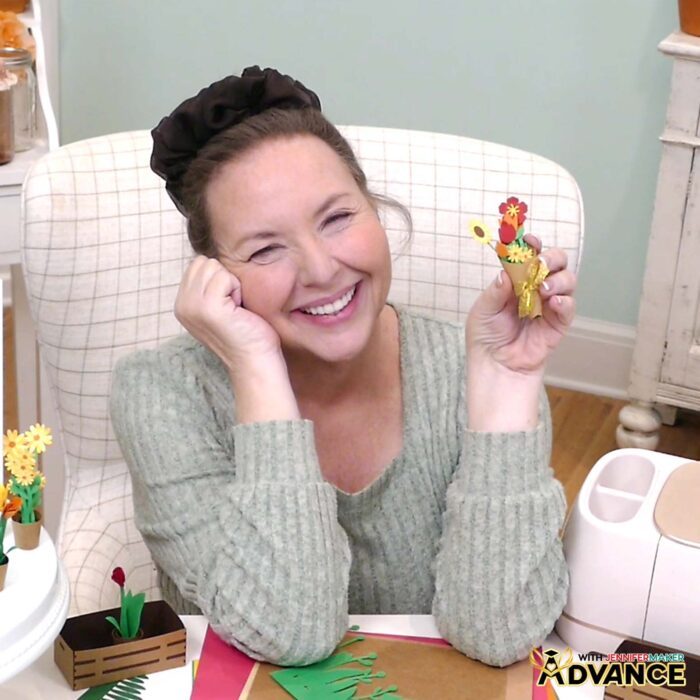
And if you’re ready to go further, inside ADVANCE with JenniferMaker I’ll show you how to design custom arrangements and even turn these into miniature bouquets. It’s a really fun (and pretty!) next step once you’ve got the basics down.
These are small projects, and they do ask for a little patience. My advice is to take your time and let yourself learn the feel of it. Once you see that first flower come together, it’s so satisfying… you won’t be able to stop at just one!
Materials to Make Mini Paper Flowers
View my Amazon shopping list with the exact items I used.
- Several Sheets of 12″ x 12″ 65 lb. Cardstock (alternative) (I used 7 sheets in brown, orange, light yellow, darker yellow, green, and red)
- One to Two (1-2) Sheets of Green 12″ x 12″ 65 lb. Cardstock (alternative) (optional, additional green shades for plants)
- One (1) Sheet of 92 lb. Cardstock (in light brown for the pot)
- One (1) 8″ x 8″ Shadow Box (optional for display) -AND-
- One (1) Dollhouse Shelf (optional for display)
- A way to cut your cardstock – I’m using the Cricut Maker 4, but you can also use any Cricut Maker series machine, a Cricut Explore Series machine, a Cricut Joy series machine, or the Cricut Venture
- Cricut StandardGrip Machine Mat 12″ x 12″
- Scoring Stylus (optional for files with score lines) -OR-
- Single Scoring Wheel & Housing (optional for files with score lines)
- Brayer
- Scraper
- Craft Glue – I used Bearly Art Precision Craft Glue
- Tweezers
- Flow Tool -AND-
- Quilling Tool (for Tulips)
- Measuring Tape (for shadow box)
- Super Glue (to attach shelf in shadow box)
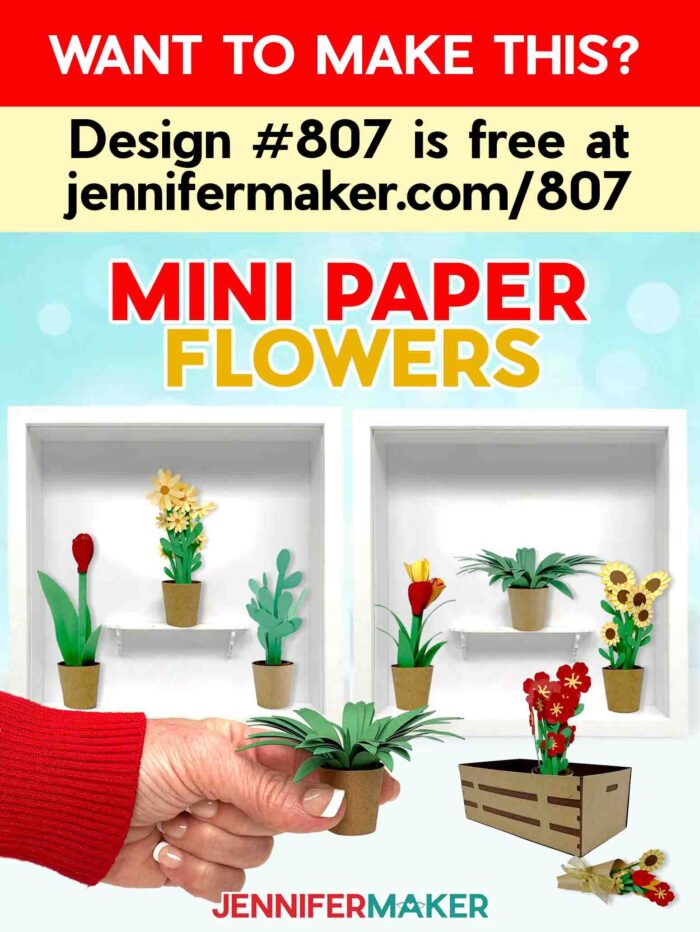
- Design #807 (My free SVG/DXF/PDF design files are available in my free library – get the password by filling out the form at the bottom of this page)
How to Make Mini Paper Flowers
Mini Paper Flower Tutorial
Follow my Mini Paper Flower Tutorial to learn how to make adorable miniature flower arrangements out of simple cardstock!
Materials
- Several Sheets of 12" x 12" 65 lb. Cardstock (I used 7 sheets in brown, orange, light yellow, darker yellow, green, and red)
- One to Two (1-2) Sheets of 12" x 12" 65 lb. Green Cardstock (optional, additional green shades for plants)
- One (1) Sheet of 8.5" x 11" 92 lb. Cardstock (in light brown for the pot)
- One (1) 8" x 8" Shadow Box (optional for display)
- One (1) Dollhouse Shelf (optional for display)
- Design #807 (My free SVG/PDF/DXF design files are available in my free resource library - get the password by filling out the form at the bottom of this page)
Tools
- A way to cut your cardstock - I’m using the Cricut Maker 4, but you can also use any Cricut Maker series machine, a Cricut Explore series machine, a Cricut Joy series machine, or a Cricut Venture
- Cricut Green StandardGrip Machine Mat 12" x 12"
- Scoring Stylus (optional for files with score lines) -OR-
- Single Scoring Wheel & Housing (optional for files with score lines)
- Brayer
- Scraper
- Tweezers (optional)
- Flow Tool -AND-
- Quilling Tool (for tulips)
- Measuring Tape (for shadow box)
- Craft Glue - I used Bearly Art Precision Craft Glue
- Super Glue (to attach shelf)
Instructions
STEP 1: GET MY FREE MINI PAPER FLOWER DESIGN FILES
First, download my Mini Paper Flower designs from my free library – look for Design #807. Alternatively, you can use the Save This Project form near the top of this post and the design link will be emailed to you.
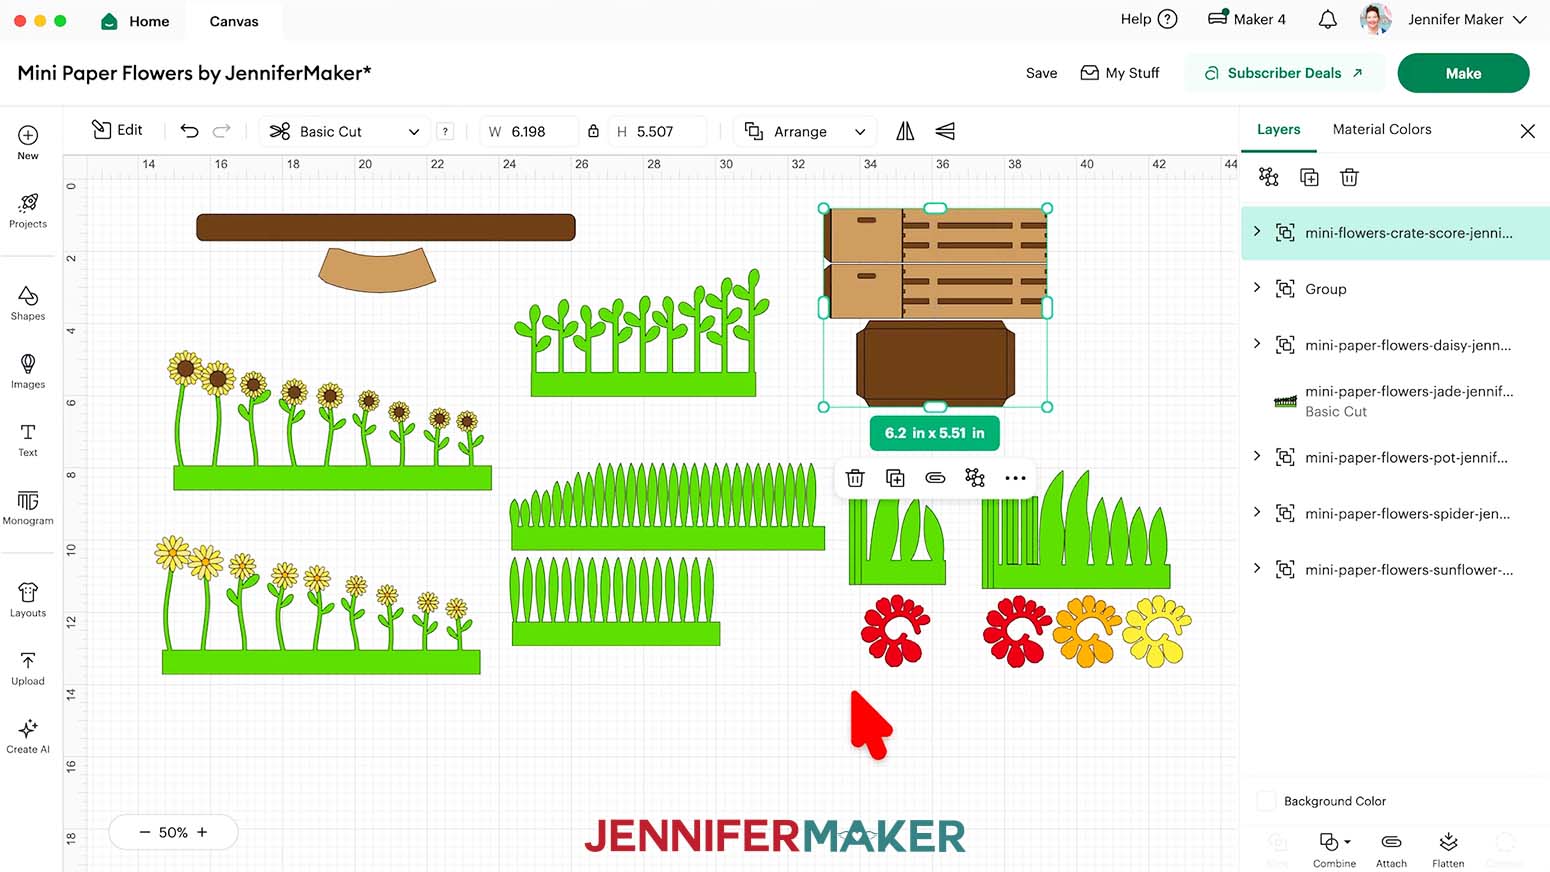
In the SVG folder, you’ll find nine files:
- “crate no-score” that uses the standard Premium Fine Point blade to create dashed cut lines you can fold along, for displaying plants and flowers
- “crate score” for use with a scoring tool to create the foldable creases
- “tulip no-score” for use with a standard Premium Fine Point Blade, with a single tulip and a three-stem tulip arrangement
- “tulip score” for use with a scoring tool, with a single tulip and a three-stem tulip arrangement
- “daisy” arrangement with nine blooms
- “jade” plant
- “pot” with dirt piece for displaying plants and flowers
- “spider” plant
- “sunflower” arrangement with nine blooms
There’s also a DXF folder with versions for use with other cutting machines.
There’s also a PDF version of my designs that you can print and cut by hand.
TIP: If you’re not sure how to upload, go to jennifermaker.com/svgs to learn how to unzip and upload SVG files.
STEP 2: PREPARE AND CUT YOUR MINI PAPER FLOWER DESIGNS
CRICUT DESIGN SPACE
- In Cricut Design Space on a blank Canvas, click “Upload.”
NOTE: If you’re new to using Cricut Design Space, go to cricutkickoff.com for my introductory tutorial on Design Space basics. - Click “Upload” and then “Upload Image.”
- Click “Browse.”
- Select the SVG file from the design folder.
NOTE: I’ll demonstrate with the “score” version of the “crate” design first, but these directions work for the other designs, too. - Click “Open” and then “Continue.”
- Click “Upload” to add the design to your Canvas.
- Repeat these steps to upload any other SVG files you want on your Canvas.
NOTE: I’ll also upload the “score” version of the “tulip,” as well as the “daisy,” “jade,” “pot,” “spider,” and “sunflower” designs.
- Click “Save” and give your project a name.
- If you’d like to resize your designs, drag a selection box around all of the designs on the Canvas, then use the corner handles to resize everything at the same time to make sure the pieces will assemble correctly.
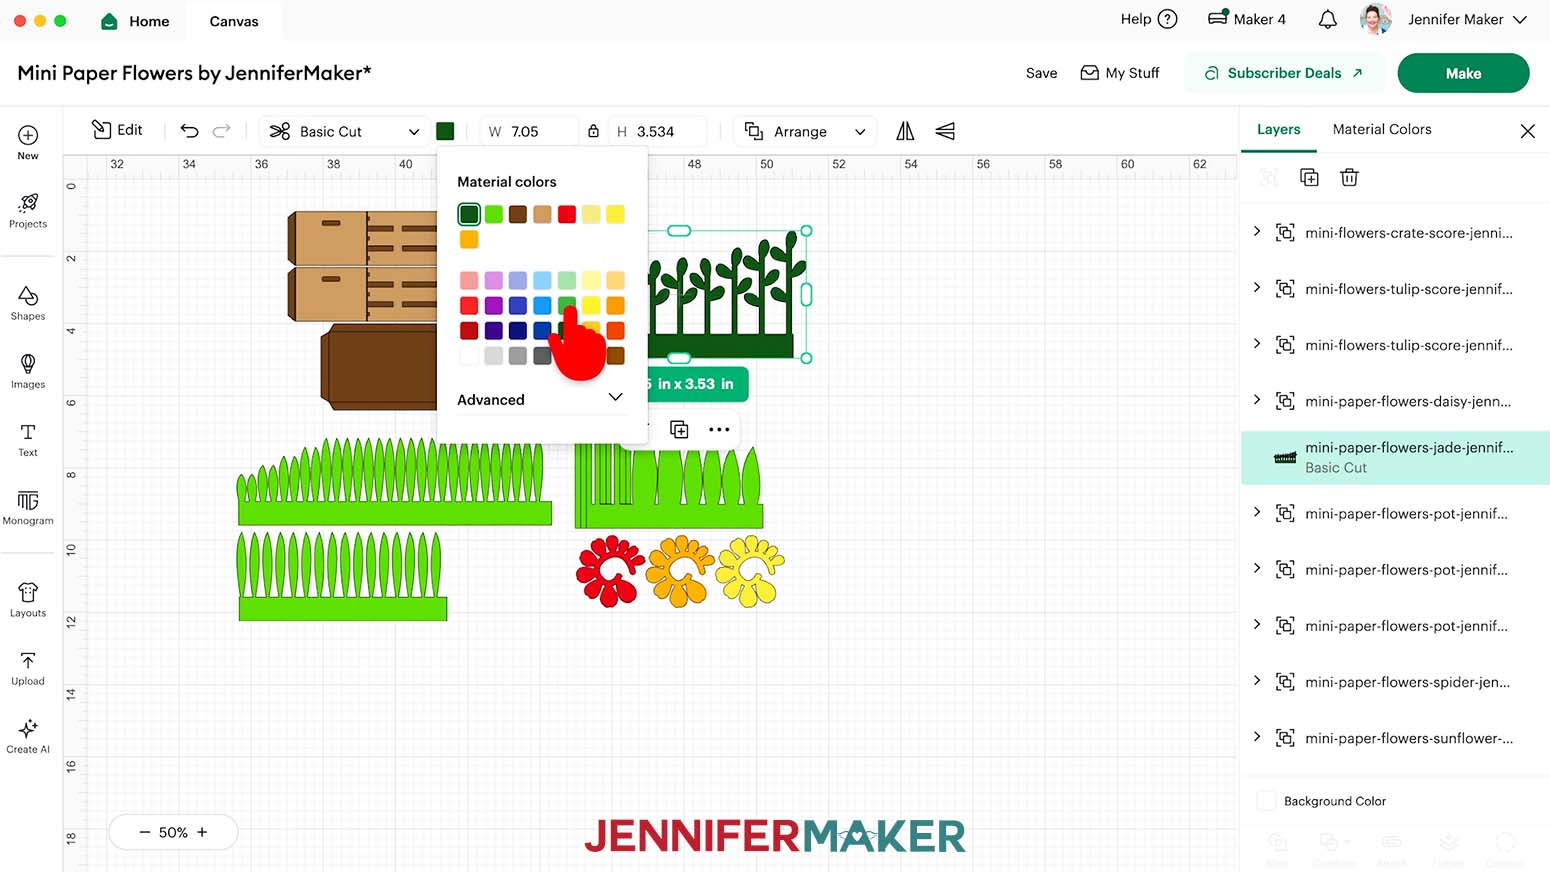
NOTE: I do NOT recommend resizing the flower blooms smaller than 0.6”, or they will be very difficult to cut and work with. I’ll keep my pieces sized as-is. - If you’d like to change the color of the blooms or stems to more closely match your cardstock, click “Ungroup” to work with the pieces separately.
- Select the piece you want to adjust, and use the Color Box at the top to pick a new color.
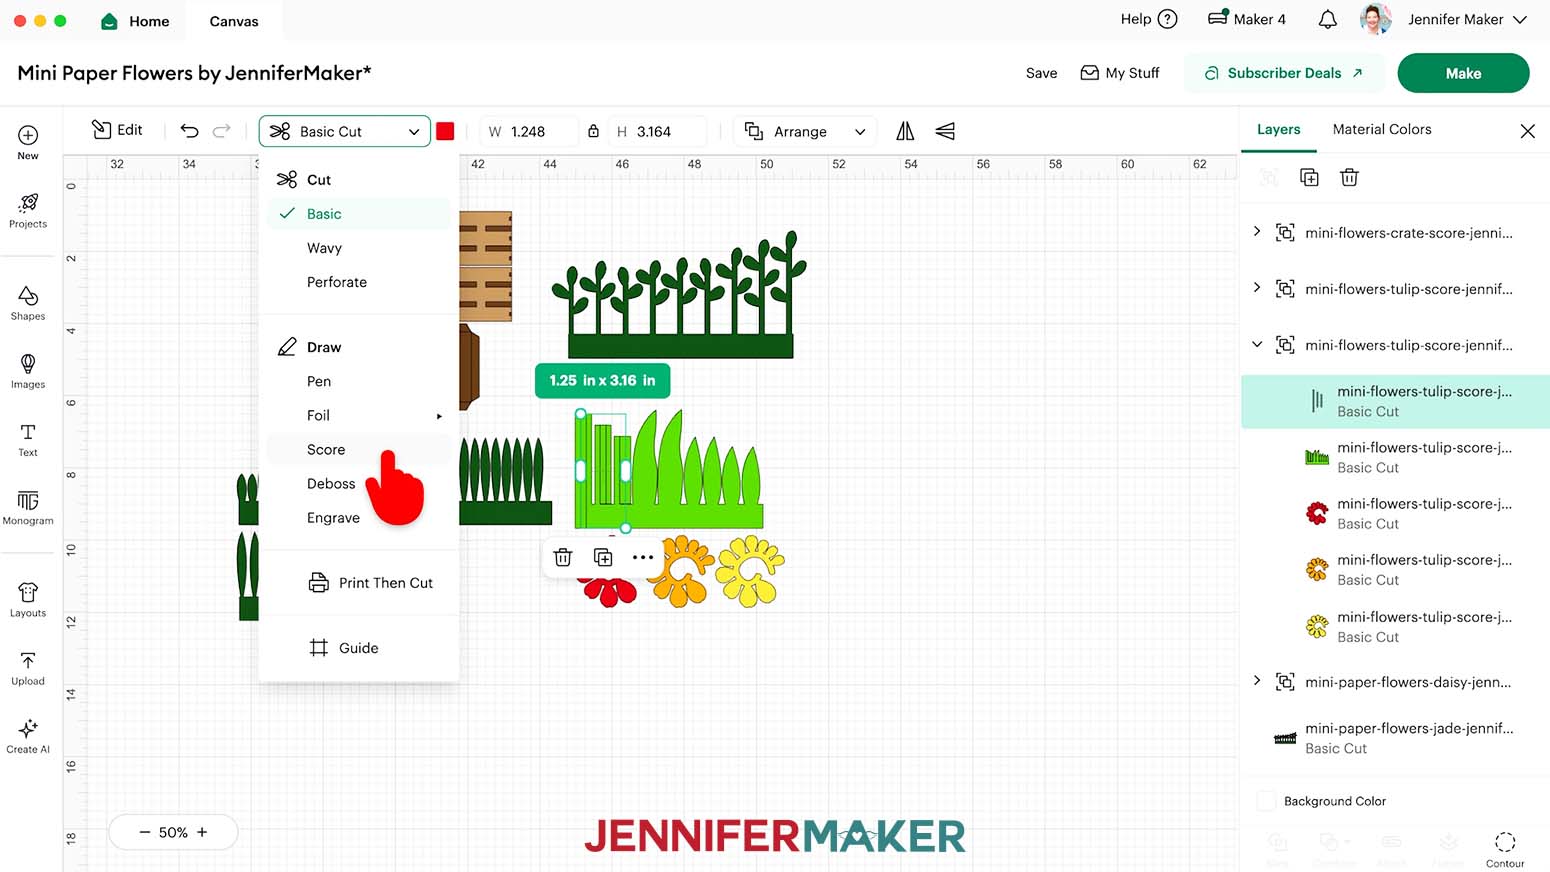
NOTE: I’ll change the “jade” plant and “spider” plant pieces to darker shades of green. - If you’re using the “score” version of the “crate” and/or “tulip” designs, select the design and click the arrow next to the design in the Layers Panel.
NOTE: If you’re using the “no-score” version of the “crate” and/or “tulip” designs, skip ahead to Step 18. - Select the layer that looks like only lines.
- In the top menu, change the operation from “Basic Cut” to “Score.”
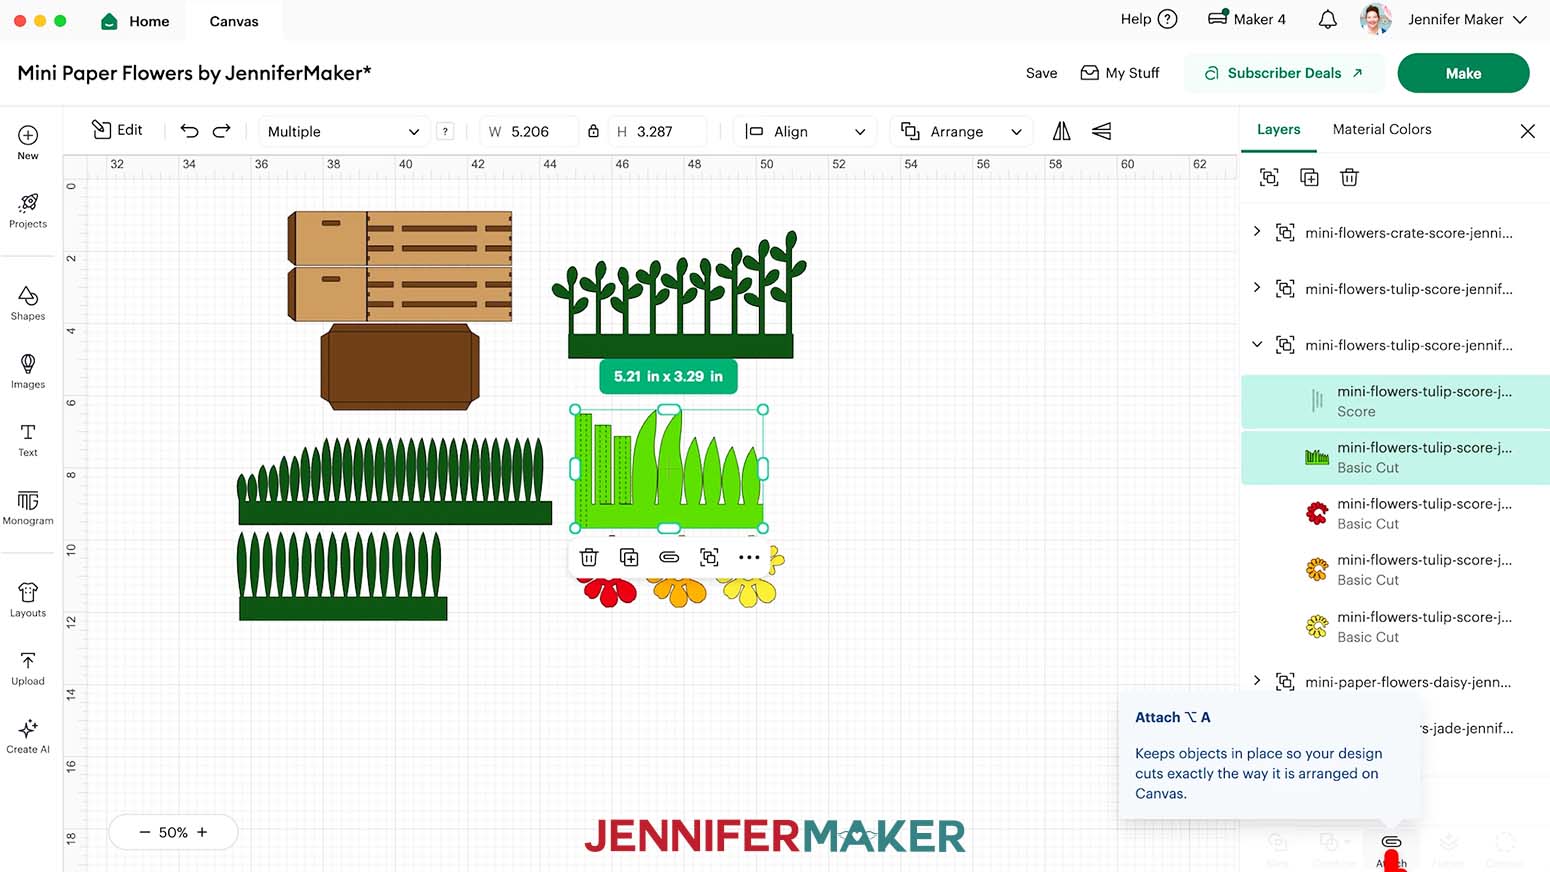
- Click the grouped layer with an arrow next to it to select the “Score” layer and cut shape together.
- Click “Attach” to keep the “Score” line and cut shape together.
NOTE: After clicking “Attach,” some of the design elements may move to the back of the Canvas. You can adjust their position by selecting them, then clicking “Arrange” and “Bring to Front.” - Repeat Steps 12-16 to adjust and “Attach” the remaining groups with “Score” lines.
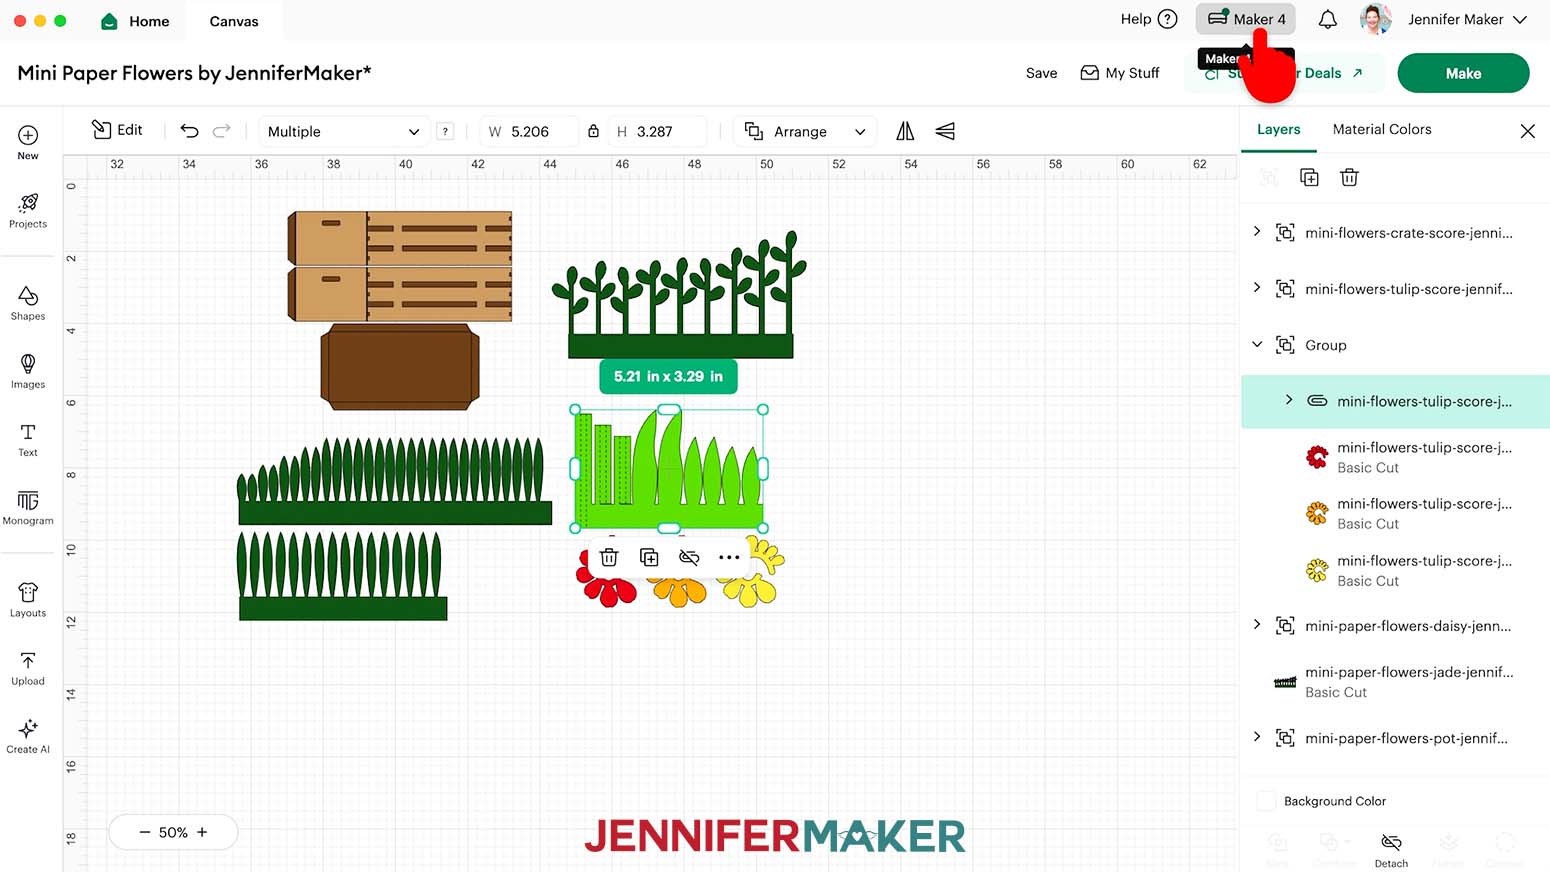
- Use the “Duplicate” icon above the Layers Panel to create as many copies of the flowers, pot (and dirt), or crates as you want for your mini flower arrangements.
NOTE: I’ll duplicate the pot and dirt pieces until I have three pots and three dirt pieces. - Your project is ready to cut!
CUTTING
- Make sure the correct machine is selected in the top right.
- Click “Make.”
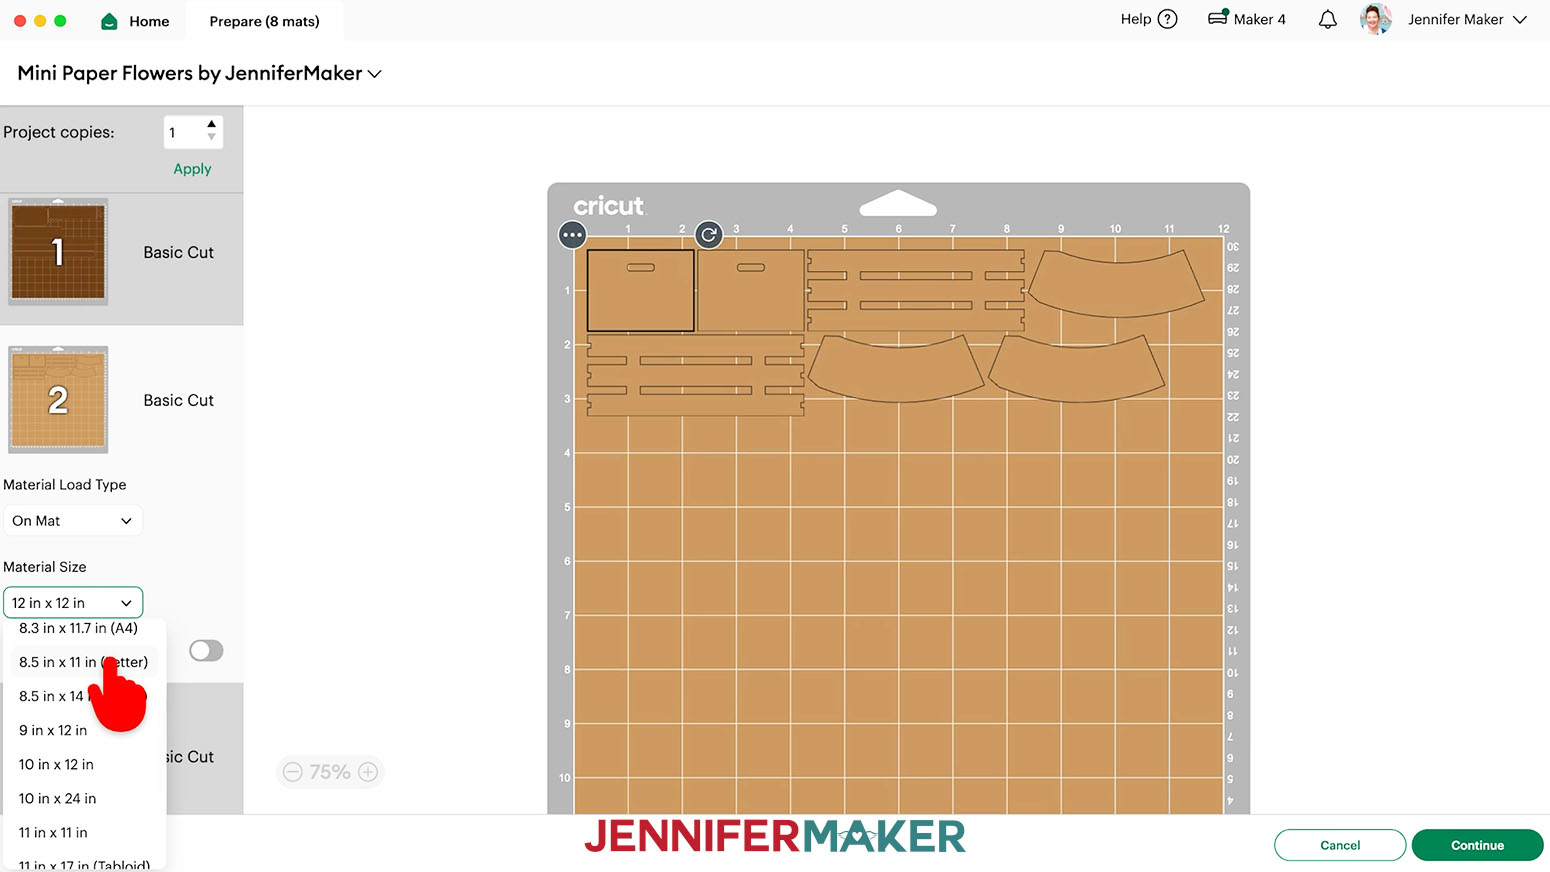
- On the “Prepare” screen, make sure the correct “Material Size” is selected for your materials.
TIP: If prompted, click "On Mat," choose your mat size, and click “Confirm.”
NOTE: I’ll choose “8.5 in x 11 in” for my light brown mat, and “12 in x 12 in” for the rest of my mats. - Make sure Mat 1 is selected so it loads first on the next screen, and click “Continue.”
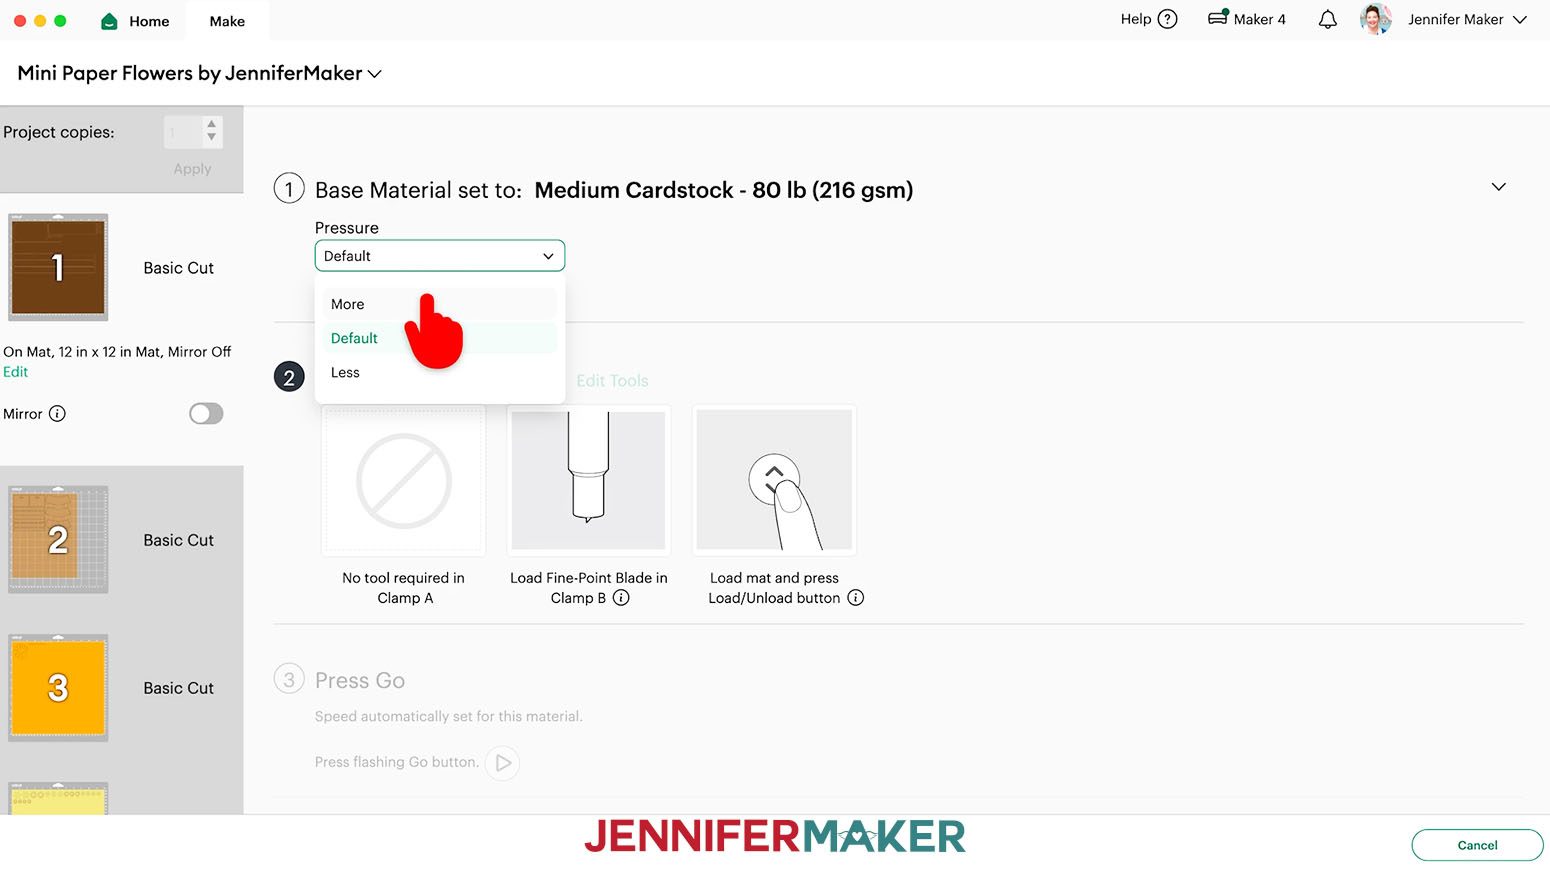
- On the “Make” screen, set the “Base Material” for your first mat.
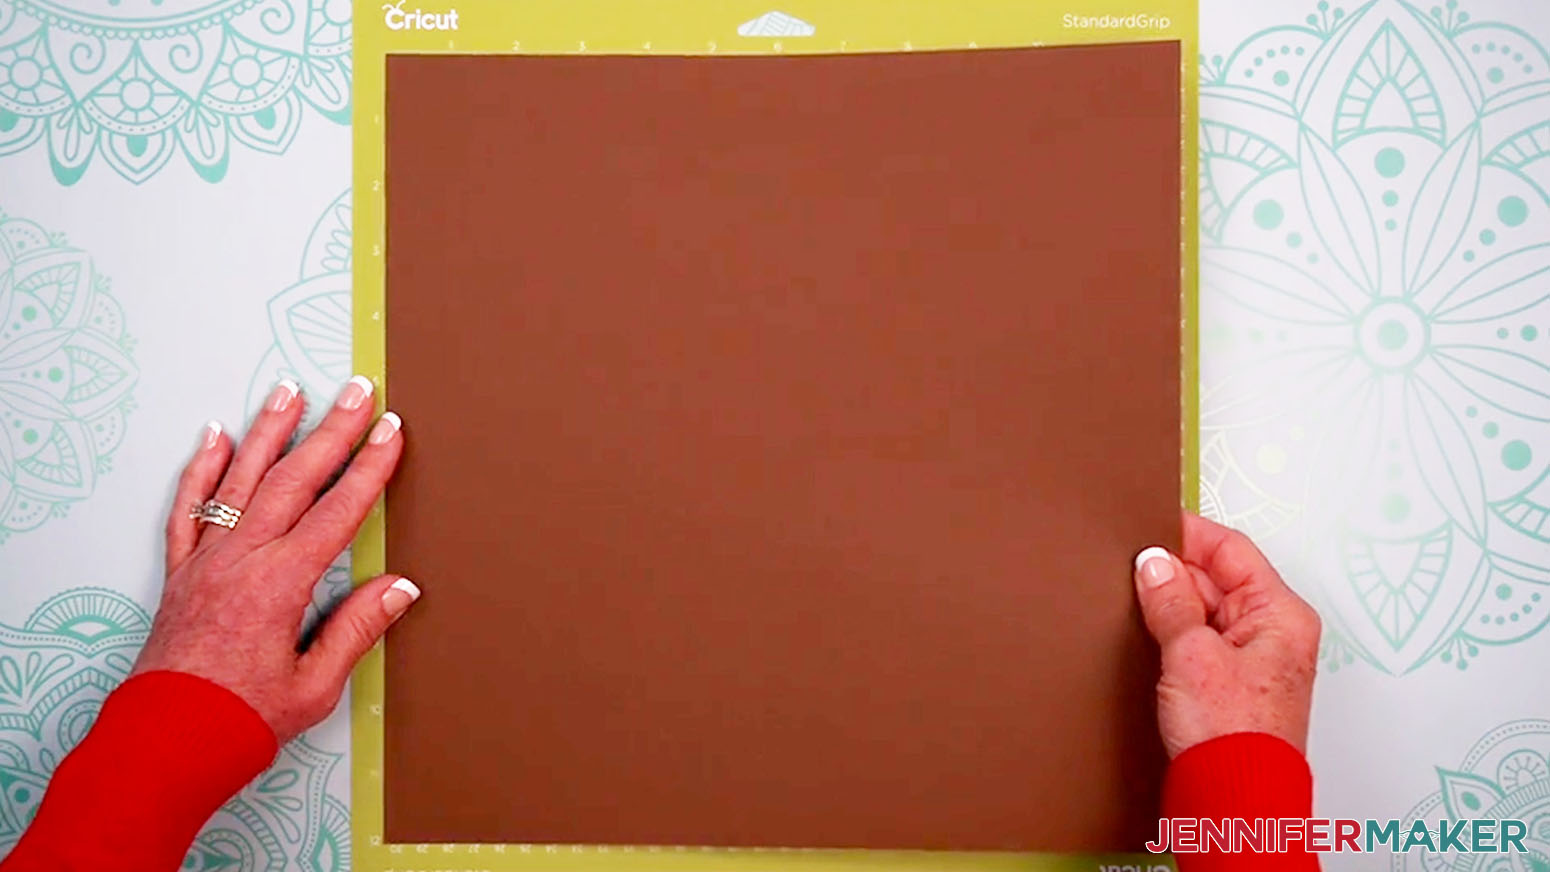
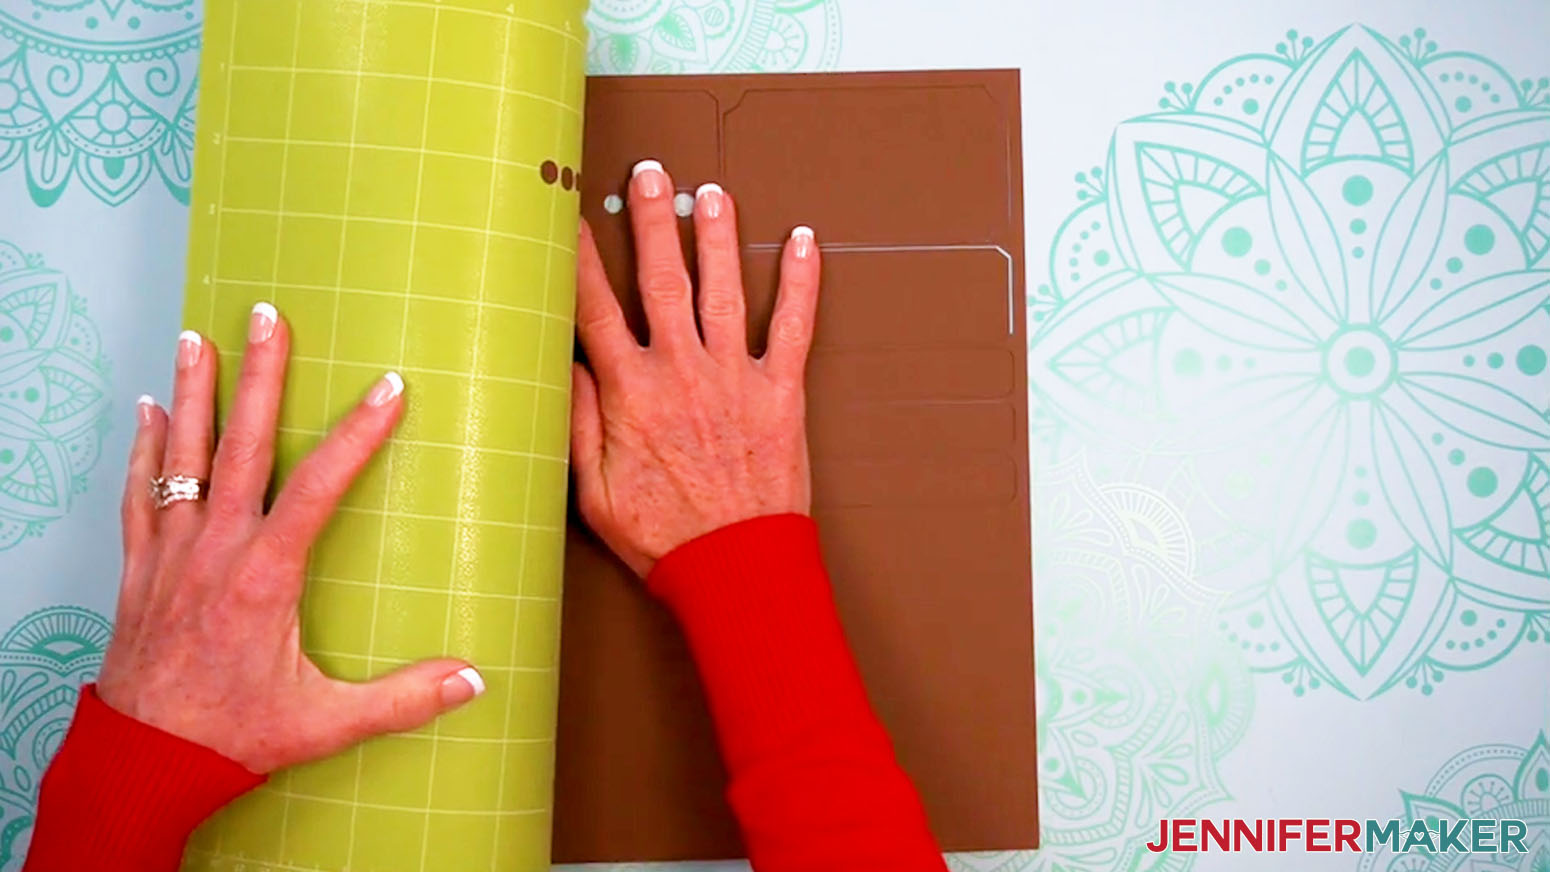
NOTE: Mine is dark brown, but yours might be different if you adjusted colors. I’m using 65 lb. cardstock, so I’ll choose the “Medium Cardstock - 80 lb. (216 gsm)” setting with “More” Pressure. For the 92 lb. cardstock, I’ll choose the “Heavy Cardstock - 100 lb. (270 gsm)” setting with “Default” Pressure. - Place your cardstock face up on a green StandardGrip machine mat.
TIP: A clean mat is extra important for successful cuts on tiny, intricate shapes like these. - Use a brayer to make sure it’s fully adhered.
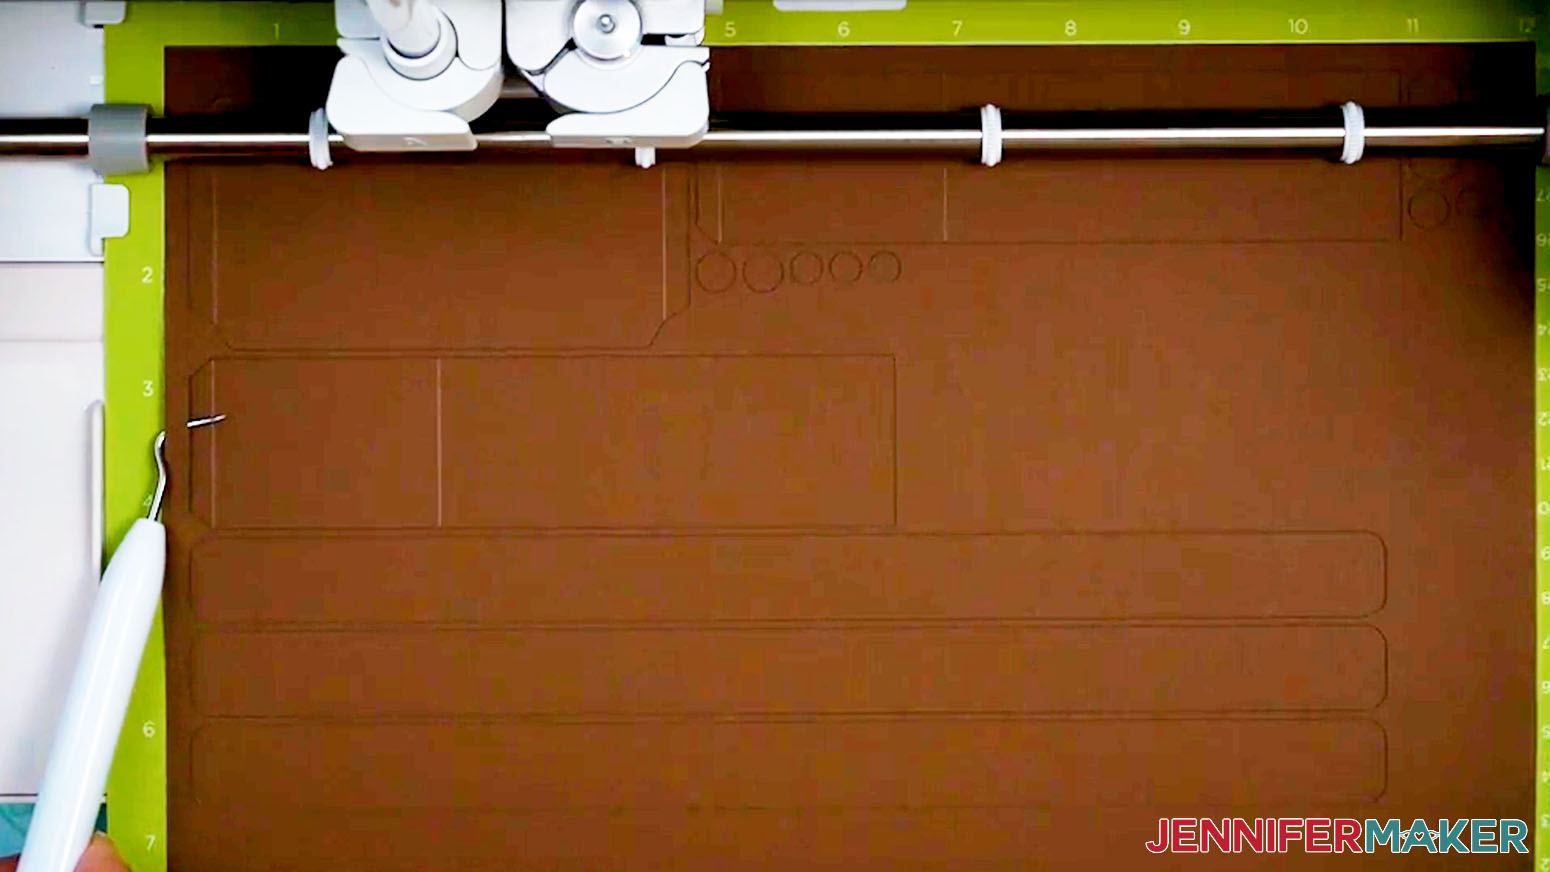
- Check that your Premium Fine-Point Blade is clean and in the clamp.
- Press the flashing “Load/Unload” button to load the prepared mat into your Cricut.
- Press the flashing middle button to begin cutting.
- When it has finished cutting, don’t unload the mat right away. Gently lift a corner of the material to make sure the cuts went all the way through. If not, press the middle button again to make a second pass of cuts in the same spots.
- When the cuts are complete, unload the mat, flip it over onto your work surface, and roll it back to release the cardstock.
TIP: If you have any issues with your cuts, go to jennifermaker.com/cleaner-cuts. - Use a scraper tool to clean off the small bits left on your mat after you remove the cut pieces.
- Cut the rest of your mats using the correct settings and materials, repeating the steps above.
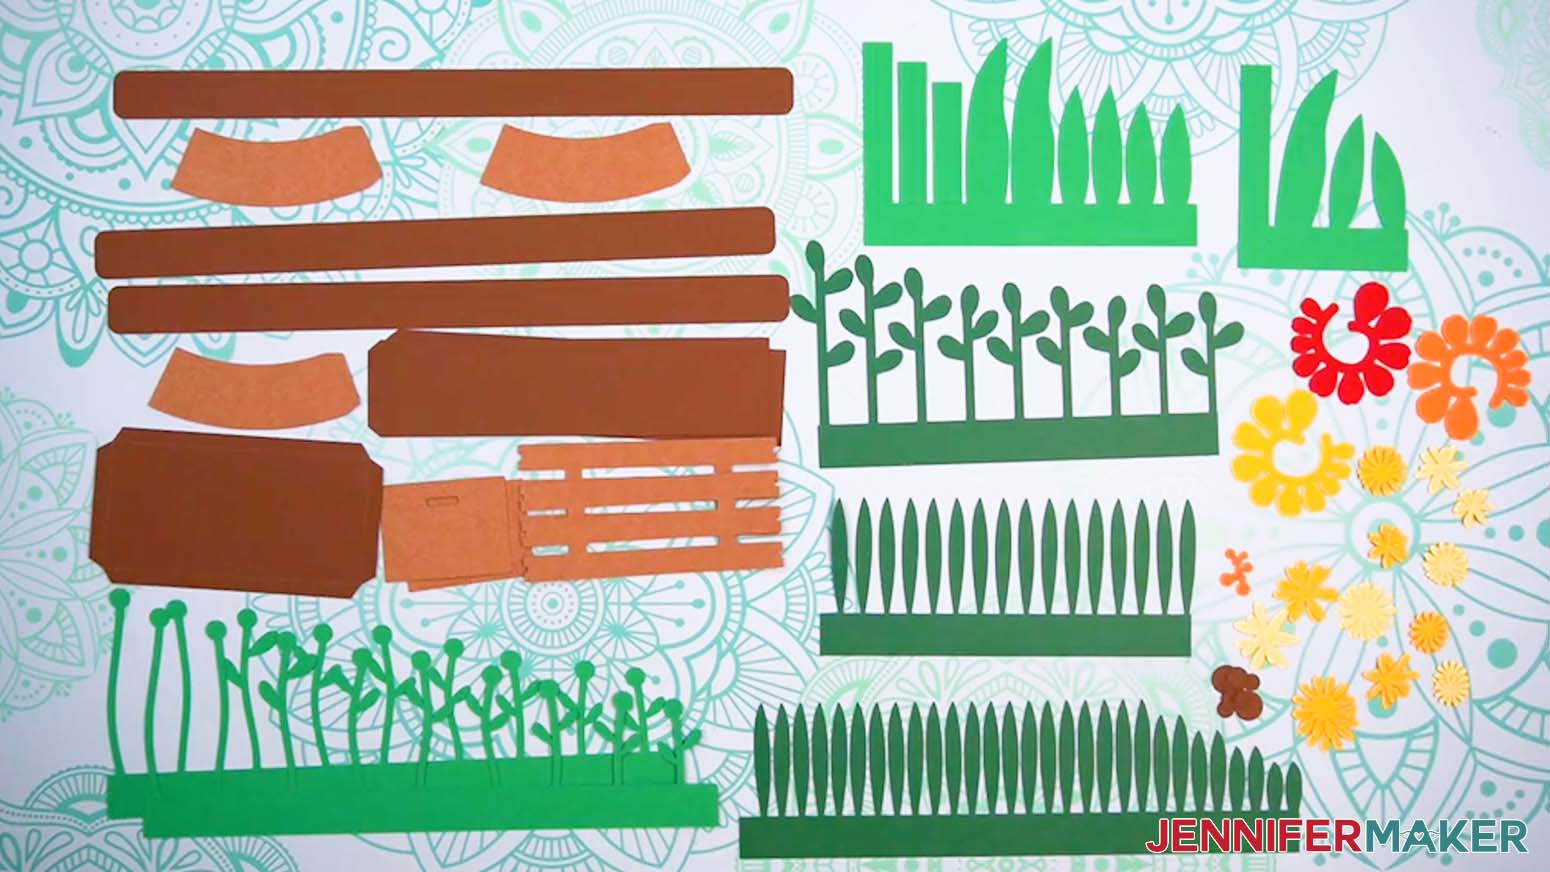
- Lay out all of the pieces face up to make sure you have them all, using your Canvas for reference.
STEP 3: ASSEMBLE YOUR MINI PAPER FLOWERS
SINGLE TULIP
- Gather your tulip pieces and place them face up on your work surface, using your Canvas as reference.
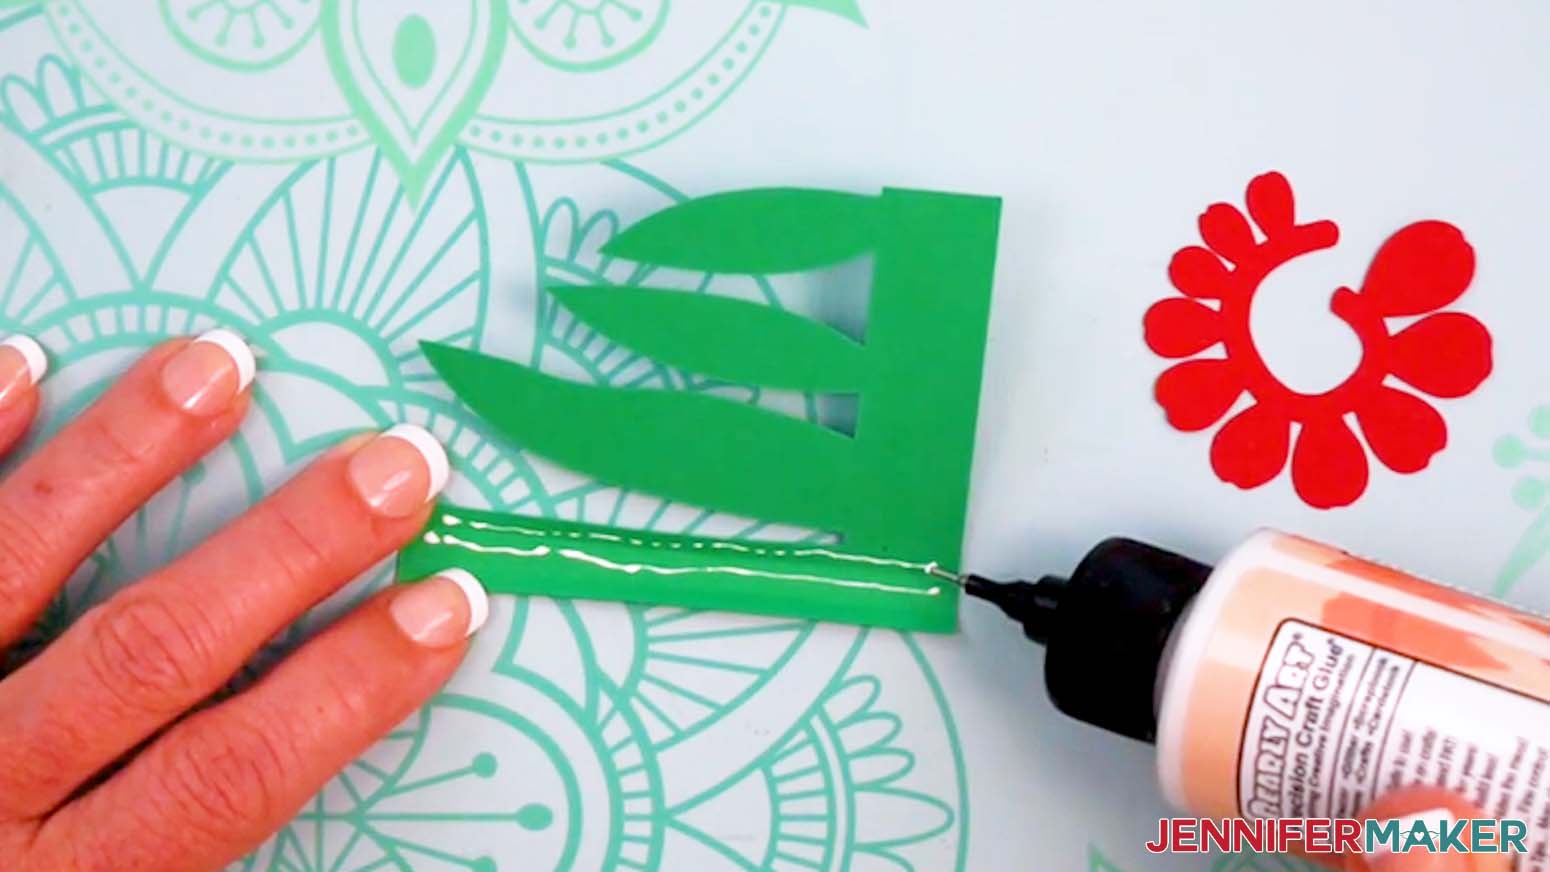
NOTE: You should have one foliage piece and one bloom piece for each single tulip. - Grab the tulip’s foliage piece, and carefully fold along the stem’s dashed cut or score lines to establish the creases and form three long strips we’ll fold to form a strong stem.
- Apply a thin line of glue along each long strip, between the creases.
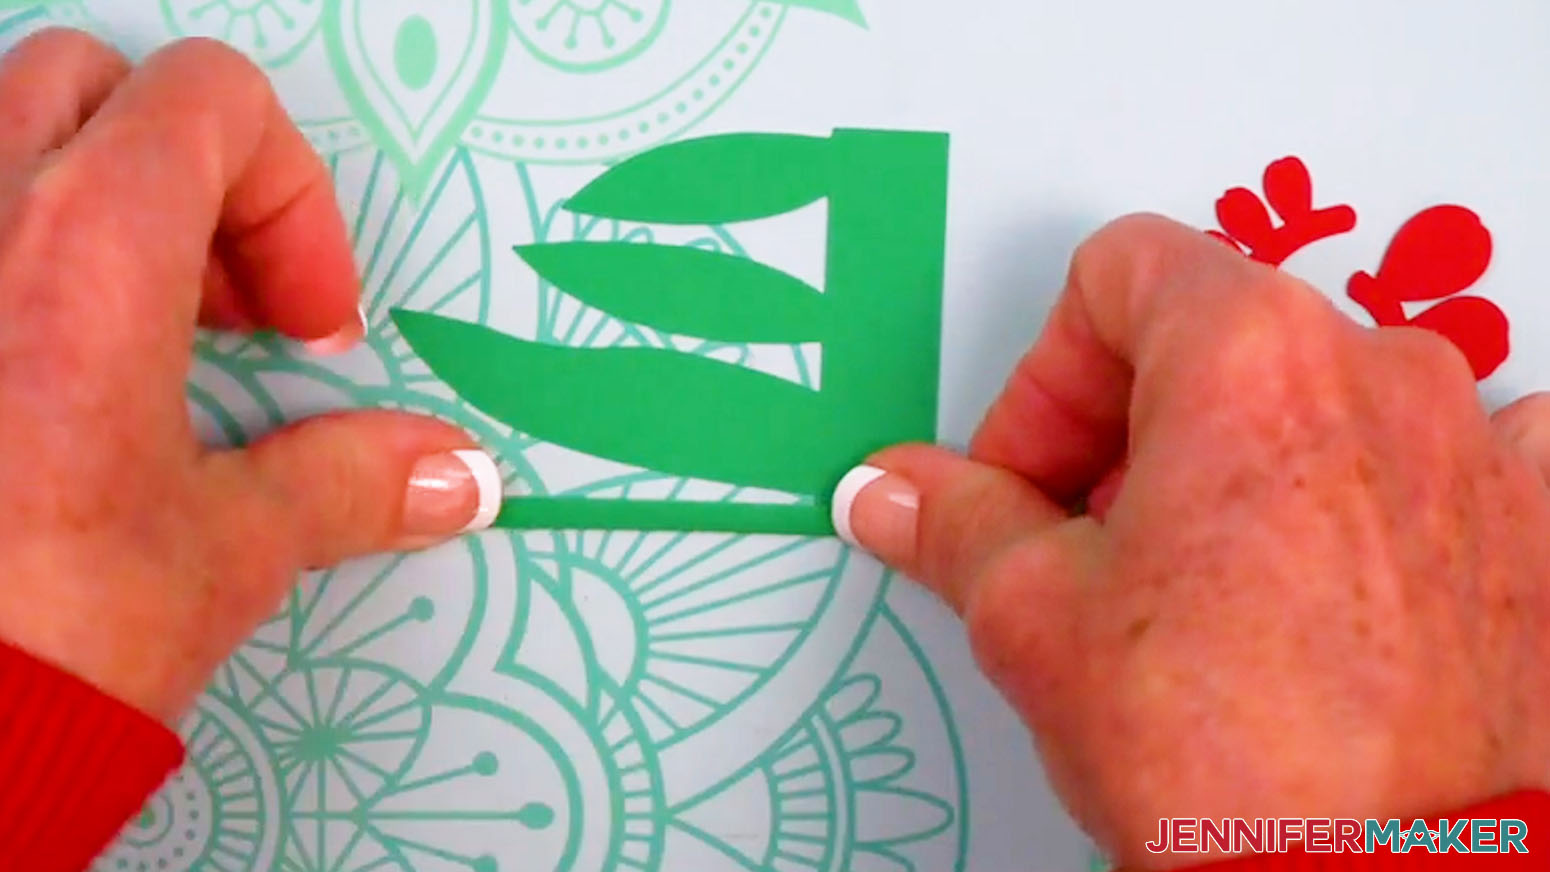
- Use your fingers to fold the strips into a stem. Press with your fingers as you go to adhere the strips together.
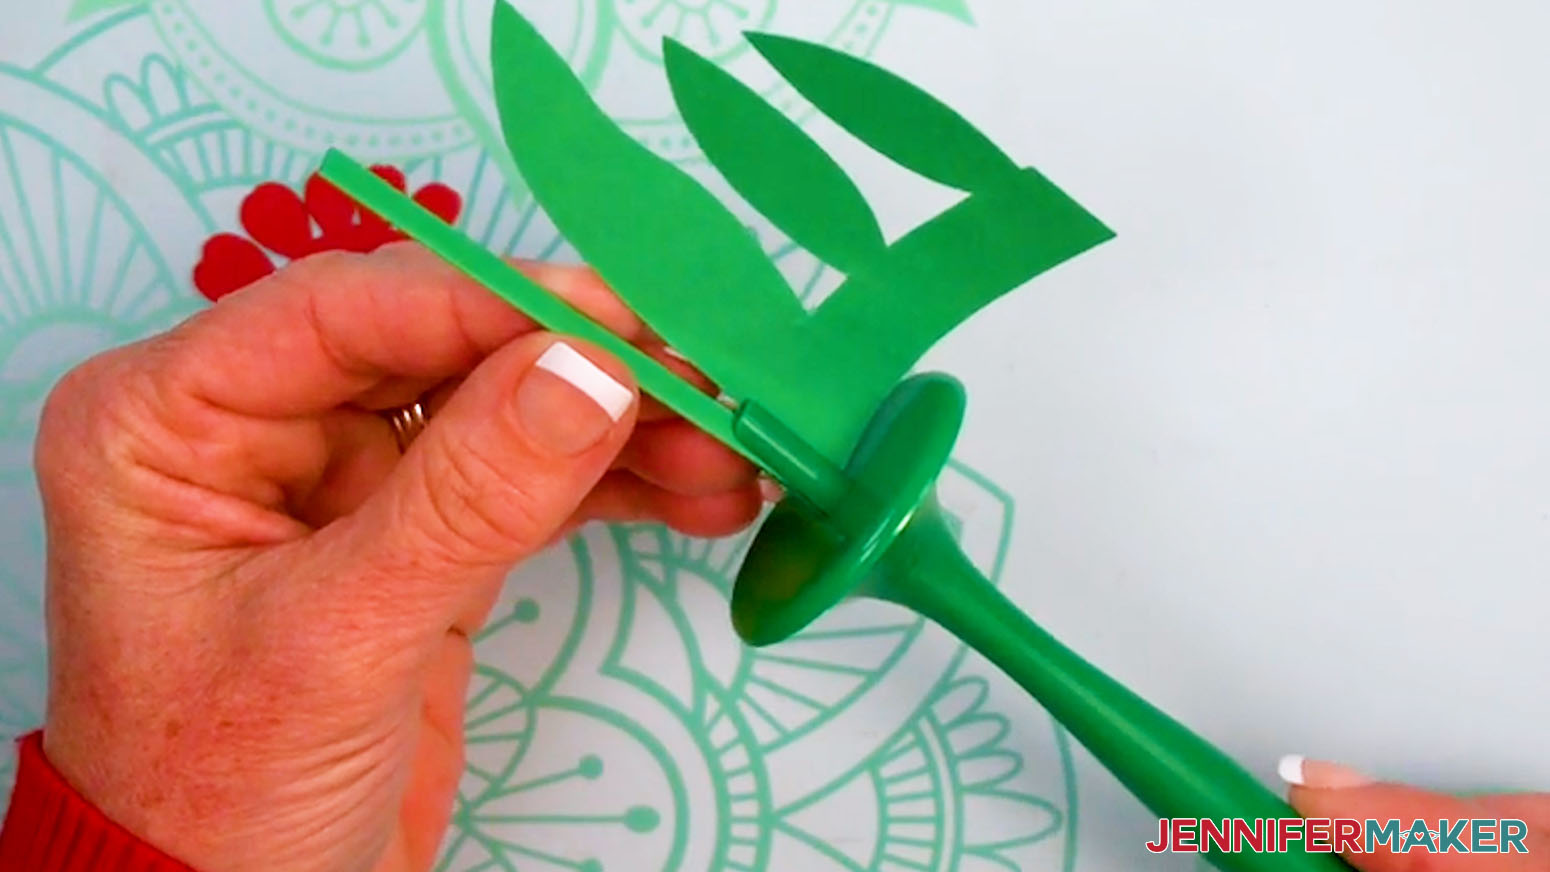
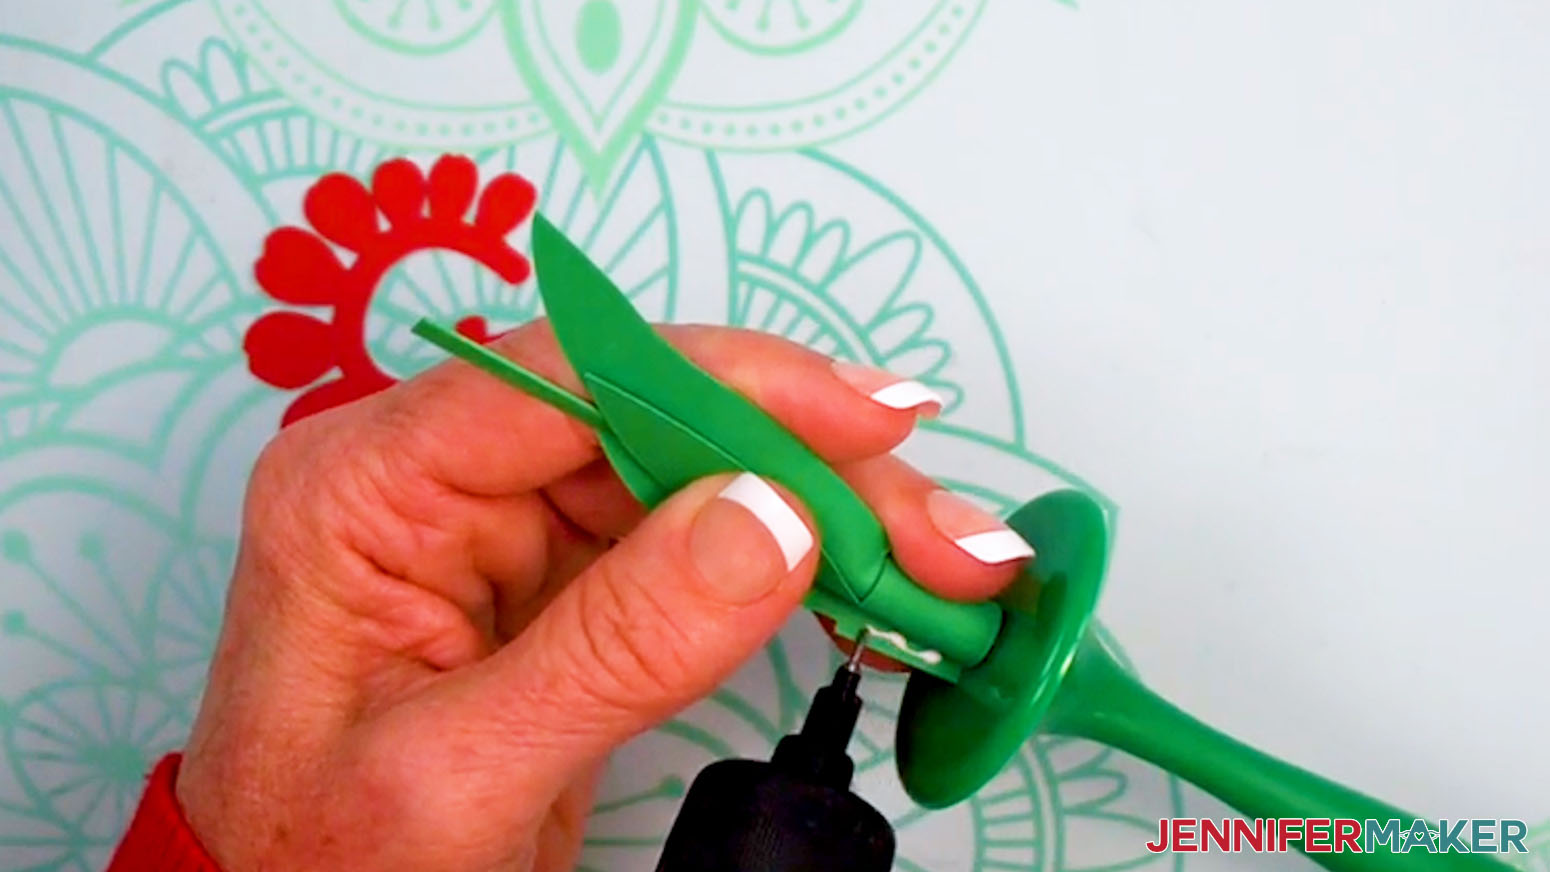
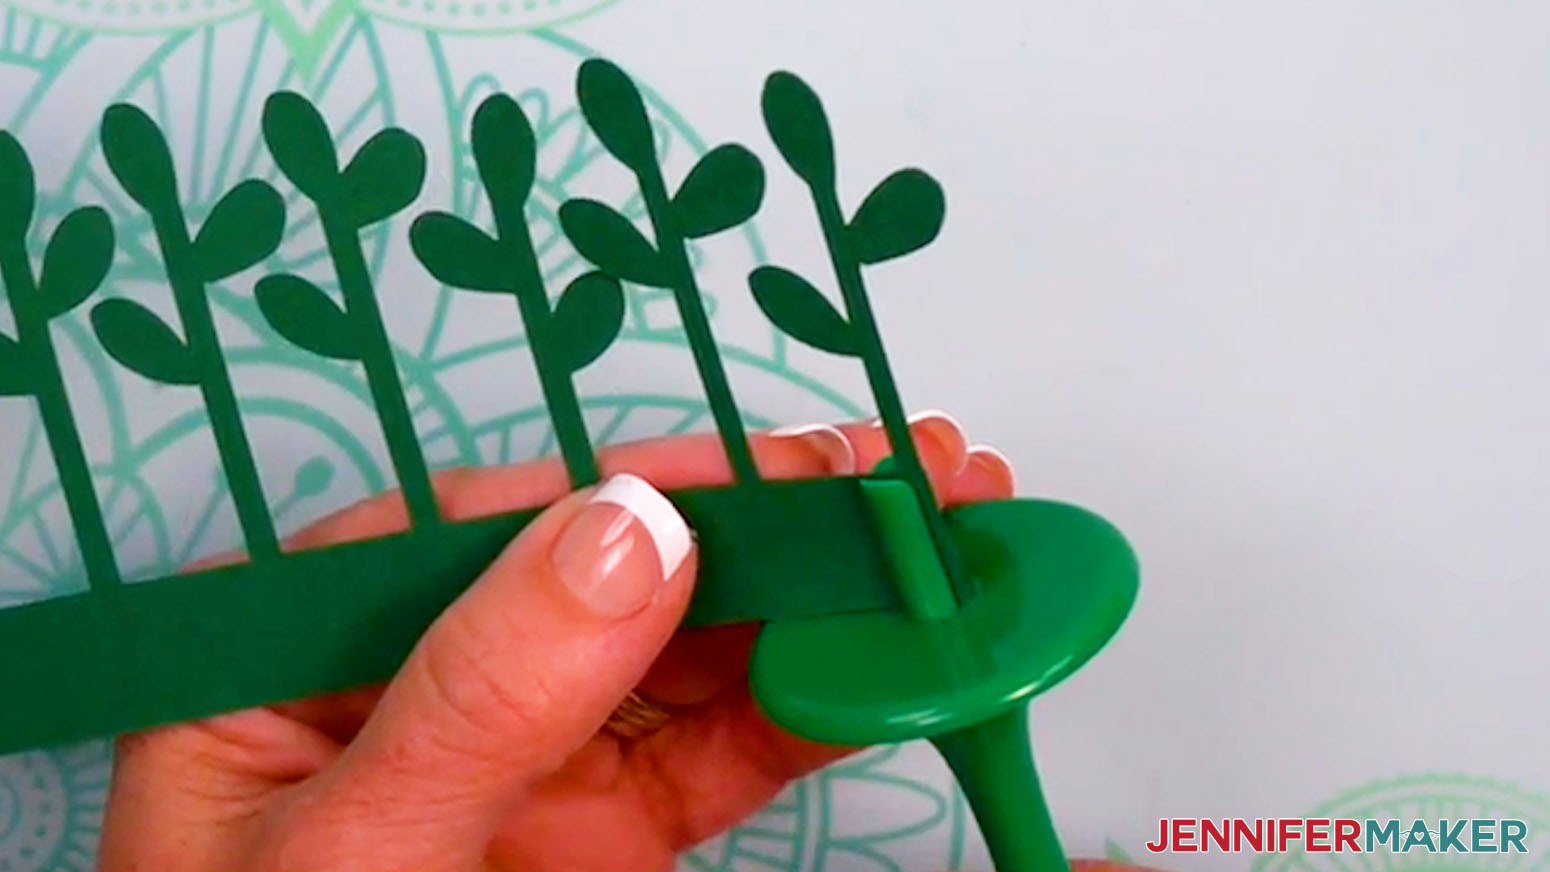
TIP: If any glue seeps out, wipe it away quickly with your finger. - Grab the Flow Tool and insert the bottom edge under the stem into the tool’s spindle slot.
NOTE: I’ll use a Flow tool here because I find it results in a more even roll. If you don’t want to use a Flow Tool, you can also use a quilling tool, a pair of tweezers (reverse-action tweezers work best), or roll it carefully by hand so the bottom edge of the roll is even. - While keeping the stem piece’s end in place, roll the tool toward you so the spiral begins winding around the spindle and itself.
- Continue rolling your paper, keeping the bottom edges aligned with one another as best you can. The platform around the spindle helps keep the bottom edges aligned.
- When almost the entire spiral is rolled around the spindle, add a dab of glue to the inside of the loose end and press it into place to attach it.
- Hold it together with your fingers until the glue is fully dry.
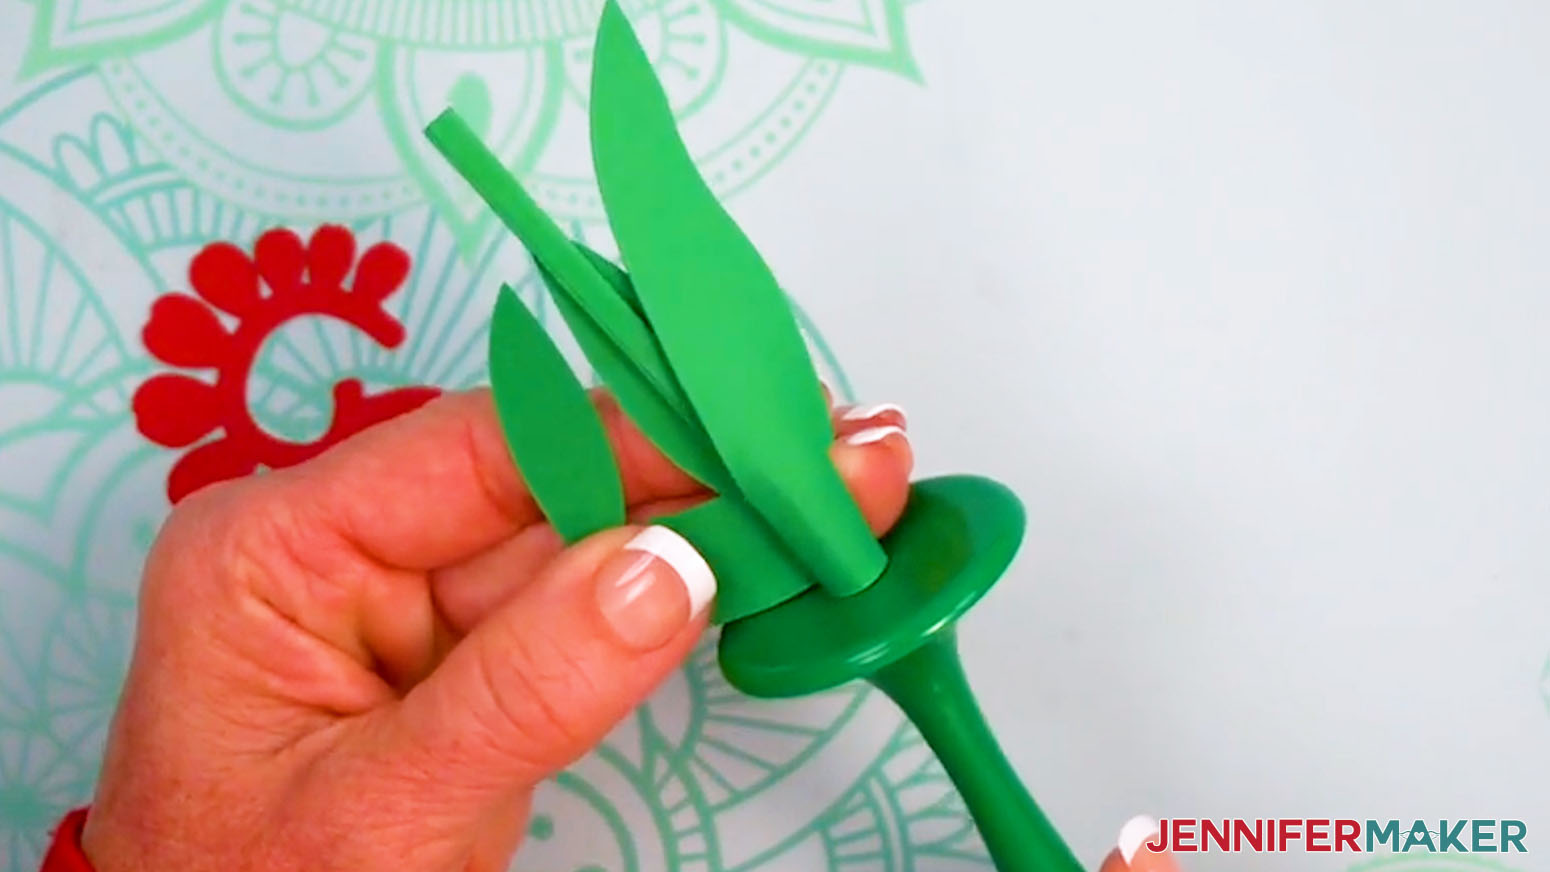
- Remove the Flow Tool.
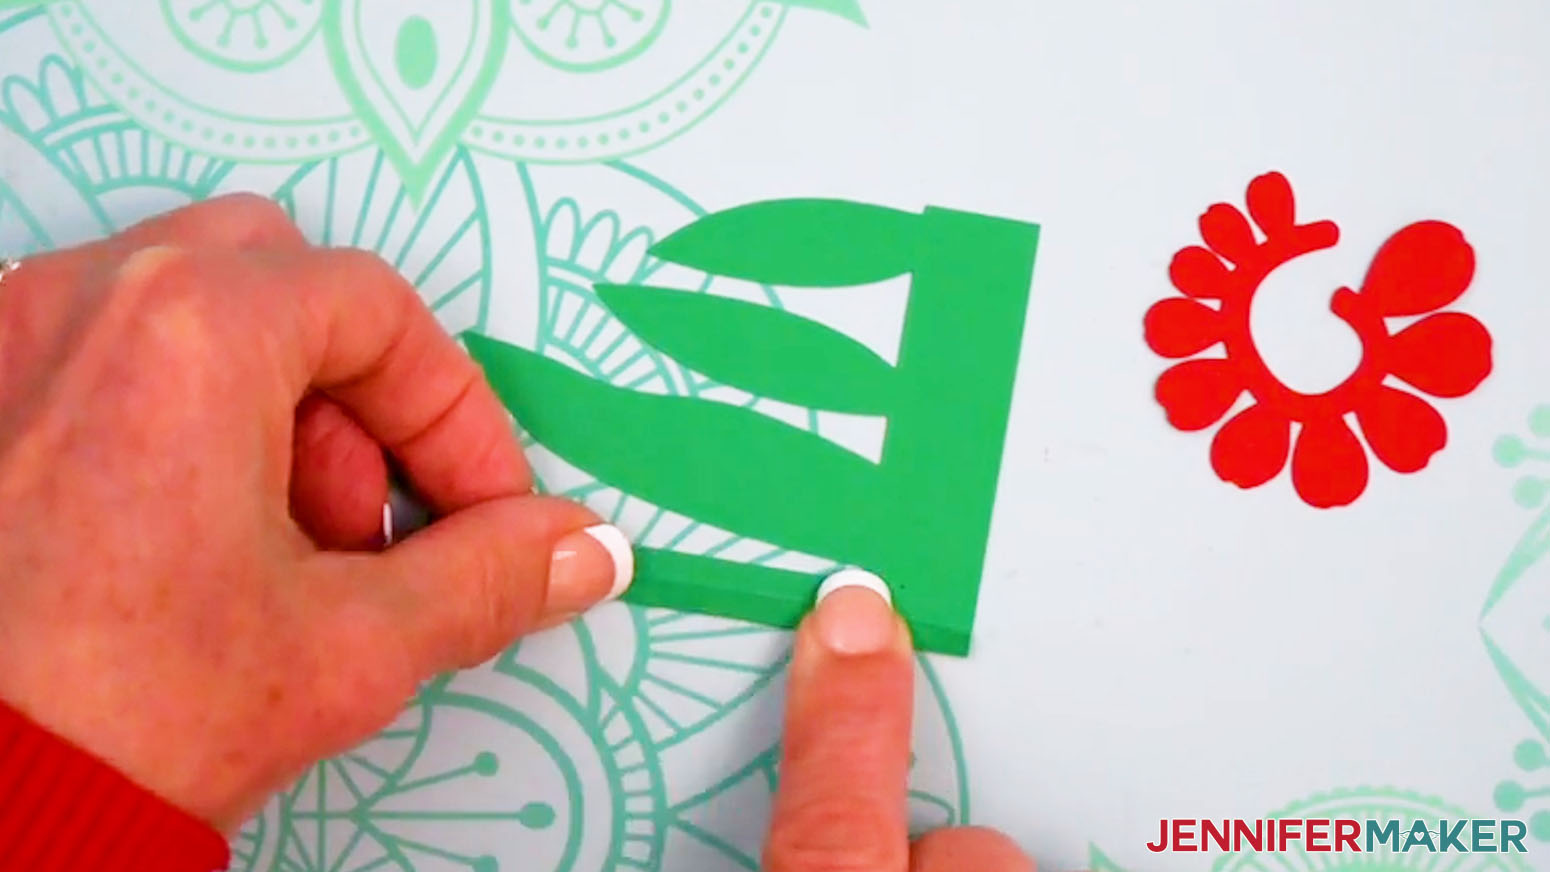
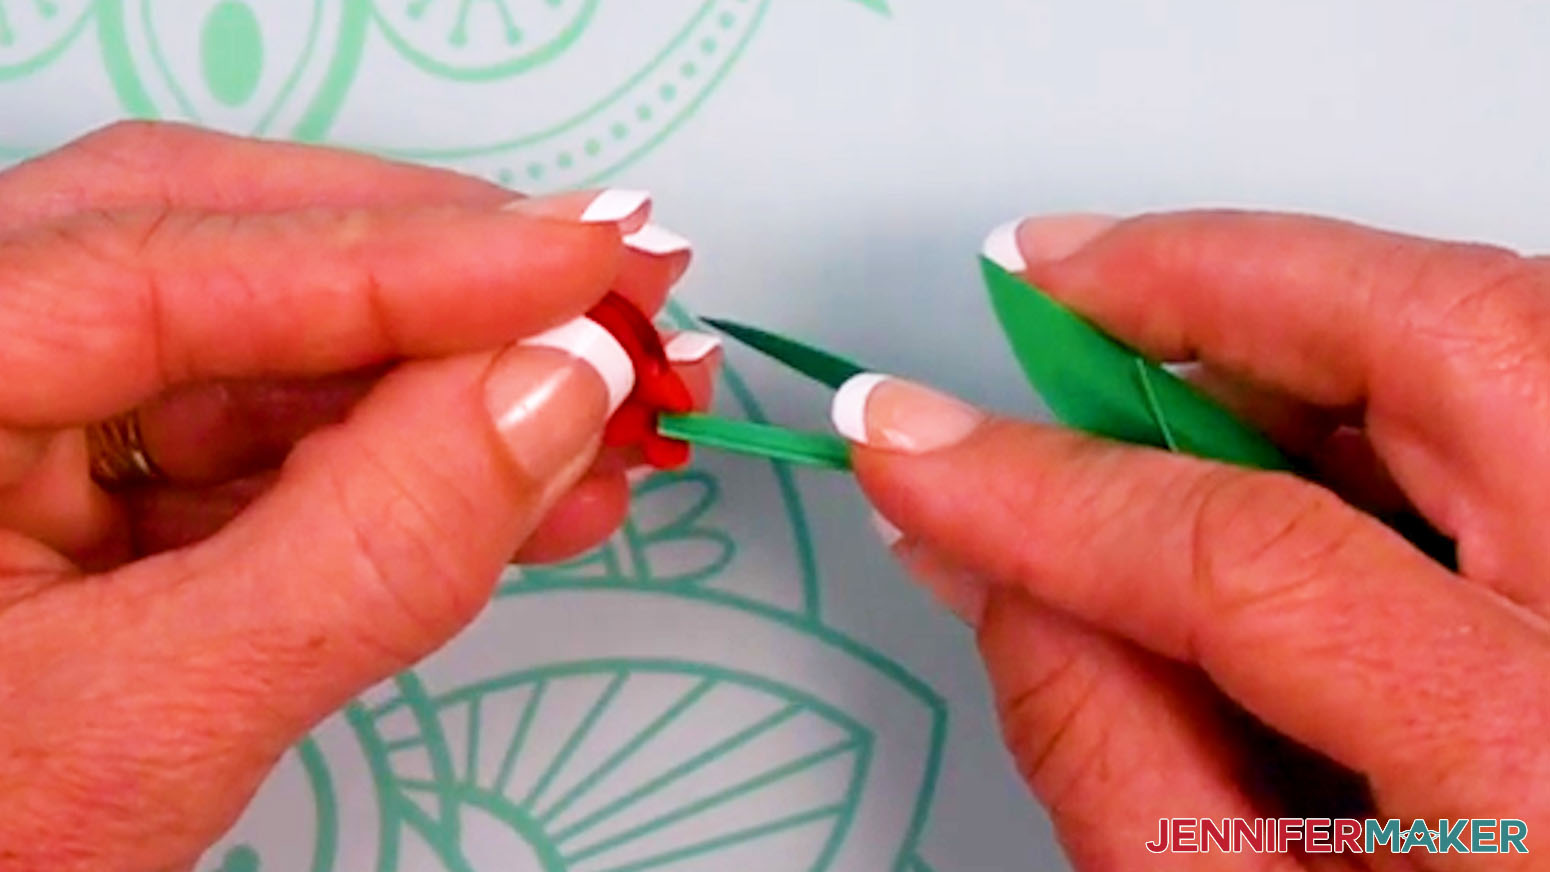
- Use your fingers to gently curve the wider leaves outward to add dimension.
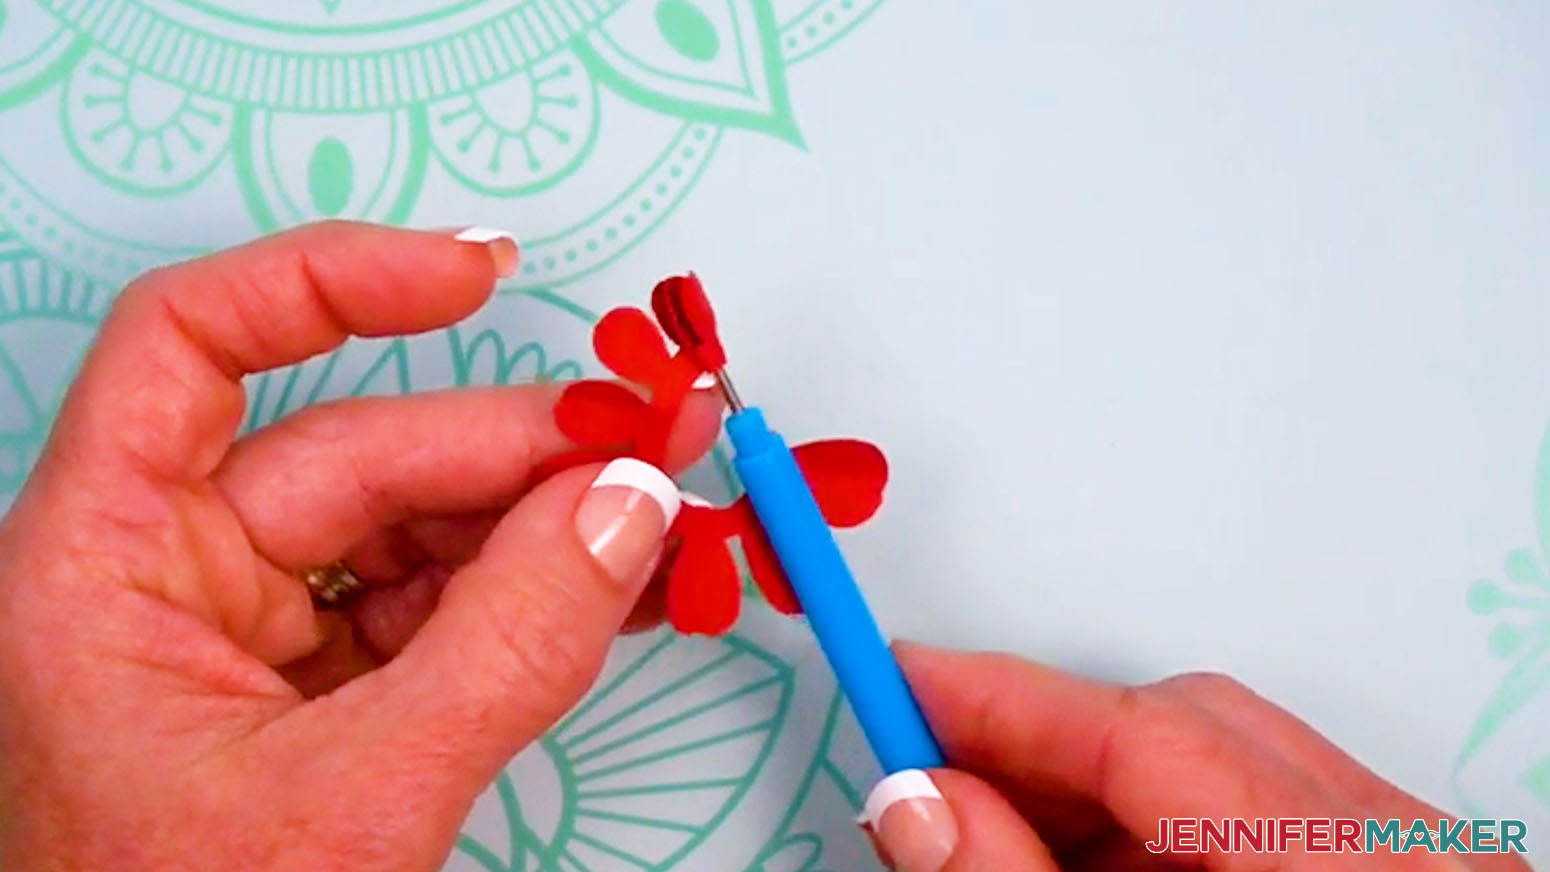
- Grab the tulip’s bloom piece, and use your fingers to gently curve each petal up into a “cupped” shape to add dimension.
- Grab your quilling tool and insert the bottom edge of the smallest petal into the slot at the end.
NOTE: I find it easier to get a tighter roll on extra-tiny blooms like my “tulip” design using a quilling tool instead of a Flow Tool. You can also use tweezers, but rolling by hand will be tricky because of the intricate size.
TIP: If you don’t have a quilling tool, use a pair of tweezers (reverse-action tweezers work best) or roll it carefully by hand so the bottom edge of the roll is even. - Rotate the quilling tool toward you, rolling up a few petals to start.
NOTE: The key is to keep the paper tightly rolled around the tip of the quilling tool while keeping the base straight. - Every few petals, add a small dot of glue down inside the roll, near the base, to keep the bloom secure.
NOTE: Do NOT attach the very end of the bloom yet. - When you’re done rolling the tulip bloom around the quilling tool and the end has been left loose, gently hold the bloom between your thumb and forefinger and pull it off of the quilling tool.
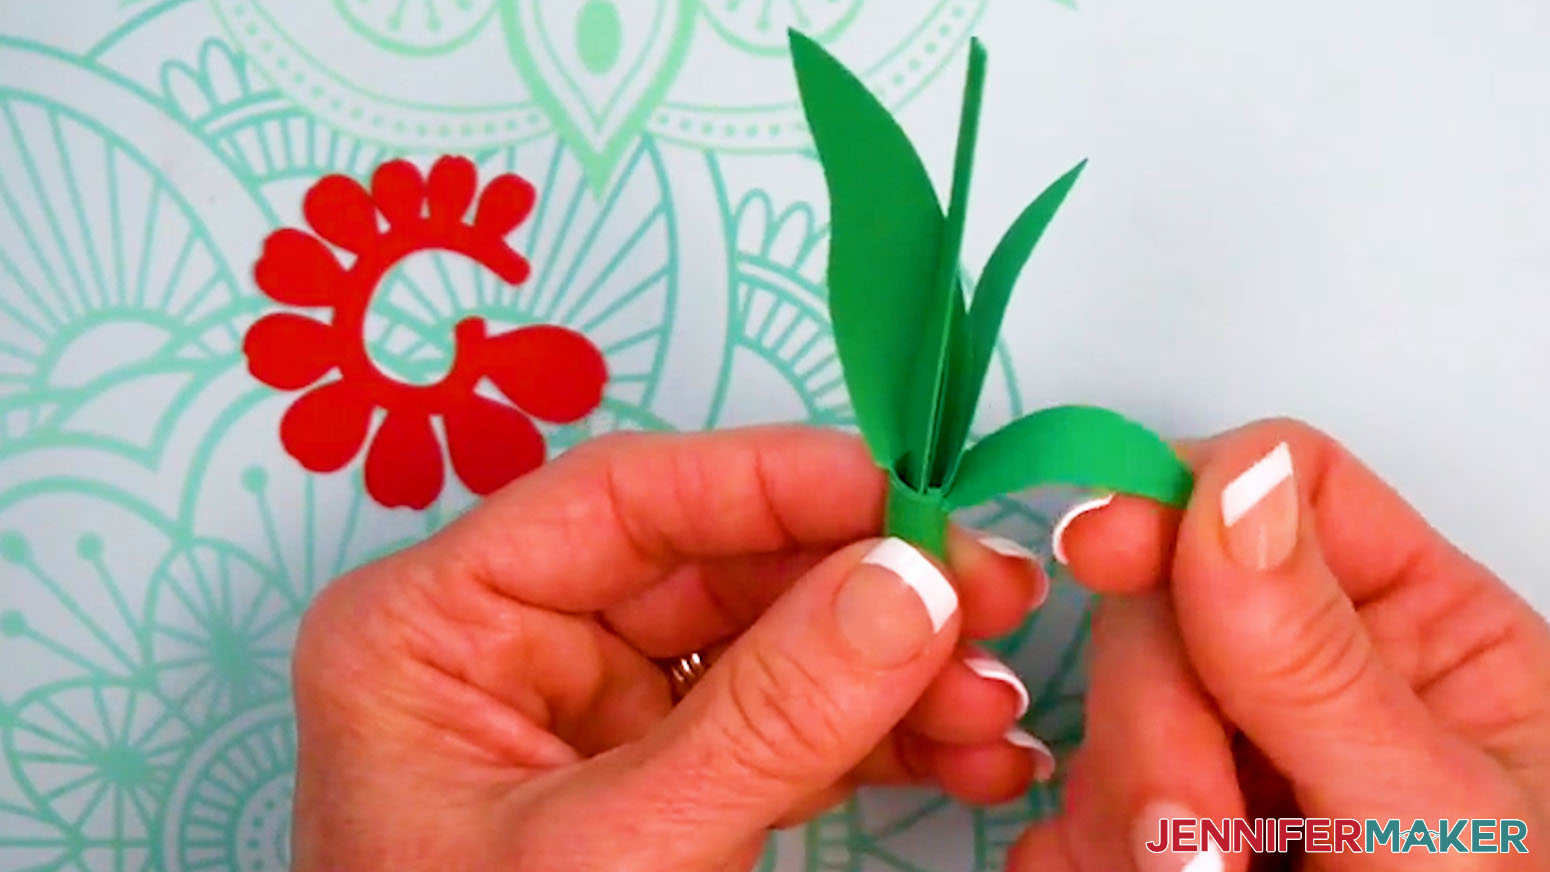
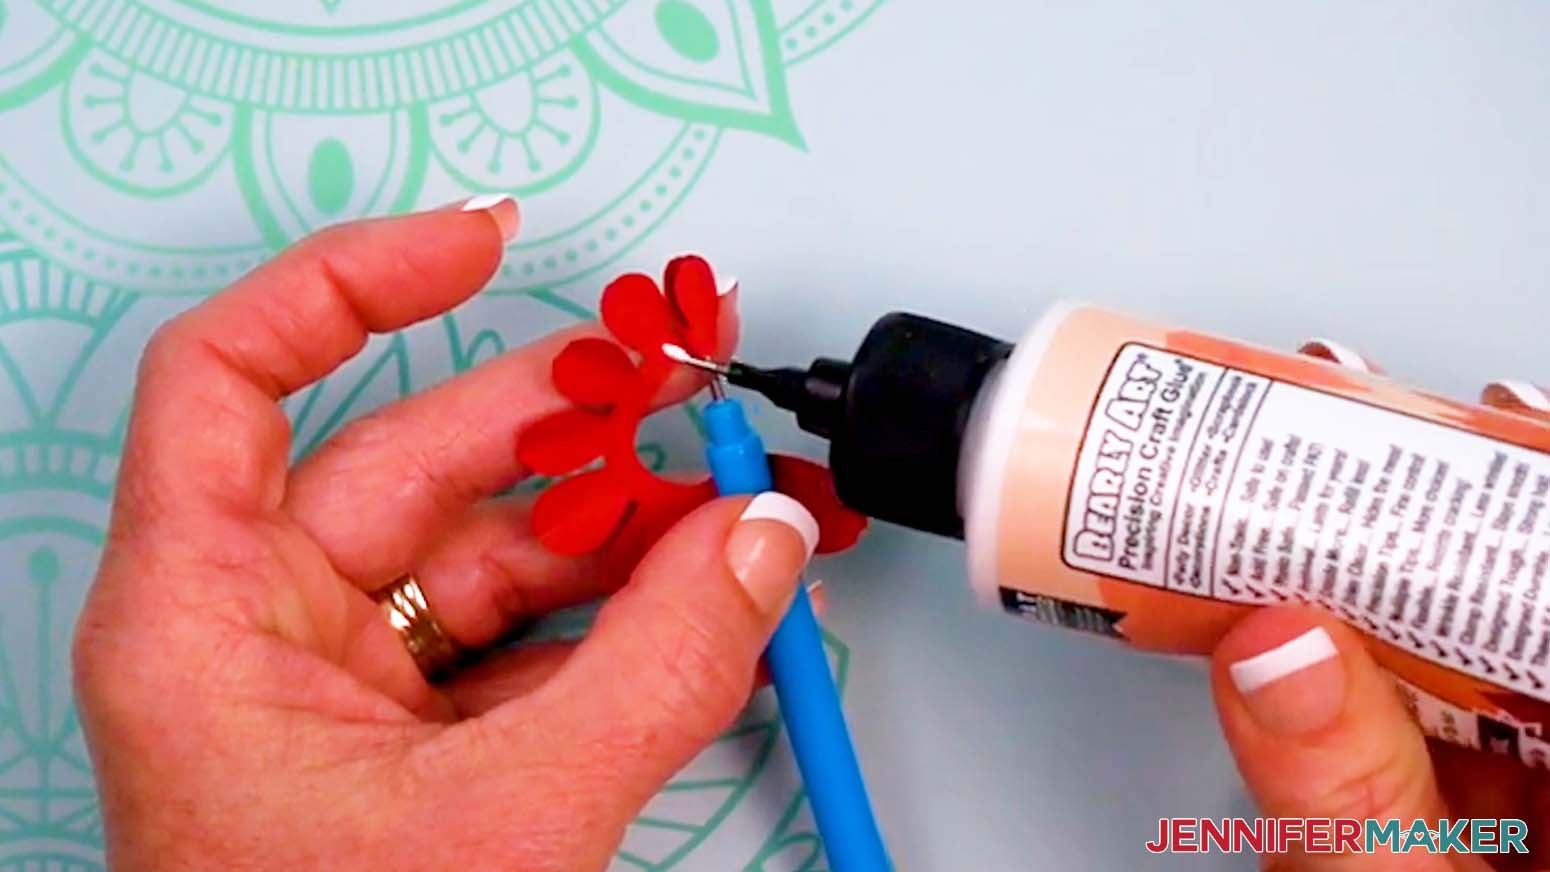
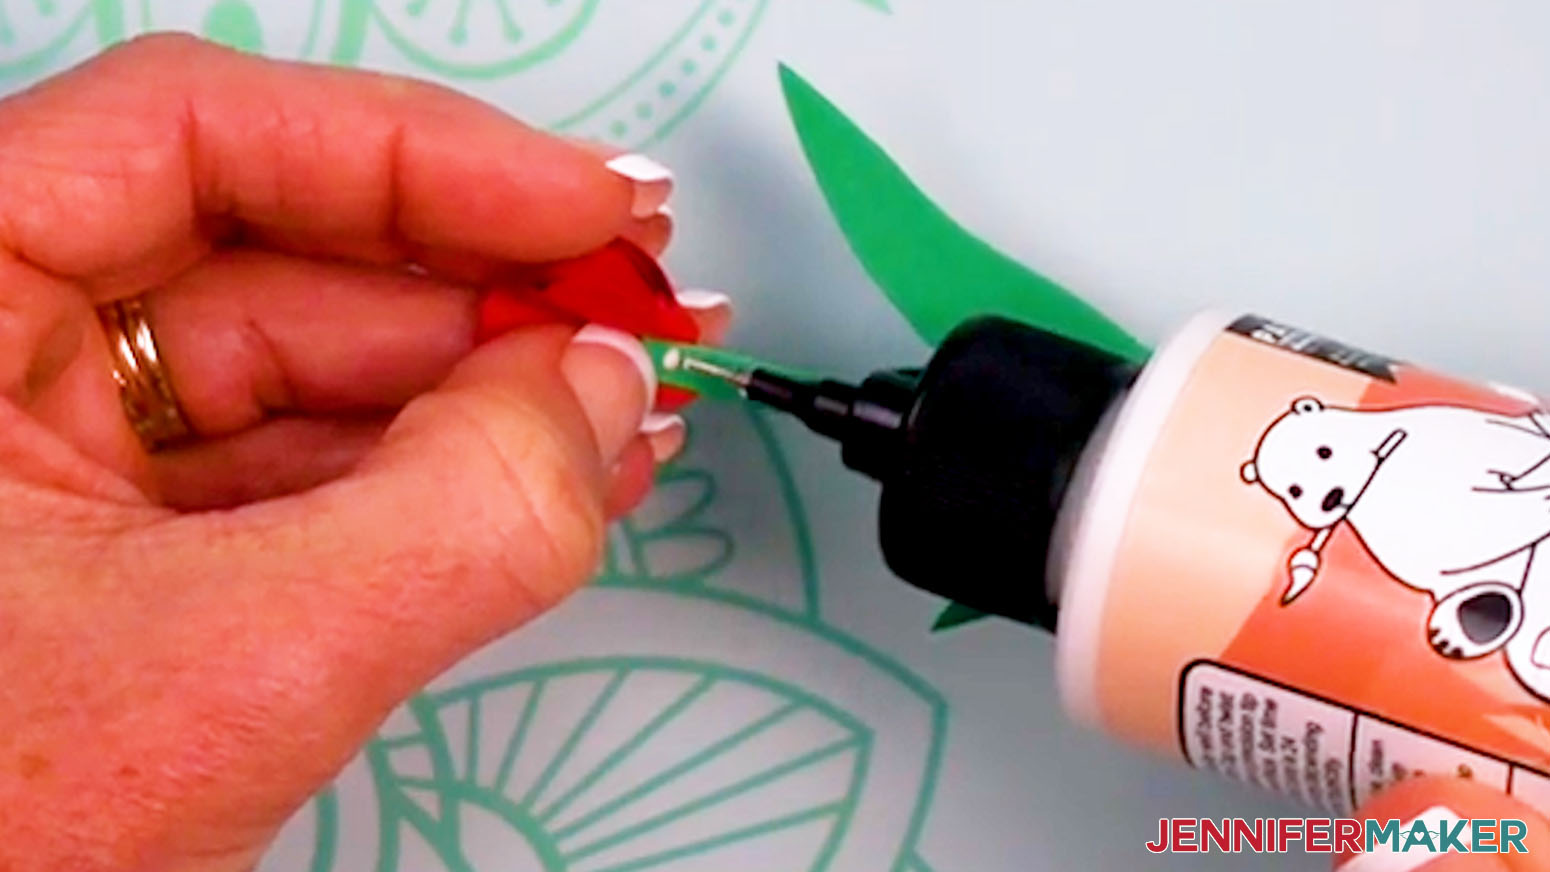
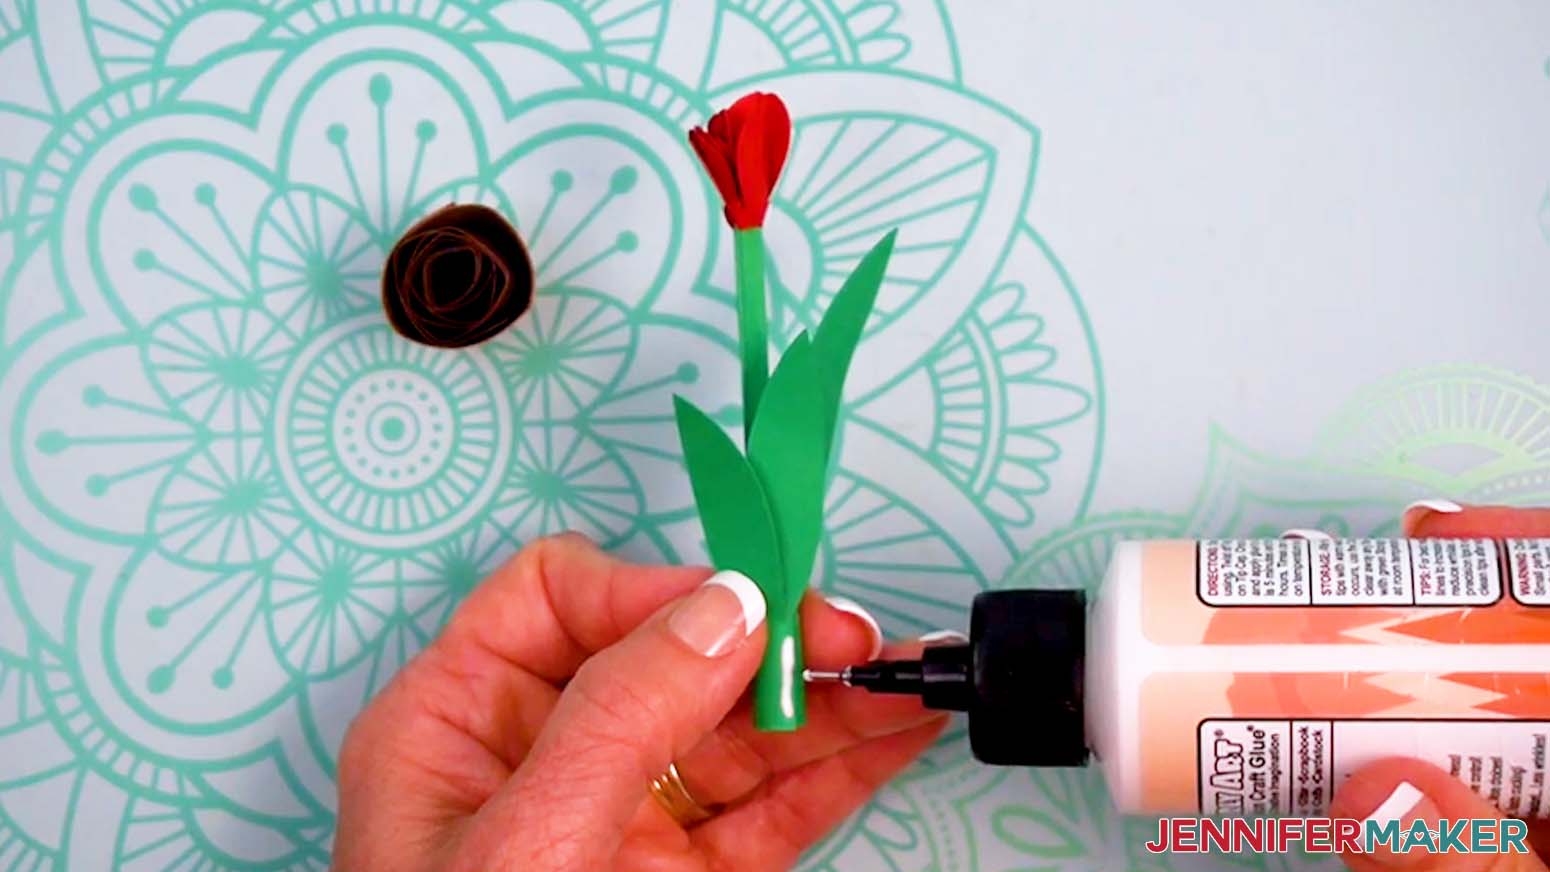
- Grab the foliage piece, and place the tip of the rolled stem against the inside open end of the tulip bloom.
- Add a dab of glue between the stem tip and the open end of the bloom.
- Hold and gently squeeze the bloom around the stem until the glue dries.
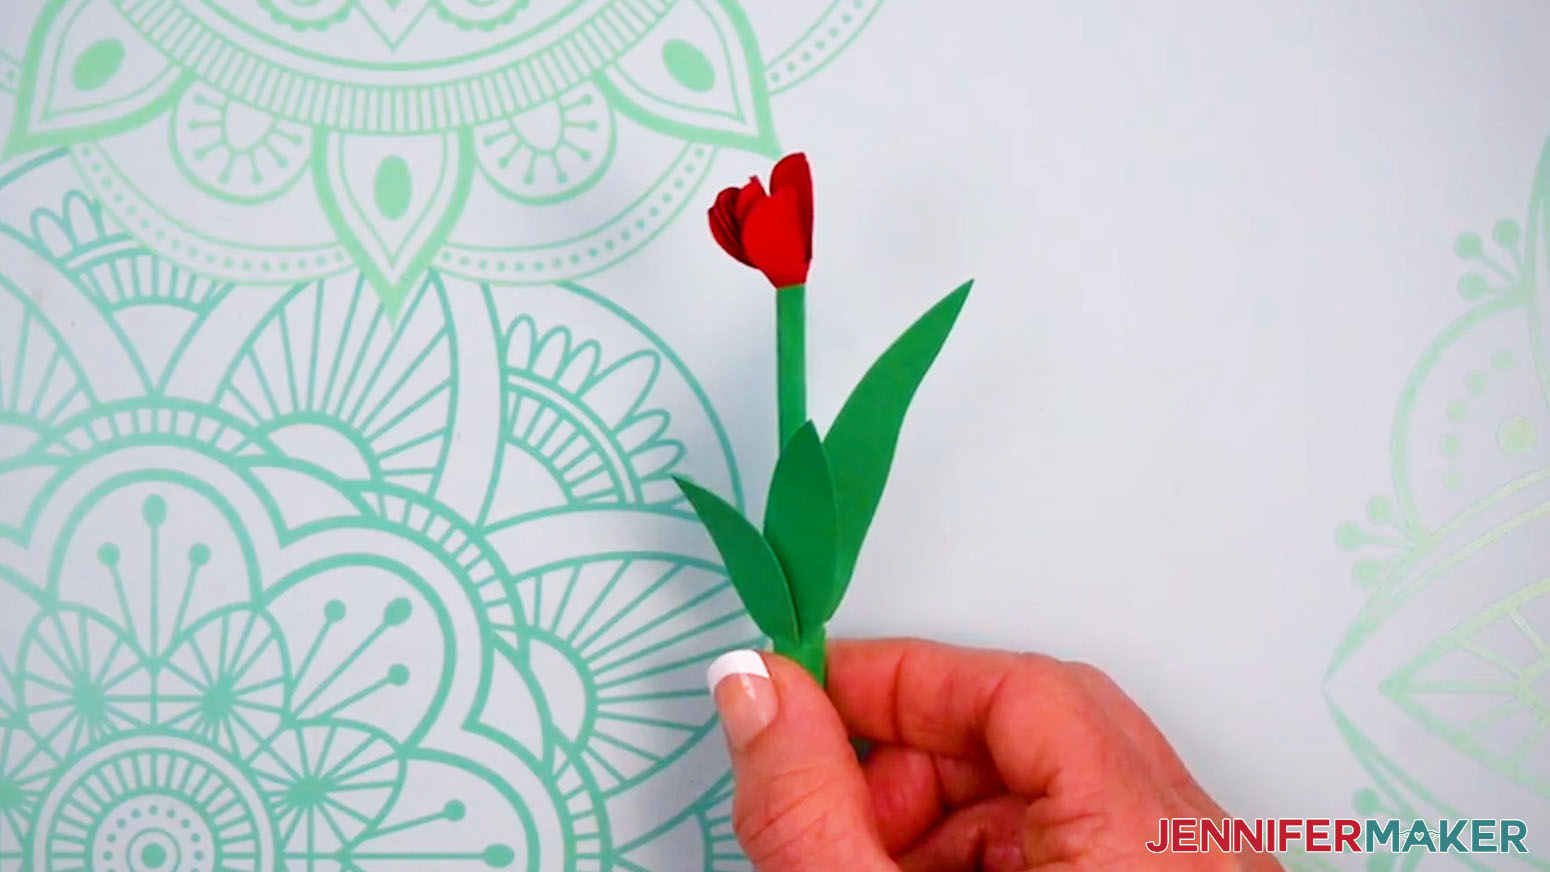
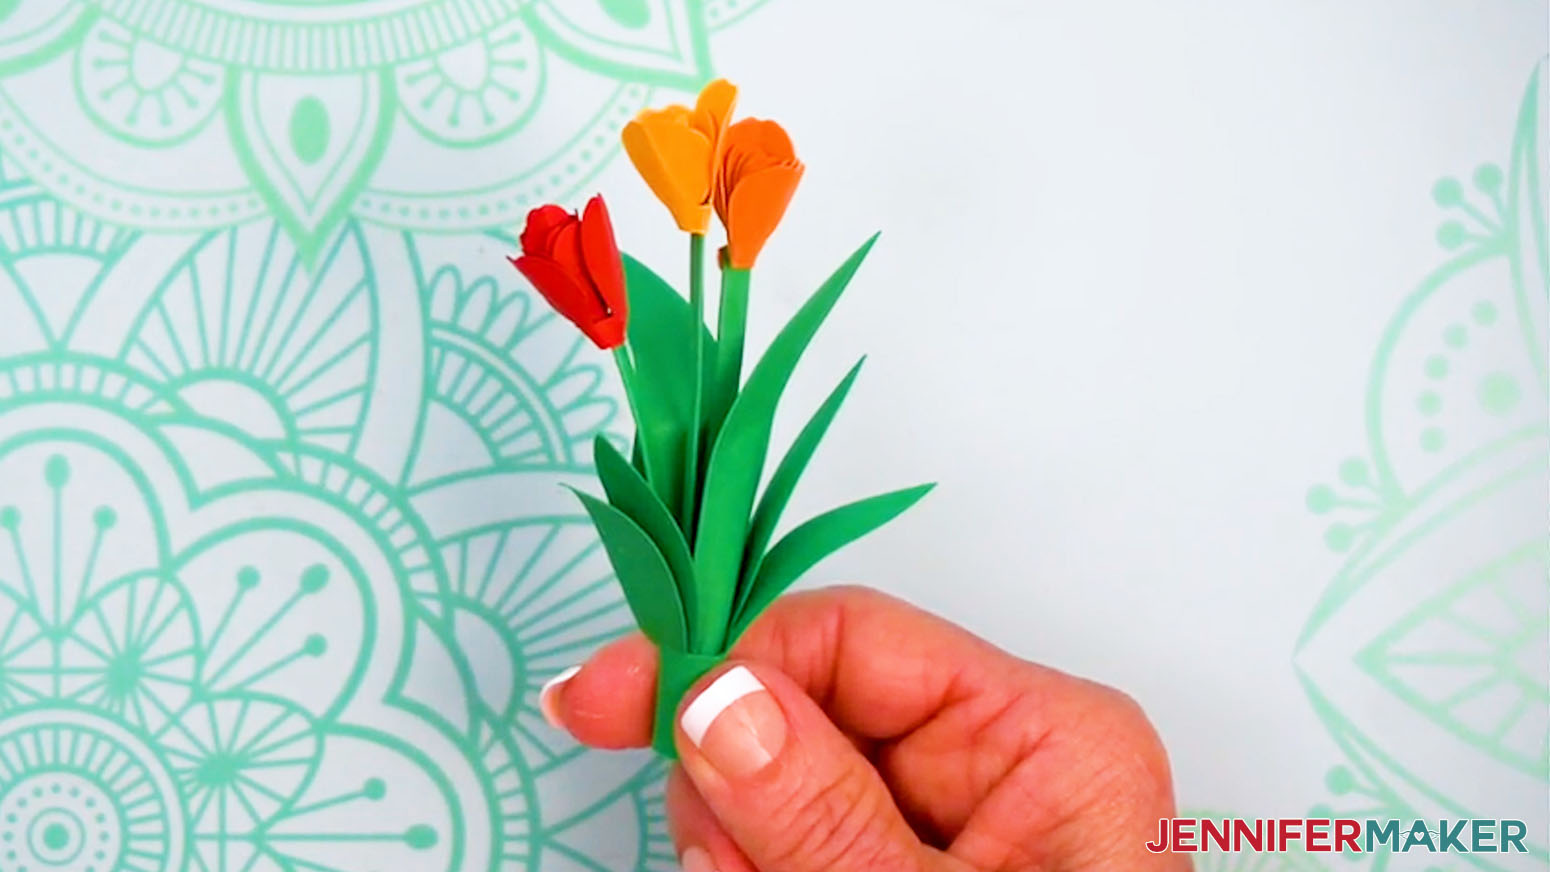
- Your mini paper tulip is ready to add to a display!
THREE-STEM TULIP
- Gather your three-stem tulip pieces and place them face up on your work surface, using your Canvas as reference.
NOTE: You should have one foliage piece and three bloom pieces for each three-stem tulip arrangement. - Grab the foliage piece and follow Steps 1-4 in the “SINGLE TULIP” section above to fold and glue the longest stem.
- On the next, smaller stem, carefully fold along the dashed cut lines or score lines to establish the creases and form three long strips.
- Apply a thin line of glue along each long strip, between the creases.
- Use your fingers to fold the strips into a stem. Press with your fingers as you go to adhere the strips together.
TIP: If any glue seeps out, wipe it away quickly with your finger. - Follow Steps 3-5 to fold and glue the last smaller stem.
- Follow Steps 5-19 in the “SINGLE TULIP” section above to roll and glue the foliage piece (starting at the end with the longest stem), then roll and attach the tulips to the stems.
- Your mini paper three-stem tulip is ready to add to a display!
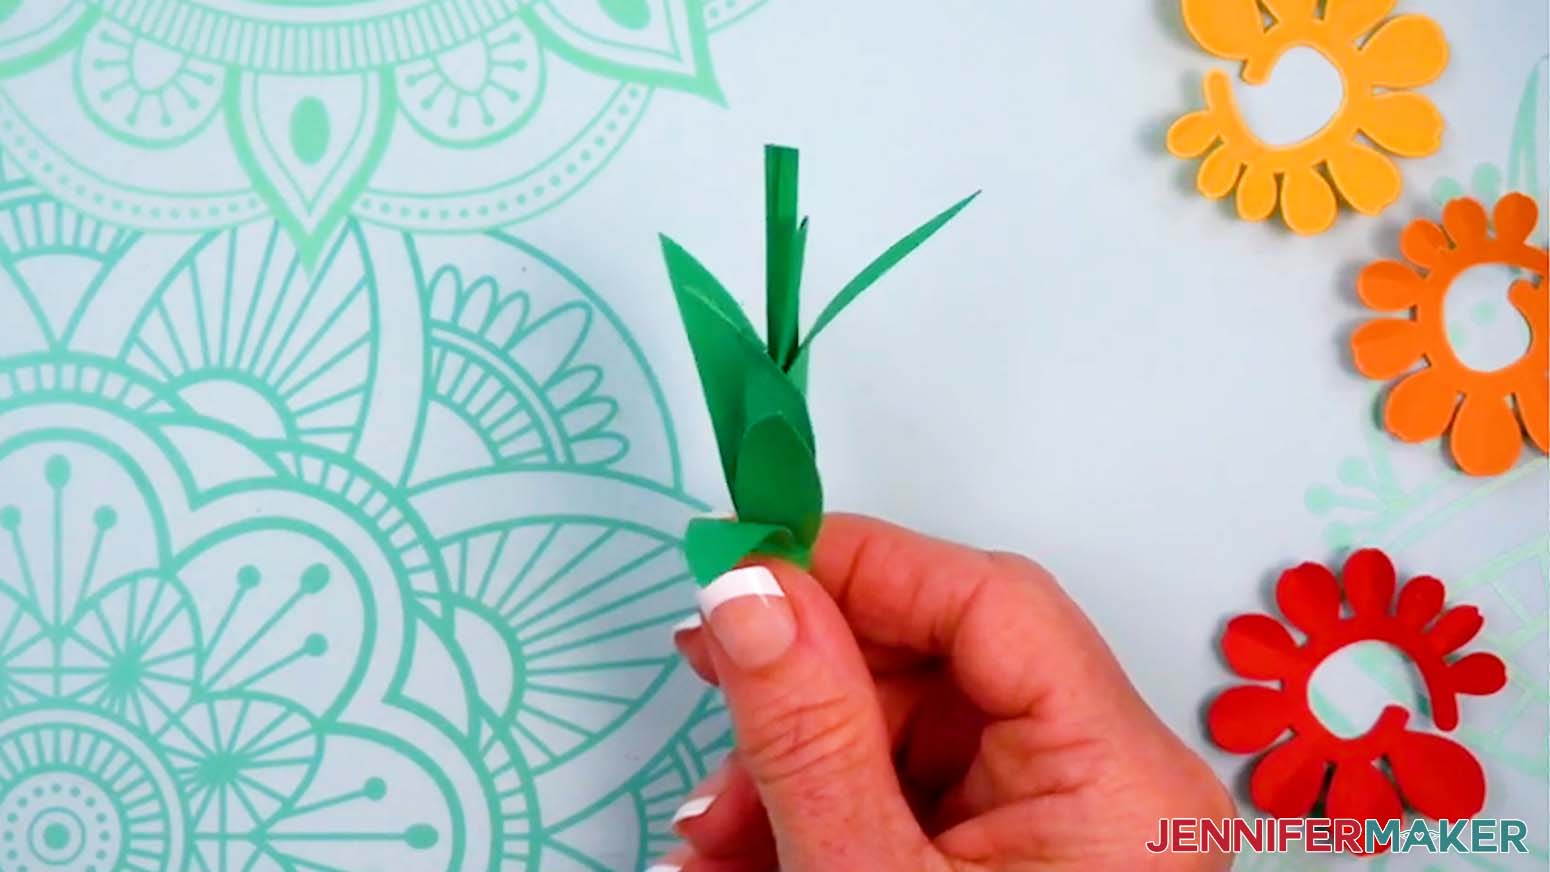
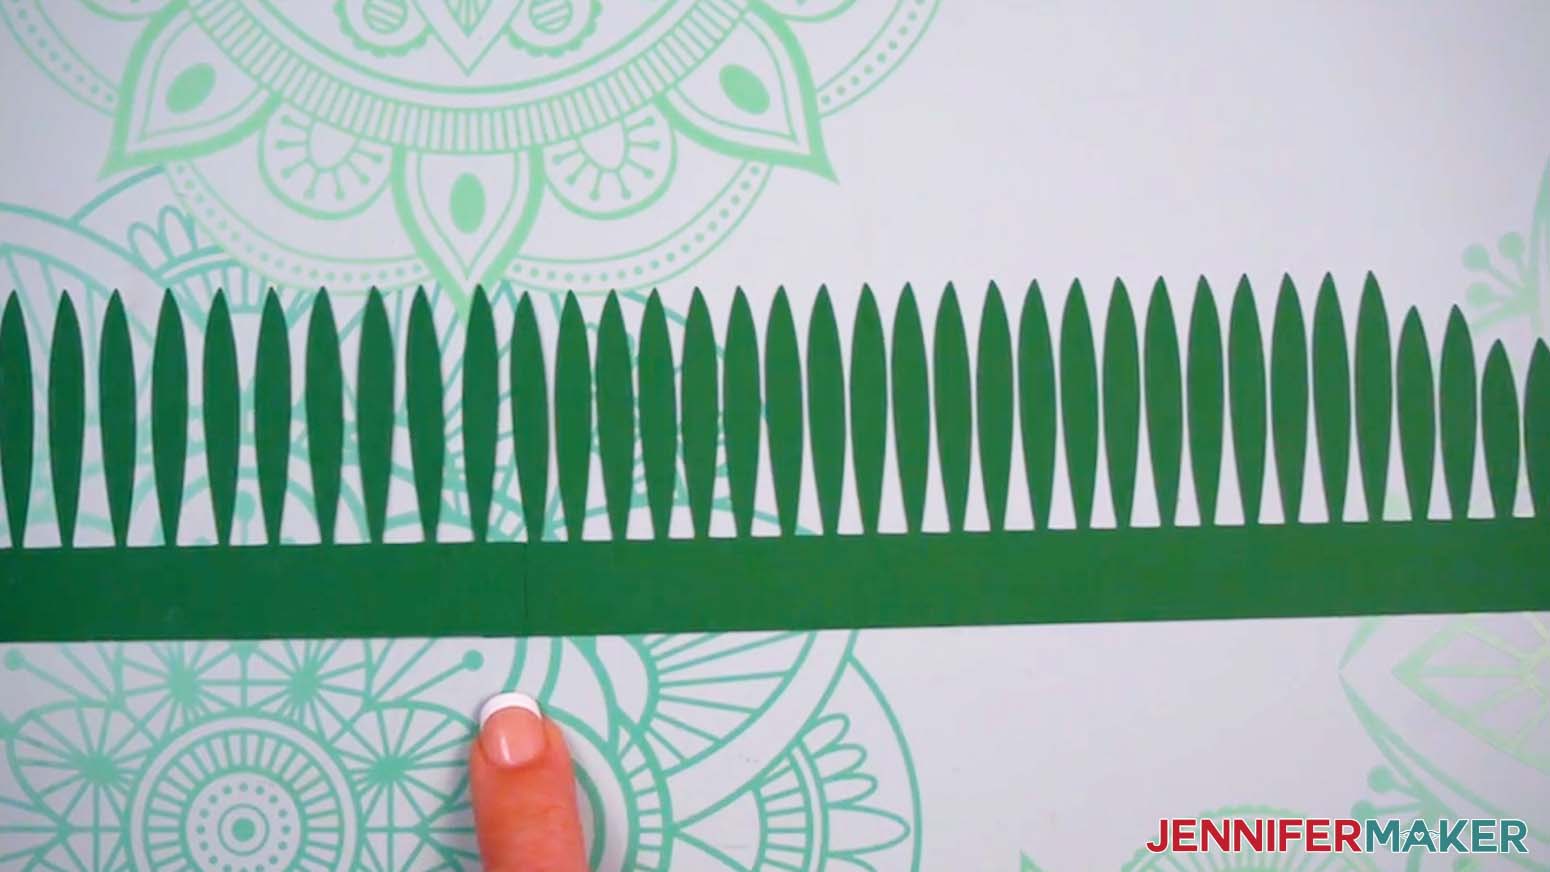
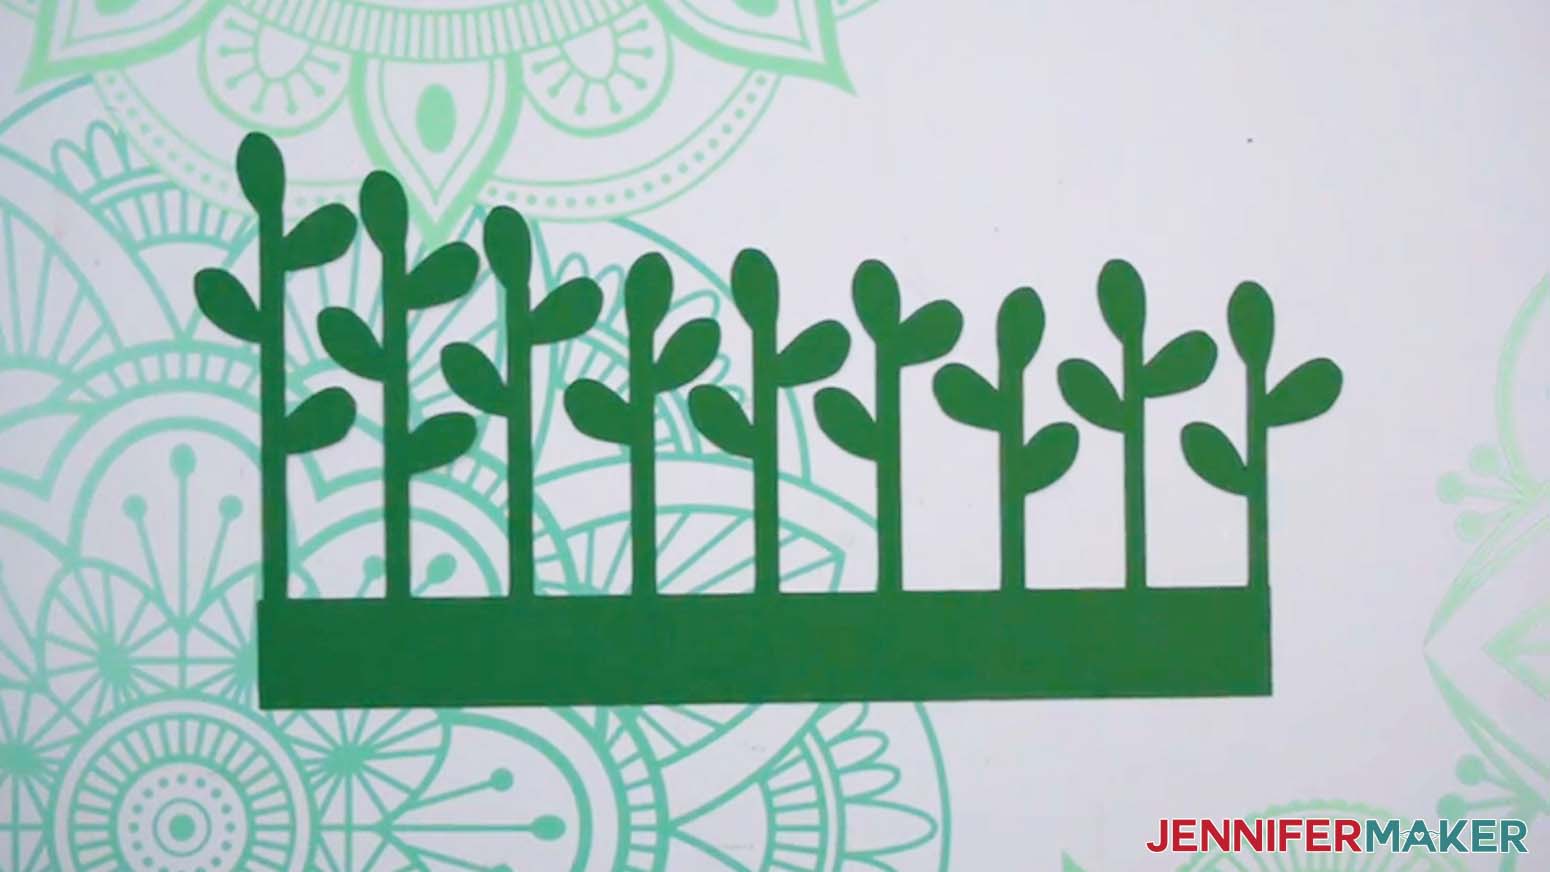
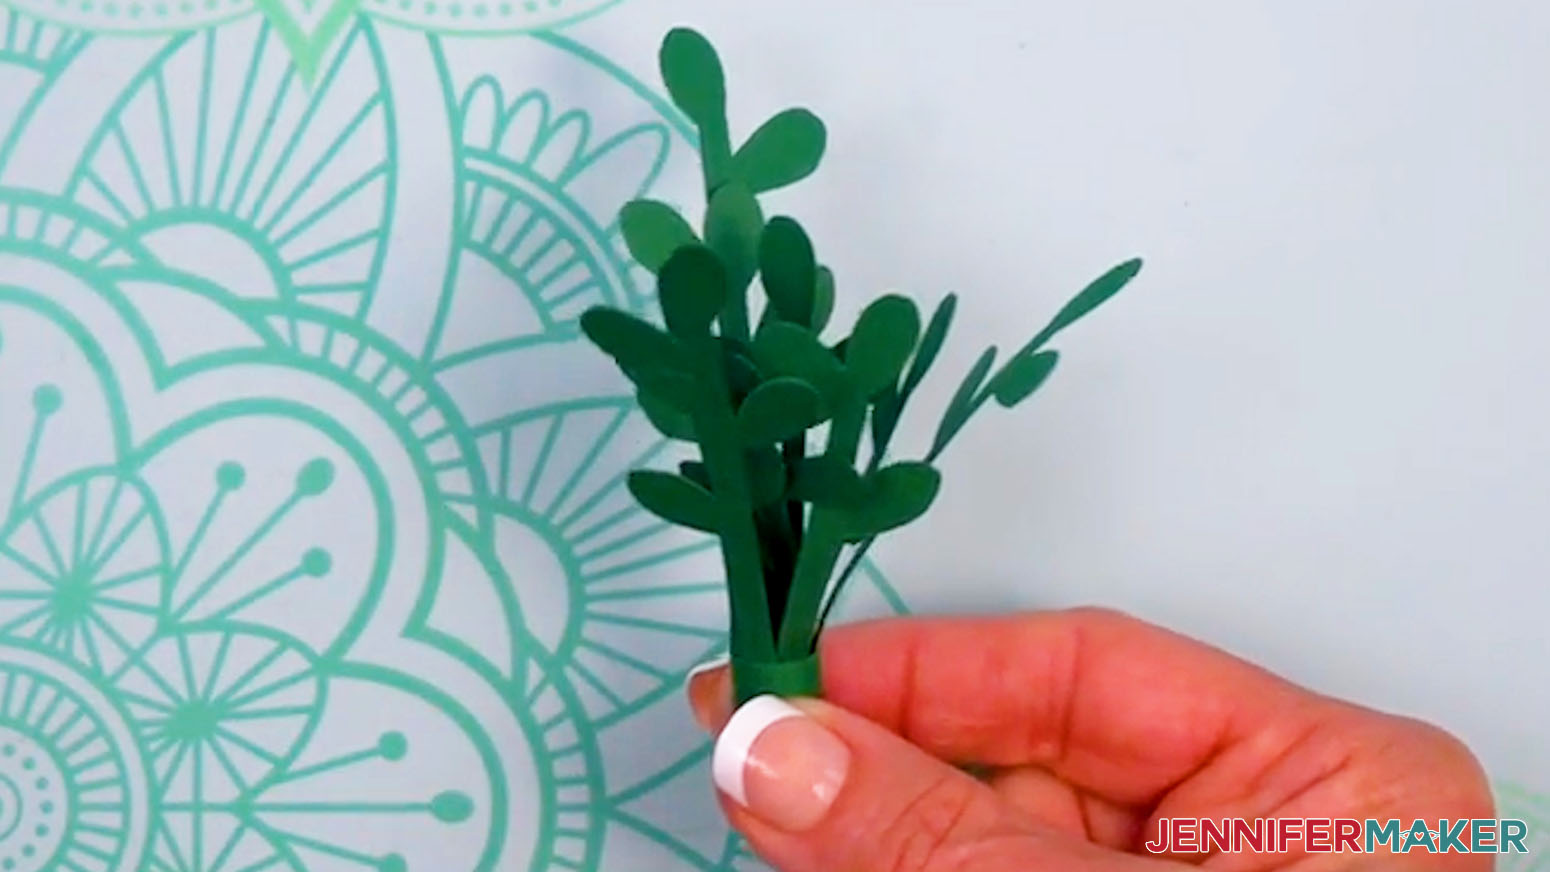
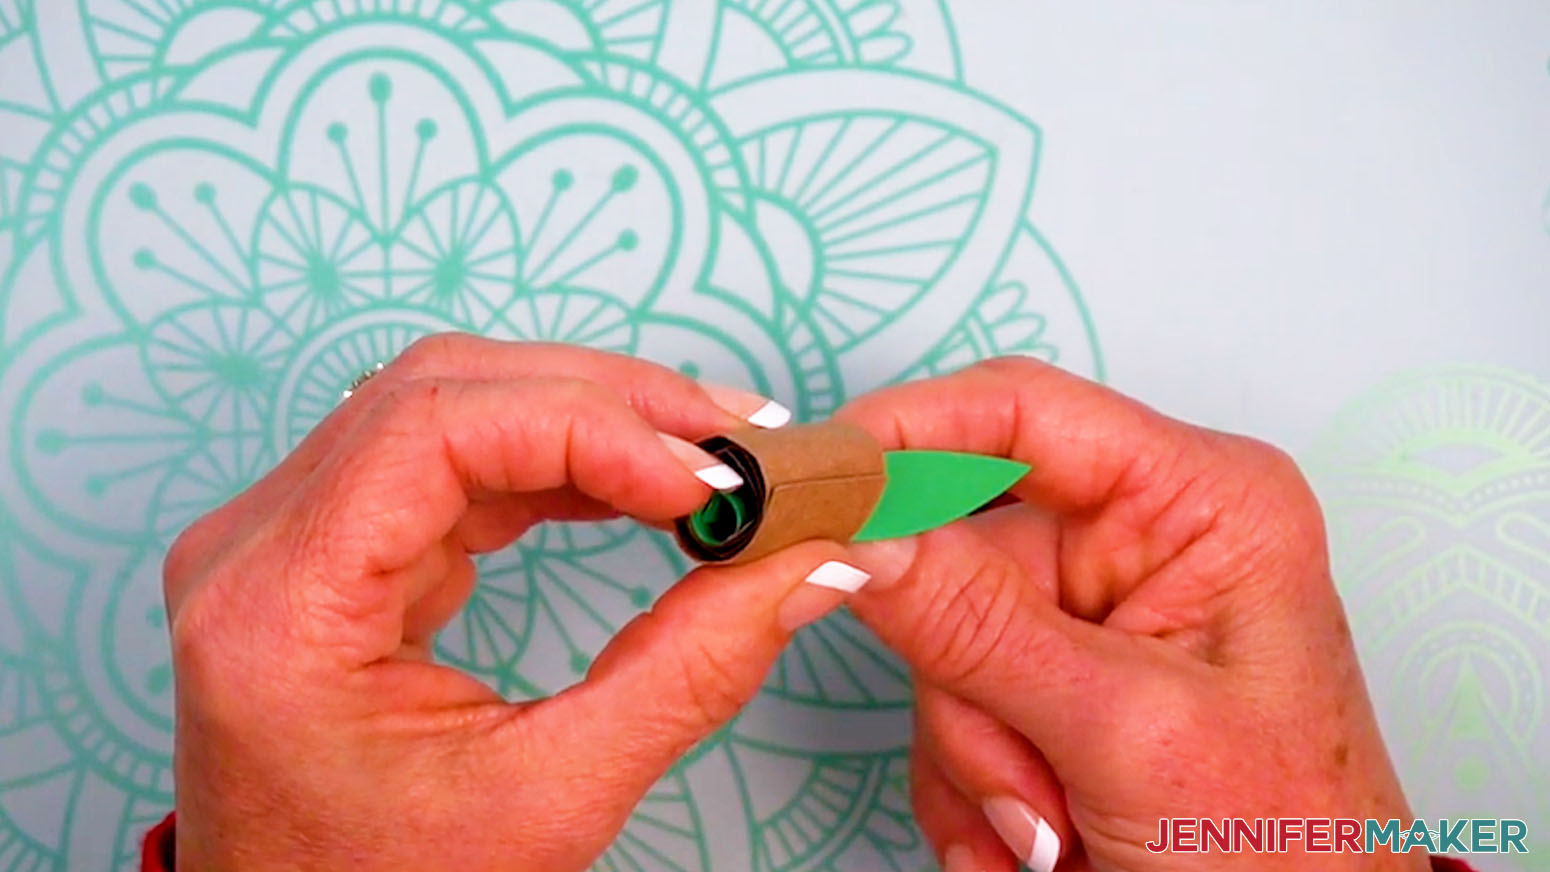
SPIDER PLANT
- Gather your spider plant pieces and place them face up on your work surface, using your Canvas as reference.
NOTE: You should have one longer strip of leaves with a tab on the right end, and one shorter strip of leaves with a tab on the right end. - Grab the longer piece and apply a line of glue along the short edge of the tab.
- Adhere the un-tabbed end of the shorter piece to the glued tab, so the leaves are equally-spaced across the combined strip. Press the ends together until the glue dries.
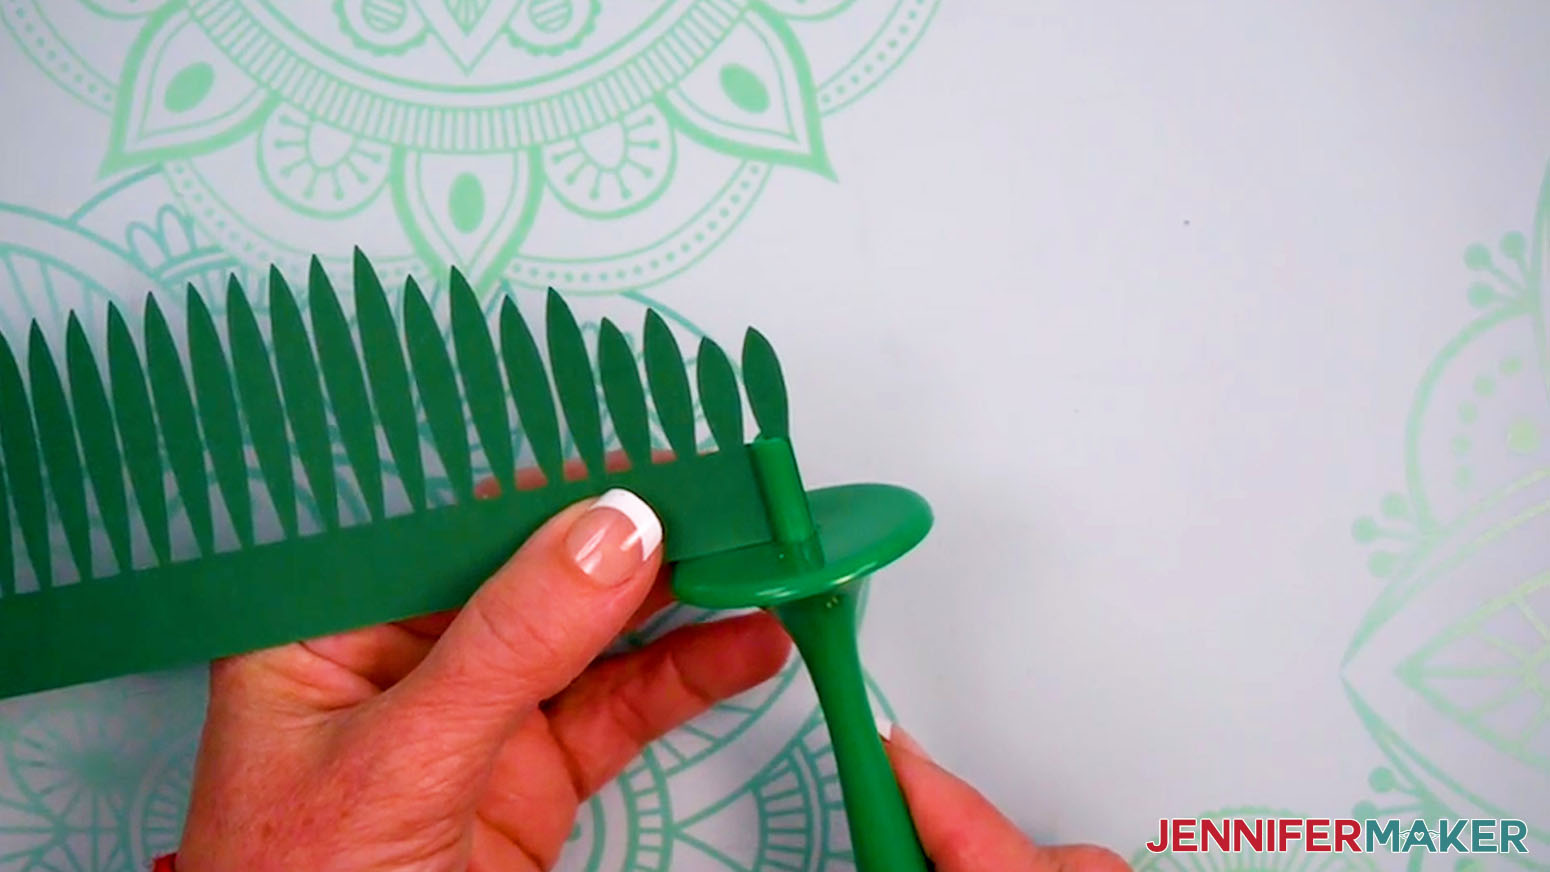
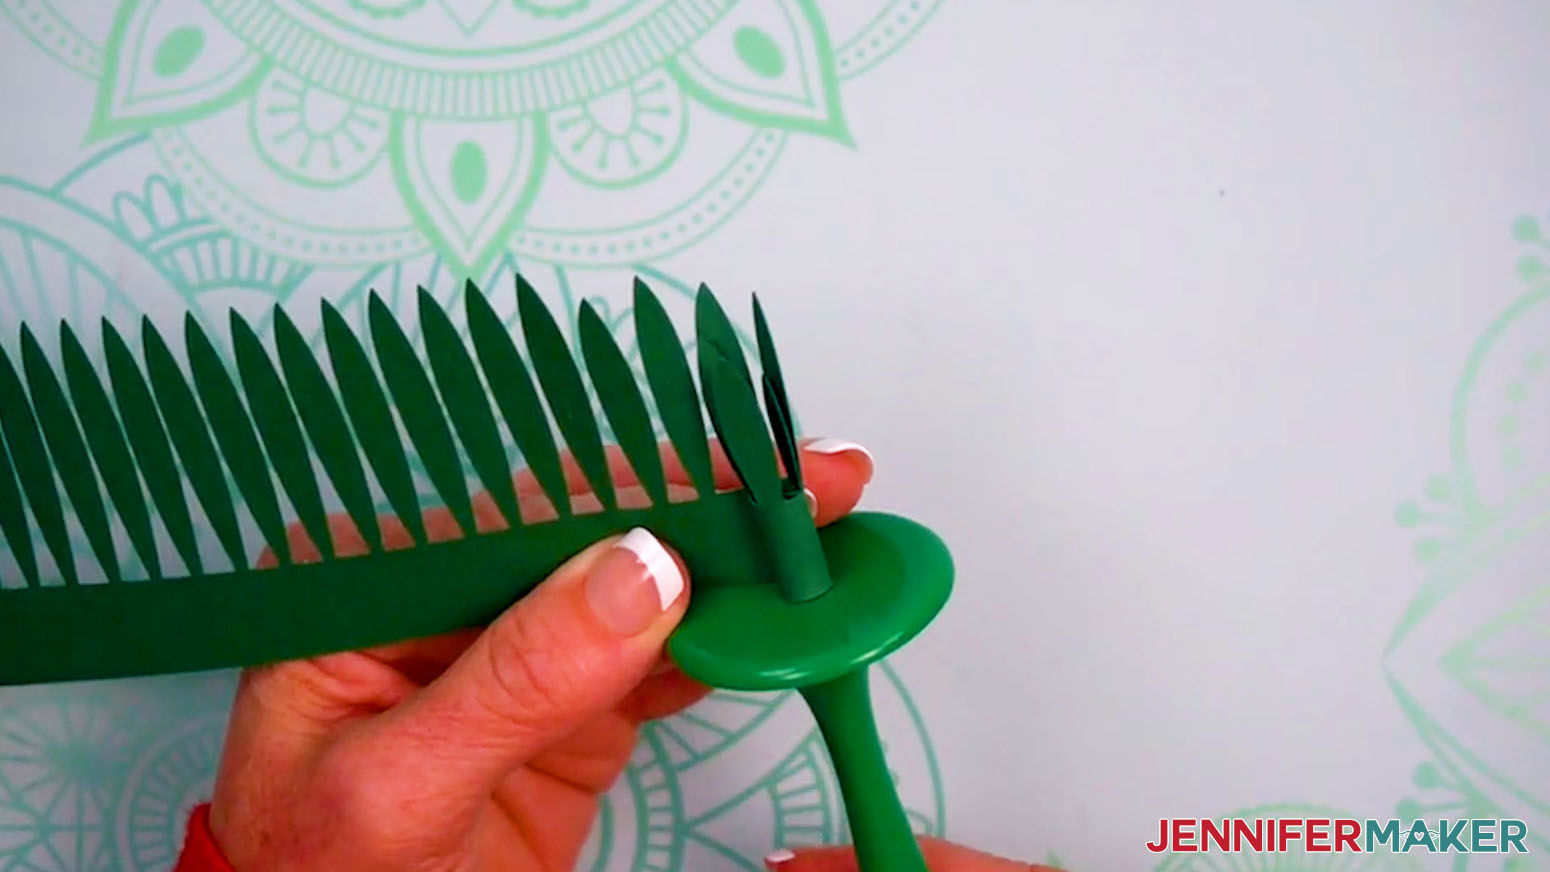
- Grab the Flow Tool and insert the bottom edge under the shortest leaf into the tool’s spindle slot.
- Follow Steps 6-10 in the “SINGLE TULIP” section above to roll and glue the spider plant.
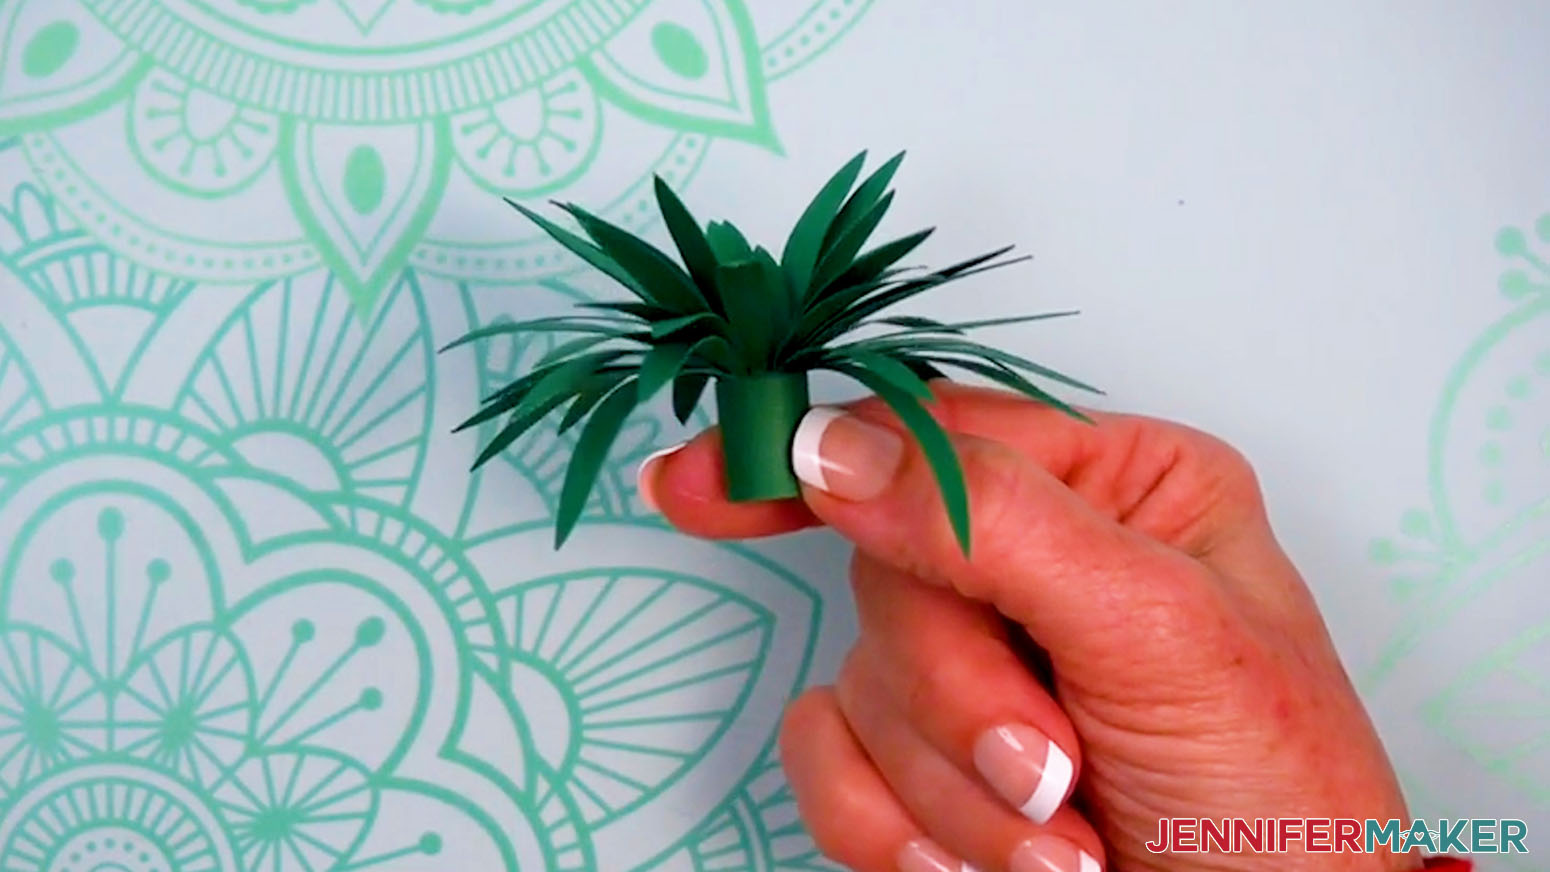
- Use your fingers to gently curve the leaves out and slightly downward to give the plant volume.
- Your mini paper spider plant is ready to add to a display!
JADE PLANT
- Grab your jade plant piece.
- Insert the bottom edge under the shortest foliage into the Flow Tool’s spindle slot.
- Follow Steps 6-10 in the “SINGLE TULIP” section above to roll and glue the jade plant.
- Use your fingers to gently curve the leaves out and downward to give the plant volume.
- Your mini paper jade plant is ready to add to a display!
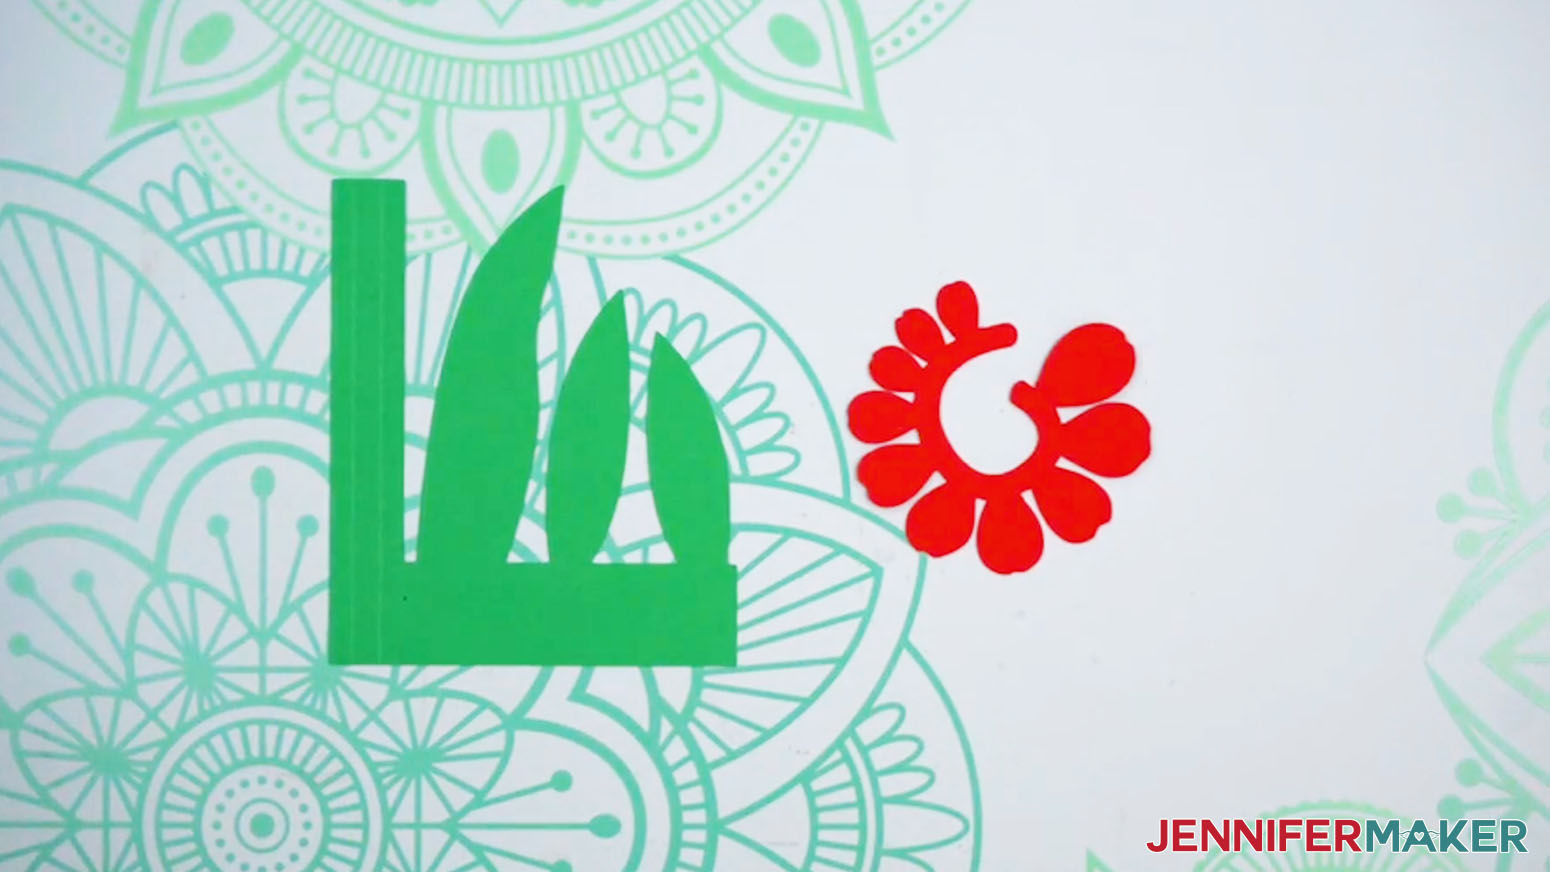
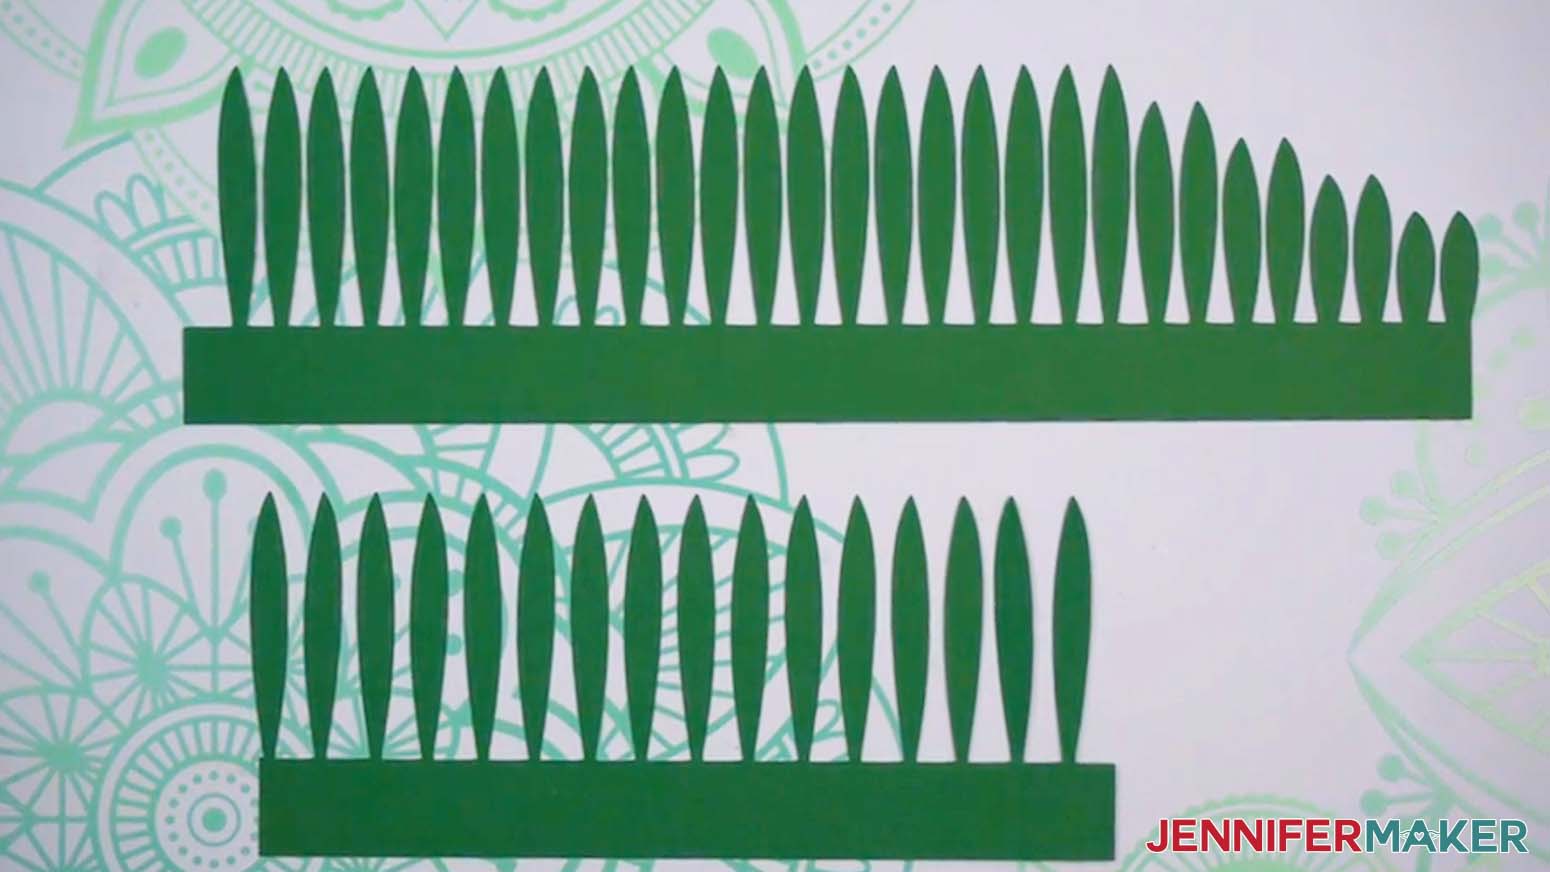
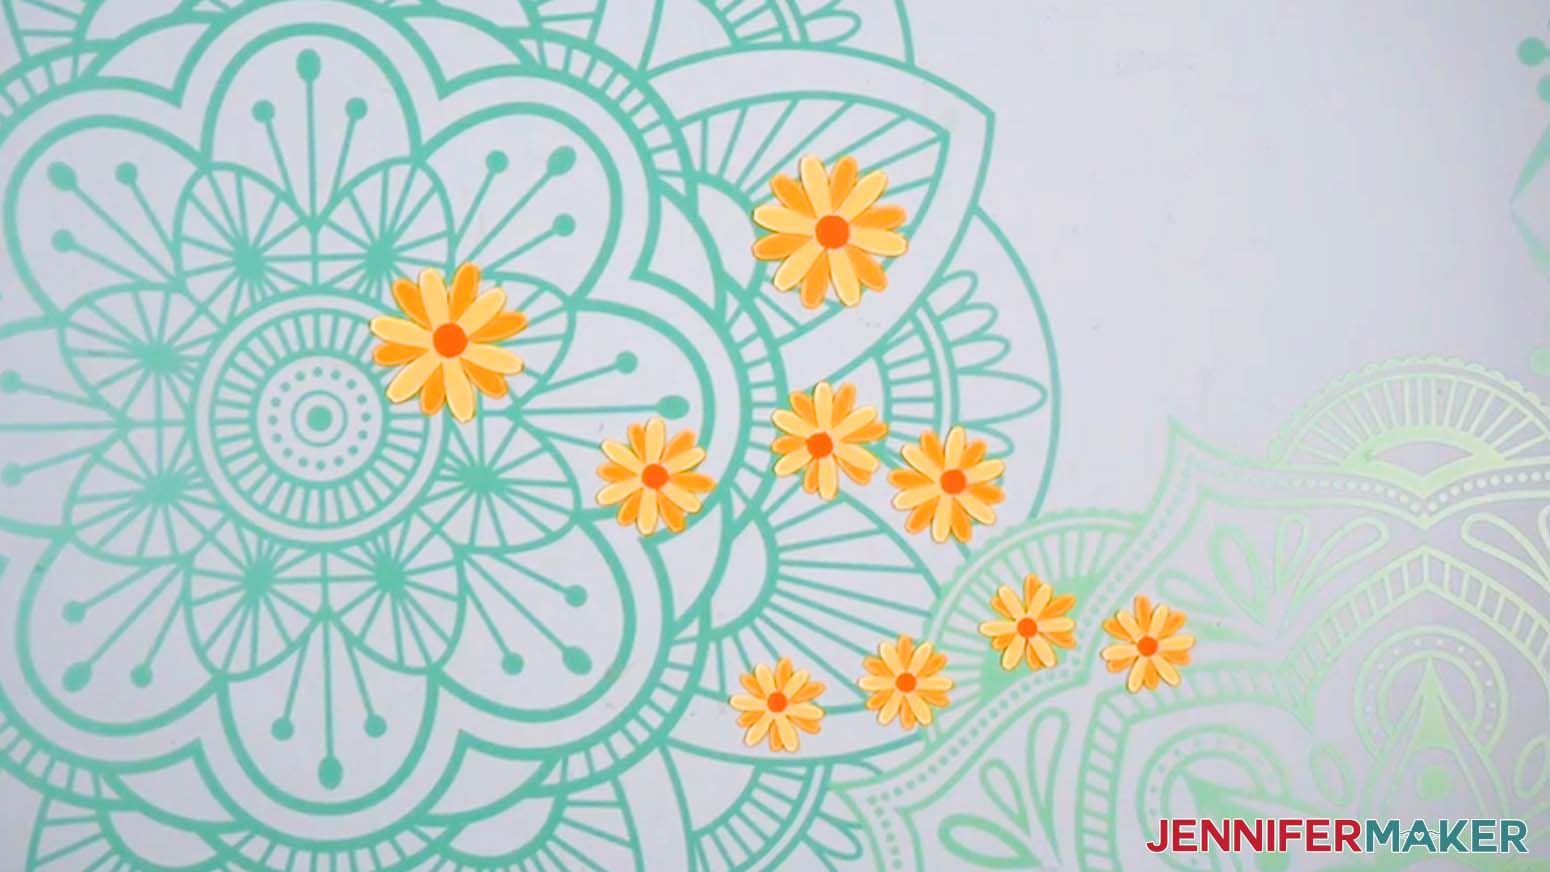
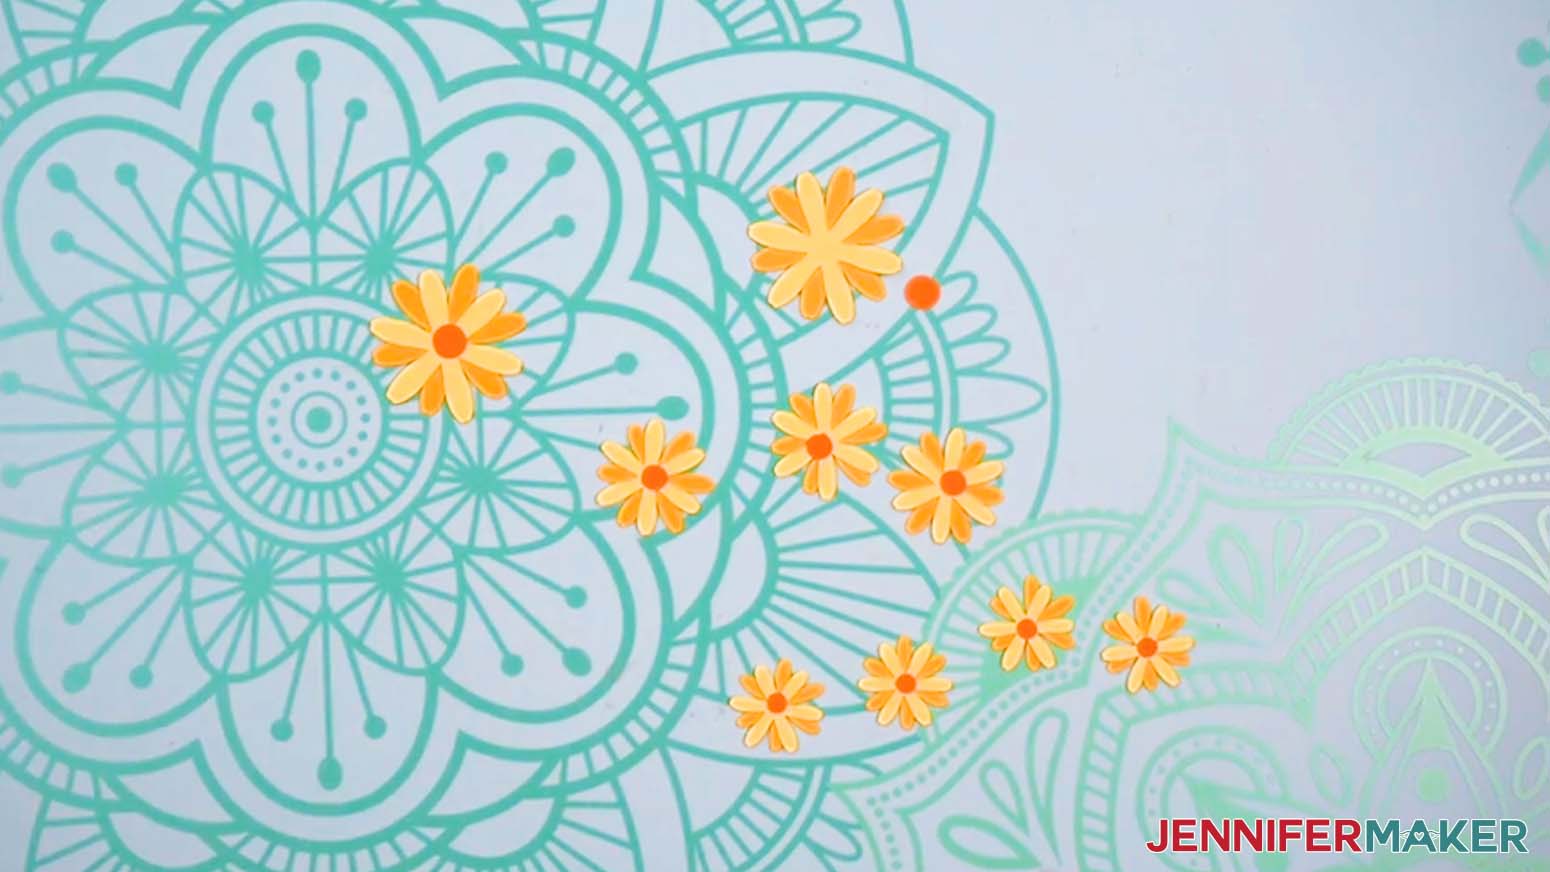
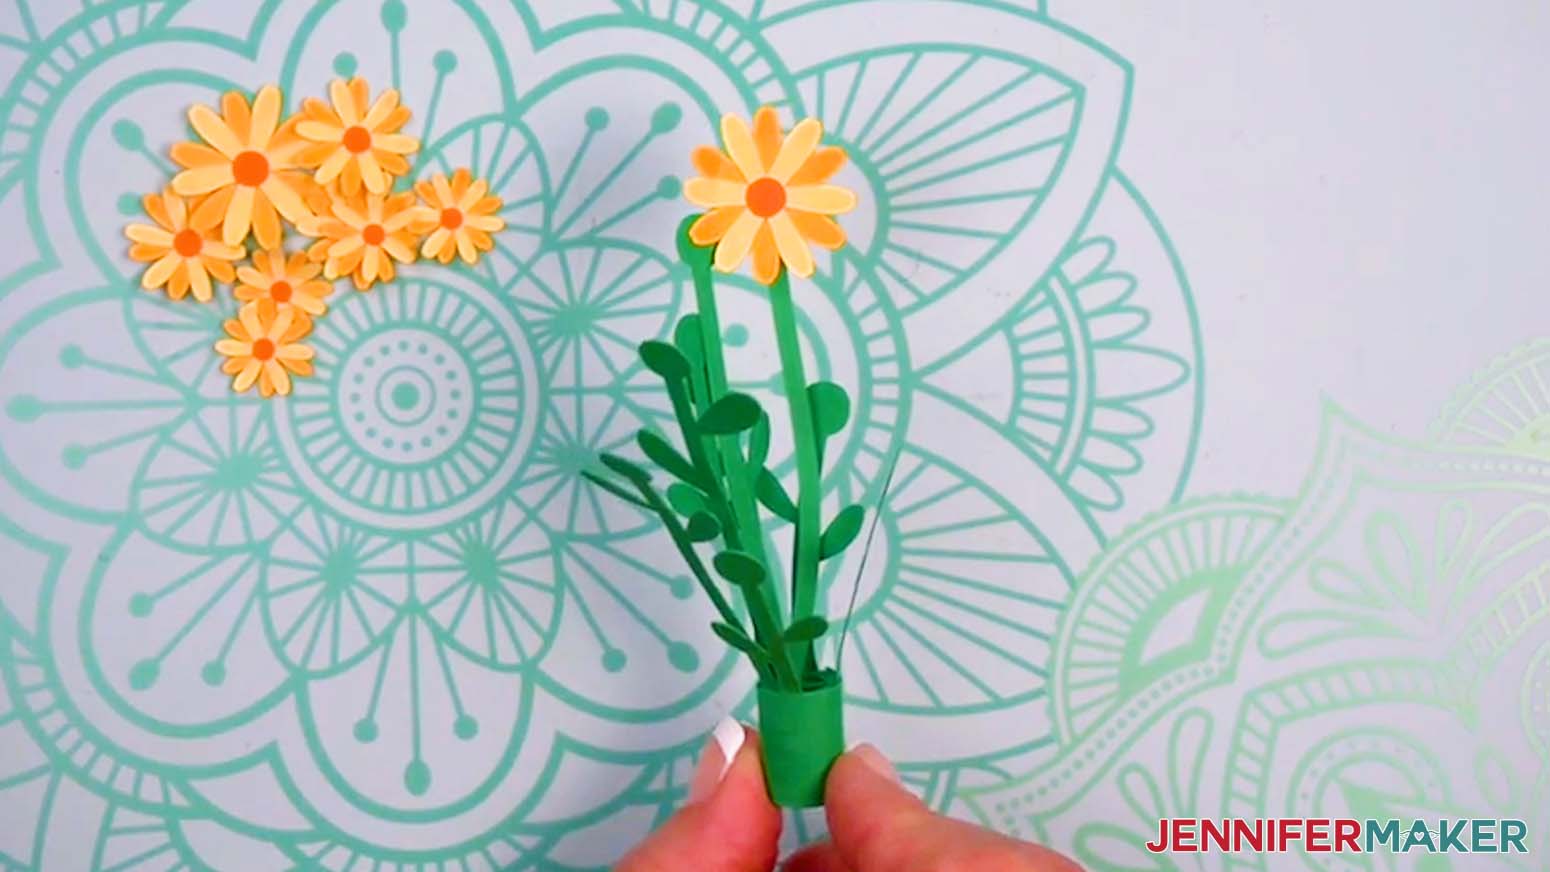
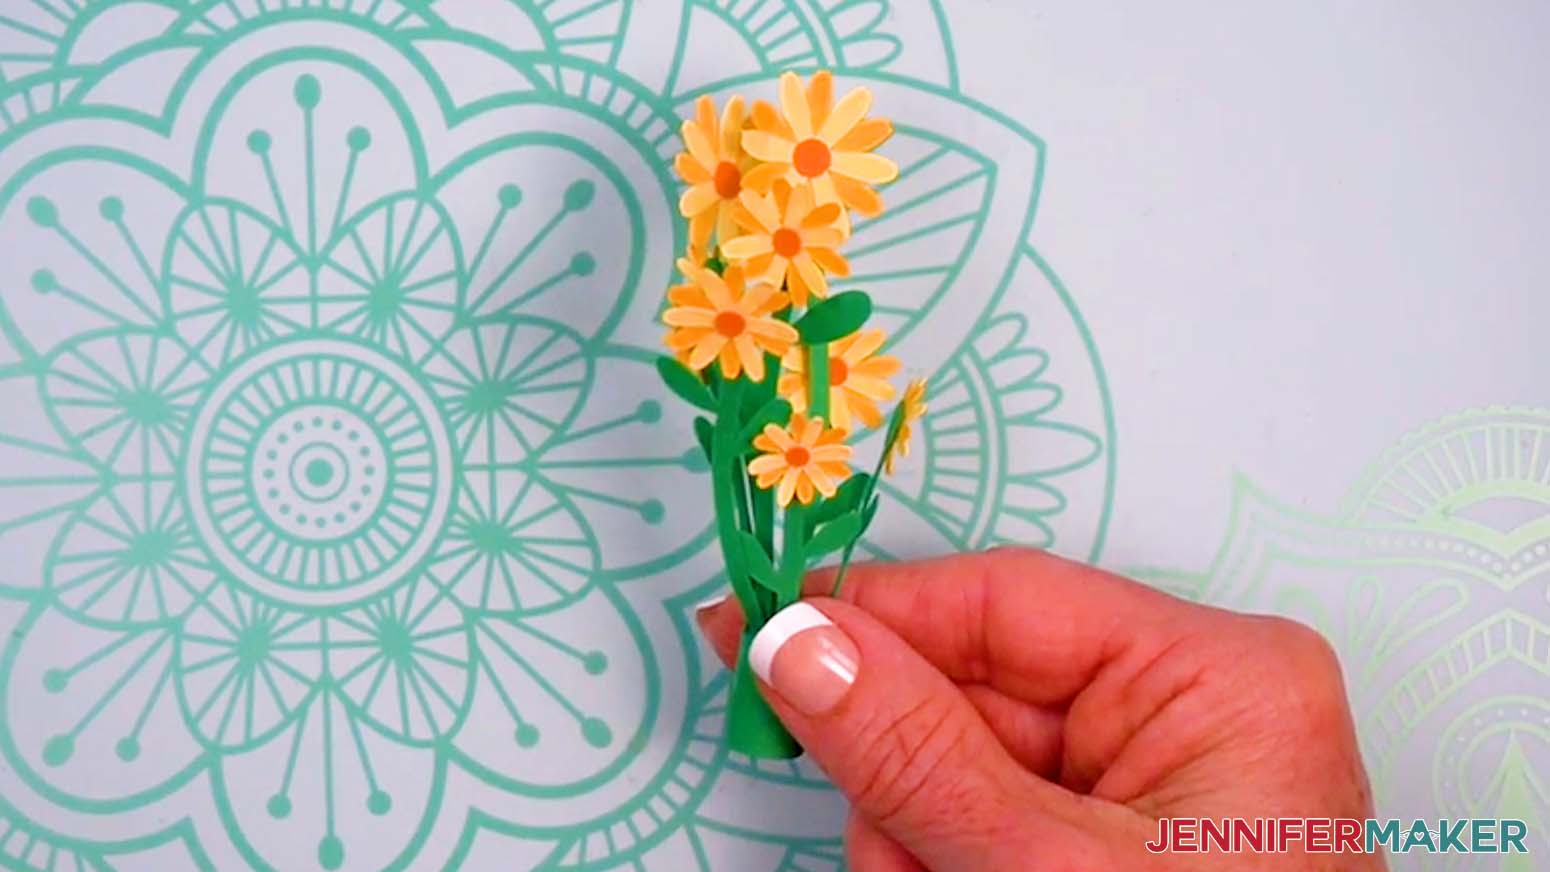
DAISIES
- Gather your daisy pieces and place them face up on your work surface, using your Canvas as reference.
NOTE: If you didn’t change your colors, you should have one green stem piece, nine light yellow petal pieces, nine darker yellow petal pieces, and nine orange daisy centers.
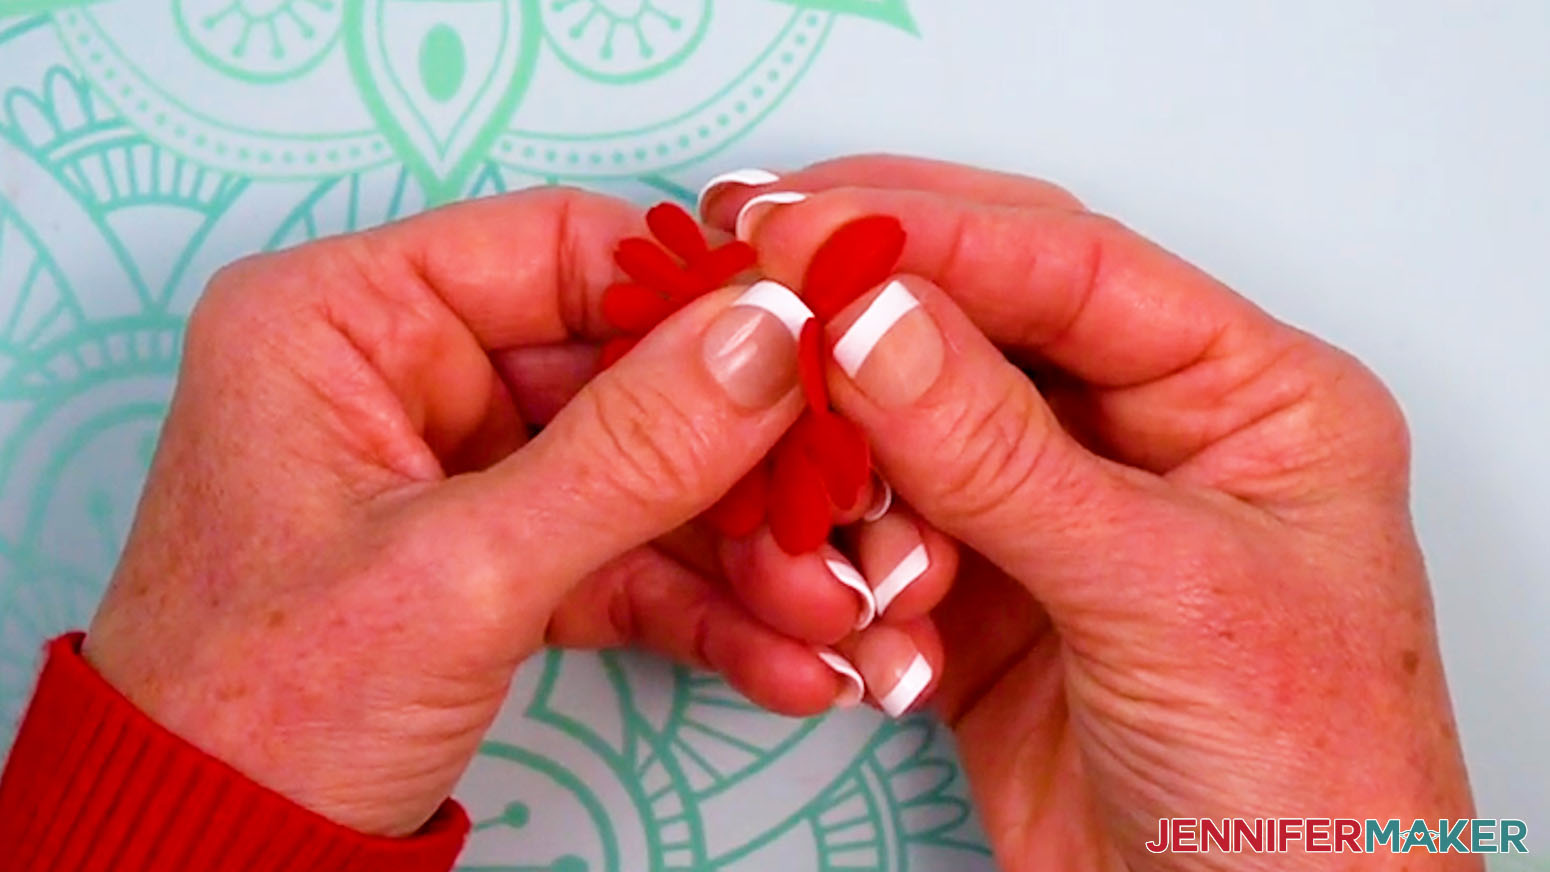
TIP: The daisies have six petals and the sunflowers have 12 petals, so don’t get them confused. - Pair each light yellow petal piece with its matching-sized darker yellow piece, and arrange them in order from smallest blooms to largest.
- Pair each daisy center piece with its corresponding pair of blooms, from smallest to largest.
- Apply a dot of glue to the back center of the largest light yellow bloom.
- Adhere the light yellow bloom to the center of its matching darker yellow bloom, staggering the petals so you can see them all. Press the layers together until the glue dries.
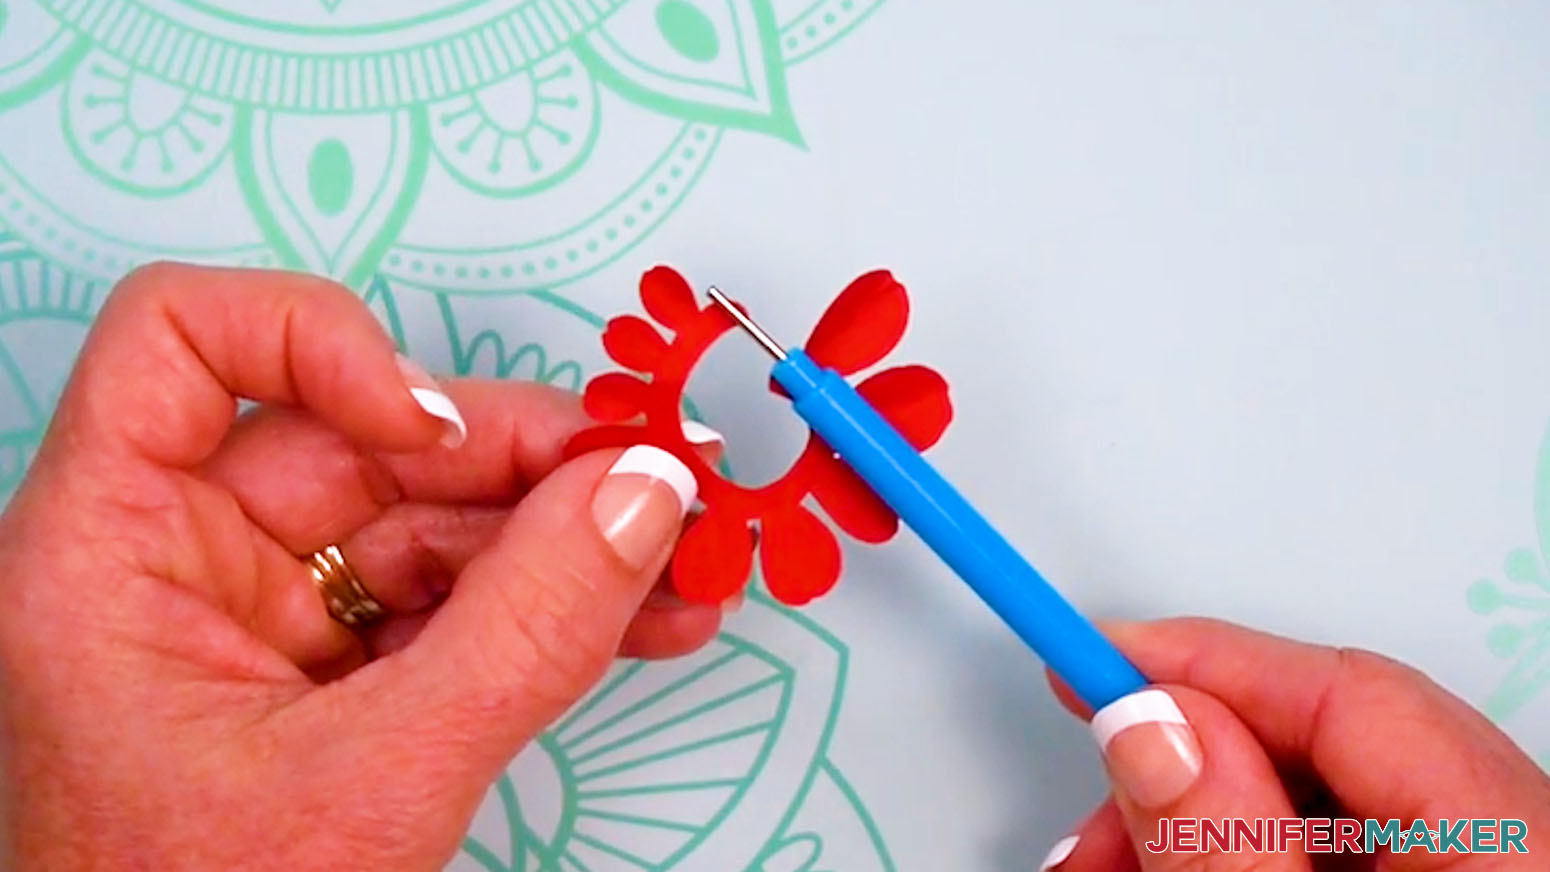
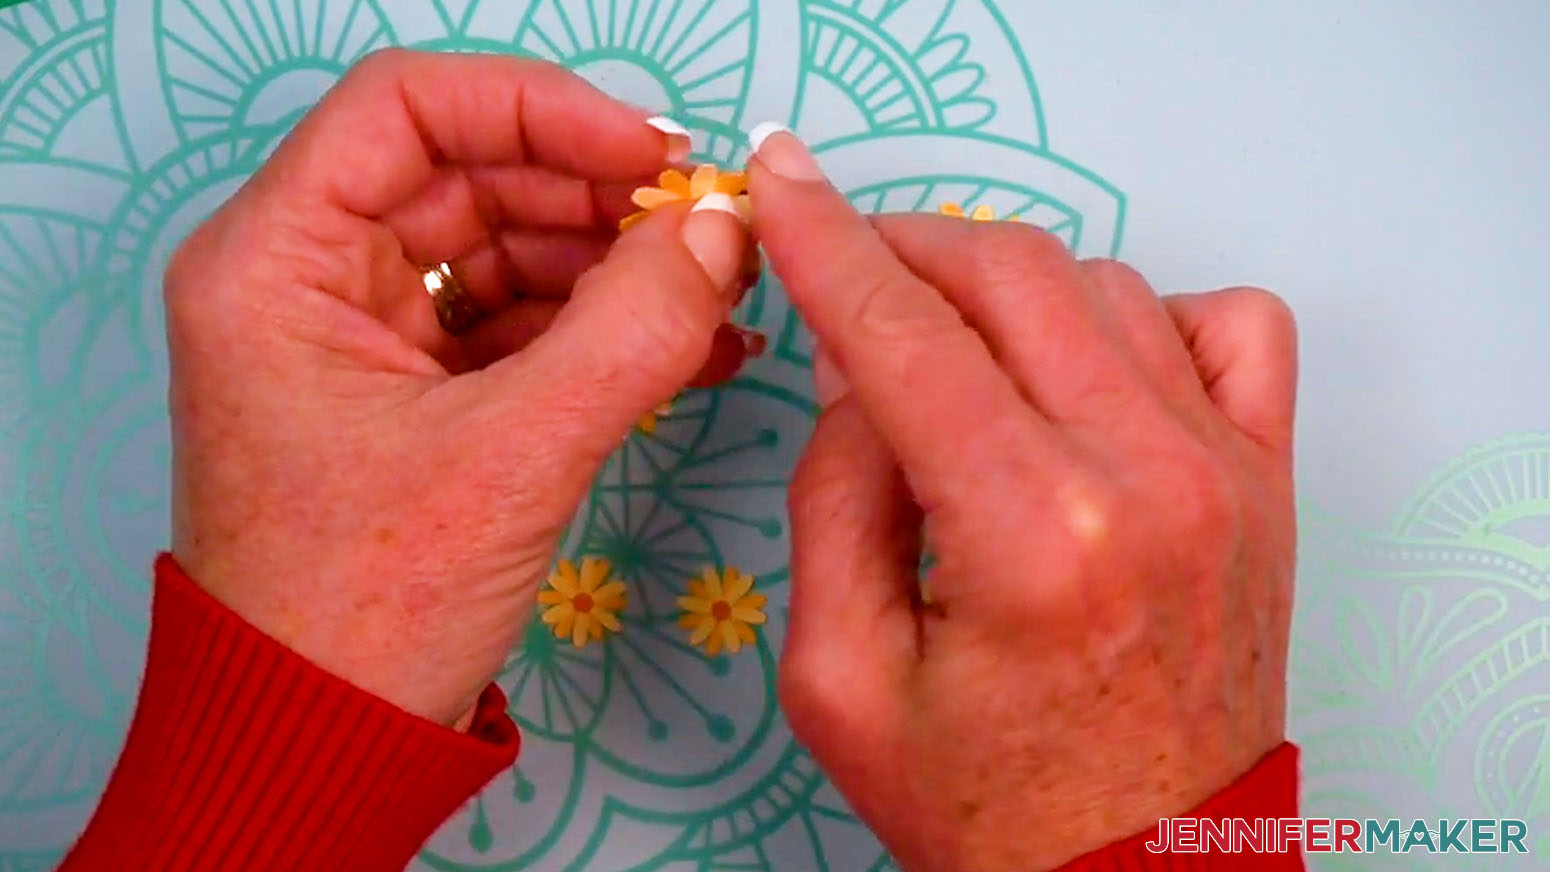
- Grab one of the daisy centers and add a dot of glue to the back center.
- Adhere the daisy center to the center of one of the blooms.
- When dry, use your fingers to gently curve the petals slightly toward the center to add dimension.
- Repeat Steps 4-8 with the rest of the daisies.
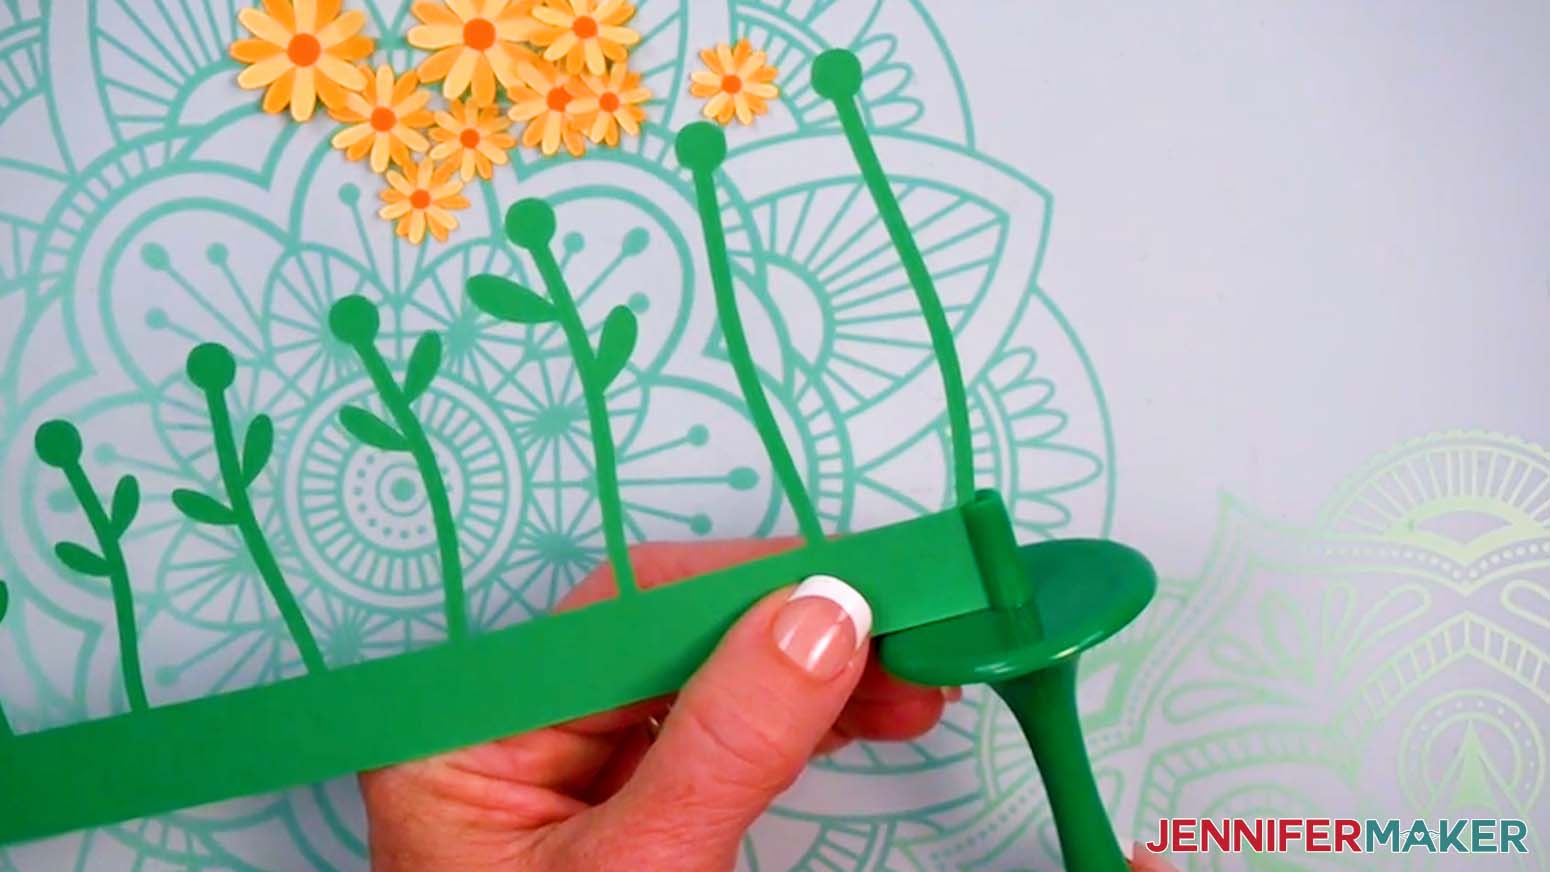
NOTE: I recommend attaching the blooms to the foliage after the foliage has been rolled so you can ensure they face forward. - Grab the Flow Tool and insert the longest stem’s bottom edge into the tool’s spindle slot.
- Follow Steps 6-10 in the “SINGLE TULIP” section above to roll and glue the daisy stem piece.
- Use your fingers to gently curve the leaves out slightly to give them volume.
- Find the side of the foliage that is opposite the seam. That’s the front.
- Apply a dot of glue to the front of the tallest stem’s circular tip.
- Adhere the back of one of the largest daisies to the glued tip.
- Repeat Steps 14-15 with the remainder of your daisies, adding the largest daisies to the longest stems and the shorter daisies to the shortest stems.
TIP: When you run out of front-facing tips to adhere front-facing daisies, start adding them to the back and sides. - Your mini paper daisies are ready to add to a display!
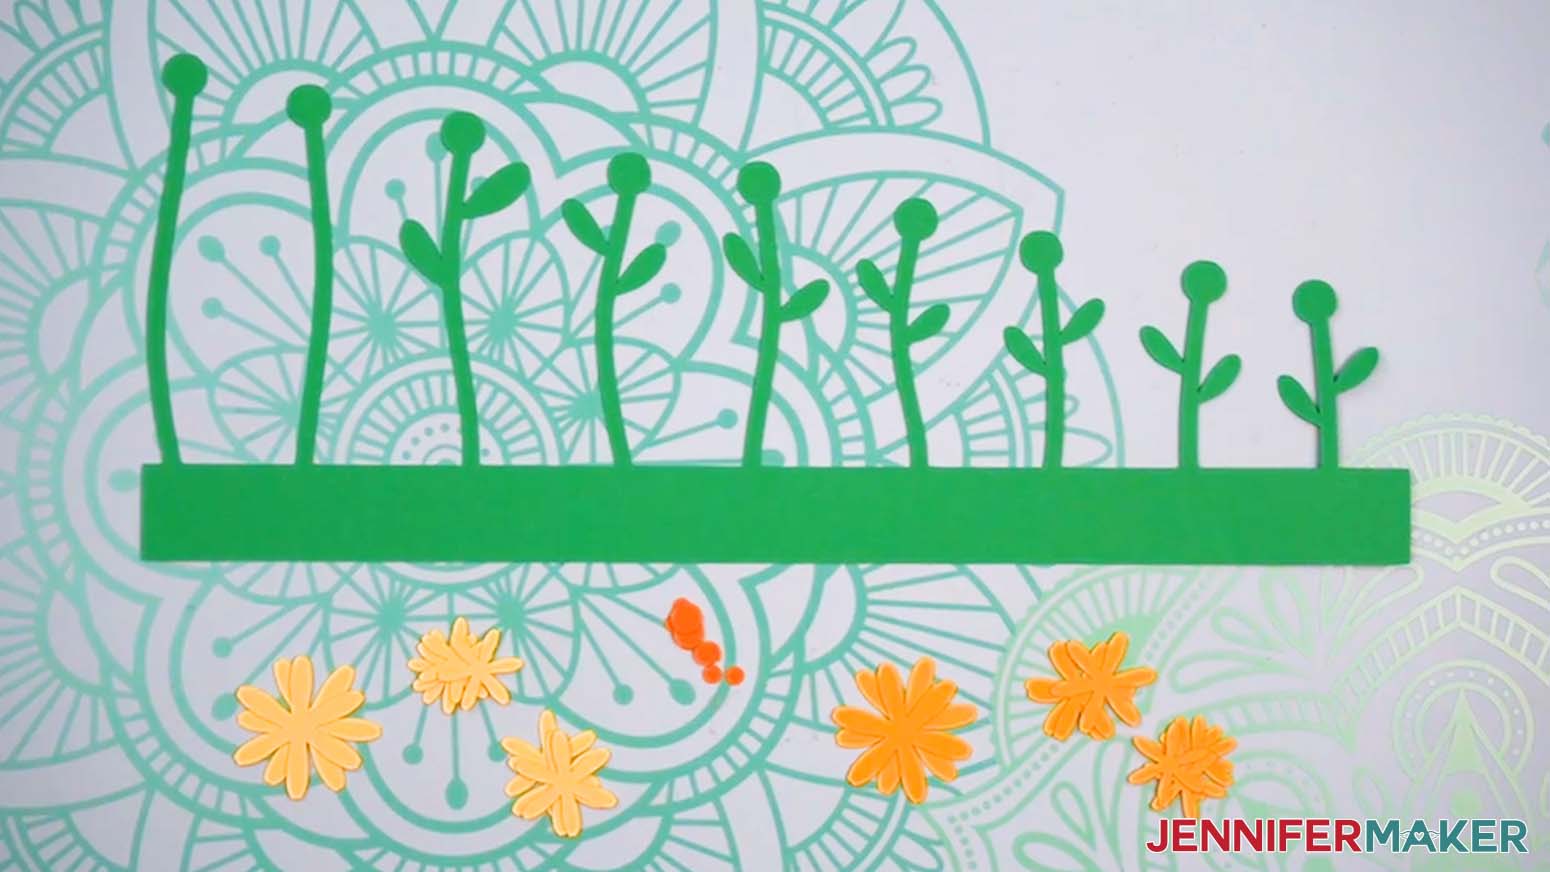
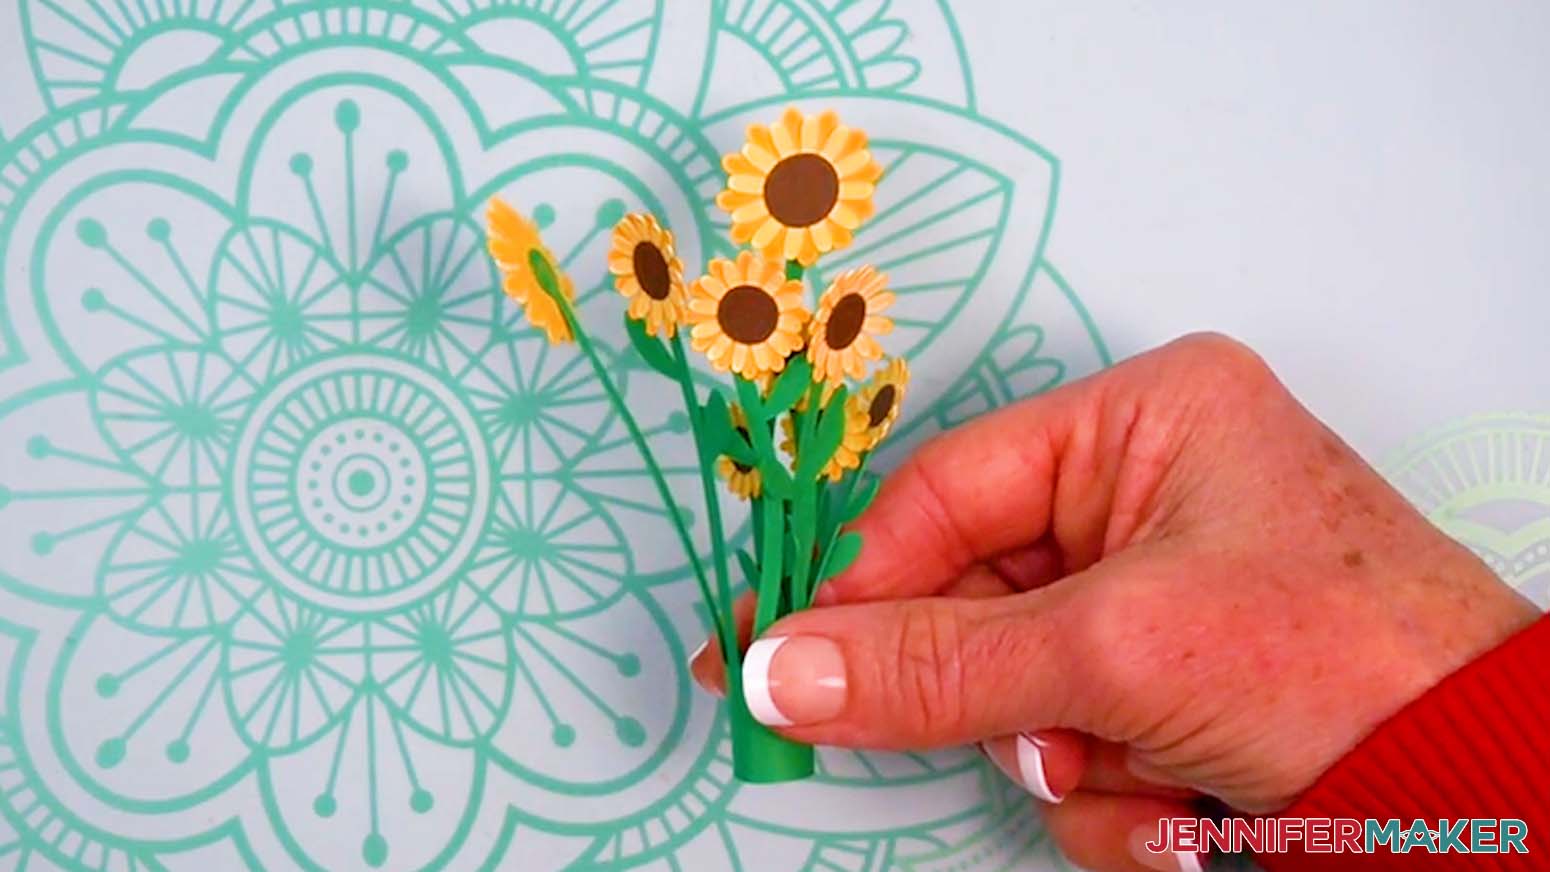
SUNFLOWERS
- Follow Steps 1-16 in the “DAISIES” section above.
NOTE: If you didn’t change your colors, you should have one green stem piece, nine light yellow petal pieces, nine darker yellow petal pieces, and nine dark brown sunflower centers.
TIP: The sunflowers have 12 petals. The daisies have six petals, so don’t get them confused. - Your mini paper sunflowers are ready to add to a display!
STEP 4: DISPLAY YOUR MINI PAPER FLOWERS
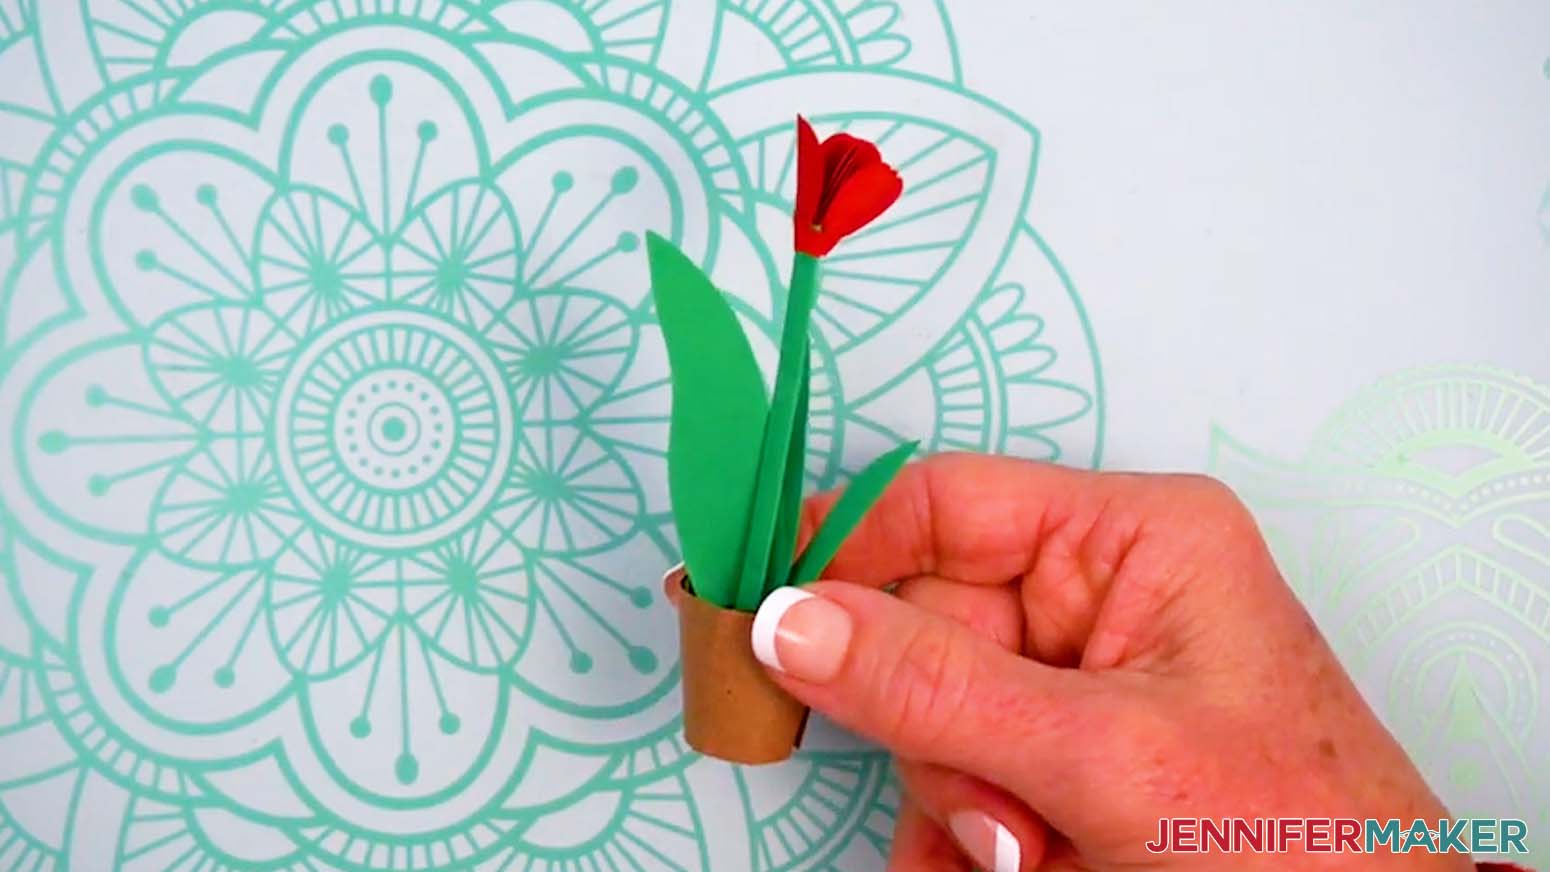
OPTION 1: DISPLAY YOUR MINI PAPER FLOWERS IN A POT
- Gather your pot and dirt pieces and place them face up on your work surface, using your Canvas as reference.
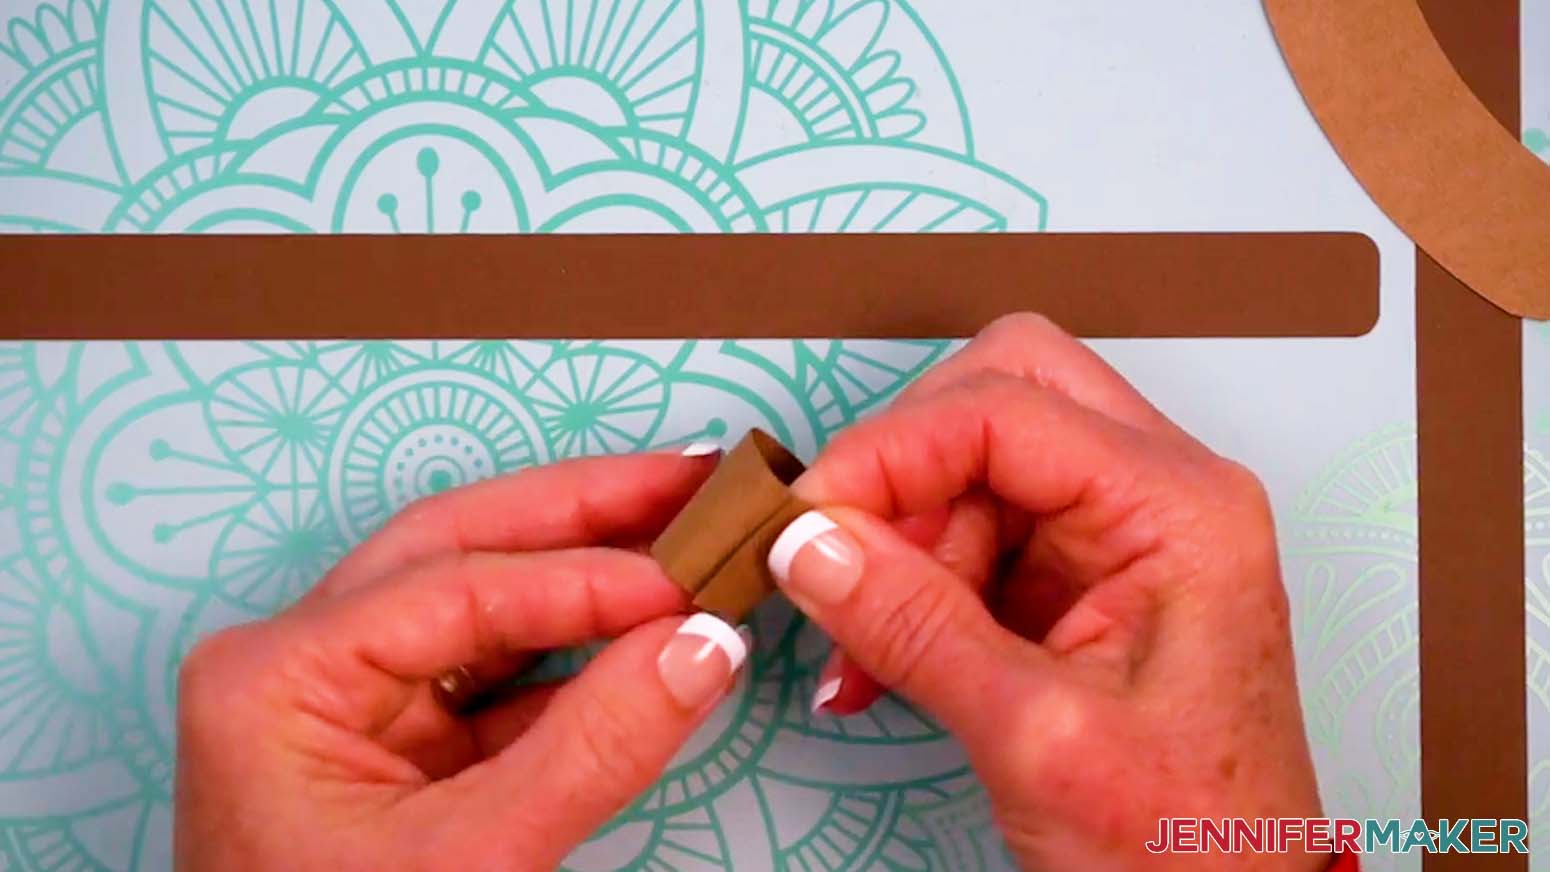
NOTE: You should have a small piece for the pot and a long piece for the dirt. - Grab the pot piece and curl it into a cylinder shape to help keep it curved.
NOTE: The sides of your cylinder should NOT be perfectly straight – it should be more like a flower pot shape. - Unroll it, then apply a thin line of glue along one short edge.
- Keeping the glued side on the inside, roll the piece back up into a cylinder shape, and overlap the glued end over the other end.
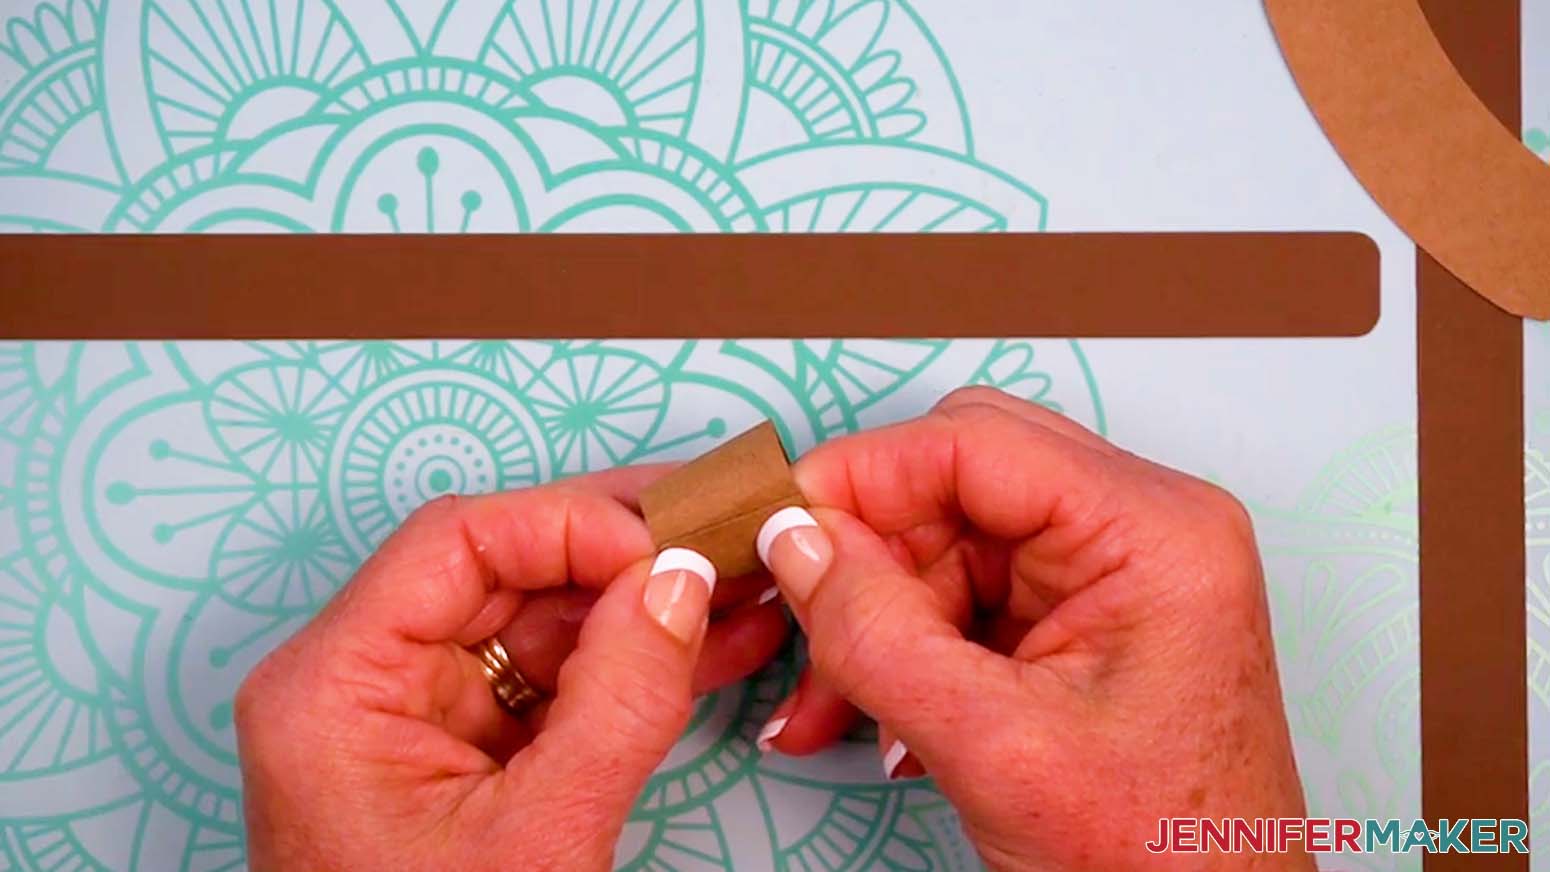
- Align the top and bottom edges of the pot, then press the ends together from both sides to adhere them.
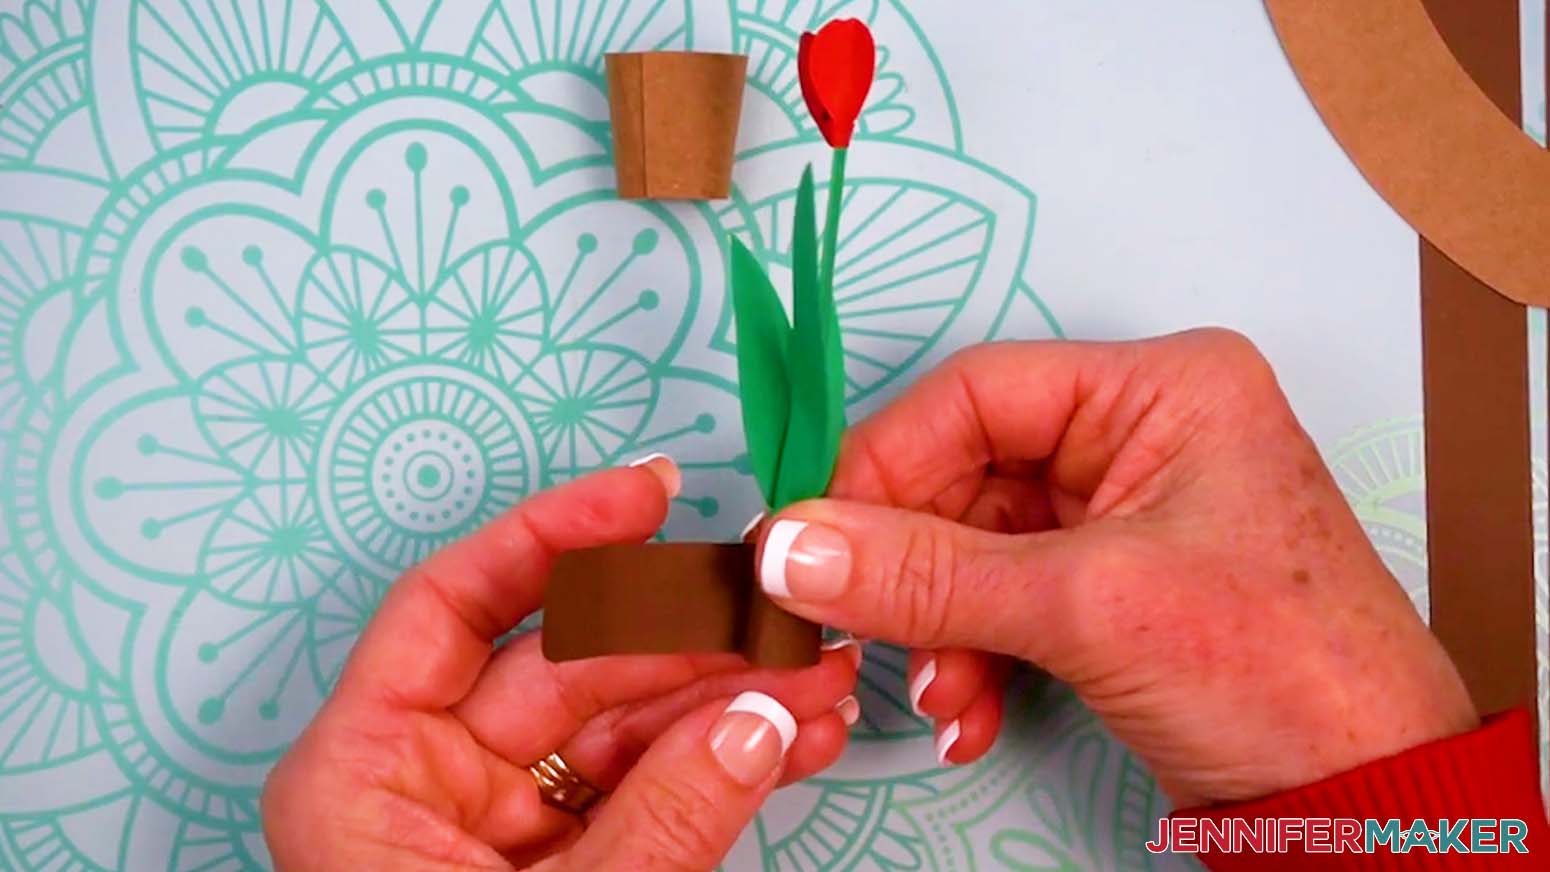
- Grab the dirt piece and roll it into a loose cylinder shape to help keep it curled.
- Wrap the dirt piece around the base of your assembled mini flower arrangement or plant.
- Slide the dirt-wrapped base of the plant into the larger opening on the pot and let the dirt piece unfurl to fill the space.
- If the plant won’t stand up on its own, apply a line of glue along the solid part of the plant’s base.
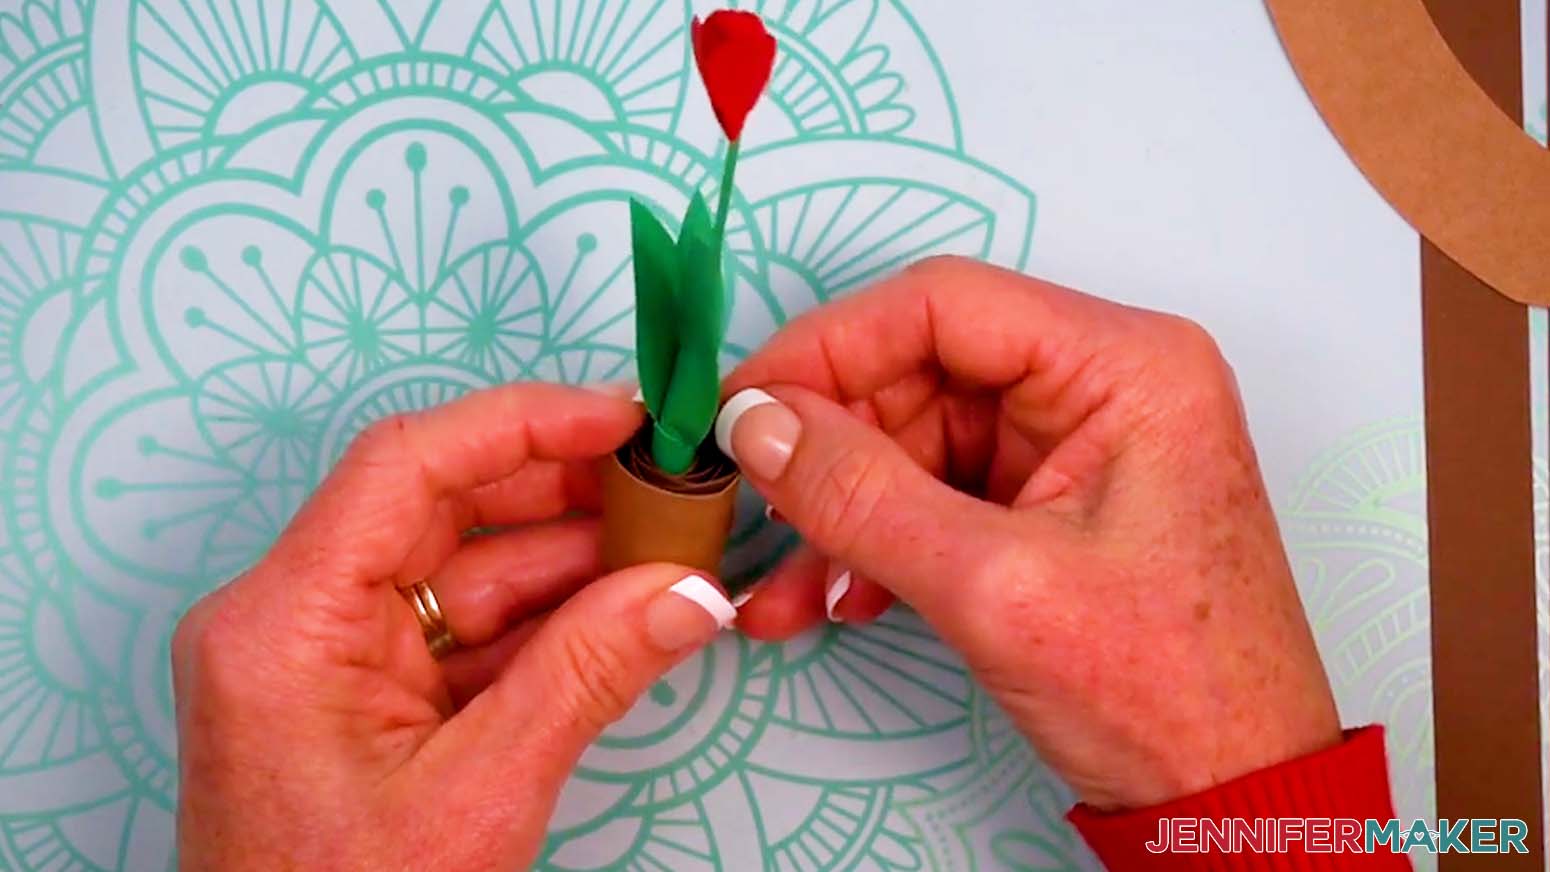
- Insert the plant’s base into the center of the rolled dirt piece inside the pot, then press and hold it against one side of the dirt roll until the glue dries.
- Your mini paper flower pot is ready for display!
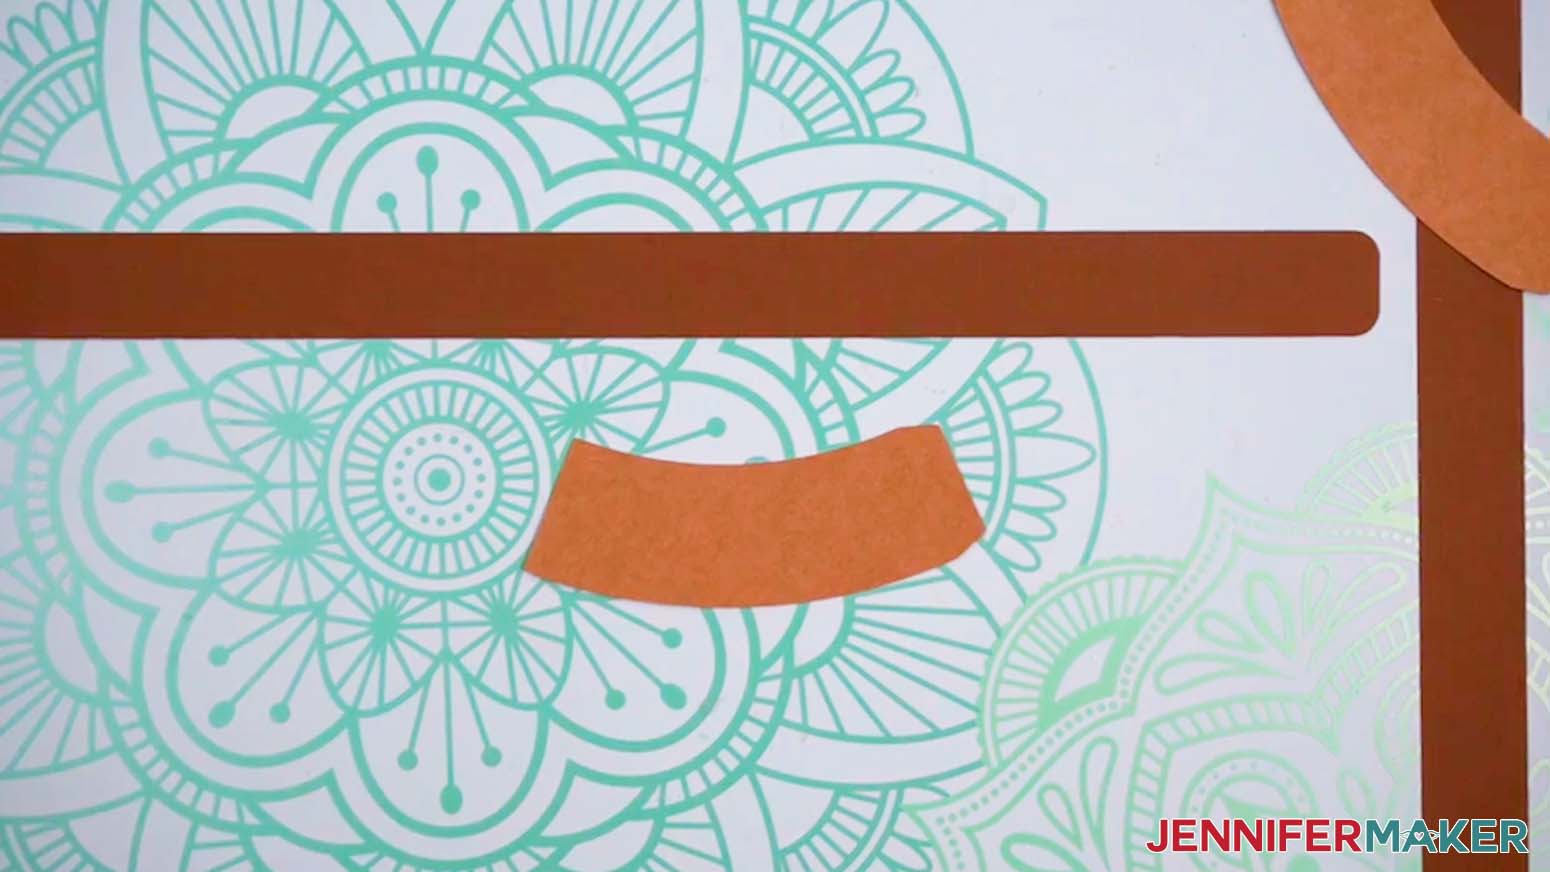
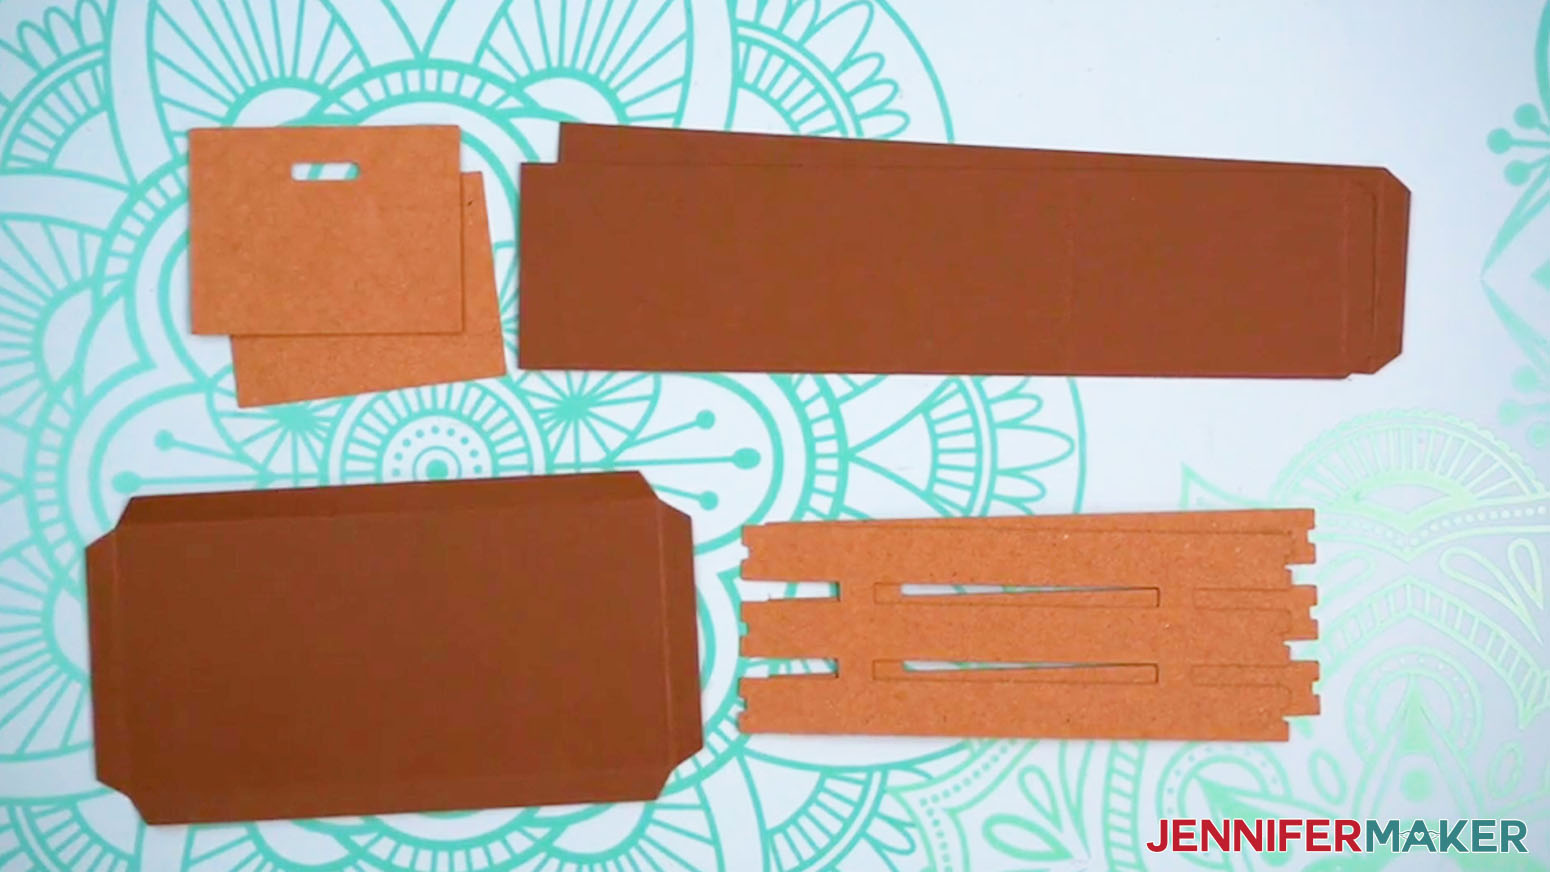
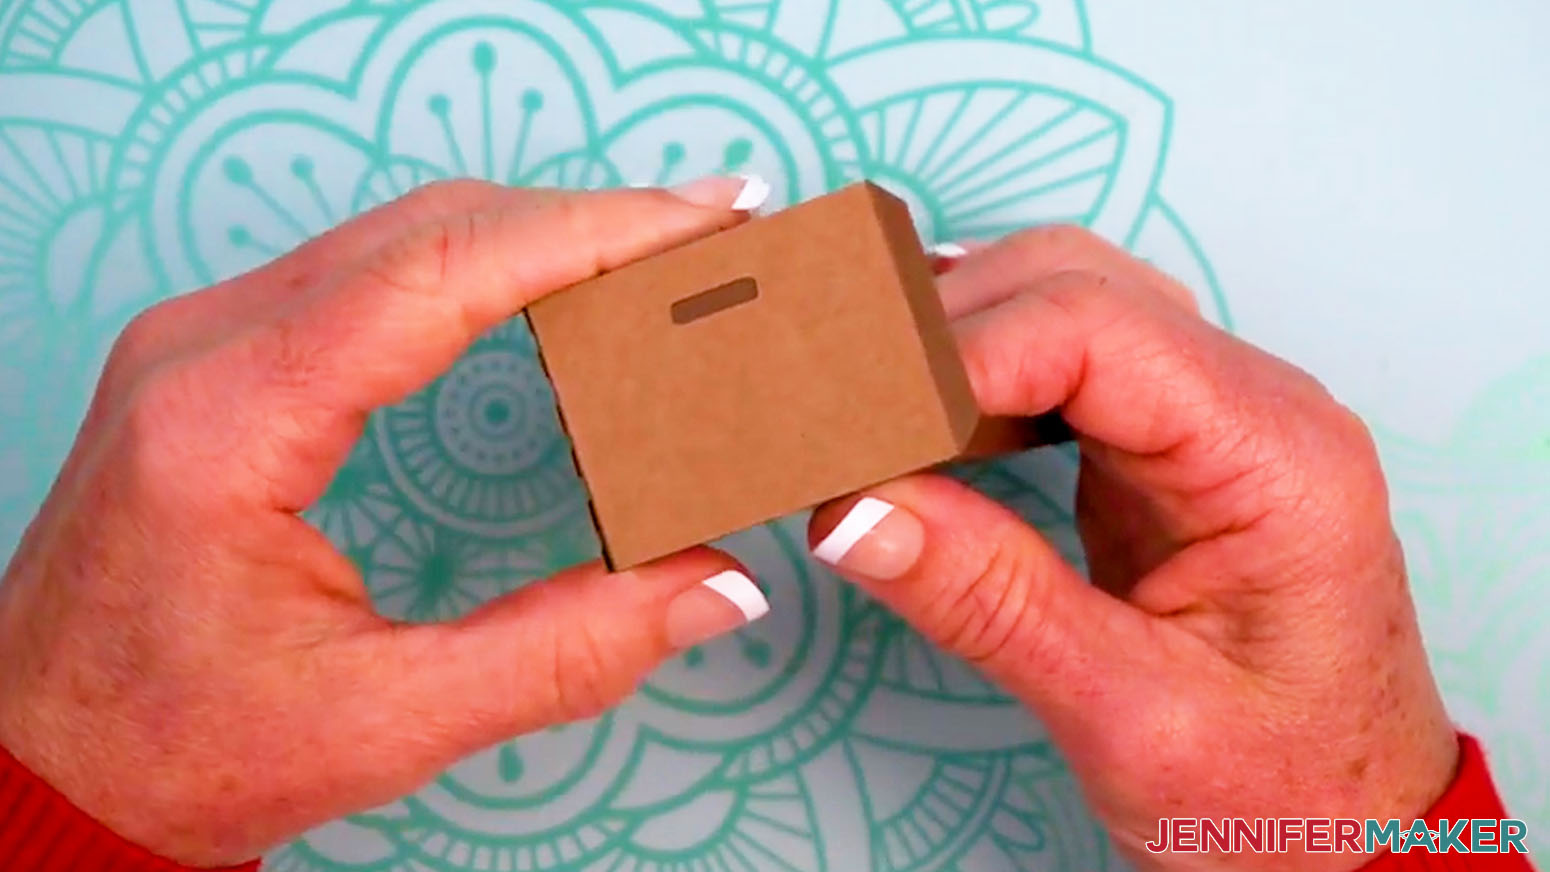
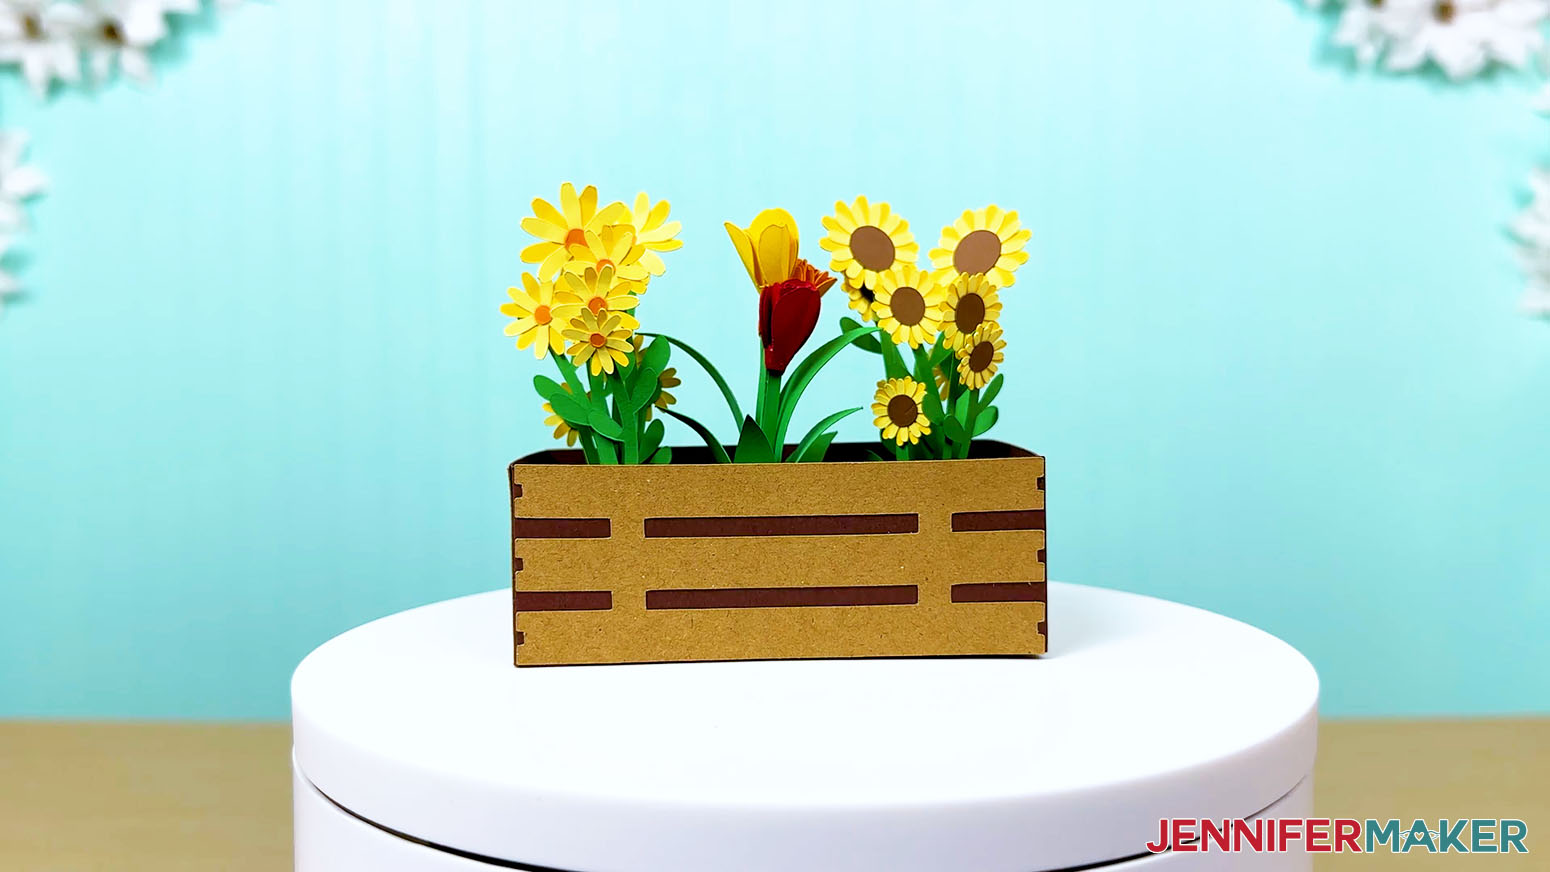
OPTION 2: DISPLAY YOUR MINI PAPER FLOWERS IN A CRATE
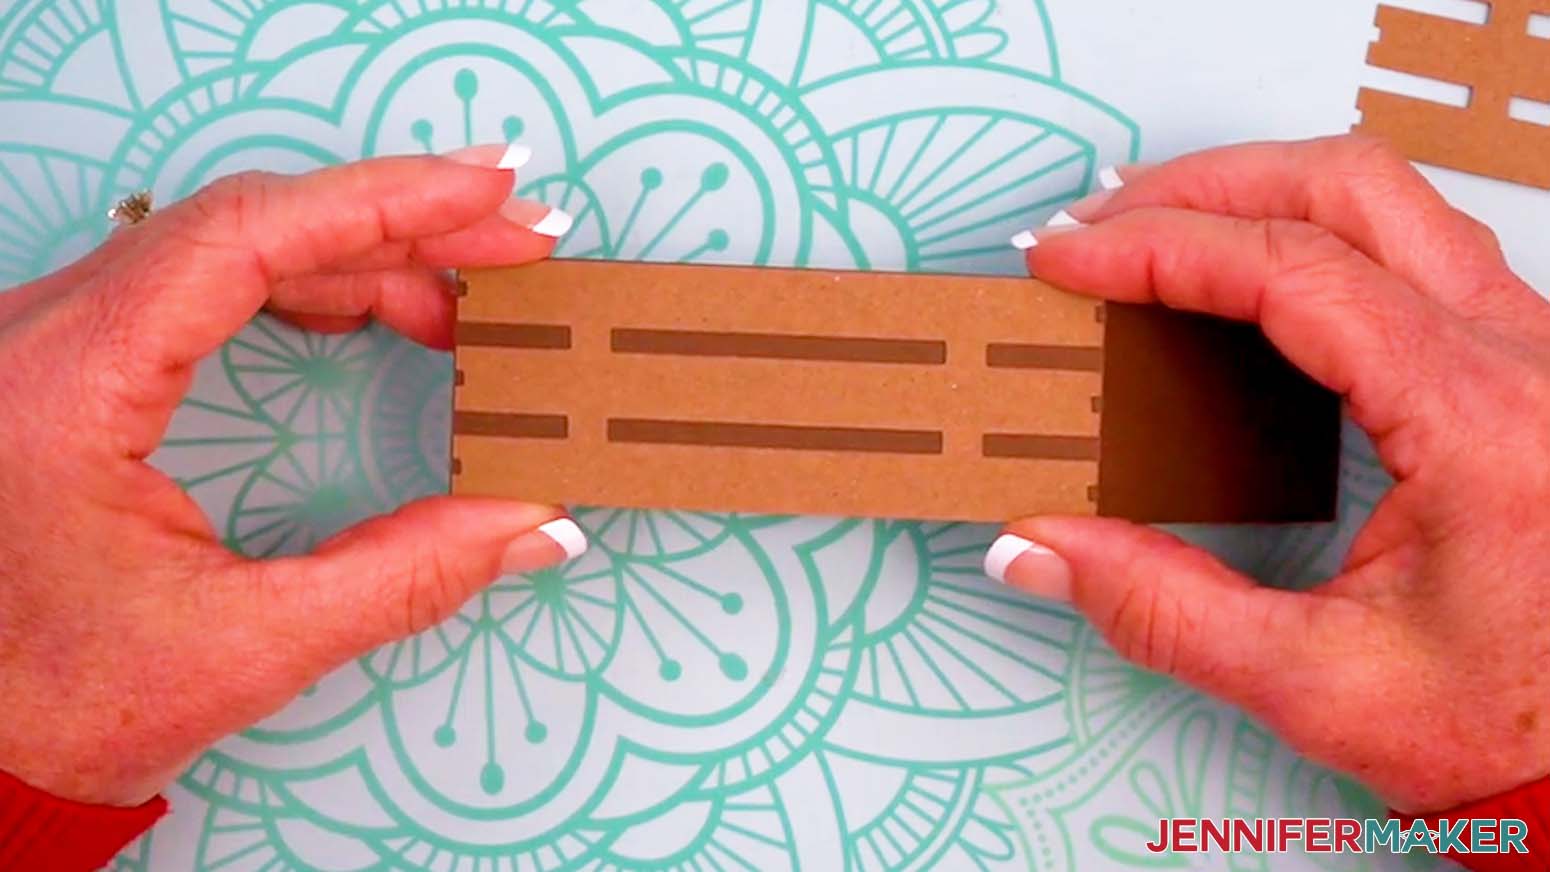
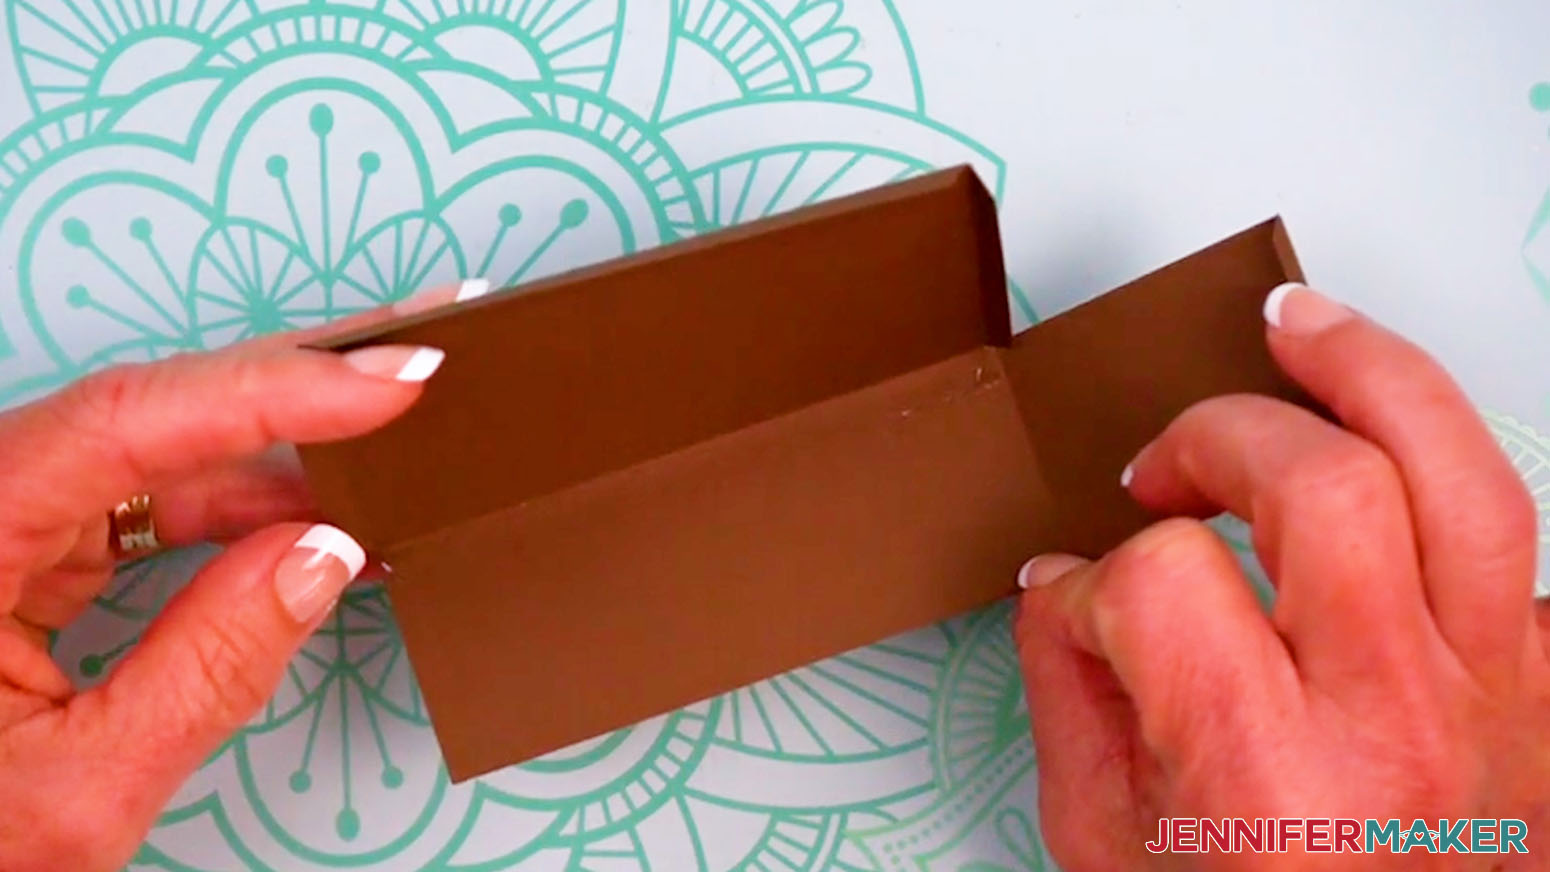
- Gather your crate pieces and place them face up on your work surface, using your Canvas as reference.
NOTE: You should have two long detailed pieces, two short detailed pieces, two side dirt pieces, and one bottom dirt piece. - On the dirt pieces, fold along the scored or dashed cut lines in the same direction on each piece.
- Use a scraper tool to crease the folds.
- Place the folded dirt side pieces on your work surface so the creased folds are pointing up.
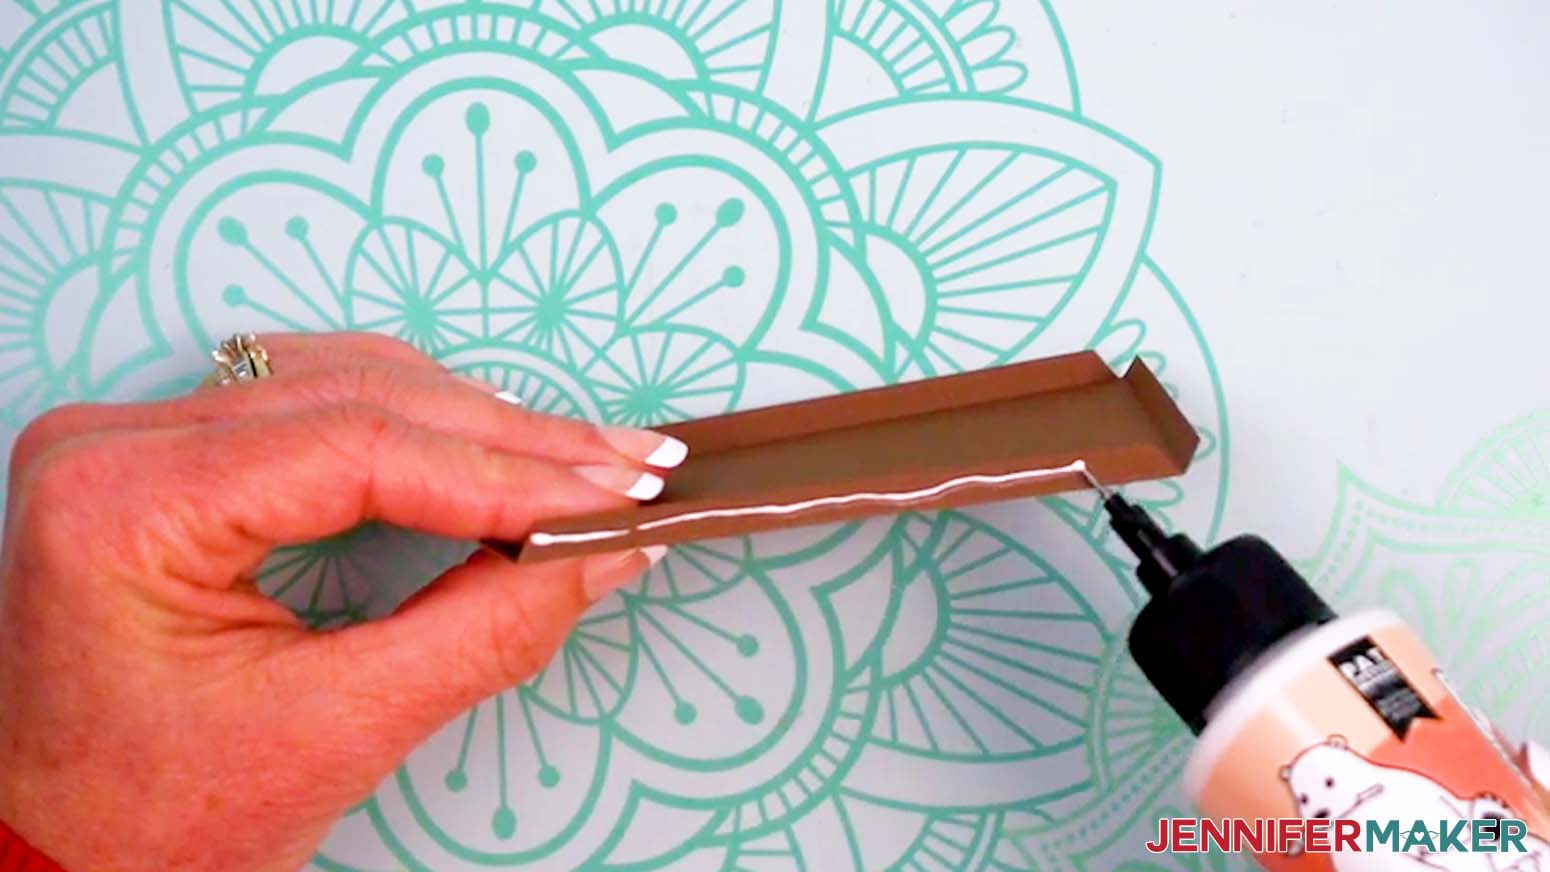
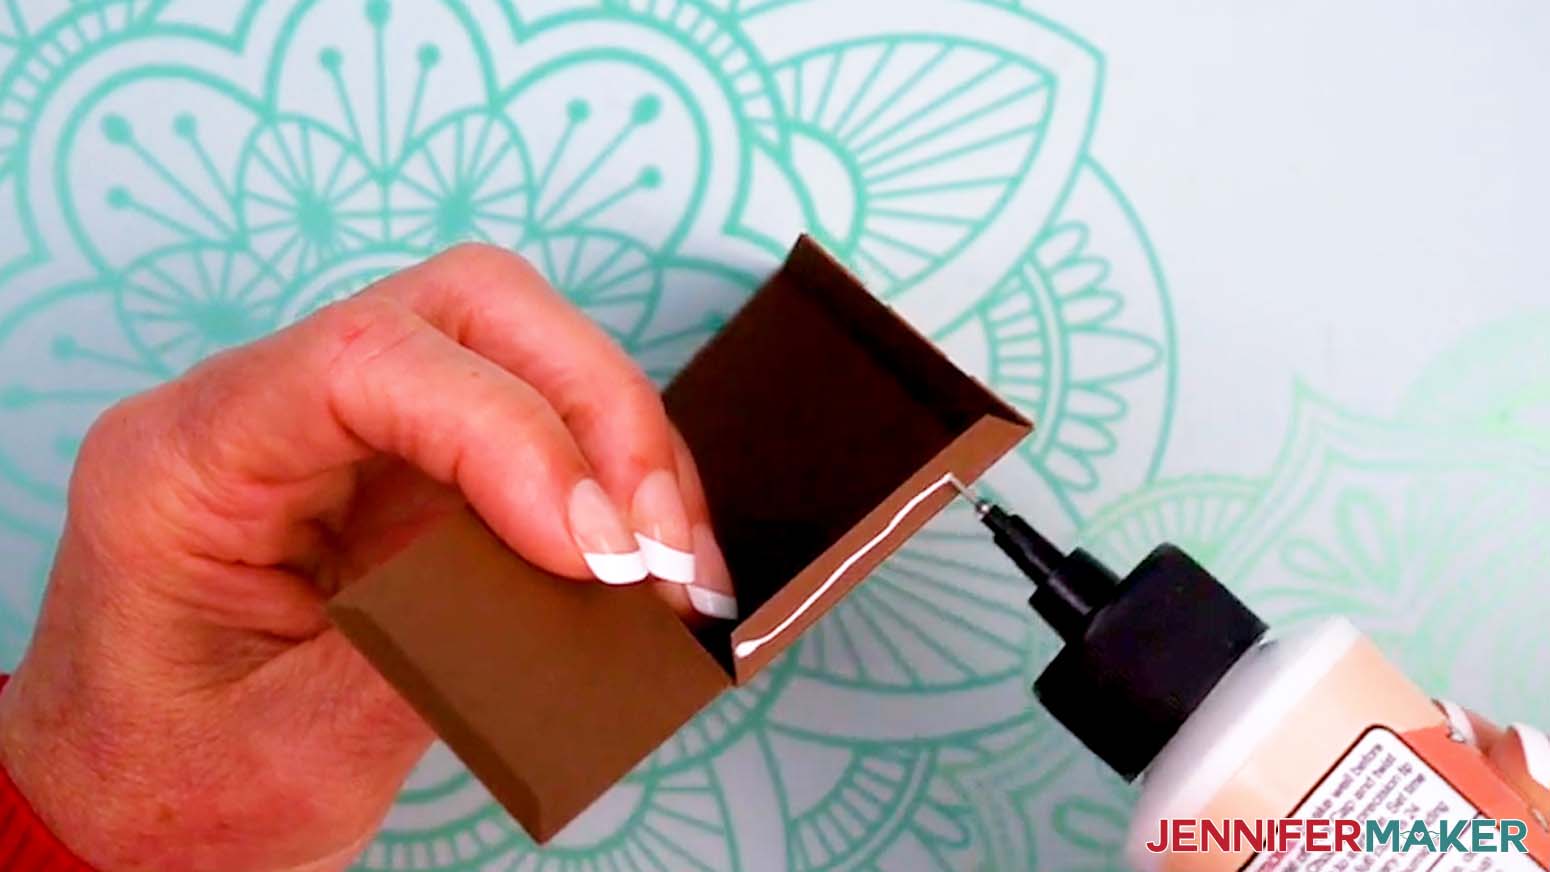
- Grab one of the long, detailed pieces and apply lines of glue to one side, between the cutouts.
- Adhere the long, detailed piece to the longer section of one folded dirt side piece, making sure the edges align.
TIP: If any glue seeps out, quickly wipe it away with your finger. - Grab one of the crate’s short detail pieces and apply glue to one side.
- Adhere the short detail piece to the shorter section of the folded dirt side piece, making sure the edges align, to create one assembled crate piece
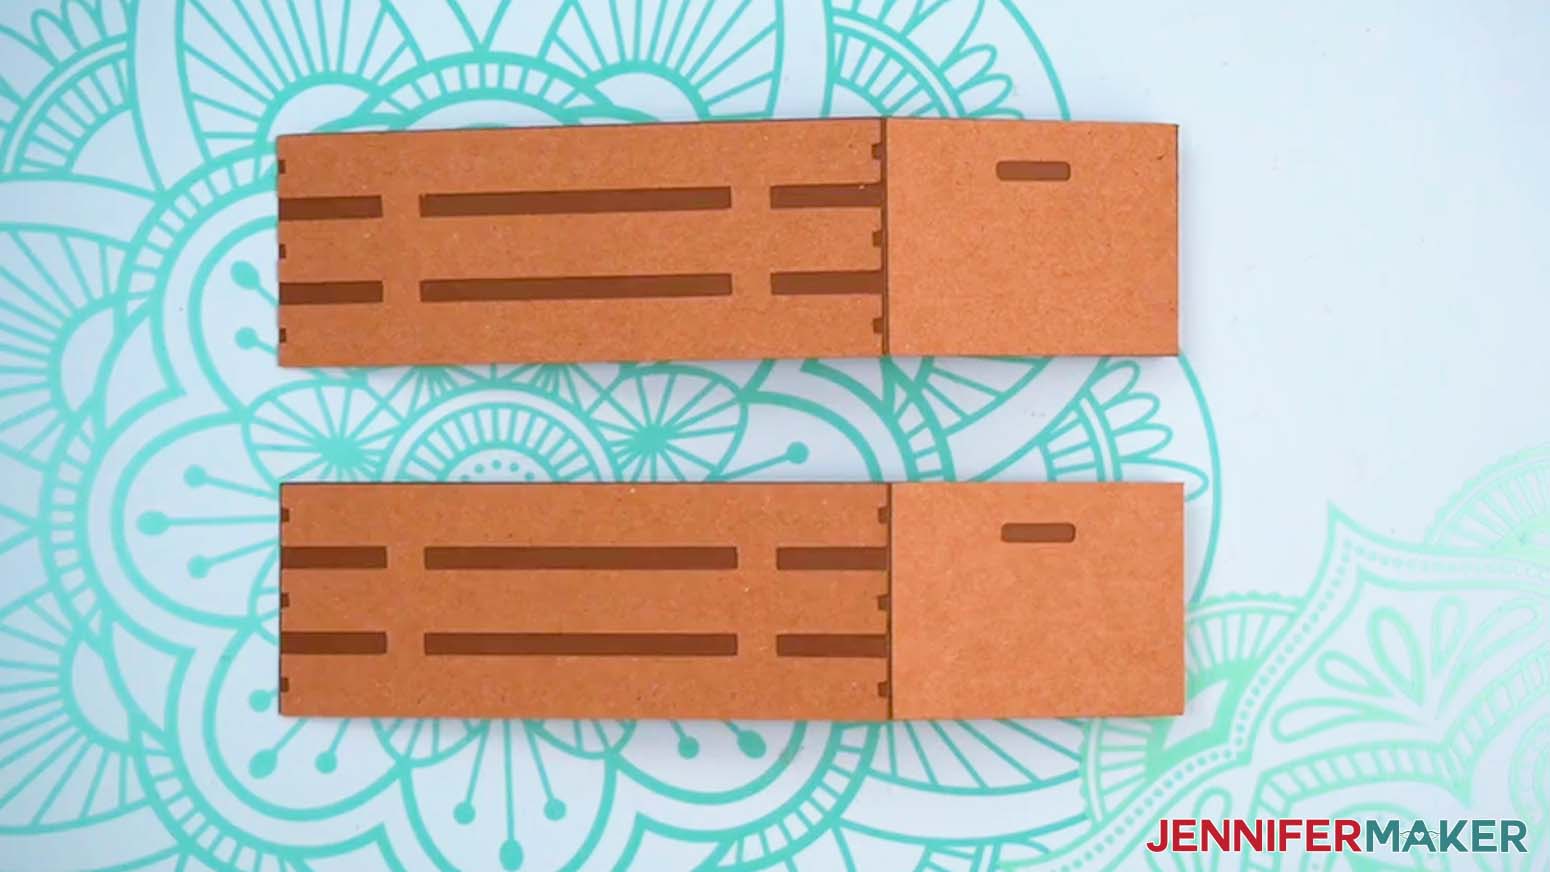
- Repeat Steps 5-8 with the other long dirt side piece and the other long detail piece only.
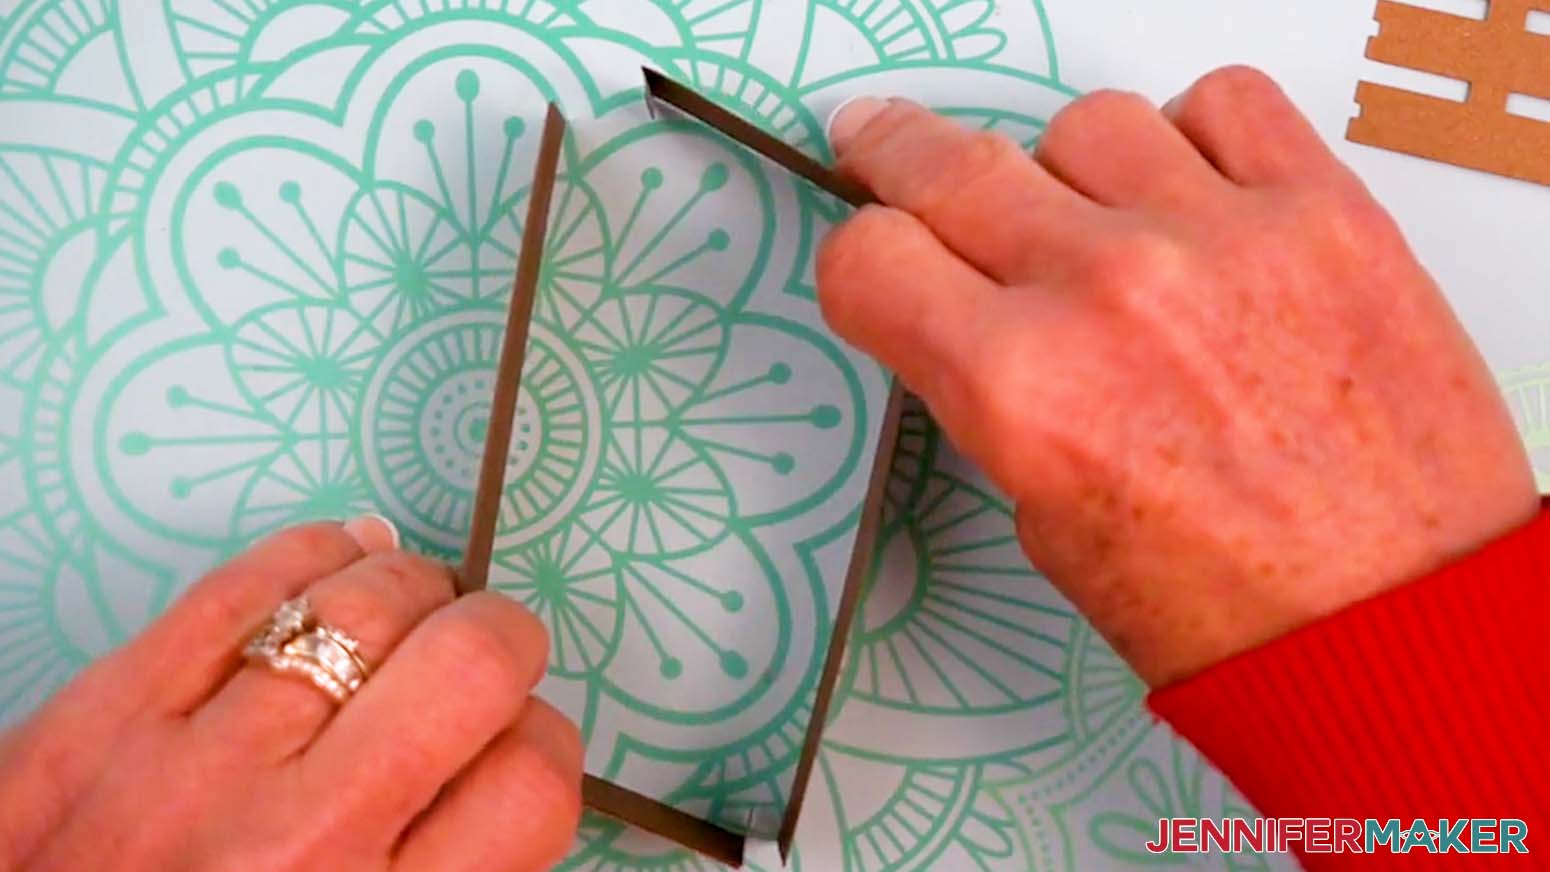
- Make sure your already-assembled crate piece is oriented like a “J,” not an “L.” If the assembled crate piece looks like an “L,” flip your in-progress crate piece so it looks like a “J,” with the short side facing you.
- Apply glue to one side of the remaining short detail piece, then attach it handle-side up to the shorter section of the in-progress crate piece.
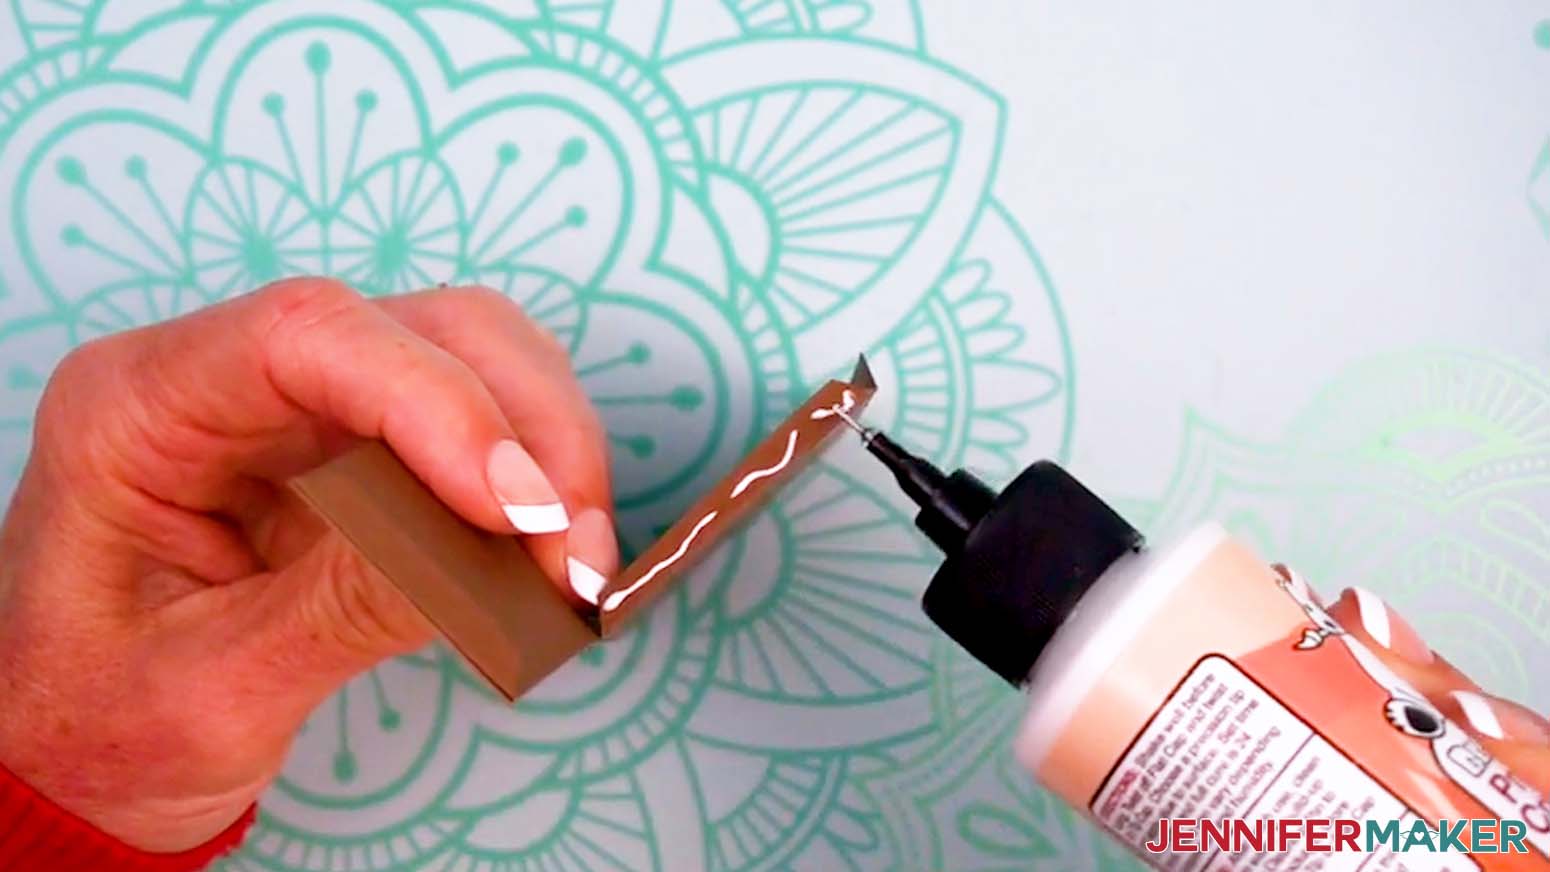
NOTE: This way, when the two L-shaped crate pieces are joined together, both short sides will end up right-side-up with the handle cutouts at the top. - Grab the bottom dirt piece and apply glue to the outside of one longer tab.
- Adhere the bottom back of one assembled crate piece to the tab, making sure the bottom edge is flush with the fold in the tab. Hold until the glue dries.
TIP: Use your flat work surface to align the edges. - Apply glue to the outside of the bottom dirt piece’s shorter tab on the same side as your crate piece’s short side.
- Adhere the bottom back of the short side to the tab, making sure the bottom edge is flush with the fold in the tab. Hold until the glue dries.
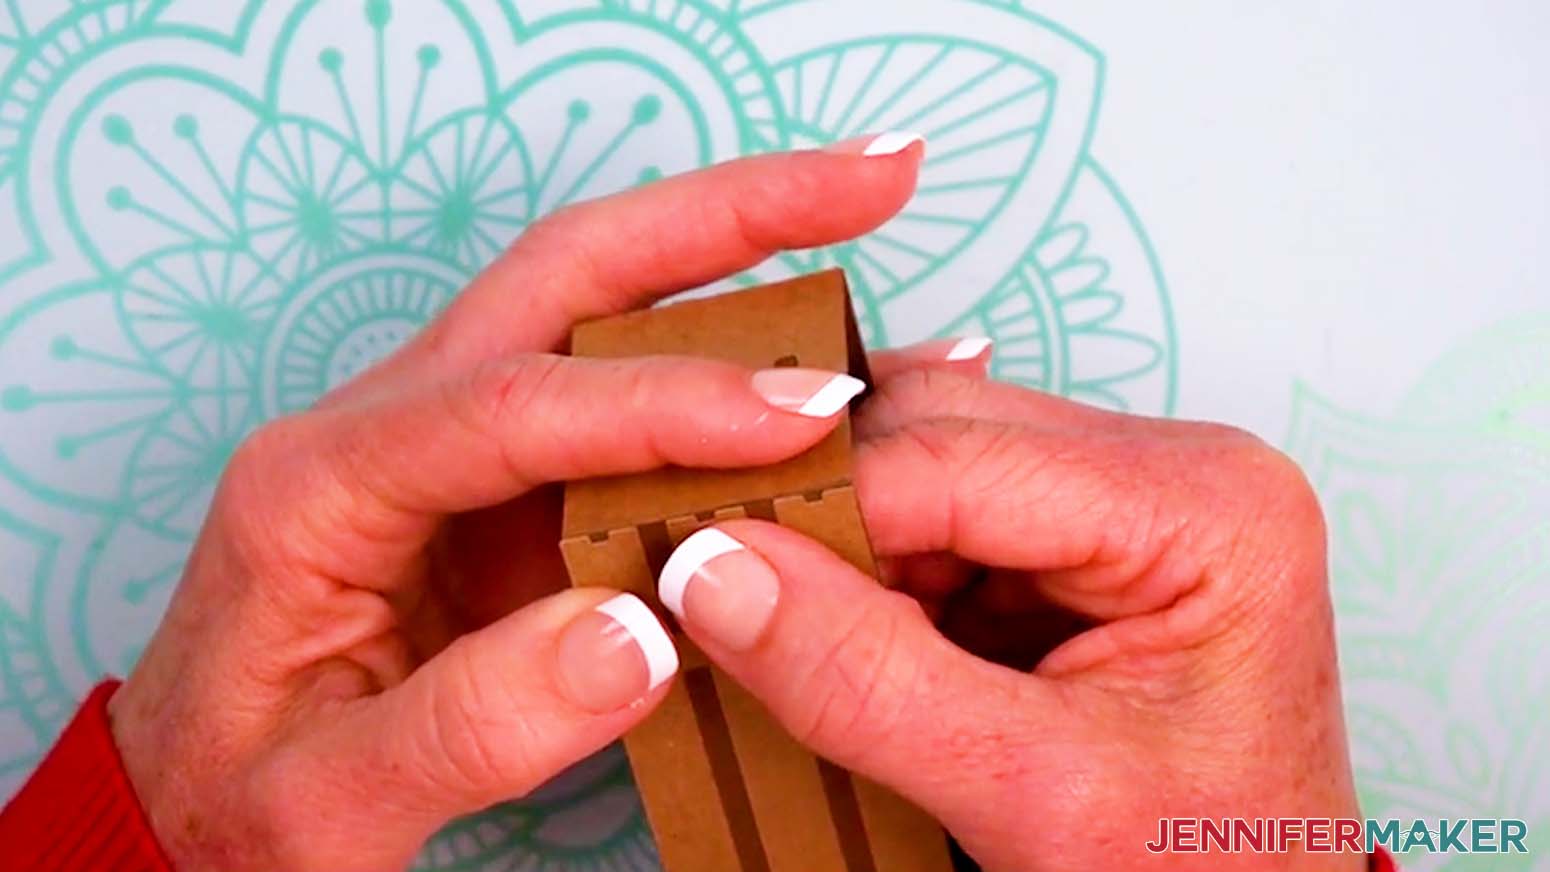
- Repeat steps 12-15 to adhere the other crate piece to the bottom dirt piece, making sure the tabs on both crate piece’s short ends are tucked inside the crate.
- Use your glue’s precision tip to apply glue to the outside of one of the short ends’ tabs and adhere it to the inside of its corresponding long crate side. Hold until the glue dries.
- Repeat Step 17 with the remaining short end’s tab.
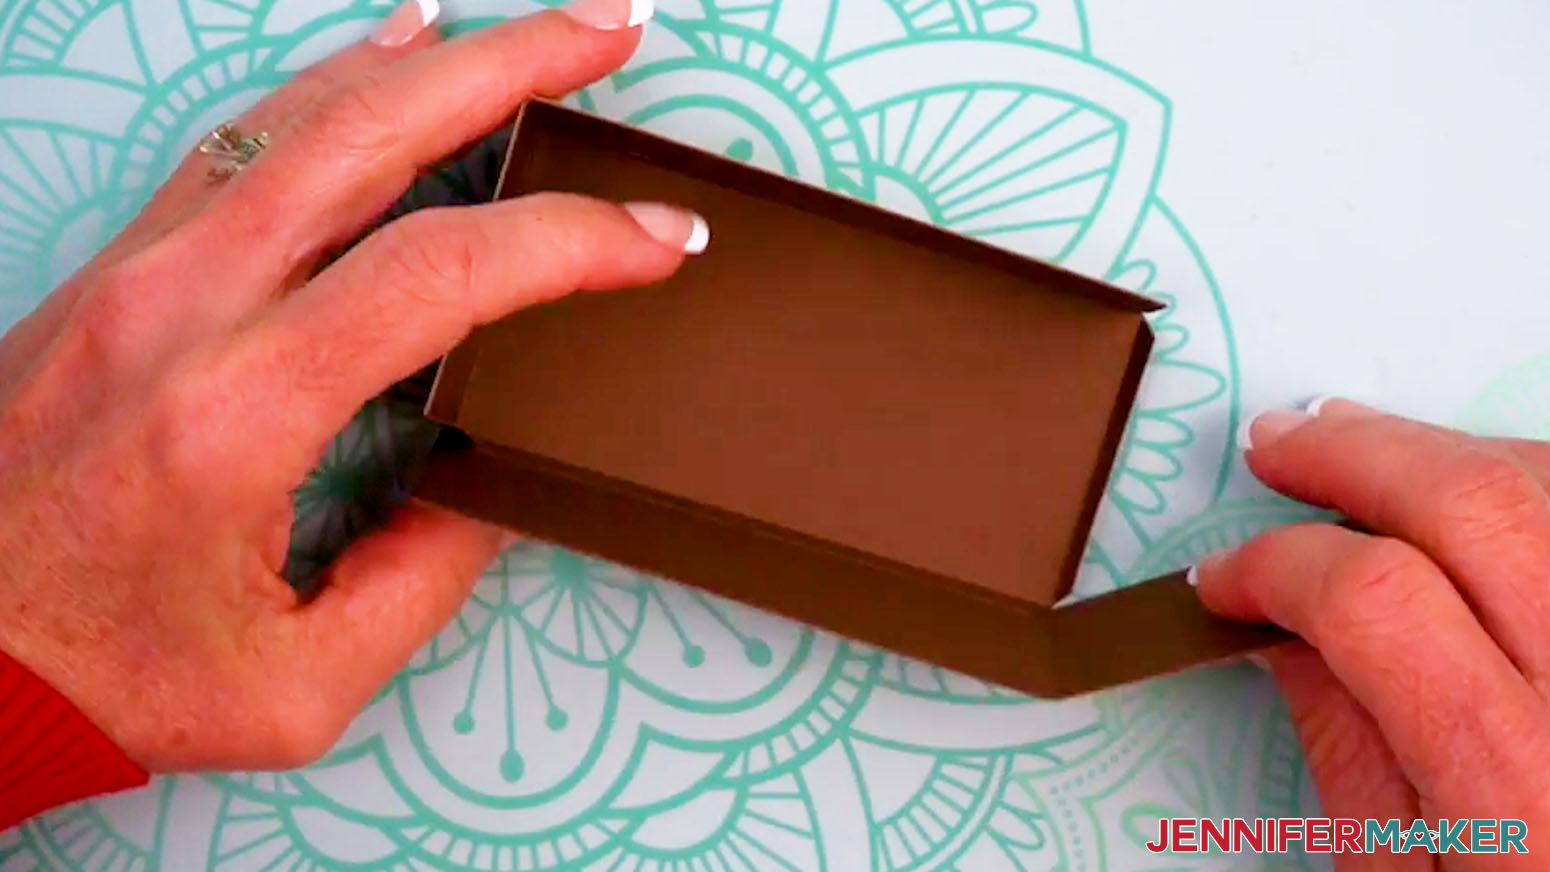
- Set a few assembled mini flowers or plants inside the crate.
- Your mini crate is ready for display!


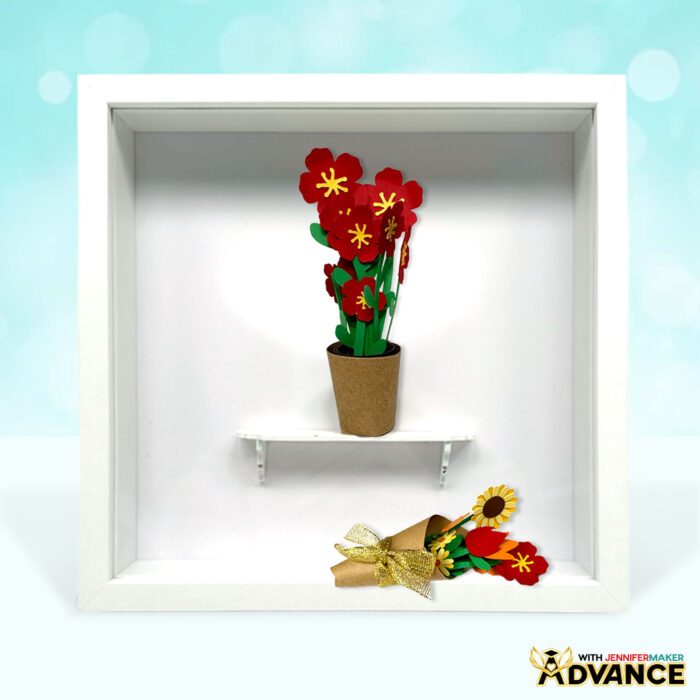
OPTION 3: DISPLAY YOUR MINI PAPER FLOWERS IN A SHADOW BOX
- Open the prongs of your shadow box frame and remove the backer.
NOTE: My frame has a spacer, but it’s attached to the inside of the frame. If your frame has a removable spacer, remove it now. - Clean the plastic (or glass) with isopropyl alcohol and a lint-free cloth, then set the frame aside.
NOTE: Be sure to remove any protective film from the plastic before cleaning. - Lay your shadow box backer on your work surface face up. If the backer has a hanger on the other side, point it away from you.
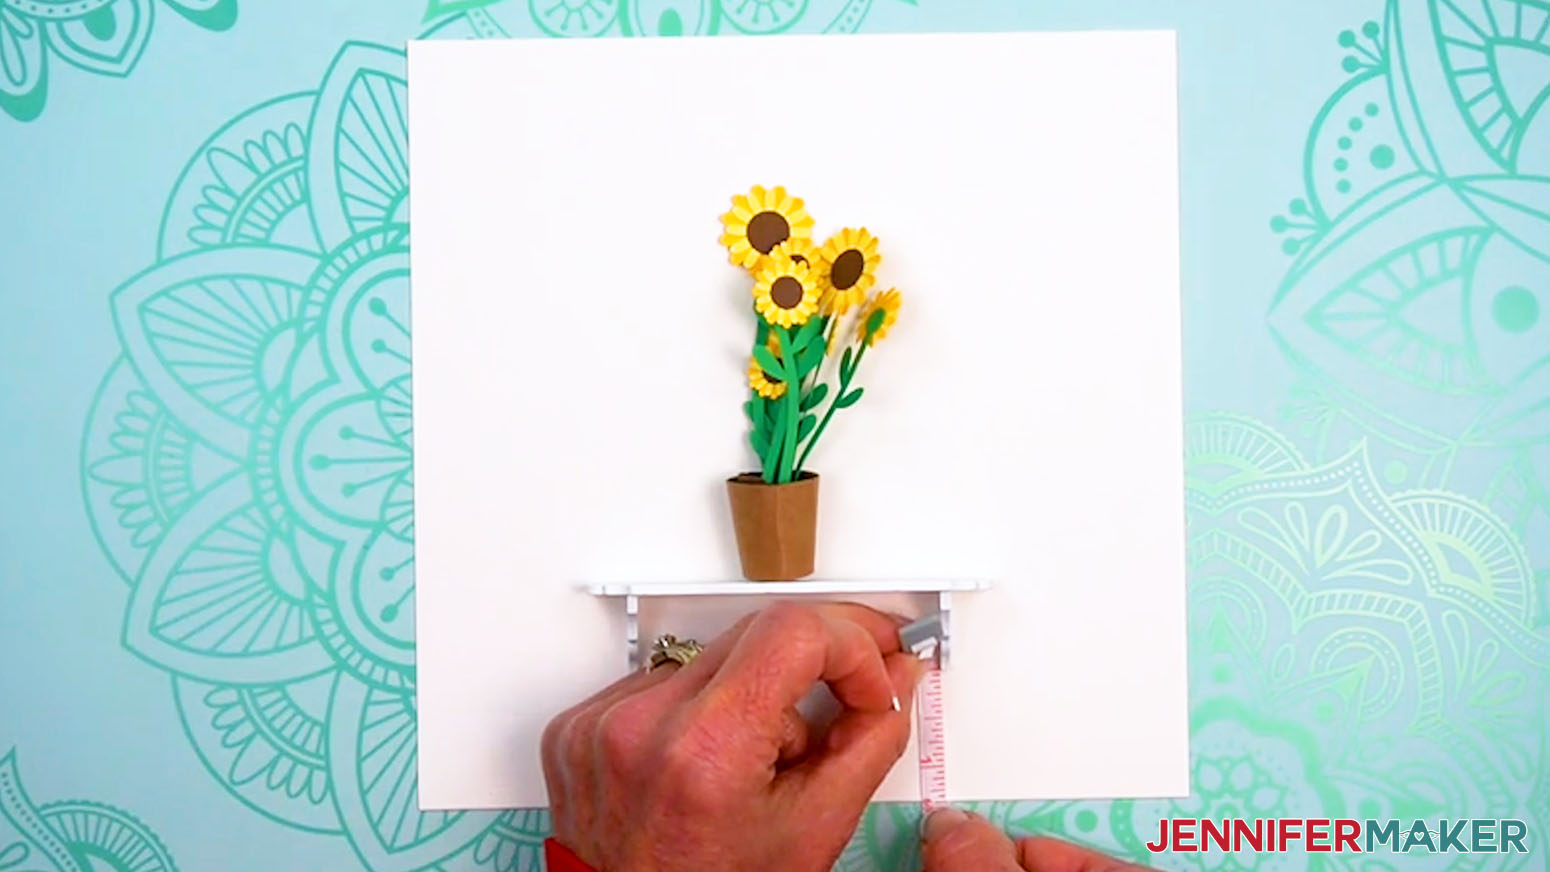
NOTE: My frame has a separate white backer inside, separate from the brown chipboard backer. I’ll decorate the white backer. - To plan your shelf placement, lay your paper flower arrangement on its side, roughly in the center of the backer.
- Find and lightly mark the backer width’s center under the arrangement with a pencil.
NOTE: My backer is 8” wide, so my center point is at 4”. - Place the small shelf piece under the bottom of the plant so it looks like the plant is sitting on it, and the shelf’s center is aligned with the 4” mark on the backer.
- Find and lightly mark the center of the shelf’s underside.
TIP: Keep your marks under the shelf and they’ll be less noticeable in the final project. - While keeping the shelf centered side to side, measure the distance from the backer’s bottom edge to the bottom of each support, adjusting them until they match.
NOTE: This ensures your shelf is level. - Once the shelf is centered, at the right height, and is parallel to the bottom edge of the backer, hold the shelf firmly in place and draw a light pencil line up against its bottom edge. That gives you a “parking spot” to return to after adding glue.
- Remove the shelf from the backer.
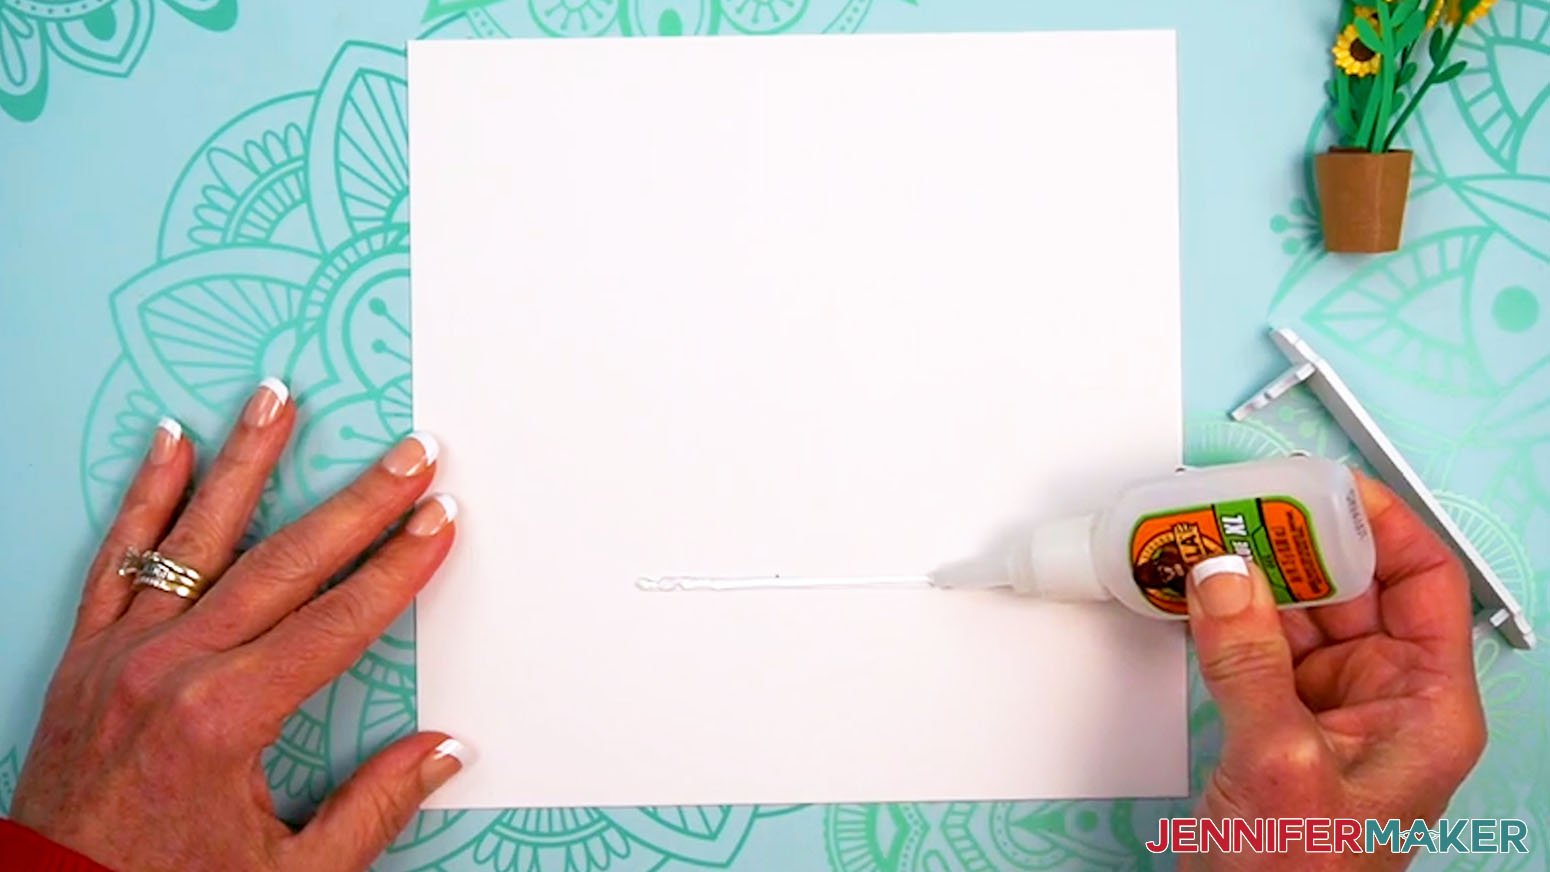
- Add a line of super glue along the top edge of the pencil line on the backer.
- Press the shelf into place on the super glue line, making any adjustments so it looks level and centered before the super glue dries.
- Let the super glue dry completely.
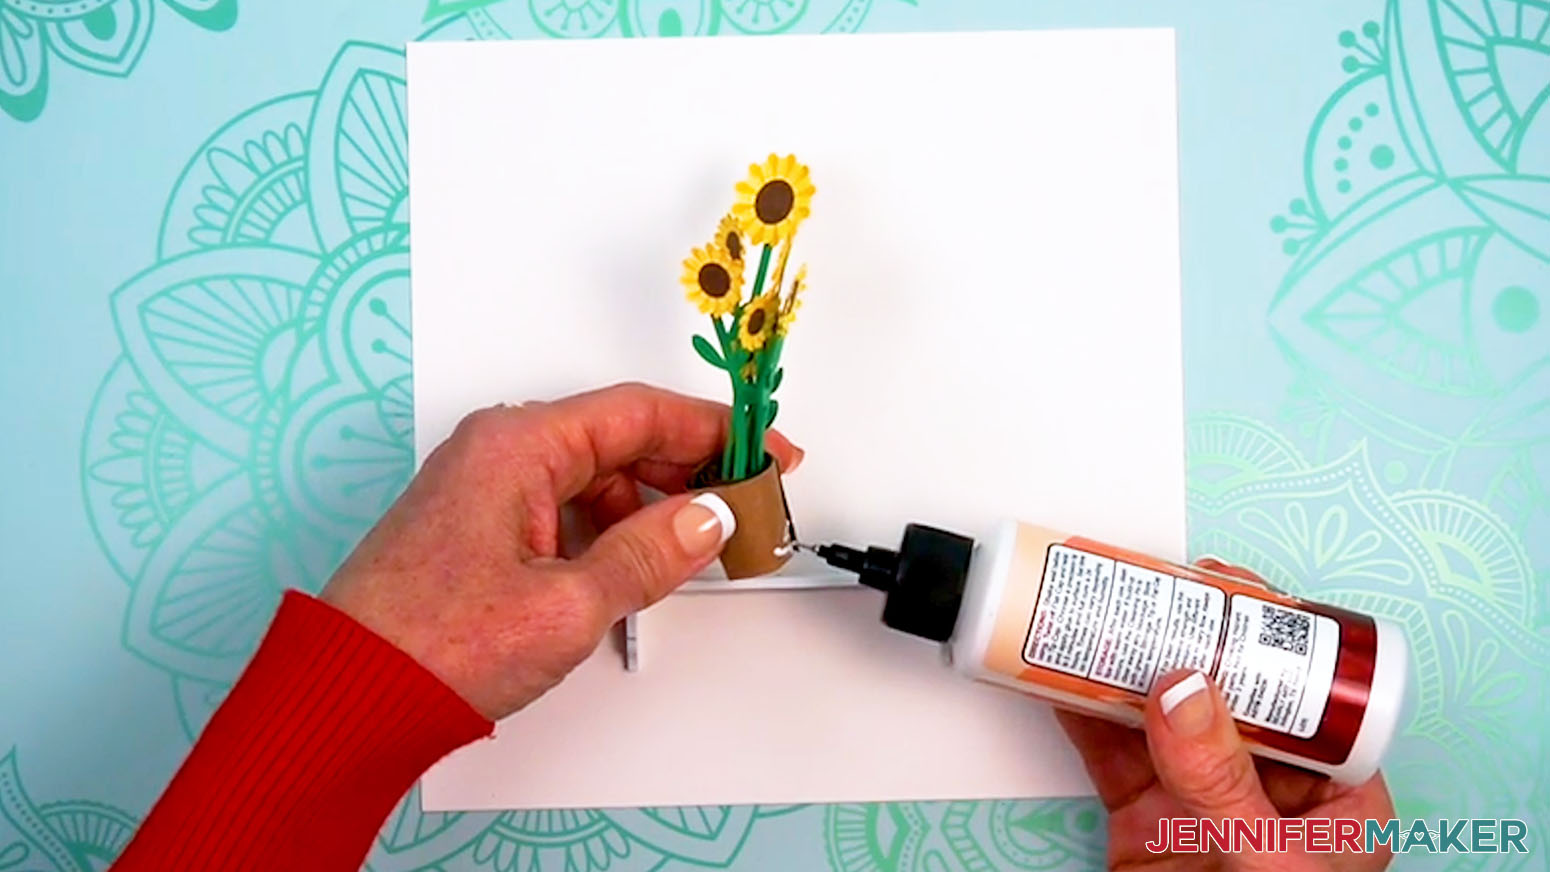
- Add some craft glue to the bottom edges of the pot and the bottom of the plant’s base and dirt piece.
- Press the pot down onto the top center of the shelf and hold it in place for a few minutes, until the craft glue is completely dry.
- Grab your shadow box frame and lay it on your work surface with the open back side facing up.
- Turn the shadow box backer over so the shelf and floral arrangement are facing down, then place the decorated backer into the shadow box.
NOTE: If your frame has a removable spacer, insert it now to check if it still fits inside your frame along with the decorated backer. If it doesn’t, remove the spacer, as it’s not necessary. - Bend the prongs on the shadow box closed to secure it.
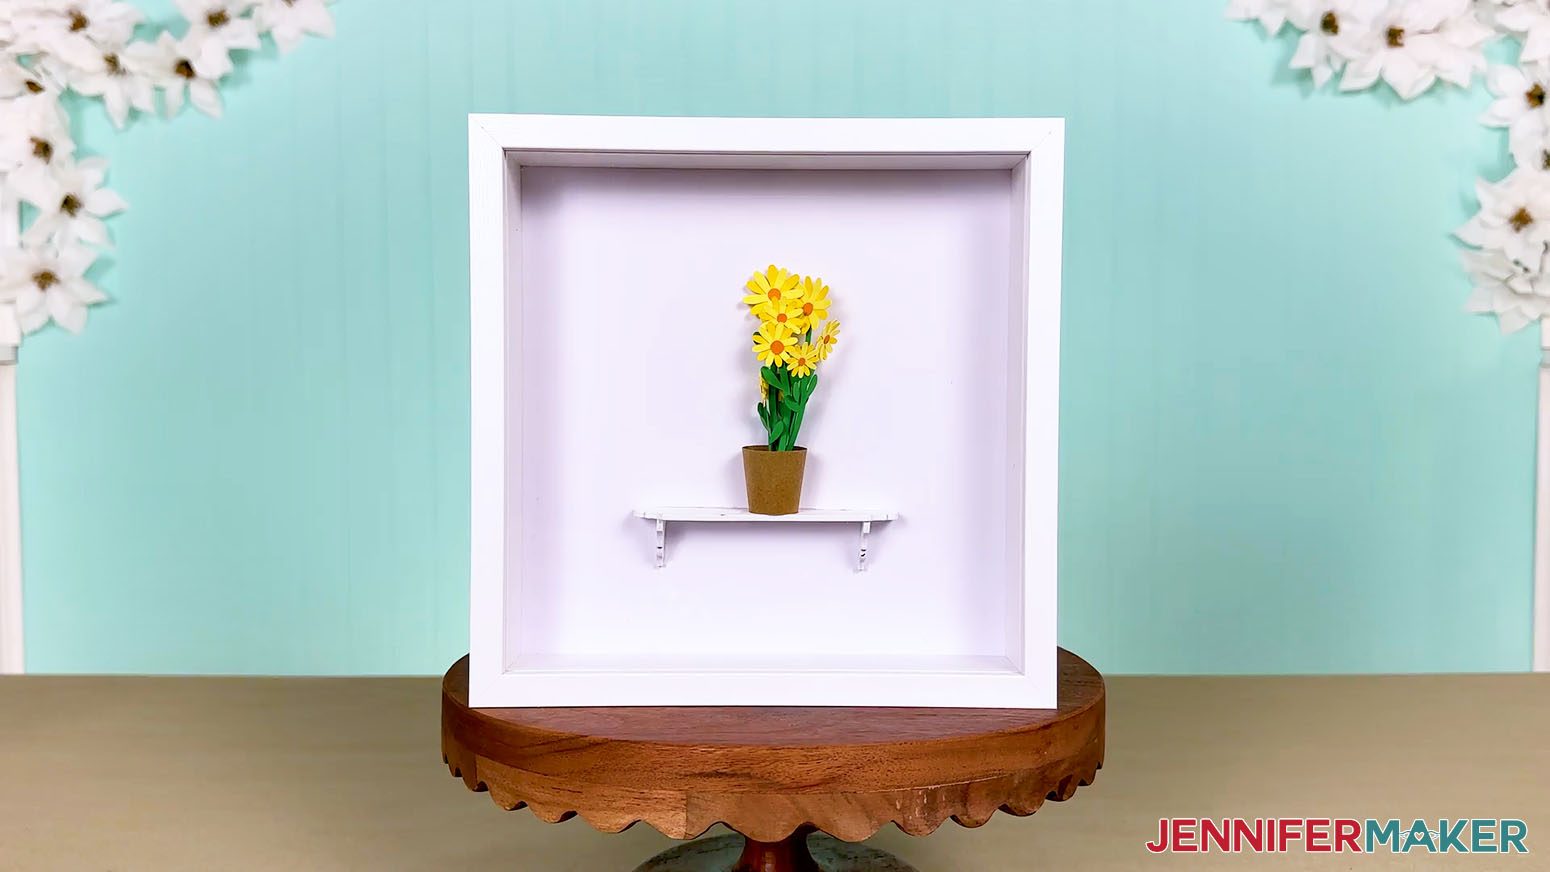
- Your mini paper flower shadow box is ready for display!
STEP 5: SHOW IT OFF!
Your mini paper flowers, plants, and holders are done and ready for display!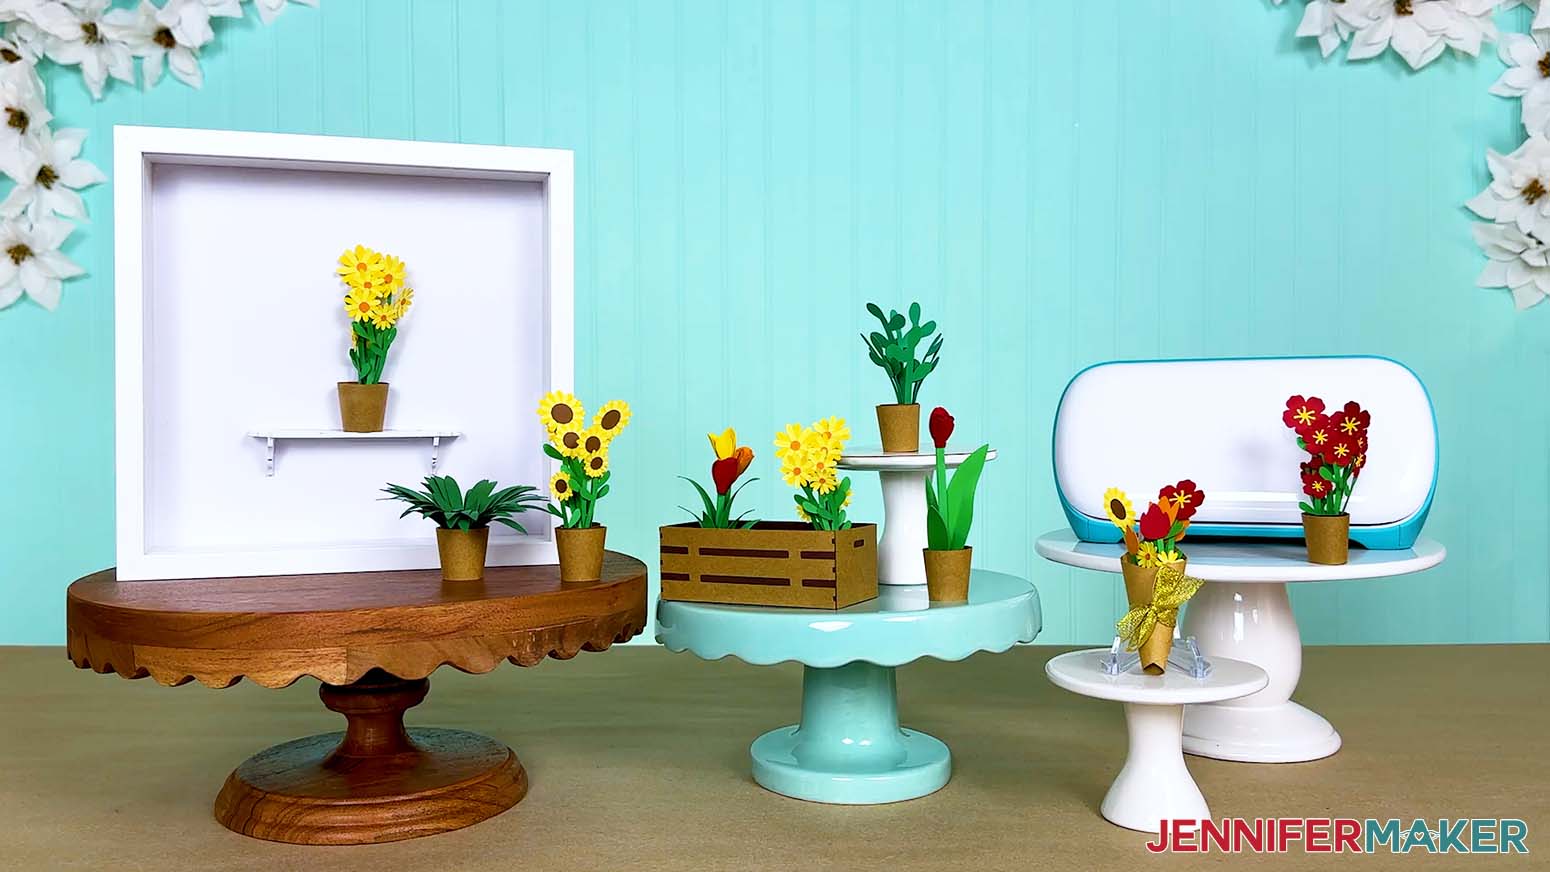
Notes
Finished Sizes:
Tulip: 0.75" W x 0.75" H
Tulip Stem: 3.2" H x 1" W
Sunflowers: 1” diameter, 0.75" diameter, and 0.6" diameter
Daisies: 1” diameter, 0.75" diameter, and 0.6" diameter
Sunflower and Daisy Stem: 3.5" H x 1" W
Spider Plant: 3” W x 1.75” H
Jade Plant: 3” W x 2.75” H
Crate: 4” W x 1.5” H x 2” D
Pot: 1” diameter
Answers to Your Questions About the Mini Paper Flower Tutorial
Q: Is there a way to create a custom mini paper flower bouquet?
A: You can learn how to design your own custom mini paper flower bouquets like the designs below in my ADVANCE program. Learn more about ADVANCE here!
Q: Help! My Cricut Design Space screen looks different from yours!
A: If you’re using the latest version of Cricut Design Space, your screen may have slight variations from the screen you see on the video tutorial. Good news! All of the same functions are there, they may just be in different spots or have new icons.
Q: Can I make and sell mini paper flower arrangements using your designs?
A: If you want to use my mini paper flower designs and project for commercial use, please familiarize yourself with my important licensing information before selling your crafts.
Q: Can a Cricut really cut pieces this small?
A: Yes, it can, but setup matters more than usual. Make sure your mat is clean and sticky, your blade is free of debris, and your paper is pressed down firmly. This helps because even a tiny shift can affect small cuts like these.
Q: Which Cricut machines work for making mini paper flowers?
A: You can make this project on any Cricut machine, like a Cricut Maker series, Explore series, Joy series, or the Venture. The best part is that these are made completely out of paper and a little glue! No faux flowers, floral wire, or other materials to mess with.
Q: Can I make this without a Cricut?
A: Yes! While it’s a bit easier to get precise, detailed cuts on your mini flower shapes and foldable crease lines when using a cutting machine, I also include a printable PDF to help you hand-cut the pieces as part of my free download.
Q: What’s the best way to roll the mini paper flowers neatly?
A: You’ll want to keep the bottom edge even as you roll. A Flow Tool makes this easier since it guides the paper into a straight roll. A quilling tool works well for smaller blooms. If you’re using tweezers or your fingers, just go slowly and check that the edge is even as you go.
Q: Why are my pieces tearing or lifting from the mat?
A: This is usually a mat or blade issue. Make sure your mat still has good grip, and your blade is clean. Also, press your cardstock down really well before cutting. If needed, you can run a second cut pass before unloading.
Q: What cardstock should I use to make mini paper flowers?
A: Medium-weight cardstock works well for most flowers because it cuts cleanly and rolls easily. Heavier cardstock is better for structural pieces like crates since it holds its shape more firmly.
Q: What material settings should I use?
A: When cutting the cardstock I’ve listed, choose “Medium Cardstock” in Cricut Design Space and set the pressure to “More” for clean cuts.
Q: What blade should I use?
A: A Premium Fine-Point blade (the one that came with your machine) works best for accurate cuts on all weights of cardstock.
Q: How can I make my mini paper flower look more realistic?
A: Gently curve the petals before and after assembling. This adds dimension and helps the flowers look fuller. It’s a small step, but it makes a noticeable difference.
Q: Where can I get help if I get stuck?
A: If you want quick troubleshooting, my Cricut Survival Guide can help! It’s a practical guide for fixing Cricut problems without wasting materials, time, or patience. If you want to show off your finished mini paper flowers, my Cricut Facebook group is a helpful place to get help, compare notes, and see what others are making!
Get my free SVG/DXF/PDF files to make your own Mini Paper Flowers and other projects!
(If you do not see the signup form above, click here.)
I absolutely love seeing your mini paper flowers! Once you’ve learned how to make your own using my mini paper flower tutorial, inspire others and share photos of your projects in our Facebook group or tag me on social media with #jennifermaker.
Love,

Want to remember this? Save this Mini Paper Flower Tutorial to your favorite Pinterest Board!