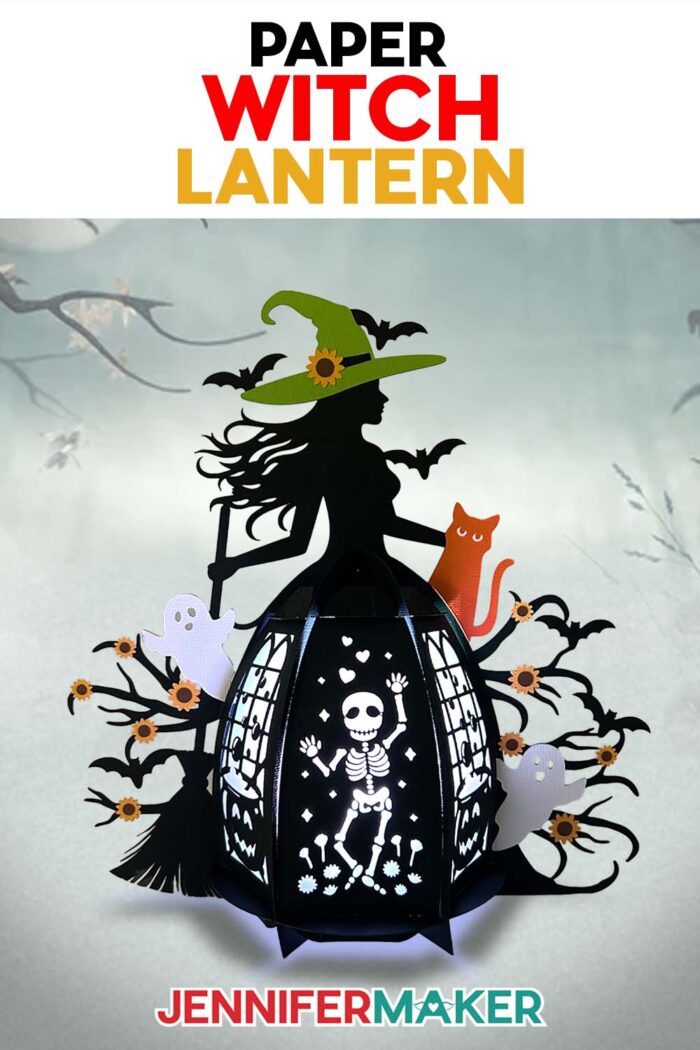
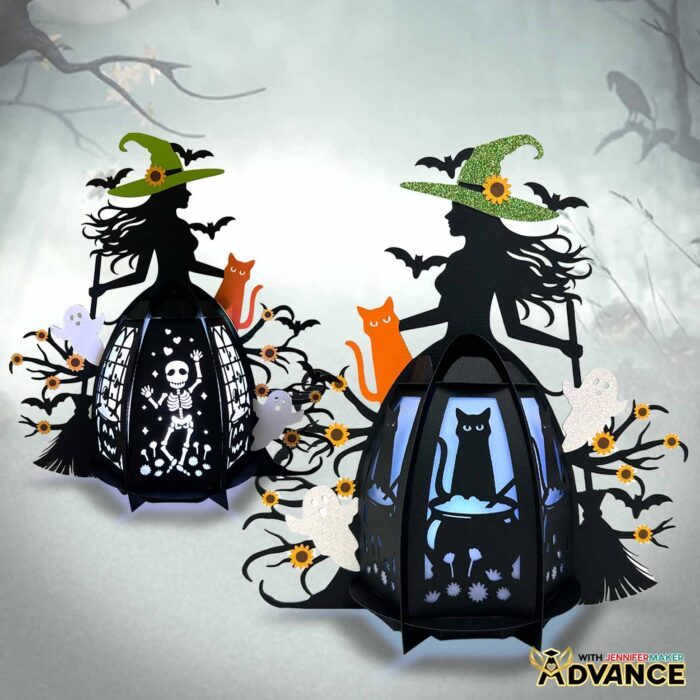
Learn how to make a spellbinding witch lantern with cardstock for Halloween!
Halloween has always been one of my favorite times to decorate. There’s just something about the way shadows stretch a little longer and the night feels alive with possibility. For me, making Halloween decorations is more than just filling my house with spooky seasonal flair. It’s a way to slow down, spend time in the moment, and to remind myself that even a little paper and glue can create something hauntingly beautiful. This year, I wanted to make a piece that was detailed and pretty, but still felt truly eerie. That’s how my paper witch lantern design came to life!
Watch the full step-by-step tutorial on how to make a witch lantern:

If you’re new to Cricut crafts, don’t be intimidated by lantern projects like these, even though they may look complex! It’s actually rather easy, and I walk you through the entire process in my step-by-step video tutorial, from cutting the pieces using Cricut Design Space to putting it all together and adding your lighting. Everything you need, including my free witch lantern design file, is in my free resource library. You’ll be amazed at how easily your flat cardstock transforms into a stunning Halloween decoration that looks like it might cast a spell on you!

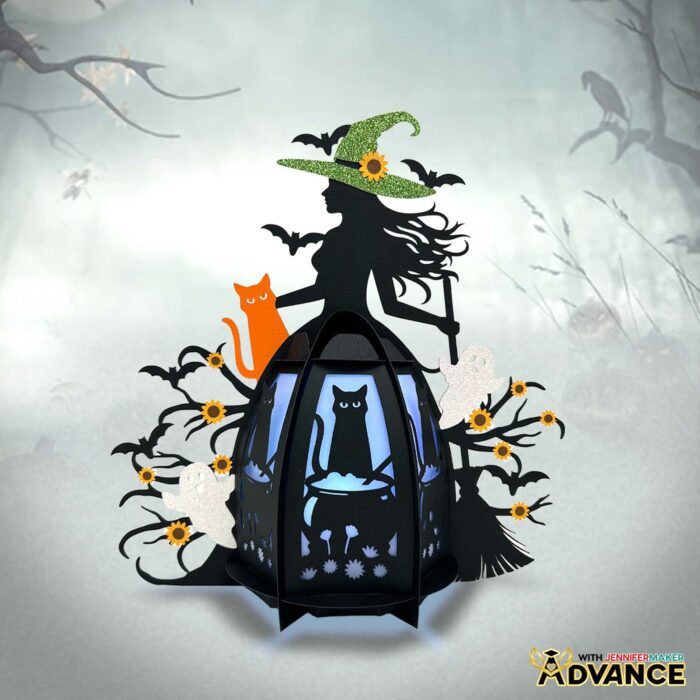
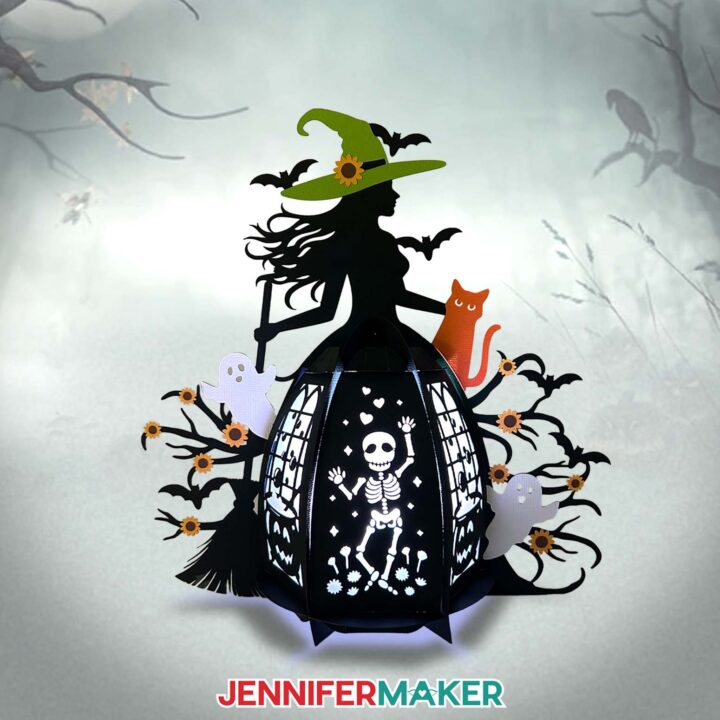
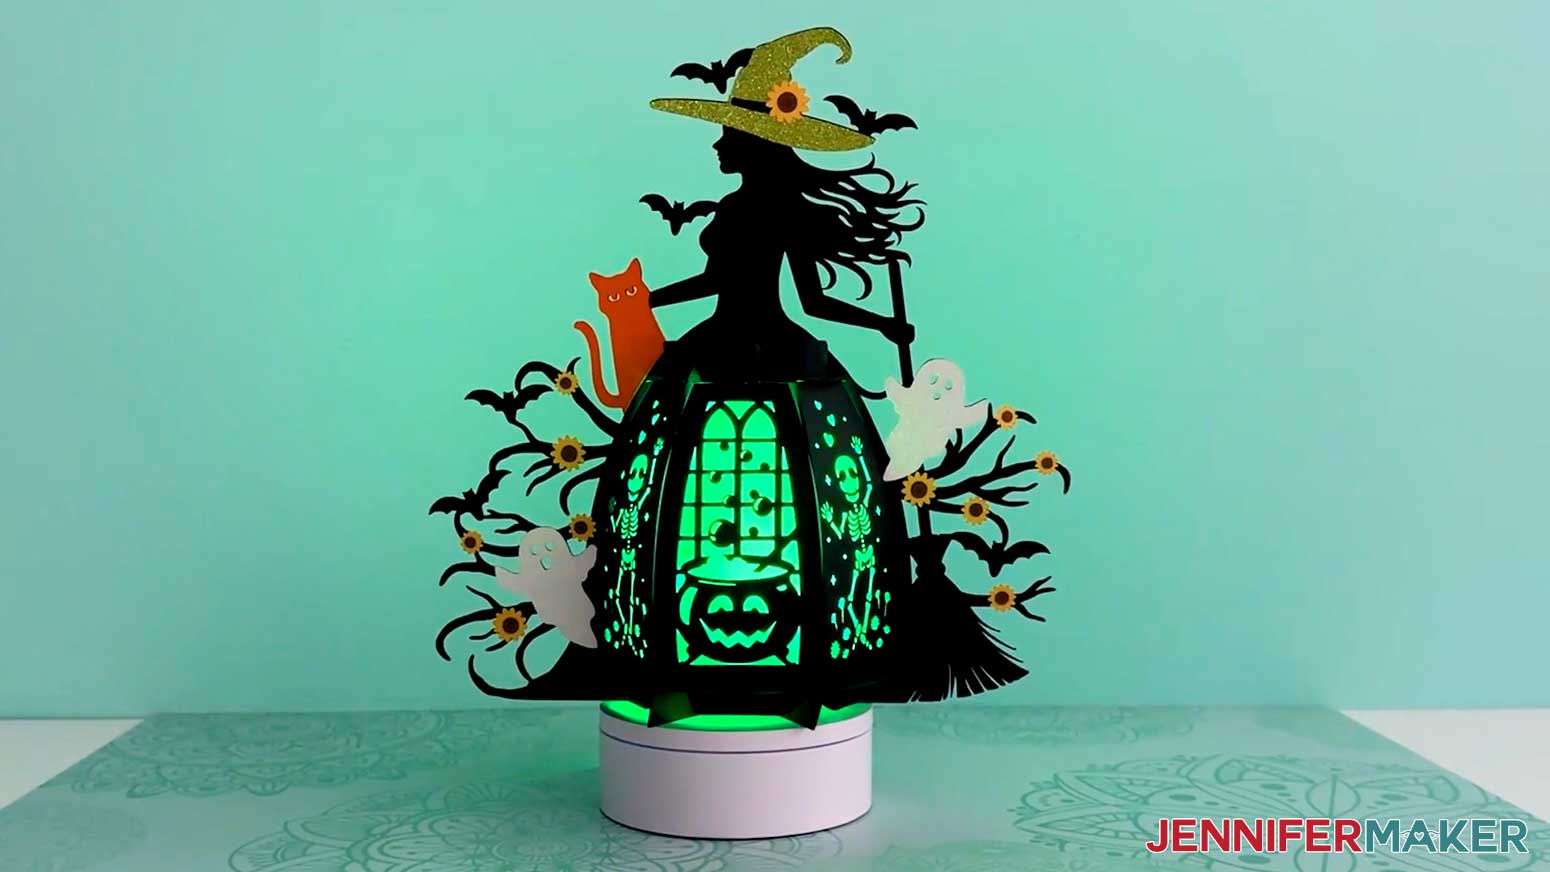
In the daylight, it looks like a layered paper craft with sharp silhouettes of a watchful witch, twisting branches, drifting ghosts, and even a playful skeleton dancing in the shadows. But when the sun goes down and the LED light comes on, it comes to life with a spooky glow that feels straight out of a haunted fairytale.
So, what kind of paper do you need to make a witch lantern? The structure of the lantern is cut from sturdy 80 pound cardstock so the witch’s top half keeps its rigid shape. You can use solid-core 65 pound cardstock for the details, or glitter cardstock to make certain pieces shimmer like moonlight.
My favorite part, though, is the vellum. I cut diffuser panels from it to soften and spread the light inside. That’s what gives the lantern its eerie, glowing effect once it’s lit.
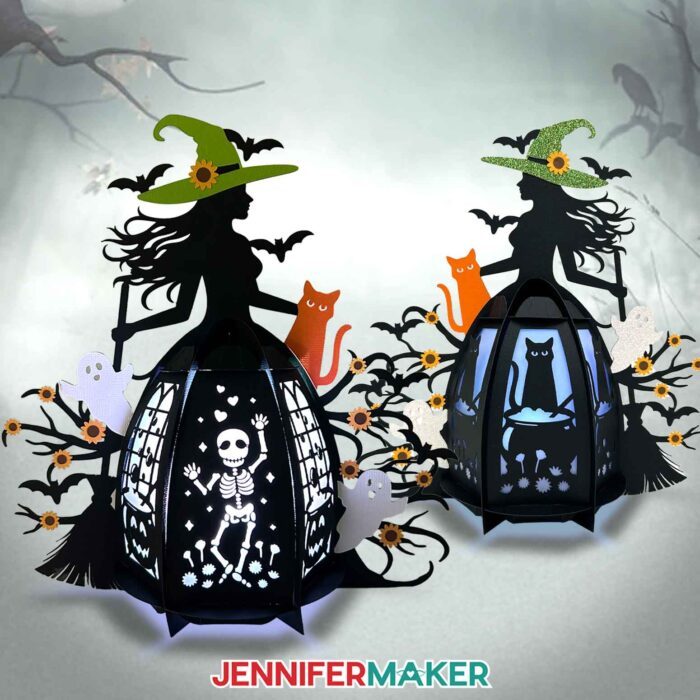
Speaking of lighting, we never use real flames in paper projects, but that doesn’t mean we’re limited. An LED tea light at the bottom lets soft and eerie light shine through the cutouts. Fairy lights float within the frames like restless spirits. And my personal favorite, puck lights, cast a deep, haunting glow in any color you choose. I love the green light the most!
If you’re excited about this lantern but wish you could make it even more personal, I’ve got just the thing for you. In my ADVANCE with JenniferMaker program, I teach you how to design your own custom lantern panels with my toolkit of elements. I walk you step by step through adding shapes, connecting designs, and preparing them for cutting so they come together seamlessly in your lantern design. It’s a wonderful way to take the basic witch lantern and transform it into something uniquely yours! Click here to learn more about the Advance program!
Even though the witch lantern design looks intricate, it’s so easy to make. If you can cut with a Cricut, fold paper, and use glue, you can build this lantern. I used my Cricut Maker 4, but you can use another Maker series machine, an Explore series machine, or a Cricut Venture to cut out the pieces.
When the holiday is over, simply remove the batteries from your LED light and store your paper witch lantern in a sturdy box until next year. With careful storage, it should last several seasons!
This project really reminded me of why I love Halloween crafting so much. It’s all about stepping into that playful, spooky spirit and letting your imagination run wild!
Do you want to learn how to make your own enchanting witch lantern for Halloween? Let me show you how fun and easy it is with my witch lantern tutorial and design! This post contains some affiliate links for your convenience (which means if you make a purchase after clicking a link I will earn a small commission but it won’t cost you a penny more)! Read my full disclosure policy.
Materials to Make a Paper Witch Lantern
View my Amazon shopping list with the exact items I used.
- Three to Four (3-4) Sheets of 12″ x 12″ 80 lb. Solid Core Black Cardstock (for the frame and panels)
- Sheets of 12″ x 12″ 65 lb. Solid Core Cardstock (optional for the elements) -OR-
- One to Three (1-3) sheets of 12″ x 12″ 80 lb. Solid Core Brights Cardstock (optional for the elements – I used the colors “Sunflower” for the flower petals, “Tangerine” for that cat, and “Cricket” for the witch’s hat) -AND-
- One to Two (1-2) Sheets of 12″ x 12″ 80 lb. Solid Core Neutrals Cardstock (optional for the ghost and flower elements – I used the colors “Chocolate” for the flower centers and “White” for the ghosts)
- One (1) Sheet of 12″ x 12″ White Glitter Cardstock (optional for the ghosts)
- One (1) Sheet of 12″ x 12″ Green Glitter Cardstock (optional for the witch’s hat)
- One (1) Sheet of 12″ x 12″ Vellum (optional for the diffuser panels)
- One (1) Strand of LED Fairy Lights -OR-
- One (1) Remote-Controlled LED Tea Light -OR-
- One (1) Remote-Controlled LED Puck Light
- Three (3) AAA Batteries (for LED Puck Light)
- A way to cut your materials – I’m using the Cricut Maker 4, but you can also use any Cricut Maker series machine, a Cricut Explore Series machine, or the Cricut Venture
- Cricut Green StandardGrip Machine Mat 12″ x 12”
- Cricut Blue LightGrip Machine Mat 12″ x 12″ (optional for diffuser pieces)
- Scoring Stylus (optional for files with score lines) -OR-
- Single Scoring Wheel (optional for files with score lines)
- Craft Glue (I used Bearly Art Precision Craft Glue)
- Brayer
- Spatula
- Scraper
- Weeding Tool
- Tweezers
- Design #766 (My free SVG/DXF/PDF design files are available in my free library – get the password by filling out the form at the bottom of this page)
How to Make a Paper Witch Lantern
Witch Lantern
Learn to make a paper Witch Lantern for spooky Halloween lighting!
Materials
- Three to Four (3-4) Sheets of 12" x 12" 80 lb. Solid Core Black Cardstock
- One (1) Sheet of 12" x 12" Vellum (any color for optional diffuser panels)
- One (1) Strand of LED Fairy Lights -OR-
- One (1) Remote-Controlled LED Tea Light -OR-
- One (1) Remote-Controlled LED Puck Light
- Three (3) AAA Batteries (for LED puck light)
- OPTIONAL: 12" x 12" 80 lb. Solid Core Brights Cardstock (for the elements - I used the colors Sunflower for the flower petals, Tangerine for the cat, and Cricket for the witch's hat)
- OPTIONAL: 12" x 12" 80 lb. Solid Core Neutrals Cardstock (for the ghost and flower elements - I used the colors Chocolate for the flower centers and White for the ghosts)
- OPTIONAL: 12" x 12" 65 lb. Solid Core Cardstock (for the elements)
- OPTIONAL: 12" x 12" White Glitter Cardstock (for the ghost elements)
- OPTIONAL: 12" x 12" Green Glitter Cardstock (for the witch's hat elements)
- Design #766 (My free SVG/PDF/DXF design files are available in my free resource library - get the password by filling out the form at the bottom of this page)
Tools
- A way to cut your cardstock - I’m using the Cricut Maker 4, but you can use any Cricut Maker Series machine, a Cricut Explore Series machine, or the Cricut Venture
- Cricut Green StandardGrip Machine Mat 12" x 12"
- Cricut Blue LightGrip Machine Mat 12" x 12" (optional for diffuser pieces)
- Scoring Stylus (optional for files with score lines) -OR-
- Single Scoring Wheel (optional for files with score lines)
- Craft Glue (I used Bearly Art Precision Glue)
- Brayer
- Spatula
- Scraper
- Weeding Tool (optional for poking out small cutouts)
- Tweezers (optional)
Instructions
STEP 1: GET MY FREE PAPER WITCH LANTERN DESIGNS
First, download my paper Witch Lantern files from my free library – look for Design #766. Alternatively, you can use the Save This Project form near the top of this post and the design link will be emailed to you.
In the SVG folder, you’ll find “score” and “no-score” versions of my paper witch lantern design. I made some parts of these designs with the help of AI and used image editing software to polish them up.
The “score” version requires a Scoring Stylus or Single Scoring Wheel to create smooth lines for folding and alignment. If you don’t have a scoring tool, or if you prefer dashed cut lines, you can use the “no-score” version instead.
There is also a DXF folder with cut files, and a PDF folder with versions you can print and cut by hand.
TIP: If you’re not sure how to upload, go to jennifermaker.com/svgs to learn how to unzip and upload SVG files.
STEP 2: PREPARE AND CUT YOUR WITCH LANTERN DESIGN
CRICUT DESIGN SPACE
- In Cricut Design Space, open a blank Canvas. NOTE: If you’re new to using Cricut Design Space, go to cricutkickoff.com for my introductory tutorial on Design Space basics.
- Click “Upload” and then “Upload Image.”
- Click “Browse” and select the lantern SVG file you want to use. NOTE: I’ll demonstrate with the “score” version of the file.
- Click “Open,” and then “Continue.”
- Click “Upload” to add the design to your Canvas.
TIP: You can click the minus (-) icon in the lower left corner to zoom out and see everything on your canvas.

- Click “Save” and give your project a name so you can find it easily.
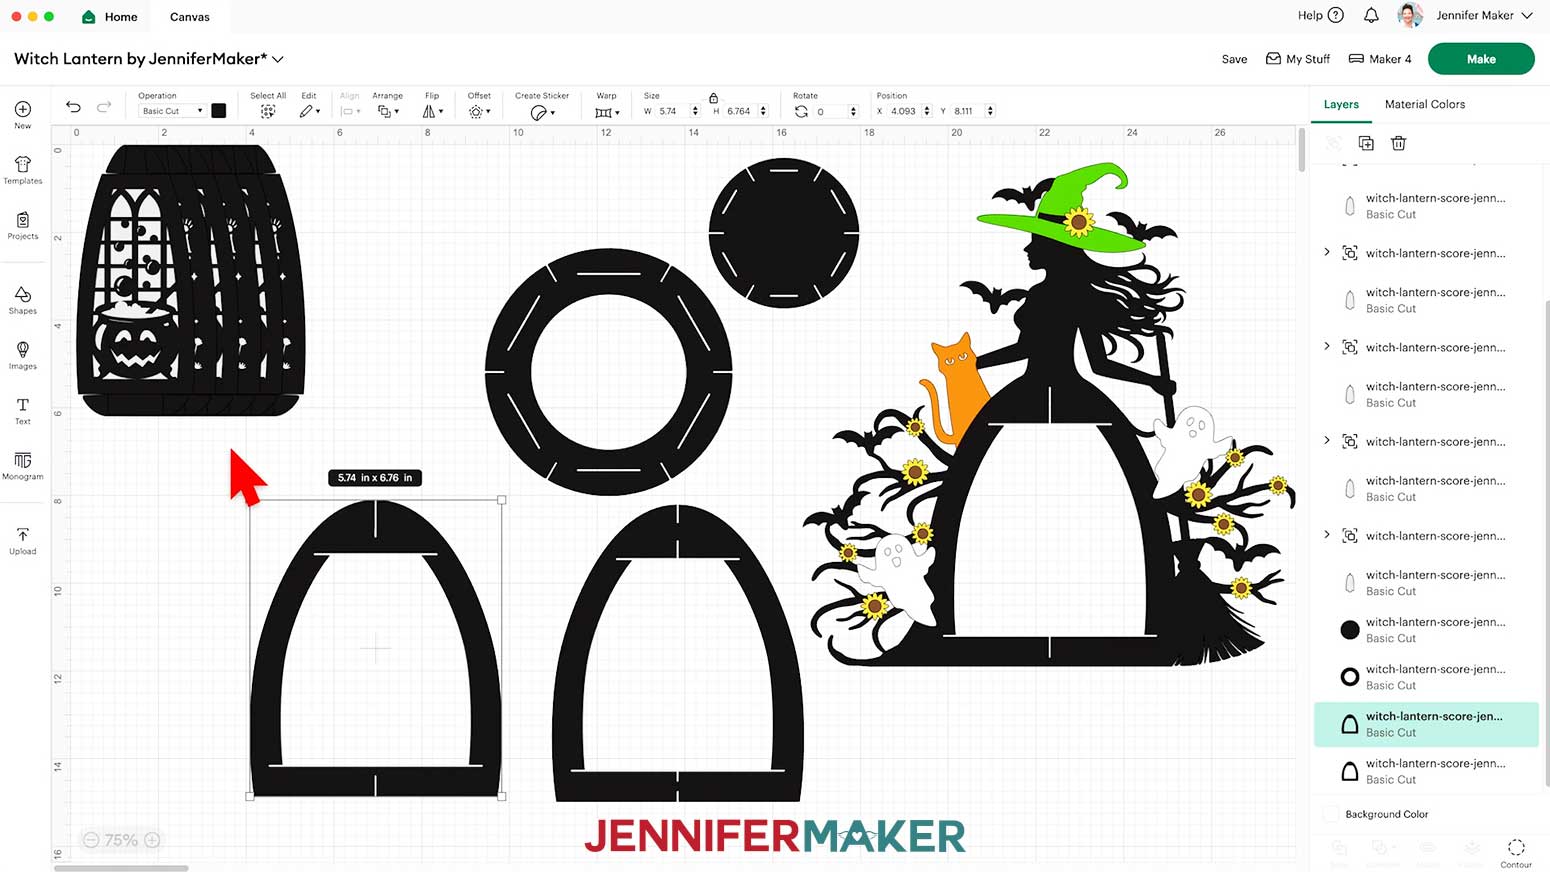
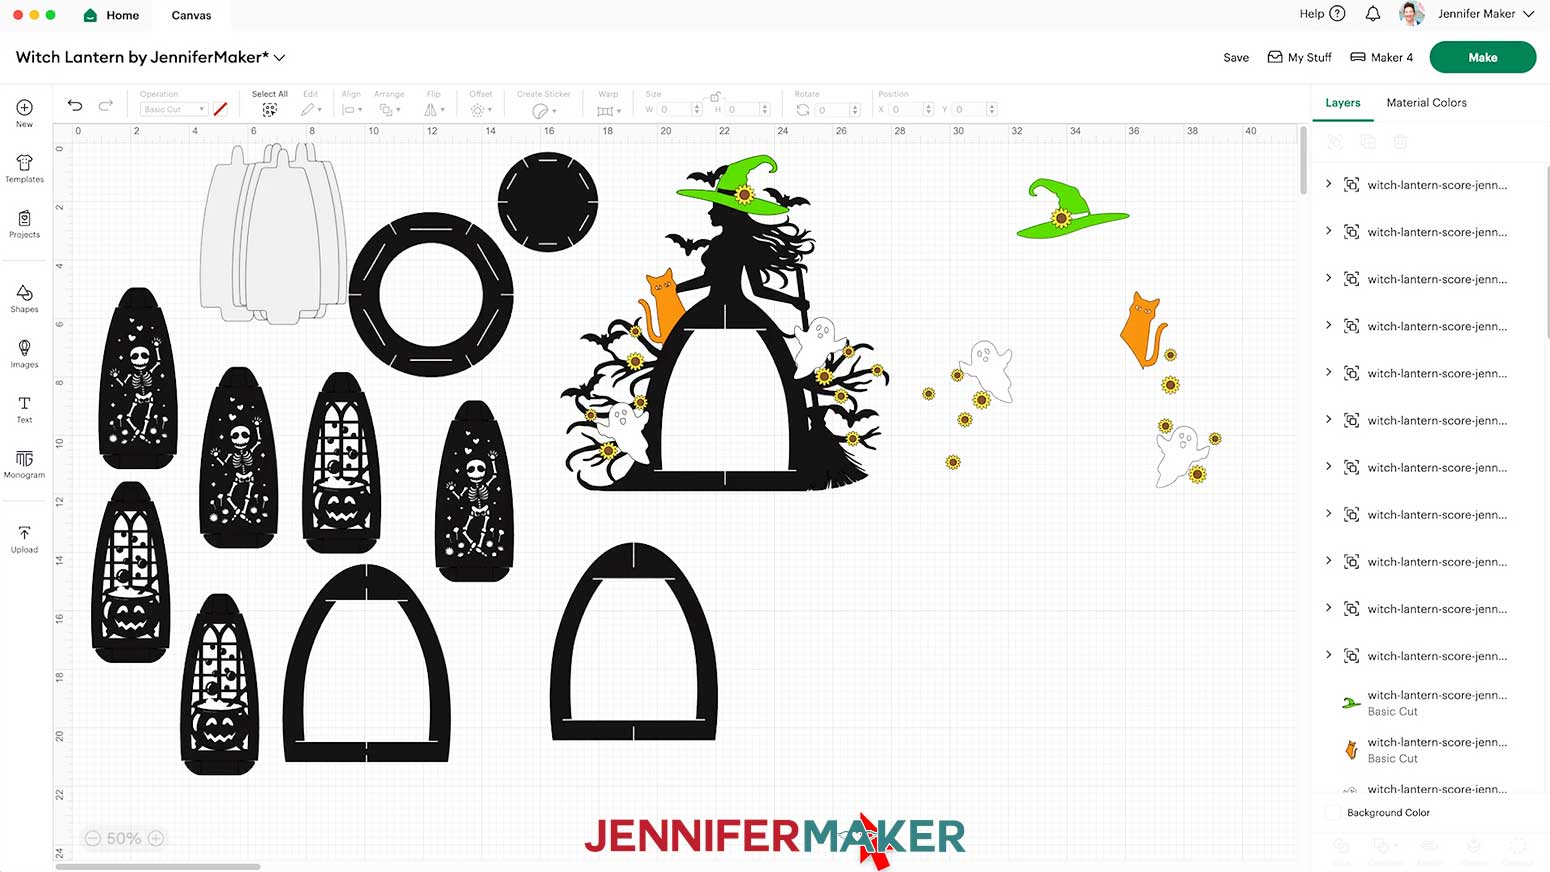
- “Ungroup” the design to work with the elements separately. You can drag them apart to see everything as needed.
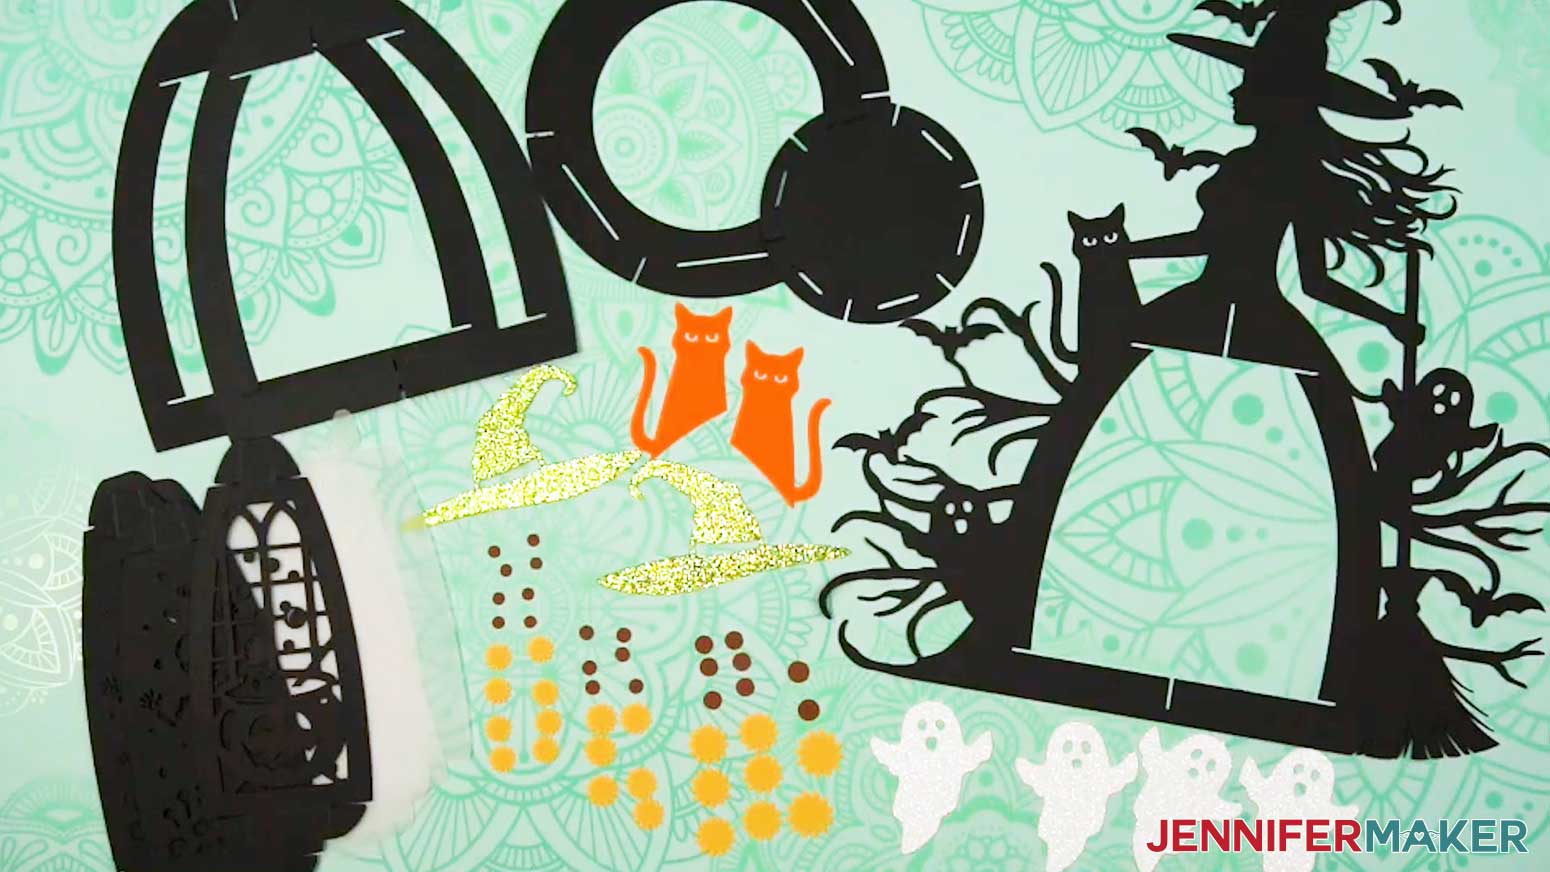
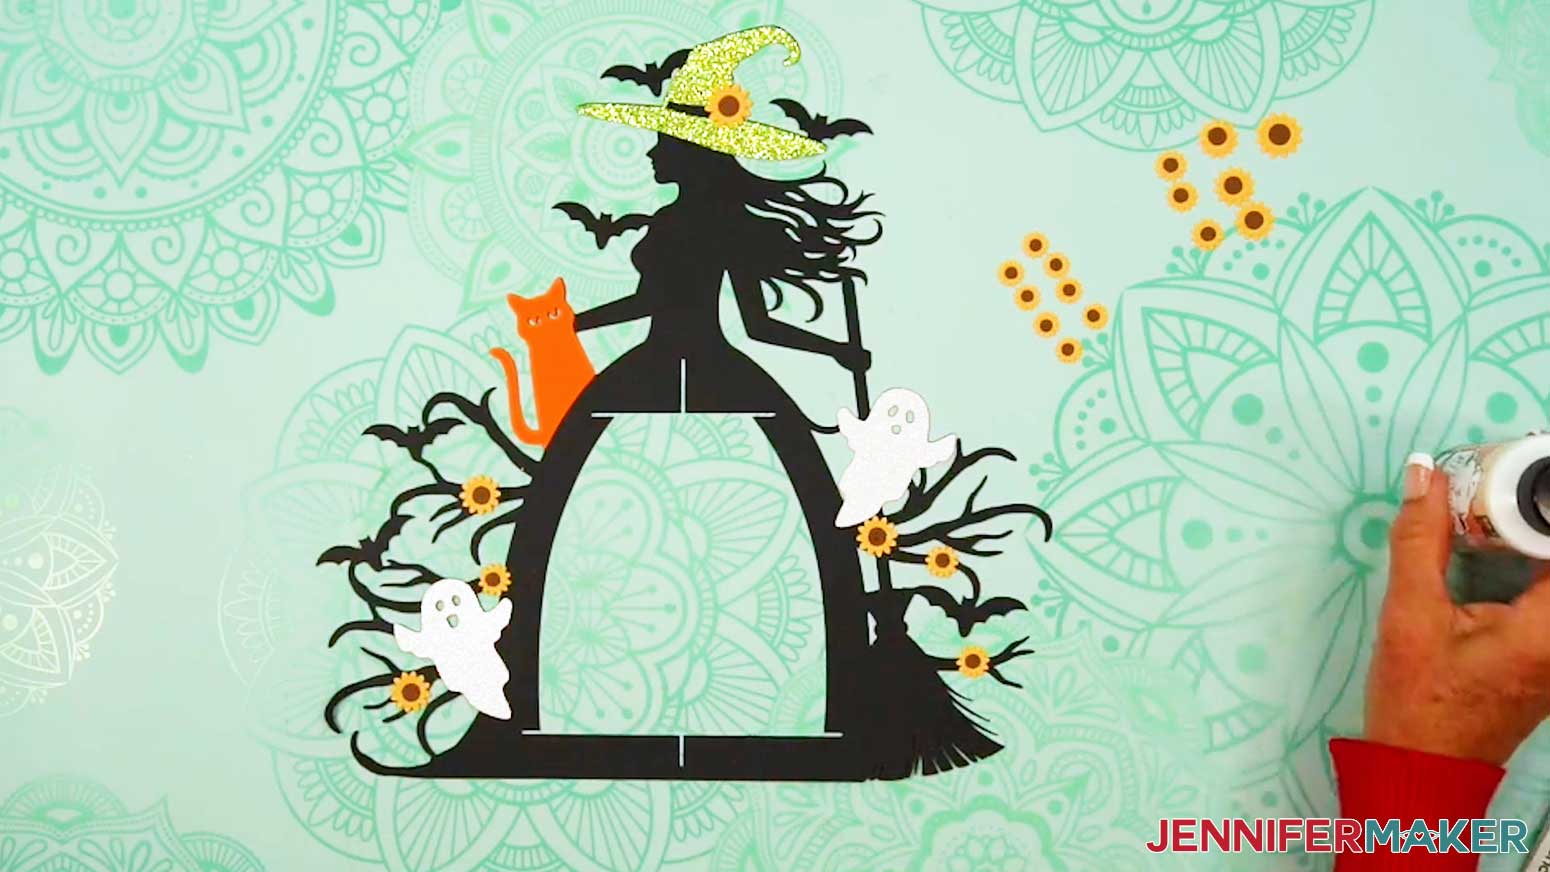
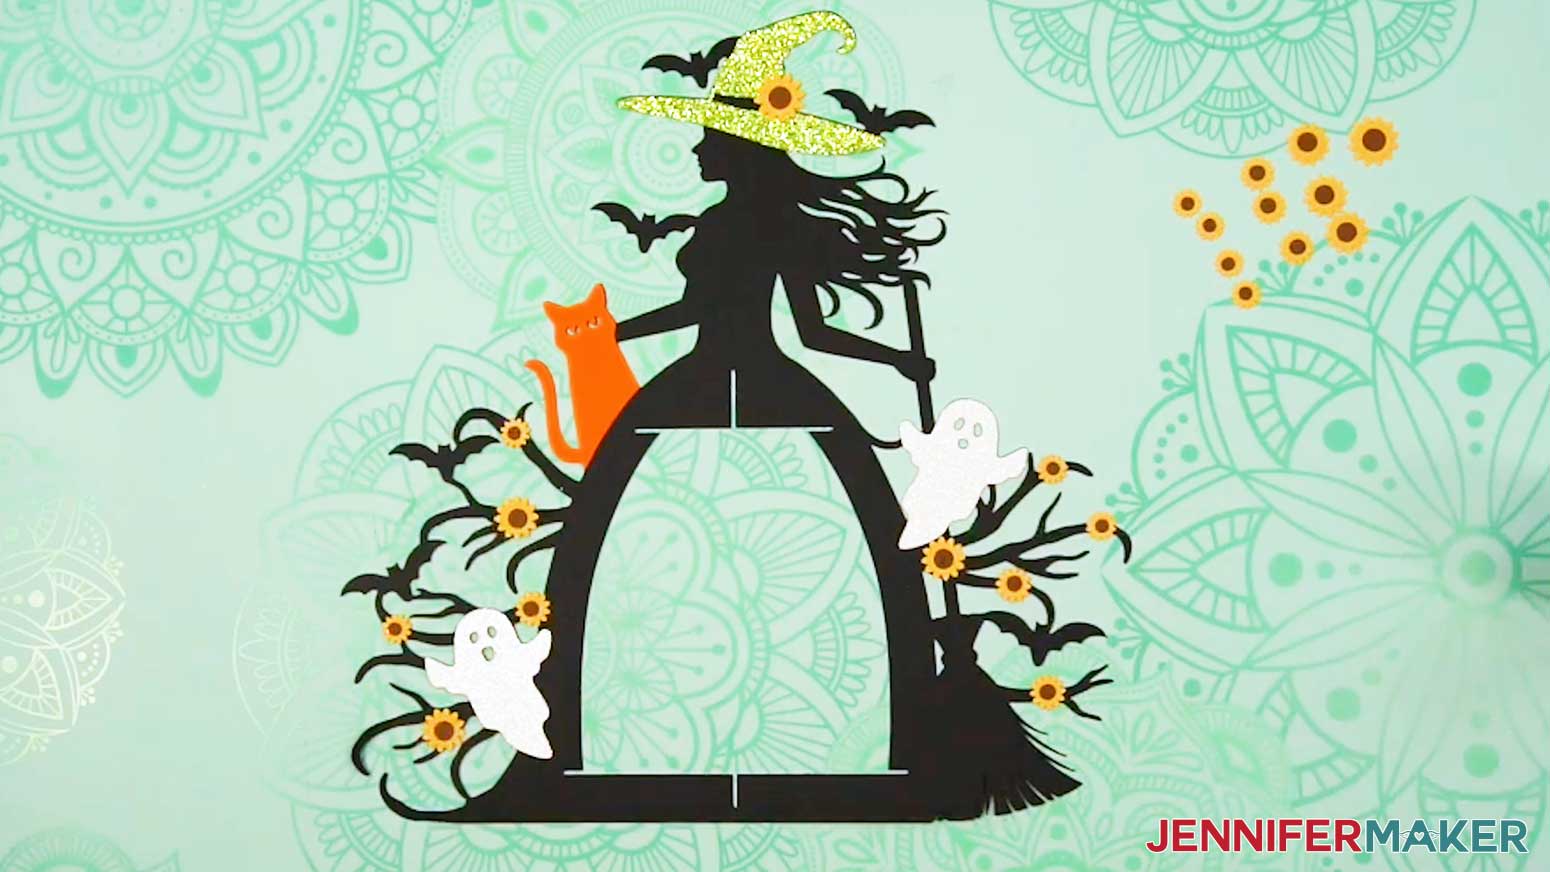
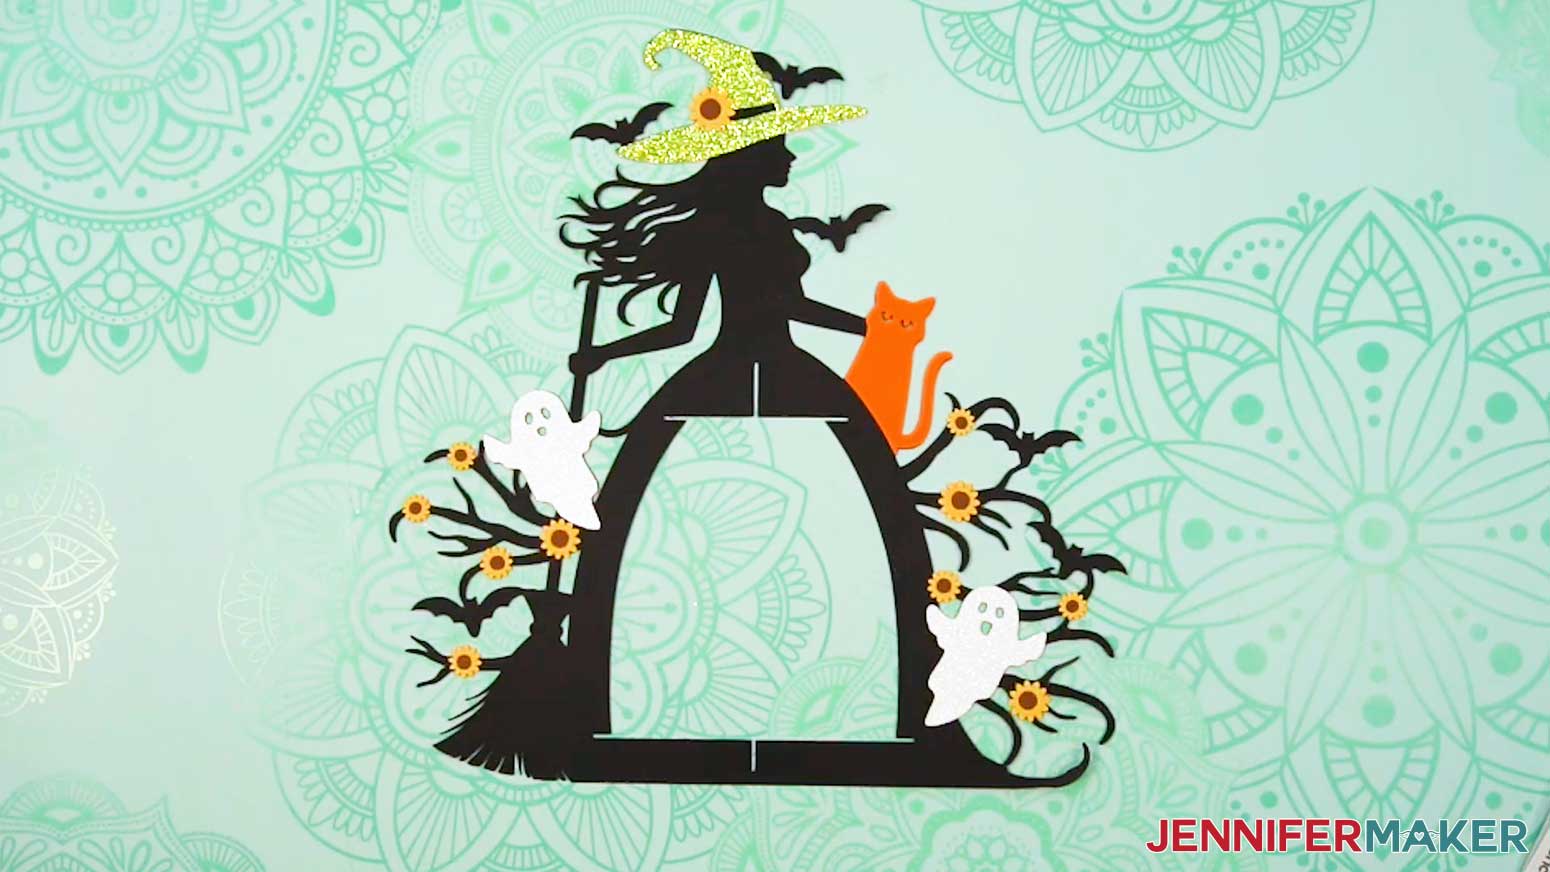
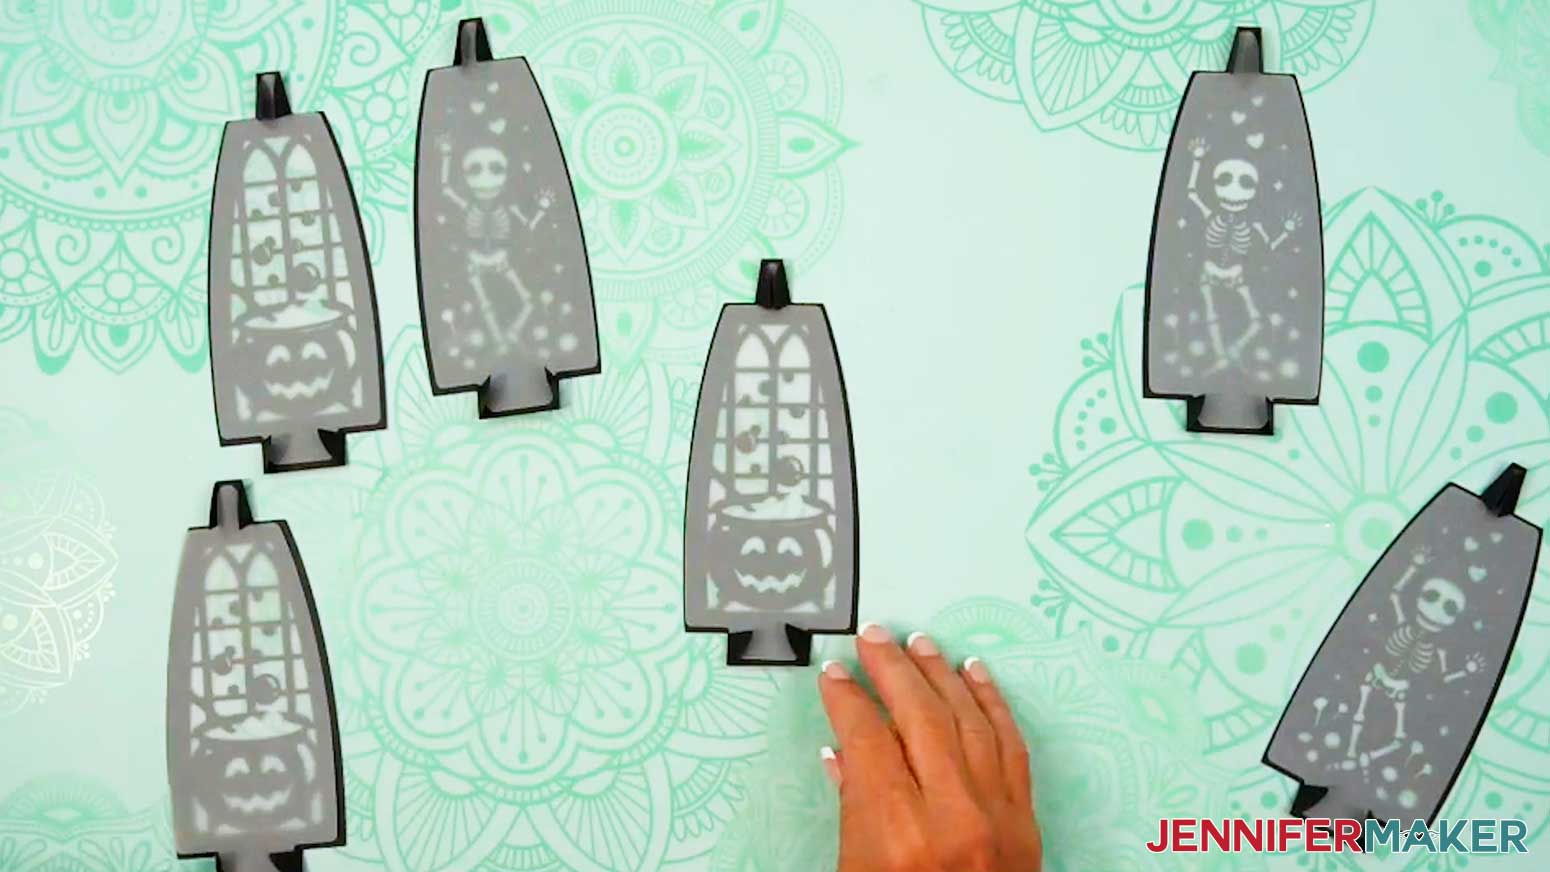
NOTE: On your Canvas, you'll have two black frame pieces, two black circular base pieces, three black cauldron panels, three black skeleton panels, as well as six optional gray diffuser panels. For the witch, you’ll have one black frame piece, one green hat, one orange cat, and two white ghosts. There are also 11 yellow sunflower petal pieces, and 11 brown sunflower center pieces.
- If you don’t want to cut the diffuser pieces, drag the decorative panels away to expose the gray diffuser layers. Select the diffuser pieces and click the “Trash” icon to delete them.
- If you don’t want to cut the hat, cat, ghost, or sunflower decorative elements, “Ungroup” the witch and accessories, then delete any pieces you don’t want. NOTE: The main frame design still includes the hat, cat, and ghosts, but there are no visible placeholders for the sunflowers.
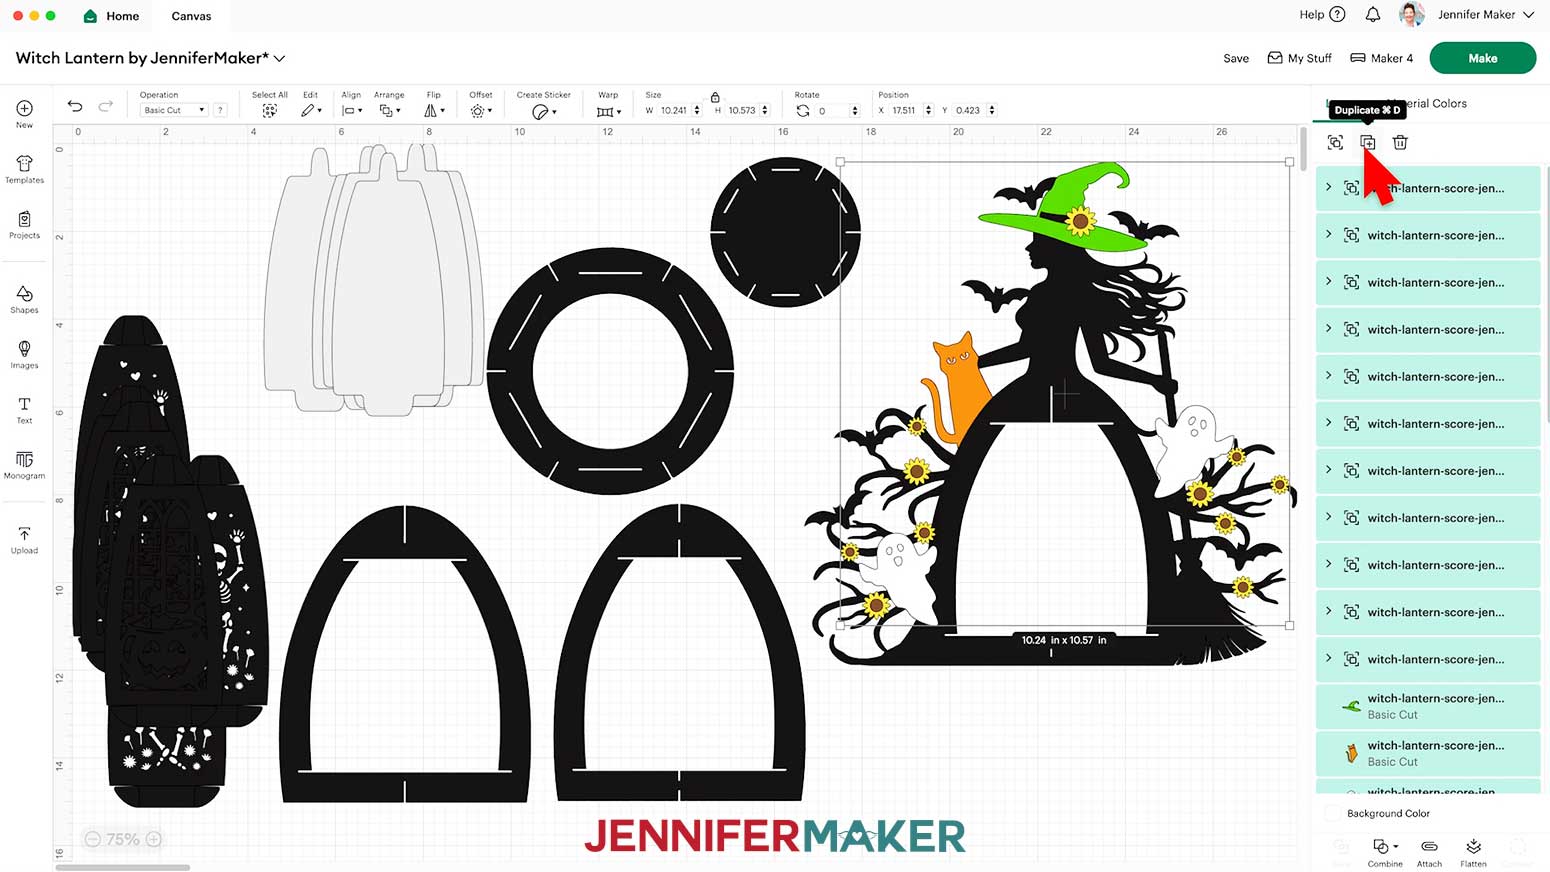
- If you’d like to have hat, cat, ghost, and sunflower pieces on the back of your lantern as well, hold down the “Shift” key on your keyboard and click each of the detail pieces (including the sunflower groups) in the Layers Panel to select them all at the same time.
- Click the “Duplicate” icon to create a copy of all the pieces, then move them to the side.
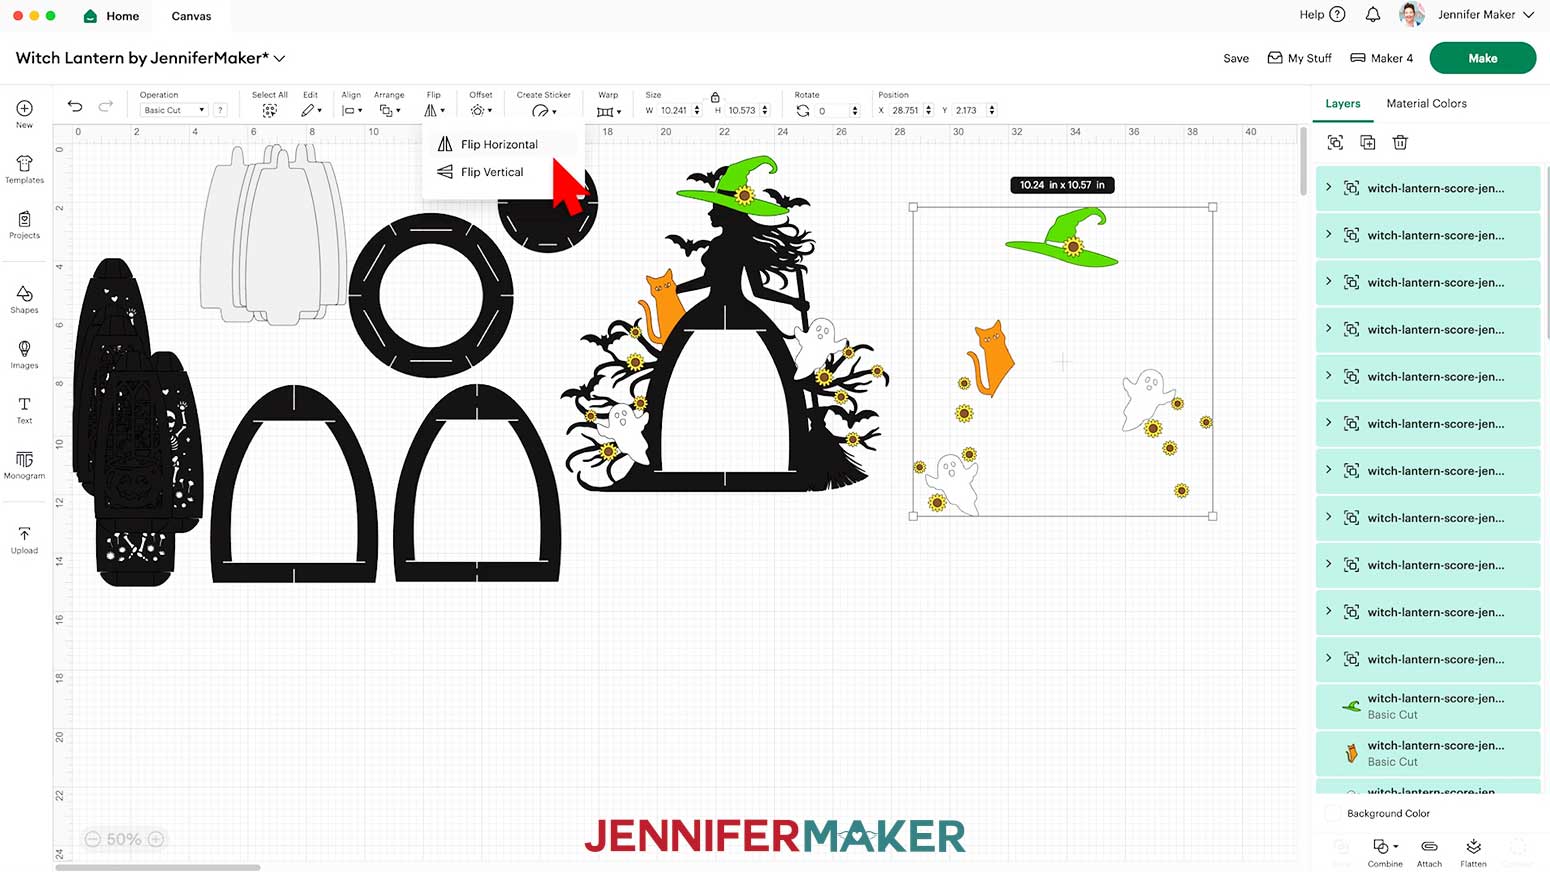
- Then, with the duplicated elements still selected, click “Flip” and “Flip Horizontal” so the pieces will match the orientation correctly on the back side of the witch frame piece.
- To change the color of a piece to match the cardstock you’ll cut it from, select the piece in the Layers Panel, click the Color Box next to “Operation,” and choose a new option. NOTE: If the piece is in a grouped layer, click the small arrow to expand the group and then select the single piece you want to change.
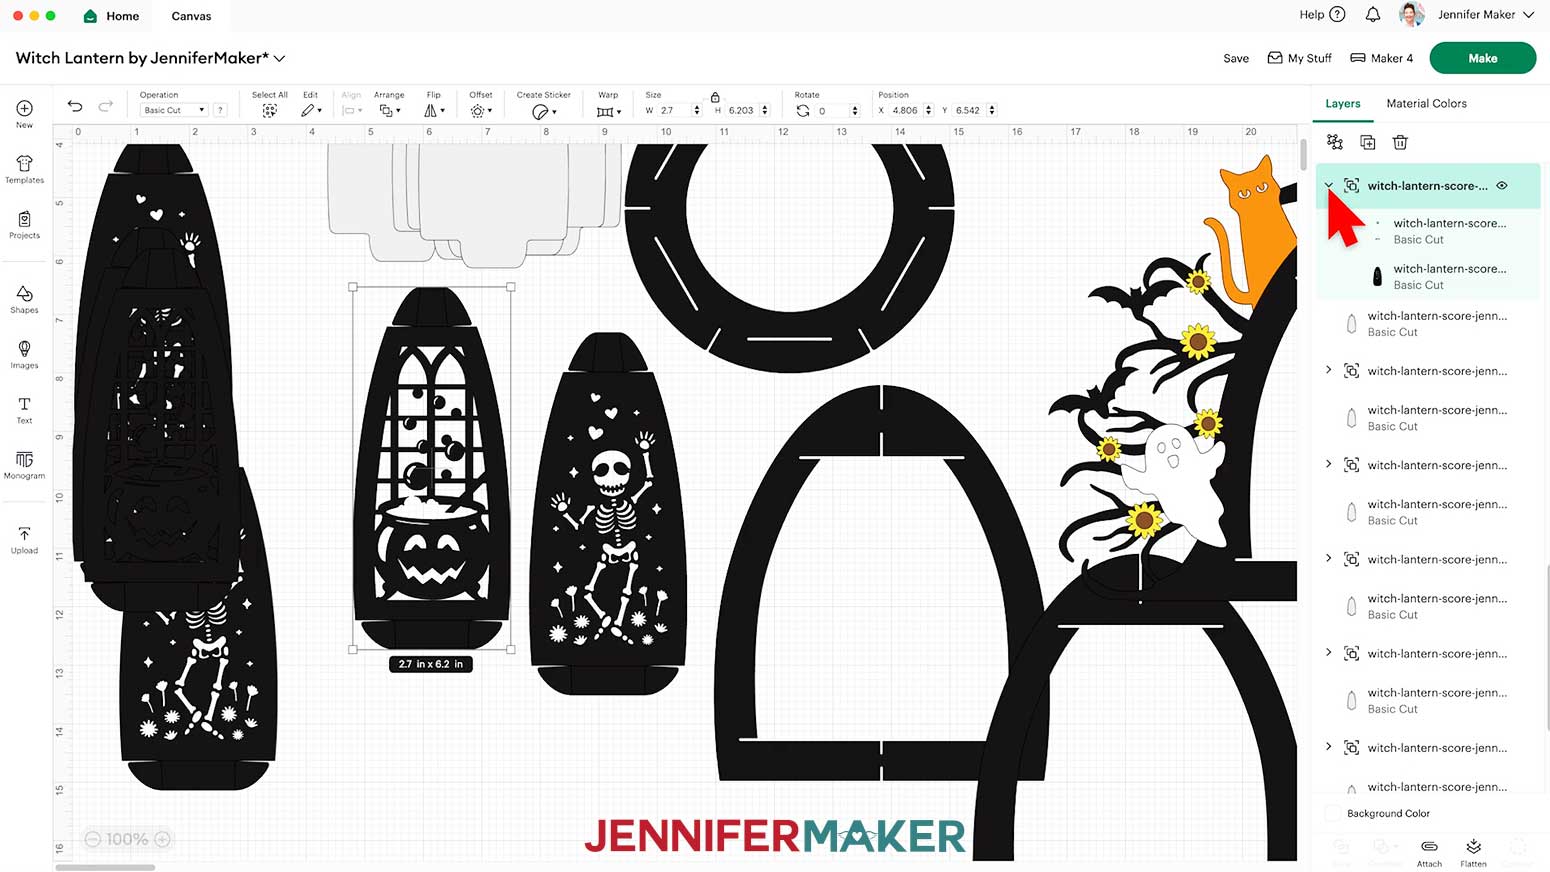
- Next, scroll down in the Layers Panel to find six groups of panel pieces, each indicated by a small arrow. NOTE: We need to adjust these groups to make sure the score lines are made on the panel tabs correctly.
- In the Layers Panel, click the arrow to expand the first panel group.
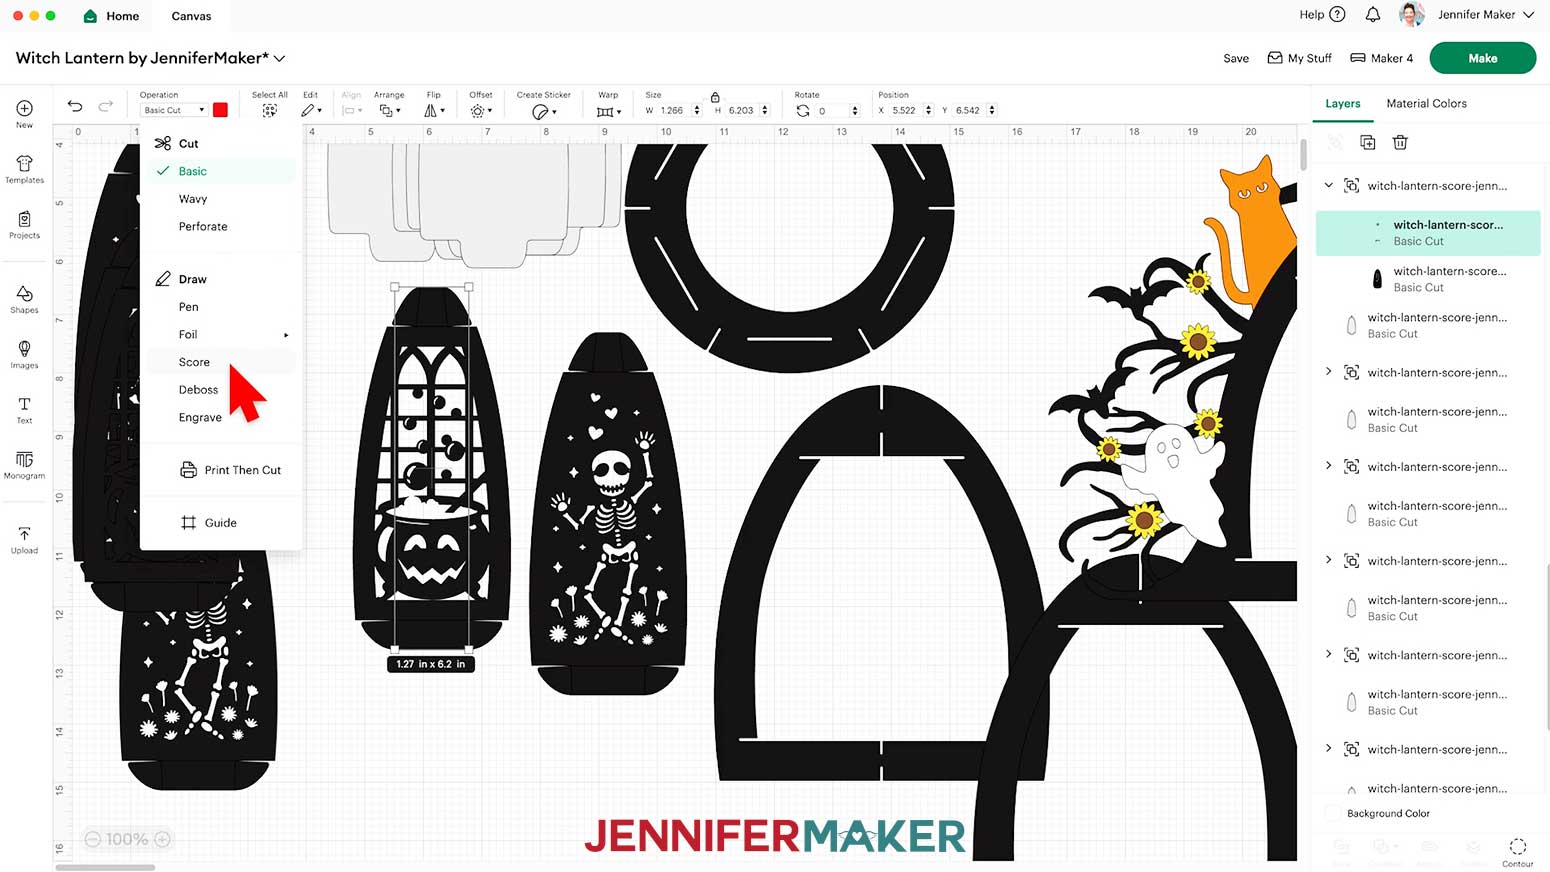
- Select the top layer with the solid lines and change its “Operation” to “Score” so the Cricut knows to make the crease lines where your panel tabs will be folded.
NOTE: The score lines for this project are all red, which is reflected in the Color Box when selecting a line layer.
NOTE: If you’re making the “no-score” version, your crease lines are already dashed line cuts and don’t need to be changed to “Score,” so you can skip this step.
- Click the group layer with the arrow to select both layers in this group, then click “Attach” to keep your crease lines with your cut shape.
- Repeat Steps 15-17 for the five remaining groups of panels, changing the lines to “Score” and Attaching them to their cut shapes.
- Your project is ready to cut!
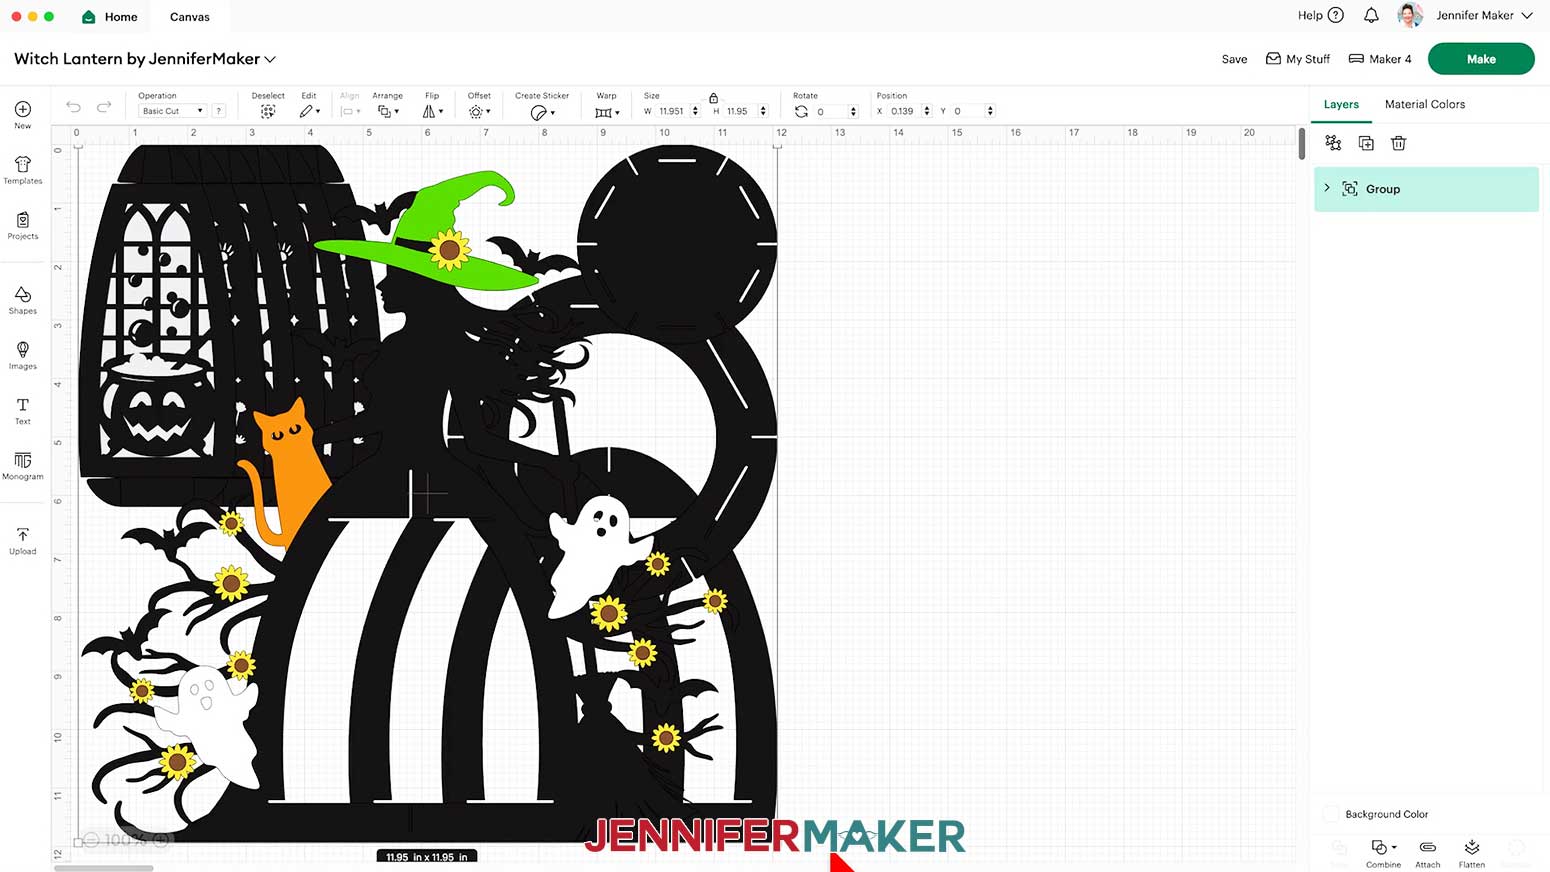
 NOTE: On your Canvas, you'll have two black frame pieces, two black circular base pieces, three black cauldron panels, three black skeleton panels, as well as six optional gray diffuser panels. For the witch, you’ll have one black frame piece, one green hat, one orange cat, and two white ghosts. There are also 11 yellow sunflower petal pieces, and 11 brown sunflower center pieces.
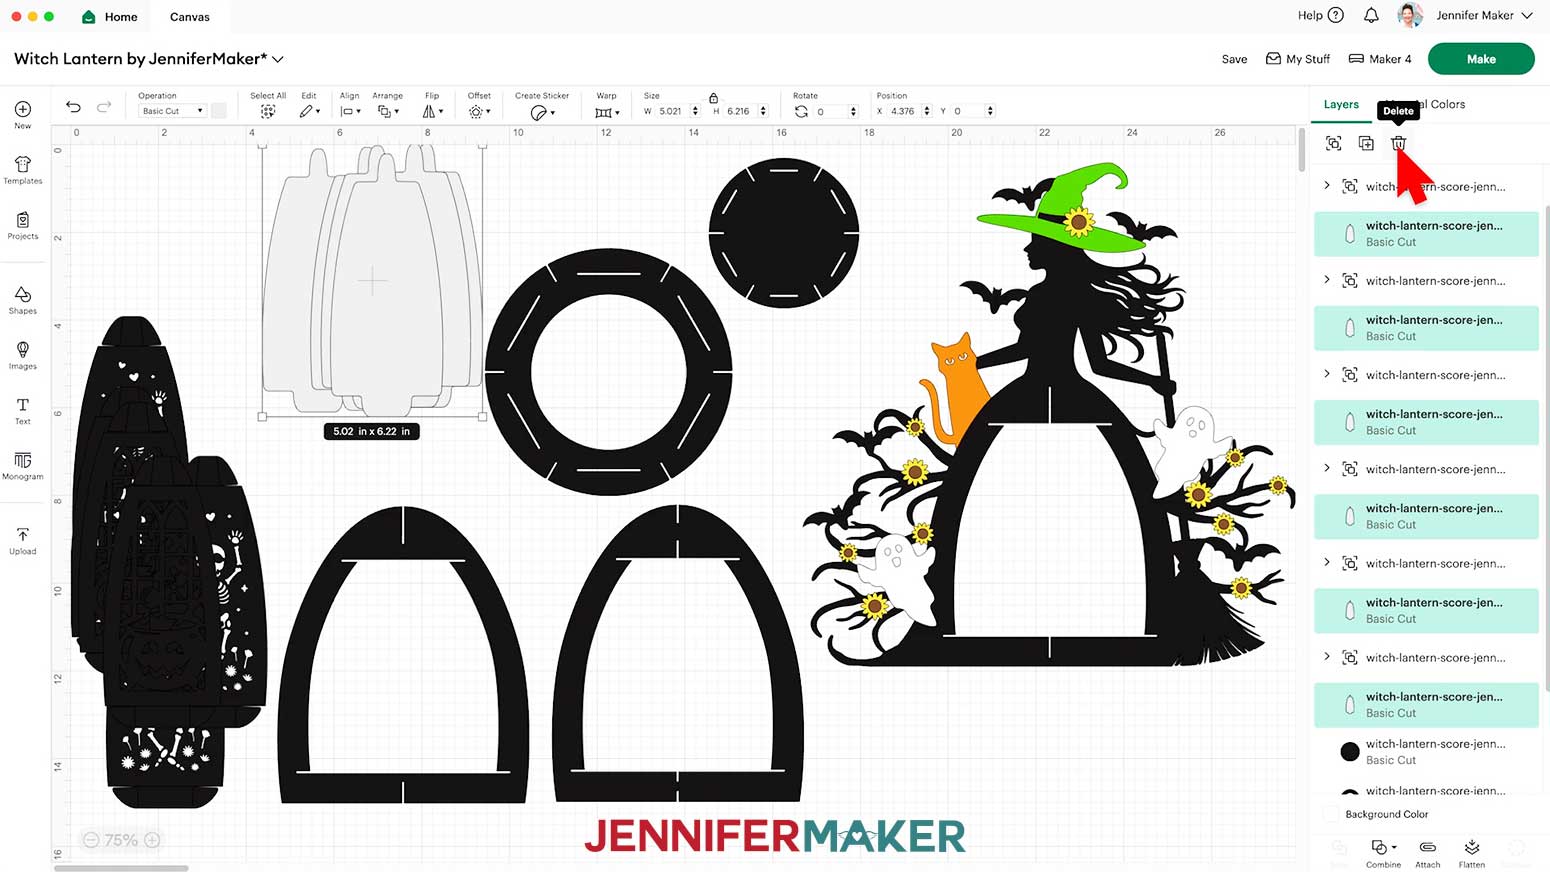
 NOTE: The score lines for this project are all red, which is reflected in the Color Box when selecting a line layer.
NOTE: If you’re making the “no-score” version, your crease lines are already dashed line cuts and don’t need to be changed to “Score,” so you can skip this step.
NOTE: The score lines for this project are all red, which is reflected in the Color Box when selecting a line layer.
NOTE: If you’re making the “no-score” version, your crease lines are already dashed line cuts and don’t need to be changed to “Score,” so you can skip this step.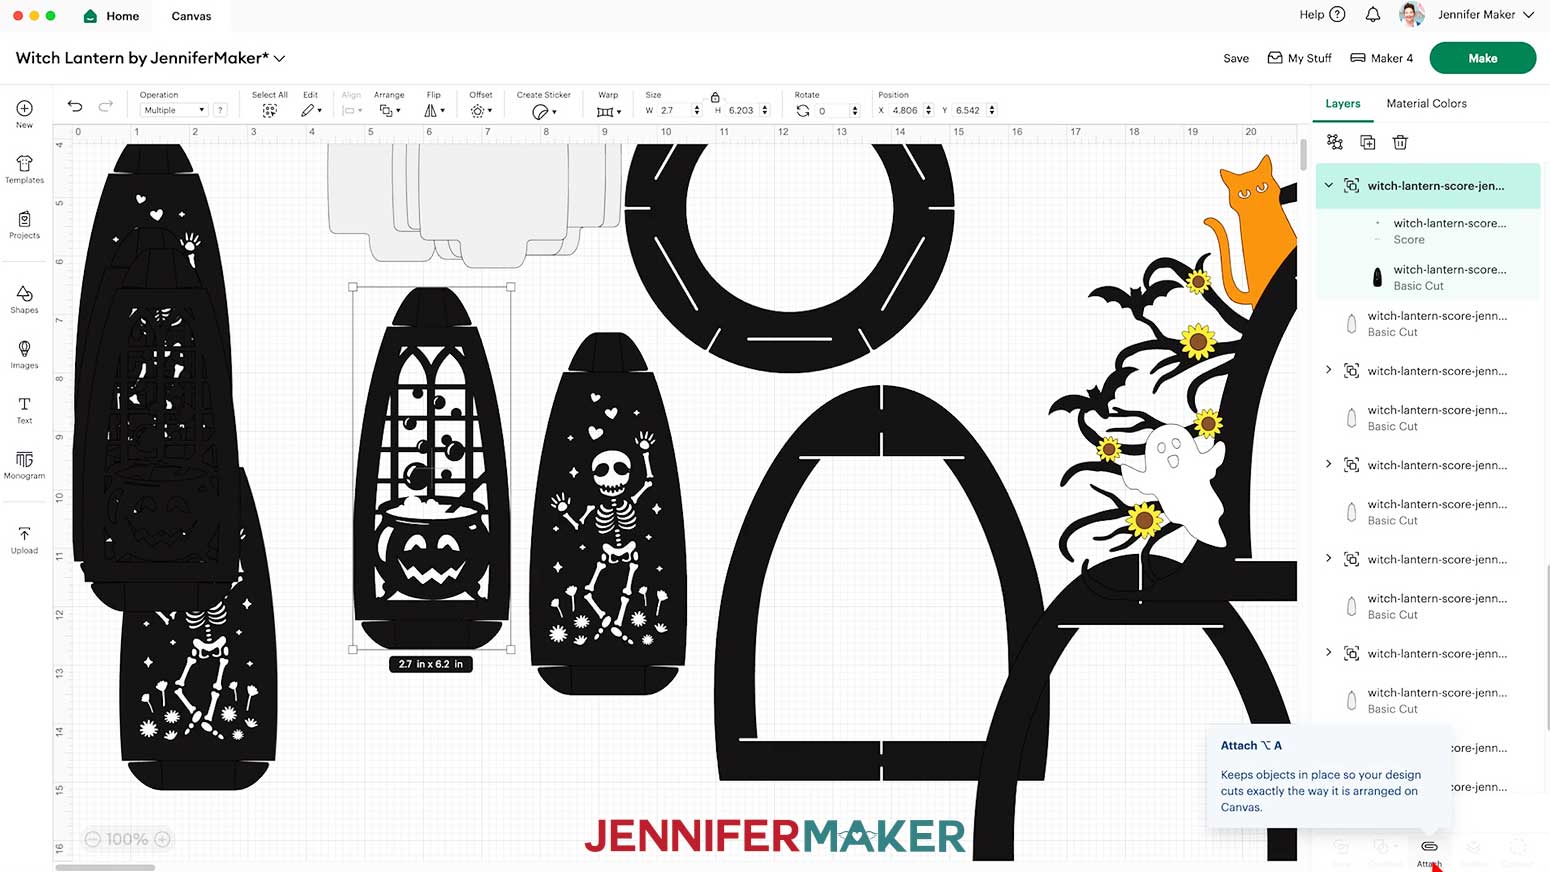
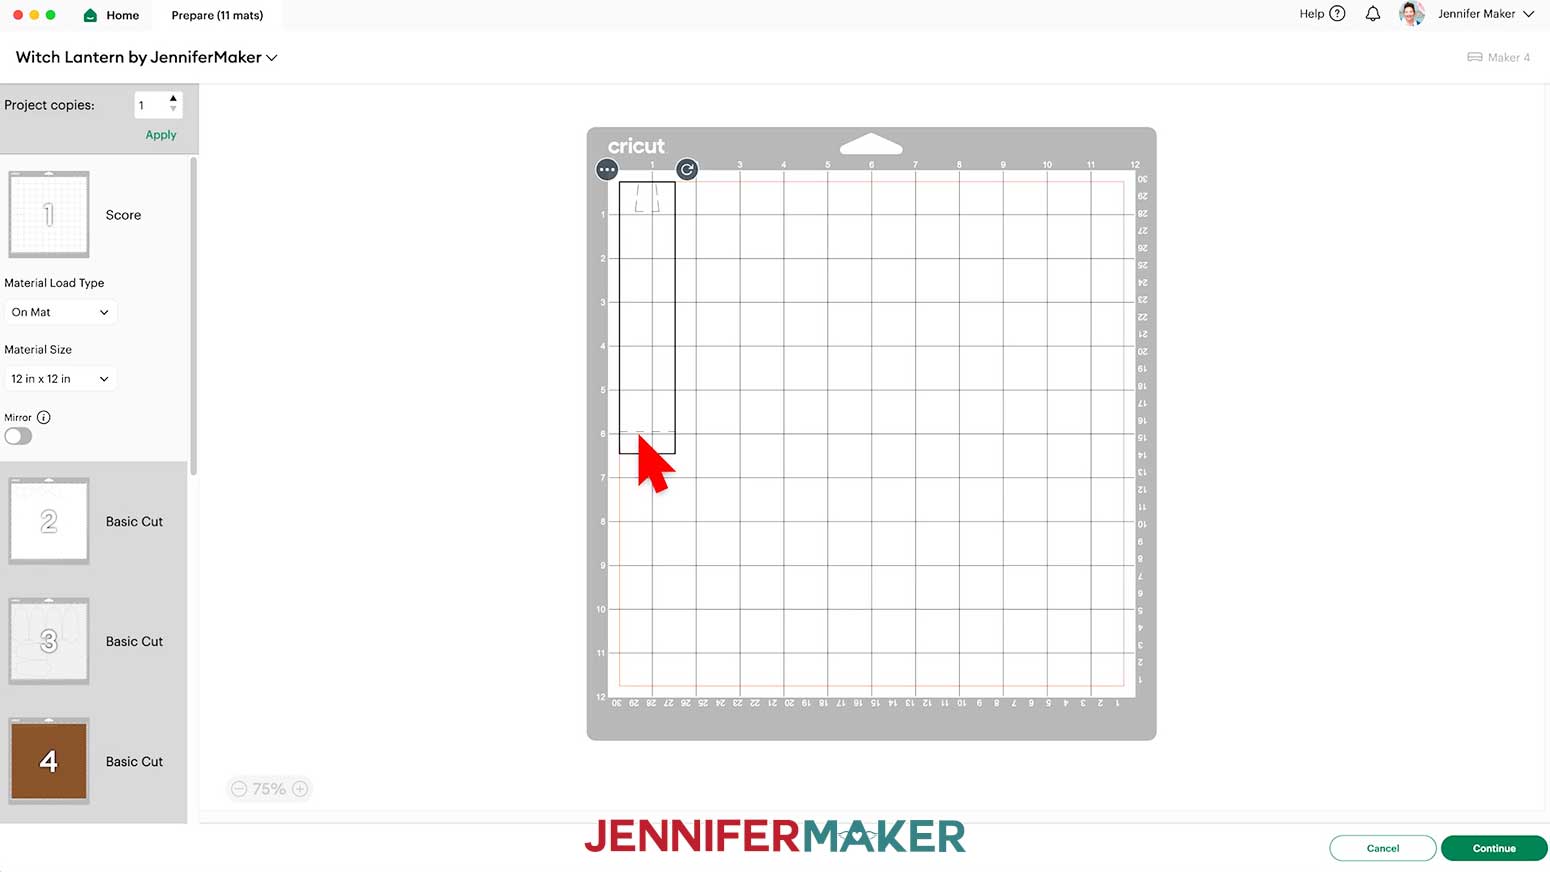
CUTTING
- Make sure the correct machine is selected in the top right.
- Click “Make.”
- On the Prepare screen, make sure the correct Material Size is selected for your materials.
NOTE: I’m using “12 in x 12 in” for all my mats.
NOTE: If you see a mat with just lines, one or more of your score layers may not have attached correctly, so click on “Cancel” to return to the Canvas to check and adjust as needed.
- Once you are satisfied with your mat layouts, select the mat with your witch frame so it loads first on the next screen and click “Continue.”
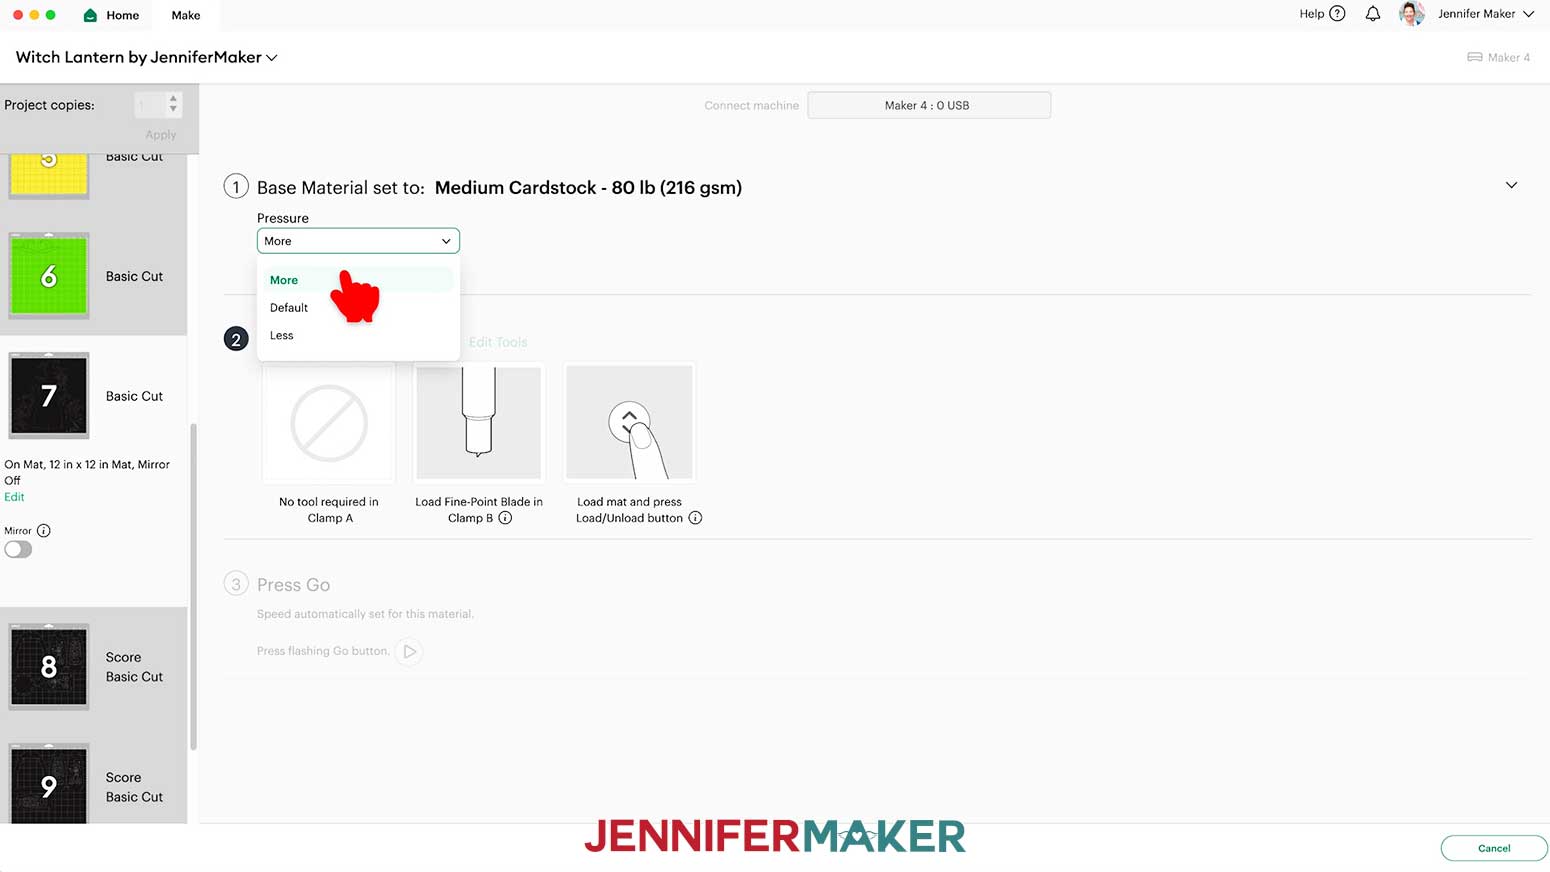
- On the Make screen, set the Base Material for your mat.
NOTE: I’m using 80 lb. cardstock for my frames, so I’ll use the “Medium Cardstock - 80 lb (216 gsm)” setting with “More” pressure. 65 lb. cardstock also cuts well at this setting, so I’ll use it for my cat and sunflower mats, too.
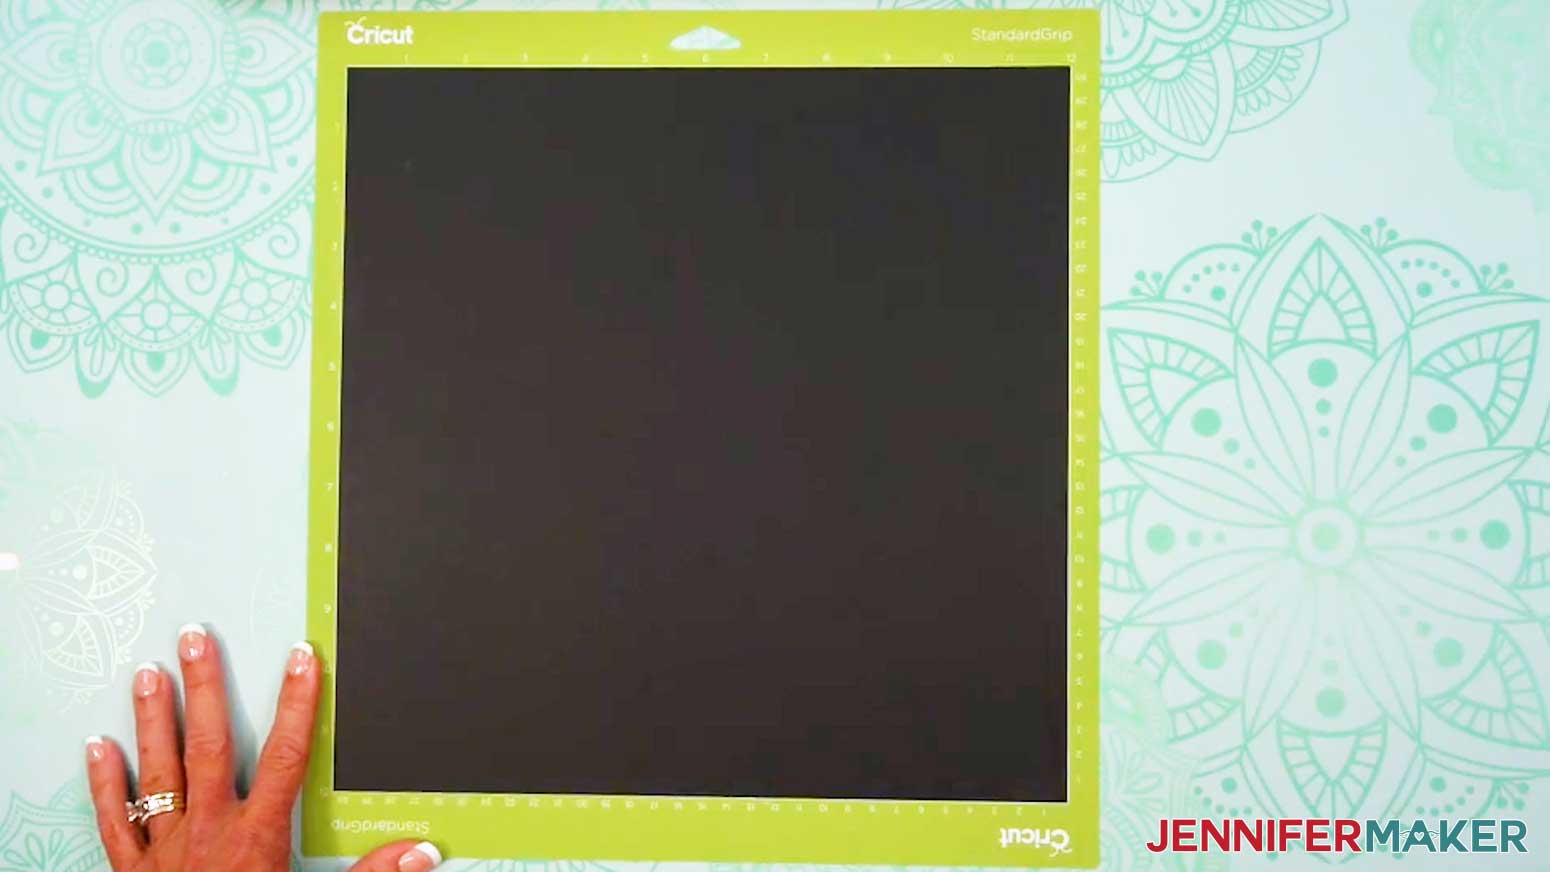
- Place the material face up on a green StandardGrip machine mat.
- Use a brayer to make sure it’s fully adhered.
- Check that your Premium Fine-Point Blade is clean and in the clamp.
- Press the flashing “Load/Unload” button to load the prepared mat into your Cricut.
- Press the flashing middle button to begin cutting.
- When it has finished cutting, don’t unload the mat right away. Gently lift a corner of the material to make sure the cuts went all the way through. If not, press the middle button again to make a second pass of cuts in the same spots.
- When the cuts are complete, unload the mat, flip it over onto your work surface, and roll it back to release the cardstock.
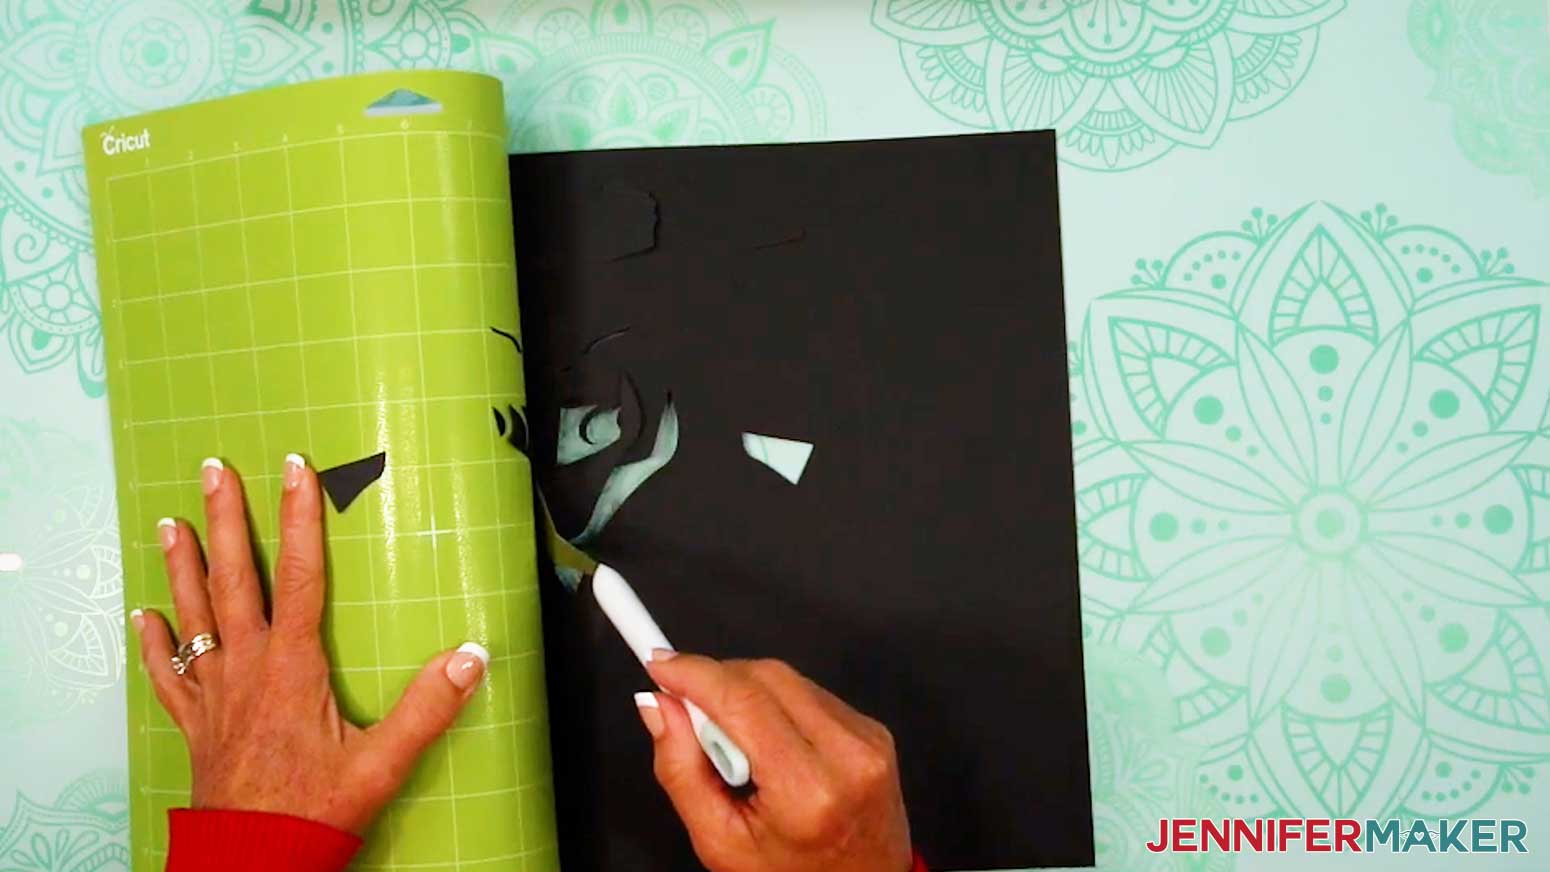
- Use the spatula to help lift delicate parts, and your weeding tool to poke out small bits of cardstock that may have been left behind. If you have any issues with your cuts, check out my Tips for Cleaner Cuts tutorial.
- Use a scraper tool to remove the small bits left on your mat after you remove the cut pieces.
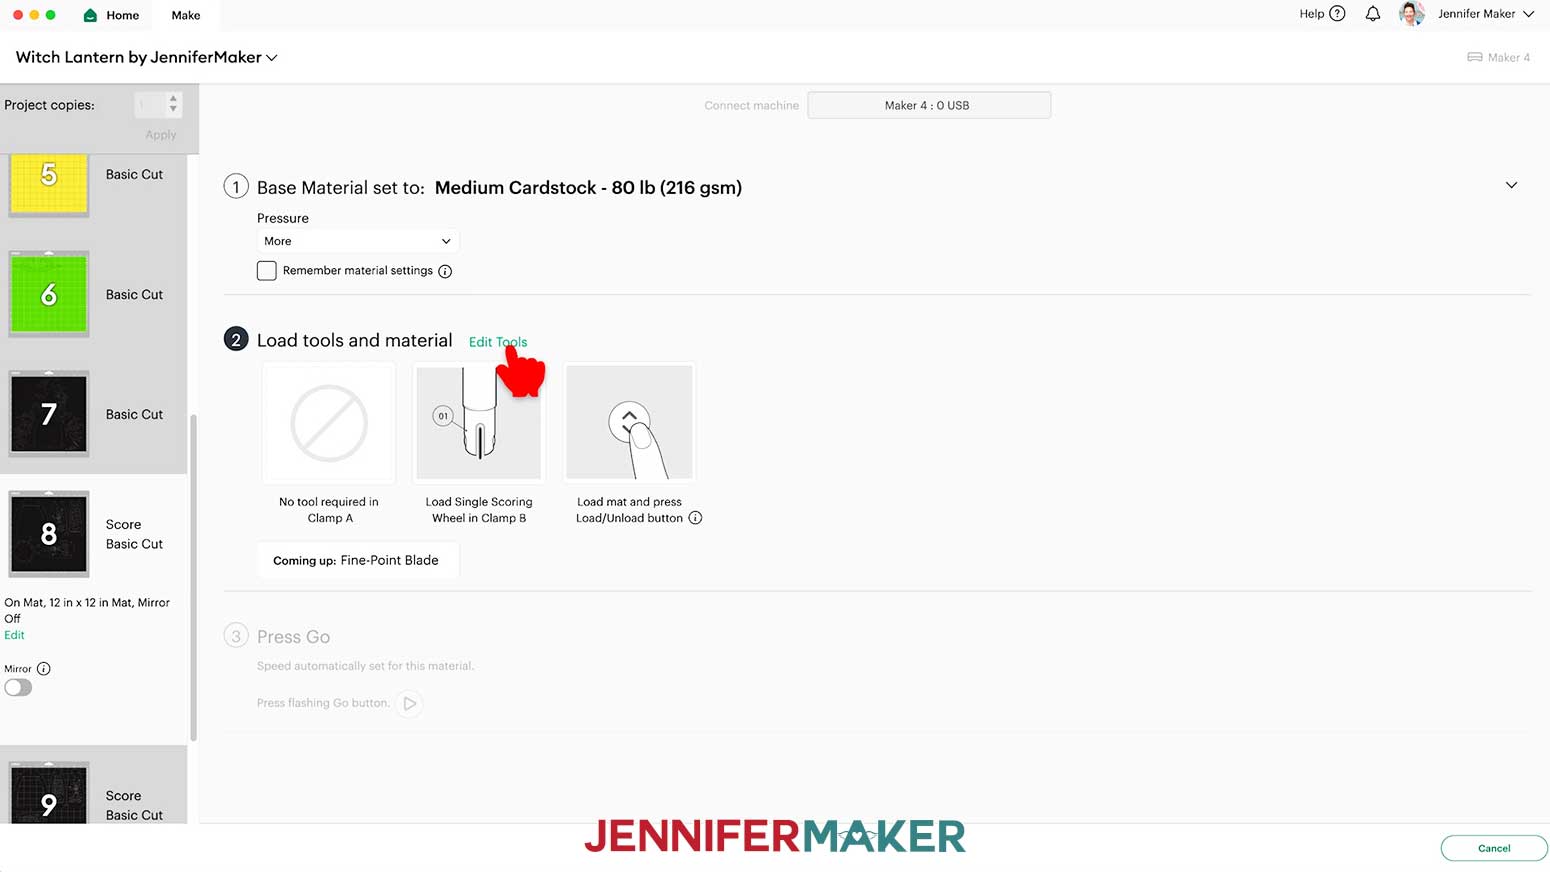
- If your mat has score lines, follow the screen prompts to select and add your scoring tool. Depending on your machine, click “Edit Tools” and select the Scoring Stylus to load both the scoring tool and the blade at the same time. Or, you can select the Scoring Wheel and switch tools when prompted. Click “Apply” to close the “Edit Tools” window.
NOTE: If you’re using the “no-score” version, you won’t see the Scoring Tool prompts since all of your creases are dashed cuts.
- Then repeat Steps 6-14 to cut and score your mats that have score lines.
- For glitter cardstock mats, I used the “Glitter Cardstock” material setting with “More” pressure for cleaner cuts.
NOTE: I used glitter cardstock for my ghost and hat mats.
- Place the cardstock face up on a green StandardGrip machine mat.
- Use a brayer to make sure it’s fully adhered.
- Then repeat Steps 8-14 to cut your glitter cardstock mats. NOTE: Glitter can stick to the blade and cause trouble on your future cuts, so I recommend cleaning it after each sheet of glitter cardstock. You can take the housing and blade out of the clamp, press down on the plunger, and carefully poke the blade into a ball of aluminum foil several times, or clean it with an alcohol wipe. Be careful, it's sharp!
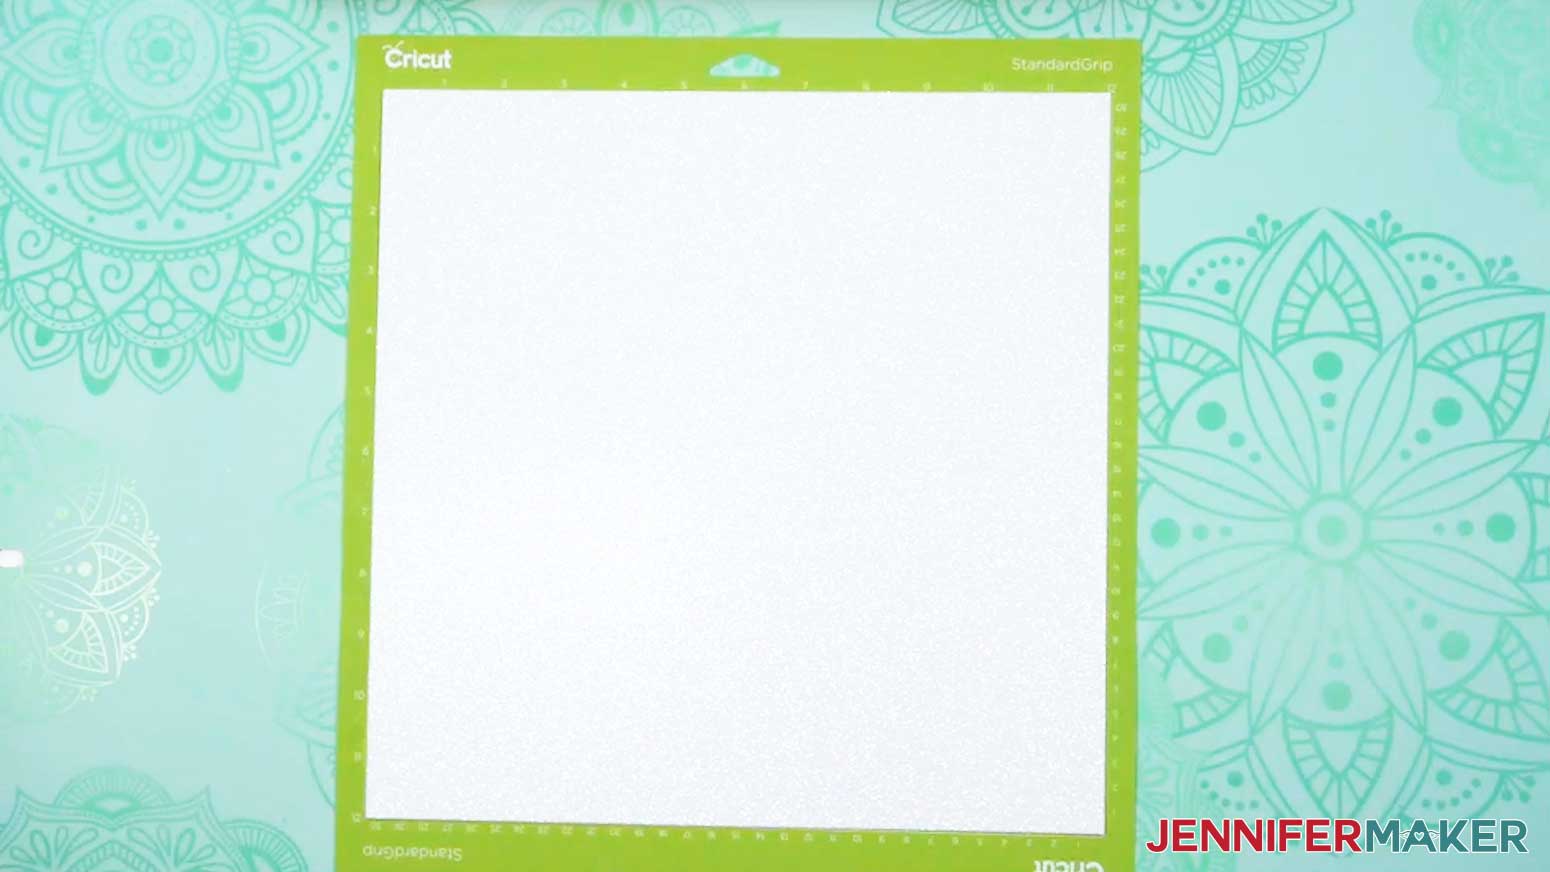
- For the (optional) lantern diffusers, set your material to the “Vellum” setting with “More” pressure.
- Place the vellum face up on a blue LightGrip machine mat.
TIP: You can also use a less sticky green StandardGrip machine mat.
- Use a brayer to make sure it’s fully adhered.
- Repeat Steps 8-14 to cut and unload your vellum diffuser pieces.
- Lay out all of the pieces face up in organized piles. You should have:
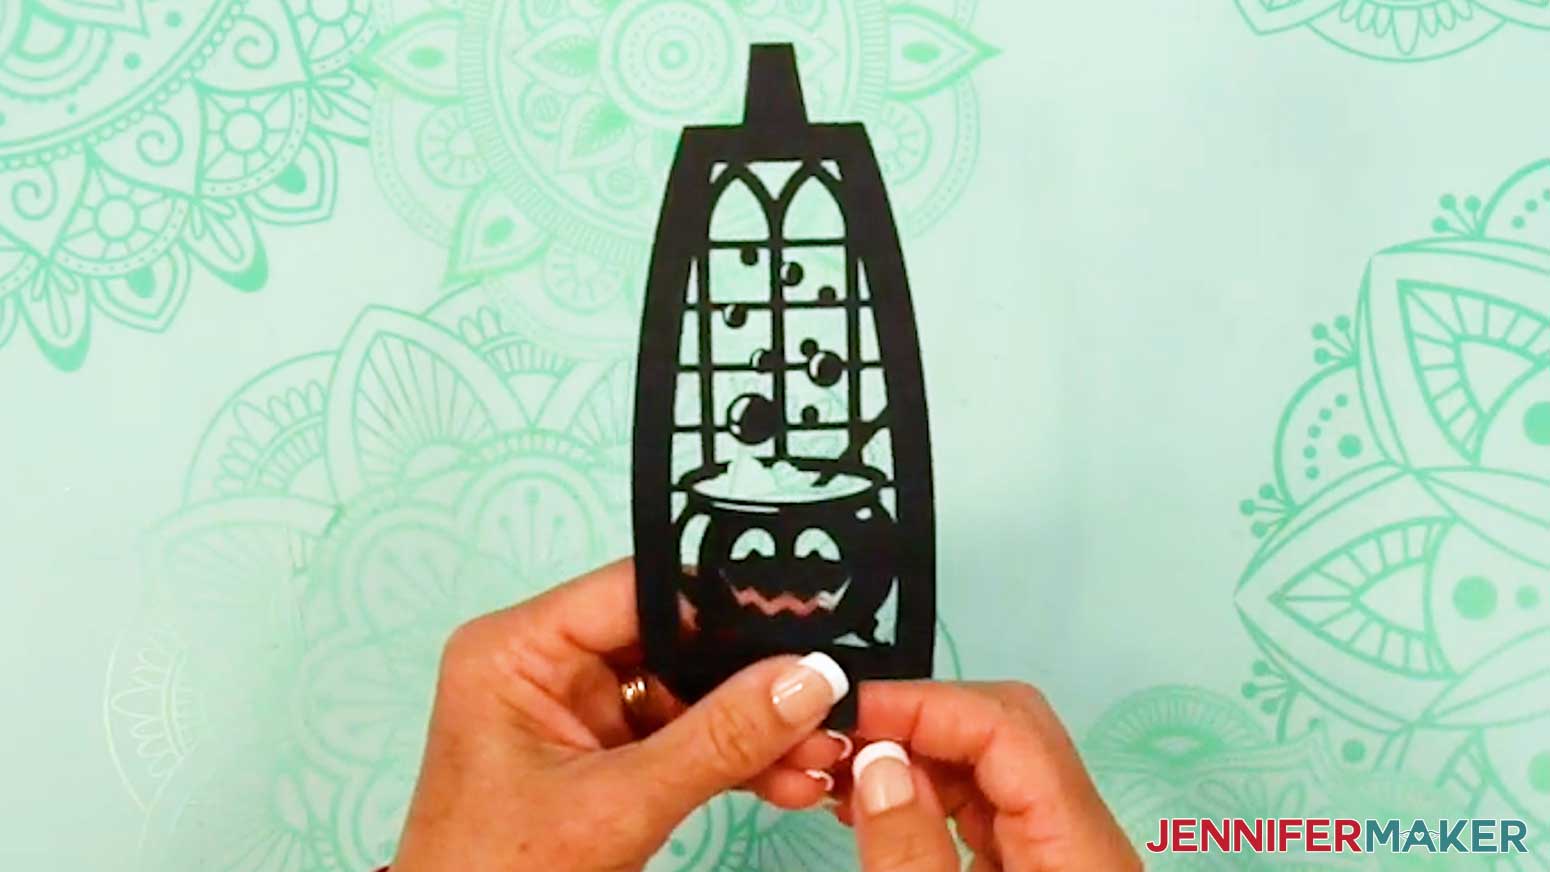
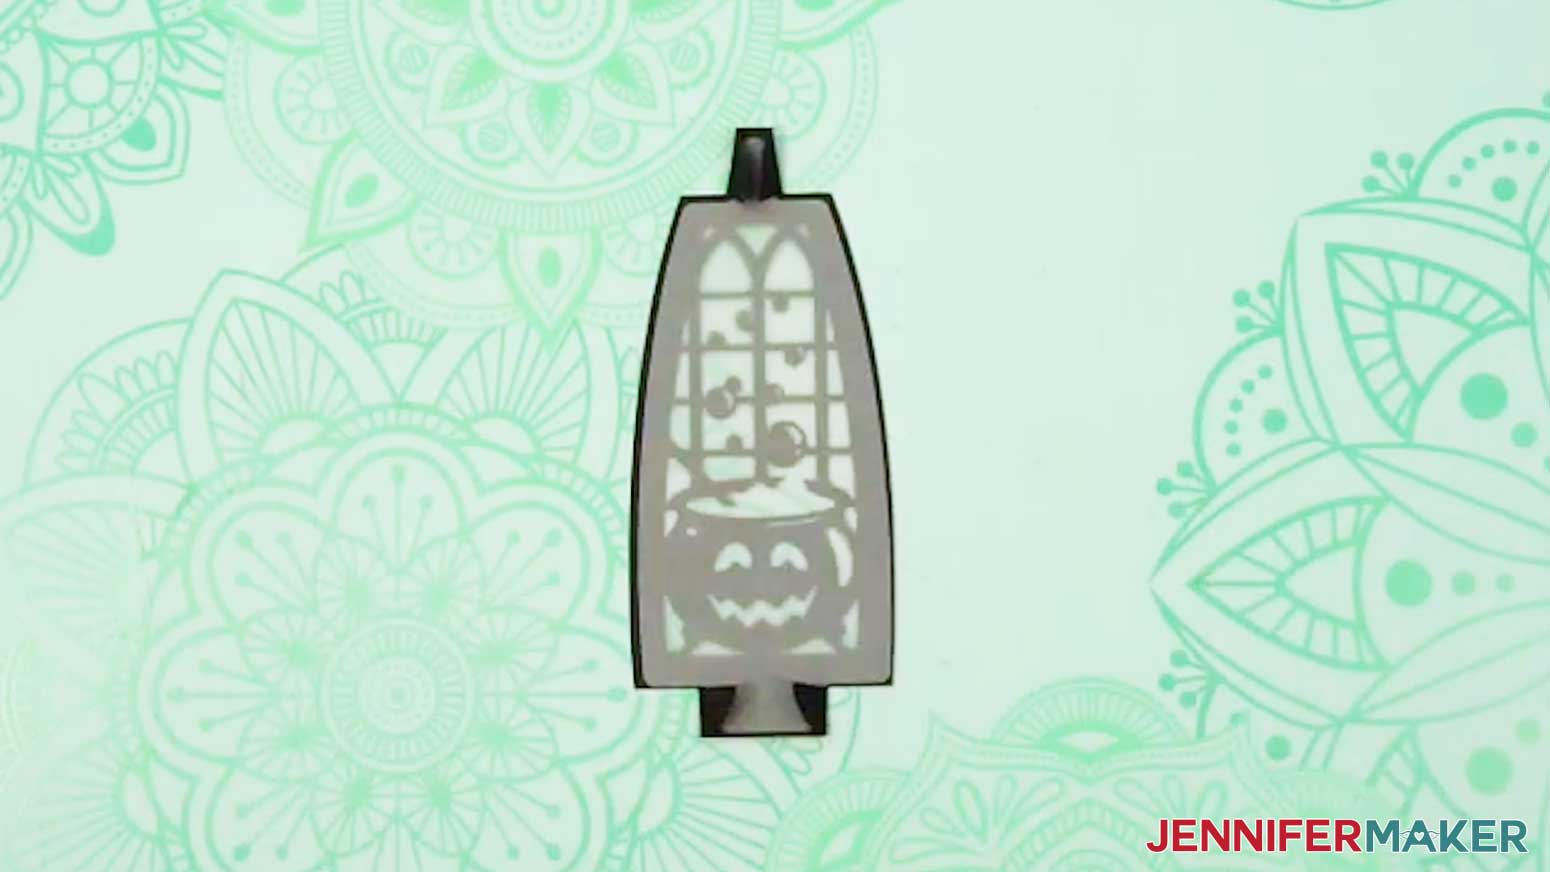
- For the lantern base: one witch main frame piece with a vertical slit at the bottom of the arch, one frame piece with slits at the top and bottom of the arch, one frame piece with a slit at the top of the arch, two circular base pieces, six decorative panels, and six diffuser panels (if you cut them).
- For the decorative elements: two cats, two hats, and four ghosts.
- For the flowers: eight small petal pieces, eight small center pieces, six medium petal pieces, six medium center pieces, six large petal pieces, six large center pieces, two extra-large petal pieces, and two extra-large center pieces.
TIP: Refer to the Design Space screen if you’re not sure about some pieces’ orientation.
 NOTE: If you’re using the “no-score” version, you won’t see the Scoring Tool prompts since all of your creases are dashed cuts.
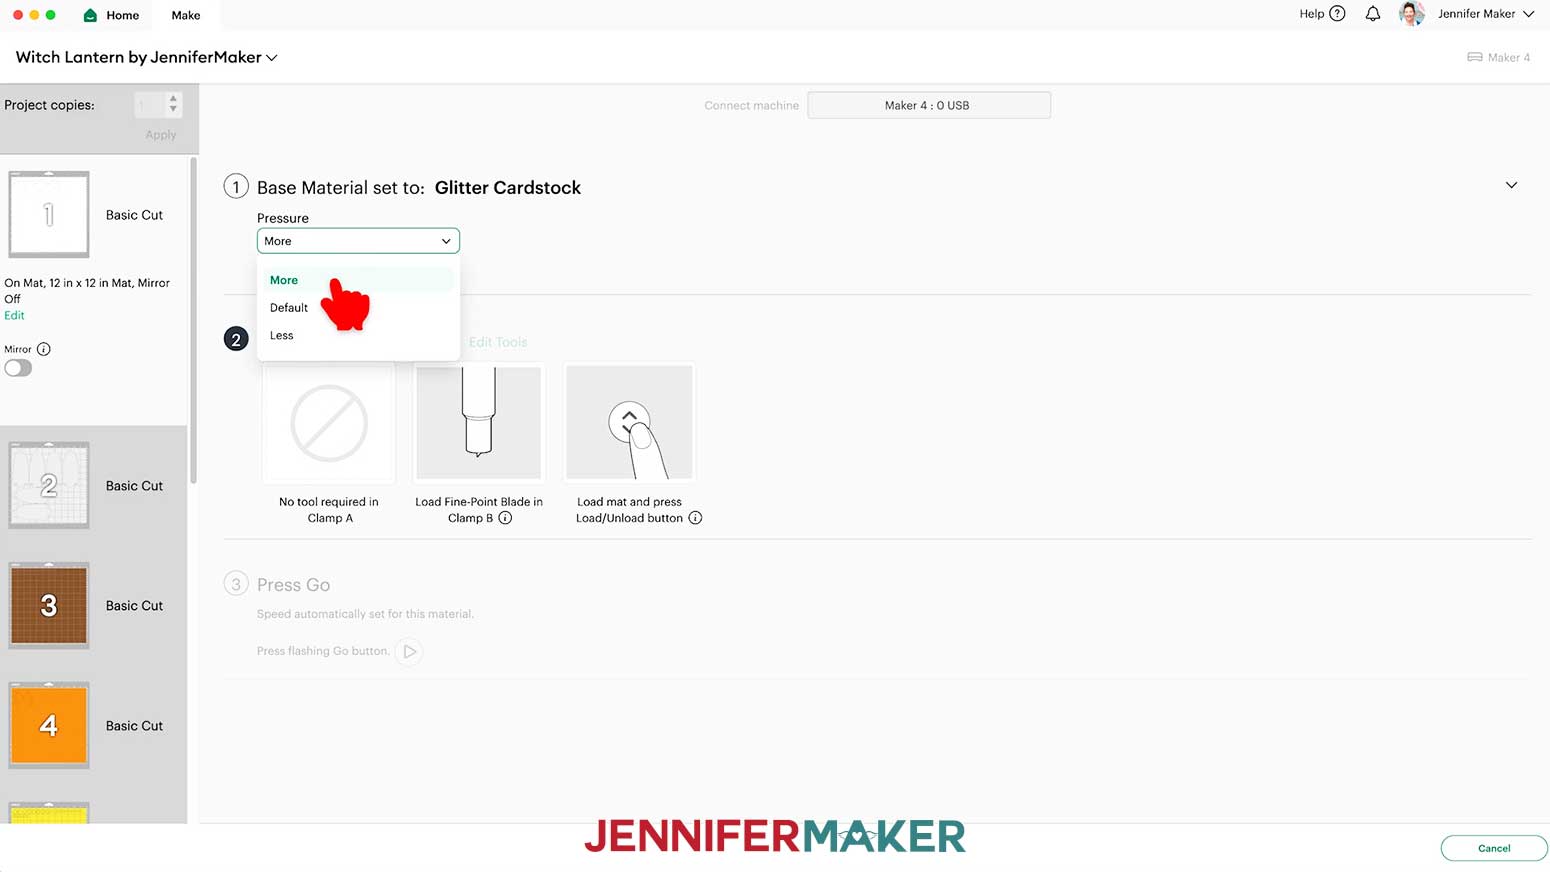
STEP 3: ASSEMBLE YOUR PAPER WITCH LANTERN
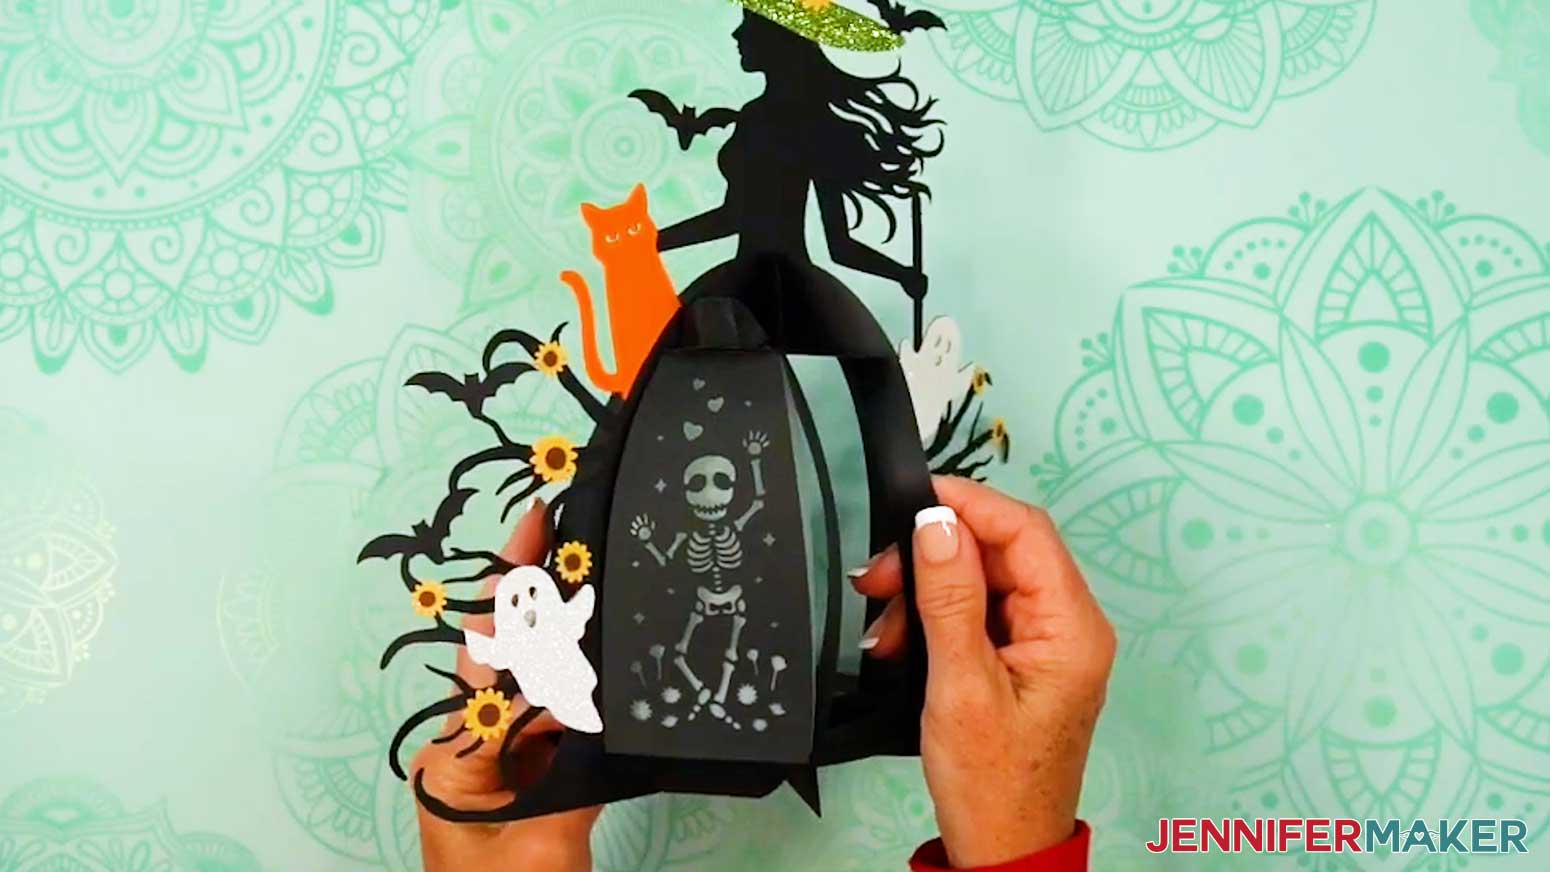
ASSEMBLE THE WITCH FRAME AND ACCESSORIES
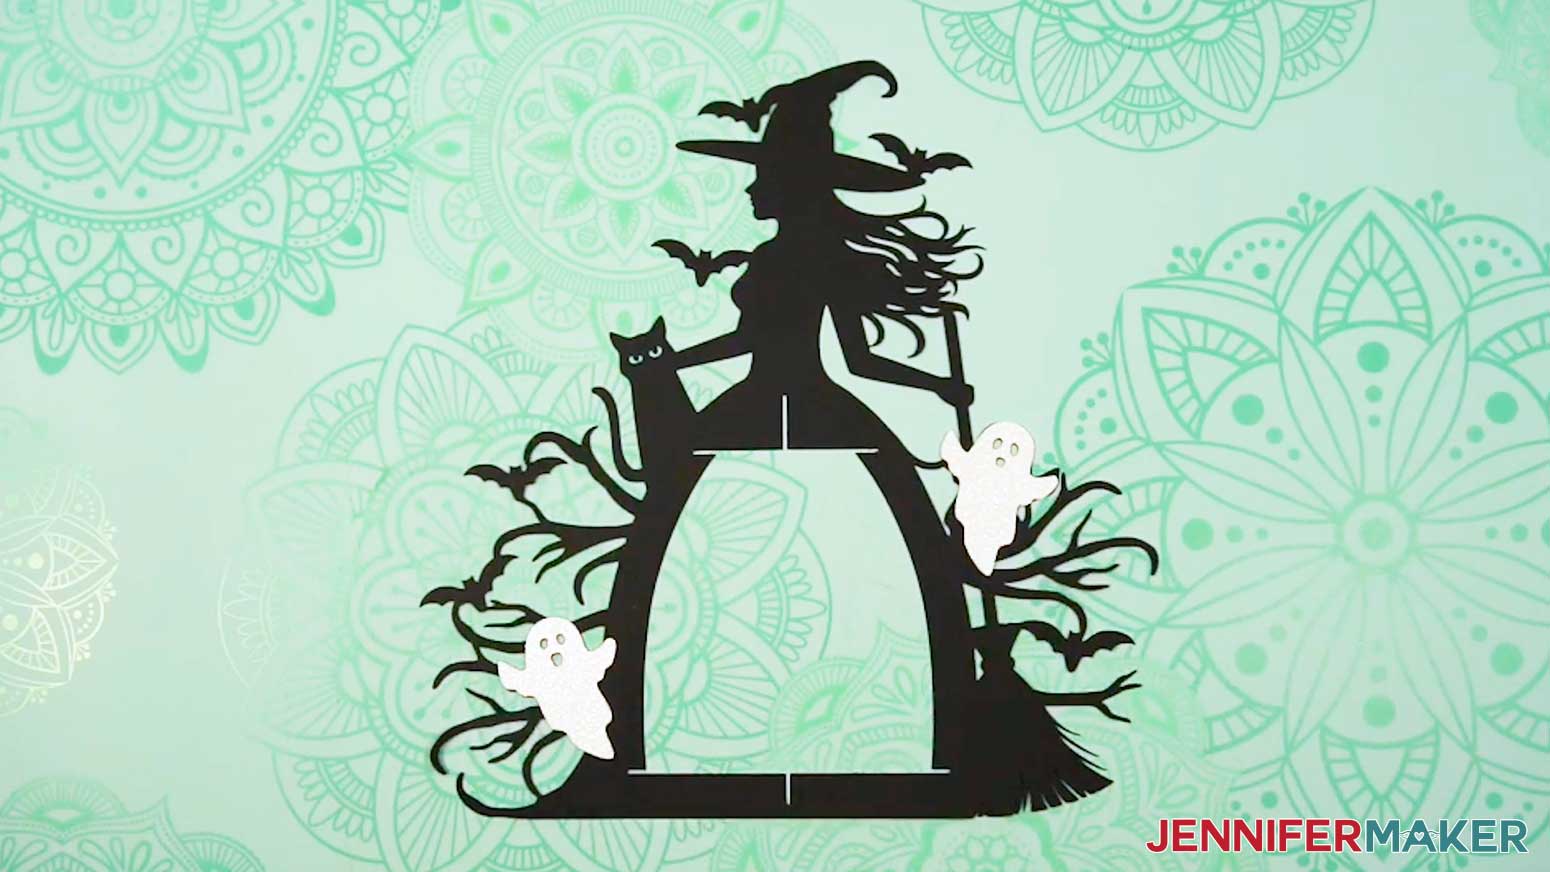
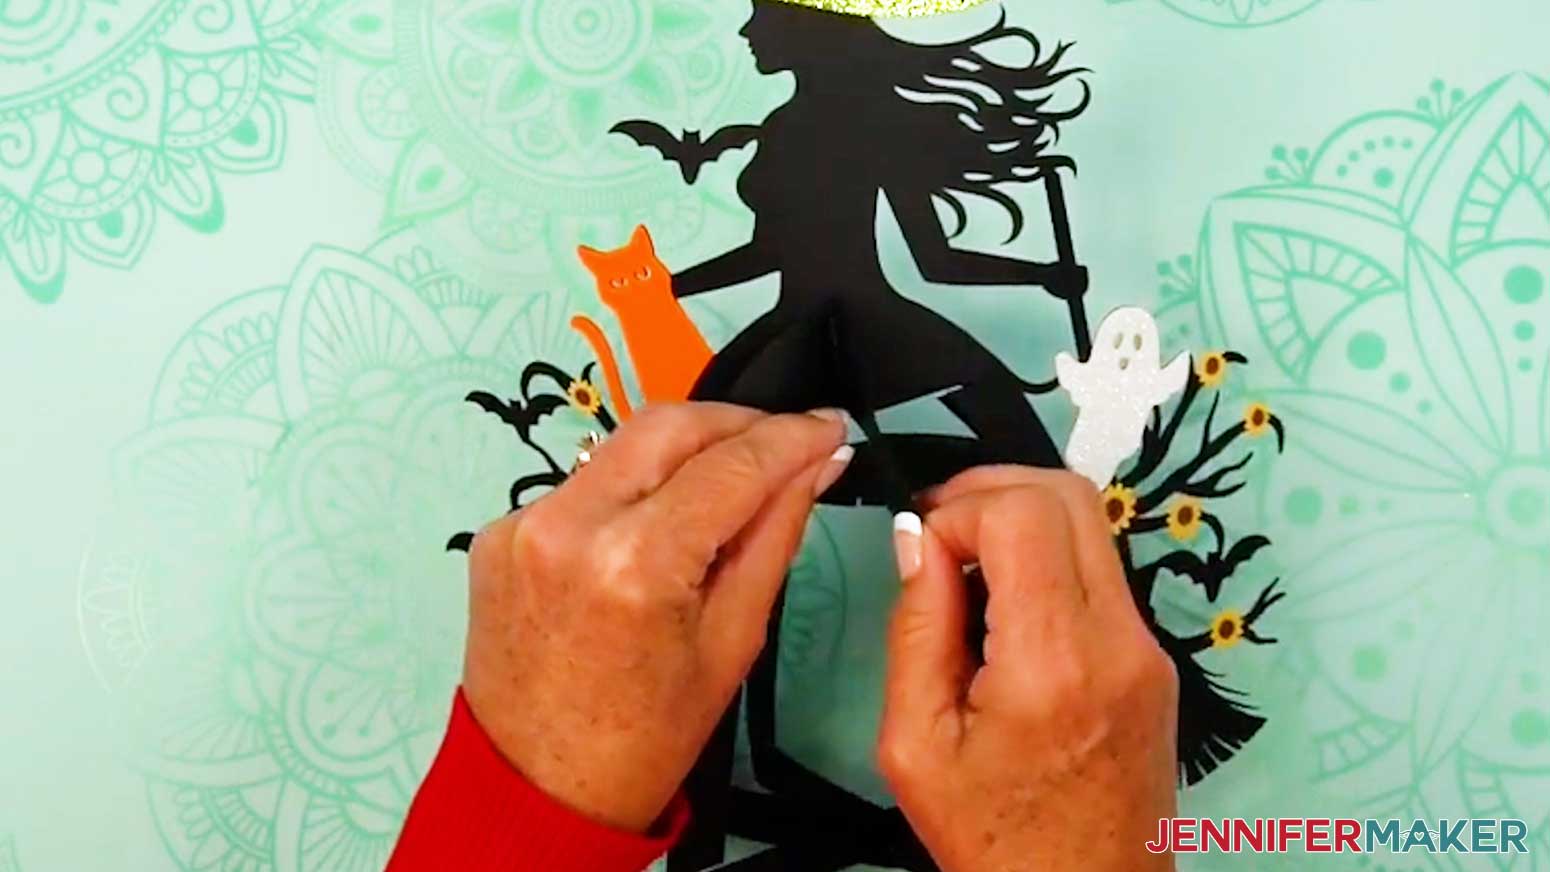
- Start with the witch frame piece face-up (with the witch’s face pointing to the left) on your work surface.
- Place a left ghost (with the bigger mouth) and a right ghost (with the smaller mouth) face up onto their spots on the front of the frame to make sure they align correctly.
- Flip the left ghost piece face-down and apply lines of glue all over its back, avoiding the eye and mouth cutouts.
- Then flip it over again and place it onto its spot on the witch frame, aligning the edges carefully.
- Press and smooth to adhere the left ghost to the witch frame.
- Gently wipe away any excess glue with a paper towel or your finger.
- Repeat Steps 3-6 to adhere the right ghost to the witch frame.
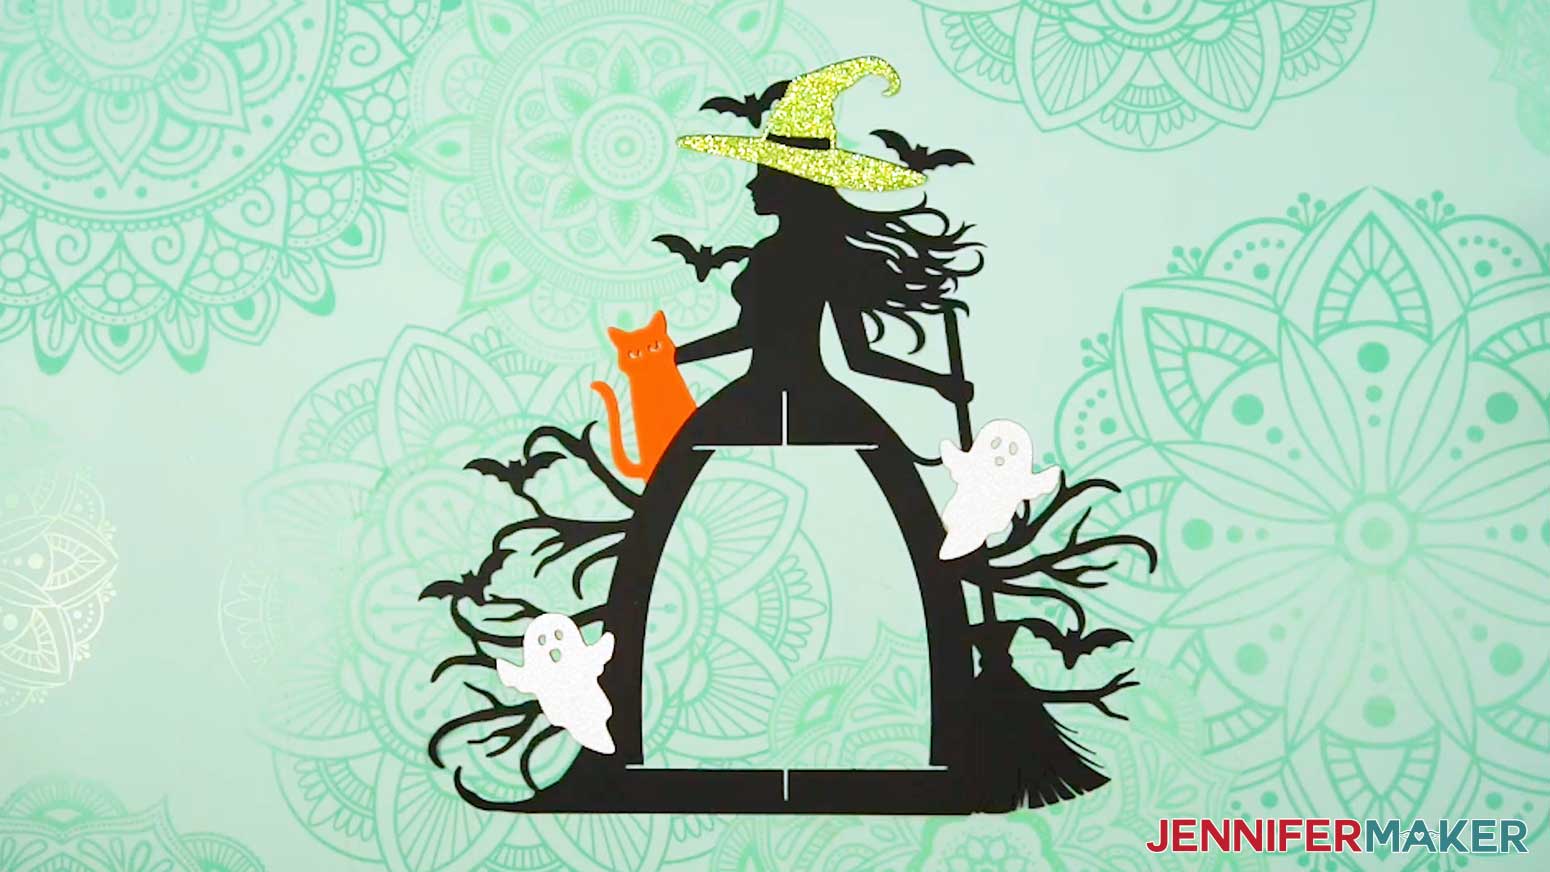
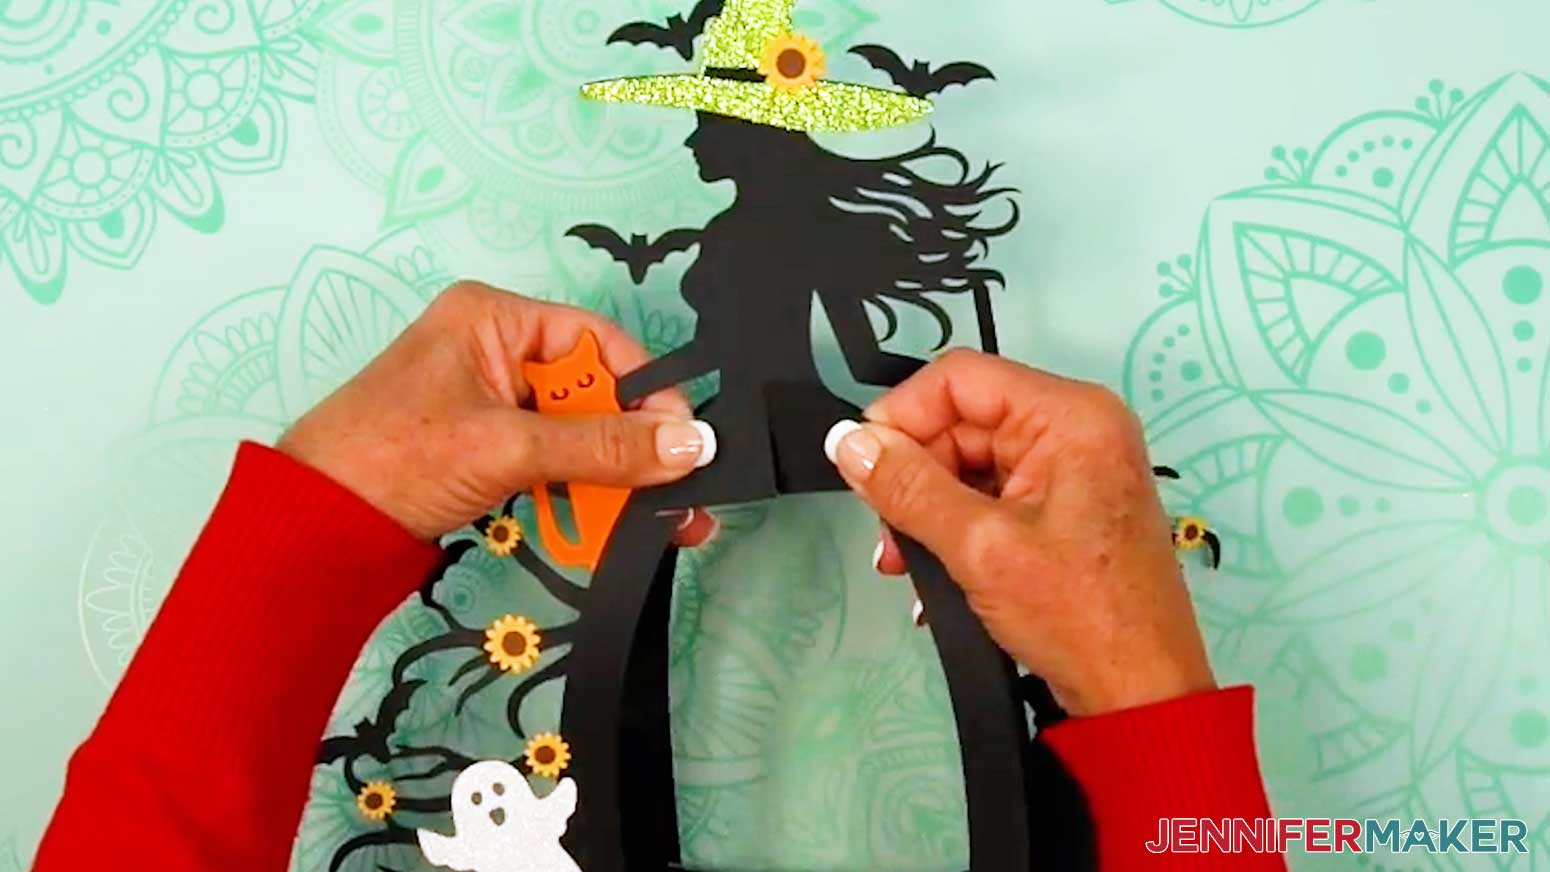
- Then repeat Steps 2-6 to adhere the hat and the cat face-up in their proper positions on the front of the frame.
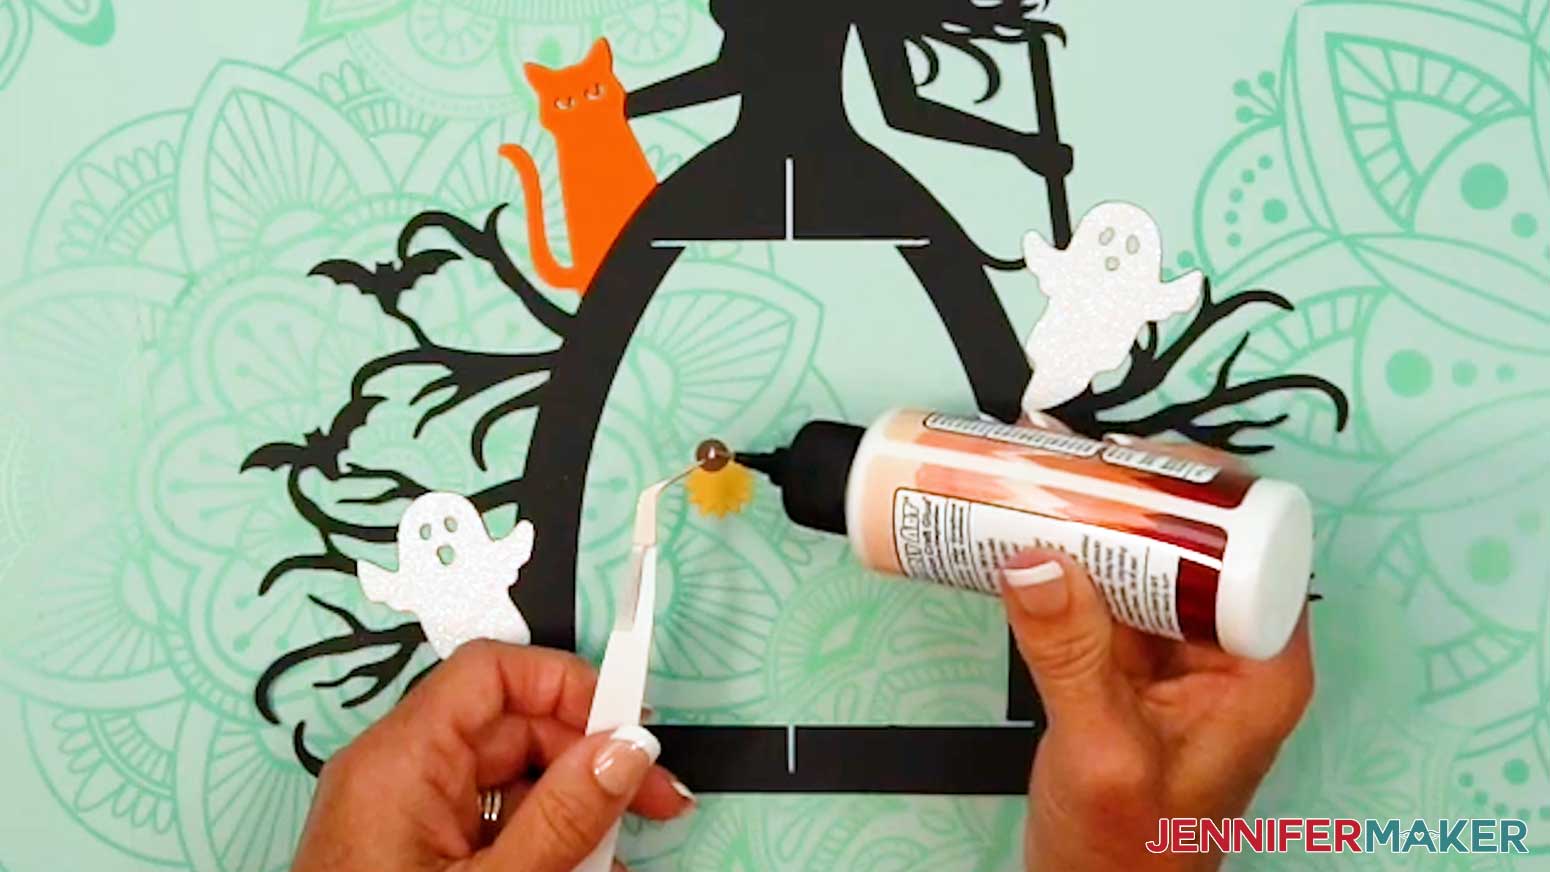
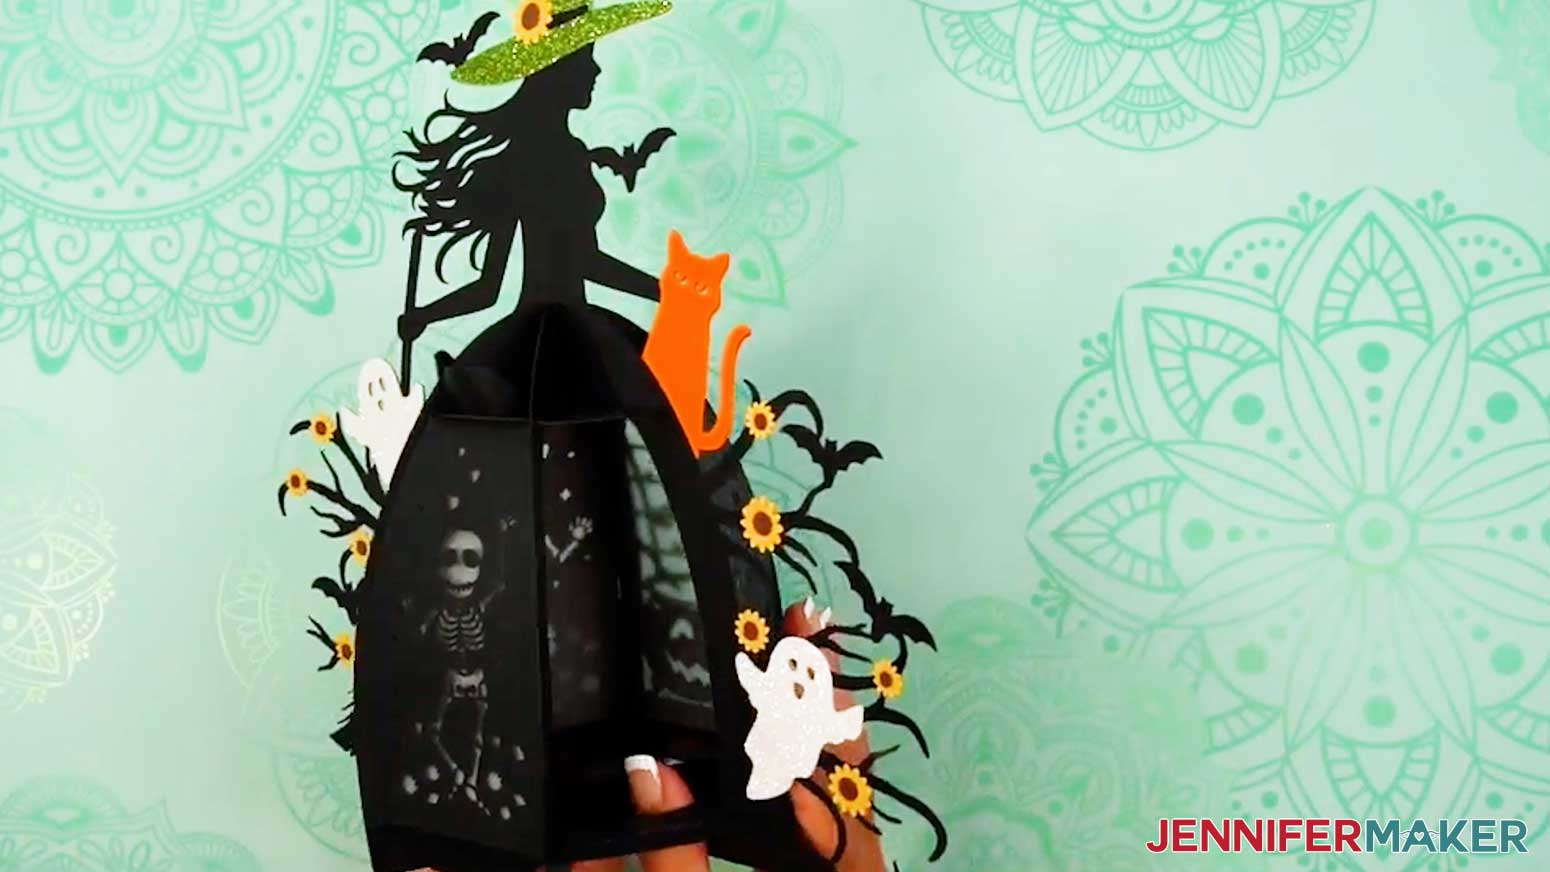
- Next, flip an extra-large sunflower center piece face-down and add a small dot of glue to the back.
TIP: Use a pair of tweezers to help assemble the flower pieces!
- Then flip it face-up and place it in the center of an extra-large sunflower petal piece.
- Press and hold to adhere the center to the petals.
- Repeat Steps 9-11 to assemble the remaining sunflowers, making sure to match the sizes correctly.
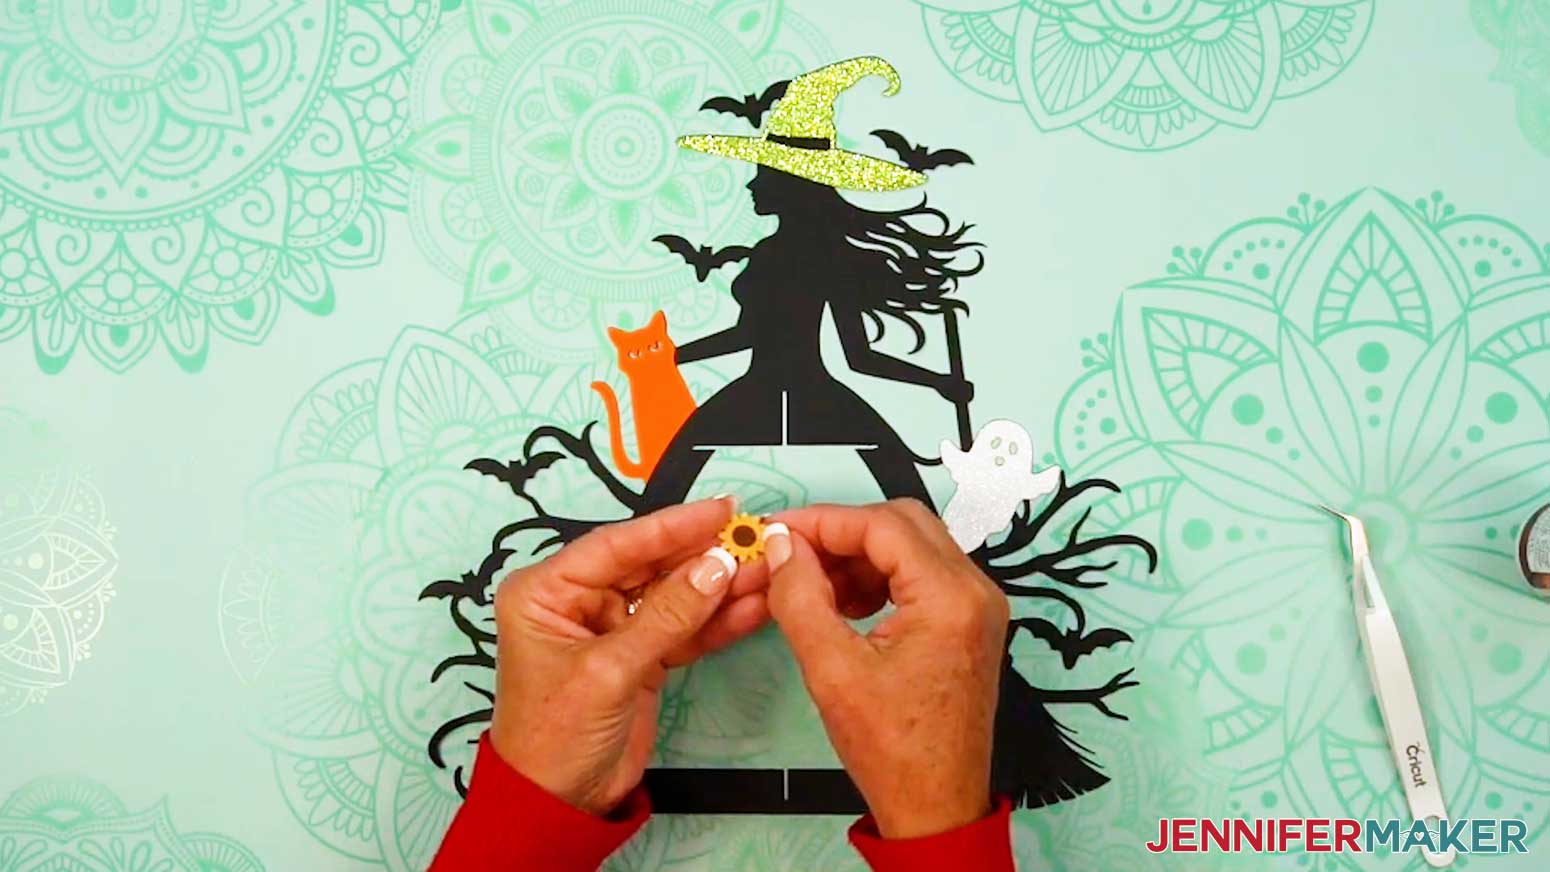
- Take an extra-large sunflower and add a small dot of glue to its back, then adhere it to the witch’s hat.
TIP: Refer back to your Design Space screen if you’re unsure of where to place each flower.
- Set aside the sunflower piece for the back of the hat for now.
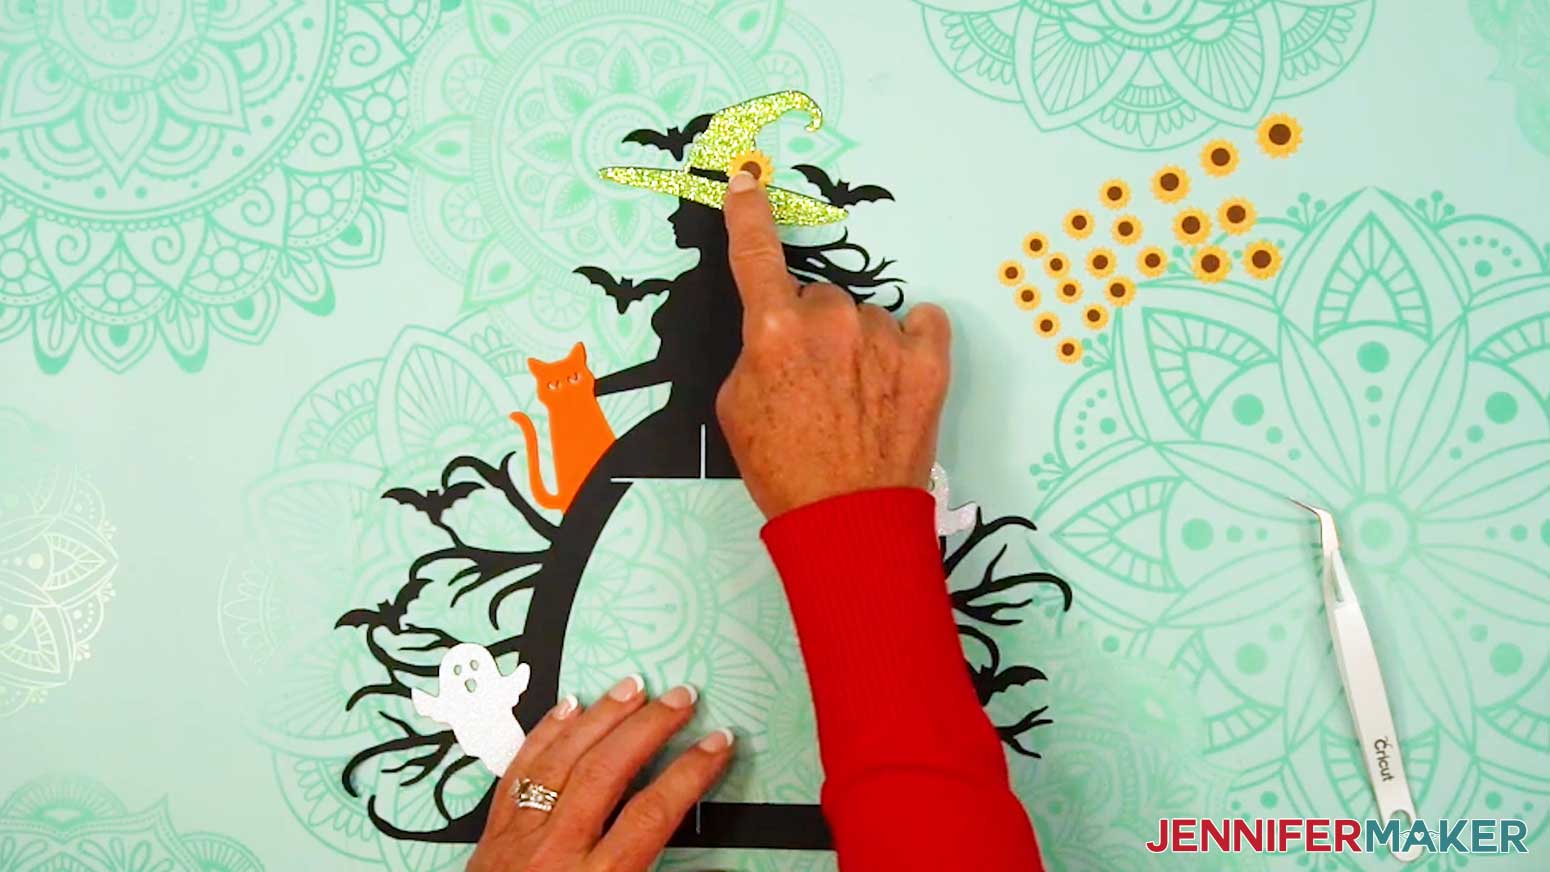
- Repeat Steps 13-14 to adhere the three large sunflowers face-up on the front of the witch frame piece.
- Adhere the three medium sunflowers to the frame’s front the same way.
- Then adhere the four small sunflowers to the frame’s front the same way, as well.
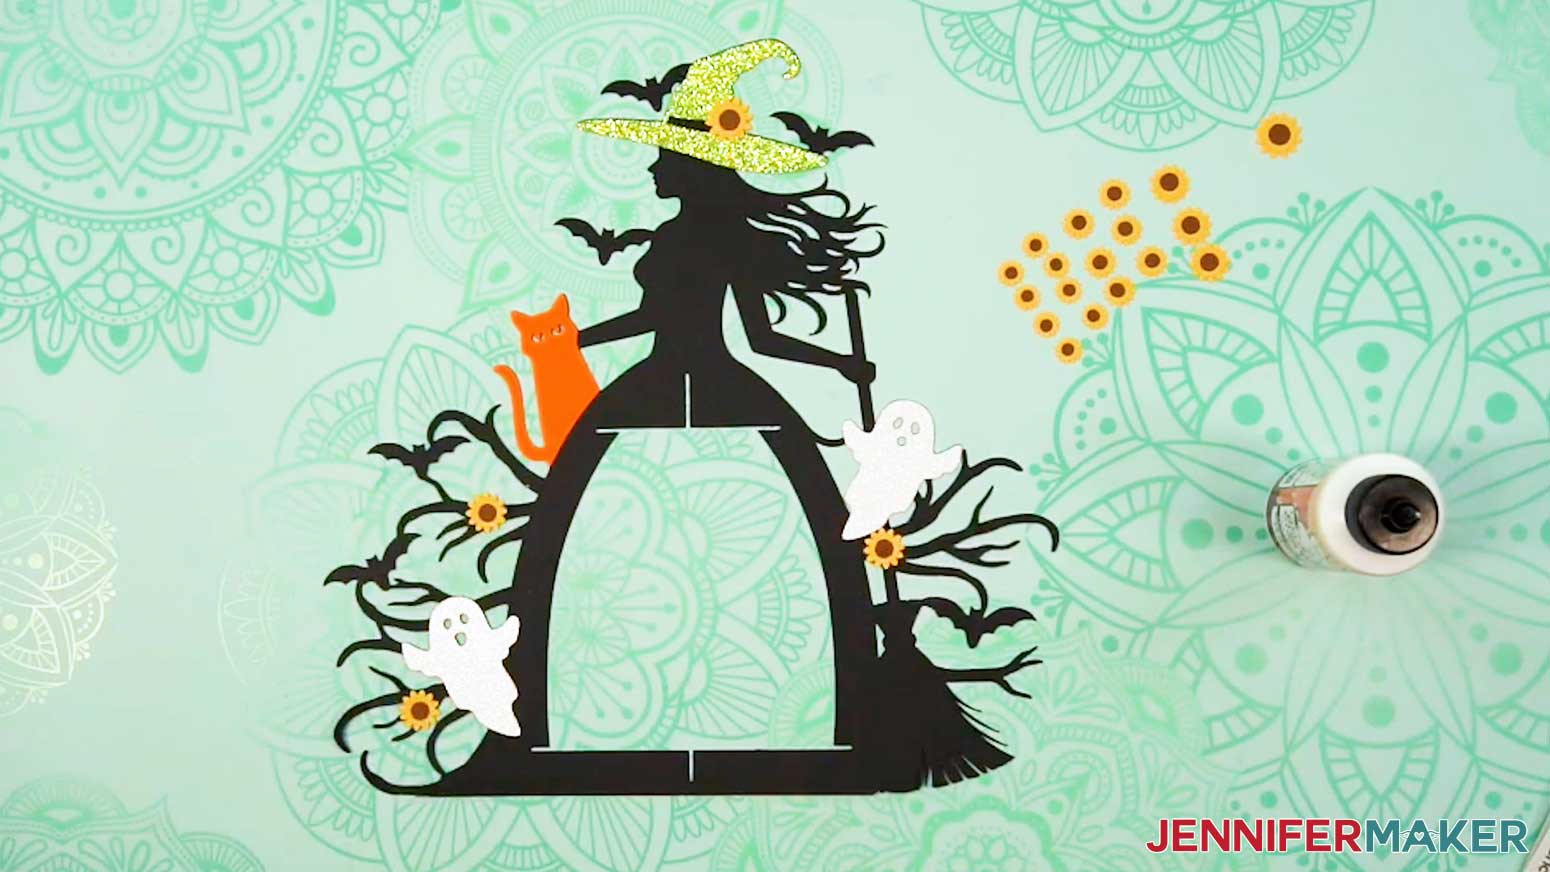
- Allow a few minutes for the glue to dry and the pieces to set, then flip the witch frame piece face-down.
- Repeat Steps 2-17 to add the decorative elements and flowers to the back of the witch frame. Remember, everything will be facing the opposite direction on the back side.
ASSEMBLE YOUR LANTERN BASE
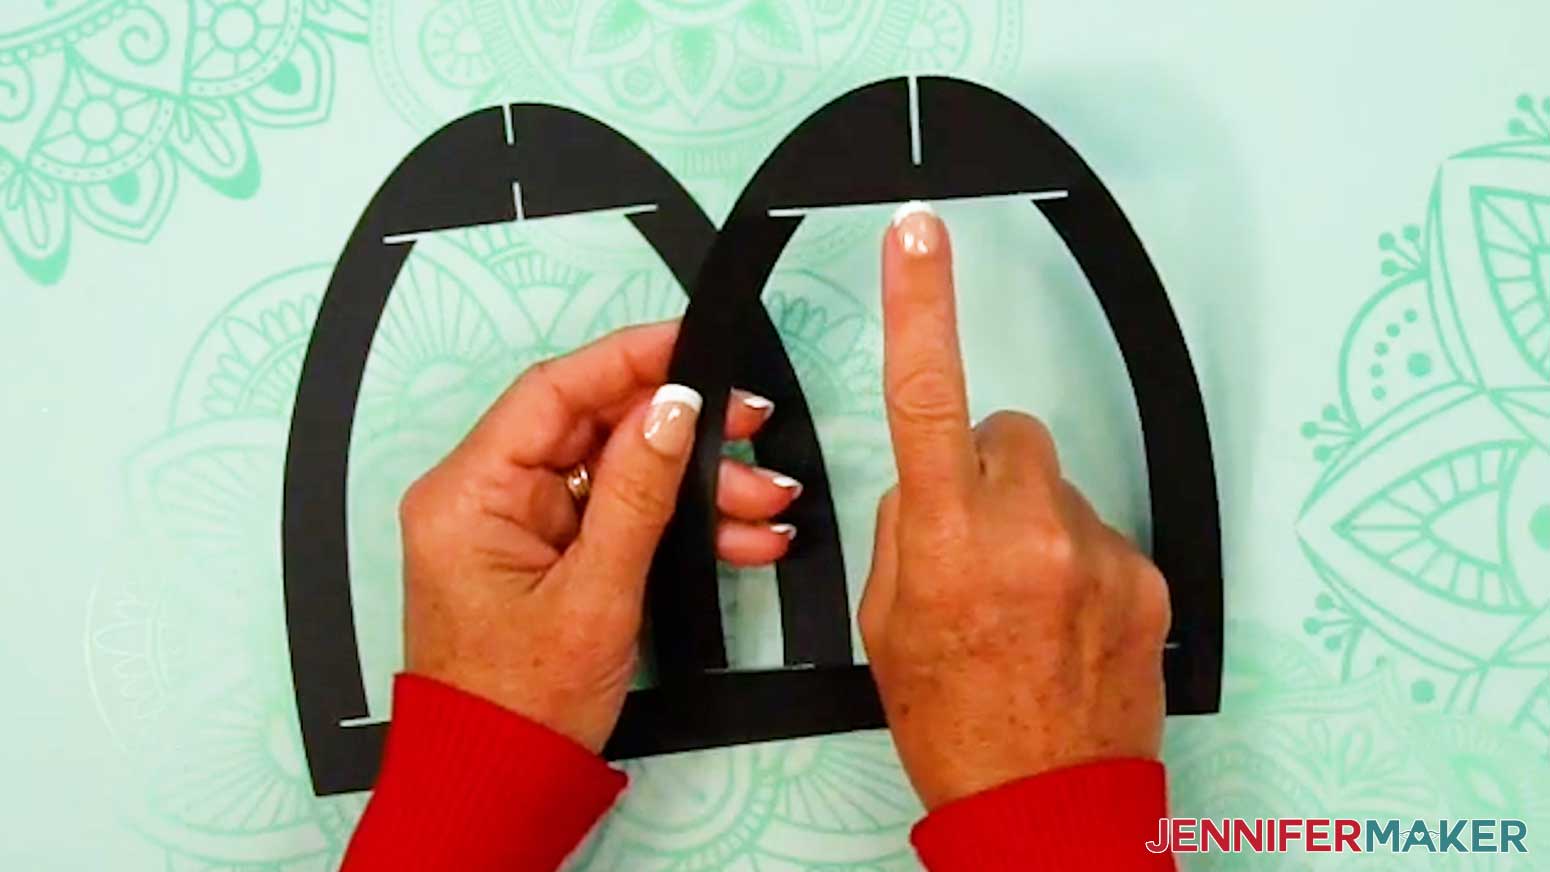
- Take the lantern frame piece with a slit at the top of the arch and slot it inside the frame piece with slits at the top and bottom of the arch.
- Lay the two frame pieces flat against each other, then slot them into the main witch frame piece.
- Spread out the frame pieces, and stand the constructed frame upright.
- Insert the solid top base piece’s six outer slits into the three frame pieces’ top slits.
TIP: Curve the inner frames slightly if needed to fit them into the top base piece’s slits.
- Insert the bottom base piece’s six outer slits into the three frame pieces’ bottom slits.
NOTE: The bottom base has a hole in the center for access to the lights in the assembled lantern.
- Take the first panel piece and fold back the top and bottom horizontal crease lines.
- Then fold back the top tab’s two wings along the vertical crease lines, and do the same for the bottom tab wings.
NOTE: Make sure your panel’s design is facing the correct direction when you fold the tabs back.
- If using the vellum diffuser pieces, insert one onto the back of your folded panel, using the wings to hold it in place.
- Repeat Steps 6-8 for the five remaining panels and diffusers (if using them).
- Insert a panel’s top and bottom tabs into the first section of the frame’s top and bottom base slots.
- After each tab is inserted, unfold the tab’s wings to lock the panel in place.
- Repeat Steps 10-11 to insert the next four panels.
TIP: I like to alternate the panel patterns around the lantern base.
NOTE: We will insert the last panel after we put the lights inside.
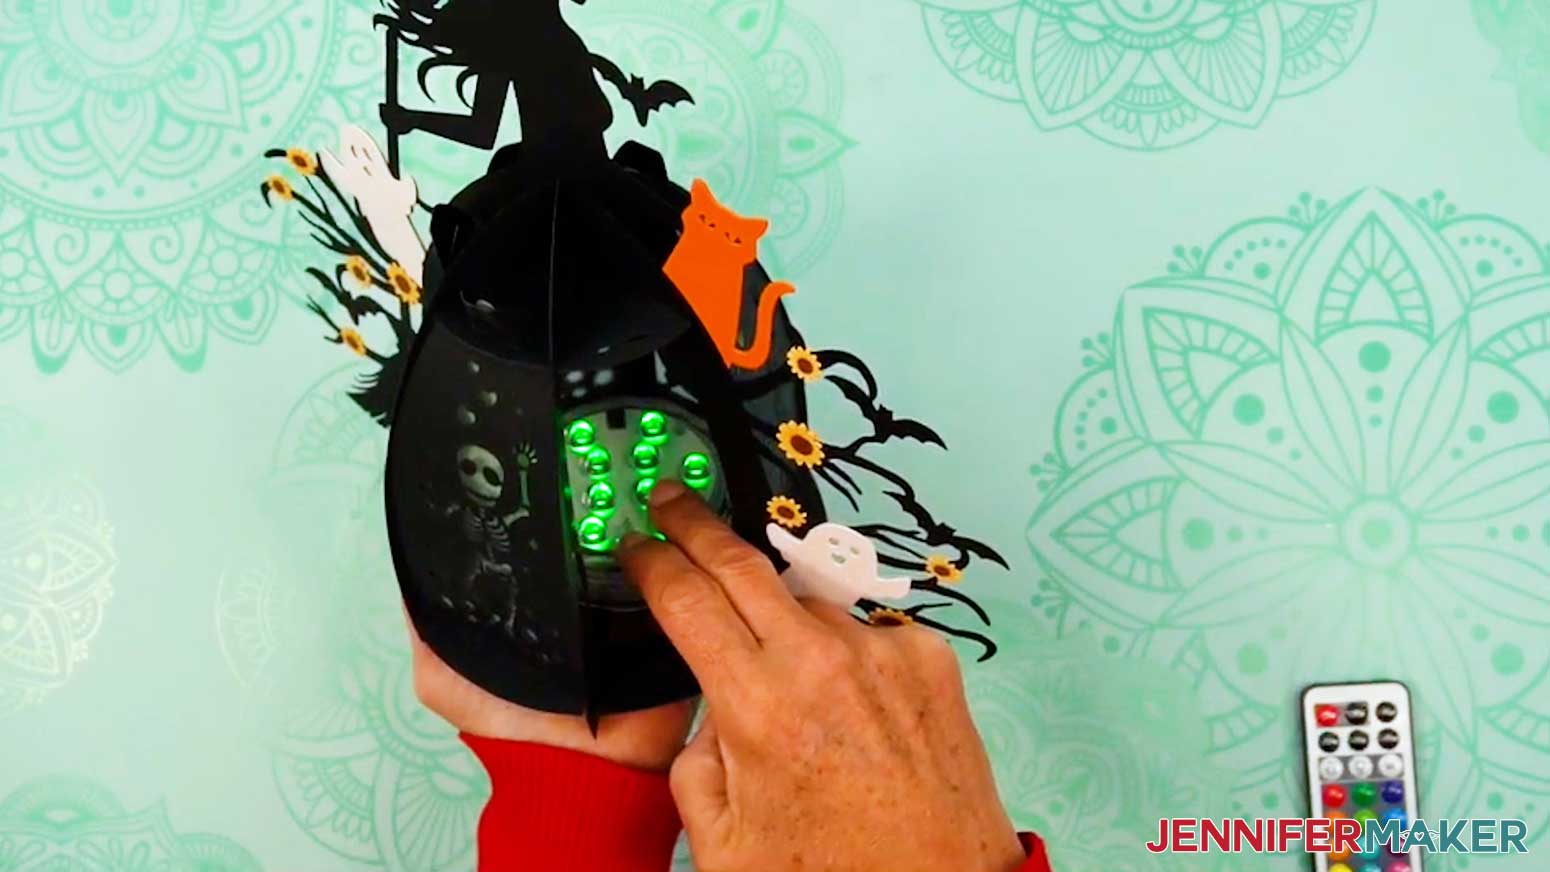
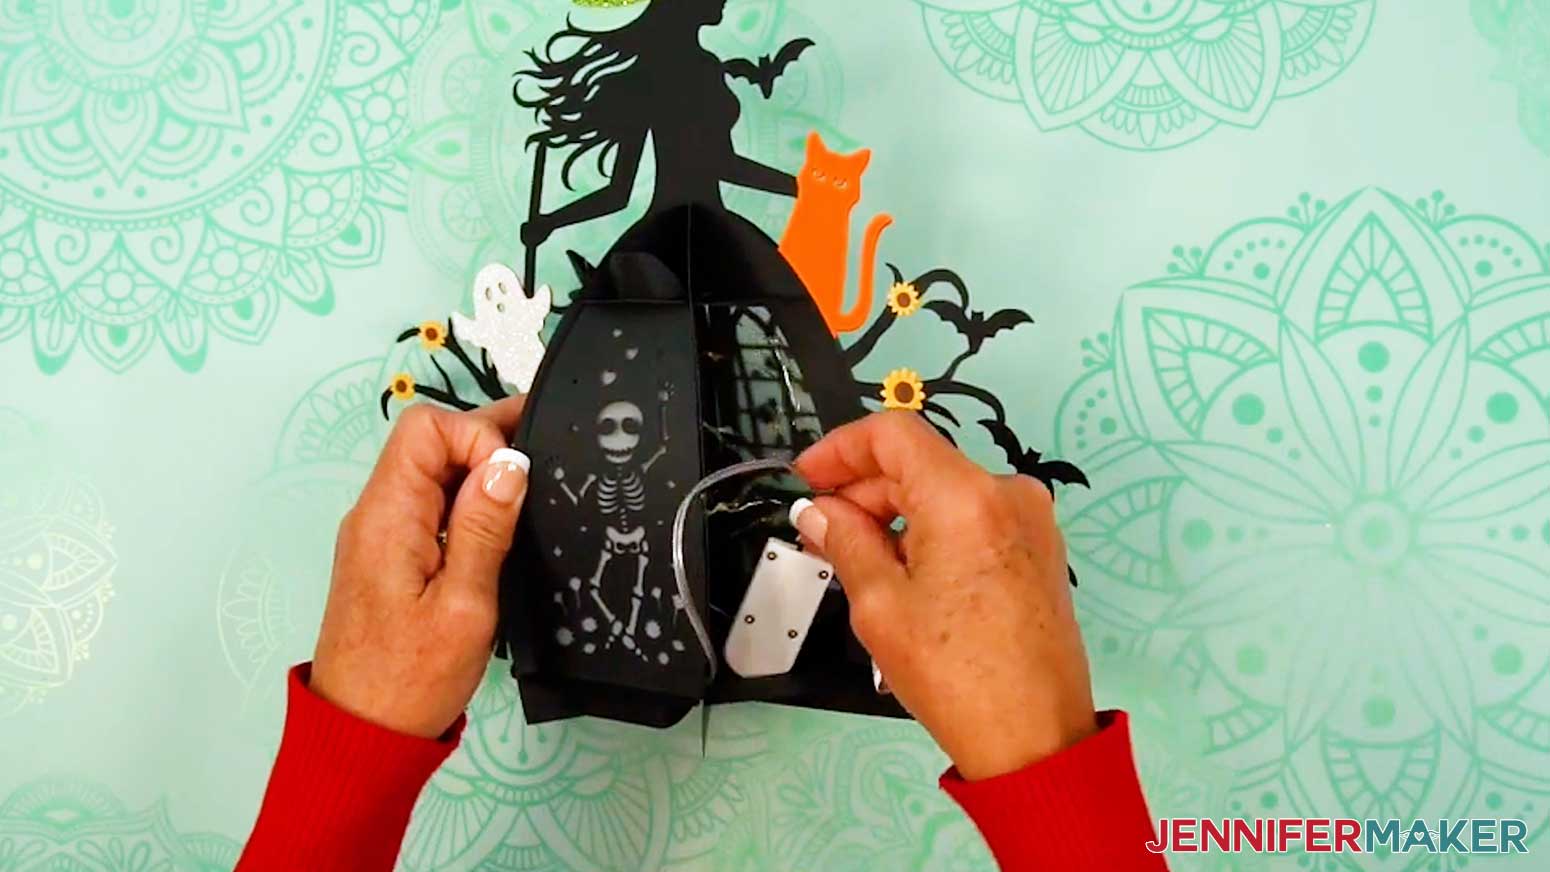
- Test your lights to make sure they work, including any remotes depending on your light source. You may have to remove a battery protector tab first.
- If you’re using an LED tea light or puck light, place it in the bottom of the lantern base.
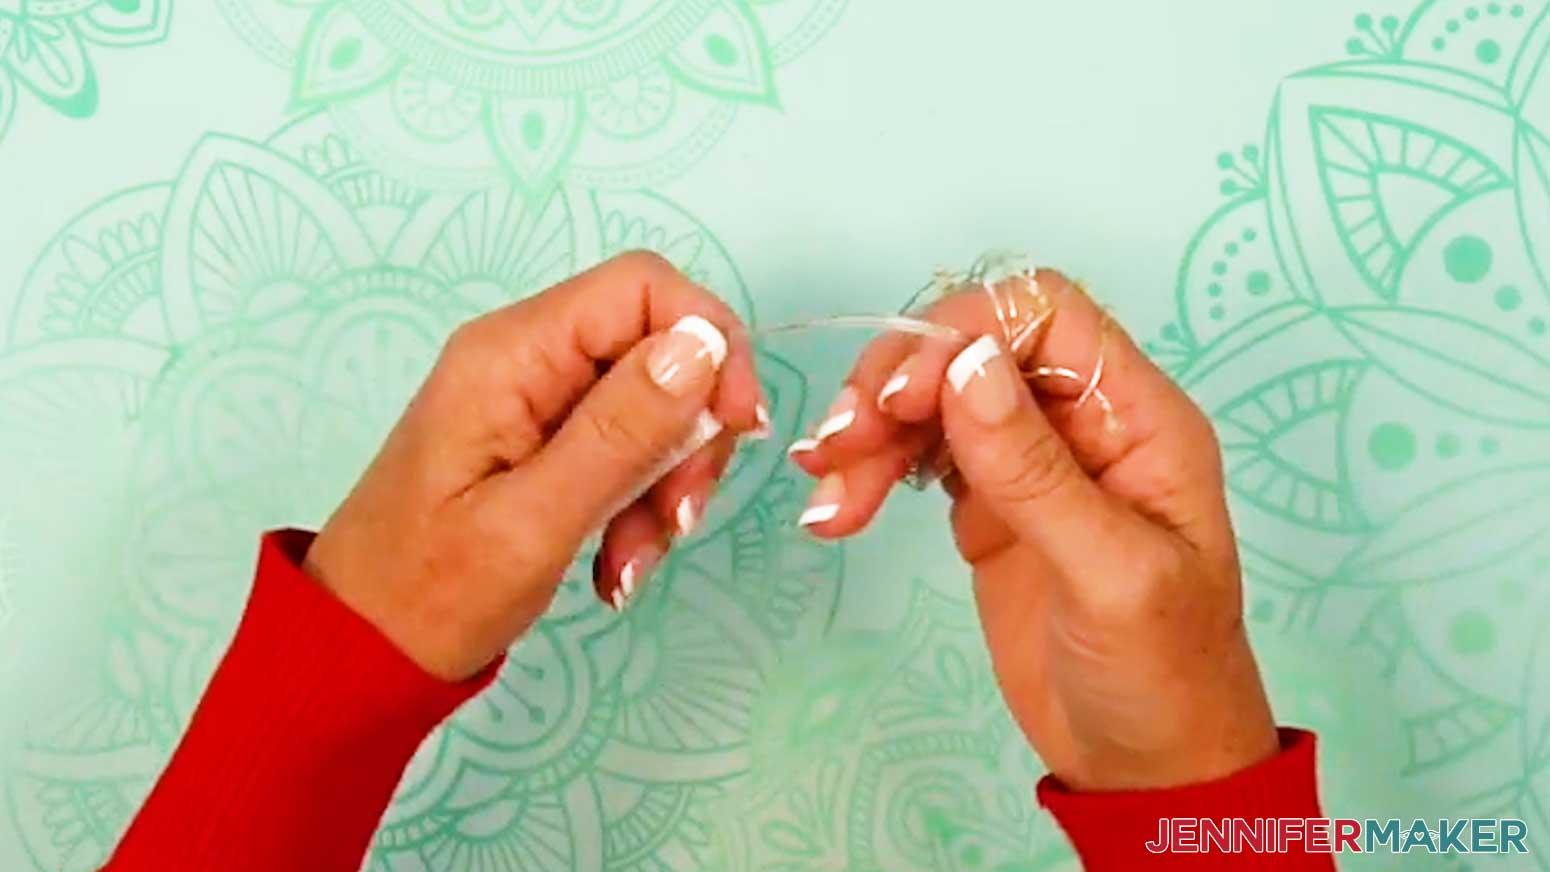
- If you’re using fairy lights, remove any twist ties, and then unwind the lights.
- Loosely wrap the wire around your fingers to make a coil to evenly distribute the lights.
- Place the coil of lights and the battery pack inside the lantern.
TIP: Position the battery pack so the power switch is easily accessible via the openings in the bottom of the lantern. OR, to keep the battery pack accessible without having to reach inside the lantern, slide the battery pack through a bottom hole and keep it hidden behind the lantern.
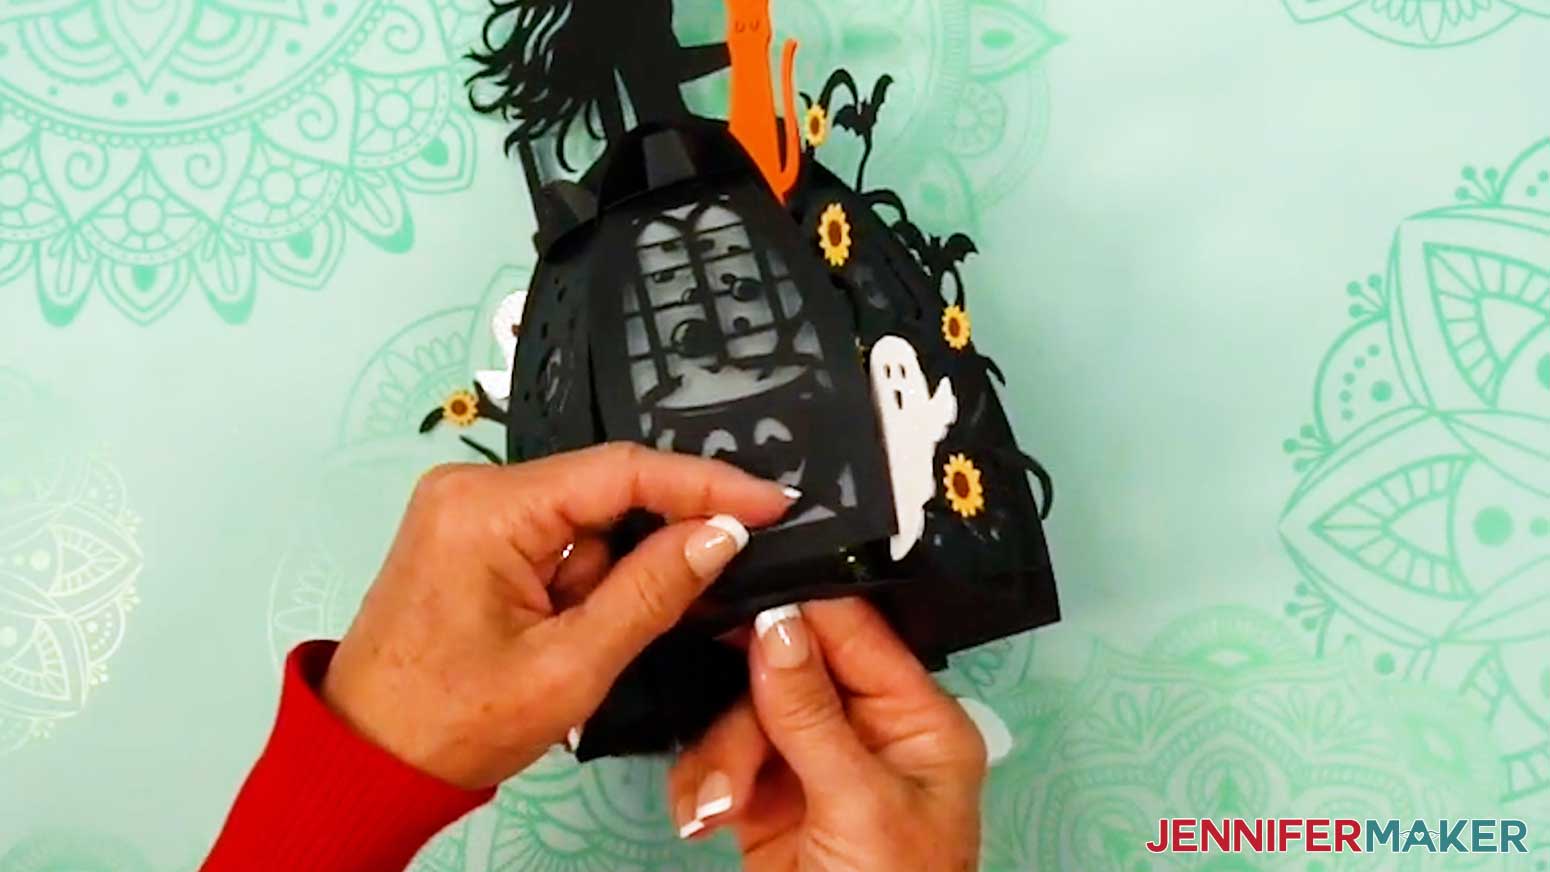
- Once your lights are inserted, follow Steps 10-11 to slot in the final panel.
- Your witch lantern is ready for display!

STEP 4: SHOW IT OFF
You now have a fun paper witch lantern you can display for spooky Halloween lighting!
Notes
Finished Size: 11.25"W x 11.5"H x 5.7"D
Answers to Your Questions About Making a Witch Lantern
Q: Is there a way to create a custom paper witch lantern design?
A: You can learn how to create your own customized paper witch lantern panel designs in my ADVANCE program. Learn more about ADVANCE here!
Q: How do I craft a lantern?
A: Start by cutting your pieces from cardstock and vellum using a Cricut machine or by hand with the free design files. Then glue your decorative elements, like the witch, ghosts, and flowers, onto the main frame. Assemble the base and frame pieces, slot in the panels, and finally add safe lights, like an LED tea light or fairy lights, inside to bring your lantern to life. I guide you through the whole process in my free tutorial!
Q: What materials are best for DIY lanterns? What paper should I use?
A: For a sturdy frame, I recommend 80 lb. cardstock. For details, 65 lb. or glitter cardstock works beautifully, and vellum makes great diffuser panels that soften and spread the light. You’ll also need craft glue and, of course, a safe lighting option such as LED tea lights, fairy lights, or puck lights.
Q: Can I make a lantern without a Cricut?
A: Yes! It is much easier to cut the shapes precisely with a cutting machine, but along with SVG files for Cricut, I’ve included a PDF version in the free design folder so you can cut the pieces by hand with scissors or a craft knife.
Q: What kinds of lights work best in a paper lantern?
A: Since this project is made from cardstock, you should never use an open flame. Instead, use safe lights like LED tea lights for a flickering effect, fairy lights for a twinkly look, or puck lights if you want bold colors and remote control options.
Q: Can I decorate both sides of the lantern?
A: Absolutely! In the tutorial, I show you how to duplicate and flip your decorative pieces so your lantern looks just as spooky from the back as it does from the front.
Q: How can I make my witch lantern look more unique?
A: Just have fun with it! You can add rhinestones, extra embellishments (like lots of little stars in place of flowers), and experiment with the colors of cardstock, vellum, and LED lights to make your lantern uniquely yours. Or check out my ADVANCE with JenniferMaker program to learn how to customize your own panel designs!
Q: Where can I buy the supplies and tools to make a witch lantern?
A: I have a list above with links to all of the materials I used to make it super easy for you to find what you need. I love shopping for craft supplies and deals on Amazon with my Prime membership for fast, free shipping!
Q: Help! My Cricut Design Space screen looks different from yours!
A: If you’re using the latest version of Cricut Design Space, your screen may have slight variations from the screen you see on the video tutorial. Good news! All of the same functions are there, they may just be in different spots or have new icons. Pause the video if you need, or follow along with the written tutorial. If you get stuck, ask for expert support in our Facebook group. Plus, you can catch the latest news on JenniferMaker tutorials and more.
Q: Can I make and sell paper witch lanterns using your design?
A: If you want to use my witch lantern designs and project for commercial use, please familiarize yourself with my important licensing information before selling your crafts.
Q: Do you have other Halloween paper lanterns I can make?
A: I sure do! Light up your night with these spooky designs:
- 3D Fall Hanging Lantern
- Pumpkin Lanterns
- Halloween Paper Lantern
- Haunted House Lanterns
- Pumpkin Filigree Lantern
- 3D Paper Pumpkin Carving Kit
- Pumpkin Shadow Box
I also have lanterns to light up other holidays like Christmas, New Years Eve, Easter, and more! Check them out on my blog.
Get my free SVG/DXF/PDF files to make your own witch lantern!
(If you do not see the signup form above, click here.)
I absolutely love seeing your crafted lantern projects! Once you’ve learned how to make a witch lantern, inspire others and share a photo of your project in our Facebook group or tag me on social media with #jennifermaker.
Love,

Want to remember this? Save this Paper Witch Lantern Tutorial to your favorite Pinterest Board!