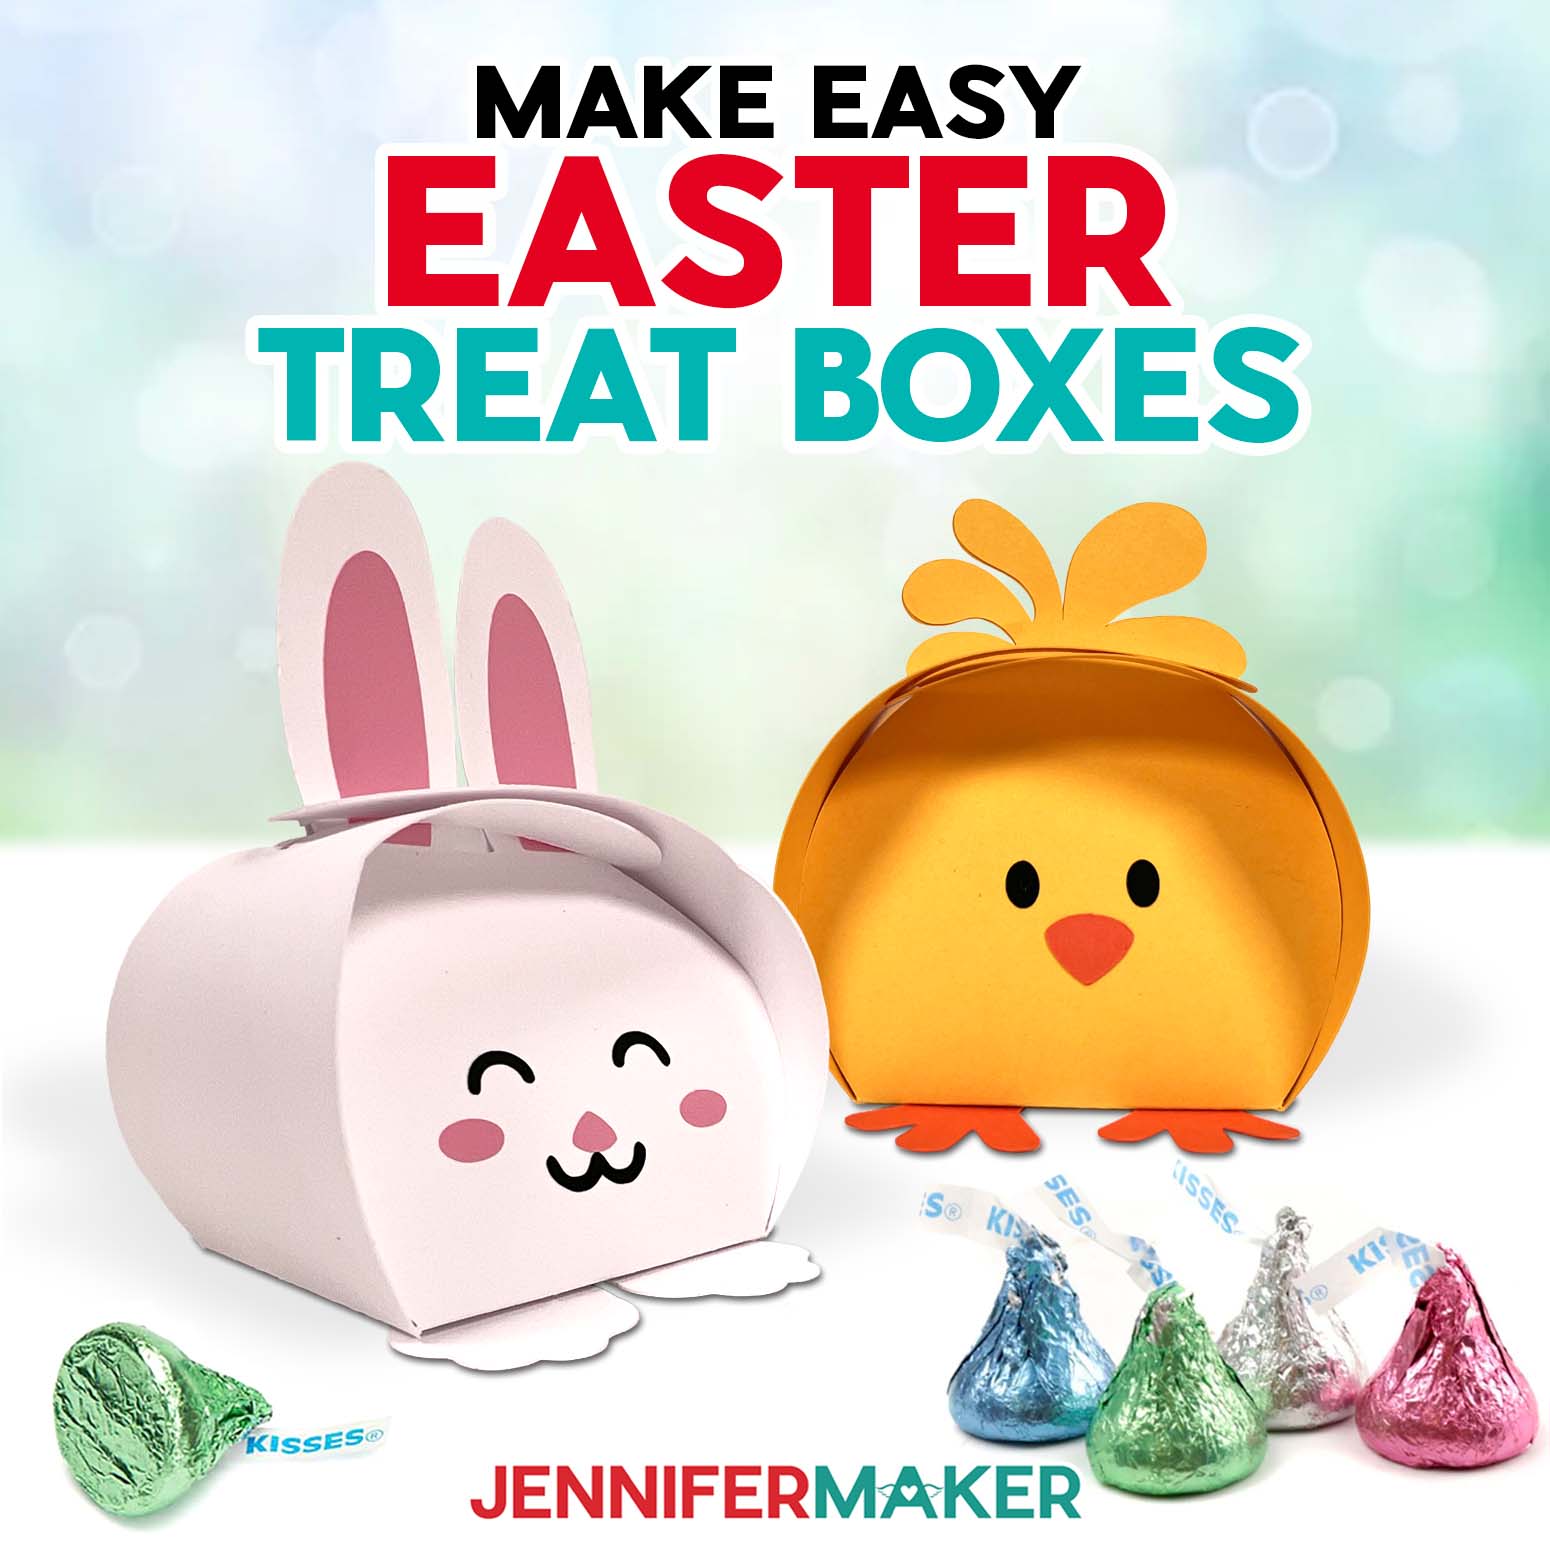
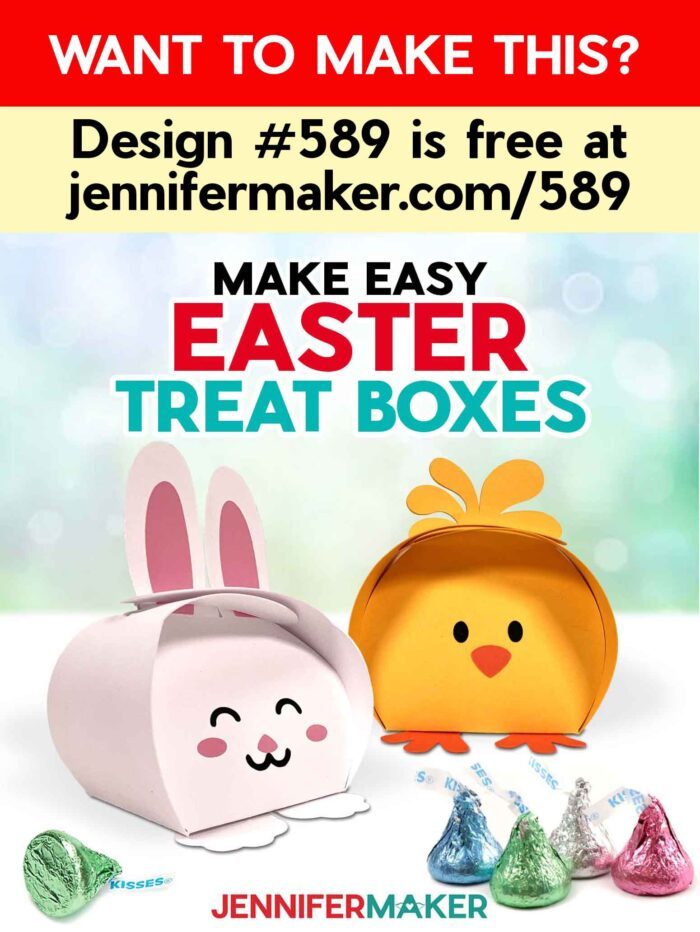
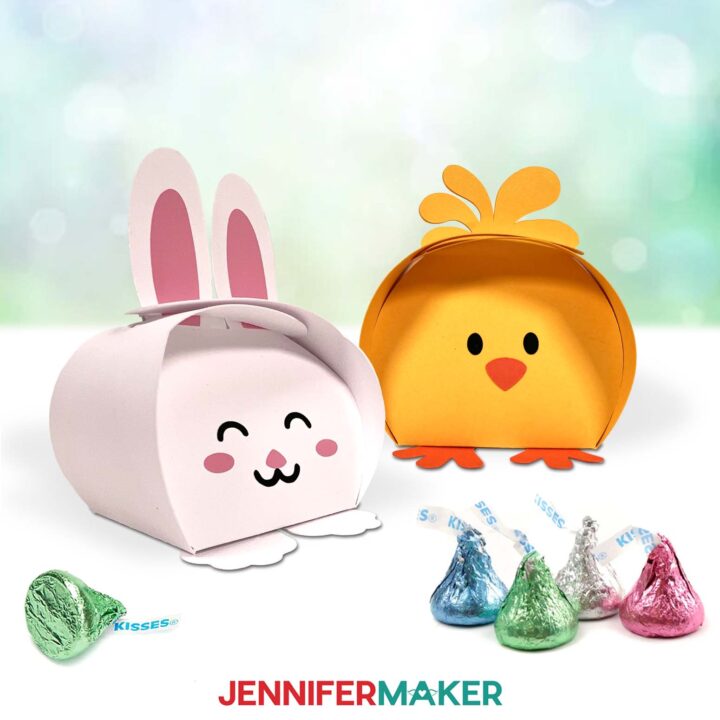
Learn how to make simple Easter treat boxes!
What do you do when a present’s packaging is so cute you don’t even want to open it? We might need to find the answer for these adorable Easter treat boxes! My little bunny and chick boxes are super fast and easy to make with cardstock, a little adhesive vinyl, and a few dabs of glue. Your cutting machine does nearly all the work for you! Make a whole bunch of DIY boxes to give little gifts or candy to your loved ones, and they’ll have a cute memento long after the sweet treats are gone!

Update: You can also use this tutorial to make my Halloween boxes and Christmas boxes!
I wanted to make a new little box design to celebrate spring holidays and had so much fun creating these simple Easter treat boxes for you! My little bunny and chick friends would look perfect in an Easter basket, or could even take the place of Easter eggs if you’re having an Easter egg hunt on a dry day!
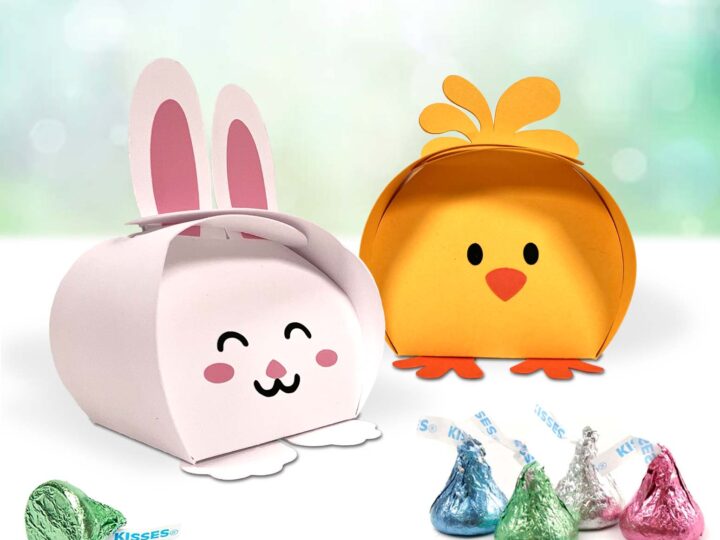
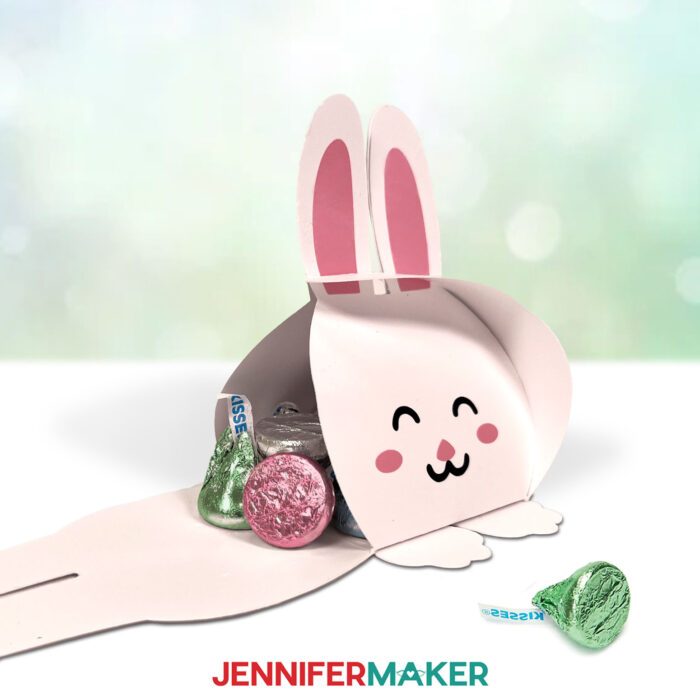
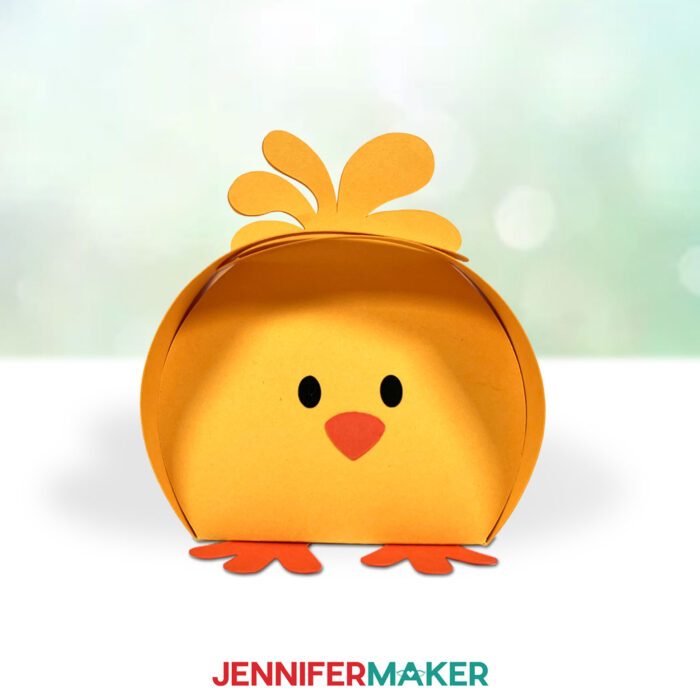
Don’t let their small size fool you, inside they can hold little Easter treats like chocolates, a small toy, stickers, or other tiny gifts! The shape of these gable favor boxes give you space to work with! And they’re so cute, you’ll want to keep them as decorations after the holiday!
You can also make the size of the box a little bigger or smaller, depending on how you want to use them and your tools and supplies. While I used my Cricut Maker 3 to cut the originals, I tested resizing them to fit on paper for a Joy Xtra and Joy with success! Just be a little extra careful because the delicate pieces like the bunny’s ears are fragile at the smaller sizes. You can also use an original Maker, any Explore, or a Venture. Think of how many you can cut at once with the big cutting machine!
The assembly steps are pretty easy to follow and are detailed below. And the adhesive vinyl details are so tiny, this is a great scrap buster project! Do take your time transferring the vinyl faces to the cardstock. The best way to avoid ripping the paper is to re-use some transfer tape that’s less sticky.

Of course, you can use these for much more than Easter treat boxes! They would be adorable party favors for birthday parties, or decorate your dessert table at other spring celebrations! I hope you have lots of fun making your own Easter bunny and chick!
Ready to learn how to make Easter treat boxes? This post contains some affiliate links for your convenience (which means if you make a purchase after clicking a link I will earn a small commission but it won’t cost you a penny more)! Read my full disclosure policy.
Materials And Tools to Make Easter Treat Boxes
See my Amazon shopping list with exactly what I used!
-
- Several Sheets of 12″ x 12″ 65 lb. Cardstock (various colors)
- Black Permanent Vinyl (for both Easter treat boxes)
- Pink Permanent Vinyl (for the bunny)
- Orange Permanent Vinyl (for the chick)
- A way to cut your materials – I’m using the Cricut Maker 3, but you can also use the Cricut Maker, a Cricut Explore Series machine, or a Venture. You can also resize them to fit on a Joy Xtra or original Joy.
- Cricut Green StandardGrip Machine Mat 12″ x 12″
- StandardGrip Transfer Tape
- Scissors
- Brayer
- Spatula
- Scraper
- Weeding Tool
- Bearly Art Precision Craft Glue
-
- Design #589– My free SVG/DXF/PDF design files are available in my free resource library – get the password by filling out the form at the bottom of this page
How to Make Easter Treat Boxes!
Easter Treat Boxes
Learn how to make fast, easy Easter treat boxes!
Materials
- Several Sheets of 12" x 12" 65 lb. Cardstock (1 white for bunny, 1 yellow and 1 orange for chick)
- Black permanent vinyl (both)
- Pink permanent vinyl (bunny)
- Orange permanent vinyl (chick)
- StandardGrip Transfer Tape
- Design #589 (My free SVG/PDF/DXF design files are available in my free resource library - get the password by filling out the form at the bottom of this page)
Tools
- A way to cut your materials - I’m using the Cricut Maker 3 but you could also use the Cricut Maker, an Explore Series machine, a Venture, Joy Xtra, or Joy.
- Cricut Green StandardGrip Machine Mat 12” x 12”
- Brayer
- Spatula
- Scraper
- Weeding Tool
- Craft Glue (I used Bearly Art Precision Glue)
- Weeding Tools
- Scissors
Instructions
Update: You can also use this tutorial to make my Halloween boxes and Christmas boxes!
STEP 1: GET MY FREE EASTER TREAT BOXES DESIGNS
First, download my Easter Treat Boxes SVG/PDF/DXF files from my free library -- look for Design #589. Alternatively, you can use the Save This Project form near the top of this post and the design link will be emailed to you.
There are two designs in the folder: a bunny or a chick. There are score and no-score versions of each design. There is also a DXF folder with cut files, and a PDF folder with versions you can print and cut by hand.
In this tutorial, I will show you how to prepare and assemble the no-score bunny, but you can also follow these steps to make the chick.
If you want to make the score version, follow the steps from my score tool tutorial to adjust your file.
TIP: If you’re not sure how to upload, go to jennifermaker.com/svgs to learn how to unzip and upload SVG files.
STEP 2: PREPARE AND CUT YOUR EASTER TREAT BOXES DESIGN
CRICUT DESIGN SPACE
- Open Cricut Design Space and click “New Project.”
- Click “Upload” and then “Upload Image.”
- Click “Browse.”
- Select the SVG file. I'll use the no-score bunny.
- On the Prepare to Upload screen, it will say “Cut image” with the design preview.
- Click “Upload.”
- Find your design in Recent Uploads and add it to the Canvas.

- If you want to resize the design, keep the Lock icon closed and adjust the height or wdith in the Size fields.
- If you are using the "noscore" version, your layers are ready to cut!
- Make sure the correct machine is selected in the top right.
- Click “Make.”
- If prompted, click "On Mat," choose your mat size, and click “Confirm.”
- On the Prepare Screen, you should have mats for the cardstock, then two for the vinyl.
- If needed, change the Material Size to match each paper you’re using.
- Select the first mat again and click “Continue.”

CUTTING
- On the Make Screen, click “Browse All Materials.”
- Search for and select the settings needed for the materials you’re using. I used 65 lb. cardstock for the box mats and Cricut Permanent Vinyl for the faces. These are the settings you can use for each material:
65 lb. Cardstock - “Medium Cardstock - 80 lb (216 gsm)” Setting with More Pressure
Permanent Vinyl - “Premium Vinyl - Permanent Glossy” Setting with More Pressure - Place your paper face up on a StandardGrip machine mat and use a brayer to make sure it’s fully adhered.
- Check that your Fine-Point Blade is clean and in the clamp.
- Press the flashing “Load/Unload” button to load the prepared mat into your Cricut.
- Press the flashing “Go” button to begin cutting.
- When it has finished cutting, unload the mat, flip it over onto your work surface, and roll it back to release the paper.
- Place the first piece of vinyl face up on a green StandardGrip machine mat and use a brayer to make sure it’s fully adhered.
- Follow Steps 4-7 to cut your vinyl mats.
- Trim away the excess vinyl, then cut the designs apart if you have more than one.
- Weed the excess vinyl from your designs.
TIP: Place the vinyl carrier sheet side down on the machine mat to hold it steady.
STEP 3: ASSEMBLE YOUR EASTER TREAT BOXES
- Place your pieces face up. Make sure the pieces with slits are at the sides.
- Starting with the vinyl ears, cut a piece of StandardGrip transfer tape slightly larger than the shape.
- Remove the transfer tape backing.
TIP: Very sticky transfer tape might stick to the cardstock and damage it, so stick it to a cloth a few times to make it less sticky. - Fold the tape's edges up like a taco.
- Lower the center of the transfer tape onto the ears and press in place.
TIP: You can also transfer one ear at a time if the alignment is off a little. - Use a scraper to burnish the transfer tape to the vinyl on both sides.
- Remove the vinyl's backing.
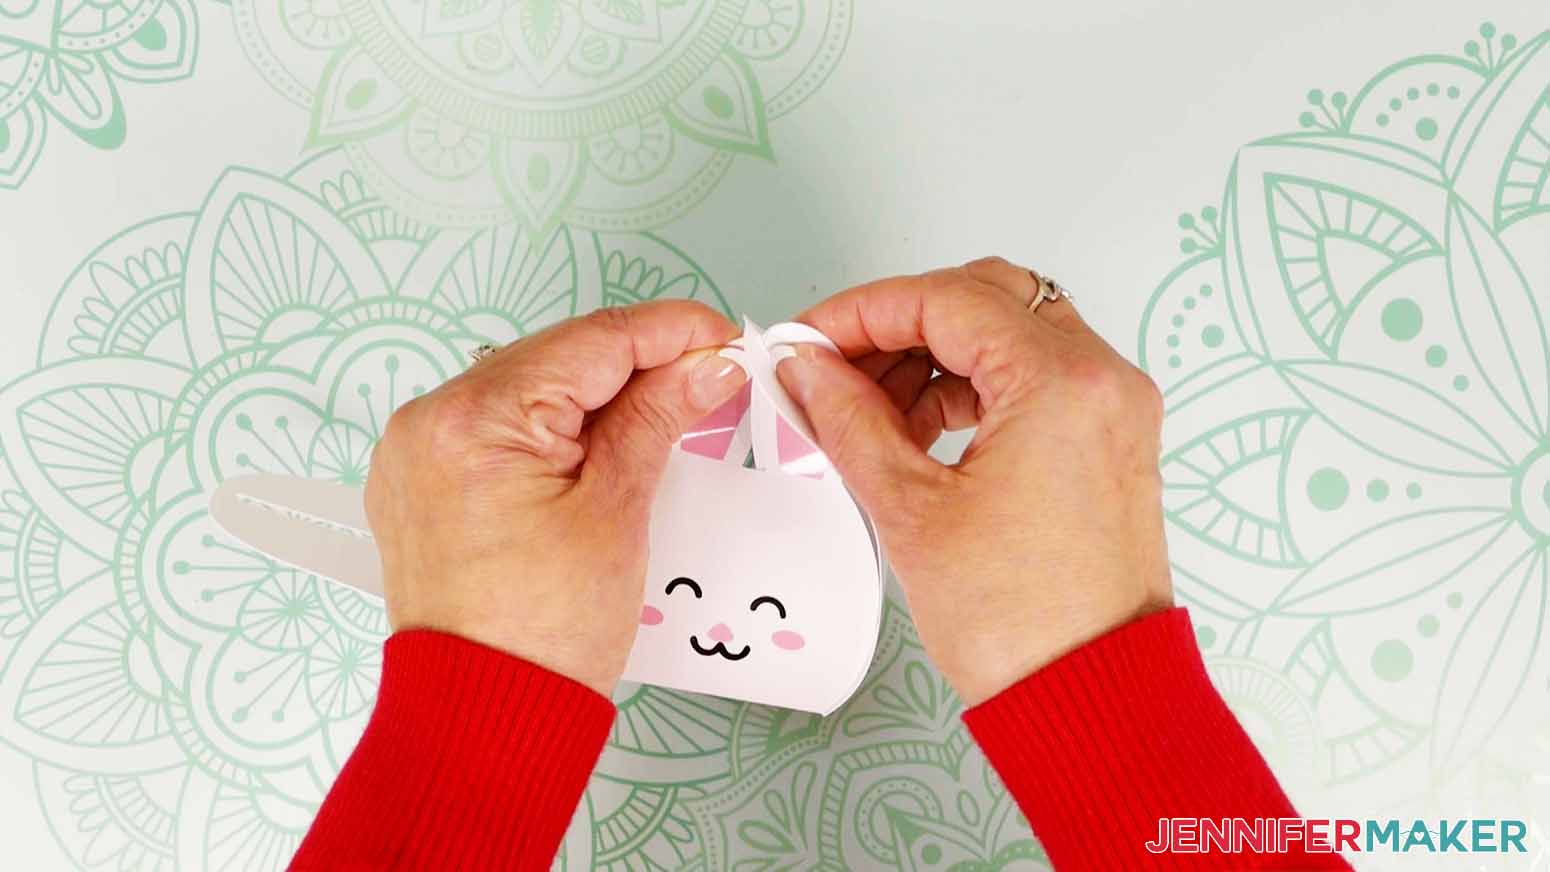
- Hold the vinyl over the ears so they're centered side to side and the bottom edges are just above the crease line.
TIP: Refer back to the design on the Design Space Canvas to help you guide the placement.
- Press the vinyl to the paper and burnish it with a scraper. Press mostly on the vinyl so the transfer tape doesn't stick to the cardstock.
- Gently pull away the transfer tape.
- Pick up the nose and cheeks in the middle of your transfer tape.
- Hold the nose and cheeks over the vinyl face pieces until they're centered.
- Burnish the transfer tape on both sides to pick up both colors for the face.
- Remove the vinyl from the backing.
- Hold the transfer tape like a taco to find the middle above the eyes and make a crease in just the tape.
- Center the crease between the ears and press the layered vinyl onto the face.
TIP: Refer back to the design on the Design Space Canvas to help you guide the placement. - Gently burnish the small vinyl pieces to the cardstock and remove the transfer tape.
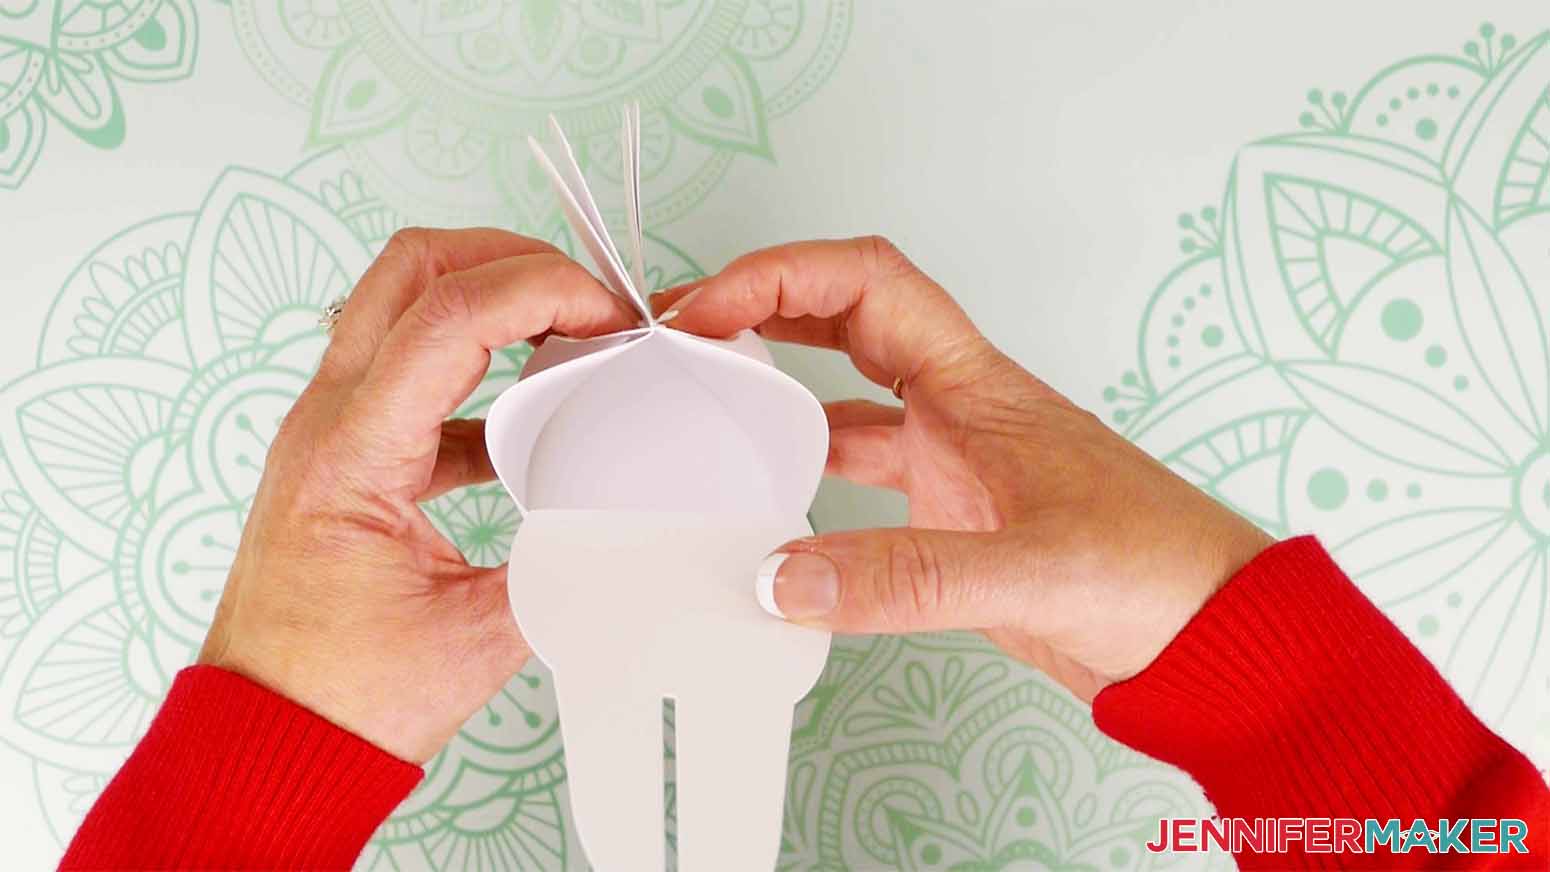
- Turn the box face down and carefully fold up the four sides along the creases.
NOTE: Don't fold the ears yet. - Fold the pieces without slits up and align the shapes.
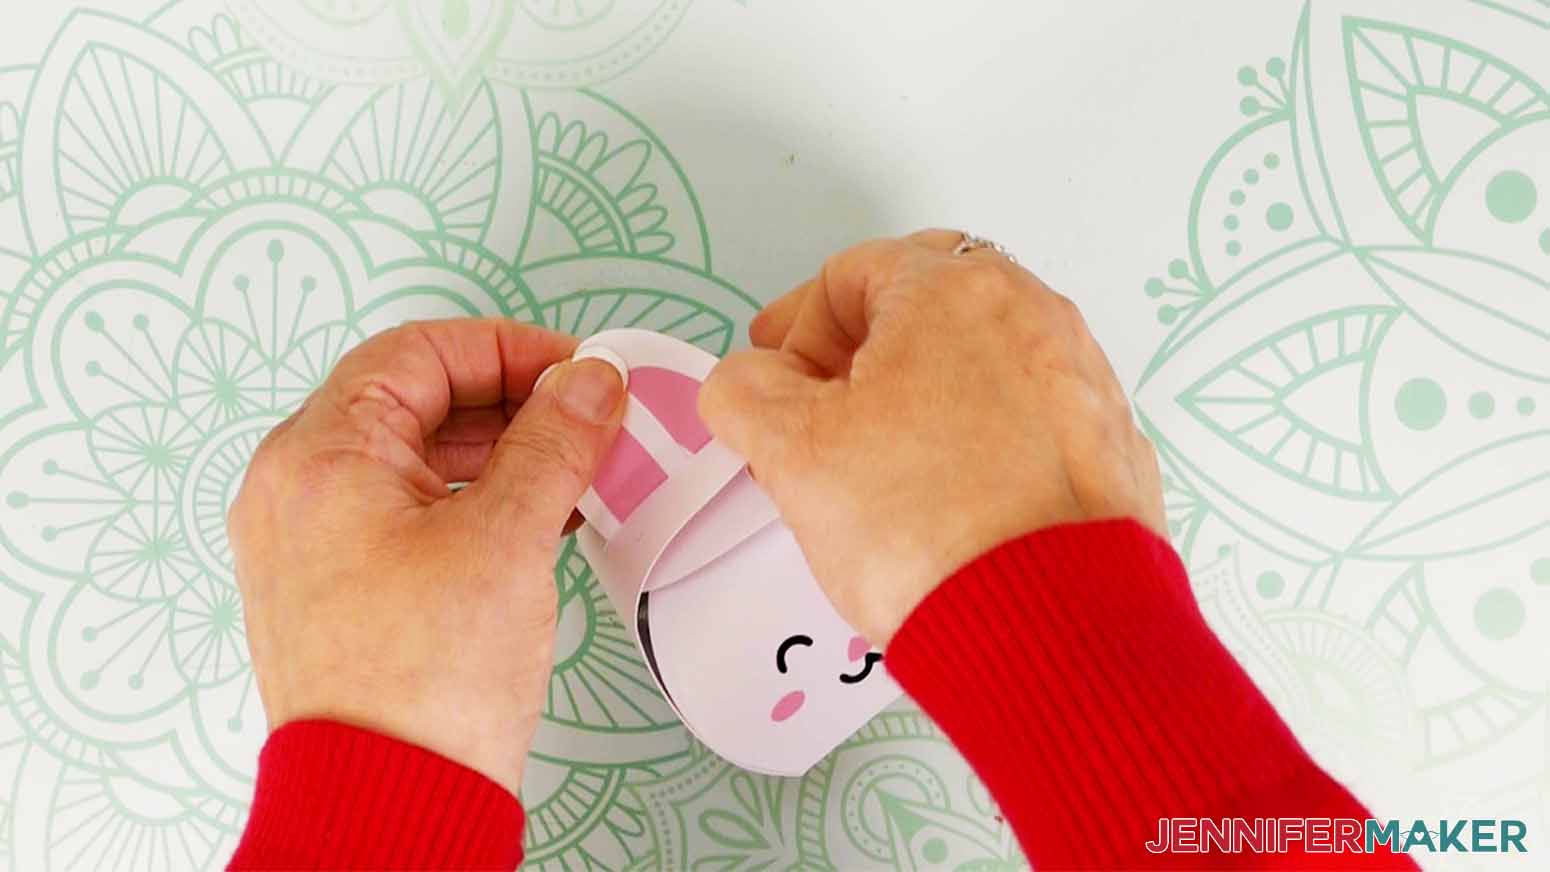
- Fold one slotted side up and gently tuck the nearby ear through the slot just a little.
- Carefully move the second ear to slightly overlap the other one so it can go through the slot at the same time.
TIP: If you used the file with dashed cut lines for the creases, be very gentle moving the delicate pieces to avoid ripping them. - Once both ears are in, slide the slotted piece down them to through the top of the box.
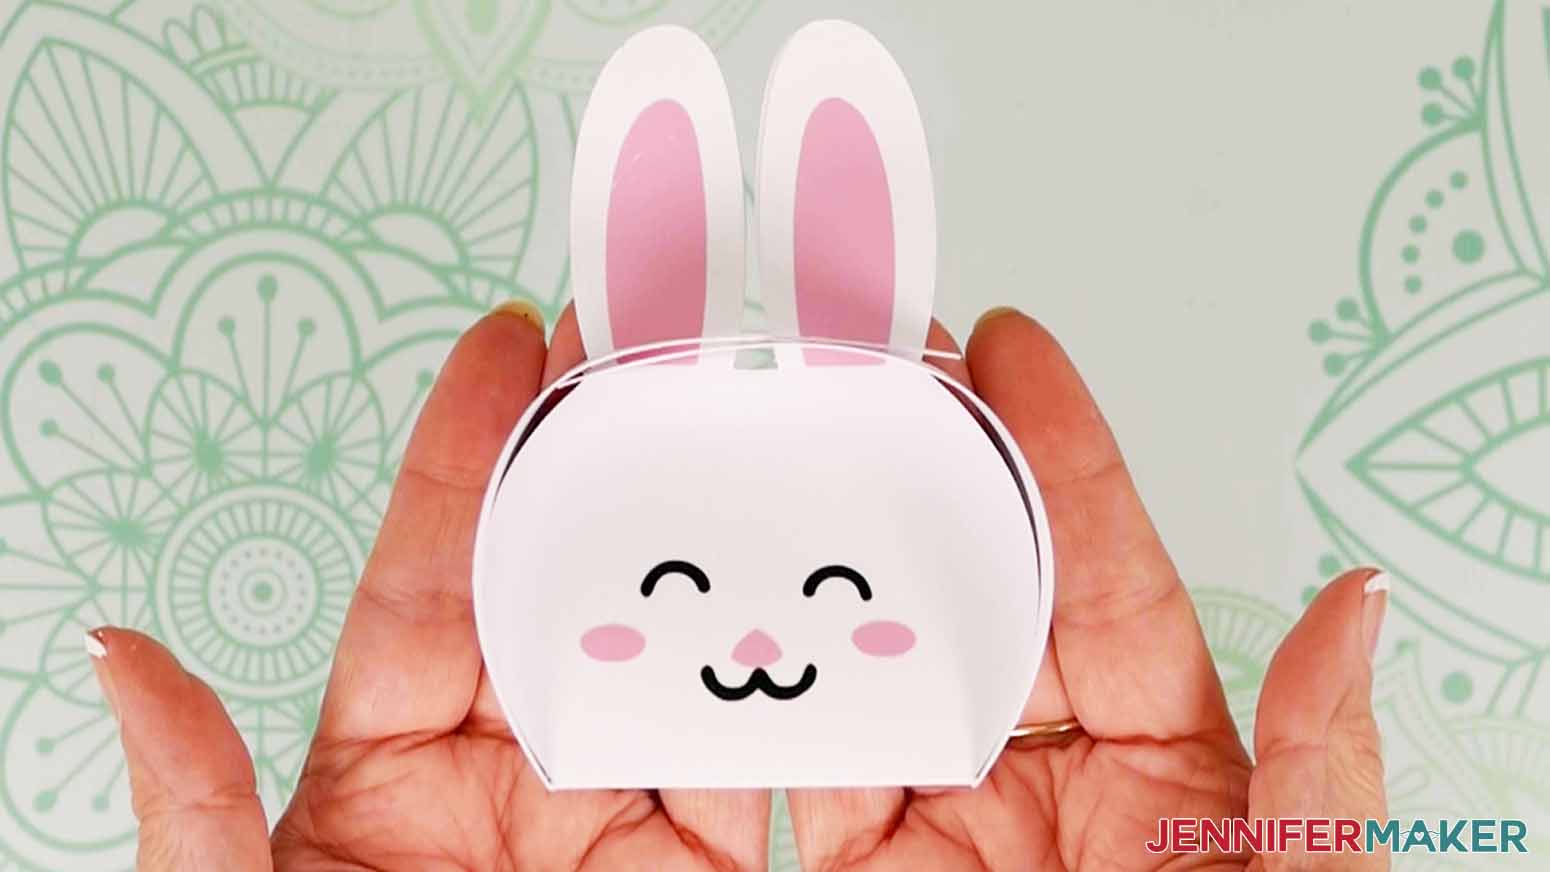
- Gently push down on either side of the ears to help the face sides round out instead of in where you want to put your treats.
- If you are putting candy in the box, add it now.
- Use Steps 20-22 to slide the ears into the second slotted side.
- Use a little glue to attach the feet to the box's bottom on the face side.


STEP 4: SHOW IT OFF!
Enjoy gifting your Easter treat boxes!

Notes
Finished sizes: bunny 3 x 3 x 4” chick 3 x 3 x 3.5”
Answers to Your Questions About How to Make Easter Treat Boxes
Q: How do you make Easter treat boxes?
A: With some basic supplies and my free files, you can follow my free tutorial to make your own Easter treat boxes at home! My designs are based on the popular gable box shape, so they can fit more than you might think!
Q: What are the most popular Easter treats?
A: Chocolates, jelly beans, and marshmallows are always popular at Easter, especially if they’re shaped like cute animals like a rabbit or a chicken.
Q: What do you get kids for Easter instead of candy?
A: There are lots of items you can gift instead of candy, but always keep the recipient in mind. Maybe they like stickers, would love a T-shirt with their favorite character, or have a new book they’d love to read?
Q: What are the most popular items in Easter baskets?
A: While chocolate bunny rabbits are always a hit, jelly beans, cookies, and marshmallow candies are popular for Easter celebrations.
Q: Do adults get Easter gifts?
A: Of course adults can get gifts at Easter parties! If you want to celebrate with older friends and family members, edible gifts are often big hits! You could make homemade cookies with pretty edible decorations, like sugar flowers, edible sprays, or sugar pearls. You could even host a party so everyone can make themed holiday cookie boxes together! Make a lot of cookies ahead of time and some holiday boxes. When guests arrive, display boxes for ides, set out your decorating gear, and show everyone how to use simple supplies like drawing with edible markers or adding edible glitter. For extra fun, invite everyone to bring a different type of cookie to swap!
Q: Can Cricut Fine Point Blade cut vinyl?
A: The Premium Fine Point blade can cut a variety of materials like Kraft board (or cereal boxes), faux leather, adhesive removable or permanent vinyl, specialty vinyl, iron-on vinyl, and other materials of similar thickness.
Q: How do I add adhesive vinyl to cardstock?
A: You can apply adhesive vinyl to cardstock using transfer tape just like you would layer vinyl on top if itself. Just be careful when burnishing the vinyl to the paper, because some scrapers & smoothers can damage the paper if you press to hard. For the best results, focus the pressure just on the vinyl so the transfer tape won’t stick to the paper.
Q: What Cricut blade should I use for cardstock?
A: The Cricut Fine Point Blade is my favorite blade for cutting cardstock and a long list of materials like most other paper projects, glitter cardstock, poster board, vinyl, and most other popular materials used in many craft projects. It’s versatile, comes standard with your Cricut machine, and gives the best results on these basic materials time and time again — especially when you keep your blade clean for a nice, clean cut!
Q: Do you have other craft projects for Easter?
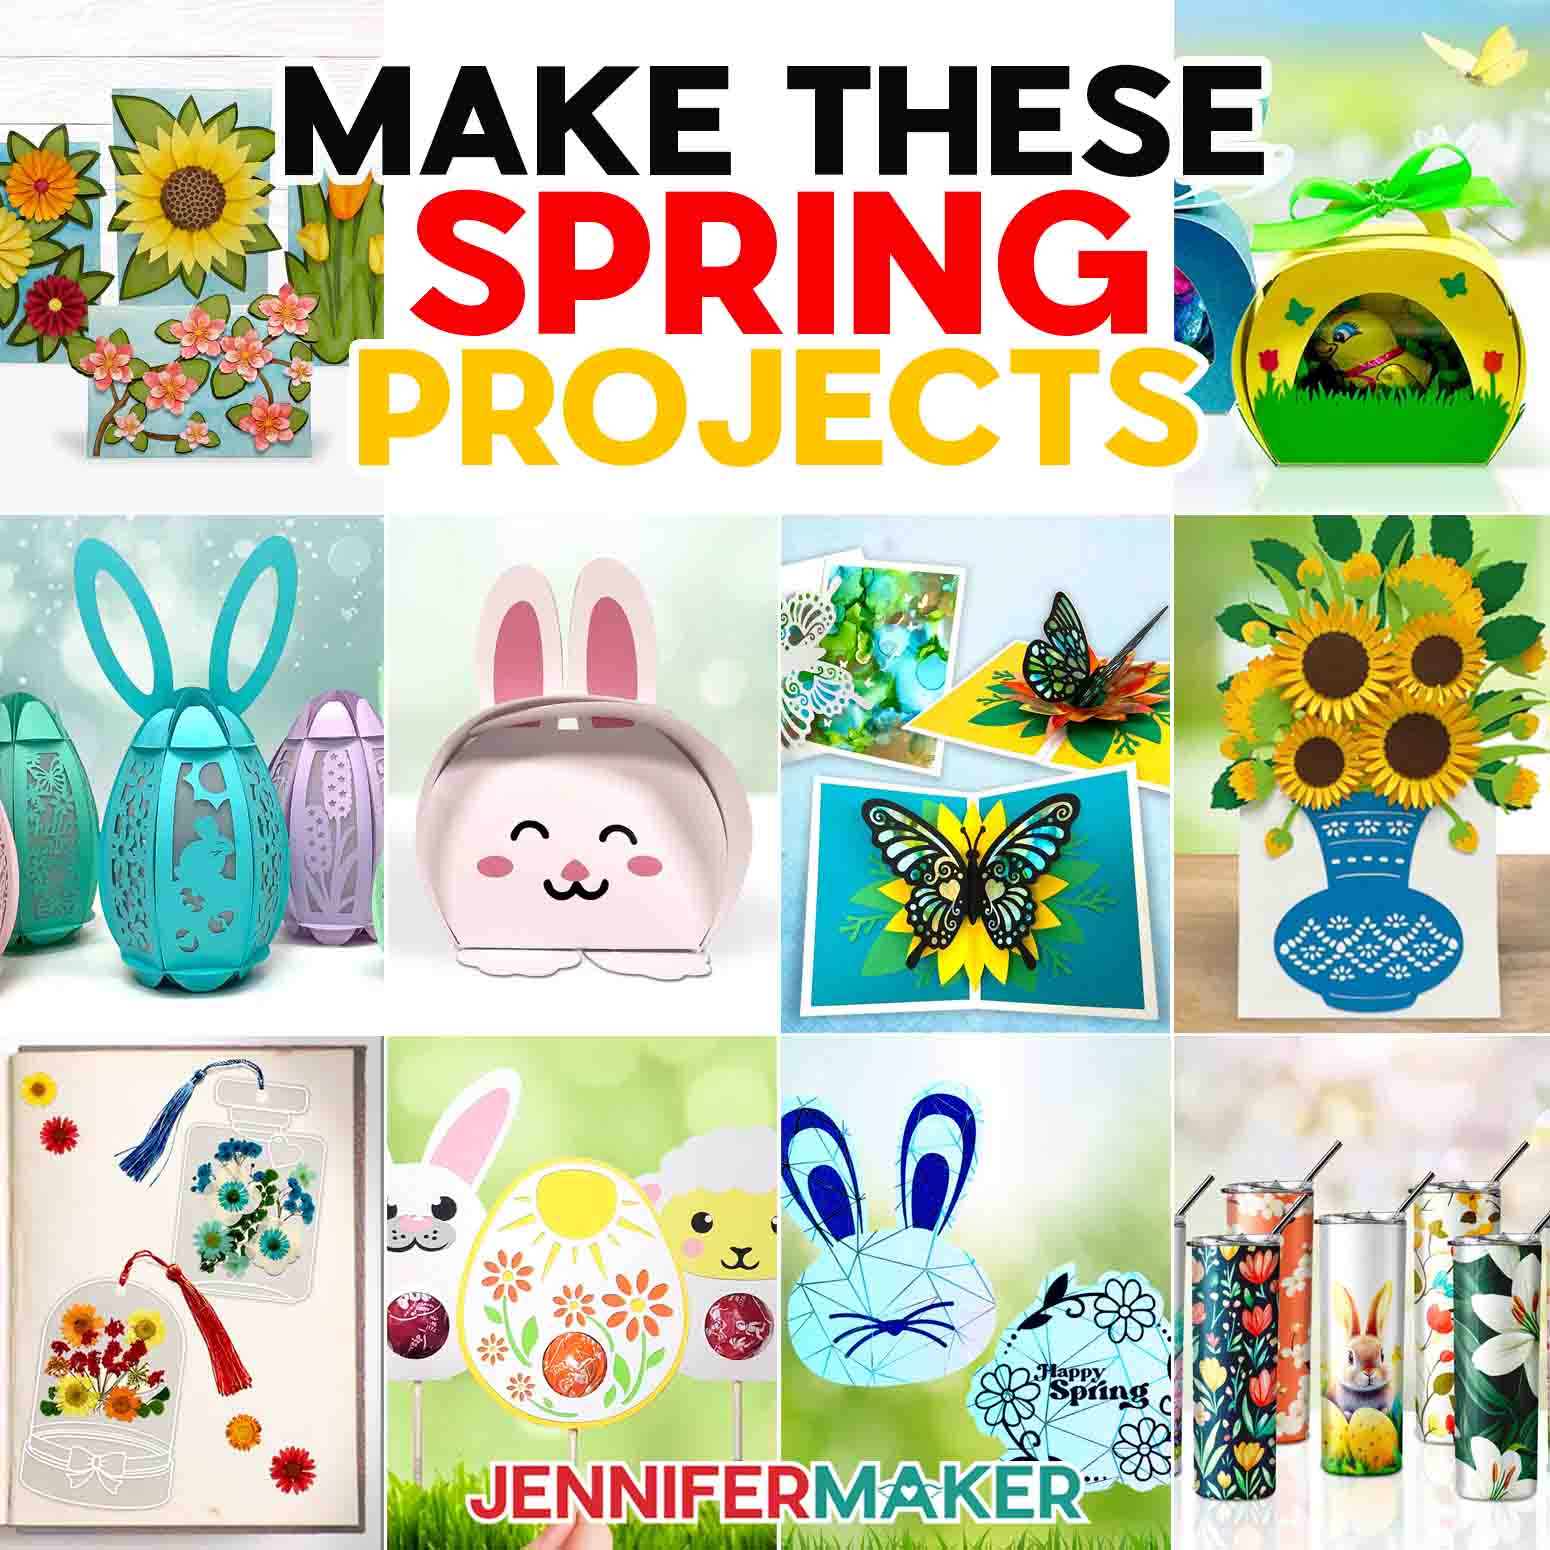
A: Yes I have different Eastern patterns and there are so many you can make! Make a card to go with an Easter basket, add stickers to a poly treat bag, or make a custom Easter decoration. All my favorite spring and Easter projects are gathered in one spot for you!
Get my free SVG files to make Easter treat boxes!
(If you do not see the signup form above, click here.)
I’d love to see your adorable Easter treat boxes and what you ! Please share a photo in our Facebook group or on social media and tag me with #jennifermaker.
Love,

Want to remember this? Save this set of Easter treat boxes to to your favorite Pinterest Board!